Tag Archives: AWS Lambda

Data Caching Across Microservices in a Serverless Architecture

Post Syndicated from Irfan Saleem original https://aws.amazon.com/blogs/architecture/data-caching-across-microservices-in-a-serverless-architecture/

Organizations are re-architecting their traditional monolithic applications to incorporate microservices. This helps them gain agility and scalability and accelerate time-to-market for new features.

Each microservice performs a single function. However, a microservice might need to retrieve and process data from multiple disparate sources. These can include data stores, legacy systems, or other shared services deployed on premises in data centers or in the cloud. These scenarios add latency to the microservice response time because multiple real-time calls are required to the backend systems. The latency often ranges from milliseconds to a few seconds depending on size of the data, network bandwidth, and processing logic. In certain scenarios, it makes sense to maintain a cache close to the microservices layer to improve performance by reducing or eliminating the need for the real-time backend calls.

Caches reduce latency and service-to-service communication of microservice architectures. A cache is a high-speed data storage layer that stores a subset of data. When data is requested from a cache, it is delivered faster than if you accessed the data’s primary storage location.

While working with our customers, we have observed use cases where data caching helps reduce latency in the microservices layer. Caching can be implemented in several ways. In this blog post, we discuss a couple of these use cases that customers have built. In both use cases, the microservices layer is created using Serverless on AWS offerings. It requires data from multiple data sources deployed locally in the cloud or on premises. The compute layer is built using AWS Lambda. Though Lambda functions are short-lived, the cached data can be used by subsequent instances of the same microservice to avoid backend calls.

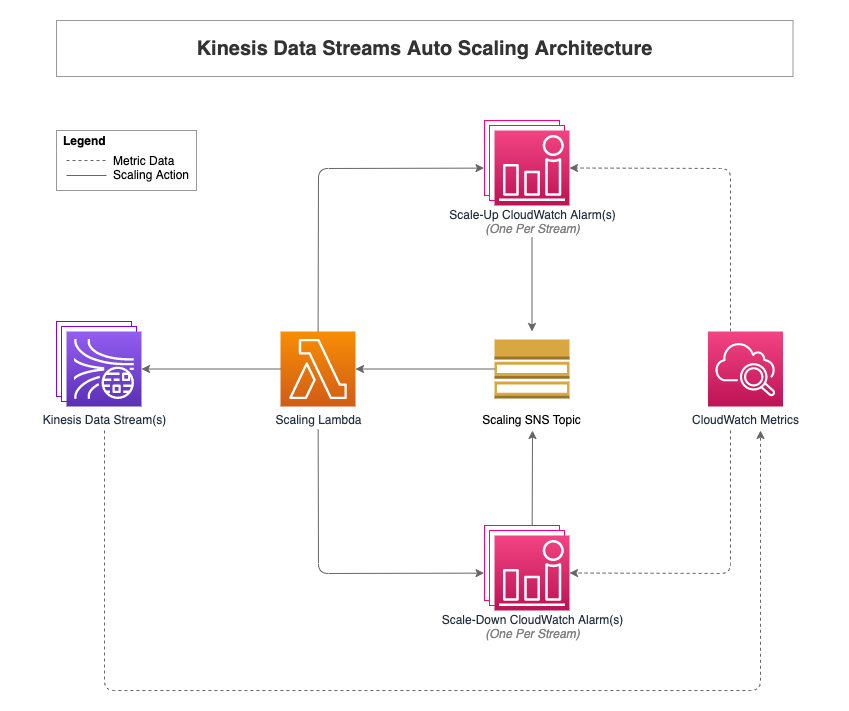
Use case 1: On-demand cache to reduce real-time calls

In this use case, the Cache-Aside design pattern is used for lazy loading of frequently accessed data. This means that an object is only cached when it is requested by a consumer, and the respective microservice decides if the object is worth saving.

This use case is typically useful when the microservices layer makes multiple real-time calls to fetch and process data. These calls can be greatly reduced by caching frequently accessed data for a short period of time.

Let’s discuss a real-world scenario. Figure 1 shows a customer portal that provides a list of car loans, their status, and the net outstanding amount for a customer:

  • The Billing microservice gets a request. It then tries to get required objects (for example, the list of car loans, their status, and the net outstanding balance) from the cache using an object_key. If the information is available in the cache, a response is sent back to the requester using cached data.
  • If requested objects are not available in the cache (a cache miss), the Billing microservice makes multiple calls to local services, applications, and data sources to retrieve data. The result is compiled and sent back to the requester. It also resides in the cache for a short period of time.
  • Meanwhile, if a customer makes a payment using the Payment microservice, the balance amount in the cache must be invalidated/deleted. The Payment microservice processes the payment and invokes an asynchronous event (payment_processed) with the respective object key for the downstream processes that will remove respective objects from the cache.
  • The events are stored in the event store.
  • The CacheManager microservice gets the event (payment_processed) and makes a delete request to the cache for the respective object_key. If necessary, the CacheManager can also refresh cached data. It can call a resource within the Billing service or it can refresh data directly from the source system depending on the data refresh logic.
Reducing latency by caching frequently accessed data on demand

Figure 1. Reducing latency by caching frequently accessed data on demand

Figure 2 shows AWS services for use case 1. The microservices layer (Billing, Payments, and Profile) is created using Lambda. The Amazon API Gateway is exposing Lambda functions as API operations to the internal or external consumers.

Suggested AWS services for implementing use case 1

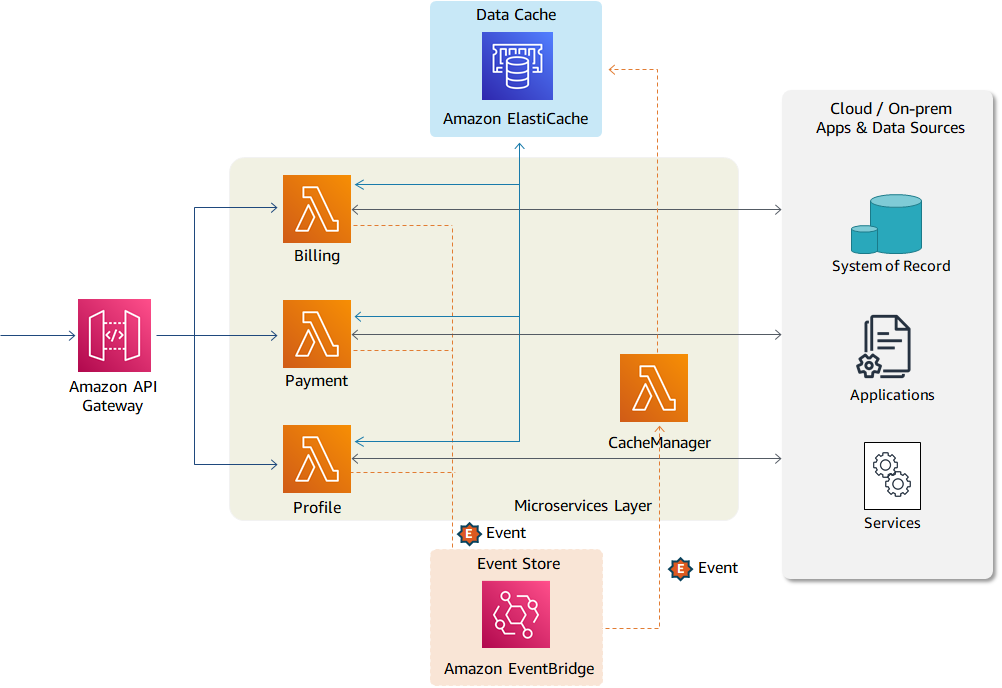
Figure 2. Suggested AWS services for implementing use case 1

All three microservices are connected with the data cache and can save and retrieve objects from the cache. The cache is maintained in-memory using Amazon ElastiCache. The data objects are kept in cache for a short period of time. Every object has an associated TTL (time to live) value assigned to it. After that time period, the object expires. The custom events (such as payment_processed) are published to Amazon EventBridge for downstream processing.

Use case 2: Proactive caching of massive volumes of data

During large modernization and migration initiatives, not all data sources are colocated for a certain period of time. Some legacy systems, such as mainframe, require a longer decommissioning period. Many legacy backend systems process data through periodic batch jobs. In such scenarios, front-end applications can use cached data for a certain period of time (ranging from a few minutes to few hours) depending on nature of data and its usage. The real-time calls to the backend systems cannot deal with the extensive call volume on the front-end application.

In such scenarios, required data/objects can be identified up front and loaded directly into the cache through an automated process as shown in Figure 3:

  • An automated process loads data/objects in the cache during the initial load. Subsequent changes to the data sources (either in a mainframe database or another system of record) are captured and applied to the cache through an automated CDC (change data capture) pipeline.
  • Unlike use case 1, the microservices layer does not make real-time calls to load data into the cache. In this use case, microservices use data already cached for their processing.
  • However, the microservices layer may create an event if data in the cache is stale or specific objects have been changed by another service (for example, by the Payment service when a payment is made).
  • The events are stored in Event Manager. Upon receiving an event, the CacheManager initiates a backend process to refresh stale data on demand.
  • All data changes are sent directly to the system of record.
Eliminating real-time calls by caching massive data volumes proactively

Figure 3. Eliminating real-time calls by caching massive data volumes proactively

As shown in Figure 4, the data objects are maintained in Amazon DynamoDB, which provides low-latency data access at any scale. The data retrieval is managed through DynamoDB Accelerator (DAX), a fully managed, highly available, in-memory cache. It delivers up to a 10 times performance improvement, even at millions of requests per second.

Suggested AWS services for implementing use case 2

Figure 4. Suggested AWS services for implementing use case 2

The data in DynamoDB can be loaded through different methods depending on the customer use case and technology landscape. API Gateway, Lambda, and EventBridge are providing similar functionality as described in use case 1.

Use case 2 is also beneficial in scenarios where front-end applications must cache data for an extended period of time, such as a customer’s shopping cart.

In addition to caching, the following best practices can also be used to reduce latency and to improve performance within the Lambda compute layer:

Conclusion

The microservices architecture allows you to build several caching layers depending on your use case. In this blog, we discussed data caching within the compute layer to reduce latency when data is retrieved from disparate sources. The information from use case 1 can help you reduce real-time calls to your back-end system by saving frequently used data to the cache. Use case 2 helps you maintain large volumes of data in caches for extended periods of time when real-time calls to the backend system are not possible.

Query a Teradata database using Amazon Athena Federated Query and join with data in your Amazon S3 data lake

Post Syndicated from Navnit Shukla original https://aws.amazon.com/blogs/big-data/query-a-teradata-database-using-amazon-athena-federated-query-and-join-with-data-in-your-amazon-s3-data-lake/

If you use data lakes in Amazon Simple Storage Service (Amazon S3) and use Teradata as your transactional data store, you may need to join the data in your data lake with Teradata in the cloud, Teradata running on Amazon Elastic Compute Cloud (Amazon EC2), or with an on-premises Teradata database, for example to build a dashboard or create consolidated reporting.

In these use cases, the Amazon Athena Federated Query feature allows you to seamlessly access the data from Teradata database without having to move the data to your S3 data lake. This removes the overhead in managing such jobs.

In this post, we will walk you through a step-by-step configuration to set up Athena Federated Query using AWS Lambda to access data in a Teradata database running on premises.

For this post, we will be using the Oracle Athena Federated Query connector developed by Trianz. The runtime includes a Teradata instance on premises. Your Teradata instance can be on the cloud, on Amazon EC2, or on premises. You can deploy the Trianz Oracle Athena Federated Query connector from the AWS Serverless Application Repository.

Let’s start with discussing the solution and then detailing the steps involved.

Solution overview

Data federation is the capability to integrate data in another data store using a single interface (Athena). The following diagram depicts how Athena Federated Query works by using Lambda to integrate with a federated data source.

Athena is an interactive query service that makes it easy to analyze data in Amazon S3 using standard SQL. If you have data in sources other than Amazon S3, you can use Athena Federated Query to query the data in place or build pipelines to extract data from multiple data sources and store them in Amazon S3. With Athena Federated Query, you can run SQL queries across data stored in relational, non-relational, object, and custom data sources.

When a federated query is run, Athena identifies the parts of the query that should be routed to the data source connector and executes them with Lambda. The data source connector makes the connection to the source, runs the query, and returns the results to Athena. If the data doesn’t fit into Lambda RAM runtime memory, it spills the data to Amazon S3 and is later accessed by Athena.

Athena uses data source connectors which internally use Lambda to run federated queries. Data source connectors are pre-built and can be deployed from the Athena console or from the Serverless Application Repository. Based on the user submitting the query, connectors can provide or restrict access to specific data elements.

To implement this solution, we complete the following steps:

  1. Create a secret for the Teradata instance using AWS Secrets Manager.
  2. Create an S3 bucket and subfolder for Lambda to use.
  3. Configure Athena federation with the Teradata instance.
  4. Run federated queries with Athena.

Prerequisite

Before you start this walkthrough, make sure your Teradata database is up and running.

Create a secret for the Teradata instance

Our first step is to create a secret for the Teradata instance with a username and password using Secrets Manager.

  1. On the Secrets Manager console, choose Secrets.
  2. Choose Store a new secret.
  3. Select Other types of secrets.
  4. Set the credentials as key-value pairs (username, password) for your Teradata instance.

  1. For Secret name, enter a name for your secret. Use the prefix TeradataAFQ so it’s easy to find.
  2. Leave the remaining fields at their defaults and choose Next.
  3. Complete your secret creation.

Set up your S3 bucket for Lambda

On the Amazon S3 console, create a new S3 bucket and subfolder for Lambda to use. For this post, we create athena-accelerator/teradata.

Configure Athena federation with the Teradata instance

To configure Athena federation with Teradata instance, complete the following steps:

  1. On the AWS Serverless Application Repository console, choose Available applications.
  2. Select Show apps that create custom IAM roles or resource policies.
  3. In the search field, enter TrianzTeradataAthenaJDBC.
  4. Choose the application.

  1. For SecretNamePrefix, enter TeradataAFQ.
  2. For SpillBucket, enter Athena-accelerator/teradata.
  3. For JDBCConnectorConfig, use the format teradata://jdbc:teradata://hostname/user=testUser&password=testPassword.
  4. For DisableSpillEncryption, enter false.
  5. For LambdaFunctionName, enter teradataconnector.
  6. For SecurityGroupID, enter the security group ID where the Teradata instance is deployed.

Make sure to apply valid inbound and outbound rules based on your connection.

  1. For SpillPrefix, create a folder under the S3 bucket you created and specify the name (for example, athena-spill).
  2. For Subnetids, use the subnets where the Teradata instance is running with comma separation.

Make sure the subnet is in a VPC and has NAT gateway and internet gateway attached.

  1. Select the I acknowledge check box.
  2. Choose Deploy.

Make sure that the AWS Identity and Access Management (IAM) roles have permissions to access AWS Serverless Application Repository, AWS CloudFormation, Amazon S3, Amazon CloudWatch, Amazon CloudTrail, Secrets Manager, Lambda, and Athena. For more information about Athena IAM access, see Example IAM Permissions Policies to Allow Athena Federated Query.

Run federated queries with Athena

Run your queries using lambda:teradataconnector to run against tables in the Teradata database. teradataconnector is the name of lambda function which we have created in step 7 of previous section of this blog.

lambda:teradataconnector references a data source connector Lambda function using the format lambda:MyLambdaFunctionName. For more information, see Writing Federated Queries.

The following screenshot shows the query that joins the dataset between Teradata and the S3 data lake.

Key performance best practices

If you’re considering Athena Federated Query with Teradata, we recommend the following best practices:

  • Athena Federated query works great for queries with predicate filtering because the predicates are pushed down to the Teradata database. Use filter and limited-range scans in your queries to avoid full table scans.
  • If your SQL query requires returning a large volume of data from the Teradata database to Athena (which could lead to query timeouts or slow performance), you may consider moving data from Teradata to your S3 data lake.
  • The star schema is a commonly used data model in Teradata. In the star schema model, unload your large fact tables into your S3 data lake and leave the dimension tables in Teradata. If large dimension tables are contributing to slow performance or query timeouts, unload those tables to your S3 data lake.
  • When you run federated queries, Athena spins up multiple Lambda functions, which causes a spike in database connections. It’s important to monitor the Teradata database WLM queue slots to ensure there is no queuing. Additionally, you can use concurrency scaling on your Teradata database cluster to benefit from concurrent connections to queue up.

Conclusion

In this post, you learned how to configure and use Athena Federated Query with Teradata. Now you don’t need to wait for all the data in your Teradata data warehouse to be unloaded to Amazon S3 and maintained on a day-to-day basis to run your queries.

You can use the best practices outlined in the post to help minimize the data transferred from Teradata for better performance. When queries are well written for Athena Federated Query, the performance penalties are negligible.

For more information, see the Athena User Guide and Using Amazon Athena Federated Query.


About the Author

Navnit Shukla is an AWS Specialist Solution Architect in Analytics. He is passionate about helping customers uncover insights from their data. He has been building solutions to help organizations make data-driven decisions.

How to restrict IAM roles to access AWS resources from specific geolocations using AWS Client VPN

Post Syndicated from Artem Lovan original https://aws.amazon.com/blogs/security/how-to-restrict-iam-roles-to-access-aws-resources-from-specific-geolocations-using-aws-client-vpn/

You can improve your organization’s security posture by enforcing access to Amazon Web Services (AWS) resources based on IP address and geolocation. For example, users in your organization might bring their own devices, which might require additional security authorization checks and posture assessment in order to comply with corporate security requirements. Enforcing access to AWS resources based on geolocation can help you to automate compliance with corporate security requirements by auditing the connection establishment requests. In this blog post, we walk you through the steps to allow AWS Identity and Access Management (IAM) roles to access AWS resources only from specific geographic locations.

Solution overview

AWS Client VPN is a managed client-based VPN service that enables you to securely access your AWS resources and your on-premises network resources. With Client VPN, you can access your resources from any location using an OpenVPN-based VPN client. A client VPN session terminates at the Client VPN endpoint, which is provisioned in your Amazon Virtual Private Cloud (Amazon VPC) and therefore enables a secure connection to resources running inside your VPC network.

This solution uses Client VPN to implement geolocation authentication rules. When a client VPN connection is established, authentication is implemented at the first point of entry into the AWS Cloud. It’s used to determine if clients are allowed to connect to the Client VPN endpoint. You configure an AWS Lambda function as the client connect handler for your Client VPN endpoint. You can use the handler to run custom logic that authorizes a new connection. When a user initiates a new client VPN connection, the custom logic is the point at which you can determine the geolocation of this user. In order to enforce geolocation authorization rules, you need:

  • AWS WAF to determine the user’s geolocation based on their IP address.
  • A Network address translation (NAT) gateway to be used as the public origin IP address for all requests to your AWS resources.
  • An IAM policy that is attached to the IAM role and validated by AWS when the request origin IP address matches the IP address of the NAT gateway.

One of the key features of AWS WAF is the ability to allow or block web requests based on country of origin. When the client connection handler Lambda function is invoked by your Client VPN endpoint, the Client VPN service invokes the Lambda function on your behalf. The Lambda function receives the device, user, and connection attributes. The user’s public IP address is one of the device attributes that are used to identify the user’s geolocation by using the AWS WAF geolocation feature. Only connections that are authorized by the Lambda function are allowed to connect to the Client VPN endpoint.

Note: The accuracy of the IP address to country lookup database varies by region. Based on recent tests, the overall accuracy for the IP address to country mapping is 99.8 percent. We recommend that you work with regulatory compliance experts to decide if your solution meets your compliance needs.

A NAT gateway allows resources in a private subnet to connect to the internet or other AWS services, but prevents a host on the internet from connecting to those resources. You must also specify an Elastic IP address to associate with the NAT gateway when you create it. Since an Elastic IP address is static, any request originating from a private subnet will be seen with a public IP address that you can trust because it will be the elastic IP address of your NAT gateway.

AWS Identity and Access Management (IAM) is a web service for securely controlling access to AWS services. You manage access in AWS by creating policies and attaching them to IAM identities (users, groups of users, or roles) or AWS resources. A policy is an object in AWS that, when associated with an identity or resource, defines their permissions. In an IAM policy, you can define the global condition key aws:SourceIp to restrict API calls to your AWS resources from specific IP addresses.

Note: Throughout this post, the user is authenticating with a SAML identity provider (IdP) and assumes an IAM role.

Figure 1 illustrates the authentication process when a user tries to establish a new Client VPN connection session.

Figure 1: Enforce connection to Client VPN from specific geolocations

Figure 1: Enforce connection to Client VPN from specific geolocations

Let’s look at how the process illustrated in Figure 1 works.

  1. The user device initiates a new client VPN connection session.
  2. The Client VPN service redirects the user to authenticate against an IdP.
  3. After user authentication succeeds, the client connects to the Client VPN endpoint.
  4. The Client VPN endpoint invokes the Lambda function synchronously. The function is invoked after device and user authentication, and before the authorization rules are evaluated.
  5. The Lambda function extracts the public-ip device attribute from the input and makes an HTTPS request to the Amazon API Gateway endpoint, passing the user’s public IP address in the X-Forwarded-For header.Because you’re using AWS WAF to protect API Gateway, and have geographic match conditions configured, a response with the status code 200 is returned only if the user’s public IP address originates from an allowed country of origin. Additionally, AWS WAF has another rule configured that blocks all requests to API Gateway if the request doesn’t originate from one of the NAT gateway IP addresses. Because Lambda is deployed in a VPC, it has a NAT gateway IP address, and therefore the request isn’t blocked by AWS WAF. To learn more about running a Lambda function in a VPC, see Configuring a Lambda function to access resources in a VPC.The following code example showcases Lambda code that performs the described step.

    Note: Optionally, you can implement additional controls by creating specific authorization rules. Authorization rules act as firewall rules that grant access to networks. You should have an authorization rule for each network for which you want to grant access. To learn more, see Authorization rules.

  6. The Lambda function returns the authorization request response to Client VPN.
  7. When the Lambda function—shown following—returns an allow response, Client VPN establishes the VPN session.
import os
import http.client


cloud_front_url = os.getenv("ENDPOINT_DNS")
endpoint = os.getenv("ENDPOINT")
success_status_codes = [200]


def build_response(allow, status):
    return {
        "allow": allow,
        "error-msg-on-failed-posture-compliance": "Error establishing connection. Please contact your administrator.",
        "posture-compliance-statuses": [status],
        "schema-version": "v1"
    }


def handler(event, context):
    ip = event['public-ip']

    conn = http.client.HTTPSConnection(cloud_front_url)
    conn.request("GET", f'/{endpoint}', headers={'X-Forwarded-For': ip})
    r1 = conn.getresponse()
    conn.close()

    status_code = r1.status

    if status_code in success_status_codes:
        print("User's IP is based from an allowed country. Allowing the connection to VPN.")
        return build_response(True, 'compliant')

    print("User's IP is NOT based from an allowed country. Blocking the connection to VPN.")
    return build_response(False, 'quarantined')

After the client VPN session is established successfully, the request from the user device flows through the NAT gateway. The originating source IP address is recognized, because it is the Elastic IP address associated with the NAT gateway. An IAM policy is defined that denies any request to your AWS resources that doesn’t originate from the NAT gateway Elastic IP address. By attaching this IAM policy to users, you can control which AWS resources they can access.

Figure 2 illustrates the process of a user trying to access an Amazon Simple Storage Service (Amazon S3) bucket.

Figure 2: Enforce access to AWS resources from specific IPs

Figure 2: Enforce access to AWS resources from specific IPs

Let’s look at how the process illustrated in Figure 2 works.

  1. A user signs in to the AWS Management Console by authenticating against the IdP and assumes an IAM role.
  2. Using the IAM role, the user makes a request to list Amazon S3 buckets. The IAM policy of the user is evaluated to form an allow or deny decision.
  3. If the request is allowed, an API request is made to Amazon S3.

The aws:SourceIp condition key is used in a policy to deny requests from principals if the origin IP address isn’t the NAT gateway IP address. However, this policy also denies access if an AWS service makes calls on a principal’s behalf. For example, when you use AWS CloudFormation to provision a stack, it provisions resources by using its own IP address, not the IP address of the originating request. In this case, you use aws:SourceIp with the aws:ViaAWSService key to ensure that the source IP address restriction applies only to requests made directly by a principal.

IAM deny policy

The IAM policy doesn’t allow any actions. What the policy does is deny any action on any resource if the source IP address doesn’t match any of the IP addresses in the condition. Use this policy in combination with other policies that allow specific actions.

Prerequisites

Make sure that you have the following in place before you deploy the solution:

Implementation and deployment details

In this section, you create a CloudFormation stack that creates AWS resources for this solution. To start the deployment process, select the following Launch Stack button.

Select the Launch Stack button to launch the template

You also can download the CloudFormation template if you want to modify the code before the deployment.

The template in Figure 3 takes several parameters. Let’s go over the key parameters.

Figure 3: CloudFormation stack parameters

Figure 3: CloudFormation stack parameters

The key parameters are:

  • AuthenticationOption: Information about the authentication method to be used to authenticate clients. You can choose either AWS Managed Microsoft AD or IAM SAML identity provider for authentication.
  • AuthenticationOptionResourceIdentifier: The ID of the AWS Managed Microsoft AD directory to use for Active Directory authentication, or the Amazon Resource Number (ARN) of the SAML provider for federated authentication.
  • ServerCertificateArn: The ARN of the server certificate. The server certificate must be provisioned in ACM.
  • CountryCodes: A string of comma-separated country codes. For example: US,GB,DE. The country codes must be alpha-2 country ISO codes of the ISO 3166 international standard.
  • LambdaProvisionedConcurrency: Provisioned concurrency for the client connection handler. We recommend that you configure provisioned concurrency for the Lambda function to enable it to scale without fluctuations in latency.

All other input fields have default values that you can either accept or override. Once you provide the parameter input values and reach the final screen, choose Create stack to deploy the CloudFormation stack.

This template creates several resources in your AWS account, as follows:

  • A VPC and associated resources, such as InternetGateway, Subnets, ElasticIP, NatGateway, RouteTables, and SecurityGroup.
  • A Client VPN endpoint, which provides connectivity to your VPC.
  • A Lambda function, which is invoked by the Client VPN endpoint to determine the country origin of the user’s IP address.
  • An API Gateway for the Lambda function to make an HTTPS request.
  • AWS WAF in front of API Gateway, which only allows requests to go through to API Gateway if the user’s IP address is based in one of the allowed countries.
  • A deny policy with a NAT gateway IP addresses condition. Attaching this policy to a role or user enforces that the user can’t access your AWS resources unless they are connected to your client VPN.

Note: CloudFormation stack deployment can take up to 20 minutes to provision all AWS resources.

After creating the stack, there are two outputs in the Outputs section, as shown in Figure 4.

Figure 4: CloudFormation stack outputs

Figure 4: CloudFormation stack outputs

  • ClientVPNConsoleURL: The URL where you can download the client VPN configuration file.
  • IAMRoleClientVpnDenyIfNotNatIP: The IAM policy to be attached to an IAM role or IAM user to enforce access control.

Attach the IAMRoleClientVpnDenyIfNotNatIP policy to a role

This policy is used to enforce access to your AWS resources based on geolocation. Attach this policy to the role that you are using for testing the solution. You can use the steps in Adding IAM identity permissions to do so.

Configure the AWS client VPN desktop application

When you open the URL that you see in ClientVPNConsoleURL, you see the newly provisioned Client VPN endpoint. Select Download Client Configuration to download the configuration file.

Figure 5: Client VPN endpoint

Figure 5: Client VPN endpoint

Confirm the download request by selecting Download.

Figure 6: Client VPN Endpoint - Download Client Configuration

Figure 6: Client VPN Endpoint – Download Client Configuration

To connect to the Client VPN endpoint, follow the steps in Connect to the VPN. After a successful connection is established, you should see the message Connected. in your AWS Client VPN desktop application.

Figure 7: AWS Client VPN desktop application - established VPN connection

Figure 7: AWS Client VPN desktop application – established VPN connection

Troubleshooting

If you can’t establish a Client VPN connection, here are some things to try:

  • Confirm that the Client VPN connection has successfully established. It should be in the Connected state. To troubleshoot connection issues, you can follow this guide.
  • If the connection isn’t establishing, make sure that your machine has TCP port 35001 available. This is the port used for receiving the SAML assertion.
  • Validate that the user you’re using for testing is a member of the correct SAML group on your IdP.
  • Confirm that the IdP is sending the right details in the SAML assertion. You can use browser plugins, such as SAML-tracer, to inspect the information received in the SAML assertion.

Test the solution

Now that you’re connected to Client VPN, open the console, sign in to your AWS account, and navigate to the Amazon S3 page. Since you’re connected to the VPN, your origin IP address is one of the NAT gateway IPs, and the request is allowed. You can see your S3 bucket, if any exist.

Figure 8: Amazon S3 service console view - user connected to AWS Client VPN

Figure 8: Amazon S3 service console view – user connected to AWS Client VPN

Now that you’ve verified that you can access your AWS resources, go back to the Client VPN desktop application and disconnect your VPN connection. Once the VPN connection is disconnected, go back to the Amazon S3 page and reload it. This time you should see an error message that you don’t have permission to list buckets, as shown in Figure 9.

Figure 9: Amazon S3 service console view - user is disconnected from AWS Client VPN

Figure 9: Amazon S3 service console view – user is disconnected from AWS Client VPN

Access has been denied because your origin public IP address is no longer one of the NAT gateway IP addresses. As mentioned earlier, since the policy denies any action on any resource without an established VPN connection to the Client VPN endpoint, access to all your AWS resources is denied.

Scale the solution in AWS Organizations

With AWS Organizations, you can centrally manage and govern your environment as you grow and scale your AWS resources. You can use Organizations to apply policies that give your teams the freedom to build with the resources they need, while staying within the boundaries you set. By organizing accounts into organizational units (OUs), which are groups of accounts that serve an application or service, you can apply service control policies (SCPs) to create targeted governance boundaries for your OUs. To learn more about Organizations, see AWS Organizations terminology and concepts.

SCPs help you to ensure that your accounts stay within your organization’s access control guidelines across all your accounts within OUs. In particular, these are the key benefits of using SCPs in your AWS Organizations:

  • You don’t have to create an IAM policy with each new account, but instead create one SCP and apply it to one or more OUs as needed.
  • You don’t have to apply the IAM policy to every IAM user or role, existing or new.
  • This solution can be deployed in a separate account, such as a shared infrastructure account. This helps to decouple infrastructure tooling from business application accounts.

The following figure, Figure 10, illustrates the solution in an Organizations environment.

Figure 10: Use SCPs to enforce policy across many AWS accounts

Figure 10: Use SCPs to enforce policy across many AWS accounts

The Client VPN account is the account the solution is deployed into. This account can also be used for other networking related services. The SCP is created in the Organizations root account and attached to one or more OUs. This allows you to centrally control access to your AWS resources.

Let’s review the new condition that’s added to the IAM policy:

"ArnNotLikeIfExists": {
    "aws:PrincipalARN": [
    "arn:aws:iam::*:role/service-role/*"
    ]
}

The aws:PrincipalARN condition key allows your AWS services to communicate to other AWS services even though those won’t have a NAT IP address as the source IP address. For instance, when a Lambda function needs to read a file from your S3 bucket.

Note: Appending policies to existing resources might cause an unintended disruption to your application. Consider testing your policies in a test environment or to non-critical resources before applying them to production resources. You can do that by attaching the SCP to a specific OU or to an individual AWS account.

Cleanup

After you’ve tested the solution, you can clean up all the created AWS resources by deleting the CloudFormation stack.

Conclusion

In this post, we showed you how you can restrict IAM users to access AWS resources from specific geographic locations. You used Client VPN to allow users to establish a client VPN connection from a desktop. You used an AWS client connection handler (as a Lambda function), and API Gateway with AWS WAF to identify the user’s geolocation. NAT gateway IPs served as trusted source IPs, and an IAM policy protects access to your AWS resources. Lastly, you learned how to scale this solution to many AWS accounts with Organizations.

If you have feedback about this post, submit comments in the Comments section below.

Want more AWS Security how-to content, news, and feature announcements? Follow us on Twitter.

Author

Artem Lovan

Artem is a Senior Solutions Architect based in New York. He helps customers architect and optimize applications on AWS. He has been involved in IT at many levels, including infrastructure, networking, security, DevOps, and software development.

Author

Faiyaz Desai

Faiyaz leads a solutions architecture team supporting cloud-native customers in New York. His team guides customers in their modernization journeys through business and technology strategies, architectural best practices, and customer innovation. Faiyaz’s focus areas include unified communication, customer experience, network design, and mobile endpoint security.

Query Snowflake using Athena Federated Query and join with data in your Amazon S3 data lake

Post Syndicated from Navnit Shukla original https://aws.amazon.com/blogs/big-data/query-snowflake-using-athena-federated-query-and-join-with-data-in-your-amazon-s3-data-lake/

If you use data lakes in Amazon Simple Storage Service (Amazon S3) and use Snowflake as your data warehouse solution, you may need to join your data in your data lake with Snowflake. For example, you may want to build a dashboard by joining historical data in your Amazon S3 data lake and the latest data in your Snowflake data warehouse or create consolidated reporting.

In such use cases, Amazon Athena Federated Query allows you to seamlessly access the data from Snowflake without building ETL pipelines to copy or unload the data to the S3 data lake or Snowflake. This removes the overhead of creating additional extract, transform, and load (ETL) processes and shortens the development cycle.

In this post, we will walk you through a step-by-step configuration to set up Athena Federated Query using AWS Lambda to access data in a Snowflake data warehouse.

For this post, we are using the Snowflake connector for Amazon Athena developed by Trianz.

Let’s start with discussing the solution and then detailing the steps involved.

Solution overview

Data Federation refers to the capability to query data in another data store using a single interface (Amazon Athena). The following diagram depicts how a single Amazon Athena federated query uses Lambda to query the underlying data source and parallelizes execution across many workers.

Athena is an interactive query service that makes it easy to analyze data in Amazon S3 using standard SQL. If you have data in sources other than Amazon S3, you can use Athena Federated Query to query the data in place or build pipelines to extract data from multiple data sources and store them in Amazon S3. With Athena Federated Query, you can run SQL queries across data stored in relational, non-relational, object, and custom data sources.

When a federated query is run, Athena identifies the parts of the query that should be routed to the data source connector and executes them with Lambda. The data source connector makes the connection to the source, runs the query, and returns the results to Athena. If the data doesn’t fit into Lambda RAM runtime memory, it spills the data to Amazon S3 and is later accessed by Athena.

Athena uses data source connectors which internally use Lambda to run federated queries. Data source connectors are pre-built and can be deployed from the Athena console or from the Serverless Application Repository. Based on the user submitting the query, connectors can provide or restrict access to specific data elements.

To implement this solution, we complete the following steps:

  1. Create a secret for the Snowflake instance using AWS Secrets Manager.
  2. Create an S3 bucket and subfolder for Lambda to use.
  3. Configure Athena federation with the Snowflake instance.
  4. Run federated queries with Athena.

Prerequisites

Before getting started, make sure you have a Snowflake data warehouse up and running.

Create a secret for the Snowflake instance

Our first step is to create a secret for the Snowflake instance with a username and password using Secrets Manager.

  1. On the Secrets Manager console, choose Secrets.
  2. Choose Store a new secret.
  3. Select Other types of secrets.
  4. Enter the credentials as key-value pairs (username, password) for your Snowflake instance.
  5. For Secret name, enter a name for your secret. Use the prefix snowflake so it’s easy to find.

  1. Leave the remaining fields at their defaults and choose Next.
  2. Complete your secret creation.

Create an S3 bucket for Lambda

On the Amazon S3 console, create a new S3 bucket and subfolder for Lambda to use. For this post, we use athena-accelerator/snowflake.

Configure Athena federation with the Snowflake instance

To configure Athena data source connector for Snowflake with your Snowflake instance, complete the following steps:

  1. On the AWS Serverless Application Repository console, choose Available applications.
  2. In the search field, enter TrianzSnowflakeAthenaJDBC.

  1. For Application name, enter TrianzSnowflakeAthenaJDBC.
  2. For SecretNamePrefix, enter trianz-snowflake-athena.
  3. For SpillBucket, enter Athena-accelerator/snowflake.
  4. For JDBCConnectorConfig, use the format snowflake://jdbc:snowflake://{snowflake_instance_url}/?warehouse={warehousename}&db={databasename}&schema={schemaname}&${secretname}

For example, we enter snowflake://jdbc:snowflake://trianz.snowflakecomputing.com/?warehouse=ATHENA_WH&db=ATHENA_DEV&schema=ATHENA&${trianz-snowflake-athena}DisableSpillEncyption – False

  1. For LambdaFunctionName, enter trsnowflake.
  2. For SecurityGroupID, enter the security group ID where the Snowflake instance is deployed.

Make sure to apply valid inbound and outbound rules based on your connection.

  1. For SpillPrefix, create a folder under the S3 bucket you created and specify the name (for example, athena-spill).
  2. For Subnetids, use the subnets where the Snowflake instance is running with comma separation.

Make sure the subnet is in a VPC and has NAT gateway and internet gateway attached.

  1. Select the I acknowledge check box.
  2. Choose Deploy.

Make sure that the AWS Identity and Access Management (IAM) roles have permissions to access AWS Serverless Application Repository, AWS CloudFormation, Amazon S3, Amazon CloudWatch, AWS CloudTrail, Secrets Manager, Lambda, and Athena. For more information, see Example IAM Permissions Policies to Allow Athena Federated Query.

Run federated queries with Athena

Before running your federated query, be sure that you have selected Athena engine version 2. The current Athena engine version for any workgroup can be found in the Athena console page.

Run your federated queries using lambda:trsnowflake to run against tables in the Snowflake database. This is the name of lambda function which we have created in step 7 of previous section of this blog.

lambda:trsnowflake is a reference data source connector Lambda function using the format lambda:MyLambdaFunctionName. For more information, see Writing Federated Queries.

The following screenshot is a unionall query example of data in Amazon S3 with a table in the AWS Glue Data Catalog and a table in Snowflake.

Key performance best practices

If you’re considering Athena Federated Query with Snowflake, we recommend the following best practices:

  • Athena Federated query works great for queries with predicate filtering because the predicates are pushed down to the Snowflake database. Use filter and limited-range scans in your queries to avoid full table scans.
  • If your SQL query requires returning a large volume of data from Snowflake to Athena (which could lead to query timeouts or slow performance), you may consider copying data from Snowflake to your S3 data lake.
  • The Snowflake schema, which is an extension of the star schema, is used as a data model in Snowflake. In the Snowflake schema model, unload your large fact tables into your S3 data lake and leave the dimension tables in Snowflake. If large dimension tables are contributing to slow performance or query timeouts, unload those tables to your S3 data lake.
  • When you run federated queries, Athena spins up multiple Lambda functions, which causes a spike in database connections. It’s important to monitor the Snowflake database WLM queue slots to ensure there is no queuing. Additionally, you can use concurrency scaling on your Snowflake database cluster to benefit from concurrent connections to queue up.

Conclusion

In this post, you learned how to configure and use Athena federated with Snowflake using Lambda. With Athena Federated query user can leverage all of their data to produce analytics, derive business value without building ETL pipelines to bring data from different datastore such as Snowflake to Data Lake.

You can use the best practice considerations outlined in the post to help minimize the data transferred from Snowflake for better performance. When queries are well written for federation, the performance penalties are negligible.

For more information, see the Athena User Guide and Using Amazon Athena Federated Query.


About the Author

Navnit Shukla is AWS Specialist Solution Architect in Analytics. He is passionate about helping customers uncover insights from their data. He has been building solutions to help organizations make data-driven decisions.

Architecting a Highly Available Serverless, Microservices-Based Ecommerce Site

Post Syndicated from Senthil Kumar original https://aws.amazon.com/blogs/architecture/architecting-a-highly-available-serverless-microservices-based-ecommerce-site/

The number of ecommerce vendors is growing globally—they often handle large traffic at different times of the day and different days of the year. This, in addition to building, managing, and maintaining IT infrastructure on-premises data centers can present challenges to ecommerce businesses’ scalability and growth.

This blog provides you a Serverless on AWS solution that offloads the undifferentiated heavy lifting of managing resources and ensures your businesses’ architecture can handle peak traffic.

Common architecture set up versus serverless solution

The following sections describe a common monolithic architecture and our suggested alternative approach: setting up microservices-based order submission and product search modules. These modules are independently deployable and scalable.

Typical monolithic architecture

Figure 1 shows how a typical on-premises ecommerce infrastructure with different tiers is set up:

  • Web servers serve static assets and proxy requests to application servers
  • Application servers process ecommerce business logic and authentication logic
  • Databases store user and other dynamic data
  • Firewall and load balancers provide network components for load balancing and network security
Monolithic on-premises ecommerce infrastructure with different tiers

Figure 1. Monolithic on-premises ecommerce infrastructure with different tiers

Monolithic architecture tightly couples different layers of the application. This prevents them from being independently deployed and scaled.

Microservices-based modules

Order submission workflow module

This three-layer architecture can be set up in the AWS Cloud using serverless components:

  • Static content layer (Amazon CloudFront and Amazon Simple Storage Service (Amazon S3)). This layer stores static assets on Amazon S3. By using CloudFront in front of the S3 storage cache, you can deliver assets to customers globally with low latency and high transfer speeds.
  • Authentication layer (Amazon Cognito or customer proprietary layer). Ecommerce sites deliver authenticated and unauthenticated content to the user. With Amazon Cognito, you can manage users’ sign-up, sign-in, and access controls, so this authentication layer ensures that only authenticated users have access to secure data.
  • Dynamic content layer (AWS Lambda and Amazon DynamoDB). All business logic required for the ecommerce site is handled by the dynamic content layer. Using Lambda and DynamoDB ensures that these components are scalable and can handle peak traffic.

As shown in Figure 2, the order submission workflow is split into two sections: synchronous and asynchronous.

By splitting the order submission workflow, you allow users to submit their order details and get an orderId. This makes sure that they don’t have to wait for backend processing to complete. This helps unburden your architecture during peak shopping periods when the backend process can get busy.

Microservices-based order submission workflow

Figure 2. Microservices-based order submission workflow

The details of the order, such as credit card information in encrypted form, shipping information, etc., are stored in DynamoDB. This action invokes an asynchronous workflow managed by AWS Step Functions.

Figure 3 shows sample step functions from the asynchronous process. In this scenario, you are using external payment processing and shipping systems. When both systems get busy, step functions can manage long-running transactions and also the required retry logic. It uses a decision-based business workflow, so if a payment transaction fails, the order can be canceled. Or, once payment is successful, the order can proceed.

Amazon Simple Notification Service (Amazon SNS) notifies users whenever their order status changes. You can even extend Step Functions to have it react based on status of shipping.

Sample AWS Step Functions asynchronous workflow that uses external payment processing service and shipping system

Figure 3. Sample AWS Step Functions asynchronous workflow that uses external payment processing service and shipping system

Product search module

Our product search module is set up using the following serverless components:

  • Amazon Elasticsearch Service (Amazon ES) stores product data, which is updated whenever product-related data changes.
  • Lambda formats the data.
  • Amazon API Gateway allows users to search without authentication. As shown in Figure 4, searching for products on the ecommerce portal does not require users to log in. All traffic via API Gateway is unauthenticated.
Microservices-based product search workflow module with dynamic traffic through API Gateway

Figure 4. Microservices-based product search workflow module with dynamic traffic through API Gateway

Replicating data across Regions

If your ecommerce application runs on multiple Regions, it may require the content and data to be replicated. This allows the application to handle local traffic from that Region and also act as a failover option if the application fails in another Region. The content and data are replicated using the multi-Region replication features of Amazon S3 and DynamoDB global tables.

Figure 5 shows a multi-Region ecommerce site built on AWS with serverless services. It uses the following features to make sure that data between all Regions are in sync for data/assets that do not need data residency compliance:

  • Amazon S3 multi-Region replication keeps static assets in sync for assets.
  • DynamoDB global tables keeps dynamic data in sync across Regions.

Assets that are specific to their Region are stored in Regional specific buckets.

Data replication for a multi-Region ecommerce website built using serverless components

Figure 5. Data replication for a multi-Region ecommerce website built using serverless components

Amazon Route 53 DNS web service manages traffic failover from one Region to another. Route 53 provides different routing policies, and depending on your business requirement, you can choose the failover routing policy.

Best practices

Now that we’ve shown you how to build these applications, make sure you follow these best practices to effectively build, deploy, and monitor the solution stack:

  • Infrastructure as Code (IaC). A well-defined, repeatable infrastructure is important for managing any solution stack. AWS CloudFormation allows you to treat your infrastructure as code and provides a relatively easy way to model a collection of related AWS and third-party resources.
  • AWS Serverless Application Model (AWS SAM). An open-source framework. Use it to build serverless applications on AWS.
  • Deployment automation. AWS CodePipeline is a fully managed continuous delivery service that automates your release pipelines for fast and reliable application and infrastructure updates.
  • AWS CodeStar. Allows you to quickly develop, build, and deploy applications on AWS. It provides a unified user interface, enabling you to manage all of your software development activities in one place.
  • AWS Well-Architected Framework. Provides a mechanism for regularly evaluating your workloads, identifying high risk issues, and recording your improvements.
  • Serverless Applications Lens. Documents how to design, deploy, and architect serverless application workloads.
  • Monitoring. AWS provides many services that help you monitor and understand your applications, including Amazon CloudWatch, AWS CloudTrail, and AWS X-Ray.

Conclusion

In this blog post, we showed you how to architect a highly available, serverless, and microservices-based ecommerce website that operates in multiple Regions.

We also showed you how to replicate data between different Regions for scaling and if your workload fails. These serverless services reduce the burden of building and managing physical IT infrastructure to help you focus more on building solutions.

Related information

Integrating Amazon Connect and Amazon Lex with Third-party Systems

Post Syndicated from Steven Warwick original https://aws.amazon.com/blogs/architecture/integrating-amazon-connect-and-amazon-lex-with-third-party-systems/

AWS customers who provide software solutions that integrate with AWS often require design patterns that offer some flexibility. They must build, support, and expand products and solutions to meet their end user business requirements. These design patterns must use the underlying services and infrastructure through API operations. As we will show, third-party solutions can integrate with Amazon Connect to initiate customer-specific workflows. You don’t need specific utterances when using Amazon Lex to convert speech to text.

Introduction to Amazon Connect workflows

Platform as a service (PaaS) systems are built to handle a variety of use cases with various inputs. These inputs are provided by upstream systems and sometimes result in complex integrations. For example, when creating a call center management solution, these workflows may require opaque transcription data to be sent to downstream third-party system. This pattern allows the caller to interact with a third-party system with an Amazon Connect flow. The solution allows for communication to occur multiple times. Opaque transcription data is transferred between the Amazon Connect contact flow, through Amazon Lex, and then to the third-party system. The third-party system can modify and update workflows without affecting the Amazon Connect or Amazon Lex systems.

API workflow use case

AnyCompany Tech (our hypothetical company) is a PaaS company that allows other companies to quickly build workflows with their tools. It provides the ability to take customer calls with a request-response style interaction. AnyCompany built an API into the Amazon Connect flow to allow their end users to return various response types. Examples of the response types are “disconnect,” “speak,” and “failed.”

Using Amazon Connect, AnyCompany allows their end users to build complex workflows using a basic question-response API. Each customer of AnyCompany can build workflows that respond to a voice input. It is processed via the high-quality speech recognition and natural language understanding capabilities of Amazon Lex. The caller is prompted by “What is your question?” Amazon Lex processes the audio input then invokes a Lambda function that connects to AnyCompany Tech. They in turn initiate their customer’s unique workflow. The customer’s workflow may change over time without requiring any further effort from AnyCompany Tech.

Questions graph database use case

AnyCompany Storage is a company that has a graph database that stores documents and information correlating the business to its inventory, sales, marketing, and employees. Accessing this database will be done via a question-response API. For example, such questions might be: “What are our third quarter earnings?”, “Do we have product X in stock?”, or “When was Jane Doe hired?” The company wants the ability to have their employees call in and after proper authentication, ask any question of the system and receive a response. Using the architecture in Figure 1, the company can link their Amazon Connect implementation up to this API. The output from Amazon Lex is passed into the API, a response is received, and it is then passed to Amazon Connect.

Amazon Connect third-party system architecture

Figure 1. End-customer call flow

Figure 1. End-customer call flow

  1. User calls Amazon Connect using the telephone number for the connect instance.
  2. Amazon Connect receives the incoming call and starts an Amazon Connect contact flow. This Amazon Connect flow captures the caller’s utterance and forwards it to Amazon Lex.
  3. Amazon Lex starts the requested bot. The Amazon Lex bot translates the caller’s utterance into text and sends it to AWS Lambda via an event.
  4. AWS Lambda accepts the incoming data, transforms or enhances it as needed, and calls out to the external API via some transport
  5. The external API processes the content sent to it from AWS Lambda.
  6. The external API returns a response back to AWS Lambda.
  7. AWS Lambda accepts the response from the external API, then forwards this response to Amazon Lex.
  8. Amazon Lex returns the response content to Amazon Connect.
  9. Amazon Connect processes the response.

Solution components

Amazon Connect

Amazon Connect allows customer calls to get information from the third-party system. An Amazon Connect contact flow is required to get the callers input, which is then sent to Amazon Lex. The Amazon Lex bot must be granted permission to interact with an Amazon Connect contact flow. As shown in Figure 2, the Get customer input block must call the fallback intent of the Amazon Lex bot. Figure 2 demonstrates a basic flow used to get input, check the response, and perform an action.

Figure 2. Basic Amazon Connect contact flow to integrate with Amazon Lex

Figure 2. Basic Amazon Connect contact flow to integrate with Amazon Lex

Amazon Lex

Amazon Lex converts the voice given by a caller into text, which is then processed by a Lambda function. When setting up the Amazon Lex bot you will require one fallback intent (Figure 3), one unused intent (Figure 4), and one clarification prompts disabled (Figure 5).

Figure 3. Amazon Lex fallback intent

Figure 3. Amazon Lex fallback intent

The fallback intent is created by using the pre-defined AMAZON.FallbackIntent and must be set up to call a Lambda function in the Fulfillment section. Using the fallback intent and Lambda fulfillment causes the system to ignore any utterance pattern and pass any translation directly to the Lambda function.

Figure 4. Amazon Lex unused intent

Figure 4. Amazon Lex unused intent

The unused intent is only created to satisfy Amazon Lex’s requirement for a bot to have at least one custom intent with a valid utterance.

Figure 5. Amazon Lex error handling clarification prompts

Figure 5. Amazon Lex error handling clarification prompts

In the error handling section of the Amazon Lex bot, the clarification prompts must be disabled. Disabling the clarification prompts stops the Amazon Lex bot from asking the caller to clarify the input.

AWS Lambda

AWS Lambda is called by Amazon Lex, which is used to interact with the third-party system. The third-party system will return values, which the Lambda will add to its session attributes resulting object. The resulting object from AWS Lambda requires the dialog action to be set up with the type set to “Close,” fulfillmentState set to “Fulfilled,” and the message contentType set to “CustomPayload”. This will allow Amazon Lex to pass the values to Amazon Connect without speaking the results to the caller.

Conclusion

In this blog we showed how Amazon Connect, Amazon Lex, and AWS Lambda functions can be used together to create common interactions with third-party systems. This is a flexible architecture and requires few changes to the Amazon Connect contact flow. You don’t have to set up pre-defined utterances that limit the allowed inputs. Using this solution, AWS customers can provide flexible solutions that interact with third-party systems.

Related information

Auto scaling Amazon Kinesis Data Streams using Amazon CloudWatch and AWS Lambda

Post Syndicated from Matthew Nolan original https://aws.amazon.com/blogs/big-data/auto-scaling-amazon-kinesis-data-streams-using-amazon-cloudwatch-and-aws-lambda/

This post is co-written with Noah Mundahl, Director of Public Cloud Engineering at United Health Group.

In this post, we cover a solution to add auto scaling to Amazon Kinesis Data Streams. Whether you have one stream or many streams, you often need to scale them up when traffic increases and scale them down when traffic decreases. Scaling your streams manually can create a lot of operational overhead. If you leave your streams overprovisioned, costs can increase. If you want the best of both worlds—increased throughput and reduced costs—then auto scaling is a great option. This was the case for United Health Group. Their Director of Public Cloud Engineering, Noah Mundahl, joins us later in this post to talk about how adding this auto scaling solution impacted their business.

Overview of solution

In this post, we showcase a lightweight serverless architecture that can auto scale one or many Kinesis data streams based on throughput. It uses Amazon CloudWatch, Amazon Simple Notification Service (Amazon SNS), and AWS Lambda. A single SNS topic and Lambda function process the scaling of any number of streams. Each stream requires one scale-up and one scale-down CloudWatch alarm. For an architecture that uses Application Auto Scaling, see Scale Amazon Kinesis Data Streams with AWS Application Auto Scaling.

The workflow is as follows:

  1. Metrics flow from the Kinesis data stream into CloudWatch (bytes/second, records/second).
  2. Two CloudWatch alarms, scale-up and scale-down, evaluate those metrics and decide when to scale.
  3. When one of these scaling alarms triggers, it sends a message to the scaling SNS topic.
  4. The scaling Lambda function processes the SNS message:
    1. The function scales the data stream up or down using UpdateShardCount:
      1. Scale-up events double the number of shards in the stream
      2. Scale-down events halve the number of shards in the stream
    2. The function updates the metric math on the scale-up and scale-down alarms to reflect the new shard count.

Implementation

The scaling alarms rely on CloudWatch alarm metric math to calculate a stream’s maximum usage factor. This usage factor is a percentage calculation from 0.00–1.00, with 1.00 meaning the stream is 100% utilized in either bytes per second or records per second. We use the usage factor for triggering scale-up and scale-down events. Our alarms use the following usage factor thresholds to trigger scaling events: >= 0.75 for scale-up and < 0.25 for scale-down. We use 5-minute data points (period) on all alarms because they’re more resistant to Kinesis traffic micro spikes.

Scale-up usage factor

The following screenshot shows the metric math on a scale-up alarm.

The scale-up max usage factor for a stream is calculated as follows:

s1 = Current shard count of the stream
m1 = Incoming Bytes Per Period, directly from CloudWatch metrics
m2 = Incoming Records Per Period, directly from CloudWatch metrics
e1 = Incoming Bytes Per Period with missing data points filled by zeroes
e2 = Incoming Records Per Period with missing data points filled by zeroes
e3 = Incoming Bytes Usage Factor 
   = Incoming Bytes Per Period / Max Bytes Per Period
   = e1/(1024*1024*60*$kinesis_period_mins*s1)
e4 = Incoming Records Usage Factor  
   = Incoming Records Per Period / Max Records Per Period 
   = e2/(1000*60*$kinesis_period_mins*s1) 
e6 = Max Usage Factor: Incoming Bytes or Incoming Records 
   = MAX([e3,e4])

Scale-down usage factor

We calculate the scale-down usage factor the same as the scale-up usage factor with some additional metric math to (optionally) take into account the iterator age of the stream to block scale-downs when stream processing is falling behind. This is useful if you’re using Lambda functions per shard, known as the Parallelization Factor, to process your streams. If you have a backlog of data, scaling down reduces the number of Lambda functions you need to process that backlog.

The following screenshot shows the metric math on a scale-down alarm.

The scale-down max usage factor for a stream is calculated as follows:

s1 = Current shard count of the stream
s2 = Iterator Age (in minutes) after which we begin blocking scale downs	
m1 = Incoming Bytes Per Period, directly from CloudWatch metrics
m2 = Incoming Records Per Period, directly from CloudWatch metrics
e1 = Incoming Bytes Per Period with missing data points filled by zeroes
e2 = Incoming Records Per Period with missing data points filled by zeroes
e3 = Incoming Bytes Usage Factor 
   = Incoming Bytes Per Period / Max Bytes Per Period
   = e1/(1024*1024*60*$kinesis_period_mins*s1)
e4 = Incoming Records Usage Factor  
   = Incoming Records Per Period / Max Records Per Period 
   = e2/(1000*60*$kinesis_period_mins*s1)
e5 = Iterator Age Adjusted Factor 
   = Scale Down Threshold * (Iterator Age Minutes / Iterator Age Minutes to Block Scale Down)
   = $kinesis_scale_down_threshold * ((FILL(m3,0)*1000/60)/s2)
e6 = Max Usage Factor: Incoming Bytes, Incoming Records, or Iterator Age Adjusted Factor
   = MAX([e3,e4,e5])

Deployment

You can deploy this solution via AWS CloudFormation. For more information, see the GitHub repo.

If you need to generate traffic on your streams for testing, consider using the Amazon Kinesis Data Generator. For more information, see Test Your Streaming Data Solution with the New Amazon Kinesis Data Generator.

Optum’s story

As the health services innovation arm of UnitedHealth Group, Optum has been on a multi-year journey towards advancing maturity and capabilities in the public cloud. Our multi-cloud strategy includes using many cloud-native services offered by AWS. The elasticity and self-healing features of the public cloud are among of its many strengths, and we use the automation provided natively by AWS through auto scaling capabilities. However, some services don’t natively provide those capabilities, such as Kinesis Data Streams. That doesn’t mean that we’re complacent and accept inelasticity.

Reducing operational toil

At the scale Optum operates at in the public cloud, monitoring for errors or latency related to our Kinesis data stream shard count and manually adjusting those values in response could become a significant source of toil for our public cloud platform engineering teams. Rather than engaging in that toil, we prefer to engineer automated solutions that respond much faster than humans and help us maintain performance, data resilience, and cost-efficiency.

Serving our mission through engineering

Optum is a large organization with thousands of software engineers. Our mission is to help people live healthier lives and help make the health system work better for everyone. To accomplish that mission, our public cloud platform engineers must act as force multipliers across the organization. With solutions such as this, we ensure that our engineers can focus on building and not on responding to needless alerts.

Conclusion

In this post, we presented a lightweight auto scaling solution for Kinesis Data Streams. Whether you have one stream or many streams, this solution can handle scaling for you. The benefits include less operational overhead, increased throughput, and reduced costs. Everything you need to get started is available on the Kinesis Auto Scaling GitHub repo.


About the authors

Matthew NolanMatthew Nolan is a Senior Cloud Application Architect at Amazon Web Services. He has over 20 years of industry experience and over 10 years of cloud experience. At AWS he helps customers rearchitect and reimagine their applications to take full advantage of the cloud. Matthew lives in New England and enjoys skiing, snowboarding, and hiking.


Paritosh Walvekar Paritosh Walvekar is a Cloud Application Architect with AWS Professional Services, where he helps customers build cloud native applications. He has a Master’s degree in Computer Science from University at Buffalo. In his free time, he enjoys watching movies and is learning to play the piano.


Noah Mundahl Noah Mundahl is Director of Public Cloud Engineering at United Health Group.

Intelligently Search Media Assets with Amazon Rekognition and Amazon ES

Post Syndicated from Sridhar Chevendra original https://aws.amazon.com/blogs/architecture/intelligently-search-media-assets-with-amazon-rekognition-and-amazon-es/

Media assets have become increasingly important to industries like media and entertainment, manufacturing, education, social media applications, and retail. This is largely due to innovations in digital marketing, mobile, and ecommerce.

Successfully locating a digital asset like a video, graphic, or image reduces costs related to reproducing or re-shooting. An efficient search engine is critical to quickly delivering something like the latest fashion trends. This in turn increases customer satisfaction, builds brand loyalty, and helps increase businesses’ online footprints, ultimately contributing towards revenue.

This blog post shows you how to build automated indexing and search functions using AWS serverless managed artificial intelligence (AI)/machine learning (ML) services. This architecture provides high scalability, reduces operational overhead, and scales out/in automatically based on the demand, with a flexible pay-as-you-go pricing model.

Automatic tagging and rich metadata with Amazon ES

Asset libraries for images and videos are growing exponentially. With Amazon Elasticsearch Service (Amazon ES), this media is indexed and organized, which is important for efficient search and quick retrieval.

Adding correct metadata to digital assets based on enterprise standard taxonomy will help you narrow down search results. This includes information like media formats, but also richer metadata like location, event details, and so forth. With Amazon Rekognition, an advanced ML service, you do not need to tag and index these media assets. This automatic tagging and organization frees you up to gain insights like sentiment analysis from social media.

Figure 1 is tagged using Amazon Rekognition. You can see how rich metadata (Apparel, T-Shirt, Person, and Pills) is extracted automatically. Without Amazon Rekognition, you would have to manually add tags and categorize the image. This means you could only do a keyword search on what’s manually tagged. If the image was not tagged, then you likely wouldn’t be able to find it in a search.

Figure 1. An image tagged automatically with Amazon Rekognition

Figure 1. An image tagged automatically with Amazon Rekognition

Data ingestion, organization, and storage with Amazon S3

As shown in Figure 2, use Amazon Simple Storage Service (Amazon S3) to store your static assets. It provides high availability and scalability, along with unlimited storage. When you choose Amazon S3 as your content repository, multiple data providers are configured for data ingestion for future consumption by downstream applications. In addition to providing storage, Amazon S3 lets you organize data into prefixes based on the event type and captures S3 object mutations through S3 event notifications.

Figure 2. Solution overview diagram

Figure 2. Solution overview diagram

S3 event notifications are invoked for a specific prefix, suffix, or combination of both. They integrate with Amazon Simple Queue Service (Amazon SQS), Amazon Simple Notification Service (Amazon SNS), and AWS Lambda as targets. (Refer to the Amazon S3 Event Notifications user guide for best practices). S3 event notification targets vary across use cases. For media assets, Amazon SQS is used to decouple the new data objects ingested into S3 buckets and downstream services. Amazon SQS provides flexibility over the data processing based on resource availability.

Data processing with Amazon Rekognition

Once media assets are ingested into Amazon S3, they are ready to be processed. Amazon Rekognition determines the entities within each asset. Amazon Rekognition then extracts the entities in JSON format and assigns a confidence score.

If the confidence score is below the defined threshold, use Amazon Augmented AI (A2I) for further review. A2I is an ML service that helps you build the workflows required for human review of ML predictions.

Amazon Rekognition also supports custom modeling to help identify entities within the images for specific business needs. For instance, a campaign may need images of products worn by a brand ambassador at a marketing event. Then they may need to further narrow their search down by the individual’s name or age demographic.

Using our solution, a Lambda function invokes Amazon Rekognition to extract the entities from the ingested assets. Lambda continuously polls the SQS queue for any new messages. Once a message is available, the Lambda function invokes the Amazon Rekognition endpoint to extract the relevant entities.

The following is a sample output from detect_labels API call in Amazon Rekognition and the transformed output that will be updated to downstream search engine:

{'Labels': [{'Name': 'Clothing', 'Confidence': 99.98137664794922, 'Instances': [], 'Parents': []}, {'Name': 'Apparel', 'Confidence': 99.98137664794922,'Instances': [], 'Parents': []}, {'Name': 'Shirt', 'Confidence': 97.00833129882812, 'Instances': [], 'Parents': [{'Name': 'Clothing'}]}, {'Name': 'T-Shirt', 'Confidence': 76.36670684814453, 'Instances': [{'BoundingBox': {'Width': 0.7963646650314331, 'Height': 0.6813027262687683, 'Left':
0.09593021124601364, 'Top': 0.1719706505537033}, 'Confidence': 53.39663314819336}], 'Parents': [{'Name': 'Clothing'}]}], 'LabelModelVersion': '2.0', 'ResponseMetadata': {'RequestId': '3a561e82-badc-4ba0-aa77-39a13f1bb3a6', 'HTTPStatusCode': 200, 'HTTPHeaders': {'content-type': 'application/x-amz-json-1.1', 'date': 'Mon, 17 May 2021 18:32:27 GMT', 'x-amzn-requestid': '3a561e82-badc-4ba0-aa77-39a13f1bb3a6','content-length': '542', 'connection': 'keep-alive'}, 'RetryAttempts': 0}}

As shown, the Lambda function submits an API call to Amazon Rekognition, where a T-shirt image in .jpeg format is provided as the input. Based on your confidence score threshold preference, Amazon Rekognition will prompt you to initiate a human review using Amazon A2I. It will also prompt you to use Amazon Rekognition Custom Labels to train the custom models. Lambda then identifies and arranges the labels and updates the specified index.

Indexing with Amazon ES

Amazon ES is a managed search engine service that provides enterprise-grade search engine capability for applications. In our solution, assets are searched based on entities that are used as metadata to update the index. Amazon ES is hosted as a public endpoint or a VPC endpoint for secure access within the specified AWS account.

Labels are identified and marked as tags, which are assigned to .jpeg formatted images. The following sample output shows the query on one of the tags issued on an Amazon ES cluster.

Query:

curl-XGET https://<ElasticSearch Endpoint>/<_IndexName>/_search?q=T-Shirt

Output:

{"took":140,"timed_out":false,"_shards":{"total":5,"successful":5,"skipped":0,"failed":0},"hits":{"total":{"value":1,"relation":"eq"},"max_score":0.05460011,"hits":[{"_index":"movies","_type":"_doc","_id":"15","_score":0.05460011,"_source":{"fileName":"s7-1370766_lifestyle.jpg","objectTags":["Clothing","Apparel","Sailor
Suit","Sleeve","T-Shirt","Shirt","Jersey"]}}]}}

In addition to photos, Amazon Rekognition also detects the labels on videos. It can recognize labels and identify characters and entities. These are then added to Amazon ES to enhance search capability. This allows users to skip to specific parts of a video for quick searchability. For instance, a marketer may need images of cashmere sweaters from a fashion show that was streamed and recorded.

Once the raw video clip is identified, it is then converted using Amazon Elastic Transcoder to play back on mobile devices, tablets, web browsers, and connected televisions. Elastic Transcoder is a highly scalable and cost-effective media transcoding service in the cloud. Segmented output renditions are created for delivery using the multiple protocols to compatible devices.

Conclusion

This blog describes AWS services that can be applied to diverse set of use cases for tagging and efficient search of images and videos. You can build automated indexing and search using AWS serverless managed AI/ML services. They provide high scalability, reduce operational overhead, and scale out/in automatically based on the demand, with a flexible pay-as-you-go pricing model.

To get started, use these references to create your own sample architectures:

Query your Oracle database using Athena Federated Query and join with data in your Amazon S3 data lake

Post Syndicated from Navnit Shukla original https://aws.amazon.com/blogs/big-data/query-your-oracle-database-using-athena-federated-query-and-join-with-data-in-your-amazon-s3-data-lake/

If you use data lakes in Amazon Simple Storage Service (Amazon S3) and use Oracle as your transactional data store, you may need to join the data in your data lake with Oracle on Amazon Relational Database Service (Amazon RDS), Oracle running on Amazon Elastic Compute Cloud (Amazon EC2), or an on-premises Oracle database, for example to build a dashboard or create consolidated reporting.

In these use cases, Amazon Athena Federated Query allows you to seamlessly access the data you’re your Oracle database without having to move the data to the S3 data lake. This removes the overhead in managing such jobs.

In this post, we walk you through a step-by-step configuration to set up Athena Federated query using AWS Lambda to access data in Oracle on Amazon RDS.

For this post, we will be using the Oracle Athena Federated query connector developed by Trianz. The runtime includes Oracle XE running on Amazon EC2 and Amazon RDS. Your Oracle instance can be on Amazon RDS, Amazon EC2, or on premises. You can deploy the Trianz Oracle AFQ connector available in the AWS Serverless Application Repository.

Let’s start with discussing the solution and then detailing the steps involved.

Solution overview

Data federation is the capability to integrate data in another data store using a single interface (Amazon Athena). The following diagram depicts how Athena federation works by using Lambda to integrate with a federated data source.

Athena is an interactive query service that makes it easy to analyze data in Amazon S3 using standard SQL. If you have data in sources other than Amazon S3, you can use Athena Federated Query to query the data in place or build pipelines to extract data from multiple data sources and store them in Amazon S3. With Athena Federated Query, you can run SQL queries across data stored in relational, non-relational, object, and custom data sources.

When a federated query is run, Athena identifies the parts of the query that should be routed to the data source connector and executes them with Lambda. The data source connector makes the connection to the source, runs the query, and returns the results to Athena. If the data doesn’t fit into Lambda RAM runtime memory, it spills the data to Amazon S3 and is later accessed by Athena.

Athena uses data source connectors which internally use Lambda to run federated queries. Data source connectors are pre-built and can be deployed from the Athena console or from the Serverless Application Repository. Based on the user submitting the query, connectors can provide or restrict access to specific data elements.

To implement this solution, we complete the following steps:

  1. Create a secret for the Oracle instance using AWS Secrets Manager.
  2. Create an S3 bucket and subfolder for Lambda to use.
  3. Configure Athena federation with the Oracle XE instance.
  4. Run federated queries with Athena.

Prerequisites

Before getting started, make sure you have an Oracle database up and running.

Create a secret for the Oracle instance

Our first step is to create a secret for the Oracle instance with a username and password using Secrets Manager.

  1. On the Secrets Manager console, choose Secrets.
  2. Choose Store a new secret.
  3. Select Other types of secrets.
  4. Enter the credentials as key-value pairs (username, password) for your Oracle XE instance.

  1. For Secret name, enter a name for your secret. Use the prefix OracleAFQ so it’s easy to find.
  2. Leave the remaining fields at their defaults and choose Next.
  3. Complete your secret creation.

Create an S3 bucket for Lambda

On the Amazon S3 console, create a new S3 bucket and subfolder for Lambda to use. For this post, I use athena-accelerator/oracle.

Configure Athena federation with the Oracle XE instance

To configure Athena federation with your Oracle instance, complete the following steps:

  1. On the AWS Serverless Application Repository console, choose Available applications.
  2. In the search field, enter TrianzOracleAthenaJDBC.

  1. For Application name, enter TrianzOracleAthenaJDBC.
  2. For SecretNamePrefix, enter OracleAFQ_XE.
  3. For SpillBucket, enter Athena-accelerator/oracle.
  4. For JDBCConnectorConfig, use the format oracle://jdbc:oracle:thin:${secretname}@//hostname:port/servicename.

For example, we enter oracle://jdbc:oracle:thin:${OracleAFQ_XE}@//12.345.67.89:1521/xe.

  1. For DisableSpillEncryption, enter false.
  2. For LambdaFunctionName, enter oracleconnector.
  3. For SecurityGroupID, enter the security group ID where the Oracle instance is deployed.

Make sure to apply valid inbound and outbound rules based on your connection.

  1. For SpillPrefix, create a folder under the S3 bucket you created and specify the name (for example, athena-spill).
  2. For Subnetids, use the subnets where the Oracle instance is running with comma separation.

Make sure the subnet is in a VPC and has NAT gateway and internet gateway attached.

  1. Select the I acknowledge check box.
  2. Choose Deploy.

Make sure that the AWS Identity and Access Management (IAM) roles have permissions to access AWS Serverless Application Repository, AWS CloudFormation, Amazon S3, Amazon CloudWatch, AWS CloudTrail, Secrets Manager, Lambda, and Athena. For more information, see Example IAM Permissions Policies to Allow Athena Federated Query.

Run federated queries with Athena

Run your federated queries using lambda:trianzoracle against tables in the Oracle database. trianzoracle is the name of lambda function which we have created in step 7 of previous section of this blog

lambda:trianzoracle is a reference data source connector Lambda function using the format lambda:MyLambdaFunctionName. For more information, see Writing Federated Queries.

The following query joins the dataset between Oracle and the S3 data lake.

Key performance best practices

If you’re considering Athena Federated query with Oracle, we recommend the following best practices:

  • Athena Federated query works great for queries with predicate filtering because the predicates are pushed down to the Oracle database. Use filter and limited-range scans in your queries to avoid full table scans.
  • If your SQL query requires returning a large volume of data from the Oracle database to Athena (which could lead to query timeouts or slow performance), unload the large tables in your query from Oracle to your S3 data lake.
  • The star schema is a commonly used data model in Oracle. In the star schema model, unload your large fact tables into your S3 data lake and leave the dimension tables in Oracle. If large dimension tables are contributing to slow performance or query timeouts, unload those tables to your S3 data lake.
  • When you run federated queries, Athena spins up multiple Lambda functions, which causes a spike in database connections. It’s important to monitor the Oracle database WLM queue slots to ensure there is no queuing. Additionally, you can use concurrency scaling on your Oracle database cluster to benefit from concurrent connections to queue up.

Conclusion

In this post, you learned how to configure and use Athena Federated query with Oracle. Now you don’t need to wait for all the data in your Oracle data warehouse to be unloaded to Amazon S3 and maintained on a day-to-day basis to run your queries.

You can use the best practice considerations outlined in the post to help minimize the data transferred from Oracle for better performance. When queries are well written for Federated query, the performance penalties are negligible.

For more information, see the Athena User Guide and Using Amazon Athena Federated Query.


About the Author

Navnit Shukla is AWS Specialist Solution Architect in Analytics. He is passionate about helping customers uncover insights from their data. He has been building solutions to help organizations make data-driven decisions.

Building well-architected serverless applications: Implementing application workload security – part 2

Post Syndicated from Julian Wood original https://aws.amazon.com/blogs/compute/building-well-architected-serverless-applications-implementing-application-workload-security-part-2/

This series of blog posts uses the AWS Well-Architected Tool with the Serverless Lens to help customers build and operate applications using best practices. In each post, I address the serverless-specific questions identified by the Serverless Lens along with the recommended best practices. See the introduction post for a table of contents and explanation of the example application.

Security question SEC3: How do you implement application security in your workload?

This post continues part 1 of this security question. Previously, I cover reviewing security awareness documentation such as the Common Vulnerabilities and Exposures (CVE) database. I show how to use GitHub security features to inspect and manage code dependencies. I then show how to validate inbound events using Amazon API Gateway request validation.

Required practice: Store secrets that are used in your code securely

Store secrets such as database passwords or API keys in a secrets manager. Using a secrets manager allows for auditing access, easier rotation, and prevents exposing secrets in application source code. There are a number of AWS and third-party solutions to store and manage secrets.

AWS Partner Network (APN) member Hashicorp provides Vault to keep secrets and application data secure. Vault has a centralized workflow for tightly controlling access to secrets across applications, systems, and infrastructure. You can store secrets in Vault and access them from an AWS Lambda function to, for example, access a database. You can use the Vault Agent for AWS to authenticate with Vault, receive the database credentials, and then perform the necessary queries. You can also use the Vault AWS Lambda extension to manage the connectivity to Vault.

AWS Systems Manager Parameter Store allows you to store configuration data securely, including secrets, as parameter values.

AWS Secrets Manager enables you to replace hardcoded credentials in your code with an API call to Secrets Manager to retrieve the secret programmatically. You can protect, rotate, manage, and retrieve database credentials, API keys, and other secrets throughout their lifecycle. You can also generate secure secrets. By default, Secrets Manager does not write or cache the secret to persistent storage.

Parameter Store integrates with Secrets Manager. For more information, see “Referencing AWS Secrets Manager secrets from Parameter Store parameters.”

To show how Secrets Manager works, deploy the solution detailed in “How to securely provide database credentials to Lambda functions by using AWS Secrets Manager”.

The AWS Cloud​Formation stack deploys an Amazon RDS MySQL database with a randomly generated password. This is stored in Secrets Manager using a secret resource. A Lambda function behind an API Gateway endpoint returns the record count in a table from the database, using the required credentials. Lambda function environment variables store the database connection details and which secret to return for the database password. The password is not stored as an environment variable, nor in the Lambda function application code.

Lambda environment variables for Secrets Manager

Lambda environment variables for Secrets Manager

The application flow is as follows:

  1. Clients call the API Gateway endpoint
  2. API Gateway invokes the Lambda function
  3. The Lambda function retrieves the database secrets using the Secrets Manager API
  4. The Lambda function connects to the RDS database using the credentials from Secrets Manager and returns the query results

View the password secret value in the Secrets Manager console, which is randomly generated as part of the stack deployment.

Example password stored in Secrets Manager

Example password stored in Secrets Manager

The Lambda function includes the following code to retrieve the secret from Secrets Manager. The function then uses it to connect to the database securely.

secret_name = os.environ['SECRET_NAME']
rds_host = os.environ['RDS_HOST']
name = os.environ['RDS_USERNAME']
db_name = os.environ['RDS_DB_NAME']

session = boto3.session.Session()
client = session.client(
	service_name='secretsmanager',
	region_name=region_name
)
get_secret_value_response = client.get_secret_value(
	SecretId=secret_name
)
...
secret = get_secret_value_response['SecretString']
j = json.loads(secret)
password = j['password']
...
conn = pymysql.connect(
	rds_host, user=name, passwd=password, db=db_name, connect_timeout=5)

Browsing to the endpoint URL specified in the Cloud​Formation output displays the number of records. This confirms that the Lambda function has successfully retrieved the secure database credentials and queried the table for the record count.

Lambda function retrieving database credentials

Lambda function retrieving database credentials

Audit secrets access through a secrets manager

Monitor how your secrets are used to confirm that the usage is expected, and log any changes to them. This helps to ensure that any unexpected usage or change can be investigated, and unwanted changes can be rolled back.

Hashicorp Vault uses Audit devices that keep a detailed log of all requests and responses to Vault. Audit devices can append logs to a file, write to syslog, or write to a socket.

Secrets Manager supports logging API calls with AWS CloudTrail. CloudTrail captures all API calls for Secrets Manager as events. This includes calls from the Secrets Manager console and from code calling the Secrets Manager APIs.

Viewing the CloudTrail event history shows the requests to secretsmanager.amazonaws.com. This shows the requests from the console in addition to the Lambda function.

CloudTrail showing access to Secrets Manager

CloudTrail showing access to Secrets Manager

Secrets Manager also works with Amazon EventBridge so you can trigger alerts when administrator-specified operations occur. You can configure EventBridge rules to alert on deleted secrets or secret rotation. You can also create an alert if anyone tries to use a secret version while it is pending deletion. This can identify and alert when there is an attempt to use an out-of-date secret.

Enforce least privilege access to secrets

Access to secrets must be tightly controlled because the secrets contain sensitive information. Create AWS Identity and Access Management (IAM) policies that enable minimal access to secrets to prevent credentials being accidentally used or compromised. Secrets that have policies that are too permissive could be misused by other environments or developers. This can lead to accidental data loss or compromised systems. For more information, see “Authentication and access control for AWS Secrets Manager”.

Rotate secrets frequently.

Rotating your workload secrets is important. This prevents misuse of your secrets since they become invalid within a configured time period.

Secrets Manager allows you to rotate secrets on a schedule or on demand. This enables you to replace long-term secrets with short-term ones, significantly reducing the risk of compromise. Secrets Manager creates a CloudFormation stack with a Lambda function to manage the rotation process for you. Secrets Manager has native integrations with Amazon RDS, Amazon Redshift, and Amazon DocumentDB. It populates the function with the Amazon Resource Name (ARN) of the secret. You specify the permissions to rotate the credentials, and how often you want to rotate the secret.

The CloudFormation stack creates a MySecretRotationSchedule resource with a MyRotationLambda function to rotate the secret every 30 days.

MySecretRotationSchedule:
    Type: AWS::SecretsManager::RotationSchedule
    DependsOn: SecretRDSInstanceAttachment
    Properties:
    SecretId: !Ref MyRDSInstanceRotationSecret
    RotationLambdaARN: !GetAtt MyRotationLambda.Arn
    RotationRules:
        AutomaticallyAfterDays: 30
MyRotationLambda:
    Type: AWS::Serverless::Function
    Properties:
    Runtime: python3.7
    Role: !GetAtt MyLambdaExecutionRole.Arn
    Handler: mysql_secret_rotation.lambda_handler
    Description: 'This is a lambda to rotate MySql user passwd'
    FunctionName: 'cfn-rotation-lambda'
    CodeUri: 's3://devsecopsblog/code.zip'      
    Environment:
        Variables:
        SECRETS_MANAGER_ENDPOINT: !Sub 'https://secretsmanager.${AWS::Region}.amazonaws.com'

View and edit the rotation settings in the Secrets Manager console.

Secrets Manager rotation settings

Secrets Manager rotation settings

Manually rotate the secret by selecting Rotate secret immediately. This invokes the Lambda function, which updates the database password and updates the secret in Secrets Manager.

View the updated secret in Secrets Manager, where the password has changed.

Secrets Manager password change

Secrets Manager password change

Browse to the endpoint URL to confirm you can still access the database with the updated credentials.

Access endpoint with updated Secret Manager password

Access endpoint with updated Secret Manager password

You can provide your own code to customize a Lambda rotation function for other databases or services. The code includes the commands required to interact with your secured service to update or add credentials.

Conclusion

Implementing application security in your workload involves reviewing and automating security practices at the application code level. By implementing code security, you can protect against emerging security threats. You can improve the security posture by checking for malicious code, including third-party dependencies.

In this post, I continue from part 1, looking at securely storing, auditing, and rotating secrets that are used in your application code.

In the next post in the series, I start to cover the reliability pillar from the Well-Architected Serverless Lens with regulating inbound request rates.

For more serverless learning resources, visit Serverless Land.

Should I Run my Containers on AWS Fargate, AWS Lambda, or Both?

Post Syndicated from Rob Solomon original https://aws.amazon.com/blogs/architecture/should-i-run-my-containers-on-aws-fargate-aws-lambda-or-both/

Containers have transformed how companies build and operate software. Bundling both application code and dependencies into a single container image improves agility and reduces deployment failures. But what compute platform should you choose to be most efficient, and what factors should you consider in this decision?

With the release of container image support for AWS Lambda functions (December 2020), customers now have an additional option for building serverless applications using their existing container-oriented tooling and DevOps best practices. In addition, a single container image can be configured to run on both of these compute platforms: AWS Lambda (using serverless functions) or AWS Fargate (using containers).

Three key factors can influence the decision of what platform you use to deploy your container: startup time, task runtime, and cost. That decision may vary each time a task is initiated, as shown in the three scenarios following.

Design considerations for deploying a container

Total task duration consists of startup time and runtime. The startup time of a containerized task is the time required to provision the container compute resource and deploy the container. Task runtime is the time it takes for the application code to complete.

Startup time: Some tasks must complete quickly. For example, when a user waits for a web response, or when a series of tasks is completed in sequential order. In those situations, the total duration time must be minimal. While the application code may be optimized to run faster, startup time depends on the chosen compute platform as well. AWS Fargate container startup time typically takes from 60 to 90 seconds. AWS Lambda initial cold start can take up to 5 seconds. Following that first startup, the same containerized function has negligible startup time.

Task runtime: The amount of time it takes for a task to complete is influenced by the compute resources allocated (vCPU and memory) and application code. AWS Fargate lets you select vCPU and memory size. With AWS Lambda, you define the amount of allocated memory. Lambda then provisions a proportional quantity of vCPU. In both AWS Fargate and AWS Lambda uses, increasing the amount of compute resources may result in faster completion time. However, this will depend on the application. While the additional compute resources incur greater cost, the total duration may be shorter, so the overall cost may also be lower.

AWS Lambda has a maximum limit of 15 minutes of runtime. Lambda shouldn’t be used for these tasks to avoid the likelihood of timeout errors.

Figure 1 illustrates the proportion of startup time to total duration. The initial steepness of each line shows a rapid decrease in startup overhead. This is followed by a flattening out, showing a diminishing rate of efficiency. Startup time delay becomes less impactful as the total job duration increases. Other factors (such as cost) become more significant.

Figure 1. Ratio of startup time as a function to overall job duration for each service

Figure 1. Ratio of startup time as a function to overall job duration for each service

Cost: When making the choice between Fargate and Lambda, it is important to understand the different pricing models. This way, you can make the appropriate selection for your needs.

Figure 2 shows a cost analysis of Lambda vs Fargate. This is for the entire range of configurations for a runtime task. For most of the range of configurable memory, AWS Lambda is more expensive per second than even the most expensive configuration of Fargate.

Figure 2. Total cost for both AWS Lambda and AWS Fargate based on task duration

Figure 2. Total cost for both AWS Lambda and AWS Fargate based on task duration

From a cost perspective, AWS Fargate is more cost-effective for tasks running for several seconds or longer. If cost is the only factor at play, then Fargate would be the better choice. But the savings gained by using Fargate may be offset by the business value gained from the shorter Lambda function startup time.

Dynamically choose your compute platform

In the following scenarios, we show how a single container image can serve multiple use cases. The decision to run a given containerized application on either AWS Lambda or AWS Fargate can be determined at runtime. This decision depends on whether cost, speed, or duration are the priority.

In Figure 3, an image-processing AWS Batch job runs on a nightly schedule, processing tens of thousands of images to extract location information. When run as a batch job, image processing may take 1–2 hours. The job pulls images stored in Amazon Simple Storage Service (S3) and writes the location metadata to Amazon DynamoDB. In this case, AWS Fargate provides a good combination of compute and cost efficiency. An added benefit is that it also supports tasks that exceed 15 minutes. If a single image is submitted for real-time processing, response time is critical. In that case, the same image-processing code can be run on AWS Lambda, using the same container image. Rather than waiting for the next batch process to run, the image is processed immediately.

Figure 3. One-off invocation of a typically long-running batch job

Figure 3. One-off invocation of a typically long-running batch job

In Figure 4, a SaaS application uses an AWS Lambda function to allow customers to submit complex text search queries for files stored in an Amazon Elastic File System (EFS) volume. The task should return results quickly, which is an ideal condition for AWS Lambda. However, a small percentage of jobs run much longer than the average, exceeding the maximum duration of 15 minutes.

A straightforward approach to avoid job failure is to initiate an Amazon CloudWatch alarm when the Lambda function times out. CloudWatch alarms can automatically retry the job using Fargate. An alternate approach is to capture historical data and use it to create a machine learning model in Amazon SageMaker. When a new job is initiated, the SageMaker model can predict the time it will take the job to complete. Lambda can use that prediction to route the job to either AWS Lambda or AWS Fargate.

Figure 4. Short duration tasks with occasional outliers running longer than 15 minutes

Figure 4. Short duration tasks with occasional outliers running longer than 15 minutes

In Figure 5, a customer runs a containerized legacy application that encompasses many different kinds of functions, all related to a recurring data processing workflow. Each function performs a task of varying complexity and duration. These can range from processing data files, updating a database, or submitting machine learning jobs.

Using a container image, one code base can be configured to contain all of the individual functions. Longer running functions, such as data preparation and big data analytics, are routed to Fargate. Shorter duration functions like simple queries can be configured to run using the container image in AWS Lambda. By using AWS Step Functions as an orchestrator, the process can be automated. In this way, a monolithic application can be broken up into a set of “Units of Work” that operate independently.

Figure 5. Heterogeneous function orchestration

Figure 5. Heterogeneous function orchestration

Conclusion

If your job lasts milliseconds and requires a fast response to provide a good customer experience, use AWS Lambda. If your function is not time-sensitive and runs on the scale of minutes, use AWS Fargate. For tasks that have a total duration of under 15 minutes, customers must decide based on impacts to both business and cost. Select the service that is the most effective serverless compute environment to meet your requirements. The choice can be made manually when a job is scheduled or by using retry logic to switch to the other compute platform if the first option fails. The decision can also be based on a machine learning model trained on historical data.

Create a secure data lake by masking, encrypting data, and enabling fine-grained access with AWS Lake Formation

Post Syndicated from Shekar Tippur original https://aws.amazon.com/blogs/big-data/create-a-secure-data-lake-by-masking-encrypting-data-and-enabling-fine-grained-access-with-aws-lake-formation/

You can build data lakes with millions of objects on Amazon Simple Storage Service (Amazon S3) and use AWS native analytics and machine learning (ML) services to process, analyze, and extract business insights. You can use a combination of our purpose-built databases and analytics services like Amazon EMR, Amazon Elasticsearch Service (Amazon ES), and Amazon Redshift as the right tool for your specific job and benefit from optimal performance, scale, and cost.

In this post, you learn how to create a secure data lake using AWS Lake Formation for processing sensitive data. The data (simulated patient metrics) is ingested through a serverless pipeline to identify, mask, and encrypt sensitive data before storing it securely in Amazon S3. After the data has been processed and stored, you use Lake Formation to define and enforce fine-grained access permissions to provide secure access for data analysts and data scientists.

Target personas

The proposed solution focuses on the following personas, with each one having different level of access:

  • Cloud engineer – As the cloud infrastructure engineer, you implement the architecture but may not have access to the data itself or to define access permissions
  • secure-lf-admin – As a data lake administrator, you configure the data lake setting and assign data stewards
  • secure-lf-business-analyst – As a business analyst, you shouldn’t be able to access sensitive information
  • secure-lf-data-scientist – As a data scientist, you shouldn’t be able to access sensitive information

Solution overview

We use the following AWS services for ingesting, processing, and analyzing the data:

  • Amazon Athena is an interactive query service that can query data in Amazon S3 using standard SQL queries using tables in an AWS Glue Data Catalog. The data can be accessed via JDBC for further processing such as displaying in business intelligence (BI) dashboards.
  • Amazon CloudWatch is a monitoring and observability service that provides you with data and actionable insights to monitor your applications, respond to system-wide performance changes, and more. The logs from AWS Glue jobs and AWS Lambda functions are saved in CloudWatch logs.
  • Amazon Comprehend is a natural language processing (NLP) service that uses ML to uncover information in unstructured data.
  • Amazon DynamoDB is a NoSQL database that delivers single-digit millisecond performance at any scale and is used to avoid processing duplicates files.
  • AWS Glue is a serverless data preparation service that makes it easy to extract, transform, and load (ETL) data. An AWS Glue job encapsulates a script that reads, processes, and writes data to a new schema. This solution uses Python3.6 AWS Glue jobs for ETL processing.
  • AWS IoT provides the cloud services that connect your internet of things (IoT) devices to other devices and AWS Cloud services.
  • Amazon Kinesis Data Firehose is the easiest way to reliably load streaming data into data lakes, data stores, and analytics services.
  • AWS Lake Formation makes it easy to set up, secure, and manage your data lake. With Lake Formation, you can discover, cleanse, transform, and ingest data into your data lake from various sources; define fine-grained permissions at the database, table, or column level; and share controlled access across analytic, ML, and ETL services.
  • Amazon S3 is a scalable object storage service that hosts the raw data files and processed files in the data lake for millisecond access.

You can enhance the security of your sensitive data with the following methods:

  • Implement encryption at rest using AWS Key Management Service (AWS KMS) and customer managed encryption keys
  • Instrument AWS CloudTrail and audit logging
  • Restrict access to AWS resources based on the least privilege principle

Architecture overview

The solution emulates diagnostic devices sending Message Queuing Telemetry Transport (MQTT) messages onto an AWS IoT Core topic. We use Kinesis Data Firehose to preprocess and stage the raw data in Amazon S3. We then use AWS Glue for ETL to further process the data by calling Amazon Comprehend to identify any sensitive information. Finally, we use Lake Formation to define fine-grained permissions that restrict access to business analysts and data scientists who use Athena to query the data.

The following diagram illustrates the architecture for our solution.

Prerequisites

To follow the deployment walkthrough, you need an AWS account. Use us-east-1 or us-west-2 as your Region.

For this post, make sure you don’t have Lake Formation enabled in your AWS account.

Stage the data

Download the zipped archive file to use for this solution and unzip the files locally. patient.csv file is dummy data created to help demonstrate masking, encryption, and granting fine-grained access. The send-messages.sh script randomly generates simulated diagnostic data to represent body vitals. AWS Glue job uses glue-script.py script to perform ETL that detects sensitive information, masks/encrypt data, and populates curated table in AWS Glue catalog.

Create an S3 bucket called secure-datalake-scripts-<ACCOUNT_ID> via the Amazon S3 console. Upload the scripts and CSV files to this location.

Deploy your resources

For this post, we use AWS CloudFormation to create our data lake infrastructure.

  1. Choose Launch Stack:
  2. Select I acknowledge that AWS CloudFormation might create IAM resources with custom names before deploying.

The stack takes approximately 5 minutes to complete.

The following screenshot shows the key-values the stack created. We use the TestUserPassword parameter for the Lake Formation personas to sign in to the AWS Management Console.

Load the simulation data

Sign in to the AWS CloudShell console and wait for the terminal to start.

Stage the send-messages.sh script by running the Amazon S3 copy command:

aws s3 cp s3://secure-datalake-scripts-<ACCOUNT_ID>/send-messages.sh

Run your script by using the following command:

sh send-messages.sh.

The script runs for a few minutes and emits 300 messages. This sends MQTT messages to the secure_iot_device_analytics topic, filtered using IoT rules, processed using Kinesis Data Firehose, and converted to Parquet format. After a minute, data starts showing up in the raw bucket.

Run the AWS Glue ETL pipeline

Run AWS Glue workflow (secureGlueWorkflow) from the AWS Glue console; you can also schedule to run this using CloudWatch. It takes approximately 10 minutes to complete.

The AWS Glue job that is triggered as part of the workflow (ProcessSecureData) joins the patient metadata and patient metrics data. See the following code:

# Join Patient metadata and patient metrics dataframe
combined_df=Join.apply(patient_metadata, patient_metrics, 'PatientId', 'pid', transformation_ctx = "combined_df")

The ensuing dataframe contains sensitive information like FirstName, LastName, DOB, Address1, Address2, and AboutYourself. AboutYourself is freeform text entered by the patient during registration. In the following code snippet, the detect_sensitive_info function calls the Amazon Comprehend API to identify personally identifiable information (PII):

# Apply groupBy to get unique  AboutYourself records
group=combined_df.toDF().groupBy("pid","DOB", "FirstName", "LastName", "Address1", "Address2", "AboutYourself").count()
# Apply detect_sensitive_info to get the redacted string after masking  PII data
df_with_about_yourself = Map.apply(frame = group_df, f = detect_sensitive_info)
# Apply encryption to the identified fields
df_with_about_yourself_encrypted = Map.apply(frame = group_df, f = encrypt_rows)

Amazon Comprehend returns an object that has information about the entity name and entity type. Based on your needs, you can filter the entity types that need to be masked.

These fields are masked, encrypted, and written to their respective S3 buckets where fine-grained access controls are applied via Lake Formation:

  • Masked datas3://secure-data-lake-masked-<ACCOUNT_ID>
    secure-dl-masked-data/
  • Encrypted datas3://secure-data-lake-masked-<ACCOUNT_ID>
    secure-dl-encrypted-data/
  • Curated datas3://secure-data-lake-<ACCOUNT_ID>
    secure-dl-curated-data/

Now that the tables have been defined, we review permissions using Lake Formation.

Enable Lake Formation fine-grained access

To enable fine-grained access, we first add a Lake Formation admin user.

  1. On the Lake Formation console, select Add other AWS users or roles.
  2. On the drop-down menu, choose secure-lf-admin.
  3. Choose Get started.
  4. In the navigation pane, choose Settings.
  5. On the Data Catalog Settings page, deselect Use only IAM access control for new databases and Use only IAM access control for new tables in new databases.
  6. Choose Save.

Grant access to different personas

Before we grant permissions to different user personas, let’s register the S3 locations in Lake Formation so these personas can access S3 data without granting access through AWS Identity and Access Management (IAM).

  1. On the Lake Formation console, choose Register and ingest in the navigation pane.
  2. Choose Data lake locations.
  3. Choose Register location.
  4. Find and select each of the following S3 buckets and choose Register location:
    1. s3://secure-raw-bucket-<ACCOUNT_ID>/temp-raw-table
    2. s3://secure-data-lake-masked-<ACCOUNT_ID>/secure-dl-encrypted-data
    3. s3://secure-data-lake-<ACCOUNT_ID>/secure-dl-curated-data
    4. s3://secure-data-lake-masked-<ACCOUNT_ID>/secure-dl-masked-data

We’re now ready to grant access to our different users.

Grant read-only access to all the tables to secure-lf-admin

First, we grant read-only access to all the tables for the user secure-lf-admin.

  1. Sign in to the console with secure-lf-admin (use the password value for TestUserPassword from the CloudFormation stack) and make sure you’re in the same Region.
  2. Navigate to AWS Lake Formation console
  3. Under Data Catalog, choose Databases.
  4. Select the database secure-db.
  5. On the Actions drop-down menu, choose Grant.
  6. Select IAM users and roles.
  7. Choose the role secure-lf-admin.
  8. Under Policy tags or catalog resources, select Named data catalog resources.
  9. For Database, choose the database secure-db.
  10. For Tables, choose All tables.
  11. Under Permissions, select Table permissions.
  12. For Table permissions, select Super.
  13. Choose Grant.
  14. Choosesecure_dl_curated_data table.
  15. On the Actions drop-down menu, chose View permissions.
  16. Check IAMAllowedPrincipals and select Revoke and click on Revoke button.

You can confirm your user permissions on the Data Permissions page.

Grant read-only access to secure-lf-business-analyst

Now we grant read-only access to certain encrypted columns to the user secure-lf-business-analyst.

  1. On the Lake Formation console, under Data Catalog, choose Databases.
  2. Select the database secure-db and choose View tables.
  3. Select the table secure_dl_encrypted_data.
  4. On the Actions drop-down menu, choose Grant.
  5. Select IAM users and roles.
  6. Choose the role secure-lf-business-analyst.
  7. Under Permissions, select Column-based permissions.
  8. Choose the following columns:
    1. count
    2. address1_encrypted
    3. firstname_encrypted
    4. address2_encrypted
    5. dob_encrypted
    6. lastname_encrypted
  9. For Grantable permissions, select Select.
  10. Choose Grant.
  11. Chose secure_dl_encrypted_data table.
  12. On the Actions drop-down menu, chose View permissions.
  13. Check IAMAllowedPrincipals and select Revoke and click on Revoke button.

You can confirm your user permissions on the Data Permissions page.

Grant read-only access to secure-lf-data-scientist

Lastly, we grant read-only access to masked data to the user secure-lf-data-scientist.

  1. On the Lake Formation console, under Data Catalog, choose Databases.
  2. Select the database secure-db and choose View tables.
  3. Select the table secure_dl_masked_data.
  4. On the Actions drop-down menu, choose Grant.
  5. Select IAM users and roles.
  6. Choose the role secure-lf-data-scientist.
  7. Under Permissions, select Table permissions.
  8. For Table permissions, select Select.
  9. Choose Grant.
  10. Under Data Catalog, chose Tables.
  11. Chose secure_dl_masked_data table.
  12. On the Actions drop-down menu, chose View permissions.
  13. Check IAMAllowedPrincipals and select Revoke and click on Revoke button.

You can confirm your user permissions on the Data Permissions page.

Query the data lake using Athena from different personas

To validate the permissions of different personas, we use Athena to query against the S3 data lake.

Make sure you set the query result location to the location created as part of the CloudFormation stack (secure-athena-query-<ACCOUNT_ID>). The following screenshot shows the location information in the Settings section on the Athena console.

You can see all the tables listed under secure-db.

  1. Sign in to the console with secure-lf-admin (use the password value for TestUserPassword from the CloudFormation stack) and make sure you’re in the same Region.
  2. Navigate to Athena Console.
  3. Run a SELECT query against the secure_dl_curated_data

The user secure-lf-admin should see all the columns with encryption or masking.

Now let’s validate the permissions of secure-lf-business-analyst user.

  1. Sign in to the console with secure-lf-business-analyst.
  2. Navigate to Athena console.
  3. Run a SELECT query against the secure_dl_encrypted_data table.

The secure-lf-business-analyst user can only view the selected encrypted columns.

Lastly, let’s validate the permissions of secure-lf-data-scientist.

  1. Sign in to the console with secure-lf-data-scientist.
  2. Run a SELECT query against the secure_dl_masked_data table.

The secure-lf-data-scientist user can only view the selected masked columns.

If you try to run a query on different tables, such as secure_dl_curated_data, you get an error message for insufficient permissions.

Clean up

To avoid unexpected future charges, delete the CloudFormation stack.

Conclusion

In this post, we presented a potential solution for processing and storing sensitive data workloads in an S3 data lake. We demonstrated how to build a data lake on AWS to ingest, transform, aggregate, and analyze data from IoT devices in near-real time. This solution also demonstrates how you can mask and encrypt sensitive data, and use fine-grained column-level security controls with Lake Formation, which benefits those with a higher level of security needs.

Lake Formation recently announced the preview for row-level access; and you can sign up for the preview now!


About the Authors

Shekar Tippur is an AWS Partner Solutions Architect. He specializes in machine learning and analytics workloads. He has been helping partners and customers adopt best practices and discover insights from data.


Ramakant Joshi is an AWS Solution Architect, specializing in the analytics and serverless domain. He has over 20 years of software development and architecture experience, and is passionate about helping customers in their cloud journey.


Navnit Shukla is AWS Specialist Solution Architect, Analytics, and is passionate about helping customers uncover insights from their data. He has been building solutions to help organizations make data-driven decisions.

Coming soon: Expansion of AWS Lambda states to all functions

Post Syndicated from Chris Munns original https://aws.amazon.com/blogs/compute/coming-soon-expansion-of-aws-lambda-states-to-all-functions/

In November of 2019, we announced AWS Lambda function state attributes, a capability to track the current “state” of a function throughout its lifecycle.

Since launch, states have been used in two primary use-cases. First, to move the blocking setup of VPC resources out of the path of function invocation. Second, to allow the Lambda service to optimize new or updated container images for container-image based functions, also before invocation. By moving this additional work out of the path of the invocation, customers see lower latency and better consistency in their function performance. Soon, we will be expanding states to apply to all Lambda functions.

This post outlines the upcoming change, any impact, and actions to take during the roll out of function states to all Lambda functions. Most customers experience no impact from this change.

As functions are created or updated, or potentially fall idle due to low usage, they can transition to a state associated with that lifecycle event. Previously any function that was zip-file based and not attached to a VPC would only show an Active state. Updates to the application code and modifications of the function configuration would always show the Successful value for the LastUpdateStatus attribute. Now all functions will follow the same function state lifecycles described in the initial announcement post and in the documentation for Monitoring the state of a function with the Lambda API.

All AWS CLIs and SDKs have supported monitoring Lambda function states transitions since the original announcement in 2019. Infrastructure as code tools such as AWS CloudFormation, AWS SAM, Serverless Framework, and Hashicorp Terraform also already support states. Customers using these tools do not need to take any action as part of this, except for one recommended service role policy change for AWS CloudFormation customers (see Updating CloudFormation’s service role below).

However, there are some customers using SDK-based automation workflows, or calling Lambda’s service APIs directly, that must update those workflows for this change. To allow time for testing this change, we are rolling it out in a phased model, much like the initial rollout for VPC attached functions. We encourage all customers to take this opportunity to move to the latest SDKs and tools available.

Change details

Nothing is changing about how functions are created, updated, or operate as part of this. However, this change may impact certain workflows that attempt to invoke or modify a function shortly after a create or an update action. Before making API calls to a function that was recently created or modified, confirm it is first in the Active state, and that the LastUpdateStatus is Successful.

For a full explanation of both the create and update lifecycles, see Tracking the state of AWS Lambda functions.

Create function state lifecycle

Create function state lifecycle

Update function state lifecycle

Update function state lifecycle

Change timeframe

We are rolling out this change over a multiple phase period, starting with the Begin Testing phase today, July 12, 2021. The phases allow you to update tooling for deploying and managing Lambda functions to account for this change. By the end of the update timeline, all accounts transition to using the create/update Lambda lifecycle.

July 12 2021– Begin Testing: You can now begin testing and updating any deployment or management tools you have to account for the upcoming lifecycle change. You can also use this time to update your function configuration to delay the change until the End of Delayed Update.

September 6 2021 – General Update (with optional delayed update configuration): All customers without the delayed update configuration begin seeing functions transition through the lifecycles for create and update. Customers that have used the delay update configuration as described below will not see any change.

October 01 2021 – End of Delayed Update: The delay mechanism expires and customers now see the Lambda states lifecycle applied during function create or update.

Opt-in and delayed update configurations

Starting today, we are providing a mechanism for an opt-in. This allows you to update and test your tools and developer workflow processes for this change. We are also providing a mechanism to delay this change until the End of Delayed Update date. After the End of Delayed Update date, all functions will begin using the Lambda states lifecycle.

This mechanism operates on a function-by-function basis, so you can test and experiment individually without impacting your whole account. Once the General Update phase begins, all functions in an account that do not have the delayed update mechanism in place see the new lifecycle for their functions.

Both mechanisms work by adding a special string in the “Description” parameter of Lambda functions. You can add this string anywhere in this parameter. You can opt to add it to the prefix or suffix, or set the entire contents of the field. This parameter is processed at create or update in accordance with the requested action.

To opt in:

aws:states:opt-in

To delay the update:

aws:states:opt-out

NOTE: Delay configuration mechanism has no impact after the end of the Delayed Update.

Here is how this looks in the console:

I add the opt-in configuration to my function’s Description. You can find this under Configuration -> General Configuration in the Lambda console. Choose Edit to change the value.

Edit basic settings

Edit basic settings

After choosing Save, you can see the value in the console:

Opt-in flag set

Opt-in flag set

Once the opt-in is set for a function, then updates on that function go through the preceding update flow.

Checking a function’s state

With this in place, you can now test your development workflow ahead of the General Update phase. Download the latest AWS CLI (version 2.2.18 or greater) or SDKs to see function state and related attribute information.

You can confirm the current state of a function using the AWS APIs or AWS CLI to perform the GetFunction or GetFunctionConfiguration API or command for a specified function:

$ aws lambda get-function --function-name MY_FUNCTION_NAME --query 'Configuration.[State, LastUpdateStatus]'
[
    "Active",
    "Successful"
]

This returns the State and LastUpdateStatus in order for a function.

Updating CloudFormation’s service role

CloudFormation allows customers to create an AWS Identity and Access Management (IAM) service role to make calls to resources in a stack on your behalf. Customers can use service roles to allow or deny the ability to create, update, or delete resources in a stack.

As part of the rollout of function states for all functions, we recommend that customers configure CloudFormation service roles with an Allow for the “lambda:GetFunction” API. This API allows CloudFormation to get the current state of a function, which is required to assist in the creation and deployment of functions.

Conclusion

With function states, you can have better clarity on how the resources required by your Lambda function are being created. This change does not impact the way that functions are invoked or how your code is run. While this is a minor change to when resources are created for your Lambda function, the result is even better consistency of working with the service.

For more serverless learning resources, visit Serverless Land.

Understanding data streaming concepts for serverless applications

Post Syndicated from James Beswick original https://aws.amazon.com/blogs/compute/understanding-data-streaming-concepts-for-serverless-applications/

Amazon Kinesis is a suite of managed services that can help you collect, process, and analyze streaming data in near-real time. It consists of four separate services that are designed for common tasks with streaming data: This blog post focuses on Kinesis Data Streams.

One of the main benefits of processing streaming data is that an application can react as new data is generated, instead of waiting for batches. This real-time capability enables new functionality for applications. For example, payment processors can analyze payments in real time to detect fraudulent transactions. Ecommerce websites can use streams of clickstream activity to determine site engagement metrics in near-real time.

Kinesis can be used with Amazon EC2-based and container-based workloads. However, its integration with AWS Lambda can make it a useful data source for serverless applications. Using Lambda as a stream consumer can also help minimize the amount of operational overhead for managing streaming applications.

In this post, I explain important streaming concepts and how they affect the design of serverless applications. This post references the Alleycat racing application. Alleycat is a home fitness system that allows users to compete in an intense series of 5-minute virtual bicycle races. Up to 1,000 racers at a time take the saddle and push the limits of cadence and resistance to set personal records and rank on leaderboards. The Alleycat software connects the stationary exercise bike with a backend application that processes the data from thousands of remote devices.

The Alleycat frontend allows users to configure their races and view real-time leaderboard and historical rankings. The frontend could wait until the end of each race and collect the total output from each racer. Once the batch is ready, it could rank the results and provide a leaderboard once the race is completed. However, this is not very engaging for competitors. By using streaming data instead of a batch, the application show the racers a view of who is winning during the race. This makes the virtual environment more like a real-life cycling race.

Producers and consumers

In streaming data workloads, producers are the applications that produce data and consumers are those that process it. In a serverless streaming application, a consumer is usually a Lambda function, Amazon Kinesis Data Firehose, or Amazon Kinesis Data Analytics.

Kinesis producers and consumers

There are a number of ways to put data into a Kinesis stream in serverless applications, including direct service integrations, client libraries, and the AWS SDK.

Producer

Kinesis Data Streams

Kinesis Data Firehose

Amazon CloudWatch Logs Yes, using subscription filters Yes, using subscription filters
AWS IoT Core Yes, using IoT rule actions Yes, using IoT rule actions
AWS Database Migration Service Yes – set stream as target Not directly.
Amazon API Gateway Yes, via REST API direct service integration Yes, via REST API direct service integration
AWS Amplify Yes – via JavaScript library Not directly
AWS SDK Yes Yes

A single stream may have tens of thousands of producers, which could be web or mobile applications or IoT devices. The Alleycat application uses the AWS IoT SDK for JavaScript to publish messages to an IoT topic. An IoT rule action then uses a direct integration with Kinesis Data Streams to push the data to the stream. This configuration is ideal at the device level, especially since the device may already use AWS IoT Core to receive messages.

The Alleycat simulator uses the AWS SDK to send a large number of messages to the stream. The SDK provides two methods: PutRecord and PutRecords. The first allows you to send a single record, while the second supports up to 500 records per request (or up to 5 MB in total). The simulator uses the putRecords JavaScript API to batch messages to the stream.

A producer can put records directly on a stream, for example via the AWS SDK, or indirectly via other services such as Amazon API Gateway or AWS IoT Core. If direct, the producer must have appropriate permission to write data to the stream. If indirect, the producer must have permission to invoke the proxy service, and then the service must have permission to put data onto the stream.

While there may be many producers, there are comparatively fewer consumers. You can register up to 20 consumers per data stream, which share the outgoing throughout limit per shard. Consumers receive batches of records sequentially, which means processing latency increases as you add more consumers to a stream. For latency-sensitive applications, Kinesis offers enhanced fan-out which gives consumers 2 MB per second dedicated throughput and uses a push model to reduce latency.

Shards, streams, and partition keys

A shard is a sequence of data records in a stream with a fixed capacity. Part of Kinesis billing is based upon the number of shards. A single shard can process up to 1 MB per second or 1,000 records of incoming data. One shard can also send up to 2 MB per second of outgoing data to downstream consumers. These are hard limits on the throughputs of a shard and as your application approaches these limits, you must add more shards to avoid exceeding these limits.

A stream is a collection of these shards and is often a grouping at the workload or project level. Adding another shard to a stream effectively doubles the throughput, though it also doubles the cost. When there is only one shard in a stream, all records sent to that sent are routed to the same shard. With multiple shards, the routing of incoming messages to shards is determined by a partition key.

The data producer adds the partition key before sending the record to Kinesis. The service calculates an MD5 hash of the key, which maps to one of the shards in the stream. Each shard is assigned a range of non-overlapping hash values, so each partition key maps to only one shard.

MD5 hash function

The partition key exists as an alternative to specifying a shard ID directly, since it’s common in production applications to add and remove shards depending upon traffic. How you use the partition key determines the shard-mapping behavior. For example:

  • Same value: If you specify the same string as the partition key, every message is routed to a single shard, regardless of the number of shards in the stream. This is called overheating a shard.
  • Random value: Using a pseudo-random value, such as a UUID, evenly distributes messages between all the shards available.
  • Time-based: Using a timestamp as a partition key may result in a preference for a single shard if multiple messages arrive at the same time.
  • Applicationspecific: The Alleycat application uses the raceId as a partition key to ensure that all messages from a single race are processed by the same shard consumer.

A Lambda function is a consumer application for a data stream and processes one batch of records for each shard. Since Alleycat uses a tumbling window to calculate aggregates between batches, this use of the partition key ensures that all messages for each raceId are processed by the same function. The downside to this architecture is that it is limited to 1,000 incoming messages per second with the same raceId since it is bound to a single shard.

Deciding on a partition key strategy depends upon the specific needs of your workload. In most cases, a random value partition key is often the best approach.

Streaming payloads in serverless applications

When using the SDK to put messages to a stream, the Data attribute can be a buffer, typed array, blob, or string. Combined with the partition key value, the maximum record size is 1 MB. The Data value is base64 encoded when serialized by Kinesis and delivered as an encoded value to downstream consumers. When using a Lambda function consumer, Kinesis delivers batches in a Records array. Each record contains the encoded data attribute, partition key, and additional metadata in a JSON envelope:

JSON transformation from producer to consumer

Ordering and idempotency

Records in a Kinesis stream are delivered to consuming applications in the same order that they arrive at the Kinesis service. The service assigns a sequence number to the record when it is received and this is delivered as part of the payload to a Kinesis consumer:

Sequence number in payload

When using Lambda as a consuming application for Kinesis, by default each shard has a single instance of the function processing records. In this case, ordering is guaranteed as Kinesis invokes the function serially, one batch of records at a time.

Parallelization factor of 1

You can increase the number of concurrent function invocations by setting the ParallelizationFactor on the event source mapping. This allows you to set a concurrency of between 1 and 10, which provides a way to increase Lambda throughout if the IteratorAge metric is increasing. However, one side effect is that ordering per shard is no longer guaranteed, since the shard’s messages are split into multiple subgroups based upon an internal hash.

Parallelization factor is 2

Kinesis guarantees that every record is delivered “at least once”, but occasionally messages are delivered more than once. This is caused by producers that retry messages, network-related timeouts, and consumer retries, which can occur when worker processes restart. In both cases, these are normal activities and you should design your application to handle infrequent duplicate records.

To prevent the duplicate messages causing unintentional side effects, such as charging a payment twice, it’s important to design your application with idempotency in mind. By using transaction IDs appropriately, your code can determine if a given message has been processed previously, and ignore any duplicates. In the Alleycat application, the aggregation and processes of messages is idempotent. If two identical messages are received, processing completes with the same end result.

To learn more about implementing idempotency in serverless applications, read the “Serverless Application Lens: AWS Well-Architected Framework”.

Conclusion

In this post, I introduce some of the core streaming concepts for serverless applications. I explain some of the benefits of streaming architectures and how Kinesis works with producers and consumers. I compare different ways to ingest data, how streams are composed of shards, and how partition keys determine which shard is used. Finally, I explain the payload formats at the different stages of a streaming workload, how message ordering works with shards, and why idempotency is important to handle.

To learn more about building serverless web applications, visit Serverless Land.

Developing evolutionary architecture with AWS Lambda

Post Syndicated from James Beswick original https://aws.amazon.com/blogs/compute/developing-evolutionary-architecture-with-aws-lambda/

This post was written by Luca Mezzalira, Principal Solutions Architect, Media and Entertainment.

Agility enables you to evolve a workload quickly, adding new features, or introducing new infrastructure as required. The key characteristics for achieving agility in a code base are loosely coupled components and strong encapsulation.

Loose coupling can help improve test coverage and create atomic refactoring. With encapsulation, you expose only what is needed to interact with a service without revealing the implementation logic.

Evolutionary architectures can help achieve agility in your design. In the book “Building Evolutionary Architectures”, this architecture is defined as one that “supports guided, incremental change across multiple dimensions”.

This blog post focuses on how to structure code for AWS Lambda functions in a modular fashion. It shows how to embrace the evolutionary aspect provided by the hexagonal architecture pattern and apply it to different use cases.

Introducing ports and adapters

Hexagonal architecture is also known as the ports and adapters architecture. It is an architectural pattern used for encapsulating domain logic and decoupling it from other implementation details, such as infrastructure or client requests.

Ports and adapters

  1. Domain logic: Represents the task that the application should perform, abstracting any interaction with the external world.
  2. Ports: Provide a way for the primary actors (on the left) to interact with the application, via the domain logic. The domain logic also uses ports for interacting with secondary actors (on the right) when needed.
  3. Adapters: A design pattern for transforming one interface into another interface. They wrap the logic for interacting with a primary or secondary actor.
  4. Primary actors: Users of the system such as a webhook, a UI request, or a test script.
  5. Secondary actors: used by the application, these services are either a Repository (for example, a database) or a Recipient (such as a message queue).

Hexagonal architecture with Lambda functions

Lambda functions are units of compute logic that accomplish a specific task. For example, a function could manipulate data in a Amazon Kinesis stream, or process messages from an Amazon SQS queue.

In Lambda functions, hexagonal architecture can help you implement new business requirements and improve the agility of a workload. This approach can help create separation of concerns and separate the domain logic from the infrastructure. For development teams, it can also simplify the implementation of new features and parallelize the work across different developers.

The following example introduces a service for returning a stock value. The service supports different currencies for a frontend application that displays the information in a dashboard. The translation of a stock value between currencies happens in real time. The service must retrieve the exchange rates with every request made by the client.

The architecture for this service uses an Amazon API Gateway endpoint that exposes a REST API. When the client calls the API, it triggers a Lambda function. This gets the stock value from a DynamoDB table and the currency information from a third-party endpoint. The domain logic uses the exchange rate to convert the stock value to other currencies before responding to the client request.

The full example is available in the AWS GitHub samples repository. Here is the architecture for this service:

Hexagonal architecture example

  1. A client makes a request to the API Gateway endpoint, which invokes the Lambda function.
  2. The primary adapter receives the request. It captures the stock ID and pass it to the port:
    exports.lambdaHandler = async (event) => {
        try{
    	// retrieve the stockID from the request
            const stockID = event.pathParameters.StockID;
    	// pass the stockID to the port
            const response = await getStocksRequest(stockID);
            return response
        } 
    };
  3. The port is an interface for communicating with the domain logic. It enforces the separation between an adapter and the domain logic. With this approach, you can change and test the infrastructure and domain logic in isolation without impacting another part of the code base:
    const retrieveStock = async (stockID) => {
        try{
    	//use the port “stock” to access the domain logic
            const stockWithCurrencies = await stock.retrieveStockValues(stockID)
            return stockWithCurrencies;
        }
    }
    
  4. The port passing the stock ID invokes the domain logic entry point. The domain logic fetches the stock value from a DynamoDB table, then it requests the exchange rates. It returns the computed values to the primary adapter via the port. The domain logic always uses a port to interact with an adapter because the ports are the interfaces with the external world:
    const CURRENCIES = [“USD”, “CAD”, “AUD”]
    const retrieveStockValues = async (stockID) => {
    try {
    //retrieve the stock value from DynamoDB using a port
            const stockValue = await Repository.getStockData(stockID);
    //fetch the currencies value using a port
            const currencyList = await Currency.getCurrenciesData(CURRENCIES);
    //calculate the stock value in different currencies
            const stockWithCurrencies = {
                stock: stockValue.STOCK_ID,
                values: {
                    "EUR": stockValue.VALUE
                }
            };
            for(const currency in currencyList.rates){
                stockWithCurrencies.values[currency] =  (stockValue.VALUE * currencyList.rates[currency]).toFixed(2)
            }
    // return the final computation to the port
            return stockWithCurrencies;
        }
    }


This is how the domain logic interacts with the DynamoDB table:

DynamoDB interaction

  1. The domain logic uses the Repository port for interacting with the database. There is not a direct connection between the domain and the adapter:
    const getStockData = async (stockID) => {
        try{
    //the domain logic pass the request to fetch the stock ID value to this port
            const data = await getStockValue(stockID);
            return data.Item;
        } 
    }
    
  2. The secondary adapter encapsulates the logic for reading an item from a DynamoDB table. All the logic for interacting with DynamoDB is encapsulated in this module:
    const getStockValue = async (stockID) => {
        let params = {
            TableName : DB_TABLE,
            Key:{
                'STOCK_ID': stockID
            }
        }
        try {
            const stockData = await documentClient.get(params).promise()
            return stockData
        }
    }


The domain logic uses an adapter for fetching the exchange rates from the third-party service. It then processes the data and responds to the client request:


  1. Currencies API interactionThe second operation in the business logic is retrieving the currency exchange rates. The domain logic requests the operation via a port that proxies the request to the adapter:
    const getCurrenciesData = async (currencies) => {
        try{
            const data = await getCurrencies(currencies);
            return data
        } 
    }
    
  2. The currencies service adapter fetches the data from a third-party endpoint and returns the result to the domain logic.
    const getCurrencies = async (currencies) => {
        try{        
            const res = await axios.get(`http://api.mycurrency.io?symbols=${currencies.toString()}`)
            return res.data
        } 
    }
    

These eight steps show how to structure the Lambda function code using a hexagonal architecture.

Adding a cache layer

In this scenario, the production stock service experiences traffic spikes during the day. The external endpoint for the exchange rates cannot support the level of traffic. To address this, you can implement a caching strategy with Amazon ElastiCache using a Redis cluster. This approach uses a cache-aside pattern for offloading traffic to the external service.

Typically, it can be challenging to evolve code to implement this change without the separation of concerns in the code base. However, in this example, there is an adapter that interacts with the external service. Therefore, you can change the implementation to add the cache-aside pattern and maintain the same API contract with the rest of the application:

const getCurrencies = async (currencies) => {
    try{        
// Check the exchange rates are available in the Redis cluster
        let res = await asyncClient.get("CURRENCIES");
        if(res){
// If present, return the value retrieved from Redis
            return JSON.parse(res);
        }
// Otherwise, fetch the data from the external service
        const getCurr = await axios.get(`http://api.mycurrency.io?symbols=${currencies.toString()}`)
// Store the new values in the Redis cluster with an expired time of 20 seconds
        await asyncClient.set("CURRENCIES", JSON.stringify(getCurr.data), "ex", 20);
// Return the data to the port
        return getCurr.data
    } 
}

This is a low-effort change only affecting the adapter. The domain logic and port interacting with the adapter are untouched and maintain the same API contract. The encapsulation provided by this architecture helps to evolve the code base. It also preserves many of the tests in place, considering only an adapter is modified.

Moving domain logic from a container to a Lambda function

In this example, the team working on this workload originally wrap all the functionality inside a container using AWS Fargate with Amazon ECS. In this case, the developers define a route for the GET method for retrieving the stock value:

// This web application uses the Fastify framework 
  fastify.get('/stock/:StockID', async (request, reply) => {
    try{
        const stockID = request.params.StockID;
        const response = await getStocksRequest(stockID);
        return response
    } 
})

In this case, the route’s entry point is exactly the same for the Lambda function. The team does not need to change anything else in the code base, thanks to the characteristics provided by the hexagonal architecture.

This pattern can help you more easily refactor code from containers or virtual machines to multiple Lambda functions. It introduces a level of code portability that can be more challenging with other solutions.

Benefits and drawbacks

As with any pattern, there are benefits and drawbacks to using hexagonal architecture.

The main benefits are:

  • The domain logic is agnostic and independent from the outside world.
  • The separation of concerns increases code testability.
  • It may help reduce technical debt in workloads.

The drawbacks are:

  • The pattern requires an upfront investment of time.
  • The domain logic implementation is not opinionated.

Whether you should use this architecture for developing Lambda functions depends upon the needs of your application. With an evolving workload, the extra implementation effort may be worthwhile.

The pattern can help improve code testability because of the encapsulation and separation of concerns provided. This approach can also be used with compute solutions other than Lambda, which may be useful in code migration projects.

Conclusion

This post shows how you can evolve a workload using hexagonal architecture. It explains how to add new functionality, change underlying infrastructure, or port the code base between different compute solutions. The main characteristics enabling this are loose coupling and strong encapsulation.

To learn more about hexagonal architecture and similar patterns, read:

For more serverless learning resources, visit Serverless Land.

Automate Amazon ES synonym file updates

Post Syndicated from Ashwini Rudra original https://aws.amazon.com/blogs/big-data/automate-amazon-es-synonym-file-updates/

Search engines provide the means to retrieve relevant content from a collection of content. However, this can be challenging if certain exact words aren’t entered. You need to find the right item from a catalog of products, or the correct provider from a list of service providers, for example. The most common method of specifying your query is through a text box. If you enter the wrong terms, you won’t match the right items, and won’t get the best results.

Synonyms enable better search results by matching words that all match to a single indexable term. In Amazon Elasticsearch Service (Amazon ES), you can provide synonyms for keywords that your application’s users may look for. For example, your website may provide medical practitioner searches, and your users may search for “child’s doctor” instead of “pediatrician.” Mapping the two words together enables either search term to match documents that contain the term “pediatrician.” You can achieve similar search results by using synonym files. Amazon ES custom packages allow you to upload synonym files that define the synonyms in your catalog. One best practice is to manage the synonyms in Amazon Relational Database Service (Amazon RDS). You then need to deploy the synonyms to your Amazon ES domain. You can do this with AWS Lambda and Amazon Simple Storage Service (Amazon S3).

In this post, we discuss an approach using Amazon Aurora and Lambda functions to automate updating synonym files for improved search results.

Overview of solution

Amazon ES is a fully managed service that makes it easy to deploy, secure, and run Elasticsearch cost-effectively and at scale. You can build, monitor, and troubleshoot your applications using the tools you love, at the scale you need. The service supports open-source Elasticsearch API operations, managed Kibana, integration with Logstash, and many AWS services with built-in alerting and SQL querying.

The following diagram shows the solution architecture. One Lambda function pushes files to Amazon S3, and another function distributes the updates to Amazon ES.

Walkthrough overview

For search engineers, the synonym file’s content is usually stored within a database or in a data lake. You may have data in tabular format in Amazon RDS (in this case, we use Amazon Aurora MySQL). When updates to the synonym data table occur, the change triggers a Lambda function that pushes data to Amazon S3. The S3 event triggers a second function, which pushes the synonym file from Amazon S3 to Amazon ES. This architecture automates the entire synonym file update process.

To achieve this architecture, we complete the following high-level steps:

  1. Create a stored procedure to trigger the Lambda function.
  2. Write a Lambda function to verify data changes and push them to Amazon S3.
  3. Write a Lambda function to update the synonym file in Amazon ES.
  4. Test the data flow.

We discuss each step in detail in the next sections.

Prerequisites

Make sure you complete the following prerequisites:

  1. Configure an Amazon ES domain. We use a domain running Elasticsearch version 7.9 for this architecture.
  2. Set up an Aurora MySQL database. For more information, see Configuring your Amazon Aurora DB cluster.

Create a stored procedure to trigger a Lambda function

You can invoke a Lambda function from an Aurora MySQL database cluster using a native function or a stored procedure.

The following script creates an example synonym data table:

CREATE TABLE SynonymsTable (
SynID int NOT NULL AUTO_INCREMENT,
Base_Term varchar(255),
Synonym_1 varchar(255),
Synonym_2 varchar(255),
PRIMARY KEY (SynID)
)

You can now populate the table with sample data. To generate sample data in your table, run the following script:

INSERT INTO SynonymsTable(Base_Term, Synonym_1, Synonym_2)
VALUES ( 'danish', 'croissant', 'pastry')

Create a Lambda function

You can use two different methods to send data from Aurora to Amazon S3: a Lambda function or SELECT INTO OUTFILE S3.

To demonstrate the ease of setting up integration between multiple AWS services, we use a Lambda function that is called every time a change occurs that must be tracked in the database table. This function passes the data to Amazon S3. First create an S3 bucket where you store the synonym file using the Lambda function.

When you create your function, make sure you give the right permissions using an AWS Identity and Access Management (IAM) role for the S3 bucket. These permissions are for the Lambda execution role and S3 bucket where you store the synonyms.txt file. By default, Lambda creates an execution role with minimal permissions when you create a function on the Lambda console. The following is the Python code to create the synonyms.txt file in S3:

import boto3
import json
import botocore
from botocore.exceptions import ClientError

s3_resource = boto3.resource('s3')

filename = 'synonyms.txt'
BucketName = '<<provide your bucket name>>
local_file = '/tmp/test.txt'

def lambda_handler(event, context):
    S3_data = (("%s,%s,%s \n") %(event['Base_Term'], event['Synonym_1'], event['Synonym_2']))
    # open  a file and append new line
    try:
        obj=s3_resource.Bucket(BucketName).download_file(local_file,filename)
    except ClientError as e:
        if e.response['Error']['Code'] == "404":
            # create a new file if file does not exits 
            s3_resource.meta.client.put_object(Body=S3_data, Bucket= BucketName,Key=filename)
        else:
            # append file
            raise
    with open('/tmp/test.txt', 'a') as fd:
        fd.write(S3_data)
        
    s3_resource.meta.client.upload_file('/tmp/test.txt', BucketName, filename)

Note the Amazon Resource Name (ARN) of this Lambda function to use in a later step.

Give Aurora permissions to invoke a Lambda function

To give Aurora permissions to invoke your function, you must attach an IAM role with the appropriate permissions to the cluster. For more information, see Invoking a Lambda function from an Amazon Aurora DB cluster.

When you’re finished, the Aurora database has access to invoke a Lambda function.

Create a stored procedure and a trigger in Aurora

To create a new stored procedure, return to MySQL Workbench. Change the ARN in the following code to your Lambda function’s ARN before running the procedure:

DROP PROCEDURE IF EXISTS Syn_TO_S3;
DELIMITER ;;
CREATE PROCEDURE Syn_TO_S3 (IN SysID INT,IN Base_Term varchar(255),IN Synonym_1 varchar(255),IN Synonym_2 varchar(255)) LANGUAGE SQL
BEGIN
   CALL mysql.lambda_async('<<Lambda-Funtion-ARN>>,
    CONCAT('{ "SysID ": "', SysID,
    '", "Base_Term" : "', Base_Term,
    '", "Synonym_1" : "', Synonym_1,
    '", "Synonym_2" : "', Synonym_2,'"}')
    );
END
;;
DELIMITER

When this stored procedure is called, it invokes the Lambda function you created.

Create a trigger TR_SynonymTable_CDC on the table SynonymTable. When a new record is inserted, this trigger calls the Syn_TO_S3 stored procedure. See the following code:

DROP TRIGGER IF EXISTS TR_Synonym_CDC;
 
DELIMITER ;;
CREATE TRIGGER TR_Synonym_CDC
  AFTER INSERT ON SynonymsTable
  FOR EACH ROW
BEGIN
  SELECT  NEW.SynID, NEW.Base_Term, New.Synonym_1, New.Synonym_2 
  INTO @SynID, @Base_Term, @Synonym_1, @Synonym_2;
  CALL  Syn_TO_S3(@SynID, @Base_Term, @Synonym_1, @Synonym_2);
END
;;
DELIMITER ;

If a new row is inserted in SynonymsTable, the Lambda function that is mentioned in the stored procedure is invoked.

Verify that data is being sent from the function to Amazon S3 successfully. You may have to insert a few records, depending on the size of your data, before new records appear in Amazon S3.

Update synonyms in Amazon ES when a new synonym file becomes available

Amazon ES lets you upload custom dictionary files (for example, stopwords and synonyms) for use with your cluster. The generic term for these types of files is packages. Before you can associate a package with your domain, you must upload it to an S3 bucket. For instructions on uploading a synonym file for the first time and associating it to an Amazon ES domain, see Uploading packages to Amazon S3 and Importing and Associating packages.

To update the synonyms (package) when a new version of the synonym file becomes available, we complete the following steps:

  1. Create a Lambda function to update the existing package.
  2. Set up an S3 event notification to trigger the function.

Create a Lambda function to update the existing package

We use a Python-based Lambda function that uses the Boto3 AWS SDK for updating the Elasticsearch package. For more information about how to create a Python-based Lambda function, see Building Lambda functions with Python. You need the following information before we start coding for the function:

  • The S3 bucket ARN where the new synonym file is written
  • The Amazon ES domain name (available on the Amazon ES console)

  • The package ID of the Elasticsearch package we’re updating (available on the Amazon ES console)

You can use the following code for the Lambda function:

import logging
import boto3
import os

# Elasticsearch client
client = boto3.client('es')
# set up logging
logger = logging.getLogger('boto3')
logger.setLevel(logging.INFO)
# fetch from Environment Variable
package_id = os.environ['PACKAGE_ID']
es_domain_nm = os.environ['ES_DOMAIN_NAME']

def lambda_handler(event, context):
    s3_bucket = event["Records"][0]["s3"]["bucket"]["name"]
    s3_key = event["Records"][0]["s3"]["object"]["key"]
    logger.info("bucket: {}, key: {}".format(s3_bucket, s3_key))
    # update package with the new Synonym file.
    up_response = client.update_package(
        PackageID=package_id,
        PackageSource={
            'S3BucketName': s3_bucket,
            'S3Key': s3_key
        },
        CommitMessage='New Version: ' + s3_key
    )
    logger.info('Response from Update_Package: {}'.format(up_response))
    # check if the package update is completed
    finished = False
    while finished == False:
        # describe the package by ID
        desc_response = client.describe_packages(
            Filters=[{
                    'Name': 'PackageID',
                    'Value': [package_id]
                }],
            MaxResults=1
        )
        status = desc_response['PackageDetailsList'][0]['PackageStatus']
        logger.info('Package Status: {}'.format(status))
        # check if the Package status is back to available or not.
        if status == 'AVAILABLE':
            finished = True
            logger.info('Package status is now Available. Exiting loop.')
        else:
            finished = False
    logger.info('Package: {} update is now Complete. Proceed to Associating to ES Domain'.format(package_id))
    # once the package update is completed, re-associate with the ES domain
    # so that the new version is applied to the nodes.
    ap_response = client.associate_package(
        PackageID=package_id,
        DomainName=es_domain_nm
    )
    logger.info('Response from Associate_Package: {}'.format(ap_response))
    return {
        'statusCode': 200,
        'body': 'Custom Package Updated.'
    }

The preceding code requires environment variables to be set to the appropriate values and the IAM execution role assigned to the Lambda function.

Set up an S3 event notification to trigger the Lambda function

Now we set up event notification (all object create events) for the S3 bucket in which the updated synonym file is uploaded. For more information about how to set up S3 event notifications with Lambda, see Using AWS Lambda with Amazon S3.

Test the solution

To test our solution, let’s consider an Elasticsearch index (es-blog-index-01) that consists of the following documents:

  • tennis shoe
  • hightop
  • croissant
  • ice cream

A synonym file is already associated with the Amazon ES domain via Amazon ES custom packages and the index (es-blog-index-01) has the synonym file in the settings (analyzer, filter, mappings). For more information about how to associate a file to an Amazon ES domain and use it with the index settings, see Importing and associating packages and Using custom packages with Elasticsearch. The synonym file contains the following data:

danish, croissant, pastry

Test 1: Search with a word present in the synonym file

For our first search, we use a word that is present in the synonym file. The following screenshot shows that searching for “danish” brings up the document croissant based on a synonym match.

Test 2: Search with a synonym not present in the synonym file

Next, we search using a synonym that’s not in the synonym file. In the following screenshot, our search for “gelato” yields no result. The word “gelato” doesn’t match with the document ice cream because no synonym mapping is present for it.

In the next test, we add synonyms for “ice cream” and perform the search again.

Test 3: Add synonyms for “ice cream” and redo the search

To add the synonyms, let’s insert a new record into our database. We can use the following SQL statement:

INSERT INTO SynonymsTable(Base_Term, Synonym_1, Synonym_2)
VALUES ('frozen custard', 'gelato', 'ice cream')

When we search with the word “gelato” again, we get the ice cream document.

This confirms that the synonym addition is applied to the Amazon ES index.

Clean up resources

To avoid ongoing charges to your AWS account, remove the resources you created:

  1. Delete the Amazon ES domain.
  2. Delete the RDS DB instance.
  3. Delete the S3 bucket.
  4. Delete the Lambda functions.

Conclusion

In this post, we implemented a solution using Aurora, Lambda, Amazon S3, and Amazon ES that enables you to update synonyms automatically in Amazon ES. This provides central management for synonyms and ensures your users can obtain accurate search results when synonyms are changed in your source database.


About the Authors

Ashwini Rudra is a Solutions Architect at AWS. He has more than 10 years of experience architecting Windows workloads in on-premises and cloud environments. He is also an AI/ML enthusiast. He helps AWS customers, namely major sports leagues, define their cloud-first digital innovation strategy.


Arnab Ghosh is a Solutions Architect for AWS in North America helping enterprise customers build resilient and cost-efficient architectures. He has over 13 years of experience in architecting, designing, and developing enterprise applications solving complex business problems.


Jennifer Ng is an AWS Solutions Architect working with enterprise customers to understand their business requirements and provide solutions that align with their objectives. Her background is in enterprise architecture and web infrastructure, where she has held various implementation and architect roles in the financial services industry.

Translating content dynamically by using Amazon S3 Object Lambda

Post Syndicated from James Beswick original https://aws.amazon.com/blogs/compute/translating-content-dynamically-by-using-amazon-s3-object-lambda/

This post is written by Sandeep Mohanty, Senior Solutions Architect.

The recent launch of Amazon S3 Object Lambda creates many possibilities to transform data in S3 buckets dynamically. S3 Object Lambda can be used with other AWS serverless services to transform content stored in S3 in many creative ways. One example is using S3 Object Lambda with Amazon Translate to translate and serve content from S3 buckets on demand.

Amazon Translate is a serverless machine translation service that delivers fast and customizable language translation. With Amazon Translate, you can localize content such as websites and applications to serve a diverse set of users.

Using S3 Object Lambda with Amazon Translate, you do not need to translate content in advance for all possible permutations of source to target languages. Instead, you can transform content in near-real time using a data driven model. This can serve multiple language-specific applications simultaneously.

S3 Object Lambda enables you to process and transform data using Lambda functions as objects are being retrieved from S3 by a client application. S3 GET object requests invoke the Lambda function and you can customize it to transform the content to meet specific requirements.

For example, if you run a website or mobile application with global visitors, you must provide translations in multiple languages. Artifacts such as forms, disclaimers, or product descriptions can be translated to serve a diverse global audience using this approach.

Solution architecture

This is the high-level architecture diagram for the example application that translates dynamic content on demand:

Solution architecture

In this example, you create an S3 Object Lambda that intercepts S3 GET requests for an object. It then translates the file to a target language, passed as an argument appended to the S3 object key. At a high level, the steps can be summarized as follows:

  1. Create a Lambda function to translate data from a source language to a target language using Amazon Translate.
  2. Create an S3 Object Lambda Access Point from the S3 console.
  3. Select the Lambda function created in step 1.
  4. Provide a supporting S3 Access Point to give S3 Object Lambda access to the original object.
  5. Retrieve a file from S3 by invoking the S3 GetObject API, and pass the Object Lambda Access Point ARN as the bucket name instead of the actual S3 bucket name.

Creating the Lambda function

In the first step, you create the Lambda function, DynamicFileTranslation. This Lambda function is invoked by an S3 GET Object API call and it translates the requested object. The target language is passed as an argument appended to the S3 object key, corresponding to the object being retrieved.

For example, for the object key passed in the S3 GetObject API call is customized to look something like “ContactUs/contact-us.txt#fr”, the characters after the pound sign represent the code for the target language. In this case, ‘fr’ is French. The full list of supported languages and language codes can be found here.

This Lambda function dynamically translates the content of an object in S3 to a target language:

import json
import boto3
from urllib.parse import urlparse, unquote
from pathlib import Path
def lambda_handler(event, context):
    print(event)

   # Extract the outputRoute and outputToken from the object context
    object_context = event["getObjectContext"]
    request_route = object_context["outputRoute"]
    request_token = object_context["outputToken"]

   # Extract the user requested URL and the supporting access point arn
    user_request_url = event["userRequest"]["url"]
    supporting_access_point_arn = event["configuration"]["supportingAccessPointArn"]

    print("USER REQUEST URL: ", user_request_url)
   
   # The S3 object key is after the Host name in the user request URL.
   # The user request URL looks something like this, 
   # https://<User Request Host>/ContactUs/contact-us.txt#fr.
   # The target language code in the S3 GET request is after the "#"
    
    user_request_url = unquote(user_request_url)
    result = user_request_url.split("#")
    user_request_url = result[0]
    targetLang = result[1]
    
   # Extract the S3 Object Key from the user requested URL
    s3Key = str(Path(urlparse(user_request_url).path).relative_to('/'))
       
   # Get the original object from S3
    s3 = boto3.resource('s3')
    
   # To get the original object from S3,use the supporting_access_point_arn 
    s3Obj = s3.Object(supporting_access_point_arn, s3Key).get()
    srcText = s3Obj['Body'].read()
    srcText = srcText.decode('utf-8')

   # Translate original text
    translateClient = boto3.client('translate')
    response = translateClient.translate_text(
                                                Text = srcText,
                                                SourceLanguageCode='en',
                                                TargetLanguageCode=targetLang)
    
  # Write object back to S3 Object Lambda
    s3client = boto3.client('s3')
    s3client.write_get_object_response(
                                        Body=response['TranslatedText'],
                                        RequestRoute=request_route,
                                        RequestToken=request_token )
    
    return { 'statusCode': 200 }

The code in the Lambda function:

  • Extracts the outputRoute and outputToken from the object context. This defines where the WriteGetObjectResponse request is delivered.
  • Extracts the user-requested url from the event object.
  • Parses the S3 object key and the target language that is appended to the S3 object key.
  • Calls S3 GetObject to fetch the raw text of the source object.
  • Invokes Amazon Translate with the raw text extracted.
  • Puts the translated output back to S3 using the WriteGetObjectResponse API.

Configuring the Lambda IAM role

The Lambda function needs permissions to call back to the S3 Object Lambda access point with the WriteGetObjectResponse. It also needs permissions to call S3 GetObject and Amazon Translate. Add the following permissions to the Lambda execution role:

{
    "Version": "2012-10-17",
    "Statement": [
        {
            "Sid": "S3ObjectLambdaAccess",
            "Effect": "Allow",
            "Action": [
                "s3:GetObject",
                "s3-object-lambda:WriteGetObjectResponse"
            ],
            "Resource": [
                "<arn of your S3 access point/*>”,
                "<arn of your Object Lambda accesspoint>"
            ]
        },
        {
            "Sid": "AmazonTranslateAccess",
            "Effect": "Allow",
            "Action": "translate:TranslateText",
            "Resource": "*"
        }
    ]
}

Deploying the Lambda using an AWS SAM template

Alternatively, deploy the Lambda function with the IAM role by using an AWS SAM template. The code for the Lambda function and the AWS SAM template is available for download from GitHub.

Creating the S3 Access Point

  1. Navigate to the S3 console and create a bucket with a unique name.
  2. In the S3 console, select “Access Points” and choose “Create access point”. Enter a name for the access point.
  3. For Bucket name, enter the S3 bucket name you entered in step 1.Create access point

This access point is the supporting access point for the Object Lambda Access Point you create in the next step. Keep all other settings on this page as default.

After creating the S3 access point, create the S3 Object Lambda Access Point using the supporting Access Point. The Lambda function you created earlier uses the supporting Access Point to download the original untransformed objects from S3.

Create Object Lambda Access Point

In the S3 console, go to the Object Lambda Access Point configuration and create an Object Lambda Access Point. Enter a name.

Create Object Lambda Access Point

For the Lambda function configurations, associate this with the Lambda function created earlier. Select the latest version of the Lambda function and keep all other settings as default.

Select Lambda function

To understand how to use the other settings of the S3 Object Lambda configuration, refer to the product documentation.

Testing dynamic content translation

In this section, you create a Python script and invoke the S3 GetObject API twice. First, against the S3 bucket and then against the Object Lambda Access Point. You can then compare the output to see how content is transformed using Object Lambda:

  1. Upload a text file to the S3 bucket using the Object Lambda Access Point you configured. For example, upload a sample “Contact Us” file in English to S3.
  2. To use the object Lambda Access Point, locate its ARN from the Properties tab of the Object Lambda Access Point.Object Lambda Access Point
  3. Create a local file called s3ol_client.py that contains the following Python script:
    import json
    import boto3
    import sys, getopt
      
    def main(argv):
    	
      try:	
        targetLang = sys.argv[1]
        print("TargetLang = ", targetLang)
        
        s3 = boto3.client('s3')
        s3Bucket = "my-s3ol-bucket"
        s3Key = "ContactUs/contact-us.txt"
    
        # Call get_object using the S3 bucket name
        response = s3.get_object(Bucket=s3Bucket,Key=s3Key)
        print("Original Content......\n")
        print(response['Body'].read().decode('utf-8'))
    
        print("\n")
    
        # Call get_object using the S3 Object Lambda access point ARN
        s3Bucket = "arn:aws:s3-object-lambda:us-west-2:123456789012:accesspoint/my-s3ol-access-point"
        s3Key = "ContactUs/contact-us.txt#" + targetLang
        response = s3.get_object(Bucket=s3Bucket,Key=s3Key)
        print("Transformed Content......\n")
        print(response['Body'].read().decode('utf-8'))
    
        return {'Success':200}             
      except:
        print("\n\nUsage: s3ol_client.py <Target Language Code>")
    
    #********** Program Entry Point ***********
    if __name__ == '__main__':
        main(sys.argv[1: ])
    
  4. Run the client program from the command line, passing the target language code as an argument. The full list of supported languages and codes in Amazon Translate can be found here.python s3ol_client.py "fr"

The output looks like this:

Example output

The first output is the original content that was retrieved when calling GetObject with the S3 bucket name. The second output is the transformed content when calling GetObject against the Object Lambda access point. The content is transformed by the Lambda function as it is being retrieved, and translated to French in near-real time.

Conclusion

This blog post shows how you can use S3 Object Lambda with Amazon Translate to simplify dynamic content translation by using a data driven approach. With user-provided data as arguments, you can dynamically transform content in S3 and generate a new object.

It is not necessary to create a copy of this new object in S3 before returning it to the client. We also saw that it is not necessary for the object with the same name to exist in the S3 bucket when using S3 Object Lambda. This pattern can be used to address several real world use cases that can benefit from the ability to transform and generate S3 objects on the fly.

For more serverless learning resources, visit Serverless Land.

Building well-architected serverless applications: Implementing application workload security – part 1

Post Syndicated from Julian Wood original https://aws.amazon.com/blogs/compute/building-well-architected-serverless-applications-implementing-application-workload-security-part-1/

This series of blog posts uses the AWS Well-Architected Tool with the Serverless Lens to help customers build and operate applications using best practices. In each post, I address the serverless-specific questions identified by the Serverless Lens along with the recommended best practices. See the introduction post for a table of contents and explanation of the example application.

Security question SEC3: How do you implement application security in your workload?

Review and automate security practices at the application code level, and enforce security code review as part of development workflow. By implementing security at the application code level, you can protect against emerging security threats and reduce the attack surface from malicious code, including third-party dependencies.

Required practice: Review security awareness documents frequently

Stay up to date with both AWS and industry security best practices to understand and evolve protection of your workloads. Having a clear understanding of common threats helps you to mitigate them when developing your workloads.

The AWS Security Blog provides security-specific AWS content. The Open Web Application Security Project (OWASP) Top 10 is a guide for security practitioners to understand the most common application attacks and risks. The OWASP Top 10 Serverless Interpretation provides information specific to serverless applications.

Review and subscribe to vulnerability and security bulletins

Regularly review news feeds from multiple sources that are relevant to the technologies used in your workload. Subscribe to notification services to be informed of critical threats in near-real time.

The Common Vulnerabilities and Exposures (CVE) program identifies, defines, and catalogs publicly disclosed cybersecurity vulnerabilities. You can search the CVE list directly, for example “Python”.

CVE Python search

CVE Python search

The US National Vulnerability Database (NVD) allows you to search by vulnerability type, severity, and impact. You can also perform advanced searching by vendor name, product name, and version numbers. GitHub also integrates with CVE, which allows for advanced searching within the CVEproject/cvelist repository.

AWS Security Bulletins are a notification system for security and privacy events related to AWS services. Subscribe to the security bulletin RSS feed to keep up to date with AWS security announcements.

The US Cybersecurity and Infrastructure Security Agency (CISA) provides alerts about current security issues, vulnerabilities, and exploits. You can receive email alerts or subscribe to the RSS feed.

AWS Partner Network (APN) member Palo Alto Networks provides the “Serverless architectures Security Top 10” list. This is a security awareness and education guide to use while designing, developing, and testing serverless applications to help minimize security risks.

Good practice: Automatically review a workload’s code dependencies/libraries

Regularly reviewing application and code dependencies is a good industry security practice. This helps detect and prevent non-certified application code, and ensure that third-party application dependencies operate as intended.

Implement security mechanisms to verify application code and dependencies before using them

Combine automated and manual security code reviews to examine application code and its dependencies to ensure they operate as intended. Automated tools can help identify overly complex application code, and common security vulnerability exposures that are already cataloged.

Manual security code reviews, in addition to automated tools, help ensure that application code works as intended. Manual reviews can include business contextual information and integrations that automated tools may not capture.

Before adding any code dependencies to your workload, take time to review and certify each dependency to ensure that you are adding secure code. Use third-party services to review your code dependencies on every commit automatically.

OWASP has a code review guide and dependency check tool that attempt to detect publicly disclosed vulnerabilities within a project’s dependencies. The tool has a command line interface, a Maven plugin, an Ant task, and a Jenkins plugin.

GitHub has a number of security features for hosted repositories to inspect and manage code dependencies.

The dependency graph allows you to explore the packages that your repository depends on. Dependabot alerts show information about dependencies that are known to contain security vulnerabilities. You can choose whether to have pull requests generated automatically to update these dependencies. Code scanning alerts automatically scan code files to detect security vulnerabilities and coding errors.

You can enable these features by navigating to the Settings tab, and selecting Security & analysis.

GitHub configure security and analysis features

GitHub configure security and analysis features

Once Dependabot analyzes the repository, you can view the dependencies graph from the Insights tab. In the serverless airline example used in this series, you can view the Loyalty service package.json dependencies.

Serverless airline loyalty dependencies

Serverless airline loyalty dependencies

Dependabot alerts for security vulnerabilities are visible in the Security tab. You can review alerts and see information about how to resolve them.

Dependabot alert

Dependabot alert

Once Dependabot alerts are enabled for a repository, you can also view the alerts when pushing code to the repository from the terminal.

Dependabot terminal alert

Dependabot terminal alert

If you enable security updates, Dependabot can automatically create pull requests to update dependencies.

Dependabot pull requests

Dependabot pull requests

AWS Partner Network (APN) member Snyk has an integration with AWS Lambda to manage the security of your function code. Snyk determines what code and dependencies are currently deployed for Node.js, Ruby, and Java projects. It tests dependencies against their vulnerability database.

If you build your functions using container images, you can use Amazon Elastic Container Registry’s (ECR) image scanning feature. You can manually scan your images, or scan them on each push to your repository.

Elastic Container Registry image scanning example results

Elastic Container Registry image scanning example results

Best practice: Validate inbound events

Sanitize inbound events and validate them against a predefined schema. This helps prevent errors and increases your workload’s security posture by catching malformed events or events intentionally crafted to be malicious. The OWASP Input validation cheat sheet includes guidance for providing input validation security functionality in your applications.

Validate incoming HTTP requests against a schema

Implicitly trusting data from clients could lead to malformed data being processed. Use data type validators or web application frameworks to ensure data correctness. These should include regular expressions, value range, data structure, and data normalization.

You can configure Amazon API Gateway to perform basic validation of an API request before proceeding with the integration request to add another layer of security. This ensures that the HTTP request matches the desired format. Any HTTP request that does not pass validation is rejected, returning a 400 error response to the caller.

The Serverless Security Workshop has a module on API Gateway input validation based on the fictional Wild Rydes unicorn raid hailing service. The example shows a REST API endpoint where partner companies of Wild Rydes can submit unicorn customizations, such as branded capes, to advertise their company. The API endpoint should ensure that the request body follows specific patterns. These include checking the ImageURL is a valid URL, and the ID for Cape is a numeric value.

In API Gateway, a model defines the data structure of a payload, using the JSON schema draft 4. The model ensures that you receive the parameters in the format you expect. You can check them against regular expressions. The CustomizationPost model specifies that the ImageURL and Cape schemas should contain the following valid patterns:

    "imageUrl": {
      "type": "string",
      "title": "The Imageurl Schema",
      "pattern": "^https?:\/\/[-a-zA-Z0-9@:%_+.~#?&//=]+$"
    },
    "sock": {
      "type": "string",
      "title": " The Cape Schema ",
      "pattern": "^[0-9]*$"
    },
    …

The model is applied to the /customizations/post method as part of the Method Request. The Request Validator is set to Validate body and the CustomizationPost model is set for the Request Body.

API Gateway request validator

API Gateway request validator

When testing the POST /customizations API with valid parameters using the following input:

{  
   "name":"Cherry-themed unicorn",
   "imageUrl":"https://en.wikipedia.org/wiki/Cherry#/media/File:Cherry_Stella444.jpg",
   "sock": "1",
   "horn": "2",
   "glasses": "3",
   "cape": "4"
}

The result is a valid response:

{"customUnicornId":<the-id-of-the-customization>}

Testing validation to the POST /customizations API using invalid parameters shows the input validation process.

The ImageUrl is not a valid URL:

 {  
    "name":"Cherry-themed unicorn",
    "imageUrl":"htt://en.wikipedia.org/wiki/Cherry#/media/File:Cherry_Stella444.jpg",
    "sock": "1" ,
    "horn": "2" ,
    "glasses": "3",
    "cape": "4"
 }

The Cape parameter is not a number, which shows a SQL injection attempt.

 {  
    "name":"Orange-themed unicorn",
    "imageUrl":"https://en.wikipedia.org/wiki/Orange_(fruit)#/media/File:Orange-Whole-%26-Split.jpg",
    "sock": "1",
    "horn": "2",
    "glasses": "3",
    "cape":"2); INSERT INTO Cape (NAME,PRICE) VALUES ('Bad color', 10000.00"
 }

These return a 400 Bad Request response from API Gateway before invoking the Lambda function:

{"message": "Invalid request body"}

To gain further protection, consider adding an AWS Web Application Firewall (AWS WAF) access control list to your API endpoint. The workshop includes an AWS WAF module to explore three AWS WAF rules:

  • Restrict the maximum size of request body
  • SQL injection condition as part of the request URI
  • Rate-based rule to prevent an overwhelming number of requests
AWS WAF ACL

AWS WAF ACL

AWS WAF also includes support for custom responses and request header insertion to improve the user experience and security posture of your applications.

For more API Gateway security information, see the security overview whitepaper.

Also add further input validation logic to your Lambda function code itself. For examples, see “Input Validation for Serverless”.

Conclusion

Implementing application security in your workload involves reviewing and automating security practices at the application code level. By implementing code security, you can protect against emerging security threats. You can improve the security posture by checking for malicious code, including third-party dependencies.

In this post, I cover reviewing security awareness documentation such as the CVE database. I show how to use GitHub security features to inspect and manage code dependencies. I then show how to validate inbound events using API Gateway request validation.

This well-architected question will be continued where I look at securely storing, auditing, and rotating secrets that are used in your application code.

For more serverless learning resources, visit Serverless Land.

Vertical Integration Strategy Powered by Amazon EventBridge

Post Syndicated from Tiago Oliveira original https://aws.amazon.com/blogs/architecture/vertical-integration-strategy-powered-by-amazon-eventbridge/

Over the past few years, midsize and large enterprises have adopted vertical integration as part of their strategy to optimize operations and profitability. Vertical integration consists of separating different stages of the production line from other related departments, such as marketing and logistics. Enterprises implement such strategy to gain full control of their value chain: from the raw material production to the assembly lines and end consumer.

To achieve operational efficiency, enterprises must keep a level of independence between departments. However, this can lead to unstandardized operations and communication issues. Moreover, with this kind of autonomy for independent and dynamic verticals, the enterprise may lose some measure of visibility and control. As a result, it becomes challenging to generate a basic report from multiple departments. This blog post provides a high-level solution to integrate your different business verticals, using an event-driven architecture on top of Amazon EventBridge.

Event-driven architecture

Event-driven architecture is an architectural pattern to model communication between services while decoupling applications from each other. Applications scale and fail independently, and a central event bus facilitates the communication between the services in the enterprise. Instead of a particular application sending a request directly to another, it produces an event. The central event router captures it and forwards the message to the proper destinations.

For instance, when a customer places a new order on the retail website, the application sends the event to the event bus. Following, the event bus sends the message to the ERP system and the fulfillment center for dispatch. In this scenario, we call the application sending the event, an event publisher, and the applications receiving the event, event consumers.

Because all messages are going through the central event bus, there is clear independence between the applications within the enterprise. Here are some benefits:

  • Application independence occurs even if they belong to the same business workflow
  • You can plug in more event consumers to receive the same event type
  • You can add a data lake to receive all new order events from the retail website
  • You can receive all the events from the payment system and the customer relations department

This ensures you can integrate independent departments, increase overall visibility, and make sense of specific processes happening in the organization using the right tools.

Implementing event-driven architecture with Amazon EventBridge

Each vertical organically generates lifecycle events. Enterprises can use the event-driven architecture paradigm to make the information flow between the departments by asynchronously exchanging events through the event bus. This way, each department can react to events generated by other departments and initiate processes or actions depending on its business needs.

Such an approach creates a dynamic and flexible choreography between the different participants, which is unique to the enterprise. Such choreography can be followed and monitored using analytics and fine-grained event data collected on the data lake. Read Using AWS X-Ray tracing with Amazon EventBridge to learn how to debug and analyze this kind of distributed application.

Figure 1. Architecture diagram depicting enterprise vertical integration with Amazon EventBridge

Figure 1. Architecture diagram depicting enterprise vertical integration with Amazon EventBridge

In Figure 1, Amazon EventBridge works as the central event bus, the core component of this event-driven architecture. Through Amazon EventBridge, each event publisher sends or receives lifecycle events to and from all the other participants. Amazon EventBridge has an advanced routing mechanism using the concept of rules. Each rule defines up to five targets for the event arriving on the bus. Events are selected based on the event pattern. You can set up routing rules to determine where to send your data to build application architectures. These will react in real time to your data sources, with event publisher and consumer decoupled.

In addition to initiating the heavy routing and distribution of events, Amazon EventBridge can also give real-time insights into how the business runs. Using metrics automatically sent to Amazon CloudWatch, it is possible to see which kinds of events are arriving, and at which rate. You can also see how those events are distributed across the registered targets, and any failures that occur during this distribution. Every event can also be archived using the Amazon EventBridge events archiving feature.

Amazon Simple Storage Service (S3) is the backend storage, or data lake, for all the events that have ever transited via the event bus. With Amazon S3, customers have a cost-efficient storage service at any scale, with 11 9’s of durability. To help customers manage and secure their data, S3 provides features such as Amazon S3 Lifecycle to optimize costs. S3 Object Lock allows the write-once-read-many (WORM) model. You can expand this data and transform it into information using S3. Using services like Amazon AthenaAmazon Redshift, and Amazon EMR, those events can be transformed, correlated, and aggregated to generate insights on the business. The Amazon S3 data lake can also be the input to a data warehouse, machine learning models, and real-time analytics. Learn more about how to use Amazon S3 as the data lake storage.

A critical feature of this solution is the initiation of complex queries on top of the data lake. Amazon API Gateway provides one single flexible and elastic API entry point to retrieve data from the data lake. It also can publish events directly to the event bus. For complex queries, Amazon API Gateway can be integrated with an AWS Lambda. It will coordinate the execution of standard SQL queries using Amazon Athena as the query engine. You can read about a fully functional example of such an API called athena-express.

After collecting data from multiple departments, third-party entities, and shop floors, you can use the data to derive business value using cross-organization dashboards. In this way, you can increase visibility over the different entities and make sense of the data from the distributed systems. Even though this design allows you to use your favorite BI tool, we are using Amazon QuickSight for this solution. For example, with QuickSight, you can author your interactive dashboards, which include machine learning-powered insights. Those dashboards can then connect the marketing campaigns data with the sales data. You can measure how effective those campaigns were and forecast the demand on the production lines.

Conclusion

In this blog post, we showed you how to use Amazon EventBridge as an event bus to allow event-driven architectures. This architecture pattern streamlines the adoption of vertical integration. Enterprises can decouple IT systems from each other while retaining visibility into the data they generate. Integrating those systems can happen asynchronously using a choreography approach instead of having an orchestrator as a central component. There are technical challenges to implement this kind of solution, such as maintaining consistency in distributed applications and transactions spanning multiple microservices. Refer to the saga pattern for microservices-based architecture, and how to implement it using AWS Step Functions.

With a data lake in place to collect all the data produced by IT systems, you can create BI dashboards that provide a holistic view of multiple departments. Moreover, it allows organizations to get better insights into their valuable data and explore other use cases, such as machine learning. To support the data lake creation and management, refer to AWS Lake Formation and a series of other blog posts.

To learn more about Amazon EventBridge from a hands-on perspective, refer to this EventBridge workshop.

ICYMI: Serverless Q2 2021

Post Syndicated from James Beswick original https://aws.amazon.com/blogs/compute/icymi-serverless-q2-2021/

Welcome to the 14th edition of the AWS Serverless ICYMI (in case you missed it) quarterly recap. Every quarter, we share all of the most recent product launches, feature enhancements, blog posts, webinars, Twitch live streams, and other interesting things that you might have missed!

Q2 calendar

In case you missed our last ICYMI, check out what happened last quarter here.

AWS Step Functions

Step Functions launched Workflow Studio, a new visual tool that provides a drag-and-drop user interface to build Step Functions workflows. This exposes all the capabilities of Step Functions that are available in Amazon States Language (ASL). This makes it easier to build and change workflows and build definitions in near-real time.

For more:

Workflow Studio

The new data flow simulator in the Step Functions console helps you evaluate the inputs and outputs passed through your state machine. It allows you to simulate each of the fields used to process data and updates in real time. It can help accelerate development with workflows and help visualize JSONPath processing.

For more:

Data flow simulator

Also, Amazon API Gateway can now invoke synchronous Express Workflows using REST APIs.

Amazon EventBridge

EventBridge now supports cross-Region event routing from any commercial AWS Region to a list of supported Regions. This feature allows you to centralize global events for auditing and monitoring or replicate events across Regions.

EventBridge cross-Region routing

The service now also supports bus-to-bus event routing in the same Region and in the same AWS account. This can be useful for centralizing events related to a single project, application, or team within your organization.

EventBridge bus-to-bus

You can now use EventBridge as a resource within Step Functions workflows. This provides a direct service integration for both standard and Express Workflows. You can publish events directly to a specified event bus using either a request-response or wait-for-callback pattern.

EventBridge added a new target for rules – Amazon SageMaker Pipelines. This allows you to use a rule to trigger a continuous integration and continuous deployment (CI/CD) service for your machine learning workloads.

AWS Lambda

Lambda Extensions

AWS Lambda extensions are now generally available including some performance and functionality improvements. Lambda extensions provide a new way to integrate your chosen monitoring, observability, security, and governance tools with AWS Lambda. These use the Lambda Runtime Extensions API to integrate with the execution environment and provide hooks into the Lambda lifecycle.

To help build your own extensions, there is an updated GitHub repository with example code.

To learn more:

  • Watch a Tech Talk with Julian Wood.
  • Watch the 8-episode Learning Path series covering all aspects of extensions.

Extensions available today

Amazon CloudWatch Lambda Insights support for Lambda container images is now generally available.

Amazon SNS

Amazon SNS has expanded the set of filter operators available to include IP address matching, existence of an attribute key, and “anything-but” matching.

The service has also introduced an SMS sandbox to help developers testing workloads that send text messages.

To learn more:

Amazon DynamoDB

DynamoDB announced CloudFormation support for several features. First, it now supports configuring Kinesis Data Streams using CloudFormation. This allows you to use infrastructure as code to set up Kinesis Data Streams instead of DynamoDB streams.

The service also announced that NoSQL Workbench now supports CloudFormation, so you can build data models and configure table capacity settings directly from the tool. Finally, you can now create and manage global tables with CloudFormation.

Learn how to use the recently launched Serverless Patterns Collection to configure DynamoDB as an event source for Lambda.

AWS Amplify

Amplify Hosting announced support for server-side rendered (SSR) apps built with the Next.js framework. This provides a zero configuration option for developers to deploy and host their Next.js-based applications.

The Amplify GLI now allows developers to make multiple DynamoDB GSI updates in a single deployment. This can help accelerate data model iterations. Additionally, the data management experience in the Amplify Admin UI launched at AWS re:Invent 2020 is now generally available.

AWS Serverless Application Model (AWS SAM)

AWS SAM has a public preview of support for local development and testing of AWS Cloud Development Kit (AWS CDK) projects.

To learn more:

Serverless blog posts

Operating Lambda

The “Operating Lambda” blog series includes the following posts in this quarter:

Streaming data

The “Building serverless applications with streaming data” blog series shows how to use Lambda with Kinesis.

Getting started with serverless for developers

Learn how to build serverless applications from your local integrated development environment (IDE).

April

May

June

Tech Talks & Events

We hold AWS Online Tech Talks covering serverless topics throughout the year. These are listed in the Serverless section of the AWS Online Tech Talks page. We also regularly deliver talks at conferences and events around the world, speak on podcasts, and record videos you can find to learn in bite-sized chunks.

Here are some from Q2:

Serverless Live was a day of talks held on May 19, featuring the serverless developer advocacy team, along with Adrian Cockroft and Jeff Barr. You can watch a replay of all the talks on the AWS Twitch channel.

Videos

YouTube ServerlessLand channel

Serverless Office Hours – Tues 10 AM PT / 1PM EST

Weekly live virtual office hours. In each session we talk about a specific topic or technology related to serverless and open it up to helping you with your real serverless challenges and issues. Ask us anything you want about serverless technologies and applications.

YouTube: youtube.com/serverlessland
Twitch: twitch.tv/aws

April

May

June

DynamoDB Office Hours

Are you an Amazon DynamoDB customer with a technical question you need answered? If so, join us for weekly Office Hours on the AWS Twitch channel led by Rick Houlihan, AWS principal technologist and Amazon DynamoDB expert. See upcoming and previous shows

Learning Path – AWS Lambda Extensions: The deep dive

Are you looking for a way to more easily integrate AWS Lambda with your favorite monitoring, observability, security, governance, and other tools? Welcome to AWS Lambda extensions: The deep dive, a learning path video series that shows you everything about augmenting Lambda functions using Lambda extensions.

There are also other helpful videos covering serverless available on the Serverless Land YouTube channel.

Still looking for more?

The Serverless landing page has more information. The Lambda resources page contains case studies, webinars, whitepapers, customer stories, reference architectures, and even more Getting Started tutorials.

You can also follow the Serverless Developer Advocacy team on Twitter to see the latest news, follow conversations, and interact with the team.