Tag Archives: AWS

Advanced Amazon Pinpoint Templates using Message Template Helpers

Post Syndicated from davelem original https://aws.amazon.com/blogs/messaging-and-targeting/advanced-amazon-pinpoint-templates-using-message-template-helpers/

Personalization of customer messages is a proven way to increase engagement of promotional and transactional communications. In order to make these communications repeatable and scalable, building personalization through templates is often required.

Using the Advanced Template Capabilities feature of Amazon Pinpoint, it’s now possible to create highly customized templates used for email, SMS, and Push Notifications.

Pinpoint templates are personalized using Handlebars.js. The new message template helpers are an expansion on the default Handlebars.js features. Please refer to handlebarsjs.com for more information on the default functionality of Handlebars.js

In this blog we will build an Order Confirmation template that will demonstrate a few helpers from each of the following categories:

Prerequisites

Before creating a template, you need to have an existing Amazon Pinpoint Project with the email channel enabled. The following will walk you through creating a project if you don’t already have one: Create and configure a Pinpoint Project

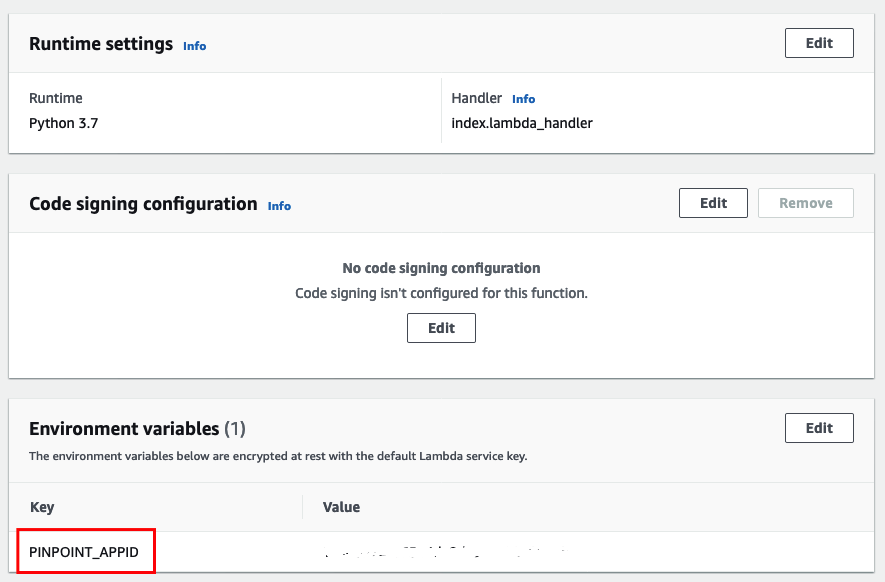
Architecture Overview

Step 1: Create a CSV file with sample Endpoint and Imported Segment

In Amazon Pinpoint, an endpoint represents a specific method of contacting a customer. This could be their email address (for email messages) or their phone number (for SMS messages) or a custom endpoint type. Endpoints can also contain custom attributes, and you can associate multiple endpoints with a single user. In this step, we create a simple CSV file which we will use to create a Segment in Pinpoint.

The data below contains the sample Order and Product data we will use in our Order Confirmation Email.

  1. Create a .CSV file named AdvancedTemplatesSegment.csv with the following data:
    ChannelType,Address,Id,Attributes.FirstName,Attributes.LastName,Attributes.OrderDate,Attributes.OrderNumber,Attributes.ProductNumber,Attributes.ProductNumber,Attributes.ProductNumber,Attributes.ProductNumber,Attributes.ProductNumber,Attributes.ProductName,Attributes.ProductName,Attributes.ProductName,Attributes.ProductName,Attributes.ProductName,Attributes.Amount,Attributes.Amount,Attributes.Amount,Attributes.Amount,Attributes.Amount,Attributes.ItemCount,Attributes.ItemCount,Attributes.ItemCount,Attributes.ItemCount,Attributes.ItemCount,Attributes.CLVTier,User.UserId,Metrics.Age
    EMAIL,[email protected],287b3858-3097-40e3-9af4-19bd4509a8f2,Mary,Smith,2021-01-15T18:07:13Z,460-ITS-2320,DWG8799598,XTC5517773,XRO7471152,EAT5122843,LNP9056489,non lectus aliquam,sapien placerat ante,semper sapien a libero nam dui,vitae consectetuer eget rutrum,nisl ut volutpat sapien arcu,68.88,32.89,53.19,45.38,47.31,20,76,33,15,53,High,66af7a81-77f2-485f-b115-d8c3a00f7077,84
    EMAIL,[email protected],b42e6c5f-3e15-4fdd-b61c-499508271082,,,2021-01-30T22:33:22Z,296-OZA-6579,VMC0637283,RGM6575767,BTM9430068,XCV9343127,GVU2858284,a libero nam dui,sit amet consectetuer adipiscing,at ipsum,ut dolor morbi,nullam molestie,74.86,83.18,15.42,97.03,37.42,13,94,50,54,84,Low,dadc1be9-daf4-46ce-9069-13565e03eaa0,61

    NOTE: The file above has a few attributes that are the key to personalizing our email and including multiple items in our Order Confirmation table:

    • Attributes.FirstName – This will allow us to personalize with a salutation if available.
    • Attributes.CLVTier – This is an attribute that could be specified from a Machine Learning model to determine the customers CLV Tier. We will be using it to provide coupons specific to a given CLV Tier. See Predictive Segmentation Using Amazon Pinpoint and Amazon SageMaker for an example solution that demonstrates using Machine Learning to analyze information in Pinpoint.
    • Attributes.ProductNumber – Note that we have multiple columns that repeat for the product information in the order.  Pinpoint attributes are actually stored as a list, so if you pass multiple columns with the same name it will add items to the attribute list.This is the key to how we are able to display a table of information, but note that it does require making sure the attributes are aligned in the proper columns. For example, Attributes.ProductNumber[0] needs to align with Attributes.ProductName[0]See Using variables with message template helpers for more details.
  2. Search for [email protected] above and replace with two valid email addresses. Note that if your account is still in the sandbox these will need to be verified email addresses. If you only have access to a single email address you can use labels by adding a plus sign (+) followed by a string of text after the local part of the address and before the at (@) sign. For example: [email protected] and [email protected]
  3. Create a Pinpoint Segment
    1. Open the Amazon Pinpoint console at http://console.aws.amazon.com/pinpoint, and then choose the project that you created as part of the Prerequisites.
    2. In the navigation pane, choose Segments, and then choose Create a segment.
    3. Select Import a Segment.
    4. Browse to or Drag and Drop the .CSV file you created in the previous step.
    5. Use the default Segment Name and select Create Segment.

Step 2: Build The Message Template

  1. Open the Amazon Pinpoint console at http://console.aws.amazon.com/pinpoint.
  2. In the navigation pane, choose Message templates, and then choose Create template.
  3. Select Email as the Channel.
  4. For Template name use: AdvancedTemplateExample.
  5. For Subject use: AdvancedTemplateExample.
  6. Paste the following code into the HTML Editor. We will take some time later on to dig into the specific Handlebars helpers:
    {{#* inline "salutation"}}
        {{#if Attributes.FirstName.[0]}}
            Dear {{Attributes.FirstName.[0]}},<br />
        {{else}}
            Dear Valued Customer,<br />
        {{/if}}
    {{/inline}}
    
    {{#* inline "clvcoupon"}}
        {{#if Attributes.CLVTier.[0]}}
            {{#eq Attributes.CLVTier.[0] "High"}}
                As a thank-you for your continued support, please use this coupon code for <strong>30%</strong> off your next order: <strong>WELOVEYOU30</strong>
            {{/eq}}
        {{/if}}
    {{/inline}}
    
    {{#* inline "footer"}}
        <hr />	
        Accent Athletics - 1234 Anywhere Ave, Anywhere USA, 12345 - <a href="https://www.example.com/preferences/index.html?pid={{ApplicationId}}&uid={{User.UserId}}&h={{sha256 (join User.UserId "d67c37ed538b751d850de18" "+" prefix="" suffix="")}}">Manage Preferences</a>
        <hr />
    {{/inline}}
    
    
    <!DOCTYPE html>
        <html lang="en">
        <head>
        <meta http-equiv="Content-Type" content="text/html; charset=utf-8" />
    </head>
    <body>
      {{> salutation}}
      Thank-you for your order! {{> clvcoupon}}<br /><br />
      Order Date: {{now format="d MMM yyyy HH:mm:ss" tz=America/Los_Angeles}}<br /><br />
      <table>
      <thead>
        <tr style="background-color: #f2f2f2;">
          <th style="text-align:left; width:75px">
            Product #
          </th>
          <th style="text-align:left; width:200px;">
            Name
          </th>
          <th style="text-align:center; width:75px;">
            Count
          </th>
          <th style="text-align:center; width:75px;">
            Amount
          </th>
        </tr>
      </thead>
      <tbody>
      {{#each Attributes.ProductNumber}}
        {{#eq (modulo @index 2) "1.0"}}
            <tr style="background-color: #f2f2f2;">
        {{else}}
            <tr>
        {{/eq}}
          <td style="text-align:left;">{{this}}</td>
          <td style="text-align:left;">{{#with (lookup ../Attributes.ProductName @index)}}{{this}}{{/with}}</td>
          <td style="text-align:center;">{{#with (lookup ../Attributes.ItemCount @index)}}{{this}}{{/with}}</td>
          <td style="text-align:center;">${{#with (lookup ../Attributes.Amount @index)}}{{this}}{{/with}}</td>
        </tr>
      {{else}}
        <tr>
          <td style="text-align:left;">{{Attributes.ProductNumber}}</td>
          <td style="text-align:center;">{{Attributes.ProductName}}</td>
          <td style="text-align:center;">{{Attributes.ItemCount}}</td>
          <td style="text-align:center;">{{Attributes.Amount}}</td>
        </tr>
      {{/each}}
      </tbody>
      </table>
      {{> footer}}
    </body>
    </html>

  7. Click Create to finish creating your template

Step 3: Create an Amazon Pinpoint Campaign

By sending a campaign, we can verify that our Amazon Pinpoint project is configured correctly, and that we created the segment and template correctly.

To create the segment and campaign:

  1. Open the Amazon Pinpoint console at http://console.aws.amazon.com/pinpoint, and then choose the project that you created in step 1.
  2. In the navigation pane, choose Campaigns, and then choose Create a campaign.
  3. Name the campaign “AdvancedTemplateTest.” Under Choose a channel for this campaign, choose Email, and then choose Next.
  4. On the Choose a segment page, choose the “AdvancedTemplateExample” segment that you just created, and then choose Next.
  5. In Create your message, choose the template we just created, ‘AdvancedTemplateExample. Note: You will see an Alert with: “This template contains a reference to an attribute from another project…” This is expected as Pinpoint is scanning the template for attributes allowing you to specify default values in case the endpoint doesn’t contain a value for the attribute. In this blog post we are using the {{#if}} conditional helper to handle any missing data, i.e. {{#if Attributes.FirstName.[0]}}
  6. On the Choose when to send the campaign page, keep all of the default values, and then choose Next.
  7. On the Review and launch page, choose Launch campaign.

Within a few seconds, you should receive an email:

So what just happened?

Let’s take a deeper dive at each of helpers we included in the template:

{{#* inline "salutation"}}
    {{#if Attributes.FirstName.[0]}}
        Dear {{Attributes.FirstName.[0]}},<br /><br />
    {{else}}
        Dear Valued Customer,<br /><br />
    {{/if}}
{{/inline}}

First you will notice that we are making use of Inline Partials. Using Inline Partials allows you to build a library of frequently used snippets of content. In this case we frequently use a salutation in our communications. You can build and maintain your own frequently used snippets and include them at the beginning of the template.

Later in the message we can simply include: {{> salutation}} to include a salutation in our email.

In this example we also see the {{#if}} helper which is used to evaluate if a first name is available on the endpoint. If the name is found, a greeting is returned that passes the user’s first name in the response. Otherwise, the else statement returns an alternative greeting.

{{#* inline "clvcoupon"}}
    {{#if Attributes.CLVTier.[0]}}
        {{#eq Attributes.CLVTier.[0] "High"}}
            As a thank-you for your continued support, please use this coupon code for <strong>30%</strong> off your next order: <strong>WELOVEYOU30</strong>
        {{/eq}}
    {{/if}}
{{/inline}}

Again, we are using Inline Partials to organize our code. Additionally we are using {{#if}} to see if the user has a CLVTier attribute and if so, we use the {{#eq}} conditional helper to see if their CLVTier is “High” as we only want this coupon to display for customers that fall into that tier.

Note that CLVTier is an attribute that is populated along with the Endpoint when we created the Segment above. You could also use a solution such as Predictive Segmentation using Amazon Pinpoint and Amazon SageMaker to incorporate Machine Learning to classify your existing users.

{{#* inline "footer"}}
    <hr />
    Accent Athletics - 1234 Anywhere Ave, Anywhere USA, 12345 - <a href="https://www.example.com/preferences/index.html?pid={{ApplicationId}}&uid={{User.UserId}}&h={{sha256 (join User.UserId "d67c37ed538b751d850de18" "+" prefix="" suffix="")}}">Manage Preferences</a>
    <hr />
{{/inline}}

In the example above we are using the {{sha256}} and {{join}} helpers to create a secure link to the Preference Center deployed as part of the Amazon Pinpoint Preference Center solution.

{{> salutation}}
Thank-you for your order! {{> clvcoupon}}<br /><br /><hr />
Order Date: {{now format="d MMM yyyy HH:mm:ss" tz=America/Los_Angeles}}<br /><br />

This is where all of our hard work implementing Inline Partials really starts to pay off. To include our salutation and coupon we simply need to specify: {{> salutation}} and {{> clvcoupon}}

The {{now}} string helper allows us to display the current date and time in the format of our choosing. Please reference the following for more details on the date pattern and available timezones:

<tbody>
{{#each Attributes.ProductNumber}}
{{#eq (modulo @index 2) "1.0"}}
    		<tr style="background-color: #f2f2f2;">
{{else}}
    		<tr>
{{/eq}}
    	<td style="text-align:left;">{{this}}</td>
    	<td style="text-align:left;">{{#with (lookup ../Attributes.ProductName @index)}}{{this}}{{/with}}</td>
    	<td style="text-align:center;">{{#with (lookup ../Attributes.ItemCount @index)}}{{this}}{{/with}}</td>
    	<td style="text-align:center;">${{#with (lookup ../Attributes.Amount @index)}}{{this}}{{/with}}</td>
</tr>
{{else}}
<tr>
    		<td style="text-align:left;">{{Attributes.ProductNumber}}</td>
    		<td style="text-align:center;">{{Attributes.ProductName}}</td>
    		<td style="text-align:center;">{{Attributes.ItemCount}}</td>
    		<td style="text-align:center;">{{Attributes.Amount}}</td>
</tr>
{{/each}}
</tbody>

This particular section has a lot going on. We will break each part down for further explanation:

  • {{#each}} – Allows us to loop through each of the values in our attribute. In this case our ProductNumber attribute will contain: [“order#1”, “order#2”,”order#3, etc.]
    Note that if you only have one item in the attribute array. Pinpoint will simplify that into a single string attribute. That is why we have the {{each}} part of the {{#else}} statement. This allows us to reference the attribute as a single string in case we don’t have a collection of values in the attribute.
  • {{#eq (modulo @index 2) “1.0”}} – In order to alternate our background color for even/odd rows, we are making use of the {{modulo}} operator from the Math and encoding helpers which will return the remainder of two given numbers allowing us to determine if this is an odd or even row.
    @index is a native Handlebars.js property that contains the current index we are on in the loop.
  • {{this}} – When iterating through a collection using {{#each}}, {{this}} allows you to reference the current item in the collection
  • {{#with (lookup ../Attributes.ProductName @index)}}{{this}}{{/with}}Lookup is a built-in handlebars helper that allows us to find values in another collection. We are using the index combined with lookup to find the Product Name that goes along with the Product Number we are currently on. The same pattern is used for the remaining columns of the table.The ability to lookup values in another attribute collection is the key to how we are able to display a table of information, but note that it does require making sure the attributes are aligned in the proper columns. For example, Attributes.ProductNumber[0] needs to align with Attributes.ProductName[0]See Using variables with message template helpers for more details.
{{> footer}}

And just to wrap things up, let’s pull in the footer we defined with Inline Partials.

Next Steps

Using the techniques above, you can create sophisticated and personalized communications using Amazon Pinpoint.

Think about your existing communications to see if you can use personalization to increase customer engagement for your promotional and transactional messages.

Amazon Pinpoint is a flexible and scalable outbound and inbound marketing communications service. Learn more here: https://aws.amazon.com/pinpoint/

Complying with DMARC across multiple accounts using Amazon SES

Post Syndicated from Brendan Paul original https://aws.amazon.com/blogs/messaging-and-targeting/complying-with-dmarc-across-multiple-accounts-using-amazon-ses/

Introduction

For enterprises of all sizes, email is a critical piece of infrastructure that supports large volumes of communication from an organization. As such, companies need a robust solution to deal with the complexities this may introduce. In some cases, companies have multiple domains that support several different business units and need a distributed way of managing email sending for those domains. For example, you might want different business units to have the ability to send emails from subdomains, or give a marketing company the ability to send emails on your behalf. Amazon Simple Email Service (Amazon SES) is a cost-effective, flexible, and scalable email service that enables developers to send mail from any application. One of the benefits of Amazon SES is that you can configure Amazon SES to authorize other users to send emails from addresses or domains that you own (your identities) using their own AWS accounts. When allowing other accounts to send emails from your domain, it is important to ensure this is done securely. Amazon SES allows you to send emails to your users using popular authentication methods such as DMARC. In this blog, we walk you through 1/ how to comply with DMARC when using Amazon SES and 2/ how to enable other AWS accounts to send authenticated emails from your domain.

DMARC: what is it, why is it important?

DMARC stands for “Domain-based Message Authentication, Reporting & Conformance”, and it is an email authentication protocol (DMARC.org). DMARC gives domain owners and email senders a way to protect their domain from being used by malicious actors in phishing or spoofing attacks. Email spoofing can be used as a way to compromise users’ financial or personal information by taking advantage of their trust of well-known brands. DMARC makes it easier for senders and recipients to determine whether or not an email was actually sent by the domain that it claims to have been sent by.

Solution Overview

In this solution, you will learn how to set up DKIM signing on Amazon SES, implement a DMARC Policy, and enable other accounts in your organization to send emails from your domain using Sending Authorization. When you set up DKIM signing, Amazon SES will attach a digital signature to all outgoing messages, allowing recipients to verify that the email came from your domain. You will then set your DMARC Policy, which tells an email receiver what to do if an email is not authenticated. Lastly, you will set up Sending Authorization so that other AWS accounts can send authenticated emails from your domain.

Prerequisites

In order to complete the example illustrated in this blog post, you will need to have:

  1. A domain in an Amazon Route53 Hosted Zone or third-party provider. Note: You will need to add/update records for the domain. For this blog we will be using Route53.
  2. An AWS Organization
  3. A second AWS account to send Amazon SES Emails within a different AWS Organizations OU. If you have not worked with AWS Organizations before, review the Organizations Getting Started Guide

How to comply with DMARC (DKIM and SPF) in Amazon SES

In order to comply with DMARC, you must authenticate your messages with either DKIM (DomainKeys Identified Mail), SPF (Sender Policy Framework), or both. DKIM allows you to send email messages with a cryptographic key, which enables email providers to determine whether or not the email is authentic. SPF defines what servers are allowed to send emails for their domain. To use SPF for DMARC compliance you need to set up a custom MAIL FROM domain in Amazon SES. To authenticate your emails with DKIM in Amazon SES, you have the option of:

In this blog, you will be setting up a sending identity.

Setting up DKIM Signing in Amazon SES

  1. Navigate to the Amazon SES Console 
  2. Select Verify a New Domain and type the name of your domain in
  3. Select Generate DKIM Settings
  4. Choose Verify This Domain
    1. This will generate the DNS records needed to complete domain verification, DKIM signing, and routing incoming mail.
    2. Note: When you initiate domain verification using the Amazon SES console or API, Amazon SES gives you the name and value to use for the TXT record. Add a TXT record to your domain’s DNS server using the specified Name and Value. Amazon SES domain verification is complete when Amazon SES detects the existence of the TXT record in your domain’s DNS settings.
  5. If you are using Route 53 as your DNS provider, choose the Use Route 53 button to update the DNS records automatically
    1. If you are not using Route 53, go to your third-party provider and add the TXT record to verify the domain as well as the three CNAME records to enable DKIM signing. You can also add the MX record at the end to route incoming mail to Amazon SES.
    2. A list of common DNS Providers and instructions on how to update the DNS records can be found in the Amazon SES documentation
  6. Choose Create Record Sets if you are using Route53 as shown below or choose Close after you have added the necessary records to your third-party DNS provider.


Note: in the case that you previously verified a domain, but did NOT generate the DKIM settings for your domain, follow the steps below. Skip these steps if this is not the case:

  1. Go to the Amazon SES Console, and select your domain
  2. Select the DKIM dropdown
  3. Choose Generate DKIM Settings and copy the three values in the record set shown
    1. You may also download the record set as a CSV file
  4. Navigate to the Route53 console or your third-party DNS provider. Instructions on how to update the DNS records in your third-party can be found in the Amazon SES documentation
  5. Select the domain you are using
  6. Choose Create Record

  1. Enter the values that Amazon SES has generated for you, and add the three CNAME records to your domain
  2. Wait a few minutes, and go back to your domain in the Amazon SES Console
  3. Check that the DKIM status is verified

You also want to set up a custom MAIL FROM domain that you will use later on. To do so, follow the steps in the documentation.

Setting up a DMARC policy on your domain

DMARC policies are TXT records you place in DNS to define what happens to incoming emails that don’t align with the validations provided when setting up DKIM and SPF. With this policy, you can choose to allow the email to pass through, quarantine the email into a folder like junk or spam, or reject the email.

As a best practice, you should start with a DMARC policy that doesn’t reject all email traffic and collect reports on emails that don’t align to determine if they should be allowed. You can also set a percentage on the DMARC policy to perform filtering on a subset of emails to, for example, quarantine only 50% of the emails that don’t align. Once you are in a state where you can begin to reject non-compliant emails, flip the policy to reject failed authentications. When you set the DMARC policy for your domain, any subdomains that are authorized to send on behalf of your domain will inherit this policy and the same rule will apply. For more information on setting up a DMARC policy, see our documentation.

In a scenario where you have multiple subdomains sending emails, you should be setting the DMARC policy for the organizational domain that you own. For example, if you own the domain example.com and also want to use the sub-domain sender.example.com to send emails you can set the organizational DMARC policy (as a DNS TXT record) to:

Name Type Value
1 _dmarc.example.com TXT “v=DMARC1;p=quarantine;pct=50;rua=mailto:[email protected]

This DMARC policy states that 50% of emails coming from example.com that fail authentication should be quarantined and you want to send a report of those failures to [email protected]. For your sender.example.com sub-domain, this policy will be inherited unless you specify another DMARC policy for our sub-domain. In the case where you want to be stricter on the sub-domain you could add another DMARC policy like you see in the following table.


Name Type Value
1 _dmarc.sender.example.com TXT “v=DMARC1;p=reject;pct=100;rua=mailto:[email protected];ruf=mailto:[email protected]

This policy would apply to emails coming from sender.example.com and would reject any email that fails authentication. It would also send aggregate feedback to [email protected] and detailed message-specific failure information to [email protected] for further analysis.

Sending Authorization in Amazon SES – Allowing Other Accounts to Send Authenticated Emails

Now that you have configured Amazon SES to comply with DMARC in the account that owns your identity, you may want to allow other accounts in your organization the ability to send emails in the same way. Using Sending Authorization, you can authorize other users or accounts to send emails from identities that you own and manage. An example of where this could be useful is if you are an organization which has different business units in that organization. Using sending authorization, a business unit’s application could send emails to their customers from the top-level domain. This application would be able to leverage the authentication settings of the identity owner without additional configuration. Another advantage is that if the business unit has its own subdomain, the top-level domain’s DKIM settings can apply to this subdomain, so long as you are using Easy DKIM in Amazon SES and have not set up Easy DKIM for the specific subdomains.

Setting up sending authorization across accounts

Before you set up sending authorization, note that working across multiple accounts can impact bounces, complaints, pricing, and quotas in Amazon SES. Amazon SES documentation provides a good understanding of the impacts when using multiple accounts. Specifically, delegated senders are responsible for bounces and complaints and can set up notifications to monitor such activities. These also count against the delegated senders account quotas. To set up Sending Authorization across accounts:

  1. Navigate to the Amazon SES Console from the account that owns the Domain
  2. Select Domains under Identity Management
  3. Select the domain that you want to set up sending authorization with
  4. Select View Details
  5. Expand Identity Policies and Click Create Policy
  6. You can either create a policy using the policy generator or create a custom policy. For the purposes of this blog, you will create a custom policy.
  7. For the custom policy, you will allow a particular Organization Unit (OU) from our AWS Organization access to our domain. You can also limit access to particular accounts or other IAM principals. Use the following policy to allow a particular OU to access the domain:

{
  “Version”: “2012-10-17”,
  “Id”: “AuthPolicy”,
  “Statement”: [
    {
      “Sid”: “AuthorizeOU”,
      “Effect”: “Allow”,
      “Principal”: “*”,
      “Action”: [
        “SES:SendEmail”,
        “SES:SendRawEmail”
      ],
      “Resource”: “<Arn of Verified Domain>”,
      “Condition”: {
        “ForAnyValue:StringLike”: {
          “aws:PrincipalOrgPaths”: “<Organization Id>/<Root OU Id>/<Organizational Unit Id>”
        }
      }
    }
  ]
}

9. Make sure to replace the escaped values with your Verified Domain ARN and the Org path of the OU you want to limit access to.


You can find more policy examples in the documentation. Note that you can configure sending authorization such that all accounts under your AWS Organization are authorized to send via a certain subdomain.

Testing

You can now test the ability to send emails from your domain in a different AWS account. You will do this by creating a Lambda function to send a test email. Before you create the Lambda function, you will need to create an IAM role for the Lambda function to use.

Creating the IAM Role:

  1. Log in to your separate AWS account
  2. Navigate to the IAM Management Console
  3. Select Role and choose Create Role
  4. Under Choose a use case select Lambda
  5. choose Next: Permissions
  6. In the search bar, type SES and select the check box next to AmazonSESFullAccess
  7. Choose Next:Tags and Review
  8. Give the role a name of your choosing, and choose Create Role

Navigate to Lambda Console

  1. Select Create Function
  2. Choose the box marked Author from Scratch
  3. Give the function a name of your choosing (Ex: TestSESfunction)
  4. In this demo, you will be using Python 3.8 runtime, but feel free to modify to your language of choice
  5. Select the Change default execution role dropdown, and choose the Use an existing role radio button
  6. Under Existing Role, choose the role that you created in the previous step, and create the function

Edit the function

  1. Navigate to the Function Code portion of the page and open the function python file
  2. Replace the default code with the code shown below, ensuring that you put your own values in based on your resources
  3. Values needed:
    1. Test Email Address: an email address you have access to
      1. NOTE: If you are still operating in the Amazon SES Sandbox, this will need to be a verified email in Amazon SES. To verify an email in Amazon SES, follow the process here. Alternatively, here is how you can move out of the Amazon SES Sandbox
    2. SourceArn: The arn of your domain. This can be found in Amazon SES Console → Domains → <YourDomain> → Identity ARN
    3. ReturnPathArn: The same as your Source ARN
    4. Source: This should be your Mail FROM Domain @ your domain
      1. Your Mail FROM Domain can be found under Domains → <YourDomain> → Mail FROM Domain dropdown
      2. Ex: [email protected]
    5. Use the following function code for this example

import json
import boto3
from botocore.exceptions import ClientError

client = boto3.client('ses')
def lambda_handler(event, context):
    # Try to send the email.
    try:
        #Provide the contents of the email.
        response = client.send_email(
            Destination={
                'ToAddresses': [
                    '<[email protected]>',
                ],
            },
            Message={
                'Body': {
                    'Html': {
                        'Charset': 'UTF-8',
                        'Data': 'This email was sent with Amazon SES.',
                    },
                },
                'Subject': {
                    'Charset': 'UTF-8',
                    'Data': 'Amazon SES Test',
                },
            },
            SourceArn='<your-ses-identity-ARN>',
            ReturnPathArn='<your-ses-identity-ARN>',
            Source='<[email protected]>',
             )
    # Display an error if something goes wrong.
    except ClientError as e:
        print(e.response['Error']['Message'])
    else:
        print("Email sent! Message ID:"),
        print(response['ResponseMetadata']['RequestId'])

  1. Once you have replaced the appropriate values, choose the Deploy button to deploy your changes

Run a Test invocation

  1. After you have deployed your changes, select the “Test” Panel above your function code

  1. You can leave all of these keys and values as default, as the function does not use any event parameters
  2. Choose the Invoke button in the top right corner
  3. You should see this above the test event window:

Verifying that the Email has been signed properly

Depending on your email provider, you may be able to check the DKIM signature directly in the application. As an example, for Outlook, right click on the message, and choose View Source from the menu. You should see line that shows the Authentication Results and whether or not the DKIM/SPF signature passed. For Gmail, go to your Gmail Inbox on the Gmail web app. Choose the message you wish to inspect, and choose the More Icon. Choose View Original from the drop-down menu. You should then see the SPF and DKIM “PASS” Results.

Cleanup

To clean up the resources in your account,

  1. Navigate to the Route53 Console
  2. Select the Hosted Zone you have been working with
  3. Select the CNAME, TXT, and MX records that you created earlier in this blog and delete them
  4. Navigate to the SES Console
  5. Select Domains
  6. Select the Domain that you have been working with
  7. Click the drop down Identity Policies and delete the one that you created in this blog
  8. If you verified a domain for the sake of this blog: navigate to the Domains tab, select the domain and select Remove
  9. Navigate to the Lambda Console
  10. Select Functions
  11. Select the function that you created in this exercise
  12. Select Actions and delete the function

Conclusion

In this blog post, we demonstrated how to delegate sending and management of your sub-domains to other AWS accounts while also complying with DMARC when using Amazon SES. In order to do this, you set up a sending identity so that Amazon SES automatically adds a DKIM signature to your messages. Additionally, you created a custom MAIL FROM domain to comply with SPF. Lastly, you authorized another AWS account to send emails from a sub-domain managed in a different account, and tested this using a Lambda function. Allowing other accounts the ability to manage and send email from your sub-domains provides flexibility and scalability for your organization without compromising on security.

Now that you have set up DMARC authentication for multiple accounts in your enviornment, head to the AWS Messaging & Targeting Blog to see examples of how you can combine Amazon SES with other AWS Services!

If you have more questions about Amazon Simple Email Service, check out our FAQs or our Developer Guide.

If you have feedback about this post, submit comments in the Comments section below.

Forwarding emails automatically based on content with Amazon Simple Email Service

Post Syndicated from Murat Balkan original https://aws.amazon.com/blogs/messaging-and-targeting/forwarding-emails-automatically-based-on-content-with-amazon-simple-email-service/

Introduction

Email is one of the most popular channels consumers use to interact with support organizations. In its most basic form, consumers will send their email to a catch-all email address where it is further dispatched to the correct support group. Often, this requires a person to inspect content manually. Some IT organizations even have a dedicated support group that handles triaging the incoming emails before assigning them to specialized support teams. Triaging each email can be challenging, and delays in email routing and support processes can reduce customer satisfaction. By utilizing Amazon Simple Email Service’s deep integration with Amazon S3, AWS Lambda, and other AWS services, the task of categorizing and routing emails is automated. This automation results in increased operational efficiencies and reduced costs.

This blog post shows you how a serverless application will receive emails with Amazon SES and deliver them to an Amazon S3 bucket. The application uses Amazon Comprehend to identify the dominant language from the message body.  It then looks it up in an Amazon DynamoDB table to find the support group’s email address specializing in the email subject. As the last step, it forwards the email via Amazon SES to its destination. Archiving incoming emails to Amazon S3 also enables further processing or auditing.

Architecture

By completing the steps in this post, you will create a system that uses the architecture illustrated in the following image:

Architecture showing how to forward emails by content using Amazon SES

The flow of events starts when a customer sends an email to the generic support email address like [email protected]. This email is listened to by Amazon SES via a recipient rule. As per the rule, incoming messages are written to a specified Amazon S3 bucket with a given prefix.

This bucket and prefix are configured with S3 Events to trigger a Lambda function on object creation events. The Lambda function reads the email object, parses the contents, and sends them to Amazon Comprehend for language detection.

Amazon DynamoDB looks up the detected language code from an Amazon DynamoDB table, which includes the mappings between language codes and support group email addresses for these languages. One support group could answer English emails, while another support group answers French emails. The Lambda function determines the destination address and re-sends the same email address by performing an email forward operation. Suppose the lookup does not return any destination address, or the language was not be detected. In that case, the email is forwarded to a catch-all email address specified during the application deployment.

In this example, Amazon SES hosts the destination email addresses used for forwarding, but this is not a requirement. External email servers will also receive the forwarded emails.

Prerequisites

To use Amazon SES for receiving email messages, you need to verify a domain that you own. Refer to the documentation to verify your domain with Amazon SES console. If you do not have a domain name, you will register one from Amazon Route 53.

Deploying the Sample Application

Clone this GitHub repository to your local machine and install and configure AWS SAM with a test AWS Identity and Access Management (IAM) user.

You will use AWS SAM to deploy the remaining parts of this serverless architecture.

The AWS SAM template creates the following resources:

  • An Amazon DynamoDB mapping table (language-lookup) contains information about language codes and associates them with destination email addresses.
  • An AWS Lambda function (BlogEmailForwarder) that reads the email content parses it, detects the language, looks up the forwarding destination email address, and sends it.
  • An Amazon S3 bucket, which will store the incoming emails.
  • IAM roles and policies.

To start the AWS SAM deployment, navigate to the root directory of the repository you downloaded and where the template.yaml AWS SAM template resides. AWS SAM also requires you to specify an Amazon Simple Storage Service (Amazon S3) bucket to hold the deployment artifacts. If you haven’t already created a bucket for this purpose, create one now. You will refer to the documentation to learn how to create an Amazon S3 bucket. The bucket should have read and write access by an AWS Identity and Access Management (IAM) user.

At the command line, enter the following command to package the application:

sam package --template template.yaml --output-template-file output_template.yaml --s3-bucket BUCKET_NAME_HERE

In the preceding command, replace BUCKET_NAME_HERE with the name of the Amazon S3 bucket that should hold the deployment artifacts.

AWS SAM packages the application and copies it into this Amazon S3 bucket.

When the AWS SAM package command finishes running, enter the following command to deploy the package:

sam deploy --template-file output_template.yaml --stack-name blogstack --capabilities CAPABILITY_IAM --parameter-overrides FromEmailAddress=info@ YOUR_DOMAIN_NAME_HERE CatchAllEmailAddress=catchall@ YOUR_DOMAIN_NAME_HERE

In the preceding command, change the YOUR_DOMAIN_NAME_HERE with the domain name you validated with Amazon SES. This domain also applies to other commands and configurations that will be introduced later.

This example uses “blogstack” as the stack name, you will change this to any other name you want. When you run this command, AWS SAM shows the progress of the deployment.

Configure the Sample Application

Now that you have deployed the application, you will configure it.

Configuring Receipt Rules

To deliver incoming messages to Amazon S3 bucket, you need to create a Rule Set and a Receipt rule under it.

Note: This blog uses Amazon SES console to create the rule sets. To create the rule sets with AWS CloudFormation, refer to the documentation.

  1. Navigate to the Amazon SES console. From the left navigation choose Rule Sets.
  2. Choose Create a Receipt Rule button at the right pane.
  3. Add info@YOUR_DOMAIN_NAME_HERE as the first recipient addresses by entering it into the text box and choosing Add Recipient.


Choose the Next Step button to move on to the next step.

  1. On the Actions page, select S3 from the Add action drop-down to reveal S3 action’s details. Select the S3 bucket that was created by the AWS SAM template. It is in the format of your_stack_name-inboxbucket-randomstring. You will find the exact name in the outputs section of the AWS SAM deployment under the key name InboxBucket or by visiting the AWS CloudFormation console. Set the Object key prefix to info/. This tells Amazon SES to add this prefix to all messages destined to this recipient address. This way, you will re-use the same bucket for different recipients.

Choose the Next Step button to move on to the next step.

In the Rule Details page, give this rule a name at the Rule name field. This example uses the name info-recipient-rule. Leave the rest of the fields with their default values.

Choose the Next Step button to move on to the next step.

  1. Review your settings on the Review page and finalize rule creation by choosing Create Rule

  1. In this example, you will be hosting the destination email addresses in Amazon SES rather than forwarding the messages to an external email server. This way, you will be able to see the forwarded messages in your Amazon S3 bucket under different prefixes. To host the destination email addresses, you need to create different rules under the default rule set. Create three additional rules for catchall@YOUR_DOMAIN_NAME_HERE , english@ YOUR_DOMAIN_NAME_HERE and french@YOUR_DOMAIN_NAME_HERE email addresses by repeating the steps 2 to 5. For Amazon S3 prefixes, use catchall/, english/, and french/ respectively.


Configuring Amazon DynamoDB Table

To configure the Amazon DynamoDB table that is used by the sample application

  1. Navigate to Amazon DynamoDB console and reach the tables view. Inspect the table created by the AWS SAM application.

language-lookup table is the table where languages and their support group mappings are kept. You need to create an item for each language, and an item that will hold the default destination email address that will be used in case no language match is found. Amazon Comprehend supports more than 60 different languages. You will visit the documentation for the supported languages and add their language codes to this lookup table to enhance this application.

  1. To start inserting items, choose the language-lookup table to open table overview page.
  2. Select the Items tab and choose the Create item From the dropdown, select Text. Add the following JSON content and choose Save to create your first mapping object. While adding the following object, replace Destination attribute’s value with an email address you own. The email messages will be forwarded to that address.

{

  “language”: “en”,

  “destination”: “english@YOUR_DOMAIN_NAME_HERE”

}

Lastly, create an item for French language support.

{

  “language”: “fr”,

  “destination”: “french@YOUR_DOMAIN_NAME_HERE”

}

Testing

Now that the application is deployed and configured, you will test it.

  1. Use your favorite email client to send the following email to the domain name info@ email address.

Subject: I need help

Body:

Hello, I’d like to return the shoes I bought from your online store. How can I do this?

After the email is sent, navigate to the Amazon S3 console to inspect the contents of the Amazon S3 bucket that is backing the Amazon SES Rule Sets. You will also see the AWS Lambda logs from the Amazon CloudWatch console to confirm that the Lambda function is triggered and run successfully. You should receive an email with the same content at the address you defined for the English language.

  1. Next, send another email with the same content, this time in French language.

Subject: j’ai besoin d’aide

Body:

Bonjour, je souhaite retourner les chaussures que j’ai achetées dans votre boutique en ligne. Comment puis-je faire ceci?


Suppose a message is not matched to a language in the lookup table. In that case, the Lambda function will forward it to the catchall email address that you provided during the AWS SAM deployment.

You will inspect the new email objects under english/, french/ and catchall/ prefixes to observe the forwarding behavior.

Continue experimenting with the sample application by sending different email contents to info@ YOUR_DOMAIN_NAME_HERE address or adding other language codes and email address combinations into the mapping table. You will find the available languages and their codes in the documentation. When adding a new language support, don’t forget to associate a new email address and Amazon S3 bucket prefix by defining a new rule.

Cleanup

To clean up the resources you used in your account,

  1. Navigate to the Amazon S3 console and delete the inbox bucket’s contents. You will find the name of this bucket in the outputs section of the AWS SAM deployment under the key name InboxBucket or by visiting the AWS CloudFormation console.
  2. Navigate to AWS CloudFormation console and delete the stack named “blogstack”.
  3. After the stack is deleted, remove the domain from Amazon SES. To do this, navigate to the Amazon SES Console and choose Domains from the left navigation. Select the domain you want to remove and choose Remove button to remove it from Amazon SES.
  4. From the Amazon SES Console, navigate to the Rule Sets from the left navigation. On the Active Rule Set section, choose View Active Rule Set button and delete all the rules you have created, by selecting the rule and choosing Action, Delete.
  5. On the Rule Sets page choose Disable Active Rule Set button to disable listening for incoming email messages.
  6. On the Rule Sets page, Inactive Rule Sets section, delete the only rule set, by selecting the rule set and choosing Action, Delete.
  7. Navigate to CloudWatch console and from the left navigation choose Logs, Log groups. Find the log group that belongs to the BlogEmailForwarderFunction resource and delete it by selecting it and choosing Actions, Delete log group(s).
  8. You will also delete the Amazon S3 bucket you used for packaging and deploying the AWS SAM application.


Conclusion

This solution shows how to use Amazon SES to classify email messages by the dominant content language and forward them to respective support groups. You will use the same techniques to implement similar scenarios. You will forward emails based on custom key entities, like product codes, or you will remove PII information from emails before forwarding with Amazon Comprehend.

With its native integrations with AWS services, Amazon SES allows you to enhance your email applications with different AWS Cloud capabilities easily.

To learn more about email forwarding with Amazon SES, you will visit documentation and AWS blogs.

Create a serverless feedback collector application using Amazon Pinpoint’s two-way SMS functionality

Post Syndicated from Murat Balkan original https://aws.amazon.com/blogs/messaging-and-targeting/create-a-serverless-feedback-collector-application-by-using-amazon-pinpoints-two-way-sms-functionality/

Introduction

Two-way SMS communication is used by many companies to create interactive engagements with their customers. Traditional SMS notifications are one-way. While this is valid for many different use cases like one-time passwords (OTP) notifications and security notifications or reminders, some other use-cases may benefit from collecting information from the same channel. Two-way SMS allows customers to create this feedback mechanism and enhance business interactions and overall customer experience.

SMS is chosen for its simplicity and availability across different sets of devices. By combining the two-way SMS mechanism with the vast breadth of services Amazon Web Services (AWS) offers, companies can create effective architectures to better interact and serve their customers.

This blog post shows you how a serverless online appointment application can use Amazon Pinpoint’s two-way SMS functionality to collect customer feedback for completed appointments. You will learn how Amazon Pinpoint interacts with other AWS serverless services with its out-of-the-box integrations to create a scalable messaging application.

Architecture

By completing the steps in this post, you can create a system that uses the architecture illustrated in the following image:

The architecture of a feedback collector application that is composed of serverless AWS services

The flow of events starts when a Amazon DynamoDB table item, representing an online appointment, changes its status to COMPLETED. An AWS Lambda function which is subscribed to these changes over DynamoDB Streams detects this change and sends an SMS to the customer by using Amazon Pinpoint API’s sendMessages operation.

Amazon Pinpoint delivers the SMS to the recipient and generates a unique message ID to the AWS Lambda function. The Lambda function then adds this message ID to a DynamoDB table called “message-lookup”. This table is used for tracking different feedback requests sent during a multi-step conversation and associate them with the appointment ids. At this stage, the Lambda function also populates another table “feedbacks” which will hold the feedback responses that will be sent as SMS reply messages.

Each time a recipient replies to an SMS, Amazon Pinpoint publishes this reply event to an Amazon SNS topic which is subscribed by an Amazon SQS queue. Amazon Pinpoint will also add a messageId to this event which allows you to bind it to a sendMessages operation call.

A second AWS Lambda function polls these reply events from the Amazon SQS queue. It checks whether the reply is in the correct format (i.e. a number) and also associated with a previous request. If all conditions are met, the AWS Lambda function checks the ConversationStage attribute’s value from its message-lookup table. According to the current stage and the SMS answer received, AWS Lambda function will determine the next step.

For example, if the feedback score received is less than 5, a follow-up SMS is sent to the user asking if they’ll be happy to receive a call from the customer support team.

All SMS replies from the users are reflected to “feedbacks” table for further analysis.

Deploying the Sample Application

  1. Clone this GitHub repository to your local machine and install and configure AWS SAM with a test AWS IAM user.

You will use AWS SAM to deploy the remaining parts of this serverless architecture.

The AWS SAM template creates the following resources:

    • An Amazon DynamoDB table (appointments) that contains information about appointments, customers and their appointment status.
    • An Amazon DynamoDB table (feedbacks) that holds the received feedbacks from customers.
    • An Amazon DynamoDB table (message-lookup) that holds the Amazon Pinpoint message ids and associate them to appointments to track a multi-step conversation.
    • Two AWS Lambda functions (FeedbackSender and FeedbackReceiver)
    • An Amazon SNS topic that collects state change events from Amazon Pinpoint.
    • An Amazon SQS queue that queues the incoming messages.
    • An Amazon Pinpoint Application with an associated SMS channel.

This architecture consists of two Lambda functions, which are represented as two different apps in the AWS SAM template. These functions are named FeedbackSender and FeedbackReceiver. The FeedbackSender function listens the Amazon DynamoDB Stream associated with the appointments table and sends the SMS message requesting a feedback. Second Lambda function, FeedbackReceiver, polls the Amazon SQS queue and updates the feedbacks table in Amazon DynamoDB. (pinpoint-two-way-sms)

          Note: You’ll incur some costs by deploying this stack into your account.

  1. To start the SAM deployment, navigate to the root directory of the repository you downloaded and where the template.yaml AWS SAM template resides. AWS SAM also requires you to specify an Amazon Simple Storage Service (Amazon S3) bucket to hold the deployment artifacts. If you haven’t already created a bucket for this purpose, create one now. The bucket should have read and write access by an AWS Identity and Access Management (IAM) user.

At the command line, enter the following command to package the application:

sam package --template template.yaml --output-template-file output_template.yaml --s3-bucket BUCKET_NAME_HERE

In the preceding command, replace BUCKET_NAME_HERE with the name of the Amazon S3 bucket that should hold the deployment artifacts.

AWS SAM packages the application and copies it into this Amazon S3 bucket.

When the AWS SAM package command finishes running, enter the following command to deploy the package:

sam deploy --template-file output_template.yaml --stack-name BlogStackPinpoint --capabilities CAPABILITY_IAM

When you run this command, AWS SAM shows the progress of the deployment. When the deployment finishes, navigate to the Amazon Pinpoint console and choose the project named “BlogApplication”. This example uses “BlogStackPinpoint” as the stack name, you can change this to any other name you want.

  1. From the left navigation, choose Settings, SMS and voice. On the SMS and voice settings page, choose the Request phone number button under Number settings

Screenshot of request phone number screen

  1. Choose a target country. Set the Default message type as Transactional, and click on the Request long codes button to buy a long code.

Note: In United States, you can also request a Toll Free Number(TFN)

Screenshot showing long code additio

A long code will be added to the Number settings list.

  1. Choose the newly added number to reach the SMS Settings page and enable the option Enable two-way-SMS. At the Incoming messages destination, select Choose an existing SNS topic, and from the drop down select the Amazon SNS topic that was created by the BlogStackPinpoint stack.

Choose Save to save your SMS settings.


Testing the Sample Application

Now that the application is deployed and configured, test it by creating sample records in the Amazon DynamoDB table. Navigate to Amazon DynamoDB console and reach the tables view. Inspect the tables that were created by the AWS SAM application.

Here, appointments table is the table where the appointments and their statuses are kept. It tracks the appointment lifecycle events with items identified by unique ids. In this sample scenario, we are assuming that an appointment application creates a record with ‘CREATED’ status when a new appointment is planned. After the appointment is finished, same application updates the status to ‘COMPLETED’ which will trigger the feedback collection process. Feedback results are collected in the feedbacks table. Amazon Pinpoint message id’s, conversation stage and appointment id’s are kept in the message-lookup table.

  1. To start testing the end-to-end flow, choose the appointments table to open table overview page.
  2. Next, select the Items tab and choose the Create item From the dropdown, select Text. Add the following and choose Save to create your first appointment object. While adding the following object, replace CustomerPhone attribute’s value with a phone number you own. The feedback request messages will be delivered to that number. Note: This number should match the country number for the long code you provisioned.

{

"CustomerName": "Customer A",

"CustomerPhone": "+12345678900",

"AppointmentStatus":"CREATED",

"id": "1"

}

  1. To trigger sending the feedback SMS, you need to set an existing item’s status to “COMPLETED” To do this, select the item and click Edit from the Actions menu.

Replace the item’s current JSON with the following.

{

"AppointmentStatus": "COMPLETED",

"CustomerName": "Customer A",

"CustomerPhone": "+12345678900",

"id": "1"

}

  1. Before choosing the Save button, double check that you have set CustomerPhone attribute’s value to a valid phone number.

After the change, you should receive an SMS message asking for a feedback. Provide a numeric reply of that is less than five to this message. This will trigger a follow up question asking for a consent to receive an in-person callback.


During your SMS conversation with the application, inspect the feedbacks table. The feedback you have given over this two-way SMS channel should have been reflected into the table.

If you want to repeat the process, make sure to increment the AppointmentId field for any additional appointment records.

Cleanup

To clean up the resources you used in your account, simply navigate to AWS Cloudformation console and delete the stack named “BlogStackPinpoint”.

After the stack is deleted, you also need to delete the Long code from the Pinpoint Console by choosing the number and pressing Remove phone number button. You can also delete the Amazon S3 bucket you used for packaging and deploying the AWS SAM application.

Conclusion

This architecture shows how Amazon Pinpoint can be used to make two-way SMS communication with your customers. You can implement Two-way SMS functionality in other use cases such as appointment reminders, polls, Q&A services, and more.

To learn more about Pinpoint and it’s two-way SMS mechanism, you can visit the Pinpoint documentation.


Send SMS at scale to Indian recipients using Amazon Pinpoint

Post Syndicated from Meng Kang original https://aws.amazon.com/blogs/messaging-and-targeting/send-sms-at-scale-to-indian-recipients-using-amazon-pinpoint/

SMS has one of the highest open rates of all customer communications channels, and is popular with application builders for both transactional use cases like appointment reminders or asynchronous use cases like a SMS chatbot. Amazon Pinpoint supports SMS in over 200 countries and territories, but SMS sending requirements can vary by recipient destination. SMS sending requirements, depending on locale, can include restrictions on origination identity used, messages content, or the routes used to deliver to recipients. Amazon Pinpoint is making it easier for you to send application-to-person (A2P) SMS to Indian recipients using domestic routes. Amazon Pinpoint now supports submitting the Principal Entity ID (PEID) and Template ID using the Send Message API.

Introduction to new regulations and DLT platform

In 2018, the Telecom Regulatory Authority of India (TRAI) released The Telecom Commercial Communication Customer Preference Regulation (TCCCPR) to regulate text messaging in India. To implement this, TRAI adopted a block-chain technology called the Distributed Ledger Technology (DLT) platform. Every business entity who wants to send Application-to-Person (A2P) SMS to their end users in India using domestic routes will need to register their business and use case on the DLT platform. DLT registration is a concept that is unique to the SMS industry in India. If you don’t send text messages to recipients in India then DLT registration doesn’t apply to you. You will not be able to send A2P SMS to Indian recipients using domestic routes if you do not register on the DLT platform. Please note that if you are an international enterprise and you would like to send A2P SMS to recipients in India, you can leverage Amazon Pinpoint’s International Long Distance Operator (ILDO) routes. See more information here.

Changes in sending A2P SMS

DLT has brought many changes to the way SMS is sent in India. These include a new registration process, new message categorization, as well as restrictions around how to send messages. See below for an overview of this process.

Registration with TRAI: Prior to DLT, only service providers/telemarketers were required to register with TRAI. With the updated regulations, business owners/principal entity who wants to send SMS to their customers in India have to sign-up and complete the registration process on DLT platform.

Sender ID & Template Registration: Prior to DLT, bulk SMS service providers used to approve Sender IDs and templates. With the updated regulations, business owners/principal entity have to register Sender ID and Templates on the DLT platform and get those approved.

Customer Preference and Consent: Prior to DLT, customers were either on National Do Not Disturb Registry (DND) or not. The new regulation gave control to consumers/mobile subscribers by offering a time-window where they can manage their preferences based on a specific time or day and allow receipt of certain kinds of promotional messages. It means that customers can choose to receive promotional text from a company even if they have activated DND.

Types of Message: With the new regulation, the DLT-defined domestic routes are as follows.

  • Promotional SMS: these include offers, discounts to non-opt in users, and SMS delivered to Non-DND numbers where the customer has not explicitly opted in. These can only be delivered between 10.00AM to 21:00PM IST. Operators have also stopped supporting delivery notification and receipts for promotional SMS. Promotional messages are sent using 6-digit numeric Sender IDs.
  • Transactional SMS: this is reserved for financial organizations to send One-Time-Passwords (OTPs). Transactional messages use 6-digit alpha Sender IDs.
  • Service Implicit: these include service-related informative messages other than OTPs. Amazon Pinpoint classifies these under the “transactional” route type, so customers will continue to select the “transactional” route type to send these messages.
  • Service Explicit: these include promotional messages customers have opted to receive from a particular business. Amazon Pinpoint classifies these under the “transactional” route type, so customers will continue to select the “transactional” route type to send these messages.

Validation (Scrubbing) Functionality: With DLT, customers’ mobile numbers are filtered in real-time to match the desired criteria set by the customer. This means that if a customer gave consent to receive SMS on Monday, but withdraws the permission on Wednesday, then the SMS will not be delivered on Thursday. Customer preferences are updated in real-time and the results are immediately available on DLT. When sending, the DLT platform will validate the PEID customers used to send against the registered Sender ID, and validate the SMS Template against the registered Brand name, so that only approved businesses using approved SMS Sender are able to send SMS to the end recipient.

DLT registration timeline

TRAI is the entity enforcing DLT implementation in India. TRAI has designated these changes to take place over several phases and months, with each phase increasing the level of restriction on message sending:

Phase 1 (Initiated June 2020): The first phase is to complete Principal Entity ID (PEID) & the SMS Header or Sender ID registration on the DLT platform. Only registered SMS Header or Sender ID can be used to send SMS to India using domestic routes.

Phase 2 (Initiated Nov 2020): The second phase is to register Template ID on the DLT platform. For each SMS send, the PEID and Template ID are validated against the registered Sender ID.

Phase 3 (Initiated April 2021): The third phase is to validate that the content of the message template matches exactly what was registered on the DLT platform. Brand Name is a mandatory field to be included in content for template registration.

Using Pinpoint to send SMS to India

To send SMS messages to India from Amazon Pinpoint, you’ll first need to complete DLT registration. To do so, follow the steps described on the Special requirements for sending SMS messages to recipients in India documentation.

Next, to make sure your SMS messages are delivered successfully using local routes, you need to do the following when using Amazon Pinpoint sending the SMS message.

  • Use a Sender ID which has been registered on the DLT platform that matches your message content.
  • In the Pinpoint Send Message API, provide values for the following parameters:
    • EntityId – The entity ID or Principal Entity (PE) ID received from the regulatory body for sending SMS in your country.
    • TemplateId – The template ID received from the regulatory body for sending SMS in your country.
  • Choose one of the following route types:
    • Promotional – Choose this type for promotional messages, which use a numeric sender ID.
    • Transactional – Choose this type for transactional messages, which use a case-sensitive alphanumeric sender ID.

When adding the content to your message, thoroughly review your content to ensure that it exactly matches the content in the DLT registered template. If you include additional character returns, spaces, punctuation, or mismatched sentence case, carriers will block your SMS. Variables in a template – for example, {#var#} – cannot exceed 30 characters for each variable. The following are some common use cases for message rejection:

No template was found that matched the content sent.
Content sent: <#> 12345 is your OTP to verify mobile number. Your OTP is valid for 15 minutes — ABC Pvt. Ltd.
Matched template: None
Issue: There are no DLT templates that include <#> or {#var#} at the beginning of the DLT registered template.

The value of a variable exceeds 30 characters.
Content sent: 12345 is your OTP code for ABC (ABC Company – India Private Limited) – (ABC 123456789). Share with your agent only. – ABC Pvt. Ltd.
Matched template: {#var#} is your OTP code for {#var#} ({#var#}) – ({#var#} {#var#}). Share with your agent only. – ABC Pvt. Ltd.
Issue: The value of “ABC Company – India Private Limited” in the content sent exceeds a single {#var#} character limit of 30.

The message sentence case does not match the sentence case in the template.
Content sent: 12345 is your OTP code for ABC (ABC Company – India Private Limited) – (ABC 123456789). Share with your agent only. – ABC Pvt. Ltd.
Matched template: {#var#} is your OTP code for {#var#} ({#var#}) – ({#var#} {#var#}). Share with your agent only. – ABC PVT. LTD.
Issue: The company name appended to the DLT matched template is capitalized while the content sent has changed parts of the name to lowercase — “ABC Pvt. Ltd.” vs. “ABC PVT. LTD.”

Start using Amazon Pinpoint to send SMS messages to Indian recipients by following the steps described on the Special requirements for sending SMS messages to recipients in India documentation.

Maintain consistency in emails with custom content using Amazon SES templates

Post Syndicated from Seth Theeke original https://aws.amazon.com/blogs/messaging-and-targeting/maintain-consistency-in-emails-with-custom-content-with-amazon-ses-templates/

When sending emails, content creators often want to add custom content such as images or videos while maintaining consistency in their messages. They also want to send those emails automatically once new content is ready. In this blog, we will show you how to create templates for emails with a common theme by combining Amazon Simple Email Service (Amazon SES) templates, AWS Lambda, Amazon Simple Storage Service (Amazon S3), and Amazon SES templates.

Promotional content (such as logos, images, videos, and more) can be stored, managed, and hosted in Amazon S3. You can then embed this content into promotional emails without making any changes to email templates or email processing. You can trigger a Lambda function to send promotional emails with the newly added content through using the Amazon SES SDK.

This post shows readers how to:

  • Create an Amazon SES email template with tags to be replaced by image URLs
  • Upload those templates to Amazon SES
  • Setup an AWS CloudFormation stack using the AWS Cloud Development Kit(AWS CDK)
  • Create a Lambda function and Amazon S3 bucket to send emails using the AWS SDK for Javascript

Solution Architecture

The proceeding image shows the architecture you will build as part of this post. You will use the AWS CDK to provision an Amazon S3 bucket, Lambda, and AWS Identity and Access Management(IAM) permissions. You will also use the AWS Command Line Interface(AWS CLI) to upload and manage our Amazon SES templates.

The architecture allows you to upload content to S3 which will trigger a Lambda function. That Lambda will form an Amazon SES request using the template you have uploaded and embed the S3 content as a parameter which will be sent to the user and render in their email client.

Metadata

Time to Read: ~ 20 minutes

Time to Complete: ~ 15 minutes

Cost to Complete: Free Tier

Learning Level: Intermediate

Services Used: Amazon Simple Email Service, Amazon Simple Storage Service, AWS Lambda

Prerequisites

For this walkthrough, you should have the following prerequisites:

Solution Overview

You will walk through creating Amazon SES templates and then a CloudFormation stack using the AWS CDK. You will then create a template file, a lambda directory, and a CDK application directory which should all be in the same level in your package structure in order to follow these steps explicitly.

Step 1: Create an Amazon SES template in JSON with a tag representing your image URL and upload via the CLI

Step 2: Initialize an AWS CDK package using the AWS CDK CLI and add necessary dependencies

Step 3: Initialize a NodeJS AWS Lambda package

Step 4: Provision an Amazon S3 bucket and Lambda in your AWS CDK app

Step 5: Configure your Lambda to be triggered when objects are added to S3

Step 6: Configure your Lambda’s IAM role to allow sending emails via Amazon SES

Step 7: Write necessary code for AWS Lambda to send emails via Amazon SES

Step 8: Deploy and Test!

Step 1: Create an Amazon SES Email template

Amazon SES Email templates are defined as a JSON object containing:

  • TemplateName – name of the template, must be unique across email templates and will be used by our Lambda to pass to Amazon SES
  • SubjectPart – represents the subject of the email
  • HtmlPart – represents the body of the email
  • TextPart – when email clients cannot render HTML, this is displayed instead of HtmlPart

More detailed information about email templates can be found in the Amazon SES Developer Guide.

1.     Open your text editor and save the empty file as email-template.json

2.     Paste the following into your json file and save your changes

{
  "Template": {
    "TemplateName": "MyTemplate",
    "SubjectPart": "Greetings Customer",
    "HtmlPart": "<img src={{imageURL}} alt=\"logo\" width=\"100\" height=\"100\">",
    "TextPart": "Dear Customer,\r\nCheck out our website for new promotional content."
  }
}

This template has a single tag called imageURL which will be replaced during execution with our content’s S3 URL.

3.     Run the following AWS CLI command to upload your template to Amazon SES

aws ses create-template --cli-input-json file://email-template.json

4.     Once your template has been uploaded, you can confirm its creation by logging into the AWS Console, navigating to Amazon SES, and then selecting Email Templates

Step 2: Initialize an AWS CDK package and add necessary dependencies

In this section, you will be using the AWS CDK CLI to initialize a new code package and add the dependencies for Lambda and Amazon S3.

1.     Create a new directory at the same level as email-template.json called email-infrastructure

2.     Navigate to the promotional-email-infrastructure directory and run the following CDK CLI command to generate the skeleton for your cdk application

cdk init app --language=typescript

3.     Add dependencies for Amazon S3, Lambda, and IAM by adding the following lines to your dependencies section of your package.json and then run npm install

"@aws-cdk/aws-lambda": "1.86.0"
"@aws-cdk/aws-lambda-event-sources": "1.86.0"
"@aws-cdk/aws-s3": "1.86.0"
"@aws-cdk/aws-iam": "1.86.0"

Make sure to install the version of these dependencies that matches the version of the aws-cdk stack so you don’t run into compatibility issues.

Step 3: Create a NodeJS Lambda package

In this step, you will create the barebones for our Lambda function that will call Amazon SES and revisit in step 7 to implement the handler

1.     Create a new directory at the same level as email-template.json called email-lambda

2.     Add a package.json file in the email-lambda directory that looks like the following

{
    "name": "email-lambda",
    "version": "1.0.0",
    "main": "index.js",
    "dependencies": {
        "aws-sdk": "2.831.0"
    }
}

3.     Add a file called index.js, this will be our Lambda handler and will look like the following for now. Make sure to insert your verified email address into the testAddress variable, this will be used later as both your to and from address for testing.

var AWS = require("aws-sdk");
var ses = new AWS.SES({apiVersion: "2010-12-01"});
var testAddress = "INSERT_VERIFIED_EMAIL_HERE";

exports.handler = async function(event) { 
    console.log(JSON.stringify(event));
    return "200";
}

4.     Finish this step by running npm install in the email-lambda directory to install the aws-sdk dependencies you will use in a later step. Your top-level directory structure should look like the following:

  • email-template.json – contains your email template from step 1
  • email-infrastructure – contains your CDK stack from step 2
  • email-lambda – contains your email lambda function code from step 3

Step 4: Provision an Amazon S3 bucket and Lambda function in your CDK app

In this step, you will add an Amazon S3 bucket and a NodeJS Lambda function into our CDK application based on what you setup in previous steps. After this, you will connect all the pieces together.

1.     Import all the services you need into our CDK stack construct. The imports you will need are listed below, copy them into your editor in the imports section.

import * as s3 from '@aws-cdk/aws-s3';
import * as lambda from '@aws-cdk/aws-lambda';
import * as lambdaEventSource from '@aws-cdk/aws-lambda-event-sources';
import * as iam from '@aws-cdk/aws-iam';
import path = require('path');

2.     Add S3 bucket to CDK App by adding an instance of the Bucket construct

const promotionalContentBucket = new s3.Bucket(this, "DOC-EXAMPLE-BUCKET");

3.     Similarly, add your Lambda function by creating an instance of the Function construct referencing your Lambda function package by path

const emailLambda = new lambda.Function(this, "EmailLambda", {
    code: lambda.Code.fromAsset(path.join(__dirname, "../../email-lambda")),
    handler: "index.handler",
    runtime: lambda.Runtime.NODEJS_12_X
});

4.     Execute npm run build in your CDK directory to ensure you’ve setup the package correctly. You can get additional help from the Troubleshooting Guide for CDK

Step 5: Configure Lambda with an S3 Event Source

In this step, you will configure your Lambda function to be triggered when objects are added to your Amazon S3 bucket by using the Lambda event sources module for CDK.

1.     Create an instance of the S3EventSource construct in your stack for OBJECT_CREATED events only because you don’t want to trigger a lambda invocation when an object is removed for this post

const s3EventSource = new lambdaEventSource.S3EventSource(promotionalContentBucket, {
    events: [s3.EventType.OBJECT_CREATED]
});

2.     Now that you have an event source defined, you need to add the event source to your Lambda function

emailLambda.addEventSource(s3EventSource);

3.     Add the Amazon S3 bucket’s domain name as an environment variable so you can reference objects by URL by adding the environment property to your Lambda function like below.

environment: {
    "BUCKET_DOMAIN_NAME": promotionalContentBucket.bucketDomainName
}

Step 6: Configure the email Lambda IAM role

In this step, you will add an IAM policy statement to your email Lambda’s execution role so it can call Amazon SES.

1.     Add an IAM PolicyStatement construct with effect ALLOW on all resources with SendTemplatedEmail action

const emailPolicyStatement = new iam.PolicyStatement({
    effect: iam.Effect.ALLOW,
    actions: ["ses:SendTemplatedEmail"],
    resources: ["*"]
});

2.     Finish this step by adding your newly created policy to the Lambda execution role

emailLambda.addToRolePolicy(emailPolicyStatement)

Step 7: Add Lambda implementation to send templated emails

You will use the AWS NodeJS Amazon SES SDK to send emails using the SendTemplatedEmail API. Our implementation will assume a batch of size 1 for each Lambda invocation for simplicity.

1.     Replace your function handler in the email Lambda function with the code below. This will read the S3Event’s first record, prepare parameters for the Amazon SES SDK call and invoke the sendTemplatedEmail function with the imageURL embedded into your previously created template.

exports.handler =  async function(event) {  
    console.log(JSON.stringify(event));
    let s3Object = event.Records[0];
    let sendEmailParams = {
        Destination: {
            ToAddresses: [testAddress]
        },
        Template: 'MyTemplate',
        TemplateData: JSON.stringify({
            "imageURL": process.env.BUCKET_DOMAIN_NAME + "/" + s3Object.s3.object.key,
        }),
        Source: testAddress
    };
    let response = await ses.sendTemplatedEmail(sendEmailParams).promise();
    return response;
}

2.     Deploy your stack with the CDK CLI by running cdk deploy, this may take a couple minutes. If you run into problems, see the Troubleshooting Guide for CDK.

Step 8: Test your System

At this point, you should have an Amazon SES template uploaded to your account as well as a CloudFormation stack that contains an Amazon S3 bucket and a Lambda function that is triggered when objects are added to that bucket and had permissions to invoke Amazon SES APIs. Now you will test the system by adding an image into our Amazon S3 bucket.

1.     Log in to the AWS Console

2.     Navigate to Amazon S3

3.     Select your promotional content bucket from the list of buckets

4.     Click Upload on the right-hand side of the screen

5.     Add an image from your computer by clicking Add files

6.     Scroll down to the bottom and expand Additional Upload Options

7.     Scroll down to Access Control List

8.     Select the check boxes for Read for Everyone(public access) so the images are accessible when the user opens their email

9.     Scroll down to the bottom and select Upload

10.     Done! You should have an email in your inbox shortly that renders the image you just uploaded. Check the Lambda logs and errors in case you don’t see your email.

Cleaning up

To avoid incurring future charges, delete your CloudFormation stack by running cdk destroy or manually through the AWS Console. Keep in mind, by default Amazon S3 buckets won’t be deleted so you will need to navigate to Amazon S3 in the AWS Console, clear the bucket of any objects and then manually delete the resource.

Conclusion

Congratulations! You now have an understanding of how to combine Amazon SES templates with Amazon S3 and Lambda to inject custom images into emails without the need for any servers and have launched this stack using the AWS Cloud Development Kit.

Author Bio

My name is Seth Theeke, I work as a Software Development Engineer in Amazon Freight. I’ve been working with AWS since 2016 and hold a Developer Associate Certification. I love soccer and I love software engineering, the simplest things in life!

Solving abandoned cart scenarios using Amazon Pinpoint event-triggered journeys

Post Syndicated from Ryan Lowe original https://aws.amazon.com/blogs/messaging-and-targeting/solving-abandon-cart-scenarios-using-amazon-pinpoints-event-triggered-journeys/

In this post, we will walk through building an abandoned shopping cart user journey in Amazon Pinpoint. Journeys are multi-step user engagements with channels sends (SMS, email or push) based on conditional logic with a goal to drive a high value action. This journey will enable customers to identify users who added a product to their shopping cart but have not purchased, and follow up with them via email to encourage them to complete the transaction. Though the example will be specific to this use case, the steps used can be adapted to fit similar user journeys.

Abandoned Shopping Cart Journey

The Baynard Institute states the average cart abandonment rate is 69.57%, which means over half of users add a product to cart but do not check out. Any improvement in this metric has a direct impact on revenue, and is easily measurable. This makes it a no brainer for marketers to support through campaigns. Previously, customers did not have a way to immediately react to a cart abandonment or other important events within a journey. This meant customers would need to create a segment of users who abandoned their cart and do a daily send. By this time, the user might have purchased an item somewhere else, or lost interest in the product or service.

Solution Overview

The solution that we will build relies on Amazon Pinpoint’s events API to report two application events: AddToCartEvent, CartPurchasedEvent. These events should be reported to Amazon Pinpoint from your electronic shopping cart system. The integration with the online shopping cart system is out of scope for this article. Please refer to the Amazon Pinpoint developer guide for more information.

Architecture Diagram

When a user of your e-commerce shopping cart adds items to their shopping cart, you can report the AddToCartEvent to Amazon Pinpoint. At a later time, when the user completes their purchase, you can report the CartPurchasedEvent. If the CartPurchasedEvent does not get reported to Amazon Pinpoint within an hour of receiving the AddToCartEvent, then you can trigger our abandon shopping cart email to encourage the user to return and complete their purchase.

Using these events, you are able to use Amazon Pinpoint’s journey feature to orchestrate our user experience. You will use the first event, AddToCartEvent, to trigger your journey. After an hour wait, you will then use the second event, CartPurchasedEvent, to filter out users who have completed the purchase. The remaining users will receive your abandon shopping cart email message urging them to return to their cart and complete their order.

Step 1: Create Add to Cart and Purchase custom events

The first step in setting up this solution is to create and report the two custom events. There are multiple ways to report events in your application. For demonstration purposes, we have included two example event calls in the proceeding code chunk using the AWS SDK for Python (Boto3) from inside an AWS Lambda Function.

It is important to note that the Amazon Pinpoint events API can also be used to update endpoints at the same time that the event gets registered. In the proceeding example, the first API call will update the endpoint’s attribute Cart with the contents of the shopping cart. In the second example, the API call update the endpoint’s attribute Purchased with the flag Yes.

Sample Event: Item Hat was added to cart with a price of $29.95

import boto3

client = boto3.client('pinpoint')
app_id = '[PINPOINT_PROJECT_ID]'
endpoint_id = '[ENDPOINT_ID]'
address = '[EMAIL_ADDRESS]'

def lambda_handler(event, context):
    
    client.put_events(
        ApplicationId = applicationId,
        EventsRequest={
            'BatchItem': {
                endpoint_id: {
                    'Endpoint': {
                        'ChannelType': 'EMAIL',
                        'Address': address,
                        'Attributes': {
                            'Cart': ['Hat'],
                            'Purchased': ['No']
                        }
                    },
                    'Events':{
                        'cart-event-2': {
                            'Attributes':{
                                'AddedToCart': 'Hat'
                            },
                            'EventType': 'AddToCartEvent',
                            'Metrics': 29.95,
                            'Timestamp': datetime.datetime.fromtimestamp(time.time()).isoformat()
                        }
                    }
                }
            } 
        }
    )

Sample Event: Cart purchased

import boto3

client = boto3.client('pinpoint')
app_id = '[PINPOINT_PROJECT_ID]'
endpoint_id = '[ENDPOINT_ID]'
address = '[EMAIL_ADDRESS]'

def lambda_handler(event, context):
    
    client.put_events(
        ApplicationId = applicationId,
        EventsRequest={
            'BatchItem': {
                endpoint_id: {
                    'Endpoint': {
                        'ChannelType': 'EMAIL',
                        'Address': address,
                        'Attributes': {
                            'Cart': ['Hat'],
                            'Purchased': ['Yes']
                        }
                    },
                    'Events':{
                        'cart-event-2': {
                            'Attributes':{
                                'Purchased': 'Yes'
                            },
                            'EventType': 'CartPurchasedEvent',
                            'Timestamp': datetime.datetime.fromtimestamp(time.time()).isoformat()
                        }
                    }
                }
            } 
        }
    )

Note: Both events above must be reported to Amazon Pinpoint in order to complete the remaining steps in this post.

Step 2: Create a “Made a Purchase” Dynamic Segment

The second step in our solution is to create a dynamic segment to filter out users who have made a purchase. To do this, you will look for users with the endpoint attribute of Purchased to be the value Yes.

  1. Navigate to your project in the Amazon Pinpoint Console, then Segments.
  2. Choose Create a segment.
  3. Select Build a segment.
  4. Provide the name Made a Purchase into the name field.
  5. Configure Segment Group 1 to add segment filters.
    1. Under the Add filters to refine your segment choose Filter by endpoint.
    2. For the Choose an endpoint attribute dropdown choose Purchased
    3. Ensure Is is chosen in the middle dropdown.
    4. In the Choose values dropdown choose Yes.
  6. Click Create Segment to create your first dynamic segment. Note, a pop-up will appear highlighting that this segment targets multiple endpoint channels. Select I Understand.

Step 3: Create our Abandon Cart Journey

The last step is to design out the journey itself.

  1. Navigate to your project in the Amazon Pinpoint Console, then Journeys.
  2. Choose Create journey to create a new journey.
  3. Give the Journey the name Abandon Cart by replacing the Untitled text.
  4. Define a Journey entry criteria
    1. Choose Set entry condition to expand the Journey entry activity.
    2. Choose Add participants when they perform an activity and choose AddToCartEvent in the Events field.
    3. Choose Save
  5. Create a branch to target users who did not make a purchase
    1. Choose Add activity directly under the Journey entry activity
    2. Under Choose a journey activity choose Yes/no split.
    3. Under Select a condition type choose Segment.
    4. Under Segments choose the Made a Purchase dynamic segment created earlier.
    5. Under Condition evaluation choose Evaluate after and then choose 1 hours.
    6. Choose Save
  6. Add an email activity to send our abandon cart message
    1. Choose Add activity directly under the No split path.
    2. Under Choose a journey activity choose Send email.
    3. Choose Choose an email template and select your messaging template and choose Choose template.
    4. Choose Save.

At this point, your journey should look like the screenshot below. You can now choose Review to walkthrough steps to publish your journey.

Next Steps

You can continue to iterate on this experience using the journeys tool to create a custom user-experience for your users without any code changes.

  • Filter the journey entry event to only high dollar cart items by adding Event metrics filters in the Journey entry criteria.
  • Test out different channels by sending message to users over SMS instead of email.
  • Add additional splits to send messages on users’ preferred channels.
  • Add a second wait of 24 hours and send a final reminder with a 10% off coupon code.
  • Add random splits to do A/B testing of different messages and channels.

Cleanup

To stop and remove the journey in order to not incur further charges, please follow the steps below.

  1. Navigate to your project in the Amazon Pinpoint Console, then Journeys.
  2. Select the Abandon Cart journey.
  3. Choose Stop journey then choose Stop journey again in the Stop journey confirmation.
  4. To fully delete the journey choose Delete from the Actions menu.

Conclusion

Cart abandonment is a major issue that has a direct impact on revenue. This solution allows customers to recognize a user has abandoned a critical flow and allows a marketer to re-engage them through a messaging channel before it is too late. Different components of the user journey can also be A/B tested and targeted with different user segments to drive the highest return from different user cohorts. Once set up, the journey can be always-on and independently drive incremental revenue for a business.

Log into the Amazon Pinpoint Console to get started creating your own abandon shopping cart journey.

AWS Managed Services by Anchor 2021-03-23 07:38:38

Post Syndicated from Gerald Bachlmayr original https://www.anchor.com.au/blog/2021/03/why-cloud-native-is-essential-for-your-2021-retail-strategy-and-how-to-get-started/

The retail market has changed a lot over the last years and Covid is often referenced as the main driver for digital transformation and self-service offerings. Retail customers can easily compare products and customer feedback online via various comparison websites and search engines.

The customers interact with the e-commerce application that allows them to search for products, purchase them and keep them updated about the delivery status. Customers do not care where the application is hosted or what the technology stack is. They care about things like usability, speed, features and they want to interact with the applications on different devices.

What is Cloud Native?

Cloud Native is an approach where your application leverages the advantages of the cloud computing delivery model. Cloud-native systems are designed to embrace rapid change, large scale, and resilience. With this approach you let AWS do the Undifferentiated Heavy Lifting and your team can focus on the actual application. For example, you can deploy your code to fully managed runtime environments that scale automatically and AWS manages all the operational aspects and security of those runtimes for you.

Why is Cloud Native a retail enabler?

Taking a customer centric view, you want to focus on the things that provide value to the customer. The most visible aspect of the retail solution is the actual application or service – not the IT infrastructure behind it. Therefore you want to make sure that your application keeps improving without wasting time and budget on things that can be commoditised.

Let’s look at an example: You run a coffee shop. You grind the beans so the coffee is fresh.  Your customers can then enjoy a great tasting experience. This is the ultimate business value that the customer can see. You would not generate the electricity yourself, as an energy provider does that in a much more efficient way.

This is exactly the same with all the underlying infrastructure of your retail application: AWS can manage this for you in a much more efficient, secure and cost effective way. AWS calls all those activities that do not differentiate your business from others ‘Undifferentiated Heavy Lifting’. By handing all those Undifferentiated Heavy Lifting activities over to AWS you can focus on the things that really matter to your customers – like good coffee!

How do you get started?

If you start from scratch then you have an easier journey ahead because you can tap into all the cloud native offerings right from the beginning. For now we will assume that you already have an application and you want to move it to the cloud, leveraging the advantages of Cloud Native services. At the beginning of your journey you will make sure you have answers to some of the typical discovery questions, such as:

  1. Understand your current state and pain points
    1. Time to market:
      Do you get new features out quick and often enough. If not, what is causing those delays?
    2. Data insights and metrics:
      What insights do you need to understand what your customers want and how you can increase your conversion rate?
    3. Quality assurance and security:
      Are there sufficient quality checks in place before you release new features or product catalogue items? Do you have guardrails in place that protect your team from security breaches?
  2. Understand the Return on Investment of Cloud Native and why do you want to migrate
    1. Lost opportunity:
      What is the impact of not moving to cloud native? For example you will be slower in releasing new features than your competitors.
    2. Operational simplification:
      How can you focus more on your customer facing application when you remove the Undifferentiated Heavy Lifting?
    3. Business agility:
      Do you need geographic data isolation to meet regulatory requirements or do you need temporary environments for testing or demos?
  3. Are your ways of working aligned with where you want to be in the future?
    1. Internal collaboration:
      Is your internal communication structure future proof? “Conways Law” describes  how organisations design systems which mirror their own communication structure. This is one of many reasons why organisation move towards cross-functional delivery squads.
    2. Team hand-offs:
      Do you have many hand-offs during your software delivery life-cycle? This will slow down the process due to waiting times between team hand-offs and also potential communication gaps.
    3. Skills:
      Does your team have the required skills? By offloading the Undifferentiated Heavy Lifting to AWS the required skill set becomes narrower and your team can focus on training that is relevant for the application development and test automation.

How to expertly execute a Cloud Native approach

  1. Understand your strategy:
    1. Strategy:
      The strategy will articulate why you want to achieve change and what principles will guide the the target state
    2. Target State:
      The target state describes where you eventually want to be. Words like ‘customer focus’ and ‘simplification’ should be on the forefront of your mind. Amazons “Working backwards from the customer” framework and the AWS Well Architected Framework can help you here.
    3. Transitions:
      The transition states describe how to get to your target state. The transition states are individual architecture blueprints that describe your transformation stages.
  2. Build a roadmap
    1. Define a backlog:
      The backlog articulates the expected business outcomes typically in form of user stories that can be achieved within a sprint duration (1-2 weeks). Good user stories also include acceptance criteria and test cases.
    2. Understand dependencies:
      The backlog is driven by business outcomes but there will be some technical dependencies that dictate in which order some activities need to be completed. Understanding those dependencies is important to make sure the team can be productive and do not have unnecessary wait times.
    3. Identify skill gaps and build a learning plan:
      Once you build your backlog you get a better understanding of the required skills. This helps you to plan for training courses and other learning initiatives.
  3. Build a governance framework
    1. Strategic guidelines:
      Having clear articulated guidelines in place will help you to speed up the decision process for any changes you will perform. Make sure the required teams are represented in your governance working group so that you don’t miss out any requirements and concerns.
    2. Align with best practices:
      There are lots of best practices that can be utilised rather than reinventing the wheel. The AWS Well Architected Framework for example can help you with architecture guidelines and principles.
    3. Define how you measure success:
      You need to know what good looks like: what does a good customer experience look like and what are your milestones? What is the productivity, team happiness and customer satisfaction that you need as a successful and sustainable retail business? Agree on a set of metrics that you can compare against. You can gradually build up these metrics.
  4. Establish cross-functional teams (squads)
    1. Squads:
      A squad will have team members representing architecture, development, testing and technical business analysis. The goal is to establish an autonomous team that can tackle the user stories from the backlog. Depending on your organisation structure the squad will be represented by members from different business units.
    2. Ceremonies:
      Since the squad members can come from different business units, they might not have worked together before. Therefore a good team collaboration is crucial and agile ceremonies will help with that. Some of the key ceremonies are sprint planning, daily standups (maximum 15 minutes), a demo at the end of the sprint to show the stakeholders the produced outputs, followed by a retrospective to get feedback from the team.
    3. Experiment:
      When you change your ways of working approach it is easier to start small and pick an initiative that is not overly time critical. This way you can start with a smaller team, establish short feedback loops and tweak the approach for your organisation. The insights from the retrospective will help you to improve the process. Once you have established one successful squad you can start rolling out the new process further.
  5. Measure your outcomes:
    1. Feedback from your team:
      Your team will provide feedback during the retrospective session at the end of each sprint. You can measure aspects like: How much did the team learn, did it feel like they delivered value? This gives you visibility of any trends and if any changes around the process result in better feedback.
    2. Feedback from the customer:
      There are several ways how you can measure this. Customer surveys are insightful if you ask the right questions. Statistics from your website will be very helpful for any retail organisation. You can measure things like average time on a page, bounce rate, exit rates, conversion rates. If you can link those numbers back to your releases and release changes you can actually see which website updates change the customer behaviour. Machine learning is another way how you can identify customer patterns and determine the sentiment of online chats or phone calls to a virtual call center like Amazon Connect.
    3. Insights from your automation tools:
      Your automation tools can provide metrics such as number of incidents, criticality, ratio of successful deployments, test coverage and many more. Once you can capture those metrics you can run historic comparison and project trends. If you link incidents to releases you will also get insights into the root cause of problems.

Key Cloud Native takeaways

Adopting Cloud Native is not just a technical challenge, it is a journey. If you want to turn it into a success story you need to consider the cultural changes and also a governance process that makes sure you are heading in the right direction. This can be complex and challenging when you haven’t done it before. The good news is that Anchor have championed it many times and we can help you on the journey.

The post appeared first on AWS Managed Services by Anchor.

Connecting to Kibana Within an AWS VPC

Post Syndicated from Bozho original https://techblog.bozho.net/connecting-to-kibana-within-an-aws-vpc/

When you use the managed Elasticsearch service on AWS, you usually choose an encrypted connection (via KMS-managed keys), which means you can’t use just any tool to connect to your Elasticsearch cluster. In fact, in order to manually execute commands the easiest option is to use the built-in Kibana and its dev tools.

However, connecting to Kibana is also not trivial due to typical security precautions. Elasticsearch can be run outside or inside a VPC. If you run it outside a VPC, you have to modify its access policy to allow connections from a set of IPs (e.g. your office network).

But if you run it inside a VPC (which is recommended), you have to connect to the VPC. And you have a lot of options for that, but all of them are rather complicated and sometimes even introduce additional cost.

A much simpler approach is to connect via SSH to a machine in the VPC (typically your bastion/jump host) and use it as a SOCKS proxy for your browser. The steps are:

  1. Open an SSH tunnel. If you are using Windows, you can do it with PuTTy. On Linux, you can use ssh$ ssh -D 1337 -q -C -N [email protected]
  2. Set the SOCKS proxy in the browser. On Firefox, open Options and type “SOCKS”, you’ll have only one option (in Network options) to choose, and then set localhost, 1337 (or whatever port you’ve chosen). Here are the instruction for Chrome (or you can use a plugin)
  3. Open the Kibana URL in the browser. Note that now all your browser traffic will go through your VPC, so depending on the VPC configuration other websites might not work.

That’s it, a quick tip that might potentially save a lot of time trying to get a VPC connection to work.

The post Connecting to Kibana Within an AWS VPC appeared first on Bozho's tech blog.

Send SMS messages at scale using 10DLC and Amazon Pinpoint

Post Syndicated from Brent Meyer original https://aws.amazon.com/blogs/messaging-and-targeting/send-sms-messages-at-scale-using-10dlc-and-amazon-pinpoint/

This week, we’re adding support for 10DLC phone numbers to Amazon Pinpoint. You can use 10DLC phone numbers to send SMS text messages at scale quickly and affordably.

What is 10DLC?

The abbreviation 10DLC stands for Ten-Digit Long Code. 10DLC phone numbers are intended specifically for sending Application-to-Person (A2P) messages—that is, messages that are sent from applications like Amazon Pinpoint to individual recipients. 10DLC is a concept that’s unique to the SMS industry in the United States. If you don’t send text messages to recipients in the US, then 10DLC doesn’t apply to you.

Before the launch of 10DLC, you could purchase unregistered US long codes instantly through the Amazon Pinpoint console. These long codes didn’t require a registration process—anyone could purchase them for $1 per month. However, the mobile carriers never intended for senders to use them to send A2P messages. For these reasons, their capabilities were limited. To prevent bad actors from sending spam and other malicious content, unregistered long codes could only send one message per second, and about 100 messages in a 24-hour period. Carriers applied heavy filtering to these phone numbers and blocked them for sending high volumes of messages, or as a penalty for sending unsolicited messages.

The alternative to using unregistered long codes is to use a short code. Short codes are a premium SMS product. They offer high rates of deliverability and high throughput (starting at 100 messages per second and going up to thousands of messages per second). The mobile carriers apply a rigorous approval process to short code applications. This process takes several weeks to complete. Short codes cost $995 per month, plus a one-time setup fee of $650. We continue to offer and support short codes in Amazon Pinpoint. Short codes are the right solution for many of our customers, and will continue to be part of the US SMS landscape well into the future.

For many customers though, the ideal solution is somewhere in the middle. 10DLC was designed to cover that middle ground. With 10DLC, senders are required to register both their company and their campaign. This registration information is added to The Campaign Registry (TCR), an industry-wide database of companies and use cases that are authorized to send messages using 10DLC phone numbers. Some use cases, such as one-time passwords and other authentication systems, can be approved within a week. Other use cases, such as promotional messaging, are subject to additional scrutiny, but can still be approved in a few weeks. While 10DLC phone numbers don’t offer the high throughput rates that short codes do, they can exceed the one message per second limit of unregistered long codes while offering higher deliverability rates. And importantly for many customers, they don’t come with the price tag associated with short codes. You pay a one-time fee of $4 to register your company, and a $10 monthly fee for each 10DLC campaign that you register. You also pay a $1 monthly charge for each 10DLC long code that you lease.

Note: On March 1, 2021, T-Mobile will begin to charge a one-time, $50 fee for registering your company. This fee will be charged in addition to the $4 company registration fee. No other carriers have announced similar fees.

The following table compares the costs associated with obtaining and using a short code against the costs of obtaining and using a 10DLC phone number. This table assumes that you only register one 10DLC company and campaign. It also assumes that you only use a single long code with your 10DLC campaign.

Short code 10DLC
One-time fees $650 $54 ($4 company registration + $50 T-Mobile registration fee)
Monthly fees $995 $11 ($1 phone number lease + $10 campaign registration fee)

Senders with very low throughput and volume requirements can register a “low-volume” 10DLC campaign for $2 per month, as opposed to the standard campaign fee of $10 per month. This option is a good choice for test and proof-of-concept use cases.

Drawbacks of using 10DLC phone numbers

For users of Amazon Pinpoint, 10DLC phone numbers offer several benefits. However, they also come with a few drawbacks. One drawback is the different ways that the US carriers support 10DLC. As I mentioned earlier, when you apply for a 10DLC phone number, you have to provide information about your company or brand, and information about your specific messaging use case. The carriers use this information to calculate a trust score. They then use this trust score to determine the capabilities of your 10DLC phone number. On T-Mobile and Sprint, your trust score determines the maximum number of messages that you can send each day through your 10DLC phone number. But for AT&T, your trust score determines the number of messages that you can send each minute, with no limit on the daily number of messages that you can send. (As of this writing, Verizon hasn’t announced their throughput plan.) These differences mean that you must carefully manage your messaging program to stay within the daily and per-second limits imposed by the different carriers.

A final drawback to using 10DLC phone numbers is related to throughput. If your use case requires you to send a large number of text messages in a short amount of time (100 messages per second or more), you need a short code.

10DLC Capabilities

10DLC phone numbers typically have higher per-second and daily sending limits than unregistered long codes. The actual performance of your 10DLC phone number is based on the trust score for the company that you registered. The following table shows the trust score tiers and their associated limits.

Tier Message parts per minute (AT&T) Maximum daily messages (T-Mobile & Sprint)
High 1,800 200,000
Medium-High 300 40,000
Medium-Low 30 10,000
Basic 12 2,000

Setting up 10DLC

To set up 10DLC, you have to do three things. First, you must register your company. Second, you must register your use case. And third, you must add a phone number to your 10DLC campaign.

Important: When you complete the steps in this section, you are charged for registering both your company and your use case. These registration charges can’t be reversed. Only complete these steps if you agree to pay these charges.

Step 1: Register your company

When you register your company, you provide your company details to The Campaign Registry (TCR). The mobile carriers use this data to determine the trustworthiness of your use cases. Company approvals are usually granted instantly.

To register your company:

  1. Sign in to the Amazon Pinpoint console at https://console.aws.amazon.com/pinpoint.
  2. In the navigation pane, under Settings, choose SMS and voice.
  3. On the 10DLC campaigns tab, choose Register company, as shown in the following image.
    Shows the location of the Create 10DLC Company button on the SMS and voice settings page of the Amazon Pinpoint console.
  4. On the Register your company page, fill out the form completely. There are a few things to note in this process:
    • The Doing business as (DBA) or brand name field is mandatory. The value that you provide can be the same as your company name.
    • The Support email and Support phone number are the email address and phone number that your customers can use to contact you when they have questions.
  5. When you finish, choose Create.

Step 2: Register a 10DLC campaign

After you register a company, you can begin to register campaigns. In 10DLC terms, a campaign is a use case or set of closely related use cases. Amazon Pinpoint also sends this information to TCR. Carriers use this information to determine whether traffic that they see from a certain phone number is legitimate. Campaigns associated with common, low-risk use cases can typically be approved in about a week.

To register a 10DLC campaign:

  1. On the SMS and voice settings page, on the 10DLC campaigns tab, choose Create 10DLC Campaign, as shown in the following image.
    Shows the location of the Create 10DLC Campaign button on the SMS and voice settings page of the Amazon Pinpoint console.
  2. On the Create 10DLC Campaign page, do the following:
    1. For Company name, choose the company that you registered in the preceding section.
    2. For 10DLC campaign name, enter a name that describes your messaging use case, such as “Example Corp One-Time Passwords.”
    3. For Vertical, choose the category that most accurately describes your company and use case. For example, if you develop software for the healthcare industry, choose Healthcare.
    4. For Help message, enter the response that will be returned to recipients who reply to your messages with the keyword HELP. A good help message describes the purpose of the campaign. It also provides your customers with a method of contacting you for more help (typically an email address or phone number).
    5. For Stop message, enter the response that will be returned to recipients who reply to your messages with the keyword STOP. A typical stop message tells your customer what type of messages they’re unsubscribing from, and lets them know that you won’t send them any more messages.
    6. Under Campaign use case, choose the use case that most accurately describes how you plan to use the 10DLC phone number. Many common use cases—including two-factor authentication (2FA), marketing, security and fraud alerts, and public service announcements—are considered Standard use cases. Use cases that involve a greater degree of risk for carriers—such as political, sweepstakes, and emergency notifications—are considered Special use cases.
  3. When you finish, choose Create.

Step 3: Associate phone numbers with your 10DLC campaign

After your 10DLC company and campaign are approved, you can purchase new long codes. When you purchase a long code, you choose which 10DLC campaign to associate it with.

To purchase a long code:

  1. On the SMS and voice settings page, on the Phone numbers tab, choose Request long code/toll-free.
  2. On the Define your phone numbers page, in the Phone number 1 section, do the following:
    1. For Country, choose United States.
    2. For Number type, choose 10DLC.
    3. For Assign to existing 10DLC campaign, choose the 10DLC campaign that you created in the preceding section.
    4. For Default message type, choose the option that most accurately describes your use case.
    5. In the Summary section, for Quantity, specify how many phone numbers you want to purchase.
  3. Choose Next. Then, on the Review and request page, choose Request.

Cleanup

If you no longer need the long codes that are associated with your 10DLC campaign registration, you can delete them. If you delete a long code, you’re no longer charged the $1 monthly lease charge. However, you’re still charged the recurring 10DLC campaign registration fee, unless you delete your 10DLC campaign as well.

If you want to delete the 10DLC company or campaign registration information in Amazon Pinpoint, you can do so by opening a case in the AWS Support Center. The SMS and voice settings page in the Amazon Pinpoint console contains links that you can use to quickly open these cases.

Conclusion

If you need to start sending SMS messages to your customers quickly, and without the expense of a short code, 10DLC is a great option. With common use cases such as two-factor authentication, your 10DLC campaigns and phone numbers can be ready to use relatively quickly. Messages that you send using 10DLC will have the high deliverability rates that were previously reserved only for short codes.

Opt-in to the new Amazon SES console experience

Post Syndicated from Simon Poile original https://aws.amazon.com/blogs/messaging-and-targeting/amazon-ses-console-opt-in/

Amazon Web Services (AWS) is pleased to announce the launch of the newly redesigned Amazon Simple Email Service (SES) console. With its streamlined look and feel, the new console makes it even easier for customers to leverage the speed, reliability, and flexibility that Amazon SES has to offer. Customers can access the new console experience via an opt-in link on the classic console.

Amazon SES now offers a new, optimized console to provide customers with a simpler, more intuitive way to create and manage their resources, collect sending activity data, and monitor reputation health. It also has a more robust set of configuration options and new features and functionality not previously available in the classic console.

Here are a few of the improvements customers can find in the new Amazon SES console:

Verified identities

Streamlines how customers manage their sender identities in Amazon SES. This is done by replacing the classic console’s identity management section with verified identities. Verified identities are a centralized place in which customers can view, create, and configure both domain and email address identities on one page. Other notable improvements include:

  • DKIM-based verification
    DKIM-based domain verification replaces the previous verification method which was based on TXT records. DomainKeys Identified Mail (DKIM) is an email authentication mechanism that receiving mail servers use to validate email. This new verification method offers customers the added benefit of enhancing their deliverability with DKIM-compliant email providers, and helping them achieve compliance with DMARC (Domain-based Message Authentication, Reporting and Conformance).
  • Amazon SES mailbox simulator
    The new mailbox simulator makes it significantly easier for customers to test how their applications handle different email sending scenarios. From a dropdown, customers select which scenario they’d like to simulate. Scenario options include bounces, complaints, and automatic out-of-office responses. The mailbox simulator provides customers with a safe environment in which to test their email sending capabilities.

Configuration sets

The new console makes it easier for customers to experience the benefits of using configuration sets. Configuration sets enable customers to capture and publish event data for specific segments of their email sending program. It also isolates IP reputation by segment by assigning dedicated IP pools. With a wider range of configuration options, such as reputation tracking and custom suppression options, customers get even more out of this powerful feature.

  • Default configuration set
    One important feature to highlight is the introduction of the default configuration set. By assigning a default configuration set to an identity, customers ensure that the assigned configuration set is always applied to messages sent from that identity at the time of sending. This enables customers to associate a dedicated IP pool or set up event publishing for an identity without having to modify their email headers.

Account dashboard

There is also an account dashboard for the new SES console. This feature provides customers with fast access to key information about their account, including sending limits and restrictions, and overall account health. A visual representation of the customer’s daily email usage helps them ensure that they aren’t approaching their sending limits. Additionally, customers who use the Amazon SES SMTP interface to send emails can visit the account dashboard to obtain or update their SMTP credentials.

Reputation metrics

The new reputation metrics page provides customers with high-level insight into historic bounce and complaint rates. This is viewed at both the account level and the configuration set level. Bounce and complaint rates are two important metrics that Amazon SES considers when assessing a customer’s sender reputation, as well as the overall health of their account.

The redesigned Amazon SES console, with its easy-to-use workflows, will not only enhance the customers’ on-boarding experience, it will also change the paradigms used for their on-going usage. The Amazon SES team remains committed to investing on behalf of our customers and empowering them to be productive anywhere, anytime. We invite you to opt in to the new Amazon SES console experience and let us know what you think.

AWS Managed Services by Anchor 2021-02-12 02:20:26

Post Syndicated from Andy Haine original https://www.anchor.com.au/blog/2021/02/is-it-possible-to-downsize-it-staff-by-making-the-switch-to-aws/

If you’re an SMB or enterprise business with a sizable reliance on digital infrastructure, it is a common query to wonder if moving your online services to a cloud provider could allow you simplify your services, benefit from a network that is perceived to be infallible, and ultimately, to downsize on technical staff and slim down your IT spend.

Many businesses believe that without having to purchase their own server hardware, pay for data centre rackspace costs, or pay for quite so many staff members to manage it all, a significant amount of money can be saved on IT costs. However, while it is true that moving to the AWS cloud would reduce hardware and rackspace costs to nil, there are a number of new costs and challenges to consider.

Is the cloud actually cheaper?

Upon completing the migration from data centre hosting services to cloud hosting services, many businesses mistakenly believe that they will be able to lower their costs by downsizing on the number of IT staff they need to manage their technological infrastructure. This is not always the case. Cloud can require more extensive expertise to both set up and maintain on an ongoing basis as a trade-off for the other benefits offered.

AWS is a complex beast, and without proper support and planning, businesses can find their costs higher than they originally were, their services more complex and difficult to manage, as well as their online assets failing on an even more regular basis. Wasted cloud spend is a very common occurrence within the cloud services industry, with many cloud users not optimising costs where they can. In a 2019 report from Flexera, they measured the actual waste of cloud spending at 35 percent.

Why is it not such a simple switch?

Cloud is fundamentally a different approach to hosting and provides more opportunity, scale and complexity. Understanding how to make the most of those requires a thorough assessment of your infrastructure and business. It is, therefore, of pertinent importance to ensure that the IT staff that you do intend to retain are properly trained and qualified to manage cloud services.

Check out our blog, “What’s the difference between Traditional Hosting and AWS Cloud Hosting?” for more information on how the two environments greatly differ.

If your IT staff are more certified in AWS cloud management, you could be looking at higher costs than you started with. You would therefore need to factor in the costs of hiring new, properly qualified staff, or investing in upskilling existing staff – at the risk of losing that investment should the staff member leave in future.

The costs of qualified staff.

Certain types of AWS certified professionals are able to command some of the highest salaries in the cloud industry, due to the high level of expertise and capability that they can provide to a business. AWS engineers can maintain the performance and security of high- demand websites and software, optimising them for lower cost and better performance. 

Large enterprises conducting a high volume of online transactions, or businesses that involve the handling of sensitive data would be in particular need of high-quality architects and engineers to keep their cloud environments both adequately optimised, reliable and safe. Though even as a small business, the build, deployment and operating of AWS services is always best conducted by experienced, AWS certified professionals to ensure the integrity and availability of your online services.

A win-win alternative.

What many businesses have discovered is that there is an alternative to managing their own AWS infrastructure. AWS management service providers can act as the vital middleman between your business and your cloud services, ensuring your digital infrastructure is being set up, maintained and cost-optimised by industry-leading AWS professionals.

Oftentimes, the cost optimisations achieved by a high-quality AWS management service provider completely pay for themselves in what would otherwise be wasted spend. Check out our blog, “4 Important Considerations To Avoid Wasted Cloud Spend” to learn more about wasted cloud spend.

One of the most beneficial things an AWS management service provider can offer your business is ensuring that you’re only paying for what your business needs. It may save your business significantly more money in the long run, even when factoring in management fees.

If you’re interested in learning more about how managed AWS services can help your business to potentially slim down on IT spend, please contact our friendly AWS experts on 1300 883 979, or submit an enquiry through our website anytime.

The post appeared first on AWS Managed Services by Anchor.

Why businesses are migrating to AWS Managed Cloud Hosting during the COVID-19 pandemic

Post Syndicated from Andy Haine original https://www.anchor.com.au/blog/2021/02/why-businesses-are-migrating-to-aws-managed-cloud-hosting-during-the-covid-19-pandemic/

COVID-19 has been an eye-opening experience for many of us. Prior to the current pandemic, many of us, as individuals, had never experienced the impacts of a global health crisis before. The same can very much be said for the business world. Quite simply, many businesses never considered it, nor had a plan in place to survive it.

As a consequence, we’ve seen the devastating toll that COVID-19 has had on some businesses and even entire sectors. According to an analysis by Oxford Economics, McKinsey and McKinsey Global Institute, certain sectors such as manufacturing, accommodation and food services, arts, entertainment and recreation, transportation and warehousing and educational services will take at least 5 years to recover from the impact of COVID-19 and return to pre-pandemic contributions to GDP. There is one industry however, that was impacted by the pandemic in the very opposite way; technology services.

The growth of our digital landscape

With many countries going into varying levels of lockdown, schools and workplaces shutting down their premises, and social distancing enforcement in many facets of our new COVID-safe lives, our reliance on technology has skyrocketed throughout 2020. In 2020, “buy online” searches increased by 50% over 2019, almost doubling during the first wave of the pandemic in March. Looking at statistics from the recent Black Friday sales event gives us a staggering further example of how much our lives have transitioned into the digital world.

In the US, Black Friday online searches increased by 34.13% this year. Even here in Australia, where there is significantly less tradition surrounding the Thanksgiving/Black Friday events, online searches for Black Friday still also increased by 34.39%. Globally, when you compare October 2019 to October 2020, online retail traffic numbers grew by a massive 30%, which accounts for billions of visitors.

Retail isn’t the only sector that now relies on the cloud far more heavily than ever before. Enterprises have also had to move even more of their operations into the cloud to accommodate the sudden need for remote working facilities. With lockdowns occurring all over the world for sometimes unknown lengths of time, businesses have had to quickly adapt to allow employees to continue their roles from their own homes. Likewise, the education sector is another who have had to adapt to providing their resources and services to students remotely. Cloud computing platforms, such as AWS, are the only viable platforms that are set up to handle such vast volumes of data while remaining both reliable and affordable.

Making the transition to online

With such clear growth in the digital sector, it makes sense that businesses who already existed online, or were quick to transition to an online presence at the start of the pandemic, have by far and large had the best chance at surviving. In the early months of the pandemic, many bricks and mortar businesses returned to their innovative roots, finding ways to digitise and mobilise their products and services. Many in the hospitality industry, for example, had to quickly adapt to online ordering and delivery to stay afloat, while many other businesses and sectors transitioned in new and unexpected ways too.

What many of these businesses had in common, was to decide somewhere along the way how to get online quickly, while being mindful of costs and long-term sustainability. When it comes to flexibility, availability and reliability, there really is no competition to cloud computing to be able to consistently deliver all three.

What is AWS Managed Cloud Hosting?

Amazon Web Services has taken over the world as one of the leading public cloud infrastructure providers, offering an abundance of products and services that can greatly assist you in bringing your business presence online.

AWS provides pay-as-you-go infrastructure that allows businesses to scale their IT resources with the business demand. Prior to the proliferation of cloud providers, businesses would turn to smaller localised companies, such as web hosts and software development agencies, to provide them with what they needed. Over recent years, things have greatly progressed as cloud services have become more expansive, integrated and able to cater to more complex business requirements than ever before.

When you first create an account with AWS and open up the console menu for the first time, the expansive nature of the services that they provide becomes very apparent.

Here, you’ll find all of the most expected services such as online storage facilities such as (S3), database hosting (RDS), DNS hosting (Route 53) and computing (EC2). But it doesn’t stop there, other popular services include Lambda, Lightsail and VPC, creating an array of infrastructure options large enough to host any environment. At the time of writing, there are 161 different services on offer in the AWS Management Console, spread out over 26 broader categories.

AWS Cloud Uptake during the Pandemic

Due to the flexible, scalable and highly reliable nature of AWS cloud hosting, the uptake of managed cloud services has continued to rise steadily throughout the pandemic. So far in 2020, AWS has experienced a 29% growth, bringing the total value up to a sizable $10.8bn.

With the help of an accredited and reputable AWS MSP (Managed Service Provider), businesses of all scales are able to digitise their operations quickly and cost-effectively. Whether you’re an SMB in the retail space who needs to provide a reliable platform for customers to find and purchase your goods, or an enterprise level business with thousands of staff members who rely on internal networks to perform their work remotely, AWS provides a vast array of services to cater to every need.

If you’re interested in finding out what AWS cloud hosting could do for your business, please don’t hesitate to get in touch with our expert team for a free consultation.

The post Why businesses are migrating to AWS Managed Cloud Hosting during the COVID-19 pandemic appeared first on AWS Managed Services by Anchor.

AWS Managed Services by Anchor 2021-02-12 01:52:57

Post Syndicated from Andy Haine original https://www.anchor.com.au/blog/2021/02/25645/

The thought of downtime can bring a chill to the bones of any IT team. Depending on the online demand you have for your products or services, even an hour or two of downtime can result in significant financial losses or catastrophic consequences of various other kinds.

As such, avoiding downtime should be a high priority item for any IT or Operations Manager. So, is the AWS cloud completely immune to downtime? We’ll discuss the various aspects of this question below.

The true cost of downtime

The true cost of downtime will vary from business to business, but whether you’re an SMB or an enterprise, all businesses that have critical services on the cloud should design their services from the ground up for high availability.

Gartner has reported the average cost of downtime to be $5,600 per minute. This varies between businesses, as no single business is run the exact same way or has the exact same setup, so at the low end this average could be more like $140,000 per hour, and $300,000 per hour on the high end.

To further break down their findings, Gartner’s research showed that 98% of organisations experience costs over $100,000 from a single hour of downtime. 81% of respondents said that 60 minutes of downtime costs their business in excess of $300,000. And 33% of enterprises found that that one hour of downtime cost them anywhere between $1-5 million.

Some of the causes for such a huge loss during and after a business experiences downtime can include some of the following:

  • Loss of sales
  • Certain business-critical data can become corrupted, depending on the outage
  • Costs of reviewing and resolving systems issues and processes
  • Detrimental reputational effect with stakeholders and customers
  • A drop in employee morale
  • A reduction in employee productivity

The always-online cloud services fallacy

Many businesses have migrated to the cloud and assumed that high availability is all a part of the cloud package, and doesn’t require any further expertise, investigation or implementation – however, this is not the case. To ensure high availability and uptime of internal systems and tools, a business must plan for this during its initial implementation. Properly setting up a business AWS environment for high availability requires an in-depth understanding of all that AWS has to offer, which is where a business can benefit greatly from outsourcing to an MSP that specialises in AWS cloud services.

Your business could experience more downtime with AWS than you would with a traditional hosting service.

Many people are surprised to learn that simply migrating to the cloud doesn’t automatically mean that their services will effectively become bullet-proof. In fact, the opposite can often be true.

AWS cloud services are complex and require extensive experience and in-depth knowledge to properly manage. This means there is a far greater chance for error when AWS services are being configured by an inexperienced user, leaving the services more vulnerable to security threats or performance issues that could ultimately result in downtime.

However, on the other hand, when AWS cloud services have been properly planned and configured from the ground up by certified professionals, the cloud can offer significantly greater availability and protection from downtime than traditional hosting services.

High Availability, Redundancy and Backups

‘High Availability’ is a term often attributed to cloud services, and refers to having multiple geographical regions where your website or application can be accessed from (as opposed to end-users always relaying requests back to a single server in one location). Because of the dynamic and data replicating nature of the cloud, some businesses mistake high availability for being inclusive of redundancy and backups.


High availability can refer to redundancy in the sense that should one geographical access point suffer an outage, and another can automatically step in to cater to an end-user’s request. However, it does not mean that your website or application does not still also require an effective backup and disaster recovery plan.


Should something go wrong with your cloud services, or certain parts of your environment become unavailable, you will need to rely on your own plan for replication or recovery. AWS offers a range of options to cater to this, and these should always be carefully considered and implemented during the planning and building phases.

How can you best protect your business from downtime?

So, to answer the question “Are AWS cloud services immune to downtime?”, the answer is no, as it would be for any form of technology. At this time, there is no technology that can truly claim to be entirely failsafe. However, AWS cloud services can get your business as close to failsafe as it is possible to get – if it’s done right.

For businesses that are serious about ensuring their online operations are available as much as possible, such as those involved in providing critical care, high demand eCommerce environments, or enterprise-level tools and systems, it’s essential to have your cloud services designed by a team of certified AWS professionals who have the correct credentials and expertise. If you’re interested in discussing this further, please don’t hesitate to get in touch with our expert team for a free consultation.


The post appeared first on AWS Managed Services by Anchor.

Improving AWS Java applications with Amazon CodeGuru Reviewer

Post Syndicated from Rajdeep Mukherjee original https://aws.amazon.com/blogs/devops/improving-aws-java-applications-with-amazon-codeguru-reviewer/

Amazon CodeGuru Reviewer is a machine learning (ML)-based AWS service for providing automated code reviews comments on your Java and Python applications. Powered by program analysis and ML, CodeGuru Reviewer detects hard-to-find bugs and inefficiencies in your code and leverages best practices learned from across millions of lines of open-source and Amazon code. You can start analyzing your code through pull requests and full repository analysis (for more information, see Automating code reviews and application profiling with Amazon CodeGuru).

The recommendations generated by CodeGuru Reviewer for Java fall into the following categories:

  • AWS best practices
  • Concurrency
  • Security
  • Resource leaks
  • Other specialized categories such as sensitive information leaks, input validation, and code clones
  • General best practices on data structures, control flow, exception handling, and more

We expect the recommendations to benefit beginners as well as expert Java programmers.

In this post, we showcase CodeGuru Reviewer recommendations related to using the AWS SDK for Java. For in-depth discussion of other specialized topics, see our posts on concurrency, security, and resource leaks. For Python applications, see Raising Python code quality using Amazon CodeGuru.

The AWS SDK for Java simplifies the use of AWS services by providing a set of features that are consistent and familiar for Java developers. The SDK has more than 250 AWS service clients, which are available on GitHub. Service clients include services like Amazon Simple Storage Service (Amazon S3), Amazon DynamoDB, Amazon Kinesis, Amazon Elastic Compute Cloud (Amazon EC2), AWS IoT, and Amazon SageMaker. These services constitute more than 6,000 operations, which you can use to access AWS services. With such rich and diverse services and APIs, developers may not always be aware of the nuances of AWS API usage. These nuances may not be important at the beginning, but become critical as the scale increases and the application evolves or becomes diverse. This is why CodeGuru Reviewer has a category of recommendations: AWS best practices. This category of recommendations enables you to become aware of certain features of AWS APIs so your code can be more correct and performant.

The first part of this post focuses on the key features of the AWS SDK for Java as well as API patterns in AWS services. The second part of this post demonstrates using CodeGuru Reviewer to improve code quality for Java applications that use the AWS SDK for Java.

AWS SDK for Java

The AWS SDK for Java supports higher-level abstractions for simplified development and provides support for cross-cutting concerns such as credential management, retries, data marshaling, and serialization. In this section, we describe a few key features that are supported in the AWS SDK for Java. Additionally, we discuss some key API patterns such as batching, and pagination, in AWS services.

The AWS SDK for Java has the following features:

  • Waiters Waiters are utility methods that make it easy to wait for a resource to transition into a desired state. Waiters makes it easier to abstract out the polling logic into a simple API call. The waiters interface provides a custom delay strategy to control the sleep time between retries, as well as a custom condition on whether polling of a resource should be retried. The AWS SDK for Java also offer an async variant of waiters.
  • Exceptions The AWS SDK for Java uses runtime (or unchecked) exceptions instead of checked exceptions in order to give you fine-grained control over the errors you want to handle and to prevent scalability issues inherent with checked exceptions in large applications. Broadly, the AWS SDK for Java has two types of exceptions:
    • AmazonClientException – Indicates that a problem occurred inside the Java client code, either while trying to send a request to AWS or while trying to parse a response from AWS. For example, the AWS SDK for Java throws an AmazonClientException if no network connection is available when you try to call an operation on one of the clients.
    • AmazonServiceException – Represents an error response from an AWS service. For example, if you try to end an EC2 instance that doesn’t exist, Amazon EC2 returns an error response, and all the details of that response are included in the AmazonServiceException that’s thrown. For some cases, a subclass of AmazonServiceException is thrown to allow you fine-grained control over handling error cases through catch blocks.

The API has the following patterns:

  • Batching – A batch operation provides you with the ability to perform a single CRUD operation (create, read, update, delete) on multiple resources. Some typical use cases include the following:
  • Pagination – Many AWS operations return paginated results when the response object is too large to return in a single response. To enable you to perform pagination, the request and response objects for many service clients in the SDK provide a continuation token (typically named NextToken) to indicate additional results.

AWS best practices

Now that we have summarized the SDK-specific features and API patterns, let’s look at the CodeGuru Reviewer recommendations on AWS API use.

The CodeGuru Reviewer recommendations for the AWS SDK for Java range from detecting outdated or deprecated APIs to warning about API misuse, missing pagination, authentication and exception scenarios, and using efficient API alternatives. In this section, we discuss a few examples patterned after real code.

Handling pagination

Over 1,000 APIs from more than 150 AWS services have pagination operations. The pagination best practice rule in CodeGuru covers all the pagination operations. In particular, the pagination rule checks if the Java application correctly fetches all the results of the pagination operation.

The response of a pagination operation in AWS SDK for Java 1.0 contains a token that has to be used to retrieve the next page of results. In the following code snippet, you make a call to listTables(), a DynamoDB ListTables operation, which can only return up to 100 table names per page. This code might not produce complete results because the operation returns paginated results instead of all results.

public void getDynamoDbTable() {
        AmazonDynamoDBClient client = new AmazonDynamoDBClient();
        List<String> tables = dynamoDbClient.listTables().getTableNames();
        System.out.println(tables)
}

CodeGuru Reviewer detects the missing pagination in the code snippet and makes the following recommendation to add another call to check for additional results.

Screenshot of recommendations for introducing pagination checks

You can accept the recommendation and add the logic to get the next page of table names by checking if a token (LastEvaluatedTableName in ListTablesResponse) is included in each response page. If such a token is present, it’s used in a subsequent request to fetch the next page of results. See the following code:

public void getDynamoDbTable() {
        AmazonDynamoDBClient client = new AmazonDynamoDBClient();
        ListTablesRequest listTablesRequest = ListTablesRequest.builder().build();
        boolean done = false;
        while (!done) {
            ListTablesResponse listTablesResponse = client.listTables(listTablesRequest);
	    System.out.println(listTablesResponse.tableNames());
            if (listTablesResponse.lastEvaluatedTableName() == null) {
                done = true;
            }
            listTablesRequest = listTablesRequest.toBuilder()
                    .exclusiveStartTableName(listTablesResponse.lastEvaluatedTableName())
                    .build();
        }
}

Handling failures in batch operation calls

Batch operations are common with many AWS services that process bulk requests. Batch operations can succeed without throwing exceptions even if some items in the request fail. Therefore, a recommended practice is to explicitly check for any failures in the result of the batch APIs. Over 40 APIs from more than 20 AWS services have batch operations. The best practice rule in CodeGuru Reviewer covers all the batch operations. In the following code snippet, you make a call to sendMessageBatch, a batch operation from Amazon SQS, but it doesn’t handle any errors returned by that batch operation:

public void flush(final String sqsEndPoint,
                     final List<SendMessageBatchRequestEntry> batch) {
    AwsSqsClientBuilder awsSqsClientBuilder;
    AmazonSQS sqsClient = awsSqsClientBuilder.build();
    if (batch.isEmpty()) {
        return;
    }
    sqsClient.sendMessageBatch(sqsEndPoint, batch);
}

CodeGuru Reviewer detects this issue and makes the following recommendation to check the return value for failures.

Screenshot of recommendations for batch operations

You can accept this recommendation and add logging for the complete list of messages that failed to send, in addition to throwing an SQSUpdateException. See the following code:

public void flush(final String sqsEndPoint,
                     final List<SendMessageBatchRequestEntry> batch) {
    AwsSqsClientBuilder awsSqsClientBuilder;
    AmazonSQS sqsClient = awsSqsClientBuilder.build();
    if (batch.isEmpty()) {
        return;
    }
    SendMessageBatchResult result = sqsClient.sendMessageBatch(sqsEndPoint, batch);
    final List<BatchResultErrorEntry> failed = result.getFailed();
    if (!failed.isEmpty()) {
           final String failedMessage = failed.stream()
                         .map(batchResultErrorEntry -> 
                            String.format("…", batchResultErrorEntry.getId(), 
                            batchResultErrorEntry.getMessage()))
                         .collect(Collectors.joining(","));
           throw new SQSUpdateException("Error occurred while sending 
                                        messages to SQS::" + failedMessage);
    }
}

Exception handling best practices

Amazon S3 is one of the most popular AWS services with our customers. A frequent operation with this service is to upload a stream-based object through an Amazon S3 client. Stream-based uploads might encounter occasional network connectivity or timeout issues, and the best practice to address such a scenario is to properly handle the corresponding ResetException error. ResetException extends SdkClientException, which subsequently extends AmazonClientException. Consider the following code snippet, which lacks such exception handling:

private void uploadInputStreamToS3(String bucketName, 
                                   InputStream input, 
                                   String key, ObjectMetadata metadata) 
                         throws SdkClientException {
    final AmazonS3Client amazonS3Client;
    PutObjectRequest putObjectRequest =
          new PutObjectRequest(bucketName, key, input, metadata);
    amazonS3Client.putObject(putObjectRequest);
}

In this case, CodeGuru Reviewer correctly detects the missing handling of the ResetException error and suggests possible solutions.

Screenshot of recommendations for handling exceptions

This recommendation is rich in that it provides alternatives to suit different use cases. The most common handling uses File or FileInputStream objects, but in other cases explicit handling of mark and reset operations are necessary to reliably avoid a ResetException.

You can fix the code by explicitly setting a predefined read limit using the setReadLimit method of RequestClientOptions. Its default value is 128 KB. Setting the read limit value to one byte greater than the size of stream reliably avoids a ResetException.

For example, if the maximum expected size of a stream is 100,000 bytes, set the read limit to 100,001 (100,000 + 1) bytes. The mark and reset always work for 100,000 bytes or less. However, this might cause some streams to buffer that number of bytes into memory.

The fix reliably avoids ResetException when uploading an object of type InputStream to Amazon S3:

private void uploadInputStreamToS3(String bucketName, InputStream input, 
                                   String key, ObjectMetadata metadata) 
                             throws SdkClientException {
        final AmazonS3Client amazonS3Client;
        final Integer READ_LIMIT = 10000;
        PutObjectRequest putObjectRequest =
   			new PutObjectRequest(bucketName, key, input, metadata);  
        putObjectRequest.getRequestClientOptions().setReadLimit(READ_LIMIT);
        amazonS3Client.putObject(putObjectRequest);
}

Replacing custom polling with waiters

A common activity when you’re working with services that are eventually consistent (such as DynamoDB) or have a lead time for creating resources (such as Amazon EC2) is to wait for a resource to transition into a desired state. The AWS SDK provides the Waiters API, a convenient and efficient feature for waiting that abstracts out the polling logic into a simple API call. If you’re not aware of this feature, you might come up with a custom, and potentially inefficient polling logic to determine whether a particular resource had transitioned into a desired state.

The following code appears to be waiting for the status of EC2 instances to change to shutting-down or terminated inside a while (true) loop:

private boolean terminateInstance(final String instanceId, final AmazonEC2 ec2Client)
    throws InterruptedException {
    long start = System.currentTimeMillis();
    while (true) {
        try {
            DescribeInstanceStatusResult describeInstanceStatusResult = 
                            ec2Client.describeInstanceStatus(new DescribeInstanceStatusRequest()
                            .withInstanceIds(instanceId).withIncludeAllInstances(true));
            List<InstanceStatus> instanceStatusList = 
                       describeInstanceStatusResult.getInstanceStatuses();
            long finish = System.currentTimeMillis();
            long timeElapsed = finish - start;
            if (timeElapsed > INSTANCE_TERMINATION_TIMEOUT) {
                break;
            }
            if (instanceStatusList.size() < 1) {
                Thread.sleep(WAIT_FOR_TRANSITION_INTERVAL);
                continue;
            }
            currentState = instanceStatusList.get(0).getInstanceState().getName();
            if ("shutting-down".equals(currentState) || "terminated".equals(currentState)) {
                return true;
             } else {
                 Thread.sleep(WAIT_FOR_TRANSITION_INTERVAL);
             }
        } catch (AmazonServiceException ex) {
            throw ex;
        }
        …
 }

CodeGuru Reviewer detects the polling scenario and recommends you use the waiters feature to help improve efficiency of such programs.

Screenshot of recommendations for introducing waiters feature

Based on the recommendation, the following code uses the waiters function that is available in the AWS SDK for Java. The polling logic is replaced with the waiters() function, which is then run with the call to waiters.run(…), which accepts custom provided parameters, including the request and optional custom polling strategy. The run function polls synchronously until it’s determined that the resource transitioned into the desired state or not. The SDK throws a WaiterTimedOutException if the resource doesn’t transition into the desired state even after a certain number of retries. The fixed code is more efficient, simple, and abstracts the polling logic to determine whether a particular resource had transitioned into a desired state into a simple API call:

public void terminateInstance(final String instanceId, final AmazonEC2 ec2Client)
    throws InterruptedException {
    Waiter<DescribeInstancesRequest> waiter = ec2Client.waiters().instanceTerminated();
    ec2Client.terminateInstances(new TerminateInstancesRequest().withInstanceIds(instanceId));
    try {
        waiter.run(new WaiterParameters()
              .withRequest(new DescribeInstancesRequest()
              .withInstanceIds(instanceId))
              .withPollingStrategy(new PollingStrategy(new MaxAttemptsRetryStrategy(60), 
                    new FixedDelayStrategy(5))));
    } catch (WaiterTimedOutException e) {
        List<InstanceStatus> instanceStatusList = ec2Client.describeInstanceStatus(
               new DescribeInstanceStatusRequest()
                        .withInstanceIds(instanceId)
                        .withIncludeAllInstances(true))
                        .getInstanceStatuses();
        String state;
        if (instanceStatusList != null && instanceStatusList.size() > 0) {
            state = instanceStatusList.get(0).getInstanceState().getName();
        }
    }
}

Service-specific best practice recommendations

In addition to the SDK operation-specific recommendations in the AWS SDK for Java we discussed, there are various AWS service-specific best practice recommendations pertaining to service APIs for services such as Amazon S3, Amazon EC2, DynamoDB, and more, where CodeGuru Reviewer can help to improve Java applications that use AWS service clients. For example, CodeGuru can detect the following:

  • Resource leaks in Java applications that use high-level libraries, such as the Amazon S3 TransferManager
  • Deprecated methods in various AWS services
  • Missing null checks on the response of the GetItem API call in DynamoDB
  • Missing error handling in the output of the PutRecords API call in Kinesis
  • Anti-patterns such as binding the SNS subscribe or createTopic operation with Publish operation

Conclusion

This post introduced how to use CodeGuru Reviewer to improve the use of the AWS SDK in Java applications. CodeGuru is now available for you to try. For pricing information, see Amazon CodeGuru pricing.

Updating opt-in status for Amazon Pinpoint channels

Post Syndicated from Varinder Dhanota original https://aws.amazon.com/blogs/messaging-and-targeting/updating-opt-in-status-for-amazon-pinpoint-channels/

In many real-world scenarios, customers are using home-grown or 3rd party systems to manage their campaign related information. This includes user preferences, segmentation, targeting, interactions, and more. To create customer-centric engagement experiences with such existing systems, migrating or integrating into Amazon Pinpoint is needed. Luckily, many AWS services and mechanisms can help to streamline this integration in a resilient and cost-effective way.

In this blog post, we demonstrate a sample solution that captures changes from an on-premises application’s database by utilizing AWS Integration and Transfer Services and updates Amazon Pinpoint in real-time.

If you are looking for a serverless, mobile-optimized preference center allowing end users to manage their Pinpoint communication preferences and attributes, you can also check the Amazon Pinpoint Preference Center.

Architecture

Architecture

In this scenario, users’ SMS opt-in/opt-out preferences are managed by a home-grown customer application. Users interact with the application over its web interface. The application, saves the customer preferences on a MySQL database.

This solution’s flow of events is triggered with a change (insert / update / delete) happening in the database. The change event is then captured by AWS Database Migration Service (DMS) that is configured with an ongoing replication task. This task continuously monitors a specified database and forwards the change event to an Amazon Kinesis Data Streams stream. Raw events that are buffered in this stream are polled by an AWS Lambda function. This function transforms the event, and makes it ready to be passed to Amazon Pinpoint API. This API call will in turn, change the opt-in/opt-out subscription status of the channel for that user.

Ongoing replication tasks are created against multiple types of database engines, including Oracle, MS-SQL, Postgres, and more. In this blog post, we use a MySQL based RDS instance to demonstrate this architecture. The instance will have a database we name pinpoint_demo and one table we name optin_status. In this sample, we assume the table is holding details about a user and their opt-in preference for SMS messages.

userid phone optin lastupdate
user1 +12341111111 1 1593867404
user2 +12341111112 1 1593867404
user2 +12341111113 1 1593867404

Prerequisites

  1. AWS CLI is configured with an active AWS account and appropriate access.
  2. You have an understanding of Amazon Pinpoint concepts. You will be using Amazon Pinpoint to create a segment, populate endpoints, and validate phone numbers. For more details, see the Amazon Pinpoint product page and documentation.

Setup

First, you clone the repository that contains a stack of templates to your local environment. Make sure you have configured your AWS CLI with AWS credentials. Follow the steps below to deploy the CloudFormation stack:

  1. Clone the git repository containing the CloudFormation templates:
    git clone https://github.com/aws-samples/amazon-pinpoint-rds-integration.git
    cd amazon-pinpoint-rds-integration
  2. You need an S3 Bucket to hold the template:
    aws s3 create-bucket –bucket <YOUR-BUCKET-NAME>
  3. Run the following command to package the CloudFormation templates:
    aws cloudformation package --template-file template_stack.yaml --output-template-file template_out.yaml --s3-bucket <YOUR-BUCKET-NAME>
  4. Deploy the stack with the following command:
    aws cloudformation deploy --template-file template_out.yaml --stack-name pinpointblogstack --capabilities CAPABILITY_AUTO_EXPAND CAPABILITY_NAMED_IAM

The AWS CloudFormation stack will create and configure resources for you. Some of the resources it will create are:

  • Amazon RDS instance with MySQL
  • AWS Database Migration Service replication instance
  • AWS Database Migration Service source endpoint for MySQL
  • AWS Database Migration Service target endpoint for Amazon Kinesis Data Streams
  • Amazon Kinesis Data Streams stream
  • AWS Lambda Function
  • Amazon Pinpoint Application
  • A Cloud9 environment as a bastion host

The deployment can take up to 15 minutes. You can track its progress in the CloudFormation console’s Events tab.

Populate RDS data

A CloudFormation stack will output the DNS address of an RDS endpoint and Cloud9 environment upon completion. The Cloud9 environment acts as a bastion host and allows you to reach the RDS instance endpoint deployed into the private subnet by CloudFormation.

  1. Open the AWS Console and navigate to the Cloud9 service.
    Cloud9Console
  2. Click on the Open IDE button to reach your IDE environment.
    Cloud9Env
  3. At the console pane of your IDE, type the following to login to your RDS instance. You can find the RDS Endpoint address at the outputs section of the CloudFormation stack. It is under the key name RDSInstanceEndpoint.
    mysql -h <YOUR_RDS_ENDPOINT> -uadmin -pmypassword
    use blog_db;
  4. Issue the following command to create a table that holds the user’s opt-in status:
    create table optin_status (
      userid varchar(50) not null,
      phone varchar(50) not null,
      optin tinyint default 1,
      lastupdate TIMESTAMP NOT NULL DEFAULT CURRENT_TIMESTAMP
    );
  5. Next, load sample data into the table. The following inserts nine users for this demo:
    
    INSERT INTO optin_status (userid, phone, optin) VALUES ('user1', '+12341111111', 1);
    INSERT INTO optin_status (userid, phone, optin) VALUES ('user2', '+12341111112', 1);
    INSERT INTO optin_status (userid, phone, optin) VALUES ('user3', '+12341111113', 1);
    INSERT INTO optin_status (userid, phone, optin) VALUES ('user4', '+12341111114', 1);
    INSERT INTO optin_status (userid, phone, optin) VALUES ('user5', '+12341111115', 1);
    INSERT INTO optin_status (userid, phone, optin) VALUES ('user6', '+12341111116', 1);
    INSERT INTO optin_status (userid, phone, optin) VALUES ('user7', '+12341111117', 1);
    INSERT INTO optin_status (userid, phone, optin) VALUES ('user8', '+12341111118', 1);
    INSERT INTO optin_status (userid, phone, optin) VALUES ('user9', '+12341111119', 1);
  6. The table’s opt-in column holds the SMS opt-in status and phone number for a specific user.

Start the DMS Replication Task

Now that the environment is ready, you can start the DMS replication task and start watching the changes in this table.

  1. From the AWS DMS Console, go to the Database Migration Tasks section.
    DMSMigTask
  2. Select the Migration task named blogreplicationtask.
  3. From the Actions menu, click on Restart/Resume to start the migration task. Wait until the task’s Status transitions from Ready to Starting and Replication ongoing.
  4. At this point, all the changes on the source database are replicated into a Kinesis stream. Before introducing the AWS Lambda function that will be polling this stream, configure the Amazon Pinpoint application.

Inspect the AWS Lambda Function

An AWS Lambda function has been created to receive the events. The Lambda function uses Python and Boto3 to read the records delivered by Kinesis Data Streams. It then performs the update_endpoint API calls in order to add, update, or delete endpoints in the Amazon Pinpoint application.

Lambda code and configuration is accessible through the Lambda Functions Console. In order to inspect the Python code, click the Functions item on the left side. Select the function starting with pinpointblogstack-MainStack by clicking on the function name.

Note: The PINPOINT_APPID under the Environment variables section. This variable provides the Lambda function with the Amazon Pinpoint application ID to make the API call.

LambdaPPAPPID

Inspect Amazon Pinpoint Application in Amazon Pinpoint Console

A Pinpoint application is needed by the Lambda Function to update the endpoints. This application has been created with an SMS Channel by the CloudFormation template. Once the data from the RDS database has been imported into Pinpoint as SMS endpoints, you can validate this import by creating a segment in Pinpoint.

PinpointProject

Testing

With the Lambda function ready, you now test the whole solution.

  1. To initiate the end-to-end test, go to the Cloud9 terminal. Perform the following SQL statement on the optin_table:
    UPDATE optin_status SET optin=0 WHERE userid='user1';
    UPDATE optin_status SET optin=0 WHERE userid='user2';
    UPDATE optin_status SET optin=0 WHERE userid='user3';
    UPDATE optin_status SET optin=0 WHERE userid='user4';
  2. This statement will cause four changes in the database which is collected by DMS and passed to Kinesis Data Streams stream.
  3. This triggers the Lambda function that construct an update_endpoint API call to the Amazon Pinpoint application.
  4. The update_endpoint operation is an upsert operation. Therefore, if the endpoint does not exist on the Amazon Pinpoint application, it creates one. Otherwise, it updates the current endpoint.
  5. In the initial dataset, all the opt-in values are 1. Therefore, these endpoints will be created with an OptOut value of NONE in Amazon Pinpoint.
  6. All OptOut=NONE typed endpoints are considered as active endpoints. Therefore, they are available to be used within segments.

Create Amazon Pinpoint Segment

  1. In order to see these changes, go to the Pinpoint console. Click on PinpointBlogApp.
    PinpointConsole
  2. Click on Segments on the left side. Then click Create a segment.
    PinpointSegment
  3. For the segment name, enter US-Segment.
  4. Select Endpoint from the Filter dropdown.
  5. Under the Choose an endpoint attribute dropdown, select Country.
  6. For Choose values enter US.
    Note: As you do this, the right panel Segment estimate will refresh to show the number of endpoints eligible for this segment filter.
  7. Click Create segment at the bottom of the page.
    PinpointSegDetails
  8. Once the new segment is created, you are directed to the newly created segment with configuration details. You should see five eligible endpoints corresponding to database table rows.
    PinpointSegUpdate
  9. Now, change one row by issuing the following SQL statement. This simulates a user opting out from SMS communication for one of their numbers.
    UPDATE optin_status SET optin=0 WHERE userid='user5';
  10. After the update, go to the Amazon Pinpoint console. Check the eligible endpoints again. You should only see four eligible endpoints.

PinpointSegUpdate

Cleanup

If you no longer want to incur further charge, delete the Cloudformation stack named pinpointblogstack. Select it and click Delete.

PinpointCleanup

Conclusion

This solution walks you through how opt-in change events are delivered from Amazon RDS to Amazon Pinpoint. You can use this solution in other use cases as well. Some examples are importing segments from a 3rd party application like Salesforce and importing other types of channels like e-mail, push, and voice. To learn more about Amazon Pinpoint, visit our website.

Amazon SES celebrates 10 years of email sending and deliverability

Post Syndicated from Simon Poile original https://aws.amazon.com/blogs/messaging-and-targeting/amazon-ses-celebrates-10-years-of-email-sending-and-deliverability/

Amazon Simple Email Service (Amazon SES) turns 10 years old today. Back on January 25th 2011, Amazon Web Services (AWS) had only 15 services. Today, AWS has grown to over 180 services. Jeff Barr launched Amazon SES as part of his web evangelist blog. Much of what he wrote about then is still true today. Even 10 years later, email is an important channel for customer communications. Developers still want to rely on a trusted global partner to deliver email at scale. However, mailbox providers are even more protective of their end users’ security. They actively work to ensure that any perceived, unwanted email doesn’t make it to the inbox.

Inbox providers use several factors to determine the legitimacy of email traffic. Over the last decade, we have worked diligently to measure many of those factors in Amazon SES to help our customers achieve great deliverability. The focus for much of that work has been a combination of investments into reputation, engagement, and trust. I want to outline what we’ve accomplished to improve your email sending over the last 10 years.

Reputation

Reputation is the measurement mailbox providers use to determine how closely you follow their sending standards. Amazon SES measures perceived reputation through metrics such as bounce rate or complaint rate in the reputation dashboard. The reputation dashboard also shares overall Amazon SES account sending status like “Healthy” or “Under Review.” Some Inbox providers, or ISPs, also provide feedback to help us measure the effectiveness of a specific IP or domain in sending trustworthy traffic.

You can influence reputation in Amazon SES through:

  • Setting up dedicated IPs: Set up IPs in Amazon SES for your own specific sending with appropriate warm-up plans. Split IPs out by use case such as separating password resets from marketing messages.
  • Customer owned IPs (New in 2020): You can now transition IPs you’ve invested in through your own data center or with another ESP to Amazon SES without interruption.
  • Following sending volume best practices: Nothing can flag your IP addresses faster than non-predictable sending patterns. We help you manage this through sending quotas.
  • Use our SES email simulator: Test your application sending without messages leaving the sandbox.


Engagement

Engagement is the rate by which customers are interacting with your content. Amazon SES helps you measure engagement through conversion rates (such as open or click-through) and unsubscribe rates. These are measured in the event publishing click stream. This area is more of an art in our deliverability calculus because success varies by industry and use case.

You can influence engagement in Amazon SES through:

  • Customizing content as much as possible, but follow content best practices to avoid setting off content filters. Mailbox providers often utilize behavioral content filtering using AI to determine if your content is relevant based on engagement behavior.
  • Use consent and list management (New in 2020) with customized topics and opt-out pages. It’s important to offer recipients a way to select what emails they want to receive from you and give them an option to opt-out. This is a great new feature that we’ve added based on customer feedback.
  • Remove emails that are not engaging from your lists. Some customers have a time limit, for example, 60 days, before they are automatically removed from an active email list.


Trust

Earning trust on email sending is done through the adherence to proper sending behavior, as measured by both individual ISPs as well as industry watch-groups. Trust is closely related to reputation.  We measure trust through messages in the reputation dashboard based on feedback loops, Real-time Blocklists (RBLs), and spam-traps. You can also see the complaint rate associated to your sending in the complaint area of the reputation dashboard. It has statuses like healthy or under review.

You can influence trust in Amazon SES through:


Deliverability is a multi-dimensional part of email sending, beyond just setting up an SMTP (Simple Mail Transfer Protocol) endpoint, with constant complexities. But, we’re here to help. In addition to these investments in deliverability, we’ve also expanded Amazon SES to 18 regions, including the government cloud. It’s been an exciting time at AWS, and we look forward to supporting all of our customers in the years to come with Amazon SES.


You Can Now Buy (And Renew) Five More Rapid7 Products Through AWS Marketplace

Post Syndicated from Aaron Sawitsky original https://blog.rapid7.com/2021/01/20/you-can-now-buy-and-renew-five-more-rapid7-products-through-aws-marketplace/

You Can Now Buy (And Renew) Five More Rapid7 Products Through AWS Marketplace

Purchasing software through AWS Marketplace has to be one of the most under-appreciated perks of being an Amazon Web Services (AWS) customer. For starters, products you purchase through Marketplace automatically show up on your next AWS bill, which can really simplify your procurement process. In addition, a feature called private offers makes it possible to get things like custom pricing and legal terms. However, the really cool part about Marketplace is that in many cases, it can unlock new budget sources to help pay for your purchases and even help your organization save money on its AWS bill.

Read on to learn more about our expanded set of listings and how Marketplace might be able to help you find budget to pay for that shiny new Rapid7 solution you’ve had your eye on.

New listings

Over the last six weeks, we’ve added InsightVM, InsightAppSec, and InsightConnect to AWS Marketplace, alongside our existing InsightIDR and DivvyCloud listings. What’s more, our Managed Vulnerability Management Services (MVM), Managed Detection and Response Services (MDR), and Managed Application Security Services (MAS) can now be purchased via Marketplace Private Offer. We’ve also added support so that existing Rapid7 customers can now renew through Marketplace.

In other words, all our Insight products (except InsightOps) and all our managed services can now be bought or renewed through AWS Marketplace.

Learn more about the Rapid7 Insight Platform

Get Started

A quick recap of Marketplace

AWS Marketplace is a digital catalog with thousands of software listings from companies like Rapid7. The Marketplace makes it easy for AWS customers to find, test, buy, and deploy software.

Rapid7 has two types of listings on Marketplace:

  1. Our VM Scan Engine and VM Security Console listings are what AWS refers to as Bring Your Own License (BYOL) listings. These are designed to help existing InsightVM customers deploy scan engines and consoles in their AWS environment. They can’t be used to actually purchase a product (“bring your own license” means you have to have purchased a license for the product before you can make use of whatever is in the listing).
  2. In contrast, the listings we mentioned at the beginning of this blog post are called SaaS Contract listings. These listings allow you to purchase our solutions through Marketplace. We’ll be focusing on these listings in this discussion.

When you want to buy a Rapid7 product via AWS Marketplace, there are two options. If the quantity you want to purchase is shown in the Pricing section of the listing, you can simply click the “Continue to Subscribe” button and follow the instructions. The other option (and the one we recommend) is for you to reach out to our sales team, who will work with you to develop a quote that reflects your specific needs. We’ll then send you a Marketplace Private Offer to accept. With a Private Offer, you get exactly what you need and still enjoy all the benefits of buying through Marketplace.
Important note: Any existing Rapid7 customers that are looking to do a renewal or expansion must use a Private Offer. Please talk to your Customer Success Manager (CSM), who will be happy to help you.

What are the benefits of using AWS Marketplace?

As we touched on in the introduction, there are a number of benefits that come with purchasing software through AWS Marketplace. Let’s look at these in some more detail:

  1. Ease of procurement: The charges for Marketplace purchases show up on your next AWS invoice. There’s no need to set up a billing relationship with Rapid7—you pay for your Rapid7 purchase simply by paying your AWS bill.
  2. Sourcing budget: Many organizations make an upfront commitment to spend a certain amount of money with AWS in exchange for discounts. This is known as a PPA or EDP. Most companies will allocate budget to cover this commitment. Since AWS considers 50% of any Marketplace purchase as native AWS spend, your finance team might be willing to let you pay for half of a Marketplace purchase using funds drawn from your AWS EDP budget. Talk to your finance team to learn what’s possible.
  3. Increased AWS spend: AWS has minimum spend levels an organization must reach to qualify for the discounted pricing of a PPA or EDP. Since AWS counts 50% of any Marketplace purchase as native AWS spend, organizations that are close to qualifying for discounts often use Marketplace to get their spend level over the line. In addition, many organizations that already have an EDP use Marketplace to increase their AWS spend so they can qualify for larger discounts in the future.

We’ve expanded our presence on AWS Marketplace because it provides our customers with a simplified procurement experience that also contributes to AWS cost optimization. To learn more about Rapid7 solutions and purchasing them through AWS Marketplace, please contact us or leave a comment below.

NEVER MISS A BLOG

Get the latest stories, expertise, and news about security today.

Send localized messages using Amazon Pinpoint templates and standard demographic attributes

Post Syndicated from Mohit Palriwal original https://aws.amazon.com/blogs/messaging-and-targeting/send-localized-messages-using-pinpoint-templates-and-standard-demographic-attributes/

As your application user base expands into more countries and languages, it’s important to make sure messages are localized for each recipient to improve engagement. Localizing your messages helps you reach your audience with content specific to their language settings. Creating separate messages for each language and managing each template separately can require a lot of duplication effort. It is also challenging to manage and group templates based on all possible locales or specific campaigns.

Amazon Pinpoint‘s messaging template provides a way to build a single message with multiple localizations. You prepare localizations based on locale of your audience registered with Amazon Pinpoint project.

This blog post walks you through a solution that uses the locale of your user endpoints to build a localized messaging template. We provide you with a template that is used with an Amazon Pinpoint campaign or journeys to target your audience across multiple locale with localized message content. This solution is applicable for all supported channels under Amazon Pinpoint, SMS, email, push, voice. This blog explains the solution for a SMS channel-specific scenario.

Solution overview

The solution below describes the workflow to send localized messaging to a group of users across various locales. The first prerequisite is to create an Amazon Pinpoint project in your AWS account and enable corresponding channels for message sending. Next, you will create an Amazon Pinpoint template using locale-specific message variables and register users endpoints with a demographic locale property. Once segment and template resources are generated, you can create a localized message in your campaign or journey.

Prerequisites

Setting up the solution

1. Set up Amazon Pinpoint

First, create a new Amazon Pinpoint project and configure the desired channels from which you want to send localized messages.

2. Create a localized template

  1. Create an Amazon Pinpoint messaging template with supported message variables of your choice. This builds more dynamic and personalized content.
  2. Use Demographic.Locale from supported Endpoint attributes to customize your message content per locale using eq comparison helper.

Below is an example of using an endpoint standard locale attribute in a template.

{{#eq Demographic.Locale "fr-FR"}} Bienvenue dans l'expérience utilisateur Pinpoint! 
{{else eq Demographic.Locale "de-DE"}} Willkommen bei Pinpoint User Experience! 
{{else}} Welcome to Pinpoint User Experience ! {{/eq}}  

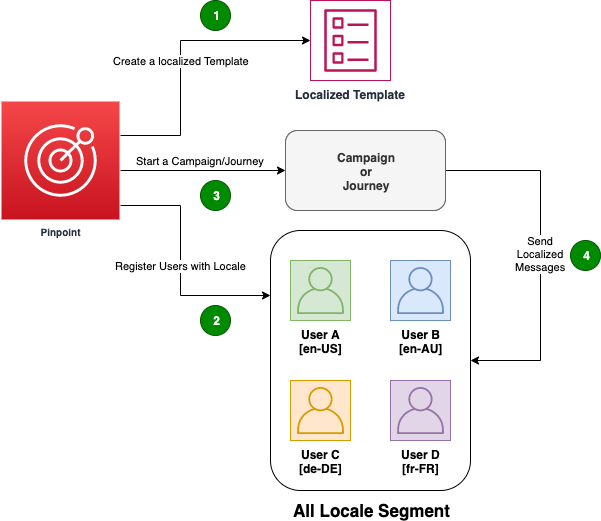
3. Register your users with locale property

Register your user endpoint to pinpoint with the demographic locale/timezone standard attribute.

The below is an example for registering an SMS endpoint with de-DE locale.
aws pinpoint update-endpoint –application-id $APP_ID –endpoint-id

$ENDPOINT_ID --endpoint-request '{"Address":"+19999999999","ChannelType":"SMS","Demographic":{"Locale":"de-DE", "Timezone": "Europe/Berlin"}}'

Note: You can also register your user endpoints using the import segment feature. This accepts a .csv file with all endpoints.

4. Create a segment with all locale users

Create an Amazon Pinpoint segment to define the audience you want to target with localized message.

5. Create a journey or campaign

  1. Create an Amazon Pinpoint campaign or journey.
  2. Use the template from earlier in Step 2.
  3. Create a segment with all locale users from Step 4.Note: You can also use Amazon Pinpoint local time and quiet time features to target your audience in their local time zone or at a specific global time (for example 10am GMT). This also respects the quiet hours (for example 23:00 to 8:00) specific to their local time zone based on the EndpointDemographic.Timezone property.


6. Execution:

A marketing campaign manager wants to send a localized message to every audience based of their preferred language.

  1. Creates a single journey targeting a segment with 2 endpoints (each with unique locale) from Step 4.
  2. Create a segment with all locale users using the template defined in Step 2.
  3. Create a localized template

Conclusion

The Amazon Pinpoint messaging template provides you the ease of managing a single template for multiple locales.

With a localized messaging template you can simply target your audience across locales and receive targeted analytics. Get started today by visiting Amazon Pinpoint’s webpage.

Other useful links


Introducing advanced segmentation in Amazon Pinpoint

Post Syndicated from Srini Sekaran original https://aws.amazon.com/blogs/messaging-and-targeting/introducing-advanced-segmentation-in-amazon-pinpoint/

Today, Amazon Pinpoint announced the launch of several new segmentation capabilities for Amazon Pinpoint. Amazon Pinpoint now provides customers additional filters to perform more granular segmentation. You can increase the level of campaign and message personalization by being able to reach more specific audiences.

Today’s end users require consistent and personalized experiences across channels such as email, SMS, and push. On average, 71% of consumers feel frustrated when their user experience is impersonal1. The ability to target a specific audience is a fundamental step to delivering personalized experiences. However, marketers struggle to target the right audience due to technical barriers such as the need for query language to segment groups. This is particularly resonant for organizations with a large pool of customer information. For these teams, understanding and targeting an audience based on preferences and behavior often extends to manual workarounds such as using spreadsheets.

With more data at their disposal, marketers want the ability to filter by user attributes in terms of metrics and time so they can send the right message to the right audience, at the right time.

Amazon Pinpoint now provides comparative and time-based filters, unlocking more use cases for targeting and retargeting. These filters allow you, for example, to define a segment of mobile users between the ages of 18 and 24 that joined after a October 24, 2020 with a lifetime value of more than $500. For marketers, being able to create defined segments such as this helps them increase user engagement by allowing them to tailor the right messaging and campaigns to specific sub-groups based on their characteristics.

When creating a segment, you will now have access to more segmentation filters including greater than, less than, between, before, and after. You can combine filters and create specific segments directly on the Pinpoint console or the CLI to build targeted and relevant campaigns that increase user engagement and marketing efficiency.

Amazon Pinpoint now provides the following filters to help you define and target the specific audience you would like to reach in your marketing campaigns:

  • Comparative filters: greater than, less than, equals, greater than or equals, less than or equals — a certain value

  • Matching filters: is, is not, contains — a certain string or text

  • Date filters: before, after, between, on — a certain date

To learn more about how you can create targeted campaigns with new segmentation capabilities, visit https://aws.amazon.com/pinpoint.

  1. https://www.forbes.com/sites/blakemorgan/2020/02/18/50-stats-showing-the-power-of-personalization/?sh=637812d52a94