In Part 1 of this series, we provided guidance on how to discover and classify secrets and design a migration solution for customers who plan to migrate secrets to AWS Secrets Manager. We also mentioned steps that you can take to enable preventative and detective controls for Secrets Manager. In this post, we discuss how teams should approach the next phase, which is implementing the migration of secrets to Secrets Manager. We also provide a sample solution to demonstrate migration.
Implement secrets migration
Application teams lead the effort to design the migration strategy for their application secrets. Once you’ve made the decision to migrate your secrets to Secrets Manager, there are two potential options for migration implementation. One option is to move the application to AWS in its current state and then modify the application source code to retrieve secrets from Secrets Manager. Another option is to update the on-premises application to use Secrets Manager for retrieving secrets. You can use features such as AWS Identity and Access Management (IAM) Roles Anywhere to make the application communicate with Secrets Manager even before the migration, which can simplify the migration phase.
If the application code contains hardcoded secrets, the code should be updated so that it references Secrets Manager. A good interim state would be to pass these secrets as environment variables to your application. Using environment variables helps in decoupling the secrets retrieval logic from the application code and allows for a smooth cutover and rollback (if required).
Cutover to Secrets Manager should be done in a maintenance window. This minimizes downtime and impacts to production.
Before you perform the cutover procedure, verify the following:
Application components can access Secrets Manager APIs. Based on your environment, this connectivity might be provisioned through interface virtual private cloud (VPC) endpoints or over the internet.
Secrets exist in Secrets Manager and have the correct tags. This is important if you are using attribute-based access control (ABAC).
Applications that integrate with Secrets Manager have the required IAM permissions.
Have a well-documented cutover and rollback plan that contains the changes that will be made to the application during cutover. These would include steps like updating the code to use environment variables and updating the application to use IAM roles or instance profiles (for apps that are being migrated to Amazon Elastic Compute Cloud (Amazon EC2)).
After the cutover, verify that Secrets Manager integration was successful. You can use AWS CloudTrail to confirm that application components are using Secrets Manager.
We recommend that you further optimize your integration by enabling automatic secrets rotation. If your secrets were previously widely accessible (for example, they were stored in your Git repositories), we recommend rotating as soon as possible when migrating .
Sample application to demo integration with Secrets Manager
In the next sections, we present a sample AWS Cloud Development Kit (AWS CDK) solution that demonstrates the implementation of the previously discussed guardrails, design, and migration strategy. You can use the sample solution as a starting point and expand upon it. It includes components that environment teams may deploy to help provide potentially secure access for application teams to migrate their secrets to Secrets Manager. The solution uses ABAC, a tagging scheme, and IAM Roles Anywhere to demonstrate regulated access to secrets for application teams. Additionally, the solution contains client-side utilities to assist application and migration teams in updating secrets. Teams with on-premises applications that are seeking integration with Secrets Manager before migration can use the client-side utility for access through IAM Roles Anywhere.
VPC endpoints for the AWS Key Management Service (AWS KMS) and Secrets Manager services to the sample VPC. The use of VPC endpoints means that calls to AWS KMS and Secrets Manager are not made over the internet and remain internal to the AWS backbone network.
An empty shell secret, tagged with the supplied attributes and an IAM managed policy that uses attribute-based access control conditions. This means that the secret is managed in code, but the actual secret value is not visible in version control systems like GitHub or in AWS CloudFormation parameter inputs.
An IAM Roles Anywhere infrastructure stack (created and owned by environment teams). This stack provisions the following resources:
An IAM Roles Anywhere public key infrastructure (PKI) trust anchor that uses AWS Private CA.
An IAM role for the on-premises application that uses the common environment infrastructure stack.
An IAM Roles Anywhere profile.
Note: You can choose to use your existing CAs as trust anchors. If you do not have a CA, the stack described here provisions a PKI for you. IAM Roles Anywhere allows migration teams to use Secrets Manager before the application is moved to the cloud. Post migration, you could consider updating the applications to use native IAM integration (like instance profiles for EC2 instances) and revoking IAM Roles Anywhere credentials.
A client-side utility (primarily used by application or migration teams). This is a shell script that does the following:
Assists in provisioning a certificate by using OpenSSL.
Assists application teams to access and update their application secrets after assuming an IAM role by using IAM Roles Anywhere.
A sample application stack (created and owned by the application/migration team). This is a sample serverless application that demonstrates the use of the solution. It deploys the following components, which indicate that your ABAC-based IAM strategy is working as expected and is effectively restricting access to secrets:
The sample application stack uses a VPC-deployed common environment infrastructure stack.
It deploys an Amazon Aurora MySQL serverless cluster in the PRIVATE_ISOLATED subnet and uses the secret that is created through a common environment infrastructure stack.
It deploys a sample Lambda function in the PRIVATE_WITH_NAT subnet.
It deploys two IAM roles for testing:
allowedRole (default role): When the application uses this role, it is able to use the GET action to get the secret and open a connection to the Aurora MySQL database.
Not allowedRole: When the application uses this role, it is unable to use the GET action to get the secret and open a connection to the Aurora MySQL database.
Prerequisites to deploy the sample solution
The following software packages need to be installed in your development environment before you deploy this solution:
Note: In this section, we provide examples of AWS CLI commands and configuration for Linux or macOS operating systems. For instructions on using AWS CLI on Windows, refer to the AWS CLI documentation.
Before deployment, make sure that the correct AWS credentials are configured in your terminal session. The credentials can be either in the environment variables or in ~/.aws. For more details, see Configuring the AWS CLI.
Next, use the following commands to set your AWS credentials to deploy the stack:
You can view the IAM credentials that are being used by your session by running the command aws sts get-caller-identity. If you are running the cdk command for the first time in your AWS account, you will need to run the following cdk bootstrap command to provision a CDK Toolkit stack that will manage the resources necessary to enable deployment of cloud applications with the AWS CDK.
cdk bootstrap aws://<AWS account number>/<Region> # Bootstrap CDK in the specified account and AWS Region
Select the applicable archetype and deploy the solution
This section outlines the design and deployment steps for two archetypes:
For customers with applications already migrated to AWS, we demonstrate a sample integration of Secrets Manager with AWS Lambda. (See the section Archetype 2: Application has migrated to AWS.)
Archetype 1: Application is currently on premises
Archetype 1 has the following requirements:
The application is currently hosted on premises.
The application would consume API keys, stored credentials, and other secrets in Secrets Manager.
The application, environment and security teams work together to define a tagging strategy that will be used to restrict access to secrets. After this, the proposed workflow for each persona is as follows:
The environment engineer deploys a common environment infrastructure stack (as described earlier in this post) to bootstrap the AWS account with secrets and IAM policy by using the supplied tagging requirement.
Additionally, the environment engineer deploys the IAM Roles Anywhere infrastructure stack.
The application developer updates the secrets required by the application by using the client-side utility (helper.sh).
The application developer uses the client-side utility to update the AWS CLI profile to consume the IAM Roles Anywhere role from the on-premises servers.
Figure 1 shows the workflow for Archetype 1.
Figure 1: Application on premises connecting to Secrets Manager
To deploy Archetype 1
(Actions by the application team persona) Clone the repository and update the tagging details at configs/tagconfig.json.
Note: Do not modify the tag/attributes name/key, only modify value.
(Actions by the environment team persona) Run the following command to deploy the common environment infrastructure stack. ./helper.sh prepare Then, run the following command to deploy the IAM Roles Anywhere infrastructure stack../helper.sh on-prem
(Actions by the application team persona) Update the secret value of the dummy secrets provided by the environment team, by using the following command. ./helper.sh update-secret
Note: This command will only update the secret if it’s still using the dummy value.
Then, run the following command to set up the client and server on premises../helper.sh client-profile-setup
Follow the command prompt. It will help you request a client certificate and update the AWS CLI profile.
Important: When you request a client certificate, make sure to supply at least one distinguished name, like CommonName.
The sample output should look like the following.
‐‐> This role can be used by the application by using the AWS CLI profile 'developer'.
‐‐> For instance, the following output illustrates how to access secret values by using the AWS CLI profile 'developer'.
‐‐> Sample AWS CLI: aws secretsmanager get-secret-value ‐‐secret-id $SECRET_ARN ‐‐profile developer
At this point, the client-side utility (helper.sh client-profile-setup) should have updated the AWS CLI configuration file with the following profile.
The application team can verify that the AWS CLI profile has been properly set up and is capable of retrieving secrets from Secrets Manager by running the following client-side utility command. ./helper.sh on-prem-test
This client-side utility (helper.sh) command verifies that the AWS CLI profile (for example, developer) has been set up for IAM Roles Anywhere and can run the GetSecretValue API action to retrieve the value of the secret stored in Secrets Manager.
The sample output should look like the following.
‐‐> Checking credentials ...
{
    "UserId": "AKIAIOSFODNN7EXAMPLE:EXAMPLE11111EXAMPLEEXAMPLE111111",
    "Account": "444455556666",
    "Arn": "arn:aws:sts::444455556666:assumed-role/RolesanywhereabacStack-onPremAppRole-1234567890ABC"
}
‐‐> Assume role worked for:
arn:aws:sts::444455556666:assumed-role/RolesanywhereabacStack-onPremAppRole-1234567890ABC
‐‐> This role can be used by the application by using the AWS CLI profile 'developer'.
‐‐> For instance, the following output illustrates how to access secret values by using the AWS CLI profile 'developer'.
‐‐> Sample AWS CLI: aws secretsmanager get-secret-value --secret-id $SECRET_ARN ‐‐profile $PROFILE_NAME
-------Output-------
{
  "password": "randomuniquepassword",
  "servertype": "testserver1",
  "username": "testuser1"
}
-------Output-------
Archetype 2: Application has migrated to AWS
Archetype 2 has the following requirement:
Deploy a sample application to demonstrate how ABAC authorization works for Secrets Manager APIs.
The application, environment, and security teams work together to define a tagging strategy that will be used to restrict access to secrets. After this, the proposed workflow for each persona is as follows:
The environment engineer deploys a common environment infrastructure stack to bootstrap the AWS account with secrets and an IAM policy by using the supplied tagging requirement.
The application developer updates the secrets required by the application by using the client-side utility (helper.sh).
The application developer tests the sample application to confirm operability of ABAC.
Figure 2 shows the workflow for Archetype 2.
Figure 2: Sample migrated application connecting to Secrets Manager
To deploy Archetype 2
(Actions by the application team persona) Clone the repository and update the tagging details at configs/tagconfig.json.
Note: Don’t modify the tag/attributes name/key, only modify value.
(Actions by the environment team persona) Run the following command to deploy the common platform infrastructure stack. ./helper.sh prepare
(Actions by the application team persona) Update the secret value of the dummy secrets provided by the environment team, using the following command. ./helper.sh update-secret
Note: This command will only update the secret if it is still using the dummy value.
Then, run the following command to deploy a sample app stack. ./helper.sh on-aws
Note: If your secrets were migrated from a system that did not have the correct access controls, as a best security practice, you should rotate them at least once manually.
At this point, the client-side utility should have deployed a sample application Lambda function. This function connects to a MySQL database by using credentials stored in Secrets Manager. It retrieves the secret values, validates them, and establishes a connection to the database. The function returns a message that indicates whether the connection to the database is working or not.
To test Archetype 2 deployment
The application team can use the following client-side utility (helper.sh) to invoke the Lambda function and verify whether the connection is functional or not. ./helper.sh on-aws-test
The sample output should look like the following.
‐‐> Check if AWS CLI is installed
‐‐> AWS CLI found
‐‐> Using tags to create Lambda function name and invoking a test
‐‐> Checking the Lambda invoke response.....
‐‐> The status code is 200
‐‐> Reading response from test function:
"Connection to the DB is working."
‐‐> Response shows database connection is working from Lambda function using secret.
Conclusion
Building an effective secrets management solution requires careful planning and implementation. AWS Secrets Manager can help you effectively manage the lifecycle of your secrets at scale. We encourage you to take an iterative approach to building your secrets management solution, starting by focusing on core functional requirements like managing access, defining audit requirements, and building preventative and detective controls for secrets management. In future iterations, you can improve your solution by implementing more advanced functionalities like automatic rotation or resource policies for secrets.
If you have feedback about this post, submit comments in the Comments section below. If you have questions about this post, start a new thread on the AWS Secrets Manager re:Post or contact AWS Support.
Want more AWS Security news? Follow us on Twitter.
“An ounce of prevention is worth a pound of cure.” – Benjamin Franklin
A secret can be defined as sensitive information that is not intended to be known or disclosed to unauthorized individuals, entities, or processes. Secrets like API keys, passwords, and SSH keys provide access to confidential systems and resources, but it can be a challenge for organizations to maintain secure and consistent management of these secrets. Commonly observed anti-patterns in organizational secrets management systems include sharing plaintext secrets in emails or messaging apps, allowing application developers to view secrets in plaintext, hard-coding secrets into applications and storing them in version control systems, failing to rotate secrets regularly, and not logging and monitoring access to secrets.
We have created a two-part Amazon Web Services (AWS) blog post that provides prescriptive guidance on how you can use AWS Secrets Manager to help you achieve a cloud-based and modern secrets management system. In this first blog post, we discuss approaches to discover and classify secrets. In Part 2 of this series, we elaborate on the implementation phase and discuss migration techniques that will help you migrate your secrets to AWS Secrets Manager.
Managing secrets: Best practices and personas
A secret’s lifecycle comprises four phases: create, store, use, and destroy. An effective secrets management solution protects the secret in each of these phases from unauthorized access. Besides being secure, robust, scalable, and highly available, the secrets management system should integrate closely with other tools, solutions, and services that are being used within the organization. Legacy secret stores may lack integration with privileged access management (PAM), logging and monitoring, DevOps, configuration management, and encryption and auditing, which leads to teams not having uniform practices for consuming secrets and creates discrepancies from organizational policies.
Secrets Manager is a secrets management service that helps you protect access to your applications, services, and IT resources. This is a non-exhaustive list of features that AWS Secrets Manager offers:
Access control through AWS Identity and Access Management (IAM) — Secrets Manager offers built-in integration with the AWS Identity and Access Management (IAM) service. You can attach access control policies to IAM principals or to secrets themselves (by using resource-based policies).
Logging and monitoring — Secrets Manager integrates with AWS logging and monitoring services such as AWS CloudTrail and Amazon CloudWatch. This means that you can use your existing AWS logging and monitoring stack to log access to secrets and audit their usage.
Secrets encryption at rest — Secrets Manager integrates with AWS Key Management Service (AWS KMS). Secrets are encrypted at rest by using an AWS-managed key or customer-managed key.
Framework to support the rotation of secrets securely — Rotation helps limit the scope of a compromise and should be an integral part of a modern approach to secrets management. You can use Secrets Manager to schedule automatic database credentials rotation for Amazon RDS, Amazon Redshift, and Amazon DocumentDB. You can use customized AWS Lambda functions to extend the Secrets Manager rotation feature to other secret types, such as API keys and OAuth tokens for on-premises and cloud resources.
Security, cloud, and application teams within an organization need to work together cohesively to build an effective secrets management solution. Each of these teams has unique perspectives and responsibilities when it comes to building an effective secrets management solution, as shown in the following table.
Persona
Responsibilities
What they want
What they don’t want
Security teams/security architect
Define control objectives and requirements from the secrets management system
Least privileged short-lived access, logging and monitoring, and rotation of secrets
Secrets sprawl
Cloud team/environment team
Implement controls, create guardrails, detect events of interest
Scalable, robust, and highly available secrets management infrastructure
Application teams reaching out to them to provision or manage app secrets
Developer/migration engineer
Migrate applications and their secrets to the cloud
Independent control and management of their app secrets
Dependency on external teams
To sum up the requirements from all the personas mentioned here: The approach to provision and consume secrets should be secure, governed, easily scalable, and self-service.
We’ll now discuss how to discover and classify secrets and design the migration in a way that helps you to meet these varied requirements.
Discovery — Assess and categorize existing secrets
The initial discovery phase involves running sessions aimed at discovering, assessing, and categorizing secrets. Migrating applications and associated infrastructure to the cloud requires a strategic and methodical approach to progressively discover and analyze IT assets. This analysis can be used to create high-confidence migration wave plans. You should treat secrets as IT assets and include them in the migration assessment planning.
For application-related secrets, arguably the most appropriate time to migrate a secret is when the application that uses the secret is being migrated itself. This lets you track and report the use of secrets as soon as the application begins to operate in the cloud. If secrets are left on-premises during an application migration, this often creates a risk to the availability of the application. The migrated application ends up having a dependency on the connectivity and availability of the on-premises secrets management system.
The activities performed in this phase are often handled by multiple teams. Depending on the purpose of the secret, this can be a mix of application developers, migration teams, and environment teams.
Following are some common secret types you might come across while migrating applications.
Type
Description
Application secrets
Secrets specific to an application
Client credentials
Cloud to on-premises credentials or OAuth tokens (such as Okta, Google APIs, and so on)
Database credentials
Credentials for cloud-hosted databases, for example, Amazon Redshift, Amazon RDS or Amazon Aurora, Amazon DocumentDB
Third-party credentials
Vendor application credentials or API keys
Certificate private keys
Custom applications or infrastructure that might require programmatic access to the private key
Cryptographic keys
Cryptographic keys used for data encryption or digital signatures
SSH keys
Centralized management of SSH keys can potentially make it easier to rotate, update, and track keys
AWS access keys
On-premises to cloud credentials (IAM)
Creating an inventory for secrets becomes simpler when organizations have an IT asset management (ITAM) or Identity and Access Management (IAM) tool to manage their IT assets (such as secrets) effectively. For organizations that don’t have an on-premises secrets management system, creating an inventory of secrets is a combination of manual and automated efforts. Application subject matter experts (SMEs) should be engaged to find the location of secrets that the application uses. In addition, you can use commercial tools to scan endpoints and source code and detect secrets that might be hardcoded in the application. Amazon CodeGuru is a service that can detect secrets in code. It also provides an option to migrate these secrets to Secrets Manager.
AWS has previously described seven common migration strategies for moving applications to the cloud. These strategies are refactor, replatform, repurchase, rehost, relocate, retain, and retire. For the purposes of migrating secrets, we recommend condensing these seven strategies into three: retire, retain, and relocate. You should evaluate every secret that is being considered for migration against a decision tree to determine which of these three strategies to use. The decision tree evaluates each secret against key business drivers like cost reduction, risk appetite, and the need to innovate. This allows teams to assess if a secret can be replaced by native AWS services, needs to be retained on-premises, migrated to Secrets Manager, or retired. Figure 1 shows this decision process.
Figure 1: Decision tree for assessing a secret for migration
Capture the associated details for secrets that are marked as RELOCATE. This information is essential and must remain confidential. Some secret metadata is transitive and can be derived from related assets, including details such as itsm-tier, sensitivity-rating, cost-center, deployment pipeline, and repository name. With Secrets Manager, you will use resource tags to bind this metadata with the secret.
You should gather at least the following information for the secrets that you plan to relocate and migrate to AWS Secrets Manager.
Metadata about secrets
Rationale for gathering data
Secrets team name or owner
Gathering the name or email address of the individual or team responsible for managing secrets can aid in verifying that they are maintained and updated correctly.
Secrets application name or ID
To keep track of which applications use which secrets, it is helpful to collect application details that are associated with these secrets.
Secrets environment name or ID
Gathering information about the environment to which secrets belong, such as “prod,” “dev,” or “test,” can assist in the efficient management and organization of your secrets.
Secrets data classification
Understanding your organization’s data classification policy can help you identify secrets that contain sensitive or confidential information. It is recommended to handle these secrets with extra care. This information, which may be labeled “confidential,” “proprietary,” or “personally identifiable information (PII),” can indicate the level of sensitivity associated with a particular secret according to your organization’s data classification policy or standard.
Secrets function or usage
If you want to quickly find the secrets you need for a specific task or project, consider documenting their usage. For example, you can document secrets related to “backup,” “database,” “authentication,” or “third-party integration.” This approach can allow you to identify and retrieve the necessary secrets within your infrastructure without spending a lot of time searching for them.
This is also a good time to decide on the rotation strategy for each secret. When you rotate a secret, you update the credentials in both Secrets Manager and the service to which that secret provides access (in other words, the resource). Secrets Manager supports automatic rotation of secrets based on a schedule.
Design the migration solution
In this phase, security and environment teams work together to onboard the Secrets Manager service to their organization’s cloud environment. This involves defining access controls, guardrails, and logging capabilities so that the service can be consumed in a regulated and governed manner.
As a starting point, use the following design principles mentioned in the Security Pillar of the AWS Well Architected Framework to design a migration solution:
Implement a strong identity foundation
Enable traceability
Apply security at all layers
Automate security best practices
Protect data at rest and in transit
Keep people away from data
Prepare for security events
The design considerations covered in the rest of this section will help you prepare your AWS environment to host production-grade secrets. This phase can be run in parallel with the discovery phase.
Design your access control system to establish a strong identity foundation
In this phase, you define and implement the strategy to restrict access to secrets stored in Secrets Manager. You can use the AWS Identity and Access Management (IAM) service to specify that identities (human and non-human IAM principals) are only able to access and manage secrets that they own. Organizations that organize their workloads and environments by using separate AWS accounts should consider using a combination of role-based access control (RBAC) and attribute-based access control (ABAC) to restrict access to secrets depending on the granularity of access that’s required.
You can use a scalable automation to deploy and update key IAM roles and policies, including the following:
Pipeline deployment policies and roles — This refers to IAM roles for CICD pipelines. These pipelines should be the primary mechanism for creating, updating, and deleting secrets in the organization.
IAM Identity Center permission sets — These allow human identities access to the Secrets Manager API. We recommend that you provision secrets by using infrastructure as code (IaC). However, there are instances where users need to interact directly with the service. This can be for initial testing, troubleshooting purposes, or updating a secret value when automatic rotation fails or is not enabled.
IAM permissions boundary — Boundary policies allow application teams to create IAM roles in a self-serviced, governed, and regulated manner.
Most organizations have Infrastructure, DevOps, or Security teams that deploy baseline configurations into AWS accounts. These solutions help these teams govern the AWS account and often have their own secrets. IAM policies should be created such that the IAM principals created by the application teams are unable to access secrets that are owned by the environment team, and vice versa. To enforce this logical boundary, you can use tagging and naming conventions on your secrets by using IAM.
A sample scheme for tagging your secrets can look like the following.
Tag key
Tag value
Notes
Policy elements
Secret tags
appname
Lowercase
Alphanumeric only
User friendly
Quickly identifiable
A user-friendly name for the application
PrincipalTag/ appname =<value> (applies to role) RequestTag/ appname =<value> (applies to caller) SecretManager:ResourceTag/ appname=<value> (applies to the secret)
appname:<value>
appid
Lowercase
Alphanumeric only
Unique across the organization
Fixed length (5–7 characters)
Uniquely identifies the application among other cloud-hosted apps
If you maintain a registry that documents details of your cloud-hosted applications, most of these tags can be derived from the registry.
It’s common to apply different security and operational policies for the non-production and production environments of a given workload. Although production environments are generally deployed in a dedicated account, it’s common to have less critical non-production apps and environments coexisting in the same AWS account. For operation and governance at scale in these multi-tenanted accounts, you can use attribute-based access control (ABAC) to manage secure access to secrets. ABAC enables you to grant permissions based on tags. The main benefits of using tag-based access control are its scalability and operational efficiency.
Figure 2 shows an example of ABAC in action, where an IAM policy allows access to a secret only if the appfunc, appenv, and appid tags on the secret match the tags on the IAM principal that is trying to access the secrets.
Figure 2: ABAC access control
ABAC works as follows:
Tags on a resource define who can access the resource. It is therefore important that resources are tagged upon creation.
For a create secret operation, IAM verifies whether the Principal tags on the IAM identity that is making the API call match the request tags in the request.
For an update, delete, or read operation, IAM verifies that the Principal tags on the IAM identity that is making the API call match the resource tags on the secret.
Regardless of the number of workloads or environments that coexist in the same account, you only need to create one ABAC-based IAM policy. This policy is the same for different kinds of accounts and can be deployed by using a capability like AWS CloudFormation StackSets. This is the reason that ABAC scales well for scenarios where multiple applications and environments are deployed in the same AWS account.
IAM roles can use a common IAM policy, such as the one described in the previous bullet point. You need to verify that the roles have the correct tags set on them, according to your tagging convention. This will automatically grant the roles access to the secrets that have the same resource tags.
Note that with this approach, tagging secrets and IAM roles becomes the most critical component for controlling access. For this reason, all tags on IAM roles and secrets on Secrets Manager must follow a standard naming convention at all times.
The following is an ABAC-based IAM policy that allows creation, updates, and deletion of secrets based on the tagging scheme described in the preceding table.
In addition to controlling access, this policy also enforces a naming convention. IAM principals will only be able to create a secret that matches the following naming scheme.
Secret name = value of tag-key (appid + appfunc + appenv + name)
For example, /ordersapp/api/prod/logisticsapi
You can choose to implement ABAC so that the resource name matches the principal tags or the resource tags match the principal tags, or both. These are just different types of ABAC. The sample policy provided here implements both types. It’s important to note that because ABAC-based IAM policies are shared across multiple workloads, potential misconfigurations in the policies will have a wider scope of impact.
You can also add checks in your pipeline to provide early feedback for developers. These checks may potentially assist in verifying whether appropriate tags have been set up in IaC resources prior to their creation. Your pipeline-based controls provide an additional layer of defense and complement or extend restrictions enforced by IAM policies.
Resource-based policies
Resource-based policies are a flexible and powerful mechanism to control access to secrets. They are directly associated with a secret and allow specific principals mentioned in the policy to have access to the secret. You can use these policies to grant identities (internal or external to the account) access to a secret.
If your organization uses resource policies, security teams should come up with control objectives for these policies. Controls should be set so that only resource-based policies meeting your organizations requirements are created. Control objectives for resource policies may be set as follows:
Allow statements in the policy to have allow access to the secret from the same application.
Allow statements in the policy to have allow access from organization-owned cross-account identities only if they belong to the same environment. Controls that meet these objectives can be preventative (checks in pipeline) or responsive (config rules and Amazon EventBridge invoked Lambda functions).
Environment teams can also choose to provision resource-based policies for application teams. The provision process can be manual, but is preferably automated. An example would be that these teams can allow application teams to tag secrets with specific values, like a cross-account IAM role Amazon Resource Number (ARN) that needs access. An automation invoked by EventBridge rules then asserts that the cross-account principal in the tag belongs to the organization and is in the same environment, and then provisions a resource-based policy for the application team. Using such mechanisms creates a self-service way for teams to create safe resource policies that meet common use cases.
Resource-based policies for Secrets Manager can be a helpful tool for controlling access to secrets, but it is important to consider specific situations where alternative access control mechanisms might be more appropriate. For example, if your access control requirements for secrets involve complex conditions or dependencies that cannot be easily expressed using the resource-based policy syntax, it may be challenging to manage and maintain the policies effectively. In such cases, you may want to consider using a different access control mechanism that better aligns with your requirements. For help determining which type of policy to use, see Identity-based policies and resource-based policies.
Design detective controls to achieve traceability, monitoring, and alerting
Prepare your environment to record and flag events of interest when Secrets Manager is used to store and update secrets. We recommend that you start by identifying risks and then formulate objectives and devise control measures for each identified risk, as follows:
Control objectives — What does the control evaluate, and how is it configured? Controls can be configured by using CloudTrail events invoked by Lambda functions, AWS config rules, or CloudWatch alarms. Controls can evaluate a misconfigured property in a secrets resource or report on an event of interest.
Target audience — Identify teams that should be notified if the event occurs. This can be a combination of the environment, security, and application teams.
Notification type — SNS, email, Slack channel notifications, or an ITIL ticket.
Criticality — Low, medium, or high, based on the criticality of the event.
The following is a sample matrix that can serve as a starting point for documenting detective controls for Secrets Manager. The column titled AWS services in the table offers some suggestions for implementation to help you meet your control objetves.
Risk
Control objective
Criticality
AWS services
A secret is created without tags that match naming and tagging schemes
Enforce least privilege
Establish logging and monitoring
Manage secrets
HIGH (if using ABAC)
CloudTrail invoked Lambda function or custom AWS config rule
IAM related tags on a secret are updated, removed
Manage secrets
Enforce least privilege
HIGH (if using ABAC)
CloudTrail invoked Lambda function or custom config rule
A resource policy is created when resource policies have not been onboarded to the environment
Manage secrets
Enforce least privilege
HIGH
Pipeline or CloudTrail invoked ¬Lambda function or custom config rule
A secret is marked for deletion from an unusual source — root user or admin break glass role
Improve availability
Protect configurations
Prepare for incident response
Manage secrets
HIGH
CloudTrail invoked Lambda function
A non-compliant resource policy was created — for example, to provide secret access to a foreign account
Enforce least privilege
Manage secrets
HIGH
CloudTrail invoked Lambda function or custom config rule
An AWS KMS key for secrets encryption is marked for deletion
Manage secrets
Protect configurations
HIGH
CloudTrail invoked Lambda function
A secret rotation failed
Manage secrets
Improve availability
MEDIUM
Managed config rule
A secret is inactive and is not being accessed for x number of days
Optimize costs
LOW
Managed config rule
Secrets are created that do not use KMS key
Encrypt data at rest
LOW
Managed config rule
Automatic rotation is not enabled
Manage secrets
LOW
Managed config rule
Successful create, update, and read events for secrets
Establish logging and monitoring
LOW
CloudTrail logs
We suggest that you deploy these controls in your AWS accounts by using a scalable mechanism, such as CloudFormation StackSets.
Design for additional protection at the network layer
You can use the guiding principles for Zero Trust networking to add additional mechanisms to control access to secrets. The best security doesn’t come from making a binary choice between identity-centric and network-centric controls, but by using both effectively in combination with each other.
VPC endpoints allow you to provide a private connection between your VPC and Secrets Manager API endpoints. They also provide the ability to attach a policy that allows you to enforce identity-centric rules at a logical network boundary. You can use global context keys like aws:PrincipalOrgID in VPC endpoint policies to allow requests to Secrets Manager service only from identities that belong to the same AWS organization. You can also use aws:sourceVpce and aws:sourceVpc IAM conditions to allow access to the secret only if the request originates from a specific VPC endpoint or VPC, respectively.
Design for least privileged access to encryption keys
To reduce unauthorized access, secrets should be encrypted at rest. Secrets Manager integrates with AWS KMS and uses envelope encryption. Every secret in Secrets Manager is encrypted with a unique data key. Each data key is protected by a KMS key. Whenever the secret value inside a secret changes, Secrets Manager generates a new data key to protect it. The data key is encrypted under a KMS key and stored in the metadata of the secret. To decrypt the secret, Secrets Manager first decrypts the encrypted data key by using the KMS key in AWS KMS.
The following is a sample AWS KMS policy that permits cryptographic operations to a KMS key only from the Secrets Manager service within an AWS account, and allows the AWS KMS decrypt action from a specific IAM principal throughout the organization.
{
    "Version": "2012-10-17",
    "Id": "secrets_manager_encrypt_org",
    "Statement": [
        {
            "Sid": "Root Access",
            "Effect": "Allow",
            "Principal": {
                "AWS": "arn:aws:iam::444455556666:root"
            },
            "Action": "kms:*",
            "Resource": "*"
        },
        {
            "Sid": "Allow access for Key Administrators",
            "Effect": "Allow",
            "Principal": {
                "AWS": [
             "arn:aws:iam::444455556666:role/platformRoles/KMS-key-admin-role",                    "arn:aws:iam::444455556666:role/platformRoles/KMS-key-automation-role"
                ]
            },
            "Action": [
                "kms:CancelKeyDeletion",
                "kms:Create*",
                "kms:Delete*",
                "kms:Describe*",
                "kms:Disable*",
                "kms:Enable*",
                "kms:Get*",
                "kms:List*",
                "kms:Put*",
                "kms:Revoke*",
                "kms:ScheduleKeyDeletion",
                "kms:TagResource",
                "kms:UntagResource",
                "kms:Update*"
            ],
            "Resource": "*"
        },
        {
            "Sid": "Allow Secrets Manager use of the KMS key for a specific account",
            "Effect": "Allow",
            "Principal": {
                "AWS": "*"
            },
            "Action": [
                "kms:Encrypt",
                "kms:Decrypt",
                "kms:ReEncrypt*",
                "kms:GenerateDataKey*",
                "kms:CreateGrant",
                "kms:ListGrants",
                "kms:DescribeKey"
            ],
            "Resource": "*",
            "Condition": {
                "StringEquals": {
                    "kms:CallerAccount": "444455556666",
                    "kms:ViaService": "secretsmanager.us-east-1.amazonaws.com"
                }
            }
        },
        {
            "Sid": "Allow use of Secrets Manager secrets from a specific IAM role (service account) throughout your org",
            "Effect": "Allow",
            "Principal": {
                "AWS": "*"
            },
            "Action": "kms:Decrypt",
            "Resource": "*",
            "Condition": {
                "StringEquals": {
                    "aws:PrincipalOrgID": "o-exampleorgid"
                },
                "StringLike": {
                    "aws:PrincipalArn": "arn:aws:iam::*:role/platformRoles/secretsAccessRole"
                }
            }
        }
    ]
}
Additionally, you can use the secretsmanager:KmsKeyId IAM condition key to allow secrets creation only when AWS KMS encryption is enabled for the secret. You can also add checks in your pipeline that allow the creation of a secret only when a KMS key is associated with the secret.
Design or update applications for efficient retrieval of secrets
In applications, you can retrieve your secrets by calling the GetSecretValue function in the available AWS SDKs. However, we recommend that you cache your secret values by using client-side caching. Caching secrets can improve speed, help to prevent throttling by limiting calls to the service, and potentially reduce your costs.
Secrets Manager integrates with the following AWS services to provide efficient retrieval of secrets:
For Amazon RDS, you can integrate with Secrets Manager to simplify managing master user passwords for Amazon RDS database instances. Amazon RDS can manage the master user password and stores it securely in Secrets Manager, which may eliminate the need for custom AWS Lambda functions to manage password rotations. The integration can help you secure your database by encrypting the secrets, using your own managed key or an AWS KMS key provided by Secrets Manager. As a result, the master user password is not visible in plaintext during the database creation workflow. This feature is available for the Amazon RDS and Aurora engines, and more information can be found in the Amazon RDS and Aurora User Guides.
For Amazon Elastic Kubernetes Service (Amazon EKS), you can use the AWS Secrets and Configuration Provider (ASCP) for the Kubernetes Secrets Store CSI Driver. This open-source project enables you to mount Secrets Manager secrets as Kubernetes secrets. The driver translates Kubernetes secret objects into Secrets Manager API calls, allowing you to access and manage secrets from within Kubernetes. After you configure the Kubernetes Secrets Store CSI Driver, you can create Kubernetes secrets backed by Secrets Manager secrets. These secrets are securely stored in Secrets Manager and can be accessed by your applications that are running in Amazon EKS.
For Amazon Elastic Container Service (Amazon ECS), sensitive data can be securely stored in Secrets Manager secrets and then accessed by your containers through environment variables or as part of the log configuration. This allows for a simple and potentially safe injection of sensitive data into your containers, making it a possible solution for your needs.
For AWS Lambda, you can use the AWS Parameters and Secrets Lambda Extension to retrieve and cache Secrets Manager secrets in Lambda functions without the need for an AWS SDK. It is noteworthy that retrieving a cached secret is faster compared to the standard method of retrieving secrets from Secrets Manager. Moreover, using a cache can be cost-efficient, because there is a charge for calling Secrets Manager APIs. For more details, see the Secrets Manager User Guide.
For additional information on how to use Secrets Manager secrets with AWS services, refer to the following resources:
Develop an incident response plan for security events
It is recommended that you prepare for unforeseeable incidents such as unauthorized access to your secrets. Developing an incident response plan can help minimize the impact of the security event, facilitate a prompt and effective response, and may help to protect your organization’s assets and reputation. The traceability and monitoring controls we discussed in the previous section can be used both during and after the incident.
The Computer Security Incident Handling Guide SP 800-61 Rev. 2, which was created by the National Institute of Standards and Technology (NIST), can help you create an incident response plan for specific incident types. It provides a thorough and organized approach to incident response, covering everything from initial preparation and planning to detection and analysis, containment, eradication, recovery, and follow-up. The framework emphasizes the importance of continual improvement and learning from past incidents to enhance the overall security posture of the organization.
Refer to the following documentation for further details and sample playbooks:
In this post, we discussed how organizations can take a phased approach to migrate their secrets to AWS Secrets Manager. Your teams can use the thought exercises mentioned in this post to decide if they would like to rehost, replatform, or retire secrets. We discussed what guardrails should be enabled for application teams to consume secrets in a safe and regulated manner. We also touched upon ways organizations can discover and classify their secrets.
In Part 2 of this series, we go into the details of the migration implementation phase and walk you through a sample solution that you can use to integrate on-premises applications with Secrets Manager.
If you have feedback about this post, submit comments in the Comments section below. If you have questions about this post, start a new thread on the AWS Secrets Manager re:Post or contact AWS Support.
Want more AWS Security news? Follow us on Twitter.
Today, accelerating application development while shifting security and assurance left in the development lifecycle is essential. One of the most critical components of application security is access control. While traditional access control mechanisms such as role-based access control (RBAC) and access control lists (ACLs) are still prevalent, policy-based access control (PBAC) is gaining momentum. PBAC is a more powerful and flexible access control model, allowing developers to apply any combination of coarse-, medium-, and fine-grained access control over resources and data within an application. In this article, we will explore PBAC and how it can be used in application development using Amazon Verified Permissions and how you can define permissions as policies using Cedar, an expressive and analyzable open-source policy language. We will briefly describe here how developers and admins can define policy-based access controls using roles and attributes for fine-grained access.
What is Policy-Based Access Control?
PBAC is an access control model that uses permissions expressed as policies to determine who can access what within an application. Administrators and developers can define application access statically as admin-time authorization where the access is based on users and groups defined by roles and responsibilities. On the other hand, developers set up run-time or dynamic authorization at any time to apply access controls at the time when a user attempts to access a particular application resource. Run-time authorization takes in attributes of application resources, such as contextual elements like time or location, to determine what access should be granted or denied. This combination of policy types makes policy-based access control a more powerful authorization engine.
A central policy store and policy engine evaluates these policies continuously, in real-time to determine access to resources. PBAC is a more dynamic access control model as it allows developers and administrators to create and modify policies according to their needs, such as defining custom roles within an application or enabling secure, delegated authorization. Developers can use PBAC to apply role- and attributed-based access controls across many different types of applications, such as customer-facing web applications, internal workforce applications, multi-tenant software-as-a-service (SaaS) applications, edge device access, and more. PBAC brings together RBAC and attribute-based access control (ABAC), which have been the two most widely used access control models for the past couple decades (See the figure below).
Figure 1: Overview of policy-based access control (PBAC)
Before we try and understand how to modernize permissions, let’s understand how developers implement it in a traditional development process. We typically see developers hardcode access control into each and every application. This creates four primary challenges.
First, you need to update code every time to update access control policies. This is time-consuming for a developer and done at the expense of working on the business logic of the application.
Second, you need to implement these permissions in each and every application you build.
Third, application audits are challenging, you need to run a battery of tests or dig through thousands of lines of code spread across multiple files to demonstrate who has access to application resources. For example, providing evidence to audits that only authorized users can access a patient’s health record.
Finally, developing hardcoded application access control is often time consuming and error prone.
Amazon Verified Permissions simplifies this process by externalizing access control rules from the application code to a central policy store within the service. Now, when a user tries to take an action in your application, you call Verified Permissions to check if it is authorized. Policy admins can respond faster to changing business requirements, as they no longer need to depend on the development team when updating access controls. They can use a central policy store to make updates to authorization policies. This means that developers can focus on the core application logic, and access control policies can be created, customized, and managed separately or collectively across applications. Developers can use PBAC to define authorization rules for users, user groups, or attributes based on the entity type accessing the application. Restricting access to data and resources using PBAC protects against unintended access to application resources and data.
For example, a developer can define a role-based and attribute-based access control policy that allows only certain users or roles to access a particular API. Imagine a group of users within a Marketing department that can only view specific photos within a photo sharing application. The policy might look something like the following using Cedar.
permit(
principal in Role::"expo-speakers",
action == Action::"view",
resource == Photo::"expoPhoto94.jpg"
)
when {
principal.department == “Marketing”
}
;
How do I get started using PBAC in my applications?
PBAC can be integrated into the application development process in several ways when using Amazon Verified Permissions. Developers begin by defining an authorization model for their application and use this to describe the scope of authorization requests made by the application and the basis for evaluating the requests. Think of this as a narrative or structure to authorization requests. Developers then write a schema which documents the form of the authorization model in a machine-readable syntax. This schema document describes each entity type, including principal types, actions, resource types, and conditions. Developers can then craft policies, as statements, that permit or forbid a principal to one or more actions on a resource.
Next, you define a set of application policies which define the overall framework and guardrails for access controls in your application. For example, a guardrail policy might be that only the owner can access photos that are marked ‘private’. These policies are applicable to a large set of users or resources, and are not user or resource specific. You create these policies in the code of your applications, and instantiate them in your CI/CD pipeline, using CloudFormation, and tested in beta stages before being deployed to production.
Lastly, you define the shape of your end-user policies using policy templates. These end-user policies are specific to a user (or user group). For example, a policy that states “Alice” can view “expoPhoto94.jpg”. Policy templates simplify managing end-user policies as a group. Now, every time a user in your application tries to take an action, you call Verified Permissions to confirm that the action is authorized.
Benefits of using Amazon Verified Permissions policies in application development
Amazon Verified Permissions offers several benefits when it comes to application development.
One of the most significant benefits is the flexibility in using the PBAC model. Amazon Verified Permissions allows application administrators or developers to create and modify policies at any time without going into application code, making it easier to respond to changing security needs.
Secondly, it simplifies the application development process by externalizing access control rules from the application code. Developers can reuse PBAC controls for newly built or acquired applications. This allows developers to focus on the core application logic and mitigates security risks within applications by applying fine-grained access controls.
Lastly, developers can add secure delegated authorization using PBAC and Amazon Verified Permissions. This enables developers to enable a group, role, or resource owner the ability to manage data sharing within application resources or between services. This has exciting implications for developers wanting to add privacy and consent capabilities for end users while still enforcing guardrails defined within a centralized policy store.
In Summary
PBAC is a more flexible access control model that enables fine-grained control over access to resources in an application. By externalizing access control rules from the application code, PBAC simplifies the application development process and reduces the risks of security vulnerabilities in the application. PBAC also offers flexibility, aligns with compliance mandates for access control, and developers and administrators benefit from centralized permissions across various stages of the DevOps process. By adopting PBAC in application development, organizations can improve their application security and better align with industry regulations.
Amazon Verified Permissions is a scalable permissions management and fine-grained authorization service for applications developers build. The service helps developers to build secure applications faster by externalizing authorization and centralizing policy management and administration. Developers can align their application access with Zero Trust principles by implementing least privilege and continuous verification within applications. Security and audit teams can better analyze and audit who has access to what within applications.
October 8, 2025: This blog post has been updated to include the Amazon Cognito managed login experience. The managed login experience has an updated look, additional features, and enhanced customization options.
September 8, 2023: It’s important to know that if you activate user sign-up in your user pool, anyone on the internet can sign up for an account and sign in to your apps. Don’t enable self-registration in your user pool unless you want to open your app to allow users to sign up.
June 9, 2023: Original publication date.
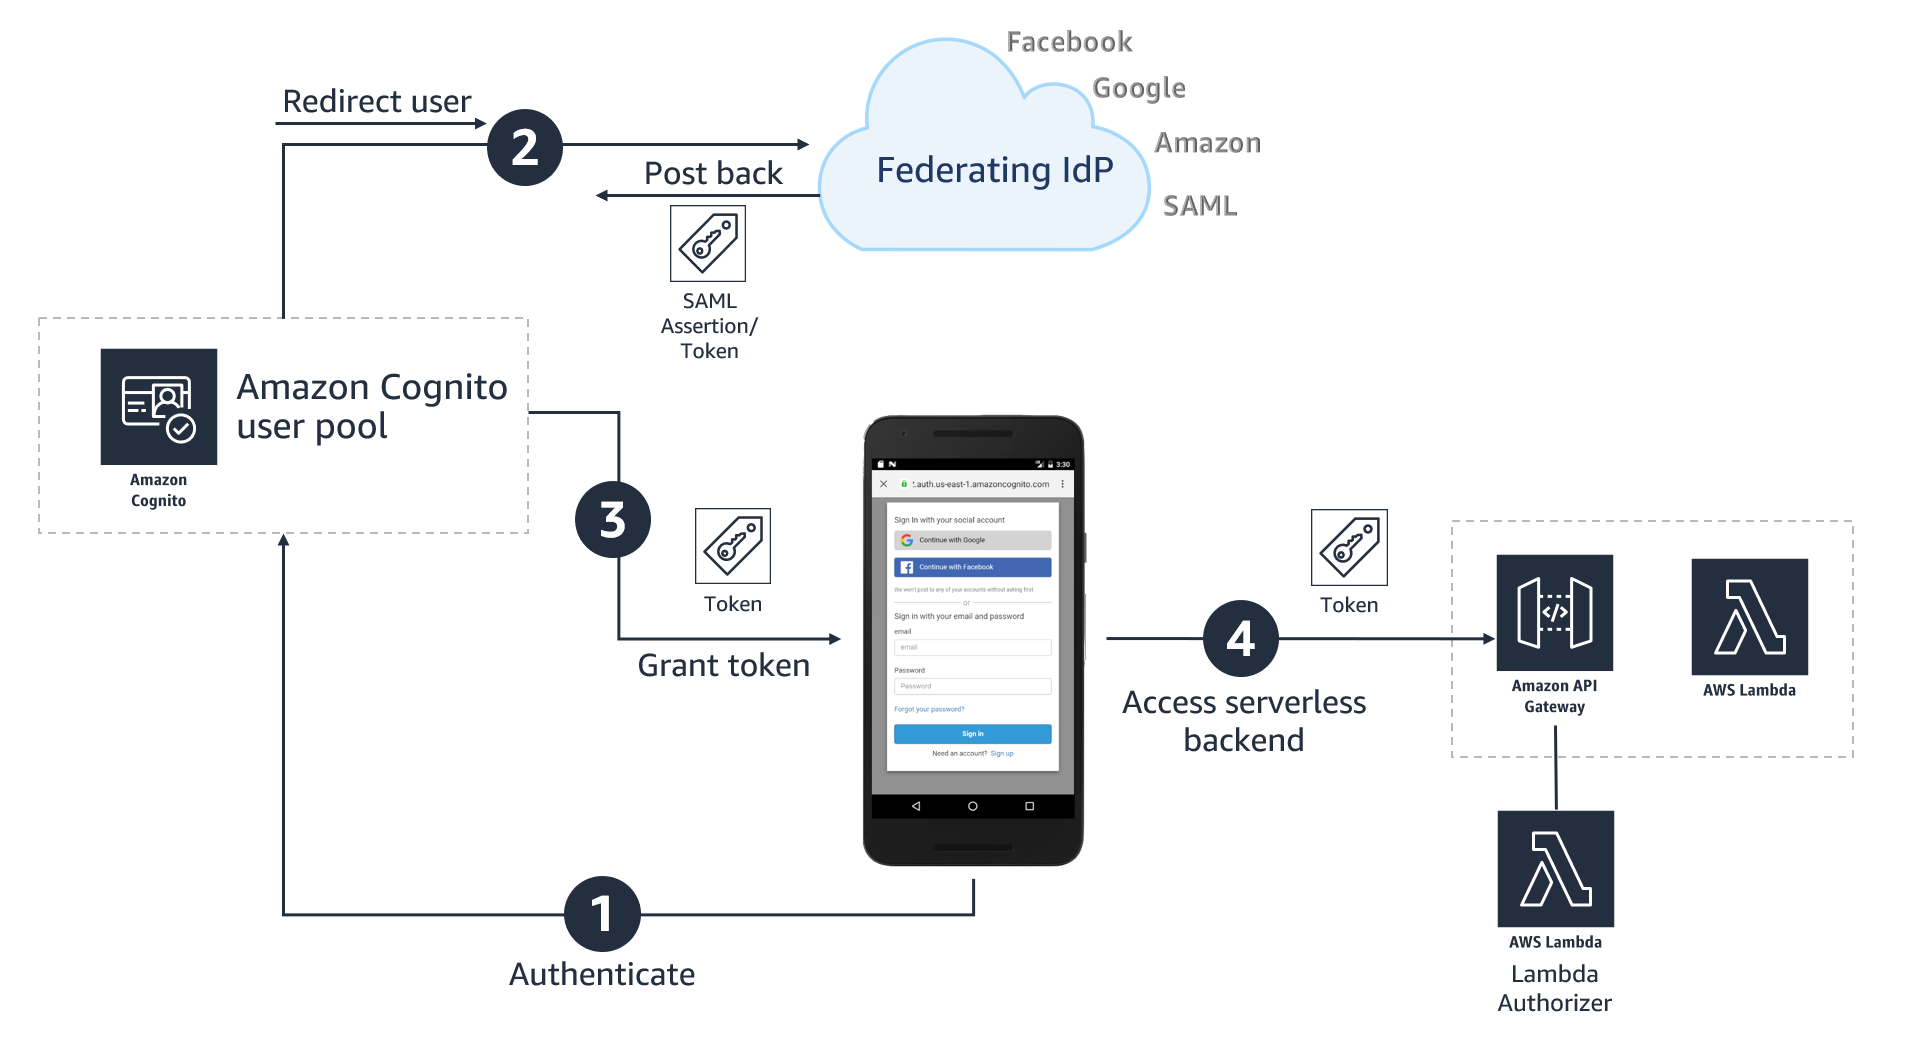
Amazon Cognito is an authentication, authorization, and user management service for your web and mobile applications. Your users can sign in directly through many different authentication methods, such as user accounts within Amazon Cognito or through social providers such as Facebook, Amazon, Apple, or Google. You can also configure federation through a third-party OpenID Connect (OIDC) or SAML 2.0 identity provider (IdP).
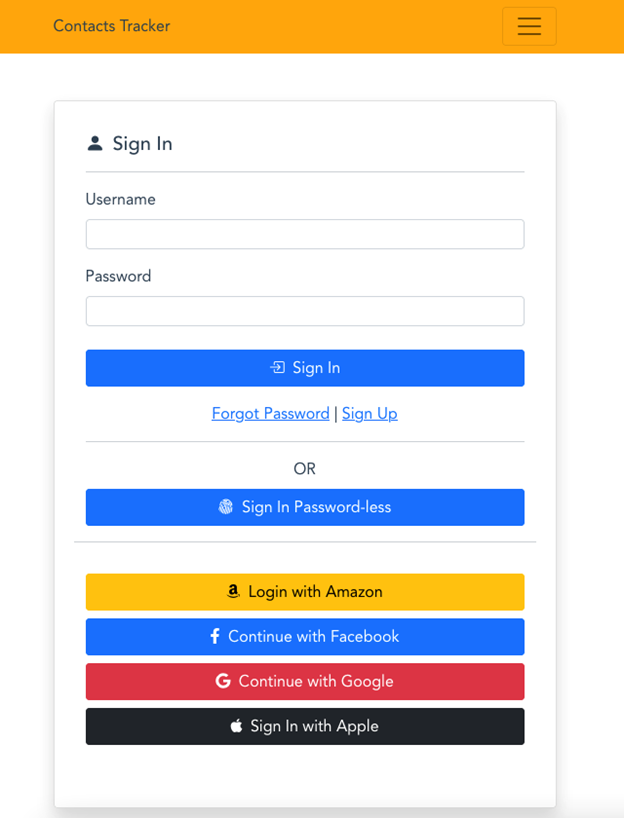
Amazon Cognito user pools are user directories that provide sign-up and sign-in functions for your application users, including federated authentication capabilities. A Cognito user pool has two primary UI options:
Managed login: AWS hosts, preconfigures, maintains, and scales the UI—including managed login branding and classic Hosted UI branding—with a set of options that you can customize or configure for sign-up and sign-in for app users.
Custom UI: You can configure an Amazon Cognito user pool with a completely custom UI by using the SDK. You’re accountable for hosting, configuring, maintaining, and scaling your custom UI as a part of your responsibility in the AWS Shared Responsibility Model.
In this blog post, we review the benefits of using the managed login or creating a custom UI with the SDK and things to consider in determining which to choose for your application.
Managed login
Managed login provides web interfaces for sign-up, sign-in, multi-factor authentication (MFA), password management, and passwordless and passkey sign-in capabilities in your user pool. The managed login provides an authorization server based on the OAuth 2.0 specification, and has a default implementation of user flows for sign-up and sign-in. Your application can redirect to the managed login, which will handle the user flows through the authorization code grant flow. The managed login also supports sign-in through social providers and federation from OIDC-compliant and SAML 2.0 providers. Amazon Cognito offers two visual modes and branding and customization experiences: managed login branding with branding editor and hosted UI (classic) branding.
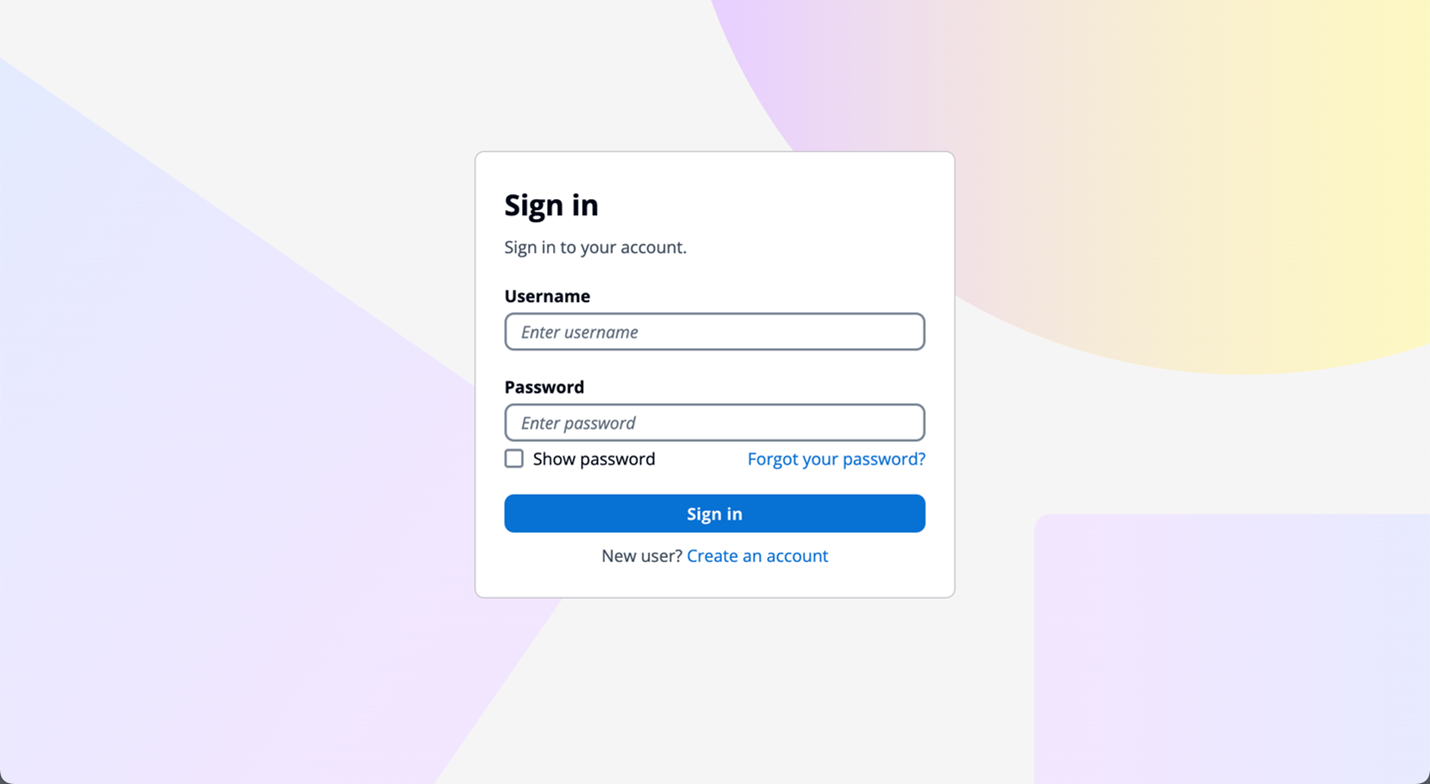
Managed login branding with branding editor Managed login branding provides an improved user experience with the most up-to-date authentication options for the user pool UI experience. Figure 1 shows managed login using the default branding settings.
Figure 1: Managed login default branding settings
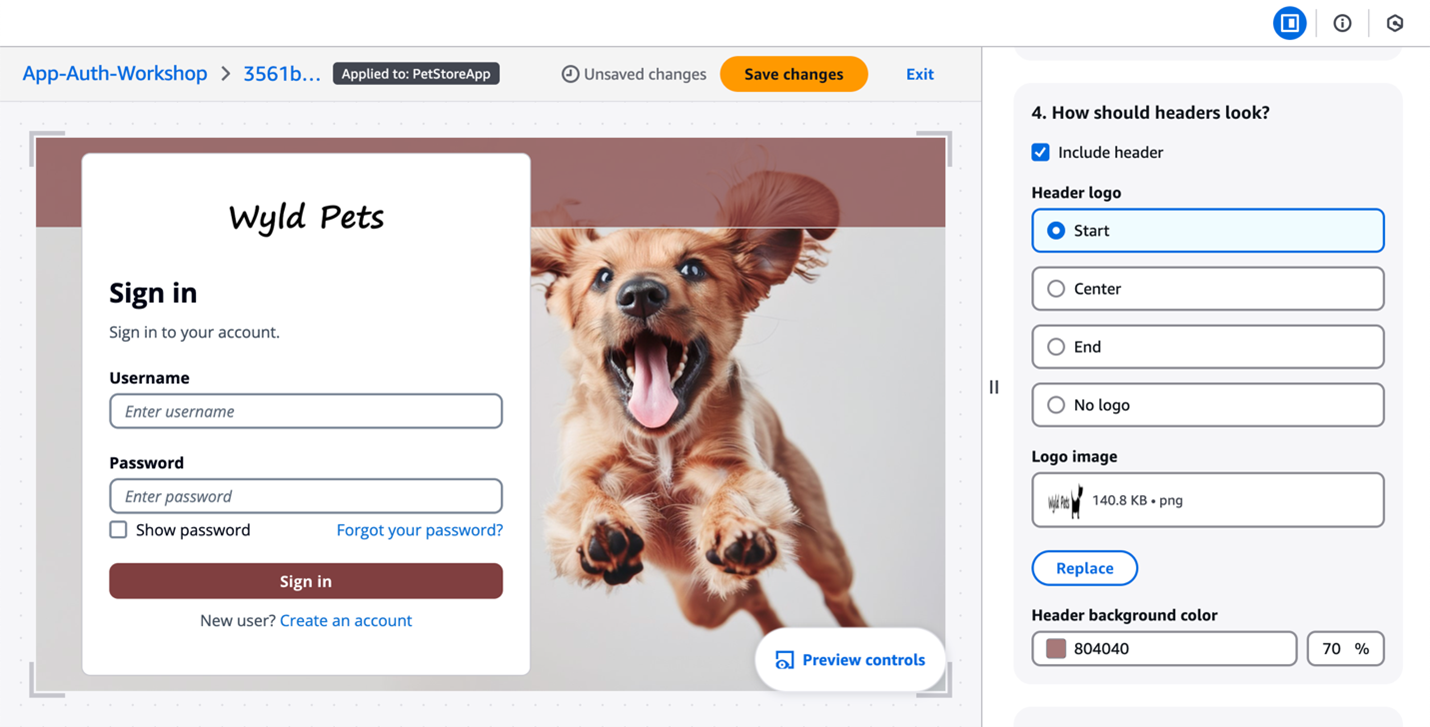
The branding editor is a no-code visual editor that you can use to customize the look and feel of the entire user journey. You can customize each user pool application client individually, and preview screens in real-time with different screen sizes, as shown in Figure 2.
Figure 2: Customization in the Amazon Cognito branding editor (Image credits)
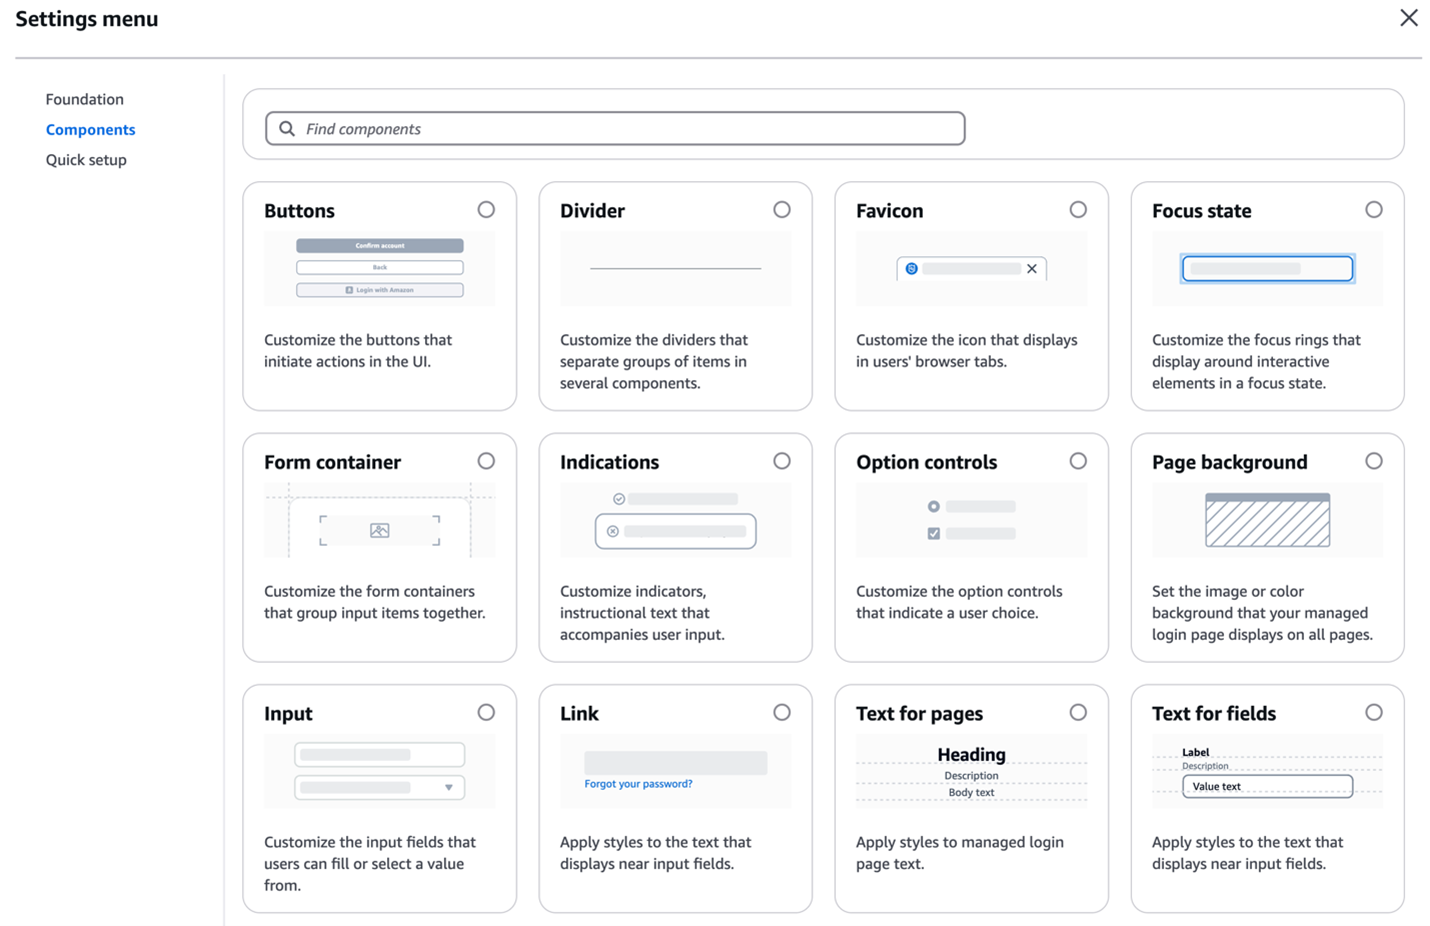
As shown in Figure 3, You can customize various components using the branding editor, including background, header and footer, buttons, focus state, icons, and more.
Figure 3: Various components customization options
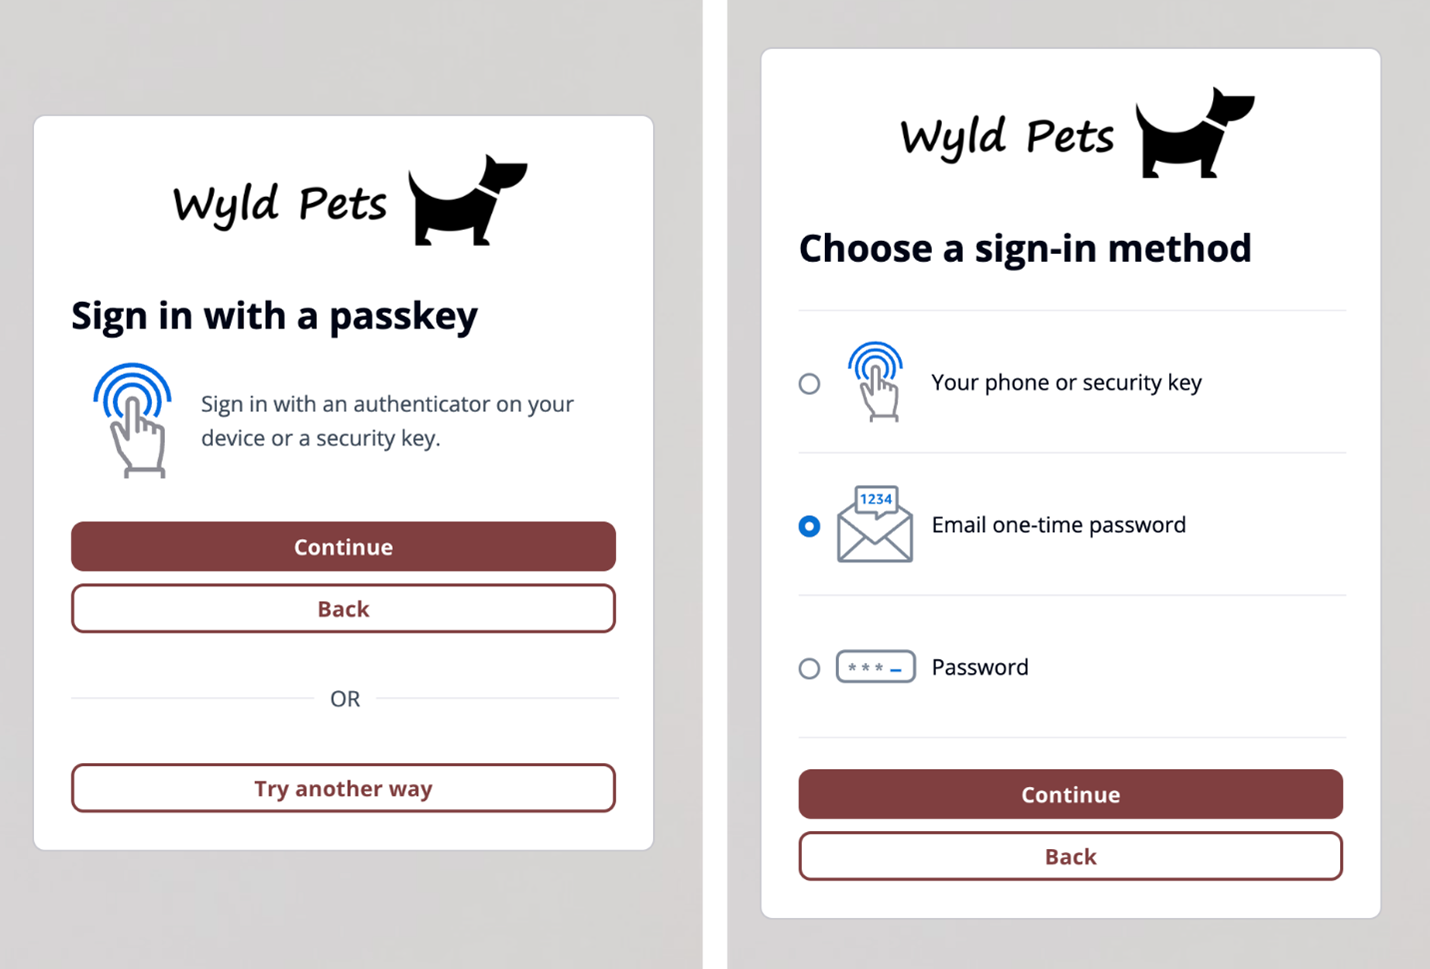
Additionally, managed login branding adds support for passwordless sign-in with passkeys, email one-time-passwords (OTP) and SMS OTPs, as shown in Figure 4. After you enable passwordless login in your user pool, managed login branding adapts to curated user flows with users’ preferred authentication methods.
Figure 4: Sign in with passkey flow (left) and user-selected sign-in method flow (right)
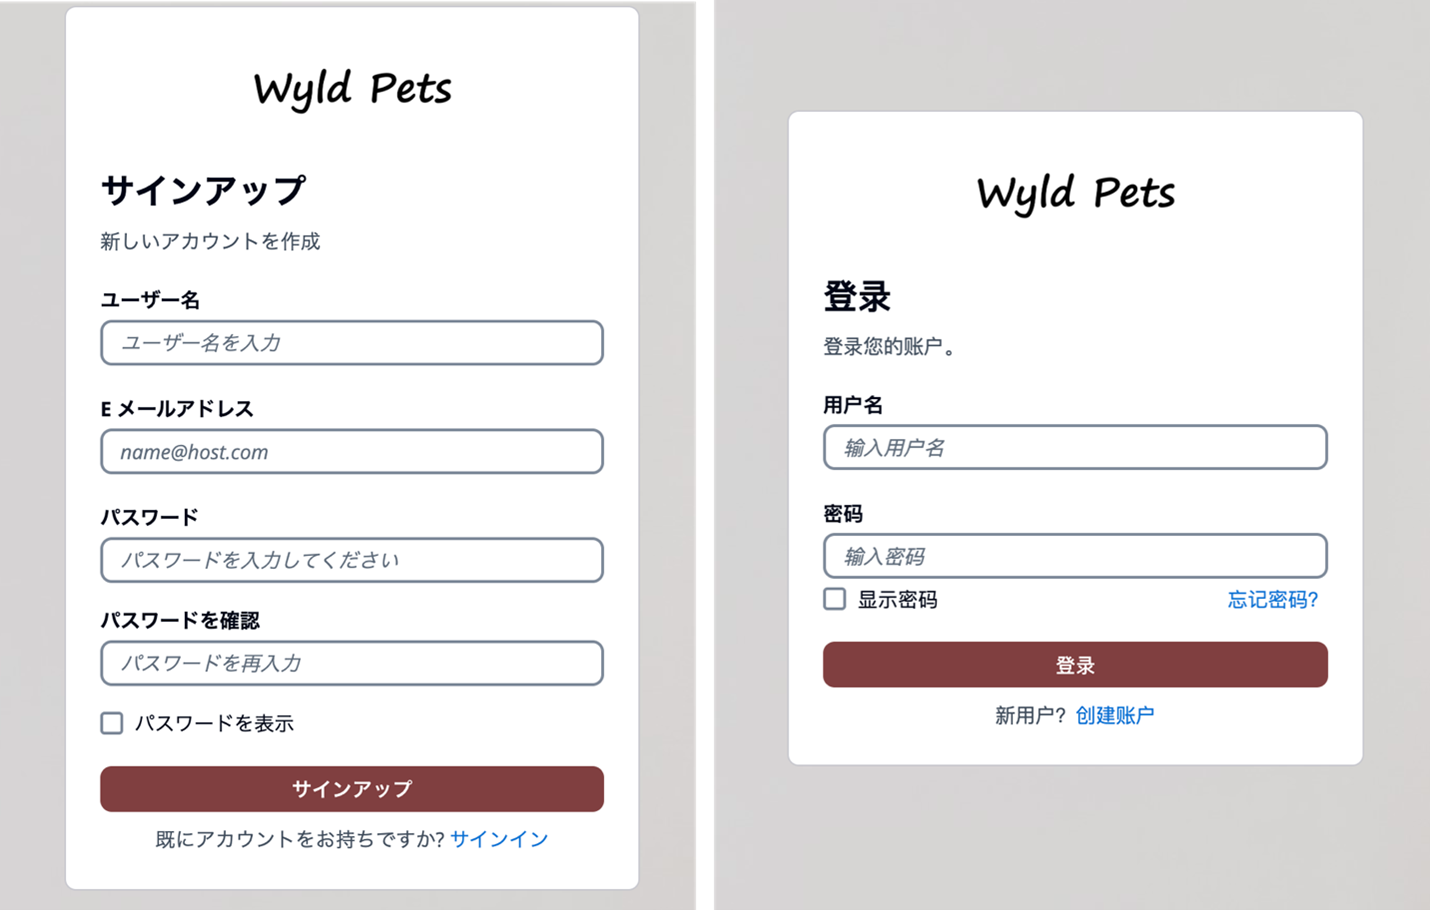
Managed login branding also offers localization options in several languages (two are shown in Figure 5). You can add a lang query parameter in the link you distribute to users, and Amazon Cognito will set a cookie in users’ browsers with their language preference after the initial request.
Figure 5: Cognito user sign up page in Japanese (left) and user sign in page in Simplified Chinese (right)
Hosted UI (classic) branding For customers who prefer a traditional approach, Amazon Cognito continues to support the Hosted UI (classic) branding (shown in Figure 6) with basic customization where you can upload a CSS file to design the UI styling and upload a brand-specific logo. Hosted UI (classic) supports standard authentication flows with MFA and self-service sign up.
Figure 6: Hosted UI (classic) branding
The managed login branding with branding editor is available to Amazon Cognito user pools with Essentials and Plus feature tiers, and Hosted UI (classic) branding is available to most Cognito user pools including Lite tier. To learn more about Cognito feature tiers, visit Amazon Cognito pricing.
Security and compliance capabilities
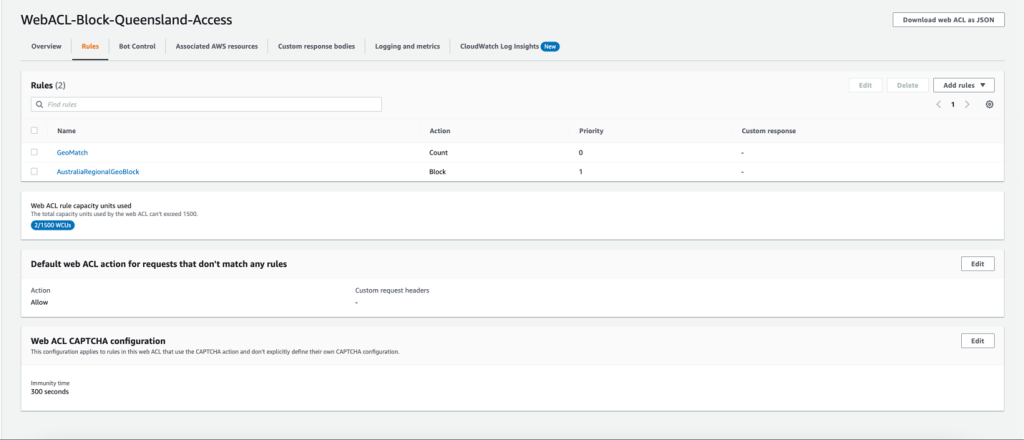
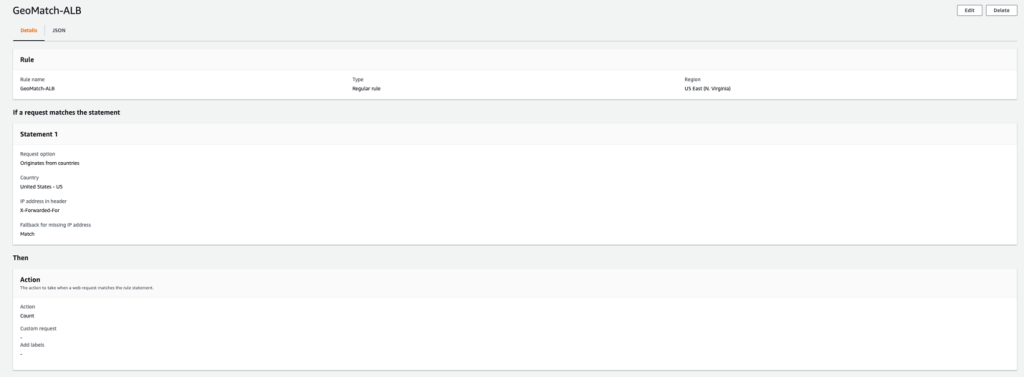
Both managed login branding and Hosted UI (classic) branding are designed to help you meet your compliance and security requirements and your users’ needs. Managed login supports custom OAuth scopes and OAuth 2.0 flows. If you want single sign-on (SSO), you can use managed login to support a single login across many application clients, with browser session cookies for the same domain. Actions are logged in AWS CloudTrail, and you can use the logs for audit and reactionary automation. The managed login experience also supports the full suite of threat protection features for Amazon Cognito. For additional protection, managed login has support for AWS WAF web ACLs and for AWS WAF CAPTCHA, which can help protect your Cognito user pools from web-based exploits and unwanted bots.
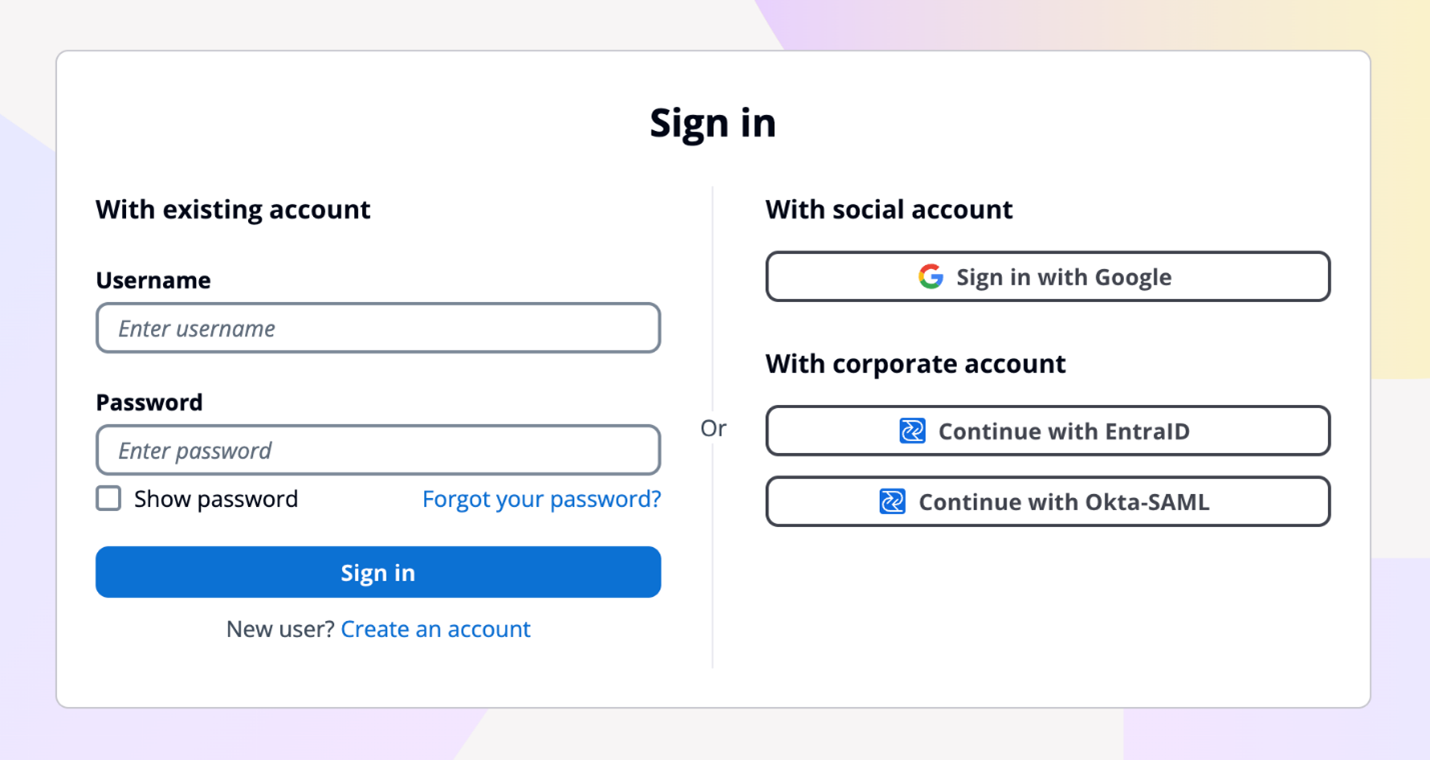
Figure 7: Example default managed login with several login providers enabled
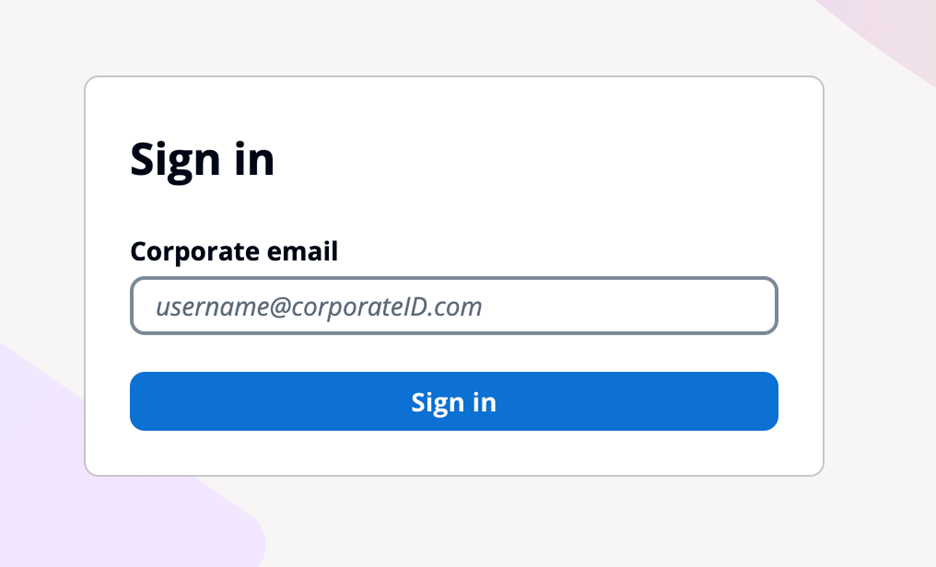
For federation, managed loginsupports federation with third-party IdPs that support OIDC and SAML 2.0, as well as social IdPs, as shown in Figure 7. Identity providers are connected to your Amazon Cognito user pool. In managed login, users use a button to select the federation source, and redirection is automatic. With SAML and OIDC IdPs, you can also configure mapping by using the domain in the user’s email address. In this case, a single text field is visible to your application users to enter an email address, as shown in Figure 8, and the lookup and redirect to the appropriate SAML IdP is automatic, as described in Choosing SAML identity provider names.
Figure 8: Managed login that links to corporate IdP through an email domain
Managed login integrates with Application Load Balancer (ALB) for web applications and works with AWS Amplify to enable social identity provider and enterprise federation (SAML and OIDC) capabilities. Beyond these integrations, Amazon Cognito user pools integrate with various AWS services (such as AWS AppSync), that require user authentication and authorization, and Amazon API Gateway through Cognito authorizers to secure your REST and HTTP endpoints.
You might choose to use managed login for many reasons. AWS fully manages the hosting, maintenance, and scaling of the managed login, which can contribute to the speed of go-to-market for customers. If your app requires OAuth 2.0 custom scopes, federation, social login, or native users with basic but customized branding and potentially numerous Amazon Cognito user pools, you might benefit from using managed login.
Creating a custom UI using the SDK for Amazon Cognito provides a host of benefits and features that can help you completely customize the UI for your application users. With a custom UI, you have complete control over the look and feel of the UI that your application users will land on, including designing your app to support multiple languages, and you can build and design custom authentication flows.
There are numerous features that are supported when you build a custom UI. As with the managed login, the APIs invoked from a custom UI using the SDK will create log entries in CloudTrail, and you can use the logs for audit and automation. You can also create a custom authentication flow for your users with a fully custom authentication experience beyond the those available in managed login.
In a custom UI, you can build custom session management and integrate with AWS WAF. A custom UI also works with the threat protection features of Amazon Cognito.
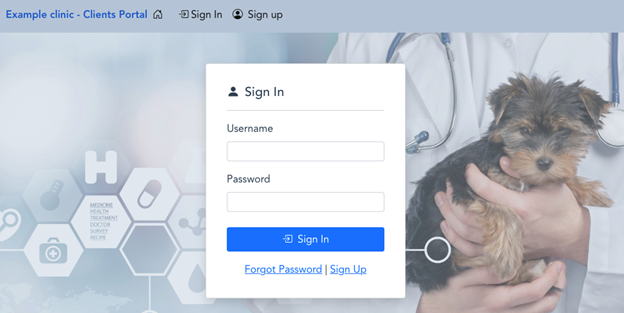
Figure 9: Example of a custom user interface
With a custom UI, such as the one shown in Figure 10, you can orchestrate a suite of sign-in options and sign-in flows for your users. For example, you can collect a user or tenant identifier at the beginning of the authentication flow and apply your own logic for user authentication flow, such as redirecting federated users to external IdPs, displaying a password prompt for local users, or directing users to create a new account if they don’t exist. You can also build flows to let a user choose alternative MFA methods if their preferred choices aren’t available.
Figure 10: Custom UI example
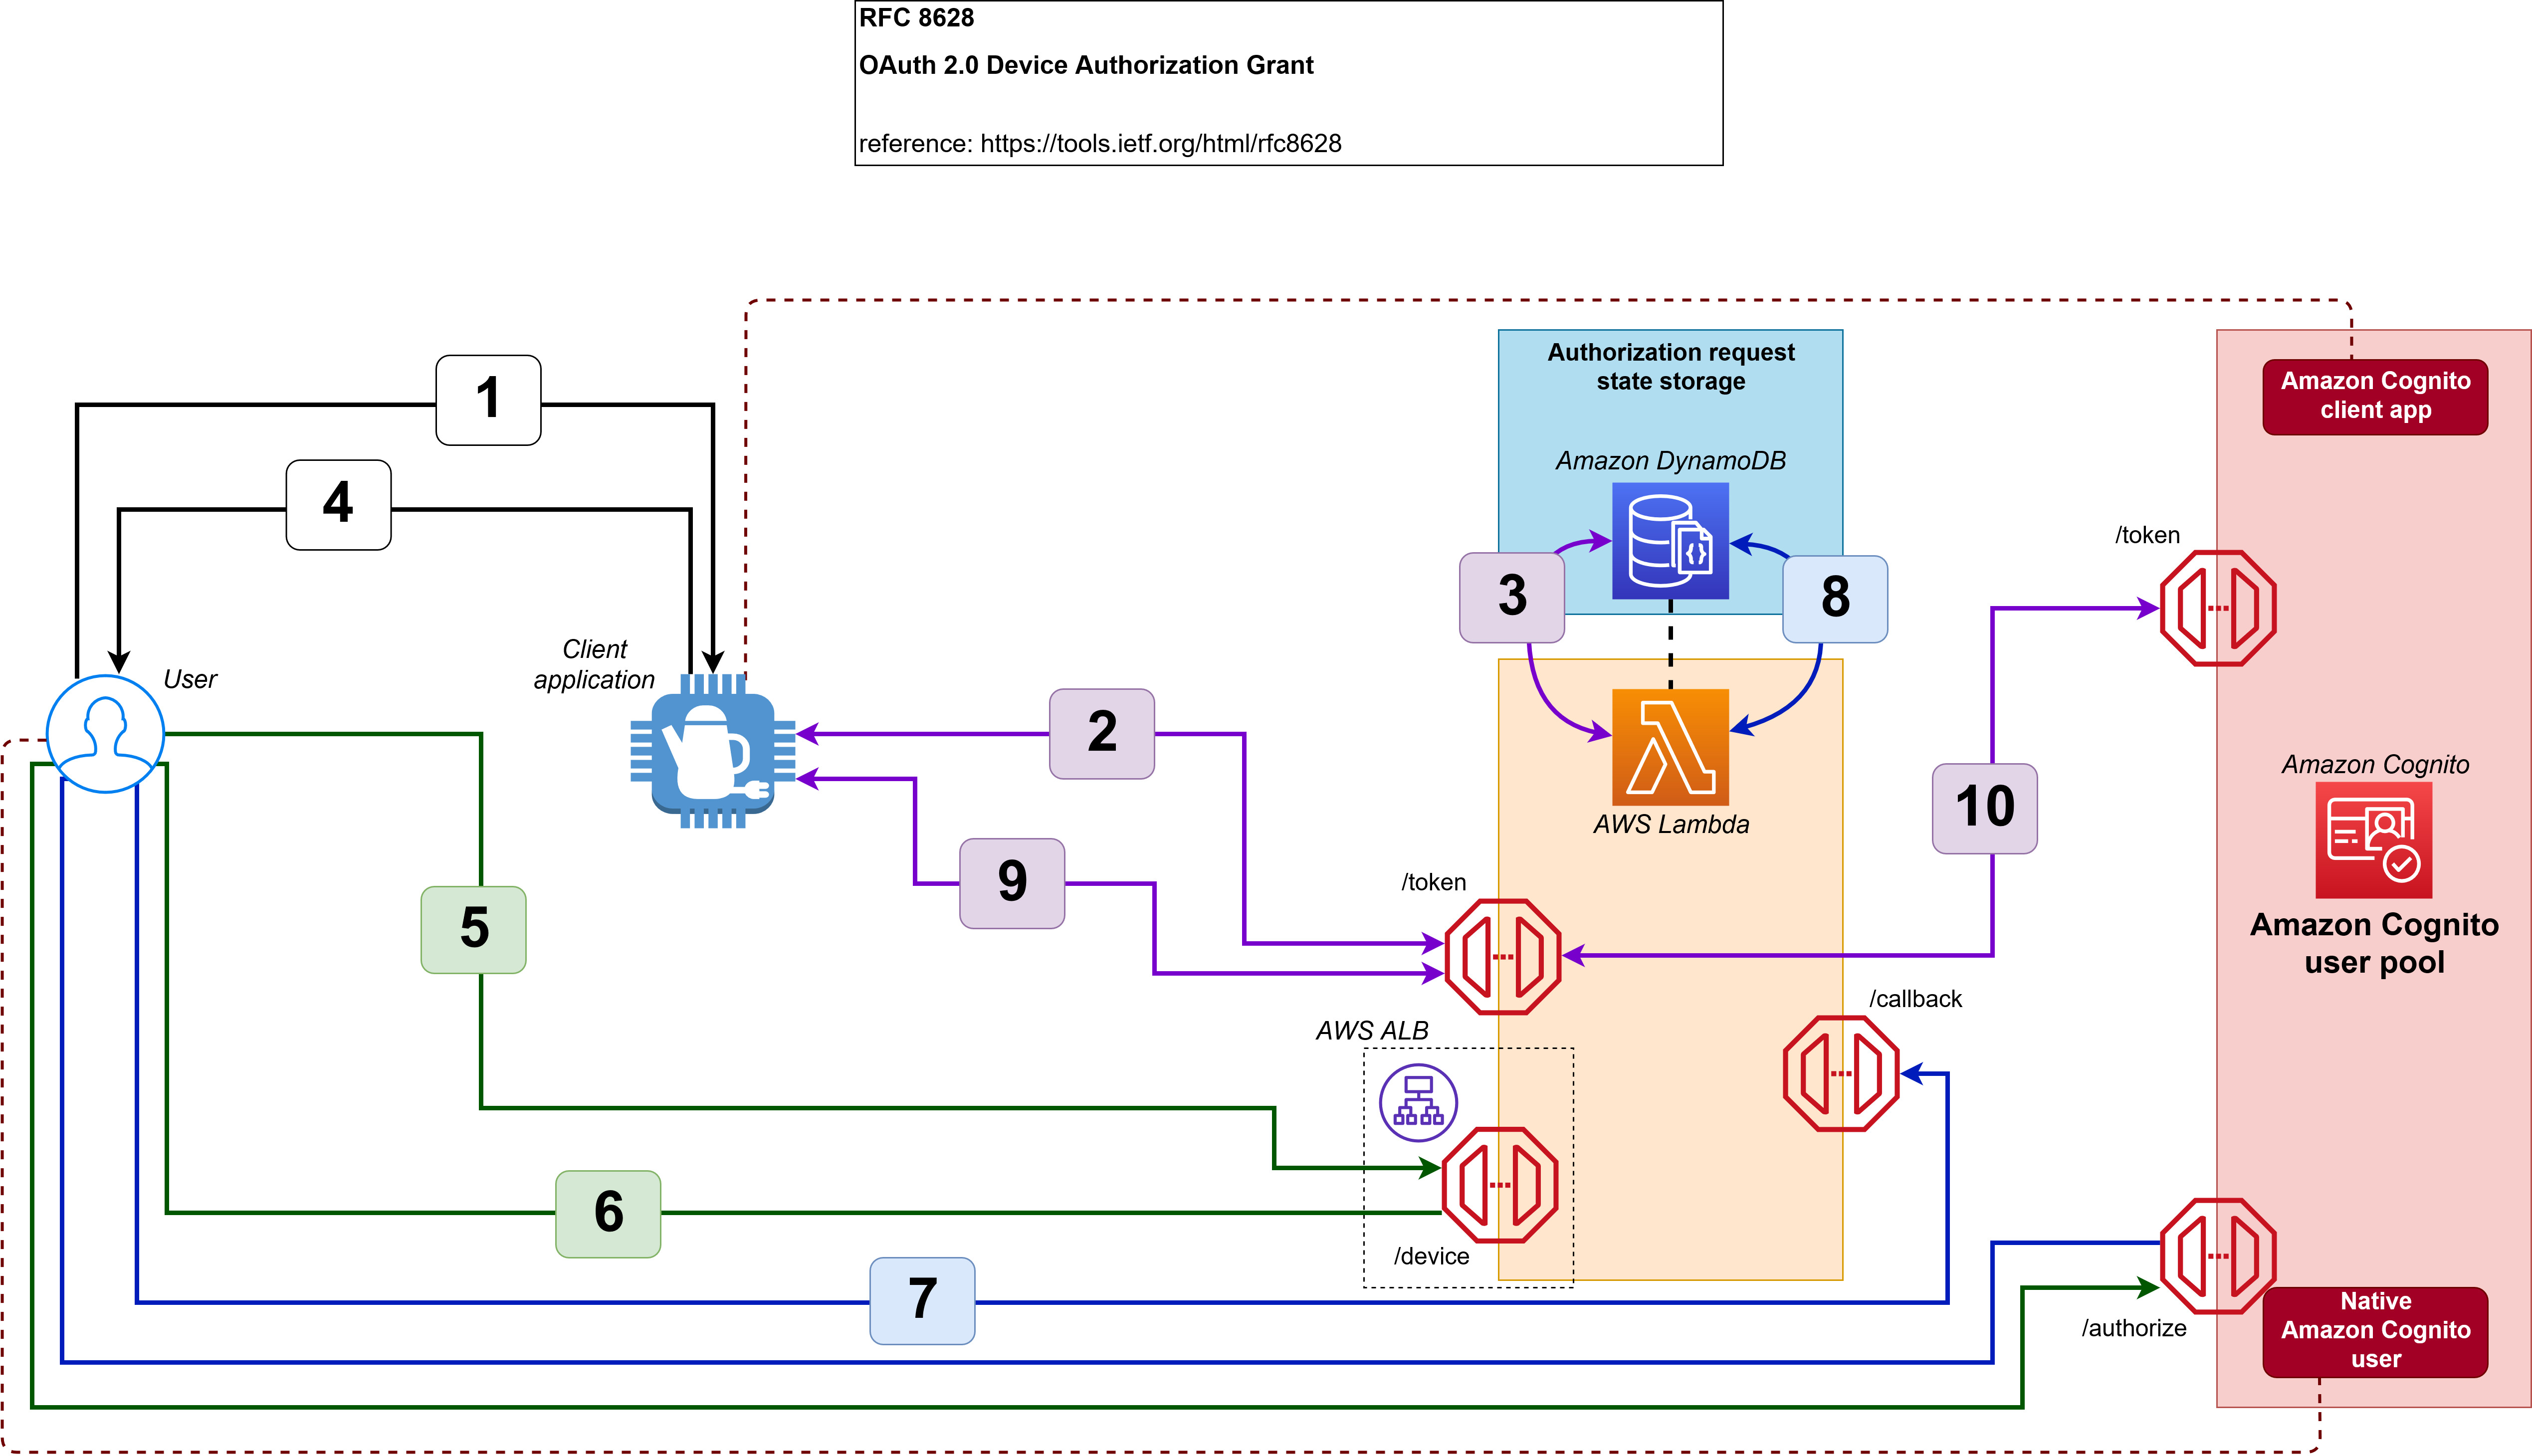
When you build a custom UI, there is support for custom endpoints and proxies so that you have a wider range of options for management and consistency across application development as it relates to authentication. Custom authentication flows are only available in applications with a custom UI, which gives you the ability to make customized challenge prompts and answers to help you meet custom security requirements by using AWS Lambda triggers. For example, you could use it to implement OAuth 2.0 device grant flows. Lastly, a custom UI supports a remember device feature where you can add low-effort sign-in from trusted devices.
You might choose to build a custom UI with an SDK when full customization is a requirement or where you want to incorporate customized authentication flows using the custom authentication challenge Lambda triggers. A custom UI is a great choice if you aren’t required to use OAuth 2.0 flows and you have the resources to develop and implement a unique UI for your application users.
When deciding between Amazon Cognito managed login branding options and a custom UI, there are some unique differences that can help you determine which UI is best for your application needs. Managed login offers a modern, customizable authentication experience with advanced features like no-code visual customization, dark mode themes, and support for passwordless options. It supports OAuth 2.0 flows, custom OAuth scopes, the ability to sign in one time and access many Cognito application clients (using SSO), and full use of the Cognito threat protection features. For applications requiring complete control over the authentication experience and UX—including custom authentication flows, device fingerprinting, and reduced token expiration—a custom UI is the better choice. This option allows for full UI customization, implementation of custom authentication flows, and integration with specific frameworks or libraries not supported by managed login.
When making your decision, consider factors such as the level of customization required, specific authentication features needed, development resources available, integration requirements with other AWS services, security and compliance needs, and user experience priorities. Remember that your application authentication requirements and customer experience should take precedence over other considerations. You can use the following table to help select the best UI for your requirements.
Requirements
Managed login
Hosted UI (classic)
Custom UI (SDK)
OAuth 2.0 flows
Supported
Supported
Not available
Custom OAuth scopes
Supported
Supported
Supported
Customization of UI
No-code branding designer
Limited CSS customization
Full custom control
Custom user input forms
Not available
Not available
Supported
Custom authentication flow
Not available
Not available
Supported
Passwordless authentication flow
Supported
Not available
Custom implementation available
Localization with multiple languages
Supported
Not available
Supported
Login once across many app clients
Supported
Supported
Not available
Session expiration configurable under 1 hour
Not available
Not available
Supported
Trusted-device authentication
Not available
Not available
Supported
AWS WAF integration
Supported
Supported
Supported
Support for AWS WAF CAPTCHA
Supported
Supported
Not available
Ability to use a custom endpoint or proxy
Not available
Not available
Supported
AWS Application Load Balancer integration
Supported
Supported
Not available
Figure 11: Decision criteria matrix
Conclusion
In this post, you learned about using managed login, including its two branding options and creating a custom UI in Amazon Cognito and the many supported features and benefits of each. Each UI option targets a specific need. Choose from available options based on your list of requirements for authentication and the user sign-up and sign-in experience. You can use the information in this post as a reference as you add Amazon Cognito to your mobile and web applications for authentication.
Have a question? Contact us for general support services.
With Amazon Cognitouser pools, you can configure third-party SAML identity providers (IdPs) so that users can log in by using the IdP credentials. The Amazon Cognito user pool manages the federation and handling of tokens returned by a configured SAML IdP. It uses the public certificate of the SAML IdP to verify the signature in the SAML assertion returned by the IdP. Public certificates have an expiry date, and an expired public certificate will result in a SAML user federation failing because it can no longer be used for signature verification. To avoid user authentication failures, you must monitor and rotate SAML public certificates before expiration.
You can configure SAML IdPs in an Amazon Cognito user pool by using a SAML metadata document or a URL that points to the metadata document. If you use the SAML metadata document option, you must manually upload the SAML metadata. If you use the URL option, Amazon Cognito downloads the metadata from the URL and automatically configures the SAML IdP. In either scenario, if you don’t rotate the SAML certificate before expiration, users can’t log in using that SAML IdP.
In this blog post, I will show you how to monitor SAML certificates that are about to expire or already expired in an Amazon Cognito user pool by using an AWS Lambda function initiated by an Amazon EventBridge rule.
Solution overview
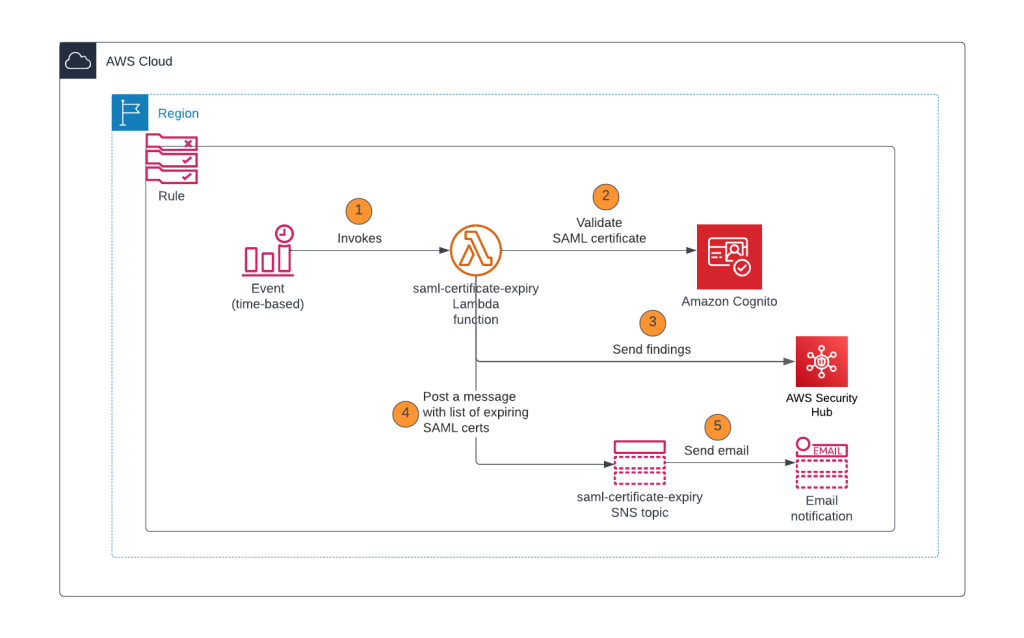
In this section, you will learn how to configure a Lambda function that checks the validity period of the SAML IdP certificates in an Amazon Cognito user pool, logs the findings to AWS Security Hub, and sends out an Amazon Simple Notification Service (Amazon SNS) notification with the list of certificates that are about to expire or have already expired. This Lambda function is invoked by an EventBridge rule that uses a rate or cron expression and runs on a defined schedule. For example, if the rate expression is defined as 1 day, the EventBridge rule initiates the Lambda function once each day. Figure 1 shows an overview of this process.
Figure 1: Lambda function initiated by EventBridge rule
As shown in Figure 1, this process involves the following steps:
Gets the list of SAML IdPs and corresponding X509 certificates.
Verifies if the X509 certificates are about to expire or already expired based on the dates in the certificate.
Based on the results of step 2, the Lambda function logs the findings in AWS Security Hub. Each finding shows the SAML certificate that is about to expire or is already expired.
Based on the results of step 2, the Lambda function publishes a notification to the Amazon SNS topic with the certificate expiration details. For example, if CERT_EXPIRY_DAYS=60, the details of SAML certificates that are going to expire within 60 days or are already expired are published in the SNS notification.
Amazon SNS sends messages to the subscribers of the topic, such as an email address.
Prerequisites
For this setup, you will need to have the following in place:
In this section, we will walk you through how to deploy the Lambda function and configure an EventBridge rule that invokes the Lambda function.
Step 1: Create the Node.js Lambda package
Open a command line terminal or shell.
Create a folder named saml-certificate-expiration-monitoring.
Install the fast-xml-parser module by running the following command:
cd saml-certificate-expiration-monitoring
npm install fast-xml-parser
Create a file named index.js and paste the following content in the file.
const AWS = require('aws-sdk');
const { X509Certificate } = require('crypto');
const { XMLParser} = require("fast-xml-parser");
const https = require('https');

exports.handler = async function(event, context, callback) {

    const cognitoUPID = process.env.COGNITO_UPID;
    const expiryDays = process.env.CERT_EXPIRY_DAYS;
    const snsTopic = process.env.SNS_TOPIC_ARN;
    const postToSh = process.env.ENABLE_SH_MONITORING; //Enable security hub monitoring
    var securityhub = new AWS.SecurityHub({apiVersion: '2018-10-26'});

    var shParams = {
      Findings: []
    };

    AWS.config.apiVersions = {
      cognitoidentityserviceprovider: '2016-04-18',
    };

    // Initialize CognitoIdentityServiceProvider.
    const cognitoidentityserviceprovider = new AWS.CognitoIdentityServiceProvider();

    let listProvidersParams = {
      UserPoolId: cognitoUPID /* required */
    };

    let hasNext = true;
    const providerNames = [];

    while (hasNext) {
      const listProvidersResp = await cognitoidentityserviceprovider.listIdentityProviders(listProvidersParams).promise();
      listProvidersResp['Providers'].forEach(function(provider) {
            if(provider.ProviderType == 'SAML') {
              providerNames.push(provider.ProviderName);
            }
        });

      listProvidersParams.NextToken = listProvidersResp.NextToken;
      hasNext = !!listProvidersResp.NextToken; //Keep iterating if there are more pages
    }

    let describeIdentityProviderParams = {
      UserPoolId: cognitoUPID /* required */
    };

    //Initialize the options for fast-xml-parser
    //Parse KeyDescriptor as an array
    const alwaysArray = [
      "EntityDescriptor.IDPSSODescriptor.KeyDescriptor"
    ];
    const options = {
      removeNSPrefix: true,
      isArray: (name, jpath, isLeafNode, isAttribute) => {
        if( alwaysArray.indexOf(jpath) !== -1) return true;
      },
      ignoreDeclaration: true
    };
    const parser = new XMLParser(options);

    let certExpMessage = '';
    const today = new Date();

    if(providerNames.length == 0) {
      console.log("There are no SAML providers in this Cognito user pool. ID : " + cognitoUPID);
    }

    for (let provider of providerNames) {
      describeIdentityProviderParams.ProviderName = provider;
      const descProviderResp = await cognitoidentityserviceprovider.describeIdentityProvider(describeIdentityProviderParams).promise();
      let xml = '';
      //Read SAML metadata from Cognito if the file is available. Else, read the SAML metadata from URL
      if('MetadataFile' in descProviderResp.IdentityProvider.ProviderDetails) {
        xml = descProviderResp.IdentityProvider.ProviderDetails.MetadataFile;
      } else {
        let metadata_promise = getMetadata(descProviderResp.IdentityProvider.ProviderDetails.MetadataURL);
		    xml = await metadata_promise;
      }
      let jObj = parser.parse(xml);
      if('EntityDescriptor' in jObj) {
        //SAML metadata can have multiple certificates for signature verification.
        for (let cert of jObj['EntityDescriptor']['IDPSSODescriptor']['KeyDescriptor']) {
          let certificate = '-----BEGIN CERTIFICATE-----\n'
          + cert['KeyInfo']['X509Data']['X509Certificate']
          + '\n-----END CERTIFICATE-----';
          let x509cert = new X509Certificate(certificate);
          console.log("------ Provider : " + provider + "-------");
          console.log("Cert Expiry: " + x509cert.validTo);
          const diffTime = Math.abs(new Date(x509cert.validTo) - today);
          const diffDays = Math.ceil(diffTime / (1000 * 60 * 60 * 24));
          console.log("Days Remaining: " + diffDays);
          if(diffDays <= expiryDays) {

            certExpMessage += 'Provider name: ' + provider + ' SAML certificate (serialnumber : '+ x509cert.serialNumber + ') expiring in ' + diffDays + ' days \n';

            if(postToSh === 'true') {
              //Log finding for security hub
              logFindingToSh(context, shParams,
              'Provider name: ' + provider + ' SAML certificate is expiring in ' + diffDays + ' days. Please contact the Identity provider to rotate the certificate.',
              x509cert.fingerprint, cognitoUPID, provider);
            }
          }
        }
      }
    }
    //Send a SNS message if a certificate is about to expire or already expired
    if(certExpMessage) {
      console.log("SAML certificates expiring within next " + expiryDays + " days :\n");
      console.log(certExpMessage);
      certExpMessage = "SAML certificates expiring within next " + expiryDays + " days :\n" + certExpMessage;
      // Create publish parameters
      let snsParams = {
        Message: certExpMessage, /* required */
        TopicArn: snsTopic
      };
      // Create promise and SNS service object
      let publishTextPromise = await new AWS.SNS({apiVersion: '2010-03-31'}).publish(snsParams).promise();
      console.log(publishTextPromise);

      if(postToSh === 'true') {
        console.log("Posting the finding to SecurityHub");
        let shPromise = await securityhub.batchImportFindings(shParams).promise();
        console.log("shPromise : " + JSON.stringify(shPromise));
      }

    } else {
      console.log("No certificates are expiring within " + expiryDays + " days");
    }
};

function getMetadata(url) {
	return new Promise((resolve, reject) => {
		https.get(url, (response) => {
			let chunks_of_data = [];

			response.on('data', (fragments) => {
				chunks_of_data.push(fragments);
			});

			response.on('end', () => {
				let response_body = Buffer.concat(chunks_of_data);
				resolve(response_body.toString());
			});

			response.on('error', (error) => {
				reject(error);
			});
		});
	});
}

function logFindingToSh(context, shParams, remediationMsg, certFp, cognitoUPID, provider) {
  const accountID = context.invokedFunctionArn.split(':')[4];
  const region = process.env.AWS_REGION;
  const sh_product_arn = `arn:aws:securityhub:${region}:${accountID}:product/${accountID}/default`;
  const today = new Date().toISOString();

  shParams.Findings.push(
        {
      SchemaVersion: "2018-10-08",
      AwsAccountId: `${accountID}`, /* required */
      CreatedAt: `${today}`, /* required */
      UpdatedAt: `${today}`,
      Title: 'SAML Certificate expiration',
      Description: 'SAML certificate expiry', /* required */
      GeneratorId: `${context.invokedFunctionArn}`, /* required */
      Id: `${cognitoUPID}:${provider}:${certFp}`, /* required */
      ProductArn: `${sh_product_arn}`, /* required */
      Severity: {
          Original: '89.0',
          Label: 'HIGH'
      },
      Types: [
                "Software and Configuration Checks/AWS Config Analysis"
      ],
      Compliance: {Status: 'WARNING'},
      Resources: [ /* required */
        {
          Id: `${cognitoUPID}`, /* required */
          Type: 'AWSCognitoUserPool', /* required */
          Region: `${region}`,
          Details : {
            Other: {
                       "IdPIdentifier" : `${provider}`
            }
          }
        }
      ],
      Remediation: {
                Recommendation: {
                    Text: `${remediationMsg}`,
                    Url: `https://console.aws.amazon.com/cognito/v2/idp/user-pools/${cognitoUPID}/sign-in/identity-providers/details/${provider}`
                }
      }
    }
  );
}
To create the deployment package for a .zip file archive, you can use a built-in .zip file archive utility or other third-party zip file utility. If you are using Linux or Mac OS, run the following command.
zip -r saml-certificate-expiration-monitoring.zip .
Step 2: Create an Amazon SNS topic
Create a standard Amazon SNS topic named saml-certificate-expiration-monitoring-topic for the Lambda function to use to send out notifications, as described in Creating an Amazon SNS topic.
Copy the Amazon Resource Name (ARN) for Amazon SNS. Later in this post, you will use this ARN in the AWS Identity and Access Management (IAM) policy and Lambda environment variable configuration.
After you create the Amazon SNS topic, create email subscribers to this topic.
Step 3: Configure the IAM role and policies and deploy the Lambda function
In the IAM documentation, review the section Creating policies on the JSON tab. Then, using those instructions, use the following template to create an IAM policy named lambda-saml-certificate-expiration-monitoring-function-policy for the Lambda role to use. Replace <REGION> with your Region, <AWS-ACCT-NUMBER> with your AWS account ID, <SNS-ARN> with the Amazon SNS ARN from Step 2: Create an Amazon SNS topic, and <USER_POOL_ID> with your Amazon Cognito user pool ID that you want to monitor.
After the policy is created, create a role for the Lambda function to use the policy, by following the instructions in Creating a role to delegate permissions to an AWS service. Choose Lambda as the service to assume the role and attach the policy lambda-saml-certificate-expiration-monitoring-function-policy that you created in step 1 of this section. Specify a role named lambda-saml-certificate-expiration-monitoring-function-role, and then create the role.
If you make code changes after uploading, deploy the Lambda function.
Step 4: Create an EventBridge rule
Follow the instructions in creating an Amazon EventBridge rule that runs on a schedule to create a rule named saml-certificate-expiration-monitoring-rule. You can use a rate expression of 24 hours to initiate the event. This rule will invoke the Lambda function once per day.
Create an environment variable called CERT_EXPIRY_DAYS. This specifies how much lead time, in days, you want to have before the certificate expiration notification is sent.
Create an environment variable called COGNITO_UPID. This identifies the Amazon Cognito user pool ID that needs to be monitored.
Create an environment variable called ENABLE_SH_MONITORING and set it to true or false. If you set it to true, the Lambda function will log the findings in AWS Security Hub.
Configure a test event for the Lambda function by using the default template and name it TC1, as shown in Figure 2.
Figure 2: Create a Lambda test case
Run the TC1 test case to test the Lambda function. To make sure that the Lambda function ran successfully, check the Amazon CloudWatchlogs. You should see the console log messages from the Lambda function. If ENABLE_SH_MONITORING is set to true in the Lambda environment variables, you will see a list of findings in AWS Security Hub for certificates with an expiry of less than or equal to the value of the CERT_EXPIRY_DAYS environment variable. Also, an email will be sent to each subscriber of the Amazon SNS topic.
Cleanup
To avoid future charges, delete the following resources used in this post (if you don’t need them) and disable AWS Security Hub.
Lambda function
EventBridge rule
CloudWatch logs associated with the Lambda function
Amazon SNS topic
IAM role and policy that you created for the Lambda function
Conclusion
An Amazon Cognito user pool with hundreds of SAML IdPs can be challenging to monitor. If a SAML IdP certificate expires, users can’t log in using that SAML IdP. This post provides the steps to monitor your SAML IdP certificates and send an alert to Amazon Cognito user pool administrators when a certificate is about to expire so that you can proactively work with your SAML IdP administrator to rotate the certificate. Now that you’ve learned the benefits of monitoring your IdP certificates for expiration, I recommend that you implement these, or similar, controls to make sure that you’re notified of these events before they occur.
If you have feedback about this post, submit comments in the Comments section below. If you have questions about this post, start a new thread on the Amazon Cognito re:Post or contact AWS Support.
Want more AWS Security news? Follow us on Twitter.
I’d like to personally invite you to attend the Amazon Web Services (AWS) security conference, AWS re:Inforce 2023, in Anaheim, CA on June 13–14, 2023. You’ll have access to interactive educational content to address your security, compliance, privacy, and identity management needs. Join security experts, peers, leaders, and partners from around the world who are committed to the highest security standards, and learn how your business can stay ahead in the rapidly evolving security landscape.
As Chief Information Security Officer of AWS, my primary job is to help you navigate your security journey while keeping the AWS environment secure. AWS re:Inforce offers an opportunity for you to dive deep into how to use security to drive adaptability and speed for your business. With headlines currently focused on the macroeconomy and broader technology topics such as the intersection between AI and security, this is your chance to learn the tactical and strategic lessons that will help you develop a security culture that facilitates business innovation.
Here are a few reasons I’m especially looking forward to this year’s program:
Sharing my keynote, including the latest innovations in cloud security and what AWS Security is focused on
AWS re:Inforce 2023 will kick off with my keynote on Tuesday, June 13, 2023 at 9 AM PST. I’ll be joined by Steve Schmidt, Chief Security Officer (CSO) of Amazon, and other industry-leading guest speakers. You’ll hear all about the latest innovations in cloud security from AWS and learn how you can improve the security posture of your business, from the silicon to the top of the stack. Take a look at my most recent re:Invent presentation, What we can learn from customers: Accelerating innovation at AWS Security and the latest re:Inforce keynote for examples of the type of content to expect.
Engaging sessions with real-world examples of how security is embedded into the way businesses operate
AWS re:Inforce offers an opportunity to learn how to prioritize and optimize your security investments, be more efficient, and respond faster to an evolving landscape. Using the Security pillar of the AWS Well-Architected Framework, these sessions will demonstrate how you can build practical and prescriptive measures to protect your data, systems, and assets.
Sessions are offered at all levels and all backgrounds. Depending on your interests and educational needs, AWS re:Inforce is designed to meet you where you are on your cloud security journey. There are learning opportunities in several hundred sessions across six tracks: Data Protection; Governance, Risk & Compliance; Identity & Access Management; Network & Infrastructure Security, Threat Detection & Incident Response; and, this year, Application Security—a brand-new track. In this new track, discover how AWS experts, customers, and partners move fast while maintaining the security of the software they are building. You’ll hear from AWS leaders and get hands-on experience with the tools that can help you ship quickly and securely.
Shifting security into the “department of yes”
Rather than being seen as the proverbial “department of no,” IT teams have the opportunity to make security a business differentiator, especially when they have the confidence and tools to do so. AWS re:Inforce provides unique opportunities to connect with and learn from AWS experts, customers, and partners who share insider insights that can be applied immediately in your everyday work. The conference sessions, led by AWS leaders who share best practices and trends, will include interactive workshops, chalk talks, builders’ sessions, labs, and gamified learning. This means you’ll be able to work with experts and put best practices to use right away.
Our Expo offers opportunities to connect face-to-face with AWS security solution builders who are the tip of the spear for security. You can ask questions and build solutions together. AWS Partners that participate in the Expo have achieved security competencies and are there to help you find ways to innovate and scale your business.
A full conference pass is $1,099. Register today with the code ALUMwrhtqhv to receive a limited time $300 discount, while supplies last.
I’m excited to see everyone at re:Inforce this year. Please join us for this unique event that showcases our commitment to giving you direct access to the latest security research and trends. Our teams at AWS will continue to release additional details about the event on our website, and you can get real-time updates by following @awscloud and @AWSSecurityInfo.
I look forward to seeing you in Anaheim and providing insight into how we prioritize security at AWS to help you navigate your cloud security investments.
If you have feedback about this post, submit comments in the Comments section below. If you have questions about this post, contact AWS Support.
Want more AWS Security news? Follow us on Twitter.
Companies that store and process data on Amazon Web Services (AWS) want to prevent transfers of that data to or from locations outside of their company’s control. This is to support security strategies, such as data loss prevention, or to comply with the terms and conditions set forth by various regulatory and privacy agreements. On AWS, a resource perimeter is a set of AWS Identity and Access Management (IAM) features and capabilities that you can use to build your defense-in-depth protection against unintended data transfers. In this third blog post of the Establishing a data perimeter on AWS series, we review the benefits and implementation considerations when you define your resource perimeter.
The resource perimeter is one of the three perimeters in the data perimeter framework on AWS and has the following two control objectives:
My identities can access only trusted resources – This helps to ensure that IAM principals that belong to your AWS Organizations organization can access only the resources that you trust.
Only trusted resources can be accessed from my network – This helps to ensure that only resources that you trust can be accessed through expected networks, regardless of the principal that is making the API call.
Trusted resources are the AWS resources, such as Amazon Simple Storage Service (Amazon S3) buckets and objects or Amazon Simple Notification Service (Amazon SNS) topics, that are owned by your organization and in which you store and process your data. Additionally, there are resources outside your organization that your identities or AWS services acting on your behalf might need to access. You will need to consider these access patterns when you define your resource perimeter.
Security risks addressed by the resource perimeter
The resource perimeter helps address three main security risks.
Unintended data disclosure through use of corporate credentials — Your developers might have a personal AWS account that is not part of your organization. In that account, they could configure a resource with a resource-based policy that allows their corporate credentials to interact with the resource. For example, they could write an S3 bucket policy that allows them to upload objects by using their corporate credentials. This could allow the intentional or unintentional transfer of data from your corporate environment — your on-premises network or virtual private cloud (VPC) — to their personal account. While you advance through your least privilege journey, you should make sure that access to untrusted resources is prohibited, regardless of the permissions granted by identity-based policies that are attached to your IAM principals. Figure 1 illustrates an unintended access pattern where your employee uses an identity from your organization to move data from your on-premises or AWS environment to an S3 bucket in a non-corporate AWS account.
Figure 1: Unintended data transfer to an S3 bucket outside of your organization by your identities
Unintended data disclosure through non-corporate credentials usage — There is a risk that developers could introduce personal IAM credentials to your corporate network and attempt to move company data to personal AWS resources. We discussed this security risk in a previous blog post: Establishing a data perimeter on AWS: Allow only trusted identities to access company data. In that post, we described how to use the aws:PrincipalOrgID condition key to prevent the use of non-corporate credentials to move data into an untrusted location. In the current post, we will show you how to implement resource perimeter controls as a defense-in-depth approach to mitigate this risk.
Unintended data infiltration — There are situations where your developers might start the solution development process using commercial datasets, tooling, or software and decide to copy them from repositories, such as those hosted on public S3 buckets. This could introduce malicious components into your corporate environment, your on-premises network, or VPCs. Establishing the resource perimeter to only allow access to trusted resources from your network can help mitigate this risk. Figure 2 illustrates the access pattern where an employee with corporate credentials downloads assets from an S3 bucket outside of your organization.
Figure 2: Unintended data infiltration
Implement the resource perimeter
To achieve the resource perimeter control objectives, you can implement guardrails in your AWS environment by using the following AWS policy types:
Service control policies (SCPs) – Organization policies that are used to centrally manage and set the maximum available permissions for your IAM principals. SCPs help you ensure that your accounts stay within your organization’s access control guidelines. In the context of the resource perimeter, you will use SCPs to help prevent access to untrusted resources from AWS principals that belong to your organization.
VPC endpoint policy – An IAM resource-based policy that is attached to a VPC endpoint to control which principals, actions, and resources can be accessed through a VPC endpoint. In the context of the resource perimeter, VPC endpoint policies are used to validate that the resource the principal is trying to access belongs to your organization.
The condition key used to constrain access to resources in your organization is aws:ResourceOrgID. You can set this key in an SCP or VPC endpoint policy. The following table summarizes the relationship between the control objectives and the AWS capabilities used to implement the resource perimeter.
Control objective
Implemented by using
Primary IAM capability
My identities can access only trusted resources
SCPs
aws:ResourceOrgID
Only trusted resources can be accessed from my network
VPC endpoint policies
aws:ResourceOrgID
In the next section, you will learn how to use the IAM capabilities listed in the preceding table to implement each control objective of the resource perimeter.
My identities can access only trusted resources
The following is an example of an SCP that limits all actions to only the resources that belong to your organization. Replace <MY-ORG-ID> with your information.
In this policy, notice the use of the negated condition key StringNotEqualsIfExists. This means that this condition will evaluate to true and the policy will deny API calls if the organization identifier of the resource that is being accessed differs from the one specified in the policy. It also means that this policy will deny API calls if the resource being accessed belongs to a standalone account, which isn’t part of an organization. The negated condition operators in the Deny statement mean that the condition still evaluates to true if the key is not present in the request; however, as a best practice, I added IfExists to the end of the StringNotEquals operator to clearly express the intent in the policy.
Note that for a permission to be allowed for a specific account, a statement that allows access must exist at every level of the hierarchy of your organization.
Only trusted resources can be accessed from my network
You can achieve this objective by combining the SCP we just reviewed with the use of aws:PrincipalOrgID in your VPC endpoint policies, as shown in the Establishing a data perimeter on AWS: Allow only trusted identities to access company data blog post. However, as a defense in depth, you can also apply resource perimeter controls on your networks by using aws:ResourceOrgID in your VPC endpoint policies.
The following is an example of a VPC endpoint policy that allows access to all actions but limits access to only trusted resources and identities that belong to your organization. Replace <MY-ORG-ID> with your information.
The preceding VPC endpoint policy uses the StringEquals condition operator. To invoke the Allow effect, the principal making the API call and the resource they are trying to access both need to belong to your organization. Compared to the SCP example that we reviewed earlier, your intent for this policy is different — you want to make sure that the Allow condition evaluates to true only if the specified key exists in the request. Additionally, VPC endpoint policies apply to principals, as long as their request flows through the VPC endpoint.
In VPC endpoint policies, you do not grant permissions; rather, you define the maximum allowed access through the network. Therefore, this policy uses an Allow effect.
Extend your resource perimeter
The previous two policies help you ensure that your identities and networks can only be used to access AWS resources that belong to your organization. However, your company might require that you extend your resource perimeter to also include AWS owned resources — resources that do not belong to your organization and that are accessed by your principals or by AWS services acting on your behalf. For example, if you use the AWS Service Catalog in your environment, the service creates and uses Amazon S3 buckets that are owned by the service to store products. To allow your developers to successfully provision AWS Service Catalog products, your resource perimeter needs to account for this access pattern. The following statement shows how to account for the service catalog access pattern. Replace <MY-ORG-ID> with your information.
Note that the EnforceResourcePerimeter statement in the SCP was modified to exclude s3:GetObject, s3:PutObject, and s3:PutObjectAcl actions from its effect (NotAction element). This is because these actions are performed by the Service Catalog to access service-owned S3 buckets. These actions are then restricted in the ExtendResourcePerimeter statement, which includes two negated condition keys. The second statement denies the previously mentioned S3 actions unless the resource that is being accessed belongs to your organization (StringNotEqualsIfExists with aws:ResourceOrgID), or the actions are performed by Service Catalog on your behalf (ForAllValues:StringNotEquals with aws:CalledVia). The aws:CalledVia condition key compares the services specified in the policy with the services that made requests on behalf of the IAM principal by using that principal’s credentials. In the case of the Service Catalog, the credentials of a principal who launches a product are used to access S3 buckets that are owned by the Service Catalog.
It is important to highlight that we are purposely not using the aws:ViaAWSService condition key in the preceding policy. This is because when you extend your resource perimeter, we recommend that you restrict access to only calls to buckets that are accessed by the service you are using.
You might also need to extend your resource perimeter to include the third-party resources of your partners. For example, you could be working with business partners that require your principals to upload or download data to or from S3 buckets that belong to their account. In this case, you can use the aws:ResourceAccount condition key in your resource perimeter policy to specify resources that belong to the trusted third-party account.
The following is an example of an SCP that accounts for access to the Service Catalog and third-party partner resources. Replace <MY-ORG-ID> and <THIRD-PARTY-ACCOUNT> with your information.
To account for access to trusted third-party account resources, the condition StringNotEqualsIfExists in the ExtendResourcePerimeter statement now also contains the condition key aws:ResourceAccount. Now, the second statement denies the previously mentioned S3 actions unless the resource that is being accessed belongs to your organization (StringNotEqualsIfExists with aws:ResourceOrgID), to a trusted third-party account (StringNotEqualsIfExists with aws:ResourceAccount), or the actions are performed by Service Catalog on your behalf (ForAllValues:StringNotEquals with aws:CalledVia).
The next policy example demonstrates how to extend your resource perimeter to permit access to resources that are owned by your trusted third parties through the networks that you control. This is required if applications running in your VPC or on-premises need to be able to access a dataset that is created and maintained in your business partner AWS account. Similar to the SCP example, you can use the aws:ResourceAccount condition key in your VPC endpoint policy to account for this access pattern. Replace <MY-ORG-ID>, <THIRD-PARTY-ACCOUNT>, and <THIRD-PARTY-RESOURCE-ARN> with your information.
The second statement, AllowRequestsByOrgsIdentitiesToThirdPartyResources, in the updated VPC endpoint policy allows s3:GetObject, s3:PutObject, and s3:PutObjectAcl actions on trusted third-party resources (StringEquals with aws:ResourceAccount) by principals that belong to your organization (StringEquals with aws:PrincipalOrgID).
Note that you do not need to modify your VPC endpoint policy to support the previously discussed Service Catalog operations. This is because calls to Amazon S3 made by Service Catalog on your behalf originate from the Service Catalog service network and do not traverse your VPC endpoint. However, you should consider access patterns that are similar to the Service Catalog example when defining your trusted resources. To learn about services with similar access patterns, see the IAM policy samples section later in this post.
Our GitHub repository contains policy examples that illustrate how to implement perimeter controls for a variety of AWS services. The policy examples in the repository are for reference only. You will need to tailor them to suit the specific needs of your AWS environment.
Conclusion
In this blog post, you learned about the resource perimeter, the control objectives achieved by the perimeter, and how to write SCPs and VPC endpoint policies that help achieve these objectives for your organization. You also learned how to extend your perimeter to include AWS service-owned resources and your third-party partner-owned resources.
For additional learning opportunities, see the Data perimeters on AWS page. This information resource provides additional materials such as a data perimeter workshop, blog posts, whitepapers, and webinar sessions.
If you have questions, comments, or concerns, contact AWS Support or browse AWS re:Post. If you have feedback about this post, submit comments in the Comments section below.
Want more AWS Security news? Follow us on Twitter.
In November 2022, AWS introduced support for granular geographic (geo) match conditions in AWS WAF. This blog post demonstrates how you can use this new feature to customize your AWS WAF implementation and improve the security posture of your protected application.
AWS WAF provides inline inspection of inbound traffic at the application layer. You can use AWS WAF to detect and filter common web exploits and bots that could affect application availability or security, or consume excessive resources. Inbound traffic is inspected against web access control list (web ACL) rules. A web ACL rule consists of rule statements that instruct AWS WAF on how to inspect a web request.
The AWS WAF geographic match rule statement functionality allows you to restrict application access based on the location of your viewers. This feature is crucial for use cases like licensing and legal regulations that limit the delivery of your applications outside of specific geographic areas.
AWS recently released a new feature that you can use to build precise geographic rules based on International Organization for Standardization (ISO) 3166 country and area codes. With this release, you can now manage access at the ISO 3166 region level. This capability is available across AWS Regions where AWS WAF is offered and for all AWS WAF supported services. In this post, you will learn how to use this new feature with Amazon CloudFront and Elastic Load Balancing (ELB) origin types.
Summary of concepts
Before we discuss use cases and setup instructions, make sure that you are familiar with the following AWS services and concepts:
Amazon CloudFront: CloudFront is a web service that gives businesses and web application developers a cost-effective way to distribute content with low latency and high data transfer speeds.
Amazon Simple Storage Service (Amazon S3):Amazon S3 is an object storage service built to store and retrieve large amounts of data from anywhere.
AWS WAF labels: Labels contain metadata that can be added to web requests when a rule is matched. Labels can alter the behavior or default action of managed rules.
ISO (International Organization for Standardization) 3166 codes:ISO codes are internationally recognized codes that designate for every country and most of the dependent areas a two- or three-letter combination. Each code consists of two parts, separated by a hyphen. For example, in the code AU-QLD, AU is the ISO 3166 alpha-2 code for Australia, and QLD is the subdivision code of the state or territory—in this case, Queensland.
How granular geo labels work
Previously, geo match statements in AWS WAF were used to allow or block access to applications based on country of origin of web requests. With updated geographic match rule statements, you can control access at the region level.
In a web ACL rule with a geo match statement, AWS WAF determines the country and region of a request based on its IP address. After inspection, AWS WAF adds labels to each request to indicate the ISO 3166 country and region codes. You can use labels generated in the geo match statement to create a label match rule statement to control access.
AWS WAF generates two types of labels based on origin IP or a forwarded IP configuration that is defined in the AWS WAF geo match rule. These labels are the country and region labels.
By default, AWS WAF uses the IP address of the web request’s origin. You can instruct AWS WAF to use an IP address from an alternate request header, like X-Forwarded-For, by enabling forwarded IP configuration in the rule statement settings. For example, the country label for the United States with origin IP and forwarded IP configuration are awswaf:clientip:geo:country:US and awswaf:forwardedip:geo:country:US, respectively. Similarly, the region labels for a request originating in Oregon (US) with origin and forwarded IP configuration are awswaf:clientip:geo:region:US-OR and awswaf:forwardedip:geo:region:US-OR, respectively.
To demonstrate this AWS WAF feature, we will outline two distinct use cases.
Use case 1: Restrict content for copyright compliance using AWS WAF and CloudFront
Licensing agreements might prevent you from distributing content in some geographical locations, regions, states, or entire countries. You can deploy the following setup to geo-block content in specific regions to help meet these requirements.
In this example, we will use an AWS WAF web ACL that is applied to a CloudFront distribution with an S3 bucket origin. The web ACL contains a geo match rule to tag requests from Australia with labels, followed by a label match rule to block requests from the Queensland region. All other requests with source IP originating from Australia are allowed.
To configure the AWS WAF web ACL rule for granular geo restriction
In the navigation pane, choose Web ACLs, select Global (CloudFront) from the dropdown list, and then choose Create web ACL.
For Name, enter a name to identify this web ACL.
For Resource type, choose the CloudFront distribution that you created in step 1, and then choose Add.
Choose Next.
Choose Add rules, and then choose Add my own rules and rule groups.
For Name, enter a name to identify this rule.
For Rule type, choose Regular rule.
Configure a rule statement for a request that matches the statement Originates from a Country and select the Australia (AU) country code from the dropdown list.
Set the IP inspection configuration parameter to Source IP address.
Under Action, choose Count, and then choose Add Rule.
Create a new rule by following the same actions as in step 7 and enter a name to identify the rule.
For Rule type, choose Regular rule.
Configure a rule statement for a request that matches the statement Has a Label and enter awswaf:clientip:geo:region:AU-QLD for the match key.
Set the action to Block and choose Add rule.
For Actions, keep the default action of Allow.
For Amazon CloudWatch metrics, select the AWS WAF rules that you created in steps 8 and 14.
For Request sampling options, choose Enable sampled requests, and then choose Next.
Review and create the web ACL rule.
After the web ACL is created, you should see the web ACL configuration, as shown in the following figures. Figure 1 shows the geo match rule configuration.
Figure 1: Web ACL rule configuration
Figure 2 shows the Queensland regional geo restriction.
Figure 2: Queensland regional geo restriction – web ACL configuration<
The setup is now complete—you have a web ACL with two regular rules. The first rule matches requests that originate from Australia and adds geographic labels automatically. The label match rule statement inspects requests with Queensland granular geo labels and blocks them. To understand where requests are originating from, you can configure logging on the AWS WAF web ACL.
You can test this setup by making requests from Queensland, Australia, to the DNS name of the CloudFront distribution to invoke a block. CloudFront will return a 403 error, similar to the following example.
As shown in these test results, requests originating from Queensland, Australia, are blocked.
Use case 2: Allow incoming traffic from specific regions with AWS WAF and Application Load Balancer
We recently had a customer ask us how to allow traffic from only one region, and deny the traffic from other regions within a country. You might have similar requirements, and the following section will explain how to achieve that. In the example, we will show you how to allow only visitors from Washington state, while disabling traffic from the rest of the US.
This example uses an AWS WAF web ACL applied to an application load balancer in the US East (N. Virginia) Region with an Amazon EC2 instance as the target. The web ACL contains a geo match rule to tag requests from the US with labels. After we enable forwarded IP configuration, we will inspect the X-Forwarded-For header to determine the origin IP of web requests. Next, we will add a label match rule to allow requests from the Washington region. All other requests from the United States are blocked.
To configure the AWS WAF web ACL rule for granular geo restriction
After the application load balancer is created, open the AWS WAF console.
In the navigation pane, choose Web ACLs, and then choose Create web ACL in the US east (N. Virginia) Region.
For Name, enter a name to identify this web ACL.
For Resource type, choose the application load balancer that you created in step 1 of this section, and then choose Add.
Choose Next.
Choose Add rules, and then choose Add my own rules and rule groups.
For Name, enter a name to identify this rule.
For Rule type, choose Regular rule.
Configure a rule statement for a request that matches the statement Originates from a Country in, and then select the United States (US) country code from the dropdown list.
Set the IP inspection configuration parameter to IP address in Header.
Enter the Header field name as X-Forwarded-For.
For Match, choose Fallback for missing IP address. Web requests without a valid IP address in the header will be treated as a match and will be allowed.
Under Action, choose Count, and then choose Add Rule.
Create a new rule by following the same actions as in step 7 of this section, and enter a name to identify the rule.
For Rule type, choose Regular rule.
Configure a rule statement for a request that matches the statement Has a Label, and for the match key, enter awswaf:forwardedip:geo:region:US-WA.
Set the action to Allow and add choose Add Rule.
For Default web ACL action for requests that don’t match any rules, set the Action to Block.
For Amazon CloudWatch metrics, select the AWS WAF rules that you created in steps 8 and 14 of this section.
For Request sampling options, choose Enable sampled requests, and then choose Next.
Review and create the web ACL rule.
After the web ACL is created, you should see the web ACL configuration, as shown in the following figures. Figure 3 shows the geo match rule
Figure 3: Geo match rule
Figure 4 shows the Washington regional geo restriction.
Figure 4: Washington regional geo restriction – web ACL configuration
The following is a JSON representation of the rule:
The setup is now complete—you have a web ACL with two regular rules. The first rule matches requests that originate from the US after inspecting the origin IP in the X-Forwarded-For header, and adds geographic labels. The label match rule statement inspects requests with the Washington region granular geo labels and allows these requests.
If a user makes a web request from outside of the Washington region, the request will be blocked and a HTTP 403 error response will be returned, similar to the following.
AWS WAF now supports the ability to restrict traffic based on granular geographic labels. This gives you further control based on geographic location within a country.
In this post, we demonstrated two different use cases that show how this feature can be applied with CloudFront distributions and application load balancers. Note that, apart from CloudFront and application load balancers, this feature is supported by other origin types that are supported by AWS WAF, such as Amazon API Gateway and Amazon Cognito.
If you have feedback about this post, submit comments in the Comments section below. If you have questions about this post, start a new thread on the AWS WAF re:Post or contact AWS Support.
Want more AWS Security news? Follow us on Twitter.
AWS Private Certificate Authority (AWS Private CA) is a highly available, fully managed private certificate authority (CA) service that you can use to create CA hierarchies and issue private X.509 certificates. You can use these private certificates to establish endpoints for TLS encryption, cryptographically sign code, authenticate users, and more.
Based on customer feedback for prorated certificate pricing options, AWS Private CA now offers short-lived certificate mode, a lower cost mode of AWS Private CA that is designed to issue short-lived certificates. In this blog post, we will compare the original general-purpose and new short-lived CA modes and discuss use cases for each of them.
The general-purpose mode of AWS Private CA supports certificates of any validity period. The addition of short-lived CA mode is intended to facilitate use cases where you want certificates with a short validity period, defined as 7 days or less. Keep in mind this doesn’t mean that the root CA certificate must also be short lived. Although a typical root CA certificate is valid for 10 years, you can customize the certificate validity period for CAs in either mode when you install the CA certificate.
You select the CA mode when you create a certificate authority. The CA mode cannot be changed for an existing CA. Both modes (general-purpose and short-lived) have distinct pricing for the different use cases that they support.
The short-lived CA mode offers an accessible pricing model for customers who need to issue certificates with a short-term validity period. You can use these short-lived certificates for on-demand AWS workloads and align the validity of the certificate with the lifetime of the certificate holder. For example, if you’re using certificate-based authentication for a virtual workstation that is rebuilt each day, you can configure your certificates to expire after 24 hours.
In this blog post, we will compare the two CA modes, examine their pricing models, and discuss several potential use cases for short-lived certificates. We will also provide a walkthrough that shows you how to create a short-lived mode CA by using the AWS Command Line Interface (AWS CLI). To create a short-lived mode CA using the AWS Management Console, see Procedure for creating a CA (console).
Comparing general-purpose mode CAs to short-lived mode CAs
You might be wondering, “How is the short-lived CA mode different from the general-purpose CA mode? I can already create certificates with a short validity period by using AWS Private CA.” The key difference between these two CA modes is cost. Short-lived CA mode is priced to better serve use cases where you reissue private certificates frequently, such as for certificate-based authentication (CBA).
With CBA, users can authenticate once and then seamlessly access resources, including Amazon WorkSpaces and Amazon AppStream 2.0, without re-entering their credentials. This use case demonstrates the security value of short-lived certificates. A short validity period for the certificate reduces the impact of a compromised certificate because the certificate can only be used for authentication during a small window before it’s automatically invalidated. This method of authentication is useful for customers who are looking to adopt a Zero Trust security strategy.
Before the release of the short-lived CA mode, using AWS Private CA for CBA could be cost prohibitive for some customers. This is because CBA needs a new certificate for each user at regular intervals, which can require issuing a high volume of certificates. The best practice for CBA is to use short-lived CA mode, which can issue certificates at a lower cost that can be used to authenticate a user and then expire shortly afterward.
Let’s take a closer look at the pricing models for the two CA modes that are available when you use AWS Private CA.
Pricing model comparison
You can issue short-lived certificates from both the general-purpose and short-lived CA modes of AWS Private CA. However, the general-purpose mode CAs incur a monthly charge of $400 per CA. The cost of issuing certificates from a general-purpose mode CA is based on the number of certificates that you issue per month, per AWS Region.
The following table shows the pricing tiers for certificates issued by AWS Private CA by using a general-purpose mode CA.
Number of private certificates created each month (per Region)
Price (per certificate)
1–1,000
$0.75 USD
1,001–10,000
$0.35 USD
10,001 and above
$0.001 USD
The short-lived mode CA will only incur a monthly charge of $50 per CA. The cost of issuing certificates from a short-lived mode CA is the same regardless of the volume of certificates issued: $0.058 per certificate. This pricing structure is more cost effective than general-purpose mode if you need to frequently issue new, short-lived certificates for a use case like certificate-based authentication. Figure 1 compares costs between modes at different certificate volumes.
Figure 1: Cost comparison of AWS Private CA modes
It’s important to note that if you already issue a high volume of certificates each month from AWS Private CA, the short-lived CA mode might not be more cost effective than the general-purpose mode. Consider a customer who has one CA and issues 80,000 certificates per month using the general-purpose CA mode: This will incur a total monthly cost of $4,370. A breakdown of the total cost per month in this scenario is as follows.
1 private CA x 400 USD per month = 400 USD per month for operation of AWS Private CA
Tiered price for 80,000 issued certificates: 1,000 issued certificates x 0.75 USD = 750 USD 9,000 issued certificates x 0.35 USD = 3,150 USD 70,000 issued certificates x 0.001 USD = 70 USD Total tier cost: 750 USD + 3,150 USD + 70 USD = 3,970 USD per month for certificates issued 400 USD for instances + 3,970 USD for certificate issued = 4,370 USD Total cost (monthly): 4,370 USD
Now imagine that same customer chose to use a short-lived mode CA to issue the same number of private certificates. Although the cost per month of the short-lived mode CA instance is lower, the price of issuing short-lived certificates would still be greater than the 70,000 certificates issued at a cost of $0.001 with the general-purpose mode CA. The total cost of issuing this many certificates from a single short-lived mode CA is $4,690. A breakdown of the total cost per month in this scenario is as follows.
1 private CA x 50 USD per month = 50 USD per month for operation of AWS Private CA (short-lived CA mode)
Price for 80,000 issued certificates (short-lived CA mode): 80,000 issued certificates x 0.058 USD = 4,640 USD 50 USD for instances + 4,640 USD for certificate issued = 4,690 USD Total cost (monthly): 4,690 USD
At very high volumes of certificate issuance, the short-lived CA mode is not as cost effective as the general-purpose CA mode. It’s important to consider the volume of certificates that your organization will be issuing when you decide which CA mode to use. Figure 1 shows the cost difference at various volumes of certificate issuance. This difference will vary based on the number of certificates issued, as well as the number of CAs that your organization used.
You should also evaluate the various use cases that your organization has for using private certificates. For example, private certificates that are used to terminate TLS traffic typically have a validity of a year or more, meaning that the short-lived CA mode could not facilitate this use case. The short-lived CA mode can only issue certificates with a validity of 7 days or less.
However, you can create multiple private CAs and select the appropriate certificate authority mode for each CA based on your requirements. We recommend that you evaluate your use cases and estimate your certificate volume when you consider which CA mode to use.
In general, you should use the new short-lived CA mode for use cases where you require certificates with a short validity period (less than 7 days) and you are not planning to issue more than 75,000 certificates per month. You should use the general-purpose CA mode for scenarios where you need to issue certificates with a validity period of more than 7 days, or when you need short-lived certificates but will be issuing very high volumes of certificates each month (for example, over 75,000).
For customers who use AWS Identity and Access Management (IAM) Roles Anywhere, you might want to reduce the time period for which a certificate can be used to retrieve temporary credentials to assume an IAM role. If you frequently issue X.509 certificates to servers outside of AWS for use with IAM Roles Anywhere, and you want to use short-lived certificates, the pricing model for short-lived CA mode will be more cost effective in most cases (see Figure 1).
Short-lived credentials are useful for administrative personas that have broad permissions to AWS resources. For instance, you might use IAM Roles Anywhere to allow an entity outside AWS to assume an IAM role with the AdministratorAccess AWS managed policy attached. To help manage the risk of this access pattern, we want the certificate to expire relatively quickly, which reduces the time period during which a compromised certificate could potentially be used to authenticate to a highly privileged IAM role.
Furthermore, IAM Roles Anywhere requires that you manually upload a certificate revocation list (CRL), and does not support the CRL and Online Certificate Status Protocol (OCSP) mechanisms that are native to AWS Private CA. Using short-lived certificates is a way to reduce the impact of a potential credential compromise without needing to configure revocation for IAM Roles Anywhere. The need for certificate revocation is greatly reduced if the certificates are only valid for a single day and can’t be used to retrieve temporary credentials to assume an IAM role after the certificate expires.
Mutual TLS between workloads
Consider a highly sensitive workload running on Amazon Elastic Kubernetes Service (Amazon EKS). AWS Private CA supports an open-source plugin for cert-manager, a widely adopted solution for TLS certificate management in Kubernetes, that offers a more secure CA solution for Kubernetes containers. You can use cert-manager and AWS Private CA to issue certificates to identify cluster resources and encrypt data in transit with TLS.
If you use mutual TLS (mTLS) to protect network traffic between Kubernetes pods, you might want to align the validity period of the private certificates with the lifetime of the pods. For example, if you rebuild the worker nodes for your EKS cluster each day, you can issue certificates that expire after 24 hours and configure your application to request a new short-lived certificate before the current certificate expires.
This enables resource identification and mTLS between pods without requiring frequent revocation of certificates that were issued to resources that no longer exist. As stated previously, this method of issuing short-lived certificates is possible with the general-purpose CA mode—but using the new short-lived CA mode makes this use case more cost effective for customers who issue fewer than 75,000 certificates each month.
Create a short-lived mode CA by using the AWS CLI
In this section, we show you how to use the AWS CLI to create a new private certificate authority with the usage mode set to SHORT_LIVED_CERTIFICATE. If you don’t specify a usage mode, AWS Private CA creates a general-purpose mode CA by default. We won’t use a form of revocation, because the short-lived CA mode makes revocation less useful. The certificates expire quickly as part of normal operations. For more examples of how to create CAs with the AWS CLI, see Procedure for creating a CA (CLI). For instructions to create short-lived mode CAs with the AWS console, see Procedure for creating a CA (Console).
This walkthrough has the following prerequisites:
A terminal with the .aws configuration directory set up with a valid default Region, endpoint, and credentials. For information about configuring your AWS CLI environment, see Configuration and credential file settings.
A certificate authority configuration file to supply when you create the CA. This file provides the subject details for the CA certificate, as well as the key and signing algorithm configuration.
Note: We provide an example CA configuration file, but you will need to modify this example to meet your requirements.
To use the create-certificate-authority command with the AWS CLI
We will use the following ca_config.txt file to create the certificate authority. You will need to modify this example to meet your requirements.
Use the describe-certificate-authority command to view the status of your new root CA. The status will show Pending_Certificate, until you install a self-signed root CA certificate. You will need to replace the certificate authority Amazon Resource Name (ARN) in the following command with your own CA ARN.
Generate a certificate signing request for your root CA certificate by running the following command. Make sure to replace the certificate authority ARN in the command with your own CA ARN.
Using the ca.csr file from the previous step as the argument for the --csr parameter, issue the root certificate with the following command. Make sure to replace the certificate authority ARN in the command with your own CA ARN.
The response will include the CertificateArn for the issued root CA certificate. Next, use your CA ARN and the certificate ARN provided in the response to retrieve the certificate by using the get-certificate CLI command, as follows.
Notice that we created a new file, cert.pem, that contains the certificate we retrieved in the previous command. We will import this certificate to our short-lived mode root CA by running the following command. Make sure to replace the certificate authority ARN in the command with your own CA ARN.
Check the status of your short-lived mode CA again by using the describe-certificate-authority command. Make sure to replace the certificate authority ARN in the following command with your own CA ARN.
Great! As shown in the output from the preceding command, the new short-lived mode root CA has a status of ACTIVE, meaning it can now issue certificates. This certificate authority will be able to issue end-entity certificates that have a validity period of up to 7 days, as shown in the UsageMode: SHORT_LIVED_CERTIFICATE parameter.
Conclusion
In this post, we introduced the short-lived CA mode that is offered by AWS Private CA, explained how it differs from the general-purpose CA mode, and compared the pricing models for both CA modes. We also provided some recommendations for choosing the appropriate CA mode based on your certificate issuance volume and use cases. Finally, we showed you how to create a short-lived mode CA by using the AWS CLI.
If you have feedback about this post, submit comments in the Comments section below. If you have questions about this post, start a new thread on the AWS Certificate Manager re:Post or contact AWS Support.
Want more AWS Security news? Follow us on Twitter.
As described in an earlier blog post, Establishing a data perimeter on AWS, Amazon Web Services (AWS) offers a set of capabilities you can use to implement a data perimeter to help prevent unintended access. One type of unintended access that companies want to prevent is access to corporate data by users who do not belong to the company. A combination of AWS Identity and Access Management (AWS IAM) features and capabilities that can help you achieve this goal in AWS while fostering innovation and agility form the identity perimeter. In this blog post, I will provide an overview of some of the security risks the identity perimeter is designed to address, policy examples, and implementation guidance for establishing the perimeter.
The identity perimeter is a set of coarse-grained preventative controls that help achieve the following objectives:
Only trusted identities can access my resources
Only trusted identities are allowed from my network
Trusted identities encompass IAM principals that belong to your company, which is typically represented by an AWS Organizations organization. In AWS, an IAM principal is a person or application that can make a request for an action or operation on an AWS resource. There are also scenarios when AWS services perform actions on your behalf using identities that do not belong to your organization. You should consider both types of data access patterns when you create a definition of trusted identities that is specific to your company and your use of AWS services. All other identities are considered untrusted and should have no access except by explicit exception.
Security risks addressed by the identity perimeter
The identity perimeter helps address several security risks, including the following.
Unintended data disclosure due to misconfiguration. Some AWS services support resource-based IAM policies that you can use to grant principals (including principals outside of your organization) permissions to perform actions on the resources they are attached to. While this allows developers to configure resource-based policies based on their application requirements, you should ensure that access to untrusted identities is prohibited even if the developers grant broad access to your resources, such as Amazon Simple Storage Service (Amazon S3) buckets. Figure 1 illustrates examples of access patterns you would want to prevent—specifically, principals outside of your organization accessing your S3 bucket from a non-corporate AWS account, your on-premises network, or the internet.
Figure 1: Unintended access to your S3 bucket by identities outside of your organization
Unintended data disclosure through non-corporate credentials. Some AWS services, such as Amazon Elastic Compute Cloud (Amazon EC2) and AWS Lambda, let you run code using the IAM credentials of your choosing. Similar to on-premises environments where developers might have access to physical and virtual servers, there is a risk that the developers can bring personal IAM credentials to a corporate network and attempt to move company data to personal AWS resources. For example, Figure 2 illustrates unintended access patterns where identities outside of your AWS Organizations organization are used to transfer data from your on-premises networks or VPC to an S3 bucket in a non-corporate AWS account.
Figure 2: Unintended access from your networks by identities outside of your organization
Implementing the identity perimeter
Before you can implement the identity perimeter by using preventative controls, you need to have a way to evaluate whether a principal is trusted and do this evaluation effectively in a multi-account AWS environment. IAM policies allow you to control access based on whether the IAM principal belongs to a particular account or an organization, with the following IAM condition keys:
The aws:PrincipalOrgID condition key gives you a succinct way to refer to all IAM principals that belong to a particular organization. There are similar condition keys, such as aws:PrincipalOrgPaths and aws:PrincipalAccount, that allow you to define different granularities of trust.
The aws:PrincipalIsAWSService condition key gives you a way to refer to AWS service principals when those are used to access resources on your behalf. For example, when you create a flow log with an S3 bucket as the destination, VPC Flow Logs uses a service principal, delivery.logs.amazonaws.com, which does not belong to your organization, to publish logs to Amazon S3.
In the context of the identity perimeter, there are two types of IAM policies that can help you ensure that the call to an AWS resource is made by a trusted identity:
Using the IAM condition keys and the policy types just listed, you can now implement the identity perimeter. The following table illustrates the relationship between identity perimeter objectives and the AWS capabilities that you can use to achieve them.
Data perimeter
Control objective
Implemented by using
Primary IAM capability
Identity
Only trusted identities can access my resources.
Resource-based policies
aws:PrincipalOrgID aws:PrincipalIsAWSService
Only trusted identities are allowed from my network.
VPC endpoint policies
Let’s see how you can use these capabilities to mitigate the risk of unintended access to your data.
Only trusted identities can access my resources
Resource-based policies allow you to specify who has access to the resource and what actions they can perform. Resource-based policies also allow you to apply identity perimeter controls to mitigate the risk of unintended data disclosure due to misconfiguration. The following is an example of a resource-based policy for an S3 bucket that limits access to only trusted identities. Make sure to replace <DOC-EXAMPLE-MY-BUCKET> and <MY-ORG-ID> with your information.
The Deny statement in the preceding policy has two condition keys where both conditions must resolve to true to invoke the Deny effect. This means that this policy will deny any S3 action unless it is performed by an IAM principal within your organization (StringNotEqualsIfExists with aws:PrincipalOrgID) or a service principal (BoolIfExists with aws:PrincipalIsAWSService). Note that resource-based policies on AWS resources do not allow access outside of the account by default. Therefore, in order for another account or an AWS service to be able to access your resource directly, you need to explicitly grant access permissions with appropriate Allow statements added to the preceding policy.
Only trusted identities are allowed from my network
When you access AWS services from on-premises networks or VPCs, you can use public service endpoints or connect to supported AWS services by using VPC endpoints. VPC endpoints allow you to apply identity perimeter controls to mitigate the risk of unintended data disclosure through non-corporate credentials. The following is an example of a VPC endpoint policy that allows access to all actions but limits the access to trusted identities only. Replace <MY-ORG-ID> with your information.
As opposed to the resource-based policy example, the preceding policy uses Allow statements to enforce the identity perimeter. This is because VPC endpoint policies do not grant any permissions but define the maximum access allowed through the endpoint. Your developers will be using identity-based or resource-based policies to grant permissions required by their applications. We use two statements in this example policy to invoke the Allow effect in two scenarios: if an action is performed by an IAM principal that belongs to your organization (StringEquals with aws:PrincipalOrgID in the AllowRequestsByOrgsIdentities statement) or if an action is performed by a service principal (Bool with aws:PrincipalIsAWSService in the AllowRequestsByAWSServicePrincipals statement). We do not use IfExists in the end of the condition operators in this case, because we want the condition elements to evaluate to true only if the specified keys exist in the request.
There might be circumstances when you want to grant access to your resources to principals outside of your organization. For example, you might be hosting a dataset in an Amazon S3 bucket that is being accessed by your business partners from their own AWS accounts. In order to support this access pattern, you can use the aws:PrincipalAccount condition key to include third-party account identities as trusted identities in a policy. This is shown in the following resource-based policy example. Replace <DOC-EXAMPLE-MY-BUCKET>, <MY-ORG-ID>, <THIRD-PARTY-ACCOUNT-A>, and <THIRD-PARTY-ACCOUNT-B> with your information.
The preceding policy adds the aws:PrincipalAccount condition key to the StringNotEqualsIfExists operator. You now have a Deny statement with three condition keys where all three conditions must resolve to true to invoke the Deny effect. Therefore, this policy denies any S3 action unless it is performed by an IAM principal that belongs to your organization (StringNotEqualsIfExists with aws:PrincipalOrgID), by an IAM principal that belongs to specified third-party accounts (StringNotEqualsIfExists with aws:PrincipalAccount), or a service principal (BoolIfExists with aws:PrincipalIsAWSService).
There might also be circumstances when you want to grant access from your networks to identities external to your organization. For example, your applications could be uploading or downloading objects to or from a third-party S3 bucket by using third-party generated pre-signed Amazon S3 URLs. The principal that generates the pre-signed URL will belong to the third-party AWS account. Similar to the previously discussed S3 bucket policy, you can extend your identity perimeter to include identities that belong to trusted third-party accounts by using the aws:PrincipalAccount condition key in your VPC endpoint policy.
Additionally, some AWS services make unauthenticated requests to AWS owned resources through your VPC endpoint. An example of such a pattern is Kernel Live Patching on Amazon Linux 2, which allows you to apply security vulnerability and critical bug patches to a running Linux kernel. Amazon EC2 makes an unauthenticated call to Amazon S3 to download packages from Amazon Linux repositories hosted on Amazon EC2 service-owned S3 buckets. To include this access pattern into your identity perimeter definition, you can choose to allow unauthenticated API calls to AWS owned resources in the VPC endpoint policies.
The following example VPC endpoint policy demonstrates how to extend your identity perimeter to include access to Amazon Linux repositories and to Amazon S3 buckets owned by a third-party. Replace <MY-ORG-ID>, <REGION>, <ACTION>, <THIRD-PARTY-ACCOUNT-A>, and <THIRD-PARTY-BUCKET-ARN> with your information.
The preceding example adds two new statements to the VPC endpoint policy. The AllowUnauthenticatedRequestsToAWSResources statement allows the s3:GetObject action on buckets that host Amazon Linux repositories. The AllowRequestsByThirdPartyIdentitiesToThirdPartyResources statement allows actions on resources owned by a third-party entity by principals that belong to the third-party account (StringEquals with aws:PrincipalAccount).
Note that identity perimeter controls do not eliminate the need for additional network protections, such as making sure that your private EC2 instances or databases are not inadvertently exposed to the internet due to overly permissive security groups.
Apart from preventative controls established by the identity perimeter, we also recommend that you configure AWS Identity and Access Management Access Analyzer. IAM Access Analyzer helps you identify unintended access to your resources and data by monitoring policies applied to supported resources. You can review IAM Access Analyzer findings to identify resources that are shared with principals that do not belong to your AWS Organizations organization. You should also consider enabling Amazon GuardDuty to detect misconfigurations or anomalous access to your resources that could lead to unintended disclosure of your data. GuardDuty uses threat intelligence, machine learning, and anomaly detection to analyze data from various sources in your AWS accounts. You can review GuardDuty findings to identify unexpected or potentially malicious activity in your AWS environment, such as an IAM principal with no previous history invoking an S3 API.
IAM policy samples
This AWS git repository contains policy examples that illustrate how to implement identity perimeter controls for a variety of AWS services and actions. The policy samples do not represent a complete list of valid data access patterns and are for reference purposes only. They are intended for you to tailor and extend to suit the needs of your environment. Make sure that you thoroughly test the provided example policies before you implement them in your production environment.
Deploying the identity perimeter at scale
As discussed earlier, you implement the identity perimeter as coarse-grained preventative controls. These controls typically need to be implemented for each VPC by using VPC endpoint policies and on all resources that support resource-based policies. The effectiveness of these controls relies on their ability to scale with the environment and to adapt to its dynamic nature.
The methodology you use to deploy identity perimeter controls will depend on the deployment mechanisms you use to create and manage AWS accounts. For example, you might choose to use AWS Control Tower and the Customizations for AWS Control Tower solution (CfCT) to govern your AWS environment at scale. You can use CfCT or your custom CI/CD pipeline to deploy VPC endpoints and VPC endpoint policies that include your identity perimeter controls.
Because developers will be creating resources such as S3 buckets and AWS KMS keys on a regular basis, you might need to implement automation to enforce identity perimeter controls when those resources are created or their policies are changed. One option is to use custom AWS Config rules. Alternatively, you can choose to enforce resource deployment through AWS Service Catalog or a CI/CD pipeline. With the AWS Service Catalog approach, you can have identity perimeter controls built into the centrally controlled products that are made available to developers to deploy within their accounts. With the CI/CD pipeline approach, the pipeline can have built-in compliance checks that enforce identity perimeter controls during the deployment. If you are deploying resources with your CI/CD pipeline by using AWS CloudFormation, see the blog post Proactively keep resources secure and compliant with AWS CloudFormation Hooks.
Regardless of the deployment tools you select, identity perimeter controls, along with other baseline security controls applicable to your multi-account environment, should be included in your account provisioning process. You should also audit your identity perimeter configurations periodically and upon changes in your organization, which could lead to modifications in your identity perimeter controls (for example, disabling a third-party integration). Keeping your identity perimeter controls up to date will help ensure that they are consistently enforced and help prevent unintended access during the entire account lifecycle.
Conclusion
In this blog post, you learned about the foundational elements that are needed to define and implement the identity perimeter, including sample policies that you can use to start defining guardrails that are applicable to your environment and control objectives.
Following are additional resources that will help you further explore the identity perimeter topic, including a whitepaper and a hands-on-workshop.
If you have any questions, comments, or concerns, contact AWS Support or browse AWS re:Post. If you have feedback about this post, submit comments in the Comments section below.
Want more AWS Security news? Follow us on Twitter.
AWS Identity and Access Management (IAM) has now made it easier for you to use IAM roles for your workloads that are running outside of AWS, with the release of IAM Roles Anywhere. This feature extends the capabilities of IAM roles to workloads outside of AWS. You can use IAM Roles Anywhere to provide a secure way for on-premises servers, containers, or applications to obtain temporary AWS credentials and remove the need for creating and managing long-term AWS credentials.
In this post, I will briefly discuss how IAM Roles Anywhere works. I’ll mention some of the common use cases for IAM Roles Anywhere. And finally, I’ll walk you through an example scenario to demonstrate how the implementation works.
Background
To enable your applications to access AWS services and resources, you need to provide the application with valid AWS credentials for making AWS API requests. For workloads running on AWS, you do this by associating an IAM role with Amazon Elastic Compute Cloud (Amazon EC2), Amazon Elastic Container Service (Amazon ECS), Amazon Elastic Kubernetes Service (Amazon EKS), or AWS Lambda resources, depending on the compute platform hosting your application. This is secure and convenient, because you don’t have to distribute and manage AWS credentials for applications running on AWS. Instead, the IAM role supplies temporary credentials that applications can use when they make AWS API calls.
IAM Roles Anywhere enables you to use IAM roles for your applications outside of AWS to access AWS APIs securely, the same way that you use IAM roles for workloads on AWS. With IAM Roles Anywhere, you can deliver short-term credentials to your on-premises servers, containers, or other compute platforms. When you use IAM Roles Anywhere to vend short-term credentials you can remove the need for long-term AWS access keys and secrets, which can help improve security, and remove the operational overhead of managing and rotating the long-term credentials. You can also use IAM Roles Anywhere to provide a consistent experience for managing credentials across hybrid workloads.
In this post, I assume that you have a foundational knowledge of IAM, so I won’t go into the details here about IAM roles. For more information on IAM roles, see the IAM documentation.
How does IAM Roles Anywhere work?
IAM Roles Anywhere relies on public key infrastructure (PKI) to establish trust between your AWS account and certificate authority (CA) that issues certificates to your on-premises workloads. Your workloads outside of AWS use IAM Roles Anywhere to exchange X.509 certificates for temporary AWS credentials. The certificates are issued by a CA that you register as a trust anchor (root of trust) in IAM Roles Anywhere. The CA can be part of your existing PKI system, or can be a CA that you created with AWS Certificate Manager Private Certificate Authority (ACM PCA).
Your application makes an authentication request to IAM Roles Anywhere, sending along its public key (encoded in a certificate) and a signature signed by the corresponding private key. Your application also specifies the role to assume in the request. When IAM Roles Anywhere receives the request, it first validates the signature with the public key, then it validates that the certificate was issued by a trust anchor previously configured in the account. For more details, see the signature validation documentation.
After both validations succeed, your application is now authenticated and IAM Roles Anywhere will create a new role session for the role specified in the request by calling AWS Security Token Service (AWS STS). The effective permissions for this role session are the intersection of the target role’s identity-based policies and the session policies, if specified, in the profile you create in IAM Roles Anywhere. Like any other IAM role session, it is also subject to other policy types that you might have in place, such as permissions boundaries and service control policies (SCPs).
There are typically three main tasks, performed by different personas, that are involved in setting up and using IAM Roles Anywhere:
Initial configuration of IAM Roles Anywhere – This task involves creating a trust anchor, configuring the trust policy of the role that IAM Roles Anywhere is going to assume, and defining the role profile. These activities are performed by the AWS account administrator and can be limited by IAM policies.
Provisioning of certificates to workloads outside AWS – This task involves ensuring that the X.509 certificate, signed by the CA, is installed and available on the server, container, or application outside of AWS that needs to authenticate. This is performed in your on-premises environment by an infrastructure admin or provisioning actor, typically by using existing automation and configuration management tools.
Using IAM Roles Anywhere – This task involves configuring the credential provider chain to use the IAM Roles Anywhere credential helper tool to exchange the certificate for session credentials. This is typically performed by the developer of the application that interacts with AWS APIs.
I’ll go into the details of each task when I walk through the example scenario later in this post.
Common use cases for IAM Roles Anywhere
You can use IAM Roles Anywhere for any workload running in your data center, or in other cloud providers, that requires credentials to access AWS APIs. Here are some of the use cases we think will be interesting to customers based on the conversations and patterns we have seen:
Send security findings from on-premises sources to AWS Security Hub
Enable hybrid workloads to access AWS services over the course of phased migrations
Example scenario and walkthrough
To demonstrate how IAM Roles Anywhere works in action, let’s walk through a simple scenario where you want to call S3 APIs to upload some data from a server in your data center.
Prerequisites
Before you set up IAM Roles Anywhere, you need to have the following requirements in place:
The certificate bundle of your own CA, or an active ACM PCA CA in the same AWS Region as IAM Roles Anywhere
An end-entity certificate and associated private key available on the on-premises server
Administrator permissions for IAM roles and IAM Roles Anywhere
Setup
Here I demonstrate how to perform the setup process by using the IAM Roles Anywhere console. Alternatively, you can use the AWS API or Command Line Interface (CLI) to perform these actions. There are three main activities here:
Create a trust anchor
Create and configure a role that trusts IAM Roles Anywhere
Under Trust anchors, choose Create a trust anchor.
On the Create a trust anchor page, enter a name for your trust anchor and select the existing AWS Certificate Manager Private CA from the list. Alternatively, if you want to use your own external CA, choose External certificate bundle and provide the certificate bundle.
Figure 1: Create a trust anchor in IAM Roles Anywhere
To create and configure a role that trusts IAM Roles Anywhere
Using the AWS Command Line Interface (AWS CLI), you are going to create an IAM role with appropriate permissions that you want your on-premises server to assume after authenticating to IAM Roles Anywhere. Save the following trust policy as rolesanywhere-trust-policy.json on your computer.
Save the following identity-based policy as onpremsrv-permissions-policy.json. This grants the role permissions to write objects into the specified S3 bucket.
You can optionally use condition statements based on the attributes extracted from the X.509 certificate to further restrict the trust policy to control the on-premises resources that can obtain credentials from IAM Roles Anywhere. IAM Roles Anywhere sets the SourceIdentity value to the CN of the subject (onpremsrv01 in my example). It also sets individual session tags (PrincipalTag/) with the derived attributes from the certificate. So, you can use the principal tags in the Condition clause in the trust policy as additional authorization constraints.
For example, the Subject for the certificate I use in this post is as follows.
Subject: … O = Example Corp., OU = SecOps, CN = onpremsrv01
So, I can add condition statements like the following into the trust policy (rolesanywhere-trust-policy.json):
On the Create a profile page, enter a name for the profile.
For Roles, select the role that you created in the previous step (ExampleS3WriteRole).
5. Optionally, you can define session policies to further scope down the sessions delivered by IAM Roles Anywhere. This is particularly useful when you configure the profile with multiple roles and want to restrict permissions across all the roles. You can add the desired session polices as managed policies or inline policy. Here, for demonstration purpose, I add an inline policy to only allow requests coming from my specified IP address.
Figure 2: Create a profile in IAM Roles Anywhere
At this point, IAM Roles Anywhere setup is complete and you can start using it.
Use IAM Roles Anywhere
IAM Roles Anywhere provides a credential helper tool that can be used with the process credentials functionality that all current AWS SDKs support. This simplifies the signing process for the applications. See the IAM Roles Anywhere documentation to learn how to get the credential helper tool.
To test the functionality first, run the credential helper tool (aws_signing_helper) manually from the on-premises server, as follows.
Figure 3: Running the credential helper tool manually
You should successfully receive session credentials from IAM Roles Anywhere, similar to the example in Figure 3. Once you’ve confirmed that the setup works, update or create the ~/.aws/config file and add the signing helper as a credential_process. This will enable unattended access for the on-premises server. To learn more about the AWS CLI configuration file, see Configuration and credential file settings.
To verify that the config works as expected, call the aws sts get-caller-identity AWS CLI command and confirm that the assumed role is what you configured in IAM Roles Anywhere. You should also see that the role session name contains the Serial Number of the certificate that was used to authenticate (cc:c3:…:85:37 in this example). Finally, you should be able to copy a file to the S3 bucket, as shown in Figure 4.
Figure 4: Verify the assumed role
Audit
As with other AWS services, AWS CloudTrail captures API calls for IAM Roles Anywhere. Let’s look at the corresponding CloudTrail log entries for the activities we performed earlier.
The first log entry I’m interested in is CreateSession, when the on-premises server called IAM Roles Anywhere through the credential helper tool and received session credentials back.
You can see that the cert, along with other parameters, is sent to IAM Roles Anywhere and a role session along with temporary credentials is sent back to the server.
The next log entry we want to look at is the one for the s3:PutObject call we made from our on-premises server.
In addition to the CloudTrail logs, there are several metrics and events available for you to use for monitoring purposes. To learn more, see Monitoring IAM Roles Anywhere.
Additional notes
You can disable the trust anchor in IAM Roles Anywhere to immediately stop new sessions being issued to your resources outside of AWS. Certificate revocation is supported through the use of imported certificate revocation lists (CRLs). You can upload a CRL that is generated from your CA, and certificates used for authentication will be checked for their revocation status. IAM Roles Anywhere does not support callbacks to CRL Distribution Points (CDPs) or Online Certificate Status Protocol (OCSP) endpoints.
Another consideration, not specific to IAM Roles Anywhere, is to ensure that you have securely stored the private keys on your server with appropriate file system permissions.
Conclusion
In this post, I discussed how the new IAM Roles Anywhere service helps you enable workloads outside of AWS to interact with AWS APIs securely and conveniently. When you extend the capabilities of IAM roles to your servers, containers, or applications running outside of AWS you can remove the need for long-term AWS credentials, which means no more distribution, storing, and rotation overheads.
I mentioned some of the common use cases for IAM Roles Anywhere. You also learned about the setup process and how to use IAM Roles Anywhere to obtain short-term credentials.
If you have any questions, you can start a new thread on AWS re:Post or reach out to AWS Support.
Customers often ask for guidance on permissions boundaries in AWS Identity and Access Management (IAM) and when, where, and how to use them. A permissions boundary is an IAM feature that helps your centralized cloud IAM teams to safely empower your application developers to create new IAM roles and policies in Amazon Web Services (AWS). In this blog post, we cover this common use case for permissions boundaries, some best practices to consider, and a few things to avoid.
Background
Developers often need to create new IAM roles and policies for their applications because these applications need permissions to interact with AWS resources. For example, a developer will likely need to create an IAM role with the correct permissions for an Amazon Elastic Compute Cloud (Amazon EC2) instance to report logs and metrics to Amazon CloudWatch. Similarly, a role with accompanying permissions is required for an AWS Glue job to extract, transform, and load data to an Amazon Simple Storage Service (Amazon S3) bucket, or for an AWS Lambda function to perform actions on the data loaded to Amazon S3.
Before the launch of IAM permissions boundaries, central admin teams, such as identity and access management or cloud security teams, were often responsible for creating new roles and policies. But using a centralized team to create and manage all IAM roles and policies creates a bottleneck that doesn’t scale, especially as your organization grows and your centralized team receives an increasing number of requests to create and manage new downstream roles and policies. Imagine having teams of developers deploying or migrating hundreds of applications to the cloud—a centralized team won’t have the necessary context to manually create the permissions for each application themselves.
Because the use case and required permissions can vary significantly between applications and workloads, customers asked for a way to empower their developers to safely create and manage IAM roles and policies, while having security guardrails in place to set maximum permissions. IAM permissions boundaries are designed to provide these guardrails so that even if your developers created the most permissive policy that you can imagine, such broad permissions wouldn’t be functional.
By setting up permissions boundaries, you allow your developers to focus on tasks that add value to your business, while simultaneously freeing your centralized security and IAM teams to work on other critical tasks, such as governance and support. In the following sections, you will learn more about permissions boundaries and how to use them.
Permissions boundaries
A permissions boundary is designed to restrict permissions on IAM principals, such as roles, such that permissions don’t exceed what was originally intended. The permissions boundary uses an AWS or customer managed policy to restrict access, and it’s similar to other IAM policies you’re familiar with because it has resource, action, and effect statements. A permissions boundary alone doesn’t grant access to anything. Rather, it enforces a boundary that can’t be exceeded, even if broader permissions are granted by some other policy attached to the role. Permissions boundaries are a preventative guardrail, rather than something that detects and corrects an issue. To grant permissions, you use resource-based policies (such as S3 bucket policies) or identity-based policies (such as managed or in-line permissions policies).
The predominant use case for permissions boundaries is to limit privileges available to IAM roles created by developers (referred to as delegated administrators in the IAM documentation) who have permissions to create and manage these roles. Consider the example of a developer who creates an IAM role that can access all Amazon S3 buckets and Amazon DynamoDB tables in their accounts. If there are sensitive S3 buckets in these accounts, then these overly broad permissions might present a risk.
To limit access, the central administrator can attach a condition to the developer’s identity policy that helps ensure that the developer can only create a role if the role has a permissions boundary policy attached to it. The permissions boundary, which AWS enforces during authorization, defines the maximum permissions that the IAM role is allowed. The developer can still create IAM roles with permissions that are limited to specific use cases (for example, allowing specific actions on non-sensitive Amazon S3 buckets and DynamoDB tables), but the attached permissions boundary prevents access to sensitive AWS resources even if the developer includes these elevated permissions in the role’s IAM policy. Figure 1 illustrates this use of permissions boundaries.
Figure 1: Implementing permissions boundaries
The central IAM team adds a condition to the developer’s IAM policy that allows the developer to create a role only if a permissions boundary is attached to the role.
The developer creates a role with accompanying permissions to allow access to an application’s Amazon S3 bucket and DynamoDB table. As part of this step, the developer also attaches a permissions boundary that defines the maximum permissions for the role.
Resource access is granted to the application’s resources.
Resource access is denied to the sensitive S3 bucket.
You can use the following policy sample for your developers to allow the creation of roles only if a permissions boundary is attached to them. Make sure to replace <YourAccount_ID> with an appropriate AWS account ID; and the <DevelopersPermissionsBoundary>, with your permissions boundary policy.
Put together, you can use the following permissions policy for your developers to get started with permissions boundaries. This policy allows your developers to create downstream roles with an attached permissions boundary. The policy further denies permissions to detach, delete, or modify the attached permissions boundary policy. Remember, nothing is implicitly allowed in IAM, so you need to allow access permissions for any other actions that your developers require. To learn about allowing access permissions for various scenarios, see Example IAM identity-based policies in the documentation.
You can build on these concepts and apply permissions boundaries to different organizational structures and functional units. In the example shown in Figure 2, the developer can only create IAM roles if a permissions boundary associated to the business function is attached to the IAM roles. In the example, IAM roles in function A can only perform Amazon EC2 actions and Amazon DynamoDB actions, and they don’t have access to the Amazon S3 or Amazon Relational Database Service (Amazon RDS) resources of function B, which serve a different use case. In this way, you can make sure that roles created by your developers don’t exceed permissions outside of their business function requirements.
Figure 2: Implementing permissions boundaries in multiple organizational functions
Best practices
You might consider restricting your developers by directly applying permissions boundaries to them, but this presents the risk of you running out of policy space. Permissions boundaries use a managed IAM policy to restrict access, so permissions boundaries can only be up to 6,144 characters long. You can have up to 10 managed policies and 1 permissions boundary attached to an IAM role. Developers often need larger policy spaces because they perform so many functions. However, the individual roles that developers create—such as a role for an AWS service to access other AWS services, or a role for an application to interact with AWS resources—don’t need those same broad permissions. Therefore, it is generally a best practice to apply permissions boundaries to the IAM roles created by developers, rather than to the developers themselves.
There are better mechanisms to restrict developers, and we recommend that you use IAM identity policies and AWS Organizations service control policies (SCPs) to restrict access. In particular, the Organizations SCPs are a better solution here because they can restrict every principal in the account through one policy, rather than separately restricting individual principals, as permissions boundaries and IAM identity policies are confined to do.
You should also avoid replicating the developer policy space to a permissions boundary for a downstream IAM role. This, too, can cause you to run out of policy space. IAM roles that developers create have specific functions, and the permissions boundary can be tailored to common business functions to preserve policy space. Therefore, you can begin to group your permissions boundaries into categories that fit the scope of similar application functions or use cases (such as system automation and analytics), and allow your developers to choose from multiple options for permissions boundaries, as shown in the following policy sample.
Finally, it is important to understand the differences between the various IAM resources available. The following table lists these IAM resources, their primary use cases and managing entities, and when they apply. Even if your organization uses different titles to refer to the personas in the table, you should have separation of duties defined as part of your security strategy.
IAM resource
Purpose
Owner/maintainer
Applies to
Federated roles and policies
Grant permissions to federated users for experimentation in lower environments
Central team
People represented by users in the enterprise identity provider
IAM workload roles and policies
Grant permissions to resources used by applications, services
Developer
IAM roles representing specific tasks performed by applications
Permissions boundaries
Limit permissions available to workload roles and policies
Central team
Workload roles and policies created by developers
IAM users and policies
Allowed only by exception when there is no alternative that satisfies the use case
Central team plus senior leadership approval
Break-glass access; legacy workloads unable to use IAM roles
Conclusion
This blog post covered how you can use IAM permissions boundaries to allow your developers to create the roles that they need and to define the maximum permissions that can be given to the roles that they create. Remember, you can use AWS Organizations SCPs or deny statements in identity policies for scenarios where permissions boundaries are not appropriate. As your organization grows and you need to create and manage more roles, you can use permissions boundaries and follow AWS best practices to set security guard rails and decentralize role creation and management. Get started using permissions boundaries in IAM.
If you have feedback about this post, submit comments in the Comments section below. If you have questions about this post, contact AWS Support.
Want more AWS Security news? Follow us on Twitter.
Many Amazon Web Services (AWS) customers choose to use federation with SAML 2.0 in order to use their existing identity provider (IdP) and avoid managing multiple sources of identities. Some customers have previously configured federation by using AWS Identity and Access Management (IAM) with the endpoint signin.aws.amazon.com. Although this endpoint is highly available, it is hosted in a single AWS Region, us-east-1. This blog post provides recommendations that can improve resiliency for customers that use IAM federation, in the unlikely event of disrupted availability of one of the regional endpoints. We will show you how to use multiple SAML sign-in endpoints in your configuration and how to switch between these endpoints for failover.
How to configure federation with multi-Region SAML endpoints
AWS Sign-In allows users to log in into the AWS Management Console. With SAML 2.0 federation, your IdP portal generates a SAML assertion and redirects the client browser to an AWS sign-in endpoint, by default signin.aws.amazon.com/saml. To improve federation resiliency, we recommend that you configure your IdP and AWS federation to support multiple SAML sign-in endpoints, which requires configuration changes for both your IdP and AWS. If you have only one endpoint configured, you won’t be able to log in to AWS by using federation in the unlikely event that the endpoint becomes unavailable.
Let’s take a look at the Region code SAML sign-in endpoints in the AWS General Reference. The table in the documentation shows AWS regional endpoints globally. The format of the endpoint URL is as follows, where <region-code> is the AWS Region of the endpoint: https://<region-code>.signin.aws.amazon.com/saml
All regional endpoints have a region-code value in the DNS name, except for us-east-1. The endpoint for us-east-1 is signin.aws.amazon.com—this endpoint does not contain a Region code and is not a global endpoint. AWS documentation has been updated to reference SAML sign-in endpoints.
In the next two sections of this post, Configure your IdP and Configure IAM roles, I’ll walk through the steps that are required to configure additional resilience for your federation setup.
Important: You must do these steps before an unexpected unavailability of a SAML sign-in endpoint.
Configure your IdP
You will need to configure your IdP and specify which AWS SAML sign-in endpoint to connect to.
To configure your IdP
If you are setting up a new configuration for AWS federation, your IdP will generate a metadata XML configuration file. Keep track of this file, because you will need it when you configure the AWS portion later.
Register the AWS service provider (SP) with your IdP by using a regional SAML sign-in endpoint. If your IdP allows you to import the AWS metadata XML configuration file, you can find these files available for the public,GovCloud, and China Regions.
If you are manually setting the Assertion Consumer Service (ACS) URL, we recommend that you pick the endpoint in the same Region where you have AWS operations.
In SAML 2.0, RelayState is an optional parameter that identifies a specified destination URL that your users will access after signing in. When you set the ACS value, configure the corresponding RelayState to be in the same Region as the ACS. This keeps the Region configurations consistent for both ACS and RelayState. Following is the format of a Region-specific console URL.
https://<region-code>.console.aws.amazon.com/
For more information, refer to your IdP’s documentation on setting up the ACS and RelayState.
Configure IAM roles
Next, you will need to configure IAM roles’ trust policies for all federated human access roles with a list of all the regional AWS Sign-In endpoints that are necessary for federation resiliency. We recommend that your trust policy contains all Regions where you operate. If you operate in only one Region, you can get the same resiliency benefits by configuring an additional endpoint. For example, if you operate only in us-east-1, configure a second endpoint, such as us-west-2. Even if you have no workloads in that Region, you can switch your IdP to us-west-2 for failover. You can log in through AWS federation by using the us-west-2 SAML sign-in endpoint and access your us-east-1 AWS resources.
To configure IAM roles
Log in to the AWS Management Console with credentials to administer IAM. If this is your first time creating the identity provider trust in AWS, follow the steps in Creating IAM SAML identity providers to create the identity providers.
Next, create or update IAM roles for federated access. For each IAM role, update the trust policy that lists the regional SAML sign-in endpoints. Include at least two for increased resiliency.
The following example is a role trust policy that allows the role to be assumed by a SAML provider coming from any of the four US Regions.
When you use a regional SAML sign-in endpoint, the corresponding regional AWS Security Token Service (AWS STS) endpoint is also used when you assume an IAM role. If you are using service control policies (SCP) in AWS Organizations, check that there are no SCPs denying the regional AWS STS service. This will prevent the federated principal from being able to obtain an AWS STS token.
Switch regional SAML sign-in endpoints
In the event that the regional SAML sign-in endpoint your ACS is configured to use becomes unavailable, you can reconfigure your IdP to point to another regional SAML sign-in endpoint. After you’ve configured your IdP and IAM role trust policies as described in the previous two sections, you’re ready to change to a different regional SAML sign-in endpoint. The following high-level steps provide guidance on switching the regional SAML sign-in endpoint.
To switch regional SAML sign-in endpoints
Change the configuration in the IdP to point to a different endpoint by changing the value for the ACS.
Change the configuration for the RelayState value to match the Region of the ACS.
Log in with your federated identity. In the browser, you should see the new ACS URL when you are prompted to choose an IAM role.
Figure 1: New ACS URL
The steps to reconfigure the ACS and RelayState will be different for each IdP. Refer to the vendor’s IdP documentation for more information.
Conclusion
In this post, you learned how to configure multiple regional SAML sign-in endpoints as a best practice to further increase resiliency for federated access into your AWS environment. Check out the updates to the documentation for AWS Sign-In endpoints to help you choose the right configuration for your use case. Additionally, AWS has updated the metadata XML configuration for the public,GovCloud, and China AWS Regions to include all sign-in endpoints.
The simplest way to get started with SAML federation is to use AWS Single Sign-On (AWS SSO). AWS SSO helps manage your permissions across all of your AWS accounts in AWS Organizations.
Recently, AWS launched the ability to delegate administration of AWS Single Sign-On (AWS SSO) in your AWS Organizations organization to a member account (an account other than the management account). This post will show you a practical approach to using this new feature. For the documentation for this feature, see Delegated administration in the AWS Single Sign-On User Guide.
With AWS Organizations, your enterprise organization can manage your accounts more securely and at scale. One of the benefits of Organizations is that it integrates with many other AWS services, so you can centrally manage accounts and how the services in those accounts can be used.
AWS SSO is where you can create, or connect, your workforce identities in AWS just once, and then manage access centrally across your AWS organization. You can create user identities directly in AWS SSO, or you can bring them from your Microsoft Active Directory or a standards-based identity provider, such as Okta Universal Directory or Azure AD. With AWS SSO, you get a unified administration experience to define, customize, and assign fine-grained access.
By default, the management account in an AWS organization has the power and authority to manage member accounts in the organization. Because of these additional permissions, it is important to exercise least privilege and tightly control access to the management account. AWS recommends that enterprises create one or more accounts specifically designated for security of the organization, with proper controls and access management policies in place. AWS provides a method in which many services can be administered for the organization from a member account; this is usually referred to as a delegated administrator account. These accounts can reside in a security organizational unit (OU), where administrators can enforce organizational policies. Figure 1 is an example of a recommended set of OUs in Organizations.
Figure 1: Recommended AWS Organizations OUs
Many AWS services support this delegated administrator model, including Amazon GuardDuty, AWS Security Hub, and Amazon Macie. For an up-to-date complete list, see AWS services that you can use with AWS Organizations. AWS SSO is now the most recent addition to the list of services in which you can delegate administration of your users, groups, and permissions, including third-party applications, to a member account of your organization.
How to configure a delegated administrator account
In this scenario, your enterprise AnyCompany has an organization consisting of a management account, an account for managing security, as well as a few member accounts. You have enabled AWS SSO in the organization, but you want to enable the security team to manage permissions for accounts and roles in the organization. AnyCompany doesn’t want you to give the security team access to the management account, and they also want to make sure the security team can’t delete the AWS SSO configuration or manage access to that account, so you decide to delegate the administration of AWS SSO to the security account.
Note: There are a few things to consider when making this change, which you should review before you enable delegated administration. These items are covered in the console during the process, and are described in the section Considerations when delegating AWS SSO administration in this post.
To delegate AWS SSO administration to a security account
In the AWS SSO console, navigate to the Region in which AWS SSO is enabled.
Choose Settings on the left navigation pane, and then choose the Management tab on the right side.
Under Delegated administrator, choose Register account, as shown in Figure 2.
Figure 2: The Register account button in AWS SSO
Consider the implications of designating a delegated administrator account (as described in the section Considerations when delegating AWS SSO administration). Select the account you want to be able to manage AWS SSO, and then choose Register account, as shown in Figure 3.
Figure 3: Choosing a delegated administrator account in AWS SSO
You should see a success message to indicate that the AWS SSO delegated administrator account is now setup.
To remove delegated AWS SSO administration from an account
In the AWS SSO console, navigate to the Region in which AWS SSO is enabled.
Choose Settings on the left navigation pane, and then choose the Management tab on the right side.
Under Delegated administrator, select Deregister account, as shown in Figure 4.
Figure 4: The Deregister account button in AWS SSO
Consider the implications of removing a delegated administrator account (as described in the section Considerations when delegating AWS SSO administration), then enter the account name that is currently administering AWS SSO, and choose Deregister account, as shown in Figure 5.
Figure 5: Considerations of deregistering a delegated administrator in AWS SSO
There are a few considerations you should keep in mind when you delegate AWS SSO administration. The first consideration is that the delegated administrator account will not be able to perform the following actions:
Delete the AWS SSO configuration.
Delegate (to other accounts) administration of AWS SSO.
Manage user or group access to the management account.
Manage permission sets that are provisioned (have a user or group assigned) in the organization management account.
For examples of those last two actions, consider the following scenarios:
In the first scenario, you are managing AWS SSO from the delegated administrator account. You would like to give your colleague Saanvi access to all the accounts in the organization, including the management account. This action would not be allowed, since the delegated administrator account cannot manage access to the management account. You would need to log in to the management account (with a user or role that has proper permissions) to provision that access.
In a second scenario, you would like to change the permissions Paulo has in the management account by modifying the policy attached to a ManagementAccountAdmin permission set, which Paulo currently has access to. In this scenario, you would also have to do this from inside the management account, since the delegated administrator account does not have permissions to modify the permission set, because it is provisioned to a user in the management account.
With those caveats in mind, users with proper access in the delegated administrator account will be able to control permissions and assignments for users and groups throughout the AWS organization. For more information about limiting that control, see Allow a user to administer AWS SSO for specific accounts in the AWS Single Sign-On User Guide.
Deregistering an AWS SSO delegated administrator account will not affect any permissions or assignments in AWS SSO, but it will remove the ability for users in the delegated account to manage AWS SSO from that account.
Additional considerations if you use Microsoft Active Directory
There are additional considerations for you to keep in mind if you use Microsoft Active Directory (AD) as an identity provider, specifically if you use AWS SSO configurable AD sync, and which AWS account the directory resides in. In order to use AWS SSO delegated administration when the identity source is set to Active Directory, AWS SSO configurable AD sync must be enabled for the directory. Your organization’s administrators must synchronize Active Directory users and groups you want to grant access to into an AWS SSO identity store. When you enable AWS SSO configurable AD sync, a new feature that launched in April, Active Directory administrators can choose which users and groups get synced into AWS SSO, similar to how other external identity providers work today when using the System for Cross-domain Identity Management (SCIM) v2.0 protocol. This way, AWS SSO knows about users and groups even before they are granted access to specific accounts or roles, and AWS SSO administrators don’t have to manually search for them.
Another thing to consider when delegating AWS SSO administration when using AD as an identity source is where your directory resides, that is which AWS account owns the directory. If you decide to change the AWS SSO identity source from any other source to Active Directory, or change it from Active Directory to any other source, then the directory must reside in (be owned by) the account that the change is being performed in. For example, if you are currently signed in to the management account, you can only change the identity source to or from directories that reside in (are owned by) the management account. For more information, see Manage your identity source in the AWS Single Sign-On User Guide.
Best practices for managing AWS SSO with delegated administration
AWS recommends the following best practices when using delegated administration for AWS SSO:
Maintain separate permission sets for use in the organization management account (versus the rest of the accounts). This way, permissions can be kept separate and managed from within the management account without causing confusion among the delegated administrators.
When granting access to the organization management account, grant the access to groups (and permission sets) specifically for access in that account. This helps enable the principal of least privilege for this important account, and helps ensure that AWS SSO delegated administrators are able to manage the rest of the organization as efficiently as possible (by reducing the number of users, groups, and permission sets that are off limits to them).
If you plan on using one of the AWS Directory Services for Microsoft Active Directory (AWS Managed Microsoft AD or AD Connector) as your AWS SSO identity source, locate the directory and the AWS SSO delegated administrator account in the same AWS account.
Conclusion
In this post, you learned about a helpful new feature of AWS SSO, the ability to delegate administration of your users and permissions to a member account of your organization. AWS recommends as a best practice that the management account of an AWS organization be secured by a least privilege access model, in which as few people as possible have access to the account. You can enable delegated administration for supported AWS services, including AWS SSO, as a useful tool to help your organization minimize access to the management account by moving that control into an AWS account designated specifically for security or identity services. We encourage you to consider AWS SSO delegated administration for administrating access in AWS. To learn more about the new feature, see Delegated administration in the AWS Single Sign-On User Guide.
If you have feedback about this post, submit comments in the Comments section below. If you have questions about this post, start a new thread on the AWS IAM forum or contact AWS Support.
Want more AWS Security how-to content, news, and feature announcements? Follow us on Twitter.
For your sensitive data on AWS, you should implement security controls, including identity and access management, infrastructure security, and data protection. Amazon Web Services (AWS) recommends that you set up multiple accounts as your workloads grow to isolate applications and data that have specific security requirements. AWS tools can help you establish a data perimeter between your multiple accounts, while blocking unintended access from outside of your organization. Data perimeters on AWS span many different features and capabilities. Based on your security requirements, you should decide which capabilities are appropriate for your organization. In this first blog post on data perimeters, I discuss which AWS Identity and Access Management (IAM) features and capabilities you can use to establish a data perimeter on AWS. Subsequent posts will provide implementation guidance and IAM policy examples for establishing your identity, resource, and network data perimeters.
A data perimeter is a set of preventive guardrails that help ensure that only your trusted identities are accessing trusted resources from expected networks. These terms are defined as follows:
Trusted identities – Principals (IAM roles or users) within your AWS accounts, or AWS services that are acting on your behalf
Trusted resources – Resources that are owned by your AWS accounts, or by AWS services that are acting on your behalf
Expected networks – Your on-premises data centers and virtual private clouds (VPCs), or networks of AWS services that are acting on your behalf
Data perimeter guardrails
You typically implement data perimeter guardrails as coarse-grained controls that apply across a broad set of AWS accounts and resources. When you implement a data perimeter, consider the following six primary control objectives.
Data perimeter
Control objective
Identity
Only trusted identities can access my resources.
Only trusted identities are allowed from my network.
Resource
My identities can access only trusted resources.
Only trusted resources can be accessed from my network.
Network
My identities can access resources only from expected networks.
My resources can only be accessed from expected networks.
Note that the controls in the preceding table are coarse in nature and are meant to serve as always-on boundaries. You can think of data perimeters as creating a firm boundary around your data to prevent unintended access patterns. Although data perimeters can prevent broad unintended access, you still need to make fine-grained access control decisions. Establishing a data perimeter does not diminish the need to continuously fine-tune permissions by using tools such as IAM Access Analyzer as part of your journey to least privilege.
To implement the preceding control objectives on AWS, use three primary capabilities:
Service control policies (SCPs) – AWS Organizations policies that you can use to establish the maximum available permissions for your principals (IAM roles or users) within your organization. SCPs help you ensure that your accounts stay within your organization’s access control guidelines. In the context of data perimeters, you use SCPs so that your identities can access only trusted resources from expected networks.
VPC endpoint policies – Policies that you attach to VPC endpoints to control which principals, actions, and resources can be accessed by using a VPC endpoint. In the context of data perimeters, use VPC endpoint policies to specify that your network can be used only by trusted identities to access only trusted resources. For a list of services that support VPC endpoints and VPC endpoint policies, see AWS services that integrate with AWS PrivateLink.
Let’s expand the previous table to include the corresponding policies you would use to implement the controls for each of the control objectives.
Data perimeter
Control objective
Implemented by using
Identity
Only trusted identities can access my resources.
Resource-based policies
Only trusted identities are allowed from my network.
VPC endpoint policies
Resource
My identities can access only trusted resources.
SCPs
Only trusted resources can be accessed from my network.
VPC endpoint policies
Network
My identities can access resources only from expected networks.
SCPs
My resources can only be accessed from expected networks.
Resource-based policies
As you can see in the preceding table, the correct policy for each control objective depends on which resource you are trying to secure. Resource-based policies, which are applied to resources such as Amazon S3 buckets, can be used to filter access based on the calling principal and the network from which they are making a call. VPC endpoint policies are used to inspect the principal that is making the API call and the resource they are trying to access. And SCPs are used to restrict your identities from accessing resources outside your control or from outside your network. Note that SCPs apply only to your principals within your AWS organization, whereas resource policies can be used to limit access to all principals.
The last components are the specific IAM controls or condition keys that enforce the control objective. For effective data perimeter controls, use the following primary IAM condition keys, including the new resource owner condition keys:
aws:PrincipalOrgID – Use this condition key to restrict access to trusted identities, your principals (roles or users) that belong to your organization. In the context of a data perimeter, you will use this condition key with your resource-based policies and VPC endpoint policies.
aws:ResourceOrgID – Use this condition key to restrict access to resources that belong to your AWS organization. To establish a data perimeter, you will use this condition key within SCPs and VPC endpoint policies.
aws:SourceIp, aws:SourceVpc, aws:SourceVpce – Use these condition keys to restrict access to expected network locations, such as your corporate network or your VPCs. In the context of a data perimeter, you will use these keys within identity and resource-based policies.
We can now complete the table that we’ve been developing throughout this post.
Data perimeter
Control objective
Implemented by using
Primary IAM capability
Identity
Only trusted identities can access my resources.
Resource-based policies
aws:PrincipalOrgID aws:PrincipalIsAWSService
Only trusted identities are allowed from my network.
VPC endpoint policies
aws:PrincipalOrgID
Resource
My identities can access only trusted resources.
SCPs
aws:ResourceOrgID
Only trusted resources can be accessed from my network.
VPC endpoint policies
aws:ResourceOrgID
Network
My identities can access resources only from expected networks.
For the identity data perimeter, the primary condition key is aws:PrincipalOrgID, which you can use in resource-based policies and VPC endpoint policies so that only your identities are allowed access. Use aws:PrincipalIsAWSService to allow AWS services to access your resources by using their own identities—for example, AWS CloudTrail can use this access to write data to your bucket.
For the resource data perimeter, the primary condition key is aws:ResourceOrgID, which you can use in an SCP policy or VPC endpoint policy to allow your identities and network to access only the resources that belong to your AWS organization.
In this blog post, you learned the foundational elements that are needed to implement an identity, resource, and network data perimeter on AWS, including the primary IAM capabilities that are used to implement each of the control objectives. Stay tuned to the follow-up posts in this series, which will provide prescriptive guidance on establishing your identity, resource, and network data perimeters.
Following are additional resources that will help you further explore the data perimeter topic, including a whitepaper and a hands-on-workshop. We have also curated several blog posts related to the key IAM capabilities discussed in this post.
If you have any questions, comments, or concerns, contact AWS Support or start a new thread on the IAM forum. If you have feedback about this post, submit comments in the Comments section below.
Want more AWS Security news? Follow us on Twitter.
You can use third-party identity providers (IdPs) such as Okta, Ping, or OneLogin to federate with the AWS Identity and Access Management (IAM) service using SAML 2.0, allowing your workforce to configure services by providing authorization access to the AWS Management Console or Command Line Interface (CLI). When you federate to AWS, you assume a role through the AWS Security Token Service (AWS STS), which through the AssumeRole API returns a set of temporary security credentials you then use to access AWS resources. The use of temporary credentials can make it challenging for administrators to trace which identity was responsible for actions performed.
To address this, with AWS STS you set a unique attribute called SourceIdentity, which allows you to easily see which identity is responsible for a given action.
This post will show you how to set up the AWS STS SourceIdentity attribute when using Okta, Ping, or OneLogin as your IdP. Your IdP administrator can configure a corporate directory attribute, such as an email address, to be passed as the SourceIdentity value within the SAML assertion. This value is stored as the SourceIdentity element in AWS CloudTrail, along with the activity performed by the assumed role. This post will also show you how to set up a sample policy for setting the SourceIdentity when switching roles. Finally, as an administrator reviewing CloudTrail activity, you can use the source identity information to determine who performed which actions. We will walk you through CloudTrail logs from two accounts to demonstrate the continuance of the source identity attribute, showing you how the SourceIdentity will appear in both accounts’ logs.
Configure the SourceIdentity attribute with Okta integration
You will do this portion of the configuration within the Okta administrative console. This procedure assumes that you have a previously configured AWS and Okta integration. If not, you can configure your integration by following the instructions in the Okta AWS Multi-Account Configuration Guide. You will use the Okta to SAML integration and configure an optional attribute to map as the SourceIdentity.
To set up Okta with SourceIdentity
Log in to the Okta admin console.
Navigate to Applications–AWS.
In the top navigation bar, select the Sign On tab, as shown in Figure 1.
Figure 1 – Navigate to attributes in SAML settings on the Okta applications page
Under Sign on methods, select SAML 2.0, and choose the arrow next to Attributes (Optional) to expand, as shown in Figure 2.
Figure 2 – Add new attribute SourceIdentity and map it to Okta provided attribute of your choice
Add the optional attribute definition for SourceIdentity using the following parameters:
For Name, enter: https://aws.amazon.com/SAML/Attributes/SourceIdentity
For Name format, choose URI Reference.
For Value, enter user.login.
Note: The Name format options are the following: Unspecified – can be any format defined by the Okta profile and must be interpreted by your application. URI Reference – the name is provided as a Uniform Resource Identifier string. Basic – a simple string; the default if no other format is specified.
The examples shown in Figure 1 and Figure 2 show how to map an email address to the SourceIdentity attribute by using an on-premises Active Directory sync. The SourceIdentity can be mapped to other attributes from your Active Directory.
Configure the SourceIdentity attribute with PingOne integration
You do this portion of the configuration in the Ping Identity administrative console. This procedure assumes that you have a previously configured AWS and Ping integration. If not, you can set up the PingFederate AWS Connector by following the Ping Identity instructions Configuring an SSO connection to Amazon Web Services.
You’re using the Ping to SAML integration and configuring an optional attribute to map as the source identity.
Configuring PingOne as an IdP involves setting up an identity repository (in this case, the PingOne Directory), creating a user group, and adding users to the individual groups.
Choose the My Applications tab, as shown in Figure 3.
Figure 3. PingOne My Applications tab
On the Amazon Web Services line, choose on the arrow on the right side to show application details to edit and add a new attribute for the source identity.
Choose Continue to Next Step to open the Attribute Mapping section, as shown in Figure 4.
Figure 4. Attribute mappings
In the Attribute Mapping section line 1, for SAML_SUBJECT, choose Advanced.
On the Advanced Attribute Options page, for Name ID Format to send to SP select urn:oasis:names:tc:SAML:2.0:nameid-format:persistent. For IDP Attribute Name or Literal Value, select SAML_SUBJECT, as shown in Figure 4.
Figure 5. Advanced Attribute Options for SAML_SUBJECT
In the Attribute Mapping section line 2 as shown in Figure 4, for the application attribute https://aws.amazon.com/SAML/Attributes/Role, select Advanced.
On the Advanced Attribute Options page, for Name Format, select urn:oasis:names:tc:SAML:2.0:attrname-format:uri, as shown in Figure 6.
Figure 6. Advanced Attribute Options for https://aws.amazon.com/SAML/Attributes/Role
In the Attribute Mapping section line 2 as shown in Figure 4, select As Literal.
For IDP Attribute Name or Literal Value, format the role and provider ARNs (which are not yet created on the AWS side) in the following format. Be sure to replace the placeholders with your own values. Make a note of the role name and SAML provider name, as you will be using these exact names to create an IAM role and an IAM provider on the AWS side.
In the Attribute Mapping section line 3 as shown in Figure 4, for the application attribute https://aws.amazon.com/SAML/Attributes/RoleSessionName, enter Email (Work).
In the Attribute Mapping section as shown in Figure 4, to create line 5, choose Add a new attribute in the lower left.
In the newly added Attribute Mapping section line 5 as shown in Figure 4, add the SourceIdentity.
For Application Attribute, enter: https://aws.amazon.com/SAML/Attributes/SourceIdentity
For Identity Bridge Attribute or Literal Value, enter: SAML_SUBJECT
Choose Continue to Next Step in the lower right.
For Group Access, add your existing PingOne Directory Group to this application.
Review your setup configuration, as shown in Figure 7, and choose Finish.
Figure 7. Review mappings
Configure the SourceIdentity attribute with OneLogin integration
For the OneLogin SAML integration with AWS, you use the Amazon Web Services Multi Account application and configure an optional attribute to map as the SourceIdentity. You do this portion of the configuration in the OneLogin administrative console.
This procedure assumes that you already have a previously configured AWS and OneLogin integration. For information about how to configure the OneLogin application for AWS authentication and authorization, see the OneLogin KB article Configure SAML for Amazon Web Services (AWS) with Multiple Accounts and Roles.
After the OneLogin Multi Account application and AWS are correctly configured for SAML login, you can further customize the application to pass the SourceIdentity parameter upon login.
To change OneLogin configuration to add SourceIdentity attribute
In the OneLogin administrative console, in the Amazon Web Services Multi Account application, on the app administration page, navigate to Parameters, as shown in Figure 8.
Figure 8. OneLogin AWS Multi Account Application Configuration Parameters
To add a parameter, choose the + (plus) icon to the right of Value.
As shown in Figure 9, for Field Name enter https://aws.amazon.com/SAML/Attributes/SourceIdentity, select Include in SAML assertion, then choose Save.
Figure 9. OneLogin AWS Multi Account Application add new field
In the Edit Field page, select the default value you want to use for SourceIdentity. For the example in this blog post, for Value, select Email, then choose Save, as shown in Figure 10.
Figure 10. OneLogin AWS Multi Account Application map new field to email
After you’ve completed this procedure, review the final mapping details, as shown in Figure 11, to confirm that you see the additional parameter that will be passed into AWS through the SAML assertion.
Figure 11. OneLogin AWS Multi Account Application final mapping details
Configuring AWS IAM role trust policy
Now that the IdP configuration is complete, you can enable your AWS accounts to use SourceIdentity by modifying the IAM role trust policy.
For the workforce identity or application to be able to define their source identity when they assume IAM roles, you must first grant them permission for the sts:SetSourceIdentity action, as illustrated in the sample policy document below. This will permit the workforce identity or application to set the SourceIdentity themselves without any need for manual intervention.
To modify an AWS IAM role trust policy
Log in to the AWS Management Console for your account as a user with privileges to configure an IdP, typically an administrator.
Navigate to the AWS IAM service.
For trusted identity, choose SAML 2.0 federation.
From the SAML Provider drop down menu, select the IAM provider you created previously.
Modify the role trust policy and add the SetSourceIdentity action.
Sample policy document
This is a sample policy document attached to a role you assume when you log in to Account1 from the Okta dashboard. Edit your Account1/Role1 trust policy document and add sts:AssumeRoleWithSAML and sts:setSourceIdentity to the Action section.
Notes: The SetSourceIdentity action has to be allowed in the trust policy for assumeRole to work when the IdP is set up to pass SourceIdentity in the assertion. Future version of the sign-in URL may contain a Region code. When this occurs, you will need to modify the URL appropriately.
Policy statement
The following are examples of how the line “Federated”: “arn:aws:iam::<AccountId>:saml-provider/<IdP>” should look, based on the different IdPs specified in this post:
The following is a sample access control policy document in Account2 for Role2 that allows you to switchRole from Account1. Edit the control policy and add sts:AssumeRole and sts:SetSourceIdentity in the Action section.
Validate that the CloudTrail log entries for Account1 contain the Active Directory mapped SourceIdentity.
Use the Switch Role feature to switch to a second account Account2 (444455556666), using a role named Role2.
Create a new Amazon S3 bucket in Account2.
To summarize what you’ve done so far, you have:
Configured your corporate directory to pass a unique attribute to AWS as the source identity.
Configured a role that will persist the SourceIdentity attribute in AWS STS, which an employee will use to federate into your account.
Configured an Amazon S3 bucket that user will access.
Now you’ll observe in CloudTrail the SourceIdentity attribute that will be associated with every IAM action.
To see the SourceIdentity attribute in CloudTrail
From the your preferred IdP dashboard, select the AWS tile to log into the AWS console. The example in Figure 12 shows the Okta dashboard.
Figure 12. Login to AWS from IdP dashboard
Choose the AWS icon, which will take you to the AWS Management Console. Notice how the user has assumed the role you created earlier.
To test the SourceIdentity action, you will create a new Amazon S3 bucket.
Amazon S3 bucket names are globally unique, and the namespace is shared by all AWS accounts, so you will need to create a unique bucket name in your account. For this example, we used a bucket named DOC-EXAMPLE-BUCKET1 to validate CloudTrail log entries containing the SourceIdentity attribute.
Log into an account Account1 (111122223333) using a role named Role1.
Next, create a new Amazon S3 bucket in Account1, and validate that the Account1 CloudTrail logs entries contain the SourceIdentity attribute.
Create an Amazon S3 bucket called DOC-EXAMPLE-BUCKET1, as shown in Figure 13.
Figure 13. Create S3 bucket
In the AWS Management Console go to CloudTrail and check the log entry for bucket creation event, as shown in Figure 14.
Switch to Account2 (444455556666) using assume role, and switch to Account2/assumeRoleSourceIdentity.
Create a new Amazon S3 bucket in Account2 and validate that the Account2 CloudTrail log entries contain the SourceIdentity attribute, as shown in Figure 15.
Figure 15 – Switch role to assumeRoleSourceIdentity
Create a new Amazon S3 bucket in account2 called DOC-EXAMPLE-BUCKET2, as shown in Figure 16.
Figure 16 – Create DOC-EXAMPLE-BUCKET2 bucket while logged into account2 using assumeRoleSourceIdentity
Check the CloudTrail logs for account2 (444455556666) to see if the original SourceIdentity is logged, as shown in Figure 17.
Figure 17 – CloudTrail log entry for the above action
CloudTrail entry showing original SourceIdentity after assuming a role
You logged into Account1/Role1 and switched to Account2/Role2. All the user activities performed in AWS using the Assume Role were also logged with the original user’s sourceIdentity attribute. This makes it simple to trace user activity in CloudTrail.
Conclusion
Now that you have configured your SourceIdentity, you have made it easier for the security team of your organization to use CloudTrail logs to investigate and identify the originating identity of a user. In this post, you learned how to configure the AWS STSSourceIdentity attribute for three different popular IdPs, as well as how to configure each IdP using SAML and their optional attributes. We also provided sample control policy documents outlining how to configure the SourceIdentity for each provider. Additionally, we provide a sample policy for setting the SourceIdentity when switching roles. Lastly, the post walks through how the source identity will show in CloudTrail logs, and provides logs from two accounts to demonstrate the continuance of the source identity attribute. You can now test this capability yourself in your own environment, validate activity in your CloudTrail logs, and determine which user performed a specific action while using the assumeRole functionality.
If you have feedback about this post, submit comments in the Comments section below. If you have questions about this post, contact AWS Support.
Want more AWS Security news? Follow us on Twitter.
In this blog post, I’ll walk you through the steps to integrate Azure AD as a federated identity provider in Amazon Cognito user pool. A user pool is a user directory in Amazon Cognito that provides sign-up and sign-in options for your app users.
Identity management and authentication flow can be challenging when you need to support requirements such as OAuth, social authentication, and login using a Security Assertion Markup Language (SAML) 2.0 based identity provider (IdP) to meet your enterprise identity management requirements. Amazon Cognito provides you a managed, scalable user directory, user sign-up and sign-in, and federation through third-party identity providers. An added benefit for developers is that it provides you a standardized set of tokens (Identity, Access and Refresh Token). So, in situations when you have to support authentication with multiple identity providers (e.g. Social authentication, SAML IdP, etc.), you don’t have to write code for handling different tokens issued by different identity providers. Instead, you can just work with a consistent set of tokens issued by Amazon Cognito user pool.
Figure 1: High-level architecture for federated authentication in a web or mobile app
As shown in Figure 1, the high-level application architecture of a serverless app with federated authentication typically involves following steps:
User selects their preferred IdP to authenticate.
User gets re-directed to the federated IdP for login. On successful authentication, the IdP posts back a SAML assertion or token containing user’s identity details to an Amazon Cognito user pool.
Amazon Cognito user pool issues a set of tokens to the application
Application can use the token issued by the Amazon Cognito user pool for authorized access to APIs protected by Amazon API Gateway.
Step-by-step instructions for enabling Azure AD as federated identity provider in an Amazon Cognito user pool
This post will walk you through the following steps:
Create an Amazon Cognito user pool
Add Amazon Cognito as an enterprise application in Azure AD
Add Azure AD as SAML identity provider (IDP) in Amazon Cognito
Create an app client and use the newly created SAML IDP for Azure AD
Prerequisites
You’ll need to have administrative access to Azure AD, an AWS account and the AWS Command Line Interface (AWS CLI) installed on your machine. Follow the instructions for installing, updating, and uninstalling the AWS CLI version 2; and then to configure your installation, follow the instructions for configuring the AWS CLI. If you don’t want to install AWS CLI, you can also run these commands from AWS CloudShell which provides a browser-based shell to securely manage, explore, and interact with your AWS resources.
Use the following command to create a user pool with default settings. Be sure to replace <yourUserPoolName> with the name you want to use for your user pool.
One of the many useful features of Amazon Cognito is hosted UI which provides a configurable web interface for user sign in. Hosted UI is accessible from a domain name that needs to be added to the user pool. There are two options for adding a domain name to a user pool. You can either use an Amazon Cognito domain, or a domain name that you own. This solution uses an Amazon Cognito domain, which will look like the following:
Use following CLI command to add an Amazon Cognito domain to the user pool. Replace <yourDomainPrefix> with a unique domain name prefix (for example example-corp-prd). Note that you cannot use keywords aws, amazon, or cognito for domain prefix.
Next, you prepare Identifier (Entity ID) and Reply URL, which are required to add Amazon Cognito as an enterprise application in Azure AD (done in Step 2 below). Azure AD expects these values in a very specific format. In a text editor, note down your values for Identifier (Entity ID) and Reply URL according to the following formats:
Note: The Reply URL is the endpoint where Azure AD will send SAML assertion to Amazon Cognito during the process of user authentication.
Update the placeholders above with your values (without < >), and then note the values of Identifier (Entity ID) and Reply URL in a text editor for future reference.
Step 2: Add Amazon Cognito as an enterprise application in Azure AD
In this step, you add an Amazon Cognito user pool as an application in Azure AD, to establish a trust relationship between them.
To add new application in Azure AD
Log in to the Azure Portal.
In the Azure Services section, choose Azure Active Directory.
In the left sidebar, choose Enterprise applications.
Choose New application.
On the Browse Azure AD Gallery page, choose Create your own application.
Under What’s the name of your app?, enter a name for your application and select Integrate any other application you don’t find in the gallery (Non-gallery), as shown in Figure 2. Choose Create.
Figure 2: Add an enterprise app in Azure AD
It will take few seconds for the application to be created in Azure AD, then you should be redirected to the Overview page for the newly added application.
Note: Occasionally, this step can result in a Not Found error, even though Azure AD has successfully created a new application. If that happens, in Azure AD navigate back to Enterprise applications and search for your application by name.
To set up Single Sign-on using SAML
On the Getting started page, in the Set up single sign on tile, choose Get started, as shown in Figure 3.
Figure 3: Application configuration page in Azure AD
On the next screen, select SAML.
In the middle pane under Set up Single Sign-On with SAML, in the Basic SAML Configuration section, choose the edit icon ().
In the right pane under Basic SAML Configuration, replace the default Identifier ID (Entity ID) with the Identifier (Entity ID) you copied previously. In the Reply URL (Assertion Consumer Service URL) field, enter the Reply URL you copied previously, as shown in Figure 4. Choose Save.
Figure 4: Azure AD SAML-based Sign-on setup
In the middle pane under Set up Single Sign-On with SAML, in the User Attributes & Claims section, choose Edit.
Choose Add a group claim.
On the User Attributes & Claims page, in the right pane under Group Claims, select Groups assigned to the application, leave Source attribute as Group ID, as shown in Figure 5. Choose Save.
Figure 5: Option to select group claims to release to Amazon Cognito
This adds the group claim so that Amazon Cognito can receive the group membership detail of the authenticated user as part of the SAML assertion.
In a text editor, note down the Claim names under Additional claims, as shown in Figure 5. You’ll need these when creating attribute mapping in Amazon Cognito.
Close the User Attributes & Claims screen by choosing the X in the top right corner. You’ll be redirected to the Set up Single Sign-on with SAML page.
Scroll down to the SAML Signing Certificate section, and copy the App Federation Metadata Url by choosing the copy into clipboard icon (highlighted with red arrow in Figure 6). Keep this URL in a text editor, as you’ll need it in the next step.
Figure 6: Copy SAML metadata URL from Azure AD
Step 3: Add Azure AD as SAML IDP in Amazon Cognito
Next, you need an attribute in the Amazon Cognito user pool where group membership details from Azure AD can be received, and add Azure AD as an identity provider.
To add custom attribute to user pool and add Azure AD as an identity provider
Use the following CLI command to add a custom attribute to the user pool. Replace <yourUserPoolID> and <customAttributeName> with your own values.
Successful running of this command adds Azure AD as a SAML IDP to your Amazon Cognito user pool.
Step 4: Create an app client and use the newly created SAML IDP for Azure AD
Before you can use Amazon Cognito in your web application, you need to register your app with Amazon Cognito as an app client. An app client is an entity within an Amazon Cognito user pool that has permission to call unauthenticated API operations (operations that do not require an authenticated user), for example to register, sign in, and handle forgotten passwords.
To create an app client
Use following command to create an app client. Be sure to replace the following with your own values:
Replace <yourUserPoolID> with the Amazon Cognito user pool ID created previously.
Replace <yourAppClientName> with a name for your app client.
Replace <callbackURL> with the URL of your web application that will receive the authorization code. It must be an HTTPS endpoint, except for in a local development environment where you can use http://localhost:PORT_NUMBER.
Use parameter –allowed-o-auth-flows for allowed OAuth flows that you want to enable. In this example, we use code for Authorization code grant.
Use parameter –allowed-o-auth-scopes to specify which OAuth scopes (such as phone, email, openid) Amazon Cognito will include in the tokens. In this example, we use openid.
Replace <IDProviderName> with the same name you used for ID provider previously.
Successful running of this command will provide an output in following format. In a text editor, note down the ClientId for referencing in the web application. In this following example, the ClientId is 7xyxyxyxyxyxyxyxyxyxy.
Choose Manage User Pools, then choose the user pool you created in Step 1: Create an Amazon Cognito user pool.
In the left sidebar, choose App client settings, then look for the app client you created in Step 4: Create an app client and use the newly created SAML IDP for Azure AD. Scroll to the Hosted UI section and choose Launch Hosted UI, as shown in Figure 7.
Figure 7: App client settings showing link to access Hosted UI
On the sign-in page as shown in Figure 8, you should see all the IdPs that you enabled on the app client. Choose the Azure-AD button, which redirects you to the sign-in page hosted on https://login.microsoftonline.com/.
Figure 8: Amazon Cognito hosted UI
Sign in using your corporate ID. If everything is working properly, you should be redirected back to the callback URL after successful authentication.
(Optional) Add authentication to a single page application
One way to add secure authentication using Amazon Cognito into a single page application (SPA) is to use the Auth.federatedSignIn() method of Auth class from AWS Amplify. AWS Amplify provides SDKs to integrate your web or mobile app with a growing list of AWS services, including integration with Amazon Cognito user pool. The federatedSign() method will render the hosted UI that gives users the option to sign in with the identity providers that you enabled on the app client (in Step 4), as shown in Figure 8. One advantage of hosted UI is that you don’t have to write any code for rendering it. Additionally, it will transparently implement the Authorization code grant with PKCE and securely provide your client-side application with the tokens (ID, Access and Refresh) that are required to access the backend APIs.
In this blog post, you learned how to integrate an Amazon Cognito user pool with Azure AD as an external SAML identity provider, to allow your users to use their corporate ID to sign in to web or mobile applications.
For more information about this solution, see our video Integrating Amazon Cognito with Azure Active Directory (from timestamp 25:26) on the official AWS twitch channel. In the video, you’ll find an end-to-end demo of how to integrate Amazon Cognito with Azure AD, and then how to use AWS Amplify SDK to add authentication to a simple React app (using the example of a pet store). The video also includes how you can access group membership details from Azure AD for authorization and fine-grained access control.
If you have feedback about this post, submit comments in the Comments section below. If you have questions about this post, start a new thread on the Amazon Cognito forum or contact AWS Support.
Want more AWS Security how-to content, news, and feature announcements? Follow us on Twitter.
When you implement the OAuth 2.0 authorization framework (RFC 6749) for internet-connected devices with limited input capabilities or that lack a user-friendly browser—such as wearables, smart assistants, video-streaming devices, smart-home automation, and health or medical devices—you should consider using the OAuth 2.0 device authorization grant (RFC 8628). This authorization flow makes it possible for the device user to review the authorization request on a secondary device, such as a smartphone, that has more advanced input and browser capabilities. By using this flow, you can work around the limits of the authorization code grant flow with Proof Key for Code Exchange (PKCE)-defined OpenID Connect Core specifications. This will help you to avoid scenarios such as:
Forcing end users to define a dedicated application password or use an on-screen keyboard with a remote control
Degrading the security posture of the end users by exposing their credentials to the client application or external observers
One common example of this type of scenario is a TV HDMI streaming device where, to be able to consume videos, the user must slowly select each letter of their user name and password with the remote control, which exposes these values to other people in the room during the operation.
Solution overview
The OAuth 2.0 device authorization grant (RFC 8628) is an IETF standard that enables Internet of Things (IoT) devices to initiate a unique transaction that authenticated end users can securely confirm through their native browsers. After the user authorizes the transaction, the solution will issue a delegated OAuth 2.0 access token that represents the end user to the requesting device through a back-channel call, as shown in Figure 1.
Figure 1: The device grant flow implemented in this solution
The workflow is as follows:
An unauthenticated user requests service from the device.
The device requests a pair of random codes (one for the device and one for the user) by authenticating with the client ID and client secret.
The Lambda function creates an authorization request that stores the device code, user code, scope, and requestor’s client ID.
The device provides the user code to the user.
The user enters their user code on an authenticated web page to authorize the client application.
The user is redirected to the Amazon Cognito user pool /authorize endpoint to request an authorization code.
The user is returned to the Lambda function /callback endpoint with an authorization code.
The Lambda function stores the authorization code in the authorization request.
The device uses the device code to check the status of the authorization request regularly. And, after the authorization request is approved, the device uses the device code to retrieve a set of JSON web tokens from the Lambda function.
In this case, the Lambda function impersonates the device to the Amazon Cognito user pool /token endpoint by using the authorization code that is stored in the authorization request, and returns the JSON web tokens to the device.
To achieve this flow, this blog post provides a solution that is composed of:
An AWS Lambda function with three additional endpoints:
The /token endpoint, which will handle client application requests such as generation of codes, the authorization request status check, and retrieval of the JSON web tokens.
The /device endpoint, which will handle user requests such as delivering the UI for approval or denial of the authorization request, or retrieving an authorization code.
The /callback endpoint, which will handle the reception of the authorization code associated with the user who is approving or denying the authorization request.
After you have the certificate in ACM, navigate to the Certificates page in the ACM console.
Choose the right arrow (►) icon next to your certificate to show the certificate details.
Figure 2: Locating the certificate in ACM
Copy the Amazon Resource Name (ARN) of the certificate and save it in a text file.
Figure 3: Locating the certificate ARN in ACM
Step 2: Deploy the solution by using a CloudFormation template
To configure this solution, you’ll need to deploy the solution CloudFormation template.
Before you deploy the CloudFormation template, you can view it in its GitHub repository.
To deploy the CloudFormation template
Choose the following Launch Stack button to launch a CloudFormation stack in your account.
Note: The stack will launch in the N. Virginia (us-east-1) Region. To deploy this solution into other AWS Regions, download the solution’s CloudFormation template, modify it, and deploy it to the selected Region.
During the stack configuration, provide the following information:
A name for the stack.
The ARN of the certificate that you created or imported in AWS Certificate Manager.
A valid email address that you own. The initial password for the Amazon Cognito test user will be sent to this address.
The FQDN that you chose earlier, and that is associated to the certificate that you created or imported in AWS Certificate Manager.
Figure 4: Configure the CloudFormation stack
After the stack is configured, choose Next, and then choose Next again. On the Review page, select the check box that authorizes CloudFormation to create AWS Identity and Access Management (IAM) resources for the stack.
Figure 5: Authorize CloudFormation to create IAM resources
Choose Create stack to deploy the stack. The deployment will take several minutes. When the status says CREATE_COMPLETE, the deployment is complete.
Step 3: Finalize the configuration
After the stack is set up, you must finalize the configuration by creating a DNS CNAME entry in the DNS zone you own that points to the Application Load Balancer DNS name.
To create the DNS CNAME entry
In the CloudFormation console, on the Stacks page, locate your stack and choose it.
Figure 6: Locating the stack in CloudFormation
Choose the Outputs tab.
Copy the value for the key ALBCNAMEForDNSConfiguration.
Figure 7: The ALB CNAME output in CloudFormation
Configure a CNAME DNS entry into your DNS hosted zone based on this value. For more information on how to create a CNAME entry to the Application Load Balancer in a DNS zone, see Creating records by using the Amazon Route 53 console.
Note the other values in the Output tab, which you will use in the next section of this post.
Output key
Output value and function
DeviceCognitoClientClientID
The app client ID, to be used by the simulated device to interact with the authorization server
DeviceCognitoClientClientSecret
The app client secret, to be used by the simulated device to interact with the authorization server
TestEndPointForDevice
The HTTPS endpoint that the simulated device will use to make its requests
TestEndPointForUser
The HTTPS endpoint that the user will use to make their requests
UserPassword
The password for the Amazon Cognito test user
UserUserName
The user name for the Amazon Cognito test user
Evaluate the solution
Now that you’ve deployed and configured the solution, you can initiate the OAuth 2.0 device code grant flow.
Until you implement your own device logic, you can perform all of the device calls by using the curl library, a Postman client, or any HTTP request library or SDK that is available in the client application coding language.
All of the following device HTTPS requests are made with the assumption that the device is a private OAuth 2.0 client. Therefore, an HTTP Authorization Basic header will be present and formed with a base64-encoded Client ID:Client Secret value.
You can retrieve the URI of the endpoints, the client ID, and the client secret from the CloudFormation Output table for the deployed stack, as described in the previous section.
Initialize the flow from the client application
The solution in this blog post lets you decide how the user will ask the device to start the authorization request and how the user will be presented with the user code and URI in order to verify the request. However, you can emulate the device behavior by generating the following HTTPS POST request to the Application Load Balancer–protected Lambda function /token endpoint with the appropriate HTTP Authorization header. The Authorization header is composed of:
The prefix Basic, describing the type of Authorization header
A space character as separator
The base64 encoding of the concatenation of:
The client ID
The colon character as a separator
The client secret
 POST /token?client_id=AIDACKCEVSQ6C2EXAMPLE HTTP/1.1
 User-Agent: Mozilla/4.0 (compatible; MSIE5.01; Windows NT)
 Host: <FQDN of the ALB protected Lambda function>
 Accept: */*
 Accept-Encoding: gzip, deflate
 Connection: Keep-Alive
 Authorization: Basic QUlEQUNLQ0VWUwJalrXUtnFEMI/K7MDENG/bPxRfiCYEXAMPLEKEY VORy9iUHhSZmlDWUVYQU1QTEVLRVkg
The following JSON message will be returned to the client application.
Server: awselb/2.0
Date: Tue, 06 Apr 2021 19:57:31 GMT
Content-Type: application/json
Content-Length: 33
Connection: keep-alive
cache-control: no-store
{
    "device_code": "APKAEIBAERJR2EXAMPLE",
    "user_code": "ANPAJ2UCCR6DPCEXAMPLE",
    "verification_uri": "https://<FQDN of the ALB protected Lambda function>/device",
    "verification_uri_complete":"https://<FQDN of the ALB protected Lambda function>/device?code=ANPAJ2UCCR6DPCEXAMPLE&authorize=true",
    "interval": <Echo of POLLING_INTERVAL environment variable>,
    "expires_in": <Echo of CODE_EXPIRATION environment variable>
}
Check the status of the authorization request from the client application
You can emulate the process where the client app regularly checks for the authorization request status by using the following HTTPS POST request to the Application Load Balancer–protected Lambda function /token endpoint. The request should have the same HTTP Authorization header that was defined in the previous section.
POST /token?client_id=AIDACKCEVSQ6C2EXAMPLE&device_code=APKAEIBAERJR2EXAMPLE&grant_type=urn:ietf:params:oauth:grant-type:device_code HTTP/1.1
 User-Agent: Mozilla/4.0 (compatible; MSIE5.01; Windows NT)
 Host: <FQDN of the ALB protected Lambda function>
 Accept: */*
 Accept-Encoding: gzip, deflate
 Connection: Keep-Alive
 Authorization: Basic QUlEQUNLQ0VWUwJalrXUtnFEMI/K7MDENG/bPxRfiCYEXAMPLEKEY VORy9iUHhSZmlDWUVYQU1QTEVLRVkg
Until the authorization request is approved, the client application will receive an error message that includes the reason for the error: authorization_pending if the request is not yet authorized, slow_down if the polling is too frequent, or expired if the maximum lifetime of the code has been reached. The following example shows the authorization_pending error message.
Approve the authorization request with the user code
Next, you can approve the authorization request with the user code. To act as the user, you need to open a browser and navigate to the verification_uri that was provided by the client application.
If you don’t have a session with the Amazon Cognito user pool, you will be required to sign in.
Note: Remember that the initial password was sent to the email address you provided when you deployed the CloudFormation stack.
If you used the initial password, you’ll be asked to change it. Make sure to respect the password policy when you set a new password. After you’re authenticated, you’ll be presented with an authorization page, as shown in Figure 8.
Figure 8: The user UI for approving or denying the authorization request
Fill in the user code that was provided by the client application, as in the previous step, and then choose Authorize.
When the operation is successful, you’ll see a message similar to the one in Figure 9.
Figure 9: The “Success” message when the authorization request has been approved
Finalize the flow from the client app
After the request has been approved, you can emulate the final client app check for the authorization request status by using the following HTTPS POST request to the Application Load Balancer–protected Lambda function /token endpoint. The request should have the same HTTP Authorization header that was defined in the previous section.
POST /token?client_id=AIDACKCEVSQ6C2EXAMPLE&device_code=APKAEIBAERJR2EXAMPLE&grant_type=urn:ietf:params:oauth:grant-type:device_code HTTP/1.1
 User-Agent: Mozilla/4.0 (compatible; MSIE5.01; Windows NT)
 Host: <FQDN of the ALB protected Lambda function>
 Accept: */*
 Accept-Encoding: gzip, deflate
 Connection: Keep-Alive
 Authorization: Basic QUlEQUNLQ0VWUwJalrXUtnFEMI/K7MDENG/bPxRfiCYEXAMPLEKEY VORy9iUHhSZmlDWUVYQU1QTEVLRVkg
The JSON web token set will then be returned to the client application, as follows.
The client application can now consume resources on behalf of the user, thanks to the access token, and can refresh the access token autonomously, thanks to the refresh token.
Going further with this solution
This project is delivered with a default configuration that can be extended to support additional security capabilities or to and adapted the experience to your end-users’ context.
Extending security capabilities
Through this solution, you can:
Use an AWS KMS key issued by AWS KMS to:
Encrypt the data in the database;
Protect the configuration in the Amazon Lambda function;
Use AWS Secret Manager to:
Securely store sensitive information like Cognito application client’s credentials;
Implement additional Amazon Lambda’s code to enforce data integrity on changes;
Activate AWS WAF WebACLs to protect your endpoints against attacks;
Customizing the end-user experience
The following table shows some of the variables you can work with.
Name
Function
Default value
Type
CODE_EXPIRATION
Represents the lifetime of the codes generated
1800
Seconds
DEVICE_CODE_FORMAT
Represents the format for the device code
#aA
A string where: # represents numbers a lowercase letters A uppercase letters ! special characters
DEVICE_CODE_LENGTH
Represents the device code length
64
Number
POLLING_INTERVAL
Represents the minimum time, in seconds, between two polling events from the client application
5
Seconds
USER_CODE_FORMAT
Represents the format for the user code
#B
A string where: # represents numbers a lowercase letters b lowercase letters that aren’t vowels A uppercase letters B uppercase letters that aren’t vowels ! special characters
USER_CODE_LENGTH
Represents the user code length
8
Number
RESULT_TOKEN_SET
Represents what should be returned in the token set to the client application
ACCESS+REFRESH
A string that includes only ID, ACCESS, and REFRESH values separated with a + symbol
To change the values of the Lambda function variables
In the Lambda console, navigate to the Functions page.
Select the DeviceGrant-token function.
Figure 10: AWS Lambda console—Function selection
Choose the Configuration tab.
Figure 11: AWS Lambda function—Configuration tab
Select the Environment variables tab, and then choose Edit to change the values for the variables.
Generate new codes as the device and see how the experience changes based on how you’ve set the environment variables.
Conclusion
Although your business and security requirements can be more complex than the example shown in this post, this blog post will give you a good way to bootstrap your own implementation of the Device Grant Flow (RFC 8628) by using Amazon Cognito, AWS Lambda, and Amazon DynamoDB.
Your end users can now benefit from the same level of security and the same experience as they have when they enroll their identity in their mobile applications, including the following features:
Credentials will be provided through a full-featured application on the user’s mobile device or their computer
Credentials will be checked against the source of authority only
The authentication experience will match the typical authentication process chosen by the end user
Upon consent by the end user, IoT devices will be provided with end-user delegated dynamic credentials that are bound to the exact scope of tasks for that device
If you have feedback about this post, submit comments in the Comments section below. If you have questions about this post, start a new thread on the Amazon Cognito forum or reach out through the post’s GitHub repository.
Want more AWS Security how-to content, news, and feature announcements? Follow us on Twitter.
In Amazon Cognitouser pools, an app client is an entity that has permission to call unauthenticated API operations (that is, operations that don’t have an authenticated user), such as operations to sign up, sign in, and handle forgotten passwords. In this post, I show you a solution designed to protect these API operations from unwanted bots and distributed denial of service (DDoS) attacks.
To protect Amazon Cognito services and customers, Amazon Cognito applies request rate quotas on all API categories, and throttles rapid calls that exceed the assigned quota. For that reason, you must ensure your applications control who can call unauthenticated API operations and at what rate, so that user calls aren’t throttled because of unwanted or misconfigured clients that call these API operations at high rates.
App clients fall into one of two categories: public clients (used from web or mobile applications) and private or confidential clients (used from a secured backend). Public clients shouldn’t have secrets, because it isn’t possible to protect secrets in these types of clients. Confidential clients, on the other hand, use a secret to authorize calls to unauthenticated operations. In these clients, the secret can be protected in the backend.
The benefit of using a confidential app client with a secret in Amazon Cognito is that unauthenticated API operations will accept only the calls that include the secret hash for this client, and will drop calls with an invalid or missing secret. In this way, you control who calls these API operations. Public applications can use a confidential app client by implementing a lightweight proxy layer in front of the Amazon Cognito endpoint, and then using this proxy to add a secret hash in relevant requests before passing the requests to Amazon Cognito.
There are multiple options that you can use to implement this proxy. One option is to use Amazon CloudFront and Lambda@Edge to add the secret hash to the incoming requests. When you use a CloudFront proxy, you can also use AWS WAF, which gives you tools to detect and block unwanted clients. From Lambda@Edge, you can also integrate with other services (like Amazon Fraud Detector or third-party bot detection services) to help you detect possible fraudulent requests and block them. The CloudFront proxy, with the right set of security tools, helps protect your Amazon Cognito user pool from unwanted clients.
Solution overview
To implement this lightweight proxy pattern, you need to create an application client with a secret. Unauthenticated API calls to this client must include the secret hash which is added to the request from the proxy layer. Client applications use an SDK like AWS Amplify, the Amazon Cognito Identity SDK, or a mobile SDK to communicate with Amazon Cognito. By default, the SDK sends requests to the Regional Amazon Cognito endpoint. Your application must override the default endpoint by manually adding an “Endpoint” property in the app configuration. See the Integrate the client application with the proxy section later in this post for more details.
Figure 1 shows how this works, step by step.
Figure 1: A proxy solution to the Amazon Cognito Regional endpoint
The workflow is as follows:
You configure the client application (mobile or web client) to use a CloudFront endpoint as a proxy to an Amazon Cognito Regional endpoint. You also create an application client in Amazon Cognito with a secret. This means that any unauthenticated API call must have the secret hash.
Clients that send unauthenticated API calls to the Amazon Cognito endpoint directly are blocked and dropped because of the missing secret.
You use Lambda@Edge to add a secret hash to the relevant incoming requests before passing them on to the Amazon Cognito endpoint.
From Lambda@Edge, you must have the app client secret to be able to calculate the secret hash and add it to the request. It’s recommended that you keep the secret in AWS Secrets Manager and cache it for the lifetime of the function.
You use AWS WAF with CloudFront distribution to enforce rate limiting, allow and deny lists, and other rule groups according to your security requirements.
When to use this pattern
It’s a best practice to use this proxy pattern with clients that use SDKs to integrate with Amazon Cognito user pools. Examples include mobile applications that use the iOS or Android SDK, or web applications that use client-side libraries like Amplify or the Amazon Cognito Identity SDK to integrate with Amazon Cognito.
You don’t need to use a proxy pattern with server-side applications that use an AWS SDK to integrate with Amazon Cognito user pools from a protected backend, because server-side applications can natively use confidential clients and protect the secret in the backend.
You can’t use this solution with applications that use Hosted UI and OAuth 2.0 endpoints to integrate with Amazon Cognito user pools. This includes federation scenarios where users sign in with an external identity provider (IdP).
Implementation and deployment details
Before you deploy this solution, you need a user pool and an application client that has the client secret. When you have these in place, choose the following Launch Stack button to launch a CloudFormation stack in your account and deploy the proxy solution.
Note: The CloudFormation stack must be created in the us-east-1 AWS Region, but the user pool itself can exist in any supported Region.
The template takes the parameters shown in Figure 2 below.
Figure 2: CloudFormation stack creation with initial parameters
The parameters in Figure 2 include:
AdvancedSecurityEnabled is a flag that indicates whether advanced security is enabled in the user pool or not. This flag determines which version of the Lambda function is deployed. Notice that if you change this flag as part of a stack update, it overrides the function code, so if you have any manual changes, make sure to back up your changes.
AppClientSecret is the secret for your application client. This secret is stored in Secrets Manager and accessed from Lambda@Edge as needed.
LambdaS3BucketName is the bucket that hosts the Lambda code package. You don’t need to change this parameter unless you have a requirement to modify or extend the solution with your own Lambda function.
RateLimit is the maximum number of calls from a single IP address that are allowed within a 5 minute period. Values between 100 requests and 20 million requests are valid for RateLimit.
Important: provide a value suitable for your application and security requirements.
UserPoolId is the ID of your user pool. This value is used by Lambda@Edge when needed (for example, to call admin APIs, which require the user pool ID).
UserPoolRegion is the AWS Region where you created your user pool. This value is used to determine which Amazon Cognito Regional endpoint to proxy the calls to.
This template creates several resources in your AWS account, as follows:
A CloudFront distribution that serves as a proxy to an Amazon Cognito Regional endpoint.
An AWS WAF web access control list (ACL) with rules for the allow list, deny list, and rate limit.
A Lambda function to be deployed at the edge and assigned to the origin request event.
A secret in Secrets Manager, to hold the values of the application client secret and user pool ID.
After you create the stack, the CloudFront distribution domain name is available on the Outputs tab in the CloudFront console, as shown in Figure 3. This is the value that’s used as the Endpoint property in your client-side application. You can optionally add an alternative domain name to the CloudFront distribution if you prefer to use your own custom domain.
Figure 3: The output of the CloudFormation stack creation, displaying the CloudFront domain name
Use Lambda@Edge to add a secret hash to the request
As explained earlier, the purpose of having this proxy is to be able to inject the secret hash in unauthenticated API calls before passing them to the Amazon Cognito endpoint. This injection is achieved by a Lambda function that intercepts incoming requests at the edge (the CloudFront distribution) before passing them to the origin (the Amazon Cognito Regional endpoint).
The Lambda function that is deployed to the edge has two versions. One is a simple pass-through proxy that only adds the secret hash, and this version is used if Amazon Cognito advanced security isn’t enabled. The other version is a proxy that uses the AdminInitiateAuth and AdminRespondToAuthChallenge API operations instead of unauthenticated API operations for the user authentication and challenge response. This allows the proxy layer to propagate the client IP address to the Amazon Cognito endpoint, which guides the adaptive authentication features of advanced security. The version that is deployed by the stack is determined by the AdvancedSecurityEnabled flag when you create or update the CloudFormation stack.
You can extend this solution by manually modifying the Lambda function with your own processing logic. For example, you can integrate with fraud detection or bot detection services to evaluate the request and decide to proceed or reject the call. Note that after making any change to the Lambda function code, you must deploy a new version to the edge location. To do that from the Lambda console, navigate to Actions, choose Deploy to Lambda@Edge, and then choose Use existing CloudFront trigger on this function.
Important: If you update the stack from CloudFormation and change the value of the AdvancedSecurityEnabled flag, the new value overrides the Lambda code with the default version for the choice. In that case, all manual changes are lost.
Allow or block requests
The template that is provided in this blog post creates a web ACL with three rules: AllowList, DenyList, and RateLimit. These rules are evaluated in order and determine which requests are allowed or blocked. The template also creates four IP sets, as shown in Figure 4, to hold the values of allowed or blocked IPs for both IPv4 and IPv6 address types.
Figure 4: The CloudFormation template creates IP sets in the AWS WAF console for allow and deny lists
If you want to always allow requests from certain clients, for example, trusted enterprise clients or server-side clients in cases where a large volume of requests is coming from the same IP address like a VPN gateway, add these IP addresses to the corresponding AllowList IP set. Similarly, if you want to always block traffic from certain IPs, add those IPs to the corresponding DenyList IP set.
Requests from sources that aren’t on the allow list or deny list are evaluated based on the volume of calls within 5 minutes, and sources that exceed the defined rate limit within 5 minutes are automatically blocked. If you want to change the defined rate limit, you can do so by updating the CloudFormation stack and providing a different value for the RateLimit parameter. Or you can modify this value directly in the AWS WAF console by editing the RateLimit rule.
You can integrate the client application with the proxy by changing the Endpoint in your client application to use the CloudFront distribution domain name. The domain name is located in the Outputs section of the CloudFormation stack.
You then need to edit your client-side code to forward calls to Amazon Cognito through the proxy endpoint. For example, if you’re using the Identity SDK, you should change this property as follows.
If you’re using AWS Amplify, you can change the endpoint in the aws-exports.js file by overriding the property aws_cognito_endpoint. Or, if you configure Amplify Auth in your code, you can provide the endpoint as follows.
If you have a mobile application that uses the Amplify mobile SDK, you can override the endpoint in your configuration as follows (don’t include AppClientSecret parameter in your configuration). Note that the Endpoint value contains the domain name only, not the full URL. This feature is available in the latest releases of the iOS and Android SDKs.
Warning: The Amplify CLI overwrites customizations to the awsconfiguration.json and amplifyconfiguration.json files if you do an amplify push or amplify pull operation. You must manually re-apply the Endpoint customization and remove the AppClientSecret if you use the CLI to modify your cloud backend.
Solution limitations
This solution has these limitations:
If advanced security features are enabled for the user pool, Amazon Cognito calculates risk for user events. If you use this proxy pattern, the IP address that is propagated in user events is the proxy IP address, which causes risk calculation for SignUp, ForgotPassword, and ResendCode events to be inaccurate. On the other hand, Sign-In events still have the client IP address propagated correctly, and risk calculation and adaptive authentication for Sign-In events aren’t affected by the use of this proxy.
This solution is not applicable to Hosted UI, OAuth 2.0 endpoints, and federation flows.
Authenticated and admin API operations (which require developer credentials or an access token) aren’t covered in this solution. These API operations don’t require a secret hash, and they use other authentication mechanisms.
Using this proxy solution with mobile apps requires an update to the application. The update might take time to be available in the relevant app store, and you must depend on end users to update their app. Plan ahead of time to use the solution with mobile apps.
How to detect unusual behavior
In this section, I share with you the steps to detect, quickly analyze and respond to unwanted clients. It’s a best practice to configure monitoring and alarms that help you to detect unexpected spikes in activity. Additionally, I show you how to be ready to quickly identify clients that are calling your resources at a higher-than-usual rate.
Monitor utilization compared to quotas
Amazon Cognito integrates with Service Quotas, which monitor service utilization compared to quotas. These metrics help you detect unexpected spikes and be alerted if you’re approaching your quota for a certain API category. Approaching your quota indicates that there is a risk that calls from legitimate users will be throttled.
To view utilization versus quota metrics
In the Service Quotas console, choose Service Quotas, choose AWS Services, and then choose Amazon Cognito User Pools.
Under Service quotas, enter the search term rate of. This shows you the list of API categories and the assigned quotas for each category.
Figure 5: The Service Quotas console showing Amazon Cognito API category rate quotas
Choose any of the API categories to see utilization versus quota metrics.
Figure 6: The Service Quotas console showing utilization vs quota metrics for Amazon Cognito UserCreation APIs
You can also create alarms from this page to alert you if utilization is above a pre-defined threshold. You can create alarms starting at 50 percent utilization. It’s recommended that you create multiple alarms, for example at the 50 percent, 70 percent, and 90 percent thresholds, and configure CloudWatch alarms as appropriate.
Figure 7: Creating an alarm for the utilization of the UserCreation API category
Analyze CloudTrail logs with Athena
If you detect an unexpected spike in traffic to a certain API category, the next step is to identify the sources of this spike. You can do that by using CloudTrail logs or, after you deploy and use this proxy solution, CloudFront logs as sources of information. You can then analyze these logs by using Amazon Athena queries.
The first step is to create Athena tables from CloudTrail and CloudFront logs. You can do that by following these steps for CloudTrail and similar steps for CloudFront. After you have these tables created, you can create a set of queries that help you identify unwanted clients. Here are a couple of examples:
Use the following query to identify clients with the highest call rate to the InitiateAuth API operation within the timeframe you noticed the spike (change the eventtime value to reflect the attack window).
SELECT sourceipaddress, count(*)
FROM "default"."cloudtrail_logs"
WHERE eventname='InitiateAuth'
AND eventtime >= '2021-03-01T00:00:00Z'and eventtime < '2021-03-31T00:00:00Z'
GROUP BY sourceipaddress
LIMIT 10
Use the following query to identify clients that come through CloudFront with the highest error rate.
SELECT count(*) as count, request_ip
FROM "default"."cloudfront_logs"
WHERE status>500
GROUP BY request_ip
After you identify sources that are calling your service with a higher-than-usual rate, you can block these clients by adding them to the DenyList IP set that was created in AWS WAF.
Analyze CloudTrail events with CloudWatch Logs Insights
In this post, I showed you how to implement a lightweight proxy to an Amazon Cognito endpoint, which can be used with an application client secret to control access to unauthenticated API operations. This approach, together with security tools such as AWS WAF, helps provide protection for these API operations from unwanted clients. I also showed you strategies to help detect an ongoing attack and quickly analyze, identify, and block unwanted clients.
If you have feedback about this post, submit comments in the Comments section below. If you have questions about this post, start a new thread on the Amazon Cognito forum or contact AWS Support.
Want more AWS Security how-to content, news, and feature announcements? Follow us on Twitter.
Identity management is easiest when you can manage identities in a centralized location and use these identities across various accounts and applications. You also want to be able to use these identities for other purposes within applications, like searching through groups, finding members of a certain group, and sharing projects with other users or groups. For example, when you use AWS Systems Manager Change Manager, you might want to search for groups or distinguish a user from a list of users with the same name based on their email address. You expect that the user and group details you see are consistent with the details that appear in a different application.
AWS Single Sign-On (AWS SSO) streamlines identity management by enabling you to connect an identity provider (IdP), such as the AWS internal directory or a range of partners and use the IdP identity information for access and collaboration within applications. Now you can get the same benefits when you connect your Microsoft Active Directory (AD) as your AWS SSO identity source. With the release of AWS SSO AD sync, you’ll be able to access AD groups, along with AD users, from AWS SSO-integrated applications, and use these groups and users for collaborative experiences. AD sync automatically brings identity information from your Active Directory into AWS SSO and makes this information available to you within applications. It makes sure that the user and group details you access in Amazon Web Services (AWS) stay consistent with information in Active Directory through periodic synchronizations.
In this post, I’ll walk you through key use cases that highlight how applications use the user and group information that is synchronized from Active Directory and how the AD synchronization capability works to make this possible.
Access control
Your ability to manage who can access which parts of an application or who has the necessary permissions to drive certain tasks within an application relies on the application’s ability to retrieve user and group information. It’s also important that any access that you configure is updated dynamically when there are any changes at the source. For example, if you define approval access to a group in an application and a member leaves the group when they change roles within the company, their group-based access within the application should be revoked. With AD sync, AWS SSO-integrated applications can utilize user and group information that is periodically updated, and therefore stays current.
Suppose you’ve set up an approval template in Systems Manager Change Manager for patching instances and want to require that all members of the IT Security Operations team approve any change requests created with this template. AD sync enhances this process by giving you the option to define approvers at the AD group level. If you have an IT Security Operations group in Active Directory and the group has permissions set up to access AWS SSO, this group will be available to you in Change Manager to select as an approver in your template. If a member of the IT Security Operations group switches roles and leaves the team, AD sync helps to ensure that the member’s access to approve patching-related change requests is revoked, by dynamically updating the IT Security Operations group in Change Manager once the member is removed from the group in Active Directory.
It’s common for teams at companies to work on cross-functional initiatives that involve sharing projects, reports, or dashboards with members of different teams for their review and feedback, or for collaboration. In such cases, you want to be able to easily search for users and groups within the application and share out relevant artifacts. AD sync makes it possible to access users and groups within AWS SSO-integrated applications, and you can then use this information for searching and sharing.
For example, if you use an AWS SSO-integrated application like AWS IoT SiteWise to create and share dashboards for metrics reviews with leadership or to collaborate with other teams in your organization, you’ll now be able to see all users with access to AWS. AD sync makes it possible for AWS IoT SiteWise to access all users, rather than only the users who signed in to AWS at least once.
Administrative efficiency
If you’re a platform admin or cloud admin who manages access to AWS SSO in your company, assigning users and groups with access to AWS accounts and resources is a routine task that requires administrative effort. Because AD sync periodically syncs AD groups into AWS SSO, you only need to pre-define access to resources for an AD group once. After that point, any new member, such as a new employee, who is added to the AD group in Active Directory will gain access to resources tied to the AD group. The new employee will also be added to AWS SSO through AD sync, and their information will stay current through periodic syncs. Therefore, the administrative effort involved on your end for managing users is reduced.
Similarly, if an employee leaves the company, you will no longer have to worry about deleting their information in AWS, because AD sync automatically deletes user and group objects that you delete in Active Directory. This simplifies your user lifecycle management and reduces the manual effort involved in the process.
How Active Directory sync works in the background
This new AD sync feature is for customers who want to use their AD identities with AWS SSO, without setting up a separate IdP, such as AD Federation Service or Azure AD. To use this capability, you must connect AWS SSO to your Active Directory by using AWS SSO with either AWS Directory Service for Microsoft Active Directory (AWS Managed Microsoft AD) or AD Connector. Learn more about using AWS Managed Microsoft AD and AD Connector.
AD sync brings in user and group information from your Active Directory and stores it in the AWS SSO identity store. Once this information is synchronized, AWS SSO-integrated applications can use the user and group information to deliver collaborative experiences, such as sharing a dashboard with other users.
AD sync obtains a list of users and groups to be synchronized from Active Directory based on the assignments that you make to AWS accounts and applications. It then syncs those users and groups (including the group members) into the AWS identity store, keeping the information updated through periodic syncs, as shown in Figure 1.
Figure 1: Active Directory synchronization of users and groups
If a user has assignments based on attribute-based access-control (ABAC) and changes departments, attributes will automatically update at the next sync. If a user happens to sign in before the next sync, the attributes will be updated at sign-in to maintain consistency. The user will now see their assignments updated based on their new department.
AD sync also syncs in all members of a group, including sub-groups or nested groups. It flattens members of the nested groups, that is, it adds them to the parent group in the AWS SSO identity store. For example, if Group B is a member or nested group of Group A in Active Directory, then members of Group B are also synced into AWS SSO and added directly to Group A, as shown in Figure 2. So, only Group A can be used in AWS SSO accounts and applications.
Figure 2: Members of nested Group B flattened and added to parent Group A
If you delete a user or group in Active Directory, AD sync automatically deletes the user or group from the AWS SSO identity store. You won’t see the deleted identity appear in AWS SSO-integrated applications, either. However, if you only delete the assignments for a user or group, the user or group will remain in AWS SSO and won’t be automatically deleted.
Summary
In this blog post, I explained how user and group synchronization can help deliver better application experiences with less administrative effort. I also covered how the AWS SSO AD sync capability delivers this benefit for applications such as AWS Systems Manager and AWS IoT SiteWise. AD sync capability is available to you at no additional cost in all AWS Regions supported by AWS SSO. If you want to get started with AWS SSO or learn more about AD sync, see the AWS SSO User Guide.
If you have feedback about this post, submit comments in the Comments section below. If you have questions about this post, start a new thread on the AWS SSO forum or contact AWS Support.
Want more AWS Security how-to content, news, and feature announcements? Follow us on Twitter.
The collective thoughts of the interwebz
Manage Consent
To provide the best experiences, we use technologies like cookies to store and/or access device information. Consenting to these technologies will allow us to process data such as browsing behavior or unique IDs on this site. Not consenting or withdrawing consent, may adversely affect certain features and functions.
Functional
Always active
The technical storage or access is strictly necessary for the legitimate purpose of enabling the use of a specific service explicitly requested by the subscriber or user, or for the sole purpose of carrying out the transmission of a communication over an electronic communications network.
Preferences
The technical storage or access is necessary for the legitimate purpose of storing preferences that are not requested by the subscriber or user.
Statistics
The technical storage or access that is used exclusively for statistical purposes.The technical storage or access that is used exclusively for anonymous statistical purposes. Without a subpoena, voluntary compliance on the part of your Internet Service Provider, or additional records from a third party, information stored or retrieved for this purpose alone cannot usually be used to identify you.
Marketing
The technical storage or access is required to create user profiles to send advertising, or to track the user on a website or across several websites for similar marketing purposes.