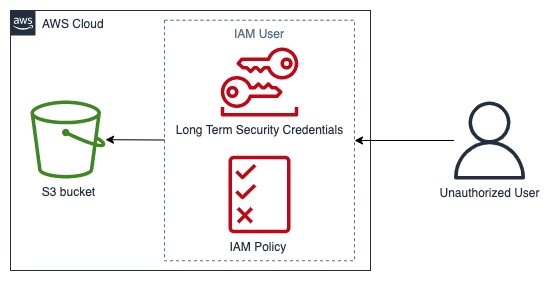
When modernizing applications, customers in regulated industries like government, financial, and research face a critical challenge: how to transform their systems while meeting strict digital sovereignty and security compliance requirements. A common misconception tied to this is that data must be moved to an AWS Region to fully use Amazon Web Services (AWS) security services.
In this blog post, we dispel that misconception by addressing how to use the following Region-based AWS security services while keeping your data within AWS Dedicated Local Zones.
AWS CloudTrail maintains governance through monitoring and auditing
Dedicated Local Zones are AWS-managed on-premises infrastructure configured for your exclusive use. They help meet specific regulatory requirements while providing cloud benefits such as elasticity, scalability, and pay-as-you-grow pricing. You can place data in your chosen location and use it with enhanced security and governance features provided by AWS to monitor and control application access while maintaining data isolation, in-country data residency, digital sovereignty, and meeting compliance requirements.
AWS Nitro System
Many organizations with strict compliance and data sovereignty requirements are understandably hesitant about moving confidential workloads to the cloud. Their concerns are legitimate and specific: they need a solution that provides independently verifiable protection and isolation from data access by privileged parties, including cloud provider personnel. These organizations also require assurance that unauthorized data access through the cloud control plane is technically impossible, not just contractually prohibited.
Perhaps most critically, they need side-channel protection to help make sure that sensitive data cannot leak through memory or other means to other hypervisor tenants sharing the same physical infrastructure. Traditional cloud security approaches often rely on operational controls and promises rather than technical impossibility, which doesn’t meet the stringent requirements these organizations face.
The AWS Nitro System, which is the foundation of AWS next generation Amazon Elastic Compute Cloud (Amazon EC2) instances that run in a Dedicated Local Zone and its parent Region, addresses each of these concerns through its architecture. This purpose-built combination of specialized hardware and software creates a secure enclave that shields your data from unauthorized access during processing on EC2 instances.
The EC2 instances that run in your Dedicated Local Zones are based on AWS Nitro System, which is designed to provide robust security for compute workloads. It uses specialized hardware and software components to help protect your data from unauthorized access during processing on Amazon EC2.
The three key components of Nitro System include a purpose-built Nitro cards, the Nitro Security Chip, and a Nitro Hypervisor. Together, these three components are designed to enforce restrictions and provide physical and logical security boundaries so that no one, including AWS employees, can access customer workloads or data running on Amazon EC2 without your explicit authorization.
The Nitro System whitepaper details how the Nitro System, by design, removes the possibility of administrator access to an EC2 instance, the overall passive communications design of the Nitro System, and the Nitro System change management process. The security design of the Nitro System has also been independently validated by the NCC Group in a public report.
AWS Key Management Service
Working with customers, we’ve noticed that one of the most persistent sources of confusion and concern isn’t just about whether their data is encrypted, but about who controls the keys that protect that encryption. Many organizations struggle with a fundamental tension: they want the operational benefits of cloud computing, but they also need to maintain strict control over their encryption keys to meet compliance requirements.
This concern is particularly acute for organizations in regulated industries, which often ask pointed questions like “Where exactly are my encryption keys stored?” and “Who can access my keys?” AWS KMS addresses this by offering multiple approaches to key management, each designed for different security and operational requirements. The service provides centralized control over the lifecycle and permissions of encryption keys, so you can create new keys whenever needed and control key management access separate from key policies
By default, Dedicated Local Zones customers can use the integration with AWS KMS in the parent Region to store and control encryption keys. You can then use these encryption keys to encrypt your data stored locally in Amazon EBS, and Amazon S3 in the Dedicated Local Zones.
If your use cases require an external encryption key store to maintain strict data sovereignty requirements, then the combination of Dedicated Local Zones and an AWS KMS external key store can provide a robust solution.
Using an external key store in Dedicated Local Zones, you can host the external hardware security module (HSM) that stores your encryption keys on-premises or colocated with your other infrastructure. By doing this, you maintain full control over the physical security and management of the HSM, while benefiting from the low-latency access and data processing capabilities of Dedicated Local Zones.
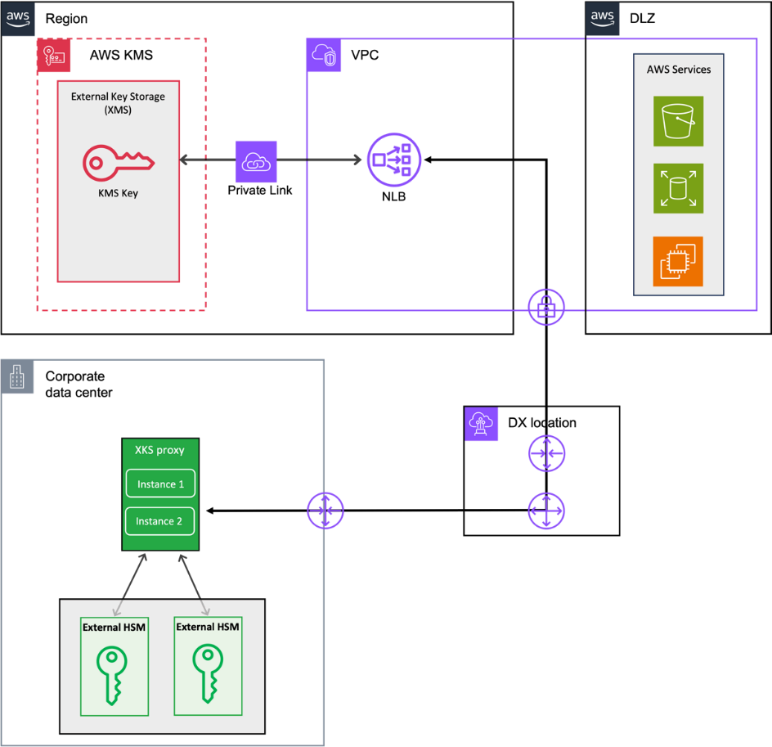
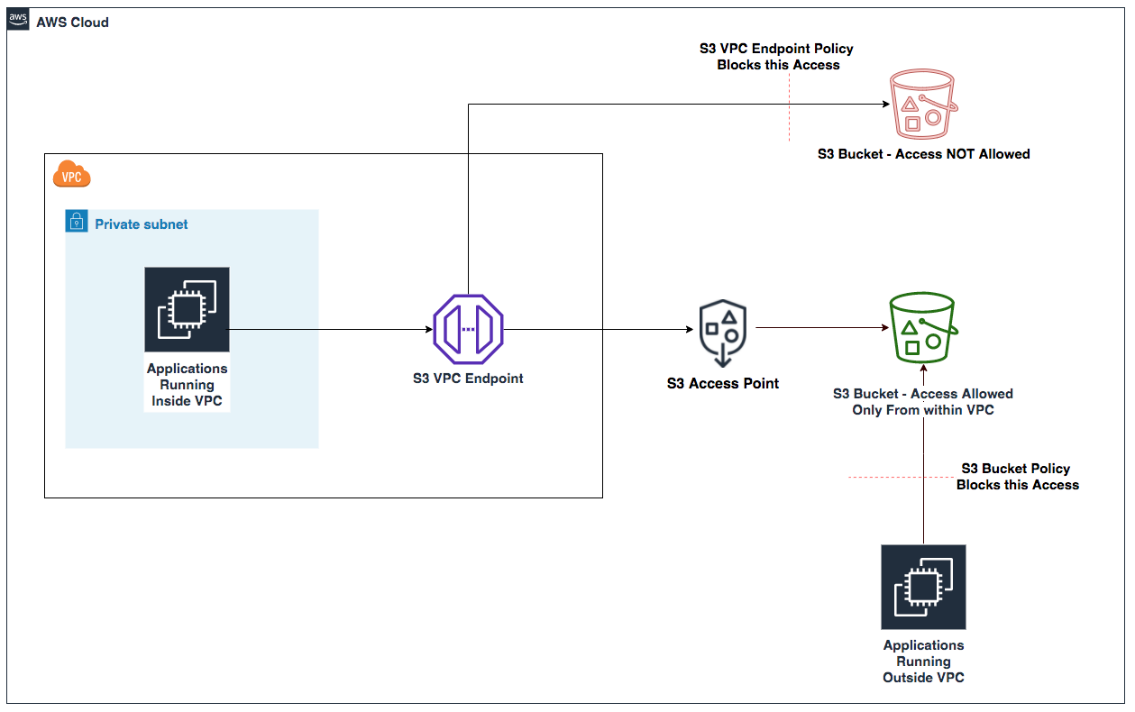
The main components of AWS KMS external key store architecture are:
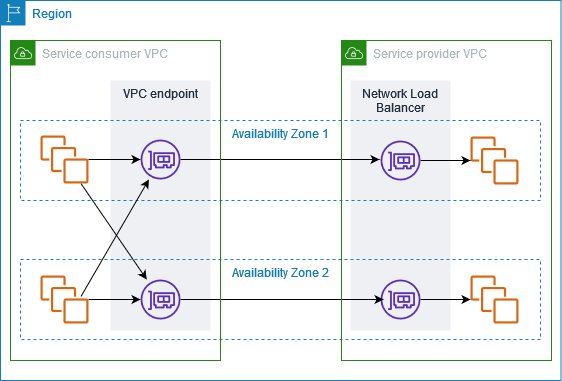
XKS proxy server: You provision an external key store proxy (XKS proxy) server within your on-premises data center (as shown in Figure 1) or within the Dedicated Local Zones. The role of the XKS proxy is to act as the intermediary between AWS KMS and your on-premises HSM. The XKS proxy must be registered as target of a Network Load Balancer (NLB) in Region, this means that if it’s hosted on your on-premises data center, then NLB Amazon Virtual Private Cloud (Amazon VPC) must have private connectivity to the on-premises network through a site-to-site VPN or AWS Direct Connect connection.
On-premises HSM: You configure your on-premises HSM to securely store the root encryption keys that will be used to protect your data encryption keys.
External key store: You create an external key store resource in AWS KMS, which maps to your on-premises HSM through the XKS proxy.
Figure 1: AWS KMS external key store in a Dedicated Local Zone
AWS KMS sends a request to the XKS proxy, which communicates with your on-premises HSM to generate the root key material.
AWS KMS uses this root key to encrypt the data encryption key before returning it to the requesting service and stores the encrypted data encryption key alongside the encrypted data in Amazon S3 or Amazon EBS.
For future encrypt/decrypt operations, the AWS service uses the previously generated and AWS KMS-encrypted data encryption key, without needing to interact with the on-premises HSM.
Note: The on-premises HSM only participates in the initial root key generation to protect the data encryption key, not in the high-volume encrypt/decrypt operations on the data itself.
This architecture delivers two key benefits:
You maintain complete control of your encryption keys by storing them in your data center, helping you meet security compliance requirements.
Dedicated Local Zones keep your data isolated in your chosen location, providing low latency for your users.
It’s important to note that using an AWS KMS external key store requires you to manage additional operational tasks beyond standard AWS KMS. To maintain continuous access to your encrypted data, you must provide 24/7 availability of your on-premises HSM, monitor XKS proxy infrastructure performance, implement robust security controls, and create backup and recovery procedures.
Because system outages can prevent access to your encrypted data, we recommend that you develop detailed operational runbooks, set up comprehensive monitoring, test your recovery procedures regularly, and maintain redundant systems where possible.
Another common concern we hear from organizations evaluating Dedicated Local Zones is whether they’ll need to compromise on security capabilities to maintain data residency. The reality is that AWS security services running in a Region, such as Amazon Inspector, are specifically designed to provide comprehensive protection while respecting your data location requirements.
Organizations running regulated applications in Dedicated Local Zones require robust protection from zero-day vulnerabilities, prioritized patch remediation, and automated vulnerability management to meet compliance requirements. Amazon Inspector addresses these needs by continuously scanning your workloads to detect software vulnerabilities and unintended network exposure without requiring data movement from your chosen location.
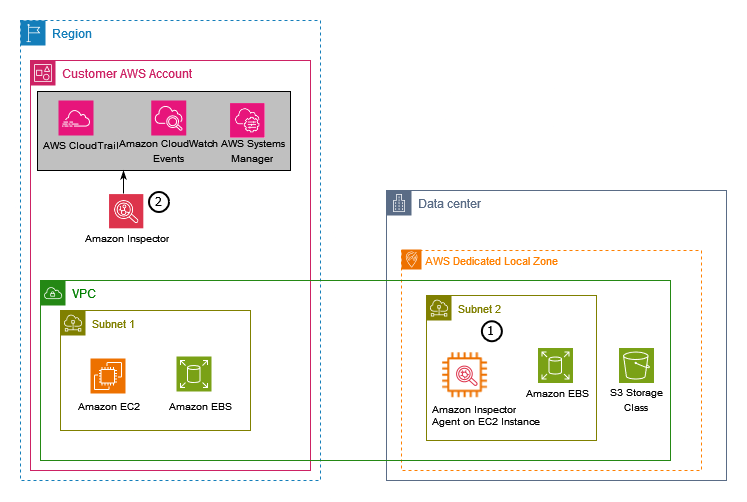
Amazon Inspector helps protect your workloads through two distinct scanning modes: hybrid scanning and agent-based scanning. However, for the context of this blog, let’s consider only agent-based scanning mode.
To securely meet data residency requirements in Dedicated Local Zones, enable agent-based scanning mode on AWS Systems Manager (AWS SSM)-managed instances in your account. It’s the default mode for new accounts offering enhanced security through continuous scanning, immediately responding to new common vulnerabilities and exposures (CVEs) and instance changes. It also enables deep inspection capabilities for eligible instances, providing comprehensive vulnerability assessment.
The reference architecture in Figure 2 shows:
Amazon Inspector agent running on AWS SSM managed instances, keeping your application data within Dedicated Local Zones.
Amazon Inspector evaluates and generates findings for detected vulnerabilities.
Figure 2: Amazon Inspector in Dedicated Local Zones
Amazon GuardDuty
Maintaining data sovereignty with Dedicated Local Zones doesn’t mean sacrificing advanced security capabilities. GuardDuty demonstrates how sophisticated threat detection can operate effectively while honoring strict data residency requirements.
Protecting your AI workloads from ransomware and advanced security threats requires an AI and machine learning (AL/ML)-integrated threat intelligence solution that can detect suspicious activity and respond proactively. GuardDuty uses AI/ML-based threat detection and integrated threat intelligence from AWS and leading third parties to protect your AWS accounts, workloads, and data. It continuously monitors malicious activity, delivers detailed security findings, and you can use the information it provides to respond quickly to threats.
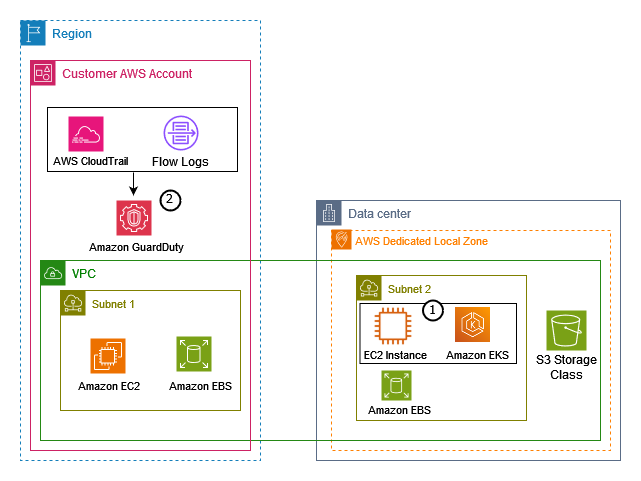
GuardDuty Runtime Monitoring observes and analyzes operating system, networking, and file events to detect potential threats in your AWS workloads. The parent Region receives only threat reports while Dedicated Local Zones retain your data.
The reference architecture in Figure 3 shows how GuardDuty helps protect your data in a Dedicated Local Zones:
GuardDuty monitors EC2 instances while your data stays in Dedicated Local Zones.
GuardDuty analyzes data sources from AWS CloudTrail event logs, management events, and Amazon VPC flow logs that your AWS account captures in the Region.
Figure 3: Amazon GuardDuty in Dedicated Local Zones
AWS Certificate Manager
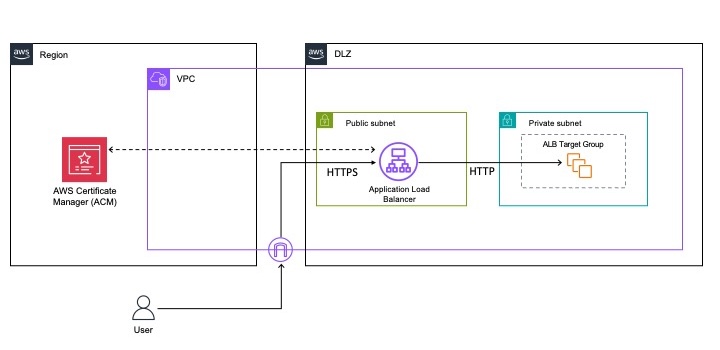
Organizations frequently express concern about certificate management complexity when deploying applications in Dedicated Local Zones. AWS Certificate Manager (ACM), which operates in the parent Region, addresses these challenges by serving as the primary service that customers use to provision, manage, and deploy certificates for use in both public-facing and private Dedicated Local Zones workloads.
ACM integrates seamlessly with ALBs in Dedicated Local Zones to manage your complete certificate lifecycle, as shown in Figure 4.
Figure 4: ACM in Dedicated Local Zones
Follow these steps to implement TLS certificates in Dedicated Local Zones:
Provision or import certificates through ACM in the parent Region.
Associate your certificates with ALB HTTPS listeners in Dedicated Local Zones to enable secure, low-latency SSL/TLS termination near your users.
ACM renews certificates automatically, avoids manual management tasks, and maintains continuous HTTPS service availability. This integration delivers enterprise-grade security with your data residing locally in Dedicated Local Zones. It also provides enhanced performance and reduced latency through proximity to users.
AWS Shield
Business-critical applications in Dedicated Local Zones need maximum availability and responsiveness. AWS Shield Standard, a managed distributed denial of service (DDoS) protection service that runs at the AWS edge, automatically helps protect your applications by detecting and mitigating network (Layer 3) and transport (Layer 4) DDoS attacks even before they reach your workloads.
AWS CloudTrail
A common concern when deploying workloads in Dedicated Local Zones is whether organizations can maintain the same level of governance and compliance oversight they expect from traditional AWS deployments. CloudTrail demonstrates how comprehensive auditing capabilities can extend seamlessly across distributed infrastructure while respecting data residency requirements.
CloudTrail, running in the parent Region, enables governance, compliance, operational auditing, and risk auditing of your AWS account providing you aggregated and consolidated record of multisource events in a single place. This includes a detailed history of AWS API calls for your account, including API calls made using the AWS Management Console, the AWS SDKs, the command line tools, and higher-level AWS services used by the applications running in your Dedicated Local Zones. Only the logs are stored in the parent Region, while your data remains within the Dedicate Local Zones. AWS CloudTrail helps you to enable operational and risk auditing, governance, and compliance of your AWS accounts.
Conclusion
Dedicated Local Zones provide a robust solution for running regulated workloads for all industries, to meet strict data residency and digital sovereignty. Through integrated security services like AWS Nitro System, AWS KMS External Key Store, ACM, AWS Shield, Amazon GuardDuty, Amazon Inspector, and AWS CloudTrail, your organization can achieve stronger security compliance for their mission-critical applications running in AWS Dedicated Local Zones.
To learn more about implementing these security solutions in your Dedicated Local Zones deployment, contact your AWS account team.
If you have feedback about this post, submit comments in the Comments section below. If you have questions about this post, contact AWS Support.
Encryption of both data at rest and in transit is a non-negotiable feature for most organizations. Furthermore, organizations operating in highly regulated and security-sensitive environments—such as those in the financial sector—often require full control over the cryptographic keys used for their workloads.
Amazon Managed Service for Apache Flink makes it straightforward to process real-time data streams with robust security features, including encryption by default to help protect your data in transit and at rest. The service removes the complexity of managing the key lifecycle and controlling access to the cryptographic material.
If you need to retain full control over your key lifecycle and access, Managed Service for Apache Flink now supports the use of customer managed keys (CMKs) stored in AWS Key Management Service (AWS KMS) for encrypting application data.
This feature helps you manage your own encryption keys and key policies, so you can meet strict compliance requirements and maintain complete control over sensitive data. With CMK integration, you can take advantage of the scalability and ease of use that Managed Service for Apache Flink offers, while meeting your organization’s security and compliance policies.
In this post, we explore how the CMK functionality works with Managed Service for Apache Flink applications, the use cases it unlocks, and key considerations for implementation.
Data encryption in Managed Service for Apache Flink
In Managed Service for Apache Flink, there are multiple aspects where data should be encrypted:
Data at rest directly managed by the service – Durable application storage (checkpoints and snapshots) and running application state storage (disk volumes used by RocksDB state backend) are automatically encrypted
Data in transit internal to the Flink cluster – Automatically encrypted using TLS/HTTPS
Data in transit to and at rest in external systems that your Flink application accesses – For example, an Amazon Managed Streaming for Apache Kafka (Amazon MSK) topic through the Kafka connector or calling an endpoint through a custom AsyncIO); encryption depends on the external service, user settings, and code
For data at rest managed by the service, checkpoints, snapshots, and running application state storage are encrypted by default using AWS owned keys. If your security requirements require you to directly control the encryption keys, you can use the CMK held in AWS KMS.
Key components and roles
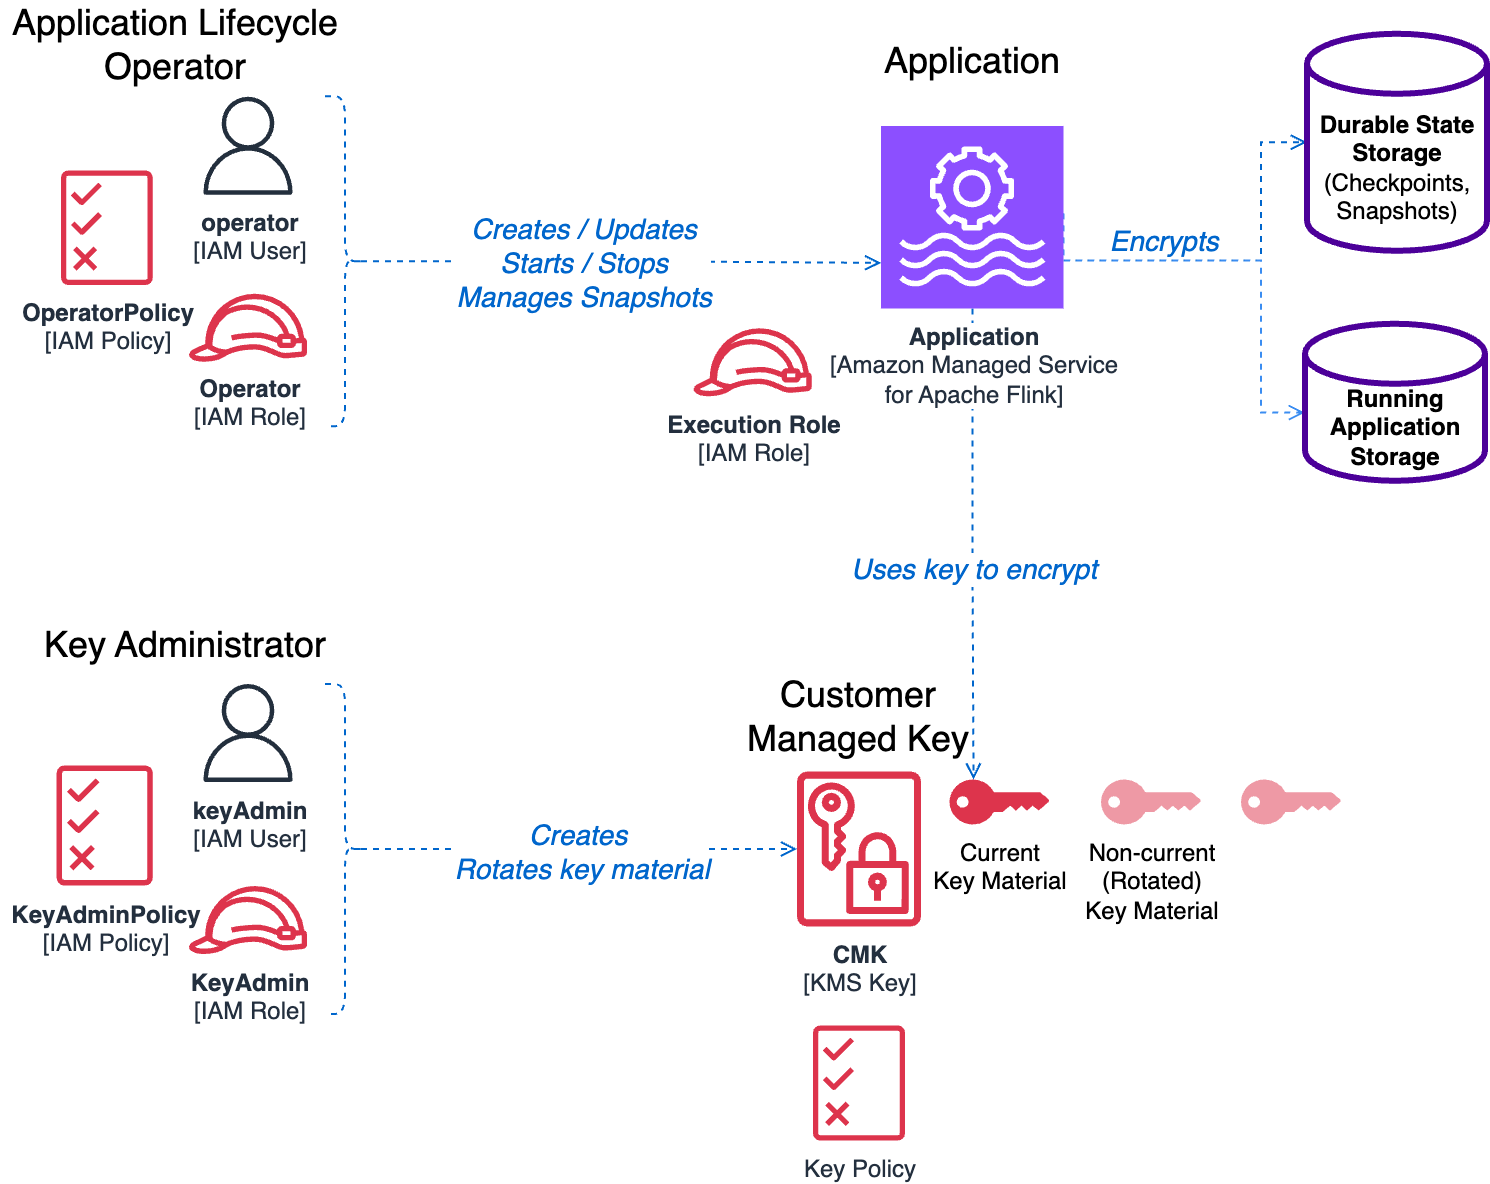
To understand how CMKs work in Managed Service for Apache Flink, we first need to introduce the components and roles involved in managing and running an application using CMK encryption:
Customer managed key (CMK):
Resides in AWS KMS within the same AWS account as your application
Has an attached key policy that defines access permissions and usage rights to other components and roles
Encrypts both durable application storage (checkpoints and snapshots) and running application state storage
Managed Service for Apache Flink application:
The application whose storage you want to encrypt using the CMK
The execution role doesn’t have to provide any specific permissions to use the CMK for encryption operations
Key administrator:
Manages the CMK lifecycle (creation, rotation, policy updates, and so on)
Can be an IAM user or IAM role, and used by a human operator or by automation
Requires administrative access to the CMK
Permissions are defined by the attached IAM policies and the key policy
Application operator:
Manages the application lifecycle (start/stop, configuration updates, snapshot management, and so on)
Can be an IAM User or IAM role, and used by a human operator or by automation
Requires permissions to manage the Flink application and use the CMK for encryption operations
Permissions are defined by the attached IAM policies and the key policy
The following diagram illustrates the solution architecture.
Enabling CMK following the principle of least privilege
When deploying applications in production environments or handling sensitive data, you should follow the principle of least privilege. CMK support in Managed Service for Apache Flink has been designed with this principle in mind, so each component receives only the minimum permissions necessary to function.
For detailed information about the permissions required by the application operator and key policy configurations, refer to Key management in Amazon Managed Service for Apache Flink. Although these policies might appear complex at first glance, this complexity is intentional and necessary. For more details about the requirements for implementing the most restrictive key management possible while maintaining functionality, refer to Least-privilege permissions.
For this post, we highlight some important points about CMK permissions:
Application execution role – Requires no additional permissions to use a CMK. You don’t need to change the permissions of an existing application; the service handles CMK operations transparently during runtime.
Application operator permissions – The operator is the user or role who controls the application lifecycle. For the permissions required to operate an application that uses CMK encryption, refer to Key management in Amazon Managed Service for Apache Flink. In addition to these permissions, an operator normally has permissions on actions with the kinesisanalytics prefix. It is a best practice to restrict these permissions to a specific application defining the Resource. The operator must also have the iam:PassRole permission to pass the service execution role to the application.
To simplify managing the permissions of the operator, we recommend creating two separate IAM policies, to be attached to the operator’s role or user:
A base operator policy defining the basic permissions to operate the application lifecycle without a CMK
An additional CMK operator policy that adds permissions to operate the application with a CMK
The following IAM policy example illustrates the permissions that should be included in the base operator policy:
Separating these two policies has an additional benefit of simplifying the process of setting up an application for the CMK, due to the dependencies we illustrate in the following section.
Dependencies between the key policy and CMK operator policy
If you carefully observe the operator’s permissions and the key policy explained in Create a KMS key policy, you will notice some interdependencies, illustrated by the following diagram.
In particular, we highlight the following:
CMK key policy dependencies – The CMK policy requires references to both the application Amazon Resource Name (ARN) and the key administrator or operator IAM roles or users. This policy must be defined at key creation time by the key administrator.
IAM policy dependencies – The operator’s IAM policy must reference both the application ARN and the CMK key itself. The operator role is responsible for various tasks, including configuring the application to use the CMK.
To properly follow the principle of least privilege, each component requires the others to exist before it can be correctly configured. This necessitates a carefully orchestrated deployment sequence.
In the following section, we demonstrate the precise order required to resolve these dependencies while maintaining security best practices.
Sequence of operations to create a new application with a CMK
When deploying a new application that uses CMK encryption, we recommend following this sequenced approach to resolve dependency conflicts while maintaining security best practices:
Create the operator IAM role or user with a base policy that includes application lifecycle permissions. Do not include CMK permissions at this stage, because the key doesn’t exist yet.
The operator creates the application using the default AWS owned key. Keep the application in a stopped state to prevent data creation—there should be no data at rest to encrypt during this phase.
Create the key administrator IAM role or user, if not already available, with permissions to create and manage KMS keys. Refer to Using IAM policies with AWS KMS for detailed permission requirements.
The key administrator creates the CMK in AWS KMS. At this point, you have the required components for the key policy: application ARN, operator IAM role or user ARN, and key administrator IAM role or user ARN.
The operator can now modify the application configuration using the UpdateApplication action, to enable CMK encryption, as illustrated in the following section.
The application is now ready to run with all data at rest encrypted using your CMK.
When setting up CMK encryption in a production environment, you will probably use an automation tool rather than the console. These tools eventually use the AWS API under the hood, and the UpdateApplication action of the kinesisanalyticsv2 API in particular. In this post, we analyze the additions to the API that you can use to control the encryption configuration.
An additional top-level block ApplicationEncryptionConfigurationUpdate has been added to the UpdateApplication request payload. With this block, you can enable and disable the CMK.
You must add the following block to the UpdateApplication request:
Theoretically, you can enable the CMK directly when you first create the application using the CreateApplication action.
A top-level block ApplicationEncryptionConfiguration has been added to the CreateApplication request payload, with a syntax similar to UpdateApplication.
However, due to the interdependencies described in the previous section, you will most often create an application with the default AWS owned key and later use UpdateApplication to enable the CMK.
If you omit ApplicationEncryptionConfiguration when you create the application, the default behavior is using the AWS owned key, for backward compatibility.
Sample CloudFormation templates to create IAM roles and the KMS key
The process you use to create the roles and key and configure the application to use the CMK will vary, depending on the automation you use and your approval and security processes. Any automation example we can provide will likely not fit your processes or tooling.
However, the following GitHub repository provides some example CloudFormation templates to generate some of the IAM policies and the KMS key with the correct key policy:
IAM policy for the key administrator – Allows managing the key
Base IAM policy for the operator – Allows managing the normal application lifecycle operations without the CMK
CMK IAM policy for the operator – Provides additional permissions required to manage the application lifecycle when the CMK is enabled
KMS key policy – Allows the application to encrypt and decrypt the application state and the operator to manage the application operations
CMK operations
We have described the process of creating a new Managed Service for Apache Flink application with CMK. Let’s now examine other common operations you can perform.
Changes to the encryption key become effective when the application is restarted. If you update the configuration of a running application, this causes the application to restart and the new key to be used immediately. Conversely, if you change the key of a READY (not running) application, the new key is not actually used until the application is restarted.
Enable a CMK on an existing application
If you have an application running with an AWS owned key, the process is similar to what we described for creating new applications. In this case, you already have a running application state and older snapshots that are encrypted using the AWS owned key.
Also, if you have a running application, you probably already have an operator role with an IAM policy that you can use to control the operator lifecycle.
The sequence of steps to enable a CMK on an existing and running application is as follows:
If you don’t already have one, create a key administrator IAM role or user with permissions to create and manage keys in AWS KMS. See Using IAM policies with AWS KMS for more details about the permissions required to manage keys.
The key administrator creates the CMK. The key policy references the application ARN, the operator’s ARN, and the key administrator’s role or user ARN.
Create an additional IAM policy that allows the use of the CMK and attach this policy to the operator. Alternatively, modify the operator’s existing IAM policy by adding these permissions.
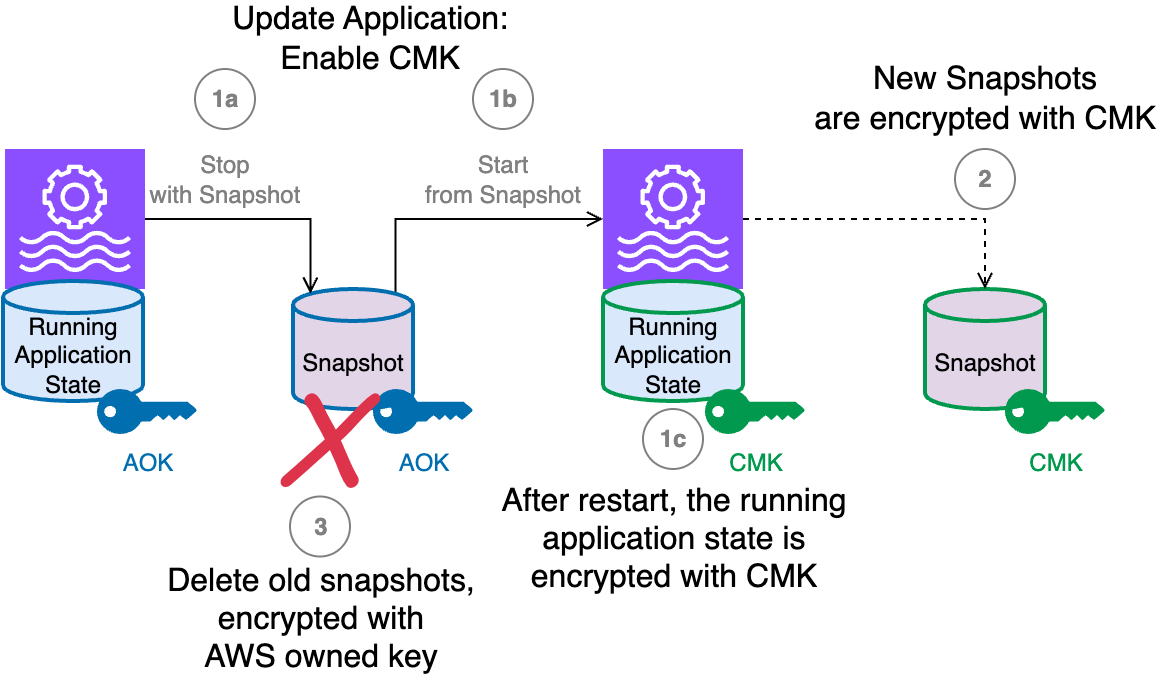
Finally, the operator can update the application and enable the CMK.The following diagram illustrates the process that occurs when you execute an UpdateApplication action on the running application to enable a CMK.
The workflow consists of the following steps:
When you update the application to set up the CMK, the following happens:
The application running state, at the moment it is encrypted with the AWS owned key, is saved in a snapshot while the application is stopped. This snapshot is encrypted with the default AWS owned key. The running application state storage is volatile and destroyed when the application is stopped.
The application is redeployed, restoring the snapshot into the running application state.
The running application state storage is now encrypted with the CMK.
New snapshots created from this point on are encrypted using the CMK.
You will probably want to delete all the old snapshots, including the one created automatically by the UpdateApplication that enabled the CMK, because they are all encrypted using the AWS owned key.
Rotate the encryption key
As with any cryptographic key, it’s a best practice to rotate the key periodically for enhanced security. Managed Service for Apache Flink does not support AWS KMS automatic key rotation, so you have two primary options for rotating your CMK.
Option 1: Create a new CMK and update the application
The first approach involves creating an entirely new KMS key and then updating your application configuration to use the new key. This method provides a clean separation between the old and new encryption keys, making it easier to track which data was encrypted with which key version.
Let’s assume you have a running application using CMK#1 (the current key) and want to rotate to CMK#2 (the new key) for enhanced security:
Prerequisites and preparation – Before initiating the key rotation process, you must update the operator’s IAM policy to include permissions for both CMK#1 and CMK#2. This dual-key access supports uninterrupted operation during the transition period. After the application configuration has been successfully updated and verified, you can safely remove all permissions to CMK#1.
Application update process – The UpdateApplication operation used to configure CMK#2 automatically triggers an application restart. This restart mechanism makes sure both the application’s running state and any newly created snapshots are encrypted using the new CMK#2, providing immediate security benefits from the updated encryption key.
Important security considerations – Existing snapshots, including the automatic snapshot created during the CMK update process, remain encrypted with the original CMK#1. For complete security hygiene and to minimize your cryptographic footprint, consider deleting these older snapshots after verifying that your application is functioning correctly with the new encryption key.
This approach provides a clean separation between old and new encrypted data while maintaining application availability throughout the key rotation process.
Option 2: Rotate the key material of the existing CMK
The second option is to rotate the cryptographic material within your existing KMS key. For a CMK used for Managed Service for Apache Flink, we recommend using on-demand key material rotation.
The benefit of this approach is simplicity: no change is required to the application configuration nor to the operator’s IAM permissions.
Important security considerations
The new encryption key is used by the Managed Service for Apache Flink application only after the next application restart. To make the new key material effective, immediately after the rotation, you need to stop and start using snapshots to preserve the application state or execute an UpdateApplication, which also forces a stop-and-restart. After the restart, you should consider deleting the old snapshots, including the one taken automatically in the last stop-and-restart.
Switch back to the AWS owned key
At any time, you can decide to switch back to using an AWS owned key. The application state is still encrypted, but using the AWS owned key instead of your CMK.
If you are using the UpdateApplication API or AWS CLI command to switch back to CMK, you must explicitly pass ApplicationEncryptionConfigurationUpdate, setting the key type to AWS_OWNED_KEY as shown in the following snippet:
When you execute UpdateApplication to switch off the CMK, the operator must still have permissions on the CMK. After the application is successfully running using the AWS owned key, you can safely remove any CMK-related permissions from the operator’s IAM policy.
Test the CMK in development environments
In a production environment—or an environment containing sensitive data—you should follow the principle of least privilege and apply the restrictive permissions described so far.
However, if you want to experiment with CMKs in a development setting, such as using the console, strictly following the production process might become cumbersome. In these environments, the roles of key administrator and operator are often filled by the same person.
For testing purposes in development environments, you might want to use a permissive key policy like the following, so you can freely experiment with CMK encryption:
This policy must never be used in an environment containing sensitive data, and especially not in production.
Common caveats and pitfalls
As discussed earlier, this feature is designed to maximize security and promote best practices such as the principle of least privilege. However, this focus can introduce some corner cases you should be aware of.
The CMK must be enabled for the service to encrypt and decrypt snapshots and running state
With AWS KMS, you can disable one key at any time. If you disable the CMK while the application is running, it might cause unpredictable failures. For example, an application will not be able to restore a snapshot if the CMK used to encrypt that snapshot has been disabled. For example, if you attempt to roll back an UpdateApplication that changed the CMK, and the previous key has since been disabled, you might not be able to restore from an old snapshot. Similarly, you might not be able to restart the application from an older snapshot if the corresponding CMK is disabled.
If you encounter these scenarios, the solution is to reenable the required key and retry the operation.
The operator requires permissions to all keys involved
To perform an action on the application (such as Start, Stop, UpdateApplication, or CreateApplicationSnapshot), the operator must have permissions for all CMKs involved in that operation. AWS owned keys don’t require explicit permission.
Some operations implicitly involve two CMKs—for example, when switching from one CMK to another, or when switching from a CMK to an AWS owned key by disabling the CMK. In these cases, the operator must have permissions for both keys for the operation to succeed.
The same rule applies when rolling back an UpdateApplication action that involved multiple CMKs.
A new encryption key takes effect only after restart
A new encryption key is only used after the application is restarted. This is important when you rotate the key material for a CMK. Rotating the key material in AWS KMS doesn’t require updating the Managed Flink application’s configuration. However, you must restart the application as a separate step after rotating the key. If you don’t restart the application, it will continue to use the old encryption key for its running state and snapshots until the next restart.
For this reason, it is recommended not to enable automatic key rotation for the CMK. When automatic rotation is enabled, AWS KMS might rotate the key material at any time, but your application will not start using the new key until it is next restarted.
CMKs are only supported with Flink runtime 1.20 or later
CMKs are only supported when you are using the Flink runtime 1.20 or later. If your application is currently using an older runtime, you should upgrade to Flink 1.20 first. Managed Service for Apache Flink makes it straightforward to upgrade your existing application using the in-place version upgrade.
Conclusion
Managed Service for Apache Flink provides robust security by enabling encryption by default, protecting both the running state and persistently saved state of your applications. For organizations that require full control over their encryption keys (often due to regulatory or internal policy needs), the ability to use a CMK integrated with AWS KMS offers a new level of assurance.
By using CMKs, you can tailor encryption controls to your specific compliance requirements. However, this flexibility comes with the need for careful planning: the CMK feature is intentionally designed to enforce the principle of least privilege and strong role separation, which can introduce complexity around permissions and operational processes.
In this post, we reviewed the key steps for enabling CMKs on existing applications, creating new applications with a CMK, and managing key rotation. Each of these processes gives you greater control over your data security but also requires attention to access management and operational best practices.
As your organization grows, the amount of data you own and the number of data sources to store and process your data across multiple Amazon Web Services (AWS) accounts increases. Enforcing consistent access controls that restrict access to known networks might become a key part in protecting your organization’s sensitive data.
Previously, AWS customers could rely on AWS Identity and Access Management (IAM) global condition keys such as aws:SourceVpc and aws:SourceVpce to restrict access to specific virtual private clouds (VPCs) or VPC endpoints. These condition keys work well for organizations with few accounts and for use cases limited to specific workloads. However, as the number of your VPCs grow, using these keys could introduce challenges in scaling the control across a large set of resources.
To address this challenge, AWS has introduced three new global condition keys for scalable access controls based on request origin: aws:VpceAccount, aws:VpceOrgPaths, and aws:VpceOrgID.
In this blog post, we demonstrate how these keys can help make sure that your AWS resources are accessible only from expected VPCs, so that you can scale your data perimeter implementation across your organization within AWS Organizations.
Background
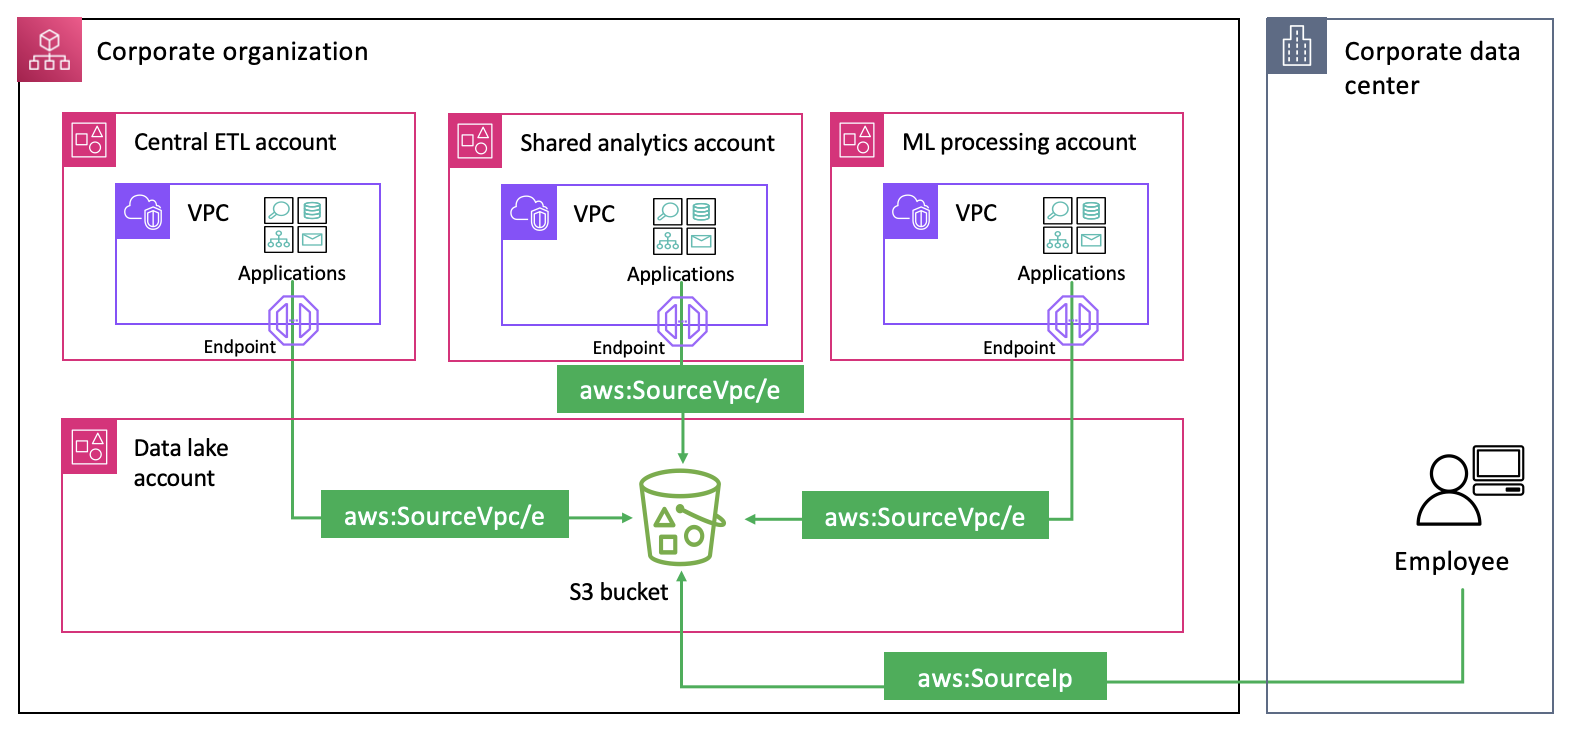
Organizations often store data in AWS resources such as Amazon Simple Storage Service (Amazon S3) buckets. For example, you might use Amazon S3 as your data lake foundation with data scientists and analysts running their data processing and analytics workflows against data stored in a centralized S3 bucket.
To limit access to data stored in your S3 buckets to expected networks, you can use IAM policies associated with your identities and resources. You can define expected networks in a policy using specific IAM global condition keys based on your organization’s intended data access patterns and unique requirements. For example, use aws:SourceIp to specify your corporate IP CIDR ranges, and aws:SourceVpc or aws:SourceVpce to list VPC and VPC endpoint IDs you expect requests to come from. These condition keys help make sure that only workloads operating within your expected network boundaries can access sensitive data.
However, there are scenarios where you might want to allow access from multiple networks within your organization, as illustrated in Figure 1.
Figure 1: Applications and users accessing an S3 bucket from VPCs and public networks
In such cases, using the aws:SourceVpc and aws:SourceVpce condition keys requires enumerating all expected VPC and VPC endpoint IDs and updating policies whenever new VPCs or VPC endpoints are added or deleted. This approach creates operational overhead and increases the risk of misconfigurations. The operational complexity grows as organizations scale their data processing capacity across multiple AWS Regions and accounts. While many organizations have developed automated mechanisms to detect changes in VPC configurations and update policies accordingly, auditing lengthy policies that enumerate VPCs within their organization remains challenging.
The new global condition keys provide a more scalable way to restrict access to expected networks:
aws:VpceAccount – Restricts the use of your identities and resources to networks that belong to a specific AWS account.
aws:VpceOrgID – Restricts the use of your identities and resources to networks that belong to your organization.
The value of these keys in the request context is the ID of the account (for example, 111122223333), organization unit (OU) (for example, o-abcdef0123/r-acroot/ou-development/*), or organization (for example, o-abcdef0123) that owns the VPC endpoint the request is made through.
Note that at the time of writing, not all services support these keys. See AWS global condition context keys for a list of supported services.
Implementation examples
Let’s look at how to restrict access to expected networks using the three new condition keys for common use cases. Each of the use cases demonstrates how the new condition keys help simplify controlling access to your resources in the sample scenario from Figure 1.
Use case 1: Allow access to your S3 buckets only from networks of data processing accounts
Data owners might want to strictly manage what data workflows can access their data sources and restrict cross-account access to specific data processing accounts and networks. They can use the aws:VpceAccount condition key to allow access based on the account that owns the VPC endpoint the request is made through. The following is an example S3 bucket policy.
This policy allows specific principals listed in the Principal element to list and download objects from the data lake bucket but only if they make requests from networks in one of the specified AWS accounts (StringEquals and aws:VpceAccount). Using the aws:VpceAccount condition key in this policy alleviates the need to maintain a list of VPC IDs or VPC endpoint IDs for the data processing accounts, reduces the size of the policy document, and simplifies auditing.
Use case 2: Restricting access to company networks for resources across multiple accounts
Central security teams often look for ways to enforce a set of standard access controls on resources across their entire organization. This is to meet compliance and security requirements, fulfill legal and contractual obligations, and to protect corporate data from unintended access. One such control could be used to limit access to only expected networks within the organization. In our sample scenario, this control helps prevent your data analysts and scientists from using their credentials to access data outside of your corporate environment. The following RCP demonstrates how to enforce the network perimeter controls on S3 buckets:
This policy denies access to S3 buckets and objects unless it is from expected networks defined as: your corporate IP CIDR range (NotIpAddressIfExists and aws:SourceIp), VPC endpoints in your organization (StringNotEqualsIfExists and aws:VpceOrgID), networks of AWS services that use their service principals or forward access sessions (FAS) to act on your behalf (BoolIfExists with aws:PrincipalIsAWSService and aws:ViaAWSService). It also allows access to networks of AWS services using specific service roles to access your resources (StringNotEqualsIfExists and aws:PrincipalTag/network-perimeter-exception set to true). Some organizations might need to edit this policy to allow third-party partner access. See Establishing a data perimeter on AWS: Allow access to company data only from expected networks for additional information on access patterns that need to be accounted for to meet the needs of your organization.
We used an RCP because it can be used to apply access controls centrally on resources across multiple accounts. Central security teams use RCPs to enforce security invariants on resources across their entire organization. For best practices in designing and deploying RCPs, see Effectively implementing resource control policies in a multi-account environment.
Remember to reference the list of services that support aws:VpceOrgID before using it in a policy such as an RCP. Enforcing it on an unsupported service might prevent your developers from using the service. If you need to restrict access to expected networks on a wider range of services, consider using the aws:SourceVpc and aws:SourceVpce condition keys. See the data perimeter policy examples repository that illustrate how to implement network perimeter controls for a wider range of services.
Use case 3: Restricting access based on intra-organization boundaries
Organizations often need to segment environments within their organization with varying data access requirements. For example, they might need to separate production from non-production environments or create boundaries between different business units, such as Finance, Marketing, and Sales; each operating in separate accounts. This might include making sure that resources within a specific OU can only be accessed from networks in the same OU. Central security teams can use aws:VpceOrgPaths to achieve this objective at scale.
The following is an example RCP that restricts access to your Amazon S3 and AWS Key Management Service (AWS KMS) resources so that they can only be accessed through VPC endpoints in a specific OU.
This policy is similar to the one we built for the previous use case but uses aws:VpceOrgPaths instead of aws:VpceOrgID to enforce a more granular boundary based on the requests’ network origin.
Best practices and considerations
When implementing the new condition keys, consider the following best practices.
Identify opportunities to adopt the new global condition keys by reviewing your security objectives and controls
If you currently restrict access to a wide range of resources using the aws:SourceVpc and aws:SourceVpce condition keys and want to avoid the need to enumerate VPC or VPC endpoint IDs in your policies, evaluate if you can migrate to aws:VpceAccount, aws:VpceOrgPaths, or aws:VpceOrgID. This migration decision depends on whether services you restrict access to are supported by the new condition keys. Similarly, if you plan to add network perimeter restrictions to your security baseline, first evaluate whether the new condition keys offer a more scalable solution for your target services. Only enforce the new keys on services that are currently supported. If you need to enforce the restriction on a service not yet supported, you should use aws:SourceVpc and aws:SourceVpce. Also, continue using aws:SourceVpc and aws:SourceVpce to achieve your least privilege objectives, for example if the network boundary you need to maintain for a subset of resources is scoped to specific VPCs or VPC endpoints.
Plan the implementation of the new condition keys
We recommend that you test access controls updates in a non-production environment and only promote them to production after validating their expected behavior. If you currently maintain an automation to enumerate VPC or VPC endpoint IDs in your policies and plan to migrate to the new keys, deactivate your automation only after you have completed policy updates across all environments. This approach helps make sure that your existing security posture remains intact while you progressively deploy the changes.
Monitor and validate the implementation
Use AWS CloudTrail to audit access patterns and regularly review and update your access controls as your organization structure evolves and security objectives change. For example, you might need to adjust access controls when accounts requiring access to your data lakes change, or when organizational boundaries need modification to accommodate new integrations between business units. You must establish processes to continuously evaluate the effectiveness of your controls in meeting both security and business objectives.
Conclusion
In this post, you learned how to use the new global condition keys—aws:VpceAccount, aws:VpceOrgPaths, and aws:VpceOrgID—to restrict access to expected networks at scale. By using these keys, you can:
Implement network perimeter controls that scale with your AWS organization.
Reduce the operational overhead of managing access to your data.
Simplify your IAM policies and reduce the risk of misconfigurations.
Scale your data lake implementation while maintaining security.
If you have feedback about this post, submit comments in the Comments section below. If you have questions about this post, start a new thread on AWS IAM re:Post or contact AWS Support.
The NHS DSPT is an assessment that allows organizations to measure their performance against the National Data Guardian’s 10 data security standards. All organizations that access NHS patient data and systems are expected to use the toolkit to demonstrate their compliance with safe data security standards. NHS DSPT covers standards regarding Personal Confidential Data, Continuity Planning, IT Protection, and more. AWS undergoes the assessment to provide customers with assurance that we are practicing good data security.
Security and compliance is a shared responsibility between AWS and the customer. When customers move their computer systems and data to the cloud, security responsibilities are shared between the customer and the cloud service provider. For more information, see the AWS Shared Security Responsibility Model.
To learn more about our compliance and security programs, see AWS Compliance Programs. As always, we value your feedback and questions; reach out to the AWS Compliance team through the Contact Us page.
Reach out to your AWS account team if you have questions or feedback about NHS DSPT.
If you have feedback about this post, submit comments in the Comments section below.
Amazon Web Services (AWS) is pleased to announce the successful completion of our annual audit to renew our Payment Card Industry Three Domain Secure (PCI 3DS) certification. As part of this renewal, we have expanded the scope to include three additional AWS services and three additional AWS Regions:
This certification allows customers to use these services while maintaining PCI 3DS compliance, enabling innovation without compromising security. The full list of services can be found on the AWS Services in Scope by Compliance Program page.
The PCI 3DS compliance package includes two key components:
Attestation of Compliance (AOC) – demonstrates that AWS was successfully validated against the PCI 3DS standard.
AWS Responsibility Summary – provides guidance to help AWS customers understand their responsibility in developing and operating a highly secure environment on AWS for handling payment card data.
AWS was evaluated by Coalfire, a third-party Qualified Security Assessor (QSA).
This refreshed certification offers customers greater flexibility in deploying regulated workloads while reducing compliance overhead. Customers can access the PCI 3DS reports through AWS Artifact. This self-service portal provides on-demand access to AWS compliance reports, streamlining audit processes.
To learn more about our PCI programs and other compliance and security programs, see the AWS Compliance Programs page. As always, we value your feedback and questions; reach out to the AWS Compliance team through the Compliance Support page.
If you have feedback about this post, submit comments in the Comments section below. If you have questions about this post, contact AWS Support.
Amazon Web Services (AWS) is excited to announce that 177 AWS services have achieved HITRUST certification for the 2025 assessment cycle, including the following five services which were certified for the first time:
The full list of AWS services, which a third-party assessor audited and certified under the HITRUST CSF, is now available on our Services in Scope by Compliance Program page. Customers can view and download our 2025 HITRUST certification on demand through AWS Artifact.
AWS HITRUST certification is available for customer inheritance
As an added benefit to our customers, organizations no longer have to assess inherited controls for their HITRUST validated assessment because AWS already has. You can deploy business solutions to the AWS Cloud and inherit our HITRUST certification, provided that you use only in-scope services and properly apply the controls detailed on the HITRUST website according to the AWS Shared Responsibility Model.
Our HITRUST certification is based on the version 11.5.1 control framework, so you can inherit the latest controls and related scoring, knowing that AWS has attested to the latest framework standards available. Leading organizations in a variety of industries have adopted HITRUST CSF as part of their approach to security and privacy. For more information, see the HITRUST website.
As always, we value your feedback and questions and are committed to helping you achieve and maintain the highest standard of security and compliance. Feel free to contact the team through AWS Compliance Support. If you have feedback about this post, submit comments in the Comments section below.
Security teams often need to analyze potentially malicious files, binaries, or behaviors in a tightly controlled environment. While this has traditionally been done in on-premises sandboxes, the flexibility and scalability of AWS make it an attractive alternative for running such workloads.
However, conducting malware analysis in the cloud brings a unique set of challenges—not only technical, but also policy-driven. Amazon Web Services (AWS) enforces a range of policies that govern acceptable use, prohibited activities, and testing permissions. For more information see AWS Acceptable Use Policy and AWS Service Terms.
Security teams must architect their malware analysis environments in a way that adheres to these policies, enforces strong isolation, and helps prevent misuse or escalation of privileges.
Setting up secure malware analysis environments that meet compliance requirements can be challenging, especially in cloud environments. Security teams need isolated sandbox environments, robust security controls, and proper monitoring policies to safely analyze malware. In this post, we discuss the basic steps to build these capabilities in AWS, showing you how to implement best practices for both new deployments and migrations of existing malware analysis workloads. You’ll learn how to create secure, compliance-aligned analysis environments that align with AWS policy requirements.
Problem statement
Performing malware analysis in AWS introduces unique security and operational challenges. Unlike typical workloads, malware analysis environments must be treated with heightened caution because of the risk of malicious behavior and the need to strictly adhere to the AWS Acceptable Use Policy and AWS Service Terms.
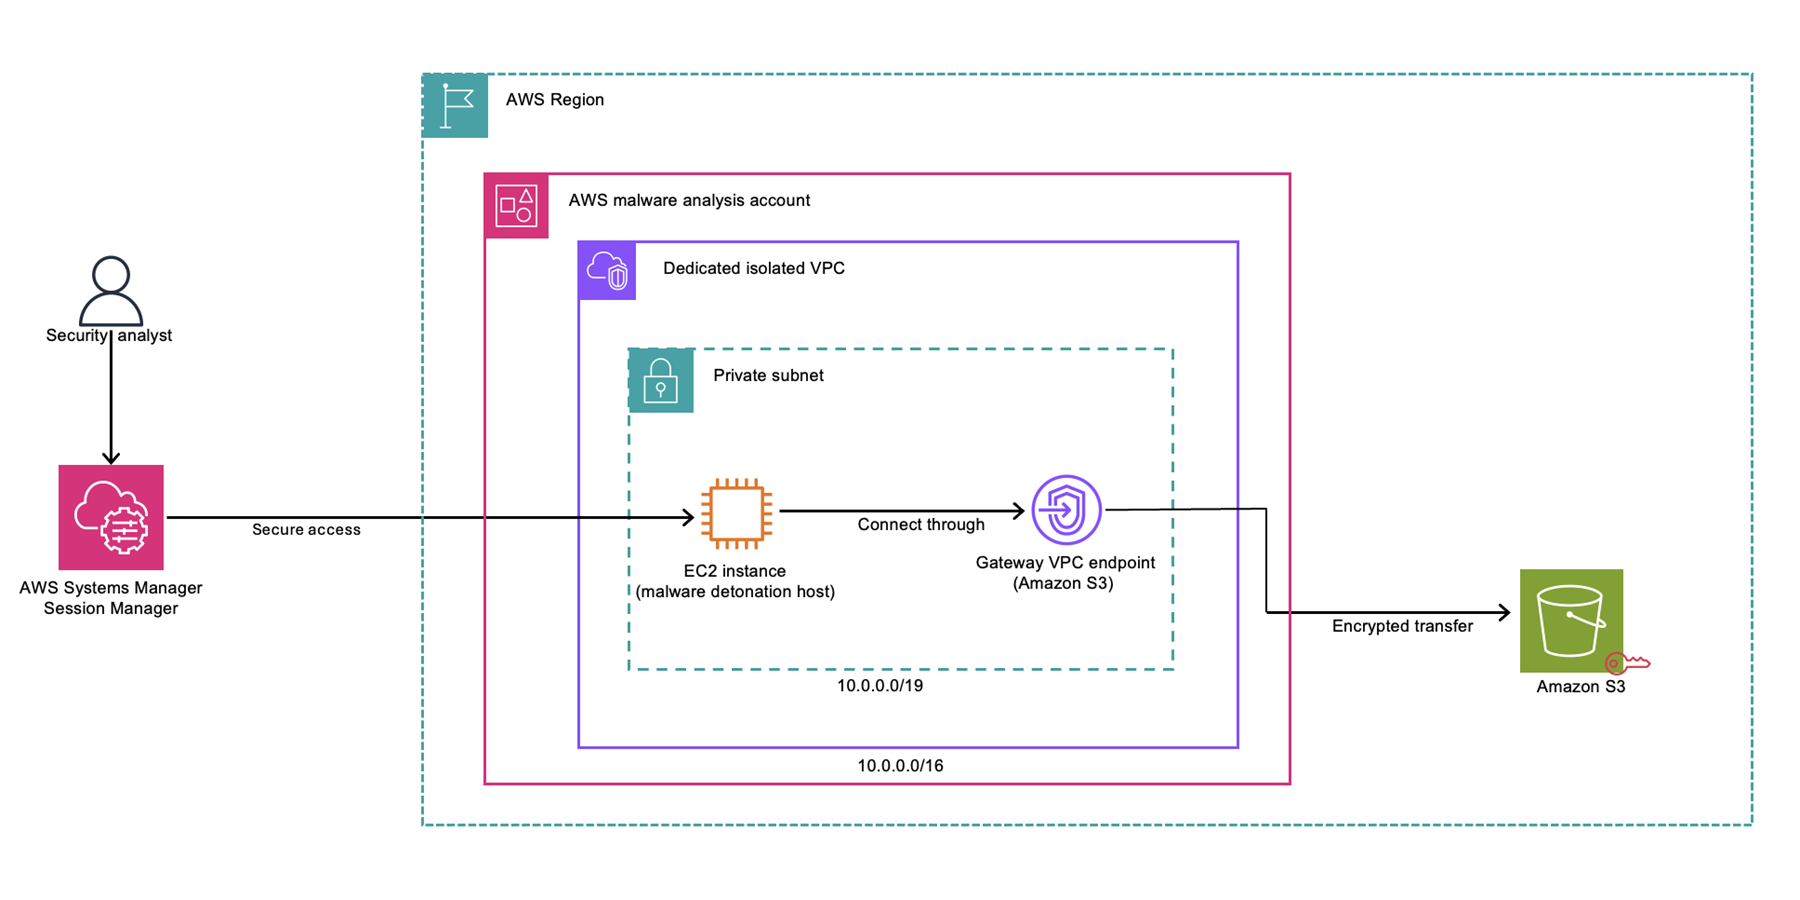
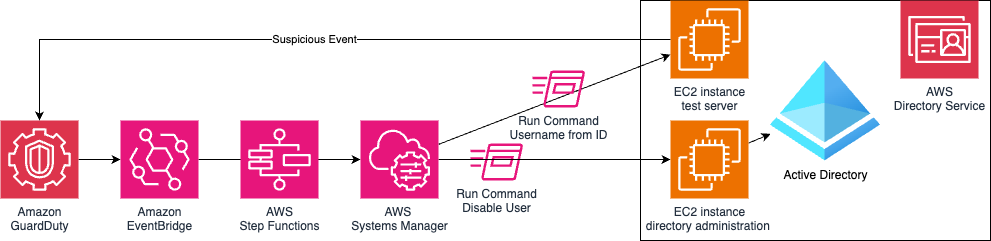
Figure 1 is a high-level illustration of the malware analysis architecture.
Figure 1: Malware analysis architecture
At a high level, the malware analysis architecture includes:
A security analyst gains access to the environment through AWS Systems Manager Session Manager.
The analyst connects to an EC2 instance (malware detonation host) in a private subnet.
The subnet resides in a dedicated isolated VPC within the AWS malware analysis account and has no outbound connectivity.
The EC2 instance connects to the malware samples and artifacts bucket through a VPC gateway endpoint for Amazon S3.
Data is transferred securely using encrypted transfer.
Key considerations
Conducting malware analysis in AWS requires a thoughtful balance between flexibility, security, and compliance to help make sure that teams operate within AWS policies while minimizing risk and cost.
Adhering to AWS policies and service terms: Activities such as simulating malware behavior or generating exploit traffic might fall under restricted use cases defined in the AWS Acceptable Use Policy and Service Terms. In addition, teams must submit a formal request for approval through the penetration testing and simulated events form for malware testing.
Need for isolation: Malware analysis requires isolated environments that can safely contain malicious code without exposing internal resources, AWS services, or other accounts. In addition, no malicious traffic is allowed to leave the Amazon Virtual Private Cloud (Amazon VPC).
Guardrails and lifecycle management: Without clear boundaries, sandbox accounts can become long-lived, misused, or even treated as production environments—potentially increasing your exposure to security risks or incurring ongoing costs unnecessarily. Guardrails such as budget alerts, lifecycle automation, and AWS Identity and Access Management (IAM) permission boundaries are essential.
Lack of unified patterns: Existing AWS guidance covers sandboxing and security best practices but doesn’t provide a focused blueprint for malware analysis that aligns with policy constraints, isolation needs, and security operations.
Architecture building blocks
Designing a secure malware analysis environment in AWS begins with containment. The architecture must assume that the code under investigation is malicious and capable of attempting escape, exfiltration, or lateral movement. That’s why isolation, tight access controls, and strict egress management are a core requirement of the architecture described below.
Network isolation with Amazon VPC
The foundation of a secure sandbox is a dedicated VPC in a dedicated account that is fully isolated from other workloads. Key considerations include:
Note: Outbound traffic can be allowed out from AWS in a bring your own IP (BYOIP) scenario for approved use cases.
No internet access: Egress should be completely blocked. NAT gateways, internet gateways, and VPC endpoints should be avoided unless explicitly needed and secured. This helps make sure that malware samples cannot beacon out or download additional payloads.
DNS disabled: To help prevent malware from resolving command-and-control (C2) infrastructure, disable DNS resolution in the VPC settings unless simulation tools (such as INetSim) require it, in which case they must operate strictly inside the same VPC.
IAM and permission boundaries
IAM plays a critical role in helping to make sure that the sandbox doesn’t gain unexpected permissions over time.
Enforce the principle of least privilege (PoLP), which means granting only the minimum permissions necessary for users, roles, and services to perform their required tasks.
Use permission boundaries to scope what roles within the sandbox can do, even if they’re granted broader policies later.
Help prevent sandbox IAM roles or users from creating or modifying IAM resources or attaching policies.
Use service control policies (SCPs) to block privilege escalation or cross-account access from the start.
Instance hardening
Even though malware analysis sandbox accounts are designed to be isolated, every instance should be hardened:
Use hardened Amazon Machine Images (AMIs) (such as CIS benchmark), and keep systems fully patched before use. See Building CIS hardened Golden Images as an example.
Make sure that host-level monitoring is enabled using agents such as AWS Systems Manager, Amazon CloudWatch Agent, Amazon GuardDuty Runtime Monitoring, or external endpoint detection and response (EDR) tooling (without enabling internet connectivity).
Note: The Systems Manager Agent requires access to Systems Manager endpoints to maintain updates and will regularly report node status. Consider this connectivity requirement when designing your isolation strategy.
GuardDuty Runtime Monitoring requires a VPC endpoint and will transmit telemetry data to the GuardDuty service. GuardDuty findings can be generated based on activities observed on the host, which could be expected behavior in a malware analysis environment.
Detonation hosts should be built to be ephemeral—treated as single-use, with instance refreshes after each session to avoid persistence.
Storage and containment
Proper storage configuration is critical when handling malware samples and related artifacts. Storage solutions, particularly Amazon Simple Storage Service (Amazon S3) buckets, must implement multiple layers of security controls, as described in the following lists.
Encryption requirements:
Enable default encryption on all S3 buckets
Use either AWS Key Management Service (AWS KMS) customer managed keys (CMK) or AWS managed keys for encryption based on your security requirements
Enforce encryption in transit by requiring HTTPS (TLS) using bucket policies
Deny any unencrypted object uploads using bucket policies
Network access:
Configure VPC endpoints (gateway endpoints) for Amazon S3 to help facilitate private communication within the VPC
Implement endpoint policies to restrict access to specific buckets and actions
Avoid cross-account sharing of buckets used in malware analysis unless absolutely necessary and reviewed on an ongoing basis.
Implement least-privilege bucket policies that explicitly deny access except to approved sandbox roles or accounts
Use resource-based policies to help prevent cross-account access unless specifically required
Enable Versioning in Amazon S3 to help prevent accidental or malicious overwrites
Enable Amazon S3 Object Lock (if needed) to help prevent deletion of critical log files or samples
Monitoring, guardrails, and operational controls
A secure malware analysis environment in AWS must balance controlled flexibility with enforced boundaries. Even in an isolated VPC, human error is possible, tools might not operate as intended, and malicious code can attempt to escape or persist. That’s why you need layers: visibility, guardrails, and operational discipline.
This section covers how to monitor activity, detect threats, and enforce sandbox boundaries—whether you’re operating in an organization within AWS Organizations or a standalone account.
Monitoring activity using AWS CloudTrail
AWS CloudTrail is an AWS service that helps you enable operational and risk auditing, governance, and compliance of your AWS account. Actions taken by a user, role, or an AWS service are recorded as events in CloudTrail.
GuardDuty: Native threat detection
GuardDuty is a threat detection service that continuously monitors your AWS environment for malicious activity through the analysis of VPC Flow Logs, CloudTrail logs, and DNS logs. When implemented in a malware analysis environment, GuardDuty generates findings that detail potential security threats that it detects through machine learning models and threat intelligence feeds. Security teams should note that in a malware analysis sandbox, GuardDuty will generate findings for activities that might be intentional parts of the analysis process. It’s crucial to establish proper procedures for reviewing and categorizing these findings, distinguishing between expected sandbox behavior and actual security concerns.
Organizations should configure appropriate notification workflows and create baseline expectations for normal sandbox operations. This enables security teams to focus on findings that might indicate sandbox escape attempts or unexpected malicious activities while properly managing expected alerts from normal analysis operations. Each finding provides detailed information about the detected activity, including the affected resources, severity level, and specific details about the potential security issue, enabling teams to make informed decisions about necessary response actions.
Service control policies: Policy guardrails in AWS Organizations
For malware analysis environments, we recommend operating the sandbox account within AWS Organizations rather than as a standalone account. This strategy uses SCPs to establish critical security boundaries while maintaining necessary operational flexibility. Operating within Organizations enables centralized security policy enforcement, clear isolation from production workloads, and enhanced audit capabilities—all essential for secure malware analysis operations. While this approach might require additional governance overhead and careful organizational unit (OU) structure design, the security benefits outweigh these considerations.
By placing the malware analysis account in a dedicated OU with specific SCPs, you can enforce strict security controls while enabling necessary analysis capabilities. This organizational structure maintains clear separation from production workloads while providing the robust security controls needed for malware analysis activities. The ability to implement granular permission boundaries through SCPs, combined with centralized logging and monitoring, creates a more secure and manageable environment for conducting malware analysis while helping to prevent potential security risks from affecting other organizational resources.
For malware analysis we recommend implementing SCPs to enforce the following:
Deny accounts from leaving the organization: When an account leaves an organization, it’s no longer bounded by the controls established within that organization. This SCP can be used to help prevent someone from moving an account to a different organization that has a set of different controls that aren’t as restrictive and there is risk of someone making undesired changes.
Deny access to specific AWS Regions (reduce surface area): AWS has 37 Regions, yet customers scope down to one Region when it comes to malware analysis. This SCP gives you the ability to limit the Regions where AWS resources can be deployed, thus reducing the scope of impact.
Help prevent escalation of privileges: Privilege escalation refers to the ability of a threat actor to use stealthy permissions to elevate permission levels and compromise security. To help prevent privilege escalation, use SCPs to help prevent users in your accounts from using administrative IAM actions, except from approved roles. With this policy, administrative IAM actions can be restricted to delegated IAM admins. You can use permissions boundaries to safely delegate permissions management to trusted employees or a continuous integration and delivery CI/CD pipeline.
What if your account isn’t a part of an organization?
If your environment doesn’t use AWS Organizations and SCPs aren’t available, you can enforce similar boundaries using IAM permissions boundaries and identity-based policies:
Use permissions boundaries for roles used in the sandbox to prevent them from escalating or accessing other AWS services
Explicitly deny sensitive IAM actions (such as iam:*Policy, iam:PassRole) at the identity policy level
Implement resource tagging policies through AWS Organizations or custom enforcement logic to provide resource ownership and control
Operational best practices
The following best practices help make sure your sandbox remains ephemeral, controlled, and cost-aware.
Immutable by design: Treat analysis virtual machines (VMs) as disposable. Never reuse a detonation instance across sessions
Automated teardown: Use lifecycle policies or automation scripts to destroy resources after each use
Cost and drift control: Tag relevant resources (Environment=sandbox, Owner=security), enable AWS Budgets, and monitor with AWS Config to help maintain sandbox hygiene
Setup checklist
This checklist provides a step-by-step guide for creating a secure malware analysis environment in AWS, focusing on isolation, access control, monitoring, and cost.
Submit a formal request for approval through the penetration testing and simulated events form for malware testing. This needs to be done for every simulated event you plan on running.
Account setup
Use a dedicated AWS account for malware analysis (if the account is part of an organization, also use a dedicated OU).
Apply SCPs to restrict Region access, deny IAM changes, and enforce tagging and encryption.
VPC design
Create a dedicated sandbox VPC with no internet gateway or NAT gateway.
Disable DNS resolution at the VPC level (unless simulating Amazon EC2 behavior internally).
Verify that no public IPs are assigned to any resource.
Use security groups and network access control lists (network ACLs) to restrict ingress to known internal IP ranges.
Disable SSH; use Systems Manager Session Manager for access.
Use EC2 Auto Recovery or instance refresh patterns for teardown between analyses.
Storage and logging
Use encrypted S3 buckets for sample storage and log archival.
Make sure that audit logs (CloudTrail) are retained and protected.
Store logs centrally in a secure logging account.
Monitoring and detection
Enable GuardDuty for behavioral detection (VPC, API, and DNS analysis).
Enable AWS Config rules to detect drift (for example, internet gateways and public IPs).
Set up a dedicated CloudTrail log for the relevant account with multi-Region logging for full traceability.
Enabling VPC Flow Logs and Amazon Route 53 query logs might provide additional visibility into how the malware is operating.
IAM and permissions
Generate policies using AWS IAM Access Analyzer policy generation. You can use this to generate an IAM policy that is based on access activity for an entity. You can then refine the policy to exactly what is needed to operate in the account and adhere to the principle of least privilege.
Apply permission boundaries to sandbox roles to restrict privilege scope.
IAM permissions should forbid/minimize cross account access where applicable
Restrict use of services outside the malware analysis scope. See the following documentation on how to only allow the use of a subset of services in your environment
Tag to assist with financial allocation, ownership and support use cases (for example, Environment=sandbox, Purpose=malware-analysis). For more information, see Best Practices for Tagging AWS Resources.
Conclusion
Malware analysis can be an effective addition to modern security operations—but when conducted in cloud environments, it demands strict architectural discipline and adherence to system-level policies. AWS offers the tools and services needed to build secure, isolated, and policy-aligned environments.
This guide has outlined a defense-in-depth approach that you can use to create a malware analysis sandbox in AWS that prioritizes isolation, visibility, and control. From VPC configuration and IAM boundaries to monitoring and organizational guardrails, each layer contributes to a controlled and repeatable environment while reducing risk to your broader AWS environment.
By following these patterns, you can empower your security teams to investigate threats without compromising the integrity, security, or governance of your broader AWS environment.
The guest data of AWS customers running on the AWS Nitro System and Nitro Hypervisor is not at risk from a new attack dubbed “L1TF Reloaded.” No additional action is required by AWS customers; however, AWS continues to recommend that customers isolate their workloads using instance, enclave, or function boundaries as described in AWS public documentation. The AWS Nitro System and Nitro Hypervisor are designed to help protect against this class of attacks.
The Nitro Hypervisor’s protection against L1TF Reloaded is not the result of a specific patch or reactive mitigation, but rather due to the proactive approach to security at AWS. The fundamental security design principles of the Nitro Hypervisor—particularly the implementation of secret hiding through an extensive use of the eXclusive Page Frame Ownership (XFPO) concept (in some contexts referred to as process-localmemory)—provides robust protection against this class of attacks. L1TF Reloaded represents an innovative approach to transient execution attacks, showing how threat actors can combine seemingly mitigated vulnerabilities to create new attacks that are more than the sum of their parts. The research is impressive and constructs a multilayer end-to-end exploit with real-world applicability. AWS sponsored a portion of this work and would like to thank the researchers for their collaboration and coordinated disclosure. The remainder of this post is a deeper dive into the published research.
The Nitro Hypervisor: Purpose-built for security
The Nitro Hypervisor is a foundational component of the AWS Nitro System, designed from the ground up with security as a primary consideration. Unlike traditional hypervisors that evolved from general-purpose operating systems, the Nitro Hypervisor, which is based on Linux/Kernel-based Virtual Machine (KVM), has been intentionally minimized and purpose-built with only the capabilities needed to perform its assigned functions.
The Nitro Hypervisor’s responsibilities are deliberately constrained: it receives virtual machine (VM) management requests from the Nitro Controller, partitions memory and CPU resources using hardware virtualization features, and assigns PCIe devices, including both Physical (PF) and Single Root I/O Virtualization (SR-IOV) Virtual Functions (VF) provided by Nitro hardware (such as NVMe for EBS and instance storage, and Elastic Network Adapter for networking) and third party devices (GPUs), to VMs. Critically, the Nitro Hypervisor excludes entire categories of functionality that exist in conventional hypervisors. There is no networking stack, no general-purpose file system implementations, no peripheral device-driver support, no shell, and no interactive access mode. This meticulous exclusion of non-essential features helps avoid entire classes of issues and attack vectors that can impact other hypervisors, such as remote networking attacks or driver-based privilege escalations.
Understanding transient execution vulnerabilities
To understand why the Nitro Hypervisor’s defenses are effective against L1TF Reloaded, it is important to first understand the fundamentals of transient execution vulnerabilities that emerged in 2018. Modern CPUs implement out-of-order and prediction-based speculative execution to optimize performance by executing operations before they are needed or before the CPU knows whether it should perform them at all. When predictions are wrong, or the CPU encounters execution faults, the CPU will eventually detect these errors and roll back all speculatively computed changes to the architectural state. However, traces of these “transient executions” remain detectable in the microarchitectural state, such as data that was speculatively loaded into CPU caches, creating opportunities for data leakage through side-channel attacks.
Half-Spectre gadgets: Incomplete but dangerous code patterns
While traditional Spectre attacks require complete “gadgets” that both access secret data and transmit it through side channels, researchers have identified a weaker class of gadgets called “half-Spectre gadgets.” These are incomplete Spectre-like code patterns that perform speculative out-of-bounds memory accesses, but lack the transmission component that would make them immediately exploitable.
A classic Spectre v1 gadget contains two key elements: first, a speculative access that loads secret data (such as x = A[index] where index is out of bounds), and second, a transmission mechanism that leaks the data through a side channel (such as y = B[64 * x] that creates cache patterns based on the secret value). Half-Spectre gadgets contain only the first element—the speculative access—without the transmission component.
Because half-Spectre gadgets appear harmless in isolation, they are commonly found throughout software, including hypervisors. These gadgets typically arise from array-indexing operations where bounds checking occurs, but the transient execution window allows out-of-bounds access before the bounds check resolves. The gadgets can be either absolute (directly providing the address to access) or relative (controlling an offset from a base address), with relative gadgets being more common due to typical array indexing patterns. The key insight of L1TF Reloaded is that half-Spectre gadgets, while harmless alone, become dangerous when combined with other vulnerabilities like L1TF. A threat actor can trigger a half-Spectre gadget in the hypervisor to speculatively load arbitrary data into the L1 data cache and then use L1TF to extract that cached data—effectively turning the “harmless” half-Spectre gadget into a complete gadget.
L1 Terminal Fault (L1TF), discovered in January 2018 and disclosed in August 2018, represents a significant type of transient execution vulnerability that affects Intel processors up to Coffee Lake. These processors are used in some 5th generation EC2 instance families and all older instance types. L1TF leverages faulty address translations during transient execution when accessing invalid page table entries. Under normal operation, when a CPU encounters a Page Table Entry (PTE) with the present bit cleared or reserved bits set, address translation should halt immediately. However, during transient execution, Intel processors affected by L1TF ignore these invalid page table states and utilize a partially translated address. If the target data exists in the L1 data cache, the CPU will speculatively load it and make it available to subsequent instructions, even though the access should be blocked. This behavior is particularly problematic in virtualized environments. A malicious guest operating system can deliberately clear present bits in its own page tables to trigger terminal faults. When this happens, the CPU skips the normal host address translation process and passes the guest physical address directly to the L1 data cache. This allows the threat actor to potentially read any cached physical memory on the system, regardless of ownership or privilege boundaries. For affected processors, comprehensive software mitigation requires expensive measures, like disabling Simultaneous Multi-Threading (SMT), flushing the L1 data cache on every context switch, or disabling Extended Page Tables (EPT) entirely—performance costs so significant that many systems implement only partial mitigations.
The L1TF Reloaded attack: Exploiting mitigation gaps using Spectre
The research paper demonstrates how threat actors can combine half-Spectre gadgets with L1TF to create a powerful attack vector against hypervisors that lack complete implementation of the previously outlined mitigations. The attack shows that vulnerabilities considered individually mitigated can still be leveraged if combined in novel ways. L1TF Reloaded works by leveraging the fact that while L1TF mitigations like L1 data cache flushing and core scheduling help prevent guest-to-guest attacks, they do not fully mitigate guest-to-host attacks. The attack operates across logical cores that share the L1 data cache in an SMT core. On one logical core, the threat actor triggers a half-Spectre gadget. By mistraining the branch predictor, the threat actor causes the hypervisor to speculatively access out-of-bounds memory, loading sensitive data into the shared L1 data cache. Simultaneously, on the other logical core, the threat actor uses L1TF to extract the cached data. While other research papers have demonstrated L1TF exploitation, this research paper has successfully demonstrated a multilayer end-to-end attack on upstream Linux/KVM and other cloud providers. The authors were able to use an existing half-Spectre gadget, break host Kernel Address Space Layout Randomization (KASLR), gain host address translation capability, find all the processes running on the host, identify the victim VM, break guest KASLR, gain guest address translation capability, identify the init process in the victim VM, enumerate the child processes of the init process, identify the nginx webserver process, locate the private TLS certificate in the guest process heap, and finally leak the private TLS certificate. However, when they attempted the same attack on AWS instances, they encountered a critical limitation: while they could leak some non-sensitive host data, they were unable to access guest data due to what they described as “an undocumented defense in the hypervisor that unmaps victim data from it. This “undocumented defense” is the Nitro Hypervisor’s implementation of secret hiding—a fundamental architectural decision that prevented this type of attack.
Traditional hypervisor designs follow a hierarchical privilege model where each higher level of privilege is granted access to all lower level memory. In conventional systems, the hypervisor running at the highest privilege level can access all VM memory, ostensibly for legitimate management purposes. However, this design creates a vulnerability: if a threat actor can trick the hypervisor into speculatively accessing guest data, that data becomes available for extraction through side-channel attacks. The Nitro Hypervisor takes a fundamentally different approach through a technique called secret hiding. Instead of following the traditional model where the hypervisor has access to all VM memory (Figure 1), the Nitro Hypervisor makes sure that guest data is not present in the hypervisor’s virtual address space. By removing VM memory pages from the hypervisor’s virtual address space (Figure 2), we avoid the possibility of transient execution attacks accessing guest data, even if a threat actor successfully triggers gadgets within the hypervisor.
Figure 1: Memory view of the hypervisor without mitigations in the context of VM1
Figure 2: Memory view of the Nitro Hypervisor in the context of VM1. While no guest memory is mapped, only the state of the active guest can be accessed with other guest states remaining inaccessible.
This architectural decision means that when transient execution occurs in the Nitro Hypervisor—whether through L1TF, half-Spectre gadgets, or other transient execution vulnerabilities—there is simply no guest data available to be leaked, creating a barrier against this class of vulnerabilities. The Nitro Hypervisor retains access only to its own data, but guest data remain isolated and inaccessible. While we could not anticipate L1TF Reloaded exactly, we knew transient execution vulnerabilities would continue to be discovered and built defense-in-depth mechanisms which blocked extraction of guest data on AWS instances. This design decision was made proactively during the Nitro Hypervisor development, based on our threat model that explicitly includes guest-to-host attacks that exploit the hypervisor. By assuming that threat actors might find ways to trigger transient execution vulnerabilities within the Nitro Hypervisor—whether through known vulnerabilities like L1TF or future unknown attack vectors—we designed the system to limit the scope of such attacks from the outset.
Beyond memory: Protecting guest CPU context
When VMs are scheduled and context-switched, guest CPU context information such as general-purpose and floating-point register content must be saved and restored. Guest CPU context can contain highly sensitive information. Registers might contain cryptographic keys, memory addresses that could defeat Address Space Layout Randomization (ASLR), or other secrets that applications rely on for security. In traditional hypervisors, guest CPU context is often stored in memory accessible to the hypervisor, creating another potential target for transient execution attacks. The original XPFO (eXclusive Page Frame Ownership) implementation makes sure that either user space or the kernel—but not both—can access a memory page and does not protect guest CPU context since it is exclusively owned by the kernel. The Nitro Hypervisor extends the XPFO concept to guest CPU context by saving it in memory—also known as process-local memory—that is solely mapped by process-specific kernel Page Table Entries (PTEs), as is shown in Figure 2 above. This memory is specifically designed to be only accessible from the Nitro Hypervisor in the context of the process it belongs to. This makes sure that even if a threat actor successfully triggers transient execution vulnerabilities within the Nitro Hypervisor, they cannot access the guest CPU context from other guests. The researchers confirmed this protection, noting that the AWS threat model accounts for guest-to-host attacks and that secret hiding, combined with existing L1 data cache flushing and core scheduling, prevented them from leaking guest data. This comprehensive approach to secret hiding demonstrates the defense-in-depth philosophy of the Nitro System: rather than protecting only known attack vectors, AWS systematically identifies and protects potential sources of guest data leakage, including both VM memory and guest CPU context.
Applying secret hiding principles to Xen
Most AWS Xen instances are now running on the AWS Nitro System and hence enjoy the benefits of the Nitro Hypervisor thanks to Xen-on-Nitro. For our portfolio of instance families running on the AWS Xen Hypervisor, we have implemented similar secrethiding principles to provide protection against transient execution attacks.
Defense in depth: The Nitro Hypervisor’s proven security model
L1TF Reloaded represents an important advancement in our understanding of how seemingly mitigated vulnerabilities can be combined to create new attack vectors. The researchers of the Rain paper demonstrated how L1TF and half-Spectre gadgets can work together to leak guest data from hypervisors. We are pleased to support their work and collaborate with them. The Nitro Hypervisor’s protection against L1TF Reloaded is not the result of a specific patch or reactive mitigation, but rather due to AWS deeply investing in securing multi-tenant cloud environments against sophisticated adversaries. This research reinforces our confidence in the Nitro System’s security model against both known and unknown attack vectors. The proactive security approach of AWS includes designing systems with defense-in-depth principles from the ground up. The threat landscape will continue to evolve, and at the same time, the defense-in-depth mechanisms built into the Nitro Hypervisor and our other products and services will continue to help protect AWS customers from sophisticated attacks, while maintaining the performance and functionality they depend on.
Recent security research has highlighted the importance of CI/CD pipeline configurations, as documented in AWS Security Bulletin AWS-2025-016. This post pulls together existing guidance and recommendations into one guide.
Continuous integration and continuous deployment (CI/CD) practices help development teams deliver software efficiently and reliably. AWS CodeBuild provides managed build services that integrate with source code repositories like GitHub, GitLab, and other Source Control Management (SCM) systems. While this guide uses GitHub examples, the security principles and webhook configuration approaches apply to other supported source control systems.
However, certain configurations require careful attention. We strongly recommend that you do not use automatic pull request builds from untrusted repository contributors without proper security controls and a clear understanding of your threat model. This configuration allows untrusted code to execute in your build environment with access to repository credentials and environment variables. Webhook configurations determine which repository events trigger builds and what code gets executed during the build process. Understanding these configurations is essential for maintaining appropriate security boundaries while preserving the automation benefits that make CI/CD valuable.
Security teams and DevOps engineers can use these practical approaches to configure AWS CodeBuild to meet their security goals while maintaining development velocity. We’ll explore webhook configurations, trust boundaries, and implementation strategies that emphasize threat model assessment, least-privilege access, and proactive monitoring of your pipeline configurations.
Security of the pipeline implications
Under the shared responsibility model, while AWS manages the security of the underlying AWS CodeBuild infrastructure, customers are responsible for securing their pipeline configurations, access controls, and the code that runs within their build environments. This shared responsibility is critical when considering the security of the pipeline itself.
When AWS CodeBuild processes pull requests automatically, it builds the code in an environment with access to repository credentials, environment variables, and potentially sensitive information. This creates specific security of the pipeline considerations:
Repository access: AWS CodeBuild projects require repository credentials to read source code and create webhooks. These credentials provide specific permissions that vary based on your configuration.
Build execution: The build process runs the retrieved source code, which may include build scripts, dependency definitions, or test files from pull requests.
Build environment: AWS CodeBuild environments may have access to environment variables, AWS credentials, or other configuration data needed for the build process.
Establishing trust boundaries
Effective security of the pipeline starts with clearly defining trust boundaries for different types of code contributions:
Internal contributors: Team members with repository write access who have been verified through your organization’s access management processes.
External contributors: Contributors from outside your organization who submit pull requests from forked repositories.
Automated processing: Code that runs without manual review as part of the build process.
These trust boundaries form the foundation for threat modeling your specific environment. Internal and trusted environments can often rely more heavily on automation with contributor filtering and least-privilege controls. Public and open source projects require more stringent controls due to the inherent risks of processing untrusted contributions – these environments benefit from stricter webhook filtering, comprehensive approval gates, or the self-hosted GitHub Actions runner approach discussed later.
The key principle is finding the appropriate balance between security controls and development velocity based on your specific risk profile and contributor trust levels. With these considerations in mind, let’s examine how to assess and configure your current AWS CodeBuild webhook settings.
Configuring secure webhooks
Webhooks represent the preferred mechanism by which external events trigger AWS CodeBuild processes. When properly configured, webhooks provide a powerful and efficient way to automate your build processes in response to repository changes. However, improper webhook configuration can create security vulnerabilities by allowing untrusted code to execute in privileged environments.The security of your webhook configuration depends on understanding exactly which events trigger builds, what level of access those builds have, and what code gets executed during the build process. This section provides a comprehensive approach to authoring, assessing, configuring, and maintaining secure webhook configurations.
Assessing current webhook configurations
Begin by reviewing your existing AWS CodeBuild projects to understand their current webhook configurations. The following AWS CLI commands provide a systematic approach to gathering this information:
# List all CodeBuild projects in your region
aws codebuild list-projects --region us-west-2

# Retrieve detailed configuration for analysis
aws codebuild batch-get-projects --region us-west-2 \
  --names $(aws codebuild list-projects --region us-west-2 \
  --query 'projects[*]' --output text | tr '\n' ' ')
When you run these commands, pay particular attention to the webhook section in the output. This section contains the filterGroups configuration, which determines exactly which repository events trigger builds.
Now that you understand how to review your current setup, let’s examine common configuration patterns and their security implications.
Webhook configuration patterns
Understanding common webhook configuration patterns helps you quickly identify potential security concerns and implement appropriate improvements. The following patterns represent different approaches to webhook configuration, each with specific security implications.
Note: These patterns are not recommended for use and are shown here to help you identify configurations that may need attention.
This configuration allows contributors who can create a pull request to trigger code execution in your build environment. We strongly recommend that you do not use automatic pull request builds from untrusted repository contributors.
Configuration requiring immediate review – No event filtering
Without filtering, this configuration can trigger builds for a wide variety of repository events.
Recommended secure webhook configurations
The following configurations represent security best practices that balance automation benefits with appropriate security controls. These patterns help to reduce security risks while maintaining the development velocity that makes CI/CD valuable.
Push-based builds (Recommended for most use cases)
Push-based builds make sure that only users with repository write access can trigger builds, which means contributors have already been vetted through your repository’s access control mechanisms.
Organizations that rely heavily on external open-source contributions may find this approach too restrictive. For example, a popular open-source project that receives dozens of pull requests daily from external contributors would need to manually merge each contribution before builds can run, significantly slowing down the contribution review process. In such cases, contributor-filtered builds or the self-hosted GitHub Actions runner approach may be more appropriate.
Contributor-filtered builds (Recommended for trusted contributors only)
This configuration allows pull request builds from specific, trusted contributors.
Important: Filtering applies to the GitHub account ID, not repository ownership. Contributors working from forked repositories can still introduce untrusted code that executes in your build environment.
Before implementing these configurations in your environment, consider these key factors that will help facilitate a smooth transition.
Webhook configuration implementation steps
While implementing the webhook security measures below, consider these broader practices:
Threat modeling: Assess your specific risk profile before selecting approaches.
Infrastructure as code: Use Infrastructure as Code (IaC) tools for production implementations.
Gradual implementation: Implement changes incrementally with observation periods.
Testing and rollback: Validate changes in non-production environments first.
The following implementation approach moves from most restrictive to more automated configurations. Choose the approach that best fits your organization’s risk tolerance and operational requirements. This three-step process moves from the most restrictive approach to more automated configurations while maintaining security controls. Each step builds upon the previous one, creating layers of security that work together to protect your pipeline.
Note: The following examples use the AWS CLI for demonstration purposes. Similar configuration steps can be performed using the AWS Management Console through the AWS CodeBuild project settings.
Step 1: Configure push-only builds
Push-based builds help make sure that only verified contributors can trigger builds. This approach is more secure, because contributors must already be vetted through your repository’s access control mechanisms before they can push code. Configure your webhook to trigger only on push events:
Branch-based filtering adds an additional layer of security by making sure that builds are triggered only for changes to specific branches. This approach recognizes that not all branches in a repository have the same security requirements or risk profiles.
For example, changes to main or production branches typically require more stringent security controls than changes to feature or development branches. By implementing branch-based filtering, you can apply appropriate security measures based on the criticality and exposure of different branches.
Contributor filtering can be used to manage pull request builds by allowing automation for trusted contributors while requiring manual review for others. This approach recognizes that different contributors represent different risk profiles and should be treated accordingly.
The first step in implementing contributor filtering is identifying the GitHub user IDs of your trusted contributors.
Retrieve GitHub user IDs for trusted contributors:
Important: Contributor allowlists require ongoing maintenance as team membership changes. Consider using Infrastructure as Code templates like the Cloudformation examples to manage webhook configurations and contributor lists in version control.
Webhook filtering provides the first layer of security by controlling which events trigger builds. However, comprehensive pipeline security requires additional controls around the permissions and credentials available to those builds once they execute. The following section covers how to implement defense-in-depth security through proper access controls and credential management.
Access control and credential management
This section covers specific approaches to limit the permissions available to build processes, scope repository access tokens appropriately, and create isolated environments that help contain potential security issues. These practices work together to implement defense-in-depth security while maintaining the operational benefits of automated CI/CD workflows.
Implementing least-privilege access
AWS CodeBuild projects require IAM service roles to access AWS resources during the build process. The principle of least privilege dictates that each role should have only the minimum permissions necessary to perform its intended function. By creating separate, purpose-built IAM roles for different types of builds, you can help reduce the potential impact of unauthorized access to build environments.
The following examples demonstrate how to structure minimal IAM roles for different build scenarios. These examples serve as starting points that you should customize based on your specific requirements, adding only the permissions your builds actually need.
Service role configuration
Create minimal IAM roles that provide only the permissions required for specific build types:
Leveraging IAM Access Analyzer for CodeBuild security
AWS IAM Access Analyzer can generate least-privilege policies for your AWS CodeBuild service roles based on actual CloudTrail activity from your build executions. This eliminates guesswork by analyzing the specific AWS API calls your builds make, rather than requiring you to predict what permissions might be needed.
After running your CodeBuild projects for a representative period, use Access Analyzer’s policy generation feature to create refined policies. This approach proves particularly valuable for complex build processes where the required permissions might not be immediately obvious.
When processing external contributions, the principle of least privilege becomes important for repository access tokens. If an unauthorized user gains access to a token through an untrusted build, properly scoped tokens limit the potential impact to only the permissions necessary for the build process.
Configure fine-grained GitHub Personal Access Tokens with minimal permissions to help reduce this risk. Even if accessed inappropriately, a properly scoped token can only read source code (already accessible through the PR) and write status messages – it cannot push code, modify repository settings, or access other repositories.
The following permissions represent the minimum required access for processing external pull requests, demonstrating how to limit token scope to only essential operations:
contents:read – Read-only access to repository source code (already accessible through the PR)
statuses:write – Write commit status messages only (cannot modify code or settings)
metadata:read – Access basic repository information (name, description, public status)
Important: Use fine-grained personal access tokens restricted to the target repository only. Otherwise, this could allow access to other repositories beyond what is necessary for the build process.
This scoped approach ensures that even if a token is accessed inappropriately, the potential impact is limited to reading already-accessible information and writing status messages. The token cannot push code, modify repository settings, create webhooks, or access other repositories.
Credential storage and rotation
The following examples demonstrate how to securely store and reference these tokens using AWS Secrets Manager. AWS Secrets Manager provides automatic rotation capabilities, encryption at rest and in transit, and fine-grained access controls that help prevent tokens from being exposed in build logs or configuration files. This approach also enables centralized token management across multiple CodeBuild projects while maintaining audit trails of token access.
The centralized storage enables credential rotation capabilities, helping to minimize the window of exposure compared to hardcoded tokens that would require infrastructure updates to rotate.
Build environment isolation
Establishing proper build environment security controls helps maintain pipeline integrity. The foundation of this approach involves implementing separation between test and release builds, which helps prevent credential escalation and limits the scope of potential unauthorized access.
Network isolation represents another layer of protection. Configure VPC settings specifically for builds that process external code by creating dedicated security groups with carefully restricted outbound access. These security groups should permit only necessary connections, such as HTTPS traffic for downloading legitimate dependencies, while blocking unnecessary network access that could be exploited by untrusted code.
Update your AWS CodeBuild projects to leverage this network isolation through proper VPC configuration, including specified subnets and the restricted security groups you’ve established.
Multi-stage pipeline security with human review gates
Implementing security controls across multiple pipeline stages helps provide proper validation and approval processes, especially when processing external contributions. This approach combines automated scanning with human oversight to identify issues before they reach production.
Code inspection integration
Configure your build specification to automatically run security tools like Automated Security Helper during the build process. These tools scan for code security issues and dependency problems, generating detailed reports for review.
Structure the build to continue execution even when issues are found, allowing all scans to complete while automatically failing builds that contain security problems requiring attention. Store all scan artifacts to provide security teams with detailed information for approval decisions.
Manual approval gates
After code passes automated security scans, configure manual approval gates to involve human reviewers for final validation. This helps provide appropriate human review before proceeding to sensitive environments.
The access control and credential management practices outlined in this section provide specific, actionable approaches to implementing defense-in-depth security for AWS CodeBuild pipelines. These controls work together to create multiple layers of protection while maintaining the operational benefits that make CI/CD automation valuable.
Alternative approach – Self-hosted GitHub Actions runners
AWS CodeBuild’s self-hosted GitHub Actions runner capability addresses the configuration issues described in this guide by isolating repository credentials from the build environment and using GitHub Actions’ execution framework instead of AWS CodeBuild webhook processing.
For organizations that need to process external contributions automatically, configure runners with proper access controls, use ephemeral runners to minimize persistent access, and apply standard security practices for runner management.
The security controls outlined in previous sections provide protection at build time, but comprehensive defense-in-depth security requires ongoing visibility into your pipeline activities and configuration changes. Monitoring and compliance tracking serve as the final layer of your security framework, helping you detect configuration drift, audit access patterns, and maintain security posture over time.
AWS CloudTrail provides detailed logging of API calls made to AWS services, including AWS CodeBuild. Enable CloudTrail logging to create a comprehensive audit trail of all build-related activities in your environment.
AWS Config tracks AWS CodeBuild project configurations over time, providing an inventory of projects and a complete history of configuration changes. This includes webhook modifications, resource relationships, and compliance tracking across your environment. Configure AWS Config to monitor AWS CodeBuild projects and receive notifications when security-critical configurations like webhook filters are modified. For more information, see the AWS Config sample with CodeBuild documentation.
Conclusion
Implementing defense-in-depth security for AWS CodeBuild pipelines requires layered controls that address different security considerations. The most effective approach combines webhook filtering, access controls, credential management, and monitoring to provide comprehensive protection. By implementing these layered practices outlined in this guide, you can maintain development velocity while establishing robust pipeline security. Key principles to remember:
Assess your threat model first – different projects require different security approaches
Establish clear trust boundaries between different types of contributors
Use webhook filtering to control when builds are triggered
Implement least-privilege access for build environments
Monitor and audit configurations regularly using AWS Config and CloudTrail
Store secrets in AWS Secrets Manager or SSM Parameter Store and enable rotation
AWS CodeBuild provides the flexibility to implement these security measures while maintaining the operational benefits that make pipelines valuable. Apply the configurations and mitigations in this guide based on your specific risk profile and operational requirements. Regular review and updates of your configurations will help your pipelines remain secure as your organization’s needs evolve.
Stay tuned for additional practical guides for implementing CI/CD security best practices. If you have questions or feedback about this post, including suggestions for topics that would help you most, start a new thread on re:Post : Begimher or contact AWS Support.
As introduced in Part 1 of this series, implementing secure file sharing solutions in AWS requires a comprehensive understanding of your organization’s needs and constraints. Before selecting a specific solution, organizations must evaluate five fundamental areas: access patterns and scale, technical requirements, security and compliance, operational requirements, and business constraints. These areas cover everything from how files will be shared and what protocols are needed, to security measures, day-to-day operations, and business limitations.
See Part 1 of this series for detailed information about each of these fundamental areas and their specific considerations. Part 1 also covers solutions including AWS Transfer Family, Transfer Family web apps, and Amazon Simple Storage Service (Amazon S3) pre-signed URLs. This part continues our analysis with additional AWS file sharing solutions to help you make an informed decision based on your specific requirements.
Solutions
Let’s start by looking at the various file sharing mechanisms that AWS supports. The following table identifies the key AWS services needed for each solution, describes the security and cost implications of the solutions, and describes their complexity and protocol support capabilities.
Solution
AWS services
Security features
Cost*
Region control
CloudFront signed URLs
CloudFront, Amazon S3, and Lambda
Optional edge security using AWS Lambda@Edge, WAF integration, SSL/TLS, geo restrictions, and AWS Shield Standard (included automatically)
Content delivery network (CDN) costs, request pricing, and data transfer fees
Global service by design; origin can be AWS Region-specific
Amazon VPC endpoint service
AWS PrivateLink, Amazon VPC, and Network Load Balancer (NLB)
Complete network isolation, private connectivity, and multi-layer security
Endpoint hourly charges, NLB costs, and data processing fees
Service endpoints are strictly Region-specific; must create endpoints in each Region where access is needed
Data transfer fees apply based on standard S3 rates
Amazon VPC endpoint charges apply when using VPC endpoints with access points
Access points are Region-specific
Each access point is created in the same Region as its S3 bucket
Cross-Region access requires separate access points in each Region
VPC-specific access points are limited to the VPC’s Region
The following table shows the solutions described in Part 1.
Solution
AWS services
Security features
Cost*
Region control
AWS Transfer Family
Transfer Family, Amazon S3, API Gateway, and Lambda
Managed security, encryption in transit and at rest, IAM integration, and custom authentication
$0.30 per hour per protocol, data transfer fees, and storage costs
Can deploy to specific AWS Regions, can only transfer files to and from S3 buckets in the same Region
Transfer Family web apps
Transfer Family, S3, and CloudFront
Browser-based access, IAM Identity Center integration, and S3 Access Grants
Pay-per-file operation, CloudFront costs, and storage costs
Uses CloudFront (global) for web access, but backend components can be Region-specific
Amazon S3 pre-signed URLs
S3
Time-limited URLs, IAM controls for URL generation, and HTTPS
S3 request and data transfer fees
Can be restricted to specific Regions
Serverless application with Amazon S3 presigned URLs
S3, Lambda, and API Gateway
Time-limited URLs, HTTPS, IAM controls, customizable authentication
Pay per request and minimal infrastructure cost
Components can be Region-specific
* Pricing information provided is based on AWS service rates at the time of publication and is intended as an estimation only. Additional costs may be incurred depending on your specific implementation and usage patterns. For the most current and accurate pricing details, please consult the official AWS pricing pages for each service mentioned.
Let’s examine each of the solutions in detail. Part 1 talked about AWS Transfer Family, Transfer Family web apps, and Amazon S3 pre-signed URLs. Here in Part 2, we explain the remaining solutions to help you make the right choice for your use case.
CloudFront signed URLs with Amazon S3
Amazon CloudFront signed URLs combine Amazon S3 storage with the global edge network of CloudFront to deliver files securely with lower latency.
CloudFront edge locations cache content geographically closer to users, which usually reduces latency and gives better performance for users. CloudFront also reduces the number of origin requests to Amazon S3. CloudFront integration with AWS Shield and AWS WAF provides options for additional security layers, helping to protect against DDoS events and unintended requests. You can use custom domains with AWS-provided or your own SSL/TLS certificates managed through AWS Certificate Manager (ACM), helping to facilitate secure connections from users to edge locations.
When a user requests a file, the system generates a signed URL using either a CloudFront key pair or a custom trusted signer (such as Lambda Edge) that includes security parameters such as IP restrictions, time windows, and custom policies. The major difference is the content distribution network (CDN) making performance faster by caching data geographically close to the user downloading it.
The built-in logging and monitoring capabilities of CloudFront provide detailed insights into content access patterns, cache hit ratios, and security events. CloudFront integrates seamlessly with Amazon S3 to support origin access identity (OAI), helping to make sure that the S3 objects can be accessed only through CloudFront and not directly through S3 APIs.
Figure 1: CloudFront signed URLs with Amazon S3 architecture
Pros
If Amazon S3 pre-signed URLs sound good, but you need higher performance at a global scale, CloudFront signed URLs are the right choice. The AWS global edge network has points of presence (POPs) all over the world, which significantly reduces latency for users and minimizes data transfer costs through caching. This architecture provides substantial cost savings for frequently accessed content, because edge locations serve cached copies without retrieving objects from the S3 origin. The integration with AWS security services offers protection against various threats, including sophisticated distributed denial of service (DDoS) events and web application issues, making it particularly suitable for public-facing file sharing applications. Choose CloudFront instead of S3 if you tend to make the same file available to many people who download it many times, such as in software distribution or documentation distribution.
The solution’s security model provides extensive flexibility in access control implementation. You can define granular permissions through custom policies, implement geo-restriction rules, and enforce IP-based access controls. The ability to use custom TLS certificates and domains maintains brand consistency while helping to facilitate secure communications. The integration with AWS WAF enables advanced request filtering and rate limiting, while detailed access logging and real-time metrics provide visibility into content delivery and security events. The solution’s support for both signed URLs and signed cookies offers flexibility in implementing various access control scenarios. Signed cookies are used when you want to provide access to multiple restricted files. For example, if you need to provide access to many files in a private directory, you can use signed cookies to avoid having to create individual signed URLs for each file. When choosing between CloudFront signed URLs (ideal for individual file access) or signed cookies (better for providing access to multiple files, like a subscriber’s content library), consider your content distribution needs and whether your clients support cookies.
Cons
If you implement CloudFront, you must develop expertise in its configuration options, including robust key management processes and secure key rotation procedures. Self-managed certificates don’t automatically renew. You must track expiration dates and make sure you renew on time, or your users will get warnings and errors when they try to download. ACM can simplify TLS certificate management and automatically renew certificates before they expire. while trusted signer workflows enhance your security posture.
Note: To create signed URLs, you need a signer. A signer is either a trusted key group that you create in CloudFront, or an AWS account that contains a CloudFront key pair.
Misconfigured web caches have many surprising and frustrating effects for users. Understanding and configuring CloudFront cache behavior is key to helping to prevent unintended content exposure or availability issues. You need to add cache invalidation to your publication workflows so that old versions are no longer available from the cache. This might introduce additional costs and operational overhead, especially in scenarios with frequent content changes. If you frequently change the content that you share, if the content is unique to an individual (such as a personalized report), or if the same content isn’t downloaded many times by many people in many locations, you won’t realize much cost savings or reduced latency from CloudFront caching. The additional complexity added by cache configuration might not be justified unless the cache is used a lot.
If you use the CloudFront global content delivery network, your content will be stored in caches in hundreds of locations around the world. ACM will store your TLS certificates for CloudFront (whether ACM is issuing them or you manage them yourself) in the us-east-1 AWS Region. Because CloudFront is a global service, it automatically distributes the certificate from the us-east-1 Region to the Regions associated with your CloudFront distribution. Caching data and keys around the world might not be acceptable if you have data sovereignty requirements to keep your data in one country.
From a cost perspective, while CloudFront can provide savings through caching, the pricing model has other variables to consider. Data transfer costs vary by Region and can be significant for large-scale distributions. If you need custom domain names and custom TLS certificates, that might introduce additional costs. Implementation expertise is needed when dealing with dynamic content or when specific origin request handling is required. CloudFront only delivers via HTTPS and HTTP protocols, so you won’t be able to use it if you require support for other file transfer protocols. CloudFront distributions provide statistics on cache hit-and-miss rates—pay attention to these because low cache hit rates mean that you’re pulling data from the origin frequently, which limits the possible cost savings.
Amazon VPC endpoint service with custom application
Amazon VPC endpoint services, powered by AWS PrivateLink, enable private connectivity between VPCs without requiring internet access, VPN connections, or direct physical connections. This solution creates a highly secure, private network path for file sharing by exposing services through Network Load Balancers (NLB) and allowing other VPCs to access them through interface endpoints. The architecture isolates the file sharing service from the public internet, operating entirely within the AWS private network infrastructure.
The best use cases for this architecture involve sharing data or distributing software around your AWS infrastructure without exposing it to the public internet.
Figure 2: Amazon VPC endpoint service architecture
The solution, shown in Figure 2, typically involves deploying a custom file sharing application behind an NLB in the service VPC, which is then exposed as an endpoint service. Consumer VPCs create interface endpoints to connect to this service, establishing private connectivity through the AWS backbone network. Traffic remains within the AWS network, is encrypted in transit, and is subject to security controls at both the endpoint and VPC levels. The architecture supports many TCP-based protocols, making it versatile for various file transfer requirements.
This architecture provides secure pathways for data to travel by using multiple layers, including VPC security groups, network access control lists (ACLs), endpoint policies, and the custom application’s authentication mechanisms. The built-in security features of PrivateLink are designed so that only approved AWS principals can create interface endpoints to connect to the service, while detailed VPC flow logs provide network traffic visibility.
Pros
Amazon VPC endpoint services provide complete network isolation and private connectivity that’s inaccessible from the public internet. This reduces the exposure footprint and helps meet security requirements for sensitive data transfer operations. The solution maintains private connectivity across different AWS accounts and Regions while keeping traffic within the AWS network infrastructure.
This solution also provides the most flexible protocol support. Other solutions require you to use HTTPS, AWS API calls (which are HTTPS), or one of the protocols supported by Transfer Family (such as SFTP). If you have software that uses custom protocols, and you need security controls and network isolation, this architecture provides predictable performance through dedicated network paths and supports high throughput requirements without internet bandwidth constraints. The granular control over network security through VPC security groups, network ACLs, and endpoint policies enables organizations to implement defense-in-depth strategies effectively. Additionally, the solution’s integration with AWS Organizations facilitates centralized management and governance across multiple accounts.
Cons
Setting up and maintaining VPC endpoints requires significant expertise in AWS networking, including VPC design, PrivateLink configuration, and network security controls. The initial architecture design must carefully consider IP address management, service quotas, and Regional availability to provide scalability and reliability. Organizations must also develop and maintain the custom file sharing application in addition to the VPC endpoints.
This solution has many components that incur hourly and bandwidth-related charges. Each interface endpoint incurs hourly charges and data processing fees, which can accumulate significantly in multi-VPC or multi-Region deployments. NLBs add another cost component, and you must maintain sufficient capacity for peak loads. The solution also has operational costs because of the need for specialized expertise and ongoing maintenance. Additionally, while the private connectivity model provides superior security, it can make troubleshooting more challenging and might require additional tooling for effective monitoring and diagnostics. The Regional nature of VPC endpoints might necessitate additional architecture for multi-Region deployments, potentially increasing both costs and operational overhead. This solution is most suitable when private network security considerations are the highest priority, and cost considerations are secondary.
Amazon S3 Access Points
Amazon S3 Access Points simplify managing data access at scale for applications using shared data sets on S3. Access points are named network endpoints attached to S3 buckets that streamline managing access to shared datasets. Each access point has its own AWS Identity and Access Management (IAM) policy that controls access to the data, allowing you to create custom access permissions for different applications or user groups accessing the same bucket.
The architecture uses S3 buckets with access points providing dedicated access paths to the data. Each access point has its own hostname (URL) and access policy that works in conjunction with the bucket policy. You can create access points that only allow connections from your Amazon Virtual Private Cloud (Amazon VPC) for private network access to Amazon S3 or create access points with Internet connectivity. You can use this flexibility to implement sophisticated access control patterns while maintaining a single source of truth in S3.
Figure 3: S3 Access Points with VPC endpoints
Pros
Amazon S3 Access Points simplify permissions management and security to accommodate multiple access patterns and use cases. For example, if an S3 bucket contains data that needs to be accessed by multiple applications, each requiring different levels of access, you can create a dedicated access point for each application with precisely the permissions it needs, rather than managing a long monolithic bucket policy.
You can implement access control workflows, such as restricting access to specific VPCs, encryption, or limit access to specific objects or prefixes. The service requires no new infrastructure management, reducing operational overhead and allowing you to focus on business logic implementation.
Access points provide a way to enforce network controls through VPC-only access points, helping to make sure that data can only be accessed from within your private network. IAM permissions management becomes more granular and straightforward to audit when each application or user group has its own access point with a dedicated policy. You can associate different access points with different network origins.
Another possible use case is when you need to provide temporary access to specific data within a bucket without modifying the bucket policy. You can create a temporary access point with the necessary permissions and delete it when the access is no longer needed.
Cons
Access points add another layer to your Amazon S3 architecture that needs to be managed and monitored. Each access point has its own Amazon Resource Name (ARN) and hostname that applications need to use instead of the bucket name, which might require changes to your application code.
There are limits to the number of access points you can create for each bucket, which might be a constraint for large-scale applications. Access points can only control access to the bucket they’re associated with, not across multiple buckets, so if your application needs to access data across buckets, you’ll need multiple access points.
When implementing this solution, you need to design your access point policies to make sure that they work correctly with your bucket policy. Think of your S3 bucket policy as the primary security framework, while access point policies act as specialized gatekeepers. These two layers of security must work in harmony. The bucket policy takes precedence. For example, if your bucket policy explicitly denies access from specific IP ranges, an access point policy can’t override this restriction. This hierarchical relationship requires strategic planning. Start by defining your broad security boundaries in the bucket policy—perhaps allowing access only from specific VPCs or requiring encryption. Then create your access point policies within these boundaries.
While Amazon S3 Access Points offer powerful flexibility, understanding their boundaries is crucial. Cross-account scenarios, common in large enterprises or partner collaborations, require careful configuration. Imagine you’re working with an external auditing firm that needs temporary access to your financial data stored in S3. Setting up a cross-account access point requires creating the access point in your account, configuring a trust policy to allow the external account, verifying that the bucket policy permits access from the access point, and providing the auditors with the access point ARN and necessary IAM permissions in their account. This process maintains tight control over your data while enabling secure cross-account access.
Some Amazon S3 operations are only controlled at the bucket level and can’t be controlled by access points. Core bucket operations such as configuring versioning, logging, managing lifecycle policies, and setting up cross-Region replication require direct bucket access. For these operations, you need to interact directly with the bucket through the appropriate permissions. This limitation helps make sure that fundamental bucket configurations remain centralized and controlled by bucket owners.
Creating a dedicated IAM role for bucket administration tasks—separate from the roles that interact with data through access points—enhances security and aligns with the principle of least privilege.
Conclusion
In this second part of a two-part post, you’ve learned about multiple solutions for secure file sharing using AWS services and the pros and cons of each. You can find additional options and a full decision matrix in Part 1. The optimal solution depends on your specific organizational requirements, technical capabilities, and budget constraints. You don’t have to choose just one option, you can implement multiple solutions to address different use cases, creating a file sharing strategy that balances security, cost, and operational efficiency.
July 30, 2025: This post has been republished to migrate the Amazon EC2 Oracle Transparent Data Encryption database encryption keystore to AWS CloudHSM using AWS CloudHSM Client SDK 5.
Encrypting databases is crucial for protecting sensitive data, helping you to be aligned with security regulations and safeguarding against data loss. Oracle Transparent Data Encryption (TDE) is a feature that you can use to encrypt data at rest within an Oracle database. TDE uses envelope encryption. Envelope encryption is when the encryption key used to encrypt the tables of your database is encrypted by a primary key that resides either in a software keystore or on a hardware keystore, such as a hardware security module (HSM). This primary key is non-exportable by design to protect the confidentiality and integrity of your database operation. This gives you a more granular encryption scheme on your data. Hence, TDE for Oracle is a common use case for HSM devices such as AWS CloudHSM.
Oracle TDE supports keystores to securely store the TDE primary encryption keys. You can use either the TDE wallet (software keystore) or external key managers such as an HSM device. In this solution, we show you how to migrate a TDE keystore for an Oracle 19c database installed on Amazon Elastic Compute Cloud (Amazon EC2) from a software-based TDE wallet to AWS CloudHSM.
Using an external key manager, such as CloudHSM, offers several benefits over keeping keys on the Oracle wallet on the host:
Centralized key management: CloudHSM supports centralized management of encryption keys, making it straightforward to rotate, back up, and audit keys.
Compliance: Your regulatory requirements may include encryption, and using CloudHSM can help you meet these compliance needs.
When you move from one type of keystore to another, new TDE primary keys are created inside the new keystore. To make sure that you have access to backups that rely on your past encryption keys, consider leaving the keystore running for your normal recovery window period or copying existing keys to the new keystore with exact key labels. Being able to access prior primary keys will help avoid data re-encryption.
You can use TDE to encrypt data online or offline. Encrypting TDE tablespace online minimizes disruption to database operations; however, it requires twice the storage space as the tablespace being encrypted, because the encryption process happens on a copy of the original tablespace.
Solution overview
In this solution, you migrate a TDE keystore for an Oracle 19c database from a software-based TDE wallet to CloudHSM, using the steps shown in Figure 1. Start by moving the current encryption keystore, which is your original TDE wallet, to a software wallet. This is done by replacing the PKCS#11 provider of your original HSM with the CloudHSM PKCS#11 software library (steps 1–2), next you reverse migrate to a local wallet (steps 3–5). The third step is to switch the encryption wallet for your database to your CloudHSM cluster (steps 6 and 7). After this process is complete, your database will automatically re-encrypt the data keys using the new primary key.
Figure 1: Steps to migrate your EC2 Oracle TDE database encryption wallet to CloudHSM
Note: The following instructions were tested using Oracle version 19c.
Prerequisites
You must have the following prerequisites in place to complete the solution in this post.
AWS CloudHSM cluster: You need to have a CloudHSM cluster set up and configured with an admin EC2 instance for interacting with CloudHSM following steps and best practices covered in Getting started with AWS CloudHSM.
Oracle database: Make sure that your Oracle database is up and running. This post assumes that you have an Oracle Database 19c database running on an EC2 Linux instance and there is network connectivity set up to CloudHSM as explained in this Configure the Client Amazon EC2 instance security groups for AWS CloudHSM.
Migrate an Oracle database keystore to a CloudHSM external keystore
As the first step in the migration, you need to migrate your Oracle database keystore to a CloudHSM external keystore. You do this by installing the CloudHSM client and the PKCS#11 library and then configuring the PKCS#11 library to connect to the HSM cluster.
Configure the client to connect to HSMs in your cluster. For Linux EC2, use the following command:
sudo /opt/cloudhsm/bin/configure-cli -a <The ENI IPv4 / IPv6 addresses of the HSM>
Copy the CloudHSM issuing certificate created when you initialized the cluster (customerCA.crt) to the /opt/cloudhsm/etc folder. For more information, see Activate the cluster in AWS CloudHSM.
Validate connectivity to the CloudHSM cluster.
/opt/cloudhsm/bin/cloudhsm-cli interactive
Sign in to the cluster as admin and create a crypto user (e.g. hsm-crypto-user) and assign it the role crypto-user.
Verify that the WALLET_ROOT parameter is pointing to the current file-based TDE wallet location. This parameter defines the location where the TDE wallet (and other related files) will be stored. You can set it to an existing directory, preferably one in your $ORACLE_BASE or $ORACLE_HOME directory, but other locations are also possible.
show parameter wallet_root
show parameter tde_configuration
Use the following commands to set WALLET_ROOT if it hasn’t already been set.
ALTER SYSTEM SET WALLET_ROOT = '/u01/app/oracle/admin/orcl/wallet' SCOPE=BOTH SID='*';
ALTER SYSTEM SET TDE_CONFIGURATION=“KEYSTORE_CONFIGURATION=FILE” SCOPE=BOTH SID=“*”
Note:
In Oracle Database 19c and later, the ENCRYPTION_WALLET_LOCATION. parameter in sqlnet.ora is deprecated in favor of using WALLET_ROOT and TDE_CONFIGURATION.
You can also use the V$ENCRYPTION_WALLET view to check the current keystore location and status.
Point the Oracle database to use a local file-based keystore and CloudHSM
The KEYSTORE_CONFIGURATION attribute within TDE_CONFIGURATION determines the keystore type.
To point the Oracle database:
Use the following code to point the database to the local keystore and CloudHSM.
ALTER SYSTEM SET TDE_CONFIGURATION="KEYSTORE_CONFIGURATION=HSM|FILE" SCOPE = BOTH SID = '*';
Restart the database to have consistent results.
Verify that the keystore file-based wallet is open
To proceed with encryption key migration, you need to check the current keystore status and make sure that the file-based wallet is open.
To verify that the wallet is open:
Check to see if the file-based wallet is open.
Select * from V$encryption_wallet;
Figure 2: Verify that the wallet status is OPEN
If the wallet status is not OPEN, use the following command to open it:
ALTER SYSTEM SET ENCRYPTION WALLET OPEN IDENTIFIED BY "wallet_password";
Migrate the encryption key to CloudHSM
Use the ADMINISTER KEY MANAGEMENT SET ENCRYPTION KEY command to initiate the TDE primary encryption key migration.
To migrate the encryption key:
Use the following command to migrate the encryption key:
ADMINISTER KEY MANAGEMENT SET ENCRYPTION KEY IDENTIFIED BY "hsm-crypto-user:password" MIGRATE USING "wallet-password" WITH BACKUP USING 'backup_tag';
The parameters used to migrate the encryption key are:
SET ENCRYPTION KEY: Specifies that the command is related to the TDE primary encryption key
IDENTIFIED BY: Specifies the details for migrating the keystore, including the external keystore user and password
MIGRATE USING: Specifies the password for the file-based wallet containing the primary encryption key
WITH BACKUP: Creates a backup of the keystore before the migration
Verify that the migration is complete
At this point, the migration from Oracle to Cloud HSM should be complete. Use the following steps to verify it.
To verify the migration:
Check the wallet status again. If the migration was successful, the WALLET_TYPE will be HSM and the WALLET_OR will be PRIMARY.
Select * from V$encryption_wallet;
Figure 3: Verify that WALLET_TYPE and WALLET_OR are correct
In the wallet is not open, use:
SQL>administer key management set keystore open identified by "hsm-crypto-user:password"
Verify that the database can access encrypted data without issues, confirming that the migration was successful.
Setup auto-login
Create auto-login to open the wallet during database restarts to connect to AWS CloudHSM.
To set up auto_login:
Create a new file-based keystore with the same username and password as the CloudHSM crypto user.
ADMINISTER KEY MANAGEMENT CREATE KEYSTORE '/etc/oracle/wallets/<path>/tde' IDENTIFIED BY "hsm-crypto-user:password";
Add the CloudHSM crypto user password to a keystore (TDE wallet).
ADMINISTER KEY MANAGEMENT ADD SECRET 'hsm-crypto-user:password' FOR CLIENT 'HSM_PASSWORD' TO KEYSTORE '/etc/oracle/wallets/<path>/tde' IDENTIFIED BY "hsm-crypto-user:password" WITH BACKUP;
The following command creates a new auto-login keystore. This is useful for scenarios where the keystore needs to be accessed without human intervention.
ADMINISTER KEY MANAGEMENT CREATE AUTO_LOGIN KEYSTORE FROM KEYSTORE '/etc/oracle/wallets/<path>/tde' IDENTIFIED BY "<hsm-crypto-user:password>";
Open the newly created file based keystore.
ADMINISTER KEY MANAGEMENT SET KEYSTORE OPEN IDENTIFIED BY "<hsm-crypto-user:password>"
Key rotation
Key rotation helps you to adhere to security best practices by providing several data security benefits. Regular rotation of TDE keys reduces the window of opportunity for a bad actor who might have obtained a key, thereby minimizing the impact of a potential breach.
Many established security frameworks and compliance standards—such as PCI DSS and HIPAA—recommend or require regular key rotation to maintain the integrity and confidentiality of encrypted data. By making sure that keys aren’t used indefinitely, you can help reduce the risk of exposure or compromise, which reinforces overall security.
Encryption algorithms can become less secure over time because of advancements in computing power or newly discovered vulnerabilities. By rotating keys regularly, you can transition to stronger encrypting methods as needed, and so improve protection against emerging risks.
When to rotate TDE keys
The frequency of key rotation depends on several factors, including organizational policies, regulatory requirements, and the sensitivity of the data being protected. Here are some common practices:
Annually: Many organizations rotate TDE keys once a year to align with common compliance requirements.
Quarterly: For higher-security environments or more sensitive data, rotating keys every quarter can provide an additional layer of security.
If keys are compromised or suspected to be compromised: If you believe a key to be compromised, rotating that key as soon as possible is recommended to reduce the impact window.
Oracle TDE primary key rotation with an HSM key
In this section, you choose a 32-bit hex value to use as a prefix when generating a key, then use that key to update the Oracle database to use the new primary key.
Sign in to the database instance as a user who has the ADMINISTER KEY MANAGEMENT or SYSKM privilege and execute following command:
ADMINISTER KEY MANAGEMENT SET ENCRYPTION KEY IDENTIFIED BY "<hsm-crypto-user:password>"
Decide on a 32-bit hex value pattern to be used. We used 15A5142C9E2D3C2F18FD435814257DFD in this example.
Add the prefix ORACLE.TDE.HSM.MK to the hex pattern.
Update the Oracle database to use the new primary TDE key.
ADMINISTER KEY MANAGEMENT USE KEY '0615A5142C9E2D3C2F18FD435814257DFD' FORCE KEYSTORE IDENTIFIED BY "hsm-crypto-user:password"
By following these guidelines, you can enhance the security of your encrypted data, align with regulatory requirements, and maintain robust key management practices.
Conclusion
In this post, we’ve shown you the importance of Transparent Data Encryption (TDE) and the benefits of using an external key manager such as AWS CloudHSM for storing TDE encryption keys. We’ve discussed the benefits of TDE compared to encrypting underlying storage and why using an external key manager is superior to keeping keys on the Oracle wallet on the host. Following these guidelines can help you enhance the security of your encrypted data, align with regulatory requirements, and maintain robust key management practices.
The key takeaways from this post are:
TDE offers granular encryption, compliance benefits, and robust key management.
External key managers provide enhanced security, centralized management, improved auditability and scalability.
Regular rotation of TDE keys is crucial for maintaining security, aligning with regulations, and following recommended practices in key management.
To start securing your Oracle databases with TDE and AWS CloudHSM, visit the AWS Management Console. Follow the steps outlined in this guide to migrate your TDE encryption keystore to AWS CloudHSM and begin rotating your keys regularly to enhance your data security posture. By taking these actions, you can make sure that your sensitive data remains protected, your organization remains aligned with regulations, and you are following the best practices in data encryption and key management.
Organizations are facing an increasing number of security threats, especially in the form of compromised user accounts. Manually monitoring and acting on suspicious activities is not only time-consuming but also prone to human error. The lack of automated responses to security incidents can lead to disastrous consequences, such as data breaches and financial loss.
This post addresses scenarios where, for example, you have a web server that uses a Microsoft Active Directory user account (service account) to access an application or database resources on other servers, and you want to automate disabling the user account if suspicious activity is detected.
In this example, shown in Figure 1, you deploy a test EC2 instance and enable GuardDuty runtime monitoring. Findings will trigger an EventBridge rule that executes a Step Functions state machine, which runs two Systems Manager Run Command documents that discover the username and disable that user using the directory administration EC2 instance.
Figure 1: Solution architecture
GuardDuty
GuardDuty is an automated threat detection service that continuously monitors for suspicious activity and unauthorized behavior to protect your AWS accounts, workloads, and data stored in Amazon Simple Storage Service (Amazon S3).
To activate GuardDuty:
Go to GuardDuty on the AWS Management Console.
If you’re activating GuardDuty for the first time, under Try threat detection with GuardDuty, select All Features and then choose Get Started.
If you’ve used GuardDuty before, select Runtime Monitoring and then choose Enable under Runtime Monitoring.
Figure 2: GuardDuty Runtime Monitoring enabled with EC2 monitoring
AWS Managed Microsoft AD
AWS Managed Microsoft AD provides a fully managed service for Microsoft Active Directory (AD) in the AWS Cloud. When you create your directory, AWS deploys two domain controllers in separate Availability Zones that are exclusively yours for high availability. For use cases that require even higher resilience and performance in a specific AWS Region or during specific hours, you can scale AWS Managed Microsoft AD by deploying additional domain controllers to meet your needs. These domain controllers can help load balance, increase overall performance, or provide additional nodes to protect against temporary availability issues. Using AWS Managed Microsoft AD, you can define the correct number of domain controllers for your directory based on your use case.
To deploy a new AWS Managed Microsoft AD:
Go to the Directory Service console.
Choose Set up directory and select AWS Managed Microsoft AD.
Select Standard Edition and enter a Directory DNS name and password.
Select a virtual private cloud (VPC), for this example use the Default VPC.
Choose Create directory.
Directory administration EC2 instance
This directory administration EC2 instance will be used to control the Microsoft Active Directory using AWS Systems Manager.
To deploy the directory administration EC2 instance:
If you have deployed a new directory, you might need to wait 20–45 minutes until the directory status is Active.
Select the Directory ID.
Choose Actions and select Launch directory Administration EC2 Instance, using the default options.
Alternatively, you can build your own Windows EC2 instances with a role that has the AmazonSSMManagedInstanceCore policy, join it to the Active Directory domain, and install Active Directory management tools.
To remotely connect to the directory administration EC2 instance:
Go to the Systems Manager console.
Open Fleet Manager from the navigation pane.
Select the Node ID for the instance with the name ending managementInstance.
Choose Node Actions (top right), select Connect, and then choose Connect with Remote Desktop.
Enter the username admin and the directory password that you set earlier.
Create a test Active Directory user
You will use this test user account to sign in to an EC2 instance and initiate a command that simulates suspicious activity that results in this account being disabled.
To use the directory administration EC2 instance to create a test user on the Active Directory:
From the management EC2 instance, open the start menu, select Windows Administrative Tools and then open Active Directory Users and Computers.
Browse to your Domain, the Domain OU, and then the Users OU, right-click and choose New and then select User.
Create a TestUser user, making sure that you don’t select Account is disabled.
Create a privileged domain service account
You will create this domain user account with delegated permissions to be used by Systems Manager Windows Service.
To use the directory administration EC2 instance to create a service account in AD:
From the management EC2 instance, open the start menu, select Windows Administrative Tools, and then open Active Directory Users and Computers.
Browse to your Domain, the Domain OU, and then the Users OU. Right-click and select New, and then select User
Create an SSMService user, making sure that you don’t select Account is disabled.
To delegate permission to the service account in AD:
Right-click on the Users OU and select Delegate Control.
Choose Next on the Delegation of Control Wizard.
Add the new service user you created earlier and choose Next.
Select Create a custom task to delegate and choose Next.
Select Only the following objects in the folder and select User Objects, then choose Next.
Select General and Property-specific to show the permissions, select Read userAccountControl and Write userAccountControl (near the end of the list), then choose Next and Finish.
To add a service account to the local administrators group:
From the management EC2 instance, open the start menu, select Windows Administrative Tools, and then open Computer Management.
Browse to Local Users and Groups, then to Groups.
Right-click on Administrators and select Properties.
Choose Add to add the new service user you created earlier and choose OK.
Configure Systems Manager
Configure Systems Manager on the directory administration EC2 instance with permission to manage the Active Directory.
To configure Systems Manager:
From the management EC2 instance from the Start Menu, select Windows Administrative Tools, and then open Services.
Locate the Amazon SSM Agent, right-click, and select Properties.
Select the Log On tab and select This account.
Within This account enter the privileged domain username you created earlier followed by @ and then the domain name, for example [email protected]. Enter your password and choose OK.
Figure 3: Microsoft Windows Services showing Systems Manager Agent settings
Choose OK on the This account has been granted Log On As A Service right and The new logon name will not take effect until you stop and restart the service popups.
Right-click Amazon SSM Agent and select Restart.
Systems Manager Run Command
Run Command is a feature of Systems Manager that can remotely and securely manage the configuration of your managed nodes. You can use Run Command to automate common administrative tasks and perform one-time configuration changes at scale. You can use Run Command from the console, the AWS Command Line Interface (AWS CLI), AWS Tools for PowerShell, or the AWS SDKs. Run Command is offered at no additional cost.
To create a Run Command document with a PowerShell command to disable domain user accounts:
Go to the AWS Systems Manager console.
Select Documents under Change Management Tools.
Choose Create document and select Command or Session.
Step Functions is a serverless orchestration service that you can use to coordinate multiple AWS services, microservices, and third-party integrations into business-critical applications. Step Functions is widely used for orchestrating complex workflows, such as loan processing, fraud detection, risk management, and compliance processes. By breaking down these processes into a series of steps, Step Functions provides a clear overview and control of the entire workflow. This helps make sure that it executes each stage correctly and in the right order. One of the critical aspects of using Step Functions in regulated industries is the importance of security and data protection.
By the end of this section, your state machine should have a sequential flow that starts with a choice that defaults to No UserID found and with the UserID present, includes the steps Find Username, Wait, Get Username, and Disable AD User. If it doesn’t, you can drag the actions into the correct order or change the next state associated with each action. Alternatively, copy this state machine definition JSON and import it directly into Step Functions.
To create a Step Functions state machine to execute the Systems Manager Run Commands:
Go to the Step Functions console.
Choose Get Started.
Choose Create your own.
Enter a name for the state machine, select Standard, and choose Continue.
Select JSONPath as the state machine query language.
From the navigation pane, search for and add the Pass action by dragging the action to the center window.
Add the Systems Manager: SendCommand Action for Finding the Username using Run Command.
Select the SendCommand, change the state name to Find Username, and then enter the following code into API Parameters on the right side of the screen.
With SendCommand selected, select the Input/Output tab, select Add original input to output using ResultPath, select Combine original input with result, and enter the following:
$.RunCommand.State
Add a Wait Action and set the number of seconds to wait before resuming the execution to 5 seconds.
Add a Systems Manager: GetCommandInvocation action, which will get the Username value from Run Command and change the state name to Get Username, then enter the following API Parameters.
Add a Systems Manager: SendCommand action which will disable the Active Directory user using Run Command. Change the state name to Disable AD User then enter the following API Parameters, changing the InstanceIds value to the ID of your Active Directory Management server.
Add a Choice action, choose the pencil icon next to Rule #1, choose Edit conditions, enter the variable $.detail.service.runtimeDetails.process.euid, select operator is present, value true, leave Not as blank, and choose Save Conditions.
Re-arrange the state machine layout to the same structure as displayed in Figure 4, with a sequential flow that starts with a choice that defaults to No UserID found and with the UserID present includes the steps Find Username, Wait, Get Username, and Disable AD User.
Figure 4: Step Functions state machine structure
Choose Create (top right) and then Confirm to create the step function state machine.
To add permissions to enable the State Machine to run System Manager commands:
Within the newly created state machine, choose Config (top center).
Choose View in IAM, under Permissions, Execution role.
Search for and select AmazonSSMAutomationRole and choose Add permission.
EventBridge
EventBridge helps developers build event-driven architectures (EDA) by connecting loosely coupled publishers and consumers using event routing, filtering, and transformation. To create an EventBridge rule that triggers the Systems Manger Run Command document you created earlier:
Go to the Amazon EventBridge console and select Create rule with EventBridge Rule.
Enter a name, for example GuardDutyDisableADuser.
Select Rule with an event pattern and choose Next.
Under the Event pattern JSON window, choose Edit pattern and enter the following:
Select Step Functions state machine as the target.
Select the state machine you created earlier, for example MyStateMachine-A123456789.
Choose Next twice and choose Create rule
Create a test EC2 instance
To generate alerts on GuardDuty, you create a domain joined Linux EC2 instance. For this example, you’ll use two separate EC2 instances so you can monitor for activity from each instance within GuardDuty and use EventBridge to create automations.
To create a domain joined EC2 instance for testing this GuardDuty automation:
Go to the Amazon EC2 console.
Select Instances from navigation pane.
Choose Launch Instances.
Select Amazon Linux AMI.
Select an existing Key Pair or create a new key pair.
Scroll to the bottom and select Advanced details.
Within Domain join directory, select the domain
Within IAM instance profile, select the EC2DomainJoin role that you created earlier.
Choose Launch Instance.
Testing
To simulate a threat, use a GuardDuty test domain that GuardDuty will recognize as a command and control server.
Go to the Amazon EC2 console.
Choose Instances from the navigation pane.
Select the test EC2 instance that you created earlier.
Choose Connect, select the Session Manager tab, and choose Connect
Authenticate with your test user by entering su followed by the test user with the domain name that you created earlier. For example su [email protected], then enter the password.
Enter the command curl guarddutyc2activityb.com.
You will receive an error because the page won’t resolve, but GuardDuty will have detected suspicious events.
Go to the GuardDuty console and select Findings from the navigation pane.
Within 3–5 minutes, you should see a high severity finding for Backdoor:EC2/C&CActivity.B!DNS.
Note: You must archive the GuardDuty finding before re-running this test, because the EventBridge rule only runs once against a GuardDuty finding with the same details. To archive the finding, select the check box next to the Backdoor:EC2/C&CActivity.B!DNS finding, choose Actions (top right), and select Archive.
Figure 5: GuardDuty simulated findings
If you go back to Active Directory Users and Computers on the Directory Administration EC2 instance, you should see that the Test User is now disabled. You can enable the user by right-clicking on the user and selecting Enable Account.
Figure 6: Active Directory Users and Computers showing the disabled test use
Conclusion
In this post, you learned how to deploy AWS Managed AD, Systems Manager Run Command, EventBridge, Step Functions, and GuardDuty to monitor for suspicious events and disable the associated Active Directory user account.
You can expand this scenario by creating Run Command documents that reset Active Directory passwords, disable computer accounts, or Active Directory tasks supported by Microsoft PowerShell. Additionally, you can add steps within the Step Functions state machine to notify administrators through Amazon Simple Notification Service (Amazon SNS) or add additional checks with AWS Lambda.
Although this post uses AWS Managed Microsoft AD, the same functionality can be achieved with a manual deployment of Active Directory on Amazon EC2 or on-premises, either by using an EC2 instance joined to the Active Directory domain with the Active Directory administration tools installed or by installing Systems Manager agent onto a management server on-premises.
If you have feedback about this post, submit comments in the Comments section below. If you have questions about this post, start a new thread on AWS re:Post GuardDuty or contact AWS Support.
The updated whitepaper continues our efforts to help AWS customers navigate APRA’s regulatory expectations in a shared responsibility environment. It is intended for APRA-regulated institutions that are looking to run workloads on AWS and is particularly useful for leadership, governance, security, risk, and compliance teams that need to understand APRA requirements and guidance.
The whitepaper summarizes APRA’s requirements and guidance related to operational risk management and information security. It also gives APRA-regulated institutions information they can use to commence their due diligence and assess how to implement the appropriate programs for their use of AWS.
As the regulatory environment continues to evolve, we’ll provide further updates through the AWS Security Blog and the AWS Compliance page. You can find more information on cloud-related regulatory compliance at the AWS Compliance Center. You can also reach out to your AWS account manager for help finding the resources you need.
If you have feedback about this post, submit comments in the Comments section below. If you have questions about this post, contact AWS Support.
At Amazon Web Services (AWS), security is a top priority. Maintaining data confidentiality is a substantial component of operating environment security for AWS and our customers. Though not yet available, a cryptographically relevant quantum computer (CRQC) could be used to break public key algorithms that are used today to provide data confidentiality. To prepare for a world where CRQCs might exist, the National Institute of Standards and Technology (NIST) initiated a search for new algorithms that are robust against potential CRQCs. In August 2024, after eight years of intense scrutiny by the cryptography community, NIST selected three post-quantum cryptography (PQC) standards, including FIPS 203’s ML-KEM, to supplement and eventually replace classical public key algorithms.
A few recent AWS blog posts have discussed PQC at AWS, particularly post-quantum Transport Layer Security (PQ TLS) using ML-KEM:
In this post, we demonstrate how you can test PQ TLS in Python applications today.
Testing PQ TLS in Python
As described in detail elsewhere, AWS currently deploys PQ TLS in a hybrid configuration where a classical key exchange is used alongside ML-KEM to provide defense-in-depth for data confidentiality. ML-KEM has much larger keys than classical schemes, so hybrid TLS handshakes send and receive more data when establishing a connection. As with other protocol updates, it’s important to test hybrid TLS in your network to validate that security appliances and network devices can handle these connections appropriately. We hope that you find the provided AWS Sample useful for such tests.
To negotiate hybrid TLS, PQ-ready software is required on both ends of the connection: client and server. AWS is currently rolling out hybrid TLS on the server side transparently with no customer configuration required. On the client side, each language SDK’s story for enabling hybrid TLS will be slightly different.
The AWS SDK for Python (Boto3) relies the on the Python interpreter’s ssl module for TLS, which in turn uses the operating system’s cryptography library. For most Linux distributions, this is OpenSSL. OpenSSL recently announced support for hybrid TLS and has enabled it by default in version 3.5. However, OpenSSL 3.5 is not yet the default on most operating system distributions.
To unblock testing, we provide a container definition that installs OpenSSL 3.5 alongside a standard Python distribution, allowing Python applications to perform PQ hybrid TLS connections. The container definition also installs common packages such as boto3 and requests. We provide example Python code for basic interactions with: AWS services (using boto3 and the AWS Command Line Interface (AWS CLI)), arbitrary HTTPS endpoints (using requests), and TLS-secured TCP servers (using Python’s standard library ssl module).
In the following sections, we walk through how to use this container definition to test PQ TLS connections from Python applications to AWS services.
Build the container
You can build this container on your local machine, or you can build it in a cloud environment such as Amazon Elastic Compute Cloud (Amazon EC2) or AWS CloudShell. Note that if you want to exercise the network path between your machine and AWS, you must build and run the container locally. The only prerequisite for building the container is having Docker (or an equivalent container tool) installed. For simplicity, the following steps mostly assume that you’re running these commands in a Linux CloudShell environment.
Clone the sample repo: git clone https://github.com/aws-samples/sample-post-quantum-tls-python
Change into the sample’s directory and build the container by executing the following command: cd sample-post-quantum-tls-python && docker build . -t pq-tls-python
Run the container
To run the samples described earlier, execute the following:
docker run --rm \
    -e AWS_ACCESS_KEY_ID=$(aws configure get aws_access_key_id) \
    -e AWS_SECRET_ACCESS_KEY=$(aws configure get aws_secret_access_key) \
    -it pq-tls-python \
    test.sh
The preceding command assumes that you have an AWS CLI default profile with permission to call the AWS Secrets ManagerListSecrets API. With this permission, you can make a basic, read-only test call to Secrets Manager PQ-enabled API endpoints that won’t return sensitive or secret values. In CloudShell, you’ll need to set access key and secret key values with aws configure. In Amazon EC2, you can configure an instance profile and remove the access key and secret key environment.
After printing out the name and version of the cryptography library used by Python, test.sh will test hybrid TLS connections used to secure (in order):
TCP sockets using Python’s socket and ssl modules
HTTP requests using the requests library
AWS API requests using boto3 and the AWS CLI
If the tests are successful you should see the following output:
Crypto library: OpenSSL 3.5.0 8 Apr 2025
Testing ssl socket... ok
Testing requests... ok
Testing boto3... ok
Testing AWS CLI... ok
You can inspect, modify, and extend the examples in the tests/ directory as needed for your experiments. Instead of running the provided test.sh script, you can access an interactive shell with the following command.
docker run --rm -it pq-tls-python
Make sure to rebuild the container if you add or modify the files for testing.
Confirm PQ TLS negotiation
To confirm that PQ hybrid TLS is negotiated, inspect the samples’ TLS handshakes to confirm that the PQ hybrid TLS key exchange is performed. To do this, you must capture host network traffic. In CloudShell, you can do this using the following command:
sudo tcpdump -A -i docker0 -w pq_tls.pcap
This will capture TCP traffic to port 443, the standard port for TLS. Modify the command as needed if you’re capturing traffic for a non-standard port. Alternatively, if you’re running the container locally, you can perform the packet capture in Wireshark’s GUI on a local network device, such as docker0 on Linux or en0 on MacOS.
Next, run the test suite in a separate terminal using the Docker run command from Run the container. As before, you should see the success messages in your terminal, and a new file named docker_443.pcap if you’re using tcpdump. You can download this file from CloudShell to view locally in Wireshark. Specifically, look for the key_share extension in client or server Hello handshake messages. If you’re using Wireshark to view the packet capture, you can specify the display filter tls.handshake to only show handshake messages. Your packet capture should look something like Figure 1:
Figure 1: Wireshark view of packet capture
You can see in Figure 1 that X25519MLKEM768 is selected in the server Hello handshake message, showing that PQ hybrid TLS was successfully negotiated.
Conclusion
In this post, you’ve seen how to use a container definition to test PQ hybrid TLS in Python today. The linked AWS Sample shows how to establish PQ hybrid TLS connections for:
AWS API requests with boto3 or the AWS CLI
General HTTPS requests with requests
TLS-secured TCP sockets with Python’s socket and ssl modules
We encourage you to use the AWS Sample to start vetting your networks and Python applications in preparation for upcoming PQ hybrid TLS migrations. AWS is committed to supporting our customers through their migration journeys, and PQ hybrid TLS is no exception.
If you have feedback about this post, submit comments in the Comments section below. If you have questions about this post, contact AWS Support.
Organizations face mounting challenges in building and maintaining effective security incident response programs. Studies from IBM and Morning Consult show security teams face two major challenges: over 50 percent of security alerts go unaddressed because of resource constraints and alert fatigue, while false positives consume 30 percent of investigation time, delaying responses to true positive threats
According to the 2024 IBM Cost of a Data Breach Report, organizations now take an average of 258 days to identify and contain security events. The report also reveals that nearly half of SOC teams report increased detection and response times over the past two years, with 80 percent indicating that manual threat investigation significantly impacts their response times.
Despite these challenges, according to the 2024 IBM Security Services Benchmark Report, organizations with mature incident response capabilities demonstrate a 50 percent reduction in mean time to resolution (MTTR) and achieve cost savings of up to 58 percent per incident. These improvements are driven by the adoption of automated workflows, integrated tools, and streamlined communication processes that accelerate threat detection and containment.
In this post, we walk you through a real-world scenario to show how AWS Security Incident Response can immediately generate benefits by accelerating every step of your incident response lifecycle, how it integrates with other native AWS services such as Amazon GuardDuty, AWS Security Hub, and AWS Systems Manager, and how to integrate third-party threat detection findings for inclusion in your automated monitoring, triage, and containment capabilities.
How AWS Security Incident Response can help
AWS Security Incident Response is a Tier 1 service that launched in December 2024. The service is an AWS-native, purpose-built security incident response solution for customers that can be used as a better-together experience with other AWS services in the areas of detection and response (GuardDuty and Security Hub), networking and content delivery (AWS WAF and AWS Shield), and management and governance (Systems Manager). AWS Security Incident Response is also integrated across AWS Partners through a service specific Partner Specialization program. More detailed information is available in the AWS Security Incident Response documentation.
AWS Security Incident Response complements existing services by enhancing your security posture through streamlined incident management capabilities before, during, and after security events.
Key challenges
AWS Security Incident Response addresses three common challenges:
Alert fatigue: It can reduce alert fatigue and accelerate security investigations through automated monitoring and intelligent triage, reducing false positives and helping to prevent security team burnout.
Fragmented access and communications: By simplifying AWS Management Console permissions management and unifying incident response team communications, it can resolve fragmented access issues.
Security skills gaps: It can bridge cloud security skills gaps by providing 24/7 access to AWS security experts who support the incidents including credential compromise, data exfiltration, and ransomware. The AWS Security Incident Response service allows security teams to handle immediate security challenges while maintaining focus on strategic long-term preparedness and operational improvements.
Service integration
AWS Security Incident Response complements and integrates with AWS security services to provide comprehensive incident response capabilities. The service works seamlessly with:
This integration helps you build efficient incident response capabilities that can minimize the time, cost, and impact of security events throughout your organization’s cloud journey, while helping to reduce investments in additional staffing, training, and tool maintenance.
Distinct capabilities
The AWS Security Incident Response service offers:
Expert knowledge from the AWS Customer Incident Response Team (CIRT)
Tools through APIs and the console
Streamlined processes for handling security incidents
Prerequisites
Before implementing the capabilities described in this post, make sure that you have:
These prerequisites help make sure that you can fully utilize the service’s automated detection, triage, and response capabilities.
The service provides automated monitoring and analysis capabilities within its own service infrastructure, enabling automatic triage of findings from GuardDuty and Security Hub.
For automated containment actions in your AWS accounts, you must first deploy the required CloudFormation StackSets and configure the appropriate IAM permissions. This helps make sure that you maintain full control over automated actions taken in your environment while benefiting from the service’s detection capabilities. This automation can be customized based on variables you establish, such as known CIDR ranges (specific ranges of IP addresses that define your network) and IP addresses, and you can implement GuardDuty suppression rules to help reduce false positives and alert volumes. As a result, the service can serve as a powerful augmentation to your existing security incident response programs and tools.
Setting up AWS Security Incident Response
Your cloud administrator, with AWSSecurityIncidentResponseFullAccess permissions, has established the incident response team in the service. The service notifies individuals, your partners or managed security service provider (MSSP), and other contacts added to the team, supporting a rapid escalation to alert the required parties and respond to the event.
As a best practice, your team establishes minimal privileges for accessing and managing information within AWS Security Incident Response cases. This helps make sure that team members have appropriate access levels to case details, findings, and investigation data while maintaining security and compliance requirements. AWS Security Incident Response provides multiple API actions, such as CreateCaseComment (to add notes to investigations) and GetCase (to retrieve case metadata), to limit whom and which actions can be performed against differing cases. For development and testing environments, AWS provides role-based policies that you can use such as AWSSecurityIncidentResponseCaseFullAccess and AWSSecurityIncidentResponseReadOnlyAccess for role-based access control (as shown in Figure 1). For production environments, we recommend creating custom IAM policies following the principle of least privilege based on your security requirements.
Figure 1: Permissions policies for security incident response
Following your configuration of the AWS Security Incident Response service, your security team reviews the email distribution list or alias for notifications for notifications from the service, as shown in Figure 2. You have developed items in your backlog to take advantage of Amazon EventBridge integrations to add in pager duty, Jira, and other services in the future for additional notification mechanisms.
Figure 2: Use the console to manage your incident response team membership
Detecting and responding to suspicious activity
At 2:00 AM, days after AWS Security Incident Response has been set up, the service detects a combination of suspicious activities through GuardDuty findings, including anomalous IAM user behavior (such as shown in Figure 3), unusual API calls from unknown IP addresses, and a surge of Amazon Elastic Compute Cloud (Amazon EC2) instance creations that deviate from your account’s normal baseline. This pattern of activities matches known threat behaviors monitored by GuardDuty Extended Threat Detection. Without the service, security teams would need to manually analyze and correlate these separate findings across accounts and Regions. Instead, the service automatically identifies the pattern of suspicious activities.
Figure 3: Pattern of potentially suspicious activity
One of the anomalous behaviors is a surge of unrecognized EC2 instance creations, complete with SSH keys (secure credentials used for remote access) and security group configurations (firewall rules that control network traffic) allowing internet connectivity. Using this example scenario, let’s walk through how the service’s automated monitoring, triage and containment capabilities, access management, API actions for custom integrations, collaboration tools, and 24/7 AWS security experts work together to help you navigate security incident response challenges across your AWS environment.
With the initial detection complete, the next phase focuses on centralizing and analyzing the security findings to understand the full scope of the incident.
Centralizing security findings: A systematic approach
GuardDuty begins to generate findings in your enabled Regions.
Note: GuardDuty must be enabled in your accounts and Regions. For setup instructions, see the GuardDuty documentation.
Because AWS Security Incident Response is integrated with GuardDuty, these findings are automatically sent to the service for internal processing, analysis, and auto-triage without manual effort. The service’s proactive response and alert triaging feature analyzes multiple factors, including your account’s historical baseline activity, specific GuardDuty finding types, and correlation patterns across accounts. In this case, it identified anomalous EC2 instance creation activity that deviated significantly from your environment’s normal patterns.
When the service identifies a true positive, an AWS Security Incident Response case is opened automatically (see Figure 4), resulting in a notification to the incident response team you configured earlier. A central benefit is how the service correlates disparate events—connecting the instance creations with the security group modifications—to paint a complete picture of the potential security event.
Figure 4: Automated incident remediation flow
This proactive monitoring and analysis, as documented in your monthly service reports, demonstrates tangible benefits by reducing alert fatigue, and providing intelligent triage capabilities to SOC teams every day. The service’s automated analysis and correlation capabilities set the stage for rapid response when security events occur, which means that your team can focus on strategic security initiatives instead of spending time manually investigating alerts. The service feature helps you maintain strong security in two ways:
Comprehensive monitoring across configured Regions.
Integration with third-party security tools. This automated approach reduces the time, cost, and impact of security events.
As the investigation progresses from initial detection to detailed analysis, the GuardDuty integration provides crucial insights into the threat patterns.
From detection to action: The GuardDuty integration story
As your security team responds to the internal detection mechanisms, AWS Security Incident Response processes security findings in three key steps:
It analyzes GuardDuty alerts to identify genuine security threats
Using GuardDuty Extended Threat Detection, it correlates related events to identify threat patterns
It tracks the threat sequence, from initial actions (deleting logs or creating unauthorized access) through to potential data theft attempts
For this event, the sequence started with the deletion of CloudTrail logs, followed by the creation of unauthorized access keys. As the threat progressed, the service identified suspicious Amazon Simple Storage Service (Amazon S3) object access patterns and potential data exfiltration attempts, along with sophisticated evasion techniques and persistence mechanisms. Each of these signals maps directly to specific MITRE ATT&CK® tactics, techniques and procedures (TTPs), revealing the systematic nature of a potential ransomware threat. For detailed mapping of AWS Security Incident Response findings to MITRE ATT&CK® frameworks, see Mapping AWS security services to MITRE frameworks for threat detection and mitigation.
The service assists in correlation and analysis, evaluating patterns such as deletion of CloudTrail trails, creation of new access keys, and suspicious actions targeting S3 objects. When the AI and machine learning (AI/ML) capabilities of GuardDuty detect these concerning patterns over periods of time, the service automatically elevates the situation by creating an AWS Security Incident Response case on your behalf, bringing additional resources and focused attention to the situation. The incident response team defined in the earlier steps are then notified by email or other methods (shown in Figure 5) that a new triaged event has been created and to begin their investigations.
The benefits include the service coordinating communication across your affected accounts. Instead of juggling multiple alerts and trying to piece together the scope of the potential ransomware incident, GuardDuty Extended Threat Detection provides a comprehensive view of the threat sequence, while the AWS Security Incident Response case offers a single, coherent channel for triaging these signals and providing coordination as your global team comes online to join the response effort.
Note: For brevity, Security Hub’s workflow details have been omitted because they mirror the monitoring and escalation processes described above for GuardDuty. Both services integrate closely and share similar operational patterns, with GuardDuty findings being sent to Security Hub within five minutes of detection. Security Hub enhances security coverage by aggregating findings from multiple AWS services and third-party partners.
With the threat patterns identified, your team moves to the next phase—engaging AWS CIRT for specialized expertise and advanced investigation capabilities.
Partnering with AWS CIRT through the incident response case
Your team continues investigating the event and discovers that they need additional assistance. An authorized user in your account opens a service supported case to request assistance from AWS.
The AWS Security Incident Response case establishes a direct communication channel with AWS CIRT (shown in Figure 6) with a one-click escalation of the case within the console, providing immediate access to specialized expertise. Upon case escalation, AWS CIRT engages through the incident response case with a 15-minute acknowledgement timeframe, bringing their advanced tooling and specialized knowledge to analyze patterns across your accounts—even in environments with limited logging capabilities. This partnership delivers:
Real-time collaboration through conference bridge video calls
Advanced artifact analysis and pattern recognition
Technical guidance for investigation and containment
Recommendations for improving security posture
Figure 6: Connect with the AWS CIRT
Figure 6 is an example of how this would appear in your account, with the resolver set to Self for a self-managed case.
Returning to the scenario, you discover that multiple accounts have insufficient logging enabled—which limits the available investigation data. While AWS CIRT can provide additional insights through specialized tooling, maintaining comprehensive logging across your accounts remains crucial for security visibility, compliance requirements, and thorough incident investigations. The capabilities of AWS CIRT complement—but do not replace—proper logging practices. This capability provides an understanding of the scope of the incident, as they see patterns and activities otherwise invisible to you.
The collaboration begins with AWS CIRT analyzing your environment using their tooling, looking for anomalous patterns beyond what you see in your immediate logs. Through the incident response case, they help you understand the scope of your situation by:
Communicating their findings
Recommending additional investigation paths
Sharing analysis showing similar EC2 instance creation patterns from other environments
AWS CIRT uses the incident response case to establish a bridge call, bringing together their team and yours for real-time collaboration. During these calls, AWS CIRT shares their ongoing analysis of artifacts and service data, helping you understand what happened, why it happened, and how to prevent similar issues in the future. They also provide guidance on implementing proper logging across your accounts to improve your future security posture.
Managing the incident through intelligent tagging
As AWS CIRT begins their analysis, your team implements real-time resource tagging using the incident case ID. This systematic tagging approach proves crucial for tracking and managing the suspicious EC2 instances across your accounts. By using tags, you can quickly implement isolation policies and track costs while maintaining clear documentation of affected resources throughout the investigation.
Your tag-based approach helps track affected resources to implement isolation policies. You used the incident case ID tags to quickly identify resources connected to the incident, which you use to apply targeted access controls and containment measures. The tags also help you track costs associated with the incident, giving your finance team precise visibility into the event’s financial impact.
Working alongside the AWS Security Incident Response service, you find that using the incident case ID as your primary tag key (shown in Figure 7) created a consistent way to correlate resources across affected accounts. This proves especially helpful when coordinating with AWS CIRT, because you can quickly direct them to specific resources requiring investigation. Even after containment, these tags continue to provide value in supporting your post-incident analysis and helping you implement targeted security controls based on what you learn from the incident.
Figure 7: Incident tags
Automated containment options through Systems Manager integration
While working with AWS CIRT to understand the incident scope, you can also use Systems Manager to help automatically contain threats. Your team previously deployed the required CloudFormation StackSets across your organization, enabling Amazon EC2 containment actions through Systems Manager.
The setup process required deploying CloudFormation StackSets with specific IAM roles and Systems Manager configurations across your accounts. This infrastructure allows the AWS Security Incident Response service to make containment actions on your behalf. These actions can be reversed if needed—similar to using an undo function—so that you can restore systems to their previous state.
When authorized through your pre-deployed CloudFormation StackSets, AWS Security Incident Response service can request Systems Manager to implement containment measures. Containment actions require explicit customer authorization and proper IAM permissions to be configured in advance. The service isolates the tagged suspicious instances by modifying their security groups and network access, while preserving their state to maintain forensic integrity for analysis.
The containment process happens in three steps:
Isolate: Remove compromised instances from security groups
Preserve: Create backup copies (snapshots) of affected systems
Investigate: Collect system information using Systems Manager
These actions can be reversed if needed, supporting containment decisions for legitimate workloads.
The automation capabilities help streamline containment procedures across multiple instances, reducing the time taken to contain impacted resources. The service maintains detailed logs of each action in the incident response case, providing your team with clear visibility into the containment efforts.
Through this response capability, combined with the guidance from AWS CIRT, you can contain the incident’s spread within minutes rather than hours. The Systems Manager integration provides a reliable way to implement containment actions while preserving evidence for investigation (shown in Figure 8).
Figure 8: Systems Manager documents for containment actions
Resolution and lessons learned
As the incident moves toward resolution, your team works through a systematic process to verify containment, alleviate threats, and restore services. Working alongside AWS CIRT through the AWS Security Incident Response case, you implement a structured approach to make sure that affected resources are secured and normal operations can safely resume. The immediate resolution actions fall into three main categories:
Containment confirmation through Systems Manager verification
Verify security group modifications are in place
Confirm network isolation of affected instances
Validate that automated containment actions were successful
Review Systems Manager logs for containment action completion
Verification of threat alleviation across affected resources
Analyze GuardDuty findings to confirm that there’s no new suspicious activity
Review tagged resources for complete containment
Verify termination of unauthorized access attempts
Confirm removal of persistence mechanisms
Check for remaining unauthorized IAM access
Service restoration and access control normalization
Restore legitimate workload access based on verified baselines
Implement updated security group configurations
Reset affected IAM credentials and access keys
Re-establish normal network connectivity for verified clean resources
Update resource tags to reflect post-incident status
Documentation and reporting:
As the incident reaches resolution, AWS Security Incident Response service compiles a comprehensive incident timeline. This documentation accelerates your reporting process, helping you quickly generate required reports for executives, regulators, and cyber insurance providers—all from within the incident response case.
The incident response case captures the complete timeline of events, starting with GuardDuty Extended Threat Detection identifying the initial threat sequences. Each step of the incident response is documented, from the moment suspicious EC2 instance creations were detected, through the MITRE ATT&CK® tactics observed, to the containment actions implemented through Systems Manager integration, and finally to the resolution steps that proved effective.
Long-term Improvements: Through this collaborative post-incident review process, your team:
Implements enhanced logging based on AWS CIRT recommendations
Updates security controls to help prevent similar incidents
Improves incident response processes based on lessons learned
Strengthens your security posture through targeted improvements
Conclusion
This example illustrates how AWS Security Incident Response service can enhance security operations through automated detection, triage, containment, access, and coordinated response capabilities. The service’s integration with AWS Security Hub and Amazon GuardDuty provides efficient handling of security events, while the optional escalation to the AWS CIRT can provide valuable expertise and specialized tooling to help accelerate every stage of your incident response lifecycle and strengthen your security posture.
AWS Security Incident Response service serves as a critical component of a comprehensive security operations strategy, delivering measurable benefits through:
Continuous threat monitoring for automated correlation and machine learning to identify high-priority security risks while minimizing false positives.
Reduced incident response times through automated detection and coordinated response
Enhanced investigation capabilities through direct AWS CIRT collaboration
Streamlined, rapid containment
Comprehensive incident documentation and audit trails to support and accelerate reporting requirements
To prepare for, respond to and recover from security incidents faster and more efficiently today, visit AWS Security Incident Response or contact your AWS account team to schedule a discussion.
Additional resources
Here are some additional AWS resources that your teams can use to further improve your security incident response capabilities:
Before an event:
AWS Customer Playbook Framework: Publicly available response frameworks that use AWS CIRT lessons learned from security events
Assisted Log Enabler: A tool that assists customers to enable logs, including the following: Amazon VPC Flow Logs, AWS CloudTrail, Amazon Elastic Kubernetes Service audit and authenticator logs, Amazon Route 53 Resolver Query Logs, Amazon S3 server access logs, and Elastic Load Balancing logs
During an event:
Athena Security Analytics Bootstrap: A tool for customers who need a quick method to set up Amazon Athena and perform investigations on AWS service logs archived in S3 buckets
We’re excited to announce the release of our latest whitepaper, AICPA SOC 2 Compliance Guide on AWS, which provides in-depth guidance on implementing and maintaining SOC 2-aligned controls using AWS services.
Building and operating cloud-native services in alignment with the AICPA’s Trust Services Criteria requires thoughtful planning and robust implementation. This new whitepaper helps cloud architects, security and compliance teams, and DevOps professionals design environments that meet SOC 2 requirements while leveraging AWS’s shared responsibility model.
What’s inside the whitepaper:
Overview of the SOC 2 framework—including Common Criteria (CC 1–CC 9) and category-specific criteria (Security, Availability, Processing Integrity, Confidentiality, Privacy)
Mapping of each Trust Services Criterion to AWS services and constructs
Guidance on implementing complementary user entity controls (CUECs)
Strategies for evidence collection, documentation, and audit procedures
Risk and governance for executives
Best practices for automating compliance and preparing for SOC 2 readiness assessments
The AWS Security Reference Architecture (AWS SRA) provides prescriptive guidance for deploying AWS security services in a multi-account environment. However, validating that your implementation aligns with these best practices can be challenging and time-consuming.
Today, we’re announcing the open source release of SRA Verify, a security assessment tool that helps you assess your organization’s alignment to the AWS SRA.
The AWS SRA is a holistic set of guidelines for deploying the full complement of AWS security services in a multi-account environment. You can use it to design, implement, and manage AWS security services so that they align with AWS recommended practices. The recommendations are built around a single-page architecture that includes AWS security services—how they help achieve security objectives, where they can be best deployed and managed in your AWS accounts, and how they interact with other security services. This overall architectural guidance complements detailed, service-specific recommendations such as those found in AWS Security Documentation.
SRA Verify directly maps to these recommendations by providing automated checks that validate your implementation against the AWS SRA guidance. The tool helps you verify that security services are properly configured according to the reference architecture. To assist with remediation and implementing the guidance in the AWS SRA, review the infrastructure as code (IaC) examples in the AWS Security Reference Architecture Github repo.
At Amazon Web Services (AWS), customer privacy and security are our top priority. We provide our customers with industry-leading privacy and security when they use the AWS Cloud anywhere in the world. In recent months, we’ve noticed an increase in inquiries about how we manage government requests for data. While many of the questions center around a 2018 U.S. law known as the Clarifying Lawful Overseas Use of Data Act (CLOUD Act), the CLOUD Act in fact did not give the U.S. government any new authority to compel data from providers and provides critical legal guardrails to protect content.
To put this whole issue in context—there have been no data requests to AWS that resulted in disclosure to the U.S. government of enterprise or government content data stored outside the U.S. since we started reporting the statistic in 2020. Our commitment to protecting customer data is underpinned by several layers of legal, technical, and operational protection. For example, AWS has designed its core products and services to prevent anyone but the customer and those authorized by the customer from accessing the customer’s content. And in these instances, any government that wants access to the customer’s content would have to seek that data directly from the customer. Additionally, U.S. law itself provides numerous statutory protections that help lower the risk that AWS could be required to disclose enterprise or government content data, and the U.S. Department of Justice (DOJ) has implemented additional operational protections over the past eight years.
With that in mind, we want to address some common misconceptions about the CLOUD Act and provide some clarity about how this law impacts—or doesn’t impact—AWS customers worldwide. We’re also expanding our FAQs on the CLOUD Act to help our customers and partners better navigate this topic.
Fact 1: The CLOUD Act does not give the U.S. government unfettered or automatic access to data stored in the cloud
The CLOUD Act was passed to address challenges law enforcement faced in obtaining data stored abroad in cross-border investigations involving serious crimes, ranging from terrorism and violent crime to sexual exploitation of children and cybercrime. The CLOUD Act primarily enabled the U.S. to enter into reciprocal executive agreements with trusted foreign partners to obtain access to electronic evidence for investigations of serious crimes, wherever the evidence happens to be located, by lifting blocking statutes under U.S. law. Many governments rely on domestic laws to require providers within their jurisdiction to disclose electronic data under the companies’ control, regardless of where the data is stored. Similarly, The CLOUD Act clarified that U.S. law enforcement can use existing authorities such as a court-approved search warrant to compel data within a provider’s control, regardless of where the data is stored; the executive agreements enable the effectiveness of these reciprocal laws, supported by strong procedural and substantive safeguards.
Access to data under U.S. law is far from unfettered or automatic, and law enforcement must meet strict legal standards. Under U.S. law, providers are actually prohibited from disclosing data to the U.S. government absent a legal exception. To compel a provider to disclose content data, law enforcement must convince an independent federal judge that probable cause exists related to a particular crime, and that evidence of the crime will be found in the place to be searched (that is, a specific electronic account such as an email account). This legal standard must be established through specific and trustworthy facts. Each search warrant must pass this stringent probable cause determination using credible facts, particularity, and legality, must receive approval from an independent judge, and must meet requirements regarding scope and jurisdiction. In May 2023, the DOJ also issued a policy that prosecutors seeking evidence known to be located abroad must obtain approval from Department’s Office of International Affairs (OIA) prior to obtaining an order for such evidence. The DOJ policy on evidence abroad notes that every nation enacts laws to protect its sovereignty; OIA works to address these issues and assist prosecutors in selecting an appropriate mechanism to secure evidence.
Fact 2: AWS has not disclosed any enterprise or government customer content data under the CLOUD Act since we started tracking the statistic
AWS has rigorous procedures in place for handling law enforcement requests from any country to validate legitimacy and verify that they comply with applicable law. AWS recognizes the legitimate needs of law enforcement agencies in investigating criminal and terrorist activity, but they must observe legal safeguards for conducting such investigations. We do not disclose customer data in response to any government request unless we are obligated to do so by a legally valid and binding order. We have publicly committed to this in our legal terms. Additionally, we will challenge government requests that conflict with the law, are overbroad, or are otherwise inappropriate (for example, if such a request would violate individuals’ fundamental rights). When we receive such requests for enterprise customer content, we make every reasonable effort to redirect law enforcement to the customer and notify the customer when legally permitted. If we are required to disclose customer content, we notify customers before disclosure to provide them an opportunity to seek protection from disclosure unless prohibited by law. If after exhausting these steps, AWS remains compelled to disclose customer data, and we have the technical ability to do so (which, as described above, in many instances we do not), we disclose only the minimum necessary to satisfy the legal process.
Consistent with our policy to redirect law enforcement to customers, the DOJ’s Computer Crime and Intellectual Property Section has also issued guidance advising prosecutors to generally seek data directly from an enterprise, such as a company that stores data with a cloud provider, rather than from the provider.
A clear measure of the effectiveness of our measures and the rigorous legal requirements embodied in law is the fact that since we began reporting this statistic in 2020, AWS has not disclosed any enterprise or government customer content data stored outside the U.S. to the U.S. government. This record reflects the technical safeguards AWS offers, the robust legal protections within U.S. law, policies implemented by the DOJ, and the nature of law enforcement investigations which primarily focus on collecting electronic evidence from consumer accounts.
Fact 3: The CLOUD Act does not only apply to U.S.-headquartered companies—it applies to all providers that do business in the United States
The CLOUD Act applies to all electronic communication service or remote computing service providers that operate or have a legal presence in the U.S.—regardless of where their headquarters are located. For example, European-headquartered cloud providers with U.S. operations are also subject to the Act’s requirements. OVHcloud, a French headquartered cloud service provider that operates in the U.S., notes in its CLOUD Act FAQ page that “OVHcloud will comply with lawful requests from public authorities. Under the CLOUD Act, that could include data stored outside of the United States.” Similarly, other cloud providers headquartered in the E.U. and elsewhere, also have operations in the U.S.
Fact 4: The principles in the CLOUD Act are consistent with international law and the laws of other countries
The CLOUD Act did not introduce a new legal concept regarding the scope of electronic data that must be disclosed as part of legitimate criminal investigations. Many countries require disclosure of customer data wherever it’s stored in response to legal process involving serious crimes. The United Kingdom’s (U.K.’s) Crime (Overseas Production Orders) Act, for instance, allows U.K. law enforcement agencies to obtain stored electronic data located outside of the U.K. in connection to a criminal investigation. According to a 2024 filing by the U.S. DOJ, the laws of several European Union member states, including Belgium, Denmark, France, Ireland, and Spain, have similar requirements. In fact, since 2023, most law enforcement requests that AWS receives come from authorities outside of the United States.
This concept is also enshrined within the Budapest Convention on Cybercrime, which was the first international treaty aimed at improving cooperation in investigations of cybercrimes. Additionally, the EU’s e-Evidence Regulation, 2023/1543, adopted in August 2023, authorizes Member States to “order a service provider…to produce or preserve electronic evidence regardless of the location of data.” The GDPR also allows for transfers of personal data in response to compelled disclosure requests from third countries, provided that the relevant party can cite an appropriate legal basis and transfer mechanism or derogation (see EDPB’s recent Guidelines 02/2024 on Article 48).
AWS is advocating for governments to conclude reciprocal executive agreements under the CLOUD Act, including between the U.S. and the European Union, and the U.S. and Canada. We believe these agreements are important to definitively resolve potential conflicts of law and enable effective investigation of serious crimes to advance public safety, while recognizing the strong substantive and procedural safeguards that already exist under U.S. law.
Fact 5: The CLOUD Act does not limit the technical measures and operational controls AWS offers to customers to prevent unauthorized access to customer data
We can only respond to legal requests for data where we have the technical ability to do so. AWS has a number of products and services designed to make sure that no one—not even AWS operators—can access customer content. AWS customers also have a range of additional technical measures and operational controls to prevent access to data. For example, many of the AWS core systems and services are designed with zero operator access, meaning the services don’t have any technical means for AWS operators to access customer data in response to a legal request.
The AWS Nitro System, which is the foundation of AWS computing services, uses specialized hardware and software to protect data from outside access during processing on Amazon Elastic Compute Cloud (Amazon EC2). By providing a strong physical and logical security boundary, Nitro is designed so that no unauthorized person—not even AWS operators—can access customer workloads on EC2. The design of the Nitro System has been validated by the NCC Group, an independent cybersecurity firm. The controls that help prevent operator access are so fundamental to the Nitro System that we’ve added them in our AWS Service Terms to provide an additional contractual assurance to all of our customers.
We also give customers features and controls to encrypt data, whether in transit, at rest, or in memory. All AWS services already support encryption, with most also supporting encryption with customer managed keys that are inaccessible to AWS. AWS Key Management Service (AWS KMS) is the first highly scalable, cloud-native key management system with FIPS 140-3 Security Level 3 certification. In plain English, this means AWS offers encryption that is super strong and where our customers control who gets a key.
Continuing our customer obsession
At AWS, our customer-first approach drives everything we do—from how we design our services to how we protect your data. We understand that your trust is earned through transparency, strong technical controls, and unwavering advocacy for your interests. That’s why we’ve been clear about how we handle government requests for data, including the impact of the CLOUD Act, and the multiple layers of protection—legal, operational, and technical—to safeguard your data.
We encourage you to learn more about this important topic by reviewing our expanded CLOUD Act FAQ. We will continue to innovate on your behalf, building new features and services that put you in control of your data, and maintaining our commitment to the highest standards of privacy and security.
French version
CLOUD Act : cinq points clés pour comprendre son fonctionnement réel
Chez Amazon Web Services (AWS), la confidentialité et la sécurité des clients constituent notre priorité absolue. Nous mettons à leur disposition une confidentialité et une sécurité à la pointe de l’industrie lorsqu’ils utilisent le Cloud AWS, partout dans le monde. Ces derniers mois, nous avons constaté une augmentation des questions concernant notre gestion des demandes d’accès aux données émanant d’autorités gouvernementales. Si de nombreuses interrogations portent sur une loi américaine de 2018 connue sous le nom de Clarifying Lawful Overseas Use of Data Act (CLOUD Act), cette loi n’a en réalité octroyé aucune nouvelle prérogative au gouvernement américain pour contraindre les fournisseurs à divulguer des données. Elle prévoit des garde-fous juridiques essentiels pour protéger les données des utilisateurs.
Replaçons cette question en perspective : depuis que nous avons commencé à publier des rapports sur les demandes d’informations en 2020, aucune demande n’a abouti à la divulgation auprès du gouvernement américain, de données d’entreprises ou de gouvernements stockées hors des États-Unis. Notre engagement à protéger les données de nos clients repose sur plusieurs niveaux de protection juridique, technique et opérationnelle. A titre d’exemple, les principaux produits et services d’AWS ont été conçus by design de manière à empêcher quiconque, hormis le client et les personnes autorisées par celui-ci, d’accéder à ses données. Ainsi, toute autorité gouvernementale souhaitant accéder aux données d’un client doit en faire la demande directement auprès de celui-ci. En outre, la législation américaine prévoit elle-même de nombreuses protections statutaires qui limitent la possibilité qu’AWS soit contrainte de divulguer des données d’entreprises ou de gouvernements. Le Département de la Justice américain (DOJ) a mis en place des mesures de protections supplémentaires au cours des huit dernières années d’un point de vue opérationnel.
Dans ce contexte, nous souhaitons revenir sur certaines idées reçues courantes à propos du CLOUD Act et apporter des éclaircissements sur l’impact – ou l’absence d’impact – de cette loi sur les clients d’AWS dans le monde entier. Afin d’aider nos clients et partenaires à mieux appréhender ce sujet, nous avons également complété notre FAQ sur le CLOUD Act.
Fait n°1 : Le CLOUD Act n’accorde pas au gouvernement américain un accès illimité ou automatique aux données stockées dans le cloud
Le CLOUD Act a été adopté pour répondre aux défis rencontrés par les autorités judiciaires dans l’obtention des données stockées à l’étranger dans le cadre d’enquêtes transfrontalières sur des crimes graves, allant du terrorisme et des crimes violents à l’exploitation sexuelle d’enfants et à la cybercriminalité. Le CLOUD Act a principalement permis aux États-Unis de conclure des accords exécutifs réciproques avec des partenaires étrangers de confiance. Ces accords visent à faciliter l’accès aux preuves électroniques dans le cadre d’enquêtes sur des crimes graves, indépendamment de la localisation de ces preuves. Pour ce faire, le CLOUD Act lève certaines restrictions prévues par la législation américaine.
De nombreux gouvernements s’appuient sur leurs lois nationales pour exiger des fournisseurs assujettis à ces lois qu’ils divulguent des données électroniques sous leur contrôle, indépendamment du lieu de stockage de ces données. De même, le CLOUD Act a clarifié que les autorités judiciaires américaines pouvaient s’appuyer sur les dispositifs légaux existants, tel qu’un mandat de perquisition autorisé par un tribunal, pour exiger d’un fournisseur la divulgation de données sous son contrôle, indépendamment de leur localisation. Les accords exécutifs bilatéraux permettent la mise en œuvre effective de ces accords de réciprocité, encadrée par des garanties procédurales et juridiques rigoureuses.
L’accès à des données en vertu de la loi américaine est loin d’être illimité ou automatique, et les autorités judiciaires doivent respecter des conditions juridiques strictes. En vertu de la loi américaine, il est de fait interdit aux fournisseurs de divulguer des données au gouvernement américain, sauf exception spécifique. Pour contraindre un fournisseur à la divulgation de données, les autorités judiciaires doivent démontrer devant un juge fédéral indépendant qu’il existe des indices graves et concordants relatifs à un crime et qu’il est probable que des éléments de preuve de ce crime se trouvent dans le périmètre visé par la perquisition (par exemple, un compte électronique spécifique tel qu’une messagerie). La mise en œuvre de cette exception doit s’appuyer sur des éléments factuels précis et vérifiables.
Chaque mandat de perquisition est soumis à cette évaluation stricte de la présence d’indices graves et concordants, qui doit reposer sur des faits crédibles, respecter les critères de spécificité et de légalité, être autorisé par un juge indépendant et satisfaire aux conditions de compétence matérielle et juridictionnelle. En mai 2023, le DOJ a par ailleurs publié des directives imposant aux procureurs qui recherchent des preuves localisées à l’étranger d’obtenir préalablement l’autorisation du Bureau des Affaires Internationales (OIA) avant d’obtenir toute ordonnance. La politique du DOJ concernant les preuves situées à l’étranger reconnaît que chaque État adopte des lois pour protéger sa souveraineté. L’OIA intervient pour traiter ces questions et accompagner les procureurs dans l’identification des mécanismes appropriés d’obtention des preuves.
Fait n°2 : Depuis la mise en place du suivi statistique, AWS n’a divulgué aucune donnée d’entreprise ou de gouvernement en vertu du CLOUD Act
AWS applique des procédures strictes pour traiter les demandes des autorités judiciaires de tout pays, en vérifiant leur légitimité et leur conformité à la réglementation applicable. Si AWS reconnaît les besoins légitimes des autorités judiciaires dans leurs enquêtes sur les activités criminelles et terroristes, les autorités doivent respecter les mesures de protection juridiques encadrant ces enquêtes. En effet, notre politique est claire : nous ne divulguons pas les données des clients en réponse à une demande gouvernementale, sauf si nous en sommes contraints par une ordonnance juridiquement valide et contraignante. Nous avons pris cet engagement publiquement dans nos conditions juridiques.
Nous contestons les demandes gouvernementales qui s’avèrent illégales, disproportionnées ou inappropriées (notamment celles qui porteraient atteintes aux droits fondamentaux des individus). Pour les demandes concernant les données d’entreprises clientes, nous mettons tout en œuvre pour rediriger les autorités judiciaires vers le client et l’informer lorsque la loi le permet. En cas d’obligation de divulgation des données d’un client, nous l’en informons au préalable pour lui permettre de se prémunir contre cette divulgation, sauf interdiction par la loi. Si, après ces étapes, AWS reste contrainte de divulguer des données client et dispose de la capacité technique de le faire (ce qui, comme mentionné précédemment, est rarement le cas), nous limitons la divulgation au strict minimum requis par la procédure judiciaire.
Conformément à notre politique de redirection des autorités judiciaires vers les clients, le département des crimes informatiques et de la propriété intellectuelle du DOJ américain a également émis des lignes directrices recommandant aux procureurs de privilégier l’obtention des données directement auprès de l’entreprise concernée, plutôt qu’auprès du fournisseur cloud hébergeant ces données.
Une preuve tangible de l’efficacité de nos mesures et des exigences juridiques rigoureuses inscrites dans la loi : depuis le début du suivi de cette statistique en 2020, AWS n’a divulgué au gouvernement américain aucune donnée de client d’entreprise ou de gouvernement stockée hors des États-Unis. Ce bilan résulte des garanties techniques offertes par AWS, des conditions juridiques strictes prévues par la législation américaine, des politiques mises en œuvre par le DOJ, et de la nature des enquêtes des autorités judiciaires qui ciblent principalement la collecte de preuves électroniques issues de comptes de particuliers.
Fait n°3 : Le CLOUD Act ne s’applique pas uniquement aux entreprises dont le siège est situé aux États-Unis, mais à toute entreprise exerçant une activité commerciale aux États-Unis
Le CLOUD Act s’applique à l’ensemble des fournisseurs de services de communication électronique ou de services informatiques à distance qui exercent une activité ou disposent d’une présence juridique aux États-Unis, indépendamment de la localisation de leur siège social. Par conséquent, les fournisseurs de services cloud européens ayant des activités aux États-Unis sont également assujettis aux dispositions de cette loi. À titre d’exemple, OVHcloud, entreprise française de services cloud présente aux États-Unis, précise dans sa FAQ relative au CLOUD Act qu’”OVHcloud se conformera aux demandes légales des autorités publiques. En vertu du CLOUD Act, cela pourrait inclure des données stockées en dehors des États-Unis.” De même, d’autres fournisseurs de cloud dont le siège est situé dans l’Union européenne ou ailleurs exercent également des activités aux États-Unis.
Fait n°4 : Les principes du CLOUD Act s’inscrivent dans le cadre du droit international et des législations nationales
Le CLOUD Act n’a pas introduit de nouveau concept juridique concernant l’accès aux données électroniques dans le cadre d’enquêtes pénales. De nombreux États exigent la divulgation de données clients quel que soit leur lieu de stockage en réponse à des procédures judiciaires impliquant des crimes graves. La loi britannique Crime (Overseas Production Orders) Act, par exemple, permet aux autorités judiciaires britanniques d’obtenir des données électroniques stockées hors du Royaume-Uni dans le cadre d’une enquête pénale. Selon un document du DOJ américain publié en 2024, plusieurs États membres de l’Union européenne, dont la Belgique, le Danemark, la France, l’Irlande et l’Espagne, disposent d’exigences similaires. En réalité, depuis 2023, la majorité des demandes d’accès aux données reçues par AWS émanent d’autorités situées en dehors des États-Unis.
Ce principe est également inscrit dans la Convention de Budapest sur la cybercriminalité, premier traité international visant à renforcer la coopération en matière d’enquêtes sur la cybercriminalité. Par ailleurs, le Règlement européen e-Evidence (2023/1543), adopté en août 2023, habilite les États membres à “ordonner à un fournisseur de services de produire ou de conserver des preuves électroniques, quelle que soit la localisation des données.” Le RGPD prévoit également la possibilité de transferts de données personnelles en réponse aux demandes contraignantes de pays tiers, sous réserve d’une base juridique appropriée et d’un mécanisme de transfert ou d’une dérogation (voir les Lignes directrices 02/2024 du Comité européen de la protection des données sur l’Article 48).
AWS soutient la conclusion d’accords de coopération bilatéraux dans le cadre du CLOUD Act, notamment entre les États-Unis et l’Union européenne, ainsi qu’entre les États-Unis et le Canada. Ces accords sont essentiels pour résoudre les conflits potentiels de lois et permettre des enquêtes efficaces sur les crimes graves afin d’améliorer la sécurité publique, tout en s’appuyant sur les garanties procédurales et juridiques substantielles déjà prévues par la législation américaine.
Fait n°5 : Le CLOUD Act n’a pas d’impact sur les dispositifs techniques et les mesures de contrôle qu’AWS met à disposition de ses clients pour prévenir tout accès non autorisé à leurs données
AWS ne peut répondre aux demandes judiciaires de communication de données que lorsqu’elle dispose de la capacité technique de le faire. Or, AWS a développé de nombreux produits et services garantissant qu’aucun tiers – y compris ses propres employés – ne peut accéder aux données des clients. Les clients d’AWS ont également à leur disposition un ensemble de dispositifs techniques et de mesures de contrôle complémentaires pour protéger leurs données. À titre d’exemple, la plupart des principaux systèmes et services d’AWS sont conçus sans aucune possibilité d’accès technique, selon le principe d’absence d’accès pour les opérateurs (zero operator access). Cela signifie que les services ne disposent d’aucun moyen technique permettant aux opérateurs d’AWS d’accéder aux données des clients en réponse à une demande judiciaire.
Le système AWS Nitro, qui est à la base des services informatiques AWS, utilise des composants matériels et logiciels spécifiques pour protéger les données de tout accès externe lors de leur traitement sur Amazon Elastic Compute Cloud (Amazon EC2). En établissant une barrière physique et logique renforcée, le système Nitro est conçu de sorte qu’aucune personne non autorisée – y compris les opérateurs d’AWS – ne peut accéder aux charges de travail des clients sur EC2. L’architecture du système Nitro a été certifiée par NCC Group, organisme indépendant en cybersécurité. Ces dispositifs de contrôle empêchant tout accès de nos opérateurs sont si essentiels au système Nitro que nous les avons intégrés dans nos Conditions de Service AWS, offrant ainsi une garantie contractuelle supplémentaire à l’ensemble de nos clients.
Nous proposons également à nos clients des fonctionnalités et des mécanismes de chiffrement des données, qu’elles soient en transit, au repos ou en mémoire. L’ensemble des services AWS intègrent le chiffrement, la majorité permettant également le chiffrement via des clés gérées par le client et inaccessibles à AWS. AWS Key Management Service (AWS KMS) est le premier système de gestion de clés natif au cloud, hautement évolutif, à obtenir la certification FIPS 140-3 Niveau 3. Concrètement, AWS propose un chiffrement de niveau supérieur où les clients conservent le contrôle exclusif de l’accès aux clés.
Poursuivre notre obsession client
Chez AWS, notre approche centrée sur le client guide l’ensemble de nos actions, de la conception de nos services à la protection de vos données. La confiance que vous nous accordez repose sur notre transparence, la robustesse de nos dispositifs techniques de contrôle et notre détermination à défendre vos intérêts.
C’est dans cet esprit que nous avons établi une communication claire et transparente sur notre traitement des demandes d’accès aux données émanant des autorités, notamment concernant l’application du CLOUD Act, ainsi que sur les différents niveaux de protection – juridiques, opérationnels et techniques – mis en œuvre pour sécuriser vos données.
Nous vous invitons à approfondir vos connaissances de ce sujet en consultant notre FAQ détaillée sur le CLOUD Act.
Nous poursuivrons nos efforts d’innovation, à votre service, en développant de nouvelles fonctionnalités et de nouveaux services vous garantissant la maîtrise de vos données, tout en maintenant nos engagements en matière de confidentialité et de sécurité.
A propos de l’auteur
Bob Kimball occupe le poste de Chief Regulatory Officer après avoir été General Counsel d’AWS. Dans ses fonctions actuelles, il pilote les questions réglementaires mondiales d’AWS, travaillant en étroite collaboration avec les régulateurs et les clients sur des enjeux tels que l’IA, la souveraineté numérique, l’énergie et d’autres sujets clés liés à l’exploitation des infrastructures et services cloud.
German version
Fünf Fakten zur tatsächlichen Funktionsweise des CLOUD Act
Bei Amazon Web Services (AWS) haben Kundendatenschutz und -sicherheit höchste Priorität. Wir bieten unseren Kunden branchenführenden Datenschutz und erstklassige Sicherheit bei der Nutzung der AWS Cloud – weltweit. In den vergangenen Monaten haben wir ein gestiegenes Interesse zum Umgang mit behördlichen Datenanfragen festgestellt. Viele dieser Fragen beziehen sich auf ein US-amerikanisches Gesetz aus dem Jahr 2018, den Clarifying Lawful Overseas Use of Data Act (CLOUD Act). Tatsächlich hat der CLOUD Act der US-Regierung keinerlei neue Befugnisse eingeräumt, Daten von Anbietern anzufordern, sondern schafft vielmehr wichtige rechtliche Leitplanken zum Schutz von Inhalten.
Um diese Thematik in den richtigen Kontext zu setzen: Seit wir 2020 mit der statistischen Erfassung begonnen haben, gab es keine Datenanfragen an AWS, die zur Offenlegung von außerhalb der USA gespeicherten Kundeninhalten von Unternehmens- oder Regierungsdaten gegenüber der US-Regierung geführt haben. Unser Engagement zum Schutz von Kundendaten wird durch mehrere Ebenen rechtlichen, technischen und operativen Schutzes untermauert. AWS hat beispielsweise seine Kernprodukte und -services so konzipiert, dass nur Kunden selbst und die von ihnen autorisierten Personen auf die Kundeninhalte zugreifen können. In diesen Fällen müsste jede Regierung, die Zugriff auf Kundeninhalte wünscht, diese Daten direkt beim Kunden anfragen. Darüber hinaus bietet das US-Recht selbst zahlreiche gesetzliche Schutzmaßnahmen, die das Risiko verringern, dass AWS zur Offenlegung von Unternehmens- oder Regierungsdaten verpflichtet werden könnte. Das US-Justizministerium (DOJ) hat in den letzten acht Jahren zusätzliche operative Schutzmaßnahmen implementiert.
Vor diesem Hintergrund möchten wir einige häufige Missverständnisse über den CLOUD Act ansprechen und Klarheit darüber schaffen, wie sich dieses Gesetz auf AWS Kunden weltweit auswirkt – oder eben nicht auswirkt. Außerdem erweitern wir unsere FAQ zum CLOUD Act, um unseren Kunden und Partnern den Umgang mit diesem Thema zu erleichtern.
Fakt 1: Der CLOUD Act gewährt der US-Regierung keinen uneingeschränkten oder automatischen Zugriff auf in der Cloud gespeicherte Daten
Der CLOUD Act wurde verabschiedet, um Herausforderungen zu bewältigen, denen Strafverfolgungsbehörden bei der Beschaffung von im Ausland gespeicherten Daten in grenzüberschreitenden Ermittlungen zu schweren Straftaten begegneten. Dazu gehören Terrorismus und Gewaltverbrechen bis hin zu sexueller Ausbeutung von Kindern und Cyberkriminalität. Der CLOUD Act ermöglicht es den USA in erster Linie, gegenseitige Vollzugsvereinbarungen mit vertrauenswürdigen ausländischen Partnern zu schließen, um Zugang zu elektronischen Beweismitteln für Ermittlungen bei schweren Straftaten zu erhalten, unabhängig vom Speicherort der Beweise, indem Sperrgesetze nach US-Recht aufgehoben wurden. Viele Regierungen stützen sich auf nationale Gesetze, um von Anbietern innerhalb ihres Zuständigkeitsbereichs die Offenlegung elektronischer Daten unter der Kontrolle der Unternehmen zu verlangen, unabhängig davon, wo die Daten gespeichert sind. In ähnlicher Weise stellte der CLOUD Act klar, dass US-Strafverfolgungsbehörden bestehende Befugnisse wie einen gerichtlich genehmigten Durchsuchungsbeschluss nutzen können, um Daten unter der Kontrolle eines Anbieters anzufordern, unabhängig vom Speicherort der Daten; die Vollzugsvereinbarungen ermöglichen die Wirksamkeit dieser gegenseitigen Gesetze, unterstützt durch strenge verfahrensrechtliche und materielle Schutzmaßnahmen.
Der Zugriff auf Daten nach US-Recht ist bei weitem nicht uneingeschränkt oder automatisch möglich, und Strafverfolgungsbehörden müssen strenge rechtliche Standards erfüllen. Nach US-Recht ist es Anbietern sogar untersagt, Daten ohne rechtliche Ausnahmeregelung an die US-Regierung weiterzugeben. Um einen Anbieter zur Offenlegung von Inhaltsdaten zu verpflichten, muss die Strafverfolgungsbehörde einen unabhängigen Bundesrichter davon überzeugen, dass ein hinreichender Verdacht bezüglich einer bestimmten Straftat besteht und dass Beweise für diese Straftat am zu durchsuchenden Ort gefunden werden (das heißt in einem bestimmten elektronischen Konto wie einem E-Mail-Account). Dieser Rechtsstandard muss durch konkrete und vertrauenswürdige Fakten belegt werden. Jeder Durchsuchungsbeschluss muss diese strenge Prüfung des hinreichenden Verdachts anhand glaubwürdiger Fakten, Spezifität und Rechtmäßigkeit bestehen, muss von einem unabhängigen Richter genehmigt werden und muss die Anforderungen hinsichtlich Umfang und Zuständigkeit erfüllen. Im Mai 2023 hat das DOJ außerdem eine Richtlinie erlassen, wonach Staatsanwälte, die nachweislich im Ausland gespeicherte Beweismittel anfordern, vor Erhalt einer entsprechenden Anordnung die Genehmigung des Office of International Affairs (OIA) des Ministeriums einholen müssen. Die DOJ-Richtlinie zu Beweismitteln im Ausland weist darauf hin, dass jede Nation Gesetze zum Schutz ihrer Souveränität erlässt; das OIA arbeitet daran, diesbezügliche Fragen zu klären und Staatsanwälte bei der Auswahl eines geeigneten Mechanismus zur Sicherung von Beweismitteln zu unterstützen.
Fakt 2: AWS hat seit Beginn der statistischen Erfassung keine Kundeninhalte von Unternehmens- oder Regierungskundendaten aufgrund des CLOUD Act offengelegt
AWS verfügt über strenge Verfahren zur Bearbeitung von Anfragen von Strafverfolgungsbehörden aus allen Ländern, um deren Legitimität zu prüfen und sicherzustellen, dass sie geltendem Recht entsprechen. AWS erkennt die legitimen Bedürfnisse von Strafverfolgungsbehörden bei der Untersuchung krimineller und terroristischer Aktivitäten an, aber diese müssen die rechtlichen Schutzmaßnahmen für solche Ermittlungen beachten. Wir geben Kundendaten auf keinerlei behördliche Anfragen heraus, es sei denn, wir sind dazu durch eine rechtlich gültige und verbindliche Anordnung verpflichtet. Dies haben wir in unseren rechtlichen Bedingungen öffentlich zugesichert. Darüber hinaus werden wir behördliche Anfragen anfechten, die gegen das Gesetz verstoßen, zu weitreichend oder anderweitig unangemessen sind (beispielsweise, wenn eine solche Anfrage die Grundrechte von Personen verletzen würde). Wenn wir solche Anfragen nach Inhalten von Unternehmenskunden erhalten, unternehmen wir alle angemessenen Anstrengungen, um Strafverfolgungsbehörden an den Kunden zu verweisen und den Kunden zu benachrichtigen, wenn dies rechtlich zulässig ist. Wenn wir zur Offenlegung von Kundeninhalten verpflichtet sind, benachrichtigen wir die Kunden vor der Offenlegung, um ihnen die Möglichkeit zu geben, sich gegen die Offenlegung zu schützen, sofern dies nicht gesetzlich untersagt ist. Wenn AWS nach Ausschöpfung dieser Schritte weiterhin zur Offenlegung von Kundendaten verpflichtet ist und wir die technische Möglichkeit dazu haben (was, wie oben beschrieben, in vielen Fällen nicht der Fall ist), legen wir nur das zur Erfüllung des rechtlichen Verfahrens unbedingt Notwendige offen.
In Übereinstimmung mit unserer Richtlinie, Strafverfolgungsbehörden an die Kunden zu verweisen, hat auch die Computer Crime and Intellectual Property Section des DOJ Leitlinien herausgegeben, die Staatsanwälte anweisen, Daten grundsätzlich direkt von einem Unternehmen anzufordern, wie beispielsweise von einem Unternehmen, das Daten bei einem Cloud-Anbieter speichert, und nicht vom Anbieter selbst.
Ein deutlicher Beleg für die Wirksamkeit unserer Maßnahmen und der strengen gesetzlichen Anforderungen ist die Tatsache, dass AWS seit Beginn der statistischen Erfassung im Jahr 2020 keine außerhalb der USA gespeicherten Kundeninhalte von Unternehmens- oder Regierungskundendaten an die US-Regierung weitergegeben hat. Diese Bilanz spiegelt die technischen Schutzmaßnahmen von AWS, die robusten rechtlichen Schutzmaßnahmen im US-Recht, die vom DOJ umgesetzten Richtlinien und die Art der strafrechtlichen Ermittlungen wider, die sich hauptsächlich auf die Sammlung elektronischer Beweise aus Verbraucherkonten konzentrieren.
Fakt 3: Der CLOUD Act gilt nicht nur für Unternehmen mit Hauptsitz in den USA – er gilt für alle Anbieter, die Geschäfte in den Vereinigten Staaten tätigen
Der CLOUD Act gilt für alle Anbieter von elektronischen Kommunikationsdiensten oder Remote-Computing-Diensten, die in den USA tätig sind oder dort eine rechtliche Präsenz haben – unabhängig vom Standort ihres Hauptsitzes. Beispielsweise unterliegen auch Cloud-Anbieter mit Hauptsitz in Europa, die Geschäfte in den USA tätigen, den Anforderungen des Gesetzes. OVHcloud, ein Cloud-Service-Anbieter mit Hauptsitz in Frankreich, der in den USA tätig ist, vermerkt auf seiner CLOUD Act FAQ-Seite, dass “OVHcloud rechtmäßigen Anfragen von Behörden nachkommen wird. Im Rahmen des CLOUD Act könnte dies auch Daten einschließen, die außerhalb der Vereinigten Staaten gespeichert sind.” Ähnlich verhält es sich mit anderen Cloud-Anbietern mit Hauptsitz in der EU und anderswo, die ebenfalls in den USA tätig sind.
Fakt 4: Die Grundsätze des CLOUD Act stehen im Einklang mit internationalem Recht und den Gesetzen anderer Länder
Der CLOUD Act hat keine neue Rechtsposition bezüglich des Umfangs elektronischer Daten eingeführt, die im Rahmen legitimer strafrechtlicher Ermittlungen offengelegt werden müssen. Viele Länder verlangen die Offenlegung von Kundendaten, unabhängig vom Speicherort, als Reaktion auf rechtliche Verfahren im Zusammenhang mit schweren Straftaten. Der britische Crime (Overseas Production Orders) Act beispielsweise ermöglicht es britischen Strafverfolgungsbehörden, im Zusammenhang mit strafrechtlichen Ermittlungen auf außerhalb des Vereinigten Königreichs gespeicherte elektronische Daten zuzugreifen. Laut einer Einreichung des US-DOJ von 2024 haben mehrere EU-Mitgliedstaaten, darunter Belgien, Dänemark, Frankreich, Irland und Spanien, ähnliche Anforderungen. Tatsächlich kommt seit 2023 die Mehrheit der Strafverfolgungsanfragen, die AWS erhält, von Behörden außerhalb der Vereinigten Staaten.
Dieses Konzept ist auch in der Budapest-Konvention zur Cyberkriminalität verankert, dem ersten internationalen Vertrag zur Verbesserung der Zusammenarbeit bei der Untersuchung von Cyberkriminalität. Darüber hinaus ermächtigt die EU-Verordnung e-Evidence, 2023/1543, die im August 2023 verabschiedet wurde, die Mitgliedstaaten dazu, “einen Dienstanbieter anzuweisen, elektronische Beweismittel unabhängig vom Standort der Daten zu erstellen oder zu sichern”. Die DSGVO erlaubt ebenfalls die Übermittlung personenbezogener Daten als Reaktion auf verpflichtende Offenlegungsanfragen aus Drittländern – vorausgesetzt, die betreffende Partei kann sich auf eine geeignete Rechtsgrundlage und ein Übertragungsinstrument oder eine Ausnahmeregelung berufen (siehe die aktuellen EDSA Leitlinien 02/2024 zu Artikel 48).
AWS setzt sich dafür ein, dass Regierungen gegenseitige Vollzugsvereinbarungen im Rahmen des CLOUD Act abschließen, einschließlich zwischen den USA und der Europäischen Union sowie den USA und Kanada. Wir glauben, dass diese Vereinbarungen wichtig sind, um potenzielle Gesetzeskonflikte endgültig zu lösen und eine effektive Untersuchung schwerer Straftaten zur Förderung der öffentlichen Sicherheit zu ermöglichen. Dabei werden die bereits bestehenden starken materiell- und verfahrensrechtlichen Schutzmaßnahmen nach US-Recht anerkannt.
Fakt 5: Der CLOUD Act beschränkt nicht die technischen Maßnahmen und operativen Kontrollen, die AWS seinen Kunden zum Schutz vor unbefugtem Zugriff auf Kundendaten anbietet
Wir können auf rechtliche Datenanfragen nur dann reagieren, wenn wir die technische Möglichkeit dazu haben. AWS verfügt über eine Reihe von Produkten und Services, die sicherstellen, dass niemand – nicht einmal Mitarbeiter:innen von AWS – auf Kundeninhalte zugreifen können. AWS Kunden verfügen auch über eine Reihe zusätzlicher technischer Maßnahmen und operativer Kontrollen, um den Zugriff auf Daten zu verhindern. Beispielsweise sind viele der AWS Kernsysteme und Services mit Zero-Operator-Zugriff konzipiert, was bedeutet, dass die Services keine technischen Möglichkeiten für AWS Mitarbeiter:innen bieten, auf Kundendaten als Reaktion auf eine rechtliche Anfrage zuzugreifen.
Das AWS Nitro System, das die Grundlage der AWS Rechendienstleistungen bildet, verwendet spezialisierte Hardware und Software, um Daten während der Verarbeitung auf Amazon Elastic Compute Cloud (Amazon EC2) vor externem Zugriff zu schützen. Durch eine starke physische und logische Sicherheitsgrenze ist Nitro so konzipiert, dass keine unbefugte Person – nicht einmal AWS Mitarbeiter:innen – auf Workloads von Kunden auf EC2 zugreifen kann. Das Design des Nitro Systems wurde von der NCC Group, einem unabhängigen Cybersicherheitsunternehmen, validiert. Die Kontrollen, die den Betreiberzugriff verhindern, sind für das Nitro System so grundlegend, dass wir sie in unsere AWS Servicebedingungen aufgenommen haben, um allen unseren Kunden eine zusätzliche vertragliche Zusicherung zu geben.
Wir bieten Kunden auch Funktionen und Kontrollen zur Verschlüsselung von Daten, sei es während der Übertragung, im Ruhezustand oder im Arbeitsspeicher. Alle AWS Services unterstützen bereits Verschlüsselung, wobei die meisten auch die Verschlüsselung mit kundenverwalteten Schlüsseln unterstützen, die für AWS nicht zugänglich sind. Der AWS Key Management Service (AWS KMS) ist das erste hochskalierbare, Cloud-native Schlüsselverwaltungssystem mit FIPS 140-3 Level 3-Zertifizierung. Vereinfacht ausgedrückt bedeutet dies, dass AWS eine äußerst starke Verschlüsselung anbietet, bei der unsere Kunden kontrollieren, wer einen Schlüssel erhält.
Fortsetzung unserer Kundenorientierung
Bei AWS bestimmt unser kundenorientierter Ansatz alles, was wir tun – von der Gestaltung unserer Services bis zum Schutz Ihrer Daten. Wir verstehen, dass Ihr Vertrauen durch Transparenz, starke technische Kontrollen und unermüdlichen Einsatz für Ihre Interessen verdient wird. Deshalb haben wir klar kommuniziert, wie wir mit behördlichen Datenanfragen umgehen, einschließlich der Auswirkungen des CLOUD Act, und der mehrschichtigen Schutzmaßnahmen – rechtlich, operativ und technisch – zum Schutz Ihrer Daten.
Wir ermutigen Sie, mehr über dieses wichtige Thema zu in unseren erweiterten CLOUD Act FAQs zu lesen. Wir werden weiterhin in Ihrem Interesse innovativ sein, neue Funktionen und Services entwickeln, die Ihnen die Kontrolle über Ihre Daten geben, und unser Engagement für höchste Datenschutz- und Sicherheitsstandards aufrechterhalten.
Über den Autor
Bob Kimball ist Chief Regulatory Officer und ehemaliger General Counsel bei AWS. In seiner aktuellen Position ist Bob ein AWS-Experte für globale regulatorische Fragen und arbeitet eng mit Aufsichtsbehörden und Kunden zu Themen wie KI, digitale Souveränität, Energie und anderen Schlüsselthemen zusammen, die den Betrieb von Cloud-Infrastruktur und -Services betreffen.
If you have feedback about this post, submit comments in the Comments section below. If you have questions about this post, contact AWS Support.
When it comes to AWS authentication, relying on long-term credentials, such as AWS Identity and Access Management (IAM) access keys, introduces unnecessary risks; including potential credential exposure, unauthorized sharing, or theft. In this post, I present five common use cases where AWS customers traditionally use IAM access keys and present more secure alternatives that you should consider.
AWS CLI access: Embrace CloudShell
If you’re primarily using access keys for AWS Command Line Interface (AWS CLI) access, consider AWS CloudShell—a browser-based CLI that minimizes the need for local credential management while providing the same powerful CLI capabilities that you’re accustomed to.
AWS CLI with enhanced security: IAM Identity Center
If you need a more robust solution, AWS CLI v2 combined with AWS IAM Identity Center offers a superior authentication approach. This integration enables:
For developers working in local environments, modern integrated development environments (IDEs) such as Visual Studio Code, with AWS Toolkit support offer secure authentication through IAM Identity Center. This alleviates the need for static access keys while maintaining a smooth development experience. Learn more about AWS IDE integrations.
AWS compute services and CI/CD access
When your applications and automation pipelines need AWS resource access, whether running on AWS compute services (Amazon Elastic Compute Cloud (Amazon EC2), Amazon Elastic Container Service (Amazon ECS), or AWS Lambda) or through continuous integration and delivery (CI/CD) tools, IAM roles can provide the ideal solution. These roles automatically manage temporary credential rotation and follow security best practices.
For AWS compute services: Use standard IAM roles with your compute resources. Review the EC2 IAM roles documentation for implementation details.
For CI/CD tools self-hosted on Amazon EC2: If you’re running tools such as Jenkins or GitLab on AWS resources, use the instance profile roles the same as you would with other compute services.
For third-party CI/CD services (such as GitHub Actions, CircleCI, and so on), see External access requirements.
External access requirements
For scenarios involving third-party applications or on-premises workloads, AWS offers three methods:
Third-party applications: Implement temporary security credentials through IAM roles instead of static access keys. Never use root account access keys. See third-party access documentation.
CI/CD software as a service (SaaS): For cloud-based CI/CD services, use OpenID Connect (OIDC) integration with IAM roles to minimize the need for long-term credentials. This allows your CI/CD pipelines to obtain temporary credentials through trust relationships. See the AWS OIDC provider documentation for implementation details.
Best practice: Principle of least privilege
Regardless of your authentication method, always implement the principle of least privilege. This helps make sure that users and applications have only the permissions they need. For guidance on crafting precise IAM policies, see Techniques for writing least privilege IAM policies.
Note: AWS also offers policy generation based on AWS CloudTrail logs, helping you create permission templates based on actual usage patterns. Learn about this feature in the IAM policy generation documentation.
Conclusion
As you’ve seen, there are numerous secure alternatives to IAM access keys that you can use to enhance your AWS authentication strategy while reducing security risks. By using tools such as CloudShell, IAM Identity Center, IDE integrations, IAM roles, and IAM Roles Anywhere, you can implement robust authentication mechanisms that align with modern security best practices.Key takeaways:
Prefer temporary credentials over long-term access keys
Choose the authentication method that best fits your use case
Implement the principle of least privilege across all access methods
Take advantage of the built-in tools provided by AWS for policy generation and management
Regularly review and update your authentication methods as new solutions become available
By making these changes, you can not only improve your security posture but also streamline your authentication processes across your AWS environment. Start small by identifying your current IAM access key use cases and gradually transition to these more secure alternatives. Your future self—and your security team—will thank you.
If you have feedback about this post, submit comments in the Comments section below.
At AWS, security remains our highest priority. As customers continue to embrace the scalability and flexibility of the cloud, we support them in evolving security, identity, and compliance into core business enablers. The AWS Compliance Program helps customers understand the robust controls in place at AWS and empowers them to architect secure and resilient environments aligned to regulatory expectations.
What is CCAG?
The CCAG is a not-for-profit association representing a growing number of regulated financial services institutions across Europe. Its mission is to execute pooled audits of cloud service providers, enabling participating institutions to exercise their audit rights in alignment with supervisory expectations, including those set out by the European Banking Authority (EBA).
The CCAG audit methodology is grounded in recognized international standards and frameworks, including:
While there are many established security frameworks, CCAG uses the CSA Cloud Controls Matrix to assess the control environment of cloud service providers. This framework provides foundational security principles tailored to cloud environments and enables risk-informed assurance in regulated industries.
Between February and December 2024, AWS collaborated with CCAG member auditors through a structured, multi-phase audit program. Fieldwork activities were conducted entirely on site across two AWS locations in Europe and North America. The scope of the audit covered selected AWS services and corresponding enterprise-wide controls, aligned to the expectations of European financial regulators.
As part of the audit, CCAG evaluated the ability of AWS to protect the confidentiality, integrity, and sovereignty of customer data across AWS Regions; to detect and respond effectively to security incidents and make sure of forensic readiness; to enforce strict access controls and manage privileged users with precision; and to maintain operational resilience through structured change and configuration management processes. Further areas of assessment included the security of APIs and customer-facing interfaces, the ability to support interoperability and data portability, the governance of supplier relationships and workforce lifecycle management, and the enforcement of centralized policy, risk, and compliance oversight across the AWS environment.
CCAG 2024: A collaborative milestone in assurance
The 2024 engagement exemplified strong alignment between CCAG’s audit strategy and the commitment of AWS to assurance. Through effective governance structures, shared timelines, and continuous dialogue, AWS supported the audit with clarity, responsiveness, and precision.
“CCAG proudly acknowledges the exceptional collaboration with AWS in delivering a strategically significant and highly complex audit. This engagement brought together CCAG’s deep-rooted expertise in banking and financial services—including decades of regulatory insight, audit precision, and sector-specific resilience knowledge—with AWS’s outstanding technical leadership, operational agility, and commitment to transparency.
This partnership exemplified the highest standards of professional alignment, mutual accountability, and excellence. The shared focus on rigor and process integrity enabled CCAG to conduct a risk-informed, regulatory-grade audit within agreed timelines—reinforcing what best-in-class assurance in cloud-enabled financial services can look like.” Audit Coordinators of the CCAG Group
“CCAG proudly acknowledges the exceptional collaboration with AWS in delivering a strategically significant and highly complex audit. This engagement brought together CCAG’s deep-rooted expertise in banking and financial services—including decades of regulatory insight, audit precision, and sector-specific resilience knowledge—with AWS’s outstanding technical leadership, operational agility, and commitment to transparency.
This partnership exemplified the highest standards of professional alignment, mutual accountability, and excellence. The shared focus on rigor and process integrity enabled CCAG to conduct a risk-informed, regulatory-grade audit within agreed timelines—reinforcing what best-in-class assurance in cloud-enabled financial services can look like.” — Audit Coordinators of the CCAG Group
Looking ahead
Following the successful completion of the 2024 cycle, AWS has already initiated the 2025 CCAG engagement. We remain committed to strengthening trust, improving transparency, and continuing to collaborate with customers and regulators to support the secure and compliance-aligned adoption of cloud services across the financial sector.
To learn more about AWS compliance programs, visit AWS Compliance Programs. For audit-specific inquiries, reach out to your AWS account team or contact the Security Assurance team.
If you have feedback about this post, submit comments in the section below.
The collective thoughts of the interwebz
Manage Consent
To provide the best experiences, we use technologies like cookies to store and/or access device information. Consenting to these technologies will allow us to process data such as browsing behavior or unique IDs on this site. Not consenting or withdrawing consent, may adversely affect certain features and functions.
Functional
Always active
The technical storage or access is strictly necessary for the legitimate purpose of enabling the use of a specific service explicitly requested by the subscriber or user, or for the sole purpose of carrying out the transmission of a communication over an electronic communications network.
Preferences
The technical storage or access is necessary for the legitimate purpose of storing preferences that are not requested by the subscriber or user.
Statistics
The technical storage or access that is used exclusively for statistical purposes.The technical storage or access that is used exclusively for anonymous statistical purposes. Without a subpoena, voluntary compliance on the part of your Internet Service Provider, or additional records from a third party, information stored or retrieved for this purpose alone cannot usually be used to identify you.
Marketing
The technical storage or access is required to create user profiles to send advertising, or to track the user on a website or across several websites for similar marketing purposes.