The whitepaper covers the core security principles of Amazon EKS Auto Mode, highlighting its unique approach to managing Kubernetes clusters. This includes how AWS has reimagined node management by building on top of Amazon Elastic Compute Cloud (Amazon EC2) managed instances, which introduces a new way for customers to delegate operational control of EC2 instances to an AWS service.
Designed for cloud architects, security professionals, and Kubernetes practitioners, the whitepaper serves as a comprehensive guide to understanding the security architecture of Amazon EKS Auto Mode. It represents the AWS commitment to providing secure, manageable, and innovative Kubernetes infrastructure solutions that minimize undifferentiated heavy lifting, so that customers can focus more on application development and less on infrastructure management.
If you have feedback about this post, submit comments in the Comments section below. If you have questions about this post, contact AWS Support.
Many organizations operating in regulated industries need complete control over encryption key management. While Identity Center already encrypts data at rest using AWS-owned keys, some customers require the ability to manage their own encryption keys for audit and compliance purposes.
With this launch, you can now use customer-managed KMS keys (CMKs) to encrypt Identity Center identity data at rest. CMKs provide you with full control over the key lifecycle, including creation, rotation, and deletion. You can configure granular access controls to keys with AWS Key Management Service (AWS KMS) key policies and IAM policies, helping to ensure that only authorized principals can access your encrypted data. At launch time, the CMK must reside in the same AWS account and Region as your IAM Identity Center instance. The integration between Identity Center and KMS provides detailed AWS CloudTrail logs for auditing key usage and helps meet regulatory compliance requirements.
Identity Center supports both single-Region and multi-Region keys to match your deployment needs. While Identity Center instances can currently only be deployed in a single Region, we recommend using multi-Region AWS KMS keys unless your company policies restrict you to single-Region keys. Multi-Region keys provide consistent key material across Regions while maintaining independent key infrastructure in each Region. This gives you more flexibility in your encryption strategy and helps future-proof your deployment.
Let’s get started Let’s imagine I want to use a CMK to encrypt the identity data of my Identity Center organization instance. My organization uses Identity Center to give employees access to AWS managed applications, such as Amazon Q Business or Amazon Athena.
As of today, some AWS managed applications cannot be used with Identity Center configured with a customer managed KMS key. See AWS managed applications that you can use with Identity Center to keep you updated with the ever evolving list of compatible applications.
The high-level process requires first to create a symmetric customer managed key (CMK) in AWS KMS. The key must be configured for encrypt and decrypt operations. Next, I configure the key policies to grant access to Identity Center, AWS managed applications, administrators, and other principals who need access the Identity Center and IAM Identity Center service APIs. Depending on your usage of Identity Center, you’ll have to define different policies for the key and IAM policies for IAM principals. The service documentation has more details to help you cover the most common use cases.
This demo is in three parts. I first create a customer managed key in AWS KMS and configure it with permissions that will authorize Identity Center and AWS managed applications to use it. Second, I update the IAM policies for the principals that will use the key from another AWS account, such as AWS applications administrators. Finally, I configure Identity Center to use the key.
Part 1: Create the key and define permissions
First, let’s create a new CMK in AWS KMS.
The key must be in the same AWS Region and AWS account as the Identity Center instance. You must create the Identity Center instance and the key in the management account of your organization within AWS Organization.
I navigate to the AWS Key Management Service (AWS KMS) console in the same Region as my Identity Center instance, then I choose Create a key. This launches me into the key creation wizard.
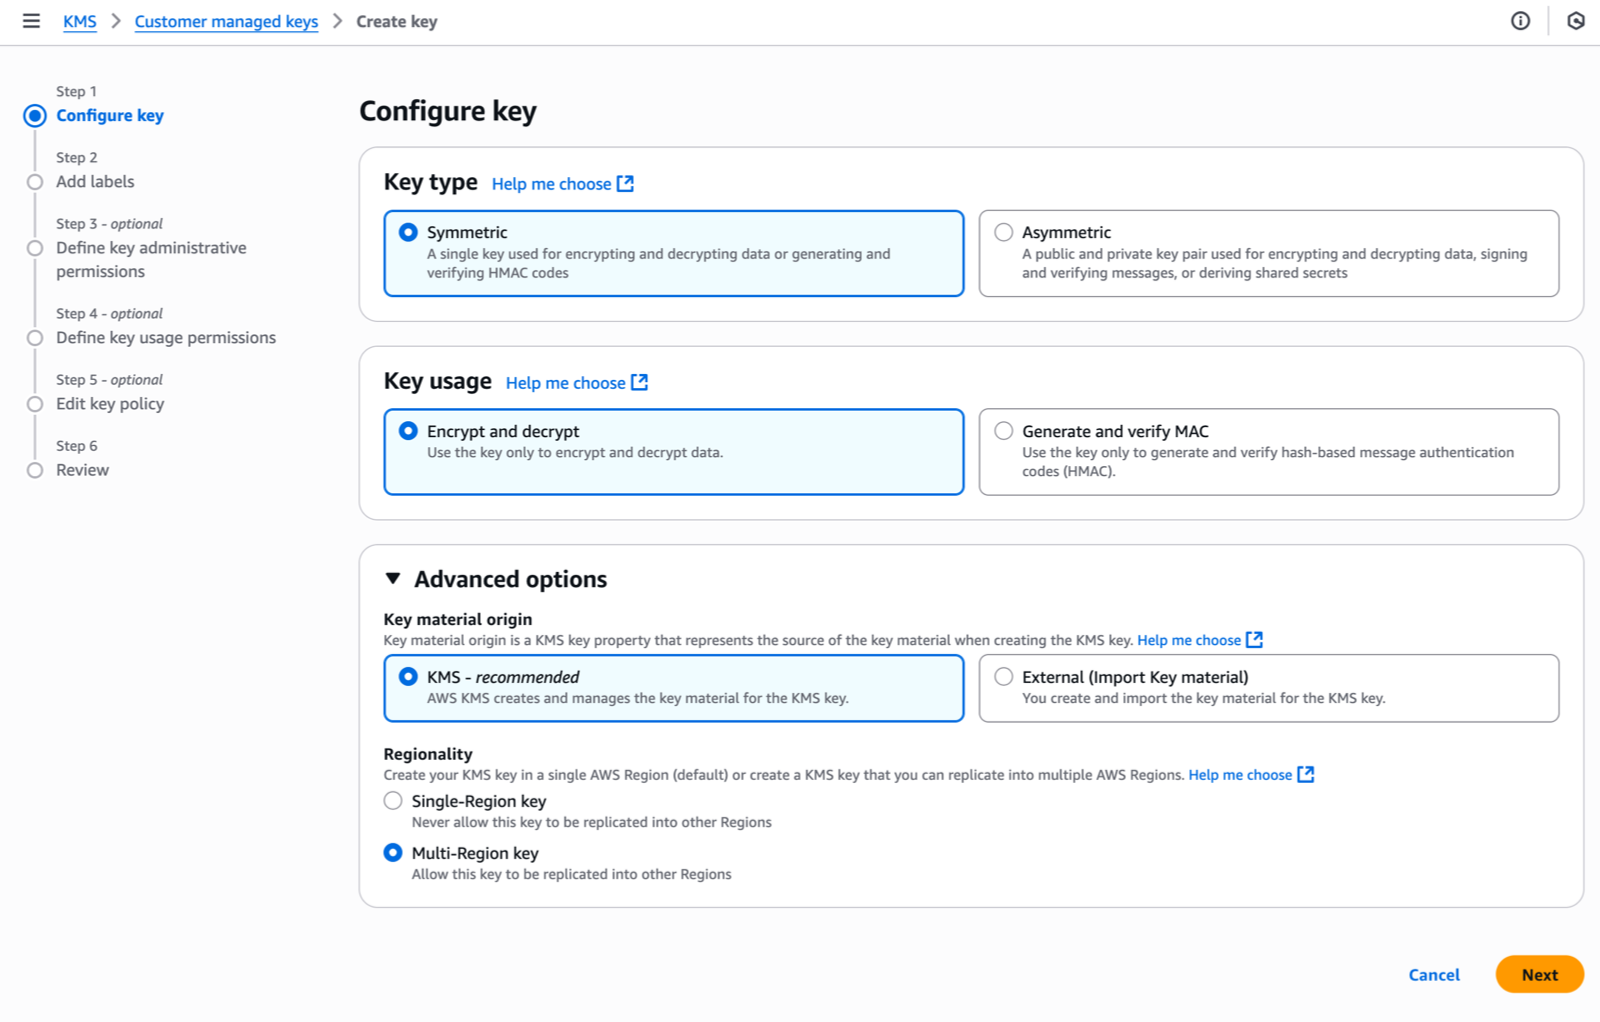
Under Step 1–Configure key, I select the key type–either Symmetric (a single key used for both encryption and decryption) or Asymmetric (a public-private key pair for encryption/decryption and signing/verification). Identity Center requires symmetric keys for encryption at rest. I select Symmetric.
For key usage, I select Encrypt and decrypt which allows the key to be used only for encrypting and decrypting data.
Under Advanced options, I select KMS – recommended for Key material origin, so AWS KMS creates and manages the key material.
For Regionality, I choose between Single-Region or Multi-Region key. I select Multi-Region key to allow key administrators to replicate the key to other Regions. As explained already, Identity Center doesn’t require this today but it helps to future-proof your configuration. Remember that you can not transform a single-Region key to a multi-Region one after its creation (but you can change the key used by Identity Center).
Then, I choose Next to proceed with additional configuration steps, such as adding labels, defining administrative permissions, setting usage permissions, and reviewing the final configuration before creating the key.
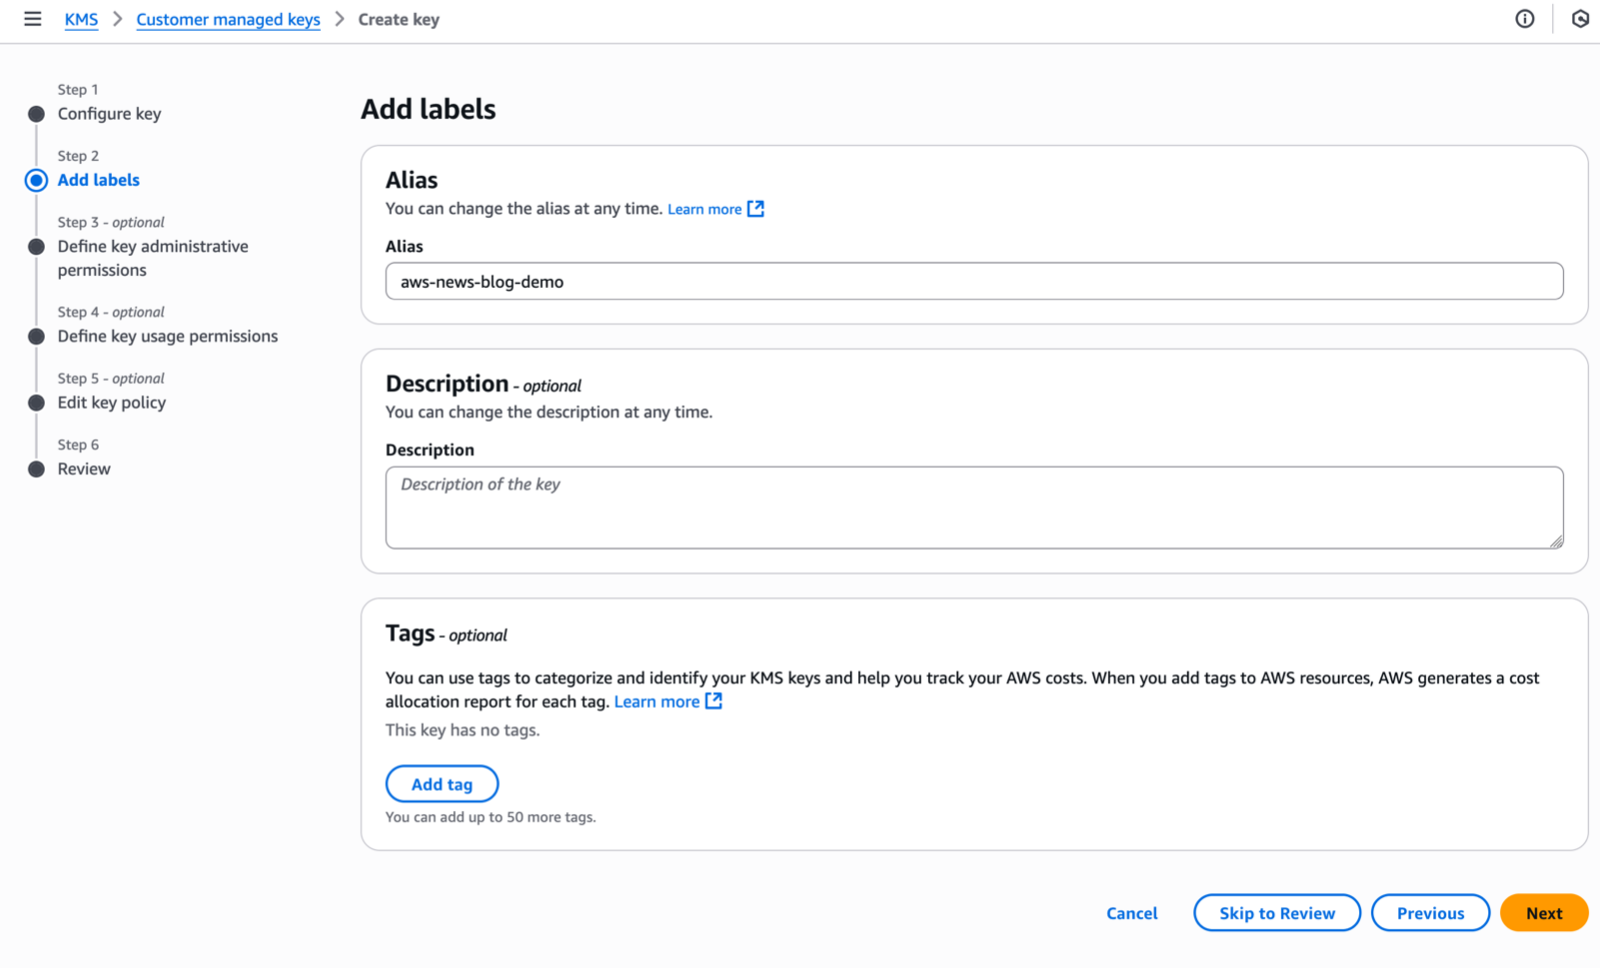
Under Step 2–Add Labels, I enter an Alias name for my key and select Next.
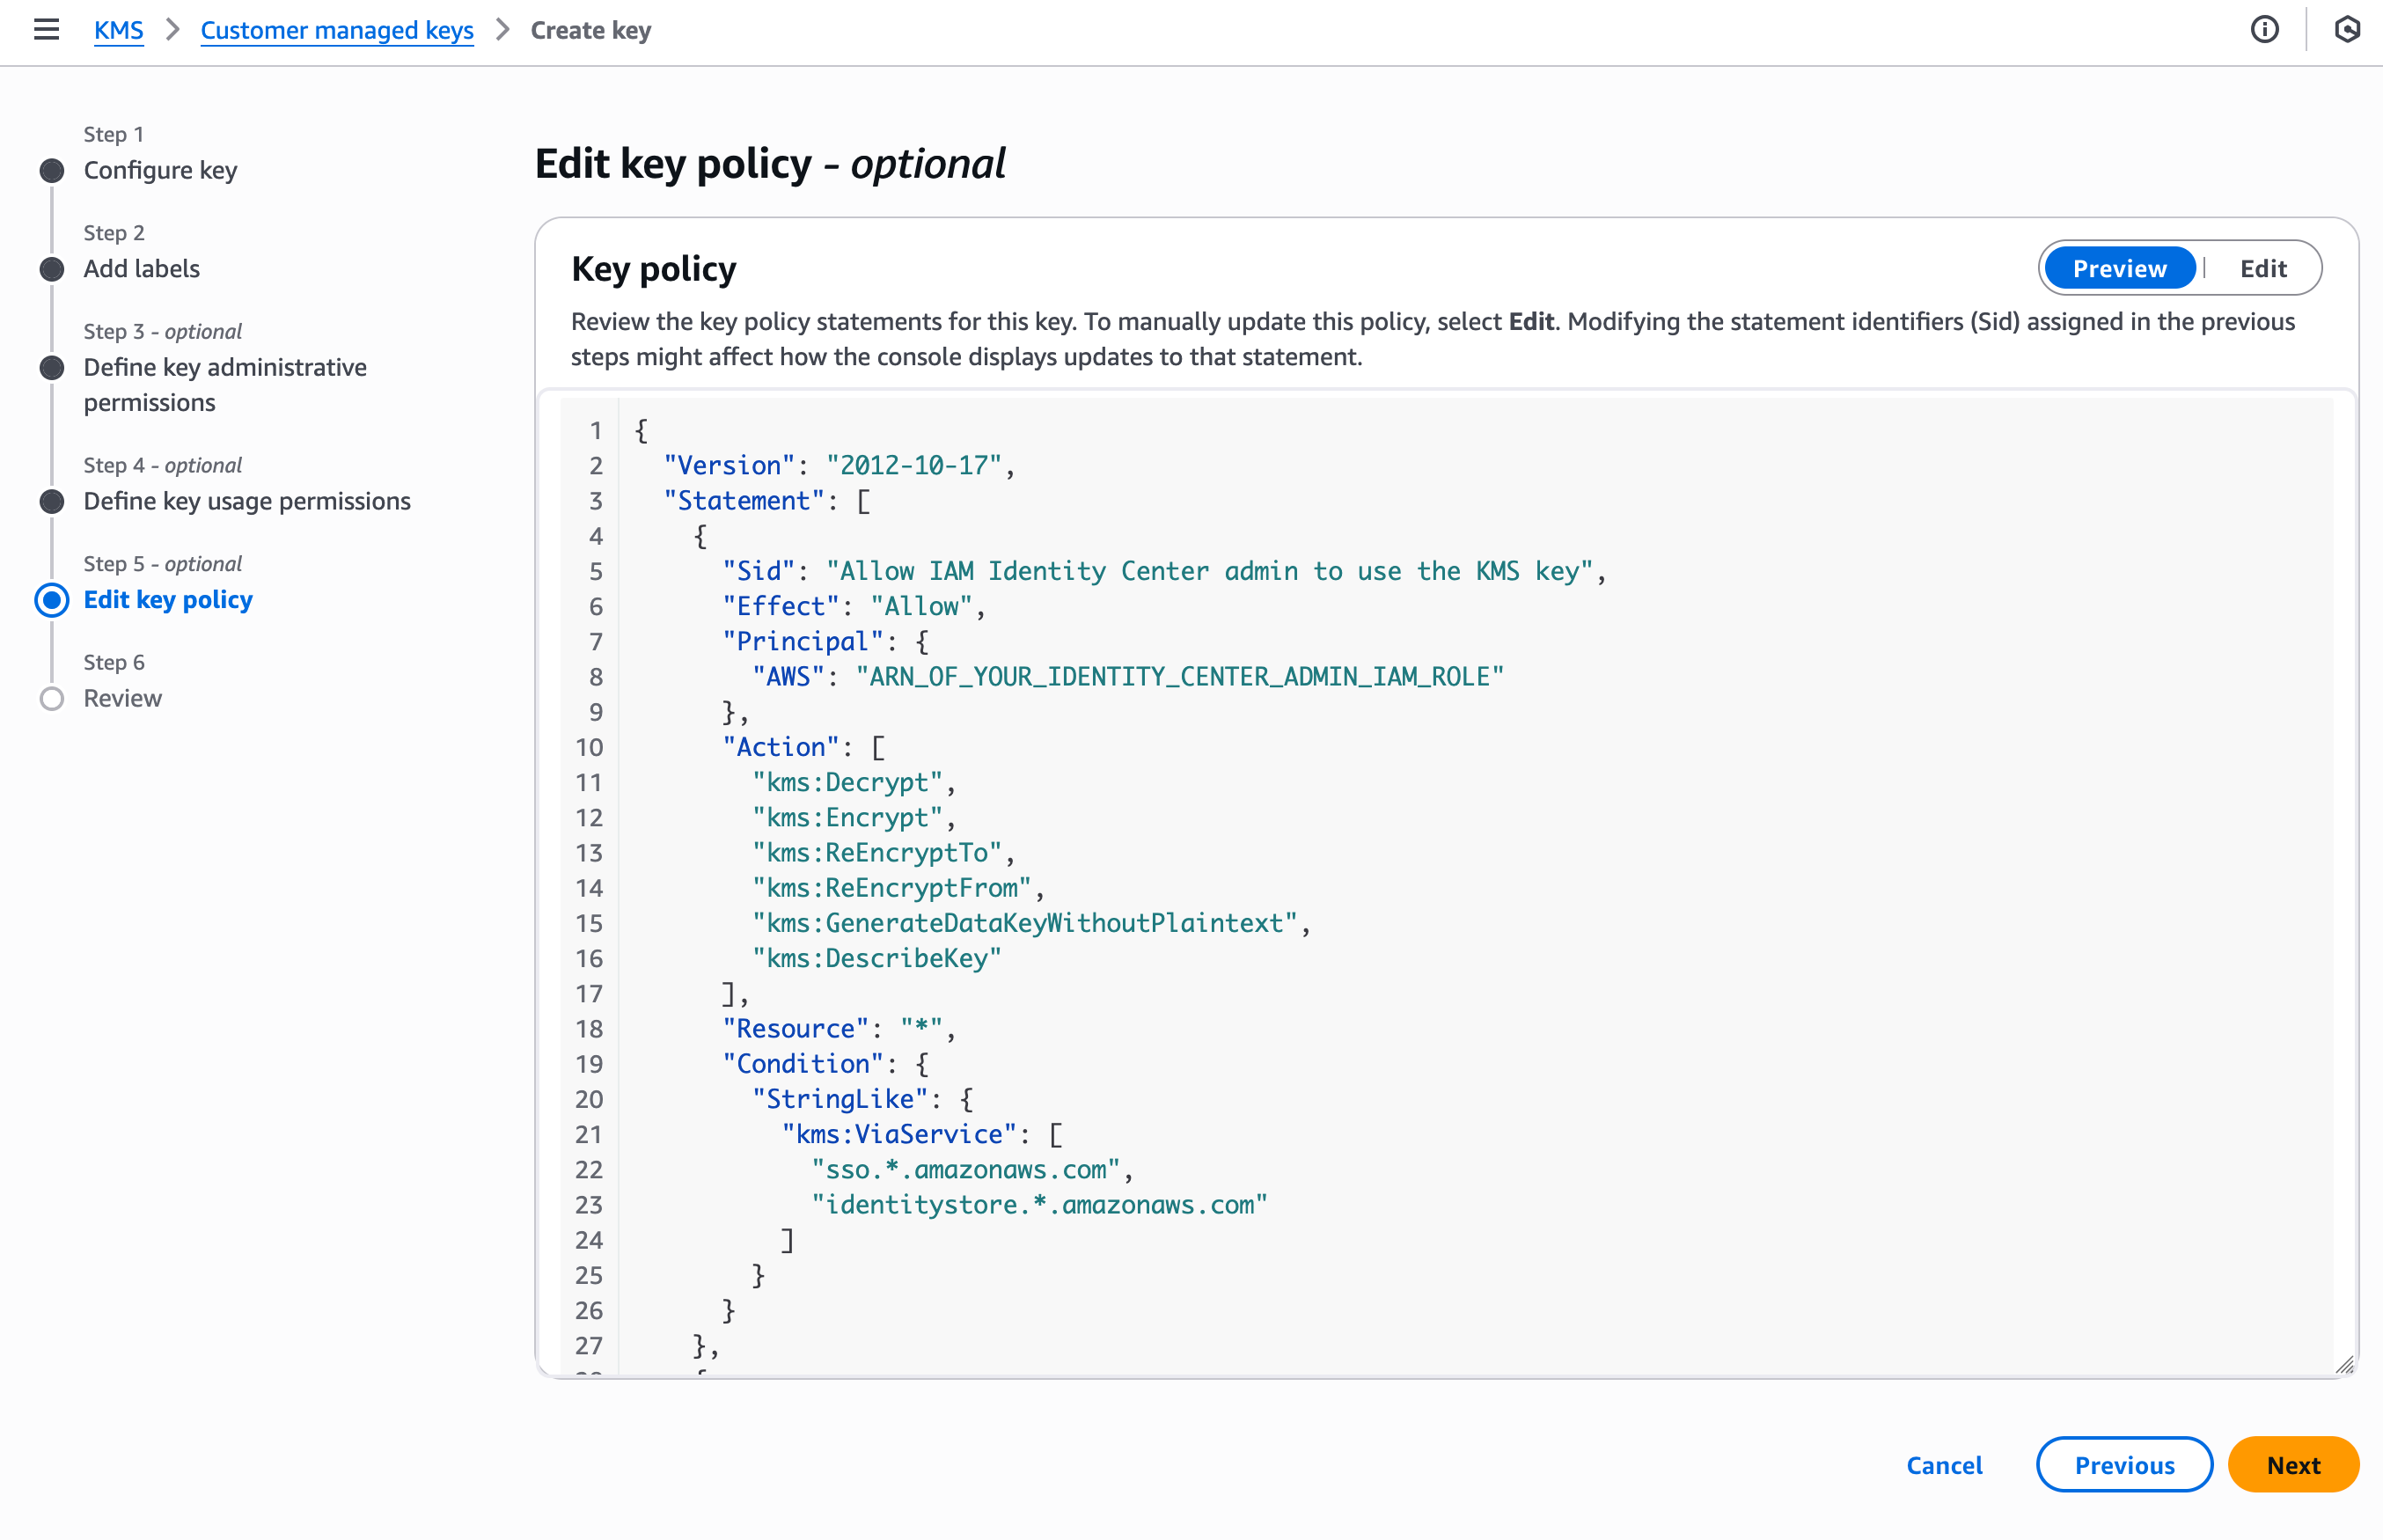
In this demo, I am editing the key policy by adding policy statements using templates provided in the documentation. I skip Step 3 and Step 4 and navigate to Step 5–Edit key policy.
Identity Center requires, at the minimum, permissions allowing Identity Center and its administrators to use the key. Therefore, I add three policy statements, the first and second authorize the administrators of the service, the third one to authorize the Identity Center service itself.
I also have to add additional policy statements to allow my use case: the use of AWS managed applications. I add these two policy statements to authorize AWS managed applications and their administrators to use the KMS key. The document lists additional use cases and their respective policies.
To help protect against IAM role name changes when permission sets are recreated, use the approach described in the Custom trust policy example.
Part 2: Update IAM policies to allow use of the KMS key from another AWS account
Any IAM principal that uses the Identity Center service APIs from another AWS account, such as Identity Center delegated administrators and AWS application administrators, need an IAM policy statement that allows use of the KMS key via these APIs.
I grant permissions to access the key by creating a new policy and attaching the policy to the IAM role relevant for my use case. You can also add these statements to the existing identity-based policies of the IAM role.
Part 3: Configure IAM Identity Center to use the key
I can configure a CMK either during the enablement of an Identity Center organization instance or on an existing instance, and I can change the encryption configuration at any time by switching between CMKs or reverting to AWS-owned keys.
Please note that an incorrect configuration of KMS key permissions can disrupt Identity Center operations and access to AWS managed applications and accounts through Identity Center. Proceed carefully to this final step and ensure you have read and understood the documentation.
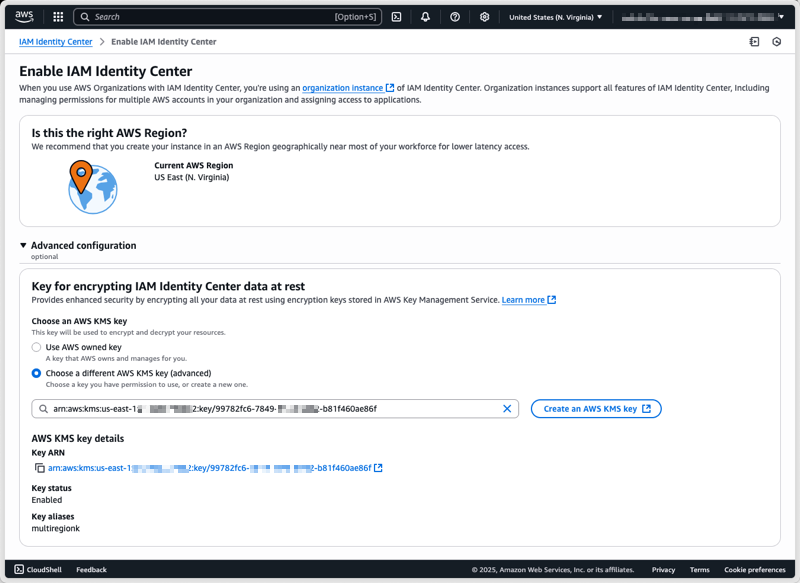
After I have created and configured my CMK, I can select it under Advanced configuration when enabling Identity Center.
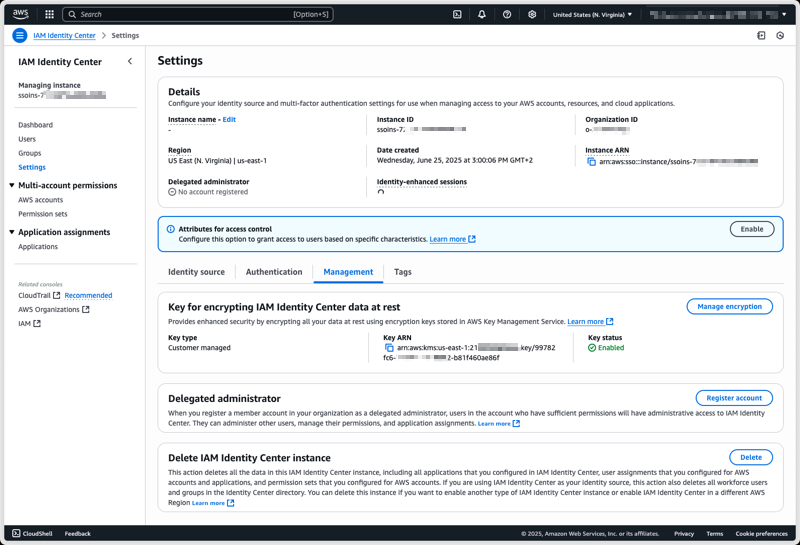
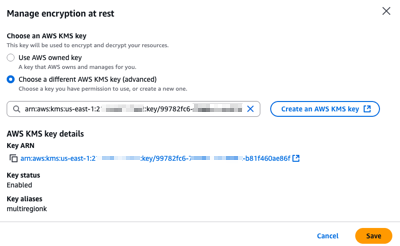
To configure a CMK on an existing Identity Center instance using the AWS Management Console, I start by navigating to the Identity Center section of the AWS Management Console. From there, I select Settings from the navigation pane, then I select the Management tab, and select Manage encryption in the Key for encrypting IAM Identity Center data at rest section.
At any time, I can select another CMK from the same AWS Account, or switch back to an AWS-managed key.
After choosing Save, the key change process takes a few seconds to complete. All service functionalities continue uninterrupted during the transition. If, for whatever reasons, Identity Center can not access the new key, an error message will be returned and Identity Center will continue to use the current key, keeping your identity data encrypted with the mechanism it is already encrypted with.
Things to keep in mind The encryption key you create becomes a crucial component of your Identity Center. When you choose to use your own managed key to encrypt identity attributes at rest, you have to verify the following points.
Have you configured the necessary permissions to use the KMS key? Without proper permissions, enabling the CMK may fail or disrupt IAM Identity Center administration and AWS managed applications.
Have you verified that your AWS managed applications are compatible with CMK keys? For a list of compatible applications, see AWS managed applications that you can use with IAM Identity Center. Enabling CMK for Identity Center that is used by AWS managed applications incompatible with CMK will result in operational disruption for those applications. If you have incompatible applications, do not proceed.
Is your organization using AWS managed applications that require additional IAM role configuration to use the Identity Center and Identity Store APIs? For each such AWS managed application that’s already deployed, check the managed application’s User Guide for updated KMS key permissions for IAM Identity Centre usage and update them as instructed to prevent application disruption.
Pricing and availability Standard AWS KMS charges apply for key storage and API usage. Identity Center remains available at no additional cost.
This capability is now available in all AWS commercial Regions, AWS GovCloud (US), and AWS China Regions. To learn more, visit the IAM Identity Center User Guide.
We look forward to learning how you use this new capability to meet your security and compliance requirements.
Building on top of open source packages can help accelerate development. By using common libraries and modules from npm, PyPI, Maven Central, NuGet, and others, teams can focus on writing code that is unique to their situation. These open source package registries host millions of packages that are integrated into thousands of programs daily.
Unfortunately, these key services are prime targets for threat actors looking to distribute their code at scale. If they can compromise a package in one of these services, that one action can automatically affect thousands of other systems.
September 8: Chalk and Debug compromise
It started with compromised credentials for a trusted maintainer for npm. After social engineering the credentials, 18 popular packages (including Chalk, Debug, ansi-styles, supports-color, and more) were updated with an injected payload.
This payload was designed to silently intercept cryptocurrency activity and manipulate transactions to the bad actor’s benefit.
Together these packages are downloaded an estimated two billion times each week. That means even with the rapid response from the maintainer and npm, the couple of hours that the compromised versions were available could have led to significant exposures. Any build systems that downloaded the packages during this window or sites that loaded them remotely were potentially vulnerable.
This sophisticated malware used intelligent reconnaissance techniques and adapted its behavior to find the most effective attack vector for its current context.
September 15: Shai-Hulud worm
The very next week, the Shai-Hulud worm started to spread autonomously through the npm trust chain. This malware uses its initial foothold in a developer’s environment to harvest a variety of credentials, such as npm tokens, GitHub personal access tokens, and cloud credentials.
When possible, the malware would expose the harvested credentials publicly. When npm tokens are available, it publishes updated packages that now contain the worm as an additional payload. The now compromised packages will execute the worm as a postinstall script to continue propagating the infection.
In addition to this self-propagation method, the worm also attempts to manipulate GitHub repositories it gains access to. Shai-Hulud sets up malicious workflows that run on every repository activity, creating a resilient and continuous exfiltration of code.
This exploit showed technical sophistication and a deep understanding of the developer workflows and the trust relationships that power the community. By using the standard npm installation processes, the worm makes detection more challenging because it operates within the behavioral patterns expected of developers.
Within the first 24 hours of this exploit, over 180 npm packages had been compromised, again potentially affecting millions of systems. Both incidents show the potential scale of supply chain compromises.
How to respond to these types of events
If a compromised package has made it into production, you should follow your standard incident response process for active incidents to resolve the issue. To sweep your development environment, we recommend the following steps:
Audit dependencies: Remove or upgrade to clean versions of Chalk and Debug packages and check for Shai-Hulud-infected packages.
Rotate secrets: Assume npm tokens, GitHub PATs, and API keys might be compromised. Rotate and reissue credentials immediately.
Audit build pipelines: Check for unauthorized GitHub Actions workflows or unexpected script insertions.
Use Amazon Inspector: Review Amazon Inspector findings for exposure to the Chalk/Debug exploit or Shai-Hulud worm and follow recommended remediation.
Harden supply chains: Enforce SBOMs, pin package versions, adopt scoped tokens, and isolate continuous integration and delivery (CI/CD) environments.
How Amazon Inspector strengthens open source security with OpenSSF
We regularly share the findings from the malicious package detection system in Amazon Inspector with the community through our partnership with the Open Source Security Foundation (OpenSSF). Amazon Inspector uses an automated process to share this type of threat intelligence using the Open Source Vulnerability (OSV) format.
Amazon Inspector employs a multi-layered detection approach that combines complementary analysis techniques to identify malicious packages. This approach provides robust protection against both known attack patterns and novel threats.
Starting with static analysis using an extensive library of YARA rules, Amazon Inspector can identify suspicious code patterns, obfuscation techniques, and known malicious signatures within package contents. Building on that, the system uses dynamic analysis and behavioral monitoring to identify threats, despite their use of evasion techniques. The final set of analysis is conducted using AI and machine learning models to analyze code semantics and determine the intended purpose versus suspicious functionality within packages.
This multi-stage approach enables Amazon Inspector to maintain high detection accuracy while minimizing false positives, helping to make sure that legitimate packages are not incorrectly flagged and sophisticated threats are reliably identified and mitigated.
When these threats are detected in open source packages, the system starts the automated workflows to share this threat intelligence with the OpenSSF. This workflow sends the validated threat intelligence to the OpenSSF where the contributions are rigorously reviewed by the OpenSSF maintainers before being merged in the community database. That is where they receive an official MAL-ID or malicious package identifier.
This process helps verify and share these types of discoveries as quickly as possible with the community, so that other security tools and researchers benefit from the detection capabilities of Amazon Inspector.
What’s next?
Chalk/Debug and the Shai-Hulud worm are not novel exploits. These are—unfortunately—the most recent incidents using this vector. Open source repositories are a fantastic resource for developers and help many teams to innovate more quickly. The open source community is working hard to reduce the impact of these types of incidents.
That is why we have partnered with the OpenSSF and have contributed reports that highlight over 40,000 npm packages that were compromised or created with malicious intent. We believe that Amazon Inspector is an excellent tool to help you build safely and securely, and while we would love everyone to use it, we are proud that our work and contributions to efforts like OpenSSF are helping improve the security of everyone in the community.
As generative AI becomes foundational across industries—powering everything from conversational agents to real-time media synthesis—it simultaneously creates new opportunities for bad actors to exploit. The complex architectures behind generative AI applications expose a large surface area including public-facing APIs, inference services, custom web applications, and integrations with cloud infrastructure. These systems are not immune to classic or emerging external threats. We have introduced a series of posts on securing generative AI, starting with Securing generative AI: An introduction to the Generative AI Security Scoping Matrix, which establishes a model for the risk and security implications based on the type of generative AI workload you are deploying and lays the foundation for the rest of our series.
This post continues the series, and provides guidance on how to build secure, scalable network architectures for generative AI applications on Amazon Web Services (AWS) through a defense-in-depth approach. You’ll learn how to protect your AI workloads while maintaining performance and reliability. We cover multiple security layers including virtual private cloud (VPC) isolation, network firewalls, application protection, and edge security controls that you can use to create a comprehensive defense strategy for generative AI workloads.
Common generative AI external threats
In this section, we review some of the most common external threats facing generative AI applications today.
Network level DDoS attacks (layer 4)
Network level distributed denial-of-service (DDoS) or volumetric attacks such as SYN floods, UDP floods, and ICMP floods, target the network layer by sending a flood of layer 4 requests to a server. The aim is to exhaust the server’s resources by initiating multiple half-open layer 4 connections, ultimately rendering the system unresponsive to legitimate users. For generative AI applications, which often require sustained sessions and low-latency responses, such exploits can severely disrupt availability and user experience. Another type of volumetric attack is reflection attacks, where threat actors exploit services such as DNS to amplify the volume of traffic sent to a target. A small request sent to a vulnerable third-party server is reflected and expanded into a large response directed at the victim. This technique is particularly dangerous when generative AI APIs are exposed to the public internet, because it can flood the endpoints with unexpected traffic, causing service degradation.
Web request flood (layer 7)
These sophisticated exploits on layer 7 mimic legitimate traffic patterns to evade traditional security filters. By overwhelming application endpoints with excessive HTTP requests, bad actors can cause compute exhaustion, especially in inference-heavy AI workloads. Unlike volumetric DDoS, these requests are often hard to distinguish from real users, making mitigation more complex.
Application-specific exploits
Bad actors increasingly focus on exploiting vulnerabilities in application-specific code or the systems on which the code runs—such as Apache, Nginx, or Tomcat. For generative AI applications, which often involve custom APIs and orchestration layers, even a small misconfiguration or unpatched component can open the door to unauthorized access, data leakage, or system compromise.
SQL injection
By injecting malicious SQL code through input fields or query parameters, bad actors can manipulate backend databases to exfiltrate or corrupt data. Generative AI apps that log prompts or store user interactions are especially susceptible if input sanitization is not enforced rigorously.
Cross-site scripting
Cross-site scripting (XSS) attacks involve injecting malicious scripts into trusted web pages. When unsuspecting users interact with these scripts, bad actors can hijack sessions, steal data, or redirect users to malicious sites. Frontend interfaces for AI services, especially dashboards or prompt consoles, are particularly vulnerable.
OWASP top application security risks
The OWASP Top 10 serves as a critical framework for identifying common security risks in web applications. These include issues such as broken access control, security misconfigurations, and insufficient logging and monitoring. Generative AI solutions must adhere to OWASP guidelines to mitigate the broader landscape of web application threats.
Common vulnerabilities and exposures
Security professionals must remain vigilant to known common vulnerabilities and exposures (CVEs) impacting AI stack components—ranging from open-source libraries to model-serving infrastructure. Ignoring CVEs can lead to exploits that compromise sensitive model outputs, internal APIs, or user data.
Malicious bots and crawlers
Malicious bots increasingly target AI applications to scrape content such as generated text, pricing data, proprietary models, or images behind paywalls. These bots can masquerade as legitimate crawlers or scanners but are designed to harvest content at scale, potentially violating terms of service and impacting infrastructure costs.
Content scrapers and probing tools
Automated tools that crawl, scrape, or scan generative AI systems are often used for competitive intelligence, model inversion, or discovering exposed endpoints. These tools can weaken privacy guarantees and expose AI behavior to unintended third parties.
Securing your generative AI applications
Here are some of the common strategies that you can use to help secure your generative AI applications using AWS services.
Private networking with Amazon Bedrock
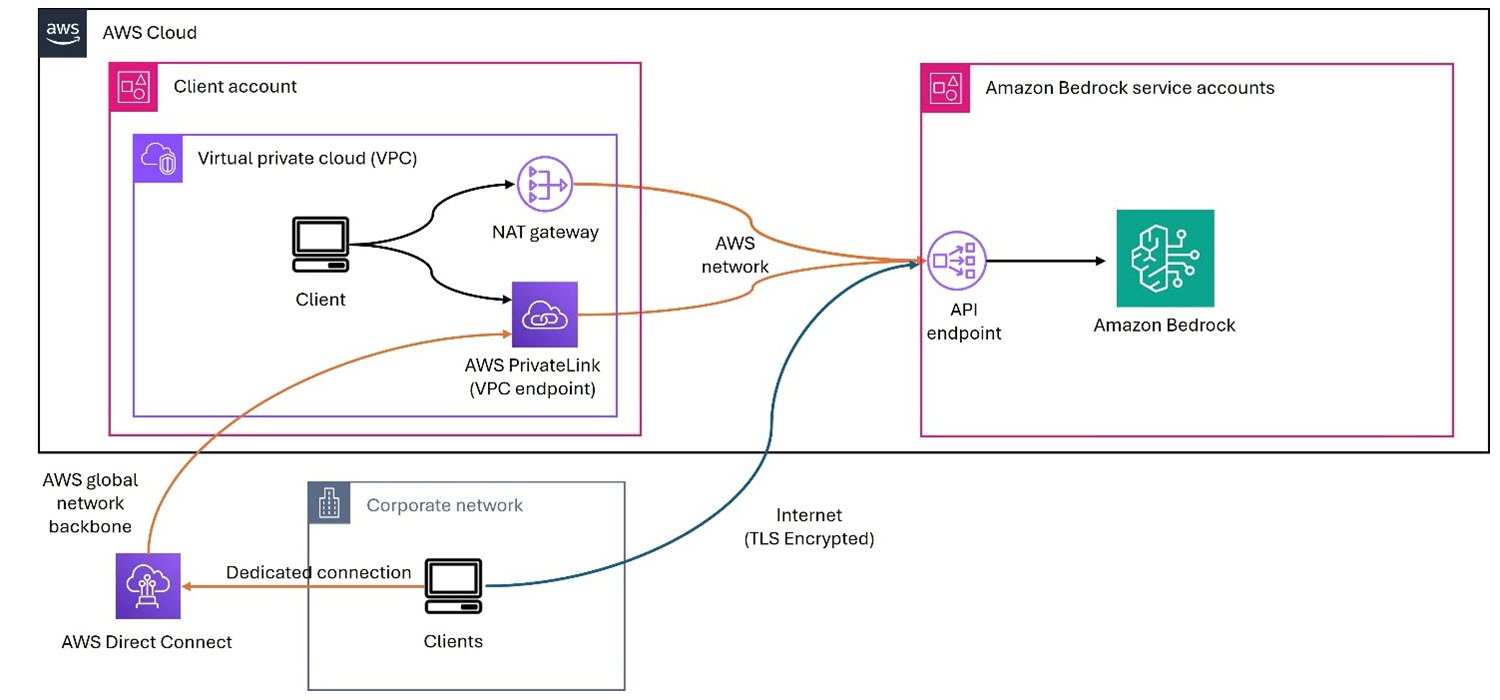
Amazon Bedrock is a fully managed service provided by AWS that offers developers access to foundation models (FMs) and the tools to customize them for specific applications. Developers can use it to build and scale generative AI applications using FMs through an API, without managing infrastructure. A typical set of environments is shown in Figure 1. It has the following network components:
The Amazon Bedrock service accounts, which hold the service components and exposes its API endpoint within the same AWS Region as the customer’s account.
The customer’s AWS account, from which the application needs to use Amazon Bedrock and invokes the Amazon Bedrock API with the query request.
The customer’s corporate network within the existing data center, which is external to the AWS global network, and holds the customer’s application that also needs to use Amazon Bedrock and can involve the Amazon Bedrock API request. AWS Direct Connect provides a dedicated network connection between an on-premises network and AWS, bypassing the public internet.
Figure 1 – Private networking architecture with Amazon Bedrock
You can use AWS PrivateLink to establish private connectivity between the FMs and the generative AI applications running in on-premises networks or your Amazon Virtual Private Cloud (Amazon VPC), without exposing your traffic to the public internet. In the case of Amazon VPC, the application running on the private subnet instance invokes the Amazon Bedrock API call. The API call is routed to the Amazon Bedrock VPC endpoint that is associated to the VPC endpoint policy and then to Amazon Bedrock APIs. The Amazon Bedrock service API endpoint receives the API request over PrivateLink without traversing the public internet. You also have the option of connecting to the Amazon Bedrock service API through the NAT Gateway. Note that in this case, the traffic goes over the AWS network backbone without being exposed to the public internet.
You can also privately access Amazon Bedrock APIs over the VPC endpoint from your corporate network through an AWS Direct Connect gateway. In case you don’t have Direct Connect, you can connect to the Amazon Bedrock service API over public internet (shown by the lower arrow in figure 1). In each of these cases, traffic to the API endpoint for Amazon Bedrock is encrypted in flight using TLS 1.2 or later, and traffic within the Amazon Bedrock service is also encrypted in flight to at least this standard. Customer content processed by Amazon Bedrock is encrypted and stored at rest in the Region where you are using Amazon Bedrock.
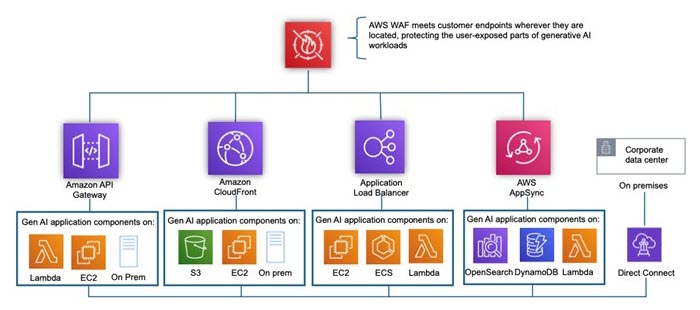
Minimize layer 7 generative AI threats with AWS WAF
As generative AI systems become integral to content creation, customer service, and decision-making processes, they are increasingly targeted by malicious bot threats. These exploits can distort outputs, flood models with biased or harmful training data (data poisoning), exploit vulnerabilities for prompt injection, or overwhelm systems through automated abuse. The consequences include degraded model performance, spread of misinformation, compromised data privacy, and erosion of user trust. To mitigate these threats, safeguards such as user authentication, input validation, anomaly detection, and continuous monitoring must be embedded into generative AI pipelines. AWS WAF is a web application firewall that helps protect applications (OSI Layer 7) from bot exploits by using intelligent detection and rule-based defenses. Its Bot Control feature identifies and filters out harmful bots while allowing legitimate ones. Through rate limiting, custom rules, and anomaly detection, AWS WAF can block scraping, credential stuffing, and distributed denial-of-service attempts (DDoS). Anti-DDoS rule group—targeted specifically at automatic mitigation of application exploits that involve HTTP request floods—is available as a Managed Rules group through AWS WAF. It removes the complexity associated with managing various AWS WAF rules and ACLs to handle these increasingly agile threats.
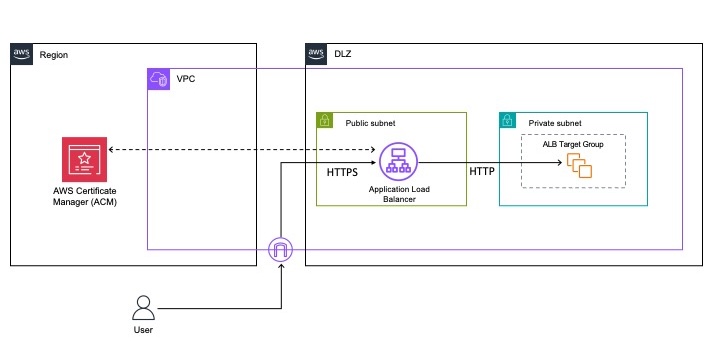
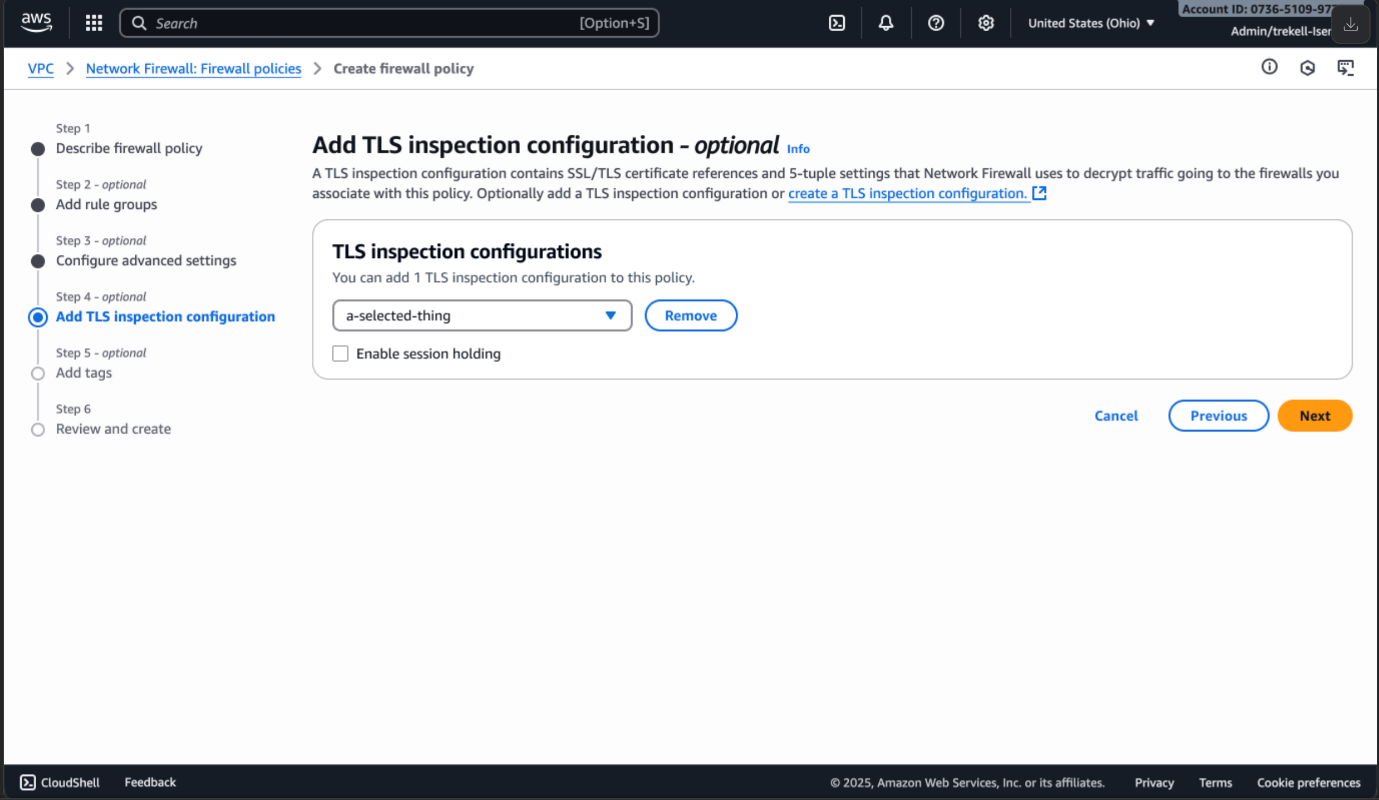
AWS WAF can be enabled on Amazon CloudFront, Amazon API Gateway, Application Load Balancer (ALB) and is deployed alongside these services (Figure 2). These AWS services terminate the TCP/TLS connection, process incoming HTTP requests, and then forward the request to AWS WAF for inspection and filtering. There is no need for reverse proxy, DNS setup, or TLS certification.
Figure 2 – Architecture using AWS WAF to minimize layer 7 generative AI threats
Mitigate DDoS at the edge for generative AI applications
DDoS attacks pose a serious threat to generative AI applications by overwhelming servers with massive traffic, leading to latency, degraded performance, or complete outages. Because generative AI workloads are often resource-intensive and operate in real time (for example, chatbots, image generators, and coding assistants), even brief disruptions can impact user experience and trust. Moreover, DDoS attacks can be used as a smokescreen for other exploits, such as data exfiltration or prompt injection. Protecting generative AI systems with scalable defenses such as rate limiting, traffic filtering, and auto-scaling infrastructure is crucial to help maintain availability and service continuity.
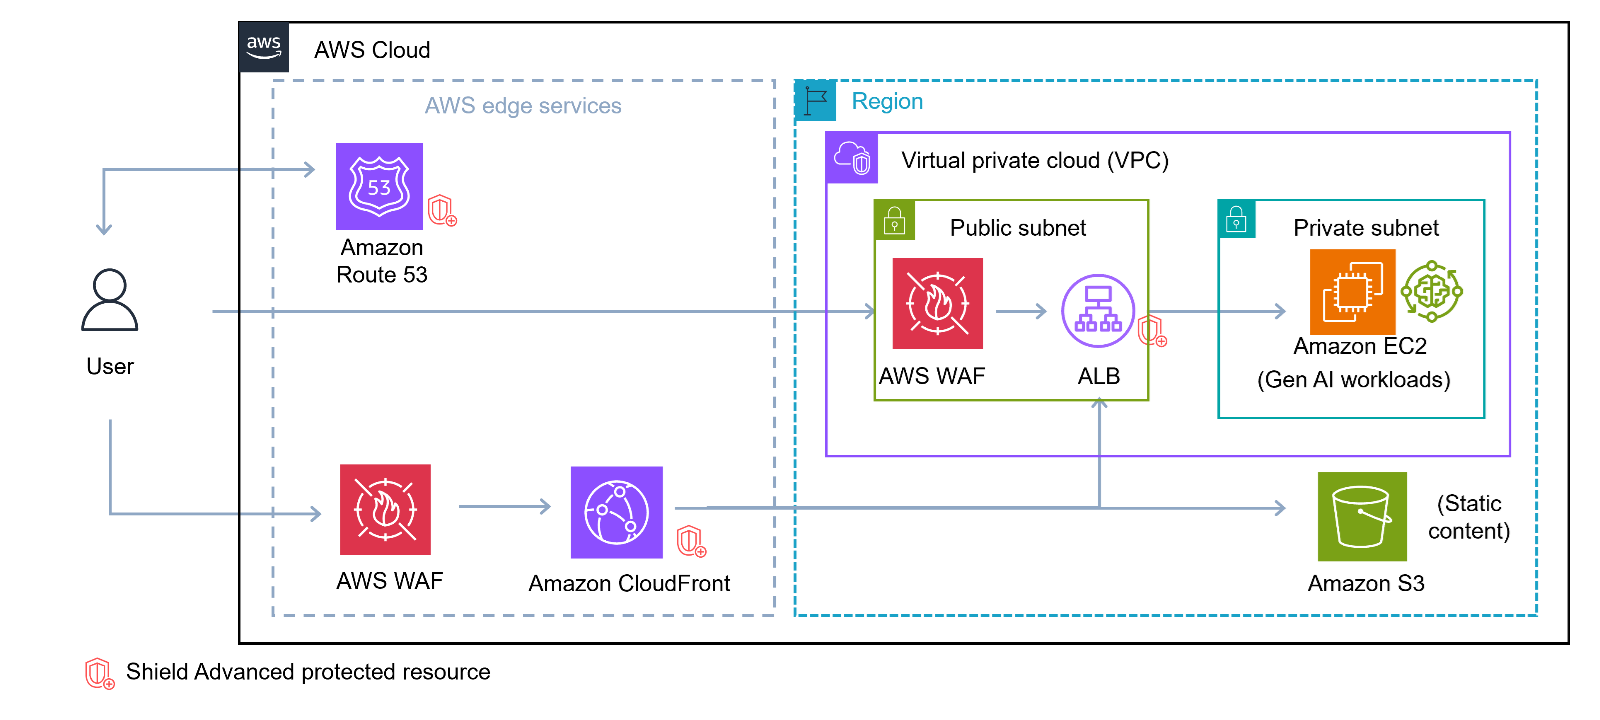
AWS Shield safeguards generative AI applications from DDoS attacks by providing always-on detection and automated mitigation. The standard tier, AWS Shield Standard, defends against common volumetric and state-exhaustion attacks with no additional cost. For advanced protection, AWS Shield Advanced offers real-time threat intelligence, adaptive rate limiting, and 24/7 access to the AWS Shield Response Team (SRT). To use the services of the SRT, you must be subscribed to the Business Support plan or the Enterprise Support plan. This helps makes sure that generative AI services—often reliant on high availability and low latency—remain resilient under threat, maintaining performance and uptime even during large-scale traffic surges. Integration with services like Amazon CloudFront and Elastic Load Balancing further enhances scalability and protection (Figure 3).
Figure 3 – Help protect your applications from DDoS attack by using AWS Shield Advance at the edge
Perimeter firewall for generative AI applications
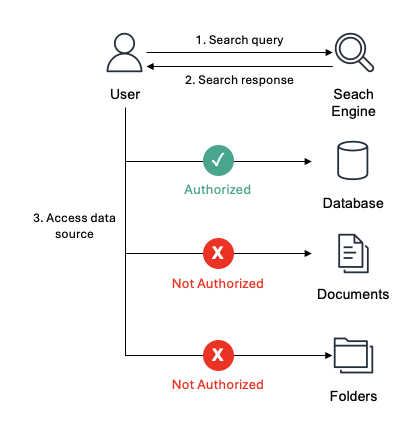
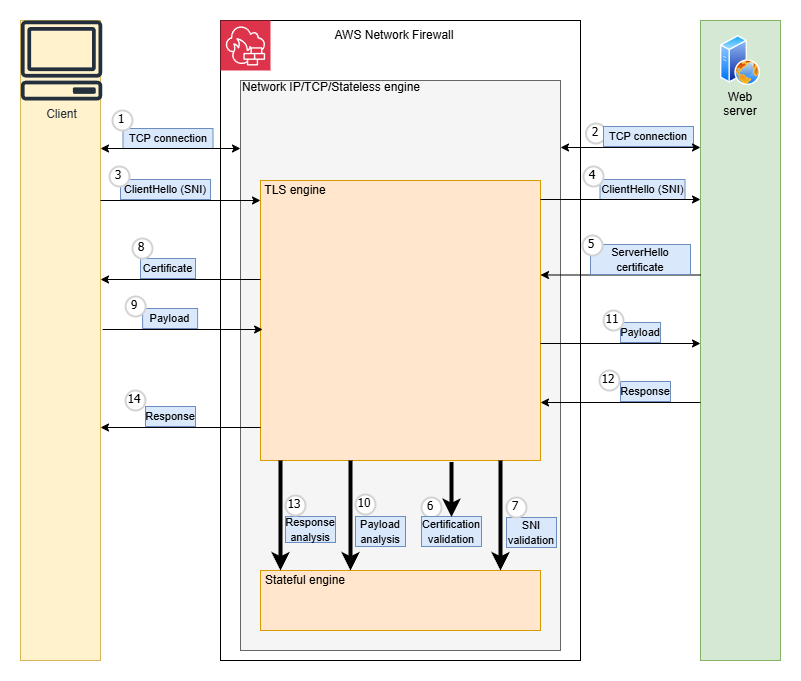
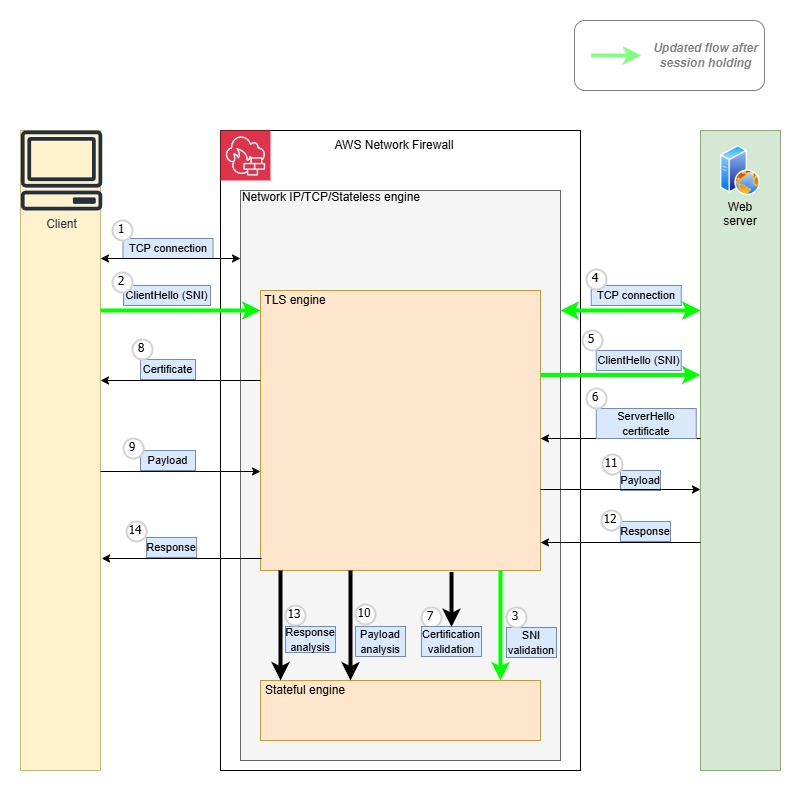
AWS Network Firewall is a managed network security service that you can use to deploy stateful and stateless packet inspection, intrusion prevention (IPS), and domain filtering capabilities directly into your Amazon VPCs. It helps inspect and filter both inbound and outbound traffic at the subnet level. For generative AI applications, this means enforcing fine-grained traffic controls without the complexity of managing your own appliances or proxies. You can use AWS Network Firewall to create custom stateless or stateful rules to block specific payloads, known signatures, or unusual traffic patterns. In multi-model or multi-tenant environments, the firewall can help enforce east-west segmentation, so that a compromised microservice cannot laterally access other AI components or sensitive services. Network Firewall can also be effective in collecting hostnames of the specific sites that are being accessed by your generative AI application. This process is called egress filtering and is specifically helpful in case an adversary compromises the generative AI workload and tries to establish a connection to an external command and control system. Network Firewall can be used to help secure outbound traffic by blocking packets that fail to meet certain security requirements.
Monitor for malicious activity
Monitoring for malicious activity is essential to protect generative AI applications from evolving security threats. These applications process unpredictable user inputs and generate dynamic outputs, making them particularly vulnerable to exploitation. Continuous monitoring enables early detection of unusual traffic patterns, excessive API usage, or anomalous input behavior, symptoms which might indicate potential exploits. It also helps prevent misuse of AI models through prompt injection, adversarial inputs, or attempts to extract sensitive information from model responses. In addition, monitoring plays a critical role in identifying DDoS attempts and resource abuse, which could otherwise disrupt the availability of AI services. By observing and analyzing real-time activity, organizations can take proactive steps to block malicious actors, adjust security controls, and maintain the integrity and reliability of their generative AI applications. Amazon GuardDuty, a threat detection service, continuously analyzes AWS account activity, network flow logs, and DNS queries to uncover potential compromises or malicious behaviors targeting your environment. GuardDuty identifies suspicious activity such as AWS credential exfiltration and suspicious user API usage in Amazon SageMaker APIs. Additionally, GuardDuty offers protection plans for Amazon Simple Storage Service (Amazon S3), Amazon Relational Database Service (Amazon RDS), Amazon Elastic Kubernetes Service (Amazon EKS), EKS Runtime Monitoring, Runtime Monitoring for Amazon ECS and Amazon EC2, Malware Protection for Amazon EC2 and S3, and AWS Lambda Protection. Amazon Inspector is an automated vulnerability management service that continually scans AWS workloads for software vulnerabilities and unintended network exposure. Amazon Detective simplifies the investigative process and helps security teams conduct faster and more effective forensic investigations.
Network defense in depth for generative AI
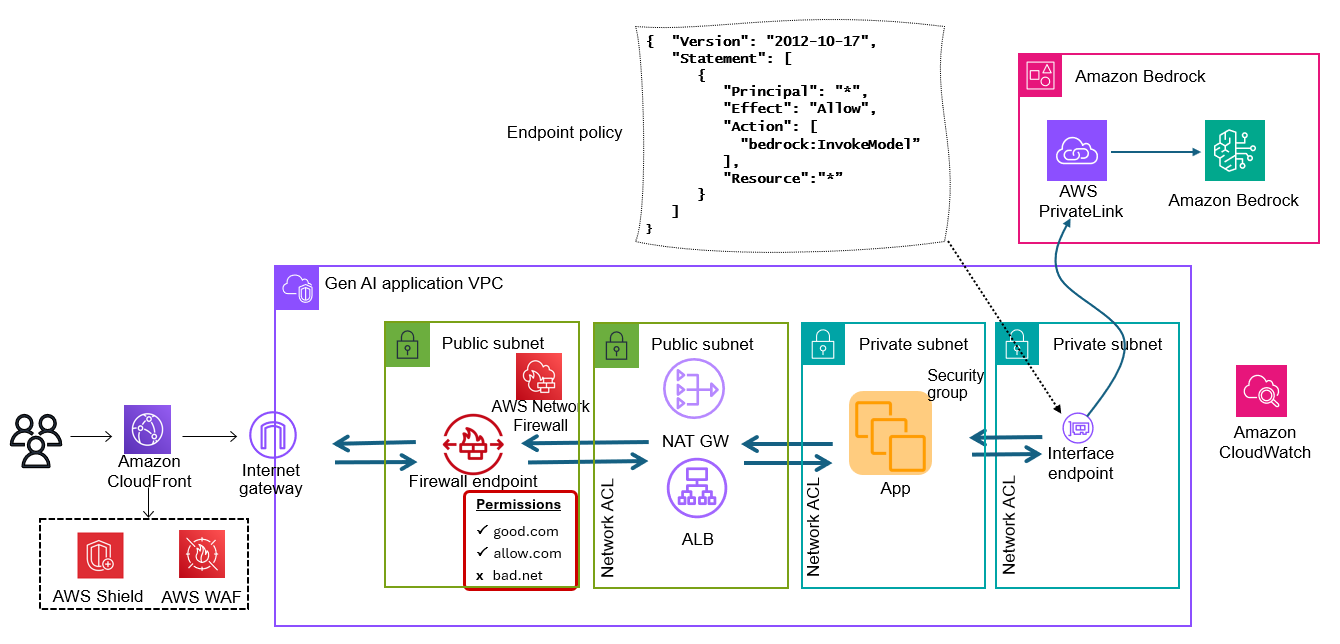
Like other modern applications, a defense-in-depth approach is recommended when designing network architectures for generative AI applications. A complete reference architecture of a generative AI application showing defense in depth protection using AWS services is shown in Figure 4.
Figure 4 – Workflow for generative AI network defense in depth
The workflow shown in Figure 4 is as follows:
A client makes a request to your application. DNS directs the client to a CloudFront location, where AWS WAF and Shield are deployed.
CloudFront sends the request through an AWS WAF rule to determine whether to block, monitor, or allow the traffic. Shield can mitigate a wide range of known DDoS attack vectors and zero-day attack vectors. Depending on the configuration, Shield Advanced and AWS WAF work together to rate-limit traffic coming from individual IP addresses. If AWS WAF or Shield Advanced don’t block the traffic, the services will send it to the CloudFront routing rules.
CloudFront sends the traffic to the ALB. However, before reaching the ALB, the traffic is inspected through a Network Firewall endpoint. Network Firewall supports deep packet inspection to decrypt, inspect, and re-encrypt inbound and outbound TLS traffic destined for the Internet, another VPC, or another subnet to help protect data. You can limit access to threat actors at this stage with additional safeguards. If you are not expecting traffic from high risk countries, it is advisable to restrict access through geographic blocking or you could at least put a strict rate limit for those countries where you don’t expect traffic through AWS WAF rules on ingress and Network Firewall on egress.
Note: If you use Amazon CloudFront geographic restrictions to block a country’s access to your content, then CloudFront blocks every request from that country. CloudFront doesn’t forward the requests to AWS WAF. To use AWS WAF criteria to allow or block requests based on geography, use an AWS WAF geographic match rule statement instead.
The ALB is in a public subnet. To keep the instances that run your app isolated from the rest of the world using the ALB, you can additionally, help protect from common layer 7 exploits with AWS WAF.
The ALB has target groups in the form of instances that are running the generative AI application running in a private subnet. You can help protect the instances and their network interfaces with the foundational VPC constructs like security groups, network ACLs (NACLs), and segmentation.
The application calls the Amazon Bedrock API. You can use PrivateLink to create a private connection between your VPC and Amazon Bedrock. You can then access Amazon Bedrock as if it were in your VPC, without the use of an internet gateway, NAT device, VPN connection, or Direct Connect connection. Instances in your VPC don’t need public IP addresses to access Amazon Bedrock. You establish this private connection by creating an interface endpoint, powered by PrivateLink. You create an endpoint network interface in each subnet that you enable for the interface endpoint. These are requester-managed network interfaces that serve as the entry point for traffic destined for Amazon Bedrock.
Create an interface endpoint for Amazon Bedrock using either the Amazon VPC console or the AWS Command Line Interface (AWS CLI). Create an interface endpoint for Amazon Bedrock using the following service name: com.amazonaws.region.bedrock-runtime
Create an endpoint policy for your interface endpoint. An endpoint policy is an AWS Identity and Access Management (IAM) resource that you can attach to an interface endpoint. The default endpoint policy allows full access to Amazon Bedrock through the interface endpoint. To control the access allowed to Amazon Bedrock from your VPC, attach a custom endpoint policy to the interface endpoint. An example of a custom endpoint policy is shown in Figure 4. When you attach this policy to your interface endpoint, it grants access to the listed Amazon Bedrock actions for all principals on all resources.
This solution uses Amazon CloudWatch to collect operational metrics from various services to generate custom dashboards that you can use to monitor the deployment’s performance and operational health.
The return flow of the traffic traverses the same path in reverse direction.
Conclusion
In this post, we reviewed the secure network design principles that provide a robust foundation for deploying generative AI applications on AWS while maintaining strong security controls. By implementing the patterns described in this post, you can confidently use AI capabilities while protecting sensitive data and infrastructure.
Want to dive deeper into additional areas of generative AI security? Check out the other posts in the Securing generative AI series:
Part 1 – Securing generative AI: An introduction to the generative AI Security Scoping Matrix
Part 2 – Designing generative AI workloads for resilience
Part 3 – Securing generative AI: Applying relevant security controls
Part 4 – Securing generative AI: data, compliance, and privacy considerations
Part 5 – Build secure network architectures for generative AI applications using AWS services (this post)
The enhanced AWS Security Hub (currently in public preview) prioritizes your critical security issues and helps you respond at scale to protect your environment. It detects critical issues by correlating and enriching signals into actionable insights, enabling streamlined response. You can use these capabilities to gain visibility across your cloud environment through centralized management in a unified cloud security solution. During the preview period, these enhanced Security Hub capabilities are available at no additional cost. While the integrated services—Amazon GuardDuty, Amazon Inspector, Amazon Macie, and AWS Security Hub Cloud Security Posture Management (CSPM)—will continue to incur standard charges, new customers can use the trial periods available at no additional cost for each of these underlying security services. By combining these trials with the Security Hub preview, organizations can conduct comprehensive proof of concept (POC) evaluations without significant upfront investment.
In this blog post, we guide you through how to plan and implement a proof of concept (POC) for Security Hub to assess the implementation, functionality, and value of Security Hub in your environment. We walk you through the following steps:
Understand the value of Security Hub
Determine success criteria for the POC
Define Security Hub configuration
Prepare for deployment
Enable Security Hub
Validate deployment
Understand the value of Security Hub
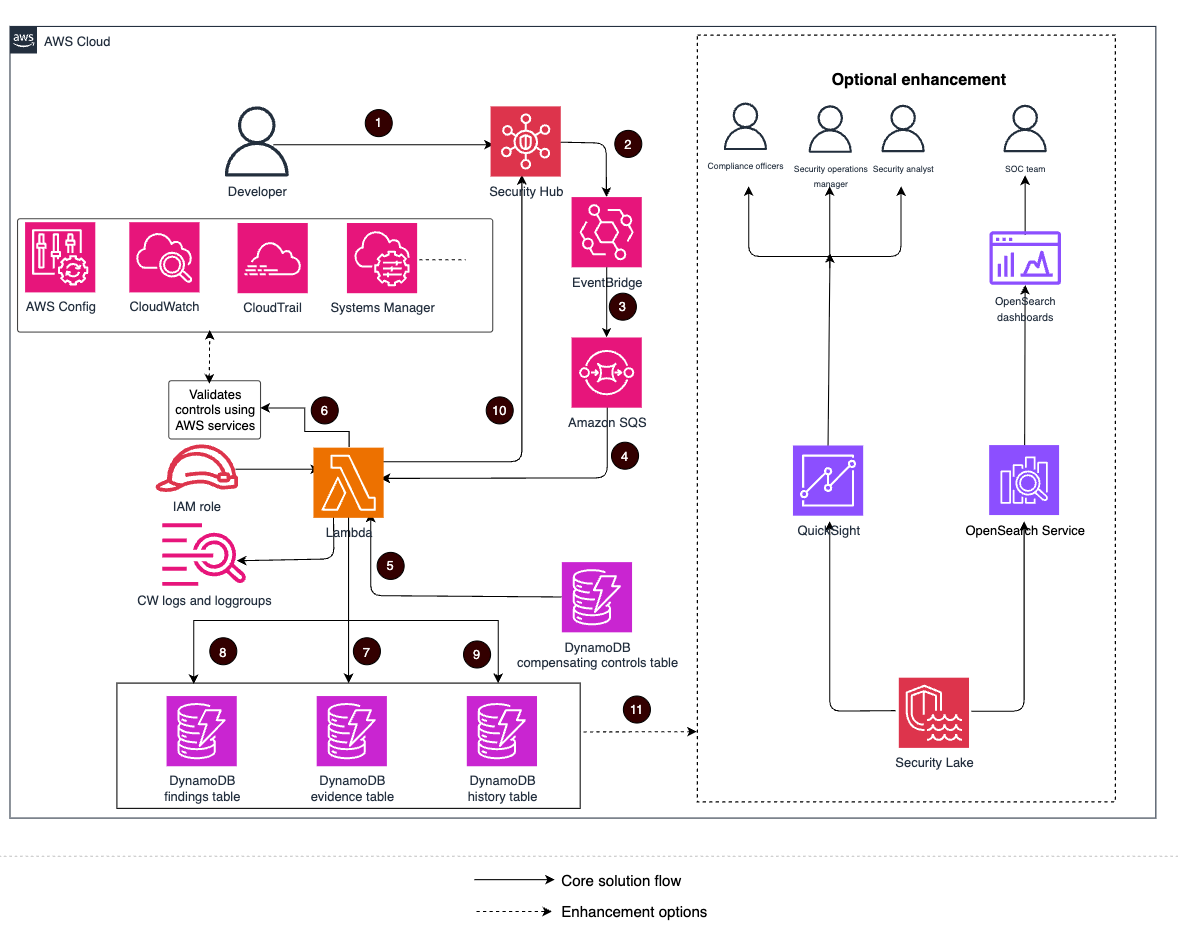
Figure1: AWS Security Hub overview
Figure 1 provides a visualization of how Security Hub unifies signals from multiple AWS security services and capabilities. The signals, which are ingested by Security Hub from multiple AWS security services and capabilities, include:
At its core, Security Hub provides four key capabilities in one unified solution:
Unified security operations: Security Hub delivers a unified security operations experience, bringing your security signals into a single consolidated view and avoiding the need to switch between multiple security tools. This provides comprehensive visibility across your AWS environment, empowering your security teams to efficiently detect, prioritize, and respond to potential security risks.
Intelligent prioritization helps focus on what matters most: AWS Security Hub helps you identify and prioritize critical security risks that might be missed when viewing findings in isolation. Security findings are correlated by analyzing resource relationships and signals from AWS security services and capabilities.
Actionable insights guide security teams on next steps:Gain actionable insights through advanced analytics to transform correlated findings into clear, prioritized insights that highlight the most critical security risks in your environment. You can quickly understand potential impacts, visualize relationships, and identify which security issues pose the greatest risk to critical resources
Streamlined security response and automation capabilities: Security Hub enhances your security operations by enabling streamlined response capabilities. It seamlessly integrates with your existing ticketing systems to help facilitate efficient incident management.
With this integrated approach your security team can:
Investigate critical risks that need immediate attention
Monitor security trends across cloud environment
Automate responses to streamline remediation
Understand the Open Cybersecurity Schema Framework
Security Hub uses the Open Cybersecurity Schema Framework (OCSF) to help standardize security data and analysis and enable better integration between security tools. This standardization helps simplify how security findings are structured and analyzed across your environment. This standardized data model enables seamless integration and data exchange across your security tooling, providing normalized and consistent data formats. When implementing your Security Hub POC, make sure that you’re familiar with the OCSF specifications. The OCSF schema has eight categories to organize event classes, and each of them are aligned with a specific domain or area of focus. Security Hub uses the Findings category and the classes in the following list.
Compliance: describes results of evaluations performed against resources, to check compliance with various industry frameworks or security standards.
Data Security: describes detections or alerts generated by various data security processes such as data loss prevention (DLP), data classification, secrets management, digit rights management (DRM), and data security posture management (DSPM).
Detection: describes detections or alerts generated by security products using correlation engines, detection engines or other methodologies.
Vulnerability: notifications about weakness in an information system, system security procedures, internal controls, or implementation that could be exploited or triggered by a threat source.
Additionally, confirm that any analytics or security information and event management (SIEM) tools you plan to integrate with support the OCSF data format to maximize the value of the consolidated security insights provided by Security Hub.
Determine success criteria
Establishing clear, measurable objectives is fundamental to a successful POC. Begin by defining success metrics that will demonstrate the effectiveness of Security Hub, and whether Security Hub has helped address challenges that you’re facing. Some examples of success criteria include:
Alert consolidation metrics: I use multiple security services and need a solution that I can use to correlate signals from each service to help me prioritize risks in my environment.
o Reduced time spent correlating alerts across different services.
o Fewer duplicate alerts across services.
Response time improvements: I need to visualize potential attack paths that adversaries could use to exploit resources and assess the potential blast radius.
Reduced mean time to detect (MTTD) security incidents.
Reduced mean time to response (MTTR) for critical findings.
Reduced time to identify potentially affected resources in blast radius.
Increased accuracy of attack path analysis.
Number of controls implemented based on attack path insights.
Automation capabilities: I want to automate and reduce the time my team takes to implement response and remediation actions and want to integrate more automated workflows, including a ticketing system.
Increased percentage of security findings automatically routed to correct teams using Jira Cloud or ServiceNow.
Reduced average time from detection to ticket creation.
Risk visibility improvements: I want to collect an inventory of my assets within my environment, understand which resources have security coverage by AWS security services, and identify which are the most critical and have the most risk.
Reduced time to identify critical resources affected by new vulnerabilities, threats, and misconfigurations.
Faster identification and remediation of security coverage gaps across my AWS Organizations.
After establishing your success criteria, it’s essential to evaluate organizational readiness and potential constraints that might impact your POC implementation. Begin by conducting a comprehensive assessment of your current environment: Are the foundational security services (GuardDuty, Amazon Inspector, Security Hub CSPM, and Macie) enabled across your accounts?
Review your administrative capabilities within AWS Organizations to verify that you have the necessary permissions and control over service deployment. Consider your team’s capacity—do you have dedicated people who can focus on implementation and testing? Additionally, verify that the timing aligns with stakeholder availability for proper evaluation and feedback.
Maximize your POC value through service activation
To get the most comprehensive evaluation of the capabilities of Security Hub, carefully plan your service activation timeline to optimize the trial periods available at no additional cost. Here’s how to strategically enable services:
Coordinate the activation of foundational security services to maximize their overlapping trial periods available at no additional cost:
Consider enabling these services simultaneously so that you have at least two weeks of overlapping coverage to evaluate the full correlation and risk prioritization capabilities of Security Hub across each service. Optionally, if you want to conduct a POC with minimal configuration because of limitations, you can enable Security Hub CSPM and Amazon Inspector during the initial POC phase to properly assess the results and data.
Note: Document your activation dates and trial expiration dates carefully. Create calendar reminders for trial end dates and schedule your key POC evaluation milestones to occur while services are active. This will help make sure that you can thoroughly assess the unified security operations capabilities of Security Hub when services are running at full capacity.
If you already have one or more of these underlying services enabled, you can proceed to enable the new Security Hub. To fully use the new Security Hub capabilities, particularly the exposure findings feature, specific service dependencies must be met, both Security Hub CSPM and Amazon Inspector are essential because they provide the foundational data needed for the Security Hub correlation engine and exposure findings features. The combination enables Security Hub to deliver comprehensive risk analysis and prioritization by correlating configuration risks with runtime vulnerabilities. If you have other security services already enabled (such as GuardDuty or Macie), you can maintain these existing services while enabling Security Hub, and it will automatically begin incorporating their findings into its consolidated view, enhancing your overall security posture visualization.
Resources
To maximize the value of your Security Hub POC you can use this GuardDuty findings tester repository hosted in the AWS Labs GitHub account and discussed in the Testing and evaluating GuardDuty detections. This repository contains scripts and guidance that you can use as a POC to generate GuardDuty findings related to real AWS resources. There are multiple tests that can be run independently or together depending on the findings you want to generate.
These findings are correlated with Security Hub CSPM control checks to detect misconfigurations and Inspector for vulnerabilities as shown in Figure 2. The example shows the finding page for a Potential Remote Execution finding: Lambda function has network-exploitable software vulnerabilities with a high likelihood of exploitation. The Potential attack path shows that the Lambda function can be exploited remotely over the network with no user interaction or special privileges.
Note: It’s recommended that you deploy these tests in a non-production account to help make sure that findings generated by these tests can be clearly identified.
Define your Security Hub configuration
After your success criteria have been established, you’re ready to plan your configuration. Some important decisions include:
Determine AWS service integrations: In addition to the core security capabilities of posture management through Security Hub CSPM and vulnerability management through Amazon Inspector, Security Hub integrates signals from other AWS security services such as GuardDuty and Macie.
Define third-party integrations:
For ticketing, Security Hub has native integrations with popular service management systems such as Atlassian’s Jira Service Management Cloud and ServiceNow.
Partners who already support or intend to support the OCSF schema to receive findings from Security Hub include companies such as Arctic Wolf, CrowdStrike, DataBee, Datadog, DTEX Systems, Dynatrace, Fortinet, IBM, Netskope, Orca Security, Palo Alto Neworks, Rapid7, Securonix, SentinelOne, Sophos, Splunk, Sumo Logic, Tines, Trellix, Wiz, and Zscaler.
Service partners such as Accenture, Caylent, Deloitte, IBM, and Optiv can help you adopt Security Hub and the OCSF schema.
Select a delegated administrator: From the AWS Organizations management account, you can set a delegated administrator for your organization. As a best practice, we recommend using the same delegated administrator across security services for consistent governance.
Select accounts in scope: Define accounts you want to have Security Hub enabled for.
Define regions: Determine regional restrictions or considerations.
Prepare for deployment
After you determine your success criteria and your Security Hub configuration, you should have an idea of your stakeholders, desired state, and timeframe. Now, you need to prepare for deployment. In this step, you should complete as much as possible before you deploy Security Hub. The following are some steps to take:
Create a project plan and timeline so that everyone involved understands what success look like and what the scope and timeline is.
Define the relevant stakeholders and consumers of the Security Hub data. Some common stakeholders include security operations center (SOC) analysts, incident responders, security engineers, cloud engineers, and finance.
Define who is responsible, accountable, consulted, and informed during the deployment. Make sure that team members understand their roles.
Make sure that you have access through your AWS Organizations management account to enable Security Hub for your organization and delegate an administrator.
Determine which accounts and AWS Regions you want to enable Security Hub in.
Enable Security Hub
AWS security services integrate with AWS Organizations to help you centrally manage Security Hub.
If you haven’t already done so, enable at least Security Hub CSPM and Amazon Inspector. Also enable any other AWS security services that you want to integrate with Security Hub.
Note: As a best practice, we recommend using the same delegated administrator across security services for consistent governance.
Sign into the delegated administrator with an IAM policy that gives you permission to enable and disable member accounts. With this policy, you will have granular control to decide what Regions you want enabled.
Note: After you enable Security Hub, exposure findings in your environment are created and analyzed immediately. However, it can take up to 6 hours to receive an exposure finding for a resource.
Validate deployment
The final step is to confirm that Security Hub is configured correctly and evaluate the solution against your success criteria.
Validate policy: Verify that you have the correct permissions to manage member accounts and regional restrictions are configured correctly.
Validate integrations: Verify that tickets with ServiceNow or Jira Cloud are working correctly by signing in to the AWS Management Console for Security hub and choosing Inventory in the navigation pane. Select Findings and verify there is a ticket ID in your finding.
Assess success criteria: Determine if you achieved the success criteria that you defined at the beginning of the project.
Clean up
You might want to remove Security Hub if you do not plan to move forward with deploying into production or need to gain approvals before continuing to use Security Hub. To properly clean up your test environment make sure you address each item below:
Before completing the cleanup, document your evaluation results, findings, and recommendations for production implementation.
If you used the GuardDuty findings tester or other testing tools, remove these resources first to stop generating test findings.
If you enabled services specifically for the POC and don’t plan to continue using them, disable them:
Disable third-party integrations (such as Jira Cloud or ServiceNow connections)
Disable Security Hub
Disable Amazon Inspector, GuardDuty, and Macie if they were enabled only for testing
Remove any test resources that were created specifically for the POC such as IAM roles, and policies.
Conclusion
In this post, we showed you how to plan and implement a Security Hub POC. You learned how to do so through phases, including defining success criteria, configuring Security Hub, and validating that Security Hub meets your business needs. Remember to use the trial periods to maximize your testing window without incurring significant costs. Throughout the POC, maintain focus on your predefined success criteria while remaining open to unexpected benefits or challenges that may arise. Maintain open communication with your AWS account team to address any questions or concerns to help you get the most out of your Security Hub POC experience.
As organizations increasingly adopt AI-powered development tools, a critical challenge emerges: how do you maintain security governance when AI assistants execute AWS operations on behalf of users? Organizations want to leverage AI assistance for development and read operations while maintaining strict controls over write operations that impact production systems and auditing calls made via AI assistants. Consider this scenario: A developer asks Amazon Q Developer“List my S3 buckets”, Q Developer suggests aws s3 ls, the developer approves, and Q Developer executes the command via AWS CLI. From an AWS perspective, this looks identical to the developer manually running the aws s3 ls command on the terminal outside of Amazon Q Developer. But what if your organization needs to distinguish between AI-assisted operations and manual commands for governance or compliance?
Amazon Q Developer, the most capable generative AI–powered assistant for software development, generates AWS CLI commands in response to user requests and executes them using its use_aws and execute_bashbuilt-in tools. The challenge of distinguishing AI-assisted operations from manual commands is a key consideration for Amazon Q Developer adoption in enterprise environments. To address this governance challenge, Amazon Q Developer includes a built-in solution: user-agent markers that automatically identify AWS CLI calls made through Q Developer in CloudTrail logs, enabling precise IAM policy controls.
This blog post explores how Amazon Q Developer’s built-in user agent markers set for AWS CLI calls enable precise IAM policy controls, allowing organizations to distinguish and govern AI-assisted AWS operations while maintaining the productivity benefits of AI-powered development. The following sections demonstrate how these user agent markers work, how to implement IAM policies that leverage them, and how to monitor their effectiveness in your environment.
Understanding Amazon Q Developer User Agent Markers
Prerequisites
This section builds on your knowledge of these concepts and assumes you have the necessary setup in place. These foundational elements are essential for understanding how user agent markers work and for implementing the governance controls discussed later in this post. If you need guidance on any of these topics, please refer to the linked documentation:
Amazon Q Developer setup for CLI and/or IDE extensions – Needed to generate the user agent markers this post examines
AWS CloudTrail concepts and API logging – Essential for monitoring and verifying user agent markers in practice
IAM policies and permissions management – Critical for implementing the governance controls that leverage these markers
Amazon Q Developer automatically includes identifiable markers in the user agent string of all AWS API calls it makes via AWS CLI. These markers appear in two primary contexts: CLI tool operations and IDE integration operations.
Q Developer CLI Tool
When using Amazon Q Developer CLI (both use_aws and execute_bash tools), all AWS CLI calls include:
exec-env/AmazonQ-For-CLI-Version-<QCLI-VersionNo>
How It Works: Amazon Q Developer CLI automatically sets:
This means all AWS CLI commands executed through Q Developer CLI – whether via the use_aws tool or execute_bash commands – automatically include this marker.
This applies when Q Developer makes AWS API calls through IDE integrations, such as when analyzing your codebase or suggesting AWS resource configurations. The IDE marker enables you to distinguish between CLI-based and IDE-based Q Developer operations.
Complete User Agent Example
Here’s how a complete user agent string appears in CloudTrail:
The key identifiers are exec-env/AmazonQ-For-CLI-Version-* and exec-env/AmazonQ-For-IDE-Version-*, which clearly distinguish Amazon Q Developer operations from regular AWS CLI/SDK usage executed outside of Q Developer.
Use the aws:userAgent condition in IAM policies to control Amazon Q Developer operations through two approaches:
IAM Policies: Deploy in each AWS account where developers have access for deploying workloads or performing AWS operations. Q Developer operates using the developer’s existing AWS credentials and permissions – it doesn’t have additional access beyond what the user already possesses. Attach these policies to the same IAM users, groups, or roles that developers use for their regular AWS work.
Service Control Policies (SCPs): Deploy once at the AWS Organizations level for organization-wide governance. SCPs apply to all member accounts automatically and cannot be overridden by account-level policies.
The following policy allows read operations from Q Developer, blocks write operations from Q Developer, and allows write operations from regular AWS CLI executed outside Q Developer:
Note: This IAM policy example is for illustration purposes only. Follow least privilege principles in production environments. For more details refer prepare for least previlege permissions.
Note on User Agent Reliability: While AWS warns that user agents can be “spoofed,” this concern is reduced for Q Developer governance use cases. The user agent is automatically set by Q Developer’s tools, not manually controlled by users. Any spoofing would require deliberate effort and would be detectable through usage pattern analysis. This approach is designed for operational governance and policy differentiation, not as a sole security control.
Additional Control Layer: Custom Agent Configuration
For an additional layer of control, you can create a custom agent configuration that restricts which AWS services Amazon Q Developer can access using allowedServices and deniedServices parameters for the use_aws tool:
This custom agent configuration works in conjunction with IAM policies to provide defense-in-depth governance of AI-assisted AWS operations. For more details, refer to the agent configuration documentation.
Verification and Monitoring
CloudTrail Event Analysis
To verify that your policies are working correctly, examine CloudTrail events. Here’s what to look for:
Create a simple monitoring script to track Amazon Q Developer usage:
#!/bin/bash
# Monitor Amazon Q Developer AWS API usage
# Get events from last 24 hours and filter for Q Developer user agents
aws cloudtrail lookup-events \
  --start-time $(date -u -v-24H '+%Y-%m-%dT%H:%M:%SZ') \
  --lookup-attributes AttributeKey=EventName,AttributeValue=GetCallerIdentity \
  --query 'Events[?contains(CloudTrailEvent, `AmazonQ-For-CLI`)].[EventTime,EventName,UserIdentity.userName]' \
  --output table
Conclusion
Amazon Q Developer’s built-in user agent markers provide a powerful foundation for implementing enterprise-grade security controls around AI-assisted AWS operations. By leveraging these markers in IAM policies, organizations can:
Distinguish between AI-assisted and manual AWS operations
Implement differentiated security policies based on operation source
Maintain detailed audit trails for compliance requirements
Enable secure Amazon Q Developer adoption in enterprise environments while maintaining strict controls over write operations that could impact production systems
For organizations currently evaluating Amazon Q Developer adoption, implementing user agent marker-based controls is a key component of your deployment strategy. This approach enables you to realize the productivity benefits of AI-assisted development while maintaining the governance and security controls your organization requires.
Experience the power of Amazon Q Developer as your AI-powered coding assistant, and implement the governance controls outlined in this post to ensure secure adoption in your enterprise environment. These built-in user agent markers enable you to maintain enterprise-grade security while unlocking the productivity benefits of AI-assisted development.
Kirankumar Chandrashekar is a Generative AI Specialist Solutions Architect at AWS, focusing on Amazon Q Developer/Kiro and developer productivity. Bringing deep expertise in AWS cloud services, DevOps, modernization, and infrastructure as code, he helps customers accelerate their development cycles and elevate developer productivity through innovative AI-powered solutions. By leveraging Amazon Q Developer and Kiro, he enables teams to build applications faster, automate routine tasks, and streamline development workflows. Kirankumar is dedicated to enhancing developer efficiency while solving complex customer challenges, and enjoys music, cooking, and traveling.
In Part 1 of this series, we explored the fundamental risks and governance considerations. In this part, we examine practical strategies for adapting your enterprise risk management framework (ERMF) to harness generative AI’s power while maintaining robust controls.
This part covers:
Adapting your ERMF for the cloud
Adapting your ERMF for generative AI
Sustainable Risk Management
By the end of this post, you’ll have a roadmap for scaling generative AI adoption securely and responsibly.
Adapting your ERMF for the cloud
Before diving into generative AI-specific controls, it’s crucial to understand the fundamental infrastructure that enables these technologies. Cloud computing is the foundational infrastructure that has made generative AI possible and accessible at scale. The development and deployment of large language models and other generative AI systems require massive computational resources, vast amounts of data storage, and sophisticated distributed processing capabilities that cloud systems can efficiently provide.
Cloud technology differs from on-premises IT solutions, and the relationship between financial institutions and cloud service providers is also different from the relationship with a traditional outsourcing provider.
These differences change the nature of many risks that financial institutions face and how they manage them. However, if cloud technology is implemented in the right way, it can reduce risk and provide tools to help Chief Risk Officers (CROs) to manage risk too.
Organizations adopting generative AI can use their enterprise risk management framework to realize business value while maintaining appropriate controls. This approach allows you to build on existing risk management practices while addressing generative AI’s unique characteristics.
When it comes to model management and the AI system lifecycle, customers can consult ISO42001 AI Management, Section A6. This section encompasses capturing the objective and processes for the responsible design and development of AI systems, including criteria and requirements for each stage of the AI system life cycle. This guidance can help organizations verify that their model management practices align with industry standards for responsible AI development.
From a business leader’s perspective, incorporating generative AI considerations into your ERMF helps establish documented good practices, implement effective controls, and maintain transparency about usage across the enterprise. This enables both responsible innovation and prudent risk management. Here’s how organizations are approaching this:
Generative AI policy and governance foundations in ERMF
In the field of generative AI, organizations establish both guardrails for innovation and clear accountability for risk management. The three lines of defense model provides the structure for implementing these foundational elements:
Acceptable use framework for your organization: Clear direction on appropriate generative AI use helps organizations manage risks while enabling innovation. The range of use cases for generative AI is large and likely to expand over the years, making it essential to have clear guidance on what applications are permitted and under what conditions. As organizations explore these opportunities, their framework can evolve with their experience and maturity.
Risk accountability: The generative AI lifecycle—from use case selection through implementation and ongoing monitoring—requires clear ownership across business and control functions. While organizations can establish specific generative AI oversight mechanisms, these should integrate with existing governance structures. Risk reporting and accountability for generative AI initiatives should flow through established enterprise risk committees and governance boards, helping to facilitate consistent risk management across the organization rather than creating isolated pockets of oversight.
Implementation approach for generative AI: Putting principles into practice
Building on the three lines of defense model discussed earlier, organizations can adapt their risk management practices to address the unique characteristics of generative AI while using industry best practices and frameworks. This often involves evolving existing controls and introducing new ones specific to generative AI. AWS services have built-in capabilities that support these enhanced governance, risk management, and compliance requirements, helping organizations to implement controlled and responsible generative AI solutions. This includes, for example, Amazon Bedrock Guardrails, among many others.
Building on the risk areas we outlined earlier, we now explore how organizations can implement controls for each of these areas. For each, we describe the principle and the practical implementation considerations. While organizations might prioritize these areas differently based on their use cases and risk appetite, together they provide a framework for responsible generative AI adoption through ERMF.
While we explore high-level control principles that follow, technical teams can review the AWS Well-Architected Framework – Generative AI Lens for detailed architectural guidance that supports these governance objectives.
Fairness
Generative AI systems can deliver equitable outcomes across different stakeholder groups, helping organizations build trust and meet expectations. Organizations can support this by setting up clear fairness metrics for specific use cases, regularly assessing training data for bias, and closely monitoring performance across different groups. For high-stakes applications, additional checks can help facilitate fair treatment across diverse populations.
Amazon Bedrock Guardrails provides configurable safeguards to help maintain fair and unbiased outputs, with customizable thresholds to match different use case requirements. Amazon Bedrock provides comprehensive model evaluation tools including model cards with detailed bias metrics, to assess bias across demographic groups. Amazon Bedrock includes built-in prompt datasets like the Bias in Open-ended Language Generation Dataset (BOLD), which automatically evaluates fairness across key areas such as profession, gender, race, and various ideologies. These capabilities integrate with Amazon SageMaker Clarify for comprehensive bias detection and mitigation, supported by built-in bias metrics and reporting.
Explainability
Generative AI systems can provide understanding of their decision-making processes, supporting accountability and effective oversight. Explainability is essential for all generative AI systems—whether using custom-built or pre-built models, particularly for complex models like transformer networks.
Organizations can implement practical controls by establishing clear explainability thresholds based on use case risk levels. This remains an active industry challenge, with ongoing research and evolving approaches. For critical business applications, tailoring explanations to different stakeholders while maintaining accuracy can improve understanding and trust.
Amazon Bedrock provides tools that help identify which factors influenced the generative AI’s decisions, while maintaining detailed records of system inputs and outputs. For complex workflows, Chain-of-Thought (CoT) reasoning traces are available through Amazon Bedrock Agents, showing the step-by-step logic behind each decision. Organizations can monitor how responses are generated in real time. For Retrieval-Augmented Generation (RAG) applications, which optimize AI outputs by referencing specific knowledge bases, Amazon Bedrock Knowledge Bases automatically includes references and links to source materials used in generating responses.
Privacy and security
Generative AI systems benefit from strong privacy and security measures to protect sensitive information and help prevent unauthorized access or data exposure. These systems can potentially generate content or unintentionally reveal confidential data, which organizations can proactively manage.
Organizations can set up multi-layered protection strategies, including access controls, content filtering, and data privacy safeguards. This can involve creating company-wide standards for prompt engineering to help prevent harmful outputs, using techniques like RAG to control information sources, and using automated systems to detect and protect personal information. Regular testing and validation, especially to comply with regulations like GDPR, can be part of the development and deployment process.
Amazon Bedrock implements multiple security layers including private endpoints with Amazon Virtual Private Cloud (Amazon VPC) support, fine-grained AWS Identity and Access Management (IAM) access control, and end-to-end encryption. Importantly, it maintains no persistent storage of prompt or completion data and helps preserve model provider isolation.
Amazon Bedrock Guardrails provides sensitive information filters that can detect and protect personally identifiable information (PII) through automated input rejection, response redaction, and configurable regex patterns, supporting various use cases while maintaining data privacy. Organizations like Genesys demonstrate these capabilities at scale, maintaining GDPR compliance while processing 1.5 billion monthly customer interactions through Amazon Bedrock.
For detailed security considerations, see Generative AI Security Scoping Matrix, which provides a comprehensive framework for assessing and addressing generative AI security risks.
Safety
Generative AI systems can be designed and operated with safeguards to avoid harm to individuals, and communities. This includes addressing risks of generating dangerous, illegal, or abusive content, and helping to prevent system misuse.
Organizations can implement specific safety measures through predeployment content filtering, real-time safety boundaries with prompt constraints, and output classification systems to detect and block dangerous content. Context-aware content moderation considers the specific application domain, while automated detection can identify potential safety violations before content generation. Ongoing monitoring and updating of these controls help address evolving capabilities and potential risks of generative AI systems.
Amazon Bedrock Guardrails delivers industry-leading safety protections across text and images, blocking up to 85 percent more harmful content on top of native protections provided by foundation models (FMs). Additional safety controls include token limits to avoid excessive responses, rate limiting against misuse, and moderation endpoints for content screening.
Organizations can maintain appropriate control over generative AI systems to make sure that they work as intended and can be adjusted or stopped if issues arise. This helps manage risks and maintain system reliability.
A multi-layered approach to control includes implementing technical safeguards and operational processes. Organizations can control model behaviour by adjusting parameters such as temperature (controlling output randomness), and sampling methods like top-k or top-p (managing output diversity). Clear operational boundaries define the system’s scope of action, while human-in-the-loop validation provides oversight for critical applications.
For effective control, organizations can establish parameter thresholds tailored to different use cases, implement rapid adjustment mechanisms, and create clear escalation procedures. Amazon Bedrock enhances control through customizable agent prompts and reasoning techniques, and the ability to break complex tasks into smaller, manageable components. Organizations can choose between structured workflows or flexible agent-based approaches. Regular comparison of outputs against established benchmarks helps maintain system reliability.
This balanced approach supports creative AI outputs while helping to facilitate consistent performance within defined quality limits. This helps prevent service degradation and business disruption while minimizing inefficiencies.
Control capabilities are further enhanced through Amazon CloudWatch monitoring integration and robust knowledge base version control. The capabilities of Amazon Bedrock, including LLM-as-a-judge features, help organizations assess and optimize their generative AI applications efficiently.
Veracity and robustness
Generative AI systems can produce reliable and accurate outputs, even when faced with unexpected or challenging inputs. This helps maintain trust and helps maintain the system’s usefulness across various applications.
Organizations can implement a combination of technical and procedural controls to enhance both system robustness and output reliability. This includes establishing clear parameter thresholds for different use cases, implementing human-in-the-loop validation for critical applications, and regularly comparing outputs against established ground truths. The framework specifies when and how these controls are applied based on the use case criticality and required level of accuracy.
Amazon Bedrock Guardrails improves veracity by helping to prevent factual errors through automated reasoning checks that deliver up to 99 percent accuracy in detecting correct responses from models, using mathematical logic and formal verification techniques. This capability supports processing of large documents up to 80,000 tokens and includes automated scenario generation for comprehensive testing.
Amazon Bedrock also includes sophisticated input sanitization features and supports adversarial testing through AWS testing tools integration.
Governance
Effective governance of generative AI systems helps manage risks, maintain accountability, and align AI use with organizational values and regulations. This covers the entire AI lifecycle, from development to deployment and ongoing operation.
Organizations can create clear governance structures, including defined roles for AI oversight, regular risk assessments, and ways to engage with stakeholders. This involves integrating AI governance into existing risk management practices and making sure of compliance with relevant laws and standards. Because AI technology is evolving rapidly, regular reviews and updates to governance practices are essential to address new capabilities, emerging risks, and changing regulatory requirements. This includes providing appropriate training and skill development for system users.
AWS has achieved of ISO/IEC 42001 certification, demonstrating our commitment to systematic governance approaches in AI implementation. Governance features in Amazon Bedrock include comprehensive model provenance tracking, detailed AWS CloudTrail audit logging, and streamlined model deployment approval workflows integrated with AWS Organizations. AWS Audit Manager provides pre-built frameworks to assess generative AI implementation against best practices.
Transparency
Generative AI systems can operate transparently, helping stakeholders understand system capabilities, limitations, and the context of AI-generated outputs. This builds trust and enables informed decision-making by users and affected parties.
Organizations can implement specific transparency measures including comprehensive model documentation detailing intended use cases, known limitations, and performance boundaries. Clear AI disclosure practices should describe when and how AI is being used and what data is being processed. Regular performance reporting can include accuracy rates, error patterns, and bias assessments.
For customer-facing applications, transparency includes providing clear indicators of AI-generated content, documenting how decisions are made, and establishing processes for users to question or challenge outputs. Maintaining detailed version histories of model updates and changes in system behavior helps track the evolution of AI capabilities and their impacts over time.
From the AWS side of the Shared Responsibility Model, transparency is supported through AWS AI Service Cards and detailed documentation of model characteristics. Amazon Bedrock enhances this with comprehensive logging and monitoring capabilities to track model behavior and performance metrics.
Unified risk management
These eight areas are interconnected and mutually reinforcing within the enterprise risk management framework. While organizations might prioritize them differently based on their use cases and risk appetite, together they provide a comprehensive approach to responsible generative AI adoption. For detailed technical guidance, standards, and compliance requirements, see the AWS guidance documents in Resources for technical implementation, at the end of this blog post, that support implementation across these areas.
AI risk management in practice: Building organizational capability
Successful implementation of generative AI systems involves integrating risk management practices across the organization. This includes establishing processes for measuring outcomes and risks and preparing the organization to adapt as technology evolves. Effective risk management depends on building appropriate knowledge and skills at all levels of the organization.
Organizations can create clear pathways from proof of concept to production by aligning with the three lines of defense model. The ERMF provides broad parameters for reliability, safety, and privacy, which business units can adapt for their specific use cases.
To build and maintain lasting capability for both current and future generative AI adoption, organizations can focus on:
Developing incident response plans for AI-specific scenarios
Building expertise through training and certification programs
Regular review and updates of risk management practices
These elements, when woven into the organization’s operating fabric, create sustainable practices that evolve with advancing technology and emerging risks.
Sustainable risk management: Making your ERMF generative AI-ready
Governance, risk, and compliance (GRC) leaders, Chief Risk Officers (CROs), and Chief Internal Auditors (CIAs) can provide sustained executive sponsorship for generative AI adoption. Long-term capability building extends beyond technology and innovation hubs to encompass business and control functions. Clear direction from leadership helps organizations balance generative AI opportunities with appropriate risk management.
Organizations benefit from viewing generative AI as a transformative capability that touches many functions rather than as isolated initiatives. This approach supports sustainable integration of enterprise-wide governance approaches for generative AI, avoiding the limitations of short-term projects with restricted scope and impact.
Organizations can successfully implement generative AI while maintaining their risk management obligations through controlled, well-defined use cases. TP ICAP’s Parameta division demonstrates this approach in their regulatory compliance implementation. By focusing initially on a highly regulated area, maintaining clear governance controls, and making sure there was human oversight in the compliance review process, they established a framework for responsible AI adoption. This led to creating dedicated oversight roles for AI initiatives, strengthening their governance structure for future AI implementations.
Similarly, Rocket Mortgage’s implementation of AWS services for their AI tool Rocket Logic – Synopsis demonstrates how organizations can use Amazon Bedrock for responsible AI integration at scale. This approach enabled them to maintain stringent data security and compliance measures while saving 40,000 team hours annually through automated processes.
Action checklist for sustainable generative AI implementation:
ERMF foundations: Assess and enhance your risk framework’s readiness for generative AI, including acceptable use guidelines and clear accountabilities
Technical controls: Begin with core controls such as Amazon Bedrock Guardrails and expand based on specific use cases and risk profiles
Organizational capability: Develop broad expertise through training and oversight mechanisms across business and control functions
Monitoring and measurement: Create dashboards for key risk indicators and maintain regular reviews
Integration strategy: Align generative AI controls with existing processes and organizational strategy
Conclusion
This two-part series has explored the critical importance of integrating generative AI governance into enterprise risk management frameworks. In Part 1, we introduced the unique risks and governance considerations associated with generative AI adoption. Part 2 has provided a comprehensive guide for adapting your ERMF to address these challenges effectively.
We’ve outlined practical strategies for scaling generative AI adoption securely and responsibly, covering key areas such as fairness, explainability, privacy and security, safety, controllability, veracity and robustness, governance, and transparency. By implementing these strategies and following the action checklist provided, organizations can build sustainable practices that evolve with advancing technology and emerging risks.
Organizations that integrate generative AI governance into their ERMF as described in this post are better positioned to accelerate innovation and operational efficiency while protecting against key risks such as data exposure, model hallucinations, and regulatory non-compliance. This balanced approach enables organizations to capture the transformative potential of generative AI while maintaining the robust controls essential for financial services institutions.
For foundational concepts and risk considerations, see Part 1.
According to BCG research, 84% of executives view responsible AI as a top management responsibility, yet only 25% of them have programs that fully address it. Responsible AI can be achieved through effective governance, and with the rapid adoption of generative AI, this governance has become a business imperative, not just an IT concern. By implementing systematic governance approaches at the enterprise level, organizations can balance innovation with control, effectively managing the risks while harnessing the transformative potential of generative AI.
While generative AI technologies offer compelling capabilities, they also introduce new types of risks that need business oversight and management. Financial institutions face real challenges—AI-driven financial analysis tools could make investment recommendations based on biased data, leading to significant losses, while generative AI-powered customer service systems might inadvertently expose confidential customer information. The unprecedented scale and speed at which generative AI operates makes robust business controls essential. However, with the right governance approach and strategic oversight, these risks are manageable.
Part 1 of this two-part blog post guides business leaders, Chief Risk Officers (CROs), and Chief Internal Auditors (CIAs) through three critical questions:
What specific or unique risks does generative AI introduce and how can they be managed?
How should your enterprise risk management framework (ERMF) evolve to support generative AI adoption?
How can you build sustainable generative AI governance in an ever-changing world—what should be on your checklist?
To address these questions, organizations can use established frameworks and standards including:
ISO/IEC 42001 AI Management System standard – outlining best practices and controls for responsible development, deployment, and operation of AI systems. AWS is the first major cloud provider to achieve accredited certification for this standard.
These frameworks provide valuable guidance for organizations looking to implement responsible and governed AI practices.
Role of GRC leaders, CROs, and CIAs
Governance, risk and control (GRC) functions led by business leaders, CROs and CIAs are well-positioned to advance generative AI innovation in financial services institutions. These functions have successfully managed complex risks in banks for years, and their existing expertise, proven approaches, and established risk frameworks provide a strong foundation for guiding generative AI adoption. They collaborate across the three lines of defense: business leaders making implementation decisions and managing associated risks (first line), risk and compliance functions providing frameworks and oversight (second line), and internal audit providing independent assurance (third line).
If generative AI risks, both perceived and real, are managed through enterprise-wide governance practices rather than isolated project-by-project approaches, organizations can use the advantages offered by generative AI over the long term. This requires integration with the ERMF, with some practices fitting into existing structures while others need deliberate adjustments to ERMF itself to address generative AI’s unique characteristics.
New frontiers in generative AI risk management
The traditional risk landscape at the enterprise level was based on a paradigm in which risks are predicted from past exposures. Preventive controls help stop unwanted things from happening, detective controls discover when bad things slip through the preventive controls, and corrective controls take remediation actions.
Much of this paradigm is still valid in the world of generative AI. For example, access to generative AI applications needs to be managed carefully to avoid unauthorized use. All three types of the preceding controls should help prevent unauthorized use, identify potential breaches, and remedy unauthorized access when detected.
However, additional focus and attention are required in the following areas when implementing generative AI solutions:
Non-deterministic outputs – The non-deterministic nature of generative AI outputs poses a specific challenge. While the probabilistic nature of these systems is often useful, the risk of inaccurate output from the black box can have serious business implications, and organizations need to take conscious actions to address these risks. Organizations can address this through Amazon Bedrock GuardrailsAutomated Reasoning checks, which use mathematically sound verification to help prevent factual errors and hallucinations.
Deepfake threat – Generative AI’s ability to create authentic-looking images and documents extends beyond traditional fraudulent activities. It elevates the threat to an entirely new level, creating eerily realistic content with unprecedented ease—hence the term deepfake. This poses significant challenges for organizations in verifying document authenticity, particularly in processes like Know Your Customer (KYC).
Layered opacity – While enterprises are learning about generative AI, they must address risks from multi-layered AI systems where each layer generates content and makes decisions based on potentially unexplainable models, hampering traceability. For example, consider generative AI outputs from a third-party system serving as inputs to internal AI systems, creating a chain of interdependent decisions. This lack of transparency in critical decisions affecting organizational performance and customer treatment could have profound implications for enterprise trustworthiness, brand reputation, and regulatory compliance.
The following table outlines key generative AI risk areas and their potential business impacts. In Part 2, we explain how organizations can address these risks through their ERMF. Effectively managing these risks through enterprise-wide governance not only protects the organization but also forms the foundation for responsible AI adoption. Robust risk management and governance are essential prerequisites for achieving responsible AI outcomes.
For a comprehensive foundation in responsible AI implementation, see the AWS Responsible Use of AI Guide, which aligns with the governance principles that we discuss throughout this article.
Risk area
Description
Potential risk impact
Fairness
Are the underlying data and algorithms fair and unbiased? Are the outputs leading to fair outcomes for different groups of stakeholders?
Discrimination lawsuits
Loss of trust
Business loss because of exclusion of segments
Explainability
Can stakeholders understand the black box behavior and evaluate system outputs?
Legal liabilities and regulatory sanctions due to inability to explain decisions
Incorrect business decisions
Privacy and security
Are the systems aligned with privacy regulations and security requirements?
Fines arising from data breaches
Loss of trust
Damage because of security incidents
Safety
Are there controls to help prevent harmful system output and misuse?
Harmful content generation
Customer harm
Reputational damage
Controllability
Are there mechanisms to monitor and steer AI system behaviour, including detection of model and data drifts?
Undetected degradation of service
Business disruption because of unreliable decisions
Customer harm
Inefficiencies arising from remediation
Veracity and robustness
Can the system maintain correct outputs even with unexpected or adversarial inputs?
Incorrect business decisions
System failures under stress
Loss of operational reliability
Governance
Are there documented accountabilities across the AI supply chain including model providers and deployers? Are users adequately trained to use systems?
Confusion in crisis management
Personal liability for executives
Regulatory censure for governance failures
System misuse by untrained staff
Transparency
Can stakeholders make informed choices about their engagement with the AI system?
Loss of customer trust
Regulatory non-compliance
Stakeholder dissatisfaction
Remitly’s implementation of Amazon Bedrock Guardrails to protect customer personally identifiable information (PII) data and reduce hallucinations demonstrates how financial institutions can effectively manage privacy and veracity risks in generative AI applications, addressing several of the risk areas outlined above.
Conclusion
In this post, we introduced the critical importance of responsible AI governance for enterprises adopting generative AI at scale. We explored the unique risks that generative AI presents, including non-deterministic outputs, deepfake threats, and layered opacity. We outlined key risk areas such as fairness, explainability, privacy and security, safety, controllability, veracity and robustness, governance, and transparency. These risks underscore the need for a robust enterprise risk management framework tailored to the challenges of generative AI.
We emphasized the crucial role of GRC leaders, CROs, and CIAs in advancing generative AI innovation while managing associated risks. By using established frameworks like the AWS Cloud Adoption Framework for AI, ISO/IEC 42001, and the NIST AI Risk Management Framework, organizations can implement responsible and governed AI practices.
In Part 2 of this series, we explore how organizations can adapt their enterprise risk management framework to address these risks effectively, including specific considerations for cloud and generative AI implementation. We’ll provide detailed guidance on making your ERMF generative AI-ready and outline practical steps for sustainable risk management.
Security threats demand swift action, which is why AWS Security Incident Response delivers AWS-native protection that can immediately strengthen your security posture. This comprehensive solution combines automated triage and evaluation logic with your security perimeter metadata to identify critical issues, seamlessly bringing in human expertise when needed. When Security Incident Response is integrated with Amazon GuardDuty and AWS Security Hub within a unified security environment, organizations gain 24/7 access to the AWS Customer Incident Response Team (CIRT) for rapid detection, expert analysis, and efficient threat containment—managed through one intuitive console. Security Incident Response is included with Amazon Managed Services (AMS), which helps organizations adopt and operate AWS at scale efficiently and securely.
In this post, we guide you through enabling Security Incident Response and executing a proof of concept (POC) to quickly enhance your security capabilities while realizing immediate benefits. We explore the service’s functionality, establish POC success criteria, define your configuration, prepare for deployment, enable the service, and optimize effectiveness from day one, helping your organization build confidence throughout the incident response lifecycle while improving recovery time.
Understanding the functionality of Security Incident Response
AWS Security Incident Response service provides comprehensive threat detection and response capabilities through a streamlined four-step process. It begins by ingesting security findings from GuardDuty and select Security Hub integrations with third-party tools. The service then automatically triages these findings using customer metadata and threat intelligence to identify anomalous behavior and suspicious activities. When potential threats are detected, CIRT members proactively investigate cases through the customer portal to determine whether they are true or false positives. For confirmed threats, the service escalates findings for immediate action, while false positives trigger updates to the auto-triage system and suppression rules for GuardDuty and Security Hub, continuously improving detection accuracy.
Comprehensive protection with minimal prerequisites
Security Incident Response delivers powerful security capabilities through seamless integration with both the AWS threat detection and incident response (TDIR) system and third-party security services such as CrowdStrike, Lacework, and TrendMicro. This solution provides a unified command center for end-to-end incident management—from planning and communication to resolution—while ingesting GuardDuty findings and integrating with external providers through Security Hub. With secure case management and an immutable activity timeline, it significantly enhances your security operations by augmenting your security operations center (SOC) and incident response (IR) teams with improved visibility and access to AWS-proven tools and personnel. The AWS CIRT works collaboratively with your responders during investigations and recovery, freeing your valuable resources for other priorities.
The service delivers continuous value through proactive monitoring and response capabilities. It constantly monitors your environment using GuardDuty and Security Hub findings, with service automation, triage, and analysis working diligently in the background to alert you only for genuine security concerns. This protection provides immediate value during potential incidents without demanding your constant attention.
Getting started is straightforward—the only prerequisite is having AWS Organizations enabled and making sure that you have established Organizations with a fundamental organizational unit (OU) structure encompassing member accounts. This foundation not only enables Security Incident Response deployment but also serves as the cornerstone for implementing a robust TDIR strategy across your organization.
Determine success criteria
Establishing success criteria helps benchmark the outcomes of the POC with the goals of the business. Some example criteria include:
Designate an incident response team: Identity and document internal team members and external resources responsible for incident response. As highlighted in AWS Well-Architected Security Pillar, having designated personnel reduces triage and response times during security incidents.
Develop a formal incident response framework: Develop a comprehensive incident response plan with detailed playbooks and regular table-top exercise protocols. AWS provides a reference library of playbooks on GitHub.
Run tabletop exercises: Consider implementing regular simulations that test incident response plans, identify gaps, and build muscle memory across security teams before a real crisis occurs. AWS provides context on various types of tabletop exercises.
Identify existing third-party security providers: Identify third-party security providers with Security Hub integrations that feed into Security Incident Response. AWS partners provide findings as documented at Detect and Analyze.
Implement GuardDuty: Configure GuardDuty according to best practices to monitor and detect threats across critical services. AWS maintains GuardDuty best practices in AWS Security Services Best Practices for GuardDuty.
Review your success criteria to make sure that your goals are realistic given your timeframe and potential constraints that are specific to your organization. For example, do you have full control over the configuration of AWS services that are deployed in an organization? Do you have resources that can dedicate time to implement and test? Is this time convenient for relevant stakeholders to evaluate the service?
Define your Security Incident Response configuration
After establishing your success criteria and timeline, it’s best practice to defineyour Security Incident Response configuration. Some important decisions include the following:
Select a delegated administrator account: Identify which account will serve as delegated administrator (DA) for Security Incident Response. This account and the AWS Region you select will host the Security Incident Response service and portal. AWS Security Reference Architecture (SRA) recommends using dedicated security tooling account. Review Important considerations and recommendations documentation before finalizing the DA.
Define the account scope: Security Incident Response is considered an organization-level service. Every account in every Region within your organization is entitled to coverage under a single subscription. Service coverage automatically adjusts as accounts are added or removed, providing complete protection across your entire AWS footprint.
Configure findings sources: Determine which security findings meet your organization’s needs. The service automatically ingests GuardDuty findings organization-wide and select Security Hub finding types from third-party partners. Evaluate which GuardDuty protection plans and Security Hub findings provide the most value for your security posture and incident response capabilities.
Develop an escalation framework: Establish clear escalation thresholds for different case types: self-managed, AWS-supported, and proactive cases. Define who has authority to determine case submission and type based on severity, impact, and resource requirements.
Implement analytics strategy: Determine whether to use native AWS analytics tools (such as Amazon Athena, Amazon OpenSearch, and Amazon Detective) or integrate with existing security information and event management (SIEM) solutions. These capabilities can enrich incident response with contextual data and deeper insights.
Prepare for deployment
After determining success criteria and Security Incident Response configuration, identify stakeholders, desired state, and timeframe. Prepare for deployment by completing:
Project plan and timeline: Develop a project plan with defined success criteria, scope boundaries, key milestones, and realistic implementation timelines. Suggested timeline of events:
Before enablement:
Configure GuardDuty and Security Hub third parties, perform resource planning
Request approvals for POC trial from the AWS account team or Service team
Day 0 – Enable the service
Week 1 – Open reactive CIRT cases
Week 2 – Connect to IT service management (ITSM) tools
Week 3 – Execute a tabletop exercise
Week 4 – Review the reporting provided by CIRT
Identify stakeholders: Identify CISO, information security teams, SOC personnel, incident response teams, security engineers, finance, legal, compliance, external MSSPs, and business unit representatives.
Develop a RACI matric: Create detailed RACI chart defining roles and responsibilities across incident response lifecycle, facilitating accountability and proper communication channels.
Set up IAM roles and permissions: Use AWS Identity and Access Management (IAM) roles to implement role-based access controls aligned with the RACI chart, including case management, escalation, and read-only roles using AWS managed policies. For more information, see AWS Managed Policies
Enable Security Incident Response
With preparations in place, you are ready to enable the service.
Access Security Incident Response in the management account:
Within the organization’s management account, go to the AWS Management Console and search for Security Incident Response in the console search bar.
Choose Sign Up.
Verify that Use delegated administrator account – Recommended is selected, enter the delegated administrator account number in the Account ID field, and choose Next.
Sign in to the delegated administrator account configured in step 3, search for Security Incident Response, and choose Sign up.
Complete setup in the delegated administrator account:
Define membership details:
Select your home region under Region selection.
For Membership name, enter a suitable name that follows your organization’s naming standards.
Under Membership contacts, enter the Primary and Secondary contact information.
Add Membership tags according to your organization’s tagging strategy.
Choose Next.
Configure permissions for proactive response:
Service permissions for proactive response is already enabled, but you can disable this feature if needed.
Select By choosing this option… and choose Next.
Review service permissions and choose Next.
Review the membership configuration and details, then choose Sign up.
The service-linked role created with proactive response cannot be created in the management account through this on-boarding process. See the AWS Security Incident Response User Guide for deploying the service-linked role to the management account.
Many organizations have well-established processes and application suites for IR and security threat management. To accommodate these pre-existing setups, AWS has developed integrations with popular ITSM and case management applications. Our initial releases enable complete bi-directional integration with both Jira and ServiceNow, with more on the way.
We have provided comprehensive instructions to guide you through the setup process in GitHub.
Optimize value on day one
Immediately after enabling the service, Security Incident Response begins to ingest your GuardDuty and Security Hub findings (from security partners). Your findings are automatically triaged and monitored using deterministic evaluation logic; based on your organization’s unique metadata and security perimeter, high-priority threats are escalated to your Security Incident Response command center for immediate investigation. While your organization receives 24/7 coverage from the start, implementing these recommended optimizations will significantly enhance threat detection accuracy, reduce false positives, accelerate response times, and strengthen your overall security posture through customized protection aligned with your specific business risks and compliance requirements.
To maximize immediate value from Security Incident Response, we suggest using its reactive capabilities beginning at day one. When your team encounters suspicious activities or requires expert investigation, you can create an AWS-supported case through the service portal to engage AWS CIRT specialists directly. These security experts effectively extend your team’s capabilities, providing specialized knowledge and guidance to help you quickly understand, contain, and remediate potential security concerns. This on-demand access to AWS CIRT can reduce your mean time to resolution, minimize potential impact, and make sure you have professional support even for complex security scenarios that might otherwise overwhelm internal resources.
Examples of reactive support queries include:
We noticed a suspicious IP address in our environment, performing various API calls. Can you help us investigate?
A new account was created two days ago, we were notified through an Amazon EventBridge rule and our endpoint detection and response (EDR) integrations, can you help us scope it and find out who created it? How was it created?
If you decide to move forward with AWS Security Incident Response and deploy a POC, we recommend the following action items:
Determine if you have the approval and budget to use Security Incident Response. Preferred pricing agreements, discounts, and performance-based trials are available.
Configure and deploy GuardDuty to help maintain comprehensive and relevant coverage across your management and member accounts, critical services, and workloads.
Verify that third-party security tools (such as CrowdStrike, Lacework, or Trend Micro) are properly integrated with Security Hub.
Communicate the security incident response tooling changes to the relevant organizational teams.
Conclusion
In this post, we showed you how to plan and implement an AWS Security Incident Response POC. You learned how to do so through phases, including defining success criteria, configuring Security Incident Response, and validating that Security Incident Response meets your business needs.
As a customer, this guide will help you run a successful POC with Security Incident Response. It guides you in assessing the value and factors to consider when deciding to implement the current features.
Security and governance teams across all environments face a common challenge: translating abstract security and governance requirements into a concrete, integrated control framework. AWS services provide capabilities that organizations can use to implement controls across multiple layers of their architecture—from infrastructure provisioning to runtime monitoring. Many organizations deploy multi-account environments with AWS Control Tower, or Landing Zone Accelerator to implement a foundational baseline of controls and security architecture. Once their environment is provisioned, organizations typically look to add additional detective controls from services such as AWS Security Hub and AWS Config based on security, compliance, and operational requirements. While this sequence is a great start, there are more opportunities during this time to implement layered defense-in-depth coverage to enhance your security posture.
Highly regulated industries such as fintech and financial services are often viewed as the gold standard for governance and security controls. While these sectors have established robust frameworks, there’s consistently room for improvement and valuable lessons for other industries looking to enhance their control environments. However, many organizations struggle to move beyond a basic compliance-focused approach. In our experience working with customers across various sectors, this limited perspective often stems from multiple factors, including:
Immediate compliance pressures
Resource constraints
Limited understanding of control maturity pathways
Focus on detection rather than prevention
A tendency to prioritize technology-agnostic controls over bult-in AWS capabilities, leading to unnecessarily complex implementations
The good news? A more comprehensive approach that uses AWS preventative, proactive, detective, and responsive controls can significantly reduce risk while decreasing operational overhead through automation.
In this post, we outline a practical framework that you can adopt to evolve your security and governance controls strategy. We explore how your organization can mature from a detection-focused security posture to a multi-layered control framework, using real-world examples across the resource lifecycle, including infrastructure-as-code testing and preventative controls such as service control policies (SCPs), resource control policies (RCPs), and declarative policies (DPs).
Drawing from best practices in highly regulated industries while incorporating modern cloud capabilities through services such as AWS Organizations and AWS Control Tower, we provide a structured framework that you can use to elevate your organization’s control environment beyond basic compliance requirements.
Customer challenges in implementing controls
Organizations face several significant challenges when attempting to implement a comprehensive control framework in AWS. Let’s explore the main obstacles:
Resource constraints and expertise gaps
Security teams often find themselves caught between limited resources and expanding responsibilities in the cloud. With constrained budgets and personnel, teams typically gravitate toward quick wins through detective controls, which appear straightforward to implement initially. While this provides immediate visibility, it can leave critical gaps in security posture. Many teams lack comprehensive expertise across all control types, particularly in implementing preventative, proactive, and responsive controls effectively. The pressure to demonstrate immediate security improvements, combined with day-to-day operational demands, frequently results in tactical solutions rather than strategic, layered security approaches.
Analysis paralysis
Deciding which tools to prioritize can be a challenge; the breadth of options and extensive capabilities available across AWS security services and third-party tools can feel overwhelming at times. Security teams struggle to determine the optimal mix of controls for their environment and where to begin implementation. This challenge is compounded by the complexity of mapping technical compliance requirements to cloud-focused capabilities and maintaining visibility into emerging threats as the security landscape evolves. The layers of abstraction created by proliferating security controls can further obscure clear decision-making, leading teams to delay critical security improvements while seeking perfect solutions.
Misunderstanding of defense in depth
Defense in depth as a concept is good, but it can be misunderstood and difficult to achieve, leading to vulnerabilities in the security architecture. A common misconception is that a single strong control, separation of duties in AWS Identity and Access Management (IAM) roles, least permission in IAM policies, and so on, provide sufficient protection. This overlooks the crucial value of implementing controls at multiple points and how different control types can be combined to create a robust security posture. Teams often miss how organizational controls like SCPs can work in harmony with workload-specific controls to achieve greater protection. The role of preventative controls in guiding technical implementations is frequently under appreciated.
Maturity journey challenges
The path to security maturity presents numerous obstacles. Many organizations remain stuck in the early stages, implementing detective controls but never progressing to preventative measures. Security controls are often implemented in isolation, without consideration for the broader security landscape. Organizations struggle to create and follow a clear roadmap for evolving their security posture, and measuring improvement over time proves challenging.
Scale and consistency issues
As AWS environments grow, maintaining consistent governance and security becomes increasingly complex. Organizations face mounting challenges in managing exceptions and special cases across their expanding infrastructure. These interrelated challenges often result in controls implementations that fail to achieve their intended risk reduction goals. You need a structured approach to overcome these obstacles and implement comprehensive security controls, which we explore in the following sections.
Strategic investment in security
While implementing comprehensive controls requires an initial investment in time and resources, the long-term benefits fundamentally transform how organizations operate.
The foundation for this transformation begins with establishing baseline controls through proven starting points such as AWS Control Tower and its customization options. AWS Control Tower provides building blocks for secure multi-account architectures with hundreds of security capabilities and proactive controls already built in. Rather than trying to create baselines from scratch by wrangling vast amounts of account-level or resource-specific controls, you can use these accelerators to rapidly establish a strong security foundation. With these baseline controls in place, this transformation extends beyond security teams to enable the entire organization to operate more efficiently. Development and operations teams can deploy faster with confidence when security guardrails are in place. Security becomes an enabler rather than a bottleneck, so that teams across the organization can innovate while maintaining a strong security posture.
As you mature your organization’s control framework through automation and layered defenses, a security transformation occurs. Security teams shift from constant firefighting to proactive risk management. Automated policy enforcement replaces manual reviews, and the time previously spent on routine tasks can be redirected to strategic initiatives.
Preventative controls establish the foundation of a secure environment by defining the policies, standards, and requirements that guide security implementations. At their core, these controls encompass corporate security policies that outline acceptable resource configurations across the organization. They work in conjunction with compliance requirements and frameworks to help maintain regulatory alignment, while architectural standards and guidelines provide technical direction for implementations. Data classification policies play a crucial role by determining specific security requirements based on data sensitivity.
To illustrate how preventative controls work in practice, consider a common S3 bucket security requirement. A typical preventative control might establish a corporate policy stating All S3 buckets must be private by default, with public access granted only through an approved exception process. This simple but effective policy sets clear expectations and requirements before a technical implementation begins.
Organization level: SCPs blocking public S3 bucket creation.
Resource level:
RCPs enforcing network access controls, such as requiring authenticated access or limiting requests to your organization’s network range.
SCPs to stop malicious overwrites of S3 objects using SSE-C encryption by blocking s3:PutObject requests with customer-provided keys unless explicitly allowed, paired with AWS IAM Roles Anywhere for short-term credential enforcement.
Proactive controls act as an early warning system, identifying and addressing potential security issues before they manifest in your environment. These controls work by validating configurations and changes against established security requirements during the development and deployment phases. Through automated validation and policy enforcement at build and deploy time, proactive controls help prevent misconfigurations from reaching production environments, reducing the operational overhead of fixing security issues after the fact. Think of proactive controls as your first line of defense in maintaining a secure cloud environment. In AWS, these can be implemented at multiple levels:
Amazon S3 Block Public Access settings at the account level.
Policy-as-code checks in continuous integration and delivery (CI/CD) pipelines (such as CFN-Nag, or AWS Config proactive rules).
AWS CloudFormation hooks for pre-deployment validation and policy enforcement.
AWS Config rules in proactive mode to evaluate resources before creation.
At the resource level, you can use:
IAM policies restricting bucket policy modifications
CloudFormation Guard rules
#####################################
##           Gherkin               ##
#####################################
# Rule Identifier:
#    S3_BUCKET_SERVER_SIDE_ENCRYPTION_ENABLED
# Description:
#   Checks if your Amazon S3 bucket either has the Amazon S3 default encryption enabled or that the Amazon S3 bucket policy
#   explicitly denies put-object requests without server side encryption that uses AES-256 or AWS Key Management Service.
# Reports on:
#    AWS::S3::Bucket
# Evaluates:
#    AWS CloudFormation
# Rule Parameters:
#    NA
# Scenarios:
# a) SKIP: when there are no S3 resource present
# b) PASS: when all S3 resources Bucket Encryption ServerSideEncryptionByDefault is set to either "aws:kms" or "AES256"
# c) FAIL: when all S3 resources have Bucket Encryption ServerSideEncryptionByDefault is not set or does not have "aws:kms" or "AES256" configurations
# d) SKIP: when metadata includes the suppression for rule S3_BUCKET_SERVER_SIDE_ENCRYPTION_ENABLED
#
# Select all S3 resources from incoming template (payload)
#
let s3_buckets_server_side_encryption = Resources.*[ Type == 'AWS::S3::Bucket'
  Metadata.cfn_nag.rules_to_suppress not exists or
  Metadata.cfn_nag.rules_to_suppress.*.id != "W41"
  Metadata.guard.SuppressedRules not exists or
  Metadata.guard.SuppressedRules.* != "S3_BUCKET_SERVER_SIDE_ENCRYPTION_ENABLED"
]
rule S3_BUCKET_SERVER_SIDE_ENCRYPTION_ENABLED when %s3_buckets_server_side_encryption !empty {
  %s3_buckets_server_side_encryption.Properties.BucketEncryption exists
  %s3_buckets_server_side_encryption.Properties.BucketEncryption.ServerSideEncryptionConfiguration[*].ServerSideEncryptionByDefault.SSEAlgorithm in ["aws:kms","AES256"]
  <<
    Violation: S3 Bucket must enable server-side encryption.
    Fix: Set the S3 Bucket property BucketEncryption.ServerSideEncryptionConfiguration.ServerSideEncryptionByDefault.SSEAlgorithm to either "aws:kms" or "AES256"
  >>
}
Detective controls provide continuous visibility into your security posture by monitoring for and identifying potential security violations or unauthorized changes within your environment. While preventative controls aim to stop issues before they occur, detective controls help you maintain awareness of your security state and can identify when preventative controls have been bypassed or failed. These controls form a critical layer of defense by enabling rapid identification of security issues and providing the visibility needed for effective incident response and compliance reporting. While many organizations start and stop here, detective controls are only part of the solution:
AWS Config rules monitoring for public buckets
Security Hub findings to flag non-compliant resources
Responsive controls complete the security lifecycle by providing automated and manual mechanisms to address security issues after they’re detected. These controls define and implement the actions taken when security violations are identified, ranging from automated remediation of common misconfigurations to coordinated incident response procedures for complex security events. By establishing clear response patterns and using automation where appropriate, responsive controls help facilitate consistent and timely handling of security issues while reducing the mean time to remediation. Responsive controls address violations when they occur:
The power comes not from implementing these controls in isolation, but from using them together in a coordinated way. This layered approach begins with preventative controls to establish the requirements, followed by proactive controls to block most potential violations at the source. Issues that manage to slip through are caught by detective controls, while responsive controls automatically remediate identified problems. Throughout this process, comprehensive documentation tracks issues, remediation plans, and progress, such as through a plan of action and milestones (POAM), helping to make sure that compliance requirements are met and improvements can be measured over time.
Implementation lifecycles: Ideal compared to reality
You can follow one of two paths when implementing security controls: starting fresh with a comprehensive approach or evolving from an existing detective-focused implementation. Let’s examine both scenarios.
Starting fresh: The ideal approach
When starting from scratch, you have a unique opportunity to build your security and governance following an ideal approach. Your team can take advantage of this clean slate to architect controls and processes methodically, free from legacy constraints. The following steps offer guidance though establishing a strong foundation while maintaining the flexibility you need as your business grows.
Rationalize controls against requirements and risk profile:
Choose appropriate security frameworks (for example, CIS and NIST).
Map compliance, regulatory, legal, and contractual requirements to your base framework.
Define clear security objectives and success criteria for your security and compliance program.
Design a comprehensive control strategy:
Document control requirements across all four types (preventive, proactive, detective, and responsive controls). You can use the framework to decide which controls are best for each type of requirement.
Plan implementation phases and priorities.
Define metrics for measuring effectiveness.
Implement controls in layers:
Start with AWS Control Tower, which gives you foundational controls to mature from. You can add customizations if required.
Think about additional preventative controls that can help establish a stronger security and compliance posture.
Deploy proactive controls to stop violations.
Add detective controls as safeguards.
Implement responsive controls for automated or manual remediation.
Monitor and assess effectiveness
Evaluate control performance against defined metrics.
Identify gaps and areas for improvement.
Adjust controls based on emerging threats and changing requirements.
Implement continuous improvement feedback loop.
Evolution from detective controls: The common path
Most organizations find themselves starting with detective controls and face challenges in maturing from there:
Initial state:
Baseline detective controls through Security Hub and AWS Config
Manual remediation processes
Limited visibility into security posture
Maturation steps:
Analyze findings to identify patterns
Implement automated remediation for common issues
Add preventative and proactive controls based on recurring events
Periodically refine and update policies
Optimization:
Review control effectiveness
Identify gaps in coverage
Implement additional preventative, proactive, detective, and responsive measures
Automate processes where possible
The goal: Comprehensive and layered security controls
The goal of implementing security controls across multiple layers isn’t just about compliance or following best practices—it’s about creating a robust, resilient security posture that can effectively help prevent, detect, and respond to security issues. Let’s explore why this approach is crucial:
Why multiple control layers matter
Security controls shouldn’t exist in isolation. When implementing a security requirement, you should consider:
How can we prevent this issue from occurring?
How will we detect if our preventative controls fail?
What should happen when we detect a violation?
What policies and standards guide these decisions?
Moving beyond detection
While detective controls are important, they signal that a security violation has already occurred. A mature security posture requires:
Strong preventative controls to stop violations before they happen
Detective controls as a safety net if there is drift or a violation
Automated remediation where possible, to reduce exposure time
Clear policies to guide implementation and decisions
Measuring success
You should measure the effectiveness of your control framework through several key performance indicators. Success can be seen in the steady reduction of security findings over time, coupled with decreasing time-to-remediation metrics. The maturity of the framework becomes evident through an increasing percentage of automated remediation activities and a declining number of recurring issues. These improvements manifest in better audit outcomes, providing tangible evidence that the control framework is delivering its intended results.
Practical implementation: From theory to practice
Let’s examine how to implement a comprehensive control framework using a common security requirement: preventing exposure of sensitive data through public S3 buckets. This example demonstrates how different control types work together to create defense in depth. While not every control might be necessary for every situation, each should be carefully considered and evaluated based on various factors including system criticality, data sensitivity, operational overhead, and organizational risk tolerance. The decision to implement or omit specific controls should be deliberate and documented, rather than occurring by default.
The architecture will have layers and components like the following.
Preventative layer:
Service control policies (SCPs) or resource control policies (RCPs)
An effective security and compliance strategy includes all four types of security controls. While preventative controls are a first line of defense to help prevent unauthorized access or unwanted changes to your network, it’s important to make sure that you establish detective and responsive controls so that you know when an event occurs and can take immediate and appropriate action to remediate it. Using proactive controls adds another layer of security because it complements preventative controls, which are generally stricter in nature.
Begin by defining your security objectives, then establish clear policies to meet those objectives:
Define organizational and business objectives:
Identify data protection goals
Determine acceptable risk levels
Align with compliance requirements
Establish clear policies:
For example, document business requirements for external data sharing and access controls in security policies. These requirements will drive technical decisions around AWS storage configurations such as S3 bucket policies and public access settings.
Define permitted use cases for public access.
Establish exception processes.
Set clear ownership and responsibilities.
Deploy preventative guardrails:
Organization level:
SCPs to block public bucket creation at the organization level
Account-level S3 Block Public Access settings to enforce account-level restrictions
Resource level:
IAM policies restricting bucket policy modifications
S3 bucket policy templates with controlled deployment
RCPs to enforce rules on specific resource types across your organization
Deploy proactive guardrails:
Infrastructure as code:
Implement policy-as-code checks in CI/CD pipelines using:
Enable relevant optional AWS Control Tower guardrails
Add detective controls by creating a monitoring framework:
AWS CloudTrail for comprehensive API activity logging and auditing to enable investigation of unauthorized access attempts and configuration changes.
AWS Config rules for bucket configuration. AWS Config rules or AWS Config conformance packs deployed for the entire organization can monitor S3 bucket configurations for compliance.
Security Hub findings for continuous assessment by aggregating findings and flagging non-compliant resources.
Amazon EventBridge rules for policy changes to detect and route S3 bucket policy modifications.
IAM Access Analyzer for external access review.
Regular compliance reporting, which can be automated through AWS Audit Manager.
Implement responsive controls by automating remediation where possible:
Security Hub and Systems Manager integration to automate incident response workflows.
Custom Lambda functions for specific use cases.
Integration with ITSM for human review when needed.
The following table describes control types, what a basic implementation includes, and the services and methods used for advanced implementation.
Control type
Basic implementation
Advanced implementation
Preventative
Documentation, peer reviews
SCPs, RCPs, DPs, IAM policies, and S3 Block Public Access
Detective
Security Hub, AWS Config rules
Security Hub, AWS Config, and CloudWatch alerts
Responsive
Manual remediation
Auto-remediation through AWS Config, Systems Manager, EventBridge, and Lambda
Compliance
One-time checks
CIS/NIST mapping with Security Hub and automation of evidence collection and reporting using AWS Audit Manager
Automation
Limited
Full CI/CD Integration (for example, using CloudFormation or Terraform)
Cost optimization effort
High (manual effort)
Low (automation reduces overhead)
Scaling and management considerations
As your security and governance program matures, scaling these controls across a growing organization requires thoughtful management and automation. This section explores key considerations for effectively managing your security posture at scale, optimizing costs, and maintaining consistency across your AWS environment. Whether you’re expanding across multiple accounts, business units, or AWS Regions, these practices help you balance security requirements with operational efficiency and cost management.
Use AWS services effectively:
Consider deploying AWS Control Tower for consistent account setup and centrally deploying and managing controls at scale across multiple use cases and organizational units.
AWS Organizations can aid hierarchical policy management and the implementation of:
IAM policies for identity-based guardrails and permissions
SCPs for access guardrails
RCPs define permissions based on resource attributes
DPs to help facilitate consistent resource configurations across your organization
Tag policies for consistent resource categorization
Backup policies for data protection standards
AI service opt-out policies for data privacy requirements
Cost allocation tag policies to standardize cost attribution
Data residency policies to enforce regional restrictions
Implement resource governance through policy integration
For example, use Organizations tag policies to enforce a Confidential tag on S3 buckets storing personally identifiable information (PII). Combine this with SCPs that mandate AES-256 encryption for tagged buckets, overriding developer attempts to disable it.
Using backup policies to enforce retention rules (for example, Retention=7 years).
Use DPs to help maintain consistent security configurations across resources, such as enforcing encryption settings on Amazon Elastic Block Store (Amazon EBS) volumes or requiring specific security group rules.
Centralize logging and monitoring
Manage compliance exceptions:
Implement clear exception processes
Document and track approved exceptions
Establish regular periodic reviews of exceptions
Use time-bound approvals with automated expiration
Optimize costs:
Use periodic instead of continuous checking where appropriate
Implement targeted monitoring based on resource criticality
Implementing a comprehensive control framework is a journey, not a destination. Start from your organization’s current position, whether that’s with basic detective controls or a fresh implementation, and focus on progressive improvement rather than attempting to implement everything at once. Success comes from carefully documenting decisions about control implementation, regularly reviewing them, and using automation to reduce operational overhead while improving consistency. Progress can be measured through concrete metrics: reduced findings, faster remediation times, and increased automation.
Remember that the goal extends beyond better security—it’s about transforming security and governance from a reactive operation to a strategic enabler that provides real business value. This transformation manifests through reduced risk from systematic controls, improved operational efficiency through automation, and enhanced visibility and governance. Perhaps most importantly, it frees security teams to focus on strategic initiatives rather than routine operational tasks.
By following this approach, you can build a robust security and governance posture that not only protects your organization’s AWS environment but also supports business innovation and growth. The result is a security program that evolves alongside the business, enabling rather than hindering progress, while maintaining a strong approach that can scale with your organization’s needs.
If you have feedback about this post, submit comments in the Comments section below. If you have questions about this post, contact AWS Support.
Security teams must efficiently validate and document exceptions to AWS Security Hub findings, while maintaining proper governance. Enterprise security teams need to make sure that exceptions to security best practices are properly validated and documented, while development teams need a streamlined process for implementing and verifying compensating controls.
In this blog post, we show you an automated solution that’s ideal for organizations using AWS Security Hub that need to manage security exceptions at scale while maintaining governance controls. It’s particularly valuable for enterprises that have complex compliance requirements and multiple development teams. By implementing this solution, you can accelerate the Security Hub findings review process while maintaining proper security governance and providing clear business context for security exceptions.
Note: The solution in this post is provided as a reference architecture and should not be implemented as-is in production environments. Organizations must thoroughly review, customize, and enhance this solution to align with their specific security requirements, compliance frameworks, governance policies, and risk tolerance. Engage with your security, compliance, and legal teams before deploying this automated security validation solution.
Amazon S3 Block Public Access not enabled: A marketing team might need a public Amazon Simple Storage Service (Amazon S3) bucket for website assets, but should implement the following compensating controls:
Amazon CloudWatch alarms for suspicious access patterns and comprehensive access logging
Managing exceptions to security best practices can be challenging and typically involve multiple steps. Security teams spend significant time reviewing exception requests and defining and validating compensating controls, and developers must then implement and validate those controls. Multiple teams must be included to create and manage documentation for compliance and audit purposes. Overall, this process, if done manually, is time intensive, error-prone (with a risk of missing implementation issues), and has a risk of poor visibility because of limited or missing documentation of the business context in the security findings.
Solution prerequisites
For this solution, you must have the following elements in place:
The solution includes a pre-deployment validation script (validate-environment.sh) that automatically verifies the following:
Tool versions and installations
AWS service enablement status
Resource conflicts
This validation runs automatically during deployment (Integrated in deploy.sh script) to help make sure that required prerequisites are met before infrastructure creation begins.
This solution provides sample code and CloudFormation templates that organizations can deploy to automate the validation of compensating controls for suppressed Security Hub findings while maintaining proper segregation of duties between the security and development teams.
Architecture
Figure 1: Solution architecture diagram
Figure 1 illustrates the solution workflow that’s initiated when a developer changes a Security Hub finding’s workflow status to SUPPRESSED to request a business-justified security exception. The process concludes with the solution adding validation results as notes to the respective Security Hub finding, maintaining a complete audit trail of the exception request and validation outcome.
Note: Before initiating this workflow, developers must first consult with their organization’s security team to explain their business justification for the exception. During this initial consultation, the security team defines required compensating controls for the finding type. The security team uses the add-controls-role-based.sh script to add controls to DynamoDB. A developer enables the required compensating controls before proceeding with the workflow status change.
The workflow shown in Figure 1 includes the following steps:
A developer changes the Security Hub finding status to SUPPRESSED.
EventBridge detects the status change to SUPPRESSED.
An EventBridge rule sends an event to the Amazon SQS queue.
A Lambda function retrieves messages from the Amazon SQS queue.
The Lambda function fetches compensating controls from the DynamoDB compensating controls table.
The Lambda function validates each control using the appropriate AWS services APIs.
Evidence is collected for each validation and stored in DynamoDB.
Findings validation results and timestamps are stored in the DynamoDB Findings table.
A versioned history of finding validation attempts is stored in the DynamoDB History table.
If the security team provided controls pass validation, the finding remains SUPPRESSED, and a note is added in the respective Security Hub finding with adjusted severity information (the original severity assigned by Security Hub isn’t changed by this solution). If one of these control fails validation, finding status is changed to NOTIFIED, and a note is added in the respective Security Hub finding of failed controls (the original severity assigned by Security Hub isn’t changed by this solution).
OPTIONAL: Extend the solution with Amazon OpenSearch for SOC teams to perform advanced search, correlation, and visualization of validation evidence across findings, and historical trend analysis of compensating control effectiveness. Use Amazon QuickSight for visualization of compliance metrics, and AWS Security Lake to centralize validation data across multiple accounts and Regions, standardizing it in OCSF format for comprehensive cross-account analysis and long-term compliance reporting.
Note: This solution should be deployed in accordance with your organization’s security policies and the AWS Shared Responsibility Model. Review and test security controls before deploying in production environments.
How it works
This solution is designed exclusively for deployment and management by organizational security teams. Only security teams should have permissions to deploy the AWS CloudFormation stack, modify Lambda validation code, add/modify compensating controls, or access the four DynamoDB tables (Controls, Findings, History, Evidence).
Developers are restricted to two specific actions: suppressing Security Hub findings and reading compensating control requirements. This strict role separation facilitates proper governance and helps prevent bypass of security validation logic. Organizations must implement appropriate IAM policies to enforce these access restrictions in production environments.
Here’s how the solution works:
The security team defines controls: A Security team establishes compensating controls for specific Security Hub finding types and stores them in a DynamoDB table. This helps make sure that approved exceptions follow security-approved guidelines and maintain compliance standards.
Key files for security teams:
File
Purpose
add-controls-role-based.sh
Utility script for adding compensating controls
/templates/findings/*.json
Example compensating controls for reference
/docs/guides/compensating-controls.md
Guide for defining controls
Supported validation Types: The solution supports 13 validation methods to accommodate diverse security requirements:
Validation type
Description
Example use case
CONFIG_RULE
Validates using AWS Config rules
For GuardDuty not enabled finding: vpc-flow-logs-enabled Config rule helps make sure that network traffic is monitored
API_CALL
Validates using direct AWS API calls
For Amazon S3 public access finding: API call to verify CloudFront distribution exists in front of the S3 bucket
SECURITY_HUB_CONTROL
Validates using Security Hub control status
For GuardDuty not enabled finding: CloudTrail.1 control passing confirms comprehensive API logging
CLOUDWATCH
Validates using CloudWatch alarms
For GuardDuty not enabled finding: Alarms monitoring for suspicious API calls and network traffic patterns
CLOUDTRAIL
Validates CloudTrail configuration
For GuardDuty not enabled finding: Multi-Region CloudTrail with log validation and CloudWatch integration
SYSTEMS_MANAGER
Validates using Systems Manager parameters
For GuardDuty not enabled finding: Parameter confirming custom threat detection solution is enabled
PROCESS_CONTROL
Validates process-based controls
For GuardDuty not enabled finding: Documented incident response process for network security events
INSPECTOR
Validates Amazon Inspector configuration
For vulnerability finding: Inspector EC2 scanning enabled with zero critical findings allowed
For security best practice finding: S3 bucket permissions check passing with zero warnings or error resources
Note: Only security team members have access to add or modify compensating controls. The solution enforces this through IAM permissions and runtime checks to maintain proper governance.
Approved security exceptions must have an expiration date to facilitate periodic review. The solution automatically enforces these time limits based on the expiration date defined by the security team.
For this post, we provide a utility script (add-controls-role-based.sh) to demonstrate adding compensating controls. However, in a production enterprise environment, organizations should integrate DynamoDB with their existing governance systems (such as Jira, ServiceNow, and so on) to automatically populate controls from authorized security team sources. This solution focuses on validating controls, not prescribing how they’re ingested.
2. Developers implement controls: When Security Hub findings are suppressed, developers must implement the required compensating controls defined by the security team.
How developers interact with the solution:
View required controls: The solution provides clear requirements for each finding type.
Implement compensating controls: Developers should implement the security team provided compensating controls in their AWS environment, referring to the compensating controls defined by Security team. The specific compensating controls depend on the finding type and security team requirements.
Finding status change: Developers change the Security Hub finding status to SUPPRESSED in Security Hub.
Automatic validation: The solution validates compensating controls when Security Hub findings workflow status is changed.
Status updates: Findings remain SUPPRESSED if controls pass validation; they change to NOTIFIED with failure details if validation fails.
Note: This solution doesn’t modify the original severity of findings in Security Hub. It adds business context with security-approved adjusted severity to findings based on security-approved compensating controls validation, helping security teams make informed decisions.
For this solution, we’re simulating the developer workflow of addressing Security Hub findings by implementing and validating compensating controls. In a production environment, developers would receive notifications about findings that require attention, implement the necessary controls according to security team guidance, and use this validation system to verify their implementations. The solution focuses on the validation aspect but assumes organizations will integrate it with their existing developer workflows, ticketing systems, and continuous integration and delivery (CI/CD) pipelines to create a seamless process from finding detection to remediation verification.
Evidence collection and audit trail
The solution automatically captures comprehensive evidence for each validation activity. The key features of the solution are:
Four-table design: Separate tables for Controls, Findings, History, and Evidence (shown in Figure 2) provide security through segregation while maintaining a complete audit trail
Figure 2: The four-table design for storing compensating controls, evidence, findings, and history
Detailed evidence: Each validation stores specific evidence based on its type—from AWS Config rule compliance details to API responses and process documentation verification
Immutable records: Each evidence includes timestamps, validation context, and results that cannot be modified after collection (shown in Figure 3)
Figure 3: Sample evidence collected for a CONFIG_RULE validation showing PASSED status
Historical tracking: The solution maintains a complete history of each validation attempt, allowing organizations to demonstrate continuous compliance over time
Deployment and configuration
You can deploy the solution using the provided scripts.
Use the following command to clone the repository:
git clone https://github.com/aws-samples/sample-automated-securityhub-validator.git
cd automated-securityhub-validator
Use the following command to check service quotas and to create the security team and developer roles:
cd scripts
./create-roles-quotas-check.sh
Use the following command to assume the security team role:
In the preceding command’s output, note the AccessKeyId, SecretAccessKey, and SessionToken. The timestamp in the expiration field is in the UTC time zone and shows when the IAM role’s temporary credentials expire. After the temporary credentials expire, the user must assume the role again.
Note: For temporary credentials, you can use the DurationSeconds parameter to increase the maximum session duration for IAM roles.
Create environment variables to assume the security team role and verify user assumed the IAM role:
Run the following commands to set the environment variables to assume the IAM role:
Note: Replace the example values with the values that you noted when you assumed the IAM role. For Windows (OS, replace export with set.
Run the get-caller-identity command to verify that the user assumed the IAM role:
aws sts get-caller-identity
Note: In the preceding command’s output, confirm that the ARN is arn:aws:sts::ACCOUNT_ID:assumed-role/securityhub-validator-SecurityTeamRole/SecurityTeamSession instead of arn:aws:iam::ACCOUNT_ID:user/username.
Use the following command to deploy the solution:
cd scripts
./deploy.sh
You can verify that the stack has been created by going to the AWS Management Console for CloudFormation and using the following steps:
In the CloudFormation console, choose Stacks and then Stack details in the navigation pane.
Locate and select the stack securityhub-validator to open its details page.
On the stack details page, select the Resources tab.
In the Resources section, you’ll see a list of the resources that are part of the stack.
Figure 4: Resources created using the CloudFormation stack
The deployment script creates a CloudFormation stack with the necessary resources:
DynamoDB tables for controls, findings, history, and evidence
A Lambda function for validation and Security Hub updates
An EventBridge rule for capturing finding status changes
An Amazon SQS queue and dead letter queue (DLQ) for message processing
IAM roles with least privilege permissions
Add compensating controls (security team):
cd scripts
./add-controls-role-based.sh
Implement controls (developers).
Now, a developer will assume the developer role and implement the required controls based on the security team’s specifications. The solution automatically validates these implementations when the Security Hub finding workflow status is changed to SUPPRESSED by a developer.
To test the solution, you can validate the compensating controls for a GuardDuty finding using the following example scenario:
A developer wants a security exception for the Security Hub finding GuardDuty.1: GuardDuty should be enabled, and because of cost constraints, the developer’s organization hasn’t implemented GuardDuty and requested a security exception from their organization’s security team.
Compensating controls provided by the security team include:
CloudWatch alarms are enabled to monitor for suspicious activity
Note: To simulate this finding, do not enable GuardDuty so that the GuardDuty should be enabled finding appears in the Security Hub console.
Approximately 20–30 mins after enabling AWS Config and Security Hub, you can locate the finding in the console using the following steps and then add the compensating controls provided by the security team.
For this use case, we’re using the GuardDuty should be enabled Security Hub finding:
Navigate to the AWS Security Hub console and choose Findings in the navigation pane.
In the Add filter search bar at the top, select Severity label and set the is value to HIGH.
After applying the filter, select GuardDuty should be enabled in the Finding column to view its details in the righthand pane.
Choose Actions in the top-right corner and select View JSON.
Figure 5: Security Hub findings
In the JSON details window, locate the SecurityControlId field and note the value. You’ll be prompted to enter it by the add-controls-role-based.sh utility in the next step.
Note: The SecurityControlId value is required by the add-controls-role-based.sh utility to properly associate your compensating control with the correct Security Hub finding.
Figure 6: SecurityControlId from the GuardDuty finding
Use the following command to clone the repository:
git clone https://github.com/aws-samples/sample-automated-securityhub-validator.git
cd sample-automated-securityhub-validator
For this demo, you will act as a member of the security team by assuming security team role and use the add-controls-role-based.sh utility to create compensating controls and push them to the compensating control DynamoDB table.
cd sample-automated-securityhub-validator/scripts
./add-controls-role-based.sh
Use the following prompt values in add-controls-role-based.sh to create compensating control table entries using four compensating controls given by the security team for the GuardDuty.1 finding type:
./add-controls-role-based.sh
Security Team - Compensating Controls Management Utility
--------------------------------------------------------
SECURITY NOTICE: This utility is restricted to security team members only
Validating security team role...
✓ Security team role validated: arn:aws:sts::xxxxxxxxxxx:assumed-role/securityhub-validator-SecurityTeamRole/SecurityTeamSession
Using AWS Region: us-east-1
Using stack: securityhub-validator
Using controls table: securityhub-validator-ControlsTable-ARDQCU67CBCN
Enter finding type (e.g., GuardDuty.1): GuardDuty.1
Security approved adjusted risk level [CRITICAL/HIGH/MEDIUM/LOW/INFORMATIONAL]: MEDIUM
Expiration date (YYYY-MM-DD): 2026-12-31
Ticket reference: JIRA-SEC-1234
Business justification: Alternative monitoring solution provides equivalent detection capabilities
Adding Control #1
Control ID: VPC-FLOW-LOGS
Control description: VPC Flow logs must be enabled for network monitoring
Validation type [CONFIG_RULE/API_CALL/SECURITY_HUB_CONTROL/INSPECTOR/ACCESS_ANALYZER/CLOUDTRAIL/MACIE/AUDIT_MANAGER/CLOUDWATCH/SYSTEMS_MANAGER/EVENTBRIDGE/TRUSTED_ADVISOR/PROCESS_CONTROL]: CONFIG_RULE
Config rule name (exact name): vpc-flow-logs-enabled
Description of how this rule mitigates the finding: Provides comprehensive network traffic visibility similar to GuardDuty's network monitoring capabilities
Add another control? [y/n]: y
Adding Control #2
Control ID: SECURITY-ALARMS
Control description: CloudWatch alarms for suspicious activity
Validation type [CONFIG_RULE/API_CALL/SECURITY_HUB_CONTROL/INSPECTOR/ACCESS_ANALYZER/CLOUDTRAIL/MACIE/AUDIT_MANAGER/CLOUDWATCH/SYSTEMS_MANAGER/EVENTBRIDGE/TRUSTED_ADVISOR/PROCESS_CONTROL]: CLOUDWATCH
Alarm name pattern: SecurityMonitoring-
Required metrics (comma-separated): UnauthorizedAPICalls,NetworkPortProbing
Required alarm state [ALARM/OK/INSUFFICIENT_DATA/ANY]: ANY
Minimum number of matching alarms required: 2
Description of how these alarms mitigate the finding: Alarms detect suspicious API calls and network activity similar to GuardDuty's threat detection
Add another control? [y/n]: n
Generated controls:
{
  "findingType": {
    "S": "GuardDuty.1"
  },
  "securityApprovedAdjustedRiskLevel": {
    "S": "MEDIUM"
  },
  "expirationDate": {
    "S": "2026-12-31T00:00:00Z"
  },
  "ticketReference": {
    "S": "JIRA-SEC-1234"
  },
  "businessJustification": {
    "S": "Alternative monitoring solution provides equivalent detection capabilities"
  },
  "auditInfo": {
    "S": "{\"createdBy\":\"arn:aws:sts::xxxxxxxxxxx:assumed-role/securityhub-validator-SecurityTeamRole/SecurityTeamSession\",\"createdAt\":\"2025-08-05T08:49:51Z\",\"lastModifiedBy\":\"arn:aws:sts::xxxxxxxxxxx:assumed-role/securityhub-validator-SecurityTeamRole/SecurityTeamSession\",\"lastModifiedAt\":\"2025-08-05T08:49:51Z\"}"
  },
  "securityControlHash": {
    "S": "a0b33a0a96a6b282bad1c093586d89cef832d40bb379abd4a004d00afdf603d1"
  },
  "requiredControls": {
    "S": "[{\"controlId\":\"VPC-FLOW-LOGS\",\"description\":\"VPC Flow logs must be enabled for network monitoring\",\"validationType\":\"CONFIG_RULE\",\"validationParams\":{\"ruleName\":\"vpc-flow-logs-enabled\",\"justification\":\"Provides comprehensive network traffic visibility similar to GuardDuty's network monitoring capabilities\"}},{\"controlId\":\"SECURITY-ALARMS\",\"description\":\"CloudWatch alarms for suspicious activity\",\"validationType\":\"CLOUDWATCH\",\"validationParams\":{\"alarmNamePattern\":\"SecurityMonitoring-\",\"requiredMetrics\":[\"UnauthorizedAPICalls\",\"NetworkPortProbing\"],\"requiredState\":\"ANY\",\"minimumAlarms\":2,\"justification\":\"Alarms detect suspicious API calls and network activity similar to GuardDuty's threat detection\"}}]"
  }
}
Save to DynamoDB? [y/n]: y
Compensating controls saved to DynamoDB!
This action has been logged for audit purposes.
When prompted to save to DynamoDB, enter Y. Compensating controls will be added to the DynamoDB compensating controls table.
Figure 7: Compensating controls for GuardDuty.1 finding
For this proof-of-concept demonstration, the compensating controls implementation requires additional AWS permissions beyond what the developer role provides. In a production environment, these controls would typically be implemented by infrastructure teams or through automated deployment pipelines.
Switch to administrative credentials.
For the demonstration, temporarily switch back to your administrative AWS credentials (the ones used to create the roles):
Control 2: Create security monitoring alarms starting with creating metric filters for CloudTrail Logs; start by creating a log group for CloudTrail (if none exists):aws logs create-log-group --log-group-name CloudTrail/SecurityEventsCreate a metric filter for unauthorized API calls:
Change the workflow status of the Security Hub finding related to GuardDuty from NEW to SUPPRESSED.
To change the workflow status using the AWS CLI (developer):
# Get the finding ARN first (command shown for reference)
aws securityhub get-findings \
    --filters '{"GeneratorId":[{"Value":"security-control/GuardDuty.1","Comparison":"EQUALS"}]}' \
    --query 'Findings[0].Id'
# Get the product ARN (command shown for reference)
aws securityhub get-findings \
    --filters '{"GeneratorId":[{"Value":"security-control/GuardDuty.1","Comparison":"EQUALS"}]}' \
    --query 'Findings[0].ProductArn' \
    --output text
# Then suppress the finding
aws securityhub batch-update-findings \
  --finding-identifiers '[{"Id":"finding-arn-from-above","ProductArn":"product-arn-from-above"}]' \
  --workflow '{"Status":"SUPPRESSED"}' \
  --note '{"Text":"Implemented compensating controls as per security team requirements","UpdatedBy":"[email protected]"}'
To change the workflow status using the console (developer):
Go to the Security Hub console.
In the navigation pane, choose Findings.
In the search bar, select Compliance Security Control ID filter and enter the value of Is as GuardDuty.1.
Select the finding GuardDuty should be enabled and under Workflow status, select SUPPRESSED.
In the Note field, enter Implemented compensating controls as per security team requirements.
Choose Set status to save the note.
Figure 8: GuardDuty.1 finding workflow status changed from NEW to SUPPRESSED
Note: Only suppress findings after implementing the required compensating controls provided by the security team.
After the Workflow status of the finding is SUPPRESSED, the automated validation process begins and you can see the Lambda function logs in the CloudWatch console related to different validations performed.
To view Lambda function logs in the CloudWatch console:
Go to the Amazon CloudWatch console.
In the navigation pane, under Logs, choose Log groups.
Select the log group with the Lambda function name.
Select the most recent log stream to view the logs.
Figure 9: Lambda function CloudWatch logs
The solution updates the note section of the findings in Security Hub with the validation results:
If all controls pass:
Finding status remains SUPPRESSED.
A note is added with validation results and adjusted risk level.
Business context is added to the finding.
If one of the controls fails:
Finding status changes to NOTIFIED.
A note is added with details about failed controls.
The security team reviews the changes as part of their standard process.
To view the finding’s workflow status and updated note using the console (developer):
Go to the Security Hub console.
In the navigation pane, choose Findings.
In the search bar, select Compliance Security Control ID filter and enter value of Is as GuardDuty.1.
Select the finding GuardDuty should be enabled and check the Workflow status.
For Actions, choose Add note.
Check the Last note added.
Figure 10: Security Hub updated finding note
The finding note shows that automated validation has performed checks and documented the results, also note that the original severity of HIGH that was assigned by Security Hub is maintained and the adjusted severity of MEDIUM that was provided by the security team is added in the Note section and to the Evidence table, providing transparency and accountability while maintaining the original severity assigned by Security Hub.
Clean up
To avoid incurring ongoing charges, use the following command to clean up resources created for this post.
./cleanup.sh
This deployment process is designed to be straightforward and to maintain security best practices such as encryption, least privilege, and segregation of duties.
Conclusion
In this post, we showed you how to implement a solution that security teams can use to define compensating controls for AWS Security Hub findings and automatically validate their implementation. We walked through the challenges of managing security exceptions and demonstrated how this solution helps to bridge the gap between security requirements and practical implementation.
The solution provides a structured workflow where security teams define acceptable compensating controls, developers implement them, and an automated system validates their effectiveness. With support for 13 different validation types, from AWS Config rules to process documentation, the solution offers comprehensive coverage for various security scenarios.
We also demonstrated the end-to-end process of adding compensating controls for a GuardDuty finding and showed how the solution maintains the original finding severity assigned by Security Hub while documenting the adjusted risk level approved by the security team. This approach helps maintain transparency and auditability while allowing for necessary exceptions.
Give it a try and share your feedback in the comments section.
Security Implication Disclaimer: The Amazon S3 configurations demonstrated in this post involve public access settings that expose data to the internet and should only be used for demonstration or non-sensitive content. Public S3 buckets carry significant risks including data exposure, unexpected costs from unauthorized usage, compliance violations, and potential security breaches. For production environments, use IAM roles, implement least privilege access policies, enable S3 Block Public Access settings, and consider CloudFront with Origin Access Control for public content delivery. Consult your security team and make sure of compliance with organizational policies before implementing public S3 configurations in production systems.
Amazon Web Services (AWS) is pleased to announce that the Summer 2025 System and Organization Controls (SOC) 1 report is now available. The report covers 183 services over the 12-month period from July 1, 2024 to June 30, 2025, giving customers a full year of assurance. The reports demonstrate our continuous commitment to adhering to the heightened expectations of cloud service providers.
AWS strives to continuously bring services into the scope of its compliance programs to help customers meet their architectural and regulatory needs. You can view the current list of services in scope on our Services in Scope page. As an AWS customer, you can reach out to your AWS account team if you have any questions or feedback about SOC compliance.
To learn more about AWS compliance and security programs, see AWS Compliance Programs. As always, we value feedback and questions; reach out to the AWS Compliance team through the Contact Us page.
If you have feedback about this post, submit comments in the Comments section below.
Organizations are increasingly using large language models (LLMs) to provide new types of customer interactions through generative AI-powered chatbots, virtual assistants, and intelligent search capabilities. To enhance these interactions, organizations are using Retrieval-Augmented Generation (RAG) to incorporate proprietary data, industry-specific knowledge, and internal documentation to provide more accurate, contextual responses. With RAG, LLMs use an external knowledge base that uses a vector store to incorporate specific knowledge data before generating responses.
Our customers have told us that they’re concerned adding additional context to prompts will lead to leakage of sensitive information to principals (persons or applications) that might exist in some of these tools or to unstructured data within the knowledge base. As mentioned in previous posts (Part 1, Part 2), LLMs should be considered untrusted entities because they do not implement authorization as part of a response. A good mental model for organizations is to assume that any data passed to an LLM as part of a prompt could be returned to the principal. With tools (APIs that an LLM can invoke to interact with external resources), you can pass the identity tokens of the principal to the tool to determine what the principal is permitted to access and actions that are allowed. Capabilities across different vector databases—including metadata filters and syncing identity information between the data source and the knowledge base—support providing better results from the knowledge base and provide a baseline filtering capability. This does not provide for strong authorization capabilities using the data source as the source of truth, which some customers are looking for.
In this blog post, I show you an architecture pattern for providing strong authorization for results returned from knowledge bases with a walkthrough example of this using Amazon S3 Access Grants with Amazon Bedrock Knowledge Bases. I also provide an outline of considerations when implementing similar architecture patterns with other data sources.
RAG usage overview
RAG architectures share similarities with search engines but have key differences. While both use indexed data sources to find relevant information, their approaches to data access differ. Search engines provide links to information sources, requiring users to access the original data source directly based on their permissions. This flow is shown in Figure 1.
Figure 1: A principal, User in this example, accessing a data source after the search engine returns results
Unlike search engines, RAG implementations return vector database results directly from the LLM, bypassing permission checks at the original data source. While metadata filtering can help control access, it presents two key challenges. First, vector databases only sync periodically, meaning permission changes in the source data aren’t immediately reflected. Second, complex identity permissions—where principals might belong to hundreds of groups—make it difficult to accurately filter results. This makes metadata filtering insufficient for organizations that require stronger authorization controls. This flow is shown in Figure 2.
Figure 2: An application accessing data in a vector database
To implement robust authorization for knowledge base data access, verify permissions directly at the data source rather than relying on intermediate systems. When using the search engine example, access verification occurs when retrieving the actual result from the data source, not during the initial search. For vector databases, the generative AI application validates access rights by sending an authorization request to the data source before retrieving the data. This helps make sure that the data source that maintains the authoritative access control rules determines whether the principal has permission to access specific objects. This real-time authorization check means permission changes are immediately reflected when accessing the data source. This authorization pattern is similar to how AWS Lake Formation manages access to structured data. Lake Formation evaluates permissions when a principal requests access to databases or tables, granting or denying access based on the principal’s defined permissions. You can implement comparable authorization controls for vector database results before providing that context to large language models.
Let’s look at a solution using S3 Access Grants with Amazon Bedrock Knowledge Bases as an example use case.
Solution overview: S3 Access Grants with Bedrock Knowledge Bases
In the following example, you have an ACME organization that wants to create a generative AI chatbot for their employees. There are multiple teams within the organization (Marketing, Sales, HR, and IT) that work on projects throughout the organization. You have five users (the principals accessing the application) with the following group permissions:
Alice: Marketing Team
Bob: Sales Team, Project A Team
Carol: HR Team, Project B Team
Dave: IT Support, Project C Team
Eve: Marketing Team
Each principal will have access to their respective project (for example /projects/projectA) or department folders (for example departments/marketing/). Marketing also will have access to everything in the projects folder (/projects/*) unless they are considered highly confidential files. To mark Project B files as highly confidential, you will include a metadata tag for objects within the Project C prefix with classification = ‘highly confidential’. Figure 3 shows the relationship between the principals and access to the different folders within the data source. As an example, only Carol has access to highly confidential data in the Project B folder.
Figure 3: Group permissions for the organization
To authorize access for each principal to the objects within the knowledge base, you will use Amazon S3 Access Grants. You can learn how to set up S3 Access Grants in Part 1 or Part 2 of the blog series.
Within AWS IAM Identity Center, you will add each user to their respective groups. Bob will be added to both the Sales Team group and Project A Team group, similar to what is shown in Figure 3.
Each prefix (projectA/, marketing/) will have a single file that provides a status for the team. In addition, for Project B, you will also add a status.txt.metadata.json file to tag the object as highly confidential, because it’s a HR project. For example, for Project B, the status.txt file looks like the following:
Project B status is as follows:
Project B = Compensation Update
STATUS = YELLOW
Project completion = 50%
Notes: we are tracking behind schedule. Need to pull more resources to get it completed by next month.
After the knowledge base and S3 access grants are configured, you can now test the authorization of knowledge base chunks. The application flow is the following, as shown in Figure 4:
The user uses their identity provider (IdP) to sign in to the generative AI application (steps 1a, 1b, and 1c).
The generative AI application exchanges a token with IAM Identity Center and assumes the role on behalf of the user (step 2).
The generative AI application calls S3 Access Grants to get a list of the grants the user is authorized to access (step 3).
The user sends a query to the generative AI application (step 4).
The generative AI application sends a query to knowledge base (step 5).
The generative AI application reviews chunks from the knowledge base against the scopes the user is authorized to access (step 6).
Only scopes the user is authorized to will be passed to the LLM for a response (step 7).
The generative AI application will continue steps 5–7 until you want to get a new list of authorized scopes (repeat step 4) or the token expires (repeat steps 3 and 4).
Figure 4: Application flow to authorize data from knowledge bases
The grant scopes are shown in the following table:
For this example, you can use Bob’s role to demonstrate how chunk authorization works. When you call the knowledge base without performing any data authorization, you receive the following back when asking “What is the status of my project.” With each object within the data source, you also include meta data, in the form of *.metadata.json, which is used by the knowledge base to assign specific key/value pairs to each object. This is where you add the classification for Projects A and C as confidential and Project B as highly confidential, as mentioned previously. You pass this filter as part of the Bedrock knowledge base request, using a RetrievalFilter within the retrievalConfiguration. The following code shows the response from the Bedrock knowledge base:
{
    "ResponseMetadata": {
        ...
    },
    "retrievalResults": [
        {
            "content": {
                "text": "Project A status is as follows:  Project A = Sales Strategy STATUS = GREEN Project completion = 80% Notes:  we are on track to complete the project by end of month",
                "type": "TEXT"
            },
            "location": {
                "s3Location": {
                    "uri": "s3://amzn-s3-demo-bucket/projects/projectA/status.txt"
                },
                "type": "S3"
            },
            "metadata": {
                "x-amz-bedrock-kb-source-uri": "s3://amzn-s3-demo-bucket/projects/projectA/status.txt",
                "classification": "confidential",
                "x-amz-bedrock-kb-chunk-id": "1%3A0%3AnTT-15UBTG7d8qG4nL6p",
                "x-amz-bedrock-kb-data-source-id": "CIUUDCONV2"
            },
            "score": 0.558023
        },
        {
            "content": {
                "text": "Project C status is as follows:  Project C = Infrastucture Update STATUS = RED Project completion = 30% Notes:  ROI is not meeting expectations, rethinking strategy with project",
                "type": "TEXT"
            },
            "location": {
                "s3Location": {
                    "uri": "s3://amzn-s3-demo-bucket/projects/projectC/status.txt"
                },
                "type": "S3"
            },
            "metadata": {
                "x-amz-bedrock-kb-source-uri": "s3://amzn-s3-demo-bucket/projects/projectC/status.txt",
                "classification": "confidential",
                "x-amz-bedrock-kb-chunk-id": "1%3A0%3AnDT-15UBTG7d8qG4mb78",
                "x-amz-bedrock-kb-data-source-id": "CIUUDCONV2"
            },
            "score": 0.52052265
        }
    ]
}
The data from Project B isn’t included in the output because it’s tagged as highly confidential. Data from Project C is included, which Bob shouldn’t have access to, so let’s step through how to authorize Bob to the correct data.In the following steps and using the provided sample Python code, I will walk through calling each one of the functions shown in the following code block. You can use this code as part of your application to validate permissions for data returned from the Bedrock knowledge base.
# Execute the workflow
# 1. Assume role for S3 access
client_s3_oidc = assume_role(
   args.client_id, args.grant_type, args.assertion,
   args.role_arn, args.role_session_name, args.provider_arn
)

# 2. Get caller's authorized S3 scopes
scopes = get_caller_grant_scopes(client_s3_oidc, args.account)

# 3. Filter chunks based on caller's authorization
authorized, not_authorized = check_grant_scopes(chunks, scopes)
Step 1: User uses the IdP to sign in to the generative AI application
When Bob first accesses the generative AI application, the application will redirect him using a single sign-on flow for him to authenticate with their IdP. Bob will receive a signed identity token from the IdP that will validate who Bob is from an identity perspective. An example identity token for Bob is shown in the following example:
After Bob is authenticated and passes his token to the generative AI application, the application will exchange the identity token from the IdP with the IAM Identity Center identity token and retrieve temporary credentials on behalf of Bob. You will create a function called assume_role in Python that passes multiple different variables used to allow Bob to assume a role inside AWS:
client_id: The unique identifier string for the client or application. This value is an application Amazon Resource Name (ARN) that has OAuth grants configured.
grant_type: OAuth grant type, which for our example will be JWT Bearer.
role_arn: The ARN of the role to assume.
role_session_name: An identifier for the assumed role session.
provider_arn: The context provider ARN from which the trusted context assertion was generated.
client_assertion: This value specifies the JSON Web Token (JWT) issued by a trusted token issuer.
In the sample Python function, shown in the following example code, you will perform the following steps:
You open both a boto3 client for sso-oidc (to create a token with IAM) and sts (to assume the temporary role for Bob).
Next, you will use the client_id, grant_type, and client_assertion to call create_token_with_iam to create an IAM Identity Center token that is passed back to the token_response variable.
Within the token_response, there is an sts:identity_context that is needed to assume the role for Bob.
With the identity_context, you pass the identity context to assume_role with the role_arn, role_session_name, and provider_arn to retrieve temporary credentials for Bob.
Lastly, you return to the application a boto3 client for s3-control that uses Bob’s temporary credentials to validate his authorization with S3 access grants.
def assume_role(client_id, grant_type, client_assertion, role_arn, role_session_name, provider_arn):
    """
    Assume an IAM role using SSO/OIDC authentication and return an S3 control client.

    Args:
        client_id: The ID of the OIDC client
        grant_type: The type of grant being requested
        client_assertion: The client assertion token
        role_arn: ARN of the role to assume
        role_session_name: Name for the temporary session
        provider_arn: ARN of the identity provider

    Returns:
        boto3.client: An S3 control client with temporary credentials
    """
    client_oidc = boto3.client('sso-oidc')
    client_sts = boto3.client('sts')
    try:
        # Get ID token from IAM using SSO OIDC
        token_response = client_oidc.create_token_with_iam(
            clientId=client_id,
            grantType=grant_type,
            assertion=client_assertion
        )

        # Extract identity context from token
        id_token = jwt.decode(token_response['idToken'], options={'verify_signature': False})
        identity_context = id_token['sts:identity_context']

        # Assume role using identity context
        temp_credentials = client_sts.assume_role(
            RoleArn=role_arn,
            RoleSessionName=role_session_name,
            ProvidedContexts=[{
                'ProviderArn': provider_arn,
                'ContextAssertion': identity_context
            }]
        )

        # Create and return S3 control client with temporary credentials
        creds = temp_credentials['Credentials']
        return boto3.client(
            's3control',
            region_name='us-west-2',
            aws_access_key_id=creds['AccessKeyId'],
            aws_secret_access_key=creds['SecretAccessKey'],
            aws_session_token=creds['SessionToken']
        )
    except ClientError as e:
        print(f'Error: {e}')
        sys.exit(1)
Step 3: Retrieve the caller grant scopes
Next, you need to retrieve what Bob is allowed to access in the data source by using S3 Access Grants. In our example, you need to validate the data Bob is authorized to access with the data source, not the S3 object itself. To obtain the prefixes Bob is authorized to access, you will need to do the following in the get_caller_grant_scopes function.
First, you will pass the s3control client that was returned from assume_role. in addition to the account for the S3 access grants.
With the temporary role for Bob, you will call list_caller_access_grants. This will return a list of caller access grants available to Bob. So, for example, when you call this for Bob, you would receive the following response from list_caller_access_grants, where you can see he has access to the sales prefix and projectA prefix. This is shown in the following example code.
You add the scopes to an array and return the array back to the application. The code example for this follows. Note: you remove the * from the access grant, because the chunk URI is the full path, not just the prefix.
def get_caller_grant_scopes(client, account):
    """
    Retrieve the S3 access scopes granted to a caller.

    Args:
        client: S3 control client with assumed role credentials
        account: AWS account ID

    Returns:
        List of S3 path prefixes the caller is authorized to access
    """
    try:
        # Get list of access grants for the caller
        response = client.list_caller_access_grants(AccountId=account)

        # Extract S3 path prefixes and remove trailing wildcards
        scopes = [grant['GrantScope'].replace('*','') for grant in response['CallerAccessGrantsList']]
        return scopes
    except ClientError as e:
        print(f'Error: {e}')
        sys.exit(1)
At this point, you have a list of the grant scopes that Bob is authorized to access in the data source. This information can now be used to check against chunks that are returned from the knowledge base to authorize access to the data before passing the final prompt with additional context to the LLM.
Step 4: Check caller grant scopes
The last step is to check chunks returned by the knowledge base against the list of the grants Bob has access to. For this, you define check_grant_scopes and pass both the chunks and the scopes Bob is authorized to access. The variable chunks is an array of dictionaries that you will parse, validating it against the list of scopes, shown in the following code example.
You first loop through each chunk that was passed to the function.
For each chunk, you will check to see if the chunk location starts with a given prefix that is in the S3 access grant.
If a match is found, you add it to the chunk, along with the scope found in the S3 access grant, to the list of e chunks. If a match is not found in the scopes, then you add it to the not_authorized chunks.
The function will return both the list of authorized chunks and not_authorized chunks to provide visibility into the different chunks Bob was denied access to.
def check_grant_scopes(chunks, scopes):
    """
    Check which chunks a user is authorized to access based on their granted scopes.

    Args:
        chunks: List of dictionaries containing content chunks with 'location' keys
        scopes: List of authorized S3 path prefixes the user has access to

    Returns:
        tuple: (authorized_chunks, unauthorized_chunks)
    """
    authorized = []
    not_authorized = []
    # If user has no scopes, they are not authorized for any chunks
    if not scopes:
        return [], chunks

    # Check each chunk against available scopes
    for chunk in chunks:
        location = chunk['location']
        authorized_scope = next((scope for scope in scopes if location.startswith(scope)), None)

        if authorized_scope:
            chunk['scope'] = authorized_scope
            authorized.append(chunk)
        else:
            not_authorized.append(chunk)

    return authorized, not_authorized
When running the preceding function for Bob and the chunks returned from the knowledge base, you get the following authorized chunks and not authorized chunks as shown in the following example. The authorized chunks are added to the query, which is then passed to the LLM, returning a response.
# Authorized:
[
    {
        "content": "Project A status is as follows:  Project A = Sales Strategy STATUS = GREEN Project completion = 80% Notes:  we are on track to complete the project by end of month",
        "location": "s3://amzn-s3-demo-bucket/projects/projectA/status.txt",
        "scope": "s3://amzn-s3-demo-bucket/projects/projectA/"
    }
]
# Not Authorized:
[
    {
        "content": "Project C status is as follows:  Project C = Infrastucture Update STATUS = RED Project completion = 30% Notes:  ROI is not meeting expectations, rethinking strategy with project",
        "location": "s3://amzn-s3-demo-bucket/projects/projectC/status.txt"
    }
]
Solution considerations
When implementing this authorization architecture for RAG implementations, it’s important to understand several key considerations that impact security, performance, and scalability. These considerations help make sure your implementation maintains strong security controls, while optimizing system performance and providing flexibility for different data sources. The following points outline important aspects to evaluate when designing and implementing this authorization pattern:
For this example, you used S3 Access Grants as the example of how to check for authorization. However, this architecture can be used with your choice of data source, if the URI for the data source is returned from the knowledge base and there is an API that can be called to validate what a principal is authorized to access, like the get_caller_grant_scopes function described previously.
The use of S3 Access Grants provides authorization for a principal to access the data source. Additional access control policies could be applied to each bucket by adding a key/value tag or data source if desired. By doing this, the principal would be denied access to the bucket even though S3 Access Grants provides authorization. To support this functionality, you can add metadata for the vector database to ingest and filter on the query to the knowledge base, as shown in the preceding example.
Similar to stale data until resync of the knowledge base, the list of authorized scopes can also become stale. It’s up to you to decide how often you refresh the list of authorized scopes (step 3 in Figure 4) and the duration of the assume role of the principal (step 2 in Figure 4).
Depending on the chunks the principal is authorized to access and what the knowledge base returns, chunks could be dropped before sending to the LLM. From a security point of view, this is preferred so principals will not get access to chunks they aren’t authorized to. From an architecture point of view, you should optimize the knowledge base query and add additional metadata tags to limit the number of non-authorized chunks returned from the knowledge base. This is one reason to include a not_authorized list as part of the check_grant_scopes function.
Conclusion
In this post, I showed you an architecture pattern to provide strong authorization for results returned from knowledge bases. You walked through the importance of strong authorization with knowledge bases and how to implement authorization with Amazon S3 Access Grants. Lastly, you walked through code examples of how this would work in practice using Amazon Bedrock Knowledge Bases with S3 Access Grants.
AWS Network Firewall is a managed firewall service that filters and controls network traffic in Amazon Virtual Private Cloud (Amazon VPC). Unlike traditional network controls such as security groups or network access control lists (NACLs), Network Firewall can inspect and make decisions based on information from higher layers of the OSI model, including the Transport through Application layers. Furthermore, you can use the TLS inspection capability of Network Firewall to create firewall rules that match the content of encrypted TLS traffic. Network Firewall decrypts the traffic using your configured certificate and matches the decrypted payload against the rules in the firewall policy.
This post introduces Server Name Indication (SNI) session holding, which enhances TLS inspection by stopping TCP or TLS establishment packets from reaching the destination server until TLS inspection rules for SNI have been applied. When SNI is enabled, Network Firewall will not initiate an outbound TCP connection to the target until it has received the client hello and matched its domain information sent through SNI against firewall rules. The TCP session between the firewall and the upstream server is only initiated after the firewall validates traffic to that domain. This offers you additional security controls on outbound traffic with minimal latency and performance overheads, helping protect against malicious targets.
Network Firewall TLS inspection prior to SNI session holding
When TLS inspection is enabled, Network Firewall acts as an intermediary between the client and server, maintaining separate connections with each endpoint. Throughout this process, Network Firewall evaluates outbound traffic against configured rules to determine whether the traffic should be allowed to exit the firewall.As shown in Figure 1, the steps prior to availability of SNI session holding were:
The client creates a TCP connection, and Network Firewall evaluates the stateless rules to determine if the traffic is allowed. If not, the connection is terminated.
Network Firewall creates a TCP Connection to the destination server.
The client sends a ClientHello message, including SNI information, to Network Firewall. The firewall validates that the SNI is valid, otherwise the connection is terminated.
Network Firewall forwards the ClientHello message to the destination server.
The destination server responds with a ServerHello message and its certificate.
Network Firewall validates the certificates downloaded from the destination server.
At this point, the server name indication is validated against the certificate subject name.
Network Firewall forwards the server’s certificate to the client and completes the TLS connection with the client.
The client encrypts the application payload using the session keys it negotiated during TLS handshake and sends it to Network Firewall.
Network Firewall decrypts the traffic, uses its stateful engine to evaluate rules against the traffic, and determines if it is allowed.
If traffic is allowed, Network Firewall re-encrypts the application layer payload with the destination server’s session keys and forwards it to the destination server.
The destination server sends back response data to Network Firewall.
The Network Firewall stateful engine analyzes the destination server’s response.
Network Firewall forwards the server response to the client. The communication continues until the client or destination server terminates the connection.
Figure 1: Steps prior to availability of SNI session holding
With the current sequence of traffic inspection, the TCP connection is established before the TLS SNI field is evaluated, which could lead to a server learning about a connection before the firewall inspects the SNI.
For example, when customers configure rules to reject traffic based on TLS SNI fields (such as example.com), they expect these connections to be blocked before opening a connection to the destination server and before data transmission occurs. However, because of the inherent protocol sequence, TCP connections are briefly established before SNI rule validation takes place. This processing order creates a narrow window where sophisticated threat actors could potentially attempt to circumvent data exfiltration prevention controls, even with properly configured SNI-based blocking rules.
Session holding addresses this concern so that the traffic originating from within VPCs cannot connect to destination servers until Network Firewall verifies the TLS SNI.
How TLS inspection works with session holding
SNI session holding implements a two-step validation process. First, the firewall examines the TLS layer and validates the SNI when the client sends the TLS client hello message. After the message is approved, Network Firewall allows the connection to the destination server, permitting encrypted upper-layer protocols like HTTP or SMTP to initiate their negotiations. This approach creates a distinct separation between TLS validation and protocol inspection, where protocol examination only occurs after successful TLS handshake authorization.As shown in Figure 2, the steps in this scenario with SNI session holding are:
Note: Steps 2–5 are part of SNI session holding.
The client creates a TCP connection, and Network Firewall evaluates the stateless rules to determine if the traffic is allowed. If not, the connection is terminated.
The Client sends a ClientHello message including SNI information to Network Firewall. Network Firewall performs validation of the SNI.
The firewall evaluates the TLS inspection rules, including the SNI rules, to determine if the traffic is allowed. If not, the connection is terminated.
Network Firewall creates a TCP connection to the destination server.
Network Firewall forwards the ClientHello message to the destination server.
The destination server responds with a ServerHello message and its certificate.
Network Firewall validates the certificates downloaded from the destination server.
Network Firewall forwards the server’s certificate to the client and completes the TLS connection with the client.
The client encrypts the application payload using the session keys it negotiated during TLS handshake and sends it to Network Firewall.
Network Firewall decrypts the traffic, uses its stateful engine to evaluate rules against the traffic, and determines if it is allowed.
If traffic is allowed, Network Firewall re-encrypts the application layer payload with the destination server’s session keys and forwards it to destination server.
The destination server sends back response data to Network Firewall.
Network Firewall stateful engine analyzes the destination server response.
Network Firewall forwards the server response to the client. The communication continues until the client, or the destination server terminates the connection.
To get started setting up a Network Firewall policy with session holding, visit the Network Firewall console or see the AWS Network Firewall Developers Guide. Session holding is supported in AWS Regions where Network Firewall is available today, including the AWS GovCloud (US) Regions and China Regions.
If this is your first time using Network Firewall, make sure to complete the following prerequisites. If you already have a firewall and TLS inspection configuration, you can skip this section.
To enable session holding, follow the steps to create a firewall policy. On the step to Add TLS Inspection configuration, you will have an option to enable session holding by selecting the box as shown in Figure 3.
Figure 3: Enable session holding
After adding the TLS inspection configuration and selecting the box to enable session holding, continue to create the new firewall policy and then associate this policy to your firewall.
If you have an existing policy that is attached to a TLS inspection configuration, choose Manage TLS Inspection Configuration on your firewall policy.
Figure 4: TLS inspection configuration
This will provide the option to enable session holding as shown in figure 3.
Pricing
SNI session holding is included in the cost of TLS advanced inspection. For TLS advanced inspection pricing, see AWS Network Firewall pricing.
Considerations
When enabling the session holding, note the following considerations:
Keywords: Session holding is only applicable to Suricata rules using the TLS.SNI keyword. It does not apply to rules using other TLS application keywords, such as TLS.CERT or TLS.VERSION.
Performance: Because TCP connection establishment packets are held until the SNI validation is complete, session holding might introduce latency in the TCP connection establishment. You’ll notice the impact only when there is a surge in new TCP connections being inspected by Network Firewall with TLS inspection enabled.
Compatibility: TLS.SNI takes priority over http.host rules when session holding is enabled. When disabled, the traffic can match rules based on the http.host keyword and tls.sni keyword simultaneously, resulting in an outcome defined by the combination of the actions in these two types of rules. However, when this session holding is enabled, this traffic can only match the rule with TLS.SNI keyword and the rule with http.host keyword is applied only when the decrypted traffic has not matched other TLS.SNI-based pass rules.
Conclusion
As a preventive measure, this session holding helps make sure that SNI validation happens before a connection is established with the destination server, avoiding even initial contact with potentially malicious endpoints. For more information, see What is AWS Network Firewall?
If you have feedback about this post, submit comments in the Comments section below.
I joined Amazon Web Services (AWS) as a principal security engineer 3 years ago and my first project was leading security for PL/Rust on Amazon Relational Database Service (Amazon RDS). This is an extension that lets you write custom functions for PostgreSQL in Rust, which are then compiled to native machine code. These functions can be quite performant and offer a lot of advantages to customers.
From my perspective as a security engineer, “compiled to native machine code” was a flashing neon sign that said, “Start work here” with a big arrow pointing to the Rust toolchain and that’s exactly where I dove in.
The pieces of the system
postgrestd is the Rust standard library at the heart of PL/Rust. The design of this library includes prevention for database escapes. However, at the time, it was fairly new and hadn’t yet been hardened to the realities of production environments at scale. Adding to the challenge, PL/Rust compiles extensions on the database instance itself. This requires a full toolchain to be available locally.
If the extension has a full toolchain available, the potential risk increases. Poorly constructed extensions can cause issues for the database or the host instances. Attackers can use a variety of techniques to try to get around the security controls put in place or break the write xor execute (W^X) model for the container.To support PL/Rust and provide this functionality to customers safely, we needed to add a series of mitigations to address these new risks.
Challenging our approach
Behind the scenes in AWS, we obsess over how we operate our systems. We focus on automation and resilience to help make sure that we meet our commitment to our customers. We’ve learned time and time again that simpler is often a better choice. Operating at scale is complicated enough, don’t add to the problem!
SELinux was—and continues to be—a long debated option for a number of solutions. For those unfamiliar, SELinux is a set of kernel features and tools that enforce mandatory access control on Linux subsystems. Using SELinux policies, you can be extremely specific about what is allowed on a system. You can mandate that a process cannot write to a specific file, even if the ownership of that process permits that actor.
In simpler terms, SELinux mandatory access control is another layer of protection that can be added to the existing authorization system. If a process has permissions to a file, SELinux can block those permissions if a policy is configured for that action. It’s a deterministic way of making sure that specific actions don’t happen.
This approach can greatly increase the security of the operating system. The trade off? Reduced flexibility when it comes to operating that system and the effort required to configure mandatory access control to meet your security requirements. Like any security control, you need to understand the benefit and compare it to the potential downside.
When it came to the PL/Rust case, the benefits of SELinux outweighed the downside. This functionality would allow us to provide the ability to enable PL/Rust to customers in a safe and secure manner.
As simple as it is to write that out, the reality was representative of the culture at AWS. As a brand new team member, I brought the idea up and our senior leaders took the time to listen. The discussions were tough as we all deeply questioned the idea and its implementation. One aspect of our culture is that we try to peek around corners and try to anticipate issues before they occur.
This type of discussion and push back on ideas helps make sure that we’re making the right call for our customers. It’s not always easy, but it is worth it. As a result of these discussions, we agreed to try the SELinux approach for this feature.
Building a complete solution
Our builders and operators built the SELinux environment, and we created appropriate policies for enforcement. This was an important first step, but not the most interesting part of the story.
We configured the mandatory access control policies to send denial messages to our telemetry systems. AWS systems generate a lot of telemetry and we regularly use this information to learn about the state of our systems and improve how we operate and design them.
Using this infrastructure, we started to build a process that would allow us to respond and investigate the denial messages generated. Working with our blue team, we developed playbooks for incident response specifically for our Amazon RDS team. We started running game days every quarter, where we have our red team stage exploits on the system and we would respond.
Afterwards, all our teams came together to measure and analyze the responses. We worked to identify bottlenecks or areas where we could improve. This regular effort helped to mature our response quickly.
At this point, we had a strong solution to reduce the risks of enabling PL/Rust, deep monitoring of our systems, and a well-tested incident response process that helped improve the entire setup.
In action
With the feature in production, we use our monitoring system to automatically cut a high severity ticket to our service team for every SELinux denial message. This level of follow-up helps us make sure that the controls are working as expected and it provides valuable insights in the reality of potential risks to the system.
This process for tracking and investigating possible issues helps our team make sure that we’re providing the level of service our customers expect. As PostgreSQL or Rust releases new features, or when customers have a new data analysis need, we want our security controls to support that work, not block it needlessly.
The feedback loop we’ve created with the investigation of the mandatory access control log messages helps our team to stay aware of what activities are being attempted in the environment. This not only helps catch issues that could affect intended uses, but also acts as an intrusion detection system.
An example of this use recently became public. In October, our team was assigned a high severity ticket that was automatically generated based on an SELinux denial message.
After a quick check to make sure that we hadn’t failed to update our monitoring criteria after recent changes to PL/Rust, our red team, blue team, and AWS security sprang into action. Remember, this activity was kicked off in response to unsuccessful access attempts! It was initiated by a message from the system letting us know it had stopped an activity, but—as is our practice—we wanted to understand what had been attempted.
We verified that the SELinux policy was correctly enforced and had blocked the activity in question. That taken care of, we continued to chase down this issue. As an aside, you might be asking yourself why we would continue to work on this case. That’s a valid question, and the answer is straightforward: we’re constantly looking to see if we can improve our systems to be more effective or more efficient.
Finding the root cause of the signal and learning more about it helps to tune our approach. Depending on the situation, we might be able to avoid a potential risk entirely and reduce the volume of alerts. Or we might see an opportunity to roll out a new feature that helps customers achieve their goals without reducing the security of the system.
In this case, our investigation determined that the detected activity was initiated by the research team at Varonis Threat Labs. We reached out to them and let them know that we had detected their activity, offering to work with them because collaboration with the research community often leads to security improvements that benefit our customers.
In this situation, the initial block and detection validated our security approach. Our policies worked as expected and prevented the activity the researchers were attempting to complete.
The research team, Tal Peleg and Coby Abrams at Varonis Threat Labs, recently spoke about this case at BlackHat 2025. They’ve published the details of their work on the Varonis blog.
As a security engineer, this is quite validating. While we test and validate the controls we put in place, to see a concrete example of how that work can benefit our customers is deeply rewarding.
If you have feedback about this post, submit comments in the Comments section below.
Amazon Web Services (AWS) successfully completed an onboarding audit with no findings for ISO 9001:2015, 27001:2022, 27017:2015, 27018:2019, 27701:2019, 20000-1:2018, and 22301:2019, and Cloud Security Alliance (CSA) STAR Cloud Controls Matrix (CCM) v4.0. EY CertifyPoint auditors conducted the audit and reissued the certificates on August 13, 2025. The objective of the audit was to enable AWS to expand their ISO and CSA STAR certifications to include AWS Resource Explorer and AWS Incident Response to their scope. The ISO standards cover areas including quality management, information security, cloud security, privacy protection, service management, and business continuity. The certifications demonstrate AWS’s commitment to maintaining robust security controls and protecting customer data across our services.
During this onboarding audit, we added two additional AWS services to the scope since the last certification issued on May 26, 2025. The following are the two additional services:
For a full list of AWS services that are certified under ISO and CSA Star, see the AWS ISO and CSA STAR Certified page. Customers can also access the certifications in the AWS Management Console through AWS Artifact.
If you have feedback about this post, submit comments in the Comments section below.
Elastic Load Balancing simplifies authentication by offloading it to OpenID Connect (OIDC) compatible identity providers (IdPs). This lets builders focus on application logic while using robust identity management.
OIDC client secrets are confidential credentials used in OAuth 2.0 and OIDC protocols for authenticating clients (applications). However, manual management of OIDC client secrets introduces security risks and operational overhead. As shown in Figure 1, manual management of OIDC client secrets starts with authentication through a third-party IdP.
Figure 1: Manual management of OIDC client secrets
The risks of manual management of OIDC client secrets include:
Lack of proactive monitoring of credential changes
Lack of continued verification of authentication credentials
Not scalable for ALB configuration with multiple listener rules
In this blog post I show you how to automate OIDC client secret rotation using AWS Secrets Manager, AWS Lambda, and Amazon EventBridge, helping to enhance security and streamline operations. Automating secret rotation is a critical security practice that minimizes the risk of credential compromise and helps facilitate ongoing compliance.
This solution provides a flexible framework for automated credential management across various OIDC providers (Auth0 as an example), with a specific implementation demonstrating integration with AWS services. The core architecture supports automated credential rotation, secure secret storage, provider agnostic design, and scalable implementation across different authentication workflows. The key components are:
Secrets Manager: Securely stores and manages OIDC (Auth0) client credentials.
Lambda: Executes the secret rotation logic on a scheduled basis.
Elastic Load Balancing: Offloads authentication using OIDC listener rules.
EventBridge (scheduled): Triggers the Lambda function according to a defined schedule.
Custom AWS CloudFormation resource: Automates the entire stack and architecture used in this post.
Figure 2: Automated OIDC client secret rotation
The authentication workflow, as shown in Figure 2, is:
EventBridge triggers the Auth0CredentialHandler Lambda handler every 15 minutes
The Auth0CredentialHandler Lambda handler connects to the Auth0 management domain and gets the current client credentials—auth0_current.
The Auth0CredentialHandler Lambda handler fetches the existing credentials auth0/credentials/${Auth0-dev-domain} from Secrets Manager and compares them with the credential auth0_current retrieved in the previous step.
If the secret isn’t found, the handler retries three times within a 30-minute period and then logs AWS CloudWatch alarms.
Assumes that the secret Amazon Resource Name (ARN) is already present in Secrets Manager.
If the credentials are different, Auth0CredentialHandler updates the auth0/credentials/${Auth0-dev-domain} with the new value. If the credentials are the same, no action is taken. CloudWatch alarms are configured to trigger for successful and for failed secret updates.
The ALB listener rule is configured to pull client credentials dynamically from the auth0/credentials/${Auth0-dev-domain} resource ARN in Secrets Manager.
Security recommendations
There are several things you can do to improve the security of your authentication system, starting with implementing centralized secret management with encryption enabled for data at rest. You can also configure Lambda functions with least-privilege permissions, limiting access to only required Secrets Manager and ALB listener resources, which can reduce the security blast radius.
Use CloudWatch alarms to monitor key operational events, including secret updates, update failures, and ALB credential issues and use AWS Config to track rule configurations and perform regular security audits.
By creating separate secrets for each ALB listener rule, you can enable granular access control and narrow the scope of permissions, helping to enhance overall system security.
By following these practices, you can establish a robust security framework for your application and provide proper data protection and access management.
Prerequisites
This solution assumes that the following prerequisites are met before beginning implementation:
An existing ALB configured with a listener and target groups to be used as Listenerarn and targetarn in the CloudFormation template
An OIDC IdP (for example, Auth0) account and client application
Auth0 IdP application client credentials stored in Secrets Manager
Note: This solution demonstrates OIDC client secret rotation using Auth0 as the IdP. While the core principles and architectural patterns are generally applicable, specific implementation details might vary across different identity providers. Users are advised to consult their specific IdP’s documentation for precise configuration steps, API interactions, and AWS compatible authentication mechanisms.
This is an automated, simple and scalable approach using a CloudFormation custom resource to create the resources mentioned in architecture diagram. The CloudFormation template and AWS Lambda implementation are hosted in demo-stack
Core components
In this section, I explain the key components of the solution.
Credential refresh rule
An EventBridge rule is scheduled to trigger the Auth0CredentialHandler Lambda function at 15-minute intervals using the LambdaInvokePermissionAWS Identity and Access Management (IAM) role.
Auth0CredentialHandler Lambda function
The Auth0CredentialHandler Lambda function is responsible for securely managing client credentials. It retrieves the Auth0 configuration from the Secrets Manager resource auth0/credentials/${Auth0-dev-domain}, makes API calls to the Auth0 domain to obtain new tokens, and manages the updating of these credentials in Secrets Manager. It requires permissions to interact with Secrets Manager, which are provided through its execution role.
This IAM role used by Lambda has two main permission sets.
The AWS managed policy AWSLambdaBasicExecutionRole, which allows the Lambda function to create CloudWatch logs.
A custom policy that grants specific Secrets Manager permissions (GetSecretValue, CreateSecret, UpdateSecret) for secrets under the auth0/credentials/${Auth0-dev-domain} path.
Lambda will retry three times within a 30 minute period. If all attempts fail, then a CloudWatch warning will be logged and create alarms.
Elastic Load Balancing listener rule resources in CloudFormation are configured to dynamically resolve the client credentials from Secrets Manager and forwards authenticated requests to a specific target group. It integrates with the Auth0 credentials that are regularly refreshed by the Auth0CredentialHandler. This configuration requires read access to Secrets Manager to obtain the Auth0 client credentials for authentication.
# ALB Listener Rules - replace the Oidc config with your endpoints. Only Client credentials are stored in SecretsManager
  ListenerRule1:
    Type: AWS::ElasticLoadBalancingV2::ListenerRule
    Properties:
      ListenerArn: arn:aws:elasticloadbalancing:region:account-id:listener/app/my-load-balancer/1234567890/abcdef
      Priority: 1
      Actions:
        - Type: authenticate-oidc
          AuthenticateOidcConfig:
            ClientId:
'{{resolve:secretsmanager:auth0/credentials/your-tenant.auth0.com:SecretString:client_id}}'
            ClientSecret:
'{{resolve:secretsmanager:auth0/credentials/your-tenant.auth0.com:SecretString:client_secret}}'
            Issuer: https://idp1.example.com
            AuthorizationEndpoint: https://idp1.example.com/auth
            TokenEndpoint: https://idp1.example.com/token
            UserInfoEndpoint: https://idp1.example.com/userinfo
            OnUnauthenticatedRequest: authenticate
        - Type: forward
          TargetGroupArn:
arn:aws:elasticloadbalancing:region:account-id:targetgroup/target-group-1/1234567890abc
      Conditions:
        - Field: path-pattern
          Values:
            - /app1/*
CloudWatch monitoring and alerting
The provided CloudFormation template is configured to establish security monitoring for secret updates. The template provisions alerts for successful and failed secret updates. The template creates CloudWatch metric filters using AWS CloudTrail logs, sets up corresponding alarms with defined thresholds, and establishes an Amazon Simple Notification Service (Amazon SNS) topic for consolidated alert delivery. Upon deployment, this infrastructure-as-code solution enables automated detection and notification of potential security events related to secrets management and unauthorized access attempts.
  # CloudWatch Log Group
  CloudTrailLogGroup:
    Type: AWS::Logs::LogGroup
    Properties:
      LogGroupName: secrets-manager-monitoring
      RetentionInDays: 14

  # Combined Metric Filter for Both Success and Failed Updates
  SecretUpdateMetricFilter:
    Type: AWS::Logs::MetricFilter
    Properties:
      LogGroupName: !Ref CloudTrailLogGroup
      FilterPattern: !Sub '{ $.eventSource = secretsmanager.amazonaws.com && ($.eventName = UpdateSecret || $.eventName = PutSecretValue) && $.responseElements.ARN = "${MyCustomResource.SecretArn}" }'
      MetricTransformations:
        - MetricNamespace: 'SecretsManager/Updates'
          MetricName: 'SecretUpdates'
          MetricValue: '1'
          DefaultValue: 0

  # Combined Alarm for Both Success and Failed Updates
  SecretUpdateAlarm:
    Type: AWS::CloudWatch::Alarm
    Properties:
      AlarmName: !Sub '${AWS::StackName}-secret-update'
      AlarmDescription: !Sub 'Alarm for any updates (success or failure) to secret ${MyCustomResource.SecretArn}'
      MetricName: SecretUpdates
      Namespace: SecretsManager/Updates
      Statistic: Sum
      Period: 300
      EvaluationPeriods: 1
      Threshold: 0
      ComparisonOperator: GreaterThanThreshold
      TreatMissingData: notBreaching
      AlarmActions:
        - !Ref SecretMonitoringTopic
To enhance the reliability of the secret rotation process, implement comprehensive monitoring by creating CloudWatch alarms to detect Lambda rotation failures beyond threshold and high rates of authentication failures, unusual spikes in HTTP 4xx and 5xx error rates from ALB and using CloudTrail to track API calls and configuration changes related to secrets in Secrets Manager and load balancer settings. By implementing these custom alarms alongside standard configurations, potential security incidents and unauthorized access attempts can be quickly detected across your AWS resources. This multi-layered approach helps maintain visibility into the rotation process and helps quickly identify and respond to potential issues.
Deploy the CloudFormation template using the AWS Command Line Interface (AWS CLI) or AWS Management Console. Replace <your-region> with the AWS Region where you want to deploy the solution.
Note: You can add additional parameters if required by your IdP configuration.
Testing and verification
Disclaimer: It’s recommended to test in a separate non-critical environment to make sure that any customer-specific settings are fully verified before deploying in production environments.
For secret updates, verify that the configured CloudWatch alarms are triggered. For ALB authentication, examine ALB access logs for authentication_success entries and the presence of OIDC identity tokens.
Set up CloudWatch metrics and alarms to monitor the rotation process and authentication success rates.Verify failure cases by manually editing ALB rule configuration to point to a different secret ARN and confirm that the CloudWatch alarm is triggered.The following is an example CloudTrail event for a successful Secrets Manager update:
{
  "source": ["aws.secretsmanager"],
  "detail-type": ["AWS API Call via CloudTrail"],
  "detail": {
    "eventSource": ["secretsmanager.amazonaws.com"],
    "eventName": ["UpdateSecret"],
    "responseElements": {"status": "Success"}
  }
}
The following is an example of ALB access logs:
/aws/alb/<your-alb-name>:
- Look for entries containing:
  "authentication_success"
  "id_token_authentication_successful"
  "x-amzn-oidc-identity"
  HTTP status code 200
- Example log pattern:
  timestamp elb_name client:port target:port request_processing_time
  target_processing_time response_processing_time status_code
  "authentication_success" "x-amzn-oidc-identity: [token]"
Advanced scenarios
In this section, you learn how to reduce the wait time and make the Secrets Manager update nearly synchronous.
Rotate the client ID: While rotating the client secret is the most common scenario, there might be instances where rotating the client ID is also necessary. In most identity providers, this means creating a new application client and migrating resources. To do this, the Auth0CredentialHandler requires permissions to modify ALB listener rules (elasticloadbalancing:ModifyRule, elasticloadbalancing:DescribeListeners, elasticloadbalancing:DescribeRules). Client ID rotation can cause temporary authentication disruptions, so thorough testing is crucial. Use AWS Config to monitor ALB rule configurations for unexpected changes. This feature empowers a more comprehensive security posture, although it can increase the complexity of the solution and might require manual intervention.
Multi-provider strategies: If your organization handles multiple IdPs, implement a centralized rotation framework that abstracts provider-specific nuances, focusing on core security principles outlined in this post. Key considerations include creating provider-agnostic interfaces to support comprehensive monitoring and minimizing configuration overhead.
Conclusion
In this post, you explored a comprehensive approach to automating OIDC client secret rotation using AWS services. By implementing this solution, you can enhance your application’s security, reduce manual management overhead, and maintain a robust authentication strategy.
Consider exploring advanced identity management techniques or integrating multi-factor authentication with your OIDC implementation. If you are new to automated secrets rotation, visit Back to Basics: Secrets Management.
In our previous blog post (Part 1 of our key replication series), Automatically replicate your card payment keys across AWS Regions, we explored an event-driven, serverless architecture using AWS PrivateLink to securely replicate card payment keys across AWS Regions. That solution demonstrated how to build a custom replication framework for payment cryptography keys.
Based on customer feedback requesting a more automated, no-code approach, we’re excited to announce an additional option to this capability with Multi-Region keys for AWS Payment Cryptography in Part 2 of our series.
By using this new feature, you can automatically synchronize payment cryptography keys from a primary Region to other Regions that you select, improving resilience and availability of payment applications. You can also choose between account-level replication or key-level replication, giving more flexibility in how to manage payment keys across Regions.
Multi-Region keys: Overview and benefits
The new Multi-Region key replication feature for AWS Payment Cryptography offers you flexible control over your key replication strategy through the following primary capabilities:
Control whether keys are replicated
Select specific Regions for key replication
Manage replication configuration changes
Configure either account-level or key-level replication to meet business needs
Multi-Region keys help deliver several benefits for global payment operations, including:
Improved availability: Access your payment keys even if a Region becomes unavailable
Disaster recovery: Maintain business continuity with replicated keys across Regions
Global operations: Support payment processing across multiple geographic regions
Simplified management: Centralized control with distributed availability
Consistent key IDs: The same key ID across Regions simplifies application development
Configuration options
Payment Cryptography provides two distinct methods for configuring Multi-Region key replication, giving flexibility to implement a strategy that best fits your organization’s needs. You can choose between a broad, account-level approach or a more granular, key-level method.
Account-level
With account-level configuration, AWS automatically replicates exportable symmetric keys created in your Payment Cryptography account from your designated primary Region to other Regions you specify. This simplifies key management in multi-Region deployments, provides consistent key availability in the Regions that you specify, and reduces the operational overhead of key management.
To configure account-level replication using the AWS Command Line Interface (AWS CLI), use the new enable-default-key-replication-regions API to set the Regions where AWS will replicate your keys. To remove Regions from your default replication list, use the disable-default-key-replication-regions API.
Note: Only symmetric keys created after the account-level replication is enabled will be replicated.
Key-level replication
By using key-level replication, you can achieve more granular control by:
Designating specific keys as multi-Region keys
Defining custom replication targets for each multi-Region key
Maintaining Region-specific keys when needed
Note: Within each Region, Payment Cryptography maintains redundancy of your keys across multiple Availability Zones for high availability. Multi-Region key replication extends across geographic boundaries, giving you additional resilience against Regional outages while maintaining control over where your keys are stored.
You can specify replication Regions during key creation using the --replication-regions parameter, using the AWS CLI, with the create-key or import-key APIs. For existing keys, you can use the new add-key-replication-regions and remove-key-replication-regions APIs to manage which regions receive your replicated keys.
Important: When you specify replication Regions during key creation, these settings take precedence over default replication Regions configured at the account level.
How it works
Figure 1 shows the process when you replicate a key in Payment Cryptography.
The key is created in your designated primary Region
Payment Cryptography automatically replicates the key material asynchronously to the specified replica Regions
The replicated keys maintain the same key ID across Regions; only the Region portion of the Amazon Resource Name (ARN) changes
The key in the primary Region is marked with MultiRegionKeyType: PRIMARY
Keys in replica Regions are marked with MultiRegionKeyType: REPLICA and include a reference to the primary Region
When deleting a key, its deletion cascades from the primary to replica Regions
Figure 1: Representation of key replication from us-east-1 to us-west-2
Example: Creating a multi-Region key at key level
The following is an example of creating a card verification key (CVK) in the primary Region (us-east-1) with replication to us-west-2:
When using multi-Region keys, several important aspects should be considered. Multi-Region key replication supports only symmetric keys with the exportable attribute enabled, and asymmetric keys are not supported. For billing purposes, AWS bills per key per Region, which means replicating to three Regions incurs costs for the primary key plus costs for each key in the replica Regions.
Key aliases and tags require separate management in each Region because they are not part of the replication process. While primary keys support modifications and updates, replica keys are read-only copies that support only cryptographic operations. Modifications must be made to the key in the primary Region, and Payment Cryptography automatically propagates these changes to the replica Regions. Monitor the replication status to confirm successful synchronization of these changes.
The deletion process for multi-Region keys follows specific behavior patterns that are important to understand. When a primary key is scheduled for deletion, associated replica keys are deleted immediately. The primary key enters a pending deletion state with a minimum 3-day waiting period, during which the deletion can be canceled. However, if you restore the primary key by canceling its deletion, you will need to re-enable replication to recreate the replica keys in your desired Regions. After the 3-day waiting period expires, the primary key is permanently deleted and becomes unrecoverable. Note that deleting a replica key affects only that specific Region and does not impact the primary key or other replica keys.
Multi-Region key replication operates with eventual consistency. When creating new keys or making changes to existing keys, these updates might not appear immediately across all Regions. Applications should be designed to handle this eventual consistency model and not assume immediate availability of keys or key changes in replica Regions. If your application requires strong consistency, implement polling mechanisms using the GetKey API to verify that changes have been synchronized before proceeding with key operations.
Logging and monitoring
Payment Cryptography logs API activity through AWS CloudTrail, which now includes new events and attributes specific to Multi-Region key replication.
New CloudTrail event
The service logs a new event type called SynchronizeMultiRegionKey, which appears in primary and replica Regions.
Primary Region events:
Two SynchronizeMultiRegionKey events are logged in the primary Region for each replication Region defined:
To start using Multi-Region key replication in Payment Cryptography:
Determine your primary Region.
Determine your replica Regions and if you will use account-level or key-level configuration.
Create new exportable symmetric keys or update existing keys to use the Multi-Region key replication feature.
Update your applications to use the consistent key IDs across Regions.
Conclusion
The new Multi-Region key replication feature in Payment Cryptography enhances our automatic key replication capabilities, providing improved resilience and simplified management for global payment applications. This feature helps make sure your payment cryptography keys are available when and where you need them, with the flexibility to choose between account-level or key-level replication strategies.
We’re pleased to announce the completion of our annual AWS Outsourced Service Provider’s Audit Report (OSPAR) audit cycle on August 7, 2025, based on the newly enhanced version 2.0 guidelines (OSPAR v2.0). AWS is the first global cloud service provider in Singapore to obtain the report using the new OSPAR v2.0 guidelines.
The Association of Banks in Singapore (ABS) established the Guidelines on Control Objectives and Procedures for Outsourced Service Providers (ABS Guidelines) to provide baseline controls criteria that outsourced service providers (OSPs) operating in Singapore should have in place. ABS enhanced the ABS Guidelines to version 2.0, which OSPs—such as AWS—need to comply with for the audit period commencing on or after January 1, 2025. The enhanced ABS Guidelines integrate key elements from the Monetary Authority of Singapore (MAS) regulatory updates on cyber hygiene, technology risk management, and business continuity management, and include new control domains such as data security, cryptography, software application development and management, and business continuity management.
The 2025 OSPAR certification cycle includes the addition of seven new services in scope, bringing the total number of services in scope to 170 in the AWS Asia Pacific (Singapore) Region. Newly added services in scope include the following:
Successfully completing the OSPAR assessment demonstrates that AWS continues to maintain a robust system of controls to meet these guidelines. This underscores our commitment to fulfill the security expectations for cloud service providers set by the financial services industry in Singapore.Customers can use OSPAR to streamline their due diligence processes, thereby reducing the effort and costs associated with compliance. OSPAR remains a core assurance program for our financial services customers because it is closely aligned with local regulatory requirements from MAS.
As always, we’re committed to bringing new services into the scope of our OSPAR program based on your architectural and regulatory needs. If you have questions about the OSPAR report, contact your AWS account team.
If you have feedback about this post, submit comments in the Comments section below.
Organizations are innovating and growing their cloud presence to deliver better customer experiences and drive business value. To support and protect this growth, organizations can use Amazon GuardDuty, a threat detection service that continuously monitors for malicious activity and unauthorized behavior across your AWS environment. GuardDuty uses artificial intelligence (AI), machine learning (ML), and anomaly detection using both AWS and industry-leading threat intelligence to help protect your AWS accounts, workloads, and data. Building on these foundational capabilities, GuardDuty offers a comprehensive suite of protection plans and the Extended Threat Detection feature.
In this post, we explore how to use these features to provide robust security coverage for your AWS workloads, helping you detect sophisticated threats across your AWS environment.
Understanding GuardDuty protection plans
GuardDuty starts with foundational security monitoring, which analyzes AWS CloudTrail management events, Amazon Virtual Private Cloud (Amazon VPC) Flow Logs, and DNS logs. Building on this foundation, GuardDuty offers several protection plans that extend its threat detection capabilities to additional AWS services and data sources. These protection plans are optional features that analyze data from specific AWS services in your environment to provide enhanced security coverage. GuardDuty offers the flexibility to customize how new accounts inherit protection plans, so you can add coverage for your accounts or select specific accounts based on your security needs. You can enable or disable these protection plans at any time to align with your evolving workload requirements.
Here are the available GuardDuty protection plans and their capabilities:
Detects the potential presence of malware by scanning the Amazon Elastic Block Store (Amazon EBS) volumes associated with your EC2 instances. There is an option to use this feature on-demand.
Monitors AWS Lambda network activity logs, starting with VPC Flow Logs, to detect threats to your Lambda functions. Examples of these potential threats include crypto mining and communicating with malicious servers.
Let’s explore how these protection plans help secure different aspects of your AWS environment.
S3 Protection
S3 Protection extends threat detection capabilities of GuardDuty to your S3 buckets by monitoring object-level API operations. Beyond basic monitoring, it analyzes patterns of behavior to detect sophisticated threats. When a threat actor attempts to exfiltrate data, GuardDuty can detect unusual sequences of API calls, such as ListBucket operations followed by suspicious GetObject requests from unusual locations. It also identifies potential security risks like attempts to disable S3 server access logging or unauthorized changes to bucket policies that could indicate an attempt to make buckets public. For instance, GuardDuty would generate an UnauthorizedAccess finding if it detects these suspicious API calls originating from known malicious IP addresses.
EKS Protection
For containerized workloads, EKS Protection monitors your Amazon EKS clusters’ control plane audit logs for security threats. It’s specifically designed to detect container-based exploits by analyzing Kubernetes audit logs from your EKS clusters. GuardDuty detects scenarios such as containers deployed with suspicious characteristics (like known malicious images), attempted privilege escalation through role binding modifications, and suspicious service account activities that could indicate compromise of your Kubernetes environment. When detecting such activities, GuardDuty would generate a PrivilegeEscalation finding, alerting you to potential unauthorized access attempts within your clusters. For a comprehensive understanding of the tactics, techniques, and procedures (TTPs), see the AWS Threat Technique Catalog.
Runtime Monitoring
Runtime Monitoring provides deeper visibility into potential threats by analyzing runtime behavior in EC2 instances, EKS clusters, and container workloads. This capability detects threats that manifest at the operating system level by monitoring process executions, file system changes, and network connections. GuardDuty can identify defense evasion tactics, execution of suspicious processes, and file access patterns indicating potential malware activity. For example, if a compromised instance attempts to disable security monitoring or creates unusual processes, GuardDuty would generate a Runtime finding indicating potential malicious activity at the OS level.
Malware Protection
Malware Protection offers two distinct capabilities: scanning EBS volumes attached to EC2 instances and scanning objects uploaded to S3 buckets. For EC2 instances, GuardDuty can perform both agentless scan-on-demand and continuous scanning of EBS volumes, detecting both known malware and potentially malicious files using advanced heuristics. For S3, it automatically scans newly uploaded objects, helping protect against malware distribution through your S3 buckets. When malware is detected, GuardDuty generates a Malware finding, specifying whether the threat was found in an EC2 instance or S3 bucket, helping you quickly identify and respond to the threat.
RDS Protection
RDS Protection focuses on database security by analyzing login activity for supported Amazon Aurora databases. It creates behavioral baselines of normal database access patterns and can detect anomalous sign-in attempts that might indicate unauthorized access attempts. This includes detecting unusual sign-in patterns, access from unexpected locations, and potential database compromise attempts. When suspicious database access is detected, GuardDuty generates an RDS finding, alerting you to potential unauthorized access or credential compromise.
Lambda Protection
Lambda Protection monitors your serverless applications by analyzing Lambda function activity through VPC Flow Logs. It can detect threats specific to serverless environments, such as when Lambda functions exhibit signs of compromise through unexpected network connections or potential cryptocurrency mining activity. If a Lambda function attempts to communicate with known malicious IP addresses or shows signs of cryptojacking, GuardDuty will generate a Lambda finding, so you can quickly identify and remediate compromised functions.
Each protection plan adds specialized detection capabilities designed for specific workload types, working together to provide comprehensive threat detection across your AWS environment. By enabling the protection plans relevant to your workloads, you can help make sure that GuardDuty provides targeted security monitoring for your specific use cases
Tailoring GuardDuty protection plans to your workload types
To maximize threat detection coverage, consider enabling all applicable GuardDuty protection plans across your AWS environment. This approach helps provide comprehensive coverage while maintaining cost efficiency, because you’re only charged for active protections on resources that exist in your account. For example, if you don’t use Amazon EKS, you won’t incur charges for EKS Protection even if it’s enabled. This strategy also helps facilitate automatic security coverage if teams deploy new services, without requiring immediate security team intervention. You retain the flexibility to adjust your protection plans at any time as your workload requirements evolve.
Based on AWS security best practices, we offer recommendations for different protection plan combinations aligned with common workload profiles. These recommendations help you understand how different protection plans work together to secure your specific architectures. For Amazon EC2 and Amazon S3 workloads, GuardDuty recommends Foundational, Amazon S3 Protection, and Amazon GuardDuty Malware Protection for Amazon EC2 to detect threats to compute instances, data storage, and AWS Identity and Access Management (IAM) misuse.
Container-heavy environments using Amazon EKS and Amazon ECS benefit from Foundational, Amazon EKS Protection, Amazon GuardDuty Runtime Monitoring, and Amazon GuardDuty Malware Protection for Amazon EC2. These plans work together to monitor container control-plane and runtime for threats and malware.
For serverless-first architectures built on Lambda, GuardDuty suggests Foundational, AWS Lambda Protection, and Amazon S3 Protection (if using Amazon S3 triggers) to identify anomalous function behavior and suspicious traffic patterns.
Data systems using Amazon Aurora or Amazon RDS should consider Foundational, Amazon RDS Protection, Amazon S3 Protection, and Amazon GuardDuty Malware Protection for Amazon S3. This combination helps detect anomalous database sign-ins and potential S3 bucket misuse.
For regulated environments or those implementing zero-trust architectures, enabling all GuardDuty protection plans helps provide comprehensive threat detection coverage that can support your broader security monitoring and compliance program requirements.
For quick reference, here’s what protection plans you should use to actively monitor your different workload types:
Workload profile
Expected security outcomes
Recommended GuardDuty plans
Amazon EC2 and Amazon S3
Detect threats to compute instances, data storage, and IAM misuse
Foundational, Amazon S3 Protection, and Amazon GuardDuty Malware Protection for Amazon EC2
Container-heavy (Amazon EKS, Amazon ECS)
Monitor container control-plane and runtime for threats and malware
Foundational, Amazon EKS Protection, Amazon GuardDuty Runtime Monitoring, and Amazon GuardDuty Malware Protection for Amazon EC2
Serverless-first (AWS Lambda)
Identify anomalous function behavior and suspicious traffic patterns
Foundational, GuardDuty Lambda Protection, GuardDuty S3 Protection (if using Amazon S3 triggers), and GuardDuty Runtime Monitoring for ECS on Fargate
Data system (Amazon Aurora or Amazon RDS)
Detect anomalous database logins and potential S3 bucket misuse
Foundational, Amazon RDS Protection, GuardDuty S3 Protection, and Amazon GuardDuty Malware Protection for Amazon S3
Regulated and Zero-Trust
Comprehensive threat detection to support compliance requirements
All Amazon GuardDuty protection plans
The power of GuardDuty Extended Threat Detection
Building upon these protection plans, GuardDuty offers Extended Threat Detection by default at no additional cost, using AI/ML capabilities to provide improved threat detection for your applications, workloads, and data. This capability correlates security signals to identify active threat sequences, offering a more comprehensive approach to cloud security.
Extended Threat Detection includes a Critical severity level for the most urgent and high-confidence threats based on correlating multiple steps taken by adversaries, such as privilege discovery, API manipulation, persistence activities, and data exfiltration. Integration with the MITRE ATT&CK® framework allows GuardDuty to map observed activities to tactics and techniques, providing context for security teams. To help teams respond quickly, GuardDuty provides specific remediation recommendations based on AWS best practices for each identified threat.
Real-world protection: Extended Threat Detection in action
To understand how GuardDuty protection plans and Extended Threat Detection work together in practice, let’s examine two sophisticated threat scenarios that security teams commonly face: data compromise and container cluster compromise.
Data compromise detection
GuardDuty Extended Threat Detection continuously analyzes and correlates events across multiple protection plans, providing comprehensive visibility when data compromise attempts occur in Amazon S3. For example, in a recent incident, GuardDuty identified a critical severity attack sequence spanning 24 hours. The sequence began with discovery actions through unusual S3 API calls, progressed to defense evasion through CloudTrail modifications, and culminated in potential data exfiltration attempts.
During the discovery phase, S3 Protection detected an IAM role making unusual ListBuckets and GetObject API calls across multiple buckets—a significant deviation from their normal pattern of accessing only specific assigned buckets. Extended Threat Detection then correlated this suspicious activity with subsequent actions from the same IAM role: attempts to disable CloudTrail logging and modify bucket policies (classic signs of defense evasion), followed by the creation of new access keys. This connected sequence of events, all from the same identity, indicated a progressing exploit moving from initial discovery to establishing persistence through credential creation.
Container environment compromise
Protecting containerized environments requires visibility across multiple layers of your Amazon EKS infrastructure. GuardDuty combines signals from EKS control plane (through EKS Protection), container runtime behavior (through Runtime Monitoring), and foundational infrastructure logs to provide comprehensive threat detection for your Kubernetes clusters. For example, EKS Protection detects suspicious activities at the Kubernetes control plane level, such as unusual kubernetes API server authentication attempts or the creation of service accounts with elevated permissions. Runtime Monitoring provides visibility into container behavior, identifying unexpected privileged commands or suspicious file system access. Together with foundational logs, these components provide multi-layer threat detection for your container workloads.
Here’s how these components worked together in detecting an attack sequence: The exploit began when EKS Protection detected unusual Kubernetes API server authentication attempts from a container within the cluster. Runtime Monitoring simultaneously observed commands that deviated from the container’s baseline behavior, such as privilege escalation attempts and unauthorized system calls. As the exploit progressed, GuardDuty detected the creation of a Kubernetes service account with elevated permissions, followed by attempts to mount sensitive host paths to containers.
The scenario then escalated when the compromised Kubernetes Pod established connections to other Pods across namespaces, suggesting lateral movement. GuardDuty Extended Threat Detection correlated these events with the Pod accessing sensitive Kubernetes secrets and AWS credentials stored in Kubernetes ConfigMaps. The final stage revealed the compromised Pod making AWS API calls using stolen credentials, targeting resources outside the cluster’s normal operational scope.
The detection of this multi-stage attack, spanning container exploitation, privilege escalation, and credential theft, demonstrates the power of the correlation capabilities of Extended Threat Detection. Security teams received a single critical finding that mapped the entire exploit sequence to MITRE ATT&CK® tactics, providing clear visibility into the exploit progression and specific remediation steps.
These real-world scenarios illustrate how GuardDuty protection plans work in concert with Extended Threat Detection to provide deep security insights. The combination of targeted protection plans and AI-powered correlation helps security teams identify and respond to sophisticated threats that might otherwise go unnoticed or be difficult to piece together manually.
Conclusion
GuardDuty protection plans, coupled with its built-in Extended Threat Detection feature, offer a powerful suite of managed detections to secure your AWS environment. By tailoring your security strategy to your specific workload types and using AI-powered insights, you can significantly enhance your ability to detect and respond to sophisticated threats. To get started with GuardDuty protection plans and Extended Threat Detection, visit the GuardDuty console. Each protection plan includes a 30-day trial at no additional cost per AWS account and AWS Region, allowing you to evaluate the security coverage for your specific needs. Remember, you can adjust your enabled plans at any time to align with your evolving security requirements and workload changes. By using these capabilities, you can strengthen your organization’s threat detection and response in the face of evolving security risks.
If you have feedback about this post, submit comments in the Comments section below. If you have questions about this post, contact AWS Support.
The collective thoughts of the interwebz
Manage Consent
To provide the best experiences, we use technologies like cookies to store and/or access device information. Consenting to these technologies will allow us to process data such as browsing behavior or unique IDs on this site. Not consenting or withdrawing consent, may adversely affect certain features and functions.
Functional
Always active
The technical storage or access is strictly necessary for the legitimate purpose of enabling the use of a specific service explicitly requested by the subscriber or user, or for the sole purpose of carrying out the transmission of a communication over an electronic communications network.
Preferences
The technical storage or access is necessary for the legitimate purpose of storing preferences that are not requested by the subscriber or user.
Statistics
The technical storage or access that is used exclusively for statistical purposes.The technical storage or access that is used exclusively for anonymous statistical purposes. Without a subpoena, voluntary compliance on the part of your Internet Service Provider, or additional records from a third party, information stored or retrieved for this purpose alone cannot usually be used to identify you.
Marketing
The technical storage or access is required to create user profiles to send advertising, or to track the user on a website or across several websites for similar marketing purposes.