Tag Archives: Technical How-to

Managing and Securing AWS Outposts Instances using AWS Systems Manager, Amazon Inspector, and Amazon GuardDuty

Post Syndicated from sbbusser original https://aws.amazon.com/blogs/compute/managing-and-securing-aws-outposts-instances-using-aws-systems-manager-amazon-inspector-and-amazon-guardduty/

This post is written by Sumeeth Siriyur, Specialist Solutions Architect.

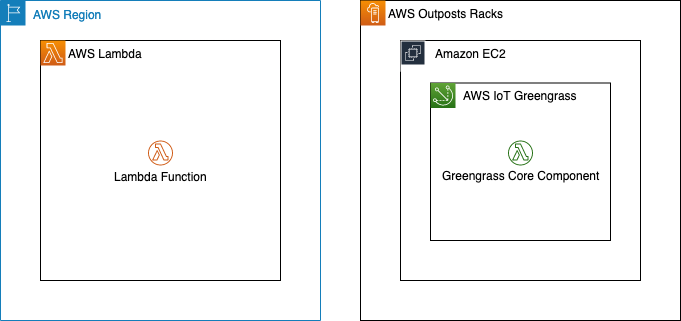
AWS Outposts is a family of fully managed solutions that deliver AWS infrastructure and services to virtually any on-premises or edge location for a truly consistent hybrid experience. Outposts is ideal for workloads that need low latency access to on-premises applications or systems, local data processing, and secure storage of sensitive customer data that must remain anywhere without an AWS region, including inside company-controlled environments or a specific country.

A key feature of Outposts is that it offers the same AWS hardware infrastructure, services, APIs, and tools to build and run your applications on-premises and “in AWS Regions”. Outposts is part of the cloud for a truly consistent hybrid experience. AWS compute, storage, database, and other services run locally on Outposts, and you can access the full range of AWS services available in the Region to build, manage, and scale your on-premises applications using familiar AWS services and tools.

Outposts comes in a variety of form factors, from 1U and 2U servers to 42U Outposts rack. This post focuses on the 42U form factor of Outposts.

This post demonstrates how to use some of the existing AWS services in the Region, such as AWS System Manager (SSM), Amazon Inspector, and Amazon GuardDuty to manage and secure your workload environment on Outposts rack. This is no different from how you use these services for workloads in the AWS Regions.

Solution overview

In this scenario, Outposts rack is locally installed in a customer premises. The service link connectivity to the AWS Region can be either via an AWS Direct Connect private virtual interface, a public virtual interface, or the public internet.

The local gateway (LGW) provides connectivity between the Outposts instances and the local on-premises network.

A virtual private cloud (VPC) spans all Availability Zones in its AWS Region. You can extend the VPC in the Region to the Outpost by adding an Outpost subnet. To add an Outpost subnet to a VPC, specify the Amazon Resource Name (ARN) – arn:aws:outposts:region:account-id – of the Outpost when you create the subnet. Outposts rack support multiple subnets. In this scenario, we have extended the VPC from the Region (us-west-2) to the Outpost.

To improve the security posture of the Outposts instance, you can configure AWS SSM to use an interface VPC endpoint in Amazon Virtual Private Cloud (VPC). An interface VPC endpoint lets you connect to services powered by AWS PrivateLink, a technology that lets you privately access AWS SSM APIs by using private IP addresses. See the details in the following AWS SSM section for the VPC endpoints.

Most importantly, to leverage any of the AWS services in the Region, Outposts rack relies on connectivity to the parent AWS Region. Outposts rack is not designed for disconnected operations or environments with limited to no connectivity. We recommend that you have highly-available networking connections back to your AWS Region. For an optimal experience and resiliency, AWS recommends that you use redundant connectivity of at least 500 Mbps (1 Gbps or higher) for the service link connection to the AWS Region.

An overview of the AWS Outposts setup and connectivity back to the region.

Outposts offers a consistent experience with the same hardware infrastructure, services, APIs, management, and operations on-premises as in the AWS Regions. Unlike other hybrid solutions that require different APIs, manual software updates, and purchase of third-party hardware and support, Outposts enables developers and IT operations teams to achieve the same pace of innovation across different environments.

In the first section, let’s see how we can use AWS SSM services for managing and operating Outposts instances.

Managing Outposts instances using AWS SSM

The Amazon Systems Manager Agent (SSM Agent) is installed and running on the Outposts instances.

SSM Agent is installed by default on Amazon Linux, Amazon Linux 2, Ubuntu Server16.04 and Ubuntu Server 18.04 LTS based Amazon Elastic Compute Cloud (EC2) AMIs. If SSM Agent isn’t preinstalled, then you must manually install the agent. Agent communication with SSM is via TCP port 443.

Linux: Manually install SSM Agent on EC2 instances for Linux

Windows: Manually install SSM Agent on EC2 instances for Windows Server

  1. Create an IAM instance profile for SSM

By default, SSM doesn’t have permission to perform actions on your instances. Grant access by using an AWS Identity and Access Management (IAM) instance profile. An instance profile is a container that passes IAM role information to an Amazon EC2 instance at launch. You can create an instance profile for SSM by attaching one or more IAM policies that define the necessary permissions to a new role or to a role that you already created. Make sure that you follow AWS best practices by having a least-privileges policy created.

  1. Create VPC endpoints for SSM.

a. amazonaws.us-west-2.ssm: The endpoint for the Systems Manager service.

b. amazonaws.us-west-2.ec2messages: Systems Manager uses this endpoint to make calls from the SSM Agent to the Systems Manager service.

c. amazonaws.us-west-2.ec2: If you’re using Systems Manager to create VSS-enabled snapshots, then you must make sure that you have an endpoint to the EC2 service. Without the EC2 endpoint defined, a call to enumerate attached Amazon Elastic Block Storage (EBS) volumes fails, which causes the Systems Manager command to fail.

d. amazonaws.us-west-2.ssmmessages: This endpoint is for connecting to your instances with a secure data channel using Session Manager.

e. amazonaws.us-west-2.s3: Systems Manager uses this endpoint to update SSM agent, perform patch operation, and for uploading logs into Amazon Simple Storage Service (S3) buckets.

  1. Once the SSM agent has been installed and the necessary permission has been provided for the Systems Manager, log in to Systems Manager Console and navigate to Fleet Manager to discover the Outposts instances as shown in the following image.

Fleet Manager to discover the Outposts instances.

4. You can use compliance to scan the Outposts instances for patch compliance and configuration inconsistencies.

Compliance to scan the Outposts instances for patch compliance and configuration inconsistencies.

5. AWS Systems Manager Inventory provides visibility into your Outposts computing environment. You can use this inventory to collect metadata about the instances.

AWS SSM inventory to collect metadata about the instances.

6. With Session Manager, you can log into your Outposts instances. You can use either an interactive one-click browser-based shell, or the AWS Command Line Interface (CLI) for Linux based EC2 instances. For Windows instances, you can connect using Remote Desktop Protocol (RDP). For better SEO, suggest replacing this with “Check out”, attach the link to “how to connect to Windows instances from the Fleet Manager console”, and delete can be found here. here.

Note that accessing the Outposts EC2 instances through SSH or RDP via the Region based Session Manager will have more latency via service link than accessing via the LGW.

Session Manager to connect to Outposts EC2 instances.

7. Patch Manager automated the process of patching the Outposts instances with both security-related and other types of updates. In the following you can see that one of the Outposts instances is scanned and updated with an operational update.

AWS SSM Patch Manager to patch the Outposts Instances.

Security at AWS is the highest priority. Security is a shared responsibility between AWS and customers. We offer the security tools and procedures to secure the Outposts instances as in the AWS region. By using AWS services, you can enhance your security posture on Outposts rack in these areas.

In the second section, let’s see how we can use Amazon Inspector running in the AWS Region to scan for vulnerabilities within the Outposts environment. Amazon Inspector uses the widely deployed SSM Agent to automatically scan for vulnerabilities on Outposts instances.

Scan Outposts instances for vulnerabilities using Amazon Inspector

Amazon Inspector is an automated vulnerability management service that continually scans AWS workloads for software vulnerabilities and unintended network exposure. Amazon Inspector automatically discovers all of the Outposts EC2 instances (installed with SSM Agent) and container images residing in Amazon Elastic Container Registry (ECR) that are identified for scanning. Then, it immediately starts scanning them for software vulnerabilities and unintended network exposure.

All workloads are continually rescanned when a new Common Vulnerabilities And Exposures (CVE) is published, or when there are changes in the workloads, such as installation of new software in an Outposts EC2 instance.

Amazon Inspector uses the widely deployed SSM Agent (deployed in the previous scenario) to collect the software inventory and configurations from your Outposts EC2 instances. Use the VPC interface endpoint – com.amazonaws.us-west-2.inspector2 – to privately access Amazon Inspector. The collected application inventory and configurations are used to assess workloads for vulnerabilities.

  1. The following Summary Dashboard provides information on how many Outposts EC2 instances and the container repositories are scanned and discovered.

Amazon Inspector Summary Console.

2. The findings by Vulnerability tab help to identify the most vulnerable Outposts EC2 instances in your environment. In the following, you can see Outposts instances with the following vulnerability highlighted.

a. Port range 0 to 65535 is reachable from an Internet Gateway

b. Port 22 is reachable from an Internet Gateway

Amazon Inspector Vulnerability console.

3. The findings by instance tab shows you all of the active findings for a Single Outposts instance in your environment. In the following, you can see that for this instance there are a total of 12 high and 19 medium findings based on the rules in the Common Vulnerabilities And Exposures (CVE) package.

Amazon Inspector Instances Console.

In the last section, let’s see how we can use GuardDuty to detect any threats within the Outposts environment.

Threat Detection service for your AWS accounts and Outposts workloads using Amazon GuardDuty

GuardDuty is a threat detection service that continuously monitors your AWS accounts and workloads for malicious activities and delivers detailed security findings for visibility and remediation.

GuardDuty continuously monitors and analyses the Outposts instances and reports suspicious activities using the GuardDuty console. It gets this information from CloudTrail Management Events, VPC Flow Logs, and DNS logs.

In this scenario, GuardDuty has detected an SSH brute force attack against an Outposts instance.

Amazon GuardDuty threat detection console.

Costs associated with the scenario

  • Systems Manager: With AWS Systems Manager, you pay only for what you use on the priced feature. In this scenario, we have used the following features.
    1. Inventory – No additional charges
    2. Session Manager – No additional charges
    3. Patch Manager – No additional charges

*Note that there will be charges for the VPC endpoint created.

  • Amazon Inspector: Costs for Amazon Inspector are based on container images scanned to ECR and the EC2 instances being scanned.
    1. The average number of EC2 instances scanned per month in US-WEST-2 region is $1.258 per instance. In the above scenario, there are three instances within the Outposts at $1.258 = $3.774
  • Amazon GuardDuty: VPC Flow logs and CloudWatch logs are used for GuardDuty analysis. In this scenario, Only VPC Flow logs are considered.
    1. VPC Flow log is charged per GB/month. In US-WEST-2 region – the First 500 GB/month is $1 per GB. In the above scenario, there are three instances within the Outposts that would generate approximately 80 MB of data, which is still within the 500 GB limit.
  • Understand more about AWS Outposts rack pricing on our website.

Cleaning up

Please delete example resources if they are no longer needed to avoid incurring future costs.

  • Amazon Inspector: Disable Amazon Inspector from the Amazon Inspector Console.
  • Amazon GuardDuty: You can use the GuardDuty console to suspend or disable GuardDuty. You are not charged for using GuardDuty when the service is suspended.
  • Delete unused IAM policies

Conclusion

On-premises data centers traditionally use a variety of infrastructure, tools, and APIs. This disparate assortment of hardware and software solutions results in complexity. In turn, this leads to greater management costs, inability of staff to translate skills from one setting to another, and limits in innovation and knowledge-sharing between environments.

Using a common set of tools, services in the AWS Regions and on Outposts on premises allows you to have a consistent operation environment, thereby delivering a true hybrid cloud experience. Equally, by using the same tools to deploy and manage workloads in both environments, you can reduce operational overhead.

To get started with Outposts, see AWS Outposts Family. For more information about Outposts availability, see the Outposts rack FAQ.

Automate the Creation of On-Demand Capacity Reservations for running EC2 instances

Post Syndicated from sbbusser original https://aws.amazon.com/blogs/compute/automate-the-creation-of-on-demand-capacity-reservations-for-running-ec2-instances/

This post is written by Ballu Singh a Principal Solutions Architect at AWS, Neha Joshi a Senior Solutions Architect at AWS, and Naveen Jagathesan a Technical Account Manager at AWS.

Customers have asked how they can “create On-Demand Capacity Reservations (ODCRs) for their existing instances during events, such as the holiday season, Black Friday, marketing campaigns, or others?”

ODCRs let you reserve compute capacity for your your Amazon Elastic Compute Cloud (Amazon EC2) instances. ODCRs further make sure that you always have EC2 capacity access when required, and for as long as you need it. Customers who want to make sure that any instances that are stopped/started during the critical event and are available when needed should be covered by ODCRs.

ODCRs let you reserve compute capacity for your Amazon EC2 instances in a specific availability zone for any duration. This means that you can create and manage capacity reservations independently from the billing discounts offered by Savings Plans or Regional Reserved Instances. You can create ODCR at any time, without entering into a one-year or three-year term commitment, and the capacity is available immediately. Billing starts as soon as the ODCR enters the active state. When you no longer need it, cancel the ODCR to stop incurring charges.

At the time of this blog publication, if you need to create ODCR for existing running instances, you must manually identify your running instances configuration with matching attributes, such as instance type, platform, and Availability Zone. This is a time and resource consuming process.

In this post, we provide an automated way to manage ODCR operations. This includes creating, modifying, and cancelling ODCRs for the running instances across regions in an account, all without requiring any manual intervention of specifying instance configuration attributes. Additionally, it creates an Amazon CloudWatch Alarm for InstanceUtilization and an Amazon Simple Notification Service (Amazon SNS) topic with topic name ODCRAlarmNotificationTopic to notify when the threshold breaches.

Note: This will not create cluster placement group ODCRs. For details on capacity reservations in cluster placement groups, refer here.

Getting started

Before you create Capacity Reservations, note the limitations and restrictions here.

To get started, download the scripts for registering, modifying, and canceling ODCRs and associated requirements.txt, as well as AWS Identity and Access Management (IAM) policy from the GitHub link here.

Pre-requisites

To implement these scripts, you need the following prerequisites:

  1. Access to AWS Management Console, AWS Command Line Interface (CLI),or AWS SDK for ODCR.
  2. The following IAM role permissions for IAM users using the solution as provided in ODCR_IAM.json.
  3. Amazon EC2 instance having supported platform for capacity reservation. Capacity Reservations support the following platforms listed here for Linux and Windows.
  4. Refer to the above GitHub link for the code, and save the requirements.txt file in the same directory with other python scripts. You may want to run the requirements.txt file if you don’t have appropriate dependency to run the rest of the python scripts. You can run this using the following command:
pip3 install -r requirements.txt

Implementation Details

To create ODCR capacity reservation

The following instructions will guide you through creating a capacity reservation of running instances across all of the Regions within an AWS account.
Input variables needed from users:

  • EndDateType (String) – Indicates how the Capacity Reservation ends. A Capacity Reservation can have one of the following end types:
      • unlimited – The Capacity Reservation remains active until you explicitly cancel it. Don’t provide an EndDate if the EndDateType is unlimited.
      • limited – The Capacity Reservation expires automatically at a specified date and time. You must provide an EndDate value if the EndDateType value is limited.
  • EndDate (datetime) – The date and time when the Capacity Reservation expires. When a Capacity Reservation expires, the reserved capacity is released and you can no longer launch instances into it. The Capacity Reservation’s state changes to expired when it reaches its end date and time.

You must provide EndDateType as ‘limited’ and the EndDate in standard UTC format to secure instances for a limited period. Command to execute register ODCR script with limited period:

You must provide EndDateType as ‘unlimited’ to secure instances for unlimited period. Command to execute register ODCR script with unlimited period:

registerODCR.py '<EndDateType>' '<EndDate>'
    Example- registerODCR.py 'limited' '2022-01-31 14:30:00'
  • You must provide EndDateType as ‘unlimited’ to secure instances for unlimited period. Command to execute register ODCR script with unlimited period:
registerODCR.py 'EndDateType'
    Example- registerODCR.py 'unlimited'

This registerODCR.py script does following four things:

1. Describe instances cross-region in an account. It checks for the instance that has:

    • No Capacity reservation
    • State of the instance is running
    • Tenancy is default
    • InstanceLifecycle is None indicates whether this is a Spot Instance or a Scheduled Instance

Note: Describe instances API call is counted toward your account API limit. Therefore, it is advisable to run the script during non-peak hours or before the short-term scaling event begins. Work with AWS Support team if you run into API throttling.

2. Aggregates instances with similar attributes, such as InstanceType, AvailabilityZone, Tenancy, and Platform.

3. Describe reserved instances cross-region in an account. It checks for instance(s) that have Zonal Reservation Instances (ZRIs) and compares them with aggregated instances with similar attributes.

4. Finally,

    • Reserves ODCR(s) for existing running instances with matching attributes for which ZRIs do not exist.

Note: If you have one or more ZRIs in an account, then the script compares them with the existing instances with matching characteristics – Instance Type, AZ, and Platform – and does NOT create ODCR for the ZRIs to avoid incurring redundant charges. If there are more running instances than ZRIs, then the script creates an ODCR for just the delta.

    • Creates an SNS topic with the topic name – ODCRAlarmNotificationTopic in the region where you’re registering ODCR, if it doesn’t already exist.
    • Creates CloudWatch alarm for InstanceUtilization using the best practices, which can be found here.

Note: You must subscribe and confirm to the SNS topic, if you haven’t already, to receive notifications.

The CloudWatch alarm is also created on your behalf in the region for each ODCR. This alarm monitors your ODCR metric- InstanceUtilization. Whenever it breaches threshold (50% in this case), it enters the alarm state and sends an SNS notification using the topic that was created for you if you subscribed to it.

Note: You can change the alarm threshold based on your specific needs.

  • You will receive an email notification when CloudWatch Alarm State changes to Alarm with:
    • SNS Subject (Assuming CW alarms triggers in US East region).
ALARM: "ODCRAlarm-cr-009969c7abf4daxxx" in US East (N. Virginia)
    • SNS Body will have the details
      • CW alarm, region, link to view the alarm, alarm details, and state change actions.

With this, if your ODCR InstanceUtilization drops, then you will be notified in near-real time to help you optimize the capacity and stop unnecessary payments for unused capacity.

To modify ODCR capacity reservation

To modify the attributes of an active capacity reservation after you have created it, adhere to the following instructions.

Note: When modifying a Capacity Reservation, you can only increase or decrease the quantity and change how it is released. You can’t change the instance type, EBS optimization, instance store settings, platform, Availability Zone, or instance eligibility of a Capacity Reservation. If you must modify any of these attributes, then we recommend that you cancel the reservation, and then create a new one with the required attributes. You can’t modify a Capacity Reservation after it has expired or after you have explicitly canceled it.

  • Input variables needed from users:
    • CapacityReservationID – The ID of the Capacity Reservation that you want to modify.
    • InstanceCount (integer) – The number of instances for which to reserve capacity. The number of instances can’t be increased or decreased by more than 1000 in a single request.
    • EndDateType (String) – Indicates how the Capacity Reservation ends. A Capacity Reservation can have one of the following end types:
      • unlimited – The Capacity Reservation remains active until you explicitly cancel it. Don’t provide an EndDate if the EndDateType is unlimited.
      • limited – The Capacity Reservation expires automatically at a specified date and time. You must provide an EndDate value if the EndDateType value is limited.
    • EndDate (datetime) – The date and time of when the Capacity Reservation expires. When a Capacity Reservation expires, the reserved capacity is released, and you can no longer launch
    • instances into it. The Capacity Reservation’s state changes to expired when it reaches its end date and time.
      Example to run the modify ODCR script for ‘limited’ period:
    • You must provide EndDateType as ‘unlimited’ to modify instances for an unlimited period. Command to the run modify ODCR script with unlimited period:
  • Command to execute modify ODCR script:
    modifyODCR.py <CapacityReservationId> <InstanceCount> <EndDateType> <EndDate> 
  • Example to execute the modify ODCR script for limited period:
modifyODCR.py 'cr-05e6a94b99915xxxx' '1' 'limited' '2022-01-31 14:30:00'

Note: EndDate is in the standard UTC time.

  • You must provide EndDateType as ‘unlimited’ to modify instances for unlimited period. Command to execute modify ODCR script with unlimited period:
modifyODCR.py <CapacityReservationId> <InstanceCount> <EndDateType>
  • Example to execute the modify ODCR script for unlimited period:
modifyODCR.py 'cr-05e6a94b99915xxxx' '1' 'unlimited'

To cancel ODCR capacity reservation

To cancel the ODCR that are in the “Active” state, follow these instructions:

Note: Once the cancellation request succeeds, the reservation status will be marked as “cancelled”.

  • Input variables needed from users:
    • CapacityReservationID – The ID of the Capacity Reservation to cancel.
  • You must provide one parameter while executing the cancellation script.
  • Command to execute cancel ODCR script:
cancelODCR.py <CapacityReservationId> 
  • Example to execute the cancel ODCR script:
Example - cancelODCR.py 'cr-05e6a94b99915xxxx'

Monitoring

CloudWatch metrics let you monitor the unused capacity in your Capacity Reservations to optimize the ODCR. ODCRs send metric data to CloudWatch every five minutes. Although Capacity Reservation usage metrics are UsedInstanceCount, AvailableInstanceCount, TotalInstanceCount, and InstanceUtilization, for this solution we will be using the InstanceUtilization metric. This shows the percentage of reserved capacity instances that are currently in use. This will be useful for monitoring and optimizing ODCR consumption.

For example, if your On-Demand Capacity Reservation is for four instances and with matching criteria only one EC2 instance is currently running, then the InstanceUtilization metric will be 25% for your respective capacity reservation.

Let’s look at the steps to create the CloudWatch monitoring dashboard for your On-Demand Capacity Reservation solution:

  1. Open the CloudWatch console at https://console.aws.amazon.com/cloudwatch/.
  2. If necessary, change the Region. From the navigation bar, select the Region where your Capacity Reservation resides. For more information, see Regions and Endpoints.
  3. In the navigation pane, choose Metrics.

Amazon CloudWatch Dashboard

For All metrics, choose EC2 Capacity Reservations.

Amazon CloudWatch Dashboard: Metrics

4. Choose the metric dimension By Capacity Reservation. Metrics will be grouped by

Amazon CloudWatch Metrics: Capacity Reservation Ids

5. Select the dropdown arrow for InstanceUtilization, and select Search for this only.

Amazon CloudWatch Metrics Filter

Once we see the InstanceUtilization metric in the filter list, select Graph Search.

Amazon CloudWatch Metrics: Graph Search

This displays the InstanceUtilization metrics for the selected period.

Amazon CloudWatch Metrics Duration

OPTIONAL: To display the Capacity Reservation IDs for active metrics only:

    • Navigate to Graphed metrics.

Amazon CloudWatch: Graphed Metrics

    • Under Details column, select Edit math expression.

Amazon CloudWatch Metrics: Math Expression

    • Edit the math expression with the following, and select Apply:
REMOVE_EMPTY(SEARCH('{AWS/EC2CapacityReservations,CapacityReservationId} MetricName="InstanceUtilization"', 'Average', 300))

Amazon CloudWatch Graphed Metrics: Math Expression Apply

This displays the Capacity Reservation IDs for active metrics only.

Amazon CloudWatch Metrics: Active Capacity Reservation Ids

With this configuration, whenever new Capacity Reservations are created, the InstanceUtilization metric for respective Capacity Reservation IDs will be populated.

6. From the Actions drop-down menu, select Add to dashboard.

Amazon CloudWatch Metrics: Add to Dashboard

Select Create new to create a new dashboard for monitoring your ODCR metrics.

Amazon CloudWatch: Creat New Dashboard

Specify the new dashboard name, and select Add to dashboard.

Amazon CloudWatch: Create New Dashboard

7. These configuration steps will navigate you to your newly created CloudWatch dashboard under Dashboards.

Amazon CloudWatch Dashboard: ODCR Metrics

Once this is created, if you create new Capacity Reservations, or new instances get added to existing reservations, then those metrics will be automatically be added to your CloudWatch Dashboard.

Note: You may see a delay of approximately 5-10 minutes from the point when changes are made to your environment (ODCR operations or instances launch/termination activities) to those changes getting reflected on your CloudWatch Dashboard metrics.

Conclusion

In this post, we discussed a solution for automating ODCR operations for existing EC2 instances. This included creating capacity reservation, modifying capacity reservation, and cancelling capacity reservation operations that inherit your existing EC2 instances for attribute details. We also discussed monitoring aspects of ODCR metrics using CloudWatch. This solution allows you to automate some of the ODCR operations for existing instances, thereby optimizing and speeding up the entire process.

For more information, see Target a group of Amazon EC2 On-Demand Capacity Reservations blog and Capacity Reservations documentation.

If you have feedback or questions about this post, please submit your comments in the comments section or contact AWS Support.

Running cross-account workflows with AWS Step Functions and Amazon API Gateway

Post Syndicated from James Beswick original https://aws.amazon.com/blogs/compute/running-cross-account-workflows-with-aws-step-functions-and-amazon-api-gateway/

This post is written by Hardik Vasa, Senior Solutions Architect, and Pratik Jain, Cloud Infrastructure Architect.

AWS Step Functions allow you to build scalable and distributed applications using state machines. With the launch of Step Functions nested workflows, you can start a Step Functions workflow from another workflow. However, this requires both workflows to be in the same account. There are many use cases that require you to orchestrate workflows across different AWS accounts from one central AWS account.

This blog post covers a solution to invoke Step Functions workflows cross account using Amazon API Gateway. With this, you can perform cross-account orchestration for scheduling, ETL automation, resource deployments, security audits, and log aggregations all from a central account.

Overview

The following architecture shows a Step Functions workflow in account A invoking an API Gateway endpoint in account B, and passing the payload in the API request. The API then invokes another Step Functions workflow in account B asynchronously.  The resource policy on the API allows you to restrict access to a specific Step Functions workflow to prevent anonymous access.

Cross-account workflows

You can extend this architecture to run workflows across multiple Regions or accounts. This blog post shows running cross-account workflows with two AWS accounts.

To invoke an API Gateway endpoint, you can use Step Functions AWS SDK service integrations. This approach allows users to build solutions and integrate services within a workflow without writing code.

The example demonstrates how to use the cross-account capability using two AWS example accounts:

  • Step Functions state machine A: Account ID #111111111111
  • API Gateway API and Step Functions state machine B: Account ID #222222222222

Setting up

Start by creating state machine A in the account #111111111111. Next, create the state machine in target account #222222222222, followed by the API Gateway REST API integrated to the state machine in the target account.

Account A: #111111111111

In this account, create a state machine, which includes a state that invokes an API hosted in a different account.

Create an IAM role for Step Functions

  1. Sign in to the IAM console in account #111111111111, and then choose Roles from left navigation pane
  2. Choose Create role.
  3. For the Select trusted entity, under AWS service, select Step Functions from the list, and then choose Next.
  4. On the Add permissions page, choose Next.
  5. On the Review page, enter StepFunctionsAPIGatewayRole for Role name, and then choose Create role.
  6. Create inline policies to allow Step Functions to access the API actions of the services you need to control. Navigate to the role that you created and select Add Permissions and then Create inline policy.
  7. Use the Visual editor or the JSON tab to create policies for your role. Enter the following:
    Service: Execute-API
    Action: Invoke
    Resource: All Resources
  8. Choose Review policy.
  9. Enter APIExecutePolicy for name and choose Create Policy.

Creating a state machine in source account

  1. Navigate to the Step Functions console in account #111111111111 and choose Create state machine
  2. Select Design your workflow visually, and the click Standard and then click Next
  3. On the design page, search for APIGateway:Invoke state, then drag and drop the block on the page:
    Step Functions designer console
  4. In the API Gateway Invoke section on the right panel, update the API Parameters with the following JSON policy:
     {
      "ApiEndpoint.$": "$.ApiUrl",
      "Method": "POST",
      "Stage": "dev",
      "Path": "/execution",
      "Headers": {},
      "RequestBody": {
       "input.$": "$.body",
       "stateMachineArn.$": "$.stateMachineArn"
      },
      "AuthType": "RESOURCE_POLICY"
    }

    These parameters indicate that the ApiEndpoint, payload (body) and stateMachineArn are dynamically assigned values based on input provided during workflow execution. You can also choose to assign these values statically, based on your use case.

  5. [Optional] You can also configure the API Gateway Invoke state to retry upon task failure by configuring the retries setting.
    Configuring State Machine
  6. Choose Next and then choose Next again. On the Specify state machine settings page:
    1. Enter a name for your state machine.
    2. Select Choose an existing role under Permissions and choose StepFunctionsAPIGatewayRole.
    3. Select Log Level ERROR.
  7. Choose Create State Machine.

After creating this state machine, copy the state machine ARN for later use.

Account B: #222222222222

In this account, create an API Gateway REST API that integrates with the target state machine and enables access to this state machine by means of a resource policy.

Creating a state machine in the target account

  1. Navigate to the Step Functions Console in account #222222222222 and choose Create State Machine.
  2. Under Choose authoring method select Design your workflow visually and the type as Standard.
  3. Choose Next.
  4. On the design page, search for Pass state. Drag and drop the state.
    State machine
  5. Choose Next.
  6. In the Review generated code page, choose Next and:
    1. Enter a name for the state machine.
    2. Select Create new role under the Permissions section.
    3. Select Log Level ERROR.
  7. Choose Create State Machine.

Once the state machine is created, copy the state machine ARN for later use.

Next, set up the API Gateway REST API, which acts as a gateway to accept requests from the state machine in account A. This integrates with the state machine you just created.

Create an IAM Role for API Gateway

Before creating the API Gateway API endpoint, you must give API Gateway permission to call Step Functions API actions:

  1. Sign in to the IAM console in account #222222222222 and choose Roles. Choose Create role.
  2. On the Select trusted entity page, under AWS service, select API Gateway from the list, and then choose Next.
  3. On the Select trusted entity page, choose Next
  4. On the Name, review, and create page, enter APIGatewayToStepFunctions for Role name, and then choose Create role
  5. Choose the name of your role and note the Role ARN:
    arn:aws:iam::222222222222:role/APIGatewayToStepFunctions
  6. Select the IAM role (APIGatewayToStepFunctions) you created.
  7. On the Permissions tab, choose Add permission and choose Attach Policies.
  8. Search for AWSStepFunctionsFullAccess, choose the policy, and then click Attach policy.

Creating the API Gateway API endpoint

After creating the IAM role, create a custom API Gateway API:

  1. Open the Amazon API Gateway console in account #222222222222.
  2. Click Create API. Under REST API choose Build.
  3. Enter StartExecutionAPI for the API name, and then choose Create API.
  4. On the Resources page of StartExecutionAPI, choose Actions, Create Resource.
  5. Enter execution for Resource Name, and then choose Create Resource.
  6. On the /execution Methods page, choose Actions, Create Method.
  7. From the list, choose POST, and then select the check mark.

Configure the integration for your API method

  1. On the /execution – POST – Setup page, for Integration Type, choose AWS Service. For AWS Region, choose a Region from the list. For Regions that currently support Step Functions, see Supported Regions.
  2. For AWS Service, choose Step Functions from the list.
  3. For HTTP Method, choose POST from the list. All Step Functions API actions use the HTTP POST method.
  4. For Action Type, choose Use action name.
  5. For Action, enter StartExecution.
  6. For Execution Role, enter the role ARN of the IAM role that you created earlier, as shown in the following example. The Integration Request configuration can be seen in the image below.
    arn:aws:iam::222222222222:role/APIGatewayToStepFunctions
    API Gateway integration request configuration
  7. Choose Save. The visual mapping between API Gateway and Step Functions is displayed on the /execution – POST – Method Execution page.
    API Gateway method configuration

After you configure your API, you can configure the resource policy to allow the invoke action from the cross-account Step Functions State Machine. For the resource policy to function in cross-account scenarios, you must also enable AWS IAM authorization on the API method.

Configure IAM authorization for your method

  1. On the /execution – POST method, navigate to the Method Request, and under the Authorization option, select AWS_IAM and save.
  2. In the left navigation pane, choose Resource Policy.
  3. Use this policy template to define and enter the resource policy for your API.
    {
        "Version": "2012-10-17",
        "Statement": [
            {
                "Effect": "Allow",
                "Principal": {
                    "Service": "states.amazonaws.com"
                },
                "Action": "execute-api:Invoke",
                "Resource": "execute-api:/*/*/*",
                "Condition": {
                    "StringEquals": {
                        "aws:SourceArn": [
                            "<SourceAccountStateMachineARN>"
                         ]
                    }
                }
            }
        ]
    }

    Note: You must replace <SourceAccountStateMachineARN> with the state machine ARN from account #111111111111 (account A).

  4. Choose Save.

Once the resource policy is configured, deploy the API to a stage.

Deploy the API

  1. In the left navigation pane, click Resources and choose Actions.
  2. From the Actions drop-down menu, choose Deploy API.
  3. In the Deploy API dialog box, choose [New Stage], enter dev in Stage name.
  4. Choose Deploy to deploy the API.

After deployment, capture the API ID, API Region, and the stage name. These are used as inputs during the execution phase.

Starting the workflow

To run the Step Functions workflow in account A, provide the following input:

{
   "ApiUrl": "<api_id>.execute-api.<region>.amazonaws.com",
   "stateMachineArn": "<stateMachineArn>",
   "body": "{\"someKey\":\"someValue\"}"
}

Start execution

Paste in the values of APIUrl and stateMachineArn from account B in the preceding input. Make sure the ApiUrl is in the format as shown.

AWS Serverless Application Model deployment

You can deploy the preceding solution architecture with the AWS Serverless Application Model (AWS SAM), which is an open-source framework for building serverless applications. During deployment, AWS SAM transforms and expands the syntax into AWS CloudFormation syntax, enabling you to build serverless applications faster.

Logging and monitoring

Logging and monitoring are vital for observability, measuring performance and audit purposes. Step Functions allows logging using CloudWatch Logs. Step Functions also automatically sends execution metrics to CloudWatch. You can learn more on monitoring Step Functions using CloudWatch.

Cleaning up

To avoid incurring any charges, delete all the resources that you have created in both the accounts. This would include deleting the Step Functions state machines and API Gateway API.

Conclusion

This blog post provides a step-by-step guide on securely invoking a cross-account Step Functions workflow from a central account using API Gateway as front end. This pattern can be extended to scale workflow executions across different Regions and accounts.

By using a centralized account to orchestrate workflows across AWS accounts, this can help prevent duplicating work in each account.

To learn more about serverless and AWS Step Functions, visit the Step Functions Developer Guide.

For more serverless learning resources, visit Serverless Land.

Incident notification mechanism using Amazon Pinpoint two-way SMS

Post Syndicated from Pavlos Ioannou Katidis original https://aws.amazon.com/blogs/messaging-and-targeting/incident-notification-mechanism-using-amazon-pinpoint-two-way-sms/

Unexpected situations that require immediate attention can occur in any industry. Part of resolving these incidents is the notifications’ delivery. For example, utility companies that have installed gas sensors need to notify immediately the available engineer if a leak occurs.

The goal of an incident management process is to restore a normal service operation as quickly as possible and to minimize the impact on business operations, thus ensuring that the best possible levels of service quality and availability are maintained. A key element of incident management is sending timely notifications to the assigned or available resource(s) who can rectify the issue.

An incident can take place at any time and the resource(s) assigned to it might not have internet access and even if they receive the message they might not be equipped to work on it. This creates five key requirements for an incident notifications mechanism:

  1. Notify the resources via a communication channel that ensures message delivery even without internet access
  2. Enable assigned resources to respond to a request via a communication channel that doesn’t require internet access
  3. Send reminder(s) in case there is no response from the assigned resource(s)
  4. Escalate to another resource in case the first one doesn’t reply or declines the incident
  5. Store the incident details & status for reporting and data analysis

In this blog post, I share a solution on how you can automate the delivery of incident notifications. This solution utilizes Amazon Pinpoint SMS channel to contact the designated resources who might not have access to the internet. Furthermore, the recipient of the SMS is able to reply with an acknowledgement. AWS Step Functions orchestrates the user journey using AWS Lambda functions to evaluate the recipients’ response and trigger the next best action. You will use AWS CloudFormation to deploy this solution.

Use Cases

An incident notification mechanism can vary depending the organization’s requirements and 3rd party system integrations. In this blog the solution covers all five points listed above but it might require further modifications depending your use case.

With minor modifications this solution can also be used in the following use cases:

  1. Medicine intake notification: It will notify the patient via SMS that it is their time to take their medicine. If the patient doesn’t acknowledge the SMS by replying then this can be escalated to their assigned doctor
  2. Assignment submission: It will notify the student that their assignment is due. If the student doesn’t acknowledge the SMS by replying then this can be escalated to their teacher

High-level Architecture

The solution requires the country of your SMS recipients to support two-way SMS. To check which countries, support two-way SMS visit this page.  If two-way SMS is supported then you will need to request a dedicated originating identity. You can also use Toll Free Number or 10DLC if your recipients are in the US.

Note: Sender ID doesn’t support two-way SMS.

A new incident is represented as an item in an Amazon DynamoDB table containing information such as description, URL, incident_id as well as the contact numbers for two resources. A resource is someone who has been assigned to work on this incident. The second resource is for escalation purposes in case the first one doesn’t acknowledge or decline the incident notification.

The Amazon DynamoDB table covers three functions for this solution:

  1. A way to add new incidents using either the AWS console or programmatically
  2. As a storage for variables that indicate the incident’s status and can be used from the solution to determine the next action(s)
  3. As a historical data storage for all incidents that have been created for data analysis purposes

The solution utilizes Amazon DynamoDB Streams to invoke an AWS Lambda function every time a new incident is created. The AWS Lambda function triggers an AWS Step Function State machine, which orchestrates three AWS Lambda functions:

  1. Send_First_SMS: Sends the first SMS
  2. Reminder_SMS: Sends a reminder SMS if the resource does not acknowledge the first SMS
  3. Incident_State_Review: Assesses the status of the incident and either goes back to the first AWS Lambda function or finishes the AWS Step Function State machine execution

The AWS Step Functions State machine uses the Choice state, which evaluates the response of the previous AWS Lambda function and decides on the next state. This is a very useful feature that can reduce custom code and potentially AWS Lambda invocations resulting to cost savings.

Additionally, the waiting between steps is also managed from AWS Step Functions State machine using the Wait state. This can be configured to wait seconds, days or till a specific point in the future.

To be able to receive SMS, this solution uses Amazon Pinpoint’s two-way SMS feature. When receiving an SMS Amazon Pinpoint sends a payload to an Amazon SNS topic, which needs to be created separately. An AWS Lambda function that is subscribed to the Amazon SNS topic processes the SMS content and performs one or both of the following actions:

  1. Update the incident status in the DynamoDB table
  2. Create a new Step Function State machine execution

In this solution SMS recipients can reply by typing either yes or no. The SMS response is not case sensitive.

An inbound SMS payload contains the originationNumber, destinationNumber, messageKeyword, messageBody, inboundMessageId and previousPublishedMessageId. Noticeably there isn’t a direct way to associate an inbound SMS with an incident. To overcome this challenge this solution uses a second DynamoDB table, which stores the message_id and incident_id every time an SMS is send to any of the two resources. This allows the solution to use the previousPublishedMessageId from the inbound SMS payload to fetch the respective incident_id from the second DynamoDB table.

The code in this solution uses AWS SDK for Python (Boto3).

Prerequisites

  1. An Amazon Pinpoint project with the SMS channel enabled – Guide on how to enable Amazon Pinpoint SMS channel
  2. Check if the country you want to send SMS to, supports two-way SMS – List with countries that support two-way SMS
  3. An originating identity that supports two-way SMS – Guide on how to request a phone number
  4. Increase your monthly SMS spending quota for Amazon Pinpoint – Guide on how to increase the monthly SMS spending quota

Deploy the solution

Step 1: Create an S3 bucket

  1. Navigate to the Amazon S3 console
  2. Select Create bucket
  3. Enter a unique name for Bucket name
  4. Select the AWS Region to be the same as the one of your Amazon Pinpoint project
  5. Scroll to the bottom of the page and select Create bucket
  6. Follow this link to download the GitHub repository. Once the repository is downloaded, unzip it and navigate to  \amazon-pinpoint-incident-notifications-mechanism-main\src
  7. Access the S3 bucket created above and upload the five .zip files

Step 2: Create a stack

  1. The application is deployed using an AWS CloudFormation template.
  2. Navigate to the AWS CloudFormation console select Create stack > With new resources (standard)
  3. Select Template is ready as Prerequisite – Prepare template and choose Upload a template file as Template source
  4. Select Choose file and from the GitHub repository downloaded in step 1.6 navigate to amazon-pinpoint-incident-notifications-mechanism-main\cfn upload CloudFormation_template.yaml and select Next
  5. Type Pinpoint-Incident-Notifications-Mechanism as Stack name, paste the S3 bucket name created in step 1.5 as the LambdaCodeS3BucketName, type the Amazon Pinpoint Originating Number in E.164 format as OriginatingIdenity, paste the Amazon Pinpoint project ID as PinpointProjectId and type 40 for WaitingBetweenSteps
  6. Select Next, till you reach to Step 4 Review where you will need to check the box I acknowledge that AWS CloudFormation might create IAM resources and then select Create Stack
  7. The stack creation process takes approximately 2 minutes. Click on the refresh button to get the latest event regarding the deployment status. Once the stack has been deployed successfully you should see the last Event with Logical ID Pinpoint-Incident-Notifications-Mechanism and with Status CREATE_COMPLETE

Step 3: Configure two-way SMS SNS topic

  1. Navigate to the Amazon Pinpoint console > SMS and voice > Phone numbers. Select the originating identity that supports two-way SMS. Scroll to the bottom of the page and click to expand the  and check the box to enable it.

    For SNS topic select Choose an existing SNS topic then using the drop down choose the one that contains the name of the AWS CloudFormation stack from Step 2.4 as well as the name TwoWaySMSSNSTopic and click Save.

Step 4: Create a new incident

To create a new incident, navigate to Amazon DynamoDB console > Tables and select the table containing the name of the AWS CloudFormation stack from Step 2.4 as well as the name IncidentInfoDynamoDB. Select View items and then Create item.

On the Create item page choose JSON, copy and paste the JSON below into the text box and replace the values for the first_contact and second_contact with a valid mobile number that you have access to.

Note: If you don’t have two different mobile numbers, enter the same for both first_contact and second_contact fields. The mobile numbers must follow E.164 format +<country code><number>.

{
   "incident_id":{
      "S":"123"
   },
   "incident_stat":{
      "S":"not_acknowledged"
   },
   "double_escalation":{
      "S":"no"
   },
   "description":{
      "S":"Error 111, unit 1 malfunctioned. Urgent assistance is required."
   },
   "url":{
      "S":"https://example.com/incident/111/overview"
   },
   "first_contact":{
      "S":"+4479083---"
   },
   "second_contact":{
      "S":"+4479083---"
   }
}

Incident fields description:

  • incident_id: Needs to be unique
  • incident_stat: This is used from the application to store the incident status. When creating the incident, this value should always be not_acknowledged
  • double_escalation: This is used from the application as a flag for recipients who try to escalate an incident that is already escalated. When creating the incident, this value should always be no
  • description: You can type a description that best describes the incident. Be aware that depending the number of characters the SMS parts will increase. For more information on SMS character limits visit this page
  • url: You can add a URL that resources can access to resolve the issue. If this field is not pertinent to your use case then type no url
  • first_contact: This should contain the mobile number in E.164 format for the first resource
  • second_contact: This should contain the mobile number in E.164 format for the second resource. The second resource will be contacted only if the first one does not acknowledge the SMS or declines the incident

Once the above is ready you can select Create item. This will execute the AWS Step Functions State machine and you should receive an SMS. You can reply with yes to acknowledge the incident or with no to decline it. Depending your response, the incident status in the DynamoDB table will be updated and if you reply no then the incident will be escalated sending a SMS to the second_contact.

Note: The SMS response is not case sensitive.

Clean-up

To remove the solution:

  1. Delete the AWS CloudFormation stack by following the steps listed in this guide
  2. Delete the dedicated originating identity that you used to send the SMS by following the steps listed in this guide
  3. Delete the Amazon Pinpoint project by navigating the Amazon Pinpoint console, select your Amazon Pinpoint Project, choose Settings > General settings > Delete Project

Next Steps

This solution currently works only if your SMS recipients are in one country. If your use case requires to send SMS to multiple countries you will need to:

  • Check this page to ensure that these countries support two-way SMS
  • Follow the instructions in this page to obtain a number that supports two-way SMS for each country
  • Expand the solution to identify the country of the SMS recipient and to choose the correct number accordingly. To identify the country of the SMS recipient you can use Amazon Pinpoint’s phone number validate service via Amazon Pinpoint API or SDKs. The phone validate service returns a list of data points per mobile number with one of them being the Country

Incidents that are not being acknowledged by any of the assigned resources, have their status updated to unacknowledged but they don’t escalate further. Depending your requirements, you can expand the solution to send an email using Amazon Pinpoint APIs or perform an outbound call using Amazon Connect APIs.

Conclusion

In this blog post, I have demonstrated how your organization can use Amazon Pinpoint two-way SMS and Step Functions to automate incident notifications. Furthermore, the solution highlights the synergy of AWS services and how you can build a custom solution with little effort that meets your requirements.

About the Author

Pavlos Ioannou Katidis

Pavlos Ioannou Katidis

Pavlos Ioannou Katidis is an Amazon Pinpoint and Amazon Simple Email Service Specialist Solutions Architect at AWS. He loves to dive deep into his customer’s technical issues and help them design communication solutions. In his spare time, he enjoys playing tennis, watching crime TV series, playing FPS PC games, and coding personal projects.

Implementing mutual TLS for Java-based AWS Lambda functions

Post Syndicated from Julian Wood original https://aws.amazon.com/blogs/compute/implementing-mutual-tls-for-java-based-aws-lambda-functions-2/

This post is written by Dhiraj Mahapatro, Senior Specialist SA, Serverless and Christian Mueller, Principal Solutions Architect

Modern secure applications establish network connections to other services through HTTPS. This ensures that the application connects to the right party and encrypts the data before sending it over the network.

You might not want unauthenticated users to connect to your service as a service provider. One solution to this requirement is to use mutual TLS (Transport Layer Security). Mutual TLS (or mTLS) is a common security mechanism that uses client certificates to add an authentication layer. This allows the service provider to verify the client’s identity cryptographically.

The purpose of mutual TLS in serverless

mTLS refers to two parties authenticating each other at the same time when establishing a connection. By default, the TLS protocol only proves the identity of the server to a client using X.509 certificates. With mTLS, a client must prove its identity to the server to communicate. This helps support a zero-trust policy to protect against adversaries like man-in-the-middle attacks.

mTLS is often used in business-to-business (B2B) applications and microservices, where interservice communication needs mutual authentication of parties. In Java, you see the following error when the server expects a certificate, but the client does not provide one:

PKIX path building failed: sun.security.provider.certpath.SunCertPathBuilderException: unable to find valid certification path to requested target

This blog post explains multiple ways to implement a Java-based AWS Lambda function that uses mTLS to authenticate with a third-party internal or external service. The sample application and this post explain the advantages and tradeoffs of each approach.

The KeyStore and TrustStore in Java

The TrustStore is used to store certificate public keys from a certificate authority (CA) or trusted servers. A client can verify the public certificate presented by the server in a TLS connection. A KeyStore stores private key and identity certificates that a specific application uses to prove the client’s identity.

The stores contain opposite certificates. The TrustStore holds the identification certificates that identify others, while the KeyStore holds the identification certificates that identify itself.

Overview

To start, you create certificates. For brevity, this sample application uses a script that uses OpenSSL and Java’s keytool for self-signed certificates from a CA. You store the generated keys in Java KeyStore and TrustStore. However, the best practice for creating and maintaining certificates and private CA is to use AWS Certificate Manager and AWS Certificate Manager Private Certificate Authority.

You can find the details of the script in the README file.

The following diagram shows the use of KeyStore and TrustStore in the client Lambda function, and the server running on Fargate.

KeyStore and TrustStore

KeyStore and TrustStore

The demo application contains several Lambda functions. The Lambda functions act as clients to services provided by Fargate behind an Amazon Network Load Balancer (NLB) running in a private Amazon VPC. Amazon Route 53 private hosted zones are used to resolve selected hostnames. You attach the Lambda functions to this VPC to resolve the hostnames for the NLB. To learn more, read how AWS Lambda uses Hyperplane elastic network interfaces to work with custom VPC.

The following examples refer to portions of InfrastructureStack.java and the implementation in the corresponding Lambda functions.

Providing a client certificate in a Lambda function artifact

The first option is to provide the KeyStore and TrustStore in a Lambda functions’ .zip artifact. You provide specific Java environment variables within the Lambda configuration to instruct the JVM to load and trust your provided Keystore and TrustStore. The JVM uses these settings instead of the Java Runtime Environment’s (JRE) default settings (use a stronger password for your use case):

"-Djavax.net.ssl.keyStore=./client_keystore_1.jks -Djavax.net.ssl.keyStorePassword=secret -Djavax.net.ssl.trustStore=./client_truststore.jks -Djavax.net.ssl.trustStorePassword=secret"

The JRE uses this KeyStore and TrustStore to build a default SSLContext. The HttpClient uses this default SSLContext to create a TLS connection to the backend service running on Fargate.

The following architecture diagram shows the sample implementation. It consists of an Amazon API Gateway endpoint with a Lambda proxy integration that calls a backend Fargate service running behind an NLB.

Providing a client certificate in a Lambda function artifact

Providing a client certificate in a Lambda function artifact

This is a basic approach for a prototype. However, it has a few shortcomings related to security and separation of duties. The KeyStore contains the private key, and the password is exposed to the source code management (SCM) system, which is a security concern. Also, it is the Lambda function owner’s responsibility to update the certificate before its expiration. You can address these concerns about separation of duties with the following approach.

Providing the client certificate in a Lambda layer

In this approach, you separate the responsibility between two entities. The Lambda function owner and the KeyStore and TrustStore owner.

The KeyStore and TrustStore owner provides the certificates securely to the function developer who may be working in a separate AWS environment. For simplicity, the demo application uses the same AWS account.

The KeyStore and TrustStore owner achieves this by using AWS Lambda layers. The KeyStore and TrustStore owner packages and uploads the certificates as a Lambda layer and only allows access to authorized functions. The Lambda function owner does not access the KeyStore or manage its lifecycle. The KeyStore and TrustStore owner’s responsibility is to release a new version of this layer when necessary and inform users.

Providing the client certificate in a Lambda layer

Providing the client certificate in a Lambda layer

The KeyStore and TrustStore are extracted under the path /opt as part of including a Lambda layer. The Lambda function can now use the layer as:

Function lambdaLayerFunction = new Function(this, "LambdaLayerFunction", FunctionProps.builder()
  .functionName("lambda-layer")
  .handler("com.amazon.aws.example.AppClient::handleRequest")
  .runtime(Runtime.JAVA_11)
  .architecture(ARM_64)
  .layers(singletonList(lambdaLayerForService1cert))
  .vpc(vpc)
  .code(Code.fromAsset("../software/2-lambda-using-separate-layer/target/lambda-using-separate-layer.jar"))
  .memorySize(1024)
  .environment(Map.of(
    "BACKEND_SERVICE_1_HOST_NAME", BACKEND_SERVICE_1_HOST_NAME,
    "JAVA_TOOL_OPTIONS", "-Djavax.net.ssl.keyStore=/opt/client_keystore_1.jks -Djavax.net.ssl.keyStorePassword=secret -Djavax.net.ssl.trustStore=/opt/client_truststore.jks -Djavax.net.ssl.trustStorePassword=secret"
  ))
  .timeout(Duration.seconds(10))
  .logRetention(RetentionDays.ONE_WEEK)
  .build());

The KeyStore and TrustStore passwords are still supplied as environment variables and stored in the SCM system, which is against best practices. You can address this with the next approach.

Storing passwords securely in AWS Systems Manager Parameter Store

AWS Systems Manager Parameter Store provides secure, hierarchical storage for configuration data and secret management. You can use Parameter Store to store the KeyStore and TrustStore passwords instead of environment variables. The Lambda function uses an IAM policy to access Parameter Store and gets the passwords as a secure string during the Lambda initialization phase.

With this approach, you build a custom SSLContext after retrieving the KeyStore and TrustStore passwords from the Parameter Store. Once you create SSLContext, provide that to the HttpClient you use to connect with the backend service:

HttpClient client = HttpClient.newBuilder()
  .version(HttpClient.Version.HTTP_2)
  .connectTimeout(Duration.ofSeconds(5))
  .sslContext(sslContext)
  .build();

You can also use a VPC interface endpoint for AWS Systems Manager to keep the traffic from your Lambda function to Parameter Store internal to AWS. The following diagram shows the interaction between AWS Lambda and Parameter Store.

Storing passwords securely in AWS Systems Manager Parameter Store

Storing passwords securely in AWS Systems Manager Parameter Store

This approach works for Lambda functions interacting with a single backend service requiring mTLS. However, it is common in a modern microservices architecture to integrate with multiple backend services. Sometimes, these services require a client to assume different identities by using different KeyStores. The next approach explains how to handle the multiple services scenario.

Providing multiple client certificates in Lambda layers

You can provide multiple KeyStore and TrustStore pairs within multiple Lambda layers. All layers attached to a function are merged when provisioning the function. Ensure your KeyStore and TrustStore names are unique. A Lambda function can use up to five Lambda layers.

Similar to the previous approach, you load multiple KeyStores and TrustStores to construct multiple SSLContext objects. You abstract the common logic to create an SSLContext object in another Lambda layer. Now, the Lambda function calling two different backend services uses 3 Lambda layers:

  • Lambda layer for backend service 1 (under /opt)
  • Lambda layer for backend service 2 (under /opt)
  • Lambda layer for the SSL utility that takes the KeyStore, TrustStore, and their passwords to return an SSLContext object

SSL utility Lambda layer provides the getSSLContext default method in a Java interface. The Lambda function implements this interface. Now, you create a dedicated HTTP client per service.

The following diagram shows your final architecture:

Providing multiple client certificates in Lambda layers

Providing multiple client certificates in Lambda layers

Prerequisites

To run the sample application, you need:

  1. CDK v2
  2. Java 11
  3. AWS CLI
  4. Docker
  5. jq

To build and provision the stack:

  1. Clone the git repository.
  2. git clone https://github.com/aws-samples/serverless-mutual-tls.git
    cd serverless-mutual-tls
  3. Create the two root CA’s, client, and server certificates.
  4. ./scripts/1-create-certificates.sh
  5. Build and package all examples.
  6. ./scripts/2-build_and_package-functions.sh
  7. Provision the AWS infrastructure (make sure that Docker is running).
  8. ./scripts/3-provision-infrastructure.sh

Verification

Verify that the API endpoints are working and using mTLS by running these commands from the base directory:

export API_ENDPOINT=$(cat infrastructure/target/outputs.json | jq -r '.LambdaMutualTLS.apiendpoint')

To see the error when mTLS is not used in the Lambda function, run:

curl -i $API_ENDPOINT/lambda-no-mtls

The preceding curl command responds with an HTTP status code 500 and plain body as:

PKIX path building failed: sun.security.provider.certpath.SunCertPathBuilderException: unable to find valid certification path to requested target

For successful usage of mTLS as shown in the previous use cases, run:

curl -i $API_ENDPOINT/lambda-only
curl -i $API_ENDPOINT/lambda-layer
curl -i $API_ENDPOINT/lambda-parameter-store
curl -i $API_ENDPOINT/lambda-multiple-certificates

The last curl command responds with an HTTP status code 200 and body as:

[
 {"hello": "from backend service 1"}, 
 {"hello": "from backend service 2"}
]

Additional security

You can add additional controls via Java environment variables. Compliance standards like PCI DSS in financial services require customers to exercise more control over the underlying negotiated protocol and ciphers.

Some of the useful Java environment variables to troubleshoot SSL/TLS connectivity issues in a Lambda function are:

-Djavax.net.debug=all
-Djavax.net.debug=ssl,handshake
-Djavax.net.debug=ssl:handshake:verbose:keymanager:trustmanager
-Djavax.net.debug=ssl:record:plaintext

You can enforce a specific minimum version of TLS (for example, v1.3) to meet regulatory requirements:

-Dhttps.protocols=TLSv1.3

Alternatively, programmatically construct your SSLContext inside the Lambda function:

SSLContext sslContext = SSLContext.getInstance("TLSv1.3");

You can also use the following Java environment variable to limit the use of weak cipher suites or unapproved algorithms, and explicitly provide the supported cipher suites:

-Dhttps.cipherSuites=TLS_ECDHE_ECDSA_WITH_AES_128_GCM_SHA256,TLS_ECDHE_ECDSA_WITH_AES_256_GCM_SHA384,TLS_ECDHE_ECDSA_WITH_AES_128_CBC_SHA,TLS_ECDHE_ECDSA_WITH_AES_256_CBC_SHA,TLS_ECDHE_ECDSA_WITH_AES_128_CBC_SHA256,TLS_ECDHE_ECDSA_WITH_AES_256_CBC_SHA384,TLS_ECDHE_RSA_WITH_AES_128_GCM_SHA256,TLS_ECDHE_RSA_WITH_AES_256_GCM_SHA384,TLS_ECDHE_RSA_WITH_AES_128_CBC_SHA,TLS_ECDHE_RSA_WITH_AES_256_CBC_SHA,TLS_ECDHE_RSA_WITH_AES_128_CBC_SHA256,TLS_ECDHE_RSA_WITH_AES_256_CBC_SHA384,TLS_DHE_RSA_WITH_AES_128_GCM_SHA256,TLS_DHE_RSA_WITH_AES_256_GCM_SHA384,TLS_DHE_RSA_WITH_AES_128_CBC_SHA,TLS_DHE_RSA_WITH_AES_256_CBC_SHA,TLS_DHE_RSA_WITH_AES_128_CBC_SHA256,TLS_DHE_RSA_WITH_AES_256_CBC_SHA256

You achieve the same programmatically with the following code snippet:

httpClient = HttpClient.newBuilder()
  .version(HttpClient.Version.HTTP_2)
  .connectTimeout(Duration.ofSeconds(5))
  .sslContext(sslContext)
  .sslParameters(new SSLParameters(new String[]{
    "TLS_ECDHE_ECDSA_WITH_AES_128_GCM_SHA256",
    "TLS_ECDHE_ECDSA_WITH_AES_256_GCM_SHA384",
    "TLS_ECDHE_ECDSA_WITH_AES_128_CBC_SHA",
    ………
  }))
  .build();

Cleaning up

The stack creates a custom VPC and other related resources. Clean up after usage to avoid the ongoing cost of running these services. To clean up the infrastructure and the self-generated certificates, run:

./scripts/4-delete-certificates.sh
./scripts/5-deprovision-infrastructure.sh

Conclusion

mTLS in Java using KeyStore and TrustStore is a well-established approach for using client certificates to add an authentication layer. This blog highlights the four approaches that you can take to implement mTLS using Java-based Lambda functions.

Each approach addresses the separation of concerns required while implementing mTLS with additional security features. Use an approach that suits your needs, organizational security best practices, and enterprise requirements. Refer to the demo application for additional details.

For more serverless learning resources, visit Serverless Land.

Extend SQL Server DR using log shipping for SQL Server FCI with Amazon FSx for Windows configuration

Post Syndicated from Yogi Barot original https://aws.amazon.com/blogs/architecture/extend-sql-server-dr-using-log-shipping-for-sql-server-fci-with-amazon-fsx-for-windows-configuration/

This week for Women’s History Month, we’re continuing to feature female authors. We’re showcasing women in the tech industry who are building, creating, and, above all, inspiring, empowering, and encouraging everyone—especially women and girls—in tech.


Companies choosing to rehost their on-premises SQL Server workloads to AWS can face challenges with setting up their disaster recovery (DR) strategy. Solutions such as Always On can be a more expensive, complex configuration across Regions. It can cause latency issues when synchronously replicating data cross-Region. Snapshots have additional overhead and may breach their stringent recovery point objective/recovery time objective (RPO/RTO) requirements.

A log shipping solution can take advantage of cross-Region replication of data using Amazon FSx for Windows File Server. It has less maintenance overhead, doesn’t introduce latency, and meets RPO/RTO requirements. A multi-Region architecture for Microsoft SQL Server is often adopted for SQL Server deployments for business continuity (disaster recovery) and improved latency (for a geographically distributed customer base).

This blog post explores SQL Server DR architecture using SQL Server failover cluster with Amazon FSx for Windows File Server for the primary site and secondary DR site. We describe how to set up a multi-Region DR using log shipping. We’ll explain the architecture patterns so you can follow along and effectively design a highly available SQL Server deployment that spans two or more AWS Regions.

Here are some advantages of using log shipping versus Always On distributed availability group DR setup.

  • Log shipping works with SQL Server Standard edition
  • It lowers total cost of ownership (TCO) as you only need one SQL Server Standard edition license at the primary/DR site
  • It’s straightforward to configure
  • There’s no need for clustering setup at the OS level
  • It supports all SQL Server versions. You don’t need the SQL Server version to be the same for source and destination instances.

Log shipping DR solution for SQL Server FCI with Amazon FSx

The architecture diagram in Figure 1 depicts SQL Server failover cluster instance (FCI) using Amazon FSx as storage (multiple Availability Zones) in Region 1. It uses a standalone or a similar setup on Region 2. It uses a log shipping feature for replication and DR. This will also serve as the reference architecture for our solution.

Log shipping DR solution for SQL Server FCI with Amazon FSx

Figure 1. Log shipping DR solution for SQL Server FCI with Amazon FSx

Figure 1 shows an SQL cluster in Region 1 and standalone SQL cluster in Region 2. The primary cluster in Region 1 is initially configured with SQL Server failover cluster instance (FCI) using Amazon FSx for its shared storage. Region 2 can have a standalone Amazon EC2 server with SQL Server and Amazon Elastic Block Store (EBS) as storage. Or it can have an identical configuration to Region 1, but with different hostnames, and an SQL network name (SQLFCI02) to avoid possible collisions.

You can build the VPC peering or AWS Transit Gateway to have seamless connectivity between the two Regions for the opened ports (SQL Server, SMB for file share, and others.)

With Amazon FSx, you get a fully managed and shared file storage solution, that automatically replicates the underlying storage synchronously across multiple Availability Zones. Amazon FSx provides high availability with automatic failure detection and automatic failover if there are any hardware or storage issues. The service fully supports continuously available shares, a feature that permits SQL Server uninterrupted access to shared file data.

There is an asynchronous replication setup from Region 1 to Region 2 using the log shipping feature. In this type of configuration, Microsoft SQL Server log shipping replicates databases using transaction logs. This ensures that a physically replicated warm standby database is an exact binary replica of the primary database. This is referred to as physical replication.

Log shipping can be configured with two available modes. These are related to the state of the secondary log-shipped SQL Server database.

  • Standby mode. The database is available for querying. Users cannot access the database while restore is going on. But once restore is completed, users can access it in read-only mode.
  • Restore mode. The database is not accessible for users.

In this solution, you configure a warm standby SQL Server database on an EC2 instance designated in SQL FCI using Amazon FSx as shared storage. You can send transaction log backups asynchronously between your primary Region database and the warm standby server in the other Region. The transaction log backups are then applied to the warm standby database sequentially. When all the logs have been applied, you can perform a manual failover and point the application to the secondary Region. We recommend running the primary and secondary database instances in separate Availability Zones, and configuring a monitor instance to track all the details of log shipping.

Prerequisites

Walkthrough steps to set up DR for SQL Server FCI

Following are the steps required to configure SQL Server DR using SQL Server failover cluster. Amazon FSx for Windows File Server is used for the primary site and secondary DR site. We also demonstrate how to set up a multi-Region log shipping.

Assumed variables

Region_01:
WSFC Cluster Name: SQLCluster1
FCI Virtual Network Name: SQLFCI01
Region_02:
Amazon EC2 Name: EC2SQL2

Make sure to configure network connectivity between your clusters. In this solution, we are using two VPCs in two separate Regions.

    • VPC peering is configured to enable network traffic on both VPCs.
    • The domain controller (AWS Managed Microsoft AD) on both VPCs are configured with conditional forwarding. This enables DNS resolution between the two VPCs.
  1. Configure SQL FCI setup using Amazon FSx as shared storage on Region_01.
  2. Configure SQL standalone instance on Region_02 with EBS volume as storage.
  3. Create an Amazon FSx in the primary Region with AWS managed Active Directory, or on-premises Active Directory connected with trust relation or AD Connector.
  4. Create a SQL Server service account with proper permissions to be able to set up transaction log settings.
  5. Configure VPC peering between the primary and DR/secondary Region.
  6. Join the domain to the Active Directory network for both primary and secondary servers in primary Region.
  7. Mount Amazon FSx on primary and secondary server and allow shared permissions, so SQL Server is able to access the folder. Use Amazon FSx for storing transaction log backups and EBS for storing transaction logs on the secondary Region.
  8. Set up log shipping from the primary server SQL Server FCI01 to the secondary SQL Server EC2SQL2 with the standby option enabled. This way the databases can be in read on the secondary SQL Server.
  9. In case of disaster, follow the FAILOVER and FAILBACK steps in the next sections. Learn more by reading Change Roles Between Primary and Secondary Log Shipping Servers.

Failover steps

In case of disaster at primary Region node SQLFCI01, log shipping acts as DR solution. Following, we show the steps to bring the databases online on EC2SQL02. Once SQLFCI01 is back, Use the following steps if DR drill checks to failover. In a real disaster, follow the process from Step 3 onwards.

1. Stop all activities on SQLFCI01 databases involved in log shipping jobs on SQLFCI01 and EC2SQL02. Confirm if any process is running by using the following query:

Use master
Go
select * from sysprocesses where dbid = DB_ID('DatabaseName')

2. Take full backup on SQLFCI01 as rollback option.

BACKUP DATABASE [DatabaseName]
TO  DISK = N'Provide Drive details'
WITH COMPRESSION
GO

3. Take last tail transaction log backup if we have access to SQL Server. Otherwise, check the last available transaction log stored in EC2SQL02 and restore it with RECOVERY to bring the databases online on EC2SQL02.

RESTORE LOG [DatabaseName] FROM  DISK = N'Provide path of last tlog'
WITH  FILE = 1,  RECOVERY,  NOUNLOAD,  STATS = 10
GO

4. Redirect the application connections to EC2SQL02.

Failback methods

1. Native backup/restore or rollback strategy

  • Take full backup from EC2SQL02 and copy to the SQLFCI01.
  • RESTORE the full backup on SQLFCI01.
  • Reconfigure log shipping between SQLFCI01 and EC2SQL02.

2.    Reverse log shipping

In case of DR drills or business continuity and disaster recovery (BCDR) activities, we can set up reverse log shipping to reduce the time taken to failover. It doesn’t require reinitializing the database with a full backup if performed carefully. It is crucial to preserve the log sequence number (LSN) chain. Perform the final log backup using the NORECOVERY option. Backing up the log with this option puts the database in a state where log backups can be restored. It ensures that the database’s LSN chain doesn’t deviate. This procedure helps reduce downtime to bring back SQLFCI01.

  • STOP all activities on SQLFCI01 databases involved in log shipping jobs on SQLFCI01 and EC2SQL02.
  • TAKE Tlog backup of SQLFCI01 with NORECOVERY option.

BACKUP LOG [DatabaseName]
TO DISK = 'BackupFilePathname'
WITH NORECOVERY;

  • RESTORE transaction log backup on EC2SQL02 with NORECOVERY.
  • Reconfigure log shipping and reenable the jobs back.
  • Reconfigure the application connections to SQLFCI01.

Conclusion

A multi-Region strategy for your mission-critical SQL Server deployments is key for business continuity and disaster recovery. This blog post shows how to achieve that using log shipping for SQL Server FCI deployment. Setting up DR using log shipping can help you save costs and meet your business requirements.

To learn more, check out Simplify your Microsoft SQL Server high availability deployments using Amazon FSx for Windows File Server.

More posts for Women’s History Month!

Other ways to participate

How to set up federated single sign-on to AWS using Google Workspace

Post Syndicated from Wei Chen original https://aws.amazon.com/blogs/security/how-to-set-up-federated-single-sign-on-to-aws-using-google-workspace/

Organizations who want to federate their external identity provider (IdP) to AWS will typically do it through AWS Single Sign-On (AWS SSO), AWS Identity and Access Management (IAM), or use both. With AWS SSO, you configure federation once and manage access to all of your AWS accounts centrally. With AWS IAM, you configure federation to each AWS account, and manage access individually for each account. AWS SSO supports identity synchronization through the System for Cross-domain Identity Management (SCIM) v2.0 for several identity providers. For IdPs not currently supported, you can provision users manually. Otherwise, you can choose to federate to AWS from Google Workspace through IAM federation, which this post will cover below.

Google Workspace offers a single sign-on service based off of the Security Assertion Markup Language (SAML) 2.0. Users can use this service to access to your AWS resources by using their existing Google credentials. For users to whom you grant access, they will see an additional SAML app in their Google Workspace console. When your users choose this SAML app, they will be redirected to www.google.com the AWS Management Console.

Solution Overview

In this solution, you will create a SAML identity provider in IAM to establish a trusted communication channel across which user authentication information may be securely passed with your Google IdP in order to permit your Google Workspace users to access the AWS Management Console. You, as the AWS administrator, delegate responsibility for user authentication to a trusted IdP, in this case Google Workspace. Google Workspace leverages SAML 2.0 messages to communicate user authentication information between Google and your AWS account. The information contained within the SAML 2.0 messages allows an IAM role to grant the federated user permissions to sign in to the AWS Management Console and access your AWS resources. The IAM policy attached to the role they select determines which permissions the federated user has in the console.

Figure 1: Login process for IAM federation

Figure 1: Login process for IAM federation

Figure 1 illustrates the login process for IAM federation. From the federated user’s perspective, this process happens transparently: the user starts at the Google Workspace portal and ends up at the AWS Management Console, without having to supply yet another user name and password.

  1. The portal verifies the user’s identity in your organization. The user begins by browsing to your organization’s portal and selects the option to go to the AWS Management Console. In your organization, the portal is typically a function of your IdP that handles the exchange of trust between your organization and AWS. In Google Workspace, you navigate to https://myaccount.google.com/ and select the nine dots icon on the top right corner. This will show you a list of apps, one of which will log you in to AWS. This blog post will show you how to configure this custom app.
    Figure 2: Google Account page

    Figure 2: Google Account page

  2. The portal verifies the user’s identity in your organization.
  3. The portal generates a SAML authentication response that includes assertions that identify the user and include attributes about the user. The portal sends this response to the client browser. Although not discussed here, you can also configure your IdP to include a SAML assertion attribute called SessionDuration that specifies how long the console session is valid. You can also configure the IdP to pass attributes as session tags.
  4. The client browser is redirected to the AWS single sign-on endpoint and posts the SAML assertion.
  5. The endpoint requests temporary security credentials on behalf of the user, and creates a console sign-in URL that uses those credentials.
  6. AWS sends the sign-in URL back to the client as a redirect.
  7. The client browser is redirected to the AWS Management Console. If the SAML authentication response includes attributes that map to multiple IAM roles, the user is first prompted to select the role for accessing the console.

The list below is a high-level view of the specific step-by-step procedures needed to set up federated single sign-on access via Google Workspace.

The setup

Follow these top-level steps to set up federated single sign-on to your AWS resources by using Google Apps:

  1. Download the Google identity provider (IdP) information.
  2. Create the IAM SAML identity provider in your AWS account.
  3. Create roles for your third-party identity provider.
  4. Assign the user’s role in Google Workspace.
  5. Set up Google Workspace as a SAML identity provider (IdP) for AWS.
  6. Test the integration between Google Workspace and AWS IAM.
  7. Roll out to a wider user base.

Detailed procedures for each of these steps compose the remainder of this blog post.

Step 1. Download the Google identity provider (IdP) information

First, let’s get the SAML metadata that contains essential information to enable your AWS account to authenticate the IdP and locate the necessary communication endpoint locations:

  1. Log in to the Google Workspace Admin console
  2. From the Admin console Home page, select Security > Settings > Set up single sign-on (SSO) with Google as SAML Identity Provider (IdP).
    Figure 3: Accessing the "single sign-on for SAML applications" setting

    Figure 3: Accessing the “single sign-on for SAML applications” setting

  3. Choose Download Metadata under IdP metadata.
    Figure 4: The "SSO with Google as SAML IdP" page

    Figure 4: The “SSO with Google as SAML IdP” page

Step 2. Create the IAM SAML identity provider in your account

Now, create an IAM IdP for Google Workspace in order to establish the trust relationship between Google Workspace and your AWS account. The IAM IdP you create is an entity within your AWS account that describes the external IdP service whose users you will configure to assume IAM roles.

  1. Sign in to the AWS Management Console and open the IAM console at https://console.aws.amazon.com/iam/.
  2. In the navigation pane, choose Identity providers and then choose Add provider.
  3. For Configure provider, choose SAML.
  4. Type a name for the identity provider (such as GoogleWorkspace).
  5. For Metadata document, select Choose file then specify the SAML metadata document that you downloaded in Step 1–c.
  6. Verify the information that you have provided. When you are done, choose Add provider.
    Figure 5: Adding an Identity provider

    Figure 5: Adding an Identity provider

  7. Document the Amazon Resource Name (ARN) by viewing the identity provider you just created in step f. The ARN should looks similar to this:

    arn:aws:iam::123456789012:saml-provider/GoogleWorkspace

Step 3. Create roles for your third-party Identity Provider

For users accessing the AWS Management Console, the IAM role that the user assumes allows access to resources within your AWS account. The role is where you define what you allow a federated user to do after they sign in.

  1. To create an IAM role, go to the AWS IAM console. Select Roles > Create role.
  2. Choose the SAML 2.0 federation role type.
  3. For SAML Provider, select the provider which you created in Step 2.
  4. Choose Allow programmatic and AWS Management Console access to create a role that can be assumed programmatically and from the AWS Management Console.
  5. Review your SAML 2.0 trust information and then choose Next: Permissions.
    Figure 6: Reviewing your SAML 2.0 trust information

    Figure 6: Reviewing your SAML 2.0 trust information

GoogleSAMLPowerUserRole:

  1. For this walkthrough, you are going to create two roles that can be assumed by SAML 2.0 federation. For GoogleSAMLPowerUserRole, you will attach the PowerUserAccess AWS managed policy. This policy provides full access to AWS services and resources, but does not allow management of users and groups. Choose Filter policies, then select AWS managed – job function from the dropdown. This will show a list of AWS managed policies designed around specific job functions.
    Figure 7: Selecting the AWS managed job function

    Figure 7: Selecting the AWS managed job function

  2. To attach the policy, select PowerUserAccess. Then choose Next: Tags, then Next: Review.
    Figure 8: Attaching the PowerUserAccess policy to your role

    Figure 8: Attaching the PowerUserAccess policy to your role

  3. Finally, choose Create role to finalize creation of your role.
    Figure 9: Creating your role

    Figure 9: Creating your role

GoogleSAMLViewOnlyRole

Repeat steps a to g for the GoogleSAMLViewOnlyRole, attaching the ViewOnlyAccess AWS managed policy.

Figure 10: Creating the GoogleSAMLViewOnlyRole

Figure 10: Creating the GoogleSAMLViewOnlyRole

Figure 11: Attaching the ViewOnlyAccess permissions policy

Figure 11: Attaching the ViewOnlyAccess permissions policy

  1. Document the ARN of both roles. The ARN should be similar to

    arn:aws:iam::123456789012:role/GoogleSAMLPowerUserRole and

    arn:aws:iam::123456789012:role/GoogleSAMLViewOnlyAccessRole.

Step 4. Assign the user’s role in Google Workspace

Here you will specify the role or roles that this user can assume in AWS.

  1. Log in to the Google Admin console.
  2. From the Admin console Home page, go to Directory > Users and select Manage custom attributes from the More dropdown, and choose Add Custom Attribute.
  3. Configure the custom attribute as follows:

    Category: AWS
    Description: Amazon Web Services Role Mapping

    For Custom fields, enter the following values:

    Name: AssumeRoleWithSaml
    Info type: Text
    Visibility: Visible to user and admin
    InNo. of values: Multi-value
  4. Choose Add. The new category should appear in the Manage user attributes page.
    Figure12: Adding the custom attribute

    Figure12: Adding the custom attribute

  5. Navigate to Users, and find the user you want to allow to federate into AWS. Select the user’s name to open their account page, then choose User Information.
  6. Select on the custom attribute you recently created, named AWS. Add two rows, each of which will include the values you recorded earlier, using the format below for each AssumeRoleWithSaml row.

    Row 1:
    arn:aws:iam::123456789012:role/GoogleSAMLPowerUserRole,arn:aws:iam:: 123456789012:saml-provider/GoogleWorkspace

    Row 2:
    arn:aws:iam::123456789012:role/GoogleSAMLViewOnlyAccessRole,arn:aws:iam:: 123456789012:saml-provider/GoogleWorkspace

    The format of the AssumeRoleWithSaml is constructed by using the RoleARN(from Step 3-h) + “,”+ Identity provider ARN (from Step 2-g), this value will be passed as SAML attribute value for attribute with name https://aws.amazon.com/SAML/Attributes/Role. The final result will look similar to below:

    Figure 13: Adding the roles that the user can assume

    Figure 13: Adding the roles that the user can assume

Step 5. Set up Google Workspace as a SAML identity provider (IdP) for AWS

Now you’ll set up the SAML app in your Google Workspace account. This includes adding the SAML attributes that the AWS Management Console expects in order to allow a SAML-based authentication to take place.

Log into the Google Admin console.

  1. From the Admin console Home page, go to Apps > Web and mobile apps.
  2. Choose Add custom SAML app from the Add App dropdown.
  3. Enter AWS Single-Account Access for App name and upload an optional App icon to identify your SAML application, and select Continue.
    Figure 14: Naming the custom SAML app and setting the icon

    Figure 14: Naming the custom SAML app and setting the icon

  4. Fill in the following values:

    ACS URL: https://signin.aws.amazon.com/saml
    Entity ID: urn:amazon:webservices
    Name ID format: EMAIL
    Name ID: Basic Information > Primary email

    Note: Your primary email will become your role’s AWS session name

  5. Choose CONTINUE.
    Figure 15: Adding the custom SAML app

    Figure 15: Adding the custom SAML app

  6. AWS requires the IdP to issue a SAML assertion with some mandatory attributes (known as claims). The AWS documentation explains how to configure the SAML assertion. In short, you need to create an assertion with the following:
    • An attribute of name https://aws.amazon.com/SAML/Attributes/Role. This element contains one or more AttributeValue elements that list the IAM identity provider and role to which the user is mapped by your IdP. The IAM role and IAM identity provider are specified as a comma-delimited pair of ARNs in the same format as the RoleArn and PrincipalArn parameters that are passed to AssumeRoleWithSAML.
    • An attribute of name https://aws.amazon.com/SAML/Attributes/RoleSessionName (again, this is just a definition of type, not an actual URL) with a string value. This is the federated user’s role session name in AWS.
    • A name identifier (NameId) that is used to identify the subject of a SAML assertion.

      Google Directory attributes App attributes
      AWS > AssumeRoleWithSaml https://aws.amazon.com/SAML/Attributes/Role
      Basic Information > Primary email https://aws.amazon.com/SAML/Attributes/RoleSessionName
      Figure 16: Mapping between Google Directory attributes and SAML attributes

      Figure 16: Mapping between Google Directory attributes and SAML attributes

  7. Choose FINISH and save the mapping.

Step 6. Test the integration between Google Workspace and AWS IAM

  1. Log into the Google Admin portal.
  2. From the Admin console Home page, go to Apps > Web and mobile apps.
  3. Select the Application you created in Step 5-i.
  4. At the top left, select TEST SAML LOGIN, then choose ALLOW ACCESS within the popup box.
    Figure 18: Testing the SAML login

    Figure 18: Testing the SAML login

  5. Select ON for everyone in the Service status section, and choose SAVE. This will allow every user in Google Workspace to see the new SAML custom app.
    Figure 19: Saving the custom app settings

    Figure 19: Saving the custom app settings

  6. Now navigate to Web and mobile apps and choose TEST SAML LOGIN again. Amazon Web Services should open in a separate tab and display two roles for users to choose from:
    FIgure 20: Testing SAML login again

    FIgure 20: Testing SAML login again

    Figure 21: Selecting the IAM role you wish to assume for console access

    Figure 21: Selecting the IAM role you wish to assume for console access

  7. Select the desired role and select Sign in.
  8. You should now be redirected to AWS Management Console home page.
  9. Google workspace users should now be able to access the AWS application from their workspace:
    Figure 22: Viewing the AWS custom app

    Figure 22: Viewing the AWS custom app

Conclusion

By following the steps in this blog post, you’ve configured your Google Workspace directory and AWS accounts to allow SAML-based federated sign-on for selected Google Workspace users. Using this over IAM users helps centralize identity management, making it easier to adopt a multi-account strategy.

If you have feedback about this post, submit comments in the Comments section below. If you have questions about this post, contact AWS Support.

Want more AWS Security news? Follow us on Twitter.

Wei Chen

Wei Chen

Wei Chen is a Sr. Solutions Architect at Amazon Web Services, based in Austin, TX. He has more than 20 years of experience assisting customers with the building of solutions to significantly complex challenges. At AWS, Wei helps customers achieve their strategic business objectives by rearchitecting their applications to take full advantage of the cloud. He specializes on mastering the compliance frameworks, technical compliance programs, physical security, security processes, and AWS Security services.

Roy Tokeshi

Roy Tokeshi

Roy is a Solutions Architect for Amazon End User Computing. He enjoys making in AWS, CNC, laser engravers, and IoT. He likes to help customers build mechanisms to create business value.

Michael Chan

Michael Chan

Michael is a Solutions Architect for AWS Identity. He enjoys understanding customer problems with AWS IAM and working backwards to provide practical solutions.

Building serverless multi-Region WebSocket APIs

Post Syndicated from James Beswick original https://aws.amazon.com/blogs/compute/building-serverless-multi-region-websocket-apis/

This post is written by Ben Freiberg, Senior Solutions Architect, and Marcus Ziller, Senior Solutions Architect.

Many modern web applications use the WebSocket protocol for bidirectional communication between frontend clients and backends. The fastest way to get started with WebSockets on AWS is to use WebSocket APIs powered by Amazon API Gateway.

This serverless solution allows customers to get started with WebSockets without having the complexity of running a WebSocket API. WebSocket APIs are a Regional service bound to a single Region, which may affect latency and resilience for some workloads.

This post shows how to build a multi-regional WebSocket API for a global real-time chat application.

Overview of the solution

This solution uses AWS Cloud Development Kit (CDK). This is an open source software development framework to model and provision cloud application resources. Using the CDK can reduce the complexity and amount of code needed to automate the deployment of resources.

This solution uses AWS Lambda, Amazon API Gateway, Amazon DynamoDB, and Amazon EventBridge.

This diagram outlines the workflow implemented in this blog:

Solution architecture

  1. Users across different Regions establish WebSocket connections to an API endpoint in a Region. For every connection, the respective API Gateway invokes the ConnectionHandler Lambda function, which stores the connection details in a Regional DynamoDB table.
  2. User A sends a chat message via the established WebSocket connection. The API Gateway invokes the ClientMessageHandler Lambda function with the received message. The Lambda function publishes an event to an EventBridge event bus that contains the message and the connectionId of the message sender.
  3. The event bus invokes the EventBusMessageHandler Lambda function, which pushes the received message to all other clients connected in the Region. It also replicates the event into us-west-1.
  4. EventBusMessageHandler in us-west-1 receives and send it out to all connected clients in the Region via the same mechanism.

Walkthrough

The following walkthrough explains the required components, their interactions and how the provisioning can be automated via CDK.

For this walkthrough, you need:

Checkout and deploy the sample stack:

  1. After completing the prerequisites, clone the associated GitHub repository by running the following command in a local directory:
    git clone [email protected]/aws-samples/multi-region-websocket-api
  2. Open the repository in your preferred editor and review the contents of the src and cdk folder.
  3. Follows the instructions in the README.md to deploy the stack.

The following components are deployed in your account for every specified Region. If you didn’t change the default, the Regions are eu-west-1 and us-west-1.

API Gateway for WebSocket connectivity

API Gateway is a fully managed service that makes it easier for developers to create, publish, maintain, monitor, and secure APIs at any scale. APIs act as the “front door” for applications to access data, business logic, or functionality from your backend services. Using API Gateway, you can create RESTful APIs and WebSocket APIs that enable real-time two-way communication applications.

WebSocket APIs serve as a stateful frontend for an AWS service, in this case AWS Lambda. A Lambda function is used for the WebSocket endpoint that maintains a persistent connection to handle message transfer between the backend service and clients. The WebSocket API invokes the backend based on the content of the messages that it receives from client apps.

There are three predefined routes that can be used: $connect, $disconnect, and $default.

const connectionLambda = new lambda.Function(..);
const requestHandlerLambda = new lambda.Function(..);

const webSocketApi = new apigwv2.WebSocketApi(this, 'WebsocketApi', {
      apiName: 'WebSocketApi',
      description: 'A regional Websocket API for the multi-region chat application sample',
      connectRouteOptions: {
        integration: new WebSocketLambdaIntegration('connectionIntegration', connectionLambda.fn),
      },
      disconnectRouteOptions: {
        integration: new WebSocketLambdaIntegration('disconnectIntegration', connectionLambda.fn),
      },
      defaultRouteOptions: {
        integration: new WebSocketLambdaIntegration('defaultIntegration', requestHandlerLambda.fn),
      },
});

const websocketStage = new apigwv2.WebSocketStage(this, 'WebsocketStage', {
      webSocketApi,
      stageName: 'dev',
      autoDeploy: true,
});

$connect and $disconnect are used by clients to initiate or end a connection with the API Gateway. Each route has a backend integration that is invoked for the respective event. In this example, a Lambda function gets invoked with details of the event. The following code snippet shows how you can track each of the connected clients in an Amazon DynamoDB table. Amazon DynamoDB is a fully managed, serverless, key-value NoSQL database designed to run high-performance applications at any scale.

// Simplified example for brevity
// Visit GitHub repository for complete code

function connectionHandler(event: APIGatewayEvent) {
  if (eventType === 'CONNECT') {
    await dynamoDbClient.put({
      Item: {
        connectionId,
        chatId: 'DEFAULT',
        ttl: Math.round(Date.now() / 1000 + 3600) // TTL of one hour
      },
    });
  }

  if (eventType === 'DISCONNECT') {
    await dynamoDbClient.delete({
      TableName: process.env.TABLE_NAME!,
      Key: {
        connectionId,
        chatId: 'DEFAULT',
      },
    })
  }

  return ..
}

The $default route is used when the route selection expression produces a value that does not match any of the other route keys in your API routes. For this post, we use it as a default route for all messages sent to the API Gateway by a client. For each message, a Lambda function is invoked with an event of the following format.

{
     "requestContext": {
         "routeKey": "$default",
         "messageId": "GXLKJfX4FiACG1w=",
         "eventType": "MESSAGE",
         "messageDirection": "IN",
         "connectionId": "GXLKAfX1FiACG1w=",
         "apiId": "3m4dnp0wy4",
         "requestTimeEpoch": 1632812813588,
         // some fields omitted for brevity   
         },
     "body": "{ .. }",
     "isBase64Encoded": false
}

EventBridge for cross-Region message distribution

The Lambda function uses the AWS SDK to publish the message data in event.body to EventBridge. EventBridge is a serverless event bus that makes it easier to build event-driven applications at scale. It delivers a stream of real-time data from event sources to targets. You can set up routing rules to determine where to send your data to build application architectures that react in real time to your data sources with event publishers and consumers decoupled.

The following CDK code defines routing rules on the event bus that is applied for every event with source ChatApplication and detail type ChatMessageReceived.

    new events.Rule(this, 'ProcessRequest', {
      eventBus,
      enabled: true,
      ruleName: 'ProcessChatMessage',
      description: 'Invokes a Lambda function for each chat message to push the event via websocket and replicates the event to event buses in other regions.',
      eventPattern: {
        detailType: ['ChatMessageReceived'],
        source: ['ChatApplication'],
      },
      targets: [
        new LambdaFunction(processLambda.fn),
        ...additionalEventBuses,
      ],
    });

Intra-Region message delivery

The first target is a Lambda function that sends the message out to clients connected to the API Gateway endpoint in the same Region where the message was received.

To that end, the function first uses the AWS SDK to query DynamoDB for active connections for a given chatId in its AWS Region. It then removes the connectionId of the message sender from the list and calls postToConnection(..) for the remaining connection ids to push the message to the respective clients.

export async function handler(event: EventBridgeEvent<'EventResponse', ResponseEventDetails>): Promise<any> {
  const connections = await getConnections(event.detail.chatId);
  connections
    .filter((cId: string) => cId !== event.detail.senderConnectionId)
    .map((connectionId: string) => gatewayClient.postToConnection({
      ConnectionId: connectionId,
      Data: JSON.stringify({ data: event.detail.message }),
    })
}

Inter-Region message delivery

To send messages across Regions, this solution uses EventBridge’s cross-Region event routing capability. Cross-Region event routing allows you to replicate events across Regions by adding an event bus in another Region as the target of a rule. In this case, the architecture is a mesh of event buses in all Regions so that events in every event bus are replicated to all other Regions.

A message sent to an event bus in a Region is replicated to the event buses in the other Regions and trigger the intra-region workflow that I described earlier. However, to avoid infinite loops the EventBridge service implements circuit breaker logic that prevents infinite loops of event buses sending messages back and forth. Thus, only ProcessRequestLambda is invoked as a rule target. The function receives the message via its invocation event and looks up the active WebSocket connections in its Region. It then pushes the message to all relevant clients.

This process happens in every Region so that the initial message is delivered to every connected client with at-least-once semantics.

Improving resilience

The architecture of this solution is resilient to service disruptions in a Region. In such an event, all clients connected to the affected Region reconnect to an unaffected Region and continue to receive events. Although this isn’t covered in the CDK code, you can also set up Amazon Route 53 health checks to automate DNS failover to a healthy Region.

Testing the workflow

You can use any WebSocket client to test the application. Here you can see three clients, one connected to the us-west-1 API Gateway endpoint and two connected to the eu-west-1 endpoint. Each one sends a message to the application and every other client receives it, regardless of the Region it is connected to.

Testing

Testing

Testing

Cleaning up

Most services used in this blog post have an allowance in the AWS Free Tier. Be sure to check potential costs of this solution and delete the stack if you don’t need it anymore. Instructions on how to do this are included inside the README in the repository.

Conclusion

This blog post shows how to use the AWS serverless platform to build a multi-regional chat application over WebSockets. With the cross-Region event routing of EventBridge the architecture is resilient as well as extensible.

For more resources on how to get the most out of the AWS serverless platform, visit Serverless Land.

Composing AWS Step Functions to abstract polling of asynchronous services

Post Syndicated from James Beswick original https://aws.amazon.com/blogs/compute/composing-aws-step-functions-to-abstract-polling-of-asynchronous-services/

This post is written by Nicolas Jacob Baer, Senior Cloud Application Architect, Goeksel Sarikaya, Senior Cloud Application Architect, and Shukhrat Khodjaev, Engagement Manager, AWS ProServe.

AWS Step Functions workflows can use the three main integration patterns when calling AWS services. A common integration pattern is to call a service and wait for a response before proceeding to the next step.

While this works well with AWS services, there is no built-in support for third-party, on-premises, or custom-built services running on AWS. When a workflow integrates with such a service in an asynchronous fashion, it requires a primary step to invoke the service. There are additional steps to wait and check the result, and handle possible error scenarios, retries, and fallbacks.

Although this approach may work well for small workflows, it does not scale to multiple interactions in different steps of the workflow and becomes repetitive. This may result in a complex workflow, which makes it difficult to build, test, and modify. In addition, large workflows with many repeated steps are more difficult to troubleshoot and understand.

This post demonstrates how to decompose the custom service integration by nesting Step Functions workflows. One basic workflow is dedicated to handling the asynchronous communication that offers modularity. It can be re-used as a building block. Another workflow is used to handle the main process by invoking the nested workflow for service interaction, where all the repeated steps are now hidden in multiple executions of the nested workflow.

Overview

Consider a custom service that provides an asynchronous interface, where an action is initially triggered by an API call. After a few minutes, the result is available to be polled by the caller. The following diagram shows a basic workflow interacting with this custom service that encapsulates the service communication in a workflow:

Workflow diagram

  1. Call Custom Service API – calls a custom service, in this case through an API. Potentially, this could use a service integration or use AWS Lambda if there is custom code.
  2. Wait – waits for the service to prepare a result. This depends on the service that the workflow is interacting with, and could vary from seconds to days to months.
  3. Poll Result – attempts to poll the result from the custom service.
  4. Choice – repeats the polling in case the result was not available yet, move on to failed or success state if result was retrieved. In addition, a timeout should be in place here in case the result is not available within the expected time range. Otherwise, this might lead to an infinite loop.
  5. Fail – fails the workflow if a timeout or a threshold for the number of retries with error conditions is reached.
  6. Transform Result – transforms the result or adds additional meta information to provide further information to the caller (for example, runtime or retries).
  7. Success – finishes the workflow successfully.

If you build a larger workflow that interacts with this custom service in multiple steps in a workflow, you can reduce the complexity by using the Step Functions integration to call the nested workflow with a Wait state.

An illustration of this can be found in the following diagram, where the nested stack is called three times sequentially. Likewise, you can build a more complex workflow that adds additional logic through more steps or interacts with a custom service in parallel. The polling logic is hidden in the nested workflow.

Nested workflow

Walkthrough

To get started with AWS Step Functions and Amazon API Gateway using the AWS Management Console:

  1. Go to AWS Step Functions in the AWS Management Console.
  2. Choose Run a sample project and choose Start a workflow within a workflow.
    Defining state machine
  3. Scroll down to the sample projects, which are defined using Amazon States Language (ASL).
    Definition
  4. Review the example definition, then choose Next.
  5. Choose Deploy resources. The deployment can take up to 10 minutes. After deploying the resources, you can edit the sample ASL code to define steps in the state machine.
    Deploy resources
  6. The deployment creates two state machines: NestingPatternMainStateMachine and NestingPatternAnotherStateMachine. NestingPatternMainStateMachine orchestrates the other nested state machines sequentially or in parallel.
    Two state machines
  7. Select a state machine, then choose Edit to edit the workflow. In the NestingPatternMainStateMachine, the first state triggers the nested workflow NestingPatternAnotherStateMachine. You can pass necessary parameters to the nested workflow by using Parameters and Input as shown in the example below with Parameter1 and Parameter2. Once the first nested workflow completes successfully, the second nested workflow is triggered. If the result of the first nested workflow is not successful, the NestingPatternMainStateMachine fails with the Fail state.
    Editing state machine
  8. Select nested workflow NestingPatternAnotherStateMachine, and then select Edit to add AWS Lambda functions to start a job and poll the state of the jobs. This can be any asynchronous job that needs to be polled to query its state. Based on expected job duration, the Wait state can be configured for 10-20 seconds. If the workflow is successful, the main workflow returns a successful result.
    Edited next state machine

Use cases and limitations

This approach allows encapsulation of workflows consisting of multiple sequential or parallel services. Therefore, it provides flexibility that can be used for different use cases. Services can be part of distributed applications, part of automated business processes, big data or machine learning pipelines using AWS services.

Each nested workflow is responsible for an individual step in the main workflow, providing flexibility and scalability. Hundreds of nested workflows can run and be monitored in parallel with the main workflow (see AWS Step Functions Service Quotas).

The approach described here is not applicable for custom service interactions faster than 1 second, since it is the minimum configurable value for a wait step.

Nested workflow encapsulation

Similar to the principle of encapsulation in object-oriented programming, you can use a nested workflow for different interactions with a custom service. You can dynamically pass input parameters to the nested workflow during workflow execution and receive return values. This way, you can define a clear interface between the nested workflow and the parent workflow with different actions and integrations. Depending on the use-case, a custom service may offer a variety of different actions that must be integrated into workflows that run in Step Functions, but can all be combined into a single workflow.

Debugging and tracing

Additionally, debugging and tracing can be done through Execution Event History in the State Machine Management Console. In the Resource column, you can find a link to the executed nested step function. It can be debugged in case of any error in the nested Step Functions workflow.

Execution event history

However, debugging can be challenging in case of multiple parallel nested workflows. In such cases, AWS X-Ray can be enabled to visualize the components of a state machine, identify performance bottlenecks, and troubleshoot requests that have led to an error.

To enable AWS X-Ray in AWS Step Functions:

  1. Open the Step Functions console and choose Edit state machine.
  2. Scroll down to Tracing settings, and Choose Enable X-Ray tracing.

Tracing

For detailed information regarding AWS X-Ray and AWS Step Functions please refer to the following documentation: https://docs.aws.amazon.com/step-functions/latest/dg/concepts-xray-tracing.html

Conclusion

This blog post describes how to compose a nested Step Functions workflow, which asynchronously manages a custom service using the polling mechanism.

To learn more about how to use AWS Step Functions workflows for serverless microservices orchestration, visit Serverless Land.

Decoding protobuf messages using AWS Lambda

Post Syndicated from James Beswick original https://aws.amazon.com/blogs/compute/decoding-protobuf-messages-using-aws-lambda/

This post is written by Ennio Pastore, Data Lab Architect.

Protobuf is short for protocol buffers, which are language- and platform-neutral mechanisms for serializing structured data. Compared to XML or JSON the size of the messages is smaller, so the network transfer is faster, reducing latency in the interactions between applications. They are commonly used in communications protocols like RPC systems, for persistent storage of data in a variety of storage systems, and in use-cases ranging from data analysis pipelines to mobile clients.

Since the protobuf messages are encoded in a binary format, they are non-human readable and in order to be processed you have to decode them. You define how you want your data to be structured once, then you can use generated source code to read and write structured data more easily. You can use a variety of languages to read and write data from a variety of data streams. Currently the supported languages are C++, C#, Dart, Go, Java, Kotlin, Python.

This blog post shows you how to decode protobuf messages in a data stream processing application using AWS Lambda functions.

Overview

Solution architecture

This example assumes you are already receiving protobuf messages in an Amazon Kinesis Data Streams.

You will learn how to deploy a Lambda function that decodes protobuf messages and store them in JSON format in an Amazon S3 bucket.

To achieve this, create an AWS Lambda layer (step 1) containing the protobuf libraries that are required for the decoding. You can use any development environment where you can install Python 3.x and pip to create the Lambda layers.

After creating the layer, you can include it in the Lambda function (step 2) and you can implement the logic to decode the messages.

Prerequisites

You need the following prerequisites to deploy the solution:

To generate the Python source code required to decode protobuf data, you need a development environment with Python (3.x) and pip already installed.

You can use a local machine, an Amazon EC2 instance, or if you cannot install Python locally, use AWS Cloud9.

Generation of the Python source code for protobuf

Generate the Python source code required for the protobuf encoding and decoding, starting from the proto definition file. This code can be generated using the protobuf compiler from the proto definition file.

  1. Create the proto definition file:
    cat > /home/ec2-user/environment/demo.proto << ENDOFFILE
    syntax = "proto3";
    message demo {
      optional int32 id = 1;
      optional string name = 2;
      optional int32 timevalue = 3;
      optional string event = 4;
    }
    ENDOFFILE 
    
  2. Compile this file with the protobuf compiler (protoc) to generate the Python source code required for the protobuf encoding/decoding. The generated code only works for the classes defined in the proto definition file.
    wget 
    https://github.com/protocolbuffers/protobuf/releases/download/v3.19.1/protoc-3.19.1-linux-x86_64.zip
    
    unzip protoc-3.19.1-linux-x86_64.zip
    
    mkdir /home/ec2-user/environment/output
    
    /home/ec2-user/environment/bin/protoc -I=/home/ec2-user/environment/ --python_out=/home/ec2-user/environment/output demo.proto
    

Create the Lambda layer

  1. In your development environment, in the output directory, create a new directory named protobuf. Install the protobuf libraries locally:
    mkdir -p ~/environment/output/protobuf
    cd ~/environment/output/protobuf
    mkdir python
    cd python
    pip3 install protobuf --target .
    
  2. Include the Python source code to the libraries installed locally:
    mkdir custom
    cd custom
    cp ~/environment/output/demo_pb2.py .
    echo 'custom' >> ~/environment/output/protobuf/python/protobuf-3.19.1.dist-info/namespace_packages.txt
    echo 'custom/demo_pb2.py' >> ~/environment/output/protobuf/python/protobuf-3.19.1.dist-info/RECORD
    echo 'custom' >> ~/environment/output/protobuf/python/protobuf-3.19.1.dist-info/top_level.txt
    
  3. Zip the Python folder:
    cd ~/environment/output/protobuf
    zip -r protobuf.zip .
    
  4. The Lambda layer is ready. If you built it on a remote instance, you must download it in your local machine.

Step 4: Adding the Protobuf Layer to Lambda

Add the layer created in the previous steps to Lambda:

  1. From the AWS Management Console select the Lambda service and choose Create a Layer:
    Creation of the Lambda layer
  2. Enter the name protobuf-lambda and upload the protobuf.zip that you created in the previous step.
  3. Once the upload is complete, select x86_64 compatible architecture and select the corresponding Python runtime versions.

Implementation

The full source of the solution is in the GitHub repository and is deployed with AWS SAM.

  1. Clone the solution repository using git:
    git clone https://github.com/aws-samples/lambda-protobuf-decoder
  2. Build the AWS SAM project:
    sam build
  3. Deploy the project using AWS SAM and the AWS SAM CLI. Follow the prompts, entering:
    1. The name of the Kinesis Data Stream containing the protobuf messages
    2. The name of the S3 Bucket that will be used to store the decoded messages
    3. The name of your previously created AWS Lambda layer.For all other prompts select “Y”.
  4. Deploy the project using AWS SAM:
    sam deploy --guided --capabilities CAPABILITY_NAMED_IAM

SAM output

The stack is complete when the message “Successfully created/updated stack”. If the stack fails, find the resources that failed to create and troubleshoot any issues.

Success message

Testing the AWS SAM stack

  1. Once the AWS SAM stack is successfully deployed, navigate to the Lambda service and choose “protobuf-decoder-lambda”.
    Choose function
  2. Choose the “Monitoring” tab, then “View logs in CloudWatch”:
    View logs in CloudWatch
  3. Select the top Log stream from the list. The logs show for each message the original protobuf message and the decoded message:
    Log messages

Check that all the messages are stored correctly in JSON format in the S3 bucket:

  1. Navigate to the Amazon S3 console and find the destination bucket you specified in the AWS SAM template.
    S3 objects
  2. There are multiple files. Select one and choose Actions -> Query with S3 Select.
    Select multiple objects
  3. In the “Input settings” panel and “Output settings” panels, for the “Format” options, select the value JSON.
    JSON selection #1
  4. In the “SQL query” panel, using the default query, choose Run SQL Query. You can see that the content of the object in the S3 bucket is a JSON message.
    SQL query

Cleaning up

If you have generated any events, empty the S3 bucket before deleting the entire stack. If you do not, the data will not be deleted.

To delete the stack, use the AWS SAM CLI. Assuming the stack name is protodecoder, run:

sam delete --stack-name protodecoder

Conclusion

This post shows how to create a Lambda function to decode in real-time protobuf messages. You import the proto message definition in a development environment and compile it to generate the Python source code.

You create the Lambda layer for the protobuf decoding Lambda function, integrating the Python source code previously created with the protobuf libraries. Using AWS SAM, you create the Lambda function including the protobuf libraries.

If you want to dig deeper into Lambda functions, see What is AWS Lambda? To extend the Lambda function to interact with multiple AWS services, see the Boto3 documentation.

For more serverless learning resources, visit Serverless Land.

Migrating a monolithic .NET REST API to AWS Lambda

Post Syndicated from James Beswick original https://aws.amazon.com/blogs/compute/migrating-a-monolithic-net-rest-api-to-aws-lambda/

This post is written by James Eastham, Cloud Infrastructure Architect.

There are many ways to deploy a .NET application to AWS. From a single process ASP.NET core web API hosted on an EC2 instance to a serverless API backed by AWS Lambda. This post explains key topics to simplify your move from monolith to serverless.

The .NET Framework launched in 2002. This means that there are years’ worth of existing .NET application code that can benefit from moving to a serverless architecture. With the release of the AWS Porting Assistant for .NET and the AWS Microsoft Extractor for .NET, AWS tooling can assist directly with this modernization.

These tools help modernization but don’t migrate the compute layer from traditional servers to serverless technology.

Hexagonal architecture

The hexagonal architecture pattern proposes the division of a system into loosely coupled and interchangeable components. The application and business logic sit at the core of the application.

Layers of a hexagonal architecture

The next layer up is a set of interfaces that handle bidirectional communication from the core business logic layer. Implementation details are moved to the outside. The inputs (API controllers, UI, consoles, test scripts) and outputs (database implementations, message bus interactions) are at the perimeter.

The chosen compute layer becomes an implementation detail, not a core part of the system. It allows a cleaner process for migrating any integrations, from the frontend, to the compute layer and underlying database engine.

Code examples

The GitHub repo contains the code examples from this post with instructions for deploying the migrated serverless application.

The repository contains a .NET core REST API. It uses MySQL for its database engine and relies on an external API as part of its business logic. It also contains a migrated serverless version of the same application that you can deploy to your AWS account. This uses a combination of the AWS Cloud Development Kit (CDK) and the AWS Serverless Application Model (AWS SAM) CLI.

The architecture of the deployed monolithic application is:

Architecture of the deployed monolithic application

After migrating the application to Lambda, the architecture is:

Architecture after migrating

Integrations

Modern web applications rely on databases, file systems, and even other applications. With first class support for dependency injection in .NET Core, managing these integrations is simpler.

The following code snippet is taken from the BookingController.cs file. It shows how required interfaces are injected into the constructor of the controller. One of the controller methods uses the injected interface to list bookings from the BookingRepository.

    [ApiController]
    [Route("[controller]")]
    public class BookingController : ControllerBase
    {
        private readonly ILogger<BookingController> _logger;
        private readonly IBookingRepository _bookingRepository;
        private readonly ICustomerService _customerService;

        public BookingController(ILogger<BookingController> logger,
            IBookingRepository bookingRepository,
            ICustomerService customerService)
        {
            this._logger = logger;
            this._bookingRepository = bookingRepository;
            this._customerService = customerService;
        }

        /// <summary>
        /// HTTP GET endpoint to list all bookings for a customer.
        /// </summary>
        /// <param name="customerId">The customer id to list for.</param>
        /// <returns>All <see cref="Booking"/> for the given customer.</returns>
        [HttpGet("customer/{customerId}")]
        public async Task<IActionResult> ListForCustomer(string customerId)
        {
            this._logger.LogInformation($"Received request to list bookings for {customerId}");

            return this.Ok(await this._bookingRepository.ListForCustomer(customerId));
        }
}

The implementation of the IBookingRepository is configured at startup using dependency injection in the Startup.cs file.

services.AddTransient<IBookingRepository, BookingRepository>();

This works when using an ASP.NET Core Web API project, since the framework abstracts much of the complexity and configuration. But it’s possible to apply the same practices for .NET core code running in Lambda.

Configuring dependency injection in AWS Lambda

The startup logic is moved to a standalone DotnetToLambda.Serverless.Config library. This allows you to share the dependency injection configuration between multiple Lambda functions. This library contains a single static class named ServerlessConfig.

There is little difference between this file and the Startup.cs file:

public void ConfigureServices(IServiceCollection services)
{
	var databaseConnection =
		new DatabaseConnection(this.Configuration.GetConnectionString("DatabaseConnection"));
	
	services.AddSingleton<DatabaseConnection>(databaseConnection);
	
	services.AddDbContext<BookingContext>(options =>
		options.UseMySQL(databaseConnection.ToString()));

	services.AddTransient<IBookingRepository, BookingRepository>();
	services.AddHttpClient<ICustomerService, CustomerService>();
	
	services.AddControllers();
}

And the configuration method in the ServerlessConfig class:


public static void ConfigureServices()
{
	var client = new AmazonSecretsManagerClient();
	
	var serviceCollection = new ServiceCollection();

	var connectionDetails = LoadDatabaseSecret(client);

	serviceCollection.AddDbContext<BookingContext>(options =>
		options.UseMySQL(connectionDetails.ToString()));
	
	serviceCollection.AddHttpClient<ICustomerService, CustomerService>();
	serviceCollection.AddTransient<IBookingRepository, BookingRepository>();
	serviceCollection.AddSingleton<DatabaseConnection>(connectionDetails);
	serviceCollection.AddSingleton<IConfiguration>(LoadAppConfiguration());

	serviceCollection.AddLogging(logging =>
	{
		logging.AddLambdaLogger();
		logging.SetMinimumLevel(LogLevel.Debug);
	});

	Services = serviceCollection.BuildServiceProvider();
}

The key addition is the manual creation of the ServiceCollection object on line 27 and the call to BuildServiceProvider on line 45. In.NET core the framework abstracts away this manual object initialization. The created ServiceProvider is then exposed as a read-only property of the ServerlessConfig class. All we have done is taken the boilerplate code that an ASP.NET Core web API performs behind the scenes and brought it into the foreground.

This allows you to copy and paste large parts of the startup configuration directly from the web API and re-use it in your Lambda functions.

Lambda API controllers

For the function code, follow a similar process. For example, here is the ListForCustomer endpoint re-written for Lambda:

 public class Function
{
	private readonly IBookingRepository _bookingRepository;
	private readonly ILogger<Function> _logger;
	
	public Function()
	{
		ServerlessConfig.ConfigureServices();

		this._bookingRepository = ServerlessConfig.Services.GetRequiredService<IBookingRepository>();
		this._logger = ServerlessConfig.Services.GetRequiredService<ILogger<Function>>();
	}
	
	public async Task<APIGatewayProxyResponse> FunctionHandler(APIGatewayProxyRequest apigProxyEvent, ILambdaContext context)
	{
		if (!apigProxyEvent.PathParameters.ContainsKey("customerId"))
		{
			return new APIGatewayProxyResponse
			{
				StatusCode = 400,
				Headers = new Dictionary<string, string> { { "Content-Type", "application/json" } }
			};
		}

		var customerId = apigProxyEvent.PathParameters["customerId"];
		
		this._logger.LogInformation($"Received request to list bookings for: {customerId}");

		var customerBookings = await this._bookingRepository.ListForCustomer(customerId);
		
		return new APIGatewayProxyResponse
		{
			Body = JsonSerializer.Serialize(customerBookings),
			StatusCode = 200,
			Headers = new Dictionary<string, string> { { "Content-Type", "application/json" } }
		};
	}
}

The function constructor calls the startup configuration. This allows the initial configuration to be re-used while the Lambda execution environment is still active. Once the services have been configured any required interfaces can be retrieved from the services property of the ServerlessConfig class.

The second key differences are the mapping of the inbound request and response back to API Gateway. The HTTP request arrives as an event and the contents must be manually parsed out of the raw HTTP data. The same applies to the HTTP response, which must be constructed manually. Other than these two differences, it’s a copy from the original BookingController.

Application configuration

An ASP.NET Core Web API contains an appsettings.json file, which contains runtime specific configuration. The framework handles loading the file and exposing it as an injectable IConfiguration interface. It’s also possible to load settings from environment variables.

This is still possible when using Lambda. You can package an appsettings.json file with the compiled code and load it manually at runtime. However, when using Lambda as the compute layer, there are AWS-specific options for managing configuration.

Environment variables

Lambda environment variables are used to add runtime configuration, as shown in the template.yaml file:

 Environment:
	Variables:
		SERVICE: bookings
		DATABASE_CONNECTION_SECRET_ID: !Ref SecretArn

This AWS SAM configuration adds an environment variable named DATABASE_CONNECTION_SECRET_ID. You can access this in Lambda the same way an environment variable is accessed in any C# application:

 var databaseConnectionSecret = client.GetSecretValueAsync(new GetSecretValueRequest()
            {
                SecretId = Environment.GetEnvironmentVariable("DATABASE_CONNECTION_SECRET_ID"),
            }).Result;

This is the simplest way to add runtime configuration. The variables are stored in plaintext and any change requires a redeployment or manual interaction.

External configuration services

AWS has services that allow you to move application configuration outside of the function code. These include AWS Systems Manager Parameter Store, AWS AppConfig and AWS Secrets Manager.

You can use Parameter Store to store plaintext parameters that can also be encrypted using the AWS Key Management Service. The contents of the appsettings.json file from the ASP.NET Core API is directly copied into the parameter string and deployed using the AWS CDK.

 var parameter = new StringParameter(this, "dev-configuration", new StringParameterProps()
{
	ParameterName = "dotnet-to-lambda-dev",
	StringValue = "{\"CustomerApiEndpoint\": \"https://jsonplaceholder.typicode.com/users\"}",
	DataType = ParameterDataType.TEXT,
	Tier = ParameterTier.STANDARD,
	Type = ParameterType.STRING,
	Description = "Dev configuration for dotnet to lambda",
});

This JSON data is loaded as part of the startup configuration. The IConfiguration implementation is then built manually using the parameter string.

 private static IConfiguration LoadAppConfiguration()
{
	var client = new AmazonSimpleSystemsManagementClient();
	var param = client.GetParameterAsync(new GetParameterRequest()
	{
		Name = "dotnet-to-lambda-dev"
	}).Result;
	
	return new ConfigurationBuilder()
		.AddJsonStream(new MemoryStream(Encoding.ASCII.GetBytes(param.Parameter.Value)))
		.Build();

The second configuration mechanism is Secrets Manager. This helps protect secrets and provides easier rotation and management of database credentials.

Amazon RDS is integrated with Secrets Manager. When creating a new RDS instance, the database connection details can be automatically encrypted and persisted as a secret. The details for the MySQL instance are stored in Secrets Manager and are not exposed. These connection details can be accessed as part of the startup configuration using the Secrets Manager SDK.

private static DatabaseConnection LoadDatabaseSecret(AmazonSecretsManagerClient client)
{
	var databaseConnectionSecret = client.GetSecretValueAsync(new GetSecretValueRequest()
	{
		SecretId = Environment.GetEnvironmentVariable("DATABASE_CONNECTION_SECRET_ID"),
	}).Result;

	return JsonSerializer
		.Deserialize<DatabaseConnection>(databaseConnectionSecret.SecretString);
}

The Lambda functions require IAM permissions to access both Secrets Manager and Parameter Store. AWS SAM includes pre-defined policy templates that you can add to the template. Four lines of YAML apply the required Secrets Manager and SSM permissions:

Policies:
	- AWSSecretsManagerGetSecretValuePolicy:
		SecretArn: !Ref SecretArn
	- SSMParameterReadPolicy:
		ParameterName: dotnet-to-lambda-dev

For a full list, see the policy template list.

Networking

The final architectural component is the network. Lambda functions are deployed into a VPC owned by the service. The function can access anything available on the public internet such as other AWS services, HTTPS endpoints for APIs, or services and endpoints outside AWS. The function then has no way to connect to your private resources inside of your VPC.

When deploying an RDS instance into AWS, it’s best practice to place the database in a private subnet with external ingress. If Lambda uses RDS, you must create a connection between the Lambda service VPC and your VPC. The details of this networking component can be found in this blog article.

The AWS SAM template defines this networking configuration:

VpcConfig:
	SubnetIds:
	  - !Ref PrivateSubnet1
	  - !Ref PrivateSubnet2
	SecurityGroupIds:
	  - !Ref SecurityGroup

In this example, the networking configuration is applied globally. This means that the same configuration is applied to all Lambda functions in the template. The functions here are deployed across two subnets and one security group. Learn more about the steps for configuring the subnets and security groups for RDS access in this article.

The specific values for the subnets and security groups are taken from environment variables. When running locally, you can provide these variables manually. When deploying via CICD, these variables can be changed dynamically based on the stage of the pipeline.

 PrivateSubnet1:
	Description: 'Required. Private subnet 1. Output from cdk deploy'
	Type: 'String'
PrivateSubnet2:
	Description: 'Required. Private subnet 2. Output from cdk deploy'
	Type: 'String'
SecurityGroup:
	Description: 'Required. Security group. Output from cdk deploy'
	Type: 'String'

Conclusion

This blog post shows the required considerations for migrating a .NET core REST API to AWS Lambda. You can now start to look at your existing code base and make an informed decision whether Lambda is for you. With the right abstractions and configuration, you can migrate a .NET core API to Lambda compute with copy and paste.

For more serverless learning resources, visit Serverless Land.

Audit AWS service events with Amazon EventBridge and Amazon Kinesis Data Firehose

Post Syndicated from Anand Shah original https://aws.amazon.com/blogs/big-data/audit-aws-service-events-with-amazon-eventbridge-and-amazon-kinesis-data-firehose/

Amazon EventBridge is a serverless event bus that makes it easy to build event-driven applications at scale using events generated from your applications, integrated software as a service (SaaS) applications, and AWS services. Many AWS services generate EventBridge events. When an AWS service in your account emits an event, it goes to your account’s default event bus.

The following are a few event examples:

By default, these AWS service-generated events are transient and therefore not retained. This post shows how you can forward AWS service-generated events or custom events to Amazon Simple Storage Service (Amazon S3) for long-term storage, analysis, and auditing purposes using EventBridge rules and Amazon Kinesis Data Firehose.

Solution overview

In this post, we provide a working example of AWS service-generated events ingested to Amazon S3. To make sure we have some service events available in default event bus, we use Parameter Store, a capability of AWS Systems Manager to store new parameters manually. This action generates a new event, which is ingested by the following pipeline.

Architecture Diagram

The pipeline includes the following steps:

  1. AWS service-generated events (for example, a new parameter created in Parameter Store) goes to the default event bus at EventBridge.
  2. The EventBridge rule matches all events and forwards those to Kinesis Data Firehose.
  3. Kinesis Data Firehose delivers events to the S3 bucket partitioned by detail-type and receipt time using its dynamic partitioning capability.
  4. The S3 bucket stores the delivered events, and their respective event schema is registered to the AWS Glue Data Catalog using an AWS Glue crawler.
  5. You query events using Amazon Athena.

Deploy resources using AWS CloudFormation

We use AWS CloudFormation templates to create all the necessary resources for the ingestion pipeline. This removes opportunities for manual error, increases efficiency, and provides consistent configurations over time. The template is also available on GitHub.

Complete the following steps:

  1. Click here to
    Launch Stack
  2. Acknowledge that the template may create AWS Identity and Access Management (IAM) resources.
  3. Choose Create stack.

The template takes about 10 minutes to complete and creates the following resources in your AWS account:

  • An S3 bucket to store event data.
  • A Firehose delivery stream with dynamic partitioning configuration. Dynamic partitioning enables you to continuously partition streaming data in Kinesis Data Firehose by using keys within the data (for example, customer_id or transaction_id) and then deliver the data grouped by these keys into corresponding S3 prefixes.
  • An EventBridge rule that forwards all events from the default event bus to Kinesis Data Firehose.
  • An AWS Glue crawler that references the path to the event data in the S3 bucket. The crawler inspects data landed to Amazon S3 and registers tables as per the schema with the AWS Glue Data Catalog.
  • Athena named queries for you to query the data processed by this example.

Trigger a service event

After you create the CloudFormation stack, you trigger a service event.

  1. On the AWS CloudFormation console, navigate to the Outputs tab for the stack.
  2. Choose the link for the key CreateParameter.

Create Parameter

You’re redirected to the Systems Manager console to create a new parameter.

  1. For Name, enter a name (for example, my-test-parameter).
  2. For Value, enter the test value of your choice (for example, test-value).

My Test parameter

  1. Leave everything else as default and choose Create parameter.

This step saves the new Systems Manager parameter and pushes the parameter-created event to the default EventBridge event bus, as shown in the following code:

{
  "version": "0",
  "id": "6a7e4feb-b491-4cf7-a9f1-bf3703497718",
  "detail-type": "Parameter Store Change",
  "source": "aws.ssm",
  "account": "123456789012",
  "time": "2017-05-22T16:43:48Z",
  "region": "us-east-1",
  "resources": [
    "arn:aws:ssm:us-east-1:123456789012:parameter/foo"
  ],
  "detail": {
    "operation": "Create",
    "name": "my-test-parameter",
    "type": "String",
    "description": ""
  }
}

Discover the event schema

After the event is triggered by saving the parameter, wait at least 2 minutes for the event to be ingested via Kinesis Data Firehose to the S3 bucket. Now complete the following steps to run an AWS Glue crawler to discover and register the event schema in the Data Catalog:

  1. On the AWS Glue console, choose Crawlers in the navigation pane.
  2. Select the crawler with the name starting with S3EventDataCrawler.
  3. Choose Run crawler.

Run Crawler

This step runs the crawler, which takes about 2 minutes to complete. The crawler discovers the schema from all events and registers it as tables in the Data Catalog.

Query the event data

When the crawler is complete, you can start querying event data. To query the event, complete the following steps:

  1. On the AWS CloudFormation console, navigate to the Outputs tab for your stack.
  2. Choose the link for the key AthenaQueries.

Athena Queries

You’re redirected to the Saved queries tab on the Athena console. If you’re running Athena queries for the first time, set up your S3 output bucket. For instructions, see Working with Query Results, Recent Queries, and Output Files.

  1. Search for Blog to find the queries created by this post.
  2. Choose the query Blog – Query Parameter Store Events.

Find Athena Saved Queries

The query opens on the Athena console.

  1. Choose Run query.

You can update the query to search the event you created earlier.

  1. Apply a WHERE clause with the parameter name you selected earlier:
SELECT * FROM "AwsDataCatalog"."eventsdb-randomId"."parameter_store_change"
WHERE detail.name = 'Your event name'

You can also choose the link next to the key CuratedBucket from the CloudFormation stack outputs to see paths and the objects loaded to the S3 bucket from other event sources. Similarly, you can query them via Athena.

Clean up

Complete the following steps to delete your resources and stop incurring costs:

  1. On the AWS CloudFormation console, select the stack you created and choose Delete.
  2. On the Amazon S3 console, find the bucket with the name starting with eventbridge-firehose-blog-curatedbucket.
  3. Select the bucket and choose Empty.
  4. Enter permanently delete to confirm the choice.
  5. Select the bucket again and choose Delete.
  6. Confirm the action by entering the bucket name when prompted.
  7. On the Systems Manager console, go to the parameter store and delete the parameter you created earlier.

Summary

This post demonstrates how to use an EventBridge rule to redirect AWS service-generated events or custom events to Amazon S3 using Kinesis Data Firehose to use for long-term storage, analysis, querying, and audit purposes.

For more information, see the Amazon EventBridge User Guide. To learn more about AWS service events supported by EventBridge, see Events from AWS services.


About the Author

Anand ShahAnand Shah is a Big Data Prototyping Solution Architect at AWS. He works with AWS customers and their engineering teams to build prototypes using AWS analytics services and purpose-built databases. Anand helps customers solve the most challenging problems using the art of the possible technology. He enjoys beaches in his leisure time.

Avoid affecting your production environment during migration with AWS Application Migration Service

Post Syndicated from Michael Spence original https://aws.amazon.com/blogs/architecture/avoid-affecting-your-production-environment-during-migration-with-aws-application-migration-service/

Customers commonly use AWS Application Migration Service to migrate Active Directory joined Windows or Linux servers to Amazon Web Services (AWS). However, this process can affect the production environment during testing. For example, if you update DNS addresses during testing, clients that try to reach the original server will be redirected to the testing server.

To avoid this issue, you could launch instances in a completely isolated network environment. However, this may not be an option for you if your application stack depends on other applications or services.

In this post, we offer an architecture and process that can be applied to applications that cannot be completely isolated during testing. It uses Microsoft Domain Name System (DNS) Query Policies and a Group Policy and does not affect the production environment.

Overview of solution

Using a simple application stack of a WordPress site as an example, we’ll show you how to implement this solution. We’ll also discuss the prequisites required to implement this solution and describe potential domain issues you may encounter and how to solve them.

Figure 1 shows a view of the testing architecture on-premises and in AWS:

  1. It uses an Amazon Virtual Private Cloud (Amazon VPC) that was set up specifically for testing.
  2. Within this Amazon VPC, a management subnet that runs on Amazon Elastic Compute Cloud (Amazon EC2) contains the production environment’s self-managed domain controller. This domain controller provides authentication and DNS services to the instances launched during testing.
  3. The client that tests the application is located within the same private subnet as the applications being tested.
Testing architecture design

Figure 1. Testing architecture design

Prerequisites

To implement this solution, you will need:

  • An AWS account
  • Network connectivity between an on-premises server (or other cloud) and AWS
  • Active Directory (Windows Server 2016 or later)
  • Active Directory Integrated DNS
  • Basic understanding of the following technologies:
    • Application Migration Service
    • EC2 launch templates
    • Active Directory (Windows Version 2016, 2019, or 2022)
    • Microsoft Group Policy
    • Active Directory Integrated DNS
    • Windows PowerShell

Potential domain issues and how to solve them

Application Migration Service is a block-level replication of the original source server, meaning that the replicated server is an exact copy of the original server. During testing, the original source server and the server that was launched for testing are active on the domain at the same time.

This has the potential to create these issues:

  • Each server joined to an Active Directory domain has an associated computer object, and that object has a password. The server will change this password automatically every 30 days by default. If either server changes the password for that object, it will cause the other server to fail because it cannot establish a secure session with a domain controller.
  • Active Directory supports dynamic DNS updates by allowing servers to register and dynamically update their resource records. If the replicated server updates DNS with a new IP address, that change can propagate to the rest of the environment. This means that clients trying to reach the original server will be redirected to the testing server, which will affect the production environment.

By creating a new Group Policy Object (GPO) with the following settings (and as shown in Figure 2), you can avoid these potential issues.

  1. Disable Machine Password Changes. Use reverse logic notation to enable the setting to disable the automatic password changes on the server.
  2. Disable Dynamic Updates from the DNS Client. This setting will prevent the server from updating DNS with a new IP address when you are testing it.

Apply this newly created GPO to the servers that are being migrated. The servers can be targeted for the policy by Active Directory security group, or you can move the servers to a separate organizational unit (OU) within Active Directory and apply the GPO to that OU.

GPO settings

Figure 2. GPO settings

After you apply GPO settings to the server being migrated, verify the GPO settings from an administrative command prompt:

C:\> gpupdate /force

C:\> gpresult /r /scope computer

Active Directory replication

You can disable outbound replication from the domain controller in the testing VPC while still allowing inbound replication. We intentionally configured the network configuration within the testing VPC to allow connectivity to on-premises and other networks.

To do this, issue the following command from an administrative command prompt with a domain administrator privileged user:

C:\> repadmin /options <Testing DC> +disable_outbound_repl

Example walkthrough

1.     Example application description

Let’s look at a simple application stack of a WordPress site. It consists of a single web server and a single database server that are being migrated from on-premises to AWS. The WordPress stack could be Linux or Windows. The WordPress configuration on the web server points to the database by hostname only (not by IP address).

When the web server starts up during the testing phase, it issues a DNS query to find the database server by name. Note that we don’t want to return the IP address of the current production database server; we want the one currently being tested. When our workstation in the testing VPC opens up a browser to the WordPress site, we also want it to return the IP address of the web server being tested.

For reference, Table 1 reflects the IP addresses, network information, and URL used in the testing example.

Table 1. Example values for the testing scenario
Testing Private Subnet CIDR 10.0.67.0/24
Domain Zone Name awslaunch.local
WordPress Site URL http://wswpweb1
Hostname Original IP Address Testing IP Address
wswpweb1 10.0.4.171 10.0.67.171
wswpsql1 10.0.4.202 10.0.67.202

2.     Modify EC2 launch templates

To ensure that we launch the EC2 instances with the IP addresses we specified in Table 1, let’s change the EC2 launch template associated with each of the source servers from within Application Migration Service. The EC2 launch template should specify the testing subnet and the IP address to be assigned to the test instances.

EC2 launch template settings

Figure 3. EC2 launch template settings

Once you’ve modified the EC2 launch template, be sure to set it as the “Default” template because this is the version of the template that Application Migration Service will launch upon testing.

3.     Create Microsoft DNS Query Policies

Now that we’ve launched the EC2 instances for testing, let’s set up DNS Query Policies for DNS to return an alternate set of IP addresses during the testing phase.

We’ll set these policies to return alternate IP addresses from DNS for the servers involved in testing and only within the boundary of the testing private subnet (Policy 3.4). By doing this, if any client outside of the testing private subnet queries this domain controller, it will return the original IP addresses and not the testing ones.

Because DNS Query Policies are specific to a specific domain controller, let’s issue the following PowerShell commands on the domain controller that is active in our testing VPC (AD-DC-2 in Figure 1) to create the following policies:

Policy 3.1       A client subnet that represents our private subnet in the testing VPC. This is a one-time configuration.

Add-DnsServerClientSubnet -Name
"MGN-Testing-AZ1" -IPv4Subnet "10.0.67.0/24"

Policy 3.2       A zone scope within the domain zone name. This is a one-time configuration.

Add-DnsServerZoneScope -ZoneName
"awslaunch.local" -Name "MGN-Testing-AZ1-Scope"

Policy 3.3       Alternative IP addresses in the new zone scope.

Add-DnsServerResourceRecord -ZoneName
"awslaunch.local" -A -Name "wswpweb1" -IPv4Address
"10.0.67.171" -ZoneScope "MGN-Testing-AZ1-Scope"

Add-DnsServerResourceRecord -ZoneName
"awslaunch.local" -A -Name "wswpsql1" -IPv4Address
"10.0.67.202" -ZoneScope "MGN-Testing-AZ1-Scope"

Policy 3.4       A query resolution policy that returns alternate IP addresses for our testing servers without impacting the rest of the domain.

Add-DnsServerQueryResolutionPolicy -Name
"MGN-Testing-AZ1-Policy" -Action ALLOW -FQDN "eq,wswpweb1.awslaunch.local,wswpsql1.awslaunch.local"
-ClientSubnet "eq,MGN-Testing-AZ1" -ZoneScope
"MGN-Testing-AZ1-Scope,1" -ZoneName "awslaunch.local"

4.     Verify current production IP addresses

Now that we have our policies set, let’s make sure that the application stack IP addresses are still returning correctly from the current production environment with the following command:

C:\>nslookup wswpweb1

Server: WSDC1.awslaunch.local

Address: 10.0.5.10


Name: wswpweb1.awslaunch.local

Address: 10.0.4.171


C:\>nslookup wswpsql1

Server: WSDC1.awslaunch.local

Address: 10.0.5.10


Name: wswpsql1.awslaunch.local

Address: 10.0.4.202

These are the correct IP addresses. They match the original IP addresses from Table 1.

5.    Verify testing IP addresses

Now let’s verify that the application stack IP addresses are returning correctly from the testing environment.

C:\>nslookup wswpweb1

Server: WSDC5.awslaunch.local

Address: 10.0.69.10


Name: wswpweb1.awslaunch.local

Address: 10.0.67.171


C:\>nslookup wswpsql1

Server: WSDC5.awslaunch.local

Address: 10.0.69.10


Name: wswpsql1.awslaunch.local

Address: 10.0.67.202

There are the correct addresses. They match the testing IP addresses from Table 1.

We can also verify that the WordPress site is functional by opening a browser from our testing client and browsing to the URL (https://wswpweb1, listed in Table 1).

WordPress site verification

Figure 4. WordPress site verification

Additionally, we can verify that the web server is connecting to the correct SQL server database by issuing the following command when logged into the WordPress web server:

C:\ >netstat | findstr /c:"ms-sql-s"

 TCP 10.0.67.171:50355 10.0.67.202:ms-sql-s TIME_WAIT

 TCP 10.0.67.171:50361
10.0.67.202:ms-sql-s
TIME_WAIT

6.     Cleanup

After you’ve tested everything, mark the source servers in Application Migration Service as “Ready for Cutover.” This will terminate the EC2 testing instances.

The following PowerShell commands will remove the DNS resource records and the DNS Query Policy:

Remove-DnsServerResourceRecord -ZoneName
"awslaunch.local" -ZoneScope "MGN-Testing-AZ1-Scope"
-RRType "A" -Name "wswpweb1"

Remove-DnsServerResourceRecord -ZoneName
"awslaunch.local" -ZoneScope "MGN-Testing-AZ1-Scope"
-RRType "A" -Name "wswpsql1"

Remove-DnsServerQueryResolutionPolicy -Name
"MGN-Testing-AZ1-Policy" -ZoneName "awslaunch.local"

This command will re-enable replication from the testing domain controller.

C:\> repadmin /options <Testing DC>
-disable_outbound_repl

Once the servers are launched for final cutover, you can remove the Group Policy applied to the servers to allow the server to resume password changes and dynamic DNS updates.

Conclusion

When you migrate your server resources to AWS with Application Migration Service, the testing phase of the migration lifecycle is critical. It verifies that your application will function properly within the AWS environment before committing to a final cutover. The testing phase can uncover unexpected application dependencies, gauge application performance, and deliver the confidence that your migration to AWS will be successful without risks to your production environment.

In this blog post, we explored an architecture and process that uses Microsoft DNS Query Policies and Group Policy to address potential domain issues and avoids affecting the production environment. This testing framework persists during the entire cloud migration and across multiple application migrations. Once migration is complete, the testing architecture can be removed or maintained for future cloud migrations.

Ready to get started? Read more about the AWS Application Migration Service and other blog posts related to migrations on the AWS Cloud Enterprise Strategy Blog and the AWS Architecture Blog.

Looking for more architecture content? AWS Architecture Center provides reference architecture diagrams, vetted architecture solutions, Well-Architected best practices, patterns, icons, and more!

Automate code reviews with Amazon CodeGuru Reviewer

Post Syndicated from Dhiraj Thakur original https://aws.amazon.com/blogs/devops/automate-code-reviews-with-amazon-codeguru-reviewer/

A common problem in software development is accidentally or unintentionally merging code with bugs, defects, or security vulnerabilities into your main branch. Finding and mitigating these faulty lines of code deployed to the production environment can cause severe outages in running applications and can cost unnecessary time and effort to fix.

Amazon CodeGuru Reviewer tackles this issue using automated code reviews, which allows developers to fix the issue based on automated CodeGuru recommendations before the code moves to production.

This post demonstrates how to use CodeGuru for automated code reviews and uses an AWS CodeCommit approval process to set up a code approval governance model.

Solution overview

In this post, you create an end-to-end code approval workflow and add required approvers to your repository pull requests. This can help you identify and mitigate issues before they’re merged into your main branches.

Let’s discuss the core services highlighted in our solution. CodeGuru Reviewer is a machine learning-based service for automated code reviews and application performance recommendations. CodeCommit is a fully managed and secure source control repository service. It eliminates the need to scale infrastructure to support highly available and critical code repository systems. CodeCommit allows you to configure approval rules on pull requests. Approval rules act as a gatekeeper on your source code changes. Pull requests that fail to satisfy the required approvals can’t be merged into your main branch for production deployment.

The following diagram illustrates the architecture of this solution.

With CodeCommit repository, creating a pull request and approval rule. Then run the workflow to test the code, review CodeGuru recommendations to make appropriate changes, and run the workflow again to confirm that the code is ready to be merged

The solution has three personas:

  • Repository admin – Sets up the code repository in CodeCommit
  • Developer – Develops the code and uses pull requests in the main branch to move the code to production
  • Code approver – Completes the code review based on the recommendations from CodeGuru and either approves the code or asks for fixes for the issue

The solution workflow contains the following steps:

  1. The repository admin sets up the workflow, including a code repository in CodeCommit for the development group, required access to check in their code to the dev branch, integration of the CodeCommit repository with CodeGuru, and approval details.
  2. Developers develop the code and check in their code in the dev branch. This creates a pull request to merge the code in the main branch.
  3. CodeGuru analyzes the code and reports any issues, along with recommendations based on the code quality.
  4. The code approver analyzes the CodeGuru recommendations and provides comments for how to fix the issue in the code.
  5. The developers fix the issue based on the feedback they received from the code approver.
  6. The code approver analyzes the CodeGuru recommendations of the updated code. They approve the code to merge if everything is okay.
  7. The code gets merged in the main branch upon approval from all approvers.
  8. An AWS CodePipeline pipeline is triggered to move the code to the preproduction or production environment based on its configuration.

In the following sections, we walk you through configuring the CodeCommit repository and creating a pull request and approval rule. We then run the workflow to test the code, review recommendations and make appropriate changes, and run the workflow again to confirm that the code is ready to be merged.

Prerequisites

Before we get started, we create an AWS Cloud9 development environment, which we use to check in the Python code for this solution. The sample Python code for the exercise is available at the link. Download the .py files to a local folder.

Complete the following steps to set up the prerequisite resources:

  1. Set up your AWS Cloud9 environment and access the bash terminal, preferably in the us-east-1 Region.
  2. Create three AWS Identity and Access Management (IAM) users and its roles for the repository admin, developer, and approver by running the AWS CloudFormation template.

Configuring IAM roles and users

  1. Sign in to the AWS Management Console.
  2. Download ‘Persona_Users.yaml’ from github
  3. Navigate to AWS CloudFormation and click on Create Stack drop down to choose With new resouces (Standard).
  4. click on Upload a template file to upload file form local.
  5. Enter a Stack Name such as ‘Automate-code-reviews-codeguru-blog’.
  6. Enter IAM user’s temp password.
  7. Click Next to all the other default options.
  8. Check mark I acknowledge that AWS CloudFormation might create IAM resources with custom names. Click Create Stack.

This template creates three IAM users for Repository admin, Code Approver, Developer that are required at different steps while following this blog.

Configure the CodeCommit repository

Let’s start with CodeCommit repository. The repository works as the source control for the Java and Python code.

  1. Sign in to the AWS Management Console as the repository admin.
  2. On the CodeCommit console, choose Getting started in the navigation pane.
  3. Choose Create repository.

Creating AWS CodeCommit create a new repository using AWS Console

  1. For Repository name, enter transaction_alert_repo.
  2. Select Enable Amazon CodeGuru Reviewer for Java and Python – optional.
  3. Choose Create.

create CodeCommit repository named transaction_alert_repo, check box on Enable Amazon CodeGuru Reviewer for Java and Python

The repository is created.

  1. On the repository details page, choose Clone HTTPS on the Clone URL menu.

clone HTTPS link for CodeCommit repo transaction_alert_repo using clone URL menu

  1. Copy the URL to use in the next step to clone the repository in the development environment.

Clone link for HTTPS for CodeCommit repo transaction_alert_repo is avaiable to copy

  1. On the CodeGuru console, choose Repositories in the navigation pane under Reviewer.

You can see our CodeCommit repository is associated with CodeGuru.

CodeCommit repository is to be associated with CodeGuru

  1. Sign in to the console as the developer.
  2. On the AWS Cloud9 console, clone the repository, using the URL that you copied in the previous step.

This action clones the repository and creates the transaction_alert_repo folder in the environment.

git clone https://git-codecommit.us-east-.amazonaws.com/v1/repos/transaction_alert_repo
cd transaction_alert_repo
echo "This is a test file" > README.md
git add -A
git commit -m "initial setup"
git push

git clone CodeCommit repo to Cloud9 using git clone command, readme.md file is created locally and pushed back to CodeCommit repo]

  1. Check the file in CodeCommit to confirm that the README.md file is copied and available in the CodeCommit repository.

CodeCommit repo is now pushed with readme.md file

  1. In the AWS Cloud9 environment, choose the transaction_alert_repo folder.
  2. On the File menu, choose Upload Local Files to upload the Python files from your local folder (which you downloaded earlier).

Upload downloaded python test files that we are going to use for this blog from local system to Cloud9

  1. Choose Select files and upload read_file.py and read_rule.py.

Drag and drop python files on cloud9 upload UI

  1. You can see that both files are copied in the AWS Cloud9 environment under the transaction_alert_repo folder:
git checkout -b dev
git add -A
git commit -m "initial import of files"
git push --set-upstream origin dev

Push python local files are pushed to CodeCommit repo using git push command

  1. Check the CodeCommit console to confirm that the read_file.py and read_rule.py files are copied in the repository.

Check the CodeCommit console to verify these pushed files are available

Create a pull request

Now we create our pull request.

  1. On the CodeCommit console, navigate to your repository and choose Pull requests in the navigation pane.
  2. Choose Create pull request.

Create pull request for the new files added

  1. For Destination, choose master.
  2. For Source, choose dev.
  3. Choose Compare to see any conflict details in merging the request.

Pull request is visible to master branch, ready to merge

  1. If the environments are mergeable, enter a title and description.
  2. Choose Create pull request.

Pull request is merged and CodeGuru recommendation is triggered

Create an approval rule

We now create an approval rule as the repository admin.

  1. Sign in to the console as the repository admin.
  2. On the CodeCommit console, navigate to the pull request you created.
  3. On the Approvals tab, choose Create approval rule.

Creating new Approval rule for any merge action

  1. For Rule name, enter Require an approval before merge.
  2. For Number of approvals needed, enter 1.
  3. Under Approval pool members, provide an IAM ARN value for the code approver.
  4. Choose Create.

Approval Rule mentions, requires an approval before merge

Review recommendations

We can now view any recommendations regarding our pull request code review.

  1. As the repository admin, on the CodeGuru console, choose Code reviews in the navigation pane.
  2. On the Pull request tab, confirm that the code review is completed, as it might take some time to process.
  3. To review recommendations, choose the completed code review.

Check CodeGuru recommendation to see avaiable recommendation

You can now review the recommendation details, as shown in the following screenshot.

Review CodeGuru review recommendation details

  1. Sign in to the console as the code approver.
  2. Navigate to the pull request to view its details.

check pull request in detail, check stauts and Approval status

  1. On the Changes tab, confirm that the CodeGuru recommendation files are available.

confirm that the CodeGuru recommendation files are available

  1. Check the details of each recommendation and provide any comments in the New comment section.

The developer can see this comment as feedback from the approver to fix the issue.

  1. Choose Save.

In CodeGuru console developer can see this comment as feedback from the approver to fix the issue

  1. Enter any overall comments regarding the changes and choose Save.

Enter any overall comments regarding the changes and choose save

  1. Sign in to the console as the developer.
  2. On the CodeCommit console, navigate to the pull request -> select the request -> click on Changes to review the approver feedback.

click on Changes to review the approver feedback in CodeCommit console

Make changes, rerun the code review, and merge the environments

Let’s say the developer makes the required changes in the code to address the issue and uploads the new code in the AWS Cloud9 environment. If CodeGuru doesn’t find additional issues, we can merge the environments.

  1. Run the following command to push the updated code to CodeCommit:
git add -A
git commit -m "code-fixed"
git push --set-upstream origin dev

git clone CodeCommit repo to Cloud9 using git clone command, readme.md file is created locally and pushed back to CodeCommit repo

  1. Sign in to the console as the approver.
  2. Navigate to the code review.

CodeGuru hasn’t found any issue in the updated code, so there are no recommendations.

CodeGuru hasn’t found any issue in the updated code, so there are no recommendations avaiable this time

  1. On the CodeCommit console, you can verify the code and provide your approval comment.
  2. Choose Save.

Using CodeCommit console, code can be now verified for approval

  1. On the pull request details page, choose Approve.

New code is found with no conflict and can be approved

Now the developer can see on the CodeCommit console that the pull request is approved.

Code pull request is in Approved status

  1. Sign in to the console as the developer. On the pull request details page, choose Merge.

Approved code is ready to be merged

  1. Select your merge strategy. For this post, we select Fast forward merge.
  2. Choose Merge pull request.

Fast and forward merge is used to merge the code

You can see a success message.

Success message is generated for successful merge

  1. On the CodeCommit console, choose Code in the navigation pane for your repository.
  2. Choose master from the branch list.

The read_file.py and read_rule.py files are available under the main branch.

the new files are also avaiable in main branch beacuse of the successful merge

Clean up the resources

To avoid incurring future charges, remove the resources created by this solution by

Conclusion

This post highlighted the benefits of CodeGuru automated code reviews. You created an end-to-end code approval workflow and added required approvers to your repository pull requests. This solution can help you identify and mitigate issues before they’re merged into your main branches.

You can get started from the CodeGuru console by integrating CodeGuru Reviewer with your supported CI/CD pipeline.

For more information about automating code reviews and check out the documentation.

About the Authors

Dhiraj Thakur

Dhiraj Thakur is a Solutions Architect with Amazon Web Services. He works with AWS customers and partners to provide guidance on enterprise cloud adoption, migration, and strategy. He is passionate about technology and enjoys building and experimenting in the analytics and AI/ML space.

Akshay Goel

Akshay is a Cloud Support Associate with Amazon Web Services working closing with all AWS deployment services. He loves to play, test, create, modify and simplify the solution which makes the task easy and interesting.

Sameer Goel

Sameer is a Sr. Solutions Architect in Netherlands, who drives customer success by building prototypes on cutting-edge initiatives. Prior to joining AWS, Sameer graduated with a master’s degree from NEU Boston, with a concentration in data science. He enjoys building and experimenting with AI/ML projects on Raspberry Pi.

Building custom connectors using the Amazon AppFlow Custom Connector SDK

Post Syndicated from James Beswick original https://aws.amazon.com/blogs/compute/building-custom-connectors-using-the-amazon-appflow-custom-connector-sdk/

This post is written by Kamen Sharlandjiev, Sr. Specialist SA, Integration, Ray Jang, Principal PMT, Amazon AppFlow, and Dhiraj Mahapatro, Sr. Specialist SA, Serverless.

Amazon AppFlow is a fully managed integration service that enables you to transfer data securely between software as a service (SaaS) applications like Salesforce, SAP, Zendesk, Slack, ServiceNow, and AWS services like Amazon S3 and Amazon Redshift. Amazon AppFlow lets you run enterprise-scale data flows on a schedule, in response to business events, or on-demand.

Overview diagram

Amazon AppFlow is a managed integration service that replaces the heavy-lifting of developing, maintaining, and updating connectors. It supports bidirectional integration between external SaaS applications and AWS services.

The Custom Connector Software Development Kit (SDK) now makes it easier to integrate with private API endpoints, proprietary applications, or other cloud services. It provides access to all available managed integrations and the ability to build your own custom integration as part of the integrated experience. The SDK is open-source and available for Java or Python.

You can deploy custom connectors built with the SDK in different ways:

  • Private – The connector is available only inside the AWS account where deployed.
  • Shared – The connector can be shared for use with other AWS accounts.
  • Public – Publish connectors on the AWS Marketplace for free or charge a subscription fee. For more information, refer to Sharing AppFlow connectors via AWS Marketplace.

Overview

This blog takes you through building and deploying your own Amazon AppFlow Custom Connector using the Java SDK. The sample application shows how to build your first custom connector with Amazon AppFlow.

Custom connector flow

The process of building, deploying, and using a custom connector is:

  1. Create a custom connector as an AWS Lambda function using the Amazon AppFlow Custom Connector SDK.
  2. Deploy the custom connector Lambda function, which provides the serverless compute for the connector.
  3. Lambda function integrates with a SaaS application or private API.
  4. Register the custom connector with Amazon AppFlow.
  5. Users can now use this custom connector in the Amazon AppFlow service.

Building an Amazon AppFlow custom connector

The sample application used in this blog creates a new custom connector that implements a MySQL JDBC driver. With this connector, you can connect to a remote MySQL or MariaDB instance to read and write data.

The SDK allows you to build custom connectors and use the service’s built-in authentication support for: OAuth2, API key, and basic auth. For other use cases, such as JDBC, you must create your own custom authentication implementation.

The SDK includes the source code for an example Salesforce connector. This highlights a complete use case for a source and destination Amazon AppFlow connector using OAuth2 as authentication.

Details

There are three mandatory Java interfaces that a connector must implement:

  1. ConfigurationHandler.java: Defines the functionality to implement connector configurations, and credentials-related operations.
  2. MetadataHandler.java: Represents the functionality to implement for objects metadata.
  3. RecordHandler.java: Defines functionality to implement record-related CRUD operations.

Prerequisites

Ensure that the following software is installed on your workstation:

  1. Java 11
  2. Maven
  3. AWS CLI
  4. AWS SAM CLI

To run the sample application:

  1. Clone the code repository:
    git clone https://github.com/aws-samples/amazon-appflow-custom-jdbc-connector.git
    
    cd amazon-appflow-custom-jdbc-connector
  2. After cloning the sample application, visit these Java classes for more details:

To add JDBC clients for other database engines, implement JDBCClient.java interface. The custom connector uses a Lambda function as a POJO class to handle requests. The SDK provides an abstract BaseLambdaConnectorHandler class that, which you use as follows:

import com.amazonaws.appflow.custom.connector.lambda.handler.BaseLambdaConnectorHandler;

public class JDBCConnectorLambdaHandler extends BaseLambdaConnectorHandler {

  public JDBCConnectorLambdaHandler() {
    super(
      new JDBCConnectorMetadataHandler(),
      new JDBCConnectorRecordHandler(),
      new JDBCConnectorConfigurationHandler()
    );
  }
}

Local testing and debugging

While developing the connector specific functionality, developers require local testing capability to build and debug faster. The SDK and the example connector provides examples on testing custom connectors.

Additionally, you can experiment with JUnit and the DSL builders provided by the SDK. The JUnit test allows you to test this implementation locally by simulating an appropriate request to the Lambda functions. You can use debug points and step into the code implementation from start to end using the built-in IDE debugger. The sample application comes with example of JUnit tests that can be used with debug points.

Credentials management 

Amazon AppFlow stores all sensitive information in AWS Secrets Manager. The secret is created when you create a connector profile. The secret ARN is passed in the ConnectorContext that forms part of the Lambda function’s invocation request.

To test locally:

  • Mock the “CredentialsProvider” and stub out the response of GetCredentials API. Note that the CredentialProvider provides several different GetCredentials methods, depending on the authentication used.
  • Create a secret in AWS Secrets Manager. Configure an IAM user with programmatic access and sufficient permissions to allow the secretsmanager:GetSecretValue action and let the CredentialsProvider call Secrets Manager locally. When you initialize a new service client without supplying any arguments, the SDK attempts to find AWS credentials by using the default credential provider chain.

For more information, read Working with AWS Credentials (SDK for Java) and Creating an IAM user with programmatic access.

Deploying the Lambda function in an AWS account

This example connector package provides an AWS Serverless Application Model (AWS SAM) template in the project folder. It describes the following resources:

  1. The Lambda function containing the custom connector code.
  2. The AWS IAM policy, allowing the function to read secrets from AWS Secrets Manager.
  3. The AWS Lambda policy permission allowing Amazon AppFlow to invoke the Lambda function.

The sample application’s AWS SAM template provides two resources:

AWSTemplateFormatVersion: '2010-09-09'
Transform: 'AWS::Serverless-2016-10-31'
Description: Template to deploy the lambda connector in your account.
Resources:
  ConnectorFunction:
    Type: 'AWS::Serverless::Function'
    Properties:
      Handler: "org.custom.connector.jdbc.handler.JDBCConnectorLambdaHandler::handleRequest"
      CodeUri: "./target/appflow-custom-jdbc-connector-jdbc-1.0.jar"
      Description: "AppFlow custom JDBC connector example"
      Runtime: java11
      Timeout: 30
      MemorySize: 1024
      Policies:
        Version: '2012-10-17'
        Statement:
          Effect: Allow
          Action: 'secretsmanager:GetSecretValue'
          Resource: !Sub 'arn:aws:secretsmanager:${AWS::Region}:${AWS::AccountId}:secret:appflow!${AWS::AccountId}-*'

  PolicyPermission:
    Type: 'AWS::Lambda::Permission'
    Properties:
      FunctionName: !GetAtt ConnectorFunction.Arn
      Action: lambda:InvokeFunction
      Principal: 'appflow.amazonaws.com'
      SourceAccount: !Ref 'AWS::AccountId'
      SourceArn: !Sub 'arn:aws:appflow:${AWS::Region}:${AWS::AccountId}:*'

Deploy this custom connector by using the following command from the amazon-appflow-custom-jdbc-connector base directory:

mvn package && sam deploy –-guided

Once deployment completes, follow below steps to register and use the connector.

Registering the custom connector

There are two ways to register the custom connector.

1. Register through the AWS Management Console

  1. From the AWS Management Console, navigate to Amazon AppFlow. Select Connectors on the left-side menu. Choose on the “Register New Connector” button.
  2. Register the connector by selecting your Lambda function and typing in the connector label.
    Register a new connectorThe newly created custom connector Lambda function appears in the list if you deployed using AWS SAM by following the steps in this tutorial. If you deployed the Lambda function manually, ensure that appropriate Lambda permissions are set, as described in the Lambda Permissions and Resource Policy section.
  3. Provide a label for the connector. The label must be unique per account per Region. Choose Register.
    Provide a label
  4. The connector appears in the list of custom connectors.
    List of connectors

2. Register with the API

Invoke the registerConnector public API endpoint with the following request payload:

{
   "connectorLabel":"TestCustomConnector",
   "connectorProvisioningType":"LAMBDA",
   "connectorProvisioningConfig":{
      "lambda":{ "lambdaArn":"arn:aws:lambda:<region>:<aws_account_id>:function:<lambdaFunctionName>"
      }
   }
}

For connectorLabel, use a unique label. Currently, the only supported connectorProvisioningType is LAMBDA.

Using the new custom connector

  1. Navigate to the Connections link from the left-menu. Select the registered connector from the drop-down.
    Selecting the connector
  2. Choose Create Connection.
    Choose Create Connection
  3. Complete the connector-specific setup:
    Setup page
  4. Proceed with creating a flow and selecting your new connection.
  5. Check Lambda function’s Amazon CloudWatch Logs to troubleshoot errors, if any, during connector registration, connector profile creation, and flow execution process.

Production considerations

This example is a proof of concept. To build a production-ready solution, review the non-exhaustive list of differences between sample and production-ready solutions.

If you plan to use the custom connector with high concurrency, review AWS Lambda quotas and limitations.

Cleaning up the custom connector stack

To delete the connector:

  1. Delete all flows in Amazon AppFlow that you created as part of this tutorial.
  2. Delete any connector profiles.
  3. Unregister the custom connector.
  4. To delete the stack, run the following command from the amazon-appflow-custom-jdbc-connector base directory:
    sam delete

Conclusion

This blog post shows how to extend the Amazon AppFlow service to move data between SaaS endpoints and custom APIs. You can now build custom connectors using the Amazon AppFlow Custom Connector SDK.

Using custom connectors in Amazon AppFlow allows you to integrate siloed applications with minimal code. For example, different business units using legacy applications in an organization can now integrate their services via the Amazon AppFlow Custom Connectors SDK.

Depending on your choice of framework you can use the open source Python SDK or Java SDK from GitHub. To learn more, refer to the Custom Connector SDK Developer Guide.

For more serverless learning resources, visit Serverless Land.

Introducing AWS Virtual Waiting Room

Post Syndicated from James Beswick original https://aws.amazon.com/blogs/compute/introducing-aws-virtual-waiting-room/

This post is written by Justin Pirtle, Principal Solutions Architect, Joan Morgan, Software Developer Engineer, and Jim Thario, Software Developer Engineer.

Today, AWS is introducing an official AWS Virtual Waiting Room solution. You can integrate this new, open-source solution with existing web and mobile applications. It can help buffer users during times of peak demand and sudden bursts of traffic, preventing systems from resource exhaustion.

Events commonly use virtual waiting rooms where there is either unknown demand or expected large bursts of traffic. Examples of such events include concert ticket sales, Black Friday promotions, COVID-19 vaccine registrations, and more. Virtual waiting rooms allow a quota of users to view, select, and complete their transactions directly. They shield the application’s backend environment from traffic by buffering users in a waiting room until it is their turn in line.

Like any real-life queuing system, a user enters the AWS Virtual Waiting Room and requests a number in line. After receiving a number corresponding to the unique device ID, the browser then polls regularly for updates. The update provides the current number being served and anticipated time until they are front of line.

After reaching the front of the line, the user can exchange the number and device ID for a secure session token. This is included with their downstream requests to authenticate users securely.

If a user discovers the backend endpoint and tries to send requests, they are redirected into the waiting room. The API requests are denied access until they have a valid token. This prevents the backend from needing to scale to accommodate all users at a single time.

Integrating the AWS Virtual Waiting Room into your application

Integration steps depend on the integration pattern for your application. You can decide if all users are routed through the waiting room or only during periods of excessive traffic. You can also choose to protect only the web host serving the backend webpages or one or more APIs powering backend commerce services.

There are four common patterns supported for integrating the waiting room into your application:

  1. Upstream redirection of all traffic from the main target site to flow through AWS Virtual Waiting Room. This option sends all user traffic through the waiting room with the initial capacity of users permitted to the protected system. The traffic passes through transparently, then it buffers the remaining users. It admits new users as capacity becomes available. The target system is only accessible by users who pass through the waiting room.
  2. Downstream redirection to the virtual waiting room from the target site. This option sends all traffic to the target site. The target site conditionally redirects requests that need to enter the waiting room. No DNS or upstream modifications are needed. The target site must be able to handle the initial user requests and redirection responses.
  3. Direct target site API integration for buffering users from an existing website without any redirection. Your web or mobile application integrates the virtual waiting room at the API-level. This does not need any redirection to a different waiting room endpoint or site. This can offer a seamless user experience but may require more development for the integration.
  4. OpenID Connect (OIDC) adapter. This option offers no-code native integration of the waiting room with OpenID Connect-enabled system components, such as the AWS Application Load Balancer (ALB). Users are redirected by the load balancer or similar component to the waiting room. They are buffered until issued a signed, time-limited JSON Web Token (JWT). Once the user’s JWT token is issued, the load balancer then forwards user requests to the target backend systems.

Overview of the AWS Virtual Waiting Room solution

The AWS Virtual Waiting Room solution implementation includes three main components:

  • Core APIs. The main resources deployed include two Amazon API Gateway deployments, a VPC, several AWS Lambda functions, an Amazon DynamoDB table, and an Amazon ElastiCache cluster. This API provides the basic mechanisms for tracking clients entering the waiting room. It requests status of the line progression and an authentication token to enter the target protected site.
  • Waiting room front-end website. The waiting room static site is shown to users awaiting their turn. This site dynamically updates the position being served and their place in line on a configurable interval. You customize this site’s HTML, CSS, and JavaScript to match your frontend styling and theme.
  • Lambda authorizer for protected target system. The Lambda authorizer wraps and protects the downstream protected target system’s APIs. This ensures that all user invocations have a validated time-limited token issued by the waiting room core API. It helps to prevent users from bypassing the waiting room.

Reference architecture

The Virtual Waiting Room CloudFormation template deploys the following infrastructure:

  1. An Amazon CloudFront distribution to deliver public API calls for the client.
  2. Amazon API Gateway public API resources to process queue requests from the virtual waiting room, track the queue position, and support validation of tokens that allow access to the target website.
  3. An Amazon Simple Queue Service (Amazon SQS) queue to regulate traffic to the AWS Lambda function that processes the queue messages. Instead of invoking the Lambda function for each request, the SQS queue batches the incoming bursts of requests.
  4. API Gateway private API resources to support administrative functions.
  5. Lambda functions to validate and process public and private API requests, and return the appropriate responses.
  6. Amazon Virtual Private Cloud (VPC) to host the Lambda functions that interact directly with the Amazon ElastiCache for Redis cluster. VPC endpoints allow Lambda functions in the VPC to communicate with services within the solution.
  7. An Amazon CloudWatch rule to invoke a Lambda function that works with a custom Amazon EventBridge bus to periodically broadcast status updates.
  8. An Amazon DynamoDB table to store token data.
  9. AWS Secrets Manager to store keys for token operations and other sensitive data.
  10. (Optional) Authorizer component consisting of an AWS Identity and Access Management (IAM) role and a Lambda function to validate signatures for your API calls. The only requirement for the authorizer to protect your API is to use API Gateway.
  11. (Optional) Amazon Simple Notification Service (Amazon SNS), CloudWatch, and Lambda functions to support two inlet strategies.
  12. (Optional) OpenID adaptor component with API Gateway and Lambda functions to allow an OpenID provider to authenticate users to your website. CloudFront distribution with an Amazon Simple Storage Service (Amazon S3) bucket for the waiting room page for this component.
  13. (Optional) A CloudFront distribution with Amazon S3 origin bucket for the optional sample waiting room web application.

Deploying the AWS Virtual Waiting Room

To get started with the AWS Virtual Waiting Room, deploy the Getting Started stack. This deploys the Core APIs stack, the Authorizers stack, and a sample application CloudFormation stack:

  1. Launch the Getting Started CloudFormation stack. The template launches in the US East (N. Virginia) Region by default. To launch the solution in a different AWS Region, use the Region selector in the console navigation bar.
  2. On the Create stack page, verify that the correct template URL is in the Amazon S3 URL text box and choose Next.
    Create stack page
  3. On the Specify stack details page, assign a name to your solution stack, and accept all default parameter values. For information about naming character limitations, refer to IAM and STS Limits in the AWS Identity and Access Management User Guide. Choose Next.
    Specify stack details page
  4. On the Configure stack options page, choose Next.
  5. On the Review page, review and confirm the settings. Check the box acknowledging that the template creates AWS Identity and Access Management (IAM) resources.
  6. Choose Create stack to deploy the stack.
  7. You can view the status of the stack in the AWS CloudFormation Console in the Status column. You should receive a CREATE_COMPLETE status in approximately 30 minutes.
  8. Once successfully deployed, browse to the Outputs tab.
  9. Copy the ControlPanelURL and WaitingRoomURL to a scratch pad file for later use.

Configuring the AWS Virtual Waiting Room

After deploying the three stacks, test the waiting room using the sample application:

  1. Navigate to the IAM console. Create a new IAM user or select an existing IAM user in the same account where you deployed the waiting room stack.
  2. Grant the selected IAM user programmatic access. Download the key file or copy the access key ID and secret access key values to your scratch pad for later use.
  3. Add the IAM user to the ProtectedAPIGroup IAM user group created by the getting started template:
    Add user to groups
  4. Open the control panel in a new tab or browser window using the ControlPanelURL output you saved earlier.
  5. In the control panel, expand the Configuration section.
  6. Enter the access key ID and secret access key that you retrieved in Generate AWS keys to call the IAM secured APIs. The endpoints and event ID are filled in from the URL parameters.
    Control panel
  7. Choose Use. The button activates after you have supplied the credentials.
  8. You now see the status “Connected” shown following the various metrics reported:
    Metrics page

Test the sample waiting room

  1. Browse to the sample waiting room in a new browser tab. Use the WaitingRoomURL you captured previously from the CloudFormation stack output values.
  2. Select Reserve to enter the waiting room. If you are unable to proceed with your transaction, your assigned number is not yet reached.
    Waiting room status page
  3. Navigate back to the browser tab with the control panel.
  4. Under Increment Serving Counter, select Change. This manually increments the serving counter and allows 100 users to move on from the waiting room to the target site.
    Increment serving counter
  5. Navigate back to the waiting room and choose Check out now! You are redirected to the target site since your serving number is eligible to proceed beyond the waiting room.
    Waiting room config page
  6. Select Purchase now to finish your transaction at the target site. This page represents the protected system beyond the waiting room. Replace this with the actual system users you are protecting.
    Purchase now page
  7. After the simulated purchase is complete, you can see that the transaction is successful. This transaction is authorized using the time-limited authorization token, which came from the waiting room previously. If a user bypasses the waiting room, they would not be successful in completing a transaction.
    Purchase receipt

Customizing the AWS Virtual Waiting Room for your application

The sample browser client demonstrates an entire user flow frontend with the AWS Virtual Waiting Room flow for an ecommerce purchase. You can use this code as a starting point for your waiting room or reference the API communication code for integrating the waiting room into your existing website.

This sample code is built with Vue.js and Bootstrap to render the user interface. It uses the Axios and Axios-Retry packages to make API calls to the virtual waiting room stack. The sample code uses the Axios-Retry package to show how to handle throttling conditions and exponential backoff in high-traffic situations.

The control panel client is used to make requests to the private waiting room API that requires IAM-based authorization. The control panel client demonstrates how to construct and sign requests to the private API. It can be used in production or customized further. All of the sample source code room source is available in GitHub including the sample user client and control panel client.

Conclusion

The AWS Virtual Waiting Room solution is available today at no additional cost, provided as open source under the Apache 2 license. It supports customized integration with any front-end application via a variety of integration techniques. You can also customize how and when the waiting room allows users to progress into the protected target system using a variety of strategies.

To learn more about the AWS Virtual Waiting Room solution, visit the solution implementation and implementation guide.

For more serverless learning resources, visit Serverless Land.

Creating computing quotas on AWS Outposts rack with EC2 Capacity Reservations sharing

Post Syndicated from Rachel Zheng original https://aws.amazon.com/blogs/compute/creating-computing-quotas-on-aws-outposts-rack-with-ec2-capacity-reservation-sharing/

This post is written by Yi-Kang Wang, Senior Hybrid Specialist SA.

AWS Outposts rack is a fully managed service that delivers the same AWS infrastructure, AWS services, APIs, and tools to virtually any on-premises datacenter or co-location space for a truly consistent hybrid experience. AWS Outposts rack is ideal for workloads that require low latency access to on-premises systems, local data processing, data residency, and migration of applications with local system interdependencies. In addition to these benefits, we have started to see many of you need to share Outposts rack resources across business units and projects within your organization. This blog post will discuss how you can share Outposts rack resources by creating computing quotas on Outposts with Amazon Elastic Compute Cloud (Amazon EC2) Capacity Reservations sharing.

In AWS Regions, you can set up and govern a multi-account AWS environment using AWS Organizations and AWS Control Tower. The natural boundaries of accounts provide some built-in security controls, and AWS provides additional governance tooling to help you achieve your goals of managing a secure and scalable cloud environment. And while Outposts can consistently use organizational structures for security purposes, Outposts introduces another layer to consider in designing that structure. When an Outpost is shared within an Organization, the utilization of the purchased capacity also needs to be managed and tracked within the organization. The account that owns the Outpost resource can use AWS Resource Access Manager (RAM) to create resource shares for member accounts within their organization. An Outposts administrator (admin) can share the ability to launch instances on the Outpost itself, access to the local gateways (LGW) route tables, and/or access to customer-owned IPs (CoIP). Once the Outpost capacity is shared, the admin needs a mechanism to control the usage and prevent over utilization by individual accounts. With the introduction of Capacity Reservations on Outposts, we can now set up a mechanism for computing quotas.

Concept of computing quotas on Outposts rack

In the AWS Regions, Capacity Reservations enable you to reserve compute capacity for your Amazon EC2 instances in a specific Availability Zone for any duration you need. On May 24, 2021, Capacity Reservations were enabled for Outposts rack. It supports not only EC2 but Outposts services running over EC2 instances such as Amazon Elastic Kubernetes (EKS), Amazon Elastic Container Service (ECS) and Amazon EMR. The computing power of above services could be covered in your resource planning as well. For example, you’d like to launch an EKS cluster with two self-managed worker nodes for high availability. You can reserve two instances with Capacity Reservations to secure computing power for the requirement.

Here I’ll describe a method for thinking about resource pools that an admin can use to manage resource allocation. I’ll use three resource pools, that I’ve named reservation pool, bulk and attic, to effectively and extensibly manage the Outpost capacity.

A reservation pool is a resource pool reserved for a specified member account. An admin creates a Capacity Reservation to match member account’s need, and shares the Capacity Reservation with the member account through AWS RAM.

A bulk pool is an unreserved resource pool that is used when member accounts run out of compute capacity such as EC2, EKS, or other services using EC2 as underlay. All compute capacity in the bulk pool can be requested to launch until it is exhausted. Compute capacity that is not under a reservation pool belongs to the bulk pool by default.

An attic is a resource pool created to hold the compute capacity that the admin wouldn’t like to share with member accounts. The compute capacity remains in control by admin, and can be released to the bulk pool when needed. Admin creates a Capacity Reservation for the attic and owns the Capacity Reservation.

The following diagram shows how the admin uses Capacity Reservations with AWS RAM to manage computing quotas for two member accounts on an Outpost equipped with twenty-four m5.xlarge. Here, I’m going to break the idea into several pieces to help you understand easily.

  1. There are three Capacity Reservations created by admin. CR #1 reserves eight m5.xlarge for the attic, CR #2 reserves four m5.xlarge instances for account A and CR #3 reserves six m5.xlarge instances for account B.
  2. The admin shares Capacity Reservation CR #2 and CR #3 with account A and B respectively.
  3. Since eighteen m5.xlarge instances are reserved, the remaining compute capacity in the bulk pool will be six m5.xlarge.
  4. Both Account A and B can continue to launch instances exceeding the amount in their Capacity Reservation, by utilizing the instances available to everyone in the bulk pool.

Concept of defining computing quotas

  1. Once the bulk pool is exhausted, account A and B won’t be able to launch extra instances from the bulk pool.
  2. The admin can release more compute capacity from the attic to refill the bulk pool, or directly share more capacity with CR#2 and CR#3. The following diagram demonstrates how it works.

Concept of refilling bulk pool

Based on this concept, we realize that compute capacity can be securely and efficiently allocated among multiple AWS accounts. Reservation pools allow every member account to have sufficient resources to meet consistent demand. Making the bulk pool empty indirectly sets the maximum quota of each member account. The attic plays as a provider that is able to release compute capacity into the bulk pool for temporary demand. Here are the major benefits of computing quotas.

  • Centralized compute capacity management
  • Reserving minimum compute capacity for consistent demand
  • Resizable bulk pool for temporary demand
  • Limiting maximum compute capacity to avoid resource congestion.

Configuration process

To take you through the process of configuring computing quotas in the AWS console, I have simplified the environment like the following architecture. There are four m5.4xlarge instances in total. An admin account holds two of the m5.4xlarge in the attic, and a member account gets the other two m5.4xlarge for the reservation pool, which results in no extra instance in the bulk pool for temporary demand.

Prerequisites

  • The admin and the member account are within the same AWS Organization.
  • The Outpost ID, LGW and CoIP have been shared with the member account.

Architecture for configuring computing quotas

  1. Creating a Capacity Reservation for the member account

Sign in to AWS console of the admin account and navigate to the AWS Outposts page. Select the Outpost ID you want to share with the member account, choose Actions, and then select Create Capacity Reservation. In this case, reserve two m5.4xlarge instances.

Create a capacity reservation

In the Reservation details, you can terminate the Capacity Reservation by manually enabling or selecting a specific time. The first option of Instance eligibility will automatically count the number of instances against the Capacity Reservation without specifying a reservation ID. To avoid misconfiguration from member accounts, I suggest you select Any instance with matching details in most use cases.

Reservation details

  1. Sharing the Capacity Reservation through AWS RAM

Go to the RAM page, choose Create resource share under Resource shares page. Search and select the Capacity Reservation you just created for the member account.

Specify resource sharing details

Choose a principal that is an AWS ID of the member account.

Choose principals that are allowed to access

  1. Creating a Capacity Reservation for attic

Create a Capacity Reservation like step 1 without sharing with anyone. This reservation will just be owned by the admin account. After that, check Capacity Reservations under the EC2 page, and the two Capacity Reservations there, both with availability of two m5.4xlarge instances.

3.	Creating a Capacity Reservation for attic

  1. Launching EC2 instances

Log in to the member account, select the Outpost ID the admin shared in step 2 then choose Actions and select Launch instance. Follow AWS Outposts User Guide to launch two m5.4xlarge on the Outpost. When the two instances are in Running state, you can see a Capacity Reservation ID on Details page. In this case, it’s cr-0381467c286b3d900.

Create EC2 instances

So far, the member account has run out of two m5.4xlarge instances that the admin reserved for. If you try to launch the third m5.4xlarge instance, the following failure message will show you there is not enough capacity.

Launch status

  1. Allocating more compute capacity in bulk pool

Go back to the admin console, select the Capacity Reservation ID of the attic on EC2 page and choose Edit. Modify the value of Quantity from 2 to 1 and choose Save, which means the admin is going to release one more m5.4xlarge instance from the attic to the bulk pool.

Instance details

  1. Launching more instances from bulk pool

Switch to the member account console, and repeat step 4 but only launch one more m5.4xlarge instance. With the resource release on step 5, the member account successfully gets the third instance. The compute capacity is coming from the bulk pool, so when you check the Details page of the third instance, the Capacity Reservation ID is blank.

6.	Launching more instances from bulk pool

Cleaning up

  1. Terminate the three EC2 instances in the member account.
  2. Unshare the Capacity Reservation in RAM and delete it in the admin account.
  3. Unshare the Outpost ID, LGW and CoIP in RAM to get the Outposts resources back to the admin.

Conclusion

In this blog post, the admin can dynamically adjust compute capacity allocation on Outposts rack for purpose-built member accounts with an AWS Organization. The bulk pool offers an option to fulfill flexibility of resource planning among member accounts if the maximum instance need per member account is unpredictable. By contrast, if resource forecast is feasible, the admin can revise both the reservation pool and the attic to set a hard limit per member account without using the bulk pool. In addition, I only showed you how to create a Capacity Reservation of m5.4xlarge for the member account, but in fact an admin can create multiple Capacity Reservations with various instance types or sizes for a member account to customize the reservation pool. Lastly, if you would like to securely share Amazon S3 on Outposts with your member accounts, check out Amazon S3 on Outposts now supports sharing across multiple accounts to get more details.

How UnitedHealth Group Improved Disaster Recovery for Machine-to-Machine Authentication

Post Syndicated from Vinodh Kumar Rathnasabapathy original https://aws.amazon.com/blogs/architecture/how-unitedhealth-group-improved-disaster-recovery-for-machine-to-machine-authentication/

This blog post was co-authored by Vinodh Kumar Rathnasabapathy, Senior Manager of Software Engineering, UnitedHealth Group. 

Engineers who use Amazon Cognito for machine-to-machine authentication select a primary Region where they deploy their application infrastructure and the Amazon Cognito authorization endpoint. Amazon Cognito is a highly available service in single Region deployments with a published service-level agreement (SLA) target of 99.9%. The UnitedHealth Group (UHG) team needed a solution that would enable them to build and deploy their applications in multiple Regions to achieve higher availability targets. A multi-Region application architecture would also allow UHG engineers to failover to a secondary Region in the event that their application experienced issues in the primary Region.

At UHG, Federated Data Services (FDS) is a business-critical customer-facing application, which requires 99.95% availability and disaster recovery features. The FDS engineering team needed their Amazon Cognito infrastructure to be highly available in case of any service events in AWS Regions, along with having greater flexibility of switching between Regions.

The FDS engineering team worked on a custom solution using existing AWS services to fulfill their availability and recovery requirements. This solution not only serves the purpose of their current business needs but also provides recovery in case of any future disaster.

Overview of the solution

In this solution, we select two AWS Regions which will include the primary Region and the failover Region. Amazon Cognito app clients (including client ID and client secret pair) are created in both Regions and stored in an Amazon DynamoDB table. Client applications are given the client ID and client secret of the primary Region. Optionally, an application-generated ID and secret can be provided to the client to conceal the actual Amazon Cognito client ID and client secret. The process is as follows:

  • The client application (machine) initiates an authentication request by sending the Amazon Cognito app client ID and client secret to an Amazon Route 53 domain record.
  • Route 53 routes authentication requests to the in-Region Amazon API Gateway utilizing a Simple routing policy. From there, API Gateway shuts down the TLS connection using AWS Certificate Manager (ACM), and serves as a proxy for the authentication request to AWS Lambda.
  • AWS Lambda verifies the client ID and client secret, and uses them to look up the in-Region client ID and client secret.
  • Lambda uses preconfigured environment variables to request the appropriate Region from DynamoDB.
  • AWS Lambda then passes the returned app client credentials to the in-Region Amazon Cognito deployment. Amazon Cognito verifies the client ID and client secret, and returns an access token to the Lambda function.
  • The client application (machine) can now use this token to access downstream applications.
  • The client authentication process in the secondary (failover) Region is the same, with one exception. In the secondary Region, the Lambda environment variables retrieve app client credentials from the DynamoDB database for the secondary Region Amazon Cognito instance.

To initiate a failover between Regions, the Route 53 domain record needs to be pointed to the secondary Region API Gateway Regional endpoint. The downstream application’s Amazon Cognito configuration files must also be updated to point to the secondary Region Amazon Cognito instance. Alerts can be enabled using Amazon CloudWatch alarms to notify system operators of issues that may warrant a failover (a manual process to help system operators decide when to failover). The entire failover process takes just a couple of seconds for DNS to switch over and for the application to start accepting tokens from the secondary Region. This failover process could be automated based on generated alerts.

This architecture is suitable for a hot standby, active-passive type of application deployment. It is important to note that independent Amazon Cognito environments are being used in each Region, so you will need to set up your application to failover to the secondary Region for authentication. For example, your backend should be able to accept and validate access tokens from both primary and secondary Amazon Cognito user pools. To learn more about disaster recovery options in AWS, visit Disaster recovery options in the cloud.

Architecture overview

Figure 1 shows you how to build a multi-Region machine-to-machine architecture using Amazon Cognito, which uses DynamoDB global tables to perform the data replication. A Lambda function is utilized to retrieve the credentials for the active Region that the application is operating in, and a Regional Amazon Cognito endpoint returns the required token.

Figure 1. Multi-Region Amazon Cognito machine-to-machine architecture

Figure 1. Multi-Region Amazon Cognito machine-to-machine architecture

Process flow

  1. The Route53 domain record for the authentication proxy service is given to the client application and pointed at the API Gateway Regional endpoint. The client passes primary Region app client credentials to the API Gateway.
  2. API Gateway passes Lambda the client ID and client secret pair.
  3. Lambda does a lookup in DynamoDB to verify the client ID and client secret. After the identity is confirmed, Lambda uses Region-based environment variables to identify if the client should be using the primary Region or secondary Region for authenticating to Amazon Cognito. Lambda retrieves the Region-based client ID and client secret from DynamoDB.
  4. Lambda passes the Region-based app ID and secret to Amazon Cognito, which verifies the client ID and client secret, and returns an access token to the Lambda function.
  5. Lambda passes the access token from the Regional Amazon Cognito environment back to the client to be used against Region-based backend applications.

Prerequisites

For this walkthrough, you should have the following prerequisites:

Note: Ensure that you are following your organization’s security best practices while deploying this architecture.

Implementation

This implementation will focus on the Lambda logic that is used to retrieve user credentials based on Lambda environment variables. We will share snippets of the Lambda function code so you can create the logic necessary to enable multi-Region application architecture using Amazon Cognito app clients. In addition to the Lambda function, you will also need to create and configure the following resources using security implementation designated by your organization:

  1. DynamoDB table with fields primaryClientID, primaryClientSecret, secondaryClientID, and secondaryClientSecret.
    1. Because this table is used to store secrets, make sure encryption is enabled and you follow Security Best Practices for Amazon DynamoDB and your organization’s security best practices.
    2. Enable DynamoDB global tables.
  1. API Gateway Regional endpoint with TLS encryption using ACM.
  2. Route53 domain record routing traffic to Regional API Gateway.
  3. Downstream application configuration pointing at the Regional Amazon Cognito endpoint.
  4. IAM role that grants access from Lambda to DynamoDB.

Now let’s configure our Lambda function using Node.js language. Within the Lambda console create a new Lambda function that you will author from scratch. Select the Node.js runtime and change the runtime Lambda execution role to the IAM role that you have created for Lambda. Next, we will walk through the Lambda function code and configuration.

  1. Attach your new IAM role as a Lambda runtime role that will grant your Lambda function access to the DynamoDB table.
  2. Within the Lambda configuration environment variables, create several key-value variables in the Lambda function. The following are the environmental variables we will add.
    1. key: OAUTH_HOST_PRIMARY, value: https://${cognito-primary-region-domain-name}/oauth2/token
    2. key: OAUTH_HOST_SECONDARY, value: https://${cognito-secondary-region-domain-name}/oauth2/token
  1. Import the Node.js libraries using the following code.
"dependencies": {
    "aws-sdk": "^2.723.0",
    "aws-serverless-express": "^3.3.8",
    "axios": "^0.21.1",
    "base-64": "^1.0.0",
    "cors": "^2.8.5",
    "dotenv": "^8.2.0",
    "express": "^4.17.1",
    "jsonwebtoken": "^8.5.1",
    "jwt-decode": "^2.2.0",
    }
  1. Parse data from the incoming client application authentication request.
router.post("/", async (request, response) => {
  const client_id = request.body["client_id"];
  const client_secret = request.body["client_secret"]
      
  const client = await dynamoDB.getClientCredentialById(client_id, client_secret);
    
  if (client === undefined) {
    return response.status(400).json({
       message:
          "Client not configured for in Cognito. Please check with support team",
        });
      }
    
   const client_credentials = getClientCredentials(client);
   let access_token = await authService.getJwtToken(client_credentials);
          
   response.send(access_token);
});
  1. Reference the environment variables to determine the Region that the Lambda function is operating in and set the Region as primary or secondary.
getClientCredentials = client => {
   return region === "us-east-1" ? { clientId: client.primaryClientId, clientSecret: client.primaryClientSecret, oAuthHost: config.OAUTH_HOST }
   : region === "us-east-2" ? { clientId: client.secondaryClientId, clientSecret: client.secondaryClientSecret, oAuthHost: config.OAUTH_HOST_EAST_2 }
   : {};
}
  1. Verify the client ID and client secret against the DynamoDB table and get the Region-based client ID and client secret.
const getClientCredentialById = async (client_id, client_secret) => {

  let params = {
    TableName: clientCredentialTable,
    Key: {
      primaryClientId: client_id,
      primaryClientSecret: client_secret,
    },
  };

  const clientCredential = await ddb.get(params).promise();
  return clientCredential.Item;
};
  1. Pass the Regional client ID and client secret to Amazon Cognito. You will receive an access token from Amazon Cognito.
   const base64ClientCredentials = base64.encode(
     client_credentials.clientId.concat(":").concat(client_credentials.clientSecret)
   );
   const headers = {
     "content-type": "application/x-www-form-urlencoded",
     authorization: "Basic " + base64ClientCredentials,
    };
    const data = "grant_type=client_credentials";
    
    // Post request to Cognito OAuth URL
    const token = await Axios.post(client_credentials.oAuthHost, data, { headers });
    return token.data;
 };
  1. Pass the access token from the Regional Amazon Cognito environment back to the client to be used against Region-based backend applications.
let access_token = await authService.getJwtToken(client_credentials);
 
  response.send(access_token);

New app client creation

You need to implement this Lambda function in both the primary and secondary Regions. Modify the environmental variables in the secondary Region with the secondary Region’s information.

To enroll a new client in this multi-Region architecture using Amazon Cognito we will go through the process as shown in the following illustration.

Figure 2. Creating a new app client

Figure 2. Creating a new app client

You need to create a new:

  1. App ID and secret in Amazon Cognito in the primary Region.
  2. App ID and secret in Amazon Cognito in the secondary Region.
  3. Item in DynamoDB table consisting of the Amazon Cognito credentials created: primaryClientID, primaryClientSecret, secondaryClientID, and secondaryClientSecret.

Failover process

In this blog post we are creating a hot standby, active-passive type of application deployment. You will need to ensure your application is configured to be able to use either the primary Region Amazon Cognito or the secondary Region Amazon Cognito environment. The process to failover between Regions consists of the following:

  1. Start application backend in the secondary Region.
  2. Reconfigure the application backend Amazon Cognito identity provider YAML file to point at the secondary Region Amazon Cognito identity provider.
  3. Modify the Route 53 domain record to point client applications at the secondary Region API Gateway Regional endpoint.

Cleaning up

In order to avoid unnecessary charges, please be sure to clean up any resources that were built as part of this architecture that are no longer in use.

Conclusion

In this blog post, we presented a solution that allows you to failover Amazon Cognito app clients from one AWS Region to another Region. The benefits of this architecture will allow you to have greater flexibility for running your Amazon Cognito app clients in the Region that is best suited for your use case. With this solution you now have the capability to failover Amazon Cognito app clients to a different AWS Region in the event of application or system errors.

Several variants of this solution can be implemented using the provided Lambda failover logic. You can store App ID and secret in AWS Secrets Manager. To learn more, see How to replicate secrets in AWS Secrets Manager to multiple Regions. You can also automate the failover process between primary and secondary Regions. To accomplish this, you will need to evaluate events which should cause a failover in your environment. Later, build the appropriate automation to failover your downstream application to the secondary Region Amazon Cognito deployment.

Amazon Cognito can be used for machine authentication as per the limits posted in Quotas in Amazon Cognito. Review the limits of number of app clients per user pool and the other applicable rate limits (for example, client credentials rate limits) and verify that these limits meet the needs of your application.

Optum’s Story

UnitedHealth Group (UHG) is the health and well-being company responsible for over 150 million lives globally. Optum, a part of UnitedHealth Group, is a health services business serving the healthcare marketplace, including payers, care providers, employers, governments, life sciences companies and consumers, through its OptumHealth, OptumInsight, OptumRx, and OptumServe businesses.

Federated Data Services (FDS) is the power behind the scenes that enables interoperability and secure transmission of personally identifiable information. It protects health information between lines of businesses, technology systems, applications, members and providers. With FDS, data is centralized, making it easier to share and retrieve by other systems. This assures businesses get a flexible and scalable solution that adapts to changes in technology and business needs.

How to mount Linux volume and keep mount point consistency

Post Syndicated from limillan original https://aws.amazon.com/blogs/compute/how-to-mount-linux-volume-and-keep-mount-point-consistency/

This post is written by: Leonardo Azize Martins, Cloud Infrastructure Architect, Professional Services

Customers often use Amazon Elastic Compute Cloud (Amazon EC2) Linux based instances with many Amazon Elastic Block Store (Amazon EBS) volumes attached. In this case, device name can vary depending on some facts, such as virtualization type, instance type, or operating system. As the device name can change, the customer shouldn’t rely on the device name to mount volumes from it. The customer wants to avoid the situation where a volume is mounted on a different mount point just because the device name changed, or the device name doesn’t exist because the name pattern changed.

Customers who want to utilize the latest instance family usually change the instance type when a new one is available. The device name can be different between instance families, such as T2 and T3. T2 uses /dev/sd[a-z], while T3 uses /dev/nvme[0-26]n1. If you mount a device on T2 called /dev/sdc, when you change the instance family to T3 the same device won’t be called /dev/sdc anymore. In this case, it will fail to mount.

Amazon EBS volumes are exposed as NVMe block devices on instances built on the AWS Nitro System. The block device driver can assign NVMe device names in a different order than what you specified for the volumes in the block device mapping. In this situation, a device that should be mounted on /data could end-up being mounted on /logs.

On Linux, you can use the fstab file to mount devices using kernel name descriptors (the traditional way), file system labels, or the file system UUID. Kernel name descriptors aren’t persistent and can change each boot. Therefore, they shouldn’t be used in configuration files.

UUID is a mechanism for giving each filesystem a unique identifier. These identifiers’ attributes are generated by filesystem utilities (mkfs.*) when the device is formatted, and they’re designed so that collisions are unlikely. All GNU/Linux filesystems (including swap and LUKS headers of raw encrypted devices) support UUID.

As UUID is a filesystem attribute, it can also be used with Logical Volume Manager (LVM) and Linux software RAID (mdadm).

Depending on the fstab file configuration, you may find that you can’t access your instance, which requires you to follow a rescue process to fix issues. This is the case if you configure the fstab file with the device name and change the instance type.

This post shows how to mount Linux volumes and keep mount points preserved when the instance type is changed or the instance is rebooted.

Overview of solution

When you create an instance, you specify block devices mapping. It doesn’t mean that the Linux device has the same name or can be discovered in the same order as specified on the instance mapping. This situation can be more evident when using applications that require more volumes.

Using UUID to mount volumes lets you mitigate future issues when you stop and start your instance or change the instance type.

EC2 instance block device mapping

Figure 1: EC2 instance block device mapping

Walkthrough

You will create one instance with three volumes: one root volume and two data volumes. We use Amazon Linux 2 in this post. In this instance type, volumes have a specific name format. Later, you will change the instance type. The new instance type volumes will have another name format.

Follow these steps:

  • Create an instance with three volumes
  • Create the filesystem on the volumes and mount them
  • Change the instance type

Prerequisites

For this walkthrough, you should have the following prerequisites:

Create instance

Create one instance with three volumes: a root volume and two data volumes. Use Launch Instance Wizard with the following details.

Launch Amazon Linux 2 instance

  1. On Step 1, choose Amazon Linux 2 AMI (HVM), SSD Volume Type.
  2. On Step 2, choose micro.
  3. On Step 3, choose Next.
  4. On Step 4, add two new volumes, device /dev/sdb 10 GiB and device /dev/sdc 12 GiB.

Launch instances, add storage

Figure 2: Launch instances, add storage

Create filesystem and mount

Connect to your instance using EC2 Instance Connect or any other method that feels comfortable for you. Mount the device using UUID instead of the device name. Run the following instructions as the user root.

Format and mount the device

  1. Run the following command to confirm that you have three disks:
    $ lsblk
  2. Format disk as xfs, and run the following commands:
    mkfs.xfs /dev/xvdb
    mkfs.xfs /dev/xvdc
  3. Create mount point, and run the following commands:
    mkdir /mnt/disk1
    mkdir /mnt/disk2
  4. Add mount instructions, and run the following commands:
    echo "$(blkid /dev/xvdb | awk '{print $2}') /mnt/disk1 xfs defaults,noatime" | tee -a /etc/fstab
    echo "$(blkid /dev/xvdc | awk '{print $2}') /mnt/disk2 xfs defaults,noatime" | tee -a /etc/fstab
  5. Mount volumes, create dummy file, and run the following commands:
    mount -a
    touch /mnt/disk1/file1.txt
    touch /mnt/disk2/file2.txt

You will have an fstab file like the following:

cat /etc/fstab
UUID=7b355c6b-f82b-4810-94b9-4f3af651f629     /           xfs    defaults,noatime  1   1
UUID="2c160dd6-586c-4258-84bb-c79933b9ae02" /mnt/disk1 xfs defaults,noatime
UUID="3e7a0c28-7cf1-40dc-82a1-2f5cfb53f9a4" /mnt/disk2 xfs defaults,noatime

Change instance type

Change the instance type from t2.micro to t3.micro.

Launch Amazon Linux 2 instance

  1. Stop instance.
  2. Change the instance type to micro.
  3. Start instance.
  4. Connect to your instance using EC2 Instance Connect.
  5. Check the device name, and run the following command:
lsblk
  1. List files, and run the following command:
ls -l /mnt/*

Note that the device names are changed from xvd* to nvme*. All of the devices are mounted without any issue and with the correct mount points.

Cleaning up

To avoid incurring future charges, delete the instance and all of the volumes that you created in this post.

The other side

UUID is an attribute of the filesystem that was generated when you formatted your device. Therefore, it will follow your device even if you create an AMI or snapshot. So you don’t need to worry about a restore process, and it will smoothly proceed to an instance restore. You must be careful if you restore a snapshot from one volume and attach it to the same instance, as you will end-up with two volumes that are using the same UUID. If you try to mount the restored volume on the same instance, then it will fail and you will find this message on /var/log/messages file. kernel: XFS (xvdf1): Filesystem has duplicate UUID f6646b81-f2a6-46ca-9f3d-c746cf015379 - can't mount It is even more important to be careful if you attach a volume created from the snapshot of the root volume and restart your instance. Since both volumes have the same UUID, you may find that a volume other than the one attached to /dev/xvda or /dev/sda has become the root volume of your instance. See the following example for details. Note that both volumes have the same UUID, but the one mounted on / is /dev/xvdf1, not /dev/xvda1, which is the real root volume for this instance.

$ blkid
/dev/xvda1: LABEL="/" UUID="f6646b81-f2a6-46ca-9f3d-c746cf015379" TYPE="xfs" PARTLABEL="Linux" PARTUUID="79fae994-3708-4293-bb29-4d069d1c786b"
/dev/xvdf1: LABEL="/" UUID="f6646b81-f2a6-46ca-9f3d-c746cf015379" TYPE="xfs" PARTLABEL="Linux" PARTUUID="79fae994-3708-4293-bb29-4d069d1c786b"
$ lsblk
NAME    MAJ:MIN RM SIZE RO TYPE MOUNTPOINT
xvda    202:0    0   8G  0 disk
└─xvda1 202:1    0   8G  0 part
xvdf    202:80   0   8G  0 disk
└─xvdf1 202:81   0   8G  0 part /

Conclusion

In this post, we covered how to use UUID to mount Linux devices using fstab file. This keeps the mount point on the correct device. It also lets you change the instance type without changes to the fstab file. You can use UUID with LVM and Linux software RAID (mdadm), UUID, as an attribute of the filesystem, will be the same even after a backup and restore process, snapshot, or clone. To learn more, check out our block device mappings and device names on Linux instances documentation.

Expanding Your EC2 Possibilities By Utilizing the CPU Launch Options

Post Syndicated from limillan original https://aws.amazon.com/blogs/compute/expanding-your-ec2-possibilities-by-utilizing-the-cpu-launch-options/

This post is written by: Matthew Brunton, Senior Solutions Architect – WWPS

To ensure our customers have the appropriate machines available for their workloads, AWS offers a wide range of hardware options that include hundreds of types of instances that help customers achieve the best price performance for their workloads.  In some specialized circumstances, our customers need an even wider range of options, or more flexibility. This could be driven by a desire to optimize licensing costs, or the customer wanting more hardware configuration options. Some high performance workloads can improve by turning off simultaneous multithreading. In our AWS Well Architected Framework – High Performance Computing Lens we have the following recommendation “Unless an application has been tested with hyperthreading enabled, it is recommended that hyperthreading be disabled”. With these factors in mind, AWS offers the ability to configure some options regarding the CPU configuration in launched instances.

Our larger instance types that have a higher number of cores, and offer multithreaded cores will translate to a larger combination of potential options. The valid combinations of cores and threads per core can be found here. To consider utilizing the CPU options for both cores and threads per core, you will need to consider instance types that have multiple CPU’s and/or cores.

You can specify numerous CPU options for some of our larger instances via the console, command line interface, or the API. Moreover, you can remove CPUs from the launch configuration, or deactivate threading within CPUs that have multiple threads per core. Amazon Elastic Compute Cloud (Amazon EC2) FAQ’s for the Optimize CPU’s feature can be found here. You should be aware that this feature is only available during instance launch and cannot be modified after launch. The launch options persist after you reboot, stop, or start an instance.

You can easily determine how many CPUs and threads a machine has. There are numerous ways to see this via the AWS Management Console and the AWS Command Line Interface (CLI).

Within the AWS Management Console, under the ‘Instance Details’ section, opening up the ‘Host and placement group’ item reveals the number of vCPUs that your machine has.

Instance Details showing the number of vCPU's a particular EC2 machine has

Figure 1: Console details showing number of vCPU’s

This information is also available using the AWS CLI as follows:

aws ec2 describe-instances --region us-east-1 --filters "Name=instance-type,Values='c6i.*large'"

...
    "Instances": [
        {
            "Monitoring": {
                "State": "disabled"
            }, 
            "PrivateDnsName": "ip-172-31-44-121.ec2.internal",
 "PrivateIpAddress": "172.31.44.121",                              
 "State": {
                "Code": 16, 
                "Name": "running"
            }, 
            "EbsOptimized": false, 
            "LaunchTime": "2021-11-22T01:46:58+00:00",
            "ProductCodes": [], 
            "VpcId": " vpc-7f7f1502", 
            "CpuOptions": { "CoreCount": 32, "ThreadsPerCore": 1 }, 
            "StateTransitionReason": "", 
            ...
        }
    ]
...

Figure 2: ec2 describe-instances cli output

A handy AWS CLI command ‘describe-instance-types’ will show the list of valid cores, the possible threads-per-core, and the default values for the vCPUs and cores. These are listed in the ‘DefaultVCpus’ and ‘DefaultCores’ items in the returned JSON listed as follows.

aws ec2 describe-instance-types --region us-east-1 --filters "Name=instance-type,Values='c6i.*'"
{
    "InstanceTypes": [
        {
            "InstanceType": "c6i.4xlarge",
            "CurrentGeneration": true,
            "FreeTierEligible": false,
            "SupportedUsageClasses": [
                "on-demand",
                "spot"
            ],
            "SupportedRootDeviceTypes": [
                "ebs"
            ],
            "SupportedVirtualizationTypes": [
                "hvm"
            ],
            "BareMetal": false,
            "Hypervisor": "nitro",
            "ProcessorInfo": {
                "SupportedArchitectures": [
                    "x86_64"
                ],
                "SustainedClockSpeedInGhz": 3.5
            },
            "VCpuInfo": { "DefaultVCpus": 16, "DefaultCores": 8, "DefaultThreadsPerCore": 2, "ValidCores": [ 2, 4, 6, 8 ], "ValidThreadsPerCore": [ 1, 2 ] },
            "MemoryInfo": {
                "SizeInMiB": 32768
            },


Figure 3: ec2 describe-instance-types cli output

To utilize the AWS CLI to launch one or multiple instances, you should use the run instances CLI command.

The following is the shorthand syntax:

aws ec2 run-instances --image-id xxx --instance-type xxx --cpu-options “CoreCount=xx,ThreadsPerCore=xx” --key-name xxx --region xxx

For example, the following command launches a 32-core machine with only 1 thread per core instead of the standard 2 threads per core:

aws ec2 run-instances --image-id ami-0c2b8ca1dad447f8a --instance-type c6i.16xlarge
--cpu-options " CoreCount =32, ThreadsPerCore =1" --key-name MyKeyPair --region xxx

If you are using the CPU options parameters in CloudFormation templates, then the following applies:

https://docs.aws.amazon.com/AWSCloudFormation/latest/UserGuide/aws-properties-ec2-instance-cpuoptions.html

The following is an example of the YAML syntax for specifying the CPU configuration.

Resources:
  CustomEC2Instance:
    Type: "AWS::EC2::Instance"
    Properties:
      InstanceType: xxx
      ImageId: xxx
      CpuOptions:
CoreCount: xx
ThreadsPerCore: x

As can be seen in the following table, there are a number of valid CPU core options, as well as the option to set one or two threads per core for each CPU for certain instance types. This significantly opens up the number of combinations and permutations to meet your specific workload need. In the case of the c6i instance listed in the following table, there are an additional 32 CPU core and threading combinations available to customers.

Instance type Default vCPUs Default CPU cores Default threads per core Valid CPU cores Valid threads per core
c6i.16xlarge 64 32 2 2, 4, 6, 8, 10, 12, 14, 16, 18, 20, 22, 24, 26, 28, 30, 32 1, 2

Figure 4: Valid Core and Thread Launch Options

Note that you still pay the same amount for the EC2 instance, even if you deactivate some of the cores or threads.

Conclusion

This approach can let customers customize the EC2 hardware options even further to ensure a wider range of CPU/memory combinations over and above the already extensive AWS instance options. This lets customers finely tune hardware for their exact application requirements, whether that is running High Performance workloads or trying to save money where license restrictions mean you can benefit from a specific CPU configuration.

We have run through various scenarios in this post, which detailed how to launch instances with alternate CPU configurations, easily check the current configuration of your running instances via our API and console, and how to configure the options in CloudFormation templates.

We love to see our customers maximizing the flexibility of the AWS platform to deliver outstanding results. Have a look at some of your High Performance workloads and give the threading options a try, or take a deep dive into any of your more expensive licenses to see if you could benefit from an alternate CPU configuration. In order to get started, check out our detailed developer documentation for the optimize CPU options.