Match Cutting at Netflix: Finding Cuts with Smooth Visual Transitions

Post Syndicated from Netflix Technology Blog original https://netflixtechblog.com/match-cutting-at-netflix-finding-cuts-with-smooth-visual-transitions-31c3fc14ae59

By Boris Chen, Kelli Griggs, Amir Ziai, Yuchen Xie, Becky Tucker, Vi Iyengar, Ritwik Kumar

Creating Media with Machine Learning episode 1

Introduction

At Netflix, part of what we do is build tools to help our creatives make exciting videos to share with the world. Today, we’d like to share some of the work we’ve been doing on match cuts.

In film, a match cut is a transition between two shots that uses similar visual framing, composition, or action to fluidly bring the viewer from one scene to the next. It is a powerful visual storytelling tool used to create a connection between two scenes.

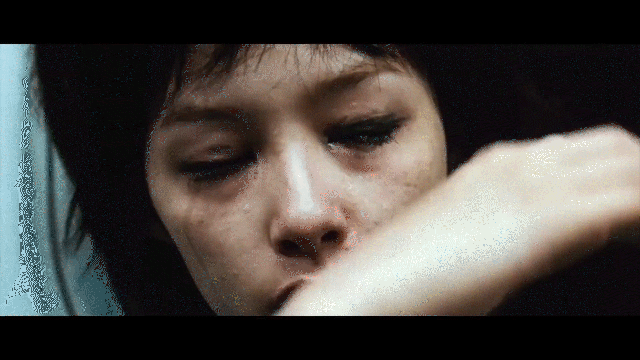
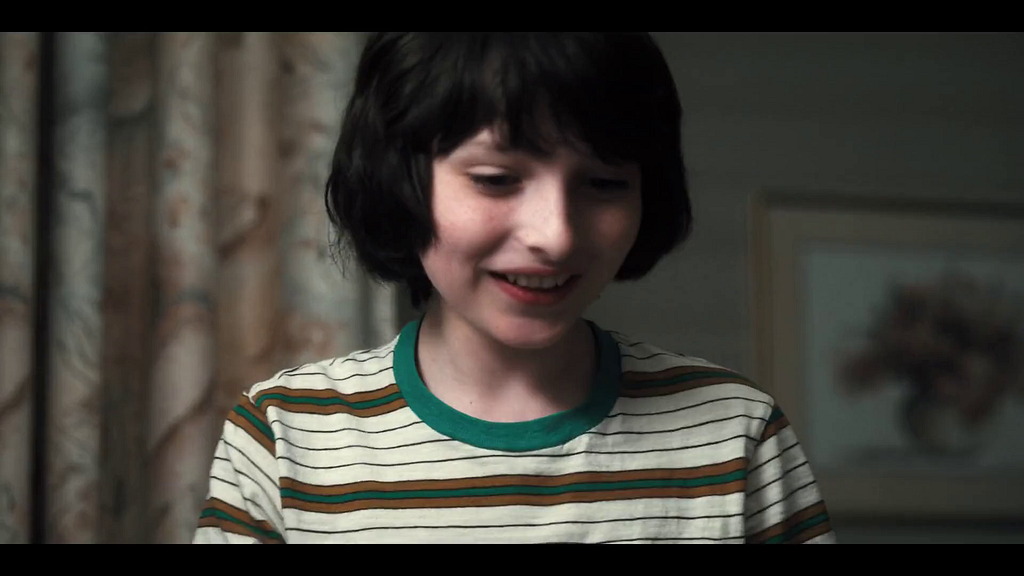
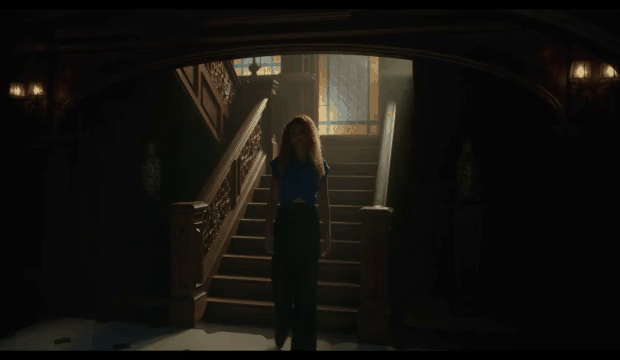
[Spoiler alert] consider this scene from Squid Game:

The players voted to leave the game after red-light green-light, and are back in the real world. After a rough night, Gi Hung finds another calling card and considers returning to the game. As he waits for the van, a series of powerful match cuts begins, showing the other characters doing the exact same thing. We never see their stories, but because of the way it was edited, we instinctively understand that they made the same decision. This creates an emotional bond between these characters and ties them together.

A more common example is a cut from an older person to a younger person (or vice versa), usually used to signify a flashback (or flashforward). This is sometimes used to develop the story of a character. This could be done with words verbalized by a narrator or a character, but that could ruin the flow of a film, and it is not nearly as elegant as a single well executed match cut.

An example from Oldboy. A child wipes their eyes on a train, which cuts to a flashback of a younger child also wiping their eyes. We as the viewer understand that the next scene must be from this child’s upbringing.
A flashforward from a young Indian Jones to an older Indian Jones conveys to the viewer that what we just saw about his childhood makes him the person he is today.

Here is one of the most famous examples from Stanley Kubrik’s 2001: A Space Odyssey. A bone is thrown into the air. As it spins, a single instantaneous cut brings the viewer from the prehistoric first act of the film into the futuristic second act. This highly artistic cut suggests that mankind’s evolution from primates to space technology is natural and inevitable.

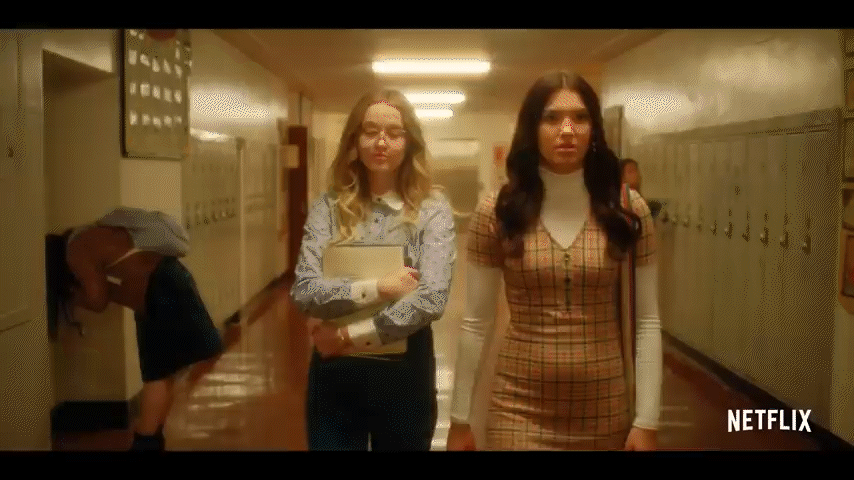
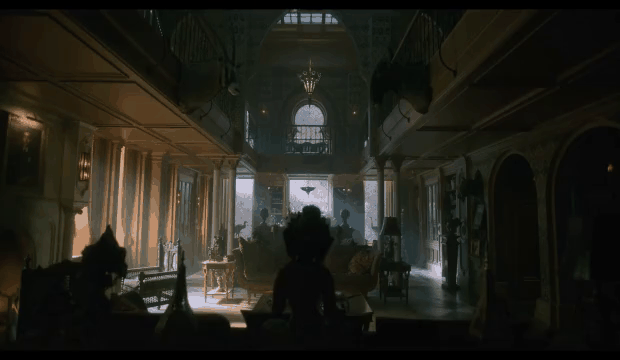
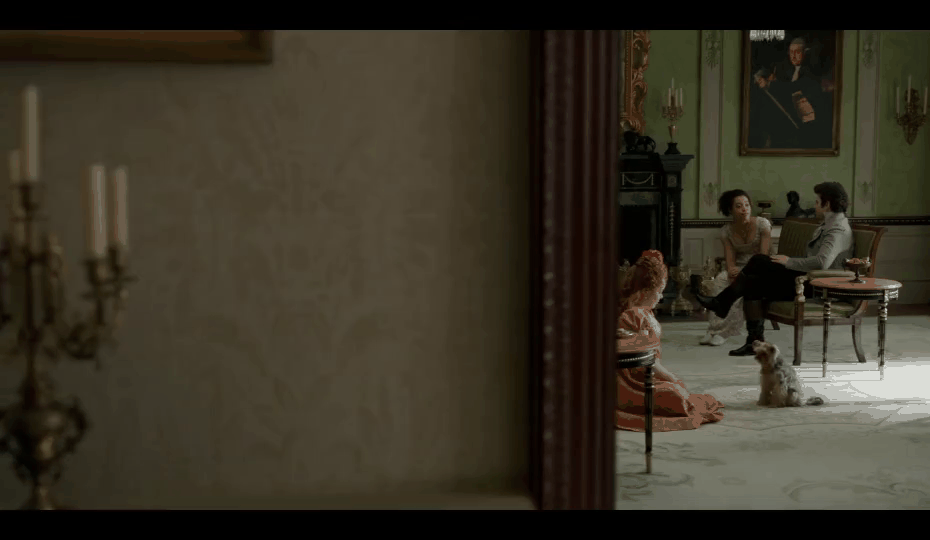
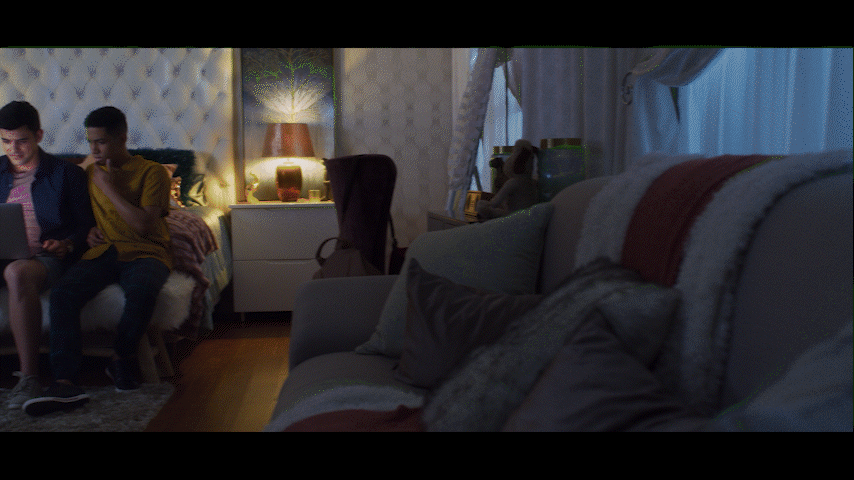
Match cutting is also widely used outside of film. They can be found in trailers, like this sequence of shots from the trailer for Firefly Lane.

Match cutting is considered one of the most difficult video editing techniques, because finding a pair of shots that match can take days, if not weeks. An editor typically watches one or more long-form videos and relies on memory or manual tagging to identify shots that would match to a reference shot observed earlier.

A typical two hour movie might have around 2,000 shots, which means there are roughly 2 million pairs of shots to compare. It quickly becomes impossible to do this many comparisons manually, especially when trying to find match cuts across a 10 episode series, or multiple seasons of a show, or across multiple different shows.

What’s needed in the art of match cutting is tools to help editors find shots that match well together, which is what we’ve started building.

Our Initial Approach

Collecting training data is much more difficult compared to more common computer vision tasks. While some types of match cuts are more obvious, others are more subtle and subjective.

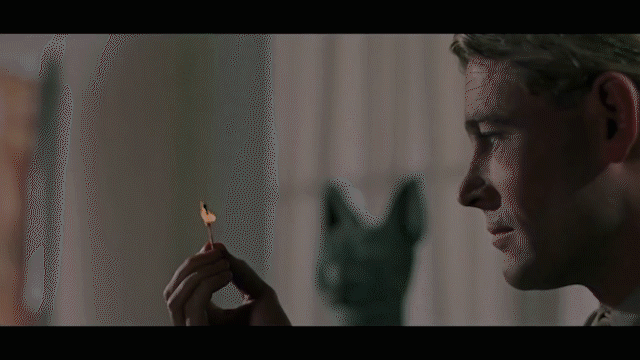
For instance, consider this match cut from Lawrence of Arabia. A man blows a match out, which cuts into a long, silent shot of a sunrise. It’s difficult to explain why this works, but many creatives recognize this as one of the greatest match cuts in film.

To avoid such complexities, we started with a more well-defined flavor of match cuts: ones where the visual framing of a person is aligned, aka frame matching. This came from the intuition of our video editors, who said that a large percentage of match cuts are centered around matching the silhouettes of people.

Frame matches from Stranger Things.

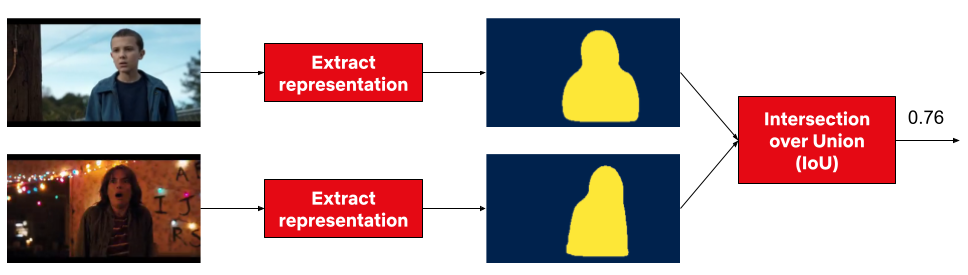
We tried several approaches, but ultimately what worked well for frame matching was instance segmentation. The output of segmentation models gives us a pixel mask of which pixels belong to which objects. We take the segmentation output of two different frames, and compute intersection over union (IoU) between the two. We then rank pairs using IoU and surface high-scoring pairs as candidates.

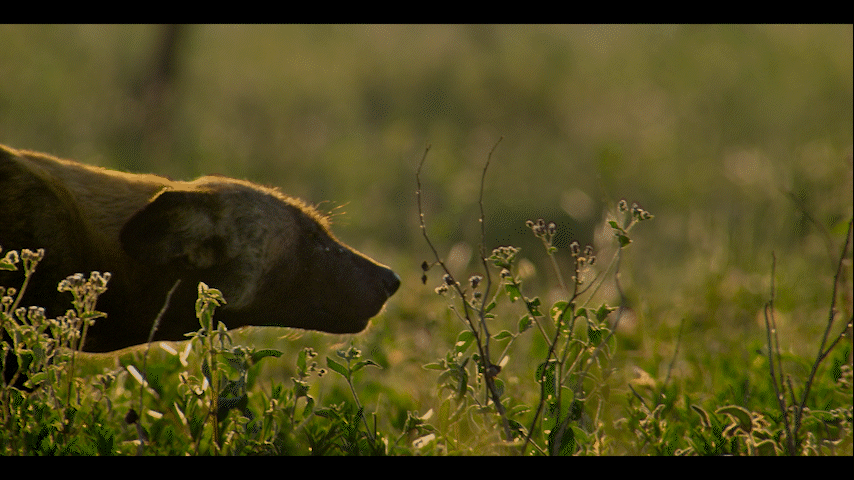
A few other details were added along the way. To deal with not having to brute force every single pair of frames, we only took the middle frame of each shot, since many frames look visually similar within a single shot. To deal with similar frames from different shots, we performed image deduplication upfront. In our early research, we simply discarded any mask that wasn’t a person to keep things simple. Later on, we added non-person masks back to be able to find frame match cuts of animals and objects.

A series of frame match cuts of animals from Our planet.
Object frame match from Paddington 2.

Action and Motion

At this point, we decided to move onto a second flavor of match cutting: action matching. This type of match cut involves the continuation of motion of object or person A’s motion to the object or person B’s motion in another shot (A and B can be the same so long as the background, clothing, time of day, or some other attribute changes between the two shots).

An action match cut from Resident Evil.
A series of action mat cuts from Extraction, Red Notice, Sandman, Glow, Arcane, Sea Beast, and Royalteen.

To capture this type of information, we had to move beyond image level and extend into video understanding, action recognition, and motion. Optical flow is a common technique used to capture motion, so that’s what we tried first.

Consider the following shots and the corresponding optical flow representations:

Shots from The Umbrella Academy.

A red pixel means the pixel is moving to the right. A blue pixel means the pixel is moving to the left. The intensity of the color represents the magnitude of the motion. The optical flow representations on the right show a temporal average of all the frames. While averaging can be a simple way to match the dimensionality of the data for clips of different duration, the downside is that some valuable information is lost.

When we substituted optical flow in as the shot representations (replacing instance segmentation masks) and used cosine similarity in place of IoU, we found some interesting results.

Shots from The Umbrella Academy.

We saw that a large percentage of the top matches were actually matching based on similar camera movement. In the example above, purple in the optical flow diagram means the pixel is moving up. This wasn’t what we were expecting, but it made sense after we saw the results. For most shots, the number of background pixels outnumbers the number of foreground pixels. Therefore, it’s not hard to see why a generic similarity metric giving equal weight to each pixel would surface many shots with similar camera movement.

Here are a couple of matches found using this method:

Camera movement match cut from Bridgerton.
Camera movement match cut from Blood & Water.

While this wasn’t what we were initially looking for, our video editors were delighted by this output, so we decided to ship this feature as is.

Our research into true action matching still remains as future work, where we hope to leverage action recognition and foreground-background segmentation.

Match cutting system

The two flavors of match cutting we explored share a number of common components. We realized that we can break the process of finding matching pairs into five steps.

System diagram for match cutting. The input is a video file (film or series episode) and the output is K match cut candidates of the desired flavor. Each colored square represents a different shot. The original input video is broken into a sequence of shots in step 1. In Step 2, duplicate shots are removed (in this example the fourth shot is removed). In step 3, we compute a representation of each shot depending on the flavor of match cutting that we’re interested in. In step 4 we enumerate all pairs and compute a score for each pair. Finally, in step 5, we sort pairs and extract the top K (e.g. K=3 in this illustration).

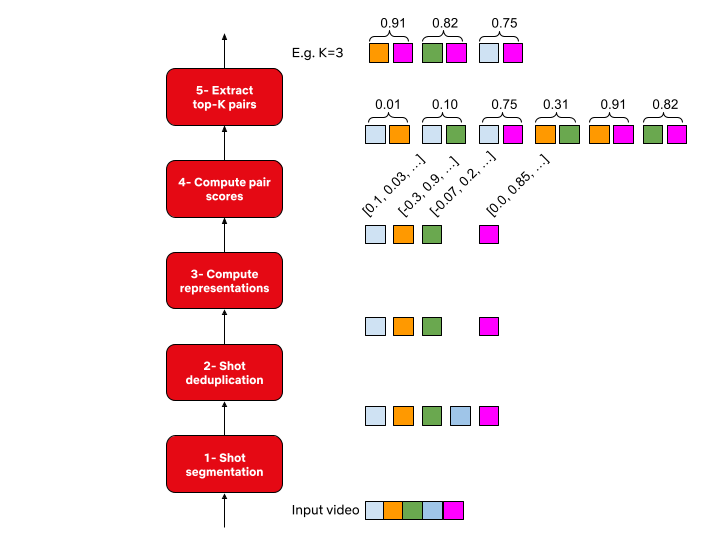
1- Shot segmentation

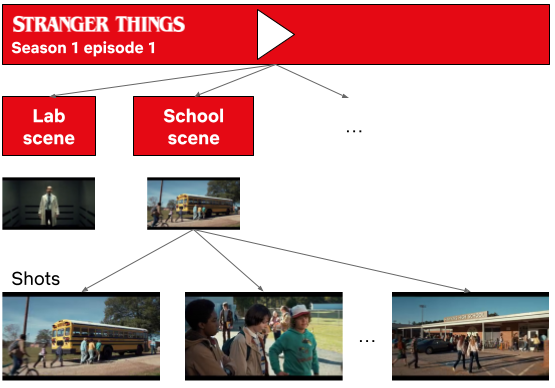
Movies, or episodes in a series, consist of a number of scenes. Scenes typically transpire in a single location and continuous time. Each scene can be one or many shots- where a shot is defined as a sequence of frames between two cuts. Shots are a very natural unit for match cutting, and our first task was to segment a movie into shots.

Stranger Things season 1 episode 1 broken down into scenes and shots.

Shots are typically a few seconds long, but can be much shorter (less than a second) or minutes long in rare cases. Detecting shot boundaries is largely a visual task and very accurate computer vision algorithms have been designed and are available. We used an in-house shot segmentation algorithm, but similar results can be achieved with open source solutions such as PySceneDetect and TransNet v2.

2- Shot deduplication

Our early attempts surfaced many near-duplicate shots. Imagine two people having a conversation in a scene. It’s common to cut back and forth as each character delivers a line.

A dialogue sequence from Stranger Things Season 1.

These near-duplicate shots are not very interesting for match cutting and we quickly realized that we need to filter them out. Given a sequence of shots, we identified groups of near-duplicate shots and only retained the earliest shot from each group.

Identifying near-duplicate shots

Given the following pair of shots, how do you determine if the two are near-duplicates?

Near-duplicate shots from Stranger Things.

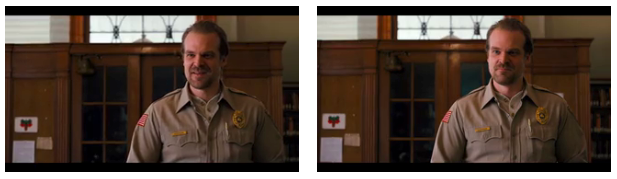
You would probably inspect the two visually and look for differences in colors, presence of characters and objects, poses, and so on. We can use computer vision algorithms to mimic this approach. Given a shot, we can use an algorithm that’s been trained on a large dataset of videos (or images) and can describe it using a vector of numbers.

An encoder represents a shot from Stranger Things using a vector of numbers.

Given this algorithm (typically called an encoder in this context), we can extract a vector (aka embedding) for a pair of shots, and compute how similar they are. The vectors that such encoders produce tend to be high dimensional (hundreds or thousands of dimensions).

To build some intuition for this process, let’s look at a contrived example with 2 dimensional vectors.

Three shots from Stranger Things and the corresponding vector representations.

The following is a depiction of these vectors:

Shots 1 and 3 are near-duplicates. The vectors representing these shots are close to each other. All shots are from Stranger Things.

Shots 1 and 3 are near-duplicates and we see that vectors 1 and 3 are close to each other. We can quantify closeness between a pair of vectors using cosine similarity, which is a value between -1 and 1. Vectors with cosine similarity close to 1 are considered similar.

The following table shows the cosine similarity between pairs of shots:

Shots 1 and 3 have high cosine similarity (0.96) and are considered near-duplicates while shots 1 and 2 have a smaller cosine similarity value (0.42) and are not considered near-duplicates. Note that the cosine similarity of a vector with itself is 1 (i.e. it’s perfectly similar to itself) and that cosine similarity is commutative. All shots are from Stranger Things.

This approach helps us to formalize a concrete algorithmic notion of similarity.

3- Compute representations

Steps 1 and 2 are agnostic to the flavor of match cutting that we’re interested in finding. This step is meant for capturing the matching semantics that we are interested in. As we discussed earlier, for frame match cutting, this can be instance segmentation, and for camera movement, we can use optical flow.

However, there are many other possible options to represent each shot that can help us do the matching. These can be heuristically defined ahead of time based on our knowledge of the flavors, or can be learned from labeled data.

4- Compute pair scores

In this step, we compute a similarity score for all pairs. The similarity score function takes a pair of representations and produces a number. The higher this number, the more similar the pairs are deemed to be.

Steps 3 and 4 for a pair of shots from Stranger Things. In this example the representation is the person instance segmentation mask and the metric is IoU.

5- Extract top-K results

Similar to the first two steps, this step is also agnostic to the flavor. We simply rank pairs by the computed score in step 4, and take the top K (a parameter) pairs to be surfaced to our video editors.

Using this flexible abstraction, we have been able to explore many different options by picking different concrete implementations for steps 3 and 4.

Dataset

How well does this system work? To answer this question, we decided to collect a labeled dataset of approximately 20k labeled pairs. Each pair was annotated by 3 video editors. For frame match cutting, the three video editors were in perfect agreement (i.e. all three selected the same label) 84% of the time. For motion match cutting, which is a more nuanced and subjective task, perfect agreement was 75%.

We then took the majority label for each pair and used it to evaluate our model.

We started with 100 movies, which produced 128k shots and 8.2 billion unique pairs. This diagram depicts the process of reducing this set down to the final set of 19,305 pairs that were annotated.

Evaluation

Binary classification with frozen embeddings

With the above dataset with binary labels, we are armed to train our first model. We extracted fixed embeddings from a variety of image, video, and audio encoders (a model or algorithm that extracts a representation given a video clip) for each pair and then aggregated the results into a single feature vector to learn a classifier on top of.

We extracted fixed embeddings using the same encoder for each shot. Then we aggregated the embeddings and passed the aggregation results to a classification model.

We surface top ranking pairs to video editors. A high quality match cutting system places match cuts at the top of the list by producing higher scores. We used Average Precision (AP) as our evaluation metric. AP is an information retrieval metric that is suitable for ranking scenarios such as ours. AP ranges between 0 and 1, where higher values reflect a higher quality model.

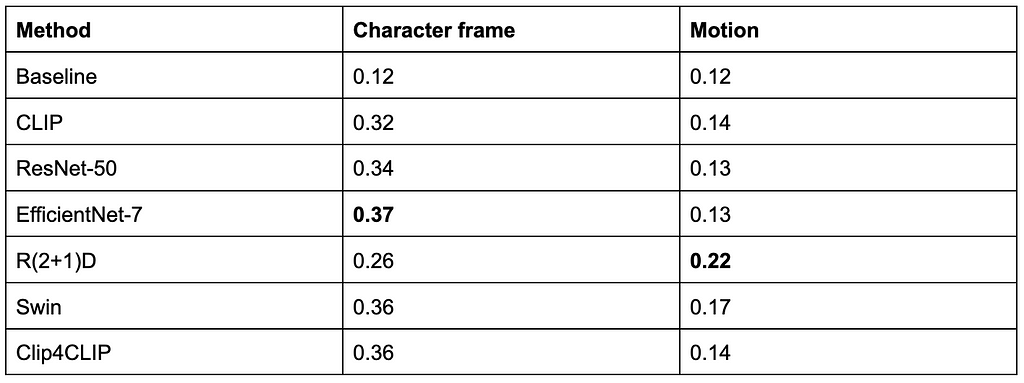
The following table summarizes our results:

Reporting AP on the test set. Baseline is a random ranking of the pairs, which for AP is equivalent to the positive prevalence of each task in expectation.

EfficientNet7 and R(2+1)D perform best for frame and motion respectively.

Metric learning

A second approach we considered was metric learning. This approach gives us transformed embeddings which can be indexed and retrieved using Approximate Nearest Neighbor (ANN) methods.

Reporting AP on the test set. Baseline is a random ranking of the pairs similar to the previous section.

Leveraging ANN, we have been able to find matches across hundreds of shows (on the order of tens of millions of shots) in seconds.

If you’re interested in more technical details make sure you take a look at our preprint paper here.

Conclusion

There are many more ideas that have yet to be tried: other types of match cuts such as action, light, color, and sound, better representations, and end-to-end model training, just to name a few.

Match cuts from Partner Track.
An action match cut from Lost In Space and Cowboy Bebop.
A series of match cuts from 1899.

We’ve only scratched the surface of this work and will continue to build tools like this to empower our creatives. If this type of work interests you, we are always looking for collaboration opportunities and hiring great machine learning engineers, researchers, and interns to help build exciting tools.

We’ll leave you with this teaser for Firefly Lane, edited by Aly Parmelee, which was the first piece made with the help of the match cutting tool:


Match Cutting at Netflix: Finding Cuts with Smooth Visual Transitions was originally published in Netflix TechBlog on Medium, where people are continuing the conversation by highlighting and responding to this story.

Fall 2022 SOC reports now available with 154 services in scope

Post Syndicated from Andrew Najjar original https://aws.amazon.com/blogs/security/fall-2022-soc-reports-now-available-with-154-services-in-scope/

At Amazon Web Services (AWS), we’re committed to providing customers with continued assurance over the security, availability, and confidentiality of the AWS control environment. We’re proud to deliver the Fall 2022 System and Organizational Controls (SOC) 1, 2, and 3 reports, which cover April 1–September 30, 2022, to support our customers’ confidence in AWS services.

AWS has also updated the associated infrastructure supporting our in-scope products and services to reflect new edge locations, AWS Wavelength zones, and AWS Local Zones.

The Fall 2022 SOC reports include an additional seven services in scope, for a new total of 154 services. See the full list on our Services in Scope by Compliance Program page.

The following are the additional seven services now in scope for the Fall 2022 SOC reports:

Customers can download the Fall 2022 SOC reports through AWS Artifact in the AWS Management Console. You can also download the SOC 3 report as a PDF file from AWS.

AWS strives to bring services into the scope of its compliance programs to help you meet your architectural and regulatory needs. If there are additional AWS services that you would like to see added to the scope of our SOC reports (or other compliance programs), reach out to your AWS representatives.

As always, we value your feedback and questions. Feel free to reach out to the team through the Contact Us page. If you have feedback about this post, submit comments in the Comments section below.

Want more AWS Security how-to-content, news, and feature announcements? Follow us on Twitter.

Andrew Najjar

Andrew Najjar

Andrew is a Compliance Program Manager at Amazon Web Services. He leads multiple security and privacy initiatives within AWS and has 8 years of experience in security assurance. Andrew holds a master’s degree in information systems and bachelor’s degree in accounting from Indiana University. He is a CPA and AWS Certified Solution Architect – Associate.

ryan wilks

Ryan Wilks

Ryan is a Compliance Program Manager at Amazon Web Services. He leads multiple security and privacy initiatives within AWS. Ryan has 11 years of experience in information security and holds ITIL, CISM and CISA certifications.

Nathan Samuel

Nathan Samuel

Nathan is a Compliance Program Manager at Amazon Web Services. He leads multiple security and privacy initiatives within AWS. Nathan has a Bachelors of Commerce degree from the University of the Witwatersrand, South Africa and has 17 years’ experience in security assurance and holds the CISA, CRISC, CGEIT, CISM, CDPSE and Certified Internal Auditor certifications.

Fall 2022 SOC 2 Type 2 Privacy report now available

Post Syndicated from Nimesh Ravasa original https://aws.amazon.com/blogs/security/fall-2022-soc-2-type-2-privacy-report-now-available/

Your privacy considerations are at the core of our compliance work at Amazon Web Services (AWS), and we are focused on the protection of your content while using AWS services.

We are happy to announce that our Fall 2022 SOC 2 Type 2 Privacy report is now available. The report provides a third-party attestation of our system and the suitability of the design of our privacy controls. The SOC 2 Privacy Trust Service Criteria (TSC), developed by the American Institute of Certified Public Accountants (AICPA), establishes the criteria for evaluating controls that relate to how personal information is collected, used, retained, disclosed, and disposed of. For more information about our privacy commitments supporting the SOC 2 Type 2 report, see the AWS Customer Agreement.

The scope of the Fall 2022 SOC 2 Type 2 Privacy report includes information about how we handle the content that you upload to AWS, and how that content is protected across the services and locations that are in scope for the latest AWS SOC reports. AWS customers can download the SOC 2 Type 2 Privacy report through AWS Artifact in the AWS Management Console.

As always, we value your feedback and questions. Feel free to reach out to the compliance team through the AWS Compliance Contact Us page. If you have feedback about this post, submit comments in the Comments section below.

Want more AWS Security how-to-content, news, and feature announcements? Follow us on Twitter.

Nimesh Ravasa

Nimesh Ravasa

Nimesh is a Compliance Program Manager at Amazon Web Services. He leads multiple security and privacy initiatives within AWS. Nimesh has 14 years of experience in information security and holds CISSP, CISA, PMP, CSX, AWS Solution Architect – Associate, and AWS Security Specialty certifications.

Emma Zhang

Emma Zhang

Emma is a Compliance Program Manager at Amazon Web Services. She leads multiple process improvement projects across multiple compliance programs within AWS. Emma has 8 years of experience in risk management, IT risk assurance, and technology risk advisory.

Brownell Combs

Brownell Combs

Brownell is a Compliance Program Manager at Amazon Web Services. He leads multiple security and privacy initiatives within AWS. Brownell holds a Master of Science, Computer Science degree from the University of Virginia and a Bachelor of Science, Computer Science degree from Centre College. He has over 20 years of experience in Information Technology risk management and CISSP, CISA, and CRISC certifications.

Rapid7 and HashiCorp Partner to Secure Terraform-based Cloud Infrastructure Deployments

Post Syndicated from Clint Merrill original https://blog.rapid7.com/2022/11/17/rapid7-and-hashicorp-partner-to-secure-terraform-based-cloud-infrastructure-deployments/

Rapid7 and HashiCorp Partner to Secure Terraform-based Cloud Infrastructure Deployments

Welcome to the latest installment in our cloud security “shift-left” blog series. In our last post, we covered the importance of integrating cloud infrastructure security assessments into DevOps tools and enabling Infrastructure as Code (IaC) developers. This time, we’re focusing on Rapid7’s recent partnership with Hashicorp, ongoing support for scanning Terraform plans with our IaC security feature, and the recently released integration with Terraform Cloud & Enterprise run tasks.

HashiCorp Terraform and InsightCloudSec are a powerful combination

Rapid7 and HashiCorp Partner to Secure Terraform-based Cloud Infrastructure Deployments

There are countless reasons to adopt cloud infrastructure: hosting applications, compute workloads, data storage, virtual networking, governing identity and access control, and many other use-cases. We are spoiled for choice with the vast array of cloud resources and services designed to perform specific tasks, but each one requires specialized knowledge to configure it securely and interact with other resources. Additionally, resilient cloud applications typically leverage best-in-class features from multiple cloud service providers (CSPs) who compete with innovation, unique features and cost optimization. The more distributed your cloud resources are across providers, the more powerful it is to define them via IaC with a tool that can deploy to any provider.

HashiCorp Terraform is a widely-used open-source IaC tool, especially for supporting multi-cloud deployments. InsightCloudSec has the ability to scan Terraform plans destined for accounts in AWS, Azure or GCP. Rapid7 supports the key resource types for each of the three major cloud providers, and we are constantly expanding our coverage based on usage trends or as needed by our customers.

A major benefit of using InsightCloudSec for IaC security and compliance scans is that you can use the same Insight Compliance Pack for assessing runtime environments and IaC, rather than correlating policy definitions across different tools. This reduces the overhead of maintaining multiple policies and the associated rules across different tools and languages which can easily drift apart. We call this “One Policy”.

Terraform allows users to develop immutable cloud resource definitions as code in a common language for deployment to multiple cloud providers. When paired with InsightCloudSec, resource definitions can be assessed with a single set of security policies applied to both development and runtime environments—creating an optimized experience that delivers efficiency and convenience. To further power this union, Rapid7 has partnered with HashiCorp to develop a formal integration between Terraform Cloud and InsightCloudSec (ICS).

New integrations with HashiCorp Terraform Cloud and Terraform Enterprise run tasks

IaC developers create Terraform configurations using HashiCorp configuration language (HCL) and commit them to a source code repository such as Git. The Terraform configuration and the current infrastructure state are evaluated to generate a deployment plan—a preview of changes that will be made in the destination cloud account(s). By linking HCL configurations to collections of resources defined as workspaces in Terraform Cloud, deployment plans are generated and await approval to apply them. At this point, run tasks are used to invoke analysis of the plan, including security and compliance checks in external tools to inform or gate the approval step. This process can be managed through workflows on one of many supported CI/CD platforms; however, HashiCorp developed Terraform Cloud and Enterprise to govern, optimize and secure the process.

DevOps teams using Terraform Cloud to govern cloud infrastructure deployments can securely and reliably trigger a security and compliance assessment of a Terraform plan in ICS using a run task. We’ve worked with the team at HashiCorp to streamline the process of linking a run task to an IaC Configuration in ICS which defines the security policy (Insight Compliance Pack) that will be used to assess the Terraform plan.

Rapid7 and HashiCorp Partner to Secure Terraform-based Cloud Infrastructure Deployments

This investment is the latest step in our strategy at Rapid7 to directly support DevOps teams to apply IaC security using the tool of their choice. Terraform Cloud was at the top of our list for a formal integration given its prevalent use in the cloud infrastructure and application development community.

Ready to get started?

Configuring the new integrations with Terraform is a straightforward process, but let’s walk through it at a high level. Assuming you’ve configured your Terraform Cloud or Enterprise environment with workspaces to generate plans, we’ll show you how to link a Run Task to an IaC Configuration in ICS. Detailed instructions are available in the ICS Product Documentation.

Visit the Infrastructure as Code landing page and select the Configurations tab at the top. Any existing Configuration defined to support scanning Terraform plans can be linked to a run task.  Click the Action menu and select the “TFC/E Run Task Integrations” option.

Rapid7 and HashiCorp Partner to Secure Terraform-based Cloud Infrastructure Deployments

From there, you’ll generate an unique Endpoint URL and HMAC key used during the creation of the run task in Terraform Cloud to securely bind the two systems.

Rapid7 and HashiCorp Partner to Secure Terraform-based Cloud Infrastructure Deployments

Next, switch to the Terraform Cloud / Enterprise organization settings interface and create a run task. Copy/paste the Endpoint URL and HMAC key provided to you in ICS.

Rapid7 and HashiCorp Partner to Secure Terraform-based Cloud Infrastructure Deployments

After the run task is successfully created, you will need to associate it with a workspace before generating a plan and triggering it to test the end-to-end process.

During the run task execution, you’ll notice active communication between the two systems monitoring the state of the scan job in ICS and reporting back a final state as Passed, Failed, or Error (indicating the scan job didn’t successfully complete).

We’ve made this integration process simple and accessible to DevOps teams via ICS and Terraform Cloud without any custom API integration required. You can ensure IaC security and compliance scans in ICS are routinely applied to the approval step before Terraform plans are applied to a destination cloud environment.

Our DevOps-focused cloud security investment continues

Rapid7’s InsightCloudSec is proud to partner with HashiCorp to help fulfill the joint mission of making cloud infrastructure and application development and maintenance low cost, code-driven, repeatable, scalable and secure.

For more information , please visit HashiCorp’s partnership page.

Our next blog in the “shift-left” series will include an announcement and overview of a significant upgrade we’re making to our IaC scanning engine and the underlying technology we use to identify issues, pinpoint the location of the problem in code, and provide ‘Actionable Results’ to assist developers with remediation.

[$] Rust in the 6.2 kernel

Post Syndicated from original https://lwn.net/Articles/914458/

The merge window for the 6.1 release brought in basic support for writing kernel code in Rust
— with an emphasis on “basic”. It is possible to create a “hello world”
module for 6.1, but not much can be done beyond that. There is, however, a
lot more Rust code for the kernel out there; it’s just waiting for its turn to be
reviewed and merged into the mainline. Miguel Ojeda has now posted the next
round
of Rust patches, adding to the support infrastructure in the
kernel.

Spice up your sites on Cloudflare Pages with Pages Functions General Availability

Post Syndicated from Nevi Shah original https://blog.cloudflare.com/pages-function-goes-ga/

Spice up your sites on Cloudflare Pages with Pages Functions General Availability

Spice up your sites on Cloudflare Pages with Pages Functions General Availability

Before we launched Pages back in April 2021, we knew it would be the start of something magical – an experience that felt “just right”. We envisioned an experience so simple yet so smooth that any developer could ship a website in seconds and add more to it by using the rest of our Cloudflare ecosystem.

A few months later, when we announced that Pages was a full stack platform in November 2021, that vision became a reality. Creating a development platform for just static sites was not the end of our Pages story, and with Cloudflare Workers already a part of our ecosystem, we knew we were sitting on untapped potential. With the introduction of Pages Functions, we empowered developers to take any static site and easily add in dynamic content with the power of Cloudflare Workers.

In the last year since Functions has been in open beta, we dove into an exploration on what kinds of full stack capabilities developers are looking for on their projects – and set out to fine tune the Functions experience into what it is today.

We’re thrilled to announce that Pages Functions is now generally available!

Functions recap

Though called “Functions” in the context of Pages, these functions running on our Cloudflare network are Cloudflare Workers in “disguise”. Pages harnesses the power and scalability of Workers and specializes them to align with the Pages experience our users know and love.

With Functions you can dream up the possibilities of dynamic functionality to add to your site – integrate with storage solutions, connect to third party services, use server side rendering with your favorite full stack frameworks and more. As Pages Functions opens its doors to production traffic, let’s explore some of the exciting features we’ve improved and added on this release.

The experience

Deploy with Git

Love to code? We’ll handle the infrastructure, and leave you to it.

Simply write a JavaScript/Typescript Function and drop it into a functions directory by committing your code to your Git provider. Our lightning fast CI system will build your code and deploy it alongside your static assets.

Directly upload your Functions

Prefer to handle the build yourself? Have a special git provider not yet supported on Pages? No problem! After dropping your Function in your functions folder, you can build with your preferred CI tooling and then upload your project to Pages to be deployed.

Debug your Functions

While in beta, we learned that you and your teams value visibility above all. As on Cloudflare Workers, we’ve built a simple way for you to watch your functions as it processes requests – the faster you can understand an issue the faster you can react.

You can now easily view logs for your Functions by “tailing” your logs. For basic information like outcome and request IP, you can navigate to the Pages dashboard to obtain relevant logs.

For more specific filters, you can use

wrangler pages deployment tail

to receive a live feed of console and exception logs for each request your Function receives.

Spice up your sites on Cloudflare Pages with Pages Functions General Availability

Get real time Functions metrics

In the dashboard, Pages aggregates data for your Functions in the form of request successes/error metrics and invocation status. You can refer to your metrics dashboard not only to better understand your usage on a per-project basis but also to get a pulse check on the health of your Functions by catching success/error volumes.

Spice up your sites on Cloudflare Pages with Pages Functions General Availability

Quickly integrate with the Cloudflare ecosystem

Storage bindings

Want to go truly full stack? We know finding a storage solution that fits your needs and fits your ecosystem is not an easy task – but it doesn’t have to be!

With Functions, you can take advantage of our broad range of storage products including Workers KV, Durable Objects, R2, D1 and – very soon – Queues and Workers Analytics Engine! Simply create your namespace, bucket or database and add your binding in the Pages dashboard to get your full stack site up and running in just a few clicks.

From dropping in a quick comment system to rolling your own authentication to creating database-backed eCommerce sites, integrating with existing products in our developer platform unlocks an exponential set of use cases for your site.

Secret bindings

In addition to adding environment variables that are available to your project at both build-time and runtime, you can now also add “secrets” to your project. These are encrypted environment variables which cannot be viewed by any dashboard interfaces, and are a great home for sensitive data like API tokens or passwords.

Integrate with 3rd party services

Our goal with Pages is always to meet you where you are when it comes to the tools you love to use. During this beta period we also noticed some consistent patterns in how you were employing Functions to integrate with common third party services. Pages Plugins – our ready-made snippets of code – offers a plug and play experience for you to build the ecosystem of your choice around your application.

In essence, a Pages Plugin is a reusable – and customizable – chunk of runtime code that can be incorporated anywhere within your Pages application. It’s a “composable” Pages Function, granting Plugins the full power of Functions (i.e. Workers), including the ability to set up middleware, parameterized routes, and static assets.

With Pages Plugins you can integrate with a plethora of 3rd party applications – including officially supported Sentry, Honeycomb, Stytch, MailChannels and more.

Use your favorite full stack frameworks

In the spirit of meeting developers where they are at, this sentiment also comes in the form of Javascript frameworks. As a big supporter of not only widely adopted frameworks but up and coming frameworks, our team works with a plethora of framework authors to create opportunities for you to play with their new tech and deploy on Pages right out of the box.

Now compatible with Next.js 13 and more!

Recently, we announced our support for Next.js applications which opt in to the Edge Runtime. Today we’re excited to announce we are now compatible with Next.js 13. Next.js 13 brings some most-requested modern paradigms to the Next.js framework, including nested routing, React 18’s Server Components and streaming.

Have a different preference of framework? No problem.

Go full stack on Pages to take advantage of server side rendering (SSR) with one of many other officially supported frameworks like Remix, SvelteKit, QwikCity, SolidStart, Astro and Nuxt. You can check out our blog post on SSR support on Pages and how to get started with some of these frameworks.

Go fast in advanced mode

While Pages Functions are powered by Workers, we understand that at face-value they are not exactly the same. Nevertheless, for existing users who are perhaps using Workers and are keen on trying Cloudflare Pages, we’ve got a direct path to get you started quickly.

If you already have a single Worker and want an easy way to go full stack on Pages, you can use Pages Function’s “advanced mode”. Generate an ES module Worker called _worker.js in the output directory of your project and deploy!
This can be especially helpful if you’re a framework author or perhaps have a more complex use case that does not fit into our file-based router.

Scaling without limits

So today, as we announce Functions as generally available we are thrilled to allow your traffic to scale. During the Open Beta period, we imposed a daily limit of 100,000 free requests per day as a way to let you try out the feature. While 100,000 requests per day remains the free limit today, you can now pay to truly go unlimited.

Since Functions are just “special” Workers, with this announcement you will begin to see your Functions usage reflected on your bill under the Workers Paid subscription or via your Workers Enterprise contract. Like Workers, when on a paid plan, you have the option to choose between our two usage models – Bundled and Unbound – and will be billed accordingly.

Keeping Pages on brand as Cloudflare’s “gift to the Internet”, you will get unlimited free static asset requests and will be billed primarily on dynamic requests. You can read more about how billing with Functions works in our documentation.

Get started today

To start jamming, head over to the Pages Functions docs and check out our blog on some of the best frameworks to use to deploy your first full stack application. As you begin building out your projects be sure to let us know in the #functions channel under Pages of our Cloudflare Developers Discord. Happy building!

Announcing the first Workers Launchpad cohort and growth of the program to $2 billion

Post Syndicated from Mia Wang original https://blog.cloudflare.com/launchpad-fall-22/

Announcing the first Workers Launchpad cohort and growth of the program to $2 billion

This post is also available in 简体中文, 日本語, 한국어, Deutsch, Français, Español.

Announcing the first Workers Launchpad cohort and growth of the program to $2 billion

During Birthday Week 2022, we announced a $1.25 billion funding program for startups building on our developer platform, Cloudflare Workers. This was done in partnership with 26 leading VC firms who have been investing in or seeking to invest in Workers-based startups.

Today, we’re excited to reveal the first cohort of Launchpad Startups as well as 14 additional VC partners, bringing the Launchpad to $2 billion in potential funding from 40 VC firms in total.

Who are our new VC partners?

We are excited to welcome 14 additional firms to the Workers Launchpad, which you can find included in the image below. They have worked with hundreds of companies that have grown to become leaders in their areas including Asana, Canva, Figma, Netlify, Vercel, Area 1 Security (which Cloudflare acquired in 2022), and many others. Notably, they also represent a diverse group of investors who support startups across North and South America, Europe, and Asia.

Announcing the first Workers Launchpad cohort and growth of the program to $2 billion

Many of these investors have seen the competitive advantages of building on Workers through their own portfolio companies firsthand and are looking forward to providing the capital and resources you need to build and scale your business.

Announcing the Fall 2022 cohort of Launchpad Startups!

We received hundreds of applications for the Fall cohort from startups representing more than 30 countries. We were blown away by the breadth of businesses that folks were building – some are creating tools to simplify developer workflows, while others are helping ecommerce businesses better reach and serve customers around the world. The common thread amongst all the Launchpad companies, however, is their usage of Cloudflare’s developer platform to build more secure, reliable, and feature-rich products faster than they otherwise could.

Introducing the Fall 2022 cohort

Announcing the first Workers Launchpad cohort and growth of the program to $2 billion

Our inaugural cohort of Launchpad startups features 25 diverse businesses. Here’s what they’re building, in their own words:

AIDEM Privacy first, sustainable, transparent digital advertising.
Apyfy The data privacy & security firewall.
Authdog Identity & access management streamlined.
Axiom Logging solved, at any scale.
BlocPal Unlocking accessible & affordable financial services for all.
COPILOT TRAVEL Next-generation infrastructure for global travel data.
Data Narratives Data superpowers for growth teams.
Drivly APIs to buy and sell cars online.
Endear Retail CRM for consumer brands.
flethy Design. Configure. Automate.
GPUX Serverless GPU inference.
Grafbase The easiest way to build and deploy GraphQL backends.
JEMPass Authentication made simple, seamless, secure.
Karambit.AI Stop software supply chain attacks.
KubeLT Simple and secure user identity for supercharging your user experience.
Narrative BI No-code analytics platform for growth teams.
Ninetailed Composable personalization and experimentation solution for digital builders.
Nostra.ai Predictive commerce edge delivery engine to boost conversion rates.
Patr Deploy and scale your applications in 60 seconds.
Quest.ai Generate front-end code from designs automatically.
qxip Polyglot monitoring and edge observability.
repeat.dev Create. Deploy. Repeat. The one-stop-shop for your webhooks & scheduled tasks.
Service Loom Start a service business in 3 minutes.
Targum Translating videos at the speed of social media using AI.
Touchless The fastest sites, with no code.

Is it too late to join the Launchpad?

Nope! We will select Launchpad Startups on a quarterly basis, so if you are building on Workers, interested in pitching VCs, and want to join our next cohort of Workers Founder, apply here! If you’re new to Workers and looking to begin building, check out our Startup Plan for a year of free Cloudflare services, Built with Workers, and join our Cloudflare Developer Discord community.

Cloudflare is not providing any funding or making any funding decisions, and there is no guarantee that any particular company will receive funding through the program. All funding decisions will be made by the venture capital firms that participate in the program. Cloudflare is not a registered broker-dealer, investment adviser, or other similar intermediary.

How we built it: the technology behind Cloudflare Radar 2.0

Post Syndicated from Celso Martinho original https://blog.cloudflare.com/technology-behind-radar2/

How we built it: the technology behind Cloudflare Radar 2.0

How we built it: the technology behind Cloudflare Radar 2.0

Radar 2.0 was built on the learnings of Radar 1.0 and was launched last month during Cloudflare’s Birthday Week as a complete product revamp. We wanted to make it easier for our users to find insights and navigate our data, and overall provide a better and faster user experience.

How we built it: the technology behind Cloudflare Radar 2.0

We’re building a Supercloud. Cloudflare’s products now include hundreds of features in networking, security, access controls, computing, storage, and more.

This blog will explain how we built the new Radar from an engineering perspective. We wanted to do this to demonstrate that anyone could build a somewhat complex website that involves demanding requirements and multiple architectural layers, do it on top of our stack, and how easy it can be.

Hopefully, this will inspire other developers to switch from traditional software architectures and build their applications using modern, more efficient technologies.

High level architecture

The following diagram is a birds-eye view of the Radar 2.0 architecture. As you can see, it’s divided into three main layers:

  • The Core layer is where we keep our data lake, data exploration tools, and backend API.
  • The Cloudflare network layer is where we host and run Radar and serve the public APIs.
  • The Client layer is essentially everything else that runs in your browser. We call it the Radar Web app.
How we built it: the technology behind Cloudflare Radar 2.0

As you can see, there are Cloudflare products everywhere. They provide the foundational resources to host and securely run our code at scale, but also other building blocks necessary to run the application end to end.

By having these features readily available and tightly integrated into our ecosystem and tools, at the distance of a click and a few lines of code, engineering teams don’t have to reinvent the wheel constantly and can use their time on what is essential: their app logic.

Let’s dig in.

Cloudflare Pages

Radar 2.0 is deployed using Cloudflare Pages, our developer-focused website hosting platform. In the early days, you could only host static assets on Pages, which was helpful for many use cases, including integrating with static site generators like Hugo, Jekyll, or Gatsby. Still, it wouldn’t solve situations where your application needs some sort of server-side computing or advanced logic using a single deployment.

Luckily Pages recently added support to run custom Workers scripts. With Functions, you can now run server-side code and enable any kind of dynamic functionality you’d typically implement using a separate Worker.

Cloudflare Pages Functions also allow you to use Durable Objects, KV, R2, or D1, just like a regular Worker would. We provide excellent documentation on how to do this and more in our Developer Documentation. Furthermore, the team wrote a blog on how to build a full-stack application that describes all the steps in detail.

Radar 2.0 needs server-side functions for two reasons:

  • To render Radar and run the server side of Remix.
  • To implement and serve our frontend API.

Remix and Server-side Rendering

We use Remix with Cloudflare Pages on Radar 2.0.

Remix follows a server/client model and works under the premise that you can’t control the user’s network, so web apps must reduce the amount of Javascript, CSS, and JSON they send through the wire. To do this, they move some of the logic to the server.

In this case, the client browser will get pre-rendered DOM components and the result of pre-fetched API calls with just the right amount of JSON, Javascript, and CSS code, rightfully adjusted to the UI needs. Here’s the technical explanation with more detail.

Typically, Remix would need a Node.js server to do all of this, but guess what: It can also run on Cloudflare Workers and Pages.

Here’s the code to get the Remix server running on Workers, using Cloudflare Pages:

import { createPagesFunctionHandler } from "@remix-run/cloudflare-pages";
import * as build from "@remix-run/dev/server-build";

const handleRequest = createPagesFunctionHandler({
  build: {
    ...build,
    publicPath: "/build/",
    assetsBuildDirectory: "public/build",
  },
  mode: process.env.NODE_ENV,
  getLoadContext: (context) => ({
    ...context.env,
    CF: (context.request as any).cf as IncomingRequestCfProperties | undefined,
  }),
});

const handler: ExportedHandler<Env> = {
  fetch: async (req, env, ctx) => {
    const r = new Request(req);
    return handleRequest({
      env,
      params: {},
      request: r,
      waitUntil: ctx.waitUntil,
      next: () => {
        throw new Error("next() called in Worker");
      },
      functionPath: "",
      data: undefined,
    });
  },
};

In Remix, routes handle changes when a user interacts with the app and changes it (clicking on a menu option, for example). A Remix route can have a loader, an action and a default export. The loader handles API calls for fetching data (GET method). The action handles submissions to the server (POST, PUT, PATCH, DELETE methods) and returns the response. The default export handles the UI code in React that’s returned for that route. A route without a default export returns only data.

Because Remix runs both on the server and the client, it can get smart and know what can be pre-fetched and computed server-side and what must go through the network connection, optimizing everything for performance and responsiveness.

Here’s an example of a Radar route, simplified for readability, for the Outage Center page.

import type { MetaFunction } from "@remix-run/cloudflare";
import { useLoaderData } from "@remix-run/react";
import { type LoaderArgs } from "@remix-run/server-runtime";

export async function loader(args: LoaderArgs) {
  const ssr = await initialFetch(SSR_CHARTS, args);
  return { ssr, };
}

export default function Outages() {
  const { ssr } = useLoaderData<typeof loader>();

  return (
    <Page
      filters={["timerange"]}
      title={
        <>
          <Svg use="icon-outages" />
          {t("nav.main.outage-center")}
        </>
      }
    >
      <Grid columns={[1, 1, 1, 1]}>
        <Card.Article colspan={[1, 1, 1, 1]} rowspan={[1, 1, 1, 1]}>
          <Card.Section>
            <Components.InternetOutagesChoropleth ssr={ssr} />
          </Card.Section>
          <Divider />
          <Card.Section>
            <Components.InternetOutagesTable ssr={ssr} />
          </Card.Section>
        </Card.Article>
      </Grid>
    </Page>
  );
}

And here’s what it produces:

How we built it: the technology behind Cloudflare Radar 2.0

Remix and SSR can also help you with your Lighthouse scores and SEO. It can drastically improve metrics like Cumulative Layout Shift, First Contentful Paint and Largest Contentful Paint by reducing the number of fetches and information traveling from the server to the browser and pre-rendering the DOM.

Another project porting their app to Remix is Cloudflare TV. This is how their metrics looked before and after the changes.

How we built it: the technology behind Cloudflare Radar 2.0

Radar’s Desktop Lighthouse score is now nearly 100% on Performance, Accessibility, Best Practices, and SEO.

How we built it: the technology behind Cloudflare Radar 2.0

Another Cloudflare product that we use extensively on Radar 2.0 is Speed. In particular, we want to mention the Early Hints feature. Early Hints is a new web standard that defines a new HTTP 103 header the server can use to inform the browser which assets will likely be needed to render the web page while it’s still being requested, resulting in dramatic load times improvements.

How we built it: the technology behind Cloudflare Radar 2.0

You can use Cloudflare Pages with Early Hints.

APIs

Radar has two APIs. The backend which has direct access to our data sources, and the frontend, which is available on the Internet.

Backend API

The backend API was written using Python, Pandas and FastAPI and is protected by Cloudflare Access, JWT tokens and an authenticated origin pull (AOP) configuration. Using Python allows anyone on the team, engineers or data scientists, to collaborate easily and contribute to improving and expanding the API, which is great. Our data science team uses JupyterHub and Jupyter Notebooks as part of their data exploration workflows, which makes prototyping and reusing code, algorithms and models particularly easy and fast.

It then talks to the upstream frontend API via a Strawberry based GraphQL server. Using GraphQL makes it easy to create complex queries, giving internal users and analysts the flexibility they need when building reports from our vast collection of data.

Frontend API

We built Radar’s frontend API on top of Cloudflare Workers. This worker has two main functions:

  • It fetches data from the backend API using GraphQL, and then transforms it.
  • It provides a public REST API that anyone can use, including Radar.

Using a worker in front of our core API allows us to easily add and separate microservices, and also adds notable features like:

  • Cloudflare’s Cache API allows finer control over what to cache and for how long and supports POST requests and customizable cache control headers, which we use.
  • Stale responses using R2. When the backend API cannot serve a request for some reason, and there’s a stale response cached, it’ll be served directly from R2, giving end users a better experience.
  • CSV and JSON output formats. The CSV format is convenient and makes it easier for data scientists, analysts, and others to use the API and consume our API data directly from other tools.

Open sourcing our OpenAPI 3 schema generator and validator

One last feature on the frontend API is OpenAPI 3 support. We automatically generate an OpenAPI schema and validate user input with it. This is done through a custom library that we built on top of itty-router, which we also use. Today we’re open sourcing this work.

itty-router-openapi provides an easy and compact OpenAPI 3 schema generator and validator for Cloudflare Workers. Check our GitHub repository for more information and details on how to use it.

Developer’s Documentation

Today we’re also launching our developer’s documentation pages for the Radar API where you can find more information about our data license, basic concepts, how to get started and the available API methods. Cloudflare Radar’s API is free, allowing academics, data sleuths and other web enthusiasts to investigate Internet usage across the globe, based on data from our global network.

How we built it: the technology behind Cloudflare Radar 2.0

To facilitate using our API, we also put together a Colab Notebook template that you can play with, copy and expand to your use case.

How we built it: the technology behind Cloudflare Radar 2.0

The Radar App

The Radar App is the code that runs in your browser. We’ve talked about Remix, but what else do we use?

Radar relies on a lot of data visualizations. Things like charts and maps are essential to us. We decided to build our reusable library of visualization components on top of two other frameworks: visx, a “collection of expressive, low-level visualization primitives for React,” D3, a powerful JavaScript library for manipulating the DOM based on data, and MapLibre, an open-source map visualization stack.

Here’s one of our visualization components in action. We call it the “PewPew map”.

How we built it: the technology behind Cloudflare Radar 2.0

And here’s the Remix React code for it, whenever we need to use it in a page:

<Card.Section
    title={t("card.attacks.title")}
    description={t("card.attacks.description")}
  >
    <Flex gap={spacing.medium} align="center" justify="flex-end">
      <SegmentedControl
        label="Sort order:"
        name="attacksDirection"
        value={attacksDirection}
        options={[
          { label: t("common.source"), value: "ORIGIN" },
          { label: t("common.target"), value: "TARGET" },
        ]}
      onChange={({ target }: any) => setAttacksDirection(target.value)}
      />
    </Flex>

    <Components.AttacksCombinedChart
      ssr={ssr}
      height={400}
      direction={attacksDirection}
    />
  </Card.Section>

SVGs

Another change we made to Radar was switching our images and graphical assets to Scalable Vector Graphics. SVGs are great because they’re essentially a declarative graphics language. They’re XML text files with vectorial information. And so, they can be easily manipulated, transformed, stored, or indexed, and of course, they can be rendered at any size, producing beautiful, crisp results on any device and resolution.

SVGs are also extremely small and efficient in size compared to bitmap formats and support internationalization, making them easier to translate to other languages (localization), thus providing better accessibility.

Here’s an example of a Radar Bubble Chart, inspected, where you can see the SVG code and the <text/> strings embedded.

How we built it: the technology behind Cloudflare Radar 2.0

Cosmos

React Cosmos is a “sandbox for developing and testing UI components in isolation.” We wanted to use Cosmos with Radar 2.0 because it’s the perfect project for it:

  1. It has a lot of visual components; some are complex and have many configuration options and features.
  2. The components are highly reusable across multiple pages in different contexts with different data.
  3. We have a multidisciplinary team; everyone can send a pull request and add or change code in the frontend.

Cosmos acts as a component library where you can see our palette of ready-to-use visualizations and widgets, from simple buttons to complex charts, and you play with their options in real-time and see what happens. Anyone can do it, not only designers or engineers but also other project stakeholders. This effectively improves team communications and makes contributing and iterating quickly.

Here’s a screenshot of our Cosmos in action:

How we built it: the technology behind Cloudflare Radar 2.0

Continuous integration and development

Continuous integration is important for any team doing modern software. Cloudflare Pages provides multiple options to work with CI tools using direct uploads, out of the box. The team has put up documentation and examples on how to do that with GitHub Actions, CircleCI, and Travis, but you can use others.

In our case, we use BitBucket and TeamCity internally to build and deploy our releases. Our workflow automatically builds, tests, and deploys Radar 2.0 within minutes on an approved PR and follow-up merge.

Unit tests are done with Vitest and E2E tests with Playwright. Visual Regression testing is planned and Playwright can also help with that.

Furthermore, we have multiple environments to stage and test our releases before they go live to production. Our CI/CD setup makes it easy to switch from one environment to the other or quickly roll back any undesired deployment.

Again Cloudflare Pages makes it easy to do this using Preview deployments, aliases, or Branch build controls. The same is true for regular Workers using Environments.

How we built it: the technology behind Cloudflare Radar 2.0

Fast previews and notifications

Radar 1.0 wasn’t particularly fast doing CI/CD, we confess. We had a few episodes when a quick fix could take some good 30 minutes from committing the code to deployment, and we felt frustrated about it.

So we invested a lot in ensuring that the new CI would be fast, efficient, and furious.

One cool thing we ended up doing was fast preview links on any commit pushed to the code repository. Using a combination of intelligent caching during builds and doing asynchronous tests when the commit is outside the normal release branches, we were able to shorten the deployment time to seconds.

This is the notification we get in our chat when anyone pushes code to any branch:

How we built it: the technology behind Cloudflare Radar 2.0

Anyone can follow a thread for a specific branch in the chat and get notified on new changes when they happen.

Blazing-fast builds, preview links and notifications are game-changers. An engineer can go from an idea or a quick fix to showing the result on a link to a product manager or another team member. Anyone can quickly click the link to see the changes on a fully working end-to-end version of Radar.

Accessibility and localization

Cloudflare is committed to web accessibility. Recently we announced how we upgraded Cloudflare’s Dashboard to adhere to industry accessibility standards, but this premise is valid for all our properties. The same is true for localization. In 2020, we internationalized our Dashboard and added support for new languages and locales.

Accessibility and localization go hand in hand and are both important, but they are also different. The Web Content Accessibility Guidelines define many best practices around accessibility, including using color and contrast, tags, SVGs, shortcuts, gestures, and many others. The A11Y project page is an excellent resource for learning more.

Localization, though, also known as L10n, is more of a technical requirement when you start a new project. It’s about making sure you choose the right set of libraries and frameworks that will make it easier to add new translations without engineering dependencies or code rewrites.

We wanted Radar to perform well on both fronts. Our design system takes Cloudflare’s design and brand guidelines seriously and adds as many A11Y good practices as possible, and the app is fully aware of localization strings across its pages and UI components.

Adding a new language is as easy as translating a single JSON file. Here’s a snippet of the en-US.json file with the default American English strings:

{
  "abbr.asn": "Autonomous System Number",
  "actions.chart.download.csv": "Download chart data in CSV",
  "actions.chart.download.png": "Download chart in PNG Format",
  "actions.chart.download.svg": "Download chart in SVG Format",
  "actions.chart.download": "Download chart",
  "actions.chart.maximize": "Maximize chart",
  "actions.chart.minimize": "Minimize chart",
  "actions.chart.share": "Share chart",
  "actions.download.csv": "Download CSV",
  "actions.download.png": "Download PNG",
  "actions.download.svg": "Download SVG",
  "actions.share": "Share",
  "alert.beta.link": "Radar Classic",
  "alert.beta.message": "Radar 2.0 is currently in Beta. You can still use {link} during the transition period.",
  "card.about.cloudflare.p1": "Cloudflare, Inc. ({website} / {twitter}) is on a mission to help build a better Internet. Cloudflare's suite of products protects and accelerates any Internet application online without adding hardware, installing software, or changing a line of code. Internet properties powered by Cloudflare have all web traffic routed through its intelligent global network, which gets smarter with every request. As a result, they see significant improvement in performance and a decrease in spam and other attacks. Cloudflare was named to Entrepreneur Magazine's Top Company Cultures 2018 list and ranked among the World's Most Innovative Companies by Fast Company in 2019.",
  "card.about.cloudflare.p2": "Headquartered in San Francisco, CA, Cloudflare has offices in Austin, TX, Champaign, IL, New York, NY, San Jose, CA, Seattle, WA, Washington, D.C., Toronto, Dubai, Lisbon, London, Munich, Paris, Beijing, Singapore, Sydney, and Tokyo.",
  "card.about.cloudflare.title": "About Cloudflare",
...

You can expect us to release Radar in other languages soon.

Radar Reports and Jupyter notebooks

Radar Reports are documents that use data exploration and storytelling to analyze a particular theme in-depth. Some reports tend to get updates from time to time. Examples of Radar Reports are our quarterly DDoS Attack Trends, or the IPv6 adoption.

How we built it: the technology behind Cloudflare Radar 2.0

The source of these Reports is Jupyter Notebooks. Our Data Science team works on some use-case or themes with other stakeholders using our internal Jupyter Hub tool. After all the iteration and exploration are done, and the work is signed off, a notebook is produced.

A Jupyter Notebook is a JSON document containing text, source code, rich media such as images or charts, and other metadata. It is the de facto standard for presenting data science projects, and every data scientist uses it.

With Radar 1.0, converting a Jupyter Notebook to a Radar page was a lengthy and manual process implicating many engineering and design resources and causing much frustration to everyone involved. Even updating an already-published notebook would frequently cause trouble for us.

Radar 2.0 changed all of this. We now have a fully automated process that takes a Jupyter Notebook and, as long as it’s designed using a list of simple rules and internal guidelines, converts it automatically, hosts the resulting HTML and assets in an R2 bucket, and publishes it on the Reports page.

How we built it: the technology behind Cloudflare Radar 2.0

The conversion to HTML takes into account our design system and UI components, and the result is a beautiful document, usually long-form, perfectly matching Radar’s look and feel.

How we built it: the technology behind Cloudflare Radar 2.0

We will eventually open-source this tool so that anyone can use it.

More Cloudflare, less to worry about

We gave examples of using Cloudflare’s products and features to build your next-gen app without worrying too much about things that aren’t core to your business or logic. A few are missing, though.

Once the app is up and running, you must protect it from bad traffic and malicious actors. Cloudflare offers you DDoS, WAF, and Bot Management protection out of the box at a click’s distance.

For example, here are some of our security rules. This is traffic we don’t have to worry about in our app because Cloudflare detects it and acts on it according to our rules.

How we built it: the technology behind Cloudflare Radar 2.0

Another thing we don’t need to worry about is redirects from the old site to the new one. Cloudflare has a feature called Bulk Redirects, where you can easily create redirect lists directly on the dashboard.

How we built it: the technology behind Cloudflare Radar 2.0

It’s also important to mention that every time we talk about what you can do using our Dashboard, we’re, in fact, also saying you can do precisely the same using Cloudflare’s APIs. Our Dashboard is built entirely on top of them. And if you’re the infrastructure as code kind of person, we have you covered, too; you can use the Cloudflare Terraform provider.

Deploying and managing Workers, R2 buckets, or Pages sites is obviously scriptable too. Wrangler is the command-line tool to do this and more, and it goes the extra mile to allow you to run your full app locally, emulating our stack, on your computer, before deploying.

Final words

We hope you enjoyed this Radar team write-up and were inspired to build your next app on top of our Supercloud. We will continue improving and innovating on Radar 2.0 with new features, share our findings and open-sourcing our tools with you.

In the meantime, we opened a Radar room on our Developers Discord Server. Feel free to join it and ask us questions; the team is eager to receive feedback and discuss web technology with you.

You can also follow us on Twitter for more Radar updates.

Server-side render full stack applications with Pages Functions

Post Syndicated from Peter Bacon Darwin original https://blog.cloudflare.com/pages-full-stack-frameworks/

Server-side render full stack applications with Pages Functions

Server-side render full stack applications with Pages Functions

Pages Functions are now out of beta and generally available, bringing dynamic computation within 50ms of 95% of users globally. Built on top of Cloudflare Workers, Pages projects are easy to deploy and instantly benefit from this low latency, with over 275 data centers across the globe.

With Page Functions comes the ability to add dynamic server-side rendering to your applications. Pages makes it easy to deploy applications built using all the major meta-frameworks such as Astro, Next.js, Qwik, Remix, Solid, and Svelte. There is no better time to start deploying your server-side rendered full-stack applications to Cloudflare Pages.

Go server-side with Pages Functions

When Pages launched in December 2020, it was focused on being a high-performance host for static assets. Pages was a perfect choice for anyone building websites which could be generated ahead of time with static site generation. Jamstack was all the rage, and Cloudflare’s network was an excellent choice for its ability to serve static files to visitors from around the globe.

Once deployed the files would be effortlessly hosted and served at incredible speeds across the world to your users. These statically generated applications can run client-side code in the browser to customize the appearance and behavior of the page, but this approach often struggles with slow time-to-interactive (TTI), which results in a poor user experience, and SEO rankings.

Once loaded, client-side rendered applications are great at building highly interactive applications, but in order for such applications to load and become interactive, they usually need to make several network requests to fetch all the code and data it needs to create the UI. If your client devices have a slow or unreliable network connection, each request will become a hurdle that decreases the quality of the user experience.

Server-side render full stack applications with Pages Functions
Slow connected device making lots of requests

If you want users to start interacting with your web applications faster, you must make data requests when rendering the HTML. While static generation can avoid these runtime requests by making them at build time, it is not able to provide dynamic customized content. To give users both a customized and fast experience you can server-side render the HTML.

By using server-side rendering, you can optimize access to resources making use of Cloudflare’s high-bandwidth connectivity and the ability to cache data nearby, minimizing the time spent on the device waiting for data.

Furthermore, by running the server-side rendering in a Pages Function you get the benefit that both the client (browser) and server (Cloudflare Worker) are both executing similar JavaScript runtimes. This means that you can write isomorphic code that works on both the frontend and backend, avoiding duplication of business and data access logic. Many of the modern full-stack frameworks even provide for code to begin execution on the server and then continue running on the client.

Server-side render full stack applications with Pages Functions
Fast connected Worker making lots of requests

Use a full-stack framework

Writing your own library to do server-side rendering is no simple task. But luckily many frontend frameworks support server-side rendering, and Cloudflare Pages offers the perfect deployment platform for them. Each framework has its own take on server-side rendering, but most can be integrated effortlessly with Pages Functions. In fact, many frameworks come with starter kits and libraries that make deploying to Pages trivial.

We have previously blogged about deploying SvelteKit, Remix and Next.js to Cloudflare Pages, but there are many more integrations already available. Let’s take a look at a few of the other popular ones:

QwikCity

The full-stack framework that uses the Qwik frontend framework is called QwikCity. You can read the full quick-start documentation for running Qwik on Pages here.

Create a new project by running the following command in your terminal:

npm create qwik@latest

You will be prompted to select a name – choose qwik-app – and a starter project – choose “Basic App (QwikCity)”. Now add the Cloudflare Pages adaptor by running the following in your terminal:

cd qwik-app
npm run qwik add cloudflare-pages

By installing the cloudflare-pages adapter, your project will have a Cloudflare Pages functions/[[path]].ts file. The [[path]] filename indicates that this file will handle requests to all incoming URLs, rendering the response in Pages Functions. Now, build and test the application using the wrangler pages dev tool:

npm run build
npx wrangler pages dev ./dist

The client and server-side code will be compiled and then Wrangler will start up a dev session. Press b to open a browser and see the server-side rendered site.

Astro

Astro is a full-stack framework that can run a range of different frontend frameworks. It added support for server-side rendering earlier this year. You can read the full quick-start documentation for running Astro on Pages here.

Create a new project by running the following command in your terminal:

npm create astro@latest

You will be prompted to select a path to the project, a starter template, and additional setup configuration – accept the defaults. Now add the Cloudflare Pages adaptor by running the following in your terminal:

cd <path/to/project>
npx astro add cloudflare

You will be prompted whether you wish to install – select continue when asked. This will update the astro.build/config file with the plugin. Update the configuration to set the cloudflare plugin to directory mode:

export default defineConfig({
  adapter: cloudflare({ mode: "directory" }),
});

By installing this adaptor in directory mode, Astro will compile the server-side part of the application into a Pages Function at functions/[[path]].js. Now build and test the application using the wrangler pages dev tool:

npm run build
npx wrangler pages dev ./dist

The client and server-side code will be compiled and then Wrangler will start up a dev session. Press b to open a browser and see the server-side rendered site. Check out Astro’s docs to read more about configuring your Astro project when deploying it to Cloudflare Pages.

SolidStart

The full-stack framework that uses the SolidJS frontend framework is called SolidStart. Support for running SolidStart on Cloudflare Pages is provided by the start-cloudflare-pages Vite adapter.

Create a new SolidStart project by running the following command in your terminal:

mkdir my-app
cd my-app
npm init solid

You will be prompted to choose a template – choose “todomvc”. You are then prompted whether to add Server Side Rendering and TypeScript – choose “yes” for both. Now install the solid-start-cloudflare-pages adaptor.

npm install --save-dev solid-start-cloudflare-pages

Update the vite.config.ts file to use this adaptor.

import solid from "solid-start/vite";
import { defineConfig } from "vite";
import cloudflare from "solid-start-cloudflare-pages";

export default defineConfig({
  plugins: [solid({ adapter: cloudflare({}) })],
});

By including this adapter, Solid will compile the server-side part of the application into a Pages Function at functions/[[path]].js and the client-side part into dist/public. Now build and test the application using the wrangler pages dev tool:

npm run build
npx wrangler pages dev ./dist/public

The client and server-side code will be compiled and then Wrangler will start up a dev session. Press b to open a browser and see the server-side rendered site.

Nuxt.js

The full-stack framework that uses the Vue.js frontend framework is called Nuxt.js. Nuxt.js supports deploying to Cloudflare Pages natively via a Nitro preset.

Create a new Nuxt project using nuxi (a Nuxt.js specific version of Nitro), giving it the title nuxt-app in your terminal:

npx nuxi init nuxt-app
cd nuxt-app
npm install

By specifying an environment variable Nuxt.js can generate output for Cloudflare Pages Functions. Build and test the application using nuxi and wrangler:

NITRO_PRESET=cloudflare-pages npx nuxi build
npx wrangler pages dev .output/public

The client and server-side code will be compiled and then Wrangler will start up a dev session. Press b to open a browser and see the server-side rendered site.

Get rendering!

Now that Pages Functions are generally available, and the major full-stack frameworks provide straightforward integrations with Pages, there is no better time to add server-side rendering to your application and deploy to Cloudflare Pages.

Check out the Cloudflare Pages documentation for more help in getting started or chat with us on our friendly Discord server about what Pages Functions can do for your project.

If you are a framework author and would also like to integrate with Pages Functions then get in touch. We would love to help make that happen!

How Cloudflare uses Terraform to manage Cloudflare

Post Syndicated from Michael Wolf original https://blog.cloudflare.com/terraforming-cloudflare-at-cloudflare/

How Cloudflare uses Terraform to manage Cloudflare

How Cloudflare uses Terraform to manage Cloudflare

Configuration management is far from a solved problem. As organizations scale beyond a handful of administrators, having a secure, auditable, and self-service way of updating system settings becomes invaluable. Managing a Cloudflare account is no different. With dozens of products and hundreds of API endpoints, keeping track of current configuration and making bulk updates across multiple zones can be a challenge. While the Cloudflare Dashboard is great for analytics and feature exploration, any changes that could potentially impact users really should get a code review before being applied!

This is where Cloudflare’s Terraform provider can come in handy. Built as a layer on top of the cloudflare-go library, the provider allows users to interface with the Cloudflare API using stateful Terraform resource declarations. Not only do we actively support this provider for customers, we make extensive use of it internally! In this post, we hope to provide some best practices we’ve learned about managing complex Cloudflare configurations in Terraform.

Why Terraform

Unsurprisingly, we find Cloudflare’s products to be pretty useful for securing and enhancing the performance of services we deploy internally. We use DNS, WAF, Zero Trust, Email Security, Workers, and all manner of experimental new features throughout the company. This dog-fooding allows us to battle-harden the services we provide to users and feed our desired features back to the product teams all while running the backend of Cloudflare. But, as Cloudflare grew, so did the complexity and importance of our configuration.

When we were a much smaller company, we only had a handful of accounts with designated administrators making changes on behalf of their colleagues. However, over time this handful of accounts grew into hundreds with each managed by separate teams. Independent accounts are useful in that they allow service-owners to make modifications that can’t impact others, but it comes with overhead.

We faced the challenge of ensuring consistent security policies, up-to-date account memberships, and change visibility. While our  accounts were still administered by kind human stewards, we had numerous instances of account members not being removed after they transferred to a different team. While this never became a security incident, it demonstrated the shortcomings of manually provisioning account memberships. In the case of a production service migration, the administrator executing the change would often hop on a video call and ask for others to triple-check an IP address, ruleset, or access policy update. It was an era of looking through the audit logs to see what broke a service.

We wanted to make it easier for developers and users to make the changes they wanted without having to reach out to an administrator. Defining our configuration in code using Terraform has allowed us to keep tabs on the complexity of configuration while improving visibility and change management practices. By dogfooding the Cloudflare Terraform provider, we’ve been able to ensure:

  • Modifications to accounts are peer reviewed by the team that owns an account.
  • Each change is tied to a user, commit, and a ticket explaining the rationale for the change.
  • API Tokens are tied to service accounts rather than individual human users, meaning they survive team changes and offboarding.
  • Account configuration can be audited by anyone at the company for current state, accuracy, and security without needing to add everyone as a member of every account.
  • Large changes, such as enforcing hard keys can be done rapidly– even in a single pull request.
  • Configuration can be easily copied and reused across accounts to promote best practices and speed up development.
  • We can use and iterate on our awesome provider and provide a better experience to other users (shoutout in particular to Jacob!).

Terraform in CI/CD

Terraform has a fairly mature open source ecosystem, built from years of running-in-production experience. Thus, there are a number of ways to make interacting with the system feel as comfortable to developers as git. One of these tools is Atlantis.

Atlantis acts as continuous integration/continuous delivery (CI/CD) for Terraform; fitting neatly into version control workflows, and giving visibility into the changes being deployed in each code change. We use Atlantis to display Terraform plans (effectively a diff in configuration) within pull requests and apply the changes after the pull request has been approved. Having all the output from the terraform provider in the comments of a pull request means there’s no need to fiddle with the state locally or worry about where a state lock is coming from. Using Terraform CI/CD like this makes configuration management approachable to developers and non-technical folks alike.

In this example pull request, I’m adding a user to the cloudflare-cool-account (see the code in the next section). Once the PR is opened, Bitbucket posts a webhook to Atlantis, telling it to run a `terraform plan` using this branch. The resulting comment is placed in the pull request. Notice that this pull request can’t be applied or merged yet as it doesn’t have an approval! Once the pull request is approved, I would comment “atlantis apply”, wait for Atlantis to post a comment containing the output of the command, and merge the pull request if that output looks correct.

How Cloudflare uses Terraform to manage Cloudflare

Our Terraforming Cloudflare architecture consists of a monorepo with one directory (and tfstate) for each internally-owned Cloudflare account. This keeps all of our Cloudflare configuration centralized for easier oversight while remaining neatly organized.

It will be possible in a future (as of this writing) release to manage multiple Cloudflare accounts in the same tfstate, but we’ve found that accounts in our use generally map fairly neatly onto teams. Teams can be configured as CODEOWNERS for a given directory and be tagged on any pull requests to that account. With teams owning separate accounts and each account having a separate tfstate, it’s rare for pull requests to get stuck waiting for a lock on the tfstate. Team-account-sized states remain relatively small, meaning that they also build quickly. Later on, we’ll share some of the other optimizations we’ve made to keep the repo user-friendly.

Each of our terraform states, given that they include secrets (including the API key!), is stored encrypted in an internal datastore. When a pull request is opened, Atlantis reaches out to a piece of middleware (that we may open source once it’s cleaned up a bit) that retrieves and decrypts the state for processing. Once the pull request is applied, the state is encrypted and put away again.

How Cloudflare uses Terraform to manage Cloudflare

We execute a daily Terraform apply across all tfstates to capture any unintended config drift and rotate certificates when they approach expiration. This prevents unrelated changes from popping up in pull request diffs and causing confusion. While we could run more frequent state applies to ensure Terraform remains firmly up to date, once-a-day rectification strikes a balance between code enforcement and avoiding state locks while users are running Terraform plans in pull requests.

One of the problems that we encountered during our transition to Terraform is that folks were in the habit of making updates to configuration in the Dashboard and were still able to edit settings there. Thus, we didn’t always have a single source of truth for our configuration in code. It also meant the change would get mysteriously (to them) reverted the next day! So that’s why I’m excited to share a new Zero Trust Dashboard toggle that we’ve been turning on for our accounts internally: API/Terraform read-only mode.

How Cloudflare uses Terraform to manage Cloudflare
Easily one of my favorite new features

With this button, we’re able to politely prevent manual changes to your Cloudflare account’s Zero Trust configuration without removing permissions from the set of users who can fix settings manually in a break-glass emergency scenario. Check out how you can enable this setting in your Zero Trust organization.

Slick Snippets and Terraforming Recommendations

As our Terraform repository has matured, we’ve refined how we define Cloudflare resources in code. By finding a sweet spot between code reuse and readability, we’ve been able to minimize operational overhead and generally let users get their work done. Here’s a couple of useful snippets that have been particularly valuable to us.

Account Membership

This allows for defining a fairly straightforward mapping of user emails to account privileges without code duplication or complex modules. We pull the list of human-friendly names of account roles from the API to show user permission assignments at a glance. Note: status is a new argument that allows for accounts to be added without sending an email to the user; perfect for when an organization is using SSO. (Thanks patrobinson for the feature request and mblackman for the PR!)

variables.tf
—-
data "cloudflare_account_roles" "my_account" {
	account_id = var.account_id
}

locals {
  roles = {
	for role in data.cloudflare_account_roles.my_account.roles :
  	role.name => role
  }
}

members.tf
—-
locals {
  users = {
    emerson = {
      roles = [
        local.roles["Administrator"].id
      ]
    }
    lucian = {
      roles = [
        local.roles["Super Administrator - All Privileges"].id
      ]
    }
    walruto = {
      roles = [
        local.roles_by_name["Audit Logs Viewer"].id,
        local.roles_by_name["Cloudflare Access"].id,
        local.roles_by_name["DNS"].id
      ]
  }
}

resource "cloudflare_account_member" "account_member" {
  for_each  	= local.users
  account_id	= var.account_id
  email_address = "${each.key}@cloudflare.com"
  role_ids  	= each.value.roles
  status            = "accepted"
}

Defining Auto-Refreshing Access Service Tokens

The GitHub issue and provider change that enabled automatic Access service token refreshes actually came from a need inside Cloudflare. Here’s how we ended up implementing it. We begin by defining a set of services that need to connect to our hostnames that are protected by Access. Each of these tokens are created and stored in a secret key value store. Next, we reference those access tokens by ID in the target Access policies. Once this has run, the service owner or the service itself can retrieve the credentials from the data store. (Note: we’re using Vault here, but any storage provider could be used in its place).

tokens.tf
—
locals {
  service_tokens = toset([
    "customer-service",     # TICKET-120
    "full-service",               # TICKET-128
    "quality-of-service"      # TICKET-420 
    "room-service"            # TICKET-927
  ])
}

resource "cloudflare_access_service_token" "token" {
  for_each   = local.service_tokens
  account_id = var.account_id
  name   	= each.key
  min_days_for_renewal = 30
}

resource "vault_generic_secret" "access_service_token" {
  for_each   = local.service_tokens
  path = "kv/secrets/${each.key}/access_service_token"
  disable_read = true

  data_json = jsonencode({
	client_id        = cloudflare_access_service_token.token["${each.key}"].client_id,
client_secret = cloudflare_access_service_token.token["${each.key}"].client_secret
  })
}

super_cool_hostname.tf
—
resource "cloudflare_access_application" "super_cool_hostname" {
  account_id             	            = var.account_id
  name                   	            = "Super Cool Hostname"
  domain                 	            = "supercool.hostname.tld"
}

resource "cloudflare_access_policy" "super_cool_hostname_service_access" {
  application_id = cloudflare_access_application.super_cool_hostname.id
  zone_id    	= data.cloudflare_zone.hostname_tld.id
  name       	= "TICKET-927 Allow Room Service "
  decision   	= "non_identity"
  precedence 	= 1
  include {
	service_token = [cloudflare_access_service_token.token["room-service"].id]
  }
}

mTLS (Authenticated Origin Pulls) certificate creation and rotation

To further defense-in-depth objectives, we’ve been rolling out mTLS throughout our internal systems. One of the places where we can take advantage of our Terraform provider is in defining AOP (Authenticated Origin Pulls) certificates to lock down the Cloudflare-edge-to-origin connection. Anyone who has managed certificates of any kind can speak to the headaches they can cause. Having certificate configurations in Terraform takes out the manual work of rotation and expiration.

In this example we’re defining hostname-level AOP as opposed to zone-level AOP. We start by cutting a certificate for each hostname. Once again we’re using Vault for certificate creation, but other backends could be used just as well. This certificate is created with a (not-shown) 30 day expiration, but set to renew automatically. This means once the time-to-expiration is equal to min_seconds_remaining, the resource will be automatically tainted and replaced on the next Terraform run. We like to give this automation plenty of room before expiration to take into account holiday seasons and avoid sending alerts to humans when the alerts hit seven days to expiration. For the rest of this snippet, the certificate is uploaded to Cloudflare and the ID from that upload is then placed in the AOP configuration for the given hostname. The create_before_destroy meta-argument ensures that the replacement certificate is uploaded successfully before we remove the certificate that’s currently in place.

locals {
  hostnames = toset([
	"supercool.hostname.tld",
            "thatsafinelooking.hostname.tld"
  ])
}

resource "vault_pki_secret_backend_cert" "vault_cert" {
  for_each          	      = local.hostnames
  backend           	      = "pki-aop"
  name              	      = "default"
  auto_renew         	      = true
  common_name       	      = "${each.key}.aop.pki.vault.cfdata.org"
  min_seconds_remaining = 864000 // renew when there are 10 days left before expiration
}

resource "cloudflare_authenticated_origin_pulls_certificate" "aop_cert" {
  for_each  = local.hostnames
  zone_id   = data.cloudflare_zone.hostname_tld.id
  type 	      = "per-hostname"

  certificate = vault_pki_secret_backend_cert.vault_cert["${each.key}"].certificate
  private_key = vault_pki_secret_backend_cert.vault_cert["${each.key}"].private_key

  lifecycle {
	create_before_destroy = true
  }
}

resource "cloudflare_authenticated_origin_pulls" "aop_config" {
  for_each                           	= local.hostnames
  zone_id    	                        = data.cloudflare_zone.hostname_tld.id
  authenticated_origin_pulls_certificate = cloudflare_authenticated_origin_pulls_certificate.aop_cert["${each.key}"].id
  hostname                           	= "${each.key}"
  enabled                            	= true
}

Terraform recommendations

The comfortable automation that we’ve achieved thus far did not come without some hair-pulling. Below are a few of the learnings that have allowed us to maintain the repository as a side project run by two engineers (shoutout David).

Store your state somewhere safe

It feels worth repeating that the tfstate contains secrets including any API keys you’re using with providers and the default location of the tfstate is in the current working directory. It’s very easy to accidentally commit this to source control. By defining a backend, the state can be stored with a cloud storage provider, in a secure location on a filesystem, in a database, or even Cloudflare Workers! Wherever the state is stored, make sure it is encrypted.

Choose simplicity, avoid modules

Modules are intended to reduce code repetition for well-defined chunks of systems such as “I want three clusters of whizz-bangs in locations A, C, and F.” If cloud-computing was like Factorio, this would be amazing. However, financial, technical, and physical constraints mean subtle differences in systems develop over time such as “I want fewer whizz-bangs in C and the whizz-bangs in F should get a different network topology.” In Terraform, implementation logic of these requirements is moved to the module code. HCL is absolutely not the place to write decipherable conditionals. While module versioning prevents having to make every change backwards-compatible, keeping module usage up-to-date becomes another chore for repository maintainers.

An understandable code base is a user-friendly codebase. It’s rare that a deeply cryptic error will return from a misconfigured resource definition. Conversely, modules, especially custom ones, can lead users on a head-scratching adventure. This kind of system can’t scale with confused users.

A few well-designed for_each loops (we’re obviously fans) can achieve similar objectives as modules without the complexity. It’s fine to use plain old resources too! Especially when there are more than a handful of varying arguments, it’s more valuable for the configuration to be clear than to be eloquent. For example: an account_member resource makes sense to be in a for_loop, but a page_rule probably doesn’t.

Keep tfstates small

Maintaining quick pull-request-to-plan turnaround keeps Terraform from feeling like a burden on users’ time. Furthermore, if a plan is taking 30 minutes to run, a rollback in the case of an issue would also take 30 minutes! This post describes our single-account-to-tfstate model.

However, after noticing slow-downs coming from the large number of AOP certificate configurations in a big zone, we moved that code to a separate tfstate. We were able to make this change because AOP configuration is fairly self-contained. To ensure there would be no fighting between the states, we kept the API token permissions for each tfstate mutually exclusive of each other. Our Atlantis Terraform plans typically finish under five minutes. If it feels impossible to keep the size of a tfstate down to a reasonable amount of time, it may be worth considering a different tool for that bit of configuration management.

Know when to use a Different tool

Terraform isn’t a panacea. We generally don’t use Terraform to manage DNS records, for example. We use OctoDNS which integrates more neatly into our infrastructure automation. DNS records can quickly add up to long state-rendering times and are often dynamically generated from systems that Terraform doesn’t know about. To avoid conflicts, there should only ever be one system publishing changes to DNS records.

We also haven’t figured out a maintainable way of managing Workers scripts in Terraform. When a .js script in the Terraform directory changes, Terraform isn’t aware of it. This means a change needs to occur somewhere else in a .tf file before the plan diff is generated. It likely isn’t an unsolvable issue, but doesn’t seem particularly worth cramming into Terraform when there are better options for Worker management like Wrangler.

Looking forward

We’re continuing to invest in the Cloudflare Terraforming experience both for our own use and for the benefit of our users. With the provider, we hope to offer a comfortable and scalable method of interacting with Cloudflare products. Hopefully this post has presented some useful suggestions to anyone interested in adopting Cloudflare-configuration-as-code. Don’t hesitate to reach out on the GitHub project for troubleshooting, bug reports, or feature requests. For more in depth documentation on using Terraform to manage your Cloudflare account, read on here. And if you don’t have a Cloudflare account already, click here to get started.

Keep track of Workers’ code and configuration changes with Deployments

Post Syndicated from Kabir Sikand original https://blog.cloudflare.com/deployments-for-workers/

Keep track of Workers’ code and configuration changes with Deployments

Keep track of Workers’ code and configuration changes with Deployments

Today we’re happy to introduce Deployments for Workers. Deployments allow developers to keep track of changes to their Worker; not just the code, but the configuration and bindings as well. With deployments, developers now have access to a powerful audit log of changes to their production applications.

And tracking changes is just the beginning! Deployments provide a strong foundation to add: automated deployments, rollbacks, and integration with version control.

Today we’ll dive into the details of deployments, how you can use them, and what we’re thinking about next.

Deployments

Deployments are a powerful new way to track changes to your Workers. With them, you can track who’s making changes to your Workers, where those changes are coming from, and when those changes are being made.

Keep track of Workers’ code and configuration changes with Deployments

Cloudflare reports on deployments made from wrangler, API, dashboard, or Terraform anytime you make changes to your Worker’s code, edit resource bindings and environment variables, or modify configuration like name or usage model.

Keep track of Workers’ code and configuration changes with Deployments

We expose the source of your deployments, so you can track where changes are coming from. For example, if you have a CI job that’s responsible for changes, and you see a user made a change through the Cloudflare dashboard, it’s easy to flag that and dig into whether the deployment was a mistake.

Interacting with deployments

Cloudflare tracks the authors, sources, and timestamps of deployments. If you have a set of users responsible for deployment, or an API Token that’s associated with your CI tool, it’s easy to see which made recent deployments. Each deployment also includes a timestamp, so you can track when those changes were made.

Keep track of Workers’ code and configuration changes with Deployments

You can access all this deployment information in your Cloudflare dashboard, under your Worker’s Deployments tab. We also report on the active version right at the front of your Worker’s detail page. Wrangler will also report on deployment information. wrangler publish now reports the latest deployed version, and a new `wrangler deployments` command can be used to view a deployment history.

Keep track of Workers’ code and configuration changes with Deployments

To learn more about the details of deployments, head over to our Developer Documentation.

What’s next?

We’re excited to share deployments with our customers, available today in an open beta. As we mentioned up front, we’re just getting started with deployments. We’re also excited for more on-platform tooling like rollbacks, deploy status, deployment rules, and a view-only mode to historical deployments. Beyond that, we want to ensure deployments can be automated from commits to your repository, which means working on version control integrations to services like GitHub, Bitbucket, and Gitlab. We’d love to hear more about how you’re currently using Workers and how we can improve developer experience. If you’re interested, let’s chat.

If you’d like to join the conversation, head over to Cloudflare’s Developer Discord and give us a shout! We love hearing from our customers, and we’re excited to see what you build with Cloudflare.

The most programmable Supercloud with Cloudflare Snippets

Post Syndicated from Sam Marsh original https://blog.cloudflare.com/snippets-announcement/

The most programmable Supercloud with Cloudflare Snippets

Your traffic, how you like it

The most programmable Supercloud with Cloudflare Snippets

Cloudflare is used by a highly diverse customer base. We offer simple-to-use products for everything from setting HTTP headers to rewriting the URI path and performing URL redirects. Sometimes customers need more than the out-of-the-box functionality, not just adding an HTTP header – but performing some advanced calculation to create the output. Today they would need to create a feature request and wait for it to be shipped, write a Cloudflare Worker, or keep this modification ‘on origin’ – on their own infrastructure.

To simplify this, we are delighted to announce Cloudflare Snippets. Snippets are a new way to perform traffic modifications that users either cannot do via our productised offerings, or want to do programmatically. The best part? The vast majority of customers will pay nothing extra for using Snippets.

Users now have a choice. Perform the action via a rule. Or, if more functionality is needed, write a Snippet.  Neither will mean waiting. Neither will incur additional cost (although a high fair usage cap will apply). Snippets unblocks users to do what they want, when they want. All on Cloudflare.

Snippets will support the import of code written in various languages, such as JavaScript (modern), VCL (legacy) and Apache .htaccess files (legacy). This allows customers to migrate legacy operational code onto our platform – whilst also consolidating their JavaScript operations.

Please use the sign-up form to join the waitlist for Snippets if you are interested in testing. We hope to begin admitting users into the closed beta early 2023.

Why build Snippets?

Over the past 18 months we have released a number of new rules products such as Transform Rules, Cache Rules, Origin Rules, Config Rules and Redirect Rules. These new products give more control to customers on how we process their traffic as it flows through our global network. The feedback on these products so far has been overwhelmingly positive. However, our customers still occasionally need the ability to do more than the out-of-the-box functionality allows.

There are always some use cases where a product doesn’t provide the functionality that a customer needs for their specific situation.  For example, whilst thousands of our customers are now using Transform Rules to solve their HTTP header modification use cases, there remains a small number of use cases that are not possible, such as setting dynamic expiry times with cookies or hashing tokens with a key.

This is where Cloudflare Snippets help. Customers will no longer need to use the full Cloudflare Workers platform to implement these relatively simple use cases. Nor will they need to wait for us to build their feature requests. Instead, they will be able to run a Snippet of JavaScript.

Migrating legacy code to Snippets

Varnish Control Language (VCL) is only used within the context of Varnish. Launched around 16 years ago, it has historically been used to configure traffic and routing for Content Delivery Networks as it was extensible to a wide range of use cases.

There are still a good number of businesses out there using VCL to perform routing and traffic modification actions. Whilst other providers are deprecating support for VCL, we want to make sure those of you comfortable using it are still supported.

Snippets won’t run pure VCL. Instead, we will convert VCL into easy to maintain rules or Snippets. To achieve this we’re building a simple-to-use, self-serve VCL converter that analyzes uploaded VCL code and auto-generates suggested Snippets, and if we can find a match, also generates suggested rules for products such as Transform Rules or Cache Rules.

This topic was initially handled via Project Turpentine, a suite of tools used by Cloudflare employees to parse a customer’s VCL into a suggested JavaScript configuration. This JavaScript could then be loaded into a Worker, or series of Workers.

Snippets takes the idea and principles of Turpentine further. Much further. By building a parser directly in the dashboard it puts the power directly into the hands of users and gives them a choice. You can tell us to migrate everything we can into Rules with the remaining code migrated into Snippets, or, you can choose to tell us to migrate everything into discrete Snippets. It’s your call.

The most programmable Supercloud with Cloudflare Snippets

We’ll give Apache htaccess and NGINX configuration files the same treatment. The goal being users simply upload the files from their websites Apache or NGINX configuration, and we generate suggested Snippets and/or rules.

The days of having to use legacy code for operational tasks are coming to an end. Snippets allow users to migrate these workloads to Cloudflare, and let them focus on the bigger problems of the business vs maintaining legacy systems.

The difference between Snippets and Workers

Most readers will already be familiar with Cloudflare Workers, our powerful developer platform which allows businesses to run and build entire products and solutions on Cloudflare’s global network. Snippets is also built on this platform, but has a few key differences.

The first major difference is that a Snippet will run as part of the Ruleset Engine as dedicated new phases, similar to Transform Rules and Cache Rules. Customers will be able to select and execute a Snippet based on any ruleset engine filter. This allows customers to run a Snippet against every request, or filter for specific HTTP traffic based on the fields we offer, such as traffic with a certain bot score, originating from a specific country, or with a specific cookie. Snippets will be additive, meaning users can have one Snippet to add an HTTP header, and another to rewrite the URL, and both will execute if they match:

The most programmable Supercloud with Cloudflare Snippets

Another major difference – Cloudflare Snippets are available for all plan levels, at no additional cost. 99% of users won’t pay a single cent, ever, to use this solution. This allows customers to migrate their simple workloads from legacy solutions like VCL to the Cloudflare platform, and actively reduce their monthly spend.

Free Plans Pro Plans Business Plans Enterprise Plans
Snippets available 5 Snippets per zone. 20 Snippets per zone. 50 Snippets per zone. 200 Snippets per zone*
(Customers can speak with their Customer Success team to have this increased).

Cloudflare Snippets are lightweight when compared with Workers, offering 5ms maximum execution time, 2MB maximum memory and 32KB total package size. This comparably small footprint allows us to offer this to 99% of users at no additional cost, whilst also being sufficient for the identified use cases like HTTP header modification, URL rewriting and traffic routing – all of which don’t need the vast resources offered by Cloudflare Workers.

Cloudflare Snippets Cloudflare Workers Unbound
(For comparison)
Runtime support JavaScript JavaScript and WASM
Execution location Global – All Cloudflare locations Global – All Cloudflare locations
Triggers supported Ruleset Engine Filters HTTP Request
HTTP Response
Cron Triggers
Maximum execution time 5ms 30 Seconds HTTP
15 Minutes (Cron Trigger)
Maximum memory 2MB 128MB
Total package size 32KB 5MB
Environment variables 8/Snippet 64/Worker
Environment variable size 1KB 5KB
Subrequests 1/request 1000/request
Terraform Support
Wrangler Support
Cron Triggers
Key Value Store
Durable Objects
R2 Integration

What will you be able to build with Cloudflare Snippets?

Snippets will allow customers to migrate their existing workloads to Cloudflare. They will also open up a number of new possible use cases for customers. We have highlighted three common examples below, however there are many more to choose from.

Example 1: Sending suspect bots to a honeypot

When creating Snippets customers will be able to access Cloudflare features available in the Workers runtime, such as the bot score field. This enables customers to forward an HTTP request to a honeypot or use the RegExp Javascript function to change the URL construct being sent back to the end user when traffic is assigned a bot score below a certain threshold, e.g. 29 and lower.

…
if (request.cf.botManagement.score < 30) {
const honeypot = "https://example.com/";
return await fetch(honeypot, request);
…
}

Another common use case we foresee Snippets addressing is cookie modification. Usage can range from simply setting an expiry in five minutes by using getTime and setTime JavaScript functions to setting a dynamic cookie based on user request attributes for A/B testing purposes.

…
{
let res = await fetch(request);
res = new Response(res.body, res);
// 24h * 60m * 60s * 1000ms = 86400000ms
const expiry = new Date(Date.now() + 7 * 86400000).toUTCString();
const group = request.headers.get("userGroup") == "premium" ? "A" : "B";
res.headers.append(
      "Set-Cookie",
`testGroup=${group}; Expires=${expiry}; path=/`
    );
…

Example 3: URI query management

Customers can also deploy Cloudflare Snippets to do complex operations such as splicing the URI query value to selectively remove or inject additional parameters. Query string manipulation is typically done using Transform Rules. However, with Transform Rules the set/ action is effectively a replace action. This action when applied to the URI query string will remove the entire value if there is one and set it to what the user specifies, thus overwriting it. This is a problem for customers who wish to selectively inject specific query parameters for matching traffic. For example,  setting an additional query, e.g. ?utm_campaign=facebook when common social media platforms are detected in the user agent. With Snippets, customers will be able to do this selective removal and insertion using a simple piece of JavaScript, e.g.

…
if (userAgent.includes("Facebook")) {
      const url = new URL(request.url);
      const params = new URLSearchParams(url.search);
      params.set("utm_campaign", "facebook");
      url.search = params.toString();
      const transformedRequest = new Request(url, request)
…
}

We are excited to see what other use cases Cloudflare Snippets unlock for our customers.

Will you stop adding actions to rulesets?

The simple answer is no! We will continue to build out our no-code actions within the ruleset engine, developing new products to solve customer needs.

It may sound obvious – but a core component to feature improvement is talking to customers. Talking to Snippet users will help us understand what real life use cases Snippets help solve and highlight feature gaps we have in our product suite. We can then review if it makes sense to productise that use case, or leave it requiring Snippets.

We also understand that not everyone is a software developer. We are therefore exploring how we can make Snippets accessible to all by creating selectable templates available in a library that can be copied and modified by customers, with minimum coding knowledge required. With Snippets, powerful won’t mean difficult.

Accessing Cloudflare Snippets

Snippets are currently under development — you can sign up here to join the waitlist for access.

We hope to begin admitting users into the closed beta in early 2023, with an open beta to follow.

Incremental adoption of micro-frontends with Cloudflare Workers

Post Syndicated from Peter Bacon Darwin original https://blog.cloudflare.com/fragment-piercing/

Incremental adoption of micro-frontends with Cloudflare Workers

Bring micro-frontend benefits to legacy Web applications

Incremental adoption of micro-frontends with Cloudflare Workers

Recently, we wrote about a new fragment architecture for building Web applications that is fast, cost-effective, and scales to the largest projects, while enabling a fast iteration cycle. The approach uses multiple collaborating Cloudflare Workers to render and stream micro-frontends into an application that is interactive faster than traditional client-side approaches, leading to better user experience and SEO scores.

This approach is great if you are starting a new project or have the capacity to rewrite your current application from scratch. But in reality most projects are too large to be rebuilt from scratch and can adopt architectural changes only in an incremental way.

In this post we propose a way to replace only selected parts of a legacy client-side rendered application with server-side rendered fragments. The result is an application where the most important views are interactive sooner, can be developed independently, and receive all the benefits of the micro-frontend approach, while avoiding large rewrites of the legacy codebase. This approach is framework-agnostic; in this post we demonstrate fragments built with React, Qwik, and SolidJS.

The pain of large frontend applications

Many large frontend applications developed today fail to deliver good user experience. This is often caused by architectures that require large amounts of JavaScript to be downloaded, parsed and executed before users can interact with the application. Despite efforts to defer non-critical JavaScript code via lazy loading, and the use of server-side rendering, these large applications still take too long to become interactive and respond to the user’s inputs.

Furthermore, large monolithic applications can be complex to build and deploy. Multiple teams may be collaborating on a single codebase and the effort to coordinate testing and deployment of the project makes it hard to develop, deploy and iterate on individual features.

As outlined in our previous post, micro-frontends powered by Cloudflare Workers can solve these problems but converting an application monolith to a micro-frontend architecture can be difficult and expensive. It can take months, or even years, of engineering time before any benefits are perceived by users or developers.

What we need is an approach where a project can incrementally adopt micro-frontends into the most impactful parts of the application incrementally, without needing to rewrite the whole application in one go.

Fragments to the rescue

The goal of a fragment based architecture is to significantly decrease loading and interaction latency for large web applications (as measured via Core Web Vitals) by breaking the application into micro-frontends that can be quickly rendered (and cached) in Cloudflare Workers. The challenge is how to integrate a micro-frontend fragment into a legacy client-side rendered application with minimal cost to the original project.

The technique we propose allows us to convert the most valuable parts of a legacy application’s UI, in isolation from the rest of the application.

It turns out that, in many applications, the most valuable parts of the UI are often nested within an application “shell” that provides header, footer, and navigational elements. Examples of these include a login form, product details panel in an e-commerce application, the inbox in an email client, etc.

Let’s take a login form as an example. If it takes our application several seconds to display the login form, the users will dread logging in, and we might lose them. We can however convert the login form into a server-side rendered fragment, which is displayed and interactive immediately, while the rest of the legacy application boots up in the background. Since the fragment is interactive early, the user can even submit their credentials before the legacy application has started and rendered the rest of the page.

Animation showing the login form being available before the main application

This approach enables engineering teams to deliver valuable improvements to users in just a fraction of the time and engineering cost compared to traditional approaches, which either sacrifice user experience improvements, or require a lengthy and high-risk rewrite of the entire application. It allows teams with monolithic single-page applications to adopt a micro-frontend architecture incrementally, target the improvements to the most valuable parts of the application, and therefore front-load the return on investment.

An interesting challenge in extracting parts of the UI into server-side rendered fragments is that, once displayed in the browser, we want the legacy application and the fragments to feel like a single application. The fragments should be neatly embedded within the legacy application shell, keeping the application accessible by correctly forming the DOM hierarchy, but we also want the server-side rendered fragments to be displayed and become interactive as quickly as possible — even before the legacy client-side rendered application shell comes into existence. How can we embed UI fragments into an application shell that doesn’t exist yet? We resolved this problem via a technique we devised, which we call “fragment piercing”.

Fragment piercing

Fragment piercing combines HTML/DOM produced by server-side rendered micro-frontend fragments with HTML/DOM produced by a legacy client-side rendered application.

The micro-frontend fragments are rendered directly into the top level of the HTML response, and are designed to become immediately interactive. In the background, the legacy application is client-side rendered as a sibling of these fragments. When it is ready, the fragments are “pierced” into the legacy application – the DOM of each fragment is moved to its appropriate place within the DOM of the legacy application – without causing any visual side effects, or loss of client-side state, such as focus, form data, or text selection. Once “pierced”, a fragment can begin to communicate with the legacy application, effectively becoming an integrated part of it.

Here, you can see a “login” fragment and the empty legacy application “root” element at the top level of the DOM, before piercing.

<body>
  <div id="root"></div>
  <piercing-fragment-host fragment-id="login">
    <login q:container...>...</login>
  </piercing-fragment-host>
</body>

And here you can see that the fragment has been pierced into the “login-page” div in the rendered legacy application.

<body>
  <div id="root">
    <header>...</header>
    <main>
      <div class="login-page">
        <piercing-fragment-outlet fragment-id="login">
          <piercing-fragment-host fragment-id="login">
            <login  q:container...>...</login>
          </piercing-fragment-host>
        </piercing-fragment-outlet>
      </div>
    </main>
    <footer>...</footer>
  </div>
</body>

To keep the fragment from moving and causing a visible layout shift during this transition, we apply CSS styles that position the fragment in the same way before and after piercing.

At any time an application can be displaying any number of pierced fragments, or none at all. This technique is not limited only to the initial load of the legacy application. Fragments can also be added to and removed from an application, at any time. This allows fragments to be rendered in response to user interactions and client-side routing.

With fragment piercing, you can start to incrementally adopt micro-frontends, one fragment at a time. You decide on the granularity of fragments, and which parts of the application to turn into fragments. The fragments don’t all have to use the same Web framework, which can be useful when switching stacks, or during a post-acquisition integration of multiple applications.

The “Productivity Suite” demo

As a demonstration of fragment piercing and incremental adoption we have developed a “productivity suite” demo application that allows users to manage to-do lists, read hacker news, etc. We implemented the shell of this application as a client-side rendered React application — a common tech choice in corporate applications. This is our “legacy application”. There are three routes in the application that have been updated to use micro-frontend fragments:

  • /login – a simple dummy login form with client-side validation, displayed when users are not authenticated (implemented in Qwik).
  • /todos – manages one or more todo lists, implemented as two collaborating fragments:
    • Todo list selector – a component for selecting/creating/deleting Todo lists (implemented in Qwik).
    • Todo list editor – a clone of the TodoMVC app (implemented in React).
  • /news – a clone of the HackerNews demo (implemented in SolidJS).

This demo showcases that different independent technologies can be used for both the legacy application and for each of the fragments.

Incremental adoption of micro-frontends with Cloudflare Workers
A visualization of the fragments that are pierced into the legacy application

The application is deployed at https://productivity-suite.web-experiments.workers.dev/.

To try it out, you first need to log in – simply use any username you like (no password needed). The user’s data is saved in a cookie, so you can log out and back in using the same username. After you’ve logged in, navigate through the various pages using the navigation bar at the top of the application. In particular, take a look at the “Todo Lists” and “News” pages to see the piercing in action.

At any point, try reloading the page to see that fragments are rendered instantly while the legacy application loads slowly in the background. Try interacting with the fragments even before the legacy application has appeared!

At the very top of the page there are controls to let you see the impact of fragment piercing in action.

Incremental adoption of micro-frontends with Cloudflare Workers
  • Use the “Legacy app bootstrap delay” slider to set the simulated delay before the legacy application starts.
  • Toggle “Piercing Enabled” to see what the user experience would be if the app did not use fragments.
  • Toggle “Show Seams” to see where each fragment is on the current page.

How it works

The application is composed of a number of building blocks.

Incremental adoption of micro-frontends with Cloudflare Workers
An overview of the collaborating Workers and legacy application host

The Legacy application host in our demo serves the files that define the client-side React application (HTML, JavaScript and stylesheets). Applications built with other tech stacks would work just as well. The Fragment Workers host the micro-frontend fragments, as described in our previous fragment architecture post. And the Gateway Worker handles requests from the browser, selecting, fetching and combining response streams from the legacy application and micro-frontend fragments.

Once these pieces are all deployed, they work together to handle each request from the browser. Let’s look at what happens when you go to the `/login` route.

Incremental adoption of micro-frontends with Cloudflare Workers
The flow of requests when viewing the login page

The user navigates to the application and the browser makes a request to the Gateway Worker to get the initial HTML. The Gateway Worker identifies that the browser is requesting the login page. It then makes two parallel sub-requests – one to fetch the index.html of the legacy application, and another to request the server-side rendered login fragment. It then combines these two responses into a single response stream containing the HTML that is delivered to the browser.

The browser displays the HTML response containing the empty root element for the legacy application, and the server-side rendered login fragment, which is immediately interactive for the user.

The browser then requests the legacy application’s JavaScript. This request is proxied by the Gateway Worker to the Legacy application host. Similarly, any other assets for the legacy application or fragments get routed through the Gateway Worker to the legacy application host or appropriate Fragment Worker.

Once the legacy application’s JavaScript has been downloaded and executed, rendering the shell of the application in the process, the fragment piercing kicks in, moving the fragment into the appropriate place in the legacy application, while preserving all of its UI state.

While focussed on the login fragment to explain fragment piercing, the same ideas apply to the other fragments implemented in the /todos and /news routes.

The piercing library

Despite being implemented using different Web frameworks, all the fragments are integrated into the legacy application in the same way using helpers from a “Piercing Library”. This library is a collection of server-side and client-side utilities that we developed, for the demo, to handle integrating the legacy application with micro-frontend fragments. The main features of the library are the PiercingGateway class, fragment host and fragment outlet custom elements, and the MessageBus class.

PiercingGateway

The PiercingGateway class can be used to instantiate a Gateway Worker that handles all requests for our application’s HTML, JavaScript and other assets. The `PiercingGateway` routes requests through to the appropriate Fragment Workers or to the host of the Legacy Application. It also combines the HTML response streams from these fragments with the response from the legacy application into a single HTML stream that is returned to the browser.

Implementing a Gateway Worker is straightforward using the Piercing Library. Create a new gateway instance of PiercingGateway, passing it the URL to the legacy application host and a function to determine whether piercing is enabled for the given request. Export the gateway as the default export from the Worker script so that the Workers runtime can wire up its fetch() handler.

const gateway = new PiercingGateway<Env>({
  // Configure the origin URL for the legacy application.
  getLegacyAppBaseUrl: (env) => env.APP_BASE_URL,
  shouldPiercingBeEnabled: (request) => ...,
});
...

export default gateway;

Fragments can be registered by calling the registerFragment() method so that the gateway can automatically route requests for a fragment’s HTML and assets to its Fragment Worker. For example, registering the login fragment would look like:

gateway.registerFragment({
  fragmentId: "login",
  prePiercingStyles: "...",
  shouldBeIncluded: async (request) => !(await isUserAuthenticated(request)),
});

Fragment host and outlet

Routing requests and combining HTML responses in the Gateway Worker is only half of what makes piercing possible. The other half needs to happen in the browser where the fragments need to be pierced into the legacy application using the technique we described earlier.

The fragment piercing in the browser is facilitated by a pair of custom elements, the fragment host (<piercing-fragment-host>) and the fragment outlet (<piercing-fragment-outlet>).

The Gateway Worker wraps the HTML for each fragment in a fragment host. In the browser, the fragment host manages the life-time of the fragment and is used when moving the fragment’s DOM into position in the legacy application.

<piercing-fragment-host fragment-id="login">
  <login q:container...>...</login>
</piercing-fragment-host>

In the legacy application, the developer marks where a fragment should appear when it is pierced by adding a fragment outlet. Our demo application’s Login route looks as follows:

export function Login() {
  …
  return (
    <div className="login-page" ref={ref}>
      <piercing-fragment-outlet fragment-id="login" />
    </div>
  );
}

When a fragment outlet is added to the DOM, it searches the current document for its associated fragment host. If found, the fragment host and its contents are moved inside the outlet. If the fragment host is not found, the outlet will make a request to the gateway worker to fetch the fragment HTML, which is then streamed directly into the fragment outlet, using the writable-dom library (a small but powerful library developed by the MarkoJS team).

This fallback mechanism enables client-side navigation to routes that contain new fragments. This way fragments can be rendered in the browser via both initial (hard) navigation and client-side (soft) navigation.

Message bus

Unless the fragments in our application are completely presentational or self-contained, they also need to communicate with the legacy application and other fragments. The MessageBus is a simple asynchronous, isomorphic, and framework-agnostic communication bus that the legacy application and each of the fragments can access.

In our demo application the login fragment needs to inform the legacy application when the user has authenticated. This message dispatch is implemented in the Qwik LoginForm component as follows:

const dispatchLoginEvent = $(() => {
  getBus(ref.value).dispatch("login", {
    username: state.username,
    password: state.password,
  });
  state.loading = true;
});

The legacy application can then listen for these messages like this:

useEffect(() => {
  return getBus().listen<LoginMessage>("login", async (user) => {
    setUser(user);
    await addUserDataIfMissing(user.username);
    await saveCurrentUser(user.username);
    getBus().dispatch("authentication", user);
    navigate("/", { replace: true, });
  });
}, []);

We settled on this message bus implementation because we needed a solution that was framework-agnostic, and worked well on both the server as well as client.

Give it a go!

With fragments, fragment piercing, and Cloudflare Workers, you can improve performance as well as the development cycle of legacy client-side rendered applications. These changes can be adopted incrementally, and you can even do so while implementing fragments with a Web framework for your choice.

The “Productivity Suite” application demonstrating these capabilities can be found at https://productivity-suite.web-experiments.workers.dev/.

All the code we have shown is open-source and published to Github: https://github.com/cloudflare/workers-web-experiments/tree/main/productivity-suite.

Feel free to clone the repository. It is easy to run locally and even deploy your own version (for free) to Cloudflare. We tried to make the code as reusable as possible. Most of the core logic is in the piercing library that you could try in your own projects. We’d be thrilled to receive feedback, suggestions, or hear about applications you’d like to use it for. Join our GitHub discussion or also reach us on our discord channel.

We believe that combining Cloudflare Workers with the latest ideas from frameworks will drive the next big steps forward in improved experiences for both users and developers in Web applications. Expect to see more demos, blog posts and collaborations as we continue to push the boundaries of what the Web can offer. And if you’d also like to be directly part of this journey, we are also happy to share that we are hiring!

Security updates for Thursday

Post Syndicated from original https://lwn.net/Articles/915245/

Security updates have been issued by Debian (firefox-esr and thunderbird), Fedora (expat, xen, and xorg-x11-server), Oracle (kernel, kernel-container, qemu, xorg-x11-server, and zlib), Scientific Linux (xorg-x11-server), Slackware (firefox, krb5, samba, and thunderbird), SUSE (ant, apache2-mod_wsgi, jsoup, rubygem-nokogiri, samba, and tomcat), and Ubuntu (firefox and linux, linux-aws, linux-aws-hwe, linux-dell300x, linux-hwe, linux-kvm, linux-oracle, linux-raspi2, linux-snapdragon).

Introduce young people to coding with our updated projects

Post Syndicated from Liz Smart original https://www.raspberrypi.org/blog/introduction-to-scratch/

A year ago we launched our Introduction to Scratch path of six new coding projects. This was the first path to use our new 3…2…1…Make! approach for prioritising fun and engagement whilst enabling creators to make the things that matter to them. Creators learn how to add code, costumes, and sounds to sprites as they make animations, a game, an app, and a book.

Young person using Scratch.

As the first birthday of the Introduction to Scratch path approached, we decided to review and refresh each project. We used input from the community, looked at remixes of the projects, and analysed visitor data to guide us in our review.

We would like to say a massive thank you to everyone who engaged in focus groups, provided input via social channels, or clicked the project feedback buttons. We really appreciate you taking the time to reach out and we hope you will be pleased with the changes. 

An illustration of the 3-2-1 structure of the new Raspberry Pi Foundation coding project paths.
Our project paths have a 3-2-1 structure (click the image to enlarge)

The updates are split into two parts, those we made specifically to the Introduction to Scratch path, and changes made across all of the 3…2…1…Make! projects.

3…2…1…Make! projects

The first thing you might notice is the revamp of our Introduction step, now called ‘You will make’. This simplified step focuses on setting the scene and encourages creators to play with a completed project example.

Young person using a computer.
Picture Conor McCabe Photography

Also changed is the Reflection step, replaced by ‘Quick quiz’ — a much neater page that guides creators through three questions before awarding a project badge. 

Introduction to Scratch

Here is an overview of the Scratch path to tell you more about the projects and the changes we’ve made to the content.

Creators can start using the updated Scratch projects right away!

Three Explore projects

Our first three projects in the path introduce creators to a set of skills and provide step-by-step instructions to help them develop initial confidence.

Explore 1: Space talk 

In this project, creators design a space scene with characters that emote to share their thoughts or feelings. We received some amazing feedback from a member of the Deaf community to enhance the Nano uses sign language task and include a great new boxout to prompt discussion amongst our creators.

We also heard from a couple of club leaders that the Text to Speech extension in Scratch was a great addition to this project so we added an optional Text to Speech information card to the Upgrade your project step.  

Three alien characters stood still on a planet. One alien has a speech bubble that says, "Hello!". Another has a thinking bubble that reads, "Hmm...".

Explore 2: Catch the bus

The bus in the Catch the bus project is a tour bus, but we originally used the school backdrop as a departure point. We liked how the backdrop looked but now recognise that doing a project about a school bus whilst in a club was probably not the most popular choice. Please forgive us! The project now uses a nighttime city scene.

We also removed the use of the ‘Timer hat block’ from this project — it isn’t needed for the rest of the path and has behaviour that complicates things. The ‘timer hat block’ has been replaced by a ‘wait block’.

A bus drives along a cityscape at night. Scratch cat is faced towards the bus. A hippo with wings flies alongside the bus and towards Scratch cat.


Explore 3: Find the bug

We have loved engaging with the community submissions of this project and really enjoyed seeing how quickly we can find the small bugs on each level of the games that have been created. With replicating that enthusiasm in mind, our changes to this project focused on young creators sharing their project and playing projects created by others.

Our new Share and play step has a number of options, including sharing in a club, submitting your project to a shared studio, and experiencing remixes as a user. We have also embedded some community projects into the step to provide upgrade ideas and inspiration.

An insect is on a blackboard. Next to the insect is a speech bubble that contains "13.10". A parrot is below the blackboard.

Two Design projects

The next two projects in the path encourage creators to practise the skills they learned in the previous ‘Explore’ projects, and to express themselves creatively while they grow in independence.

The revamped Get ideas task on the first step of each Design project now has a featured community project that will be regularly updated. You may also notice that the inspirational examples have been reordered or changed using analysis from interactions with them.

Additional community submissions can be found in the Share and play steps to provide upgrade ideas and creators are encouraged to look at remixes of the starter project for even more inspiration. 

Design 1: Silly eyes

Interacting with remixes of the Silly eyes project is one of our favourite things to do! The project involves creating a character whose eyes follow the mouse pointer. We love seeing how design decisions have shaped each project and how various upgrades have been used.

For this project, we decided to remove the ‘Add stage effects’ step as it was largely a repeat of the earlier ‘Add sprite effects’ step. Stage effects is now an optional upgrade which means creators can get through to the ‘Share and play’ step to look at the design decisions made by others, then use those to choose which ideas to include in their project. 

A sea creature with large eyes.

Design 2: Surprise animation

This project consists of creating an animation of a story. We looked at the remixes so far and realised the main steps of the surprise animations were:  

  1. Create your scene
  2. Show curiosity
  3. Add a surprise

Sometimes projects had a reaction in them but others relied on creating a reaction in the user watching the animation. With this in mind we moved the Reaction step and added it as an optional upgrade. We also added graphics to each step to explain the step position in the animation timeline.

A new option to remix one of the example projects was added to this project as a starting point if creators were short of time, needed help with ideas, or had perhaps already thought of an extension to the example animations. 

A filmstrip that contains three images.

One Invent project

Our final project in the path is where creators use their skills to meet a project brief for a particular audience.

The project brief has been revamped to make it more concise with the Reflection step becoming a checklist to keep track of how the project is meeting the brief. 

Invent: I made you a book

This project consists of creating a book with multiple pages to tell a story or share facts. The major change to this project is a reorganisation of the steps. The original planning step has now split in two — the first step to decide the high-level purpose and audience for the book and the second step to plan the book in more detail using either the starter Scratch project or our new planning sheet

A storyboard with images that have been drawn by hand.
Creators can use the new planning sheet to sketch their ideas on paper

The build and test step has also been restructured to break up the skills into categories and make the tasks clearer. At the end of the step, creators are encouraged to ask for feedback then repeat the process to work on their book until it is ready to share.  

What next?

We will start refreshing another path soon but in the meantime, we hope you and your creators enjoy using the revamped Introduction to Scratch path. We would love to hear your feedback on any of our projects via the feedback button on the bottom of each project page. 

Two learners working together at a computer.

We look forward to seeing what your creators make. 

The post Introduce young people to coding with our updated projects appeared first on Raspberry Pi.

Failures in Twitter’s Two-Factor Authentication System

Post Syndicated from Bruce Schneier original https://www.schneier.com/blog/archives/2022/11/failures-in-twitters-two-factor-authentication-system.html

Twitter is having intermittent problems with its two-factor authentication system:

Not all users are having problems receiving SMS authentication codes, and those who rely on an authenticator app or physical authentication token to secure their Twitter account may not have reason to test the mechanism. But users have been self-reporting issues on Twitter since the weekend, and WIRED confirmed that on at least some accounts, authentication texts are hours delayed or not coming at all. The meltdown comes less than two weeks after Twitter laid off about half of its workers, roughly 3,700 people. Since then, engineers, operations specialists, IT staff, and security teams have been stretched thin attempting to adapt Twitter’s offerings and build new features per new owner Elon Musk’s agenda.

On top of that, it seems that the system has a new vulnerability:

A researcher contacted Information Security Media Group on condition of anonymity to reveal that texting “STOP” to the Twitter verification service results in the service turning off SMS two-factor authentication.

“Your phone has been removed and SMS 2FA has been disabled from all accounts,” is the automated response.

The vulnerability, which ISMG verified, allows a hacker to spoof the registered phone number to disable two-factor authentication. That potentially exposes accounts to a password reset attack or account takeover through password stuffing.

This is not a good sign.

Защитен: Един не лош шанс за младите хора, платен от банките парола в Telegram канала Kendov.com

Post Syndicated from VassilKendov original http://kendov.com/young_people_chance_payed_by_banks/

Съдържанието е заключено. За да го разгледате, въведете паролата си отдолу:

The post Защитен: Един не лош шанс за младите хора, платен от банките парола в Telegram канала Kendov.com appeared first on Kendov.com.

You can now assign multiple MFA devices in IAM

Post Syndicated from Liam Wadman original https://aws.amazon.com/blogs/security/you-can-now-assign-multiple-mfa-devices-in-iam/

At Amazon Web Services (AWS), security is our top priority, and configuring multi-factor authentication (MFA) on accounts is an important step in securing your organization.

Now, you can add multiple MFA devices to AWS account root users and AWS Identity and Access Management (IAM) users in your AWS accounts. This helps you to raise the security bar in your accounts and limit access management to highly privileged principals, such as root users. Previously, you could only have one MFA device associated with root users or IAM users, but now you can associate up to eight MFA devices of the currently supported types with root users and IAM users.

In this blog post, we review the current MFA features for IAM, share use cases for multiple MFA devices, and show you how to manage and sign in with the additional MFA devices for better resiliency and flexibility.

Overview of MFA for IAM

First, let’s recap some of the benefits and available MFA configurations for IAM.

The use of MFA is an important security best practice on AWS. With MFA, you have an additional layer of protection to help prevent unauthorized individuals from gaining access to your systems and data. MFA can help protect your AWS environments if a password associated with your root user or IAM user became compromised.

As a security best practice, AWS recommends that you avoid using root users or IAM users to manage access to your accounts. Instead, you should use AWS IAM Identity Center (successor to AWS Single Sign-On) to manage access to your accounts. You should only use root users for tasks that they are required for.

To help meet different customer needs, AWS supports three types of MFA devices for IAM, including FIDO security keys, virtual authenticator applications, and time-based one-time password (TOTP) hardware tokens. You should select the device type that aligns with your security and operational requirements. You can associate different types of MFA devices with an IAM principal.

Use cases for multiple MFA devices

There are several use cases in which associating multiple MFA devices with an IAM principal is beneficial to the security and operational efficiency of your organization, such as the following:

  • In the event of a lost, stolen, or inaccessible MFA device, you can use one of the remaining MFA devices to access the account without performing the AWS account recovery procedure. If an MFA device is lost or stolen, it’s best practice to disassociate the lost or stolen device from the root users or IAM users that it’s associated with.
  • Geographically dispersed teams, or teams working remotely, can use hardware-based MFA to access AWS, without shipping a single hardware device or coordinating a physical exchange of a single hardware device between team members.
  • If the holder of an MFA device isn’t available, you can maintain access to your root users and IAM users by using a different MFA device associated with an IAM principal.
  • You can store additional MFA devices in a secure physical location, such as a vault or safe, while retaining physical access to another MFA device for redundancy.

How to manage multiple MFA devices in IAM

You can register up to eight MFA devices, in any combination of the currently supported MFA types, with your root users and IAM users.

To register an MFA device

  1. Sign in to the AWS Management Console and do the following:
    • For a root user, choose My Security Credentials.
    • For an IAM user, choose Security credentials.
  2. For Multi-factor authentication (MFA), choose Assign MFA device.
  3. Select the type of MFA device that you want to use and then choose Next.

With multiple MFA devices, you only need one MFA device to sign in to the console or to create a session through the AWS Command Line Interface (AWS CLI) as that principal.

You don’t need to make permissions changes in order for your organization to start taking advantage of multiple MFA devices. The root users and IAM users in your accounts that manage MFA devices today can use their existing IAM permissions to enable additional MFA devices.

Changes to Cloudtrail log entries

In support of this new feature, the identifier of the MFA device used will now be added to the console sign-in events of the root user and IAM user that use MFA. With these changes to AWS CloudTrail log entries, you can now view both the user and the MFA device used to authenticate to AWS. This provides better traceability and audibility for your accounts.

You can find this information in the MFAIdentifier field in CloudTrail, within additionalEventData. You don’t need to take action for this information to be logged. The following is a sample log from CloudTrail that includes the MFAIdentifier.

"additionalEventData": {
"LoginTo": "https://console.aws.amazon.com/console/home?state=hashArgs%23&isauthcode=true",
"MobileVersion": "No",
"MFAIdentifier": "arn:aws:iam::111122223333:mfa/root-account-mfa-device",
"MFAUsed": "YES"
}

The identifier of the MFA devices used for AWS CLI sessions with the sts:GetSessionToken action are logged in the requestParameters field.

    "requestParameters": {
"serialNumber": "arn:aws:iam::111122223333:mfa/root-account-mfa-device"
    }

Sign-in experience with multiple MFA devices

In this section, we’ll show you how to sign in to the console as an IAM principal with multiple MFA devices associated with it.

To authenticate as an IAM principal with multiple MFA devices

  1. Sign in to the IAM console as an IAM principal.
  2. Authenticate with the principal’s password.
  3. For Additional verification required, select the type of MFA device that you want to use to continue authenticating, and then choose Next:
    Figure 1: MFA device selection when authenticating to the console as an IAM user or root user with different types of MFA devices available

    Figure 1: MFA device selection when authenticating to the console as an IAM user or root user with different types of MFA devices available

  4. You will then be prompted to authenticate with the type of device that you selected.
    Figure 2: Prompt to authenticate with a FIDO security key

    Figure 2: Prompt to authenticate with a FIDO security key

Conclusion

In this blog post, you learned about the new multiple MFA devices feature in IAM, and how to set up and manage multiple MFA devices in IAM. Associating multiple MFA devices with your root users and IAM users can make it simpler for you to manage access to them. This feature is available now for AWS customers, except for customers operating in AWS GovCloud (US) Regions or in the AWS China Regions. For more information about how to configure multiple MFA devices on your root users and IAM users, see the documentation on MFA in IAM. There is no extra charge to use MFA devices in IAM.

AWS offers a free MFA security key to eligible AWS account owners in the United States. To determine eligibility and order a key, see the ordering portal.

If you have questions, post them in the AWS Identity and Access Management re:Post topic or reach out to AWS Support.

 
If you have feedback about this post, submit comments in the Comments section below. If you have questions about this post, contact AWS Support.

Want more AWS Security news? Follow us on Twitter.

Liam Wadman

Liam Wadman

Liam is a Solutions Architect with the Identity Solutions team. When he’s not building exciting solutions on AWS or helping customers, he’s often found in the hills of British Columbia on his Mountain Bike. Liam points out that you cannot spell LIAM without IAM.

Khaled Zaky

Khaled Zaky

Khaled is a Sr. Product Manager – Technical at Amazon Web Services. He is responsible for AWS Identity products related to user authentication such as sign-in security and multi-factor authentication products. Khaled has deep industry experience in cloud computing and product management. He is passionate about building customer-centric products that make it easier and more secure for customers to use the cloud. Outside of work interests include teaching product management, road cycling, Taekwondo (Martial Arts) and DIY home renovations.

The collective thoughts of the interwebz