Post Syndicated from The History Guy: History Deserves to Be Remembered original https://www.youtube.com/watch?v=PYR6EPlPDPU
„Интеграция“ на хотелски начала
Post Syndicated from Светла Енчева original https://toest.bg/integratsiya-na-hotelski-nachala/
„Имам нужда от муниции, не от превоз.“ Тези думи се приписват на Володимир Зеленски като реакция на предложение САЩ да съдействат за евакуацията му непосредствено след нахлуването на Русия в Украйна. Независимо дали е имало такова предложение и дали украинският президент действително е изрекъл тези думи, те се превръщат в символ на смелостта му и безкомпромисната му позиция по отношение на войната.
Украинските бежанци в България пък имат нужда от работа, не от хотел. И от доста време го казват, но остават нечути. Вместо това продължават да пребивават в една и съща несигурност, превърнала се почти в безвремие. Настаняването им в хотелски бази трябваше да е временна мярка. Девет месеца след началото на войната обаче тези от тях, които не са успели да се спасят поединично, в повечето случаи – напускайки България, продължават да живеят по хотели. Те са все така изпълнени с несигурност заради плановете на държавата да ги разселва в държавни бази. И все така протестират срещу неизвестността и липсата на информация.
За толкова време ситуацията на украинските бежанци не се подобри, а се влоши.
Новопристигналите биват настанявани във фургони в центъра за задържане (или както се казва официално – „принудително настаняване“) на чужденци в Елхово, който прилича на затвор и в който няма елементарни условия, да не говорим за медицинска помощ. И макар това да е временна мярка преди разпределянето им в държавни бази, то прилича на проява на излишна репресия. Вярно е, че мнозина бягащи от Сирия, Афганистан или Ирак не разполагат и с тези мизерни условия, а някои от тях са пребивани и ограбвани на границата. Или продължават да се възприемат като проблем дори когато незнайно как са починали. Тези ужасяващи факти обаче не превръщат отношението на институциите у нас към украинците в хуманно.
Последното издевателство над бягащите от руската агресия е спирането на парите за изхранването им. Промяната е извършена с наглед невинната формулировка в държавната програма за хуманитарното им подпомагане, че за настаняването им се полагат по 15 лв. на денонощие. Храната просто е „изпусната“. При наличие на протести и остри публични реакции държавата може би ще се „сети“ да я добави. Междувременно украинските бежанци ще оцеляват благодарение на дарения и доброволци, а държавата ще се държи, сякаш така е редно. Както беше по времето на сирийската бежанска вълна.
А защо не работят?
Според държавата настаняването на украинците в хотелски бази е луксозна мярка, за която те трябва да са благодарни. Доброто решение и за тях, и за България обаче е друго. То се нарича интеграция. Това означава бежанците да имат възможност да работят и да живеят в нормални жилища, да учат български език, а децата им да ходят на училище без риск да бъдат преместени неизвестно къде като чували с картофи. И средствата, които получава страната ни за тях, да се отделят за тази цел, вместо де факто да служат за поддържане на почивни бази извън активния сезон.
Ако може да се говори за предпочитан вид бежанци (преглъщайки цинизма да имаме предпочитания, когато става дума за бягащи от война), то украинците са от най-предпочитания вид. Не само защото са славяни и християни (повечето от които православни), и в огромната си част – жени с деца. По данни към месец май т.г. близо 70% от тях са с висше образование, една трета – със средно и само 3% – с основно. На фона на липсата на квалифицирана работна ръка, особено в здравеопазването и образованието, няма процедура за признаване на украинските дипломи въпреки препоръките на Европейската комисия. Медицинската сестра Светлана Дениченко е само една от многото, които не могат да работят по специалността си поради тази причина.
Кой каза „интеграция“?
Липсата на интеграция, с която се сблъскват бягащите от Украйна, си има история и контекст. По времето на социализма миграцията от и към България е по-скоро изключение. След падането на тоталитарния режим страната е основно източник на емиграция, а не приемник на имигранти и бежанци. Три десетилетия по-късно държавата продължава да функционира с предпоставката, че чужденците на територията ѝ са по-скоро изключение. В първите години след приемането в ЕС поне имаше някаква публична имитация на интеграционни мерки. Не за друго, а защото се даваха европейски пари за целта. Това се промени по времето на управлението на ГЕРБ с националистически партии.
„На практика в България няма действаща интеграционна програма от декември 2013 г., а приетата през 2017 г. наредба [за интеграцията, б.р.] е трудна за приложение, тъй като възлага отговорности и правомощия на общините без финансово обезпечаване“, се казва в експертен коментар на Центъра за правна помощ „Глас в България“ по повод приемането през 2021 г. на новата Национална стратегия по миграция на Република България 2021–2025. От заглавието на тази стратегия са изпаднали убежището и интеграцията, присъстващи в предишните ѝ варианти. И това не е случайно – на интеграцията се гледа като на нещо излишно.
От 50-те страници на стратегическия документ на интеграцията се полага… по-малко от една. Не глава, а страница. Половината от текста, посветен на нея, препраща към същия механизъм, който от „Глас в България“ определят като трудно приложим. В другата половина се твърди, че България си има много хубаво и европейско антидискриминационно законодателство. Един вид, правата на чужденците са гарантирани, няма нужда от специално уреждане на интеграцията им. (Друг въпрос е, че в Стратегията се говори само за бежанци със статут на убежище или международна закрила, но не и с временна закрила, с каквато са повечето бягащи от Украйна.)
Ако интеграцията е „излишна“, то е, защото самата миграция е „лоша“.
Така излиза според Стратегията, в която, макар с половин уста да се признава, че миграцията си има и някои добри страни, се твърди, че тя „обичайно се асоциира с наличието на конфликти и в действителност тя може да бъде породена от тях, но и да е техен източник“. Това е, което остава, ако се абстрахираме от всичко в този документ, написано само защото ще се прочете и от международни институции, чието законодателство България е ратифицирала.
Ето защо, колкото и да са квалифицирани украинските бежанци и колкото и да са културно близки до българите по език и религия, държавата ще продължава да ги третира като чуждо тяло, защото друго не може. А не може, защото систематично не иска. И докато Калина Константинова поне поемаше лична отговорност за издънките в отношението към тях, поредното им разиграване се случва безлично, чрез пропуснати думи във формулировка.
Междувременно губещи са не само бягащите от Украйна, озовали се в България, а и страната ни, която отказва да използва техния потенциал.
Заглавна снимка: © Анастас Търпанов
„Интеграция“ на хотелски начала
Post Syndicated from Светла Енчева original https://www.toest.bg/integratsiya-na-hotelski-nachala/

„Имам нужда от муниции, не от превоз.“ Тези думи се приписват на Володимир Зеленски като реакция на предложение САЩ да съдействат за евакуацията му непосредствено след нахлуването на Русия в Украйна. Независимо дали е имало такова предложение и дали украинският президент действително е изрекъл тези думи, те се превръщат в символ на смелостта му и безкомпромисната му позиция по отношение на войната.
Украинските бежанци в България пък имат нужда от работа, не от хотел. И от доста време го казват, но остават нечути. Вместо това продължават да пребивават в една и съща несигурност, превърнала се почти в безвремие. Настаняването им в хотелски бази трябваше да е временна мярка. Девет месеца след началото на войната обаче тези от тях, които не са успели да се спасят поединично, в повечето случаи – напускайки България, продължават да живеят по хотели. Те са все така изпълнени с несигурност заради плановете на държавата да ги разселва в държавни бази. И все така протестират срещу неизвестността и липсата на информация.
За толкова време ситуацията на украинските бежанци не се подобри, а се влоши.
Новопристигналите биват настанявани във фургони в центъра за задържане (или както се казва официално – „принудително настаняване“) на чужденци в Елхово, който прилича на затвор и в който няма елементарни условия, да не говорим за медицинска помощ. И макар това да е временна мярка преди разпределянето им в държавни бази, то прилича на проява на излишна репресия. Вярно е, че мнозина бягащи от Сирия, Афганистан или Ирак не разполагат и с тези мизерни условия, а някои от тях са пребивани и ограбвани на границата. Или продължават да се възприемат като проблем дори когато незнайно как са починали. Тези ужасяващи факти обаче не превръщат отношението на институциите у нас към украинците в хуманно.
Последното издевателство над бягащите от руската агресия е спирането на парите за изхранването им. Промяната е извършена с наглед невинната формулировка в държавната програма за хуманитарното им подпомагане, че за настаняването им се полагат по 15 лв. на денонощие. Храната просто е „изпусната“. При наличие на протести и остри публични реакции държавата може би ще се „сети“ да я добави. Междувременно украинските бежанци ще оцеляват благодарение на дарения и доброволци, а държавата ще се държи, сякаш така е редно. Както беше по времето на сирийската бежанска вълна.
А защо не работят?
Според държавата настаняването на украинците в хотелски бази е луксозна мярка, за която те трябва да са благодарни. Доброто решение и за тях, и за България обаче е друго. То се нарича интеграция. Това означава бежанците да имат възможност да работят и да живеят в нормални жилища, да учат български език, а децата им да ходят на училище без риск да бъдат преместени неизвестно къде като чували с картофи. И средствата, които получава страната ни за тях, да се отделят за тази цел, вместо де факто да служат за поддържане на почивни бази извън активния сезон.
Ако може да се говори за предпочитан вид бежанци (преглъщайки цинизма да имаме предпочитания, когато става дума за бягащи от война), то украинците са от най-предпочитания вид. Не само защото са славяни и християни (повечето от които православни), и в огромната си част – жени с деца. По данни към месец май т.г. близо 70% от тях са с висше образование, една трета – със средно и само 3% – с основно. На фона на липсата на квалифицирана работна ръка, особено в здравеопазването и образованието, няма процедура за признаване на украинските дипломи въпреки препоръките на Европейската комисия. Медицинската сестра Светлана Дениченко е само една от многото, които не могат да работят по специалността си поради тази причина.
Кой каза „интеграция“?
Липсата на интеграция, с която се сблъскват бягащите от Украйна, си има история и контекст. По времето на социализма миграцията от и към България е по-скоро изключение. След падането на тоталитарния режим страната е основно източник на емиграция, а не приемник на имигранти и бежанци. Три десетилетия по-късно държавата продължава да функционира с предпоставката, че чужденците на територията ѝ са по-скоро изключение. В първите години след приемането в ЕС поне имаше някаква публична имитация на интеграционни мерки. Не за друго, а защото се даваха европейски пари за целта. Това се промени по времето на управлението на ГЕРБ с националистически партии.
„На практика в България няма действаща интеграционна програма от декември 2013 г., а приетата през 2017 г. наредба [за интеграцията, б.р.] е трудна за приложение, тъй като възлага отговорности и правомощия на общините без финансово обезпечаване“, се казва в експертен коментар на Центъра за правна помощ „Глас в България“ по повод приемането през 2021 г. на новата Национална стратегия по миграция на Република България 2021–2025. От заглавието на тази стратегия са изпаднали убежището и интеграцията, присъстващи в предишните ѝ варианти. И това не е случайно – на интеграцията се гледа като на нещо излишно.
От 50-те страници на стратегическия документ на интеграцията се полага… по-малко от една. Не глава, а страница. Половината от текста, посветен на нея, препраща към същия механизъм, който от „Глас в България“ определят като трудно приложим. В другата половина се твърди, че България си има много хубаво и европейско антидискриминационно законодателство. Един вид, правата на чужденците са гарантирани, няма нужда от специално уреждане на интеграцията им. (Друг въпрос е, че в Стратегията се говори само за бежанци със статут на убежище или международна закрила, но не и с временна закрила, с каквато са повечето бягащи от Украйна.)
Ако интеграцията е „излишна“, то е, защото самата миграция е „лоша“.
Така излиза според Стратегията, в която, макар с половин уста да се признава, че миграцията си има и някои добри страни, се твърди, че тя „обичайно се асоциира с наличието на конфликти и в действителност тя може да бъде породена от тях, но и да е техен източник“. Това е, което остава, ако се абстрахираме от всичко в този документ, написано само защото ще се прочете и от международни институции, чието законодателство България е ратифицирала.
Ето защо, колкото и да са квалифицирани украинските бежанци и колкото и да са културно близки до българите по език и религия, държавата ще продължава да ги третира като чуждо тяло, защото друго не може. А не може, защото систематично не иска. И докато Калина Константинова поне поемаше лична отговорност за издънките в отношението към тях, поредното им разиграване се случва безлично, чрез пропуснати думи във формулировка.
Междувременно губещи са не само бягащите от Украйна, озовали се в България, а и страната ни, която отказва да използва техния потенциал.
What If 2 Gift Guide
Post Syndicated from original https://xkcd.com/2702/

AWS Security Profile: Sarah Currey, Delivery Practice Manager
Post Syndicated from Maddie Bacon original https://aws.amazon.com/blogs/security/aws-security-profile-sarah-currey-delivery-practice-manager/

In the weeks leading up to AWS re:invent 2022, I’ll share conversations I’ve had with some of the humans who work in AWS Security who will be presenting at the conference, and get a sneak peek at their work and sessions. In this profile, I interviewed Sarah Currey, Delivery Practice Manager in World Wide Professional Services (ProServe).
How long have you been at AWS and what do you do in your current role?
I’ve been at AWS since 2019, and I’m a Security Practice Manager who leads a Security Transformation practice dedicated to helping customers build on AWS. I’m responsible for leading enterprise customers through a variety of transformative projects that involve adopting AWS services to help achieve and accelerate secure business outcomes.
In this capacity, I lead a team of awesome security builders, work directly with the security leadership of our customers, and—one of my favorite aspects of the job—collaborate with internal security teams to create enterprise security solutions.
How did you get started in security?
I come from a non-traditional background, but I’ve always had an affinity for security and technology. I started off learning HTML back in 2006 for my Myspace page (blast from the past, I know) and in college, I learned about offensive security by dabbling in penetration testing. I took an Information Systems class my senior year, but otherwise I wasn’t exposed to security as a career option. I’m from Nashville, TN, so the majority of people I knew were in the music or healthcare industries, and I took the healthcare industry path.
I started my career working at a government affairs firm in Washington, D.C. and then moved on to a healthcare practice at a law firm. I researched federal regulations and collaborated closely with staffers on Capitol Hill to educate them about controls to protect personal health information (PHI), and helped them to determine strategies to adhere to security, risk, and compliance frameworks such as HIPAA and (NIST) SP 800-53. Government regulations can lag behind technology, which creates interesting problems to solve. But in 2015, I was assigned to a project that was planned to last 20 years, and I decided I wanted to move into an industry that operated as a faster pace—and there was no better place than tech.
From there, I moved to a startup where I worked as a Project Manager responsible for securely migrating customers’ data to the software as a service (SaaS) environment they used and accelerating internal adoption of the environment. I often worked with software engineers and asked, “why is this breaking?” so they started teaching me about different aspects of the service. I interacted regularly with a female software engineer who inspired me to start teaching myself to code. After two years of self-directed learning, I took the leap and quit my job to do a software engineering bootcamp. After the course, I worked as a software engineer where I transformed my security assurance skills into the ability to automate security. The cloud kept coming up in conversations around migrations, so I was curious and achieved software engineering and AWS certifications, eventually moving to AWS. Here, I work closely with highly regulated customers, such as those in healthcare, to advise them on using AWS to operate securely in the cloud, and work on implementing security controls to help them meet frameworks like NIST and HIPAA, so I’ve come full circle.
How do you explain your job to non-technical friends and family?
The general public isn’t sure how to define the cloud, and that’s no different with my friends and family. I get questions all the time like “what exactly is the cloud?” Since I love storytelling, I use real-world examples to relate it to their profession or hobbies. I might talk about the predictive analytics used by the NFL or, for my friends in healthcare, I talk about securing PHI.
However, my favorite general example is describing the AWS Shared Responsibility Model as a house. Imagine a house—AWS is responsible for security of the house. We’re responsible for the physical security of the house, and we build a fence, we make sure there is a strong foundation and secure infrastructure. The customer is the tenant—they can pay as they go, leave when they need to—and they’re responsible for running the house and managing the items, or data, in the house. So it’s my job to help the customer implement new ideas or technologies in the house to help them live more efficiently and securely. I advise them on how to best lock the doors, where to store their keys, how to keep track of who is coming in and out of the house with access to certain rooms, and how to protect their items in the house from other risks.
And for my friends that love Harry Potter, I just say that I work in the Defense Against the Dark Arts.
What are you currently working on that you’re excited about?
There are a lot of things in different spaces that I’m excited about.
One is that I’m part of a ransomware working group to provide an offering that customers can use to prepare for a ransomware event. Many customers want to know what AWS services and features they can use to help them protect their environments from ransomware, and we take real solutions that we’ve used with customers and scale them out. Something that’s really cool about Professional Services is that we’re on the frontlines with customers, and we get to see the different challenges and how we can relate those back to AWS service teams and implement them in our products. These efforts are exciting because they give customers tangible ways to secure their environments and workloads. I’m also excited because we’re focusing not just on the technology but also on the people and processes, which sometimes get forgotten in the technology space.
I’m a huge fan of cross-functional collaboration, and I love working with all the different security teams that we have within AWS and in our customer security teams. I work closely with the Amazon Managed Services (AMS) security team, and we have some very interesting initiatives with them to help our customers operate more securely in the cloud, but more to come on that.
Another exciting project that’s close to my heart is the Inclusion, Diversity, and Equity (ID&E) workstream for the U.S. It’s really important to me to not only have diversity but also inclusion, and I’m leading a team that is helping to amplify diverse voices. I created an Amplification Flywheel to help our employees understand how they can better amplify diverse voices in different settings, such as meetings or brainstorming sessions. The flywheel helps illustrate a process in which 1) an idea is voiced by an underrepresented individual, 2) an ally then amplifies the idea by repeating it and giving credit to the author, 3) others acknowledge the contribution, 4) this creates a more equitable workplace, and 5) the flywheel continues where individuals feel more comfortable sharing ideas in the future.
Within this workstream, I’m also thrilled about helping underrepresented people who already have experience speaking but who may be having a hard time getting started with speaking engagements at conferences. I do mentorship sessions with them so they can get their foot in the door and amplify their own voice and ideas at conferences.
You’re presenting at re:Invent this year. Can you give us a sneak peek of your session?
I’m partnering with Johnny Ray, who is an AMS Senior Security Engineer, to present a session called SEC203: Revitalize your security with the AWS Security Reference Architecture. We’ll be discussing how the AWS SRA can be used as a holistic guide for deploying the full complement of AWS security services in a multi-account environment. The AWS SRA is a living document that we continuously update to help customers revitalize their security best practices as they grow, scale, and innovate.
What do you hope attendees take away from your session?
Technology is constantly evolving, and the security space is no exception. As organizations adopt AWS services and features, it’s important to understand how AWS security services work together to improve your security posture. Attendees will be able to take away tangible ways to:
- Define the target state of your security architecture
- Review the capabilities that you’ve already designed and revitalize them with the latest services and features
- Bootstrap the implementation of your security architecture
- Start a discussion about organizational governance and responsibilities for security
Johnny and I will also provide attendees with a roadmap at the end of the session that gives customers a plan for the first week after the session, one to three months after the session, and six months after the session, so they have different action items to implement within their organization.
You’ve written about the importance of ID&E in the workplace. In your opinion, what’s the most effective way leaders can foster an inclusive work environment?
I’m super passionate about ID&E, because it’s really important and it makes businesses more effective and a better place to work as a whole. My favorite Amazon Leadership Principle is Earn Trust. It doesn’t matter if you Deliver Results or Insist on the Highest Standards if no one is willing to listen to you because you don’t have trust built up. When it comes to building an inclusive work environment, a lot of earning trust comes from the ability to have empathy, vulnerability, and humility—being able to admit when you made a mistake—with your teammates as well as with your customers. I think we have a unique opportunity at AWS to work closely with customers and learn about what they’re doing and their best practices with ID&E, and share our best practices.
We all make mistakes, we’re all learning, and that’s okay, but having the ability to admit when you’ve made a mistake, apologize, and learn from it makes a much better place to work. When it comes to intent versus impact, I love to give the example—going back to storytelling—of walking down the street and accidentally bumping into someone, causing them to drop their coffee. You didn’t intend to hurt them or spill their coffee; your intent was to keep walking down the street. However, the impact that you had was maybe they’re burnt now, maybe their coffee is all down their clothes, and you had a negative impact on them. Now, you want to apologize and maybe look up more while you’re walking and be more observant of your surroundings. I think this is a good example because sometimes when it comes to ID&E, it can become a culture of blame and that’s not what we want to do—we want to call people in instead of calling them out. I think that’s a great way to build an inclusive team.
You can have a diverse workforce, but if you don’t have inclusion and you’re not listening to people who are underrepresented, that’s not going to help. You need to make sure you’re practicing transformative leadership and truly wanting to change how people behave and think when it comes to ID&E. You want to make sure people are more kind to each other, rather than only checking the box on arbitrary diversity goals. It’s important to be authentic and curious about how you learn from others and their experiences, and to respect them and implement that into different ideas and processes. This is important to make a more equitable workplace.
I love learning from different ID&E leaders like Camille Leak, Aiko Bethea, and Brené Brown. They are inspirational to me because they all approach ID&E with vulnerability and tackle the uncomfortable.
What’s the thing you’re most proud of in your career?
I have two different things—one from a technology standpoint and one from a personal impact perspective.
On the technology side, one of the coolest projects I’ve been on is Change Healthcare, which is an independent healthcare technology company that connects payers, providers, and patients across the United States. They have an important job of protecting a lot of PHI and personally identifiable information (PII) for American citizens. Change Healthcare needed to quickly migrate its ClaimsXten claims processing application to the cloud to meet the needs of a large customer, and it sought to move an internal demo and training application environment to the cloud to enable self-service and agility for developers. During this process, they reached out to AWS, and I took the lead role in advising Change Healthcare on security and how they were implementing their different security controls and technical documentation. I led information security meetings on AWS services, because the processes were new to a lot of the employees who were previously working in data centers. Through working with them, I was able to cut down their migration hours by 58% by using security automation and reduce the cost of resources, as well. I oversaw security for 94 migration cutovers where no security events occurred. It was amazing to see that process and build a great relationship with the company. I still meet with Change Healthcare employees for lunch even though I’m no longer on their projects. For this work, I was awarded the “Above and Beyond the Call of Duty” award, which only three Amazonians get a year, so that was an honor.
From a personal impact perspective, it was terrifying to quit my job and completely change careers, and I dealt with a lot of imposter syndrome—which I still have every day, but I work through it. Something impactful that resulted from this move was that it inspired a lot of people in my network from non-technical backgrounds, especially underrepresented individuals, to dive into coding and pursue a career in tech. Since completing my bootcamp, I’ve had more than 100 people reach out to me to ask about my experience, and about 30 of them quit their job to do a bootcamp and are now software engineers in various fields. So, it’s really amazing to see the life-changing impact of mentoring others.
You do a lot of volunteer work. Can you tell us about the work you do and why you’re so passionate about it?
Absolutely! The importance of giving back to the community cannot be understated.
Over the last 13 years, I have fundraised, volunteered, and advocated in building over 40 different homes throughout the country with Habitat for Humanity. One of my most impactful volunteer experiences was in 2013. I volunteered with a nonprofit called Bike & Build, where we cycled across the United States to raise awareness and money for affordable housing efforts. From Charleston, South Carolina to Santa Cruz, California, the team raised over $158,000, volunteered 3,584 hours, and biked 4,256 miles over the course of three months. This was such an incredible experience to meet hundreds of people across the country and help empower them to learn about affordable housing and improve their lives. It also tested me so much emotionally, mentally, and physically that I learned a lot about myself in the process. Additionally, I was selected by Gap, Inc. to participate in an international Habitat build in Antigua, Guatemala in October of 2014.
I’m currently on the Associate Board of Gilda’s Club, which provides free cancer support to anyone in need. Corporate social responsibility is a passion of mine, and so I helped organize AWS Birthday Boxes and Back to School Bags volunteer events with Gilda’s Club of Middle Tennessee. We purchased and assembled birthday and back-to-school boxes for children whose caregiver was experiencing cancer, so their caregiver would have one less thing to worry about and make sure the child feels special during this tough time. During other AWS team offsites, I’ve organized volunteering through Nashville Second Harvest food bank and created 60 shower and winter kits for individuals experiencing homelessness through ShowerUp.
I also mentor young adult women and non-binary individuals with BuiltByGirls to help them navigate potential career paths in STEM, and I recently joined the Cyversity organization, so I’m excited to give back to the security community.
If you had to pick an industry outside of security, what would you want to do?
History is one of my favorite topics, and I’ve always gotten to know people by having an inquisitive mind. I love listening and asking curious questions to learn more about people’s experiences and ideas. Since I’m drawn to the art of storytelling, I would pick a career as a podcast host where I bring on different guests to ask compelling questions and feature different, rarely heard stories throughout history.
If you have feedback about this post, submit comments in the Comments section below. If you have questions about this post, contact AWS Support.
Want more AWS Security news? Follow us on Twitter.
Introducing payload-based message filtering for Amazon SNS
Post Syndicated from Julian Wood original https://aws.amazon.com/blogs/compute/introducing-payload-based-message-filtering-for-amazon-sns/
This post is written by Prachi Sharma (Software Development Manager, Amazon SNS), Mithun Mallick (Principal Solutions Architect, AWS Integration Services), and Otavio Ferreira (Sr. Software Development Manager, Amazon SNS).
Amazon Simple Notification Service (SNS) is a messaging service for Application-to-Application (A2A) and Application-to-Person (A2P) communication. The A2A functionality provides high-throughput, push-based, many-to-many messaging between distributed systems, microservices, and event-driven serverless applications. These applications include Amazon Simple Queue Service (SQS), Amazon Kinesis Data Firehose, AWS Lambda, and HTTP/S endpoints. The A2P functionality enables you to communicate with your customers via mobile text messages (SMS), mobile push notifications, and email notifications.
Today, we’re introducing the payload-based message filtering option of SNS, which augments the existing attribute-based option, enabling you to offload additional filtering logic to SNS and further reduce your application integration costs. For more information, see Amazon SNS Message Filtering.
Overview
You use SNS topics to fan out messages from publisher systems to subscriber systems, addressing your application integration needs in a loosely-coupled way. Without message filtering, subscribers receive every message published to the topic, and require custom logic to determine whether an incoming message needs to be processed or filtered out. This results in undifferentiating code, as well as unnecessary infrastructure costs. With message filtering, subscribers set a filter policy to their SNS subscription, describing the characteristics of the messages in which they are interested. Thus, when a message is published to the topic, SNS can verify the incoming message against the subscription filter policy, and only deliver the message to the subscriber upon a match. For more information, see Amazon SNS Subscription Filter Policies.
However, up until now, the message characteristics that subscribers could express in subscription filter policies were limited to metadata in message attributes. As a result, subscribers could not benefit from message filtering when the messages were published without attributes. Examples of such messages include AWS events published to SNS from 60+ other AWS services, like Amazon Simple Storage Service (S3), Amazon CloudWatch, and Amazon CloudFront. For more information, see Amazon SNS Event Sources.
The new payload-based message filtering option in SNS empowers subscribers to express their SNS subscription filter policies in terms of the contents of the message. This new capability further enables you to use SNS message filtering for your event-driven architectures (EDA) and cross-account workloads, specifically where subscribers may not be able to influence a given publisher to have its events sent with attributes. With payload-based message filtering, you have a simple, no-code option to further prevent unwanted data from being delivered to and processed by subscriber systems, thereby simplifying the subscribers’ code as well as reducing costs associated with downstream compute infrastructure. This new message filtering option is available across SNS Standard and SNS FIFO topics, for JSON message payloads.
Applying payload-based filtering in a use case
Consider an insurance company moving their lead generation platform to a serverless architecture based on microservices, adopting enterprise integration patterns to help them develop and scale these microservices independently. The company offers a variety of insurance types to its customers, including auto and home insurance. The lead generation and processing workflow for each insurance type is different, and entails notifying different backend microservices, each designed to handle a specific type of insurance request.

Payload filtering example
The company uses multiple frontend apps to interact with customers and receive leads from them, including a web app, a mobile app, and a call center app. These apps submit the customer-generated leads to an internal lead storage microservice, which then uploads the leads as XML documents to an S3 bucket. Next, the S3 bucket publishes events to an SNS topic to notify that lead documents have been created. Based on the contents of each lead document, the SNS topic forks the workflow by delivering the auto insurance leads to an SQS queue and the home insurance leads to another SQS queue. These SQS queues are respectively polled by the auto insurance and the home insurance lead processing microservices. Each processing microservice applies its business logic to validate the incoming leads.
The following S3 event, in JSON format, refers to a lead document uploaded with key auto-insurance-2314.xml to the S3 bucket. S3 automatically publishes this event to SNS, which in turn matches the S3 event payload against the filter policy of each subscription in the SNS topic. If the event matches the subscription filter policy, SNS delivers the event to the subscribed SQS queue. Otherwise, SNS filters the event out.
{
  "Records": [{
    "eventVersion": "2.1",
    "eventSource": "aws:s3",
    "awsRegion": "sa-east-1",
    "eventTime": "2022-11-21T03:41:29.743Z",
    "eventName": "ObjectCreated:Put",
    "userIdentity": {
      "principalId": "AWS:AROAJ7PQSU42LKEHOQNIC:demo-user"
    },
    "requestParameters": {
      "sourceIPAddress": "177.72.241.11"
    },
    "responseElements": {
      "x-amz-request-id": "SQCC55WT60XABW8CF",
      "x-amz-id-2": "FRaO+XDBrXtx0VGU1eb5QaIXH26tlpynsgaoJrtGYAWYRhfVMtq/...dKZ4"
    },
    "s3": {
      "s3SchemaVersion": "1.0",
      "configurationId": "insurance-lead-created",
      "bucket": {
        "name": "insurance-bucket-demo",
        "ownerIdentity": {
          "principalId": "A1ATLOAF34GO2I"
        },
        "arn": "arn:aws:s3:::insurance-bucket-demo"
      },
      "object": {
        "key": "auto-insurance-2314.xml",
        "size": 17,
        "eTag": "1530accf30cab891d759fa3bb8322211",
        "sequencer": "00737AF379B2683D6C"
      }
    }
  }]
}
To express its interest in auto insurance leads only, the SNS subscription for the auto insurance lead processing microservice sets the following filter policy. Note that, unlike attribute-based policies, payload-based policies support property nesting.
{
  "Records": {
    "s3": {
      "object": {
        "key": [{
          "prefix": "auto-"
        }]
      }
    },
    "eventName": [{
      "prefix": "ObjectCreated:"
    }]
  }
}
Likewise, to express its interest in home insurance leads only, the SNS subscription for the home insurance lead processing microservice sets the following filter policy.
{
  "Records": {
    "s3": {
      "object": {
        "key": [{
          "prefix": "home-"
        }]
      }
    },
    "eventName": [{
      "prefix": "ObjectCreated:"
    }]
  }
}
Note that each filter policy uses the string prefix matching capability of SNS message filtering. In this use case, this matching capability enables the filter policy to match only the S3 objects whose key property value starts with the insurance type it’s interested in (either auto- or home-). Note as well that each filter policy matches only the S3 events whose eventName property value starts with ObjectCreated, as opposed to ObjectRemoved. For more information, see Amazon S3 Event Notifications.
Deploying the resources and filter policies
To deploy the AWS resources for this use case, you need an AWS account with permissions to use SNS, SQS, and S3. On your development machine, install the AWS Serverless Application Model (SAM) Command Line Interface (CLI). You can find the complete SAM template for this use case in the aws-sns-samples repository in GitHub.
The SAM template has a set of resource definitions, as presented below. The first resource definition creates the SNS topic that receives events from S3.
InsuranceEventsTopic:
    Type: AWS::SNS::Topic
    Properties:
      TopicName: insurance-events-topic
The next resource definition creates the S3 bucket where the insurance lead documents are stored. This S3 bucket publishes an event to the SNS topic whenever a new lead document is created.
InsuranceEventsBucket:
    Type: AWS::S3::Bucket
    DeletionPolicy: Retain
    DependsOn: InsuranceEventsTopicPolicy
    Properties:
      BucketName: insurance-doc-events
      NotificationConfiguration:
        TopicConfigurations:
          - Topic: !Ref InsuranceEventsTopic
            Event: 's3:ObjectCreated:*'
The next resource definitions create the SQS queues to be subscribed to the SNS topic. As presented in the architecture diagram, there’s one queue for auto insurance leads, and another queue for home insurance leads.
AutoInsuranceEventsQueue:
    Type: AWS::SQS::Queue
    Properties:
      QueueName: auto-insurance-events-queue

HomeInsuranceEventsQueue:
    Type: AWS::SQS::Queue
    Properties:
      QueueName: home-insurance-events-queue
The next resource definitions create the SNS subscriptions and their respective filter policies. Note that, in addition to setting the FilterPolicy property, you need to set the FilterPolicyScope property to MessageBody in order to enable the new payload-based message filtering option for each subscription. The default value for the FilterPolicyScope property is MessageAttributes.
AutoInsuranceEventsSubscription:
    Type: AWS::SNS::Subscription
    Properties:
      Protocol: sqs
      Endpoint: !GetAtt AutoInsuranceEventsQueue.Arn
      TopicArn: !Ref InsuranceEventsTopic
      FilterPolicyScope: MessageBody
      FilterPolicy:
        '{"Records":{"s3":{"object":{"key":[{"prefix":"auto-"}]}}
        ,"eventName":[{"prefix":"ObjectCreated:"}]}}'

HomeInsuranceEventsSubscription:
    Type: AWS::SNS::Subscription
    Properties:
      Protocol: sqs
      Endpoint: !GetAtt HomeInsuranceEventsQueue.Arn
      TopicArn: !Ref InsuranceEventsTopic
      FilterPolicyScope: MessageBody
      FilterPolicy:
        '{"Records":{"s3":{"object":{"key":[{"prefix":"home-"}]}}
        ,"eventName":[{"prefix":"ObjectCreated:"}]}}'
Once you download the full SAM template from GitHub to your local development machine, run the following command in your terminal to build the deployment artifacts.
sam build –t SNS-Payload-Based-Filtering-SAM.templateOnce SAM has finished building the deployment artifacts, run the following command to deploy the AWS resources and the SNS filter policies. The command guides you through the process of setting deployment preferences, which you can answer based on your requirements. For more information, refer to the SAM Developer Guide.
sam deploy --guidedOnce SAM has finished deploying the resources, you can start testing the solution in the AWS Management Console.
Testing the filter policies
Go the AWS CloudFormation console, choose the stack created by the SAM template, then choose the Outputs tab. Note the name of the S3 bucket created.

S3 bucket name
Now switch to the S3 console, and choose the bucket with the corresponding name. Once on the bucket details page, upload a test file whose name starts with the auto- prefix. For example, you can name your test file auto-insurance-7156.xml. The upload triggers an S3 event, typed as ObjectCreated, which is then routed through the SNS topic to the SQS queue that stores auto insurance leads.

Insurance bucket contents
Now switch to the SQS console, and choose to receive messages for the SQS queue storing an auto insurance lead. Note that the SQS queue for home insurance leads is empty.

SQS home insurance queue empty
If you want to check the filter policy configured, you may switch to the SNS console, choose the SNS topic created by the SAM template, and choose the SNS subscription for auto insurance leads. Once on the subscription details page, you can view the filter policy, in JSON format, alongside the filter policy scope set to “Message body”.

SNS filter policy
You may repeat the testing steps above, now with another file whose name starts with the home- prefix, and see how the S3 event is routed through the SNS topic to the SQS queue that stores home insurance leads.
Monitoring the filtering activity
CloudWatch provides visibility into your SNS message filtering activity, with dedicated metrics, which also enables you to create alarms. You can use the NumberOfNotifcationsFilteredOut-MessageBody metric to monitor the number of messages filtered out due to payload-based filtering, as opposed to attribute-based filtering. For more information, see Monitoring Amazon SNS topics using CloudWatch.
Moreover, you can use the NumberOfNotificationsFilteredOut-InvalidMessageBody metric to monitor the number of messages filtered out due to having malformed JSON payloads. You can have these messages with malformed JSON payloads moved to a dead-letter queue (DLQ) for troubleshooting purposes. For more information, see Designing Durable Serverless Applications with DLQ for Amazon SNS.
Cleaning up
To delete all the AWS resources that you created as part of this use case, run the following command from the project root directory.
sam deleteConclusion
In this blog post, we introduce the use of payload-based message filtering for SNS, which provides event routing for JSON-formatted messages. This enables you to write filter policies based on the contents of the messages published to SNS. This also removes the message parsing overhead from your subscriber systems, as well as any custom logic from your publisher systems to move message properties from the payload to the set of attributes. Lastly, payload-based filtering can facilitate your event-driven architectures (EDA) by enabling you to filter events published to SNS from 60+ other AWS event sources.
For more information, see Amazon SNS Message Filtering, Amazon SNS Event Sources, and Amazon SNS Pricing. For more serverless learning resources, visit Serverless Land.
Our guide to AWS Compute at re:Invent 2022
Post Syndicated from Sheila Busser original https://aws.amazon.com/blogs/compute/our-guide-to-aws-compute-at-reinvent-2022/
This blog post is written by Shruti Koparkar, Senior Product Marketing Manager, Amazon EC2.
AWS re:Invent is the most transformative event in cloud computing and it is starting on November 28, 2022. AWS Compute team has many exciting sessions planned for you covering everything from foundational content, to technology deep dives, customer stories, and even hands on workshops. To help you build out your calendar for this year’s re:Invent, let’s look at some highlights from the AWS Compute track in this blog. Please visit the session catalog for a full list of AWS Compute sessions.
Learn what powers AWS Compute
AWS offers the broadest and deepest functionality for compute. Amazon Elastic Cloud Compute (Amazon EC2) offers granular control for managing your infrastructure with the choice of processors, storage, and networking.
- One of the best ways to start is with the AWS Compute Leadership Session: “CMP223-L: Compute Innovation to enable any application in the cloud”. Join Dave Brown, VP of Amazon EC2, to hear about the innovations AWS is delivering for millions of organizations.
- If you are interested in learning about the diversity of compute options available, along with our latest offerings, attend our “CMP225: What’s New with Amazon EC2” session.
- Attend “CMP221: Modernize your iOS build pipelines with Amazon EC2 Mac instances” to learn how you can extend the flexibility, scalability, and cost benefits of AWS to your iOS application development pipelines.
The AWS Nitro System is the underlying platform for our all our modern EC2 instances. It enables AWS to innovate faster, further reduce cost for our customers, and deliver added benefits like increased security and new instance types.
- To learn more about the AWS Nitro System, attend “CMP 301: Powering Amazon EC2: Deep dive on the AWS Nitro system”.
- We often say that security is job zero at AWS. And Nitro System provides enhanced security that continuously monitors, protects, and verifies the instance hardware and firmware. Attend “CMP302: Confidential Computing with AWS compute” to learn how Nitro System helps AWS provide a secure environment for customer workloads.
Discover the benefits of AWS Silicon
AWS has invested years designing custom silicon optimized for the cloud. This investment helps us deliver high performance at lower costs for a wide range of applications and workloads using AWS services.
- Explore the AWS journey into silicon innovation with our “CMP201: Silicon Innovation at AWS” session. We will cover some of the thought processes, learnings, and results from our experience building silicon for AWS Graviton, AWS Nitro System, and AWS Inferentia.
- To learn about customer-proven strategies to help you make the move to AWS Graviton quickly and confidently while minimizing uncertainty and risk, attend “CMP410: Framework for adopting AWS Graviton-based instances”.
Explore different use cases
Amazon EC2 provides secure and resizable compute capacity for several different use-cases including general purpose computing for cloud native and enterprise applications, and accelerated computing for machine learning and high performance computing (HPC) applications.
High performance computing
- HPC on AWS can help you design your products faster with simulations, predict the weather, detect seismic activity with greater precision, and more. To learn how to solve world’s toughest problems with extreme-scale compute come join us for “CMP205: HPC on AWS: Solve complex problems with pay-as-you-go infrastructure”.
- Single on-premises general-purpose supercomputers can fall short when solving increasingly complex problems. Attend “CMP222: Redefining supercomputing on AWS” to learn how AWS is reimagining supercomputing to provide scientists and engineers with more access to world-class facilities and technology.
- AWS offers many solutions to design, simulate, and verify the advanced semiconductor devices that are the foundation of modern technology. Attend “CMP320: Accelerating semiconductor design, simulation, and verification” to hear from ARM and Marvel about how they are using AWS to accelerate EDA workloads.
Machine Learning
- Machine learning training is a complex problem requiring significant compute capacity and can benefit from specialized silicon. To hear more about the latest AWS designed silicon for deep learning training, attend “CMP313: Accelerate deep learning and innovate faster with AWS Trainium”. You will learn how Trainium delivers high performance and up to 50% savings in training costs over comparable GPU-based instances.
- Attend “CMP330: AWS managed services to run ML training workloads at scale with AWS Trainium” to hear about AWS managed services you can use to run your machine learning (ML) training workloads at scale on Trn1 instances.
- Attend “CMP209: AI parallelism explained: How Amazon Search scales deep-learning training” to learn more about Amazon Search trains large language models using various parallelism strategies and deploys them into production at scale.
- To learn about how to choose the right Amazon EC2 instance for ML training and inference, attend “CMP207: Choosing the right accelerator for training and inference”.
Cost Optimization
- Attend “CMP319: Optimize for cost and availability with capacity management” and learn how to use Amazon EC2 Capacity Reservations, On-Demand Capacity Reservations, and Savings Plans to lower costs so that you can focus on innovating.
- Do you want to host simple applications such phone systems, blogs, ecommerce sites etc. on the cloud? Amazon Lightsail is a cost-effective, easy-to-use cloud platform that’s ideal for simpler workloads and quick deployments. Attend “CMP218: Set your small business up for success with Amazon Lightsail” to learn how you can quickly deploy and configure virtually any application at a predictable monthly rate.
- Amazon EC2 Spot Instances are spare compute capacity available to you for less than On-Demand prices. To learn about the APIs and commands used to create Spot Instances, attend “CMP324: Spot the savings: Use Amazon EC2 Spot to optimize cloud deployments”.
Hear from our customers
We have several sessions this year where AWS customers are taking the stage to share their stories and details of exciting innovations made possible by AWS.
- Are you a machine learning (ML) startup trying to optimize your infrastructure costs? Attend “CMP226: How four customers reduced ML inference costs and drove innovation” to hear from Screening Eagle, Money Forward, Dataminr, and Actuate about how they have used Amazon EC2 Inf1 instances to get better performance at a lower cost per inference.
- Want to learn about the techniques Standard Chartered Bank uses to reduce waste and optimize cost and performance at scale? Attend “CMP213: Building a budget-conscious culture at Standard Chartered Bank” to learn how they’ve used a combination of AWS Savings Plan and Amazon EC2 spot instances to build critical large systems such as scaling applications, container platforms, and their grid for calculating risk and analytics.
- Come join us at “CMP208: Run large-scale graphics workloads with AWS, featuring Mircom and Snap” to learn about how Snap personalizes Bitmoji avatars and how Mircom creates digital twins of their fire alarm control panels and mission-critical smart building technologies. Learn how they leverage GPU-based instances in Amazon EC2 to unlock scalable graphics applications.
- To hear about metaverse experiences, from a panel including Epic Games, Surreal Events, and Cavrnus Inc., attend “CMP212: Metaverse experiences come to life with Amazon EC2 accelerated computing”.
Get started with hands-on sessions
Nothing like a hands-on session where you can learn by doing and get started easily with AWS compute. Our speakers and workshop assistants will help you every step of the way. Just bring your laptop to get started!
- Are you a developer or IT practitioner running Linux-based workloads in Amazon EC2 and looking for better price performance? Attend “CMP303: Get hands-on with AWS Graviton-based EC2 instances” to learn how to move a workload to AWS-Graviton based instances including containerized applications.
- Hugging Face has democratized the use of BERT-based natural language processing (NLP) models, which are a common foundation for many NLP applications. Attend “CMP206: Train & deploy a Hugging Face NLP model with AWS Trainium & AWS Inferentia” to learn how to use AWS ML silicon to train and run these popular models.
- Would you like to gain a solid skills foundation to run common HPC workloads using cloud technologies? Join us at “CMP305: Best practices for high performance computing in the cloud” to get hands-on experience setting up your own cluster in the cloud and running a sample application.
You’ll get to meet the global cloud community at AWS re:Invent and get an opportunity to learn, get inspired, and rethink what’s possible. So build your schedule in the re:Invent portal and get ready to hit the ground running. We invite you to stop by the AWS Compute booth and chat with our experts. We look forward to seeing you in Las Vegas!
Exciting new GitHub features powering machine learning
Post Syndicated from Seth Juarez original https://github.blog/2022-11-22-exciting-new-github-features-powering-machine-learning/
I’m a huge fan of machine learning: as far as I’m concerned, it’s an exciting way of creating software that combines the ingenuity of developers with the intelligence (sometimes hidden) in our data. Naturally, I store all my code in GitHub – but most of my work primarily happens on either my beefy desktop or some large VM in the cloud.
So I think it goes without saying, the GitHub Universe announcements made me super excited about building machine learning projects directly on GitHub. With that in mind, I thought I would try it out using one of my existing machine learning repositories. Here’s what I found.
Jupyter Notebooks
Machine learning can be quite messy when it comes to the exploration phase. This process is made much easier by using Jupyter notebooks. With notebooks you can try several ideas with different data and model shapes quite easily. The challenge for me, however, has been twofold: it’s hard to have ideas away from my desk, and notebooks are notoriously difficult to manage when working with others (WHAT DID YOU DO TO MY NOTEBOOK?!?!?).
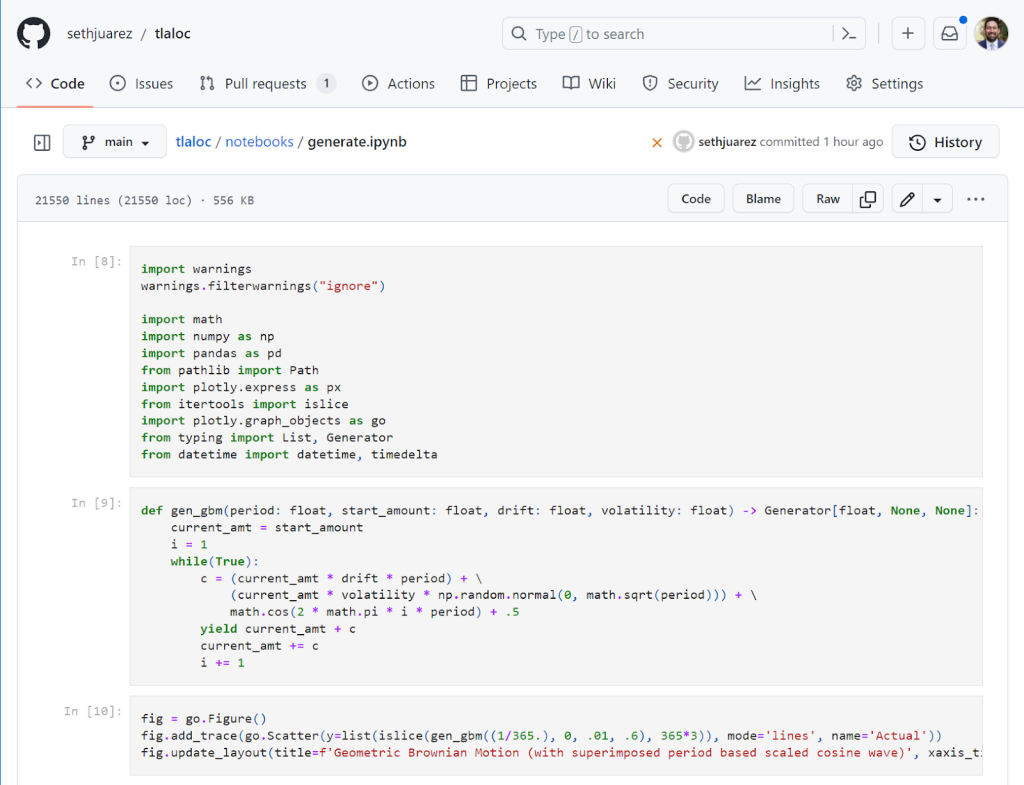
This improved rendering experience is amazing (and there’s a lovely dark mode too). In a recent pull-request I also noticed the following:
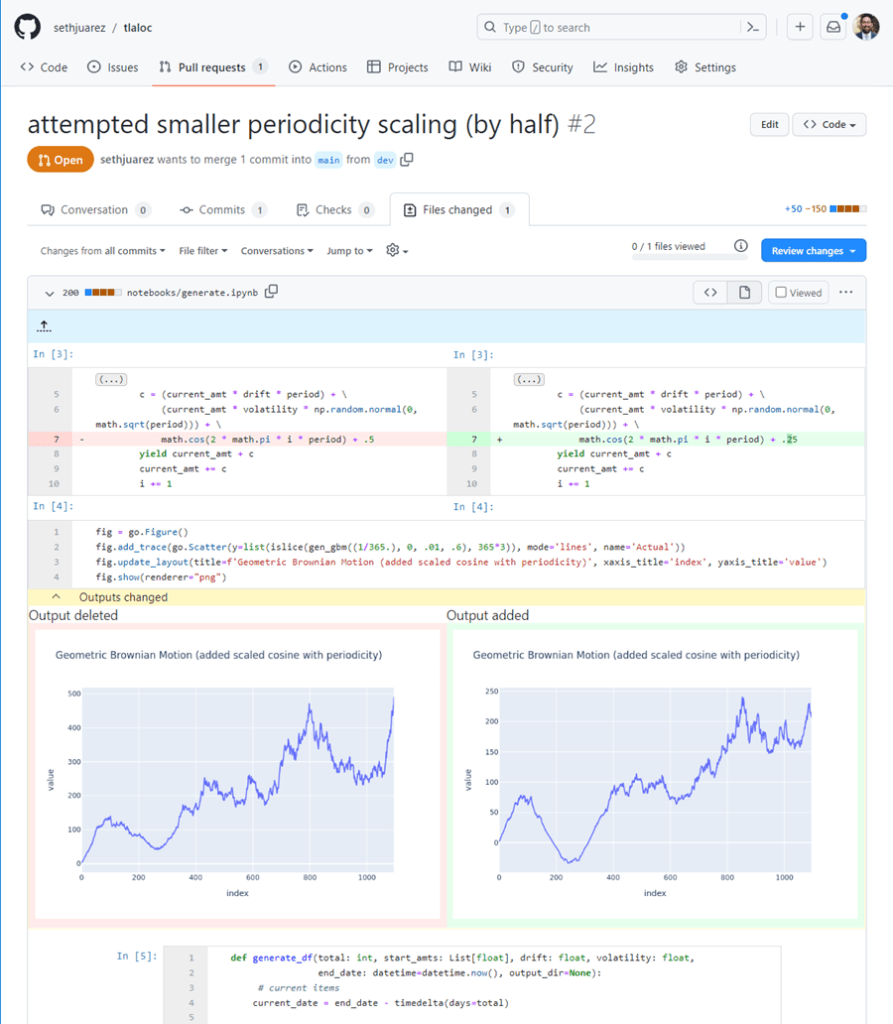
Not only can I see the cells that have been added, but I can also see side-by-side the code differences within the cells, as well as the literal outputs. I can see at a glance the code that has changed and the effect it produces thanks to NbDime running under the hood (shout out to the community for this awesome package).
Notebook Execution (and more)
While the rendering additions to GitHub are fantastic, there’s still the issue of executing the things in a reliable way when I’m away from my desk. Here’s a couple of gems we introduced at GitHub Universe to make these issues go away:
- GPUs for Codespaces
- Zero-config notebooks in Codespaces
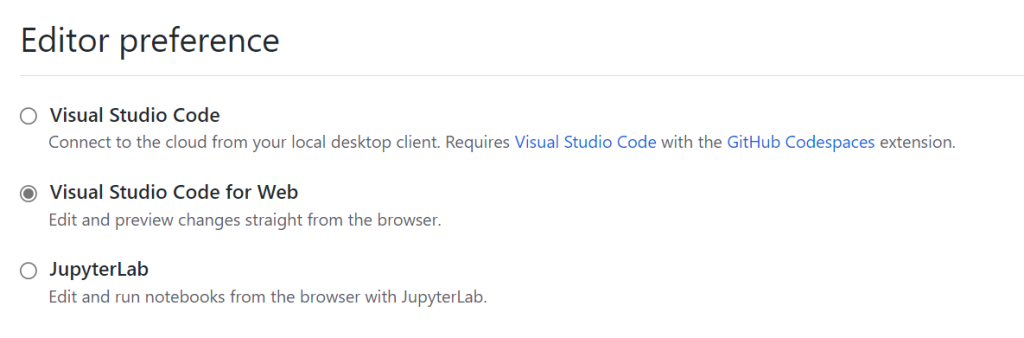
- Edit your notebooks from VS Code, PyCharm, JupyterLab, on the web, or even using the CLI (powered by Codespaces)
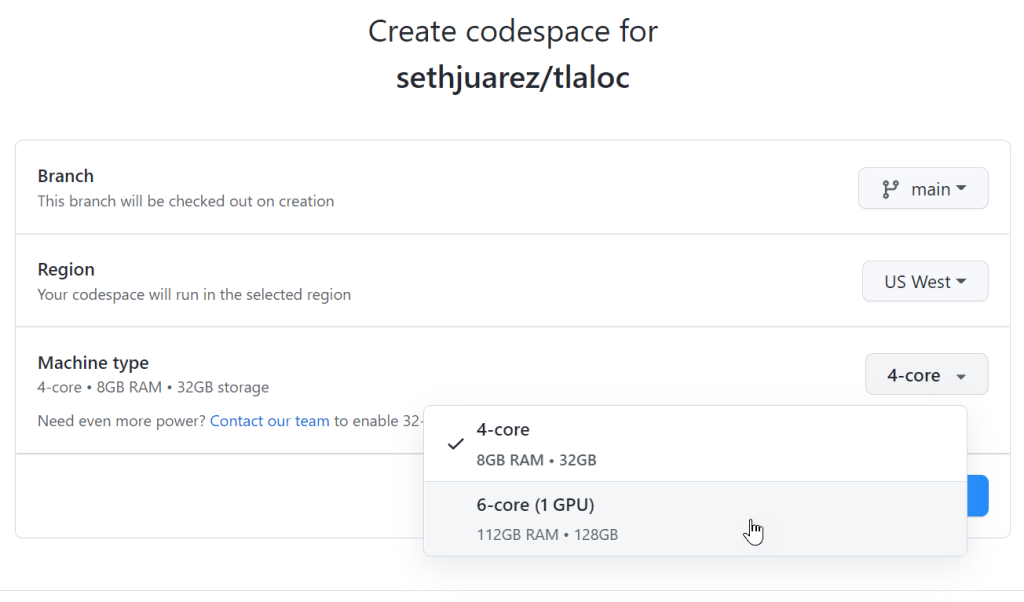
I decided to try these things out for myself by opening an existing forecasting project that uses PyTorch to do time-series analysis. I dutifully created a new Codespace (but with options since I figured I would need to tell it to use a GPU).
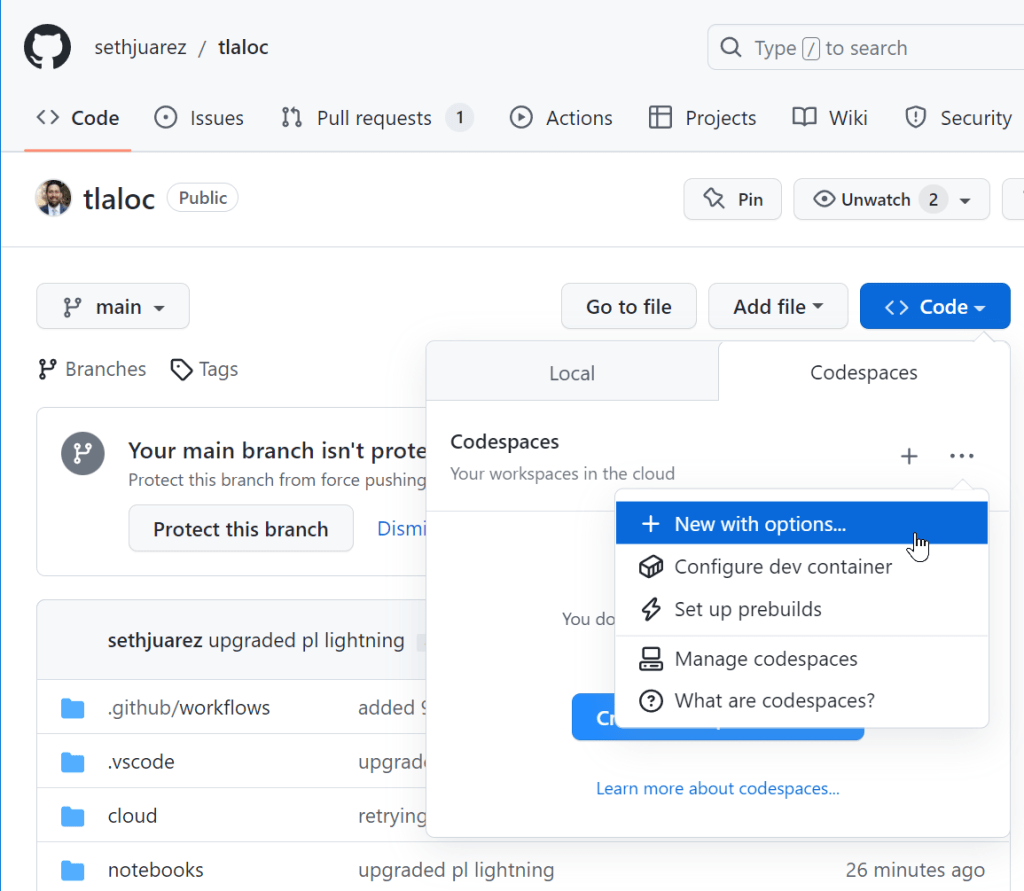
Sure enough, there was a nice GPU option:
That was it! Codespaces found my requirements.txt file and went to work pip installing everything I needed.

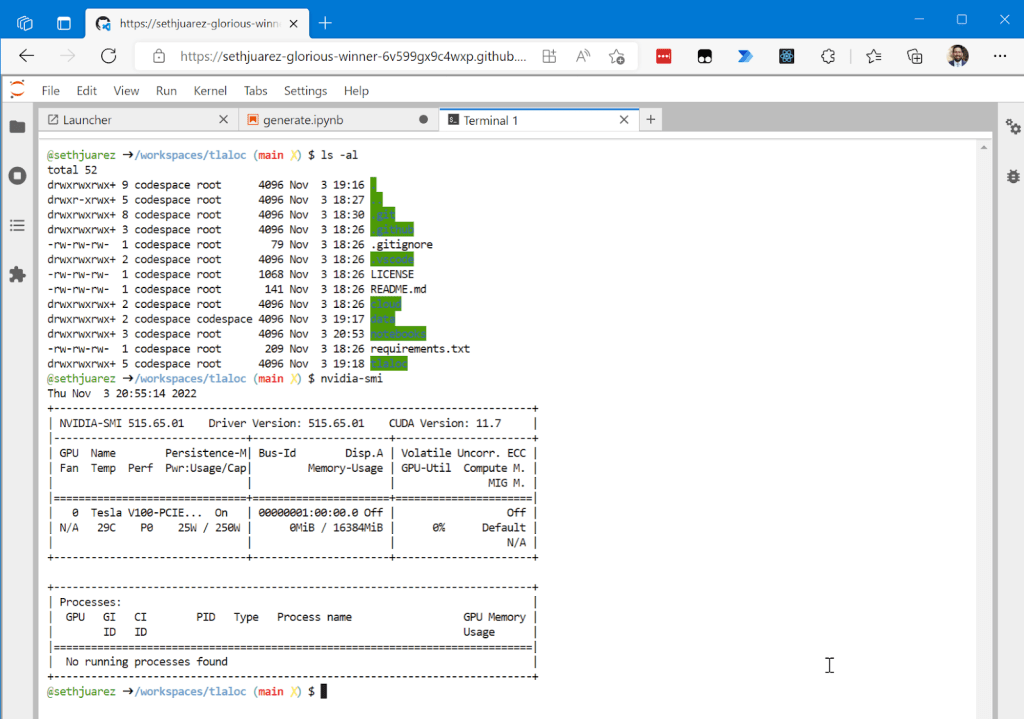
After a few minutes (PyTorch is big) I wanted to check if the GPU worked (spoiler alert below):

This is incredible! And, the notebook also worked exactly as it does when working locally:
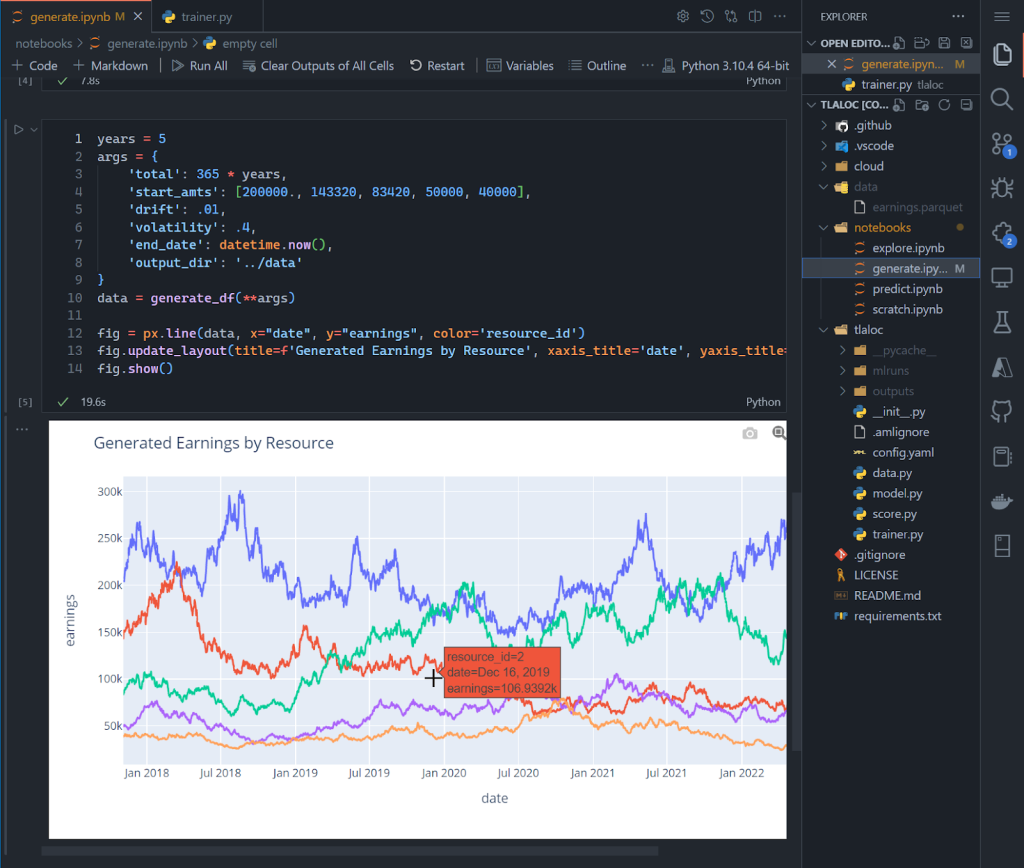
Again, this is in a browser! For kicks and giggles, I wanted to see if I could run the full blown model building process. For context, I believe notebooks are great for exploration but can become brittle when moving to repeatable processes. Eventually MLOps requires the movement of the salient code to their own scripts modules/scripts. In fact, it’s how I structure all my ML projects. If you sneak a peek above, you will see a notebooks folder and then a folder that contains the model training Python files. As an avid VSCode user I also set up a way to debug the model building process. So I crossed my fingers and started the debugging process:
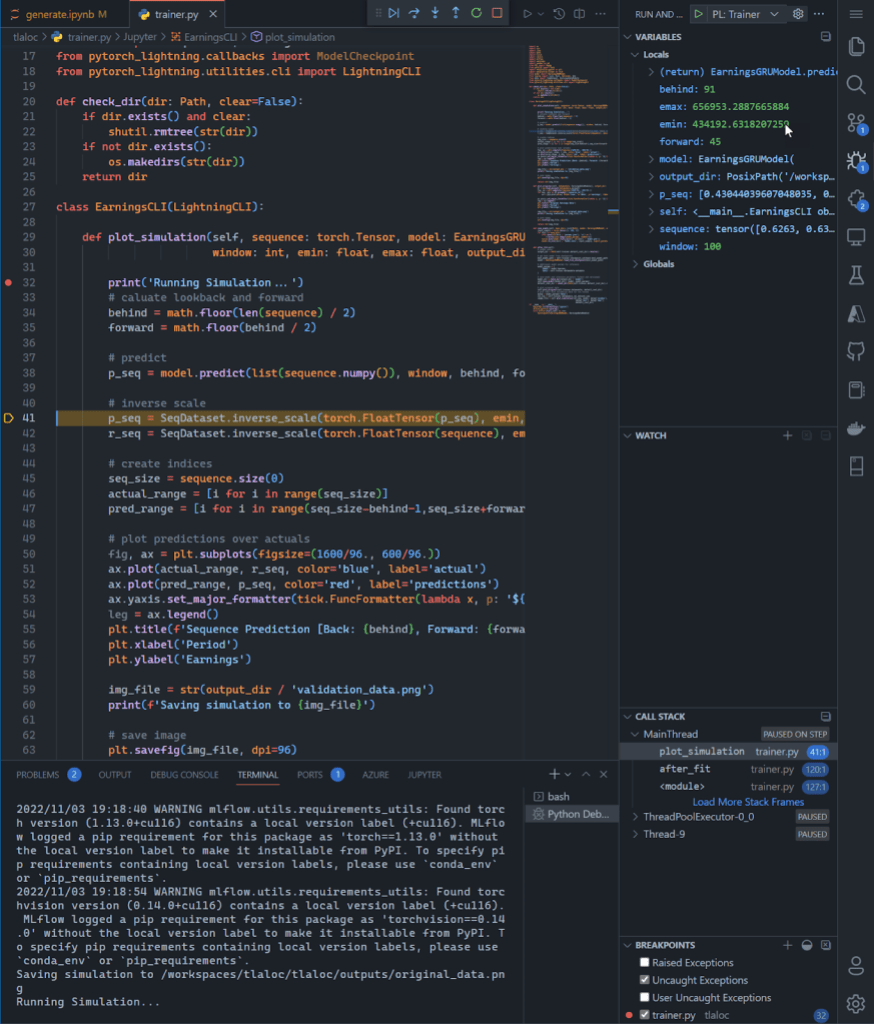
I know this is a giant screenshot, but I wanted to show the full gravity of what is happening in the browser: I am debugging the build of a deep learning PyTorch model – with breakpoints and everything – on a GPU.
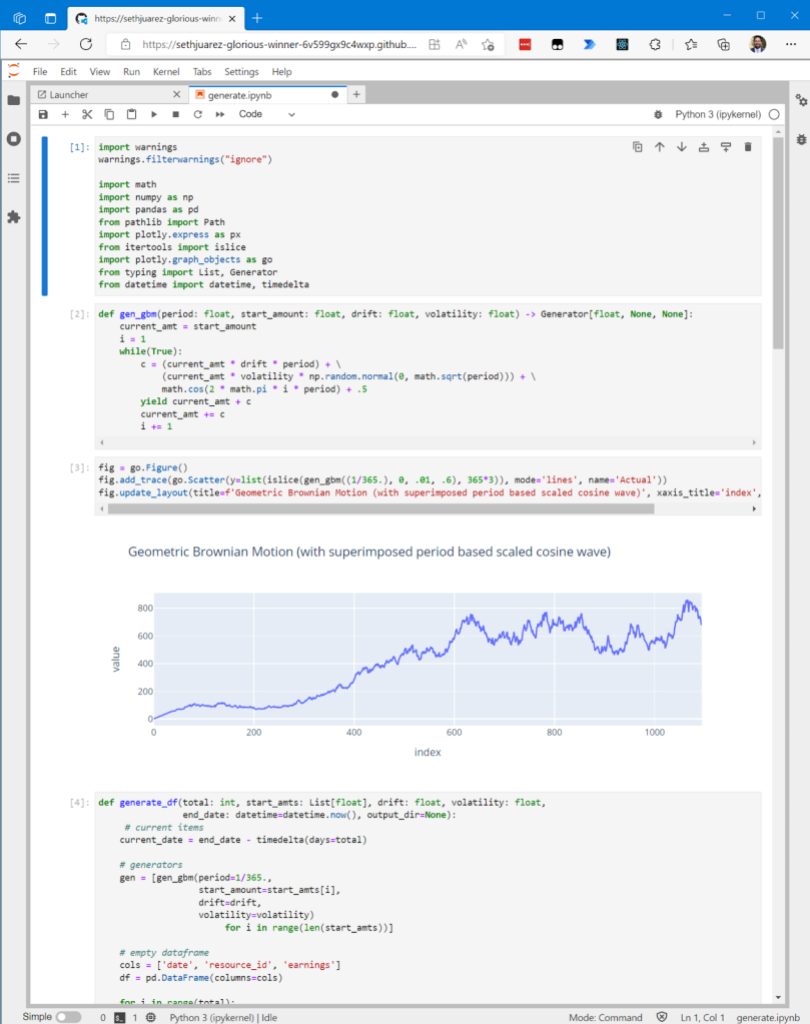
The last thing I wanted to show is the new JupyterLab feature enabled via the CLI or directly from the Codespaces page:
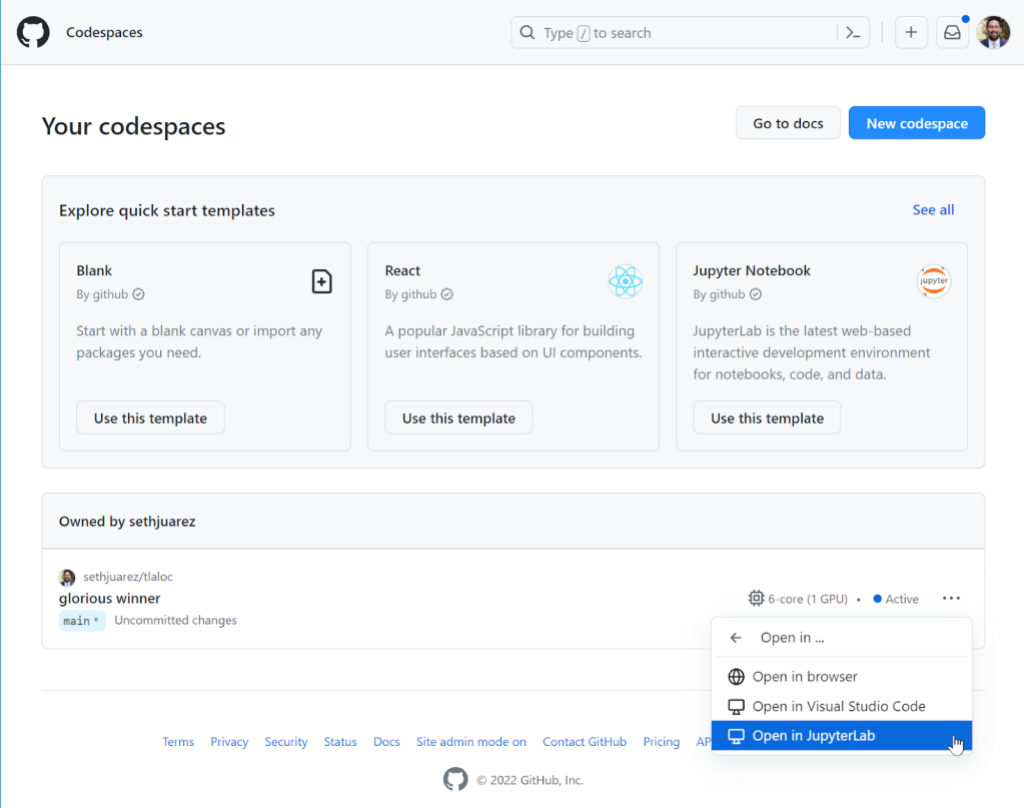
For some, JupyterLab is an indispensable part of their ML process – which is why it’s something we now support in its full glory:
What if you’re a JupyterLab user only and don’t want to use the “Open In…” menu every time? There’s a setting for that here:
And because there’s always that one person who likes to do machine learning only from the command line (you know who I’m talking about):
For good measure I wanted to show you that given it’s the same container, the GPU is still available.
Now, what if you want to just start up a notebook and try something? A File -> New Notebook experience is also available simply using this link: https://codespace.new/jupyter.
Summary
Like I said earlier, I’m a huge fan of machine learning and GitHub. The fact that we’re adding features to make the two better together is awesome. Now this might be a coincidence (I personally don’t think so), but the container name selected by Codespaces for this little exercise sums up how this all makes me feel: sethjuarez-glorious-winner (seriously, look at container url).
Would love to hear your thoughts on these and any other features you think would make machine learning and GitHub better together. In the meantime, get ready for the upcoming GPU SKU launch by signing up to be on waitlist. Until next time!
Aligning to AWS Foundational Security Best Practices With InsightCloudSec
Post Syndicated from Ryan Blanchard original https://blog.rapid7.com/2022/11/22/aligning-to-aws-foundational-security-best-practices-with-insightcloudsec/

Written by Ryan Blanchard and James Alaniz
When an organization is moving their IT infrastructure to the cloud or expanding with net-new investment, one of the hardest tasks for the security team is to identify and establish the proper security policies and controls to keep their cloud environments secure and the applications and sensitive data they host safe.
This can be a challenge, particularly when teams lack the relevant experience and expertise to define such controls themselves, often looking to peers and the cloud service providers themselves for guidance. The good news for folks in this position is that the cloud providers have answered the call by providing curated sets of security controls, including recommended resource configurations and access policies to provide some clarity. In the case of AWS, this takes the form of the AWS Foundational Security Best Practices.
What are AWS Foundational Security Best Practices?
The AWS Foundational Security Best Practices standard is a set of controls intended as a framework for security teams to establish effective cloud security standards for their organization. This standard provides actionable and prescriptive guidance on how to improve and maintain your organization’s security posture, with controls spanning a wide variety of AWS services.
If you’re an organization that is just getting going in the cloud and has landed on AWS as your platform of choice, this standard is undoubtedly a really good place to start.
Enforcing AWS Foundational Security Best Practices can be a challenge
So, you’ve now been armed with a foundational guide to establishing a strong security posture for your cloud. Simple, right? Well, it’s important to be aware before you get going that actually implementing and operationalizing these best practices can be easier said than done. This is especially true if you’re working with a large, enterprise-scale environment.
One of the things that make it challenging to manage compliance with these best practices (or any compliance framework, for that matter) is the fact that the cloud is increasingly distributed, both from a physical perspective and in terms of adoption, access, and usage. This makes it hard to track and manage access permissions across your various business units, and also makes it difficult to understand how individual teams and users are doing in complying with organizational policies and standards.
Further complicating the matter is the reality that not all of these best practices are necessarily right for your business. There could be any number of reasons that your entire cloud environment, or even specific resources, workloads, or accounts, should be exempt from certain policies — or even subject to additional controls that aren’t captured in the AWS Foundational Security Best Practices, often for regulatory purposes.
This means you’ll want a security solution that has the ability to not just slice, dice, and report on compliance at the organization and account levels, but also lets you customize the policy sets based on what makes sense for you and your business needs. If not, you’re going to be at risk of constantly dealing with false positives and spending time working through which compliance issues need your teams’ attention.
Highlights from the AWS Foundational Security Best Practices Compliance Pack
There are hundreds of controls in the AWS Foundational Security Best Practices, and each of them have been included for good reason. In this interest of time this post won’t detail all of them, but will instead present a few highlights of controls to address issues that unfortunately pop up far too often.
KMS.3 — AWS KMS Keys should not be unintentionally deleted
AWS Key Management Service (AWS KMS) is a managed service that makes it easy for you to create and control the cryptographic keys used to encrypt and protect your data. It’s possible for keys to be inadvertently deleted. This can be problematic, because once keys are deleted they can never be recovered, and the data encrypted under that key is also permanently unrecoverable. When a KMS key is scheduled for deletion, a mandatory waiting period is enforced to allow time to correct an error or reverse the decision to delete. To help avoid unintentional deletion of KMS keys, the scheduled deletion can be canceled at any point during the waiting period and the KMS key will not be deleted.
Related InsightCloudSec Check: “Encryption Key with Pending Deletion”
[S3.1] — S3 Block Public Access setting should be enabled
As you’d expect, this check focuses on identifying S3 buckets that are available to the public internet. One of the first things you’ll want to be sure of is that you’re not leaving your sensitive data open to anyone with internet access. You might be surprised how often this happens.
Related InsightCloudSec Check: “Storage Container Exposed to the Public”
CloudFront.1 — CloudFront distributions should have origin access identity enabled
While you typically access content from CloudFront by requesting the specific object — or objects — you’re looking for, it is possible for someone to request the root URL instead. To avoid this, AWS allows you to configure CloudFront to return a “default root object” when a request for the root URL is made. This is critical, because failing to define a default root object passes requests to your origin server. If you are using an S3 bucket as your origin, the user would gain access to a complete list of the contents of your bucket.
Related InsightCloudSec Check: “Content Delivery Network Without Default Root Object”
Lambda.1 — Lambda function policies should prohibit public access
Like in the control highlighted earlier about publicly accessible S3 buckets, it’s also possible for Lambda to be configured in such a way that enables public users to access or invoke them. You’ll want to keep an eye out and make sure you’re not inadvertently giving people outside of your organization access and control of your functions.
Related InsightCloudSec Check: “Serverless Function Exposed to the Public”
CodeBuild.5 — CodeBuild project environments should not have privileged mode enabled
Docker containers prohibit access to any devices by default unless they have privileged mode enabled, which grants a build project’s Docker container access to all devices and the ability to manage objects such as images, containers, networks, and volumes. Unless the build project is used to build Docker images, to avoid unintended access or deletion of critical resources, this should never be used.
Related InsightCloudSec Check: “Build Project With Privileged Mode Enabled”
Continuously enforce AWS Foundational Security Best Practices with InsightCloudSec
InsightCloudSec allows security teams to establish and continuously measure compliance against organizational policies, whether they’re based on service provider best practices like those provided by AWS or tailored to specific business needs. This is accomplished through the use of compliance packs. A compliance pack within InsightCloudSec is a set of checks that can be used to continuously assess your cloud environments for compliance with a given regulatory framework or industry or provider best practices. The platform comes out of the box with 30+ compliance packs, including a dedicated pack for the AWS Foundational Security Best Practices.
InsightCloudSec continuously assesses your entire AWS environment for compliance with AWS’s recommendations, and detects non-compliant resources within minutes after they are created or an unapproved change is made. If you so choose, you can make use of the platform’s native, no-code automation to remediate the issue — either via deletion or by adjusting the configuration or permissions — without any human intervention.
If you’re interested in learning more about how InsightCloudSec helps continuously and automatically enforce cloud security standards, be sure to check out our bi-weekly demo series that goes live every other Wednesday at 1pm EST!
How to detect security issues in Amazon EKS clusters using Amazon GuardDuty – Part 1
Post Syndicated from Marshall Jones original https://aws.amazon.com/blogs/security/how-to-detect-security-issues-in-amazon-eks-clusters-using-amazon-guardduty-part-1/
In this two-part blog post, we’ll discuss how to detect and investigate security issues in an Amazon Elastic Kubernetes Service (Amazon EKS) cluster with Amazon GuardDuty and Amazon Detective.
Amazon Elastic Kubernetes Service (Amazon EKS) is a managed service that you can use to run and scale container workloads by using Kubernetes in the AWS Cloud, which can help increase the speed of deployment and portability of modern applications. Amazon EKS provides secure, managed Kubernetes clusters on the AWS control plane by default. Kubernetes configurations such as pod security policies, runtime security, and network policies and configurations are specific for your organization’s use-case and securing them adequately would be a customer’s responsibility within AWS’ shared responsibility model.
Amazon GuardDuty can help you continuously monitor and detect suspicious activity related to AWS resources in your account. GuardDuty for EKS protection is a feature that you can enable within your accounts. When this feature is enabled, GuardDuty can help detect potentially unauthorized EKS activity resulting from misconfiguration of the control plane nodes or application.
In this post, we’ll walk through the events leading up to a real-world security issue that occurred due to EKS cluster misconfiguration, discuss how those misconfigurations could be used by a malicious actor, and how Amazon GuardDuty monitors and identifies suspicious activity throughout the EKS security event. In part 2 of the post, we’ll cover Amazon Detective investigation capabilities, possible remediation techniques, and preventative controls for EKS cluster related security issues.
Prerequisites
You must have AWS GuardDuty enabled in your AWS account in order to monitor and generate findings associated with an EKS cluster related security issue in your environment.
- Amazon GuardDuty, along with these features of GuardDuty:
EKS security issue walkthrough
Before jumping into the security issue, it is important to understand how the AWS shared responsibility model applies to the Amazon EKS managed service. AWS is responsible for the EKS managed Kubernetes control plane and the infrastructure to deliver EKS in a secure and reliable manner. You have the ability to configure EKS and how it interacts with other applications and services, where you are responsible for making sure that secure configurations are being used.
The following scenario is based on a real-world observed event, where a malicious actor used Kubernetes compromise tactics and techniques to expose and access an EKS cluster. We use this example to show how you can use AWS security services to identify and investigate each step of this security event. For a security event in your own environment, the order of operations and the investigative and remediation techniques used might be different. The scenario is broken down into the following phases and associated MITRE ATT&CK tactics:
- Phase 1 – EKS cluster misconfiguration
- Phase 2 (Discovery) – Discovery of vulnerable EKS clusters
- Phase 3 (Initial Access) – Credential access to obtain Kubernetes secrets
- Phase 4 (Persistence) – Impact to persist unauthorized access to the cluster
- Phase 5 (Impact) – Impact to manipulate resources for unauthorized activity
Phase 1 – EKS cluster misconfiguration
By default, when you provision an EKS cluster, the API cluster endpoint is set to public, meaning that it can be accessed from the internet. Despite being accessible from the internet, the endpoint is still considered secure because it requires all API requests to be authenticated by AWS Identity and Access Management (IAM) and then authorized by Kubernetes role-based access control (RBAC). Also, the entity (user or role) that creates the EKS cluster is automatically granted system:masters permissions, which allows the entity to modify the EKS cluster’s RBAC configuration.
This example scenario starts with a developer who has access to administer EKS clusters in an AWS account. The developer wants to work from their home network and doesn’t want to connect to their enterprise VPN for IAM role federation. They configure an EKS cluster API without setting up the proper authentication and authorization components. Instead, the developer grants explicit access to the system:anonymous user in the cluster’s RBAC configuration. (Alternatively, an unauthorized RBAC configuration could be introduced into your environment after a developer unknowingly installs a malicious helm chart from the internet without reviewing or inspecting it first.)
In Kubernetes anonymous requests, unauthenticated and unrejected HTTP requests are treated as anonymous access and are identified as a system:anonymous user belonging to a system:unauthenticated group. This means that any entity on the internet can access the cluster and make API requests that are permitted by the role. There aren’t many legitimate use cases for this type of activity, because it’s considered a best practice to use RBAC instead. Anonymous requests are primarily used for setting up health endpoints and custom authentication.
By monitoring EKS audit logs, GuardDuty identifies this activity and generates the finding Policy:Kubernetes/AnonymousAccessGranted, as shown in Figure 1. This finding informs you that a user on your Kubernetes cluster successfully created a ClusterRoleBinding or RoleBinding to bind the user system:anonymous to a role. This action enables unauthenticated access to the API operations permitted by the role.

Figure 1: Example GuardDuty finding for Kubernetes anonymous access granted
Phase 2 (Discovery) – Discovery of vulnerable EKS clusters
Port scanning is a method that malicious actors use to determine if resources are publicly exposed, with open ports and known vulnerabilities. As an increasing number of open-source tools allows users to search for endpoints connected to the internet, finding these endpoints has become even easier. Security teams can use these open-source tools to their advantage by proactively scanning for and identifying externally exposed resources in their organization.
This brings us to the discovery phase of our misconfigured EKS cluster. The discovery phase is defined by MITRE as follows: “Discovery consists of techniques an adversary may use to gain knowledge about the system and internal network. These techniques help adversaries observe the environment and orient themselves before deciding how to act.”
By granting system:anonymous access to the EKS cluster in our example, the developer allowed requests from any public unauthenticated source. This can result in external web crawlers probing the cluster API, which can often happen within seconds of the system:anonymous access being granted. GuardDuty identifies this activity and generates the finding Discovery:Kubernetes/SuccessfulAnonymousAccess, as shown in Figure 2. This finding informs you that an API operation to discover resources in a cluster was successfully invoked by the system:anonymous user. Remember, all API calls made by system:anonymous are unauthenticated, in addition to /healthz and /version calls that are always unauthenticated regardless of the user identity, and any entity can make use of this user within the EKS cluster.
In the screenshot, under the Action section in the finding details, you can see that the anonymous user made a get request to “/”. This is a generic request that is not specific to a Kubernetes cluster, which may indicate that the crawler is not specifically targeting Kubernetes clusters. You can further see that the Status code is 200, indicating that the request was successful. If this activity is malicious, then the actor is now aware that there is an exposed resource.

Figure 2: Example GuardDuty finding for Kubernetes successful anonymous access
Phase 3 (Initial Access) – Credential access to obtain Kubernetes secrets
Next, in this phase, you might start observing more targeted API calls for establishing initial access from unauthorized users. MITRE defines initial access as “techniques that use various entry vectors to gain their initial foothold within a network. Techniques used to gain a foothold include targeted spearphishing and exploiting weaknesses on public-facing web servers. Footholds gained through initial access may allow for continued access, like valid accounts and use of external remote services, or may be limited-use due to changing passwords.”
In our example, the malicious actor has established initial access for the EKS cluster which is evident in the next GuardDuty finding, CredentialAccess:Kubernetes/SuccessfulAnonymousAccess, as shown in Figure 3. This finding informs you that an API call to access credentials or secrets was successfully invoked by the system:anonymous user. The observed API call is commonly associated with the credential access tactic where an adversary is attempting to collect passwords, usernames, and access keys for a Kubernetes cluster.
You can see that in this GuardDuty finding, in the Action section, the Request uri is targeted at a Kubernetes cluster, specifically /api/v1/namespaces/kube-system/secrets. This request seems to be targeting the secrets management capabilities that are built into Kubernetes. You can find more information about this secrets management capability in the Kubernetes documentation.

Figure 3: Example GuardDuty finding for Kubernetes successful credential access from anonymous user
Phase 4 (Persistence) – Impact to persist unauthorized access to the cluster
The next phase of this scenario is likely to be an impact in the EKS cluster to enable persistence by the malicious actor. MITRE defines impact as “techniques that adversaries use to disrupt availability or compromise integrity by manipulating business and operational processes.” Following the MITRE definitions, “Persistence consists of techniques that adversaries use to keep access to systems across restarts, changed credentials, and other interruptions that could cut off their access. Techniques used for persistence include any access, action, or configuration changes that let them maintain their foothold on systems, such as replacing or hijacking legitimate code or adding startup code.”
In the GuardDuty finding Impact:Kubernetes/SuccessfulAnonymousAccess, shown in Figure 4, you can see the Kubernetes user details and Action sections that indicate that a successful Kubernetes API call was made to create a ClusterRoleBinding by the system:anonymous username. This finding informs you that a write API operation to tamper with resources was successfully invoked by the system:anonymous user. The observed API call is commonly associated with the impact stage of an attack, when an adversary is tampering with resources in your cluster. This activity shows that the system:anonymous user has now created their own role to enable persistent access the EKS cluster. If the user is malicious, they can now access the cluster even if access is removed in the RBAC configuration for the system:anonymous user.

Figure 4 Example GuardDuty finding for Kubernetes successful credential change by anonymous user
Phase 5 (Impact) – Impact to manipulate resources for unauthorized activity
The fifth phase of this scenario is where the unauthorized user is likely to focus on impact techniques in order to use the access for malicious purpose. MITRE says of the impact phase: “Techniques used for impact can include destroying or tampering with data. In some cases, business processes can look fine, but may have been altered to benefit the adversaries’ goals. These techniques might be used by adversaries to follow through on their end goal or to provide cover for a confidentiality breach.” Typically, once a malicious actor has access into a system, they will introduce malware to the system to manipulate the compromised resource and possibly also other resources.
With the introduction of GuardDuty Malware Protection, when an Amazon Elastic Compute Cloud (Amazon EC2) or container-related GuardDuty finding that indicates potentially suspicious activity is generated, an agentless scan on the volumes will initiate and detect the presence of malware. Existing GuardDuty customers need to enable Malware Protection, and for new customers this feature is on by default when they enable GuardDuty for the first time. Malware Protection comes with a 30-day free trial for both existing and new GuardDuty customers. You can see a list of findings that initiates a malware scan in the GuardDuty User Guide.
In this example, the malicious actor now uses access to the cluster to perform unauthorized cryptocurrency mining. GuardDuty monitors the DNS requests from the EC2 instances used to host the EKS cluster. This allows GuardDuty to identify a DNS request made to a domain name associated with a cryptocurrency mining pool, and generate the finding CryptoCurrency:EC2/BitcoinTool.B!DNS, as shown in Figure 5.

Figure 5: Example GuardDuty finding for EC2 instance querying bitcoin domain name
Because this is an EC2 related GuardDuty finding and GuardDuty Malware Protection is enabled in the account, GuardDuty then conducts an agentless scan on the volumes of the EC2 instance to detect malware. If the scan results in a successful detection of one or more malicious files, another GuardDuty finding for Execution:EC2/MaliciousFile is generated, as shown in Figure 6.

Figure 6: Example GuardDuty finding for detection of a malicious file on EC2
The first GuardDuty finding detects crypto mining activity, while the proceeding malware protection finding provides context on the malware associated with this activity. This context is very valuable for the incident response process.
Conclusion
In this post, we walked you through each of the five phases where we outlined how an initial misconfiguration could result in a malicious actor gaining control of EKS resources within an AWS account and how GuardDuty is able to continually monitor and detect the progression of the security event. As previously stated, this is just one example where a misconfiguration in an EKS cluster could result in a security event.
Now that you have a good understanding of GuardDuty capabilities to continuously monitor and detect EKS security events, you will need to establish processes and procedures to enable your security team to investigate these events. You can enable Amazon Detective to help accelerate your security team’s mean time to respond (MTTR) by providing an efficient mechanism to analyze, investigate, and identify the root cause of security events. Follow along in part 2 of this series, How to investigate and take action on an Amazon EKS cluster related security issue with Amazon Detective, where we’ll cover techniques you can use with Amazon Detective to identify impacted EKS resources in your AWS account, possible remediation actions to take on the cluster, and preventative controls you can implement.
If you have feedback about this post, submit comments in the Comments section below. If you have questions about this post, start a thread on Amazon GuardDuty re:Post.
Want more AWS Security news? Follow us on Twitter.
Build your Apache Hudi data lake on AWS using Amazon EMR – Part 1
Post Syndicated from Suthan Phillips original https://aws.amazon.com/blogs/big-data/part-1-build-your-apache-hudi-data-lake-on-aws-using-amazon-emr/
Apache Hudi is an open-source transactional data lake framework that greatly simplifies incremental data processing and data pipeline development. It does this by bringing core warehouse and database functionality directly to a data lake on Amazon Simple Storage Service (Amazon S3) or Apache HDFS. Hudi provides table management, instantaneous views, efficient upserts/deletes, advanced indexes, streaming ingestion services, data and file layout optimizations (through clustering and compaction), and concurrency control, all while keeping your data in open-source file formats such as Apache Parquet and Apache Avro. Furthermore, Apache Hudi is integrated with open-source big data analytics frameworks, such as Apache Spark, Apache Hive, Apache Flink, Presto, and Trino.
In this post, we cover best practices when building Hudi data lakes on AWS using Amazon EMR. This post assumes that you have the understanding of Hudi data layout, file layout, and table and query types. The configuration and features can change with new Hudi versions; the concept of this post applies to Hudi versions of 0.11.0 (Amazon EMR release 6.7), 0.11.1 (Amazon EMR release 6.8) and 0.12.1 (Amazon EMR release 6.9).
Specify the table type: Copy on Write Vs. Merge on Read
When we write data into Hudi, we have the option to specify the table type: Copy on Write (CoW) or Merge on Read (MoR). This decision has to be made at the initial setup, and the table type can’t be changed after the table has been created. These two table types offer different trade-offs between ingest and query performance, and the data files are stored differently based on the chosen table type. If you don’t specify it, the default storage type CoW is used.
The following table summarizes the feature comparison of the two storage types.
| CoW | MoR |
| Data is stored in base files (columnar Parquet format). | Data is stored as a combination of base files (columnar Parquet format) and log files with incremental changes (row-based Avro format). |
| COMMIT: Each new write creates a new version of the base files, which contain merged records from older base files and newer incoming records. Each write adds a commit action to the timeline, and each write atomically adds a commit action to the timeline, guaranteeing a write (and all its changes) entirely succeed or get entirely rolled back. | DELTA_COMMIT: Each new write creates incremental log files for updates, which are associated with the base Parquet files. For inserts, it creates a new version of the base file similar to CoW. Each write adds a delta commit action to the timeline. |
| Write | |
| In case of updates, write latency is higher than MoR due to the merge cost because it needs to rewrite the entire affected Parquet files with the merged updates. Additionally, writing in the columnar Parquet format (for CoW updates) is more latent in comparison to the row-based Avro format (for MoR updates). | No merge cost for updates during write time, and the write operation is faster because it just appends the data changes to the new log file corresponding to the base file each time. |
| Compaction isn’t needed because all data is directly written to Parquet files. | Compaction is required to merge the base and log files to create a new version of the base file. |
| Higher write amplification because new versions of base files are created for every write. Write cost will be O(number of files in storage modified by the write). | Lower write amplification because updates go to log files. Write cost will be O(1) for update-only datasets and can get higher when there are new inserts. |
| Read | |
| CoW table supports snapshot query and incremental queries. |
MoR offers two ways to query the same underlying storage: ReadOptimized tables and Near-Realtime tables (snapshot queries). ReadOptimized tables support read-optimized queries, and Near-Realtime tables support snapshot queries and incremental queries. |
| Read-optimized queries aren’t applicable for CoW because data is already merged to base files while writing. | Read-optimized queries show the latest compacted data, which doesn’t include the freshest updates in the not yet compacted log files. |
| Snapshot queries have no merge cost during read. | Snapshot queries merge data while reading if not compacted and therefore can be slower than CoW while querying the latest data. |
CoW is the default storage type and is preferred for simple read-heavy use cases. Use cases with the following characteristics are recommended for CoW:
- Tables with a lower ingestion rate and use cases without real-time ingestion
- Use cases requiring the freshest data with minimal read latency because merging cost is taken care of at the write phase
- Append-only workloads where existing data is immutable
MoR is recommended for tables with write-heavy and update-heavy use cases. Use cases with the following characteristics are recommended for MoR:
- Faster ingestion requirements and real-time ingestion use cases.
- Varying or bursty write patterns (for example, ingesting bulk random deletes in an upstream database) due to the zero-merge cost for updates during write time
- Streaming use cases
- Mix of downstream consumers, where some are looking for fresher data by paying some additional read cost, and others need faster reads with some trade-off in data freshness
For streaming use cases demanding strict ingestion performance with MoR tables, we suggest running the table services (for example, compaction and cleaning) asynchronously, which is discussed in the upcoming Part 3 of this series.
For more details on table types and use cases, refer to How do I choose a storage type for my workload?
Select the record key, key generator, preCombine field, and record payload
This section discusses the basic configurations for the record key, key generator, preCombine field, and record payload.
Record key
Every record in Hudi is uniquely identified by a Hoodie key (similar to primary keys in databases), which is usually a pair of record key and partition path. With Hoodie keys, you can enable efficient updates and deletes on records, as well as avoid duplicate records. Hudi partitions have multiple file groups, and each file group is identified by a file ID. Hudi maps Hoodie keys to file IDs, using an indexing mechanism.
A record key that you select from your data can be unique within a partition or across partitions. If the selected record key is unique within a partition, it can be uniquely identified in the Hudi dataset using the combination of the record key and partition path. You can also combine multiple fields from your dataset into a compound record key. Record keys cannot be null.
Key generator
Key generators are different implementations to generate record keys and partition paths based on the values specified for these fields in the Hudi configuration. The right key generator has to be configured depending on the type of key (simple or composite key) and the column data type used in the record key and partition path columns (for example, TimestampBasedKeyGenerator is used for timestamp data type partition path). Hudi provides several key generators out of the box, which you can specify in your job using the following configuration.
| Configuration Parameter | Description | Value |
hoodie.datasource.write.keygenerator.class |
Key generator class, which generates the record key and partition path | Default value is SimpleKeyGenerator |
The following table describes the different types of key generators in Hudi.
| Key Generators | Use-case |
SimpleKeyGenerator |
Use this key generator if your record key refers to a single column by name and similarly your partition path also refers to a single column by name. |
ComplexKeyGenerator |
Use this key generator when record key and partition paths comprise multiple columns. Columns are expected to be comma-separated in the config value (for example, "hoodie.datasource.write.recordkey.field" : “col1,col4”). |
GlobalDeleteKeyGenerator |
Use this key generator when you can’t determine the partition of incoming records to be deleted and need to delete only based on record key. This key generator ignores the partition path while generating keys to uniquely identify Hudi records. When using this key generator, set the config hoodie. |
NonPartitionedKeyGenerator |
Use this key generator for non-partitioned datasets because it returns an empty partition for all records. |
TimestampBasedKeyGenerator |
Use this key generator for a timestamp data type partition path. With this key generator, the partition path column values are interpreted as timestamps. The record key is the same as before, which is a single column converted to string. If using TimestampBasedKeyGenerator, a few more configs need to be set. |
CustomKeyGenerator |
Use this key generator to take advantage of the benefits of SimpleKeyGenerator, ComplexKeyGenerator, and TimestampBasedKeyGenerator all at the same time. With this you can configure record key and partition paths as a single field or a combination of fields. This is helpful if you want to generate nested partitions with each partition key of different types (for example, field_3:simple,field_5:timestamp). For more information, refer to CustomKeyGenerator. |
The key generator class can be automatically inferred by Hudi if the specified record key and partition path require a SimpleKeyGenerator or ComplexKeyGenerator, depending on whether there are single or multiple record key or partition path columns. For all other cases, you need to specify the key generator.
The following flow chart explains how to select the right key generator for your use case.

PreCombine field
This is a mandatory field that Hudi uses to deduplicate the records within the same batch before writing them. When two records have the same record key, they go through the preCombine process, and the record with the largest value for the preCombine key is picked by default. This behavior can be customized through custom implementation of the Hudi payload class, which we describe in the next section.
The following table summarizes the configurations related to preCombine.
| Configuration Parameter | Description | Value |
hoodie.datasource.write.precombine.field |
The field used in preCombining before the actual write. It helps select the latest record whenever there are multiple updates to the same record in a single incoming data batch. |
The default value is ts. You can configure it to any column in your dataset that you want Hudi to use to deduplicate the records whenever there are multiple records with the same record key in the same batch. Currently, you can only pick one field as the preCombine field. Select a column with the timestamp data type or any column that can determine which record holds the latest version, like a monotonically increasing number. |
hoodie.combine.before.upsert |
During upsert, this configuration controls whether deduplication should be done for the incoming batch before ingesting into Hudi. This is applicable only for upsert operations. | The default value is true. We recommend keeping it at the default to avoid duplicates. |
hoodie.combine.before.delete |
Same as the preceding config, but applicable only for delete operations. | The default value is true. We recommend keeping it at the default to avoid duplicates. |
hoodie.combine.before.insert |
When inserted records share the same key, the configuration controls whether they should be first combined (deduplicated) before writing to storage. | The default value is false. We recommend setting it to true if the incoming inserts or bulk inserts can have duplicates. |
Record payload
Record payload defines how to merge new incoming records against old stored records for upserts.
The default OverwriteWithLatestAvroPayload payload class always overwrites the stored record with the latest incoming record. This works fine for batch jobs and most use cases. But let’s say you have a streaming job and want to prevent the late-arriving data from overwriting the latest record in storage. You need to use a different payload class implementation (DefaultHoodieRecordPayload) to determine the latest record in storage based on an ordering field, which you provide.
For example, in the following example, Commit 1 has HoodieKey 1, Val 1, preCombine10, and in-flight Commit 2 has HoodieKey 1, Val 2, preCombine 5.

If using the default OverwriteWithLatestAvroPayload, the Val 2 version of the record will be the final version of the record in storage (Amazon S3) because it’s the latest version of the record.
If using DefaultHoodieRecordPayload, it will honor Val 1 because the Val 2’s record version has a lower preCombine value (preCombine 5) compared to Val 1’s record version, while merging multiple versions of the record.
You can select a payload class while writing to the Hudi table using the configuration hoodie.datasource.write.payload.class.
Some useful in-built payload class implementations are described in the following table.
| Payload Class | Description |
OverwriteWithLatestAvroPayload (org.apache.hudi.common.model.OverwriteWithLatestAvroPayload) |
Chooses the latest incoming record to overwrite any previous version of the records. Default payload class. |
DefaultHoodieRecordPayload (org.apache.hudi.common.model.DefaultHoodieRecordPayload) |
Uses hoodie.payload.ordering.field to determine the final record version while writing to storage. |
EmptyHoodieRecordPayload (org.apache.hudi.common.model.EmptyHoodieRecordPayload) |
Use this as payload class to delete all the records in the dataset. |
AWSDmsAvroPayload (org.apache.hudi.common.model.AWSDmsAvroPayload) |
Use this as payload class if AWS DMS is used as source. It provides support for seamlessly applying changes captured via AWS DMS. This payload implementation performs insert, delete, and update operations on the Hudi table based on the operation type for the CDC record obtained from AWS DMS. |
Partitioning
Partitioning is the physical organization of files within a table. They act as virtual columns and can impact the max parallelism we can use on writing.
Extremely fine-grained partitioning (for example, over 20,000 partitions) can create excessive overhead for the Spark engine managing all the small tasks, and can degrade query performance by reducing file sizes. Also, an overly coarse-grained partition strategy, without clustering and data skipping, can negatively impact both read and upsert performance with the need to scan more files in each partition.
Right partitioning helps improve read performance by reducing the amount of data scanned per query. It also improves upsert performance by limiting the number of files scanned to find the file group in which a specific record exists during ingest. A column frequently used in query filters would be a good candidate for partitioning.
For large-scale use cases with evolving query patterns, we suggest coarse-grained partitioning (such as date), while using fine-grained data layout optimization techniques (clustering) within each partition. This opens the possibility of data layout evolution.
By default, Hudi creates the partition folders with just the partition values. We recommend using Hive style partitioning, in which the name of the partition columns is prefixed to the partition values in the path (for example, year=2022/month=07 as opposed to 2022/07). This enables better integration with Hive metastores, such as using msck repair to fix partition paths.
To support Apache Hive style partitions in Hudi, we have to enable it in the config hoodie.datasource.write.hive_style_partitioning.
The following table summarizes the key configurations related to Hudi partitioning.
| Configuration Parameter | Description | Value |
hoodie.datasource.write.partitionpath.field |
Partition path field. This is a required configuration that you need to pass while writing the Hudi dataset. | There is no default value set for this. Set it to the column that you have determined for partitioning the data. We recommend that it doesn’t cause extremely fine-grained partitions. |
hoodie.datasource.write.hive_style_partitioning |
Determines whether to use Hive style partitioning. If set to true, the names of partition folders follow <partition_column_name>=<partition_value> format. |
Default value is false. Set it to true to use Hive style partitioning. |
hoodie.datasource.write.partitionpath.urlencode |
Indicates if we should URL encode the partition path value before creating the folder structure. | Default value is false. Set it to true if you want to URL encode the partition path value. For example, if you’re using the data format “yyyy-MM-dd HH:mm:ss“, the URL encode needs to be set to true because it will result in an invalid path due to :. |
Note that if the data isn’t partitioned, you need to specifically use NonPartitionedKeyGenerator for the record key, which is explained in the previous section. Additionally, Hudi doesn’t allow partition columns to be changed or evolved.
Choose the right index
After we select the storage type in Hudi and determine the record key and partition path, we need to choose the right index for upsert performance. Apache Hudi employs an index to locate the file group that an update/delete belongs to. This enables efficient upsert and delete operations and enforces uniqueness based on the record keys.
Global index vs. non-global index
When picking the right indexing strategy, the first decision is whether to use a global (table level) or non-global (partition level) index. The main difference between global vs. non-global indexes is the scope of key uniqueness constraints. Global indexes enforce uniqueness of the keys across all partitions of a table. The non-global index implementations enforce this constraint only within a specific partition. Global indexes offer stronger uniqueness guarantees, but they come with a higher update/delete cost, for example global deletes with just the record key need to scan the entire dataset. HBase indexes are an exception here, but come with an operational overhead.

For large-scale global index use cases, use an HBase index or record-level index (available in Hudi 0.13) because for all other global indexes, the update/delete cost grows with the size of the table, O(size of the table).
When using a global index, be aware of the configuration hoodie[bloom|simple|hbase].index.update.partition.path, which is already set to true by default. For existing records getting upserted to a new partition, enabling this configuration will help delete the old record in the old partition and insert it in the new partition.
Hudi index options
After picking the scope of the index, the next step is to decide which indexing option best fits your workload. The following table explains the indexing options available in Hudi as of 0.11.0.
| Indexing Option | How It Works | Characteristic | Scope |
| Simple Index | Performs a join of the incoming upsert/delete records against keys extracted from the involved partition in case of non-global datasets and the entire dataset in case of global or non-partitioned datasets. | Easiest to configure. Suitable for basic use cases like small tables with evenly spread updates. Even for larger tables where updates are very random to all partitions, a simple index is the right choice because it directly joins with interested fields from every data file without any initial pruning, as compared to Bloom, which in the case of random upserts adds additional overhead and doesn’t give enough pruning benefits because the Bloom filters could indicate true positive for most of the files and end up comparing ranges and filters against all these files. | Global/Non-global |
| Bloom Index (default index in EMR Hudi) | Employs Bloom filters built out of the record keys, optionally also pruning candidate files using record key ranges. Bloom filter is stored in the data file footer while writing the data. |
More efficient filter compared to simple index for use cases like late-arriving updates to fact tables and deduplication in event tables with ordered record keys such as timestamp. Hudi implements a dynamic Bloom filter mechanism to reduce false positives provided by Bloom filters. In general, the probability of false positives increases with the number of records in a given file. Check the Hudi FAQ for Bloom filter configuration best practices. |
Global/Non-global |
| Bucket Index | It distributes records to buckets using a hash function based on the record keys or subset of it. It uses the same hash function to determine which file group to match with incoming records. New indexing option since hudi 0.11.0. | Simple to configure. It has better upsert throughput performance compared to the Bloom filter. As of Hudi 0.11.1, only fixed bucket number is supported. This will no longer be an issue with the upcoming consistent hashing bucket index feature, which can dynamically change bucket numbers. | Non-global |
| HBase Index | The index mapping is managed in an external HBase table. | Best lookup time, especially for large numbers of partitions and files. It comes with additional operational overhead because you need to manage an external HBase table. | Global |
Use cases suitable for simple index
Simple indexes are most suitable for workloads with evenly spread updates over partitions and files on small tables, and also for larger tables with dimension kind of workloads because updates are random to all partitions. A common example is a CDC pipeline for a dimension table. In this case, updates end up touching a large number of files and partitions. Therefore, a join with no other pruning is most efficient.
Use cases suitable for Bloom index
Bloom indexes are suitable for most production workloads with uneven update distribution across partitions. For workloads with most updates to recent data like fact tables, Bloom filter rightly fits the bill. It can be clickstream data collected from an ecommerce site, bank transactions in a FinTech application, or CDC logs for a fact table.
When using a Bloom index, be aware of the following configurations:
hoodie.bloom.index.use.metadata– By default, it is set to false. When this flag is on, the Hudi writer gets the index metadata information from the metadata table and doesn’t need to open Parquet file footers to get the Bloom filters and stats. You prune out the files by just using the metadata table and therefore have improved performance for larger tables.hoodie.bloom.index.prune.by.ranges– Enable or disable range pruning based on use case. By default, it’s already set to true. When this flag is on, range information from files is used to speed up index lookups. This is helpful if the selected record key is monotonously increasing. You can set any record key to be monotonically increasing by adding a timestamp prefix. If the record key is completely random and has no natural ordering (such as UUIDs), it’s better to turn this off, because range pruning will only add extra overhead to the index lookup.
Use cases suitable for bucket index
Bucket indexes are suitable for upsert use cases on huge datasets with a large number of file groups within partitions, relatively even data distribution across partitions, and can achieve relatively even data distribution on the bucket hash field column. It can have better upsert performance in these cases due to no index lookup involved as file groups are located based on a hashing mechanism, which is very fast. This is totally different from both simple and Bloom indexes, where an explicit index lookup step is involved during write. The buckets here has one-one mapping with the hudi file group and since the total number of buckets (defined by hoodie.bucket.index.num.buckets(default – 4)) is fixed here, it can potentially lead to skewed data (data distributed unevenly across buckets) and scalability (buckets can grow over time) issues over time. These issues will be addressed in the upcoming consistent hashing bucket index, which is going to be a special type of bucket index.
Use cases suitable for HBase index
HBase indexes are suitable for use cases where ingestion performance can’t be met using the other index types. These are mostly use cases with global indexes and large numbers of files and partitions. HBase indexes provide the best lookup time but come with large operational overheads if you’re already using HBase for other workloads.
For more information on choosing the right index and indexing strategies for common use cases, refer to Employing the right indexes for fast updates, deletes in Apache Hudi. As you have already seen, Hudi index performance depends heavily on the actual workload. We encourage you to evaluate different indexes for your workload and choose the one which is best suited for your use case.
Migration guidance
With Apache Hudi growing in popularity, one of the fundamental challenges is to efficiently migrate existing datasets to Apache Hudi. Apache Hudi maintains record-level metadata to perform core operations such as upserts and incremental pulls. To take advantage of Hudi’s upsert and incremental processing support, you need to add Hudi record-level metadata to your original dataset.
Using bulk_insert
The recommended way for data migration to Hudi is to perform a full rewrite using bulk_insert. There is no look-up for existing records in bulk_insert and writer optimizations like small file handling. Performing a one-time full rewrite is a good opportunity to write your data in Hudi format with all the metadata and indexes generated and also potentially control file size and sort data by record keys.
You can set the sort mode in a bulk_insert operation using the configuration hoodie.bulkinsert.sort.mode. bulk_insert offers the following sort modes to configure.
| Sort Modes | Description |
NONE |
No sorting is done to the records. You can get the fastest performance (comparable to writing parquet files with spark) for initial load with this mode. |
GLOBAL_SORT |
Use this to sort records globally across Spark partitions. It is less performant in initial load than other modes as it repartitions data by partition path and sorts it by record key within each partition. This helps in controlling the number of files generated in the target thereby controlling the target file size. Also, the generated target files will not have overlapping min-max values for record keys which will further help speed up index look-ups during upserts/deletes by pruning out files based on record key ranges in bloom index. |
PARTITION_SORT |
Use this to sort records within Spark partitions. It is more performant for initial load than Global_Sort and if your Spark partitions in the data frame are already fairly mapped to the Hudi partitions (dataframe is already repartitioned by partition column), using this mode would be preferred as you can obtain records sorted by record key within each partition. |
We recommend to use Global_Sort mode if you can handle the one-time cost. The default sort mode is changed from Global_Sort to None from EMR 6.9 (Hudi 0.12.1). During bulk_insert with Global_Sort, two configurations control the sizes of target files generated by Hudi.
| Configuration Parameter | Description | Value |
hoodie.bulkinsert.shuffle.parallelism |
The number of files generated from the bulk insert is determined by this configuration. The higher the parallelism, the more Spark tasks processing the data. | Default value is 200. To control file size and achieve maximum performance (more parallelism), we recommend setting this to a value such that the files generated are equal to the hoodie.parquet.max.file.size. If you make parallelism really high, the max file size can’t be honored because the Spark tasks are working on smaller amounts of data. |
hoodie.parquet.max.file.size |
Target size for Parquet files produced by Hudi write phases. | Default value is 120 MB. If the Spark partitions generated with hoodie.bulkinsert.shuffle.parallelism are larger than this size, it splits it and generates multiple files to not exceed the max file size. |
Let’s say we have a 100 GB Parquet source dataset and we’re bulk inserting with Global_Sort into a partitioned Hudi table with 10 evenly distributed Hudi partitions. We want to have the preferred target file size of 120 MB (default value for hoodie.parquet.max.file.size). The Hudi bulk insert shuffle parallelism should be calculated as follows:
- The total data size in MB is 100 * 1024 = 102400 MB
hoodie.bulkinsert.shuffle.parallelismshould be set to 102400/120 = ~854
Please note that in reality even with Global_Sort, each spark partition can be mapped to more than one hudi partition and this calculation should only be used as a rough estimate and can potentially end up with more files than the parallelism specified.
Using bootstrapping
For customers operating at scale on hundreds of terabytes or petabytes of data, migrating your datasets to start using Apache Hudi can be time-consuming. Apache Hudi provides a feature called bootstrap to help with this challenge.
The bootstrap operation contains two modes: METADATA_ONLY and FULL_RECORD.
FULL_RECORD is the same as full rewrite, where the original data is copied and rewritten with the metadata as Hudi files.
The METADATA_ONLY mode is the key to accelerating the migration progress. The conceptual idea is to decouple the record-level metadata from the actual data by writing only the metadata columns in the Hudi files generated while the data isn’t copied over and stays in its original location. This significantly reduces the amount of data written, thereby improving the time to migrate and get started with Hudi. However, this comes at the expense of read performance, which involves the overhead merging Hudi files and original data files to get the complete record. Therefore, you may not want to use it for frequently queried partitions.
You can pick and choose these modes at partition level. One common strategy is to tier your data. Use FULL_RECORD mode for a small set of hot partitions, which are accessed frequently, and METADATA_ONLY for a larger set of cold partitions.
Consider the following:
- There is some read performance penalty for the
METADATA_ONLYpartitions, and it should only be used for archived partitions. For more details, refer to Efficient Migration of Large Parquet Tables to Apache Hudi. - The original dataset needs to be in Parquet format to use bootstrap.
Catalog sync
Hudi supports syncing Hudi table partitions and columns to a catalog. On AWS, you can either use the AWS Glue Data Catalog or Hive metastore as the metadata store for your Hudi tables. To register and synchronize the metadata with your regular write pipeline, you need to either enable hive sync or run the hive_sync_tool or AwsGlueCatalogSyncTool command line utility.
We recommend enabling the hive sync feature with your regular write pipeline to make sure the catalog is up to date. If you don’t expect a new partition to be added or the schema changed as part of each batch, then we recommend enabling hoodie.datasource.meta_sync.condition.sync as well so that it allows Hudi to determine if hive sync is necessary for the job.
If you have frequent ingestion jobs and need to maximize ingestion performance, you can disable hive sync and run the hive_sync_tool asynchronously.
If you have the timestamp data type in your Hudi data, we recommend setting hoodie.datasource.hive_sync.support_timestamp to true to convert the int64 (timestamp_micros) to the hive type timestamp. Otherwise, you will see the values in bigint while querying data.
The following table summarizes the configurations related to hive_sync.
| Configuration Parameter | Description | Value |
hoodie.datasource.hive_sync.enable |
To register or sync the table to a Hive metastore or the AWS Glue Data Catalog. | Default value is false. We recommend setting the value to true to make sure the catalog is up to date, and it needs to be enabled in every single write to avoid an out-of-sync metastore. |
hoodie.datasource.hive_sync.mode |
This configuration sets the mode for HiveSynctool to connect to the Hive metastore server. For more information, refer to Sync modes. | Valid values are hms, jdbc, and hiveql. If the mode isn’t specified, it defaults to jdbc. Hms and jdbc both talk to the underlying thrift server, but jdbc needs a separate jdbc driver. We recommend setting it to ‘hms’, which uses the Hive metastore client to sync Hudi tables using thrift APIs directly. This helps when using the AWS Glue Data Catalog because you don’t need to install Hive as an application on the EMR cluster (because it doesn’t need the server). |
hoodie.datasource.hive_sync.database |
Name of the destination database that we should sync the Hudi table to. | Default value is default. Set this to the database name of your catalog. |
hoodie.datasource.hive_sync.table |
Name of the destination table that we should sync the Hudi table to. | In Amazon EMR, the value is inferred from the Hudi table name. You can set this config if you need a different table name. |
hoodie.datasource.hive_sync.support_timestamp |
To convert logical type TIMESTAMP_MICROS as hive type timestamp. |
Default value is false. Set it to true to convert to hive type timestamp. |
hoodie.datasource.meta_sync.condition.sync |
If true, only sync on conditions like schema change or partition change. | Default value is false. |
Writing and reading Hudi datasets, and its integration with other AWS services
There are different ways you can write the data to Hudi using Amazon EMR, as explained in the following table.
| Hudi Write Options | Description |
| Spark DataSource |
You can use this option to do upsert, insert, or bulk insert for the write operation. Refer to Work with a Hudi dataset for an example of how to write data using DataSourceWrite. |
| Spark SQL | You can easily write data to Hudi with SQL statements. It eliminates the need to write Scala or PySpark code and adopt a low-code paradigm. |
| Flink SQL, Flink DataStream API | If you’re using Flink for real-time streaming ingestion, you can use the high-level Flink SQL or Flink DataStream API to write the data to Hudi. |
| DeltaStreamer | DeltaStreamer is a self-managed tool that supports standard data sources like Apache Kafka, Amazon S3 events, DFS, AWS DMS, JDBC, and SQL sources, built-in checkpoint management, schema validations, as well as lightweight transformations. It can also operate in a continuous mode, in which a single self-contained Spark job can pull data from source, write it out to Hudi tables, and asynchronously perform cleaning, clustering, compactions, and catalog syncing, relying on Spark’s job pools for resource management. It’s easy to use and we recommend using it for all the streaming and ingestion use cases where a low-code approach is preferred. For more information, refer to Streaming Ingestion. |
| Spark structured streaming | For use cases that require complex data transformations of the source data frame written in Spark DataFrame APIs or advanced SQL, we recommend the structured streaming sink. The streaming source can be used to obtain change feeds out of Hudi tables for streaming or incremental processing use cases. |
| Kafka Connect Sink | If you standardize on the Apache Kafka Connect framework for your ingestion needs, you can also use the Hudi Connect Sink. |
Refer to the following support matrix for query support on specific query engines. The following table explains the different options to read the Hudi dataset using Amazon EMR.
| Hudi Read options | Description |
| Spark DataSource | You can read Hudi datasets directly from Amazon S3 using this option. The tables don’t need to be registered with Hive metastore or the AWS Glue Data Catalog for this option. You can use this option if your use case doesn’t require a metadata catalog. Refer to Work with a Hudi dataset for example of how to read data using DataSourceReadOptions. |
| Spark SQL | You can query Hudi tables with DML/DDL statements. The tables need to be registered with Hive metastore or the AWS Glue Data Catalog for this option. |
| Flink SQL | After the Flink Hudi tables have been registered to the Flink catalog, they can be queried using the Flink SQL. |
| PrestoDB/Trino | The tables need to be registered with Hive metastore or the AWS Glue Data Catalog for this option. This engine is preferred for interactive queries. There is a new Trino connector in upcoming Hudi 0.13, and we recommend reading datasets through this connector when using Trino for performance benefits. |
| Hive | The tables need to be registered with Hive metastore or the AWS Glue Data Catalog for this option. |
Apache Hudi is well integrated with AWS services, and these integrations work when AWS Glue Data Catalog is used, with the exception of Athena, where you can also use a data source connector to an external Hive metastore. The following table summarizes the service integrations.
| AWS Service | Description |
| Amazon Athena |
You can use Athena for a serverless option to query a Hudi dataset on Amazon S3. Currently, it supports snapshot queries and read-optimized queries, but not incremental queries. For more details, refer to Using Athena to query Apache Hudi datasets. |
| Amazon Redshift Spectrum |
You can use Amazon Redshift Spectrum to run analytic queries against tables in your Amazon S3 data lake with Hudi format. Currently, it supports only CoW tables. For more details, refer to Creating external tables for data managed in Apache Hudi. |
| AWS Lake Formation | AWS Lake Formation is used to secure data lakes and define fine-grained access control on the database and table level. Hudi is not currently supported with Amazon EMR Lake Formation integration. |
| AWS DMS | You can use AWS DMS to ingest data from upstream relational databases to your S3 data lakes into an Hudi dataset. For more details, refer to Apply record level changes from relational databases to Amazon S3 data lake using Apache Hudi on Amazon EMR and AWS Database Migration Service. |
Conclusion
This post covered best practices for configuring Apache Hudi data lakes using Amazon EMR. We discussed the key configurations in migrating your existing dataset to Hudi and shared guidance on how to determine the right options for different use cases when setting up Hudi tables.
The upcoming Part 2 of this series focuses on optimizations that can be done on this setup, along with monitoring using Amazon CloudWatch.
About the Authors
 Suthan Phillips is a Big Data Architect for Amazon EMR at AWS. He works with customers to provide best practice and technical guidance and helps them achieve highly scalable, reliable and secure solutions for complex applications on Amazon EMR. In his spare time, he enjoys hiking and exploring the Pacific Northwest.
 Dylan Qu is an AWS solutions architect responsible for providing architectural guidance across the full AWS stack with a focus on Data Analytics, AI/ML and DevOps.
How Etleap and Amazon Redshift Serverless optimize costs for ETL
Post Syndicated from Caius Brindescu original https://aws.amazon.com/blogs/big-data/how-etleap-and-amazon-redshift-serverless-optimize-costs-for-etl/
Amazon Redshift Serverless lets you avoid managing infrastructure while only paying for what you use. Etleap provides data integration software that is natively built on AWS. It’s an AWS Advanced Technology Partner with the AWS Data & Analytics Competency and Amazon Redshift Service Ready designation.
In this post, we share how you can minimize the usage of resources for some workload patterns and maximize savings while seamlessly managing data pipelines. We illustrate an example of how Redshift Serverless and Etleap’s load synchronization feature can reduce active Redshift Serverless time, further optimizing extract, transform, and load (ETL) costs.
Introduction to Redshift Serverless
Redshift Serverless makes it easy to run and scale analytics in seconds without the need to set up and manage data warehouse clusters. With Redshift Serverless, you pay for the compute only when the data warehouse is in use. This is ideal when it’s difficult to predict compute needs such as variable workloads, periodic workloads with idle time, and steady-state workloads with spikes. As your demand evolves with new workloads and more concurrent users, Redshift Serverless automatically provisions the right compute resources, and your data warehouse scales seamlessly and automatically.
You can create a Redshift Serverless data warehouse either using the default settings or custom settings. Redshift Serverless creates a default workgroup and associates that to the default namespace. You can also create multiple Redshift Serverless endpoints per AWS account and Region using namespaces and workgroups.
A namespace is a collection of database objects and users, with properties such as database name and password, permissions, and encryption and security. The following screenshot shows an example of a namespace configuration on the Redshift Serverless console.
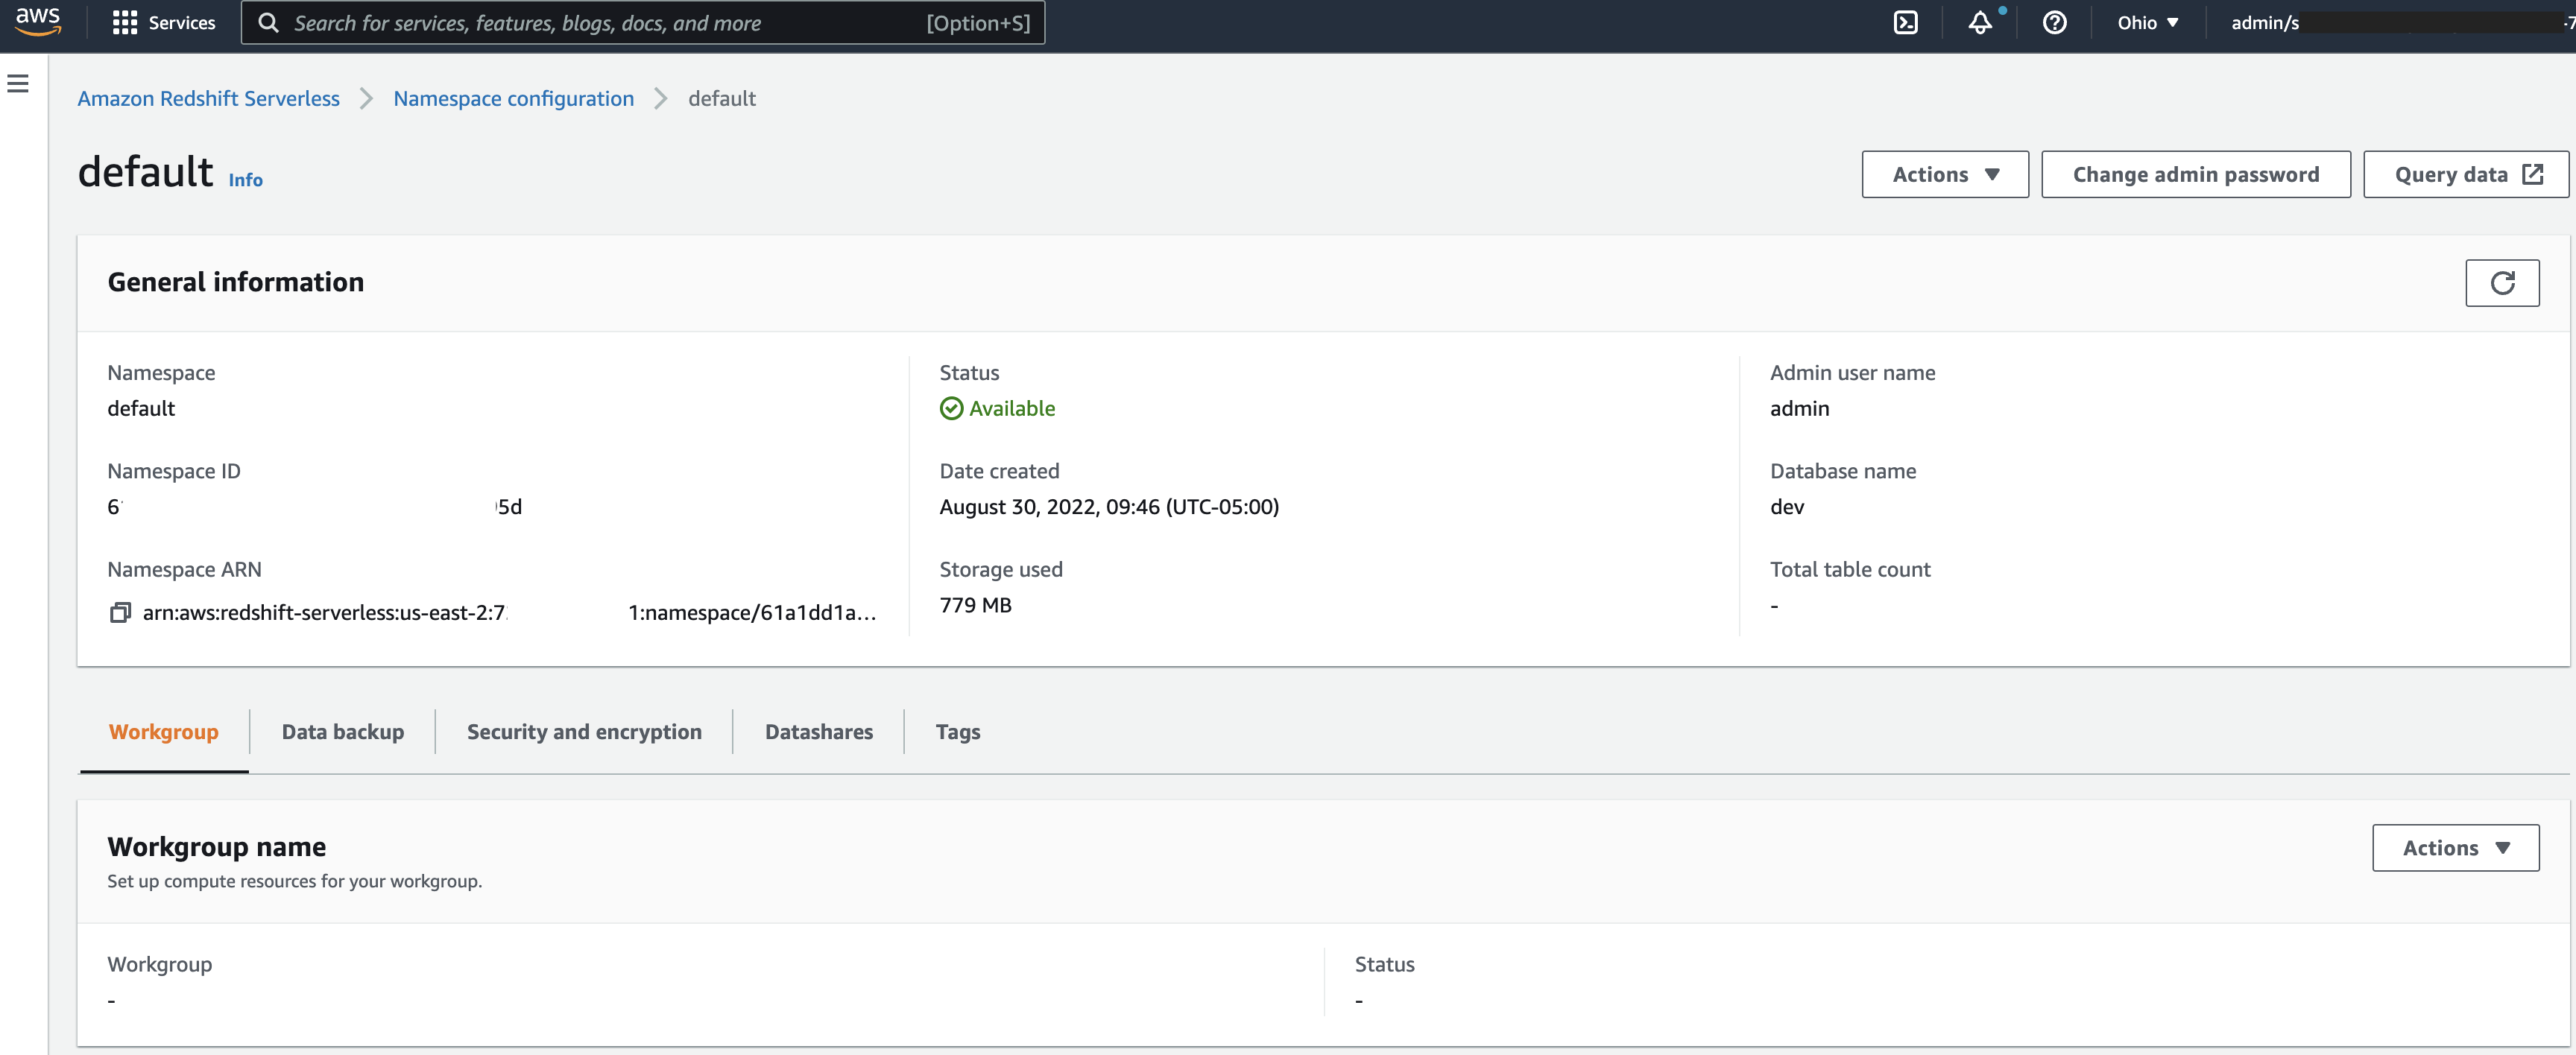
A workgroup is a collection of compute resources, which includes network and security settings. Workgroup configuration allows you to create a private or public serverless endpoint that you can use to connect with your applications. The following screenshot shows an example workgroup on the Redshift Serverless console.
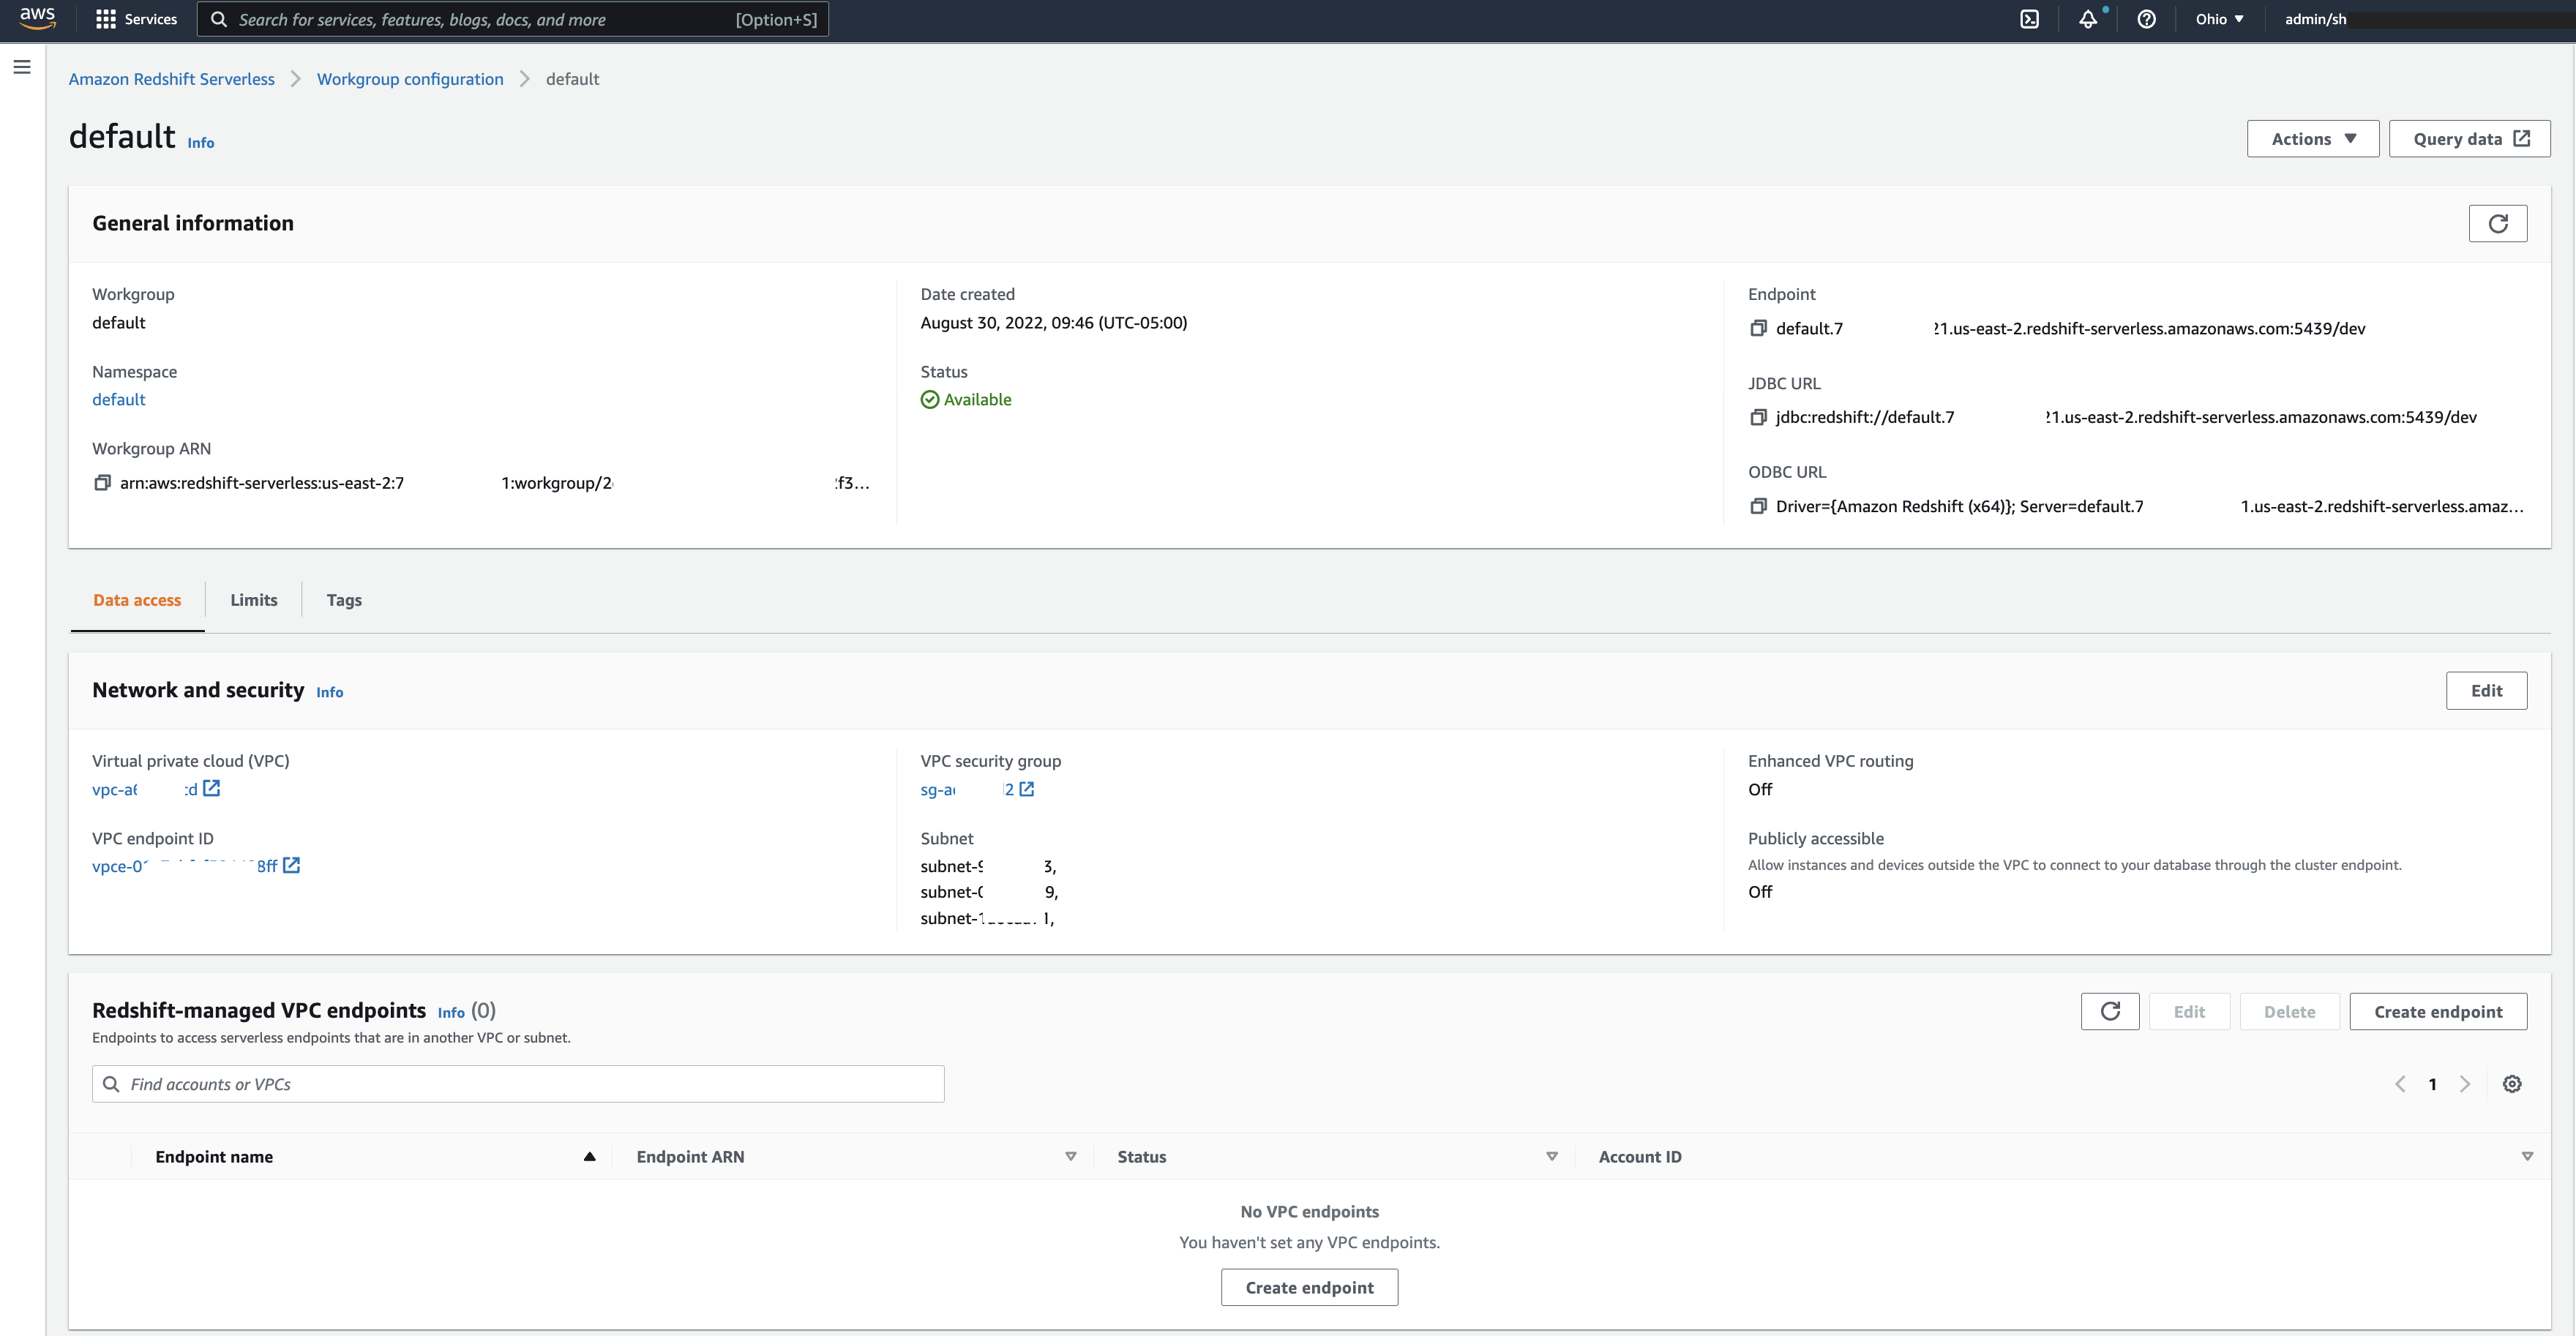
When the Redshift Serverless endpoint is available, choose Query data to launch the Amazon Redshift Query Editor v2 to create database objects, load data, and analyze and visualize data. You can also connect to Redshift Serverless endpoints using your preferred SQL client tools via Amazon Redshift JDBC/ODBC drivers.
With Redshift Serverless, you pay separately for the compute and storage you use. Compute capacity is measured in Redshift Processing Units (RPUs), and you pay for the workloads in RPU-hours with a minimum charge of 60 seconds, metered on a per-second basis. Data lake queries are also part of the same RPU-hours, and Redshift Serverless doesn’t charge separately for the per-TB based pricing of Amazon Redshift Spectrum. The default base capacity is 128 RPUs, but you can adjust it from 32 RPUs to 512 RPUs in units of 8 using the Redshift Serverless console. For storage, you pay for data stored in Amazon Redshift-managed storage and storage used for manual snapshots, similar to what you would pay with Amazon Redshift provisioned RA3 instances.
To control your costs, you can specify usage limits and define actions that Amazon Redshift automatically takes if those limits are reached. You can specify usage limits in RPU-hours and associated with a daily, weekly, or monthly duration. Setting higher usage limits can improve the overall throughput of the system, especially for workloads that need to handle high concurrency while maintaining consistently high performance.
Why Etleap customers need Redshift Serverless
Etleap gives customers robust and flexible pipelines without the hassle of coding and managing infrastructure. Redshift Serverless has a similar benefit, letting you run Amazon Redshift without worrying about provisioning and maintaining data warehouse.
With the close Etleap-AWS integration, you can get started working with multiple data sources in Redshift Serverless in minutes.
Redshift Serverless can also reduce users’ costs because it automatically scales data warehouse capacity up and down to match usage and only charges when the serverless instance is active. ETL workloads are often batch-based and characterized by spikes, so the dynamic scaling of Redshift Serverless reduces unnecessary costs.
The following diagram illustrates this solution architecture.
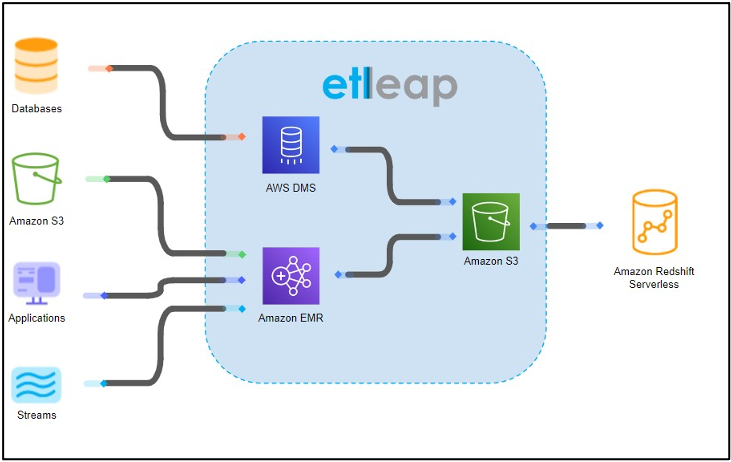
Etleap uses Amazon Database Migration Service (AWS DMS), Amazon EMR, and Amazon Simple Storage Service (Amazon S3) to process data from databases, files, applications, and streams into Redshift Serverless.
Optimize costs for Redshift Serverless
One of the main sources of cost savings when using Redshift Serverless comes from its auto-pausing feature. When a Redshift Serverless instance is idle, it will auto-pause and you aren’t charged during this period of inactivity.
However, high frequency ETL pipelines (such as those from streams or CDC sources) can constantly resume the Redshift Serverless instance, negating the cost benefit. To maximize the advantages of the auto-pausing feature of Redshift Serverless, Etleap provides the option of load synchronization. As shown in the following figure, this reduces the number of load batches, thereby lowering active Redshift Serverless instance time and cost.
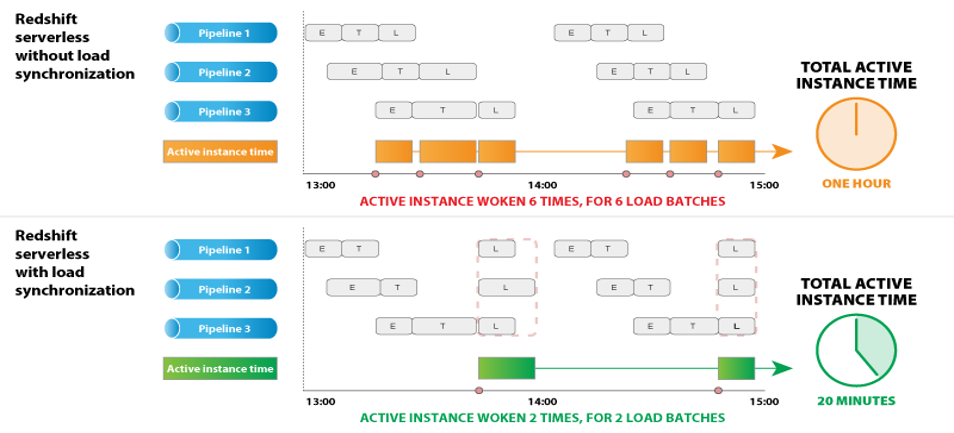
It sometimes makes sense to maximize the frequency of data ingestion, but not all use cases justify the higher cost of an always-on Amazon Redshift instance. Etleap users can set their load frequency at a cost-efficient once-per-hour or as frequently as every 5 minutes.
Amazon Redshift users typically run some SQL transformations after data is loaded in the warehouse. Etleap’s models feature lets you define the SQL transformations and their dependencies and control when these transformations are run. As with data loading, however, if these aren’t designed thoughtfully, there is a risk that models will trigger updates that unnecessarily wake up an idle Redshift Serverless instance, negating the cost savings of the Redshift Serverless auto-pausing feature.
To avoid this, Etleap schedules the models to update immediately after all the dependent tables have been updated. This maximizes the instance usage while it’s awake and allows it to pause when the loads and updates have completed.
Cost savings example
Let’s illustrate the cost savings benefits of Redshift Serverless by means of an example. A customer has set a 1-hour load synchronization schedule and has 100 pipelines and 10 models. Although by default Redshift Serverless has a provisioned base capacity of 128 RPUs, a provisioned base capacity of 32 RPUs is sufficient for the load requirements of this example. A typical average load time for Etleap customers into Amazon Redshift is 6 seconds. In Etleap, we perform a maximum of five loads at a time to avoid overloading the Redshift Serverless instance.
Here is an example of how the sequence would work for the pipelines:
- When the hourly schedule triggers, Etleap begins the extraction and transformation of source data for all pipelines with new data to process.
- After all the pipelines have finished extraction and transformation, Etleap begins to load the data into Amazon Redshift. This resumes the serverless instance. At an average of 6 seconds per load and five loads running in parallel, it takes 120 seconds to load all the pipelines (100 / 5 pipeline cycles * 6 seconds each).
- When the load is complete, Etleap triggers the model updates. A typical model in Etleap takes about 130 seconds to update. As with loads, Etleap limits models to five simultaneous updates to reduce the load on the Redshift Serverless instance. Therefore, updating all 10 models takes 260 seconds of total instance run time (130 seconds * 10/5 model cycles).
- At this point, you’re being charged for 380 seconds of active workload, and Redshift Serverless will become idle after some time.
Additionally, Etleap runs daily vacuum operations on applicable tables to minimize storage and improve query efficiency. The length of this process depends on the tables and the number of updates and deletes. For a customer with this amount of pipeline volume, 20 minutes is a typical length of time to vacuum the tables, adding that much daily runtime for the instance.
This results in a total daily runtime of 172 minutes ((380 seconds * 24 daily cycles / 60) + 20 minutes), which translates into a cost of $34.40 per day for a 32 RPU serverless instance. This is 88% lower cost than a comparable Amazon Redshift provisioned environment without the benefits of Etleap and Redshift Serverless: an always-on provisioned Amazon Redshift cluster with similar performance (1 year reserved instance pricing for 16 ra3.xlplus nodes running 24 hours/day).
Other ETL optimizations on Etleap using Redshift Serverless
Etleap natively supports Redshift Serverless by updating its ETL solution to ensure you can continue to seamlessly ingest diverse data sources.
Redshift Serverless offers new system views that are used for tracking and managing ingestion, and Etleap utilizes these new system views to natively handle tracking ingestion loads and vacuuming operations in their platform. For example, Etleap uses sys_query_history to determine which loads are in progress or complete, and thereby helps avoid double loading a batch.
Redshift Serverless automatically initiates optimizations such as sort and vacuum in the background and doesn’t charge for these automatic optimizations. As a best practice, after Etleap load synchronization, Etleap periodically runs the vacuum function on applicable tables, which reduces storage and improves query performance. Etleap uses the vacuum_sort_benefit column in svv_table_info, which provides the statistics for each table, informing which would benefit from vacuuming.
Summary
In this post, we described how Redshift Serverless frees you from managing data warehouse infrastructure and reduces costs. In particular, we illustrated a data integration pattern where Etleap can ensure further cost savings through its load synchronization feature by optimally choosing a cost-efficient once-per-hour load frequency. Although this proves to be an optimal solution for uses cases where you prefer cost efficiency over real-time data insights, Etleap also allows you to set the load frequency as low as 5 minutes for use cases where near-real-time data insights are important.
Start using Redshift Serverless to run and scale analytics without having to manage data warehouse infrastructure and take advantage of further cost savings through Etleap’s load synchronization feature. To get started with Etleap, start a free trial or request a tailored demo.
About the Authors
 Caius Brindescu is an engineer at Etleap with over 4 years of experience in developing ETL software. In addition to development work, he helps customers make the most out of Etleap and Amazon Redshift. He holds a PhD from Oregon State University and one AWS certification (Big Data – Specialty).
 Maneesh Sharma is a Senior Database Engineer at AWS with more than a decade of experience designing and implementing large-scale data warehouse and analytics solutions. He collaborates with various Amazon Redshift Partners and customers to drive better integration.
 Sathisan Vannadil is a Senior Partner Solutions Architect at Amazon Web Services (AWS). His primary focus is on helping independent software vendor (ISV) partners design and build solutions at scale on AWS. Prior to AWS, Sathisan held diverse technical positions and has over 20 years of experience in the field of data and analytics.
My snow blower has old gas in its tank. But it was stabilized — will it start?
Post Syndicated from Technology Connextras original https://www.youtube.com/watch?v=hQFkbg7he-4
Yves Morieux | The Social Economics of Productivity | Talks at Google
Post Syndicated from Talks at Google original https://www.youtube.com/watch?v=NIYeLLmT6oI
AWS achieves Spain’s ENS High certification across 166 services
Post Syndicated from Daniel Fuertes original https://aws.amazon.com/blogs/security/aws-achieves-spains-ens-high-certification-across-166-services/
Amazon Web Services (AWS) is committed to bringing additional services and AWS Regions into the scope of our Esquema Nacional de Seguridad (ENS) High certification to help customers meet their regulatory needs.
ENS is Spain’s National Security Framework. The ENS certification is regulated under the Spanish Royal Decree 3/2010 and is a compulsory requirement for central government customers in Spain. ENS establishes security standards that apply to government agencies and public organizations in Spain, and service providers on which Spanish public services depend. Updating and achieving this certification every year demonstrates our ongoing commitment to meeting the heightened expectations for cloud service providers set forth by the Spanish government.
We are happy to announce the addition of 17 services to the scope of our ENS High certification, for a new total of 166 services in scope. The certification now covers 25 Regions. Some of the additional security services in scope for ENS High include the following:
- AWS CloudShell – a browser-based shell that makes it simpler to securely manage, explore, and interact with your AWS resources. With CloudShell, you can quickly run scripts with the AWS Command Line Interface (AWS CLI), experiment with AWS service APIs by using the AWS SDKs, or use a range of other tools for productivity.
- AWS Cloud9 – a cloud-based integrated development environment (IDE) that you can use to write, run, and debug your code with just a browser. It includes a code editor, debugger, and terminal.
- Amazon DevOps Guru – a service that uses machine learning to detect abnormal operating patterns so that you can identify operational issues before they impact your customers.
- Amazon HealthLake – a HIPAA-eligible service that offers healthcare and life sciences companies a complete view of individual or patient population health data for query and analytics at scale.
- AWS IoT SiteWise – a managed service that simplifies collecting, organizing, and analyzing industrial equipment data.
AWS achievement of the ENS High certification is verified by BDO Auditores S.L.P., which conducted an independent audit and confirmed that AWS continues to adhere to the confidentiality, integrity, and availability standards at its highest level.
For more information about ENS High, see the AWS Compliance page Esquema Nacional de Seguridad High. To view the complete list of services included in the scope, see the AWS Services in Scope by Compliance Program – Esquema Nacional de Seguridad (ENS) page. You can download the ENS High Certificate from AWS Artifact in the AWS Management Console or from the Compliance page Esquema Nacional de Seguridad High.
As always, we are committed to bringing new services into the scope of our ENS High program based on your architectural and regulatory needs. If you have questions about the ENS program, reach out to your AWS account team or contact AWS Compliance.
If you have feedback about this post, submit comments in the Comments section below.
Want more AWS Security how-to content, news, and feature announcements? Follow us on Twitter.
Asahi Linux November 2022 progress report
Post Syndicated from original https://lwn.net/Articles/915725/
For those who are waiting for Linux on Apple hardware, the Asahi Linux
project has put out a detailed
report on progress toward a working kernel and distribution.
This kind of safety model is not new: it is already commonplace on
Android phones, where it is usually implemented in DSP
firmware. But of course, the desktop Linux ecosystem doesn’t even
have a speaker EQ database framework yet, nevermind safety models!
The eternal lagging behind of Linux audio strikes again. What’s the
plan? While this isn’t settled yet, our current idea is to
implement the safety model in a stand-alone daemon that captures
the voltage/current feedback data from the ALSA device, and drives
the mixer volume itself as as means of implementing soft power
limits, together with some kind of “safety watchdog interlock” with
the kernel that only enables higher volume limits when the daemon
is active and running
Apple’s Device Analytics Can Identify iCloud Users
Post Syndicated from Bruce Schneier original https://www.schneier.com/blog/archives/2022/11/apples-device-analytics-can-identify-icloud-users.html
Researchers claim that supposedly anonymous device analytics information can identify users:
On Twitter, security researchers Tommy Mysk and Talal Haj Bakry have found that Apple’s device analytics data includes an iCloud account and can be linked directly to a specific user, including their name, date of birth, email, and associated information stored on iCloud.
Apple has long claimed otherwise:
On Apple’s device analytics and privacy legal page, the company says no information collected from a device for analytics purposes is traceable back to a specific user. “iPhone Analytics may include details about hardware and operating system specifications, performance statistics, and data about how you use your devices and applications. None of the collected information identifies you personally,” the company claims.
Apple was just sued for tracking iOS users without their consent, even when they explicitly opt out of tracking.
How I make Money as a Photographer 💵 📸
Post Syndicated from Matt Granger original https://www.youtube.com/watch?v=4MlM4K1LdUA
Search Made Easy: InsightIDR’s Secret Weapon for Efficiency and Efficacy
Post Syndicated from Rapid7 original https://blog.rapid7.com/2022/11/22/search-made-easy-insightidrs-secret-weapon-for-efficiency-and-efficacy/

By Matt Heidet
Matt is a Senior Information Security Engineer at a Regional Financial Institution. He is a Customer and Guest Blogger for Rapid7
Have you ever groaned when divvying up incidents from a pen-test amongst an overworked team? Or maybe you’ve struggled to present how you adhere to multiple compliance frameworks to your board. As a Senior Information Security Engineer at a Regional Finance Institute, I’m all too familiar with the daily grind – too many threats, not nearly enough time. Fortunately, Rapid7’s InsightIDR has helped me and my team unify our data, verify the nature of threats, and uphold a security posture that we’re confident in.
InsightIDR has lots of features that have enabled my organization to identify and respond more easily to threats. In this blog post, I’m going to share some insight into my favorite – InsightIDR’s Log Search function.
Back to the Beginning: Why We Chose Rapid7
Choosing InsightIDR was a no-brainer for us. We tried two other products, but as soon as we finished the proof-of-concept with Rapid7, we went straight to purchase. There was no point in even testing the others, as InsightIDR provided us with the visibility and context necessary to keep our environment secure
If you already have InsightVM, Rapid7’s vulnerability management solution, it’s a pretty smooth transition to InsightIDR. As existing InsightVM users, we already had the Rapid7 Insight Agent deployed on our endpoints, which provided us with real-time endpoint monitoring for vulnerabilities. When we added InsightIDR to our environment, we were automatically covered on those same endpoints, without any need to set up anything additional.
We were able to get up and running and integrate with a number of Azure Event Hubs out of the gate (a centralized service from which to collect Azure data and logs). Only a few other tools would provide that same capability – but they wouldn’t fit into our existing environment the way that Rapid7 did.
Getting Started with Log Search
When we first started using InsightIDR, my team wanted to bring in as much data to InsightIDR as we could to get a clear picture of what was happening in our environment. We knew we needed holistic visibility, but weren’t 100% on what we should be alerting on or necessarily looking for. Luckily, InsightIDR’s Log Search intuitively organized all of our data and helped us get a view of everything in one place, narrowing our focus and enabling us to really focus on high priority data.
InsightIDR removed the complexity of traditional Log Search. If you’re not sure where to start, just start with a simple search – a host name, a kind of attack, or an event. Then, based on your results, you can create a more advanced search by filtering, iterating, or narrowing down your simple searches. From there, you can start creating reports. Your reports can tell you (and you can then customize) how you should be watching an endpoint, how you should be alerted, and more.
Let’s Talk Outcomes
Now it’s time to do something with all this data! We were able to compare data from those sources to the email alerts that we got from Microsoft on Azure and easily generate a report based on the email events we were seeing from Microsoft. From there, we were able to generate custom detections.
One reason this was all so straightforward is that Rapid7’s powerful search language, Log Entry Query Language (LEQL – which allows you to construct queries that can extract the hidden insights within your logs), is easy to pick up. Even if you’re not a programmer or engineer, the structure and syntax of the language are accessible.
Once you get the first couple workflows ironed out, it’s easy to extrapolate to other ones. Once my team focused on this task we were able to come up with 45 custom detections over just three days!
Where Do I Go From Here?
Detections are your bread and butter, of course. But once you’re oriented to the dashboard, the language, and the basics of a workflow, the sky’s the limit. You can then customize your reports to your heart’s desire. My team currently has about 22 reports coming in daily, summarizing almost 100 custom detections that all stem from log search.
Rapid7’s alerting and reporting is hands down the best I’ve ever worked with. But it’s not just about volume – it’s also about versatility. We’re able to monitor all of our Cloud services – including Amazon, Azure, and Google – with ease. In the past, when using managed security providers, this wasn’t nearly as straightforward. We’re looking at InsightIDR’s pre-built Attacker Behavior Analytics (ABA) and User Behavior Analytics (UBA) detections with regularity, using a mix of both custom and pre-built “cards” (a visually appealing representation of data) in our InsightIDR dashboard.
Furthermore, it’s not just that you have options. The pre-built detections that InsightIDR ships out of the box boasts plenty of efficacy, resulting in unprecedented efficiency. The ability to have all of the data you need in one place – the equivalent of a “single pane of glass” – just can’t be overstated.
Welcome Stéphane Guillou, new QA Analyst for LibreOffice (Document Foundation)
Post Syndicated from original https://lwn.net/Articles/915711/
The Document Foundation has announced
the hiring of a quality-assurance analyst, bringing its staff up to 13
people.
A lot of my time will be spent on triaging the issues users report
on Bugzilla – our bug-reporting platform. There is a lot of
activity on Bugzilla, and classifying and testing the reports is
fundamental for us to focus on the most pressing issues, help the
work developers are doing, and keep improving the software for
everyone! Part of the work will also be to analyse and summarise
the wealth of data available to help us see the bigger picture and
make better decisions when allocating resources.