Tag Archives: Amazon EC2

Introducing Amazon EC2 high memory U7i Instances for large in-memory databases (preview)

Post Syndicated from Jeff Barr original https://aws.amazon.com/blogs/aws/introducing-amazon-ec2-high-memory-u7i-instances-for-large-in-memory-databases-preview/

The new U7i instances are designed to support large, in-memory databases including SAP HANA, Oracle, and SQL Server. Powered by custom fourth generation Intel Xeon Scalable Processors (Sapphire Rapids), the instances are now available in multiple AWS regions in preview form, in the US West (Oregon), Asia Pacific (Seoul), and Europe (Frankfurt) AWS Regions, as follows:

Instance Name vCPUs
Memory (DDR5)
EBS Bandwidth
Network Bandwidth
u7in-16tb.224xlarge 896 16,384 GiB 100 Gbps 100 Gbps
u7in-24tb.224xlarge 896 24,576 GiB 100 Gbps 100 Gbps
u7in-32tb.224xlarge 896 32,768 GiB 100 Gbps 100 Gbps

We are also working on a smaller instance:

Instance Name vCPUs
Memory (DDR5)
EBS Bandwidth
Network Bandwidth
u7i-12tb.224xlarge 896 12,288 GiB 60 Gbps 100 Gbps

Here’s what 32 TiB of memory looks like:

And here are the 896 vCPUs (and lots of other info):

When compared to the first generation of High Memory instances, the U7i instances offer up to 125% more compute performance and up to 120% more memory performance. They also provide 2.5x as much EBS bandwidth, giving you the ability to hydrate in-memory databases at a rate of up to 44 terabytes per hour.

Each U7i instance supports attachment of up to 128 General Purpose (gp2 and gp3) or Provisioned IOPS (io1 and io2 Block Express) EBS volumes. Each io2 Block Express volume can be as big as 64 TiB and can deliver up to 256K IOPS at up to 32 Gbps, making them a great match for the U7i instance.

On the network side, the instances support ENA Express and deliver up to 25 Gbps of bandwidth per network flow.

Supported operating systems include Red Hat Enterprise Linux and SUSE Enterprise Linux Server.

Join the Preview
If you are ready to put the U7i instances to the test in your environment, join the preview.

Jeff;

The attendee’s guide to the AWS re:Invent 2023 Compute track

Post Syndicated from Chris Munns original https://aws.amazon.com/blogs/compute/the-attendees-guide-to-the-aws-reinvent-2023-compute-track/

This post by Art Baudo – Principal Product Marketing Manager – AWS EC2, and Pranaya Anshu – Product Marketing Manager – AWS EC2

We are just a few weeks away from AWS re:Invent 2023, AWS’s biggest cloud computing event of the year. This event will be a great opportunity for you to meet other cloud enthusiasts, find productive solutions that can transform your company, and learn new skills through 2000+ learning sessions.

Even if you are not able to join in person, you can catch-up with many of the sessions on-demand and even watch the keynote and innovation sessions live.

If you’re able to join us, just a reminder we offer several types of sessions which can help maximize your learning in a variety of AWS topics. Breakout sessions are lecture-style 60-minute informative sessions presented by AWS experts, customers, or partners. These sessions are recorded and uploaded a few days after to the AWS Events YouTube channel.

re:Invent attendees can also choose to attend chalk-talks, builder sessions, workshops, or code talk sessions. Each of these are live non-recorded interactive sessions.

  • Chalk-talk sessions: Attendees will interact with presenters, asking questions and using a whiteboard in session.
  • Builder Sessions: Attendees participate in a one-hour session and build something.
  • Workshops sessions: Attendees join a two-hour interactive session where they work in a small team to solve a real problem using AWS services.
  • Code talk sessions: Attendees participate in engaging code-focused sessions where an expert leads a live coding session.

To start planning your re:Invent week, check-out some of the Compute track sessions below. If you find a session you’re interested in, be sure to reserve your seat for it through the AWS attendee portal.

Explore the latest compute innovations

This year AWS compute services have launched numerous innovations: From the launch of over 100 new Amazon EC2 instances, to the general availability of Amazon EC2 Trn1n instances powered by AWS Trainium and Amazon EC2 Inf2 instances powered by AWS Inferentia2, to a new way to reserve GPU capacity with Amazon EC2 Capacity Blocks for ML. There’s a lot of exciting launches to take in.

Explore some of these latest and greatest innovations in the following sessions:

  • CMP102 | What’s new with Amazon EC2
    Provides an overview on the latest Amazon EC2 innovations. Hear about recent Amazon EC2 launches, learn how about differences between Amazon EC2 instances families, and how you can use a mix of instances to deliver on your cost, performance, and sustainability goals.
  • CMP217 | Select and launch the right instance for your workload and budget
    Learn how to select the right instance for your workload and budget. This session will focus on innovations including Amazon EC2 Flex instances and the new generation of Intel, AMD, and AWS Graviton instances.
  • CMP219-INT | Compute innovation for any application, anywhere
    Provides you with an understanding of the breadth and depth of AWS compute offerings and innovation. Discover how you can run any application, including enterprise applications, HPC, generative artificial intelligence (AI), containers, databases, and games, on AWS.

Customer experiences and applications with machine learning

Machine learning (ML) has been evolving for decades and has an inflection point with generative AI applications capturing widespread attention and imagination. More customers, across a diverse set of industries, choose AWS compared to any other major cloud provider to build, train, and deploy their ML applications. Learn about the generative AI infrastructure at Amazon or get hands-on experience building ML applications through our ML focused sessions, such as the following:

Discover what powers AWS compute

AWS has invested years designing custom silicon optimized for the cloud to deliver the best price performance for a wide range of applications and workloads using AWS services. Learn more about the AWS Nitro System, processors at AWS, and ML chips.

Optimize your compute costs

At AWS, we focus on delivering the best possible cost structure for our customers. Frugality is one of our founding leadership principles. Cost effective design continues to shape everything we do, from how we develop products to how we run our operations. Come learn of new ways to optimize your compute costs through AWS services, tools, and optimization strategies in the following sessions:

Check out workload-specific sessions

Amazon EC2 offers the broadest and deepest compute platform to help you best match the needs of your workload. More SAP, high performance computing (HPC), ML, and Windows workloads run on AWS than any other cloud. Join sessions focused around your specific workload to learn about how you can leverage AWS solutions to accelerate your innovations.

Hear from AWS customers

AWS serves millions of customers of all sizes across thousands of use cases, every industry, and around the world. Hear customers dive into how AWS compute solutions have helped them transform their businesses.

Ready to unlock new possibilities?

The AWS Compute team looks forward to seeing you in Las Vegas. Come meet us at the Compute Booth in the Expo. And if you’re looking for more session recommendations, check-out additional re:Invent attendee guides curated by experts.

It’s About Time: Microsecond-Accurate Clocks on Amazon EC2 Instances

Post Syndicated from Chris Munns original https://aws.amazon.com/blogs/compute/its-about-time-microsecond-accurate-clocks-on-amazon-ec2-instances/

This post is written by Josh Levinson, AWS Principal Product Manager and Julien Ridoux, AWS Principal Software Engineer

Today, we announced that we improved the Amazon Time Sync Service to microsecond-level clock accuracy on supported Amazon EC2 instances. This new capability adds a local reference clock to your EC2 instance and is designed to deliver clock accuracy in the low double-digit microsecond range within your instance’s guest OS software. This post shows you how to connect to the improved clocks on your EC2 instances. This post also demonstrates how you can measure your clock accuracy and easily generate and compare timestamps from your EC2 instances with ClockBound, an open source daemon and library.

In general, it’s hard to achieve high-fidelity clock synchronization due to hardware limitations and network variability. While customers have depended on the Amazon Time Sync Service to provide one millisecond clock accuracy, workloads that need microsecond-range accuracy, such as financial trading and broadcasting, required customers to maintain their own time infrastructure, which is a significant operational burden, and expensive. Other clock-sensitive applications that run on the cloud, including distributed databases and storage, have to incorporate message exchange delays with wait periods, data locks, or transaction journaling to maintain consistency at scale.

With global and reliable microsecond-range clock accuracy, you can now migrate and modernize your most time-sensitive applications in the cloud and retire your burdensome on-premises time infrastructure. You can also simplify your applications and increase their throughput by leveraging the high-accuracy timestamps to determine the ordering of events and transactions on workloads across instances, Availability Zones, and Regions. Additionally, you can audit the improved Amazon Time Sync Service to measure and monitor the expected microsecond-range accuracy.

New improvements to Amazon Time Sync Service

The new local clock source can be accessed over the existing Amazon Time Sync Service’s Network Time Protocol (NTP) IPv4 and IPv6 endpoints, or by configuring a new Precision Time Protocol (PTP) reference clock device, to get the best accuracy possible. It’s important to note that both NTP and the new PTP Hardware Clock (PHC) device share the same highly accurate source of time. The new PHC device is part of the AWS Nitro System, so it is directly accessible on supported bare metal and virtualized Amazon EC2 instances without using any customer resources.

A quick note about Leap Seconds

Leap seconds, introduced in 1972, are occasional one-second adjustments to UTC time to factor in irregularities in Earth’s rotation to UTC time in order to accommodate differences between International Atomic Time (TAI) and solar time (Ut1). To manage leap seconds on behalf of customers, we designed leap second smearing within the Amazon Time Sync Service (details on smearing time in “Look Before You Leap”).

Leap seconds are going away, and we are in full support of the decision made at the 27th General Conference on Weights and Measures to abandon leap seconds by or before 2035.

To support this transition, we still plan on smearing time when accessing the Amazon Time Sync Service over the local NTP connection or our Public NTP pools (time.aws.com). The new PHC device, however, will not provide a smeared time option. In the event of a leap seconds, PHC would add the leap seconds following UTC standards. Leap smeared and leap second time sources are the same in most cases. But, since they differ during a leap second event, we do not recommend mixing smeared and non-smeared time sources in your time client configuration during a leap second event.

Connect using NTP (automatic for most customers)

You can connect to the new, microsecond-accurate clocks over NTP the same way you use the Amazon Time Sync Service today at the 169.254.169.123 IPv4 address or the fd00:ec2::123 IPv6 address. This is already the default configuration on all Amazon AMIs and many partner AMIs, including RHEL, Ubuntu, and SUSE. You can verify this connection in your NTP daemon. The below example, using the chrony daemon, verifies that chrony is using the 169.254.169.123 IPv4 address of the Amazon Time Sync Service to synchronize the time:

[ec2-user@ ~]$ chronyc sources
MS Name/IP address         Stratum Poll Reach LastRx Last sample
===============================================================================
^- pacific.latt.net              3  10   377    69  +5630us[+5632us] +/-   90ms
^- edge-lax.txryan.com           2   8   377   224   -691us[ -689us] +/-   33ms
^* 169.254.169.123               1   4   377     2  -4487ns[-5914ns] +/-   85us
^- blotch.image1tech.net         2   9   377   327  -1710us[-1720us] +/-   64ms
^- 44.190.40.123                 2   9   377   161  +3057us[+3060us] +/-   84ms

The 169.254.169.123 IPv4 address of the Amazon Time Sync Service is designated with a *, showing it is the source of synchronization on this instance. See the EC2 User Guide for more details on configuring the Amazon Time Sync Service if it is not already configured by default.

Connect using the PTP Hardware Clock

First, you need to install the latest Elastic Network Adapter (ENA) driver. This driver will allow you to connect directly to the PHC. Connect to your instance and install the Linux kernel driver for Elastic Network Adapter (ENA) version 2.10.0 or later. For the installation instructions, see Linux kernel driver for Elastic Network Adapter (ENA) family on GitHub. To enable PTP support in the driver follow the instructions in the section “PTP Hardware Clock (PHC)“.

Once the driver is installed, you need to configure your NTP daemon to connect to the PHC. Below is an example on how to change the configuration in chrony by adding the PHC to your chrony configuration file. Then restart chrony for the change to take place:

[ec2-user ~]$ sudo sh -c 'echo "refclock PHC /dev/ptp0 poll 0 delay 0.000010 prefer" >> /etc/chrony.conf'
[ec2-user ~]$ sudo systemctl restart chronyd

This example uses a +/-5 microsecond range in receiving the reference signal from the PHC. These 10 microseconds are needed to account for operating system latency.

After changing your configuration, you can validate your daemon is correctly syncing to the PHC. Below is an example of output from the chronyc command. An asterisk will appear next to the PHC0 source indicating that you are now syncing to the PHC:

[ec2-user@ ~]$ chronyc sources
MS Name/IP address         Stratum Poll Reach LastRx Last sample
=============================================================================
#* PHC0                           0   0   377     1   +18ns[  +20ns] +/- 5032ns

The PHC0 device of the Amazon Time Sync Service is designated with a *, showing it is the source of synchronization on this instance

Your chrony tracking information will also show that you are syncing to the PHC:

[ec2-user@ ~]$ chronyc tracking
Reference ID    : 50484330 (PHC0)
Stratum         : 1
Ref time (UTC)  : Mon Nov 13 18:43:09 2023
System time     : 0.000000004 seconds fast of NTP time
Last offset     : -0.000000010 seconds
RMS offset      : 0.000000012 seconds
Frequency       : 7.094 ppm fast
Residual freq   : -0.000 ppm
Skew            : 0.004 ppm
Root delay      : 0.000010000 seconds
Root dispersion : 0.000001912 seconds
Update interval : 1.0 seconds
Leap status     : Normal

See the EC2 User Guide for more details on configuring the PHC.

Measuring your clock accuracy

Clock accuracy is a measure of clock error, typically defined as the offset to UTC. This clock error is the difference between the observed time on the computer and the reference time (also known as true time). If your instance is configured to use the Amazon Time Sync Service where the microsecond-accurate enhancement is available, you will typically see a clock error bound of under 100us using the NTP connection. When configured and synchronized correctly with the new PHC connection, you will typically see a clock error bound of under 40us.

We previously published a blog on measuring and monitoring clock accuracy over NTP, which still applies to the improved NTP connection.

If you are connected to the PHC, your time daemon, such as chronyd, will underestimate the clock error bound. This is because inherently, a PTP hardware clock device in Linux does not pass any “error bound” information to chrony, the way the NTP would. As a result, your clock synchronization daemon assumes the clock itself is accurate to UTC and thus has an “error bound” of 0. To get around this issue, the Nitro System calculates the error bound of the PTP Hardware Clock itself, and exposes it to your EC2 instance over the ENA driver sysfs filesystem. You can read this directly as a value in nanoseconds with the command cat /sys/devices/pci0000:00/0000:00:05.0/phc_error_bound. To get your clock error bound at some instant, you would need to add the clock error bound from chrony or ClockBound at the time that chronyd polls the PTP Hardware Clock and add it to this phc_error_bound value.

Below is how you would calculate the clock error incorporating the PHC clock error to get your true clock error bound:

CLOCK ERROR BOUND = SYSTEM TIME + (.5 * ROOT DELAY) + ROOTDISPERSION + PHC Error Bound

For the values in the example:

PHC Error Bound = cat /sys/devices/pci0000:00/0000:00:05.0/phc_error_bound

The System Time, Root Delay, and Root Dispersion are values taken from the chrony tracking information.

ClockBound

However accurate, a clock is never perfect. Instead of providing an estimate of the clock error, ClockBound provides a reliable confidence interval by automatically calculating the clock accuracy, using the calculations in which the reference time (true time) does exist. The open source ClockBound daemon provides a convenient way to retrieve this confidence interval, and work is continuing to make it easier to integrate into high performance workloads.

Conclusion

The Amazon Time Sync Service’s new microsecond-accurate clocks can be leveraged to migrate and modernize your most clock-sensitive applications in the cloud. In this post, we showed you how to can connect to the improved clocks on supported Amazon EC2 instances, how to measure your clock accuracy, and how to easily generate and compare timestamps from your Amazon EC2 instances with ClockBound. Launch a supported instance and get started today to build using this new capability.

To learn more about the Amazon Time Sync Service, see the EC2 UserGuide for Linux and Windows.

If you have questions about this post, start a new thread on the AWS Compute re:Post or contact AWS Support.

Hear about the Amazon Time Sync Service at re:Invent

We will speak in more detail about the Amazon Time Sync Service during re:invent 2023. Look for Session ID CMP220 in the AWS re:Invent session catalog to register.

Introducing instance maintenance policy for Amazon EC2 Auto Scaling

Post Syndicated from Macey Neff original https://aws.amazon.com/blogs/compute/introducing-instance-maintenance-policy-for-amazon-ec2-auto-scaling/

This post is written by Ahmed Nada, Principal Solutions Architect, Flexible Compute and Kevin OConnor, Principal Product Manager, Amazon EC2 Auto Scaling.

Amazon Web Services (AWS) customers around the world trust Amazon EC2 Auto Scaling to provision, scale, and manage Amazon Elastic Compute Cloud (Amazon EC2) capacity for their workloads. Customers have come to rely on Amazon EC2 Auto Scaling instance refresh capabilities to drive deployments of new EC2 Amazon Machine Images (AMIs), change EC2 instance types, and make sure their code is up-to-date.

Currently, EC2 Auto Scaling uses a combination of ‘launch before terminate’ and ‘terminate and launch’ behaviors depending on the replacement cause. Customers have asked for more control over when new instances are launched, so they can minimize any potential disruptions created by replacing instances that are actively in use. This is why we’re excited to introduce instance maintenance policy for Amazon EC2 Auto Scaling, an enhancement that provides customers with greater control over the EC2 instance replacement processes to make sure instances are replaced in a way that aligns with performance priorities and operational efficiencies while minimizing Amazon EC2 costs.

This post dives into varying ways to configure an instance maintenance policy and gives you tools to use it in your Amazon EC2 Auto Scaling groups.

Background

AWS launched Amazon EC2 Auto Scaling in 2009 with the goal of simplifying the process of managing Amazon EC2 capacity. Since then, we’ve continued to innovate with advanced features like predictive scaling, attribute-based instance selection, and warm pools.

A fundamental Amazon EC2 Auto Scaling capability is replacing instances based on instance health, due to Amazon EC2 Spot Instance interruptions, or in response to an instance refresh operation. The instance refresh capability allows you to maintain a fleet of healthy and high-performing EC2 instances in your Amazon EC2 Auto Scaling group. In some situations, it’s possible that terminating instances before launching a replacement can impact performance, or in the worst case, cause downtime for your applications. No matter what your requirements are, instance maintenance policy allows you to fine-tune the instance replacement process to match your specific needs.

Overview

Instance maintenance policy adds two new Amazon EC2 Auto Scaling group settings: minimum healthy percentage (MinHealthyPercentage) and maximum healthy percentage (MaxHealthyPercentage). These values represent the percentage of the group’s desired capacity that must be in a healthy and running state during instance replacement. Values for MinHealthyPercentage can range from 0 to 100 percent and from 100 to 200 percent for MaxHealthyPercentage. These settings are applied to all events that lead to instance replacement, such as Health-check based replacement, Max Instance Lifetime, EC2 Spot Capacity Rebalancing, Availability Zone rebalancing, Instance Purchase Option Rebalancing, and Instance refresh. You can also override the group-level instance maintenance policy during instance refresh operations to meet specific deployment use cases.

Before launching instance maintenance policy, an Amazon EC2 Auto Scaling group would use the previously described behaviors when replacing instances. By setting the MinHealthyPercentage of the instance maintenance policy to 100% and the MaxHealthyPercentage to a value greater than 100%, the Amazon EC2 Auto Scaling group first launches replacement instances and waits for them to become available before terminating the instances being replaced.

Setting up instance maintenance policy

You can add an instance maintenance policy to new or existing Amazon EC2 Auto Scaling groups using the AWS Management Console, AWS Command Line Interface (AWS CLI), AWS SDK, AWS CloudFormation, and Terraform.

When creating or editing Amazon EC2 Auto Scaling groups in the Console, you are presented with four options to define the replacement behavior of your instance maintenance policy. These options include the No policy option, which allows you to maintain the default instance replacement settings that the Amazon EC2 Auto Scaling service uses today.

The GUI for the instance maintenance policy feature within the “Create Auto Scaling group” wizard.

Image 1: The GUI for the instance maintenance policy feature within the “Create Auto Scaling group” wizard.

Using instance maintenance policy to increase application availability

The Launch before terminating policy is the right selection when you want to favor availability of your Amazon EC2 Auto Scaling group capacity. This policy setting temporarily increases the group’s capacity by launching new instances during replacement operations. In the Amazon EC2 console, you select the Launch before terminating replacement behavior, and then set your desired MaxHealthyPercentage value to determine how many more instances should be launched during instance replacement.

For example, if you are managing a workload that requires optimal availability during instance replacements, choose the Launch before terminating policy type with a MinHealthyPercentage set to 100%. If you set your MaxHealthyPercentage to 150%, then Amazon EC2 Auto Scaling launches replacement instances before terminating instances to be replaced. You should see the desired capacity increase by 50%, exceeding the group maximum capacity during the operation to provide you with the needed availability. The chart in the following figure illustrates what an instance refresh operation would behave like with a Launch before terminating policy.

A graph simulating the instance replacement process with a policy configured to launch before terminating.

Figure 1: A graph simulating the instance replacement process with a policy configured to launch before terminating.

Overriding a group’s instance maintenance policy during instance refresh

Instance maintenance policy settings apply to all instance replacement operations, but they can be overridden at the start of a new instance refresh operation. Overriding instance maintenance policy is helpful in situations like a bad code deployment that needs replacing without downtime. You could configure an instance maintenance policy to bring an entirely new group’s worth of instances into service before terminating the instances with the problematic code. In this situation, you set the MaxHealthyPercentage to 200% for the instance refresh operation and the replacement happens in a single cycle to promptly address the bad code issue. Setting the MaxHealthyPercentage to 200% will allow the replacement settings to breach the Auto Scaling Group’s Max capacity value, but would be constrained by any account level quotas, so be sure to factor these into application of this feature. See the following figure for a visualization of how this operation would behave.

A graph simulating the instance replacement process with a policy configured to accelerate a new deployment.

Figure 2: A graph simulating the instance replacement process with a policy configured to accelerate a new deployment.

Controlling costs during replacements and deployments

The Terminate and launch policy option allows you to favor cost control during instance replacement. By configuring this policy type, Amazon EC2 Auto Scaling terminates existing instances and then launches new instances during the replacement process. To set a Terminate and launch policy, you must specify a MinHealthyPercentage to establish how low the capacity can drop, and keep your MaxHealthyPercentage set to 100%. This configuration keeps the Auto Scaling group’s capacity at or below the desired capacity setting.

The following figure shows behavior with the MinHealthyPercentage set to 80%. During the instance replacement process, the Auto Scaling group first terminates 20% of the instances and immediately launches replacement instances, temporarily reducing the group’s healthy capacity to 80%. The group waits for the new instances to pass its configured health checks and complete warm up before it moves on to replacing the remaining batches of instances.

: A graph simulating the instance replacement process with a policy configured to terminate and launch.

Figure 3: A graph simulating the instance replacement process with a policy configured to terminate and launch.

Note that the difference between MinHealthyPercentage and MaxHealthyPercentage values impacts the speed of the instance replacement process. In the preceding figure, the Amazon EC2 Auto Scaling group replaces 20% of the instances in each cycle. The larger the gap between the MinHealthyPercentage and MaxHealthyPercentage, the faster the replacement process.

Using a custom policy for maximum flexibility

You can also choose to adopt a Custom behavior option, where you have the flexibility to set the MinHealthyPercentage and MinHealthyPercentage values to whatever you choose. Using this policy type allows you to fine-tune the replacement behavior and control the capacity of your instances within the Amazon EC2 Auto Scaling group to tailor the instance maintenance policy to meet your unique needs.

What about fractional replacement calculations?

Amazon EC2 Auto Scaling always favors availability when performing instance replacements. When instance maintenance policy is configured, Amazon EC2 Auto Scaling also prioritizes launching a new instance rather than going below the MinHealthyPercentage. For example, in an Amazon EC2 Auto Scaling group with a desired capacity of 10 instances and an instance maintenance policy with MinHealthyPercentage set to 99% and MaxHealthyPercentage set to 100%, your settings do not allow for a reduction in capacity of at least one instance. Therefore, Amazon EC2 Auto Scaling biases toward launch before terminating and launches one new instance before terminating any instances that need replacing.

Configuring an instance maintenance policy is not mandatory. If you don’t configure your Amazon EC2 Auto Scaling groups to use an instance maintenance policy, then there is no change in the behavior of your Amazon EC2 Auto Scaling groups’ existing instance replacement process.

You can set a group-level instance maintenance policy through your CloudFormation or Terraform templates. Within your templates, you must set values for both the MinHealthyPercentage and MaxHealthyPercentage settings to determine the instance replacement behavior that aligns with the specific requirements of your Amazon EC2 Auto Scaling group.

Conclusion

In this post, we introduced the new instance maintenance policy feature for Amazon EC2 Auto Scaling groups, explored its capabilities, and provided examples of how to use this new feature. Instance maintenance policy settings apply to all instance replacement processes with the option to override the settings on a per instance refresh basis. By configuring instance maintenance policies, you can control the launch and lifecycle of instances in your Amazon EC2 Auto Scaling groups, increase application availability, reduce manual intervention, and improve cost control for your Amazon EC2 usage.

To learn more about the feature and how to get started, refer to the Amazon EC2 Auto Scaling User Guide.

AWS Weekly Roundup—Reserve GPU capacity for short ML workloads, Finch is GA, and more—November 6, 2023

Post Syndicated from Marcia Villalba original https://aws.amazon.com/blogs/aws/aws-weekly-roundup-reserve-gpu-capacity-for-short-ml-workloads-finch-is-ga-and-more-november-6-2023/

The year is coming to an end, and there are only 50 days until Christmas and 21 days to AWS re:Invent! If you are in Las Vegas, come and say hi to me. I will be around the Serverlesspresso booth most of the time.

Last week’s launches
Here are some launches that got my attention during the previous week.

Amazon EC2 – Amazon EC2 announced Capacity Blocks for ML. This means that you can now reserve GPU compute capacity for your short-duration ML workloads. Learn more about this launch on the feature page and announcement blog post.

Finch – Finch is now generally available. Finch is an open source tool for local container development on macOS (using Intel or Apple Silicon). It provides a command line developer tool for building, running, and publishing Linux containers on macOS. Learn more about Finch in this blog post written by Phil Estes or on the Finch website.

AWS X-Ray – AWS X-Ray now supports W3C format trace IDs for distributed tracing. AWS X-Ray supports trace IDs generated through OpenTelemetry or any other framework that conforms to the W3C Trace Context specification.

Amazon Translate Amazon Translate introduces a brevity customization to reduce translation output length. This is a new feature that you can enable in your real-time translations where you need a shorter translation to meet caption size limits. This translation is not literal, but it will preserve the underlying message.

AWS IAM IAM increased the actions last accessed to 60 more services. This functionality is very useful when fine-tuning the permissions of the roles, identifying unused permissions, and granting the least amount of permissions that your roles need.

AWS IAM Access AnalyzerIAM Access Analyzer policy generator expanded support to identify over 200 AWS services to help you create fine-grained policies based on your AWS CloudTrail access activity.

For a full list of AWS announcements, be sure to keep an eye on the What’s New at AWS page.

Other AWS news
Some other news and blog posts that you may have missed:

AWS Compute BlogDaniel Wirjo and Justin Plock wrote a very interesting article about how you can send and receive webhooks on AWS using different AWS serverless services. This is a good read if you are working with webhooks on your application, as it not only shows you how to build these solutions but also what considerations you should have when building them.

AWS Storage Blog Bimal Gajjar and Andrew Peace wrote a very useful blog post about how to handle event ordering and duplicate events with Amazon S3 Event Notifications. This is a common challenge for many customers.

Amazon Science BlogDavid Fan wrote an article about how to build better foundation models for video representation. This article is based on a paper that Prime Video presented at a conference about this topic.

The Official AWS Podcast – Listen each week for updates on the latest AWS news and deep dives into exciting use cases. There are also official AWS podcasts in several languages. Check out the ones in FrenchGermanItalian, and Spanish.

AWS open-source news and updates – This is a newsletter curated by my colleague Ricardo to bring you the latest open source projects, posts, events, and more.

Upcoming AWS events
Check your calendars and sign up for these AWS events:

AWS Community Days – Join a community-led conference run by AWS user group leaders in your region: Ecuador (November 7), Mexico (November 11), Montevideo (November 14), Central Asia (Kazakhstan, Uzbekistan, Kyrgyzstan, and Mongolia on November 17–18), and Guatemala (November 18).

AWS re:Invent (November 27–December 1) – Join us to hear the latest from AWS, learn from experts, and connect with the global cloud community. Browse the session catalog and attendee guides and check out the highlights for generative artificial intelligence (AI).

That’s all for this week. Check back next Monday for another Weekly Roundup!

— Marcia

This post is part of our Weekly Roundup series. Check back each week for a quick roundup of interesting news and announcements from AWS!

Amazon EC2 Instance Metadata Service IMDSv2 by default

Post Syndicated from Jeff Barr original https://aws.amazon.com/blogs/aws/amazon-ec2-instance-metadata-service-imdsv2-by-default/

Effective mid-2024, newly released Amazon EC2 instance types will use only version 2 of the EC2 Instance Metadata Service (IMDSv2). We are also taking a series of steps to make IMDSv2 the default choice for AWS Management Console Quick Starts and other launch pathways.

Background
This service is accessible from within an EC2 instance at a fixed IP address (169.254.169.254 via IPv4 or fd00:ec2::254 via IPv6 on Nitro instances). It gives you (or the code running on the instance) access to a wealth of static and dynamic data including the ID of the AMI that was used to launch the instance, block device mappings, temporary IAM credentials for roles that are attached to the instance, network interface information, user data, and much more, as detailed in Instance Metadata Categories.

The v1 service uses a request/response access method and the v2 service uses a session-oriented method, as detailed in this blog post. Both services are fully secure, but v2 provides additional layers of protection for four types of vulnerabilities that could be used to try to access IMDS.

Many applications and instances are already using and benefiting from IMDSv2, but the full range of benefits become available only when IMDSv1 is disabled at the AWS account level.

Migration Plan
Here are the significant steps that we have taken, and those that plan to take, on the road to making IMDSv2 the default choice for new AWS infrastructure (allow a tiny bit of wiggle room on the 2023 and 2024 dates):

November 2019 – We launched IMDSv2 and showed you how to use it to add defense in depth.

February 2020 – We began to verify that all newly published products from AWS Marketplace sellers and AWS Partners support IMDSv2.

March 2023 – We launched Amazon Linux 2023, which uses IMDSv2 by default for all launches.

September 2023 – We published a blog post to show you how to Get the full benefits of IMDSv2 and disable IMDSv1 across your AWS infrastructure.

November 2023 – Starting today, all console Quick Start launches will use IMDSv2-only (all Amazon and Partner Quick Start AMIs support this). Here’s how this is specified in the EC2 Console within Advanced details when launching an instance:

February 2024 – We plan to introduce a new API function that will allow you to control the use of IMDSv1 as the default at the account level. You can already control IMDSv1 usage in an IAM policy (taking away and limiting existing permission), or as an SCP that is applied globally across an account, an organizational unit (OU), or an entire organization. For example IAM policies read Work with instance metadata.

Mid-2024 – Newly released Amazon EC2 instance types will use IMDSv2 only by default. For transition support, you will still be able to enable/turn on IMDSv1 at launch or after launch on an instance live without the need for a restart or stop/start.

What to Do
Now is the time to get started on your migration from IMDSv1 to IMDSv2 using the Get the full benefits.. blog post as a guide. You should also become familiar with the Tools for helping with the transition to IMDSv2, along with the recommended path on the same page. In addition to recommending tools, this page shows you how to set up an IAM policy that disables the use of IMDSv1 and shows you how to use the MetadataNoToken CloudWatch metric to detect any remaining usage:

Another helpful resource can be found on AWS re:Post: How can I use Systems Manager automation to enforce that only IMDSv2 is used to access instance metadata from my Amazon EC2 instance?

We want this transition to be as smooth as possible for you and for your customers. If you need any additional help, please contact AWS Support.

Jeff;

Announcing Amazon EC2 Capacity Blocks for ML to reserve GPU capacity for your machine learning workloads

Post Syndicated from Channy Yun original https://aws.amazon.com/blogs/aws/announcing-amazon-ec2-capacity-blocks-for-ml-to-reserve-gpu-capacity-for-your-machine-learning-workloads/

Recent advancements in machine learning (ML) have unlocked opportunities for customers across organizations of all sizes and industries to reinvent new products and transform their businesses. However, the growth in demand for GPU capacity to train, fine-tune, experiment, and inference these ML models has outpaced industry-wide supply, making GPUs a scarce resource. Access to GPU capacity is an obstacle for customers whose capacity needs fluctuate depending on the research and development phase they’re in.

Today, we are announcing Amazon Elastic Compute Cloud (Amazon EC2) Capacity Blocks for ML, a new Amazon EC2 usage model that further democratizes ML by making it easy to access GPU instances to train and deploy ML and generative AI models. With EC2 Capacity Blocks, you can reserve hundreds of GPUs collocated in EC2 UltraClusters designed for high-performance ML workloads, using Elastic Fabric Adapter (EFA) networking in a peta-bit scale non-blocking network, to deliver the best network performance available in Amazon EC2.

This is an innovative new way to schedule GPU instances where you can reserve the number of instances you need for a future date for just the amount of time you require. EC2 Capacity Blocks are currently available for Amazon EC2 P5 instances powered by NVIDIA H100 Tensor Core GPUs in the AWS US East (Ohio) Region. With EC2 Capacity Blocks, you can reserve GPU instances in just a few clicks and plan your ML development with confidence. EC2 Capacity Blocks make it easy for anyone to predictably access EC2 P5 instances that offer the highest performance in EC2 for ML training.

EC2 Capacity Block reservations work similarly to hotel room reservations. With a hotel reservation, you specify the date and duration you want your room for and the size of beds you’d like─a queen bed or king bed, for example. Likewise, with EC2 Capacity Block reservations, you select the date and duration you require GPU instances and the size of the reservation (the number of instances). On your reservation start date, you’ll be able to access your reserved EC2 Capacity Block and launch your P5 instances. At the end of the EC2 Capacity Block duration, any instances still running will be terminated.

You can use EC2 Capacity Blocks when you need capacity assurance to train or fine-tune ML models, run experiments, or plan for future surges in demand for ML applications. Alternatively, you can continue using On-Demand Capacity Reservations for all other workload types that require compute capacity assurance, such as business-critical applications, regulatory requirements, or disaster recovery.

Getting started with Amazon EC2 Capacity Blocks for ML
To reserve your Capacity Blocks, choose Capacity Reservations on the Amazon EC2 console in the US East (Ohio) Region. You can see two capacity reservation options. Select Purchase Capacity Blocks for ML and then Get started to start looking for an EC2 Capacity Block.

Choose your total capacity and specify how long you need the EC2 Capacity Block. You can reserve an EC2 Capacity Block in the following sizes: 1, 2, 4, 8, 16, 32, or 64 p5.48xlarge instances. The total number of days that you can reserve EC2 Capacity Blocks is 1– 14 days in 1-day increments. EC2 Capacity Blocks can be purchased up to 8 weeks in advance.

EC2 Capacity Block prices are dynamic and depend on total available supply and demand at the time you purchase the EC2 Capacity Block. You can adjust the size, duration, or date range in your specifications to search for other EC2 Capacity Block options. When you select Find Capacity Blocks, AWS returns the lowest-priced offering available that meets your specifications in the date range you have specified. At this point, you will be shown the price for the EC2 Capacity Block.

After reviewing EC2 Capacity Blocks details, tags, and total price information, choose Purchase. The total price of an EC2 Capacity Block is charged up front, and the price does not change after purchase. The payment will be billed to your account within 12 hours after you purchase the EC2 Capacity Blocks.

All EC2 Capacity Blocks reservations start at 11:30 AM Coordinated Universal Time (UTC). EC2 Capacity Blocks can’t be modified or canceled after purchase.

You can also use AWS Command Line Interface (AWS CLI) and AWS SDKs to purchase EC2 Capacity Blocks. Use the describe-capacity-block-offerings API to provide your cluster requirements and discover an available EC2 Capacity Block for purchase.

$ aws ec2 describe-capacity-block-offerings \
          --instance-type p5.48xlarge \
          --instance-count 4 \
          --start-date-range 2023-10-30T00:00:00Z \
          --end-date-range 2023-11-01T00:00:00Z \
          –-capacity-duration 48

After you find an available EC2 Capacity Block with the CapacityBlockOfferingId and capacity information from the preceding command, you can use purchase-capacity-block-reservation API to purchase it.

$ aws ec2 purchase-capacity-block-reservation \
          --capacity-block-offering-id cbr-0123456789abcdefg \
          –-instance-platform Linux/UNIX

For more information about new EC2 Capacity Blocks APIs, see the Amazon EC2 API documentation.

Your EC2 Capacity Block has now been scheduled successfully. On the scheduled start date, your EC2 Capacity Block will become active. To use an active EC2 Capacity Block on your starting date, choose the capacity reservation ID for your EC2 Capacity Block. You can see a breakdown of the reserved instance capacity, which shows how the capacity is currently being utilized in the Capacity details section.

To launch instances into your active EC2 Capacity Block, choose Launch instances and follow the normal process of launching EC2 instances and running your ML workloads.

In the Advanced details section, choose Capacity Blocks as the purchase option and select the capacity reservation ID of the EC2 Capacity Block you’re trying to target.

As your EC2 Capacity Block end time approaches, Amazon EC2 will emit an event through Amazon EventBridge, letting you know your reservation is ending soon so you can checkpoint your workload. Any instances running in the EC2 Capacity Block go into a shutting-down state 30 minutes before your reservation ends. The amount you were charged for your EC2 Capacity Block does not include this time period. When your EC2 Capacity Block expires, any instances still running will be terminated.

Now available
Amazon EC2 Capacity Blocks are now available for p5.48xlarge instances in the AWS US East (Ohio) Region. You can view the price of an EC2 Capacity Block before you reserve it, and the total price of an EC2 Capacity Block is charged up-front at the time of purchase. For more information, see the EC2 Capacity Blocks pricing page.

To learn more, see the EC2 Capacity Blocks documentation and send feedback to AWS re:Post for EC2 or through your usual AWS Support contacts.

Channy

AWS Weekly Roundup – re:Post Selections, SNS and SQS FIFO improvements, multi-VPC ENI attachments, and more – October 30, 2023

Post Syndicated from Danilo Poccia original https://aws.amazon.com/blogs/aws/aws-weekly-roundup-repost-selections-sns-and-sqs-fifo-improvements-multi-vpc-eni-attachments-and-more-october-30-2023/

It’s less than a month to AWS re:Invent, but interesting news doesn’t slow down in the meantime. This week is my turn to help keep you up to date!

Last week’s launches
Here are some of the launches that caught my attention last week:

AWS re:Post – With re:Post, you have access to a community of experts that helps you become even more successful on AWS. With Selections, community members can organize knowledge in an aggregated view to create learning paths or curated content sets.

Amazon SNS – First-in-First-out (FIFO) topics now support the option to store and replay messages without needing to provision a separate archival resource. This improves the durability of your event-driven applications and can help you recover from downstream failure scenarios. Find out more in this AWS Comput Blog post – Archiving and replaying messages with Amazon SNS FIFO. Also, you can now use custom data identifiers to protect not only common sensitive data (such as names, addresses, and credit card numbers) but also domain-specific sensitive data, such as your company’s employee IDs. You can find additional info on this feature in this AWS Security blog post – Mask and redact sensitive data published to Amazon SNS using managed and custom data identifiers.

Amazon SQS – With the increased throughput quota for FIFO high throughput mode, you can process up to 18,000 transactions per second, per API action. Note the throughput quota depends on the AWS Region.

Amazon OpenSearch Service – OpenSearch Serverless now supports automated time-based data deletion with new index lifecycle policies. To determine the best strategy to deliver accurate and low latency vector search queries, OpenSearch can now intelligently evaluate optimal filtering strategies, like pre-filtering with approximate nearest neighbor (ANN) or filtering with exact k-nearest neighbor (k-NN). Also, OpenSearch Service now supports Internet Protocol Version 6 (IPv6).

Amazon EC2 – With multi-VPC ENI attachments, you can launch an instance with a primary elastic network interface (ENI) in one virtual private cloud (VPC) and attach a secondary ENI from another VPC. This helps maintain network-level segregation, but still allows specific workloads (like centralized appliances and databases) to communicate between them.

AWS CodePipeline – With parameterized pipelines, you can dynamically pass input parameters to a pipeline execution. You can now start a pipeline execution when a specific git tag is applied to a commit in the source repository.

Amazon MemoryDB – Now supports Graviton3-based R7g nodes that deliver up to 28 percent increased throughput compared to R6g. These nodes also deliver higher networking bandwidth.

Other AWS news
Here are a few posts from some of the other AWS and cloud blogs that I follow:

Networking & Content Delivery Blog – Some of the technical management and hardware decisions we make when building AWS network infrastructure: A Continuous Improvement Model for Interconnects within AWS Data Centers

Interconnect monitoring service infrastructure diagram

DevOps Blog – To help enterprise customers understand how many of developers use CodeWhisperer, how often they use it, and how often they accept suggestions: Introducing Amazon CodeWhisperer Dashboard and CloudWatch Metrics

Front-End Web & Mobile Blog – How to restrict access to your GraphQL APIs to consumers within a private network: Architecture Patterns for AWS AppSync Private APIs

Architecture Blog – Another post in this super interesting series: Let’s Architect! Designing systems for stream data processing

A serverless streaming data pipeline using Amazon Kinesis and AWS Glue

From Community.AWS: Load Testing WordPress Amazon Lightsail Instances and Future-proof Your .NET Apps With Foundation Model Choice and Amazon Bedrock.

Don’t miss the latest AWS open source newsletter by my colleague Ricardo.

Upcoming AWS events
Check your calendars and sign up for these AWS events

AWS Community Days – Join a community-led conference run by AWS user group leaders in your region: Jaipur (November 4), Vadodara (November 4), Brasil (November 4), Central Asia (Kazakhstan, Uzbekistan, Kyrgyzstan, and Mongolia on November 17-18), and Guatemala (November 18).

AWS re:Invent (November 27 – December 1) – Join us to hear the latest from AWS, learn from experts, and connect with the global cloud community. Browse the session catalog and attendee guides and check out the highlights for generative AI.

Here you can browse all upcoming AWS-led in-person and virtual events and developer-focused events.

And that’s all from me for this week. On to the next one!

Danilo

This post is part of our Weekly Roundup series. Check back each week for a quick roundup of interesting news and announcements from AWS!

AWS Weekly Roundup – CodeWhisperer, CodeCatalyst, RDS, Route53, and more – October 24, 2023

Post Syndicated from Sébastien Stormacq original https://aws.amazon.com/blogs/aws/aws-weekly-roundup-codewhisperer-codecatalyst-rds-route53-and-more-october-23-2023/

The entire AWS News Blog team is fully focused on writing posts to announce the new services and features during our annual customer conference in Las Vegas, AWS re:Invent! And while we prepare content for you to read, our services teams continue to innovate. Here is my summary of last week’s launches.

Last week’s launches
Here are some of the launches that captured my attention:

Amazon CodeCatalystYou can now add a cron expression to trigger a CI/CD workflow, providing a way to start workflows at set times. CodeCatalyst is a unified development service that integrates a project’s collaboration tools, CI/CD pipelines, and development and deployment environments.

Amazon Route53You can now route your customer’s traffic to their closest AWS Local Zones to improve application performance for latency-sensitive workloads. Learn more about geoproximity routing in the Route53 documentation.

Amazon RDS – The root certificates we use to sign your databases’ TLS certificates will expire in 2024. You must generate new certificates for your databases before the expiration date. This blog post details the procedure step by step. The new root certificates we generated are valid for the next 40 years for RSA2048 and 100 years for the RSA4098 and ECC384. It is likely this is the last time in your professional career that you are obliged to renew your database certificates for AWS.

Amazon MSK – Replicating Kafka clusters at scale is difficult and often involves managing the infrastructure and the replication solution by yourself. We launched Amazon MSK Replicator, a fully managed replication solution for your Kafka clusters, in the same or across multiple AWS Regions.

Amazon CodeWhisperer – We launched a preview for an upcoming capability of Amazon CodeWhisperer Professional. You can now train CodeWhisperer on your private code base. It allows you to give your organization’s developers more relevant suggestions to better assist them in their day-to-day coding against your organization’s private libraries and frameworks.

Amazon EC2The seventh generation of memory-optimized EC2 instances is available (R7i). These instances use the 4th Generation Intel Xeon Scalable Processors (Sapphire Rapids). This family of instances provides up to 192 vCPU and 1,536 GB of memory. They are well-suited for memory-intensive applications such as in-memory databases or caches.

X in Y – We launched existing services and instance types in additional Regions:

Other AWS news
Here are some other blog posts and news items that you might like:

The Community.AWS blog has new posts to teach you how to integrate Amazon Bedrock inside your Java and Go applications, and my colleague Brooke wrote a survival guide for re:Invent first-timers.

The Official AWS Podcast – Listen each week for updates on the latest AWS news and deep dives into exciting use cases. There are also official AWS podcasts in several languages. Check out the ones in FrenchGermanItalian, and Spanish.

Some other great sources of AWS news include:

Upcoming AWS events
Check your calendars and sign up for these AWS events:

AWS Community DayAWS Community Days – Join a community-led conference run by AWS user group leaders in your region: Jaipur (November 4), Vadodara (November 4), and Brasil (November 4).

AWS Innovate: Every Application Edition – Join our free online conference to explore cutting-edge ways to enhance security and reliability, optimize performance on a budget, speed up application development, and revolutionize your applications with generative AI. Register for AWS Innovate Online Asia Pacific & Japan on October 26.

AWS re:Invent 2023AWS re:Invent (November 27 – December 1) – Join us to hear the latest from AWS, learn from experts, and connect with the global cloud community. Browse the session catalog and attendee guides and check out the re:Invent highlights for generative AI.

You can browse all upcoming in-person and virtual events.

And that’s all for me today. I’ll go back writing my re:Invent blog posts.

Check back next Monday for another Weekly Roundup!

— seb

This post is part of our Weekly Roundup series. Check back each week for a quick roundup of interesting news and announcements from AWS!

Maintaining a local copy of your data in AWS Local Zones

Post Syndicated from Macey Neff original https://aws.amazon.com/blogs/compute/maintaining-a-local-copy-of-your-data-in-aws-local-zones/

This post is written by Leonardo Solano, Senior Hybrid Cloud SA and Obed Gutierrez, Solutions Architect, Enterprise.

This post covers data replication strategies to back up your data into AWS Local Zones. These strategies include database replication, file based and object storage replication, and partner solutions for Amazon Elastic Compute Cloud (Amazon EC2).

Customers running workloads in AWS Regions are likely to require a copy of their data in their operational location for either their backup strategy or data residency requirements. To help with these requirements, you can use Local Zones.

Local Zones is an AWS infrastructure deployment that places compute, storage, database, and other select AWS services close to large population and industry centers. With Local Zones, customers can build and deploy workloads to comply with state and local data residency requirements in sectors such as healthcare, financial services, gaming, and government.

Solution overview

This post assumes the database source is Amazon Relational Database Service (Amazon RDS). To backup an Amazon RDS database to Local Zones, there are three options:

  1. AWS Database Migration Service (AWS DMS)
  2. AWS DataSync
  3. Backup to Amazon Simple Storage Service (Amazon S3)

. Amazon RDS replication to Local Zones with AWS DMS

Figure 1. Amazon RDS replication to Local Zones with AWS DMS

To replicate data, AWS DMS needs a source and a target database. The source database should be your existing Amazon RDS database. The target database is placed in an EC2 instance in the Local Zone. A replication job is created in AWS DMS, which maintains the source and target databases in sync. The replicated database in the Local Zone can be accessed through a VPN. Your database administrator can directly connect to the database engine with your preferred tool.

With this architecture, you can maintain a locally accessible copy of your databases, allowing you to comply with regulatory requirements.

Prerequisites

The following prerequisites are required before continuing:

  • An AWS Account with Administrator permissions;
  • Installation of the latest version of AWS Command Line Interface (AWS CLI v2);
  • An Amazon RDS database.

Walkthrough

1. Enabling Local Zones

First, you must enable Local Zones. Make sure that the intended Local Zone is parented to the AWS Region where the environment is running. Edit the commands to match your parameters, group-name makes reference to your local zone group and region to the region identifier to use.

aws ec2 modify-availability-zone-group \
  --region us-east-1 \
  --group-name us-east-1-qro-1\
  --opt-in-status opted-in

If you have an error when calling the ModifyAvailabilityZoneGroup operation, you must sign up for the Local Zone.

After enabling the Local Zone, you must extend the VPC to the Local Zone by creating a subnet in the Local Zone:

aws ec2 create-subnet \
  --region us-east-1 \
  --availability-zone us-east-1-qro-1a \
  --vpc-id vpc-02a3eb6585example \
  --cidr-block my-subnet-cidr

If you need a step-by-step guide, refer to Getting started with AWS Local Zones. Enabling Local Zones is free of charge. Only deployed services in the Local Zone incur billing.

2. Set up your target database

Now that you have the Local Zone enabled with a subnet, set up your target database instance in the Local Zone subnet that you just created.

You can use AWS CLI to launch it as an EC2 instance:

aws ec2 run-instances \
  --region us-east-1 \
  --subnet-id subnet-08fc749671example \
  --instance-type t3.medium \
  --image-id ami-0abcdef123example \
  --security-group-ids sg-0b0384b66dexample \
  --key-name my-key-pair

You can verify that your EC2 instance is running with the following command:

aws ec2 describe-instances --filters "Name=availability-zone,Values=us-east-1-qro-1a" --query "Reservations[].Instances[].InstanceId"

Output:

 $ ["i-0cda255374example"]

Note that not all instance types are available in Local Zones. You can verify it with the following AWS CLI command:

aws ec2 describe-instance-type-offerings --location-type "availability-zone" \
--filters Name=location,Values=us-east-1-qro-1a --region us-east-1

Once you have your instance running in the Local Zone, you can install the database engine matching your source database. Here is an example of how to install MariaDB:

  1. Updates all packages to the latest OS versionsudo yum update -y
  2. Install MySQL server on your instance, this also creates a systemd servicesudo yum install -y mariadb-server
  3. Enable the service created in previous stepsudo systemctl enable mariadb
  4. Start the MySQL server service on your Amazon Linux instancesudo systemctl start mariadb
  5. Set root user password and improve your DB securitysudo mysql_secure_installation

You can confirm successful installation with these commands:

mysql -h localhost -u root -p
SHOW DATABASES;

3. Configure databases for replication

In order for AWS DMS to replicate ongoing changes, you must use change data capture (CDC), as well as set up your source and target database accordingly before replication:

Source database:

  • Make sure that the binary logs are available to AWS DMS:

 call mysql.rds_set_configuration('binlog retention hours', 24);

  • Set the binlog_format parameter to “ROW“.
  • Set the binlog_row_image parameter to “Full“.
  • If you are using Read replica as source, then set the log_slave_updates parameter to TRUE.

For detailed information, refer to Using a MySQL-compatible database as a source for AWS DMS, or sources for your migration if your database engine is different.

Target database:

  • Create a user for AWS DMS that has read/write privileges to the MySQL-compatible database. To create the necessary privileges, run the following commands.
CREATE USER ''@'%' IDENTIFIED BY '';
GRANT ALTER, CREATE, DROP, INDEX, INSERT, UPDATE, DELETE, SELECT ON .* TO 
''@'%';
GRANT ALL PRIVILEGES ON awsdms_control.* TO ''@'%';
  • Disable foreign keys on target tables, by adding the next command in the Extra connection attributes section of the AWS DMS console for your target endpoint.

Initstmt=SET FOREIGN_KEY_CHECKS=0;

  • Set the database parameter local_infile = 1 to enable AWS DMS to load data into the target database.

4. Set up AWS DMS

Now that you have our Local Zone enabled with the target database ready and the source database configured, you can set up AWS DMS Replication instance.

Go to AWS DMS in the AWS Management Console, and under Migrate data select Replication Instances, then select the Create Replication button:

This shows the Create replication Instance, where you should fill up the parameters required:

Note that High Availability is set to Single-AZ, as this is a test workload, while Multi-AZ is recommended for Production workloads.

Refer to the AWS DMS replication instance documentation for details about how to size your replication instance.

Important note

To allow replication, make sure that you set up the replication instance in the VPC that your environment is running, and configure security groups from and to the source and target database.

Now you can create the DMS Source and Target endpoints:

5. Set up endpoints

Source endpoint:

In the AWS DMS console, select Endpoints, select the Create endpoint button, and select Source endpoint option. Then, fill the details required:

Make sure you select your RDS instance as Source by selecting the check box as show in the preceding figure. Moreover, include access to endpoint database details, such as user and password.

You can test your endpoint connectivity before creating it, as shown in the following figure:

If your test is successful, then you can select the Create endpoint button.

Target endpoint:

In the same way as the Source in the console, select Endpoints, select the Create endpoint button, and select Target endpoint option, then enter the details required, as shown in the following figure:

In the Access to endpoint database section, select Provide access information manually option, next add your Local Zone target database connection details as shown below. Notice that Server name value, should be the IP address of your target database.

Make sure you go to the bottom of the page and configure Extra connection attributes in the Endpoint settings, as described in the Configure databases for replication section of this post:

Like the source endpoint, you can test your endpoint connection before creating it.

6. Create the replication task

Once the endpoints are ready, you can create the migration task to start the replication. Under the Migrate Data section, select Database migration tasks, hit the Create task button, and configure your task:

Select Migrate existing data and replicate ongoing changes in the Migration type parameter.

Enable Task logs under Task Settings. This is recommended as it can help you with troubleshooting purposes.

In Table mappings, include the schema you want to replicate to the Local Zone database:

Once you have defined Task Configuration, Task Settings, and Table Mappings, you can proceed to create your database migration task.

This will trigger your migration task. Now wait until the migration task completes successfully.

7. Validate replicated database

After the replication job completes the Full Load, proceed to validate at your target database. Connect to your target database and run the following commands:

USE example;
SHOW TABLES;

As a result you should see the same tables as the source database.

MySQL [example]> SHOW TABLES;
+----------------------------+
| Tables_in_example          |
+----------------------------+
| actor                      |
| address                    |
| category                   |
| city                       |
| country                    |
| customer                   |
| customer_list              |
| film                       |
| film_actor                 |
| film_category              |
| film_list                  |
| film_text                  |
| inventory                  |
| language                   |
| nicer_but_slower_film_list |
| payment                    |
| rental                     |
| sales_by_film_category     |
| sales_by_store             |
| staff                      |
| staff_list                 |
| store                      |
+----------------------------+
22 rows in set (0.06 sec)

If you get the same tables from your source database, then congratulations, you’re set! Now you can maintain and navigate a live copy of database in the Local Zone for data residency purposes.

Clean up

When you have finished this tutorial, you can delete all the resources that have been deployed. You can do this in the Console or by running the following commands in the AWS CLI:

  1. Delete target DB:
    aws ec2 terminate-instances --instance-ids i-abcd1234
  2. Decommision AWS DMS
    • Replication Task:
      aws dms delete-replication-task --replication-task-arn arn:aws:dms:us-east-1:111111111111:task:K55IUCGBASJS5VHZJIIEXAMPLE
    • Endpoints:
      aws dms delete-endpoint --endpoint-arn arn:aws:dms:us-east-1:111111111111:endpoint:OUJJVXO4XZ4CYTSEG5XEXAMPLE
    • Replication instance:
      aws dms delete-replication-instance --replication-instance-arn us-east-1:111111111111:rep:T3OM7OUB5NM2LCVZF7JEXAMPLE
  3. Delete Local Zone subnet
    aws ec2 delete-subnet --subnet-id subnet-9example

Conclusion

Local Zones is a useful tool for running applications with low latency requirements or data residency regulations. In this post, you have learned how to use AWS DMS to seamlessly replicate your data to Local Zones. With this architecture you can efficiently maintain a local copy of your data in Local Zones and access it securly.

If you are interested on how to automate your workloads deployments in Local Zones, make sure you check this workshop.

Enabling highly available connectivity from on premises to AWS Local Zones

Post Syndicated from Macey Neff original https://aws.amazon.com/blogs/compute/enabling-highly-available-connectivity-from-on-premises-to-aws-local-zones/

This post is written by Leonardo Solano, Senior Hybrid Cloud SA and Robert Belson SA Developer Advocate.

Planning your network topology is a foundational requirement of the reliability pillar of the AWS Well-Architected Framework. REL02-BP02 defines how to provide redundant connectivity between private networks in the cloud and on-premises environments using AWS Direct Connect for resilient, redundant connections using AWS Site-to-Site VPN, or AWS Direct Connect failing over to AWS Site-to-Site VPN. As more customers use a combination of on-premises environments, Local Zones, and AWS Regions, they have asked for guidance on how to extend this pillar of the AWS Well-Architected Framework to include Local Zones. As an example, if you are on an application modernization journey, you may have existing Amazon EKS clusters that have dependencies on persistent on-premises data.

AWS Local Zones enables single-digit millisecond latency to power applications such as real-time gaming, live streaming, augmented and virtual reality (AR/VR), virtual workstations, and more. Local Zones can also help you meet data sovereignty requirements in regulated industries  such as healthcare, financial services, and the public sector. Additionally, enterprises can leverage a hybrid architecture and seamlessly extend their on-premises environment to the cloud using Local Zones. In the example above, you could extend Amazon EKS clusters to include node groups in a Local Zone (or multiple Local Zones) or on premises using AWS Outpost rack.

To provide connectivity between private networks in Local Zones and on-premises environments, customers typically consider Direct Connect or software VPNs available in the AWS Marketplace. This post provides a reference implementation to eliminate single points of failure in connectivity while offering automatic network impairment detection and intelligent failover using both Direct Connect and software VPNs in AWS Market place. Moreover, this solution minimizes latency by ensuring traffic does not hairpin through the parent AWS Region to the Local Zone.

Solution overview

In Local Zones, all architectural patterns based on AWS Direct Connect follow the same architecture as in AWS Regions and can be deployed using the AWS Direct Connect Resiliency Toolkit. As of the date of publication, Local Zones do not support AWS managed Site-to-Site VPN (view latest Local Zones features). Thus, for customers that have access to only a single Direct Connect location or require resiliency beyond a single connection, this post will demonstrate a solution using an AWS Direct Connect failover strategy with a software VPN appliance. You can find a range of third-party software VPN appliances as well as the throughput per VPN tunnel that each offering provides in the AWS Marketplace.

Prerequisites:

To get started, make sure that your account is opt-in for Local Zones and configure the following:

  1. Extend a Virtual Private Cloud (VPC) from the Region to the Local Zone, with at least 3 subnets. Use Getting Started with AWS Local Zones as a reference.
    1. Public subnet in Local Zone (public-subnet-1)
    2. Private subnets in Local Zone (private-subnet-1 and private-subnet-2)
    3. Private subnet in the Region (private-subnet-3)
    4. Modify DNS attributes in your VPC, including both “enableDnsSupport” and “enableDnsHostnames”;
  2. Attach an Internet Gateway (IGW) to the VPC;
  3. Attach a Virtual Private Gateway (VGW) to the VPC;
  4. Create an ec2 vpc-endpoint attached to the private-subnet-3;
  5. Define the following routing tables (RTB):
    1. Private-subnet-1 RTB: enabling propagation for VGW;
    2. Private-subnet-2 RTB: enabling propagation for VGW;
    3. Public-subnet-1 RTB: with a default route with IGW-ID as the next hop;
  6. Configure a Direct Connect Private Virtual Interface (VIF) from your on-premises environment to Local Zones Virtual Gateway’s VPC. For more details see this post: AWS Direct Connect and AWS Local Zones interoperability patterns;
  7. Launch any software VPN appliance from AWS Marketplace on Public-subnet-1. In this blog post on simulating Site-to-Site VPN customer gateways using strongSwan, you can find an example that provides the steps to deploy a third-party software VPN in AWS Region;
  8. Capture the following parameters from your environment:
    1. Software VPN Elastic Network Interface (ENI) ID
    2. Private-subnet-1 RTB ID
    3. Probe IP, which must be an on-premises resource that can respond to Internet Control Message Protocol (ICMP) requests.

High level architecture

This architecture requires a utility Amazon Elastic Compute Cloud (Amazon EC2) instance in a private subnet (private-subnet-2), sending ICMP probes over the Direct Connect connection. Once the utility instance detects lost packets to on-premises network from the Local Zone it initiates a failover by adding a static route with the on-premises CIDR range as the destination and the VPN Appliance ENI-ID as the next hop in the production private subnet (private-subnet-1), taking priority over the Direct Connect propagated route. Once healthy, this utility will revert back to the default route to the original Direct Connect connection.

On-premises considerations

To add redundancy in the on-premises environment, you can use two routers using any First Hop Redundancy Protocol (FHRP) as Hot Standby Router Protocol (HSRP) or Virtual Router Redundancy Protocol (VRRP). The router connected to the Direct Connect link has the highest priority, taking the Primary role in the FHRP process while the VPN router remain the Secondary router. The failover mechanism in the FHRP relies on interface or protocol state as BGP, which triggers the failover mechanism.

High level HA architecture for Software VPN

Figure 1. High level HA architecture for Software VPN

Failover by modifying the production subnet RTB

Figure 2. Failover by modifying the production subnet RTB

Step-by-step deployment

Create IAM role with permissions to create and delete routes in your private-subnet-1 route table:

  1. Create ec2-role-trust-policy.json file on your local machine:
cat > ec2-role-trust-policy.json <<EOF
{
    "Version": "2012-10-17",
    "Statement": [
        {
            "Effect": "Allow",
            "Principal": {
                "Service": "ec2.amazonaws.com"
            },
            "Action": "sts:AssumeRole"
        }
    ]
}
EOF
  1. Create your EC2 IAM role, such as my_ec2_role:
aws iam create-role --role-name my_ec2_role --assume-role-policy-document file://ec2-role-trust-policy.json
  1. Create a file with the necessary permissions to attach to the EC2 IAM role. Name it ec2-role-iam-policy.json.
aws iam create-policy --policy-name my-ec2-policy --policy-document file://ec2-role-iam-policy.json
  1. Create the IAM policy and attach the policy to the IAM role my_ec2_role that you previously created:
aws iam create-policy --policy-name my-ec2-policy --policy-document file://ec2-role-iam-policy.json

aws iam attach-role-policy --policy-arn arn:aws:iam::<account_id>:policy/my-ec2-policy --role-name my_ec2_role
  1. Create an instance profile and attach the IAM role to it:
aws iam create-instance-profile –instance-profile-name my_ec2_instance_profile
aws iam add-role-to-instance-profile –instance-profile-name my_ec2_instance_profile –role-name my_ec2_role   

Launch and configure your utility instance

  1. Capture the Amazon Linux 2 AMI ID through CLI:
aws ec2 describe-images --filters "Name=name,Values=amzn2-ami-kernel-5.10-hvm-2.0.20230404.1-x86_64-gp2" | grep ImageId 

Sample output:

            "ImageId": "ami-069aabeee6f53e7bf",

  1. Create an EC2 key for the utility instance:
aws ec2 create-key-pair --key-name MyKeyPair --query 'KeyMaterial' --output text > MyKeyPair.pem
  1. Launch the utility instance in the Local Zone (replace the variables with your account and environment parameters):
aws ec2 run-instances --image-id ami-069aabeee6f53e7bf --key-name MyKeyPair --count 1 --instance-type t3.medium  --subnet-id <private-subnet-2-id> --iam-instance-profile Name=my_ec2_instance_profile_linux

Deploy failover automation shell script on the utility instance

  1. Create the following shell script in your utility instance (replace the health check variables with your environment values):
cat > vpn_monitoring.sh <<EOF
// Copyright Amazon.com, Inc. or its affiliates. All Rights Reserved.
// SPDX-License-Identifier: MIT-0
# Health Check variables
Wait_Between_Pings=2
RTB_ID=<private-subnet-1-rtb-id>
PROBE_IP=<probe-ip>
remote_cidr=<remote-cidr>
GW_ENI_ID=<software-vpn-eni_id>
Active_path=DX

echo `date` "-- Starting VPN monitor"

while [ . ]; do
  # Check health of main VPN Appliance path to remote probe ip
  pingresult=`ping -c 3 -W 1 $PROBE_IP | grep time= | wc -l`
  # Check to see if any of the health checks succeeded
  if ["$pingresult" == "0"]; then
    if ["$Active_path" == "DX"]; then
      echo `date` "-- Direct Connect failed. Failing over vpn"
      aws ec2 create-route --route-table-id $RTB_ID --destination-cidr-block $remote_cidr --network-interface-id $GW_ENI_ID --region us-east-1
      Active_path=VPN
      DX_tries=10
      echo "probe_ip: unreachable – active_path: vpn"
    else
      echo "probe_ip: unreachable – active_path: vpn"
    fi
  else     
    if ["$Active_path" == "VPN"]; then
      let DX_tries=DX_tries-1
      if ["$DX_tries" == "0"]; then
        echo `date` "-- failing back to Direct Connect"
        aws ec2 delete-route --route-table-id $RTB_ID --destination-cidr-block $remote_cidr --region us-east-1
        Active_path=DX
        echo "probe_ip: reachable – active_path: Direct Connect"
      else
        echo "probe_ip: reachable – active_path: vpn"
      fi
    else
      echo "probe:ip: reachable – active_path: Direct Connect"	    
    fi
  fi    
done EOF
  1. Modify permissions to your shell script file:
chmod +x vpn_monitoring.sh
  1. Start the shell script:
./vpn_monitoring.sh

Test the environment

Failover process between Direct Connect and software VPN

Figure 3. Failover process between Direct Connect and software VPN

Simulate failure of the Direct Connect link, breaking the available path from the Local Zone to the on-premises environment. You can simulate the failure using the failure test feature in Direct Connect console.

Bringing BGP session down

Figure 4. Bringing BGP session down

Setting the failure time

Figure 5. Setting the failure time

In the utility instance you will see the following logs:

Thu Sep 21 14:39:34 UTC 2023 -- Direct Connect failed. Failing over vpn

The shell script in action will detect packet loss by ICMP probes against a probe IP destination on premises, triggering the failover process. As a result, it will make an API call (aws ec2 create-route) to AWS using the EC2 interface endpoint.

The script will create a static route in the private-subnet-1-RTB toward on-premises CIDR with the VPN Elastic-Network ID as the next hop.

private-subnet-1-RTB during the test

Figure 6. private-subnet-1-RTB during the test

The FHRP mechanisms detect the failure in the Direct Connect Link and then reduce the FHRP priority on this path, which triggers the failover to the secondary link through the VPN path.

Once you cancel the test or the test finishes, the failback procedure will revert the private-subnet-1 route table to its initial state, resulting in the following logs to be emitted by the utility instance:

Thu Sep 21 14:42:34 UTC 2023 -- failing back to Direct Connect

private-subnet-1 route table initial state

Figure 7. private-subnet-1 route table initial state

Cleaning up

To clean up your AWS based resources, run following AWS CLI commands:

aws ec2 terminate-instances --instance-ids <your-utility-instance-id>
aws iam delete-instance-profile --instance-profile-name my_ec2_instance_profile
aws iam delete-role my_ec2_role

Conclusion

This post demonstrates how to create a failover strategy for Local Zones using the same resilience mechanisms already established in the AWS Regions. By leveraging Direct Connect and software VPNs, you can achieve high availability in scenarios where you are constrained to a single Direct Connect location due to geographical limitations. In the architectural pattern illustrated in this post, the failover strategy relies on a utility instance with least-privileged permissions. The utility instance identifies network impairment and dynamically modify your production route tables to keep the connectivity established from a Local Zone to your on-premises location. This same mechanism provides capabilities to automatically failback from the software VPN to Direct Connect once the utility instance validates that the Direct Connect Path is sufficiently reliable to avoid network flapping. To learn more about Local Zones, you can visit the AWS Local Zones user guide.

Training machine learning models on premises for data residency with AWS Outposts rack

Post Syndicated from Macey Neff original https://aws.amazon.com/blogs/compute/training-machine-learning-models-on-premises-for-data-residency-with-aws-outposts-rack/

This post is written by Sumit Menaria, Senior Hybrid Solutions Architect, and Boris Alexandrov, Senior Product Manager-Tech. 

In this post, you will learn how to train machine learning (ML) models on premises using AWS Outposts rack and datasets stored locally in Amazon S3 on Outposts. With the rise in data sovereignty and privacy regulations, organizations are seeking flexible solutions that balance compliance with the agility of cloud services. Healthcare and financial sectors, for instance, harness machine learning for enhanced patient care and transaction safety, all while upholding strict confidentiality. Outposts rack provide a seamless hybrid solution by extending AWS capabilities to any on-premises or edge location, providing you the flexibility to store and process data wherever you choose. Data sovereignty regulations are highly nuanced and vary by country. This blog post addresses data sovereignty scenarios where training datasets need to be stored and processed in a geographic location without an AWS Region.

Amazon S3 on Outposts

As you prepare datasets for ML model training, a key component to consider is the storage and retrieval of your data, especially when adhering to data residency and regulatory requirements.

You can store training datasets as object data in local buckets with Amazon S3 on Outposts. In order to access S3 on Outposts buckets for data operations, you need to create access points and route the requests via an S3 on Outposts endpoint associated with your VPC. These endpoints are accessible both from within the VPC as well as on premises via the local gateway.

S3 on Outposts connectivity options

Solution overview

Using this sample architecture, you are going to train a YOLOv5 model on a subset of categories of the Common Objects in Context (COCO) dataset. The COCO dataset is a popular choice for object detection tasks offering a wide variety of image categories with rich annotations. It is also available under the AWS Open Data Sponsorship Program via fast.ai datasets.

Architecture for ML training on Outposts rack

This example is based on an architecture using an Amazon Elastic Compute Cloud (Amazon EC2) g4dn.8xlarge instance for model training on the Outposts rack. Depending on your Outposts rack compute configuration, you can use different instance sizes or types and make adjustments to training parameters, such as learning rate, augmentation, or model architecture accordingly. You will be using the AWS Deep Learning AMI to launch your EC2 instance, which comes with frameworks, dependencies, and tools to accelerate deep learning in the cloud.

For the training dataset storage, you are going to use an S3 on Outposts bucket and connect to it from your on-premises location via the Outposts local gateway. The local gateway routing mode can be direct VPC routing or Customer-owned IP (CoIP) depending on your workload’s requirements. Your local gateway routing mode will determine the S3 on Outposts endpoint configuration that you need to use.

1. Download and populate training dataset

You can download the training dataset to your local client machine using the following AWS CLI command:

aws s3 sync s3://fast-ai-coco/ .

After downloading, unzip annotations_trainval2017.zip, val2017.zip and train2017.zip files.

$ unzip annotations_trainval2017.zip
$ unzip val2017.zip
$ unzip train2017.zip

In the annotations folder, the files which you need to use are instances_train2017.json and instances_val2017.json, which contain the annotations corresponding to the images in the training and validation folders.

2. Filtering and preparing training dataset

You are going to use the training, validation, and annotation files from the COCO dataset. The dataset contains over 100K images across 80 categories, but to keep the training simple, you can focus on 10 specific categories of popular food items in supermarket shelves: banana, apple, sandwich, orange, broccoli, carrot, hot dog, pizza, donut, and cake. (Because who doesn’t like a bite after a model training.) Applications for training such models could be self-stock monitoring, automatic checkouts, or product placement optimization using computer vision in retail stores. Since YOLOv5 uses a specific annotations (labels) format, you need to convert the COCO dataset annotation to the target annotation.

3. Load training dataset to S3 on Outposts bucket

In order to load the training data on S3 on Outposts you need to first create a new bucket using the AWS Console or CLI, as well as an access point and endpoint for the VPC. You can use a bucket style access point alias to load the data, using the following CLI command:

$ cd /your/local/target/upload/path/
$ aws s3 sync . s3://trainingdata-o0a2b3c4d5e6d7f8g9h10f--op-s3

Replace the alias in the above CLI command with corresponding bucket alias name for your environment. The s3 sync command syncs the folders in the same structure containing the images and labels for the training and validation data, which you will be using later for loading it to the EC2 instance for model training.

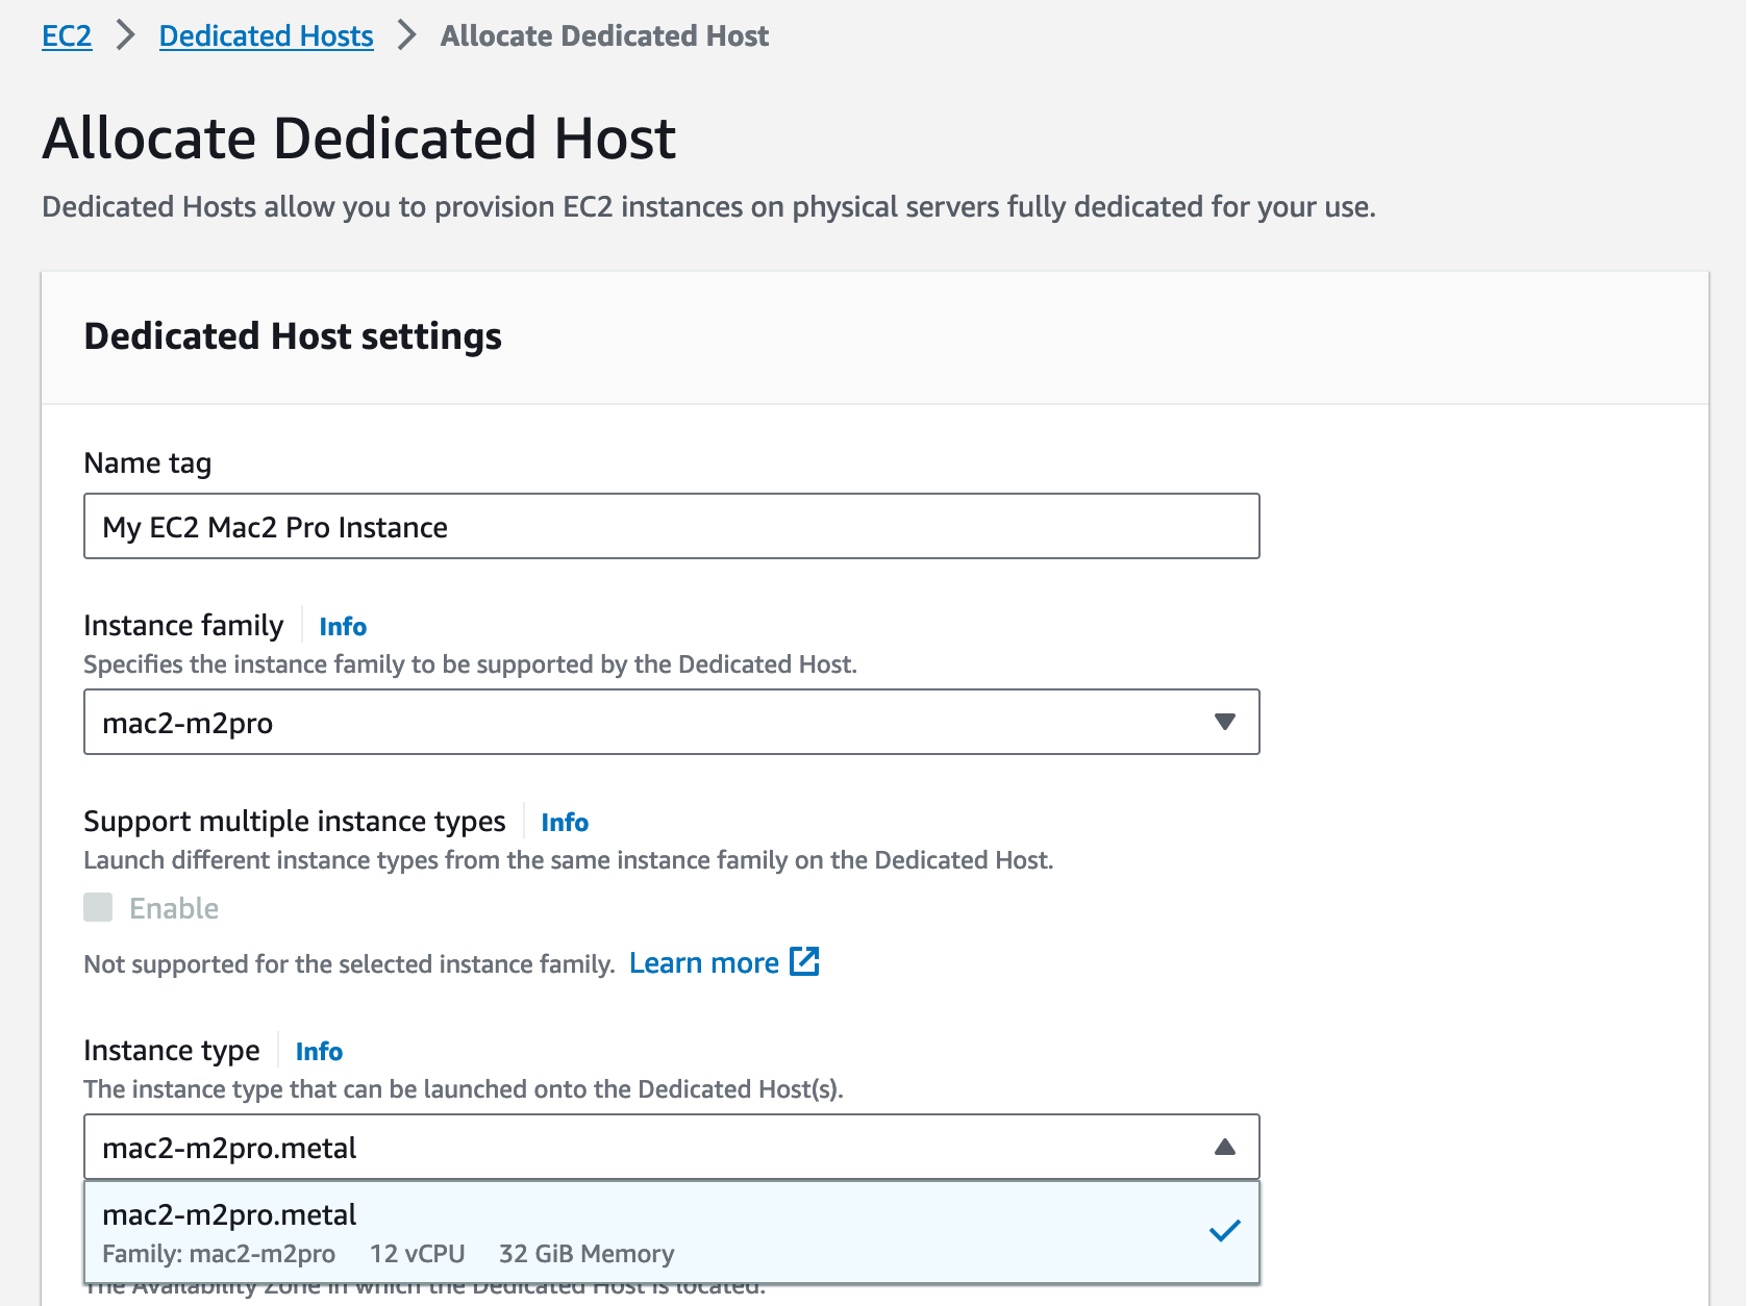
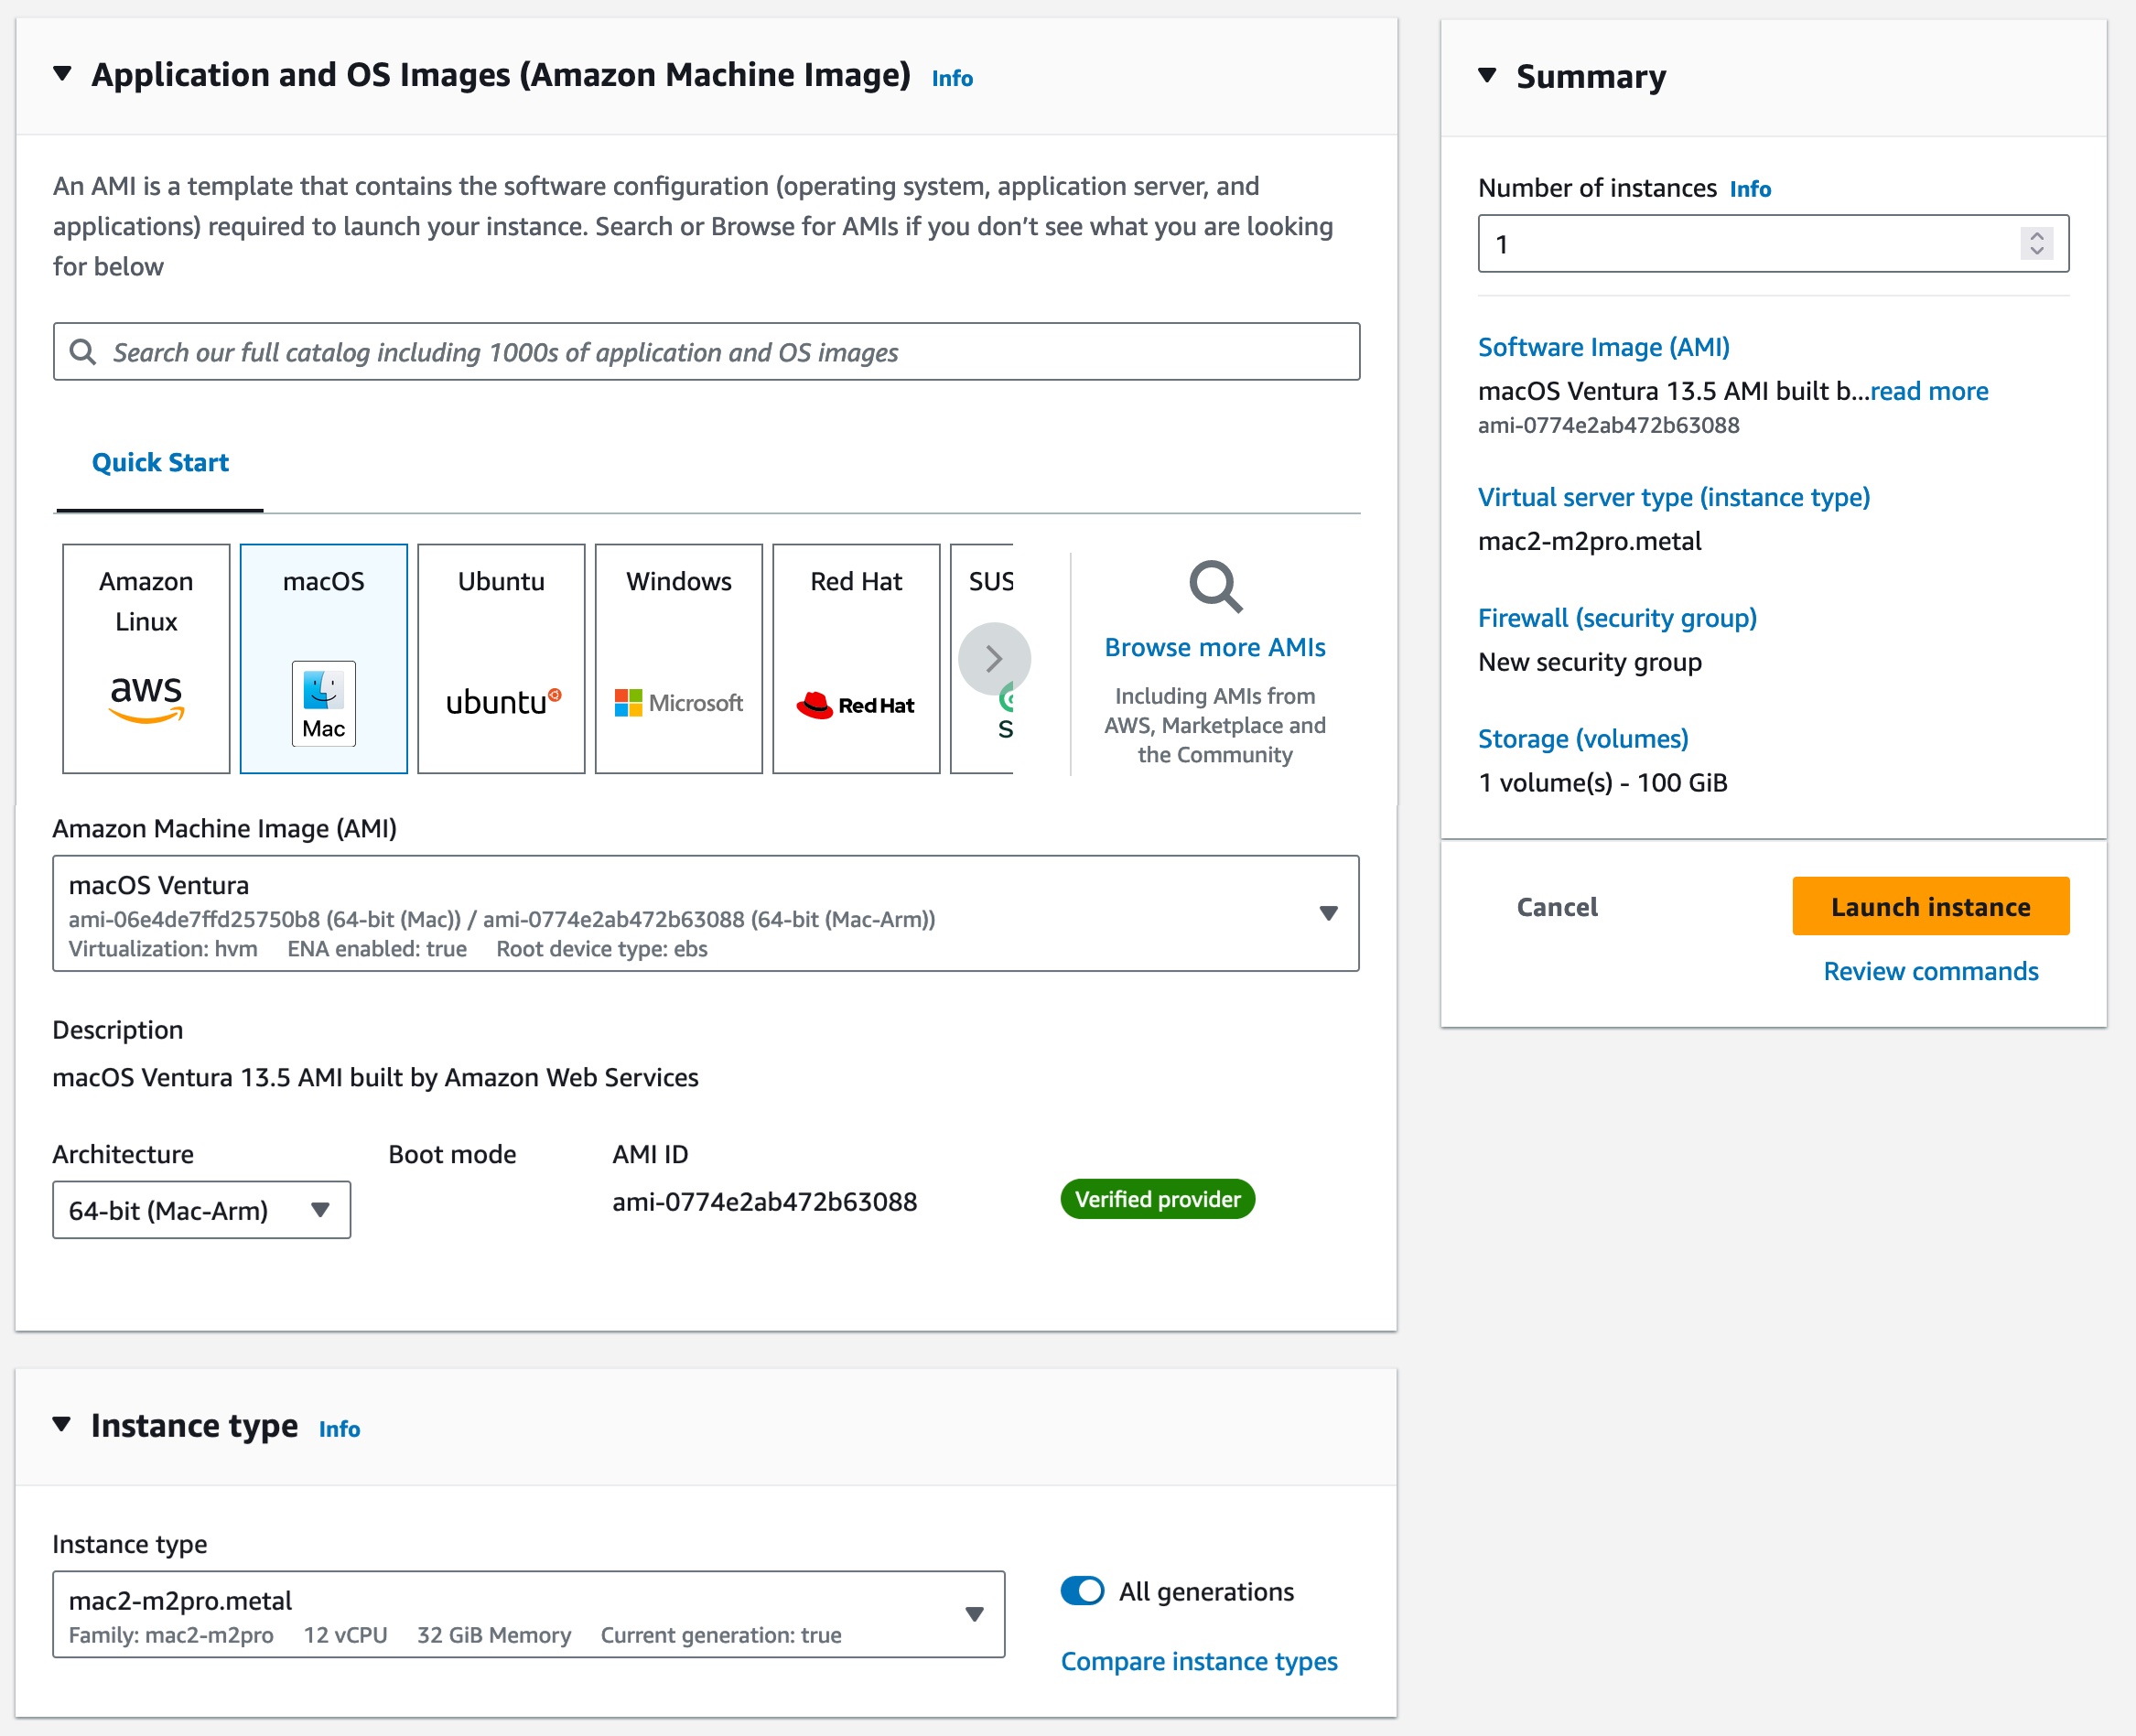
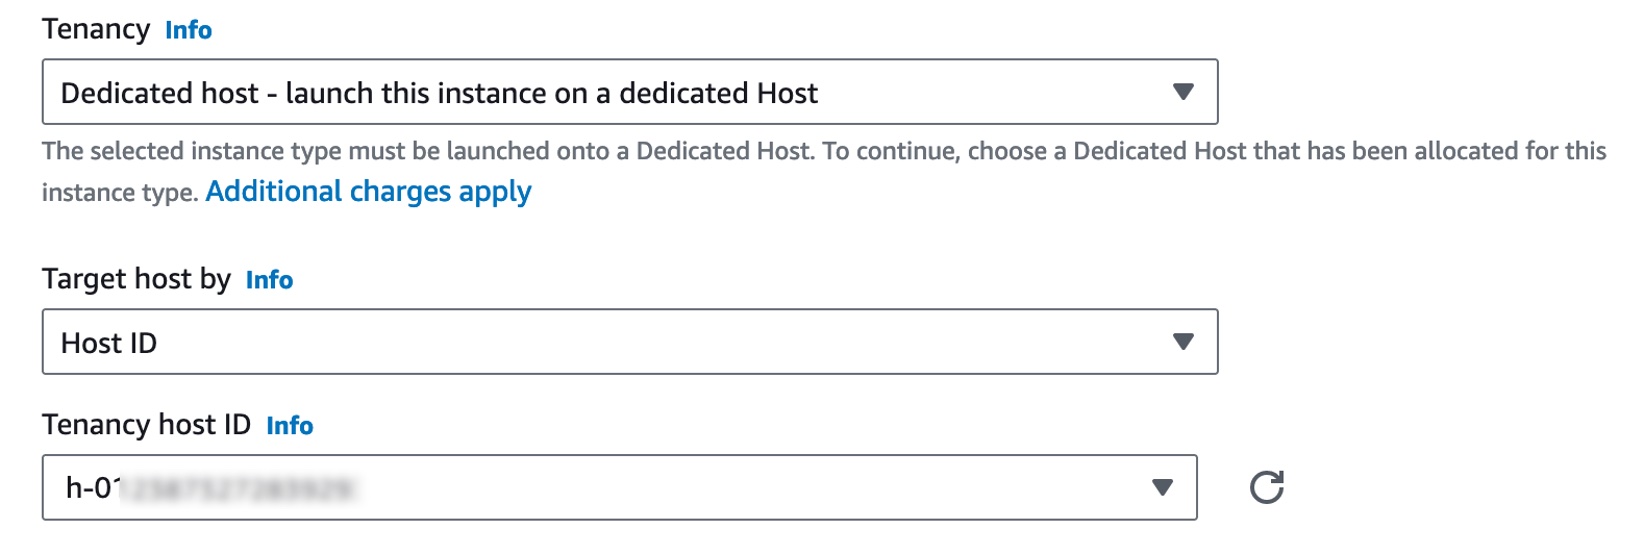
4. Launch the EC2 instance

You can launch the EC2 instance with the Deep Learning AMI based on this getting started tutorial. For this exercise, the Deep Learning AMI GPU PyTorch 2.0.1 (Ubuntu 20.04) has been used.

5. Download YOLOv5 and install dependencies

Once you ssh into the EC2 instance, activate the pre-configured PyTorch environment and clone the YOLOv5 repository.

$ ssh -i /path/key-pair-name.pem ubuntu@instance-ip-address
$ conda activate pytorch
$ git clone https://github.com/ultralytics/yolov5.git
$ cd yolov5

Then, and install its necessary dependencies.

$ pip install -U -r requirements.txt

To ensure the compatibility between various packages, you may need to modify existing packages on your instance running the AWS Deep Learning AMI.

6. Load the training dataset from S3 on Outposts to the EC2 instance

For copying the training dataset to the EC2 instance, use the s3 sync CLI command and point it to your local workspace.

aws s3 sync s3://trainingdata-o0a2b3c4d5e6d7f8g9h10f--op-s3 .

7. Prepare the configuration files

Create the data configuration files to reflect your dataset’s structure, categories, and other parameters.
data.yml

train: /your/ec2/path/to/data/images/train 
val: /your/ec2/path/to/data/images/val 
nc: 10 # Number of classes in your dataset 
names: ['banana', 'apple', 'sandwich', 'orange', 'broccoli', 'carrot', 'hot dog', 'pizza', 'donut', 'cake']

Create the model training parameter file using the sample configuration file from the YOLOv5 repository. You will need to update the number of classes to 10, but you can also change other parameters as you fine tune the model for performance.

parameters.yml:

# Parameters
nc: 10 # number of classes in your dataset
depth_multiple: 0.33 # model depth multiple
width_multiple: 0.50 # layer channel multiple
anchors:
- [10,13, 16,30, 33,23] # P3/8
- [30,61, 62,45, 59,119] # P4/16
- [116,90, 156,198, 373,326] # P5/32

# Backbone
backbone:
[[-1, 1, Conv, [64, 6, 2, 2]], # 0-P1/2
[-1, 1, Conv, [128, 3, 2]], # 1-P2/4
[-1, 3, C3, [128]],
[-1, 1, Conv, [256, 3, 2]], # 3-P3/8
[-1, 6, C3, [256]],
[-1, 1, Conv, [512, 3, 2]], # 5-P4/16
[-1, 9, C3, [512]],
[-1, 1, Conv, [1024, 3, 2]], # 7-P5/32
[-1, 3, C3, [1024]],
[-1, 1, SPPF, [1024, 5]], # 9
]

# Head
head:
[[-1, 1, Conv, [512, 1, 1]],
[-1, 1, nn.Upsample, [None, 2, 'nearest']],
[[-1, 6], 1, Concat, [1]], # cat backbone P4
[-1, 3, C3, [512, False]], # 13

[-1, 1, Conv, [256, 1, 1]],
[-1, 1, nn.Upsample, [None, 2, 'nearest']],
[[-1, 4], 1, Concat, [1]], # cat backbone P3
[-1, 3, C3, [256, False]], # 17 (P3/8-small)

[-1, 1, Conv, [256, 3, 2]],
[[-1, 14], 1, Concat, [1]], # cat head P4
[-1, 3, C3, [512, False]], # 20 (P4/16-medium)

[-1, 1, Conv, [512, 3, 2]],
[[-1, 10], 1, Concat, [1]], # cat head P5
[-1, 3, C3, [1024, False]], # 23 (P5/32-large)

[[17, 20, 23], 1, Detect, [nc, anchors]], # Detect(P3, P4, P5)

At this stage, the directory structure should look like below:

Directory tree showing training dataset and model configuration structure]

8. Train the model

You can run the following command to train the model. The batch-size and epochs can vary depending on your vCPU and GPU configuration and you can further modify these values or add weights as you try with additional rounds of training.

$ python3 train.py —img-size 640 —batch-size 32 —epochs 50 —data /your/path/to/configuation_files/dataconfig.yaml —cfg /your/path/to/configuation_files/parameters.yaml

You can monitor the model performance as it iterates through each epoch

Starting training for 50 epochs...

Epoch GPU_mem box_loss obj_loss cls_loss Instances Size
0/49 6.7G 0.08403 0.05 0.04359 129 640: 100%|██████████| 455/455 [06:14<00:00,
Class Images Instances P R mAP50 mAP50-95: 100%|██████████| 9/9 [00:05<0
all 575 2114 0.216 0.155 0.0995 0.0338

Epoch GPU_mem box_loss obj_loss cls_loss Instances Size
1/49 8.95G 0.07131 0.05091 0.02365 179 640: 100%|██████████| 455/455 [06:00<00:00,
Class Images Instances P R mAP50 mAP50-95: 100%|██████████| 9/9 [00:04<00:00, 1.97it/s]
all 575 2114 0.242 0.144 0.11 0.04

Epoch GPU_mem box_loss obj_loss cls_loss Instances Size
2/49 8.96G 0.07068 0.05331 0.02712 154 640: 100%|██████████| 455/455 [06:01<00:00, 1.26it/s]
Class Images Instances P R mAP50 mAP50-95: 100%|██████████| 9/9 [00:04<00:00, 2.23it/s]
all 575 2114 0.185 0.124 0.0732 0.0273

Once the model training finishes, you can see the validation results against the batch of validation dataset and evaluate the model’s performance using standard metrics.

Validating runs/train/exp/weights/best.pt...
Fusing layers... 
YOLOv5 summary: 157 layers, 7037095 parameters, 0 gradients, 15.8 GFLOPs
                 Class     Images  Instances          P          R      mAP50   mAP50-95: 100%|██████████| 9/9 [00:06<00:00,  1.48it/s]
                   all        575       2114      0.282      0.222       0.16     0.0653
                banana        575        280      0.189      0.143     0.0759      0.024
                 apple        575        186      0.206      0.085     0.0418     0.0151
              sandwich        575        146      0.368      0.404      0.343      0.146
                orange        575        188      0.265      0.149     0.0863     0.0362
              broccoli        575        226      0.239      0.226      0.138     0.0417
                carrot        575        310      0.182      0.203     0.0971     0.0267
               hot dog        575        108      0.242      0.111     0.0929     0.0311
                 pizza        575        208      0.405      0.418      0.333       0.15
                 donut        575        228      0.352      0.241       0.19     0.0973
                  cake        575        234      0.369      0.235      0.203     0.0853
Results saved to runs/train/exp

Use the model for inference

In order to test the model performance, you can test it by passing a new image which is from a shelf in a supermarket with some of the objects that you trained the model on.

Sample inference image with 1 cake, 6 oranges, and 4 apples

(pytorch) ubuntu@ip-172-31-48-165:~/workspace/source/yolov5$ python3 detect.py --weights /home/ubuntu/workspace/source/yolov5/runs/train/exp/weights/best.pt —source /home/ubuntu/workspace/inference/Inference-image.jpg
<<omitted output>>
Fusing layers...
YOLOv5 summary: 157 layers, 7037095 parameters, 0 gradients, 15.8 GFLOPs
image 1/1 /home/ubuntu/workspace/inference/Inference-image.jpg: 640x640 4 apples, 6 oranges, 1 cake, 5.3ms
Speed: 0.6ms pre-process, 5.3ms inference, 1.1ms NMS per image at shape (1, 3, 640, 640)
Results saved to runs/detect/exp7

The response from the preceding model inference indicates that it predicted 4 apples, 6 oranges, and 1 cake in the image. The prediction may differ based on the image type used, and while a single sample image can give you a sense of the model’s performance, it will not provide a comprehensive understanding. For a more complete evaluation, it’s always recommended to test the model on a larger and more diverse set of validation images. Additional training and tuning of your parameters or datasets may be required to achieve better prediction.

Clean Up

You can terminate the following resources used in this tutorial after you have successfully trained and tested the model:

Conclusion

The seamless integration of compute on AWS Outposts with S3 on Outposts, coupled with on-premises ML model training capabilities, offers organizations a robust solution to tackle data residency requirements. By setting up this environment, you can ensure that your datasets remain within desired geographies while still utilizing advanced machine learning models and cloud infrastructure. In addition to this, it remains essential to diligently review and fine-tune your implementation strategies and guard rails in place to ensure your data remains within the boundaries of your regulatory requirements. You can read more about architecting for data residency in this blog post.

Reference

New – Seventh Generation Memory-optimized Amazon EC2 Instances (R7i)

Post Syndicated from Irshad Buchh original https://aws.amazon.com/blogs/aws/new-seventh-generation-memory-optimized-amazon-ec2-instances-r7i/

Earlier, we introduced a duo of Amazon Elastic Compute Cloud (Amazon EC2) instances to our lineup: the general-purpose Amazon EC2 M7i instances and the compute-optimized Amazon EC2 C7i instances.

Today, I’m happy to share that we’re expanding these seventh-generation x86-based offerings to include memory-optimized Amazon EC2 R7i instances. These instances are powered by custom 4th Generation Intel Xeon Scalable Processors (Sapphire Rapids) exclusive to AWS and will offer the highest compute performance among the comparable fourth-generation Intel processors in the cloud. The R7i instances are available in eleven sizes including two bare metal sizes (coming soon), and offer 15 percent improvement in price-performance compared to Amazon EC2 R6i instances.

Amazon EC2 R7i instances are SAP Certified and are an ideal fit for memory-intensive workloads such as high-performance databases (SQL and NoSQL databases), distributed web scale in-memory caches (Memcached and Redis), in-memory databases (SAP HANA), real-time big data analytics (Apache Hadoop and Spark clusters) and other enterprise applications. Amazon EC2 R7i offers larger instance sizes (48xlarge) with up to 192 vCPUs and 1,536 GiB of memory, including both virtual and bare metal instances, enabling you to consolidate your workloads and scale-up applications.

You can attach up to 128 EBS volumes to each R7i instance; by way of comparison, the R6i instances allow you to attach up to 28 volumes.

Here are the specs for the R7i instances:

Instance Name vCPUs
Memory (GiB)
Network Bandwidth
EBS Bandwidth
r7i.large 2 16 GiB Up to 12.5 Gbps Up to 10 Gbps
r7i.xlarge 4 32 GiB Up to 12.5 Gbps Up to 10 Gbps
r7i.2xlarge 8 64 GiB Up to 12.5 Gbps Up to 10 Gbps
r7i.4xlarge 16 128 GiB Up to 12.5 Gbps Up to 10 Gbps
r7i.8xlarge 32 256 GiB 12.5 Gbps 10 Gbps
r7i.12xlarge 48 384 GiB 18.75 Gbps 15 Gbps
r7i.16xlarge 64 512 GiB 25 Gbps 20 Gbps
r7i.24xlarge 96 768 GiB 37.5 Gbps 30 Gbps
r7i.48xlarge 192 1,536 GiB 50 Gbps 40 Gbps

We’re also getting ready to launch two sizes of bare metal R7i instances soon:

Instance Name vCPUs
Memory (GiB)
Network Bandwidth
EBS Bandwidth
r7i.metal-24xl 96 768 GiB Up to 37.5 Gbps Up to 30 Gbps
r7i.metal-48xl 192 1,536 GiB Up to 50.0 Gbps Up to 40 Gbps

Built-in Accelerators
The Sapphire Rapids processors include four built-in accelerators, each providing hardware acceleration for a specific workload:

  • Advanced Matrix Extensions (AMX) – The AMX extensions are designed to accelerate machine learning and other compute-intensive workloads that involve matrix operations. It improves the efficiency of these operations by providing specialized hardware instructions and registers tailored for matrix computations. Matrix operations, such as multiplication and convolution, are fundamental building blocks in various computational tasks, especially in machine learning algorithms.
  • Intel Data Streaming Accelerator (DSA) – DSA enhances data processing and analytics capabilities for a wide range of applications and enables developers to harness the full potential of their data-driven workloads. With DSA, you gain access to optimized hardware acceleration that delivers exceptional performance for data-intensive tasks.
  • Intel In-Memory Analytics Accelerator (IAA) – This accelerator runs database and analytic workloads faster, with the potential for greater power efficiency. In-memory compression, decompression, encryption at very high throughput, and a suite of analytics primitives support in-memory databases, open-source databases, and data stores like RocksDB and ClickHouse.
  • Intel QuickAssist Technology (QAT) – This accelerator offloads encryption, decryption, and compression, freeing up processor cores and reducing power consumption. It also supports merged compression and encryption in a single data flow. To learn more start at the Intel QuickAssist Technology (Intel QAT) Overview.

Advanced Matrix Extensions are available on all sizes of R7i instances. The Intel QAT, Intel IAA, and Intel DSA accelerators will be available on the r7i.metal-24xl and r7i.metal-48xl instances.

Now Available
The new instances are available in the US East (Ohio, N. Virginia), US West (Oregon), Europe (Spain), Europe (Stockholm), and Europe (Ireland) AWS Regions.

Purchasing Options
R7i instances are available in On-Demand, Reserved, Savings Plan, and Spot Instance form. R7i instances are also available in Dedicated Host and Dedicated Instance form.

— Irshad

Quickly Restore Amazon EC2 Mac Instances using Replace Root Volume capability

Post Syndicated from Macey Neff original https://aws.amazon.com/blogs/compute/new-reset-amazon-ec2-mac-instances-to-a-known-state-using-replace-root-volume-capability/

This post is written by Sebastien Stormacq, Principal Developer Advocate.

Amazon Elastic Compute Cloud (Amazon EC2) now supports replacing the root volume on a running EC2 Mac instance, enabling you to restore the root volume of an EC2 Mac instance to its initial launch state, to a specific snapshot, or to a new Amazon Machine Image (AMI).

Since 2021, we have offered on-demand and pay-as-you-go access to Amazon EC2 Mac instances, in the same manner as our Intel, AMD and Graviton-based instances. Amazon EC2 Mac instances integrate all the capabilities you know and love from macOS with dozens of AWS services such as Amazon Virtual Private Cloud (VPC) for network security, Amazon Elastic Block Store (EBS) for expandable storage, Elastic Load Balancing (ELB) for distributing build queues, Amazon FSx for scalable file storage, and AWS Systems Manager Agent (SSM Agent) for configuring, managing, and patching macOS environments.

Just like for every EC2 instance type, AWS is responsible for protecting the infrastructure that runs all of the services offered in the AWS cloud. To ensure that EC2 Mac instances provide the same security and data privacy as other Nitro-based EC2 instances, Amazon EC2 performs a scrubbing workflow on the underlying Dedicated Host as soon as you stop or terminate an instance. This scrubbing process erases the internal SSD, clears the persistent NVRAM variables, and updates the device firmware to the latest version enabling you to run the latest macOS AMIs. The documentation has more details about this process.

The scrubbing process ensures a sanitized dedicated host for each EC2 Mac instance launch and takes some time to complete. Our customers have shared two use cases where they may need to set back their instance to a previous state in a shorter time period or without the need to initiate the scrubbing workflow. The first use case is when patching an existing disk image to bring OS-level or applications-level updates to your fleet, without manually patching individual instances in-place. The second use case is during continuous integration and continuous deployment (CI/CD) when you need to restore an Amazon EC2 Mac instance to a defined well-known state at the end of a build.

To restart your EC2 Mac instance in its initial state without stopping or terminating them, we created the ability to replace the root volume of an Amazon EC2 Mac instance with another EBS volume. This new EBS volume is created either from a new AMI, an Amazon EBS Snapshot, or from the initial volume state during boot.

You just swap the root volume with a new one and initiate a reboot at OS-level. Local data, additional attached EBS volumes, networking configurations, and IAM profiles are all preserved. Additional EBS volumes attached to the instance are also preserved, as well as the instance IP addresses, IAM policies, and security groups.

Let’s see how Replace Root Volume works

To prepare and initiate an Amazon EBS root volume replacement, you can use the AWS Management Console, the AWS Command Line Interface (AWS CLI), or one of our AWS SDKs. For this demo, I used the AWS CLI to show how you can automate the entire process.

To start the demo, I first allocate a Dedicated Host and then start an EC2 Mac instance, SSH-connect to it, and install the latest version of Xcode. I use the open-source xcodeinstall CLI tool to download and install Xcode. Typically, you also download, install, and configure a build agent and additional build tools or libraries as required by your build pipelines.

Once the instance is ready, I create an Amazon Machine Image (AMI). AMIs are disk images you can reuse to launch additional and identical EC2 Mac instances. This can be done from any machine that has the credentials to make API calls on your AWS account. In the following, you can see the commands I issued from my laptop’s Terminal application.

#
# Find the instance’s ID based on the instance name tag
#
~ aws ec2 describe-instances \
--filters "Name=tag:Name,Values=RRV-Demo" \
--query "Reservations[].Instances[].InstanceId" \
--output text 

i-0fb8ffd5dbfdd5384

#
# Create an AMI based on this instance
#
~ aws ec2 create-image \
--instance-id i-0fb8ffd5dbfdd5384 \
--name "macOS_13.3_Gold_AMI"	\
--description "macOS 13.2 with Xcode 13.4.1"

{
 
"ImageId": "ami-0012e59ed047168e4"
}

It takes a few minutes to complete the AMI creation process.

After I created this AMI, I can use my instance as usual. I can use it to build, test, and distribute my application, or make any other changes on the root volume.

When I want to reset the instance to the state of my AMI, I initiate the replace root volume operation:

~ aws ec2 create-replace-root-volume-task	\
--instance-id i-0fb8ffd5dbfdd5384 \
--image-id ami-0012e59ed047168e4
{
"ReplaceRootVolumeTask": {
"ReplaceRootVolumeTaskId": "replacevol-07634c2a6cf2a1c61", "InstanceId": "i-0fb8ffd5dbfdd5384",
"TaskState": "pending", "StartTime": "2023-05-26T12:44:35Z", "Tags": [],
"ImageId": "ami-0012e59ed047168e4", "SnapshotId": "snap-02be6b9c02d654c83", "DeleteReplacedRootVolume": false
}
}

The root Amazon EBS volume is replaced with a fresh one created from the AMI, and the system triggers an OS-level reboot.

I can observe the progress with the DescribeReplaceRootVolumeTasks API

~ aws ec2 describe-replace-root-volume-tasks \
--replace-root-volume-task-ids replacevol-07634c2a6cf2a1c61

{
"ReplaceRootVolumeTasks": [
{
"ReplaceRootVolumeTaskId": "replacevol-07634c2a6cf2a1c61", "InstanceId": "i-0fb8ffd5dbfdd5384",
"TaskState": "succeeded", "StartTime": "2023-05-26T12:44:35Z",
"CompleteTime": "2023-05-26T12:44:43Z", "Tags": [],
"ImageId": "ami-0012e59ed047168e4", "DeleteReplacedRootVolume": false
}
]
}

After a short time, the instance becomes available again, and I can connect over ssh.

~ ssh [email protected]
Warning: Permanently added '3.0.0.86' (ED25519) to the list of known hosts.
Last login: Wed May 24 18:13:42 2023 from 81.0.0.0

┌───┬──┐	 |  |_ )
│ ╷╭╯╷ │	_| (	/
│ └╮	│   |\  |  |
│ ╰─┼╯ │ Amazon EC2
└───┴──┘ macOS Ventura 13.2.1
 
ec2-user@ip-172-31-58-100 ~ %

Additional thoughts

There are a couple of additional points to know before using this new capability:

  • By default, the old root volume is preserved. You can pass the –-delete-replaced-root-volume option to delete it automatically. Do not forget to delete old volumes and their corresponding Amazon EBS Snapshots when you don’t need them anymore to avoid being charged for them.
  • During the replacement, the instance will be unable to respond to health checks and hence might be marked as unhealthy if placed inside an Auto Scaled Group. You can write a custom health check to change that behavior.
  • When replacing the root volume with an AMI, the AMI must have the same product code, billing information, architecture type, and virtualization type as that of the instance.
  • When replacing the root volume with a snapshot, you must use snapshots from the same lineage as the instance’s current root volume.
  • The size of the new volume is the largest of the AMI’s block device mapping and the size of the old Amazon EBS root volume.
  • Any non-root Amazon EBS volume stays attached to the instance.
  • Finally, the content of the instance store (the internal SSD drive) is untouched, and all other meta-data of the instance are unmodified (the IP addresses, ENI, IAM policies etc.).

Pricing and availability

Replace Root Volume for EC2 Mac is available in all AWS Regions where Amazon EC2 Mac instances are available. There is no additional cost to use this capability. You are charged for the storage consumed by the Amazon EBS Snapshots and AMIs.

Check other options available on the API or AWS CLI and go configure your first root volume replacement task today!

New – Amazon EC2 C7a Instances Powered By 4th Gen AMD EPYC Processors for Compute Optimized Workloads

Post Syndicated from Channy Yun original https://aws.amazon.com/blogs/aws/new-amazon-ec2-c7a-instances-powered-by-4th-gen-amd-epyc-processors-for-compute-optimized-workloads/

We launched the compute optimized Amazon EC2 C6a instances in February 2022 powered by 3rd Gen AMD EPYC (Milan) processors, running at frequencies up to 3.6 GHz.

Today, we’re announcing the general availability of new, compute optimized Amazon EC2 C7a instances, powered by the 4th Gen AMD EPYC (Genoa) processors with a maximum frequency of 3.7 GHz, which offer up to 50 percent higher performance compared to C6a instances. You can use this increased performance to process data faster, consolidate workloads, and lower the cost of ownership.

C7a instances offer up to 50 percent higher performance compared to C6a instances. These instances are ideal for running compute-intensive workloads such as high-performance web servers, batch processing, ad serving, machine learning, multiplayer gaming, video encoding, high performance computing (HPC) such as scientific modeling, and machine learning.

C7a instances support AVX-512, Vector Neural Network Instructions (VNNI), and brain floating point (bfloat16). These instances feature Double Data Rate 5 (DDR5) memory, which enables high-speed access to data in-memory, and deliver 2.25 times more memory bandwidth compared to the previous generation instances for lower latency.

C7a instances feature sizes of up to 192 vCPUs with 384 GiB RAM, which you have a new medium instance size, which enables you to right-size your workloads more accurately, offering 1 vCPU, 2 GiB. Here are the detailed specs:

Name vCPUs Memory (GiB) Network Bandwidth (Gbps) EBS Bandwidth (Gbps)
c7a.medium 1 2 Up to 12.5 Up to 10
c7a.large 2 4 Up to 12.5 Up to 10
c7a.xlarge 4 8 Up to 12.5 Up to 10
c7a.2xlarge 8 16 Up to 12.5 Up to 10
c7a.4xlarge 16 32 Up to 12.5 Up to 10
c7a.8xlarge 32 64 12.5 10
c7a.12xlarge 48 96 18.75 15
c7a.16xlarge 64 128 25 20
c7a.24xlarge 96 192 37.5 30
c7a.32xlarge 128 256 50 40
c7a.48xlarge 192 384 50 40
c7a.metal-48xl 192 384 50 40

C7a instances have up to 50 Gbps enhanced networking and 40 Gbps EBS bandwidth, and you can attach up to 128 EBS volumes to an instance, compared to up to 28 EBS volume attachments with the previous generation instances.

C7a instances support always-on memory encryption with AMD secure memory encryption (SME) and new AVX-512 instructions for accelerating encryption and decryption algorithms, convolutional neural network (CNN) based algorithms, financial analytics, and video encoding workloads. C7a instances also support AES-256 compared to AES-128 in C6a instances for enhanced security.

These instances are built on the AWS Nitro System and support Elastic Fabric Adapter (EFA) for workloads that benefit from lower network latency and highly scalable inter-node communication, such as high-performance computing and video processing.

Now Available
Amazon EC2 C7a instances are now available in the following AWS Regions: US East (Ohio), US East (N. Virginia), US West (Oregon), and EU (Ireland). As usual with Amazon EC2, you only pay for what you use. For more information, see the Amazon EC2 pricing page.

To learn more, visit the EC2 C7a instances page and AWS/AMD partner page. You can send feedback to [email protected], AWS re:Post for EC2, or through your usual AWS Support contacts.

Channy

Get the full benefits of IMDSv2 and disable IMDSv1 across your AWS infrastructure

Post Syndicated from Saju Sivaji original https://aws.amazon.com/blogs/security/get-the-full-benefits-of-imdsv2-and-disable-imdsv1-across-your-aws-infrastructure/

The Amazon Elastic Compute Cloud (Amazon EC2) Instance Metadata Service (IMDS) helps customers build secure and scalable applications. IMDS solves a security challenge for cloud users by providing access to temporary and frequently-rotated credentials, and by removing the need to hardcode or distribute sensitive credentials to instances manually or programmatically. The Instance Metadata Service Version 2 (IMDSv2) adds protections; specifically, IMDSv2 uses session-oriented authentication with the following enhancements:

  • IMDSv2 requires the creation of a secret token in a simple HTTP PUT request to start the session, which must be used to retrieve information in IMDSv2 calls.
  • The IMDSv2 session token must be used as a header in subsequent IMDSv2 requests to retrieve information from IMDS. Unlike a static token or fixed header, a session and its token are destroyed when the process using the token terminates. IMDSv2 sessions can last up to six hours.
  • A session token can only be used directly from the EC2 instance where that session began.
  • You can reuse a token or create a new token with every request.
  • Session token PUT requests are blocked if they contain an X-forwarded-for header.

In a previous blog post, we explained how these new protections add defense-in-depth for third-party and external application vulnerabilities that could be used to try to access the IMDS.

You won’t be able to get the full benefits of IMDSv2 until you disable IMDSv1. While IMDS is provided by the instance itself, the calls to IMDS are from your software. This means your software must support IMDSv2 before you can disable IMDSv1. In addition to AWS SDKs, CLIs, and tools like the SSM agents supporting IMDSv2, you can also use the IMDS Packet Analyzer to pinpoint exactly what you need to update to get your instances ready to use only IMDSv2. These tools make it simpler to transition to IMDSv2 as well as launch new infrastructure with IMDSv1 disabled. All instances launched with AL2023 set the instance to provide only IMDSv2 (IMDSv1 is disabled) by default, with AL2023 also not making IMDSv1 calls.

AWS customers who want to get the benefits of IMDSv2 have told us they want to use IMDSv2 across both new and existing, long-running AWS infrastructure. This blog post shows you scalable solutions to identify existing infrastructure that is providing IMDSv1, how to transition to IMDSv2 on your infrastructure, and how to completely disable IMDSv1. After reviewing this blog, you will be able to set new Amazon EC2 launches to IMDSv2. You will also learn how to identify existing software making IMDSv1 calls, so you can take action to update your software and then require IMDSv2 on existing EC2 infrastructure.

Identifying IMDSv1-enabled EC2 instances

The first step in transitioning to IMDSv2 is to identify all existing IMDSv1-enabled EC2 instances. You can do this in various ways.

Using the console

You can identify IMDSv1-enabled instances using the IMDSv2 attribute column in the Amazon EC2 page in the AWS Management Console.

To view the IMDSv2 attribute column:

  1. Open the Amazon EC2 console and go to Instances.
  2. Choose the settings icon in the top right.
  3. Scroll down to IMDSv2, turn on the slider.
  4. Choose Confirm.

This gives you the IMDS status of your instances. A status of optional means that IMDSv1 is enabled on the instance and required means that IMDSv1 is disabled.

Figure 1: Example of IMDS versions for EC2 instances in the console

Figure 1: Example of IMDS versions for EC2 instances in the console

Using the AWS CLI

You can identify IMDSv1-enabled instances using the AWS Command Line Interface (AWS CLI) by running the aws ec2 describe-instances command and checking the value of HttpTokens. The HttpTokens value determines what version of IMDS is enabled, with optional enabling IMDSv1 and IMDSv2 and required means IMDSv2 is required. Similar to using the console, the optional status indicates that IMDSv1 is enabled on the instance and required indicates that IMDSv1 is disabled.

"MetadataOptions": {
                        "State": "applied", 
                        "HttpEndpoint": "enabled", 
                        "HttpTokens": "optional", 
                        "HttpPutResponseHopLimit": 1
                    },

[ec2-user@ip-172-31-24-101 ~]$ aws ec2 describe-instances | grep '"HttpTokens": "optional"' | wc -l
4

Using AWS Config

AWS Config continually assesses, audits, and evaluates the configurations and relationships of your resources on AWS, on premises, and on other clouds. The AWS Config rule ec2-imdsv2-check checks whether your Amazon EC2 instance metadata version is configured with IMDSv2. The rule is NON_COMPLIANT if the HttpTokens is set to optional, which means the EC2 instance has IMDSv1 enabled.

Figure 2: Example of noncompliant EC2 instances in the AWS Config console

Figure 2: Example of noncompliant EC2 instances in the AWS Config console

After this AWS Config rule is enabled, you can set up AWS Config notifications through Amazon Simple notification Service (Amazon SNS).

Using Security Hub

AWS Security Hub provides detection and alerting capability at the account and organization levels. You can configure cross-Region aggregation in Security Hub to gain insight on findings across Regions. If using AWS Organizations, you can configure a Security Hub designated account to aggregate findings across accounts in your organization.

Security Hub has an Amazon EC2 control ([EC2.8] Amazon EC2 instances should use Instance Metadata Service Version 2 (IMDSv2)) that uses the AWS Config rule ec2-imdsv2-check to check if the instance metadata version is configured with IMDSv2. The rule is NON_COMPLIANT if the HttpTokens is set to optional, which means EC2 instance has IMDSv1 enabled.

Figure 3: Example of AWS Security Hub showing noncompliant EC2 instances

Figure 3: Example of AWS Security Hub showing noncompliant EC2 instances

Using Amazon Event Bridge, you can also set up alerting for the Security Hub findings when the EC2 instances are noncompliant for IMDSv2.

{
  "source": ["aws.securityhub"],
  "detail-type": ["Security Hub Findings - Imported"],
  "detail": {
    "findings": {
      "ProductArn": ["arn:aws:securityhub:us-west-2::product/aws/config"],
      "Title": ["ec2-imdsv2-check"]
    }
  }
}

Identifying if EC2 instances are making IMDSv1 calls

Not all of your software will be making IMDSv1 calls; your dependent libraries and tools might already be compatible with IMDSv2. However, to mitigate against compatibility issues in requiring IMDSv2 and disabling IMDSv1 entirely, you must check for remaining IMDSv1 calls from your software. After you’ve identified that there are instances with IMDSv1 enabled, investigate if your software is making IMDSv1 calls. Most applications make IMDSv1 calls at instance launch and shutdown. For long running instances, we recommend monitoring IMDSv1 calls during a launch or a stop and restart cycle.

You can check whether your software is making IMDSv1 calls by checking the MetadataNoToken metric in Amazon CloudWatch. You can further identify the source of IMDSv1 calls by using the IMDS Packet Analyzer tool.

Steps to check IMDSv1 usage with CloudWatch

  1. Open the CloudWatch console.
  2. Go to Metrics and then All Metrics.
  3. Select EC2 and then choose Per-Instance Metrics.
  4. Search and add the Metric MetadataNoToken for the instances you’re interested in.
Figure 4: CloudWatch dashboard for MetadataNoToken per-instance metric

Figure 4: CloudWatch dashboard for MetadataNoToken per-instance metric

You can use expressions in CloudWatch to view account wide metrics.

SEARCH('{AWS/EC2,InstanceId} MetricName="MetadataNoToken"', 'Maximum')
Figure 5: Using CloudWatch expressions to view account wide metrics for MetadataNoToken

Figure 5: Using CloudWatch expressions to view account wide metrics for MetadataNoToken

You can combine SEARCH and SORT expressions in CloudWatch to help identify the instances using IMDSv1.

SORT(SEARCH('{AWS/EC2,InstanceId} MetricName="MetadataNoToken"', 'Sum', 300), SUM, DESC, 10)
Figure 6: Another example of using CloudWatch expressions to view account wide metrics

Figure 6: Another example of using CloudWatch expressions to view account wide metrics

If you have multiple AWS accounts or use AWS Organizations, you can set up a centralized monitoring account using CloudWatch cross account observability.

IMDS Packet Analyzer

The IMDS Packet Analyzer is an open source tool that identifies and logs IMDSv1 calls from your software, including software start-up on your instance. This tool can assist in identifying the software making IMDSv1 calls on EC2 instances, allowing you to pinpoint exactly what you need to update to get your software ready to use IMDSv2. You can run the IMDS Packet Analyzer from a command line or install it as a service. For more information, see IMDS Packet Analyzer on GitHub.

Disabling IMDSv1 and maintaining only IMDSv2 instances

After you’ve monitored and verified that the software on your EC2 instances isn’t making IMDSv1 calls, you can disable IMDSv1 on those instances. For all compatible workloads, we recommend using Amazon Linux 2023, which offers several improvements (see launch announcement), including requiring IMDSv2 (disabling IMDSv1) by default.

You can also create and modify AMIs and EC2 instances to disable IMDSv1. Configure the AMI provides guidance on how to register a new AMI or change an existing AMI by setting the imds-support parameter to v2.0. If you’re using container services (such as ECS or EKS), you might need a bigger hop limit to help avoid falling back to IMDSv1. You can use the modify-instance-metadata-options launch parameter to make the change. We recommend testing with a hop limit of three in container environments.

To create a new instance

For new instances, you can disable IMDSv1 and enable IMDSv2 by specifying the metadata-options parameter using the run-instance CLI command.

aws ec2 run-instances
    --image-id <ami-0123456789example>
    --instance-type c3.large
    --metadata-options “HttpEndpoint=enabled,HttpTokens=required”

To modify the running instance

aws ec2 modify-instance-metadata-options \
--instance-id <instance-0123456789example> \
--http-tokens required \
--http-endpoint enabled

To configure a new AMI

aws ec2 register-image \
    --name <my-image> \
    --root-device-name /dev/xvda \
    --block-device-mappings DeviceName=/dev/xvda,Ebs={SnapshotId=<snap-0123456789example>} \
    --imds-support v2.0

To modify an existing AMI

aws ec2 modify-image-attribute \
    --image-id <ami-0123456789example> \
    --imds-support v2.0

Using the console

If you’re using the console to launch instances, after selecting Launch Instance from AWS Console, choose the Advanced details tab, scroll down to Metadata version and select V2 only (token required).

Figure 7: Modifying IMDS version using the console

Figure 7: Modifying IMDS version using the console

Using EC2 launch templates

You can use an EC2 launch template as an instance configuration template that an Amazon Auto Scaling group can use to launch EC2 instances. When creating the launch template using the console, you can specify the Metadata version and select V2 only (token required).

Figure 8: Modifying the IMDS version in the EC2 launch templates

Figure 8: Modifying the IMDS version in the EC2 launch templates

Using CloudFormation with EC2 launch templates

When creating an EC2 launch template using AWS CloudFormation, you must specify the MetadataOptions property to use only IMDSv2 by setting HttpTokens as required.

In this state, retrieving the AWS Identity and Access Management (IAM) role credentials always returns IMDSv2 credentials; IMDSv1 credentials are not available.

{
"HttpEndpoint" : <String>,
"HttpProtocolIpv6" : <String>,
"HttpPutResponseHopLimit" : <Integer>,
"HttpTokens" : required,
"InstanceMetadataTags" : <String>
}

Using Systems Manager automation runbook

You can run the EnforceEC2InstanceIMDSv2 automation document available in AWS Systems Manager, which will enforce IMDSv2 on the EC2 instance using the ModifyInstanceMetadataOptions API.

  1. Open the Systems Manager console, and then select Automation from the navigation pane.
  2. Choose Execute automation.
  3. On the Owned by Amazon tab, for Automation document, enter EnforceEC2InstanceIMDSv2, and then press Enter.
  4. Choose EnforceEC2InstanceIMDSv2 document, and then choose Next.
  5. For Execute automation document, choose Simple execution.

    Note: If you need to run the automation on multiple targets, then choose Rate Control.

  6. For Input parameters, enter the ID of EC2 instance under InstanceId
  7. For AutomationAssumeRole, select a role.

    Note: To change the target EC2 instance, the AutomationAssumeRole must have ec2:ModifyInstanceMetadataOptions and ec2:DescribeInstances permissions. For more information about creating the assume role for Systems Manager Automation, see Create a service role for Automation.

  8. Choose Execute.

Using the AWS CDK

If you use the AWS Cloud Development Kit (AWS CDK) to launch instances, you can use it to set the requireImdsv2 property to disable IMDSv1 and enable IMDSv2.

new ec2.Instance(this, 'Instance', {
        // <... other parameters>
        requireImdsv2: true,
})

Using AWS SDK

The new clients for AWS SDK for Java 2.x use IMDSv2, and you can use the new clients to retrieve instance metadata for your EC2 instances. See Introducing a new client in the AWS SDK for Java 2.x for retrieving EC2 Instance Metadata for instructions.

Maintain only IMDSv2 EC2 instances

To maintain only IMDSv2 instances, you can implement service control policies and IAM policies that verify that users and software on your EC2 instances can only use instance metadata using IMDSv2. This policy specifies that RunInstance API calls require the EC2 instance use only IMDSv2. We recommend implementing this policy after all of the instances in associated accounts are free of IMDSv1 calls and you have migrated all of the instances to use only IMDSv2.

{
    "Version": "2012-10-17",
    "Statement": [
               {
            "Sid": "RequireImdsV2",
            "Effect": "Deny",
            "Action": "ec2:RunInstances",
            "Resource": "arn:aws:ec2:*:*:instance/*",
            "Condition": {
                "StringNotEquals": {
                    "ec2:MetadataHttpTokens": "required"
                }
            }
        }
    ]
} 

You can find more details on applicable service control policies (SCPs) and IAM policies in the EC2 User Guide.

Restricting credential usage using condition keys

As an additional layer of defence, you can restrict the use of your Amazon EC2 role credentials to work only when used in the EC2 instance to which they are issued. This control is complementary to IMDSv2 since both can work together. The AWS global condition context keys for EC2 credential control properties (aws:EC2InstanceSourceVPC and aws:EC2InstanceSourcePrivateIPv4) restrict the VPC endpoints and private IPs that can use your EC2 instance credentials, and you can use these keys in service control policies (SCPs) or IAM policies. Examples of these policies are in this blog post.

Conclusion

You won’t be able to get the full benefits of IMDSv2 until you disable IMDSv1. In this blog post, we showed you how to identify IMDSv1-enabled EC2 instances and how to determine if and when your software is making IMDSv1 calls. We also showed you how to disable IMDSv1 on new and existing EC2 infrastructure after your software is no longer making IMDSv1 calls. You can use these tools to transition your existing EC2 instances, and set your new EC2 launches, to use only IMDSv2.

If you have feedback about this post, submit comments in the Comments section below. If you have questions about this post, start a new thread on the AWS Compute re:Post or contact AWS Support.

Want more AWS Security news? Follow us on Twitter.

Saju Sivaji

Saju Sivaji

Saju is Senior Technical Program Manager with the AWS Security organization. When Saju isn’t managing security expectation programs to help raise the security bar for both internal and external customers, he enjoys travelling, racket sports, and bicycling.

Joshua Levinson

Joshua Levinson

Joshua is a Principal Product Manager at AWS on the Amazon EC2 team. He is passionate about helping customers with highly scalable features on EC2 and across AWS and enjoys the challenge of building simplified solutions to complex problems. Outside of work, he enjoys cooking, reading with his kids, and Olympic weightlifting.

Integrating AWS WAF with your Amazon Lightsail instance

Post Syndicated from Macey Neff original https://aws.amazon.com/blogs/compute/integrating-aws-waf-with-your-amazon-lightsail-instance/

This blog post is written by Riaz Panjwani, Solutions Architect, Canada CSC and Dylan Souvage, Solutions Architect, Canada CSC.

Security is the top priority at AWS. This post shows how you can level up your application security posture on your Amazon Lightsail instances with an AWS Web Application Firewall (AWS WAF) integration. Amazon Lightsail offers easy-to-use virtual private server (VPS) instances and more at a cost-effective monthly price.

Lightsail provides security functionality built-in with every instance through the Lightsail Firewall. Lightsail Firewall is a network-level firewall that enables you to define rules for incoming traffic based on IP addresses, ports, and protocols. Developers looking to help protect against attacks such as SQL injection, cross-site scripting (XSS), and distributed denial of service (DDoS) can leverage AWS WAF on top of the Lightsail Firewall.

As of this post’s publishing, AWS WAF can only be deployed on Amazon CloudFront, Application Load Balancer (ALB), Amazon API Gateway, and AWS AppSync. However, Lightsail can’t directly act as a target for these services because Lightsail instances run within an AWS managed Amazon Virtual Private Cloud (Amazon VPC). By leveraging VPC peering, you can deploy the aforementioned services in front of your Lightsail instance, allowing you to integrate AWS WAF with your Lightsail instance.

Solution Overview

This post shows you two solutions to integrate AWS WAF with your Lightsail instance(s). The first uses AWS WAF attached to an Internet-facing ALB. The second uses AWS WAF attached to CloudFront. By following one of these two solutions, you can utilize rule sets provided in AWS WAF to secure your application running on Lightsail.

Solution 1: ALB and AWS WAF

This first solution uses VPC peering and ALB to allow you to use AWS WAF to secure your Lightsail instances. This section guides you through the steps of creating a Lightsail instance, configuring VPC peering, creating a security group, setting up a target group for your load balancer, and integrating AWS WAF with your load balancer.

AWS architecture diagram showing Amazon Lightsail integration with WAF using VPC peering across two separate VPCs. The Lightsail application is in a private subnet inside the managed VPC(vpc-b), with peering connection to your VPC(vpc-a) which has an ALB in a public subnet with WAF attached to it.

Creating the Lightsail Instance

For this walkthrough, you can utilize an AWS Free Tier Linux-based WordPress blueprint.

1. Navigate to the Lightsail console and create the instance.

2. Verify that your Lightsail instance is online and obtain its private IP, which you will need when configuring the Target Group later.

Screenshot of Lightsail console with a WordPress application set up showcasing the networking tab.

Attaching an ALB to your Lightsail instance

You must enable VPC peering as you will be utilizing an ALB in a separate VPC.

1. To enable VPC peering, navigate to your account in the top-right corner, select the Account dropdown, select Account, then select Advanced, and select Enable VPC Peering. Note the AWS Region being selected, as it is necessary later. For this example, select “us-east-2”. Screenshot of Lightsail console in the settings menu under the advanced section showcasing VPC peering.2. In the AWS Management Console, navigate to the VPC service in the search bar, select VPC Peering Connections and verify the created peering connection.

Screenshot of the AWS Console showing the VPC Peering Connections menu with an active peering connection.

3. In the left navigation pane, select Security groups, and create a Security group that allows HTTP traffic (port 80). This is used later to allow public HTTP traffic to the ALB.

4. Navigate to the Amazon Elastic Compute Cloud (Amazon EC2) service, and in the left pane under Load Balancing select Target Groups. Proceed to create a Target Group, choosing IP addresses as the target type.Screenshot of the AWS console setting up target groups with the IP address target type selected.

5. Proceed to the Register targets section, and select Other private IP address. Add the private IP address of the Lightsail instance that you created before. Select Include as Pending below and then Create target group (note that if your Lightsail instance is re-launched the target group must be updated as the private IP address may change).

6. In the left pane, select Load Balancers, select Create load balancers and choose Application Load Balancer. Ensure that you select the “Internet-facing” scheme, otherwise, you will not be able to connect to your instance over the internet.Screenshot of the AWS console setting up target groups with the IP address target type selected.

7. Select the VPC in which you want your ALB to reside. In this example, select the default VPC and all the Availability Zones (AZs) to make sure of the high availability of the load balancer.

8. Select the Security Group created in Step 3 to make sure that public Internet traffic can pass through the load balancer.

9. Select the target group under Listeners and routing to the target group you created earlier (in Step 5). Proceed to Create load balancer.Screenshot of the AWS console creating an ALB with the target group created earlier in the blog, selected as the listener.

10. Retrieve the DNS name from your load balancer again by navigating to the Load Balancers menu under the EC2 service.Screenshot of the AWS console with load balancer created.

11. Verify that you can access your Lightsail instance using the Load Balancer’s DNS by copying the DNS name into your browser.

Screenshot of basic WordPress app launched accessed via a web browser.

Integrating AWS WAF with your ALB

Now that you have ALB successfully routing to the Lightsail instance, you can restrict the instance to only accept traffic from the load balancer, and then create an AWS WAF web Access Control List (ACL).

1. Navigate back to the Lightsail service, select the Lightsail instance previously created, and select Networking. Delete all firewall rules that allow public access, and under IPv4 Firewall add a rule that restricts traffic to the IP CIDR range of the VPC of the previously created ALB.

Screenshot of the Lightsail console showing the IPv4 firewall.

2. Now you can integrate the AWS WAF to the ALB. In the Console, navigate to the AWS WAF console, or simply navigate to your load balancer’s integrations section, and select Create web ACL.

Screenshot of the AWS console showing the WAF configuration in the integrations tab of the ALB.

3. Choose Create a web ACL, and then select Add AWS resources to add the previously created ALB.Screenshot of creating and assigning a web ACL to the ALB.

4. Add any rules you want to your ACL, these rules will govern the traffic allowed or denied to your resources. In this example, you can add the WordPress application managed rules.Screenshot of adding the AWS WAF managed rule for WordPress applications.

5. Leave all other configurations as default and create the AWS WAF.

6. You can verify your firewall is attached to the ALB in the load balancer Integrations section.Screenshot of the AWS console showing the WAF integration detected in the integrations tab of the ALB.

Solution 2: CloudFront and AWS WAF

Now that you have set up ALB and VPC peering to your Lightsail instance, you can optionally choose to add CloudFront to the solution. This can be done by setting up a custom HTTP header rule in the Listener of your ALB, setting up the CloudFront distribution to use the ALB as an origin, and setting up an AWS WAF web ACL for your new CloudFront distribution. This configuration makes traffic limited to only accessing your application through CloudFront, and is still protected by WAF.AWS architecture diagram showing Amazon Lightsail integration with WAF using VPC peering across two separate VPCs. The Lightsail application is in a public subnet inside VPC-B, with peering connection to VPC-A which has an ALB in a private subnet fronted with CloudFront that has WAF attached.

1. Navigate to the CloudFront service, and click Create distribution.

2. Under Origin domain, select the load balancer that you had created previously.Screenshot of creating a distribution in CloudFront.

3. Scroll down to the Add custom header field, and click Add header.

4. Create your header name and value. Note the header name and value as you will need it later in the walkthrough.Screenshot of adding the custom header to your CloudFront distribution.

5. Scroll down to the Cache key and origin requests section. Under Cache policy, choose CachingDisabled.Screenshot of selecting the CachingDisabled cache policy inside the creation of the CloudFront distribution.

6. Scroll to the Web Application Firewall (WAF) section, and select Enable security protections.Screenshot of selecting “Enable security protections” inside the creation of the CloudFront distribution.

7. Leave all other configurations as default, and click Create distribution.

8. Wait until your CloudFront distribution has been deployed, and verify that you can access your Lightsail application using the DNS under Domain name.

Screenshot of the CloudFront distribution created with the status as enabled and the deployment finished.

9. Navigate to the EC2 service, and in the left pane under Load Balancing, select Load Balancers.

10. Select the load balancer you created previously, and under the Listeners tab, select the Listener you had created previously. Select Actions in the top right and then select Manage rules.Screenshot of the Listener section of the ALB with the Manage rules being selected.

11. Select the edit icon at the top, and then select the edit icon beside the Default rule.

Screenshot of the edit section inside managed rules.

12. Select the delete icon to delete the Default Action.

Screenshot of highlighting the delete button inside the edit rules section.

13. Choose Add action and then select Return fixed response.

Screenshot of adding a new rule “Return fixed response…”.

14. For Response code, enter 403, this will restrict access to CloudFront.

15. For Response body, enter “Access Denied”.

16. Select Update in the top right corner to update the Default rule.

Screenshot of the rule being successfully updated.

17. Select the insert icon at the top, then select Insert Rule.

Screenshot of inserting a new rule to the Listener.

18. Choose Add Condition, then select Http header. For Header type, enter the Header name, and then for Value enter the Header Value chosen previously.

19. Choose Add Action, then select Forward to and select the target group you had created in the previous section.

20. Choose Save at the top right corner to create the rule.

Screenshot of adding a new rule to the Listener, with the Http header selected as the custom-header and custom-value from the previous creation of the CloudFront distribution, with the Load Balancer selected as the target group.

21. Retrieve the DNS name from your load balancer again by navigating to the Load Balancers menu under the EC2 service.

22. Verify that you can no longer access your Lightsail application using the Load Balancer’s DNS.

Screenshot of the Lightsail application being accessed through the Load Balancer via a web browser with Access Denied being shown..

23. Navigate back to the CloudFront service and select the Distribution you had created. Under the General tab, select the Web ACL link under the AWS WAF section. Modify the Web ACL to leverage any managed or custom rule sets.

Screenshot of the CloudFront distribution focusing on the AWS WAF integration under the General tab Settings.

You have successfully integrated AWS WAF to your Lightsail instance! You can access your Lightsail instance via your CloudFront distribution domain name!

Clean Up Lightsail console resources

To start, you will delete your Lightsail instance.

  1. Sign in to the Lightsail console.
  2. For the instance you want to delete, choose the actions menu icon (⋮), then choose Delete.
  3. Choose Yes to confirm the deletion.

Next you will delete your provisioned static IP.

  1. Sign in to the Lightsail console.
  2. On the Lightsail home page, choose the Networking tab.
  3. On the Networking page choose the vertical ellipsis icon next to the static IP address that you want to delete, and then choose Delete.

Finally you will disable VPC peering.

  1. In the Lightsail console, choose Account on the navigation bar.
  2. Choose Advanced.
  3. In the VPC peering section, clear Enable VPC peering for all AWS Regions.

Clean Up AWS console resources

To start, you will delete your Load balancer.

  1. Navigate to the EC2 console, choose Load balancers on the navigation bar.
  2. Select the load balancer you created previously.
  3. Under Actions, select Delete load balancer.

Next, you will delete your target group.

  1. Navigate to the EC2 console, choose Target Groups on the navigation bar.
  2. Select the target group you created previously.
  3. Under Actions, select Delete.

Now you will delete your CloudFront distribution.

  1. Navigate to the CloudFront console, choose Distributions on the navigation bar.
  2. Select the distribution you created earlier and select Disable.
  3. Wait for the distribution to finish deploying.
  4. Select the same distribution after it is finished deploying and select Delete.

Finally, you will delete your WAF ACL.

  1. Navigate to the WAF console, and select Web ACLS on the navigation bar.
  2. Select the web ACL you created previously, and select Delete.

Conclusion

Adding AWS WAF to your Lightsail instance enhances the security of your application by providing a robust layer of protection against common web exploits and vulnerabilities. In this post, you learned how to add AWS WAF to your Lightsail instance through two methods: Using AWS WAF attached to an Internet-facing ALB and using AWS WAF attached to CloudFront.

Security is top priority at AWS and security is an ongoing effort. AWS strives to help you build and operate architectures that protect information, systems, and assets while delivering business value. To learn more about Lightsail security, check out the AWS documentation for Security in Amazon Lightsail.

Automating multi-AZ high availability for WebLogic administration server

Post Syndicated from Jack Zhou original https://aws.amazon.com/blogs/architecture/automating-multi-az-high-availability-for-weblogic-administration-server/

Oracle WebLogic Server is used by enterprises to power production workloads, including Oracle E-Business Suite (EBS) and Oracle Fusion Middleware applications.

Customer applications are deployed to WebLogic Server instances (managed servers) and managed using an administration server (admin server) within a logical organization unit, called a domain. Clusters of managed servers provide application availability and horizontal scalability, while the single-instance admin server does not host applications.

There are various architectures detailing WebLogic-managed server high availability (HA). In this post, we demonstrate using Availability Zones (AZ) and a floating IP address to achieve a “stretch cluster” (Oracle’s terminology).

Overview of a WebLogic domain

Figure 1. Overview of a WebLogic domain

Overview of problem

The WebLogic admin server is important for domain configuration, management, and monitoring both application performance and system health. Historically, WebLogic was configured using IP addresses, with managed servers caching the admin server IP to reconnect if the connection was lost.

This can cause issues in a dynamic Cloud setup, as replacing the admin server from a template changes its IP address, causing two connectivity issues:

  1. Communication­ within the domain: the admin and managed servers communicate via the T3 protocol, which is based on Java RMI.
  2. Remote access to admin server console: allowing internet admin access and what additional security controls may be required is beyond the scope of this post.

Here, we will explore how to minimize downtime and achieve HA for your admin server.

Solution overview

For this solution, there are three approaches customers tend to follow:

  1. Use a floating virtual IP to keep the address static. This solution is familiar to WebLogic administrators as it replicates historical on-premise HA implementations. The remainder of this post dives into this practical implementation.
  2. Use DNS to resolve the admin server IP address. This is also a supported configuration.
  3. Run in a “headless configuration” and not (normally) run the admin server.
    • Use WebLogic Scripting Tool to issues commands
    • Collect and observe metrics through other toolsRunning “headless” requires a high level of operational maturity. It may not be compatible for certain vendor packaged applications deployed to WebLogic.

Using a floating IP address for WebLogic admin server

Here, we discuss the reference WebLogic deployment architecture on AWS, as depicted in Figure 2.

Reference WebLogic deployment with multi-AZ admin HA capability

Figure 2. Reference WebLogic deployment with multi-AZ admin HA capability

In this example, a WebLogic domain resides in a virtual private cloud’s (VPC) private subnet. The admin server is on its own Amazon Elastic Compute Cloud (Amazon EC2) instance. It’s bound to the private IP 10.0.11.8 that floats across AZs within the VPC. There are two ways to achieve this:

  1. Create a “dummy” subnet in the VPC (in any AZ), with the smallest allowed subnet size of /28. Excluding the first “4” and the last IP of the subnet because they’re reserved, choose an address. For a 10.0.11.0/28 subnet, we will use 10.0.11.8 and configure WebLogic admin server to bind to that.
  2. Use an IP outside of the VPC. We discuss this second way and compare both processes in the later section “Alternate solution for multi-AZ floating IP”.

This example Amazon Web Services stretch architecture with one WebLogic domain and one admin server:

  • Create a VPC across two or more AZs, with one private subnet in each AZ for managed servers and an additional “dummy” subnet.
  • Create two EC2 instances, one for each of the WebLogic Managed Servers (distributed across the private subnets).
  • Use an Auto Scaling group to ensure a single admin server running.
    • Create an Amazon EC2 launch template for the admin server.
    • Associate the launch template and an Auto Scaling group with minimum, maximum, and desired capacity of 1. The Auto Scaling Group (ASG) detects EC2 and/or AZ degradation and launches a new instance in a different AZ if the current fails.
    • Create an AWS Lambda function (example to follow) to be called by the Auto Scale group lifecycle hook to update the route tables.
    • Update the user data commands (example to follow) of the launch template to:
      • Add the floating IP address to the network interface
      • Start the admin server using the floating IP

To route traffic to the floating IP, we update route tables for both public and private subnets.

We create a Lambda function launched by the Auto Scale group lifecycle hook pending:InService when a new admin instance is created. This Lambda code updates routing rules in both route tables mapping the dummy subnet CIDR (10.0.11.0/28) of the “floating” IP to the admin Amazon EC2. This updates routes in both the public and private subnets for the dynamically launched admin server, enabling managed servers to connect.

Enabling internet access to the admin server

If enabling internet access to the admin server, create an internet-facing Application Load Balancer (ALB) attached to the public subnets. With the route to the admin server, the ALB can forward traffic to it.

  • Create an IP-based target group that points to the floating IP.
  • Add a forwarding rule in the ALB to route WebLogic admin traffic to the admin server.

User data commands in the launch template to make admin server accessible upon ASG scale out

In the admin server EC2 launch template, add user data code to monitor the ASG lifecycle state. When it reaches InService state, a Lambda function is invoked to update route tables. Then, the script starts the WebLogic admin server Java process (and associated NodeManager, if used).

The admin server instance’s SourceDestCheck attribute needs to be set to false, enabling it to bind to the logical IP. This change can also be done in the Lambda function.

When a user accesses the admin server from the internet:

  1. Traffic flows to the elastic IP address associated to the internet-facing ALB.
  2. The ALB forwards to the configured target group.
  3. The ALB uses the updated routes to reach 10.0.11.8 (admin server).

When managed servers communicate with the admin server, they use the updated route table to reach 10.0.11.8 (admin server).

The Lambda function

Here, we present a Lambda function example that sets the EC2 instance SourceDeskCheck attribute to false and updates the route rules for the dummy subnet CIDR (the “floating” IP on the admin server EC2) in both public and private route tables.

import { AutoScalingClient, CompleteLifecycleActionCommand } from "@aws-sdk/client-auto-scaling";
import { EC2Client, DeleteRouteCommand, CreateRouteCommand, ModifyInstanceAttributeCommand } from "@aws-sdk/client-ec2";
export const handler = async (event, context, callback) => {
console.log('LogAutoScalingEvent');
console.log('Received event:', JSON.stringify(event, null, 2));

// IMPORTANT: replace with your dummy subnet CIDR that the floating IP resides in
const destCIDR = "10.0.11.0/28";
// IMPORTANT: replace with your route table IDs
const rtTables = ["rtb-**************ff0", "rtb-**************af5"];

const asClient = new AutoScalingClient({region: event.region});
const eventDetail = event.detail;

const ec2client = new EC2Client({region: event.region});

const inputModifyAttr = {
"SourceDestCheck": {
"Value": false
},
"InstanceId": eventDetail['EC2InstanceId'],
};

const commandModifyAttr = new ModifyInstanceAttributeCommand(inputModifyAttr);
await ec2client.send(commandModifyAttr);

// modify route in two route tables
for (const rt of rtTables) {
const inputDelRoute = { // DeleteRouteRequest
DestinationCidrBlock: destCIDR,
DryRun: false,
RouteTableId: rt, // required
};
const cmdDelRoute = new DeleteRouteCommand(inputDelRoute);
try {
const response = await ec2client.send(cmdDelRoute);
console.log(response);
} catch (error) {
console.log(error);
}

const inputCreateRoute = { // addRouteRequest
DestinationCidrBlock: destCIDR,
DryRun: false,
InstanceId: eventDetail['EC2InstanceId'],
RouteTableId: rt, // required
};

const cmdCreateRoute = new CreateRouteCommand(inputCreateRoute);
await ec2client.send(cmdCreateRoute);
}

// continue on ASG lifecycle
const params = {
AutoScalingGroupName: eventDetail['AutoScalingGroupName'], /* required */
LifecycleActionResult: 'CONTINUE', /* required */
LifecycleHookName: eventDetail['LifecycleHookName'], /* required */
InstanceId: eventDetail['EC2InstanceId'],
LifecycleActionToken: eventDetail['LifecycleActionToken']
};
const cmdCompleteLifecycle = new CompleteLifecycleActionCommand(params);
const response = await asClient.send(cmdCompleteLifecycle);
console.log(response);
return response;
};

Amazon EC2 user data

The following code in Amazon EC2 user data shows how to add logical secondary IP address to the Amazon EC2 primary ENI, keep polling the ASG lifecycle state, and start the admin server Java process upon Amazon EC2 entering the InService state.

Content-Type: text/x-shellscript; charset="us-ascii"
MIME-Version: 1.0
Content-Transfer-Encoding: 7bit
Content-Disposition: attachment; filename="userdata.txt"
#!/bin/bash

ip addr add 10.0.11.8/28 br 10.0.11.255 dev eth0
TOKEN=$(curl -X PUT "http://169.254.169.254/latest/api/token" -H "X-aws-ec2-metadata-token-ttl-seconds: 21600")
for x in {1..30}
do 
  target_state=$(curl -H "X-aws-ec2-metadata-token: $TOKEN" -v http://169.254.169.254/latest/meta-data/autoscaling/target-lifecycle-state)
  if [ \"$target_state\" = \"InService\" ]; then
    su -c 'nohup /mnt/efs/wls/fmw/install/Oracle/Middleware/Oracle_Home/user_projects/domains/domain1/bin/startWebLogic.sh &' ec2-user 
    break
  fi
  sleep 10
done

Alternate solution for multi-AZ floating IP

An alternative solution for the floating IP is to use an IP external to the VPC. The configurations for ASG, Amazon EC2 launch template, and ASG lifecycle hook Lambda function remain the same. However, the ALB cannot access the WebLogic admin console webapp from the internet due to its requirement for a VPC-internal subnet. To access the webapp in this scenario, stand up a bastion host in a public subnet.

While this approach “saves” 16 VPC IP addresses by avoiding a dummy subnet, there are disadvantages:

  • Bastion hosts are not AZ-failure resilient.
  • Missing true multi-AZ resilience like the first solution.
  • Requires additional cost and complexity in managing multiple bastion hosts across AZs or a VPN.

Conclusion

AWS has a track record of efficiently running Oracle applications, Oracle EBS, PeopleSoft, and mission critical JEE workloads. In this post, we delved into a HA solution using a multi-AZ floating IP for the WebLogic admin server, and using ASG to ensure a singular admin server. We showed how to use ASG lifecycle hooks and Lambda to automate route updates for the floating IP and configuring an ALB to allow Internet access for the admin server. This solution achieves multi-AZ resilience for WebLogic admin server with automated recovery, transforming a traditional WebLogic admin server from a pet to cattle.

New – Amazon EC2 M2 Pro Mac Instances Built on Apple Silicon M2 Pro Mac Mini Computers

Post Syndicated from Channy Yun original https://aws.amazon.com/blogs/aws/new-amazon-ec2-m2-pro-mac-instances-built-on-apple-silicon-m2-pro-mac-mini-computers/

Today, we are announcing the general availability of Amazon EC2 M2 Pro Mac instances. These instances deliver up to 35 percent faster performance over the existing M1 Mac instances when building and testing applications for Apple platforms.

New EC2 M2 Pro Mac instances are powered by Apple M2 Pro Mac Mini computers featuring 12 core CPU, 19 core GPU, 32 GiB of memory, and 16 core Apple Neural Engine and uniquely enabled by the AWS Nitro System through high-speed Thunderbolt connections, offering these Mac mini computers as fully integrated and managed compute instances with up to 10 Gbps of Amazon VPC network bandwidth and up to 8 Gbps of Amazon EBS storage bandwidth. EC2 M2 Pro Mac instances support macOS Ventura (version 13.2 or later) as AMIs.

A Story of EC2 Mac Instances
When Jeff Barr first introduced Amazon EC2 Mac Instances in 2020, customers were surprised to be able to run macOS on Amazon EC2 to build, test, package, and sign applications developed with Xcode applications for the Apple platform, including macOS, iOS, iPadOS, tvOS, and watchOS.

In his keynote in AWS re:Invent 2020, Peter DeSantis revealed the secret to build EC2 Mac instances powered by the AWS Nitro System, which makes it possible to offer Apple Mac mini computers as fully integrated and managed compute instances with Amazon VPC networking and Amazon EBS storage, just like any other EC2 instances.

“We did not need to make any changes to the Mac hardware. We simply connected a Nitro controller via the Mac’s Thunderbolt connection. When you launch a Mac instance, your Mac-compatible Amazon Machine Image (AMI) runs directly on the Mac Mini, with no hypervisor. The Nitro controller sets up the instance and provides secure access to the network and any storage attached. And that Mac Mini can now natively use any AWS service.”

In July 2022, we introduced Amazon EC2 M1 Mac Instances built around the Apple-designed M1 System on Chip (SoC). Developers building for iPhone, iPad, Apple Watch, and Apple TV applications can choose either x86-based EC2 Mac instances or Arm-based EC2 M1 instances. If you want to re-architect your apps to natively support Macs with Apple Silicon using EC2 M1 instances, you can build and test your apps to deliver up to 60 percent better price performance over the EC2 Mac instances for iPhone and Mac app build workloads with all the benefits of AWS.

Many customers take advantage of EC2 Mac instances to deliver a complete end-to-end build pipeline on macOS on AWS. With EC2 Mac instances, they can scale their iOS build fleet; easily use custom macOS environments with AMIs; and debug any build or test failures with fully reproducible macOS environments.

Customers have reported up to 4x reduction in build times, up to 3x increase in parallel builds, up to 80 percent reduction in machine-related build failures, and up to 50 percent reduction in fleet size. They can continue to prioritize their time on innovating products and features while reducing the tedious effort required to manage on-premises macOS infrastructure.

To accelerate this innovation, EC2 Mac instances recently began to support replacing root volumes on a running EC2 Mac instance, enabling you to restore the root volume of an EC2 Mac instance to its initial launch state or to a specific snapshot, without requiring you to stop or terminate the instance.

You can also use in-place operating system updates from within the guest environment on EC2 M1 Mac instances to a specific or latest macOS version, including the beta version, by registering your instances with the Apple Developer Program. Developers can now integrate the latest macOS features into their applications and test existing applications for compatibility before public macOS releases.

Getting Started with EC2 M2 Pro Instances
As with other EC2 Mac instances, EC2 M2 Pro Mac instances also support Dedicated Host tenancy with a minimum host allocation duration of 24 hours to align with macOS licensing.

To get started, you should allocate a Mac-dedicated host, a physical server fully dedicated for your own use in your AWS account. After the host is allocated, you can launch, stop, and start your own macOS environment as one instance on that host for one dedicated host.

After the host is allocated, you can start an EC2 Mac instance on it. The procedure is no different from starting any EC2 instance type. Choose your macOS AMI version and select the mac2-m2pro.metal instance type in the Application and OS Images section.

In the Advanced details section, select Dedicated host in Tenancy and a dedicated host you just created in Tenancy host ID.

When you use EC2 Mac instances for the first time, you can use SSH to connect to the newly launched instance as usual or enable Apple Remote Desktop and start a VNC session to the EC2 instance. To learn more, see Sebastien’s series of articles to launch and connect your Mac instance.

When you no longer need the Mac dedicated host, you can terminate your running Mac instance and release the underlying host. Note again that after being allocated, a Mac dedicated host can only be released after 24 hours to align with Apple’s macOS licensing.

Now Available
Amazon EC2 M2 Pro Mac instances are available in the US West (Oregon) and US East (Ohio) AWS Regions, with additional regions coming soon.

To learn more or get started, see Amazon EC2 Mac Instances or visit the EC2 Mac documentation.  You can send feedback to AWS re:Post for EC2 or through your usual AWS Support contacts.

Channy

New – Amazon EC2 R7a Instances Powered By 4th Gen AMD EPYC Processors for Memory Optimized Workloads

Post Syndicated from Channy Yun original https://aws.amazon.com/blogs/aws/new-amazon-ec2-r7a-instances-powered-by-4th-gen-amd-epyc-processors-for-memory-optimized-workloads/

We launched the memory optimized Amazon EC2 R6a instances in July 2022 powered by 3rd Gen AMD EPYC (Milan) processors, running at frequencies up to 3.6 GHz. Many customers who run workloads that are dependent on x86 instructions, such as SAP, are looking for ways to optimize their cloud utilization. They’re taking advantage of the compute choice that EC2 offers.

Today, we’re announcing the general availability of new memory optimized Amazon EC2 R7a instances powered by 4th Gen AMD EPYC (Genoa) processors with a maximum frequency of 3.7 GHz, which offer up to 50 percent higher performance compared to the previous generation instances. You can use this increased performance to process data faster, consolidate workloads, and lower the cost of ownership.

R7a instances also support AVX-512, Vector Neural Network Instructions (VNNI), and brain floating point (bfloat16). These instances feature Double Data Rate 5 (DDR5) memory, which enables high-speed access to data in-memory, and deliver 2.25 times more memory bandwidth compared to R6a instances for lower latency. Moreover, these instances support always-on memory encryption using AMD secure memory encryption (SME).

These instances are SAP-certified and ideal for high performance, memory-intensive workloads, such as SQL and NoSQL databases, distributed web scale in-memory caches, in-memory databases, real-time big data analytics, and Electronic Design Automation (EDA) applications.

R7a instances feature sizes of up to 192 vCPUs with 1536 GiB RAM. Here are the detailed specs:

Name vCPUs Memory (GiB) Network Bandwidth (Gbps) EBS Bandwidth (Gbps)
r7a.medium 1 8 Up to 12.5 Up to 10
r7a.large 2 16 Up to 12.5 Up to 10
r7a.xlarge 4 32 Up to 12.5 Up to 10
r7a.2xlarge 8 64 Up to 12.5 Up to 10
r7a.4xlarge 16 128 Up to 12.5 Up to 10
r7a.8xlarge 32 256 12.5 10
r7a.12xlarge 48 384 18.75 15
r7a.16xlarge 64 512 25 20
r7a.24xlarge 96 768 37.5 30
r7a.32xlarge 128 1024 50 40
r7a.48xlarge 192 1536 50 40

R7a instances have up to 50 Gbps enhanced networking and 40 Gbps EBS bandwidth, which is similar to R6a instances. You have a new medium instance size, which you can use to right-size your workloads more accurately, offering 1 vCPUs, 8 GiB. Additionally, with R7a instances you can attach up to 128 EBS volumes to an instance compared to up to 28 EBS volume attachments with R6a instances. R7a instances support AES-256 compared to AES-128 in R6a instances for enhanced security.

R7a instances are built on the AWS Nitro System and support Elastic Fabric Adapter (EFA) for workloads that benefit from lower network latency and highly scalable inter-node communication, such as high-performance computing and video processing.

Now Available
Amazon EC2 R7a instances are now available in AWS Regions: US East (Ohio), US East (N. Virginia), US West (Oregon), and EU (Ireland). As usual with Amazon EC2, you only pay for what you use. For more information, see the Amazon EC2 pricing page.

To learn more, visit the EC2 R7a instances page, and AWS/AMD partner page. You can send feedback to [email protected], AWS re:Post for EC2, or through your usual AWS Support contacts.

Channy