Meet our new threat operations and research team: Cloudforce One. While this team will publish research, that’s not its reason for being. Its primary objective: track and disrupt threat actors.
The security teams we speak with tell us the same thing: they’re inundated with reports from threat intelligence and security product vendors that do little to improve their actual security. The stories are indeed interesting, but they want deeper insights into the techniques and actors targeting their industry—but even more than that, they want to be protected against these threats with minimal to no involvement. That is the mission on which Cloudforce One will deliver.
This team is led by me, Blake Darché, Area 1’s co-founder and former head of Threat Intelligence. Before starting Area 1, which was acquired by Cloudflare earlier this year, I was a founding member of CrowdStrike’s services organization, and before that a Computer Network Exploitation Analyst at the National Security Agency (NSA). My career has focused on identifying and disrupting sophisticated nation-state sponsored cyber threats before they compromise enterprises and governments, and I’m excited to accelerate that work at Cloudflare.
The Cloudforce One team comprises analysts assigned to Threat Research, Malware and Vulnerability Research, and Threat Operations (i.e., disrupting actors once identified). Collectively, members of the team have tracked many of the most sophisticated cyber criminals on the Internet while at the National Security Agency and Area 1 Security, and have worked closely with similar organizations and governments to disrupt these threat actors. They’ve also been prolific in publishing “finished intel” reports on security topics of significant geopolitical importance, such as targeted attacks against governments, technology companies, the energy sector, and law firms, and have regularly briefed top organizations around the world on their efforts. Oh, and we’re growing the team, so please reach out if you’re interested.
How will Cloudforce One work?
First and foremost, the team will help protect all Cloudflare customers by working closely with our existing product, engineering, and security teams to improve our products based on tactics, techniques, and procedures (TTPs) observed in the wild. Customers will get better protection without having to take any action, and will be able to read a subset of research published on our blog and within the Cloudflare Security Center.
Additionally, enterprise customers who wish to receive one-on-one live briefings from the team, submit periodic inquiries for follow-up, and obtain early access to threat research, will soon be able to sign up for our new Threat Intelligence subscription. All other enterprise customers will be invited to join periodic group briefings.
Lastly, new capabilities within Security Center, such as access to historical threat data via API and threat pivoting features, will also be introduced by the dedicated threat intel engineering team paired with Cloudforce One.
Getting started
If you’re looking to benefit from the insights uncovered by Cloudforce One, there is nothing you need to do. But if you’re interested in receiving regular briefings from Cloudforce One tailored to your industry, contact your Customer Success manager today or fill out this form and someone will be in touch. Finally, if you’re interested in joining the team, check out our open job postings here.
Data Loss Prevention (DLP) enables you to protect your data based on its characteristics — or what it is. Today, we are very excited to announce that Data Loss Prevention is arriving as a native part of the Cloudflare One platform. If you’re interested in early access, please see the bottom of this post!
In the process of building Cloudflare One’s DLP solution, we talked to customers of all sizes and across dozens of industries. We focused on learning about their experiences, what products they are using, and what solutions they lack. The answers revealed significant customer challenges and frustrations. We are excited to deliver a product to put those problems in the past — and to do so as part of a comprehensive Zero Trust solution.
Customers are struggling to understand their data flow
Some customers have been using DLP solutions in their organizations for many years. They have deployed endpoint agents, crafted custom rulesets, and created incident response pipelines. Some built homemade tools to trace credit card numbers on the corporate network or rulesets to track hundreds of thousands of exact data match hashes.
Meanwhile, other customers are brand new to the space. They have small, scrappy teams supporting many IT and security functions. They do not have readily available resources to allocate to DLP and do not want to deprioritize other work to get started.
Still, many told the same story: the meteoric rise of SaaS tools left them unsure of where their data is moving and living. The migration of data off of corporate servers and into the cloud resulted in a loss of visibility and control. Even teams with established data protection programs strive for better visibility on the network. They are all asking the same types of questions:
Where is the data going?
Are uploads and downloads moving to and from corporate or personal SaaS instances?
What applications are storing sensitive data?
Who has access to those applications?
Can we see and block large downloads from file repositories?
Many customers seem to feel as though they have fallen behind because they haven’t solved these problems — and yet many customers are reporting the exact same story. However, these struggles do not mean anyone is behind — just that a better solution is needed. This told us that building a DLP product was the right choice, but why build it within Cloudflare One?
How Data Loss Prevention ties in to Zero Trust
A Zero Trust network architecture is fundamentally designed to secure your data. By checking every attempt to access a protected app, machine, or remote desktop, your data is protected on the basis of identity and device posture. With DNS and HTTP filtering, your data is protected based on content category and reputation. By adding an API-driven CASB, your data is protected based on your applications’ configurations, too.
With each piece of the architecture, your data is protected based on a new identifier. The identifiers above help you understand: who accessed the data, who owned the device that accessed it, where the data went, and how the destination was configured. However, what was the data that was moved?
Data Loss Prevention enables you to protect your data based on its characteristics, or what it is. For example, sensitive or confidential data can be identified a number of ways, such as keywords, patterns, or file types. These indicators help you understand the information being transmitted across or out of the network.
With DLP embedded in Cloudflare One, you can combine these identifiers to create rules catered to your organization. You get to specify the who, how, where, and what that meets your needs. We aim to deliver a comprehensive, detailed understanding of your network and your data, as well as allow you to easily implement protection.
How It Works
First: Identify the Data
DLP Profiles are being added to the Zero Trust dashboard. These profiles are where you define what data you want to protect. You will be able to add keywords and craft regexes to identify the presence of sensitive data. Profiles for common detections, such as credit card numbers, will be provided by Cloudflare.
Next: Create an HTTP Policy
After configuring a DLP Profile, you can then create a Cloudflare Gateway HTTP policy to allow or block the sensitive data from leaving your organization. Gateway will parse and scan your HTTP traffic for strings matching the keywords or regexes specified in the DLP profile.
Why Cloudflare
We know DLP is a big challenge to do comprehensively, and at scale. Those are the types of problems we excel at. Our network securely delivers traffic to 95% of the world’s Internet connected population within 50ms. It also supports our market leading products that send and protect customer traffic at unimaginable speed and scale. We are using that powerful network and our experience solving problems like this to take on Data Loss Prevention, and we’re very excited by our results
Join the waitlist
We are launching a closed beta of our Data Loss Prevention product. If you’re interested in early access, you can join the waitlist today by filling out this form.
What’s next?
We’re just getting started with DLP! We already have many plans for growth and integration with other Cloudflare One products, such as Remote Browser Isolation.
Over the last several years, both Area 1 and Cloudflare built pipelines for ingesting threat indicator data, for use within our products. During the acquisition process we compared notes, and we discovered that the overlap of indicators between our two respective systems was smaller than we expected. This presented us with an opportunity: as one of our first tasks in bringing the two companies together, we have started bringing Area 1’s threat indicator data into the Cloudflare suite of products. This means that all the products today that use indicator data from Cloudflare’s own pipeline now get the benefit of Area 1’s data, too.
Area 1 built a data pipeline focused on identifying new and active phishing threats, which now supplements the Phishing category available today in Gateway. If you have a policy that references this category, you’re already benefiting from this additional threat coverage.
How Cloudflare identifies potential phishing threats
Cloudflare is able to combine the data, procedures and techniques developed independently by both the Cloudflare team and the Area 1 team prior to acquisition. Customers are able to benefit from the work of both teams across the suite of Cloudflare products.
Cloudflare curates a set of data feeds both from our own network traffic, OSINT sources, and numerous partnerships, and applies custom false positive control. Customers who rely on Cloudflare are spared the software development effort as well as the operational workload to distribute and update these feeds. Cloudflare handles this automatically, with updates happening as often as every minute.
Cloudflare is able to go beyond this and work to proactively identify phishing infrastructure in multiple ways. With the Area 1 acquisition, Cloudflare is now able to apply the adversary-focused threat research approach of Area1 across our network. A team of threat researchers track state-sponsored and financially motivated threat actors, newly disclosed CVEs, and current phishing trends.
Cloudflare now operates mail exchange servers for hundreds of organizations around the world, in addition to its DNS resolvers, Zero Trust suite, and network services. Each of these products generates data that is used to enhance the security of all of Cloudflare’s products. For example, as part of mail delivery, the mail engine performs domain lookups, scores potential phishing indicators via machine learning, and fetches URLs. Data which can now be used through Cloudflare’s offerings.
How Cloudflare Area 1 identifies potential phishing threats
The Cloudflare Area 1 team operates a suite of web crawling tools designed to identify phishing pages, capture phishing kits, and highlight attacker infrastructure. In addition, Cloudflare Area 1 threat models assess campaigns based on signals gathered from threat actor campaigns; and the associated IOCs of these campaign messages are further used to enrich Cloudflare Area 1 threat data for future campaign discovery. Together these techniques give Cloudflare Area 1 a leg up on identifying the indicators of compromise for an attacker prior to their attacks against our customers. As part of this proactive approach, Cloudflare Area 1 also houses a team of threat researchers that track state-sponsored and financially motivated threat actors, newly disclosed CVEs, and current phishing trends. Through this research, analysts regularly insert phishing indicators into an extensive indicator management system that may be used for our email product or any other product that may query it.
Cloudflare Area 1 also collects information about phishing threats during our normal operation as the mail exchange server for hundreds of organizations across the world. As part of that role, the mail engine performs domain lookups, scores potential phishing indicators via machine learning, and fetches URLs. For those emails found to be malicious, the indicators associated with the email are inserted into our indicator management system as part of a feedback loop for subsequent message evaluation.
How Cloudflare data will be used to improve phishing detection
In order to support Cloudflare products, including Gateway and Page Shield, Cloudflare has a data pipeline that ingests data from partnerships, OSINT sources, as well as threat intelligence generated in-house at Cloudflare. We are always working to curate a threat intelligence data set that is relevant to our customers and actionable in the products Cloudflare supports. This is our North star: what data can we provide that enhances our customer’s security without requiring our customers to manage the complexity of data, relationships, and configuration. We offer a variety of security threat categories, but some major focus areas include:
Malware distribution
Malware and Botnet Command & Control
Phishing,
New and newly seen domains
Phishing is a threat regardless of how the potential phishing link gets entry into an organization, whether via email, SMS, calendar invite or shared document, or other means. As such, detecting and blocking phishing domains has been an area of active development for Cloudflare’s threat data team since almost its inception.
Looking forward, we will be able to incorporate that work into Cloudflare Area 1’s phishing email detection process. Cloudflare’s list of phishing domains can help identify malicious email when those domains appear in the sender, delivery headers, message body or links of an email.
1+1 = 3: Greater dataset sharing between Cloudflare and Area 1
Threat actors have long had an unfair advantage — and that advantage is rooted in the knowledge of their target, and the time they have to set up specific campaigns against their targets. That dimension of time allows threat actors to set up the right infrastructure, perform reconnaissance, stage campaigns, perform test probes, observe their results, iterate, improve and then launch their ‘production’ campaigns. This precise element of time gives us the opportunity to discover, assess and proactively filter out campaign infrastructure prior to campaigns reaching critical mass. But to do that effectively, we need visibility and knowledge of threat activity across the public IP space.
With Cloudflare’s extensive network and global insight into the origins of DNS, email or web traffic, combined with Cloudflare Area 1’s datasets of campaign tactics, techniques, and procedures (TTPs), seed infrastructure and threat models — we are now better positioned than ever to help organizations secure themselves against sophisticated threat actor activity, and regain the advantage that for so long has been heavily weighted towards the bad guys.
If you’d like to extend Zero Trust to your email security to block advanced threats, contact your Customer Success manager, or request a Phishing Risk Assessment here.
There is an implicit and unearned trust we place in our email communications. This realization — that an organization can’t truly have a Zero Trust security posture without including email — was the driving force behind Cloudflare’s acquisition of Area 1 Security earlier this year. Today, we have taken our first step in this exciting journey of integrating Cloudflare Area 1 email security into our broader Cloudflare One platform. Cloudflare Secure Web Gateway customers can soon enable Remote Browser Isolation (RBI) for email links, giving them an unmatched level of protection from modern multi-channel email-based attacks.
Research from Cloudflare Area 1 found that nearly 10% of all observed malicious attacks involved credential harvesters, highlighting that victim identity is what threat actors usually seek. While commodity phishing attacks are blocked by existing security controls, modern attacks and payloads don’t have a set pattern that can reliably be matched with a block or quarantine rule. Additionally, with the growth of multi-channel phishing attacks, an effective email security solution needs the ability to detect blended campaigns spanning email and Web delivery, as well as deferred campaigns that are benign at delivery time, but weaponized at click time.
When enough “fuzzy” signals exist, isolating the destination to ensure end users are secure is the most effective solution. Now, with the integration of Cloudflare Browser Isolation into Cloudflare Area 1 email security, these attacks can now be easily detected and neutralized.
Human error is human
Why do humans still click on malicious links? It’s not because they haven’t attended enough training sessions or are not conscious about security. It’s because they have 50 unread emails in their inbox, have another Zoom meeting to get to, or are balancing a four-year old on their shoulders. They are trying their best. Anyone, including security researchers, can fall for socially engineered attacks if the adversary is well-prepared.
If we accept that human error is here to stay, developing security workflows introduces new questions and goals:
How can we reduce, rather than eliminate, the likelihood of human error?
How can we reduce the impact of human error when, not if, it happens?
How can security be embedded into an employee’s existing daily workflows?
It’s these questions that we had in mind when we reached the conclusion that email needs to be a fundamental part of any Zero Trust platform. Humans make mistakes in email just as regularly — in fact, sometimes more so — as they make mistakes surfing the Web.
To block, or not to block?
For IT teams, that is the question they wrestle with daily to balance risk mitigation with user productivity. The SOC team wants IT to block everything risky or unknown, whereas the business unit wants IT to allow everything not explicitly bad. If IT decides to block risky or unknown links, and it results in a false positive, they waste time manually adding URLs to allow lists — and perhaps the attacker later pivots those URLs to malicious content anyway. If IT decides to allow risky or unknown sites, best case they waste time reimaging infected devices and resetting login credentials — but all too common, they triage the damage from a data breach or ransomware lockdown. The operational simplicity of enabling RBI with email — also known as email link isolation — saves the IT, SOC, and business unit teams significant time.
How it works
For a Cloudflare Area 1 customer, the initial steps involve enabling RBI within your portal:
With email link isolation in place, here’s the short-lived life of an email with suspicious links:
Step 1: Cloudflare Area 1 inspects the email and determines that certain links in the messages are suspicious or on the margin
Step 2: Suspicious URLs and hyperlinks in the email get rewritten to a custom Cloudflare Area 1 prefix URL.
Step 3: The email is delivered to the intended inboxes.
Step 4: If a user clicks the link in the email, Cloudflare redirects to a remote browser via <authdomain>.cloudflareaccess.com/browser/{{url}}.
Step 5: Remote browser loads a website on a server on the Cloudflare Global Network and serves draw commands to the user’s clientless browser endpoint.
By executing the browser code and controlling user interactions on a remote server rather than a user device, any and all malware and phishing attempts are isolated, and won’t infect devices and compromise user identities. This improves both user and endpoint security when there are unknown risks and unmanaged devices, and allows users to access websites without having to connect to a VPN or having strict firewall policies.
Cloudflare’s RBI technology uses a unique patented technology called Network Vector Rendering (NVR) that utilizes headless Chromium-based browsers in the cloud, transparently intercepts draw layer output, transmits the draw commands efficiency and securely over the web, and redraws them in the windows of local HTML5 browsers. Unlike legacy Browser Isolation technologies that relied on pixel pushing or DOM reconstruction, NVR is optimized for scalability, security and end user transparency, while ensuring the broadest compatibility with websites.
A phishing attack before email link isolation
Let’s look at a specific example of a deferred phishing attack, how it slips past traditional defenses, and how email link isolation addresses the threat.
As organizations look to adopt new security principles and network architectures like Zero Trust, adversaries continually come up with techniques to bypass these controls by exploiting the most used and most vulnerable application – email. Email is a good candidate for compromise because of its ubiquity and ability to be bypassed pretty easily by a motivated attacker.
Let’s take an example of a “deferred phishing attack”, without email link isolation.
Attacker preparation: weeks before launch The attacker sets up infrastructure for the phishing attempt to come. This may include:
Registering a domain
Encrypting it with SSL
Setting up proper email authentication (SPF, DKIM, DMARC)
Creating a benign web page
At this point, there is no evidence of an attack that can be picked up by secure email gateways, authentication-based solutions, or threat intelligence that relies solely on reputation-based signals and other deterministic detection techniques.
Attack “launch”: Sunday afternoon The attacker sends an authentic-looking email from the newly-created domain. This email includes a link to the (still benign) webpage. There’s nothing in the email to block or flag it as suspicious. The email gets delivered to intended inboxes.
Attack launch: Sunday evening Once the attacker is sure that all emails have reached their destination, they pivot the link to a malicious destination by changing the attacker-controlled webpage, perhaps by creating a fake login page to harvest credentials.
Attack landing: Monday morning As employees scan their inboxes to begin their week, they see the email. Maybe not all of them click the link, but some of them do. Maybe not all of those that clicked enter their credentials, but a handful do. Without email link isolation, the attack is successful.
The consequences of the attack have also just begun – once user login credentials are obtained, attackers can compromise legitimate accounts, distribute malware to your organization’s network, steal confidential information, and cause much more downstream damage.
A phishing attack after email link isolation
The integration between Cloudflare Area 1 and Cloudflare Browser Isolation provides a critical layer of post-delivery protection that can foil attacks like the deferred phishing example described above.
If the attacker prepares for and executes the attack as stated in the previous section, our email link isolation would analyze the email link at the time of click and perform a high-level assessment on whether the user should be able to navigate to it.
Safe link – Users will be redirected to this site transparently
Malicious link –Users are blocked from navigating
Suspicious link –Users are heavily discouraged to navigating and are presented with a splash warning page encouraging them to view in the link in an isolated browser
While a splash warning page was the mitigation employed in the above example, email link isolation will also offer security administrators other customizable mitigation options as well, including putting the webpage in read-only mode, restricting the download and upload of files, and disabling keyboard input altogether within their Cloudflare Gateway consoles.
Email link isolation also fits into users’ existing workflows without impacting productivity or sapping their time with IT tickets. Because Cloudflare Browser Isolation is built and deployed on the Cloudflare network, with global locations in 270 cities, web browsing sessions are served as close to users as possible, minimizing latency. Additionally, Cloudflare Browser Isolation sends the final output of each webpage to a user instead of page scrubbing or sending a pixel stream, further reducing latency and not breaking browser-based applications such as SaaS.
How do I get started?
Existing Cloudflare Area 1 and Cloudflare Gateway customers are eligible for the beta release of email link isolation. To learn more and to express interest, sign up for our upcoming beta.
If you’d like to see what threats Cloudflare Area 1 detects on your live email traffic, request a free phishing risk assessment here. It takes five minutes to get started and does not impact mail flow.
If we’d told you three years ago that a majority of your employees would no longer be in the office, you simply would not have believed it. We would not have believed it, either. The office has been a cornerstone of work in the modern era — almost an unshakeable assumption.
That assumption carried over into the way we built out IT systems, too. They were almost all predicated on us working from a consistent place.
And yet, here we are. Trends that had started out as a trickle — employees out of the office, remote work, BYOD — were transformed into a tsunami, almost overnight. Employees are anywhere, using any mobile or desktop device available to work, including personal devices. Applications exist across data centers, public clouds and SaaS hosting providers. Tasks increasingly are completed in a browser. All of this increases load on corporate networks.
While how we work has changed, the corporate networks and security models to enable this work have struggled to keep pace. They still often rely on a corporate perimeter that allows lateral network movement once a user or device is present on the network. VPNs remain a choke point in this model, tunneling their user traffic back into corporate perimeter where people rarely work; and MPLS lines and other private networking tools are still being used to extend an organization’s perimeter to… other offices, where people also rarely work.
And it’s not just that all these are expensive to set up: VPNs, MPLS lines and other perimeter solutions come with performance loss, create maintenance burden, and lack modern security tooling. Attackers know how to exploit their weaknesses. Many well known attacks over the last few years can be traced to unauthorized network access and subsequent lateral movement.
These problems are well known. Surprisingly, the answer to those challenges is also widely agreed upon at this point: shift to a Zero Trust Architecture. So what’s stopping people? As we’ve spoken to folks, it’s one thing, more than anything else: how? How do we do this? Underlying this is worry — that yes, while there are plenty of the risks and problems associated with the old world, they’d rather tackle the devil they know than the one that they don’t — the worry and change and cost associated with the lifting and shifting to Zero Trust.
This, more than anything else, is what we want to change with Cloudflare One Week.
Zero Trust doesn’t need to be hard. It can be stage-gated. You prove the benefits of the new model to your organization, while allowing it to transition at a pace it can handle. In short: Zero Trust can let your organization do more, let your organization do it better, and all this can come with cost savings.
Welcome to Cloudflare One Week.
The shifting goalposts of Zero Trust, SASE, SSE
While there is broad recognition of the limits of the perimeter model, one thing that keeps coming up in customer conversations about Zero Trust is: how do all these replacement concepts relate to one another? Which one should I be pursuing?
A big part of our efforts this week is to make the goal of a Zero Trust architecture approachable and understandable. All these terms get thrown around, sometimes interchangeably. We’ve spent the time understanding and building out the products to get a comprehensive Zero Trust solution.
But we don’t want you to just trust us.
We believe in Zero Trust Architecture so strongly that we worked with security experts to build a vendor-agnostic guide to implementing Zero Trust. Even if a business does not use Cloudflare, we believe that Zero Trust and SASE are the future for all businesses, regardless of which vendor they use. Here is a complete guide to navigating the world of Zero Trust.
Separately, we’ve also mapped all our products in this space to the concepts above — making it easy to follow along during the week to see how all the pieces fit together.
No one else delivers comprehensive security
Cloudflare was not the first in the application services space. We weren’t the first in the content delivery space; nor were we first in the web security space. But there’s a reason that analyst after analyst now recognize us as leaders there.
It is because our rate of innovation is simply unmatched.
We were not first to the Zero Trust space, either. But in the span of a few short years, in Cloudflare One, we have now built the most feature complete SASE offering on the market.
Cloudflare One’s Zero Trust offering includes Zero Trust Network Access, Secure Web Gateway, CASB, Data Loss Prevention, Remote Browser Isolation, Firewall as a Service, and Email Security. Every security control is configured through a single dashboard and can be deployed as code using our API or Terraform.
No one else does all of this. And over the course of this week, we’ll prove it to you.
And no one else can do it without slowing you down
Cloudflare One was built on top of Cloudflare’s existing global network. We spent over a decade building this network to support our global CDN and application security business. The network spans 270+ cities, 100 countries and is within 50ms of 95% of the Internet connected global population. From day one, we built our network to deploy additional technology on the same network, including Cloudflare One. This allows us to provide one of the most performant, reliable and interconnected Service Edges in the market.
The scale and scope of our network has other advantages when it comes to deploying a SASE solution, too. We make it easy to connect to Cloudflare Service Edge through a comprehensive set of on-ramps. These on-ramps allow users, devices, data centers, offices to connect to Cloudflare anywhere in the world. The on-ramps range from full scale SD-WAN to a lightweight client on user devices.
We plan on proving that we are the most performant Zero Trust provider over the course of this week, too.
Welcome to Cloudflare One Week – we’re just getting started
If you’ve been thinking about Zero Trust or SASE, Cloudflare One Week will demonstrate why Cloudflare One is one of the most complete SASE offerings in the market, with some of the best performance, and why it will only continue to improve. Over the week we will announce new features, show comparisons of competitors, and show you how easy it is to get started.
Today we’re announcing Private Access Tokens, a completely invisible, private way to validate that real users are visiting your site. Visitors using operating systems that support these tokens, including the upcoming versions of macOS or iOS, can now prove they’re human without completing a CAPTCHA or giving up personal data. This will eliminate nearly 100% of CAPTCHAs served to these users.
What does this mean for you?
If you’re an Internet user:
We’re making your mobile web experience more pleasant and more private than other networks at the same time.
You won’t see a CAPTCHA on a supported iOS or Mac device (other devices coming soon!) accessing the Cloudflare network.
If you’re a web or application developer:
Know your user is coming from an authentic device and signed application, verified by the device vendor directly.
Validate users without maintaining a cumbersome SDK.
If you’re a Cloudflare customer:
You don’t have to do anything! Cloudflare will automatically ask for and utilize Private Access Tokens
Your visitors won’t see a CAPTCHA and we’ll ask for less data from their devices.
Introducing Private Access Tokens
Over the past year, Cloudflare has collaborated with Apple, Google, and other industry leaders to extend the Privacy Pass protocol with support for a new cryptographic token. These tokens simplify application security for developers and security teams, and obsolete legacy, third-party SDK based approaches to determining if a human is using a device. They work for browsers, APIs called by browsers, and APIs called within apps. We call these new tokens Private Access Tokens (PATs). This morning, Apple announced that PATs will be incorporated into iOS 16, iPad 16, and macOS 13, and we expect additional vendors to announce support in the near future.
Cloudflare has already incorporated PATs into our Managed Challenge platform, so any customer using this feature will automatically take advantage of this new technology to improve the browsing experience for supported devices.
CAPTCHAs don’t work in mobile environments, PATs remove the need for them
We’ve writtennumeroustimes about how CAPTCHAs are a terrible user experience. However, we haven’t discussed specifically how much worse the user experience is on a mobile device. CAPTCHA as a technology was built and optimized for a browser-based world. They are deployed via a widget or iframe that is generally one size fits all, leading to rendering issues, or the input window only being partially visible on a device. The smaller real estate on mobile screens inherently makes the technology less accessible and solving any CAPTCHA more difficult, and the need to render JavaScript and image files slows down image loads while consuming excess customer bandwidth.
Usability aside, mobile environments present an additional challenge in that they are increasingly API-driven. CAPTCHAs simply cannot work in an API environment where JavaScript can’t be rendered, or a WebView can’t be called. So, mobile app developers often have no easy option for challenging a user when necessary. They sometimes resort to using a clunky SDK to embed a CAPTCHA directly into an app. This requires work to embed and customize the CAPTCHA, continued maintenance and monitoring, and results in higher abandonment rates. For these reasons, when our customers choose to show a CAPTCHA today, it’s only shown on mobile 20% of the time.
We recently posted about how we used our Managed Challenge platform to reduce our CAPTCHA use by 91%. But because the CAPTCHA experience is so much worse on mobile, we’ve been separately working on ways we can specifically reduce CAPTCHA use on mobile even further.
When sites can’t challenge a visitor, they collect more data
So, you either can’t use CAPTCHA to protect an API, or the UX is too terrible to use on your mobile website. What options are left for confirming whether a visitor is real? A common one is to look at client-specific data, commonly known as fingerprinting.
You could ask for device IMEI and security patch versions, look at screen sizes or fonts, check for the presence of APIs that indicate human behavior, like interactive touch screen events and compare those to expected outcomes for the stated client. However, all of this data collection is expensive and, ultimately, not respectful of the end user. As a company that deeply cares about privacy and helping make the Internet better, we want to use as little data as possible without compromising the security of the services we provide.
Another alternative is to use system-level APIs that offer device validation checks. This includes DeviceCheck on Apple platforms and SafetyNet on Android. Application services can use these client APIs with their own services to assert that the clients they’re communicating with are valid devices. However, adopting these APIs requires both application and server changes, and can be just as difficult to maintain as SDKs.
Private Access Tokens vastly improve privacy by validating without fingerprinting
This is the most powerful aspect of PATs. By partnering with third parties like device manufacturers, who already have the data that would help us validate a device, we are able to abstract portions of the validation process, and confirm datawithout actually collecting, touching, or storing that data ourselves. Rather than interrogating a device directly, we ask the device vendor to do it for us.
In a traditional website setup, using the most common CAPTCHA provider:
The website you visit knows the URL, your IP, and some additional user agent data.
The CAPTCHA provider knows what website you visit, your IP, your device information, collects interaction data on the page, AND ties this data back to other sites where Google has seen you. This builds a profile of your browsing activity across both sites and devices, plus how you personally interact with a page.
When PATs are used, device data is isolated and explicitly NOT exchanged between the involved parties (the manufacturer and the Cloudflare)
The website knows only your URL and IP, which it has to know to make a connection.
The device manufacturer (attester) knows only the device data required to attest your device, but can’t tell what website you visited, and doesn’t know your IP.
Cloudflare knows the site you visited, but doesn’t know any of your device or interaction information.
We don’t actually need or want the underlying data that’s being collected for this process, we just want to verify if a visitor is faking their device or user agent. Private Access Tokens allow us to capture that validation state directly, without needing any of the underlying data. They allow us to be more confident in the authenticity of important signals, without having to look at those signals directly ourselves.
How Private Access Tokens compartmentalize data
With Private Access Tokens, four parties agree to work in concert with a common framework to generate and exchange anonymous, unforgeable tokens. Without all four parties in the process, PATs won’t work.
An Origin. A website, application, or API that receives requests from a client. When a website receives a request to their origin, the origin must know to look for and request a token from the client making the request. For Cloudflare customers, Cloudflare acts as the origin (on behalf of customers) and handles the requesting and processing of tokens.
A Client. Whatever tool the visitor is using to attempt to access the Origin. This will usually be a web browser or mobile application. In our example, let’s say the client is a mobile Safari Browser.
An Attester. The Attester is who the client asks to prove something (i.e that a mobile device has a valid IMEI) before a token can be issued. In our example below, the Attester is Apple, the device vendor. An Issuer. The issuer is the only one in the process that actually generates, or issues, a token. The Attester makes an API call to whatever Issuer the Origin has chosen to trust, instructing the Issuer to produce a token. In our case, Cloudflare will also be the Issuer.
In the example above, a visitor opens the Safari browser on their iPhone and tries to visit example.com.
Since Example uses Cloudflare to host their Origin, Cloudflare will ask the browser for a token.
Safari supports PATs, so it will make an API call to Apple’s Attester, asking them to attest.
The Apple attester will check various device components, confirm they are valid, and then make an API call to the Cloudflare Issuer (since Cloudflare acting as an Origin chooses to use the Cloudflare Issuer).
The Cloudflare Issuer generates a token, sends it to the browser, which in turn sends it to the origin.
Cloudflare then receives the token, and uses it to determine that we don’t need to show this user a CAPTCHA.
This probably sounds a bit complicated, but the best part is that the website took no action in this process. Asking for a token, validation, token generation, passing, all takes place behind the scenes by third parties that are invisible to both the user and the website. By working together, Apple and Cloudflare have just made this request more secure, reduced the data passed back and forth, and prevented a user from having to see a CAPTCHA. And we’ve done it by both collecting and exchanging less user data than we would have in the past.
Most customers won’t have to do anything to utilize Private Access Tokens
To take advantage of PATs, all you have to do is choose Managed Challenge rather than Legacy CAPTCHA as a response option in a Firewall rule. More than 65% of Cloudflare customers are already doing this. Our Managed Challenge platform will automatically ask every request for a token, and when the client is compatible with Private Access Tokens, we’ll receive one. Any of your visitors using an iOS or macOS device will automatically start seeing fewer CAPTCHAs once they’ve upgraded their OS.
This is just step one for us. We are actively working to get other clients and device makers utilizing the PAT framework as well. Any time a new client begins utilizing the PAT framework, traffic coming to your site from that client will automatically start asking for tokens, and your visitors will automatically see fewer CAPTCHAs.
We will be incorporating PATs into other security products very soon. Stay tuned for some announcements in the near future.
There is a famous quote attributed to a Netscape engineer: “There are only two difficult problems in computer science: cache invalidation and naming things.” While naming things does oddly take up an inordinate amount of time, cache invalidation shouldn’t.
In the past we’ve written about Cloudflare’s incredibly fast response times, whether content is cached on our global network or not. If content is cached, it can be served from a Cloudflare cache server, which are distributed across the globe and are generally a lot closer in physical proximity to the visitor. This saves the visitor’s request from needing to go all the way back to an origin server for a response. But what happens when a webmaster updates something on their origin and would like these caches to be updated as well? This is where cache “purging” (also known as “invalidation”) comes in.
Customers thinking about setting up a CDN and caching infrastructure consider questions like:
How do different caching invalidation/purge mechanisms compare?
How many times a day/hour/minute do I expect to purge content?
How quickly can the cache be purged when needed?
This blog will discuss why invalidating cached assets is hard, what Cloudflare has done to make it easy (because we care about your experience as a developer), and the engineering work we’re putting in this year to make the performance and scalability of our purge services the best in the industry.
What makes purging difficult also makes it useful
(i) Scale The first thing that complicates cache invalidation is doing it at scale. With data centers in over 270 cities around the globe, our most popular users’ assets can be replicated at every corner of our network. This also means that a purge request needs to be distributed to all data centers where that content is cached. When a data center receives a purge request, it needs to locate the cached content to ensure that subsequent visitor requests for that content are not served stale/outdated data. Requests for the purged content should be forwarded to the origin for a fresh copy, which is then re-cached on its way back to the user.
This process repeats for every data center in Cloudflare’s fleet. And due to Cloudflare’s massive network, maintaining this consistency when certain data centers may be unreachable or go offline, is what makes purging at scale difficult.
Making sure that every data center gets the purge command and remains up-to-date with its content logs is only part of the problem. Getting the purge request to data centers quickly so that content is updated uniformly is the next reason why cache invalidation is hard.
(ii) Speed When purging an asset, race conditions abound. Requests for an asset can happen at any time, and may not follow a pattern of predictability. Content can also change unpredictably. Therefore, when content changes and a purge request is sent, it must be distributed across the globe quickly. If purging an individual asset, say an image, takes too long, some visitors will be served the new version, while others are served outdated content. This data inconsistency degrades user experience, and can lead to confusion as to which version is the “right” version. Websites can sometimes even break in their entirety due to this purge latency (e.g. by upgrading versions of a non-backwards compatible JavaScript library).
Purging at speed is also difficult when combined with Cloudflare’s massive global footprint. For example, if a purge request is traveling at the speed of light between Tokyo and Cape Town (both cities where Cloudflare has data centers), just the transit alone (no authorization of the purge request or execution) would take over 180ms on average based on submarine cable placement. Purging a smaller network footprint may reduce these speed concerns while making purge times appear faster, but does so at the expense of worse performance for customers who want to make sure that their cached content is fast for everyone.
(iii) Scope The final thing that makes purge difficult is making sure that only the unneeded web assets are invalidated. Maintaining a cache is important for egress cost savings and response speed. Webmasters’ origins could be knocked over by a thundering herd of requests, if they choose to purge all content needlessly. It’s a delicate balance of purging just enough: too much can result in both monetary and downtime costs, and too little will result in visitors receiving outdated content.
At Cloudflare, what to invalidate in a data center is often dictated by the type of purge.Purge everything, as you could probably guess, purges all cached content associated with a website. Purge by prefix purges content based on a URL prefix. Purge by hostname can invalidate content based on a hostname. Purge by URL or single file purge focuses on purging specified URLs. Finally, Purge by tag purges assets that are marked with Cache-Tag headers. These markers offer webmasters flexibility in grouping assets together. When a purge request for a tag comes into a data center, all assets marked with that tag will be invalidated.
With that overview in mind, the remainder of this blog will focus on putting each element of invalidation together to benchmark the performance of Cloudflare’s purge pipeline and provide context for what performance means in the real-world. We’ll be reviewing how fast Cloudflare can invalidate cached content across the world. This will provide a baseline analysis for how quick our purge systems are presently, which we will use to show how much we will improve by the time we launch our new purge system later this year.
How does purge work currently?
In general, purge takes the following route through Cloudflare’s data centers.
A purge request is initiated via the API or UI. This request specifies how our data centers should identify the assets to be purged. This can be accomplished via cache-tag header(s), URL(s), entire hostnames, and much more.
The request is received by any Cloudflare data center and is identified to be a purge request. It is then routed to a Cloudflare core data center (a set of a few data centers responsible for network management activities).
When a core data center receives it, the request is processed by a number of internal services that (for example) make sure the request is being sent from an account with the appropriate authorization to purge the asset. Following this, the request gets fanned out globally to all Cloudflare data centers using our distribution service.
When received by a data center, the purge request is processed and all assets with the matching identification criteria are either located and removed, or marked as stale. These stale assets are not served in response to requests and are instead re-pulled from the origin.
After being pulled from the origin, the response is written to cache again, replacing the purged version.
Now let’s look at this process in practice. Below we describe Cloudflare’s purge benchmarking that uses real-world performance data from our purge pipeline.
Benchmarking purge performance design
In order to understand how performant Cloudflare’s purge system is, we measured the time it took from sending the purge request to the moment that the purge is complete and the asset is no longer served from cache.
In general, the process of measuring purge speeds involves: (i) ensuring that a particular piece of content is cached, (ii) sending the command to invalidate the cache, (iii) simultaneously checking our internal system logs for how the purge request is routed through our infrastructure, and (iv) measuring when the asset is removed from cache (first miss).
This process measures how quickly cache is invalidated from the perspective of an average user.
Clock starts As noted above, in this experiment we’re using sampled RUM data from our purge systems. The goal of this experiment is to benchmark current data for how long it can take to purge an asset on Cloudflare across different regions. Once the asset was cached in a region on Cloudflare, we identify when a purge request is received for that asset. At that same instant, the clock started for this experiment. We include in this time any retrys that we needed to make (due to data centers missing the initial purge request) to ensure that the purge was done consistently across our network. The clock continues as the request transits our purge pipeline (data center > core > fanout > purge from all data centers).
Clock stops What caused the clock to stop was the purged asset being removed from cache, meaning that the data center is no longer serving the asset from cache to visitor’s requests. Our internal logging measures the precise moment that the cache content has been removed or expired and from that data we were able to determine the following benchmarks for our purge types in various regions.
Results
We’ve divided our benchmarks in two ways: by purge type and by region.
We singled out Purge by URL because it identifies a single target asset to be purged. While that asset can be stored in multiple locations, the amount of data to be purged is strictly defined.
We’ve combined all other types of purge (everything, tag, prefix, hostname) together because the amount of data to be removed is highly variable. Purging a whole website or by assets identified with cache tags could mean we need to find and remove a multitude of content from many different data centers in our network.
Secondly, we have segmented our benchmark measurements by regions and specifically we confined the benchmarks to specific data center servers in the region because we were concerned about clock skews between different data centers. This is the reason why we limited the test to the same cache servers so that even if there was skew, they’d all be skewed in the same way.
We took the latency from the representative data centers in each of the following regions and the global latency. Data centers were not evenly distributed in each region, but in total represent about 90 different cities around the world:
Africa
Asia Pacific Region (APAC)
Eastern Europe (EEUR)
Eastern North America (ENAM)
Oceania
South America (SA)
Western Europe (WEUR)
Western North America (WNAM)
The global latency numbersrepresent the purge data from all Cloudflare data centers in over 270 cities globally. In the results below, global latency numbers may be larger than the regional numbers because it represents all of our data centers instead of only a regional portion so outliers and retries might have an outsized effect.
Below are the results for how quickly our current purge pipeline was able to invalidate content by purge type and region. All times are represented in seconds and divided into P50, P75, and P99 quantiles. Meaning for “P50” that 50% of the purges were at the indicated latency or faster.
Purge By URL
P50
P75
P99
AFRICA
0.95s
1.94s
6.42s
APAC
0.91s
1.87s
6.34s
EEUR
0.84s
1.66s
6.30s
ENAM
0.85s
1.71s
6.27s
OCEANIA
0.95s
1.96s
6.40s
SA
0.91s
1.86s
6.33s
WEUR
0.84s
1.68s
6.30s
WNAM
0.87s
1.74s
6.25s
GLOBAL
1.31s
1.80s
6.35s
Purge Everything, by Tag, by Prefix, by Hostname
P50
P75
P99
AFRICA
1.42s
1.93s
4.24s
APAC
1.30s
2.00s
5.11s
EEUR
1.24s
1.77s
4.07s
ENAM
1.08s
1.62s
3.92s
OCEANIA
1.16s
1.70s
4.01s
SA
1.25s
1.79s
4.106s
WEUR
1.19s
1.73s
4.04s
WNAM
0.9995s
1.53s
3.83s
GLOBAL
1.57s
2.32s
5.97s
A general note about these benchmarks — the data represented here was taken from over 48 hours (two days) of RUM purge latency data in May 2022. If you are interested in how quickly your content can be invalidated on Cloudflare, we suggest you test our platform with your website.
Those numbers are good and much faster than most of our competitors. Even in the worst case, we see the time from when you tell us to purge an item to when it is removed globally is less than seven seconds. In most cases, it’s less than a second. That’s great for most applications, but we want to be even faster. Our goal is to get cache purge to as close as theoretically possible to the speed of light limit for a network our size, which is 200ms.
Intriguingly, LEO satellite networks may be able to provide even lower global latency than fiber optics because of the straightness of the paths between satellites that use laser links. We’ve done calculations of latency between LEO satellites that suggest that there are situations in which going to space will be the fastest path between two points on Earth. We’ll let you know if we end up using laser-space-purge.
Just as we have with network performance, we are going to relentlessly measure our cache performance as well as the cache performance of our competitors. We won’t be satisfied until we verifiably are the fastest everywhere. To do that, we’ve built a new cache purge architecture which we’re confident will make us the fastest cache purge in the industry.
Our new architecture
Through the end of 2022, we will continue this blog series incrementally showing how we will become the fastest, most-scalable purge system in the industry. We will continue to update you with how our purge system is developing and benchmark our data along the way.
Getting there will involve rearchitecting and optimizing our purge service, which hasn’t received a systematic redesign in over a decade. We’re excited to do our development in the open, and bring you along on our journey.
So what do we plan on updating?
Introducing Coreless Purge
The first version of our cache purge system was designed on top of a set of central core services including authorization, authentication, request distribution, and filtering among other features that made it a high-reliability service. These core components had ultimately become a bottleneck in terms of scale and performance as our network continues to expand globally. While most of our purge dependencies have been containerized, the message queue used was still running on bare metals, which led to increased operational overhead when our system needed to scale.
Last summer, we built a proof of concept for a completely decentralized cache invalidation system using in-house tech – Cloudflare Workers and Durable Objects. Using Durable Objects as a queuing mechanism gives us the flexibility to scale horizontally by adding more Durable Objects as needed and can reduce time to purge with quick regional fanouts of purge requests.
In the new purge system we’re ripping out the reliance on core data centers and moving all that functionality to every data center, we’re calling it coreless purge.
Here’s a general overview of how coreless purge will work:
A purge request will be initiated via the API or UI. This request will specify how we should identify the assets to be purged.
The request will be routed to the nearest Cloudflare data center where it is identified to be a purge request and be passed to a Worker that will perform several of the key functions that currently occur in the core (like authorization, filtering, etc).
From there, the Worker will pass the purge request to a Durable Object in the data center. The Durable Object will queue all the requests and broadcast them to every data center when they are ready to be processed.
When the Durable Object broadcasts the purge request to every data center, another Worker will pass the request to the service in the data center that will invalidate the content in cache (executes the purge).
We believe this re-architecture of our system built by stringing together multiple services from the Workers platform will help improve both the speed and scalability of the purge requests we will be able to handle.
Conclusion
We’re going to spend a lot of time building and optimizing purge because, if there’s one thing we learned here today, it’s that cache invalidation is a difficult problem but those are exactly the types of problems that get us out of bed in the morning.
If you want to help us optimize our purge pipeline, we’re hiring.
When we announced Cloudflare Images to the world, we introduced a way to store images within the product and help customers move away from the egress fees met when using remote sources for their deliveries via Cloudflare.
To store the images in Cloudflare, customers can upload them via UI with a simple drag and drop, or via API for scenarios with a high number of objects for which scripting their way through the upload process makes more sense.
To create flexibility on how to import the images, we’ve recently also included the ability to upload via URL or define custom names and paths for your images to allow a simple mapping between customer repositories and the objects in Cloudflare. It’s also possible to serve from a custom hostname to create flexibility on how your end-users see the path, to improve the delivery performance by removing the need to do TLS negotiations or to improve your brand recognition through URL consistency.
Still, there was no simple way to tell our product: “Tens of millions of images are in this repository URL. Go and grab them all from me”.
In some scenarios, our customers have buckets with millions of images to upload to Cloudflare Images. Their goal is to migrate all objects to Cloudflare through a one-time process, allowing you to drop the external storage altogether.
In another common scenario, different departments in larger companies use independent systems configured with varying storage repositories, all of which they feed at specific times with uneven upload volumes. And it would be best if they could reuse definitions to get all those new Images in Cloudflare to ensure the portfolio is up-to-date while not paying egregious egress fees by serving the public directly from those multiple storage providers.
These situations required the upload process to Cloudflare Images to include logistical coordination and scripting knowledge. Until now.
Announcing the Cloudflare Images Sourcing Kit
Today, we are happy to share with you our Sourcing Kit, where you can define one or more sources containing the objects you want to migrate to Cloudflare Images.
But, what exactly is Sourcing? In industries like manufacturing, it implies a number of operations, from selecting suppliers, to vetting raw materials and delivering reports to the process owners.
So, we borrowed that definition and translated it into a Cloudflare Images set of capabilities allowing you to:
Define one or multiple repositories of images to bulk import;
Reuse those sources and import only new images;
Make sure that only actual usable images are imported and not other objects or file types that exist in that source;
Define the target path and filename for imported images;
Obtain Logs for the bulk operations;
The new kit does it all. So let’s go through it.
How the Cloudflare Images Sourcing Kit works
In the Cloudflare Dashboard, you will soon find the Sourcing Kit under Images.
In it, you will be able to create a new source definition, view existing ones, and view the status of the last operations.
Clicking on the create button will launch the wizard that will guide you through the first bulk import from your defined source:
First, you will need to input the Name of the Source and the URL for accessing it. You’ll be able to save the definitions and reuse the source whenever you wish. After running the necessary validations, you’ll be able to define the rules for the import process.
The first option you have allows an Optional Prefix Path. Defining a prefix allows a unique identifier for the images uploaded from this particular source, differentiating the ones imported from this source.
The naming rule in place respects the source image name and path already, so let’s assume there’s a puppy image to be retrieved at:
Now, you might want to create an additional Path Prefix to identify the source, for example by mentioning that this bucket is from the Technical Writing department. In the puppy case, the result would be:
Custom Path prefixes also provide a way to prevent name clashes coming from other sources.
Still, there will be times when customers don’t want to use them. And, when re-using the source to import images, a same path+filename destinations clash might occur.
By default, we don’t overwrite existing images, but we allow you to select that option and refresh your catalog present in the Cloudflare pipeline.
Once these inputs are defined, a click on the Create and start migration button at the bottom will trigger the upload process.
This action will show the final wizard screen, where the migration status is displayed. The progress log will report any errors obtained during the upload and is also available to download.
You can reuse, edit or delete source definitions when no operations are running, and at any point, from the home page of the kit, it’s possible to access the status and return to the ongoing or last migration report.
What’s next?
With the Beta version of the Cloudflare Images Sourcing Kit, we will allow you to define AWS S3 buckets as a source for the imports. In the following versions, we will enable definitions for other common repositories, such as the ones from Azure Storage Accounts or Google Cloud Storage.
And while we’re aiming for this to be a simple UI, we also plan to make everything available through CLI: from defining the repository URL to starting the upload process and retrieving a final report.
Apply for the Beta version
We will be releasing the Beta version of this kit in the following weeks, allowing you to source your images from third party repositories to Cloudflare.
If you want to be the first to use Sourcing Kit, request to join the waitlist on the Cloudflare Images dashboard.
Here at Cloudflare we often talk about HTTP and related protocols as we work to help build a better Internet. However, the Simple Mail Transfer Protocol (SMTP) — used to send emails — is still a massive part of the Internet too.
Even though SMTP is turning 40 years old this year, most businesses still rely on email to validate user accounts, send notifications, announce new features, and more.
Sending an email is simple from a technical standpoint, but getting an email actually delivered to an inbox can be extremely tricky. Because of the enormous amount of spam that is sent every single day, all major email providers are very wary of things like new domains and IP addresses that start sending emails.
That is why we are delighted to announce a partnership with MailChannels. MailChannels has created an email sending service specifically for Cloudflare Workers that removes all the friction associated with sending emails. To use their service, you do not need to validate a domain or create a separate account. MailChannels filters spam before sending out an email, so you can feel safe putting user-submitted content in an email and be confident that it won’t ruin your domain reputation with email providers. But the absolute best part? Thanks to our friends at MailChannels, it is completely free to send email.
In the words of their CEO Ken Simpson: “Cloudflare Workers and Pages are changing the game when it comes to ease of use and removing friction to get started. So when we sat down to see what friction we could remove from sending out emails, it turns out that with our incredible anti-spam and anti-phishing, the answer is “everything”. We can’t wait to see what applications the community is going to build on top of this.”
The only constraint currently is that the integration only works when the request comes from a Cloudflare IP address. So it won’t work yet when you are developing on your local machine or running a test on your build server.
First let’s walk you through how to send out your first email using a Worker.
export default {
  async fetch(request) {
    send_request = new Request('https://api.mailchannels.net/tx/v1/send', {
      method: 'POST',
      headers: {
        'content-type': 'application/json',
      },
      body: JSON.stringify({
        personalizations: [
          {
            to: [{ email: '[email protected]', name: 'Test Recipient' }],
          },
        ],
        from: {
          email: '[email protected]',
          name: 'Workers - MailChannels integration',
        },
        subject: 'Look! No servers',
        content: [
          {
            type: 'text/plain',
            value: 'And no email service accounts and all for free too!',
          },
        ],
      }),
    })
  },
}
That is all there is to it. You can modify the example to make it send whatever email you want.
The MailChannels integration makes it easy to send emails to and from anywhere with Workers. However, we also wanted to make it easier to send emails to yourself from a form on your website. This is perfect for quickly and painlessly setting up pages such as “Contact Us” forms, landing pages, and sales inquiries.
The Pages Plugin Framework that we announced earlier this week allows other people to email you without exposing your email address.
The only thing you need to do is copy and paste the following code snippet in your /functions/_middleware.ts file. Now, every form that has the data-static-form-name attribute will automatically be emailed to you.
Here is an example of what such a form would look like. You can make the form as complex as you like, the only thing it needs is the data-static-form-name attribute. You can give it any name you like to be able to distinguish between different forms.
So as you can see there is no barrier left when it comes to sending out emails. You can copy and paste the above Worker or Pages code into your projects and immediately start to send email for free.
If you have any questions about using MailChannels in your Workers, or want to learn more about Workers in general, please join our Cloudflare Developer Discord server.
Cloudflare Email Routing has quickly grown to a few hundred thousand users, and we’re incredibly excited with the number of feature requests that reach our product team every week. We hear you, we love the feedback, and we want to give you all that you’ve been asking for. What we don’t like is making you wait, or making you feel like your needs are too unique to be addressed.
That’s why we’re taking a different approach – we’re giving you the power tools that you need to implement any logic you can dream of to process your emails in the fastest, most scalable way possible.
Today we’re announcing Route to Workers, for which we’ll start a closed beta soon. You can join the waitlist today.
How this works
When using Route to Workers your Email Routing rules can have a Worker process the messages reaching any of your custom Email addresses.
Even if you haven’t used Cloudflare Workers before, we are making onboarding as easy as can be. You can start creating Workers straight from the Email Routing dashboard, with just one click.
After clicking Create, you will be able to choose a starter that allows you to get up and running with minimal effort. Starters are templates that pre-populate your Worker with the code you would write for popular use cases such as creating a blocklist or allowlist, content based filtering, tagging messages, pinging you on Slack for urgent emails, etc.
You can then use the code editor to make your new Worker process emails in exactly the way you want it to – the options are endless.
And for those of you that prefer to jump right into writing their own code, you can go straight to the editor without using a starter. You can write Workers with a language you likely already know. Cloudflare built Workers to execute JavaScript and WebAssembly and has continuously added support for new languages.
The Workers you’ll use for processing emails are just regular Workers that listen to incoming events, implement some logic, and reply accordingly. You can use all the features that a normal Worker would.
The new `email` event will provide you with the “from”, “to” fields, the full headers, and the raw body of the message. You can then use them in any way that fits your use case, including calling other APIs and orchestrating complex decision workflows. In the end, you can decide what action to take, including rejecting or forwarding the email to one of your Email Routing destination addresses.
With these capabilities you can easily create logic that, for example, only accepts messages coming from one specific address and, when one matches the criteria, forwards to one or more of your verified destination addresses while also immediately alerting you on Slack. Code for such feature could be as simple as this:
Route to Workers enables everyone to programmatically process their emails and use them as triggers for any other action. We think this is pretty powerful.
Process up to 100,000 emails/day for free
The first 100,000 Worker requests (or Email Triggers) each day are free, and paid plans start at just $5 per 10 million requests. You will be able to keep track of your Email Workers usage right from the Email Routing dashboard.
Join the Waitlist
You can join the waitlist today by going to the Email section of your dashboard, navigating to the Email Workers tab, and clicking the Join Waitlist button.
We are expecting to start the closed beta in just a few weeks, and can’t wait to hear about what you’ll build with it!
Building inclusive technology is core to the Cloudflare mission. Cloudflare Stream has supported captions for on-demand videos for several years. Soon, Stream will auto-detect embedded captions and include it in the live stream delivered to your viewers.
Thousands of Cloudflare customers use the Stream product to build video functionality into their apps. With live caption support, Stream customers can better serve their users with a more comprehensive viewing experience.
Enabling Closed Captions in Stream Live
Stream Live scans for CEA-608 and CEA-708 captions in incoming live streams ingested via SRT and RTMPS. Assuming the live streams you are pushing to Cloudflare Stream contain captions, you don’t have to do anything further: the captions will simply get included in the manifest file.
If you are using the Stream Player, these captions will be rendered by the Stream Player. If you are using your own player, you simply have to configure your player to display captions.
Currently, Stream Live supports captions for a single language during the live event. While the support for captions is limited to one language during the live stream, you can upload captions for multiple languages once the event completes and the live event becomes an on-demand video.
What is CEA-608 and CEA-708?
When captions were first introduced in 1973, they were open captions. This means the captions were literally overlaid on top of the picture in the video and therefore, could not be turned off. In 1982, we saw the introduction of closed captions during live television. Captions were no longer imprinted on the video and were instead passed via a separate feed and rendered on the video by the television set.
CEA-608 (also known as Line 21) and CEA-708 are well-established standards used to transmit captions. CEA-708 is a modern iteration of CEA-608, offering support for nearly every language and text positioning–something not supported with CEA-608.
Availability
Live caption support will be available in closed beta next month. To request access, sign up for the closed beta.
Including captions in any video stream is critical to making your content more accessible. For example, the majority of live events are watched on mute and thereby, increasing the value of captions. While Stream Live does not generate live captions yet, we plan to build support for automatic live captions in the future.
Starting today, in open beta, Cloudflare Stream supports video playback with sub-second latency over SRT or RTMPS at scale. Just like HLS and DASH formats, playback over RTMPS and SRT costs $1 per 1,000 minutes delivered regardless of video encoding settings used.
Stream is like a magic HDMI cable to the cloud. You can easily connect a video stream and display it from as many screens as you want wherever you want around the world.
What do we mean by sub-second?
Video latency is the time it takes from when a camera sees something happen live to when viewers of a broadcast see the same thing happen via their screen. Although we like to think what’s on TV is happening simultaneously in the studio and your living room at the same time, this is not the case. Often, cable TV takes five seconds to reach your home.
On the Internet, the range of latencies across different services varies widely from multiple minutes down to a few seconds or less. Live streaming technologies like HLS and DASH, used on by the most common video streaming websites typically offer 10 to 30 seconds of latency, and this is what you can achieve with Stream Live today. However, this range does not feel natural for quite a few use cases where the viewers interact with the broadcasters. Imagine a text chat next to an esports live stream or Q&A session in a remote webinar. These new ways of interacting with the broadcast won’t work with typical latencies that the industry is used to. You need one to two seconds at most to achieve the feeling that the viewer is in the same room as the broadcaster.
We expect Cloudflare Stream to deliver sub-second latencies reliably in most parts of the world by routing the video as much as possible within the Cloudflare network. For example, when you’re sending video from San Francisco on your Comcast home connection, the video travels directly to the nearest point where Comcast and Cloudflare connect, for example, San Jose. Whenever a viewer joins, say from Austin, the viewer connects to the Cloudflare location in Dallas, which then establishes a connection using the Cloudflare backbone to San Jose. This setup avoids unreliable long distance connections and allows Cloudflare to monitor the reliability and latency of the video all the way from broadcaster the last mile to the viewer last mile.
Serverless, dynamic topology
With Cloudflare Stream, the latency of content from the source to the destination is purely dependent on the physical distance between them: with no centralized routing, each Cloudflare location talks to other Cloudflare locations and shares the video among each other. This results in the minimum possible latency regardless of the locale you are broadcasting from.
We’ve tested about 500ms of glass to glass latency from San Francisco to London, both from and to residential networks. If both the broadcaster and the viewers were in California, this number would be lower, simply because of lower delay caused by less distance to travel over speed of light. An early tester was able to achieve 300ms of latency by broadcasting using OBS via RTMPS to Cloudflare Stream and pulling down that content over SRT using ffplay.
Any server in the Cloudflare Anycast network can receive and publish low-latency video, which means that you’re automatically broadcasting to the nearest server with no configuration necessary. To minimize latency and avoid network congestion, we route video traffic between broadcaster and audience servers using the same network telemetry as Argo.
On top of this, we construct a dynamic distribution topology, unique to the stream, which grows to meet the capacity needs of the broadcast. We’re just getting started with low-latency video, and we will continue to focus on latency and playback reliability as our real-time video features grow.
An HDMI cable to the cloud
Most video on the Internet uses HTTP – the protocol for loading websites on your browser to deliver video. This has many advantages, such as easy to achieve interoperability across viewer devices. Maybe more importantly, HTTP can use the existing infrastructure like caches which reduce the cost of video delivery.
Using HTTP has a cost in latency as it is not a protocol built to deliver video. There’s been many attempts made to deliver low latency video over HTTP, with some reducing latency to a few seconds, but none reach the levels achievable by protocols designed with video in mind. WebRTC and video delivery over QUIC have the potential to further reduce latency, but face inconsistent support across platforms today.
Video-oriented protocols, such as RTMPS and SRT, side-step some of the challenges above but often require custom client libraries and are not available in modern web browsers. While we now support low latency video today over RTMPS and SRT, we are actively exploring other delivery protocols.
There’s no silver bullet – yet, and our goal is to make video delivery as easy as possible by supporting the set of protocols that enables our customers to meet their unique and creative needs. Today that can mean receiving RTMPS and delivering low-latency SRT, or ingesting SRT while publishing HLS. In the future, that may include ingesting WebRTC or publishing over QUIC or HTTP/3 or WebTransport. There are many interesting technologies on the horizon.
We’re excited to see new use cases emerge as low-latency video becomes easier to integrate and less costly to manage. A remote cycling instructor can ask her students to slow down in response to an increase in heart rate; an esports league can effortlessly repeat their live feed to remote broadcasters to provide timely, localized commentary while interacting with their audience.
Creative uses of low latency video
Viewer experience at events like a concert or a sporting event can be augmented with live video delivered in real time to participants’ phones. This way they can experience the event in real-time and see the goal scored or details of what’s going happening on the stage.
Often in big cities, people who cheer loudly across the city can be heard before seeing a goal scored on your own screen. This can be eliminated by when every video screen shows the same content at the same time.
Esports games, large company meetings or conferences where presenters or commentators react real time to comments on chat. The delay between a fan making a comment and them seeing the reaction on the video stream can be eliminated.
Online exercise bikes can provide even more relevant and timely feedback from the live instructors, adding to the sense of community developed while riding them.
Participants in esports streams can be switched from a passive viewer to an active live participant easily as there is no delay in the broadcast.
Security cameras can be monitored from anywhere in the world without having to open ports or set up centralized servers to receive and relay video.
Getting Started
Get started by using your existing inputs on Cloudflare Stream. Without the need to reconnect, they will be available instantly for playback with the RTMPS/SRT playback URLs.
If you don’t have any inputs on Stream, sign up for $5/mo. You will get the ability to push live video, broadcast, record and now pull video with sub-second latency.
You will need to use a computer program like FFmpeg or OBS to push video. To playback RTMPS you can use VLC and FFplay for SRT. To integrate in your native app, you can utilize FFmpeg wrappers for native apps such as ffmpeg-kit for iOS.
RTMPS and SRT playback work with the recently launched custom domain support, so you can use the domain of your choice and keep your branding.
The last two years have given rise to hundreds of live streaming platforms. Most live streaming platforms enable their creators to go live by providing them with a server and an RTMP/SRT key that they can configure in their broadcasting app.
Until today, even if your live streaming platform was called live-yoga-classes.com, your users would need to push the RTMPS feed to live.cloudflare.com. Starting today, every Stream account can configure its own domain in the Stream dashboard. And your creators can broadcast to a domain such as push.live-yoga-classes.com.
This feature is available to all Stream accounts, including self-serve customers at no additional cost. Every Cloudflare account with a Stream subscription can add up to five ingest domains.
Secure CNAMEing for live video ingestion
Cloudflare Stream only supports encrypted video ingestion using RTMPS and SRT protocols. These are secure protocols and, similar to HTTPS, ensure encryption between the broadcaster and Cloudflare servers. Unlike non-secure protocols like RTMP, secure RTMP (or RTMPS) protects your users from monster-in-the-middle attacks.
In an unsecure world, you could simply CNAME a domain to another domain regardless of whether you own the domain you are sending traffic to. Because Stream Live intentionally does not support insecure live streams, you cannot simply CNAME your domain to live.cloudflare.com. So we leveraged other Cloudflare products such as Spectrum to natively support custom-branded domains in the Stream Live product without making the live streams less private for your broadcasters.
Configuring Custom Domain for Live Ingestion
To begin configuring your custom domain, add the domain to your Cloudflare account as a regular zone.
Add a zone to your Cloudflare account
Next, CNAME the domain to live.cloudflare.com.
CNAME the zone to live.cloudflare.com
Assuming you have a Stream subscription, visit the Inputs page and click on the Settings icon:
Click on Settings icon on Live Inputs page
Next, add the domain you configured in the previous step as a Live Ingest Domain:
Add Custom Ingest Domain
If your domain is successfully added, you will see a confirmation:
Confirmation of domain being added as an ingest domain
Once you’ve added your ingest domain, test it by changing your existing configuration in your broadcasting software to your ingest domain. You can read the complete docs and limitations in the Stream Live developer docs.
What’s Next
Besides the branding upside — you don’t have to instruct your users to configure a domain such as live.cloudflare.com — custom domains help you avoid vendor lock-in and seamless migration. For example, if you have an existing live video pipeline that you are considering moving to Stream Live, this makes the migration one step easier because you no longer have to ask your users to change any settings in their broadcasting app.
A natural next step is to support custom keys. Currently, your users must still use keys that are provided by Stream Live. Soon, you will be able to bring your own keys. Custom domains combined with custom keys will help you migrate to Stream Live with zero breaking changes for your end users.
Creator platforms across the world use Cloudflare Stream to rapidly build video experiences into their apps. These platforms serve a diverse range of creators, enabling them to share their passion with their beloved audience. While working with creator platforms, we learned that many Stream customers track video usage on a per-creator basis in order to answer critical questions such as:
“Who are our fastest growing creators?”
“How much do we charge or pay creators each month?”
“What can we do more of in order to serve our creators?”
Introducing the Creator Property
Creator platforms enable artists, teachers and hobbyists to express themselves through various media, including video. We built Cloudflare Stream for these platforms, enabling them to rapidly build video use cases without needing to build and maintain a video pipeline at scale.
At its heart, every creator platform must manage ownership of user-generated content. When a video is uploaded to Stream, Stream returns a video ID. Platforms using Stream have traditionally had to maintain their own index to track content ownership. For example, when a user with internal user ID 83721759 uploads a video to Stream with video ID 06aadc28eb1897702d41b4841b85f322, the platform must maintain a database table of some sort to keep track of the fact that Stream video ID 06aadc28eb1897702d41b4841b85f322 belongs to internal user 83721759.
With the introduction of the creator property, platforms no longer need to maintain this index. Stream already has a direct creator upload feature to enable users to upload videos directly to Stream using tokenized URLs and without exposing account-wide auth information. You can now set the creator field with your user’s internal user ID at the time of requesting a tokenized upload URL:
When the user uploads the video, the creator property would be automatically set to your internal user ID and can be leveraged for operations such as pulling analytics data for your creators.
Query By Creator Property
Setting the creator property on your video uploads is just the beginning. You can now filter Stream Analytics via the Dashboard or the GraphQL API using the creator property.
Filter Stream Analytics in the Dashboard using the Creator property
Previously, if you wanted to generate a monthly report of all your creators and the number of minutes of watch time recorded for their videos, you’d likely use a scripting language such as Python to do the following:
Call the Stream GraphQL API requesting a list of videos and their watch time
Traverse through the list of videos and query your internal index to determine which creator each video belongs to
Sum up the video watch time for each creator to get a clean report showing you video consumption grouped by the video creator
The creator property eliminates this three step manual process. You can make a single API call to the GraphQL API to request a list of creators and the consumption of their videos for a given time period. Here is an example GraphQL API query that returns minutes delivered by creator:
Stream is focused on helping creator platforms innovate and scale. Matt Ober, CTO of NFT media management platform Piñata, says “By allowing us to upload and then query using creator IDs, large-scale analytics of Cloudflare Stream is about to get a lot easier.”
Getting Started
Read the docs to learn more about setting the creator property on new and previously uploaded videos. You can also set the creator property on live inputs, so the recorded videos generated from the live event will already have the creator field populated.
Being able to filter analytics is just the beginning. We can’t wait to enable more creator-level operations, so you can spend more time on what makes your idea unique and less time maintaining table stakes infrastructure.
We announced Cloudflare Workers in 2017, giving developers access to compute on our network. We were excited about the possibilities this unlocked, but we quickly realized — most real world applications are stateful. Since then, we’ve delivered KV, Durable Objects, and R2, giving developers access to various types of storage.
Today, we’re excited to announce D1, our first SQL database.
While the wait on beta access shouldn’t be long — we’ll start letting folks in as early as June (sign up here), we’re excited to share some details of what’s to come.
Meet D1, the database designed for Cloudflare Workers
D1 is built on SQLite. Not only is SQLite the most ubiquitous database in the world, used by billions of devices a day, it’s also the first ever serverless database. Surprised? SQLite was so ahead of its time, it dubbed itself “serverless” before the term gained connotation with cloud services, and originally meant literally “not involving a server”.
Since Workers itself runs between the server and the client, and was inspired by technology built for the client, SQLite seemed like the perfect fit for our first entry into databases.
So what can you build with D1? The true answer is “almost anything!”, that might not be very helpful in triggering the imagination, so how about a live demo?
D1 Demo: Northwind Traders
You can check out an example of D1 in action by trying out our demo running here: northwind.d1sql.com.
If you’re wondering “Who are Northwind Traders?”, Northwind Traders is the “Hello, World!” of databases, if you will. A sample database that Microsoft would provide alongside Microsoft Access to use as their own tutorial. It first appeared 25 years ago in 1997, and you’ll find many examples of its use on the Internet.
It’s a typical business application, with a realistic schema, with many foreign keys, across many different tables — a truly timeless representation of data.
When was the recent order of Queso Cabrales shipped, and what ship was it on? You can quickly find out. Someone calling in about ordering some Chai? Good thing Exotic Liquids still has 39 units in stock, for just \$18 each.
We welcome you to play and poke around, and answer any questions you have about Northwind Trading’s business.
The Northwind Traders demo also features a dashboard where you can find details and metrics about the D1 SQL queries happening behind the scenes.
What can you build with D1?
Going back to our original question before the demo, however, what can you build with D1?
While you may not be running Northwind Traders yourself, you’re likely running a very similar piece of software somewhere. Even at the very core of Cloudflare’s service is a database. A SQL database filled with tables, materialized views and a plethora of stored procedures. Every time a customer interacts with our dashboard they end up changing state in that database.
The reality is that databases are everywhere. They are inside the web browser you’re reading this on, inside every app on your phone, and the storage for your bank transaction, travel reservations, business applications, and on and on. Our goal with D1 is to help you build anything from APIs to rich and powerful applications, including eCommerce sites, accounting software, SaaS solutions, and CRMs.
You can even combine D1 with Cloudflare Access and create internal dashboards and admin tools that are securely locked to only the people in your organization. The world, truly, is your oyster.
The D1 developer experience
We’ll talk about the capabilities, and upcoming features further down in the post, but at the core of it, the strength of D1 is the developer experience: allowing you to go from nothing to a full stack application in an instant. Think back to a tool you’ve used that made development feel magical — that’s exactly what we want developing with Workers and D1 to feel like.
To give you a sense of it, here’s what getting started with D1 will look like.
Creating your first D1 database
With D1, you will be able to create a database, in just a few clicks — define the tables, insert or upload some data, no need to memorize any commands unless you need to.
Of course, if the command-line is your jam, earlier this week, we announced the new and improved Wrangler 2, the best tool for wrangling and deploying your Workers, and soon also your tool for deploying D1. Wrangler will also come with native D1 support, so you can create & manage databases with a few simple commands:
Accessing D1 from your Worker
Attaching D1 to your Worker is as easy as creating a new binding. Each D1 database that you attach to your Worker gets attached with its own binding on the env parameter:
export default {
  async fetch(request, env, ctx) {
    const { pathname } = new URL(request.url)
    if (pathname === '/num-products') {
      const { result } = await env.DB.get(`SELECT count(*) AS num_products FROM Product;`)
      return new Response(`There are ${result.num_products} products in the D1 database!`)
    }
  }
}
Or, for a slightly more complex example, you can safely pass parameters from the URL to the database using a Router and parameterised queries:
import { Router } from 'itty-router';
const router = Router();

router.get('/product/:id', async ({ params }, env) => {
  const { result } = await env.DB.get(
    `SELECT * FROM Product WHERE ID = $id;`,
    { $id: params.id }
  )
  return new Response(JSON.stringify(result), {
    headers: {
      'content-type': 'application/json'
    }
  })
})

export default {
  fetch: router.handle,
}
So what can you expect from D1?
First and foremost, we want you to be able to develop with D1, without having to worry about cost.
At Cloudflare, we don’t believe in keeping your data hostage, so D1, like R2, will be free of egress charges. Our plan is to price D1 like we price our storage products by charging for the base storage plus database operations performed.
But, again, we don’t want our customers worrying about the cost or what happens if their business takes off, and they need more storage or have more activity. We want you to be able to build applications as simple or complex as you can dream up. We will ensure that D1 costs less and performs better than comparable centralized solutions. The promise of serverless and a global network like Cloudflare’s is performance and lower cost driven by our architecture.
Here’s a small preview of the features in D1.
Read replication
With D1, we want to make it easy to store your whole application’s state in the one place, so you can perform arbitrary queries across the full data set. That’s what makes relational databases so powerful.
However, we don’t think powerful should be synonymous with cumbersome. Most relational databases are huge, monolithic things and configuring replication isn’t trivial, so in general, most systems are designed so that all reads and writes flow back to a single instance. D1 takes a different approach.
With D1, we want to take configuration off your hands, and take advantage of Cloudflare’s global network. D1 will create read-only clones of your data, close to where your users are, and constantly keep them up-to-date with changes.
Batching
Many operations in an application don’t just generate a single query. If your logic is running in a Worker near your user, but each of these queries needs to execute on the database, then sending them across the wire one-by-one is extremely inefficient.
D1’s API includes batching: anywhere you can send a single SQL statement you can also provide an array of them, meaning you only need a single HTTP round-trip to perform multiple operations. This is perfect for transactions that need to execute and commit atomically:
async function recordPurchase(userId, productId, amount) {
  const result = await env.DB.exec([
    [
      `UPDATE users SET balance = balance - $amount WHERE user_id = $user_id`,
      { $amount: amount, $user_id: userId },
    ],
    [
      'UPDATE product SET total_sales = total_sales + $amount WHERE product_id = $product_id',
      { $amount: amount, $product_id: productId },
    ],
  ])
  return result
}
Embedded compute
But we’re going further. With D1, it will be possible to define a chunk of your Worker code that runs directly next to the database, giving you total control and maximum performance—each request first hits your Worker near your users, but depending on the operation, can hand off to another Worker deployed alongside a replica or your primary D1 instance to complete its work.
Backups and redundancy
There are few things as critical as the data stored in your main application’s database, so D1 will automatically save snapshots of your database to Cloudflare’s cloud storage service, R2, at regular intervals, with a one-click restoration process. And, since we’re building on the redundant storage of Durable Objects, your database can physically move locations as needed, resulting in self-healing from even the most catastrophic problems in seconds.
Importing and exporting data
While D1 already supports the SQLite API, making it easy for you to write your queries, you might also need data to run them on. If you’re not creating a brand-new application, you may want to import an existing dataset from another source or database, which is why we’ll be working on allowing you to bring your own data to D1.
Likewise, one of SQLite’s advantages is its portability. If your application has a dedicated staging environment, say, you’ll be able to clone a snapshot of that data down to your local machine to develop against. And we’ll be adding more flexibility, such as the ability to create a new database with a set of test data for each new pull request on your Pages project.
What’s next?
This wouldn’t be a Cloudflare announcement if we didn’t conclude on “we’re just getting started!” — and it’s true! We are really excited about all the powerful possibilities our database on our global network opens up.
Are you already thinking about what you’re going to build with D1 and Workers? Same. Give us your details, and we’ll give you access as soon as we can — look out for a beta invite from us starting as early as June 2022!
Hot on the heels of the R2 open beta announcement, we’re excited that Cloudflare enterprise customers can now use Logpush to store logs on R2!
Raw logs from our products are used by our customers for debugging performance issues, to investigate security incidents, to keep up security standards for compliance and much more. You shouldn’t have to make tradeoffs between keeping logs that you need and managing tight budgets. With R2’s low costs, we’re making this decision easier for our customers!
Getting into the numbers
Cloudflare helps customers at different levels of scale — from a few requests per day, up to a million requests per second. Because of this, the cost of log storage also varies widely. For customers with higher-traffic websites, log storage costs can grow large, quickly.
As an example, imagine a website that gets 100,000 requests per second. This site would generate about 9.2 TB of HTTP request logs per day, or 850 GB/day after gzip compression. Over a month, you’ll be storing about 26 TB (compressed) of HTTP logs.
For a typical use case, imagine that you write and read the data exactly once – for example, you might write the data to object storage before ingesting it into an alerting system. Compare the costs of R2 and S3 (note that this excludes costs per operation to read/write data).
In this example, R2 leads to 86% savings! It’s worth noting that querying logs is where another hefty price tag comes in because Amazon Athena charges based on the amount of data scanned. If your team is looking back through historical data, each query can be hundreds of dollars.
Many of our customers have tens to hundreds of domains behind Cloudflare and the majority of our Enterprise customers also use multiple Cloudflare products. Imagine how costs will scale if you need to store HTTP, WAF and Spectrum logs for all of your Internet properties behind Cloudflare.
For SaaS customers that are building the next big thing on Cloudflare, logs are important to get visibility into customer usage and performance. Your customer’s developers may also want access to raw logs to understand errors during development and to troubleshoot production issues. Costs for storing logs multiply and add up quickly!
The flip side: log retrieval
When designing products, one of Cloudflare’s core principles is ease of use. We take on the complexity, so you don’t have to. Storing logs is only half the battle, you also need to be able to access relevant logs when you need them – in the heat of an incident or when doing an in depth analysis.
Our product, Logpull, offers seven days of log retention and an easy to use API to access. Our customers love that Logpull doesn’t need any setup on third parties since it’s completely managed by Cloudflare. However, Logpull is limited in the retention of logs, the type of logs that we store (only HTTP request logs) and the amount of data that can be queried at one time.
We’re building tools for log retrieval that make it super easy to get your data out of R2 from any of our datasets. Similar to Logpull, we’ll start by supporting lookups by time period and rayId. From there, we’ll tackle more complex functions like returning logs within time X and Y that have 500 errors or where WAF action = block.
We’re looking for customers to join a closed beta for our Log Retrieval API. If you’re interested in testing it out, giving feedback and ultimately helping us shape the product sign up here.
Logs on R2: How to get started
Enterprise customers first need to get R2 added to their contract. Reach out to your account team if this is something you’re interested in! Once enabled, create an R2 bucket for your logs and follow the Logpush setup flow to create your job.
It’s that simple! If you have questions, our Logpush to R2 developer docs go into more detail.
More to come
We’re continuing to build out more advanced Logpush features with a focus on customization. Here’s a preview of what’s next on the roadmap:
New datasets: Network Analytics Logs, Workers Invocation Logs
Log filtering
Custom log formatting
We also have exciting plans to build out log analysis and forensics capabilities on top of R2. We want to make log storage tightly coupled to the Cloudflare dash so you can see high level analytics and drill down into individual log lines all in one view. Stay tuned to the blog for more!
One hundred percent. 100%. One-zero-zero. That’s the cache ratio we’re all chasing. Having a high cache ratio means that more of a website’s content is served from a Cloudflare data center close to where a visitor is requesting the website. Serving content from Cloudflare’s cache means it loads faster for visitors, saves website operators money on egress fees from origins, and provides multiple layers of resiliency and protection to make sure that content is always available to be served.
Today, I’m delighted to announce a massive extension of the benefits of caching with Cache Reserve: a new way to persistently serve all static content from Cloudflare’s global cache. By using Cache Reserve, customers can see higher cache hit ratios and lower egress bills.
Why is getting a 100% cache ratio difficult?
Every second, Cloudflare serves tens-of-millions of requests from our cache which equates to multiple terabytes-per-second of cached data being delivered to website visitors around the world. With this massive scale, we must ensure that the most requested content is cached in the areas where it is most popular. Otherwise, visitors might wait too long for content to be delivered from farther away and our network would be running inefficiently. If cache storage in a certain region is full, our network avoids imposing these inefficiencies on our customers by evicting less-popular content from the data center and replacing it with more-requested content.
This works well for the majority of use cases, but all customers have long tail content that is rarely requested and may be evicted from cache. This can be a cause of concern for customers, as this unpopular content can be a major cost driver if it is evicted repeatedly and needs to be served from an origin. This concern can be especially significant for customers with massive content libraries. So how can we make sure to keep this less popular content in cache to shield the customer from origin egress?
Cache Reserve removes customer content from this popularity contest and ensures that even if the specific content hasn’t been requested in months, it can still be served from Cloudflare’s cache – avoiding the need to pull it from the origin and saving the customer money on egress. Cache Reserve helps get customers closer to that 100% cache ratio and helps serve all of their content from our global CDN, forever.
Why is cache eviction needed?
Most content served from our cache starts its journey from an origin server – where content is hosted. In order to be admitted to Cloudflare’s cache the content sent from the origin must meet certain eligibility criteria that ensures it can be reused to respond to other requests for a website (content that doesn’t change based on who is visiting the site).
After content is admitted to cache, the next question to consider is how long it should remain in cache. Since cache ratios are calculated by taking the number of requests for content and identifying the portion that are answered from a cache server instead of an origin server, ensuring content remains cached in an area it is highly requested is paramount to achieving a high cache ratio.
Some CDNs use a pay-to-play model that allows customers to pay more money to ensure content is cached in certain areas for some length of time. At Cloudflare, we don’t charge customers based on where or for how long something is cached. This means that we have to use signals other than a customer’s willingness to pay to make sure that the right content is cached for the right amount of time and in the right areas.
Where to cache a piece of content is pretty straightforward (where it’s being requested), how long content should remain in cache can be highly variable.
Beyond headers like cache-control or cdn-cache-control, which help determine how long a customer wants something to be served from cache, the other element that CDNs must consider is whether they need to evict content early to optimize storage of more popular assets. We do eviction based on an algorithm called “least recently used” or LRU. This means that the least-requested content can be evicted from cache first to make space for more popular content when storage space is full.
This caching strategy requires keeping track of a lot of information about when requests come in and constantly updating the cache to make sure that the hottest content is kept in cache and the least popular content is evicted. This works well and is fair for the wide-array of customers our CDN supports.
However, if a customer has a large library of content that might go through cycles of popularity and which they’d like to serve from cache regardless, then LRU might mean additional origin egress as assets that are requested sparingly over a long time frame are pulled more from the origin.
That’s where Cache Reserve comes in. Cache Reserve is not an alternative to our popularity-based cache but a complement to it. By backstopping all cacheable content in Cache Reserve customers don’t have to worry about cache eviction or ephemerality any longer.
Cache Reserve
Cache Reserve is a large, persistent data store that is implemented on top of R2. By pushing a single button in the dashboard, all of your website’s cacheable content will be written to Cache Reserve. In the same way that Tiered Cache builds a hierarchy of caches between your visitors and your origin, Cache Reserve serves as the ultimate upper-tier cache that will reserve storage space for your assets for as long as you want. This ensures that your content is always served from cache, shielding your origin from unneeded egress fees, and improving response performance.
How Does Cache Reserve Work?
Cache Reserve sits between our edge data centers and your origin and provides guaranteed SLAs for how long your content can remain in cache.
As content is pulled from the origin, it will be written to Cache Reserve, followed by upper-tier data centers, and lower-tier data centers until it reaches the client to fulfill the request. Subsequent requests for the same content will not need to go all the way back to the origin for the response and can, instead, be served from a cache closer to the visitor. Improving both performance and costs of serving the assets. As content gets evicted from lower-tiers and upper-tiers, it will be backstopped by Cache Reserve.
Cache Reserve voids the request-based eviction that’s implemented in LRU and ensures that assets will remain in cache as long as they are needed. Cache Reserve extends the benefits of Tiered Cache by reducing the number of times Cloudflare’s network needs to ask an origin for content we should have in cache, while simultaneously limiting the number of connections and requests that our data centers need to open to your origin to ask for missing content. Using Cache Reserve with tiered cache helps collapse the number of requests that result from multiple concurrent cache misses from lower-tiers for the same content.
As an example, let’s assume a cold request for example.com, something our network has never seen before. If a client request comes into the closest lower-tier data center and it is a miss, that lower-tier is mapped to an upper-tier data center. When the lower-tier asks the upper-tier for the content and it is also a miss, the upper-tier will ask Cache Reserve for the content. Now, being the ultimate upper-tier, it will be the only data center that can ask the origin for content if it is not stored on our network. This will help limit the origin resources you need to devote to serving this content as once it’s written to Cache Reserve, your origin doesn’t need to fan out the content to any other part of Cloudflare’s network.
When your content does need updating, Cache Reserve will respect cache-control headers and purge requests. This means that if you want to control how long something remains fresh in Cache Reserve, before Cloudflare goes back to your origin to revalidate the content, set it as a cache-control header and it will be respected without risk of early eviction. Or if you want to update content on the fly, you can send a purge request which will be respected in both Cloudflare’s cache and in Cache Reserve.
How do you use Cache Reserve?
Currently, Cache Reserve is in closed beta, meaning that it’s available to anyone who wants to sign up but we will be slowly rolling it out to customers over the coming weeks to make sure that we are quickly triaging edge cases and making fundamental improvements before we make it generally available to everyone.
The Cache Reserve Plan will mimic the low cost of R2. Storage will be \$0.015 per GB per month and operations will be \$0.36 per million reads, and \$4.50 per million writes. For more information about pricing, please refer to the R2 page to get a general idea (Cache Reserve pricing page will be out soon).
Try it out!
Cache Reserve holds tremendous promise to increase cache hit ratios — which will improve the economics of running any website while speeding up visitors’ experiences. We’re excited to begin letting people use Cache Reserve soon. Be sure to check out the beta and let us know what you think.
Since we launched Durable Objects, developers have leveraged them as a novel building block for distributed applications.
Durable Objects provide globally unique instances of a JavaScript class a developer writes, accessed via a unique ID. The Durable Object associated with each ID implements some fundamental component of an application — a banking application might have a Durable Object representing each bank account, for example. The bank account object would then expose methods for incrementing a balance, transferring money or any other actions that the application needs to do on the bank account.
Durable Objects work well as a stateful backend for applications — while Workers can instantiate a new instance of your code in any of Cloudflare’s data centers in response to a request, Durable Objects guarantee that all requests for a given Durable Object will reach the same instance on Cloudflare’s network.
Each Durable Object is single-threaded and has access to a stateful storage API, making it easy to build consistent and highly-available distributed applications on top of them.
This system makes distributed systems’ development easier — we’ve seen some impressive applications launched atop Durable Objects, from collaborative whiteboarding tools to conflict-free replicated data type (CRDT) systems for coordinating distributed state launch.
However, up until now, there’s been a piece missing — how do you invoke a Durable Object when a client Worker is not making requests to it?
As with any distributed system, Durable Objects can become unavailable and stop running. Perhaps the machine you were running on was unplugged, or the datacenter burned down and is never coming back, or an individual object exceeded its memory limit and was reset. Before today, a subsequent request would reinitialize the Durable Object on another machine, but there was no way to programmatically wake up an Object.
Durable Objects Alarms are here to change that, unlocking new use cases for Durable Objects like queues and deferred processing.
What is a Durable Object Alarm?
Durable Object Alarms allow you, from within your Durable Object, to schedule the object to be woken up at a time in the future. When the alarm’s scheduled time comes, the Durable Object’s alarm() handler will be called. If this handler throws an exception, the alarm will be automatically retried using exponential backoff until it succeeds — alarms have guaranteed at-least-once execution.
How are Alarms different from Workers Cron Triggers?
Alarms are more fine-grained than Cron Triggers. While a Workers service can have up to three Cron Triggers configured at once, it can have an unlimited amount of Durable Objects, each of which can have a single alarm active at a time.
Alarms are directly scheduled from and invoke a function within your Durable Object. Cron Triggers, on the other hand, are not programmatic — they execute based on their schedules, which have to be configured via the Cloudflare Dashboard or centralized configuration APIs.
How do I use Alarms?
First, you’ll need to add the durable_object_alarms compatibility flag to your wrangler.toml.
compatibility_flags = ["durable_object_alarms"]
Next, implement an alarm() handler in your Durable Object that will be called when the alarm executes. From anywhere else in your Durable Object, call state.storage.setAlarm() and pass in a time for the alarm to run at. You can use state.storage.getAlarm() to retrieve the currently set alarm time.
In this example, we implemented an alarm handler that wakes the Durable Object up once every 10 seconds to batch requests to a single Durable Object, deferring processing until there is enough work in the queue for it to be worthwhile to process them.
export default {
  async fetch(request, env) {
    let id = env.BATCHER.idFromName("foo");
    return await env.BATCHER.get(id).fetch(request);
  },
};

const SECONDS = 1000;

export class Batcher {
  constructor(state, env) {
    this.state = state;
    this.storage = state.storage;
    this.state.blockConcurrencyWhile(async () => {
      let vals = await this.storage.list({ reverse: true, limit: 1 });
      this.count = vals.size == 0 ? 0 : parseInt(vals.keys().next().value);
    });
  }
  async fetch(request) {
    this.count++;

    // If there is no alarm currently set, set one for 10 seconds from now
    // Any further POSTs in the next 10 seconds will be part of this kh.
    let currentAlarm = await this.storage.getAlarm();
    if (currentAlarm == null) {
      this.storage.setAlarm(Date.now() + 10 * SECONDS);
    }

    // Add the request to the batch.
    await this.storage.put(this.count, await request.text());
    return new Response(JSON.stringify({ queued: this.count }), {
      headers: {
        "content-type": "application/json;charset=UTF-8",
      },
    });
  }
  async alarm() {
    let vals = await this.storage.list();
    await fetch("http://example.com/some-upstream-service", {
      method: "POST",
      body: Array.from(vals.values()),
    });
    await this.storage.deleteAll();
    this.count = 0;
  }
}
Once every 10 seconds, the alarm() handler will be called. In the event an unexpected error terminates the Durable Object, it will be re-instantiated on another machine, following a short delay, after which it can continue processing.
Under the hood, Alarms are implemented by making reads and writes to the storage layer. This means Alarm get and set operations follow the same rules as any other storage operation – writes are coalesced with other writes, and reads have a defined ordering. See our blog post on the caching layer we implemented for Durable Objects for more information.
Durable Objects Alarms guarantee fault-tolerance
Alarms are designed to have no single point of failure and to run entirely on our edge – every Cloudflare data center running Durable Objects is capable of running alarms, including migrating Durable Objects from unhealthy data centers to healthy ones as necessary to ensure that their Alarm executes. Single failures should resolve in under 30 seconds, while multiple failures may take slightly longer.
We achieve this by storing alarms in the same distributed datastore that backs the Durable Object storage API. This allows alarm reads and writes to behave identically to storage reads and writes and to be performed atomically with them, and ensures that alarms are replicated across multiple datacenters.
Within each data center capable of running Durable Objects, there are multiple processes responsible for tracking upcoming alarms and triggering them, providing fault tolerance and scalability within the data center. A single elected leader in each data center is responsible for detecting failure of other data centers and assigning responsibility of those alarms to healthy local processes in its own data center. In the event of leader failure, another leader will be elected and become responsible for executing Alarms in the data center. This allows us to guarantee at-least-once execution for all Alarms.
How do I get started?
Alarms are a great way to build new distributed primitives, like queues, atop Durable Objects. They also provide a method for guaranteeing work within a Durable Object will complete, without relying on a client request to “kick” the Object.
You can get started with Alarms now by enabling Durable Objects in the Cloudflare dashboard. For more info, check the developer docs or jump in our Discord.
In September, we announced that we were building our own object storage solution: Cloudflare R2. R2 is our answer to egregious egress charges from incumbent cloud providers, letting developers store as much data as they want without worrying about the cost of accessing that data.
The response has been overwhelming.
Independent developers had bills too small for cloud providers to negotiate fair egress rates with them. Egress charges were the largest line-item on their cloud bills, strangling side projects and the new businesses they were building.
Large corporations had written off multi-cloud storage – and thus multi-cloud itself – as a pipe dream. They came to us with excitement, pitching new products that integrated data with partner companies.
Non-profit research organizations were paying massive egress fees just to share experiment data with one another. Egress fees were having a real impact on their ability to collaborate, driving silos between organizations and restricting the experiments and analyses they could run.
Cloudflare exists to help build a better Internet. Today, the Internet gets what it deserves: R2 is now in open beta.
Self-serve customers can enable R2 in the Cloudflare dashboard. Enterprise accounts can reach out to their CSM for onboarding.
Internal and external APIs
R2 has two APIs: an API accessible only from within Workers, which we call the In-Worker API, and an S3-compatible API, which exposes your bucket on a URL of the form bucket.account.r2storage.com. Before you can make requests to R2, you’ll need to be authenticated — R2 buckets are private by default.
In-Worker API
With the in-Worker API, a bucket is “bound” to a specific Worker, which can then perform PUT, GET, DELETE and LIST operations against the bucket.
S3-compatible API
For the S3-compatible API, authentication is done the same way as on S3: SigV4 against an R2 URL. SigV4 signs requests using a secret key to authenticate them to R2. This means public access to R2 over the Internet is only possible today by hosting a Worker, connecting it to R2, and routing requests through it.
The easiest way to test the S3-compatible API is to use an S3 client. One of the most popular S3 clients is the boto3 SDK.
In Python, copy the following script and fill in the account_id, access_key, and secret_access_key fields with your R2 account credentials.
R2 comes with support for all basic create/read/update/delete S3 features through both of its APIs.
During the open beta period, we’re targeting R2 to sustain 1,000 GET operations per second and 100 PUT operations per second, per bucket. R2 supports objects up to approximately 5 TB in size, with individual parts limited to 5 GB of data.
R2 provides strongly consistent access to data. Once a PUT is confirmed by R2, future GET operations will always reflect the new key/value pair. The only exception to this is when deleting a bucket. For a short period of time following deletion, the bucket may still exist and continue to allow reads/writes.
Pricing
When we initially announced R2, we included preliminary pricing numbers. One of our main goals with R2 has been to serve the developers who can’t negotiate large discounts with cloud vendors. To that end, we’re also announcing a forever-free tier that lets developers start building on R2 with no charges at all.
R2 charges depend on the total volume of data stored and the type of operation performed on the data:
Storage is priced at \$0.015 / GB, per month.
Class A operations (including writes and lists) cost \$4.50 / million.
Class B operations cost \$0.36 / million.
Class A operations tend to mutate state, such as creating a bucket, listing objects in a bucket, or writing an object. Class B operations tend to read existing state, for example reading an object from a bucket. You can find more information on pricing and a full list of operation types in the docs.
Of course, there is no charge for egress bandwidth from R2. You can access your bucket to your heart’s content.
R2’s forever-free tier includes:
10 GB-months of stored data
1,000,000 Class A operations, per month
10,000,000 Class B operations, per month
Free usage resets each month. While in the open beta phase, R2 usage over the free tier will be billed.
Future plans
We’ve spent the past six months in closed beta with a number of design partners, building out our storage solution. Backed by Durable Objects, R2’s novel architecture delivers both high availability and consistent performance.
While we’ve made great progress on R2, we still have plenty left to build in the coming months.
Improving performance
Our first priority is to improve performance and reliability. While we’ve thrown internal usage and our design partner’s demands at R2, there’s no substitute for live production traffic.
During the open beta period, R2 can sustain a maximum of 1,000 GET operations per second and 100 PUT operations per second, per bucket. We’ll look to raise these limits as we get comfortable operating the system. If you have higher needs, reach out to us!
When you create a bucket, you won’t see a region selector. Our vision for R2 includes automatically globally distributed storage, where R2 seamlessly places each object into the storage region closest to where the request comes from. Today, R2 primarily stores data in North America, which can lead to higher latencies when accessing content from other regions. We’ll first look to address this by adding additional regions where objects can be created, before adding automatic migration of existing objects across regions. Similar to what we’ve built with jurisdictional restrictions for Durable Objects, we’ll also enable restricting where an R2 bucket places data to comply with privacy regulations.
Expanding R2’s feature set
We’ll then focus on expanding R2 capabilities beyond the basic S3 API. In the near term, we’re focused on delivering:
Support for TTLs, so data can automatically be deleted from buckets over time.
Public buckets, so a bucket can be exposed to the internet without writing a Worker
Pre-signed URL support, which delegates read and write access for a specific key to a token.
Integration with Cloudflare’s cache, to scale read requests and provide global distribution of data.
If you have additional feature requests that aren’t listed above, we want to hear from you! Reach out and let us know what you need to make R2 your new, zero-cost egress object store.
Our Notification Center offers first class support for a variety of popular services (a list of which are available here). However, even with such extensive support, you may use a tool that isn’t on that list. In that case, it is possible to leverage Cloudflare Workers in combination with a generic webhook to deliver notifications to any service that accepts webhooks.
Today, we are excited to announce that we are open sourcing a Cloudflare Worker that will make it as easy as possible for you to transform our generic webhook response into any format you require. Here’s how to do it.
For this example, we are going to write a Cloudflare Worker that takes a generic webhook response, transforms it into the correct format and delivers it to Rocket Chat, a popular customer service messaging platform. When Cloudflare sends you a generic webhook, it will have the following schema, where “text” and “data” will vary depending on the alert that has fired:
{
   "text": "Example message",
   "attachments": [
       {
           "title": "Rocket Chat",
           "title_link": "https://rocket.chat",
           "text": "Rocket.Chat, the best open source chat",
           "image_url": "/images/integration-attachment-example.png",
           "color": "#764FA5"
       }
   ]
}
Getting Started
Firstly, you’ll need to ensure you are ready to develop on the Cloudflare Workers platform. You can find more information on how to do that here. For the purpose of this example, we will assume you have a Cloudflare account and Wrangler, the Workers CLI, setup.
Next, let us see the steps to extend the notifications system in detail.
Step 2 Check the webhook payload format required by your communication tool. In this specific case, it would look like the Rocket Chat example payload shared above.
Step 3 Sign up for Rocket Chat and add a webhook integration to accept incoming webhook notifications.
Step 4 Configure an encrypted wrangler secret for request authentication and the Rocket Chat URL for sending requests in your Worker: Environment variables · Cloudflare Workers docs (for this example, the secret is not encrypted.)
Step 5 Modify your worker to accept POST webhook requests with the secret configured as a query param for authentication.
if (headers.get("cf-webhook-auth") !== WEBHOOK_SECRET) {
    return new Response(":(", {
        headers: {'content-type': 'text/plain'},
            status: 401
    })
}
Step 6 Convert the incoming request payload from the notification system (like in the example shared above) to the Rocket Chat format in the worker.
let incReq = await request.json()
let msg = incReq.text
let webhookName = incReq.name
let rocketBody = {
    "text": webhookName,
    "attachments": [
        {
            "title": "Cloudflare Webhook",
            "text": msg,
            "title_link": "https://cloudflare.com",
            "color": "#764FA5"
        }
    ]
}
Step 7 Configure the Worker to send POST requests to the Rocket Chat webhook with the converted payload.
Step 12 Tada! With your Cloudflare Worker running, you can now receive all notifications to Rocket Chat. We can configure in the same way for any communication tool.
We know that a notification system is essential to proactively monitor any issues that may arise within a project. We are excited with this announcement to make notifications available to any communication service without having to worry too much about the system’s compatibility to them. We have lots of updates planned, like adding more alertable events to choose from and extending our support to a wide range of webhook services to receive them.
If you’re interested in building scalable services and solving interesting technical problems, we are hiring engineers on our team in Austin & Lisbon.
The collective thoughts of the interwebz
Manage Consent
To provide the best experiences, we use technologies like cookies to store and/or access device information. Consenting to these technologies will allow us to process data such as browsing behavior or unique IDs on this site. Not consenting or withdrawing consent, may adversely affect certain features and functions.
Functional
Always active
The technical storage or access is strictly necessary for the legitimate purpose of enabling the use of a specific service explicitly requested by the subscriber or user, or for the sole purpose of carrying out the transmission of a communication over an electronic communications network.
Preferences
The technical storage or access is necessary for the legitimate purpose of storing preferences that are not requested by the subscriber or user.
Statistics
The technical storage or access that is used exclusively for statistical purposes.The technical storage or access that is used exclusively for anonymous statistical purposes. Without a subpoena, voluntary compliance on the part of your Internet Service Provider, or additional records from a third party, information stored or retrieved for this purpose alone cannot usually be used to identify you.
Marketing
The technical storage or access is required to create user profiles to send advertising, or to track the user on a website or across several websites for similar marketing purposes.


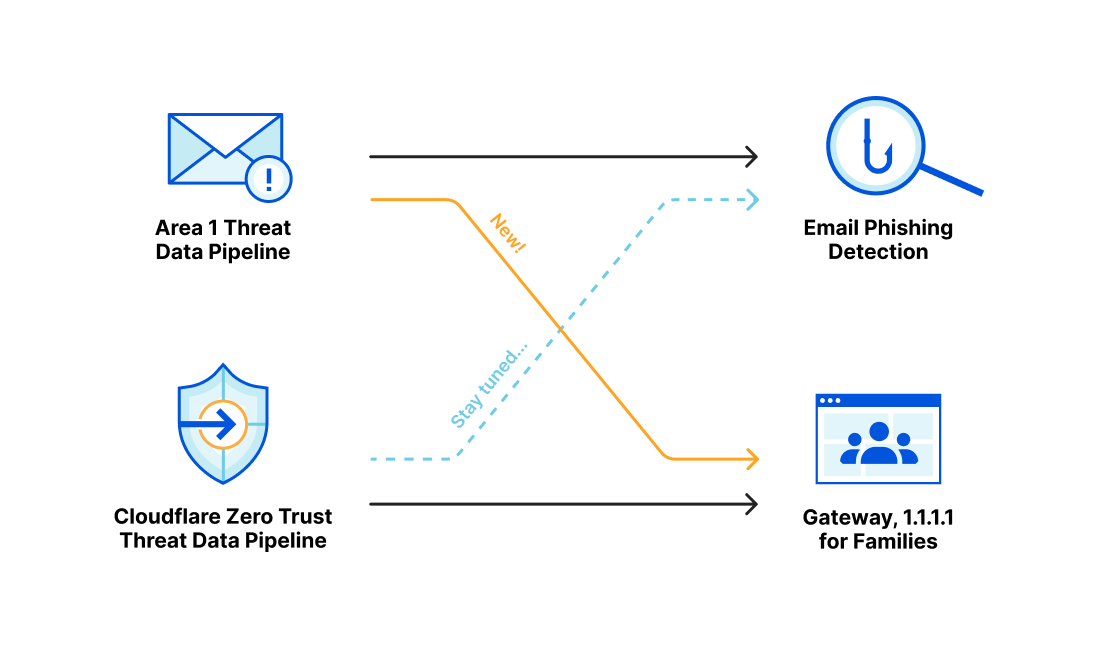


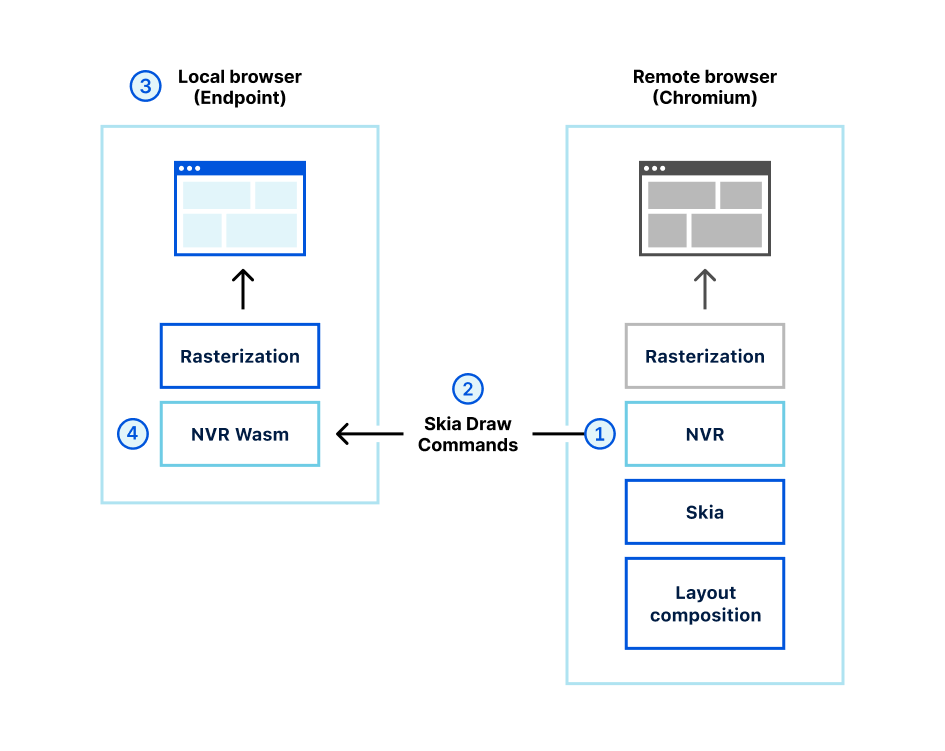
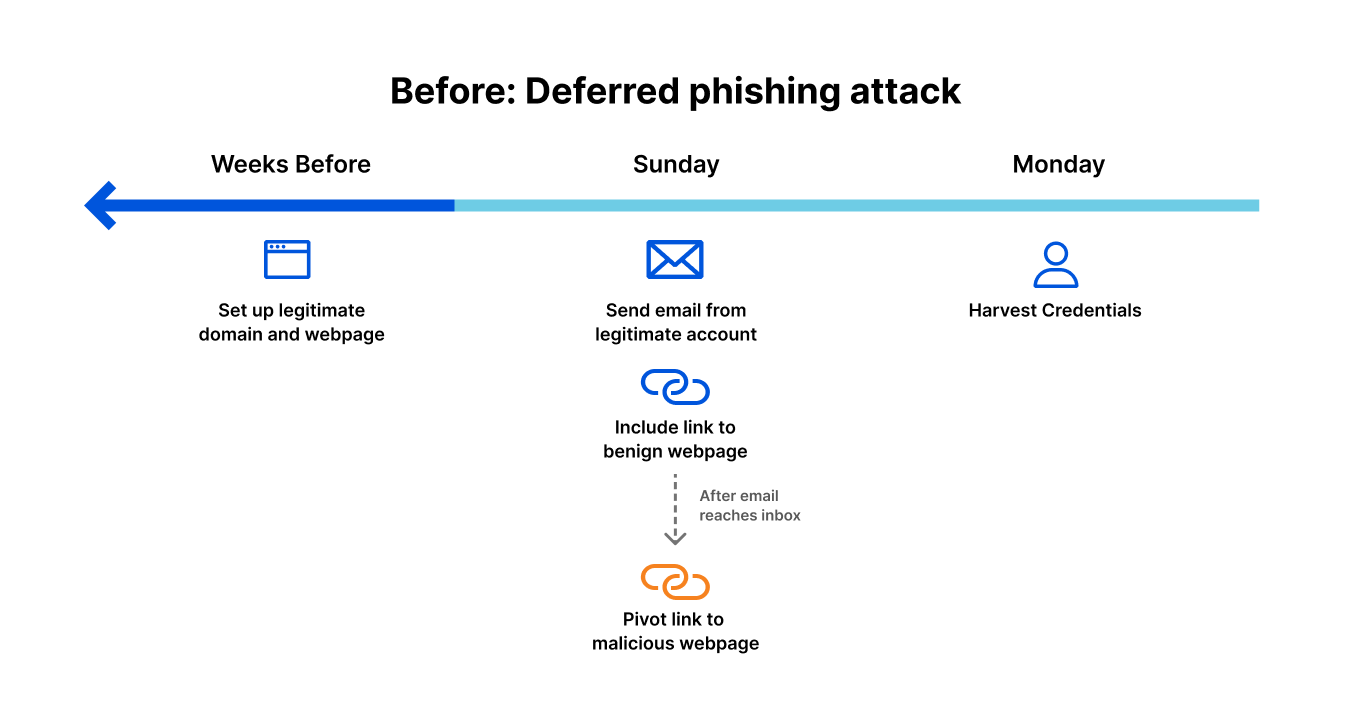
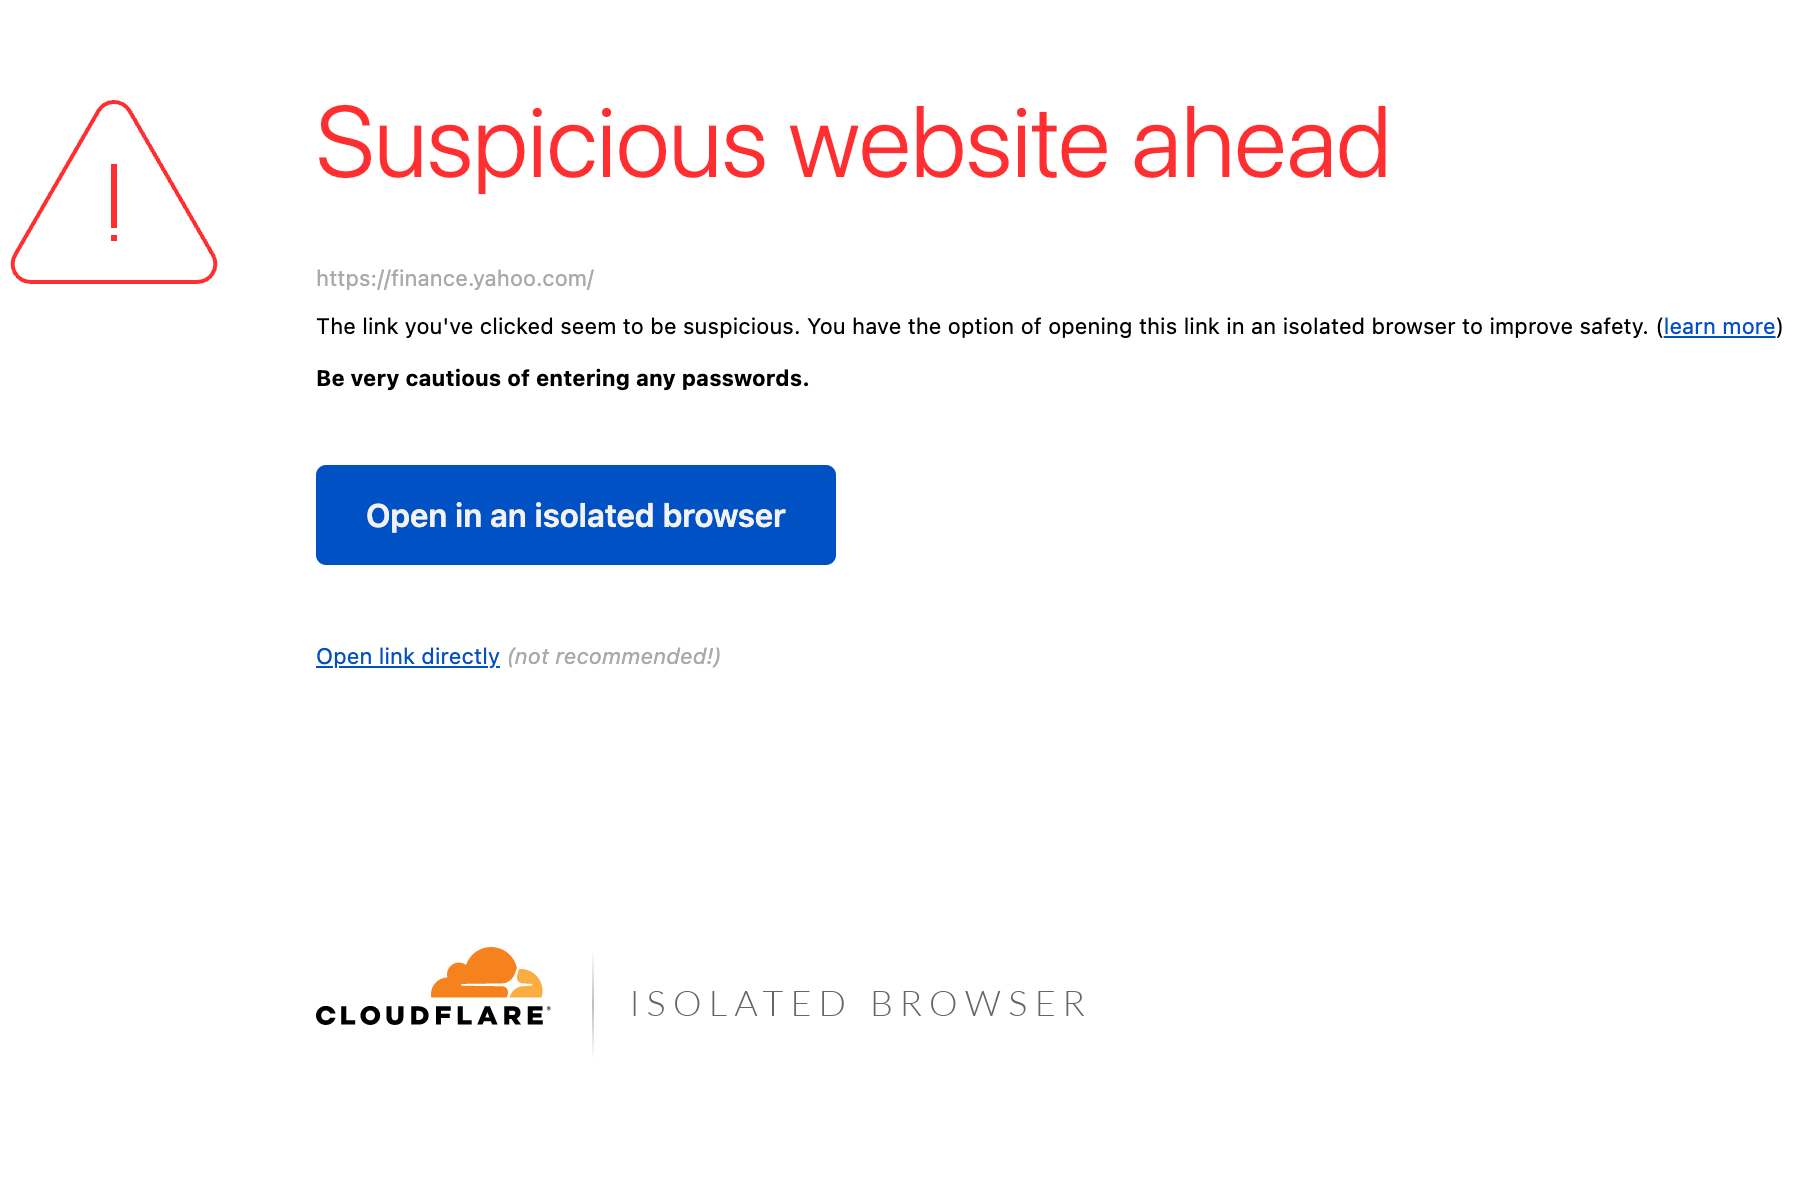


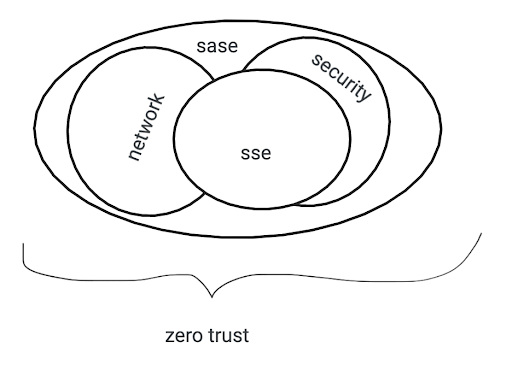

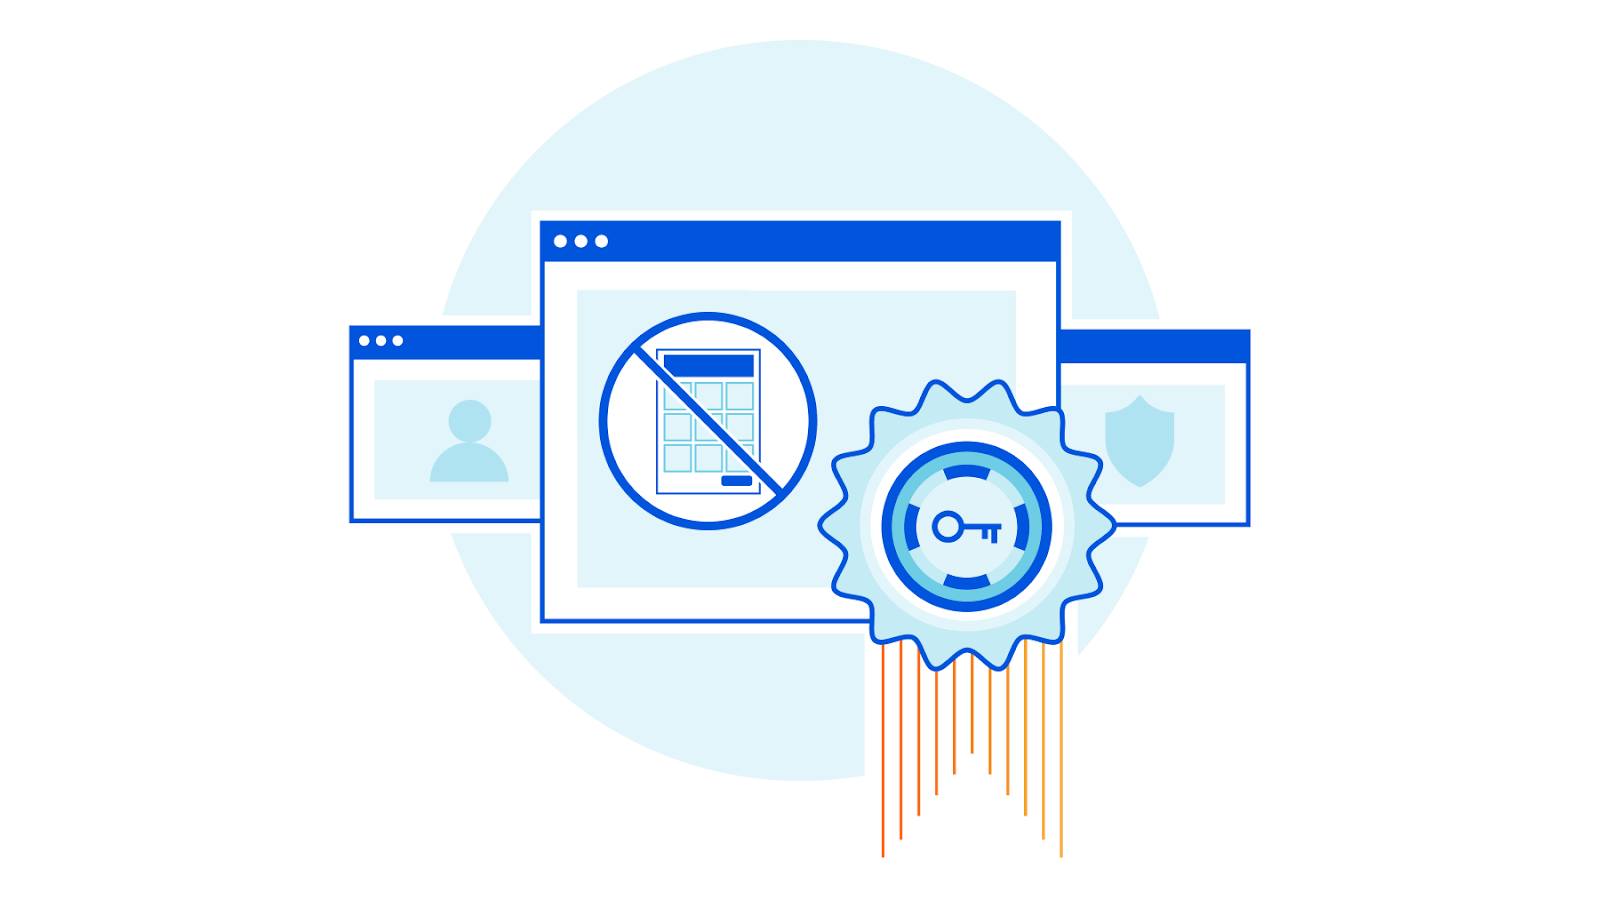
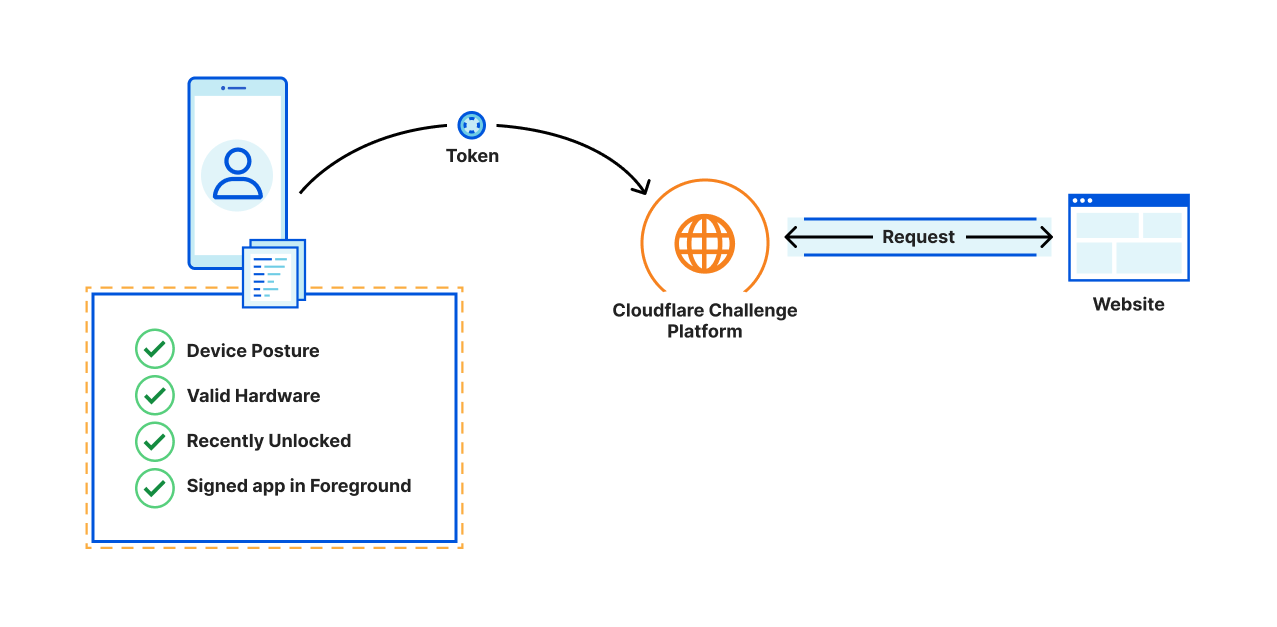
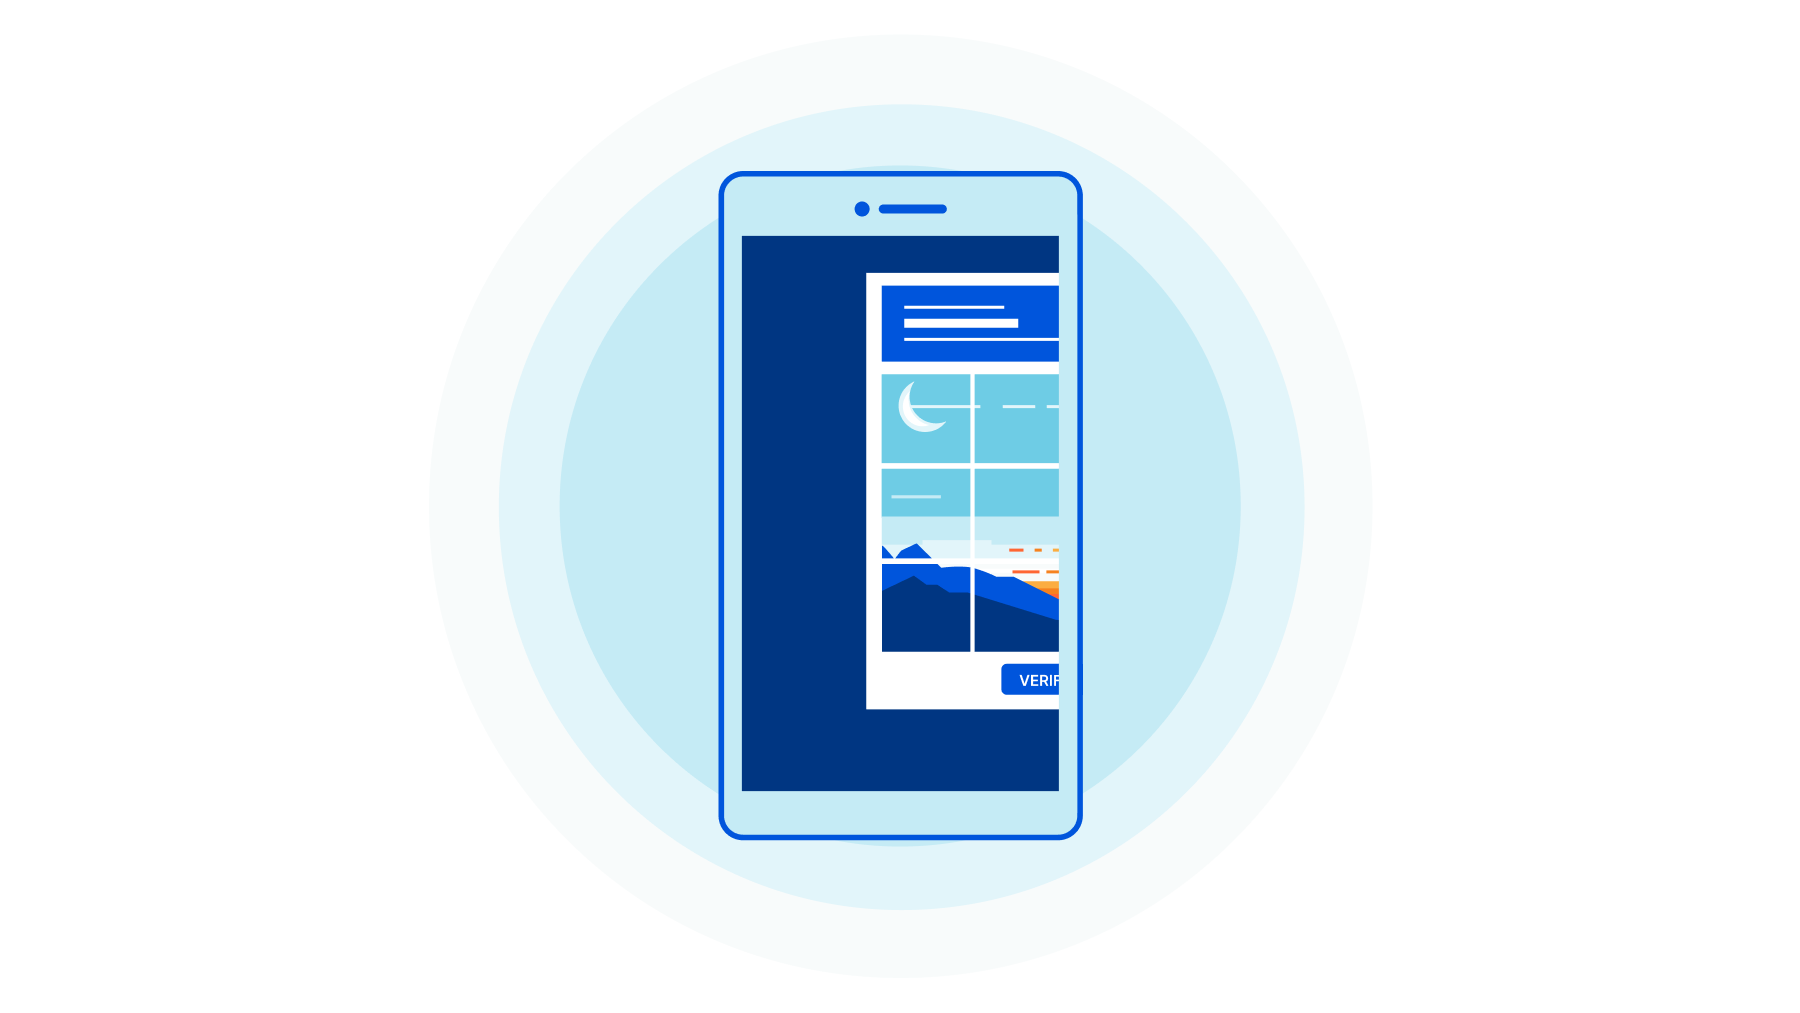
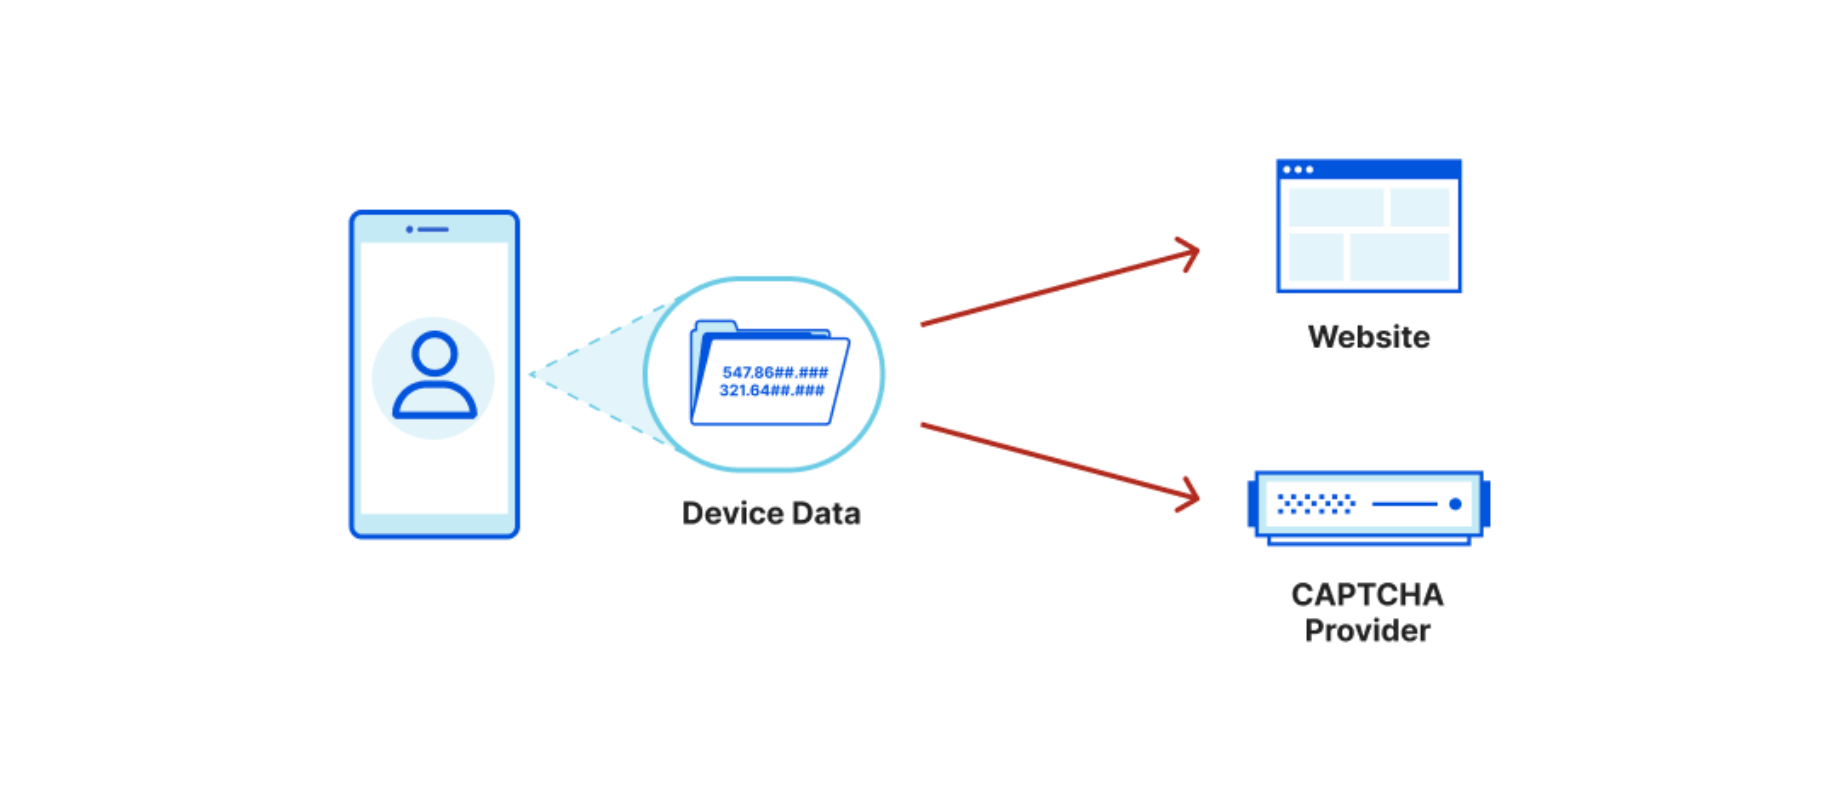
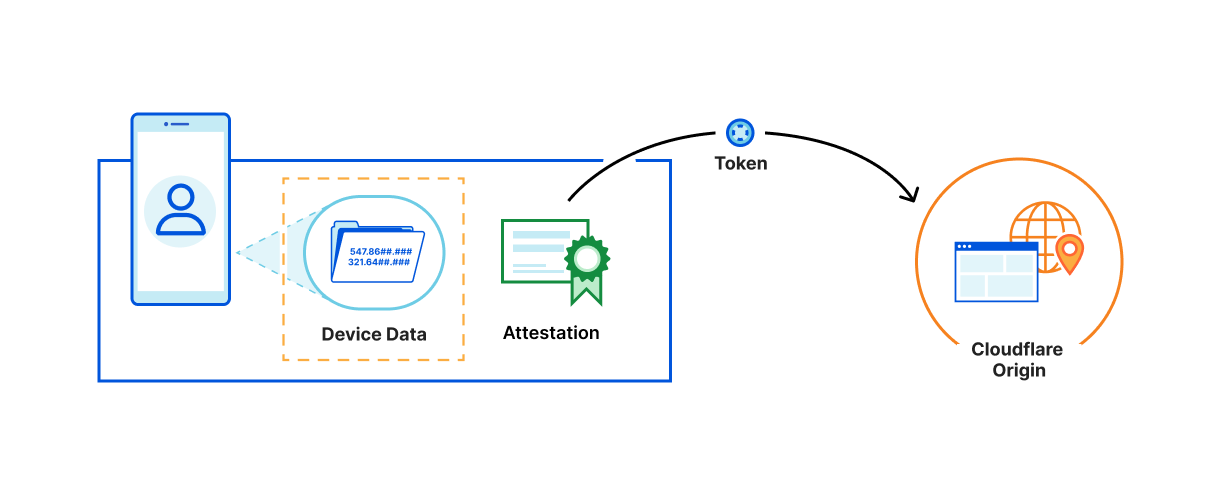
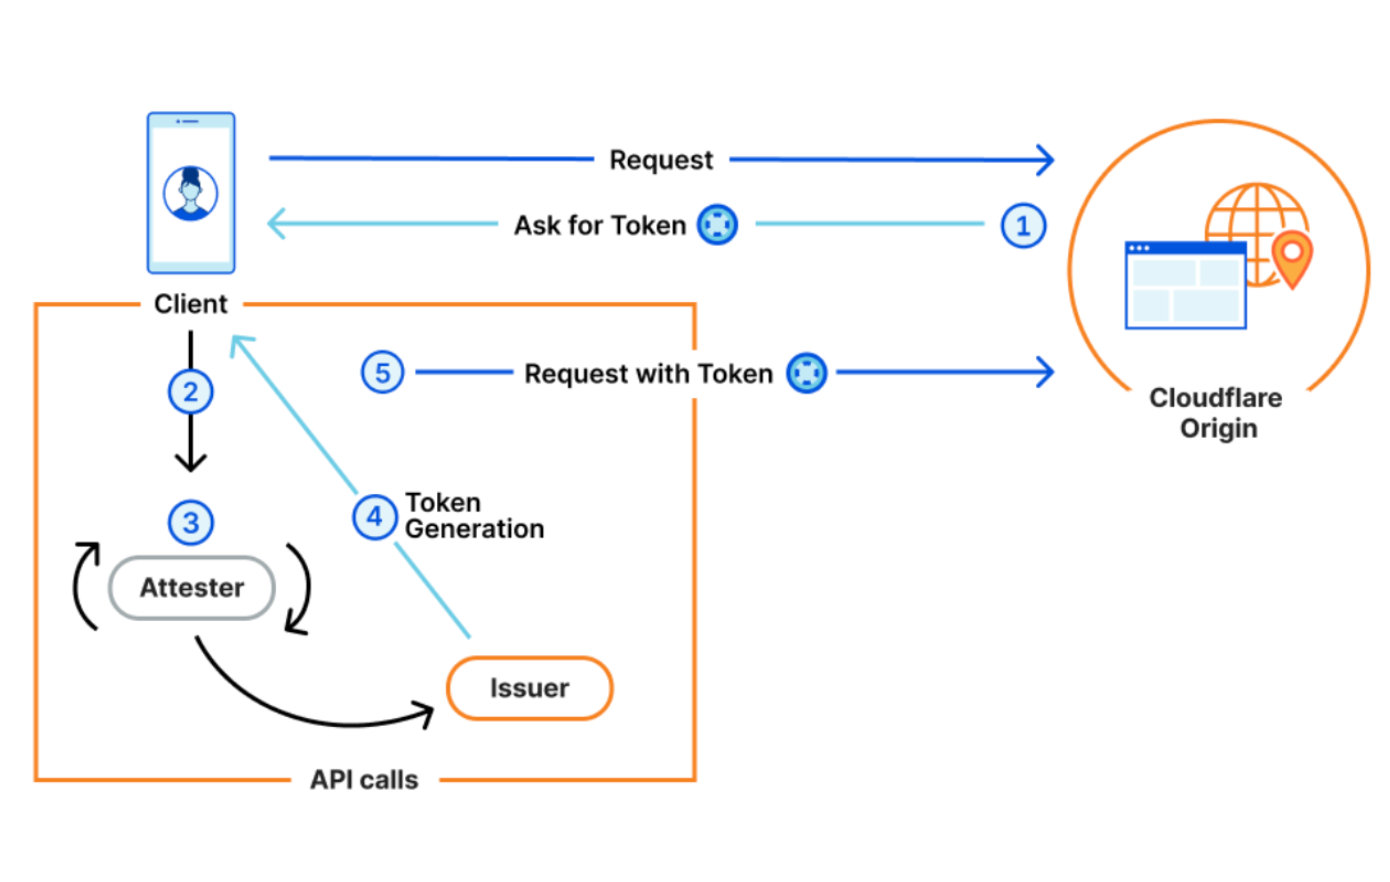

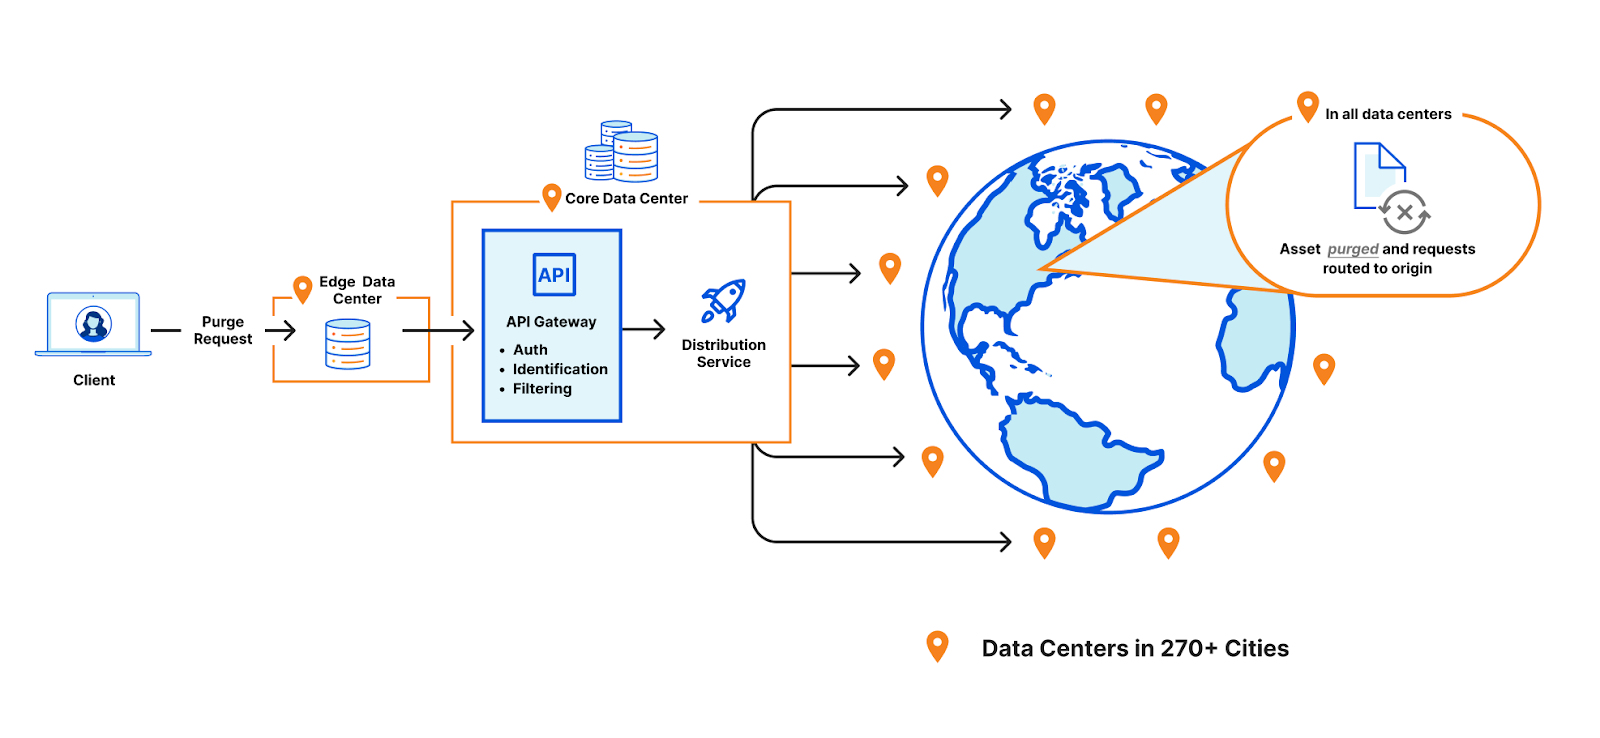
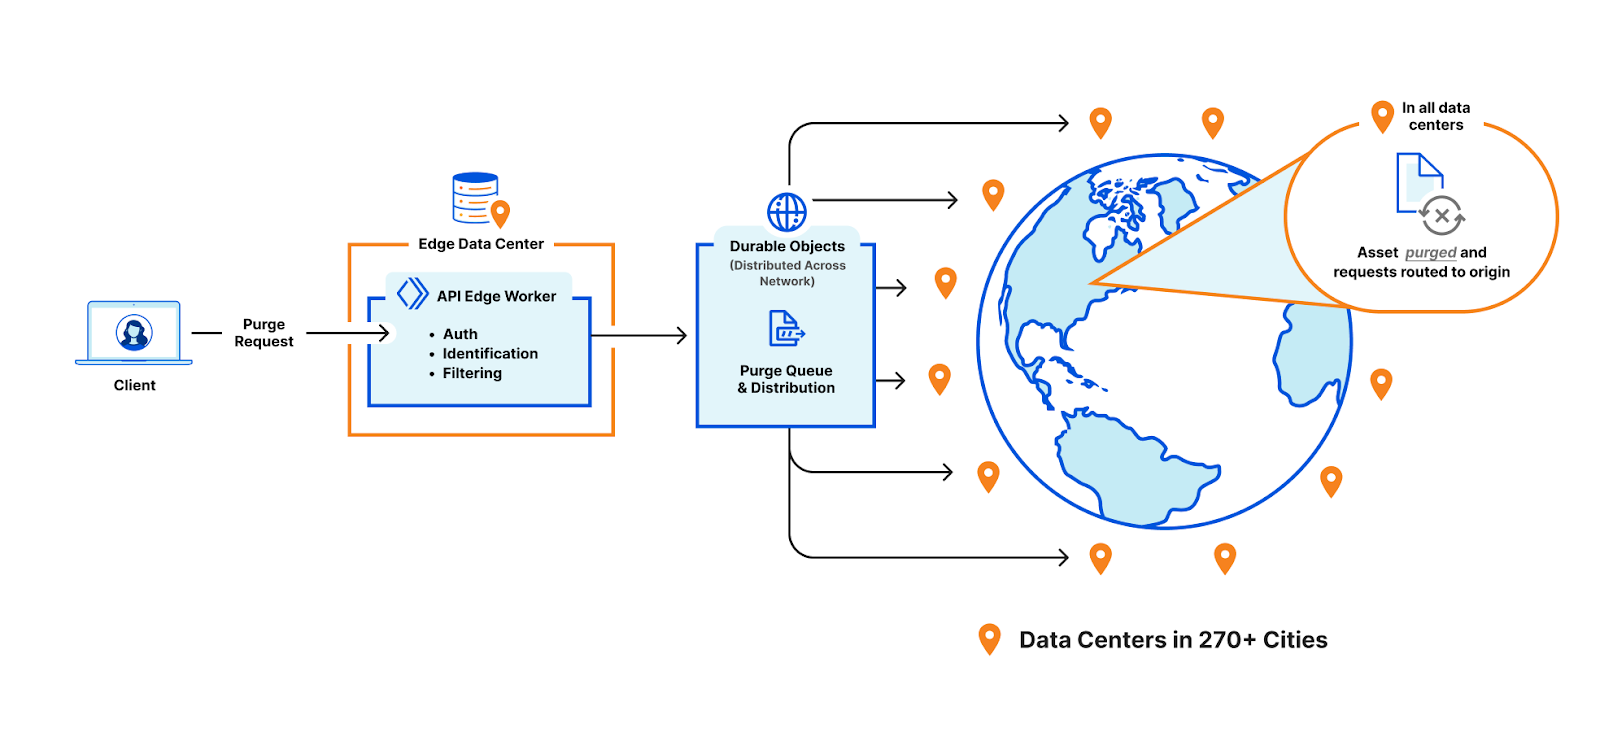

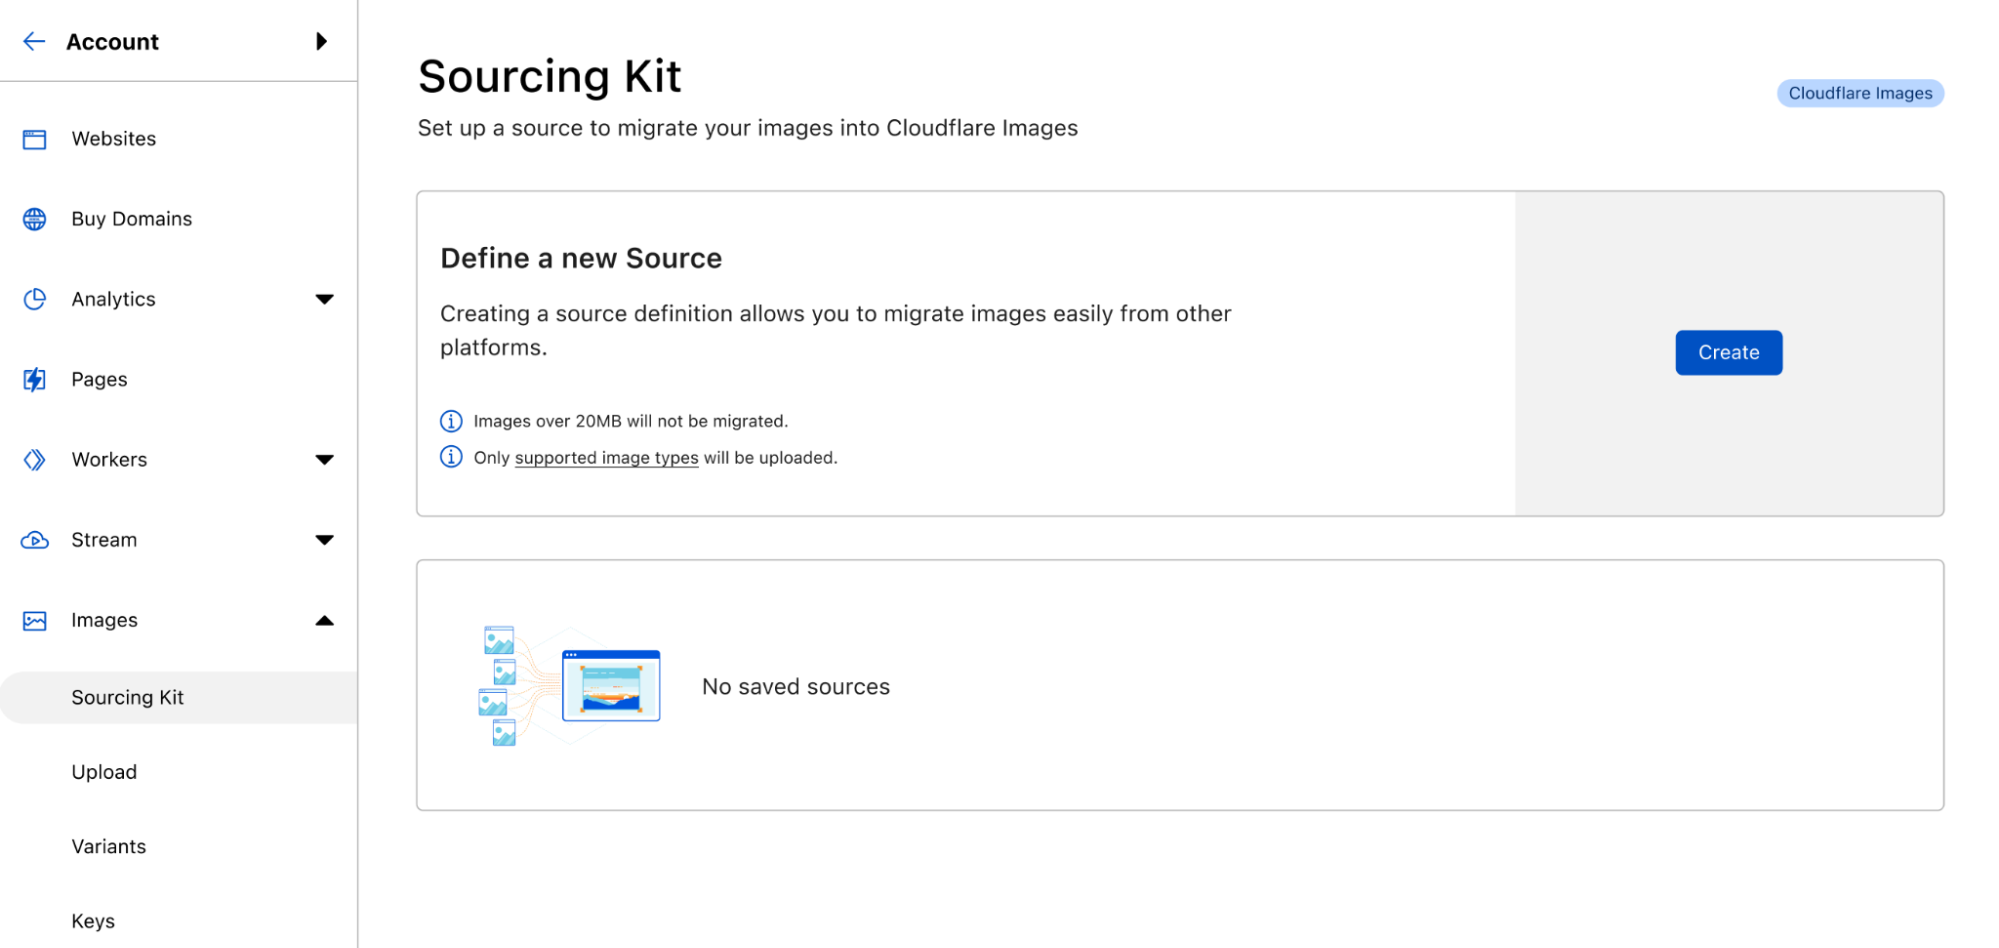
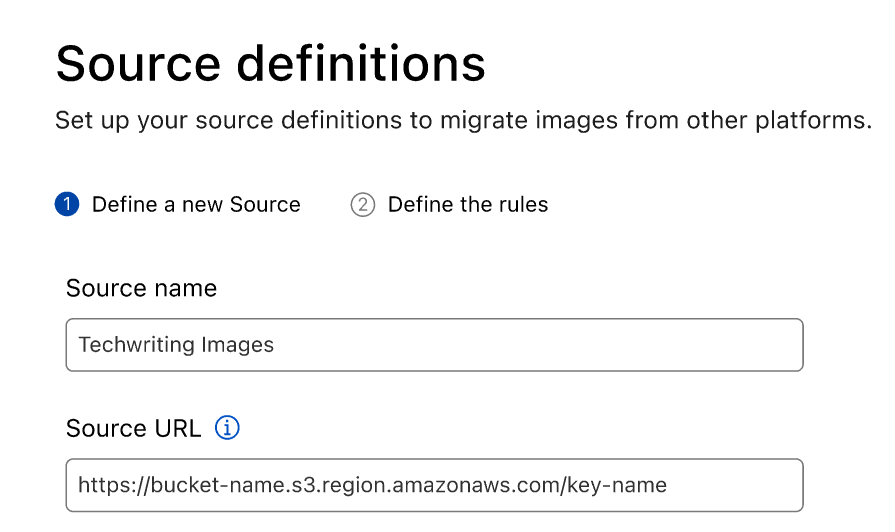


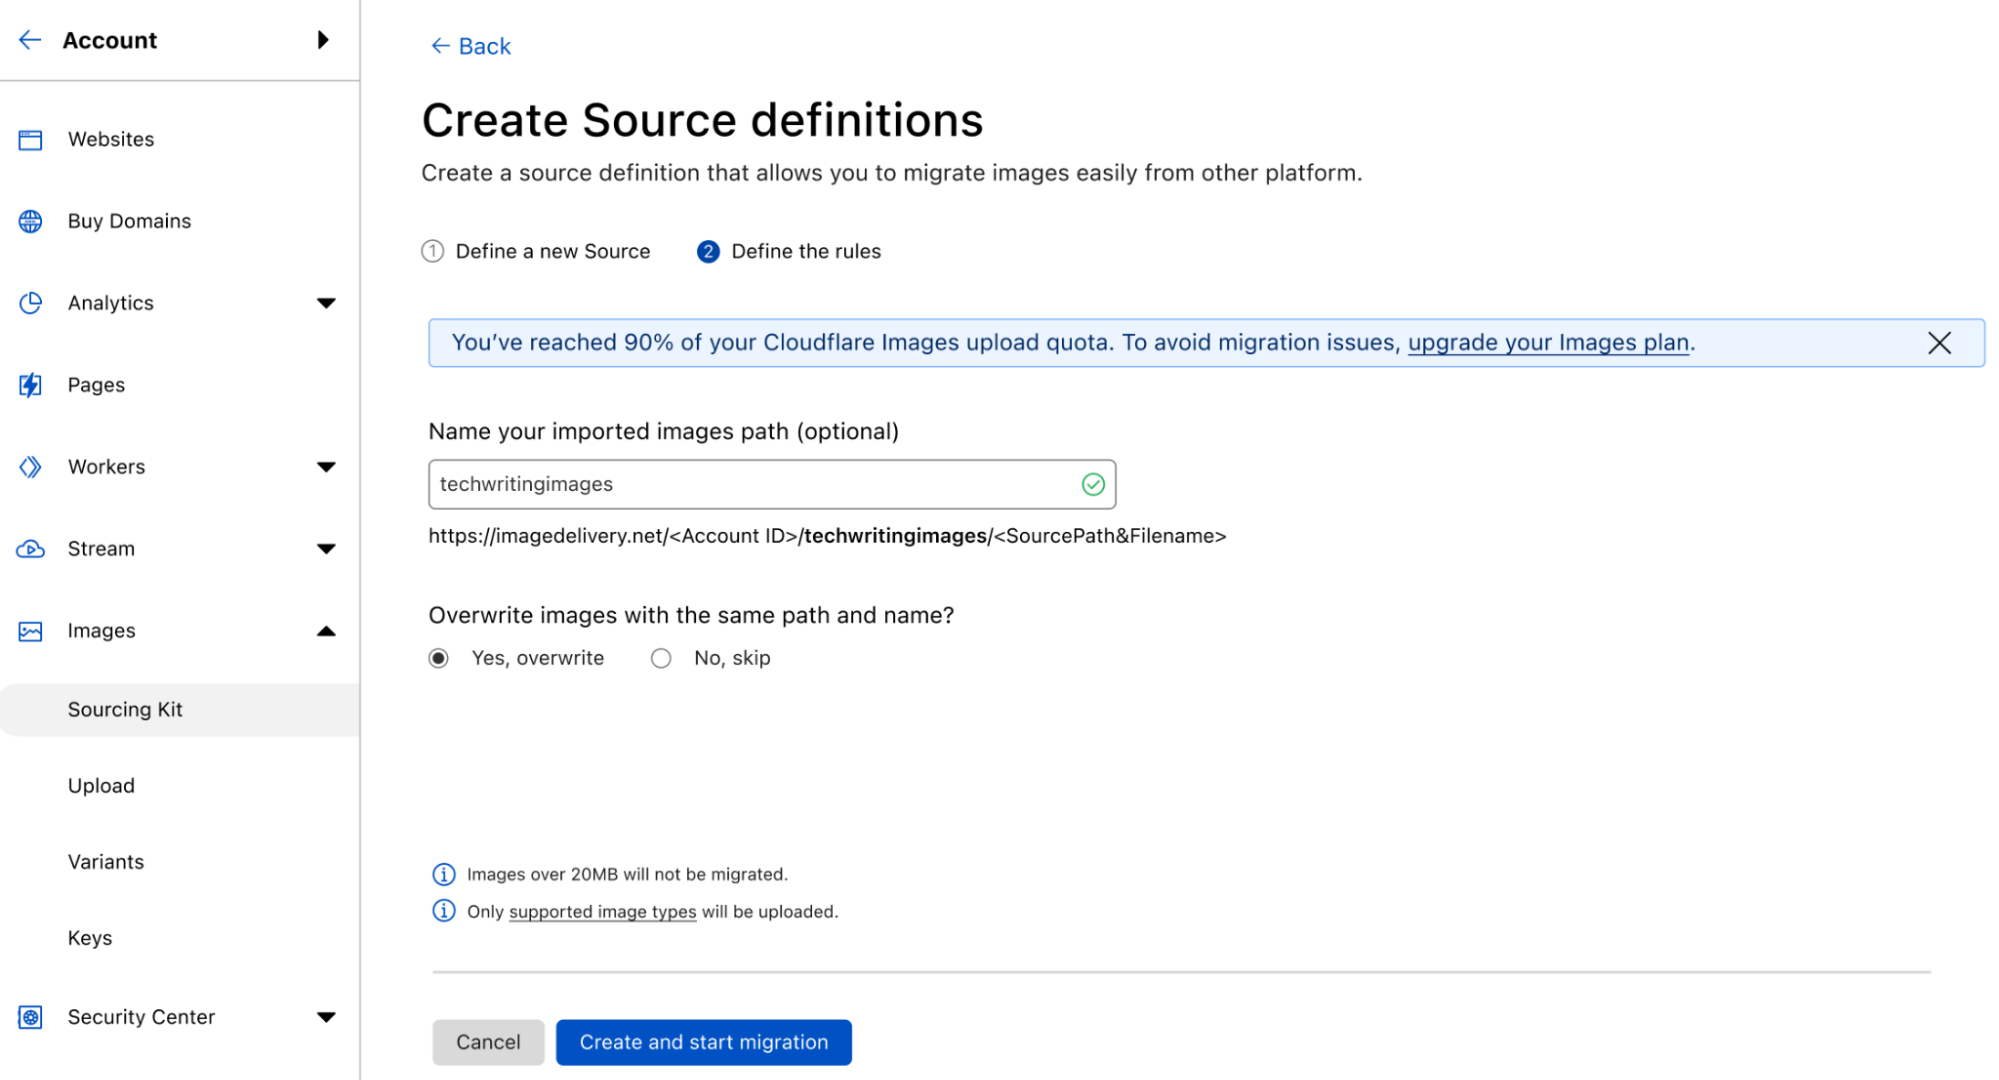
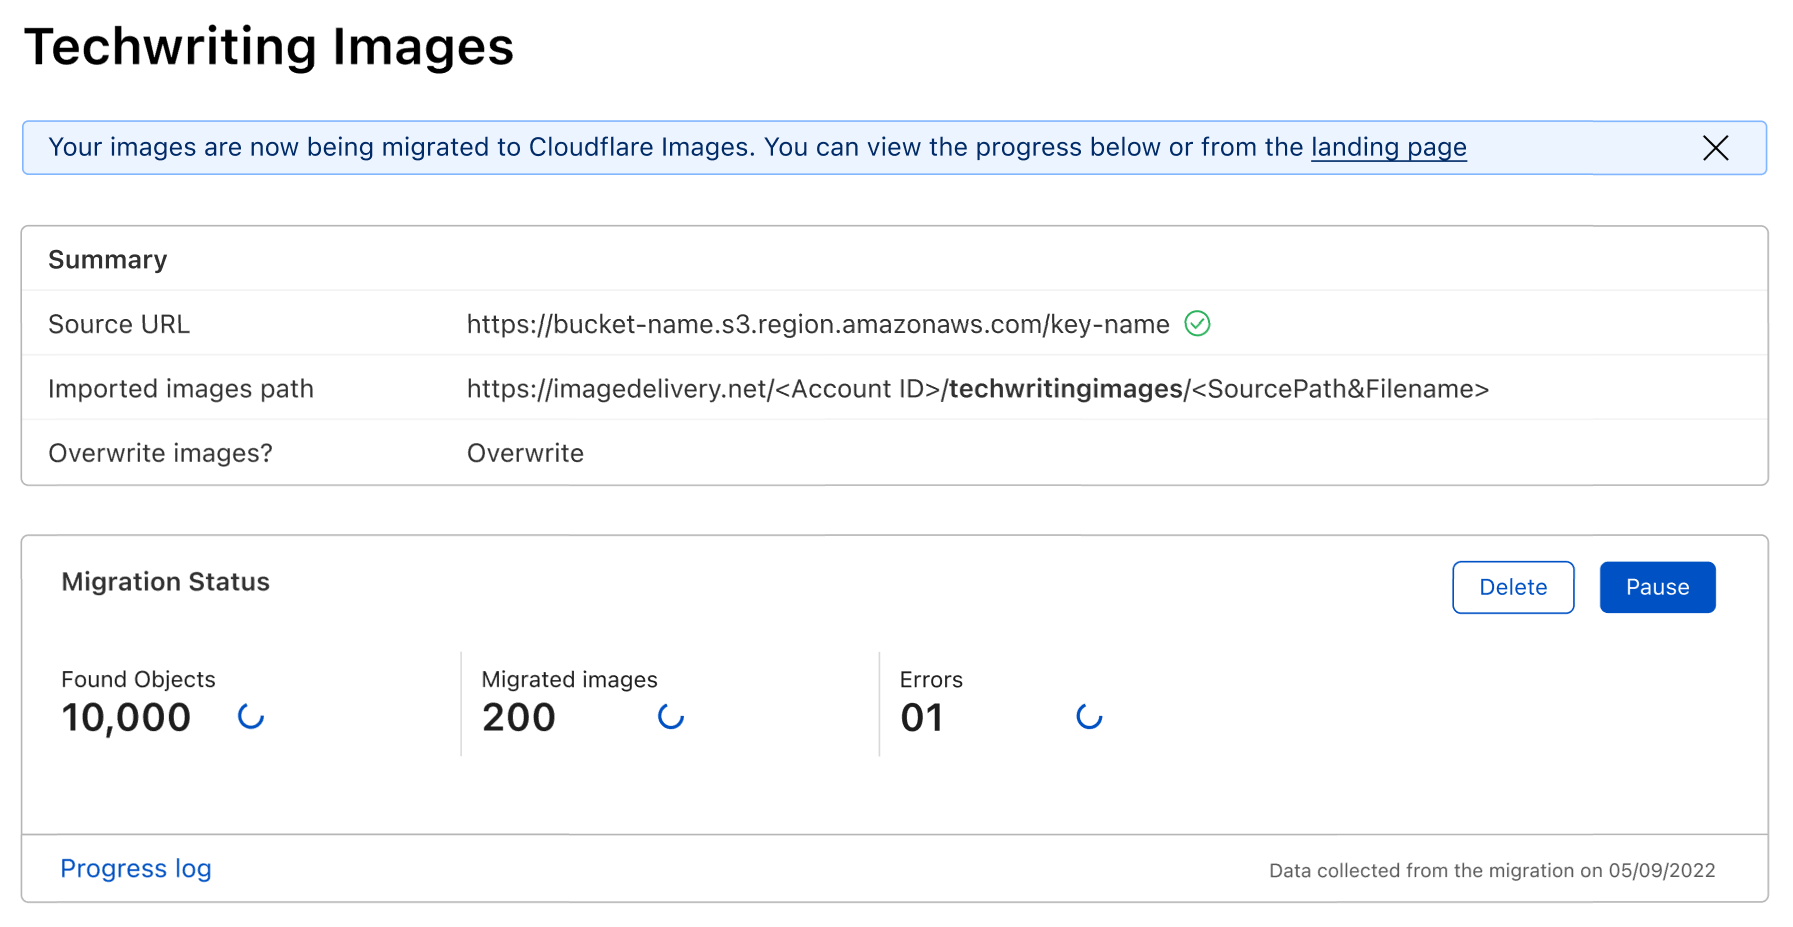
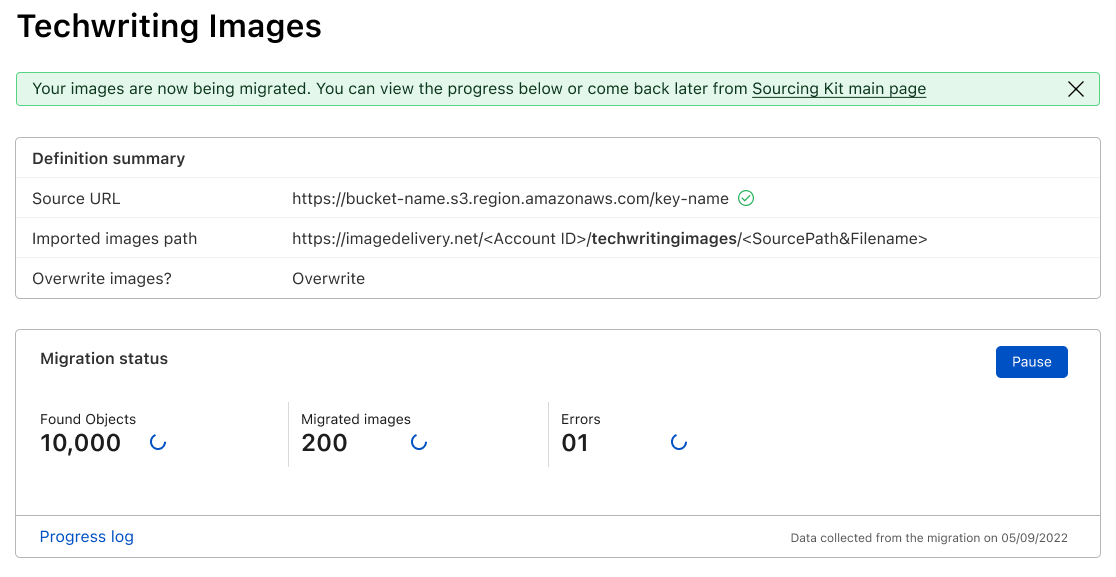
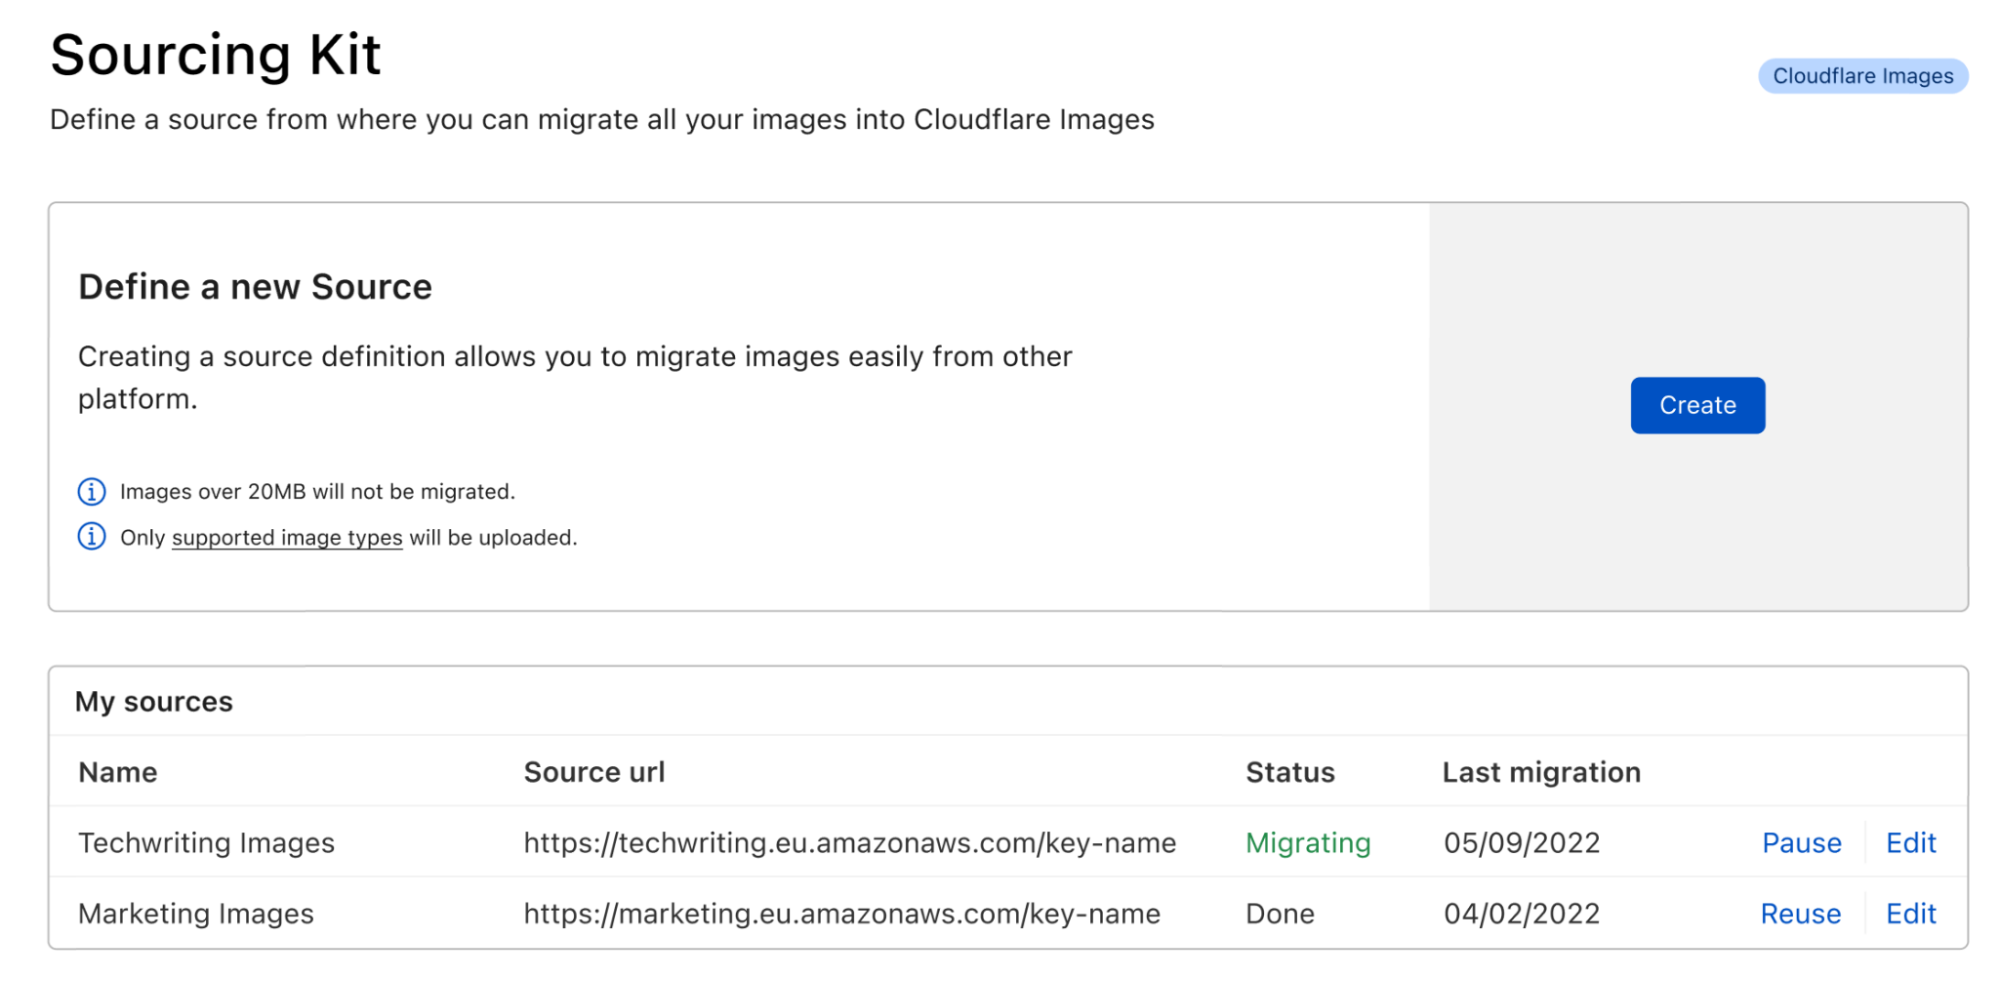
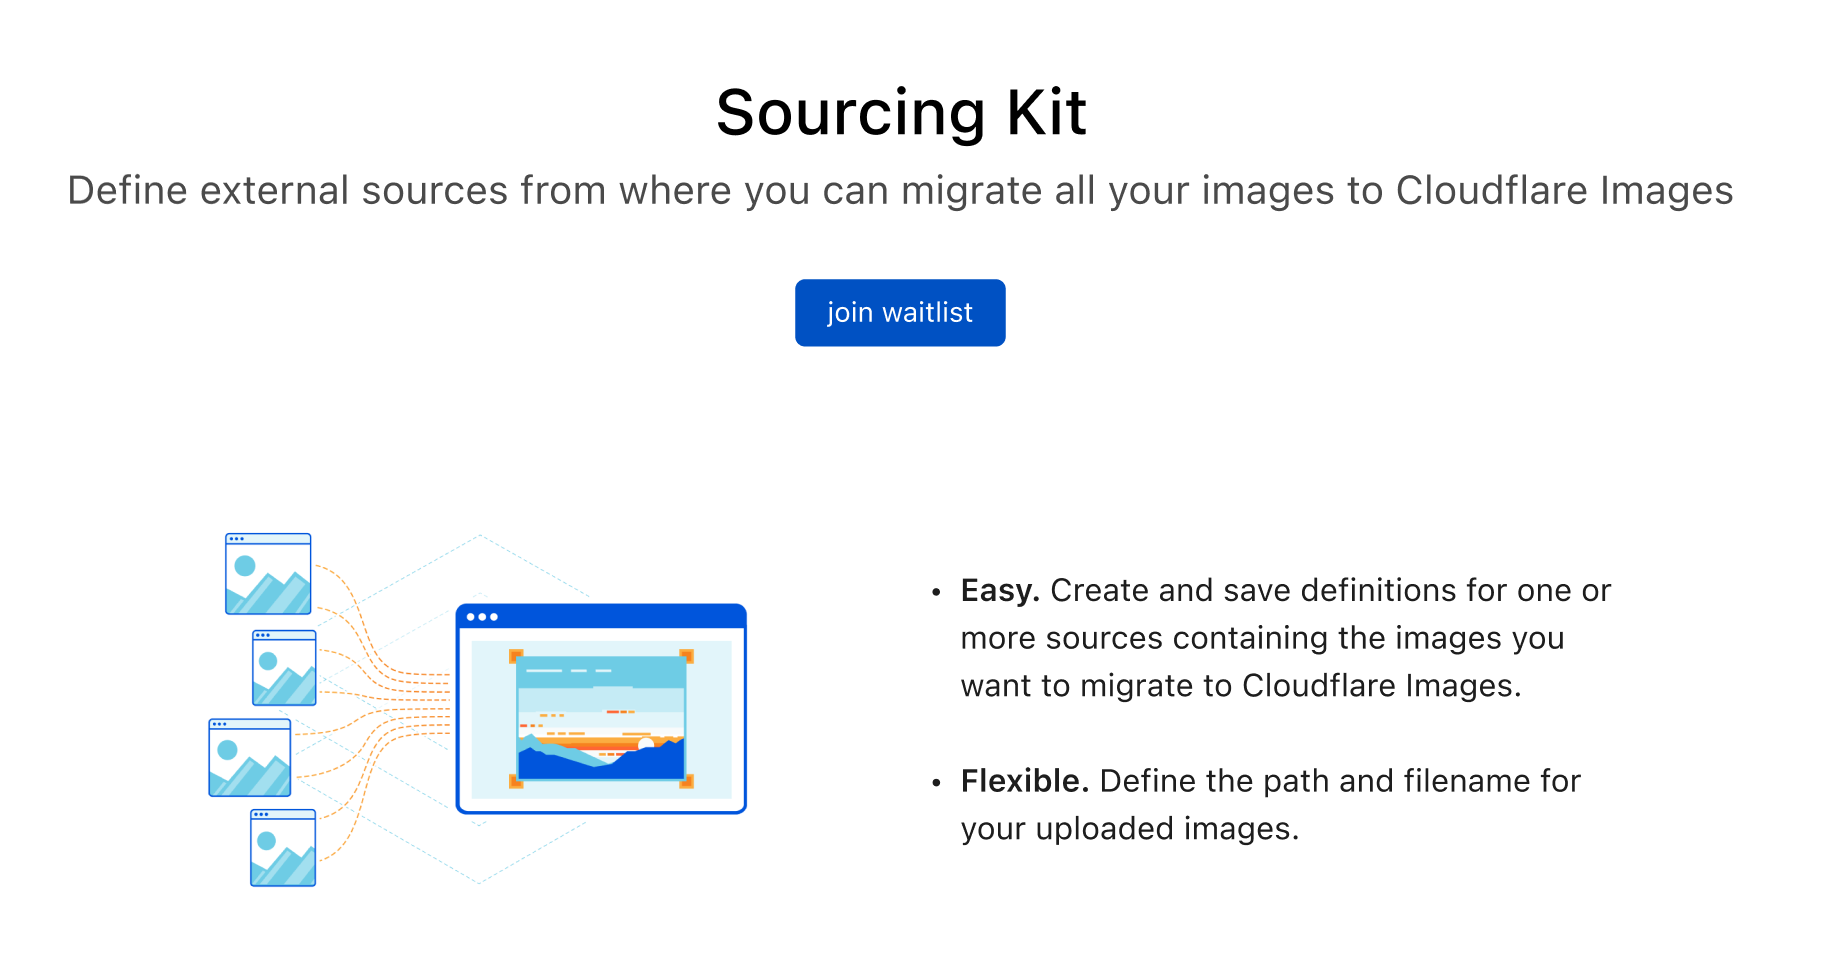


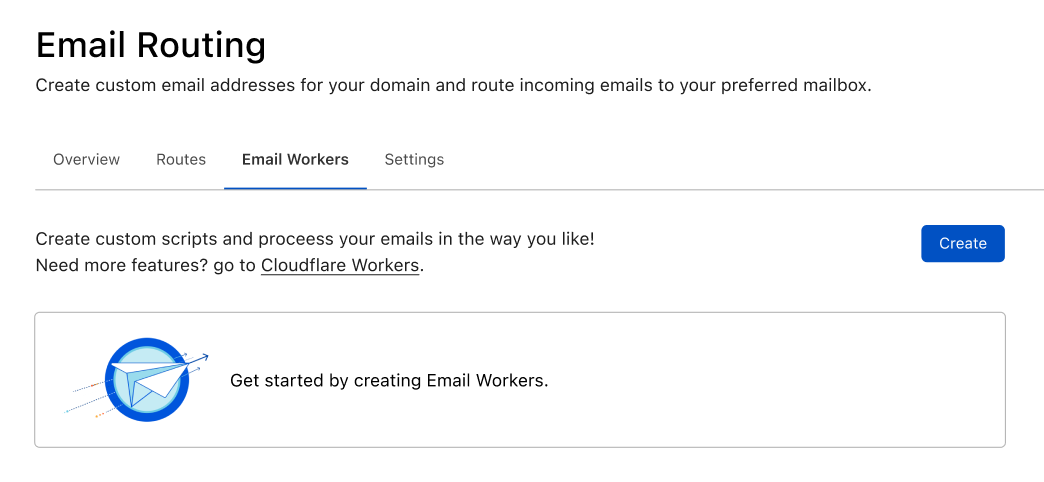
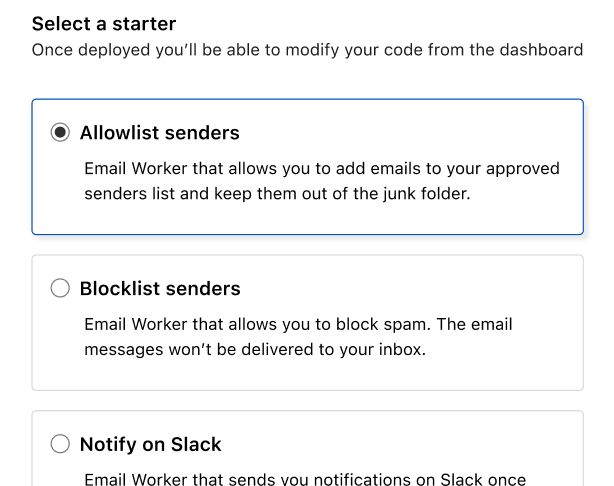
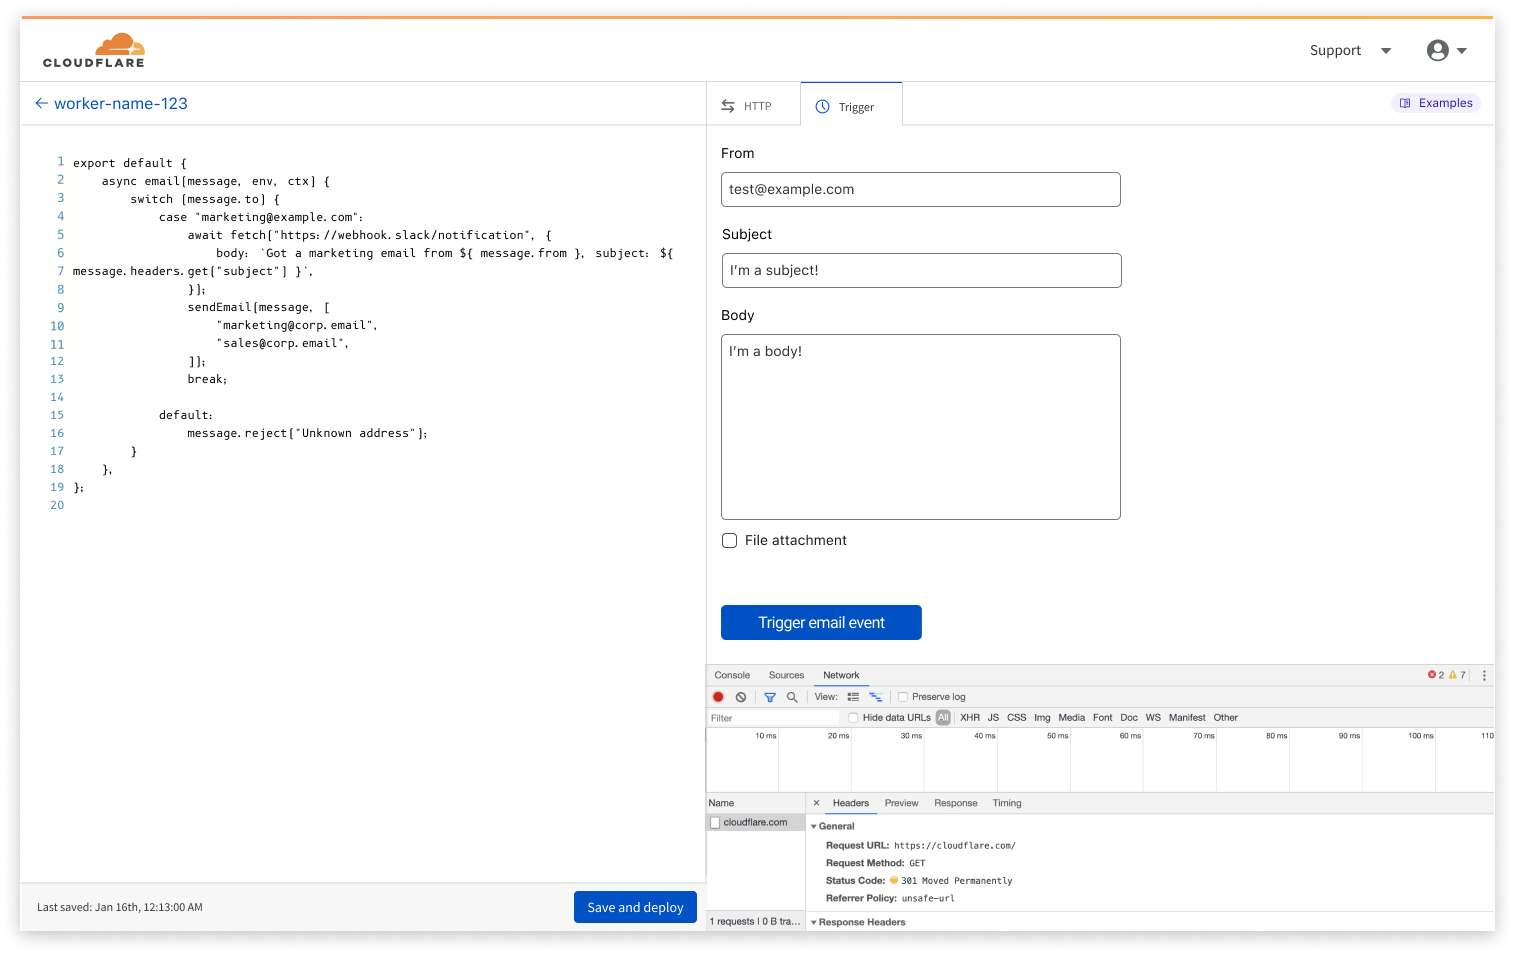
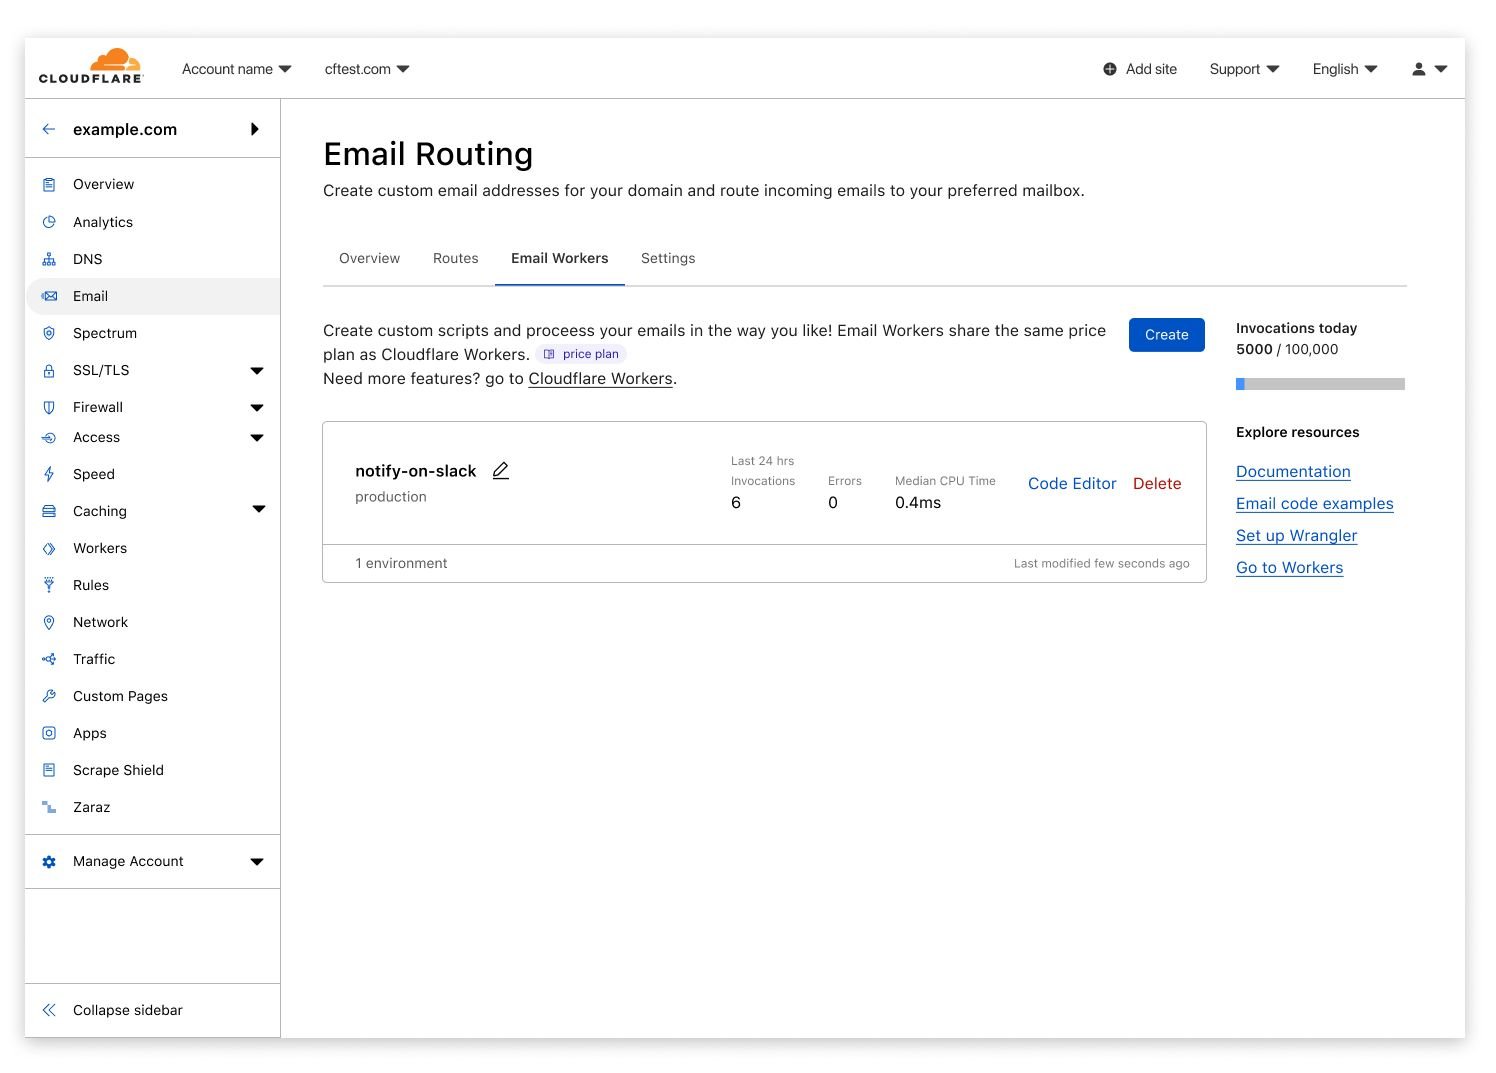
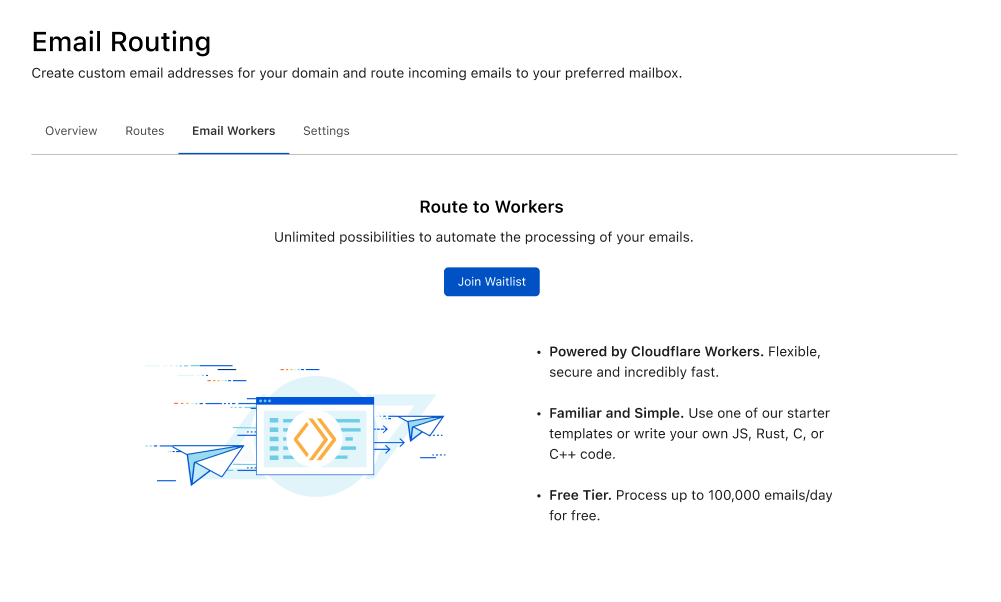

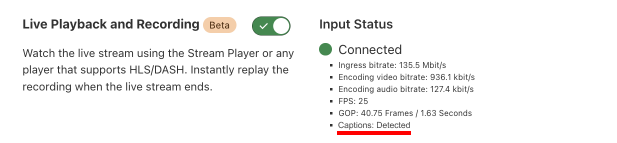


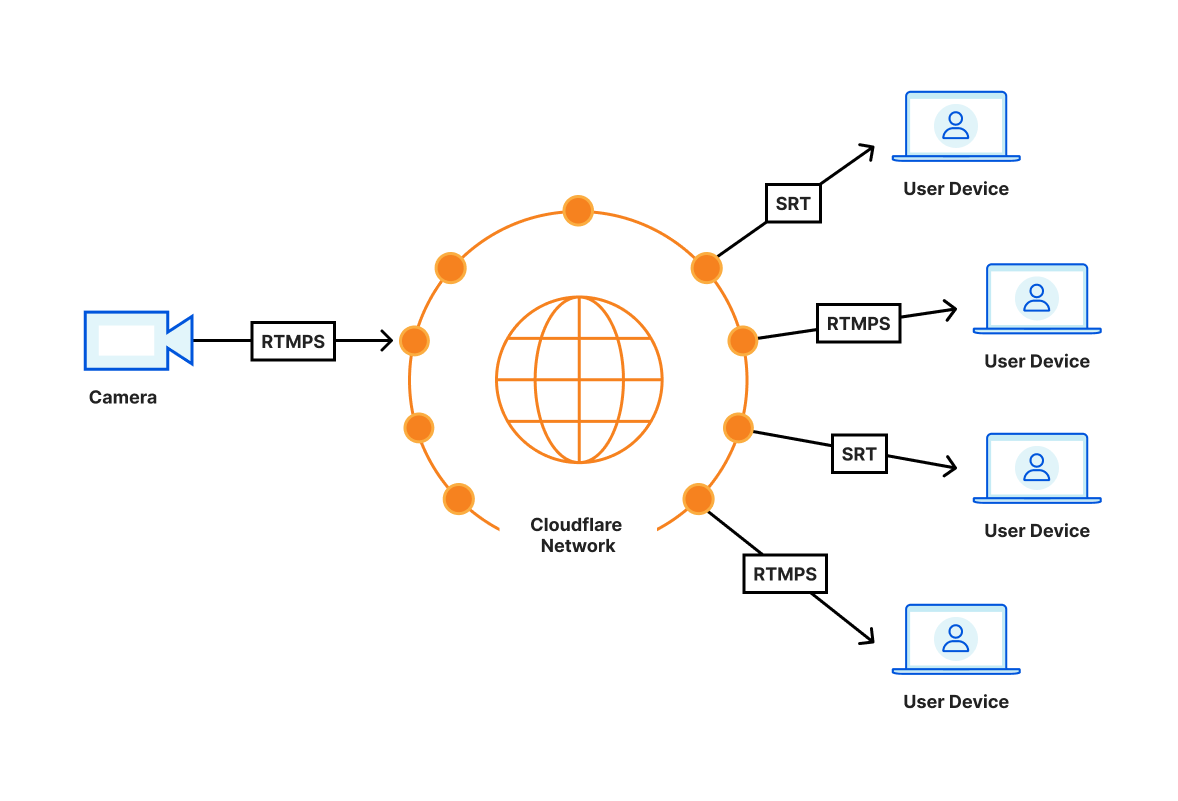


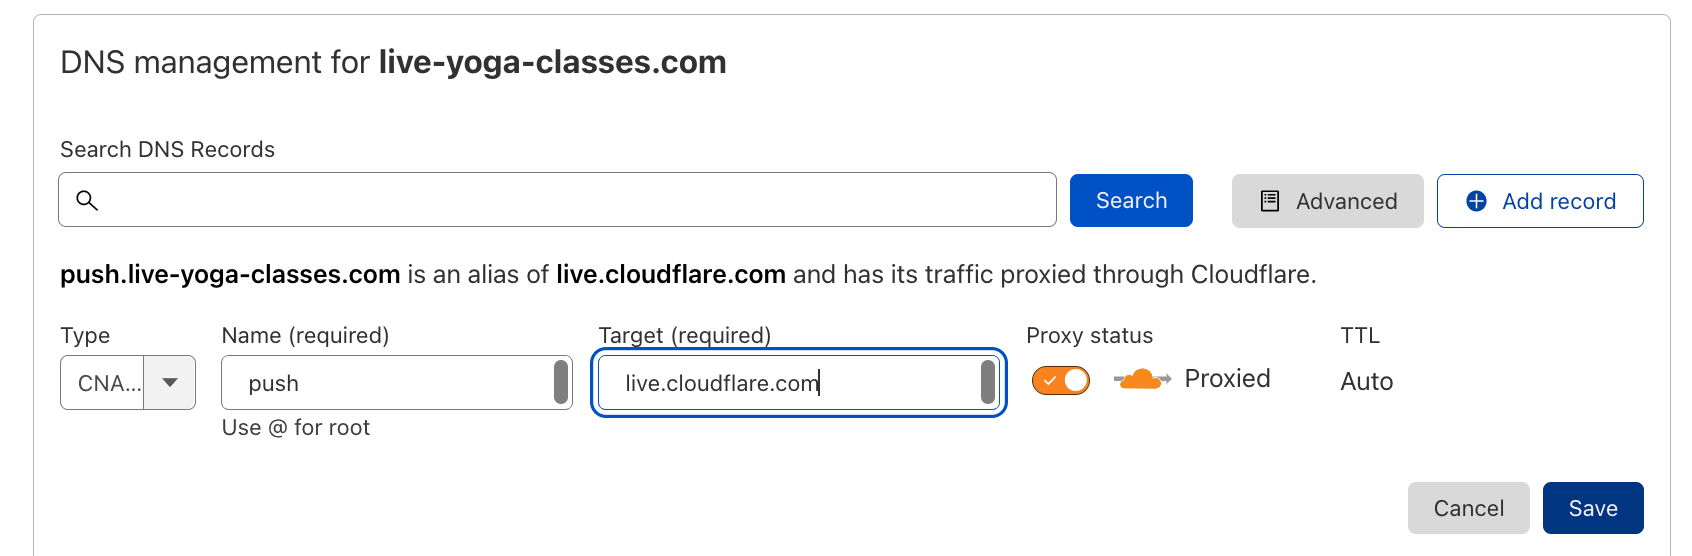

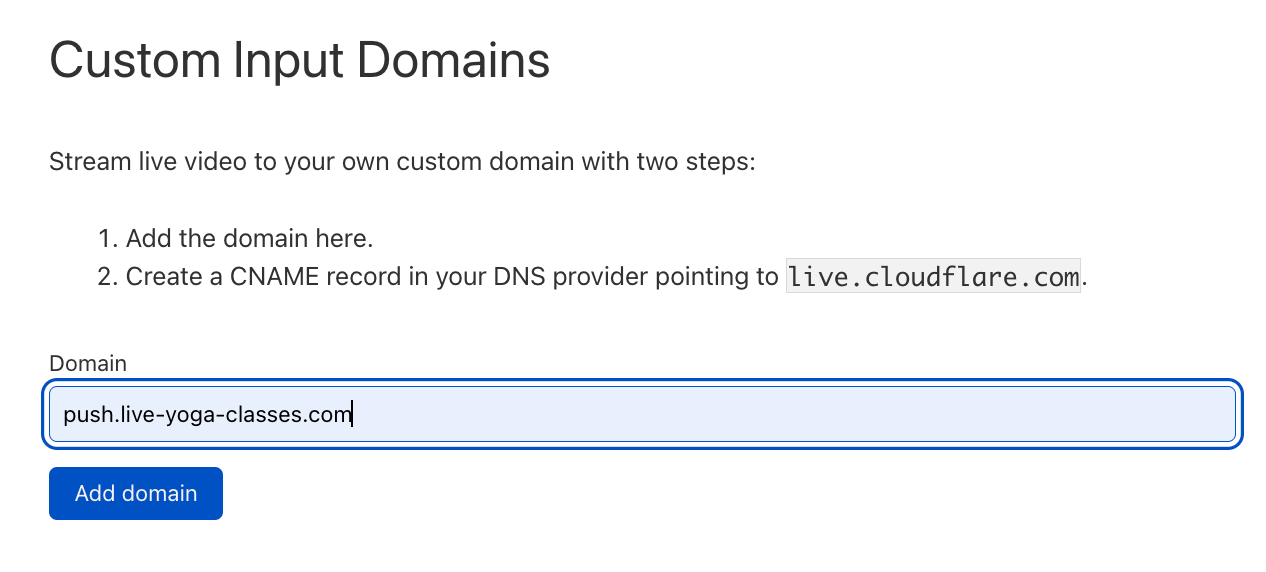


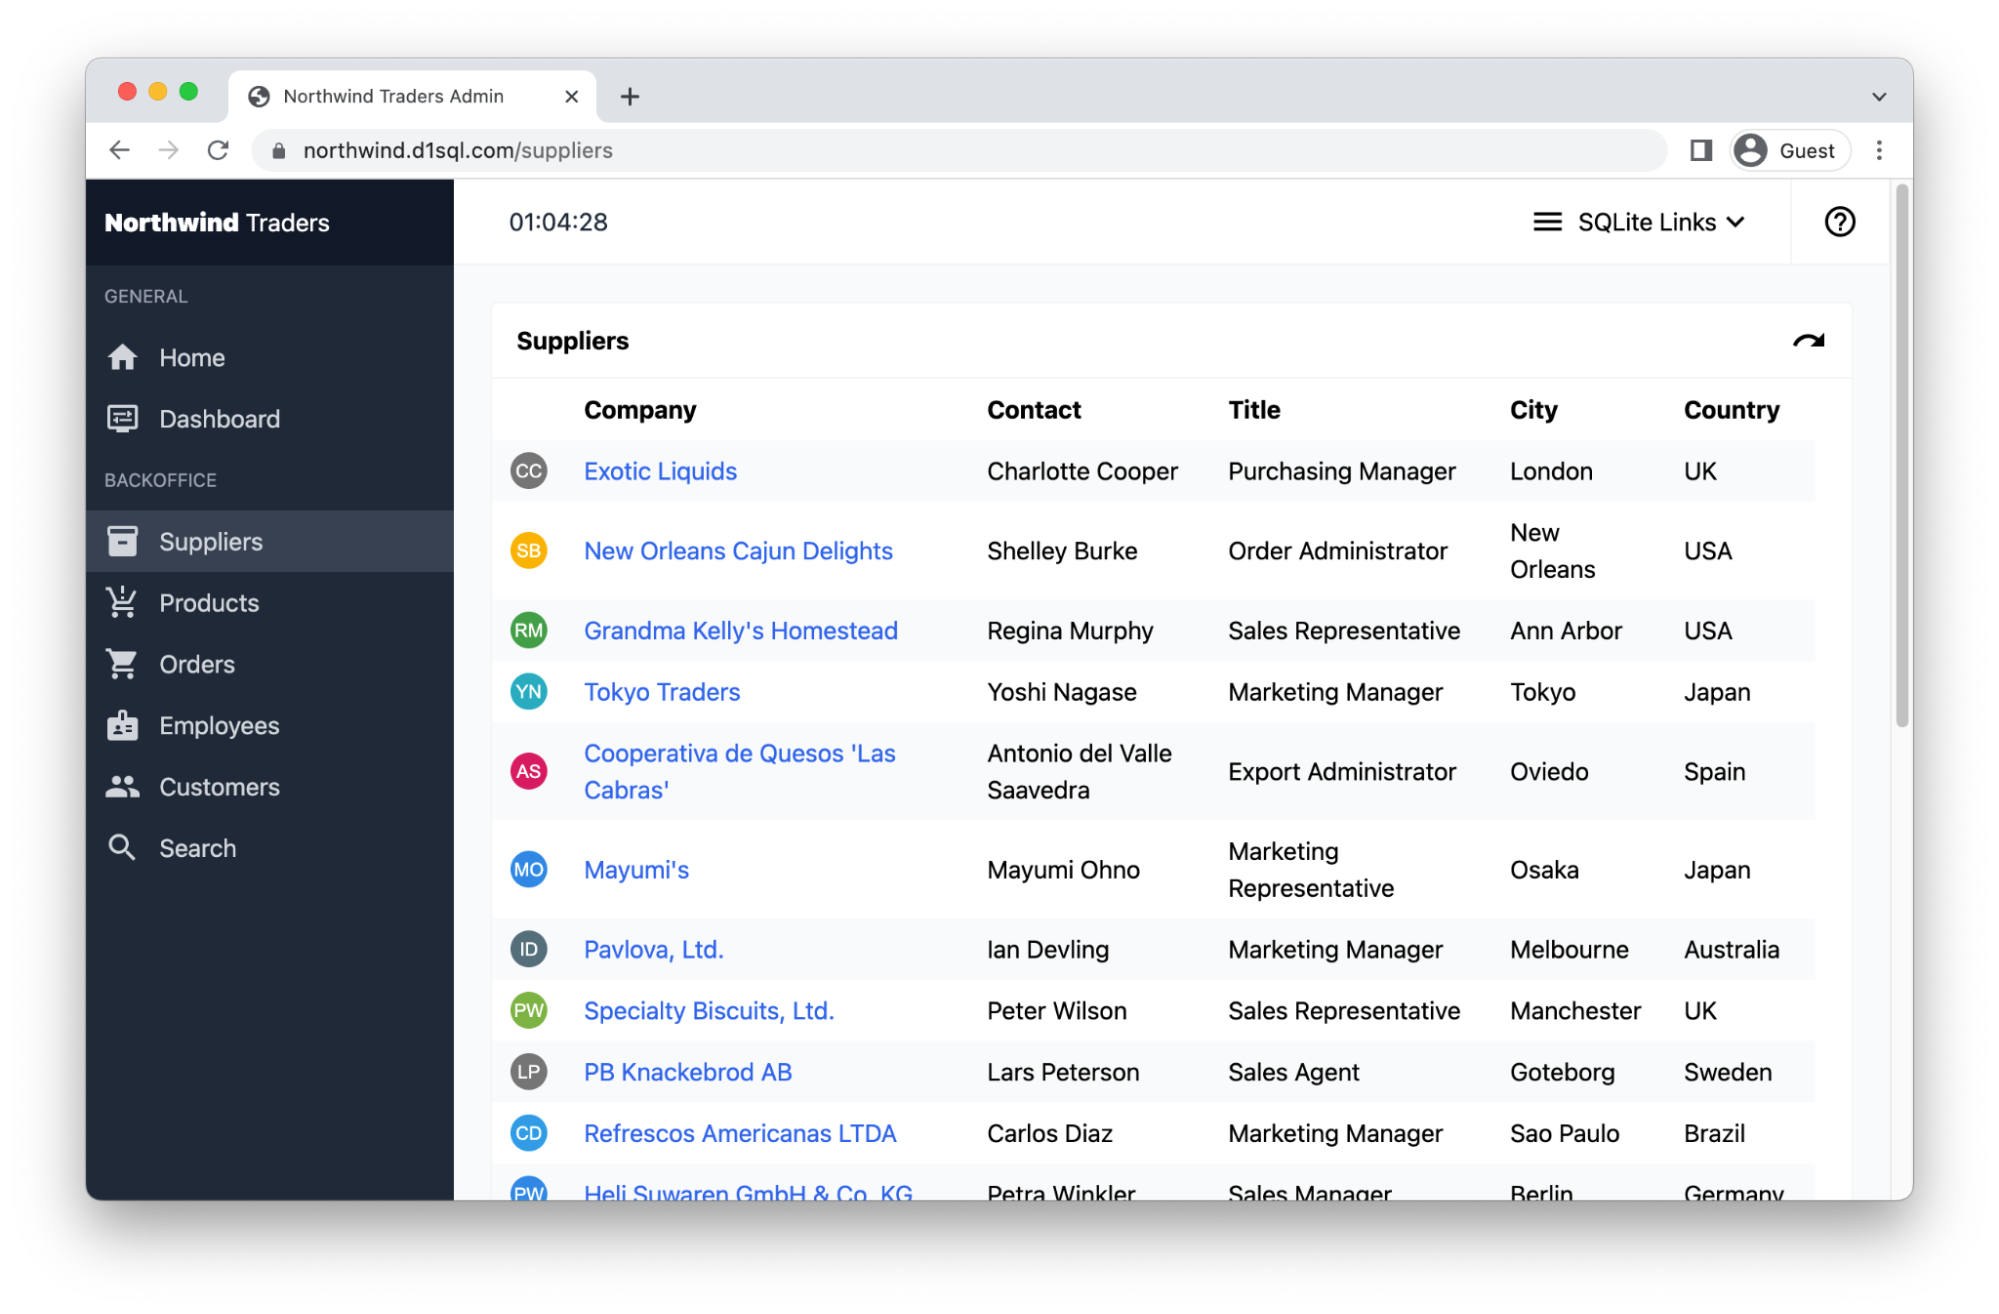
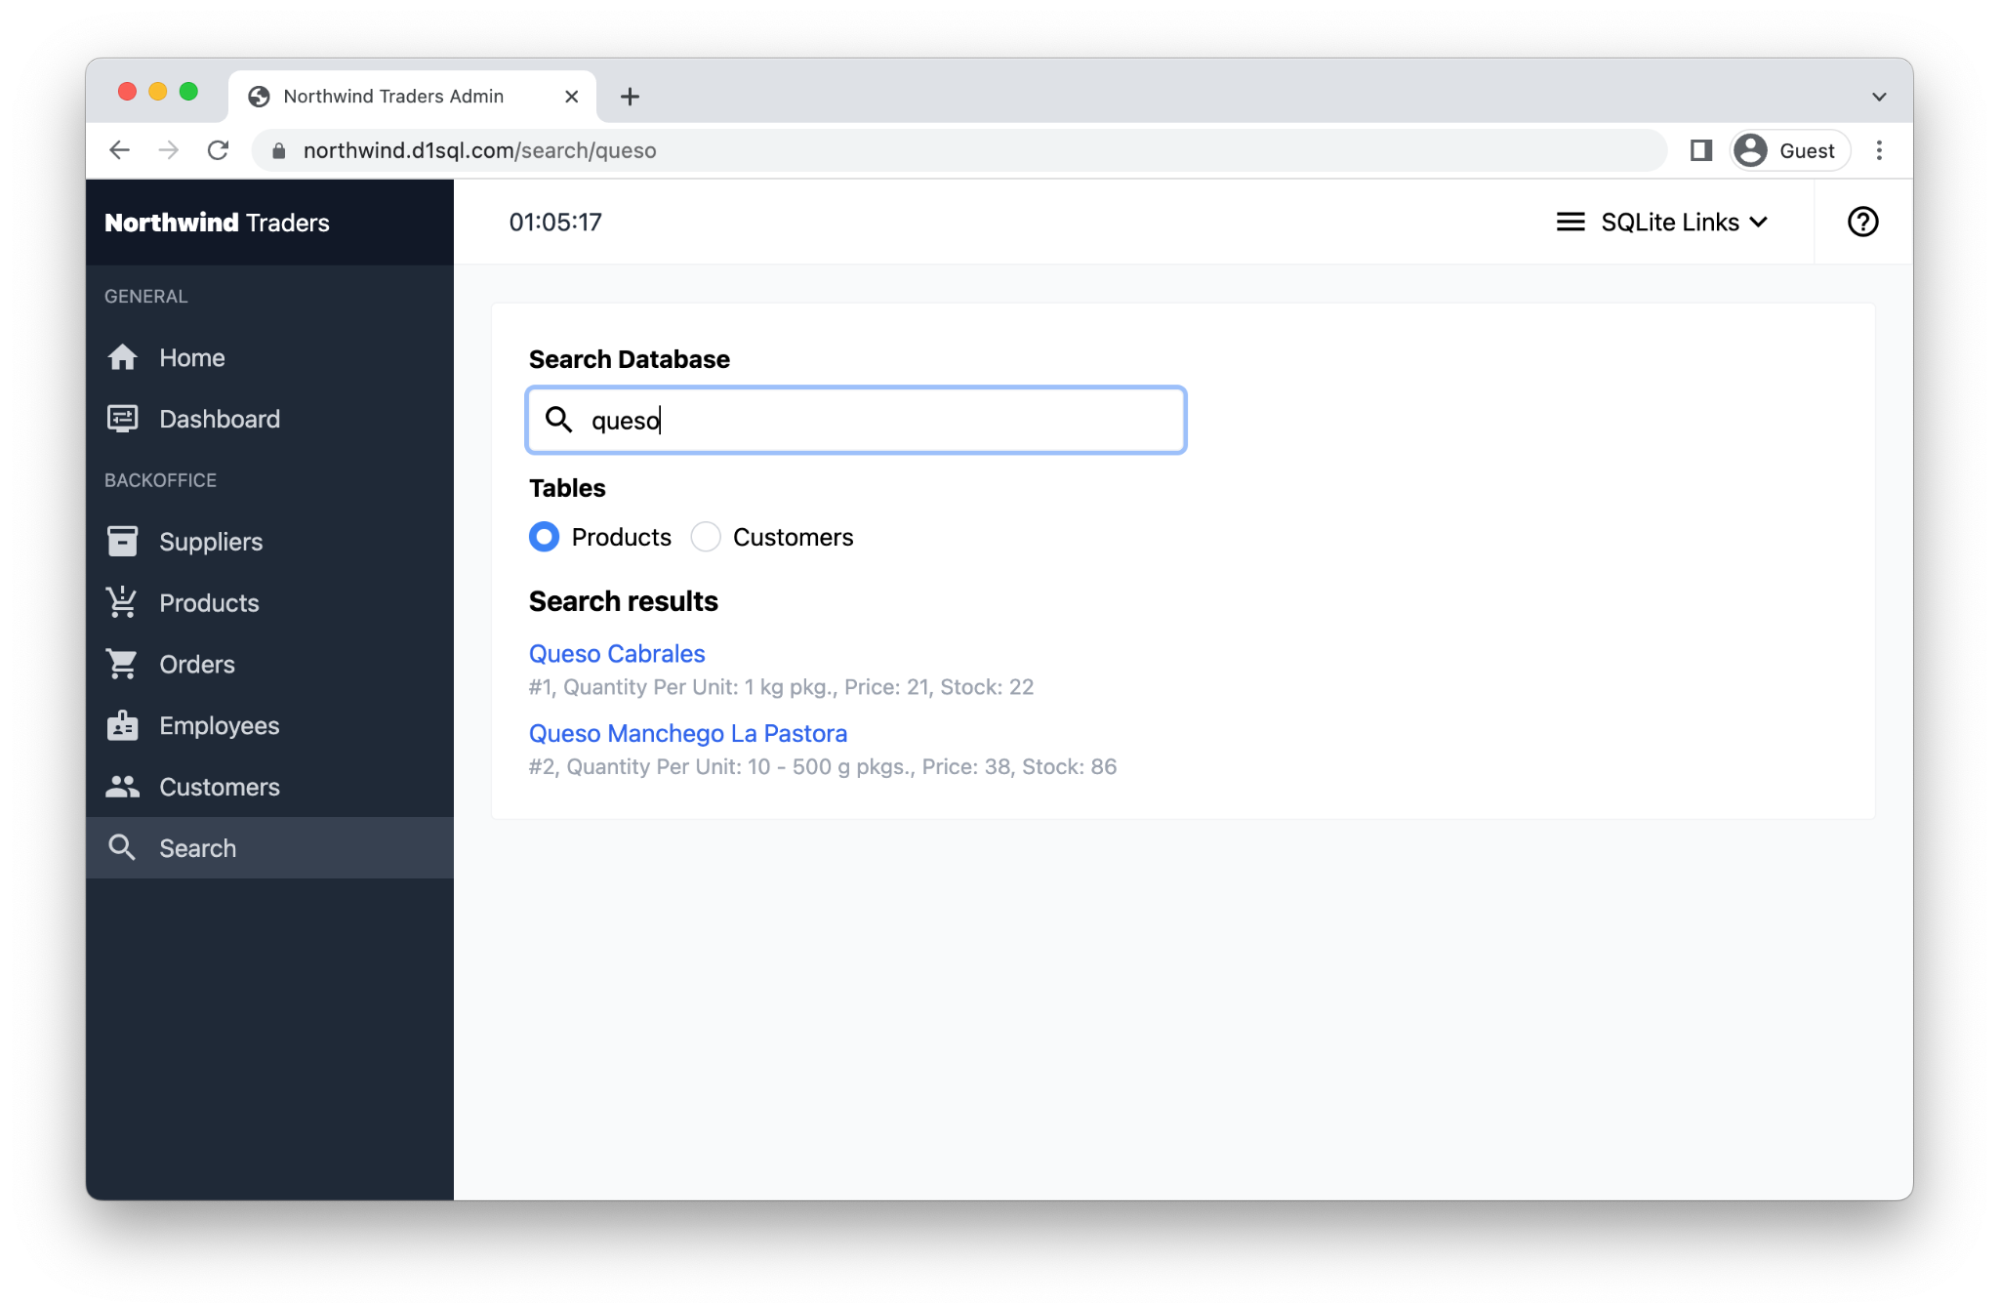
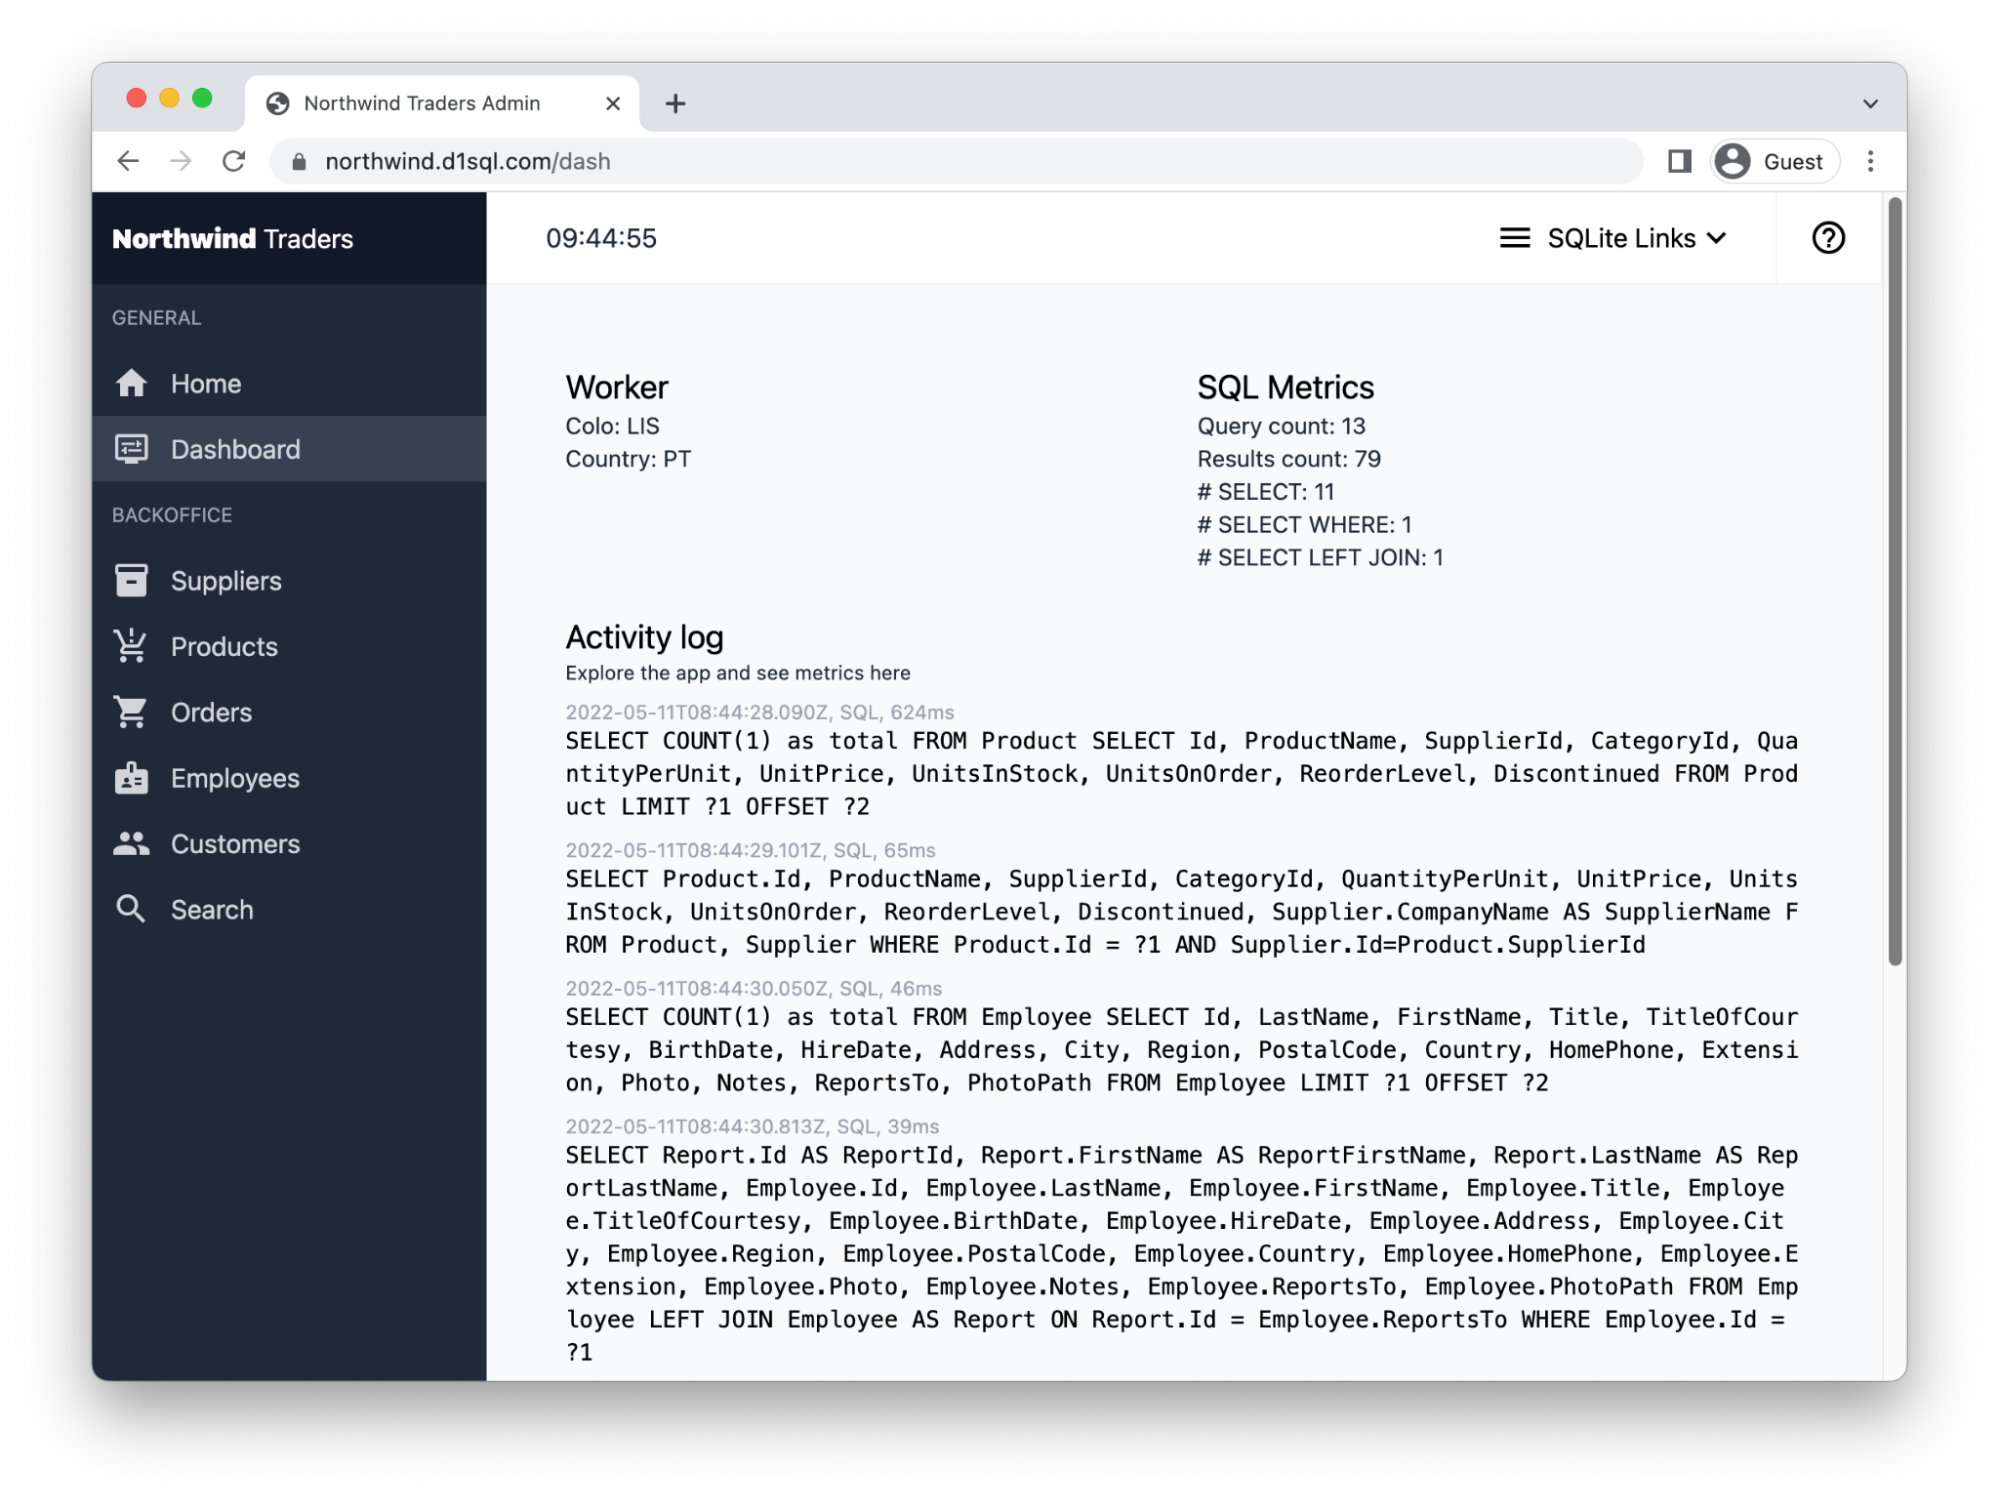
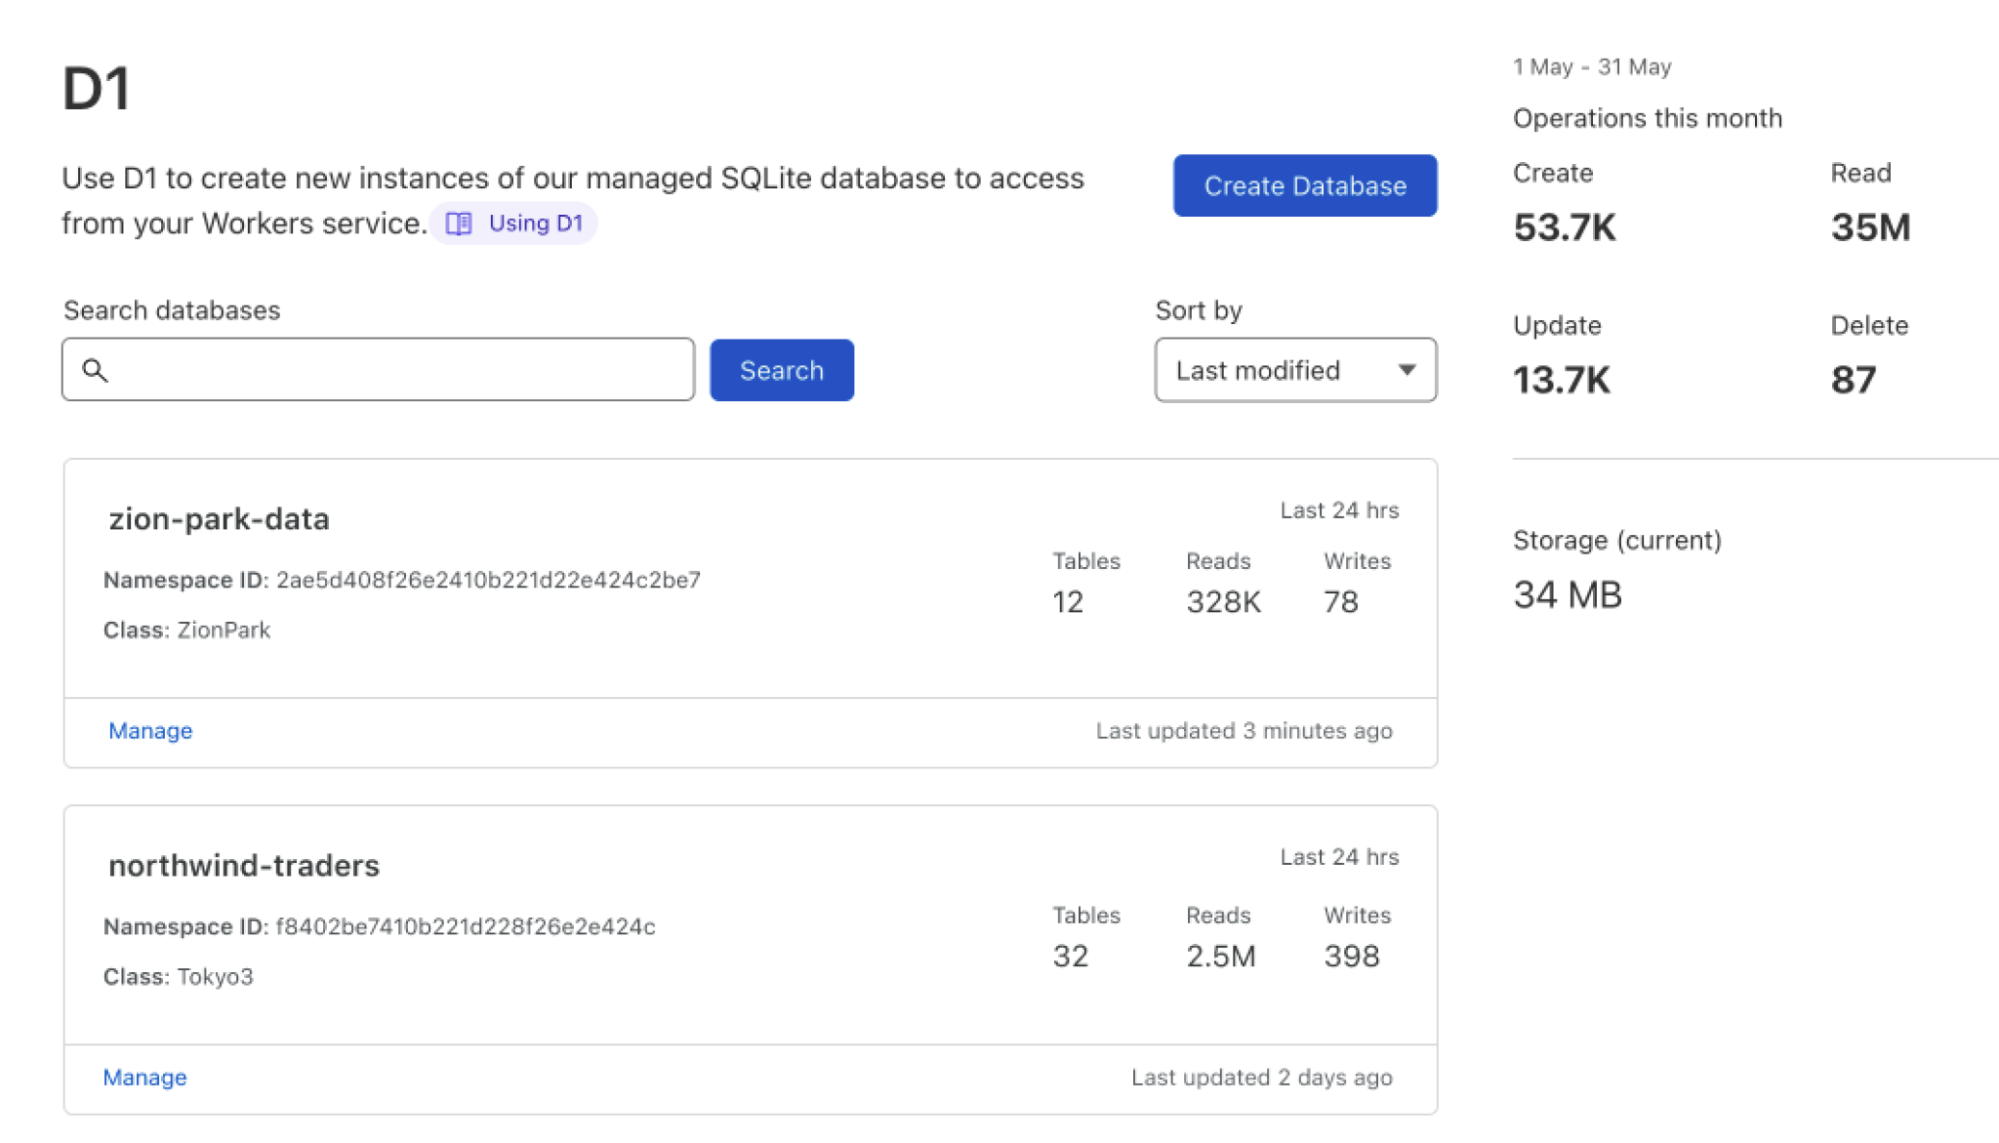

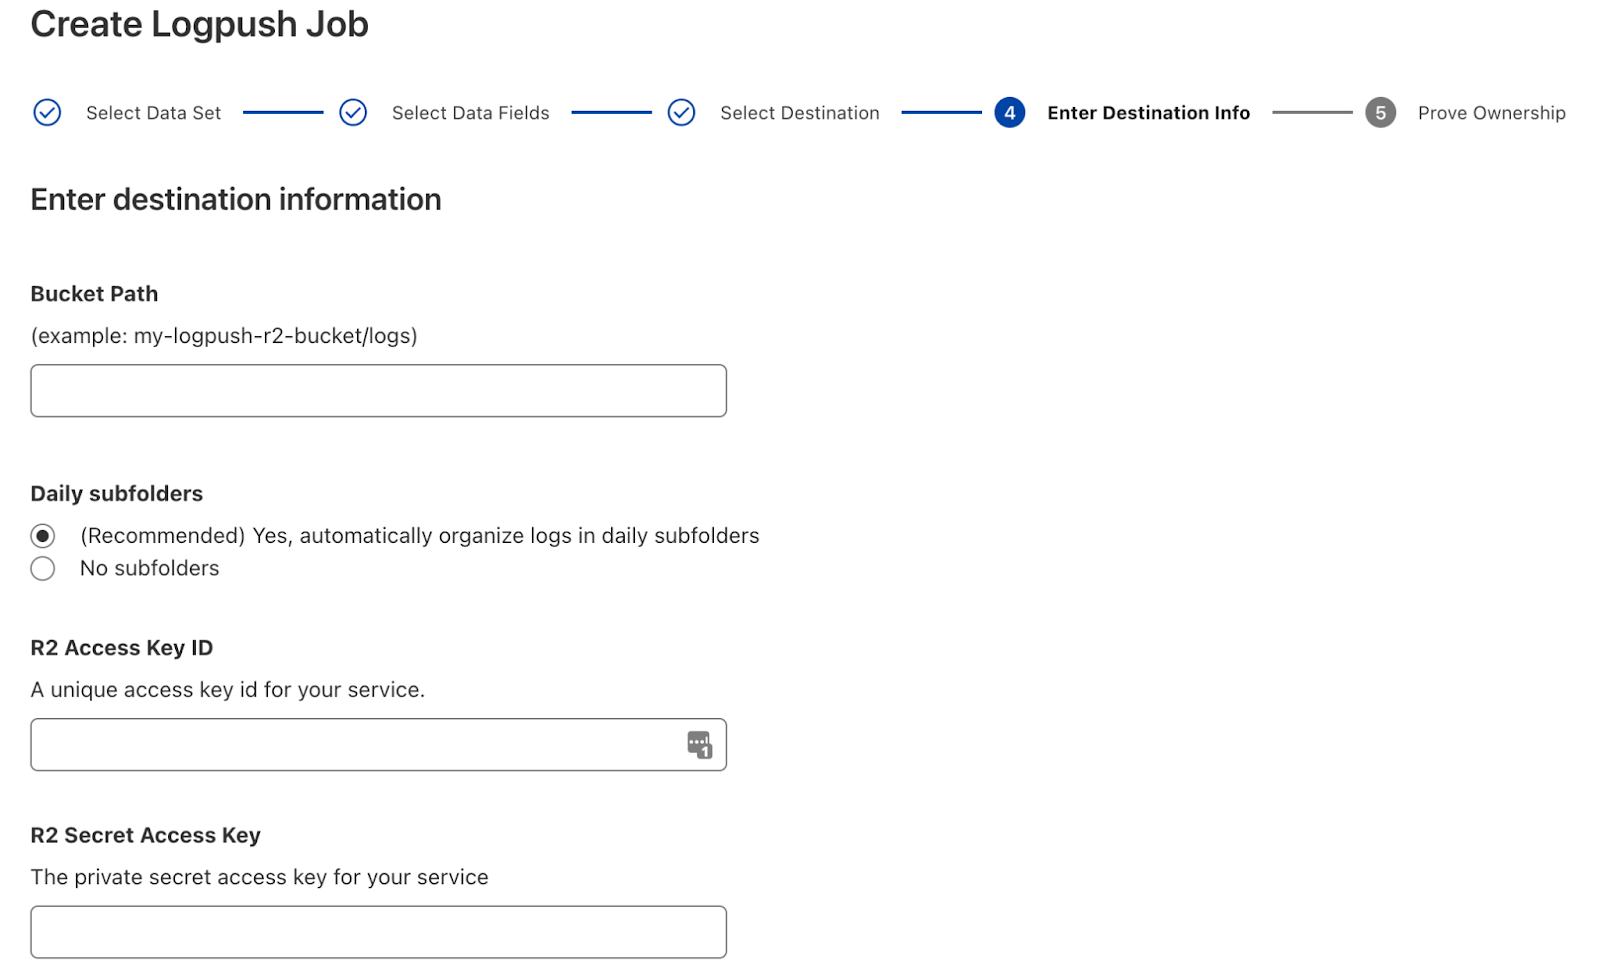

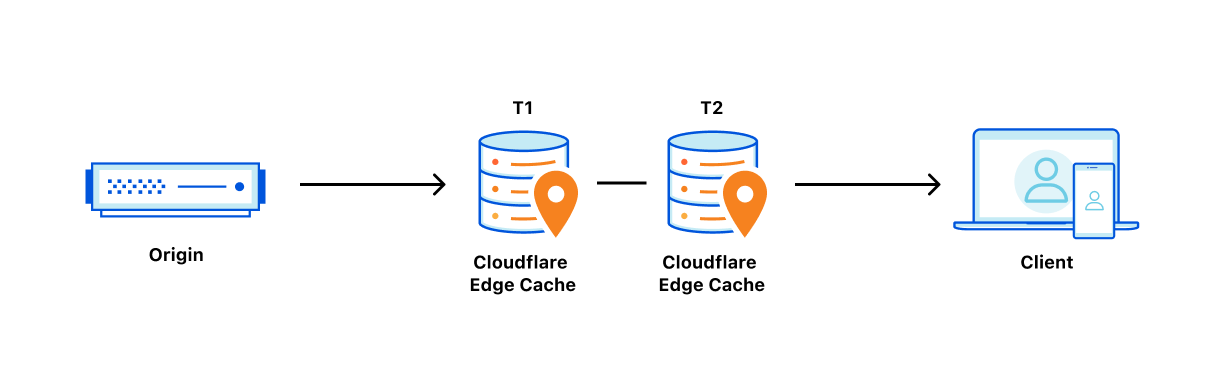
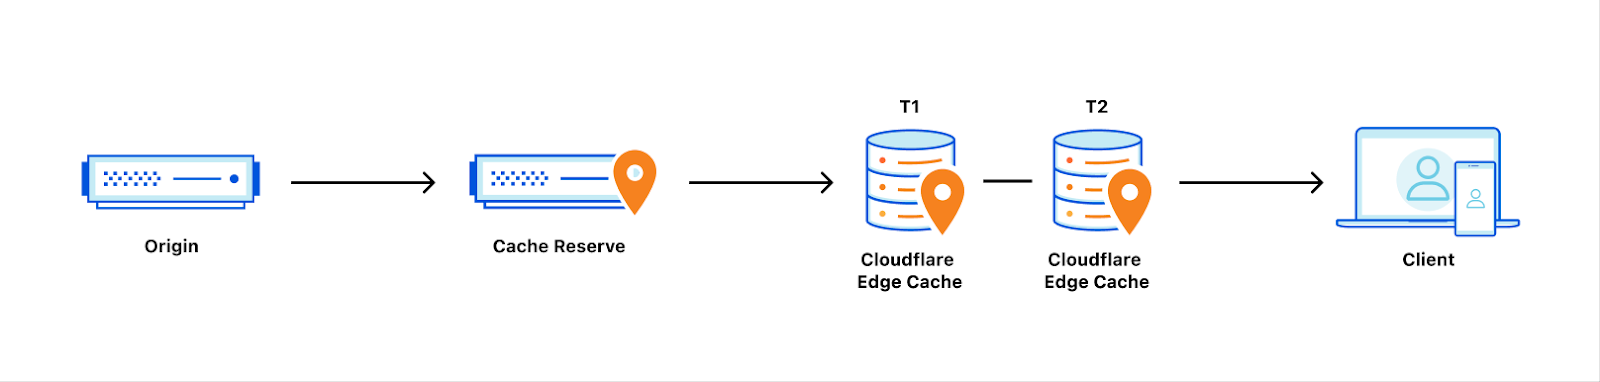
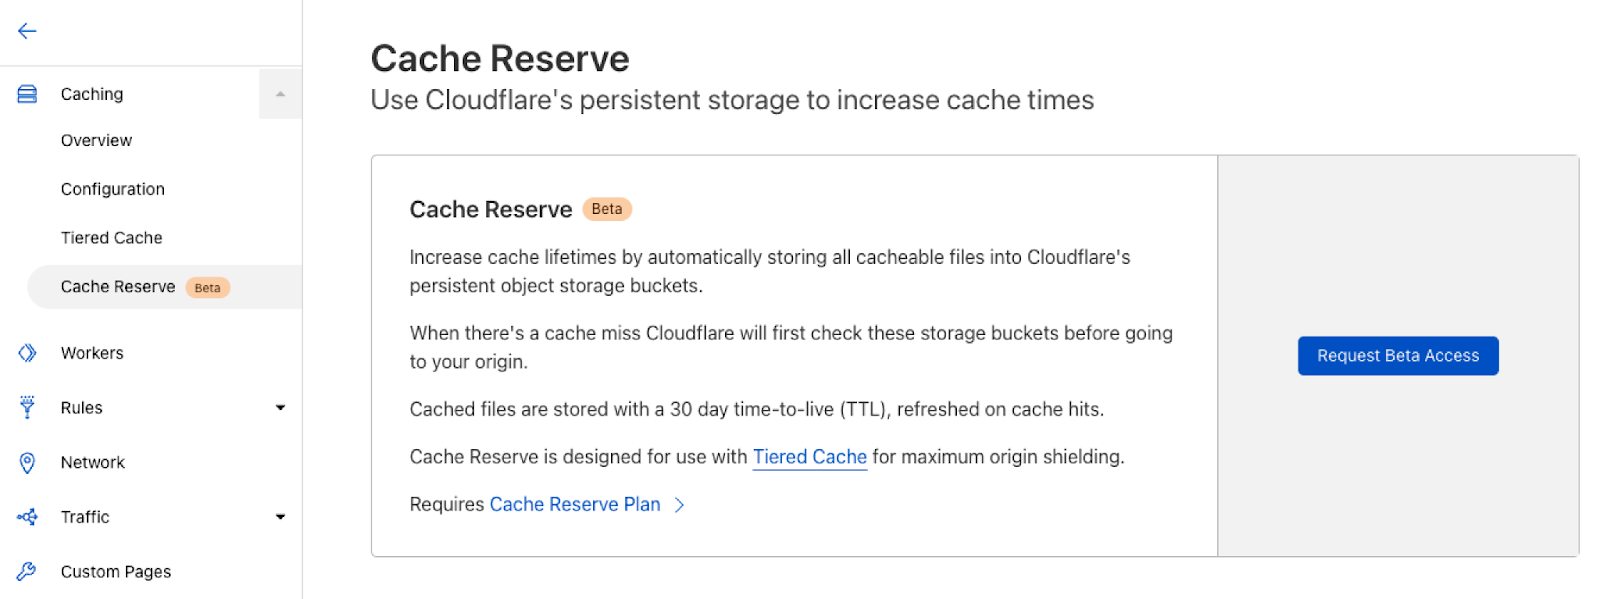


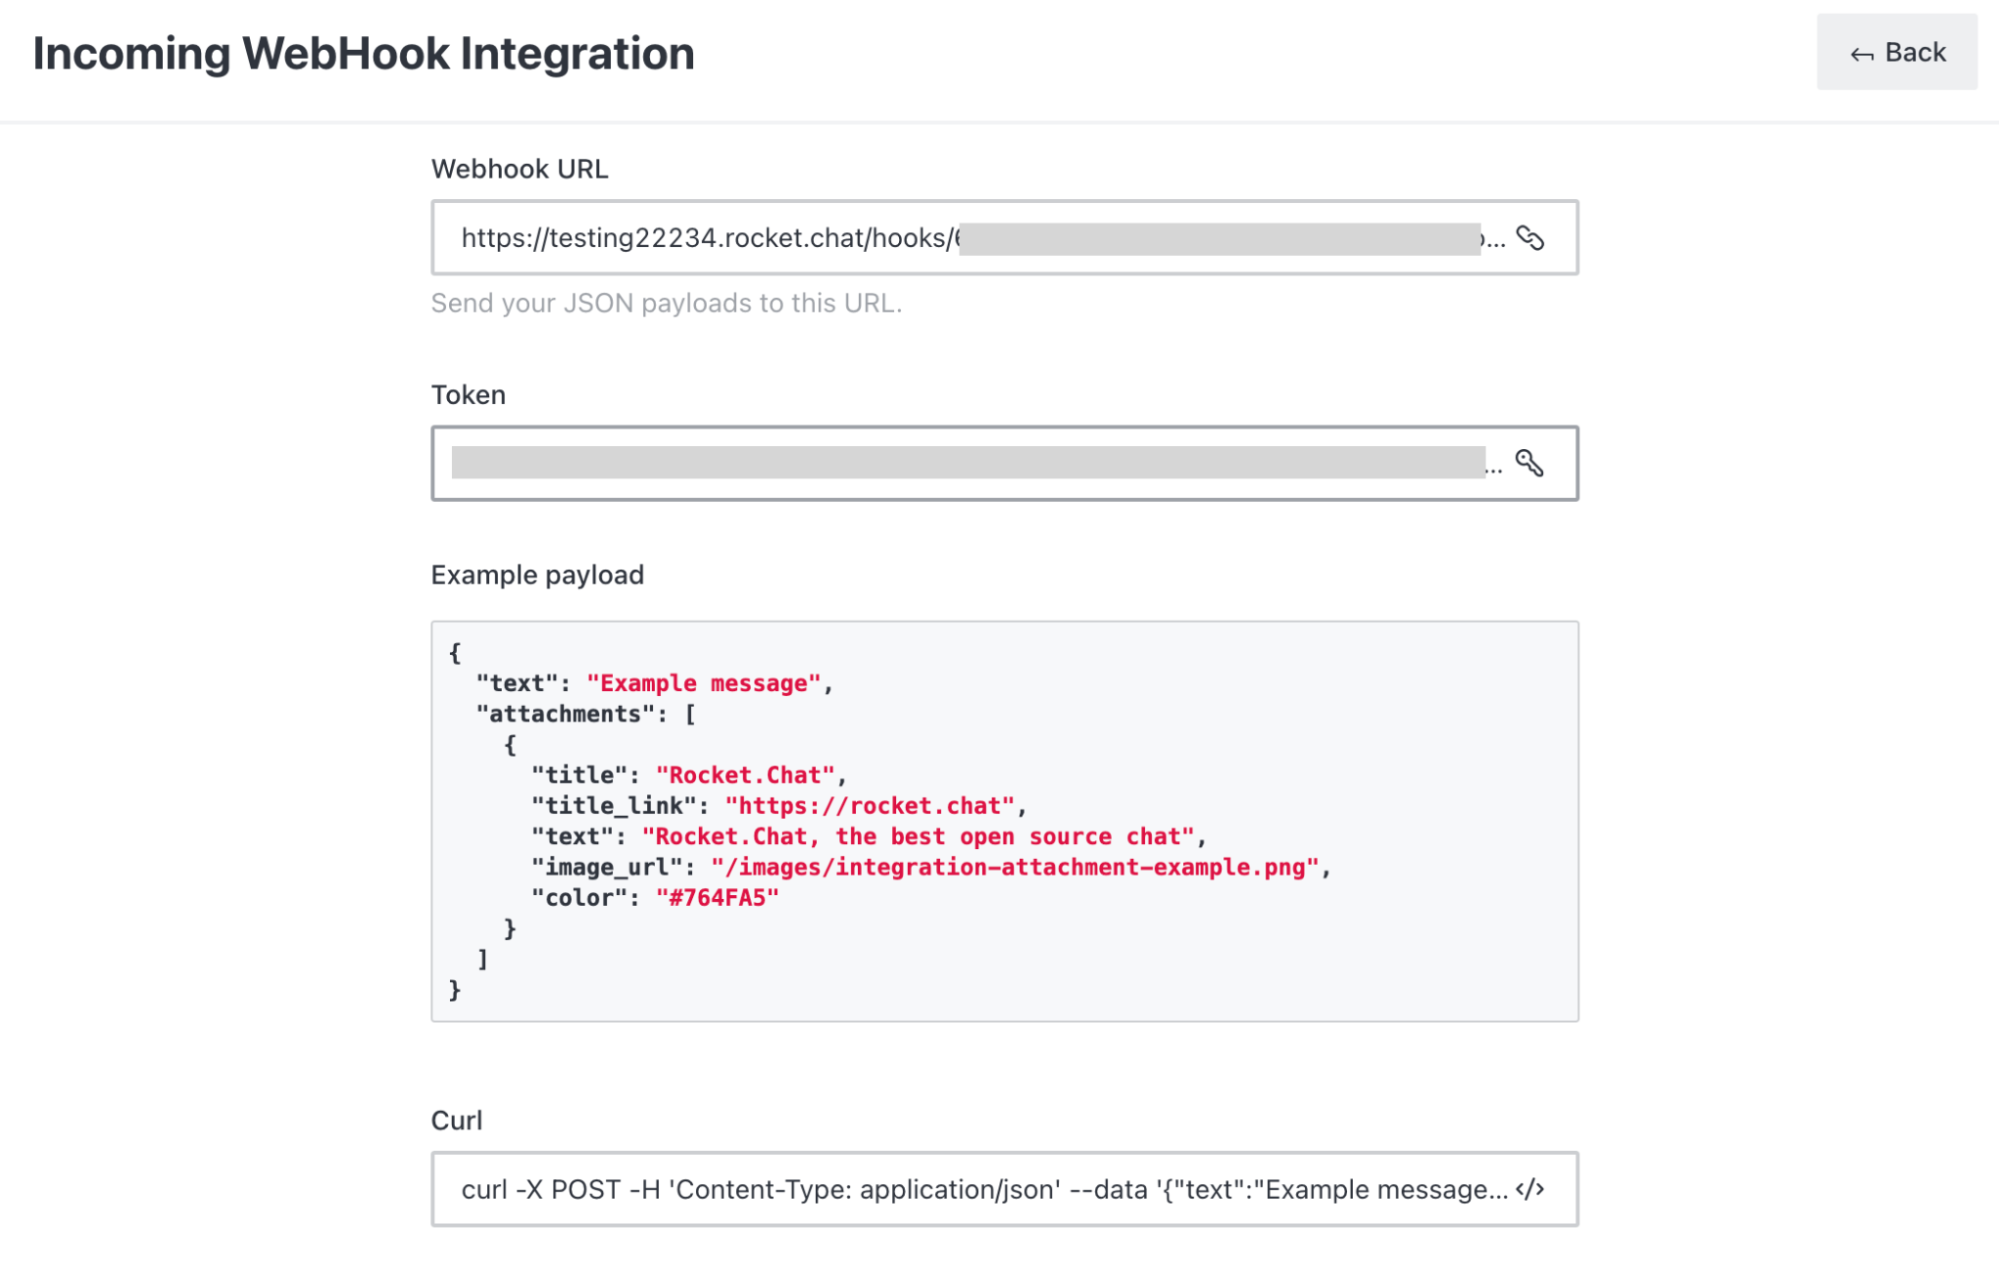
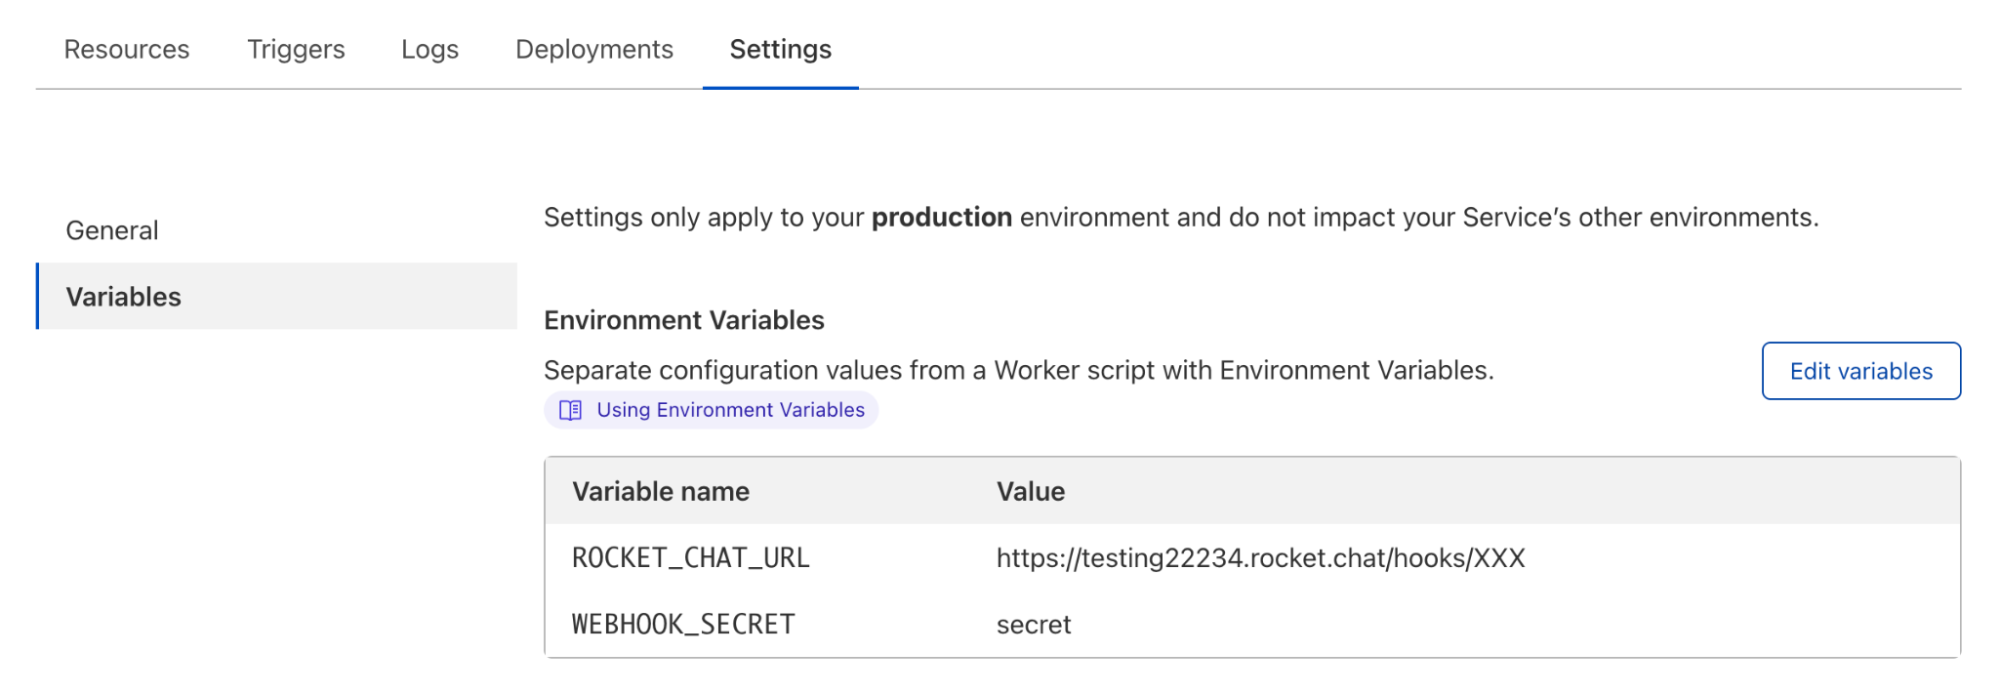
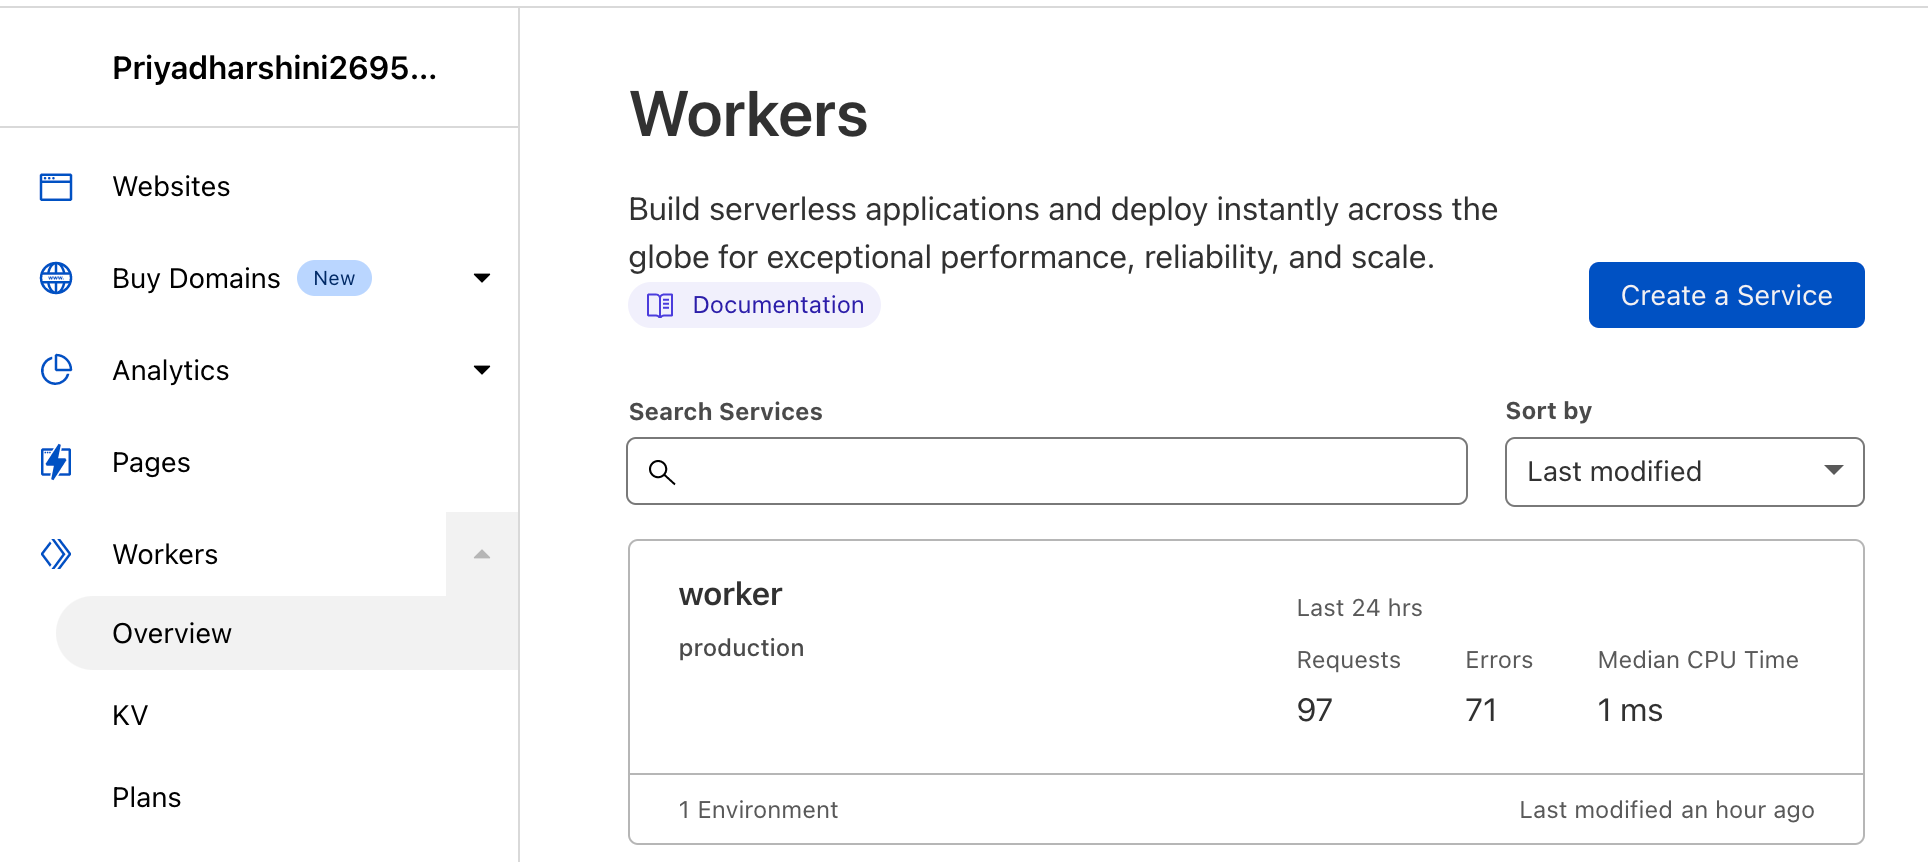
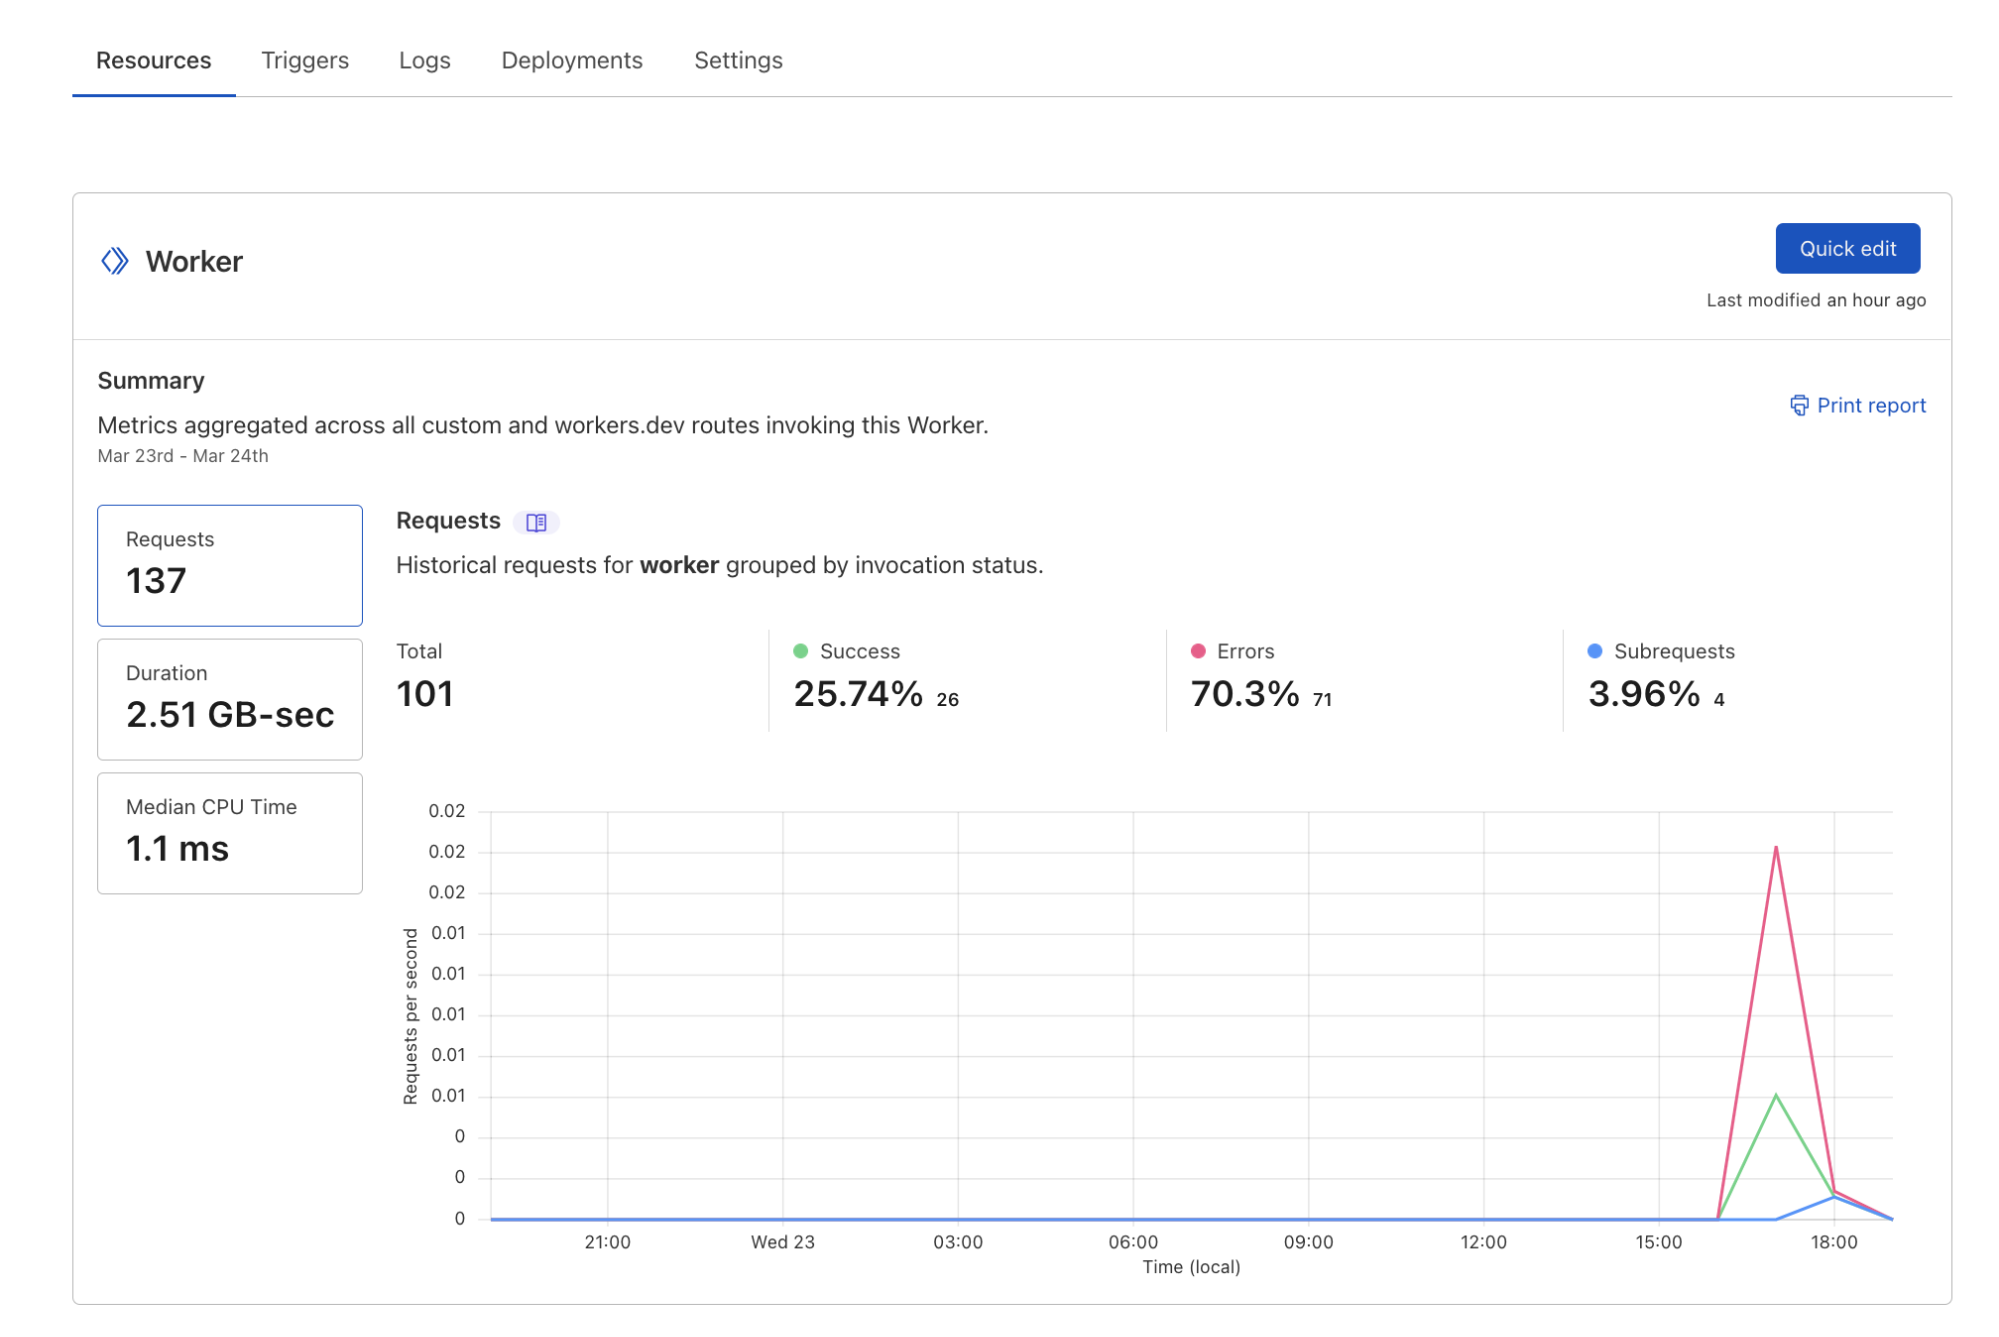
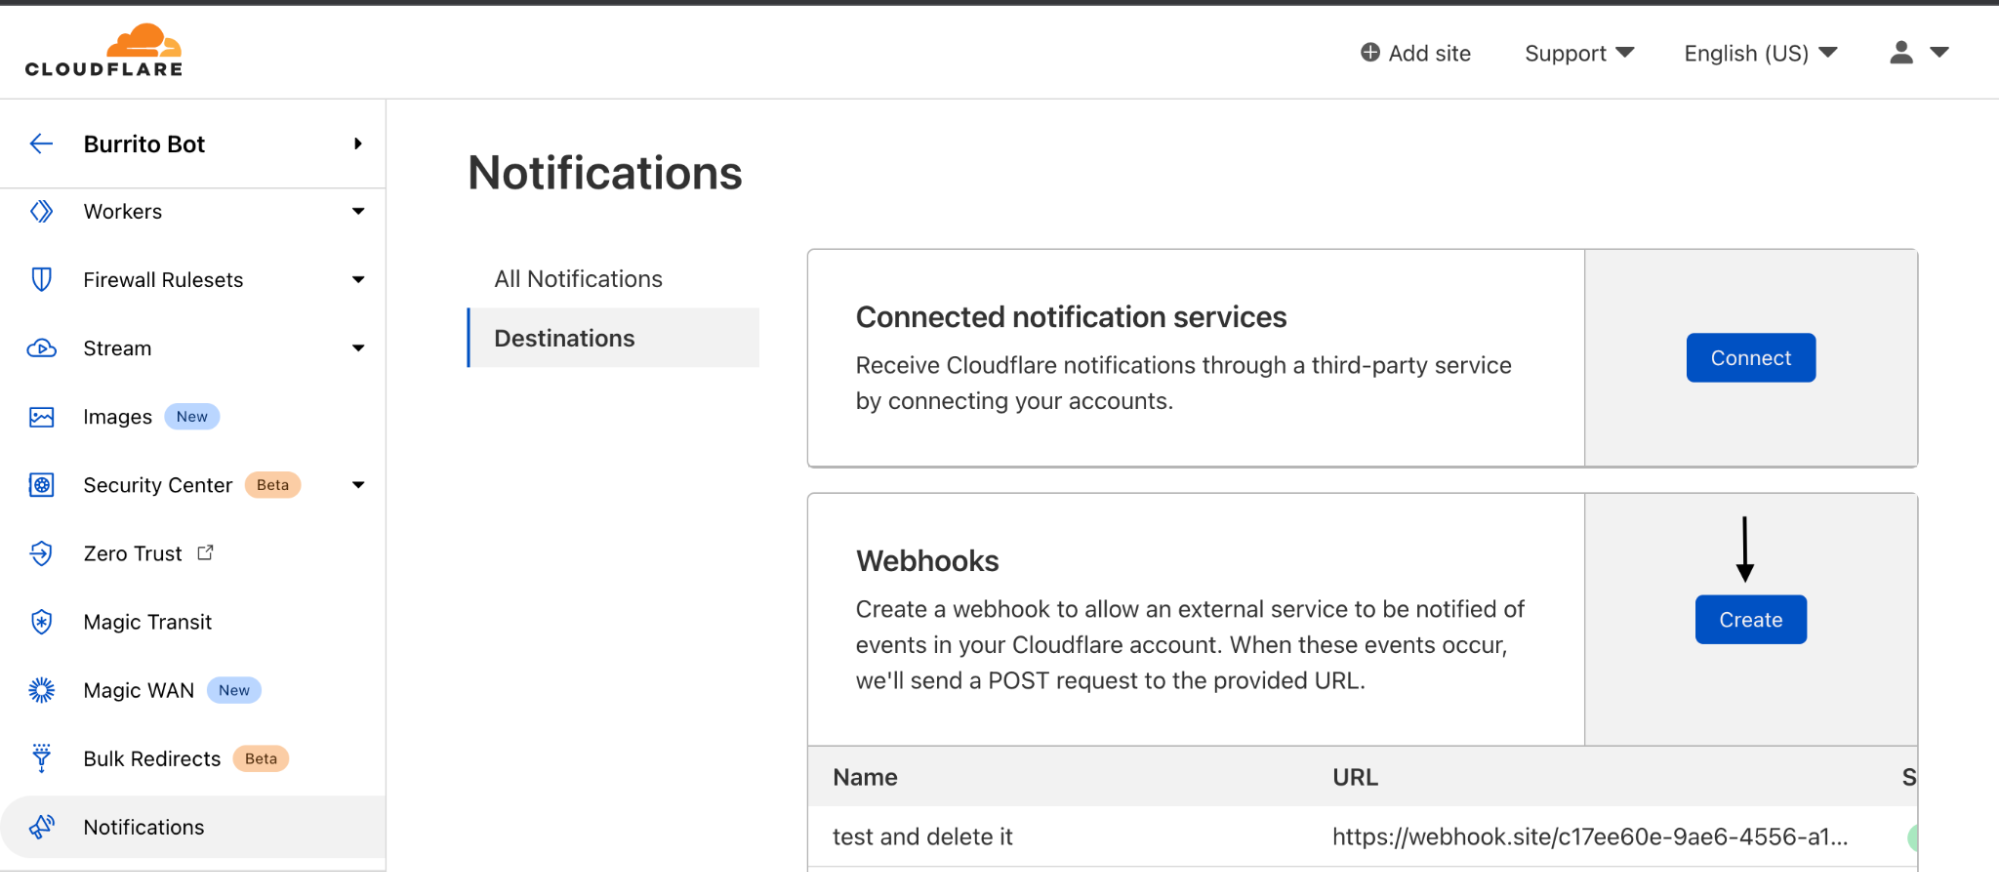
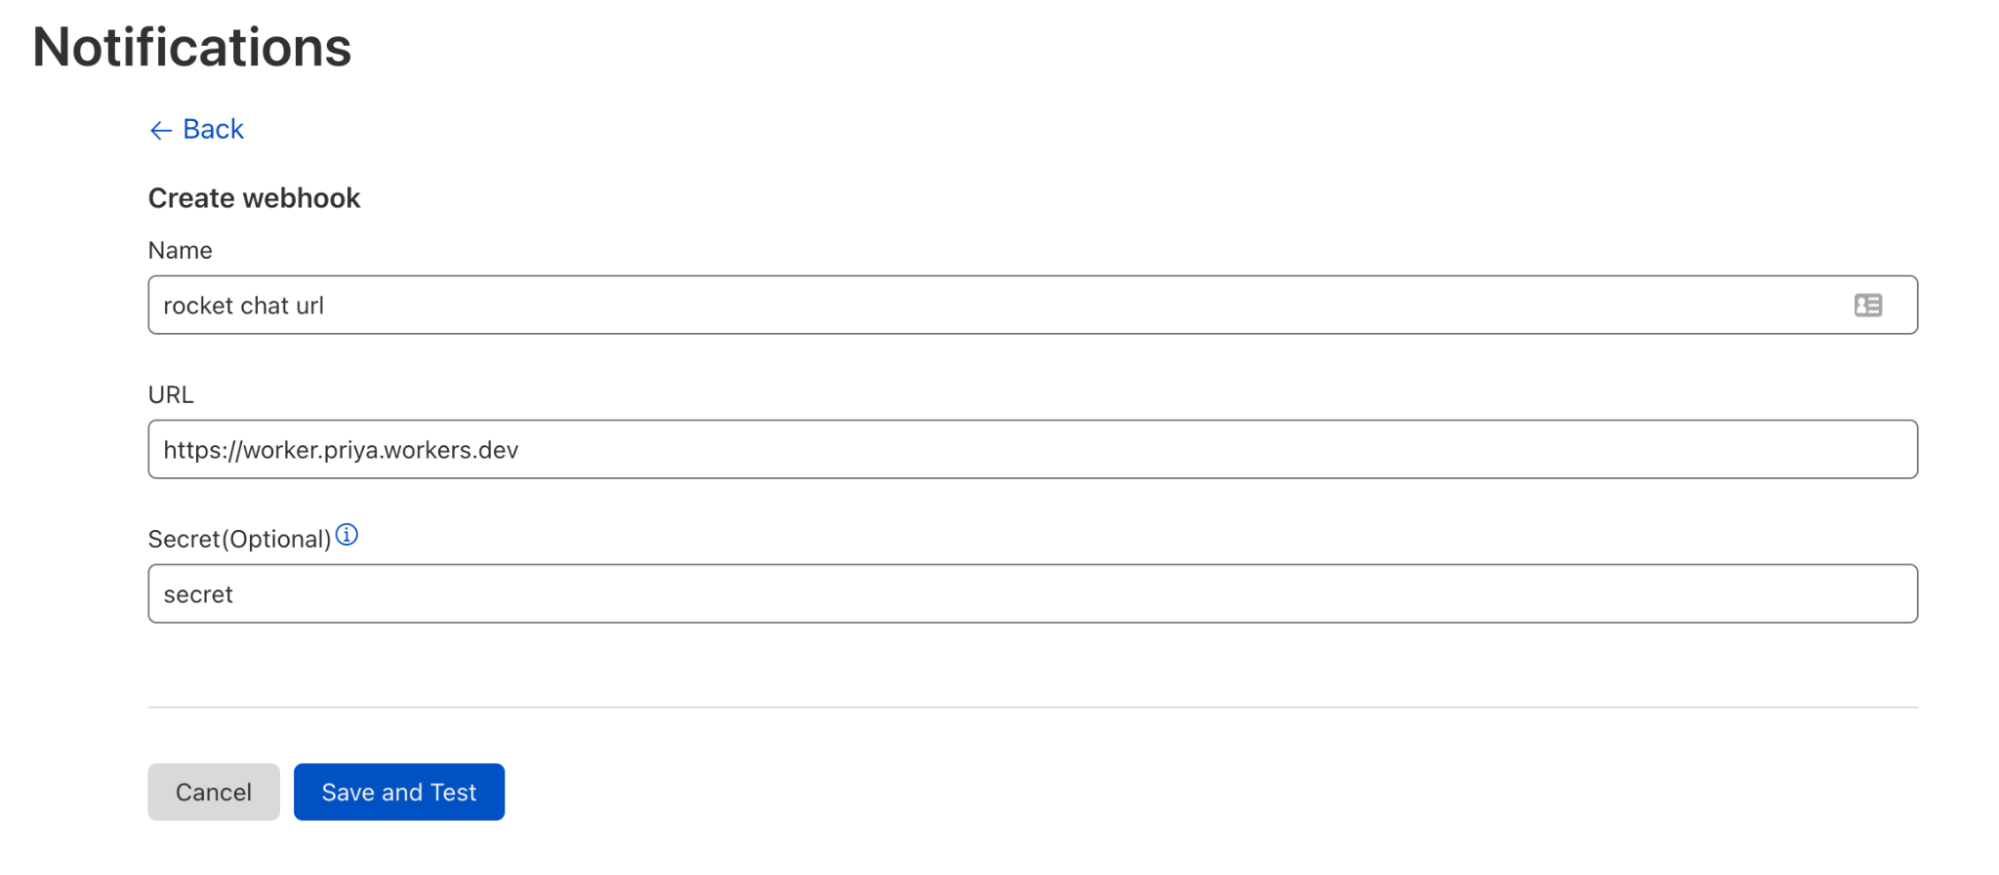
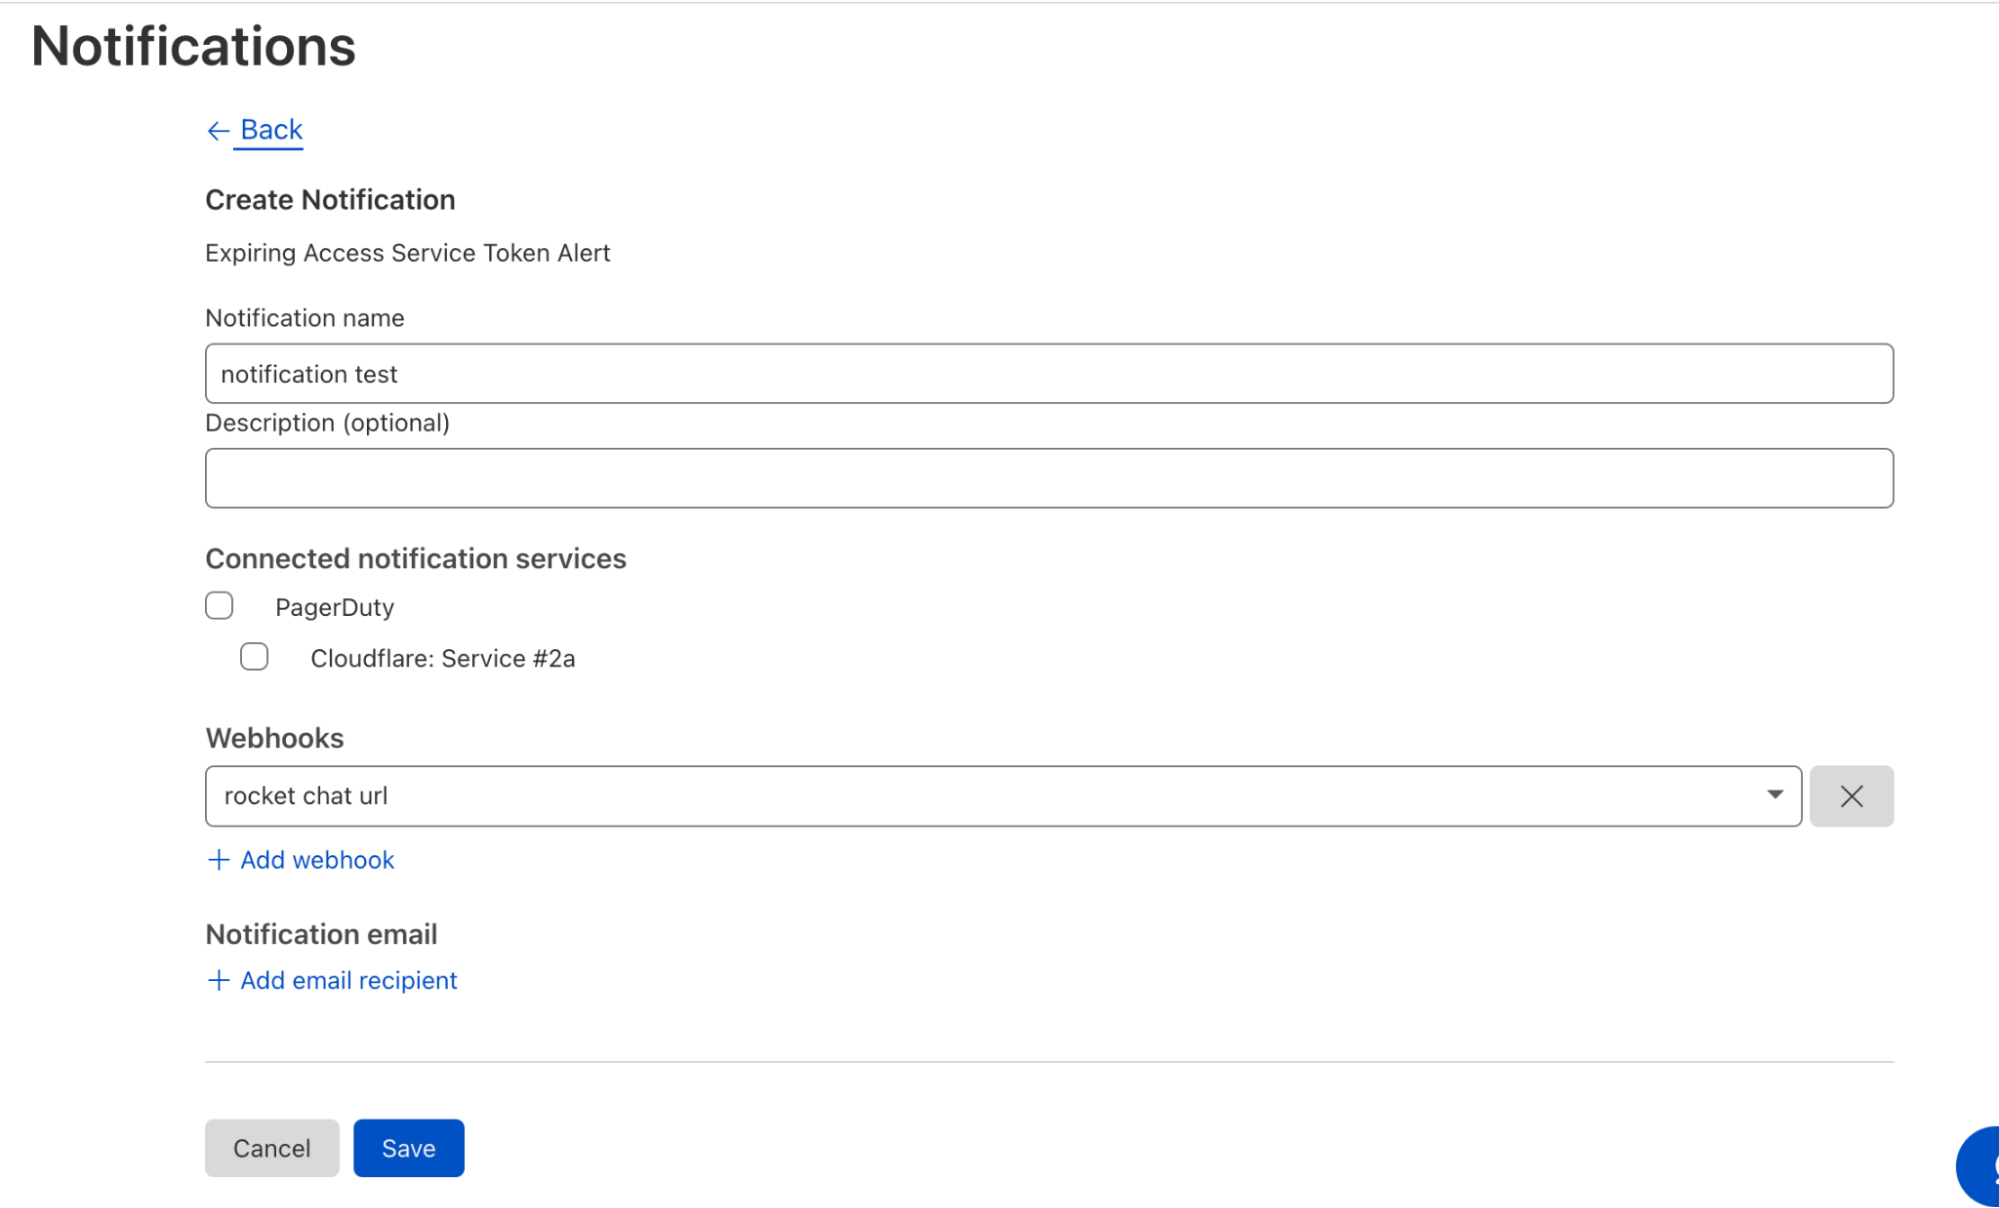
