Post Syndicated from Matt Bullock original https://blog.cloudflare.com/origin-rules/

Host headers are key
The host header of an HTTP request tells the receiving server (‘origin’) which website or application a client wants to access.
When an origin receives an HTTP request, it checks the value of this ‘host’ header to see if it is responsible for that traffic. If it finds a match the request will be routed appropriately and the correct data will be returned to the visitor. If it doesn’t find a match, it will return an error telling the visitor it doesn’t have an application or website that matches what they are asking for.
In simple setups this is often not an issue. All requests for example.com are sent to the same origin, which sees the host header example.com and returns the relevant files. However, not all setups are as straightforward. SaaS (Software-as-a-Service) platforms use host headers to route visitors to the correct instance or S3-compatible bucket.
To ensure the correct content is still loaded, the host header must equal the name of this instance or bucket to allow the receiving origin to route it correctly. This means at some point in the traffic flow, the host header must be changed to match the instance or bucket name, before being sent to the SaaS platform.
Another common issue is when web applications on an origin are listening on a non-standard port, e.g. 8001. Requests sent via HTTPS will by default arrive on port 443. To ensure the traffic isn’t subsequently sent to port 443 on the origin the traffic must be intercepted and have the destination port changed to 8001. This ensures the origin is receiving traffic where it expects it. Previously this would be done as a Cloudflare Worker, Cloudflare Spectrum application or by running a dedicated application on the origin.
Both of these scenarios require customers to write and maintain code to intercept HTTP requests and parse them to ensure they go to the correct origin location, the correct port on that origin, and with the correct host header. This is a burden for administrators to maintain, particularly as legacy applications are migrated away from on-premise and into SaaS.
Cloudflare users want more control on where their traffic goes to – when it goes there – and what it looks like when it arrives. And they want this to be simple to set up and maintain.
To meet those demands we are today announcing Origin Rules, a new product which allows for overriding the host header, the Server Name Indication (SNI), destination port and DNS resolution of matching HTTP requests.
Origin Rules is now the one-stop destination for users who want to change which origin traffic goes to, when this should happen, and what that traffic looks like when it arrives – all without ever having to write a single line of code.
One hostname, many origins
Setting up your service on Cloudflare is very simple. You tell us your domain name, example.com, and where traffic should be sent to when we receive requests that match it. Often this is an IP address. You can also create subdomains, e.g. shop.example.com, and follow the same pattern.
This allows for the web server running www.example.com to live on the IP address 98.51.100.12, and the web server responsible for running shop.example.com to live on a different IP address, e.g. 203.0.113.34. When Cloudflare receives a request for shop.example.com, we send that traffic to the web server at 203.0.113.34 with the host header shop.example.com.
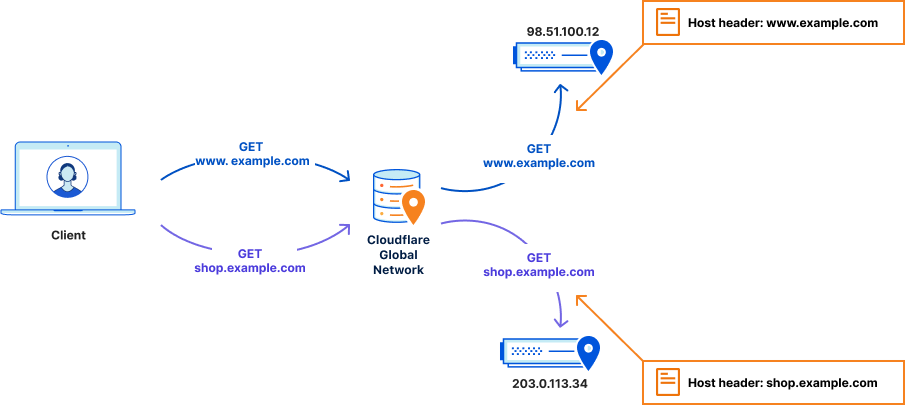
As most web servers commonly serve multiple websites, this host header is used to ensure the correct content is loaded. The web server looks at the request it receives, checks the host header, and tries to match it against websites it’s been told to serve. If it finds a match, it will route this request to the corresponding website’s configuration and the correct files are returned to the visitor.
This has been a foundational principle of the Internet for many years now. Unsurprisingly however, new solutions emerge and user needs evolve.
We have heard from users who want to be able to send different URLs to different origins, such as a SaaS provider for their ecommerce platform and a SaaS provider for their support desk. To achieve this, user’s could, and do, decide to run and manage their own reverse proxy running at this IP address to act as a router. This allows a user to send all traffic for example.com to a single IP address, and let the reverse proxy determine where it goes next:
    location ~ ^/shop {
        proxy_set_header   Host $http_host;
        proxy_pass         "https://203.0.113.34/$1";
    }
This reverse proxy would detect the traffic sent with the host header example.com with a URI path starting with /shop, and send those matching HTTP requests to the correct SaaS application.
This is potentially a complex system to maintain, however, and as it is an ‘extra hop’, there is an increase in latency as requests first go through Cloudflare, to the origin server, then back to the SaaS provider – who may also be on Cloudflare. In a world rapidly migrating away from on-premise software to SaaS platforms, running your own server to do this specific function goes against the grain.
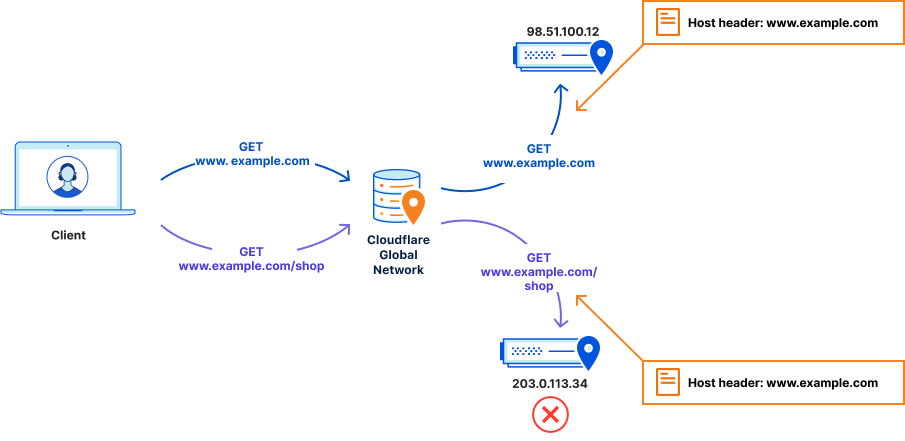
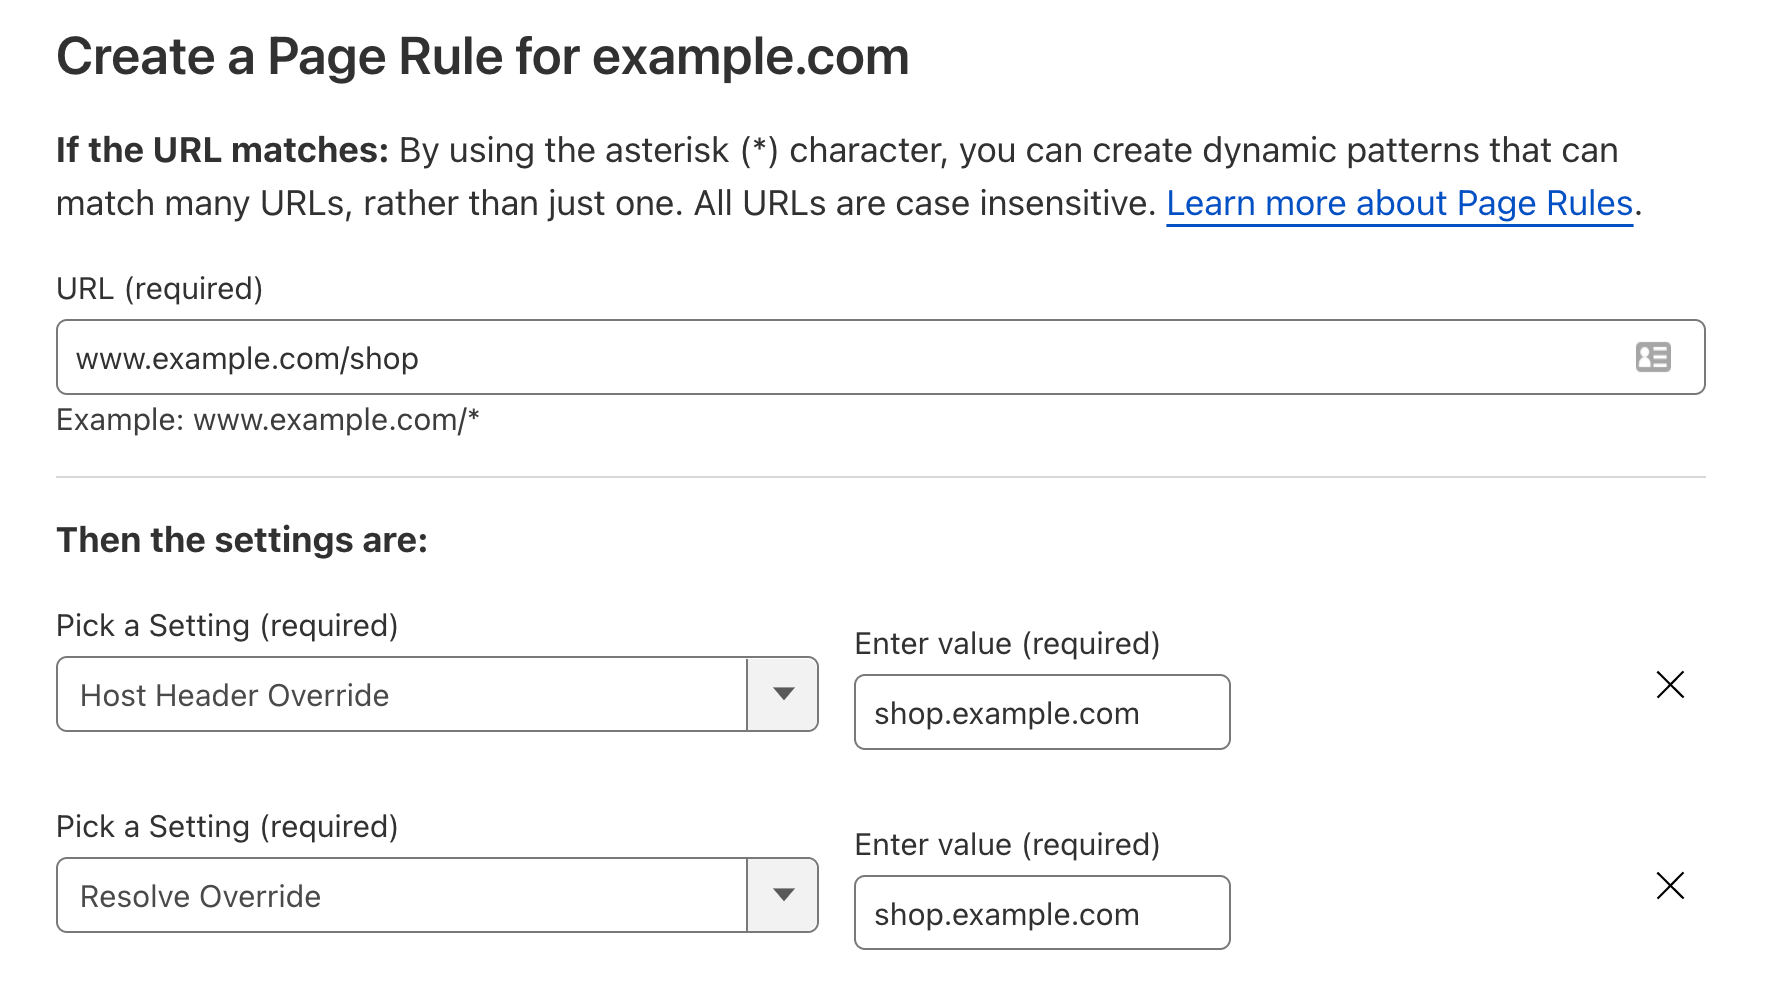
Users therefore want a way to tell Cloudflare – ‘for all traffic to www.example.com, send it to 98.51.100.12. BUT, if you see any traffic to www.example.com/shop, send it to 203.0.113.34’. This is what we call a resolve override. It is essentially a DNS override.
With a resolve override in place, HTTP requests to www.example.com/shop are now correctly sent by Cloudflare to 203.0.113.34 as requested. And they fail. The web server says it doesn’t know what to do with the HTTP request. This is because the host header is still www.example.com, and the web server does not have any knowledge of that website.
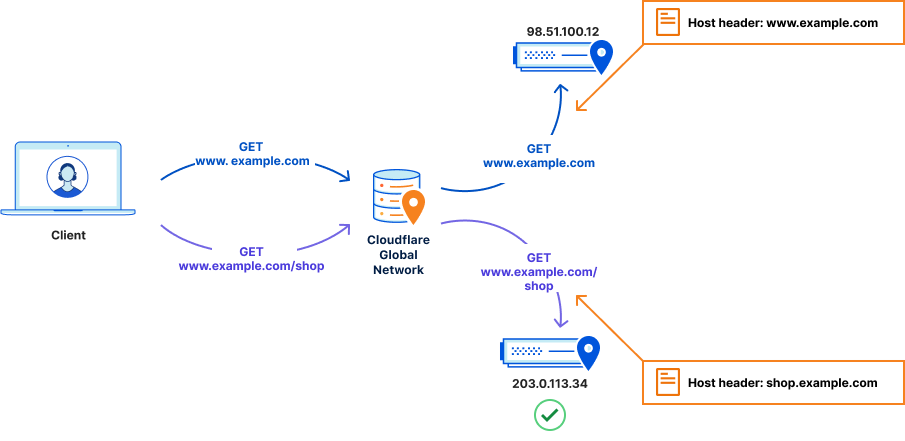
To fix this, we need to make sure these requests are sent to 203.0.113.34 with a host header of shop.example.com. This is what is known as a host header override. Now, requests to www.example.com/shop are not only correctly routed to 203.0.113.34, but the host header is changed to one that the ecommerce software is expecting – and thus the request is correctly routed, and the visitors sees the correct content.
The management of these selective overrides, and other overrides, is achieved via Origin Rules.
Origin Rules allow users to route HTTP traffic to different destinations and override certain request characteristics based on a number of criteria such as the visitor’s country, IP address or HTTP request headers.
Route on more than a URL
Origin Rules is built on top of our ruleset engine. This gives users the ability to perform routing decisions based on many fields including the requested URL, and also the visitors country, specific request headers, and more.
Using a combination of one or more of these available fields, users can ensure traffic is routed to specific backends, only when specific criteria are met such as host, URI path, visitor’s country, and HTTP request headers.
Historically, host header override and resolve override were achieved with the setting of a Page Rule.
Page Rules is the ‘If This Then That’ of Cloudflare. Where the ‘If…’ is a URL, and the ‘Then That’ is changing how we handle traffic to specific parts of a ‘zone’. It allows users to selectively change how traffic is handled, or in this case, where traffic is sent. It is very well adopted, with over one million Page Rules in the past three months alone.
Page Rules, however, are limited to performing actions based upon the requested URL. This means if users want to change the backend a HTTP request goes to, they need to make that decision based on the URL alone. This can be challenging for users who may want to perform this decision-making on more nuanced aspects, like the user agent of the visitor or on the presence of a specific cookie.
With Origin Rules, users can perform host header override, resolve override, destination port override and SNI overrides – based on any number of criteria – not only the requested URL. This unlocks a number of interesting use cases.
Example use case: integration with cloud storage endpoints
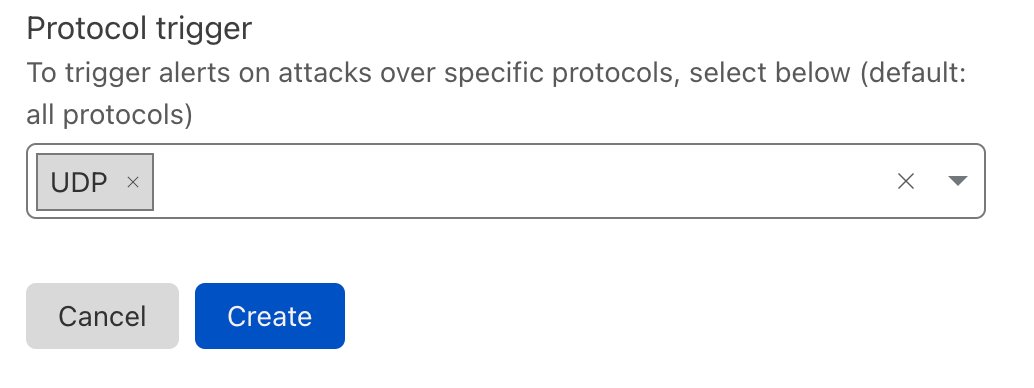
One such use case is using a cloud storage provider as a backend for static assets, such as images. Enterprise zones can use a combination of host header override and resolve override actions to override the destination of outgoing HTTP requests. This allows for all traffic to example.net to be sent to 98.51.100.12, but requests to example.net/*.jpg be sent to a publicly accessible S3-compatible bucket.
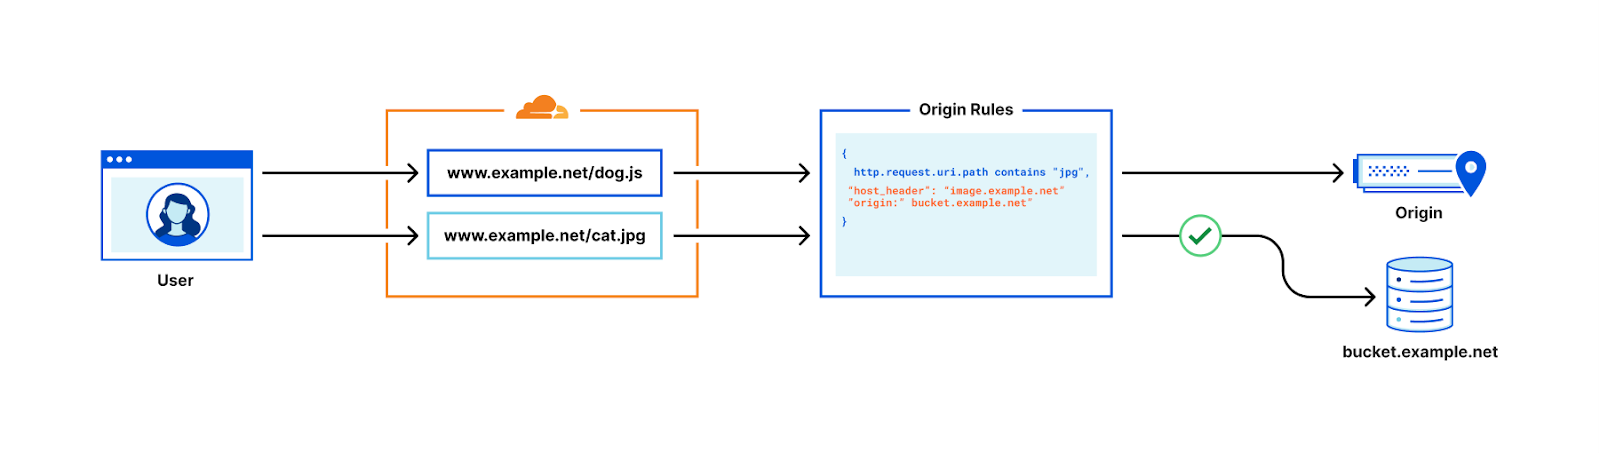
To do this, the user would create an Origin Rule setting the resolve override value to be a DNS record on their own zone, pointing to the S3 provider’s URL. This ensures that requests matching the pattern are routed to the S3 URL. However, when the cloud storage provider receives the request it will drop it – as it does not know how to route requests for the host example.net. Therefore, users also need to deploy a host header override, changing this value to match the bucket name – e.g. bucket.example.net.
Combined, this ensures requests matching the pattern correctly reach the cloud storage provider – with a host header it can use to correctly route the request to the correct bucket.
Origin Rules also enable new use cases. For example, a user can use Origin Rules to A/B test different cloud providers prior to a cut over. This is possible by using the field http.request.cookies and routing traffic to a new, test bucket or cloud provider based on the presence of a specific cookie on the request.
Users with multiple storage regions can also use the ip.geoip.country field within a filter expression to route users to the closest storage instance, reducing latency and time to load for these requests.
Destination port override
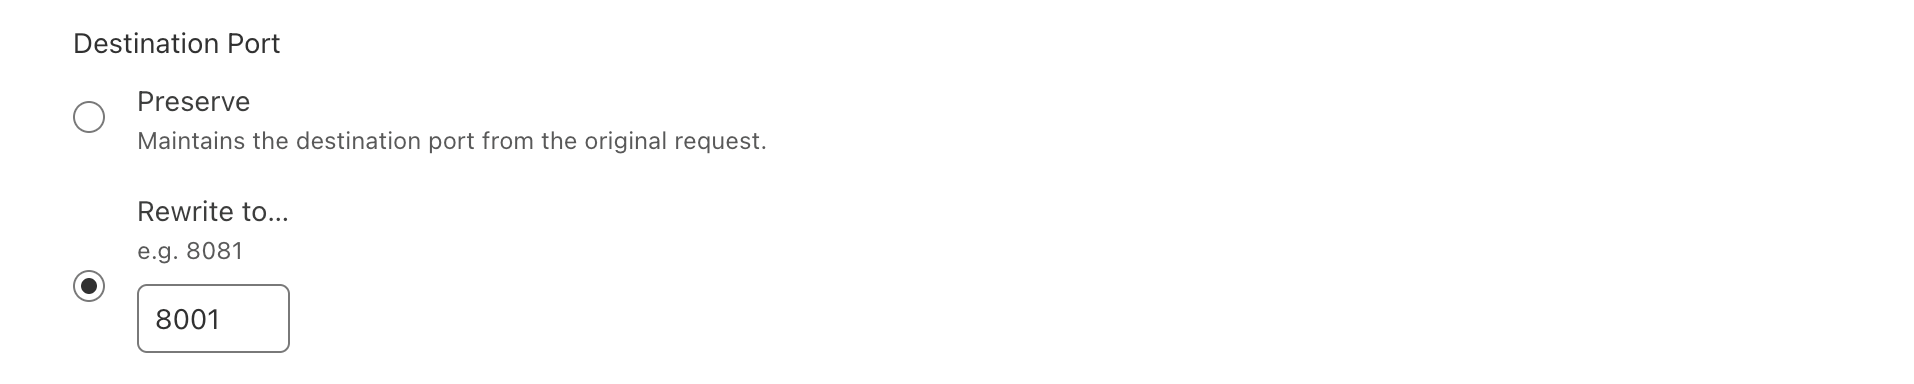
Cloudflare listens on 13 ports; seven ports for HTTP, six ports for HTTPS. This means if a request is sent to a URL with the destination port of 443, as is standard for HTTPS, it will be sent to the origin server with a destination port of 443. The same 1:1 mapping applies to the other twelve ports.
But what if a user wanted to change that mapping? For example, when the backend origin server is listening on port 8001. In this scenario, an intermediate service is required to listen for requests on port 443 and create a sub-request with the destination port set to 8001.
Historically this was done on the origin server itself – with a reverse proxy server listening for requests on 443 and other ports and proxying those requests to another port.
Apache
 <VirtualHost *:*>
        ProxyPreserveHost On
        ProxyPass / http://0.0.0.0:8001/
        ProxyPassReverse / http://0.0.0.0:8001/
        ServerName example.com
    </VirtualHost>

NGINX
server {
  listen 443;
  server_name example.com;
    location / {
      proxy_pass http://0.0.0.0:8001;
    }
}
More recently, users have deployed Cloudflare Workers to perform this service, modifying the destination port before HTTP requests ever reach their servers.
Origin Rules simplifies destination port modifications, letting users change the destination port via a simple rules experience without ever having to write a single line of code or configuration:
This destination port modification can also be triggered on almost any field available in the ruleset engine, also, allowing users to change which port to send requests to based on URL, URI path, the presence of HTTP request header and more.
Server Name Indication
Server Name Indication (SNI) is an addition to the TLS encryption protocol. It enables a client device to specify the domain name it is trying to reach in the first step of the TLS handshake, preventing common “name mismatch” errors. Customers using Cloudflare for SaaS may have millions of hostnames pointing to Cloudflare. However, the origin that these requests are sent to may not have an individual certificate for each of the hostnames.
Users today have the option of doing this on a per custom hostname basis using custom origins in SSL for SaaS, however for Enterprise customers not using this setup it was an impossible task.
Enterprise users can use Origin Rules to override the value of the SNI, providing it matches any other zone in their account. This removes the need for users to manage multiple certificates on the origin or choose not to encrypt connections from Cloudflare to the origin.
Try it now
Origin Rules are available to use now via API, Terraform, and our dashboard. Further details can be found on our Developers Docs. Currently, destination port rewriting is available for all our customers as part of Origin Rules. Resolve Override, Host Header Override and SNI overrides are available to our Enterprise users.