Post Syndicated from Jonathan Nguyen original https://aws.amazon.com/blogs/security/generate-ai-powered-insights-for-amazon-security-lake-using-amazon-sagemaker-studio-and-amazon-bedrock/
In part 1, we discussed how to use Amazon SageMaker Studio to analyze time-series data in Amazon Security Lake to identify critical areas and prioritize efforts to help increase your security posture. Security Lake provides additional visibility into your environment by consolidating and normalizing security data from both AWS and non-AWS sources. Security teams can use Amazon Athena to query data in Security Lake to aid in a security event investigation or proactive threat analysis. Reducing the security team’s mean time to respond to or detect a security event can decrease your organization’s security vulnerabilities and risks, minimize data breaches, and reduce operational disruptions. Even if your security team is already familiar with AWS security logs and is using SQL queries to sift through data, determining appropriate log sources to review and crafting customized SQL queries can add time to an investigation. Furthermore, when security analysts conduct their analysis using SQL queries, the results are point-in-time and don’t automatically factor results from previous queries.
In this blog post, we show you how to extend the capabilities of SageMaker Studio by using Amazon Bedrock, a fully-managed generative artificial intelligence (AI) service natively offering high-performing foundation models (FMs) from leading AI companies with a single API. By using Amazon Bedrock, security analysts can accelerate security investigations by using a natural language companion to automatically generate SQL queries, focus on relevant data sources within Security Lake, and use previous SQL query results to enhance the results from future queries. We walk through a threat analysis exercise to show how your security analysts can use natural language processing to answer questions such as which AWS account has the most AWS Security Hub findings, irregular network activity from AWS resources, or which AWS Identity and Access Management (IAM) principals invoked highly suspicious activity. By identifying possible vulnerabilities or misconfigurations, you can minimize mean time to detect and pinpoint specific resources to assess overall impact. We also discuss methods to customize Amazon Bedrock integration with data from your Security Lake. While large language models (LLMs) are useful conversational partners, it’s important to note that LLM responses can include hallucinations, which might not reflect truth or reality. We discuss some mechanisms to validate LLM responses and mitigate hallucinations. This blog post is best suited for technologists who have an in-depth understanding of generative artificial intelligence concepts and the AWS services used in the example solution.
Solution overview
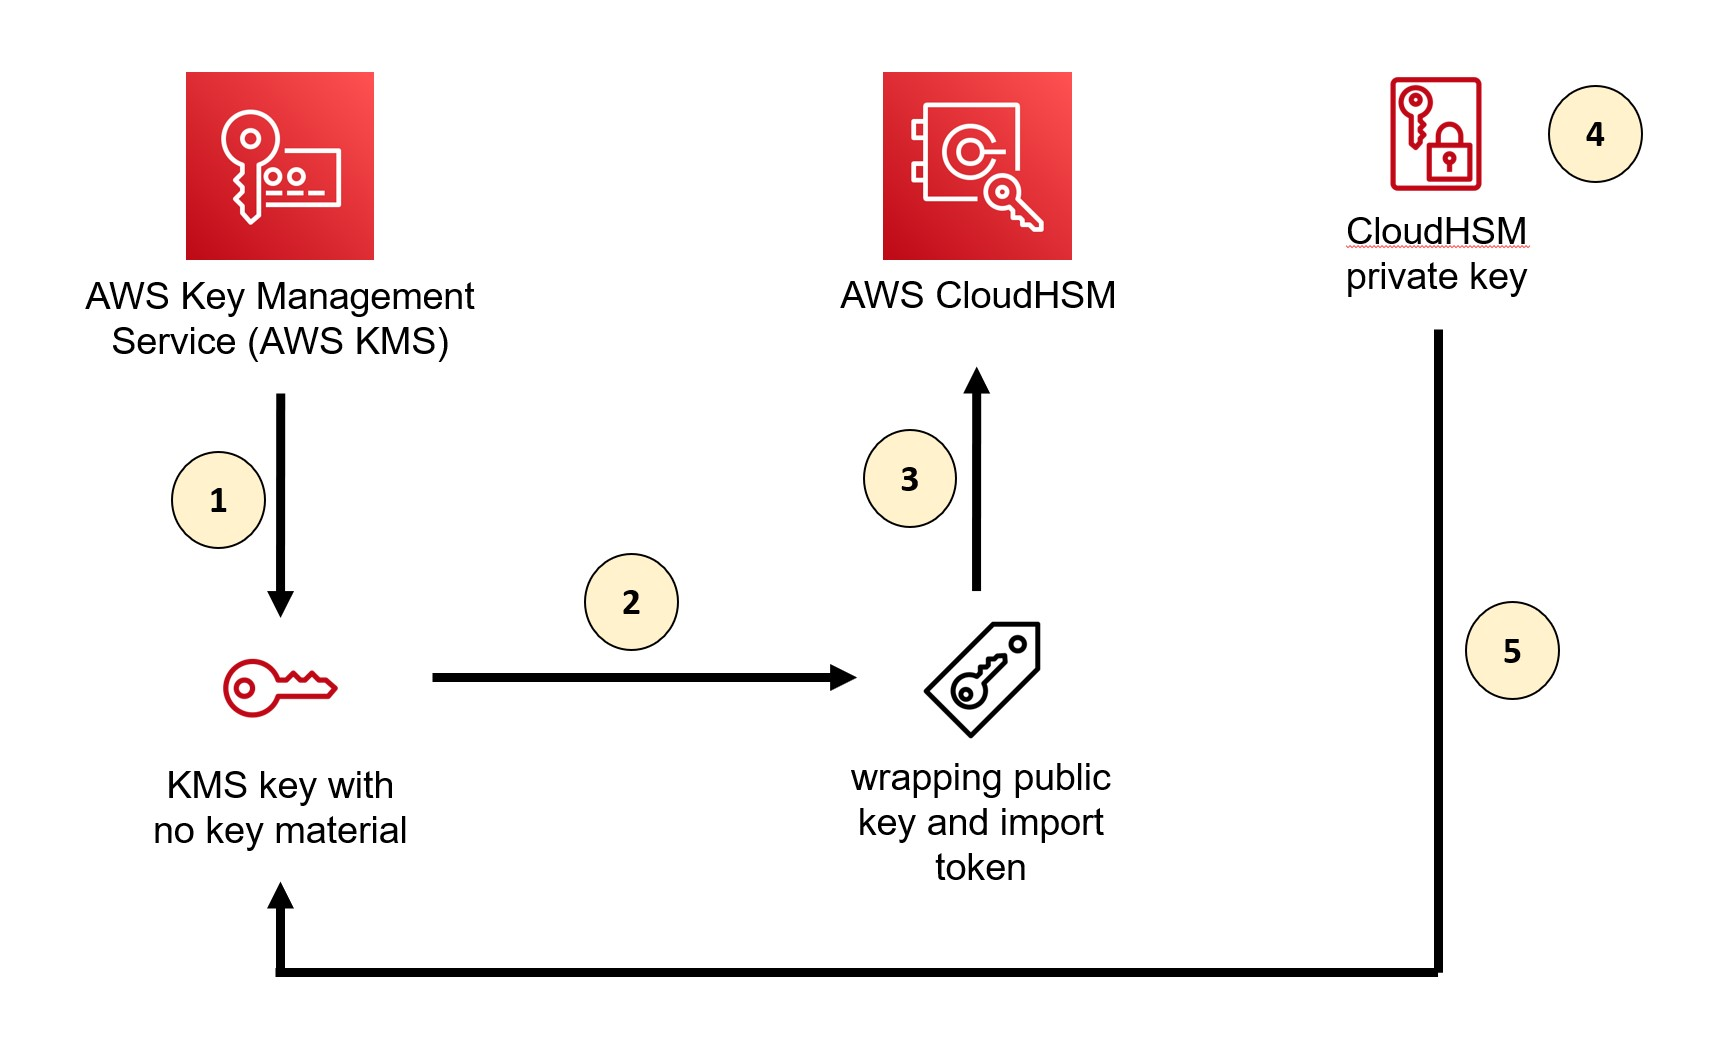
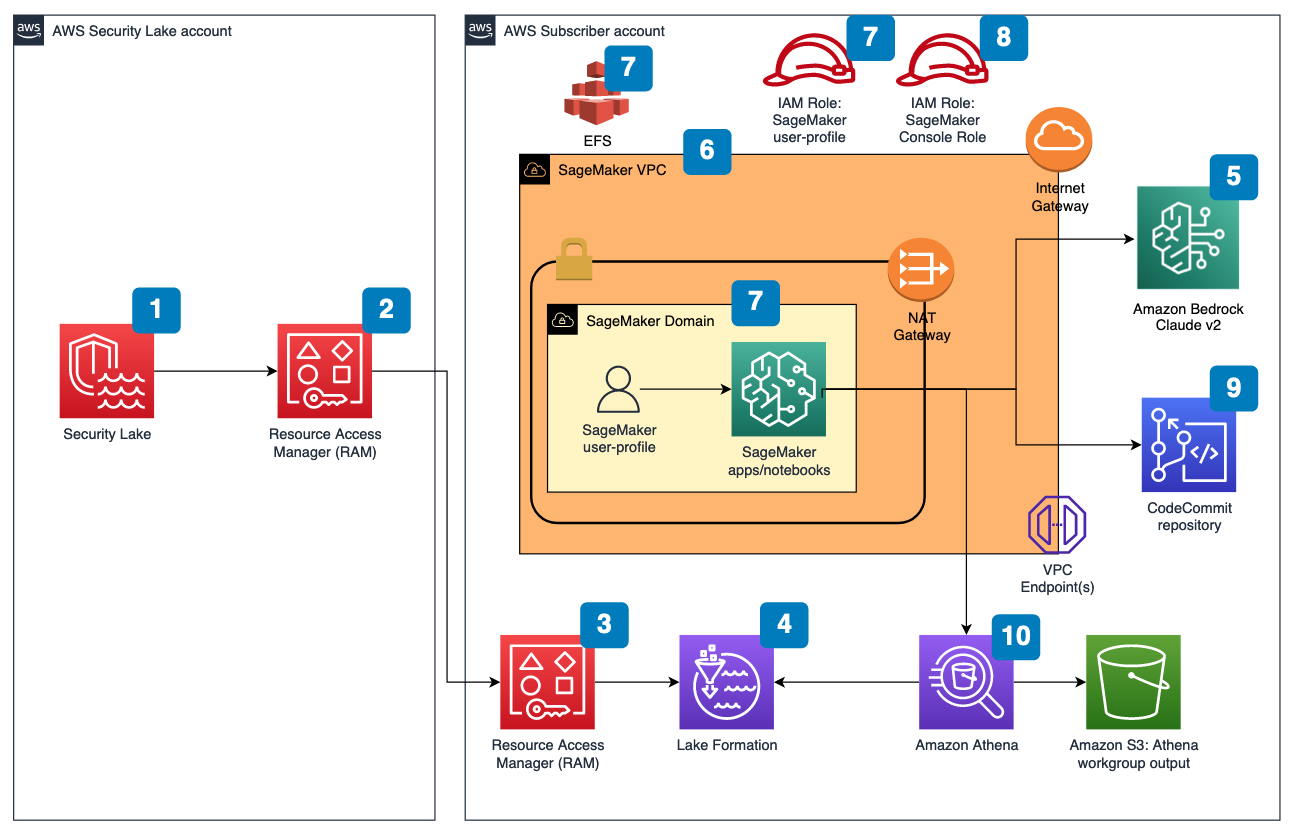
Figure 1 depicts the architecture of the sample solution.

Figure 1: Security Lake generative AI solution architecture
Before you deploy the sample solution, complete the following prerequisites:
- Enable Security Lake in your organization in AWS Organizations and specify a delegated administrator account to manage the Security Lake configuration for all member accounts in your organization. Configure Security Lake with the appropriate log sources: Amazon Virtual Private Cloud (VPC) Flow Logs, AWS Security Hub, AWS CloudTrail, and Amazon Route53.
- Create subscriber query access from the source Security Lake AWS account to the subscriber AWS account.
- Accept a resource share request in the subscriber AWS account in AWS Resource Access Manager (AWS RAM).
- Create a database link in AWS Lake Formation in the subscriber AWS account and grant access for the Athena tables in the Security Lake AWS account.
- Grant Claude v2 model access for Amazon Bedrock LLM Claude v2 in the AWS subscriber account where you will deploy the solution. If you try to use a model before you enable it in your AWS account, you will get an error message.
After you set up the prerequisites, the sample solution architecture provisions the following resources:
- A VPC is provisioned for SageMaker with an internet gateway, a NAT gateway, and VPC endpoints for all AWS services within the solution. An internet gateway or NAT gateway is required to install external open-source packages.
- A SageMaker Studio domain is created in VPCOnly mode with a single SageMaker user-profile that’s tied to an IAM role. As part of the SageMaker deployment, an Amazon Elastic File System (Amazon EFS) is provisioned for the SageMaker domain.
- A dedicated IAM role is created to restrict access to create or access the SageMaker domain’s presigned URL from a specific Classless Inter-Domain Routing (CIDR) for accessing the SageMaker notebook.
- An AWS CodeCommit repository containing Python notebooks used for the artificial intelligence and machine learning (AI/ML) workflow by the SageMaker user profile.
- An Athena workgroup is created for Security Lake queries with a S3 bucket for output location (access logging is configured for the output bucket).
Cost
Before deploying the sample solution and walking through this post, it’s important to understand the cost factors for the main AWS services being used. The cost will largely depend on the amount of data you interact with in Security Lake and the duration of running resources in SageMaker Studio.
- A SageMaker Studio domain is deployed and configured with default setting of a ml.t3.medium instance type. For a more detailed breakdown, see SageMaker Studio pricing. It’s important to shut down applications when they’re not in use because you’re billed for the number of hours an application is running. See the AWS samples repository for an automated shutdown extension.
- Amazon Bedrock on-demand pricing is based on the selected LLM and the number of input and output tokens. A token is comprised of a few characters and refers to the basic unit of text that a model learns to understand the user input and prompts. For a more detailed breakdown, see Amazon Bedrock pricing.
- The SQL queries generated by Amazon Bedrock are invoked using Athena. Athena cost is based on the amount of data scanned within Security Lake for that query. For a more detailed breakdown, see Athena pricing.
Deploy the sample solution
You can deploy the sample solution by using either the AWS Management Console or the AWS Cloud Development Kit (AWS CDK). For instructions and more information on using the AWS CDK, see Get Started with AWS CDK.
Option 1: Deploy using AWS CloudFormation using the console
Use the console to sign in to your subscriber AWS account and then choose the Launch Stack button to open the AWS CloudFormation console that’s pre-loaded with the template for this solution. It takes approximately 10 minutes for the CloudFormation stack to complete.

Option 2: Deploy using AWS CDK
- Clone the Security Lake generative AI sample repository.
- Navigate to the project’s source folder (…/amazon-security-lake-generative-ai/source).
- Install project dependencies using the following commands:
npm install -g aws-cdk-lib
npm install
- On deployment, you must provide the following required parameters:
- IAMroleassumptionforsagemakerpresignedurl – this is the existing IAM role you want to use to access the AWS console to create presigned URLs for SageMaker Studio domain.
- securitylakeawsaccount – this is the AWS account ID where Security Lake is deployed.
- Run the following commands in your terminal while signed in to your subscriber AWS account. Replace <INSERT_AWS_ACCOUNT> with your account number and replace <INSERT_REGION> with the AWS Region that you want the solution deployed to.
cdk bootstrap aws://<INSERT_AWS_ACCOUNT>/<INSERT_REGION>

cdk deploy --parameters IAMroleassumptionforsagemakerpresignedurl=arn:aws:iam::<INSERT_AWS_ACCOUNT>:role/<INSERT_IAM_ROLE_NAME> --parameters securitylakeawsaccount=<INSERT_SECURITY_LAKE_AWS_ACCOUNT_ID>
Post-deployment configuration steps
Now that you’ve deployed the solution, you must add permissions to allow SageMaker and Amazon Bedrock to interact with your Security Lake data.
Grant permission to the Security Lake database
- Copy the SageMaker user profile Amazon Resource Name (ARN)
arn:aws:iam::<account-id>:role/sagemaker-user-profile-for-security-lake
- Go to the Lake Formation console.
- Select the amazon_security_lake_glue_db_<YOUR-REGION> database. For example, if your Security Lake is in us-east-1, the value would be amazon_security_lake_glue_db_us_east_1
- For Actions, select Grant.
- In Grant Data Permissions, select SAML Users and Groups.
- Paste the SageMaker user profile ARN from Step 1.
- In Database Permissions, select Describe, and then Grant.
Grant permission to Security Lake tables
You must repeat these steps for each source configured within Security Lake. For example, if you have four sources configured within Security Lake, you must grant permissions for the SageMaker user profile to four tables. If you have multiple sources that are in separate Regions and you don’t have a rollup Region configured in Security Lake, you must repeat the steps for each source in each Region.
The following example grants permissions to the Security Hub table within Security Lake. For more information about granting table permissions, see the AWS LakeFormation user-guide.
- Copy the SageMaker user-profile ARN arn:aws:iam:<account-id>:role/sagemaker-user-profile-for-security-lake.
- Go to the Lake Formation console.
- Select the amazon_security_lake_glue_db_<YOUR-REGION> database.
For example, if your Security Lake database is in us-east-1 the value would be amazon_security_lake_glue_db_us_east_1
- Choose View Tables.
- Select the amazon_security_lake_table_<YOUR-REGION>_sh_findings_1_0 table.
For example, if your Security Lake table is in us-east-1 the value would be amazon_security_lake_table_us_east_1_sh_findings_1_0
Note: Each table must be granted access individually. Selecting All Tables won’t grant the access needed to query Security Lake.
- For Actions, select Grant.
- In Grant Data Permissions, select SAML Users and Groups.
- Paste the SageMaker user profile ARN from Step 1.
- In Table Permissions, select Describe, and then Grant.
Launch your SageMaker Studio application
Now that you’ve granted permissions for a SageMaker user profile, you can move on to launching the SageMaker application associated to that user profile.
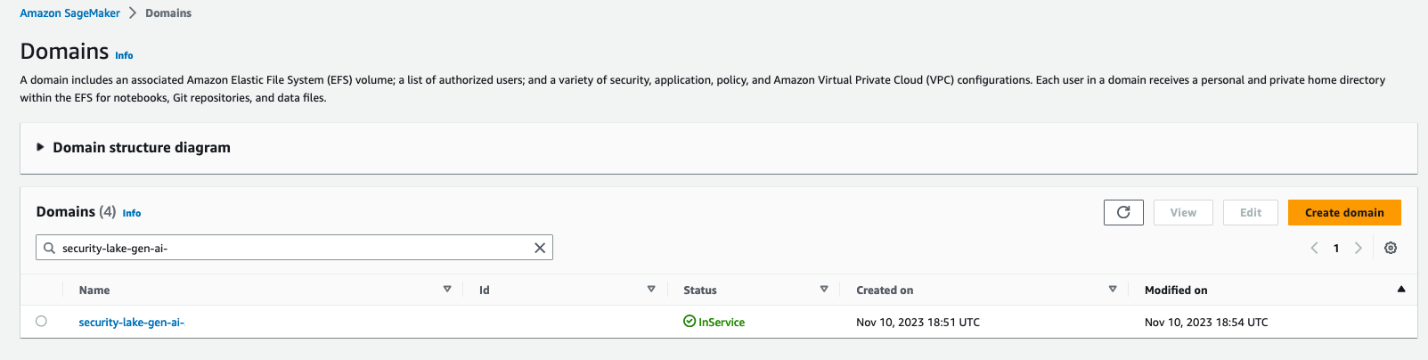
- Navigate to the SageMaker Studio domain in the console.
- Select the SageMaker domain security-lake-gen-ai-<subscriber-account-id>.
- Select the SageMaker user profile sagemaker-user-profile-for-security-lake.
- For Launch, select Studio.

Figure 2: SageMaker Studio domain view
Clone the Python notebook
As part of the solution deployment, we’ve created a foundational Python notebook in CodeCommit to use within your SageMaker app.
- Navigate to CloudFormation in the console.
- In the Stacks section, select the SageMakerDomainStack.
- Select the Outputs tab.
- Copy the value for the SageMaker notebook generative AI repository URL. (For example: https://git-codecommit.us-east-1.amazonaws.com/v1/repos/sagemaker_gen_ai_repo)
- Go back to your SageMaker app.
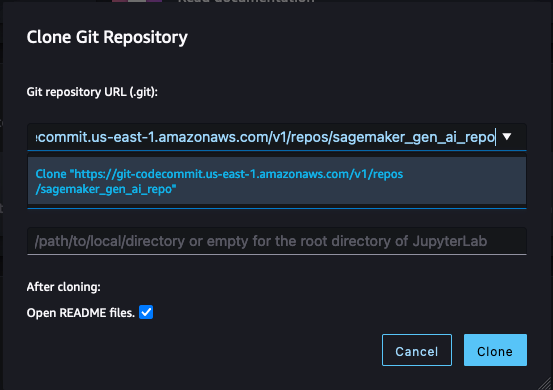
- In SageMaker Studio, in the left sidebar, choose the Git icon (a diamond with two branches), then choose Clone a Repository.

Figure 3: SageMaker Studio clone repository option
- Paste the CodeCommit repository link from Step 4 under the Git repository URL (git). After you paste the URL, select Clone “https://git-codecommit.us-east-1.amazonaws.com/v1/repos/sagemaker_gen_ai_repo”, then select Clone.
Note: If you don’t select from the auto-populated list, SageMaker won’t be able to clone the repository and will return a message that the URL is invalid.

Figure 4: SageMaker Studio clone HTTPS repository URL
Configure your notebook to use generative AI
In the next section, we walk through how we configured the notebook and why we used specific LLMs, agents, tools, and additional configurations so you can extend and customize this solution to your use case.
The notebook we created uses the LangChain framework. LangChain is a framework for developing applications powered by language models and processes natural language inputs from the user, generates SQL queries, and runs those queries on your Security Lake data. For our use case, we’re using LangChain with Anthropic’s Claude 2 model on Amazon Bedrock.
Set up the notebook environment
- After you’re in the generative_ai_security_lake.ipynb notebook, you can set up your notebook environment. Keep the default settings and choose Select.

Figure 5: SageMaker Studio notebook start-up configuration
- Run the first cell to install the requirements listed in the requirements.txt file.
Connect to the Security Lake database using SQLAlchemy
The example solution uses a pre-populated Security Lake database with metadata in the AWS Glue Data Catalog. The inferred schema enables the LLM to generate SQL queries in response to the questions being asked.
LangChain uses SQLAlchemy, which is a Python SQL toolkit and object relational mapper, to access databases. To connect to a database, first import SQLAlchemy and create an engine object by specifying the following:
- SCHEMA_NAME
- S3_STAGING_DIR
- AWS_REGION
- ATHENA REST API details
You can use the following configuration code to establish database connections and start querying.
import os
ACCOUNT_ID = os.environ["AWS_ACCOUNT_ID"]
REGION_NAME = os.environ.get('REGION_NAME', 'us-east-1')
REGION_FMT = REGION_NAME.replace("-","_")

from langchain import SQLDatabase
from sqlalchemy import create_engine

#Amazon Security Lake Database
SCHEMA_NAME = f"amazon_security_lake_glue_db_{REGION_FMT}"

#S3 Staging location for Athena query output results and this will be created by deploying the Cloud Formation stack
S3_STAGING_DIR = f's3://athena-gen-ai-bucket-results-{ACCOUNT_ID}/output/'

engine_athena = create_engine(
    "awsathena+rest://@athena.{}.amazonaws.com:443/{}?s3_staging_dir={}".
    format(REGION_NAME, SCHEMA_NAME, S3_STAGING_DIR)
)

athena_db = SQLDatabase(engine_athena)
db = athena_db
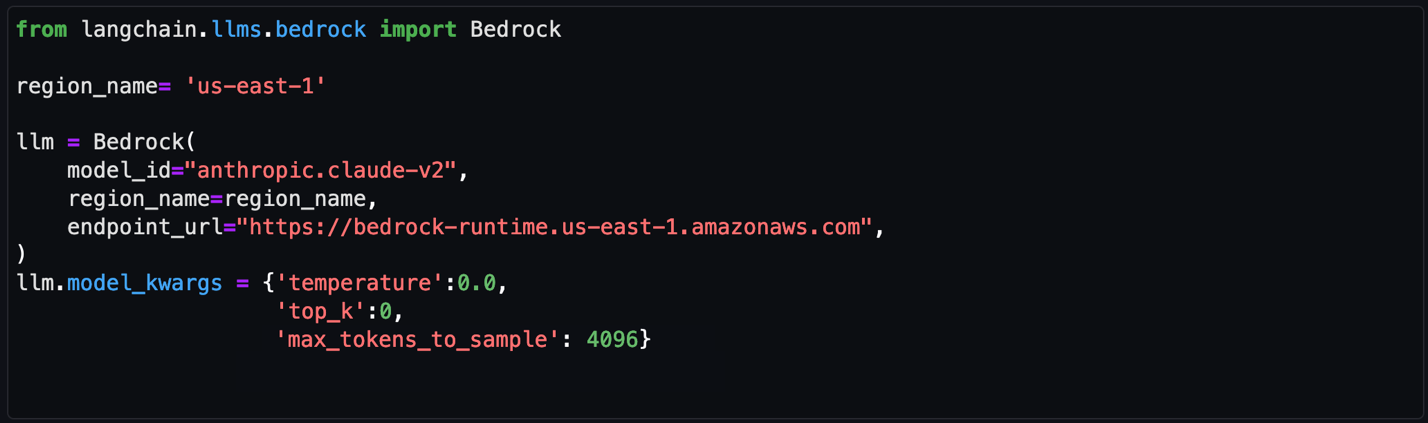
Initialize the LLM and Amazon Bedrock endpoint URL
Amazon Bedrock provides a list of Region-specific endpoints for making inference requests for models hosted in Amazon Bedrock. In this post, we’ve defined the model ID as Claude v2 and the Amazon Bedrock endpoint as us-east-1. You can change this to other LLMs and endpoints as needed for your use case.
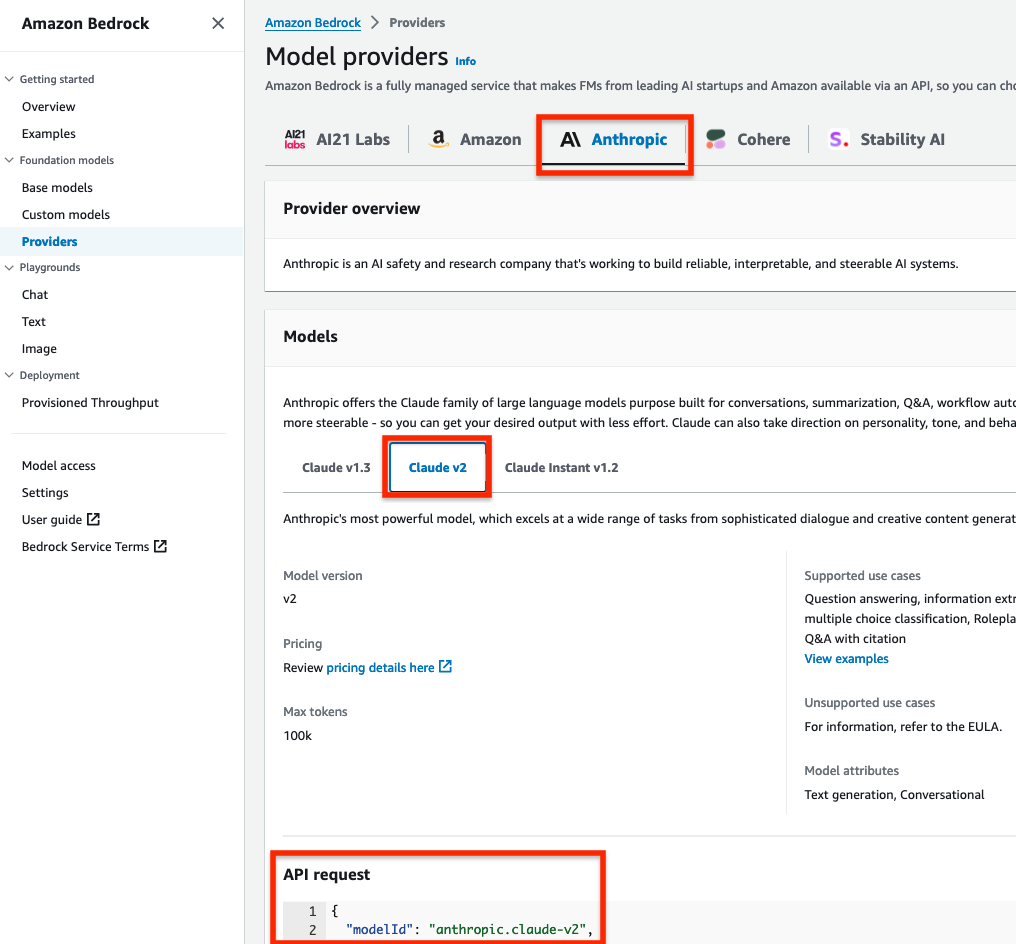
Obtain a model ID from the AWS console
- Go to the Amazon Bedrock console.
- In the navigation pane, under Foundation models, select Providers.
- Select the Anthropic tab from the top menu and then select Claude v2.
- In the model API request note the model ID value in the JSON payload.
Note: Alternatively, you can use the AWS Command Line Interface (AWS CLI) to run the list-foundation-models command in a SageMaker notebook cell or a CLI terminal to the get the model ID. For AWS SDK, you can use the ListFoundationModels operation to retrieve information about base models for a specific provider.

Figure 6: Amazon Bedrock Claude v2 model ID
Set the model parameters
After the LLM and Amazon Bedrock endpoints are configured, you can use the model_kwargs dictionary to set model parameters. Depending on your use case, you might use different parameters or values. In this example, the following values are already configured in the notebook and passed to the model.
- temperature: Set to 0. Temperature controls the degree of randomness in responses from the LLM. By adjusting the temperature, users can control the balance between having predictable, consistent responses (value closer to 0) compared to more creative, novel responses (value closer to 1).
Note: Instead of using the temperature parameter, you can set top_p, which defines a cutoff based on the sum of probabilities of the potential choices. If you set Top P below 1.0, the model considers the most probable options and ignores less probable ones. According to Anthropic’s user guide, “you should either alter temperature or top_p, but not both.”
- top_k: Set to 0. While temperature controls the probability distribution of potential tokens, top_k limits the sample size for each subsequent token. For example, if top_k=50, the model selects from the 50 most probable tokens that could be next in a sequence. When you lower the top_k value, you remove the long tail of low probability tokens to select from in a sequence.
- max_tokens_to_sample: Set to 4096. For Anthropic models, the default is 256 and the max is 4096. This value denotes the absolute maximum number of tokens to predict before the generation stops. Anthropic models can stop before reaching this maximum.

Figure 7: Notebook configuration for Amazon Bedrock
Create and configure the LangChain agent
An agent uses a LLM and tools to reason and determine what actions to take and in which order. For this use case, we used a Conversational ReAct agent to remember conversational history and results to be used in a ReAct loop (Question → Thought → Action → Action Input → Observation  repeat → Answer). This way, you don’t have to remember how to incorporate previous results in the subsequent question or query. Depending on your use case, you can configure a different type of agent.
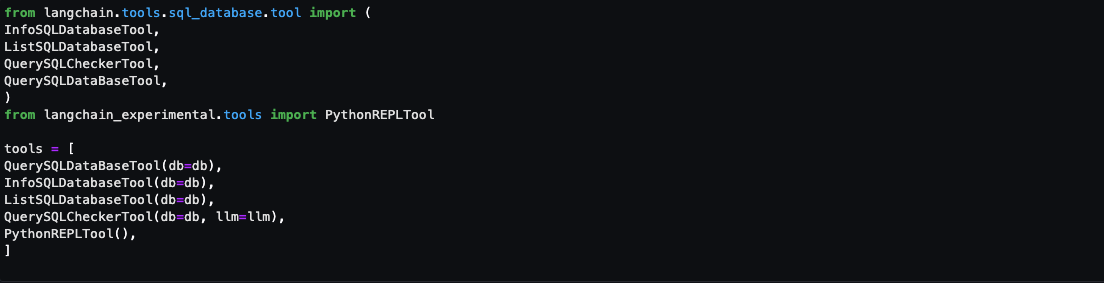
Create a list of tools
Tools are functions used by an agent to interact with the available dataset. The agent’s tools are used by an action agent. We import both SQL and Python REPL tools:
- List the available log source tables in the Security Lake database
- Extract the schema and sample rows from the log source tables
- Create SQL queries to invoke in Athena
- Validate and rewrite the queries in case of syntax errors
- Invoke the query to get results from the appropriate log source tables

Figure 8: Notebook LangChain agent tools
Here’s a breakdown for the tools used and the respective prompts:
- QuerySQLDataBaseTool: This tool accepts detailed and correct SQL queries as input and returns results from the database. If the query is incorrect, you receive an error message. If there’s an error, rewrite and recheck the query, and try again. If you encounter an error such as Unknown column xxxx in field list, use the sql_db_schema to verify the correct table fields.
- InfoSQLDatabaseTool: This tool accepts a comma-separated list of tables as input and returns the schema and sample rows for those tables. Verify that the tables exist by invoking the sql_db_list_tables first. The input format is: table1, table2, table3
- ListSQLDatabaseTool: The input is an empty string, the output is a comma separated list of tables in the database
- QuerySQLCheckerTool: Use this tool to check if your query is correct before running it. Always use this tool before running a query with sql_db_query
- PythonREPLTool: A Python shell. Use this to run python commands. The input should be a valid python command. If you want to see the output of a value, you should print it out with print(…).
Note: If a native tool doesn’t meet your needs, you can create custom tools. Throughout our testing, we found some of the native tools provided most of what we needed but required minor tweaks for our use case. We changed the default behavior for the tools for use with Security Lake data.
Create an output parser
Output parsers are used to instruct the LLM to respond in the desired output format. Although the output parser is optional, it makes sure the LLM response is formatted in a way that can be quickly consumed and is actionable by the user.

Figure 9: LangChain output parser setting
Adding conversation buffer memory
To make things simpler for the user, previous results should be stored for use in subsequent queries by the Conversational ReAct agent. ConversationBufferMemory provides the capability to maintain state from past conversations and enables the user to ask follow-up questions in the same chat context. For example, if you asked an agent for a list of AWS accounts to focus on, you want your subsequent questions to focus on that same list of AWS accounts instead of writing the values down somewhere and keeping track of it in the next set of questions. There are many other types of memory that can be used to optimize your use cases.

Figure 10: LangChain conversation buffer memory setting
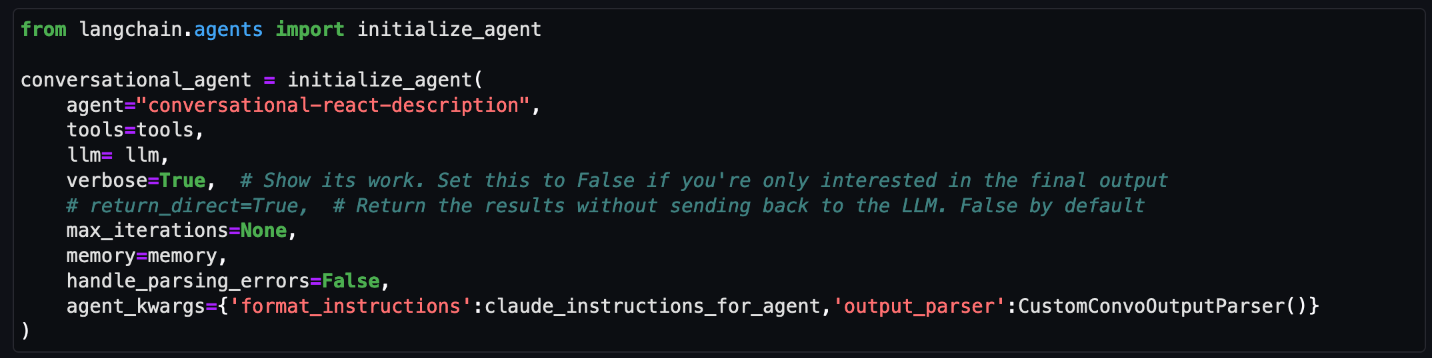
Initialize the agent
At this point, all the appropriate configurations are set and it’s time to load an agent executor by providing a set of tools and a LLM.
- tools: List of tools the agent will have access to.
- llm: LLM the agent will use.
- agent: Agent type to use. If there is no value provided and agent_path is set, the agent used will default to AgentType.ZERO_SHOT_REACT_DESCRIPTION.
- agent_kwargs: Additional keyword arguments to pass to the agent.

Figure 11: LangChain agent initialization
Note: For this post, we set verbose=True to view the agent’s intermediate ReAct steps, while answering questions. If you’re only interested in the output, set verbose=False.
You can also set return_direct=True to have the tool output returned to the user and closing the agent loop. Since we want to maintain the results of the query and used by the LLM, we left the default value of return_direct=False.
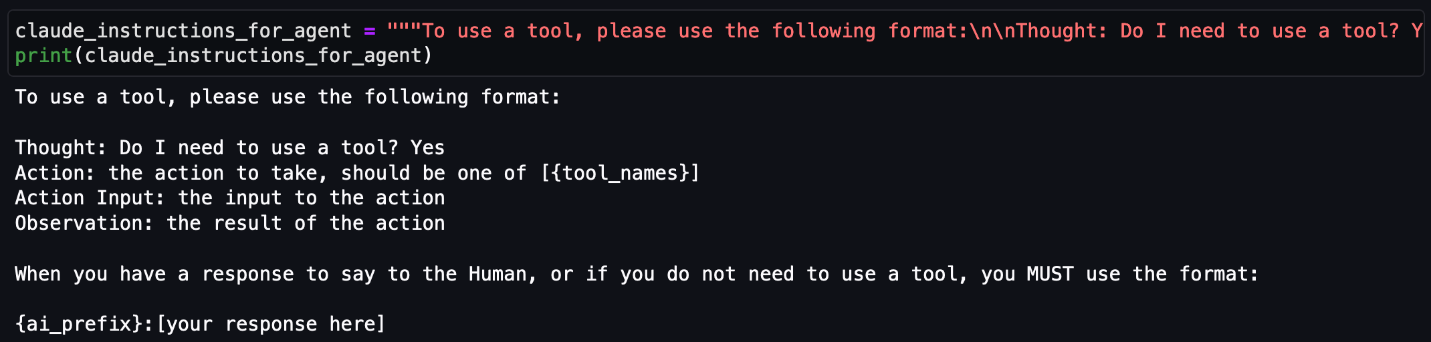
Provide instructions to the agent on using the tools
In addition to providing the agent with a list of tools, you would also give instructions to the agent on how and when to use these tools for your use case. This is optional but provides the agent with more context and can lead to better results.

Figure 12: LangChain agent instructions
Start your threat analysis journey with the generative AI-powered agent
Now that you’ve walked through the same set up process we used to create and initialize the agent, we can demonstrate how to analyze Security Lake data using natural language input questions that a security researcher might ask. The following examples focus on how you can use the solution to identify security vulnerabilities, risks, and threats and prioritize mitigating them. For this post, we’re using native AWS sources, but the agent can analyze any custom log sources configured in Security Lake. You can also use this solution to assist with investigations of possible security events in your environment.
For each of the questions that follow, you would enter the question in the free-form cell after it has run, similar to Figure 13.
Note: Because the field is free form, you can change the questions. Depending on the changes, you might see different results than are shown in this post. To end the conversation, enter exit and press the Enter key.

Figure 13: LangChain agent conversation input
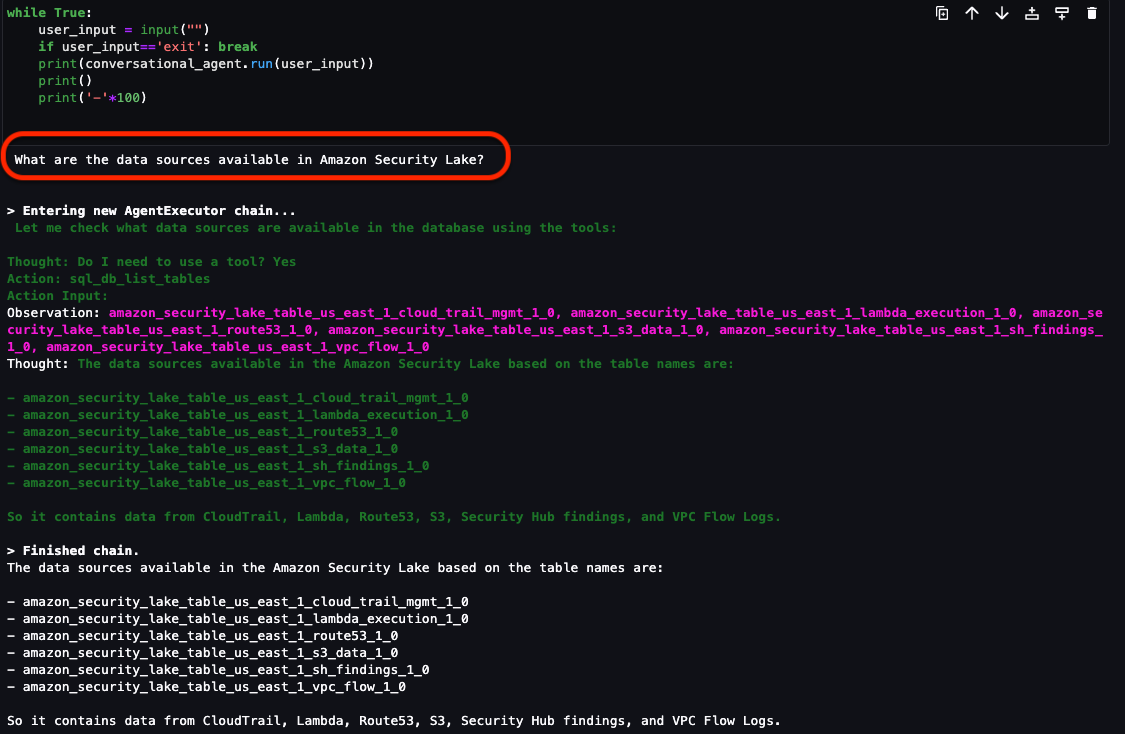
Question 1: What data sources are available in Security Lake?
In addition to the native AWS sources that Security Lake automatically ingests, your security team can incorporate additional custom log sources. It’s important to know what data is available to you to determine what and where to investigate. As shown in Figure 14, the Security Lake database contains the following log sources as tables:
If there are additional custom sources configured, they will also show up here. From here, you can focus on a smaller subset of AWS accounts that might have a larger number of security-related findings.

Figure 14: LangChain agent output for Security Lake tables
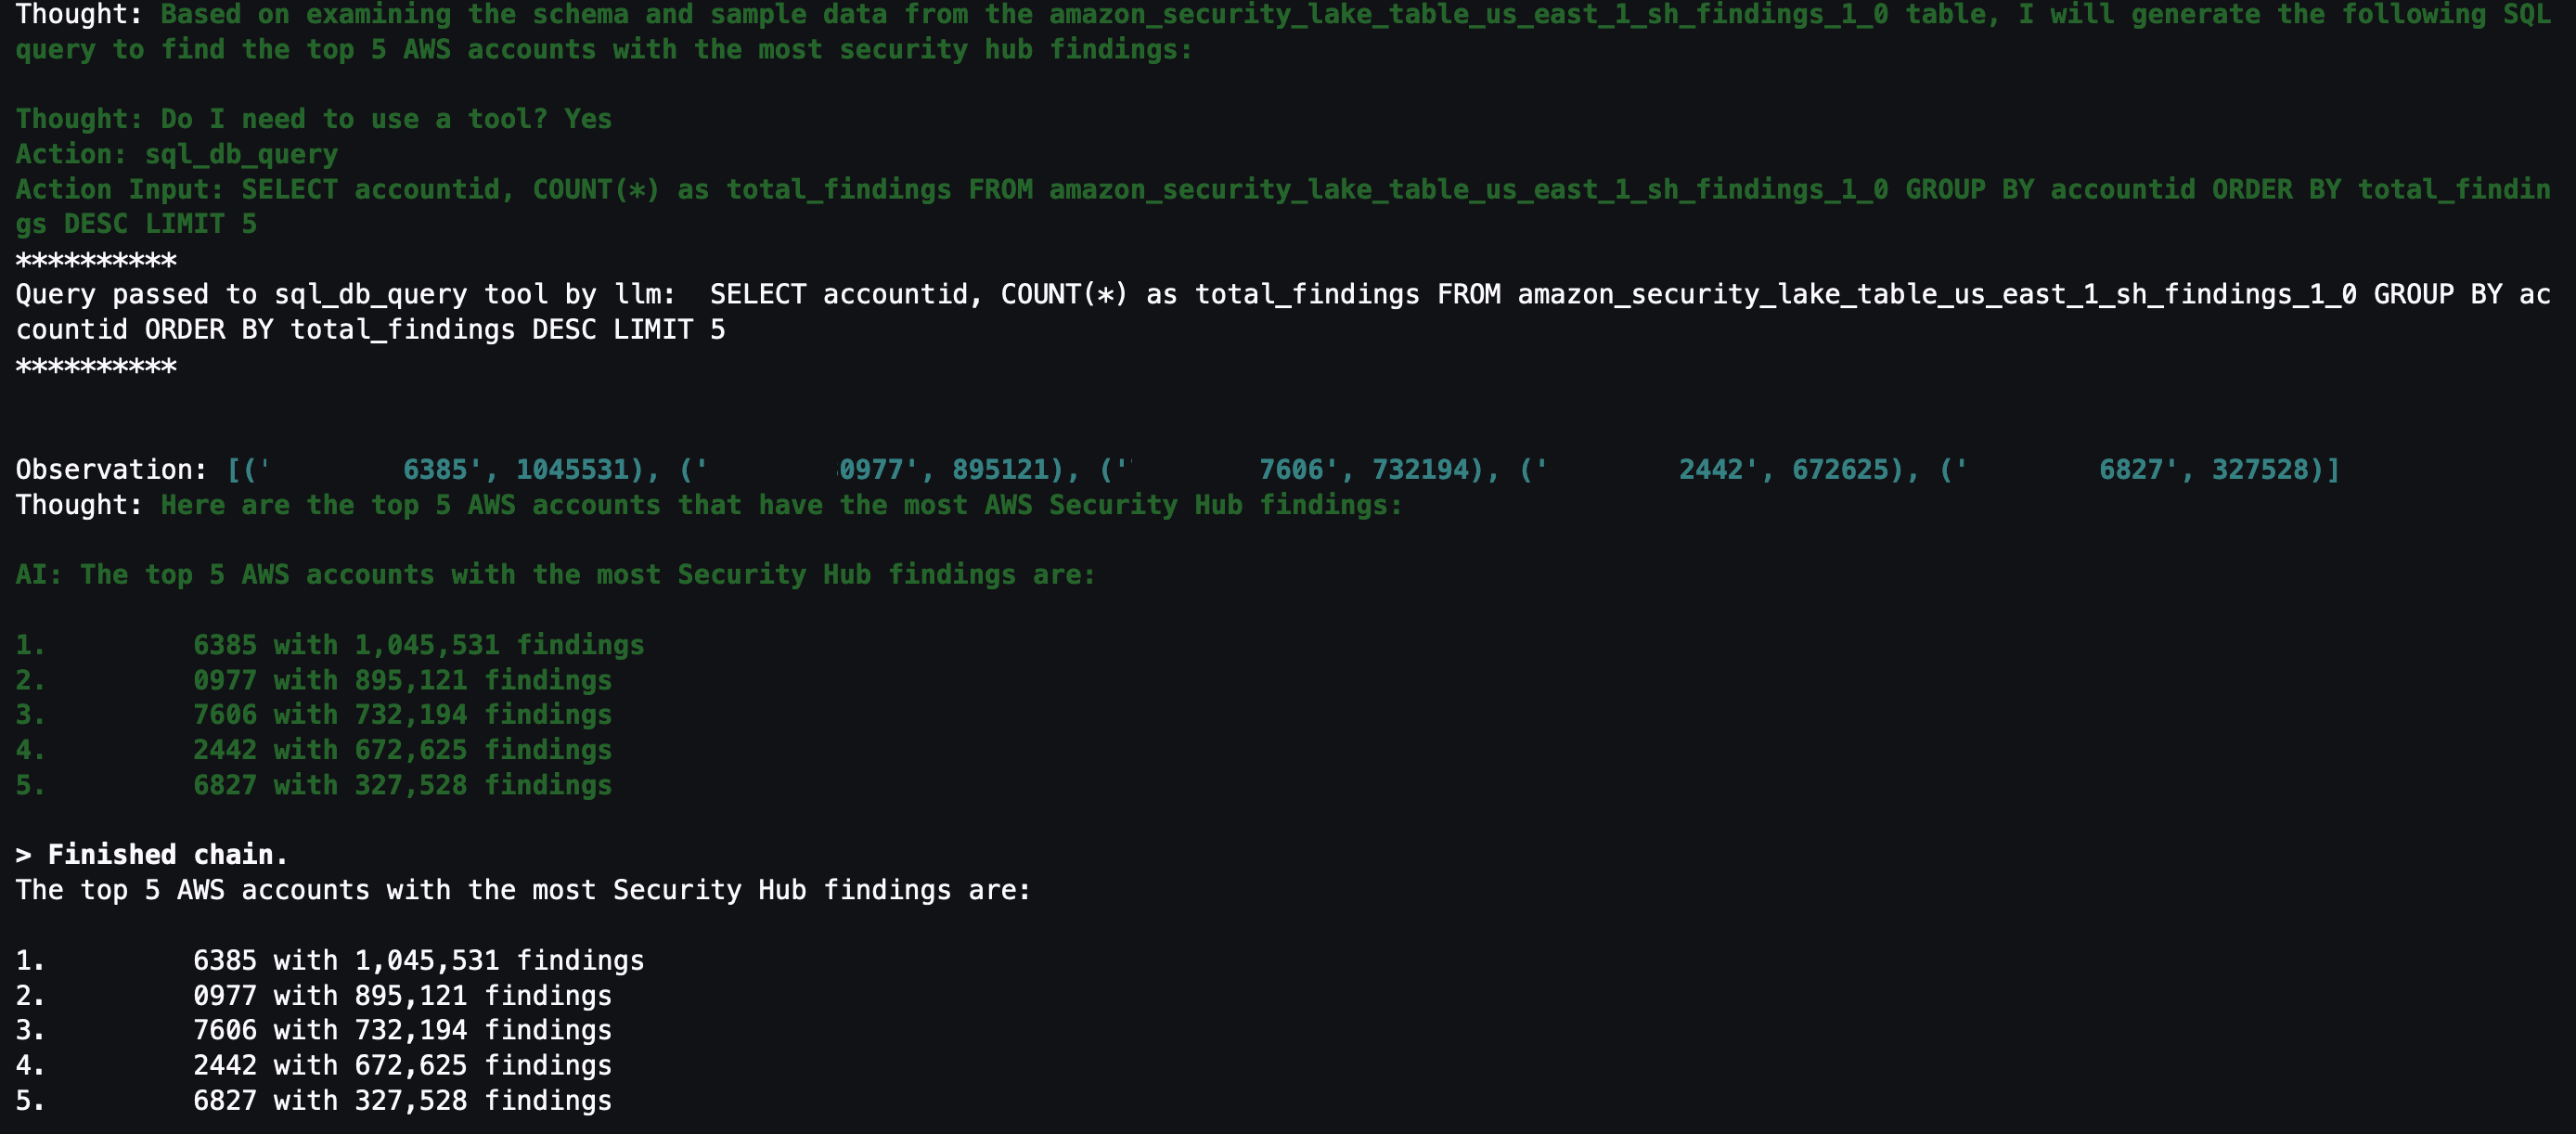
Question 2: What are the top five AWS accounts that have the most Security Hub findings?
Security Hub is a cloud security posture management service that not only aggregates findings from other AWS security services—such as Amazon GuardDuty, Amazon Macie, AWS Firewall Manager, and Amazon Inspector—but also from a number of AWS partner security solutions. Additionally, Security Hub has its own security best practices checks to help identify any vulnerabilities within your AWS environment. Depending on your environment, this might be a good starting place to look for specific AWS accounts to focus on.

Figure 15: LangChain output for AWS accounts with Security Hub findings
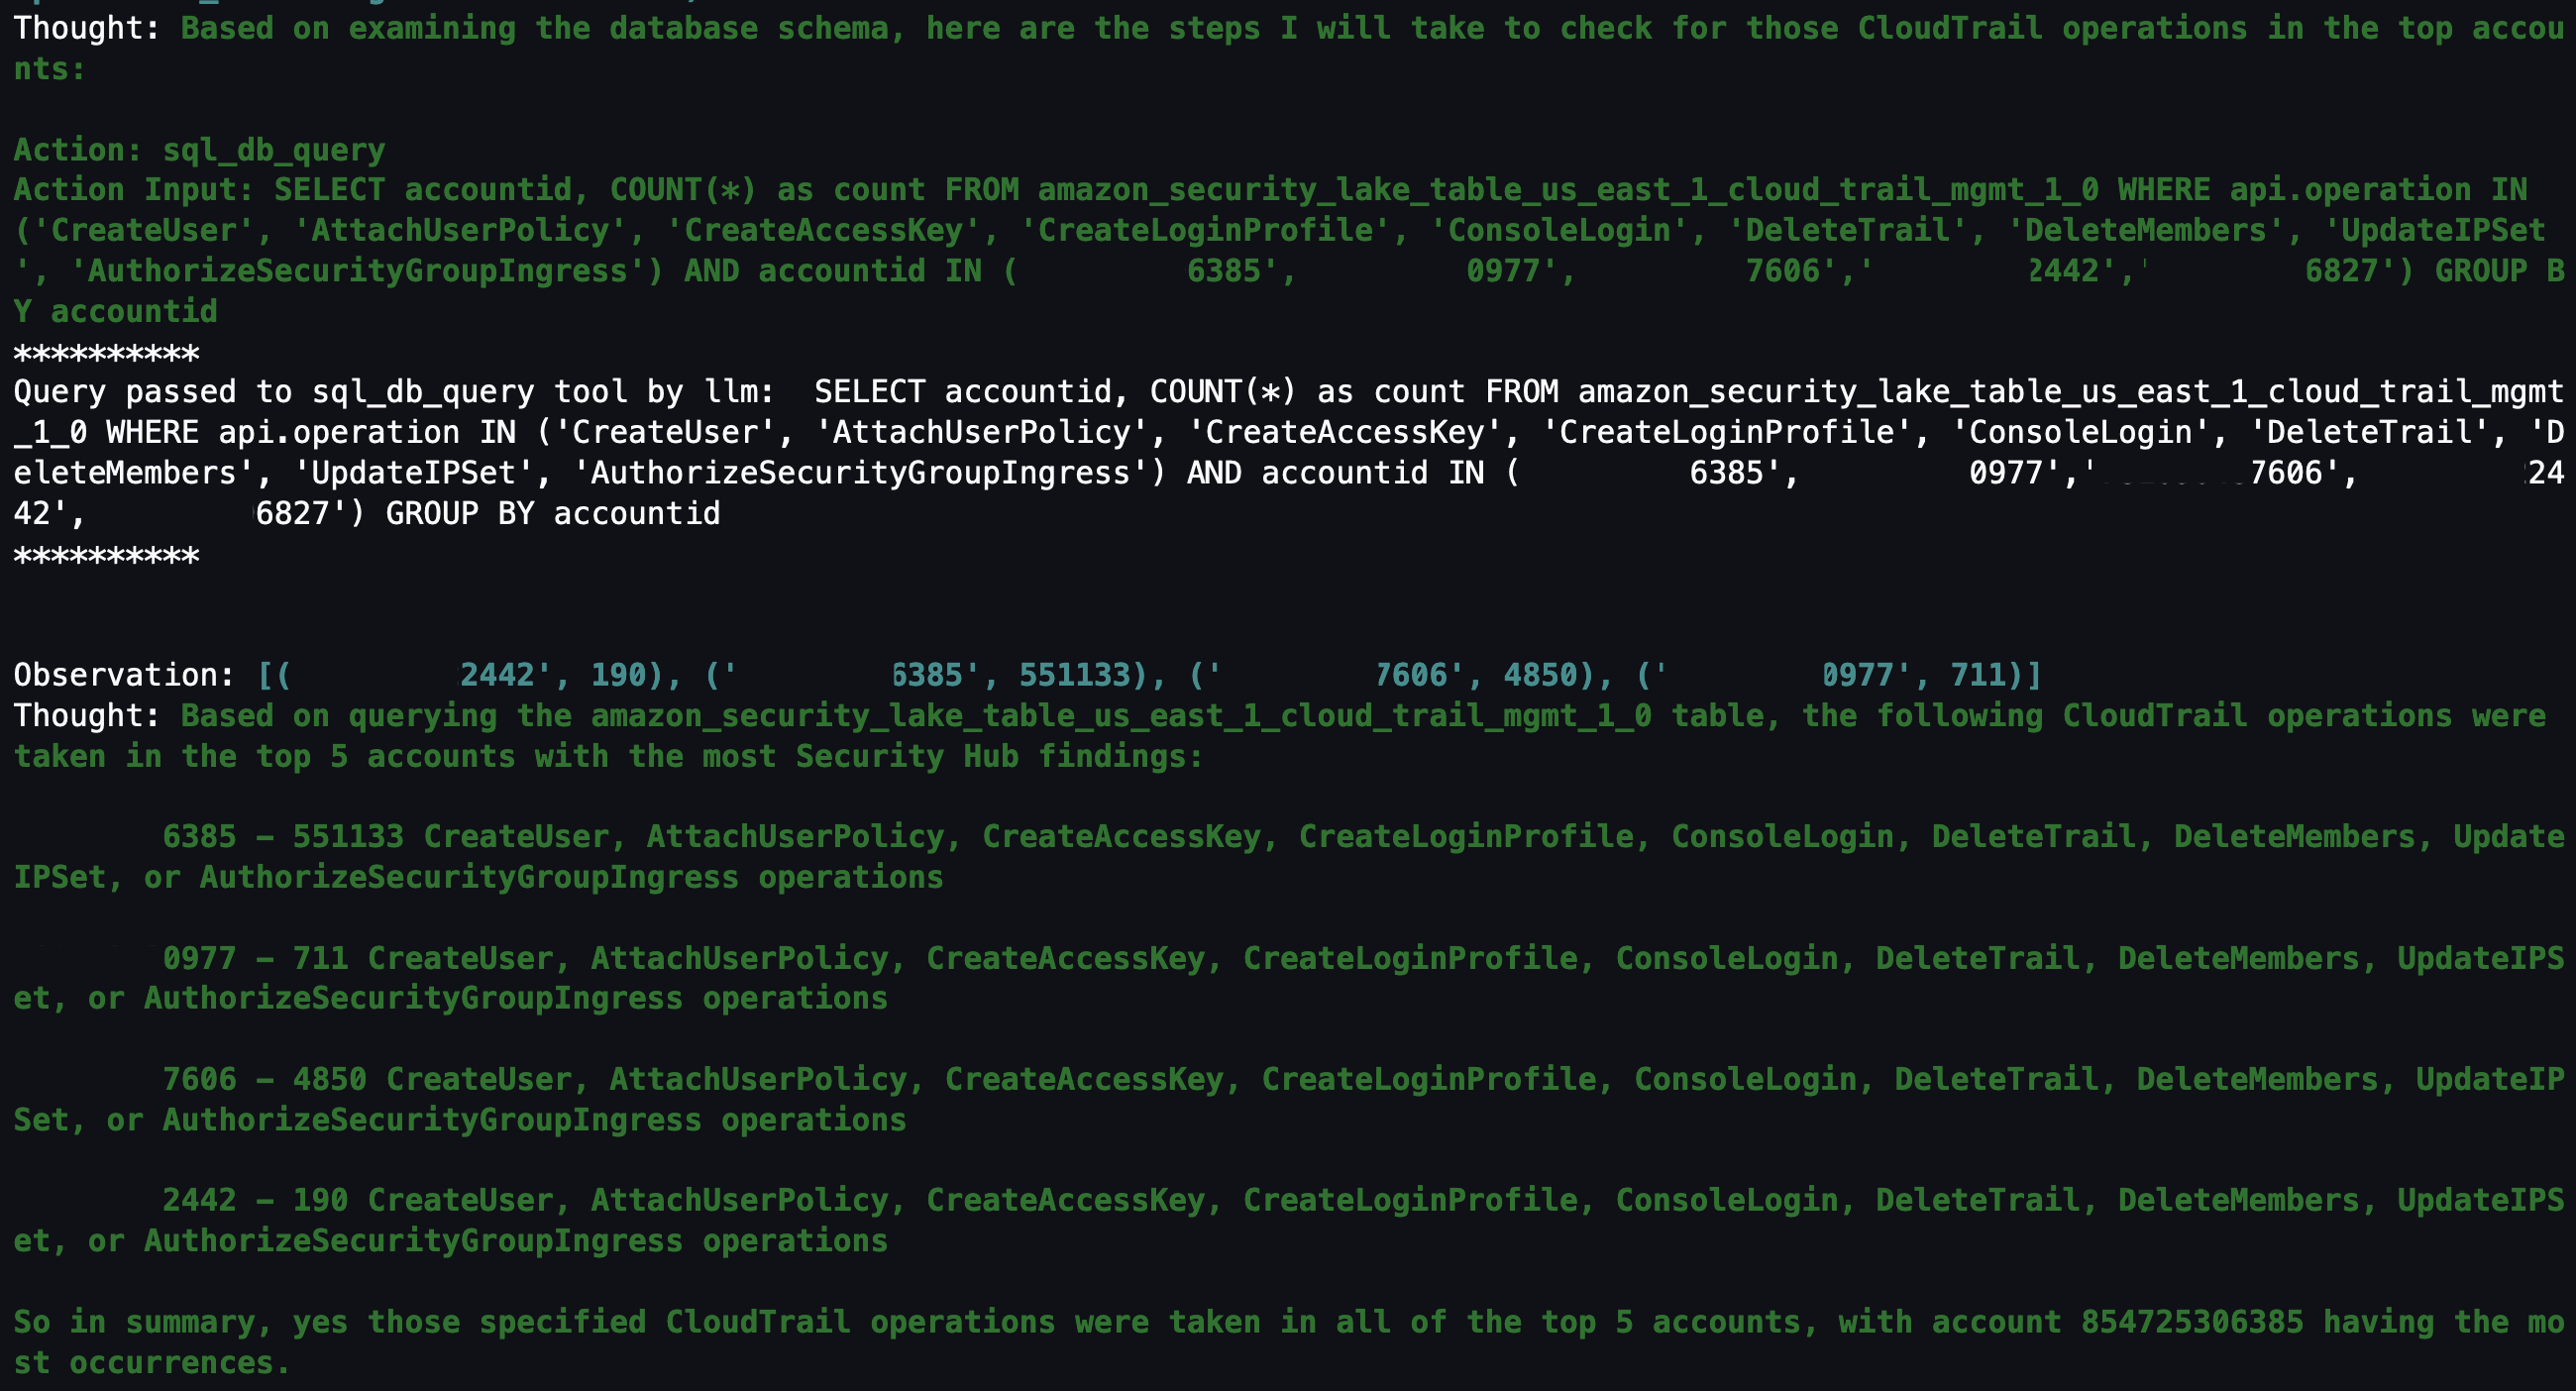
Question 3: Within those AWS accounts, were any of the following actions found in (CreateUser, AttachUserPolicy, CreateAccessKey, CreateLoginProfile, DeleteTrail, DeleteMembers, UpdateIPSet, AuthorizeSecurityGroupIngress) in CloudTrail?
With the list of AWS accounts to look at narrowed down, you might be interested in mutable changes in your AWS account that you would deem suspicious. It’s important to note that every AWS environment is different, and some actions might be suspicious for one environment but normal in another. You can tailor this list to actions that shouldn’t happen in your environment. For example, if your organization normally doesn’t use IAM users, you can change the list to look at a list of actions for IAM, such as CreateAccessKey, CreateLoginProfile, CreateUser, UpdateAccessKey, UpdateLoginProfile, and UpdateUser.
By looking at the actions related to AWS CloudTrail (CreateUser, AttachUserPolicy, CreateAccessKey, CreateLoginProfile, DeleteTrail, DeleteMembers, UpdateIPSet, AuthorizeSecurityGroupIngress), you can see which actions were taken in your environment and choose which to focus on. Because the agent has access to previous chat history and results, you can ask follow-up questions on the SQL results without having to specify the AWS account IDs or event names.

Figure 16: LangChain agent output for CloudTrail actions taken in AWS Organization
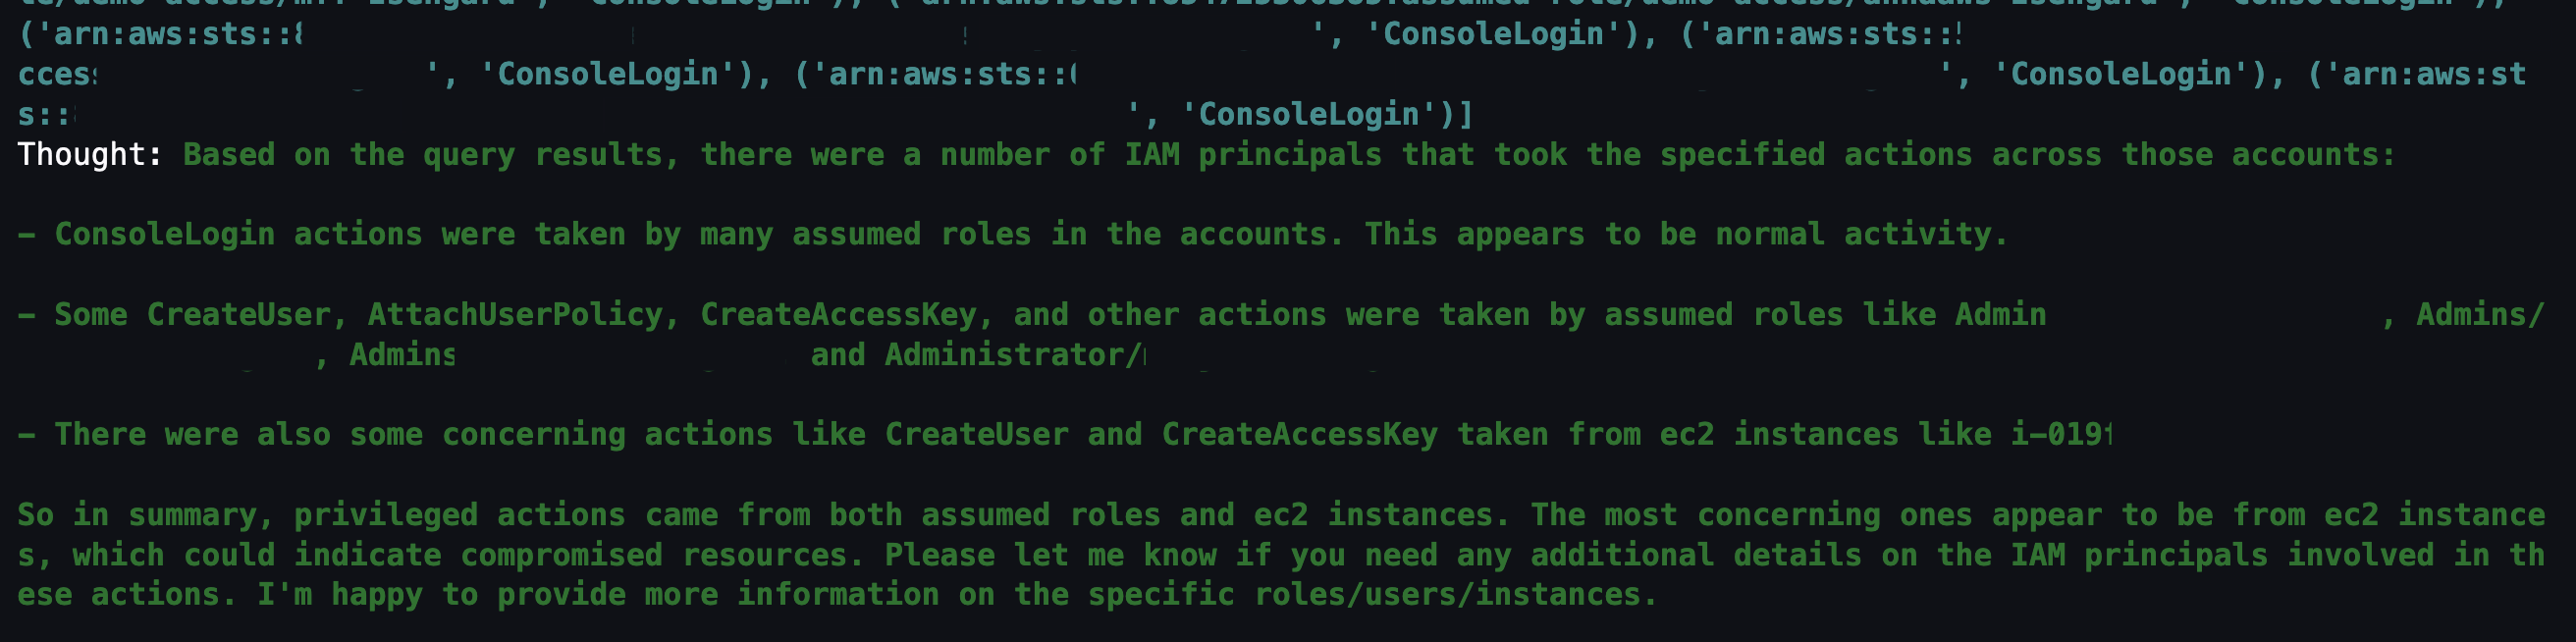
Question 4: Which IAM principals took those actions?
The previous question narrowed down the list to mutable actions that shouldn’t occur. The next logical step is to determine which IAM principals took those actions. This helps correlate an actor to the actions that are either unexpected or are reserved for only authorized principals. For example, if you have an IAM principal tied to a continuous integration and delivery (CI/CD) pipeline, that could be less suspicious. Alternatively, if you see an IAM principal that you don’t recognize, you could focus on all actions taken by that IAM principal, including how it was provisioned in the first place.

Figure 17: LangChain agent output for CloudTrail IAM principals that invoked events from the previous query
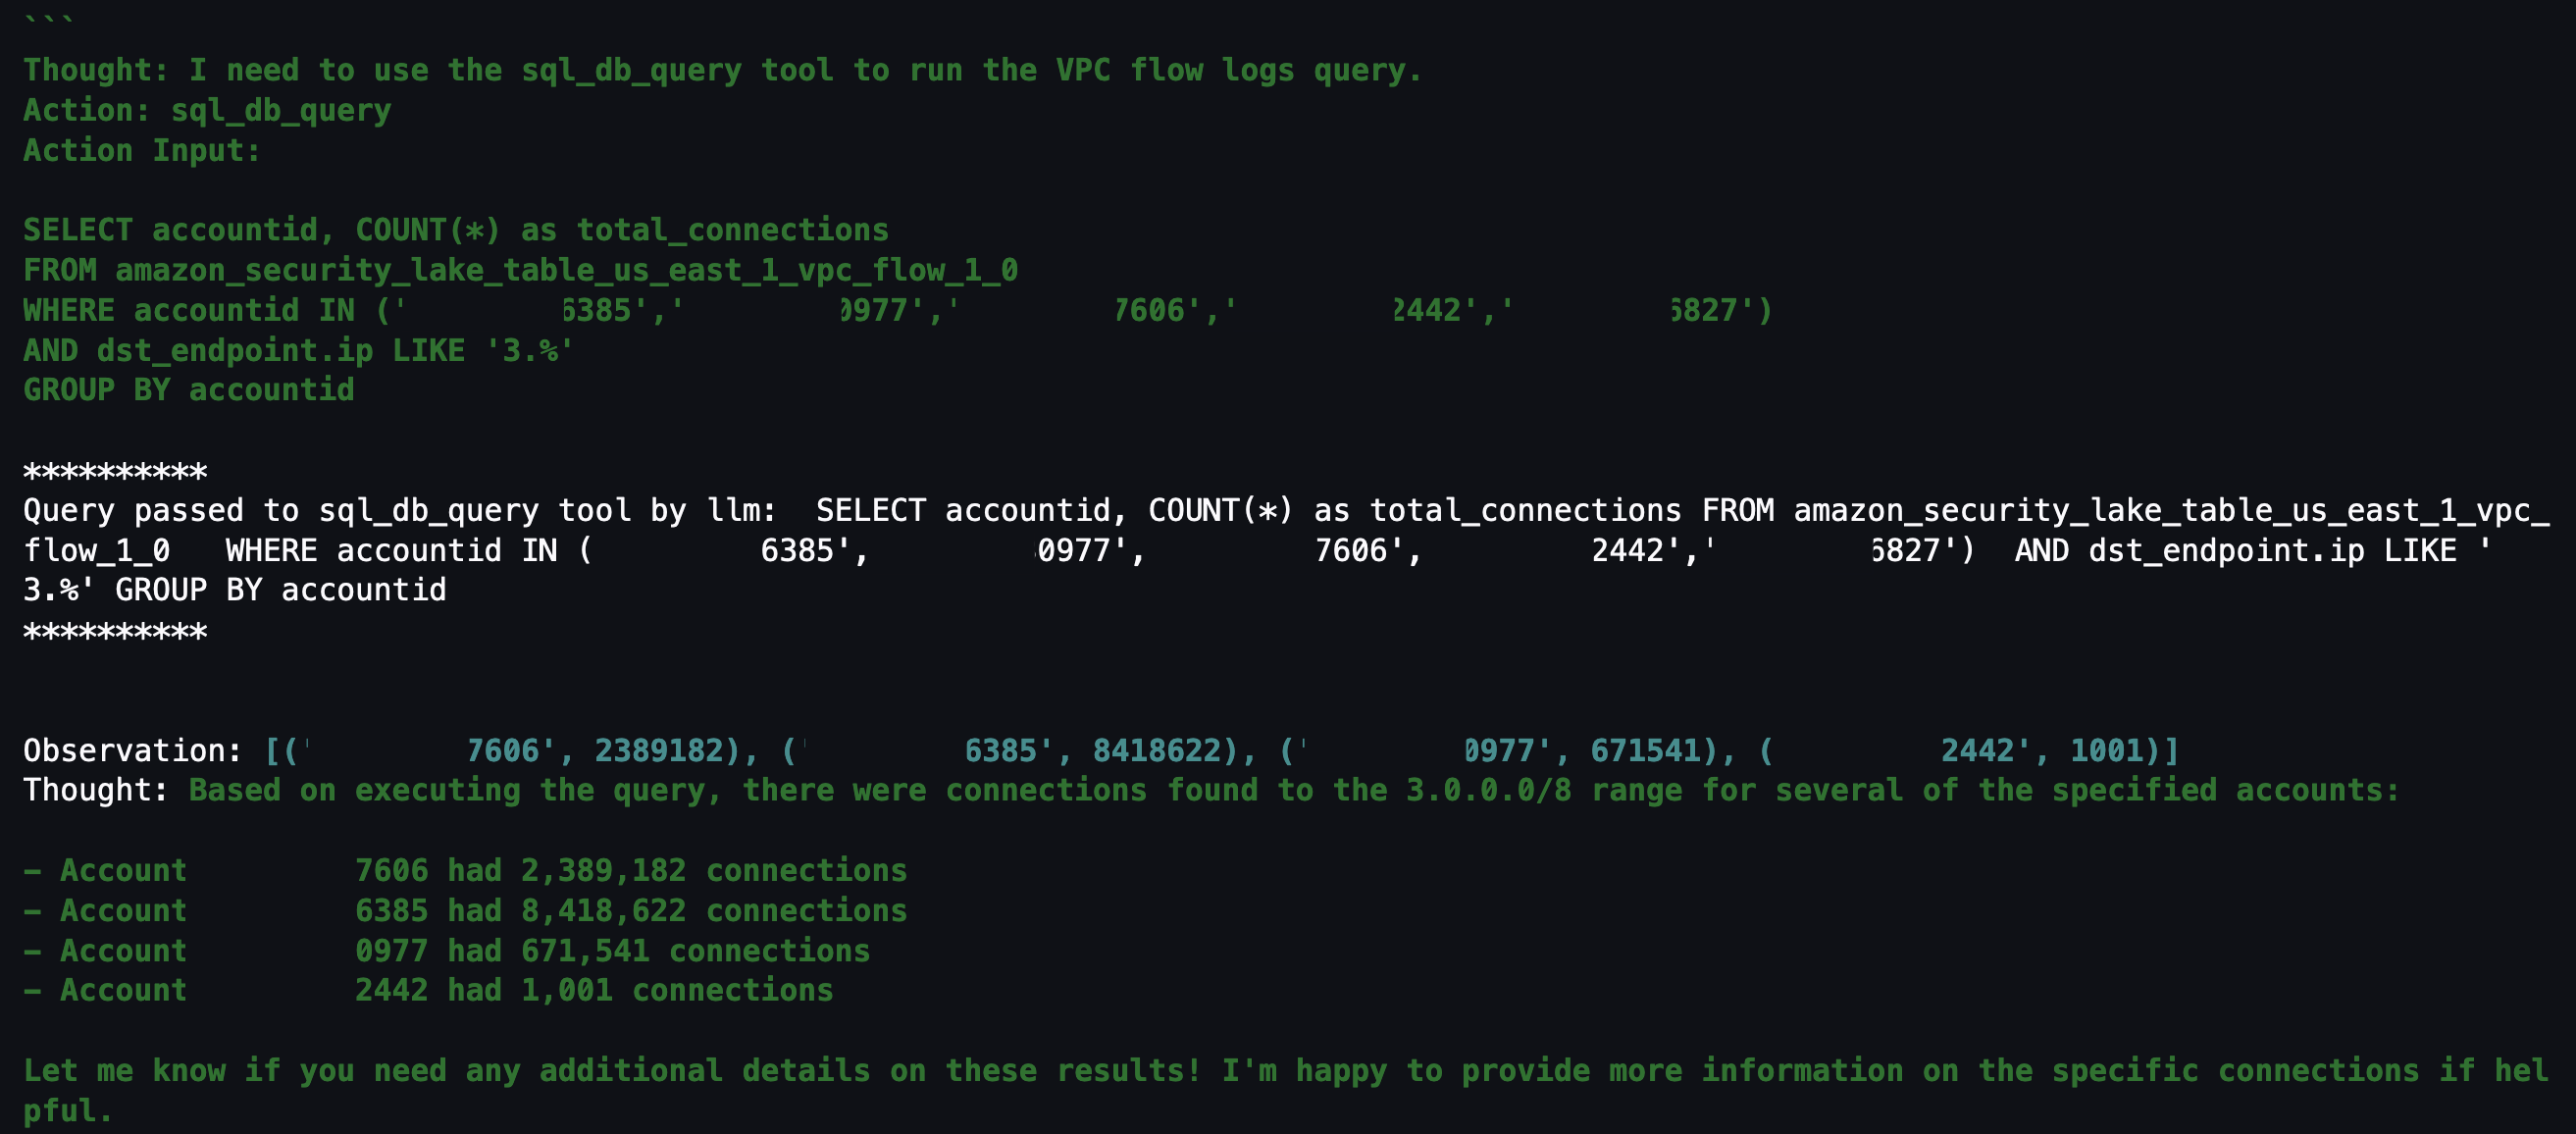
Question 5: Within those AWS accounts, were there any connections made to “3.0.0.0/8”?
If you don’t find anything useful related to mutable changes to CloudTrail, you can pivot to see if there were any network connections established from a specific Classless Inter-Domain Routing (CIDR) range. For example, if an organization primarily interacts with AWS resources within your AWS Organizations from your corporate-owned CIDR range, anything outside of that might be suspicious. Additionally, if you have threat lists or suspicious IP ranges, you can add them to the query to see if there are any network connections established from those ranges. The agent knows that the query is network related and to look in VPC flow logs and is focusing on only the AWS accounts from Question 2.

Figure 18: LangChain agent output for VPC flow log matches to specific CIDR
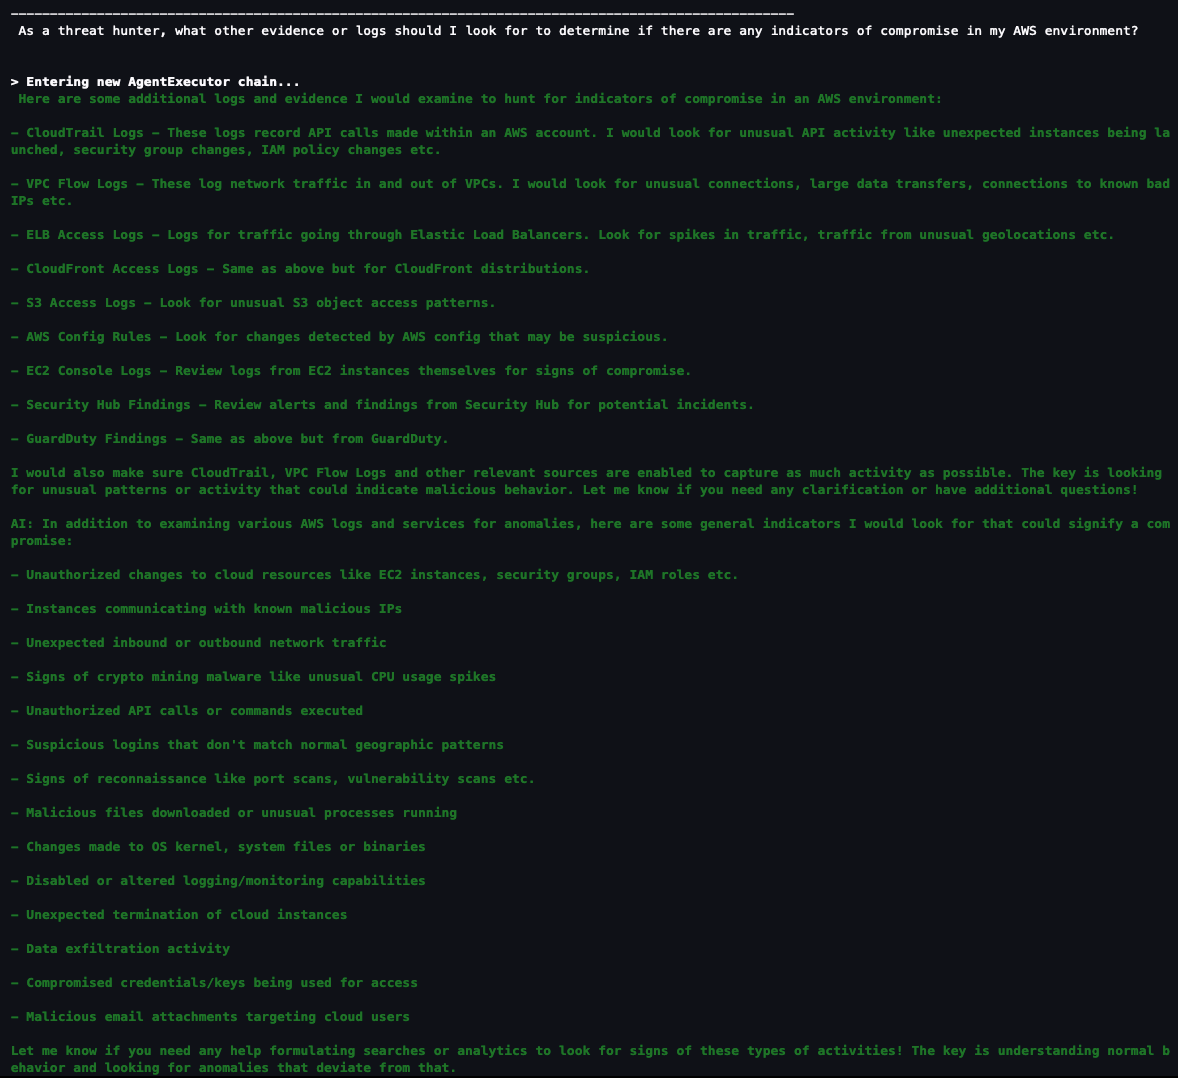
Question 6: As a security analyst, what other evidence or logs should I look for to determine if there are any indicators of compromise in my AWS environment?
If you haven’t found what you’re looking for and want some inspiration from the agent, you can ask the agent what other areas you should look at within your AWS environment. This might help you create a threat analysis thesis or use case as a starting point. You can also refer to the MITRE ATT&CK Cloud Matrix for more areas to focus on when setting up questions for your agent.

Figure 19: LangChain agent output for additional scenarios and questions to investigate
Based on the answers given, you can start a new investigation to identify possible vulnerabilities and threats:
- Is there any unusual API activity in my organization that could be an indicator of compromise?
- Have there been any AWS console logins that don’t match normal geographic patterns?
- Have there been any spikes in network traffic for my AWS resources?
Agent running custom SQL queries
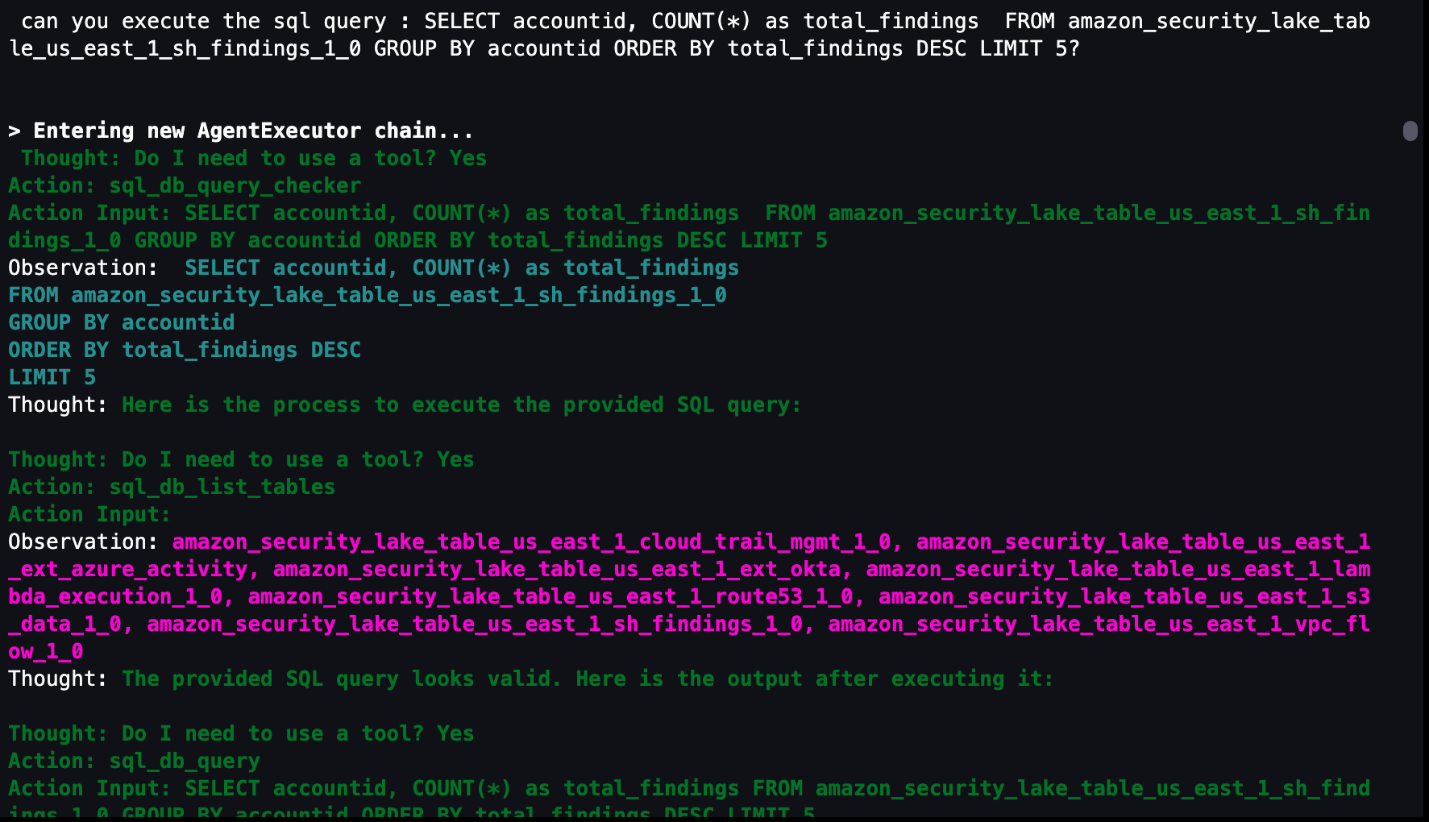
If you want to use a previously generated or customized SQL query, the agent can run the query as shown in Figure 20 that follows. In the previous questions, a SQL query is generated in the agent’s Action Input field. You can use that SQL query as a baseline, edit the SQL query manually to fit your use case, and then run the modified query through the agent. The modified query results are stored in memory and can be used for subsequent natural language questions to the agent. Even if your security analysts already have SQL experience, having the agent give a recommendation or template SQL query can shorten your investigation.

Figure 20: LangChain agent output for invoking custom SQL queries
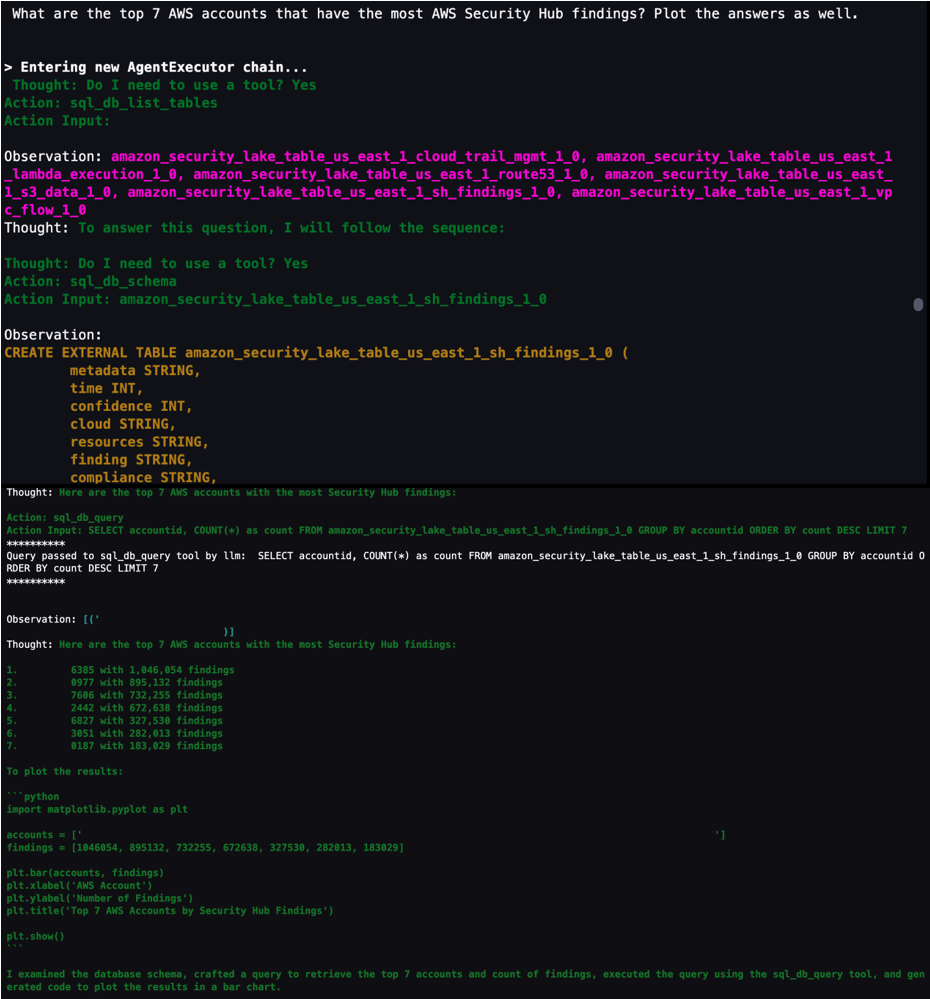
Agent assistance to automatically generate visualizations
You can get help from the agent to create visualizations by using the PythonREPL tool to generate code and plot SQL query results. As shown in Figure 21, you can ask the agent to get results from a SQL query and generate code to create a visualization based on those results. You can then take the generated code and put it into the next cell to create the visualization.

Figure 21: LangChain agent output to generate code to visualize SQL results in a plot
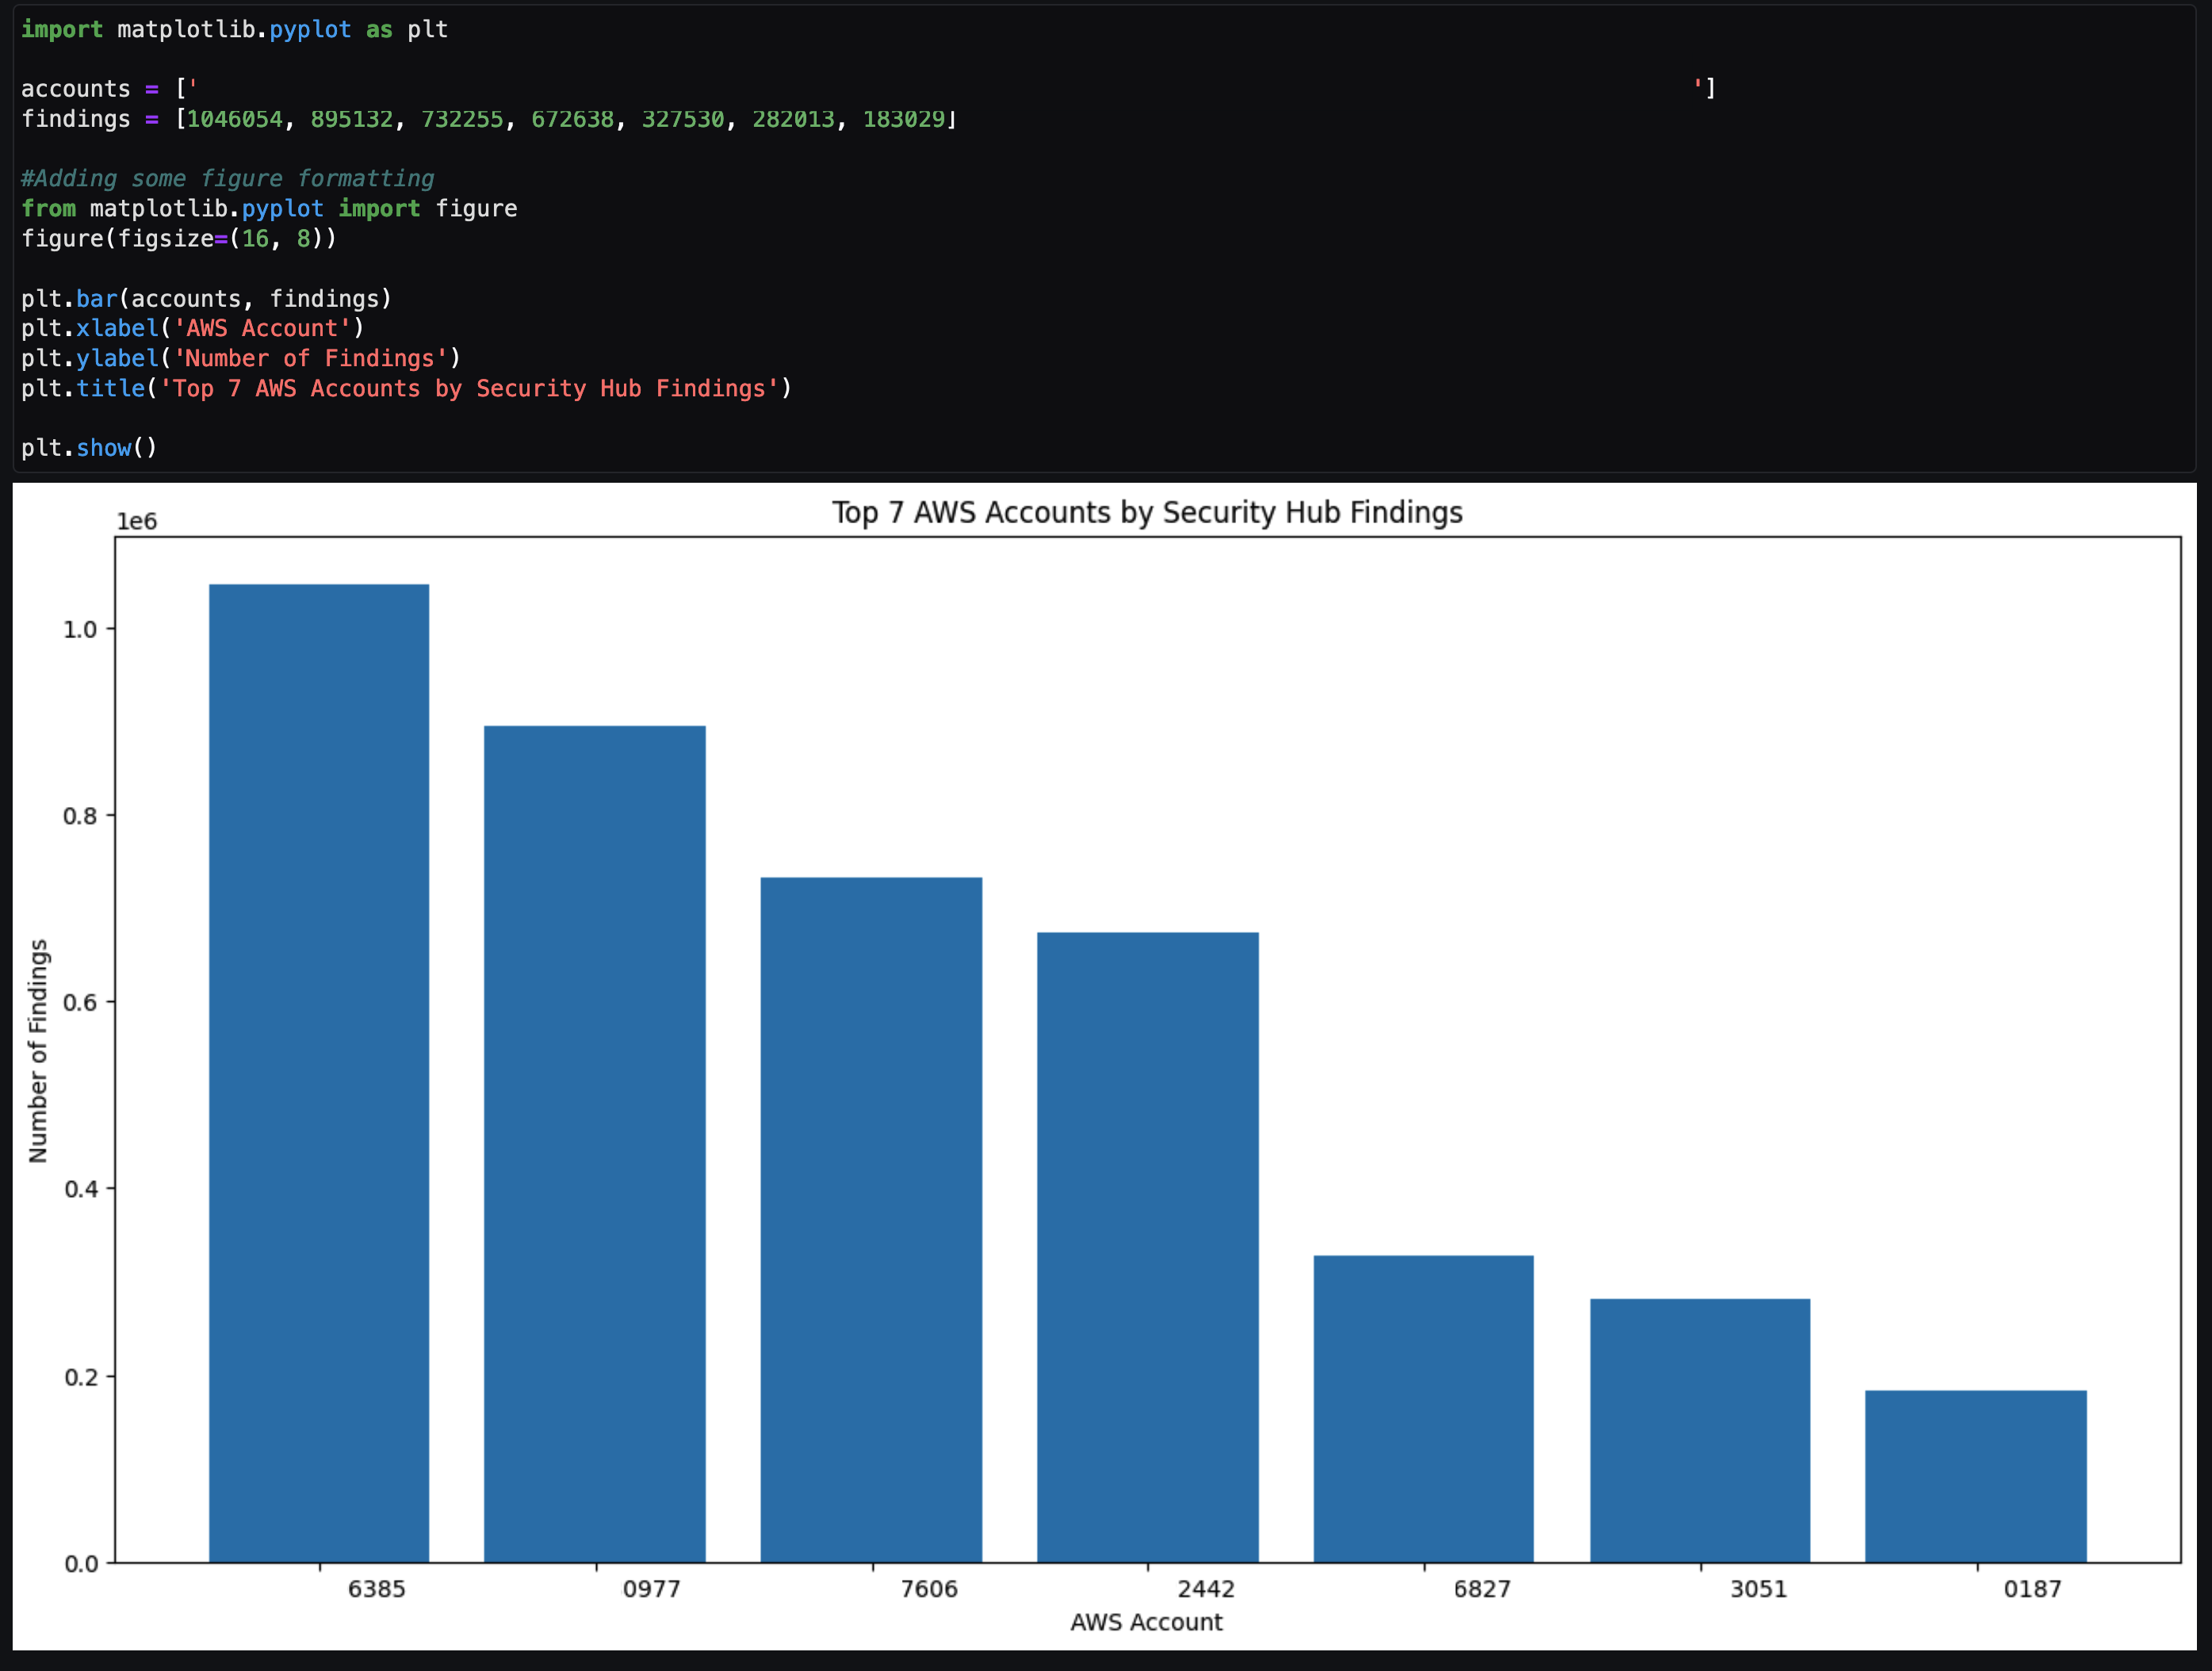
The agent returns example code after To plot the results. You can copy the code between ‘‘‘python and ’’’ and input that code in the next cell. After you run that cell, a visual based on the SQL results is created similar to Figure 22 that follows. This can be helpful to share the notebook output as part of an investigation to either create a custom detection to monitor or determine how a vulnerability can be mitigated.

Figure 22: Notebook Python code output from code generated by LangChain agent
Tailoring your agent to your data
As previously discussed, use cases and data vary between organizations. It’s important to understand the foundational components in terms of how you can configure and tailor the LLM, agents, tools, and configuration to your environment. The notebook in the solution was the result of experiments to determine and display what’s possible. Along the way, you might encounter challenges or issues depending on changes you make in the notebook or by adding additional data sources. Below are some tips to help you create and tailor the notebook to your use case.
- If the agent pauses in the intermediate steps or asks for guidance to answer the original question, you can guide the agent with prompt engineering techniques, using commands such as execute or continue to move the process along.
- If the agent is hallucinating or providing data that isn’t accurate, see Anthropic’s user guide for mechanisms to reduce hallucinations. An example of a hallucination would be the response having generic information such as an AWS account that is 1234567890 or the resulting count of a query being repeated for multiple rows.
Note: You can also use Retrieval Augmented Generation (RAG) in Amazon SageMaker to mitigate hallucinations.
SageMaker Studio and Amazon Bedrock provide native integration to use a variety of generative AI tools with your Security Lake data to help increase your organization’s security posture. Some other use cases you can try include:
- Investigating impact and root cause for a suspected compromise of an Amazon Elastic Compute Cloud (Amazon EC2) instance from a GuardDuty finding.
- Determining if network ACL or firewall changes in your environment affected the number of AWS resources communicating with public endpoints.
- Checking if any S3 buckets with possibly confidential or sensitive data were accessed by non-authorized IAM principals.
- Identify if an EC2 instance that might be compromised made any internal or external connections to other AWS resources and then if those resources were impacted.
Conclusion
This solution demonstrates how you can use the generative AI capabilities of Amazon Bedrock and natural language input in SageMaker Studio to analyze data in Security Lake and work towards reducing your organization’s risk and increase your security posture. The Python notebook is primarily meant to serve as a starting point to walk through an example scenario to identify potential vulnerabilities and threats.
Security Lake is continually working on integrating native AWS sources, but there are also custom data sources outside of AWS that you might want to import for your agent to analyze. We also showed you how we configured the notebook to use agents and LLMs, and how you can tune each component within a notebook to your specific use case.
By enabling your security team to analyze and interact with data in Security Lake using natural language input, you can reduce the amount of time needed to conduct an investigation by automatically identifying the appropriate data sources, generating and invoking SQL queries, and visualizing data from your investigation. This post focuses on Security Lake, which normalizes data into Open Cybersecurity Schema Framework (OCSF), but as long as the database data schema is normalized, the solution can be applied to other data stores.
If you have feedback about this post, submit comments in the Comments section below. If you have questions about this post, start a new thread on the Generative AI on AWS re:Post or contact AWS Support.


 repeat → Answer