Cedar is an open-source language that you can use to authorize policies and make authorization decisions based on those policies. AWS security services including AWS Verified Access and Amazon Verified Permissions use Cedar to define policies. Cedar supports schema declaration for the structure of entity types in those policies and policy validation with that schema.
In this post, we show you how to use developer tools on AWS to implement a build pipeline that validates the Cedar policy files against a schema and runs a suite of tests to isolate the Cedar policy logic. As part of the walkthrough, you will introduce a subtle policy error that impacts permissions to observe how the pipeline tests catch the error. Detecting errors earlier in the development lifecycle is often referred to as shifting left. When you shift security left, you can help prevent undetected security issues during the application build phase.
Scenario
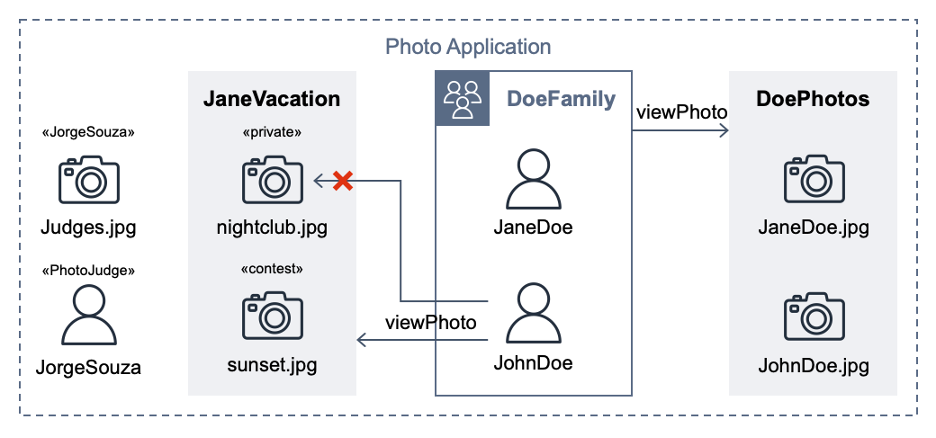
This post extends a hypothetical photo sharing application from the Cedar policy language in action workshop. By using that app, users organize their photos into albums and share them with groups of users. Figure 1 shows the entities from the photo application.
Figure 1: Photo application entities
For the purpose of this post, the important requirements are that user JohnDoe has view access to the album JaneVacation, which contains two photos that user JaneDoe owns:
Photo sunset.jpg has a contest label (indicating that the role PhotoJudge has view access)
Photo nightclub.jpg has a private label (indicating that only the owner has access)
Cedar policies separate application permissions from the code that retrieves and displays photos. The following Cedar policy explicitly permits the principal of user JohnDoe to take the action viewPhoto on resources in the album JaneVacation.
permit (
  principal == PhotoApp::User::"JohnDoe",
  action == PhotoApp::Action::"viewPhoto",
  resource in PhotoApp::Album::"JaneVacation"
);
The following Cedar policy forbids non-owners from accessing photos labeled as private, even if other policies permit access. In our example, this policy prevents John Doe from viewing the nightclub.jpg photo (denoted by an X in Figure 1).
forbid (
  principal,
  action,
  resource in PhotoApp::Application::"PhotoApp"
)
when { resource.labels.contains("private") }
unless { resource.owner == principal };
A Cedar authorization request asks the question: Can this principal take this action on this resource in this context? The request also includes attribute and parent information for the entities. If an authorization request is made with the following test data, against the Cedar policies and entity data described earlier, the authorization result should be DENY.
The project test suite uses this and other test data to validate the expected behaviors when policies are modified. An error intentionally introduced into the preceding forbid policy lets the first policy satisfy the request and ALLOW access. That unexpected test result compared to the requirements fails the build.
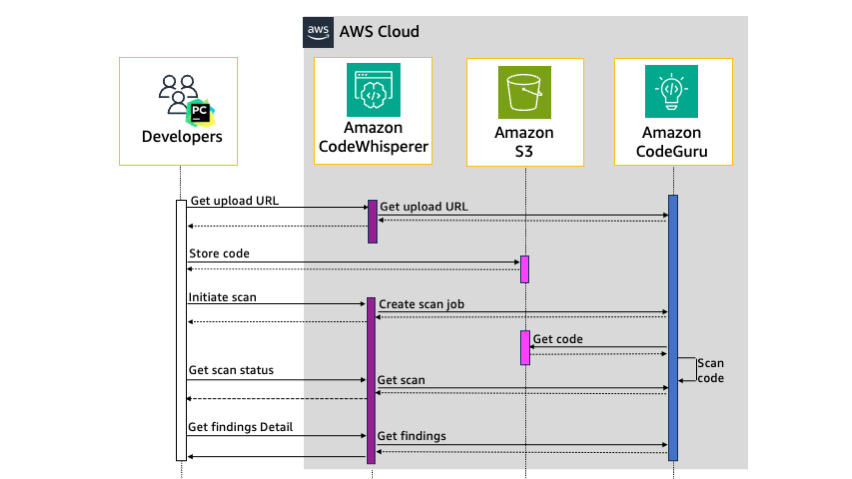
Developer tools on AWS
With AWS developer tools, you can host code and build, test, and deploy applications and infrastructure. AWS CodeCommit hosts the Cedar policies and a test suite, AWS CodeBuild runs the tests, and AWS CodePipeline automatically runs the CodeBuild job when a CodeCommit repository state change event occurs.
In the following steps, you will create a pipeline, commit policies and tests, run a passing build, and observe how a policy error during validation fails a test case.
Prerequisites
To follow along with this walkthrough, make sure to complete the following prerequisites:
Before you commit this source code to a CodeCommit repository, run the test suite locally; this can help you shorten the feedback loop. To run the test suite locally, choose one of the following options:
Option 1: Install Rust and compile the Cedar CLI binary
Locally evaluate the buildspec.yml inside a CodeBuild container image by using the codebuild_build.sh script from aws-codebuild-docker-images with the following parameters:
./codebuild_build.sh -i public.ecr.aws/codebuild/amazonlinux2-x86_64-standard:5.0 -a .codebuild
Project structure
The policystore directory contains one Cedar policy for each .cedar file. The Cedar schema is defined in the cedarschema.json file. A tests subdirectory contains a cedarentities.json file that represents the application data; its subdirectories (for example, album JaneVacation) represent the test suites. The test suite directories contain individual tests inside their ALLOW and DENY subdirectories, each with one or more JSON files that contain the authorization request that Cedar will evaluate against the policy set. A README file in the tests directory provides a summary of the test cases in the suite.
The cedar_testrunner.sh script runs the Cedar CLI to perform a validate command for each .cedar file against the Cedar schema, outputting either PASS or ERROR. The script also performs an authorize command on each test file, outputting either PASS or FAIL depending on whether the results match the expected authorization decision.
Set up the CodePipeline
In this step, you use AWS CloudFormation to provision the services used in the pipeline.
To set up the pipeline
Navigate to the directory of the cloned repository.
cd cedar-policy-validation-pipeline
Create a new CloudFormation stack from the template.
Wait for the message Successfully created/updated stack.
Invoke CodePipeline
The next step is to commit the source code to a CodeCommit repository, and then configure and invoke CodePipeline.
To invoke CodePipeline
Add an additional Git remote named codecommit to the repository that you previously cloned. The following command points the Git remote to the CodeCommit repository that CloudFormation created. The CedarPolicyRepoCloneUrl stack output is the HTTPS clone URL. Replace it with CedarPolicyRepoCloneGRCUrl to use the HTTPS (GRC) clone URL when you connect to CodeCommit with git-remote-codecommit.
The build installs Rust in CodePipeline in your account and compiles the Cedar CLI. After approximately four minutes, the pipeline run status shows Succeeded.
Refactor some policies
This photo sharing application sample includes overlapping policies to simulate a refactoring workflow, where after changes are made, the test suite continues to pass. The DoePhotos.cedar and JaneVacation.cedarstatic policies are replaced by the logically equivalent viewPhoto.template.cedarpolicy template and two template-linked policies defined in cedartemplatelinks.json. After you delete the extra policies, the passing tests illustrate a successful refactor with the same expected application permissions.
To refactor policies
Delete DoePhotos.cedar and JaneVacation.cedar.
Commit the change to the repository.
git add .
git commit -m "Refactor some policies"
git push codecommit main
Check the pipeline progress. After about 20 seconds, the pipeline status shows Succeeded.
The second pipeline build runs quicker because the build specification is configured to cache a version of the Cedar CLI. Note that caching isn’t implemented in the local testing described in Option 2 of the local environment setup.
Break the build
After you confirm that you have a working pipeline that validates the Cedar policies, see what happens when you commit an invalid Cedar policy.
To break the build
Using a text editor, open the file policystore/Photo-labels-private.cedar.
In the when clause, change resource.labels to resource.label (removing the “s”). This policy syntax is valid, but no longer validates against the Cedar schema.
Commit the change to the repository.
git add .
git commit -m "Break the build"
git push codecommit main
Sign in to the AWS Management Console and open the CodePipeline console.
Wait for the Most recent execution field to show Failed.
Select the pipeline and choose View in CodeBuild.
Choose the Reports tab, and then choose the most recent report.
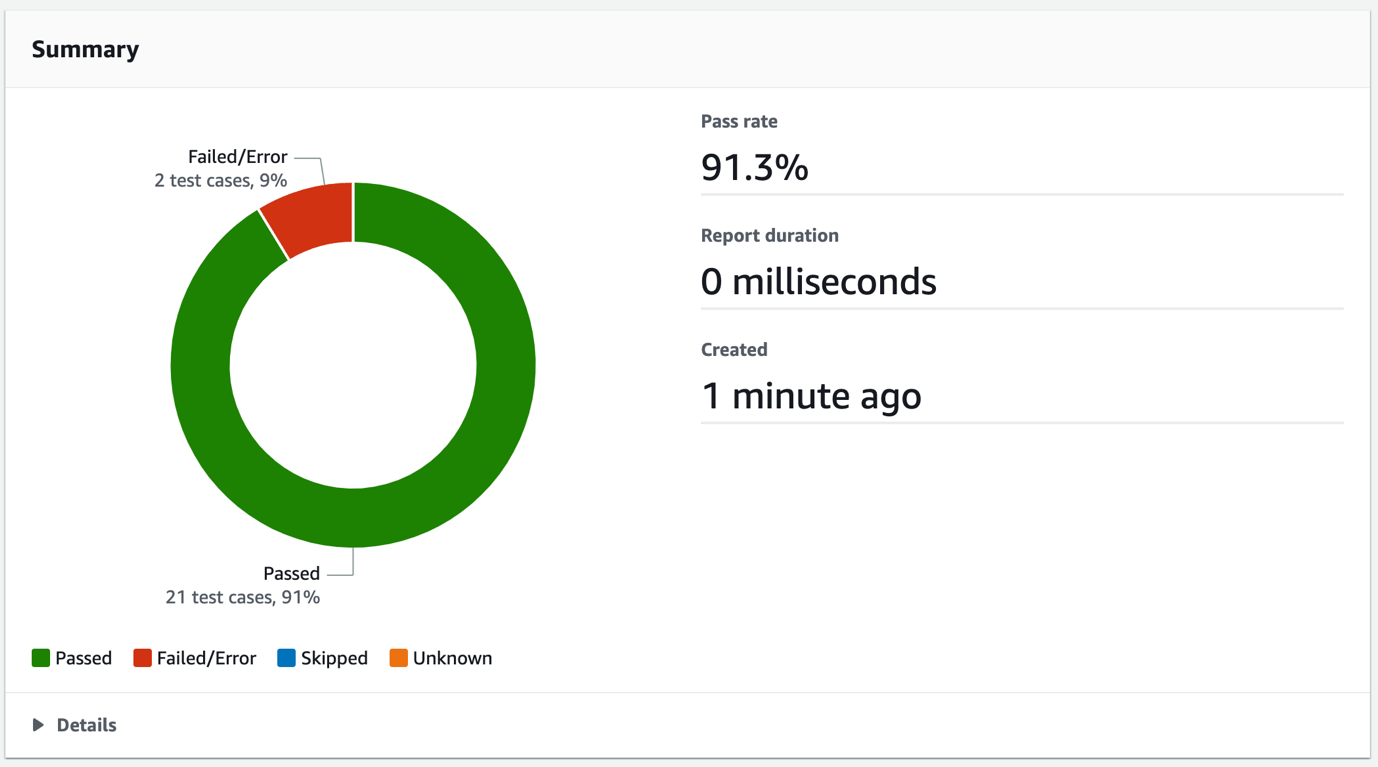
Review the report summary, which shows details such as the total number of Passed and Failed/Error test case totals, and the pass rate, as shown in Figure 2.
Figure 2: CodeBuild test report summary
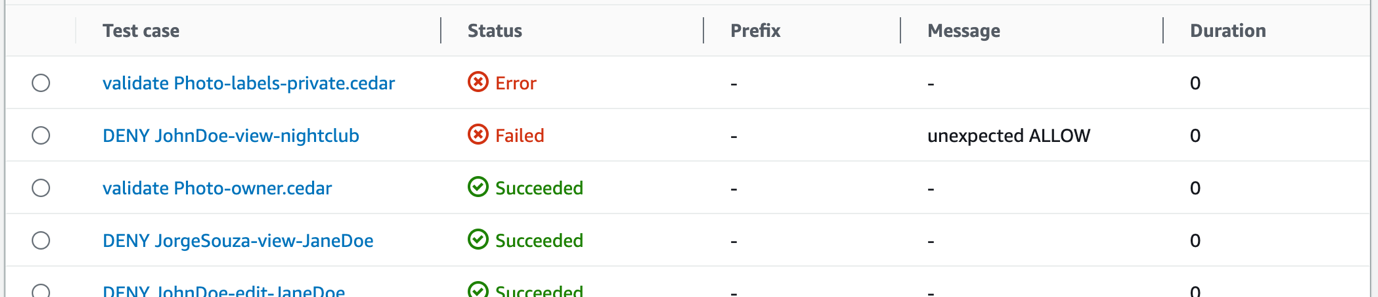
To get the error details, in the Details section, select the Test case called validate Photo-labels-private.cedar that has a Status of Error.
Figure 3: CodeBuild test report test cases
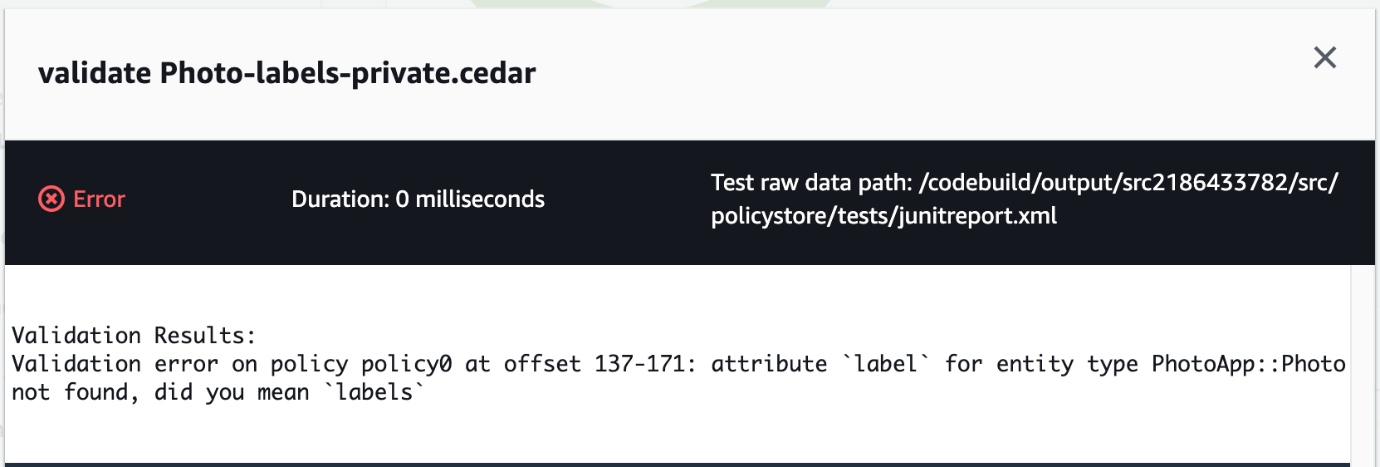
That single policy change resulted in two test cases that didn’t pass. The detailed error message shown in Figure 4 is the output from the Cedar CLI. When the policy was validated against the schema, Cedar found the invalid attribute label on the entity type PhotoApp::Photo. The Failed message of unexpected ALLOW occurred because the label attribute typo prevented the forbid policy from matching and producing a DENY result. Each of these tests helps you avoid deploying invalid policies.
Figure 4: CodeBuild test case error message
Clean up
To avoid ongoing costs and to clean up the resources that you deployed in your AWS account, complete the following steps:
To clean up the resources
Open the Amazon S3 console, select the bucket that begins with the phrase cedar-policy-validation-codepipelinebucket, and Empty the bucket.
Open the CloudFormation console, select the cedar-policy-validation stack, and then choose Delete.
Open the CodeBuild console, choose Build History, filter by cedar-policy-validation, select all results, and then choose Delete builds.
Conclusion
In this post, you learned how to use AWS developer tools to implement a pipeline that automatically validates and tests when Cedar policies are updated and committed to a source code repository. Using this approach, you can detect invalid policies and potential application permission errors earlier in the development lifecycle and before deployment.
AWS received the highest score among the providers that ISG evaluated on portfolio attractiveness, which was assessed on multiple factors, including:
Scope of portfolio – breadth and depth of offering
Portfolio quality – technology and skills, customer satisfaction, and security
Strategy and vision – product roadmap, thought leadership, and investments
Local characteristics – product support and infrastructure
According to ISG, “AWS’ network of data centers across the EU provides sovereign cloud services that are highly scalable. The AWS Nitro System, the foundation of AWS’ cloud services, ensures data residency, privacy, and sovereignty.”
Read the report to:
Gain perspective on the factors that ISG believes will influence the sovereign cloud market in the EU.
Discover some of the considerations that enterprises in the EU should consider when evaluating sovereign cloud infrastructure services.
Learn how the AWS Cloud is sovereign-by-design and how we continue to innovate without compromising on the full power of AWS.
The recognition of AWS as a Leader in this report highlights the work that we have undertaken to help address the complexity that European customers are facing in the evolving sovereignty landscape. AWS continues to deliver on the AWS Digital Sovereignty Pledge by investing in a comprehensive and ambitious roadmap of capabilities of data residency, granular access restriction, encryption, and resilience to provide customers with more choice in meeting their unique needs. Our recent innovations to help customers address their local regulatory requirements and sovereignty needs include AWS Dedicated Local Zones and the announcement of plans to launch the AWS European Sovereign Cloud. Download the full 2023 ISG Provider Lens Quadrant Report for Multi Public Cloud Services – Sovereign Cloud Infrastructure Services (EU) from AWS.
If you have feedback about this post, submit comments in the Comments section below.
AWS Certificate Manager (ACM) is a managed service that you can use to provision, manage, and deploy public and private TLS certificates for use with Amazon Web Services (AWS) and your internal connected resources. Today, we’re announcing that ACM will be discontinuing the use of WHOIS lookup for validating domain ownership when you request email-validated TLS certificates.
WHOIS lookup is commonly used to query registration information for a given domain name. This information includes details such as when the domain was originally registered, and contact information for the domain owner and the technical and administrative contacts. Domain owners create and maintain domain registration information outside of ACM in WHOIS, which is a publicly available directory that contains information about domains sponsored by domain registrars and registries. You can use WHOIS lookup to view information about domains that are registered with Amazon Route 53.
Starting June 2024, ACM will no longer send domain validation emails by using WHOIS lookup for new email-validated certificates that you request. Starting October 2024, ACM will no longer send domain validation emails to mailboxes associated with WHOIS lookup for renewal of existing email-validated certificates. ACM will continue to send validation emails to the five common system addresses for the requested domain—we provide a list of these common system addresses in the next section of this post.
In this blog post, we share important details about this change and how you can prepare. Note that if you currently use DNS validation for your certificates requested from ACM, this change doesn’t affect you. These changes only apply to certificates that use email validation.
Background
When you request public certificates through ACM, you need to prove that you own or control the domain before ACM can issue the public certificate. ACM provides two options to validate ownership of a domain: DNS validation and email validation.
AWS recommends that you use DNS validation whenever possible so that ACM can automatically renew certificates that are requested from ACM without requiring action on your part. Email validation is another option that you can use to prove ownership of the domain, but you must manually validate ownership of the domain by using a link provided in an email. Figure 1 is a sample validation email from ACM for the AWS account 111122223333 and AWS US West (Oregon) Region (us-west-2) to validate ownership of the example.com domain.
Figure 1: Sample validation email for example.com domain
How does ACM know where to send the validation email? Today, as part of the email validation process, ACM sends domain validation emails to the three contact addresses associated with the domain listed in the WHOIS database. These contact addresses are the domain registrant, technical contact, and administrative contact. You create and maintain domain registration information, including these contact addresses, outside of ACM—in the WHOIS database that your domain registrar provides.
ACM also sends validation emails to the following five common system addresses for each domain:
administrator@your_domain_name
hostmaster@your_domain_name
postmaster@your_domain_name
webmaster@your_domain_name
admin@your_domain_name
To prove that you own the domain, you must select the validation link included in these emails. ACM also sends validation emails to these same addresses to renew the certificate when the certificate is 45 days from expiry.
What’s changing?
If you currently use email validation for certificates requested from ACM, there are two important dates that you should be aware of:
Starting June 2024, ACM will no longer send domain validation emails by using WHOIS lookup for new email-validated certificates that you request. ACM will continue to send validation emails to the three WHOIS lookup contact addresses for renewal of existing certificates, until October 2024.
Starting October 2024, ACM will no longer send the validation emails to mailboxes associated with WHOIS lookup for existing certificates. After this date, ACM will not send validation emails to the three WHOIS lookup addresses for new or existing certificates.
ACM will continue to send validation emails to the five common system addresses that we listed in the previous section of this post.
Why are we making this change?
We’re making this change to mitigate a potential availability risk for ACM customers. A TLS certificate that ACM issues is valid for up to 395 days, and if you want to keep using it, you need to renew it prior to expiry. To renew an email-validated certificate, you must approve an email that ACM sends. ACM sends the first renewal email 45 days prior to certificate renewal, and if you don’t respond to this email, ACM sends additional reminders prior to expiry. If a certificate bound to one of your AWS resources—such as an Application Load Balancer—expires without being renewed, this could cause an outage for your application.
Some domain registrars that support WHOIS have made changes to the data that they publish to support their compliance with various privacy laws and recommended practices. Over the past several years, we’ve observed that the WHOIS lookup success rate has declined to less than 5 percent. If you rely on the contact addresses listed in the WHOIS database provided by your domain registrar to validate your domain ownership, this might create an availability risk. With a 5 percent success rate for WHOIS lookup, you might not receive validation emails for renewals of your certificates around 95 percent of the time. To provide a consistent mechanism for validating domain ownership when renewing certificates, ACM will only send validation emails to the five common system addresses that we listed in the Background section of this post.
What should you do to prepare?
If you currently monitor one of the five common system addresses (listed previously) for your domains, you don’t need to take any action. Otherwise, we strongly recommend that you create new DNS-validated certificates rather than creating and using email-validated certificates. ACM can automatically renew a DNS-validated certificate, without you taking any action, as long as the CNAME is accurately configured.
Alternatively, if you want to continue using email-validated certificates, we recommend that you monitor at least one of the five common email addresses listed previously. ACM sends the validation emails during certificate issuance for new ACM-issued certificates and during renewal of existing certificates. You can use the ACM describe-certificate API or check the certificate details on the ACM console to see if ACM previously sent validation emails to the relevant system addresses.
In this blog post, we outlined the changes coming to the email validation process when requesting and renewing certificates from ACM. We also shared the steps that you can take to prepare for this change, including monitoring at least one of the five relevant email addresses for your domains. Remember that these changes only apply to certificates that use email validation, not certificates that use DNS validation. For more information about certificate management on AWS, see the ACM documentation or get started using ACM today in the AWS Management Console.
If you have questions, contact AWS Support or your technical account manager (TAM), or start a new thread on the AWS re:Post ACM Forum. If you have feedback about this post, submit comments in the Comments section below.
Want more AWS Security news? Follow us on Twitter.
It’s common to manage numerous workloads in an EKS cluster, each necessitating access to a distinct set of secrets. You can verify adherence to the principle of least privilege by creating separate permission policies for each workload to restrict their access. To scale and reduce overhead, Amazon Web Services (AWS) recommends using ABAC to manage workloads’ access to secrets. ABAC helps reduce the number of permission policies needed to scale with your environment.
What is ABAC?
In IAM, a traditional authorization approach is known as role-based access control (RBAC). RBAC sets permissions based on a person’s job function, commonly known as IAM roles. To enforce RBAC in IAM, distinct policies for various job roles are created. As a best practice, only the minimum permissions required for a specific role are granted (principle of least privilege), which is achieved by specifying the resources that the role can access. A limitation of the RBAC model is its lack of flexibility. Whenever new resources are introduced, you must modify policies to permit access to the newly added resources.
Attribute-based access control (ABAC) is an approach to authorization that assigns permissions in accordance with attributes, which in the context of AWS are referred to as tags. You create and add tags to your IAM resources. You then create and configure ABAC policies to permit operations requested by a principal when there’s a match between the tags of the principal and the resource. When a principal uses temporary credentials to make a request, its associated tags come from session tags, incoming transitive sessions tags, and IAM tags. The principal’s IAM tags are persistent, but session tags, and incoming transitive session tags are temporary and set when the principal assumes an IAM role. Note that AWS tags are attached to AWS resources, whereas session tags are only valid for the current session and expire with the session.
How External Secrets Operator works
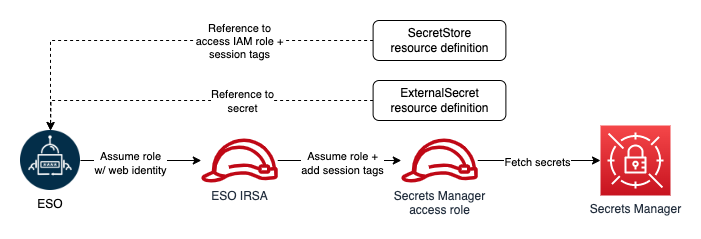
External Secrets Operator (ESO) is a Kubernetes operator that integrates external secret management systems including Secrets Manager with Kubernetes. ESO provides Kubernetes custom resources to extend Kubernetes and integrate it with Secrets Manager. It fetches secrets and makes them available to other Kubernetes resources by creating Kubernetes Secrets. At a basic level, you need to create an ESO SecretStore resource and one or more ESO ExternalSecret resources. The SecretStore resource specifies how to access the external secret management system (Secrets Manager) and allows you to define ABAC related properties (for example, session tags and transitive tags).
You declare what data (secret) to fetch and how the data should be transformed and saved as a Kubernetes Secret in the ExternalSecret resource. The following figure shows an overview of the process for creating Kubernetes Secrets. Later in this post, we review the steps in more detail.
Figure 1: ESO process
How to use ESO for ABAC
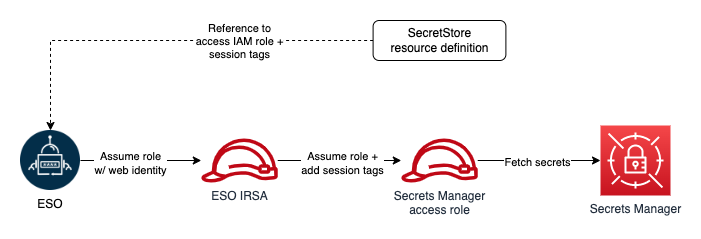
Before creating any ESO resources, you must make sure that the operator has sufficient permissions to access Secrets Manager. ESO offers multiple ways to authenticate to AWS. For the purpose of this solution, you will use the controller’s pod identity. To implement this method, you configure the ESO service account to assume an IAM role for service accounts (IRSA), which is used by ESO to make requests to AWS.
To adhere to the principle of least privilege and verify that each Kubernetes workload can access only its designated secrets, you will use ABAC policies. As we mentioned, tags are the attributes used for ABAC in the context of AWS. For example, principal and secret tags can be compared to create ABAC policies to deny or allow access to secrets. Secret tags are static tags assigned to secrets symbolizing the workload consuming the secret. On the other hand, principal (requester) tags are dynamically modified, incorporating workload specific tags. The only viable option to dynamically modifying principal tags is to use session tags and incoming transitive session tags. However, as of this writing, there is no way to add session and transitive tags when assuming an IRSA. The workaround for this issue is role chaining and passing session tags when assuming downstream roles. ESO offers role chaining, meaning that you can refer to one or more IAM roles with access to Secrets Manager in the SecretStore resource definition, and ESO will chain them with its IRSA to access secrets. It also allows you to define session tags and transitive tags to be passed when ESO assumes the IAM roles with its primary IRSA. The ability to pass session tags allows you to implement ABAC and compare principal tags (including session tags) with secret tags every time ESO sends a request to Secrets Manager to fetch a secret. The following figure shows ESO authentication process with role chaining in one Kubernetes namespace.
Figure 2: ESO AWS authentication process with role chaining (single namespace)
Architecture overview
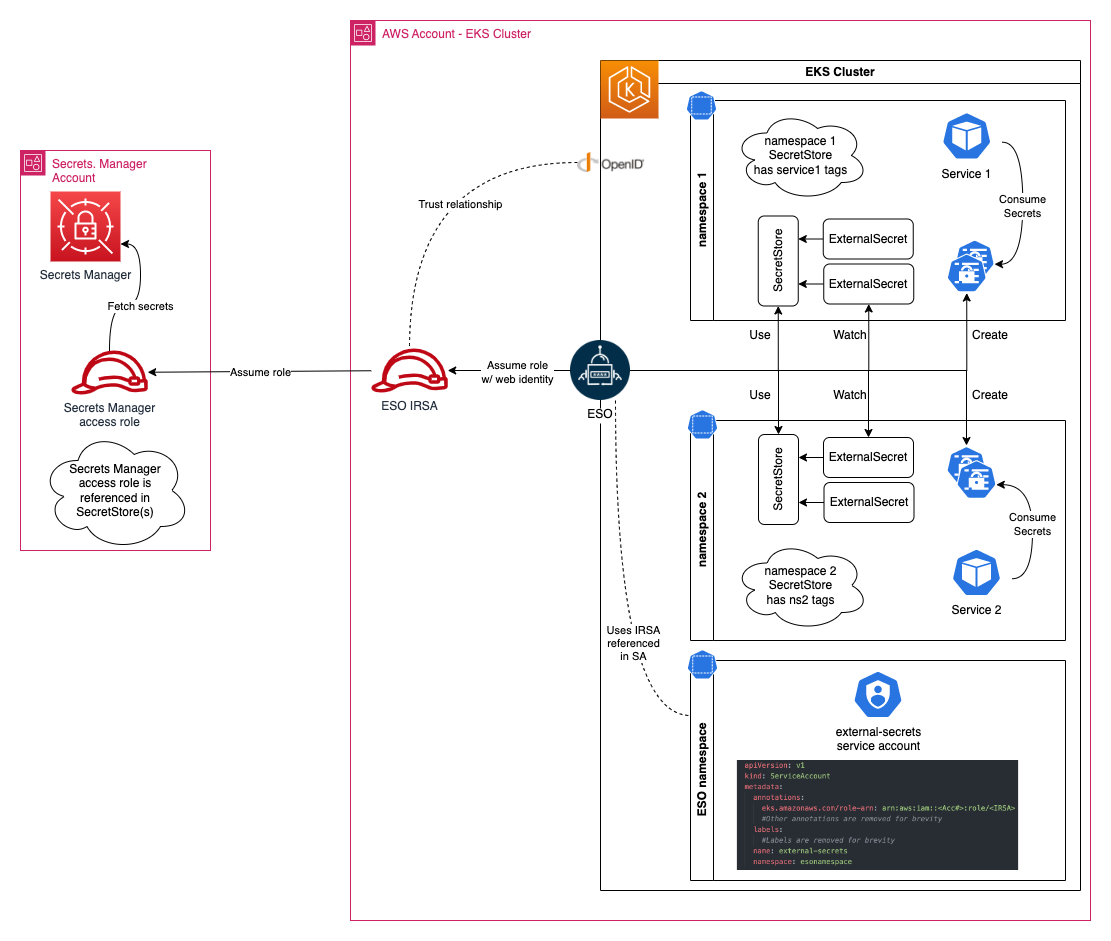
Let’s review implementing ABAC with a real-world example. When you have multiple workloads and services in your Amazon EKS cluster, each service is deployed in its own unique namespace, and service secrets are stored in Secrets Manager and tagged with a service name (key=service, value=service name). The following figure shows the required resources to implement ABAC with EKS and Secrets Manager.
Create an IAM role to access Secrets Manager secrets
You must create an IAM role with access to Secrets Manager secrets. Start by creating a customer managed policy to attach to your role. Your policy should allow reading secrets from Secrets Manager. The following example shows a policy that you can create for your role:
Secrets Manager uses an AWS managed key for Secrets Manager by default to encrypt your secrets. It’s recommended to specify another encryption key during secret creation and have separate keys for separate workloads. Modify the resource element of the second policy statement and replace <KMS Key ARN> with the KMS key ARNs used to encrypt your secrets. If you use the default key to encrypt your secrets, you can remove this statement.
The policy statement conditionally allows access to all secrets. The condition element permits access only when the value of the principal tag, identified by the key service, matches the value of the secret tag with the same key. You can include multiple conditions (in separate statements) to match multiple tags.
After you create your policy, follow the guide for Creating IAM roles to create your role, attaching the policy you created. Use the default value for your role’s trust relationship for now, you will update the trust relationship in the next step. Note the role’s ARN after creation.
Create an IAM role for the ESO service account
Use eksctl to create the IAM role for the ESO service account (IRSA). Before creating the role, you must create an IAM policy. ESO IRSA only needs permission to assume the Secrets Manager access role that you created in the previous step.
Use the following example of an IAM policy that you can create. Replace <Secrets Manager Access Role ARN> with the ARN of the role you created in the previous step and follow creating a customer managed policy to create the policy. After creating the policy, note the policy ARN.
Next, run the following command to get the account name of the ESO service. You will see a list of service accounts, pick the one that has the same name as your helm release, in this example, the service account is external-secrets.
kubectl get serviceaccounts -n external-secrets
Next, create an IRSA and configure an ESO service account to assume the role. Run the following command to create a new role and associate it with the ESO service account. Replace the variables in brackets (<example>) with your specific information:
eksctl create iamserviceaccount --name <ESO service account> \
--namespace <ESO namespace> --cluster <cluster name> \
--role-name <IRSA name> --override-existing-serviceaccounts \
--attach-policy-arn <policy arn you created earlier> --approve
You can validate the operation by following the steps listed in Configuring a Kubernetes service account to assume an IAM role. Note that you had to pass the ‑‑override-existing-serviceaccounts argument because the ESO service account was already created.
After you’ve validated the operation, run the following command to retrieve the IRSA ARN (replace <IRSA name> with the name you used in the previous step):
aws iam get-role --role-name <IRSA name> --query Role.Arn
Modify the trust relationship of the role you created previously and limit it to your newly created IRSA. The following should resemble your trust relationship. Replace <IRSA Arn> with the IRSA ARN returned in the previous step:
Note that you will be using session tags to implement ABAC. When using session tags, trust policies for all roles connected to the identity provider (IdP) passing the tags must have the sts:TagSession permission. For roles without this permission in the trust policy, the AssumeRole operation fails.
Moreover, the condition block of the second statement limits ESO’s ability to pass session tags with the key name ekssecret. We’re using this condition to verify that the ESO role can only create session tags used for accessing secrets manager, and doesn’t gain the ability to set principal tags that might be used for any other purpose. This way, you’re creating a namespace to help prevent further privilege escalations or escapes.
Create secrets in Secrets Manager
You can create two secrets in Secrets Manager and tag them.
Follow the steps in Create an AWS Secrets Manager secret to create two secrets named service1_secret and service2_secret. Add the following tags to your secrets:
service1_secret:
key=ekssecret, value=service1
service2_secret:
key=ekssecret, value=service2
Run the following command to verify both secrets are created and tagged properly:
Assume that service1-ns hosts service1 and service2-ns hosts service2. After creating the namespaces for your services, verify that each service is restricted to accessing secrets that are tagged with a specific key-value pair. In this example the key should be ekssecret and the value should match the name of the corresponding service. This means that service1 should only have access to service1_secret, while service2 should only have access to service2_secret. Next, declare session tags in SecretStore object definitions.
Edit the following command snippet using the text editor of your choice and replace every instance of <Secrets Manager Access Role ARN> with the ARN of the IAM role you created earlier to access Secrets Manager secrets. Copy and paste the edited command in your terminal and run it to create a .yaml file in your working directory that contains the SecretStore definitions. Make sure to change the AWS Region to reflect the Region of your Secrets Manager.
Create SecretStore objects by running the following command:
kubectl apply -f secretstore.yml
Validate object creation by running the following command:
kubectl describe secretstores.external-secrets.io -A
Check the status and events section for each object and make sure the store is validated.
Next, create two ExternalSecret objects requesting service1_secret and service2_secret. Copy and paste the following command in your terminal and run it. The command will create a .yaml file in your working directory that contains ExternalSecret definitions.
Verify the objects are created by running following command:
kubectl get externalsecrets.external-secrets.io -A
Each ExternalSecret object should create a Kubernetes secret in the same namespace it was created in. Kubernetes secrets are accessible to services in the same namespace. To demonstrate that both Service A and Service B has access to their secrets, run the following command.
kubectl get secrets -A
You should see service1-ns-secret1 created in service1-ns namespace which is accessible to Service 1, and service1-ns-secret2 created in service2-ns which is accessible to Service2.
Try creating an ExternalSecrets object in service1-ns referencing service2_secret. Notice that your object shows SecretSyncedError status. This is the expected behavior, because ESO passes different session tags for ExternalSecret objects in each namespace, and when the tag where key is ekssecret doesn’t match the secret tag with the same key, the request will be rejected.
What about AWS Secrets and Configuration Provider (ASCP)?
Today, customers who use AWS Fargate with Amazon EKS can’t use the ASCP method due to the incompatibility of daemonsets on Fargate. Kubernetes also doesn’t provide a mechanism to add specific claims to JSON web tokens (JWT) used to assume IAM roles. Today, when using ASCP in Kubernetes, which assumes IAM roles through IAM roles for service accounts (IRSA), there’s a constraint in appending session tags during the IRSA assumption due to JWT claim restrictions, limiting the ability to implement ABAC.
With ESO, you can create Kubernetes Secrets and have your pods retrieve secrets from them instead of directly mounting secrets as volumes in your pods. ESO is also capable of using its controller pod’s IRSA to retrieve secrets, so you don’t need to set up IRSA for each pod. You can also role chain and specify secondary roles to be assumed by ESO IRSA and pass session tags to be used with ABAC policies. ESO’s role chaining and ABAC capabilities help decrease the number of IAM roles required for secrets retrieval. See Leverage AWS secrets stores from EKS Fargate with External Secrets Operator on the AWS Containers blog to learn how to use ESO on an EKS Fargate cluster to consume secrets stored in Secrets Manager.
Conclusion
In this blog post, we walked you through how to implement ABAC with Amazon EKS and Secrets Manager using External Secrets Operator. Implementing ABAC allows you to create a single IAM role for accessing Secrets Manager secrets while implementing granular permissions. ABAC also decreases your team’s overhead and reduces the risk of misconfigurations. With ABAC, you require fewer policies and don’t need to update existing policies to allow access to new services and workloads.
If you have feedback about this post, submit comments in the Comments section below.
Building and maintaining a secure, compliant managed file transfer (MFT) solution to securely send and receive files inside and outside of your organization can be challenging. Working with a competent, vigilant, and diligent MFT vendor to help you protect the security of your file transfers can help you address this challenge. In this blog post, I will share how AWS Transfer Family can help you in that process, and I’ll cover five ways to use the security features of Transfer Family to get the most out of this service. AWS Transfer Family is a fully managed service for file transfers over SFTP, AS2, FTPS, and FTP for Amazon Simple Storage Service (Amazon S3) and Amazon Elastic File System (Amazon EFS).
Benefits of building your MFT on top of Transfer Family
As outlined in the AWS Shared Responsibility Model, security and compliance are a shared responsibility between you and Transfer Family. This shared model can help relieve your operational burden because AWS operates, manages, and controls the components from the application, host operating system, and virtualization layer down to the physical security of the facilities in which the service operates. You are responsible for the management and configuration of your Transfer Family server and the associated applications outside of Transfer Family.
AWS follows industry best practices, such as automated patch management and continuous third-party penetration testing, to enhance the security of Transfer Family. This third-party validation and the compliance of Transfer Family with various regulatory regimes (such as SOC, PCI, HIPAA, and FedRAMP) integrates with your organization’s larger secure, compliant architecture.
One example of a customer who benefited from using Transfer Family is Regeneron. Due to their needs for regulatory compliance and security, and their desire for a scalable architecture, they moved their file transfer solution to Transfer Family. Through this move, they achieved their goal of a secure, compliant architecture and lowered their overall costs by 90%. They were also able to automate their malware scanning process for the intake of files. For more information on their success story, see How Regeneron built a secure and scalable file transfer service using AWS Transfer Family. There are many other documented success stories from customers, including Liberty Mutual, Discover, and OpenGamma.
Steps you can take to improve your security posture with Transfer Family
Although many of the security improvements that Transfer Family makes don’t require action on your part to use, you do need to take action on a few for compatibility reasons. In this section, I share five steps that you should take to adopt a secure, compliant architecture on Transfer Family.
Use strong encryption for data in transit — The first step in building a secure, compliant MFT service is to use strong encryption for data in transit. To help with this, Transfer Family now offers a strong set of available ciphers, including post-quantum ciphers that have been designed to resist decryption from future, fault-tolerant quantum computers that are still several years from production. Transfer Family will offer this capability by default for newly created servers after January 31, 2024. Existing customers can select this capability today by choosing the latest Transfer Family security policy. We review the choice of the default security policy for Transfer Family periodically to help ensure the best security posture for customers. For information about how to check what security policy you’re using and how to update it, see Security policies for AWS Transfer Family.
Duplicate your server’s host key — You need to make sure that a threat actor can’t impersonate your server by duplicating your server’s host key. Your server’s host key is a vital component of your secure, compliant architecture to help prevent man-in-the-middle style events where a threat actor can impersonate your server and convince your users to provide sensitive login information and data. To help prevent this possibility, we recommend that Transfer Family SFTP servers use at least a 4,096-bit RSA, ED25519, or ECDSA host key. As part of our shared responsibility model to help you build a secure global infrastructure, Transfer Family will increase its default host key size to 4,096 bits for newly created servers after January 31, 2024. To make key rotation as simple as possible for those with weaker keys, Transfer Family supports the use of multiple host keys of multiple types on a single server. However, you should deprecate the weaker keys as soon as possible because your server is only as secure as its weakest key. To learn what keys you’re using and how to rotate them, see Key management.
The next three steps apply if you use the custom authentication option in Transfer Family, which helps you use your existing identity providers to lift and shift workflows onto Transfer Family.
Require both a password and a key — To increase your security posture, you can require the use of both a password and key to help protect your clients from password scanners and a threat actor that might have stolen their key. For details on how to view and configure this, see Create an SFTP-enabled server.
Use Base64 encoding for passwords — The next step to improve your security posture is to use or update your custom authentication templates to use Base64 encoding for your passwords. This allows for a wider variety of characters and makes it possible to create more complex passwords. In this way, you can be more inclusive of a global audience that might prefer to use different character sets for their passwords. A more diverse character set for your passwords also makes your passwords more difficult for a threat actor to guess and compromise. The example templates for Transfer Family make use of Base64 encoding for passwords. For more details on how to check and update your templates to password encoding to use Base64, see Authenticating using an API Gateway method.
Set your API Gateway method’s authorizationType property to AWS_IAM — The final recommended step is to make sure that you set your API Gateway method’s authorizationType property to AWS_IAM to require that the caller submit the user’s credentials to be authenticated. With IAM authorization, you sign your requests with a signing key derived from your secret access key, instead of your secret access key itself, helping to ensure that authorization requests to your identity provider use AWS Signature Version 4. This provides an extra layer of protection for your secret access key. For details on how to set up AWS_IAM authorization, see Control access to an API with IAM permissions.
Conclusion
Transfer Family offers many benefits to help you build a secure, compliant MFT solution. By following the steps in this post, you can get the most out of Transfer Family to help protect your file transfers. As the requirements for a secure, compliant architecture for file transfers evolve and threats become more sophisticated, Transfer Family will continue to offer optimized solutions and provide actionable advice on how you can use them. For more information, see Security in AWS Transfer Family.
If you have feedback about this post, submit comments in the Comments section below. If you have questions about this post, contact AWS Support.
Want more AWS Security news? Follow us on Twitter.
The US East (Ohio) Region first obtained GSMA certification in September 2021, and the Europe (Paris) Region first obtained GSMA certification in October 2021. This renewal demonstrates our continuous commitment to adhere to the heightened expectations for cloud service providers. AWS customers who provide an embedded Universal Integrated Circuit Card (eUICC) for mobile devices can run their remote provisioning applications with confidence in the AWS Cloud in the GSMA-certified Regions.
For up-to-date information related to the certification, see the AWS Compliance Program page and choose GSMA under Europe, Middle East & Africa.
AWS was evaluated by independent third-party auditors that GSMA selected. The Certificate of Compliance that shows AWS achieved GSMA compliance status is available on the GSMA website and through AWS Artifact. AWS Artifact is a self-service portal for on-demand access to AWS compliance reports. Sign in to AWS Artifact in the AWS Management Console, or learn more at Getting Started with AWS Artifact.
To learn more about our compliance and security programs, see AWS Compliance Programs. As always, we value your feedback and questions; reach out to the AWS Compliance team through the Contact Us page. If you have feedback about this post, submit comments in the Comments section below.
Want more AWS Security news? Follow us on Twitter.
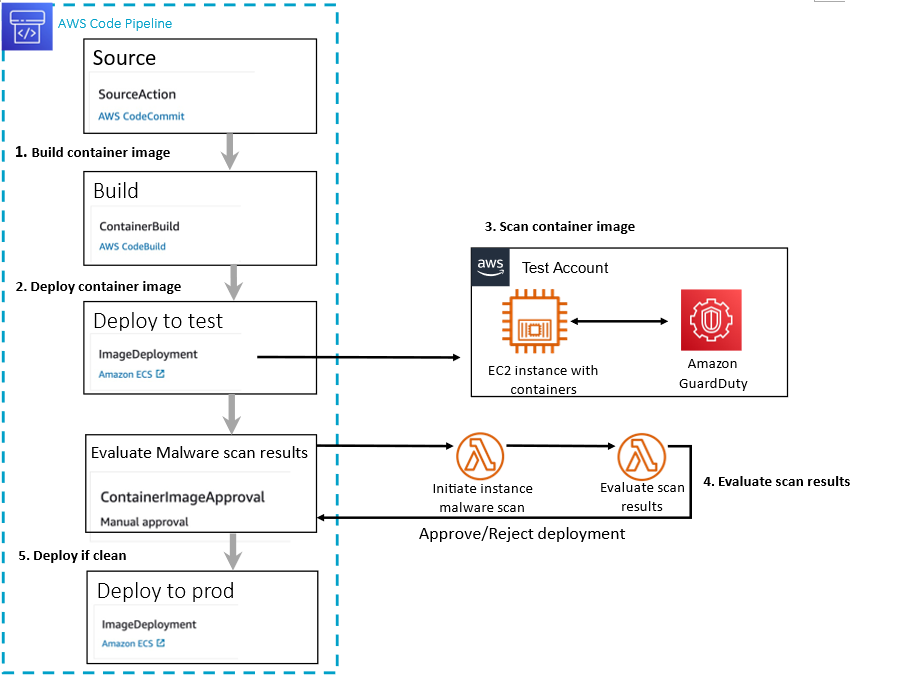
Containerization technologies such as Docker and orchestration solutions such as Amazon Elastic Container Service (Amazon ECS) are popular with customers due to their portability and scalability advantages. Container runtime monitoring is essential for customers to monitor the health, performance, and security of containers. AWS services such as Amazon GuardDuty, Amazon Inspector, and AWS Security Hub play a crucial role in enhancing container security by providing threat detection, vulnerability assessment, centralized security management, and native Amazon Web Services (AWS) container runtime monitoring.
GuardDuty is a threat detection service that continuously monitors your AWS accounts and workloads for malicious activity and delivers detailed security findings for visibility and remediation. GuardDuty analyzes tens of billions of events per minute across multiple AWS data sources and provides runtime monitoring using a GuardDuty security agent for Amazon Elastic Kubernetes Service (Amazon EKS), Amazon ECS and Amazon Elastic Compute Cloud (Amazon EC2) workloads. Findings are available in the GuardDuty console, and by using APIs, a copy of every GuardDuty finding is sent to Amazon EventBridge so that you can incorporate these findings into your operational workflows. GuardDuty findings are also sent to Security Hub helping you to aggregate and corelate GuardDuty findings across accounts and AWS Regions in addition to findings from other security services.
In this blog post, we provide an overview of the AWS Shared Responsibility Model and how it’s related to securing your container workloads running on AWS. We look at the steps to configure and use the new GuardDuty Runtime Monitoring for ECS, EC2, and EKS features. If you’re already using GuardDuty EKS Runtime Monitoring, this post provides the steps to migrate to GuardDuty Runtime Monitoring.
AWS Shared Responsibility Model and containers
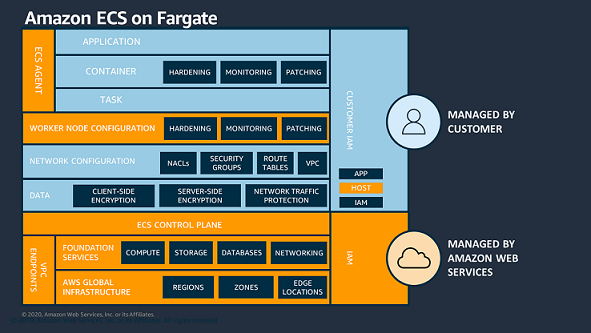
Understanding the AWS Shared Responsibility Model is important in relation to Amazon ECS workloads. For Amazon ECS, AWS is responsible for the ECS control plane and the underlying infrastructure data plane. When using Amazon ECS on an EC2 instance, you have a greater share of security responsibilities compared to using ECS on Fargate. Specifically, you’re responsible for overseeing the ECS agent and worker node configuration on the EC2 instances.
Figure 1: AWS Shared Responsibility Model – Amazon ECS on EC2
In Fargate, each task operates within its dedicated virtual machine (VM), and there’s no sharing of the operating system or kernel resources between tasks. With Fargate, AWS is responsible for the security of the underlying instance in the cloud and the runtime used to run your tasks.
Figure 2: AWS Shared Responsibility Model – Amazon ECS on Fargate
When deploying container runtime images, your responsibilities include configuring applications, ensuring container security, and applying best practices for task runtime security. These best practices help to limit adversaries from expanding their influence beyond the confines of the local container process.
Amazon GuardDuty Runtime Monitoring consolidation
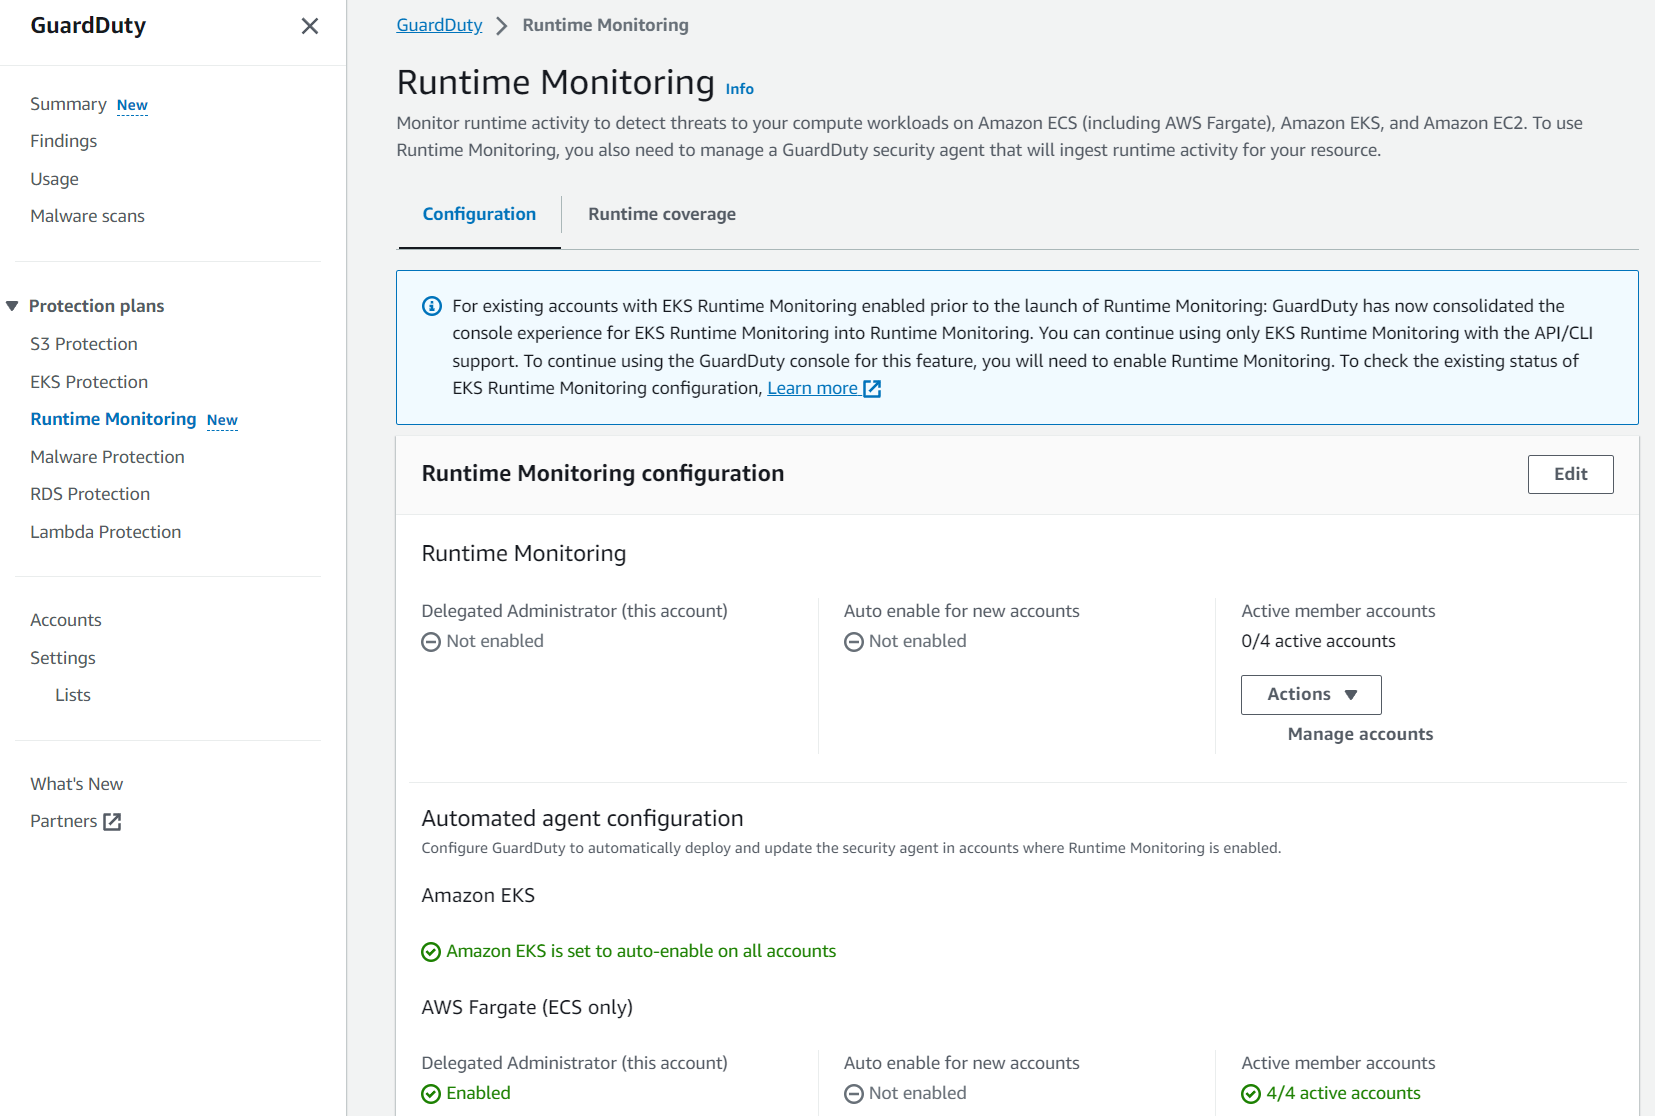
With the new feature launch, EKS Runtime Monitoring has now been consolidated into GuardDuty Runtime Monitoring. With this consolidation, you can manage the configuration for your AWS accounts one time instead of having to manage the Runtime Monitoring configuration separately for each resource type (EC2 instance, ECS cluster, or EKS cluster). A view of each Region is provided so you can enable Runtime Monitoring and manage GuardDuty security agents across each resource type because they now share a common value of either enabled or disabled.
Note: The GuardDuty security agent still must be configured for each supported resource type.
Figure 3: GuardDuty Runtime Monitoring overview
In the following sections, we walk you through how to enable GuardDuty Runtime Monitoring and how you can reconfigure your existing EKS Runtime Monitoring deployment. We also cover how you can enable monitoring for ECS Fargate and EC2 resource types.
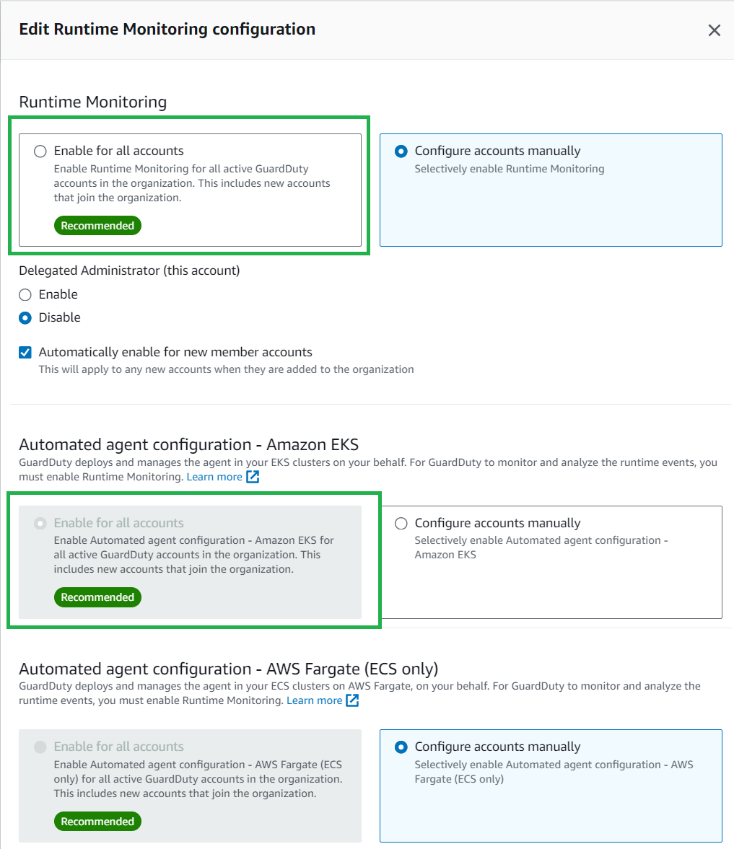
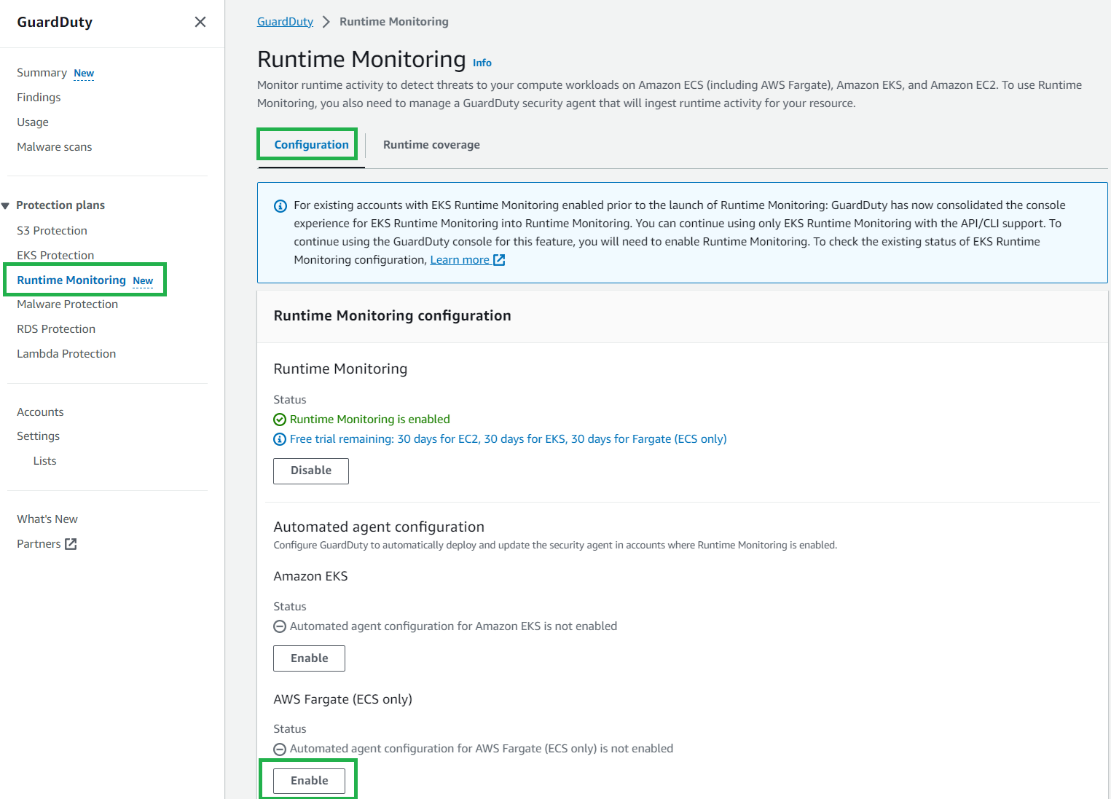
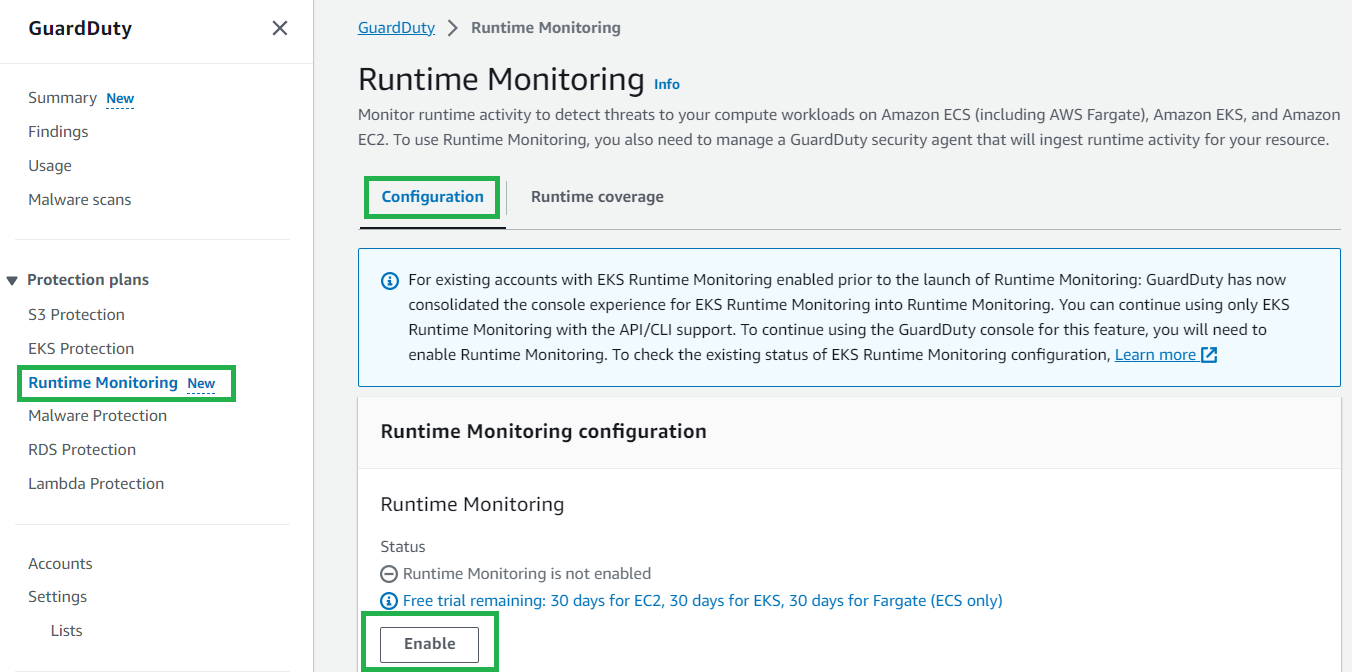
If you were using EKS Runtime Monitoring prior to this feature release, you will notice some configuration options in the updated AWS Management Console for GuardDuty. It’s recommended that you enable Runtime Monitoring for each AWS account; to do this, follow these steps:
In the GuardDuty console, in the navigation pane under Protection plans, select Runtime Monitoring.
Select the Configuration tab and then choose Edit.
Under Runtime Monitoring, select Enable for all accounts.
Under Automated agent configuration – Amazon EKS, ensure Enable for all accounts is selected.
Amazon GuardDuty ECS Runtime Monitoring for Fargate
For ECS using a Fargate capacity provider, GuardDuty deploys the security agent as a sidecar container alongside the essential task container. This doesn’t require you to make changes to the deployment of your Fargate tasks and verifies that new tasks will have GuardDuty Runtime Monitoring. If the GuardDuty security agent sidecar container is unable to launch in a healthy state, the ECS Fargate task will not be prevented from running.
When using GuardDuty ECS Runtime Monitoring for Fargate, you can install the agent on Amazon ECS Fargate clusters within an AWS account or only on selected clusters. In the following sections, we show you how to enable the service and provision the agents.
If your AWS account is managed within AWS Organizations and you’re running ECS Fargate clusters in multiple AWS accounts, only the GuardDuty delegated administrator account can enable or disable GuardDuty ECS Runtime Monitoring for the member accounts. GuardDuty is a regional service and must be enabled within each desired Region. If you’re using multiple accounts and want to centrally manage GuardDuty see Managing multiple accounts in Amazon GuardDuty.
You can use the same process to enable GuardDuty ECS Runtime Monitoring and manage the GuardDuty security agent. It’s recommended to enable GuardDuty ECS Runtime Monitoring automatically for member accounts within your organization.
To automatically enable GuardDuty Runtime Monitoring for ECS Fargate new accounts:
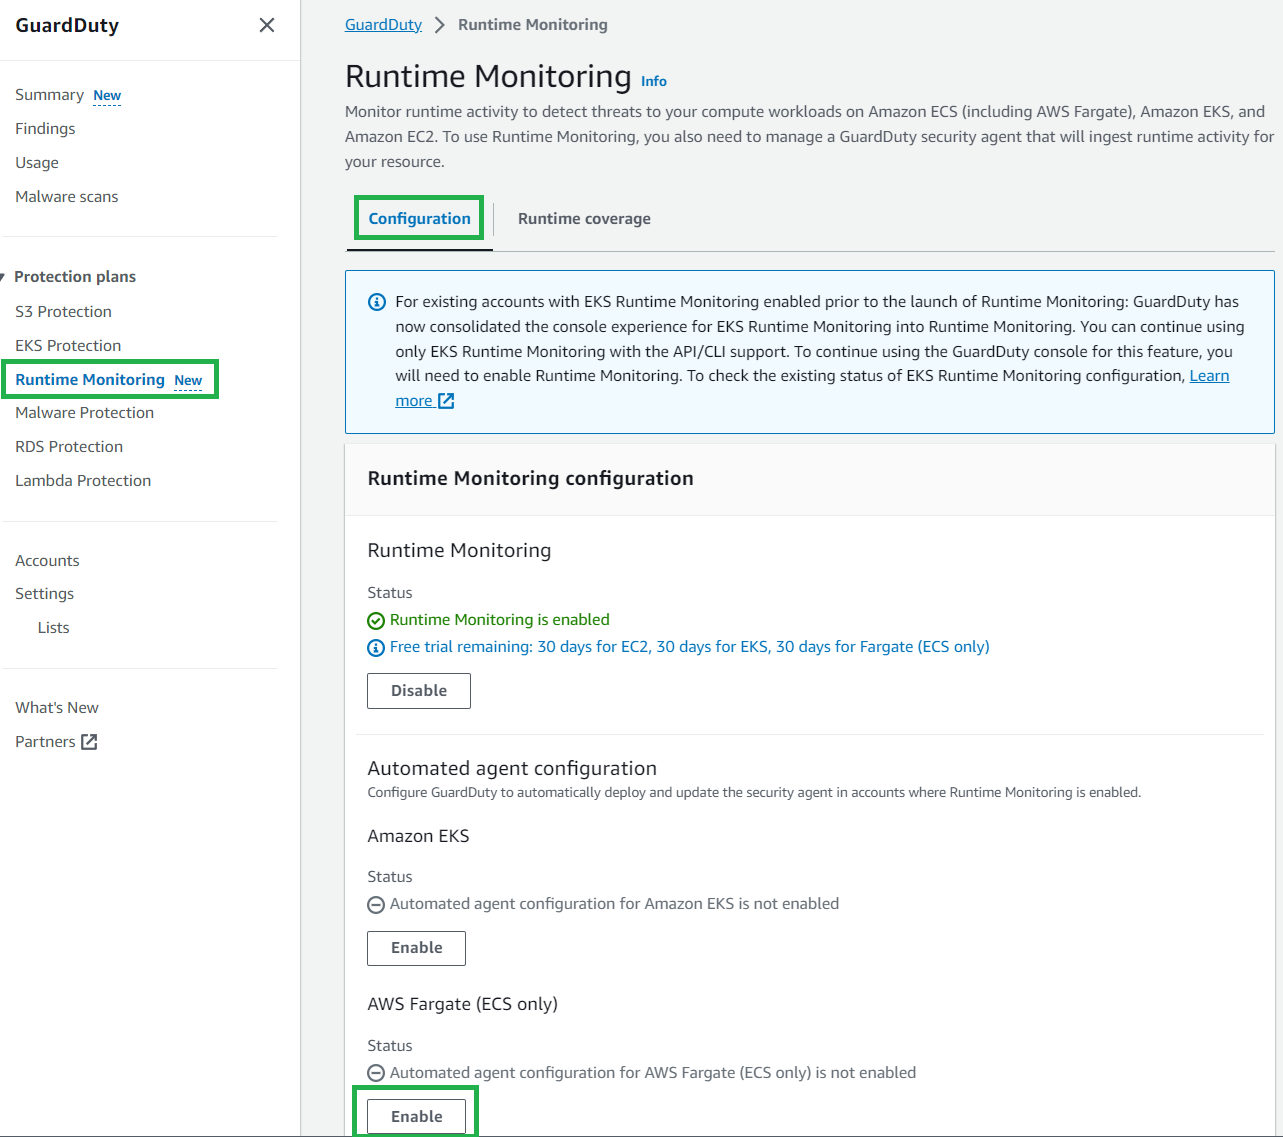
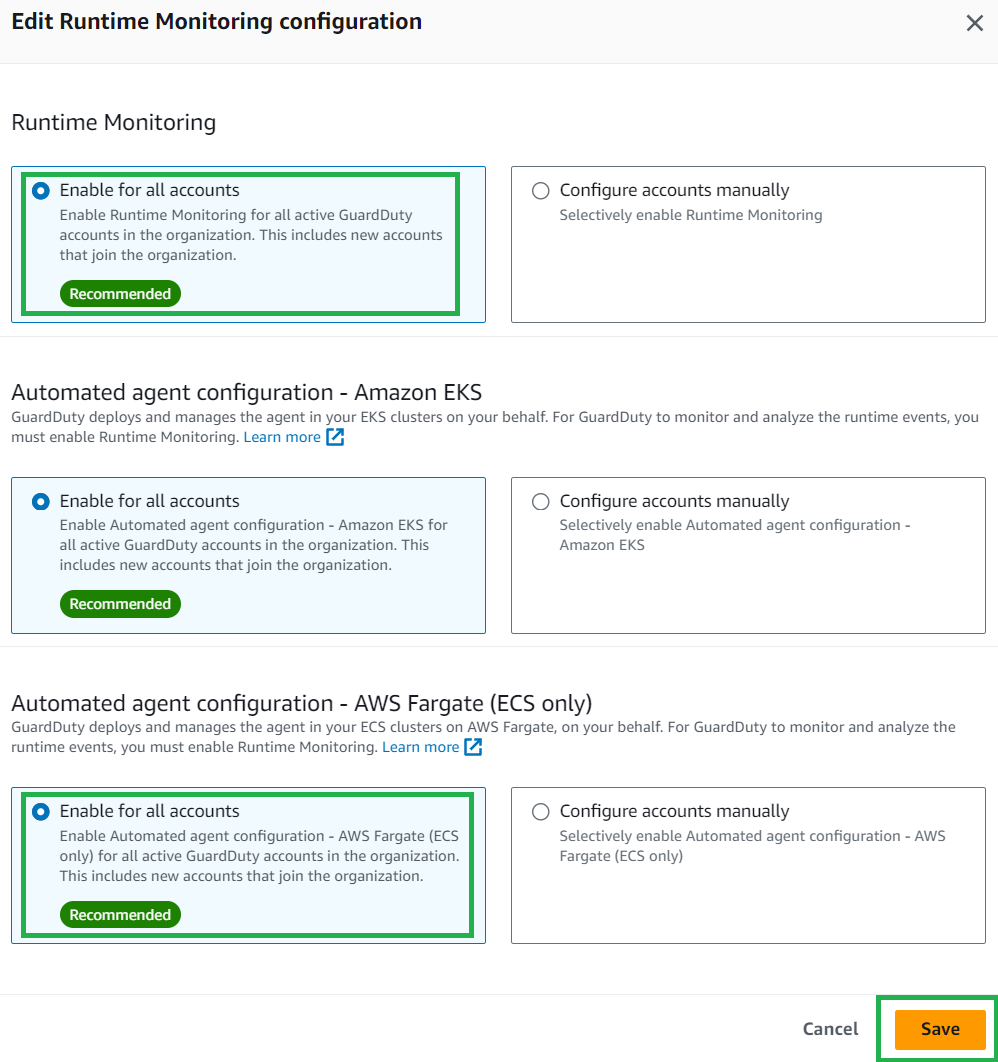
In the GuardDuty console, in the navigation pane under Protection plans, select Runtime Monitoring.
Select the Configuration tab, and then choose Edit.
Under Runtime Monitoring, ensure Enable for all accounts is selected.
Under Automated agent configuration – AWS Fargate (ECS only), select Enable for all accounts, then choose Save.
Figure 6: Enable ECS GuardDuty Runtime Monitoring for AWS accounts
After you enable GuardDuty ECS Runtime Monitoring for Fargate, GuardDuty can start monitoring and analyzing the runtime activity events for ECS tasks in your account. GuardDuty automatically creates a virtual private cloud (VPC) endpoint in your AWS account in the VPCs where you’re deploying your Fargate tasks. The VPC endpoint is used by the GuardDuty agent to send telemetry and configuration data back to the GuardDuty service API. For GuardDuty to receive the runtime events for your ECS Fargate clusters, you can choose one of three approaches to deploy the fully managed security agent:
Monitor existing and new ECS Fargate clusters
Monitor existing and new ECS Fargate clusters and exclude selective ECS Fargate clusters
Use this method when you want GuardDuty to automatically deploy and manage the security agent across each ECS Fargate cluster within your account. GuardDuty will automatically install the security agent when new ECS Fargate clusters are created.
To enable GuardDuty Runtime Monitoring for ECS Fargate across each ECS cluster:
In the GuardDuty console, in the navigation pane under Protection plans, select Runtime Monitoring.
Select the Configuration tab.
Under the Automated agent configuration for AWS Fargate (ECS only), select Enable.
Figure 7: Enable GuardDuty Runtime Monitoring for ECS clusters
Monitor all ECS Fargate clusters and exclude selected ECS Fargate clusters
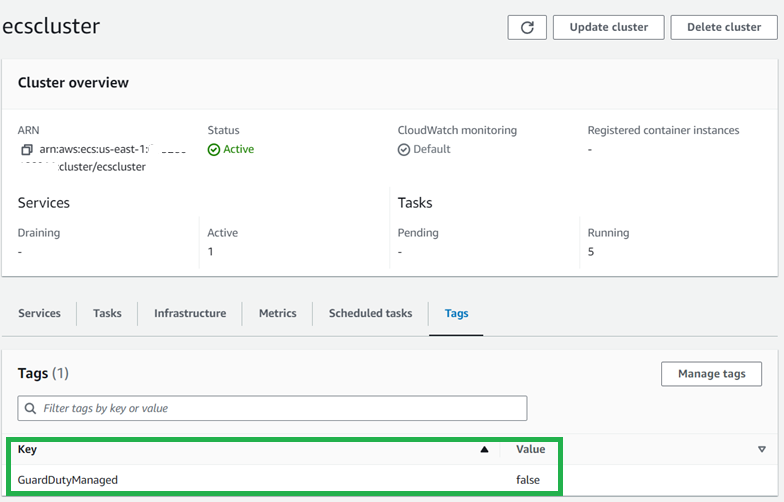
GuardDuty automatically installs the security agent on each ECS Fargate cluster. To exclude an ECS Fargate cluster from GuardDuty Runtime Monitoring, you can use the key-value pair GuardDutyManaged:false as a tag. Add this exclusion tag to your ECS Fargate cluster either before enabling Runtime Monitoring or during cluster creation to prevent automatic GuardDuty monitoring.
To add an exclusion tag to an ECS cluster:
In the Amazon ECS console, in the navigation pane under Clusters, select the cluster name.
Select the Tags tab.
Select Manage Tags and enter the key GuardDutyManaged and value false, then choose Save.
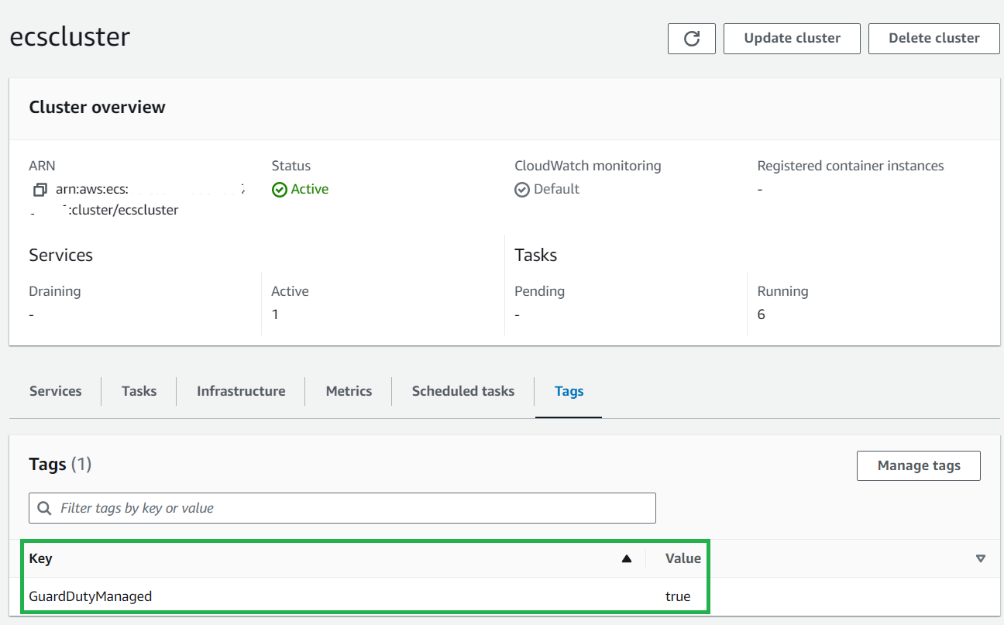
You can monitor selected ECS Fargate clusters when you want GuardDuty to handle the deployment and updates of the security agent exclusively for specific ECS Fargate clusters within your account. This could be a use case where you want to evaluate GuardDuty ECS Runtime Monitoring for Fargate. By using inclusion tags, GuardDuty automatically deploys and manages the security agent only for the ECS Fargate clusters that are tagged with the key-value pair GuardDutyManaged:true. To use inclusion tags, verify that the automated agent configuration for AWS Fargate (ECS) hasn’t been enabled.
To add an inclusion tag to an ECS cluster:
In the Amazon ECS console, in the navigation pane under Clusters, select the cluster name.
Select the Tags tab.
Select Manage Tags and enter the key GuardDutyManaged and value true, then choose Save.
After you’re enabled GuardDuty ECS Runtime Monitoring for Fargate, newly launched tasks will include the GuardDuty agent sidecar container. For pre-existing long running tasks, you might want to consider a targeted deployment for task refresh to activate the GuardDuty sidecar security container. This can be achieved using either a rolling update (ECS deployment type) or a blue/green deployment with AWS CodeDeploy.
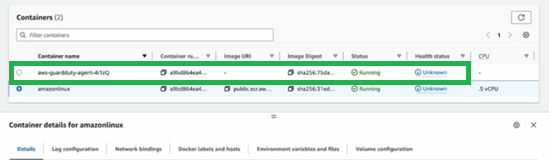
To verify the GuardDuty agent is running for a task, you can check for an additional container prefixed with aws-guardduty-agent-. Successful deployment will change the container’s status to Running.
To view the GuardDuty agent container running as part of your ECS task:
In the Amazon ECS console, in the navigation pane under Clusters, select the cluster name.
Select the Tasks tab.
Select the Task GUID you want to review.
Under the Containers section, you can view the GuardDuty agent container.
Figure 10: View status of the GuardDuty sidecar container
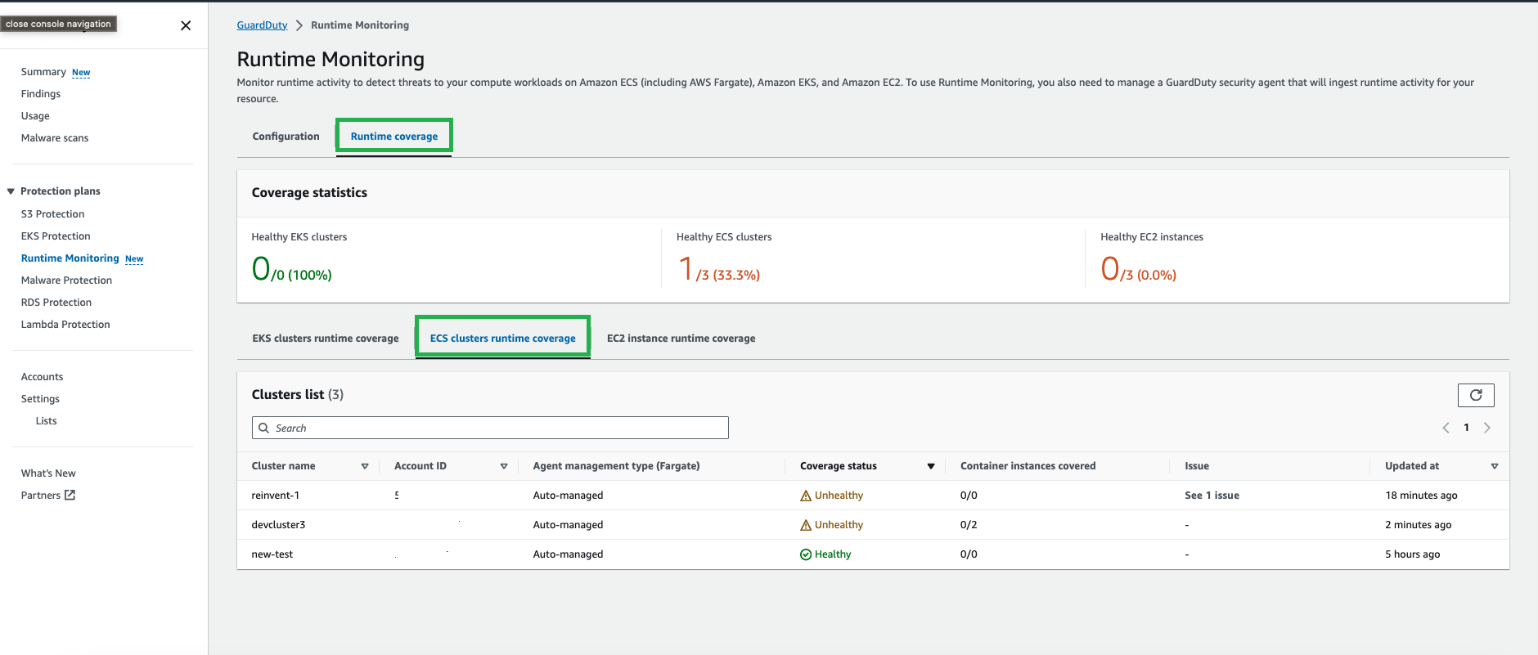
GuardDuty ECS on Fargate coverage monitoring
Coverage status of your ECS Fargate clusters is evaluated regularly and can be classified as either healthy or unhealthy. An unhealthy cluster signals a configuration issue, and you can find more details in the GuardDuty Runtime Monitoring notifications section. When you enable GuardDuty ECS Runtime Monitoring and deploy the security agent in your clusters, you can view the coverage status of new ECS Fargate clusters and tasks in the GuardDuty console.
To view coverage status:
In the GuardDuty console, in the navigation pane under Protection plans, select Runtime Monitoring.
Select the Runtime coverage tab, and then select ECS clusters runtime coverage.
Figure 11: GuardDuty Runtime ECS coverage status overview
Troubleshooting steps for cluster coverage issues such as clusters reporting as unhealthyand a sample notification schema are available at Coverage for Fargate (Amazon ECS only) resource. More information regarding monitoring can be found in the next section.
Amazon GuardDuty Runtime Monitoring for EC2
Amazon EC2 Runtime Monitoring in GuardDuty helps you provide threat detection for Amazon EC2 instances and supports Amazon ECS managed EC2 instances. The GuardDuty security agent, which GuardDuty uses to send telemetry and configuration data back to the GuardDuty service API, is required to be installed onto each EC2 instance.
Prerequisites
If you haven’t activated Amazon GuardDuty, learn more about the free trial and pricing and follow the steps in Getting started with GuardDuty to set up the service and start monitoring your account. Alternatively, you can activate GuardDuty by using the AWS CLI.
If you plan to deploy the agent to Amazon EC2 instances using AWS Systems Manager, an Amazon owned Systems Manager document named AmazonGuardDuty-ConfigureRuntimeMonitoringSsmPlugin is available for use. Alternatively, you can use RPM installation scripts whether or not your Amazon ECS instances are managed by AWS Systems Manager.
Enable GuardDuty Runtime Monitoring for EC2
GuardDuty Runtime Monitoring for EC2 is automatically enabled when you enable GuardDuty Runtime Monitoring.
To enable GuardDuty Runtime Monitoring:
In the GuardDuty console, in the navigation pane under Protection plans, select Runtime Monitoring.
Select the Configuration tab, and then in the Runtime Monitoring section, choose Enable.
Figure 12: Enable GuardDuty runtime monitoring
After the prerequisites have been met and you enable GuardDuty Runtime Monitoring, GuardDuty starts monitoring and analyzing the runtime activity events for the EC2 instances.
If your AWS account is managed within AWS Organizations and you’re running ECS on EC2 clusters in multiple AWS accounts, only the GuardDuty delegated administrator can enable or disable GuardDuty ECS Runtime Monitoring for the member accounts. If you’re using multiple accounts and want to centrally manage GuardDuty, see Managing multiple accounts in Amazon GuardDuty.
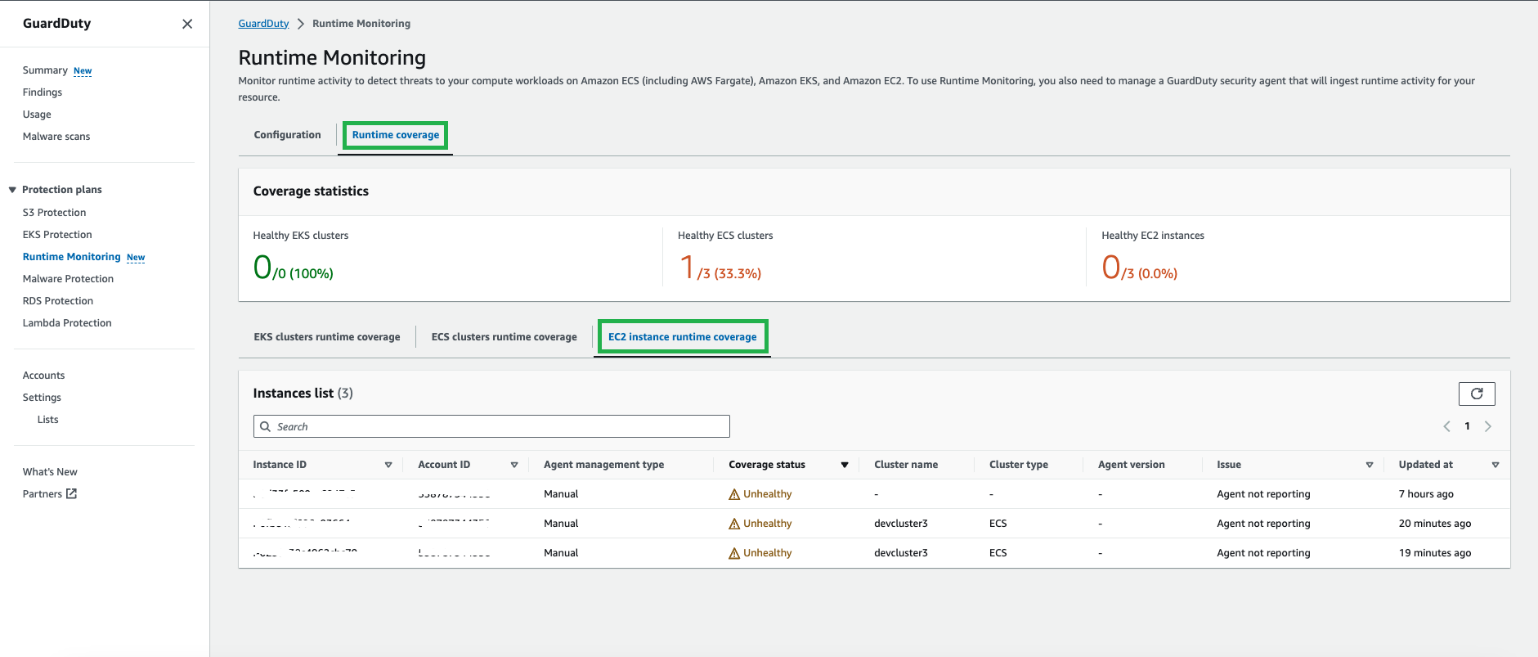
GuardDuty EC2 coverage monitoring
When you enable GuardDuty Runtime Monitoring and deploy the security agent on your Amazon EC2 instances, you can view the coverage status of the instances.
To view EC2 instance coverage status:
In the GuardDuty console, in the navigation pane under Protection plans, select Runtime Monitoring.
Select the Runtime coverage tab, and then select EC2 instance runtime coverage.
Figure 13: GuardDuty Runtime Monitoring coverage for EC2 overview
Cluster coverage status notifications can be configured using the notification schema available under Configuring coverage status change notifications. More information regarding monitoring can be found in the following section.
To stay informed about changes in the coverage status of an ECS cluster or EC2 instance, it’s recommended that you set up status change notifications. Because GuardDuty publishes these status changes on the EventBridge bus associated with your AWS account, you can do this by setting up an Amazon EventBridge rule to receive notifications.
AWSTemplateFormatVersion: "2010-09-09"
Description: CloudFormation template for Amazon EventBridge rules to monitor Healthy/Unhealthy status of GuardDuty Runtime Monitoring coverage status. This template creates the EventBridge and Amazon SNS topics to be notified via email on state change of security agents
Parameters:
  namePrefix:
    Description: a simple naming convention for the SNS & EventBridge rules
    Type: String
    Default: GuardDuty-Runtime-Agent-Status
    MinLength: 1
    MaxLength: 50
    AllowedPattern: ^[a-zA-Z0-9\-_]*$
    ConstraintDescription: Maximum 50 characters of numbers, lower/upper case letters, -,_.
  operatorEmail:
    Type: String
    Description: Email address to notify if there are security agent status state changes
    AllowedPattern: "([a-zA-Z0-9_\\-\\.]+)@((\\[[0-9]{1,3}\\.[0-9]{1,3}\\.[0-9]{1,3}\\.)|(([a-zA-Z0-9\\-]+\\.)+))([a-zA-Z]{2,4}|[0-9]{1,3})(\\]?)"
    ConstraintDescription: must be a valid email address.
Resources:
  eventRuleUnhealthy:
    Type: AWS::Events::Rule
    Properties:
      EventBusName: default
      EventPattern:
        source:
          - aws.guardduty
        detail-type:
          - GuardDuty Runtime Protection Unhealthy
      Name: !Join [ '-', [ 'Rule', !Ref namePrefix, 'Unhealthy' ] ]
      State: ENABLED
      Targets:
        - Id: "GDUnhealthyTopic"
          Arn: !Ref notificationTopicUnhealthy
  eventRuleHealthy:
    Type: AWS::Events::Rule
    Properties:
      EventBusName: default
      EventPattern:
        source:
          - aws.guardduty
        detail-type:
          - GuardDuty Runtime Protection Healthy
      Name: !Join [ '-', [ 'Rule', !Ref namePrefix, 'Healthy' ] ]
      State: ENABLED
      Targets:
        - Id: "GDHealthyTopic"
          Arn: !Ref notificationTopicHealthy
  eventTopicPolicy:
    Type: 'AWS::SNS::TopicPolicy'
    Properties:
      PolicyDocument:
        Statement:
          - Effect: Allow
            Principal:
              Service: events.amazonaws.com
            Action: 'sns:Publish'
            Resource: '*'
      Topics:
        - !Ref notificationTopicHealthy
        - !Ref notificationTopicUnhealthy
  notificationTopicHealthy:
    Type: AWS::SNS::Topic
    Properties:
      TopicName: !Join [ '-', [ 'Topic', !Ref namePrefix, 'Healthy' ] ]
      DisplayName: GD-Healthy-State
      Subscription:
      - Endpoint:
          Ref: operatorEmail
        Protocol: email
  notificationTopicUnhealthy:
    Type: AWS::SNS::Topic
    Properties:
      TopicName: !Join [ '-', [ 'Topic', !Ref namePrefix, 'Unhealthy' ] ]
      DisplayName: GD-Unhealthy-State
      Subscription:
      - Endpoint:
          Ref: operatorEmail
        Protocol: email
GuardDuty findings
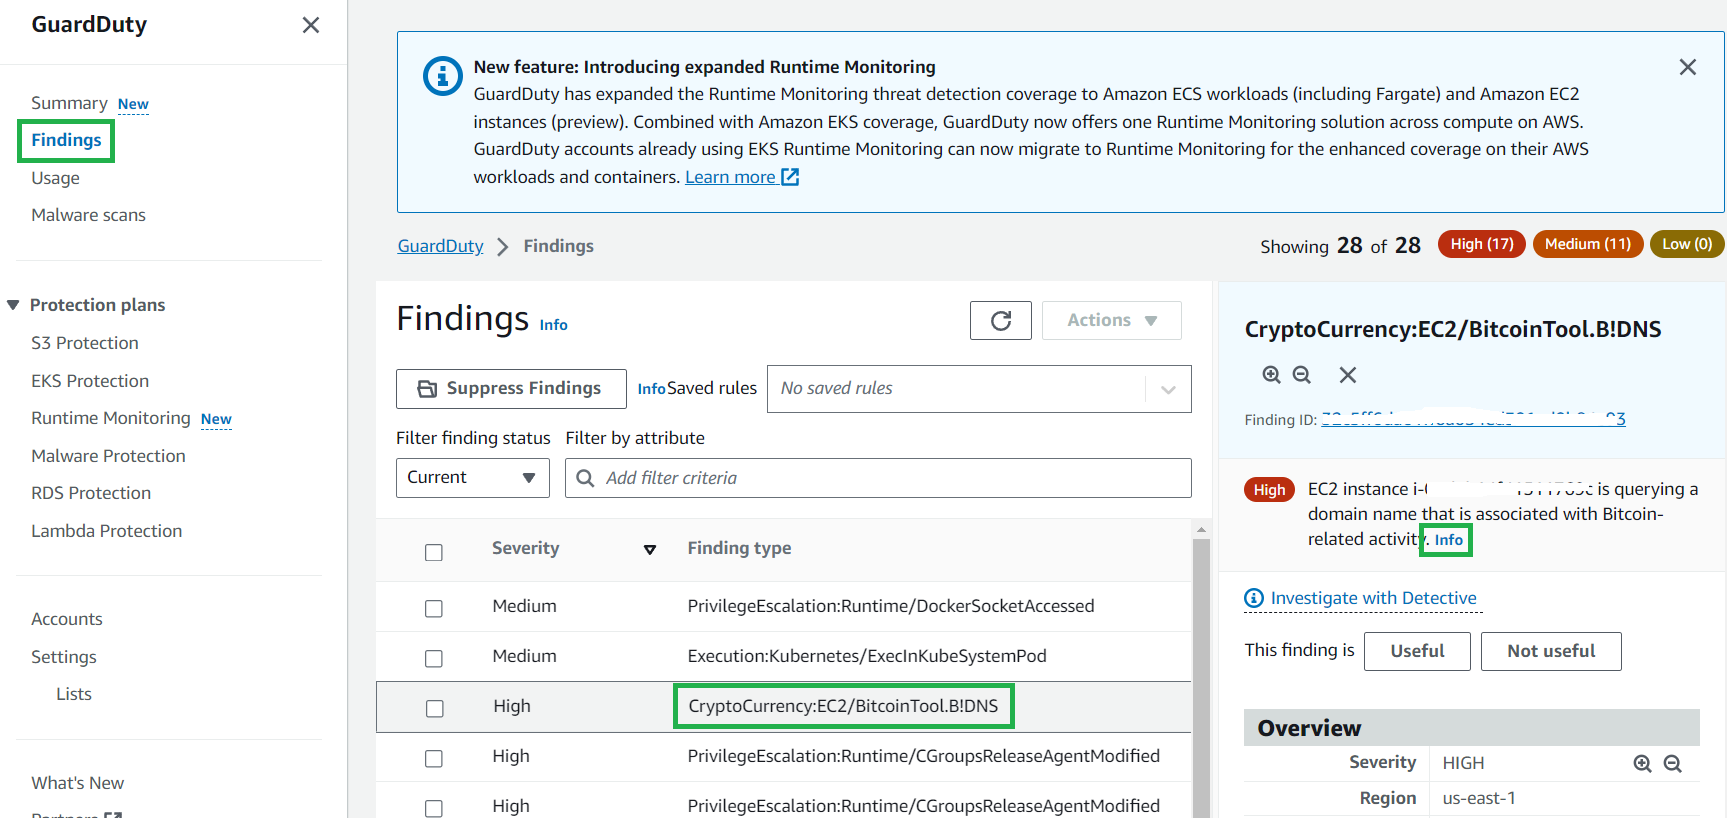
When GuardDuty detects a potential threat and generates a security finding, you can view the details of the corresponding finding. The GuardDuty agent collects kernel-space and user-space events from the hosts and the containers. See Finding types for detailed information and recommended remediation activities regarding each finding type. You can generate sample GuardDuty Runtime Monitoring findings using the GuardDuty console or you can use this GitHub script to generate some basic detections within GuardDuty.
Example ECS findings
GuardDuty security findings can indicate either a compromised container workload or ECS cluster or a set of compromised credentials in your AWS environment.
To view a full description and remediation recommendations regarding a finding:
Select a finding in the navigation pane, and then choose the Info hyperlink.
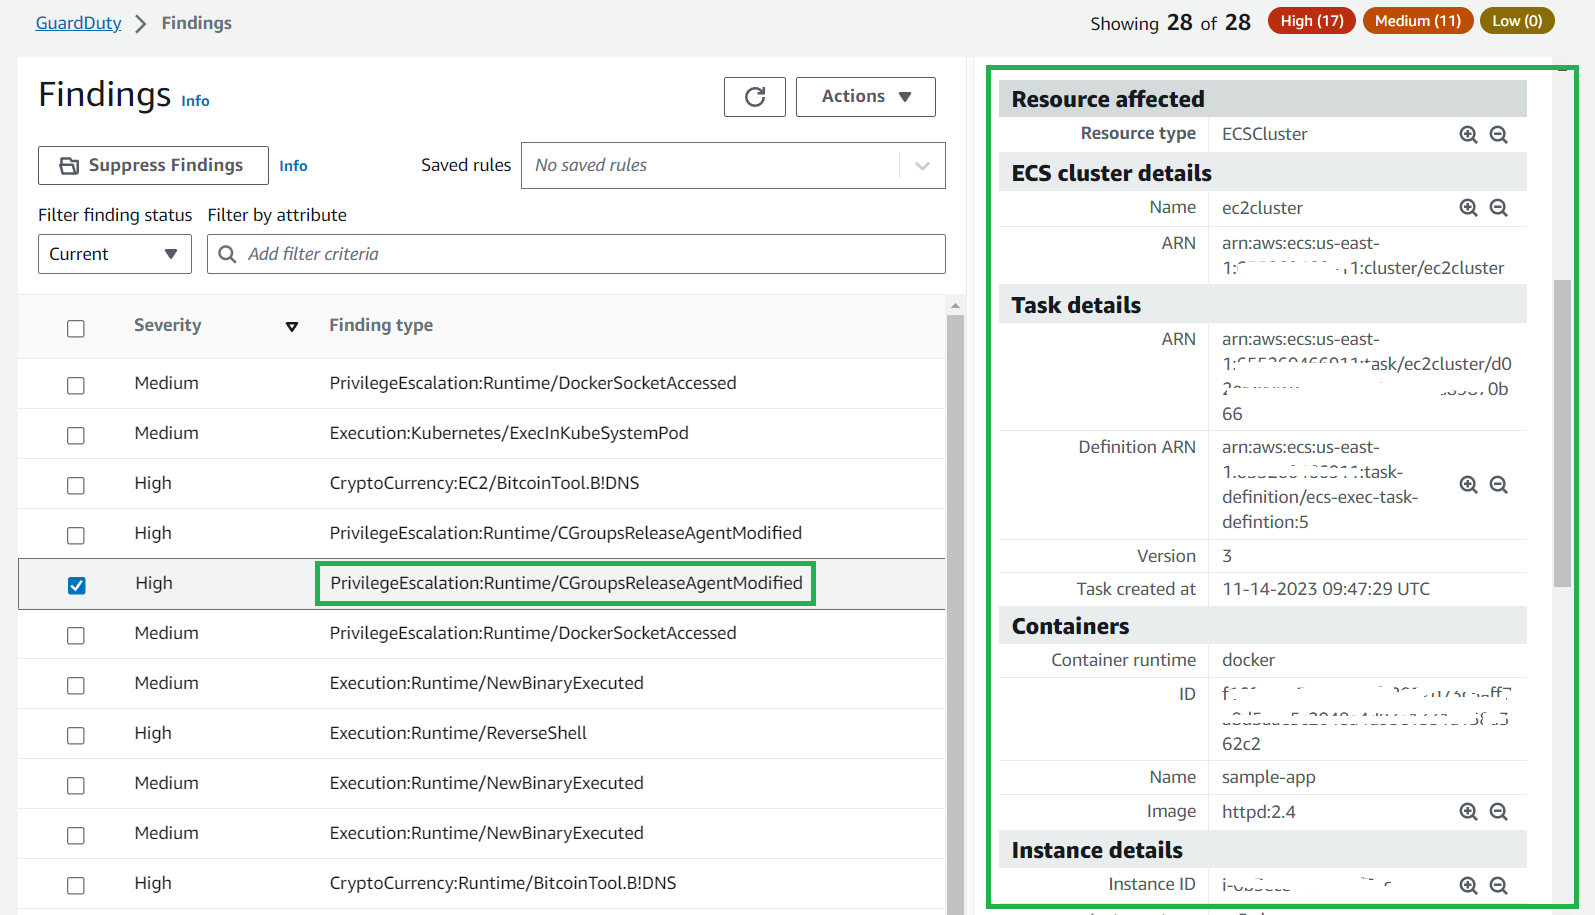
Figure 14: GuardDuty example finding
The ResourceType for an ECS Fargate finding could be an ECS cluster or container. If the resource type in the finding details is ECSCluster, it indicates that either a task or a container inside an ECS Fargate cluster is potentially compromised. You can identify the Name and Amazon Resource Name (ARN) of the ECS cluster paired with the task ARN and task Definition ARN details in the cluster.
To view affected resources, ECS cluster details, task details and instance details regarding a finding:
Select a finding related to an ECS cluster in the navigation pane and then scroll down in the right-hand pane to view the different section headings.
Figure 15: GuardDuty finding details for Fargate
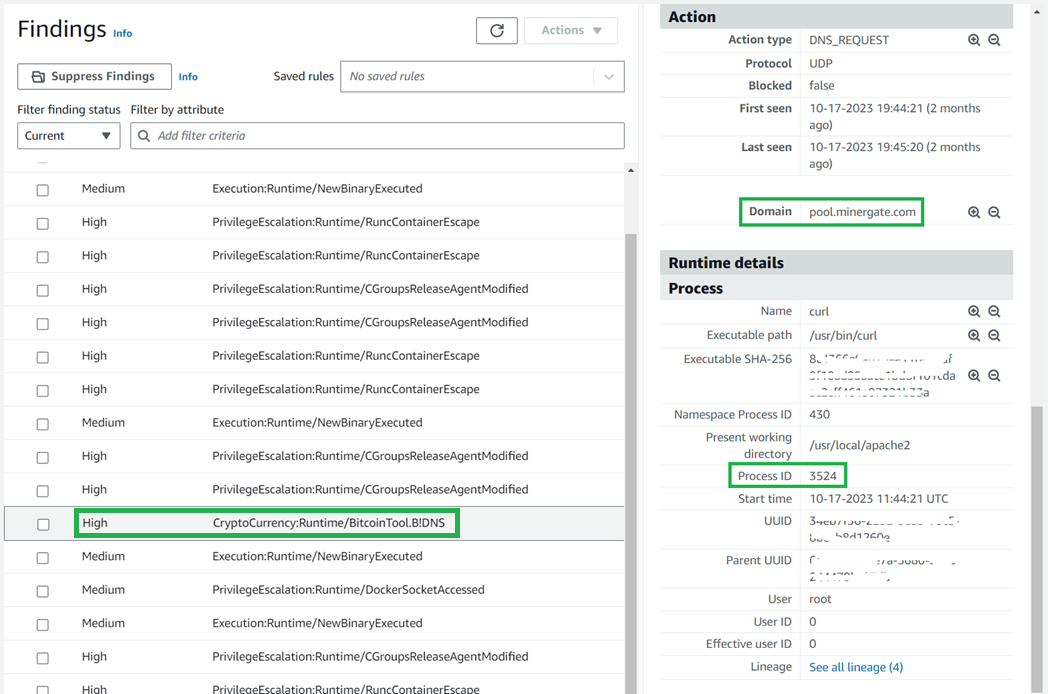
The Action and Runtime details provide information about the potentially suspicious activity. The example finding in Figure 16 tells you that the listed ECS container in your environment is querying a domain that is associated with Bitcoin or other cryptocurrency-related activity. This can lead to threat actors attempting to take control over the compute resource to repurpose it for unauthorized cryptocurrency mining.
Figure 16: GuardDuty ECS example finding with action and process details
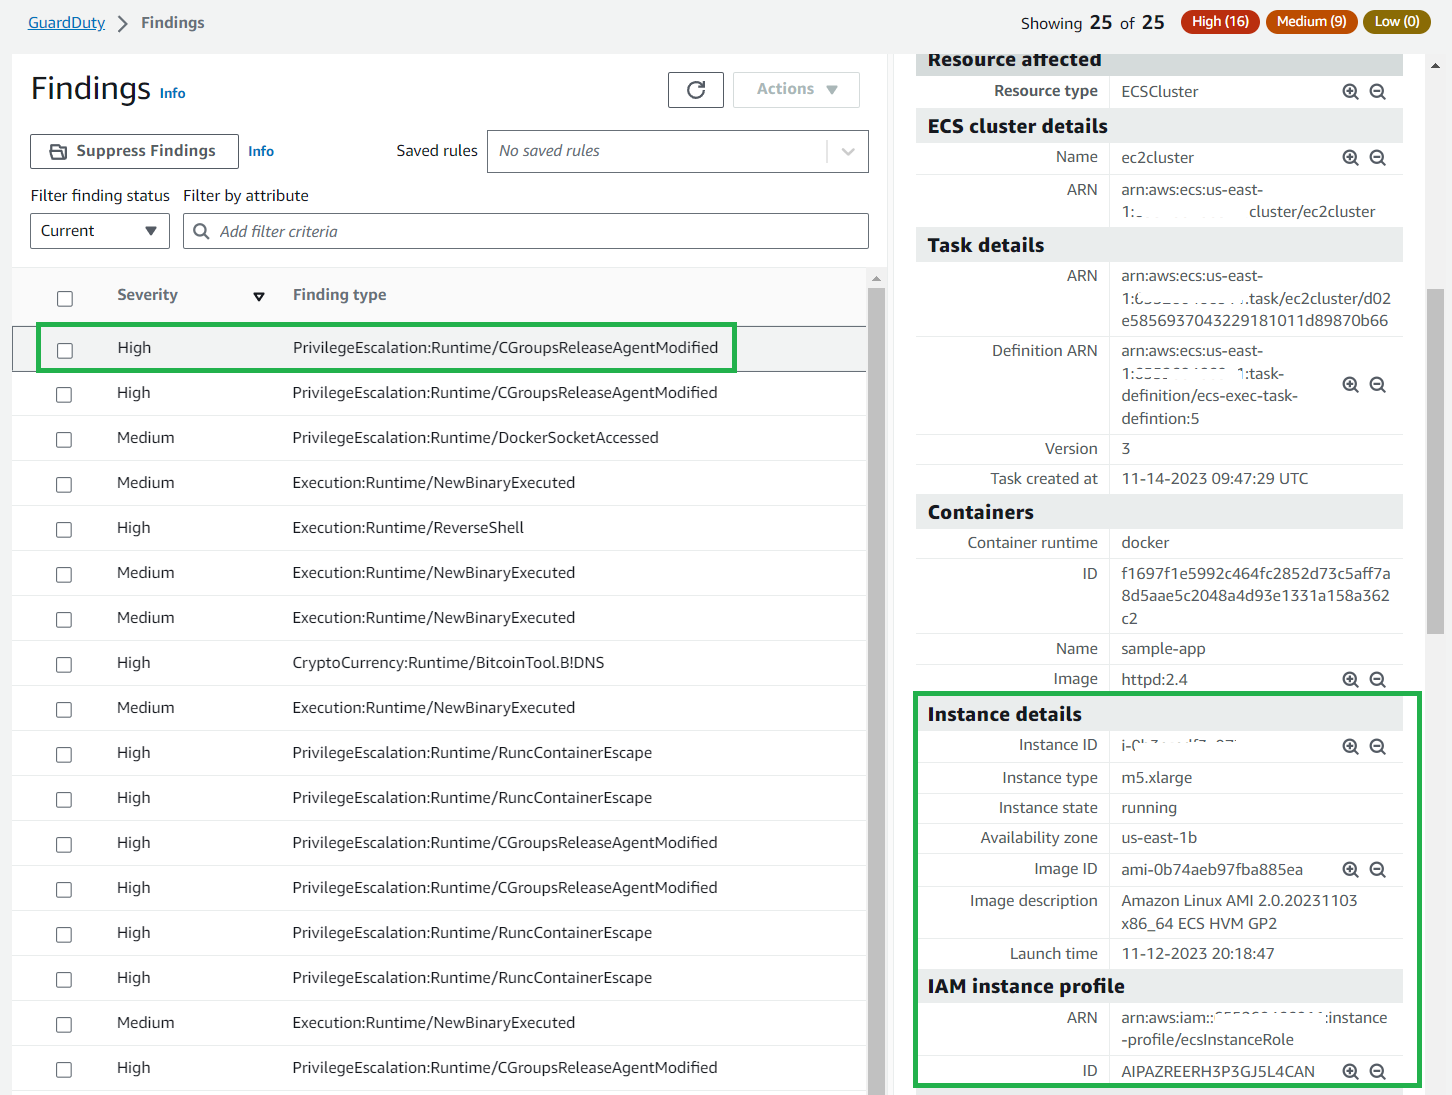
Example ECS on EC2 findings
When a finding is generated from EC2, additional information is shown including the instance details, IAM profile details, and instance tags (as shown in Figure 17), which can be used to help identify the affected EC2 instance.
Figure 17: GuardDuty EC2 instance details for a finding
This additional instance-level information can help you focus your remediation efforts.
GuardDuty finding remediation
When you’re actively monitoring the runtime behavior of containers within your tasks and GuardDuty identifies potential security issues within your AWS environment, you should consider taking the following suggested remediation actions. This helps to address potential security issues and to contain the potential threat in your AWS account.
Identify the potentially impacted Amazon ECS Cluster – The runtime monitoring finding provides the potentially impacted Amazon ECS cluster details in the finding details panel.
Evaluate the source of potential compromise – Evaluate if the detected finding was in the container’s image. If the resource was in the container image, identify all other tasks that are using this image and evaluate the source of the image.
Isolate the impacted tasks – To isolate the affected tasks, restrict both incoming and outgoing traffic to the tasks by implementing VPC network rules that deny all traffic. This approach can be effective in halting an ongoing attack by cutting off all connections to the affected tasks. Be aware that terminating the tasks could eliminate crucial evidence related to the finding that you might need for further analysis.If the task’s container has accessed the underlying Amazon EC2 host, its associated instance credentials might have been compromised. For more information, see Remediating compromised AWS credentials.
Each GuardDuty Runtime Monitoring finding provides specific prescriptive guidance regarding finding remediation. Within each finding, you can choose the Remediating Runtime Monitoring findings link for more information.
Select a finding in the navigation pane and then choose the Info hyperlink and scroll down in the right-hand pane to view the remediation recommendations section.
You can now use Amazon GuardDuty for ECS Runtime Monitoring to monitor your Fargate and EC2 workloads. For a full list of Regions where ECS Runtime Monitoring is available, see Region-specific feature availability.
It’s recommended that you asses your container application using the AWS Well-Architected Tool to ensure adherence to best practices. The recently launched AWS Well-Architected Amazon ECS Lens offers a specialized assessment for container-based operations and troubleshooting of Amazon ECS applications, aligning with the ECS best practices guide. You can integrate this lens into the AWS Well-Architected Tool available in the console.
For more information regarding security monitoring and threat detection, visit the AWS Online Tech Talks. For hands-on experience and learn more regarding AWS security services, visit our AWS Activation Days website to find a workshop in your Region.
If you have feedback about this post, submit comments in the Comments section below. If you have questions about this post, contact AWS Support.
Want more AWS Security news? Follow us on Twitter.
We continue to listen to our customers, regulators, and stakeholders to understand their needs regarding audit, assurance, certification, and attestation programs at Amazon Web Services (AWS). We’re pleased to announce that the Fall 2023 System and Organization Controls (SOC) 1, SOC 2, and SOC 3 reports are now available in Spanish. These translated reports will help drive greater engagement and alignment with customer and regulatory requirements across Latin America and Spain. The reports cover the period October 1, 2022, to September 30, 2023. We extended the period of coverage to 12 months so that you have a full year of assurance from a single report.
The Spanish language version of the reports doesn’t contain the independent opinion issued by the auditors or the control test results, but you can find this information in the English language version. Stakeholders should use the English version as a complement to the Spanish version.
Translated SOC reports in Spanish are available to customers through AWS Artifact. Translated SOC reports in Spanish will be published twice a year, in alignment with the Fall and Spring reporting cycles.
We value your feedback and questions—feel free to reach out to our team or give feedback about this post through the Contact Us page.
If you have feedback about this post, submit comments in the Comments section below.
Spanish version
LLos informes SOC de Otoño de 2023 ahora están disponibles en español
Seguimos escuchando a nuestros clientes, reguladores y partes interesadas para comprender sus necesidades en relación con los programas de auditoría, garantía, certificación y atestación en Amazon Web Services (AWS). Nos complace anunciar que de Otoño SOC 1, SOC 2 y SOC 3 de AWS de Primavera de 2023 ya están disponibles en español. Estos informes traducidos ayudarán a impulsar un mayor compromiso y alineación con los requisitos regulatorios y de los clientes en las regiones de América Latina y España. Los informes cubren el período del 1 de octubre de 2022 al 30 de septiembre de 2023. Ampliamos el período de cobertura a 12 meses para que tenga un año completo de garantía con un solo informe.
La versión en inglés de los informes debe tenerse en cuenta en relación con la opinión independiente emitida por los auditores y los resultados de las pruebas de controles, como complemento de las versiones en español.
Los informes SOC traducidos en español están disponibles en AWS Artifact. Los informes SOC traducidos en español se publicarán dos veces al año según los ciclos de informes de Otoño y Primavera.
Valoramos sus comentarios y preguntas; no dude en ponerse en contacto con nuestro equipo o enviarnos sus comentarios sobre esta publicación a través de nuestra página Contáctenos.
Si tienes comentarios sobre esta publicación, envíalos en la sección Comentarios a continuación.
AWS Signer is a fully managed code-signing service to help ensure the trust and integrity of your code. It helps you verify that the code comes from a trusted source and that an unauthorized party has not accessed it. AWS Signer manages code signing certificates and public and private keys, which can reduce the overhead of your public key infrastructure (PKI) management. It also provides a set of features to simplify lifecycle management of your keys and certificates so that you can focus on signing and verifying your code.
Containers and AWS Lambda functions are popular serverless compute solutions for applications built on the cloud. By using AWS Signer, you can verify that the software running in these workloads originates from a trusted source.
In this blog post, you will learn about the benefits of code signing for software security, governance, and compliance needs. Flexible continuous integration and continuous delivery (CI/CD) integration, management of signing identities, and native integration with other AWS services can help you simplify code security through automation.
Background
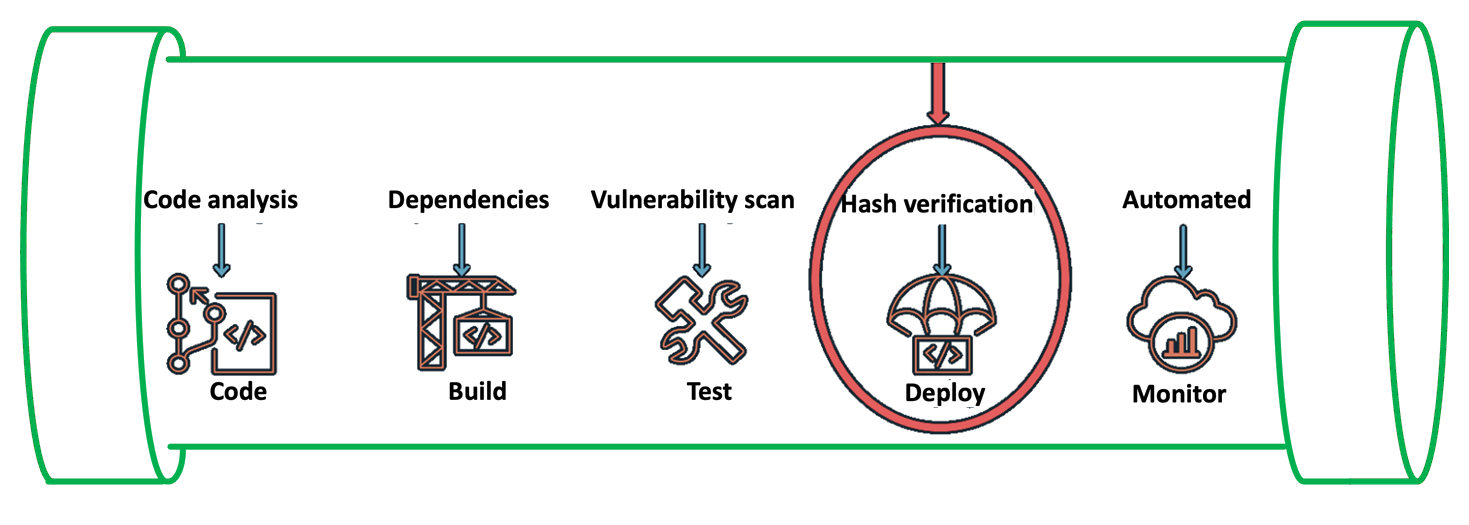
Code signing is an important part of the software supply chain. It helps ensure that the code is unaltered and comes from an approved source.
To automate software development workflows, organizations often implement a CI/CD pipeline to push, test, and deploy code effectively. You can integrate code signing into the workflow to help prevent untrusted code from being deployed, as shown in Figure 1. Code signing in the pipeline can provide you with different types of information, depending on how you decide to use the functionality. For example, you can integrate code signing into the build stage to attest that the code was scanned for vulnerabilities, had its software bill of materials (SBOM) approved internally, and underwent unit and integration testing. You can also use code signing to verify who has pushed or published the code, such as a developer, team, or organization. You can verify each of these steps separately by including multiple signing stages in the pipeline. For more information on the value provided by container image signing, see Cryptographic Signing for Containers.
Figure 1: Security IN the pipeline
In the following section, we will walk you through a simple implementation of image signing and its verification for Amazon Elastic Kubernetes Service (Amazon EKS) deployment. The signature attests that the container image went through the pipeline and came from a trusted source. You can use this process in more complex scenarios by adding multiple AWS CodeBuild code signing stages that make use of various AWS Signer signing profiles.
Services and tools
In this section, we discuss the various AWS services and third-party tools that you need for this solution.
CI/CD services
For the CI/CD pipeline, you will use the following AWS services:
AWS CodePipeline — a fully managed continuous delivery service that you can use to automate your release pipelines for fast and reliable application and infrastructure updates.
AWS Signer — a fully managed code-signing service that you can use to help ensure the trust and integrity of your code.
AWS CodeBuild — A fully managed continuous integration service that compiles source code, runs tests, and produces software packages that are ready to deploy.
Container services
You will use the following AWS services for containers for this walkthrough:
Amazon EKS — a managed Kubernetes service to run Kubernetes in the AWS Cloud and on-premises data centers.
Amazon ECR — a fully managed container registry for high-performance hosting, so that you can reliably deploy application images and artifacts anywhere.
Verification tools
The following are publicly available sign verification tools that we integrated into the pipeline for this post, but you could integrate other tools that meet your specific requirements.
Notation — A publicly available Notary project within the Cloud Native Computing Foundation (CNCF). With contributions from AWS and others, Notary is an open standard and client implementation that allows for vendor-specific plugins for key management and other integrations. AWS Signer manages signing keys, key rotation, and PKI management for you, and is integrated with Notation through a curated plugin that provides a simple client-based workflow.
Kyverno — A publicly available policy engine that is designed for Kubernetes.
Solution overview
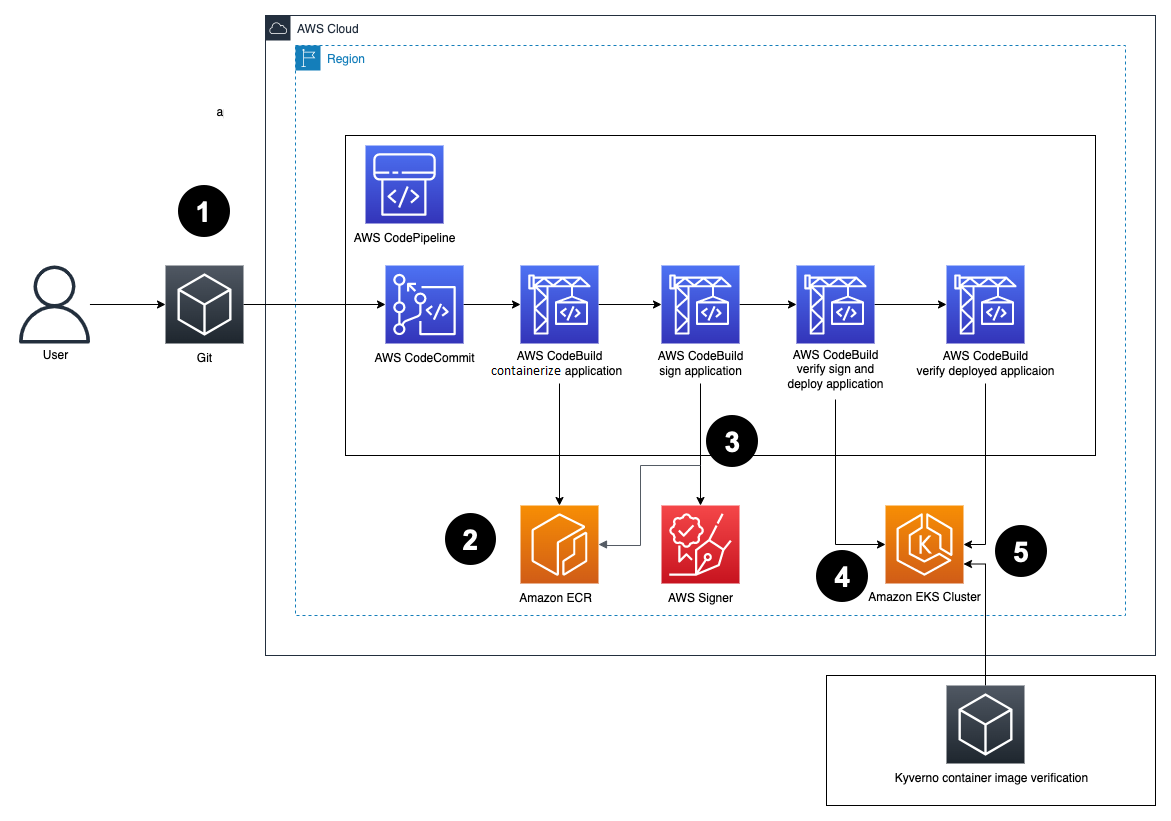
Figure 2: Solution architecture
Here’s how the solution works, as shown in Figure 2:
Developers push Dockerfiles and application code to CodeCommit. Each push to CodeCommit starts a pipeline hosted on CodePipeline.
CodeBuild packages the build, containerizes the application, and stores the image in the ECR registry.
CodeBuild retrieves a specific version of the image that was previously pushed to Amazon ECR. AWS Signer and Notation sign the image by using the signing profile established previously, as shown in more detail in Figure 3.
Figure 3: Signing images described
AWS Signer and Notation verify the signed image version and then deploy it to an Amazon EKS cluster.
If the image has not previously been signed correctly, the CodeBuild log displays an output similar to the following:
Error: signature verification failed: no signature is associated with "<AWS_ACCOUNT_ID>.dkr.ecr.<AWS_REGION>.amazonaws.com/hello-server@<DIGEST>" , make sure the artifact was signed successfully
If there is a signature mismatch, the CodeBuild log displays an output similar to the following:
Error: signature verification failed for all the signatures associated with <AWS_ACCOUNT_ID>.dkr.ecr.<AWS_REGION>.amazonaws.com/hello-server@<DIGEST>
Kyverno verifies the container image signature for use in the Amazon EKS cluster.
Figure 4 shows steps 4 and 5 in more detail.
Figure 4: Verification of image signature for Kubernetes
Prerequisites
Before getting started, make sure that you have the following prerequisites in place:
A CodePipeline pipeline deployed with the CodeCommit repository as the code source and four CodeBuild stages: Build, ApplicationSigning, ApplicationDeployment, and VerifyContainerSign. The CI/CD pipeline should look like that in Figure 5.
The commands in the buildspec.yaml configuration file do the following:
Sign you in to Amazon ECR to work with the Docker images.
Reference the specific image that will be signed by using the commit hash (or another versioning strategy that your organization uses). This gets the digest.
Sign the container image by using the notation sign command. This command uses the container image digest, instead of the image tag.
Install the Notation CLI. In this example, you use the installer for Linux. For a list of installers for various operating systems, see the AWS Signer Developer Guide,
Sign the image by using the notation sign command.
Inspect the signed image to make sure that it was signed successfully by using the notation inspect command.
To verify the signed image, use the notation verify command. The output should look similar to the following:
Successfully verified signature for <AWS_ACCOUNT_ID>.dkr.ecr.<AWS_REGION>.amazonaws.com/hello-server@<DIGEST>
(Optional) For troubleshooting, print the notation policy from the pipeline itself to check that it’s working as expected by running the notation policy show command:
notation policy show
For this, include the command in the pre_build phase after the notation version command in the buildspec.yaml configuration file.
After the notation policy show command runs, CodeBuild logs should display an output similar to the following:
To verify the image in Kubernetes, set up both Kyverno and the Kyverno-notation-AWS Signer in your EKS cluster. To get started with Kyverno and the Kyverno-notation-AWS Signer solution, see the installation instructions.
After you install Kyverno and Kyverno-notation-AWS Signer, verify that the controller is running—the STATUS should show Running:
$ kubectl get pods -n kyverno-notation-aws -w

NAME                                    READY   STATUS    RESTARTS   AGE
kyverno-notation-aws-75b7ddbcfc-kxwjh   1/1     Running   0          6h58m
Configure the CodeBuild buildspec.yaml configuration file to verify that the images deployed in the cluster have been previously signed. You can use the following code to configure the buildspec.yaml file.
The commands in the buildspec.yaml configuration file do the following:
Set up the environment variables, such as the ECR repository URI and the Commit hash, to build the image tag. The kubectl tool will use this later to reference the container image that will be deployed with the Kubernetes objects.
Use kubectl to connect to the EKS cluster and insert the container image reference in the deployment.yaml file.
After the container is deployed, you can observe the kyverno-notation-aws controller and access its logs. You can check if the deployed image is signed. If the logs contain an error, stop the pipeline run with an error code, do a rollback to a previous version, or delete the deployment if you detect that the image isn’t signed.
Decommission the AWS resources
If you no longer need the resources that you provisioned for this post, complete the following steps to delete them.
Delete the IAM roles and policies that you used for the configuration of IAM roles for service accounts.
Revoke the AWS Signer signing profile that you created and used for the signing process by running the following command in the AWS CLI:
$ aws signer revoke-signing-profile
Delete signatures from the Amazon ECR repository. Make sure to replace <AWS_ACCOUNT_ID> and <AWS_REGION> with your own information.
# Use oras CLI, with Amazon ECR Docker Credential Helper, to delete signature
$ oras manifest delete <AWS_ACCOUNT_ID>.dkr.ecr.<AWS_REGION>.amazonaws.com/pause@sha256:ca78e5f730f9a789ef8c63bb55275ac12dfb9e8099e6a0a64375d8a95ed501c4
Note: Using the ORAS project’s oras client, you can delete signatures and other reference type artifacts. It implements deletion by first removing the reference from an index, and then deleting the manifest.
Conclusion
In this post, you learned how to implement container image signing in a CI/CD pipeline by using AWS services such as CodePipeline, CodeBuild, Amazon ECR, and AWS Signer along with publicly available tools such as Notary and Kyverno. By implementing mandatory image signing in your pipelines, you can confirm that only validated and authorized container images are deployed to production. Automating the signing process and signature verification is vital to help securely deploy containers at scale. You also learned how to verify signed images both during deployment and at runtime in Kubernetes. This post provides valuable insights for anyone looking to add image signing capabilities to their CI/CD pipelines on AWS to provide supply chain security assurances. The combination of AWS managed services and publicly available tools provides a robust implementation.
If you have feedback about this post, submit comments in the Comments section below. If you have questions about this post, contact AWS Support.
Want more AWS Security news? Follow us on Twitter.
Organizations undergoing cloud migrations and business transformations often find themselves managing IT operations in hybrid or multicloud environments. This can make it more complex to safeguard workloads, applications, and data, and to securely handle identities and permissions across Amazon Web Services (AWS), hybrid, and multicloud setups.
In this post, we show you how to assume an AWS Identity and Access Management (IAM) role in your AWS accounts to securely issue temporary credentials for applications that run on the Google Cloud Platform (GCP). We also present best practices and key considerations in this authentication flow. Furthermore, this post provides references to supplementary GCP documentation that offer additional context and provide steps relevant to setup on GCP.
Access control across security realms
As your multicloud environment grows, managing access controls across providers becomes more complex. By implementing the right access controls from the beginning, you can help scale your cloud operations effectively without compromising security. When you deploy apps across multiple cloud providers, you should implement a homogenous and consistent authentication and authorization mechanism across both cloud environments, to help maintain a secure and cost-effective environment. In the following sections, you’ll learn how to enforce such objectives across AWS and workloads hosted on GCP, as shown in Figure 1.
Figure 1: Authentication flow between GCP and AWS
Prerequisites
To follow along with this walkthrough, complete the following prerequisites.
Create a service account in GCP. Resources in GCP use service accounts to make API calls. When you create a GCP resource, such as a compute engine instance in GCP, a default service account gets created automatically. Although you can use this default service account in the solution described in this post, we recommend that you create a dedicated user-managed service account, because you can control what permissions to assign to the service account within GCP.
To learn more about best practices for service accounts, see Best practices for using service accounts in the Google documentation. In this post, we use a GCP virtual machine (VM) instance for demonstration purposes. To attach service accounts to other GCP resources, see Attach service accounts to resources.
Obtaining temporary AWS credentials for workloads that run on GCP is a multi-step process. In this flow, you use the identity token from the GCP compute engine metadata server to call the AssumeRoleWithWebIdentity API to request AWS temporary credentials. This flow gives your application greater flexibility to request credentials for an IAM role that you have configured with a sufficient trust policy, and the corresponding Amazon Resource Name (ARN) for the IAM role must be known to the application.
Make sure to replace the <placeholder values> with your values from the Google ID Token. The ID token issued for the service accounts has the azp (AUTHORIZED_PARTY) field set, so condition keys are mapped to the Google ID Token fields as follows:
accounts.google.com:oaud condition key matches the aud (AUDIENCE) field on the Google ID token.
accounts.google.com:aud condition key matches the azp (AUTHORIZED_PARTY) field on the Google ID token.
accounts.google.com:sub condition key matches the sub (SUBJECT) field on the Google ID token.
The authentication flow for the scenario is shown in Figure 2.
Figure 2: Detailed authentication flow with AssumeRoleWithWebIdentity API
The authentication flow has the following steps:
On AWS, you can source external credentials by configuring the credential_process setting in the config file. For the syntax and operating system requirements, see Source credentials with an external process. For this post, we have created a custom profile TeamA-S3ReadOnlyAccess as follows in the config file:
Specify a program or a script that credential_process will invoke. For this post, credential_process invokes the script /opt/bin/credentials.sh which has the following code. Make sure to replace <111122223333> with your own account ID.
The IAM trust policy uses the aud (AUDIENCE), azp (AUTHORIZED_PARTY) and sub (SUBJECT) values from the JWT token to help ensure that the IAM role defined in the section Define an IAM role in AWS can be assumed only by the intended GCP service account.
The script invokes the AssumeRoleWithWebIdentity API call, passing in the identity token from the previous step and specifying which IAM role to assume. The script uses the Identity subject claim as the session name, which can facilitate auditing or forensic operations on this AssumeRoleWithWebIdentity API call. AWS verifies the authenticity of the token before returning temporary credentials. In addition, you can verify the token in your credential program by using the process described at Obtaining the instance identity token.
The script then returns the temporary credentials to the credential_process as the JSON output on STDOUT; we used jq to parse the output in the desired JSON format.
Note that AWS SDKs store the returned AWS credentials in memory when they call credential_process. AWS SDKs keep track of the credential expiration and generate new AWS session credentials through the credential process. In contrast, the AWS CLI doesn’t cache external process credentials; instead, the AWS CLI calls the credential_process for every CLI request, which creates a new role session and could result in slight delays when you run commands.
Test access in the AWS CLI
After you configure the config file for the credential_process, verify your setup by running the following command.
Amazon CloudTrail logs the AssumeRoleWithWebIdentity API call, as shown in Figure 3. The log captures the audience in the identity token as well as the IAM role that is being assumed. It also captures the session name with a reference to the Identity subject claim, which can help simplify auditing or forensic operations on this AssumeRoleWithWebIdentity API call.
Figure 3: CloudTrail event for AssumeRoleWithWebIdentity API call from GCP VM
Test access in the AWS SDK
The next step is to test access in the AWS SDK. The following Python program shows how you can refer to the custom profile configured for the credential process.
import boto3

session = boto3.Session(profile_name='TeamA-S3ReadOnlyAccess')
client = session.client('s3')

response = client.list_buckets()
for _bucket in response['Buckets']:
    print(_bucket['Name'])
Before you run this program, run pip install boto3. Create an IAM role that has the AmazonS3ReadOnlyAccess policy attached to it. This program prints the names of the existing S3 buckets in your account. For example, if your AWS account has two S3 buckets named DOC-EXAMPLE-BUCKET1 and DOC-EXAMPLE-BUCKET2, then the output of the preceding program shows the following:
DOC-EXAMPLE-BUCKET1
DOC-EXAMPLE-BUCKET2
If you don’t have an existing S3 bucket, then create an S3 bucket before you run the preceding program.
The list_bucket API call is also logged in CloudTrail, capturing the identity and source of the calling application, as shown in Figure 4.
Figure 4: CloudTrail event for S3 API call made with federated identity session
Clean up
If you don’t need to further use the resources that you created for this walkthrough, delete them to avoid future charges for the deployed resources:
Delete the VM instance and service account created in GCP.
Delete the resources that you provisioned on AWS to test the solution.
Conclusion
In this post, you learned how to exchange the identity token of a virtual machine running on a GCP compute engine to assume a role on AWS, so that you can seamlessly and securely access AWS resources from GCP hosted workloads.
We walked you through the steps required to set up the credential process and shared best practices to consider in this authentication flow. You can also apply the same pattern to workloads deployed on GCP functions or Google Kubernetes Engine (GKE) when they request access to AWS resources.
If you have feedback about this post, submit comments in the Comments section below. If you have questions about this post, contact AWS Support.
Want more AWS Security news? Follow us on Twitter.
ityAs you design your Amazon API Gateway applications to rely on mutual certificate authentication (mTLS), you need to consider how your application will verify the revocation status of a client certificate. In your design, you should account for the performance and availability of your verification mechanism to make sure that your application endpoints perform reliably.
In this blog post, I demonstrate an architecture that will help you on your journey to implement custom revocation checks against your certificate revocation list (CRL) for API Gateway. You will also learn advanced Amazon Simple Storage Service (Amazon S3) and AWS Lambda techniques to achieve higher performance and scalability.
Choosing the right certificate verification method
One of your first considerations is whether to use a CRL or the Online Certificate Status Protocol (OCSP), if your certificate authority (CA) offers this option. For an in-depth analysis of these two options, see my earlier blog post, Choosing the right certificate revocation method in ACM Private CA. In that post, I demonstrated that OCSP is a good choice when your application can tolerate high latency or a failure for certificate verification due to TLS service-to-OCSP connectivity. When you rely on mutual TLS authentication in a high-rate transactional environment, increased latency or OCSP reachability failures may affect your application. We strongly recommend that you validate the revocation status of your mutual TLS certificates. Verifying your client certificate status against the CRL is the correct approach for certificate verification if you require reliability and lower, predictable latency. A potential exception to this approach is the use case of AWS Certificate Manager Private Certificate Authority (AWS Private CA) with an OCSP responder hosted on AWS CloudFront.
With an AWS Private CA OCSP responder hosted on CloudFront, you can reduce the risks of network and latency challenges by relying on communication between AWS native services. While this post focuses on the solution that targets CRLs originating from any CA, if you use AWS Private CA with an OCSP responder, you should consider generating an OCSP request in your Lambda authorizer.
Mutual authentication with API Gateway
API Gateway mutual TLS authentication (mTLS) requires you to define a root of trust that will contain your certificate authority public key. During the mutual TLS authentication process, API Gateway performs the undifferentiated heavy lifting by offloading the certificate authentication and negotiation process. During the authentication process, API Gateway validates that your certificate is trusted, has valid dates, and uses a supported algorithm. Additionally, you can refer to the API Gateway documentation and related blog post for details about the mutual TLS authentication process on API Gateway.
Implementing mTLS certificate verification for API Gateway
In the remainder of this blog post, I’ll describe the architecture for a scalable implementation of a client certificate verification mechanism against a CRL on your API Gateway.
The certificate CRL verification process presented here relies on a custom Lambda authorizer that validates the certificate revocation status against the CRL. The Lambda authorizer caches CRL data to optimize the query time for subsequent requests and allows you to define custom business logic that could go beyond CRL verification. For example, you could include other, just-in-time authorization decisions as a part of your evaluation logic.
Implementation mechanisms
This section describes the implementation mechanisms that help you create a high-performing extension to the API Gateway mutual TLS authentication process.
Data repository for your certificate revocation list
API Gateway mutual TLS configuration uses Amazon S3 as a repository for your root of trust. The design for this sample implementation extends the use of S3 buckets to store your CRL and the public key for the certificate authority that signed the CRL.
We strongly recommend that you maintain an updated CRL and verify its signature before data processing. This process is automatic if you use AWS Private CA, because AWS Private CA will update your CRL automatically on revocation. AWS Private CA also allows you to retrieve the CA’s public key by using an API call.
Certificate validation
My sample implementation architecture uses the API Gateway Lambda authorizer to validate the serial number of the client certificate used in the mutual TLS authentication session against the list of serial numbers present in the CRL you publish to the S3 bucket. In the process, the API Gateway custom authorizer will read the client certificate serial number, read and validate the CRL’s digital signature, search for the client’s certificate serial number within the CRL, and return the authorization policy based on the findings.
Optimizing for performance
The mechanisms that enable a predictable, low-latency performance are CRL preprocessing and caching. Your CRL is an ASN.1 data structure that requires a relatively high computing time for processing. Preprocessing your CRL into a simple-to-parse data structure reduces the computational cost you would otherwise incur for every validation; caching the CRL will help you reduce the validation latency and improve predictability further.
Performance optimizations
The process of parsing and validating CRLs is computationally expensive. In the case of large CRL files, parsing the CRL in the Lambda authorizer on every request can result in high latency and timeouts. To improve latency and reduce compute costs, this solution optimizes for performance by preprocessing the CRL and implementing function-level caching.
Preprocessing and generation of a cached CRL file
The first optimization happens when S3 receives a new CRL object. As shown in Figure 1, the S3 PutObject event invokes a preprocessing Lambda that validates the signature of your uploaded CRL and decodes its ASN.1 format. The output of the preprocessing Lambda function is the list of the revoked certificate serial numbers from the CRL, in a data structure that is simpler to read by your programming language of choice, and that won’t require extensive parsing by your Lambda authorizer. The asynchronous approach mitigates the impact of CRL processing on your API Gateway workload.
Figure 1: Sample implementation flow of the pre-processing component
Client certificate lookup in a CRL
The optimization happens as part of your Lambda authorizer that retrieves the preprocessed CRL data generated from the first step and searches through the data structure for your client certificate serial number. If the Lambda authorizer finds your client’s certificate serial number in the CRL, the authorization request fails, and the Lambda authorizer generates a “Deny” policy. Searching through a read-optimized data structure prepared by your preprocessing step is the second optimization that reduces the lookup time and the compute requirements.
Function-level caching
Because of the preprocessing, the Lambda authorizer code no longer needs to perform the expensive operation of decoding the ASN.1 data structures of the original CRL; however, network transfer latency will remain and may impact your application.
To improve performance, and as a third optimization, the Lambda service retains the runtime environment for a recently-run function for a non-deterministic period of time. If the function is invoked again during this time period, the Lambda function doesn’t have to initialize and can start running immediately. This is called a warm start. Function-level caching takes advantage of this warm start to hold the CRL data structure in memory persistently between function invocations so the Lambda function doesn’t have to download the preprocessed CRL data structure from S3 on every request.
The duration of the Lambda container’s warm state depends on multiple factors, such as usage patterns and parallel requests processed by your function. If, in your case, API use is infrequent or its usage pattern is spiky, pre-provisioned concurrency is another technique that can further reduce your Lambda startup times and the duration of your warm cache. Although provisioned concurrency does have additional costs, I recommend you evaluate its benefits for your specific environment. You can also check out the blog dedicated to this topic, Scheduling AWS Lambda Provisioned Concurrency for recurring peak usage.
To validate that the Lambda authorizer has the latest copy of the CRL data structure, the S3 ETag value is used to determine if the object has changed. The preprocessed CRL object’s ETag value is stored as a Lambda global variable, so its value is retained between invocations in the same runtime environment. When API Gateway invokes the Lambda authorizer, the function checks for existing global preprocessed CRL data structure and ETag variables. The process will only retrieve a read-optimized CRL when the ETag is absent, or its value differs from the ETag of the preprocessed CRL object in S3.
Figure 2 demonstrates this process flow.
Figure 2: Sample implementation flow for the Lambda authorizer component
In summary, you will have a Lambda container with a persistent in-memory lookup data structure for your CRL by doing the following:
Asynchronously start your preprocessing workflow by using the S3 PutObject event so you can generate and store your preprocessed CRL data structure in a separate S3 object.
Read the preprocessed CRL from S3 and its ETag value and store both values in global variables.
Compare the value of the ETag stored in your global variables to the current ETag value of the preprocessed CRL S3 object, to reduce unnecessary downloads if the current ETag value of your S3 object is the same as the previous value.
We recommend that you avoid using built-in API Gateway Lambda authorizer result caching, because the status of your certificate might change, and your authorization decision would rest on out-of-date verification results.
Consider setting a reserved concurrency for your CRL verification function so that API Gateway can invoke your function even if the overall capacity for your account in your AWS Region is exhausted.
The sample implementation flow diagram in Figure 3 demonstrates the overall architecture of the solution.
Figure 3: Sample implementation flow for the overall CRL verification architecture
The workflow for the solution overall is as follows:
An administrator publishes a CRL and its signing CA’s certificate to their non-public S3 bucket, which is accessible by the Lambda authorizer and preprocessor roles.
An S3 event invokes the Lambda preprocessor to run upon CRL upload. The function retrieves the CRL from S3, validates its signature against the issuing certificate, and parses the CRL.
The preprocessor Lambda stores the results in an S3 bucket with a name in the form <crlname>.cache.json.
A TLS client requests an mTLS connection and supplies its certificate.
API Gateway completes mTLS negotiation and invokes the Lambda authorizer.
The Lambda authorizer function parses the client’s mTLS certificate, retrieves the cached CRL object, and searches the object for the serial number of the client’s certificate.
The authorizer function returns a deny policy if the certificate is revoked or in error.
API Gateway, if authorized, proceeds with the integrated function or denies the client’s request.
Conclusion
In this post, I presented a design for validating your API Gateway mutual TLS client certificates against a CRL, with support for extra-large certificate revocation files. This approach will help you align with the best security practices for validating client certificates and use advanced S3 access and Lambda caching techniques to minimize time and latency for validation.
Amazon GuardDuty is a threat detection service that continuously monitors your Amazon Web Services (AWS) accounts and workloads for malicious activity and delivers detailed security findings for visibility and remediation. GuardDuty Malware Protection helps detect the presence of malware by performing agentless scans of the Amazon Elastic Block Store (Amazon EBS) volumes that are attached to Amazon Elastic Compute Cloud (Amazon EC2) instances and container workloads. GuardDuty findings for identified malware provide additional insights of potential threats related to EC2 instances and containers running on an instance. Malware findings can also provide additional context for EC2 related threats identified by GuardDuty such as observed cryptocurrency-related activity and communication with a command and control server. Examples of malware categories that GuardDuty Malware Protection helps identify include ransomware, cryptocurrency mining, remote access, credential theft, and phishing. In this blog post, we provide an overview of the On-demand malware scan feature in GuardDuty and walk through several use cases where you can use On-demand malware scanning.
GuardDuty offers two types of malware scanning for EC2 instances: GuardDuty-initiated malware scans and On-demand malware scans. GuardDuty initiated malware scans are launched after GuardDuty generates an EC2 finding that indicates behavior typical of malware on an EC2 instance or container workload. The initial EC2 finding helps to provide insight that a specific threat is being observed based on VPC Flow Logs and DNS logs. Performing a malware scan on the instance goes beyond what can be observed from log activity and helps to provide additional context at the instance file system level, showing a connection between malware and the observed network traffic. This additional context can also help you determine your response and remediation steps for the identified threat.
There are multiple use cases where you would want to scan an EC2 instance for malware even when there’s no GuardDuty EC2 finding for the instance. This could include scanning as part of a security investigation or scanning certain instances on a regular schedule. You can use the On-demand malware scan feature to scan an EC2 instance when you want, providing flexibility in how you maintain the security posture of your EC2 instances.
On-demand malware scanning
To perform on-demand malware scanning, your account must have GuardDuty enabled. If the service-linked role (SLR) permissions for Malware Protection don’t exist in the account the first time that you submit an on-demand scan, the SLR for Malware Protection will automatically be created. An on-demand malware scan is initiated by providing the Amazon Resource Name (ARN) of the EC2 instance to scan. The malware scan of the instance is performed using the same functionality as GuardDuty-initiated scans. The malware scans that GuardDuty performs are agentless and the feature is designed in a way that it won’t affect the performance of your resources.
An on-demand malware scan can be initiated through the GuardDuty Malware Protection section of the AWS Management Console for GuardDuty or through the StartMalwareScan API. On-demand malware scans can be initiated from the GuardDuty delegated administrator account for EC2 instances in a member account where GuardDuty is enabled, or the scan can be initiated from a member account or a stand-alone account for Amazon EC2 instances within that account. High-level details for every malware scan that GuardDuty runs are reported in the Malware scans section of the GuardDuty console. The Malware scans section identifies which EC2 instance the scan was initiated for, the status of the scan (completed, running, skipped, or failed), the result of the scan (clean or infected), and when the malware scan was initiated. This summary information on malware scans is also available through the DescribeMalwareScans API.
When an on-demand scan detects malware on an EC2 instance, a new GuardDuty finding is created. This finding lists the details about the impacted EC2 instance, where malware was found in the instance file system, how many occurrences of malware were found, and details about the actual malware. Additionally, if malware was found in a Docker container, the finding also lists details about the container and, if the EC2 instance is used to support Amazon Elastic Kubernetes Service (Amazon EKS) or Amazon Elastic Container Service (Amazon ECS) container deployments, details about the cluster, task, and pod are also included in the finding. Findings about identified malware can be viewed in the GuardDuty console along with other GuardDuty findings or can be retrieved using the GuardDuty APIs. Additionally, each finding that GuardDuty generates is sent to Amazon EventBridge and AWS Security Hub. With EventBridge, you can author rules that allow you to match certain GuardDuty findings and then send the findings to a defined target in an event-driven flow. Security Hub helps you include GuardDuty findings in your aggregation and prioritization of security findings for your overall AWS environment.
GuardDuty charges for the total amount of Amazon EBS data that’s scanned. You can use the provisioned storage for an Amazon EBS volume to get an initial estimate on what the scan will cost. When the actual malware scan runs, the final cost is based on the amount of data that was actually scanned by GuardDuty to perform a malware scan. To get a more accurate estimate of what a malware scan on an Amazon EBS volume might cost, you must obtain the actual storage amount used from the EC2 instance that the volume is attached to. There are multiple methods available to determine the actual amount of storage currently being used on an EBS volume including using the CloudWatch Logs agent to collect disk-used metrics, and running individual commands to see the amount of free disk space on Linux and Windows EC2 instances.
Use cases using GuardDuty On-demand malware scan
Now that you’ve reviewed the on-demand malware scan feature and how it works, let’s walk through four use cases where you can incorporate it to help you achieve your security goals. In use cases 1 and 2, we provide you with deployable assets to help demonstrate the solution in your own environment.
Use case 1 – Initiating scans for EC2 instances with specific tags
This first use case walks through how on-demand scanning can be performed based on tags applied to an EC2 instance. Each tag is a label consisting of a key and an optional value to store information about the resource or data retained on that resource. Resource tagging can be used to help identify a specific target group of EC2 instances for malware scanning to meet your security requirements. Depending on your organization’s strategy, tags can indicate the data classification strategy, workload type, or the compliance scope of your EC2 instance, which can be used as criteria for malware scanning.
Figure 1 shows the high-level architecture of the solution which depicts an on-demand malware scan being initiated based on a tag key.
Figure 1: Tag based on-demand malware scan architecture
The high-level workflow is:
Enter the tag scan parameters in the SSM document that’s deployed as part of the solution.
When you initiate the SSM document, the GuardDutyMalwareOnDemandScanLambdaFunction Lambda function is invoked, which launches the collection of the associated Amazon EC2 ARNs that match your tag criteria.
The Lambda function obtains ARNs of the EC2 instances and initiates a malware scan for each instance.
GuardDuty scans each instance for malware.
A CloudWatch Logs subscription filter created under the log group /aws/guardduty/malware-scan-events monitors for log file entries of on-demand malware scans which have a status of COMPLETED or SKIPPED. If a scan matches this filter criteria, it’s sent to the GuardDutyMalwareOnDemandNotificationLambda Lambda function.
The GuardDutyMalwareOnDemandNotificationLambda function parses the information from the scan events and sends the details to an Amazon SNS topic if the result of the scan is clean, skipped, or infected.
Amazon SNS sends the message to the topic subscriptions. Information sent in the message will contain the account ID, resource ID, status, volume, and result of the scan.
Systems Manager document
AWS Systems Manager is a secure, end-to-end management solution for resources on AWS and in multi-cloud and hybrid environments. The SSM document feature is used in this solution to provide an interactive way to provide inputs to the Lambda function that’s responsible for identifying EC2 instances to scan for malware.
Identify Amazon EC2 targets Lambda
The GuardDutyMalwareOnDemandScanLambdaFunction obtains the ARN of the associated EC2 instances that match the tag criteria provided in the Systems Manager document parameters. For the EC2 instances that are identified to match the tag criteria, an On-demand malware scan request is submitted by the StartMalwareScan API.
Monitoring and reporting scan status
The solution deploys an Amazon CloudWatch Logs subscription filter that monitors for log file entries of on-demand malware scans which have a status of COMPLETED or SKIPPED. See Monitoring scan status for more information. After an on-demand malware scan finishes, the filter criteria are matched and the scan result is sent to its Lambda function destination GuardDutyMalwareOnDemandNotificationLambda. This Lambda function generates an Amazon SNS notification email that’s sent by the GuardDutyMalwareOnDemandScanTopic Amazon SNS topic.
Deploy the solution
Now that you understand how the on-demand malware scan solution works, you can deploy it to your own AWS account. The solution should be deployed in a single member account. This section walks you through the steps to deploy the solution and shows you how to verify that each of the key steps is working.
Step 1: Activate GuardDuty
The sample solution provided by this blog post requires that you activate GuardDuty in your AWS account. If this service isn’t activated in your account, learn more about the free trial and pricing or this service, and follow the steps in Getting started with Amazon GuardDuty to set up the service and start monitoring your account.
Note: On-demand malware scanning is not part of the GuardDuty free trial.
Step 2: Deploy the AWS CloudFormation template
For this step, deploy the template within the AWS account and AWS Region where you want to test this solution.
Choose the following Launch Stack button to launch an AWS CloudFormation stack in your account. Use the AWS Management Console navigation bar to choose the Region you want to deploy the stack in.
Set the values for the following parameters based on how you want to use the solution:
Create On-demand malware scan sample tester condition — Set the value to True to generate two EC2 instances to test the solution. These instances will serve as targets for an on-demand malware scan. One instance will contain EICAR malware sample files, which contain strings that will be detected as malware but aren’t malicious. The other instance won’t contain malware.
Tag key — Set the key that you want to be added to the test EC2 instances that are launched by this template.
Tag value — Set the value that will be added to the test EC2 instances that are launched by this template.
Latest Amazon Linux instance used for tester — Leave as is.
Scroll to the bottom of the Quick create stack screen and select the checkbox next to I acknowledge that AWS CloudFormation might create IAM resources.
Choose Create stack. The deployment of this CloudFormation stack will take 5–10 minutes.
After the CloudFormation stack has been deployed successfully, you can proceed to reviewing and interacting with the deployed solution.
Step 3: Create an Amazon SNS topic subscription
The CloudFormation stack deploys an Amazon SNS topic to support sending notifications about initiated malware scans. For this post, you create an email subscription for receiving messages sent through the topic.
In the Amazon SNS console, navigate to the Region that the stack was deployed in. On the Amazon SNS topics page, choose the created topic that includes the text GuardDutyMalwareOnDemandScanTopic.
Figure 2: Amazon SNS topic listing
On the Create subscription page, select Email for the Protocol, and for the Endpoint add a valid email address. Choose Create subscription.
Figure 3: Amazon SNS topic subscription
After the subscription has been created, an email notification is sent that must be acknowledged to start receiving malware scan notifications.
Amazon SNS subscriptions support many other types of subscription protocols besides email. You can review the list of Amazon SNS event destinations to learn more about other ways that Amazon SNS notifications can be consumed.
Step 4: Provide scan parameters in an SSM document
After the AWS CloudFormation template has been deployed, the SSM document will be in the Systems Manager console. For this solution, the TagKey and TagValue parameters must be entered before you can run the SSM document.
On the SSM document page, select the Owned by me tab and choose GuardDutyMalwareOnDemandScan. If you have multiple documents, use the search bar to search for the GuardDutyMalwareOnDemandScan document.
Figure 4: Systems Manager documents listing
In the page for the GuardDutyMalwareOnDemandScan, choose Execute automation.
In the Execute automation runbook page, follow the document description and input the required parameters. For this blog example, use the same tags as in the parameter section of the initial CloudFormation template. When you use this solution for your own instances, you can adjust these parameters to fit your tagging strategy.
Figure 5: Automation document details and input parameters
Choose Execute to run the document. This takes you to the Execution detail page for this run of the automation document. In a few minutes the Execution status should update its overall status to Success.
Figure 6: Automation document execution detail
Step 5: Receive status messages about malware scans
Upon completion of the scan, you should get a status of Success and email containing the results of the on-demand scan along with the scan IDs. The scan result includes a message for an INFECTED instance and one message for a CLEAN instance. For EC2 instances without a tag key, you will receive an Amazon SNS notification that says “No instances found that could be scanned.” Figure 7 shows an example email for an INFECTED instance.
Figure 7: Example email for an infected instance
Step 6: Review scan results in GuardDuty
In addition to the emails that are sent about the status of a malware scan, the details about each malware scan and the findings for identified malware can be viewed in GuardDuty.
In the GuardDuty console, select Malware scans from the left navigation pane. The Malware scan page provides you with the results of the scans performed. The scan results, for the instances scanned in this post, should match the email notifications received in the previous step.
Figure 8: GuardDuty malware scan summary
You can select a scan to view its details. The details include the scan ID, the EC2 instance, scan type, scan result (which indicates if the scan is infected or clean), and the scan start time.
Figure 9: GuardDuty malware scan details
In the details for the infected instance, choose Click to see malware findings. This takes you to the GuardDuty findings page with a filter for the specific malware scan.
Figure 10: GuardDuty malware findings
Select the finding for the MalicousFile finding to bring up details about the finding. Details of the Execution:EC2/Malicious file finding include the severity label, the overview of the finding, and the threats detected. We recommend that you treat high severity findings as high priority and immediately investigate and, if necessary, take steps to prevent unauthorized use of your resources.
Figure 11: GuardDuty malware finding details
Use case 2 – Initiating scans on a schedule
This use case walks through how to schedule malware scans. Scheduled malware scanning might be required for particularly sensitive workloads. After an environment is up and running, it’s important to establish a baseline to be able to quickly identify EC2 instances that have been infected with malware. A scheduled malware scan helps you proactively identify malware on key resources and that maintain the desired security baseline.
Solution architecture
Figure 12: Scheduled malware scan architecture
The architecture of this use case is shown in figure 12. The main difference between this and the architecture of use case 1 is the presence of a scheduler that controls submitting the GuardDutyMalwareOnDemandObtainScanLambdaFunction function to identify the EC2 instances to be scanned. This architecture uses Amazon EventBridge Scheduler to set up flexible time windows for when a scheduled scan should be performed.
EventBridge Scheduler is a serverless scheduler that you can use to create, run, and manage tasks from a central, managed service. With EventBridge Scheduler, you can create schedules using cron and rate expressions for recurring patterns or configure one-time invocations. You can set up flexible time windows for delivery, define retry limits, and set the maximum retention time for failed invocations.
Deploying the solution
Step 1: Deploy the AWS CloudFormation template
For this step, you deploy the template within the AWS account and Region where you want to test the solution.
Choose the following Launch Stack button to launch an AWS CloudFormation stack in your account. Use the AWS Management Console navigation bar to choose the Region you want to deploy the stack in.
Set the values for the following parameters based on how you want to use the solution:
Create On-demand malware scan sample tester condition — Set the value to True to generate two EC2 instances to test the solution. These instances will serve as targets for an on-demand malware scan. One instance will contain EICAR malware sample files, which contain strings that will be detected as malware but aren’t malicious. The other instance won’t contain malware.
Tag key — Set the key that you want to be added to the test EC2 instances that are launched by this template.
Tag Value — Set the value that will be added to the test EC2 instances that are launched by this template.
Latest Amazon Linux instance used for tester — Leave as is.
Scheduled malware scan parameters
Tag keys and values parameter — Enter the tag key-value pairs that the scheduled scan will look for. If you populated the tag key and tag value parameters for the sample EC2 instance, then that should be one of the values in this parameter to ensure that the test instances are scanned.
EC2 instances ARNs to scan — [Optional] EC2 instances ID list that should be scanned when the scheduled scan runs.
EC2 instances state — Enter the state the EC2 instances can be in when selecting instances to scan.
AWS Scheduler parameters
Rate for the schedule scan to be run — defines how frequently the schedule should run. Valid options are minutes, hours, or days.
First time scheduled scan will run — Enter the day and time, in UTC format, when the first scheduled scan should run.
Time zone — Enter the time zone that the schedule start time should be applied to. Here is a list of valid time zone values.
Scroll to the bottom of the Quick create stack screen and select the checkbox for I acknowledge that AWS CloudFormation might create IAM resources.
Choose Create stack. The deployment of this CloudFormation stack will take 5–10 minutes.
After the CloudFormation stack has been deployed successfully, you can review and interact with the deployed solution.
Step 2: Amazon SNS topic subscription
As in use case 1, this solution supports using Amazon SNS to send a notification with the results of a malware scan. See the Amazon SNS subscription set up steps in use case 1 for guidance on setting up a subscription for receiving the results. For this use case, the naming convention of the Amazon SNS topic will include GuardDutyMalwareOnDemandScheduledScanTopic.
Step 3: Review scheduled scan configuration
For this use case, the parameters that were filled in during submission of the CloudFormation template build out an initial schedule for scanning EC2 instances. The following details describe the various components of the schedule and where you can make changes to influence how the schedule runs in the future.
In the console, go to the EventBridge service. On the left side of the console under Scheduler, select Schedules. Select the scheduler that was created as part of the CloudFormation deployment.
Figure 13: List of EventBridge schedules
The Specify schedule detail page is where you can set the appropriate Timezone, Start date and time. In this walkthrough, this information for the schedule was provided when launching the CloudFormation template.
Figure 14: EventBridge schedule detail
On the Invoke page, the JSON will include the instance state, tags, and IDs, as well as the tags associated with the instance that were filled in during the deployment of the CloudFormation template. Make additional changes, as needed, and choose Next.
Step 4: Review malware scan results from GuardDuty
After a scheduled scan has been performed, the scan results will be available in the GuardDuty Malware console and generate a GuardDuty finding if malware is found. The output emails and access to the results in GuardDuty is the same as explained in use case 1.
Use case 3 – Initiating scans to support a security investigation
You might receive security signals or events about infrastructure and applications from multiple tools or sources in addition to Amazon GuardDuty. Investigations that arise from these security signals necessitate malware scans on specific EC2 instances that might be a source or target of a security event. With GuardDuty On-demand malware scan, you can incorporate a scan as part of your investigation workflow and use the output of the scan to drive the next steps in your investigation.
From the GuardDuty delegated administrator account, you can initiate a malware scan against EC2 instances in a member account which is associated with the administrator account. This enables you to initiate your malware scans from a centralized location and without the need for access to the account where the EC2 instance is deployed. Initiating a malware scan for an EC2 instance uses the same StartMalwareScan API described in the other use cases of this post. Depending on the tools that you’re using to support your investigations, you can also use the GuardDuty console to initiate a malware scan.
After a malware scan is run, malware findings will be available in the delegated administrator and member accounts, allowing you to get details and orchestrate the next steps in your investigation from a centralized location.
Figure 17 is an example of how a security investigation, using an on-demand malware scan, might function.
Figure 17: Example security investigation using GuardDuty On-demand malware scans
If you’re using GuardDuty as your main source of security findings for EC2 instances, the GuardDuty-initiated malware scan feature can also help facilitate an investigation workflow. With GuardDuty initiated malware scans, you can reduce the time between when an EC2 instance finding is created and when a malware scan of the instance is initiated, making the scan results available to your investigation workflows faster, helping you develop a remediation plan sooner.
Use case 4 – Malware scanning in a deployment pipeline
If you’re using deployment pipelines to build and deploy your infrastructure and applications, you want to make sure that what you’re deploying is secure. In cases where deployments involve third-party software, you want to be sure that the software is free of malware before deploying into environments where the malware could be harmful. This applies to software deployed directly onto an EC2 instance as well as containers that are deployed on an EC2 instance. In this case, you can use the on-demand malware scan in an EC2 instance in a secure test environment prior to deploying it in production. You can use the techniques described earlier in this post to design your deployment pipelines with steps that call the StartMalwareScan API and then check the results of the scan. Based on the scan results, you can decide if the deployment should continue or be stopped due to detected malware.
Running these scans before deployment into production can help to ensure the integrity of your applications and data and increase confidence that the production environment is free of significant security issues.
Figure 18 is an example of how malware scanning might look in a deployment pipeline for a containerized application.
Figure 18: Example deployment pipeline incorporating GuardDuty On-demand malware scan
In the preceding example the following steps are represented:
A container image is built as part of a deployment pipeline.
The container image is deployed into a test environment.
From the test environment, a GuardDuty On-demand malware scan is initiated against the EC2 instance where the container image has been deployed.
After the malware scan is complete, the results of the scan are evaluated.
A decision is made on allowing the image to be deployed into production. If the image is approved, it’s deployed to production. If it’s rejected, a message is sent back to the owner of the container image for remediation of the identified malware.
Conclusion
Scanning for malware on your EC2 instances is key to maintaining that your instances are free of malware before they’re deployed to production, and if malware does find its way onto a deployed instance, it’s quickly identified so that it can be investigated and remediated.
This post outlines four use cases you can use with the On-demand malware scan feature: Scan based on tag, scan on a schedule, scan as part of an investigation, and scan in a deployment pipeline. The examples provided in this post are intended to provide a foundation that you can build upon to meet your specific use cases. You can use the provided code examples and sample architectures to enhance your operational and deployment processes.
AWS Security Profile series, I interview some of the humans who work in AWS Security and help keep our customers safe and secure. In this profile, I interviewed Arynn Crow, senior manager for AWS User AuthN in AWS Identity.
How long have you been at AWS, and what do you do in your current role?
I’ve been at Amazon for over 10 years now, and AWS for three of those years. I lead a team of product managers in AWS Identity who define the strategy for our user authentication related services. This includes internal and external services that handle AWS sign-in, account creation, threat mitigation, and underlying authentication components that support other AWS services. It’s safe to say that I’m thinking about something different nearly every day, which keeps it fun.
How do you explain your job to non-technical friends and family?
I tell people that my job is about figuring out how to make sure that people are who they say they are online. If they want to know a bit more, sometimes I will relate this to examples they’re increasingly likely to encounter in their everyday lives—getting text or email messages for additional security when they try to sign in to their favorite website, or using their fingerprint or facial scan to sign in instead of entering a password. There’s a lot more to identity and authentication, of course, but this usually gets the point across!
You haven’t always been in security. Tell me a little bit about your journey and how you got started in this space?
More than 10 years ago now, I started in one of our call centers as a temporary customer service agent. I was handling Kindle support calls (this was back when our Kindles still had physical keyboards on them, and “Alexa” wasn’t even part of our lexicon yet). After New Year’s 2013, I was converted to a full-time employee and resumed my college education—I earned both of my degrees (a BA in International Affairs, and MA in political science) while working at Amazon. Over the next few years, I moved into different positions including our Back Office team, a Kindle taskforce role supporting the launch of a new services, and Executive Customer Relations. Throughout these roles, I continued to manage projects related to anti-abuse and security. I got a lot of fulfillment out of these projects—protecting our customers, employees, and business against fraud and data loss is very gratifying work. When a position opened up in our Customer Service Security team, I got the role thanks in part to my prior experience working with that team to deliver security solutions within our operations centers.
After that, things moved fast—I started first with a project on account recovery and access control for our internal workforce, and continuously expanded my portfolio into increasingly broad and more technical projects that all related to what I now know is the field of Identity and Access Management. Eventually, I started leading our identity strategy for customer service as a whole, including our internal authentication and access management as well as external customer authentication to our call centers. I also began learning about and engaging more with the security and identity community that existed outside of Amazon by attending conferences and getting involved with organizations working on standards development like the FIDO Alliance. Moving to AWS Identity a few years later was an obvious next step to gain exposure to broader applications of identity.
What advice do you have for people who want to get into security but don’t have the traditional background?
First, it can be hard. This journey wasn’t easy for me, and I’m still working to learn more every day. I want to say that because if someone is having trouble landing their first security job, or feeling like they still don’t “fit” at first when they do get the job, they should know it doesn’t mean they’re failing. There are a lot of inspiring stories out there about people who seemingly naturally segued into this field from other projects and work, but there are just as many people working very hard to find their footing. Everyone doubts themselves sometimes. Don’t let it hold you back.
Next for the practical advice, whatever you’re doing now, there are probably opportunities to begin looking at your space with a security lens, and start helping wherever you find problems to address or processes to improve by bringing them to your security teams. This will help your organization while also helping you build relationships. Be insatiably curious! Cybersecurity is community-oriented, and I find that people in this field are very passionate about what we do. Many people I met were excited that I was interested in learning about what they do and how they do it. Sometimes, they’d agree to take a couple hours with me each month for me to ask questions about how things worked, and narrow down what resources were the best use of my time.
Finally, there are a lot of resources for learning. We have highly competent, successful security professionals that learned on the job and don’t hold a roster of certifications, so I don’t think these are essential for success. But, I do think these programs can be beneficial to familiarize you with basic concepts and give you access to a common language. Various certification and training courses exist, from basic, free computer science courses online to security-specific ones like CISSP, SANS, COMPTIA Security+, and CIDPro, to name just a few. AWS offers AWS-specific cloud security training, too, like our Ramp-Up Guide. You don’t have to learn to code beautifully to succeed in security, but I think developing a working understanding of systems and principles will help build credibility and extract deeper learning out of experiences you have.
In your opinion, why is it important to have people with different backgrounds working in security?
Our backgrounds color the way we think about and approach problems, and considering all of these different approaches helps make us well-rounded. And particularly in the current context, in which women and marginalized communities are underrepresented in STEM, expanding our thinking about what skills make a good security practitioner makes room for more people at the table while giving us a more comprehensive toolkit to tackle our toughest problems. As for myself, I apply my training in political science. Security sometimes looks like a series of technical challenges and solutions, but it’s interwoven with a complex array of regulatory and social considerations, too—this makes the systems-based and abstract thinking I honed in my education useful. I know other folks who came to identity from social science, mathematics, and biology backgrounds who feel the same about skills learned from their respective fields.
Pivoting a bit, what’s something that you’re working on right now that you’re excited about?
It’s a very interesting time to be working on authentication, many people who aren’t working in enterprises or regulated industries are still hesitant to adopt controls like multi-factor authentication. And beyond MFA, organizations like NIST and CISA are emphasizing the importance of phishing-resistant MFA. So, at the same time we’re continuously working to innovate in our MFA and other authentication offerings to customers, we’re collaborating with the rest of the industry to advance technologies for strong authentication and their adoption across sectors. I represent Amazon to the FIDO Alliance, which is an industry association that supports the development of a set of protocols collectively known as FIDO2 for strong, phishing-resistant authentication. With FIDO and its various member companies, we’re working to increase the usability, awareness, and adoption of FIDO2 security keys and passkeys, which are a newer implementation of FIDO2 that improves ease of use by enabling customers to use phishing-resistant keys across devices and platforms.
In your opinion, what is the coolest thing happening in identity right now?
What I think is the most important thing happening in identity is the convergence of digital and “traditional” identities. The industry is working through challenging questions with emerging technology right now to bring forth innovation balanced with concern for equity, privacy, and sustainability. Ease of use and improved security for users as well as abuse prevention for businesses is driving conversion of real-life identities and credentials (such as peoples’ driver’s licenses as one example) to a digital format, such as digital driver’s licenses, wallets, and emerging verifiable credentials.
What are you most proud of in your career?
I’m most grateful for the opportunities I’ve had to help define the next chapter of the AWS account protection strategy. Some of our work also translates to features we get to ship to customers, like when we extended support for multiple MFA devices for AWS Identity and Access Management (IAM) late last year, and this year we announced that in 2024 we will require MFA when customers sign in to the AWS Management Console. Seeing how excited people were for a security feature was really awesome. Account protection has always been important, but this is especially true in the years following the COVID-19 outbreak when we saw a rapid acceleration of resources going digital. This kind of work definitely isn’t a one-person show, and as fulfilling as it is to see the impact I have here, what I’m really proud of is that I get to work with and learn from so many really smart, competent, and kind team members that are just as passionate about this space as I am.
If you were to do anything other than security, what would you want to do?
Before I discovered my interest for security, I was trying to decide if I would continue on from my master’s program in political science to do a PhD in either political science or public health. Towards the end of my degree program, I became really interested in how research-driven public policy could drive improvements in maternal and infant health outcomes in areas with acute opioid-related health crises, which is an ongoing struggle for my home place. I’m still very invested in that topic and try to keep on top of the latest research—I could easily see myself moving back towards that if I ever decide it’s time to close this chapter.
If you have feedback about this post, submit comments in the Comments section below. If you have questions about this post, contact AWS Support.
Want more AWS Security news? Follow us on Twitter.
Amazon Web Services (AWS) is excited to announce the availability of a new sponsored report from S&P Global Market Intelligence 451 Research, Centralized Trust for Decentralized Uses: Revisiting Private Certificate Authorities. We heard from customers actively seeking centralized management solutions for multi-cloud environments and worked with 451 Research, a technology research solution that provides a holistic view of opportunities and risks across the enterprise technology landscape, to dive into this topic.
In the report, 451 Research highlights the need for centralized trust as organizations build applications across multiple cloud providers, local infrastructure, and distributed hosting environments. For security practitioners familiar with certificate authorities (CAs), this report looks at some of the wider business implications of using cryptographic certificates to establish trust in highly decentralized and dynamic environments.
451 Research explains how decentralized architectures, including technologies such as Kubernetes, service meshes, and Internet of Things (IoT) networks, are fueling the need to modernize the legacy approach to CAs. The growing adoption of cloud native solutions from a multitude of vendors leads to a greater decentralization of applications. According to the survey Voice of the Enterprise: DevOps, Developer Experience 2023, 59% of respondent companies have architected more than 50% of their applications with cloud-native technologies.
Organizations and developers can use the report to consider the following:
Security and trust models, including zero-trust principles so that every component authenticates every other component with a bidirectional motion, even within private networks.
The use of access control policies isn’t limited to AWS resources. Customer applications running on AWS infrastructure can also use policies to help control user access. This often involves implementing custom authorization logic in the program code itself, which can complicate audits and policy changes.
To address this, AWS developed Amazon Verified Permissions, which helps implement fine-grained authorizations and permissions management for customer applications. This service uses Cedar, an open-source policy language, to define permissions separately from application code.
In addition to access control, you can also use policies to help monitor your organization’s individual governance rules for security, operations and compliance. One example of such a rule is the regular rotation of cryptographic keys to help reduce the impact in the event of a key leak.
However, manually checking and enforcing such rules is complex and doesn’t scale, particularly in fast-growing IT organizations. Therefore, organizations should aim for an automated implementation of such rules. In this blog post, I will show you how to use policy as code to help you govern your AWS landscape.
Policy as code
Similar to infrastructure as code (IaC), policy as code is an approach in which you treat policies like regular program code. You define policies in the form of structured text files (policy documents), which policy engines can automatically evaluate.
The main advantage of this approach is the ability to automate key governance tasks, such as policy deployment, enforcement, and auditing. By storing policy documents in a central repository, you can use versioning, simplify audits, and track policy changes. Furthermore, you can subject new policies to automated testing through integration into a continuous integration and continuous delivery (CI/CD) pipeline. Policy as code thus forms one of the key pillars of a modern automated IT governance strategy.
The following sections describe how you can combine different AWS services and functions to integrate policy as code into existing IT governance processes.
Access control – AWS resources
Every request to AWS control plane resources (specifically, AWS APIs)—whether through the AWS Management Console, AWS Command Line Interface (AWS CLI), or SDK — is authenticated and authorized by IAM. To determine whether to approve or deny a specific request, IAM evaluates both the applicable policies associated with the requesting principal (human user or workload) and the respective request context. These policies come in the form of JSON documents and follow a specific schema that allows for automated evaluation.
IAM supports a range of different policy types that you can use to help protect your AWS resources and implement a least privilege approach. For an overview of the individual policy types and their purpose, see Policies and permissions in IAM. For some practical guidance on how and when to use them, see IAM policy types: How and when to use them. To learn more about the IAM policy evaluation process and the order in which IAM reviews individual policy types, see Policy evaluation logic.
Traditionally, IAM relied on role-based access control (RBAC) for authorization. With RBAC, principals are assigned predefined roles that grant only the minimum permissions needed to perform their duties (also known as a least privilege approach). RBAC can seem intuitive initially, but it can become cumbersome at scale. Every new resource that you add to AWS requires the IAM administrator to manually update each role’s permissions – a tedious process that can hamper agility in dynamic environments.
In contrast, attribute-based access control (ABAC) bases permissions on the attributes assigned to users and resources. IAM administrators define a policy that allows access when certain tags match. ABAC is especially advantageous for dynamic, fast-growing organizations that have outgrown the RBAC model. To learn more about how to implement ABAC in an AWS environment, see Define permissions to access AWS resources based on tags.
Customer applications that run on AWS resources often require an authorization mechanism that can control access to the application itself and its individual functions in a fine-grained manner.
Many customer applications come with custom authorization mechanisms in the application code itself, making it challenging to implement policy changes. This approach can also hinder monitoring and auditing because the implementation of authorization logic often differs between applications, and there is no uniform standard.
To address this challenge, AWS developed Amazon Verified Permissions and the associated open-source policy language Cedar. Amazon Verified Permissions replaces the custom authorization logic in the application code with a simple IsAuthorized API call, so that you can control and monitor authorization logic centrally by using Cedar-based policies. To learn how to integrate Amazon Verified Permissions into your applications and define custom access control policies with Cedar, see How to use Amazon Verified Permissions for authorization.
Compliance
In addition to access control, you can also use policies to help monitor and enforce your organization’s individual governance rules for security, operations and compliance. AWS Config and AWS Security Hub play a central role in compliance because they enable the setup of multi-account environments that follow best practices (known as landing zones). AWS Config continuously tracks resource configurations and changes, while Security Hub aggregates and prioritizes security findings. With these services, you can create controls that enable automated audits and conformity checks. Alternatively, you can also choose from ready-to-use controls that cover individual compliance objectives such as encryption at rest, or entire frameworks, such as PCI-DSS and NIST 800-53.
AWS Control Tower builds on top of AWS Config and Security Hub to help simplify governance and compliance for multi-account environments. AWS Control Tower incorporates additional controls with the existing ones from AWS Config and Security Hub, presenting them together through a unified interface. These controls apply at different resource life cycle stages, as shown in Figure 1, and you define them through policies.
Figure 1: Resource life cycle
The controls can be categorized according to their behavior:
Proactive controls scan IaC templates before deployment to help identify noncompliance issues early.
Preventative controls restrict actions within an AWS environment to help prevent noncompliant actions. For example, these controls can help prevent deployment of large Amazon Elastic Compute Cloud (Amazon EC2) instances or restrict the available AWS Regions for some users.
Detective controls monitor deployed resources to help identify noncompliant resources that proactive and preventative controls might have missed. They also detect when deployed resources are changed or drift out of compliance over time.
Categorizing controls this way allows for a more comprehensive compliance framework that encompasses the entire resource life cycle. The stage at which each control applies determines how it may help enforce policies and governance rules.
With AWS Control Tower, you can enable hundreds of preconfigured security, compliance, and operational controls through the console with a single click, without needing to write code. You can also implement your own custom controls beyond what AWS Control Tower provides out of the box. The process for implementing custom controls varies depending on the type of control. In the following sections, I will explain how to set up custom controls for each type.
Proactive controls
Proactive controls are mechanisms that scan resources and their configuration to confirm that they adhere to compliance requirements before they are deployed. AWS provides a range of tools and services that you can use, both in isolation and in combination with each other, to implement proactive controls. The following diagram provides an overview of the available mechanisms and an example of their integration into a CI/CD pipeline for AWS Cloud Development Kit (CDK) projects.
Figure 2: CI/CD pipeline in AWS CDK projects
As shown in Figure 2, you can use the following mechanisms as proactive controls:
You can validate artifacts such as IaC templates locally on your machine by using the AWS CloudFormation Guard CLI, which facilitates a shift-left testing strategy. The advantage of this approach is the relatively early testing in the deployment cycle. This supports rapid iterative development and thus reduces waiting times.
Alternatively, you can use the CfnGuardValidator plugin for AWS CDK, which integrates CloudFormation Guard rules into the AWS CDK CLI. This streamlines local development by applying policies and best practices directly within the CDK project.
To centrally enforce validation checks, integrate the CfnGuardValidator plugin into a CDK CI/CD pipeline.
You can also invoke the CloudFormation Guard CLI from within AWS CodeBuildbuildspecs to embed CloudFormation Guard scans in a CI/CD pipeline.
With CloudFormation hooks, you can impose policies on resources before CloudFormation deploys them.
AWS CloudFormation Guard uses a policy-as-code approach to evaluate IaC documents such as AWS CloudFormation templates and Terraform configuration files. The tool defines validation rules in the Guard language to check that these JSON or YAML documents align with best practices and organizational policies around provisioning cloud resources. By codifying rules and scanning infrastructure definitions programmatically, CloudFormation Guard automates policy enforcement and helps promote consistency and security across infrastructure deployments.
In the following example, you will use CloudFormation Guard to validate the name of an Amazon Simple Storage Service (Amazon S3) bucket in a CloudFormation template through a simple Guard rule:
Create a YAML file named template.yaml with the following content and replace <DOC-EXAMPLE-BUCKET> with a bucket name of your choice (this file is a CloudFormation template, which creates an S3 bucket):
If CloudFormation Guard successfully validates the template, the validate command produces an exit status of 0 ($? in bash). Otherwise, it returns a status report listing the rules that failed. You can test this yourself by changing the bucket name.
To accelerate the writing of Guard rules, use the CloudFormation Guard rulegen command, which takes a CloudFormation template file as an input and autogenerates Guard rules that match the properties of the template resources. To learn more about the structure of CloudFormation Guard rules and how to write them, see Writing AWS CloudFormation Guard rules.
The AWS Guard Rules Registry provides ready-to-use CloudFormation Guard rule files to accelerate your compliance journey, so that you don’t have to write them yourself.
CloudFormation Guard alone can’t necessarily prevent the provisioning of noncompliant resources. This is because CloudFormation Guard can’t detect when templates or other documents change after validation. Therefore, I recommend that you combine CloudFormation Guard with a more authoritative mechanism.
One such mechanism is CloudFormation hooks, which you can use to validate AWS resources before you deploy them. You can configure hooks to cancel the deployment process with an alert if CloudFormation templates aren’t compliant, or just initiate an alert but complete the process. To learn more about CloudFormation hooks, see the following blog posts:
CloudFormation hooks provide a way to authoritatively enforce rules for resources deployed through CloudFormation. However, they don’t control resource creation that occurs outside of CloudFormation, such as through the console, CLI, SDK, or API. Terraform is one example that provisions resources directly through the AWS API rather than through CloudFormation templates. Because of this, I recommend that you implement additional detective controls by using AWS Config. AWS Config can continuously check resource configurations after deployment, regardless of the provisioning method. Using AWS Config rules complements the preventative capabilities of CloudFormation hooks.
Preventative controls
Preventative controls can help maintain compliance by applying guardrails that disallow policy-violating actions. AWS Control Tower integrates with AWS Organizations to implement preventative controls with SCPs. By using SCPs, you can restrict IAM permissions granted in a given organization or organizational unit (OU). One example of this is the selective activation of certain AWS Regions to meet data residency requirements.
SCPs are particularly valuable for managing IAM permissions across large environments with multiple AWS accounts. Organizations with many accounts might find it challenging to monitor and control IAM permissions. SCPs help address this challenge by applying centralized permission guardrails automatically to the accounts of an organization or organizational unit (OU). As new accounts are added, the SCPs are enforced without the need for extra configuration.
You can define SCPs through CloudFormation or CDK templates and deploy them through a CI/CD pipeline, similar to other AWS resources. Because misconfigured SCPs can negatively affect an organization’s operations, it’s vital that you test and simulate the effects of new policies in a sandbox environment before broader deployment. For an example of how to implement a pipeline for SCP testing, see the aws-service-control-policies-deployment GitHub repository.
To simplify audits for compliance frameworks such as PCI-DSS, HIPAA, and SOC2, AWS Config also offers conformance packs that bundle rules and remediation actions. To learn more about conformance packs, see Conformance Packs and Introducing AWS Config Conformance Packs.
When a resource’s configuration shifts to a noncompliant state that preventive controls didn’t avert, detective controls can help remedy the noncompliant state by implementing predefined actions, such as alerting an operator or reconfiguring the resource. You can implement these controls with AWS Config, which integrates with AWS Systems Manager Automation to help enable the remediation of noncompliant resources.
Security Hub can help centralize the detection of noncompliant resources across multiple AWS accounts. Using AWS Config and third-party tools for detection, Security Hub sends findings of noncompliance to Amazon EventBridge, which can then send notifications or launch automated remediations. You can also use the security controls and standards in Security Hub to monitor the configuration of your AWS infrastructure. This complements the conformance packs in AWS Config.
Conclusion
Many large and fast-growing organizations are faced with the challenge that manual IT governance processes are difficult to scale and can hinder growth. Policy-as-code services help to manage permissions and resource configurations at scale by automating key IT governance processes and, at the same time, increasing the quality and transparency of those processes. This helps to reconcile large environments with key governance objectives such as compliance.
In this post, you learned how to use policy as code to enhance IT governance. A first step is to activate AWS Control Tower, which provides preconfigured guardrails (SCPs) for each AWS account within an organization. These guardrails help enforce baseline compliance across infrastructure. You can then layer on additional controls to further strengthen governance in line with your needs. As a second step, you can select AWS Config conformance packs and Security Hub standards to complement the controls that AWS Control Tower offers. Finally, you can secure applications built on AWS by using Amazon Verified Permissions and Cedar for fine-grained authorization.
Amazon Web Services (AWS) is pleased to announce the successful renewal of the AWS CyberGRX cyber risk assessment report. This third-party validated report helps customers perform effective cloud supplier due diligence on AWS and enhances customers’ third-party risk management process.
With the increase in adoption of cloud products and services across multiple sectors and industries, AWS has become a critical component of customers’ environments. Regulated customers are held to high standards by regulators and auditors when it comes to exercising effective due diligence on third parties.
Many customers use third-party cyber risk management (TPCRM) services such as CyberGRX to better manage risks from their evolving third-party environments and to drive operational efficiencies. To help with such efforts, AWS has completed the CyberGRX assessment of its security posture. CyberGRX security analysts perform the assessment and validate the results annually.
The CyberGRX assessment applies a dynamic approach to third-party risk assessment. This approach integrates advanced analytics, threat intelligence, and sophisticated risk models with vendors’ responses to provide an in-depth view of how a vendor’s security controls help protect against potential threats.
Vendor profiles are continuously updated as the risk level of cloud service providers changes, or as AWS updates its security posture and controls. This approach eliminates outdated static spreadsheets for third-party risk assessments, in which the risk matrices are not updated in near real time.
In addition, AWS customers can use the CyberGRX Framework Mapper to map AWS assessment controls and responses to well-known industry standards and frameworks, such as National Institute of Standards and Technology (NIST) 800-53, NIST Cybersecurity Framework, International Organization for Standardization (ISO) 27001, Payment Card Industry Data Security Standard (PCI DSS), and the U.S. Health Insurance Portability and Assessment Act (HIPAA). This mapping can reduce customers’ third-party supplier due-diligence burden.
Customers can access the AWS CyberGRX report at no additional cost. Customers can request access to the report by completing an access request form, available on the AWS CyberGRX page.
As always, we value your feedback and questions. Reach out to the AWS Compliance team through the Contact Us page. If you have feedback about this post, submit comments in the Comments section below. To learn more about our other compliance and security programs, see AWS Compliance Programs.
Want more AWS Security news? Follow us on Twitter.
For ISO 27001, we updated our ISO 27001:2013 certification to the 27001:2022 version.
For ISO 9001:2015, 27001:2022, 27017:2015, 27018:2019, 27701:2019, and 22301:2019, we added seven additional AWS services to the scope of this surveillance audit since the last certification issued on May 23, 2023. The seven additional services are:
For 20000-1:2018, we added additional 65 services (including the seven noted previously) to the scope of this surveillance audit since the last certification issued on Dec 13, 2022.
For a full list of AWS services that are certified under ISO and CSA STAR, please see the AWS ISO and CSA STAR Certified page. Customers can also access the certifications in the AWS Management Console through AWS Artifact.
If you have feedback about this post, submit comments in the Comments section below.
Want more AWS Security how-to content, news, and feature announcements? Follow us on Twitter.
AWS Identity and Access Management (IAM) roles are a powerful way to manage permissions to resources in the Amazon Web Services (AWS) Cloud. IAM roles are useful when granting permissions to users whose workloads are static. However, for users whose access patterns are more dynamic, relying on roles can add complexity for administrators who are faced with provisioning roles and making sure the right people have the right access to the right roles.
The typical solution to handle dynamic workforce access is the OAuth 2.0 framework, which you can use to propagate an authenticated user’s identity to resource services. Resource services can then manage permissions based on the user—their attributes or permissions—rather than building a complex role management system. AWS IAM Identity Center recently introduced trusted identity propagation based on OAuth 2.0 to support dynamic access patterns.
With trusted identity propagation, your requesting application obtains OAuth tokens from IAM Identity Center and passes them to an AWS resource service. The AWS resource service trusts tokens that Identity Center generates and grants permissions based on the Identity Center tokens.
What happens if the application you want to deploy uses an external OAuth authorization server, such as Okta Universal Directory or Microsoft Entra ID, but the AWS service uses IAM Identity Center? How can you use the tokens from those applications with your applications that AWS hosts?
In this blog post, we show you how you can use IAM Identity Center trusted token issuers to help address these challenges. You also review the basics of Identity Center and OAuth and how Identity Center enables the use of external OAuth authorization servers.
IAM Identity Center and OAuth
IAM Identity Center acts as a central identity service for your AWS Cloud environment. You can bring your workforce users to AWS and authenticate them from an identity provider (IdP) that’s external to AWS (such as Okta or Microsoft Entra), or you can create and authenticate the users on AWS.
Trusted identity propagation in IAM Identity Center lets AWS workforce identities use OAuth 2.0, helping applications that need to share who’s using them with AWS services. In OAuth, a client application and a resource service both trust the same authorization server. The client application gets an OAuth token for the user and sends it to the resource service. Because both services trust the OAuth server, the resource service can identify the user from the token and set permissions based on their identity.
AWS supports two OAuth patterns:
AWS applications authenticate directly with IAM Identity Center: Identity Center redirects authentication to your identity source, which generates OAuth tokens that the AWS managed application uses to access AWS services. This is the default pattern because the AWS services that support trusted identity propagation use Identity Center as their OAuth authorization server.
Third-party, non-AWS applications authenticate outside of AWS (typically to your IdP) and access AWS resources: During authentication, these third-party applications obtain an OAuth token from an OAuth authorization server outside of AWS. In this pattern, the AWS services aren’t connected to the same OAuth authorization server as the client application. To enable this pattern, AWS introduced a model called the trusted token issuer.
Trusted token issuer
When AWS services use IAM Identity Center as their authentication service, directory, and OAuth authorization server, the AWS services that use OAuth tokens require that Identity Center issues the tokens. However, most third-party applications federate with an external IdP and obtain OAuth tokens from an external authorization server. Although the identities in Identity Center and the external authorization server might be for the same person, the identities exist in separate domains, one in Identity Center, the other in the external authorization server. This is required to manage authorization of workforce identities with AWS services.
The trusted token issuer (TTI) feature provides a way to securely associate one identity from the external IdP with the other identity in IAM Identity Center.
When using third-party applications to access AWS services, there’s an external OAuth authorization server for the third-party application, and IAM Identity Center is the OAuth authorization server for AWS services; each has its own domain of users. The Identity Center TTI feature connects these two systems so that tokens from the external OAuth authorization server can be exchanged for tokens from Identity Center that AWS services can use to identify the user in the AWS domain of users. A TTI is the external OAuth authorization server that Identity Center trusts to provide tokens that third-party applications use to call AWS services, as shown in Figure 1.
Figure 1: Conceptual model using a trusted token issuer and token exchange
How the trust model and token exchange work
There are two levels of trust involved with TTIs. First, the IAM Identity Center administrator must add the TTI, which makes it possible to exchange tokens. This involves connecting Identity Center to the Open ID Connect (OIDC) discovery URL of the external OAuth authorization server and defining an attribute-based mapping between the user from the external OAuth authorization server and a corresponding user in Identity Center. Second, the applications that exchange externally generated tokens must be configured to use the TTI. There are two models for how tokens are exchanged:
Managed AWS service-driven token exchange: A third-party application uses an AWS driver or API to access a managed AWS service, such as accessing Amazon Redshift by using Amazon Redshift drivers. This works only if the managed AWS service has been designed to accept and exchange tokens. The application passes the external token to the AWS service through an API call. The AWS service then makes a call to IAM Identity Center to exchange the external token for an Identity Center token. The service uses the Identity Center token to determine who the corresponding Identity Center user is and authorizes resource access based on that identity.
Third-party application-driven token exchange: A third-party application not managed by AWS exchanges the external token for an IAM Identity Center token before calling AWS services. This is different from the first model, where the application that exchanges the token is the managed AWS service. An example is a third-party application that uses Amazon Simple Storage Service (Amazon S3) Access Grants to access S3. In this model, the third-party application obtains a token from the external OAuth authorization server and then calls Identity Center to exchange the external token for an Identity Center token. The application can then use the Identity Center token to call AWS services that use Identity Center as their OAuth authorization server. In this case, the Identity Center administrator must register the third-party application and authorize it to exchange tokens from the TTI.
TTI trust details
When using a TTI, IAM Identity Center trusts that the TTI authenticated the user and authorized them to use the AWS service. This is expressed in an identity token or access token from the external OAuth authorization server (the TTI).
These are the requirements for the external OAuth authorization server (the TTI) and the token it creates:
The token must be a signed JSON Web Token (JWT). The JWT must contain a subject (sub) claim, an audience (aud) claim, an issuer (iss), a user attribute claim, and a JWT ID (JTI) claim.
The subject in the JWT is the authenticated user and the audience is a value that represents the AWS service that the application will use.
The audience claim value must match the value that is configured in the application that exchanges the token.
The issuer claim value must match the value configured in the issuer URL in the TTI.
There must be a claim in the token that specifies a user attribute that IAM Identity Center can use to find the corresponding user in the Identity Center directory.
The JWT token must contain the JWT ID claim. This claim is used to help prevent replay attacks. If a new token exchange is attempted after the initial exchange is complete, IAM Identity Center rejects the new exchange request.
The TTI must have an OIDC discovery URL that IAM Identity Center can use to obtain keys that it can use to verify the signature on JWTs created by your TTI. Identity Center appends the suffix /.well-known/openid-configuration to the provider URL that you configure to identify where to fetch the signature keys.
Note: Typically, the IdP that you use as your identity source for IAM Identity Center is your TTI. However, your TTI doesn’t have to be the IdP that Identity Center uses as an identity source. If the users from a TTI can be mapped to users in Identity Center, the tokens can be exchanged. You can have as many as 10 TTIs configured for a single Identity Center instance.
Details for applications that exchange tokens
Your OAuth authorization server service (the TTI) provides a way to authorize a user to access an AWS service. When a user signs in to the client application, the OAuth authorization server generates an ID token or an access token that contains the subject (the user) and an audience (the AWS services the user can access). When a third-party application accesses an AWS service, the audience must include an identifier of the AWS service. The third-party client application then passes this token to an AWS driver or an AWS service.
To use IAM Identity Center and exchange an external token from the TTI for an Identity Center token, you must configure the application that will exchange the token with Identity Center to use one or more of the TTIs. Additionally, as part of the configuration process, you specify the audience values that are expected to be used with the external OAuth token.
If the applications are managed AWS services, AWS performs most of the configuration process. For example, the Amazon Redshift administrator connects Amazon Redshift to IAM Identity Center, and then connects a specific Amazon Redshift cluster to Identity Center. The Amazon Redshift cluster exchanges the token and must be configured to do so, which is done through the Amazon Redshift administrative console or APIs and doesn’t require additional configuration.
If the applications are third-party and not managed by AWS, your IAM Identity Center administrator must register the application and configure it for token exchange. For example, suppose you create an application that obtains an OAuth token from Okta Universal Directory and calls S3 Access Grants. The Identity Center administrator must add this application as a customer managed application and must grant the application permissions to exchange tokens.
How to set up TTIs
To create new TTIs, open the IAM Identity Center console, choose Settings, and then choose Create trusted token issuer, as shown in Figure 2. In this section, I show an example of how to use the console to create a new TTI to exchange tokens with my Okta IdP, where I already created my OIDC application to use with my new IAM Identity Center application.
Figure 2: Configure the TTI in the IAM Identity Center console
TTI uses the issuer URL to discover the OpenID configuration. Because I use Okta, I can verify that my IdP discovery URL is accessible at https://{my-okta-domain}.okta.com/.well-known/openid-configuration. I can also verify that the OpenID configuration URL responds with a JSON that contains the jwks_uri attribute, which contains a URL that lists the keys that are used by my IdP to sign the JWT tokens. Trusted token issuer requires that both URLs are publicly accessible.
I then configure the attributes I want to use to map the identity of the Okta user with the user in IAM Identity Center in the Map attributes section. I can get the attributes from an OIDC identity token issued by Okta:
I’m requesting a token with an additional email scope, because I want to use this attribute to match against the email of my IAM Identity Center users. In most cases, your Identity Center users are synchronized with your central identity provider by using automatic provisioning with the SCIM protocol. In this case, you can use the Identity Center external ID attribute to match with oid or sub attributes. The only requirement for TTI is that those attributes create a one-to-one mapping between the two IdPs.
Now that I have created my TTI, I can associate it with my IAM Identity Center applications. As explained previously, there are two use cases. For the managed AWS service-driven token exchange use case, use the service-specific interface to do so. For example, I can use my TTI with Amazon Redshift, as shown in Figure 3:
Figure 3: Configure the TTI with Amazon Redshift
I selected Okta as the TTI to use for this integration, and I now need to configure the audclaim value that the application will use to accept the token. I can find it when creating the application from the IdP side–in this example, the value is 123456nqqVBTdtk7890, and I can obtain it by using the preceding example OIDC identity token.
I can also use the AWS Command Line Interface (AWS CLI) to configure the IAM Identity Center application with the appropriate application grants:
For AWS service-driven use cases, the token exchange between your IdP and IAM Identity Center is performed automatically by the service itself. For third-party application-driven token exchange, such as when building your own Identity Center application with S3 Access Grants, your application performs the token exchange by using the Identity Center OIDC API action CreateTokenWithIAM:
The value of the scope attribute varies depending on the IAM Identity Center application that you’re interacting with, because it defines the permissions associated with the application.
You can also inspect the idToken attribute because it’s JWT-encoded:
The AWS account and the IAM Identity Center instance and application that accepted the token exchange
The unique user ID of the user that was matched in IAM Identity Center (attribute sub)
AWS services can now use the STS Audit Context token (found in the attribute sts:audit_context) to create identity-aware sessions with the STS API. You can audit the API calls performed by the identity-aware sessions in AWS CloudTrail, by inspecting the attribute onBehalfOf within the field userIdentity. In this example, you can see an API call that was performed with an identity-aware session:
You can thus quickly filter actions that an AWS principal performs on behalf of your IAM Identity Center user.
Troubleshooting TTI
You can troubleshoot token exchange errors by verifying that:
The OpenID discovery URL is publicly accessible.
The OpenID discovery URL response conforms with the OpenID standard.
The OpenID keys URL referenced in the discovery response is publicly accessible.
The issuer URL that you configure in the TTI exactly matches the value of the iss scope that your IdP returns.
The user attribute that you configure in the TTI exists in the JWT that your IdP returns.
The user attribute value that you configure in the TTI matches exactly one existing IAM Identity Center user on the target attribute.
The aud scope exists in the token returned from your IdP and exactly matches what is configured in the requested IAM Identity Center application.
The jti claim exists in the token returned from your IdP.
If you use an IAM Identity Center application that requires user or group assignments, the matched Identity Center user is already assigned to the application or belongs to a group assigned to the application.
Note: When an IAM Identity Center application doesn’t require user or group assignments, the token exchange will succeed if the preceding conditions are met. This configuration implies that the connected AWS service requires additional security assignments. For example, Amazon Redshift administrators need to configure access to the data within Amazon Redshift. The token exchange doesn’t grant implicit access to the AWS services.
Conclusion
In this blog post, we introduced the trust token issuer feature of IAM Identity Center and what it offers, how it’s configured, and how you can use it to integrate your IdP with AWS services. You learned how to use TTI with AWS-managed applications and third-party applications by configuring the appropriate parameters. You also learned how to troubleshoot token-exchange issues and audit access through CloudTrail.
If you have feedback about this post, submit comments in the Comments section below. If you have questions about this post, start a new thread on the AWS IAM Identity Center re:Post or contact AWS Support.
AWS Identity and Access Management (IAM) Access Analyzer offers tools that help you set, verify, and refine permissions. You can use IAM Access Analyzer external access findings to continuously monitor your AWS Organizations organization and Amazon Web Services (AWS) accounts for public and cross-account access to your resources, and verify that only intended external access is granted. Now, you can use IAM Access Analyzer unused access findings to identify unused access granted to IAM roles and users in your organization.
If you lead a security team, your goal is to manage security for your organization at scale and make sure that your team follows best practices, such as the principle of least privilege. When your developers build on AWS, they create IAM roles for applications and team members to interact with AWS services and resources. They might start with broad permissions while they explore AWS services for their use cases. To identify unused access, you can review the IAM last accessed information for a given IAM role or user and refine permissions gradually. If your company has a multi-account strategy, your roles and policies are created in multiple accounts. You then need visibility across your organization to make sure that teams are working with just the required access.
Now, IAM Access Analyzer simplifies inspection of unused access by reporting unused access findings across your IAM roles and users. IAM Access Analyzer continuously analyzes the accounts in your organization to identify unused access and creates a centralized dashboard with findings. From a delegated administrator account for IAM Access Analyzer, you can use the dashboard to review unused access findings across your organization and prioritize the accounts to inspect based on the volume and type of findings. The findings highlight unused roles, unused access keys for IAM users, and unused passwords for IAM users. For active IAM users and roles, the findings provide visibility into unused services and actions. With the IAM Access Analyzer integration with Amazon EventBridge and AWS Security Hub, you can automate and scale rightsizing of permissions by using event-driven workflows.
In this post, we’ll show you how to set up and use IAM Access Analyzer to identify and review unused access in your organization.
Generate unused access findings
To generate unused access findings, you need to create an analyzer. An analyzer is an IAM Access Analyzer resource that continuously monitors your accounts or organization for a given finding type. You can create an analyzer for the following findings:
An analyzer for unused access findings is a new analyzer that continuously monitors roles and users, looking for permissions that are granted but not actually used. This analyzer is different from an analyzer for external access findings; you need to create a new analyzer for unused access findings even if you already have an analyzer for external access findings.
You can centrally view unused access findings across your accounts by creating an analyzer at the organization level. If you operate a standalone account, you can get unused access findings by creating an analyzer at the account level. This post focuses on the organization-level analyzer setup and management by a central team.
Pricing
IAM Access Analyzer charges for unused access findings based on the number of IAM roles and users analyzed per analyzer per month. You can still use IAM Access Analyzer external access findings at no additional cost. For more details on pricing, see IAM Access Analyzer pricing.
Create an analyzer for unused access findings
To enable unused access findings for your organization, you need to create your analyzer by using the IAM Access Analyzer console or APIs in your management account or a delegated administrator account. A delegated administrator is a member account of the organization that you can delegate with administrator access for IAM Access Analyzer. A best practice is to use your management account only for tasks that require the management account and use a delegated administrator for other tasks. For steps on how to add a delegated administrator for IAM Access Analyzer, see Delegated administrator for IAM Access Analyzer.
To create an analyzer for unused access findings (console)
From the delegated administrator account, open the IAM Access Analyzer console, and in the left navigation pane, select Analyzer settings.
Choose Create analyzer.
On the Create analyzer page, do the following, as shown in Figure 1:
For Findings type, select Unused access analysis.
Provide a Name for the analyzer.
Select a Tracking period. The tracking period is the threshold beyond which IAM Access Analyzer considers access to be unused. For example, if you select a tracking period of 90 days, IAM Access Analyzer highlights the roles that haven’t been used in the last 90 days.
Set your Selected accounts. For this example, we select Current organization to review unused access across the organization.
Select Create.
Figure 1: Create analyzer page
Now that you’ve created the analyzer, IAM Access Analyzer starts reporting findings for unused access across the IAM users and roles in your organization. IAM Access Analyzer will periodically scan your IAM roles and users to update unused access findings. Additionally, if one of your roles, users or policies is updated or deleted, IAM Access Analyzer automatically updates existing findings or creates new ones. IAM Access Analyzer uses a service-linked role to review last accessed information for all roles, user access keys, and user passwords in your organization. For active IAM roles and users, IAM Access Analyzer uses IAM service and action last accessed information to identify unused permissions.
Note: Although IAM Access Analyzer is a regional service (that is, you enable it for a specific AWS Region), unused access findings are linked to IAM resources that are global (that is, not tied to a Region). To avoid duplicate findings and costs, enable your analyzer for unused access in the single Region where you want to review and operate findings.
IAM Access Analyzer findings dashboard
Your analyzer aggregates findings from across your organization and presents them on a dashboard. The dashboard aggregates, in the selected Region, findings for both external access and unused access—although this post focuses on unused access findings only. You can use the dashboard for unused access findings to centrally review the breakdown of findings by account or finding types to identify areas to prioritize for your inspection (for example, sensitive accounts, type of findings, type of environment, or confidence in refinement).
Review the findings overview to identify the total findings for your organization and the breakdown by finding type. Figure 2 shows an example of an organization with 100 active findings. The finding type Unused access keys is present in each of the accounts, with the most findings for unused access. To move toward least privilege and to avoid long-term credentials, the security team should clean up the unused access keys.
Figure 2: Unused access finding dashboard
Unused access findings dashboard – Accounts with most findings
Review the dashboard to identify the accounts with the highest number of findings and the distribution per finding type. In Figure 2, the Audit account has the highest number of findings and might need attention. The account has five unused access keys and six roles with unused permissions. The security team should prioritize this account based on volume of findings and review the findings associated with the account.
Review unused access findings
In this section, we’ll show you how to review findings. We’ll share two examples of unused access findings, including unused access key findings and unused permissions findings.
Finding example: unused access keys
As shown previously in Figure 2, the IAM Access Analyzer dashboard showed that accounts with the most findings were primarily associated with unused access keys. Let’s review a finding linked to unused access keys.
Select your analyzer to view the unused access findings.
In the search dropdown list, select the property Findings type, the Equals operator, and the value Unused access key to get only Findings type = Unused access key, as shown in Figure 3.
Figure 3: List of unused access findings
Select one of the findings to get a view of the available access keys for an IAM user, their status, creation date, and last used date. Figure 4 shows an example in which one of the access keys has never been used, and the other was used 137 days ago.
Figure 4: Finding example – Unused IAM user access keys
From here, you can investigate further with the development teams to identify whether the access keys are still needed. If they aren’t needed, you should delete the access keys.
Finding example: unused permissions
Another goal that your security team might have is to make sure that the IAM roles and users across your organization are following the principle of least privilege. Let’s walk through an example with findings associated with unused permissions.
To review findings for unused permissions
On the list of unused access findings, apply the filter on Findings type = Unused permissions.
The security team now has a view of the unused actions for this role and can investigate with the development teams to check if those permissions are still required.
The development team can then refine the permissions granted to the role to remove the unused permissions.
Unused access findings notify you about unused permissions for all service-level permissions and for 200 services at the action-level. For the list of supported actions, see IAM action last accessed information services and actions.
Take actions on findings
IAM Access Analyzer categorizes findings as active, resolved, and archived. In this section, we’ll show you how you can act on your findings.
Resolve findings
You can resolve unused access findings by deleting unused IAM roles, IAM users, IAM user credentials, or permissions. After you’ve completed this, IAM Access Analyzer automatically resolves the findings on your behalf.
You can suppress a finding by archiving it, which moves the finding from the Active tab to the Archived tab in the IAM Access Analyzer console. To archive a finding, open the IAM Access Analyzer console, select a Finding ID, and in the Next steps section, select Archive, as shown in Figure 6.
Figure 6: Archive finding in the AWS management console
You can automate this process by creating archive rules that archive findings based on their attributes. An archive rule is linked to an analyzer, which means that you can have archive rules exclusively for unused access findings.
To illustrate this point, imagine that you have a subset of IAM roles that you don’t expect to use in your tracking period. For example, you might have an IAM role that is used exclusively for break glass access during your disaster recovery processes—you shouldn’t need to use this role frequently, so you can expect some unused access findings. For this example, let’s call the role DisasterRecoveryRole. You can create an archive rule to automatically archive unused access findings associated with roles named DisasterRecoveryRole, as shown in Figure 7.
Using an EventBridge rule, you can match the incoming events associated with IAM Access Analyzer unused access findings and send them to targets for processing. For example, you can notify the account owners so that they can investigate and remediate unused IAM roles, user credentials, or permissions.
With IAM Access Analyzer, you can centrally identify, review, and refine unused access across your organization. As summarized in Figure 8, you can use the dashboard to review findings and prioritize which accounts to review based on the volume of findings. The findings highlight unused roles, unused access keys for IAM users, and unused passwords for IAM users. For active IAM roles and users, the findings provide visibility into unused services and actions. By reviewing and refining unused access, you can improve your security posture and get closer to the principle of least privilege at scale.
Figure 8: Process to address unused access findings
The new IAM Access Analyzer unused access findings and dashboard are available in AWS Regions, excluding the AWS GovCloud (US) Regions and AWS China Regions. To learn more about how to use IAM Access Analyzer to detect unused accesses, see the IAM Access Analyzer documentation.
If you have feedback about this post, submit comments in the Comments section below. If you have questions about this post, contact AWS Support.
Want more AWS Security news? Follow us on Twitter.
I’ve always loved building things, but when I first began as a software developer, my least favorite part of the job was thinking about security. The security of those first lines of code just didn’t seem too important. Only after struggling through security reviews at the end of a project, did I realize that a security focus at the start can save time and money, and prevent a lot of frustration.
This focus on security at the earliest phases of development is known in the DevOps community as DevSecOps. By adopting this approach, you can identify and improve security issues early, avoiding costly rework and reducing vulnerabilities in live systems. By using the security scanning capabilities of Amazon CodeWhisperer, you can identify potential security issues in your integrated development environment (IDE) as you code. After you identify these potential issues, CodeWhisperer can offer suggestions on how you can refactor to improve the security of your code early enough to help avoid the frustration of a last-minute change to your code.
In this post, I will show you how to get started with the code scanning feature of CodeWhisperer by using the AWS Toolkit for JetBrains extension in PyCharm to identify a potentially weak hashing algorithm in your IDE, and then use CodeWhisperer suggestions to quickly cycle through possible ways to improve the security of your code.
Overview of CodeWhisperer
CodeWhisperer understands comments written in natural language (in English) and can generate multiple code suggestions in real time to help improve developer productivity. The code suggestions are based on a large language model (LLM) trained on Amazon and publicly available code with identified security vulnerabilities removed during the training process. For more details, see Amazon CodeWhisperer FAQs.
Security scans are available in VS Code and JetBrains for Java, Python, JavaScript, C#, TypeScript, CloudFormation, Terraform, and AWS Cloud Development Kit (AWS CDK) with both Python and TypeScript. AWS CodeGuru Security uses a detection engine and a machine leaning model that uses a combination of logistic regression and neural networks, finding relationships and understanding paths through code. CodeGuru Security can detect common security issues, log injection, secrets, and insecure use of AWS APIs and SDKs. The detection engine uses a Detector Library that has descriptions, examples, and additional information to help you understand why CodeWhisperer highlighted your code and whether you need to take action. You can start a scan manually through either the AWS Toolkit for Visual Studio Code or AWS Toolkit for JetBrains. To learn more, see How Amazon CodeGuru Security helps you effectively balance security and velocity.
CodeWhisperer code scan sequence
To illustrate how PyCharm, Amazon CodeWhisperer, and Amazon CodeGuru interact, Figure 1 shows a high-level view of the interactions between PyCharm and services within AWS. For more information about this interaction, see the Amazon CodeWhisperer documentation.
Figure 1: Sequence diagram of the security scan workflow
Communication from PyCharm to CodeWhisperer is HTTPS authenticated by using a bearer token in the authorization header of each request. As shown in Figure 1, when you manually start a security scan from PyCharm, the sequence is as follows:
PyCharm sends a request to CodeWhisperer for a presigned Amazon Simple Storage Service (Amazon S3) upload URL, which initiates a request for an upload URL from CodeGuru. CodeWhisperer returns the URL to PyCharm.
PyCharm archives the code in open PyCharm tabs along with linked third-party libraries into a gzip file and uploads this file directly to the S3 upload URL. The S3 bucket where the code is stored is encrypted at rest with strict access controls.
PyCharm initiates the scan with CodeWhisperer, which creates a scan job with CodeGuru. CodeWhisperer returns the scan job ID that CodeGuru created to PyCharm.
CodeGuru downloads the code from Amazon S3 and starts the code scan.
PyCharm requests the status of the scan job from CodeWhisperer, which gets the scan status from CodeGuru. If the status is pending, PyCharm keeps polling CodeWhisperer for the status until the scan job is complete.
When CodeWhisperer responds that the status of the scan job is complete, PyCharm requests the details of the security findings. The findings include the file path, line numbers, and details about the finding.
The finding details are displayed in the PyCharm code editor window and in the CodeWhisperer Security Issues window.
Walkthrough
For this walkthrough, you will start by configuring PyCharm to use AWS Toolkit for JetBrains. Then you will create an AWS Builder ID to authenticate the extension with AWS. Next, you will scan Python code that CodeWhisperer will identify as a potentially weak hashing algorithm, and learn how to find more details. Finally, you will learn how to use CodeWhisperer to improve the security of your code by using suggestions.
Prerequisites
To follow along with this walkthrough, make sure that you have the following prerequisites in place:
In this step, you will install the latest version of AWS Toolkit for JetBrains, create a new PyCharm project, sign up for an AWS Builder ID, and then use this ID to authenticate the toolkit with AWS. To authenticate with AWS, you need either an AWS Builder ID, AWS IAM Identity Center user details, or AWS IAM credentials. Creating an AWS Builder ID is the fastest way to get started and doesn’t require an AWS account, so that’s the approach I’ll walk you through here.
To install the AWS Toolkit for JetBrains
Open the PyCharm IDE, and in the left navigation pane, choose Plugins.
In the search box, enter AWS Toolkit.
For the result — AWS Toolkit — choose Install.
Figure 2 shows the plugins search dialog and search results for the AWS Toolkit extension.
Figure 2: PyCharm plugins browser
To create a new project
Open the PyCharm IDE.
From the menu bar, choose File > New Project, and then choose Create.
To authenticate CodeWhisperer with AWS
In the navigation pane, choose the AWS icon ().
In the AWS Toolkit section, choose the Developer Tools tab.
Under CodeWhisperer, double-click the Start icon().
Figure 3: Start CodeWhisperer
In the AWS Toolkit: Add Connection section, select Use a personal email to sign up and sign in with AWS Builder ID, and then choose Connect.
Figure 4: AWS Toolkit Add Connection
For the Sign in with AWS Builder ID dialog box, choose Open and Copy Code.
In the opened browser window, in the Authorize request section, in the Code field, paste the code that you copied in the previous step, and then choose Submit and continue.
Figure 5: Authorize request page
On the Create your AWS Builder ID page, do the following:
For Email address, enter a valid current email address.
Choose Next.
For Your name, enter your full name.
Choose Next.
Figure 6: Create your AWS Builder ID
Check your inbox for an email sent from [email protected] titled Verify your AWS Builder ID email address, and copy the verification code that’s in the email.
In your browser, on the Email verification page, for Verification code, paste the verification code, and then choose Verify.
Figure 7: Email verification
On the Choose your password page, enter a Password and Confirm password, and then choose Create AWS Builder ID.
In the Allow AWS Toolkit for JetBrains to access your data? section, choose Allow.
Figure 8: Allow AWS Toolkit for JetBrains to access your data
To confirm that the authentication was successful, in the PyCharm IDE navigation pane, select the AWS icon (). On the AWS Toolkit window, make sure that Connected with AWS Builder ID is displayed.
Identify a potentially weak hashing algorithm by using CodeWhisperer security scans
The next step is to create a file that uses the hashing algorithm, SHA-224. CodeWhisperer considers this algorithm to be potentially weak and references Common Weakness Enumeration (CWE)-328. In this step, you use this weak hashing algorithm instead of the recommend algorithm SHA-256 so that you can see how CodeWhisperer flags this potential issue.
To create the file with the weak hashing algorithm (SHA-224)
Create a new file in your PyCharm project named app.py
Copy the following code snippet and paste it in the app.py file. In this code snippet, PBKDF2 is used with SHA-224, instead of the recommended SHA-256 algorithm.
In the AWS Toolkit section of PyCharm, on the Developer Tools tab, double-click the play icon () next to Run Security Scan. This opens a new tab called CodeWhisperer Security Issues that shows the scan was initiated successfully, as shown in Figure 9.
Figure 9: AWS Toolkit window with security scan in progress
Interpret the CodeWhisperer security scan results
You can now interpret the results of the security scan.
To interpret the CodeWhisperer results
When the security scan completes, CodeWhisperer highlights one of the rows in the main code editor window. To see a description of the identified issue, hover over the highlighted code. In our example, the issue that is displayed is CWE-327/328, as shown in Figure 10.
Figure 10: Code highlighted with issue CWE-327,328 – Insecure hashing
The issue description indicates that the algorithm used in the highlighted line might be weak. The first argument of the pbkdf2_hmac function shown in Figure 10 is the algorithm SHA-224, so we can assume this is the highlighted issue.
CodeWhisperer has highlighted SHA-224 as a potential issue. However, to understand whether or not you need to make changes to improve the security of your code, you must do further investigation. A good starting point for your investigation is the CodeGuru Detector Library, which powers the scanning capabilities of CodeWhisperer. The entry in the Detector Library for insecure hashing provides example code and links to additional information.
This additional information reveals that the SHA-224 output is truncated and is 32 bits shorter than SHA-256. Because the output is truncated, SHA-224 is more susceptible to collision attacks than SHA-256. SHA-224 has 112-bit security compared to the 128-bit security of SHA-256. A collision attack is a way to find another input that yields an identical hash created by the original input. The CodeWhisperer issue description for insecure hashing in Figure 10 describes this as a potential issue and is the reason that CodeWhisperer flagged the code. However, if the size of the hash result is important for your use case, SHA-224 might be the correct solution, and if so, you can ignore this warning. But if you don’t have a specific reason to use SHA-224 over other algorithms, you should consider the alternative suggestions that CodeWhisperer offers, which I describe in the next section.
Use CodeWhisperer suggestions to help remediate security issues
CodeWhisperer automatically generates suggestions in real time as you type based on your existing code and comments. Suggestions range from completing a single line of code to generating complete functions. However, because CodeWhisperer uses an LLM that is trained on vast amounts of data, you might receive multiple different suggestions. These suggestions might change over time, even when you give CodeWhisperer the same context. Therefore, you must use your judgement to decide if a suggestion is the correct solution.
To replace the algorithm
In the previous step, you found that the first argument of the pbkdf2_hmac function contains the potentially vulnerable algorithm SHA-224. To initiate a suggestion for a different algorithm, delete the arguments from the function. The suggestion from CodeWhisperer was to change the algorithm from SHA-224 to SHA-256. However, because of the nature of LLMs, you could get a different suggested algorithm.
To apply this suggestion and update your code, press Tab. Figure 11 shows what the suggestion looks like in the PyCharm IDE.
Figure 11: CodeWhisperer auto-suggestions
Validate CodeWhisperer suggestions by rescanning the code
Although the training data used for the CodeWhisperer machine learning model has identified that security vulnerabilities were removed, it’s still possible that some suggestions will contain security vulnerabilities. Therefore, make sure that you fully understand the CodeWhisperer suggestions before you accept them and use them in your code. You are responsible for the code that you produce. In our example, other algorithms to consider are those from the SHA-3 family, such as SHA3-256. This family of algorithms are built using the sponge function rather than the Merkle-Damgård structure that SHA-1 and SHA-2 families are built with. This means that the SHA-3 family offers greater resistance to certain security events but can be slower to compute in certain configurations and hardware. In this case, you have multiple options to improve the security of SHA-224. Before you decide which algorithm to use, test the performance on your target hardware. Whether you use the solution that CodeWhisperer proposes or an alternative, you should validate changes in the code by running the security scans again.
To validate the CodeWhisperer suggestions
Choose Run Security Scan to rerun the scan. When the scan is complete, the CodeWhisperer Security Issues panel of PyCharm shows a notification that the rescan was completed successfully and no issues were found.
Figure 12: Final security scan results
Conclusion
In this blog post, you learned how to set up PyCharm with CodeWhisperer, how to scan code for potential vulnerabilities with security scans, and how to view the details of these potential issues and understand the implications. To improve the security of your code, you reviewed and accepted CodeWhisperer suggestions, and ran the security scan again, validating the suggestion that CodeWhisperer made. Although many potential security vulnerabilities are removed during training of the CodeWhisperer machine learning model, you should validate these suggestions. CodeWhisperer is a great tool to help you speed up software development, but you are responsible for accepting or rejecting suggestions.
In addition to using CodeWhisperer suggestions, you can also integrate security scanning into your CI/CD pipeline. By combining CodeWhisperer and automated release pipeline checks, you can detect potential vulnerabilities early with validation throughout the delivery process. Catching potential issues earlier can help you resolve them quickly and reduce the chance of frustrating delays late in the delivery process.
Prioritizing security throughout the development lifecycle can help you build robust and secure applications. By using tools such as CodeWhisperer and adopting DevSecOps practices, you can foster a security-conscious culture on your development team and help deliver safer software to your users.
If you want to explore code scanning on your own, CodeWhisperer is now generally available, and the individual tier is free for individual use. With CodeWhisperer, you can enhance the security of your code and minimize potential vulnerabilities before they become significant problems.
If you have feedback about this post, submit comments in the Comments section below. If you have questions about this post, start a new thread on the Amazon CodeWhisperer re:Post or contact AWS Support.
Want more AWS Security news? Follow us on Twitter.
The collective thoughts of the interwebz
Manage Consent
To provide the best experiences, we use technologies like cookies to store and/or access device information. Consenting to these technologies will allow us to process data such as browsing behavior or unique IDs on this site. Not consenting or withdrawing consent, may adversely affect certain features and functions.
Functional
Always active
The technical storage or access is strictly necessary for the legitimate purpose of enabling the use of a specific service explicitly requested by the subscriber or user, or for the sole purpose of carrying out the transmission of a communication over an electronic communications network.
Preferences
The technical storage or access is necessary for the legitimate purpose of storing preferences that are not requested by the subscriber or user.
Statistics
The technical storage or access that is used exclusively for statistical purposes.The technical storage or access that is used exclusively for anonymous statistical purposes. Without a subpoena, voluntary compliance on the part of your Internet Service Provider, or additional records from a third party, information stored or retrieved for this purpose alone cannot usually be used to identify you.
Marketing
The technical storage or access is required to create user profiles to send advertising, or to track the user on a website or across several websites for similar marketing purposes.