Tag Archives: security

Introducing Cloudflare Domain Protection — Making Domain Compromise a Thing of the Past

Post Syndicated from Eric Brown original https://blog.cloudflare.com/introducing-domain-protection/

Introducing Cloudflare Domain Protection — Making Domain Compromise a Thing of the Past

Introducing Cloudflare Domain Protection — Making Domain Compromise a Thing of the Past

Everything on the web starts with a domain name. It is the foundation on which a company’s online presence is built. If that foundation is compromised, the damage can be immense.

As part of CIO Week, we looked at all the biggest risks that companies continue to face online, and how we could address them. The compromise of a domain name remains one of the greatest. There are many ways in which a domain may be hijacked or otherwise compromised, all the way up to the most serious: losing control of your domain name altogether.

You don’t want it to happen to you. Imagine not just losing your website, but all your company’s email, a myriad of systems tied to your corporate domain, and who knows what else. Having an attacker compromise your corporate domain is the stuff of nightmares for every CIO. And, if you’re a CIO and it’s not something you’re worrying about, know that we literally surveyed every other domain registrar and were so unsatisfied with their security practices we needed to launch our own.

But, now that we have, we want to make domain compromise something that should never, ever happen again. For that reason, we’re excited to announce that we are extending a new level of domain record protection to all our Enterprise customers. We call it Cloudflare Domain Protection, and we’re including it for free for every Cloudflare Enterprise customer. For those customers who have domains secured by Domain Protection, we will also waive all registration and renewal fees on those domains. Cloudflare Domain Protection will be available in Q1 — you can speak to your account manager now to take advantage of the offer.

It’s not possible to build a truly secure domain registrar solution without an understanding of how a domain gets compromised. Before we get into more details of our offering, we wanted to take you on a tour of how a domain can get compromised.

Stealing the Keys to Your Kingdom

There are three types of domain compromises that we often hear about. Let’s take a look at each of them.

Domain Transfers

One of the most serious compromises is an unauthorized transfer of the domain to another registrar. While cooperation amongst registrars has improved greatly over the years, it can still be very difficult to recover a stolen domain. It can often take weeks — or even months. It may require legal action. In a best case scenario, the domain may be recovered in a few days; in the worst case, you may never get it back.

The ability to easily transfer a domain between registrars is vitally important, and is part of what keeps the market for domain registration competitive. However, it also introduces potential risk. The transfer process used by most registries involves using a token to authorize the transfer. Prior to the widespread practice of redacting publicly accessible whois data, an email approval process was also used. To steal a domain, a malicious actor only needs to gain access to the authorization code and be able to remove any domain locks.

Unauthorized transfers start often with a compromised account. In many cases, the customer may have their account credentials compromised. In other cases, attackers use elaborate social engineering schemes to take control of the domain, often moving the domain between registrar accounts before transferring the domain to another registrar.

Name Server Updates

Name server updates are another way in which domains may be compromised. Whereas a domain transfer is typically an attempt to permanently take over a domain, a name server update is more temporary in nature. However, even if the update can usually be quickly reversed, these types of domain hijacks can be very damaging. They open the possibility of stolen customer data and intercepted email traffic. But most of all: they open an organization up to very serious reputational damage.

Domain Suspensions and Deletions

Most domain suspensions and deletions are not the result of malicious activity, but rather, they often happen through human error or system failures. In many cases, the customer forgets to renew a domain or neglects to update their payment method. In other cases, the registrar mistakenly suspends or deletes a domain.

Regardless of the reason though: the result is a domain that no longer resolves.

While these are certainly not the only ways in which domains may be compromised, they are some of the most damaging. We have spent a lot of time focused on these types of compromises and how to prevent them from happening.

A Different Approach to Domains

Like a lot of folks, we’ve long been frustrated by the state of the domain business. And so this isn’t our first rodeo here.

We already have a registrar service — Cloudflare Registrar — which is open to any Cloudflare customer. We make it super easy to get started, to integrate with Cloudflare, and there’s no markup on our pricing — we promise to never charge you anything more than the wholesale price each TLD charges. The aim: no more “bait and switch” and “endless upsell” (which, according to our customers, are the two most common terms associated with the domain industry). Instead, it’s a registrar that you love. Obviously, it’s Cloudflare, so we incorporated a number of security best practices into how it operates, too.

For our most demanding enterprise customers, we also have Custom Domain Protection. Every client using Custom Domain Protection defines their own process for updating records. As we said when we introduced it: “if a Custom Domain Protection client wants us to not change their domain records unless six different individuals call us, in order, from a set of predefined phone numbers, each reading multiple unique pass codes, and telling us their favorite ice cream flavor, on a Tuesday that is also a full moon, we will enforce that. Literally.

Yes, it’s secure, but it’s also not the most scalable solution. As a result, we charge a premium for it. As we spoke to our Enterprise customers, however, there was a need for something in between — a Goldilocks solution, so to speak, that offers a high level of protection without being quite so custom.

Enter Cloudflare Domain Protection.

A Triple-Locked Approach

Our approach to securing domains with Domain Protection is quite straightforward: identify the various attack vectors, and design a layered security mode to address each potential threat.

Before we take a look at each security layer, it’s important to understand the relationship between registrars and registries, and how that impacts domain security. You can think of registries as the wholesaler of domain names. They manage the central database of all registered domains within the Top-Level-Domain (TLD). They are also responsible for determining the wholesale pricing and establishing TLD specific policies.

Registrars, on the other hand, are the retailer of domains and are responsible for selling the domains to the end user. With each registration, transfer, or renewal, the registrar pays the registry a transaction fee.

Registrars and registries jointly manage domain registrations in what’s called the Shared Registration System (SRS). Registrars communicate with registries using an IETF standard called the Extensible Provisioning Protocol (EPP). Embodied in the EPP standard are a set of domain status that can be applied by registrars and registries to lock the domain and prevent updates, deletions, and transfers (to another registrar).

Registrars are able to apply “client” locks, frequently referred to as Registrar Locks. Registries apply “server” locks, also known as Registry Locks. It’s important to note that the registry locks always supersede the registrar locks. This means that the registrar locks cannot be removed until the registry locks have been removed.

Now, let’s take a closer look at our planned approach.

We start by applying the EPP Registrar Locks to the domain name. These are the EPP client locks that prevent domain updates, transfers, and deletions.

We then apply an internal lock that prevents any API calls to that domain from being processed. This lock functions outside of EPP and is designed to protect the domain should the EPP locks be removed, as well as situations where an operation may be executed outside of EPP. For example, in some TLDs the domain contact data is only stored at the registrar and never transmitted to the registry. In these cases, it’s important to have a non EPP locking mechanism.

After the registrar locks are applied, we will request the registry to apply the Registry Locks using a special non-EPP based procedure. It’s important to note that not all registries offer Registry Lock as a service. In some instances, we may not be able to apply this last locking feature.

Lastly, a secure verification procedure is created to handle any future requests to unlock or modify the domain.

Included Out of the Box

Our aim is to make Cloudflare Domain Protection the most scalable secure solution for domains that’s available. We want to ensure that the domains that matter most to our customers — the mission critical, high value domains — are securely protected.

Eligible domains that are explicitly included under a Cloudflare Enterprise contract may be included in our Domain Protection registration service at no additional cost. And, as we mentioned earlier, this will also cover registration and renewal fees — so not only will securing your domain be one less thing for you to worry about, so too will be paying for it.

Interested in applying Cloudflare Domain Protection to your domain names? Reach out to your account manager and let them know you’re interested. Additional details will be coming in early Q1, 2022.

CVE-2021-44228 – Log4j RCE 0-day mitigation

Post Syndicated from Gabriel Gabor original https://blog.cloudflare.com/cve-2021-44228-log4j-rce-0-day-mitigation/

CVE-2021-44228 - Log4j RCE 0-day mitigation

CVE-2021-44228 - Log4j RCE 0-day mitigation

A zero-day exploit affecting the popular Apache Log4j utility (CVE-2021-44228) was made public on December 9, 2021 that results in remote code execution (RCE).

This vulnerability is actively being exploited and anyone using Log4j should update to version 2.15.0 as soon as possible. The latest version can already be found on the Log4j download page.

If updating to the latest version is not possible, customers can also mitigate exploit attempts by setting the system property “log4j2.formatMsgNoLookups” to “true”; or by removing the JndiLookup class from the classpath. Java release 8u121 also protects against this remote code execution vector.

Customers using the Cloudflare WAF can also leverage three newly deployed rules to help mitigate any exploit attempts:

Rule ID Description Default Action
100514 (legacy WAF)
6b1cc72dff9746469d4695a474430f12 (new WAF)
Log4j Headers BLOCK
100515 (legacy WAF)
0c054d4e4dd5455c9ff8f01efe5abb10 (new WAF)
Log4j Body LOG
100516 (legacy WAF)
5f6744fa026a4638bda5b3d7d5e015dd (new WAF)
Log4j URL LOG

The mitigation has been split across three rules inspecting HTTP headers, body and URL respectively.

Due to the risk of false positives, customers should immediately review Firewall Event logs and switch the Log4j Body and URL rules to BLOCK if none are found. The rule inspecting HTTP headers has been directly deployed with a default action of BLOCK to all WAF customers.

We are continuing to monitor the situation and will update any WAF managed rules accordingly.

More details on the vulnerability can be found on the official Log4j security page.

Who is affected

Log4j is a powerful Java based logging library maintained by the Apache Software Foundation.

In all Log4j versions >= 2.0-beta9 and <= 2.14.1 JNDI features used in configuration, log messages, and parameters can be exploited by an attacker to perform remote code execution. Specifically, an attacker who can control log messages or log message parameters can execute arbitrary code loaded from LDAP servers when message lookup substitution is enabled.

What’s new in Zabbix 6.0 LTS by Artūrs Lontons / Zabbix Summit Online 2021

Post Syndicated from Arturs Lontons original https://blog.zabbix.com/whats-new-in-zabbix-6-0-lts-by-arturs-lontons-zabbix-summit-online-2021/17761/

Zabbix 6.0 LTS comes packed with many new enterprise-level features and improvements. Join Artūrs Lontons and take a look at some of the major features that will be available with the release of Zabbix 6.0 LTS.

The full recording of the speech is available on the official Zabbix Youtube channel.

If we look at the Zabbix roadmap and Zabbix 6.0 LTS release in particular, we can see that one of the main focuses of Zabbix development is releasing features that solve many complex enterprise-grade problems and use cases. Zabbix 6.0 LTS aims to:

  • Solve enterprise-level security and redundancy requirements
  • Improve performance for large Zabbix instances
  • Provide additional value to different types of Zabbix users – DevOPS and ITOps teams, Business process owner, Managers
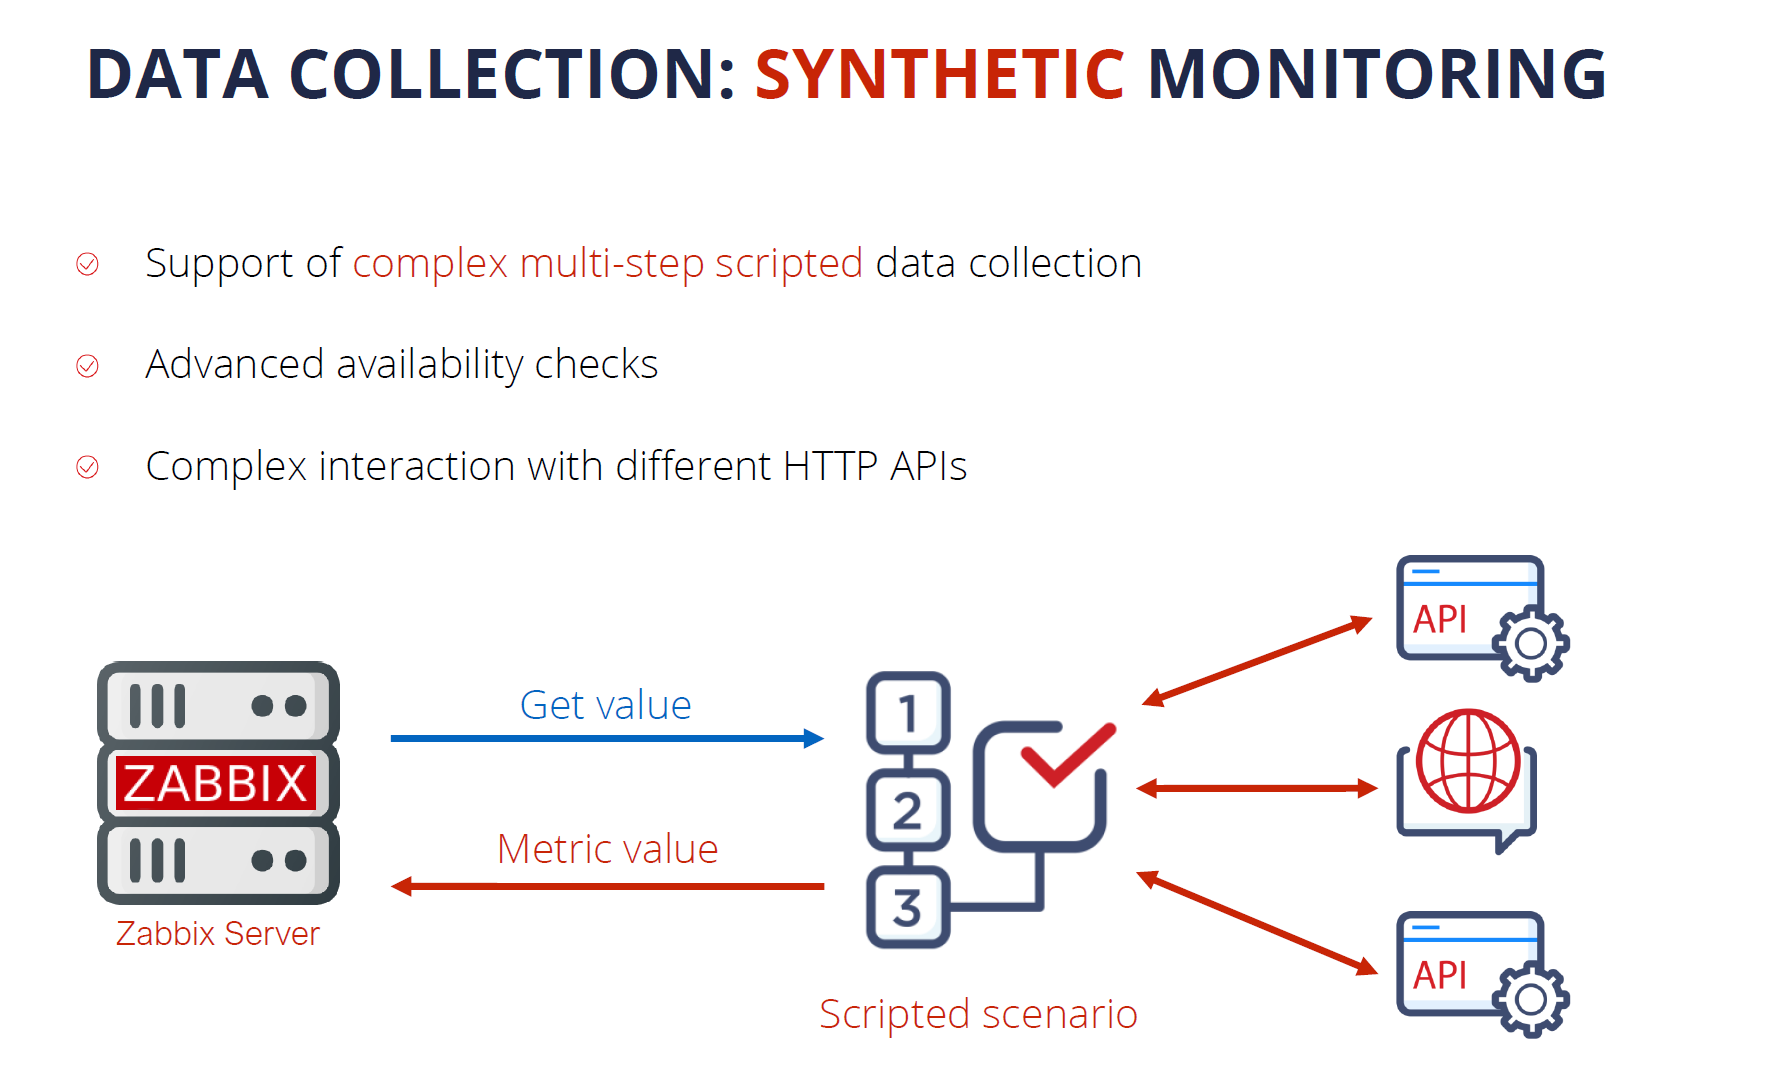
  • Continue to extend Zabbix monitoring and data collection capabilities
  • Provide continued delivery of official integrations with 3rd party systems

Let’s take a look at the specific Zabbix 6.0 LTS features that can guide us towards achieving these goals.

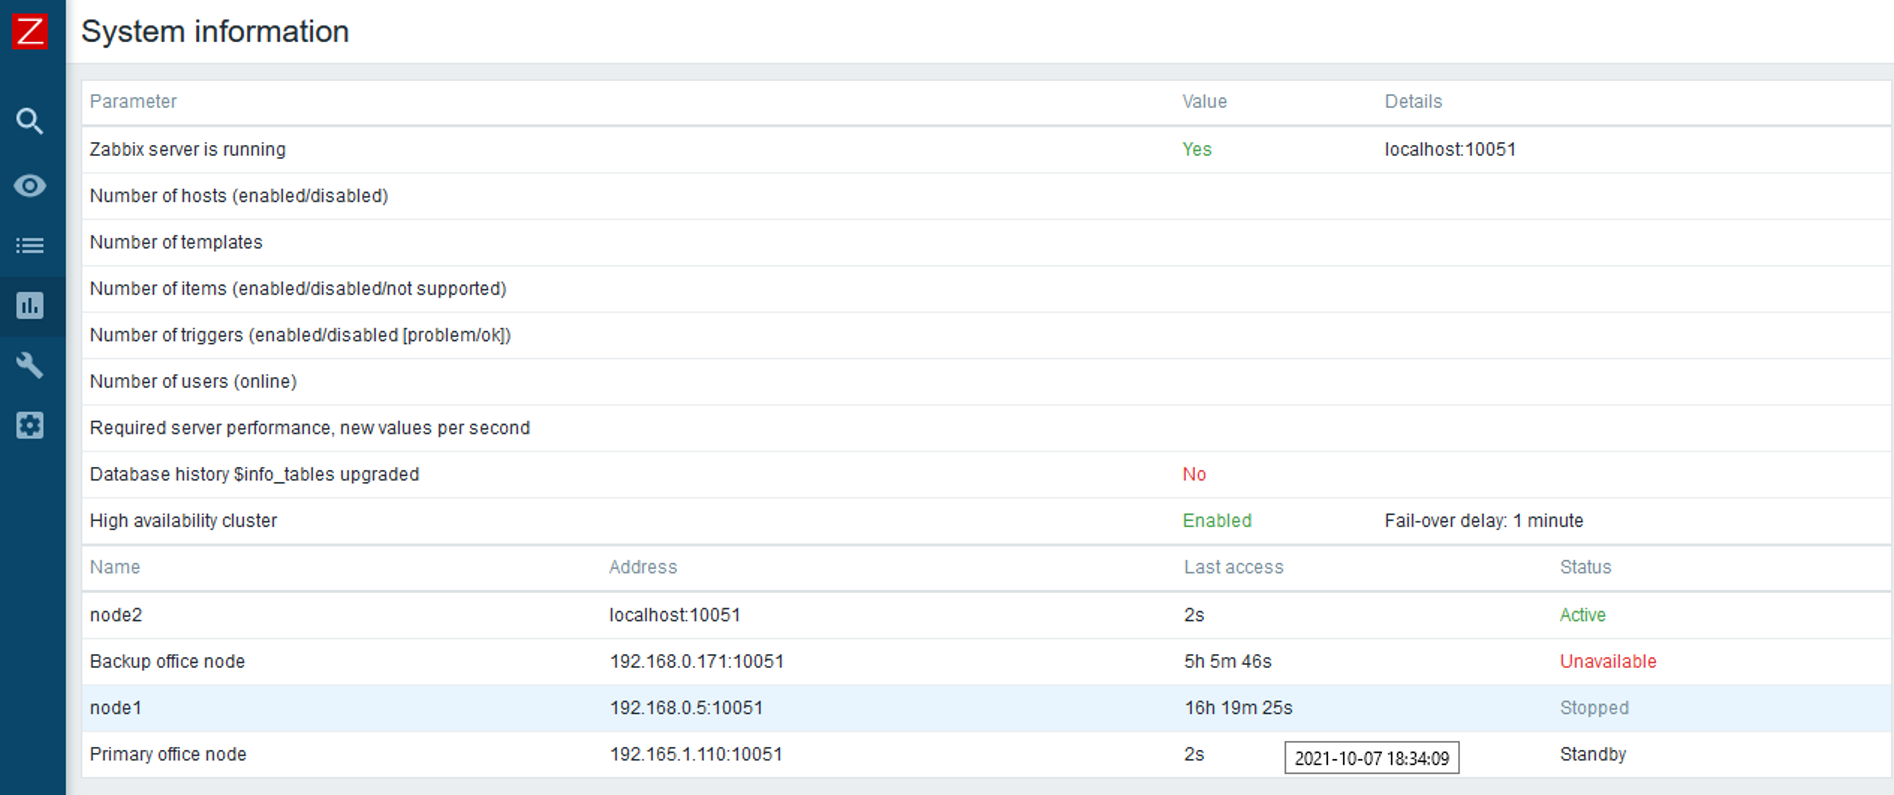
Zabbix server High Availability cluster

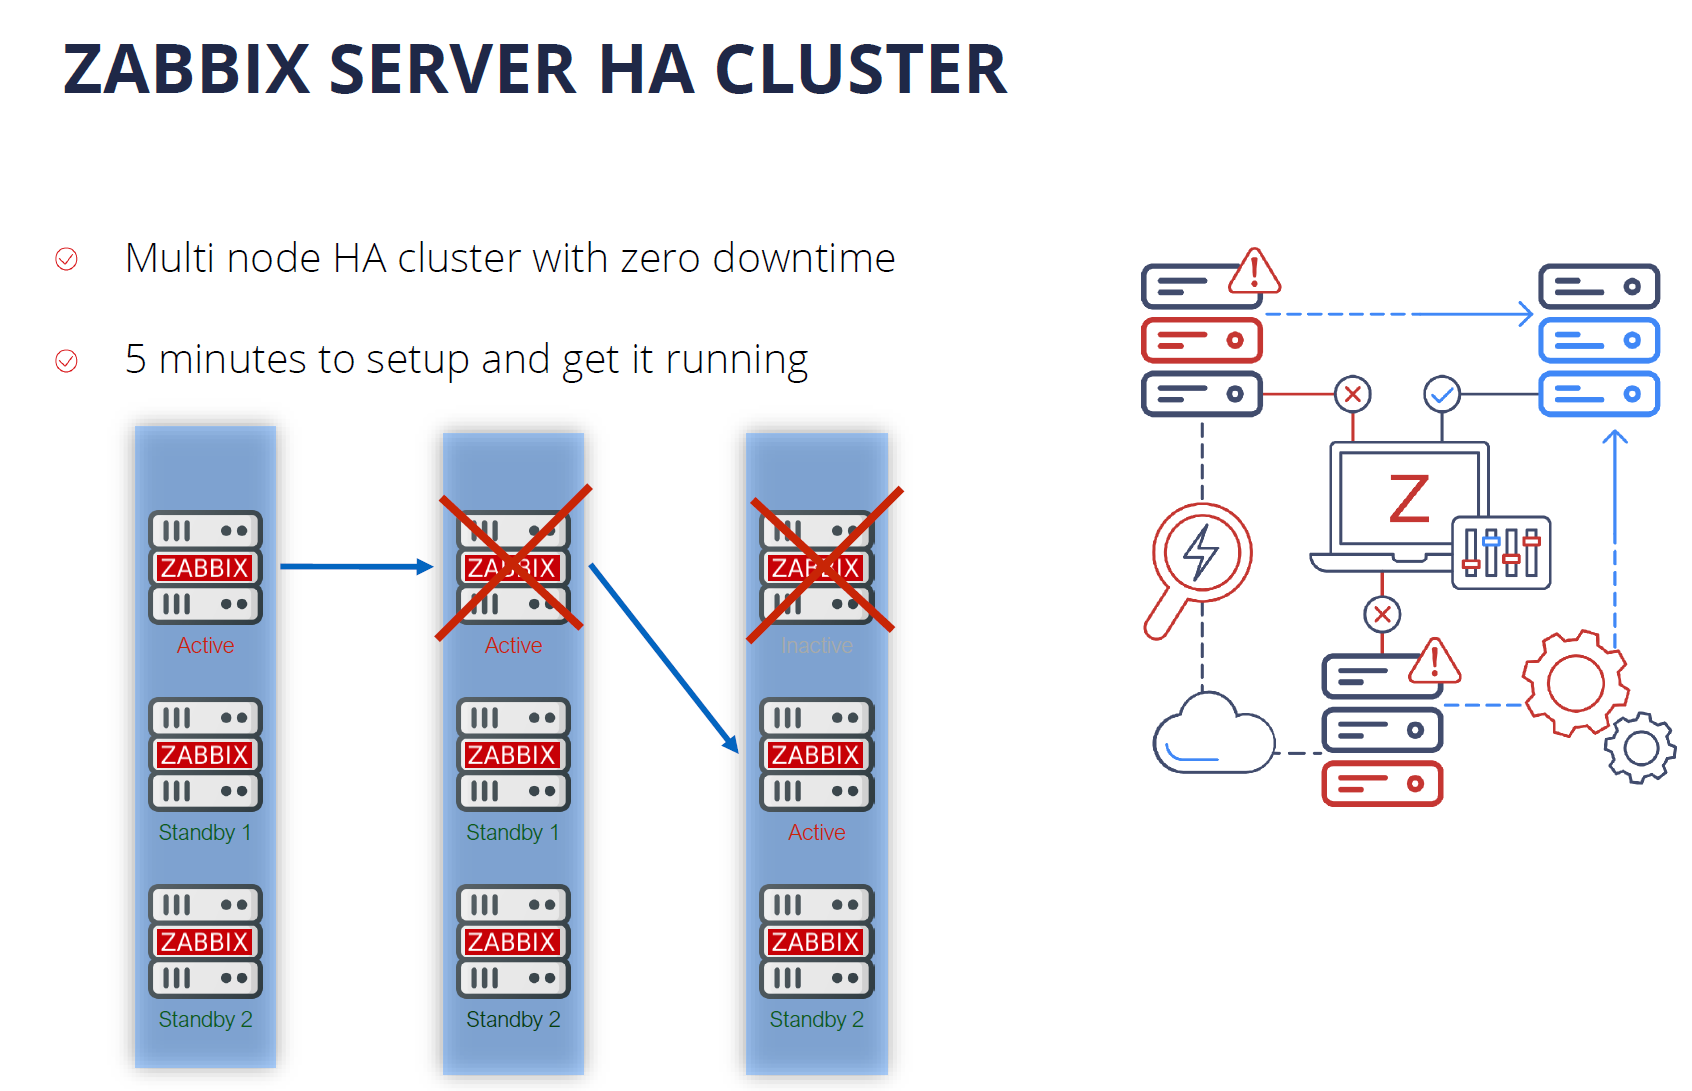
With the release of Zabbix 6.0 LTS, Zabbix administrators will now have the ability to deploy Zabbix server HA cluster out-of-the-box. No additional tools are required to achieve this.

Zabbix server HA cluster supports an unlimited number of Zabbix server nodes. All nodes will use the same database backend – this is where the status of all nodes will be stored in the ha_node table. Nodes will report their status every 5 seconds by updating the corresponding record in the ha_node table.

To enable High availability, you will first have to define a new parameter in the Zabbix server configuration file: HANodeName

  • Empty by default
  • This parameter should contain an arbitrary name of the HA node
  • Providing value to this parameter will enable Zabbix server cluster mode

Standby nodes monitor the last access time of the active node from the ha_node table.

  • If the difference between last access time and current time reaches the failover delay, the cluster fails over to the standby node
  • Failover operation is logged in the Zabbix server log

It is possible to define a custom failover delay – a time window after which an unreachable active node is considered lost and failover to one of the standby nodes takes place.

As for the Zabbix proxies, the Server parameter in the Zabbix proxy configuration file now supports multiple addresses separated by a semicolon. The proxy will attempt to connect to each of the nodes until it succeeds.

Other HA cluster related features:

  • New command-line options to check HA cluster status
  • hanode.get API method to obtain the list of HA nodes
  • The new internal check provides LLD information to discover Zabbix server HA nodes
  • HA Failover event logged in the Zabbix Audit log
  • Zabbix Frontend will automatically switch to the active Zabbix server node

You can find a more detailed look at the Zabbix Server HA cluster feature in the Zabbix Summit Online 2021 speech dedicated to the topic.

Business service monitoring

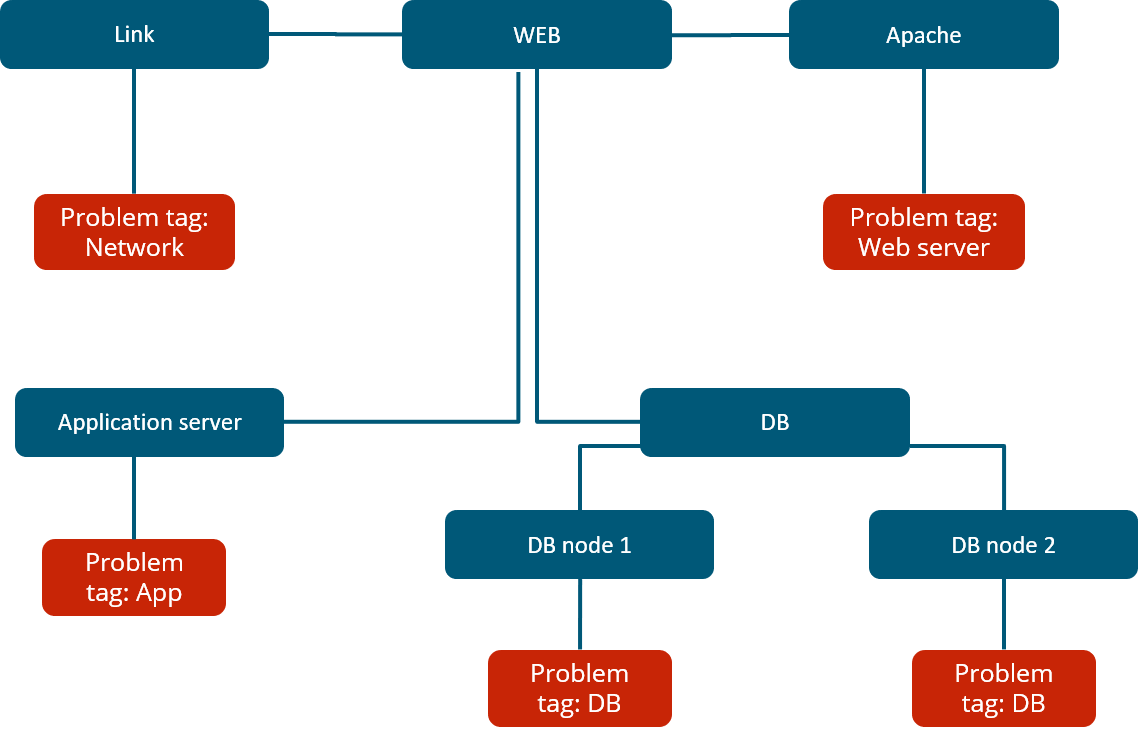
The Services section has received a complete redesign in Zabbix 6.0 LTS. Business Service Monitoring (BSM) enables Zabbix administrators to define services of varying complexity and monitor their status.

BSM provides added value in a multitude of use cases, where we wish to define and monitor services based on:

  • Server clusters
  • Services that utilize load balancing
  • Services that consist of a complex IT stack
  • Systems with redundant components in place
  • And more

Business Service monitoring has been designed with scalability in mind. Zabbix is capable of monitoring over 100k services on a single Zabbix instance.

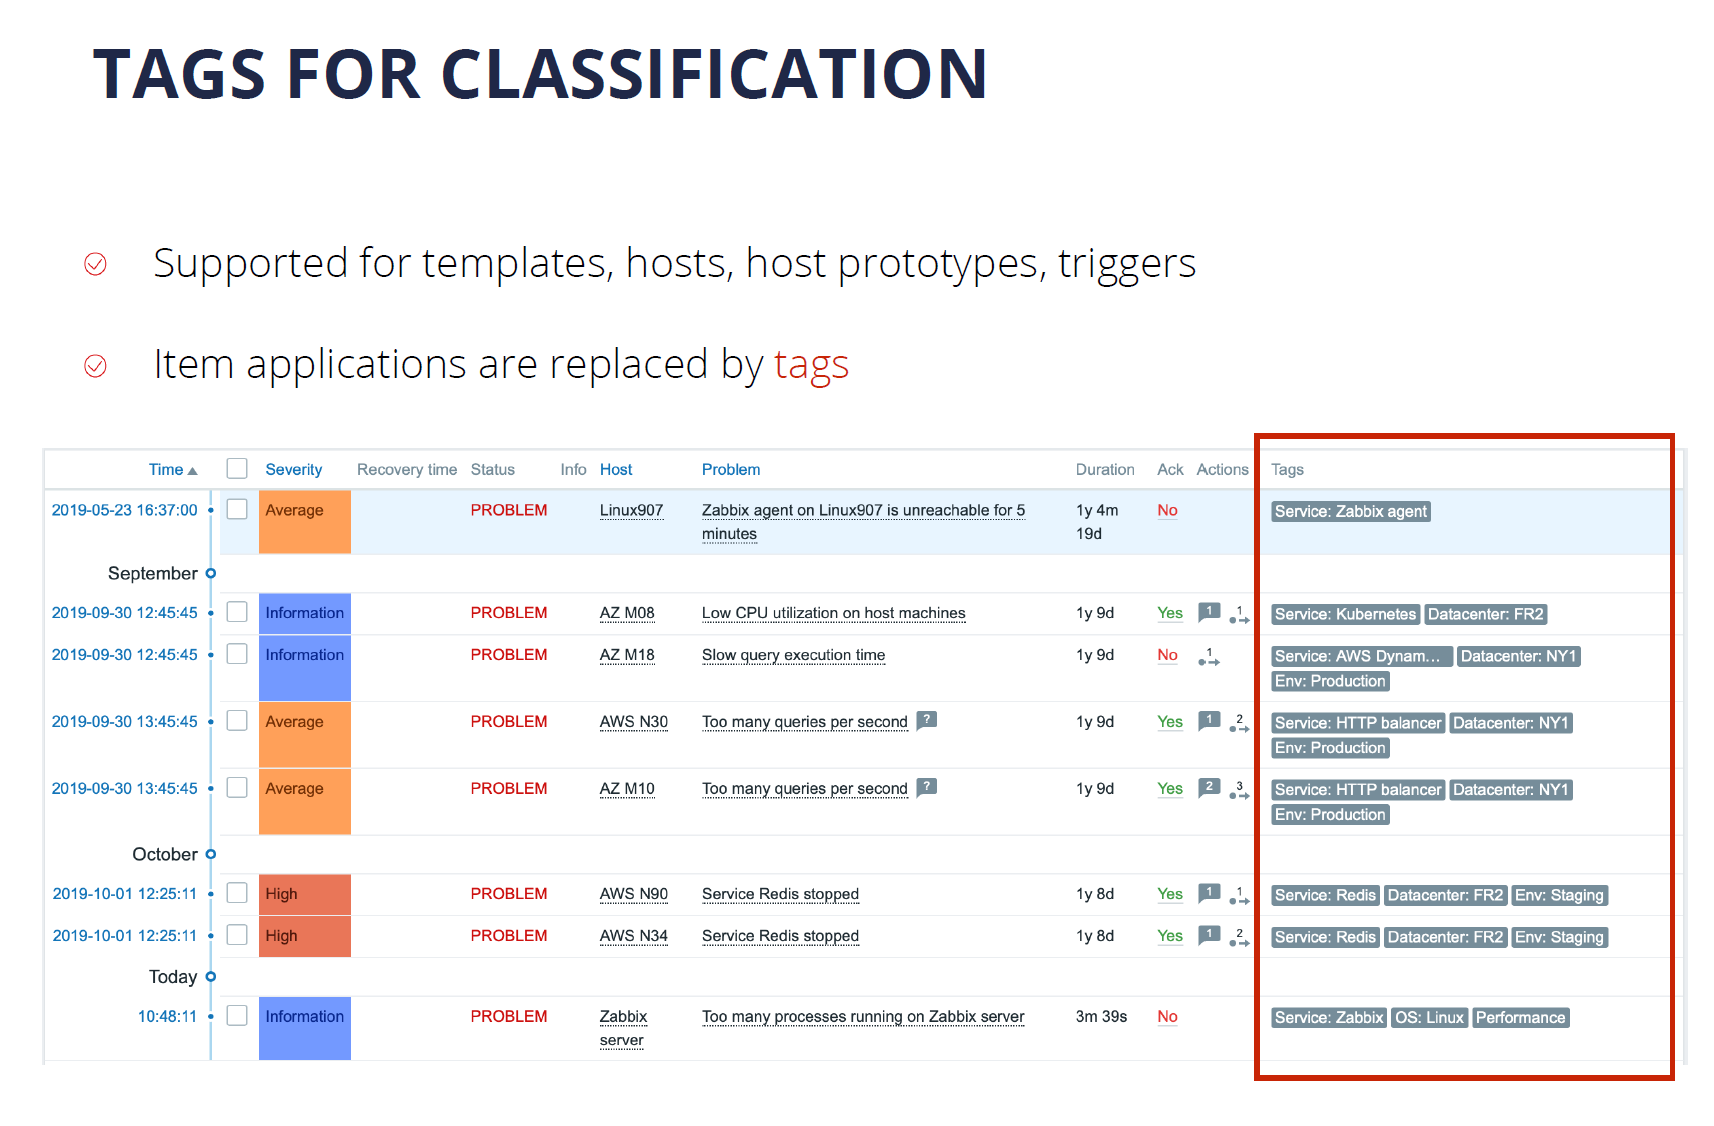
For our Business Service example, we used a website, which depends on multiple components such as the network connection, DB backend, Application server, and more. We can see that the service status calculation is done by utilizing tags and deciding if the existing problems will affect the service based on the problem tags.

In Zabbix 6.0 LTS there are many ways how service status calculations can be performed. In case of a problem, the service state can be changed to:

  • The most critical problem severity, based on the child service problem severities
  • The most critical problem severity, based on the child service problem severities, only if all child services are in a problem state
  • The service is set to constantly be in an OK state

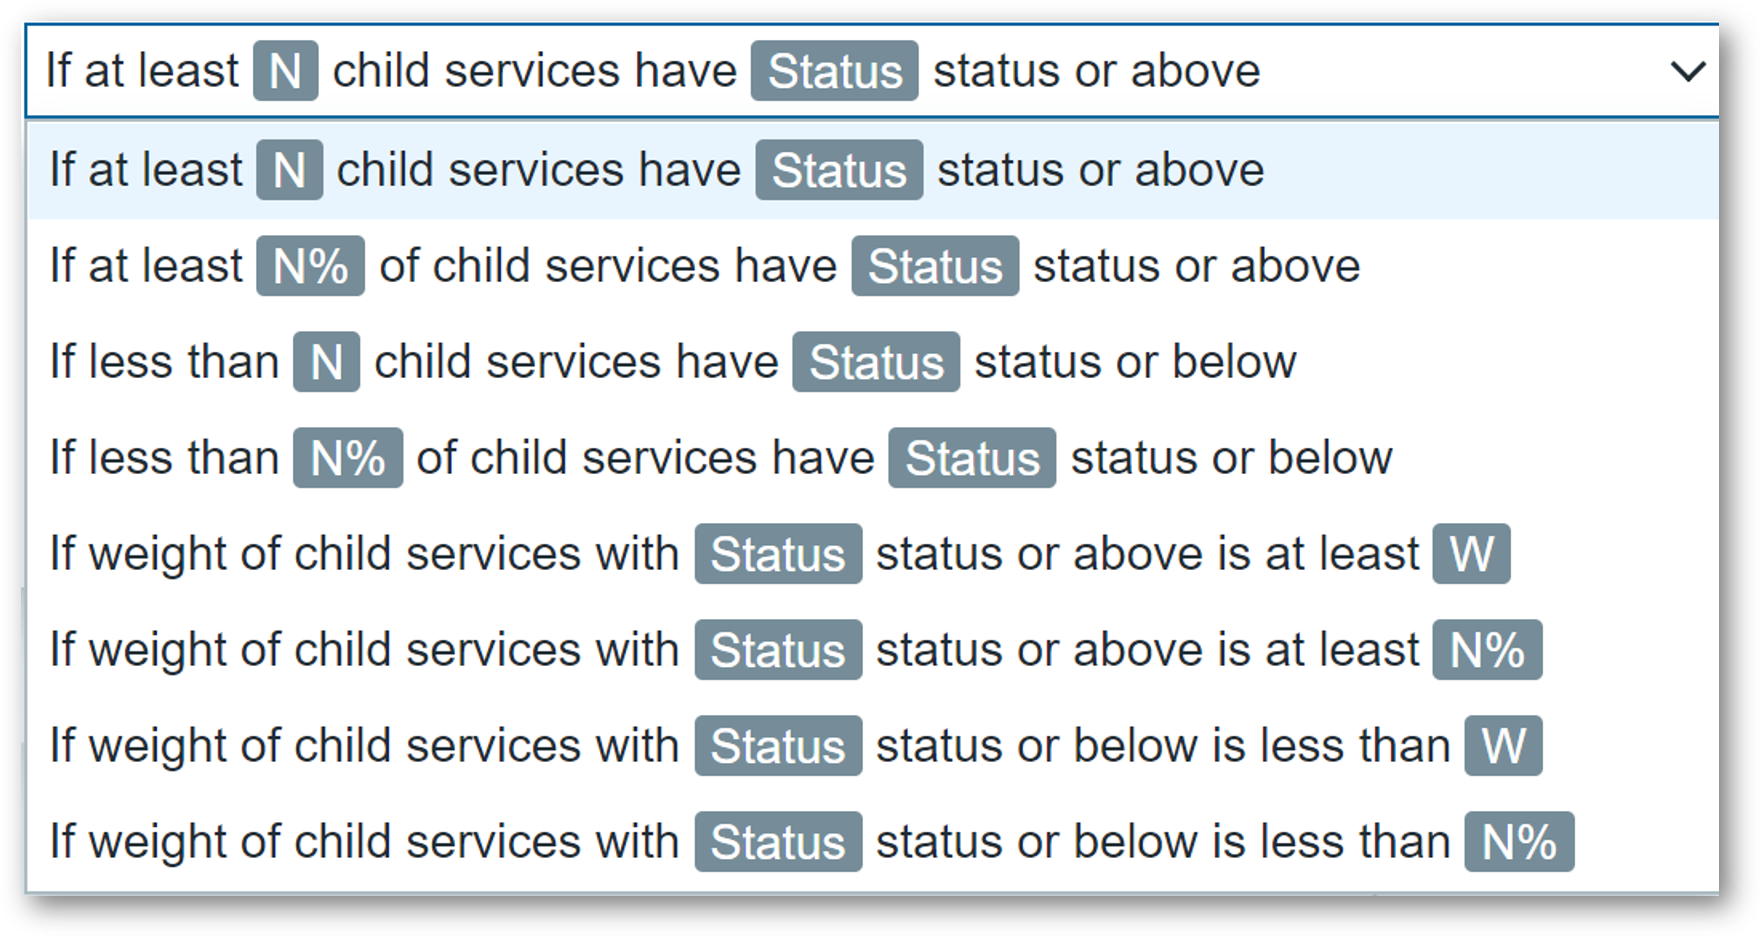
Changing the service status to a specific problem severity if:

  • At least N or N% of child services have a specific status
  • Define service weights and calculate the service status based on the service weights

There are many other additional features, all of which are covered in our Zabbix Summit Online 2021 speech dedicated to Business Service monitoring:

  • Ability to define permissions on specific services
  • SLA monitoring
  • Business Service root cause analysis
  • Receive alerts and react on Business Service status change
  • Define Business Service permissions for multi-tenant environments

New Audit log schema

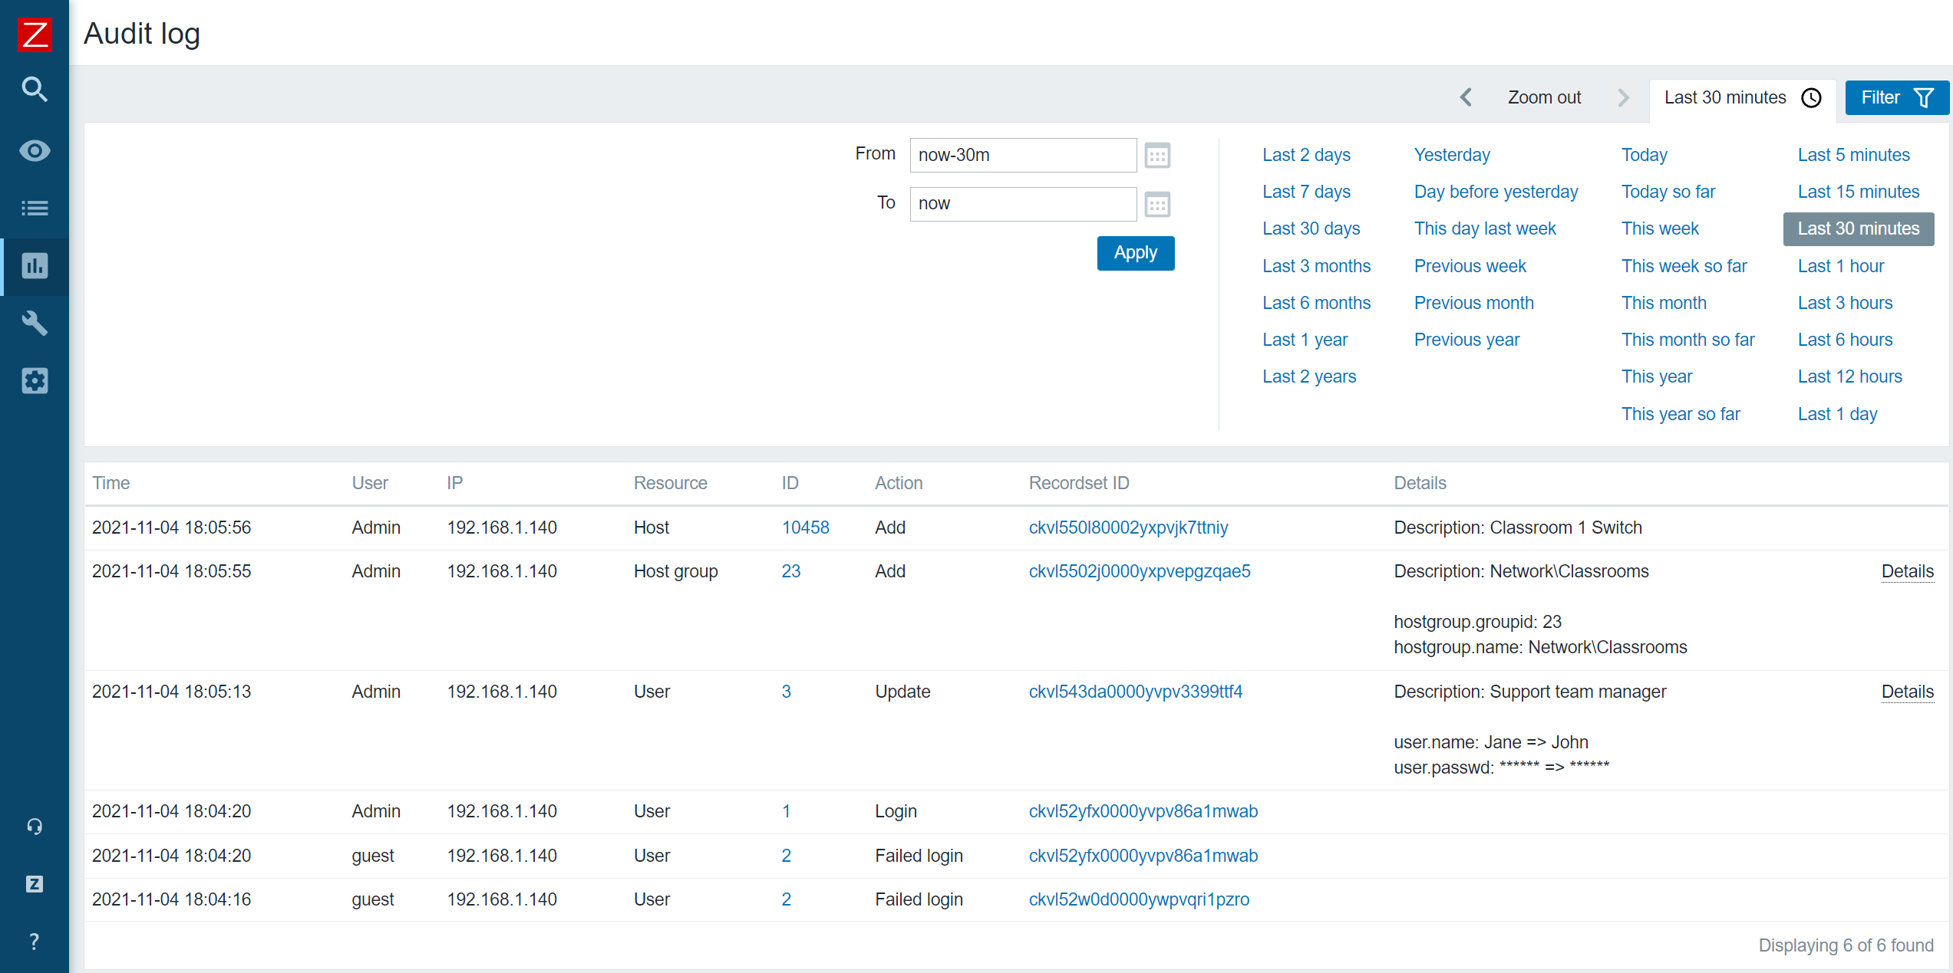
The existing audit log has been redesigned from scratch and now supports detailed logging for both Zabbix server and Zabbix frontend operations:

  • Zabbix 6.0 LTS introduces a new database structure for the Audit log
  • Collision resistant IDs (CUID) will be used for ID generation to prevent audit log row locks
  • Audit log records will be added in bulk SQL requests
  • Introducing Recordset ID column. This will help users recognize which changes have been made in a particular operation

The goal of the Zabbix 6.0 LTS audit log redesign is to provide reliable and detailed audit logging while minimizing the potential performance impact on large Zabbix instances:

  • Detailed logging of both Zabbix frontend and Zabbix server records
  • Designed with minimal performance impact in mind
  • Accessible via Zabbix API

Implementing the new audit log schema is an ongoing effort – further improvements will be done throughout the Zabbix update life cycle.

Machine learning

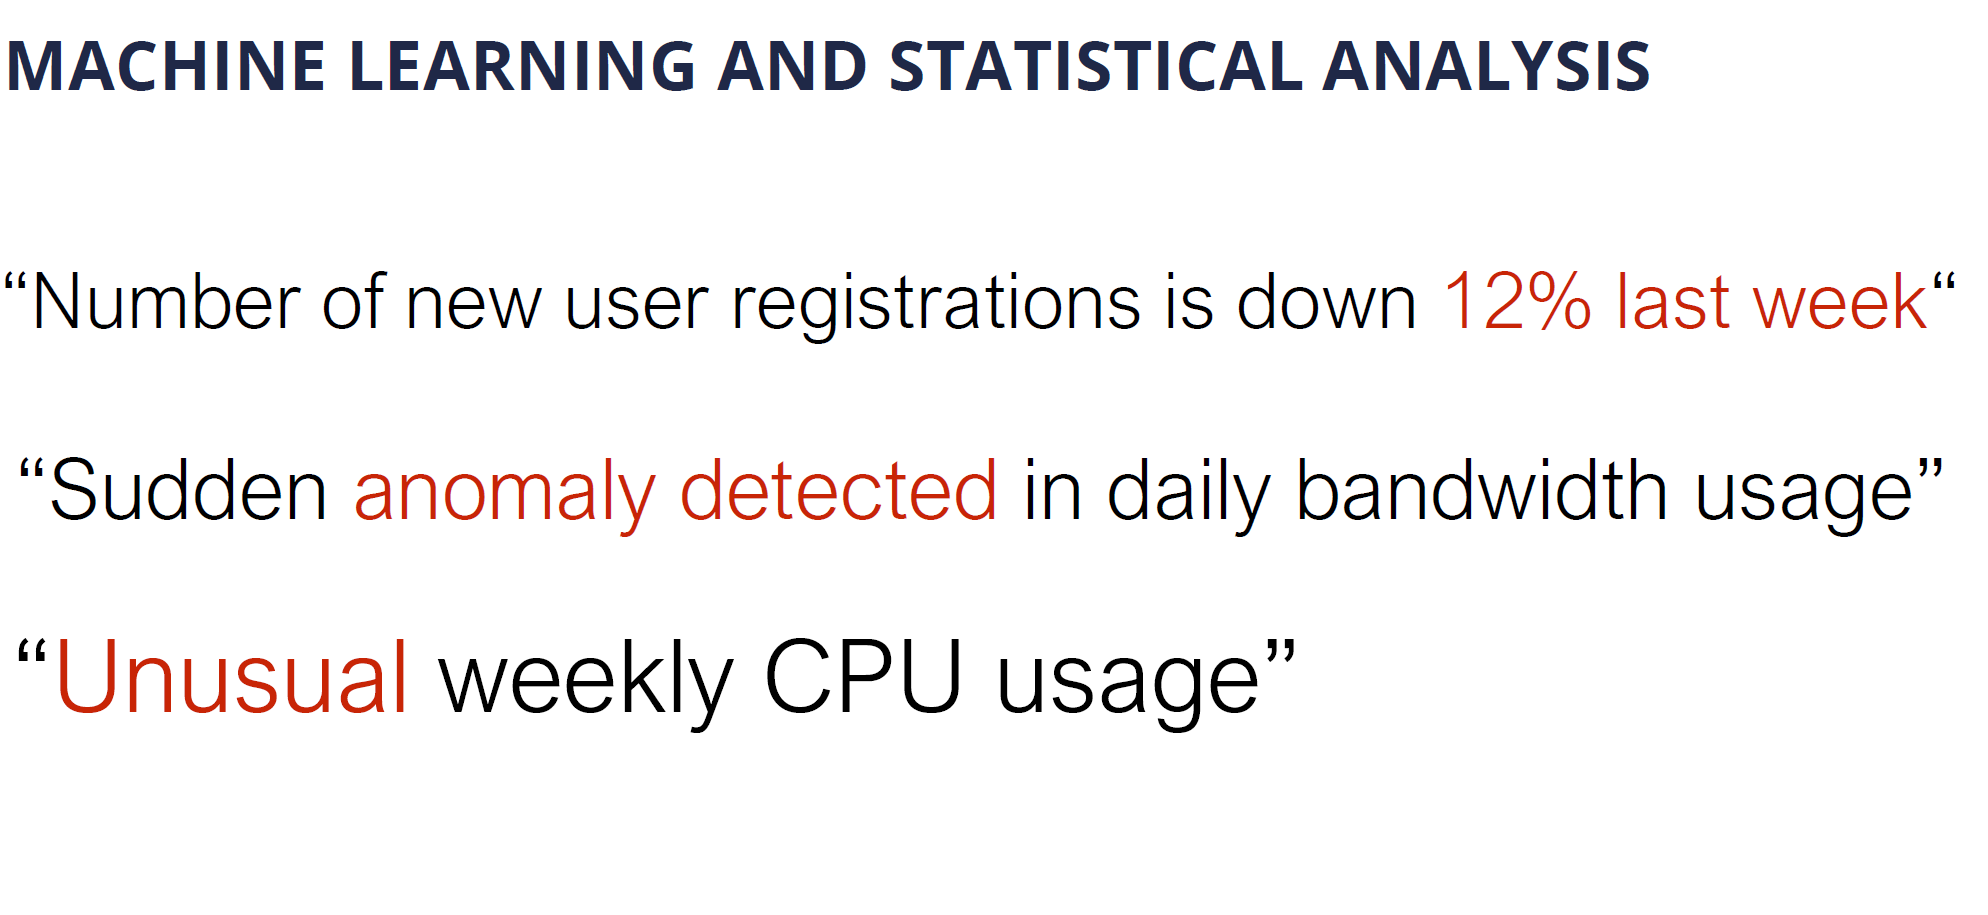
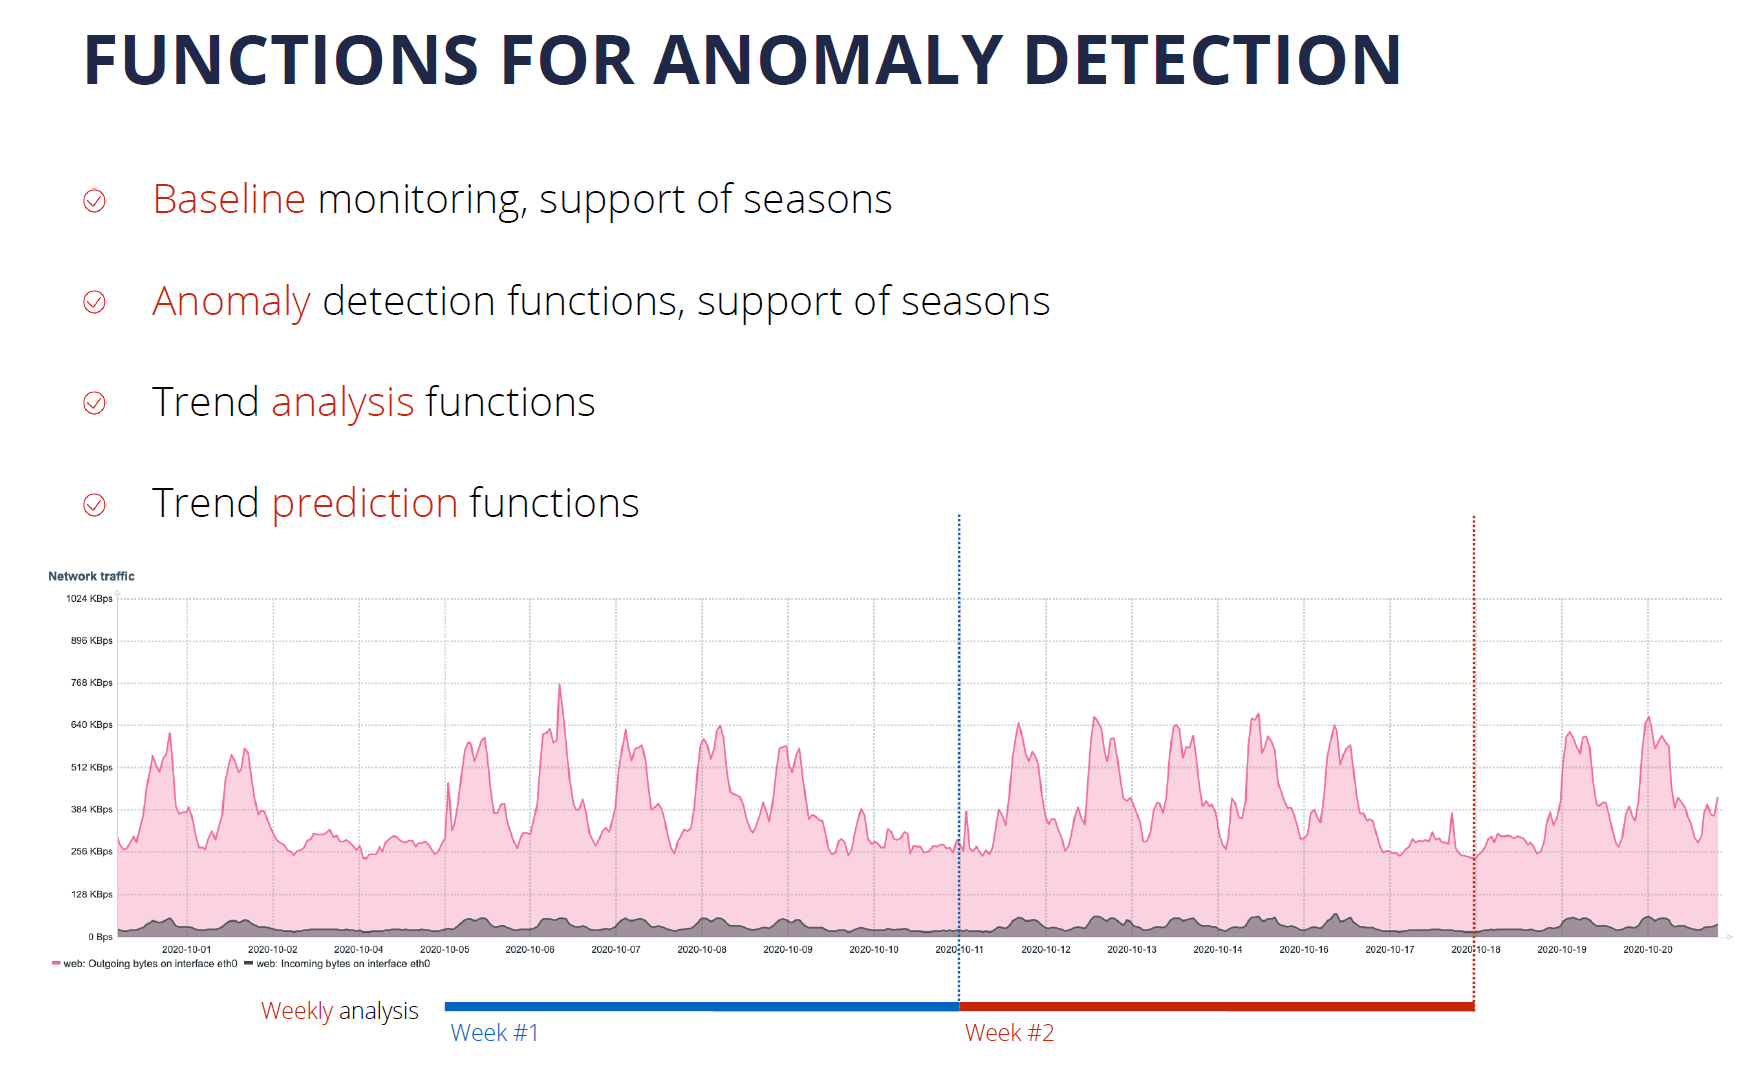
New trend functions have been added which utilize machine learning to perform anomaly detection and baseline monitoring:

  • New trend function – trendstl, allows you to detect anomalous metric behavior
  • New trend function – baselinewma, returns baseline by averaging data periods in seasons
  • New trend function – baselinedev, returns the number of standard deviations

An in-depth look into Machine learning in Zabbix 6.0 LTS is covered in our Zabbix Summit Online 2021 speech dedicated to machine learning, anomaly detection, and baseline monitoring.

New ways to visualize your data

Collecting and processing metrics is just a part of the monitoring equation. Visualization and the ability to display our infrastructure status in a single pane of glass are also vital to large environments. Zabbix 6.0 LTS adds multiple new visualization options while also improving the existing features.

  • The data table widget allows you to create a summary view for the related metric status on your hosts
  • The Top N and Bottom N functions of the data table widget allow you to have an overview of your highest or lowest item values
  • The single item widget allows you to display values for a single metric
  • Improvements to the existing vector graphs such as the ability to reference individual items and more
  • The SLA report widget displays the current SLA for services filtered by service tags

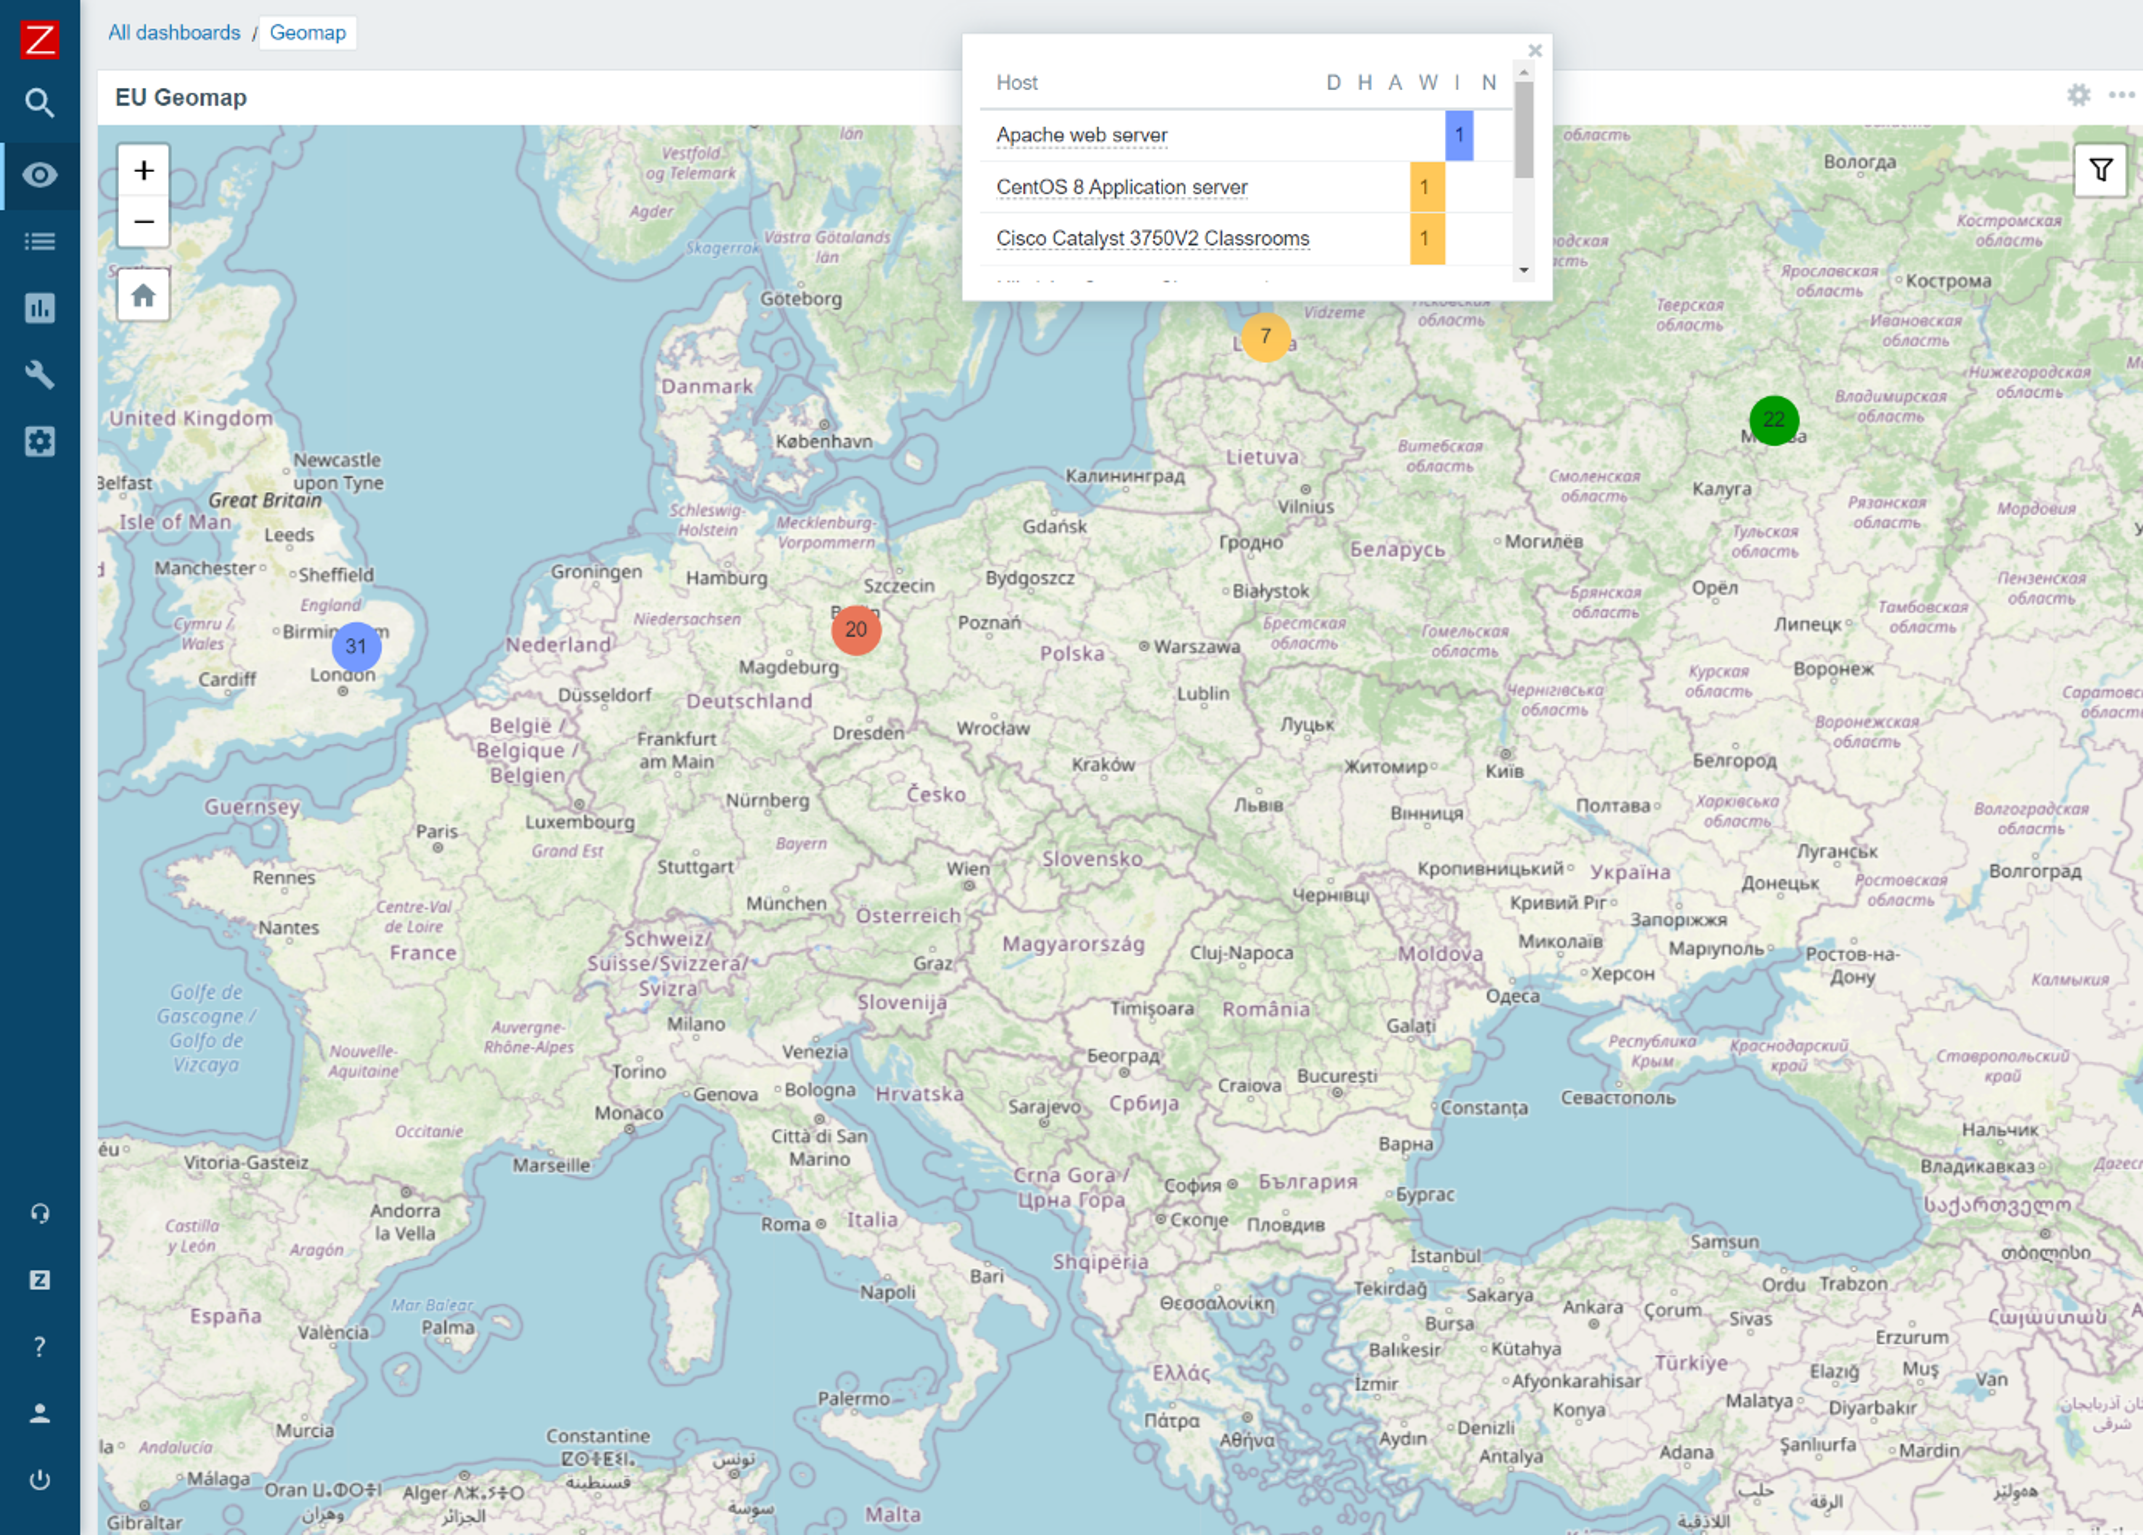
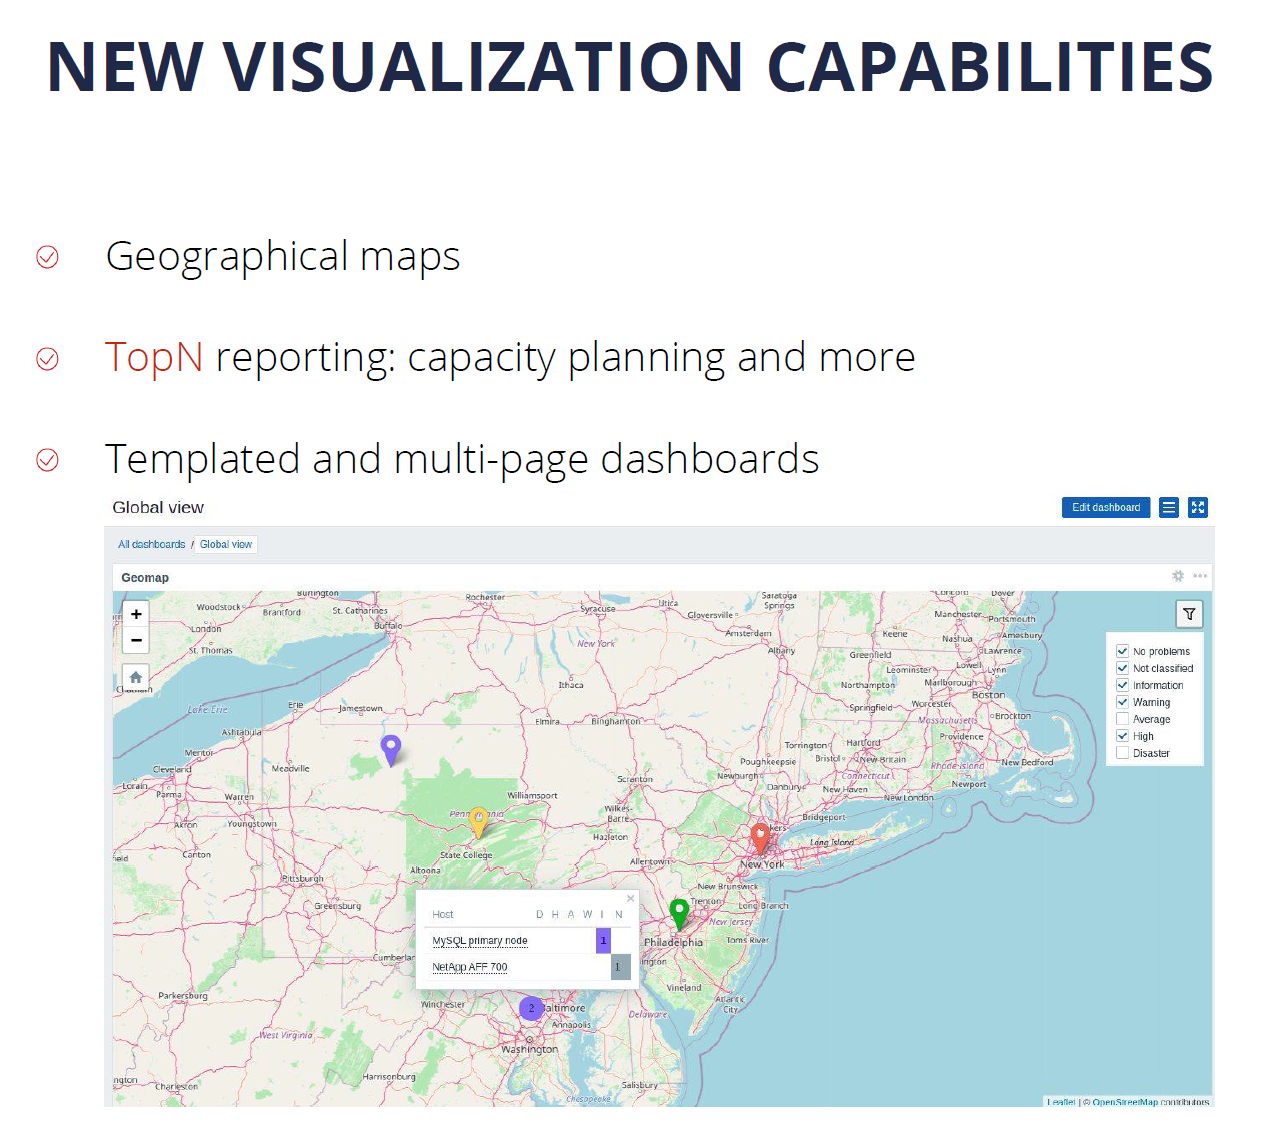
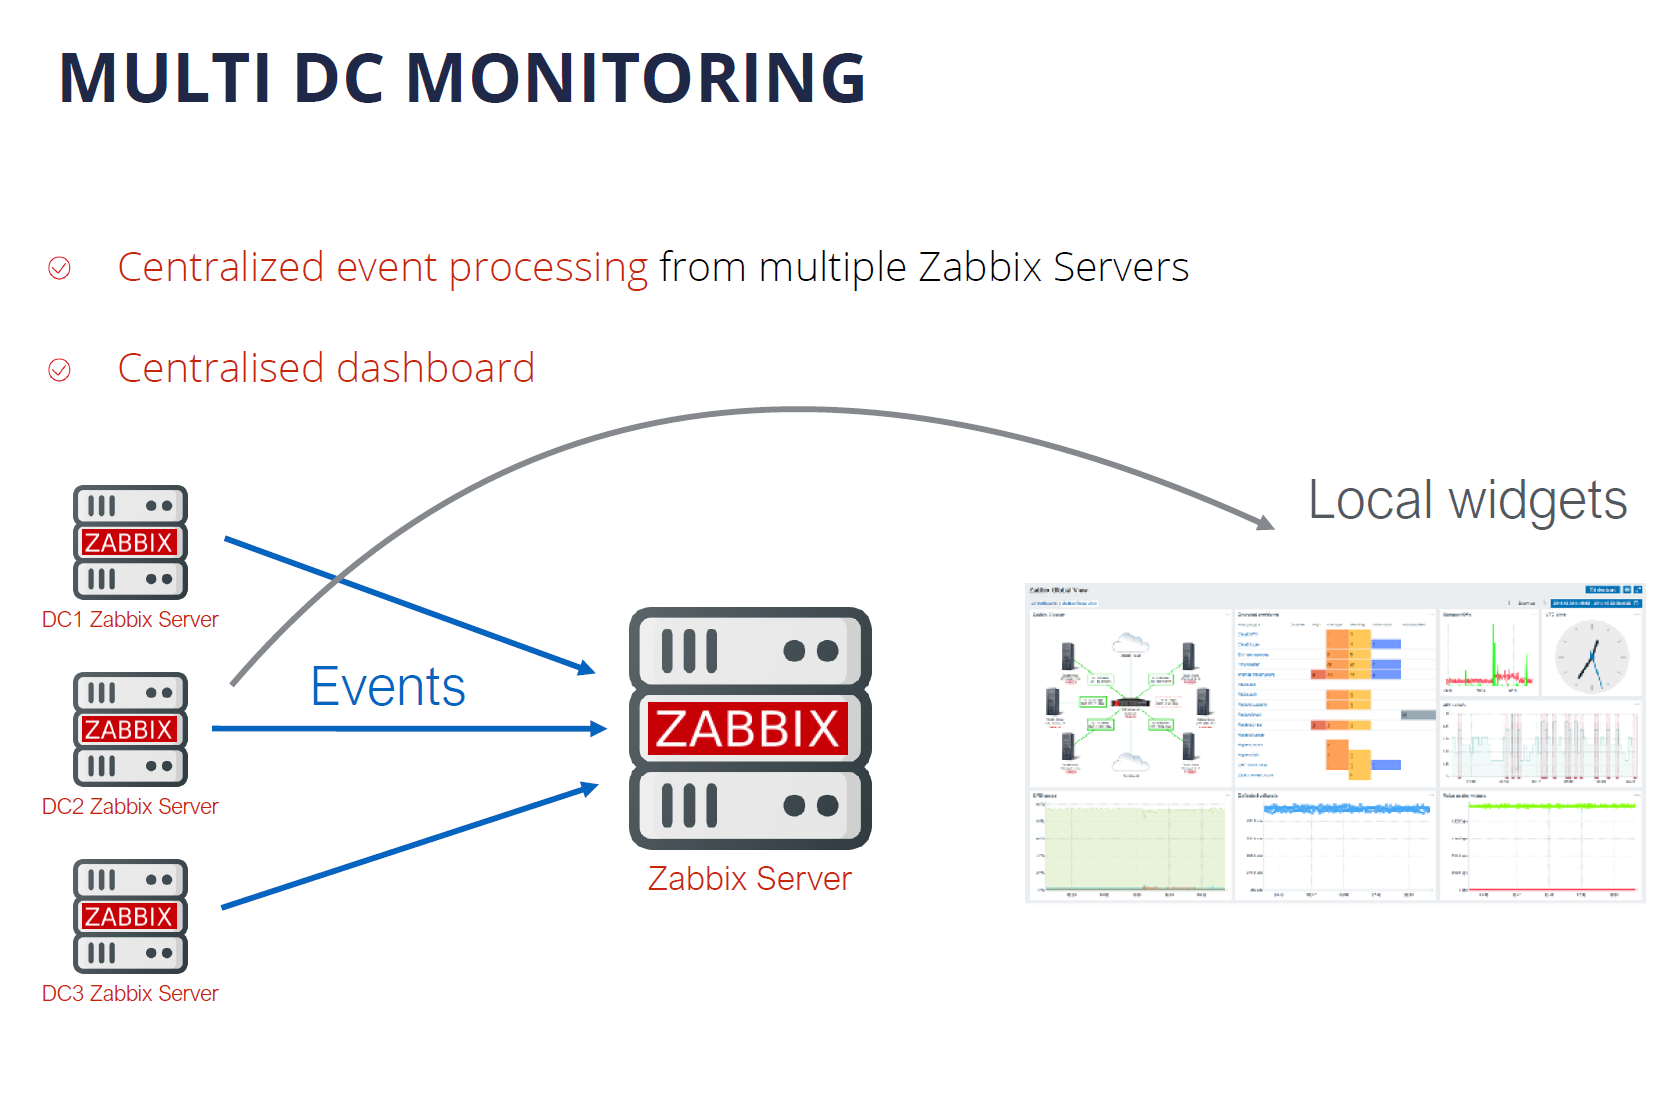
We are proud to announce that Zabbix 6.0 LTS will provide a native Geomap widget. Now you can take a look at the current status of your IT infrastructure on a geographic map:

  • The host coordinates are provided in the host inventory fields
  • Users will be able to filter the map by host groups and tags
  • Depending on the map zoom level – the hosts will be grouped into a single object
  • Support of multiple Geomap providers, such as OpenStreetMap, OpenTopoMap, Stamen Terrain, USGS US Topo, and others

Zabbix agent – improvements and new items

Zabbix agent and Zabbix agent 2 have also received some improvements. From new items to improved usability – both Zabbix agents are now more flexible than ever. The improvements include such features as:

  • New items to obtain additional file information such as file owner and file permissions
  • New item which can collect agent host metadata as a metric
  • New item with which you can count matching TCP/UDP sockets
  • It is now possible to natively monitor your SSL/TLS certificates with a new Zabbix agent2 item. The item can be used to validate a TLS/SSL certificate and provide you additional certificate details
  • User parameters can now be reloaded without having to restart the Zabbix agent

In addition, a major improvement to introducing new Zabbix agent 2 plugins has been made. Zabbix agent 2 now supports loading stand-alone plugins without having to recompile the Zabbix agent 2.

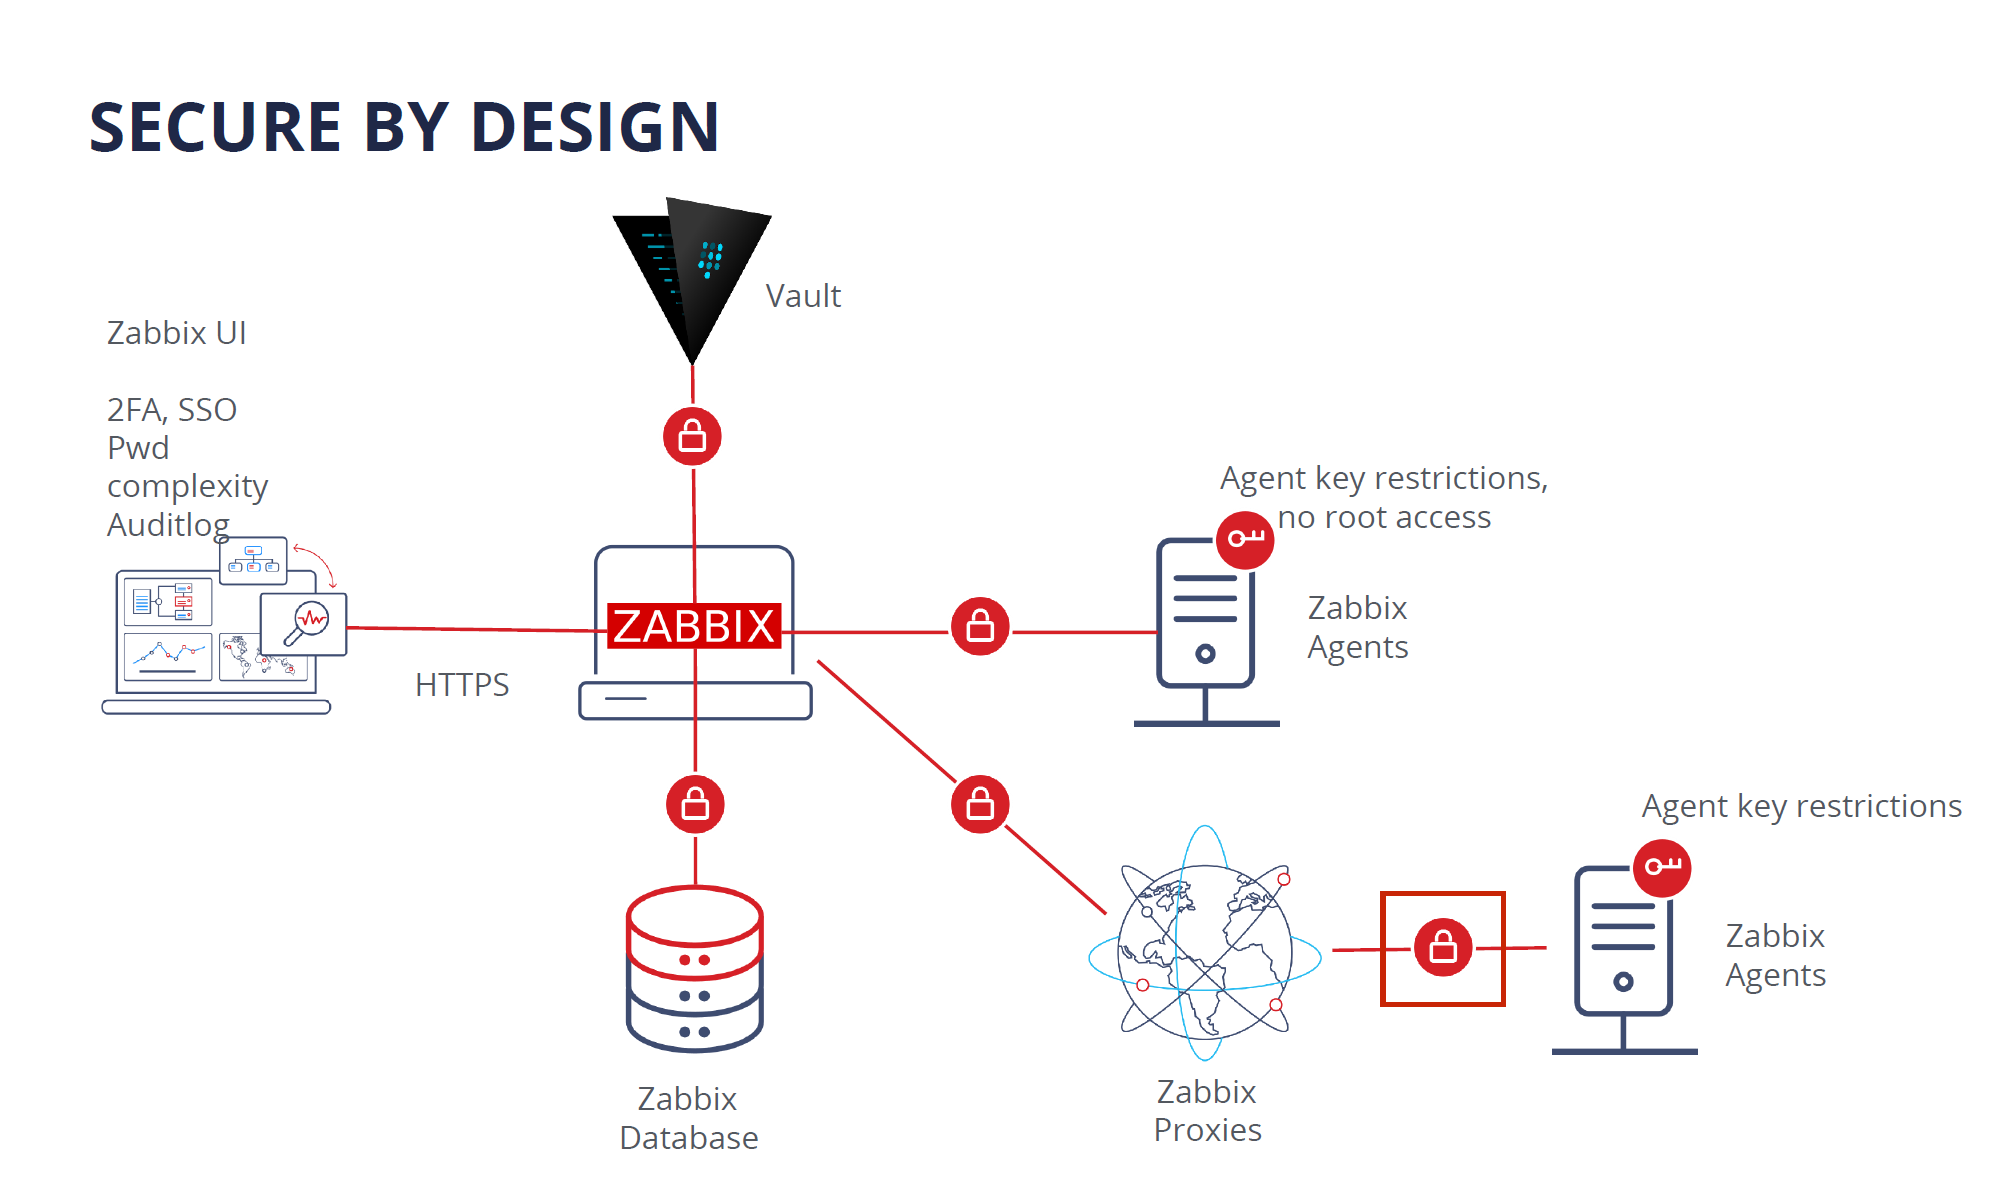
Custom Zabbix password complexity requirements

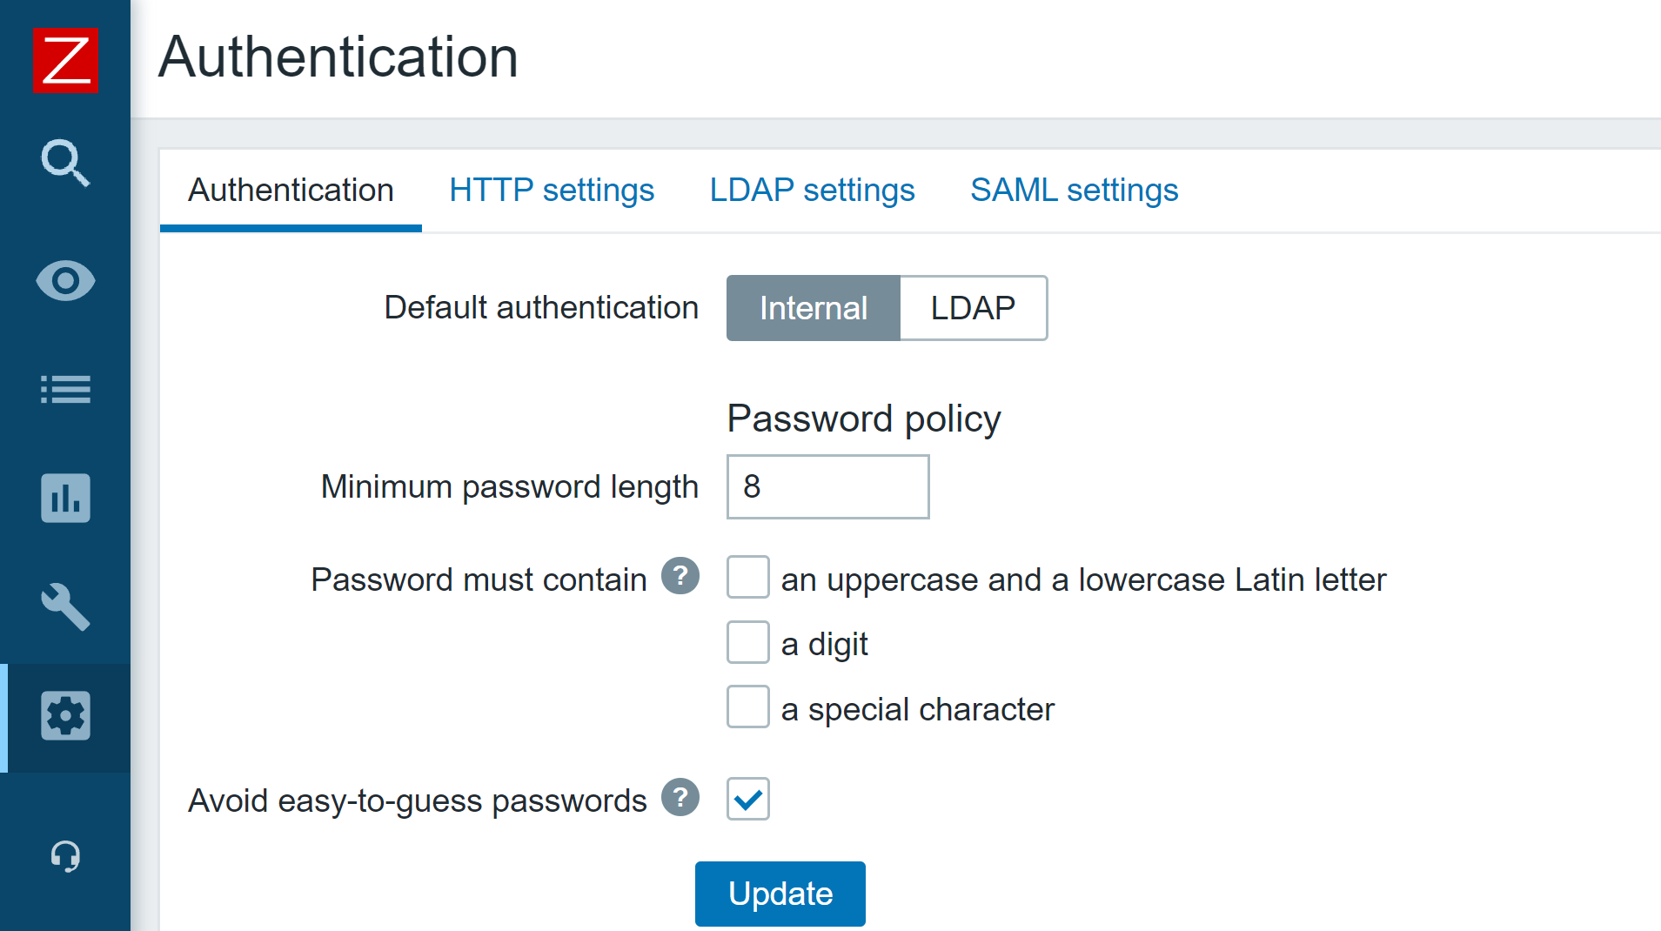
One of the main improvements to Zabbix security is the ability to define flexible password complexity requirements. Zabbix Super admins can now define the following password complexity requirements:

  • Set the minimum password length
  • Define password character requirements
  • Mitigate the risk of a dictionary attack by prohibiting the usage of the most common password strings

UI/UX improvements

Improving and simplifying the existing workflows is always a priority for every major Zabbix release. In Zabbix 6.0 LTS we’ve added many seemingly simple improvements, that have major impacts related to the “feel” of the product and can make your day-to-day workflows even smoother:

  • It is now possible to create hosts directly from MonitoringHosts
  • Removed MonitoringOverview section. For improved user experience, the trigger and data overview functionality can now be accessed only via dashboard widgets.
  • The default type of information for items will now be selected automatically depending on the item key.
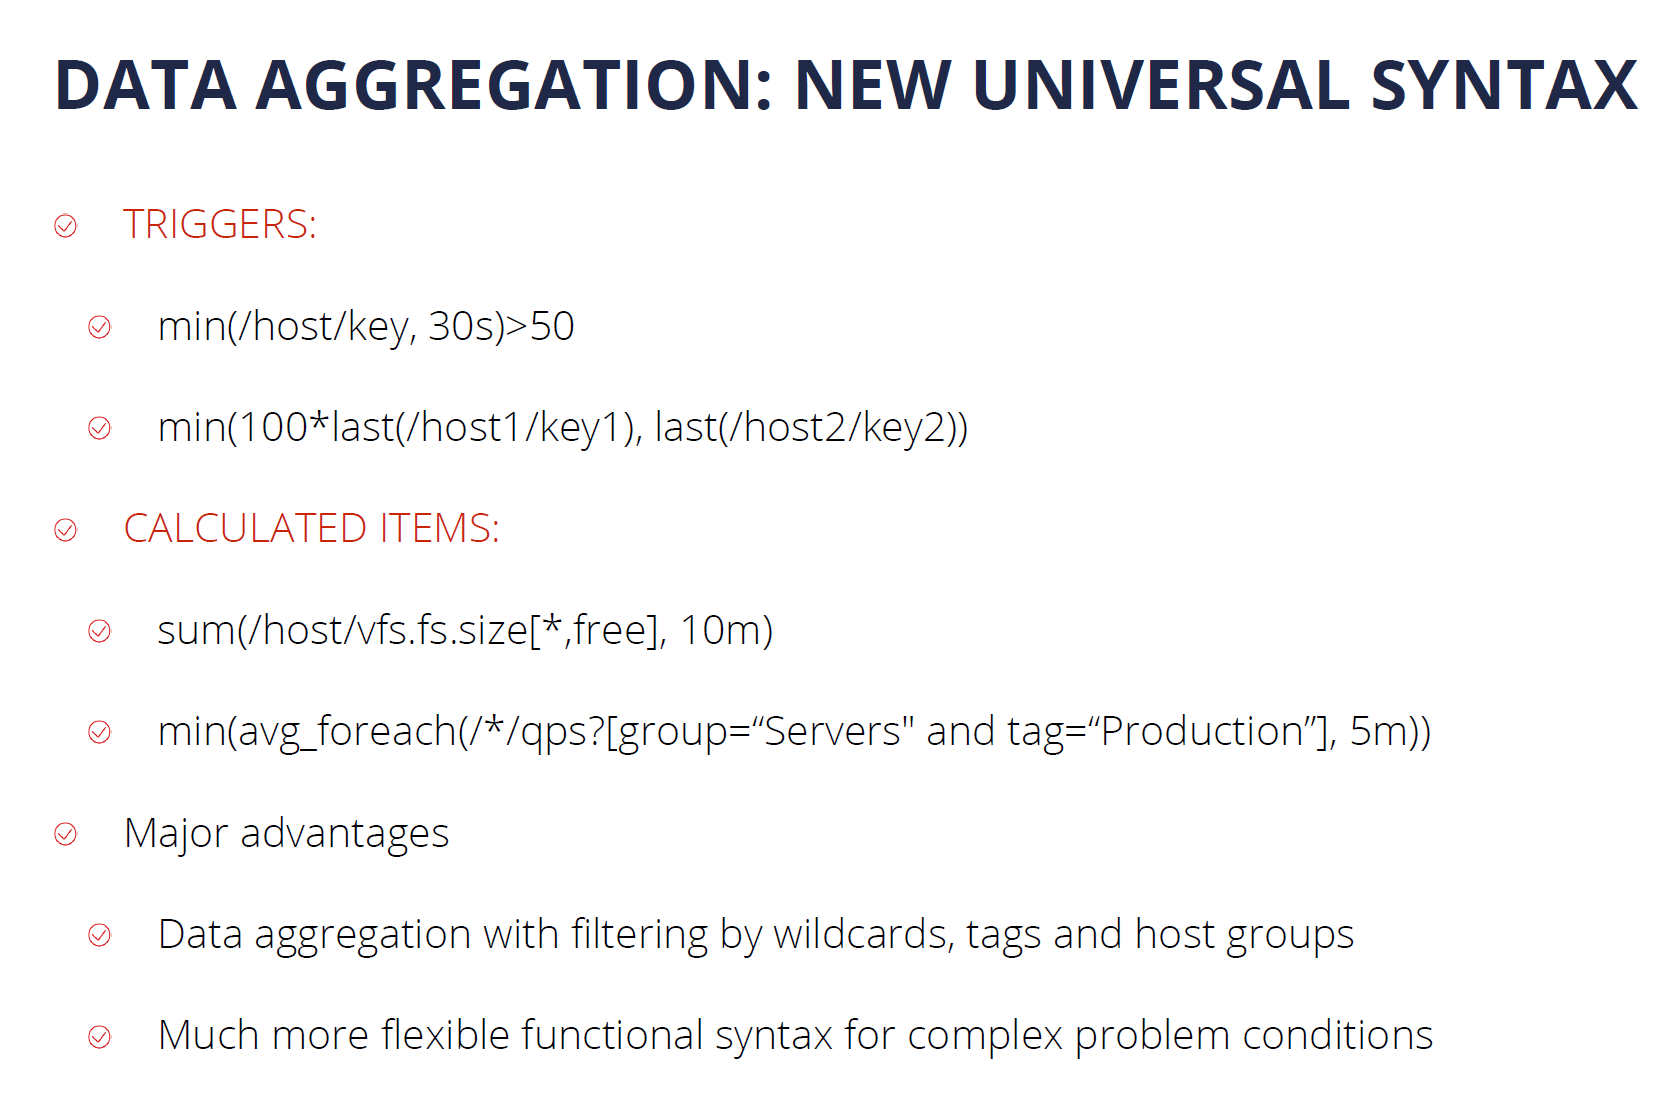
  • The simple macros in map labels and graph names have been replaced with expression macros to ensure consistency with the new trigger expression syntax

New templates and integrations

Adding new official templates and integrations is an ongoing process and Zabbix 6.0 LTS is no exception here’s a preview for some of the new templates and integrations that you can expect in Zabbix 6.0 LTS:

  • f5 BIG-IP
  • Cisco ASAv
  • HPE ProLiant servers
  • Cloudflare
  • InfluxDB
  • Travis CI
  • Dell PowerEdge

Zabbix 6.0 also brings a new GitHub webhook integration which allows you to generate GitHub issues based on Zabbix events!

Other changes and improvements

But that’s not all! There are more features and improvements that await you in Zabbix 6.0 LTS. From overall performance improvements on specific Zabbix components, to brand new history functions and command-line tool parameters:

  • Detect continuous increase or decrease of values with new monotonic history functions
  • Added utf8mb4 as a supported MySQL character set and collation
  • Added the support of additional HTTP methods for webhooks
  • Timeout settings for Zabbix command-line tools
  • Performance improvements for Zabbix Server, Frontend, and Proxy

Questions and answers

Q: How can you configure geographical maps? Are they similar to regular maps?

A: Geomaps can be used as a Dashboard widget. First, you have to select a Geomap provider in the Administration – General – Geographical maps section. You can either use the pre-defined Geomap providers or define a custom one. Then, you need to make sure that the Location latitude and Location longitude fields are configured in the Inventory section of the hosts which you wish to display on your map. Once that is done, simply deploy a new Geomap widget, filter the required hosts and you’re all set. Geomaps are currently available in the latest alpha release, so you can get some hands-on experience right now.

Q: Any specific performance improvements that we can discuss at this point for Zabbix 6.0 LTS?

A: There have been quite a few. From the frontend side – we have improved the underlying queries that are related to linking new templates, therefore the template linkage performance has increased. This will be very noticeable in large instances, especially when linking or unlinking many templates in a single go.
There have also been improvements to Server – Proxy communication. Specifically – the logic of how proxy frees up uncompressed data. We’ve also introduced improvements on the DB backend side of things – from general improvements to existing queries/logic, to the introduction of primary keys for history tables, which we are still extensively testing at this point.

Q: Will you still be able to change the type of information manually, in case you have some advanced preprocessing rules?

A: In Zabbix 6.0 LTS Zabbix will try and automatically pick the corresponding type of information for your item. This is a great UX improvement since you don’t have to refer to the documentation every time you are defining a new item. And, yes, you will still be able to change the type of information manually – either because of preprocessing rules or if you’re simply doing some troubleshooting.

Cloudflare announces partnerships with leading cyber insurers and incident response providers

Post Syndicated from Deeksha Lamba original https://blog.cloudflare.com/cyber-risk-partnerships/

Cloudflare announces partnerships with leading cyber insurers and incident response providers

Cloudflare announces partnerships with leading cyber insurers and incident response providers

We are excited to announce our cyber risk partnership program with leading cyber insurance carriers and incident response providers to help our customers reduce their cyber risk. Cloudflare customers can qualify for discounts on premiums or enhanced coverage with our partners. Additionally, our incident response partners are partnering with us for mitigating under attack scenarios in an accelerated manner.  

What is a business’ cyber risk?

Let’s start with security and insurance —  e.g., being a homeowner is an adventure and a responsibility. You personalize your home, maintain it, and make it secure against the slightest possibility of intrusion — fence it up, lock the doors, install a state of the art security system, and so on. These measures definitely reduce the probability of an intrusion, but you still buy insurance. Why? To cover for the rare possibility that something might go wrong — human errors, like leaving the garage door open, or unlikely events, like a fire, hurricane etc. And when something does go wrong, you call the experts (aka police) to investigate and respond to the situation.

Running a business that has any sort of online presence is evolving along the same lines. Getting the right security posture in place is absolutely necessary to protect your business, customers, and employees from nefarious cyber attacks. But as a responsible business owner/CFO/CISO, nevertheless you buy cyber insurance to protect your business from long-tail events that could allow malicious attackers into your environment, causing material damage to your business. And if such an event does take place, you engage with incident response companies for active investigation and mitigation.

In short, you do everything in your control to reduce your business’ cyber risk by having the right security, insurance, and active response measures in place.

The cyber insurance industry and the rise of ransomware attacks

Over the last two years, the rise of ransomware attacks has wreaked havoc on businesses and the cyber insurance industry. As per a Treasury Department report, nearly 600 million dollars in banking transactions were linked to possible ransomware payments in Suspicious Activity Reports (SARs) filed by financial services firms to the U.S. Government for the first six months of 2021, a jump of more than 40% over the total for all of 2020. Additionally, the Treasury Department investigators identified about 5.2 billion dollars in bitcoin transactions as potential ransomware payments, indicating that the actual amount of ransomware payments was much higher1.

The rise of these attacks has and should make businesses more cautious, making them more inclined to have the right cybersecurity posture in place  and to buy cyber insurance coverage.

Cloudflare announces partnerships with leading cyber insurers and incident response providers

Further, the rising frequency and severity of attacks, especially ransomware attacks, has led to increasing insurance claims and loss ratios (loss ratios refers to insurance claims i.e., how much insurance companies pay out in claims costs divided by total earned premiums i.e., how much customers pay them for insurance) for the cyber insurers. As per a recent research report, the most frequent types of losses covered by cyber insurers were ransomware (41%), funds transfer loss (27%), and business email compromise incidents (19%). These trends are pushing legacy insurance carriers to reevaluate how much coverage they can afford to offer and how much they have to charge clients to do so; thereby, triggering a structural change that can impact the ability of companies, especially the small and medium businesses, to minimize their cyber risk.

The end result has been a drastic increase in the premiums and denial rates over the last 12 months amongst some carriers, which has pushed customers to seek new coverage. The premiums have increased upwards of 50%, according to infosec experts and vendors, with some quotes jumping closer to 100%.2 Also, the lack of accessible cyber insurance and proper coverage disproportionately impacts the small and medium enterprises that find themselves as the common target for these cyber attacks. According to a recent research report, 70% of ransomware attacks are aimed at organizations with less than 1,000 employees.3 The increased automation of cyber attacks coupled with the use of insecure remote access tools during the pandemic has left these organizations exposed all while being faced with increased cyber insurance premiums or no access to coverage.

While some carriers are excluding ransomware payments from customers’ policies or are denying coverage to customers who don’t have the right security measures in place, there is a new breed of insurance carriers that are incentivizing customers in the form of broader coverage or lower prices for proactively implementing cybersecurity controls.

Cloudflare’s cyber risk partnerships

At Cloudflare, we have always believed in making the Internet a better place. We have been helping our customers focus on their core business while we take care of their cyber security. We are now going a step further, helping our customers reduce their cyber risk by partnering with leading cyber insurance underwriters and incident response providers.

Our objective is to help our customers reduce their cyber risk. We are doing so in partnership with several leading companies highlighted below. Our customers can qualify for enhanced coverage and discounted premiums for their cyber insurance policies by leveraging their security posture with Cloudflare.

Cloudflare announces partnerships with leading cyber insurers and incident response providers

Insurance companies: Powered by Cloudflare’s security suite, our customers have comprehensive protection against the most common and severe threat vectors. In most of the cases, when attackers see that a business is using Cloudflare they realize they will not be able to execute a denial of service (DoS) attack or infiltrate the customer’s network. Knowing the power of Cloudflare, the attackers prefer to spend their time on more vulnerable targets. This implies that our customers face a lower frequency and severity of attacks — an ideal customer set that could imply a lower loss ratio for underwriters. Our partners understand the security benefits of using Cloudflare’s security suite and are letting our customers qualify for lower premium rates and enhanced coverage.

Cloudflare customers can qualify for discounts/credits on premiums and enhanced coverage with our partners At-Bay, Coalition, and Cowbell Cyber.

“An insurance policy is an effective tool to articulate the impact of security choices on the financial risk of a company. By offering better pricing to companies who implement stronger controls, like Cloudflare’s Comprehensive DDoS Protection, we help customers understand how best to reduce risk. Incentivizing our customers to adopt innovative security solutions like Cloudflare, combined with At-Bay’s free active risk monitoring, has helped reduce ransomware in At-Bay’s portfolio 7x below the market average.”
Rotem Iram,
Co-founder and CEO, At-Bay

“It’s incredible what Cloudflare has done to create a safer Internet. When Cloudflare’s technology is paired with insurance, we are able to protect businesses in an entirely new way. We are excited to offer Cloudflare customers enhanced cyber insurance coverage alongside Coalition’s active security monitoring platform to help businesses build true cyber resilience with an always-on insurance policy.”
Joshua Motta, Co-founder & CEO, Coalition

“We are excited to work with Cloudflare to address our customers’ cybersecurity needs and help reduce their cyber risk. Collaborating with cybersecurity companies like Cloudflare will definitely enable a more data-driven underwriting approach that the industry needs”
Nate Walsh, Head of Strategic Partnerships, Corvus Insurance

“The complexity and frequency of cyber attacks continue to rise, and small and medium enterprises are increasingly becoming the center of these attacks. Through partners like Cloudflare, we want to encourage these businesses to adopt the best security standards and proactively address vulnerabilities, so they can benefit from savings on their cyber insurance policy premiums.”
Jack Kudale, Founder and CEO, Cowbell Cyber

Incident Response companies: Our incident response partners deal with active under attack situations day in, day out — helping customers mitigate the attack, and getting their web property and network back online. Many times, precious time is wasted in trying to figure out which security vendor to reach out to and how to get hold of the right team. We are announcing new relationships with prominent incident response providers CrowdStrike, Mandiant, and Secureworks to enable rapid referral of organizations under attack. As a refresher — my colleague, James Espinosa, wrote a great blog post on how Cloudflare helps customers against ransomware DDoS attacks.

“The speed in which a company is able to identify, investigate and remediate a threat heavily determines how it will fare in the end. Our partnership with Cloudflare provides companies the ability to take action rapidly and contain exposure at the time of an attack, enabling them to get back on their feet and return to business as usual as quickly as possible.”
Thomas Etheridge, Senior Vice President, CrowdStrike Services

“As cyber threats continue to rapidly evolve, the need for organizations to put response plans in place increases. Together, Mandiant and Cloudflare are enabling our mutual customers to mitigate the risk breaches pose to their business operations. We hope to see more of these much-needed technology collaborations that help organizations address the growing threat of ransomware and DDoS attacks in a timely manner.”
Marshall Heilman, EVP & Chief Technology Officer, Mandiant

“Secureworks’ proactive incident response and adversarial testing expertise combined with Cloudflare’s intelligent global platform enables our mutual customers to better mitigate the threats of sophisticated cyberattacks. This partnership is a much needed approach to addressing advanced cyber threats with speed and automation.”
Chris Bell, Vice President – Strategic Alliances, Secureworks

What’s next?

In summary, Cloudflare and its partners are coming together to ensure that our customers can run their business while getting adequate cybersecurity and risk coverage. However, we will not stop here. In the coming months, we’ll be working on creating programmatic ways to share threat intelligence with our cyber risk partners. Through our Security Center, we want to enable our customers, if they so choose, to safely share their security posture information with our partners for easier, transparent underwriting. Given the scale of our network and the magnitude and heterogeneity of attacks that we witness, we are in a strong position to provide our partners with insights around long-tail risks.

If you are interested in learning more, please refer to the partner links (At-Bay, Coalition, and Cowbell Cyber) or visit our cyber risk partnership page. If you’re interested in becoming a partner, please fill up this form.

….
Sources:
1https://www.wsj.com/articles/suspected-ransomware-payments-for-first-half-of-2021-total-590-million-11634308503
Gallagher, Cyber Insurance Market Update, Mid-year 2021
2https://www.ajg.com/us/news-and-insights/2021/aug/global-cyber-market-update/
3https://searchsecurity.techtarget.com/news/252507932/Cyber-insurance-premiums-costs-skyrocket-as-attacks-surge

Introducing Cloudflare Security Center

Post Syndicated from Malavika Balachandran Tadeusz original https://blog.cloudflare.com/security-center/

Introducing Cloudflare Security Center

Introducing Cloudflare Security Center

Today we are launching Cloudflare Security Center, which brings together our suite of security products, our security expertise, and unique Internet intelligence as a unified security intelligence solution.

Cloudflare was launched in 2009 to help build a better Internet and make Internet performance and security accessible to everyone. Over the last twelve years, we’ve disrupted the security industry and launched a broad range of products to address our customer’s pain points across Application Security, Network Security, and Enterprise Security.

While there are a plethora of solutions on the market to solve specific pain points, we’ve architected Cloudflare One as a unified platform to holistically address our customers’ most pressing security challenges.  As part of this vision, we are extremely excited to launch the public beta of Security Center. Our goal is to help customers understand their attack surface and quickly take action to reduce their risk of an incident.

Starting today, all Cloudflare users can use Security Center (available in your Cloudflare dashboard) to map their attack surface, review potential security risks and threats to their organizations, and mitigate these risks with a few clicks.

The changing corporate attack surface

A year ago, we announced Cloudflare One to address the complex nature of corporate networking today. The proliferation of public cloud, SaaS applications, mobile devices, and remote work has made the traditional model of the corporate network obsolete. The Internet is the new enterprise WAN, necessitating a novel approach to the way security teams manage their attack surface.

Second, the way we build applications has changed. Web applications today heavily use open source code and third-party scripts. Earlier this year we announced Page Shield, now GA, to help our customers track and monitor their third-party JavaScript dependencies.

These transformations in the IT landscape, coupled with the natural evolution that every organization goes through — such as growth, attrition, and M&A activity — create significant complexity for IT and security teams to stay on top of their organization’s ever-changing attack surface.

Introducing Cloudflare Security Center

The importance of attack surface management

An attack surface refers to the entire IT footprint of an organization that is susceptible to cyberattacks. Your attack surface consists of all the corporate servers, devices, SaaS, and cloud assets that are accessible from the Internet.

Over the last six months, something we’ve heard consistently from our customers is that they often don’t have a good grasp of their attack surface.

Because of the ease of creating new resources with the public cloud or SaaS, IT teams struggle to stay on top of shadow IT resources. Even when IT is aware of new infrastructure being spun up by dev teams, ensuring that these new resources are configured in line with corporate security standards is a constant battle.

It’s not only new resources that cause problems for IT teams — IT teams also want to quickly identify and decommission forgotten websites or applications that may have sensitive data or expose their organization to potential security risks.

These challenges are further complicated by the use of third-party software. Open source code, JavaScript libraries, SaaS applications, or self-hosted software introduce supply-chain risk into your attack surface. Security teams want to monitor potential vulnerabilities and malicious dependencies in third-party software.

Lastly, external threats add to your organization’s attack surface. Security teams want to quickly identify and take down rogue assets created by malicious actors. These rogue assets are often phishing sites or malware distribution points that attempt to trick the organization’s customers or employees into providing sensitive details or downloading a file.

The challenges of attack surface management

With such an expansive list of potential risks and threats to an organization, it’s no surprise that organizations of all sizes are struggling to keep up with their attack surface. Many of our customers have built in-house solutions or use a range of security products to ascertain and monitor their attack surface.

But we’ve consistently heard from our customers that these solutions just don’t work. They are often too noisy and produce far too many alerts, making it difficult for security teams to triage and prioritize issues. Customers are also tired of security vendor sprawl and don’t want to add yet another tool to integrate with their existing security solutions. Security teams have limited resources — across staff and budget — and they want a solution that creates less, not more, work.

Introducing Cloudflare Security Center

In order to make attack surface management accessible and actionable for all organizations, we are excited to launch Cloudflare Security Center. Security Center is a single place to map your attack surface, identify potential security risks, and mitigate risks with a few clicks.

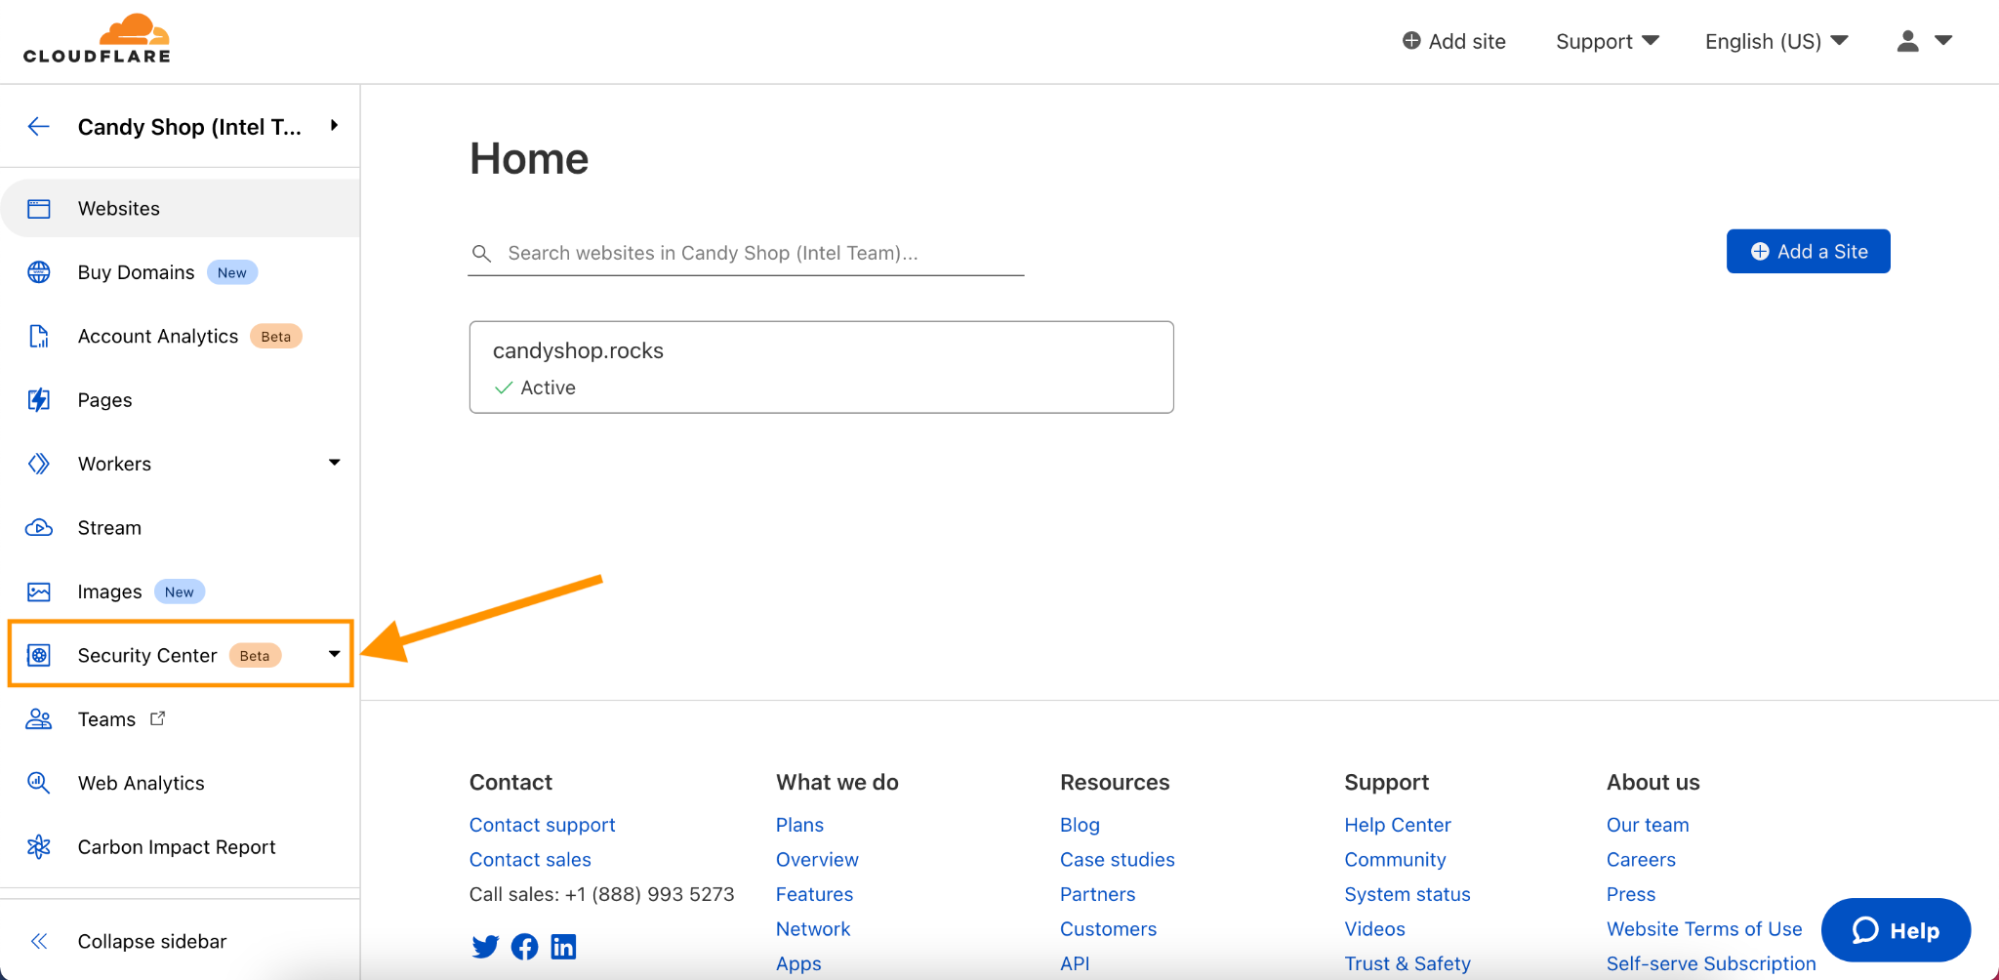
Starting today, you’ll find “Security Center” in your Account Home page.

Introducing Cloudflare Security Center

Once you navigate to Security Center within the Cloudflare dashboard, you’ll find two new features:

  • Security Insights: Review and manage potential security risks and vulnerabilities associated with your IT infrastructure.
  • Infrastructure: Review and manage your IT infrastructure

In today’s release, if you navigate to Security Insights, you can view a log of potential security risks, vulnerabilities, and insecure configurations associated with your IT infrastructure on Cloudflare. Our security experts have helped curate our automated detections to help you quickly triage and address the most critical issues impacting your attack surface.

If this is your first time using Security Center, you will need to click Start scan to consent to Cloudflare scanning your infrastructure. Once you opt in to Security Center, we will scan your infrastructure on a regular schedule:

  • If you have any Pro or higher plan zones, or are using Teams Standard or higher, after opting in to Security Center, we will scan your infrastructure on a daily basis.
  • For all other Cloudflare plans, after opting in to Security Center, we will scan your infrastructure every three days.

After every scan, you can visit the Security Insights page to view a high level summary of your attack surface and dig into the specifics of any potential security risks we have identified.

Directly from Security Insights, you can resolve any insights by making the recommended changes to your Cloudflare configurations in just a few clicks.

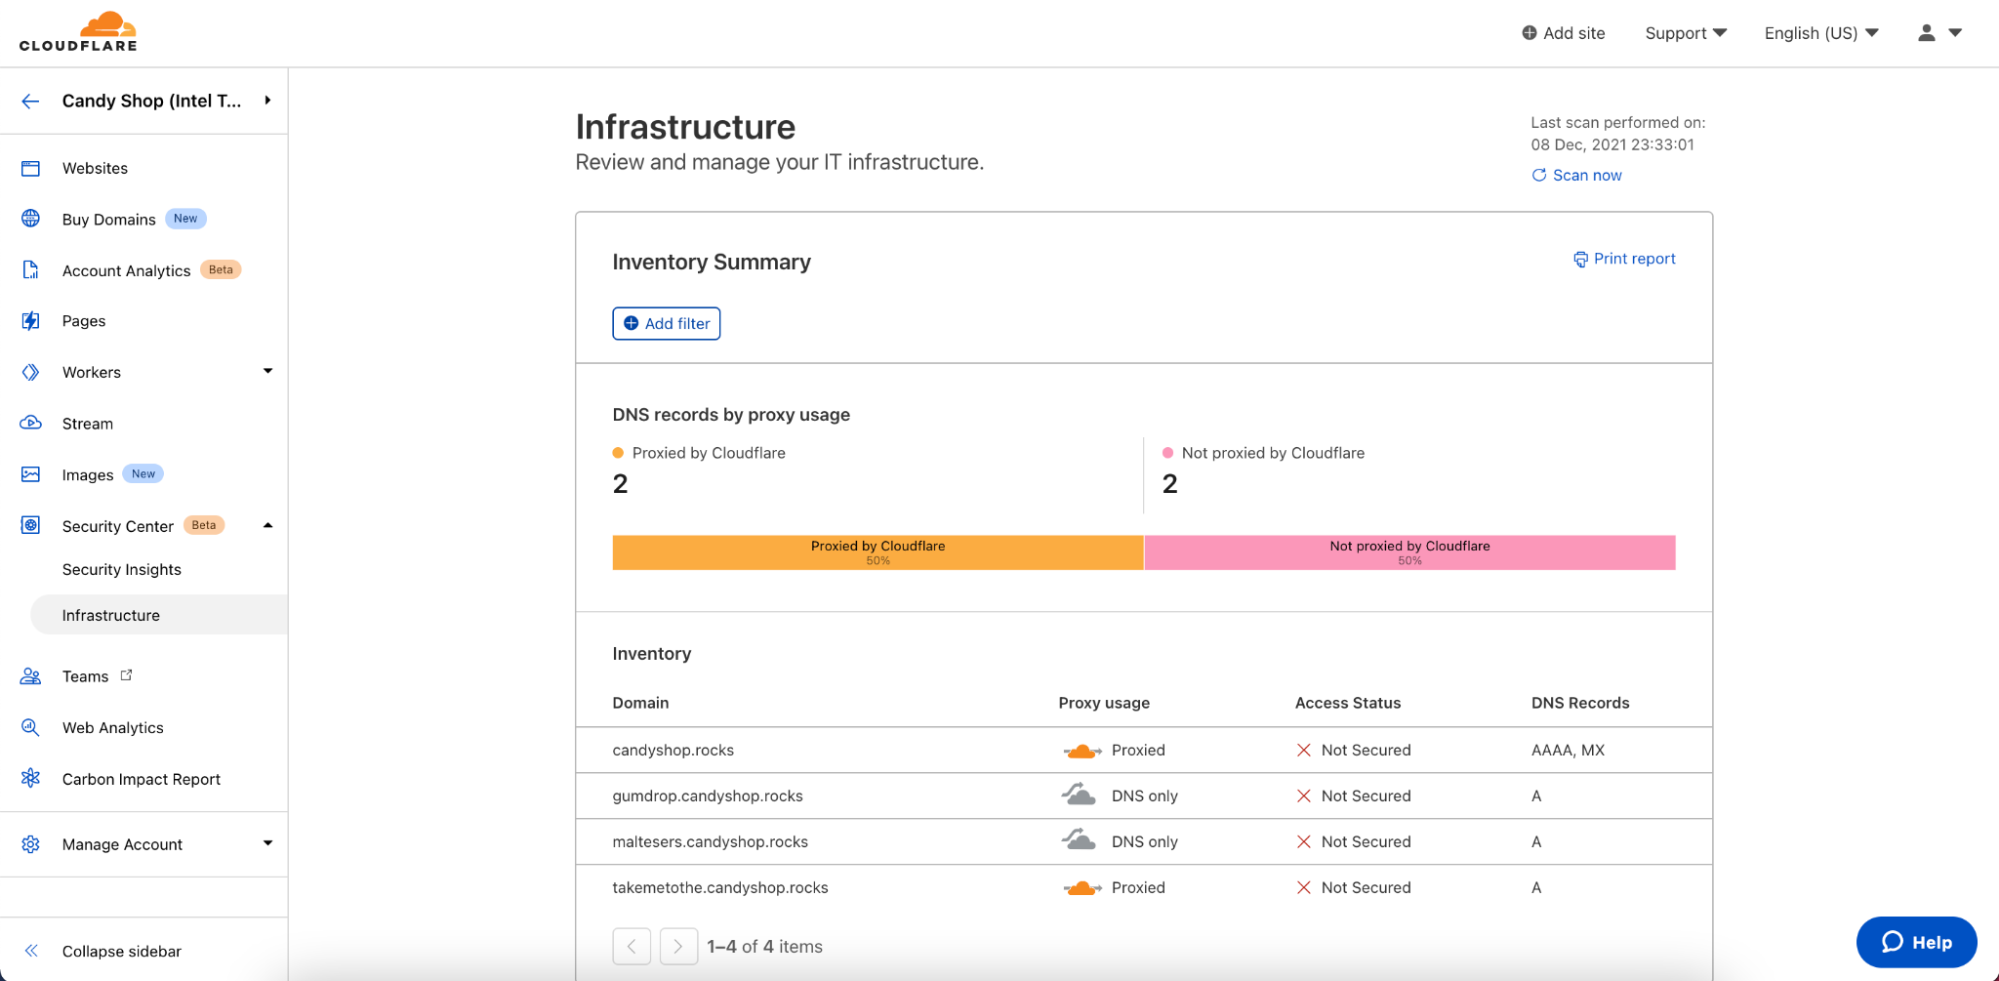
With each scan, we inventory your IT assets on Cloudflare as part of the Infrastructure feature within Security Center. Here, you can view a summary of your domains on Cloudflare. At the top of the page, you can find a breakdown of your DNS records by Proxy Usage. Below this chart, you can review a list of all your domains on Cloudflare, as well as view other key details about your domains.

Introducing Cloudflare Security Center

What’s next

All features made available as part of today’s Security Center beta release are included in your existing Cloudflare plan. It’s our mission to help build a better Internet, and we believe that making attack surface management accessible and actionable is an important part of that mission. We want everyone, from an individual web developer to the CIO of a Fortune 100 company, to be able to easily secure their IT footprint.

You can get started today with Security Center’s beta release by visiting your Cloudflare dashboard. With just a few clicks, you can ensure that your Cloudflare settings are optimized for your organization’s security.

We’d love your feedback on Security Center. If you have any comments, questions or concerns, you can contact us directly at [email protected], or on our Cloudflare Community forum.

Stay tuned for further updates, as we continue to add more features to Security Center. Soon, you’ll be able to control not only your IT assets on Cloudflare, but your entire IT footprint. We’ll continue to build upon our risk detection capabilities, going beyond Application Security to Network Security, Enterprise Security, and Brand Security.

Shadow IT: make it easy for users to follow the rules

Post Syndicated from Kenny Johnson original https://blog.cloudflare.com/shadow-it/

Shadow IT: make it easy for users to follow the rules

Shadow IT: make it easy for users to follow the rules

SaaS application usage has exploded over the last decade. According to Gartner, global spending on SaaS in 2021 was $145bn and is forecasted to reach $171bn in 2022. A key benefit of SaaS applications is that they are easy to get started with and either free or low cost. This is great for both users and leaders — it’s easy to try out new tools with no commitment or procurement process. But this convenience also presents a challenge to CIOs and security teams. Many SaaS applications are great for a specific task, but lack required security controls or visibility. It can be easy for employees to start using SaaS applications for their everyday job without IT teams noticing — these “unapproved” applications are popularly referred to as Shadow IT.

CIOs often have no visibility over what applications their SaaS employees are using. Even when they do, they may not have an easy way to block users from using unapproved applications, or on the contrary, to provide easy access to approved ones.

Visibility into application usage

In an office, it was easier for CIOs and their teams to monitor application usage in their organization. Mechanisms existed to inspect outbound DNS and HTTP traffic over office Wi-Fi equipment and detect unapproved applications. In an office setting, IT teams could also notice colleagues using new SaaS applications or maybe hear them mention these new applications. When users moved to remote work due to COVID-19 and other factors, this was no longer possible, and network-driven logging became ineffective. With no central network, the focus of application monitoring needed to shift to user’s devices.

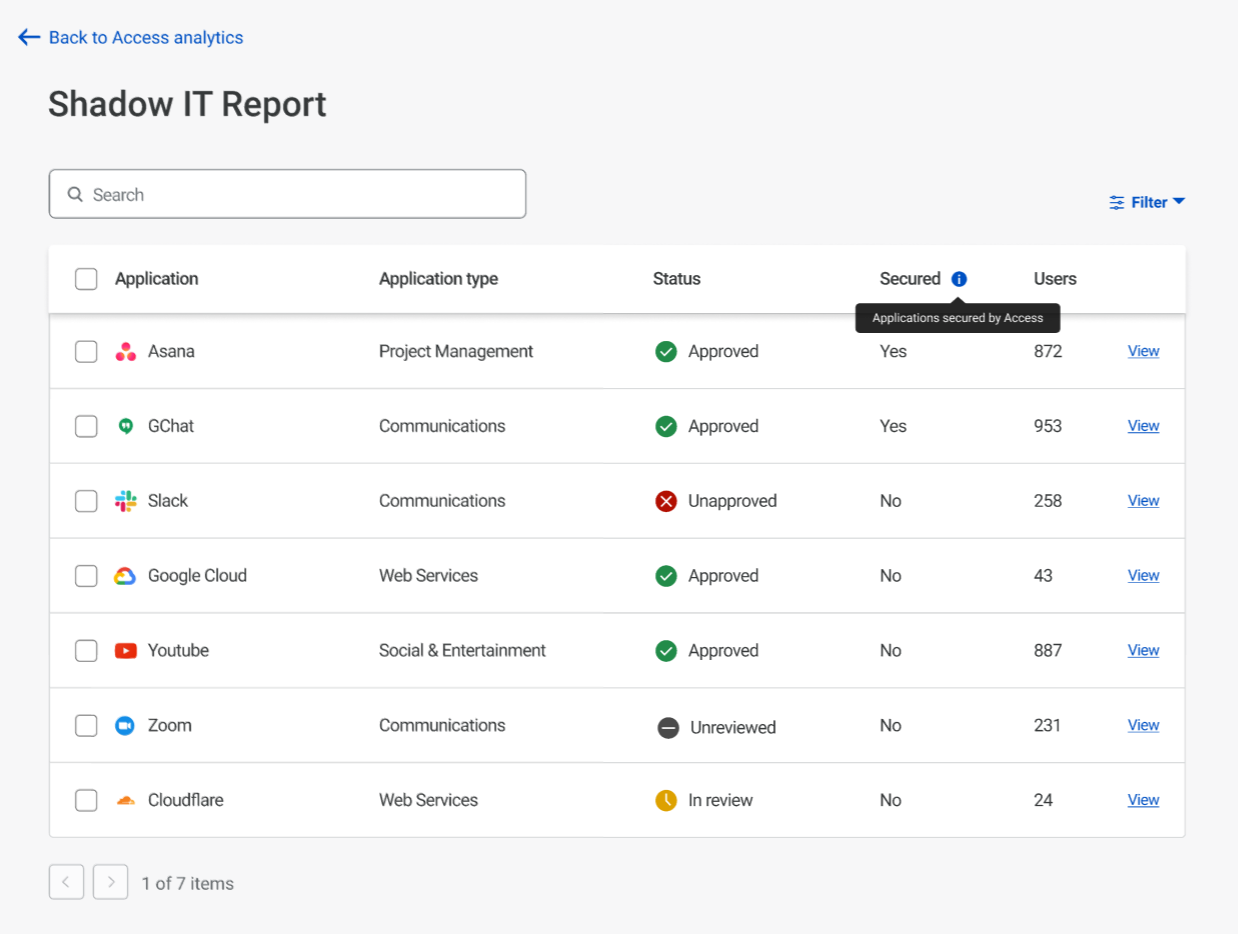
We’re excited to announce updates to Cloudflare for Teams that address Shadow IT challenges. Our Zero Trust platform provides a framework to identify new applications, block applications and provide a single location for approved applications. Cloudflare Gateway allows admins to monitor user traffic and detect new application usage. Our Shadow IT report then presents a list of new applications and allows for approval or rejection of each application.

Shadow IT: make it easy for users to follow the rules

This gives CIOs in-depth understanding of what applications are being used across their business, and enables them to come up with a plan to allow and block applications based on their approval status in the organization.

Blocking the right applications

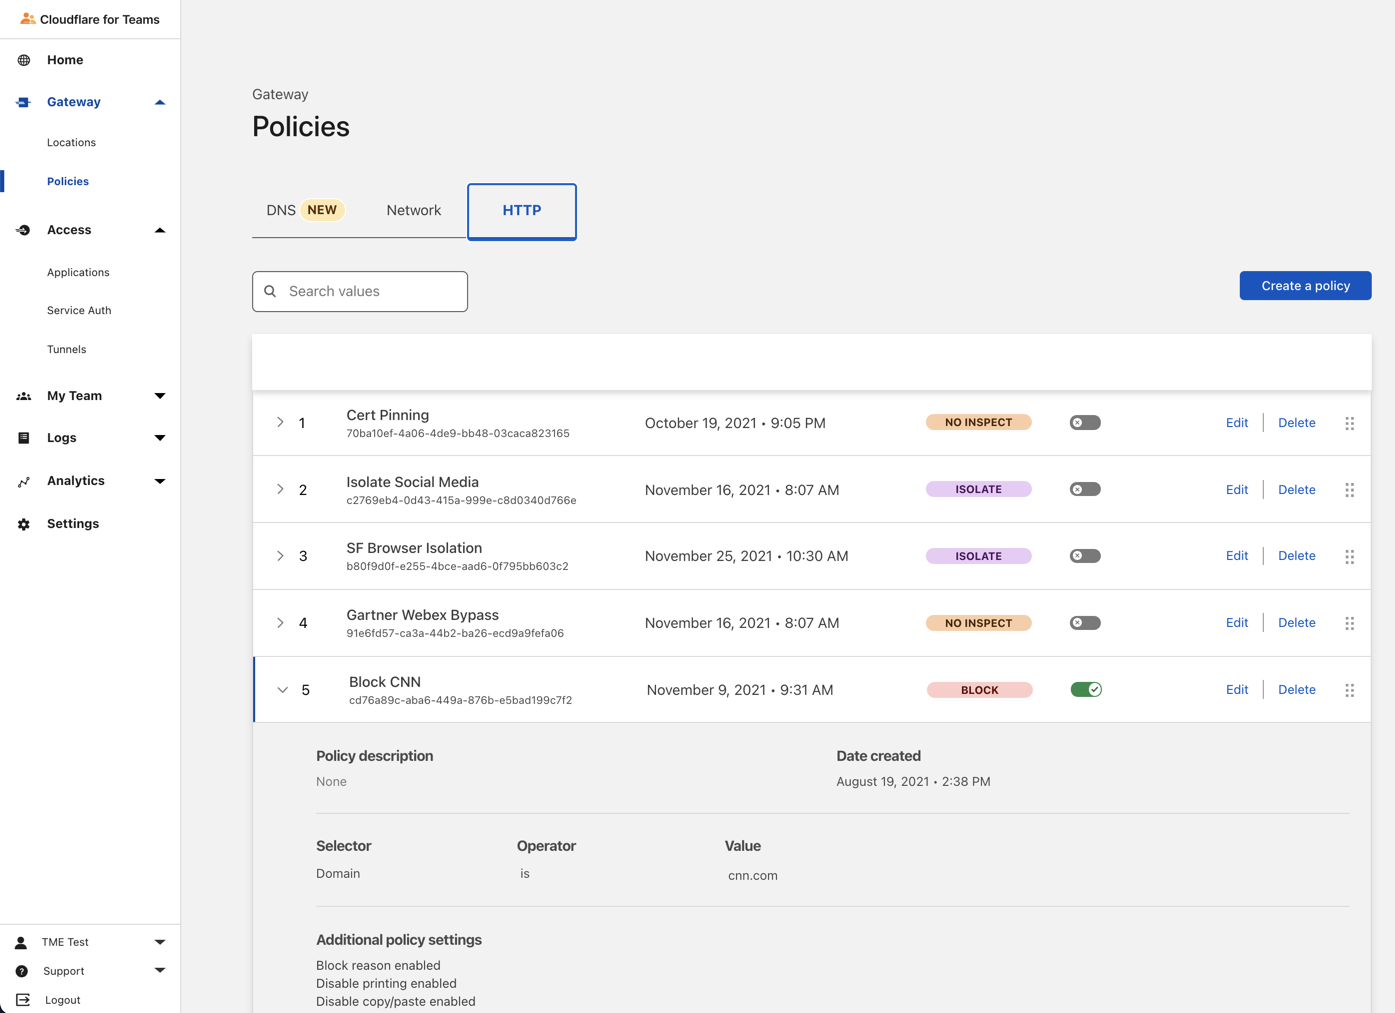
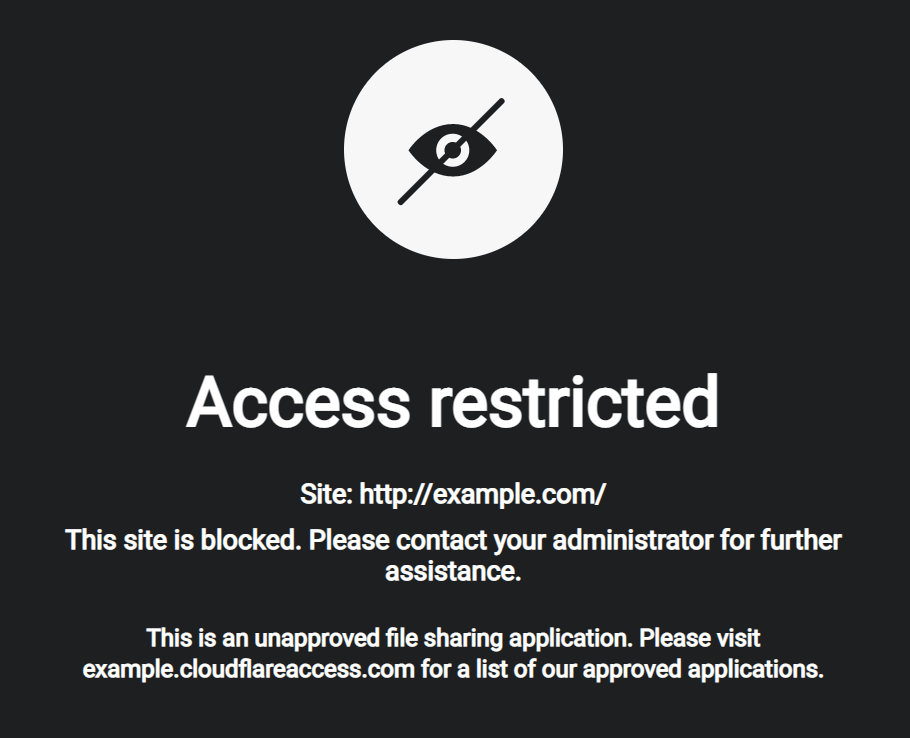
Once the list of “shadow” applications is known, the next step is to block these applications with a meaningful error message to steer the user toward an approved application. The point should not be to make the user feel like they have done something wrong, but to encourage and provide them with the right application to leverage.

Shadow IT: make it easy for users to follow the rules

Cloudflare Gateway allows teams to configure policies to block unapproved applications and provide clear instructions to a user about what their alternatives are to that application. In Gateway, administrators can configure application-specific policies like “block all file sharing applications except Google Drive.” Tenant control can be utilized to restrict access to specific instances of a given application to prevent personal account usage of these tools.

Protect your approved applications

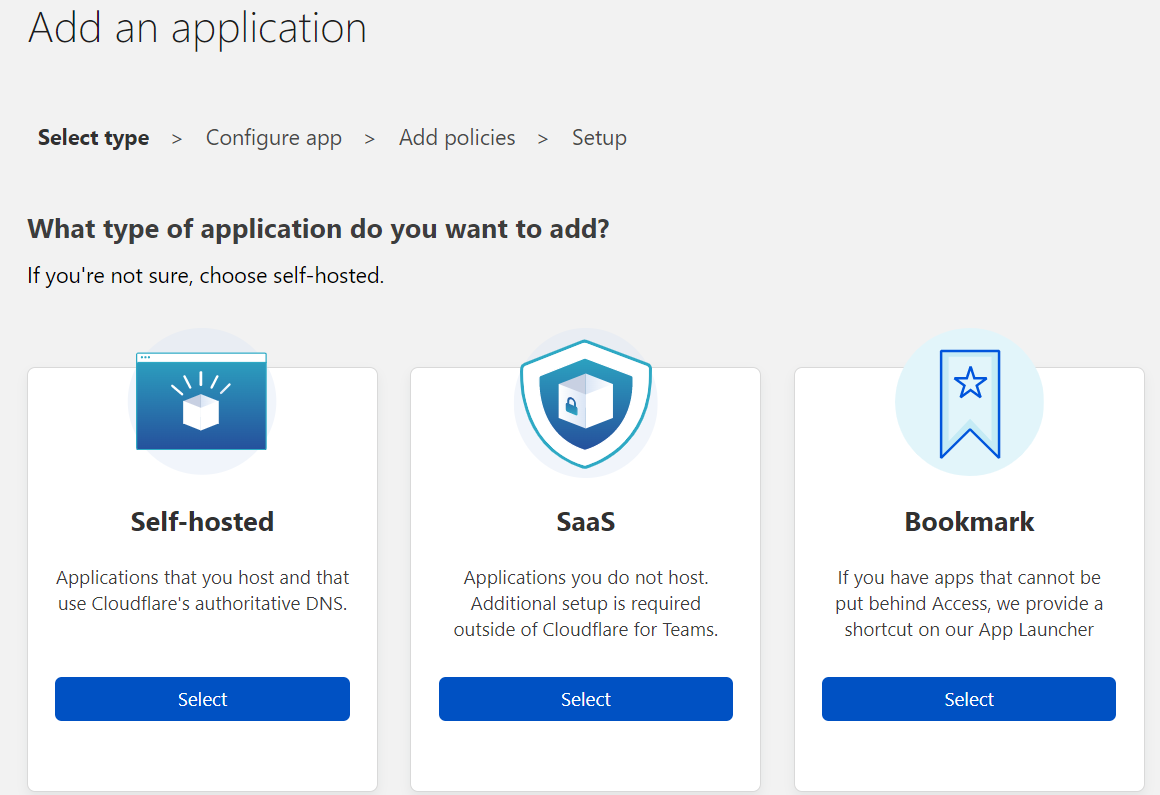
The next step is to protect the application you do want your users to use. In order to fully protect your SaaS applications, it is important to secure the initial authorization and maintain a clear audit trail of user activity. Cloudflare Access for SaaS allows administrators to protect the front door of their SaaS applications and verify user identity, multi-factor authentication, device posture and location before allowing access. Gateway then provides a clear audit trail of all user activity within the application to provide a clear picture in the case of a breach or other security events.

This allows CIOs and their teams to define which users may or may not access specific applications. Instead of creating broad access lists, they can define exactly which users need a specific tool to complete their job. This is beneficial for both security and licensing costs.

Show your users the applications they need

The final challenge is making it clear to users which applications they do and do not have access to. New employees often spend their first few weeks discovering new applications that would have helped them get up to speed more quickly.

We wanted to make it easy to provide a single place for users to access all of their approved applications. We added bookmarks and application visibility control to the Access application launcher to make this even easier.

Shadow IT: make it easy for users to follow the rules

Once all your applications are available through the application launcher, we log all user activity across these applications. And even better, many of these applications are hosted on Cloudflare which leads to performance improvements overall.

Getting started with the Access application launcher is easy and free for the first 50 users! Get started today from the Cloudflare for Teams dashboard.

Magic Firewall gets Smarter

Post Syndicated from Achiel van der Mandele original https://blog.cloudflare.com/magic-firewall-gets-smarter/

Magic Firewall gets Smarter

Magic Firewall gets Smarter

Today, we’re very excited to announce a set of updates to Magic Firewall, adding security and visibility features that are key in modern cloud firewalls. To improve security, we’re adding threat intel integration and geo-blocking. For visibility, we’re adding packet captures at the edge, a way to see packets arrive at the edge in near real-time.

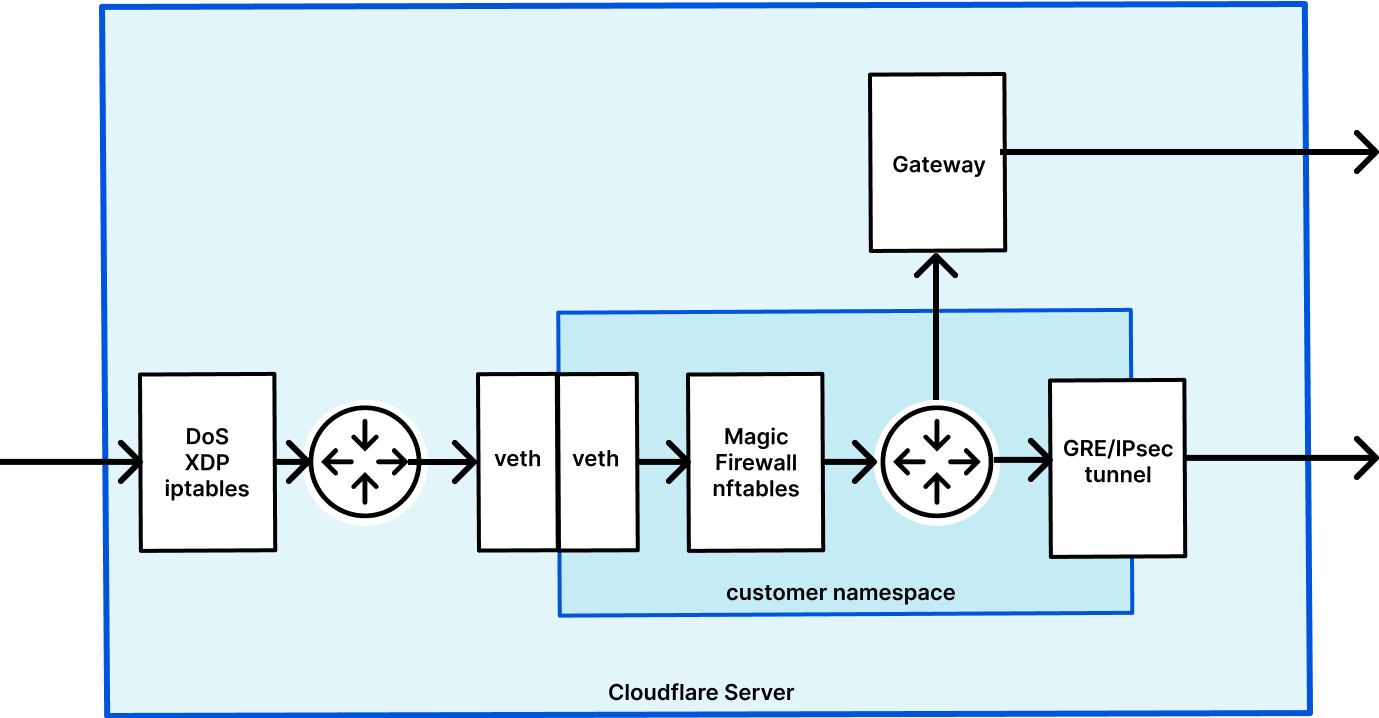
Magic Firewall is our network-level firewall which is delivered through Cloudflare to secure your enterprise. Magic Firewall covers your remote users, branch offices, data centers and cloud infrastructure. Best of all, it’s deeply integrated with Cloudflare, giving you a one-stop overview of everything that’s happening on your network.

A brief history of firewalls

We talked a lot about firewalls on Monday, including how our firewall-as-a-service solution is very different from traditional firewalls and helps security teams that want sophisticated inspections at the Application Layer. When we talk about the Application Layer, we’re referring to OSI Layer 7. This means we’re applying security features using semantics of the protocol. The most common example is HTTP, the protocol you’re using to visit this website. We have Gateway and our WAF to protect inbound and outbound HTTP requests, but what about Layer 3 and Layer 4 capabilities? Layer 3 and 4 refer to the packet and connection levels. These security features aren’t applied to HTTP requests, but instead to IP packets and (for example) TCP connections. A lot of folks in the CIO organization want to add extra layers of security and visibility without resorting to decryption at Layer 7. We’re excited to talk to you about two sets of new features that will make your lives easier: geo-blocking and threat intel integration to improve security posture, and packet captures to get you better visibility.

Threat Intel and IP Lists

Magic Firewall is great if you know exactly what you want to allow and block. You can put in rules that match exactly on IP source and destination, as well as bitslicing to verify the contents of various packets. However, there are many situations in which you don’t exactly know who the bad and good actors are: is this IP address that’s trying to access my network a perfectly fine consumer, or is it part of a botnet that’s trying to attack my network?

The same goes the other way: whenever someone inside your network is trying to create a connection to the Internet, how do you know whether it’s an obscure blog or a malware website? Clearly, you don’t want to play whack-a-mole and try to keep track of every malicious actor on the Internet by yourself. For most security teams, it’s nothing more than a waste of time! You’d much rather rely on a company that makes it their business to focus on this.

Today, we’re announcing Magic Firewall support for our in-house Threat Intelligence feed. Cloudflare sees approximately 28 million HTTP requests each second and blocks 76 billion cyber threats each day. With almost 20% of the top 10 million Alexa websites on Cloudflare, we see a lot of novel threats pop up every day. We use that data to detect malicious actors on the Internet and turn it into a list of known malicious IPs. And we don’t stop there: we also integrate with a number of third party vendors to augment our coverage.

To match on any of the threat intel lists, just set up a rule in the UI as normal:

Magic Firewall gets Smarter

Threat intel feed categories include Malware, Anonymizer and Botnet Command-and-Control centers. Malware and Botnet lists cover properties on the Internet distributing malware and known command and control centers. Anonymizers contain a list of known forward proxies that allow attackers to hide their IP addresses.

In addition to the managed lists, you also have the flexibility of creating your own lists, either to add your own known set of malicious IPs or to make management of your known good network endpoints easier. As an example, you may want to create a list of all your own servers. That way, you can easily block traffic to and from it from any rule, without having to replicate the list each time.

Another particularly gnarly problem that many of our customers deal with is geo restrictions. Many are restricted in where they are allowed (or want to) accept traffic from and to. The challenge here is that nothing about an IP address tells you anything about the geolocation of it. And even worse, IP addresses regularly change hands, moving from one country to the other.

As of today, you can easily block or allow traffic to any country, without the management hassle that comes with maintaining lists yourself. Country lists are kept up to date entirely by Cloudflare, all you need to do is set up a rule matching on the country and we’ll take care of the rest.

Magic Firewall gets Smarter

Packet captures at the edge

Finally, we’re releasing a very powerful feature: packet captures at the edge. A packet capture is a pcap file that contains all packets that were seen by a particular network box (usually a firewall or router) during a specific time frame. Packet captures are useful if you want to debug your network: why can’t my users connect to a particular website? Or you may want to get better visibility into a DDoS attack, so you can put up better firewall rules.

Traditionally, you’d log into your router or firewall and start up something like tcpdump. You’d set up a filter to only match on certain packets (packet capture files can quickly get very big) and grab the file. But what happens if you want coverage across your entire network: on-premises, offices and all your cloud environments? You’ll likely have different vendors for each of those locations and have to figure out how to get packet captures from all of them. Even worse, some of them might not even support grabbing packet captures.

With Magic Firewall, grabbing packet captures across your entire network becomes simple: because you run a single network-firewall-as-a-service, you can grab packets across your entire network in one go. This gets you instant visibility into exactly where that particular IP is interacting with your network, regardless of physical or virtual location. You have the option of grabbing all network traffic (warning, it might be a lot!) or set a filter to only grab a subset. Filters follow the same Wireshark syntax that Magic Firewall rules use:

(ip.src in $cf.anonymizer)

We think these are great additions to Magic Firewall, giving you powerful primitives to police traffic and tooling to gain visibility into what’s actually going on in your network. Threat Intel, geo blocking and IP lists are all available today — reach out to your account team to have them activated. Packet captures is entering early access later in December. Similarly, if you’re interested, please reach out to your account team!

Hardening the security of your AWS Elastic Beanstalk Application the Well-Architected way

Post Syndicated from Laurens Brinker original https://aws.amazon.com/blogs/security/hardening-the-security-of-your-aws-elastic-beanstalk-application-the-well-architected-way/

Launching an application in AWS Elastic Beanstalk is straightforward. You define a name for your application, select the platform you want to run it on (for example, Ruby), and upload the source code. The default Elastic Beanstalk configuration is intended to be a starting point which prioritizes simplicity and ease of setup. This allows you to quickly deploy a web application on the AWS Cloud. For increased security of production applications, we recommend additional steps you can take to complement the default configuration.

In this post we will describe our recommendations, which are aligned with the AWS Well-Architected Framework, to help you harden the security posture of your Elastic Beanstalk applications. The Well-Architected Framework provides best practices to help you build secure, high-performing, resilient, and efficient infrastructure for your applications and workloads. Focusing on the Security pillar of the framework, we will walk you through additional configurations for increased network protection and protection of data at rest and in transit.

Introduction to Elastic Beanstalk

Elastic Beanstalk is an orchestration service that provisions and operates infrastructure in the AWS Cloud. You can use Elastic Beanstalk to deploy and manage applications in the cloud. Elastic Beanstalk supports many programming languages and frameworks, such as Java, .NET, PHP, Node.js, Python, Ruby, Go, and Docker. Elastic Beanstalk can help you decrease overhead by handling tasks such as resource provisioning, load balancing, auto scaling, and health monitoring. You only need to upload the application code. Elastic Beanstalk automatically integrates with other AWS services such as Amazon CloudWatch for logging and monitoring.

Target scenario for this post

This post shows you how to achieve the following things:

  • Launch a highly available Ruby application on Elastic Beanstalk.
  • Attach a MySQL database to the application using Amazon RDS.
  • Protect your sensitive data.
  • Align your application’s security configuration to the Security pillar of the Well-Architected Framework.

Figure 1: Target architecture for the two-tier web application deployed using Elastic Beanstalk

Figure 1: Target architecture for the two-tier web application deployed using Elastic Beanstalk

Figure 1 depicts the target architecture, which is a two-tier web application. Clients resolve the website’s domain name using the Domain Name System (DNS) service Amazon Route 53. An Application Load Balancer (ALB) is used to direct traffic to and from the Amazon EC2 instances which are running the web servers. The EC2 instances are deployed in an Auto Scaling group in private subnets. To ensure that clients can always access the application, the infrastructure is setup so that it can automatically deal with system failures and scale up when there’s an increase in demand. This is done by placing the EC2 instances in the Auto Scaling group across two Availability Zones for high availability. There is also an RDS MySQL database deployed in a private subnet, which is replicated to a stand-by instance in another Availability Zone for disaster recovery. Logs and Metrics are sent to CloudWatch, and Amazon Simple Storage Service (Amazon S3) is used to store logs and source code. Finally, a Network Address Translation (NAT) gateway and Internet gateway manage inbound and outbound traffic to subnets.

The following sections focus on the four main security configurations numbered in Figure 1:

  1. Deploying the EC2 and RDS instances from the web and database layer in private subnets.
  2. Encrypting the logging and source code S3 bucket.
  3. Encrypting the RDS instance and its stand-by replica.
  4. Encrypting data in transit by using the HTTPS protocol.

Strengthening your Elastic Beanstalk application based on the Security pillar of the Well-Architected Framework

To harden the security of your Elastic Beanstalk application, you can build on top of the default setup to incorporate the following security best practices:

  1. Protect networks In the default Elastic Beanstalk setup, the EC2 instances are deployed together with an Application Load Balancer (ALB) in a public subnet. In most cases, EC2 instances do not need to be directly accessible from the internet and therefore should be placed in private subnets. The ALB should be left in the public subnet to provide a single entry-point for inbound traffic from external clients and forward this traffic to the instances over a private network. If these instances need to make a direct outbound connection to the internet, for example to call third-party APIs, we recommend creating a Network Address Translation (NAT) gateway in a public subnet, and adding a route from the private subnet where your instances are running to the NAT Gateway. Your instances can then send requests to the internet and receive corresponding responses through the NAT gateway, but the instances themselves will not be directly accessible from the internet. For more options on interactively accessing instances see AWS Systems Manager.
  2. Protect data at rest We recommend encrypting data at rest. Elastic Beanstalk does not encrypt data stored in Amazon S3 buckets by default, so you should modify the default setup to encrypt the bucket. Similarly, when you set up an RDS database directly through Elastic Beanstalk, you don’t have the option to encrypt the database, so you need to set up your database independently and enable encryption.
  3. Protect data in transit – Web traffic sent between your clients and the ALB over the internet should use HTTPS rather than HTTP. The HTTPS protocol creates an encrypted connection through TLS (Transport Layer Security) between client and server before sending any web traffic. The default setup in Elastic Beanstalk uses HTTP, so the choice to use HTTPS and how to enable it sits with the user. Setting up HTTPS can be done with SSL / TLS server certificates (X.509 certificates) which you manage inside AWS using AWS Certificate Manager or through an external provider. ALB supports TLS-termination, which means that it takes care of the encryption and decryption of the traffic communicated with clients, and then forwards the traffic to the instances over the AWS private network.

Implementing the recommended best practices for your application

To implement the best practices from the section above, you will take the following steps to launch your application, protect networks and to protect data at rest and in transit:

  1. Create your own VPC with public and private subnets.
  2. Create a highly-available Elastic Beanstalk application.
  3. Modify the configuration to deploy instances in private subnets.
  4. Encrypt the log and source code bucket.
  5. Launch an encrypted RDS instance.
  6. Set up encryption in-transit by using the HTTPS protocol.

Create your VPC with public and private subnets

  1. In the AWS Management Console, go to VPC, and select Launch VPC wizard.
  2. Select the VPC with Public and Private Subnets option on the left-hand side, as shown in Figure 2.

Figure 2: Launch VPC wizard

Figure 2: Launch VPC wizard

  1. Click Select.
  2. Adjust the VPC specifications as needed. Specify a CIDR range and a name for the VPC. For the private and public subnets, you need to additionally specify the subnets CIDR range as well as which Availability Zone they should be created in. In order for instances in the private subnet to access the internet, the set-up creates a NAT gateway that resides in the public subnet. In order to do that, you need to specify an Elastic IP ID. If you don’t have an Elastic IP yet, under the VPC console go to Elastic IP addresses, click on Allocate Elastic IP address and Allocate. Use the Allocation ID in the VPC wizard.
  3. Select Create VPC.
  4. Because the target architecture is highly available, another set of public and private subnets needs to be created and set to reside in a different Availability Zone from the subnets you configured in step 4. This is done by going to the Subnets section in the VPC Console. Click on Create subnet, select the VPC you just created, add a new subnet, making sure to assign it to a different Availability Zone. Press Add new subnet to add a second subnet on the same configuration page. When done, press Create subnet.
  5. By default, the subnets will use the main routing table, which will treat them as private subnets. In order to make one of the newly created subnets public, it needs to be added to the route table, which has a route to the Internet Gateway. Go to the Route Tables section in the VPC Console and find the route table associated with your newly created VPC, which has the route to the Internet Gateway. This should be the Route Table which has 1 explicit subnet association. Click on the Route Table’s ID, and verify that there’s a route to a target with the igw- prefix. Then, under the Subnet association tab, edit the explicit subnet associations to include the newly created subnet.

After this is done, you should have two public and two private subnets across two Availability Zones for your new VPC.

Create a highly available Elastic Beanstalk application

The following steps will show you how to create a highly available Elastic Beanstalk application.

  1. In the AWS Management Console, choose Elastic Beanstalk, and then, in the Get Started section, select Create Application.
  2. Provide a name for the application and define the platform it should run on. In our example, the platform is Ruby.
  3. Provide the source code for your web application or use the sample code provided in the Elastic Beanstalk setup console.
    • To use the sample code, select Sample Application.
    • To upload your own source code, in the Source code origin section, for Version label, enter the name of your application code, and then for Source code origin, choose Local file, select Choose File, and navigate to the file that you want to use, as shown in Figure 3.

Figure 3: Source code origin section of the Elastic Beanstalk console

Figure 3: Source code origin section of the Elastic Beanstalk console

  1. Select Configure more options
  2. Depending on your application’s needs, you can select a configuration preset that includes recommended values for several configurations. Select High Availability to include a load balancer and auto scaling for multiple Availability Zones.

Deploy your instances in private subnets

In this step, you will set up Elastic Beanstalk to deploy the Application Load Balancer in public subnets to provide a point of access for inbound traffic from the internet, and you deploy the EC2 instances in a private subnet.

While still in the Configure more options settings:

  1. In the Network section, select Edit, and then, from the dropdown list, select the VPC that you just created.
  2. To deploy your instances in private subnets, in the Load balancer settings section, for Load balancer subnets, check the box next to each public subnet, and in the Instance settings section, for Instance subnets, check the box next to each private subnet, as shown in Figure 4.
Figure 4: Elastic Beanstalk subnet settings for Load Balancer and instances

Figure 4: Elastic Beanstalk subnet settings for Load Balancer and instances

  1. Select Save.

Encrypt the log and source code bucket and block public access

After Elastic Beanstalk has created the application, you can encrypt the S3 bucket.

  1. Open the S3 console and choose the bucket that was created automatically as part of the Elastic Beanstalk setup. The bucket name will have the following structure: elasticbeanstalk-region-account-id.
  2. To encrypt the bucket, choose Properties, and then, for Default Encryption, select Edit, and for Server-side encryption, select Enable.
  3. For Encryption key type, you can use an S3-managed encryption key by selecting Amazon S3 key (SSE-S3). If you want more control over the keys used for encryption, select AWS Key Management Service key (SSE-KMS), which is an encryption key protected by AWS Key Management Service (KMS). Here, you can specify to use an AWS managed key or one of your own Customer managed keys from KMS. For more information on SSE-KMS, visit Protecting Data Using Server-Side Encryption with KMS keys Stored in AWS Key Management Service (SSE-KMS).
  4. Select Save changes.

Even though the bucket that was created by Elastic Beanstalk is non-public by default, we recommend to enable “S3 Block Public Access” at the account level or at least at the bucket level to prevent tampering or accidentally changing this setting in the future.

  1. In your S3 console, click on Block Public Access settings for this account.
  2. If Block all public access is not yet enabled, click on Edit, check the box next to Block all public access and click Save.
  3. Apart from that, you can also block public access at the bucket level. For this, click on the respective bucket, open the Permissions section and edit Block public access (bucket settings) similarly to how you did in step 2.

Launch an encrypted RDS instance

Elastic Beanstalk allows you to set up and run RDS instances in your Elastic Beanstalk environment. Until recently, the database was tied to the lifecycle of the Elastic Beanstalk environment, and its use was recommended to be limited to development and testing environments only. For example, if you previously launched an RDS instance using Elastic Beanstalk, and the Elastic Beanstalk environment was terminated, the RDS instance would also be deleted. As of October 6, 2021, Elastic Beanstalk now supports Database Decoupling, so that the database will persist when the environment is deleted.

However, Elastic Beanstalk currently does not allow you to set up encryption for your database. For this reason, this post shows you how to set up your Elastic Beanstalk application with a decoupled database, by creating the database directly in the RDS service, separate from your Elastic Beanstalk application. RDS allows you to encrypt your database.

Decoupling your database and setting it up directly through the RDS service in the AWS console will require additional steps for integration with your Elastic Beanstalk application, which this post will walk you through.

Note: If you are using the Elastic Beanstalk service to create your RDS instance, you can select one of three options:

  • The first option, enabled by selecting the Create snapshot retention option in the database settings in the Elastic Beanstalk console, makes sure that Elastic Beanstalk creates a snapshot of your database prior to termination. You can restore an existing snapshot of your database through the Elastic Beanstalk console. Bear in mind that there will be downtime of your database between snapshot creation and snapshot restore.
  • The second option, Retain, creates a decoupled database, which persists if the Elastic Beanstalk environment has been terminated.
  • The third option Delete removes the database upon termination.

In this step, you will create an encrypted RDS database, allow access to the database from your application’s instances only, and add the required environment variables to your application so you can use your database in the application.

  1. On the RDS service page in the console, select Create database.
  2. For the database creation method, select Standard create.
  3. For Engine options, choose MySQL and select the latest version.
  4. For Templates choose either the Dev/Test or Production template according to your use case.
  5. In the Settings section, provide a name to use as the database identifier and set a username and password.
  6. Select the appropriate DB instance class that meets your processing power and memory requirements.
  7. For Storage, select your storage type and allocate storage.
  8. If you need Multi-AZ deployment, in the Availability & durability section, choose Create a standby instance.
  9. In the Connectivity section, select the VPC that you created in the Create your VPC with public and private subnets section earlier in this blog post, and verify that Public access has been set to No. For VPC security group, choose Create new and provide a name to identify the group later on.
  10. In the Additional configuration section, under Encryption, choose Enable Encryption. You can choose the default AWS KMS key if you’re happy with AWS managing the keys, or provide a custom key if you want more control. Bear in mind that the encryption option cannot be changed after the database has been created.
  11. Leave the defaults for the remaining settings and select Create database.

After you set up the RDS database and your new Elastic Beanstalk application, you can add the database to your application.

  1. In the RDS console, go to your newly created RDS database and scroll down to Security group rules.
  2. Select the security group that has the CIDR/IP – Inbound type.
  3. Under Inbound rules, select the rule that is listed, and then select Edit inbound rules.
  4. Under the Source column, make sure Custom is selected, and in the search-box next to it, select the security group associated with your Elastic Beanstalk Auto Scaling group.

Important: As a security best practice, you should allow traffic to your RDS database from your instances only. Therefore, make sure the security group allows traffic only from the Auto Scaling group’s security group, and that it has no additional entries.

  1. To add the RDS details to the Elastic Beanstalk environment properties, go to your application’s environment in the Elastic Beanstalk service and navigate to Configuration > Software > Edit > Environment Properties. Add RDS_HOSTNAME, RDS_PORT, RDS_DB_NAME, RDS_USERNAME and RDS_PASSWORD as properties and provide the values that you used to set up the database.
  2. Restart the application by going back to your Elastic Beanstalk environment, and then under Environment actions, choose Restart app server(s).

After the server has restarted, you can access the RDS database in your web application by using the environment properties you set in the console, just as you would if you attached the database directly through the Elastic Beanstalk setup. For more information on using environment properties, visit Environment properties and other software settings.

The new database is now separate from your application and it is encrypted to provide data protection at rest.

Important: The environment properties, including the database username and password, are visible and stored in plain text in the Environment Properties in Elastic Beanstalk.

Depending on your security requirements, you can choose to use AWS Secrets Manager to protect your database credentials, which you can then fetch programmatically in your Elastic Beanstalk instance or through Elastic Beanstalk’s custom environment configuration files (.ebextensions). To learn more about using Secrets Manager to protect and rotate database credentials, see Rotate Amazon RDS database credentials automatically with AWS Secrets Manager. However, this will require additional configuration for Elastic Beanstalk and is beyond the scope of this post.

A second possibility is to use IAM database authentication, which allows you to use your Elastic Beanstalk’s EC2 IAM role to connect to your database. This method leverages short-lived authentication tokens rather than a static database password. In order to set this up, you need to enable IAM database authentication, create an IAM policy to allow IAM database access and create a database account for IAM authentication using the AWSAuthenticationPlugin (for MySQL). Authentication tokens are valid for 15 minutes, and if your web instances need to create a new database connection, or reconnect, authentication tokens will need to be refreshed if they have expired, otherwise the connection will be rejected.

For an implementation guide, check out How do I allow users to authenticate to an Amazon RDS MySQL DB instance using their IAM credentials. For Ruby applications, you can get the authentication token in your application by leveraging the auth_token_generator method in the Ruby aws-sdk.

Set up encryption in transit using the HTTPS protocol

In the Elastic Beanstalk architecture, you can encrypt data in transit at three connection points: from your clients to the load balancer, from the load balancer to the EC2 instances, and from the EC2 instances to the RDS database.

Securing the connection from clients to the ALB

You can use a custom domain name to use HTTPS for your Elastic Beanstalk environment and have your clients can connect securely to your environment. If you don’t have a domain name, you can assign a self-signed server certificate to your ALB to use HTTPS for development and testing purposes.

To secure the connection to your ALB, add a HTTPS listener for the traffic inbound port (typically 443) and attach an TLS / SSL server certificate (X.509 certificate). To generate certificates, use AWS Certificate Manager or third-party providers such as Let’s Encrypt. For a walkthrough on how to set up an HTTPS listener through the console or through .ebextensions configuration files, see the Configuring your Elastic Beanstalk environment’s load balancer to terminate HTTPS.

Securing the connection from the ALB to the EC2 instances

While securing the connection between clients and the ALB is enough for most applications, in some cases a complete end-to-end encryption may be required; for example, to comply with (external) regulations. To secure the connection from your ALB to your application running on an EC2 instance, you must use the .ebextensions configuration files to modify the software running on the instance. You then need to allow the HTTPS traffic to pass through from the ALB to your EC2 instance by allowing inbound traffic on port 443 on the instance’s security group. For a Ruby specific example, see Terminating HTTPS on EC2 instances running Ruby.

For a complete end-to-end encryption walkthrough, see How can I configure HTTPS for my Elastic Beanstalk environment?

Securing the RDS connection

To securely connect from your application to your RDS database, you can use SSL or TLS to encrypt the connection. You will need to download an RDS root certificate and require your application to use this certificate when connecting to the RDS instance to verify the RDS server certificate. For more information on how to download and use the root certificate to setup a secure RDS connection, see the Using SSL with a MySQL DB instance documentation page.

This post has shown you how to align your application with some of the security best practices of the Well-Architected Framework. After completing these steps, your architecture includes four key modifications to improve security:

  1. The EC2 and RDS instances are deployed in a private subnet.
  2. The logging and source code S3 bucket is encrypted.
  3. An encrypted RDS instance is attached.
  4. Encryption occurs in transit by using the HTTPS protocol.

Conclusion

In this post, we’ve covered the additional configuration you should be aware of to harden the security posture of your Elastic Beanstalk applications, aligning to the Security pillar of the Well-Architected Framework. The final setup you created uses a VPC and private subnets to allow internet access only to resources that require it, and provides encryption at rest and in transit using AWS Cloud Security services and secure protocols. The Well-Architected Framework describes additional concepts, design principles, and architectural best practices for designing and running workloads in the cloud. To learn more, see AWS Well-Architected.

 
If you have feedback about this post, submit comments in the Comments section below.

Want more AWS Security news? Follow us on Twitter.

Laurens Brinker

Laurens Brinker

Laurens Brinker is an Associate Solutions Architect based in London who is part of the Security Community at AWS. Laurens joined AWS as part of the TechU Graduate program in 2020 and now helps customers running their workloads securely in the AWS Cloud. Outside of work, Laurens enjoys cycling, a casual game of chess, and building small web applications.

Katja Philipp

Katja Philipp

Katja Philipp is an Associate Solutions Architect based in Germany. With a background in M.Sc. Information Systems, she joined AWS in September 2020 with the TechU Graduate program. She enables her customers in the Power & Utilities vertical with best practices around their cloud journey. Katja is passionate about sustainability and how technology can be leveraged to solve current challenges for a better future.

Laura Verghote

Laura Verghote

Laura Verghote is an Associate Technical Trainer based in London, UK. With a background in electrical engineering, she joined AWS in September 2020 with the TechU Graduate program. She delivers a variety of technical trainings to AWS customers across EMEA.

Kimessha Paupamah

Kimessha Paupamah

Kimessha Paupamah is a ProServe Consultant based in South Africa. With a background in Computer Science, she joined AWS in September 2020 with the TechU Graduate program. She accelerates customer business outcomes through guidance on how to architect, design, develop and implement the AWS platform. Kimessha is passionate about enabling customers to build innovative solutions in the cloud.

Benjamin Richer

Benjamin Richer

Benjamin Richer is an Associate Solutions Architect based in Paris. With a background in Network & Telecom, he joined AWS in 2020 through the TechU Graduate Program. Currently working in the Digital Native Business segment he helps grown up Startups optimizing their workload in the Cloud.

Snaring the Bad Folks

Post Syndicated from Netflix Technology Blog original https://netflixtechblog.com/snaring-the-bad-folks-66726a1f4c80

Project by Netflix’s Cloud Infrastructure Security team (Alex Bainbridge, Mike Grima, Nick Siow)

Cloud security is a hard problem, but an even harder one is cloud security at scale. In recent years we’ve seen several cloud focused data breaches and evidence shows that threat actors are becoming more advanced with their techniques, goals, and tooling. With 2021 set to be a new high for the number of data breaches, it was plainly evident that we needed to evolve how we approach our cloud infrastructure security strategy.

In 2020, we decided to reinvent how we handle cloud security findings by redefining how we write and respond to cloud detections. We knew that given our scale, we needed to rely heavily on automations and that we needed to build our solutions using battle tested scalable infrastructure.

Introducing Snare

Snare Logo

Snare is our Detection, Enrichment, and Response platform for handling cloud security related findings at Netflix. Snare is responsible for receiving millions of records a minute, analyzing, alerting, and responding to them. Snare also provides a space for our security engineers to track what’s going on, drill down into various findings, follow their investigation flow, and ensure that findings are reaching their proper resolution. Snare can be broken down into the following parts: Detection, Enrichment, Reporting & Management, and Remediation.

Snare Finding Lifecycle

Overview

Snare was built from the ground up to be scalable to manage Netflix’s massive scale. We currently process tens of millions of log records every minute and analyze these events to perform in-house custom detections. We collect findings from a number of sources, which includes AWS Security Hub, AWS Config Rules, and our own in-house custom detections. Once ingested, findings are then enriched and processed with additional metadata collected from Netflix’s internal data sources. Finally, findings are checked against suppression rules and routed to our control plane for triaging and remediation.

Where We Are Today

We’ve developed, deployed, and operated Snare for almost a year, and since then, we’ve seen tremendous improvements while handling our cloud security findings. A number of findings are auto remediated, others utilize slack alerts to loop in the oncall to triage via the Snare UI. One major improvement was a direct time savings for our detection squad. Utilizing Snare, we were able to perform more granular tuning and aggregation of findings leading to an average of 73.5% reduction in our false positive finding volume across our ingestion streams. With this additional time, we were able to focus on new detections and new features for Snare.

Speaking of new detections, we’ve more than doubled the number of our in-house detections, and onboarded several detection solutions from security vendors. The Snare framework enables us to write detections quickly and efficiently with all of the plumbing and configurations abstracted away from us. Detection authors only need to be concerned with their actual detection logic, and everything else is handled for them.

Simple Snare Root User Detection

As for security vendors, we’ve most notably worked with AWS to ensure that services like GuardDuty and Security Hub are first class citizens when it comes to detection sources. Integration with Security Hub was a critical design decision from the start due to the high amount of leverage we get from receiving all of the AWS Security findings in a normalized format and in a centralized location. Security Hub has played an integral role in our platform, and made evaluations of AWS security services and new features easy to try out and adopt. Our plumbing between Security Hub and Snare is managed through AWS Organizations as well as EventBridge rules deployed in every region and account to aid in aggregating all findings into our centralized Snare platform.

High Level Security Service Plumbing
Example AWS Security Finding from our testing/sandbox account In Snare UI

One area that we are investing heavily is our automated remediation potential. We’ve explored a few different options ranging from fully automated remediations, manually triggered remediations, as well as automated playbooks for additional data gathering during incident triage. We decided to employ AWS Step Functions to be our execution environment due to the unique DAGs we could build and the simplistic “wait”/”task token” functionality, which allows us to involve humans when necessary for approval/input.

Building on top of step functions, we created a 4 step remediation process: pre-processing, decision, remediation, and post-processing. Pre/post processing can be used for managing out-of-band resource checks, or any work that needs to be done in order to ensure a successful remediation. The decision step is used to perform a final pre-flight check before remediation. This can involve a human reachout, verifying the resource is still around, etc. The remediation step is where we perform our actual remediation. We’ve been able to use this to a great deal of success with infrastructure-wide misconfigured resources being automatically fixed near real time, and enabling the creation of new fully automated incident response playbooks. We’re still exploring new ways we might be able to use this, and are excited for how we might evolve our approach in the near future.

Step Function DAG for S3 Public Access Block Remediation

Diagram from a remediation to enable S3’s public access block on a non-compliant bucket. Each choice stage allows for dynamic routing to a variety of different stages based on the output of the previous function. Wait stages are used when human intervention/approval is needed.

Extensible Learnings

We’ve come a long way in our journey, and we’ve had numerous learning opportunities that we wanted to collect and share. Hopefully, we’ve made the mistakes and learned from those experiences.

Information is Key

Home grown context and metadata streams are invaluable for a detection and response program. By uniting detections and context, you’re able to unlock a new world of possibilities for reducing false positives, creating new detections that rely on business specific context, and help better tailor your severities and automated remediation decisions based on your desired risk appetite. A common theme we’ve often encountered is the need to bring additional context throughout various stages of our pipeline, so make sure to plan for that from the get-go.

Step Functions for Remediations

Step functions provide a highly extensible and unique platform to create remediations. Utilizing the AWS CDK, we were able to build a platform to enable us to easily roll out new remediations. While creating our remediation platform, we explored SSM Automation Runbooks. While SSM Automation Runbooks have great potential for remediating simple issues, we found they weren’t flexible enough to cover a wide spread of our needs, nor did they offer some of the more advanced features we were looking for such as reaching out to humans. Step functions gave us the right amount of flexibility, control, and ease of use in order to be a great asset for the Snare platform.

Closing Thoughts

We’ve come a long way in a year, and we still have a number of interesting things on the horizon. We’re looking at continuing to create new, more advanced features and detections for Snare to reduce cloud security risks in order to keep up with all of the exciting things happening here at Netflix. Make sure to check out some of our other recent blog posts!

Special Thanks

Special thanks to everyone who helped to contribute and provide feedback during the design and implementation of Snare. Notably Shannon Morrison, Sapna Solanki, Jason Schroth from our partner team Detection Engineering, as well as some of the folks from AWS — Prateek Sharma & Ely Kahn. Additional thanks to the rest of our Cloud Infrastructure Security team (Hee Won Kim, Joseph Kjar, Steven Reiling, Patrick Sanders, Srinath Kuruvadi) for their support and help with Snare features, processes, and design decisions!


Snaring the Bad Folks was originally published in Netflix TechBlog on Medium, where people are continuing the conversation by highlighting and responding to this story.

Zabbix 6.0 LTS – The next great leap in monitoring by Alexei Vladishev / Zabbix Summit Online 2021

Post Syndicated from Alexei Vladishev original https://blog.zabbix.com/zabbix-6-0-lts-the-next-great-leap-in-monitoring-by-alexei-vladishev-zabbix-summit-online-2021/17683/

The Zabbix Summit Online 2021 keynote speech by Zabbix founder and CEO Alexei Vladishev focuses on the role of Zabbix in modern, dynamic IT infrastructures. The keynote speech also highlights the major milestones leading up to Zabbix 6.0 LTS and together we take a look at the future of Zabbix.

The full recording of the speech is available on the official Zabbix Youtube channel.

Digital transformation journey
Infrastructure monitoring challenges
Zabbix – Universal Open Source enterprise-level monitoring solution
Cost-Effectiveness
Deploy Anywhere
Monitor Anything
Monitoring of Kubernetes and Hybrid Clouds
Data collection and Aggregation
Security on all levels
Powerful Solution for MSPs
Scalability and High Availability
Machine learning and Statistical analysis
More value to users
New visualization capabilities
IoT monitoring
Infrastructure as a code
Tags for classification
What’s next?
Advanced event correlation engine
Multi DC Monitoring
Zabbix Release Schedule
Zabbix Roadmap
Questions

Digital transformation journey

First, let’s talk about how Zabbix plays a role as a part of the Digital Transformation journey for many companies.

As IT infrastructures evolve, there are many ongoing challenges. Most larger companies for example have a set of legacy systems that require to be integrated with more modern systems. This results in a mix of legacy and new technologies and protocols. This means that most management and monitoring tools need to support all of these technologies – Zabbix is no exception here.

Hybrid clouds, containers, and container orchestration systems such as K8S and OpenShift have also played an immense part in the digital transformation of enterprises. It has been a very major paradigm shift – from physical machines to virtual machines, to containers and hybrid parts. We certainly must provide the required set of technologies to monitor such environments and the monitoring endpoints unique to them.

The rapid increase in the complexity of IT infrastructures caused by the two previous points requires our tools to be a lot more scalable than before. We have many more moving parts, likely located in different locations that we need to stay aware of. This also means that any downtime is not acceptable – this is why the high availability of our tools is also vital to us.

Let’s not forget that with increased complexity, many new potential security attack vectors arise and our tools need to support features that can help us with minimizing the security risks.

But making our infrastructures more agile usually comes at a very real financial cost. We must not forget that most of the time we are working with a dedicated budget for our tools and procedures.

Infrastructure monitoring challenges

The increase in the complexity of IT infrastructures also poses multiple monitoring challenges that we have to strive to overcome:

  • Requirements for scalability and high availability for our tools
    • The growing number of devices and networks as well as the increased complexity of IT infrastructures
  • Increasingly complex infrastructures often force us to utilize multiple tools to obtain the required metrics
    • This leads to a requirement for a single pane of glass to enable centralized monitoring
  • Collecting values is often not enough – we need to be able to leverage the collected data to gain the most value out of it
  • We need a solution that can deliver centralized visualization and reporting based on the obtained data
  • Our tools need to be hand-picked so that they can deliver the best ROI in an already complex infrastructure

Zabbix – Universal Open Source enterprise-level monitoring solution

Zabbix is a Universal free and Open Source enterprise-level monitoring solution. The tool comes at absolutely no cost and is available for everyone to try out and use. Zabbix provides the monitoring of modern IT infrastructures on multiple levels.

Universal is the term that we are focusing on. Given the open-source nature of the product, Zabbix can be used in infrastructures of different sizes – from small and medium organizations to large, globe-spanning enterprises. Zabbix is also capable of delivering monitoring of the whole IT stack – from hardware and network monitoring to high-level monitoring such as Business Service monitoring and more.

Cost-Effectiveness

Zabbix delivers a large set of enterprise-grade features at no cost! Features such as 2FA, Single sign-on solutions, no restrictions when it comes to data collection methods, number of monitored devices and services, or database size.

  • Exceptionally low total cost of ownership
    • Free and Open Source solution with quality and security in mind
    • Backed by reliable vendors, a global partner network, and commercial services, such as the 24/7 support
    • No limitations regarding how you use the software
    • Free and readily available documentation, HOWTOs, community resources, videos, and more.
    • Zabbix engineers are easy to find and hire for your organization
    • Cost is fully under your control – Zabbix Commercial services are under fixed-price agreements

Deploy Anywhere

Our users always have the choice of where and how they wish to deploy Zabbix. With official packages for the most popular operating systems such as RHEL, Oracle Linux, Ubuntu, Raspberry Pi OS, and more. With official Helm charts, you can quickly also deploy Zabbix in a Kubernetes cluster or in your OpenShift instance. We also provide official Docker container images with pre-installed Zabbix components that you can deploy in your environment.

We also provide one-click deployment options for multiple cloud service providers, such as Amazon AWS, Microsoft Azure, Google Cloud, Openstack, and many other cloud service providers.

Monitor Anything

With Zabbix, you can monitor anything – from legacy solutions to modern systems. With a large selection of official solutions and substantial community backing our users can be sure that they can find a suitable approach to monitor their IT infrastructure components. There are hundreds of ready-to-use monitoring solutions by Zabbix.

Whenever you deploy a new IT solution in your enterprise, you will want to tie it together with the existing toolset. Zabbix provides many out of the box integrations for the most popular ticketing and alerting systems

Recently we have introduced advanced search capabilities for the Zabbix integrations page, which allows you to quickly lookup the integrations that currently exist on the market. If you visit the Zabbix integrations page and look up a specific vendor or tool, you will see a list of both the official solutions supported by Zabbix and also a long list of community solutions backed by our users, partners, and customers.

Monitoring of Kubernetes and Hybrid Clouds

Nowadays many existing companies are considering migrating their existing infrastructure to either solutions such as Kubernetes or OpenShift, or utilizing cloud service providers such as Amazon AWS or Microsoft Azure.

I am proud to announce, that with the release of Zabbix 6.0 LTS, Zabbix will officially support out-of-the-box monitoring of OpenShfit and Kubernetes clusters.

Data collection and Aggregation

Let’s cover a few recent features that improve the out-of-the-box flexibility of Zabbix by a large margin.

Synthetic monitoring is a feature that was introduced a year ago in Zabbix version 5.2 and it has already become quite popular with our user base. The feature enables monitoring of different devices and solutions over the HTTP protocol. By using synthetic monitoring Zabbix can connect to your HTTP endpoints, such as cloud APIs, Kubernetes, and OpenShift APIs, and other HTTP endpoints, collect the metrics and then process them to extract the required information. Synthetic monitoring is extremely transparent and flexible – it can be fine-tuned to communicate with any HTTP endpoints.

Another major feature introduced in Zabbix 5.4 is the new trigger syntax. This enables our users to define much more flexible trigger expressions, supporting many new problem detection use cases. In addition, we can use this syntax to perform flexible data aggregation operations. For example, now we can aggregate data filtered by wildcards, tags, and host groups, instead of specifying individual items. This is extremely valuable for monitoring complex infrastructures, such as Kubernetes or cloud environments. At the same time, the new syntax is a lot more simple to learn and understand when compared to the old trigger syntax.

Security on all levels

Many companies are concerned about security and data protection when it comes to the tools that they are using in their day-to-day tasks. I’m happy to tell you that Zabbix follows the highest security standards when it comes to the development and usage of the product.

Zabbix is secure by design. In the diagram below you can see all of the Zabbix components, all of which are interconnected, like Zabbix Agent, Server, Proxy, Database, and Frontend. All of the communication between different Zabbix components can be encrypted by using strong encryption protocols like TLS.

If you’re using Zabbix Agent, the agent does not require root privileges. You can run Zabbix Agent under a normal user with all of the necessary user level restrictions in place. Zabbix agent can also be restricted with metric allow and deny lists, so it has access only to the metrics which are permitted for collection by your company policies.

The connections between the Zabbix database backend and the Zabbix Frontend and Zabbix Server also support encryption as of version 5.0 LTS.

As for the frontend component – users can add an additional security layer for their Zabbix frontends by configuring 2FA and SSO logins. Zabbix 6.0 LTS also introduces flexible login password complexity requirements, which can reduce the security breach risk if your frontend is exposed to the internet. To ensure that Zabbix meets the highest standards of the company security compliance, the new Audit log, introduced in Zabbix 6.0 LTS, is capable of logging all of the Zabbix Frontend and Zabbix Server operations.

For an additional security layer – sensitive information like Usernames, Passwords, API keys can be stored in an external vault. Currently, Zabbix supports secret storage in the HashiCorp Vault. Support for the CyberArk vault will be added in the Zabbix 6.2 release.

Another Zabbix feature – the Zabbix API, is often used for the automation of day-to-day configuration workflows, as well as custom integrations and data migration tasks. Zabbix 5.4 added the ability to create API tokens for particular frontend users with pre-defined token expiration dates.

In Zabbix 5.2 we added another layer for the Zabbix Frontend user permissions – User Roles. Now it is possible to define granular user roles with different types of rights and privileges, assigned to specific types of users in your organization. With User Roles, we can define which parts of the Zabbix UI the specific user role has access to and which UI actions the members of this role can perform. This can be combined with API method restrictions which can also be defined for a particular role.

Powerful Solution for MSPs

When we combine all of these features, we can see how Zabbix becomes a powerful solution for MSP customers. MSPs can use Zabbix as an added value service. This way they can provide a monitoring service for their customers and get additional revenue out of it. It is possible to build a customer portal which is a combination of User Roles for read-only access to dashboards and customized UI, rebranding option – which was just introduced in Zabbix 6.0 LTS, and a combination of SLA reporting together with scheduled PDF reports, so the customers can receive reports on a weekly, daily or monthly basis.

Scalability and High Availability

With a growing number of devices and ever-increasing network complexity, Scalability and High availability are extremely important requirements.

Zabbix provides Load balancing options for Zabbix UI and Zabbix API. In order to scale the Zabbix Frontend and Zabbix API, we can simply deploy additional Zabbix Frontend nodes, thus introducing redundancy and high availability.

Zabbix 6.0 LTS comes with out-of-the-box support for the Zabbix Server High Availability cluster. If one of the Zabbix Server nodes goes down, Zabbix will automatically switch to one of the standby nodes. And the best thing about the Zabbix Server High Availability cluster – it takes only 5 minutes to get it up and running. the HA cluster is very easy to configure and use.

One of the features in our future roadmap is introducing support for the History API to work with different time-series DB backends for extra efficiency and scalability. Another feature that we would like to implement in the future is load balancing for Zabbix Servers and Zabbix Proxies. Combining all of these features would truly make Zabbix a cloud-native application with unlimited horizontal scalability.

Machine learning and Statistical analysis

Defining static trigger thresholds is a relatively simple task, but it doesn’t scale too well in dynamic environments. With Machine Learning and Statistical Analysis, we can analyze our data trends and perform anomaly detection. This has been greatly extended in Zabbix 6.0 LTS with Anomaly Detection and Baseline Monitoring functionality.

Zabbix 6.0 Adds an extended set of functions for trend analysis and trend prediction. These support multiple flexible parameters, such as the ability to define seasonality for your data analysis. This is another way how to get additional insights out of the data collected by Zabbix

More value to users

When I think about the direction that Zabbix is headed in, and look at the Zabbix roadmap, one of the main questions I ask is “How can we deliver more value to our enterprise users?”

In Zabbix 6.0 LTS we made some major steps to make Zabbix fit not only for infrastructure monitoring but also fit for Business Service monitoring – the monitoring of services that we provide for our end-users or internal company users. Zabbix 6.0 LTS comes with complex service level object definitions, real-time SLA reporting, multi-tenancy options, Business Service alerting options, and root cause and Impact analysis.

New visualization capabilities

It is important to present the collected data in a human-readable way. That’s why we invest a lot of time and effort in order to improve the native visualization capabilities. In Zabbix 6.0 LTS we have introduced Geographical Maps together with additional widgets for TOP N reporting and templated and multi-page dashboards.

The introduction of reports in Zabbix 5.2 allowed our users to leverage their Zabbix Dashboards to generate scheduled PDF reports with respect to user permissions. Our users can generate daily, weekly, monthly or yearly reports and send them to their infrastructure administrators or customers.

IoT monitoring

With the introduction of support for Modbus and MQTT protocols, Zabbix can be used to monitor IoT devices and obtain environmental information from different sensors such as temperature, humidity, and more. In addition, Zabbix can now be used to monitor factory equipment, building management systems, IoT gateways, and more.

Infrastructure as a code

With IT infrastructures growing in scale, automation is more important than ever. For this reason, many companies prefer preserving and deploying their infrastructure as code. With the support of YAML format for our templates, you can now keep them in a git repository and by utilizing CI/CD tools you can now deploy your templates automatically.

This enables our users to manage their templates in a central location – the git repository, which helps users to perform change management and versioning and then deploy the template to Zabbix by using CI/CD tools.

Tags for classification

Over the past few versions, we have made a major push to support tags for most Zabbix entities. The switch from applications to tags in Zabbix 5.4 made the tool much more flexible. Tags can now be used for the classification of items, triggers, hosts, business services. The tags that the users define can also be used in alerting, filtering, and reporting.

What’s next?

You’re probably wondering – what’s coming next? What are the main vectors for the future development of Zabbix?

First off – we will continue to invest in usability. While the tool is made by professionals for professionals, it is important for us to make using the tool as easy as possible. Improvements to the Zabbix Frontend, general usability, and UX can be expected very soon.

We plan to continue to invest in the visualization and reporting capabilities of Zabbix. We want all data collected by our monitoring tool to provide information in a single pane of glass. This way our users can see the full picture of their environment while also seeing the root cause analysis for the ongoing problems that we face. This way we can get most of the data that Zabbix collects.

Extending the scope of monitoring is an ongoing process for us. We would like to implement additional features for compliance monitoring. I think that we will be able to introduce a solution for application performance monitoring very soon. We’d like to make log monitoring more powerful and comprehensive. monitoring of public and private clouds is also very important for us, given the current IT paradigms.

We’d like to make sure that Zabbix is absolutely extendable on all levels. While we can already extend Zabbix with different types of plugins, webhooks, and UI modules there’s more to come in the near future.

The topic of high availability, scalability, and load balancing is extremely important to us. We will continue building on the existing foundations to make Zabbix a truly cloud-native solution.

Advanced event correlation engine

Advanced event processing is a really important topic. When we talk about a monitoring solution, we pay very much attention to the number of metrics that we are collecting. We mustn’t forget, that for large-scale environments the number of events that we generate based on those metrics is also extremely important. We need to keep control and manage the ever-growing number of different events coming from different sources. This is why we would like to focus on noise reduction, specifically – root cause analysis.

For this reason, we can expect Zabbix to introduce an advanced event correlation model in the future. This model should have the ability to filter and deduplicate the events as well as perform event enrichment, thus leading to a much better root cause analysis.

Multi DC Monitoring

Currently, Multi DC monitoring can be done with Zabbix by deploying a distributed Zabbix instance that utilizes Zabbix proxies. But there are use cases, where it would be more beneficial to have multiple Zabbix servers deployed across different datacenters – all reporting to a single location for centralized event processing, centralized visualization, and reporting as well as centralized dashboards. This is something that is coming soon to Zabbix.

Zabbix Release Schedule

Of course, the burning question is – when is Zabbix 6.0 LTS going to be released? And we are very close to finalizing the next LTS release. I would expect Zabbix 6.0 LTS to be officially released in January 2022.

As for Zabbix 6.2 and 6.4 – these releases are still planned for Q2 and Q4, 2022. The next LTS release – Zabbix 7.0 LTS is planned to be released in Q2, 2023.

Zabbix Roadmap

If you want to follow the development of Zabbix – we have a special page just for that – the Zabbix Roadmap. Here you can find up-to-date information about the development plans for Zabbix 6.2, 6.4, and 7.0 LTS. The Roadmap also represents the current development status of Zabbix 6.0 LTS.

Questions

Q: What would you say is the main benefit of why users should migrate from Zabbix 5.0/4.0 or older versions to 6.0 LTS?

A: I think that Zabbix 6.0 LTS is a very different product – even when you compare it with the relatively recent Zabbix 5.0 LTS. It comes with many improvements, some of which I mentioned here in my keynote. For example, Business Service monitoring provides huge added value to enterprise customers.

With the new trigger syntax and the new functions related to anomaly detection and baseline monitoring our users can get much more out of the data that they already have in their monitoring tool.

The new visualization options – multiple new widgets, geographical maps, scheduled PDF reporting provide a lot of added value to our end-users and to their customers as well.

Q: Any plans to make changes on the Zabbix DB backend level – make it more scaleable or completely redesign it?

A: Right now we keep all of our information in a relational database such as MySQL or PostgreSQL. We have added the support for TimescaleDB which brings some huge advantages to our users, thanks to improved data storage and performance efficiency.

But we still have users that wish to connect different storage engines to Zabbix – maybe specifically optimized to keep time-series data. Actually, this is already on our roadmap. Our plan is to introduce a unified API for historical data so that if you wish to attach your own storage, we just have to deploy a plugin that will communicate both with our historical API and also talk to the storage engine of your choosing. This feature is coming and is already on our Roadmap.

Q: What is your personal favorite feature? Something that you 100% wanted to see implemented in Zabbix 6.0 LTS?

A: I see Zabbix 6.0 LTS as a combination of Zabbix 5.2, 5.4, and finally the features introduced directly in Zabbix 6.0 LTS. Personally, I think that my favorite features in Zabbix 6.0 LTS are features that make up the latest implementation of Anomaly detection.

We could be at the very beginning of exploring more advanced machine learning and statistical analysis capabilities, but I’m pretty sure that with every new release of Zabbix there will be new features related to machine learning, anomaly detection, and trend prediction.

This could provide a way for Zabbix to generate and share insights with our users. Analysis of what’s happening with your system, with your metrics – how the metrics in your system behave.


Store your Cloudflare logs on R2

Post Syndicated from Tanushree Sharma original https://blog.cloudflare.com/store-your-cloudflare-logs-on-r2/

Store your Cloudflare logs on R2

Store your Cloudflare logs on R2

We’re excited to announce that customers will soon be able to store their Cloudflare logs on Cloudflare R2 storage. Storing your logs on Cloudflare will give CIOs and Security Teams an opportunity to consolidate their infrastructure; creating simplicity, savings and additional security.

Cloudflare protects your applications from malicious traffic, speeds up connections, and keeps bad actors out of your network. The logs we produce from our products help customers answer questions like:

  • Why are requests being blocked by the Firewall rules I’ve set up?
  • Why are my users seeing disconnects from my applications that use Spectrum?
  • Why am I seeing a spike in Cloudflare Gateway requests to a specific application?

Storage on R2 adds to our existing suite of logging products. Storing logs on R2 fills in gaps that our customers have been asking for: a cost-effective solution to store logs for any of our products for any period of time.

Goodbye to old school logging

Let’s rewind to the early 2000s. Most organizations were running their own self-managed infrastructure: network devices, firewalls, servers and all the associated software. Each company has to manage logs coming from hundreds of sources in the IT stack. With dedicated storage needed for retaining an endless volume of logs, specialized teams are required to build an ETL pipeline and make the data actionable.

Fast-forward to the 2010s. Organizations are transitioning to using managed services for their IT functions. As a result of this shift, the way that customers collect logs for all their services have changed too. With managed services, much of the logging load is shifted off of the customer.

The challenge now: collecting logs from a combination of managed services, each of which has its own quirks. Logs can be sent at varying latencies, in different formats and some are too detailed while others not detailed enough. To gain a single pane view of their IT infrastructure, companies need to build or buy a SIEM solution.

Cloudflare replaces these sets of managed services. When a customer onboards to Cloudflare, we make it super easy to gain visibility to their traffic that hits our network. We’ve built analytics for many of our products, such as CDN, Firewall, Magic Transit and Spectrum to both view high level trends and dig into patterns by slicing and dicing data.

Analytics are a great way to see data at an aggregate level, but we know that raw logs are important to our customers as well, so we’ve built out a set of logging products.

Logging today

During Speed Week we announced Instant Logs to show customers traffic as it hits their domain. Instant Logs is perfect for live debugging and triaging use cases. Monitor your traffic, make a config change and instantly view its impacts. In cases where you need to retroactively inspect your logs, we have Logpush.

We’ve built an impressive logging pipeline to get data from the 250+ cities that house our data centers to our customers in under a minute using Logpush. If your organization has existing practices for getting data across your stack into one place, we support Logpush to a variety of cloud storage or SIEM destinations. We also have partnerships in place with major SIEM platforms to surface Cloudflare data in ways that are meaningful to our customers.

Last but not least is Logpull. Using Logpull, customers can access HTTP request logs using our REST API. Our customers like Logpull because it’s easy to configure, they don’t have to worry about storing logs on a third party, and you can pull data ad hoc for up to seven days.

Why Cloudflare storage?

The top four requests we’ve heard from customers when it comes to logs are:

  • I have tight budgets and need low cost log storage.
  • They should be low effort to set up and maintain.
  • I should be able to store logs for as long as I need to.
  • I want to access my logs on Cloudflare for any product.

For many of our customers, Cloudflare is one of the most important data sources, and it also generates more data than other applications on their IT stack. R2 is significantly cheaper than other cloud providers, so our customers don’t need to compromise by sampling or leaving out logs from products all together in order to cut down on costs.

Just like the simplicity of Logpull, log storage on R2 will be quick and easy. With a one click setup, we’ll store your logs, and you don’t have to worry about any configuration details. Retention is totally in our customer’s control to match the security and compliance needs of their business. With R2, you can also store your logs for any products we have logging for today (and we’re always adding more as our product line expands).

Log storage; we’re just getting started

With log storage on Cloudflare, we’re creating the building blocks to allow customers to perform log analysis and forensics capabilities directly on Cloudflare. Whether conducting an investigation, responding to a support request or addressing an incident, using analytics for a birds eye view and inspecting logs to determine the root cause is a powerful combination.

If you’re interested in getting notified when you can store your logs on Cloudflare, sign up through this form.

We’re always looking for talented engineers to take on the challenges of working with data at an incredible scale. If you’re interested apply here.

Replace your hardware firewalls with Cloudflare One

Post Syndicated from Ankur Aggarwal original https://blog.cloudflare.com/replace-your-hardware-firewalls-with-cloudflare-one/

Replace your hardware firewalls with Cloudflare One

Replace your hardware firewalls with Cloudflare One

Today, we’re excited to announce new capabilities to help customers make the switch from hardware firewall appliances to a true cloud-native firewall built for next-generation networks. Cloudflare One provides a secure, performant, and Zero Trust-enabled platform for administrators to apply consistent security policies across all of their users and resources. Best of all, it’s built on top of our global network, so you never need to worry about scaling, deploying, or maintaining your edge security hardware.

As part of this announcement, Cloudflare launched the Oahu program today to help customers leave legacy hardware behind; in this post we’ll break down the new capabilities that solve the problems of previous firewall generations and save IT teams time and money.

How did we get here?

In order to understand where we are today, it’ll be helpful to start with a brief history of IP firewalls.

Stateless packet filtering for private networks

The first generation of network firewalls were designed mostly to meet the security requirements of private networks, which started with the castle and moat architecture we defined as Generation 1 in our post yesterday. Firewall administrators could build policies around signals available at layers 3 and 4 of the OSI model (primarily IPs and ports), which was perfect for (e.g.) enabling a group of employees on one floor of an office building to access servers on another via a LAN.

This packet filtering capability was sufficient until networks got more complicated, including by connecting to the Internet. IT teams began needing to protect their corporate network from bad actors on the outside, which required more sophisticated policies.

Better protection with stateful & deep packet inspection

Firewall hardware evolved to include stateful packet inspection and the beginnings of deep packet inspection, extending basic firewall concepts by tracking the state of connections passing through them. This enabled administrators to (e.g.) block all incoming packets not tied to an already present outgoing connection.

These new capabilities provided more sophisticated protection from attackers. But the advancement came at a cost: supporting this higher level of security required more compute and memory resources. These requirements meant that security and network teams had to get better at planning the capacity they’d need for each new appliance and make tradeoffs between cost and redundancy for their network.

In addition to cost tradeoffs, these new firewalls only provided some insight into how the network was used. You could tell users were accessing 198.51.100.10 on port 80, but to do a further investigation about what these users were accessing would require you to do a reverse lookup of the IP address. That alone would only land you at the front page of the provider, with no insight into what was accessed, reputation of the domain/host, or any other information to help answer “Is this a security event I need to investigate further?”. Determining the source would be difficult here as well, it would require correlating a private IP address handed out via DHCP with a device and then subsequently a user (if you remembered to set long lease times and never shared devices).

Application awareness with next generation firewalls

To accommodate these challenges, the industry introduced the Next Generation Firewall (NGFW). These were the long reigning, and in some cases are still the industry standard, corporate edge security device. They adopted all the capabilities of previous generations while adding in application awareness to help administrators gain more control over what passed through their security perimeter. NGFWs introduced the concept of vendor-provided or externally-provided application intelligence, the ability to identify individual applications from traffic characteristics. Intelligence which could then be fed into policies defining what users could and couldn’t do with a given application.

As more applications moved to the cloud, NGFW vendors started to provide virtualized versions of their appliances. These allowed administrators to no longer worry about lead times for the next hardware version and allowed greater flexibility when deploying to multiple locations.

Over the years, as the threat landscape continued to evolve and networks became more complex, NGFWs started to build in additional security capabilities, some of which helped consolidate multiple appliances. Depending on the vendor, these included VPN Gateways, IDS/IPS, Web Application Firewalls, and even things like Bot Management and DDoS protection. But even with these features, NGFWs had their drawbacks — administrators still needed to spend time designing and configuring redundant (at least primary/secondary) appliances, as well as choosing which locations had firewalls and incurring performance penalties from backhauling traffic there from other locations. And even still, careful IP address management was required when creating policies to apply pseudo identity.

Adding user-level controls to move toward Zero Trust

As firewall vendors added more sophisticated controls, in parallel, a paradigm shift for network architecture was introduced to address the security concerns introduced as applications and users left the organization’s “castle” for the Internet. Zero Trust security means that no one is trusted by default from inside or outside the network, and verification is required from everyone trying to gain access to resources on the network. Firewalls started incorporating Zero Trust principles by integrating with identity providers (IdPs) and allowing users to build policies around user groups — “only Finance and HR can access payroll systems” — enabling finer-grained control and reducing the need to rely on IP addresses to approximate identity.

These policies have helped organizations lock down their networks and get closer to Zero Trust, but CIOs are still left with problems: what happens when they need to integrate another organization’s identity provider? How do they safely grant access to corporate resources for contractors? And these new controls don’t address the fundamental problems with managing hardware, which still exist and are getting more complex as companies go through business changes like adding and removing locations or embracing hybrid forms of work. CIOs need a solution that works for the future of corporate networks, instead of trying to duct tape together solutions that address only some aspects of what they need.

The cloud-native firewall for next-generation networks

Cloudflare is helping customers build the future of their corporate networks by unifying network connectivity and Zero Trust security. Customers who adopt the Cloudflare One platform can deprecate their hardware firewalls in favor of a cloud-native approach, making IT teams’ lives easier by solving the problems of previous generations.

Connect any source or destination with flexible on-ramps

Rather than managing different devices for different use cases, all traffic across your network — from data centers, offices, cloud properties, and user devices — should be able to flow through a single global firewall. Cloudflare One enables you to connect to the Cloudflare network with a variety of flexible on-ramp methods including network-layer (GRE or IPsec tunnels) or application-layer tunnels, direct connections, BYOIP, and a device client. Connectivity to Cloudflare means access to our entire global network, which eliminates many of the challenges with physical or virtualized hardware:

  • No more capacity planning: The capacity of your firewall is the capacity of Cloudflare’s global network (currently >100Tbps and growing).
  • No more location planning: Cloudflare’s Anycast network architecture enables traffic to connect automatically to the closest location to its source. No more picking regions or worrying about where your primary/backup appliances are — redundancy and failover are built in by default.
  • No maintenance downtimes: Improvements to Cloudflare’s firewall capabilities, like all of our products, are deployed continuously across our global edge.
  • DDoS protection built in: No need to worry about DoS attacks overwhelming your firewalls; Cloudflare’s network automatically blocks attacks close to their source and sends only the clean traffic on to its destination.

Configure comprehensive policies, from packet filtering to Zero Trust

Cloudflare One policies can be used to secure and route your organizations traffic across all the various traffic ramps. These policies can be crafted using all the same attributes available through a traditional NGFW while expanding to include Zero Trust attributes as well. These Zero Trust attributes can include one or more IdPs or endpoint security providers.

When looking strictly at layers 3 through 5 of the OSI model, policies can be based on IP, port, protocol, and other attributes in both a stateless and stateful manner. These attributes can also be used to build your private network on Cloudflare when used in conjunction with any of the identity attributes and the Cloudflare device client.

Additionally, to help relieve the burden of managing IP allow/block lists, Cloudflare provides a set of managed lists that can be applied to both stateless and stateful policies. And on the more sophisticated end, you can also perform deep packet inspection and write programmable packet filters to enforce a positive security model and thwart the largest of attacks.

Cloudflare’s intelligence helps power our application and content categories for our Layer 7 policies, which can be used to protect your users from security threats, prevent data exfiltration, and audit usage of company resources. This starts with our protected DNS resolver, which is built on top of our performance leading consumer 1.1.1.1 service. Protected DNS allows administrators to protect their users from navigating or resolving any known or potential security risks. Once a domain is resolved, administrators can apply HTTP policies to intercept, inspect, and filter a user’s traffic. And if those web applications are self-hosted or SaaS enabled you can even protect them using a Cloudflare access policy, which acts as a web based identity proxy.

Last but not least, to help prevent data exfiltration, administrators can lock down access to external HTTP applications by utilizing remote browser isolation. And coming soon, administrators will be able to log and filter which commands a user can execute over an SSH session.

Simplify policy management: one click to propagate rules everywhere

Traditional firewalls required deploying policies on each device or configuring and maintaining an orchestration tool to help with this process. In contrast, Cloudflare allows you to manage policies across our entire network from a simple dashboard or API, or use Terraform to deploy infrastructure as code. Changes propagate across the edge in seconds thanks to our Quicksilver technology. Users can get visibility into traffic flowing through the firewall with logs, which are now configurable.

Consolidating multiple firewall use cases in one platform

Firewalls need to cover a myriad of traffic flows to satisfy different security needs, including blocking bad inbound traffic, filtering outbound connections to ensure employees and applications are only accessing safe resources, and inspecting internal (“East/West”) traffic flows to enforce Zero Trust. Different hardware often covers one or multiple use cases at different locations; we think it makes sense to consolidate these as much as possible to improve ease of use and establish a single source of truth for firewall policies. Let’s walk through some use cases that were traditionally satisfied with hardware firewalls and explain how IT teams can satisfy them with Cloudflare One.

Protecting a branch office

Traditionally, IT teams needed to provision at least one hardware firewall per office location (multiple for redundancy). This involved forecasting the amount of traffic at a given branch and ordering, installing, and maintaining the appliance(s). Now, customers can connect branch office traffic to Cloudflare from whatever hardware they already have — any standard router that supports GRE or IPsec will work — and control filtering policies across all of that traffic from Cloudflare’s dashboard.

Step 1: Establish a GRE or IPsec tunnel
The majority of mainstream hardware providers support GRE and/or IPsec as tunneling methods. Cloudflare will provide an Anycast IP address to use as the tunnel endpoint on our side, and you configure a standard GRE or IPsec tunnel with no additional steps — the Anycast IP provides automatic connectivity to every Cloudflare data center.

Step 2: Configure network-layer firewall rules
All IP traffic can be filtered through Magic Firewall, which includes the ability to construct policies based on any packet characteristic — e.g., source or destination IP, port, protocol, country, or bit field match. Magic Firewall also integrates with IP Lists and includes advanced capabilities like programmable packet filtering.

Step 3: Upgrade traffic for application-level firewall rules
After it flows through Magic Firewall, TCP and UDP traffic can be “upgraded” for fine-grained filtering through Cloudflare Gateway. This upgrade unlocks a full suite of filtering capabilities including application and content awareness, identity enforcement, SSH/HTTP proxying, and DLP.

Replace your hardware firewalls with Cloudflare One

Protecting a high-traffic data center or VPC

Firewalls used for processing data at a high-traffic headquarters or data center location can be some of the largest capital expenditures in an IT team’s budget. Traditionally, data centers have been protected by beefy appliances that can handle high volumes gracefully, which comes at an increased cost. With Cloudflare’s architecture, because every server across our network can share the responsibility of processing customer traffic, no one device creates a bottleneck or requires expensive specialized components. Customers can on-ramp traffic to Cloudflare with BYOIP, a standard tunnel mechanism, or Cloudflare Network Interconnect, and process up to terabits per second of traffic through firewall rules smoothly.

Replace your hardware firewalls with Cloudflare One

Protecting a roaming or hybrid workforce

In order to connect to corporate resources or get secure access to the Internet, users in traditional network architectures establish a VPN connection from their devices to a central location where firewalls are located. There, their traffic is processed before it’s allowed to its final destination. This architecture introduces performance penalties and while modern firewalls can enable user-level controls, they don’t necessarily achieve Zero Trust. Cloudflare enables customers to use a device client as an on-ramp to Zero Trust policies; watch out for more updates later this week on how to smoothly deploy the client at scale.

Replace your hardware firewalls with Cloudflare One

What’s next

We can’t wait to keep evolving this platform to serve new use cases. We’ve heard from customers who are interested in expanding NAT Gateway functionality through Cloudflare One, who want richer analytics, reporting, and user experience monitoring across all our firewall capabilities, and who are excited to adopt a full suite of DLP features across all of their traffic flowing through Cloudflare’s network. Updates on these areas and more are coming soon (stay tuned).

Cloudflare’s new firewall capabilities are available for enterprise customers today. Learn more here and check out the Oahu Program to learn how you can migrate from hardware firewalls to Zero Trust — or talk to your account team to get started today.

How We Used eBPF to Build Programmable Packet Filtering in Magic Firewall

Post Syndicated from Chris J Arges original https://blog.cloudflare.com/programmable-packet-filtering-with-magic-firewall/

How We Used eBPF to Build Programmable Packet Filtering in Magic Firewall

How We Used eBPF to Build Programmable Packet Filtering in Magic Firewall

Cloudflare actively protects services from sophisticated attacks day after day. For users of Magic Transit, DDoS protection detects and drops attacks, while Magic Firewall allows custom packet-level rules, enabling customers to deprecate hardware firewall appliances and block malicious traffic at Cloudflare’s network. The types of attacks and sophistication of attacks continue to evolve, as recent DDoS and reflection attacks against VoIP services targeting protocols such as Session Initiation Protocol (SIP) have shown. Fighting these attacks requires pushing the limits of packet filtering beyond what traditional firewalls are capable of. We did this by taking best of class technologies and combining them in new ways to turn Magic Firewall into a blazing fast, fully programmable firewall that can stand up to even the most sophisticated of attacks.

Magical Walls of Fire

Magic Firewall is a distributed stateless packet firewall built on Linux nftables. It runs on every server, in every Cloudflare data center around the world. To provide isolation and flexibility, each customer’s nftables rules are configured within their own Linux network namespace.

How We Used eBPF to Build Programmable Packet Filtering in Magic Firewall

This diagram shows the life of an example packet when using Magic Transit, which has Magic Firewall built in. First, packets go into the server and DDoS protections are applied, which drops attacks as early as possible. Next, the packet is routed into a customer-specific network namespace, which applies the nftables rules to the packets. After this, packets are routed back to the origin via a GRE tunnel. Magic Firewall users can construct firewall statements from a single API, using a flexible Wirefilter syntax. In addition, rules can be configured via the Cloudflare dashboard, using friendly UI drag and drop elements.

Magic Firewall provides a very powerful syntax for matching on various packet parameters, but it is also limited to the matches provided by nftables. While this is more than sufficient for many use cases, it does not provide enough flexibility to implement the advanced packet parsing and content matching we want. We needed more power.

Hello eBPF, meet Nftables!

When looking to add more power to your Linux networking needs, Extended Berkeley Packet Filter (eBPF) is a natural choice. With eBPF, you can insert packet processing programs that execute in the kernel, giving you the flexibility of familiar programming paradigms with the speed of in-kernel execution. Cloudflare loves eBPF and this technology has been transformative in enabling many of our products. Naturally, we wanted to find a way to use eBPF to extend our use of nftables in Magic Firewall. This means being able to match, using an eBPF program within a table and chain as a rule. By doing this we can have our cake and eat it too, by keeping our existing infrastructure and code, and extending it further.

If nftables could leverage eBPF natively, this story would be much shorter; alas, we had to continue our quest. To get us started in our search, we know that iptables integrates with eBPF. For example, one can use iptables and a pinned eBPF program for dropping packets with the following command:

iptables -A INPUT -m bpf --object-pinned /sys/fs/bpf/match -j DROP

This clue helped to put us on the right path. Iptables uses the xt_bpf extension to match on an eBPF program. This extension uses the BPF_PROG_TYPE_SOCKET_FILTER eBPF program type, which allows us to load the packet information from the socket buffer and return a value based on our code.

Since we know iptables can use eBPF, why not just use that? Magic Firewall currently leverages nftables, which is a great choice for our use case due to its flexibility in syntax and programmable interface. Thus, we need to find a way to use the xt_bpf extension with nftables.

How We Used eBPF to Build Programmable Packet Filtering in Magic Firewall

This diagram helps explain the relationship between iptables, nftables and the kernel. The nftables API can be used by both the iptables and nft userspace programs, and can configure both xtables matches (including xt_bpf) and normal nftables matches.

This means that given the right API calls (netlink/netfilter messages), we can embed an xt_bpf match within an nftables rule. In order to do this, we need to understand which netfilter messages we need to send. By using tools such as strace, Wireshark, and especially using the source we were able to construct a message that could append an eBPF rule given a table and chain.

NFTA_RULE_TABLE table
NFTA_RULE_CHAIN chain
NFTA_RULE_EXPRESSIONS | NFTA_MATCH_NAME
	NFTA_LIST_ELEM | NLA_F_NESTED
	NFTA_EXPR_NAME "match"
		NLA_F_NESTED | NFTA_EXPR_DATA
		NFTA_MATCH_NAME "bpf"
		NFTA_MATCH_REV 1
		NFTA_MATCH_INFO ebpf_bytes	

The structure of the netlink/netfilter message to add an eBPF match should look like the above example. Of course, this message needs to be properly embedded and include a conditional step, such as a verdict, when there is a match. The next step was decoding the format of `ebpf_bytes` as shown in the example below.

 struct xt_bpf_info_v1 {
	__u16 mode;
	__u16 bpf_program_num_elem;
	__s32 fd;
	union {
		struct sock_filter bpf_program[XT_BPF_MAX_NUM_INSTR];
		char path[XT_BPF_PATH_MAX];
	};
};

The bytes format can be found in the kernel header definition of struct xt_bpf_info_v1. The code example above shows the relevant parts of the structure.

The xt_bpf module supports both raw bytecodes, as well as a path to a pinned ebpf program. The later mode is the technique we used to combine the ebpf program with nftables.

With this information we were able to write code that could create netlink messages and properly serialize any relevant data fields. This approach was just the first step, we are also looking into incorporating this into proper tooling instead of sending custom netfilter messages.

Just Add eBPF

Now we needed to construct an eBPF program and load it into an existing nftables table and chain. Starting to use eBPF can be a bit daunting. Which program type do we want to use? How do we compile and load our eBPF program? We started this process by doing some exploration and research.

First we constructed an example program to try it out.

SEC("socket")
int filter(struct __sk_buff *skb) {
  /* get header */
  struct iphdr iph;
  if (bpf_skb_load_bytes(skb, 0, &iph, sizeof(iph))) {
    return BPF_DROP;
  }

  /* read last 5 bytes in payload of udp */
  __u16 pkt_len = bswap_16(iph.tot_len);
  char data[5];
  if (bpf_skb_load_bytes(skb, pkt_len - sizeof(data), &data, sizeof(data))) {
    return BPF_DROP;
  }

  /* only packets with the magic word at the end of the payload are allowed */
  const char SECRET_TOKEN[5] = "xyzzy";
  for (int i = 0; i < sizeof(SECRET_TOKEN); i++) {
    if (SECRET_TOKEN[i] != data[i]) {
      return BPF_DROP;
    }
  }

  return BPF_OK;
}

The excerpt mentioned is an example of an eBPF program that only accepts packets that have a magic string at the end of the payload. This requires checking the total length of the packet to find where to start the search. For clarity, this example omits error checking and headers.

Once we had a program, the next step was integrating it into our tooling. We tried a few technologies to load the program, like BCC, libbpf, and we even created a custom loader. Ultimately, we ended up using cilium’s ebpf library, since we are using Golang for our control-plane program and the library makes it easy to generate, embed and load eBPF programs.

# nft list ruleset
table ip mfw {
	chain input {
		#match bpf pinned /sys/fs/bpf/mfw/match drop
	}
}

Once the program is compiled and pinned, we can add matches into nftables using netlink commands. Listing the ruleset shows the match is present. This is incredible! We are now able to deploy custom C programs to provide advanced matching inside a Magic Firewall ruleset!

More Magic

With the addition of eBPF to our toolkit, Magic Firewall is an even more flexible and powerful way to protect your network from bad actors. We are now able to look deeper into packets and implement more complex matching logic than nftables alone could provide. Since our firewall is running as software on all Cloudflare servers, we can quickly iterate and update features.

One outcome of this project is SIP protection, which is currently in beta. That’s only the beginning. We are currently exploring using eBPF for protocol validations, advanced field matching, looking into payloads, and supporting even larger sets of IP lists.

We welcome your help here, too! If you have other use cases and ideas, please talk to your account team. If you find this technology interesting, come join our team!

PII and Selective Logging controls for Cloudflare’s Zero Trust platform

Post Syndicated from Ankur Aggarwal original https://blog.cloudflare.com/pii-and-selective-logging-controls-for-cloudflares-zero-trust-platform/

PII and Selective Logging controls for Cloudflare’s Zero Trust platform

PII and Selective Logging controls for Cloudflare’s Zero Trust platform

At Cloudflare, we believe that you shouldn’t have to compromise privacy for security. Last year, we launched Cloudflare Gateway — a comprehensive, Secure Web Gateway with built-in Zero Trust browsing controls for your organization. Today, we’re excited to share the latest set of privacy features available to administrators to log and audit events based on your team’s needs.

Protecting your organization

Cloudflare Gateway helps organizations replace legacy firewalls while also implementing Zero Trust controls for their users. Gateway meets you wherever your users are and allows them to connect to the Internet or even your private network running on Cloudflare. This extends your security perimeter without having to purchase or maintain any additional boxes.

Organizations also benefit from improvements to user performance beyond just removing the backhaul of traffic to an office or data center. Cloudflare’s network delivers security filters closer to the user in over 250 cities around the world. Customers start their connection by using the world’s fastest DNS resolver. Once connected, Cloudflare intelligently routes their traffic through our network with layer 4 network and layer 7 HTTP filters.

To get started, administrators deploy Cloudflare’s client (WARP) on user devices, whether those devices are macOS, Windows, iOS, Android, ChromeOS or Linux. The client then sends all outbound layer 4 traffic to Cloudflare, along with the identity of the user on the device.

With proxy and TLS decryption turned on, Cloudflare will log all traffic sent through Gateway and surface this in Cloudflare’s dashboard in the form of raw logs and aggregate analytics. However, in some instances, administrators may not want to retain logs or allow access to all members of their security team.

The reasons may vary, but the end result is the same: administrators need the ability to control how their users’ data is collected and who can audit those records.

Legacy solutions typically give administrators an all-or-nothing blunt hammer. Organizations could either enable or disable all logging. Without any logging, those services did not capture any personally identifiable information (PII). By avoiding PII, administrators did not have to worry about control or access permissions, but they lost all visibility to investigate security events.

That lack of visibility adds even more complications when teams need to address tickets from their users to answer questions like “why was I blocked?”, “why did that request fail?”, or “shouldn’t that have been blocked?”. Without logs related to any of these events, your team can’t help end users diagnose these types of issues.

Protecting your data

Starting today, your team has more options to decide the type of information Cloudflare Gateway logs and who in your organization can review it. We are releasing role-based dashboard access for the logging and analytics pages, as well as selective logging of events. With role-based access, those with access to your account will have PII information redacted from their dashboard view by default.

We’re excited to help organizations build least-privilege controls into how they manage the deployment of Cloudflare Gateway. Security team members can continue to manage policies or investigate aggregate attacks. However, some events call for further investigation. With today’s release, your team can delegate the ability to review and search using PII to specific team members.

We still know that some customers want to reduce the logs stored altogether, and we’re excited to help solve that too. Now, administrators can now select what level of logging they want Cloudflare to store on their behalf. They can control this for each component, DNS, Network, or HTTP and can even choose to only log block events.

That setting does not mean you lose all logs — just that Cloudflare never stores them. Selective logging combined with our previously released Logpush service allows users to stop storage of logs on Cloudflare and turn on a Logpush job to their destination of choice in their location of choice as well.

How to Get Started

To get started, any Cloudflare Gateway customer can visit the Cloudflare for Teams dashboard and navigate to Settings > Network. The first option on this page will be to specify your preference for activity logging. By default, Gateway will log all events, including DNS queries, HTTP requests and Network sessions. In the network settings page, you can then refine what type of events you wish to be logged. For each component of Gateway you will find three options:

  1. Capture all
  2. Capture only blocked
  3. Don’t capture
PII and Selective Logging controls for Cloudflare’s Zero Trust platform

Additionally, you’ll find an option to redact all PII from logs by default. This will redact any information that can be used to potentially identify a user including User Name, User Email, User ID, Device ID, source IP, URL, referrer and user agent.

We’ve also included new roles within the Cloudflare dashboard, which provide better granularity when partitioning Administrator access to Access or Gateway components. These new roles will go live in January 2022 and can be modified on enterprise accounts by visiting Account Home → Members.

If you’re not yet ready to create an account, but would like to explore our Zero Trust services, check out our interactive demo where you can take a self-guided tour of the platform with narrated walkthroughs of key use cases, including setting up DNS and HTTP filtering with Cloudflare Gateway.

What’s Next

Moving forward, we’re excited to continue adding more and more privacy features that will give you and your team more granular control over your environment. The features announced today are available to users on any plan; your team can follow this link to get started today.

Get notified when your site is under attack

Post Syndicated from Michael Tremante original https://blog.cloudflare.com/get-notified-when-your-site-is-under-attack/

Get notified when your site is under attack

Get notified when your site is under attack

Our core application security features such as the WAF, firewall rules and rate limiting help keep millions of Internet properties safe. They all do so quietly without generating any notifications when attack traffic is blocked, as our focus has always been to stop malicious requests first and foremost.

Today, we are happy to announce a big step in that direction. Business and Enterprise customers can now set up proactive alerts whenever we observe a spike in firewall related events indicating a likely ongoing attack.

Alerts can be configured via email, PagerDuty or webhooks, allowing for flexible integrations across many systems.

You can find and set up the new alert types under the notifications tab in your Cloudflare account.

What Notifications are available?

Two new notification types have been added to the platform.

Security Events Alert

This notification can be set up on Business and Enterprise zones, and will alert on any spike of firewall related events across all products and services. You will receive the alert within two hours of the attack being mitigated.

Advanced Security Events Alert

This notification can be set up on Enterprise zones only. It allows you to filter on the exact security service you are interested in monitoring and different notifications can be set up for different services as necessary. The alert will fire within five minutes of the attack being mitigated.

Alerting on Application Security Anomalies

We’ve previously blogged about how accurately calculating anomalies in time series data sets is hard. Simple threshold alerting — “notify me if there are more than X events” — doesn’t work well. It takes a lot of work to tune the specific thresholds to be accurate, and even then you’re still likely to end up with false positives or missed events.

For Origin Error Rate notifications, we leaned on the methodology outlined in the Google SRE Handbook for alerting based on Service Level Objectives (SLOs). However, SLO alerting assumes that there is an established baseline. We know exactly what percentage of responses from your origin are “allowed” to be errors before something is definitely wrong. We don’t know what that percentage is for Firewall events. For example, Internet properties with many Firewall rules are more likely to have more Firewall events than Internet properties with few Firewall rules.

Instead of using SLO based alerting for Security Event notifications, we’re using Z-score calculations. The z-score methodology calculates how many standard deviations away from the mean a certain data point is. For Security Event notifications we can take the mean number of Firewall events for each distinct Internet property as the effective “baseline”, and compare the current number of Firewall events to see if there is a significant spike.

In this first iteration, a z-score threshold of 3.5 has been configured in the system and will be adjusted based on customer feedback. You can read more about the system in our WAF developer docs.

Getting started with Application Security Event notifications

To configure these notifications, navigate to the Notifications tab of the dashboard and click “Add”. Select Security Events Alert or Advanced Security Events Alert.

Get notified when your site is under attack

As with all Cloudflare notifications, you’re able to name and describe your notification, and choose how you want to be notified. From there, you can select which domains you want to monitor.

Get notified when your site is under attack

For Advanced Security Event notifications, you can also select which services the notification should monitor. The log value in Firewall Event logs for each relevant service is also displayed in the event you are integrating directly with Cloudflare logs and wish to filter relevant events in your existing SIEMs.

Get notified when your site is under attack

Once the notifications have been set up, you can rely on Cloudflare to warn you whenever an anomaly is detected. An example email notification is shown below:

Get notified when your site is under attack

The alert provides details on the service detecting the events (in this case the WAF), the timestamp and the affected zone. A link is provided that will direct you to the Firewall Events dashboard filtered on the correct service and time range.

The first of many alerts!

We are looking forward to customers setting up their notifications, so they can stay on top of any malicious activity affecting their applications.

This is just the first step of many towards building a much more comprehensive suite of notifications and incident management systems directly embedded in the Cloudflare dashboard. We look forward to posting feature improvements to our application security alert system in the near future.

New – Amazon VPC Network Access Analyzer

Post Syndicated from Jeff Barr original https://aws.amazon.com/blogs/aws/new-amazon-vpc-network-access-analyzer/

If you are a member of your organization’s networking, cloud operations, or security teams, you are going to love this new feature. The new Amazon VPC Network Access Analyzer helps you identify network configurations that lead to unintended network access. As you will see in a moment, it will point out ways that you can improve your security posture while still letting you and your organization be agile and flexible. In contrast to manual checking of network configurations, which is error prone and hard to scale, this tool lets you analyze your AWS networks of any size and complexity.

Introducing Network Access Analyzer
Network Access Analyzer takes advantage of our automated reasoning technology that already powers AWS IAM Access Analyzer, Amazon VPC Reachability Analyzer, Amazon Inspector Network Reachability, and other provable security tools.

This new tool uses Network Access Scopes to specify the desired connectivity between your AWS resources. You can get started with a set of Amazon-created scopes, and then either copy & customize them, or create your own from scratch. The scopes are high-level and independent of any particular network architecture or configuration, and can be thought of as a language for specifying the proper level of access & connectivity for your network. You can, for example, create a scope to verify that all web apps use a firewall to access Internet resources, or to indicate that AWS resources used by your Finance team are separate, distinct, and unreachable from the resources used by your Development team.

To evaluate your network against a particular scope, you select it and initiate an analysis. It runs for a few minutes and then generates a set of findings, each of which indicates an unexpected network path between the AWS resources defined in the scope. You can analyze the findings, adjust your configuration or modify the scope in response to the findings, and re-run the analysis, all in just a few minutes.

The analysis process examines a very wide range of AWS resources including Security Groups, CIDR blocks, prefix lists, Elastic Network Interfaces, EC2 instances, Load Balancers, VPC, VPC subnets, VPC endpoints, VPC endpoint services, Transit Gateways, NAT Gateways, Internet Gateways, VPN Gateways, Peering Connections, and Network Firewalls. Your scopes can use Resource Groups to reference all resources that are tagged in a particular way.

Using Network Access Analyzer
To get started, I open the VPC Console, find the Network Analysis section on the left-side navigation, and click Network Access Analyzer:

I can see all of my scopes. Initially, I have four, all created by Amazon and ready to use:

To conduct an analysis, I select a scope (AWS-VPC-Ingress (Amazon created)) and click Analyze. The scope’s description reads:

“Identify ingress paths into your VPCs from Internet Gateways, Peering Connections, VPC Service Endpoints, VPN and Transit Gateways.”

The analysis runs for a couple of minutes and displays the findings as soon as it is done:

There’s a lot of very useful information here! The spectrum chart provides an overview of the resources that are in the findings. I can hover my mouse over any of the segments to learn more, or click on one in order to filter the findings and show only those that reference a particular resource or resource type:

For example, I click VPC Peering Connections and I can see all of the findings that reference the VPC peering connection:

As you can see, the Path details highlight the VPC peering connection in the path! The next step is to examine the findings, decide which ones are expected, and to add them to the scope so that they are excluded from future findings (more on that in a bit).

Inside a Network Access Scope
Let’s take a quick look inside of the Network Access Scope that I used above, and then build another scope from scratch using the visual builder. Each scope is represented in JSON format, and indicates what is considered in-scope (acceptable) traffic between sources and destinations:

{
          "networkInsightsAccessScopeId": "nis-070dc1d37ca315e86",
          "matchPaths": [
                    {
                              "source": {
                                        "resourceStatement": {
                                                  "resources": [],
                                                  "resourceTypes": [
                                                            "AWS::EC2::InternetGateway",
                                                            "AWS::EC2::VPCPeeringConnection",
                                                            "AWS::EC2::VPCEndpointService",
                                                            "AWS::EC2::TransitGatewayAttachment",
                                                            "AWS::EC2::VPNGateway"
                                                  ]
                                        }
                              },
                              "destination": {
                                        "resourceStatement": {
                                                  "resources": [],
                                                  "resourceTypes": [
                                                            "AWS::EC2::NetworkInterface"
                                                  ]
                                        }
                              }
                    }
          ],
          "excludePaths": []
}

The matchPaths element contains source and destination elements. Each of these elements, in turn, identifies AWS resource types and specific resources. While not shown here, scopes can also contain source and destination IP addresses, ports, prefix lists, and traffic types (TCP or UDP). The excludePaths can contain resource types, specific resources, and so forth. I could, for example, define sources and destinations that match all Internet Gateway ingress traffic, but exclude traffic that flows through a Load Balancer, or I could exclude SSH traffic destined for my bastion instances.

Building a Network Access Scope
I can build a new scope in three ways. I can Duplicate and modify an existing one, I can start from scratch and use the visual builder, or I can write my own JSON and use either the CLI or the API to create a scope. I click Create Network Access Scope to use the builder:

I can start with one of five predefined templates, or I can build my own:

I enter a name and a description:

Then I define the source and destinations by resource type, id, traffic type, and so forth:

I have many options for matching the traffic type. This allows me to create scopes for very specific purposes:

I can use a similar interface to add any optional exclusions.

Things to Know
This is a very powerful tool and one that I think you are going to love. Here are a couple of things to know about it:

Pricing – You pay $0.002 for each Elastic Network Interface (ENI) analyzed as part of an assessment.

Regions – Network Access Analyzer is available in the US East (N. Virginia), US East (Ohio), US West (N. California), US West (Oregon), Africa (Cape Town), Asia Pacific (Hong Kong), Asia Pacific (Mumbai), Asia Pacific (Seoul), Asia Pacific (Singapore), Asia Pacific (Sydney), Asia Pacific (Tokyo), Canada (Central), Europe (Frankfurt), Europe (Ireland), Europe (London), Europe (Milan), Europe (Paris), Europe (Stockholm), South America (São Paulo), and Middle East (Bahrain) Regions.

In the Works – We have lots of additional features on the product roadmap including support for AWS Organizations, the ability to run your analyses on a regular schedule, and support for IPv6 address ranges and resources.

Jeff;

New for AWS Control Tower – Region Deny and Guardrails to Help You Meet Data Residency Requirements

Post Syndicated from Danilo Poccia original https://aws.amazon.com/blogs/aws/new-for-aws-control-tower-region-deny-and-guardrails-to-help-you-meet-data-residency-requirements/

Many customers, such as those in highly regulated industries and the public sector, want to have control over where their data is stored and processed. AWS already offers many tools and features to comply with local laws and regulations, but we want to provide a simplified way to translate data residency requirements into controls that can be applied to single- and multi-account environments.

Starting today, you can use AWS Control Tower to deploy data residency preventive and detective controls, referred to as guardrails. These guardrails will prevent provisioning resources in unwanted AWS Regions by restricting access to AWS APIs through service control policies (SCPs) built and managed by AWS Control Tower. In this way, content cannot be created or transferred outside of your selected Regions at the infrastructure level. In this context, content can be software (including machine images), data, text, audio, video, or images hosted on AWS for processing or storage. For example, AWS customers in Germany can deny access to AWS services in Regions outside of Frankfurt with the exception of global services such as AWS Identity and Access Management (IAM) and AWS Organizations.

AWS Control Tower also offers guardrails to further control data residency in underlying AWS service options, for example, blocking Amazon Simple Storage Service (Amazon S3) cross-region replication or blocking the creation of internet gateways.

The AWS account used for managing AWS Control Tower is not restricted by the new Region deny settings. That account can be used for remediation if you have data in an unwanted Region before enabling Region deny.

Detective guardrails are implemented via AWS Config rules and can further detect unexpected configuration changes that should not be allowed.

You still retain a shared responsibility model for data residency at the application level, but these controls can help you restrict what infrastructure and application teams can do on AWS.

Using Data Residency Guardrails in AWS Control Tower
To use the new data residency guardrails, you need to have created a landing zone using AWS Control Tower. See Plan your AWS Control Tower landing zone for more information.

To see all the new controls that are available, I select Guardrails on the left pane of the AWS Control Tower console and then find those in the Data Residency category. I sort results by Behavior. Guardrails that have a Prevention behavior are implemented as SCPs. Those that have a Detection behavior are implemented as AWS Config rules.

Console screenshot.

The most interesting guardrail is probably the one denying access to AWS based on the requested AWS Region. I choose it from the list and find that it is different from the other guardrails because it affects all Organizational Units (OUs) and cannot be activated here but must be activated in the landing zone settings.

Console screenshot.

Below the Overview, in the Guardrail components, there is a link to the full SCP for this guardrail, and I can see the list of the AWS APIs that, when this setting is enabled, are still going to be allowed towards non-governed Regions. Depending on your requirements, some of those services, such as Amazon CloudFront or AWS Global Accelerator, can be further limited by a custom SCP.

In the Landing zone settings, the Region deny guardrail is currently not enabled. I choose Modify settings and then enable the Region deny settings.

Console screenshot.

Below the Region deny settings, there is the list of AWS Regions governed by the landing zone. Those will be the regions allowed when I enable Region deny.

Console screenshot.

In my case, I have four governed Regions, two in the US and two in Europe:

  • US East (N. Virginia), which is also the home Region for the landing zone
  • US West (Oregon)
  • Europe (Ireland)
  • Europe (Frankfurt)

I choose Update landing zone at the bottom. The update of the landing zone takes a few minutes to complete. Now, the vast majority of the AWS APIs are blocked if they are not directed to one of those governed Regions. Let’s do a few tests.

Testing Region Deny in a Sandbox Account
Using AWS Single Sign-On, I copy the AWS credentials to use the sandbox account with AWSAdministratorAccess permissions. In a terminal, I paste the commands setting the environment variables to use those credentials.

Console screenshot.

Now, I try to start a new Amazon Elastic Compute Cloud (Amazon EC2) instance in US East (Ohio), one of the non-governed Regions. In a landing zone, the default VPC is replaced by a VPC managed by AWS Control Tower. To start the instance, I need to specify a VPC subnet. Let’s find a subnet ID that I can use.

aws ec2 describe-subnets --query 'Subnets[0].SubnetId' --region us-east-2

An error occurred (UnauthorizedOperation) when calling the DescribeSubnets operation:
You are not authorized to perform this operation.

As expected, I am not authorized to perform this operation in US East (Ohio). Let’s try to start an EC2 instance without passing the subnet ID.

aws ec2 run-instances --image-id ami-0dd0ccab7e2801812 --region us-east-2 \
    --instance-type t3.small                                     

An error occurred (UnauthorizedOperation) when calling the RunInstances operation:
You are not authorized to perform this operation.
Encoded authorization failure message: <ENCODED MESSAGE>

Again, I am not authorized. More information is included in the encoded authorization failure message that I can decode as described in this article:

aws sts decode-authorization-message --encoded-message <ENCODED MESSAGE>

The decoded message (that I have omitted for brevity) tells me that there was an explicit deny to my request and includes the full SCP that caused the deny. This information is really useful for debugging these kind of errors.

Now, let’s try in US East (N. Virginia), one of the four governed regions.

aws ec2 describe-subnets --query 'Subnets[0].SubnetId' --region us-east-1
"subnet-0f3580c0c5e56c210"

This time, the command returns the subnet ID of the first subnet returned by the request. Let’s start an instance in US East (N. Virginia) using this subnet.

aws ec2 run-instances --image-id  ami-04ad2567c9e3d7893 --region us-east-1 \
    --instance-type t3.small --subnet-id subnet-0f3580c0c5e56c210

As expected, it works, and I can see the EC2 instance running in the console.

Console screenshot.

Similarly, APIs for other AWS services are limited by the Region deny settings. For example, I can’t create an S3 bucket in a non-governed Region.

Console screenshot.

When I try to create the bucket, I get an access denied error.

Console screenshot.

As expected, the creation of an S3 bucket works in a governed Region.

Even if someone gives this account access to a bucket in a non-governed Region, I would not be able to copy any data into that bucket.

Other preventive guardrails can enforce data residency, for example:

  • Disallow cross-region networking for Amazon EC2, Amazon CloudFront, and AWS Global Accelerator
  • Disallow internet access for an Amazon VPC instance managed by a customer
  • Disallow Amazon Virtual Private Network (VPN) connections

Now, let’s see how detective guardrails work.

Testing Detective Guardrails in a Sandbox Account
I enable the following guardrails for all accounts in the sandbox OU:

  • Detect whether Amazon EBS snapshots are restorable by all AWS accounts
  • Detect whether public routes exist in the route table for an internet gateway

Now, I want to see what happens if I go against these guardrails. In the EC2 console, I create an EBS snapshot for the volume of the EC2 instance I started before. Then, I modify permissions to share it with all AWS accounts.

Console screenshot.

Then, in the VPC console, I create an internet gateway, attach it to the AWS Control Tower managed VPC, and update the route table of one of the private subnets to use the internet gateway.

Console screenshot.

After a few minutes, the noncompliant resources in the sandbox account are found by the detective guardrails.

Console screenshot.

I look at the information provided by the guardrails and update my configuration to fix the issues. In a multi-account setup I’d contact the account owner and ask for remediation.

Availability and Pricing
You can use data-residency guardrails to control resources in any AWS Region. To create a landing zone, you should start from one of the Regions where AWS Control Tower is offered. For more information, see the AWS Regional Services List. There is no additional cost for this feature. You pay the costs of other services used, such as AWS Config.

This feature provides you with a framework of controls and guidance for setting up a multi-account environment that addresses data residency requirements. Depending on your use case, you may use any subset of the new data residency guardrails.

Set up guardrails based on your data residency requirements with AWS Control Tower.

Danilo

Amazon CodeGuru Reviewer Introduces Secrets Detector to Identify Hardcoded Secrets and Secure Them with AWS Secrets Manager

Post Syndicated from Alex Casalboni original https://aws.amazon.com/blogs/aws/codeguru-reviewer-secrets-detector-identify-hardcoded-secrets/

Amazon CodeGuru helps you improve code quality and automate code reviews by scanning and profiling your Java and Python applications. CodeGuru Reviewer can detect potential defects and bugs in your code. For example, it suggests improvements regarding security vulnerabilities, resource leaks, concurrency issues, incorrect input validation, and deviation from AWS best practices.

One of the most well-known security practices is the centralization and governance of secrets, such as passwords, API keys, and credentials in general. As many other developers facing a strict deadline, I’ve often taken shortcuts when managing and consuming secrets in my code, using plaintext environment variables or hard-coding static secrets during local development, and then inadvertently commit them. Of course, I’ve always regretted it and wished there was an automated way to detect and secure these secrets across all my repositories.

Today, I’m happy to announce the new Amazon CodeGuru Reviewer Secrets Detector, an automated tool that helps developers detect secrets in source code or configuration files, such as passwords, API keys, SSH keys, and access tokens.

These new detectors use machine learning (ML) to identify hardcoded secrets as part of your code review process, ultimately helping you to ensure that all new code doesn’t contain hardcoded secrets before being merged and deployed. In addition to Java and Python code, secrets detectors also scan configuration and documentation files. CodeGuru Reviewer suggests remediation steps to secure your secrets with AWS Secrets Manager, a managed service that lets you securely and automatically store, rotate, manage, and retrieve credentials, API keys, and all sorts of secrets.

This new functionality is included as part of the CodeGuru Reviewer service at no additional cost and supports the most common API providers, such as AWS, Atlassian, Datadog, Databricks, GitHub, Hubspot, Mailchimp, Salesforce, SendGrid, Shopify, Slack, Stripe, Tableau, Telegram, and Twilio. Check out the full list here.

Secrets Detectors in Action
First, I select CodeGuru from the AWS Secrets Manager console. This new flow lets me associate a new repository and run a full repository analysis with the goal of identifying hardcoded secrets.

Associating a new repository only takes a few seconds. I connect my GitHub account, and then select a repository named hawkcd, which contains a few Java, C#, JavaScript, and configuration files.

A few minutes later, my full repository is successfully associated and the full scan is completed. I could also have a look at a demo repository analysis called DemoFullRepositoryAnalysisSecrets. You’ll find this demo in the CodeGuru console, under Full repository analysis, in your AWS Account.

I select the repository analysis and find 42 recommendations, including one recommendation for a hardcoded secret (you can filter recommendations by Type=Secrets). CodeGuru Reviewer identified a hardcoded AWS Access Key ID in a .travis.yml file.

The recommendation highlights the importance of storing these secrets securely, provides a link to learn more about the issue, and suggests rotating the identified secret to make sure that it can’t be reused by malicious actors in the future.

CodeGuru Reviewer lets me jump to the exact file and line of code where the secret appears, so that I can dive deeper, understand the context, verify the file history, and take action quickly.

Last but not least, the recommendation includes a Protect your credential button that lets me jump quickly to the AWS Secrets Manager console and create a new secret with the proper name and value.

I’m going to remove the plaintext secret from my source code and update my application to fetch the secret value from AWS Secrets Manager. In many cases, you can keep the current configuration structure and use existing parameters to store the secret’s name instead of the secret’s value.

Once the secret is securely stored, AWS Secrets Manager also provides me with code snippets that fetch my new secret in many programming languages using the AWS SDKs. These snippets let me save time and include the necessary SDK call, as well as the error handling, decryption, and decoding logic.

I’ve showed you how to run a full repository analysis, and of course the same analysis can be performed continuously on every new pull request to help you prevent hardcoded secrets and other issues from being introduced in the future.

Available Today with CodeGuru Reviewer
CodeGuru Reviewer Secrets Detector is available in all regions where CodeGuru Reviewer is available, at no additional cost.

If you’re new to CodeGuru Reviewer, you can try it for free for 90 days with repositories up to 100,000 lines of code. Connecting your repositories and starting a full scan takes only a couple of minutes, whether your code is hosted on AWS CodeCommit, BitBucket, or GitHub. If you’re using GitHub, check out the GitHub Actions integration as well.

You can learn more about Secrets Detector in the technical documentation.

Alex

Hands-on walkthrough of the AWS Network Firewall flexible rules engine – Part 2

Post Syndicated from Shiva Vaidyanathan original https://aws.amazon.com/blogs/security/hands-on-walkthrough-of-the-aws-network-firewall-flexible-rules-engine-part-2/

This blog post is Part 2 of Hands-on walkthrough of the AWS Network Firewall flexible rules engine – Part 1. To recap, AWS Network Firewall is a managed service that offers a flexible rules engine that gives you the ability to write firewall rules for granular policy enforcement. In Part 1, we shared how to write a rule and how the rule engine processes rules differently depending on whether you are performing stateless or stateful inspection using the action order method.

In this blog, we focus on how stateful rules are evaluated using a recently added feature—the strict rule order method. This feature gives you the ability to set one or more default actions. We demonstrate how you can use this feature to create or update your rule groups and share scenarios where this feature can be useful.

In addition, after reading this post, you’ll be able to deploy an automated serverless solution that retrieves the latest Suricata-specific rules from the community, such as from Proofpoint’s Emerging Threats OPEN ruleset. By deploying such solutions into your Amazon Web Services (AWS) environment, you can seamlessly enhance your overall security posture as the solutions fetch the latest set of intrusion detection system (IDS) rules from Proofpoint (formerly Emerging Threats) and optionally using them as intrusion prevention system (IPS) thereby keeping the rule groups updated on your Network Firewall. You can select the refresh interval to update these rulesets—the default refresh interval is 6 hours. You can also convert the set of rule groups to intrusion prevention system (IPS) mode. Finally, you have granular visibility of the various categories of rules for your Network Firewall on the AWS Management Console.

How does Network Firewall evaluate your stateful rule group?

There are two ways that Network Firewall can evaluate your stateful rule groups: the action ordering method or the strict ordering method. The settings of your rule groups must match the settings of the firewall policy that they belong to.

With the action order evaluation method for stateless inspection, all individual packets in a flow are evaluated against each rule in the policy. The rules are processed in order based on the priority assigned to them with lowest numbered rules evaluated first. For stateful inspection using the action order evaluation method, the rule engine evaluates based on the order of their action setting with pass rules processed first, then drop, then alert. The engine stops processing rules when it finds a match. The firewall also takes into consideration the order that the rules appear in the rule group, and the priority assigned to the rule, if any. Part 1 provides more details on action order evaluation.

If your firewall policy is set up to use strict ordering, Network Firewall now allows you the option to manually set a strict rule group order for stateful rule groups. Using this optional setting, the rule groups are evaluated in order of priority, starting from the lowest numbered rule, and the rules in each rule group are processed in the order in which they’re defined. You can also select which of the default actionsdrop all, drop established, alert all, or alert established—Network Firewall will take when following strict rule ordering.

A customer scenario where strict rule order is beneficial

Configuring rule groups by action order is appropriate for IDS use cases, but can be an obstacle for use cases where you deploy firewalls that follow security best practice, which is to allow only what’s required and deny everything else (default deny). You can’t achieve this best practice by using the default action order behavior. However, with strict order functionality, you can create a firewall policy that allows prioritization of stateful rules, or that can run 5-tuple and Suricata rules simultaneously. Strict rule order allows you to have a block of fine-grain rules with specific actions at the beginning followed by a coarse set of rules with specific actions and finally a default drop action. An example is shown in Figure 1 that follows.

Figure 1: An example snippet of a Network Firewall firewall policy with strict rule order

Figure 1: An example snippet of a Network Firewall firewall policy with strict rule order

Figure 1 shows that there are two different default drop actions that you can choose:
drop established and
drop all. If you choose
drop established, Network Firewall drops only the packets that are in established connections. This allows the layer 3 and 4 connection establishment packets that are needed for the upper-layer connections to be established, while dropping the packets for connections that are already established. This allows application-layer
pass rules to be written in a default-deny setup without the need to write additional rules to allow the lower-layer handshaking parts of the underlying protocols.

The drop all action drops all packets. In this scenario, you need additional rules to explicitly allow lower-level handshakes for protocols to succeed. Evaluation order for stateful rule groups provides details of how Network Firewall evaluates the different actions. In order to set the additional environment variables that are shown in the snippet, follow the instructions outlined in Examples of stateful rules for Network Firewall and the Suricata rule variables.

An example walkthrough to set up a Network Firewall policy with a stateful rule group with strict rule order and default drop action

In this section, you’ll start by creating a firewall policy with strict rule order. From there, you’ll build on it by adding a stateful rule group with strict rule order and modifying the priority order of the rules within a stateful rule group.

Step 1: Create a firewall policy with strict rule order

You can configure the default actions on policies using strict rule order, which is a property that can only be set at creation time as described below.

  1. Log in to the console and select the AWS Region where you have Network Firewall.
  2. Select VPC service on the search bar.
  3. On the left pane, under the Network Firewall section, select Firewall policies.
  4. Choose Create Firewall policy. In Describe firewall policy, enter an appropriate name and (optional) description. Choose Next.
  5. In the Add rule groups section.
    1. Select the Stateless default actions:
      1. Under Choose how to treat fragmented packets choose one of the options.
      2. Choose one of the actions for stateless default actions.
    2. Under Stateful rule order and default action
      1. Under Rule order choose Strict.
      2. Under Default actions choose the default actions for strict rule order. You can select one drop action and one or both of the alert actions from the list.
  6. Next, add an optional tag (for example, for Key enter Name, and for Value enter Firewall-Policy-Non-Production). Review and choose Create to create the firewall policy.

Step 2: Create a stateful rule group with strict rule order

  1. Log in to the console and select the AWS Region where you have Network Firewall.
  2. Select VPC service on the search bar.
  3. On the left pane, under the Network Firewall section, select Network Firewall rule groups.
  4. In the center pane, select Create Network Firewall rule group on the top right.
    1. In the rule group type, select Stateful rule group.
    2. Enter a name, description, and capacity.
    3. In the stateful rule group options select either 5-tuple or Suricata compatible IPS rules. These allow rule order to be strict.
    4. In the Stateful rule order, choose Strict.
    5. In the Add rule section, add the stateful rules that you require. Detailed instructions on creating a rule can be found at Creating a stateful rule group.
    6. Finally, Select Create stateful rule group.

Step 3: Add the stateful rule group with strict rule order to a Network Firewall policy

  1. Log in to the console and select the AWS Region where you have Network Firewall.
  2. Select VPC service on the search bar.
  3. On the left pane, under the Network Firewall section, select Firewall policies.
  4. Chose the network firewall policy you created in step 1.
  5. In the center pane, in the Stateful rule groups section, select Add rule group.
  6. Select the stateful rule group you created in step 2. Next, choose Add stateful rule group. This is explained in detail in Updating a firewall policy.

Step 4: Modify the priority of existing rules in a stateful rule group

  1. Log in to the console and select the AWS Region where you have Network Firewall.
  2. Select VPC service on the search bar.
  3. On the left pane, under the Network Firewall section, choose Network Firewall rule groups.
  4. Select the rule group that you want to edit the priority of the rules.
  5. Select the Edit rules tab. Select the rule you want to change the priority of and select the Move up and Move down buttons to reorder the rule. This is shown in Figure 2.


Figure 2: Modify the order of the rules within a stateful rule groups

Figure 2: Modify the order of the rules within a stateful rule groups

Note:

  • Rule order can be set to strict order only when network firewall policies or rule groups are created. The rule order can’t be changed to strict order evaluation on existing objects.
  • You can only associate strict-order rule groups with strict-order policies, and default-order rule groups with default-order policies. If you try to associate an incompatible rule group, you will get a validation exception.
  • Today, creating domain list-type rule groups using strict order isn’t supported. So, you won’t be able to associate domain lists with strict order policies. However, 5-tuple and Suricata compatible rules are supported.

Automated serverless solution to retrieve Suricata rules

To help simplify and maintain your more advanced Network Firewall rules, let’s look at an automated serverless solution. This solution uses an Amazon CloudWatch Events rule that’s run on a schedule. The rule invokes an AWS Lambda function that fetches the latest Suricata rules from Proofpoint’s Emerging Threats OPEN ruleset and extracts them to an Amazon Simple Storage Service (Amazon S3) bucket. Once the files lands in the S3 bucket another Lambda function is invoked that parses the Suricata rules and creates rule groups that are compatible with Network Firewall. This is shown in Figure 3 that follows. This solution was developed as an AWS Serverless Application Model (AWS SAM) package to make it less complicated to deploy. AWS SAM is an open-source framework that you can use to build serverless applications on AWS. The deployment instructions for this solution can be found in this code repository on GitHub. 

Figure 3: Network Firewall Suricata rule ingestion workflow

Figure 3: Network Firewall Suricata rule ingestion workflow

Multiple rule groups are created based on the Suricata IDS categories. This solution enables you to selectively change certain rule groups to IPS mode as required by your use case. It achieves this by modifying the default action from alert to drop in the ruleset. The modified stateful rule group can be associated to the active Network Firewall firewall policy. The quota for rule groups might need to be increased to incorporate all categories from Proofpoint’s Emerging Threats OPEN ruleset to meet your security requirements. An example screenshot of various IPS categories of rule groups created by the solution is shown in Figure 4. Setting up rule groups by categories is the preferred way to define an IPS rule, because the underlying signatures have already been grouped and maintained by Proofpoint.   

Figure 4: Rule groups created by the solution based on Suricata IPS categories

Figure 4: Rule groups created by the solution based on Suricata IPS categories

The solution provides a way to use logs in CloudWatch to troubleshoot the Suricata rulesets that weren’t successfully transformed into Network Firewall rule groups.
The final rulesets and discarded rules are stored in an S3 bucket for further analysis. This is shown in Figure 5. 

Figure 5: Amazon S3 folder structure for storing final applied and discarded rulesets

Figure 5: Amazon S3 folder structure for storing final applied and discarded rulesets

Conclusion

AWS Network Firewall lets you inspect traffic at scale in a variety of use cases. AWS handles the heavy lifting of deploying the resources, patch management, and ensuring performance at scale so that your security teams can focus less on operational burdens and more on strategic initiatives. In this post, we covered a sample Network Firewall configuration with strict rule order and default drop. We showed you how the rule engine evaluates stateful rule groups with strict rule order and default drop. We then provided an automated serverless solution from Proofpoint’s Emerging Threats OPEN ruleset that can aid you in establishing a baseline for your rule groups. We hope this post is helpful and we look forward to hearing about how you use these latest features that are being added to Network Firewall.

Author

Shiva Vaidyanathan

Shiva is a senior cloud infrastructure architect at AWS. He provides technical guidance, and designs and leads implementation projects for customers to ensure their success on AWS. He works towards making cloud networking simpler for everyone. Prior to joining AWS, he worked on several NSF-funded research initiatives on how to perform secure computing in public cloud infrastructures. He holds a MS in Computer Science from Rutgers University and a MS in Electrical Engineering from New York University.

Author

Lakshmikanth Pandre

Lakshmikanth is a senior technical consultant with an AWS Professional Services team based out of Dallas, Texas. With more than 20 years of industry experience, he works as a trusted advisor with a broad range of customers across different industries and segments, helping the customers on their cloud journey. He focuses on design and implementation, and he consults on devops strategies, infrastructure automation, and security for AWS customers.

Author

Brian Lazear

Brian is head of product management for AWS Network Firewall and Firewall Manager services. He has over 15 years of experience helping enterprise customers build secure applications in the cloud. In AWS, his focus is on network security, firewalls, NDR/EDR, monitoring, and traffic-mirroring services.

Cybersecurity Awareness Month: Learn about the job zero of securing your data using Amazon Redshift

Post Syndicated from Thiyagarajan Arumugam original https://aws.amazon.com/blogs/big-data/cybersecurity-awareness-month-learn-about-the-job-zero-of-securing-your-data-using-amazon-redshift/

Amazon Redshift is the most widely used cloud data warehouse. It allows you to run complex analytic queries against terabytes to petabytes of structured and semi-structured data, using sophisticated query optimization, columnar on high-performance storage, and massively parallel query execution.

At AWS, we embrace the culture that security is job zero, by which we mean it’s even more important than any number one priority. AWS provides comprehensive security capabilities to satisfy the most demanding requirements, and Amazon Redshift provides data security out of the box at no extra cost. Amazon Redshift uses the AWS security frameworks to implement industry-leading security in the areas of authentication, access control, auditing, logging, compliance, data protection, and network security.

Cybersecurity Awareness Month raises awareness about the importance of cybersecurity, ensuring everyone has the resources they need to be safer and more secure online. This post highlights some of the key out-of-the-box capabilities available in Amazon Redshift to manage your data securely.

Authentication

Amazon Redshift supports industry-leading security with built-in AWS Identity and Access Management (IAM) integration, identity federation for single sign-on (SSO), and multi-factor authentication. You can federate database user authentication easily with IAM and Amazon Redshift using IAM and a third-party SAML-2.0 identity provider (IdP), such as AD FS, PingFederate, or Okta.

To get started, see the following posts:

Access control

Granular row and column-level security controls ensure users see only the data they should have access to. You can achieve column-level access control for data in Amazon Redshift by using the column-level grant and revoke statements without having to implement views-based access control or use another system. Amazon Redshift is also integrated with AWS Lake Formation, which makes sure that column and row level access in Lake Formation is enforced for Amazon Redshift queries on the data in the data lake.

The following guides can help you implement fine-grained access control on Amazon Redshift:

Auditing and logging

To monitor Amazon Redshift for any suspicious activities, you can take advantage of the auditing and logging features. Amazon Redshift logs information about connections and user activities, which can be uploaded to Amazon Simple Storage Service (Amazon S3) if you enable the audit logging feature. The API calls to Amazon Redshift are logged to AWS CloudTrail, and you can create a log trail by configuring CloudTrail to upload to Amazon S3. For more details, see Database audit logging, Analyze logs using Amazon Redshift spectrum, Querying AWS CloudTrail Logs, and System object persistence utility.

Compliance

Amazon Redshift is assessed by third-party auditors for compliance with multiple programs. If your use of Amazon Redshift is subject to compliance with standards like HIPAA, PCI, or FedRAMP, you can find more details at Compliance validation for Amazon Redshift.

Data protection

To protect data both at rest and while in transit, Amazon Redshift provides options to encrypt the data. Although the encryption settings are optional, we highly recommend enabling them. When you enable encryption at rest for your cluster, it encrypts both the data blocks as well as the metadata, and there are multiple ways to manage the encryption key (see Amazon Redshift database encryption). To safeguard your data while it’s in transit from your SQL clients to the Amazon Redshift cluster, we highly recommend configuring the security options as described in Configuring security options for connections.

For additional data protection options, see the following resources:

Amazon Redshift enables you to use an AWS Lambda function as a UDF in Amazon Redshift. You can write Lambda UDFs to enable external tokenization of data dynamic data masking, as illustrated in Amazon Redshift – Dynamic Data Masking.

Network security

Amazon Redshift is a service that runs within your VPC. There are multiple configurations to ensure access to your Amazon Redshift cluster is secured, whether the connection is from an application within your VPC or an on-premises system. For more information, see VPCs and subnets. Amazon Redshift for AWS PrivateLink ensures that all API calls from your VPC to Amazon Redshift stay within the AWS network. For more information, see Connecting to Amazon Redshift using an interface VPC endpoint.

Customer success stories

You can run your security-demanding analytical workload using out-of-the-box features. For example, SoePay, a Hong Kong–based payments solutions provider, uses AWS Fargate and Amazon Elastic Container Service (Amazon ECS) to scale its infrastructure, AWS Key Management Service (AWS KMS) to manage cryptographic keys, and Amazon Redshift to store data from merchants’ smart devices.

With AWS services, GE Renewable Energy has created a data lake where it collects and analyses machine data captured at GE wind turbines around the world. GE relies on Amazon S3 to store and protect its ever-expanding collection of wind turbine data and Amazon Redshift to help them gain new insights from the data it collects.

For more customer stories, see Amazon Redshift customers.

Conclusion and Next Steps

In this post, we discussed some of the key out-of-the-box capabilities at no extra cost available in Amazon Redshift to manage your data securely, such as authentication, access control, auditing, logging, compliance, data protection, and network security.

You should periodically review your AWS workloads to ensure security best practices have been implemented. The AWS Well-Architected Framework helps you understand the pros and cons of decisions you make while building systems on AWS. This framework can help you learn architectural best practices for designing and operating reliable, secure, efficient, and cost-effective systems in the cloud. Review your security pillar provided in this framework.

In addition, AWS Security Hub, an AWS service, provides a comprehensive view of your security state within AWS that helps you check your compliance with security industry standards and best practices.

To adhere to the security needs of your organization, you can automate the deployment of an Amazon Redshift cluster in an AWS account using AWS CloudFormation and AWS Service Catalog. For more information, see Automate Amazon Redshift cluster creation using AWS CloudFormation and Automate Amazon Redshift Cluster management operations using AWS CloudFormation.


About the Authors

Kunal Deep Singh is a Software Development Manager at Amazon Web Services (AWS) and leads development of security features for Amazon Redshift. Prior to AWS he has worked at Amazon Ads and Microsoft Azure. He is passionate about building customer solutions for cloud, data and security.

Thiyagarajan Arumugam is a Principal Solutions Architect at Amazon Web Services and designs customer architectures to process data at scale. Prior to AWS, he built data warehouse solutions at Amazon.com. In his free time, he enjoys all outdoor sports and practices the Indian classical drum mridangam.