We continue to expand the scope of our assurance programs at Amazon Web Services (AWS) and are pleased to announce that our Middle East (UAE) Region is now certified by the Dubai Electronic Security Centre (DESC) to operate as a Tier 1 cloud service provider (CSP). This alignment with DESC requirements demonstrates our continuous commitment to adhere to the heightened expectations for CSPs. AWS government customers can run their applications in the AWS Cloud certified Regions in confidence.
AWS was evaluated by independent third-party auditor BSI on behalf of DESC on January 23, 2023. The Certificate of Compliance illustrating the AWS compliance status is available through AWS Artifact. AWS Artifact is a self-service portal for on-demand access to AWS compliance reports. Sign in to AWS Artifact in the AWS Management Console, or learn more at Getting Started with AWS Artifact.
As of this writing, 62 services offered in the Middle East (UAE) Region are in scope of this certification. For up-to-date information, including when additional services are added, visit the AWS Services in Scope by Compliance Program webpage and choose DESC CSP.
AWS strives to continuously bring services into scope of its compliance programs to help you meet your architectural and regulatory needs. Please reach out to your AWS account team if you have questions or feedback about DESC compliance.
To learn more about our compliance and security programs, see AWS Compliance Programs. As always, we value your feedback and questions; reach out to the AWS Compliance team through the Contact Us page.
If you have feedback about this post, submit comments in the Comments section below.
Want more AWS Security how-to content, news, and feature announcements? Follow us on Twitter.
In this blog post, we show you how to create an Amazon QuickSight dashboard to visualize the policy validation findings from AWS Identity and Access Management (IAM) Access Analyzer. You can use this dashboard to better understand your policies and how to achieve least privilege by periodically validating your IAM roles against IAM best practices. This blog post walks you through the deployment for a multi-account environment using AWS Organizations.
Policy validation is a feature of IAM Access Analyzer that guides you to author and validate secure and functional policies with more than 100 policy checks. You can use these checks when creating new policies or to validate existing policies. To learn how to use IAM Access Analyzer policy validation APIs when creating new policies, see Validate IAM policies in CloudFormation templates using IAM Access Analyzer. In this post, we focus on how to validate existing IAM policies.
Approach to visualize IAM Access Analyzer findings
As shown in Figure 1, there are four high-level steps to build the visualization.
Figure 1: Steps to visualize IAM Access Analyzer findings
Collect IAM policies
To validate your IAM policies with IAM Access Analyzer in your organization, start by periodically sending the content of your IAM policies (inline and customer-managed) to a central account, such as your Security Tooling account.
Validate IAM policies
After you collect the IAM policies in a central account, run an IAM Access Analyzer ValidatePolicy API call on each policy. The API calls return a list of findings. The findings can help you identify issues, provide actionable recommendations to resolve the issues, and enable you to author functional policies that can meet security best practices. The findings are stored in an Amazon Simple Storage Service (Amazon S3) bucket. To learn about different findings, see Access Analyzer policy check reference.
Visualize findings
IAM Access Analyzer policy validation findings are stored centrally in an S3 bucket. The S3 bucket is owned by the central (hub) account of your choosing. You can use Amazon Athena to query the findings from the S3 bucket, and then create a QuickSight analysis to visualize the findings.
Publish dashboards
Finally, you can publish a shareable QuickSight dashboard. Figure 2 shows an example of the dashboard.
Figure 2: Dashboard overview
Design overview
This implementation is a serverless job initiated by Amazon EventBridge rules. It collects IAM policies into a hub account (such as your Security Tooling account), validates the policies, stores the validation results in an S3 bucket, and uses Athena to query the findings and QuickSight to visualize them. Figure 3 gives a design overview of our implementation.
Figure 3: Design overview of the implementation
As shown in Figure 3, the implementation includes the following steps:
A time-based rule is set to run daily. The rule triggers an AWS Lambda function that lists the IAM policies of the AWS account it is running in.
When new messages are received, the Amazon SQS queue initiates the second Lambda function. For each message, the Lambda function extracts the policy document and validates it by using the IAM Access Analyzer ValidatePolicy API call.
The Lambda function stores validation results in an S3 bucket.
An AWS Glue table contains the schema for the IAM Access Analyzer findings. Athena natively uses the AWS Glue Data Catalog.
Athena queries the findings stored in the S3 bucket.
QuickSight uses Athena as a data source to visualize IAM Access Analyzer findings.
Benefits of the implementation
By implementing this solution, you can achieve the following benefits:
Store your IAM Access Analyzer policy validation results in a scalable and cost-effective manner with Amazon S3.
Add scalability and fault tolerance to your validation workflow with Amazon SQS.
Partition your evaluation results in Athena and restrict the amount of data scanned by each query, helping to improve performance and reduce cost.
Gain insights from IAM Access Analyzer policy validation findings with QuickSight dashboards. You can use the dashboard to identify IAM policies that don’t comply with AWS best practices and then take action to correct them.
Prerequisites
Before you implement the solution, make sure you’ve completed the following steps:
If you plan to deploy the implementation in a multi-account environment using Organizations, enable all features and enable trusted access with Organizations to operate a service-managed stack set.
Note: This implementation works in accounts that don’t have AWS Lake Formation enabled. If Lake Formation is enabled in your account, you might need to grant Lake Formation permissions in addition to the implementation IAM permissions. For details, see Lake Formation access control overview.
Walkthrough
In this section, we will show you how to deploy an AWS CloudFormation template to your central account (such as your Security Tooling account), which is the hub for IAM Access Analyzer findings. The central account collects, validates, and visualizes your findings.
To deploy the implementation to your multi-account environment
Deploy the CloudFormation stack to your central account.
In your central account, run the following commands in a terminal. These commands clone the GitHub repository and deploy the CloudFormation stack to your central account.
# A) Clone the repository
git clone https://github.com/aws-samples/visualize-iam-access-analyzer-policy-validation-findings.git # B) Switch to the repository's directory
cd visualize-iam-access-analyzer-policy-validation-findings # C) Deploy the CloudFormation stack to your central security account (hub). For<AWSRegion>enter your AWS Region without quotes.
make deploy-hub aws-region=<AWSRegion>
If you want to send IAM policies from other member accounts to your central account, you will need to make note of the CloudFormation stack outputs for SQSQueueUrl and KMSKeyArn when the deployment is complete.
make describe-hub-outputs aws-region=<AWSRegion>
Switch to your organization’s management account and deploy the stack sets to the member accounts. For <SQSQueueUrl> and <KMSKeyArn>, use the values from the previous step.
# Create a CloudFormation stack set to deploy the resources to the member accounts.

make deploy-members SQSQueueUrl=<SQSQueueUrl> KMSKeyArn=<KMSKeyArn< aws-region=<AWSRegion>
To deploy the QuickSight dashboard to your central account
Make sure that QuickSight is using the IAM role aws-quicksight-service-role.
In QuickSight, in the navigation bar at the top right, choose your account (indicated by a person icon) and then choose Manage QuickSight.
On the Manage QuickSight page, in the menu at the left, choose Security & Permissions.
On the Security & Permissions page, under QuickSight access to AWS services, choose Manage.
For IAM role, choose Use an existing role, and then do one of the following:
If you see a list of existing IAM roles, choose the role
# <aws-region> your Quicksight main Region, for example eu-west-1
# <account-id> The ID of your account, for example 123456789012
# <namespace-name> Quicksight namespace, for example default.
# You can list the namespaces by using aws quicksight list-namespaces --aws-account-id<account-id>
aws quicksight list-users --region <aws-region> --aws-account-id <account-id> --namespace <namespace-name>
Make a note of the user’s ARN that you want to grant permissions to list, describe, or update the QuickSight dashboard. This information is found in the arn element. For example, arn:aws:quicksight:us-east-1:111122223333:user/default/User1
To launch the deployment stack for the QuickSight dashboard, run the following command. Replace <quicksight-user-arn> with the user’s ARN from the previous step.
make deploy-dashboard-hub aws-region=<AWSRegion> quicksight-user-arn=<quicksight-user-arn>
Publish and share the QuickSight dashboard with the policy validation findings
You can publish your QuickSight dashboard and then share it with other QuickSight users for reporting purposes. The dashboard preserves the configuration of the analysis at the time that it’s published and reflects the current data in the datasets used by the analysis.
To publish the QuickSight dashboard
In the QuickSight console, choose Analyses and then choose access-analyzer-validation-findings.
In your analysis, in the application bar at the upper right, choose Share, and then choose Publish dashboard.
On the Publish dashboard page, choose Publish new dashboard as and enter IAM Access Analyzer Policy Validation.
Choose Publish dashboard. The dashboard is now published.
On the QuickSight start page, choose Dashboards.
Select the IAM Access Analyzer Policy Validation dashboard. IAM Access Analyzer policy validation findings will appear within the next 24 hours.
Note: If you don’t want to wait until the Lambda function is initiated automatically, you can invoke the function that lists customer-managed policies and inline policies by using the aws lambda invoke AWS CLI command on the hub account and wait one to two minutes to see the policy validation findings:
In the QuickSight console, choose Dashboards and then choose IAM Access Analyzer Policy Validation.
In your dashboard, in the application bar at the upper right, choose Share, and then choose Share dashboard.
On the Share dashboard page that opens, do the following:
For Invite users and groups to dashboard on the left pane, enter a user email or group name in the search box. Users or groups that match your query appear in a list below the search box. Only active users and groups appear in the list.
For the user or group that you want to grant access to the dashboard, choose Add. Then choose the level of permissions that you want them to have.
After you grant users access to a dashboard, you can copy a link to it and send it to them.
Your teams can use this dashboard to better understand their IAM policies and how to move toward least-privilege permissions, as outlined in the section Validate your IAM roles of the blog post Top 10 security items to improve in your AWS account.
Clean up
To avoid incurring additional charges in your accounts, remove the resources that you created in this walkthrough.
Before deleting the CloudFormation stacks and stack sets in your accounts, make sure that the S3 buckets that you created are empty. To delete everything (including old versioned objects) in a versioned bucket, we recommend emptying the bucket through the console. Before deleting the CloudFormation stack from the central account, delete the Athena workgroup.
To delete remaining resources from your AWS accounts
Delete the CloudFormation stack from your central account by running the following command. Make sure to replace <AWSRegion> with your own Region.
make delete-stackset-instances aws-region=<AWSRegion>

# Wait for the operation to finish. You can check its progress on the CloudFormation console.

make delete-stackset aws-region=<AWSRegion>
Delete the QuickSight dashboard by running the following command using the central account credentials. Make sure to replace <AWSRegion> with your own Region.
In this post, you learned how to validate your existing IAM policies by using the IAM Access Analyzer ValidatePolicy API and visualizing the results with AWS analytics tools. By using the implementation, you can better understand your IAM policies and work to reach least privilege in a scalable, fault-tolerant, and cost-effective way. This will help you identify opportunities to tighten your permissions and to grant the right fine-grained permissions to help enhance your overall security posture.
If you have feedback about this post, submit comments in the Comments section below. If you have questions about this post, start a new thread on the AWS Security, Identity, & Compliance re:Post.
Want more AWS Security news? Follow us on Twitter.
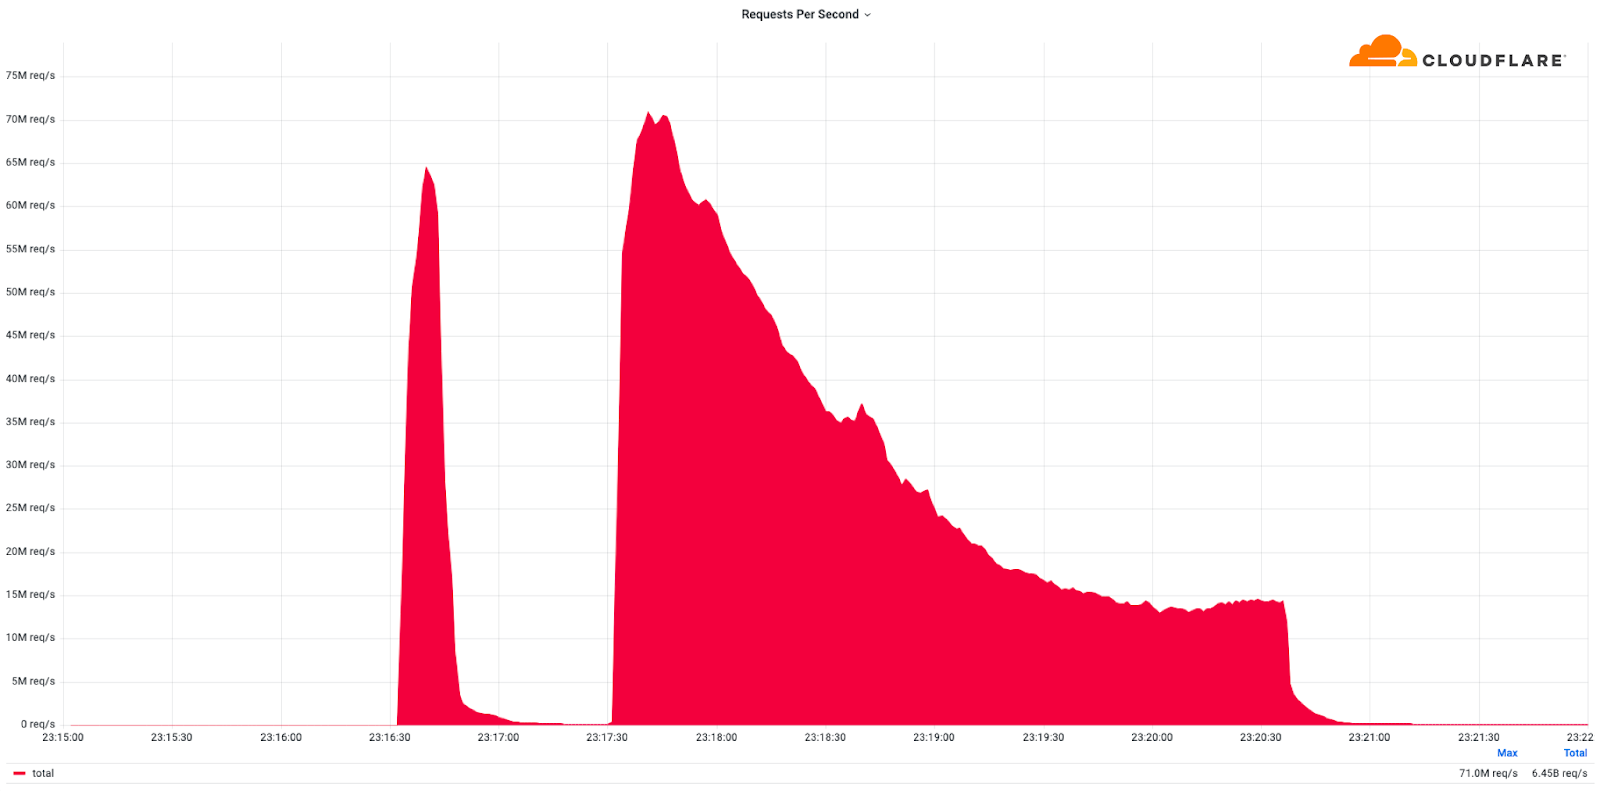
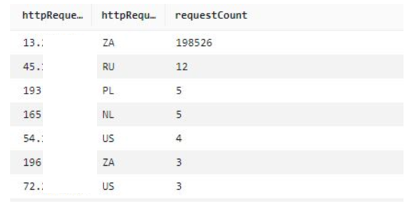
This was a weekend of record-breaking DDoS attacks. Over the weekend, Cloudflare detected and mitigated dozens of hyper-volumetric DDoS attacks. The majority of attacks peaked in the ballpark of 50-70 million requests per second (rps) with the largest exceeding 71 million rps. This is the largest reported HTTP DDoS attack on record, more than 35% higher than the previous reported record of 46M rps in June 2022.
The attacks were HTTP/2-based and targeted websites protected by Cloudflare. They originated from over 30,000 IP addresses. Some of the attacked websites included a popular gaming provider, cryptocurrency companies, hosting providers, and cloud computing platforms. The attacks originated from numerous cloud providers, and we have been working with them to crack down on the botnet.
Record breaking attack: DDoS attack exceeding 71 million requests per second
Over the past year, we’ve seen more attacks originate from cloud computing providers. For this reason, we will be providing service providers that own their own autonomous system a free Botnet threat feed. The feed will provide service providers threat intelligence about their own IP space; attacks originating from within their autonomous system. Service providers that operate their own IP space can now sign up to the early access waiting list.
Is this related to the Super Bowl or Killnet?
No. This campaign of attacks arrives less than two weeks after the Killnet DDoS campaign that targeted healthcare websites. Based on the methods and targets, we do not believe that these recent attacks are related to the healthcare campaign. Furthermore, yesterday was the US Super Bowl, and we also do not believe that this attack campaign is related to the game event.
What are DDoS attacks?
Distributed Denial of Service attacks are cyber attacks that aim to take down Internet properties and make them unavailable for users. These types of cyberattacks can be very efficient against unprotected websites and they can be very inexpensive for the attackers to execute.
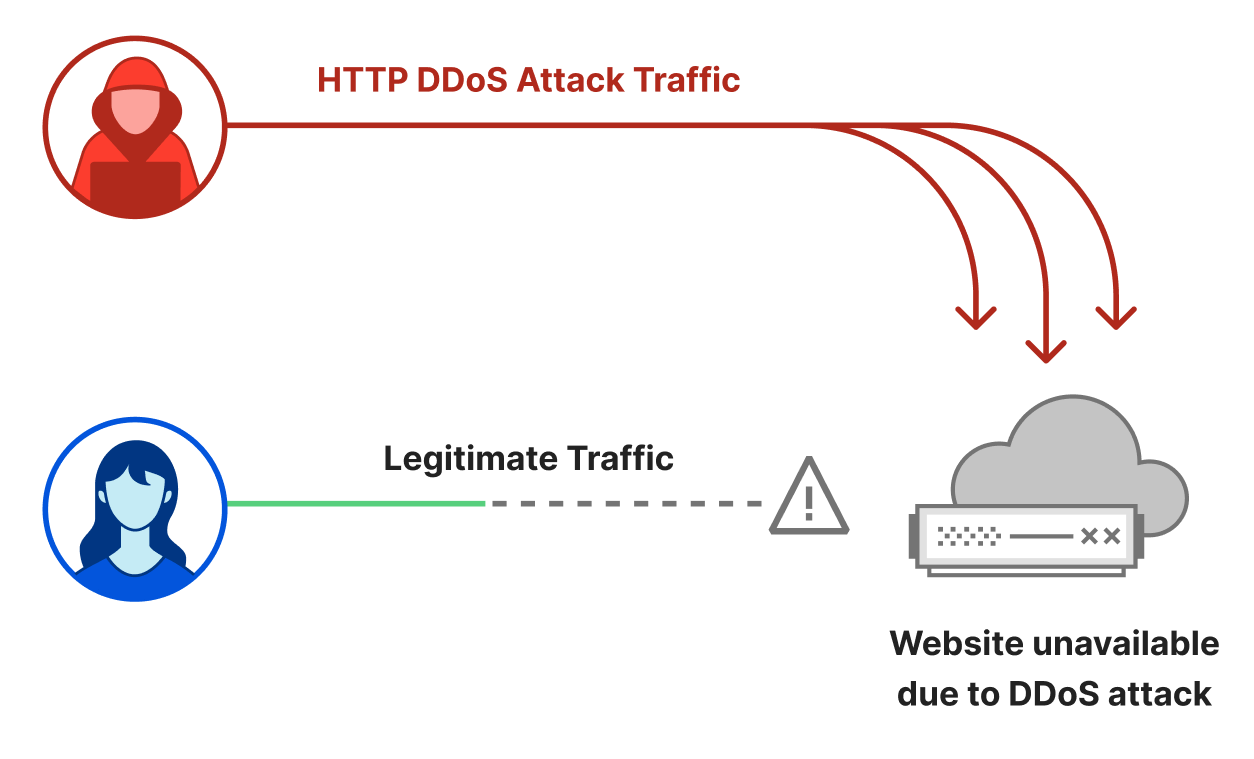
An HTTP DDoS attack usually involves a flood of HTTP requests towards the target website. The attacker’s objective is to bombard the website with more requests than it can handle. Given a sufficiently high amount of requests, the website’s server will not be able to process all of the attack requests along with the legitimate user requests. Users will experience this as website-load delays, timeouts, and eventually not being able to connect to their desired websites at all.
Illustration of a DDoS attack
To make attacks larger and more complicated, attackers usually leverage a network of bots — a botnet. The attacker will orchestrate the botnet to bombard the victim’s websites with HTTP requests. A sufficiently large and powerful botnet can generate very large attacks as we’ve seen in this case.
However, building and operating botnets requires a lot of investment and expertise. What is the average Joe to do? Well, an average Joe that wants to launch a DDoS attack against a website doesn’t need to start from scratch. They can hire one of numerous DDoS-as-a-Service platforms for as little as $30 per month. The more you pay, the larger and longer of an attack you’re going to get.
Why DDoS attacks?
Over the years, it has become easier, cheaper, and more accessible for attackers and attackers-for-hire to launch DDoS attacks. But as easy as it has become for the attackers, we want to make sure that it is even easier – and free – for defenders of organizations of all sizes to protect themselves against DDoS attacks of all types.
Unlike Ransomware attacks, Ransom DDoS attacks don’t require an actual system intrusion or a foothold within the targeted network. Usually Ransomware attacks start once an employee naively clicks an email link that installs and propagates the malware. There’s no need for that with DDoS attacks. They are more like a hit-and-run attack. All a DDoS attacker needs to know is the website’s address and/or IP address.
Is there an increase in DDoS attacks?
Yes. The size, sophistication, and frequency of attacks has been increasing over the past months. In our latest DDoS threat report, we saw that the amount of HTTP DDoS attacks increased by 79% year-over-year. Furthermore, the amount of volumetric attacks exceeding 100 Gbps grew by 67% quarter-over-quarter (QoQ), and the number of attacks lasting more than three hours increased by 87% QoQ.
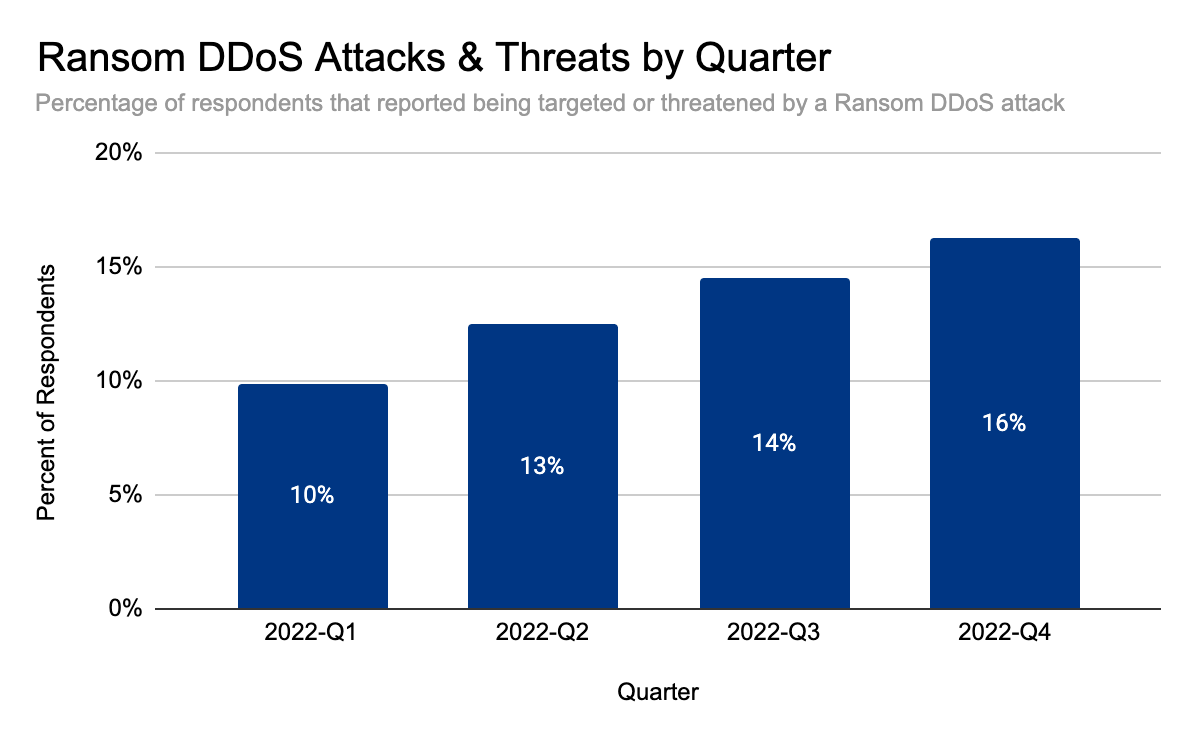
But it doesn’t end there. The audacity of attackers has been increasing as well. In our latest DDoS threat report, we saw that Ransom DDoS attacks steadily increased throughout the year. They peaked in November 2022 where one out of every four surveyed customers reported being subject to Ransom DDoS attacks or threats.
Distribution of Ransom DDoS attacks by month
Should I be worried about DDoS attacks?
Yes. If your website, server, or networks are not protected against volumetric DDoS attacks using a cloud service that provides automatic detection and mitigation, we really recommend that you consider it.
Cloudflare customers shouldn’t be worried, but should be aware and prepared. Below is a list of recommended steps to ensure your security posture is optimized.
What steps should I take to defend against DDoS attacks?
Cloudflare’s systems have been automatically detecting and mitigating these DDoS attacks.
Cloudflare offers many features and capabilities that you may already have access to but may not be using. So as extra precaution, we recommend taking advantage of these capabilities to improve and optimize your security posture:
Ensure all DDoS Managed Rules are set to default settings (High sensitivity level and mitigation actions) for optimal DDoS activation.
Cloudflare Enterprise customers that are subscribed to the Advanced DDoS Protection service should consider enabling Adaptive DDoS Protection, which mitigates attacks more intelligently based on your unique traffic patterns.
Deploy firewall rules and rate limiting rules to enforce a combined positive and negative security model. Reduce the traffic allowed to your website based on your known usage.
Ensure your origin is not exposed to the public Internet (i.e., only enable access to Cloudflare IP addresses). As an extra security precaution, we recommend contacting your hosting provider and requesting new origin server IPs if they have been targeted directly in the past.
Customers with access to Managed IP Lists should consider leveraging those lists in firewall rules. Customers with Bot Management should consider leveraging the threat scores within the firewall rules.
Enable caching as much as possible to reduce the strain on your origin servers, and when using Workers, avoid overwhelming your origin server with more subrequests than necessary.
Defending against DDoS attacks is critical for organizations of all sizes. While attacks may be initiated by humans, they are executed by bots — and to play to win, you must fight bots with bots. Detection and mitigation must be automated as much as possible, because relying solely on humans to mitigate in real time puts defenders at a disadvantage. Cloudflare’s automated systems constantly detect and mitigate DDoS attacks for our customers, so they don’t have to. This automated approach, combined with our wide breadth of security capabilities, lets customers tailor the protection to their needs.
We’ve been providing unmetered and unlimited DDoS protection for free to all of our customers since 2017, when we pioneered the concept. Cloudflare’s mission is to help build a better Internet. A better Internet is one that is more secure, faster, and reliable for everyone – even in the face of DDoS attacks.
Ransomware events have significantly increased over the past several years and captured worldwide attention. Traditional ransomware events affect mostly infrastructure resources like servers, databases, and connected file systems. However, there are also non-traditional events that you may not be as familiar with, such as ransomware events that target data stored in Amazon Simple Storage Service (Amazon S3). There are important steps you can take to help prevent these events, and to identify possible ransomware events early so that you can take action to recover. The goal of this post is to help you learn about the AWS services and features that you can use to protect against ransomware events in your environment, and to investigate possible ransomware events if they occur.
Ransomware is a type of malware that bad actors can use to extort money from entities. The actors can use a range of tactics to gain unauthorized access to their target’s data and systems, including but not limited to taking advantage of unpatched software flaws, misuse of weak credentials or previous unintended disclosure of credentials, and using social engineering. In a ransomware event, a legitimate entity’s access to their data and systems is restricted by the bad actors, and a ransom demand is made for the safe return of these digital assets. There are several methods actors use to restrict or disable authorized access to resources including a) encryption or deletion, b) modified access controls, and c) network-based Denial of Service (DoS) attacks. In some cases, after the target’s data access is restored by providing the encryption key or transferring the data back, bad actors who have a copy of the data demand a second ransom—promising not to retain the data in order to sell or publicly release it.
In the next sections, we’ll describe several important stages of your response to a ransomware event in Amazon S3, including detection, response, recovery, and protection.
After a bad actor has obtained credentials, they use AWS API actions that they iterate through to discover the type of access that the exposed IAM principal has been granted. Bad actors can do this in multiple ways, which can generate different levels of activity. This activity might alert your security teams because of an increase in API calls that result in errors. Other times, if a bad actor’s goal is to ransom S3 objects, then the API calls will be specific to Amazon S3. If access to Amazon S3 is permitted through the exposed IAM principal, then you might see an increase in API actions such as s3:ListBuckets, s3:GetBucketLocation, s3:GetBucketPolicy, and s3:GetBucketAcl.
Analysis
In this section, we’ll describe where to find the log and metric data to help you analyze this type of ransomware event in more detail.
When a ransomware event targets data stored in Amazon S3, often the objects stored in S3 buckets are deleted, without the bad actor making copies. This is more like a data destruction event than a ransomware event where objects are encrypted.
There are several logs that will capture this activity. You can enable AWS CloudTrail event logging for Amazon S3 data, which allows you to review the activity logs to understand read and delete actions that were taken on specific objects.
In addition, if you have enabled Amazon CloudWatch metrics for Amazon S3 prior to the ransomware event, you can use the sum of the BytesDownloaded metric to gain insight into abnormal transfer spikes.
Another way to gain information is to use the region-DataTransfer-Out-Bytes metric, which shows the amount of data transferred from Amazon S3 to the internet. This metric is enabled by default and is associated with your AWS billing and usage reports for Amazon S3.
Next, we’ll walk through how to respond to the unintended disclosure of IAM access keys. Based on the business impact, you may decide to create a second set of access keys to replace all legitimate use of those credentials so that legitimate systems are not interrupted when you deactivate the compromised access keys. You can deactivate the access keys by using the IAM console or through automation, as defined in your incident response plan. However, you also need to document specific details for the event within your secure and private incident response documentation so that you can reference them in the future. If the activity was related to the use of an IAM role or temporary credentials, you need to take an additional step and revoke any active sessions. To do this, in the IAM console, you choose the Revoke active session button, which will attach a policy that denies access to users who assumed the role before that moment. Then you can delete the exposed access keys.
In addition, you can use the AWS CloudTrail dashboard and event history (which includes 90 days of logs) to review the IAM related activities by that compromised IAM user or role. Your analysis can show potential persistent access that might have been created by the bad actor. In addition, you can use the IAM console to look at the IAM credential report (this report is updated every 4 hours) to review activity such as access key last used, user creation time, and password last used. Alternatively, you can use Amazon Athena to query the CloudTrail logs for the same information. See the following example of an Athena query that will take an IAM user Amazon Resource Number (ARN) to show activity for a particular time frame.
SELECT eventtime, eventname, awsregion, sourceipaddress, useragent
FROM cloudtrail
WHERE useridentity.arn = 'arn:aws:iam::1234567890:user/Name' AND
-- Enter timeframe
(event_date >= '2022/08/04' AND event_date <= '2022/11/04')
ORDER BY eventtime ASC
Recovery
After you’ve removed access from the bad actor, you have multiple options to recover data, which we discuss in the following sections. Keep in mind that there is currently no undelete capability for Amazon S3, and AWS does not have the ability to recover data after a delete operation. In addition, many of the recovery options require configuration upon bucket creation.
S3 Versioning
Using versioning in S3 buckets is a way to keep multiple versions of an object in the same bucket, which gives you the ability to restore a particular version during the recovery process. You can use the S3 Versioning feature to preserve, retrieve, and restore every version of every object stored in your buckets. With versioning, you can recover more easily from both unintended user actions and application failures. Versioning-enabled buckets can help you recover objects from accidental deletion or overwrite. For example, if you delete an object, Amazon S3 inserts a delete marker instead of removing the object permanently. The previous version remains in the bucket and becomes a noncurrent version. You can restore the previous version. Versioning is not enabled by default and incurs additional costs, because you are maintaining multiple copies of the same object. For more information about cost, see the Amazon S3 pricing page.
AWS Backup
Using AWS Backup gives you the ability to create and maintain separate copies of your S3 data under separate access credentials that can be used to restore data during a recovery process. AWS Backup provides centralized backup for several AWS services, so you can manage your backups in one location. AWS Backup for Amazon S3 provides you with two options: continuous backups, which allow you to restore to any point in time within the last 35 days; and periodic backups, which allow you to retain data for a specified duration, including indefinitely. For more information, see Using AWS Backup for Amazon S3.
Protection
In this section, we’ll describe some of the preventative security controls available in AWS.
S3 Object Lock
You can add another layer of protection against object changes and deletion by enabling S3 Object Lock for your S3 buckets. With S3 Object Lock, you can store objects using a write-once-read-many (WORM) model and can help prevent objects from being deleted or overwritten for a fixed amount of time or indefinitely.
AWS Backup Vault Lock
Similar to S3 Object lock, which adds additional protection to S3 objects, if you use AWS Backup you can consider enabling AWS Backup Vault Lock, which enforces the same WORM setting for all the backups you store and create in a backup vault. AWS Backup Vault Lock helps you to prevent inadvertent or malicious delete operations by the AWS account root user.
Amazon S3 Inventory
To make sure that your organization understands the sensitivity of the objects you store in Amazon S3, you should inventory your most critical and sensitive data across Amazon S3 and make sure that the appropriate bucket configuration is in place to protect and enable recovery of your data. You can use Amazon S3 Inventory to understand what objects are in your S3 buckets, and the existing configurations, including encryption status, replication status, and object lock information. You can use resource tags to label the classification and owner of the objects in Amazon S3, and take automated action and apply controls that match the sensitivity of the objects stored in a particular S3 bucket.
MFA delete
Another preventative control you can use is to enforce multi-factor authentication (MFA) delete in S3 Versioning. MFA delete provides added security and can help prevent accidental bucket deletions, by requiring the user who initiates the delete action to prove physical or virtual possession of an MFA device with an MFA code. This adds an extra layer of friction and security to the delete action.
Use IAM roles for short-term credentials
Because many ransomware events arise from unintended disclosure of static IAM access keys, AWS recommends that you use IAM roles that provide short-term credentials, rather than using long-term IAM access keys. This includes using identity federation for your developers who are accessing AWS, using IAM roles for system-to-system access, and using IAM Roles Anywhere for hybrid access. For most use cases, you shouldn’t need to use static keys or long-term access keys. Now is a good time to audit and work toward eliminating the use of these types of keys in your environment. Consider taking the following steps:
Create an inventory across all of your AWS accounts and identify the IAM user, when the credentials were last rotated and last used, and the attached policy.
Disable and delete all AWS account root access keys.
Rotate the credentials and apply MFA to the user.
Re-architect to take advantage of temporary role-based access, such as IAM roles or IAM Roles Anywhere.
Review attached policies to make sure that you’re enforcing least privilege access, including removing wild cards from the policy.
Server-side encryption with customer managed KMS keys
Another protection you can use is to implement server-side encryption with AWS Key Management Service (SSE-KMS) and use customer managed keys to encrypt your S3 objects. Using a customer managed key requires you to apply a specific key policy around who can encrypt and decrypt the data within your bucket, which provides an additional access control mechanism to protect your data. You can also centrally manage AWS KMS keys and audit their usage with an audit trail of when the key was used and by whom.
GuardDuty protections for Amazon S3
You can enable Amazon S3 protection in Amazon GuardDuty. With S3 protection, GuardDuty monitors object-level API operations to identify potential security risks for data in your S3 buckets. This includes findings related to anomalous API activity and unusual behavior related to your data in Amazon S3, and can help you identify a security event early on.
Conclusion
In this post, you learned about ransomware events that target data stored in Amazon S3. By taking proactive steps, you can identify potential ransomware events quickly, and you can put in place additional protections to help you reduce the risk of this type of security event in the future.
In November 2022, our bug bounty program received a critical and very interesting report. The report stated that certain types of DNS records could be used to bypass some of our network policies and connect to ports on the loopback address (e.g. 127.0.0.1) of our servers. This post will explain how we dealt with the report, how we fixed the bug, and the outcome of our internal investigation to see if the vulnerability had been previously exploited.
RFC 4291 defines ways to embed an IPv4 address into IPv6 addresses. One of the methods defined in the RFC is to use IPv4-mapped IPv6 addresses, that have the following format:
In IPv6 notation, the corresponding mapping for 127.0.0.1 is ::ffff:127.0.0.1 (RFC 4038)
The researcher was able to use DNS entries based on mapped addresses to bypass some of our controls and access ports on the loopback address or non-routable IPs.
This vulnerability was reported on November 27 to our bug bounty program. Our Security Incident Response Team (SIRT) was contacted, and incident response activities began shortly after the report was filed. A hotpatch was deployed three hours later to prevent exploitation of the bug.
Date
Time (UTC)
Activity
27 November 2022
20:42
Initial report to Cloudflare’s bug bounty program
21:04
SIRT oncall is paged
21:15
SIRT manager on call starts working on the report
21:22
Incident declared and team is assembled and debugging starts
23:20
A hotfix is ready and deployment starts
23:47
Team confirms that the hotfix is deployed and working
23:58
Team investigates if other products are affected. Load Balancers and Spectrum are potential targets. Both products are found to be unaffected by the vulnerability.
28 November 2022
21:14
A permanent fix is ready
29 November 2022
21:34
Permanent fix is merged
Blocking exploitation
Immediately after the vulnerability was reported to our Bug Bounty program, the team began working to understand the issue and find ways to quickly block potential exploitation. It was determined that the fastest way to prevent exploitation would be to block the creation of the DNS records required to execute the attack.
The team then began to implement a patch to prevent the creation of DNS records that include IPv6 addresses that map loopback or RFC 1918 (internal) IPv4 addresses. The fix was fully deployed and confirmed three hours after the report was filed. We later realized that this change was insufficient because records hosted on external DNS servers could also be used in this attack.
The exploit
The exploit provided consisted of the following: a DNS entry, and a Cloudflare Worker. The DNS entry was an AAAA record pointing to ::ffff:127.0.0.1:
The Worker was given a custom URL such as proxy.example.com.
With that setup, it was possible to make the worker attempt connections on the loopback interface of the server where it was running. The call would look like this:
The attack could then be scripted to attempt to connect to multiple ports on the server.
It was also found that a similar setup could be used with other IPv4 addresses to attempt connections into internal services. In this case, the DNS entry would look like:
exploit.example.com AAAA ::ffff:10.0.0.1
This exploit would allow an attacker to connect to services running on the loopback interface of the server. If the attacker was able to bypass the security and authentication mechanisms of a service, it could impact the confidentiality and integrity of data. For services running on other servers, the attacker could also use the worker to attempt connections and map services available over the network. As in most networks, Cloudflare’s network policies and ACLs must allow a few ports to be accessible. These ports would be accessible by an attacker using this exploit.
Investigation
We started an investigation to understand the root cause of the problem and created a proof-of-concept that allowed the team to debug the issue. At the same time, we started a parallel investigation to determine if the issue had been previously exploited.
It all happened when two bugs collided.
The first bug happened in our internal DNS system which is responsible for mapping hostnames to IP addresses of our customers’ origin servers (the DNS system). When the DNS system tried to answer a query for the DNS record from exploit.example.com, it serialized the IP as a string. The Golang net library used for DNS automatically converted the IP ::ffff:10.0.0.1 to string “10.0.0.1”. However, the DNS system still treated it as an IPv6 address. So a query response {ipv6: “10.0.0.1”} was returned.
The second bug was in our internal HTTP system (the proxy) which is responsible for forwarding HTTP traffic to customer’s origin servers. The bug happened in how the proxy validates this DNS response, {ipv6: “10.0.0.1”}. The proxy has two deny lists of IPs that are not allowed to be used, one for IPv4 and one for IPv6. These lists contain localhost IPs and private IPs. The bug was that the proxy system compared the address 10.0.0.1 against the IPv6 deny list because the address was in the “ipv6” section. Naturally the address didn’t match any entry in the deny list. So the address was allowed to be used as an origin IP address.
The second investigation team searched through the logs and found no evidence of previous exploitation of this vulnerability. The team also checked Cloudflare DNS for entries using IPv4-mapped IPv6 addresses and determined that all the existing entries had been used for testing purposes. As of now, there are no signs that this vulnerability could have been previously used against Cloudflare systems.
Remediating the vulnerability
To address this issue we implemented a fix in the proxy service to correctly use the deny list of the parsed address, not the deny list of the IP family the DNS API response claimed to be, to validate the IP address. We confirmed both in our test and production environments that the fix did prevent the issue from happening again.
Beyond maintaining a bug bounty program, we regularly perform internal security reviews and hire third-party firms to audit the software we develop. But it is through our bug bounty program that we receive some of the most interesting and creative reports. Each report has helped us improve the security of our services. We invite those that find a security issue in any of Cloudflare’s services to report it to us through HackerOne.
Managing access to accounts and applications requires a balance between delivering simple, convenient access and managing the risks associated with active user sessions. Based on your organization’s needs, you might want to make it simple for end users to sign in and to operate long enough to get their work done, without the disruptions associated with requiring re-authentication. You might also consider shortening the session to help meet your compliance or security requirements. At the same time, you might want to terminate active sessions that your users don’t need, such as sessions for former employees, sessions for which the user failed to sign out on a second device, or sessions with suspicious activity.
With AWS IAM Identity Center (successor to AWS Single Sign-On), you now have the option to configure the appropriate session duration for your organization’s needs while using new session management capabilities to look up active user sessions and revoke unwanted sessions.
In this blog post, I show you how to use these new features in IAM Identity Center. First, I walk you through how to configure the session duration for your IAM Identity Center users. Then I show you how to identify existing active sessions and terminate them.
What is IAM Identity Center?
IAM Identity Center helps you securely create or connect your workforce identities and manage their access centrally across AWS accounts and applications. IAM Identity Center is the recommended approach for workforce identities to access AWS resources. In IAM Identity Center, you can integrate with an external identity provider (IdP), such as Okta Universal Directory, Microsoft Azure Active Directory, or Microsoft Active Directory Domain Services, as an identity source or you can create users directly in IAM Identity Center. The service is built on the capabilities of AWS Identity and Access Management (IAM) and is offered at no additional cost.
IAM Identity Center sign-in and sessions
You can use IAM Identity Center to access applications and accounts and to get credentials for the AWS Management Console, AWS Command Line Interface (AWS CLI), and AWS SDK sessions. When you log in to IAM Identity Center through a browser or the AWS CLI, an AWS access portal session is created. When you federate into the console, IAM Identity Center uses the session duration setting on the permission set to control the duration of the session.
Note: The access portal session duration for IAM Identity Center differs from the IAM permission set session duration, which defines how long a user can access their account through the IAM Identity Center console.
Before the release of the new session management feature, the AWS access portal session duration was fixed at 8 hours. Now you can configure the session duration for the AWS access portal in IAM Identity Center from 15 minutes to 7 days. The access portal session duration determines how long the user can access the portal, applications, and accounts, and run CLI commands without re-authenticating. If you have an external IdP connected to IAM Identity Center, the access portal session duration will be the lesser of either the session duration that you set in your IdP or the session duration defined in IAM Identity Center. Users can access accounts and applications until the access portal session expires and initiates re-authentication.
When users access accounts or applications through IAM Identity Center, it creates an additional session that is separate but related to the AWS access portal session. AWS CLI sessions use the AWS access portal session to access roles. The duration of console sessions is defined as part of the permission set that the user accessed. When a console session starts, it continues until the duration expires or the user ends the session. IAM Identity Center-enabled application sessions re-verify the AWS access portal session approximately every 60 minutes. These sessions continue until the AWS access portal session terminates, until another application-specific condition terminates the session, or until the user terminates the session.
To summarize:
After a user signs in to IAM Identity Center, they can access their assigned roles and applications for a fixed period, after which they must re-authenticate.
If a user accesses an assigned permission set, the user has access to the corresponding role for the duration defined in the permission set (or by the user terminating the session).
The AWS CLI uses the AWS access portal session to access roles. The AWS CLI refreshes the IAM permission set in the background. The CLI job continues to run until the access portal session expires.
If users access an IAM Identity Center-enabled application, the user can retain access to an application for up to an hour after the access portal session has expired.
For more information about session management features, see Authentication sessions in the documentation.
Configure session duration
In this section, I show you how to configure the session duration for the AWS access portal in IAM Identity Center. You can choose a session duration between 15 minutes and 7 days.
Session duration is a global setting in IAM Identity Center. After you set the session duration, the maximum session duration applies to IAM Identity Center users.
To configure session duration for the AWS access portal:
On the Settings page, choose the Authentication tab.
Under Authentication, next to Session settings, choose Configure.
For Configure session settings, choose a maximum session duration from the list of pre-defined session durations in the dropdown. To set a custom session duration, select Custom duration, enter the length for the session in minutes, and then choose Save.
Figure 1: Set access portal session duration
Congratulations! You have just modified the session duration for your users. This new duration will take effect on each user’s next sign-in.
Find and terminate AWS access portal sessions
With this new release, you can find active portal sessions for your IAM Identity Center users, and if needed, you can terminate the sessions. This can be useful in situations such as the following:
A user no longer works for your organization or was removed from projects that gave them access to applications or permission sets that they should no longer use.
If a device is lost or stolen, the user can contact you to end the session. This reduces the risk that someone will access the device and use the open session.
In these cases, you can find a user’s active sessions in the AWS access portal, select the session that you’re interested in, and terminate it. Depending on the situation, you might also want to deactivate sign-in for the user from the system before revoking the user’s session. You can deactivate sign-in for users in the IAM Identity Center console or in your third-party IdP.
If you first deactivate the user’s sign-in in your IdP, and then deactivate the user’s sign-in in IAM Identity Center, deactivation will take effect in IAM Identity Center without synchronization latency. However, if you deactivate the user in IAM Identity Center first, then it is possible that the IdP could activate the user again. By first deactivating the user’s sign-in in your IdP, you can prevent the user from signing in again when you revoke their session. This action is advisable when a user has left your organization and should no longer have access, or if you suspect a valid user’s credentials were stolen and you want to block access until you reset the user’s passwords.
Termination of the access portal session does not affect the active permission set session started from the access portal. IAM role session duration when assumed from the access portal will last as long as the duration specified in the permission set. For AWS CLI sessions, it can take up to an hour for the CLI to terminate after the access portal session is terminated.
Tip: Activate multi-factor authentication (MFA) wherever possible. MFA offers an additional layer of protection to help prevent unauthorized individuals from gaining access to systems or data.
To manage active access portal sessions in the AWS access portal:
On the Users page, choose the username of the user whose sessions you want to manage. This takes you to a page with the user’s information.
On the user’s page, choose the Active sessions tab. The number in parentheses next to Active sessions indicates the number of current active sessions for this user.
Figure 2: View active access portal sessions
Select the sessions that you want to delete, and then choose Delete session. A dialog box appears that confirms you’re deleting active sessions for this user.
Figure 3: Delete selected active sessions
Review the information in the dialog box, and if you want to continue, choose Delete session.
Conclusion
In this blog post, you learned how IAM Identity Center manages sessions, how to modify the session duration for the AWS access portal, and how to view, search, and terminate active access portal sessions. I also shared some tips on how to think about the appropriate session duration for your use case and related steps that you should take when terminating sessions for users who shouldn’t have permission to sign in again after their session has ended.
With this new feature, you now have more control over user session management. You can use the console to set configurable session lengths based on your organization’s security requirements and desired end-user experience, and you can also terminate sessions, enabling you to manage sessions that are no longer needed or potentially suspicious.
Secrets managers are a great tool to securely store your secrets and provide access to secret material to a set of individuals, applications, or systems that you trust. Across your environments, you might have multiple secrets managers hosted on different providers, which can increase the complexity of maintaining a consistent operating model for your secrets. In these situations, centralizing your secrets in a single source of truth, and replicating subsets of secrets across your other secrets managers, can simplify your operating model.
This blog post explains how you can use your third-party secrets manager as the source of truth for your secrets, while replicating a subset of these secrets to AWS Secrets Manager. By doing this, you will be able to use secrets that originate and are managed from your third-party secrets manager in Amazon Web Services (AWS) applications or in AWS services that use Secrets Manager secrets.
I’ll demonstrate this approach in this post by setting up a sample open-source HashiCorp Vault to create and maintain secrets and create a replication mechanism that enables you to use these secrets in AWS by using AWS Secrets Manager. Although this post uses HashiCorp Vault as an example, you can also modify the replication mechanism to use secrets managers from other providers.
Important: This blog post is intended to provide guidance that you can use when planning and implementing a secrets replication mechanism. The examples in this post are not intended to be run directly in production, and you will need to take security hardening requirements into consideration before deploying this solution. As an example, HashiCorp provides tutorials on hardening production vaults.
You can use these links to navigate through this post:
The primary use case for this post is for customers who are running applications on AWS and are currently using a third-party secrets manager to manage their secrets, hosted on-premises, in the AWS Cloud, or with a third-party provider. These customers typically have existing secrets vending processes, deployment pipelines, and procedures and processes around the management of these secrets. Customers with such a setup might want to keep their existing third-party secrets manager and have a set of secrets that are accessible to workloads running outside of AWS, as well as workloads running within AWS, by using AWS Secrets Manager.
Another use case is for customers who are in the process of migrating workloads to the AWS Cloud and want to maintain a (temporary) hybrid form of secrets management. By replicating secrets from an existing third-party secrets manager, customers can migrate their secrets to the AWS Cloud one-by-one, test that they work, integrate the secrets with the intended applications and systems, and once the migration is complete, remove the third-party secrets manager.
Additionally, some AWS services, such as Amazon Relational Database Service (Amazon RDS) Proxy, AWS Direct Connect MACsec, and AD Connector seamless join (Linux), only support secrets from AWS Secrets Manager. Customers can use secret replication if they have a third-party secrets manager and want to be able to use third-party secrets in services that require integration with AWS Secrets Manager. That way, customers don’t have to manage secrets in two places.
Two approaches to secrets replication
In this post, I’ll discuss two main models to replicate secrets from an external third-party secrets manager to AWS Secrets Manager: a pull model and a push model.
Pull model In a pull model, you can use AWS services such as Amazon EventBridge and AWS Lambda to periodically call your external secrets manager to fetch secrets and updates to those secrets. The main benefit of this model is that it doesn’t require any major configuration to your third-party secrets manager. The AWS resources and mechanism used for pulling secrets must have appropriate permissions and network access to those secrets. However, there could be a delay between the time a secret is created and updated and when it’s picked up for replication, depending on the time interval configured between pulls from AWS to the external secrets manager.
Push model In this model, rather than periodically polling for updates, the external secrets manager pushes updates to AWS Secrets Manager as soon as a secret is added or changed. The main benefit of this is that there is minimal delay between secret creation, or secret updating, and when that data is available in AWS Secrets Manager. The push model also minimizes the network traffic required for replication since it’s a unidirectional flow. However, this model adds a layer of complexity to the replication, because it requires additional configuration in the third-party secrets manager. More specifically, the push model is dependent on the third-party secrets manager’s ability to run event-based push integrations with AWS resources. This will require a custom integration to be developed and managed on the third-party secrets manager’s side.
This blog post focuses on the pull model to provide an example integration that requires no additional configuration on the third-party secrets manager.
Replicate secrets to AWS Secrets Manager with the pull model
In this section, I’ll walk through an example of how to use the pull model to replicate your secrets from an external secrets manager to AWS Secrets Manager.
Solution overview
Figure 1: Secret replication architecture diagram
The architecture shown in Figure 1 consists of the following main steps, numbered in the diagram:
A Cron expression in Amazon EventBridge invokes an AWS Lambda function every 30 minutes.
To connect to the third-party secrets manager, the Lambda function, written in NodeJS, fetches a set of user-defined API keys belonging to the secrets manager from AWS Secrets Manager. These API keys have been scoped down to give read-only access to secrets that should be replicated, to adhere to the principle of least privilege. There is more information on this in Step 3: Update the Vault connection secret.
The third step has two variants depending on where your third-party secrets manager is hosted:
The Lambda function is configured to fetch secrets from a third-party secrets manager that is hosted outside AWS. This requires sufficient networking and routing to allow communication from the Lambda function.
Note: Depending on the location of your third-party secrets manager, you might have to consider different networking topologies. For example, you might need to set up hybrid connectivity between your external environment and the AWS Cloud by using AWS Site-to-Site VPN or AWS Direct Connect, or both.
Important: To simplify the deployment of this example integration, I’ll use a secrets manager hosted on a publicly available Amazon EC2 instance within the same VPC as the Lambda function (3b). This minimizes the additional networking components required to interact with the secrets manager. More specifically, the EC2 instance runs an open-source HashiCorp Vault. In the rest of this post, I’ll refer to the HashiCorp Vault’s API keys as Vault tokens.
The Lambda function compares the version of the secret that it just fetched from the third-party secrets manager against the version of the secret that it has in AWS Secrets Manager (by tag). The function will create a new secret in AWS Secrets Manager if the secret does not exist yet, and will update it if there is a new version. The Lambda function will only consider secrets from the third-party secrets manager for replication if they match a specified prefix. For example, hybrid-aws-secrets/.
In case there is an error synchronizing the secret, an email notification is sent to the email addresses which are subscribed to the Amazon Simple Notification Service (Amazon SNS) Topic deployed. This sample application uses email notifications with Amazon SNS as an example, but you could also integrate with services like ServiceNow, Jira, Slack, or PagerDuty. Learn more about how to use webhooks to publish Amazon SNS messages to external services.
Step 1: Deploy the solution by using the AWS CDK toolkit
For this blog post, I’ve created an AWS Cloud Development Kit (AWS CDK) script, which can be found in this AWS GitHub repository. Using the AWS CDK, I’ve defined the infrastructure depicted in Figure 1 as Infrastructure as Code (IaC), written in TypeScript, ready for you to deploy and try out. The AWS CDK is an open-source software development framework that allows you to write your cloud application infrastructure as code using common programming languages such as TypeScript, Python, Java, Go, and so on.
Prerequisites:
To deploy the solution, the following should be in place on your system:
AWS CDK Toolkit. Install using npm (included in Node setup) by running npm install -g aws-cdk in a local terminal.
An AWS access key ID and secret access key configured as this setup will interact with your AWS account. See Configuration basics in the AWS Command Line Interface User Guide for more details.
Clone the CDK script for secret replication. git clone https://github.com/aws-samples/aws-secrets-manager-hybrid-secret-replication-from-hashicorp-vault.git SecretReplication
Use the cloned project as the working directory. cd SecretReplication
Install the required dependencies to deploy the application. npm install
Adjust any configuration values for your setup in the cdk.json file. For example, you can adjust the secretsPrefix value to change which prefix is used by the Lambda function to determine the subset of secrets that should be replicated from the third-party secrets manager.
Bootstrap your AWS environments with some resources that are required to deploy the solution. With correctly configured AWS credentials, run the following command. cdk bootstrap
This command deploys the infrastructure shown in Figure 1 for you by using AWS CloudFormation. For a full list of resources, you can view the SecretsManagerReplicationStack in AWS CloudFormation after the deployment has completed.
Note: If your local environment does not have a terminal that allows you to run these commands, consider using AWS Cloud9 or AWS CloudShell.
After the deployment has finished, you should see an output in your terminal that looks like the one shown in Figure 2. If successful, the output provides the IP address of the sample HashiCorp Vault and its web interface.
Figure 2: AWS CDK deployment output
Step 2: Initialize the HashiCorp Vault
As part of the output of the deployment script, you will be given a URL to access the user interface of the open-source HashiCorp Vault. To simplify accessibility, the URL points to a publicly available Amazon EC2 instance running the HashiCorp Vault user interface as shown in step 3b in Figure 1.
Let’s look at the HashiCorp Vault that was just created. Go to the URL in your browser, and you should see the Raft Storage initialize page, as shown in Figure 3.
The vault requires an initial configuration to set up storage and get the initial set of root keys. You can go through the steps manually in the HashiCorp Vault’s user interface, but I recommend that you use the initialise_vault.sh script that is included as part of the SecretsManagerReplication project instead.
Using the HashiCorp Vault API, the initialization script will automatically do the following:
Initialize the Raft storage to allow the Vault to store secrets locally on the instance.
Create an initial set of unseal keys for the Vault. Importantly, for demo purposes, the script uses a single key share. For production environments, it’s recommended to use multiple key shares so that multiple shares are needed to reconstruct the root key, in case of an emergency.
Store the unseal keys in init/vault_init_output.json in your project.
Unseals the HashiCorp Vault by using the unseal keys generated earlier.
Enables two key-value secrets engines:
An engine named after the prefix that you’re using for replication, defined in the cdk.json file. In this example, this is hybrid-aws-secrets. We’re going to use the secrets in this engine for replication to AWS Secrets Manager.
An engine called super-secret-engine, which you’re going to use to show that your replication mechanism does not have access to secrets outside the engine used for replication.
Creates three example secrets, two in hybrid-aws-secrets, and one in super-secret-engine.
Creates a read-only policy, which you can see in the init/replication-policy-payload.json file after the script has finished running, that allows read-only access to only the secrets that should be replicated.
Creates a new vault token that has the read-only policy attached so that it can be used by the AWS Lambda function later on to fetch secrets for replication.
To run the initialization script, go back to your terminal, and run the following command. ./initialise_vault.sh
The script will then ask you for the IP address of your HashiCorp Vault. Provide the IP address (excluding the port) and choose Enter. Input y so that the script creates a couple of sample secrets.
If everything is successful, you should see an output that includes tokens to access your HashiCorp Vault, similar to that shown in Figure 4.
The setup script has outputted two tokens: one root token that you will use for administrator tasks, and a read-only token that will be used to read secret information for replication. Make sure that you can access these tokens while you’re following the rest of the steps in this post.
Note: The root token is only used for demonstration purposes in this post. In your production environments, you should not use root tokens for regular administrator actions. Instead, you should use scoped down roles depending on your organizational needs. In this case, the root token is used to highlight that there are secrets under super-secret-engine/ which are not meant for replication. These secrets cannot be seen, or accessed, by the read-only token.
Go back to your browser and refresh your HashiCorp Vault UI. You should now see the Sign in to Vault page. Sign in using the Token method, and use the root token. If you don’t have the root token in your terminal anymore, you can find it in the init/vault_init_output.json file.
After you sign in, you should see the overview page with three secrets engines enabled for you, as shown in Figure 5.
If you explore hybrid-aws-secrets and super-secret-engine, you can see the secrets that were automatically created by the initialization script. For example, first-secret-for-replication, which contains a sample key-value secret with the key secrets and value manager.
If you navigate to Policies in the top navigation bar, you can also see the aws-replication-read-only policy, as shown in Figure 6. This policy provides read-only access to only the hybrid-aws-secrets path.
Figure 6: Read-only HashiCorp Vault token policy
The read-only policy is attached to the read-only token that we’re going to use in the secret replication Lambda function. This policy is important because it scopes down the access that the Lambda function obtains by using the token to a specific prefix meant for replication. For secret replication we only need to perform read operations. This policy ensures that we can read, but cannot add, alter, or delete any secrets in HashiCorp Vault using the token.
You can verify the read-only token permissions by signing into the HashiCorp Vault user interface using the read-only token rather than the root token. Now, you should only see hybrid-aws-secrets. You no longer have access to super-secret-engine, which you saw in Figure 5. If you try to create or update a secret, you will get a permission denied error.
Great! Your HashiCorp Vault is now ready to have its secrets replicated from hybrid-aws-secrets to AWS Secrets Manager. The next section describes a final configuration that you need to do to allow access to the secrets in HashiCorp Vault by the replication mechanism in AWS.
Step 3: Update the Vault connection secret
To allow secret replication, you must give the AWS Lambda function access to the HashiCorp Vault read-only token that was created by the initialization script. To do that, you need to update the vault-connection-secret that was initialized in AWS Secrets Manager as part of your AWS CDK deployment.
For demonstration purposes, I’ll show you how to do that by using the AWS Management Console, but you can also do it programmatically by using the AWS Command Line Interface (AWS CLI) or AWS SDK with the update-secret command.
To update the Vault connection secret (console)
In the AWS Management Console, go to AWS Secrets Manager > Secrets > hybrid-aws-secrets/vault-connection-secret.
Under Secret Value, choose Retrieve Secret Value, and then choose Edit.
Update the vaultToken value to contain the read-only token that was generated by the initialization script.
Step 4: (Optional) Set up email notifications for replication failures
As highlighted in Figure 1, the Lambda function will send an email by using Amazon SNS to a designated email address whenever one or more secrets fails to be replicated. You will need to configure the solution to use the correct email address. To do this, go to the cdk.json file at the root of the SecretReplication folder and adjust the notificationEmail parameter to an email address that you own. Once done, deploy the changes using the cdk deploy command. Within a few minutes, you’ll get an email requesting you to confirm the subscription. Going forward, you will receive an email notification if one or more secrets fails to replicate.
Test your secret replication
You can either wait up to 30 minutes for the Lambda function to be invoked automatically to replicate the secrets, or you can manually invoke the function.
To test your secret replication
Open the AWS Lambda console and find the Secret Replication function (the name starts with SecretsManagerReplication-SecretReplication).
Navigate to the Test tab.
For the text event action, select Create new event, create an event using the default parameters, and then choose the Test button on the right-hand side, as shown in Figure 8.
Figure 8: AWS Lambda – Test page to manually invoke the function
This will run the function. You should see a success message, as shown in Figure 9. If this is the first time the Lambda function has been invoked, you will see in the results that two secrets have been created.
Figure 9: AWS Lambda function output
You can find the corresponding logs for the Lambda function invocation in a Log group in AWS CloudWatch matching the name /aws/lambda/SecretsManagerReplication-SecretReplicationLambdaF-XXXX.
To verify that the secrets were added, navigate to AWS Secrets Manager in the console, and in addition to the vault-connection-secret that you edited before, you should now also see the two new secrets with the same hybrid-aws-secrets prefix, as shown in Figure 10.
Figure 10: AWS Secrets Manager overview – New replicated secrets
For example, if you look at first-secret-for-replication, you can see the first version of the secret, with the secret key secrets and secret value manager, as shown in Figure 11.
Figure 11: AWS Secrets Manager – New secret overview showing values and version number
Success! You now have access to the secret values that originate from HashiCorp Vault in AWS Secrets Manager. Also, notice how there is a version tag attached to the secret. This is something that is necessary to update the secret, which you will learn more about in the next two sections.
Update a secret
It’s a recommended security practice to rotate secrets frequently. The Lambda function in this solution not only replicates secrets when they are created — it also periodically checks if existing secrets in AWS Secrets Manager should be updated when the third-party secrets manager (HashiCorp Vault in this case) has a new version of the secret. To validate that this works, you can manually update a secret in your HashiCorp Vault and observe its replication in AWS Secrets Manager in the same way as described in the previous section. You will notice that the version tag of your secret gets updated automatically when there is a new secret replication from the third-party secrets manager to AWS Secrets Manager.
Secret replication logic
This section will explain in more detail the logic behind the secret replication. Consider the following sequence diagram, which explains the overall logic implemented in the Lambda function.
Figure 12: State diagram for secret replication logic
This diagram highlights that the Lambda function will first fetch a list of secret names from the HashiCorp Vault. Then, the function will get a list of secrets from AWS Secrets Manager, matching the prefix that was configured for replication. AWS Secrets Manager will return a list of the secrets that match this prefix and will also return their metadata and tags. Note that the function has not fetched any secret material yet.
Next, the function will loop through each secret name that HashiCorp Vault gave and will check if the secret exists in AWS Secrets Manager:
If there is no secret that matches that name, the function will fetch the secret material from HashiCorp Vault, including the version number, and create a new secret in AWS Secrets Manager. It will also add a version tag to the secret to match the version.
If there is a secret matching that name in AWS Secrets Manager already, the Lambda function will first fetch the metadata from that secret in HashiCorp Vault. This is required to get the version number of the secret, because the version number was not exposed when the function got the list of secrets from HashiCorp Vault initially. If the secret version from HashiCorp Vault does not match the version value of the secret in AWS Secrets Manager (for example, the version in HashiCorp vault is 2, and the version in AWS Secrets manager is 1), an update is required to get the values synchronized again. Only now will the Lambda function fetch the actual secret material from HashiCorp Vault and update the secret in AWS Secrets Manager, including the version number in the tag.
The Lambda function fetches metadata about the secrets, rather than just fetching the secret material from HashiCorp Vault straight away. Typically, secrets don’t update very often. If this Lambda function is called every 30 minutes, then it should not have to add or update any secrets in the majority of invocations. By using metadata to determine whether you need the secret material to create or update secrets, you minimize the number of times secret material is fetched both from HashiCorp Vault and AWS Secrets Manager.
Note: The AWS Lambda function has permissions to pull certain secrets from HashiCorp Vault. It is important to thoroughly review the Lambda code and any subsequent changes to it to prevent leakage of secrets. For example, you should ensure that the Lambda function does not get updated with code that unintentionally logs secret material outside the Lambda function.
Use your secret
Now that you have created and replicated your secrets, you can use them in your AWS applications or AWS services that are integrated with Secrets Manager. For example, you can use the secrets when you set up connectivity for a proxy in Amazon RDS, as follows.
To use a secret when creating a proxy in Amazon RDS
Go to the Amazon RDS service in the console.
In the left navigation pane, choose Proxies, and then choose Create Proxy.
On the Connectivity tab, you can now select first-secret-for-replicationorsecond-secret-for-replication, which were created by the Lambda function after replicating them from the HashiCorp Vault.
Figure 13: Amazon RDS Proxy – Example of using replicated AWS Secrets Manager secrets
Due to the sensitive nature of the secrets, it is important that you scope down the permissions to the least amount required to prevent inadvertent access to your secrets. The setup adopts a least-privilege permission strategy, where only the necessary actions are explicitly allowed on the resources that are required for replication. However, the permissions should be reviewed in accordance to your security standards.
In the architecture of this solution, there are two main places where you control access to the management of your secrets in Secrets Manager.
Lambda execution IAM role: The IAM role assumed by the Lambda function during execution contains the appropriate permissions for secret replication. There is an additional safety measure, which explicitly denies any action to a resource that is not required for the replication. For example, the Lambda function only has permission to publish to the Amazon SNS topic that is created for the failed replications, and will explicitly deny a publish action to any other topic. Even if someone accidentally adds an allow to the policy for a different topic, the explicit deny will still block this action.
AWS KMS key policy: When other services need to access the replicated secret in AWS Secrets Manager, they need permission to use the hybrid-aws-secrets-encryption-key AWS KMS key. You need to allow the principal these permissions through the AWS KMS key policy. Additionally, you can manage permissions to the AWS KMS key for the principal through an identity policy. For example, this is required when accessing AWS KMS keys across AWS accounts. See Permissions for AWS services in key policies and Specifying KMS keys in IAM policy statements in the AWS KMS Developer Guide.
Options for customizing the sample solution
The solution that was covered in this post provides an example for replication of secrets from HashiCorp Vault to AWS Secrets Manager using the pull model. This section contains additional customization options that you can consider when setting up the solution, or your own variation of it.
Depending on the solution that you’re using, you might have access to different metadata attached to the secrets, which you can use to determine if a secret should be updated. For example, if you have access to data that represents a last_updated_datetime property, you could use this to infer whether or not a secret ought to be updated.
It is a recommended practice to not use long-lived tokens wherever possible. In this sample, I used a static vault token to give the Lambda function access to the HashiCorp Vault. Depending on the solution that you’re using, you might be able to implement better authentication and authorization mechanisms. For example, HashiCorp Vault allows you to use IAM auth by using AWS IAM, rather than a static token.
This post addressed the creation of secrets and updating of secrets, but for your production setup, you should also consider deletion of secrets. Depending on your requirements, you can choose to implement a strategy that works best for you to handle secrets in AWS Secrets Manager once the original secret in HashiCorp Vault has been deleted. In the pull model, you could consider removing a secret in AWS Secrets Manager if the corresponding secret in your external secrets manager is no longer present.
In the sample setup, the same AWS KMS key is used to encrypt both the environment variables of the Lambda function, and the secrets in AWS Secrets Manager. You could choose to add an additional AWS KMS key (which would incur additional cost), to have two separate keys for these tasks. This would allow you to apply more granular permissions for the two keys in the corresponding KMS key policies or IAM identity policies that use the keys.
Conclusion
In this blog post, you’ve seen how you can approach replicating your secrets from an external secrets manager to AWS Secrets Manager. This post focused on a pull model, where the solution periodically fetched secrets from an external HashiCorp Vault and automatically created or updated the corresponding secret in AWS Secrets Manager. By using this model, you can now use your external secrets in your AWS Cloud applications or services that have an integration with AWS Secrets Manager.
If you have feedback about this post, submit comments in the Comments section below. If you have questions about this post, start a new thread on the AWS Secrets Manager re:Post or contact AWS Support.
Want more AWS Security news? Follow us on Twitter.
USER namespaces power the functionality of our favorite tools such as docker, podman, and kubernetes. We wrote about Linux namespaces back in June and explained them like this:
Most of the namespaces are uncontroversial, like the UTS namespace which allows the host system to hide its hostname and time. Others are complex but straightforward – NET and NS (mount) namespaces are known to be hard to wrap your head around. Finally, there is this very special, very curious USER namespace. USER namespace is special since it allows the – typically unprivileged owner to operate as “root” inside it. It’s a foundation to having tools like Docker to not operate as true root, and things like rootless containers.
Due to its nature, allowing unprivileged users access to USER namespace always carried a great security risk. With its help the unprivileged user can in fact run code that typically requires root. This code is often under-tested and buggy. Today we will look into one such case where USER namespaces are leveraged to exploit a kernel bug that can result in an unprivileged denial of service attack.
Enter Linux Traffic Control queue disciplines
In 2019, we were exploring leveraging Linux Traffic Control’squeue discipline (qdisc) to schedule packets for one of our services with the Hierarchy Token Bucket (HTB) classful qdisc strategy. Linux Traffic Control is a user-configured system to schedule and filter network packets. Queue disciplines are the strategies in which packets are scheduled. In particular, we wanted to filter and schedule certain packets from an interface, and drop others into the noqueue qdisc.
noqueue is a special case qdisc, such that packets are supposed to be dropped when scheduled into it. In practice, this is not the case. Linux handles noqueue such that packets are passed through and not dropped (for the most part). The documentation states as much. It also states that “It is not possible to assign the noqueue queuing discipline to physical devices or classes.” So what happens when we assign noqueue to a class?
Let’s write some shell commands to show the problem in action:
First we need to log in as root because that gives us CAP_NET_ADMIN to be able to configure traffic control.
We then assign a network interface to a variable. These can be found with ip a. Virtual interfaces can be located by calling ls /sys/devices/virtual/net. These will match with the output from ip a.
Our interface is currently assigned to the pfifo_fast qdisc, so we replace it with the HTB classful qdisc and assign it the handle of 1:. We can think of this as the root node in a tree. The “default 1” configures this such that unclassified traffic will be routed directly through this qdisc which falls back to pfifo_fast queuing. (more on this later)
Next we add a class to our root qdisc 1:, assign it to the first leaf node 1 of root 1: 1:1, and give it some reasonable configuration defaults.
Lastly, we add the noqueue qdisc to our first leaf node in the hierarchy: 1:1. This effectively means traffic routed here will be scheduled to noqueue
Assuming our setup executed without a hitch, we will receive something similar to this kernel panic:
We know that the root user is responsible for setting qdisc on interfaces, so if root can crash the kernel, so what? We just do not apply noqueue qdisc to a class id of a HTB qdisc:
# dev=enp0s5
# tc qdisc replace dev $dev root handle 1: htb default 1
# tc class add dev $dev parent 1: classid 1:2 htb rate 10mbit // A
// B is missing, so anything not filtered into 1:2 will be pfifio_fast
Here, we leveraged the default case of HTB where we assign a class id 1:2 to be rate-limited (A), and implicitly did not set a qdisc to another class such as id 1:1 (B). Packets queued to (A) will be filtered to HTB_DIRECT and packets queued to (B) will be filtered into pfifo_fast.
Because we were not familiar with this part of the codebase, we notified the mailing lists and created a ticket. The bug did not seem all that important to us at that time.
Fast-forward to 2022, we are pushing USER namespace creation hardening. We extended the Linux LSM framework with a new LSM hook: userns_create to leverage eBPF LSM for our protections, and encourage others to do so as well. Recently while combing our ticket backlog, we rethought this bug. We asked ourselves, “can we leverage USER namespaces to trigger the bug?” and the short answer is yes!
Demonstrating the bug
The exploit can be performed with any classful qdisc that assumes a struct Qdisc.enqueue function to not be NULL (more on this later), but in this case, we are demonstrating just with HTB.
We use the “lo” interface to demonstrate that this bug is triggerable with a virtual interface. This is important for containers because they are fed virtual interfaces most of the time, and not the physical interface. Because of that, we can use a container to crash the host as an unprivileged user, and thus perform a denial of service attack.
Why does that work?
To understand the problem a bit better, we need to look back to the original patch series, but specifically this commit that introduced the bug. Before this series, achieving noqueue on interfaces relied on a hack that would set a device qdisc to noqueue if the device had a tx_queue_len = 0. The commit d66d6c3152e8 (“net: sched: register noqueue qdisc”) circumvents this by explicitly allowing noqueue to be added with the tc command without needing to get around that limitation.
The way the kernel checks for whether we are in a noqueue case or not, is to simply check if a qdisc has a NULL enqueue() function. Recall from earlier that noqueue does not necessarily drop packets in practice? After that check in the fail case, the following logic handles the noqueue functionality. In order to fail the check, the author had to cheat a reassignment from noop_enqueue() to NULL by making enqueue = NULL in the init which is called way afterregister_qdisc() during runtime.
Here is where classful qdiscs come into play. The check for an enqueue function is no longer NULL. In this call path, it is now set to HTB (in our example) and is thus allowed to enqueue the struct skb to a queue by making a call to the function htb_enqueue(). Once in there, HTB performs a lookup to pull in a qdisc assigned to a leaf node, and eventually attempts to queue the struct skb to the chosen qdisc which ultimately reaches this function:
We can see that the enqueueing process is fairly agnostic from physical/virtual interfaces. The permissions and validation checks are done when adding a queue to an interface, which is why the classful qdics assume the queue to not be NULL. This knowledge leads us to a few solutions to consider.
Solutions
We had a few solutions ranging from what we thought was best to worst:
Follow tc-noqueue documentation and do not allow noqueue to be assigned to a classful qdisc
For each classful qdisc, check for NULL and fallback
While we ultimately went for the first option: “disallow noqueue for qdisc classes”, the third option creates a lot of churn in the code, and does not solve the problem completely. Future qdiscs implementations could forget that important check as well as the maintainers. However, the reason for passing on the second option is a bit more interesting.
The reason we did not follow that approach is because we need to first answer these questions:
Why not allow noqueue for classful qdiscs?
This contradicts the documentation. The documentation does have some precedent for not being totally followed in practice, but we will need to update that to reflect the current state. This is fine to do, but does not address the behavior change problem other than remove the NULL dereference bug.
What behavior changes if we do allow noqueue for qdiscs?
This is harder to answer because we need to determine what that behavior should be. Currently, when noqueue is applied as the root qdisc for an interface, the path is to essentially allow packets to be processed. Claiming a fallback for classes is a different matter. They may each have their own fallback rules, and how do we know what is the right fallback? Sometimes in HTB the fallback is pass-through with HTB_DIRECT, sometimes it is pfifo_fast. What about the other classes? Perhaps instead we should fall back to the default noqueue behavior as it is for root qdiscs?
We felt that going down this route would only add confusion and additional complexity to queuing. We could also make an argument that such a change could be considered a feature addition and not necessarily a bug fix. Suffice it to say, adhering to the current documentation seems to be the more appealing approach to prevent the vulnerability now, while something else can be worked out later.
Takeaways
First and foremost, apply this patch as soon as possible. And consider hardening USER namespaces on your systems by setting sysctl -w kernel.unprivileged_userns_clone=0, which only lets root create USER namespaces in Debian kernels, sysctl -w user.max_user_namespaces=[number] for a process hierarchy, or consider backporting these two patches: security_create_user_ns() and the SELinux implementation (now in Linux 6.1.x) to allow you to protect your systems with either eBPF or SELinux. If you are sure you’re not using USER namespaces and in extreme cases, you might consider turning the feature off with CONFIG_USERNS=n. This is just one example of many where namespaces are leveraged to perform an attack, and more are surely to crop up in varying levels of severity in the future.
Special thanks to Ignat Korchagin and Jakub Sitnicki for code reviews and helping demonstrate the bug in practice.
Some web applications need to protect their authentication tokens or session IDs from cross-site scripting (XSS). It’s an Open Web Application Security Project (OWASP) best practice for session management to store secrets in the browsers’ cookie store with the HttpOnly attribute enabled. When cookies have the HttpOnly attribute set, the browser will prevent client-side JavaScript code from accessing the value. This reduces the risk of secrets being compromised.
In this blog post, you’ll learn how to store access tokens and authenticate with HttpOnly cookies in your own workloads when using Amazon API Gateway as the client-facing endpoint. The tutorial in this post will show you a solution to store OAuth2 access tokens in the browser cookie store, and verify user authentication through Amazon API Gateway. This post describes how to use Amazon Cognito to issue OAuth2 access tokens, but the solution is not limited to OAuth2. You can use other kinds of tokens or session IDs.
The solution consists of two decoupled parts:
OAuth2 flow
Authentication check
Note: This tutorial takes you through detailed step-by-step instructions to deploy an example solution. If you prefer to deploy the solution with a script, see the api-gw-http-only-cookie-auth GitHub repository.
No costs should incur when you deploy the application from this tutorial because the services you’re going to use are included in the AWS Free Tier. However, be aware that small charges may apply if you have other workloads running in your AWS account and exceed the free tier. Make sure to clean up your resources from this tutorial after deployment.
Solution architecture
This solution uses Amazon Cognito, Amazon API Gateway, and AWS Lambda to build a solution that persists OAuth2 access tokens in the browser cookie store. Figure 1 illustrates the solution architecture for the OAuth2 flow.
Figure 1: OAuth2 flow solution architecture
A user authenticates by using Amazon Cognito.
Amazon Cognito has an OAuth2 redirect URI pointing to your API Gateway endpoint and invokes the integrated Lambda function oAuth2Callback.
The oAuth2Callback Lambda function makes a request to the Amazon Cognito token endpoint with the OAuth2 authorization code to get the access token.
The Lambda function returns a response with the Set-Cookie header, instructing the web browser to persist the access token as an HttpOnly cookie. The browser will automatically interpret the Set-Cookie header, because it’s a web standard. HttpOnly cookies can’t be accessed through JavaScript—they can only be set through the Set-Cookie header.
After the OAuth2 flow, you are set up to issue and store access tokens. Next, you need to verify that users are authenticated before they are allowed to access your protected backend. Figure 2 illustrates how the authentication check is handled.
A user requests a protected backend resource. The browser automatically attaches HttpOnly cookies to every request, as defined in the web standard.
The Lambda function oAuth2Authorizer acts as the Lambda authorizer for HTTP APIs. It validates whether requests are authenticated. If requests include the proper access token in the request cookie header, then it allows the request.
API Gateway only passes through requests that are authenticated.
Amazon Cognito is not involved in the authentication check, because the Lambda function can validate the OAuth2 access tokens by using a JSON Web Token (JWT) validation check.
1. Deploying the OAuth2 flow
In this section, you’ll deploy the first part of the solution, which is the OAuth2 flow. The OAuth2 flow is responsible for issuing and persisting OAuth2 access tokens in the browser’s cookie store.
1.1. Create a mock protected backend
As shown in in Figure 2, you need to protect a backend. For the purposes of this post, you create a mock backend by creating a simple Lambda function with a default response.
Figure 3: Configuring the getProtectedResource Lambda function
The default Lambda function code returns a simple Hello from Lambda message, which is sufficient to demonstrate the concept of this solution.
1.2. Create an HTTP API in Amazon API Gateway
Next, you create an HTTP API by using API Gateway. Either an HTTP API or a REST API will work. In this example, choose HTTP API because it’s offered at a lower price point (for this tutorial you will stay within the free tier).
On the Create and configure integrations page, as shown in Figure 4, choose Add integration, then enter or select the following values:
Select Lambda.
For Lambda function, select the getProtectedResource Lambda function that you created in the previous section.
For API name, enter a name. In this example, I used MyApp.
Choose Next.
Figure 4: Configuring API Gateway integrations and API name
On the Configure routes page, as shown in Figure 5, enter or select the following values:
For Method, select GET.
For Resource path, enter / (a single forward slash).
For Integration target, select the getProtectedResource Lambda function.
Choose Next.
Figure 5: Configuring API Gateway routes
On the Configure stages page, keep all the default options, and choose Next.
On the Review and create page, choose Create.
Note down the value of Invoke URL, as shown in Figure 6.
Figure 6: Note down the invoke URL
Now it’s time to test your API Gateway API. Paste the value of Invoke URL into your browser. You’ll see the following message from your Lambda function: Hello from Lambda.
1.3. Use Amazon Cognito
You’ll use Amazon Cognito user pools to create and maintain a user directory, and add sign-up and sign-in to your web application.
On the Authentication providers page, as shown in Figure 7, for Cognito user pool sign-in options, select Email, then choose Next.
Figure 7: Configuring authentication providers
In the Multi-factor authentication pane of the Configure Security requirements page, as shown in Figure 8, choose your MFA enforcement. For this example, choose No MFA to make it simpler for you to test your solution. However, in production for data sensitive workloads you should choose Require MFA – Recommended. Choose Next.
Figure 8: Configuring MFA
On the Configure sign-up experience page, keep all the default options and choose Next.
On the Configure message delivery page, as shown in Figure 9, choose your email provider. For this example, choose Send email with Cognito to make it simple to test your solution. In production workloads, you should choose Send email with Amazon SES – Recommended. Choose Next.
Figure 9: Configuring email
In the User pool name section of the Integrate your app page, as shown in Figure 10, enter or select the following values:
For User pool name, enter a name. In this example, I used MyUserPool.
Figure 10: Configuring user pool name
In the Hosted authentication pages section, as shown in Figure 11, select Use the Cognito Hosted UI.
In the Domain section, as shown in Figure 12, for Domain type, choose Use a Cognito domain. For Cognito domain, enter a domain name. Note that domains in Cognito must be unique. Make sure to enter a unique name, for example by appending random numbers at the end of your domain name. For this example, I used https://http-only-cookie-secured-app.
Figure 12: Configuring an Amazon Cognito domain
In the Initial app client section, as shown in Figure 13, enter or select the following values:
For App type, keep the default setting Public client.
For App client name, enter a friendly name. In this example, I used MyAppClient.
For Client secret, keep the default setting Don’t generate a client secret.
For Allowed callback URLs, enter <API_GW_INVOKE_URL>/oauth2/callback, replacing <API_GW_INVOKE_URL> with the invoke URL you noted down from API Gateway in the previous section.
Figure 13: Configuring the initial app client
Choose Next.
Choose Create user pool.
Next, you need to retrieve some Amazon Cognito information for later use.
For Email address, enter [email protected]. For this tutorial, you don’t need to send out actual emails, so the email address does not need to actually exist.
Choose Mark email address as verified.
For password, enter a password you can remember (or even better: use a password generator).
Remember the email and password for later use.
Choose Create user.
1.4. Create the Lambda function oAuth2Callback
Next, you create the Lambda function oAuth2Callback, which is responsible for issuing and persisting the OAuth2 access tokens.
After you create the Lambda function, you need to add the code. Create a new folder on your local machine and open it with your preferred integrated development environment (IDE). Add the package.json and index.js files, as shown in the following examples.
In a terminal at the root of your created folder, run the following command.
$ npm install
In the index.js example code that follows, be sure to replace the placeholders with your values.
index.js
const qs = require("qs");
const axios = require("axios").default;
exports.handler = async function (event) {
  const code = event.queryStringParameters?.code;
  if (code == null) {
    return {
      statusCode: 400,
      body: "code query param required",
    };
  }
  const data = {
    grant_type: "authorization_code",
    client_id: "<your client ID from Cognito>",
    // The redirect has already happened, but you still need to pass the URI for validation, so a valid oAuth2 access token can be generated
    redirect_uri: encodeURI("<your callback URL from Cognito>"),
    code: code,
  };
  // Every Cognito instance has its own token endpoints. For more information check the documentation: https://docs.aws.amazon.com/cognito/latest/developerguide/token-endpoint.html
  const res = await axios.post(
    "<your App Client Cognito domain>/oauth2/token",
    qs.stringify(data),
    {
      headers: {
        "Content-Type": "application/x-www-form-urlencoded",
      },
    }
  );
  return {
    statusCode: 302,
    // These headers are returned as part of the response to the browser.
    headers: {
      // The Location header tells the browser it should redirect to the root of the URL
      Location: "/",
      // The Set-Cookie header tells the browser to persist the access token in the cookie store
      "Set-Cookie": `accessToken=${res.data.access_token}; Secure; HttpOnly; SameSite=Lax; Path=/`,
    },
  };
};
Along with the HttpOnly attribute, you pass along two additional cookie attributes:
Secure – Indicates that cookies are only sent by the browser to the server when a request is made with the https: scheme.
SameSite – Controls whether or not a cookie is sent with cross-site requests, providing protection against cross-site request forgery attacks. You set the value to Lax because you want the cookie to be set when the user is forwarded from Amazon Cognito to your web application (which runs under a different URL).
Afterwards, upload the code to the oAuth2Callback Lambda function as described in Upload a Lambda Function in the AWS Toolkit for VS Code User Guide.
1.5. Configure an OAuth2 callback route in API Gateway
Now, you configure API Gateway to use your new Lambda function through a Lambda proxy integration.
To configure API Gateway to use your Lambda function
In the API Gateway console, under APIs, choose your API name. For me, the name is MyApp.
Under Develop, choose Routes.
Choose Create.
Enter or select the following values:
For method, select GET.
For path, enter /oauth2/callback.
Choose Create.
Choose GET under /oauth2/callback, and then choose Attach integration.
Choose Create and attach an integration.
For Integration type, choose Lambda function.
For Lambda function, choose oAuth2Callback from the last step.
Choose Create.
Your route configuration in API Gateway should now look like Figure 14.
Figure 14: Routes for API Gateway
2. Testing the OAuth2 flow
Now that you have the components in place, you can test your OAuth2 flow. You test the OAuth2 flow by invoking the login on your browser.
To test the OAuth2 flow
In the Amazon Cognito console, choose your user pool name. For me, the name is MyUserPool.
Under the navigation tabs, choose App integration.
Under App client list, choose your app client name. For me, the name is MyAppClient.
Choose View Hosted UI.
In the newly opened browser tab, open your developer tools, so you can inspect the network requests.
Log in with the email address and password you set in the previous section. Change your password, if you’re asked to do so. You can also choose the same password as you set in the previous section.
You should see your Hello from Lambda message.
To test that the cookie was accurately set
Check your browser network tab in the browser developer settings. You’ll see the /oauth2/callback request, as shown in Figure 15.
Figure 15: Callback network request
The response headers should include a set-cookie header, as you specified in your Lambda function. With the set-cookie header, your OAuth2 access token is set as an HttpOnly cookie in the browser, and access is prohibited from any client-side code.
Alternatively, you can inspect the cookie in the browser cookie storage, as shown in Figure 16.
If you want to retry the authentication, navigate in your browser to your Amazon Cognito domain that you chose in the previous section and clear all site data in the browser developer tools. Do the same with your API Gateway invoke URL. Now you can restart the test with a clean state.
3. Deploying the authentication check
In this section, you’ll deploy the second part of your application: the authentication check. The authentication check makes it so that only authenticated users can access your protected backend. The authentication check works with the HttpOnly cookie, which is stored in the user’s cookie store.
3.1. Create the Lambda function oAuth2Authorizer
This Lambda function checks that requests are authenticated.
After you create the Lambda function, you need to add the code. Create a new folder on your local machine and open it with your preferred IDE. Add the package.json and index.js files as shown in the following examples.
In a terminal at the root of your created folder, run the following command.
$ npm install
In the index.js example code, be sure to replace the placeholders with your values.
index.js
const { CognitoJwtVerifier } = require("aws-jwt-verify");
function getAccessTokenFromCookies(cookiesArray) {
  // cookieStr contains the full cookie definition string: "accessToken=abc"
  for (const cookieStr of cookiesArray) {
    const cookieArr = cookieStr.split("accessToken=");
    // After splitting you should get an array with 2 entries: ["", "abc"] - Or only 1 entry in case it was a different cookie string: ["test=test"]
    if (cookieArr[1] != null) {
      return cookieArr[1]; // Returning only the value of the access token without cookie name
    }
  }
  return null;
}
// Create the verifier outside the Lambda handler (= during cold start),
// so the cache can be reused for subsequent invocations. Then, only during the
// first invocation, will the verifier actually need to fetch the JWKS.
const verifier = CognitoJwtVerifier.create({
  userPoolId: "<your user pool ID from Cognito>",
  tokenUse: "access",
  clientId: "<your client ID from Cognito>",
});
exports.handler = async (event) => {
  if (event.cookies == null) {
    console.log("No cookies found");
    return {
      isAuthorized: false,
    };
  }
  // Cookies array looks something like this: ["accessToken=abc", "otherCookie=Random Value"]
  const accessToken = getAccessTokenFromCookies(event.cookies);
  if (accessToken == null) {
    console.log("Access token not found in cookies");
    return {
      isAuthorized: false,
    };
  }
  try {
    await verifier.verify(accessToken);
    return {
      isAuthorized: true,
    };
  } catch (e) {
    console.error(e);
    return {
      isAuthorized: false,
    };
  }
};
After you add the package.json and index.js files, upload the code to the oAuth2Authorizer Lambda function as described in Upload a Lambda Function in the AWS Toolkit for VS Code User Guide.
3.2. Configure the Lambda authorizer in API Gateway
Next, you configure your authorizer Lambda function to protect your backend. This way you control access to your HTTP API.
To configure the authorizer Lambda function
In the API Gateway console, under APIs, choose your API name. For me, the name is MyApp.
Under Develop, choose Routes.
Under / (a single forward slash) GET, choose Attach authorization.
Choose Create and attach an authorizer.
Choose Lambda.
Enter or select the following values:
For Name, enter oAuth2Authorizer.
For Lambda function, choose oAuth2Authorizer.
Clear Authorizer caching. For this tutorial, you disable authorizer caching to make testing simpler. See the section Bonus: Enabling authorizer caching for more information about enabling caching to increase performance.
Under Identity sources, choose Remove.
Note: Identity sources are ignored for your Lambda authorizer. These are only used for caching.
Choose Create and attach.
Under Develop, choose Routes to inspect all routes.
Now your API Gateway route /oauth2/callback should be configured as shown in Figure 17.
Figure 17: API Gateway route configuration
4. Testing the OAuth2 authorizer
You did it! From your last test, you should still be authenticated. So, if you open the API Gateway Invoke URL in your browser, you’ll be greeted from your protected backend.
In case you are not authenticated anymore, you’ll have to follow the steps again from the section Testing the OAuth2 flow to authenticate.
When you inspect the HTTP request that your browser makes in the developer tools as shown in Figure 18, you can see that authentication works because the HttpOnly cookie is automatically attached to every request.
Figure 18: Browser requests include HttpOnly cookies
To verify that your authorizer Lambda function works correctly, paste the same Invoke URL you noted previously in an incognito window. Incognito windows do not share the cookie store with your browser session, so you see a {"message":"Forbidden"} error message with HTTP response code 403 – Forbidden.
Cleanup
Delete all unwanted resources to avoid incurring costs.
To delete the Amazon Cognito domain and user pool
In the Amazon Cognito console, choose your user pool name. For me, the name is MyUserPool.
Under the navigation tabs, choose App integration.
Under Domain, choose Actions, then choose Delete Cognito domain.
Confirm by entering your custom Amazon Cognito domain, and choose Delete.
Choose Delete user pool.
Confirm by entering your user pool name (in my case, MyUserPool), and then choose Delete.
To delete your API Gateway resource
In the API Gateway console, select your API name. For me, the name is MyApp.
Under Actions, choose Delete and confirm your deletion.
To delete the AWS Lambda functions
In the Lambda console, select all three of the Lambda functions you created.
Under Actions, choose Delete and confirm your deletion.
Bonus: Enabling authorizer caching
As mentioned earlier, you can enable authorizer caching to help improve your performance. When caching is enabled for an authorizer, API Gateway uses the authorizer’s identity sources as the cache key. If a client specifies the same parameters in identity sources within the configured Time to Live (TTL), then API Gateway uses the cached authorizer result, rather than invoking your Lambda function.
To enable caching, your authorizer must have at least one identity source. To cache by the cookie request header, you specify $request.header.cookie as the identity source. Be aware that caching will be affected if you pass along additional HttpOnly cookies apart from the access token.
In this blog post, you learned how to implement authentication by using HttpOnly cookies. You used Amazon API Gateway and AWS Lambda to persist and validate the HttpOnly cookies, and you used Amazon Cognito to issue OAuth2 access tokens. If you want to try an automated deployment of this solution with a script, see the api-gw-http-only-cookie-auth GitHub repository.
In this solution, you used NodeJS for your Lambda functions to implement authentication. But HttpOnly cookies are widely supported by many programing frameworks. You can find more implementation options on the OWASP Secure Cookie Attribute page.
Although this blog post gives you a tutorial on how to implement HttpOnly cookie authentication in API Gateway, it may not meet all your security and functional requirements. Make sure to check your business requirements and talk to your stakeholders before you adopt techniques from this blog post.
Furthermore, it’s a good idea to continuously test your web application, so that cookies are only set with your approved security attributes. For more information, see the OWASP Testing for Cookies Attributes page.
If you have feedback about this post, submit comments in the Comments section below. If you have questions about this post, start a new thread on the Amazon API Gateway re:Post or contact AWS Support.
Want more AWS Security news? Follow us on Twitter.
AWS WAF is a web application firewall service that helps you protect your applications from common exploits that could affect your application’s availability and your security posture. One of the most useful ways to detect and respond to malicious web activity is to collect and analyze AWS WAF logs. You can perform this task conveniently by sending your AWS WAF logs to Amazon CloudWatch Logs and visualizing them through an Amazon CloudWatch dashboard.
This blog post builds on the concepts introduced in the blog post Analyzing AWS WAF Logs in Amazon CloudWatch Logs. There we introduced how to natively set up AWS WAF logging to Amazon CloudWatch logs, and discussed the basic options that are available for visualizing and analyzing the data provided in the logs.
The only AWS services that you need to turn on for this solution are Amazon CloudWatch and AWS WAF. The solution assumes that you’ve previously set up AWS WAF log delivery to Amazon CloudWatch Logs. If you have not done so, follow the instructions for AWS WAF logging destinations – CloudWatch Logs.
You will need to provide the following parameters for the CloudFormation template:
CloudWatch log group name for the AWS WAF logs
The AWS Region for the logs
The name of the AWS WAF web access control list (web ACL)
Solution overview
The architecture of the solution is outlined in Figure 1. The solution takes advantage of the native integration available between AWS WAF and CloudWatch, which simplifies the setup and management of this solution.
Figure 1: Solution architecture
In the solution, the logs are sent to CloudWatch (when you enable log delivery). From there, they’re ready to be consumed by all the different service options that CloudWatch offers, including the ones that we’ll use in this solution: CloudWatch Logs Insights and Contributor Insights.
Deploy the solution
Choose the following Launch stack button to launch the CloudFormation stack in your account.
You’ll be redirected to the CloudFormation service in the AWS US East (N. Virginia) Region, which is the default Region to deploy this solution, although this can vary depending on where your web ACL is located. You can change the Region as preferred. The template will spin up multiple cloud resources, such as the following:
CloudWatch Logs Insights queries
CloudWatch Contributor Insights visuals
CloudWatch dashboard
The solution is quickly deployed to your account and is ready to use in less than 30 minutes. You can use the solution when the status of the stack changes to CREATE_COMPLETE.
As a measure to control costs, you can also choose whether to create the Contributor Insights rules and enable them by default. For more information on costs, see the Cost considerations section later in this post.
Explore and validate the dashboard
When the CloudFormation stack is complete, you can choose the Output tab in the CloudFormation console and then choose the dashboard link. This will take you to the CloudWatch service in the AWS Management Console. The dashboard time range presents information for the last hour of activity by default, and can go up to one week, but keep in mind that Contributor Insights has a maximum time range of 24 hours. You can also select a different dashboard refresh interval from 10 seconds up to 15 minutes.
The dashboard provides the following information from CloudWatch.
Rule name
Description
WAF_top_terminating_rules
This rule shows the top rules where the requests are being terminated by AWS WAF. This can help you understand the main cause of blocked requests.
WAF_top_ips
This rule shows the top source IPs for requests. This can help you understand if the traffic and activity that you see is spread across many IPs or concentrated in a small group of IPs.
WAF_top_countries
This rule shows the main source countries for the IPs in the requests. This can help you visualize where the traffic is originating.
WAF_top_user_agents
This rule shows the main user agents that are being used to generate the requests. This will help you isolate problematic devices or identify potential false positives.
WAF_top_uri
This rule shows the main URIs in the requests that are being evaluated. This can help you identify if one specific path is the target of activity.
WAF_top_http
This rule shows the HTTP methods used for the requests examined by AWS WAF. This can help you understand the pattern of behavior of the traffic.
WAF_top_referrer_hosts
This rule shows the main referrer from which requests are being sent. This can help you identify incorrect or suspicious origins of requests based on the known application flow.
WAF_top_rate_rules
This rule shows the main rate rules being applied to traffic. It helps understand volumetric activity identified by AWS WAF.
WAF_top_labels
This rule shows the top labels found in logs. This can help you visualize the main rules that are matching on the requests evaluated by AWS WAF.
The dashboard also provides the following information from the default CloudWatch metrics sent by AWS WAF.
Rule name
Description
AllowedvsBlockedRequests
This metric shows the number of all blocked and allowed requests. This can help you understand the number of requests that AWS WAF is actively blocking.
Bot Requests vs non-Bot requests
This visual shows the number of requests identified as bots versus non-bots (if you’re using AWS WAF Bot Control).
All Requests
This metric shows the number of all requests, separated by bot and non-bot origin. This can help you understand all requests that AWS WAF is evaluating.
CountedRequests
This metric shows the number of all counted requests. This can help you understand the requests that are matching a rule but not being blocked, and aid the decision of a configuration change during the testing phase.
CaptchaRequests
This metric shows requests that go through the CAPTCHA rule.
Figure 2 shows an example of how the CloudWatch dashboard displays the data within this solution. You can rearrange and customize the elements within the dashboard as needed.
You can review each of the queries and rules deployed with this solution. You can also customize these baseline queries and rules to provide more detailed information or to add custom queries and rules to the solution code. For more information on how to build queries and use CloudWatch Logs and Contributor Insights, see the CloudWatch documentation.
Use the dashboard for monitoring
After you’ve set up the dashboard, you can monitor the activity of the sites that are protected by AWS WAF. If suspicious activity is reported, you can use the visuals to understand the traffic in more detail, and drive incident response actions as needed.
Let’s consider an example of how to use your new dashboard and its data to drive security operations decisions. Suppose that you have a website that sells custom clothing at a bargain price. It has a sign-up link to receive offers, and you’re getting reports of unusual activity by the application team. By looking at the metrics for the web ACL that protects the site, you can see the main country for source traffic and the contributing URIs, as shown in Figure 3. You can also see that most of the activity is being detected by rules that you have in place, so you can set the rules to block traffic, or if they are already blocking, you can just monitor the activity.
You can use the same visuals to decide whether an AWS WAF rule with high activity can be changed to autoblock suspicious web traffic without affecting valid customer traffic. By looking at the top terminating rules and cross-referencing information, such as source IPs, user agents, top URIs, and other request identifiers, you can understand the traffic pattern and activity of different applications and endpoints. From here, you can investigate further by using specific queries with CloudWatch Logs Insights.
Operational and security management with CloudWatch Logs Insights
You can use CloudWatch Logs Insights to interactively search and analyze log data in Amazon CloudWatch Logs using advanced queries to effectively investigate operational issues and security incidents.
Examine a bot reported as a false positive
You can use CloudWatch Logs Insights to identify requests that have specific labels to understand where the traffic is originating from based on source IP address and other essential event details. A simple example is investigating requests flagged as potential false positives.
Imagine that you have a reported false positive request that was flagged as a non-browser by AWS WAF Bot Control. You can run the non-browser user agent query that was created by the provided template on CloudWatch Logs Insights, as shown in the following example, and then verify the source IPs for the top hits for this rule group. Or you can look for a specific request that has been flagged as a false positive, in order to review the details and make adjustments as needed.
The non-browser user agent query also allows you confirm whether this request has other rule hits that were in count mode and were non-terminating; you can do this by examining the labels. If there are multiple rules matching the requests, that can be an indicator of suspicious activity.
If you have a CAPTCHA challenge configured on the endpoint, you can also look at CAPTCHA responses. The CaptchaTokenqueryDefinition query provided in this solution uses a variation of the preceding format, and can display the main IPs from which bad tokens are being sent. An example query is shown following, along with the query results in Figure 4. If you have signals from non-browser user agents and CAPTCHA tokens missing, then that is a strong indicator of suspicious activity.
fields@timestamp, httpRequest.clientIp
| filter captchaResponse.failureReason = "TOKEN_MISSING"
| statscount(*) as requestCount by httpRequest.clientIp, httpRequest.country
| sort requestCount desc
| limit10
Figure 4: Main IP addresses and number of counts for CAPTCHA responses
This information can provide an indication of the main source of activity. You can then use other visuals, like top user agents or top referrers, to provide more context to the information and inform further actions, such as adding new rules to the AWS WAF configuration.
You can adapt the queries provided in the sample solution to other use cases by using the fields provided in the left-hand pane of CloudWatch Logs Insights.
Cost considerations
Configuring AWS WAF to send logs to Amazon CloudWatch logs doesn’t have an additional cost. The cost incurred is for the use of the CloudWatch features and services, such as log storage and retention, Contributor Insights rules enabled, Logs Insights queries run, matched log events, and CloudWatch dashboards. For detailed information on the pricing of these features, see the CloudWatch Logs pricing information. You can also get an estimate of potential costs by using the AWS pricing calculator for CloudWatch.
One way to help offset the cost of CloudWatch features and services is to restrict the use of the dashboard and enforce a log retention policy for AWS WAF that makes it cost effective. If you use the queries and monitoring only as-needed, this can also help reduce costs. By limiting the running of queries and the matched log events for the Contributor Insights rules, you can enable the rules only when you need them. AWS WAF also provides the option to filter the logs that are sent when logging is enabled. For more information, see AWS WAF log filtering.
Conclusion
In this post, you learned how to use a pre-built CloudWatch dashboard to monitor AWS WAF activity by using metrics and Contributor Insights rules. The dashboard can help you identify traffic patterns and activity, and you can use the sample Logs Insights queries to explore the log information in more detail and examine false positives and suspicious activity, for rule tuning.
For more information on AWS WAF and the features mentioned in this post, see the AWS WAF documentation.
If you have feedback about this post, submit comments in the Comments section below. If you have questions about this post, start a new thread on AWS WAF re:Post.
Want more AWS Security news? Follow us on Twitter.
The IAR provides management and technical information security controls to establish, implement, maintain, and continuously improve information assurance. AWS alignment with IAR requirements demonstrates our ongoing commitment to adhere to the heightened expectations for cloud service providers. As such, IAR-regulated customers can use AWS services with confidence.
Independent third-party auditors from BDO evaluated AWS for the period of November 1, 2021, to October 31, 2022. The assessment report illustrating the status of AWS compliance is available through AWS Artifact. AWS Artifact is a self-service portal for on-demand access to AWS compliance reports. Sign in to AWS Artifact in the AWS Management Console, or learn more at Getting Started with AWS Artifact.
AWS strives to continuously bring services into the scope of its compliance programs to help you meet your architectural and regulatory needs. If you have questions or feedback about IAR compliance, reach out to your AWS account team.
To learn more about our compliance and security programs, see AWS Compliance Programs. As always, we value your feedback and questions; reach out to the AWS Compliance team through the Contact Us page.
If you have feedback about this post, submit comments in the Comments section below.
Want more AWS Security how-to content, news, and feature announcements? Follow us on Twitter.
If you’ve made it to 2023 without ever receiving a notice that your personal information was compromised in a security breach, consider yourself lucky. In a best case scenario, bad actors only got your email address and name – information that won’t cause you a huge amount of harm. Or in a worst-case scenario, maybe your profile on a dating app was breached and intimate details of your personal life were exposed publicly, with life-changing impacts. But there are also more hidden, insidious ways that your personal data can be exploited. For example, most of us use an Internet Service Provider (ISP) to connect to the Internet. Some of those ISPs are collecting information about your Internet viewing habits, your search histories, your location, etc. – all of which can impact the privacy of your personal information as you are targeted with ads based on your online habits.
You also probably haven’t made it to 2023 without hearing at least something about Internet privacy laws around the globe. In some jurisdictions, lawmakers are driven by a recognition that the right to privacy is a fundamental human right. In other locations, lawmakers are passing laws to address the harms their citizens are concerned about – data breaches and mining of data about private details of people’s lives to sell targeted advertising. At the core of most of this legislation is an effort to give users more control over their personal data. And many of these regulations require data controllers to ensure adequate protections are in place for cross-border data transfers. In recent years, we’ve seen an increasing number of regulators interpreting these regulations in a way that would leave no room for cross-border data transfers, however. These interpretations are problematic – not only are they harmful to global commerce, but they also disregard the idea that data might be more secure if cross-border data transfers are allowed. Some regulators instead assert that personal data will be safer if it stays within their borders because their law protects privacy better than that of another jurisdiction.
So with Data Privacy Day 2023 just a few days away on January 28, we think it’s important to focus on all the ways security measures and privacy-enhancing technologies help keep personal data private and why security measures are so much more critical to protecting privacy than merely implementing the requirements of data protection laws or keeping data in a jurisdiction because regulators think that jurisdiction has stronger laws than another.
The role of data security in protecting personal information
Most data protection regulations recognize the role security plays in protecting the privacy of personal information. That’s not surprising. An entity’s efforts to follow a data protection law’s requirements for how personal data should be collected and used won’t mean much if a third party can access the data for their own malicious purposes.
The laws themselves provide few specifics about what security is required. For example, the EU General Data Protection Regulation (“GDPR”) and similar comprehensive privacy laws in other jurisdictions require data controllers (the entities that collect your data) to implement “reasonable and appropriate” security measures. But it’s almost impossible for regulators to require specific security measures because the security landscape changes so quickly. In the United States, state security breach laws don’t require notification if the data obtained is encrypted, suggesting that encryption is at least one way regulators think data should be protected.
Enforcement actions brought by regulators against companies that have experienced data breaches provide other clues for what regulators think are “best practices” for ensuring data protection. For example, on January 10 of this year, the U.S. Federal Trade Commission entered into a consent order with Drizly, an online alcohol sales and delivery platform, outlining a number of security failures that led to a data breach that exposed the personal information of about 2.5 million Drizly users and requiring Drizly to implement a comprehensive security program that includes a long list of intrusion detection and logging procedures. In particular, the FTC specifically requires Drizly to implement “…(c) data loss prevention tools; [and] (d) properly configured firewalls” among other measures.
What many regulatory post-breach enforcement actions have in common is the requirement of a comprehensive security program that includes a number of technical measures to protect data from third parties who might seek access to it. The enforcement actions tend to be data location-agnostic, however. It’s not important where the data might be stored – what is important is the right security measures are in place. We couldn’t agree more wholeheartedly.
Cloudflare’s portfolio of products and services helps our customers put protections in place to thwart would-be attackers from accessing their websites or corporate networks. By making it less likely that users’ data will be accessed by malicious actors, Cloudflare’s services can help organizations save millions of dollars, protect their brand reputations, and build trust with their users. We also spend a great deal of time working to develop privacy-enhancing technologies that directly support the ability of individual users to have a more privacy-preserving experience on the Internet.
Cloudflare is most well-known for its application layer security services – Web Application Firewall (WAF), bot management, DDoS protection, SSL/TLS, Page Shield, and more. As the FTC noted in its Drizly consent order, firewalls can be a critical line of defense for any online application. Think about what happens when you go through security at an airport – your body and your bags are scanned for something bad that might be there (e.g. weapons or explosives), but the airport security personnel are not inventorying or recording the contents of your bags. They’re simply looking for dangerous content to make sure it doesn’t make its way onto an airplane. In the same way, the WAF looks at packets as they are being routed through Cloudflare’s network to make sure the Internet equivalent of weapons and explosives are not delivered to a web application. Governments around the globe have agreed that these quick security scans at the airport are necessary to protect us all from bad actors. Internet traffic is the same.
We embrace the critical importance of encryption in transit. In fact, we see encryption as so important that in 2014, Cloudflare introduced Universal SSL to support SSL (and now TLS) connections to every Cloudflare customer. And at the same time, we recognize that blindly passing along encrypted packets would undercut some of the very security that we’re trying to provide. Data privacy and security are a balance. If we let encrypted malicious code get to an end destination, then the malicious code may be used to access information that should otherwise have been protected. If data isn’t encrypted in transit, it’s at risk for interception. But by supporting encryption in transit and ensuring malicious code doesn’t get to its intended destination, we can protect private personal information even more effectively.
Let’s take another example – In June 2022, Atlassian released a Security Advisory relating to a remote code execution (RCE) vulnerability affecting Confluence Server and Confluence Data Center products. Cloudflare responded immediately to roll out a new WAF rule for all of our customers. For customers without this WAF protection, all the trade secret and personal information on their instances of Confluence were potentially vulnerable to data breach. These types of security measures are critical to protecting personal data. And it wouldn’t have mattered if the personal data were stored on a server in Australia, Germany, the U.S., or India – the RCE vulnerability would have exposed data wherever it was stored. Instead, the data was protected because a global network was able to roll out a WAF rule immediately to protect all of its customers globally.
Global network to thwart global attacks
The power of a large, global network is often overlooked when we think about using security measures to protect the privacy of personal data. Regulators who would seek to wall off their countries from the rest of the world as a method of protecting data privacy often miss how such a move can impact the security measures that are even more critical to keeping private data protected from bad actors.
Global knowledge is necessary to stop attacks that could come from anywhere in the world. Just as an international network of counterterrorism units helps to prevent physical threats, the same approach is needed to prevent cyberthreats. The most powerful security tools are built upon identified patterns of anomalous traffic, coming from all over the world. Cloudflare’s global network puts us in a unique position to understand the evolution of global threats and anomalous behaviors. To empower our customers with preventative and responsive cybersecurity, we transform global learnings into protections, while still maintaining the privacy of good-faith Internet users.
For example, Cloudflare’s tools to block threats at the DNS or HTTP level, including DDoS protection for websites and Gateway for enterprises, allow users to further secure their entities beyond customized traffic rules by screening for patterns of traffic known to contain phishing or malware content. We use our global network to improve our identification of vulnerabilities and malicious content and to roll out rules in real time that protect everyone. This ability to identify and instantly protect our customers from security vulnerabilities that they may not have yet had time to address reduces the possibility that their data will be compromised or that they will otherwise be subjected to nefarious activity.
Similarly, Cloudflare’s Bot Management product only increases in accuracy with continued use on the global network: it detects and blocks traffic coming from likely bots before feeding back learnings to the models backing the product. And most importantly, we minimize the amount of information used to detect these threats by fingerprinting traffic patterns and forgoing reliance on PII. Our Bot Management products are successful because of the sheer number of customers and amount of traffic on our network. With approximately 20 percent of all websites protected by Cloudflare, we are uniquely positioned to gather the signals that traffic is from a bad bot and interpret them into actionable intelligence. This diversity of signal and scale of data on a global platform is critical to help us continue to evolve our bot detection tools. If the Internet were fragmented – preventing data from one jurisdiction being used in another – more and more signals would be missed. We wouldn’t be able to apply learnings from bot trends in Asia to bot mitigation efforts in Europe, for example.
A global network is equally important for resilience and effective security protection, a reality that the war in Ukraine has brought into sharp relief. In order to keep their data safe, the Ukrainian government was required to change their laws to remove data localization requirements. As Ukraine’s infrastructure came under attack during Russia’s invasion, the Ukrainian government migrated their data to the cloud, allowing it to be preserved and easily moved to safety in other parts of Europe. Likewise, Cloudflare’s global network played an important role in helping maintain Internet access inside Ukraine. Sites in Ukraine at times came under heavy DDoS attack, even as infrastructure was being destroyed by physical attacks. With bandwidth limited, it was important that the traffic that was getting through inside Ukraine was useful traffic, not attack traffic. Instead of allowing attack traffic inside Ukraine, Cloudflare’s global network identified it and rejected it in the countries where the attacks originated. Without the ability to inspect and reject traffic outside of Ukraine, the attack traffic would have further congested networks inside Ukraine, limiting network capacity for critical wartime communications.
Although the situation in Ukraine reflects the country’s wartime posture, Cloudflare’s global network provides the same security benefits for all of our customers. We use our entire network to deliver DDoS mitigation, with a network capacity of over 172 Tbps, making it possible for our customers to stay online even in the face of the largest attacks. That enormous capacity to protect customers from attack is the result of the global nature of Cloudflare’s network, aided by the ability to restrict attack traffic to the countries where it originated. And a network that stays online is less likely to have to address the network intrusions and data loss that are frequently connected to successful DDoS attacks.
Zero Trust security for corporate networks
Some of the biggest data breaches in recent years have happened as a result of something pretty simple – an attacker uses a phishing email or social engineering to get an employee of a company to visit a site that infects the employee’s computer with malware or enter their credentials on a fake site that lets the bad actor capture the credentials and then use those to impersonate the employee and log into a company’s systems. Depending on the type of information compromised, these kinds of data breaches can have a huge impact on individuals’ privacy. For this reason, Cloudflare has invested in a number of technologies designed to protect corporate networks, and the personal data on those networks.
As we noted during our recent CIO week, the FBI’s latest Internet Crime Report shows that business email compromise and email account compromise, a subset of malicious phishing campaigns, are the most costly – with U.S. businesses losing nearly $2.4 billion. Cloudflare has invested in a number of Zero Trust solutions to help fight this very problem:
Link Isolation means that when an employee clicks a link in an email, it will automatically be opened using Cloudflare’s Remote Browser Isolation technology that isolates potentially risky links, downloads, or other zero-day attacks from impacting that user’s computer and the wider corporate network.
With our Data Loss Prevention tools, businesses can identify and stop exfiltration of data.
Our Area 1 solution identifies phishing attempts, emails containing malicious code, and emails containing ransomware payloads and prevents them from landing in the inbox of unsuspecting employees.
These Zero Trust tools, combined with the use of hardware keys for multi-factor authentication, were key in Cloudflare’s ability to prevent a breach by an SMS phishing attack that targeted more than 130 companies in July and August 2022. Many of these companies reported the disclosure of customer personal information as a result of employees falling victim to this SMS phishing effort.
And remember the Atlassian Confluence RCE vulnerability we mentioned earlier? Cloudflare remained protected not only due to our rapid update of our WAF rules, but also because we use our own Cloudflare Access solution (part of our Zero Trust suite) to ensure that only individuals with Cloudflare credentials are able to access our internal systems. Cloudflare Access verified every request made to a Confluence application to ensure it was coming from an authenticated user.
All of these Zero Trust solutions require sophisticated machine learning to detect patterns of malicious activity, and none of them require data to be stored in a specific location to keep the data safe. Thwarting these kinds of security threats aren’t only important for protecting organizations’ internal networks from intrusion – they are critical for keeping large scale data sets private for the benefit of millions of individuals.
Cutting-edge technologies
Cloudflare’s security services enable our customers to screen for cybersecurity risks on Cloudflare’s network before those risks can reach the customer’s internal network. This helps protect our customers and our customers’ data from a range of cyber threats. By doing so, Cloudflare’s services are essentially fulfilling a privacy-enhancing function in themselves. From the beginning, we have built our systems to ensure that data is kept private, even from us, and we have made public policy and contractual commitments about keeping that data private and secure. But beyond securing our network for the benefit of our customers, we’ve invested heavily in new technologies that aim to secure communications from bad actors; the prying eyes of ISPs or other man-in-the-middle machines that might find your Internet communications of interest for advertising purpose; or government entities that might want to crack down on individuals exercising their freedom of speech.
For example, Cloudflare operates part of Apple’s iCloud Private Relay system, which ensures that no single party handling user data has complete information on both who the user is and what they are trying to access. Instead, a user’s original IP address is visible to the access network (e.g. the coffee shop you’re sitting in, or your home ISP) and the first relay (operated by Apple), but the server or website name is encrypted and not visible to either. The first relay hands encrypted data to a second relay (e.g. Cloudflare), but is unable to see “inside” the traffic to Cloudflare. And the Cloudflare-operated relays know only that it is receiving traffic from a Private Relay user, but not specifically who or their client IP address. Cloudflare relays then forward traffic on to the destination server.
And of course any post on how security measures enable greater data privacy would be remiss if it failed to mention Cloudflare’s privacy-first 1.1.1.1 public resolver. By using 1.1.1.1, individuals can search the Internet without their ISPs seeing where they are going. Unlike most DNS resolvers, 1.1.1.1 does not sell user data to advertisers.
Together, these many technologies and security measures ensure the privacy of personal data from many types of threats to privacy – behavioral advertising, man-in-the-middle attacks, malicious code, and more. On this data privacy day 2023, we urge regulators to recognize that the emphasis currently being placed on data localization has perhaps gone too far – and has foreclosed the many benefits cross-border data transfers can have for data security and, therefore, data privacy.
Over the last few years, there has been a rise in the number of attacks that affect how a computer boots. Most modern computers use a specification called Unified Extensible Firmware Interface (UEFI) that defines a software interface between an operating system (e.g. Windows) and platform firmware (e.g. disk drives, video cards). There are security mechanisms built into UEFI that ensure that platform firmware can be cryptographically validated and boot securely through an application called a bootloader. This firmware is stored in non-volatile SPI flash memory on the motherboard, so it persists on the system even if the operating system is reinstalled and drives are replaced.
This creates a ‘trust anchor’ used to validate each stage of the boot process, but, unfortunately, this trust anchor is also a target for attack. In these UEFI attacks, malicious actions are loaded onto a compromised device early in the boot process. This means that malware can change configuration data, establish persistence by ‘implanting’ itself, and can bypass security measures that are only loaded at the operating system stage. So, while UEFI-anchored secure boot protects the bootloader from bootloader attacks, it does not protect the UEFI firmware itself.
Because of this growing trend of attacks, we began the process of cryptographically signing our UEFI firmware as a mitigation step. While our existing solution is platform specific to our x86 AMD server fleet, we did not have a similar solution to UEFI firmware signing for Arm. To determine what was missing, we had to take a deep dive into the Arm secure boot process.
Read on to learn about the world of Arm Trusted Firmware Secure Boot.
Arm Trusted Firmware Secure Boot
Arm defines a trusted boot process through an architecture called Trusted Board Boot Requirements (TBBR), or Arm Trusted Firmware (ATF) Secure Boot. TBBR works by authenticating a series of cryptographically signed binary images each containing a different stage or element in the system boot process to be loaded and executed. Every bootloader (BL) stage accomplishes a different stage in the initialization process:
BL1
BL1 defines the boot path (is this a cold boot or warm boot), initializes the architectures (exception vectors, CPU initialization, and control register setup), and initializes the platform (enables watchdog processes, MMU, and DDR initialization).
BL2
BL2 prepares initialization of the Arm Trusted Firmware (ATF), the stack responsible for setting up the secure boot process. After ATF setup, the console is initialized, memory is mapped for the MMU, and message buffers are set for the next bootloader.
BL3
The BL3 stage has multiple parts, the first being initialization of runtime services that are used in detecting system topology. After initialization, there is a handoff between the ATF ‘secure world’ boot stage to the ‘normal world’ boot stage that includes setup of UEFI firmware. Context is set up to ensure that no secure state information finds its way into the normal world execution state.
Each image is authenticated by a public key, which is stored in a signed certificate and can be traced back to a root key stored on the SoC in one time programmable (OTP) memory or ROM.
TBBR was originally designed for cell phones. This established a reference architecture on how to build a “Chain of Trust” from the first ROM executed (BL1) to the handoff to “normal world” firmware (BL3). While this creates a validated firmware signing chain, it has caveats:
SoC manufacturers are heavily involved in the secure boot chain, while the customer has little involvement.
A unique SoC SKU is required per customer. With one customer this could be easy, but most manufacturers have thousands of SKUs
The SoC manufacturer is primarily responsible for end-to-end signing and maintenance of the PKI chain. This adds complexity to the process requiring USB key fobs for signing.
Doesn’t scale outside the manufacturer.
What this tells us is what was built for cell phones doesn’t scale for servers.
If we were involved 100% in the manufacturing process, then this wouldn’t be as much of an issue, but we are a customer and consumer. As a customer, we have a lot of control of our server and block design, so we looked at design partners that would take some of the concepts we were able to implement with AMD Platform Secure Boot and refine them to fit Arm CPUs.
Amping it up
We partnered with Ampere and tested their Altra Max single socket rack server CPU (code named Mystique) that provides high performance with incredible power efficiency per core, much of what we were looking for in reducing power consumption. These are only a small subset of specs, but Ampere backported various features into the Altra Max notably, speculative attack mitigations that include Meltdown and Spectre (variants 1 and 2) from the Armv8.5 instruction set architecture, giving Altra the “+” designation in their ISA.
Ampere does implement a signed boot process similar to the ATF signing process mentioned above, but with some slight variations. We’ll explain it a bit to help set context for the modifications that we made.
Ampere Secure Boot
The diagram above shows the Arm processor boot sequence as implemented by Ampere. System Control Processors (SCP) are comprised of the System Management Processor (SMpro) and the Power Management Processor (PMpro). The SMpro is responsible for features such as secure boot and bmc communication while the PMpro is responsible for power features such as Dynamic Frequency Scaling and on-die thermal monitoring.
At power-on-reset, the SCP runs the system management bootloader from ROM and loads the SMpro firmware. After initialization, the SMpro spawns the power management stack on the PMpro and ATF threads. The ATF BL2 and BL31 bring up processor resources such as DRAM, and PCIe. After this, control is passed to BL33 BIOS.
Authentication flow
At power on, the SMpro firmware reads Ampere’s public key (ROTPK) from the SMpro key certificate in SCP EEPROM, computes a hash and compares this to Ampere’s public key hash stored in eFuse. Once authenticated, Ampere’s public key is used to decrypt key and content certificates for SMpro, PMpro, and ATF firmware, which are launched in the order described above.
The SMpro public key will be used to authenticate the SMpro and PMpro images and ATF keys which in turn will authenticate ATF images. This cascading set of authentication that originates with the Ampere root key and stored in chip called an electronic fuse, or eFuse. An eFuse can be programmed only once, setting the content to be read-only and can not be tampered with nor modified.
This is the original hardware root of trust used for signing system, secure world firmware. When we looked at this, after referencing the signing process we had with AMD PSB and knowing there was a large enough one-time-programmable (OTP) region within the SoC, we thought: why can’t we insert our key hash in here?
Single Domain Secure Boot
Single Domain Secure Boot takes the same authentication flow and adds a hash of the customer public key (Cloudflare firmware signing key in this case) to the eFuse domain. This enables the verification of UEFI firmware by a hardware root of trust. This process is performed in the already validated ATF firmware by BL2. Our public key (dbb) is read from UEFI secure variable storage, a hash is computed and compared to the public key hash stored in eFuse. If they match, the validated public key is used to decrypt the BL33 content certificate, validating and launching the BIOS, and remaining boot items. This is the key feature added by SDSB. It validates the entire software boot chain with a single eFuse root of trust on the processor.
Building blocks
With a basic understanding of how Single Domain Secure Boot works, the next logical question is “How does it get implemented?”. We ensure that all UEFI firmware is signed at build time, but this process can be better understood if broken down into steps.
Ampere, our original device manufacturer (ODM), and we play a role in execution of SDSB. First, we generate certificates for a public-private key pair using our internal, secure PKI. The public key side is provided to the ODM as dbb.auth and dbu.auth in UEFI secure variable format. Ampere provides a reference Software Release Package (SRP) including the baseboard management controller, system control processor, UEFI, and complex programmable logic device (CPLD) firmware to the ODM, who customizes it for their platform. The ODM generates a board file describing the hardware configuration, and also customizes the UEFI to enroll dbb and dbu to secure variable storage on first boot.
Once this is done, we generate a UEFI.slim file using the ODM’s UEFI ROM image, Arm Trusted Firmware (ATF) and Board File. (Note: This differs from AMD PSB insofar as the entire image and ATF files are signed; with AMD PSB, only the first block of boot code is signed.) The entire .SLIM file is signed with our private key, producing a signature hash in the file. This can only be authenticated by the correct public key. Finally, the ODM packages the UEFI into .HPM format compatible with their platform BMC.
In parallel, we provide the debug fuse selection and hash of our DER-formatted public key. Ampere uses this information to create a special version of the SCP firmware known as Security Provisioning (SECPROV) .slim format. This firmware is run one time only, to program the debug fuse settings and public key hash into the SoC eFuses. Ampere delivers the SECPROV .slim file to the ODM, who packages it into a .hpm file compatible with the BMC firmware update tooling.
Fusing the keys
During system manufacturing, firmware is pre-programmed into storage ICs before placement on the motherboard. Note that the SCP EEPROM contains the SECPROV image, not standard SCP firmware. After a system is first powered on, an IPMI command is sent to the BMC which releases the Ampere processor from reset. This allows SECPROV firmware to run, burning the SoC eFuse with our public key hash and debug fuse settings.
Final manufacturing flow
Once our public key has been provisioned, manufacturing proceeds by re-programming the SCP EEPROM with its regular firmware. Once the system powers on, ATF detects there are no keys present in secure variable storage and allows UEFI firmware to boot, regardless of signature. Since this is the first UEFI boot, it programs our public key into secure variable storage and reboots. ATF is validated by Ampere’s public key hash as usual. Since our public key is present in dbb, it is validated against our public key hash in eFuse and allows UEFI to boot.
Validation
The first part of validation requires observing successful destruction of the eFuses. This imprints our public key hash into a dedicated, immutable memory region, not allowing the hash to be overwritten. Upon automatic or manual issue of an IPMI OEM command to the BMC, the BMC observes a signal from the SECPROV firmware, denoting eFuse programming completion. This can be probed with BMC commands.
When the eFuses have been blown, validation continues by observing the boot chain of the other firmware. Corruption of the SCP, ATF, or UEFI firmware obstructs boot flow and boot authentication and will cause the machine to fail booting to the OS. Once firmware is in place, happy path validation begins with booting the machine.
Upon first boot, firmware boots in the following order: BMC, SCP, ATF, and UEFI. The BMC, SCP, and ATF firmware can be observed via their respective serial consoles. The UEFI will automatically enroll the dbb and dbu files to the secure variable storage and trigger a reset of the system.
After observing the reset, the machine should successfully boot to the OS if the feature is executed correctly. For further validation, we can use the UEFI shell environment to extract the dbb file and compare the hash against the hash submitted to Ampere. After successfully validating the keys, we flash an unsigned UEFI image. An unsigned UEFI image causes authentication failure at bootloader stage BL3-2. The ATF firmware undergoes a boot loop as a result. Similar results will occur for a UEFI image signed with incorrect keys.
Updated authentication flow
On all subsequent boot cycles, the ATF will read secure variable dbb (our public key), compute a hash of the key, and compare it to the read-only Cloudflare public key hash in eFuse. If the computed and eFuse hashes match, our public key variable can be trusted and is used to authenticate the signed UEFI. After this, the system boots to the OS.
Let’s boot!
We were unable to get a machine without the feature enabled to demonstrate the set-up of the feature since we have the eFuse set at build time, but we can demonstrate what it looks like to go between an unsigned BIOS and a signed BIOS. What we would have observed with the set-up of the feature is a custom BMC command to instruct the SCP to burn the ROTPK into the SOC’s OTP fuses. From there, we would observe feedback to the BMC detailing whether burning the fuses was successful. Upon booting the UEFI image for the first time, the UEFI will write the dbb and dbu into secure storage.
As you can see, after flashing the unsigned BIOS, the machine fails to boot.
Despite the lack of visibility in failure to boot, there are a few things going on underneath the hood. The SCP (System Control Processor) still boots.
The SCP image holds a key certificate with Ampere’s generated ROTPK and the SCP key hash. SCP will calculate the ROTPK hash and compare it against the burned OTP fuses. In the failure case, where the hash does not match, you will observe a failure as you saw earlier. If successful, the SCP firmware will proceed to boot the PMpro and SMpro. Both the PMpro and SMpro firmware will be verified and proceed with the ATF authentication flow.
The conclusion of the SCP authentication is the passing of the BL1 key to the first stage bootloader via the SCP HOB(hand-off-block) to proceed with the standard three stage bootloader ATF authentication mentioned previously.
At BL2, the dbb is read out of the secure variable storage and used to authenticate the BL33 certificate and complete the boot process by booting the BL33 UEFI image.
Still more to do
In recent years, management interfaces on servers, like the BMC, have been the target of cyber attacks including ransomware, implants, and disruptive operations. Access to the BMC can be local or remote. With remote vectors open, there is potential for malware to be installed on the BMC via network interfaces. With compromised software on the BMC, malware or spyware could maintain persistence on the server. An attacker might be able to update the BMC directly using flashing tools such as flashrom or socflash without the same level of firmware resilience established at the UEFI level.
The future state involves using host CPU-agnostic infrastructure to enable a cryptographically secure host prior to boot time. We will look to incorporate a modular approach that has been proposed by the Open Compute Project’s Data Center Secure Control
Module Specification (DC-SCM) 2.0 specification. This will allow us to standardize our Root of Trust, sign our BMC, and assign physically unclonable function (PUF) based identity keys to components and peripherals to limit the use of OTP fusing. OTP fusing creates a problem with trying to “e-cycle” or reuse machines as you cannot truly remove a machine identity.
Dependabot helps developers secure their software with automated security updates: when a security advisory is published that affects a project dependency, Dependabot will try to submit a pull request that updates the vulnerable dependency to a safe version if one is available. Of course, there’s no rule that says a security vulnerability will only affect direct dependencies—dependencies at any level of a project’s dependency graph could become vulnerable.
Until recently, Dependabot did not address vulnerabilities on transitive dependencies, that is, on the dependencies sitting one or more levels below a project’s direct dependencies. Developers would encounter an error message in the GitHub UI and they would have to manually update the chain of ancestor dependencies leading to the vulnerable dependency to bring it to a safe version.
Internally, this would show up as a failed background job due to an update-not-possible error—and we would see a lot of these errors.
Understanding the challenge
Dependabot offers two strategies for updating dependencies: scheduled version updates and security updates. With version updates, the explicit goal is to keep project dependencies updated to the latest available version, and Dependabot can be configured to widen or increase a version requirement so that it accommodates the latest version. With security updates, Dependabot tries to make the most conservative update that removes the vulnerability while respecting version requirements. In this post we’ll be looking at security updates.
As an example, let’s say we have a repository with security updates enabled that contains an npm project with a single dependency on react-scripts@^4.0.3.
Not all package managers handle version requirements in the same way, so let’s quickly refresh. A version requirement like ^4.0.3 (a “caret range”) in npm permits updates to versions that don’t change the leftmost nonzero element in the MAJOR.MINOR.PATCHsemver version number. The version requirement ^4.0.3, then, can be understood as allowing versions greater than or equal to 4.0.3 and less than 5.0.0.
On March 18, 2022, a high-severity security advisory was published for node-forge, a popular npm package that provides tools for writing cryptographic and network-heavy applications. The advisory impacts versions earlier than 1.3.0, the patched version released the day before the advisory was published.
While we don’t have a direct dependency on node-forge, if we zoom in on our project’s dependency tree we can see that we do indirectly depend on a vulnerable version:
In order to resolve the vulnerability, we need to bring node-forge from 0.10.0 to 1.3.0, but a sequence of conflicting ancestor dependencies prevents us from doing so:
4.0.3 is the latest version of react-scripts permitted by our project
3.11.1 is the only version of webpack-dev-server permitted by [email protected]
1.10.14 is the latest version of selfsigned permitted by [email protected]
0.10.0 is the latest version of node-forge permitted by[email protected]
This is the point at which the security update would fail with an update-not-possible error. The challenge is in finding the version of selfsigned that permits [email protected], the version of webpack-dev-server that permits that version of selfsigned, and so on up the chain of ancestor dependencies until we reach react-scripts.
How we chose npm
When we set out to reduce the rate of update-not-possible errors, the first thing we did was pull data from our data warehouse in order to identify the greatest opportunities for impact.
JavaScript is the most popular ecosystem that Dependabot supports, both by Dependabot enablement and by update volume. In fact, more than 80% of the security updates that Dependabot performs are for npm and Yarn projects. Given their popularity, improving security update outcomes for JavaScript projects promised the greatest potential for impact, so we focused our investigation there.
npm and Yarn both include an operation that audits a project’s dependencies for known security vulnerabilities, but currently only npm natively has the ability to additionally make the updates needed to resolve the vulnerabilities that it finds.
After a successful engineering spike to assess the feasibility of integrating with npm’s audit functionality, we set about productionizing the approach.
Tapping into npm audit
When you run the npm audit command, npm collects your project’s dependencies, makes a bulk request to the configured npm registry for all security advisories affecting them, and then prepares an audit report. The report lists each vulnerable dependency, the dependency that requires it, the advisories affecting it, and whether a fix is possible—in other words, almost everything Dependabot should need to resolve a vulnerable transitive dependency.
node-forge  <=1.2.1
Severity: high
Open Redirect in node-forge - https://github.com/advisories/GHSA-8fr3-hfg3-gpgp
Prototype Pollution in node-forge debug API. - https://github.com/advisories/GHSA-5rrq-pxf6-6jx5
Improper Verification of Cryptographic Signature in node-forge - https://github.com/advisories/GHSA-cfm4-qjh2-4765
URL parsing in node-forge could lead to undesired behavior. - https://github.com/advisories/GHSA-gf8q-jrpm-jvxq
fix available via `npm audit fix --force`
Will install [email protected], which is a breaking change
node_modules/node-forge
  selfsigned  1.1.1 - 1.10.14
  Depends on vulnerable versions of node-forge
  node_modules/selfsigned
There were two ways in which we had to supplement npm audit to meet our requirements:
The audit report doesn’t include the chain of dependencies linking a vulnerable transitive dependency, which a developer may not recognize, to a direct dependency, which a developer should recognize. The last step in a security update job is creating a pull request that removes the vulnerability and we wanted to include some context that lets developers know how changes relate to their project’s direct dependencies.
Dependabot performs security updates for one vulnerable dependency at a time. (Updating one dependency at a time keeps diffs to a minimum and reduces the likelihood of introducing breaking changes.) npm audit and npm audit fix, however, operate on all project dependencies, which means Dependabot wouldn’t be able to tell which of the resulting updates were necessary for the dependency it’s concerned with.
Fortunately, there’s a JavaScript API for accessing the audit functionality underlying the npm audit and npm audit fix commands via Arborist, the component npm uses to manage dependency trees. Since Dependabot is a Ruby application, we wrote a helper script that uses the Arborist.audit() API and can be invoked in a subprocess from Ruby. The script takes as input a vulnerable dependency and a list of security advisories affecting it and returns as output the updates necessary to remove the vulnerabilities as reported by npm.
To meet our first requirement, the script uses the audit results from Arborist.audit() to perform a depth-first traversal of the project’s dependency tree, starting with direct dependencies. This top-down, recursive approach allows us to maintain the chain of dependencies linking the vulnerable dependency to its top-level ancestor(s) (which we’ll want to mention later when creating a pull request), and its worst-case time complexity is linear in the total number of dependencies.
function buildDependencyChains(auditReport, name) {
  const helper = (node, chain, visited) => {
    if (!node) {
      return []
    }
    if (visited.has(node.name)) {
      // We've already seen this node; end path.
      return []
    }
    if (auditReport.has(node.name)) {
      const vuln = auditReport.get(node.name)
      if (vuln.isVulnerable(node)) {
        return [{ fixAvailable: vuln.fixAvailable, nodes: [node, ...chain.nodes] }]
      } else if (node.name == name) {
        // This is a non-vulnerable version of the advisory dependency; end path.
        return []
      }
    }
    if (!node.edgesOut.size) {
      // This is a leaf node that is unaffected by the vuln; end path.
      return []
    }
    return [...node.edgesOut.values()].reduce((chains, { to }) => {
      // Only prepend current node to chain/visited if it's not the project root.
      const newChain = node.isProjectRoot ? chain : { nodes: [node, ...chain.nodes] }
      const newVisited = node.isProjectRoot ? visited : new Set([node.name, ...visited])
      return chains.concat(helper(to, newChain, newVisited))
    }, [])
  }
  return helper(auditReport.tree, { nodes: [] }, new Set())
}
To meet our second requirement of operating on one vulnerable dependency at a time, the script takes advantage of the fact that the Arborist constructor accepts a custom audit registry URL to be used when requesting bulk advisory data. We initialize a mock audit registry server using nock that returns only the list of advisories (in the expected format) for the dependency that was passed into the script and we tell the Arborist instance to use it.
We see both of these use cases—linking a vulnerable dependency to its top-level ancestor and conducting an audit for a single package or a particular set of vulnerabilities—as opportunities to extend Arborist and we’re working on integrating them upstream.
Back in the Ruby code, we parse and verify the audit results emitted by the helper script, accounting for scenarios such as a dependency being downgraded or removed in order to fix a vulnerability, and we incorporate the updates recommended by npm into the remainder of the security update job.
With a viable update path in hand, Dependabot is able to make the necessary updates to remove the vulnerability and submit a pull request that tells the developer about the transitive dependency and its top-level ancestor.
Caveats
When npm audit decides that a vulnerability can only be fixed by changing major versions, it requires use of the force option with npm audit fix. When the force option is used, npm will update to the latest version of a package, even if it means jumping several major versions. This breaks with Dependabot’s previous security update behavior. It also achieves our goal: to unlock conflicting dependencies in order to bring the vulnerable dependency to an unaffected version. Of course, you should still always review the changelog for breaking changes when jumping minor or major versions of a package.
Impact
We rolled out support for transitive security updates with npm in September 2022. Now, having a full quarter of data with the changes in place, we’re able to measure the impact: between Q1Y22 and Q4Y22 we saw a 42% reduction in update-not-possible errors for security updates on JavaScript projects.
If you have Dependabot security updates enabled on your npm projects, there’s nothing extra for you to do—you’re already benefiting from this improvement.
Looking ahead
I hope this post illustrates some of the considerations and trade-offs that are necessary when making improvements to an established system like Dependabot. We prefer to leverage the native functionality provided by package managers whenever possible, but as package managers come in all shapes and sizes, the approach may vary substantially from one ecosystem to the next.
We hope other package managers will introduce functionality similar to npm audit and npm audit fix that Dependabot can integrate with and we look forward to extending support for transitive security updates to those ecosystems as they do.
We continue to expand the scope of our assurance programs at Amazon Web Services (AWS), and we are pleased to announce that AWS has successfully completed the 2022 Cloud Computing Compliance Controls Catalogue (C5) attestation cycle with 156 services in scope. This alignment with C5 requirements demonstrates our ongoing commitment to adhere to the heightened expectations for cloud service providers. AWS customers in Germany and across Europe can run their applications on AWS Regions in scope of the C5 report with the assurance that AWS aligns with C5 requirements.
The C5 attestation scheme is backed by the German government and was introduced by the Federal Office for Information Security (BSI) in 2016. AWS has adhered to the C5 requirements since their inception. C5 helps organizations demonstrate operational security against common cyberattacks when using cloud services within the context of the German Government’s Security Recommendations for Cloud Computing Providers.
Independent third-party auditors evaluated AWS for the period October 1, 2021, through September 30, 2022. The C5 report illustrates AWS’ compliance status for both the basic and additional criteria of C5. Customers can download the C5 report through AWS Artifact. AWS Artifact is a self-service portal for on-demand access to AWS compliance reports. Sign in to AWS Artifact in the AWS Management Console, or learn more at Getting Started with AWS Artifact.
AWS has added the following 16 services to the current C5 scope:
At present, the services offered in the Frankfurt, Dublin, London, Paris, Milan, Stockholm and Singapore Regions are in scope of this certification. For up-to-date information, see the AWS Services in Scope by Compliance Program page and choose C5.
AWS strives to continuously bring services into the scope of its compliance programs to help you meet your architectural and regulatory needs. If you have questions or feedback about C5 compliance, reach out to your AWS account team.
To learn more about our compliance and security programs, see AWS Compliance Programs. As always, we value your feedback and questions; reach out to the AWS Compliance team through the Contact Us page.
If you have feedback about this post, submit comments in the Comments section below.
Want more AWS Security how-to content, news, and feature announcements? Follow us on Twitter.
We’re excited to announce that two additional AWS Regions—Asia Pacific (Jakarta) and Europe (Milan)—have been granted the Health Data Hosting (Hébergeur de Données de Santé, HDS) certification. This alignment with HDS requirements demonstrates our continued commitment to adhere to the heightened expectations for cloud service providers. AWS customers who handle personal health data can use HDS-certified Regions with confidence to manage their workloads.
The following 18 Regions are in scope for this certification:
US East (Ohio)
US East (Northern Virginia)
US West (Northern California)
US West (Oregon)
Asia Pacific (Jakarta)
Asia Pacific (Seoul)
Asia Pacific (Mumbai)
Asia Pacific (Singapore)
Asia Pacific (Sydney)
Asia Pacific (Tokyo)
Canada (Central)
Europe (Frankfurt)
Europe (Ireland)
Europe (London)
Europe (Milan)
Europe (Paris)
Europe (Stockholm)
South America (São Paulo)
Introduced by the French governmental agency for health, Agence Française de la Santé Numérique (ASIP Santé), the HDS certification aims to strengthen the security and protection of personal health data. Achieving this certification demonstrates that AWS provides a framework for technical and governance measures to secure and protect personal health data, governed by French law.
For up-to-date information, including when additional Regions are added, see the AWS Compliance Programs page, and choose HDS.
AWS strives to continuously bring services into the scope of its compliance programs to help you meet your architectural and regulatory needs. If you have questions or feedback about HDS compliance, reach out to your AWS account team.
To learn more about our compliance and security programs, see AWS Compliance Programs. As always, we value your feedback and questions; reach out to the AWS Compliance team through the Contact Us page.
If you have feedback about this post, submit comments in the Comments section below.
Want more AWS Security news? Follow us on Twitter.
When you use a centralized identity provider (IdP) for human user access, changes that an identity administrator makes to a user within the IdP won’t invalidate the user’s existing active Amazon Web Services (AWS) sessions. This is due to the nature of session durations that are configured on assumed roles. This situation presents a challenge for identity administrators.
When you configure IAM roles, you have the option of configuring a maximum session duration that specifies how long a session is valid. By default, the temporary credentials provided to the user will last for one hour, but you can change this to a value of up to 12 hours.
When a user assumes a role in AWS by using their IdP credentials, that role’s credentials will remain valid for the length of their session duration. It’s convenient for end users to have a maximum session duration set to 12 hours, because this prevents their sessions from frequently timing out and then requiring re-login. However, a longer session duration also poses a challenge if you, as an identity administrator, attempt to revoke or modify a user’s access to AWS from your IdP.
For example, user John Doe is leaving the company and you want to verify that John has his privileges within AWS revoked. If John has access to IAM roles with long-session durations, then he might have residual access to AWS despite having his session revoked or his user identity deleted within the IdP. Perhaps John assumed a role for his daily work at 8 AM and then you revoked his credentials within the IdP at 9 AM. Because John had already assumed an AWS role, he would still have access to AWS through that role for the duration of the configured session, 8 PM if the session was configured for 12 hours. Therefore, as a security best practice, AWS recommends that you do not set the session duration length longer than is needed. This example is displayed in Figure 1.
Figure 1: Session duration overview
In order to restrict access despite the session duration being active, you could update the roles that are assumable from an IdP with a deny-all policy or delete the role entirely. However, this is a disruptive action for the users that have access to this role. If the role was deleted or the policy was updated to deny all, then users would no longer be able to assume the role or access their AWS environment. Instead, the recommended approach is to revoke access based on the specific user’s principalId or sourceIdentity values.
The principalId is the unique identifier for the entity that made the API call. When requests are made with temporary credentials, such as assumed roles through IdPs, this value also includes the session name, such as [email protected]. The sourceIdentity identifies the original user identity that is making the request, such as a user who is authenticated through SAML federation from an IdP. As a best practice, AWS recommends that you configure this value within the IdP, because this improves traceability for user sessions within AWS. You can find more information on this functionality in the blog post, How to integrate AWS STS SourceIdentity with your identity provider.
Identify the principalId and sourceIdentity by using CloudTrail
You can use AWS CloudTrail to review the actions taken by a user, role, or AWS service that are recorded as events. In the following procedure, you will use CloudTrail to identify the principalId and sourceIdentity contained in the CloudTrail record contents for your IdP assumed role.
To identify the principalId and sourceIdentity by using CloudTrail
Assume a role in AWS by signing in through your IdP.
In this event record, you can see that principalId is “AROATVGBKRLCHXEXAMPLE:[email protected]” and sourceIdentity was specified as “[email protected]”. Now that you have these values, let’s explore how you can revoke access by using SCP and IAM policies.
Use an SCP to deny users based on IdP user name or revoke session token
First, you will create an SCP, a policy that can be applied to an organization to offer central control of the maximum available permissions across the accounts in the organization. More information on SCPs, including steps to create and apply them, can be found in the AWS Organizations User Guide.
The SCP will have a deny-all statement with a condition for aws:userid, which will evaluate the principalId field; and a condition for aws:SourceIdentity, which will evaluate the sourceIdentity field. In the following example SCP, the users John Doe and Mary Major are prevented from accessing AWS, in member accounts, regardless of their session duration, because each action will check against their aws:userid and aws:SourceIdentity values and be denied accordingly.
Use an IAM policy to revoke access in the AWS Organizations management account
SCPs do not affect users or roles in the AWS Organizations management account and instead only affect the member accounts in the organization. Therefore, using an SCP alone to deny access may not be sufficient. However, identity administrators can revoke access in a similar way within their management account by using the following procedure.
To create an IAM policy in the management account
Sign in to the AWS Management Console by using your AWS Organizations management account credentials.
At this point, the user actions on the IdP assumable roles within the AWS organization have been blocked. However, there is still an edge case if the target users use role chaining (use an IdP assumedRole credential to assume a second role) that uses a different RoleSessionName than the one assigned by the IdP. In a role chaining situation, the users will still have access by using the cached credentials for the second role.
This is where the sourceIdentity field is valuable. After a source identity is set, it is present in requests for AWS actions that are taken during the role session. The value that is set persists when a role is used to assume another role (role chaining). The value that is set cannot be changed during the role session. Therefore, it’s recommended that you configure the sourceIdentity field within the IdP as explained previously. This concept is shown in Figure 3.
Figure 3: Role chaining with sourceIdentity configured
A user assumes an IAM role via their IdP (#1), and the CloudTrail record displays sourceIdentity: [email protected] (#2). When the user assumes a new role within AWS (#3), that CloudTrail record continues to display sourceIdentity: [email protected] despite the principalId changing (#4).
However, if a second role is assumed in the account through role chaining and the sourceIdentity is not set, then it’s recommended that you revoke the issued session tokens for the second role. In order to do this, you can use the SCP policy at the end of this section, SCP to revoke active sessions for assumed roles. When you use this policy, the issued credentials related to the roles specified will be revoked for the users currently using them, and only users who were not denied through the previous SCP or IAM policies restricting their aws:userid will be able to reassume the target roles to obtain a new temporary credential.
If you take this approach, you will need to use an SCP to apply across the organization’s member accounts. The SCP must have the human-assumable roles for role chaining listed and a token issue time set to a specific time when you want users’ access revoked. (Normally, this time window would be set to the present time to immediately revoke access, but there might be circumstances in which you wish to revoke the access at a future date, such as when a user moves to a new project or team and therefore requires different access levels.) In addition, you will need to follow the same procedures in your management account by creating a customer-managed policy by using the same JSON with the condition statement for aws:PrincipalArn removed. Then attach the customer managed policy to the individual roles that are human-assumable through role chaining.
In this blog post, I demonstrated how you can revoke a federated user’s active AWS sessions by using SCPs and IAM policies that restrict the use of the aws:userid and aws:SourceIdentity condition keys. I also shared how you can handle a role chaining situation with the aws:TokenIssueTime condition key.
This exercise demonstrates the importance of configuring the session duration parameter on IdP assumed roles. As a security best practice, you should set the session duration to no longer than what is needed to perform the role. In some situations, that could mean an hour or less in a production environment and a longer session in a development environment. Regardless, it’s important to understand the impact of configuring the maximum session duration in the user’s environment and also to have proper procedures in place for revoking a federated user’s access.
This post also covered the recommendation to set the sourceIdentity for assumed roles through the IdP. This value cannot be changed during role sessions and therefore persists when a user conducts role chaining. Following this recommendation minimizes the risk that a user might have assumed another role with a different session name than the one assigned by the IdP and helps prevent the edge case scenario of revoking active sessions based on TokenIssueTime.
You should also consider other security best practices, described in the Security Pillar of the AWS Well-Architected Framework, when you revoke users’ AWS access. For example, rotating credentials such as IAM access keys in situations in which IAM access keys are regularly used and shared among users. The example solutions in this post would not have prevented a user from performing AWS actions if that user had IAM access keys configured for a separate IAM user in the environment. Organizations should limit long-lived security credentials such as IAM keys and instead rotate them regularly or avoid their use altogether. Also, the concept of least privilege is highly important to limit the access that users have and scope it solely to the requirements that are needed to perform their job functions. Lastly, you should adopt a centralized identity provider coupled with the AWS IAM Identity Center (successor to AWS Single Sign-On) service in order to centralize identity management and avoid the need for multiple credentials for users.
AWS re:Invent returned to Las Vegas, Nevada, November 28 to December 2, 2022. After a virtual event in 2020 and a hybrid 2021 edition, spirits were high as over 51,000 in-person attendees returned to network and learn about the latest AWS innovations.
Now in its 11th year, the conference featured 5 keynotes, 22 leadership sessions, and more than 2,200 breakout sessions and hands-on labs at 6 venues over 5 days.
With well over 100 service and feature announcements—and innumerable best practices shared by AWS executives, customers, and partners—distilling highlights is a challenge. From a security perspective, three key themes emerged.
Turn data into actionable insights
Security teams are always looking for ways to increase visibility into their security posture and uncover patterns to make more informed decisions. However, as AWS Vice President of Data and Machine Learning, Swami Sivasubramanian, pointed out during his keynote, data often exists in silos; it isn’t always easy to analyze or visualize, which can make it hard to identify correlations that spark new ideas.
“Data is the genesis for modern invention.” – Swami Sivasubramanian, AWS VP of Data and Machine Learning
At AWS re:Invent, we launched new features and services that make it simpler for security teams to store and act on data. One such service is Amazon Security Lake, which brings together security data from cloud, on-premises, and custom sources in a purpose-built data lake stored in your account. The service, which is now in preview, automates the sourcing, aggregation, normalization, enrichment, and management of security-related data across an entire organization for more efficient storage and query performance. It empowers you to use the security analytics solutions of your choice, while retaining control and ownership of your security data.
Amazon Security Lake has adopted the Open Cybersecurity Schema Framework (OCSF), which AWS cofounded with a number of organizations in the cybersecurity industry. The OCSF helps standardize and combine security data from a wide range of security products and services, so that it can be shared and ingested by analytics tools. More than 37 AWS security partners have announced integrations with Amazon Security Lake, enhancing its ability to transform security data into a powerful engine that helps drive business decisions and reduce risk. With Amazon Security Lake, analysts and engineers can gain actionable insights from a broad range of security data and improve threat detection, investigation, and incident response processes.
Strengthen security programs
According to Gartner, by 2026, at least 50% of C-Level executives will have performance requirements related to cybersecurity risk built into their employment contracts. Security is top of mind for organizations across the globe, and as AWS CISO CJ Moses emphasized during his leadership session, we are continuously building new capabilities to help our customers meet security, risk, and compliance goals.
In addition to Amazon Security Lake, several new AWS services announced during the conference are designed to make it simpler for builders and security teams to improve their security posture in multiple areas.
Identity and networking
Authorization is a key component of applications. Amazon Verified Permissions is a scalable, fine-grained permissions management and authorization service for custom applications that simplifies policy-based access for developers and centralizes access governance. The new service gives developers a simple-to-use policy and schema management system to define and manage authorization models. The policy-based authorization system that Amazon Verified Permissions offers can shorten development cycles by months, provide a consistent user experience across applications, and facilitate integrated auditing to support stringent compliance and regulatory requirements.
Additional services that make it simpler to define authorization and service communication include Amazon VPC Lattice, an application-layer service that consistently connects, monitors, and secures communications between your services, and AWS Verified Access, which provides secure access to corporate applications without a virtual private network (VPN).
Threat detection and monitoring
Monitoring for malicious activity and anomalous behavior just got simpler. Amazon GuardDuty RDS Protection expands the threat detection capabilities of GuardDuty by using tailored machine learning (ML) models to detect suspicious logins to Amazon Aurora databases. You can enable the feature with a single click in the GuardDuty console, with no agents to manually deploy, no data sources to enable, and no permissions to configure. When RDS Protection detects a potentially suspicious or anomalous login attempt that indicates a threat to your database instance, GuardDuty generates a new finding with details about the potentially compromised database instance. You can view GuardDuty findings in AWS Security Hub, Amazon Detective (if enabled), and Amazon EventBridge, allowing for integration with existing security event management or workflow systems.
To bolster vulnerability management processes, Amazon Inspector now supports AWS Lambda functions, adding automated vulnerability assessments for serverless compute workloads. With this expanded capability, Amazon Inspector automatically discovers eligible Lambda functions and identifies software vulnerabilities in application package dependencies used in the Lambda function code. Actionable security findings are aggregated in the Amazon Inspector console, and pushed to Security Hub and EventBridge to automate workflows.
Data protection and privacy
The first step to protecting data is to find it. Amazon Macie now automatically discovers sensitive data, providing continual, cost-effective, organization-wide visibility into where sensitive data resides across your Amazon Simple Storage Service (Amazon S3) estate. With this new capability, Macie automatically and intelligently samples and analyzes objects across your S3 buckets, inspecting them for sensitive data such as personally identifiable information (PII), financial data, and AWS credentials. Macie then builds and maintains an interactive data map of your sensitive data in S3 across your accounts and Regions, and provides a sensitivity score for each bucket. This helps you identify and remediate data security risks without manual configuration and reduce monitoring and remediation costs.
Encryption is a critical tool for protecting data and building customer trust. The launch of the end-to-end encrypted enterprise communication service AWS Wickr offers advanced security and administrative controls that can help you protect sensitive messages and files from unauthorized access, while working to meet data retention requirements.
Management and governance
Maintaining compliance with regulatory, security, and operational best practices as you provision cloud resources is key. AWS Config rules, which evaluate the configuration of your resources, have now been extended to support proactive mode, so that they can be incorporated into infrastructure-as-code continuous integration and continuous delivery (CI/CD) pipelines to help identify noncompliant resources prior to provisioning. This can significantly reduce time spent on remediation.
Managing the controls needed to meet your security objectives and comply with frameworks and standards can be challenging. To make it simpler, we launched comprehensive controls management with AWS Control Tower. You can use it to apply managed preventative, detective, and proactive controls to accounts and organizational units (OUs) by service, control objective, or compliance framework. You can also use AWS Control Tower to turn on Security Hub detective controls across accounts in an OU. This new set of features reduces the time that it takes to define and manage the controls required to meet specific objectives, such as supporting the principle of least privilege, restricting network access, and enforcing data encryption.
Do more with less
As we work through macroeconomic conditions, security leaders are facing increased budgetary pressures. In his opening keynote, AWS CEO Adam Selipsky emphasized the effects of the pandemic, inflation, supply chain disruption, energy prices, and geopolitical events that continue to impact organizations.
Now more than ever, it is important to maintain your security posture despite resource constraints. Citing specific customer examples, Selipsky underscored how the AWS Cloud can help organizations move faster and more securely. By moving to the cloud, agricultural machinery manufacturer Agco reduced costs by 78% while increasing data retrieval speed, and multinational HVAC provider Carrier Global experienced a 40% reduction in the cost of running mission-critical ERP systems.
“If you’re looking to tighten your belt, the cloud is the place to do it.” – Adam Selipsky, AWS CEO
Security teams can do more with less by maximizing the value of existing controls, and bolstering security monitoring and analytics capabilities. Services and features announced during AWS re:Invent—including Amazon Security Lake, sensitive data discovery with Amazon Macie, support for Lambda functions in Amazon Inspector, Amazon GuardDuty RDS Protection, and more—can help you get more out of the cloud and address evolving challenges, no matter the economic climate.
Security is our top priority
AWS re:Invent featured many more highlights on a variety of topics, such as Amazon EventBridge Pipes and the pre-announcement of GuardDuty EKS Runtime protection, as well as Amazon CTO Dr. Werner Vogels’ keynote, and the security partnerships showcased on the Expo floor. It was a whirlwind week, but one thing is clear: AWS is working harder than ever to make our services better and to collaborate on solutions that ease the path to proactive security, so that you can focus on what matters most—your business.
In our Welcome to CIO Week 2023 post, we talked about wanting to start the year by celebrating the work Chief Information Officers do to keep their organizations safe and productive.
Over the past week, you learned about announcements addressing all facets of your technology stack – including new services, betas, strategic partnerships, third party integrations, and more. This recap blog summarizes each announcement and labels what capability is generally available (GA), in beta, or on our roadmap.
Everything we launched is designed to help CIOs accelerate their pursuit of digital transformation. In this blog, we organized our announcement summaries based on the three feelings we want CIOs to have when they consider partnering with Cloudflare:
CIOs now have a simpler roadmap to Zero Trust and SASE: We announced new capabilities and tighter integrations that make it easier for organizations to adopt Zero Trust security best practices and move towards aspirational architectures like Secure Access Service Edge (SASE).
CIOs have access to the right technology and channel partners: We announced integrations and programming to help organizations access the right expertise to modernize IT and security at their own pace with the technologies they already use.
CIOs can streamline a multi-cloud strategy with ease:We announced new ways to connect, secure, and accelerate traffic across diverse cloud environments.
Thank you for following CIO Week, Cloudflare’s first of many Innovation Weeks in 2023. It can be hard to keep up with our pace of innovation sometimes, but we hope that reading this blog and registering for our recap webinar will help!
If you want to speak with us about how to modernize your IT and security and make life easier for your organization’s CIO, fill out the form here.
Simplifying your journey to Zero Trust and SASE
Securing access These blog posts are focused on making it faster, easier, and safer to connect any user to any application with the granular controls and comprehensive visibility needed to achieve Zero Trust.
Cloudflare Digital Experience Monitoring will be an all-in-one dashboard that helps CIOs understand how critical applications and Internet services are performing across their entire corporate network. Sign up for beta access.
With a single click, any device running Cloudflare’s device client, WARP, in your organization can reach any other device running WARP over a private network. Sign up for beta access.
Investigate ‘allow’ or ‘block’ decisions based on how a connection was made with the same level of ease that you can troubleshoot user identity within Cloudflare’s Zero Trust platform.
Secure sensitive data by running application sessions in an isolated browser and control how users interact with sensitive data – now with just one click. Sign up for beta access.
Cloudflare’s ZTNA (Access) and SWG (Gateway) services now support the System for Cross-domain Identity Management (SCIM) protocol, making it easier for administrators to manage identity records across systems.
Cloudflare Zero Trust administrators can use familiar debugging tools that use the ICMP protocol (like Ping, Traceroute, and MTR) to test connectivity to private network destinations.
Threat defense These blog posts are focused on helping organizations filter, inspect, and isolate traffic to protect users from phishing, ransomware, and other Internet threats.
Email Link Isolation is your safety net for the suspicious links that end up in inboxes and that users may click. This added protection turns Cloudflare Area 1 into the most comprehensive email security solution when it comes to protecting against phishing attacks.
Cloudflare’s Data Loss Prevention (DLP) service now offers the ability to create custom detections, so that organizations can inspect traffic for their most sensitive data.
Learn how the U.S. Federal Government and other large Managed Service Providers (MSPs) are using Cloudflare’s Tenant API to apply security policies like DNS filtering across the organizations they manage.
Secure SaaS environments These blog posts are focused on maintaining consistent security and visibility across SaaS application environments, in particular to protect leaks of sensitive data.
Cloudflare Zero Trust will introduce capabilities between our CASB and DLP services that will enable administrators to peer into the files stored in their SaaS applications and identify sensitive data inside them.
Cloudflare is combining capabilities from Area 1 Email Security and Data Loss Prevention (DLP) to provide complete data protection for corporate email.
Cloudflare CASB now integrates with Salesforce and Box, enabling IT and security teams to scan these SaaS environments for security risks.
Accelerating and securing connectivity In addition to product capabilities, blog posts in this section highlight speed and other strategic benefits that organizations realize with Cloudflare.
As part of CIO Week, we spoke with the leaders of some of our largest customers to better understand why they selected Cloudflare One. Learn six thematic reasons why.
Cloudflare’s device client (WARP) can now securely detect pre-configured locations and route traffic based on the needs of the organization for that location.
Making Cloudflare easier to use These blog posts highlight innovations across the Cloudflare portfolio, and outside the Zero Trust and SASE categories, to help organizations secure and accelerate traffic with ease.
Cloudflare is making it easier for account owners to view and manage the access their users have on an account by allowing them to restrict API access to the account.
Zone Versioning allows customers to safely manage zone configuration by versioning changes and choosing how and when to deploy those changes to defined environments of traffic.
Cloudflare is unlocking operational efficiencies by working on integrations between our Application Services to protect Internet-facing websites and our Cloudflare One platform to protect corporate networks.
Collaborating with the right partners
In addition to new programming for our channel partners, these blog posts describe deeper technical integrations that help organizations work more efficiently with the IT and security tools they already use.
Cloudflare announced four new integrations between Microsoft Azure Active Directory (Azure AD) and Cloudflare Zero Trust that reduce risk proactively. These integrated offerings increase automation, allowing security teams to focus on threats versus implementation and maintenance.
Now, Microsoft Office 365 customers can deploy Area 1 cloud email security via Microsoft Graph API. This feature enables O365 customers to quickly deploy the Area 1 product via API, with onboarding through the Microsoft Marketplace coming in the near future.
China Express is a suite of offerings designed to simplify connectivity and improve performance for users in China and developed in partnership with China Mobile International and China Broadband Communications.
Cloudflare announced the limited availability of a new specialization track for our channel and implementation partners, designed to help develop their expertise in delivering Cloudflare One services.
Streamlining your multi-cloud strategy
These blog posts highlight innovations that make it easier for organizations to simply ‘plug into’ Cloudflare’s network and send traffic from any source to any destination.
Cloudflare is making it even easier to get connected with the Magic WAN Connector: a lightweight software package you can install in any physical or cloud network to automatically connect, steer, and shape any IP traffic. Sign up for early access.
Customers using Google Cloud Platform, Azure, Oracle Cloud, IBM Cloud, and Amazon Web Services can now open direct connections from their private cloud instances into Cloudflare.
This blog post recaps how definitions of corporate network traffic have shifted and how Cloudflare One provides protection for all traffic flows, regardless of source or destination.
As CIOs navigate the complexities of stitching together multiple solutions, we are extending our partnership with Microsoft to create one of the best Zero Trust solutions available. Today, we are announcing four new integrations between Azure AD and Cloudflare Zero Trust that reduce risk proactively. These integrated offerings increase automation allowing security teams to focus on threats versus implementation and maintenance.
What is Zero Trust and why is it important?
Zero Trust is an overused term in the industry and creates a lot of confusion. So, let’s break it down. Zero Trust architecture emphasizes the “never trust, always verify” approach. One way to think about it is that in the traditional security perimeter or “castle and moat” model, you have access to all the rooms inside the building (e.g., apps) simply by having access to the main door (e.g., typically a VPN). In the Zero Trust model you would need to obtain access to each locked room (or app) individually rather than only relying on access through the main door. Some key components of the Zero Trust model are identity e.g., Azure AD (who), apps e.g., a SAP instance or a custom app on Azure (applications), policies e.g. Cloudflare Access rules (who can access what application), devices e.g. a laptop managed by Microsoft Intune (the security of the endpoint requesting the access) and other contextual signals.
Zero Trust is even more important today since companies of all sizes are faced with an accelerating digital transformation and an increasingly distributed workforce. Moving away from the castle and moat model, to the Internet becoming your corporate network, requires security checks for every user accessing every resource. As a result, all companies, especially those whose use of Microsoft’s broad cloud portfolio is increasing, are adopting a Zero Trust architecture as an essential part of their cloud journey.
Cloudflare’s Zero Trust platform provides a modern approach to authentication for internal and SaaS applications. Most companies likely have a mix of corporate applications – some that are SaaS and some that are hosted on-premise or on Azure. Cloudflare’s Zero Trust Network Access (ZTNA) product as part of our Zero Trust platform makes these applications feel like SaaS applications, allowing employees to access them with a simple and consistent flow. Cloudflare Access acts as a unified reverse proxy to enforce access control by making sure every request is authenticated, authorized, and encrypted.
Cloudflare Zero Trust and Microsoft Azure Active Directory
We have thousands of customers using Azure AD and Cloudflare Access as part of their Zero Trust architecture. Our partnership with Microsoft announced last year strengthened security without compromising performance for our joint customers. Cloudflare’s Zero Trust platform integrates with Azure AD, providing a seamless application access experience for your organization’s hybrid workforce.
As a recap, the integrations we launched solved two key problems:
For on-premise legacy applications, Cloudflare’s participation as Azure AD secure hybrid access partner enabled customers to centrally manage access to their legacy on-premise applications using SSO authentication without incremental development. Joint customers now easily use Cloudflare Access as an additional layer of security with built-in performance in front of their legacy applications.
For apps that run on Microsoft Azure, joint customers can integrate Azure AD with Cloudflare Zero Trust and build rules based on user identity, group membership and Azure AD Conditional Access policies. Users will authenticate with their Azure AD credentials and connect to Cloudflare Access with just a few simple steps using Cloudflare’s app connector, Cloudflare Tunnel, that can expose applications running on Azure. See guide to install and configure Cloudflare Tunnel.
Recognizing Cloudflare’s innovative approach to Zero Trust and Security solutions, Microsoft awarded us the Security Software Innovator award at the 2022 Microsoft Security Excellence Awards, a prestigious classification in the Microsoft partner community.
But we aren’t done innovating. We listened to our customers’ feedback and to address their pain points are announcing several new integrations.
Microsoft integrations we are announcing today
The four new integrations we are announcing today are:
Azure AD allows administrators to create and enforce policies on both applications and users using Conditional Access. It provides a wide range of parameters that can be used to control user access to applications (e.g. user risk level, sign-in risk level, device platform, location, client apps, etc.). Cloudflare Access now supports Azure AD Conditional Access policies per application. This allows security teams to define their security conditions in Azure AD and enforce them in Cloudflare Access.
For example, customers might have tighter levels of control for an internal payroll application and hence will have specific conditional access policies on Azure AD. However, for a general info type application such as an internal wiki, customers might enforce not as stringent rules on Azure AD conditional access policies. In this case both app groups and relevant Azure AD conditional access policies can be directly plugged into Cloudflare Zero Trust seamlessly without any code changes.
2. SCIM: Autonomously synchronize Azure AD groups between Cloudflare Zero Trust and Azure AD, saving hundreds of hours in the CIO org.
Cloudflare Access policies can use Azure AD to verify a user’s identity and provide information about that user (e.g., first/last name, email, group membership, etc.). These user attributes are not always constant, and can change over time. When a user still retains access to certain sensitive resources when they shouldn’t, it can have serious consequences.
Often when user attributes change, an administrator needs to review and update all access policies that may include the user in question. This makes for a tedious process and an error-prone outcome.
The SCIM (System for Cross-domain Identity Management) specification ensures that user identities across entities using it are always up-to-date. We are excited to announce that joint customers of Azure AD and Cloudflare Access can now enable SCIM user and group provisioning and deprovisioning. It will accomplish the following:
The IdP policy group selectors are now pre-populated with Azure AD groups and will remain in sync. Any changes made to the policy group will instantly reflect in Access without any overhead for administrators.
When a user is deprovisioned on Azure AD, all the user’s access is revoked across Cloudflare Access and Gateway. This ensures that change is made in near real time thereby reducing security risks.
3. Risky user isolation: Helps joint customers add an extra layer of security by isolating high risk users (based on AD signals) such as contractors to browser isolated sessions via Cloudflare’s RBI product.
Azure AD classifies users into low, medium and high risk users based on many data points it analyzes. Users may move from one risk group to another based on their activities. Users can be deemed risky based on many factors such as the nature of their employment i.e. contractors, risky sign-in behavior, credential leaks, etc. While these users are high-risk, there is a low-risk way to provide access to resources/apps while the user is assessed further.
We now support integrating Azure AD groups with Cloudflare Browser Isolation. When a user is classified as high-risk on Azure AD, we use this signal to automatically isolate their traffic with our Azure AD integration. This means a high-risk user can access resources through a secure and isolated browser. If the user were to move from high-risk to low-risk, the user would no longer be subjected to the isolation policy applied to high-risk users.
4. Secure joint Government Cloud customers: Helps Government Cloud customers achieve better security with centralized identity & access management via Azure AD, and an additional layer of security by connecting them to the Cloudflare global network, not having to open them up to the whole Internet.
Via Secure Hybrid Access (SHA) program, Government Cloud (‘GCC’) customers will soon be able to integrate Azure AD with Cloudflare Zero Trust and build rules based on user identity, group membership and Azure AD conditional access policies. Users will authenticate with their Azure AD credentials and connect to Cloudflare Access with just a few simple steps using Cloudflare Tunnel that can expose applications running on Microsoft Azure.
“Digital transformation has created a new security paradigm resulting in organizations accelerating their adoption of Zero Trust. The Cloudflare Zero Trust and Azure Active Directory joint solution has been a growth enabler for Swiss Re by easing Zero Trust deployments across our workforce allowing us to focus on our core business. Together, the joint solution enables us to go beyond SSO to empower our adaptive workforce with frictionless, secure access to applications from anywhere. The joint solution also delivers us a holistic Zero Trust solution that encompasses people, devices, and networks.” – Botond Szakács, Director, Swiss Re
“A cloud-native Zero Trust security model has become an absolute necessity as enterprises continue to adopt a cloud-first strategy. Cloudflare has and Microsoft have jointly developed robust product integrations with Microsoft to help security and IT leaders CIO teams prevent attacks proactively, dynamically control policy and risk, and increase automation in alignment with Zero Trust best practices.” – Joy Chik, President, Identity & Network Access, Microsoft
Try it now
Interested in learning more about how our Zero Trust products integrate with Azure Active Directory? Take a look at this extensive reference architecture that can help you get started on your Zero Trust journey and then add the specific use cases above as required. Also, check out this joint webinar with Microsoft that highlights our joint Zero Trust solution and how you can get started.
What next
We are just getting started. We want to continue innovating and make the Cloudflare Zero Trust and Microsoft Security joint solution to solve your problems. Please give us feedback on what else you would like us to build as you continue using this joint solution.
The collective thoughts of the interwebz
Manage Consent
To provide the best experiences, we use technologies like cookies to store and/or access device information. Consenting to these technologies will allow us to process data such as browsing behavior or unique IDs on this site. Not consenting or withdrawing consent, may adversely affect certain features and functions.
Functional
Always active
The technical storage or access is strictly necessary for the legitimate purpose of enabling the use of a specific service explicitly requested by the subscriber or user, or for the sole purpose of carrying out the transmission of a communication over an electronic communications network.
Preferences
The technical storage or access is necessary for the legitimate purpose of storing preferences that are not requested by the subscriber or user.
Statistics
The technical storage or access that is used exclusively for statistical purposes.The technical storage or access that is used exclusively for anonymous statistical purposes. Without a subpoena, voluntary compliance on the part of your Internet Service Provider, or additional records from a third party, information stored or retrieved for this purpose alone cannot usually be used to identify you.
Marketing
The technical storage or access is required to create user profiles to send advertising, or to track the user on a website or across several websites for similar marketing purposes.