In this post, we demonstrate how to automatically keep your base or standard images current, incorporating patches and any other changes using EC2 Image Builder pipelines. We also demonstrate how to keep workload-specific images current using Cascading Pipelines, a feature of EC2 Image Builder.
Dependency updates
You can use the Dependency update feature of EC2 Image Builder pipelines to automatically update your standard image based on changes to your build components.
When you create an EC2 Image Builder pipeline, you can choose to run the pipeline on a schedule, either using a schedule builder or a CRON expression (a method of defining minute, hour, day and month for scheduling). Furthermore, you can choose to only run the pipeline if a component in the pipeline or the source image has changed. This is referred to as a dependency update as shown in the following image.
Figure 1: An example EC2 Image Builder pipeline schedule with dependency update settings
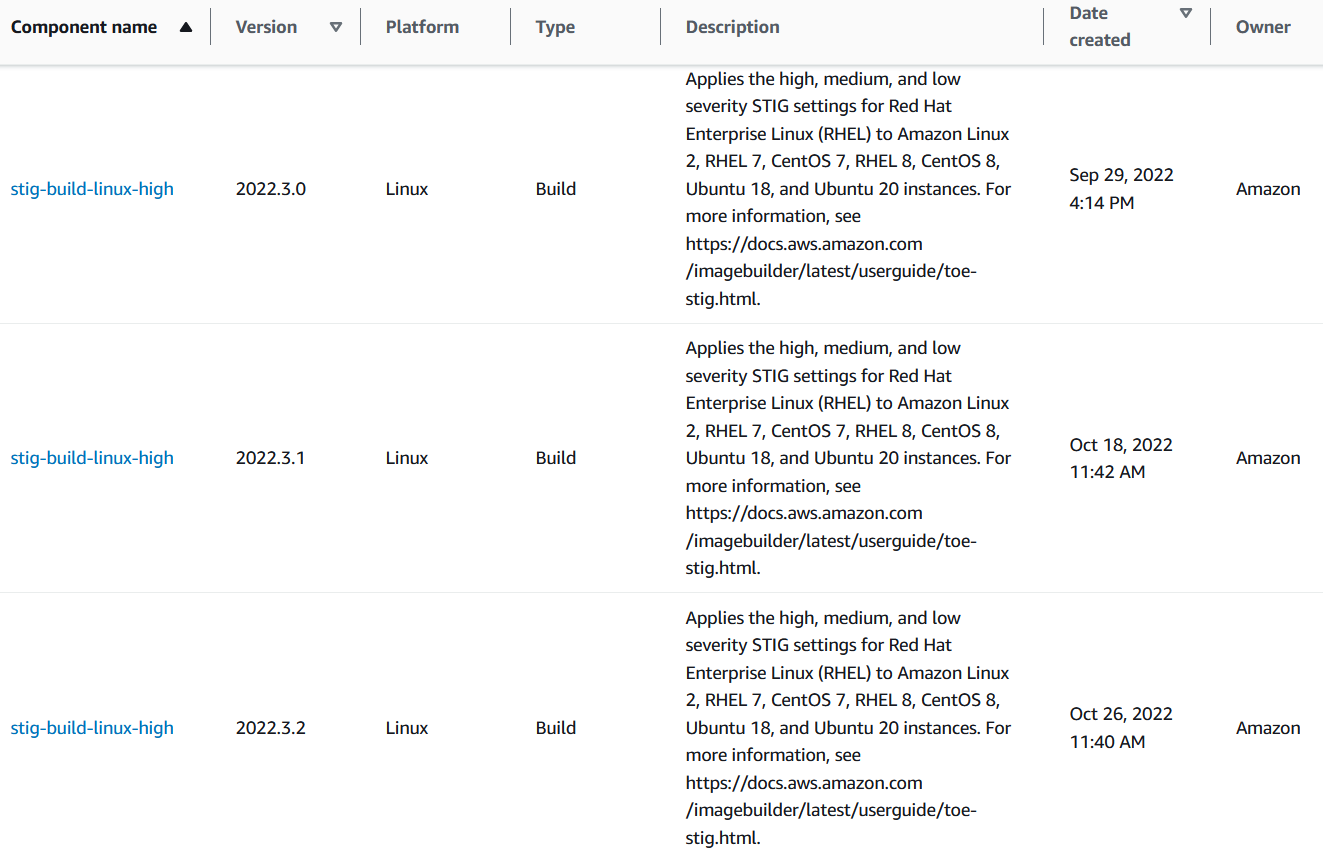
When you select “Run pipeline at the scheduled time if there are dependency updates,” your pipeline only executes if the Base AMI or any Build or Test components have changed. The version of your components must be updated for this capability to work. Amazon-provided components include versioning out of the box. Here is an example of three versions of an Amazon-provided Build component that apply Security Technical Implementation Guide (STIG) baselines to Linux images.
Figure 2: Different versions of one Amazon-managed Build component
When a new STIG baseline build component is released, the component’s version is incremented. If a pipeline includes this type of versioned Build component and utilizes the dependency updates capability, then the pipeline automatically runs at the next scheduled interval after the component is updated. Pipelines utilizing this capability will run when the base AMI changes or when a Build or Test component changes.
Notifications
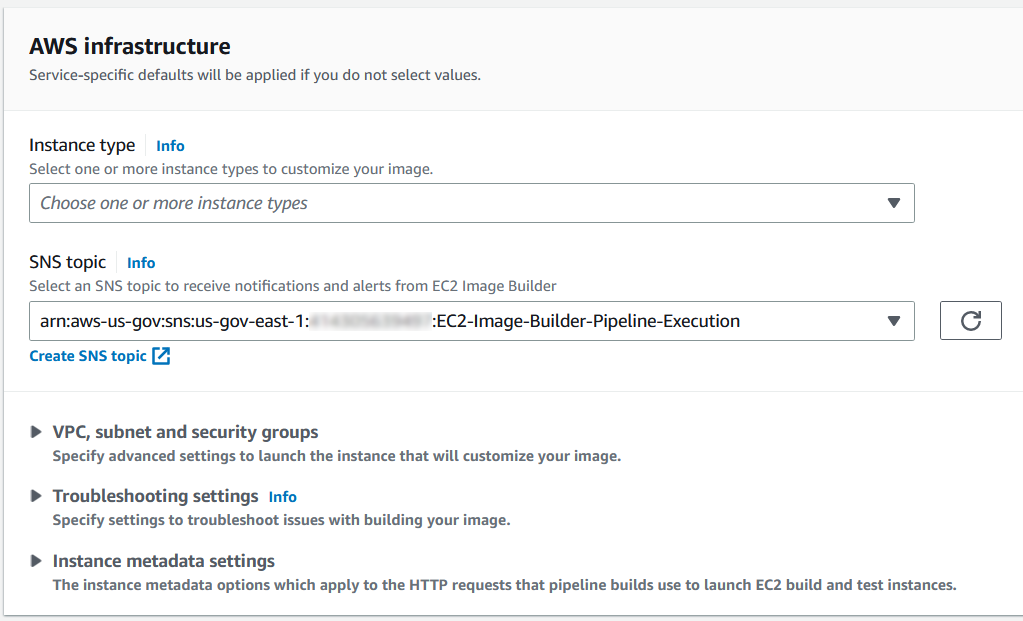
To receive notifications about the pipeline execution, you can enable an Amazon Simple Notification Service (Amazon SNS) topic from within EC2 Image Builder. Under the Infrastructure Configuration section of the EC2 Image Builder pipeline, identify an SNS topic as shown in the following image.
Figure 3: An example SNS topic for sending pipeline execution notifications
The SNS topic receives a notification if a pipeline runs and completes with a status of AVAILABLE or FAILED. This occurs even when a pipeline execution is triggered by a component change that you didn’t directly initiate, such as when a new version of an Amazon-managed build component is released.
Even if no other aspects of the infrastructure configuration are used in the pipeline (instance type, security group, subnet, etc.), the SNS topic capability can be used to send a notification when the pipeline executes. With this in mind, you can leverage Amazon SNS to make sure that you’re always notified of any pipeline executions as well as trigger AWS Lambda functions for automation.
Cascading pipelines
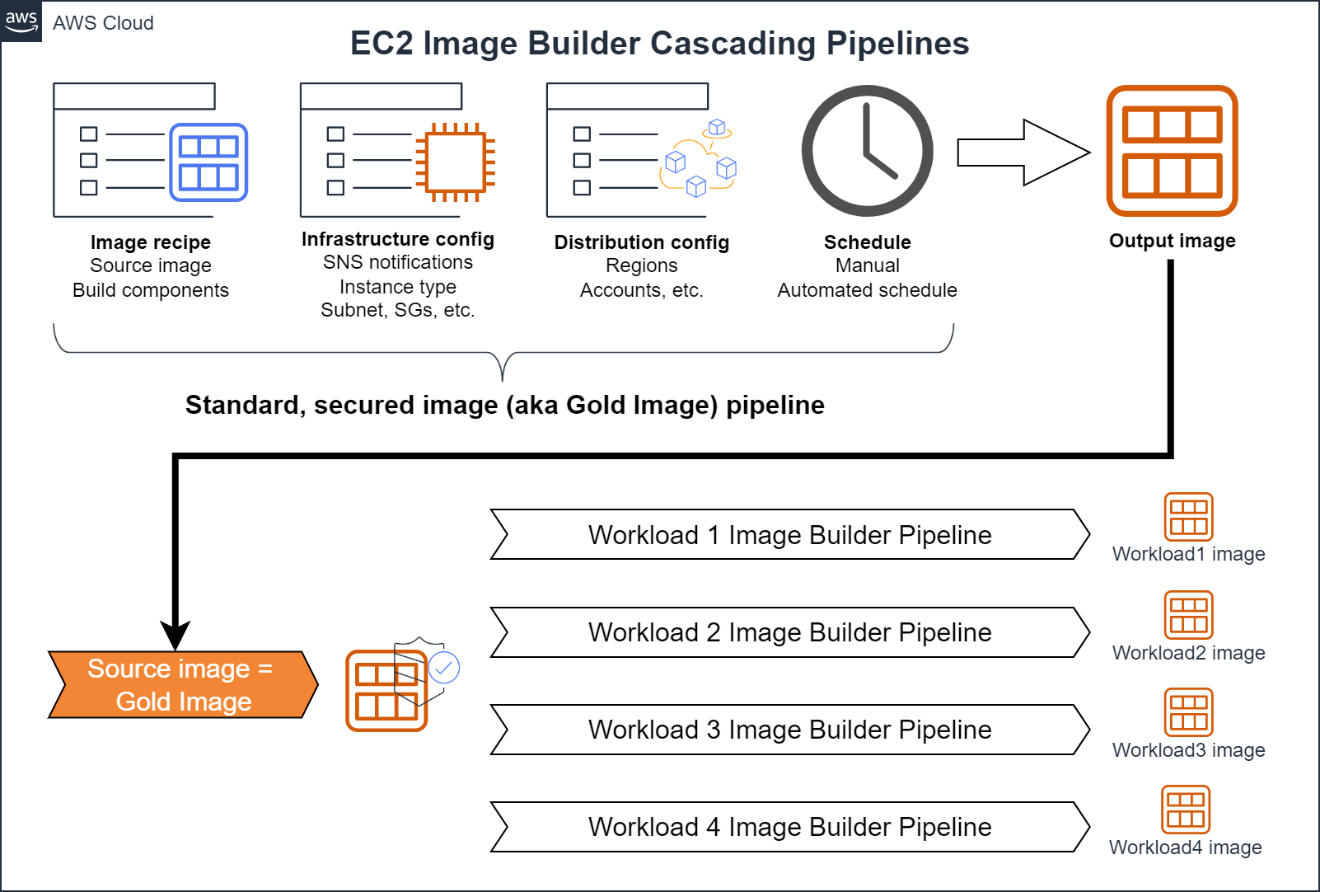
Cascading Pipelines are a feature of EC2 Image Builder that you can use to create workload-specific images from a standard secured image (aka “gold image”) of an organization. The following image shows how you can use Cascading Pipelines to keep workload specific images updated.
Figure 4: An example workflow for a EC2 Image Builder Cascading Pipelines
You create a gold image pipeline for a hardened base operating system (OS) using the steps outlined in Automate OS Image Build Pipelines with EC2 Image Builder. This pipeline could include a base OS, OS patches, Build components to harden the OS (such as STIG or CIS baselines), as well as any additional software required by the organization (agents, etc.). Do not include application- or workload-specific software in the pipeline. Infrastructure or distribution components may not be included in the pipeline to maintain flexibility for using the gold image. For example, you typically wouldn’t want to include VPC configurations in your golden AMI build because that would constrain the AMI to a particular VPC.
To create a Cascading Pipeline that uses the gold image for applications or workloads, in the Base Image section of the EC2 Image Builder console, choose Select Managed Images.
Figure 5: Selecting the base image of a pipeline
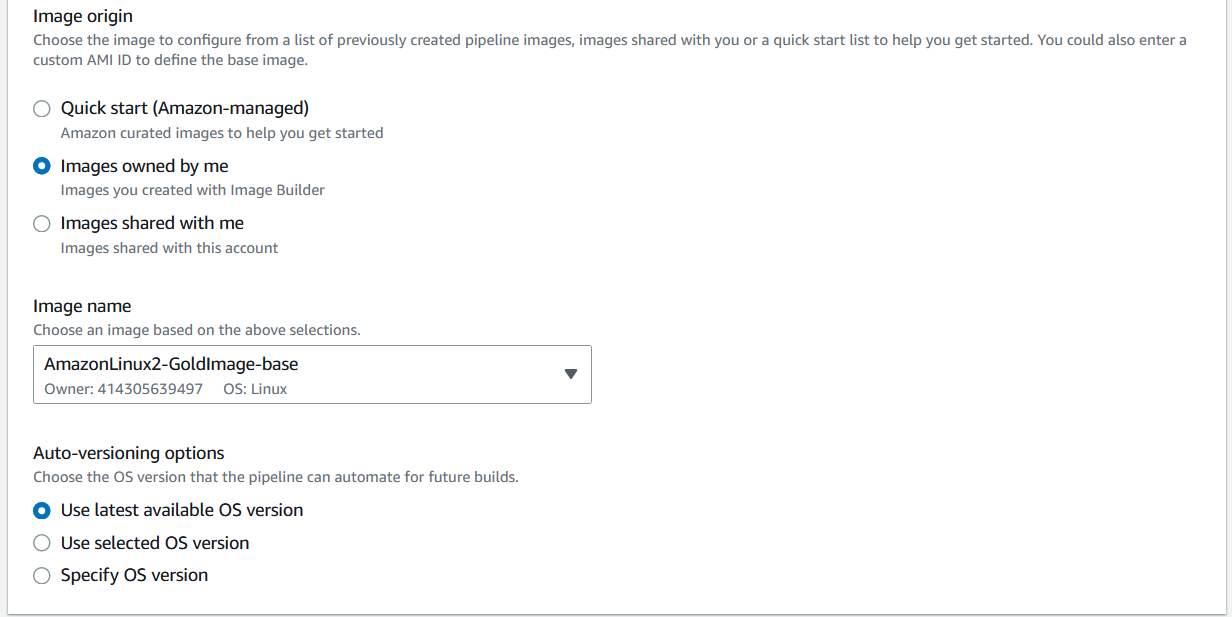
Then, select “Images Owned by Me” and under Image Name, select the EC2 Image Builder pipeline used to create the gold image. Moreover, select “Use Latest Available OS Version” under Auto-versioning options to make sure that the Cascading Pipeline is executed any time there is a change to the base image.
Figure 6: Choosing the base golden image from a previous pipeline execution
Use this configuration to maintain images for each application or workload which utilizes the gold image. Any time that an update is made to the gold image, application pipelines execute, thus providing updated images. To send notifications, SNS topics are enabled on each workload-specific pipeline.
In this post, we demonstrated how to automatically update images for any changes using EC2 Image Builder pipelines. We also demonstrated how to keep workload specific images using Cascading Pipelines. Using these features, you can make sure that your organization stays up-to-date on the latest OS patches and dependency changes, without requiring human intervention. For more information on EC2 Image Builder, see the official documentation.
The FBI is warning people against using public phone-charging stations, worrying that the combination power-data port can be used to inject malware onto the devices:
Avoid using free charging stations in airports, hotels, or shopping centers. Bad actors have figured out ways to use public USB ports to introduce malware and monitoring software onto devices that access these ports. Carry your own charger and USB cord and use an electrical outlet instead.
How much of a risk is this, really? I am unconvinced, although I do carry a USB condom for charging stations I find suspicious.
Car thieves are injecting malicious software into a car’s network through wires in the headlights (or taillights) that fool the car into believing that the electronic key is nearby.
In this blog post I’d like to walk you through how to implement BIMI while using Amazon SES. For your information BIMI can be best described by the following excerpt from bimigroup.org:
Brand Indicators for Message Identification or BIMI (pronounced: Bih-mee) is an emerging email specification that enables the use of brand-controlled logos within supporting email clients. BIMI leverages the work an organization has put into deploying DMARC protection, by bringing brand logos to the customer’s inbox. For the brand’s logo to be displayed, the email must pass DMARC authentication checks, ensuring that the organization’s domain has not been impersonated.
Brands continually need to protect themselves from spoofing and phishing from bad actors who can damage the trust that customers and recipients have in those brands. Brand Indicators for Message Identification (BIMI) is an email specification that enables email inboxes to display a brand’s logo next to the brand’s authenticated email messages within supporting email clients. BIMI is an email specification that’s directly connected to authentication, but it’s not a standalone email authentication protocol as it requires all your email to comply with DMARC authentication. Recipients are more likely to engage with email that displays the logo of the brand associated with the message author. Higher engagement helps deliverability and inbox placement because it indicates that the recipients trust your brand. BIMI is a great brand protector in email and provides a better user experience for the end recipients and customers.
BIMI requires that you authenticate all of your organization’s email with SPF, DKIM and DMARC. In this how-to we will be utilizing Amazon SES to authenticate the emails, Amazon S3 to host the SVG image, and Amazon Route53 to add DNS records. We will be walking through how to accomplish each step until completion.
Note: While we’re using AWS products in this how-to, it is not a requirement to use all AWS products to implement BIMI. Any hosting provider for content or domain can be used however the steps may differ based on the provider you use.
BIMI Implementation
The following are the steps needed to prepare your SES account and domain for BIMI:
Step 1
Note: If you already have SPF, DKIM, and DMARC enabled for your domain (with 100% as the rate for DMARC) you can move on to Step 2.
Enable Easy DKIM for your domain
Sign in to the AWS Management Console and open the Amazon SES console at https://console.aws.amazon.com/ses/.
In the navigation pane, under Configuration, choose Verified identities.
In the list of identities, choose an identity where the Identity type is Domain.
Note: If you need to create or verify a domain, see Creating a domain identity.
Under the Authentication tab, in the DomainKeys Identified Mail (DKIM) container, choose Edit.
In the Advanced DKIM settings container, choose the Easy DKIM button in the Identity type field.
In the DKIM signing key length field, choose either RSA_2048_BIT or RSA_1024_BIT.
In the DKIM signatures field, check the Enabled box.
Choose Save changes.
Now that you’ve configured your domain identity with Easy DKIM, you must complete the verification process with your DNS provider – proceed to Verifying a DKIM domain identity with your DNS provider and follow the DNS authentication procedures for Easy DKIM.
Create a DMARC record for your domain
Sign in to the AWS Management Console and open the Route 53 console at https://console.aws.amazon.com/route53/
In the navigation pane, choose Hosted zones.
On the Hosted zones page, choose the name of the hosted zone that you want to create records in.
Choose and define the applicable routing policy and the following values:
Note: The DMARC policy must enforce at 100% and include either a quarantine or reject policy. (i.e. p=reject or p=quarantine) to meet the DMARC authentication requirement. This may mean you will need to update your existing policy and DMARC record.
Configure a Custom Mail From for your sending domain
At the bottom of the screen in the in the Custom MAIL FROM domain pane, choose Edit .
In the General details pane, do the following:
a. Select the Use a custom MAIL FROM domain checkbox.
b. For MAIL FROM domain, enter the subdomain that you want to use as the MAIL FROM domain.
c. For Behavior on MX failure, choose one of the following options:
Use default MAIL FROM domain – If the custom MAIL FROM domain’s MX record is not set up correctly, Amazon SES uses a subdomain of amazonses.com. The subdomain varies based on the AWS Region that you use Amazon SES in.
Reject message – If the custom MAIL FROM domain’s MX record is not set up correctly, Amazon SES returns a MailFromDomainNotVerified error. Emails that you attempt to send from this domain are automatically rejected. If you want to ensure that 100% of your email is BIMI compatible, then you should choose the reject message option.
d. Choose Save changes – you’ll be returned to the previous screen.
Publish the MX and SPF (type TXT) records to the DNS server of the custom MAIL FROM domain:
Note: In the Custom MAIL FROM domain pane, the Publish DNS records table now displays the MX and SPF (type TXT) records in that you have to publish (add) to your domain’s DNS configuration. These records use the formats shown in the following table.
Name
Record Type
Value
subdomain.example.com
MX
10 feedback-smtp.region.amazonses.com
subdomain.example.com
TXT
v=spf1 include:amazonses.com ~all
Step 2
Produce an SVG Tiny PS version of your official logo
In order to display your logo in the email it must conform to the specifications of the BIMI requirements. To meet these requirements the logo must be a Scalable Vector Graphics (SVG) image and must meet the Tiny PS Specification. Once your image meets this requirement you can move on to the next step.
Note: bimigroup.org outlines this process and includes references to software to assist with this process.
In the Buckets list, choose the name of the bucket that you want to upload your folders or files to.
Choose Upload.
In the Upload window, do one of the following:
Drag and drop files and folders to the Upload window.
Choose Add file choose your SVG image to upload, and choose Open.
To configure additional object properties
To change access control list permissions, choose Permissions.
Under Access control list (ACL), edit the permissions.
You need to grant read access to your objects to the public (everyone in the world) for the SVG image you are uploading. However, we recommend not changing the default setting for your bucket to public read access.
To configure other additional properties, choose Properties.
To upload your objects, choose Upload.
Note: Amazon S3 uploads your object. When the upload completes, you can see a success message on the Upload: status page.
On the Hostedzones page, choose the name of the hosted zone that you want to create records in.
Choose and define the applicable routing policy and the following values with the understanding the URLs must be HTTPS:
Name
Record Type
Value
default._bimi.example.com
TXT
v=BIMI1; l=[SVG URL]; a=[PEM URL]
Choose Create records.
Note: the a= tag is currently optional and will not be used in this example.
You can validate your BIMI record with a tool like the BIMI Inspector.
Conclusion
All of the steps to set up your SES account and your domain are now complete. The final component in this process is to have regular sending patterns to the mailbox providers that support BIMI logo placement. Your domain should have a regular delivery cadence and needs to have a good reputation with the mailbox providers you are sending mail. BIMI logo placement may take time to populate to mailbox providers where you don’t have an established reputation or sending cadence. The time spent implementing BIMI is well worth it as it will strengthen your sender reputation and create a better and more trusted customer experience for your end recipients.
You can find more information about the BIMI specification here.
Here’s an experiment being run by undergraduate computer science students everywhere: Ask ChatGPT to generate phishing emails, and test whether these are better at persuading victims to respond or click on the link than the usual spam. It’s an interesting experiment, and the results are likely to vary wildly based on the details of the experiment.
But while it’s an easy experiment to run, it misses the real risk of large language models (LLMs) writing scam emails. Today’s human-run scams aren’t limited by the number of people who respond to the initial email contact. They’re limited by the labor-intensive process of persuading those people to send the scammer money. LLMs are about to change that. A decade ago, one type of spam email had become a punchline on every late-night show: “I am the son of the late king of Nigeria in need of your assistance….” Nearly everyone had gotten one or a thousand of those emails, to the point that it seemed everyone must have known they were scams.
So why were scammers still sending such obviously dubious emails? In 2012, researcher Cormac Herley offered an answer: It weeded out all but the most gullible. A smart scammer doesn’t want to waste their time with people who reply and then realize it’s a scam when asked to wire money. By using an obvious scam email, the scammer can focus on the most potentially profitable people. It takes time and effort to engage in the back-and-forth communications that nudge marks, step by step, from interlocutor to trusted acquaintance to pauper.
Long-running financial scams are now known as pig butchering, growing the potential mark up until their ultimate and sudden demise. Such scams, which require gaining trust and infiltrating a target’s personal finances, take weeks or even months of personal time and repeated interactions. It’s a high stakes and low probability game that the scammer is playing.
Here is where LLMs will make a difference. Much has been written about the unreliability of OpenAI’s GPT models and those like them: They “hallucinate” frequently, making up things about the world and confidently spouting nonsense. For entertainment, this is fine, but for most practical uses it’s a problem. It is, however, not a bug but a feature when it comes to scams: LLMs’ ability to confidently roll with the punches, no matter what a user throws at them, will prove useful to scammers as they navigate hostile, bemused, and gullible scam targets by the billions. AI chatbot scams can ensnare more people, because the pool of victims who will fall for a more subtle and flexible scammer—one that has been trained on everything ever written online—is much larger than the pool of those who believe the king of Nigeria wants to give them a billion dollars.
Personal computers are powerful enough today that they can run compact LLMs. After Facebook’s new model, LLaMA, was leaked online, developers tuned it to run fast and cheaply on powerful laptops. Numerous other open-source LLMs are under development, with a community of thousands of engineers and scientists.
A single scammer, from their laptop anywhere in the world, can now run hundreds or thousands of scams in parallel, night and day, with marks all over the world, in every language under the sun. The AI chatbots will never sleep and will always be adapting along their path to their objectives. And new mechanisms, from ChatGPT plugins to LangChain, will enable composition of AI with thousands of API-based cloud services and open source tools, allowing LLMs to interact with the internet as humans do. The impersonations in such scams are no longer just princes offering their country’s riches. They are forlorn strangers looking for romance, hot new cryptocurrencies that are soon to skyrocket in value, and seemingly-sound new financial websites offering amazing returns on deposits. And people are already fallinginlove with LLMs.
This is a change in both scope and scale. LLMs will change the scam pipeline, making them more profitable than ever. We don’t know how to live in a world with a billion, or 10 billion, scammers that never sleep.
There will also be a change in the sophistication of these attacks. This is due not only to AI advances, but to the business model of the internet—surveillance capitalism—which produces troves of data about all of us, available for purchase from data brokers. Targeted attacks against individuals, whether for phishing or data collection or scams, were once only within the reach of nation-states. Combine the digital dossiers that data brokers have on all of us with LLMs, and you have a tool tailor-made for personalized scams.
Companies like OpenAI attempt to prevent their models from doing bad things. But with the release of each new LLM, social media sites buzz with new AI jailbreaks that evade the new restrictions put in place by the AI’s designers. ChatGPT, and then Bing Chat, and then GPT-4 were all jailbroken within minutes of their release, and in dozens of different ways. Most protections against bad uses and harmful output are only skin-deep, easily evaded by determined users. Once a jailbreak is discovered, it usually can be generalized, and the community of users pulls the LLM open through the chinks in its armor. And the technology is advancing too fast for anyone to fully understand how they work, even the designers.
This is all an old story, though: It reminds us that many of the bad uses of AI are a reflection of humanity more than they are a reflection of AI technology itself. Scams are nothing new—simply intent and then action of one person tricking another for personal gain. And the use of others as minions to accomplish scams is sadly nothing new or uncommon: For example, organized crime in Asia currently kidnaps or indentures thousands in scam sweatshops. Is it better that organized crime will no longer see the need to exploit and physically abuse people to run their scam operations, or worse that they and many others will be able to scale up scams to an unprecedented level?
Defense can and will catch up, but before it does, our signal-to-noise ratio is going to drop dramatically.
This essay was written with Barath Raghavan, and previously appeared on Wired.com.
University of Connecticut basketball player Jordan Hawkins claims to have suffered food poisoning from calamari the night before his NCAA finals game. The restaurant disagrees:
On Sunday, a Mastro’s employee politely cast doubt on the idea that the restaurant might have caused the illness, citing its intense safety protocols. The staffer, who spoke on condition of anonymity because he was not authorized to officially speak for Mastro’s, said restaurants in general were more likely to arouse suspicion when they had some rooting interest against the customer-athletes.
As usual, you can also use this squid post to talk about the security stories in the news that I haven’t covered.
On 24 and 25 March, more than 140 members of the Code Club and CoderDojo communities joined us in Cambridge for our first-ever Clubs Conference.
At the Clubs Conference, volunteers and educators came together to celebrate their achievements and explore new ways to support young people to create with technology. The event included community display tables, interactive workshops, discussions,poster sessions, and talks.
For everyone who couldn’t join us in person, we recorded all of the talks that community members gave on the main stage. Here’s what you can learn from the speakers.
Running your club
Jane Waite from our team offered a taste of the research we do and how you can get insights from it to help you run your own coding club. Watch Jane’s talk to learn about the research that informs our projects for your club.
Rhodri Smith, who runs a Code Club, shared how you can use assistive technologies to open your club experience to more young people. Watch Rhodri’s talk for some fantastic tips on how assistive technology can make Code Club accessible to children of all ages and abilities.
Dave Morley, who volunteers at the CoderDojo at Royal Museums Greenwich, presented his way of using Scratch projects to keep engaging Dojo participants. Watch Dave’s talk for tips on how to create your own coding projects for young people.
Tim Duffey, who is part of the West Sound CoderDojo, shared how his Dojo ran successful online sessions during the coronavirus pandemic. Watch Tim’s talk for great advice on how to run successful coding clubs for young people online.
Steph Burton from our team presented new resources we’re working on to help clubs recruit and train volunteers. Watch Steph’s talk for tips on how to recruit new volunteers for your coding club.
Engaging young people in your club
Sophie Hudson, who runs a Code Club in rural Yorkshire, told us how her school’s Code Club turned taking part in Astro Pi Mission Zero into a cross-curricular activity, and how she partnered older learners with younger ones for peer mentoring that engaged new learners in coding. Watch Sophie’s talk to learn how you can get your school involved in Astro Pi, especially if you don’t have much adult support available.
We brought a replica of the Astro Pi computers to the Clubs Conference.
Helen Gardner from our team shared how you can motivate and inspire your coders by supporting them to share their projects in the Coolest Projects showcase — even their very first Scratch animation. Watch Helen’s talk if you’re looking for something new for your club.
The benefits of Code Club and CoderDojo for your community
Fiona Lindsay, who leads a Code Club, presented her insights into the skills beyond coding that young people learn at Code Club, and she shared some wonderful videos of her coders talking about their experience. Watch Fiona’s talk to hear young girls talk about how to get more girls into coding, and for evidence of why every school should have a Code Club.
Last year, Fiona’s Code Club held a special event to celebrate the tenth birthday of Code Club.
Bruce Harms, who is involved in AruCoderDojo, shared how he and his team are making the CoderDojo model part of their wider work to bring digital skills and infrastructure to Aruba. Watch Bruce’s talk to learn how his team has tailored their coding clubs for their local community.
What is volunteering for CoderDojo and Code Club like?
Marcus Davage, who volunteers at a Code Club, shared his journey as a volunteer translator of our resources, and how he engaged colleagues at his workplace in also supporting translations to make coding skills available to more young people across the world. Watch Marcus’s talk if you speak more than one language.
To end the day, we hosted a group of community members onstage to have a chat about their journeys with CoderDojo and Code Club, what they’ve learned, and how they see the future of their clubs. Watch the panel conversation if you want inspiration and advice for getting involved in helping kids create with tech.
Thank you to everyone who gave talks, ran workshops, presented posters, and had conversations to share their questions and insights. It was wonderful to meet all of you, and we came away from the Clubs Conference feeling super inspired by the amazing work Code Club and CoderDojo volunteers all over the world do to help young people learn to create with digital technologies.
We learned so much from listening to you, and we will take the lessons into our work to support you and your clubs in the best way we can.
As progress in AI continues to advance, it is important to know how advanced systems will make choices and in what ways they may fail. Machines can already outsmart humans in some domains, and understanding how to safely build ones which may have capabilities at or above the human level is of particular concern. One might suspect that artificially generally intelligent (AGI) and artificially superintelligent (ASI) will be systems that humans cannot reliably outsmart. As a challenge to this assumption, this paper presents the Achilles Heel hypothesis which states that even a potentially superintelligent system may nonetheless have stable decision-theoretic delusions which cause them to make irrational decisions in adversarial settings. In a survey of key dilemmas and paradoxes from the decision theory literature, a number of these potential Achilles Heels are discussed in context of this hypothesis. Several novel contributions are made toward understanding the ways in which these weaknesses might be implanted into a system.
Active since 2018, Genesis Market’s slogan was, “Our store sells bots with logs, cookies, and their real fingerprints.” Customers could search for infected systems with a variety of options, including by Internet address or by specific domain names associated with stolen credentials.
But earlier today, multiple domains associated with Genesis had their homepages replaced with a seizure notice from the FBI, which said the domains were seized pursuant to a warrant issued by the U.S. District Court for the Eastern District of Wisconsin.
The U.S. Attorney’s Office for the Eastern District of Wisconsin did not respond to requests for comment. The FBI declined to comment.
But sources close to the investigation tell KrebsOnSecurity that law enforcement agencies in the United States, Canada and across Europe are currently serving arrest warrants on dozens of individuals thought to support Genesis, either by maintaining the site or selling the service bot logs from infected systems.
The seizure notice includes the seals of law enforcement entities from several countries, including Australia, Canada, Denmark, Germany, the Netherlands, Spain, Sweden and the United Kingdom.
Researchers at Russian cybersecurity firm Kaspersky today revealed that they identified a small number of cryptocurrency-focused firms as at least some of the victims of the 3CX software supply-chain attack that’s unfolded over the past week. Kaspersky declined to name any of those victim companies, but it notes that they’re based in “western Asia.”
Security firms CrowdStrike and SentinelOne last week pinned the operation on North Korean hackers, who compromised 3CX installer software that’s used by 600,000 organizations worldwide, according to the vendor. Despite the potentially massive breadth of that attack, which SentinelOne dubbed “Smooth Operator,” Kaspersky has now found that the hackers combed through the victims infected with its corrupted software to ultimately target fewer than 10 machines—at least as far as Kaspersky could observe so far—and that they seemed to be focusing on cryptocurrency firms with “surgical precision.”
Brian Krebs is reporting that the UK’s National Crime Agency is setting up fake DDoS-for-hire sites as part of a sting operation:
The NCA says all of its fake so-called “booter” or “stresser” sites - which have so far been accessed by several thousand people—have been created to look like they offer the tools and services that enable cyber criminals to execute these attacks.
“However, after users register, rather than being given access to cyber crime tools, their data is collated by investigators,” reads an NCA advisory on the program. “Users based in the UK will be contacted by the National Crime Agency or police and warned about engaging in cyber crime. Information relating to those based overseas is being passed to international law enforcement.”
The NCA declined to say how many phony booter sites it had set up, or for how long they have been running. The NCA says hiring or launching attacks designed to knock websites or users offline is punishable in the UK under the Computer Misuse Act 1990.
“Going forward, people who wish to use these services can’t be sure who is actually behind them, so why take the risk?” the NCA announcement continues.
Thousands of pages of secret documents reveal how Vulkan’s engineers have worked for Russian military and intelligence agencies to support hacking operations, train operatives before attacks on national infrastructure, spread disinformation and control sections of the internet.
The company’s work is linked to the federal security service or FSB, the domestic spy agency; the operational and intelligence divisions of the armed forces, known as the GOU and GRU; and the SVR, Russia’s foreign intelligence organisation.
Lots more at the link.
The documents are in Russian, so it will be a while before we get translations.
AWS CodeBuild is a fully managed continuous integration service that compiles source code, runs tests, and produces ready-to-deploy software packages. With CodeBuild, you don’t need to provision, manage, and scale your own build servers. You just specify the location of your source code and choose your build settings, and CodeBuild will run your build scripts for compiling, testing, and packaging your code.
CodeBuild uses simple pay-as-you-go pricing. There are no upfront costs or minimum fees. You pay only for the resources you use. You are charged for compute resources based on the duration it takes for your build to execute.
There are three main factors that contribute to build costs with CodeBuild:
Build duration
Compute types
Additional services
Understanding how to balance these factors is key to optimizing costs on AWS and this blog post will take a look at each.
Compute Types
CodeBuild offers three compute instance types with different amounts of memory and CPU, for example the Linux GPU Large compute type has 255GB of memory and 32 vCPUs and enables you to execute CI/CD workflow for deep learning purpose (ML/AI) with AWS CodePipeline. Incremental changes in your code, data, and ML models can now be tested for accuracy, before the changes are released through your pipeline.
The Linux 2XLarge instance type is another instance type with 145GB of memory and 72 vCPUs and is suitable for building large and complex applications that require high memory and CPU resources. It can help reduce build time, speed up delivery, and support multiple build environments.
The GPU and 2XLarge compute types are powerful but are also the most expensive compute types per minute. For most build tasks the small, medium or large instance compute types are more than adequate. Using the pricing listed in US East (Ohio) we can see the price variance between the small, medium and large Linux instance types in Figure 1 below.
Figure 1. AWS CodeBuild small, medium and large compute types vs cost per minute
Analyzing the CodeBuild compute costs leads us to a number of cost optimization considerations.
Right Sizing AWS CodeBuild Compute Types to Match Workloads
Right sizing is the process of matching instance types and sizes to your workload performance and capacity requirements at the lowest possible cost. It’s also the process of looking at deployed instances and identifying opportunities to eliminate or downsize without compromising capacity or other requirements, which results in lower costs.
Right sizing is a key mechanism for optimizing AWS costs, but it is often ignored by organizations when they first move to the AWS Cloud. They lift and shift their environments and expect to right size later. Speed and performance are often prioritized over cost, which results in oversized instances and a lot of wasted spend on unused resources.
CodeBuild monitors build resource utilization on your behalf and reports metrics through Amazon CloudWatch. These include metrics such as
CPU
Memory
Disk I/O
These metrics can be seen within the CodeBuild console, for an example see Figure 2 below:
Figure 2. Resource utilization metrics
Leveraging observability to measuring build resource usage is key to understanding how to rightsize and CodeBuild makes this easy with CloudWatch metrics readily available through the CodeBuild console.
Consider ARM / Graviton
If we compare the costs of arm1.small and general1.small over a ten minute period we can see that the arm based compute type is 32% less expensive.
Figure 3. Comparison of small arm and general compute types
But cost per minute while building is not the only benefit here, ARM processors are known for their energy efficiency and high performance. Compiling code directly on an ARM processor can potentially lead to faster execution times and improved overall system performance.
AWS Graviton processors are custom built by Amazon Web Services using 64-bit Arm Neoverse cores to deliver the best price performance for your cloud workloads. The AWS Graviton Fast Start program helps you quickly and easily move your workloads to AWS Graviton in as little as four hours for applications such as serverless, containerized, database, and caching.
Consider migrating Windows workloads to Linux
If we compare the cost of a general1.medium Windows vs Linux compute type we can see that the Linux Compute type is 43% less expensive over ten minutes:
Figure 4. Build times on Windows compared to Linux
Migrating to Linux is one strategy to not only reduce the costs of building and testing code in CodeBuild but also the cost of running in production.
The effort required to re-platform from Windows to Linux varies depending on how the application was implemented. The key is to identify and target workloads with the right characteristics, balancing strategic importance and implementation effort.
For example, older .Net applications may be able to be migrated to later versions of .NET (previously named .Net Core) first before deploying to Linux. AWS have a Porting Assistant for .NET that is an analysis tool that scans .NET Framework applications and generates a cross-platform compatibility assessment, helping you port your applications to Linux faster.
One of the dimensions of the CodeBuild pricing is the duration of each build. This is calculated in minutes, from the time you submit your build until your build is terminated, rounded up to the nearest minute. For example: if your build takes a total of 35 seconds using one arm1.small Linux instance on US East (Ohio), each build will cost the price of the full minute, which is $0.0034 in that case. Similarly, if your build takes a total of 5 minutes and 20 seconds, you’ll be charged for 6 minutes.
When you define your CodeBuild project, within a buildspec file, you can specify some of the phases of your builds. The phases you can specify are install, pre-build, build, and post-build. See the documentation to learn more about what each of those phases represent. Besides that, you can define how and where to upload reports and artifacts each build generates. It means that on each of those steps, you should do only what is necessary for the task you want to achieve. Installing dependencies that you won’t need, running commands that aren’t related to your task, or performing tests that aren’t necessary will affect your build time and unnecessarily increase your costs. Packaging and uploading target artifacts with unnecessary large files would cause a similar result.
On top of the CodeBuild phases and steps that you are directly in control, each time you start a build, it takes additional time to queue the task, provision the environment, download the source code (if applicable), and finalize. See Figure 5 below a breakdown of a succeeded build:
Figure 5. AWS CodeBuild Phase details
In the above example, for each build, it takes approximately 42 seconds on top of what is specified in the buildspec file. Considering this overhead, having several smaller builds instead of fewer larger builds can potentially increase your costs. With this in mind, you have to keep your builds as short as possible, by doing only what is necessary, so that you can minimize the costs. Furthermore, you have to find a good balance between the duration and the frequency of your builds, so that the overhead doesn’t take a large proportion of your build time. Let’s explore some approaches you can factor in to find this balance.
Build caching
A common way to save time and cost on your CodeBuild builds is with build caching. With build caching, you are able to store reusable pieces of your build environment, so that you can save time next time you start a new build. There are two types of caching:
Amazon S3 — Stores the cache in an Amazon S3 bucket that is available across multiple build hosts. If you have build artifacts that are more expensive to build than to download, this is a good option for you. For large build artifacts, this may not be the best option, because it can take longer to transfer over your network.
Local caching — Stores a cache locally on a build host that is available to that build host only. When you choose this option, the cache is immediately available on the build host, making it a good option for large build artifacts that would take long network transfer time. If you choose local caching, there are multiple cache modes you can choose including source cache mode, docker layer cache mode and custom cache mode.
Docker specific optimizations
Another strategy to optimize your build time and reduce your costs is using custom Docker images. When you specify your CodeBuild project, you can either use one of the default Docker images provided by CodeBuild, or use your own build environment packaged as a Docker image. When you create your own build environment as a Docker image, you can pre-package it with all the tools, test assets, and required dependencies. This can potentially save a significant amount of time, because on the install phase you won’t need to download packages from the internet, and on the build phase, when applicable, you won’t need to download e.g., large static test datasets.
To achieve that, you must specify the image value on the environment configuration when creating or updating your CodeBuild project. See Docker in custom image sample for CodeBuild to learn more about how to configure that. Keep in mind that larger Docker images can negatively affect your build time, therefore you should aim to keep your custom build environment as lean as possible, with only the mandatory contents. Another aspect to consider is to use Amazon Elastic Container Registry (ECR) to store your Docker images. Downloading the image from within the AWS network will be, in most of the cases, faster than downloading it from the public internet and can avoid bottlenecks from public repositories.
Consider which tests to run on the feature branch
If you are using a feature-branch approach, consider carefully which build steps and tests you are going to run on your branches. Running unit tests is a good example of what you should run on the feature branches, but unless you have very specific requirements, you probably don’t need penetration or integration tests at this point. Usually the feature branch changes often, hence running all types of tests all the time is a potential waste. Prefer to have your complex, long-running tests at a later stage of your CI/CD pipeline, as you build confidence on the version that you are to release.
Build once, deploy everywhere
It’s widely considered a best practice to avoid environment-specific code builds, therefore consider a build once, deploy everywhere strategy. There are many benefits to separating environment configuration from the build including reducing build costs, improve maintainability, scalability, and reduce the risk of errors.
Build once, deploy everywhere can be seen in the AWS Deployment Pipeline Reference Architecture where the Beta, Gamma and Prod stages are created from a single artifact created in the Build Stage:
Amazon CloudWatch can be used to monitor your builds, report when something goes wrong, take automatic actions when appropriate or simply keep logs of your builds.
CloudWatch metrics show the behavior of your builds over time. For example, you can monitor:
How many builds were attempted in a build project or an AWS account over time.
How many builds were successful in a build project or an AWS account over time.
How many builds failed in a build project or an AWS account over time.
How much time CodeBuild spent running builds in a build project or an AWS account over time.
Build resource utilization for a build or an entire build project. Build resource utilization metrics include metrics such as CPU, memory, and storage utilization.
However, you may incur charges from Amazon CloudWatch Logs for build log streams. For more information, see Monitoring AWS Codebuild in the CodeBuild User Guide and the CloudWatch pricing page.
Storage Costs
You can create an CodeBuild build project with a set of output artifacts and publish then to S3 buckets. Using S3 as a repository for your artifacts, you only pay for what you use. Check the S3 pricing page.
Encryption
Cloud security at AWS is the highest priority and encryption is an important part of CodeBuild security. Some encryption, such as for data in-transit, is provided by default and does not require you to do anything. Other encryption, such as for data at-rest, you can configure when you create your project or build. Codebuild uses Amazon KMS to encrypt the data at-rest.
Build artifacts, such as a cache, logs, exported raw test report data files, and build results, are encrypted by default using AWS managed keys and are free of charge. Consider using these keys if you don’t need to create your own key.
If you do not want to use these KMS keys, you can create and configure a customer managed key. For more information, see the documentation on creating KMS Keys and AWS Key Management Service concepts in the AWS Key Management Service User Guide.
You may incur additional charges if your builds transfer data, for example:
Avoid routing traffic over the internet when connecting to AWS services from within AWS by using VPC endpoints
Traffic that crosses an Availability Zone boundary typically incurs a data transfer charge. Use resources from the local Availability Zone whenever possible.
Traffic that crosses a Regional boundary will typically incur a data transfer charge. Avoid cross-Region data transfer unless your business case requires it
Use the AWS Pricing Calculator to help estimate the data transfer costs for your solution.
Use a dashboard to better visualize data transfer charges – this workshop will show how.
In this blog post we discussed how compute types; build duration and use of additional services contribute to build costs with AWS CodeBuild.
We highlighted how right sizing compute types is an important practice for teams that want to reduce their build costs while still achieving optimal performance. The key to optimizing is by measuring and observing the workload and selecting the most appropriate compute instance based on requirements.
Further compute type cost optimizations can be found by targeting AWS Graviton processors and Linux environments. AWS Graviton Processors in particular offer several advantages over traditional x86-based instances and are designed by AWS to deliver the best price performance for your cloud workloads.
How to add WhatsApp as an Amazon Pinpoint Custom Channel
WhatsApp now reports over 2 billion users in 180 countries, making it a prime place for businesses to communicate with their customers. In addition to native channels like SMS, push notifications, and email, Amazon Pinpoint’s custom channels enable you to extend the capabilities of Amazon Pinpoint and send messages to customers through any API-enabled service, like WhatsApp. With these new channels, you have full control over the message delivery to the endpoints associated with each custom channel campaign.
In this post, we provide a quick overview of the features and capabilities of using a custom channel as part of campaigns. We also provide a blueprint that you can use to build your first sandbox integration with WhatsApp as a custom channel.
Note: WhatsApp is a third-party service subject to additional terms and charges. Amazon Web Services isn’t responsible for any third-party service that you use to send messages with custom channels.
How to add WhatsApp as a custom channel:
Prerequisites
Before creating your new custom channel, you must have the integration ready and an Amazon Identity and Account Management (IAM) User created with the necessary permissions. First set up the following:
Create an IAM administrator. For more information, see Creating your first IAM admin user and group in the IAM User Guide. Specify the credentials of this IAM User when you set up the AWS Command Line Interface (CLI).
Configure the AWS CLI. For more information about setting up the AWS CLI, see Configuring the AWS CLI.
Follow the steps at Meta documentation – https://developers.facebook.com/docs/whatsapp/cloud-api/get-started to register as a Meta Developer and getting started with WhatsApp Business Cloud API provided directly by Meta. By completing step 1 and step 2 of the above documentation, you should be able to
Register as a Meta Developer,
Claim a test phone for sending messages on WhatsApp,
Verify a recipient phone number (since, currently you’re in Sandbox, you can send WhatsApp messages only to the verified phone numbers. You can verify upto 5 phone numbers)
and finally send a test message on Whatsapp using a provided sample POST request. Remember to review the terms of use for WhatsApp.
On the All projects page, choose Create a project. Enter a name for the project, and then choose Create.
On the Configure features page, under SMS and Voice, choose Configure.
Under General settings, select Enable the SMS channel for this project, and then choose Save changes.
In the navigation pane, under Settings, choose General settings. In the Project details section, copy the value under Project ID. You need this value for later.
Step2: Create an endpoint.
In Amazon Pinpoint, an endpoint represents a specific method of contacting a customer. This could be their email address (for email messages) or their phone number (for SMS messages) or a custom endpoint type. Endpoints can also contain custom attributes, and you can associate multiple endpoints with a single user. In this step, we create an SMS endpoint that is used to send a WhatsApp message.
To create an endpoint using AWS CLI, at the command line, enter the following command:
In the preceding example, replace <project-id> with the Amazon Pinpoint Project ID that you copied in step 1.
Replace <mobile-number> with your phone number with country code (for example, 12065550142). For the WhatsApp integration to work, you must use the mobile number that are registered on WhatsApp and are already verified on Meta Developer Portal (since your Meta account is currently in sandbox).
Note: WhatsApp Business Cloud message API doesn’t require ‘+’ symbol in the front of the Phone number. So in case you plan to use this segment for both SMS and Custom Channel, you may configure Phone Number in E.164 format (for example, +12065550142) and remove ‘+’ symbol in the Lambda function code that we create in the step 4.
Step 3: Storing WHATSAPP_AUTH_TOKEN, and WHATSAPP_FROM_NUMBER_ID in AWS Secrets Manager.
We can securely store the WhatsApp Auth Token and WhatsApp From Number Id which we have received in the previous steps in AWS Secrets Manager.
For the function code, copy the following and paste into the code editor in your AWS Lambda function:
import base64
import json
import os
import urllib
from urllib import request, parse
import boto3
from botocore.exceptions import ClientError

WhatsApp_messageAPI_URL = "https://graph.facebook.com/v15.0/"

def get_secret():

    secret_name = "MetaWhatsappCreds"
    region_name = "us-east-1"
    # Pass the required AWS Region in which Secret is stored

    # Create a Secrets Manager client
    session = boto3.session.Session()
    client = session.client(
        service_name='secretsmanager',
        region_name=region_name
    )

    try:
        get_secret_value_response = client.get_secret_value(
            SecretId=secret_name
        )
    except ClientError as e:
        # For a list of exceptions thrown, see
        # https://docs.aws.amazon.com/secretsmanager/latest/apireference/API_GetSecretValue.html
        raise e

    # Decrypts secret using the associated KMS key.
    secret = get_secret_value_response['SecretString']
    return secret

def lambda_handler(event, context):
    credentials = get_secret()
    WhatsApp_AUTH_TOKEN = json.loads(credentials)["WHATSAPP_AUTH_TOKEN"]
    WhatsApp_FROM_NUMBER_ID = json.loads(credentials)["WHATSAPP_FROM_NUMBER_ID"]
    if not WhatsApp_AUTH_TOKEN:
        return "Unable to access WhatsApp Auth Token."
    elif not WhatsApp_FROM_NUMBER_ID:
        return "Unable to access WhatsApp From Number Id."
    # Lets print out the event for our logs
    print("Received event: {}".format(event))

    populated_url = WhatsApp_messageAPI_URL + WhatsApp_FROM_NUMBER_ID + "/messages"

    for key in event['Endpoints'].keys():
        to_number = event['Endpoints'][key]['Address']
        # Example body and using an attribute from the endpoint
        username = event['Endpoints'][key]['Attributes']['username'][0]
        body = "Hello {}, here is your weekly 10% discount coupon: SAVE10".format(username)
        post_params = {"messaging_product":"whatsapp","to": to_number ,"recipient_type": "individual","type": "text", "text":{"preview_url": "false","body": body}}
        # encode the parameters for Python's urllib
        print(post_params)
        data = parse.urlencode(post_params).encode('ascii')
        req = request.Request(populated_url)
        req.add_header("Authorization", WhatsApp_AUTH_TOKEN )
        req.add_header("Content-Type","application/json")
        try:
            # perform HTTP POST request
            with request.urlopen(req, data) as f:
                print("WhatsApp returned {}".format(str(f.read().decode('utf-8'))))
        except Exception as e:
            # something went wrong!
            print(e)

    return "WhatsApp messages sent successfully"
Add permissions to your AWS Lambda to allow Amazon Pinpoint to invoke it using AWS CLI:
Step 5: Create a segment and campaign in Amazon Pinpoint.
Now that we have an endpoint, we must add it to a segment so that we can use it within a campaign. By sending a campaign, we can verify that our Amazon Pinpoint project is configured correctly, and that we created the endpoint correctly.
In the navigation pane, choose Segments, and then choose Create a segment.
Name the segment “WhatsAppTest.” Under Segment group 1, include all audiences in the Base Segment and add the following Criteria:
For Choose an endpoint attribute, choose integrations, then for values, choose WhatsApp.
Confirm that the Segment estimate section shows that there is one eligible endpoint, and then choose Create segment.
In the navigation pane, choose Campaigns, and then choose Create a campaign.
Name the campaign “WhatsAppTest.” Under Choose a channel for this campaign, choose Custom, and then choose Next.
On the Choose a segment page, choose the “WhatsAppTest” segment that you just created, and then choose Next.
In Create your message, choose the AWS Lambda function we just created, ‘WhatsAppTest.’ Select SMS in the Endpoint Options. On the Choose when to send the campaign page, keep all of the default values, and then choose Next. On the Review and launch page, choose Launch campaign.
Within a few seconds, you should receive a WhatsApp message at the phone number that you specified when you created the endpoint and verified on the Meta Developer portal.
Your Custom channel solution for WhatsApp is now ready to use. But first, review and upgrade your WhatsApp sandbox. This post is simply a walkthrough to show you how quickly you can prototype and start sending WhatsApp messages with Pinpoint and Meta. However, for production usage, you need to make sure to review all of the additional terms and charges. Start here to understand more: https://developers.facebook.com/docs/whatsapp/cloud-api/get-started
As a next steps, you can go ahead and claim a Phone number for sending WhatsApp messages in production. You can further configure a Webhook which can help you in receiving WhatsApp message delivery status and other WhatsApp supported events.
There are several ways you can make this solution your own.
Expand endpoints in your application: This post only used one endpoint for the integration. You can use your WhatsApp integration with new endpoints by importing a segment that can be used with a new campaign. Learn how to import a segment here: https://docs.aws.amazon.com/pinpoint/latest/userguide/segments-importing.html
Use new integrations: This post focused on integrating your custom channel with WhatsApp but there are many other integrations that are possible when using AWS Lambda.
Amazon Pinpoint is a flexible and scalable outbound and inbound marketing communications service. Learn more here: https://aws.amazon.com/pinpoint/
Did you know you can use CloudFormation to manage third-party resources? The AWS CloudFormation Public Registry provides a searchable collection of CloudFormation extensions and makes it easy to discover and provision them in CloudFormation templates and AWS Cloud Development Kit (CDK) applications. In the past three months, we’ve added a number of new, exciting partners to the Public Registry, including GitLab, Okta, and PagerDuty.
The extensions available on the registry are wide-ranging and include third-party resources from partners such as MongoDB; hooks, which are preventative controls that add safeguards to provisioning; and modules, which are re-usable components that take into account best practices and opinionated definitions of resources. AWS Partner Network (APN), third parties, and the developer community contribute these extensions to the Public Registry. Using extensions, customers no longer need to create and maintain custom provisioning logic for resource types from third-party vendors.
Over last few months, AWS collaborated with partners to develop and publish over 80 new resources across 14 providers to Public Registry for CloudFormation. Below is a summary of the new resource type additions.
Manage components in MongoDB Atlas. Add, edit, or delete administrative objects within Atlas, including projects, users, and database deployments
Note: You cannot read or write data to Atlas Clusters with Atlas Admin APIs and AWS CloudFormation resources. To read and write data in Atlas, you must use the Atlas Data API
Manage the users and groups in an organization, set up a new project with the right users, groups, and access token, tag a project automatically for every active CI/CD deployment
Create a new Dashboard with custom Pages, Widgets and Layout, add tags to your data to help improve data organization and findability, workloads-related tasks
Here are some of the benefits for extension builders and consumers when publishing extensions to the public registry:
Discoverability – Publishing your extensions in the public registry will make them discoverable by 1M+ active CloudFormation and CDK customers.
CDK Support – We’re seeing rapid growth in the adoption of the CDK amongst the developer population. Upon publishing to the registry, L1 CDK Constructs will automatically be created for your third party resources making them compatible with the CDK with no added work required. These constructs will also be listed on Construct Hub and aids discoverability discoverable by customers. Note: Automated L1 CDK construct generation is currently an experimental feature.
Drift detection – Third-party resource types in the public registry also integrate with drift detection. After creating a resource from a third-party resource type, CloudFormation will detect changes to the third-party resource from its template configuration, known as configuration drift, just as it would with AWS resources.
AWS Config – You can also use AWS Config to manage compliance for third-party resources consumed from the registry. The resource types are automatically tracked as Configuration Items when you have configured AWS Config to record them, and used CloudFormation to create, update, and delete them. Whether the resource types you use are third-party or AWS resources, you can view configuration history for them, in addition to being able to write AWS Config rules to verify configuration best practices.
Abstraction of Best Practices with Modules – Browse and use modules from the registry when creating your CloudFormation templates to ensure you’re provisioning resources while adhering to best practices.
AWS Cloud Control API – The AWS Cloud Control API allows AWS partners and customers to interface with your resource type through API calls using Create, Read, Update, Delete, and List (CRUD-L) operations. Resources in the registry will be automatically integrated with our AWS Cloud Control API and expands your third party resource compatibility to even more AWS services and IaC tools.
We’ve seen great momentum from our partners and developer community over the past year. We are looking forward to continued investment and innovation in the Public Registry.
How to Get Started
For Resource Type Users: Explore and Activate Third Party Resource Types
Third party resource types must first be activated before they can be used. You do this by logging into your AWS Console > Navigate to CloudFormation > Registry > Public extensions > Set the Publisher to Third Party. This will show you a list of available third-party resources in your region (note that different regions may have a different set of third-party resource types). Select the radio box next to the resource types you want to activate and click the activate button at the top of the list.
Figure 1:
Don’t see the extension you need in the registry?
You can submit requests for new third-party extensions through our Community Registry Extensions Github repo issue tracker! Click the New Issue button and describe the third-party extension along with information about your use case.
For Developers and Publishers: Join the CloudFormation Developer Community and Start Building
You can see several of the community-built registry extensions in the AWS CloudFormation Community Registry Extensions repository and even contribute yourself. You can also read about the experiences and lessons learned from publishing to the Registry through this blog written by Cloudsoft.
For developers looking to create new resource types to add to the public Registry, follow this creating resource types walkthrough help you get started. If you need assistance creating, publishing resources, or just want to join the discussion, you can join the conversation today in our CloudFormation Discord Channel. We’d love to hear about your experiences and use cases in developing innovations with registry extensions.
Jenny Blessing and Ross Anderson have evaluated the security of systems designed to allow the various Internet messaging platforms to interoperate with each other:
The Digital Markets Act ruled that users on different platforms should be able to exchange messages with each other. This opens up a real Pandora’s box. How will the networks manage keys, authenticate users, and moderate content? How much metadata will have to be shared, and how?
Interoperability will vastly increase the attack surface at every level in the stack from the cryptography up through usability to commercial incentives and the opportunities for government interference.
It’s a good idea in theory, but will likely result in the overall security being the worst of each platform’s security.
Amazon DevOps Guru is a fully managed AIOps service that uses machine learning (ML) to quickly identify when applications are behaving outside of their normal operating patterns and generates insights from its findings. These insights generated by Amazon DevOps Guru can be used to alert on-call teams to react to anomalies for mission critical workloads. Various customers already utilize Incident management systems like ServiceNow to identify, analyze and resolve critical incidents which could impact business operations. ServiceNow is an IT Service Management (ITSM) platform that enables enterprise organizations to improve operational efficiencies. Among its products is Incident Management which provides a single pane view to customers and allows customers restore services and resolve issues quickly.
This blog post will show you how to integrate Amazon DevOps Guru insights with ServiceNow to automatically create and manage Incidents. We will demonstrate how an insight generated by Amazon DevOps Guru for an anomaly can automatically create a ServiceNow Incident, update the incident when there are new anomalies or recommendations from Amazon DevOps Guru, and close the ServiceNow Incident once the insight is resolved by Amazon DevOps Guru.
Overview of solution
This solution uses a combination of event driven architecture and Serverless technologies, to integrate DevOps Guru insights with ServiceNow. When an Amazon DevOps Guru insight is created, an Amazon EventBridge rule is used to capture the insight as an event and routed to an AWS Lambda Function target. The lambda function interacts with ServiceNow using a REST API to create, update and close an incident for corresponding DevOps Guru events captured by EventBridge.
The EventBridge rule can be customized to capture all DevOps Guru insights or narrowed down to specific insights. In this blog, we will be capturing all DevOps Guru insights and will be performing actions on ServiceNow for the below DevOps Guru events:
DevOps Guru New Insight Open
DevOps Guru New Anomaly Association
DevOps Guru Insight Severity Upgraded
DevOps Guru New Recommendation Created
DevOps Guru Insight Closed
Figure 1: Amazon DevOps Guru Integration with ServiceNow using Amazon EventBridge and AWS Lambda
Solution Implementation Steps
Prerequisites
Before you deploy the solution and proceed with this walkthrough, you should have the following prerequisites:
Gather the hostname for your ServiceNow cloud instance. If you do not have a ServiceNow instance, you can request a developer instance through the ServiceNow Developer page.
Gather the credentials of a ServiceNow user who has permissions to make REST API calls to ServiceNow, specifically to the Table API. If you don’t have a user provisioned, you can create one by following the steps in Getting started with the REST API in the ServiceNow documentation.
Create a secret in Secrets Manager to store the ServiceNow credentials created in previous step. You can choose any name for the secret but it should have two key/value pairs, one for username and other for password.
Enable DevOps Guru for your applications by following these steps or you can follow this blog to deploy a sample serverless application that can be used to generate DevOps Guru insights for anomalies detected in the application.
Download and set up Java. The version should be matching to the runtime that you defined in the SAM template.yaml Serverless function configuration – Install the Java SE Development Kit 11
You have two options to deploy this solution, one options is to deploy from the AWS Serverless Repository and other from the Command Line Interface (CLI).
The DevOps Guru ServiceNow Connector application is available in the AWS Serverless Application Repository which is a managed repository for serverless applications. The application is packaged with an AWS Serverless Application Model (SAM) template, definition of the AWS resources used and the link to the source code. Follow the steps below to quickly deploy this serverless application in your AWS account.
Follow the steps below to quickly deploy this serverless application in your AWS account:
Login to the AWS management console of the account to which you plan to deploy this solution.
Figure 2: Deploy solution through AWS Serverless Repository
The Lambda application deployment screen will be displayed where you can enter the ServiceNow hostname (do not include the https prefix) and the Secret Name you created in the prerequisite steps. Click on the ‘Deploy’ button.
Figure 3: AWS Lambda Application Settings
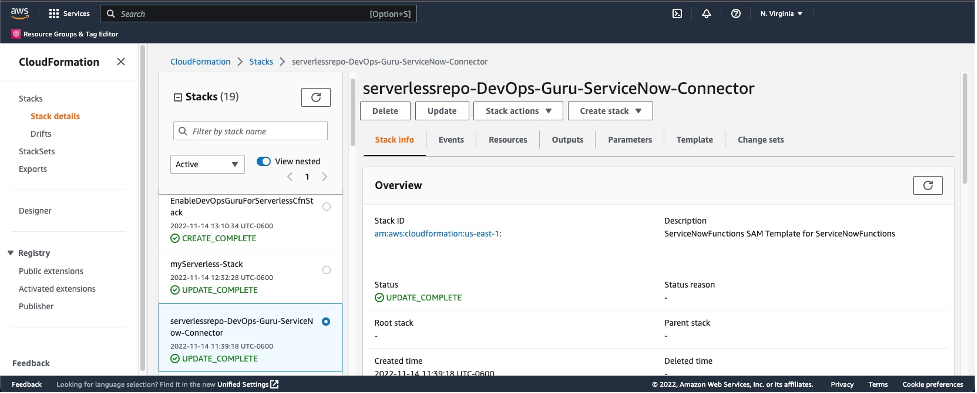
After successful deployment the AWS Lambda Application page will display the “Create complete” status for the serverlessrepo-DevOps-Guru-ServiceNow-Connector application. The CloudFormation template creates four resources:
Lambda function which has the logic to integrate to the ServiceNow
Event Bridge rule for the DevOps Guru Insights
Lambda permission
IAM role
5. Now you can skip Option 2 and follow the steps in the “Test the Solution” section to trigger some DevOps Guru insights and validate that the incidents are created and updated in ServiceNow.
Option 2: Build and Deploy sample ServiceNow Connector App using AWS SAM Command Line Interface
As you have seen above, you can directly deploy the sample serverless application from the Serverless Repository with one click deployment. Alternatively, you can choose to clone the github source repository and deploy using the SAM CLI from your terminal.
The Serverless Application Model Command Line Interface (SAM CLI) is an extension of the AWS CLI that adds functionality for building and testing serverless applications. The CLI provides commands that enable you to verify that AWS SAM template files are written according to the specification, invoke Lambda functions locally, step-through debug Lambda functions, package and deploy serverless applications to the AWS Cloud, and so on. For details about how to use the AWS SAM CLI, including the full AWS SAM CLI Command Reference, see AWS SAM reference – AWS Serverless Application Model.
Before you proceed, make sure you have completed the Prerequisites section in the beginning which should set up the AWS SAM CLI, Maven and Java on your local terminal. You also need to install and set up Docker to run your functions in an Amazon Linux environment that matches Lambda.
Follow the steps below to build and deploy this serverless application using AWS SAM CLI in your AWS account:
Before you build the resources defined in the SAM template, you can use the below validate command which will run cfn-lint validations on your SAM JSON/YAML template
$ sam validate –-lint --template template.yaml
3. Build the application with SAM CLI
$ cd amazon-devops-guru-connector-servicenow
$ sam build
If everything is set up correctly, you should have a success message like shown below:
Build Succeeded

Built Artifacts : .aws-sam/build
Built Template : .aws-sam/build/template.yaml

Commands you can use next
=========================
[*] Validate SAM template: sam validate
[*] Invoke Function: sam local invoke
[*] Test Function in the Cloud: sam sync --stack-name {{stack-name}} --watch
[*] Deploy: sam deploy –guided
4. Deploy the application with SAM CLI
$ sam deploy –-guided
This command will package and deploy your application to AWS, with a series of prompts that you should respond to as shown below:
Stack Name: The name of the stack to deploy to CloudFormation. This should be unique to your account and region, and a good starting point would be something matching your project name – amazon-devops-guru-connector-servicenow
AWS Region: The AWS region you want to deploy your application to.
Parameter ServiceNowHost []: The ServiceNow host name/instance URL you set up. Example: dev92031.service-now.com
Parameter SecretName []: The secret name that you set up for ServiceNow credentials in the Prerequisites.
Confirm changes before deploy: If set to yes, any change sets will be shown to you before execution for manual review. If set to no, the AWS SAM CLI will automatically deploy application changes.
Allow SAM CLI IAM role creation: Many AWS SAM templates, including this example, create AWS IAM roles required for the AWS Lambda function(s) included to access AWS services. By default, these are scoped down to minimum required permissions. To deploy an AWS CloudFormation stack which creates or modifies IAM roles, the CAPABILITY_IAM value for capabilities must be provided. If permission isn’t provided through this prompt, to deploy this example you must explicitly pass --capabilities CAPABILITY_IAM to the sam deploy command.
Disable rollback [y/N]: If set to Y, preserves the state of previously provisioned resources when an operation fails.
Save arguments to configuration file (samconfig.toml): If set to yes, your choices will be saved to a configuration file inside the project, so that in the future you can just re-run sam deploy without parameters to deploy changes to your application.
After you enter your parameters, you should see something like this if you have provided Y to view and confirm ChangeSets. Proceed here by providing ‘Y’ for deploying the resources.
Initiating deployment
=====================
Uploading to amazon-devops-guru-connector-servicenow/46bb4841f8f37fd41d3f40f86f31c4d7.template 1918 / 1918 (100.00%)

Waiting for changeset to be created..
CloudFormation stack changeset
-----------------------------------------------------------------------------------------------------------------------------------------------------
Operation LogicalResourceId ResourceType Replacement
-----------------------------------------------------------------------------------------------------------------------------------------------------
+ Add FunctionsDevOpsGuruPermission AWS::Lambda::Permission N/A
+ Add FunctionsDevOpsGuru AWS::Events::Rule N/A
+ Add FunctionsRole AWS::IAM::Role N/A
+ Add Functions AWS::Lambda::Function N/A
-----------------------------------------------------------------------------------------------------------------------------------------------------

Changeset created successfully. arn:aws:cloudformation:us-east-1:123456789012:changeSet/samcli-deploy1669232233/7c97b7f5-369d-400d-89cd-ebabefaa0b57

Previewing CloudFormation changeset before deployment
======================================================
Deploy this changeset? [y/N]:
Once the deployment succeeds, you should be able to see the successful creation of your resources
You can also use the below command to list the resources deployed by passing in the stack name.
$ sam list resources --stack-name amazon-devops-guru-connector-servicenow
You can also choose to test and debug your function locally with sample events using the SAM CLI local functionality. Test a single function by invoking it directly with a test event. An event is a JSON document that represents the input that the function receives from the event source. Refer the Invoking Lambda functions locally – AWS Serverless Application Model link here for more details.
Follow the below steps for testing the lambda with the SAM CLI local. You have to create an env.json file with the correct values for your ServiceNow Host and SecretManager secret name that was created in the previous step.
Make sure you have created the AWS Secrets Manager secret with the desired name as mentioned in the prerequisites, which should be used here for SECRET_NAME.
Create env.json as below, by replacing the values for SERVICE_NOW_HOST and SECRET_NAME with your real value. These will be set as the local Lambda execution environment variables.
Run the command below to validate locally that with a sample DevOps Guru payload, to trigger Lambda locally and invoke. Remember for this to work, you should have Docker instance running and also the Secret Name created in your AWS account.
$ sam local invoke Functions --event Functions/src/test/Events/CreateIncident.json --env-vars Functions/src/test/Events/env.json
Once you are done with the above steps, move on to “Test the Solution” section below to trigger sample DevOps Guru insights and validate that the incidents are created and updated in ServiceNow.
Test the Solution
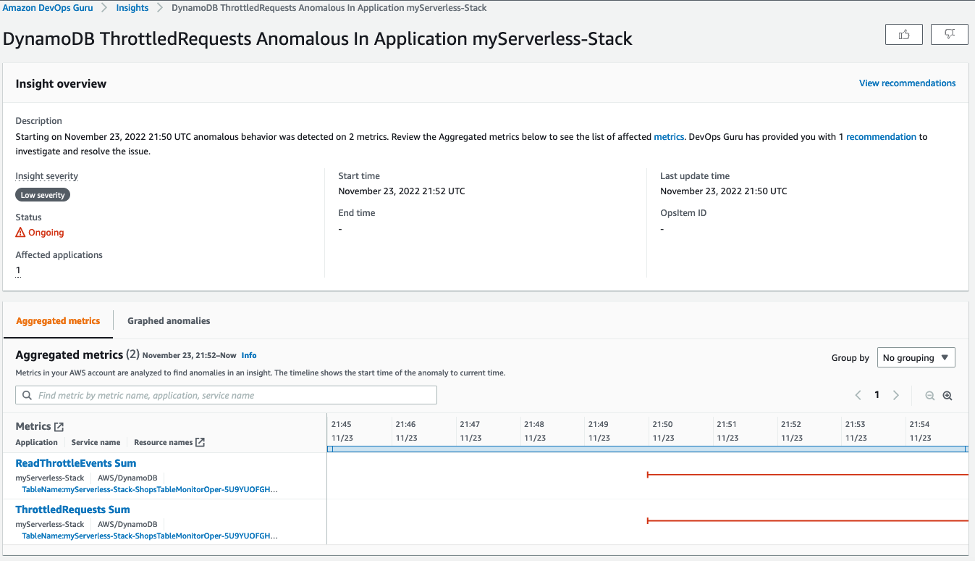
To test the solution, we will simulate a DevOps Guru insight. You can also simulate an insight by following the steps in this blog. After an anomaly is detected in the application, DevOps Guru creates an insight as seen below.
Figure 4: DevOps Guru Insight created for anomalous behavior
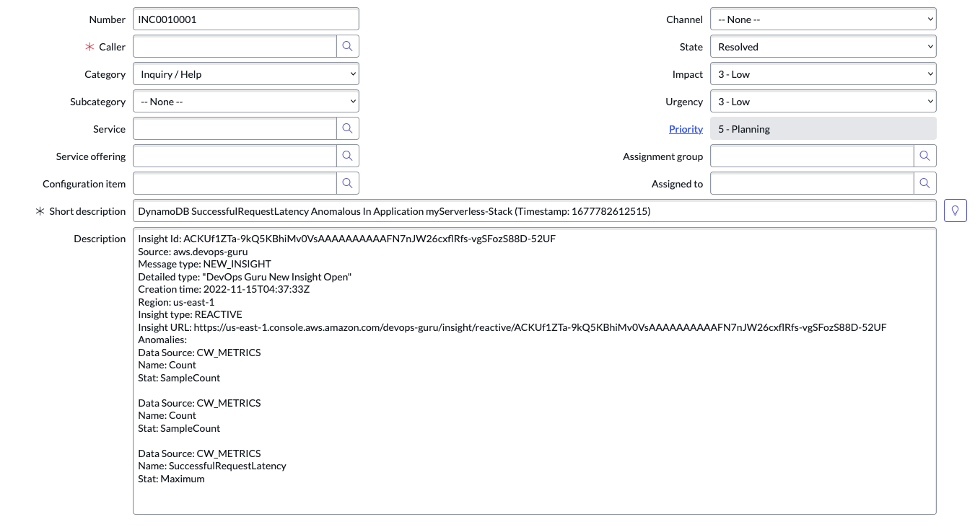
For the DevOps Guru insight shown above, a corresponding incident is automatically created on ServiceNow as shown below. In addition to the incident creation, any new anomalies and recommendations from DevOps Guru is also associated with the incident.
Figure 5: Corresponding ServiceNow Incident is created for the DevOps Guru Insight
When the anomalous behavior that generated the DevOps Guru insight is resolved, DevOps Guru automatically closes the insight. The corresponding ServiceNow incident that was created for the insight is also closed as seen below
Figure 6: ServiceNow Incident created for DevOps Guru Insight is resolved due to insight closure
Cleaning up
To avoid incurring future charges, delete the resources.
To delete the sample application that you created, use the AWS CLI command below and pass the stack name you provided in the sam deploy step.
You could also use the AWS CloudFormation Console to delete the stack:
Figure 7: AWS Stack Console with Delete action
Conclusion
This blog post showcased how DevOps Guru continuously monitor resources in a particular region in your AWS account and automatically detects operational issues, predicts impending resource exhaustion, details likely cause, and recommends remediation actions. This post described a custom solution using serverless integration pattern with AWS Lambda and Amazon EventBridge which enabled integration of the DevOps Guru insights with customer’s most popular ITSM and Change management tool ServiceNow thus streamlining the Service Management governance and oversight over AWS services. Using this solution helps Customer’s with ServiceNow to improve their operational efficiencies, and get customized insights and real time incident alerts and management directly from DevOps Guru which provides a single pane of glass to restore services and systems quickly.
This solution was created to help customers who already use ServiceNow Incident Management, if you are already using Incident Manager from AWS Systems Manager, check out how that works with Amazon DevOps Guru here.
To learn more about Amazon DevOps Guru, join us for a free hands-on Immersion Day. Events are virtual and hosted at three global time zones. Register here: April 12th.
An impressive array of hacks were demonstrated at the first day of the Pwn2Own conference in Vancouver:
On the first day of Pwn2Own Vancouver 2023, security researchers successfully demoed Tesla Model 3, Windows 11, and macOS zero-day exploits and exploit chains to win $375,000 and a Tesla Model 3.
The first to fall was Adobe Reader in the enterprise applications category after Haboob SA’s Abdul Aziz Hariri (@abdhariri) used an exploit chain targeting a 6-bug logic chain abusing multiple failed patches which escaped the sandbox and bypassed a banned API list on macOS to earn $50,000.
The STAR Labs team (@starlabs_sg) demoed a zero-day exploit chain targeting Microsoft’s SharePoint team collaboration platform that brought them a $100,000 reward and successfully hacked Ubuntu Desktop with a previously known exploit for $15,000.
Synacktiv (@Synacktiv) took home $100,000 and a Tesla Model 3 after successfully executing a TOCTOU (time-of-check to time-of-use) attack against the Tesla-Gateway in the Automotive category. They also used a TOCTOU zero-day vulnerability to escalate privileges on Apple macOS and earned $40,000.
Oracle VirtualBox was hacked using an OOB Read and a stacked-based buffer overflow exploit chain (worth $40,000) by Qrious Security’s Bien Pham (@bienpnn).
Last but not least, Marcin Wiązowski elevated privileges on Windows 11 using an improper input validation zero-day that came with a $30,000 prize.
The con’s second and third days were equally impressive.
The collective thoughts of the interwebz
Manage Consent
To provide the best experiences, we use technologies like cookies to store and/or access device information. Consenting to these technologies will allow us to process data such as browsing behavior or unique IDs on this site. Not consenting or withdrawing consent, may adversely affect certain features and functions.
Functional
Always active
The technical storage or access is strictly necessary for the legitimate purpose of enabling the use of a specific service explicitly requested by the subscriber or user, or for the sole purpose of carrying out the transmission of a communication over an electronic communications network.
Preferences
The technical storage or access is necessary for the legitimate purpose of storing preferences that are not requested by the subscriber or user.
Statistics
The technical storage or access that is used exclusively for statistical purposes.The technical storage or access that is used exclusively for anonymous statistical purposes. Without a subpoena, voluntary compliance on the part of your Internet Service Provider, or additional records from a third party, information stored or retrieved for this purpose alone cannot usually be used to identify you.
Marketing
The technical storage or access is required to create user profiles to send advertising, or to track the user on a website or across several websites for similar marketing purposes.