Синът на министъра на земеделието в кабинета “Денков”, назначен и за нов служебен такъв, Кирил Вътев, собственикът на ФК “Левски” Наско Сираков, кметът на Павликени, транспортният бос от Пловдив Миролюб…
This is the second post in a multi-part series from Netflix. See here for Part 1 which provides an overview of our efforts in rebuilding the Netflix video processing pipeline with microservices. This blog dives into the details of building our Video Encoding Service (VES), and shares our learnings.
Cosmos is the next generation media computing platform at Netflix. Combining microservice architecture with asynchronous workflows and serverless functions, Cosmos aims to modernize Netflix’s media processing pipelines with improved flexibility, efficiency, and developer productivity. In the past few years, the video team within Encoding Technologies (ET) has been working on rebuilding the entire video pipeline on Cosmos.
This new pipeline is composed of a number of microservices, each dedicated to a single functionality. One such microservice is Video Encoding Service (VES). Encoding is an essential component of the video pipeline. At a high level, it takes an ingested mezzanine and encodes it into a video stream that is suitable for Netflix streaming or serves some studio/production use case. In the case of Netflix, there are a number of requirements for this service:
Given the wide range of devices from mobile phones to browsers to Smart TVs, multiple codec formats, resolutions, and quality levels need to be supported.
Chunked encoding is a must to meet the latency requirements of our business needs, and use cases with different levels of latency sensitivity need to be accommodated.
The capability of continuous release is crucial for enabling fast product innovation in both streaming and studio spaces.
There is a huge volume of encoding jobs every day. The service needs to be cost-efficient and make the most use of available resources.
In this tech blog, we will walk through how we built VES to achieve the above goals and will share a number of lessons we learned from building microservices. Please note that for simplicity, we have chosen to omit certain Netflix-specific details that are not integral to the primary message of this blog post.
Building Video Encoding Service on Cosmos
A Cosmos microservice consists of three layers: an API layer (Optimus) that takes in requests, a workflow layer (Plato) that orchestrates the media processing flows, and a serverless computing layer (Stratum) that processes the media. These three layers communicate asynchronously through a home-grown, priority-based messaging system called Timestone. We chose Protobuf as the payload format for its high efficiency and mature cross-platform support.
To help service developers get a head start, the Cosmos platform provides a powerful service generator. This generator features an intuitive UI. With a few clicks, it creates a basic yet complete Cosmos service: code repositories for all 3 layers are created; all platform capabilities, including discovery, logging, tracing, etc., are enabled; release pipelines are set up and dashboards are readily accessible. We can immediately start adding video encoding logic and deploy the service to the cloud for experimentation.
Optimus
As the API layer, Optimus serves as the gateway into VES, meaning service users can only interact with VES through Optimus. The defined API interface is a strong contract between VES and the external world. As long as the API is stable, users are shielded from internal changes in VES. This decoupling is instrumental in enabling faster iterations of VES internals.
As a single-purpose service, the API of VES is quite clean. We defined an endpoint encodeVideo that takes an EncodeRequest and returns an EncodeResponse (in an async way through Timestone messages). The EncodeRequest object contains information about the source video as well as the encoding recipe. All the requirements of the encoded video (codec, resolution, etc.) as well as the controls for latency (chunking directives) are exposed through the data model of the encoding recipe.
//protobuf definition
message EncodeRequest { VideoSource video_source = 1;//source to be encoded Recipe recipe = 2; //including encoding format, resolution, etc. }
Like any other Cosmos service, the platform automatically generates an RPC client based on the VES API data model, which users can use to build the request and invoke VES. Once an incoming request is received, Optimus performs validations, and (when applicable) converts the incoming data into an internal data model before passing it to the next layer, Plato.
Like any other Cosmos service, the platform automatically generates an RPC client based on the VES API data model, which users can use to build the request and invoke VES. Once an incoming request is received, Optimus performs validations, and (when applicable) converts the incoming data into an internal data model before passing it to the next layer, Plato.
Plato
The workflow layer, Plato, governs the media processing steps. The Cosmos platform supports two programming paradigms for Plato: forward chaining rule engine and Directed Acyclic Graph (DAG). VES has a linear workflow, so we chose DAG for its simplicity.
In a DAG, the workflow is represented by nodes and edges. Nodes represent stages in the workflow, while edges signify dependencies — a stage is only ready to execute when all its dependencies have been completed. VES requires parallel encoding of video chunks to meet its latency and resilience goals. This workflow-level parallelism is facilitated by the DAG through a MapReduce mode. Nodes can be annotated to indicate this relationship, and a Reduce node will only be triggered when all its associated Map nodes are ready.
For the VES workflow, we defined five Nodes and their associated edges, which are visualized in the following graph:
Splitter Node: This node divides the video into chunks based on the chunking directives in the recipe.
Encoder Node: This node encodes a video chunk. It is a Map node.
Assembler Node: This node stitches the encoded chunks together. It is a Reduce node.
Validator Node: This node performs the validation of the encoded video.
Notifier Node: This node notifies the API layer once the entire workflow is completed.
In this workflow, nodes such as the Notifier perform very lightweight operations and can be directly executed in the Plato runtime. However, resource-intensive operations need to be delegated to the computing layer (Stratum), or another service. Plato invokes Stratum functions for tasks such as encoding and assembling, where the nodes (Encoder and Assembler) post messages to the corresponding message queues. The Validator node calls another Cosmos service, the Video Validation Service, to validate the assembled encoded video.
Stratum
The computing layer, Stratum, is where media samples can be accessed. Developers of Cosmos services create Stratum Functions to process the media. They can bring their own media processing tools, which are packaged into Docker images of the Functions. These Docker images are then published to our internal Docker registry, part of Titus. In production, Titus automatically scales instances based on the depths of job queues.
VES needs to support encoding source videos into a variety of codec formats, including AVC, AV1, and VP9, to name a few. We use different encoder binaries (referred to simply as “encoders”) for different codec formats. For AVC, a format that is now 20 years old, the encoder is quite stable. On the other hand, the newest addition to Netflix streaming, AV1, is continuously going through active improvements and experimentations, necessitating more frequent encoder upgrades. To effectively manage this variability, we decided to create multiple Stratum Functions, each dedicated to a specific codec format and can be released independently. This approach ensures that upgrading one encoder will not impact the VES service for other codec formats, maintaining stability and performance across the board.
Within the Stratum Function, the Cosmos platform provides abstractions for common media access patterns. Regardless of file formats, sources are uniformly presented as locally mounted frames. Similarly, for output that needs to be persisted in the cloud, the platform presents the process as writing to a local file. All details, such as streaming of bytes and retrying on errors, are abstracted away. With the platform taking care of the complexity of the infrastructure, the essential code for video encoding in the Stratum Function could be as simple as follows.
Encoding is a resource-intensive process, and the resources required are closely related to the codec format and the encoding recipe. We conducted benchmarking to understand the resource usage pattern, particularly CPU and RAM, for different encoding recipes. Based on the results, we leveraged the “container shaping” feature from the Cosmos platform.
We defined a number of different “container shapes”, specifying the allocations of resources like CPU and RAM.
# an example definition of container shape
group: containerShapeExample1
resources:
  numCpus: 2
  memoryInMB: 4000
  networkInMbp: 750
  diskSizeInMB: 12000
Routing rules are created to assign encoding jobs to different shapes based on the combination of codec format and encoding resolution. This helps the platform perform “bin packing”, thereby maximizing resource utilization.
An example of “bin-packing”. The circles represent CPU cores and the area represents the RAM. This 16-core EC2 instance is packed with 5 encoding containers (rectangles) of 3 different shapes (indicated by different colors).
Continuous Release
After we completed the development and testing of all three layers, VES was launched in production. However, this did not mark the end of our work. Quite the contrary, we believed and still do that a significant part of a service’s value is realized through iterations: supporting new business needs, enhancing performance, and improving resilience. An important piece of our vision was for Cosmos services to have the ability to continuously release code changes to production in a safe manner.
Focusing on a single functionality, code changes pertaining to a single feature addition in VES are generally small and cohesive, making them easy to review. Since callers can only interact with VES through its API, internal code is truly “implementation details” that are safe to change. The explicit API contract limits the test surface of VES. Additionally, the Cosmos platform provides a pyramid-based testing framework to guide developers in creating tests at different levels.
After testing and code review, changes are merged and are ready for release. The release pipeline is fully automated: after the merge, the pipeline checks out code, compiles, builds, runs unit/integration/end-to-end tests as prescribed, and proceeds to full deployment if no issues are encountered. Typically, it takes around 30 minutes from code merge to feature landing (a process that took 2–4 weeks in our previous generation platform!). The short release cycle provides faster feedback to developers and helps them make necessary updates while the context is still fresh.
Screenshot of a release pipeline run in our production environment
When running in production, the service constantly emits metrics and logs. They are collected by the platform to visualize dashboards and to drive monitoring/alerting systems. Metrics deviating too much from the baseline will trigger alerts and can lead to automatic service rollback (when the “canary” feature is enabled).
The Learnings:
VES was the very first microservice that our team built. We started with basic knowledge of microservices and learned a multitude of lessons along the way. These learnings deepened our understanding of microservices and have helped us improve our design choices and decisions.
Define a Proper Service Scope
A principle of microservice architecture is that a service should be built for a single functionality. This sounds straightforward, but what exactly qualifies a “single functionality”? “Encoding video” sounds good but wouldn’t “encode video into the AVC format” be an even more specific single-functionality?
When we started building the VES, we took the approach of creating a separate encoding service for each codec format. While this has advantages such as decoupled workflows, quickly we were overwhelmed by the development overhead. Imagine that a user requested us to add the watermarking capability to the encoding. We needed to make changes to multiple microservices. What is worse, changes in all these services are very similar and essentially we are adding the same code (and tests) again and again. Such kind of repetitive work can easily wear out developers.
The service presented in this blog is our second iteration of VES (yes, we already went through one iteration). In this version, we consolidated encodings for different codec formats into a single service. They share the same API and workflow, while each codec format has its own Stratum Functions. So far this seems to strike a good balance: the common API and workflow reduces code repetition, while separate Stratum Functions guarantee independent evolution of each codec format.
The changes we made are not irreversible. If someday in the future, the encoding of one particular codec format evolves into a totally different workflow, we have the option to spin it off into its own microservice.
Be Pragmatic about Data Modeling
In the beginning, we were very strict about data model separation — we had a strong belief that sharing equates to coupling, and coupling could lead to potential disasters in the future. To avoid this, for each service as well as the three layers within a service, we defined its own data model and built converters to translate between different data models.
We ended up creating multiple data models for aspects such as bit-depth and resolution across our system. To be fair, this does have some merits. For example, our encoding pipeline supports different bit-depths for AVC encoding (8-bit) and AV1 encoding (10-bit). By defining both AVC.BitDepth and AV1.BitDepth, constraints on the bit-depth can be built into the data models. However, it is debatable whether the benefits of this differentiation power outweigh the downsides, namely multiple data model translations.
Eventually, we created a library to host data models for common concepts in the video domain. Examples of such concepts include frame rate, scan type, color space, etc. As you can see, they are extremely common and stable. This “common” data model library is shared across all services owned by the video team, avoiding unnecessary duplications and data conversions. Within each service, additional data models are defined for service-specific objects.
Embrace Service API Changes
This may sound contradictory. We have been saying that an API is a strong contract between the service and its users, and keeping an API stable shields users from internal changes. This is absolutely true. However, none of us had a crystal ball when we were designing the very first version of the service API. It is inevitable that at a certain point, this API becomes inadequate. If we hold the belief that “the API cannot change” too dearly, developers would be forced to find workarounds, which are almost certainly sub-optimal.
There are many great tech articles about gracefully evolving API. We believe we also have a unique advantage: VES is a service internal to Netflix Encoding Technologies (ET). Our two users, the Streaming Workflow Orchestrator and the Studio Workflow Orchestrator, are owned by the workflow team within ET. Our teams share the same contexts and work towards common goals. If we believe updating API is in the best interest of Netflix, we meet with them to seek alignment. Once a consensus to update the API is reached, teams collaborate to ensure a smooth transition.
Stay Tuned…
This is the second part of our tech blog series Rebuilding Netflix Video Pipeline with Microservices. In this post, we described the building process of the Video Encoding Service (VES) in detail as well as our learnings. Our pipeline includes a few other services that we plan to share about as well. Stay tuned for our future blogs on this topic of microservices!
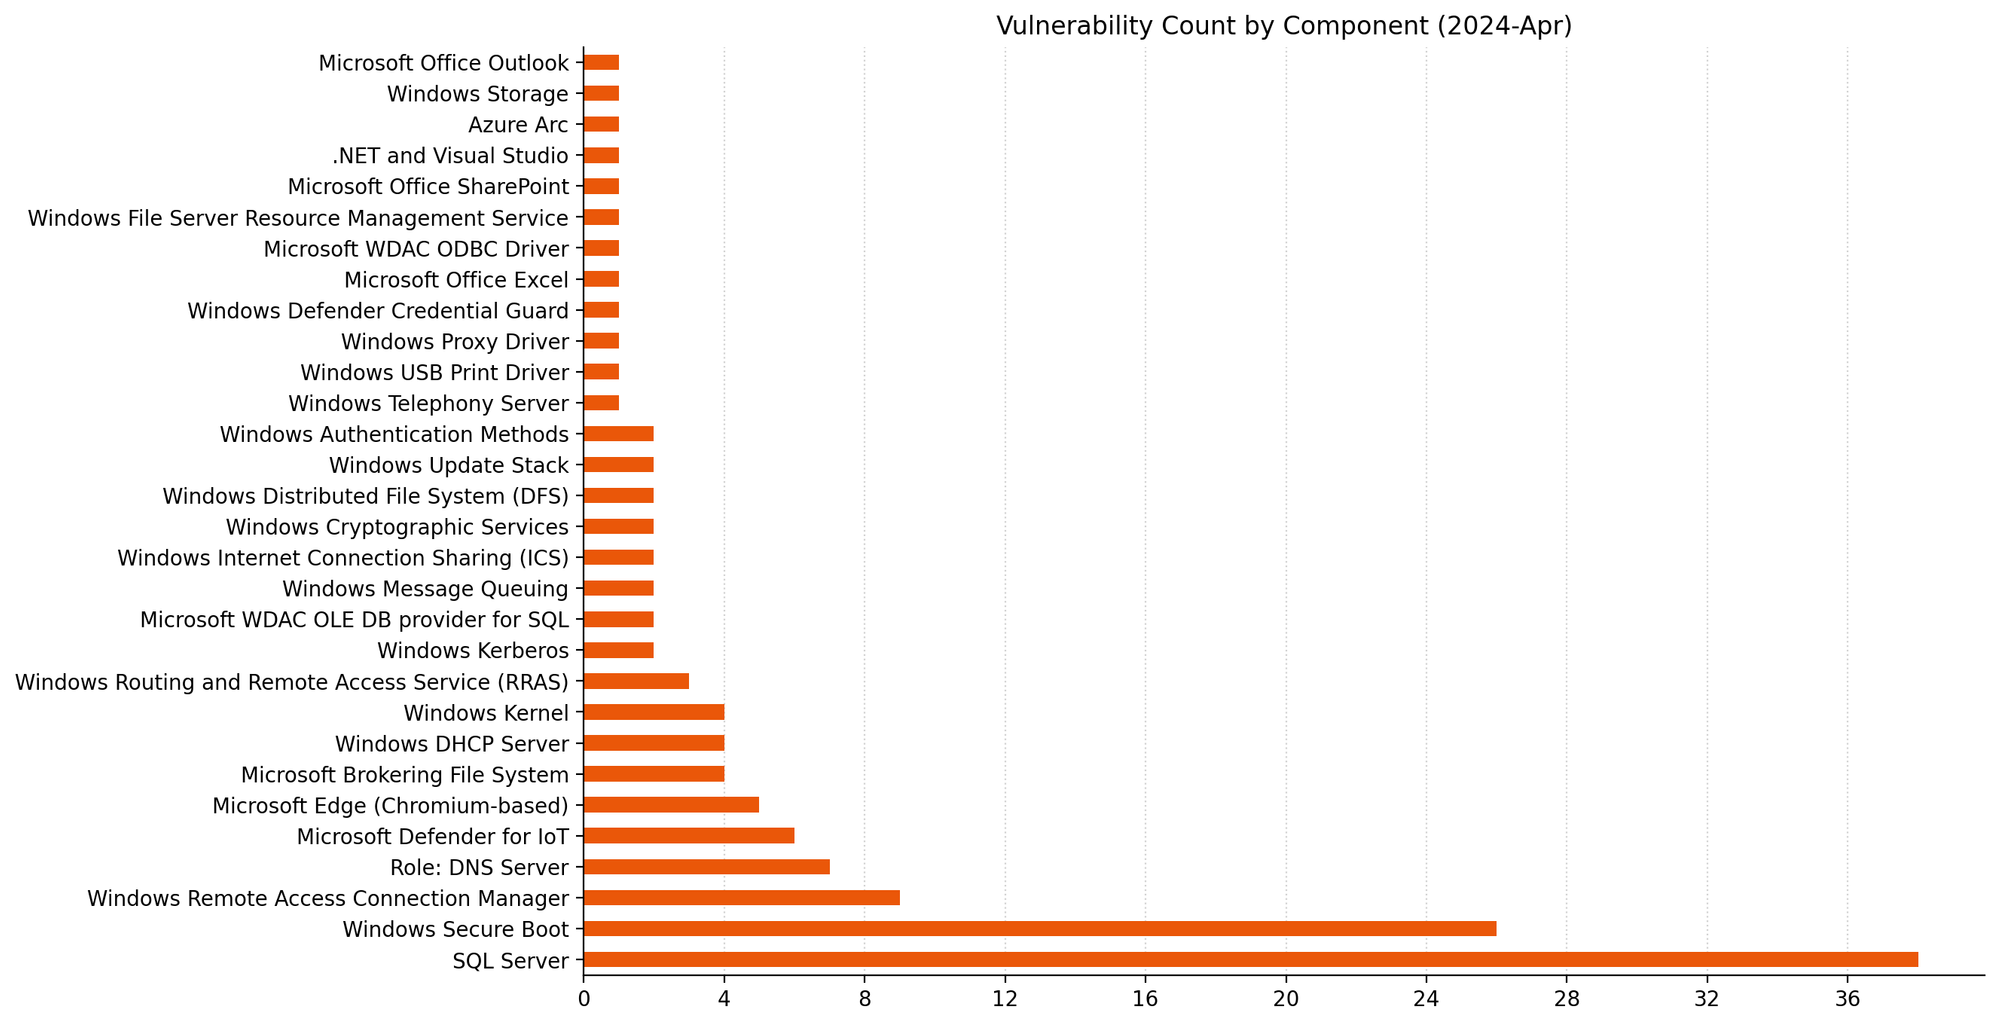
Microsoft is addressing 149 vulnerabilities this April 2024 Patch Tuesday, which is significantly more than usual. For the second month in a row, Microsoft indicated that they aren’t aware of prior public disclosure or exploitation in the wild for any of the vulnerabilities patched today, which means no new additions to CISA KEV at time of writing.
Despite the large number of vulnerabilities published today, Microsoft has ranked only three as critical under its proprietary severity scale. Five browser vulnerabilities were published separately this month, and are not included in the total.
Microsoft is now including two additional data points on advisories: Common Weakness Enumeration (CWE) and Vector String Source assessments.
Defender for IoT: three critical RCEs
Microsoft Defender for IoT receives patches for three critical remote code execution (RCE) vulnerabilities. Microsoft describes Defender for IoT as an Azure-deployable agentless monitoring solution for Internet of Things (IoT) and Operational Technology (OT) devices.
The advisory for CVE-2024-21322 is light on detail, but notes that exploitation requires the attacker to have existing administrative access to the Defender for IoT web application; this limits the attacker value in isolation, although the potential for insider threat or use as part of an exploit chain remains.
CVE-2024-21323 describes an update-based attack and requires prior authentication; an attacker with the ability to control how a Defender for IoT sensor receives updates could cause the sensor device to apply a malicious update package, overwriting arbitrary files on the sensor filesystem via a path traversal weakness.
Exploitation of CVE-2024-29053 allows arbitrary file upload for any authenticated user, also via a path traversal weakness, although the advisory does not specify what the target is other than “the server”.
The Defender for IoT 24.1.3 release notes do not call out these security fixes and describe only improvements to clock drift detection and unspecified stability improvements; this omission highlights the evergreen value of timely patching.
SharePoint: XSS spoofing
SharePoint receives a patch for CVE-2024-26251, a spoofing vulnerability which abuses cross-site scripting (XSS) and affects SharePoint Server 2016, 2019, and Subscription Edition. Exploitation requires multiple conditions to be met, including but not limited to a reliance on user actions, token impersonation, and specific application configuration. On that basis, although Microsoft is in possession of mature exploit code, exploitation is rated less likely.
Excel: arbitrary file execution
Microsoft is patching a single Office vulnerability today. CVE-2024-26257 describes a RCE vulnerability in Excel; exploitation requires that the attacker convinces the user to open a specially-crafted malicious file.
Patches for Windows-based click-to-run (C2R) Office deployments and Microsoft 365 Apps for Enterprise are available immediately. Not for the first time, a patch for Office for Mac is unavailable at time of writing, and will follow at some unspecified point in the future.
SQL Server OLE DB driver: dozens of RCE
The Microsoft OLE DB Driver for SQL Server receives patches for no fewer than 38 separate RCE vulnerabilities today, which might be a record for a single component. The common theme here is that an attacker could trick a user into connecting to a malicious SQL server to achieve code execution in the context of the client.
All quiet on the Exchange front
There are no security patches for Exchange this month.
Microsoft advisory metadata: CWE and Vector String Source
Analysis of CWE trends can help developers reduce future occurrences through improved Software Development Life Cycle (SDLC) workflows and testing, as well as helping defenders understand where to direct defense-in-depth and deployment-hardening efforts for best return on investment. At time of writing, the addition of CWE assessments does not appear to be retroactive.
The Common Vulnerability Scoring System (CVSS) is a widely-used standard for evaluation of vulnerability severity, and Microsoft has helpfully provided CVSS data for each vulnerability for a long time. The CVSS vector describes the variables which comprise the overall CVSS severity score for a vulnerability. The addition of Vector String Source — typically, the entity providing the CVSS assessment on a Microsoft vulnerability will be Microsoft — provides further welcome clarity, at least for vulnerabilities where Microsoft is the CVE Numbering Authority (CNA). It may not be a coincidence that Microsoft is choosing to start explicitly describing the source of the CVSS vector during the ongoing uncertainty around the future of the NVD program.
Lifecycle update
Several Microsoft products move past the end of mainstream support after today:
Azure DevOps Server 2019.
System Center 2019.
Visual Studio 2019.
Additionally, some older products move past the end of extended support, including:
Microsoft Deployment Agent 2013.
Microsoft Diagnostics and Recovery Toolset 8.1.
Visual Studio 2013.
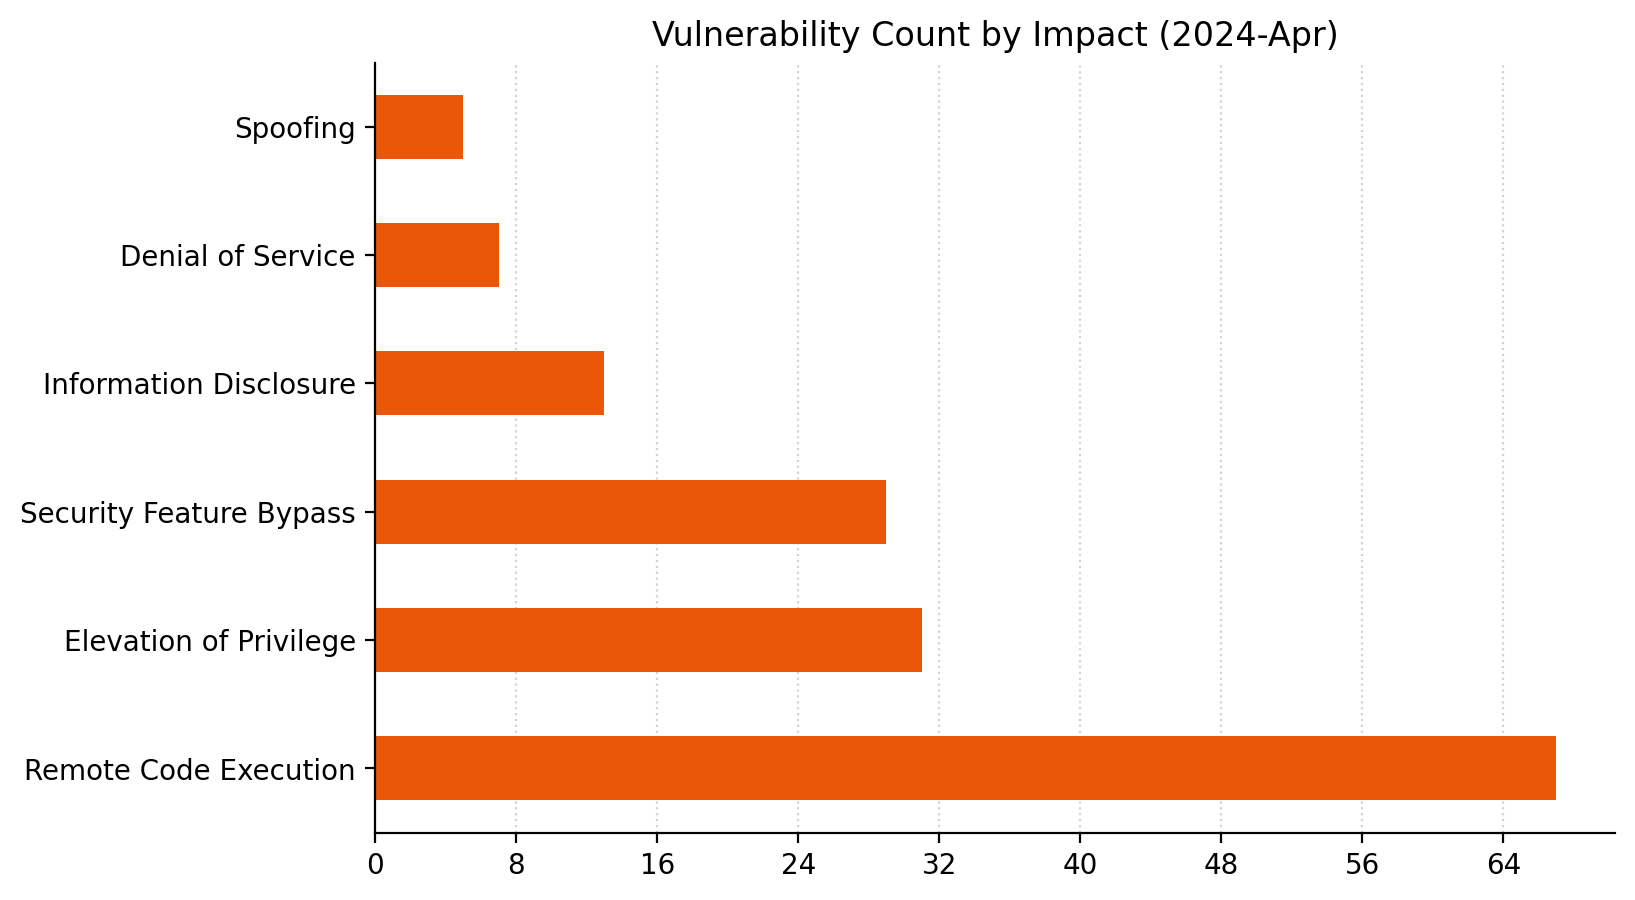
Summary Charts
38 is a big number in this context.Blowout victory for RCE this month.The sheer volume of OLE DB provider for SQL vulns eclipses everything else this month.
For businesses, particularly those in highly regulated industries, managing user accounts isn’t just a matter of security but also a compliance necessity. In sectors such as finance, healthcare, and government, where regulations often mandate strict control over user access, disabling stale user accounts is a key compliance activity. In this post, we show you a solution that uses serverless technologies to track and disable inactive user accounts. While this process is particularly relevant for those in regulated industries, it can also be beneficial for other organizations looking to maintain a clean and secure user base.
The solution focuses on identifying inactive user accounts in Amazon Cognito and automatically disabling them. Disabling a user account in Cognito effectively restricts the user’s access to applications and services linked with the Amazon Cognito user pool. After their account is disabled, the user cannot sign in, access tokens are revoked for their account and they are unable to perform API operations that require user authentication. However, the user’s data and profile within the Cognito user pool remain intact. If necessary, the account can be re-enabled, allowing the user to regain access and functionality.
While the solution focuses on the example of a single Amazon Cognito user pool in a single account, you also learn considerations for multi-user pool and multi-account strategies.
Solution overview
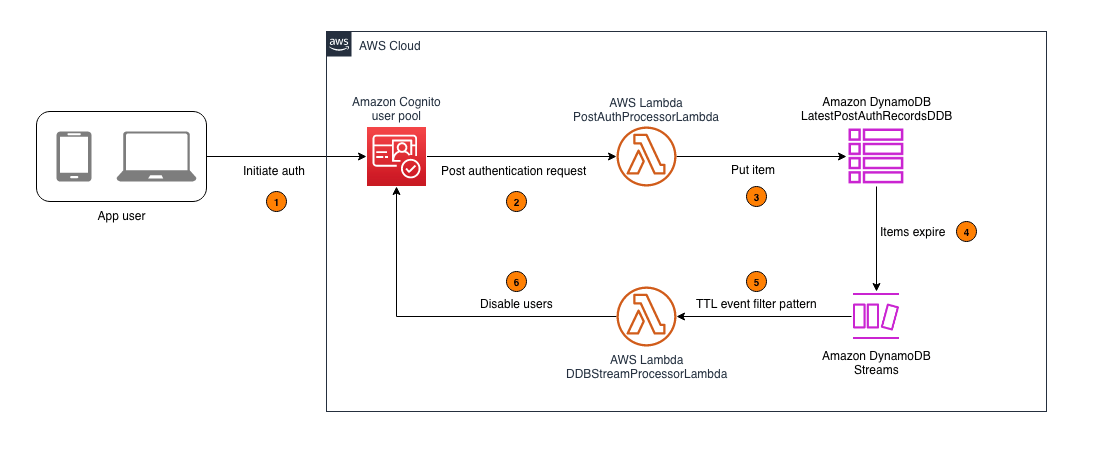
In this section, you learn how to configure an AWS Lambda function that captures the latest sign-in records of users authenticated by Amazon Cognito and write this data to an Amazon DynamoDB table. A time-to-live (TTL) indicator is set on each of these records based on the user inactivity threshold parameter defined when deploying the solution. This TTL represents the maximum period a user can go without signing in before their account is disabled. As these items reach their TTL expiry in DynamoDB, a second Lambda function is invoked to process the expired items and disable the corresponding user accounts in Cognito. For example, if the user inactivity threshold is configured to be 7 days, the accounts of users who don’t sign in within 7 days of their last sign-in will be disabled. Figure 1 shows an overview of the process.
Note: This solution functions as a background process and doesn’t disable user accounts in real time. This is because DynamoDB Time to Live (TTL) is designed for efficiency and to remain within the constraints of the Amazon Cognito quotas. Set your users’ and administrators’ expectations accordingly, acknowledging that there might be a delay in the reflection of changes and updates.
Figure 1: Architecture diagram for tracking user activity and disabling inactive Amazon Cognito users
As shown in Figure 1, this process involves the following steps:
An application user signs in by authenticating to Amazon Cognito.
Upon successful user authentication, Cognito initiates a post authentication Lambda trigger invoking the PostAuthProcessorLambda function.
The PostAuthProcessorLambda function puts an item in the LatestPostAuthRecordsDDB DynamoDB table with the following attributes:
sub: A unique identifier for the authenticated user within the Amazon Cognito user pool.
timestamp: The time of the user’s latest sign-in, formatted in UTC ISO standard.
username: The authenticated user’s Cognito username.
userpool_id: The identifier of the user pool to which the user authenticated.
ttl: The TTL value, in seconds, after which a user’s inactivity will initiate account deactivation.
Items in the LatestPostAuthRecordsDDB DynamoDB table are automatically purged upon reaching their TTL expiry, launching events in DynamoDB Streams.
DynamoDB Streams events are filtered to allow invocation of the DDBStreamProcessorLambda function only for TTL deleted items.
The DDBStreamProcessorLambda function runs to disable the corresponding user accounts in Cognito.
Implementation details
In this section, you’re guided through deploying the solution, demonstrating how to integrate it with your existing Amazon Cognito user pool and exploring the solution in more detail.
Note: This solution begins tracking user activity from the moment of its deployment. It can’t retroactively track or manage user activities that occurred prior to its implementation. To make sure the solution disables currently inactive users in the first TTL period after deploying the solution, you should do a one-time preload of those users into the DynamoDB table. If this isn’t done, the currently inactive users won’t be detected because users are detected as they sign in. For the same reason, users who create accounts but never sign in won’t be detected either. To detect user accounts that sign up but never sign in, implement a post confirmation Lambda trigger to invoke a Lambda function that processes user sign-up records and writes them to the DynamoDB table.
Prerequisites
Before deploying this solution, you must have the following prerequisites in place:
An existing Amazon Cognito user pool. This user pool is the foundation upon which the solution operates. If you don’t have a Cognito user pool set up, you must create one before proceeding. See Creating a user pool.
The ability to launch a CloudFormation template. The second prerequisite is the capability to launch an AWS CloudFormation template in your AWS environment. The template provisions the necessary AWS services, including Lambda functions, a DynamoDB table, and AWS Identity and Access Management (IAM) roles that are integral to the solution. The template simplifies the deployment process, allowing you to set up the entire solution with minimal manual configuration. You must have the necessary permissions in your AWS account to launch CloudFormation stacks and provision these services.
To deploy the solution
Choose the following Launch Stack button to deploy the solution’s CloudFormation template:
The solution deploys in the AWS US East (N. Virginia) Region (us-east-1) by default. To deploy the solution in a different Region, use the Region selector in the console navigation bar and make sure that the services required for this walkthrough are supported in your newly selected Region. For service availability by Region, see AWS Services by Region.
On the Quick Create Stack screen, do the following:
Specify the stack details.
Stack name: The stack name is an identifier that helps you find a particular stack from a list of stacks. A stack name can contain only alphanumeric characters (case sensitive) and hyphens. It must start with an alphabetic character and can’t be longer than 128 characters.
CognitoUserPoolARNs: A comma-separated list of Amazon Cognito user pool Amazon Resource Names (ARNs) to monitor for inactive users.
UserInactiveThresholdDays: Time (in days) that the user account is allowed to be inactive before it’s disabled.
Scroll to the bottom, and in the Capabilities section, select I acknowledge that AWS CloudFormation might create IAM resources with custom names.
Choose Create Stack.
Integrate with your existing user pool
With the CloudFormation template deployed, you can set up Lambda triggers in your existing user pool. This is a key step for tracking user activity.
Note: This walkthrough is using the new AWS Management Console experience. Alternatively, These steps could also be done using CloudFormation.
To integrate with your existing user pool
Navigate to the Amazon Cognito console and select your user pool.
Navigate to User pool properties.
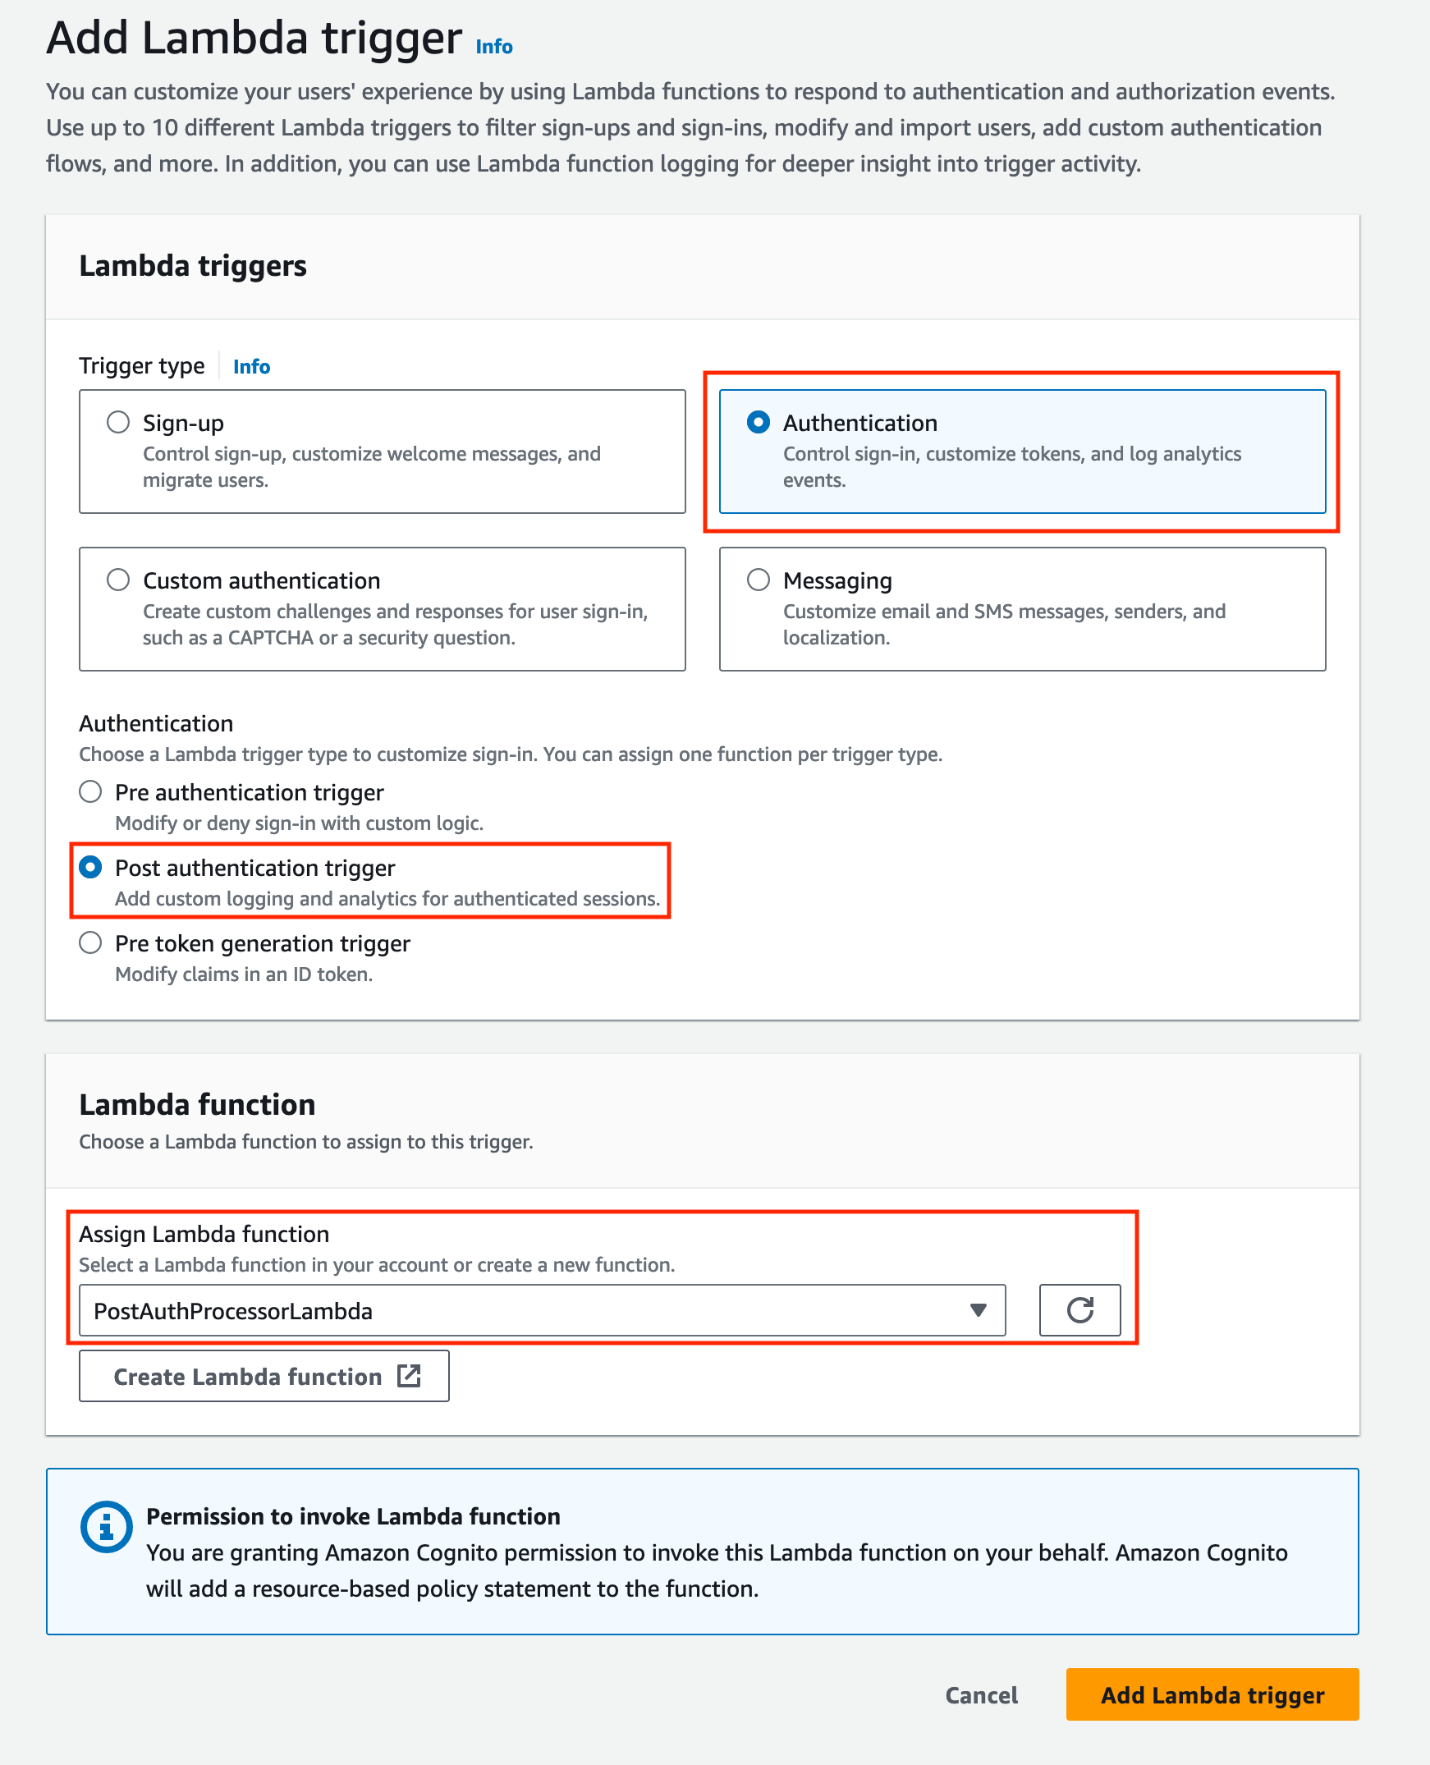
Under Lambda triggers, choose Add Lambda trigger. Select the Authentication radio button, then add a Post authentication trigger and assign the PostAuthProcessorLambda function.
Note: Amazon Cognito allows you to set up one Lambda trigger per event. If you already have a configured post authentication Lambda trigger, you can refactor the existing Lambda function, adding new features directly to minimize the cold starts associated with invoking additional functions (for more information, see Anti-patterns in Lambda-based applications). Keep in mind that when Cognito calls your Lambda function, the function must respond within 5 seconds. If it doesn’t and if the call can be retried, Cognito retries the call. After three unsuccessful attempts, the function times out. You can’t change this 5-second timeout value.
Figure 2: Add a post-authentication Lambda trigger and assign a Lambda function
When you add a Lambda trigger in the Amazon Cognito console, Cognito adds a resource-based policy to your function that permits your user pool to invoke the function. When you create a Lambda trigger outside of the Cognito console, including a cross-account function, you must add permissions to the resource-based policy of the Lambda function. Your added permissions must allow Cognito to invoke the function on behalf of your user pool. You can add permissions from the Lambda console or use the Lambda AddPermission API operation. To configure this in CloudFormation, you can use the AWS::Lambda::Permission resource.
Explore the solution
The solution should now be operational. It’s configured to begin monitoring user sign-in activities and automatically disable inactive user accounts according to the user inactivity threshold. Use the following procedures to test the solution:
Note: When testing the solution, you can set the UserInactiveThresholdDays CloudFormation parameter to 0. This minimizes the time it takes for user accounts to be disabled.
Step 1: User authentication
Create a user account (if one doesn’t exist) in the Amazon Cognito user pool integrated with the solution.
Authenticate to the Cognito user pool integrated with the solution.
Figure 3: Example user signing in to the Amazon Cognito hosted UI
Step 2: Verify the sign-in record in DynamoDB
Confirm the sign-in record was successfully put in the LatestPostAuthRecordsDDB DynamoDB table.
Navigate to the DynamoDB console.
Select the LatestPostAuthRecordsDDB table.
Select Explore Table Items.
Locate the sign-in record associated with your user.
Figure 4: Locating the sign-in record associated with the signed-in user
Step 3: Confirm user deactivation in Amazon Cognito
After the TTL expires, validate that the user account is disabled in Amazon Cognito.
Navigate to the Amazon Cognito console.
Select the relevant Cognito user pool.
Under Users, select the specific user.
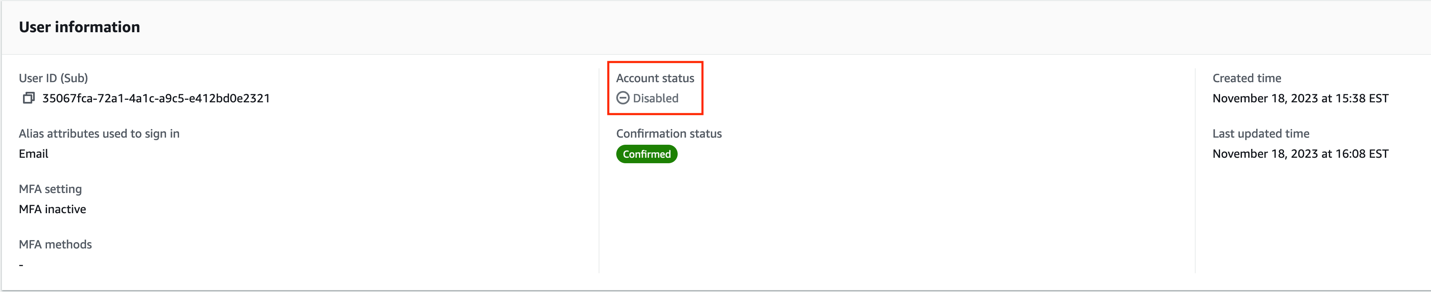
Verify the Account status in the User information section.
Figure 5: Screenshot of the user that signed in with their account status set to disabled
Note: TTL typically deletes expired items within a few days. Depending on the size and activity level of a table, the actual delete operation of an expired item can vary. TTL deletes items on a best effort basis, and deletion might take longer in some cases.
The user’s account is now disabled. A disabled user account can’t be used to sign in, but still appears in the responses to GetUser and ListUsers API requests.
Design considerations
In this section, you dive deeper into the key components of this solution.
DynamoDB schema configuration:
The DynamoDB schema has the Amazon Cognito sub attribute as the partition key. The Cognito sub is a globally unique user identifier within Cognito user pools that cannot be changed. This configuration ensures each user has a single entry in the table, even if the solution is configured to track multiple user pools. See Other considerations for more about tracking multiple user pools.
Using DynamoDB Streams and Lambda to disable TTL deleted users
This solution uses DynamoDB TTL and DynamoDB Streams alongside Lambda to process user sign-in records. The TTL feature automatically deletes items past their expiration time without write throughput consumption. The deleted items are captured by DynamoDB Streams and processed using Lambda. You also apply event filtering within the Lambda event source mapping, ensuring that the DDBStreamProcessorLambda function is invoked exclusively for TTL-deleted items (see the following code example for the JSON filter pattern). This approach reduces invocations of the Lambda functions, simplifies code, and reduces overall cost.
The DDBStreamProcessorLambda function is configured to comply with the AdminDisableUser API’s quota limits. It processes messages in batches of 25, with a parallelization factor of 1. This makes sure that the solution remains within the nonadjustable 25 requests per second (RPS) limit for AdminDisableUser, avoiding potential API throttling. For more details on these limits, see Quotas in Amazon Cognito.
Dead-letter queues:
Throughout the architecture, dead-letter queues (DLQs) are used to handle message processing failures gracefully. They make sure that unprocessed records aren’t lost but instead are queued for further inspection and retry.
Other considerations
The following considerations are important for scaling the solution in complex environments and maintaining its integrity. The ability to scale and manage the increased complexity is crucial for successful adoption of the solution.
Multi-user pool and multi-account deployment
While this solution discussed a single Amazon Cognito user pool in a single AWS account, this solution can also function in environments with multiple user pools. This involves deploying the solution and integrating with each user pool as described in Integrating with your existing user pool. Because of the AdminDisableUser API’s quota limit for the maximum volume of requests in one AWS Region in one AWS account, consider deploying the solution separately in each Region in each AWS account to stay within the API limits.
Efficient processing with Amazon SQS:
Consider using Amazon Simple Queue Service (Amazon SQS) to add a queue between the PostAuthProcessorLambda function and the LatestPostAuthRecordsDDB DynamoDB table to optimize processing. This approach decouples user sign-in actions from DynamoDB writes, and allows for batching writes to DynamoDB, reducing the number of write requests.
Clean up
Avoid unwanted charges by cleaning up the resources you’ve created. To decommission the solution, follow these steps:
Remove the Lambda trigger from the Amazon Cognito user pool:
Navigate to the Amazon Cognito console.
Select the user pool you have been working with.
Go to the Triggers section within the user pool settings.
Manually remove the association of the Lambda function with the user pool events.
Remove the CloudFormation stack:
Open the CloudFormation console.
Locate and select the CloudFormation stack that was used to deploy the solution.
Delete the stack.
CloudFormation will automatically remove the resources created by this stack, including Lambda functions, Amazon SQS queues, and DynamoDB tables.
Conclusion
In this post, we walked you through a solution to identify and disable stale user accounts based on periods of inactivity. While the example focuses on a single Amazon Cognito user pool, the approach can be adapted for more complex environments with multiple user pools across multiple accounts. For examples of Amazon Cognito architectures, see the AWS Architecture Blog.
Proper planning is essential for seamless integration with your existing infrastructure. Carefully consider factors such as your security environment, compliance needs, and user pool configurations. You can modify this solution to suit your specific use case.
Maintaining clean and active user pools is an ongoing journey. Continue monitoring your systems, optimizing configurations, and keeping up-to-date on new features. Combined with well-architected preventive measures, automated user management systems provide strong defenses for your applications and data.
If you have feedback about this post, submit comments in the Comments section. If you have questions about this post, start a new thread on the Amazon Cognito re:Post forum or contact AWS Support.
The mainline kernel has just received a set of commits mitigating the
latest x86 hardware vulnerability, known as “branch history injection”.
From this commit:
Branch History Injection (BHI) attacks may allow a malicious
application to influence indirect branch prediction in kernel by
poisoning the branch history. eIBRS isolates indirect branch
targets in ring0. The BHB can still influence the choice of
indirect branch predictor entry, and although branch predictor
entries are isolated between modes when eIBRS is enabled, the BHB
itself is not isolated between modes.
See this commit for
documentation on the command-line parameter that controls this mitigation.
There are stable kernel releases (6.8.5, 6.6.26, 6.1.85,
and 5.15.154)
in the works that also contain the mitigations.
Just recently, I was coding a new feature for GitHub Copilot Chat. My task was to enable the chat to recognize a user’s project dependencies, allowing it to provide magical answers when the user poses a question. While I could have easily listed the project dependencies and considered the task complete, I knew that to extract top-notch responses from these large language models, I needed to be careful to not overload the prompt to avoid confusing the model by providing too much context. This meant pre-processing the dependency list and selecting the most relevant ones to include in the chat prompt.
Creating machine-processable formats for the most prominent frameworks across various programming languages would have consumed days. It was during this time that I experienced one of those “Copilot moments.”
I simply queried the chat in my IDE:
Look at the data structure I have selected and create at least 10 examples that conform to the data structure. The data should cover the most prominent frameworks for the Go programming language.
Voilà, there it was my initial batch of machine-processable dependencies. Just 30 minutes later, I had amassed a comprehensive collection of significant dependencies for nearly all supported languages, complete with parameterized unit tests. Completing a task that would likely have taken days without GitHub Copilot, in just 30 minutes, was truly remarkable.
This led me to ponder: what other “Copilot moments” might my colleagues here at GitHub have experienced? Thus, here are a few ways we use GitHub Copilot at GitHub.
1. Semi-automating repetitive tasks
Semi-automating repetitive tasks is a topic that resonates with a colleague of mine from another team. He mentions that they are tasked with developing and maintaining several live services, many of which utilize protocol buffers for data communication. During maintenance, they often encounter a situation where they need to increment ID numbers in the protobuf definitions, as illustrated in the code snippet below:
He particularly appreciates having GitHub Copilot completions in the editor for these tasks. It serves as a significant time saver, eliminating the need to manually generate ID numbers. Instead, one can simply tab through the completion suggestions until the task is complete.
2. Avoid getting side tracked
Here’s another intriguing use case I heard about from a colleague. He needed to devise a regular expression to capture a Markdown code block and extract the language identifier. Fully immersed in his work, he preferred not to interrupt his flow by switching to chat, even though it could have provided a solution. Instead, he employed a creative approach by formalizing his task in a code comment:
// The string above contains a code block with a language identifier.
// Create a regexp that matches the code block and captures the language
identifier.
// Use tagged capture groups for the language and the code.
This prompted GitHub Copilot to generate the regular expression as the subsequent statement in his editor:
const re = /```(?<lang>\w+)(?<code>[\s\S]+?)```/;
With the comment deleted, the task was swiftly accomplished!
3. Structuring data-related notes
During a pleasant coffee chat, one of our support engineers shared an incident she experienced with a colleague last week. It was a Friday afternoon, and they were attempting to troubleshoot an issue for a specific customer. Eventually, they pinpointed the solution by creating various notes in VSCode. At GitHub, we prioritize remote collaboration. Thus, merely resolving the task wasn’t sufficient; it was also essential to inform our colleagues about the process to ensure the best possible experience for future customer requests. Consequently, even after completing this exhaustive task, they needed to document how they arrived at the solution.
She initiated GitHub Copilot Chat and simply typed something along the lines of, “Organize my notes, structure them, and compile the data in the editor into Markdown tables.” Within seconds, the task was completed, allowing them to commence their well-deserved weekend.
4. Exploring and learning
Enhancing and acquiring new skills are integral aspects of every engineer’s journey. John Berryman, a colleague of mine, undertook the challenge of leveraging GitHub Copilot to tackle a non-trivial coding task in a completely unfamiliar programming language. His goal was to delve into Rust, so on a Sunday, he embarked on this endeavor with the assistance of GitHub Copilot Chat. The task he set out to accomplish was to develop a program capable of converting any numerical input into its written English equivalent. While initially seeming straightforward, this task presented various complexities such as handling teen numbers, naming conventions for tens, placement of “and” in the output, and more.
Twenty-three minutes and nine seconds later, he successfully produced a functional version written in Rust, despite having no prior experience with the language. Notably, he documented his entire process, recording himself throughout the endeavor.
Berryman uses an older, experimental version of GitHub Copilot to write a program in Rust.
Your very own GitHub Copilot moment
I found it incredibly enlightening to discover how my fellow Hubbers utilize GitHub Copilot, and their innovative approaches inspired me to incorporate some of their ideas into my daily workflows. If you’re eager to explore GitHub Copilot firsthand, getting started is a breeze. Simply install it into your preferred editor and ask away.
„Нямам намерение да се самоубивам. Ако умра, трябва да знаете, че те са ме убили.“ На 1 април получих лично съобщение с тези думи от саудитския бежанец Абдулрахман ал-Халиди, интервю с когото „Тоест“ публикува на 11 март. Уви, не беше лоша шега – Ал-Халиди действително се страхуваше за живота си, след като предишния ден е бил пребит от полицаи, както твърди, в центъра за задържане в Бусманци. Това е един от няколкото случая на насилие над бежанци в рамките само на няколко дни. Как се стигна до тази вълна от насилие и как бежанците пак се превърнаха във врагове?
Отново се задават избори. А в предизборна ситуация по традиция определени политически сили и властови центрове имат нужда от враг, върху когото да се фиксира вниманието, за да се отклони погледът на обществото от реалните проблеми и нередности, за които същите тези политически сили и властови центрове носят отговорност. При липса на реален враг той винаги може да се конструира. Ето няколко примера.
Някои дежурни „врагове“
За дежурни врагове в предизборни периоди са били нарочвани ромите, които „продават гласовете си“, като по този начин остават в сянка политическите сили, които редовно купуват гласове (не само ромски). Или изселените по времето на т.нар. Възродителен процес етнически турци, заклеймени като „изборни туристи“, когато се връщат по родните си места да гласуват.
През 2017 г. председателят на националистическата партия Национален фронт за спасение на България Валери Симеонов, по онова време вицепремиер по икономическата и демографската политика, отиде на границата, за да попречи лично на български турци да упражнят правото си на глас. Тогава той удари възрастна жена така, че тя падна на земята. После се похвали в ефира на bTV, че е „избутал не само тая възрастна баба“, която определи като „изключително нагла“, а още десетина души – „почти един рейс“. И че това е донесло гласове за партията му.
ЛГБТИ+ хората също често се оказват предизборни врагове, като агресията срещу тях се усили след пропагандната кампания срещу Истанбулската конвенция. Само през 2021 г., през която три пъти се състояха парламентарни избори, случаите на хомофобска агресия бяха толкова много, че е трудно да бъдат изброени. Националисти нападнаха първия прайд в Бургас, организираха акции срещу представяне на книги и филмови прожекции в Пловдив и София, вандализираха клуб The Steps, облепиха превозни средства и улични стълбове с хомофобски лепенки. „Защитници на семейството“ разпространяваха невярна информация за ЛГБТИ+ хората. Кулминацията беше, когато група, предвождана от Боян Станков, самонарекъл се Расате, нахлу в общностния център „Рейнбоу хъб“ и го изпотроши, а самият Станков удари активистка.
От 2014–2015 г. и бежанците са сред обичайните предизборни врагове. Преди парламентарните избори през октомври 2022 г. те отново бяха нарочени за „плашила“, редом с лихварите в ромските махали и „дрогираните шофьори“.
Актуалният „враг“ – бежанците
В момента, в който премиерът Николай Денков подаде оставка съгласно споразумението за ротация на кабинета и още преди да стане публично ясно, че ротацията няма да се състои, а ще се ходи на избори, бежанците внезапно пак станаха враг. Политици и медии заговориха за „мигрантска криза“, каквато всъщност няма, и създадоха истерия заради четири случая – в поне два от тях бежанци няма, в поне три няма пострадал български гражданин и в нито един няма сериозно пострадал човек. В два от случаите българи нападнаха чуждестранни студенти. В третия бежанци бяха снимани как се гонят в близост до общежитието на Агенцията за бежанците в квартал „Овча купел“. Четвъртият случай се оказа конфликт между две групи заради гадже. В едната от групите е имало сирийски младеж.
Тези случки, в три от които пострадалите са всъщност чужденци, бяха използвани за разпалване на ксенофобски настроения. Организираха се протести пред бежански центрове – например в „Овча купел“ и в Харманли. Протестиращите искат центровете да се охраняват от полиция и ако може, да не виждат никакви бежанци, защото ги възприемат като заплаха, макар нищо да не са им направили.
От МВР хем отрекоха, че има „мигрантска криза“, хем министър Калин Стоянов използва случая да повтори искането на предшественика си за над 1000 нови гранични полицаи. В това искане беше подкрепен от председателя на ГЕРБ Бойко Борисов и съпредседателя на ДПС Делян Пеевски. Стоянов разпореди и жандармеристи с пушки да охраняват публичните места, където има „хора с различен произход“, каквото и да означава това.
На 28 март пък полицията извърши „внезапна проверка“ на спазването на реда в трите бежански центъра (от отворен тип) в София. Поводът за нея не стана ясен, но пък новинарските емисии излъчиха кадри как служители на реда с маски на лицето и каски (защо ли?) влизат в общежитията, в които има и жени с малки деца, и проверяват кой спазва вечерния час и на кого са му изрядни документите.
На същата дата – 28 март – ксенофоби пребиват поне трима бежанци. И една българка – защото е жена на един от тях. До метростанция „Мизия“, в близост до центъра на ДАБ в „Овча купел“, група напада две момчета с вид на деца. И гордо публикува в интернет видео на „подвига“ си. В друга част на София ксенофоби пребиват афганистанския бежанец Джавед Нури и жена му. На 31 март Абдулрахман ал-Халиди е пребит в Бусманци.
Побоите над Джавед Нури, жена му и бежанците в „Овча купел“
Нури бяга от Афганистан в България преди 20 години. Тогава е още непълнолетен. Първият му досег с българската земя е болезнен в буквалния смисъл – каналджиите го хвърлят от влака и той губи съзнание. Въпреки доказателствата, които представя, че семейството му е преследвано, не получава бежански статут. Прекарва години затворен – първо в центъра за задържане в ж.к. „Дружба“ (вече несъществуващ), а после и в Бусманци – и под постоянната заплаха да бъде депортиран. Нервите му не издържат и той решава да се самоубие. Самозапалва се, но оцелява.
През 2008 г. го освобождават и той се озовава на улицата, тоест на голата поляна пред центъра в Бусманци. Тогава го прибира у дома си писателят Иван Кулеков, който от години се застъпва за него. Скоро младежът се изнася на квартира, защото не иска да е в тежест на никого.
След много години и не по-малко перипетии Джавед Нури получава легален статут. Успява да устрои живота си, има жена, която го обича, приятели, работа, дом. Лошото е останало зад гърба му и той възприема България като рай. До 28 март т.г., когато, по думите на Мария Черешева, „неговият рай се превърна в ад“. Тогава група младежи напада него и жена му с аргумента „от майната си сте дошли“. Удрят ги с тръби, хвърлят камъни по тях. На Нури му разрязват пръст. Цялата му длан е в кръв.
Това е впрочем вторият път, когато му раняват пръст. Още когато е бягал от Афганистан, преследвачите му са отрязали парче от един от пръстите му.
Полицията не приема сигнала на афганистанския бежанец за побоя. Задейства се чак когато се обажда жена му, която е българка. Нещо повече – когато полицията пристига, първо обвинява него.
Джавед Нури и жена му си търсят ново жилище, защото не се чувстват в безопасност.
В деня на побоя срещу Джавед Нури и жена му група напада двама млади бежанци в „Овча купел“. Във видеото, което нападателите правят и публикуват в интернет, се чува „Вие к’ви сте?“ и „Where are you from, бе?“. Битите изглеждат деца и с нищо не са предизвикали агресията срещу себе си. „Свободна Европа“ разговаря с едно от пострадалите момчета – Али от Сирия, на 20 години. Той разказва, че това е вторият път, когато го нападат, и пита дали има някакви права.
За побоя над двамата младежи има задържани, но никой не държи самия Али в течение за това. Опитал се е да подаде жалба, но са го отпратили, защото „няма преводач“.
Побоят над Абдулрахман ал-Халиди
На 31 март саудитският бежанец Абдулрахман ал-Халиди прави нещо, което, както разказва пред „Тоест“, е правил и преди, но до този момент е нямало проблем – дава храна на едно семейство, чиито членове също са затворени в Бусманци: „Хранех ги със спагети [в оригинал – noodles, б.а.]. Правил съм го и преди без никакъв проблем, защото те постят заради Рамазана. Но само този ден полицията реши да ме спре, да ми забрани. След това имахме спор [с полицая] и към него се присъедини още един [полицай]. После отвориха вратата, закараха ме до тоалетната и ме биха там.“
От аудиосъобщението, което ми оставя, не става ясно колко точно са били полицаите, но във Facebook той уточнява, че са били трима. Добавя и че са го били, докато загуби съзнание. Когато се е свестил, те още са го биели. Започнал да плюе кръв.
В аудиосъобщенията, в които разказва това, Ал-Халиди звучи притеснено. Но не толкова плашещо, колкото на 1 април, когато се записва, за да ми каже, че е бит по лицето и тялото и че изпитва „изключителна болка“.
В продължение на няколко дни саудитският бежанец иска да бъде прегледан, за да има доказателства за побоя. Накрая го закарват в болницата на МВР, където е с белезници и не му позволяват да има придружител.
На 4 април Дирекция „Миграция“ към МВР заявява, че саудитецът всъщност се е самонаранил. „Казах го! – коментира той, препращайки към поста си, че не иска да се самоубие и ако умре, значи е убит. – Може би ще ме убият и ще кажат, че е самоубийство! Удивен съм от тази безочлива лъжа! О, Господи, спаси българския народ от тези власти!“
Няма данни за конкретен повод за побоя над Абдулрахман ал-Халиди. Но на следващия ден (1 април) във Върховния административен съд се разглежда делото за бежанския му статут. Тогава е организирана и поредна демонстрация в негова защита.
Междувременно още през януари съдът разпорежда незабавното освобождаване на Ал-Халиди от Бусманци и нарежда на ДАБ да го премести в общежитие със свободен достъп. И макар в съдебното решение да пише, че то не подлежи на обжалване, близо три месеца по-късно той още е в центъра за задържане.
Ролята на МВР
Във всички тези случаи МВР най-малкото не реагира адекватно. Не се задейства по сигнала на Джавед Нури, а когато пристига, обвинява него. Не държи в течение за разследването Али, а той не е допуснат да подаде жалба. Излиза с неправдоподобната версия, че Ал-Халиди се е самопребил.
МВР трудно признава случаи на полицейско насилие и по отношение на български граждани, какво остава за бежанци. Разривът между Калин Стоянов и Николай Денков настъпи именно защото първият отказа да поеме отговорност за насилието от страна на полицейски служители по време на протеста срещу вече бившето ръководство на БФС, ескалирал до безредици.
В предишната си статия зададох въпроса каква е целта на бутафорната активност на МВР в последно време. Две от предположенията ми бяха свързани с предстоящите предсрочни парламентарни избори. Жандармеристите с пушките по улиците могат да „дисциплинират“ определени групи избиратели, а насажданият в обществото страх може да се канализира в желаната електорална посока и да отвлича вниманието от реалните проблеми.
Вече има едно неизвестно по-малко – ясно е, че Калин Стоянов ще бъде вътрешен министър и в служебното правителство, чиято основна задача ще е организирането на изборите. Той беше министър и на последните местни избори, които ще останат в историята с много нередности и рекордно количество невалидни бюлетини.
Колкото по-бутафорна става активността на МВР обаче, толкова по-реални са потърпевшите от нея. Бежанците са удобна жертва, понеже са беззащитни. А и повечето си мълчат от страх, не са гласовити като Нури и Ал-Халиди. Но покрай „дежурните врагове“ потърпевши могат да се окажат и всички, които са неудобни. Дори главният секретар на МВР, на когото пресцентърът на Министерството не позволил да участва в телевизионно предаване, за да се защити от обвиненията, отправяни срещу него в публичното пространство.
Абдулрахман ал-Халиди призовава Бог да спаси българите от властите. За разлика от Саудитска Арабия обаче, в България има свободни избори. Поне в степента, в която не са манипулирани. Властите са резултат от избора на хората. Конструирането на врагове притъпява личната отговорност. А цената на цялата бутафория се измерва в кръв. Днес бежанска, вчера и утре – българска.
Amazon WorkMail’s new audit logging capability equips email system administrators with powerful visibility into mailbox activities and system events across their organization. As announced in our recent “What’s New” post, this feature enables the comprehensive capture and delivery of critical email data, empowering administrators to monitor, analyze, and maintain compliance.
With audit logging, WorkMail records a wide range of events, including metadata about messages sent, received, and failed login attempts, and configuration changes. Administrators have the option to deliver these audit logs to their preferred AWS services, such as Amazon Simple Storage System (S3) for long-term storage, Amazon Kinesis Data Firehose for real-time data streaming, or Amazon CloudWatch Logs for centralized log management. Additionally, standard CloudWatch metrics on audit logs provide deep insights into the usage and health of WorkMail mailboxes within the organization.
By leveraging Amazon WorkMail’s audit logging capabilities, enterprises have the ability to strengthen their security posture, fulfill regulatory requirements, and gain critical visibility into the email activities that underpin their daily operations. This post will explore the technical details and practical use cases of this powerful new feature.
In this blog, you will learn how to configure your WorkMail organization to send email audit logs to Amazon CloudWatch Logs, Amazon S3, and Amazon Data Firehose . We’ll also provide examples that show how to monitor access to your Amazon WorkMail Organization’s mailboxes by querying the logs via CloudWatch Log Insights.
Email security
Imagine you are the email administrator for a biotech company, and you’ve received a report about spam complaints coming from your company’s email system. When you investigate, you learn these complaints point to unauthorized emails originating from several of your company’s mailboxes. One or more of your company’s email accounts may have been compromised by a hacker. You’ll need to determine the specific mailboxes involved, understand who has access to those mailboxes, and how the mailboxes have been accessed. This will be useful in identifying mailboxes with multiple failed logins or unfamiliar IP access, which can indicate unauthorized attempts or hacking. To identify the cause of the security breach, you require access to detailed audit logs and familiar tools to analyze extensive log data and locate the root of your issues.
Amazon WorkMail Audit Logging
Amazon WorkMail is a secure, managed business email service that hosts millions of mailboxes globally. WorkMail features robust audit logging capabilities, equipping IT administrators and security experts with in-depth analysis of mailbox usage patterns. Audit logging provides detailed insights into user activities within WorkMail. Organizations can detect potential security vulnerabilities by utilizing audit logs. These logs document user logins, access permissions, and other critical activities. WorkMail audit logging facilitates compliance with various regulatory requirements, providing a clear audit trail of data privacy and security. WorkMail’s audit logs are crucial for maintaining the integrity, confidentiality, and reliability of your organization’s email system.
Understanding WorkMail Audit Logging
Amazon WorkMail’s audit logging feature provides you with the data you need to have a thorough understanding of your email mailbox activities. By sending detailed logs to Amazon CloudWatch Logs, Amazon S3, and Amazon Data Firehose, administrators can identify mailbox access issues, track access by IP addresses, and review mailbox data movements or deletions using familiar tools. It is also possible to configure multiple destinations for each log to meet the needs of a variety of use cases, including compliance archiving.
ACCESS CONTROL LOGS – These logs record evaluations of access control rules, noting whether access to the endpoint was granted or denied in accordance with the configured rules;
AUTHENTICATION LOGS – These logs capture details of login activities, chronicling both successful and failed authentication attempts;
AVAILABILITY PROVIDER LOGS – These logs document the use of the Availability Providers feature, tracking its operational status and interactions feature;
MAILBOX ACCESS LOGS – Logs in this category record each attempt to access mailboxes within the WorkMail Organization, providing a detailed account of credential and protocol access patterns.
Once audit logging is enabled, alerts can be configured to warn of authentication or access anomalies that surpass predetermined thresholds. JSON formatting allows for advanced processing and analysis of audit logs by third party tools. Audit logging stores all interactions with the exception of web mail client authentication metrics.
WorkMail audit logging in action
Below are two examples that show how WorkMail’s audit logging can be used to investigate unauthorized login attempts, and diagnose a misconfigured email client. In both examples, we’ll use WorkMail’s Mailbox Access Control Logs and query the mailbox access control logs in CloudWatch Log Insights.
In our first example, we’re looking for unsuccessful login attempts in a target timeframe. In CloudWatch Log Insights we run this query:
CloudWatch Log Insights returns all records in the timeframe, providing auth_succesful = 0 (false) and auth_failed_reason = Invalid username or password. We also see the source_ip, which we may decide to block in a WorkMail access control rule, or any other network security system.
Mailbox Access Control Log – an unsuccessful login attempt
In this next example, consider a WorkMail organization that has elected to block the IMAP protocol using a WorkMail access control rule (below):
WorkMail Access Control Rule – block IMAP protocol
Because some email clients use IMAP by default, occasionally new users in this example organization are denied access to email due to an incorrectly configured email client. Using WorkMail’s mailbox access control logs in CloudWatch Log Insights we run this query:
And we see the user’s attempt to access their email inbox via IMAP has been denied by the access control rule_id (below):
WorkMail Access Control logs – IMAP blocked by access rule
Conclusion
Amazon WorkMail’s audit logging feature offers comprehensive view of your organization’s email activities. Four different logs provide visibility into access controls, authentication attempts, interactions with external systems, and mailbox activities. It provides flexible log delivery through native integration with AWS services and tools. Enabling WorkMail’s audit logging capabilities helps administrators meet compliance requirements and enhances the overall security and reliability of their email system.
To learn more about audit logging on Amazon WorkMail, you may comment on this post (below), view the WorkMail documentation, or reach out to your AWS account team.
To learn more about Amazon WorkMail, or to create a no-cost 30-day test organization, see Amazon WorkMail.
About the Authors
Luis Miguel Flores dos Santos
Miguel is a Solutions Architect at AWS, boasting over a decade of expertise in solution architecture, encompassing both on-premises and cloud solutions. His focus lies on resilience, performance, and automation. Currently, he is delving into serverless computing. In his leisure time, he enjoys reading, riding motorcycles, and spending quality time with family and friends.
Andy Wong
Andy Wong is a Sr. Product Manager with the Amazon WorkMail team. He has 10 years of diverse experience in supporting enterprise customers and scaling start-up companies across different industries. Andy’s favorite activities outside of technology are soccer, tennis and free-diving.
Zip
Zip is a Sr. Specialist Solutions Architect at AWS, working with Amazon Pinpoint and Simple Email Service and WorkMail. Outside of work he enjoys time with his family, cooking, mountain biking, boating, learning and beach plogging.
For those of you attending NAB 2024 (coming up in Las Vegas from April 14–17), we’re excited to invite you to our Backblaze Tech Talk series in booth SL7077. This series will deliver insights from expert guest speakers from a range of media workflow service providers in conversation with Backblaze solution engineers. Whether you’re an experienced workflow architect or new to the industry, anyone attending will leave with actionable insights to improve their own media workflows.
All presentations are free, open to attendees, and will be held in the Backblaze booth (SL7077). Bonus: Get scanned while you’re there for exclusive Backblaze swag.
Sunday, April 14:
3:00 p.m.: Leslie Hathaway, Sales Engineer and Brian Scheffler, Pre-Sales Sys. Engineer at Quantum discuss AI tools, CatDV Classic & .io utilizing Backblaze for primary storage.
Monday, April 15:
10:00 a.m.: Helge Høibraaten, Co-Founder of CuttingRoom presents “Cloud-Powered Remote Production: Collaborative Video Editing on the Back of Backblaze.”
11:00 a.m.: Mattia Varriale, Sales Director EMEA at Backlight presents “Optimizing Media Workflow: Leveraging iconik and Backblaze for Cost-Effective, Searchable Storage.”
1:00 p.m.: Danny Peters, VP of Business Development, Americas at ELEMENTS presents “Bridging On-Premises and Cloud Workflows: The ELEMENTS Media Ecosystem.”
2:00 p.m.: Sam Bogoch, CEO at Axle AI with a new product announcement that is Powered by Backblaze.
3:00 p.m.: Greg Hollick, Chief Product Officer and Co-Founder at CloudSoda presents “Effortless Integration: Automating Media Assets into Backblaze with CloudSoda.”
Tuesday, April 16:
10:00 a.m.: Raul Vecchione, from Product Marketing at bunny.net presents “Edge Computing—Just Smarter.”
11:00 a.m.: Paul Matthijs Lombert, CEO at Hedge presents “Every Cloud Workflow Starts at the (H)edge.”
1:00 p.m.: Craig Hering, Co-Founder & CEO of Suite Studios presents “Suite Studios and Backblaze Integration Providing Direct Access to Your Data for Real-Time Editing and Archive.”
2:00 p.m.: Murad Mordukhay, CEO of Qencode presents “Building an Efficient Content Repository With Backblaze.”
Don’t miss out on these great tech talks. Elevate your expertise and connect with fellow media industry leaders. We look forward to seeing you at NAB! And, if you’re ready to sit down and take a deep dive into your storage needs, book a meeting here.
On February 20, Linaro held the initial
get-together for what is intended to be a regular Linux Kernel Forum for
the Arm-focused kernel community. This gathering aims to convene
approximately a few weeks prior to the merge window opening and prior to
the release of the current kernel version under development. Topics
covered in the first gathering include preparing 64-bit Arm kernels for
low-end embedded systems, memory errors and Compute Express
Link (CXL), devlink objectives, and scheduler integration.
Version 3.3.0 of the OpenSSL SSL/TLS implementation has been released.
Changes include a number of additions to its QUIC protocol support, some
year-2038 improvements for 32-bit systems, and a lot of cryptographic
features with descriptions like “Added a new EVP_DigestSqueeze()
API. This allows SHAKE to squeeze multiple times with different output
sizes.” See the release
notes for details.
The US Cyber Safety Review Board released a report on the summer 2023 hack of Microsoft Exchange by China. It was a serious attack by the Chinese government that accessed the emails of senior US government officials.
From the executive summary:
The Board finds that this intrusion was preventable and should never have occurred. The Board also concludes that Microsoft’s security culture was inadequate and requires an overhaul, particularly in light of the company’s centrality in the technology ecosystem and the level of trust customers place in the company to protect their data and operations. The Board reaches this conclusion based on:
the cascade of Microsoft’s avoidable errors that allowed this intrusion to succeed;
Microsoft’s failure to detect the compromise of its cryptographic crown jewels on its own, relying instead on a customer to reach out to identify anomalies the customer had observed;
the Board’s assessment of security practices at other cloud service providers, which maintained security controls that Microsoft did not;
Microsoft’s failure to detect a compromise of an employee’s laptop from a recently acquired company prior to allowing it to connect to Microsoft’s corporate network in 2021;
Microsoft’s decision not to correct, in a timely manner, its inaccurate public statements about this incident, including a corporate statement that Microsoft believed it had determined the likely root cause of the intrusion when in fact, it still has not; even though Microsoft acknowledged to the Board in November 2023 that its September 6, 2023 blog post about the root cause was inaccurate, it did not update that post until March 12, 2024, as the Board was concluding its review and only after the Board’s repeated questioning about Microsoft’s plans to issue a correction;
the Board’s observation of a separate incident, disclosed by Microsoft in January 2024, the investigation of which was not in the purview of the Board’s review, which revealed a compromise that allowed a different nation-state actor to access highly-sensitive Microsoft corporate email accounts, source code repositories, and internal systems; and
how Microsoft’s ubiquitous and critical products, which underpin essential services that support national security, the foundations of our economy, and public health and safety, require the company to demonstrate the highest standards of security, accountability, and transparency.
The report includes a bunch of recommendations. It’s worth reading in its entirety.
The board was established in early 2022, modeled in spirit after the National Transportation Safety Board. This is their third report.
There are many mechanisms for deferred work in the Linux kernel. One of them,
workqueues, has seen increasing use as part of
the move away from software interrupts. Alison Chaiken gave a talk
at SCALE
about how they compare to software interrupts, the new challenges they pose for
system administrators, and what tools are available to
kernel developers wishing to diagnose problems with workqueues as they become
increasingly prevalent.
The collective thoughts of the interwebz
Manage Consent
To provide the best experiences, we use technologies like cookies to store and/or access device information. Consenting to these technologies will allow us to process data such as browsing behavior or unique IDs on this site. Not consenting or withdrawing consent, may adversely affect certain features and functions.
Functional
Always active
The technical storage or access is strictly necessary for the legitimate purpose of enabling the use of a specific service explicitly requested by the subscriber or user, or for the sole purpose of carrying out the transmission of a communication over an electronic communications network.
Preferences
The technical storage or access is necessary for the legitimate purpose of storing preferences that are not requested by the subscriber or user.
Statistics
The technical storage or access that is used exclusively for statistical purposes.The technical storage or access that is used exclusively for anonymous statistical purposes. Without a subpoena, voluntary compliance on the part of your Internet Service Provider, or additional records from a third party, information stored or retrieved for this purpose alone cannot usually be used to identify you.
Marketing
The technical storage or access is required to create user profiles to send advertising, or to track the user on a website or across several websites for similar marketing purposes.