Post Syndicated from Julian Wood original https://aws.amazon.com/blogs/compute/using-github-actions-to-deploy-serverless-applications/
This post is written by Gopi Krishnamurthy, Senior Solutions Architect.
Continuous integration and continuous deployment (CI/CD) is one of the major DevOps components. This allows you to build, test, and deploy your applications rapidly and reliably, while improving quality and reducing time to market.
GitHub is an AWS Partner Network (APN) with the AWS DevOps Competency. GitHub Actions is a GitHub feature that allows you to automate tasks within your software development lifecycle. You can use GitHub Actions to run a CI/CD pipeline to build, test, and deploy software directly from GitHub.
The AWS Serverless Application Model (AWS SAM) is an open-source framework for building serverless applications. It provides shorthand syntax to express functions, APIs, databases, and event source mappings. With a few lines per resource, you can define the application you want and model it using YAML.
During deployment, AWS SAM transforms and expands the AWS SAM syntax into AWS CloudFormation syntax, enabling you to build serverless applications faster. The AWS SAM CLI allows you to build, test, and debug applications locally, defined by AWS SAM templates. You can also use the AWS SAM CLI to deploy your applications to AWS. For AWS SAM example code, see the serverless patterns collection.
In this post, you learn how to create a sample serverless application using AWS SAM. You then use GitHub Actions to build, and deploy the application in your AWS account.
New GitHub action setup-sam
A GitHub Actions runner is the application that runs a job from a GitHub Actions workflow. You can use a GitHub hosted runner, which is a virtual machine hosted by GitHub with the runner application installed. You can also host your own runners to customize the environment used to run jobs in your GitHub Actions workflows.
AWS has released a GitHub action called setup-sam to install AWS SAM, which is pre-installed on GitHub hosted runners. You can use this action to install a specific, or the latest AWS SAM version.
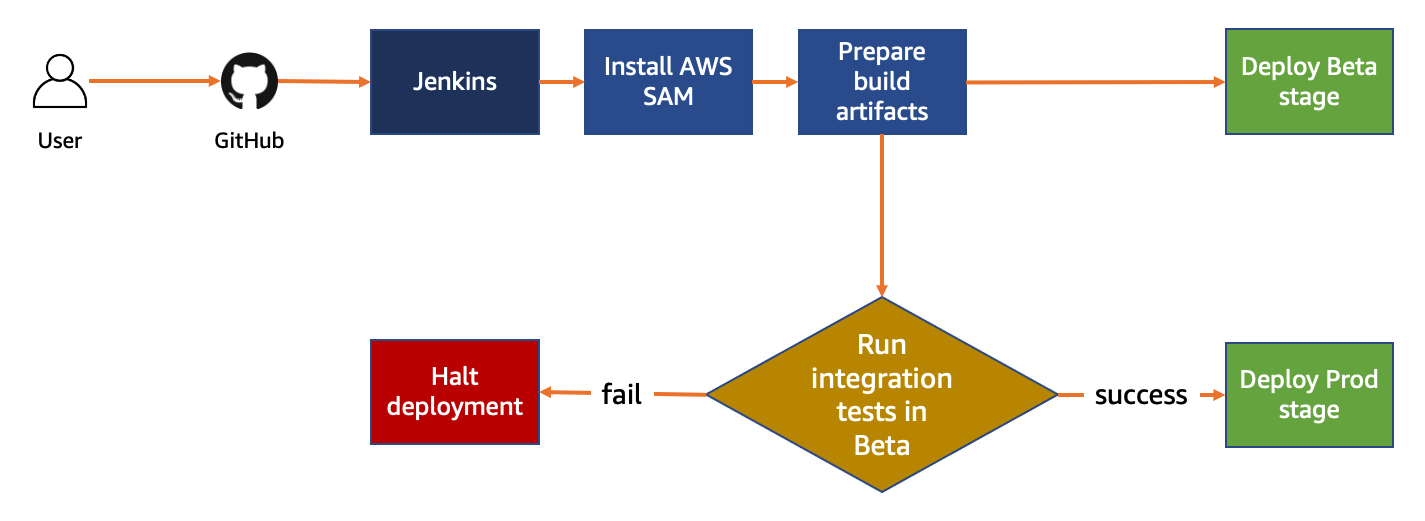
This demo uses AWS SAM to create a small serverless application using one of the built-in templates. When the code is pushed to GitHub, a GitHub Actions workflow triggers a GitHub CI/CD pipeline. This builds, and deploys your code directly from GitHub to your AWS account.
Prerequisites
- A GitHub account: This post assumes you have the required permissions to configure GitHub repositories, create workflows, and configure GitHub secrets.
- Create a new GitHub repository and clone it to your local environment. For this example, create a repository called
github-actions-with-aws-sam. - An AWS account with permissions to create the necessary resources.
- Install AWS Command Line Interface (CLI) and AWS SAM CLI locally. This is separate from using the AWS SAM CLI in a GitHub Actions runner. If you use AWS Cloud9 as your integrated development environment (IDE), AWS CLI and AWS SAM are pre-installed.
- Create an Amazon S3 bucket in your AWS account to store the build package for deployment.
- An AWS user with access keys, which the GitHub Actions runner uses to deploy the application. The user also write requires access to the S3 bucket.
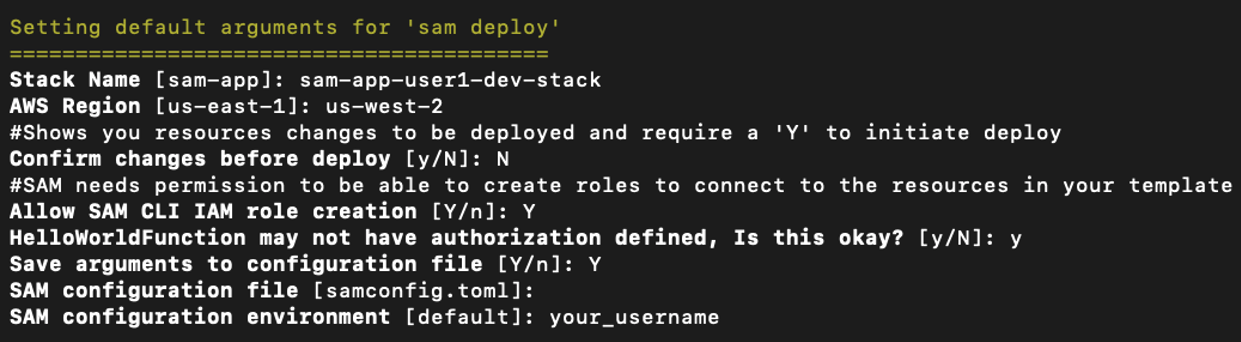
Creating the AWS SAM application
You can create a serverless application by defining all required resources in an AWS SAM template. AWS SAM provides a number of quick-start templates to create an application.
- From the CLI, open a terminal, navigate to the parent of the cloned repository directory, and enter the following:
- When asked to select package type (zip or image), select zip.
sam init -r python3.8 -n github-actions-with-aws-sam --app-template "hello-world"This creates an AWS SAM application in the root of the repository named github-actions-with-aws-sam, using the default configuration. This consists of a single AWS Lambda Python 3.8 function invoked by an Amazon API Gateway endpoint.
To see additional runtimes supported by AWS SAM and options for sam init, enter sam init -h.
Local testing
AWS SAM allows you to test your applications locally. AWS SAM provides a default event in events/event.json that includes a message body of {\"message\": \"hello world\"}.
- Invoke the
HelloWorldFunctionLambda function locally, passing the default event: - The function response is:
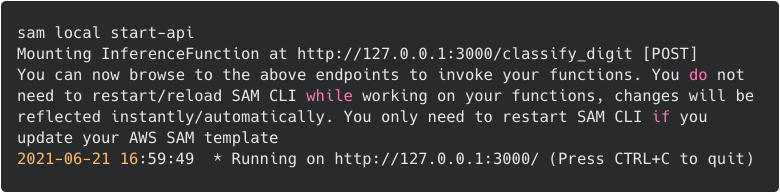
- Test the API Gateway functionality in front of the Lambda function by first starting the API locally:
- AWS SAM launches a Docker container with a mock API Gateway endpoint listening on
localhost:3000. - Use curl to call the hello API:
- Create a new file called
sam-pipeline.ymlunder the .github/workflows directory. - Edit the sam-pipeline.yml file and add the following:
- Replace
##s3-bucket##with the name of the S3 bucket previously created to store the deployment package. - Replace both
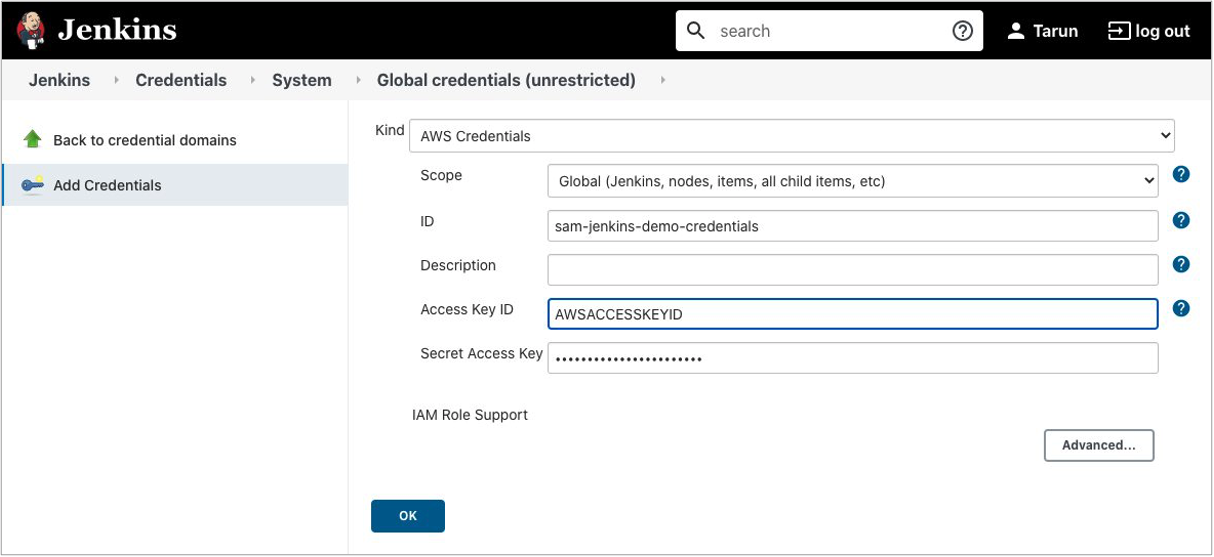
##region##with your AWS Region. - Do not store credentials in your repository code. Use GitHub Actions secrets to store credentials and redact credentials from GitHub Actions workflow logs.
- Create an individual IAM user with an access key for use in GitHub Actions workflows, preferably one per repository. Do not use the AWS account root user access key.
- Grant least privilege to the credentials used in GitHub Actions workflows. Grant only the permissions required to perform the actions in your GitHub Actions workflows.
- Rotate the credentials used in GitHub Actions workflows regularly.
- Monitor the activity of the credentials used in GitHub Actions workflows.
- Incompatible software versions such as the Python runtime being different from the Python version on the build machine. Resolve this by installing the proper software versions.
- Credentials could not be loaded. Verify that AWS credentials are stored in GitHub secrets.
- Ensure that your AWS account has the necessary permissions to deploy the resources in the AWS SAM template, in addition to the S3 deployment bucket.
- Within the workflow run, expand the Run sam deploy section.
- Navigate to the AWS SAM Outputs section. The
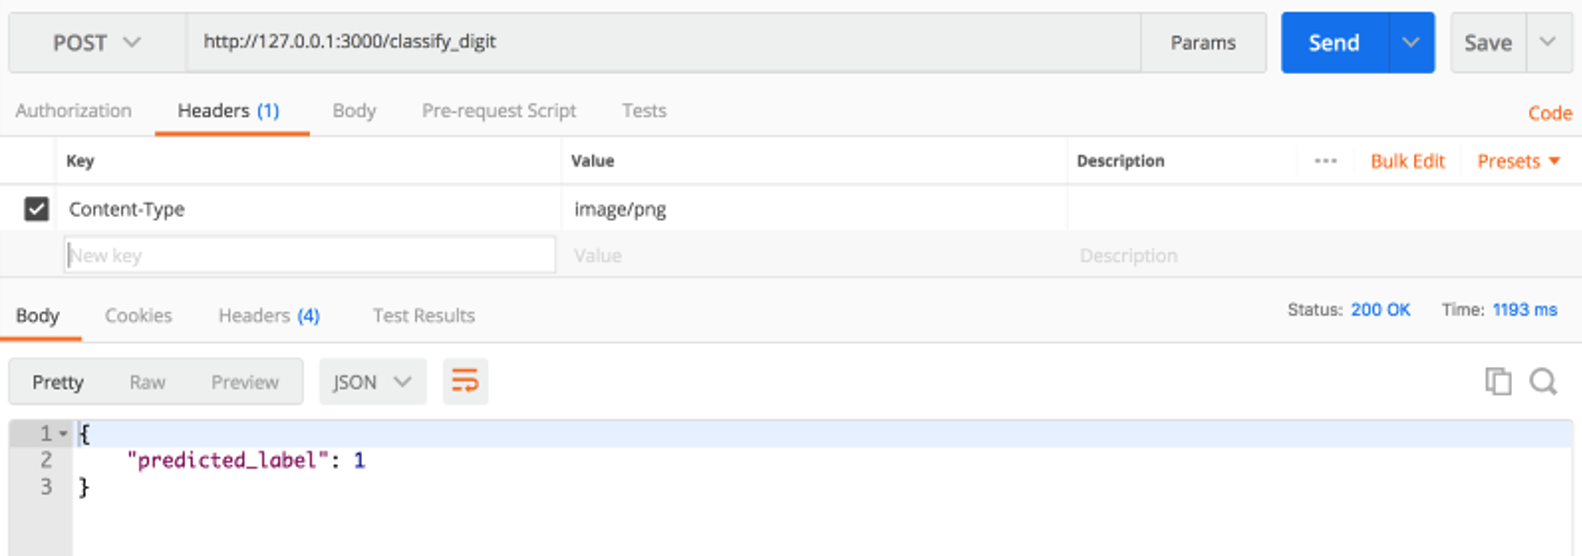
HelloWorldAPIvalue shows the API Gateway endpoint URL deployed in your AWS account. - Use curl to test the API:
sam local invoke HelloWorldFunction -e events/event.json{"message": "hello world"}
sam local start-apicurl http://127.0.0.1:3000/helloThe API response should be:
{"message": "hello world"}
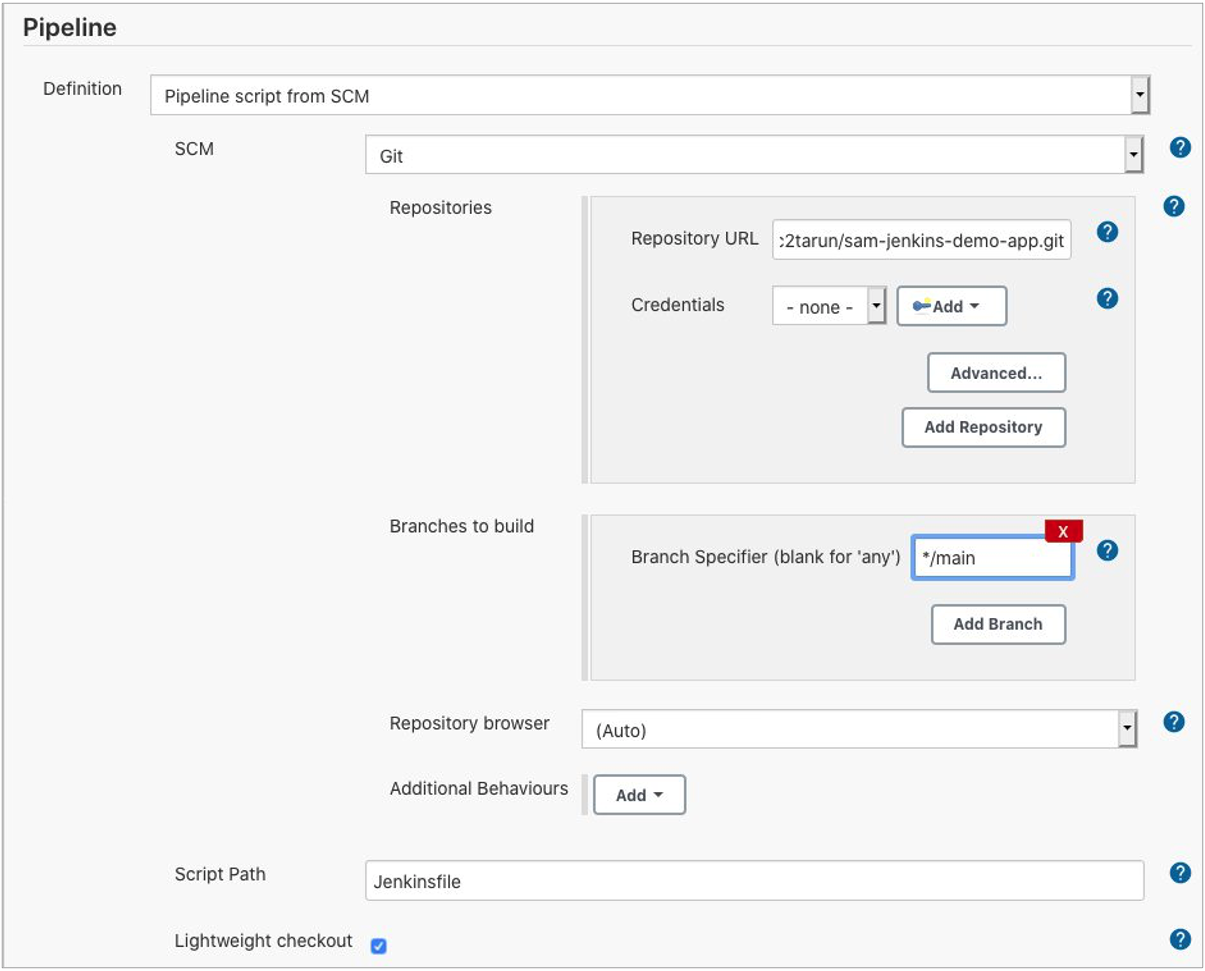
Creating the sam-pipeline.yml file
GitHub CI/CD pipelines are configured using a YAML file. This file configures what specific action triggers a workflow, such as push on main, and what workflow steps are required.
In the root of the repository containing the files generated by sam init, create the directory: .github/workflows.

sam-pipeline.yml file
on:
  push:
    branches:
      - main
jobs:
  build-deploy:
    runs-on: ubuntu-latest
    steps:
      - uses: actions/checkout@v2
      - uses: actions/setup-python@v2
      - uses: aws-actions/setup-sam@v1
      - uses: aws-actions/configure-aws-credentials@v1
        with:
          aws-access-key-id: ${{ secrets.AWS_ACCESS_KEY_ID }}
          aws-secret-access-key: ${{ secrets.AWS_SECRET_ACCESS_KEY }}
          aws-region: ##region##
      # sam build
      - run: sam build --use-container

# Run Unit tests- Specify unit tests here

# sam deploy
      - run: sam deploy --no-confirm-changeset --no-fail-on-empty-changeset --stack-name sam-hello-world --s3-bucket ##s3-bucket## --capabilities CAPABILITY_IAM --region ##region##
The configuration triggers the GitHub Actions CI/CD pipeline when code is pushed to the main branch. You can amend this if you are using another branch. For a full list of supported events, refer to GitHub documentation page.
You can further customize the sam build –use-container command if necessary. By default the Docker image used to create the build artifact is pulled from Amazon ECR Public. The default Python 3.8 image in this example is based on the language specified during sam init. To pull a different container image, use the --build-image option as specified in the documentation.
The AWS CLI and AWS SAM CLI are installed in the runner using the GitHub action setup-sam. To install a specific version, use the version parameter.
uses: aws-actions/setup-sam@v1
with:
  version: 1.23.0
As part of the CI/CD process, we recommend you scan your code for quality and vulnerabilities in bundled libraries. You can find these security offerings from our AWS Lambda Technology Partners.
Configuring AWS credentials in GitHub
The GitHub Actions CI/CD pipeline requires AWS credentials to access your AWS account. The credentials must include AWS Identity and Access Management (IAM) policies that provide access to Lambda, API Gateway, AWS CloudFormation, S3, and IAM resources.
These credentials are stored as GitHub secrets within your GitHub repository, under Settings > Secrets. For more information, see “GitHub Actions secrets”.
In your GitHub repository, create two secrets named AWS_ACCESS_KEY_ID and AWS_SECRET_ACCESS_KEY and enter the key values. We recommend following IAM best practices for the AWS credentials used in GitHub Actions workflows, including:
Deploying your application
Add all the files to your local git repository, commit the changes, and push to GitHub.
git add .
git commit -am "Add AWS SAM files"
git push
Once the files are pushed to GitHub on the main branch, this automatically triggers the GitHub Actions CI/CD pipeline as configured in the sam-pipeline.yml file.
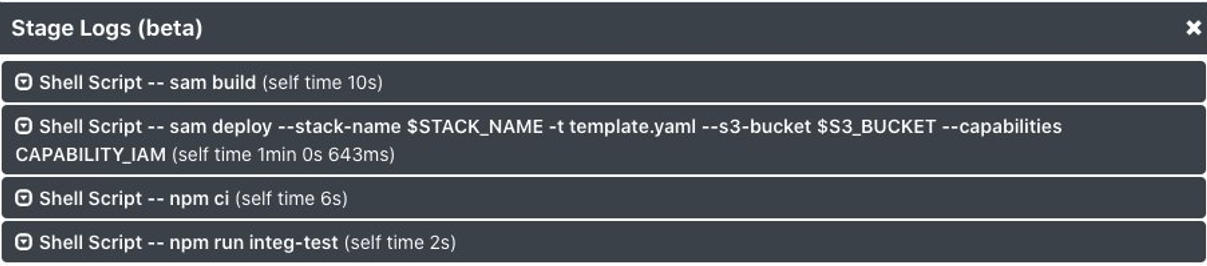
The GitHub actions runner performs the pipeline steps specified in the file. It checks out the code from your repo, sets up Python, and configures the AWS credentials based on the GitHub secrets. The runner uses the GitHub action setup-sam to install AWS SAM CLI.
The pipeline triggers the sam build process to build the application artifacts, using the default container image for Python 3.8.
sam deploy runs to configure the resources in your AWS account using the securely stored credentials.
To view the application deployment progress, select Actions in the repository menu. Select the workflow run and select the job name build-deploy.
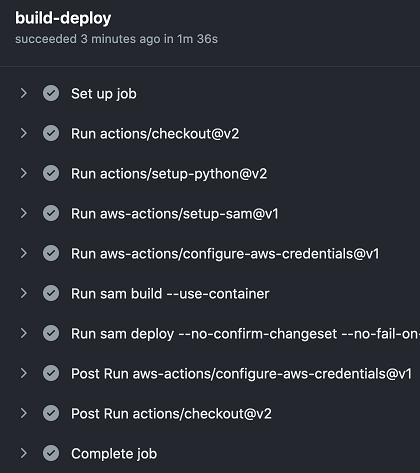
GitHub Actions progress
If the build fails, you can view the error message. Common errors are:
Testing the application

AWS SAM outputs
curl https://<api-id>.execute-api.us-east-1.amazonaws.com/Prod/hello/The API response should be:
{"message": "hello world"}
Cleanup
To remove the application resources, navigate to the CloudFormation console and delete the stack. Alternatively, you can use an AWS CLI command to remove the stack:
aws cloudformation delete-stack --stack-name sam-hello-worldEmpty, and delete the S3 deployment bucket.
Conclusion
GitHub Actions is a GitHub feature that allows you to run a CI/CD pipeline to build, test, and deploy software directly from GitHub. AWS SAM is an open-source framework for building serverless applications.
In this post, you use GitHub Actions CI/CD pipeline functionality and AWS SAM to create, build, test, and deploy a serverless application. You use sam init to create a serverless application and tested the functionality locally. You create a sam-pipeline.yml file to define the pipeline steps for GitHub Actions.
The GitHub action setup-sam installed AWS SAM on the GitHub hosted runner. The GitHub Actions workflow uses sam build to create the application artifacts and sam deploy to deploy them to your AWS account.
For more serverless learning resources, visit https://serverlessland.com.


 This generates a sample workflow definition that you can change once the workflow is created.


 The Definition section shows the ASL that makes up the example workflow. The following example shows the new API Gateway resource and its parameters:


