Post Syndicated from Benjamin Smith original https://aws.amazon.com/blogs/compute/introducing-amazon-api-gateway-service-integration-for-aws-step-functions/
AWS Step Functions now integrates with Amazon API Gateway to enable backend orchestration with minimal code and built-in error handling.
API Gateway is a fully managed service that makes it easy for developers to create, publish, maintain, monitor, and secure APIs at any scale. These APIs enable applications to access data, business logic, or functionality from your backend services.
Step Functions allows you to build resilient serverless orchestration workflows with AWS services such as AWS Lambda, Amazon SNS, Amazon DynamoDB, and more. AWS Step Functions integrates with a number of services natively. Using Amazon States Language (ASL), you can coordinate these services directly from a task state.
What’s new?
The new Step Functions integration with API Gateway provides an additional resource type, arn:aws:states:::apigateway:invoke and can be used with both Standard and Express workflows. It allows customers to call API Gateway REST APIs and API Gateway HTTP APIs directly from a workflow, using one of two integration patterns:
- Request-Response: calling a service and let Step Functions progress to the next state immediately after it receives an HTTP response. This pattern is supported by Standard and Express Workflows.
- Wait-for-Callback: calling a service with a task token and have Step Functions wait until that token is returned with a payload. This pattern is supported by Standard Workflows.
The new integration is configured with the following Amazon States Language parameter fields:
- ApiEndpoint: The API root endpoint.
- Path: The API resource path.
- Method: The HTTP request method.
- HTTP headers: Custom HTTP headers.
- RequestBody: The body for the API request.
- Stage: The API Gateway deployment stage.
- AuthType: The authentication type.
Refer to the documentation for more information on API Gateway fields and concepts.
Getting started
The API Gateway integration with Step Functions is configured using AWS Serverless Application Model (AWS SAM), the AWS Command Line Interface (AWS CLI), AWS CloudFormation or from within the AWS Management Console.
To get started with Step Functions and API Gateway using the AWS Management Console:
- Go to the Step Functions page of the AWS Management Console.
- Choose Run a sample project and choose Make a call to API Gateway.
 The Definition section shows the ASL that makes up the example workflow. The following example shows the new API Gateway resource and its parameters:
- Review example Definition, then choose Next.
- Choose Deploy resources.
 The Definition section shows the ASL that makes up the example workflow. The following example shows the new API Gateway resource and its parameters:
This deploys a Step Functions standard workflow and a REST API with a /pets resource containing a GET and a POST method. It also deploys an IAM role with the required permissions to invoke the API endpoint from Step Functions.
The RequestBody field lets you customize the API’s request input. This can be a static input or a dynamic input taken from the workflow payload.
Running the workflow
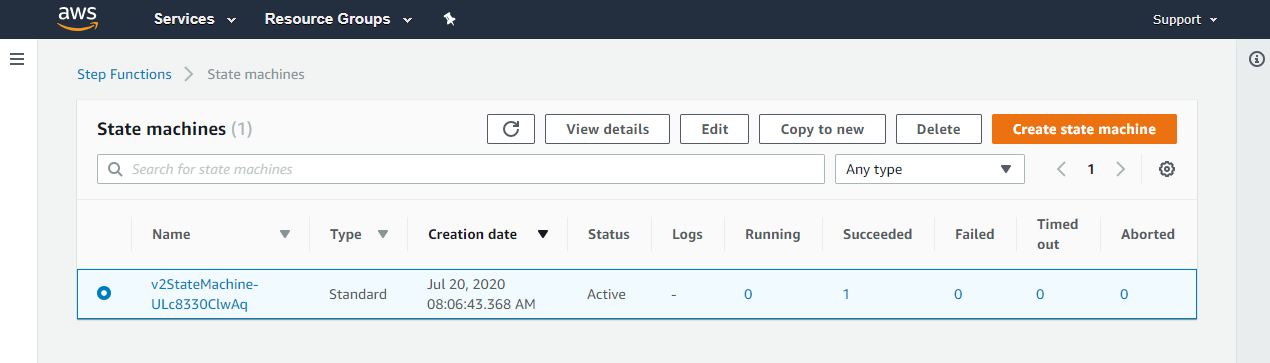
- Choose the newly created state machine from the Step Functions page of the AWS Management Console
- Choose Start execution.
- Paste the following JSON into the input field:
{ "NewPet": { "type": "turtle", "price": 74.99 } } - Choose Start execution
- Choose the Retrieve Pet Store Data step, then choose the Step output tab.
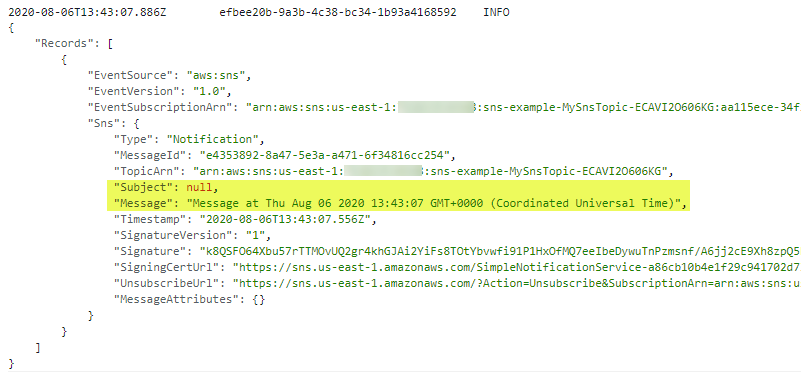
This shows the successful responseBody output from the “Add to pet store” POST request and the response from the “Retrieve Pet Store Data” GET request.

Access control
The API Gateway integration supports AWS Identity and Access Management (IAM) authentication and authorization. This includes IAM roles, policies, and tags.
AWS IAM roles and policies offer flexible and robust access controls that can be applied to an entire API or individual methods. This controls who can create, manage, or invoke your REST API or HTTP API.
Tag-based access control allows you to set more fine-grained access control for all API Gateway resources. Specify tag key-value pairs to categorize API Gateway resources by purpose, owner, or other criteria. This can be used to manage access for both REST APIs and HTTP APIs.
API Gateway resource policies are JSON policy documents that control whether a specified principal (typically an IAM user or role) can invoke the API. Resource policies can be used to grant access to a REST API via AWS Step Functions. This could be for users in a different AWS account or only for specified source IP address ranges or CIDR blocks.
To configure access control for the API Gateway integration, set the AuthType parameter to one of the following:
{“AuthType””: “NO_AUTH”}
Call the API directly without any authorization. This is the default setting.{“AuthType””: “IAM_ROLE”}
Step Functions assumes the state machine execution role and signs the request with credentials using Signature Version 4.{“AuthType””: “RESOURCE_POLICY”}
Step Functions signs the request with the service principal and calls the API endpoint.
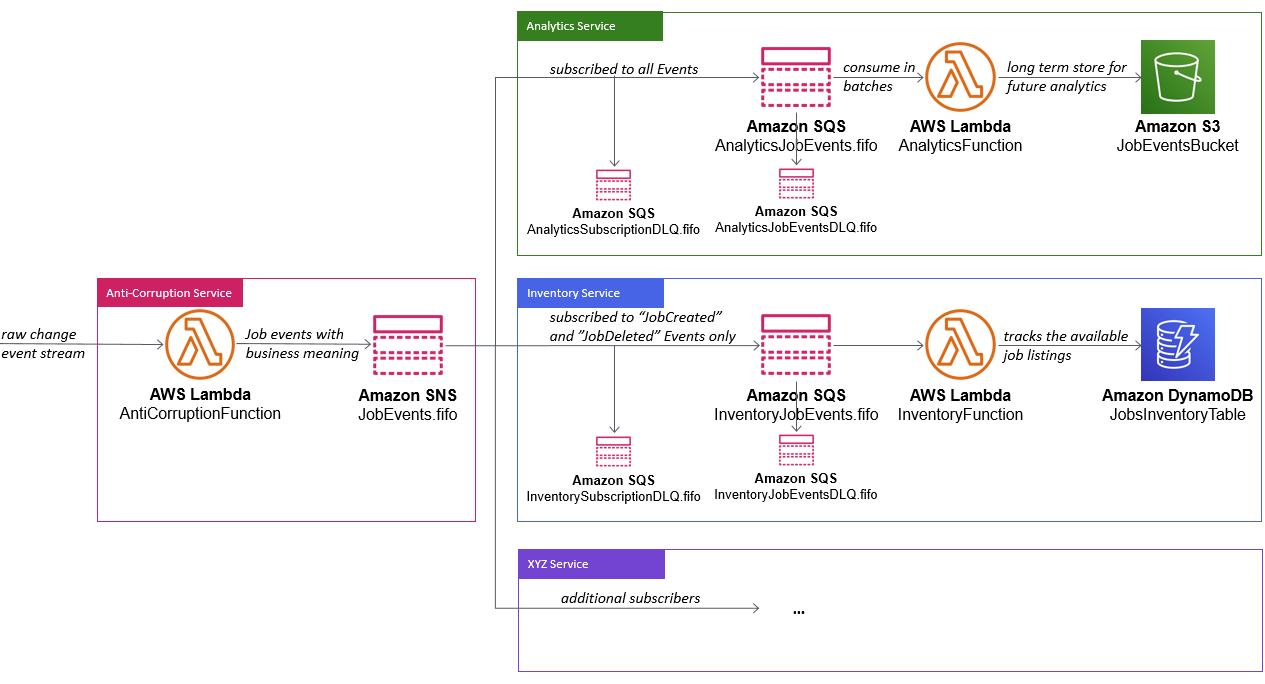
Orchestrating microservices
Customers are already using Step Functions’ built in failure handling, decision branching, and parallel processing to orchestrate application backends. Development teams are using API Gateway to manage access to their backend microservices. This helps to standardize request, response formats and decouple business logic from routing logic. It reduces complexity by allowing developers to offload responsibilities of authentication, throttling, load balancing and more. The new API Gateway integration enables developers to build robust workflows using API Gateway endpoints to orchestrate microservices. These microservices can be serverless or container-based.
The following example shows how to orchestrate a microservice with Step Functions using API Gateway to access AWS services. The example code for this application can be found in this GitHub repository.

To run the application:
- Clone the GitHub repository:
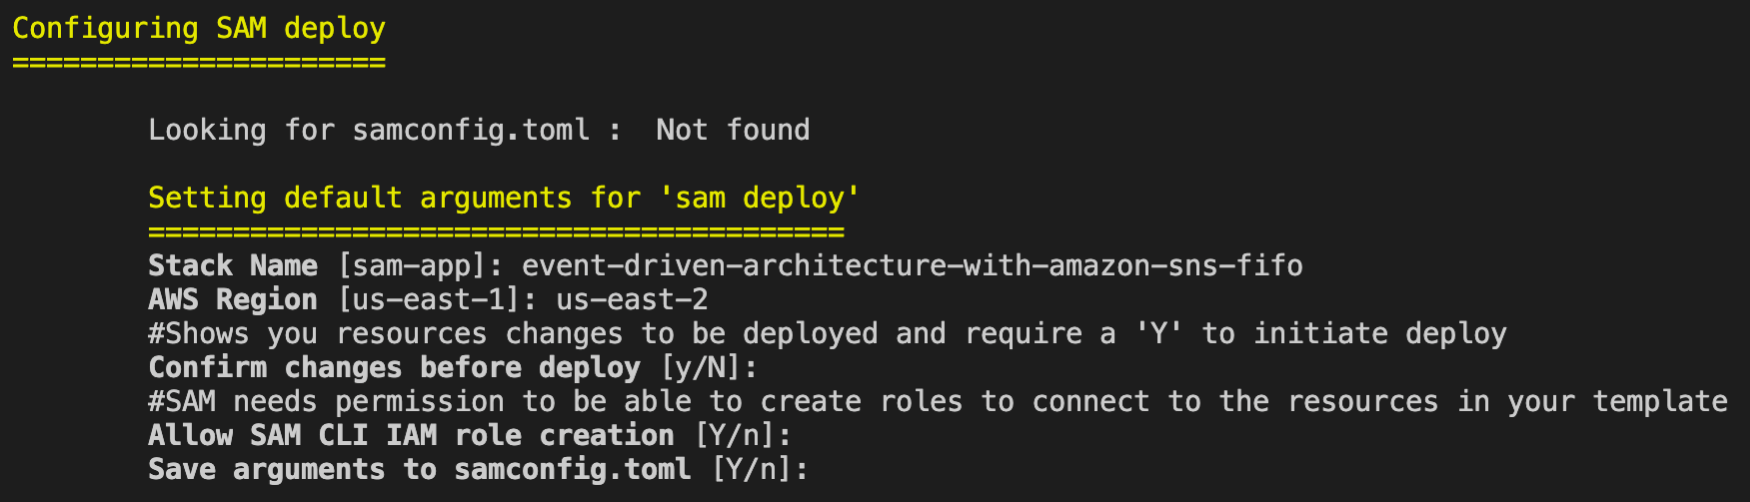
$ git clone https://github.com/aws-samples/example-step-functions-integration-api-gateway.git $ cd example-step-functions-integration-api-gateway - Deploy the application using AWS SAM CLI, accepting all the default parameter inputs:
$ sam build && sam deploy -g
This deploys 17 resources including a Step Functions standard workflow, an API Gateway REST API with three resource endpoints, 3 Lambda functions, and a DynamoDB table. Make a note of the
StockTradingStateMachineArnvalue. You can find this in the command line output or in the Applications section of the AWS Lambda Console:
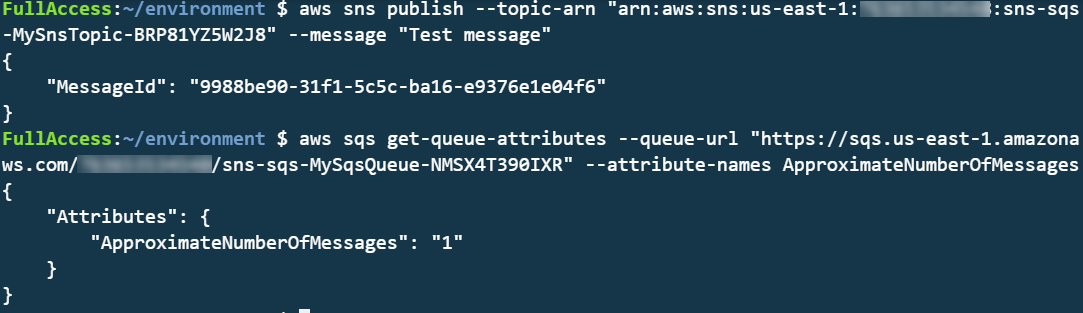
- Manually trigger the workflow from a terminal window:
aws stepFunctions start-execution \
--state-machine-arn <StockTradingStateMachineArnValue>


The response looks like:


When the workflow is run, a Lambda function is invoked via a GET request from API Gateway to the /check resource. This returns a random stock value between 1 and 100. This value is evaluated in the Buy or Sell choice step, depending on if it is less or more than 50. The Sell and Buy states use the API Gateway integration to invoke a Lambda function, with a POST method. A stock_value is provided in the POST request body. A transaction_result is returned in the ResponseBody and provided to the next state. The final state writes a log of the transition to a DynamoDB table.
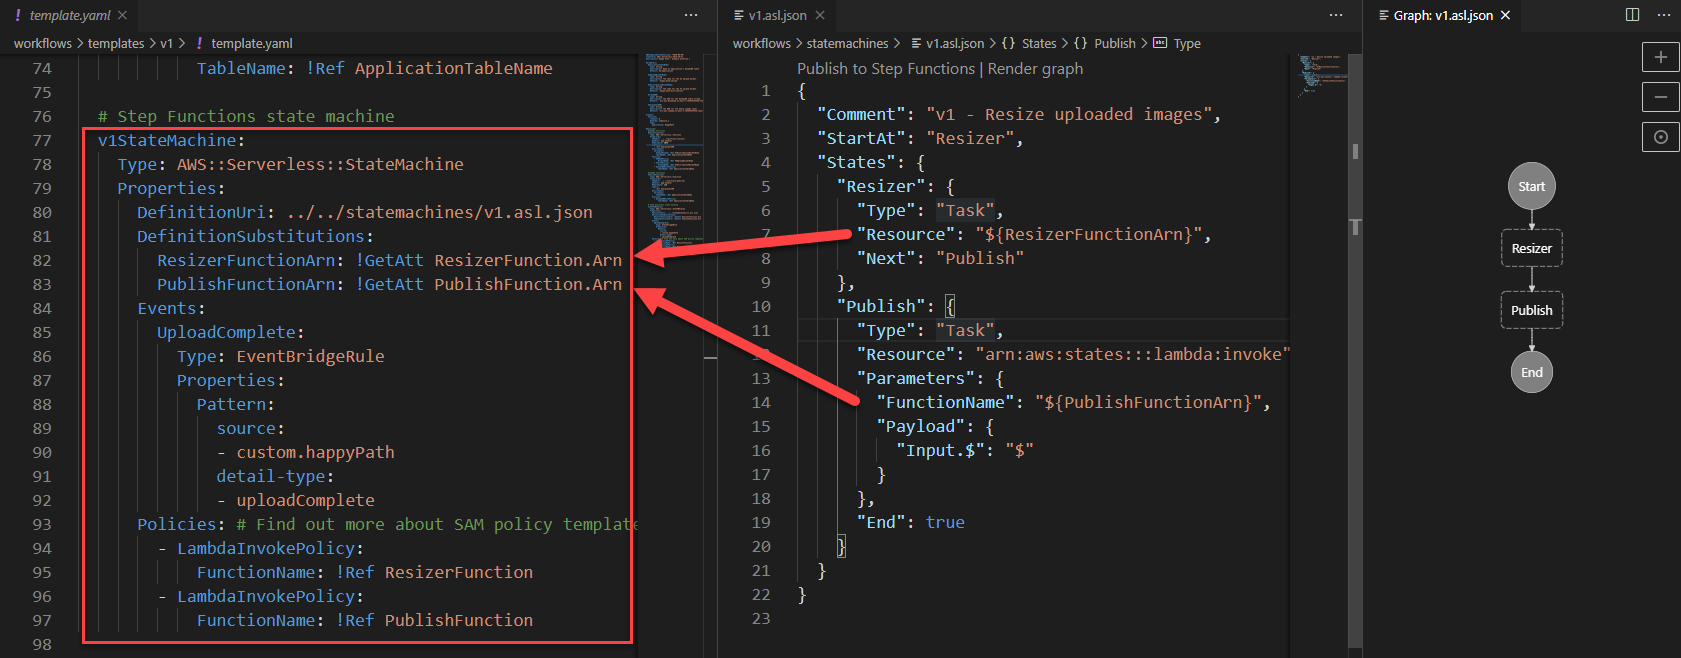
Defining the resource with an AWS SAM template
The Step Functions resource is defined in this AWS SAM template. The DefinitionSubstitutions field is used to pass template parameters to the workflow definition.
StockTradingStateMachine:
    Type: AWS::Serverless::StateMachine # More info about State Machine Resource: https://docs.aws.amazon.com/serverless-application-model/latest/developerguide/sam-resource-statemachine.html
    Properties:
      DefinitionUri: statemachine/stock_trader.asl.json
      DefinitionSubstitutions:
        StockCheckPath: !Ref CheckPath
        StockSellPath: !Ref SellPath
        StockBuyPath: !Ref BuyPath
        APIEndPoint: !Sub "${ServerlessRestApi}.execute-api.${AWS::Region}.amazonaws.com"
        DDBPutItem: !Sub arn:${AWS::Partition}:states:::dynamodb:putItem
        DDBTable: !Ref TransactionTable
The workflow is defined on a separate file (/statemachine/stock_trader.asl.json).
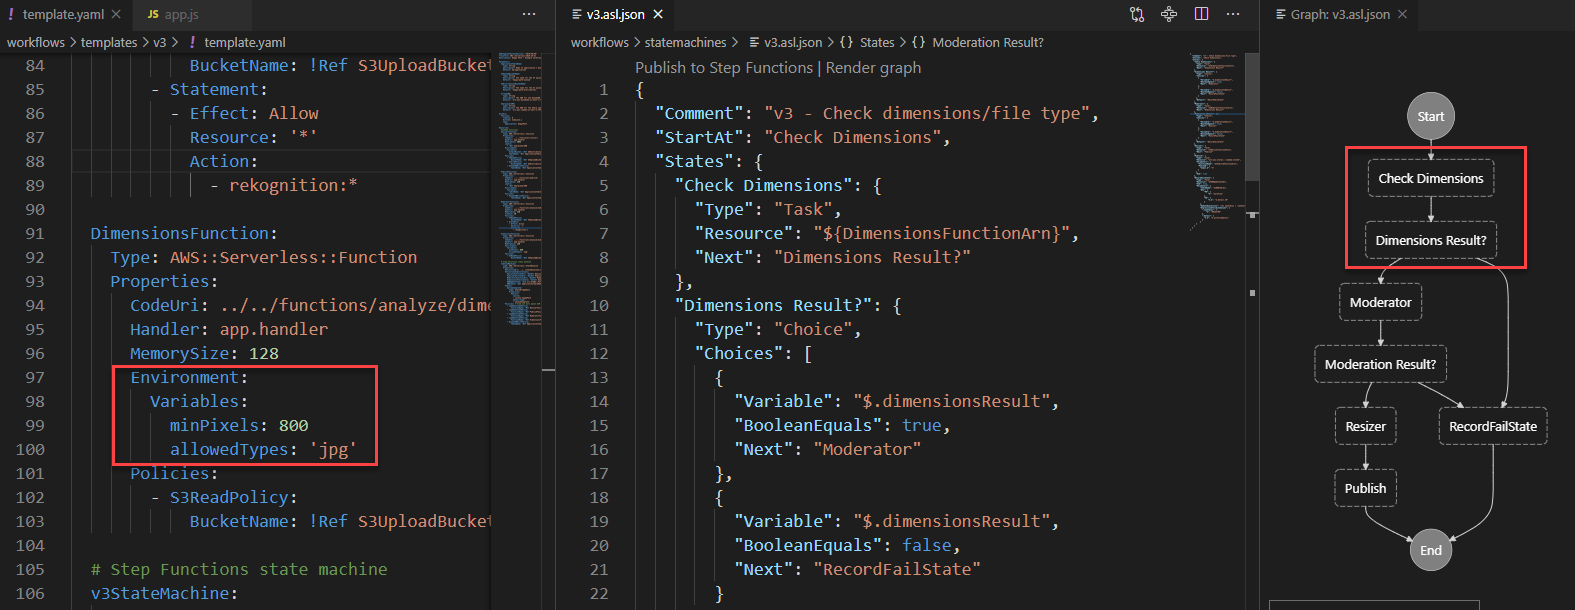
The following code block defines the Check Stock Value state. The new resource, arn:aws:states:::apigateway:invoke declares the API Gateway service integration type.
The parameters object holds the required fields to configure the service integration. The Path and ApiEndpoint values are provided by the DefinitionsSubstitutions field in the AWS SAM template. The RequestBody input is defined dynamically using Amazon States Language. The .$ at the end of the field name RequestBody specifies that the parameter use a path to reference a JSON node in the input.
"Check Stock Value": {
  "Type": "Task",
  "Resource": "arn:aws:states:::apigateway:invoke",
  "Parameters": {
      "ApiEndpoint":"${APIEndPoint}",
      "Method":"GET",
      "Stage":"Prod",
      "Path":"${StockCheckPath}",
      "RequestBody.$":"$",
      "AuthType":"NO_AUTH"
  },
  "Retry": [
      {
          "ErrorEquals": [
              "States.TaskFailed"
          ],
          "IntervalSeconds": 15,
          "MaxAttempts": 5,
          "BackoffRate": 1.5
      }
  ],
  "Next": "Buy or Sell?"
},
The deployment process validates the ApiEndpoint value. The service integration builds the API endpoint URL from the information provided in the parameters block in the format https://[APIendpoint]/[Stage]/[Path].
Conclusion
The Step Functions integration with API Gateway provides customers with the ability to call REST APIs and HTTP APIs directly from a Step Functions workflow.
Step Functions’ built in error handling helps developers reduce code and decouple business logic. Developers can combine this with API Gateway to offload responsibilities of authentication, throttling, load balancing and more. This enables developers to orchestrate microservices deployed on containers or Lambda functions via API Gateway without managing infrastructure.
This feature is available in all Regions where both AWS Step Functions and Amazon API Gateway are available. View the AWS Regions table to learn more. For pricing information, see Step Functions pricing. Normal service limits of API Gateway and service limits of Step Functions apply.
For more serverless learning resources, visit Serverless Land.


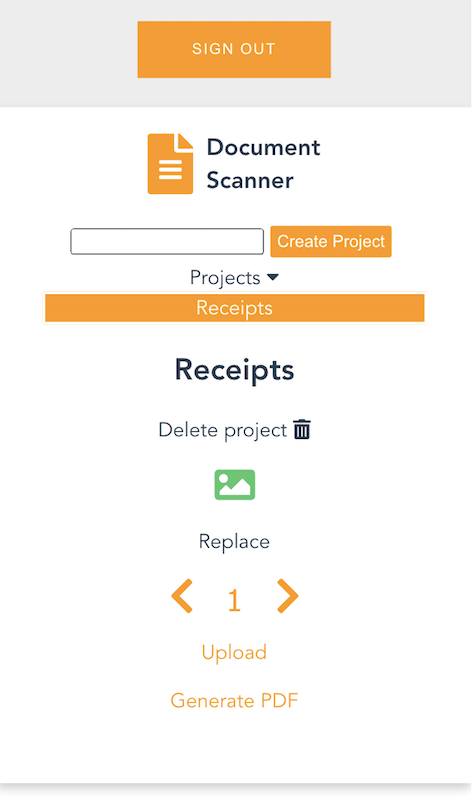
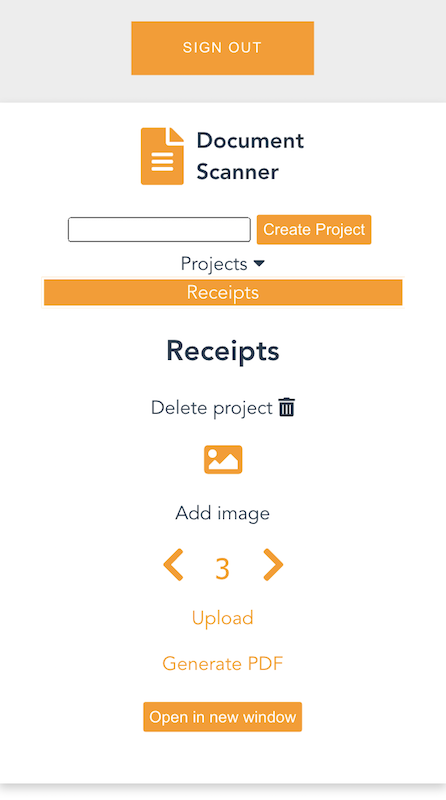
 Nuxt.js scaffolding tool inputs