Use of long-term access keys for authentication between cloud resources increases the risk of key exposure and unauthorized secrets reuse. Amazon Web Services (AWS) has developed a solution to enable customers to securely authenticate Azure resources with AWS resources using short-lived tokens to reduce risks to secure authentication.
In this solution, we show you how to obtain temporary credentials in IAM. The solution uses AWS Security Token Service (AWS STS) in conjunction with Azure managed identities and Azure App Registration. This method provides a more secure and efficient way to bridge Azure and AWS clouds, providing seamless integration without compromising secure authentication and authorization standards.
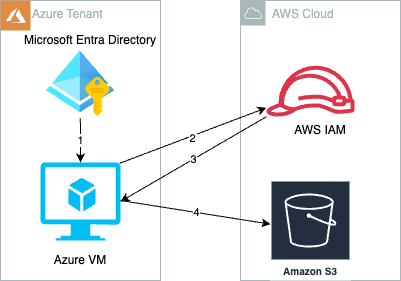
Create and attach an Azure managed identity to an Azure virtual machine (VM).
Azure VM gets an Azure access token from the managed identity and sends it to AWS STS to retrieve temporary security credentials.
An IAM role created with a valid Azure tenant audience and subject validates that the claim is sourced from a trusted entity and sends temporary security credentials to the requesting Azure VM.
Azure VM accesses AWS resources using the AWS STS provided temporary security credentials.
To prepare the authentication process with Microsoft Entra ID, an enterprise application must be created in Microsoft Entra ID. This serves as a sign-in endpoint and provides the necessary user identity information through OIDC access tokens to the identity provider (IdP) of the target AWS account.
Note: You can get short term credentials by providing access tokens from managed identities or enterprise applications. This post covers the enterprise application use case.
Register a new application in Azure
In the Azure portal, select Microsoft Entra ID.
Select App registrations.
Select New registration.
Enter a name for your application and then select an option in Supported account types (in this example, we chose Accounts in this Organization directory only). Leave the other options as is. Then choose Register.
Figure 2: Register an application in the Azure portal
Configure the application ID URI
In the Azure portal, select Microsoft Entra ID.
Select App registrations.
On the App registrations page, select All applications and choose the newly registered application.
On the newly registered application’s overview page, choose Application ID URI and then select Add.
On the Edit application ID URI page, enter the value of the URI, which looks like urn://<name of the application> or api://<name of the application>.
The application ID URI will be used later as the audience in the identity provider(idP) section of AWS.
Figure 3: Configure the application ID URI
Open the newly registered application’s overview page.
In the navigation pane, under Manage, choose App roles.
Select Create app role and then enter a Display name and for Allowed member types, select Both (Users/Groups + Applications).
For Description, enter a description.
Select Do you want to enable this app role? And then choose Apply.
Figure 4: Create and enable an application role
Assign a managed identity—as created in Step 4 of the prerequisites—to the new application role. This operation can only be done by either using the Azure Cloud Shell or running scripts locally by installing the latest version of the Microsoft Graph PowerShell SDK. (For more information about assigning managed identities to application roles using PowerShell, see Azure documentation.)
You must have the following information:
ObjectID: To find the managed identity’s Object (Principal) ID, go to the Managed Identities page, select the identity name, and then select Overview.
Figure 5: Find the ObjectID of the managed identity
ID: To find the ID of the application role, go to App registrations, select the application name, and then select App roles.
Figure 6: Find the ID of the application role
PrincipalID: Same as ObjectID, which is the managed identity’s Object (Principal) ID.
ResourceID: The ObjectID of the resource service principal, which you can find by going to the Enterprise applications page and selection the application. Select Overview and then Properties to find the ObjectID.
Figure 7: Find the ResourceID
With the resource IDs, you can now use Azure Cloud Shell and run the following script in PowerShell terminal with New-AzureADServiceAppRoleAssignment. Replace the variables with the resource IDs.
In the AWS Management Console for IAM, create an IAM Identity Provider.
In the left navigation pane, select Identity providers and then choose Add an identity provider.
For Provider type, choose OpenID Connect.
For Provider URL, enter https://sts.windows.net/<Microsoft Entra Tenant ID>. Replace <Microsoft Entra Tenant ID> with your Tenant ID from Azure. This allows only identities from your Azure tenant to access your AWS resources.
For Audience use the client_id of the Azure managed identity or the application ID URI from enterprise applications.
For Audience, enter the application ID URI that you configured on step 5 of Configure the application ID URI. If you have additional client IDs (also known as audiences) for this IdP, you can add them to the provider detail page later.
You can also use different audiences in the role trust policy in the next step to limit the roles that specific audiences can assume. To do so, you must provide a StringEquals condition in the trust policy of the IAM role.
Figure 8: Adding an audience (client ID)
Using an OIDC principal without a condition can be overly permissive. To make sure that only the intended identities assume the role, provide an audience (aud) and subject (sub) as conditions in the role trust policy for this IAM role.
sts.windows.net/<Microsoft Entra Tenant ID>/:sub represents the identity of your Azure workload that limits access to the specific Azure identity that can assume this role from the Azure tenant. See the following example for conditions.
Replace <Microsoft Entra Tenant ID> with your tenant ID from Azure.
Replace <Application ID URI> with your audience value configured in the previous step.
Replace <Managed Identity’s object (Principal) ID> with your ObjectID captured in the first bullet of Step 12 of Configure the application ID URI.
To test the access, you’ll assign a user assigned managed identity to an existing VM.
Sign in to the Azure portal.
Navigate to the desired VM and select Identity, User assigned, and then choose Add.
Figure 9: Assigning a User assigned Identity
Select the managed identity created as part of prerequisite and then choose Add.
Figure 10: Add a user assigned managed identity
In AWS, we used credential_process in a separate AWS Config profile to dynamically and programmatically retrieve AWS temporary credentials. The credential process calls a bash script that retrieves an access token from Azure and uses the token to obtain temporary credentials from AWS STS. For the syntax and operating system requirements, see Source credentials with an external process. For this post, we created a custom profile called DevTeam-S3ReadOnlyAccess, as shown in the config file:
[profile DevTeam-S3ReadOnlyAccess]
credential_process = /opt/bin/credentials.sh
region = ap-southeast-2
For this example, credentials_process invokes the script /opt/bin/credentials.sh. Replace <111122223333> with your own account ID.
/opt/bin/credentials.sh
#!/bin/bash

# Application ID URI from Azure
AUDIENCE=”urn://dev-aws-account-team-a”
# Role ARN from AWS to assume
ROLE_ARN=”arn:aws:iam::<111122223333>:role/Azure-AWSAssumeRole”

# Retrieve Access Token using Audience
access_token=$(curl “http://169.254.169.254/metadata/identity/oauth2/token?api-version=2018-02-01&resource=${AUDIENCE}” -H “Metadata:true” -s| jq -r ‘.access_token’)

# Create credentials following JSON format required by AWS CLI
credentials=$(aws sts assume-role-with-web-identity –role-arn ${ROLE_ARN} –web-identity-token $access_token –role-session-name AWSAssumeRole|jq ‘.Credentials’ | jq ‘.Version=1’)

# Write credentials to STDOUT for AWS CLI to pick up
echo $credentials
After you configure the AWS Config CLI file for the credential_process script, verify the setup by accessing AWS resources from Azure VM.
Using AWS SDK for Python to run s3AccessFromAzure.py. You should see a list of S3 buckets from your account. This example also demonstrates specifying a profile to use for credential purposes.
S3AccessFromAzure.py
import boto3

# Assume Role with Web Identity Provider profile
session = boto3.Session(profile_name=’DevTeam-S3ReadOnlyAccess’)

# Retrieve the list of existing buckets
s3 = session.client(‘s3’)
response = s3.list_buckets()

# Output the bucket names
print(‘Existing buckets:’)
for bucket in response[‘Buckets’]:
    print(f’  {bucket[“Name”]}’)
Note: The AWS CLI doesn’t cache external process credentials; instead, the AWS CLI calls the credential_process for every CLI request, which creates a new role session. If you use AWS SDKs, the credentials are cached and reused until they expire.
We used Azure VM as an example to access AWS resources, but a similar approach can be used for any compute resources in Azure that are capable of issuing Azure credentials.
Clean up
If you don’t need the resources that you created for this walkthrough, delete them to avoid future charges for the deployed resources:
Delete the VM instance, managed identity, and enterprise applications created in Azure.
Delete the resources that you provisioned on AWS to test the solution.
Conclusion
In this post, we showed you how to securely access AWS resources from Azure workloads using an IAM role assumed with one-time, short-term credentials. By using this solution, your Azure workloads will request temporary security credentials and remove the need for long-term AWS credentials or other secrets usage that are less secure methods of authentication.
Use the following resources to help you get started with AWS IAM federation:
This blog post provides architectural guidance on AWS CloudHSM crypto user credential rotation and is intended for those using or considering using CloudHSM. CloudHSM is a popular solution for secure cryptographic material management. By using this service, organizations can benefit from a robust mechanism to manage their own dedicated FIPS 140-2 level 3 hardware security module (HSM) cluster in the cloud and a client SDK that enables crypto users to perform cryptographic operations on deployed HSMs.
Credential rotation is an AWS Well-Architected best practice as it helps reduce the risks associated with the use of long-term credentials. Additionally, organizations are often required to rotate crypto user credentials for their HSM clusters to meet compliance, regulatory, or industry requirements. Unlike most AWS services that use AWS Identity and Access Management (IAM) users or IAM policies to access resources within your cluster, HSM users are directly created and maintained on the HSM cluster. As a result, how the credential rotation operation is performed might impact the workload’s availability. Thus, it’s important to understand the available options to perform crypto user credential rotation and the impact each option has in terms of ease of implementation and downtime.
In this post, we dive deep into the different options, steps to implement them, and their related pros and cons. We finish with a matrix of the relative downtime, complexity, and cost of each option so you can choose which best fits your use case.
Solution overview
In this document, we consider three approaches:
Approach 1 — For a workload with a defined maintenance window. You can shut down all client connections to CloudHSM, change the crypto user’s password, and subsequently re-establish connections to CloudHSM. This option is the most straightforward, but requires some application downtime.
Approach 2 — You create an additional crypto user (with access to all cryptographic materials) with a new password and from which new client instances are deployed. When the new user and instances are in place, traffic is rerouted to the new instances through a load balancer. This option involves no downtime but requires additional infrastructure (client instances) and a process to share cryptographic material between the crypto users.
Approach 3 — You run two separate and identical environments, directing traffic to a live (blue) environment while making and testing the changes on a secondary (green) environment before redirecting traffic to the green environment. This option involves no downtime, but requires additional infrastructure (client instances and an additional CloudHSM cluster) to support the blue/green deployment strategy.
The first approach uses an application’s planned maintenance window to enact necessary crypto user password changes. It’s the most straightforward of the recommended options, with the least amount of complexity because no additional infrastructure is needed to support the password rotation activity. However, it requires downtime (preferably planned) to rotate the password and update the client application instances; depending on how you deploy a client application, you can shorten the downtime by automating the application deployment process. The main steps for this approach are shown in Figure 1:
Figure 1: Approach 1 to update crypto user password
To implement approach 1:
Terminate all client connections to a CloudHSM cluster. This is necessary because you cannot change a password while a crypto user’s session is active.
You can query an Amazon CloudWatch log group for your CloudHSM cluster to find out if any user session is active. Additionally, you can audit Amazon Virtual Private Cloud (Amazon VPC)Flow Logs by enabling them for the elastic network interfaces (ENIs) related to the CloudHSM cluster. See where the traffic is coming from and link that to the applications.
Use the login command and log in as the user with the password you want to change. aws-cloudhsm > login --username <USERNAME> --role <ROLE>
Enter the user’s password.
Enter the user change-password command. aws-cloudhsm > user change-password --username <USERNAME> --role <ROLE>
Enter the new password.
Re-enter the new password.
Update the client connecting to CloudHSM to use the new credentials. Follow the SDK documentation for detailed steps if you are using PKCS # 11, OpenSSL Dynamic Engine, JCE provider or KSP and CNG provider.
Resume all client connections to CloudHSM cluster
Approach 2
The second approach employs two crypto users and a blue/green deployment strategy, that is, a deployment strategy in which you create two separate but identical client environments. One environment (blue) runs the current application version with crypto user 1 (CU1) and handles live traffic, while the other environment (green) runs a new application version with the updated crypto user 2 (CU2) password. After testing is complete on the green environment, traffic is directed to the green environment and the blue environment is deprecated. In this approach, both crypto users have access to the required cryptographic material. When rotating the crypto user password, you spin up new client instances and swap connection credentials to use the second crypto user. Because the client application only uses one crypto user at a time, the second user can remain dormant and be reused in the future as well. When compared to the first approach, this approach adds complexity to your architecture so that you can redirect live application traffic to the new environment by deploying additional client instances without having to restart. You also need to be aware that a shared user can only perform sign, encrypt, decrypt, verify, and HMAC operations with the shared key. Currently, export, wrap, modify, delete, and derive operations aren’t allowed with a shared user. This approach has the advantages of a classic blue/green deployment (no downtime and low risk), in addition to adding redundancy at the user management level by having multiple crypto users with access to the required cryptographic material. Figure 2 depicts a possible architecture:
Figure 2: Approach 2 to update crypto user password
Use the key share command to share the key with the other user so that both users have access to all the keys.
Start by running the key list command with a filter to return a specific key.
View the shared-users output to identify whom the key is currently shared with.
To share this key with a crypto user, enter the following command: aws-cloudhsm > aws-cloudhsm > key share --filter attr.label="rsa_key_to_share" attr.class=private-key --username <USERNAME> --role crypto-user
If CU1 is used to make client (that is, blue environment) connections to a CloudHSM cluster then change the password for CU2.
Follow the instructions in To change HSM user passwords or step 2 of Approach 1 to change the password assigned to CU2.
Spin up new client instances and use CU2 to configure the connection credentials (that is, green environment).
Add the new client instances to a new target group for the existing Application Load Balancer (ALB).
Next use the weighted target groups routing feature of ALB to route traffic to the newly configured environment.
You can use forward actions of the ALB listener rules setting to route requests to one or more target groups.
If you specify multiple target groups for a forward action, you must specify a weight for each target group. Each target group weight is a value from 0 to 999. Requests that match a listener rule with weighted target groups are distributed to these target groups based on their weights. For example, if you specify one with a weight of 10 and the other with a weight of 20, the target group with a weight of 20 receives twice as many requests as the other target group.
You can make these changes to the ALB setting using the AWS Command Line Interface (AWS CLI), AWS Management Console, or supported infrastructure as code (IaC) tools.
For the next password rotation iteration, you can switch back to using CU1 with updated credentials by updating your client instances and redeploying using steps 6 and 7.
Approach 3
The third approach is a variation of the previous approach as you build an identical environment (blue/green deployment) and change the crypto user password on the new environment to achieve zero downtime for the workload. You create two separate but identical CloudHSM clusters, with one serving as the live (blue) environment, and another as the test (green) environment in which changes are tested prior to deployment. After testing is complete in the green environment, production traffic is directed to the green environment and the blue environment is deprecated. Again, this approach adds complexity to your architecture so that you can redirect live application traffic to the new environment by deploying additional client instances and a CloudHSM cluster during the deployment and cutover window without having to restart. Additionally, changes made to the blue cluster after the green cluster was created won’t be available in the green cluster—something that can be mitigated by a brief embargo on changes while this cutover process is in progress. A key advantage to this approach is that it increases application availability without the need for a second crypto user, while still reducing deployment risk and simplifying the rollback process if a deployment fails. Such a deployment pattern is typically automated using continuous integration and continuous delivery (CI/CD) tools such as AWS CodeDeploy. For detailed deployment configuration options, see deployment configurations in CodeDeploy. Figure 3 depicts a possible architecture:
Figure 3: Approach 3 to update crypto user password
To implement approach 3:
Create a cluster from backup. Make sure you restore the new cluster in the same Availability Zone as the existing CloudHSM cluster. This will be your green environment.
Spin up new application instances (green environment) and configure them to connect to the new CloudHSM cluster.
Take note of the new CloudHSM cluster security group and attach it to the new client instances.
Follow the steps in To change HSM user passwords or Approach 1 step 2 to change the crypto user password on the new cluster.
Update the client connecting to CloudHSM with the new password.
Add the new client to the existing Application Load Balancer by following Approach 2 steps 6 and 7.
After the deployment is complete, you can delete the old cluster and client instances (blue environment).
Select the old cluster and then choose Delete cluster.
Confirm that you want to delete the cluster, then choose Delete.
To delete the cluster using the AWS Command Line Interface (AWS CLI), use the following command: aws cloudhsmv2 delete-cluster --cluster-id <cluster ID>
How to choose an approach
To better understand which approach is the best fit for your use case, consider the following criteria:
Downtime: What is the acceptable amount of downtime for your workload?
Implementation complexity: Do you need to make architecture changes to your workload and how complex is the implementation effort?
Cost: Is the additional cost required for the approach acceptable to the business?
Downtime
Relative Implementation complexity
Relative infrastructure cost
Approach 1
Yes
Low
None
Approach 2
No
Medium
Medium
Approach 3
No
Medium
High
Approach 1 — especially when run within a scheduled maintenance window—is the most straightforward of the three approaches because there’s no additional infrastructure required, and workload downtime is the only tradeoff. This is best suited for applications where planned downtime is acceptable and you need to keep solution complexity low.
Approach 2 involves no downtime for the workload and the second crypto user serves as a backup for future password updates (such as if credentials are lost, or in case there are personnel changes). The downside is the initial planning required to set up the workload to handle multiple CUs, share all keys among the crypto users, and the additional cost. This is best suited for workloads that require zero downtime and an architecture that supports hot swapping of incoming traffic.
Approach 3 also supports zero downtime for the workload, with a complex implementation and some cost to set up additional infrastructure. This is best suited for workloads that have require zero downtime, have an architecture supports hot swapping of incoming traffic, and you don’t want to maintain a second crypto user that has shared access to all required cryptographic material.
Conclusion
In this post, we covered three approaches you can take to rotate the crypto user password on your CloudHSM cluster to align with AWS security best practices of the Well-Architected Framework and to meet your compliance, regulatory, or industry requirements. Each has considerations in terms of relative cost, complexity, and downtime. We recommend carefully considering mapping them to your workload and picking the approach best suited for your business and workload needs.
If you have feedback about this post, submit comments in the Comments section below. If you have questions about this post, start a new thread on the AWS CloudHSM re:Post or contact AWS Support.
For many network security operators, protecting application uptime can be a time-consuming challenge of baselining network traffic, investigating suspicious senders, and determining how best to mitigate risks. Simplifying this process and understanding network security posture at all times is the goal of most IT organizations that are trying to scale their applications without also needing to scale their security operations center staff. To help you with this challenge, AWS WAF introduced traffic overview dashboards so that you can make informed decisions about your security posture when your application is protected by AWS WAF.
In this post, we introduce the new dashboards and delve into a few use cases to help you gain better visibility into the overall security of your applications using AWS WAF and make informed decisions based on insights from the dashboards.
Introduction to traffic overview dashboards
The traffic overview dashboard in AWS WAF displays an overview of security-focused metrics so that you can identify and take action on security risks in a few clicks, such as adding rate-based rules during distributed denial of service (DDoS) events. The dashboards include near real-time summaries of the Amazon CloudWatch metrics that AWS WAF collects when it evaluates your application web traffic.
These dashboards are available by default and require no additional setup. They show metrics—total requests, blocked requests, allowed requests, bot compared to non-bot requests, bot categories, CAPTCHA solve rate, top 10 matched rules, and more—for each web access control list (web ACL) that you monitor with AWS WAF.
You can access default metrics such as the total number of requests, blocked requests, and common attacks blocked, or you can customize your dashboard with the metrics and visualizations that are most important to you.
These dashboards provide enhanced visibility and help you answer questions such as these:
What percent of the traffic that AWS WAF inspected is getting blocked?
What are the top originating countries for the traffic that’s getting blocked?
What are common attacks that AWS WAF detects and protects me from?
How do my traffic patterns from this week compare with last week?
The dashboard has native and out-of-the-box integration with CloudWatch. Using this integration, you can navigate back and forth between the dashboard and CloudWatch; for example, you can get a more granular metric overview by viewing the dashboard in CloudWatch. You can also add existing CloudWatch widgets and metrics to the traffic overview dashboard, bringing your tried-and-tested visibility structure into the dashboard.
With the introduction of the traffic overview dashboard, one AWS WAF tool—Sampled requests—is now a standalone tab inside a web ACL. In this tab, you can view a graph of the rule matches for web requests that AWS WAF has inspected. Additionally, if you have enabled request sampling, you can see a table view of a sample of the web requests that AWS WAF has inspected.
The sample of requests contains up to 100 requests that matched the criteria for a rule in the web ACL and another 100 requests for requests that didn’t match rules and thus had the default action for the web ACL applied. The requests in the sample come from the protected resources that have received requests for your content in the previous three hours.
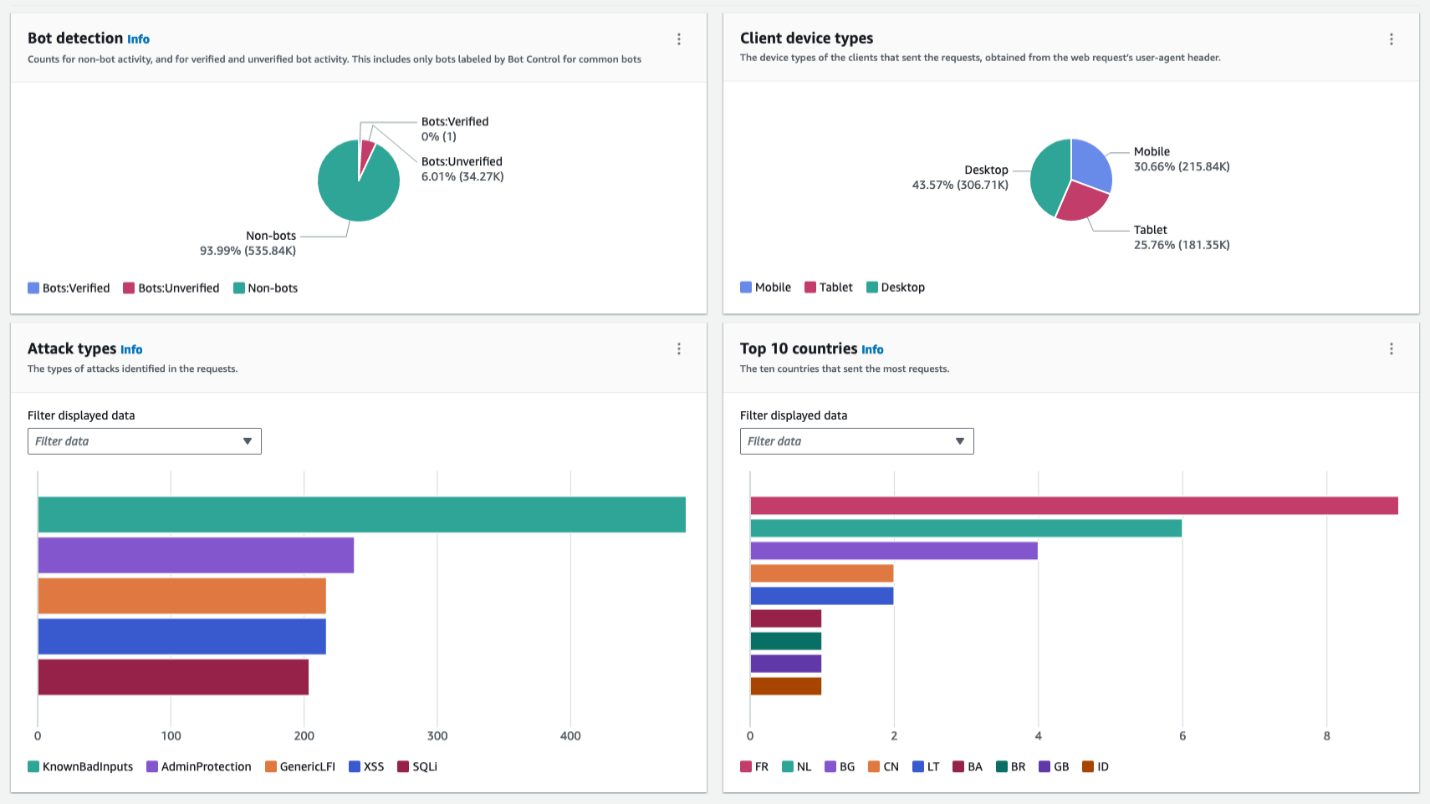
The following figure shows a typical layout for the traffic overview dashboard. It categorizes inspected requests with a breakdown of each of the categories that display actionable insights, such as attack types, client device types, and countries. Using this information and comparing it with your expected traffic profile, you can decide whether to investigate further or block the traffic right away. For the example in Figure 1, you might want to block France-originating requests from mobile devices if your web application isn’t supposed to receive traffic from France and is a desktop-only application.
Figure 1: Dashboard with sections showing multiple categories serves as a single pane of glass
Use case 1: Analyze traffic patterns with the dashboard
In addition to visibility into your web traffic, you can use the new dashboard to analyze patterns that could indicate potential threats or issues. By reviewing the dashboard’s graphs and metrics, you can spot unusual spikes or drops in traffic that deserve further investigation.
The top-level overview shows the high-level traffic volume and patterns. From there, you can drill down into the web ACL metrics to see traffic trends and metrics for specific rules and rule groups. The dashboard displays metrics such as allowed requests, blocked requests, and more.
Notifications or alerts about a deviation from expected traffic patterns provide you a signal to explore the event. During your exploration, you can use the dashboard to understand the broader context and not just the event in isolation. This makes it simpler to detect a trend in anomalies that could signify a security event or misconfigured rules. For example, if you normally get 2,000 requests per minute from a particular country, but suddenly see 10,000 requests per minute from it, you should investigate. Using the dashboard, you can look at the traffic across various dimensions. The spike in requests alone might not be a clear indication of a threat, but if you see an additional indicator, such as an unexpected device type, this could be a strong reason for you to take follow-up action.
The following figure shows the actions taken by rules in a web ACL and which rule matched the most.
Figure 2: Multidimensional overview of the web requests
The dashboard also shows the top blocked and allowed requests over time. Check whether unusual spikes in blocked requests correspond to spikes in traffic from a particular IP address, country, or user agent. That could indicate attempted malicious activity or bot traffic.
The following figure shows a disproportionately larger number of matches to a rule indicating that a particular vector is used against a protected web application.
Figure 3: The top terminating rule could indicate a particular vector of an attack
Likewise, review the top allowed requests. If you see a spike in traffic to a specific URL, you should investigate whether your application is working properly.
Next steps after you analyze traffic
After you’ve analyzed the traffic patterns, here are some next steps to consider:
Tune your AWS WAF rules to better match legitimate or malicious traffic based on your findings. You might be able to fine-tune rules to reduce false positives or false negatives. Tune rules that are blocking legitimate traffic by adjusting regular expressions or conditions.
Configure AWS WAF logging, and if you have a dedicated security information and event management (SIEM) solution, integrate the logging to enable automated alerting for anomalies.
Set up AWS WAF to automatically block known malicious IPs. You can maintain an IP block list based on identified threat actors. Additionally, you can use the Amazon IP reputation list managed rule group, which the Amazon Threat Research Team regularly updates.
If you see spikes in traffic to specific pages, check that your web applications are functioning properly to rule out application issues driving unusual patterns.
Add new rules to block new attack patterns that you spot in the traffic flows. Then review the metrics to help confirm the impact of the new rules.
Monitor source IPs for DDoS events and other malicious spikes. Use AWS WAF rate-based rules to help mitigate these spikes.
If you experience traffic floods, implement additional layers of protection by using CloudFront with DDoS protection.
The new dashboard gives you valuable insight into the traffic that reaches your applications and takes the guesswork out of traffic analysis. Using the insights that it provides, you can fine-tune your AWS WAF protections and block threats before they affect availability or data. Analyze the data regularly to help detect potential threats and make informed decisions about optimizing.
As an example, if you see an unexpected spike of traffic, which looks conspicuous in the dashboard compared to historical traffic patterns, from a country where you don’t anticipate traffic originating from, you can create a geographic match rule statement in your web ACL to block this traffic and prevent it from reaching your web application.
The dashboard is a great tool to gain insights and to understand how AWS WAF managed rules help protect your traffic.
Use case 2: Understand bot traffic during onboarding and fine-tune your bot control rule group
With AWS WAF Bot Control, you can monitor, block, or rate limit bots such as scrapers, scanners, crawlers, status monitors, and search engines. If you use the targeted inspection level of the rule group, you can also challenge bots that don’t self-identify, making it harder and more expensive for malicious bots to operate against your website.
On the traffic overview dashboard, under the Bot Control overview tab, you can see how much of your current traffic is coming from bots, based on request sampling (if you don’t have Bot Control enabled) and real-time CloudWatch metrics (if you do have Bot Control enabled).
During your onboarding phase, use this dashboard to monitor your traffic and understand how much of it comes from various types of bots. You can use this as a starting point to customize your bot management. For example, you can enable common bot control rule groups in count mode and see if desired traffic is being mislabeled. Then you can add rule exceptions, as described in AWS WAF Bot Control example: Allow a specific blocked bot.
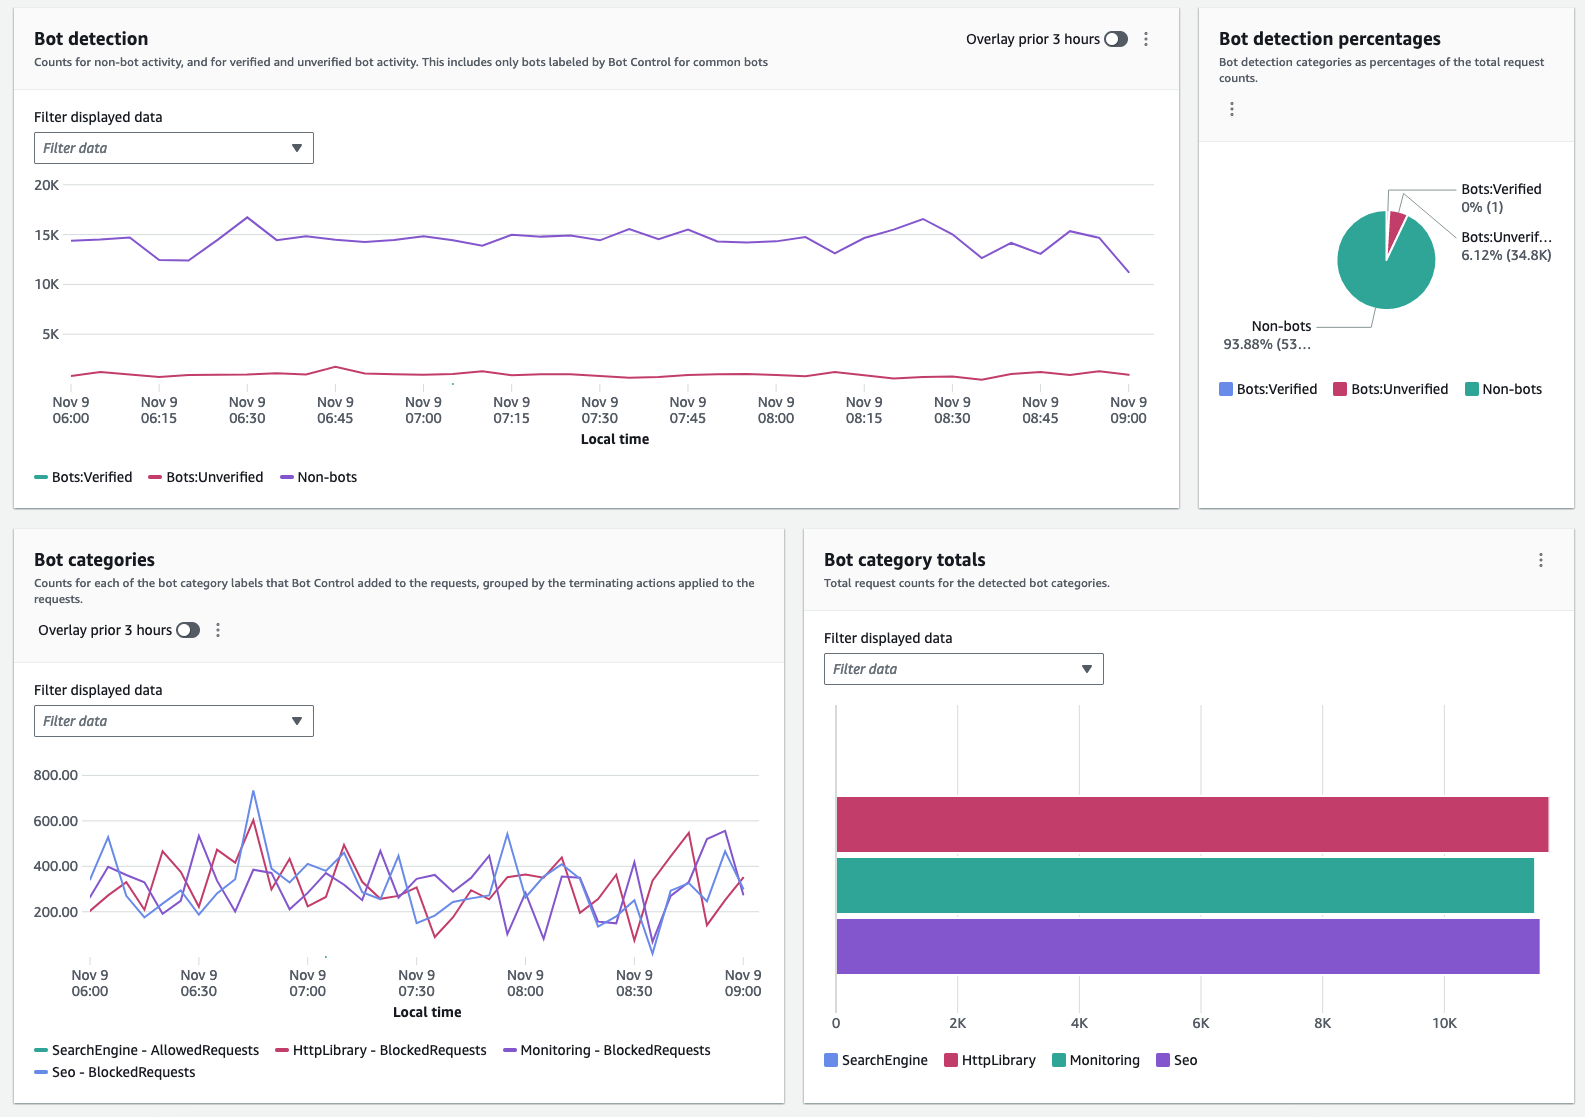
The following figure shows a collection of widgets that visualize various dimensions of requests detected as generated by bots. By understanding categories and volumes, you can make an informed decision to either investigate by further delving into logs or block a specific category if it’s clear that it’s unwanted traffic.
Figure 4: Collection of bot-related metrics on the dashboard
After you get started, you can use the same dashboard to monitor your bot traffic and evaluate adding targeted detection for sophisticated bots that don’t self-identify. Targeted protections use detection techniques such as browser interrogation, fingerprinting, and behavior heuristics to identify bad bot traffic. AWS WAF tokens are an integral part of these enhanced protections.
AWS WAF creates, updates, and encrypts tokens for clients that successfully respond to silent challenges and CAPTCHA puzzles. When a client with a token sends a web request, it includes the encrypted token, and AWS WAF decrypts the token and verifies its contents.
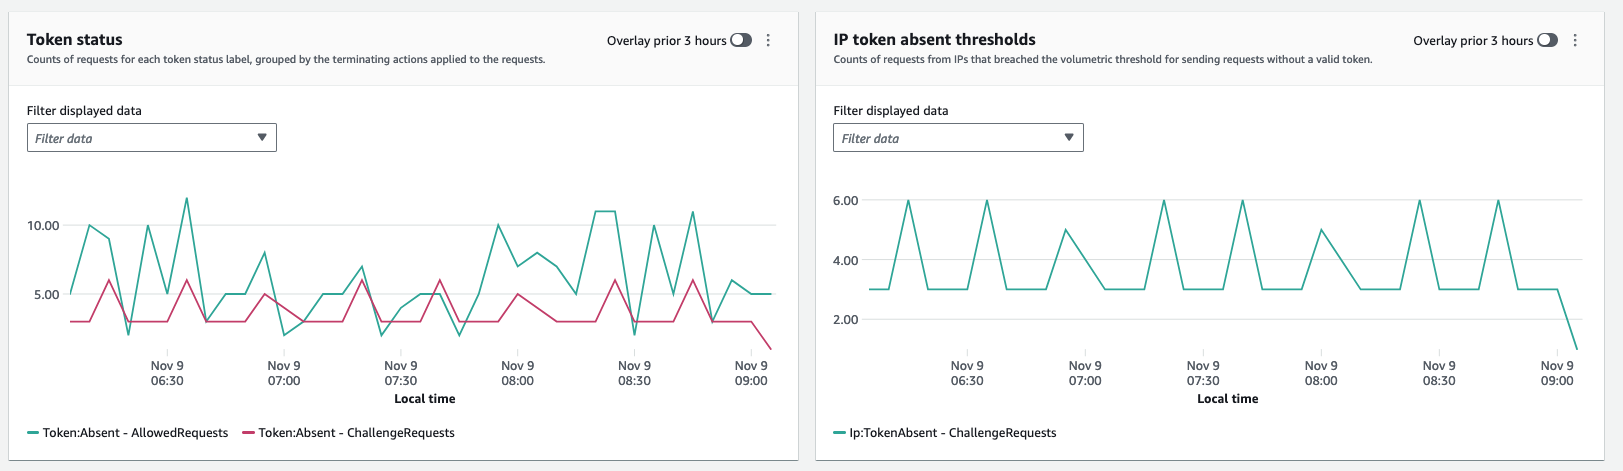
In the Bot Control dashboard, the token status pane shows counts for the various token status labels, paired with the rule action that was applied to the request. The IP token absent thresholds pane shows data for requests from IPs that sent too many requests without a token. You can use this information to fine-tune your AWS WAF configuration.
For example, within a Bot Control rule group, it’s possible for a request without a valid token to exit the rule group evaluation and continue to be evaluated by the web ACL. To block requests that are missing their token or for which the token is rejected, you can add a rule to run immediately after the managed rule group to capture and block requests that the rule group doesn’t handle for you. Using the Token status pane, illustrated in Figure 5, you can also monitor the volume of requests that acquire tokens and decide if you want to rate limit or block such requests.
Figure 5: Token status enables monitoring of the volume of requests that acquire tokens
Comparison with CloudFront security dashboard
The AWS WAF traffic overview dashboard provides enhanced overall visibility into web traffic reaching resources that are protected with AWS WAF. In contrast, the CloudFront security dashboard brings AWS WAF visibility and controls directly to your CloudFront distribution. If you want the detailed visibility and analysis of patterns that could indicate potential threats or issues, then the AWS WAF traffic overview dashboard is the best fit. However, if your goal is to manage application delivery and security in one place without navigating between service consoles and to gain visibility into your application’s top security trends, allowed and blocked traffic, and bot activity, then the CloudFront security dashboard could be a better option.
Availability and pricing
The new dashboards are available in the AWS WAF console, and you can use them to better monitor your traffic. These dashboards are available by default, at no cost, and require no additional setup. CloudWatch logging has a separate pricing model and if you have full logging enabled you will incur CloudWatch charges. See here for more information about CloudWatch charges. You can customize the dashboards if you want to tailor the displayed data to the needs of your environment.
Conclusion
With the AWS WAF traffic overview dashboard, you can get actionable insights on your web security posture and traffic patterns that might need your attention to improve your perimeter protection.
In this post, you learned how to use the dashboard to help secure your web application. You walked through traffic patterns analysis and possible next steps. Additionally, you learned how to observe traffic from bots and follow up with actions related to them according to the needs of your application.
The AWS WAF traffic overview dashboard is designed to meet most use cases and be a go-to default option for security visibility over web traffic. However, if you’d prefer to create a custom solution, see the guidance in the blog post Deploy a dashboard for AWS WAF with minimal effort.
If you have feedback about this post, submit comments in the Comments section below. If you have questions about this post, contact AWS Support.
This whitepaper summarizes OSFI’s expectations with respect to Technology and Cyber Risk Management (OSFI Guideline B-13). It also gives OSFI-regulated institutions information that they can use to commence their due diligence and assess how to implement the appropriate programs for their use of AWS Cloud services. In subsequent versions of the whitepaper, we will provide considerations for other OSFI guidelines as applicable.
In addition to this whitepaper, AWS provides updates on the evolving Canadian regulatory landscape on the AWS Security Blog and the AWS Compliance page. Customers looking for more information on cloud-related regulatory compliance in different countries around the world can refer to the AWS Compliance Center. For additional resources or support, reach out to your AWS account manager or contact us here.
If you have feedback about this post, submit comments in the Comments section below. If you have questions about this post, contact AWS Support.
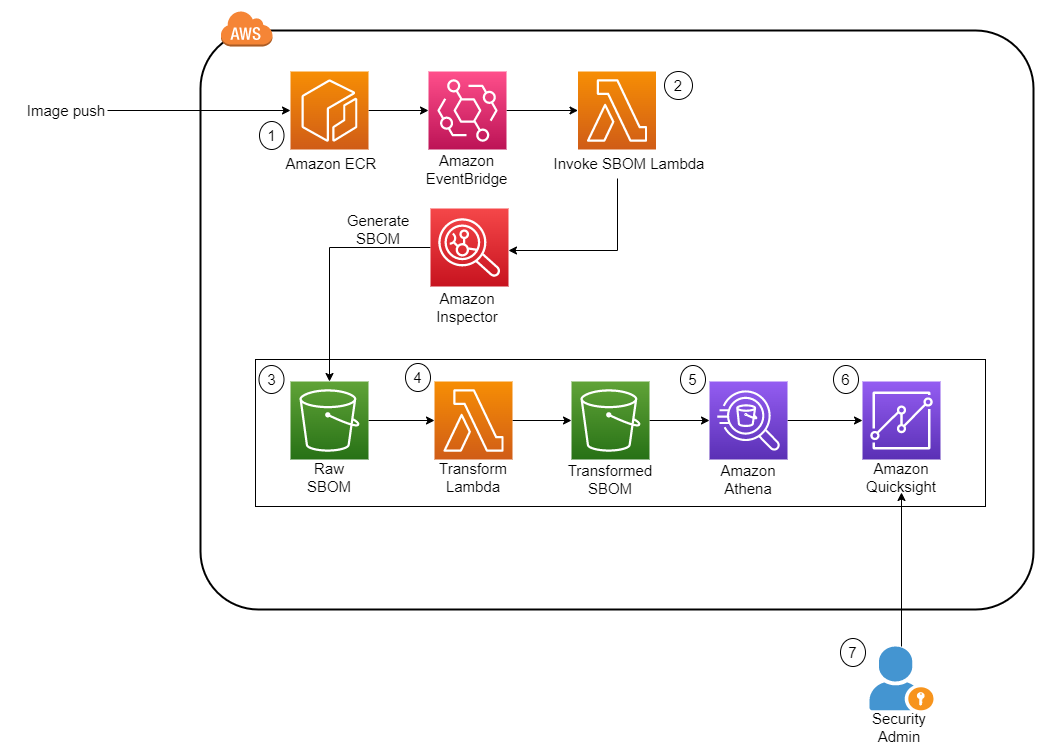
In this post, I’ll show how you can export software bills of materials (SBOMs) for your containers by using an AWS native service, Amazon Inspector, and visualize the SBOMs through Amazon QuickSight, providing a single-pane-of-glass view of your organization’s software supply chain.
The concept of a bill of materials (BOM) originated in the manufacturing industry in the early 1960s. It was used to keep track of the quantities of each material used to manufacture a completed product. If parts were found to be defective, engineers could then use the BOM to identify products that contained those parts. An SBOM extends this concept to software development, allowing engineers to keep track of vulnerable software packages and quickly remediate the vulnerabilities.
Today, most software includes open source components. A Synopsys study, Walking the Line: GitOps and Shift Left Security, shows that 8 in 10 organizations reported using open source software in their applications. Consider a scenario in which you specify an open source base image in your Dockerfile but don’t know what packages it contains. Although this practice can significantly improve developer productivity and efficiency, the decreased visibility makes it more difficult for your organization to manage risk effectively.
It’s important to track the software components and their versions that you use in your applications, because a single affected component used across multiple organizations could result in a major security impact. According to a Gartner report titled Gartner Report for SBOMs: Key Takeaways You Should know, by 2025, 60 percent of organizations building or procuring critical infrastructure software will mandate and standardize SBOMs in their software engineering practice, up from less than 20 percent in 2022. This will help provide much-needed visibility into software supply chain security.
Integrating SBOM workflows into the software development life cycle is just the first step—visualizing SBOMs and being able to search through them quickly is the next step. This post describes how to process the generated SBOMs and visualize them with Amazon QuickSight. AWS also recently added SBOM export capability in Amazon Inspector, which offers the ability to export SBOMs for Amazon Inspector monitored resources, including container images.
Why is vulnerability scanning not enough?
Scanning and monitoring vulnerable components that pose cybersecurity risks is known as vulnerability scanning, and is fundamental to organizations for ensuring a strong and solid security posture. Scanners usually rely on a database of known vulnerabilities, the most common being the Common Vulnerabilities and Exposures (CVE) database.
Identifying vulnerable components with a scanner can prevent an engineer from deploying affected applications into production. You can embed scanning into your continuous integration and continuous delivery (CI/CD) pipelines so that images with known vulnerabilities don’t get pushed into your image repository. However, what if a new vulnerability is discovered but has not been added to the CVE records yet? A good example of this is the Apache Log4j vulnerability, which was first disclosed on Nov 24, 2021 and only added as a CVE on Dec 1, 2021. This means that for 7 days, scanners that relied on the CVE system weren’t able to identify affected components within their organizations. This issue is known as a zero-day vulnerability. Being able to quickly identify vulnerable software components in your applications in such situations would allow you to assess the risk and come up with a mitigation plan without waiting for a vendor or supplier to provide a patch.
In addition, it’s also good hygiene for your organization to track usage of software packages, which provides visibility into your software supply chain. This can improve collaboration between developers, operations, and security teams, because they’ll have a common view of every software component and can collaborate effectively to address security threats.
In this post, I present a solution that uses the new Amazon Inspector feature to export SBOMs from container images, process them, and visualize the data in QuickSight. This gives you the ability to search through your software inventory on a dashboard and to use natural language queries through QuickSight Q, in order to look for vulnerabilities.
Solution overview
Figure 1 shows the architecture of the solution. It is fully serverless, meaning there is no underlying infrastructure you need to manage. This post uses a newly released feature within Amazon Inspector that provides the ability to export a consolidated SBOM for Amazon Inspector monitored resources across your organization in commonly used formats, including CycloneDx and SPDX.
Another Lambda function is invoked whenever a new JSON file is deposited. The function performs the data transformation steps and uploads the new file into a new S3 bucket.
Amazon Athena is then used to perform preliminary data exploration.
A dashboard on Amazon QuickSight displays SBOM data.
Implement the solution
This section describes how to deploy the solution architecture.
In this post, you’ll perform the following tasks:
Create S3 buckets and AWS KMS keys to store the SBOMs
Create QuickSight dashboards to identify libraries and packages
Use QuickSight Q to identify libraries and packages by using natural language queries
Deploy the CloudFormation stack
The AWS CloudFormation template we’ve provided provisions the S3 buckets that are required for the storage of raw SBOMs and transformed SBOMs, the Lambda functions necessary to initiate and process the SBOMs, and EventBridge rules to run the Lambda functions based on certain events. An empty repository is provisioned as part of the stack, but you can also use your own repository.
Browse to the CloudFormation service in your AWS account and choose Create Stack.
Upload the CloudFormation template you downloaded earlier.
For the next step, Specify stack details, enter a stack name.
You can keep the default value of sbom-inspector for EnvironmentName.
Specify the Amazon Resource Name (ARN) of the user or role to be the admin for the KMS key.
Deploy the stack.
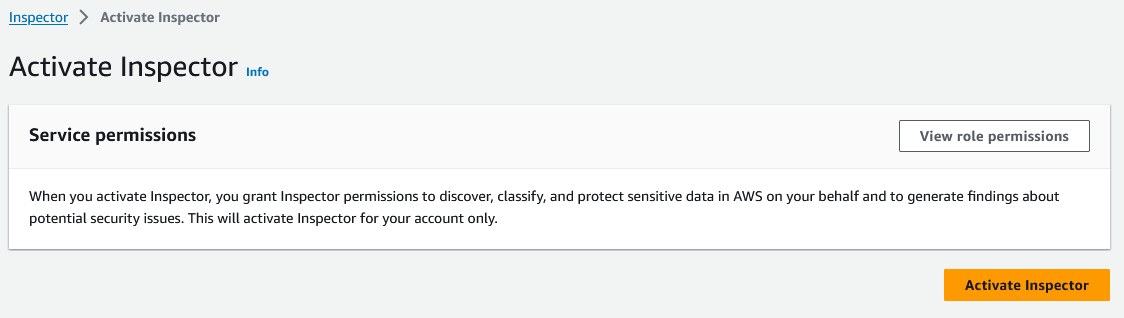
Set up Amazon Inspector
If this is the first time you’re using Amazon Inspector, you need to activate the service. In the Getting started with Amazon Inspector topic in the Amazon Inspector User Guide, follow Step 1 to activate the service. This will take some time to complete.
Figure 2: Activate Amazon Inspector
SBOM invocation and processing Lambda functions
This solution uses two Lambda functions written in Python to perform the invocation task and the transformation task.
Invocation task — This function is run whenever a new image is pushed into Amazon ECR. It takes in the repository name and image tag variables and passes those into the create_sbom_export function in the SPDX format. This prevents duplicated SBOMs, which helps to keep the S3 data size small.
Transformation task — This function is run whenever a new file with the suffix .json is added to the raw S3 bucket. It creates two files, as follows:
It extracts information such as image ARN, account number, package, package version, operating system, and SHA from the SBOM and exports this data to the transformed S3 bucket under a folder named sbom/.
Because each package can have more than one CVE, this function also extracts the CVE from each package and stores it in the same bucket in a directory named cve/. Both files are exported in Apache Parquet so that the file is in a format that is optimized for queries by Amazon Athena.
Populate the AWS Glue Data Catalog
To populate the AWS Glue Data Catalog, you need to generate the SBOM files by using the Lambda functions that were created earlier.
To populate the AWS Glue Data Catalog
You can use an existing image, or you can continue on to create a sample image.
# Pull the nginx image from a public repo
docker pull public.ecr.aws/nginx/nginx:1.19.10-alpine-perl

docker tag public.ecr.aws/nginx/nginx:1.19.10-alpine-perl <ACCOUNT-ID>.dkr.ecr.us-east-1.amazonaws.com/sbom-inspector:nginxperl

# Authenticate to ECR, fill in your account id
aws ecr get-login-password --region us-east-1 | docker login --username AWS --password-stdin <ACCOUNT-ID>.dkr.ecr.us-east-1.amazonaws.com

# Push the image into ECR
docker push <ACCOUNT-ID>.dkr.ecr.us-east-1.amazonaws.com/sbom-inspector:nginxperl
An image is pushed into the Amazon ECR repository in your account. This invokes the Lambda functions that perform the SBOM export by using Amazon Inspector and converts the SBOM file to Parquet.
Verify that the Parquet files are in the transformed S3 bucket:
Browse to the S3 console and choose the bucket named sbom-inspector-<ACCOUNT-ID>-transformed. You can also track the invocation of each Lambda function in the Amazon CloudWatch log console.
After the transformation step is complete, you will see two folders (cve/ and sbom/)in the transformed S3 bucket. Choose the sbom folder. You will see the transformed Parquet file in it. If there are CVEs present, a similar file will appear in the cve folder.
The next step is to run an AWS Glue crawler to determine the format, schema, and associated properties of the raw data. You will need to crawl both folders in the transformed S3 bucket and store the schema in separate tables in the AWS Glue Data Catalog.
On the AWS Glue Service console, on the left navigation menu, choose Crawlers.
On the Crawlers page, choose Create crawler. This starts a series of pages that prompt you for the crawler details.
In the Crawler name field, enter sbom-crawler, and then choose Next.
Under Data sources, select Add a data source.
Now you need to point the crawler to your data. On the Add data source page, choose the Amazon S3 data store. This solution in this post doesn’t use a connection, so leave the Connection field blank if it’s visible.
For the option Location of S3 data, choose In this account. Then, for S3 path, enter the path where the crawler can find the sbom and cve data, which is s3://sbom-inspector-<ACCOUNT-ID>-transformed/sbom/ and s3://sbom-inspector-<ACCOUNT-ID>-transformed/cve/. Leave the rest as default and select Add an S3 data source.
Figure 3: Data source for AWS Glue crawler
The crawler needs permissions to access the data store and create objects in the Data Catalog. To configure these permissions, choose Create an IAM role. The AWS Identity and Access Management (IAM) role name starts with AWSGlueServiceRole-, and in the field, you enter the last part of the role name. Enter sbomcrawler, and then choose Next.
Crawlers create tables in your Data Catalog. Tables are contained in a database in the Data Catalog. To create a database, choose Add database. In the pop-up window, enter sbom-db for the database name, and then choose Create.
Verify the choices you made in the Add crawler wizard. If you see any mistakes, you can choose Back to return to previous pages and make changes. After you’ve reviewed the information, choose Finish to create the crawler.
Figure 4: Creation of the AWS Glue crawler
Select the newly created crawler and choose Run.
After the crawler runs successfully, verify that the table is created and the data schema is populated.
Figure 5: Table populated from the AWS Glue crawler
Set up Amazon Athena
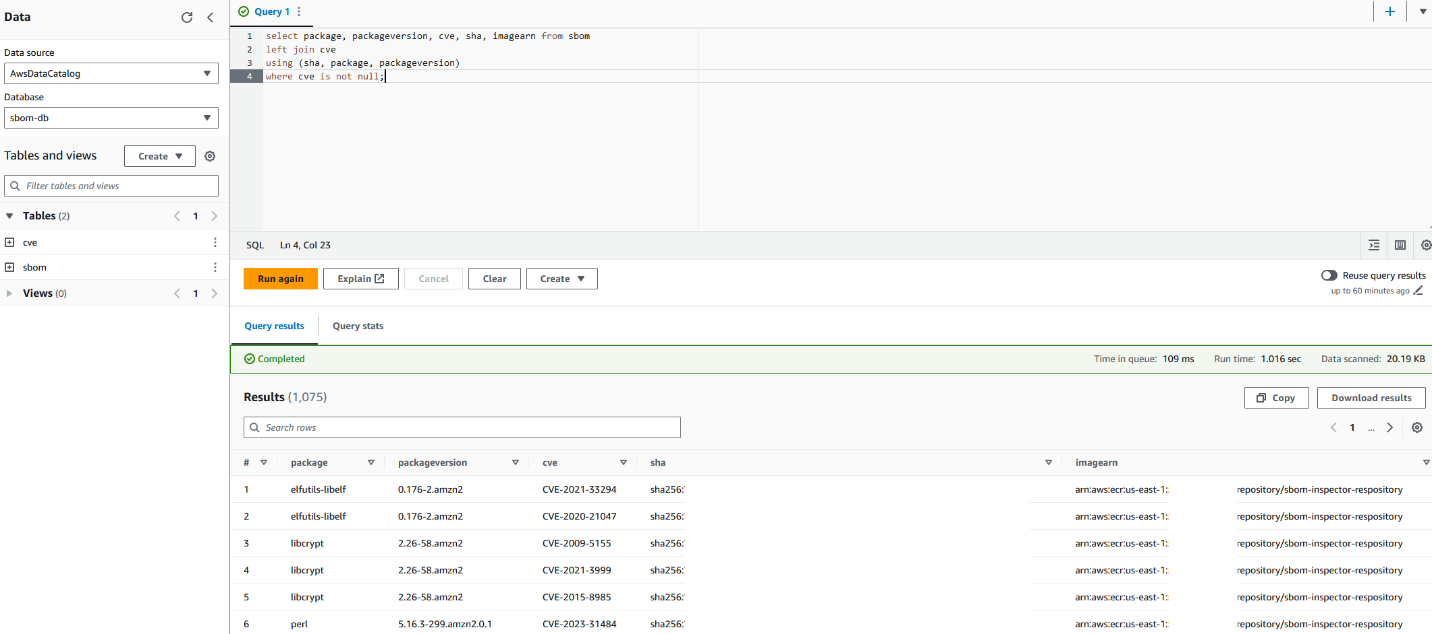
Amazon Athena performs the initial data exploration and validation. Athena is a serverless interactive analytics service built on open source frameworks that supports open-table and file formats. Athena provides a simplified, flexible way to analyze data in sources like Amazon S3 by using standard SQL queries. If you are SQL proficient, you can query the data source directly; however, not everyone is familiar with SQL. In this section, you run a sample query and initialize the service so that it can used in QuickSight later on.
To start using Amazon Athena
In the AWS Management Console, navigate to the Athena console.
For Database, select sbom-db (or select the database you created earlier in the crawler).
Navigate to the Settings tab located at the top right corner of the console. For Query result location, select the Athena S3 bucket created from the CloudFormation template, sbom-inspector-<ACCOUNT-ID>-athena.
Keep the defaults for the rest of the settings. You can now return to the Query Editor and start writing and running your queries on the sbom-db database.
You can use the following sample query.
select package, packageversion, cve, sha, imagearn from sbom
left join cve
using (sha, package, packageversion)
where cve is not null;
Your Athena console should look similar to the screenshot in Figure 6.
Figure 6: Sample query with Amazon Athena
This query joins the two tables and selects only the packages with CVEs identified. Alternatively, you can choose to query for specific packages or identify the most common package used in your organization.
Amazon QuickSight is a serverless business intelligence service that is designed for the cloud. In this post, it serves as a dashboard that allows business users who are unfamiliar with SQL to identify zero-day vulnerabilities. This can also reduce the operational effort and time of having to look through several JSON documents to identify a single package across your image repositories. You can then share the dashboard across teams without having to share the underlying data.
QuickSight SPICE (Super-fast, Parallel, In-memory Calculation Engine) is an in-memory engine that QuickSight uses to perform advanced calculations. In a large organization where you could have millions of SBOM records stored in S3, importing your data into SPICE helps to reduce the time to process and serve the data. You can also use the feature to perform a scheduled refresh to obtain the latest data from S3.
QuickSight also has a feature called QuickSight Q. With QuickSightQ, you can use natural language to interact with your data. If this is the first time you are initializing QuickSight, subscribe to QuickSight and select Enterprise + Q. It will take roughly 20–30 minutes to initialize for the first time. Otherwise, if you are already using QuickSight, you will need to enable QuickSight Q by subscribing to it in the QuickSight console.
Finally, in QuickSight you can select different data sources, such as Amazon S3 and Athena, to create custom visualizations. In this post, we will use the two Athena tables as the data source to create a dashboard to keep track of the packages used in your organization and the resulting CVEs that come with them.
Prerequisites for setting up the QuickSight dashboard
This process will be used to create the QuickSight dashboard from a template already pre-provisioned through the command line interface (CLI). It also grants the necessary permissions for QuickSight to access the data source. You will need the following:
A QuickSight + Q subscription (only if you want to use the Q feature).
QuickSight permissions to Amazon S3 and Athena (enable these through the QuickSight security and permissions interface).
Set the default AWS Region where you want to deploy the QuickSight dashboard. This post assumes that you’re using the us-east-1 Region.
Create datasets
In QuickSight, create two datasets, one for the sbom table and another for the cve table.
In the QuickSight console, select the Dataset tab.
Choose Create dataset, and then select the Athena data source.
Name the data source sbom and choose Create data source.
Select the sbom table.
Choose Visualize to complete the dataset creation. (Delete the analyses automatically created for you because you will create your own analyses afterwards.)
Navigate back to the main QuickSight page and repeat steps 1–4 for the cve dataset.
Merge datasets
Next, merge the two datasets to create the combined dataset that you will use for the dashboard.
On the Datasets tab, edit the sbom dataset and add the cve dataset.
Set three join clauses, as follows:
Sha : Sha
Package : Package
Packageversion : Packageversion
Perform a left merge, which will append the cve ID to the package and package version in the sbom dataset.
Figure 7: Combining the sbom and cve datasets
Next, you will create a dashboard based on the combined sbom dataset.
Prepare configuration files
In your terminal, export the following variables. Substitute <QuickSight username> in the QS_USER_ARN variable with your own username, which can be found in the Amazon QuickSight console.
Validate that the variables are set properly. This is required for you to move on to the next step; otherwise you will run into errors.
echo ACCOUNT_ID is $ACCOUNT_ID || echo ACCOUNT_ID is not set
echo TEMPLATE_ID is $TEMPLATE_ID || echo TEMPLATE_ID is not set
echo QUICKSIGHT USER ARN is $QS_USER_ARN || echo QUICKSIGHT USER ARN is not set
echo QUICKSIGHT DATA ARN is $QS_DATA_ARN || echo QUICKSIGHT DATA ARN is not set
Next, use the following commands to create the dashboard from a predefined template and create the IAM permissions needed for the user to view the QuickSight dashboard.
Note: Run the following describe-dashboard command, and confirm that the response contains a status code of 200. The 200-status code means that the dashboard exists.
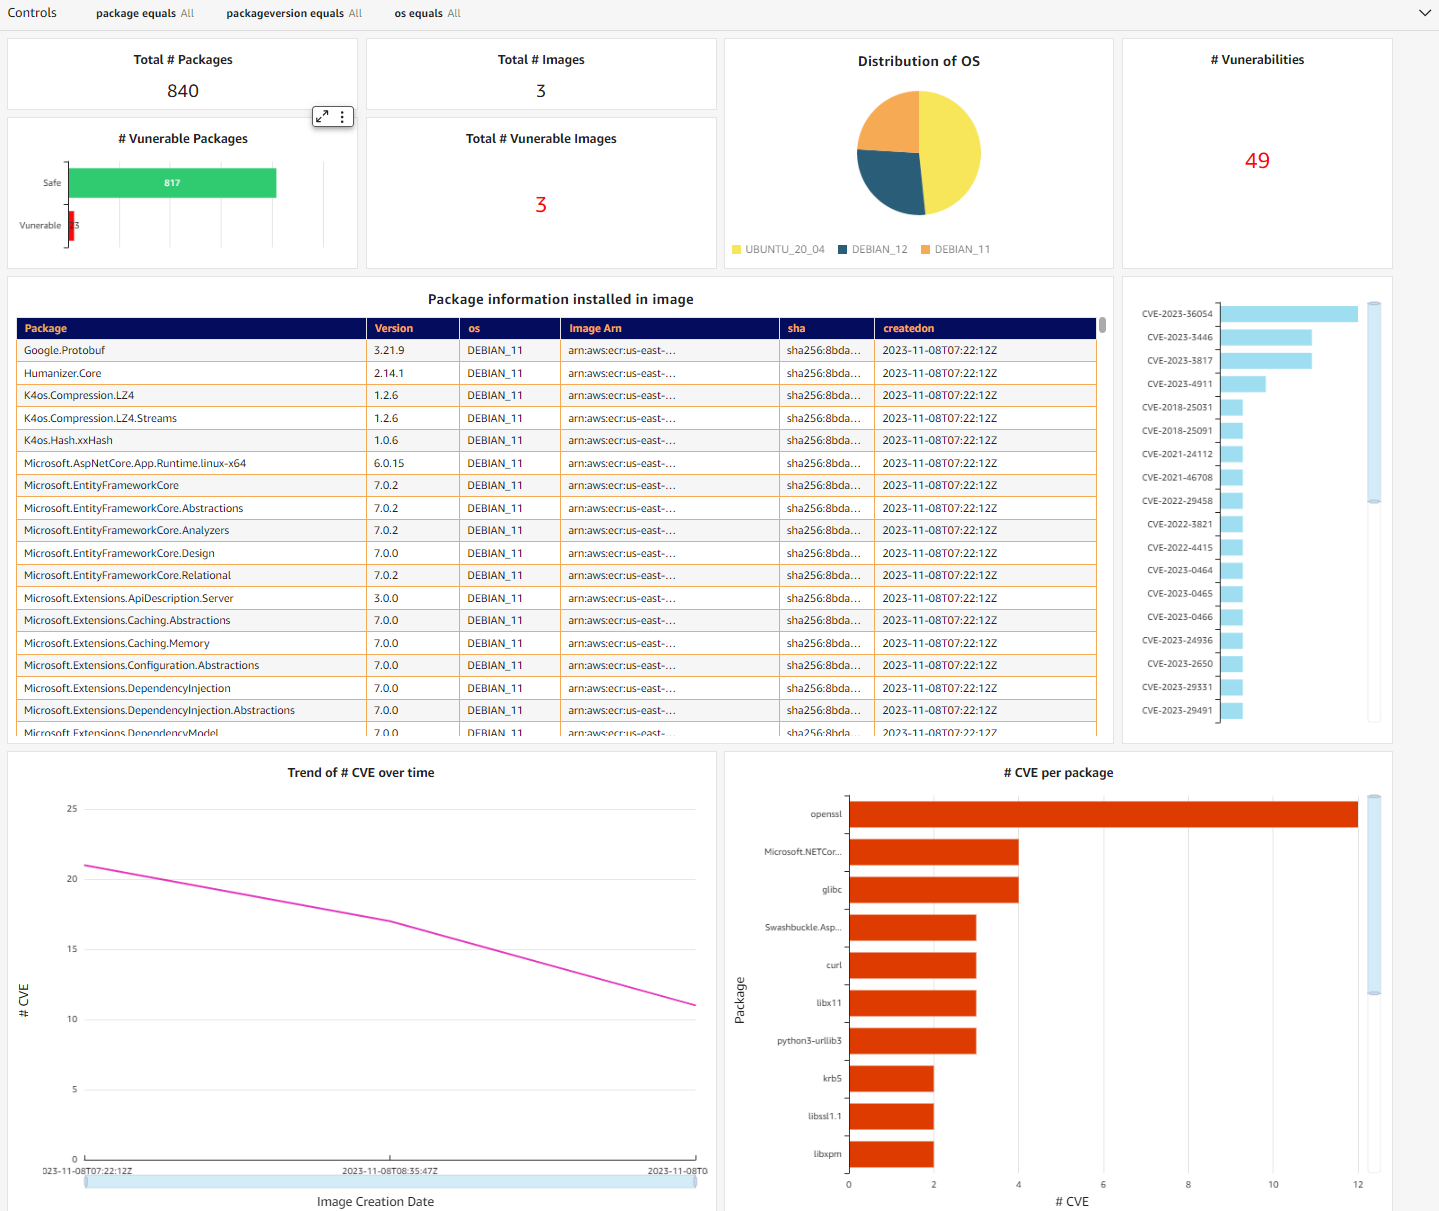
You should now be able to see the dashboard in your QuickSight console, similar to the one in Figure 8. It’s an interactive dashboard that shows you the number of vulnerable packages you have in your repositories and the specific CVEs that come with them. You can navigate to the specific image by selecting the CVE (middle right bar chart) or list images with a specific vulnerable package (bottom right bar chart).
Note: You won’t see the exact same graph as in Figure 8. It will change according to the image you pushed in.
Figure 8: QuickSight dashboard containing SBOM information
Alternatively, you can use QuickSight Q to extract the same information from your dataset through natural language. You will need to create a topic and add the dataset you added earlier. For detailed information on how to create a topic, see the Amazon QuickSight User Guide. After QuickSight Q has completed indexing the dataset, you can start to ask questions about your data.
Figure 9: Natural language query with QuickSight Q
Conclusion
This post discussed how you can use Amazon Inspector to export SBOMs to improve software supply chain transparency. Container SBOM export should be part of your supply chain mitigation strategy and monitored in an automated manner at scale.
Although it is a good practice to generate SBOMs, it would provide little value if there was no further analysis being done on them. This solution enables you to visualize your SBOM data through a dashboard and natural language, providing better visibility into your security posture. Additionally, this solution is also entirely serverless, meaning there are no agents or sidecars to set up.
You can use Amazon Security Lake to simplify log data collection and retention for Amazon Web Services (AWS) and non-AWS data sources. To make sure that you get the most out of your implementation requires proper planning.
In this post, we will show you how to plan and implement a proof of concept (POC) for Security Lake to help you determine the functionality and value of Security Lake in your environment, so that your team can confidently design and implement in production. We will walk you through the following steps:
Understand the functionality and value of Security Lake
Determine success criteria for the POC
Define your Security Lake configuration
Prepare for deployment
Enable Security Lake
Validate deployment
Understand the functionality of Security Lake
Figure 1 summarizes the main features of Security Lake and the context of how to use it:
Figure 1: Overview of Security Lake functionality
As shown in the figure, Security Lake ingests and normalizes logs from data sources such as AWS services, AWS Partner sources, and custom sources. Security Lake also manages the lifecycle, orchestration, and subscribers. Subscribers can be AWS services, such as Amazon Athena, or AWS Partner subscribers.
There are four primary functions that Security Lake provides:
Centralize visibility to your data from AWS environments, SaaS providers, on-premises, and other cloud data sources — You can collect log sources from AWS services such as AWS CloudTrail management events, Amazon Simple Storage Service (Amazon S3) data events, AWS Lambda data events, Amazon Route 53 Resolver logs, VPC Flow Logs, and AWS Security Hub findings, in addition to log sources from on-premises, other cloud services, SaaS applications, and custom sources. Security Lake automatically aggregates the security data across AWS Regions and accounts.
Normalize your security data to an open standard — Security Lake normalizes log sources in a common schema, the Open Security Schema Framework (OCSF), and stores them in compressed parquet files.
Use your preferred analytics tools to analyze your security data — You can use AWS tools, such as Athena and Amazon OpenSearch Service, or you can utilize external security tools to analyze the data in Security Lake.
Optimize and manage your security data for more efficient storage and query — Security Lake manages the lifecycle of your data with customizable retention settings with automated storage tiering to help provide more cost-effective storage.
Determine success criteria
By establishing success criteria, you can assess whether Security Lake has helped address the challenges that you are facing. Some example success criteria include:
I need to centrally set up and store AWS logs across my organization in AWS Organizations for multiple log sources.
I need to more efficiently collect VPC Flow Logs in my organization and analyze them in my security information and event management (SIEM) solution.
I want to use OpenSearch Service to replace my on-premises SIEM.
I want to collect AWS log sources and custom sources for machine learning with Amazon Sagemaker.
I need to establish a dashboard in Amazon QuickSight to visualize my Security Hub findings and a custom log source data.
Review your success criteria to make sure that your goals are realistic given your timeframe and potential constraints that are specific to your organization. For example, do you have full control over the creation of AWS services that are deployed in an organization? Do you have resources that can dedicate time to implement and test? Is this time convenient for relevant stakeholders to evaluate the service?
The timeframe of your POC will depend on your answers to these questions.
Important: Security Lake has a 15-day free trial per account that you use from the time that you enable Security Lake. This is the best way to estimate the costs for each Region throughout the trial, which is an important consideration when you configure your POC.
Define your Security Lake configuration
After you establish your success criteria, you should define your desired Security Lake configuration. Some important decisions include the following:
Determine AWS log sources — Decide which AWS log sources to collect. For information about the available options, see Collecting data from AWS services.
Determine third-party log sources — Decide if you want to include non-AWS service logs as sources in your POC. For more information about your options, see Third-party integrations with Security Lake; the integrations listed as “Source” can send logs to Security Lake.
Note: You can add third-party integrations after the POC or in a second phase of the POC. Pre-planning will be required to make sure that you can get these set up during the 15-day free trial. Third-party integrations usually take more time to set up than AWS service logs.
Select a delegated administrator – Identify which account will serve as the delegated administrator. Make sure that you have the appropriate permissions from the organization admin account to identify and enable the account that will be your Security Lake delegated administrator. This account will be the location for the S3 buckets with your security data and where you centrally configure Security Lake. The AWS Security Reference Architecture (AWS SRA) recommends that you use the AWS logging account for this purpose. In addition, make sure to review Important considerations for delegated Security Lake administrators.
Select accounts in scope — Define which accounts to collect data from. To get the most realistic estimate of the cost of Security Lake, enable all accounts across your organization during the free trial.
Determine analytics tool — Determine if you want to use native AWS analytics tools, such as Athena and OpenSearch Service, or an existing SIEM, where the SIEM is a subscriber to Security Lake.
Define log retention and Regions — Define your log retention requirements and Regional restrictions or considerations.
Prepare for deployment
After you determine your success criteria and your Security Lake configuration, you should have an idea of your stakeholders, desired state, and timeframe. Now you need to prepare for deployment. In this step, you should complete as much as possible before you deploy Security Lake. The following are some steps to take:
Create a project plan and timeline so that everyone involved understands what success look like and what the scope and timeline is.
Define the relevant stakeholders and consumers of the Security Lake data. Some common stakeholders include security operations center (SOC) analysts, incident responders, security engineers, cloud engineers, finance, and others.
Define who is responsible, accountable, consulted, and informed during the deployment. Make sure that team members understand their roles.
Consider other technical prerequisites that you need to accomplish. For example, if you need roles in addition to what Security Lake creates for custom extract, transform, and load (ETL) pipelines for custom sources, can you work with the team in charge of that process before the POC?
Enable Security Lake
The next step is to enable Security Lake in your environment and configure your sources and subscribers.
Deploy Security Lake across the Regions, accounts, and AWS log sources that you previously defined.
Configure custom sources that are in scope for your POC.
Configure analytics tools in scope for your POC.
Validate deployment
The final step is to confirm that you have configured Security Lake and additional components, validate that everything is working as intended, and evaluate the solution against your success criteria.
Validate log collection — Verify that you are collecting the log sources that you configured. To do this, check the S3 buckets in the delegated administrator account for the logs.
Validate analytics tool — Verify that you can analyze the log sources in your analytics tool of choice. If you don’t want to configure additional analytics tooling, you can use Athena, which is configured when you set up Security Lake. For sample Athena queries, see Amazon Security Lake Example Queries on GitHub and Security Lake queries in the documentation.
Obtain a cost estimate — In the Security Lake console, you can review a usage page to verify that the cost of Security Lake in your environment aligns with your expectations and budgets.
Assess success criteria — Determine if you achieved the success criteria that you defined at the beginning of the project.
Next steps
Next steps will largely depend on whether you decide to move forward with Security Lake.
Determine if you have the approval and budget to use Security Lake.
Expand to other data sources that can help you provide more security outcomes for your business.
Configure S3 lifecycle policies to efficiently store logs long term based on your requirements.
Let other teams know that they can subscribe to Security Lake to use the log data for their own purposes. For example, a development team that gets access to CloudTrail through Security Lake can analyze the logs to understand the permissions needed for an application.
Conclusion
In this blog post, we showed you how to plan and implement a Security Lake POC. You learned how to do so through phases, including defining success criteria, configuring Security Lake, and validating that Security Lake meets your business needs.
As a customer, this guide will help you run a successful proof of value (POV) with Security Lake. It guides you in assessing the value and factors to consider when deciding to implement the current features.
Amazon Web Services (AWS) is pleased to announce that AWS Payment Cryptography is certified for Payment Card Industry Personal Identification Number (PCI PIN) version 3.1 and as a PCI Point-to-Point Encryption (P2PE) version 3.1 Decryption Component.
With Payment Cryptography, your payment processing applications can use payment hardware security modules (HSMs) that are PCI PIN Transaction Security (PTS) HSM certified and fully managed by AWS, with PCI PIN and P2PE-compliant key management. These attestations give you the flexibility to deploy your regulated workloads with reduced compliance overhead.
The PCI P2PE Decryption Component enables PCI P2PE Solutions to use AWS to decrypt credit card transactions from payment terminals, and PCI PIN attestation is required for applications that process PIN-based debit transactions. According to PCI, “Use of a PCI P2PE Solution can also allow merchants to reduce where and how the PCI DSS applies within their retail environment, increasing security of customer data while simplifying compliance with the PCI DSS”.
Coalfire, a third-party Qualified PIN Assessor (QPA) and Qualified Security Assessor (P2PE), evaluated Payment Cryptography. Customers can access the PCI PIN Attestation of Compliance (AOC) report, the PCI PIN Shared Responsibility Summary, and the PCI P2PE Attestation of Validation through AWS Artifact.
To learn more about our PCI program and other compliance and security programs, see the AWS Compliance Programs page. As always, we value your feedback and questions; reach out to the AWS Compliance team through the Contact Us page.
If you have feedback about this post, submit comments in the Comments section below. If you have questions about this post, contact AWS Support.
The new IRAP report includes an additional seven AWS services that are now assessed at the PROTECTED level under IRAP. This brings the total number of services assessed at the PROTECTED level to 151.
The following are the seven newly assessed services:
AWS has developed an IRAP documentation pack to assist Australian government agencies and their partners to plan, architect, and assess risk for their workloads when they use AWS Cloud services.
The IRAP pack on AWS Artifact also includes newly updated versions of the AWS Consumer Guide and the whitepaper Reference Architectures for ISM PROTECTED Workloads in the AWS Cloud.
Reach out to your AWS representatives to let us know which additional services you would like to see in scope for upcoming IRAP assessments. We strive to bring more services into scope at the PROTECTED level under IRAP to support your requirements.
If you have feedback about this post, submit comments in the Comments section below. If you have questions about this post, contact AWS Support.
Amazon Web Services (AWS) was recognized by KuppingerCole Analysts AG as an Overall Leader in the firm’s Leadership Compass report for Policy Based Access Management. The Leadership Compass report reveals Amazon Verified Permissions as an Overall Leader (as shown in Figure 1), a Product Leader for functional strength, and an Innovation Leader for open source security. The recognition is based on a comparison with 14 other vendors, using standardized evaluation criteria set by KuppingerCole.
Figure 1: KuppingerCole Leadership Compass for Policy Based Access Management
The report helps organizations learn about policy-based access management solutions for common use cases and requirements. KuppingerCole defines policy-based access management as an approach that helps to centralize policy management, run authorization decisions across a variety of applications and resource types, continually evaluate authorization decisions, and support corporate governance.
Policy-based access management has three major benefits: consistency, security, and agility. Many organizations grapple with a patchwork of access control mechanisms, which can hinder their ability to implement a consistent approach across the organization, increase their security risk exposure, and reduce the agility of their development teams. A policy-based access control architecture helps organizations centralize their policies in a policy store outside the application codebase, where the policies can be audited and consistently evaluated. This enables teams to build, refactor, and expand applications faster, because policy guardrails are in place and access management is externalized.
Amazon Verified Permissions is a scalable, fine-grained permissions management and authorization service for the applications that you build. This service helps your developers to build more secure applications faster, by externalizing authorization and centralizing policy management and administration. Developers can align their application access with Zero Trust principles by implementing least privilege and continual authorization within applications. Security and audit teams can better analyze and audit who has access to what within applications.
Verified Permissions uses Cedar, a purpose-built and security-first open source policy language, to define policy-based access controls by using roles and attributes for more granular, context-aware access control. Cedar demonstrates the AWS commitment to raising the bar for open source security by developing key security-related technologies in collaboration with the community, with a goal of improving security postures across the industry.
The KuppingerCole Leadership Compass report offers insightful guidance as you evaluate policy-based access management solutions for your organization. Access a complimentary copy of the 2024 KuppingerCole Leadership Compass for Policy-Based Access Management.
If you have feedback about this post, submit comments in the Comments section below. If you have questions about this post, contact AWS Support.
Want more AWS Security news? Follow us on Twitter.
The management of security services across organizations has evolved over the years, and can vary depending on the size of your organization, the type of industry, the number of services to be administered, and compliance regulations and legislation. When compliance standards require you to set up scoped administrative control of event monitoring and auditing, we find that single administrator support on management consoles can present several challenges for large enterprises. In this blog post, I’ll dive deep into these security policy management challenges and show how you can optimize your security operations at scale by using AWS Firewall Manager to support multiple administrators.
These are some of the use cases and challenges faced by large enterprise organizations when scaling their security operations:
Policy enforcement across complex organizational boundaries
Large organizations tend to be divided into multiple organizational units, each of which represents a function within the organization. Risk appetite, and therefore security policy, can vary dramatically between organizational units. For example, organizations may support two types of users: central administrators and app developers, both of whom can administer security policy but might do so at different levels of granularity. The central admin applies a baseline and relatively generic policy for all accounts, while the app developer can be made an admin for specific accounts and be allowed to create custom rules for the overall policy. A single administrator interface limits the ability for multiple administrators to enforce differing policies for the organizational unit to which they are assigned.
Lack of adequate separation across services
The benefit of centralized management is that you can enforce a centralized policy across multiple services that the management console supports. However, organizations might have different administrators for each service. For example, the team that manages the firewall could be different than the team that manages a web application firewall solution. Aggregating administrative access that is confined to a single administrator might not adequately conform to the way organizations have services mapped to administrators.
Auditing and compliance
Most security frameworks call for auditing procedures, to gain visibility into user access, types of modifications to configurations, timestamps of incremental changes, and logs for periods of downtime. An organization might want only specific administrators to have access to certain functions. For example, each administrator might have specific compliance scope boundaries based on their knowledge of a particular compliance standard, thereby distributing the responsibility for implementation of compliance measures. Single administrator access greatly reduces the ability to discern the actions of different administrators in that single account, making auditing unnecessarily complex.
Availability
Redundancy and resiliency are regarded as baseline requirements for security operations. Organizations want to ensure that if a primary administrator is locked out of a single account for any reason, other legitimate users are not affected in the same way. Single administrator access, in contrast, can lock out legitimate users from performing critical and time-sensitive actions on the management console.
Security risks
In a single administrator setting, the ability to enforce the policy of least privilege is not possible. This is because there are multiple operators who might share the same levels of access to the administrator account. This means that there are certain administrators who could be granted broader access than what is required for their function in the organization.
What is multi-admin support?
Multi-admin support for Firewall Manager allows customers with multiple organizational units (OUs) and accounts to create up to 10 Firewall Manager administrator accounts from AWS Organizations to manage their firewall policies. You can delegate responsibility for firewall administration at a granular scope by restricting access based on OU, account, policy type, and AWS Region, thereby enabling policy management tasks to be implemented more effectively.
Multi-admin support provides you the ability to use different administrator accounts to create administrative scopes for different parameters. Examples of these administrative scopes are included in the following table.
Administrator
Scope
Default Administrator
Full Scope (Default)
Administrator 1
OU = “Test 1”
Administrator 2
Account IDs = “123456789, 987654321”
Administrator 3
Policy-Type = “Security Group”
Administrator 4
Region = “us-east-2”
Benefits of multi-admin support
Multi-admin support helps alleviate many of the challenges just discussed by allowing administrators the flexibility to implement custom configurations based on job functions, while enforcing the principle of least privilege to help ensure that corporate policy and compliance requirements are followed. The following are some of the key benefits of multi-admin support:
Improved security
Security is enhanced, given that the principle of least privilege can be enforced in a multi-administrator access environment. This is because the different administrators using Firewall Manager will be using delegated privileges that are appropriate for the level of access they are permitted. The result is that the scope for user errors, intentional errors, and unauthorized changes can be significantly reduced. Additionally, you attain an added level of accountability for administrators.
Autonomy of job functions
Companies with organizational units that have separate administrators are afforded greater levels of autonomy within their AWS Organizations accounts. The result is an increase in flexibility, where concurrent users can perform very different security functions.
Compliance benefits
It is easier to meet auditing requirements based on compliance standards in multi-admin accounts, because there is a greater level of visibility into user access and the functions performed on the services when compared to a multi-eyes approval workflow and approval of all policies by one omnipotent admin. This can simplify routine audits through the generation of reports that detail the chronology of security changes that are implemented by specific admins over time.
Administrator Availability
Multi-admin management support helps avoid the limitations of having a single point of access and enhances availability by providing multiple administrators with their own levels of access. This can result in fewer disruptions, especially during periods that require time-sensitive changes to be made to security configurations.
Integration with AWS Organizations
You can enable trusted access using either the Firewall Manager console or the AWS Organizations console. To do this, you sign in with your AWS Organizations management account and configure an account allocated for security tooling within the organization as the Firewall Manager administrator account. After this is done, subsequent multi-admin Firewall Manager operations can also be performed using AWS APIs. With accounts in an organization, you can quickly allocate resources, group multiple accounts, and apply governance policies to accounts or groups. This simplifies operational overhead for services that require cross-account management.
Key use cases
Multi-admin support in Firewall Manager unlocks several use cases pertaining to admin role-based access. The key use cases are summarized here.
Role-based access
Multi-admin support allows for different admin roles to be defined based on the job function of the administrator, relative to the service being managed. For example, an administrator could be tasked to manage network firewalls to protect their VPCs, and a different administrator could be tasked to manage web application firewalls (AWS WAF), both using Firewall Manager.
User tracking and accountability
In a multi-admin configuration environment, each Firewall Manager administrator’s activities are logged and recorded according to corporate compliance standards. This is useful when dealing with the troubleshooting of security incidents, and for compliance with auditing standards.
Compliance with security frameworks
Regulations specific to a particular industry, such as Payment Card Industry (PCI), and industry-specific legislation, such as HIPAA, require restricted access, control, and separation of tasks for different job functions. Failure to adhere to such standards could result in penalties. With administrative scope extending to policy types, customers can assign responsibility for managing particular firewall policies according to user role guidelines, as specified in compliance frameworks.
Region-based privileges
Many state or federal frameworks, such as the California Consumer Privacy Act (CCPA), require that admins adhere to customized regional requirements, such as data sovereignty or privacy requirements. Multi-admin Firewall Manager support helps organizations to adopt these frameworks by making it easier to assign admins who are familiar with the regulations of a particular region to that region.
Figure 1: Use cases for multi-admin support on AWS Firewall Manager
How to implement multi-admin support with Firewall Manager
To configure multi-admin support on Firewall Manager, use the following steps:
In the AWS Organizations console of the organization’s managed account, expand the Root folder to view the various accounts in the organization. Select the Default Administrator account that is allocated to delegate Firewall Manager administrators. The Default Administrator account should be a dedicated security account separate from the AWS Organizations management account, such as a Security Tooling account.
Figure 2: Overview of the AWS Organizations console
Navigate to Firewall Manager and in the left navigation menu, select Settings.
Figure 3: AWS Firewall Manager settings to update policy types
In Settings, choose an account. Under Policy types, select AWS Network Firewall to allow an admin to manage a specific firewall across accounts and across Regions. Select Edit to show the Details menu in Figure 4.
Figure 4: Select AWS Network Firewall as a policy type that can be managed by this administration account
The results of your selection are shown in Figure 5. The admin has been granted privileges to set AWS Network Firewall policy across all Regions and all accounts.
Figure 5: The admin has been granted privileges to set Network Firewall policy across all Regions and all accounts
In this second use case, you will identify a number of sub-accounts that the admin should be restricted to. As shown in Figure 6, there are no sub-accounts or OUs that the admin is restricted to by default until you choose Edit and select them.
Figure 6: The administrative scope details for the admin
In order to achieve this second use case, you choose Edit, and then add multiple sub-accounts or an OU that you need the admin restricted to, as shown in Figure 7.
Figure 7: Add multiple sub-accounts or an OU that you need the admin restricted to
The third use case pertains to granting the admin privileges to a particular AWS Region. In this case, you go into the Edit administrator account page once more, but this time, for Regions, select US West (N California) in order to restrict admin privileges only to this selected Region.
Figure 8: Restricting admin privileges only to the US West (N California) Region
Conclusion
Large enterprises need strategies for operationalizing security policy management so that they can enforce policy across organizational boundaries, deal with policy changes across security services, and adhere to auditing and compliance requirements. Multi-admin support in Firewall Manager provides a framework that admins can use to organize their workflow across job roles, to help maintain appropriate levels of security while providing the autonomy that admins desire.
You can get started using the multi-admin feature with Firewall Manager using the AWS Management Console. To learn more, refer to the service documentation.
If you have feedback about this post, submit comments in the Comments section below. If you have questions about this post, contact AWS Support.
This blog post provides recommendations that you can use to help improve resiliency in the unlikely event of disrupted availability of the global (now legacy) AWS Security Token Service (AWS STS) endpoint. Although the global (legacy) AWS STS endpoint https://sts.amazonaws.com is highly available, it’s hosted in a single AWS Region—US East (N. Virginia)—and like other endpoints, it doesn’t provide automatic failover to endpoints in other Regions. In this post I will show you how to use Regional AWS STS endpoints in your configurations to improve the performance and resiliency of your workloads.
For authentication, it’s best to use temporary credentials instead of long-term credentials to help reduce risks, such as inadvertent disclosure, sharing, or theft of credentials. With AWS STS, trusted users can request temporary, limited-privilege credentials to access AWS resources.
Temporary credentials include an access key pair and a session token. The access key pair consists of an access key ID and a secret key. AWS STS generates temporary security credentials dynamically and provides them to the user when requested, which eliminates the need for long-term storage. Temporary security credentials have a limited lifetime so you don’t have to manage or rotate them.
To get these credentials, you can use several different methods:
An AWS principal, such as a role, user, or service
A web token, such as those provided by an OAuth 2.0 or OpenID Connect (OIDC) application
Figure 1: Methods to request credentials from AWS STS
Global (legacy) and Regional AWS STS endpoints
To connect programmatically to an AWS service, you use an endpoint. An endpoint is the URL of the entry point for AWS STS.
AWS STS provides Regional endpoints in every Region. AWS initially built AWS STS with a global endpoint (now legacy) https://sts.amazonaws.com, which is hosted in the US East (N. Virginia) Region (us-east-1). Regional AWS STS endpoints are activated by default for Regions that are enabled by default in your AWS account. For example, https://sts.us-east-2.amazonaws.com is the US East (Ohio) Regional endpoint. By default, AWS services use Regional AWS STS endpoints. For example, IAM Roles Anywhere uses the Regional STS endpoint that corresponds to the trust anchor. For a complete list of AWS STS endpoints for each Region, see AWS Security Token Service endpoints and quotas. You can’t activate an AWS STS endpoint in a Region that is disabled. For more information on which AWS STS endpoints are activated by default and which endpoints you can activate or deactivate, see Regions and endpoints.
As noted previously, the global (legacy) AWS STS endpoint https://sts.amazonaws.com is hosted in a single Region — US East (N. Virginia) — and like other endpoints, it doesn’t provide automatic failover to endpoints in other Regions. If your workloads on AWS or outside of AWS are configured to use the global (legacy) AWS STS endpoint https://sts.amazonaws.com, you introduce a dependency on a single Region: US East (N. Virginia). In the unlikely event that the endpoint becomes unavailable in that Region or connectivity between your resources and that Region is lost, your workloads won’t be able to use AWS STS to retrieve temporary credentials, which poses an availability risk to your workloads.
AWS recommends that you use Regional AWS STS endpoints (https://sts.<region-name>.amazonaws.com) instead of the global (legacy) AWS STS endpoint.
In addition to improved resiliency, Regional endpoints have other benefits:
Isolation and containment — By making requests to an AWS STS endpoint in the same Region as your workloads, you can minimize cross-Region dependencies and align the scope of your resources with the scope of your temporary security credentials to help address availability and security concerns. For example, if your workloads are running in the US East (Ohio) Region, you can target the Regional AWS STS endpoint in the US East (Ohio) Region (us-east-2) to remove dependencies on other Regions.
Performance — By making your AWS STS requests to an endpoint that is closer to your services and applications, you can access AWS STS with lower latency and shorter response times.
Figure 2: Assume an IAM role by using an API call to a Regional AWS STS endpoint
Calls to AWS STS within the same Region
You should configure your workloads within a specific Region to use only the Regional AWS STS endpoint for that Region. By using a Regional endpoint, you can use AWS STS in the same Region as your workloads, removing cross-Region dependency. For example, workloads in the US East (Ohio) Region should use only the Regional endpoint https://sts.us-east-2.amazonaws.com to call AWS STS. If a Regional AWS STS endpoint becomes unreachable, your workloads shouldn’t call AWS STS endpoints outside of the operating Region. If your workload has a multi-Region resiliency requirement, your other active or standby Region should use a Regional AWS STS endpoint for that Region and should be deployed such that the application can function despite a Regional failure. You should direct STS traffic to the STS endpoint within the same Region, isolated and independent from other Regions, and remove dependencies on the global (legacy) endpoint.
Calls to AWS STS from outside AWS
You should configure your workloads outside of AWS to call the appropriate Regional AWS STS endpoints that offer the lowest latency to your workload located outside of AWS. If your workload has a multi-Region resiliency requirement, build failover logic for AWS STS calls to other Regions in the event that Regional AWS STS endpoints become unreachable. Temporary security credentials obtained from Regional AWS STS endpoints are valid globally for the default session duration or duration that you specify.
How to configure Regional AWS STS endpoints for your tools and SDKs
By default, the AWS CLI version 2 sends AWS STS API requests to the Regional AWS STS endpoint for the currently configured Region. If you are using AWS CLI v2, you don’t need to make additional changes.
By default, the AWS CLI v1 sends AWS STS requests to the global (legacy) AWS STS endpoint. To check the version of the AWS CLI that you are using, run the following command: $ aws –version.
When you run AWS CLI commands, the AWS CLI looks for credential configuration in a specific order—first in shell environment variables and then in the local AWS configuration file (~/.aws/config).
AWS SDK
AWS SDKs are available for a variety of programming languages and environments. Since July 2022, major new versions of the AWS SDK default to Regional AWS STS endpoints and use the endpoint corresponding to the currently configured Region. If you use a major version of the AWS SDK that was released after July 2022, you don’t need to make additional changes.
An AWS SDK looks at various configuration locations until it finds credential configuration values. For example, the AWS SDK for Python (Boto3) adheres to the following lookup order when it searches through sources for configuration values:
A configuration object created and passed as the AWS configuration parameter when creating a client
Environment variables
The AWS configuration file ~/.aws/config
If you still use AWS CLI v1, or your AWS SDK version doesn’t default to a Regional AWS STS endpoint, you have the following options to set the Regional AWS STS endpoint:
Option 1 — Use a shared AWS configuration file setting
The configuration file is located at ~/.aws/config on Linux or macOS, and at C:\Users\USERNAME\.aws\config on Windows. To use the Regional endpoint, add the sts_regional_endpoints parameter.
The following example shows how you can set the value for the Regional AWS STS endpoint in the US East (Ohio) Region (us-east-2), by using the default profile in the AWS configuration file:
[default]
region = us-east-2
sts_regional_endpoints = regional
The valid values for the AWS STS endpoint parameter (sts_regional_endpoints) are:
legacy (default) — Uses the global (legacy) AWS STS endpoint, sts.amazonaws.com.
regional — Uses the AWS STS endpoint for the currently configured Region.
Note: Since July 2022, major new versions of the AWS SDK default to Regional AWS STS endpoints and use the endpoint corresponding to the currently configured Region. If you are using AWS CLI v1, you must use version 1.16.266 or later to use the AWS STS endpoint parameter.
You can use the --debug option with the AWS CLI command to receive the debug log and validate which AWS STS endpoint was used.
If you search for UseGlobalEndpoint in your debug log, you’ll find that the UseGlobalEndpoint parameter is set to False, and you’ll see the Regional endpoint provider fully qualified domain name (FQDN) when the Regional AWS STS endpoint is configured in a shared AWS configuration file or environment variables:
For a list of AWS SDKs that support shared AWS configuration file settings for Regional AWS STS endpoints, see Compatibility with AWS SDKS.
Option 2 — Use environment variables
Environment variables provide another way to specify configuration options. They are global and affect calls to AWS services. Most SDKs support environment variables. When you set the environment variable, the SDK uses that value until the end of your shell session or until you set the variable to a different value. To make the variables persist across future sessions, set them in your shell’s startup script.
The following example shows how you can set the value for the Regional AWS STS endpoint in the US East (Ohio) Region (us-east-2) by using environment variables:
You can run the command $ (echo $AWS_DEFAULT_REGION; echo $AWS_STS_REGIONAL_ENDPOINTS) to validate the variables. The output should look similar to the following:
us-east-2
regional
Windows
C:\> set AWS_DEFAULT_REGION=us-east-2
C:\> set AWS_STS_REGIONAL_ENDPOINTS=regional
The following example shows how you can configure an STS client with the AWS SDK for Python (Boto3) to use a Regional AWS STS endpoint by setting the environment variable:
import boto3
import os
os.environ["AWS_DEFAULT_REGION"] = "us-east-2"
os.environ["AWS_STS_REGIONAL_ENDPOINTS"] = "regional"
You can use the metadata attribute sts_client.meta.endpoint_url to inspect and validate how an STS client is configured. The output should look similar to the following:
For a list of AWS SDKs that support environment variable settings for Regional AWS STS endpoints, see Compatibility with AWS SDKs.
Option 3 — Construct an endpoint URL
You can also manually construct an endpoint URL for a specific Regional AWS STS endpoint.
The following example shows how you can configure the STS client with AWS SDK for Python (Boto3) to use a Regional AWS STS endpoint by setting a specific endpoint URL:
You can create a private connection to AWS STS from the resources that you deployed in your Amazon VPCs. AWS STS integrates with AWS PrivateLink by using interface VPC endpoints. The network traffic on AWS PrivateLink stays on the global AWS network backbone and doesn’t traverse the public internet. When you configure a VPC endpoint for AWS STS, the traffic for the Regional AWS STS endpoint traverses to that endpoint.
By default, the DNS in your VPC will update the entry for the Regional AWS STS endpoint to resolve to the private IP address of the VPC endpoint for AWS STS in your VPC. The following output from an Amazon Elastic Compute Cloud (Amazon EC2) instance shows the DNS name for the AWS STS endpoint resolving to the private IP address of the VPC endpoint for AWS STS:
After you create an interface VPC endpoint for AWS STS in your Region, set the value for the respective Regional AWS STS endpoint by using environment variables to access AWS STS in the same Region.
The output of the following log shows that an AWS STS call was made to the Regional AWS STS endpoint:
POST
/

content-type:application/x-www-form-urlencoded; charset=utf-8
host:sts.us-east-2.amazonaws.com
Log AWS STS requests
You can use AWS CloudTrail events to get information about the request and endpoint that was used for AWS STS. This information can help you identify AWS STS request patterns and validate if you are still using the global (legacy) STS endpoint.
An event in CloudTrail is the record of an activity in an AWS account. CloudTrail events provide a history of both API and non-API account activity made through the AWS Management Console, AWS SDKs, command line tools, and other AWS services.
Log locations
Requests to Regional AWS STS endpoints sts.<region-name>.amazonaws.com are logged in CloudTrail within their respective Region.
Requests to the global (legacy) STS endpoint sts.amazonaws.com are logged within the US East (N. Virginia) Region (us-east-1).
Log fields
Requests to Regional AWS STS endpoints and global endpoint are logged in the tlsDetails field in CloudTrail. You can use this field to determine if the request was made to a Regional or global (legacy) endpoint.
Requests made from a VPC endpoint are logged in the vpcEndpointId field in CloudTrail.
The following example shows a CloudTrail event for an STS request to a Regional AWS STS endpoint with a VPC endpoint.
The following example shows how to run a CloudWatch Logs Insights query to look for API calls made to the global (legacy) AWS STS endpoint. Before you can query CloudTrail events, you must configure a CloudTrail trail to send events to CloudWatch Logs.
The query output shows event details for an AWS STS call made to the global (legacy) AWS STS endpoint https://sts.amazonaws.com.
Figure 3: Use a CloudWatch Log Insights query to look for STS API calls
Amazon Athena
The following example shows how to query CloudTrail events with Amazon Athena and search for API calls made to the global (legacy) AWS STS endpoint.
SELECT
    eventtime,
    recipientaccountid,
    eventname,
    tlsdetails.clientProvidedHostHeader,
    sourceipaddress,
    eventid,
    useridentity.arn
FROM "cloudtrail_logs"
WHERE
    eventsource = 'sts.amazonaws.com' AND
    tlsdetails.clientProvidedHostHeader = 'sts.amazonaws.com'
ORDER BY eventtime DESC
The query output shows STS calls made to the global (legacy) AWS STS endpoint https://sts.amazonaws.com.
Figure 4: Use Athena to search for STS API calls and identify STS endpoints
Conclusion
In this post, you learned how to use Regional AWS STS endpoints to help improve resiliency, reduce latency, and increase session token usage for the operating Regions in your AWS environment.
AWS recommends that you check the configuration and usage of AWS STS endpoints in your environment, validate AWS STS activity in your CloudTrail logs, and confirm that Regional AWS STS endpoints are used.
We continue to expand the scope of our assurance programs at Amazon Web Services (AWS) and are pleased to announce the first ever Winter 2023 AWS System and Organization Controls (SOC) 1 report. The new Winter SOC report demonstrates our continuous commitment to adhere to the heightened expectations for cloud service providers.
The report covers the period January 1–December 31, 2023, and specifically addresses requests from customers that require coverage over the fourth quarter, but have a fiscal year-end that necessitates obtaining a SOC 1 report before the issuance of the Spring AWS SOC 1 report, which is typically published in mid-May.
The Winter 2023 SOC 1 report includes a total of 171 services in scope. For up-to-date information, including when additional services are added, see the AWS Services in Scope by Compliance Program and choose SOC.
AWS strives to continuously bring services into the scope of its compliance programs to help you meet your architectural and regulatory needs. If you have questions or feedback about SOC compliance, reach out to your AWS account team.
To learn more about our compliance and security programs, see AWS Compliance Programs. As always, we value your feedback and questions; reach out to the AWS Compliance team through the Contact Us page.
If you have feedback about this post, submit comments in the Comments section below.
When building API-based web applications in the cloud, there are two main types of communication flow in which identity is an integral consideration:
User-to-Service communication: Authenticate and authorize users to communicate with application services and APIs
Service-to-Service communication: Authenticate and authorize application services to talk to each other
To design an authentication and authorization solution for these flows, you need to add an extra dimension to each flow:
Authentication: What identity you will use and how it’s verified
Authorization: How to determine which identity can perform which task
In each flow, a user or a service must present some kind of credential to the application service so that it can determine whether the flow should be permitted. The credentials are often accompanied with other metadata that can then be used to make further access control decisions.
In this blog post, I show you two ways that you can use Amazon VPC Lattice to implement both communication flows. I also show you how to build a simple and clean architecture for securing your web applications with scalable authentication, providing authentication metadata to make coarse-grained access control decisions.
The example solution is based around a standard API-based application with multiple API components serving HTTP data over TLS. With this solution, I show that VPC Lattice can be used to deliver authentication and authorization features to an application without requiring application builders to create this logic themselves. In this solution, the example application doesn’t implement its own authentication or authorization, so you will use VPC Lattice and some additional proxying with Envoy, an open source, high performance, and highly configurable proxy product, to provide these features with minimal application change. The solution uses Amazon Elastic Container Service (Amazon ECS) as a container environment to run the API endpoints and OAuth proxy, however Amazon ECS and containers aren’t a prerequisite for VPC Lattice integration.
If your application already has client authentication, such as a web application using OpenID Connect (OIDC), you can still use the sample code to see how implementation of secure service-to-service flows can be implemented with VPC Lattice.
VPC Lattice configuration
VPC Lattice is an application networking service that connects, monitors, and secures communications between your services, helping to improve productivity so that your developers can focus on building features that matter to your business. You can define policies for network traffic management, access, and monitoring to connect compute services in a simplified and consistent way across instances, containers, and serverless applications.
For a web application, particularly those that are API based and comprised of multiple components, VPC Lattice is a great fit. With VPC Lattice, you can use native AWS identity features for credential distribution and access control, without the operational overhead that many application security solutions require.
This solution uses a single VPC Lattice service network, with each of the application components represented as individual services. VPC Lattice auth policies are AWS Identity and Access Management (IAM) policy documents that you attach to service networks or services to control whether a specified principal has access to a group of services or specific service. In this solution we use an auth policy on the service network, as well as more granular policies on the services themselves.
User-to-service communication flow
For this example, the web application is constructed from multiple API endpoints. These are typical REST APIs, which provide API connectivity to various application components.
The most common method for securing REST APIs is by using OAuth2. OAuth2 allows a client (on behalf of a user) to interact with an authorization server and retrieve an access token. The access token is intended to be presented to a REST API and contains enough information to determine that the user identified in the access token has given their consent for the REST API to operate on their data on their behalf.
Access tokens use OAuth2 scopes to indicate user consent. Defining how OAuth2 scopes work is outside the scope of this post. You can learn about scopes in Permissions, Privileges, and Scopes in the AuthO blog.
VPC Lattice doesn’t support OAuth2 client or inspection functionality, however it can verify HTTP header contents. This means you can use header matching within a VPC Lattice service policy to grant access to a VPC Lattice service only if the correct header is included. By generating the header based on validation occurring prior to entering the service network, we can use context about the user at the service network or service to make access control decisions.
Figure 1: User-to-service flow
The solution uses Envoy, to terminate the HTTP request from an OAuth 2.0 client. This is shown in Figure 1: User-to-service flow.
Envoy (shown as (1) in Figure 2) can validate access tokens (presented as a JSON Web Token (JWT) embedded in an Authorization: Bearer header). If the access token can be validated, then the scopes from this token are unpacked (2) and placed into X-JWT-Scope-<scopename> headers, using a simple inline Lua script. The Envoy documentation provides examples of how to use inline Lua in Envoy. Figure 2 – JWT Scope to HTTP shows how this process works at a high level.
Figure 2: JWT Scope to HTTP headers
Following this, Envoy uses Signature Version 4 (SigV4) to sign the request (3) and pass it to the VPC Lattice service. SigV4 signing is a native Envoy capability, but it requires the underlying compute that Envoy is running on to have access to AWS credentials. When you use AWS compute, assigning a role to that compute verifies that the instance can provide credentials to processes running on that compute, in this case Envoy.
By adding an authorization policy that permits access only from Envoy (through validating the Envoy SigV4 signature) and only with the correct scopes provided in HTTP headers, you can effectively lock down a VPC Lattice service to specific verified users coming from Envoy who are presenting specific OAuth2 scopes in their bearer token.
To answer the original question of where the identity comes from, the identity is provided by the user when communicating with their identity provider (IdP). In addition to this, Envoy is presenting its own identity from its underlying compute to enter the VPC Lattice service network. From a configuration perspective this means your user-to-service communication flow doesn’t require understanding of the user, or the storage of user or machine credentials.
The sample code provided shows a full Envoy configuration for VPC Lattice, including SigV4 signing, access token validation, and extraction of JWT contents to headers. This reference architecture supports various clients including server-side web applications, thick Java clients, and even command line interface-based clients calling the APIs directly. I don’t cover OAuth clients in detail in this post, however the optional sample code allows you to use an OAuth client and flow to talk to the APIs through Envoy.
Service-to-service communication flow
In the service-to-service flow, you need a way to provide AWS credentials to your applications and configure them to use SigV4 to sign their HTTP requests to the destination VPC Lattice services. Your application components can have their own identities (IAM roles), which allows you to uniquely identify application components and make access control decisions based on the particular flow required. For example, application component 1 might need to communicate with application component 2, but not application component 3.
If you have full control of your application code and have a clean method for locating the destination services, then this might be something you can implement directly in your server code. This is the configuration that’s implemented in the AWS Cloud Development Kit (AWS CDK) solution that accompanies this blog post, the app1, app2, and app3 web servers are capable of making SigV4 signed requests to the VPC Lattice services they need to communicate with. The sample code demonstrates how to perform VPC Lattice SigV4 requests in node.js using the aws-crt node bindings. Figure 3 depicts the use of SigV4 authentication between services and VPC Lattice.
Figure 3: Service-to-service flow
To answer the question of where the identity comes from in this flow, you use the native SigV4 signing support from VPC Lattice to validate the application identity. The credentials come from AWS STS, again through the native underlying compute environment. Providing credentials transparently to your applications is one of the biggest advantages of the VPC Lattice solution when comparing this to other types of application security solutions such as service meshes. This implementation requires no provisioning of credentials, no management of identity stores, and automatically rotates credentials as required. This means low overhead to deploy and maintain the security of this solution and benefits from the reliability and scalability of IAM and the AWS Security Token Service (AWS STS) — a very slick solution to securing service-to-service communication flows!
VPC Lattice policy configuration
VPC Lattice provides two levels of auth policy configuration — at the VPC Lattice service network and on individual VPC Lattice services. This allows your cloud operations and development teams to work independently of each other by removing the dependency on a single team to implement access controls. This model enables both agility and separation of duties. More information about VPC Lattice policy configuration can be found in Control access to services using auth policies.
Service network auth policy
This design uses a service network auth policy that permits access to the service network by specific IAM principals. This can be used as a guardrail to provide overall access control over the service network and underlying services. Removal of an individual service auth policy will still enforce the service network policy first, so you can have confidence that you can identify sources of network traffic into the service network and block traffic that doesn’t come from a previously defined AWS principal.
The preceding auth policy example grants permissions to any authenticated request that uses one of the IAM roles app1TaskRole, app2TaskRole, app3TaskRole or EnvoyFrontendTaskRole to make requests to the services attached to the service network. You will see in the next section how service auth policies can be used in conjunction with service network auth policies.
Service auth policies
Individual VPC Lattice services can have their own policies defined and implemented independently of the service network policy. This design uses a service policy to demonstrate both user-to-service and service-to-service access control.
The preceding auth policy is an example that could be attached to the app1 VPC Lattice service. The policy contains two statements:
The first (labelled “Sid”: “UserToService”) provides user-to-service authorization and requires requiring the caller principal to be EnvoyFrontendTaskRole and the request headers to contain the header x-jwt-scope-test.all: true when calling the app1 VPC Lattice service.
The second (labelled “Sid”: “ServiceToService”) provides service-to-service authorization and requires the caller principal to be app2TaskRole when calling the app1 VPC Lattice service.
As with a standard IAM policy, there is an implicit deny, meaning no other principals will be permitted access.
The caller principals are identified by VPC Lattice through the SigV4 signing process. This means by using the identities provisioned to the underlying compute the network flow can be associated with a service identity, which can then be authorized by VPC Lattice service access policies.
Distributed development
This model of access control supports a distributed development and operational model. Because the service network auth policy is decoupled from the service auth policies, the service auth policies can be iterated upon by a development team without impacting the overall policy controls set by an operations team for the entire service network.
The AWS CDK solution deploys four Amazon ECS services, one for the frontend Envoy server for the client-to-service flow, and the remaining three for the backend application components. Figure 4 shows the solution when deployed with the internal domain parameter application.internal.
Backend application components are a simple node.js express server, which will print the contents of your request in JSON format and perform service-to-service calls.
A number of other infrastructure components are deployed to support the solution:
A VPC with associated subnets, NAT gateways and an internet gateway. Internet access is required for the solution to retrieve JSON Web Key Set (JWKS) details from your OAuth provider.
An Amazon Route53 hosted zone for handling traffic routing to the configured domain and VPC Lattice services.
An Amazon ECS cluster (two container hosts by default) to run the ECS tasks.
All application load balancers are internally facing.
Application component load balancers are configured to only accept traffic from the VPC Lattice managed prefix List.
The frontend Envoy load balancer is configured to accept traffic from any host.
Three VPC Lattice services and one VPC Lattice network.
The code for Envoy and the application components can be found in the lattice_soln/containers directory.
AWS CDK code for all other deployable infrastructure can be found in lattice_soln/lattice_soln_stack.py.
Prerequisites
Before you begin, you must have the following prerequisites in place:
An AWS account to deploy solution resources into. AWS credentials should be available to the AWS CDK in the environment or configuration files for the CDK deploy to function.
Python 3.9.6 or higher
Docker or Finch for building containers. If using Finch, ensure the Finch executable is in your path and instruct the CDK to use it with the command export CDK_DOCKER=finch
Enable elastic network interface (ENI) trunking in your account to allow more containers to run in VPC networking mode:
This solution has been tested using Okta, however any OAuth compatible provider will work if it can issue access tokens and you can retrieve them from the command line.
The following instructions describe the configuration process for Okta using the Okta web UI. This allows you to use the device code flow to retrieve access tokens, which can then be validated by the Envoy frontend deployment.
Create a new app integration
In the Okta web UI, select Applications and then choose Create App Integration.
For Sign-in method, select OpenID Connect.
For Application type, select Native Application.
For Grant Type, select both Refresh Token and Device Authorization.
Note the client ID for use in the device code flow.
Create a new API integration
Still in the Okta web UI, select Security, and then choose API.
Choose Add authorization server.
Enter a name and audience. Note the audience for use during CDK installation, then choose Save.
Select the authorization server you just created. Choose the Metadata URI link to open the metadata contents in a new tab or browser window. Note the jwks_uri and issuer fields for use during CDK installation.
Return to the Okta web UI, select Scopes and then Add scope.
For the scope name, enter test.all. Use the scope name for the display phrase and description. Leave User consent as implicit. Choose Save.
Under Access Policies, choose Add New Access Policy.
For Assign to, select The following clients and select the client you created above.
Choose Add rule.
In Rule name, enter a rule name, such as Allow test.all access
Under If Grant Type Is uncheck all but Device Authorization. Under And Scopes Requested choose The following scopes. Select OIDC default scopes to add the default scopes to the scopes box, then also manually add the test.all scope you created above.
During the API Integration step, you should have collected the audience, JWKS URI, and issuer. These fields are used on the command line when installing the CDK project with OAuth support.
You can then use the process described in configure the smart device to retrieve an access token using the device code flow. Make sure you modify scope to include test.all — scope=openid profile offline_access test.all — so your token matches the policy deployed by the solution.
Installation
You can download the deployable solution from GitHub.
Deploy without OAuth functionality
If you only want to deploy the solution with service-to-service flows, you can deploy with a CDK command similar to the following:
To deploy the solution with OAuth functionality, you must provide the following parameters:
jwt_jwks: The URL for retrieving JWKS details from your OAuth provider. This would look something like https://dev-123456.okta.com/oauth2/ausa1234567/v1/keys
jwt_issuer: The issuer for your OAuth access tokens. This would look something like https://dev-123456.okta.com/oauth2/ausa1234567
jwt_audience: The audience configured for your OAuth protected APIs. This is a text string configured in your OAuth provider.
app_domain: The domain to be configured in Route53 for all URLs provided for this application. This domain is local to the VPC created for the solution. For example application.internal.
The solution can be deployed with a CDK command as follows:
$ cdk deploy -c enable_oauth=True -c jwt_jwks=<URL for retrieving JWKS details> \
-c jwt_issuer=<URL of the issuer for your OAuth access tokens> \
-c jwt_audience=<OAuth audience string> \
-c app_domain=<application domain>
Security model
For this solution, network access to the web application is secured through two main controls:
Entry into the service network requires SigV4 authentication, enforced by the service network policy. No other mechanisms are provided to allow access to the services, either through their load balancers or directly to the containers.
Service policies restrict access to either user- or service-based communication based on the identity of the caller and OAuth subject and scopes.
The Envoy configuration strips any x- headers coming from user clients and replaces them with x-jwt-subject and x-jwt-scope headers based on successful JWT validation. You are then able to match these x-jwt-* headers in VPC Lattice policy conditions.
Solution caveats
This solution implements TLS endpoints on VPC Lattice and Application Load Balancers. The container instances do not implement TLS in order to reduce cost for this example. As such, traffic is in cleartext between the Application Load Balancers and container instances, and can be implemented separately if required.
How to use the solution
Now for the interesting part! As part of solution deployment, you’ve deployed a number of Amazon Elastic Compute Cloud (Amazon EC2) hosts to act as the container environment. You can use these hosts to test some of the flows and you can use the AWS Systems Manager connect function from the AWS Management console to access the command line interface on any of the container hosts.
In these examples, I’ve configured the domain during the CDK installation as application.internal, which will be used for communicating with the application as a client. If you change this, adjust your command lines to match.
[Optional] For examples 3 and 4, you need an access token from your OAuth provider. In each of the examples, I’ve embedded the access token in the AT environment variable for brevity.
Example 1: Service-to-service calls (permitted)
For these first two examples, you must sign in to the container host and run a command in your container. This is because the VPC Lattice policies allow traffic from the containers. I’ve assigned IAM task roles to each container, which are used to uniquely identify them to VPC Lattice when making service-to-service calls.
To set up service-to service calls (permitted):
Sign in to the Amazon ECS console. You should see at least three ECS services running.
Figure 5: Cluster console
Select the app2 service LatticeSolnStack-app2service…, then select the Tasks tab. Under the Container Instances heading select the container instance that’s running the app2 service.
Figure 6: Container instances
You will see the instance ID listed at the top left of the page.
Figure 7: Single container instance
Select the instance ID (this will open a new window) and choose Connect. Select the Session Manager tab and choose Connect again. This will open a shell to your container instance.
The policy statements permit app2 to call app1. By using the path app2/call-to-app1, you can force this call to occur.
Test this with the following commands:
sh-4.2$ sudo bash
# docker ps --filter "label=webserver=app2"
CONTAINER ID   IMAGE                                                                                                                                                                           COMMAND                  CREATED         STATUS         PORTS     NAMES
<containerid>  111122223333.dkr.ecr.ap-southeast-2.amazonaws.com/cdk-hnb659fds-container-assets-111122223333-ap-southeast-2:5b5d138c3abd6cfc4a90aee4474a03af305e2dae6bbbea70bcc30ffd068b8403   "sh /app/launch_expr…"   9 minutes ago   Up 9minutes             ecs-LatticeSolnStackapp2task4A06C2E4-22-app2-container-b68cb2ffd8e4e0819901
# docker exec -it <containerid> curl localhost:80/app2/call-to-app1
The policy statements don’t permit app2 to call app3. You can simulate this in the same way and verify that the access isn’t permitted by VPC Lattice.
To set up service-to-service calls (denied)
You can change the curl command from Example 1 to test app2 calling app3.
# docker exec -it cd8420221dcb curl localhost:80/app2/call-to-app3
{
  "upstreamResponse": "AccessDeniedException: User: arn:aws:sts::111122223333:assumed-role/LatticeSolnStack-app2TaskRoleA1BE533B-3K7AJnCr8kTj/ddaf2e517afb4d818178f9e0fef8f841 is not authorized to perform: vpc-lattice-svcs:Invoke on resource: arn:aws:vpc-lattice:ap-southeast-2:111122223333:service/svc-08873e50553c375cd/ with an explicit deny in a service-based policy"
}
[Optional] Example 3: OAuth – Invalid access token
If you’ve deployed using OAuth functionality, you can test from the shell in Example 1 that you’re unable to access the frontend Envoy server (application.internal) without a valid access token, and that you’re also unable to access the backend VPC Lattice services (app1.application.internal, app2.application.internal, app3.application.internal) directly.
You can also verify that you cannot bypass the VPC Lattice service and connect to the load balancer or web server container directly.
sh-4.2$ curl -v https://application.internal
Jwt is missing

sh-4.2$ curl https://app1.application.internal
AccessDeniedException: User: anonymous is not authorized to perform: vpc-lattice-svcs:Invoke on resource: arn:aws:vpc-lattice:ap-southeast-2:111122223333:service/svc-03edffc09406f7e58/ because no network-based policy allows the vpc-lattice-svcs:Invoke action

sh-4.2$ curl https://internal-Lattic-app1s-C6ovEZzwdTqb-1882558159.ap-southeast-2.elb.amazonaws.com
^C

sh-4.2$ curl https://10.0.209.127
^C
[Optional] Example 4: Client access
If you’ve deployed using OAuth functionality, you can test from the shell in Example 1 to access the application with a valid access token. A client can reach each application component by using application.internal/<componentname>. For example, application.internal/app2. If no component name is specified, it will default to app1.
This will fail when attempting to connect to app3 using Envoy, as we’ve denied user to service calls on the VPC Lattice Service policy
sh-4.2$ https://application.internal/app3 -H "Authorization: Bearer $AT"

AccessDeniedException: User: arn:aws:sts::111122223333:assumed-role/LatticeSolnStack-EnvoyFrontendTaskRoleA297DB4D-OwD8arbEnYoP/827dc1716e3a49ad8da3fd1dd52af34c is not authorized to perform: vpc-lattice-svcs:Invoke on resource: arn:aws:vpc-lattice:ap-southeast-2:111122223333:service/svc-06987d9ab4a1f815f/app3 with an explicit deny in a service-based policy
Summary
You’ve seen how you can use VPC Lattice to provide authentication and authorization to both user-to-service and service-to-service flows. I’ve shown you how to implement some novel and reusable solution components:
JWT authorization and translation of scopes to headers, integrating an external IdP into your solution for user authentication.
SigV4 signing from an Envoy proxy running in a container.
Service-to-service flows using SigV4 signing in node.js and container-based credentials.
Integration of VPC Lattice with ECS containers, using the CDK.
All of this is created almost entirely with managed AWS services, meaning you can focus more on security policy creation and validation and less on managing components such as service identities, service meshes, and other self-managed infrastructure.
Some ways you can extend upon this solution include:
Implementing different service policies taking into consideration different OAuth scopes for your user and client combinations
Implementing multiple issuers on Envoy to allow different OAuth providers to use the same infrastructure
Deploying the VPC Lattice services and ECS tasks independently of the service network, to allow your builders to manage task deployment themselves
I look forward to hearing about how you use this solution and VPC Lattice to secure your own applications!
The latest version of the AWS HITRUST Shared Responsibility Matrix (SRM)—SRM version 1.4.2—is now available. To request a copy, choose SRM version 1.4.2 from the HITRUST website.
SRM version 1.4.2 adds support for the HITRUST Common Security Framework (CSF) v11.2 assessments in addition to continued support for previous versions of HITRUST CSF assessments v9.1–v11.2. As with the previous SRM versions v1.4 and v1.4.1, SRM v1.4.2 enables users to trace the HITRUST CSF cross-version lineage and inheritability of requirement statements, especially when inheriting from or to v9.x and 11.x assessments.
The SRM is intended to serve as a resource to help customers use the AWS Shared Responsibility Model to navigate their security compliance needs. The SRM provides an overview of control inheritance, and customers also use it to perform the control scoring inheritance functions for organizations that use AWS services.
Using the HITRUST certification, you can tailor your security control baselines to a variety of factors—including, but not limited to, regulatory requirements and organization type. As part of their approach to security and privacy, leading organizations in a variety of industries have adopted the HITRUST CSF.
AWS doesn’t provide compliance advice, and customers are responsible for determining compliance requirements and validating control implementation in accordance with their organization’s policies, requirements, and objectives. You can deploy your environments on AWS and inherit our HITRUST CSF certification, provided that you use only in-scope services and apply the controls detailed on the HITRUST website.
What this means for our customers
The new AWS HITRUST SRM version 1.4.2 has been tailored to reflect both the Cross Version ID (CVID) and Baseline Unique ID (BUID) in the CSF object so that you can select the correct control for inheritance even if you’re still using an older version of the HITRUST CSF for your own assessment. As an additional benefit, the AWS HITRUST Inheritance Program also supports the control inheritance of AWS cloud-based workloads for new HITRUST e1 and i1 assessment types, in addition to the validated r2-type assessments offered through HITRUST.
At AWS, we’re committed to helping you achieve and maintain the highest standards of security and compliance. We value your feedback and questions. Contact the AWS HITRUST team at AWS Compliance Contact Us. If you have feedback about this post, submit comments in the Comments section below.
CCGs offer security guidance mapped to 16 different compliance frameworks for more than 130 AWS services and integrations. Customers can select from the frameworks and services available to see how security “in the cloud” applies to AWS services through the lens of compliance.
CCGs focus on security topics and technical controls that relate to AWS service configuration options. The guides don’t cover security topics or controls that are consistent across AWS services or those specific to customer organizations, such as policies or governance. As a result, the guides are shorter and are focused on the unique security and compliance considerations for each AWS service.
We value your feedback on the guides. Take our CCG survey to tell us about your experience, request new services or frameworks, or suggest improvements.
CCGs provide summaries of the user guides for AWS services and map configuration guidance to security control requirements from the following frameworks:
National Institute of Standards and Technology (NIST) 800-53
NIST Cybersecurity Framework (CSF)
NIST 800-171
System and Organization Controls (SOC) II
Center for Internet Security (CIS) Critical Controls v8.0
ISO 27001
NERC Critical Infrastructure Protection (CIP)
Payment Card Industry Data Security Standard (PCI-DSS) v4.0
Department of Defense Cybersecurity Maturity Model Certification (CMMC)
HIPAA
Canadian Centre for Cyber Security (CCCS)
New York’s Department of Financial Services (NYDFS)
Federal Financial Institutions Examination Council (FFIEC)
Cloud Controls Matrix (CCM) v4
Information Security Manual (ISM-IRAP) (Australia)
Information System Security Management and Assessment Program (ISMAP) (Japan)
CCGs can help customers in the following ways:
Shorten the process of manually searching the AWS user guides to understand security “in the cloud” details and align configuration guidance to compliance requirements
Determine the scope of controls applicable in risk assessments or audits based on which AWS services are running in customer workloads
Assist customers who perform due diligence assessments on new AWS services under consideration for use in their organization
Provide assessors or risk teams with resources to identify which security areas are handled by AWS services and which are the customer’s responsibility to implement, which might influence the scope of evidence required for assessments or internal security checks
Provide a basis for developing security documentation such as control responses or procedures that might be required to meet various compliance documentation requirements or fulfill assessment evidence requests
The AWS Global Security & Compliance Acceleration (GSCA) Program connects customers with AWS partners that can help them navigate, automate, and accelerate building compliant workloads on AWS by helping to reduce time and cost. GSCA supports businesses globally that need to meet security, privacy, and compliance requirements for healthcare, privacy, national security, and financial sectors. To connect with a GSCA compliance specialist, complete the GSCA Program questionnaire.
If you have feedback about this post, submit comments in the Comments section below. If you have questions about this post, contact AWS Support.
Many customers building applications on Amazon Web Services (AWS) use Stripe global payment services to help get their product out faster and grow revenue, especially in the internet economy. It’s critical for customers to securely and properly handle the credentials used to authenticate with Stripe services. Much like your AWS API keys, which enable access to your AWS resources, Stripe API keys grant access to the Stripe account, which allows for the movement of real money. Therefore, you must keep Stripe’s API keys secret and well-controlled. And, much like AWS keys, it’s important to invalidate and re-issue Stripe API keys that have been inadvertently committed to GitHub, emitted in logs, or uploaded to Amazon Simple Storage Service (Amazon S3).
Customers have asked us for ways to reduce the risk of unintentionally exposing Stripe API keys, especially when code files and repositories are stored in Amazon S3. To help meet this need, we collaborated with Stripe to develop a new managed data identifier that you can use to help discover and protect Stripe API keys.
“I’m really glad we could collaborate with AWS to introduce a new managed data identifier in Amazon Macie. Mutual customers of AWS and Stripe can now scan S3 buckets to detect exposed Stripe API keys.” — Martin Pool,Staff Engineer in Cloud Security at Stripe
In this post, we will show you how to use the new managed data identifier in Amazon Macie to discover and protect copies of your Stripe API keys.
About Stripe API keys
Stripe provides payment processing software and services for businesses. Using Stripe’s technology, businesses can accept online payments from customers around the globe.
Stripe authenticates API requests by using API keys, which are included in the request. Stripe takes various measures to help customers keep their secret keys safe and secure. Stripe users can generate test-mode keys, which can only access simulated test data, and which doesn’t move real money. Stripe encourages its customers to use only test API keys for testing and development purposes to reduce the risk of inadvertent disclosure of live keys or of accidentally generating real charges.
Stripe also supports publishable keys, which you can make publicly accessible in your web or mobile app’s client-side code to collect payment information.
In this blog post, we focus on live-mode keys, which are the primary security concern because they can access your real data and cause money movement. These keys should be closely held within the production services that need to use them. Stripe allows keys to be restricted to read or write specific API resources, or used only from certain IP ranges, but even with these restrictions, you should still handle live mode keys with caution.
Stripe keys have distinctive prefixes to help you detect them such as sk_live_ for secret keys, and rk_live_ for restricted keys (which are also secret).
Amazon Macie
Amazon Macie is a fully managed service that uses machine learning (ML) and pattern matching to discover and help protect your sensitive data, such as personally identifiable information. Macie can also provide detailed visibility into your data and help you align with compliance requirements by identifying data that needs to be protected under various regulations, such as the General Data Protection Regulation (GDPR) and the Health Insurance Portability and Accountability Act (HIPAA).
Macie supports a suite of managed data identifiers to make it simpler for you to configure and adopt. Managed data identifiers are prebuilt, customizable patterns that help automatically identify sensitive data, such as credit card numbers, social security numbers, and email addresses.
Now, Macie has a new managed data identifier STRIPE_CREDENTIALS that you can use to identify Stripe API secret keys.
Configure Amazon Macie to detect Stripe credentials
In this section, we show you how to use the managed data identifier STRIPE_CREDENTIALS to detect Stripe API secret keys. We recommend that you carry out these tutorial steps in an AWS account dedicated to experimentation and exploration before you move forward with detection in a production environment.
Prerequisites
To follow along with this walkthrough, complete the following prerequisites.
The first step is to create some example objects in an S3 bucket in the AWS account. The objects contain strings that resemble Stripe secret keys. You will use the example data later to demonstrate how Macie can detect Stripe secret keys.
Note: The keys mentioned in the preceding files are mock data and aren’t related to actual live Stripe keys.
Create a Macie job with the STRIPE_CREDENTIALS managed data identifier
Using Macie, you can scan your S3 buckets for sensitive data and security risks. In this step, you run a one-time Macie job to scan an S3 bucket and review the findings.
To create a Macie job with STRIPE_CREDENTIALS
Open theAmazon Macie console, and in the left navigation pane, choose Jobs. On the top right, choose Create job.
Figure 1: Create Macie Job
Select the bucket that you want Macie to scan or specify bucket criteria, and then choose Next.
Figure 2: Select S3 bucket
Review the details of the S3 bucket, such as estimated cost, and then choose Next.
Figure 3: Review S3 bucket
On the Refine the scope page, choose One-time job, and then choose Next.
Note: After you successfully test, you can schedule the job to scan S3 buckets at the frequency that you choose.
Figure 4: Select one-time job
For Managed data identifier options, select Custom and then select Use specific managed data identifiers. For Select managed data identifiers, search for STRIPE_CREDENTIALS and then select it. Choose Next.
Figure 5: Select managed data identifier
Enter a name and an optional description for the job, and then choose Next.
Figure 6: Enter job name
Review the job details and choose Submit. Macie will create and start the job immediately, and the job will run one time.
When the Status of the job shows Complete, select the job, and from the Show results dropdown, select Show findings.
Figure 7: Select the job and then select Show findings
You can now review the findings for sensitive data in your S3 bucket. As shown in Figure 8, Macie detected Stripe keys in each of the four files, and categorized the findings as High severity. You can review and manage the findings in the Macie console, retrieve them through the Macie API for further analysis, send them to Amazon EventBridge for automated processing, or publish them to AWS Security Hub for a comprehensive view of your security state.
Figure 8: Review the findings
Respond to unintended disclosure of Stripe API keys
If you discover Stripe live-mode keys (or other sensitive data) in an S3 bucket, then through the Stripe dashboard, you can roll your API keys to revoke access to the compromised key and generate a new one. This helps ensure that the key can’t be used to make malicious API requests. Make sure that you install the replacement key into the production services that need it. In the longer term, you can take steps to understand the path by which the key was disclosed and help prevent a recurrence.
Conclusion
In this post, you learned about the importance of safeguarding Stripe API keys on AWS. By using Amazon Macie with managed data identifiers, setting up regular reviews and restricted access to S3 buckets, training developers in security best practices, and monitoring logs and repositories, you can help mitigate the risk of key exposure and potential security breaches. By adhering to these practices, you can help ensure a robust security posture for your sensitive data on AWS.
If you have feedback about this post, submit comments in the Comments section below. If you have questions about this post, start a new thread on Amazon Macie re:Post.
Network Firewall offers three deployment models: Distributed, centralized, and combined. Many customers opt for a centralized model to reduce costs. In this model, customers allocate the responsibility for managing the rulesets to the owners of the VPC infrastructure (spoke accounts) being protected, thereby shifting accountability and providing flexibility to the spoke accounts. Managing rulesets in a shared firewall policy generated from distributed input configurations of protected VPCs (spoke accounts) is challenging without proper input validation, state-management, and request throttling controls.
In this post, we show you how to automate firewall rule management within the central firewall using distributed firewall configurations spread across multiple AWS accounts. The anfw-automate solution provides input-validation, state-management, and throttling controls, reducing the update time for firewall rule changes from minutes to seconds. Additionally, the solution reduces operational costs, including rule management overhead while integrating seamlessly with the existing continuous integration and continuous delivery (CI/CD) processes.
Prerequisites
For this walkthrough, the following prerequisites must be met:
Basic knowledge of networking concepts such as routing and Classless Inter-Domain Routing (CIDR) range allocations.
Basic knowledge of YAML and JSON configuration formats, definitions, and schema.
The firewall VPC in the central account must be reachable from a spoke account (see centralized deployment model). For this solution, you need two AWS accounts from the centralized deployment model:
The spoke account is the consumer account the defines firewall rules for the account and uses central firewall endpoints for traffic filtering. At least one spoke account is required to simulate the user workflow in validation phase.
The central account is an account that contains the firewall endpoints. This account is used by application and the Network Firewall.
StackSets deployment with service-managed permissions must be enabled in AWS Organizations (Activate trusted access with AWS Organizations). A delegated administrator account is required to deploy AWS CloudFormation stacks in any account in an organization. The CloudFormation StackSets in this account deploy the necessary CloudFormation stacks in the spoke accounts. If you don’t have a delegated administrator account, you must manually deploy the resources in the spoke account. Manual deployment isn’t recommended in production environments.
A resource account is the CI/CD account used to deploy necessary AWS CodePipeline stacks. The pipelines deploy relevant cross-account cross-AWS Region stacks to the preceding AWS accounts.
IAM permissions to deploy CDK stacks in the resource account.
Solution description
In Network Firewall, each firewall endpoint connects to one firewall policy, which defines network traffic monitoring and filtering behavior. The details of the behavior are defined in rule groups — a reusable set of rules — for inspecting and handling network traffic. The rules in the rule groups provide the details for packet inspection and specify the actions to take when a packet matches the inspection criteria. Network Firewall uses a Suricata rules engine to process all stateful rules. Currently, you can create Suricata compatible or basic rules (such as domain list) in Network Firewall. We use Suricata compatible rule strings within this post to maintain maximum compatibility with most use cases.
Figure 1 describes how the anfw-automate solution uses the distributed firewall rule configurations to simplify rule management for multiple teams. The rules are validated, transformed, and stored in the central AWS Network Firewall policy. This solution isolates the rule generation to the spoke AWS accounts, but still uses a shared firewall policy and a central ANFW for traffic filtering. This approach grants the AWS spoke account owners the flexibility to manage their own firewall rules while maintaining the accountability for their rules in the firewall policy. The solution enables the central security team to validate and override user defined firewall rules before pushing them to the production firewall policy. The security team operating the central firewall can also define additional rules that are applied to all spoke accounts, thereby enforcing organization-wide security policies. The firewall rules are then compiled and applied to Network Firewall in seconds, providing near real-time response in scenarios involving critical security incidents.
Figure 1: Workflow launched by uploading a configuration file to the configuration (config) bucket
The Network Firewall firewall endpoints and anfw-automate solution are both deployed in the central account. The spoke accounts use the application for rule automation and the Network Firewall for traffic inspection.
As shown in Figure 1, each spoke account contains the following:
An Amazon Simple Storage Service (Amazon S3) bucket to store multiple configuration files, one per Region. The rules defined in the configuration files are applicable to the VPC traffic in the spoke account. The configuration files must comply with the defined naming convention ($Region-config.yaml) and be validated to make sure that only one configuration file exists per Region per account. The S3 bucket has event notifications enabled that publish all changes to configuration files to a local default bus in Amazon EventBridge.
EventBridge rules to monitor the default bus and forward relevant events to the custom event bus in the central account. The EventBridge rules specifically monitor VPCDelete events published by Amazon CloudTrail and S3 event notifications. When a VPC is deleted from the spoke account, the VPCDelete events lead to the removal of corresponding rules from the firewall policy. Additionally, all create, update, and delete events from Amazon S3 event notifications invoke corresponding actions on the firewall policy.
Two AWS Identity and Access Manager (IAM) roles with keywords xaccount.lmb.rc and xaccount.lmb.re are assumed by RuleCollect and RuleExecute functions in the central account, respectively.
A CloudWatch Logs log group to store event processing logs published by the central AWS Lambda application.
In the central account:
EventBridge rules monitor the custom event bus and invoke a Lambda function called RuleCollect. A dead-letter queue is attached to the EventBridge rules to store events that failed to invoke the Lambda function.
The RuleCollect function retrieves the config file from the spoke account by assuming a cross-account role. This role is deployed by the same stack that created the other spoke account resources. The Lambda function validates the request, transforms the request to the Suricata rule syntax, and publishes the rules to an Amazon Simple Queue Service (Amazon SQS) first-in-first-out (FIFO) queue. Input validation controls are paramount to make sure that users don’t abuse the functionality of the solution and bypass central governance controls. The Lambda function has input validation controls to verify the following:
The VPC ID in the configuration file exists in the configured Region and the same AWS account as the S3 bucket.
The Amazon S3 object version ID received in the event matches the latest version ID to mitigate race conditions.
Users don’t have only top-level domains (for example, .com, .de) in the rules.
The custom Suricata rules don’t have any as the destination IP address or domain.
The VPC identifier matches the required format, that is, a+(AWS Account ID)+(VPC ID without vpc- prefix) in custom rules. This is important to have unique rule variables in rule groups.
The rules don’t use security sensitive keywords such as sid, priority, or metadata. These keywords are reserved for firewall administrators and the Lambda application.
CIDR ranges for a VPC are mapped appropriately using IP set variables.
The input validations make sure that rules defined by one spoke account don’t impact the rules from other spoke accounts. The validations applied to the firewall rules can be updated and managed as needed based on your requirements. The rules created must follow a strict format, and deviation from the preceding rules will lead to the rejection of the request.
The Amazon SQS FIFO queue preserves the order of create, update, and delete operations run in the configuration bucket of the spoke account. These state-management controls maintain consistency between the firewall rules in the configuration file within the S3 bucket and the rules in the firewall policy. If the sequence of updates provided by the distributed configurations isn’t honored, the rules in a firewall policy might not match the expected ruleset.
Rules not processed beyond the maxReceiveCount threshold are moved to a dead-letter SQS queue for troubleshooting.
The Amazon SQS messages are subsequently consumed by another Lambda function called RuleExecute. Multiple changes to one configuration are batched together in one message. The RuleExecute function parses the messages and generates the required rule groups, IP set variables, and rules within the Network Firewall. Additionally, the Lambda function establishes a reserved rule group, which can be administered by the solution’s administrators and used to define global rules. The global rules, applicable to participating AWS accounts, can be managed in the data/defaultdeny.yaml file by the central security team.
The RuleExecute function also implements throttling controls to make sure that rules are applied to the firewall policy without reaching the ThrottlingException from Network Firewall (see common errors). The function also implements back-off logic to handle this exception. This throttling effect can happen if there are too many requests issued to the Network Firewall API.
The function makes cross-Region calls to Network Firewall based on the Region provided in the user configuration. There is no need to deploy the RuleExecute and RuleCollect Lambda functions in multiple Regions unless a use case warrants it.
Walkthrough
The following section guides you through the deployment of the rules management engine.
Deployment: Outlines the steps to deploy the solution into the target AWS accounts.
Validation: Describes the steps to validate the deployment and ensure the functionality of the solution.
Cleaning up: Provides instructions for cleaning up the deployment.
Deployment
In this phase, you deploy the application pipeline in the resource account. The pipeline is responsible for deploying multi-Region cross-account CDK stacks in both the central account and the delegated administrator account.
If you don’t have a functioning Network Firewall firewall using the centralized deployment model in the central account, see the README for instructions on deploying Amazon VPC and Network Firewall stacks before proceeding. You need to deploy the Network Firewall in centralized deployment in each Region and Availability Zone used by spoke account VPC infrastructure.
The application pipeline stack deploys three stacks in all configured Regions: LambdaStack and ServerlessStack in the central account and StacksetStack in the delegated administrator account. It’s recommended to deploy these stacks solely in the primary Region, given that the solution can effectively manage firewall policies across all supported Regions.
LambdaStack deploys the RuleCollect and RuleExecute Lambda functions, Amazon SQS FIFO queue, and SQS FIFO dead-letter queue.
ServerlessStack deploys EventBridge bus, EventBridge rules, and EventBridge Dead-letter queue.
StacksetStack deploys a service-managed stack set in the delegated administrator account. The stack set includes the deployment of IAM roles, EventBridge rules, an S3 Bucket, and a CloudWatch log group in the spoke account. If you’re manually deploying the CloudFormation template (templates/spoke-serverless-stack.yaml) in the spoke account, you have the option to disable this stack in the application configuration.
Figure 2: CloudFormation stacks deployed by the application pipeline
Follow the README and cdk bootstrapping guide to bootstrap the resource account. Then, bootstrap the central account and delegated administrator account (optional if StacksetStack is deployed manually in the spoke account) to trust the resource account. The spoke accounts don’t need to be bootstrapped.
Create a folder to be referred to as <STAGE>, where STAGE is the name of your deployment stage — for example, local, dev, int, and so on — in the conf folder of the cloned repository. The deployment stage is set as the STAGE parameter later and used in the AWS resource names.
Create global.json in the <STAGE> folder. Follow the README to update the parameter values. A sample JSON file is provided in conf/sample folder.
Run the following commands to configure the local environment:
Create a file named app.json in the <STAGE> folder and populate the parameters in accordance with the README section and defined schema.
If you choose to manage the deployment of spoke account stacks using the delegated administrator account and have set the deploy_stacksets parameter to true, create a file named stackset.json in the <STAGE> folder. Follow the README section to align with the requirements of the defined schema.
You can also deploy the spoke account stack manually for testing using the AWS CloudFormation template in templates/spoke-serverless-stack.yaml. This will create and configure the needed spoke account resources.
Run the following commands to deploy the application pipeline stack:
export STACKNAME=app && make deploy
Figure 3: Example output of application pipeline deployment
After deploying the solution, each spoke account is required to configure stateful rules for every VPC in the configuration file and upload it to the S3 bucket. Each spoke account owner must verify the VPC’s connection to the firewall using the centralized deployment model. The configuration, presented in the YAML configuration language, might encompass multiple rule definitions. Each account must furnish one configuration file per VPC to establish accountability and non-repudiation.
Validation
Now that you’ve deployed the solution, follow the next steps to verify that it’s completed as expected, and then test the application.
To validate deployment
Sign in to the AWS Management Console using the resource account and go to CodePipeline.
Verify the existence of a pipeline named cpp-app-<aws_ organization_scope>-<project_name>-<module_name>-<STAGE> in the configured Region.
Verify that stages exist in each pipeline for all configured Regions.
Confirm that all pipeline stages exist. The LambdaStack and ServerlessStack stages must exist in the cpp-app-<aws_organization_scope>-<project_name>-<module_name>-<STAGE> stack. The StacksetStack stage must exist if you set the deploy_stacksets parameter to true in global.json.
To validate the application
Sign in and open the Amazon S3 console using the spoke account.
Follow the schema defined in app/RuleCollect/schema.json and create a file with naming convention ${Region}-config.yaml. Note that the Region in the config file is the destination Region for the firewall rules. Verify that the file has valid VPC data and rules.
Figure 4: Example configuration file for eu-west-1 Region
Upload the newly created config file to the S3 bucket named anfw-allowlist-<AWS_REGION for application stack>-<Spoke Account ID>-<STAGE>.
If the data in the config file is invalid, you will see ERROR and WARN logs in the CloudWatch log group named cw-<aws_organization_scope>-<project_name>-<module_name>-CustomerLog-<STAGE>.
If all the data in the config file is valid, you will see INFO logs in the same CloudWatch log group.
Figure 5: Example of logs generated by the anfw-automate in a spoke account
After the successful processing of the rules, sign in to the Network Firewall console using the central account.
Navigate to the Network Firewall rule groups and search for a rule group with a randomly assigned numeric name. This rule group will contain your Suricata rules after the transformation process.
Figure 6: Rules created in Network Firewall rule group based on the configuration file in Figure 4
Access the Network Firewall rule group identified by the suffix reserved. This rule group is designated for administrators and global rules. Confirm that the rules specified in app/data/defaultdeny.yaml have been transformed into Suricata rules and are correctly placed within this rule group.
Instantiate an EC2 instance in the VPC specified in the configuration file and try to access both the destinations allowed in the file and any destination not listed. Note that requests to destinations not defined in the configuration file are blocked.
Cleaning up
To avoid incurring future charges, remove all stacks and instances used in this walkthrough.
Sign in to both the central account and the delegated admin account. Manually delete the stacks in the Regions configured for the app parameter in global.json. Ensure that the stacks are deleted for all Regions specified for the app parameter. You can filter the stack names using the keyword <aws_organization_scope>-<project_name>-<module_name> as defined in global.json.
After deleting the stacks, remove the pipeline stacks using the same command as during deployment, replacing cdk deploy with cdk destroy.
Terminate or stop the EC2 instance used to test the application.
Conclusion
This solution simplifies network security by combining distributed ANFW firewall configurations in a centralized policy. Automated rule management can help reduce operational overhead, reduces firewall change request completion times from minutes to seconds, offloads security and operational mechanisms such as input validation, state-management, and request throttling, and enables central security teams to enforce global firewall rules without compromising on the flexibility of user-defined rulesets.
In addition to using this application through S3 bucket configuration management, you can integrate this tool with GitHub Actions into your CI/CD pipeline to upload the firewall rule configuration to an S3 bucket. By combining GitHub actions, you can automate configuration file updates with automated release pipeline checks, such as schema validation and manual approvals. This enables your team to maintain and change firewall rule definitions within your existing CI/CD processes and tools. You can go further by allowing access to the S3 bucket only through the CI/CD pipeline.
Finally, you can ingest the AWS Network Firewall logs into one of our partner solutions for security information and event management (SIEM), security monitoring, threat intelligence, and managed detection and response (MDR). You can launch automatic rule updates based on security events detected by these solutions, which can help reduce the response time for security events.
If you have feedback about this post, submit comments in the Comments section below. If you have questions about this post, contact AWS Support.
Access control is essential for multi-tenant software as a service (SaaS) applications. SaaS developers must manage permissions, fine-grained authorization, and isolation.
In this post, we demonstrate how you can use Amazon Verified Permissions for access control in a multi-tenant document management SaaS application using a per-tenant policy store approach. We also describe how to enforce the tenant boundary.
We usually see the following access control needs in multi-tenant SaaS applications:
Application developers need to define policies that apply across all tenants.
Tenant users need to control who can access their resources.
Tenant admins need to manage all resources for a tenant.
Additionally, independent software vendors (ISVs) implement tenant isolation to prevent one tenant from accessing the resources of another tenant. Enforcing tenant boundaries is imperative for SaaS businesses and is one of the foundational topics for SaaS providers.
Verified Permissions is a scalable, fine-grained permissions management and authorization service that helps you build and modernize applications without having to implement authorization logic within the code of your application.
Verified Permissions uses the Cedar language to define policies. A Cedar policy is a statement that declares which principals are explicitly permitted, or explicitly forbidden, to perform an action on a resource. The collection of policies defines the authorization rules for your application. Verified Permissions stores the policies in a policy store. A policy store is a container for policies and templates. You can learn more about Cedar policies from the Using Open Source Cedar to Write and Enforce Custom Authorization Policies blog post.
Before Verified Permissions, you had to implement authorization logic within the code of your application. Now, we’ll show you how Verified Permissions helps remove this undifferentiated heavy lifting in an example application.
Multi-tenant document management SaaS application
The application allows to add, share, access and manage documents. It requires the following access controls:
Application developers who can define policies that apply across all tenants.
Tenant users who can control who can access their documents.
Tenant admins who can manage all documents for a tenant.
Let’s start by describing the application architecture and then dive deeper into the design details.
Application architecture overview
There are two approaches to multi-tenant design in Verified Permissions: a single shared policy store and a per-tenant policy store. You can learn about the considerations, trade-offs and guidance for these approaches in the Verified Permissions user guide.
For the example document management SaaS application, we decided to use the per-tenant policy store approach for the following reasons:
Low-effort tenant policies isolation
The ability to customize templates and schema per tenant
Low-effort tenant off-boarding
Per-tenant policy store resource quotas
We decided to accept the following trade-offs:
High effort to implement global policies management (because the application use case doesn’t require frequent changes to these policies)
Medium effort to implement the authorization flow (because we decided that in this context, the above reasons outweigh implementing a mapping from tenant ID to policy store ID)
Figure 1 shows the document management SaaS application architecture. For simplicity, we omitted the frontend and focused on the backend.
A tenant user signs in to an identity provider such as Amazon Cognito. They get a JSON Web Token (JWT), which they use for API requests. The JWT contains claims such as the user_id, which identifies the tenant user, and the tenant_id, which defines which tenant the user belongs to.
The tenant user makes API requests with the JWT to the application.
Amazon API Gateway verifies the validity of the JWT with the identity provider.
If the JWT is valid, API Gateway forwards the request to the compute provider, in this case an AWS Lambda function, for it to run the business logic.
The Lambda function assumes an AWS Identity and Access Management (IAM) role with an IAM policy that allows access to the Amazon DynamoDB table that provides tenant-to-policy-store mapping. The IAM policy scopes down access such that the Lambda function can only access data for the current tenant_id.
The Lambda function looks up the Verified Permissions policy_store_id for the current request. To do this, it extracts the tenant_id from the JWT. The function then retrieves the policy_store_id from the tenant-to-policy-store mapping table.
The Lambda function assumes another IAM role with an IAM policy that allows access to the Verified Permissions policy store, the document metadata table, and the document store. The IAM policy uses tenant_id and policy_store_id to scope down access.
The Lambda function gets or stores documents metadata in a DynamoDB table. The function uses the metadata for Verified Permissions authorization requests.
Using the information from steps 5 and 6, the Lambda function calls Verified Permissions to make an authorization decision or create Cedar policies.
If authorized, the application can then access or store a document.
Application architecture deep dive
Now that you know the architecture for the use cases, let’s review them in more detail and work backwards from the user experience to the related part of the application architecture. The architecture focuses on permissions management. Accessing and storing the actual document is out of scope.
Define policies that apply across all tenants
The application developer must define global policies that include a basic set of access permissions for all tenants. We use Cedar policies to implement these permissions.
Because we’re using a per-tenant policy store approach, the tenant onboarding process should create these policies for each new tenant. Currently, to update policies, the deployment pipeline should apply changes to all policy stores.
The “Add a document” and “Manage all the documents for a tenant” sections that follow include examples of global policies.
Make sure that a tenant can’t edit the policies of another tenant
The application uses IAM to isolate the resources of one tenant from another. Because we’re using a per-tenant policy store approach we can use IAM to isolate one tenant policy store from another.
Architecture
Figure 2: Tenant isolation
A tenant user calls an API endpoint using a valid JWT.
The Lambda function uses AWS Security Token Service (AWS STS) to assume an IAM role with an IAM policy that allows access to the tenant-to-policy-store mapping DynamoDB table. The IAM policy only allows access to the table and the entries that belong to the requesting tenant. When the function assumes the role, it uses tenant_id to scope access to the items whose partition key matches the tenant_id. See the How to implement SaaS tenant isolation with ABAC and AWS IAM blog post for examples of such policies.
The Lambda function uses the user’s tenant_id to get the Verified Permissions policy_store_id.
The Lambda function uses the same mechanism as in step 2 to assume a different IAM role using tenant_id and policy_store_id which only allows access to the tenant policy store.
The Lambda function accesses the tenant policy store.
Add a document
When a user first accesses the application, they don’t own any documents. To add a document, the frontend calls the POST /documents endpoint and supplies a document_name in the request’s body.
Cedar policy
We need a global policy that allows every tenant user to add a new document. The tenant onboarding process creates this policy in the tenant’s policy store.
This policy allows any principal to add a document. Because we’re using a per-tenant policy store approach, there’s no need to scope the principal to a tenant.
Architecture
Figure 3: Adding a document
A tenant user calls the POST /documents endpoint to add a document.
The Lambda function uses the user’s tenant_id to get the Verified Permissions policy_store_id.
The Lambda function calls the Verified Permissions policy store to check if the tenant user is authorized to add a document.
After successful authorization, the Lambda function adds a new document to the documents metadata database and uploads the document to the documents storage.
The database structure is described in the following table:
tenant_id (Partition key): String
document_id (Sort key): String
document_name: String
document_owner: String
<TENANT_ID>
<DOCUMENT_ID>
<DOCUMENT_NAME>
<USER_ID>
tenant_id: The tenant_id from the JWT claims.
document_id: A random identifier for the document, created by the application.
document_name: The name of the document supplied with the API request.
document_owner: The user who created the document. The value is the user_id from the JWT claims.
Share a document with another user of a tenant
After a tenant user has created one or more documents, they might want to share them with other users of the same tenant. To share a document, the frontend calls the POST /shares endpoint and provides the document_id of the document the user wants to share and the user_id of the receiving user.
Cedar policy
We need a global document owner policy that allows the document owner to manage the document, including sharing. The tenant onboarding process creates this policy in the tenant’s policy store.
permit (
  principal,
  action,
  resource
) when {
  resource.owner == principal &&
  resource.type == "document"
};
The policy allows principals to perform actions on available resources (the document) when the principal is the document owner. This policy allows the shareDocument action, which we describe next, to share a document.
We also need a share policy that allows the receiving user to access the document. The application creates these policies for each successful share action. We recommend that you use policy templates to define the share policy. Policy templates allow a policy to be defined once and then attached to multiple principals and resources. Policies that use a policy template are called template-linked policies. Updates to the policy template are reflected across the principals and resources that use the template. The tenant onboarding process creates the share policy template in the tenant’s policy store.
The policy includes the user_id of the receiving user (principal) and the document_id of the document (resource).
Architecture
Figure 4: Sharing a document
A tenant user calls the POST /shares endpoint to share a document.
The Lambda function uses the user’s tenant_id to get the Verified Permissions policy_store_id and policy template IDs for each action from the DynamoDB table that stores the tenant to policy store mapping. In this case the function needs to use the share_policy_template_id.
The function queries the documents metadata DynamoDB table to retrieve the document_owner attribute for the document the user wants to share.
The Lambda function calls Verified Permissions to check if the user is authorized to share the document. The request context uses the user_id from the JWT claims as the principal, shareDocument as the action, and the document_id as the resource. The document entity includes the document_owner attribute, which came from the documents metadata DynamoDB table.
If the user is authorized to share the resource, the function creates a new template-linked share policy in the tenant’s policy store. This policy includes the user_id of the receiving user as the principal and the document_id as the resource.
Access a shared document
After a document has been shared, the receiving user wants to access the document. To access the document, the frontend calls the GET /documents endpoint and provides the document_id of the document the user wants to access.
Cedar policy
As shown in the previous section, during the sharing process, the application creates a template-linked share policy that allows the receiving user to access the document. Verified Permissions evaluates this policy when the user tries to access the document.
Architecture
Figure 5: Accessing a shared document
A tenant user calls the GET /documents endpoint to access the document.
The Lambda function uses the user’s tenant_id to get the Verified Permissions policy_store_id.
The Lambda function calls Verified Permissions to check if the user is authorized to access the document. The request context uses the user_id from the JWT claims as the principal, accessDocument as the action, and the document_id as the resource.
Manage all the documents for a tenant
When a customer signs up for a SaaS application, the application creates the tenant admin user. The tenant admin must have permissions to perform all actions on all documents for the tenant.
Cedar policy
We need a global policy that allows tenant admins to manage all documents. The tenant onboarding process creates this policy in the tenant’s policy store.
permit (
  principal in DocumentsAPI::Group::"<admin_group_id>”,
  action,
  resource
);
This policy allows every member of the <admin_group_id> group to perform any action on any document.
Architecture
Figure 6: Managing documents
A tenant admin calls the POST /documents endpoint to manage a document.
The Lambda function uses the user’s tenant_id to get the Verified Permissions policy_store_id.
The Lambda function calls Verified Permissions to check if the user is authorized to manage the document.
Conclusion
In this blog post, we showed you how Amazon Verified Permissions helps to implement fine-grained authorization decisions in a multi-tenant SaaS application. You saw how to apply the per-tenant policy store approach to the application architecture. See the Verified Permissions user guide for how to choose between using a per-tenant policy store or one shared policy store. To learn more, visit the Amazon Verified Permissions documentation and workshop.
Java archive files (JAR, WAR, and EAR) are widely used for packaging Java applications and libraries. These files can contain various dependencies that are required for the proper functioning of the application. In some cases, a JAR file might include other JAR files within its structure, leading to nested dependencies. To help maintain the security and stability of Java applications, you must identify and manage nested dependencies.
In this post, I will show you how to navigate the challenges of uncovering nested Java dependencies, guiding you through the process of analyzing JAR files and uncovering these dependencies. We will focus on the vulnerabilities that Amazon Inspector identifies using the Amazon Inspector SBOM Generator.
The challenge of uncovering nested Java dependencies
Nested dependencies in Java applications can be outdated or contain known vulnerabilities linked to Common Vulnerabilities and Exposures (CVEs). A crucial issue that customers face is the tendency to overlook nested dependencies during analysis and triage. This oversight can lead to the misclassification of vulnerabilities as false positives, posing a security risk.
This challenge arises from several factors:
Volume of vulnerabilities — When customers encounter a high volume of vulnerabilities, the sheer number can be overwhelming, making it challenging to dedicate sufficient time and resources to thoroughly analyze each one.
Lack of tools or insufficient tooling — There is often a gap in the available tools to effectively identify nested dependencies (for example, mvn dependency:tree, OWASP Dependency-Check). Without the right tools, customers can miss critical dependencies hidden deep within their applications.
Understanding the complexity — Understanding the intricate web of nested dependencies requires a specific skill set and knowledge base. Deficits in this area can hinder effective analysis and risk mitigation.
Overview of nested dependencies
Nested dependencies occur when a library or module that is required by your application relies on additional libraries or modules. This is a common scenario in modern software development because developers often use third-party libraries to build upon existing solutions and to benefit from the collective knowledge of the open-source community.
In the context of JAR files, nested dependencies can arise when a JAR file includes other JAR files as part of its structure. These nested files can have their own dependencies, which might further depend on other libraries, creating a chain of dependencies. Nested dependencies help to modularize code and promote code reuse, but they can introduce complexity and increase the potential for security vulnerabilities if they aren’t managed properly.
Why it’s important to know what dependencies are consumed in a JAR file
Consider the following examples, which depict a typical file structure of a Java application to illustrate how nested dependencies are organized:
This structure includes the following files and dependencies:
mywebapp-1.0-SNAPSHOT.jar is the main application JAR file.
Within mywebapp-1.0-SNAPSHOT.jar, there’s spring-boot-3.0.2.jar, which is a dependency of the main application.
Nested within spring-boot-3.0.2.jar, there’s spring-boot-autoconfigure-3.0.2.jar, a transitive dependency.
Within spring-boot-autoconfigure-3.0.2.jar, there’s log4j-to-slf4j.jar, which is our nested Log4J dependency.
This structure illustrates how a Java application might include nested dependencies, with Log4J nested within other libraries. The actual nesting and dependencies will vary based on the specific libraries and versions that you use in your project.
This structure includes the following files and dependencies:
myfinanceapp-2.5.jar is the primary application JAR file.
Within myfinanceapp-2.5.jar, there is jackson-databind-2.9.10.1.jar, which is a library that the main application relies on for JSON processing.
Nested within jackson-databind-2.9.10.1.jar, there are other Jackson components such as jackson-core-2.9.10.jar and jackson-annotations-2.9.10.jar. These are dependencies that jackson-databind itself requires to function.
This structure is an example for Java applications that use Jackson for JSON operations. Because Jackson libraries are frequently updated to address various issues, including performance optimizations and security fixes, developers need to be aware of these nested dependencies to keep their applications up-to-date and secure. If you have detailed knowledge of where these components are nested within your application, it will be easier to maintain and upgrade them.
This structure includes the following files and dependencies:
myerpsystem-3.1.jar as the primary JAR file of the application.
Within myerpsystem-3.1.jar, hibernate-core-5.4.18.Final.jar serves as a dependency for object-relational mapping (ORM) capabilities.
Nested dependencies such as hibernate-validator-6.1.5.Final.jar and hibernate-entitymanager-5.4.18.Final.jar are crucial for the validation and entity management functionalities that Hibernate provides.
In instances where MyERPSystem encounters operational issues due to a mismatch between the Hibernate versions and another library (that is, a newer version of Spring expecting a different version of Hibernate), developers can use the detailed insights that Amazon Inspector SBOM Generator provides. This tool helps quickly pinpoint the exact versions of Hibernate and its nested dependencies, facilitating a faster resolution to compatibility problems.
Here are some reasons why it’s important to understand the dependencies that are consumed within a JAR file:
Security — Nested dependencies can introduce vulnerabilities if they are outdated or have known security issues. A prime example is the Log4J vulnerability discovered in late 2021 (CVE-2021-44228). This vulnerability was critical because Log4J is a widely used logging framework, and threat actors could have exploited the flaw remotely, leading to serious consequences. What exacerbated the issue was the fact that Log4J often existed as a nested dependency in various Java applications (see Example 1), making it difficult for organizations to identify and patch each instance.
Compliance — Many organizations must adhere to strict policies about third-party libraries for licensing, regulatory, or security reasons. Not knowing the dependencies, especially nested ones such as in the Log4J case, can lead to non-compliance with these policies.
Maintainability — It’s crucial that you stay informed about the dependencies within your project for timely updates or replacements. Consider the Jackson library (Example 2), which is often updated to introduce new features or to patch security vulnerabilities. Managing these updates can be complex, especially when the library is a nested dependency.
Troubleshooting — Identifying dependencies plays a critical role in resolving operational issues swiftly. An example of this is addressing compatibility issues between Hibernate and other Java libraries or frameworks within your application due to version mismatches (Example 3). Such problems often manifest as unexpected exceptions or degraded performance, so you need to have a precise understanding of the libraries involved.
These examples underscore that you need to have deep visibility into JAR file contents to help protect against immediate threats and help ensure long-term application health and compliance.
Existing tooling limitations
When analyzing Java applications for nested dependencies, one of the main challenges is that existing tools can’t efficiently narrow down the exact location of these dependencies. This issue is particularly evident with tools such as mvn dependency:tree, OWASP Dependency-Check, and similar dependency analysis solutions.
Although tools are available to analyze Java applications for nested dependencies, they often fall short in several key areas. The following points highlight common limitations of these tools:
Inadequate depth in dependency trees — Although other tools provide a hierarchical view of project dependencies, they often fail to delve deep enough to reveal nested dependencies, particularly those that are embedded within other JAR files as nested dependencies. Nested dependencies are repackaged within a library and aren’t immediately visible in the standard dependency tree.
Lack of specific location details — These tools typically don’t offer the granularity needed to pinpoint the exact location of a nested dependency within a JAR file. For large and complex Java applications, it may be challenging to identify and address specific dependencies, especially when they are deeply embedded.
Complexity in large projects — In projects with a vast and intricate network of dependencies, these tools can struggle to provide clear and actionable insights. The output can be complicated and difficult to navigate, leaving customers without a clear path to identifying critical dependencies.
Address tooling limitations with Amazon Inspector SBOM Generator
The Amazon Inspector SBOM Generator (Sbomgen) introduces a significant advancement in the identification of nested dependencies in Java applications. Although the concept of monitoring dependencies is well-established in software development, AWS has tailored this tool to enhance visibility into the complexities of software compositions. By generating a software bill of materials (SBOM) for a container image, Sbomgen provides a detailed inventory of the software installed on a system, including hidden nested dependencies that traditional tools can overlook. This capability enriches the existing toolkit, offering a more granular and actionable understanding of the dependency structure of your applications.
Sbomgen works by scanning for files that contain information about installed packages. Upon finding such files, it extracts essential data such as package names, versions, and other metadata. Then it transforms this metadata into a CycloneDX SBOM, providing a structured and detailed view of the dependencies.
In this output, the amazon:inspector:sbom_collector:path property is particularly significant. It provides a clear and complete path to the location of the specific dependency (in this case, log4j-to-slf4j) within the application’s structure. This level of detail is crucial for several reasons:
Precise location identification — It helps you quickly and accurately identify the exact location of each dependency, which is especially useful for nested dependencies that are otherwise hard to locate.
Effective risk management — When you know the exact path of dependencies, you can more efficiently assess and address security risks associated with these dependencies.
Time and resource efficiency — It reduces the time and resources needed to manually trace and analyze dependencies, streamlining the vulnerability management process.
Enhanced visibility and transparency — It provides a clearer understanding of the application’s dependency structure, contributing to better overall management and maintenance.
Comprehensive package information — The detailed package information, including name, version, hashes, and package URL, of Sbomgen equips you with a thorough understanding of each dependency’s specifics, aiding in precise vulnerability tracking and software integrity verification.
Mitigate vulnerable dependencies
After you identify the nested dependencies in your Java JAR files, you should verify whether these dependencies are outdated or vulnerable. Amazon Inspector can help you achieve this by doing the following:
Comparing the discovered dependencies against a database of known vulnerabilities.
Providing a list of potentially vulnerable dependencies, along with detailed information about the associated CVEs.
Offering recommendations on how to mitigate the risks, such as updating the dependencies to a newer, more secure version.
By integrating Amazon Inspector into your software development lifecycle, you can continuously monitor your Java applications for vulnerable nested dependencies and take the necessary steps to help ensure that your application remains secure and compliant.
Conclusion
To help secure your Java applications, you must manage nested dependencies. Amazon Inspector provides an automated and efficient way to discover and mitigate potentially vulnerable dependencies in JAR files. By using the capabilities of Amazon Inspector, you can help improve the security posture of your Java applications and help ensure that they adhere to best practices.
If you have feedback about this post, submit comments in the Comments section below. If you have questions about this post, contact AWS Support.
An AWS Identity and Access Management (IAM) role is an IAM identity that you create in your AWS account that has specific permissions. An IAM role is similar to an IAM user because it’s an AWS identity with permission policies that determine what the identity can and cannot do on AWS. However, as outlined in security best practices in IAM, AWS recommends that you use IAM roles instead of IAM users. An IAM user is uniquely associated with one person, while a role is intended to be assumable by anyone who needs it. An IAM role doesn’t have standard long-term credentials such as a password or access keys associated with it. Instead, when you assume a role, it provides you with temporary security credentials for your role session that are only valid for certain period of time.
This blog post explores the effective implementation of security controls within IAM roles, placing a specific focus on the IAM role’s path feature. By organizing IAM roles hierarchically using paths, you can address key challenges and achieve practical solutions to enhance IAM role management.
Benefits of using IAM paths
A fundamental benefit of using paths is the establishment of a clear and organized organizational structure. By using paths, you can handle diverse use cases while creating a well-defined framework for organizing roles on AWS. This organizational clarity can help you navigate complex IAM setups and establish a cohesive structure that’s aligned with your organizational needs.
Furthermore, by enforcing a specific structure, you can gain precise control over the scope of permissions assigned to roles, helping to reduce the risk of accidental assignment of overly permissive policies. By assisting in preventing inadvertent policy misconfigurations and assisting in coordinating permissions with the planned organizational structure, this proactive solution improves security. This approach is highly effective when you consistently apply established naming conventions to paths, role names, and policies. Enforcing a uniform approach to role naming enhances the standardization and efficiency of IAM role management. This practice fosters smooth collaboration and reduces the risk of naming conflicts.
Path example
In IAM, a role path is a way to organize and group IAM roles within your AWS account. You specify the role path as part of the role’s Amazon Resource Name (ARN).
As an example, imagine that you have a group of IAM roles related to development teams, and you want to organize them under a path. You might structure it like this:
Role name: Dev App1 admin Role path: /D1/app1/admin/ Full ARN: arn:aws:iam::123456789012:role/D1/app1/admin/DevApp1admin
Role name: Dev App2 admin Role path: /D2/app2/admin/ Full ARN: arn:aws:iam::123456789012:role/D2/app2/admin/DevApp2admin
In this example, the IAM roles DevApp1admin and DevApp2admin are organized under two different development team paths: D1/app1/admin and D2/app2/admin, respectively. The role path provides a way to group roles logically, making it simpler to manage and understand their purpose within the context of your organization.
Solution overview
Figure 1: Sample architecture
The sample architecture in Figure 1 shows how you can separate and categorize the enterprise roles and development team roles into a hierarchy model by using a path in an IAM role. Using this hierarchy model, you can enable several security controls at the level of the service control policy (SCP), IAM policy, permissions boundary, or the pipeline. I recommend that you avoid incorporating business unit names in paths because they could change over time.
Here is what the IAM role path looks like as an ARN:
In this example, in the resource name, /EnT/iam/adm/ is the role path, and IAMAdmin is the role name.
You can now use the role path as part of a policy, such as the following:
arn:aws:iam::123456789012:role/EnT/iam/adm/*
In this example, in the resource name, /EnT/iam/adm/ is the role path, and * indicates any IAM role inside this path.
Walkthrough of examples for preventative controls
Now let’s walk through some example use cases and SCPs for a preventative control that you can use based on the path of an IAM role.
PassRole preventative control example
The following SCP denies passing a role for enterprise roles, except for roles that are part of the IAM admin hierarchy within the overall enterprise hierarchy.
With just a couple of statements in the SCP, this preventative control helps provide protection to your high-privilege roles for enterprise roles, regardless of the role’s name or current status.
This example uses the following paths:
/EnT/ — enterprise roles (roles owned by the central teams, such as cloud center of excellence, central security, and networking teams)
/fed/ — federated roles, which have interactive access
/iam/ — roles that are allowed to perform IAM actions, such as CreateRole, AttachPolicy, or DeleteRole
IAM actions preventative control example
The following SCP restricts IAM actions, including CreateRole, DeleteRole, AttachRolePolicy, and DetachRolePolicy, on the enterprise path.
This preventative control denies an IAM role that is outside of the enterprise hierarchy from performing the actions CreateRole, DeleteRole, DetachRolePolicy, and AttachRolePolicy in this hierarchy. Every IAM role will be denied those API actions except the one with the path as arn:aws:iam::*:role/EnT/fed/iam/*
The example uses the following paths:
/EnT/ — enterprise roles (roles owned by the central teams, such as cloud center of excellence, central security, or network automation teams)
/fed/ — federated roles, which have interactive access
/iam/ — roles that are allowed to perform IAM actions (in this case, CreateRole, DeteleRole, DetachRolePolicy, and AttachRolePolicy)
IAM policies preventative control example
The following SCP policy denies attaching certain high-privilege AWS managed policies such as AdministratorAccess outside of certain IAM admin roles. This is especially important in an environment where business units have self-service capabilities.
The following SCP doesn’t allow non-production roles to assume a role in production accounts. Make sure to replace <Your production OU ID> and <your org ID> with your own information.
This example uses the /np/ path, which specifies non-production roles. The SCP denies non-production IAM roles from assuming a role in the production organizational unit (OU) (in our example, this is represented by “<your org ID>/r-xxxx/<Your production OU ID>/*”). Depending on the structure of your organization, the ResourceOrgPaths will have one of the following formats:
Walkthrough of examples for monitoring IAM roles (detective control)
Now let’s walk through two examples of detective controls.
AssumeRole in CloudTrail Lake
The following is an example of a detective control to monitor IAM roles in AWS CloudTrail Lake.
SELECT
    userIdentity.arn as "Username", eventTime, eventSource, eventName, sourceIPAddress, errorCode, errorMessage
FROM
    <Event data store ID>
WHERE
    userIdentity.arn IS NOT NULL
    AND eventName = 'AssumeRole'
    AND userIdentity.arn LIKE '%/np/%'
    AND errorCode = 'AccessDenied'
    AND eventTime > '2023-07-01 14:00:00'
    AND eventTime < '2023-11-08 18:00:00';
This query lists out AssumeRole events for non-production roles in the organization for AccessDenied errors. The output is stored in an Amazon Simple Storage Service (Amazon S3) bucket from CloudTrail Lake, from which the csv file can be downloaded. The following shows some example output:
Username,eventTime,eventSource,eventName,sourceIPAddress,errorCode,errorMessage arn:aws:sts::123456789012:assumed-role/np/test,2023-12-09 10:35:45.000,iam.amazonaws.com,AssumeRole,11.11.113.113,AccessDenied,User: arn:aws:sts::123456789012:assumed-role/np/test is not authorized to perform: sts:AssumeRole on resource: arn:aws:iam::123456789012:role/hello because no identity-based policy allows the sts:AssumeRole action
You can modify the query to audit production roles as well.
CreateRole in CloudTrail Lake
Another example of a CloudTrail Lake query for a detective control is as follows:
SELECT
    userIdentity.arn as "Username", eventTime, eventSource, eventName, sourceIPAddress, errorCode, errorMessage
FROM
    <Event data store ID>
WHERE
    userIdentity.arn IS NOT NULL
    AND eventName = 'CreateRole'
    AND userIdentity.arn LIKE '%/EnT/fed/iam/%'
    AND eventTime > '2023-07-01 14:00:00'
    AND eventTime < '2023-11-08 18:00:00';
This query lists out CreateRole events for roles in the /EnT/fed/iam/ hierarchy. The following are some example outputs:
arn:aws:sts::123456789012:assumed-role/EnT/fed/iam/security/test,2023-12-09 16:31:11.000,iam.amazonaws.com,CreateRole,10.10.10.10,AccessDenied,User: arn:aws:sts::123456789012:assumed-role/EnT/fed/iam/security/test is not authorized to perform: iam:CreateRole on resource: arn:aws:iam::123456789012:role/EnT/fed/iam/security because no identity-based policy allows the iam:CreateRole action
arn:aws:sts::123456789012:assumed-role/EnT/fed/iam/security/test,2023-12-09 16:33:10.000,iam.amazonaws.com,CreateRole,10.10.10.10,AccessDenied,User: arn:aws:sts::123456789012:assumed-role/EnT/fed/iam/security/test is not authorized to perform: iam:CreateRole on resource: arn:aws:iam::123456789012:role/EnT/fed/iam/security because no identity-based policy allows the iam:CreateRole action
Because these roles can create additional enterprise roles, you should audit roles created in this hierarchy.
Important considerations
When you implement specific paths for IAM roles, make sure to consider the following:
The path of an IAM role is part of the ARN. After you define the ARN, you can’t change it later. Therefore, just like the name of the role, consider what the path should be during the early discussions of design.
IAM roles can’t have the same name, even on different paths.
When you switch roles through the console, you need to include the path because it’s part of the role’s ARN.
The role name can’t exceed 64 characters. If you intend to use a role with the Switch Role feature in the AWS Management Console, then the combined path and role name can’t exceed 64 characters.
When you create a role through the console, you can’t set an IAM role path. To set a path for the role, you need to use automation, such as AWS Command Line Interface (AWS CLI) commands or SDKs. For example, you might use an AWS CloudFormation template or a script that interacts with AWS APIs to create the role with the desired path.
Conclusion
By adopting the path strategy, you can structure IAM roles within a hierarchical model, facilitating the implementation of security controls on a scalable level. You can make these controls effective for IAM roles by applying them to a path rather than specific roles, which sets this approach apart.
This strategy can help you elevate your overall security posture within IAM, offering a forward-looking solution for enterprises. By establishing a scalable IAM hierarchy, you can help your organization navigate dynamic changes through a robust identity management structure. A well-crafted hierarchy reduces operational overhead by providing a versatile framework that makes it simpler to add or modify roles and policies. This scalability can help streamline the administration of IAM and help your organization manage access control in evolving environments.
If you have feedback about this post, submit comments in the Comments section below. If you have questions about this post, start a new thread on the AWS Security, Identity, & Compliance re:Post or contact AWS Support.
Want more AWS Security news? Follow us on Twitter.
The collective thoughts of the interwebz
Manage Consent
To provide the best experiences, we use technologies like cookies to store and/or access device information. Consenting to these technologies will allow us to process data such as browsing behavior or unique IDs on this site. Not consenting or withdrawing consent, may adversely affect certain features and functions.
Functional
Always active
The technical storage or access is strictly necessary for the legitimate purpose of enabling the use of a specific service explicitly requested by the subscriber or user, or for the sole purpose of carrying out the transmission of a communication over an electronic communications network.
Preferences
The technical storage or access is necessary for the legitimate purpose of storing preferences that are not requested by the subscriber or user.
Statistics
The technical storage or access that is used exclusively for statistical purposes.The technical storage or access that is used exclusively for anonymous statistical purposes. Without a subpoena, voluntary compliance on the part of your Internet Service Provider, or additional records from a third party, information stored or retrieved for this purpose alone cannot usually be used to identify you.
Marketing
The technical storage or access is required to create user profiles to send advertising, or to track the user on a website or across several websites for similar marketing purposes.