All posts by Marcia Villalba

New – Ready-to-use Models and Support for Custom Text and Image Classification Models in Amazon SageMaker Canvas

Post Syndicated from Marcia Villalba original https://aws.amazon.com/blogs/aws/new-ready-to-use-models-and-support-for-custom-text-and-image-classification-models-in-amazon-sagemaker-canvas/

Today AWS announces new features in Amazon SageMaker Canvas that help business analysts generate insights from thousands of documents, images, and lines of text in minutes with machine learning (ML). Starting today, you can access ready-to-use models and create custom text and image classification models alongside previously supported custom models for tabular data, all without requiring ML experience or writing a line of code.

Business analysts across different industries want to apply AI/ML solutions to generate insights from a variety of data and respond to ad-hoc analysis requests coming from business stakeholders. By applying AI/ML in their workflows, analysts can automate manual, time-consuming, and error-prone processes, such as inspection, classification, as well as extraction of insights from raw data, images, or documents. However, applying AI/ML to business problems requires technical expertise and building custom models can take several weeks or even months.

Launched in 2021, Amazon SageMaker Canvas is a visual, point-and-click service that allows business analysts to use a variety of ready-to-use models or create custom models to generate accurate ML predictions on their own.

Ready-to-use Models
Customers can use SageMaker Canvas to access ready-to-use models that can be used to extract information and generate predictions from thousands of documents, images, and lines of text in minutes. These ready-to-use models include sentiment analysis, language detection, entity extraction, personal information detection, object and text detection in images, expense analysis for invoices and receipts, identity document analysis, and more generalized document and form analysis.

For example, you can select the sentiment analysis ready-to-use model and upload product reviews from social media and customer support tickets to quickly understand how your customers feel about your products. Using the personal information detection ready-to-use model, you can detect and redact personally identifiable information (PII) from emails, support tickets, and documents. Using the expense analysis ready-to-use model, you can easily detect and extract data from your scanned invoices and receipts and generate insights about that data.

These ready-to-use models are powered by AWS AI services, including Amazon Rekognition, Amazon Comprehend, and Amazon Textract.

Ready-to-use models available

Custom Text and Image Classification Models
Customers that need custom models trained for their business-specific use-case can use SageMaker Canvas to create text and image classification models. 

You can use SageMaker Canvas to create custom text classification models to classify data according to your needs. For example, imagine that you work as a business analyst at a company that provides customer support. When a customer support agent engages with a customer, they create a ticket, and they need to record the ticket type, for example, “incident”, “service request”, or “problem”. Many times, this field gets forgotten, and so, when the reporting is done, the data is hard to analyze. Now, using SageMaker Canvas, you can create a custom text classification model, train it with existing customer support ticket information and ticket type, and use it to predict the type of tickets in the future when working on a report with missing data.

You can also use SageMaker Canvas to create custom image classification models using your own image datasets. For instance, imagine you work as a business analyst at a company that manufactures smartphones. As part of your role, you need to prepare reports and respond to questions from business stakeholders related to quality assessment and it’s trends. Every time a phone is assembled, a picture is automatically taken, and at the end of the week, you receive all those images. Now with SageMaker Canvas, you can create a new custom image classification model that is trained to identify common manufacturing defects. Then, every week, you can use the model to analyze the images and predict the quality of the phones produced.

SageMaker Canvas in Action
Let’s imagine that you are a business analyst for an e-commerce company. You have been tasked with understanding the customer sentiment towards all the new products for this season. Your stakeholders require a report that aggregates the results by item category to decide what inventory they should purchase in the following months. For example, they want to know if the new furniture products have received positive sentiment. You have been provided with a spreadsheet containing reviews for the new products, as well as an outdated file that categorizes all the products on your e-commerce platform. However, this file does not yet include the new products.

To solve this problem, you can use SageMaker Canvas. First, you will need to use the sentiment analysis ready-to-use model to understand the sentiment for each review, classifying them as positive, negative, or neutral. Then, you will need to create a custom text classification model that predicts the categories for the new products based on the existing ones.

Ready-to-use Model – Sentiment Analysis
To quickly learn the sentiment of each review, you can do a bulk update of the product reviews and generate a file with all the sentiment predictions.

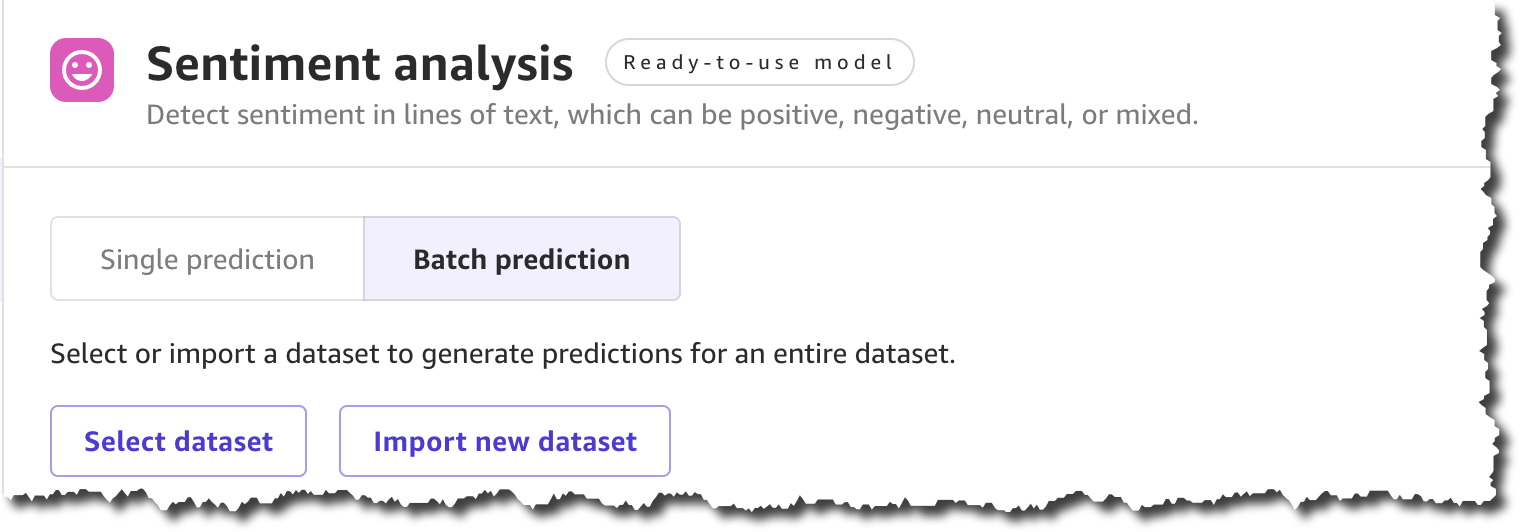
To get started, locate Sentiment analysis on the Ready-to-use models page, and under Batch prediction, select Import new dataset.

Using ready-to-use sentiment analysis with a batch dataset

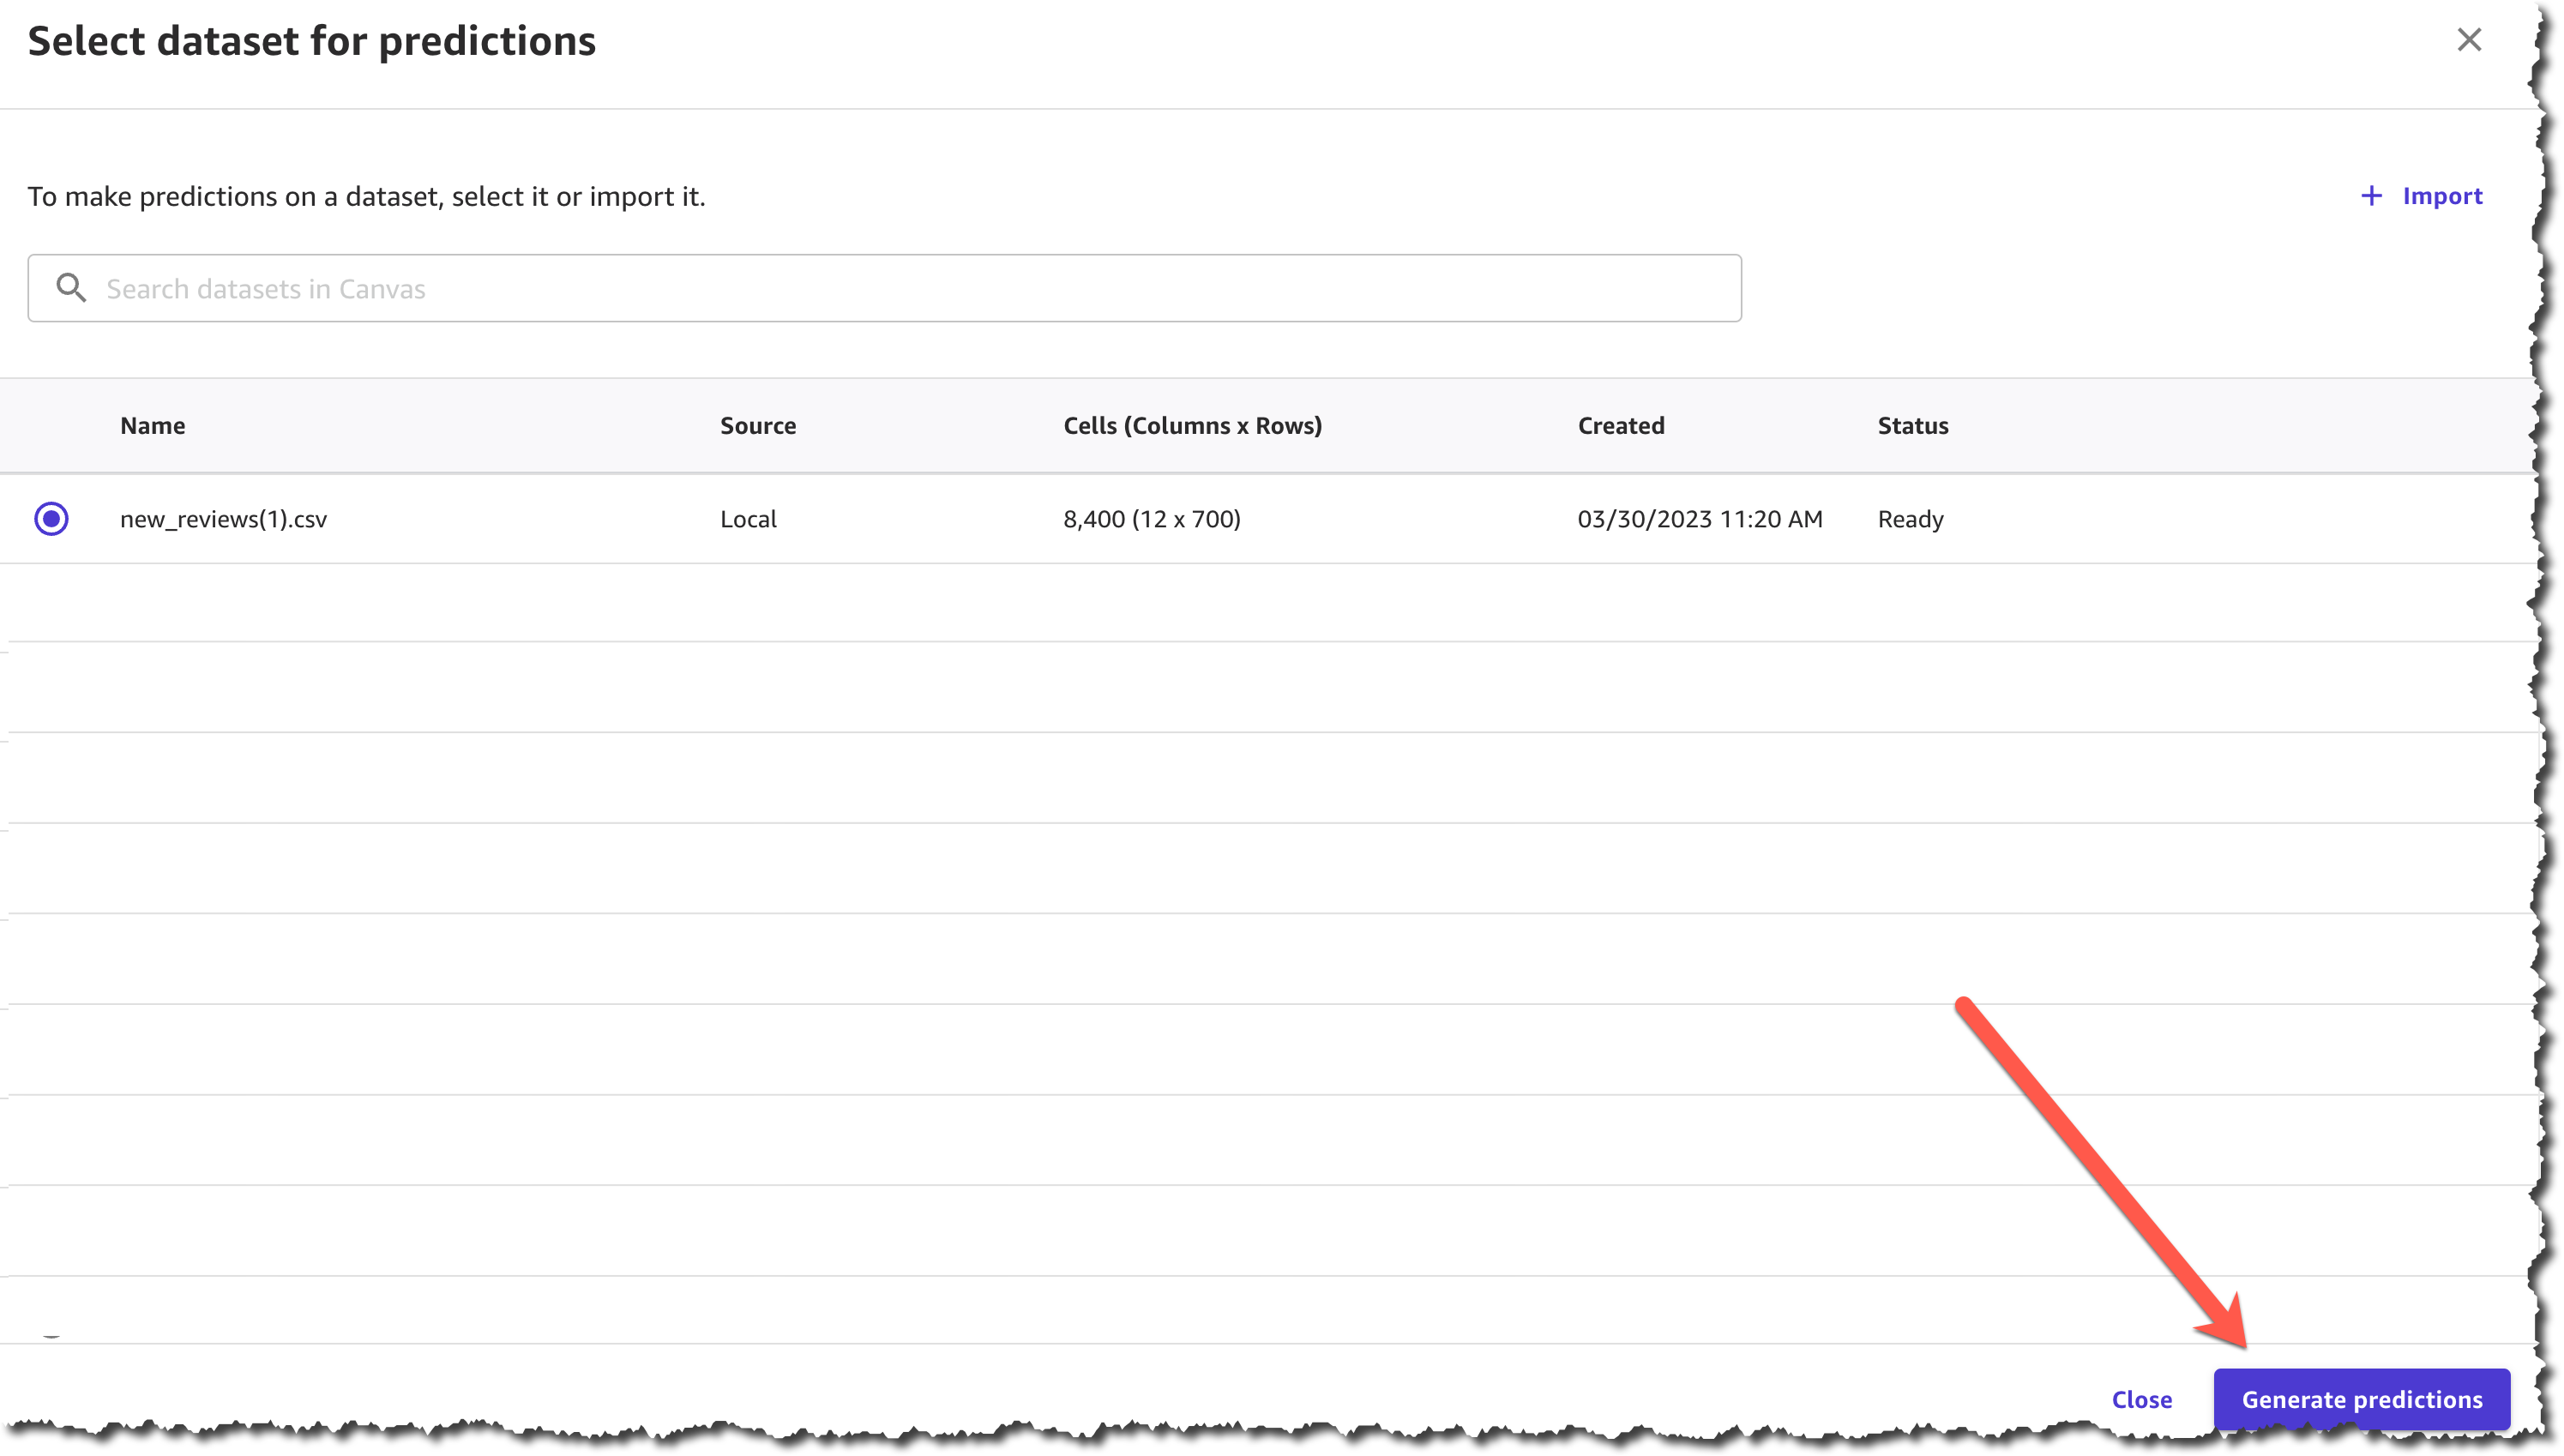
When you create a new dataset, you can upload the dataset from your local machine or use Amazon Simple Storage Service (Amazon S3). For this demo, you will upload the file locally. You can find all the product reviews used in this example in the Amazon Customer Reviews dataset.

After you complete uploading the file and creating the dataset, you can Generate predictions.

Select dataset and generate predictions

The prediction generation takes less than a minute, depending on the size of the dataset, and then you can view or download the results.

View or download predictions

The results from this prediction can be downloaded as a .csv file or viewed from the SageMaker Canvas interface. You can see the sentiment for each of the product reviews.

Preview results from ready-to-use model

Now you have the first part of your task ready—you have a .csv file with the sentiment of each review. The next step is to classify those products into categories.

Custom Text Classification Model
To classify the new products into categories based on the product title, you need to train a new text classification model in SageMaker Canvas.

In SageMaker Canvas, create a New model of the type Text analysis.

The first step when creating the model is to select a dataset with which to train the model. You will train this model with a dataset from last season, which contains all the products except for the new collection.

Once the dataset has finished importing, you will need to select the column that contains the data you want to predict, which in this case is the product_category column, and the column that will be used as the input for the model to make predictions, which is the product_title column.

After you finish configuring that, you can start to build the model. There are two modes of building:

  • Quick build that returns a model in 15–30 minutes.
  • Standard build takes 2–5 hours to complete.

To learn more about the differences between the modes of building you can check the documentation. For this demo, pick quick build, as our dataset is smaller than 50,000 rows.

Prepare and build your model

When the model is built, you can analyze how the model performs. SageMaker Canvas uses the 80-20 approach; it trains the model with 80 percent of the data from the dataset and uses 20 percent of the data to validate the model.

Model score

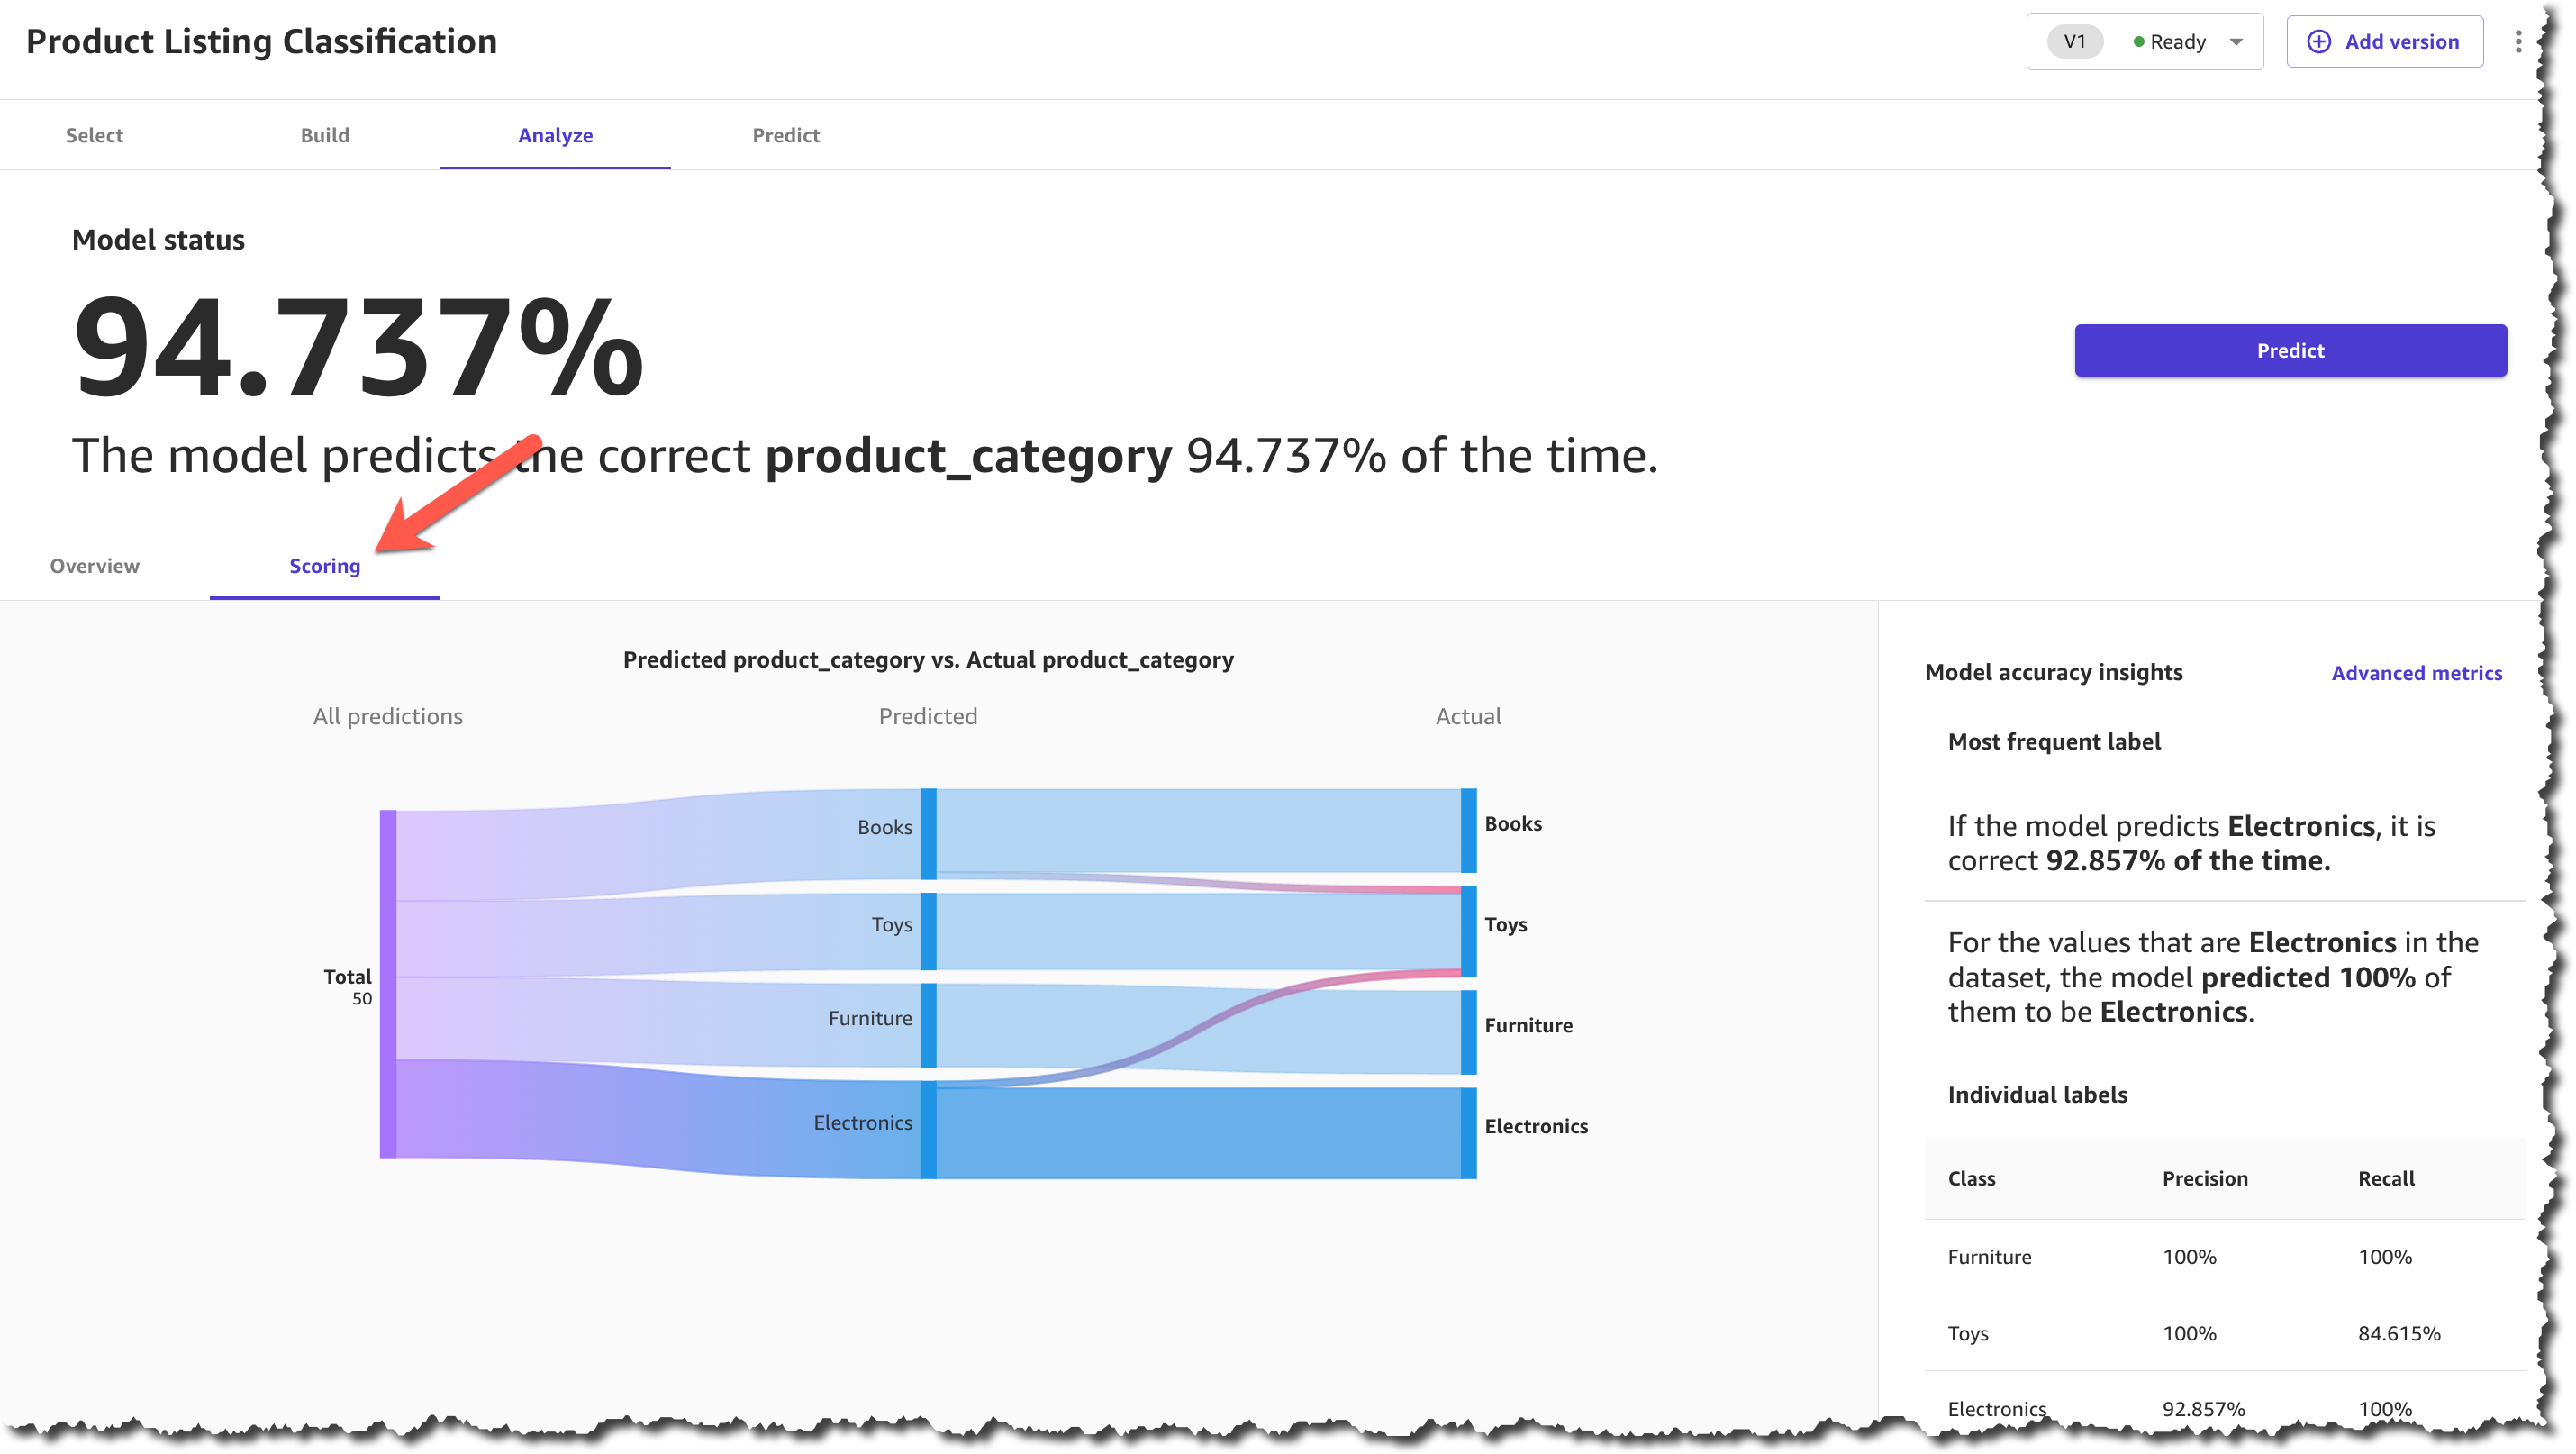
When the model finishes building, you can check the model score. The scoring section gives you a visual sense of how accurate the predictions were for each category. You can learn more about how to evaluate your model’s performance in the documentation.

After you make sure that your model has a high prediction rate, you can move on to generate predictions. This step is similar to the ready-to-use models for sentiment analysis. You can make a prediction on a single product or on a set of products. For a batch prediction, you need to select a dataset and let the model generate the predictions. For this example, you will select the same dataset that you selected in the ready-to-use model, the one with the reviews. This can take a few minutes, depending on the number of products in the dataset.

When the predictions are ready, you can download the results as a .csv file or view how each product was classified. In the prediction results, each product is assigned only one category based on the categories provided during the model-building process.

Predict categories

Now you have all the necessary resources to conduct an analysis and evaluate the performance of each product category with the new collection based on customer reviews. Using SageMaker Canvas, you were able to access a ready-to-use model and create a custom text classification model without having to write a single line of code.

Available Now
Ready-to-use models and support for custom text and image classification models in SageMaker Canvas are available in all AWS Regions where SageMaker Canvas is available. You can learn more about the new features and how they are priced by visiting the SageMaker Canvas product detail page.

— Marcia

AWS Week in Review – March 27, 2023

Post Syndicated from Marcia Villalba original https://aws.amazon.com/blogs/aws/aws-week-in-review-march-27-2023/

This post is part of our Week in Review series. Check back each week for a quick roundup of interesting news and announcements from AWS!

In Finland, where I live, spring has arrived. The snow has melted, and the trees have grown their first buds. But I don’t get my hopes high, as usually around Easter we have what is called takatalvi. Takatalvi is a Finnish world that means that the winter returns unexpectedly in the spring.

Last Week’s Launches
Here are some launches that got my attention during the previous week.

AWS SAM CLI – Now the sam sync command will compare your local Serverless Application Model (AWS SAM) template with your deployed AWS CloudFormation template and skip the deployment if there are no changes. For more information, check the latest version of the AWS SAM CLI.

IAM – AWS Identity and Access Management (IAM) has launched two new global condition context keys. With these new condition keys, you can write service control policies (SCPs) or IAM policies that restrict the VPCs and private IP addresses from which your Amazon Elastic Compute Cloud (Amazon EC2) instance credentials can be used, without hard-coding VPC IDs or IP addresses in the policy. To learn more about this launch and how to get started, see How to use policies to restrict where EC2 instance credentials can be used from.

Amazon SNS – Amazon Simple Notification Service (Amazon SNS) now supports setting context-type request headers for HTTP/S notifications, such as application/json, application/xml, or text/plain. With this new feature, applications can receive their notifications in a more predictable format.

AWS Batch – AWS Batch now allows you to configure ephemeral storage up to 200GiB on AWS Fargate type jobs. With this launch, you no longer need to limit the size of your data sets or the size of the Docker images to run machine learning inference.

Application Load Balancer – Application Load Balancer (ALB) now supports Transport Layer Security (TLS) protocol version 1.3, enabling you to optimize the performance of your application while keeping it secure. TLS 1.3 on ALB works by offloading encryption and decryption of TLS traffic from your application server to the load balancer.

Amazon IVS – Amazon Interactive Video Service (IVS) now supports combining videos from multiple hosts into the source of a live stream. For a demo, refer to Add multiple hosts to live streams with Amazon IVS.

For a full list of AWS announcements, be sure to keep an eye on the What’s New at AWS page.

Other AWS News
Some other updates and news that you may have missed:

I read the post Implementing an event-driven serverless story generation application with ChatGPT and DALL-E a few days ago, and since then I have been reading my child a lot of  AI-generated stories. In this post, David Boyne, explains step by step how you can create an event-driven serverless story generation application. This application produces a brand-new story every day at bedtime with images, which can be played in audio format.

Podcast Charlas Técnicas de AWS – If you understand Spanish, this podcast is for you. Podcast Charlas Técnicas is one of the official AWS podcasts in Spanish, and every other week there is a new episode. The podcast is meant for builders, and it shares stories about how customers have implemented and learned AWS services, how to architect applications, and how to use new services. You can listen to all the episodes directly from your favorite podcast app or at AWS Podcasts en español.

AWS open-source news and updates – The open source newsletter is curated by my colleague Ricardo Sueiras to bring you the latest open-source projects, posts, events, and more.

Upcoming AWS Events
Check your calendars and sign up for the AWS Summit closest to your city. AWS Summits are free events that bring the local community together, where you can learn about different AWS services.

Here are the ones coming up in the next months:

That’s all for this week. Check back next Monday for another Week in Review!

— Marcia

AWS Week in Review – February 6, 2023

Post Syndicated from Marcia Villalba original https://aws.amazon.com/blogs/aws/aws-week-in-review-february-6-2023/

This post is part of our Week in Review series. Check back each week for a quick roundup of interesting news and announcements from AWS!

If you are looking for a new year challenge, the Serverless Developer Advocate team launched the 30 days of Serverless. You can follow the hashtag #30DaysServerless on LinkedIn, Twitter, or Instagram or visit the challenge page and learn a new Serverless concept every day.

Last Week’s Launches
Here are some launches that got my attention during the previous week.

AWS SAM CLIv1.72 added the capability to list important information from your deployments.

  • List the URLs of the Amazon API Gateway or AWS Lambda function URL.
    $ sam list endpoints
  • List the outputs of the deployed stack.
    $ sam list outputs
  • List the resources in the local stack. If a stack name is provided, it also shows the corresponding deployed resources and the ids.
    $ sam list resources

Amazon RDSNow supports increasing the allocated storage size when creating read replicas or when restoring a database from snapshots. This is very useful when your primary instances are near their maximum allocated storage capacity.

Amazon QuickSight Allows you to create Radar charts. Radar charts are a way to visualize multivariable data that are used to plot one or more groups of values over multiple common variables.

AWS Systems Manager AutomationNow integrates with Systems Manager Change Calendar. Now you can reduce the risks associated with changes in your production environment by allowing Automation runbooks to run during an allowed time window configured in the Change Calendar.

AWS AppConfigIt announced its integration with AWS Secrets Manager and AWS Key Management Service (AWS KMS). All sensitive data retrieved from Secrets Manager via AWS AppConfig can be encrypted at deployment time using an AWS KMS customer managed key (CMK).

For a full list of AWS announcements, be sure to keep an eye on the What’s New at AWS page.

Other AWS News
Some other updates and news that you may have missed:

AWS Cloud Clubs – Cloud Clubs are peer-to-peer user groups for students and young people aged 18–28. In these clubs, you can network, attend career-building events, earn benefits like AWS credits, and more. Learn more about the clubs in your region in the AWS student portal.

Get AWS Certified: Profesional challenge – You can register now for the certification challenge. Prepare for your AWS Professional Certification exam and get a 50 percent discount for the certification exam. Learn more about the challenge on the official page.

Podcast Charlas Técnicas de AWS – If you understand Spanish, this podcast is for you. Podcast Charlas Técnicas is one of the official AWS podcasts in Spanish, and every other week, there is a new episode. The podcast is for builders, and it shares stories about how customers implemented and learned AWS services, how to architect applications, and how to use new services. You can listen to all the episodes directly from your favorite podcast app or at AWS Podcasts en Español.

AWS Open-Source News and Updates – This is a newsletter curated by my colleague Ricardo to bring you the latest open-source projects, posts, events, and more.

Upcoming AWS Events
Check your calendars and sign up for these AWS events:

AWS re:Invent recaps – We had a lot of announcements during re:Invent. If you want to learn them all in your language and in your area, check the re: Invent recaps. All the upcoming ones are posted on this site, so check it regularly to find an event nearby.

AWS Innovate Data and AI/ML edition – AWS Innovate is a free online event to learn the latest from AWS experts and get step-by-step guidance on using AI/ML to drive fast, efficient, and measurable results.

  • AWS Innovate Data and AI/ML edition for Asia Pacific and Japan is taking place on February 22, 2023. Register here.
  • Registrations for AWS Innovate EMEA (March 9, 2023) and the Americas (March 14, 2023) will open soon. Check the AWS Innovate page for updates.

You can find details on all upcoming events, in-person or virtual, here.

That’s all for this week. Check back next Monday for another Week in Review!

— Marcia

Previewing environments using containerized AWS Lambda functions

Post Syndicated from Marcia Villalba original https://aws.amazon.com/blogs/compute/previewing-environments-using-containerized-aws-lambda-functions/

This post is written by John Ritsema (Principal Solutions Architect)

Continuous integration and continuous delivery (CI/CD) pipelines are effective mechanisms that allow teams to turn source code into running applications. When a developer makes a code change and pushes it to a remote repository, a pipeline with a series of steps can process the change. A pipeline integrates a change with the full code base, verifies the style and formatting, runs security checks, and runs unit tests. As the final step, it builds the code into an artifact that is deployable to an environment for consumption.

When using GitHub or many other hosted Git providers, a pull request or merge request can be submitted for a particular code change. This creates a focused place for discussion and collaboration on the change before it is approved and merged into a shared code branch.

A powerful mechanism for collaboration involves deploying a pull request (PR) to a running environment. This allows stakeholders to preview the changes live and see how they would look. Spinning up a running environment quickly allows teammates to provide almost immediate feedback, expediting the entire development process.

Deploying PRs to ephemeral environments encourages teams to make many small changes that can be previewed and tested in parallel. This avoids having to first merge into a common source branch and deploy to long-lived environments that are always on and incur costs.

Creating this mechanism has several challenges including setup complexity, environment creation time, and environment cost. This post addresses these challenges by showing how to create a CI/CD pipeline for previewing changes to web applications in ephemeral, quick-to-provision, low-cost, and scale-to-zero environments. This post walks through the steps required to set up a sample application.

Example architecture

The concepts in this post can be implemented using a number of tools and hosted Git providers that connect to CI/CD pipelines. The example code shared in this post uses GitHub Actions to trigger a workflow. The workflow uses a small Terraform module with Docker to build the application source code into a container image, push it to Amazon Elastic Container Registry (ECR), and create an AWS Lambda function with the image.

The container running on Lambda is accessible from a web browser through a Lambda function URL. This provides a dedicated HTTPS endpoint for a function.

This is used instead of AWS App RunnerAmazon ECS Fargate with an Application Load Balancer (ALB), or Amazon EKS with ALB ingress because of speed of provisioning and low cost. Lambda function URLs are ideal for occasionally used ephemeral PR environments as they can be provisioned quickly. Lambda’s scale-to-zero compute environment leads to lower cost, as charges are only incurred for actual HTTP requests. This is useful for PRs that may only be reviewed infrequently and then sit idle until the PR is either merged or closed.

This is the example architecture:

Setting up the example

The sample project shows how to implement this example. It consists of a vanilla web application written in Node.js. All of the code needed to implement the architecture is contained within the .github directory. To enable ephemeral environments for a new project, copy over the .github directory without cluttering your project files.

There are two main resources needed to run Terraform inside of GitHub Actions: an AWS IAM role and a place to store Terraform state. AWS credentials are required to give the pipeline permission to provision AWS resources.

Instead of using static IAM user credentials that must be rotated and secured, assume an IAM role to obtain temporary credentials. Terraform remote state is needed to dispose of the environment when the PR is merged or closed. The sample project uses an Amazon S3 bucket to store Terraform state.

You can use the Terraform module located under .github/setup to create these required resources.

    1. Provide the name of your GitHub organization and repository in the terraform.tfvars file as input parameters. You can replace aws-samples with your GitHub user name:
      cat .github/setup/terraform.tfvars
      github_org  = "aws-samples"
      github_repo = "ephemeral-preview-containers-furl"

    2. To provision the resources using Terraform, run:
      cd .github/setup
      terraform init && terraform apply


      Store the outputted terraform.tfstate file safely so that you can manage these resources in the future if needed.

    3. Place the Region, generated IAM role, and bucket name into the configuration file located under .github/workflows/config.env. This configuration file is read and used by the GitHub Actions workflow.
      export AWS_REGION="<add region from setup>"
      
      export AWS_ROLE="<add role from setup>"
      
      export TF_BACKEND_S3_BUCKET="<add bucket from setup>"

      This IAM role has an inline policy that contains the minimum set of permissions needed to provision the AWS resources. This assumes that your application does not interact with external services like databases or caches. If your application needs this additional access, you can add the required permissions to the policy located here.

Running a web server in Lambda

The sample web (HTTP) application includes a Dockerfile that contains instructions for packaging the web app into a process-based container image. A Lambda extension called Lambda Web Adapter enables you to run this standard web server process on Lambda. The CI/CD workflow makes a copy of the Dockerfile and adds the following line.

COPY --from=public.ecr.aws/awsguru/aws-lambda-adapter:0.6.0 /lambda-adapter /opt/extensions/lambda-adapter

This line copies the Lambda Web Adapter executable binary from a public ECR image and writes it into the container in the /opt/extensions/ directory. When the container starts, Lambda starts the Lambda Web Adapter extension. This translates Lambda event payloads from HTTP-based triggers into actual HTTP requests that it proxies to the web app running inside the container. This is the architecture:

By default, Lambda Web Adapter assumes that the web app is listening on port 8080. However, you can change this in the Dockerfile by setting the PORT environment variable.

The containerized web app experiences a “cold start”. However, this is likely not too much of a concern, as the app will only be previewed internally by teammates.

Workflow pipeline

The GitHub Actions job defined in the up.yml workflow is triggered when a PR is opened or reopened against the repository’s main branch. The following is a summary of the steps that the Job performs.

  1. Read the configuration from .github/workflows/config.env
  2. Assume the IAM Role, which has minimal permissions to deploy AWS resources
  3. Install the Terraform CLI
  4. Add the Lambda Web Adapter extension to the copy of the Dockerfile
  5. Run terraform apply to provision the AWS resources using the S3 bucket for Terraform remote state
  6. Obtain the HTTPS endpoint from Terraform and add it to the PR as a comment

The following code snippet shows the key steps (4-6) from the up.yml workflow.

- name: Lambda-ify
  run: echo "COPY --from=public.ecr.aws/awsguru/aws-lambda-adapter:0.6.0 /lambda-adapter /opt/extensions/lambda-adapter" >> Dockerfile

- name: Deploy to ephemeral environment 
  id: furl
  working-directory: ./.github/workflows
  run: |
    terraform init \
      -backend-config="bucket=${TF_BACKEND_S3_BUCKET}" \
      -backend-config="key=${ENVIRONMENT}.tfstate"

    terraform apply -auto-approve \
      -var="name=${{ github.event.repository.name }}" \
      -var="environment=${ENVIRONMENT}" \
      -var="image_tag=${GITHUB_SHA}"

    echo "Url=$(terraform output -json | jq '.endpoint_url.value' -r)" >> $GITHUB_OUTPUT

- name: Add HTTPS endpoint to PR comment
  uses: mshick/add-pr-comment@v1
  with:
    message: |
      :rocket: Code successfully deployed to a new ephemeral containerized PR environment!
      ${{ steps.furl.outputs.Url }}
    repo-token: ${{ secrets.GITHUB_TOKEN }}
    repo-token-user-login: "github-actions[bot]"
    allow

The main.tf file (in the same directory) includes infrastructure as code (IaC) that is responsible for creating an ECR repository, building and pushing the container image to it, and spinning up a Lambda function based on the image. The following is a snippet from the Terraform configuration. You can see how concisely this can be configured.

provider "docker" {
  registry_auth {
    address  = format("%v.dkr.ecr.%v.amazonaws.com", data.aws_caller_identity.current.account_id, data.aws_region.current.name)
    username = data.aws_ecr_authorization_token.token.user_name
    password = data.aws_ecr_authorization_token.token.password
  }
}

module "docker_image" {
  source = "terraform-aws-modules/lambda/aws//modules/docker-build"

  create_ecr_repo = true
  ecr_repo        = local.ns
  image_tag       = var.image_tag
  source_path     = "../../"
}

module "lambda_function_from_container_image" {
  source = "terraform-aws-modules/lambda/aws"

  function_name              = local.ns
  description                = "Ephemeral preview environment for: ${local.ns}"
  create_package             = false
  package_type               = "Image"
  image_uri                  = module.docker_image.image_uri
  architectures              = ["x86_64"]
  create_lambda_function_url = true
}

output "endpoint_url" {
  value = module.lambda_function_from_container_image.lambda_function_url
}

Terraform outputs the generated HTTPS endpoint. The workflow writes it back to the PR as a comment so that teammates can click on the link to preview the changes:

The workflow takes about 60 seconds to spin up a new isolated containerized web application in an ephemeral environment that can be previewed.

Pull request collaboration

The following screenshot shows an example PR as the author collaborates with their team. After implementing this example, when a new PR arrives, the changes are deployed to a new ephemeral environment. Stakeholders can use the link to preview what the changes look like and provide feedback.

Once the changes are approved and merged into the main branch, the GitHub Actions down.yml workflow disposes of the environment. This means that the ephemeral environment is de-provisioned, including resources like the Lambda function and the ECR repository.

Conclusion

This post discusses some of the benefits of using ephemeral environments in CI/CD pipelines. It shows how to implement a pipeline using GitHub Actions and Lambda Function URLs for fast, low-cost, and ephemeral environments.

With this example, you can deploy PRs quickly, and the cost is based on HTTP requests made to the environment. There are no compute costs incurred while a PR is open and no one is previewing the environment. The only charges are for Lambda invocations, while stakeholders are actively interacting with the environment. When a PR is merged or closed, the cloud infrastructure is disposed of. You can find all of the example code referenced in this post here.

For more serverless learning resources, visit Serverless Land.

AWS Lambda: Resilience under-the-hood

Post Syndicated from Marcia Villalba original https://aws.amazon.com/blogs/compute/aws-lambda-resilience-under-the-hood/

This post is written by Adrian Hornsby (Principal System Dev Engineer) and Marcia Villalba (Principal Developer Advocate).

AWS Lambda comprises over 80 services working together to provide the serverless compute service that it offers to customers. Under the hood, many of these services are built on top of Amazon Elastic Compute Cloud (Amazon EC2) instances, provisioned within Availability Zones. However, AWS Lambda is a Regional service. This means that customers use Lambda services from the Region level and its services are designed to be resilient to impairments that the underlying Availability Zones might have.

This blog post discusses how a Regional service such as Lambda takes advantage of Availability Zones and static stability to achieve its high availability target, and shows how Lambda teams verify their service’s static stability using AWS Fault Injection Simulator (AWS FIS). It also provides a solution using AWS services and tools to achieve Lambda’s resiliency strategy, using FIS, Amazon CloudWatch, and Amazon Route 53 Application Recovery Controller (Route 53 ARC).

The role of Availability Zones

Availability Zones are physically isolated sections of an AWS Region, designed to operate but also fail independently. They are separated by a meaningful distance from each other, up to 100 kilometers (60 miles), to prevent correlated failures, but close enough to use synchronous replication with single-digit millisecond latency.

Customers and AWS services have been using Availability Zones for years to build highly available, fault tolerant, and scalable applications. In particular, AWS Regional services such as AWS Lambda, Amazon DynamoDB, Amazon Simple Queue Service (Amazon SQS), and Amazon Simple Storage Service (Amazon S3), have achieved their high availability promises by spreading multiple independent replicas of their services across multiple Availability Zones. It uses the principles of independence and redundancy of Availability Zones to maximize the overall availability of that service.

Each replica is called a zonal replica. The system is designed so that any of the replicas can fail at any time. When a replica fails, it can be temporarily removed from the system until everything works as expected again. When that happens, the load is shared between the remaining zonal replicas.

Designing for failures

One lesson we learned at AWS when building services is when there is an Availability Zone impairment, it is better not to rely on control plane operations to remediate the failure. A control plane operation can, for example, be provisioning more capacity in an Availability Zone that is not affected by the impairment.

This principle is called static stability, and it describes the capability for a system to keep its original steady-state (or behavior) even when subjected to disruptive events without having to make any changes. A statically stable service should have as few dependencies as possible for its recovery process.

For a Regional service like AWS Lambda, this means that the remaining capacity in the healthy Availability Zones can absorb the traffic from a potentially impaired Availability Zone without having to scale up. This implies over-provisioning resources in all Availability Zones. Having that extra capacity pre-provisioned helps Lambda achieve its static stability. It is a tradeoff between the cost of over-provisioning resources and service availability. Since AWS Lambda promises high availability to its customers, with a monthly uptime service commitment of 99.95%, that tradeoff falls towards service availability.

How to prepare for failures

Preparing for an Availability Zone impairment is difficult because the symptoms and size of the impact can vary widely. An Availability Zone may be partially accessible or totally unreachable, and everything in between. Causes for the impairment can range from fiber cuts, power issues, overheating, hardware malfunctions, networking problems, capacity issues, and other unexpected situations. While those happen, they happen rarely. The most common categories of failures are bad deployments and bad configurations.

While some of these failures can be difficult to infer or reproduce, common symptoms include disruption of connectivity, increased latency, increased traffic due to retry storms, increased CPU and memory usage, and slow I/O.

At AWS, we learned to expect the unexpected and plan for failure. This means injecting faults in the system to reproduce some of the common symptoms of Availability Zone impairments, then observe how the system responds, and implement improvements. In addition, injecting faults in the system helps uncover potential monitoring and alarming blind spots, and gives an opportunity for teams to practice and improve their response to events with a focus on reducing time to recovery.

How Lambda tests its response to an Availability Zone impairment

Lambda’s approach to being resilient to Availability Zone impairments is to rely on static stability and automated systems. Humans are slower than machines for detecting issues and mitigating them. Therefore, Lambda must ensure that its services can detect issues within a zonal replica and remediate automatically within minutes and with no operator intervention. This auto-remediation is done by shifting customer traffic away from the affected Availability Zone to healthy ones, and it is called Availability Zone evacuation.

To do this, Lambda built a tool that detects failures and performs the Availability Zone evacuation when needed. This tool does a statistical comparison of metrics between different Availability Zones and EC2 instances in order to identify unhealthy Availability Zones. If an Availability Zone is found to have issues, the tool starts the evacuation out of the unhealthy Availability Zone automatically. This automation cuts the time to the first action from 30 minutes to less than 3 minutes.

How AWS Lambda uses AWS FIS

To verify the automation continuously works as expected, Lambda performs a wide variety of tests, which includes Availability Zone failure testing in their pre-production environment. The main objective of these tests is to verify the services are statically stable in the presence of Availability Zone impairments, and to verify that the Availability Zone evacuation can be successfully initiated. The benefit of having an automated test is that teams can repeat it regularly and don’t need to have special skills. One click is all it takes to launch the test.

For these tests, Lambda uses AWS FIS to inject faults into their large fleet of EC2 instances. They use AWS FIS with support of the AWS System Manager (SSM) agent and resource filters to target their fleet of EC2 instances in a particular Availability Zone. This is a versatile approach that can inject resource faults, such as CPU and memory exhaustion, and networking faults, such as packet latency, loss, or drop.

Injecting packet loss or latency is very important, since these symptoms can have a serious impact on application and network performance. Indeed, latency and loss, even in small quantities, can create inefficiencies and prevent applications from running at their peak performance. For Lambda, being able to detect increased latency or loss before it affects customers is critical.

How to recover your applications rapidly from Availability Zones failures

You can build a similar solution to rapidly recover your applications from a zonal failure. The solution must have a mechanism to evacuate an impaired Availability Zone, a monitoring system that allows you to detect when a zonal replica is impaired, and a way to test the static stability of your system. AWS provides many tools and services that can help you build this solution to achieve Lambda’s resiliency strategy.

For performing Availability Zone evacuation, you can use the new zonal shift capability from Route 53 ARC, which at the time of writing is in preview. Zonal shift lets you evacuate an Availability Zone for applications that are uses Elastic Load Balancing. If you find out that a zonal replica is impaired or unhealthy, you can use zonal shift to evacuate the Availability Zone for a period of time, while the issue gets fixed.

For performing the zonal shift, you must detect when a zonal replica is unhealthy. Your application must provide a signal of its health per Availability Zone. There are two common ways to capture this signal. First, passively, you can check your metrics, like response times, HTTP status codes, and other metrics that can help track fatal errors in your applications. Or actively, using synthetic monitoring, which allows you to create synthetic requests against your production application to provide a more complete view of the customer experience.

Amazon CloudWatch Synthetics provides canaries, which are scripts that run on a schedule and perform synthetic requests in your application endpoints and APIs. Canaries perform the same actions as customers and continuously verify the customer experience. You can create a canary for each zonal replica of your application and monitor the results independently.

With this information, if the user experience diminishes in one of the replicas, you can start an Availability Zone evacuation using zonal shift and minimize the bad experience for the user while you find and fix the sources of the failure.

To ensure that you can successfully recover from a failure, you must test the solution in advance. Without testing, it is just an assumption. To prove or disprove your assumptions about your system’s capability to handle disruptive events such as issues within an Availability Zones, you can use FIS.

With FIS, you can inject faults simultaneously in multiple resources within the same failure domain, such as Availability Zones. FIS currently integrates with several AWS services including EC2, Amazon Elastic Kubernetes Service (Amazon EKS), Amazon Elastic Container Service (Amazon ECS), Amazon Relational Database Service (Amazon RDS), AWS Networking, and CloudWatch.

Typical use cases for testing a workload’s resilience to Availability Zones impairment are, for example, terminating all compute resources and databases within a particular Availability Zone, injecting latency or packet loss, increasing resource consumption (CPU, memory, and I/O) in compute resources in a particular Availability Zone, or impacting network communication within or between Availability Zones.

For more information and a step-by-step example of how to recover rapidly from application failures in a single Availability Zone and testing it with AWS FIS, read this blog post.

Conclusion

­­­This article discusses static stability, a mechanism that is used by AWS services such as Lambda to build resilient Regional services. It also discusses how AWS takes advantage of the same services and infrastructure as customers. It shows how Lambda uses multiple Availability Zones and services like AWS FIS to build highly available services and improve its recovery time from unexpected failures to only a few minutes without human intervention. Finally, it shows a solution that you can implement for your applications to achieve Lambda’s resilience strategy.

To learn more about AWS FIS, there are many tutorials and a workshop you can check out.

For more serverless learning resources, visit Serverless Land.

Processing geospatial IoT data with AWS IoT Core and the Amazon Location Service

Post Syndicated from Marcia Villalba original https://aws.amazon.com/blogs/compute/processing-geospatial-iot-data-with-aws-iot-core-and-the-amazon-location-service/

This post is written by Swarna Kunnath (Cloud Application Architect), and Anand Komandooru (Sr. Cloud Application Architect).

This blog post shows how to republish messages that arrive from Internet of Things (IoT) devices across AWS accounts using a replatforming approach. A replatforming approach minimizes changes to the core application architecture, allowing an organization to reduce risk and meet business needs more quickly. In this post, you also learn how to track an IoT device’s location using the Amazon Location Service.

The example used in this post relates to an aviation company that has airplanes with line replacement unit devices or transponders. Transponders are IoT devices that send airplane geospatial data (location and altitude) to the AWS IoT Core service. The company’s airplane transponders send location data to the AWS IoT Core service provisioned in an existing AWS account (source account). The solution required manual intervention to track airplane location sent by the transponders.

They must rearchitect their application due to an internal reorganization event. As part of the rearchitecture approach, the business decides to enhance the application to process the transponder messages in another AWS account (destination account). In addition, the business needs full automation of the airplane’s location tracking process, to minimize the risk of the application changes, and to deliver the changes quickly.

Solution overview

The high-level solution republishes the IoT messages from the source account to the destination account using AWS IoT Core, Amazon SQS, AWS Lambda, and integrates the application with Amazon Location Service. IoT messages are replicated to an IoT topic in the destination account for downstream processing, minimizing changes to the original application architecture. Integration with Amazon Location Service automates the process of device location tracking and alert generation.

The AWS IoT platform allows you to connect your internet-enabled devices to the AWS Cloud via MQTT, HTTP, or WebSocket protocol. Once connected, the devices send data to the MQTT topics. Data ingested on MQTT topics is routed into AWS services (Amazon S3, SQS, Amazon DynamoDB, and Lambda) by configuring rules in the AWS IoT Rules Engine. The AWS IoT Rules Engine offers ways to define queries to format and filter messages published by these devices, and supports integration with several other AWS services as targets.

The Amazon Location Service lets you add geospatial data including capabilities such as maps, points of interest, geocoding, routing, geofences, and tracking. The tracker with geofence tracks the location of the device based on the geospatial data in the published IoT messages. Amazon Location Service generates enter and exit events and integrates with Amazon EventBridge and Amazon Simple Notification Service (Amazon SNS) to generate alerts based on defined filters in EventBridge rules.

The solution in this post delivers high availability, scalability, and cost efficiency by using serverless and managed services. The serverless services used by this solution also provide automatic scaling and built-in high availability. Integrating Amazon Location Service with AWS IoT and EventBridge helps to automate the auditing and processing of geospatial messages.

Solution architecture

These steps describe an end-to-end sequence of events:

  1. An IoT device (a transponder in an airplane) publishes a message to the AWS IoT Core service in the source account.
  2. The message arrives at an AWS IoT Core topic in the source account.
  3. AWS IoT Rules Engine receives the message and processes it, using IoT rules attached to the corresponding topic in the source account.
  4. An AWS IoT rule replicates the message to an SQS queue in the destination account.
  5. A Lambda function in the destination account polls the SQS queue and publishes received messages in batches to the destination account IoT topic.
  6. The Location action configured to the IoT rule sends the messages to Amazon Location Service tracker from the IoT topic.
  7. An Amazon Location tracker sends events when an IoT device enters or exits a linked geofence.
  8. EventBridge receives these events and, via the configured event rule, sends out SNS notifications for the configured devices.

Pre-requisites

This example has the following prerequisites:

  1. Access to the AWS services mentioned in this blog post within two AWS Accounts.
  2. A local install of AWS SAM CLI to build and deploy the sample code.

Solution walkthrough

To deploy this solution, first deploy IoT components via the AWS Serverless Application Model (AWS SAM), in the source and destination accounts. After, configure Amazon Location Service resources in the destination account. To learn more, visit the AWS SAM deployment documentation.

Deploying the code

Deploy the following AWS SAM templates in order:

To build and deploy the code, run:

sam build --template <TemplateName>.yaml
sam deploy --guided

Configuring a tracker

Amazon Location Trackers send device location updates that provide data to retrieve current and historical locations for devices.

Using Amazon Location Trackers and Amazon Location Geofences together, you can automatically evaluate the location updates from your IoT devices against your geofences to generate the geofence events. Actions could be taken to generate the alerts based on the areas of interest.

  1. Follow the instructions in the documentation to create the tracker resource from the AWS Management Console. Use this information for the new tracker:
    • Name: Enter a unique name that has a maximum of 100 characters. For example, FlightTracker.
    • Description: Enter an optional description. For example, Tracker for storing device positions.
  2. Configure a Location action to the destination IoT rule that receives messages from the destination IoT topic and publishes them in batches to the configured Tracker device (for example, FlightTracker). The parameters in the JSON data that is returned to the Location action can also be configured via substitution templates.

Geofence collection

Geofences contain points and vertices that form a closed boundary, which defines an area of interest. For example, flight origin and destination details. You can use tools, such as GeoJSON.io, to draw geofences and save the output as a GeoJSON file. Follow the instructions in the documentation to create the GeoJSON file and link it to the geofence collection.

  1. Create the geofence collection with a GeoJSON file and link it to the tracker you just created.
  2. Link the tracker to the geofence by following these instructions and start tracking the device’s location updates. You can link them together so that you automatically evaluate location updates against all your geofences. You can evaluate device positions against geofences on demand as well.

When device positions are evaluated against geofences, they generate events. For example, when a plane enters or exits a location specified in the geofence.

You can configure EventBridge with rules to react to these events. You can set up SNS to notify your clients when a specific tracker device location changes. Follow the instructions in the documentation on how to set up EventBridge rules to integrate with Amazon Location Service events.

Testing the solution

You can test the first part of the solution by sending an IoT message with location details in the JSON format from the source account and verify that the message arrives at the destination account SQS queue. Detailed instructions to publish a test message from the source account that includes location information (latitude and longitude) can be found here.

Messages from the destination account SQS queue are published to the Amazon Location Service Tracker. When the location in the test message matches the criteria provided in the geofence, Amazon Location Service generates an event. EventBridge has a rule configured that gets matched when an Amazon Location tracker event arrives, and the rule target is an SNS topic that sends an email or text message to the client.

Cleaning up

To avoid incurring future charges, delete the CloudFormation stacks, location tracker, and geofence collection created as part of the solution walk-through. Replace the resource identifiers in the following commands with the ID/name of the resources.

  1. Delete the SAM application stack:
    aws cloudformation delete-stack --stack-name <StackName>
    

    Refer to this documentation for further information.

  2. Delete the location tracker:
    aws location delete-tracker --tracker-name <TrackerName>
  3. Delete the geofence collection:
    aws location delete-geofence-collection --collection-name <GeoCollectionName>

Conclusion

This blog post shows how to create a serverless solution for cross account IoT message publishing and tracking device location updates using Amazon Location Service.

It describes the process of how to publish AWS IoT messages across multiple accounts. Integration with the Amazon Location Service shows how to track IoT device location updates and generate alerts, alleviating the need for manual device location tracking.

For more serverless learning resources, visit Serverless Land.

Serverless ICYMI Q4 2022

Post Syndicated from Marcia Villalba original https://aws.amazon.com/blogs/compute/serverless-icymi-q4-2022/

Welcome to the 20th edition of the AWS Serverless ICYMI (in case you missed it) quarterly recap. Every quarter, we share all the most recent product launches, feature enhancements, blog posts, webinars, Twitch live streams, and other interesting things that you might have missed!In case you missed our last ICYMI, check out what happened last quarter here.

AWS Lambda

For developers using Java, AWS Lambda has introduced Lambda SnapStart. SnapStart is a new capability that can improve the start-up performance of functions using Corretto (java11) runtime by up to 10 times, at no extra cost.

To use this capability, you must enable it in your function and then publish a new version. This triggers the optimization process. This process initializes the function, takes an immutable, encrypted snapshot of the memory and disk state, and caches it for reuse. When the function is invoked, the state is retrieved from the cache in chunks, on an as-needed basis, and it is used to populate the execution environment.

The ICYMI: Serverless pre:Invent 2022 post shares some of the launches for Lambda before November 21, like the support of Lambda functions using Node.js 18 as a runtime, the Lambda Telemetry API, and new .NET tooling to support .NET 7 applications.

Also, now Amazon Inspector supports Lambda functions. You can enable Amazon Inspector to scan your functions continually for known vulnerabilities. The log4j vulnerability shows how important it is to scan your code for vulnerabilities continuously, not only after deployment. Vulnerabilities can be discovered at any time, and with Amazon Inspector, your functions and layers are rescanned whenever a new vulnerability is published.

AWS Step Functions

There were many new launches for AWS Step Functions, like intrinsic functions, cross-account access capabilities, and the new executions experience for Express Workflows covered in the pre:Invent post.

During AWS re:Invent this year, we announced Step Functions Distributed Map. If you need to process many files, or items inside CSV or JSON files, this new flow can help you. The new distributed map flow orchestrates large-scale parallel workloads.

This feature is optimized for files stored in Amazon S3. You can either process in parallel multiple files stored in a bucket, or process one large JSON or CSV file, in which each line contains an independent item. For example, you can convert a video file into multiple .gif animations using a distributed map, or process over 37 GB of aggregated weather data to find the highest temperature of the day. 

Amazon EventBridge

Amazon EventBridge launched two major features: Scheduler and Pipes. Amazon EventBridge Scheduler allows you to create, run, and manage scheduled tasks at scale. You can schedule one-time or recurring tasks across 270 services and over 6.000 APIs.

Amazon EventBridge Pipes allows you to create point-to-point integrations between event producers and consumers. With Pipes you can now connect different sources, like Amazon Kinesis Data Streams, Amazon DynamoDB Streams, Amazon SQS, Amazon Managed Streaming for Apache Kafka, and Amazon MQ to over 14 targets, such as Step Functions, Kinesis Data Streams, Lambda, and others. It not only allows you to connect these different event producers to consumers, but also provides filtering and enriching capabilities for events.

EventBridge now supports enhanced filtering capabilities including:

  • Matching against characters at the end of a value (suffix filtering)
  • Ignoring case sensitivity (equals-ignore-case)
  • OR matching: A single rule can match if any conditions across multiple separate fields are true.

It’s now also simpler to build rules, and you can generate AWS CloudFormation from the console pages and generate event patterns from a schema.

AWS Serverless Application Model (AWS SAM)

There were many announcements for AWS SAM during this quarter summarized in the ICMYI: Serverless pre:Invent 2022 post, like AWS SAM ConnectorsSAM CLI Pipelines now support OpenID Connect Protocol, and AWS SAM CLI Terraform support.

AWS Application Composer

AWS Application Composer is a new visual designer that you can use to build serverless applications using multiple AWS services. This is ideal if you want to build a prototype, review with others architectures, generate diagrams for your projects, or onboard new team members to a project.

Within a simple user interface, you can drag and drop the different AWS resources and configure them visually. You can use AWS Application Composer together with AWS SAM Accelerate to build and test your applications in the AWS Cloud.

AWS Serverless digital learning badges

The new AWS Serverless digital learning badges let you show your AWS Serverless knowledge and skills. This is a verifiable digital badge that is aligned with the AWS Serverless Learning Plan.

This badge proves your knowledge and skills for Lambda, Amazon API Gateway, and designing serverless applications. To earn this badge, you must score at least 80 percent on the assessment associated with the Learning Plan. Visit this link if you are ready to get started learning or just jump directly to the assessment. 

News from other services:

Amazon SNS

Amazon SQS

AWS AppSync and AWS Amplify

Observability

AWS re:Invent 2022

AWS re:Invent was held in Las Vegas from November 28 to December 2, 2022. Werner Vogels, Amazon’s CTO, highlighted event-driven applications during his keynote. He stated that the world is asynchronous and showed how strange a synchronous world would be. During the keynote, he showcased Serverlesspresso as an example of an event-driven application. The Serverless DA team presented many breakouts, workshops, and chalk talks. Rewatch all our breakout content:

In addition, we brought Serverlesspresso back to Vegas. Serverlesspresso is a contactless, serverless order management system for a physical coffee bar. The architecture comprises several serverless apps that support an ordering process from a customer’s smartphone to a real espresso bar. The customer can check the virtual line, place an order, and receive a notification when their drink is ready for pickup.

Serverless blog posts

October

November

December

Videos

Serverless Office Hours – Tuesday 10 AM PT

Weekly live virtual office hours: In each session, we talk about a specific topic or technology related to serverless and open it up to helping with your real serverless challenges and issues. Ask us anything about serverless technologies and applications.

YouTube: youtube.com/serverlessland

Twitch: twitch.tv/aws

October

November

December

FooBar Serverless YouTube Channel

Marcia Villalba frequently publishes new videos on her popular FooBar Serverless YouTube channel.

October

November

December

Still looking for more?

The Serverless landing page has more information. The Lambda resources page contains case studies, webinars, whitepapers, customer stories, reference architectures, and even more Getting Started tutorials. If you want to learn more about event-driven architectures, read our new guide that will help you get started.

You can also follow the Serverless Developer Advocacy team on Twitter and LinkedIn to see the latest news, follow conversations, and interact with the team.

For more serverless learning resources, visit Serverless Land.

AWS Week in Review – December 12, 2022

Post Syndicated from Marcia Villalba original https://aws.amazon.com/blogs/aws/aws-week-in-review-december-12-2022/

This post is part of our Week in Review series. Check back each week for a quick roundup of interesting news and announcements from AWS!

The world is asynchronous, is what Werner Vogels, Amazon CTO, reminded us during his keynote last week at AWS re:Invent. At the beginning of the keynote, he showed us how weird a synchronous world would be and how everything in nature is asynchronous. One example of an event-driven application he showcased during his keynote is Serverlesspresso, a project my team has been working on for the last year. And last week, we announced Serverlesspresso extensions, a new program that lets you contribute to Serverlesspresso and learn how event-driven applications can be extended.

Last Week’s Launches
Here are some launches that got my attention during the previous week.

Amazon SageMaker Studio now supports fine-grained data access control with AWS LakeFormation when accessing data through Amazon EMR. Now, when you connect to EMR clusters to SageMaker Studio notebooks, you can choose what runtime IAM role you want to connect with, and the notebooks will only access data and resources permitted by the attached runtime role.

Amazon Lex has now added support for Arabic, Cantonese, Norwegian, Swedish, Polish, and Finnish. This opens new possibilities to create chat bots and conversational experiences in more languages.

Amazon RDS Proxy now supports creating proxies in Amazon Aurora Global Database primary and secondary Regions. Now, building multi-Region applications with Amazon Aurora is simpler. RDS proxy sits between your application and the database pool and shares established database connections.

Amazon FSx for NetApp ONTAP launched many new features. First, it added the support for Nitro-based encryption of data in transit. It also extended NVMe read cache support to Single-AZ file systems. And it added four new features to ease the use of the service: easily assign a snapshot policy to your volumes, easily create data protection volumes, configure volumes so their tags are automatically copied to the backups, and finally, add or remove VPC route tables for your existing Multi-AZ file systems.

I would also like to mention two launches that happened before re:Invent but were not covered on the News Blog:

Amazon EventBridge Scheduler is a new capability from Amazon EventBridge that allows you to create, run, and manage scheduled tasks at scale. Using this new capability, you can schedule one-time or recurrent tasks across 270 AWS services.

AWS IoT RoboRunner is now generally available. Last year at re:Invent Channy wrote a blog post introducing the preview for this service. IoT RoboRunner is a robotic service that makes it easier to build and deploy applications for fleets of robots working seamlessly together.

For a full list of AWS announcements, be sure to keep an eye on the What’s New at AWS page.

Other AWS News
Some other updates and news that you may have missed:

I would like to recommend this really interesting Amazon Science article about federated learning. This is a framework that allows edge devices to work together to train a global model while keeping customers’ data on-device.

Podcast Charlas Técnicas de AWS – If you understand Spanish, this podcast is for you. Podcast Charlas Técnicas is one of the official AWS podcasts in Spanish, and every other week there is a new episode. Today the final episode for season three launched, and in it, we discussed many of the re:Invent launches. You can listen to all the episodes directly from your favorite podcast app or at AWS Podcasts en español.

AWS open-source news and updates–This is a newsletter curated by my colleague Ricardo to bring you the latest open-source projects, posts, events, and more.

Upcoming AWS Events
Check your calendars and sign up for these AWS events:

AWS Resiliency Hub Activation Day is a half-day technical virtual session to deep dive into the features and functionality of Resiliency Hub. You can register for free here.

AWS re:Invent recaps in your area. During the re:Invent week, we had lots of new announcements, and in the next weeks you can find in your area a recap of all these launches. All the events will be posted on this site, so check it regularly to find an event nearby.

AWS re:Invent keynotes, leadership sessions, and breakout sessions are available on demand. I recommend that you check the playlists and find the talks about your favorite topics in one collection.

That’s all for this week. Check back next Monday for another Week in Review!

— Marcia

Securing Lambda Function URLs using Amazon Cognito, Amazon CloudFront and AWS WAF

Post Syndicated from Marcia Villalba original https://aws.amazon.com/blogs/compute/securing-lambda-function-urls-using-amazon-cognito-amazon-cloudfront-and-aws-waf/

This post is written by Madhu Singh (Solutions Architect), and Krupanidhi Jay (Solutions Architect).

Lambda function URLs is a dedicated HTTPs endpoint for a AWS Lambda function. You can configure a function URL to have two methods of authentication: IAM and NONE. IAM authentication means that you are restricting access to the function URL (and in-turn access to invoke the Lambda function) to certain AWS principals (such as roles or users). Authentication type of NONE means that the Lambda function URL has no authentication and is open for anyone to invoke the function.

This blog shows how to use Lambda function URLs with an authentication type of NONE and use custom authorization logic as part of the function code, and to only allow requests that present valid Amazon Cognito credentials when invoking the function. You also learn ways to protect Lambda function URL against common security threats like DDoS using AWS WAF and Amazon CloudFront.

Lambda function URLs provides a simpler way to invoke your function using HTTP calls. However, it is not a replacement for Amazon API Gateway, which provides advanced features like request validation and rate throttling.

Solution overview

There are four core components in the example.

1. A Lambda function with function URLs enabled

At the core of the example is a Lambda function with the function URLs feature enabled with the authentication type of NONE. This function responds with a success message if a valid authorization code is passed during invocation. If not, it responds with a failure message.

2. Amazon Cognito User Pool

Amazon Cognito user pools enable user authentication on websites and mobile apps. You can also enable publicly accessible Login and Sign-Up pages in your applications using Amazon Cognito user pools’ feature called the hosted UI.

In this example, you use a user pool and the associated Hosted UI to enable user login and sign-up on the website used as entry point. This Lambda function validates the authorization code against this Amazon Cognito user pool.

3. CloudFront distribution using AWS WAF

CloudFront is a content delivery network (CDN) service that helps deliver content to end users with low latency, while also improving the security posture for your applications.

AWS WAF is a web application firewall that helps protect your web applications or APIs against common web exploits and bots and AWS Shield is a managed distributed denial of service (DDoS) protection service that safeguards applications running on AWS. AWS WAF inspects the incoming request according to the configured Web Access Control List (web ACL) rules.

Adding CloudFront in front of your Lambda function URL helps to cache content closer to the viewer, and activating AWS WAF and AWS Shield helps in increasing security posture against multiple types of attacks, including network and application layer DDoS attacks.

4. Public website that invokes the Lambda function

The example also creates a public website built on React JS and hosted in AWS Amplify as the entry point for the demo. This website works both in authenticated mode and in guest mode. For authentication, the website uses Amazon Cognito user pools hosted UI.

Solution architecture

This shows the architecture of the example and the information flow for user requests.

In the request flow:

  1. The entry point is the website hosted in AWS Amplify. In the home page, when you choose “sign in”, you are redirected to the Amazon Cognito hosted UI for the user pool.
  2. Upon successful login, Amazon Cognito returns the authorization code, which is stored as a cookie with the name “code”. The user is redirected back to the website, which has an “execute Lambda” button.
  3. When the user choose “execute Lambda”, the value from the “code” cookie is passed in the request body to the CloudFront distribution endpoint.
  4. The AWS WAF web ACL rules are configured to determine whether the request is originating from the US or Canada IP addresses and to determine if the request should be allowed to invoke Lambda function URL origin.
  5. Allowed requests are forwarded to the CloudFront distribution endpoint.
  6. CloudFront is configured to allow CORS headers and has the origin set to the Lambda function URL. The request that CloudFront receives is passed to the function URL.
  7. This invokes the Lambda function associated with the function URL, which validates the token.
  8. The function code does the following in order:
    1. Exchange the authorization code in the request body (passed as the event object to Lambda function) to access_token using Amazon Cognito’s token endpoint (check the documentation for more details).
      1. Amazon Cognito user pool’s attributes like user pool URL, Client ID and Secret are retrieved from AWS Systems Manager Parameter Store (SSM Parameters).
      2. These values are stored in SSM Parameter Store at the time these resources are deployed via AWS CDK (see “how to deploy” section)
    2. The access token is then verified to determine its authenticity.
    3. If valid, the Lambda function returns a message stating user is authenticated as <username> and execution was successful.
    4. If either the authorization code was not present, for example, the user was in “guest mode” on the website, or the code is invalid or expired, the Lambda function returns a message stating that the user is not authorized to execute the function.
  9. The webpage displays the Lambda function return message as an alert.

Getting started

Pre-requisites:

Before deploying the solution, please follow the README from the GitHub repository and take the necessary steps to fulfill the pre-requisites.

Deploy the sample solution

1. From the code directory, download the dependencies:

$ npm install

2. Start the deployment of the AWS resources required for the solution:

$ cdk deploy

Note:

  • optionally pass in the –profile argument if needed
  • The deployment can take up to 15 minutes

3. Once the deployment completes, the output looks similar to this:

Open the amplifyAppUrl from the output in your browser. This is the URL for the demo website. If you don’t see the “Welcome to Compute Blog” page, the Amplify app is still building, and the website is not available yet. Retry in a few minutes. This website works either in an authenticated or unauthenticated state.

Test the authenticated flow

  1. To test the authenticated flow, choose “Sign In”.

2. In the sign-in page, choose on sign-up (for the first time) and create a user name and password.

3. To use an existing an user name and password, enter those credentials and choose login.

4. Upon successful sign-in or sign up, you are redirected back to the webpage with “Execute Lambda” button.

5. Choose this button. In a few seconds, an alert pop-up shows the logged in user and that the Lambda execution is successful.

Testing the unauthenticated flow

1. To test the unauthenticated flow, from the Home page, choose “Continue”.

2. Choose “Execute Lambda” and in a few seconds, you see a message that you are not authorized to execute the Lambda function.

Testing the geo-block feature of AWS WAF

1. Access the website from a Region other than US or Canada. If you are physically in the US or Canada, you may use a VPN service to connect to a Region other than US or Canada.

2. Choose the “Execute Lambda” button. In the Network trace of browser, you can see the call to invoke Lambda function was blocked with Forbidden response.

3. To try either the authenticated or unauthenticated flow again, choose “Return to Home Page” to go back to the home page with “Sign In” and “Continue” buttons.

Cleaning up

To delete the resources provisioned, run the cdk destroy command from the AWS CDK CLI.

Conclusion

In this blog, you create a Lambda function with function URLs enabled with NONE as the authentication type. You then implemented a custom authentication mechanism as part of your Lambda function code. You also increased the security of your Lambda function URL by setting it as Origin for the CloudFront distribution and using AWS WAF Geo and IP limiting rules for protection against common web threats, like DDoS.

For more serverless learning resources, visit Serverless Land.

New – Process PDFs, Word Documents, and Images with Amazon Comprehend for IDP

Post Syndicated from Marcia Villalba original https://aws.amazon.com/blogs/aws/now-process-pdfs-word-documents-and-images-with-amazon-comprehend-for-idp/

Today we are announcing a new Amazon Comprehend feature for intelligent document processing (IDP). This feature allows you to classify and extract entities from PDF documents, Microsoft Word files, and images directly from Amazon Comprehend without you needing to extract the text first.

Many customers need to process documents that have a semi-structured format, like images of receipts that were scanned or tax statements in PDF format. Until today, those customers first needed to preprocess those documents using optical character recognition (OCR) tools to extract the text. Then they could use Amazon Comprehend to classify and extract entities from those preprocessed files.

Now with Amazon Comprehend for IDP, customers can process their semi-structured documents, such as PDFs, docx, PNG, JPG, or TIFF images, as well as plain-text documents, with a single API call. This new feature combines OCR and Amazon Comprehend’s existing natural language processing (NLP) capabilities to classify and extract entities from the documents. The custom document classification API allows you to organize documents into categories or classes, and the custom-named entity recognition API allows you to extract entities from documents like product codes or business-specific entities. For example, an insurance company can now process scanned customers’ claims with fewer API calls. Using the Amazon Comprehend entity recognition API, they can extract the customer number from the claims and use the custom classifier API to sort the claim into the different insurance categories—home, car, or personal.

Starting today, Amazon Comprehend for IDP APIs are available for real-time inferencing of files, as well as for asynchronous batch processing on large document sets. This feature simplifies the document processing pipeline and reduces development effort.

Getting Started
You can use Amazon Comprehend for IDP from the AWS Management Console, AWS SDKs, or AWS Command Line Interface (CLI).

In this demo, you will see how to asynchronously process a semi-structured file with a custom classifier. For extracting entities, the steps are different, and you can learn how to do it by checking the documentation.

In order to process a file with a classifier, you will first need to train a custom classifier. You can follow the steps in the Amazon Comprehend Developer Guide. You need to train this classifier with plain text data.

After you train your custom classifier, you can classify documents using either asynchronous or synchronous operations. For using the synchronous operation to analyze a single document, you need to create an endpoint to run real-time analysis using a custom model. You can find more information about real-time analysis in the documentation. For this demo, you are going to use the asynchronous operation, placing the documents to classify in an Amazon Simple Storage Service (Amazon S3) bucket and running an analysis batch job.

To get started classifying documents in batch from the console, on the Amazon Comprehend page, go to Analysis jobs and then Create job.

Create new job

Then you can configure the new analysis job. First, input a name and pick Custom classification and the custom classifier you created earlier.

Then you can configure the input data. First, select the S3 location for that data. In that location, you can place your PDFs, images, and Word Documents. Because you are processing semi-structured documents, you need to choose One document per file. If you want to override Amazon Comprehend settings for extracting and parsing the document, you can configure the Advanced document input options.

Input data for analysis job

After configuring the input data, you can select where the output of this analysis should be stored. Also, you need to give access permissions for this analysis job to read and write on the specified Amazon S3 locations, and then you are ready to create the job.

Configuring the classification job

The job takes a few minutes to run, depending on the size of the input. When the job is ready, you can check the output results. You can find the results in the Amazon S3 location you specified when you created the job.

In the results folder, you will find a .out file for each of the semi-structured files Amazon Comprehend classified. The .out file is a JSON, in which each line represents a page of the document. In the amazon-textract-output directory, you will find a folder for each classified file, and inside that folder, there is one file per page from the original file. Those page files contain the classification results. To learn more about the outputs of the classifications, check the documentation page.

Job output

Available Now
You can get started classifying and extracting entities from semi-structured files like PDFs, images, and Word Documents asynchronously and synchronously today from Amazon Comprehend in all the Regions where Amazon Comprehend is available. Learn more about this new launch in the Amazon Comprehend Developer Guide.

Marcia

AWS Machine Learning University New Educator Enablement Program to Build Diverse Talent for ML/AI Jobs

Post Syndicated from Marcia Villalba original https://aws.amazon.com/blogs/aws/aws-machine-learning-university-new-educator-enablement-program-to-build-diverse-talent-for-ml-ai-jobs/

AWS Machine Learning University is now providing a free educator enablement program. This program provides faculty at community colleges, minority-serving institutions (MSIs), and historically Black colleges and universities (HBCUs) with the skills and resources to teach data analytics, artificial intelligence (AI), and machine learning (ML) concepts to build a diverse pipeline for in-demand jobs of today and tomorrow.

According to the National Science Foundation, Black and Hispanic or Latino students earn bachelor’s degrees in Computer Science—the dominant pathway to AI/ML—at a much lower rate than their white peers, earning less than 11 percent of computer science degrees awarded. However, research shows that having diverse perspectives among skilled practitioners and across the AI/ML lifecycle contributes to the development of AI/ML systems that are safe, trustworthy, and have less bias. 

In 2018, we announced the Machine Learning University (MLU) to share with all developers the same courses that we used to train engineers at Amazon and AWS. This platform offers self-service, self-paced, AI/ML digital courses.

Machine Learning University home page

And today, we add this new program to our AI/ML training offering. Although anyone could access the MLU self-paced learning, it places the burden on the learner to source prerequisite work and solutions. This educator enablement program takes the concepts and lessons developed by MLU and makes them more accessible to educators. It offers a year-round educator enablement program with lesson planning, course playbooks, and access to free compute resources.

Program Details
Educators are onboarded in small-group cohorts into bootcamps where they will learn the material and deep dive into how to teach it via instructor-led lectures and hands-on projects. Educators who complete the bootcamp can take part in different year-round development opportunities, such as a dedicated Slack channel to share teaching best practices, education topic series and virtual study sessions moderated by MLU instructors, and regional events for continued professional development. Also, they will receive continuing education credits and AWS-provided stipends.

Faculty and students get access to instructional material through Amazon SageMaker Studio Lab. SageMaker Studio Lab was announced last year and is AWS’s free (no credit card required) ML development environment. It provides computing and storage for anybody that wants to learn and experiment with ML. Institutions can unlock additional resources to support their ML programs by registering for AWS Academy. AWS Academy unlocks all the AWS services for a complete AI/ML program.

Community colleges and universities can integrate this educator enablement program into their computer science, information technology, and business curricula to create an AI/ML course, certificate, or degree. We have worked with educators and education boards such as Houston Community College to create content that is vetted for credit-worthy and degree-earning curricula.

In August 2022, we launched our first educator bootcamp in partnership with The Coding School. The bootcamp was delivered over two weeks, offering lectures, case studies, and hands-on projects. 25 educators completed the Educator Machine Learning Bootcamp, representing 22 US community colleges and universities.

Learn More and Join The Program
During 2023, AWS Machine Learning University will run six educator-enablement cohorts starting in January. The program will give priority consideration to educators at community colleges, MSIs, and HBCUs, in alignment with this program mission to increase access to AI/ML technology to historically underserved and underrepresented students.

If you are a computer science educator or part of a board of educators interested in fostering more depth in your computer science coursework, you should sign up for the educator enablement program.

Marcia

New AWS SimSpace Weaver–Run Large-Scale Spatial Simulations in the Cloud

Post Syndicated from Marcia Villalba original https://aws.amazon.com/blogs/aws/new-aws-simspace-weaver-build-large-scale-spatial-simulations-in-the-cloud/

Today, we’re announcing AWS SimSpace Weaver, a new compute service to run real-time spatial simulations in the cloud and at scale. With SimSpace Weaver, simulation developers are no longer limited by the compute and memory of their hardware.

Organizations run simulations on situations that are rare, dangerous, or very expensive to test in the real world. For example, city managers can’t wait for a natural disaster to hit a city to test the response systems. Event planners don’t want to wait until a large sporting event to start to understand the impact the games will have on traffic. Scenarios like these need to be simulated in a safe environment in which planners can test different situations and tune each system.

Until today, spatial simulations were generally confined to being run on a single piece of hardware. If developers wanted to simulate a bigger and more complex world with lots of independent and dynamic entities, they needed to provision a bigger computer. Simulation developers were forced to make trade-offs between scale and fidelity, in other words, deciding how big the world is and how many independent entities there are.

The world we live in is complex, and the scenarios that developers want to simulate are very complex as well—for example, how traffic will be affected by a large concert or sporting event. Simulating these events requires modeling hundreds of thousands of independent dynamic entities to represent the people and vehicles. Each entity has its own set of behaviors that need to be modeled as it moves throughout the world and interacts with other entities. Simulating this at a real-world scale requires CPU and memory beyond what you can have in one instance.

With SimSpace Weaver, you can run simulations at scale across multiple Amazon Elastic Compute Cloud (Amazon EC2) instances. It supports simulating upwards of a million independent and dynamic entities.

When to Use SimSpace Weaver
Use SimSpace Weaver when you need to increase the scale or complexity of your simulations. SimSpace Weaver is great at simulating crowds. This is very useful, for example, when you’re planning large events or planning to build infrastructure like a new stadium. It is also ideal for simulating smart cities, complete with vehicles, inhabitants, and other objects.

AWS SimSpace Weaver lets you connect external clients to your simulations so that you can interact and view the simulations with multiple users in real time.

How SimSpace Weaver Works
When using SimSpace Weaver, you can parallelize your spatial simulations workloads across multiple instances. Scale your simulations across up to 10 EC2 instances by specifying the compute capacity needed for the simulation and how it should be split into partitions. SimSpace Weaver handles the provisioning of the EC2 instances, launches the simulation applications, and cleans the environment after the simulation ends.

In the following image, you can see a representation of how a spatial area, in this case, a city, is spatially partitioned across different instances. Each row represents an instance. The example simulation in this image contains 10 instances, and each instance handles 16 partitions.

Map is partitioned into different instances

Map courtesy of Amazon Location Service

When working with multiple partitions, you don’t need to worry about the complexities of transferring entities between partitions. The SimSpace Weaver data replication system handles the networking and memory management for doing the transferring, regardless of whether the partitions are in the same EC2 instance or in a different one.

Another important feature that SimSpace Weaver provides is the scheduler. The SimSpace Weaver scheduler keeps all the distributed partitions synchronized at a set simulation tick rate (10, 15, or, 30 Hz), so the simulation behaves as if it was run on one machine.

SimSpace Weaver provides the infrastructure to weave together a simulation across multiple instances, but it is not a simulator. Build your simulations by integrating the AWS SimSpace Weaver C++ SDK with your code. Integrating with the SDK allows your applications to interface with the SimSpace Weaver software running in your instances. This allows SimSpace Weaver to track the global state of all your simulated entities and facilitates the transfer of entities between simulation applications. Developers building with Unreal Engine 5 or Unity can take advantage of the SimSpace Weaver out-of-the-box plugins to jump-start their projects.

Getting Started
You can get started with SimSpace Weaver from the AWS Management Console or the AWS Command-Line Interface (AWS CLI).

Getting started

From the console, use our one-click sample to quickly launch your first simulation. This is a simple example of a simulation divided into four different partitions. This simulation involves spherical entities that move freely throughout the world, avoiding each other and static objects.

One click simulation

The wizard guides you through the main steps for running a demo simulation:

  1. Download the client demo application. This is a prebuilt application that you use later to view the simulation running in the cloud. You can only run this demo application using a computer with Windows operating system.
  2. Start the simulation infrastructure in the cloud. SimSpace Weaver takes care of deploying all the infrastructure you need in order to run this simulation.
  3. View the simulation using the demo application you downloaded in the first step. The following image shows the result of running this simulation. Each color represents a different partition.

Simulation result

Available Now
Developers using SimSpace Weaver pay for the number of instances they use for the length of their simulation, with no up-front costs or licenses.

SimSpace Weaver is available in the US East (Ohio), US East (Northern Virginia), US West (Oregon), Asia-Pacific (Singapore), Asia-Pacific (Sydney), Europe (Ireland), Europe (Frankfurt), and Europe (Stockholm) AWS Regions.

You can get started with SimSpace Weaver today from the console and the AWS CLI. Learn more about SimSpace Weaver on the service page.

Marcia

Amazon Inspector Now Scans AWS Lambda Functions for Vulnerabilities

Post Syndicated from Marcia Villalba original https://aws.amazon.com/blogs/aws/amazon-inspector-now-scans-aws-lambda-functions-for-vulnerabilities/

Amazon Inspector is a vulnerability management service that continually scans workloads across Amazon Elastic Compute Cloud (Amazon EC2) instances, container images living in Amazon Elastic Container Registry (Amazon ECR), and, starting today, AWS Lambda functions and Lambda layers.

Until today, customers that wanted to analyze their mixed workloads (including EC2 instances, container images, and Lambda functions) against common vulnerabilities needed to use AWS and third-party tools. This increased the complexity of keeping all their workloads secure.

In addition, the log4j vulnerability a few months ago was a great example that scanning your functions for vulnerabilities only before deployment is not enough. Because new vulnerabilities can appear at any time, it is very important for the security of your applications that the workloads are continuously monitored and rescanned in near real-time as new vulnerabilities are published.

Getting started
The first step to getting started with Amazon Inspector is to enable it for your account or your entire AWS Organizations. Once activated, Amazon Inspector automatically scans the functions in the selected accounts. Amazon Inspector is a native AWS service; this means that you don’t need to install a library or agent in your functions or layers for this to work.

Amazon Inspector is available starting today for functions and layers written in Java, NodeJS, and Python. By default, it continually scans all the functions inside your account, but if you want to exclude a particular Lambda function, you can attach the tag with the key InspectorExclusion and the value LambdaStandardScanning.

Amazon Inspector scans functions and layers initially upon deployment and automatically rescans them when there are changes in the workloads, for example, when a Lambda function is updated or when a new vulnerability (CVE) is published.

Summary for Amazon Inspector findings

In addition to functions, Amazon Inspector scans your Lambda layers; however, it only scans the specific layer version that is used in a function. If a layer or layer version is not used by any function, then it won’t get analyzed. If you are using third-party layers, Amazon Inspector also scans them for vulnerabilities.

You can see the findings for the different functions in the Amazon Inspector Findings console filtered By Lambda function. When Amazon Inspector finds something, all the findings are routed to AWS Security Hub and to Amazon EventBridge so you can build automation workflows, like sending notifications to the developers or system administrators.

Findings by function

Available Now
Amazon Inspector support for AWS Lambda functions and layers is generally available today in US East (Ohio), US East (N. Virginia), US West (N. California), US West (Oregon), Asia Pacific (Hong Kong), Asia Pacific (Mumbai), Asia Pacific (Seoul), Asia Pacific (Singapore), Asia Pacific (Sydney), Asia Pacific (Tokyo), Canada (Central), Europe (Frankfurt), Europe (Ireland), Europe (London), Europe (Milan), Europe (Paris), Europe (Stockholm), Middle East (Bahrain), and South America (Sao Paulo).

If you want to try this new feature, there is a 15-day free trial for you. Visit the service page to read more about the service and the free trial.

Marcia

Protect Sensitive Data with Amazon CloudWatch Logs

Post Syndicated from Marcia Villalba original https://aws.amazon.com/blogs/aws/protect-sensitive-data-with-amazon-cloudwatch-logs/

Today we are announcing Amazon CloudWatch Logs data protection, a new set of capabilities for Amazon CloudWatch Logs that leverage pattern matching and machine learning (ML) to detect and protect sensitive log data in transit.

While developers try to prevent logging sensitive information such as Social Security numbers, credit card details, email addresses, and passwords, sometimes it gets logged. Until today, customers relied on manual investigation or third-party solutions to detect and mitigate sensitive information from being logged. If sensitive data is not redacted during ingestion, it will be visible in plain text in the logs and in any downstream system that consumed those logs.

Enforcing prevention across the organization is challenging, which is why quick detection and prevention of access to sensitive data in the logs is important from a security and compliance perspective. Starting today, you can enable Amazon CloudWatch Logs data protection to detect and mask sensitive log data as it is ingested into CloudWatch Logs or as it is in transit.

Customers from all industries that want to take advantage of native data protection capabilities can benefit from this feature. But in particular, it is useful for industries under strict regulations that need to make sure that no personal information gets exposed. Also, customers building payment or authentication services where personal and sensitive information may be captured can use this new feature to detect and mask sensitive information as it’s logged.

Getting Started
You can enable a data protection policy for new or existing log groups from the AWS Management Console, AWS Command Line Interface (CLI), or AWS CloudFormation. From the console, select any log group and create a data protection policy in the Data protection tab.

Enable data protection policy

When you create the policy, you can specify the data you want to protect. Choose from over 100 managed data identifiers, which are a repository of common sensitive data patterns spanning financial, health, and personal information. This feature provides you with complete flexibility in choosing from a wide variety of data identifiers that are specific to your use cases or geographical region.

Configure data protection policy

You can also enable audit reports and send them to another log group, an Amazon Simple Storage Service (Amazon S3) bucket, or Amazon Kinesis Firehose. These reports contain a detailed log of data protection findings.

If you want to monitor and get notified when sensitive data is detected, you can create an alarm around the metric LogEventsWithFindings. This metric shows how many findings there are in a particular log group. This allows you to quickly understand which application is logging sensitive data.

When sensitive information is logged, CloudWatch Logs data protection will automatically mask it per your configured policy. This is designed so that none of the downstream services that consume these logs can see the unmasked data. From the AWS Management Console, AWS CLI, or any third party, the sensitive information in the logs will appear masked.

Example of log file with masked data

Only users with elevated privileges in their IAM policy (add logs:Unmask action in the user policy) can view unmasked data in CloudWatch Logs Insights, logs stream search, or via FilterLogEvents and GetLogEvents APIs.

You can use the following query in CloudWatch Logs Insights to unmask data for a particular log group:

fields @timestamp, @message, unmask(@message)
| sort @timestamp desc
| limit 20

Available Now
Data protection is available in US East (Ohio), US East (N. Virginia), US West (N. California), US West (Oregon), Africa (Cape Town), Asia Pacific (Hong Kong), Asia Pacific (Jakarta), Asia Pacific (Mumbai), Asia Pacific (Osaka), Asia Pacific (Seoul), Asia Pacific (Singapore), Asia Pacific (Sydney), Asia Pacific (Tokyo), Canada (Central), Europe (Frankfurt), Europe (Ireland), Europe (London), Europe (Milan), Europe (Paris), Europe (Stockholm), Middle East (Bahrain), and South America (São Paulo) AWS Regions.

Amazon CloudWatch Logs data protection pricing is based on the amount of data that is scanned for masking. You can check the CloudWatch Logs pricing page to learn more about the pricing of this feature in your Region.

Learn more about data protection on the CloudWatch Logs User Guide.

Marcia

AWS AppSync GraphQL APIs Supports JavaScript Resolvers

Post Syndicated from Marcia Villalba original https://aws.amazon.com/blogs/aws/aws-appsync-graphql-apis-supports-javascript-resolvers/

Starting today, AWS AppSync supports JavaScript resolvers and provides a resolver evaluation engine to test them before publishing them to the cloud.

AWS AppSync, launched in 2017, is a service that allows you to build, manage, and host GraphQL APIs in the cloud. AWS AppSync connects your GraphQL schema to different data sources using resolvers. Resolvers are how AWS AppSync translates GraphQL requests and fetches information from the different data sources.

Until today, many customers had to write their resolvers using Apache Velocity Template Language (VTL). To write VTL resolvers, many developers needed to learn a new language, and that discouraged them from taking advantage of the capabilities that resolvers offer. And when they did write them, developers faced the challenge of how to test the VTL resolvers. That is why many customers resorted to writing their complex resolvers as AWS Lambda functions and then creating a simple VTL resolver that invoked that function. This adds more complexity to their applications, as now they have to maintain and operate this new Lambda function.

AWS AppSync executes resolvers on a GraphQL field. Sometimes, applications require executing multiple operations to resolve a single GraphQL field. When using AWS AppSync, developers can create pipeline resolvers to compose operations (called functions) and execute them in sequence. Each function performs an operation over a data source, for example, fetching an item from an Amazon DynamoDB table.

How a function works

Introducing AWS AppSync JavaScript pipeline resolvers
Now, in addition to VTL, developers can use JavaScript to write their functions. You can mix functions written in JavaScript and VTL inside a pipeline resolver.

This new launch comes with two new NPM libraries to simplify development: @aws-appsync/eslint-plugin to catch and fix problems quickly during development and @aws-appsync/utils to provide type validation and autocompletion in code editors.

Developers can test their JavaScript code using AWS AppSync’s new API command, evaluate-code. During a test, the code is validated for correctness and evaluated with mock data. This helps developers validate their code before pushing their changes to the cloud.

With this launch, AWS AppSync becomes one of the easiest ways for your applications to talk to almost any AWS service. You can write an HTTP function that calls any AWS service with an API endpoint using JavaScript and use that function as part of your pipeline. For example, you can create a pipeline resolver that is invoked when a query on a GraphQL field occurs. This field returns the translated text in Spanish of an item stored in a table. This pipeline resolver is composed of two functions, one that fetches data from a DynamoDB table and one that uses Amazon Translate API to translate the item text into Spanish.

function awsTranslateRequest(Text, SourceLanguageCode, SourceLanguageCode) {
  return {
    method: 'POST',
    resourcePath: '/',
    params: {
      headers: {
        'content-type': 'application/x-amz-json-1.1',
        'x-amz-target': 'AWSShineFrontendService_20170701.TranslateText',
      },
      body: JSON.stringify({ Text, SourceLanguageCode, SourceLanguageCode }),
    },
  };
}

Getting started
You can create JavaScript functions from the AWS AppSync console or using the AWS Command Line Interface (CLI). Let’s create a pipeline resolver that gets an item from an existing DynamoDB table using the AWS CLI. This resolver only has one function.

When creating a new AWS AppSync function, you need to provide the code for that function. Create a new JavaScript file and copy the following code snippet.

import { util } from '@aws-appsync/utils';

/**
 * Request a single item from the attached DynamoDB table
 * @param ctx the request context
 */
export function request(ctx) {
  return {
    operation: 'GetItem',
    key: util.dynamodb.toMapValues({ id: ctx.args.id }),
  };
}

/**
 * Returns the DynamoDB result directly
 * @param ctx the request context
 */
export function response(ctx) {
  return ctx.result;
}

All functions need to have a request and response method, and in each of these methods, you can perform the operations for fulfilling the business need.

To get started, first make sure that you have the latest version of the AWS CLI, that you have a DynamoDB table created, and that you have an AWS AppSync API. Then you can create the function in AWS AppSync using the AWS CLI create-function command and the file you just created. This command returns the function ID. To create the resolver, pass the function ID, the GraphQL operation, and the field where you want to apply the resolver. In the documentation, you can find a detailed tutorial on how to create pipeline resolvers.

Testing a resolver
To test a function, use the evaluate-code command from AWS CLI or AWS SDK. This command calls the AWS AppSync service and evaluates the code with the provided context. To automate the test, you can use any JavaScript testing and assertion library. For example, the following code snippet uses Jest to validate the returned results programmatically.

import * as AWS from 'aws-sdk'
import { readFile } from 'fs/promises'
const appsync = new AWS.AppSync({ region: 'us-east-2' })
const file = './functions/updateItem.js'

test('validate an update request', async () => {
  const context = JSON.stringify({
    arguments: {
      input: { id: '<my-id>', title: 'change!', description: null },
    },
  })
  const code = await readFile(file, { encoding: 'utf8' })
  const runtime = { name: 'APPSYNC_JS', runtimeVersion: '1.0.0' }
  const params = { context, code, runtime, function: 'request' }

  const response = await appsync.evaluateCode(params).promise()
  expect(response.error).toBeUndefined()
  expect(response.evaluationResult).toBeDefined()
  const result = JSON.parse(response.evaluationResult)
  expect(result.key.id.S).toEqual(context.arguments.input.id)
  expect(result.update.expressionNames).not.toHaveProperty('#id')
  expect(result.update.expressionNames).toHaveProperty('#title')
  expect(result.update.expressionNames).toHaveProperty('#description')
  expect(result.update.expressionValues).not.toHaveProperty(':description')
})

In this way, you can add your API tests to your build process and validate that you coded the resolvers correctly before you push the changes to the cloud.

Get started today
The support for JavaScript AWS AppSync resolvers in AWS AppSync is available for all Regions that currently support AWS AppSync. You can start using this feature today from the AWS Management Console, AWS CLI, or Amazon CloudFormation.

Learn more about this launch by visiting the AWS AppSync service page.

Marcia

Now Open–AWS Region in Spain

Post Syndicated from Marcia Villalba original https://aws.amazon.com/blogs/aws/now-open-aws-region-in-spain/

The AWS Region in Aragón, Spain, is now open. The official name is Europe (Spain), and the API name is eu-south-2. You can start using it today to deploy workloads and store your data in Spain.

The AWS Europe (Spain) Region has three Availability Zones (AZ) that you can use to reliably spread your applications across multiple data centers. Each Availability Zone is a fully isolated partition of AWS infrastructure that contains one or more data centers.

Availability Zones are separate and distinct geographic locations with enough distance to reduce the risk of a single event affecting the availability of the Region but near enough for business continuity for applications that require rapid failover and synchronous replication. This gives you the ability to operate production applications that are more highly available, fault-tolerant, and scalable than would be possible from a single data center.

Instances and Services
Applications running in this three-AZ Region can use C5C5dC6gM5M5dM6gR5R5dR6gI3I3enT3, and T4g instances, and can use a long list of AWS services including: Amazon API GatewayAmazon AuroraAWS AppConfigAmazon CloudWatchAmazon DynamoDBAmazon EC2 Auto ScalingAmazon ElastiCacheAmazon Elastic Block Store (Amazon EBS)Elastic Load BalancingAmazon Elastic Compute Cloud (Amazon EC2)Amazon Elastic Container Registry (Amazon ECR)Amazon Elastic Container Service (Amazon ECS), Elastic Load Balancing–Network (NLB)Amazon EMR, Amazon OpenSearch ServiceAmazon EventBridge, AWS Fargate, Amazon Kinesis Data StreamsAmazon RedshiftAmazon Relational Database Service (Amazon RDS)Amazon Route 53Amazon Simple Notification Service (Amazon SNS)Amazon Simple Queue Service (Amazon SQS)Amazon Simple Storage Service (Amazon S3), Amazon S3 GlacierAmazon Simple Workflow Service (Amazon SWF)Amazon Virtual Private Cloud (Amazon VPC)AWS Auto ScalingAWS Certificate ManagerAWS CloudFormationAWS CloudTrailAWS CodeDeployAWS ConfigAWS Database Migration Service (AWS DMS)AWS Direct ConnectAWS Identity and Access Management (IAM)AWS Key Management Service (AWS KMS)AWS LambdaAWS Marketplace, AWS Health DashboardAWS Secrets ManagerAWS Step FunctionsAWS Support APIAWS Systems Manager, AWS Trusted AdvisorAWS VPN, VM Import/Export, and AWS X-Ray.

AWS in Spain
The new AWS Europe (Spain) Region is a natural progression for AWS to support the tens of thousands of customers on the Iberian Peninsula. The Region will support our customers’ most mission-critical workloads by providing lower latency to end users across Iberia and meeting data residency needs (now customers can store their data in Spain).

In addition to the new Region in Spain, AWS currently has four Amazon CloudFront edge locations available in Madrid, Spain. And since 2016, customers can benefit from AWS Direct Connect locations to establish private connectivity between AWS and their data centers and offices. The Region in Spain also offers low-latency connections to other AWS Regions in the area, as shown in the following chart:

Latency from the Spain Region

AWS also has had offices in Madrid since 2014 and in Barcelona since 2018 and has a broad network of local partners. In addition to expanding infrastructure, AWS continues to make investments in education initiatives, training, and start-up enablement to support Spain’s digital transformation and economic development plans.

  • AWS Activate – Since 2013, this program has given Spanish start-ups access to guidance and one-on-one time with AWS experts, along with web-based training, self-paced labs, customer support, offers from third parties, and up to $100,000 in credits to use AWS services.
  • AWS Educate and AWS Academy – AWS has trained over one hundred thousand individuals in Spain in cloud skills since 2017. These programs provide higher-education institutions, educators, and students with cloud computing courses and certifications. AWS Academy has delivered courses for institutions such as ESADE, IE, UNIR, and others.
  • AWS re/Start – AWS re/Start is a skills development and job training program that aims to build local talent by providing AWS Cloud skills development and job opportunities at no cost to learners who are unemployed or are members of under-represented communities in Spain. In November 2020, AWS launched this program in Spain in collaboration with Cámara de Comercio de Madrid and in 2021 in collaboration with Universidad of Granada.
  • AWS GetIT – AWS knows that having a diverse workforce gives organizations a better understanding of customers’ needs and is key to unlocking ideas and speeding up innovation. AWS supports many programs focused on diversity and launched AWS GetIT in Spain across 11 schools to introduce young students (ESO—Educación Secundaria Obligatoria—students) to cloud computing and inspire them to consider a career in technology.

Sustainability is also very important for AWS. In 2019, Amazon and Global Optimism co-founded The Climate Pledge, a commitment to reach net-zero carbon emissions by 2040—10 years ahead of the Paris Agreement. That is why in Spain, Amazon and AWS currently have two operational renewable energy projects delivering clean energy into the Spanish grid to support the AWS Europe (Spain) Region and Amazon’s logistics network in the country.

Amazon and AWS have announced 14 more projects, currently in development, that will come online from 2022 to 2024. The 16 projects in Spain will add 1.5 gigawatts of renewable energy to the Spanish grid. This is enough to power over 850,000 average Spanish homes. Learn more about AWS sustainability in Spain.

AWS Customers in Spain
We have many amazing customers in Spain that are doing incredible things with AWS, for example:

LactApp is a Spanish start-up that was created out of the vision that every mother should have a breastfeeding and motherhood expert in their pocket. LactApp uses AWS services to build their video-on-demand capability that allows experts to upload their content and process the videos, and they make it available for their over 4,000 end users automatically.

Glovo is one of the biggest companies in the food delivery industry, born in Barcelona, Spain. The Glovo app is available in 25 countries with over 150,000 restaurants. Glovo receives over 2 TB of data daily from all the usage of their customers. Using AWS, Glovo built a data lake that allows them to store data securely and access it when they need it.

Madrid-based Savana helps healthcare providers unlock the value of their electronic medical records (EMRs) for research. They operate one of the largest artificial intelligence–enabled, multicentric research networks in the world, with over 180 hospitals across 15 countries. They use AWS to process billions of EMRs and data points to run machine learning algorithms to investigate disease prediction and treatment.

Available Now
The new Region in Spain is ready to support your business. You can find a detailed list of the services available in this Region on the AWS Regional Service List.

With this launch, AWS now spans 93 Availability Zones within 29 geographic Regions around the world. We have also announced plans for 18 more Availability Zones and six more AWS Regions in AustraliaCanadaIndiaIsraelNew Zealand, and Thailand.

For more information on our global infrastructure, upcoming Regions, and the custom hardware we use, visit the Global Infrastructure page.

— Marcia

Introducing Amazon EventBridge Scheduler

Post Syndicated from Marcia Villalba original https://aws.amazon.com/blogs/compute/introducing-amazon-eventbridge-scheduler/

Today, we are announcing Amazon EventBridge Scheduler. This is a new capability from Amazon EventBridge that allows you to create, run, and manage scheduled tasks at scale. With EventBridge Scheduler, you can schedule one-time or recurrently tens of millions of tasks across many AWS services without provisioning or managing underlying infrastructure.

Previously, many customers used commercial off-the-shelf tools or built their own scheduling capabilities. This can increase application complexity, slow application development, and increase costs, which are magnified at scale. Most of these solutions are limited in what services they can trigger and create complexity in managing concurrency limitations of invoked targets that can affect application performance.

When to use EventBridge Scheduler?

For example, consider a company that develops a task management system. One feature that the application provides is that users can add a reminder for a task and be reminded by email one week before, two days before, or on the day of the task due date. You can automate the creation of all the schedules with EventBridge Scheduler, create the task for each of the reminders, and send it to Amazon SNS to send the notifications.

Or consider a large organization, like a supermarket, with thousands of AWS accounts and tens of thousands of Amazon EC2 instances. These instances are used in different parts of the world during business hours. You want to make sure that all the instances are started before the stores open and terminated after the business hours to reduce costs as much as possible. You can use EventBridge Scheduler to start and stop all the thousands of instances and also respect time zones.

SaaS providers can also benefit from EventBridge Scheduler, as now they can more easily manage all the different scheduled tasks that their customers have. For example, consider a SaaS provider with a subscription model for your customers paying a monthly or annual fee. You want to ensure that their license key is valid until the end of their current billing period. With Scheduler, you can create a schedule that removes the access to the service when the billing period is over, or when the user cancels their subscription. Also, you can create a series of emails that let your customer knows that their license is expiring so they can purchase a renewal. Example using scheduler

Use cases for EventBridge Scheduler are diverse, from simplifying new feature development to improving your infrastructure operations.

How does EventBridge Scheduler work?

With EventBridge Scheduler, you can now create single or recurrent schedules that trigger over 200 services with more than 6,000 APIs. EventBridge Scheduler allows you to configure schedules with a minimum granularity of one minute.

EventBridge Scheduler provides at-least-once event delivery to targets, and you can create schedules that adjust to different delivery patterns by setting the window of delivery, the number of retries, the time for the event to be retained, and the dead letter queue (DLQ). You can learn more about each configuration from the Scheduler User Guide.

  • Time window allows you to start a schedule within a window of time. This means that the scheduled tasks are dispersed across the time window to reduce the impact of multiple requests on downstream services.
  • Maximum retention time of the event is the maximum time to keep an unprocessed event in the scheduler. If the target is not responding during this time, the event is dropped or sent to a DLQ.
  • Retries with exponential backoff help to retry a failed task with delayed attempts. This improves the success of the task when the target is available.
  • A dead letter queue is an Amazon SQS queue where events that failed to get delivered to the target are routed.

By default, EventBridge Scheduler tries to send the event for 24 hours and a maximum of 185 times. You can configure these values. If that fails, the message is dropped, since by default there is not a DLQ configured.

In addition, by default, all events in Scheduler are encrypted with a key that AWS owns and manages. You can also use your own AWS KMS encryption keys.

You can also schedule tasks using Amazon EventBridge rules. But to schedule tasks at scale, EventBridge Scheduler is better suited for this task. The following table shows the main differences between EventBridge Scheduler and EventBridge rules:


Amazon EventBridge Scheduler Amazon EventBridge rules
Quota on schedules 1 million per account 300 rule limit per account per Region
Event invocation throughput Able to support throughput in 1,000s of TPS Because of the schedule limit, you can only have 300 1-minute schedules for max throughput of 5 TPS
Targets Over 270 services and over 6,000 API Actions with AWS SDK targets 20+ targets supported by EventBridge
Time expression and time-zones

at(), cron(), rate()

All time-zones and DST

cron(), rate(), UTC

No support for DST

One-time schedules Yes No
Time window schedules Yes No
Event bus support No event bus is needed Default bus only
Rule quota consumption No. 1 million schedules soft limit Yes, consumes from 2,000 rules per bus

Getting started with EventBridge Scheduler

This walkthrough builds a series of schedules to get started with EventBridge Scheduler. For that, you use the AWS Command Line (AWS CLI) to configure the schedules that send notifications using Amazon SNS.

Prerequisites

Update your AWS CLI to the latest version (v1.27.7).

As a prerequisite, you must create an SNS topic with an email subscription and an AWS IAM role that EventBridge Scheduler can assume to publish messages on your behalf. You can deploy these AWS resources using AWS SAM. Follow the instructions in the README file.

Scheduling a one-time schedule

Once configured, create your first schedule. This is a one-time schedule that publishes an event for the SNS topic you created.

For creating the schedule, run this command in your terminal and replace the schedule expression and time zone with values for your task:

$ aws scheduler create-schedule --name SendEmailOnce \ 
--schedule-expression "at(2022-11-01T11:00:00)" \ 
--schedule-expression-timezone "Europe/Helsinki" \
--flexible-time-window "{\"Mode\": \"OFF\"}" \
--target "{\"Arn\": \"arn:aws:sns:us-east-1:xxx:test-chronos-send-email\", \"RoleArn\": \" arn:aws:iam::xxxx:role/sam_scheduler_role\" }"

Let’s analyze the different parts of this command. The first parameter is the name of the schedule.

In the schedule expression attribute, you can define if the event is a one-time schedule or a recurrent schedule. Because this is a one-time schedule, it uses the at() expression with the date and time you want this schedule to run. Also, you must configure the schedule expression time zone in which this schedule run:

--schedule-expression "at(2022-11-01T11:00:00)" --schedule-expression-timezone "Europe/Helsinki"

Another setting that you can configure is the flexible time window. It’s not used for this example, but if you choose a time window, EventBridge Scheduler invokes the task within that timeframe. This setting helps to distribute the invocations across time and manage the downstream service limits.

--flexible-time-window "{\"Mode\": \"OFF\"}"

Finally, pass the IAM role ARN. This is the role previously created with the AWS SAM template. This role is the one that EventBridge Scheduler assumes when publishing events to SNS and it has permissions to publish messages on that topic.

Finally, you must configure the target. Scheduler comes with predefined targets with simpler APIs, that include actions like putting events for Amazon EventBridge, invoke a Lambda function, send a message to an Amazon SQS queue. For this example, use the universal target, which allows you to invoke almost any AWS services. Learn more about the targets from the User Guide.

--target "{\"Arn\": \"arn:aws:sns:us-east-1:xxx:test-chronos-send-email\", \"RoleArn\": \" arn:aws:iam::xxxx:role/sam_scheduler_role\" }"

Scheduling groups

Scheduling groups help you organize your schedules. Scheduling groups support tags that you can use for cost allocation, access control, and resource organization. When creating a new schedule, you can add it to a scheduling group.

To create a new scheduling group, run:

$ aws scheduler create-schedule-group --name ScheduleGroupTest

Scheduling a recurrent schedule

Now let’s create a recurrent schedule for that scheduling group. This schedule runs every five minutes and publishes a message to the SNS topic you created during the prerequisites.

$ aws scheduler create-schedule --name SendEmailTest \
--group-name ScheduleGroupTest \
--schedule-expression "rate(5minutes)" \
--flexible-time-window "{\"Mode\": \"OFF\"}" \
--target "{\"Arn\": \"arn:aws:sns:us-east-1:xxxx:test-chronos-send-email\", \"RoleArn\": \" arn:aws:iam::xxxx:role/sam_scheduler_role \" }"

Recurrent schedules can be configured with a cron expression or rate expression, to define the frequency that this schedule should be triggered. For scheduling this to run every five minutes, you can use an expression like this one:

--schedule-expression "rate(5minutes)"

Because you have selected the recurring schedule, you can define the timeframe in which this schedule runs. You can optionally choose a start and end date and time for your schedule. If you don’t do it, the schedule starts as soon as you create the task. These times are formatted in the same way as other AWS CLI timestamps.

--start-date "2022-11-01T18:48:00Z" --end-date "2022-11-01T19:00:00Z"

If you run the previous recurrent schedule for some time, and then check Amazon CloudWatch metrics, you find a metric called InvocationAttemptCount, for the schedule invocations that happened within the scheduling group you just created.

You can graph that metric in a dashboard and see how many times this schedule run. Also, you can create alarms to get notified if the number of invocations exceeds a threshold. For example, you can set this threshold to be close to the limits of your downstream service, to prevent reaching those limits.

Graphed metric in dashboard

Cleaning up

Make sure that you delete all the recurrent schedules that you created without an end time.

To check all the schedules that you have configured:

$ aws scheduler list-schedules

To delete a schedule using the AWS CLI:

$ aws scheduler delete-schedule --name <name-of-schedule> --group <name-of-group>

Also delete the CloudFormation stack with the prerequisite infrastructure when you complete this demo, as is defined in the README file of that project.

Conclusion

This blog post introduces the new Amazon EventBridge Scheduler, its use cases and its differences with existing scheduling options. It shows you how to create a new schedule using Amazon EventBridge Scheduler to simplify the creation, execution, and managing of scheduled tasks at scale.

You can get started today with EventBridge Scheduler from the AWS Management Console, AWS CLI, AWS CloudFormation, AWS SDK, and AWS SAM.

For more serverless learning resources, visit Serverless Land.

AWS Week in Review – October 10, 2022

Post Syndicated from Marcia Villalba original https://aws.amazon.com/blogs/aws/aws-week-in-review-october-10-2022/

This post is part of our Week in Review series. Check back each week for a quick roundup of interesting news and announcements from AWS!

I had an amazing start to the week last week as I was speaking at the AWS Community Day NL. This event had 500 attendees and over 70 speakers, and Dr. Werner Vogels, Amazon CTO, delivered the keynote. AWS Community Days are community-led conferences organized by local communities, with a variety of workshops and sessions. I recommend checking your region for any of these events.

Community Day NL

Last Week’s Launches
Here are some launches that got my attention during the previous week.

Amazon S3 Object Lambda now supports using your own code to change the results of HEAD and LIST requests, besides GET (which we launched last year). This feature now enables more capabilities for what you can do with S3 Object Lambda. Danilo made a Twitter thread with lots of use cases for this new launch.

Amazon SageMaker Clarify now can provide near real-time explanations for ML predictions. SageMaker Clarify is a service that provides explainability by ML models individual predictions. These explanations are important for developers to get visibility into their training data and models to identify potential bias.

AWS Storage Gateway now supports 15 TiB tapes. It increased the maximum supported virtual tape size on Tape Gateway from 5 TiB to 15 TiB, so you can store more data on a single virtual tape, and you can reduce the number of tapes you need to manage.

Amazon Aurora Serverless v2 now supports AWS CloudFormation. Early this year, we announced the general availability of Aurora Serverless v2, and now you can use AWS CloudFormation Templates to deploy and change the database along with the rest of your infrastructure.

AWS Config now supports 15 new resource types, including AWS DataSync, Amazon GuardDuty, Amazon Simple Email Service (Amazon SES), AWS AppSync, AWS Cloud Map, Amazon EC2, and AWS AppConfig. With this launch, you can use AWS Config to monitor configuration data for the supported resource types in your AWS account, and you can see how the configuration changes.

For a full list of AWS announcements, be sure to keep an eye on the What’s New at AWS page.

Other AWS News
Some other updates and news that you may have missed:

This week an article about how AWS is leading a pilot project to turn the Greek island of Naxos into a smart island caught my attention. The project introduces smart solutions for mobility, primary healthcare, and the transport of goods. The solution has been built based on four pillars that were important for the island: sustainability, telehealth, leisure, and digital skills. Check out the whole article to learn what they are doing.

Podcast Charlas Técnicas de AWS – If you understand Spanish, this podcast is for you. Podcast Charlas Técnicas is one of the official AWS podcasts in Spanish, and every other week there is a new episode. The podcast is meant for builders, and it shares stories about how customers implemented and learned AWS services, how to architect applications, and how to use new services. You can listen to all the episodes directly from your favorite podcast app or at AWS Podcasts en español.

AWS open-source news and updates – This is a newsletter curated by my colleague Ricardo to bring you the latest open-source projects, posts, events, and more.

Upcoming AWS Events
Check your calendars and sign up for these AWS events:

AWS re:Invent reserved seating opens on October 11. If you are planning to attend, book a spot in advance for your favorite sessions. AWS re:Invent is our biggest conference of the year, it happens in Las Vegas from November 28 to December 2, and registrations are open. Many writers of this blog have sessions at re:Invent, and you can search the event agenda using our names.

I started the post talking about AWS Community Days, and there is one in Warsaw, Poland, on October 14. If you are around Warsaw during this week, you can first check out the AWS Pop-up Hub in Warsaw that runs October 10-14 and then join for the Community Day.

On October 20, there is a virtual event for modernizing .NET workloads with Windows containers on AWS, You can register for free.

That’s all for this week. Check back next Monday for another Week in Review!

— Marcia

Lifting and shifting a web application to AWS Serverless: Part 2

Post Syndicated from Marcia Villalba original https://aws.amazon.com/blogs/compute/lifting-and-shifting-a-web-application-to-aws-serverless-part-2/

In part 1, you learn if it is possible to migrate a non-serverless web application to a serverless environment without changing much code. You learn different tools that can help you in this process, like Lambda Web Adaptor and AWS Amplify. By the end, you have migrated an application into a serverless environment.

However, if you test the migrated app, you find two issues. The first one is that the user session is not sticky. Every time you log in, you are logged out unexpectedly from the application. The second one is that when you create a new product, you cannot upload new images of that product.

This final post analyzes each of the problems in detail and shows solutions. In addition, it analyzes the cost and performance of the solution.

Authentication and authorization migration

The original application handled the authentication and authorization by itself. There is a user directory in the database, with the passwords and emails for each of the users. There are APIs and middleware that take care of validating that the user is logged in before showing the application. All the logic for this is developed inside the Node.js/Express application.

However, with the current migrated application every time you log in, you are logged out unexpectedly from the application. This is because the server code is responsible for handling the authentication and the authorization of the users, and now our server is running in an AWS Lambda function and functions are stateless. This means that there will be one function running per request—a request can load all the products in the landing page, get the details for a product, or log in to the site—and if you do something in one of these functions, the state is not shared across.

To solve this, you must remove the authentication and authorization mechanisms from the function and use a service that can preserve the state across multiple invocations of the functions.

There are many ways to solve this challenge. You can add a layer of authentication and session management with a database like Redis, or build a new microservice that is in charge of authentication and authorization that can handle the state, or use an existing managed service for this.

Because of the migration requirements, we want to keep the cost as low as possible, with the fewest changes to the application. The better solution is to use an existing managed service to handle authentication and authorization.

This demo uses Amazon Cognito, which provides user authentication and authorization to AWS resources in a managed, pay as you go way. One rapid approach is to replace all the server code with calls to Amazon Cognito using the AWS SDK. But this adds complexity that can be replaced completely by just invoking Amazon Cognito APIs from the React application.

Using Cognito

For example, when a new user is registered, the application creates the user in the Amazon Cognito user pool directory, as well as in the application database. But when a user logs in to the web app, the application calls Amazon Cognito API directly from the AWS Amplify application. This way minimizes the amount of code needed.

In the original application, all authenticated server APIs are secured with a middleware that validates that the user is authenticated by providing an access token. With the new setup that doesn’t change, but the token is generated by Amazon Cognito and then it can be validated in the backend.

let auth = (req, res, next) => {
    const token = req.headers.authorization;
    const jwtToken = token.replace('Bearer ', '');

    verifyToken(jwtToken)
        .then((valid) => {
            if (valid) {
                getCognitoUser(jwtToken).then((email) => {
                    User.findByEmail(email, (err, user) => {
                        if (err) throw err;
                        if (!user)
                            return res.json({
                                isAuth: false,
                                error: true,
                            });

                        req.user = user;
                        next();
                    });
                });
            } else {
                throw Error('Not valid Token');
            }
        })
        .catch((error) => {
            return res.json({
                isAuth: false,
                error: true,
            });
        });
};

You can see how this is implemented step by step in this video.

Storage migration

In the original application, when a new product is created, a new image is uploaded to the Node.js/Express server. However, now the application resides in a Lambda function. The code (and files) that are part of that function cannot change, unless the function is redeployed. Consequently, you must separate the user storage from the server code.

For doing this, there are a couple of solutions: using Amazon Elastic File System (EFS) or Amazon S3. EFS is a file storage, and you can use that to have a dynamic storage where you upload the new images. Using EFS won’t change much of the code, as the original implementation is using a directory inside the server as EFS provides. However, using EFS adds more complexity to the application, as functions that use EFS must be inside an Amazon Virtual Private Cloud (Amazon VPC).

Using S3 to upload your images to the application is simpler, as it only requires that an S3 bucket exists. For doing this, you must refactor the application, from uploading the image to the application API to use the AWS Amplify library that uploads and gets images from S3.

export function uploadImage(file) {
    const fileName = `uploads/${file.name}`;

    const request = Storage.put(fileName, file).then((result) => {
        return {
            image: fileName,
            success: true,
        };
    });

    return {
        type: IMAGE_UPLOAD,
        payload: request,
    };
}

An important benefit of using S3 is that you can also use Amazon CloudFront to accelerate the retrieval of the images from the cloud. In this way, you can speed up the loading time of your page. You can see how this is implemented step by step in this video.

How much does this application cost?

If you deploy this application in an empty AWS account, most of the usage of this application is covered by the AWS Free Tier. Serverless services, like Lambda and Amazon Cognito, have a forever free tier that gives you the benefits in pricing for the lifetime of hosting the application.

  • AWS Lambda—With 100 requests per hour, an average 10ms invocation and 1GB of memory configured, it costs 0 USD per month.
  • Amazon S3—Using S3 standard, hosting 1 GB per month and 10k PUT and GET requests per month costs 0.07 USD per month. This can be optimized using S3 Intelligent-Tiering.
  • Amazon Cognito—Provides 50,000 monthly active users for free.
  • AWS Amplify—If you build your client application once a week, serve 3 GB and store 1 GB per month, this costs 0.87 USD.
  • AWS Secrets Manager—There are two secrets stored using Secrets Manager and this costs 1.16 USD per month. This can be optimized by using AWS System Manager Parameter Store and AWS Key Management Service (AWS KMS).
  • MongoDB Atlas Forever free shared cluster.

The total monthly cost of this application is approximately 2.11 USD.

Performance analysis

After you migrate the application, you can run a page speed insight tool, to measure this application’s performance. This tool provides results mostly about the front end and the experience that the user perceives. The results are displayed in the following image. The performance of this website is good, according to the insight tool performance score – it responds quickly and the user experience is good.

Page speed insight tool results

After the application is migrated to a serverless environment, you can do some refactoring to improve further the overall performance. One alternative is whenever a new image is uploaded, it gets resized and formatted into the correct next-gen format automatically using the event driven capabilities that S3 provides. Another alternative is to use Lambda on Edge to serve the right image size for the device, as it is possible to format the images on the fly when serving them from a distribution.

You can run load tests for understanding how your backend and database will perform. For this, you can use Artillery, an open-source library that allows you to run load tests. You can run tests with the expected maximum load your site will get and ensure that your site can handle it.

For example, you can configure a test that sends 30 requests per seconds to see how your application reacts:

config:
  target: 'https://xxx.lambda-url.eu-west-1.on.aws'
  phases:
    - duration: 240
      arrivalRate: 30
      name: Testing
scenarios:
  - name: 'Test main page'
    flow:
      - post:
          url: '/api/product/getProducts/'

This test is performed on the backend APIs, not only testing your backend but also your integration with the MongoDB. After running it, you can see how the Lambda function performs on the Amazon CloudWatch dashboard.

Running this load test helps you understand the limitations of your system. For example, if you run a test with too many concurrent users, you might see that the number of throttles in your function increases. This means that you need to lift the limit of invocations of the functions you can have at the same time.

Or when increasing the requests per second, you may find that the MongoDB cluster starts throttling your requests. This is because you are using the free tier and that has a set number of connections. You might need a larger cluster or to migrate your database to another service that provides a large free tier, like Amazon DynamoDB.

Cloudwatch dashboard

Conclusion

In this two-part article, you learn if it is possible to migrate a non-serverless web application to a serverless environment without changing much code. You learn different tools that can help you in this process, like AWS Lambda Web Adaptor and AWS Amplify, and how to solve some of the typical challenges that we have, like storage and authentication.

After the application is hosted in a fully serverless environment, it can scale up and down to meet your needs. This web application is also performant once the backend is hosted in a Lambda function.

If you need, from here you can start using the strangler pattern to refactor the application to take advantage of the benefits of event-driven architecture.

To see all the steps of the migration, there is a playlist that contains all the tutorials for you to follow.

For more serverless learning resources, visit Serverless Land.

Lifting and shifting a web application to AWS Serverless: Part 1

Post Syndicated from Marcia Villalba original https://aws.amazon.com/blogs/compute/lifting-and-shifting-a-web-application-to-aws-serverless-part-1/

Customers migrating to the cloud often want to get the benefits of serverless architecture. But what is the best approach and is it possible? There are many strategies to do a migration, but lift and shift is often the fastest way to get to production with the migrated workload.

You might also wonder if it’s possible to lift and shift an existing application that runs in a traditional environment to serverless. This blog post shows how to do this for a Mongo, Express, React, and Node.js (MERN) stack web app. However, the discussions presented in this post apply to other stacks too.

Why do a lift and shift migration?

Lift and shift, or sometimes referred to as rehosting the application, is moving the application with as few changes as possible. Lift and shift migrations often allow you to get the new workload in production as fast as possible. When migrating to serverless, lift and shift can bring a workload that is not yet in the cloud or in a serverless environment to use managed and serverless services quickly.

Migrating a non-serverless workload to serverless with lift and shift might not bring all the serverless benefits right away, but it enables the development team to refactor, using the strangler pattern, the parts of the application that might benefit from what serverless technologies offer.

Why migrate a web app to serverless?

Web apps hosted in a serverless environment benefit most from the capability of serverless applications to scale automatically and for paying for what you use.

Imagine that you have a personal web app with little traffic. If you are hosting in a serverless environment, you don’t pay a fixed price to have the servers up and running. Your web app has only a few requests and the rest of the time is idle.

This benefit applies to the opposite case. For an owner of a small ecommerce site running on a server, imagine if a social media influencer with millions of followers recommends one of their products. Suddenly, thousands of requests arrive and make the site unavailable. If the site is hosted on a serverless platform, the application will scale to the traffic that it receives.

Requirements for migration

Before starting a migration, it is important to define the nonfunctional requirements that you need the new application to have. These requirements help when you must make architectural decisions during the migration process.

These are the nonfunctional requirements of this migration:

  • Environment that scales to zero and scales up automatically.
  • Pay as little as possible for idle time.
  • Configure as little infrastructure as possible.
  • Automatic high availability of the application.
  • Minimal changes to the original code.

Application overview

This blog post guides you on how to migrate a MERN application. The original application is hosted in two different servers: One contains the Mongo database and another contains the Node/js/Express and ReactJS applications.

Application overview

This demo application simulates a swag ecommerce site. The database layer stores the products, users, and the purchases history. The server layer takes care of the ecommerce business logic, hosting the product images, and user authentication and authorization. The web layer takes care of all the user interaction and communicates with the server layer using REST APIs.

How the application looks like

These are the changes that you must make to migrate to a serverless environment:

  • Database migration: Migrate the database from on-premises to MongoDB Atlas.
  • Backend migration: Migrate the NodeJS/Express application from on-premises to an AWS Lambda function.
  • Web app migration: Migrate the React web app from on-premises to AWS Amplify.
  • Authentication migration: Migrate the custom-built authentication to use Amazon Cognito.
  • Storage migration: Migrate the local storage of images to use Amazon S3 and Amazon CloudFront.

The following image shows the proposed solution for the migrated application:

Proposed architecture

Database migration

The database is already in a MongoDB vanilla container that has all the data for this application. As MongoDB is the database engine for our stack, their recommended solution to migrate to serverless is to use MongoDB Atlas. Atlas provides a database cluster in the cloud that scales automatically and you pay for what you use.

To get started, create a new Atlas cluster, then migrate the data from the existing database to the serverless one. To migrate the data, you can first dump all the content of the database to a dump folder and then restore it to the cloud:

mongodump --uri="mongodb://<localuser>:<localpassword>@localhost:27017"

mongorestore --uri="mongodb+srv://<user>:<password>@<clustername>.debkm.mongodb.net" .

After doing that, your data is now in the cloud. The next step is to change the configuration string in the server to point to the new database. To see this in action, check this video that shows a walkthrough of the migration.

Backend migration

Migrating the Node.js/Express backend is the most challenging of the layers to migrate to a serverless environment, as the server layer is a Node.js application that runs in a server.

One option for this migration is to use AWS Fargate. Fargate is a serverless container service that allows you to scale automatically and you pay as you go. Another option is to use AWS AppRunner, a container service that auto scales and you also pay as you go. However, neither of these options align with our migration requirements, as they don’t scale to zero.

Another option for the lift and shift migration of this Node.js application is to use Lambda with the AWS Lambda Web Adapter. The AWS Lambda Web Adapter is an open-source project that allows you to build web applications with familiar frameworks, like Express.js, Flask, SpringBoot, and run it on Lambda. You can learn more about this project in its GitHub repository.

Lambda Web Adapter

Using this project, you can create a new Lambda function that has the Express/NodeJS application as the function code. You can lift and shift all the code into the function. If you want a step-by-step tutorial on how to do this, check out this video.

const lambdaAdapterFunction = new Function(this,`${props.stage}-LambdaAdapterFunction`,
            {
                runtime: Runtime.NODEJS_16_X,
                code: Code.fromAsset('backend-app'),
                handler: 'run.sh',
                environment: {
                    AWS_LAMBDA_EXEC_WRAPPER: '/opt/bootstrap',
                    REGION: this.region,
                    ASYNC_INIT: 'true',
                },
                memorySize: 1024,
                layers: [layerLambdaAdapter],
                timeout: Duration.seconds(2),
                tracing: Tracing.ACTIVE,
            }
        );

The next step is to create an HTTP endpoint for the server application. There are three options for doing this: API Gateway, Application Load Balancer (ALB) , or to use Lambda Function URLs. All the options are compatible with Lambda Web Adapter and can solve the challenge for you.

For this demo, choose function URLs, as they are simple to configure and one function URL forwards all routes to the Express server. API Gateway and ALB require more configuration and have separate costs, while the cost of function URLs is included in the Lambda function.

Web app migration

The final layer to migrate is the React application. The best way to migrate the web layer and to adhere to the migration requirements is to use AWS Amplify to host it. AWS Amplify is a fully managed service that provides many features like hosting web applications and managing the CICD process for the web app. It provides client libraries to connect to different AWS resources, and many other features.

Migrating the React application is as simple as creating a new Amplify application in your AWS account and uploading the React application to a code repository like GitHub. This AWS Amplify application is connected to a GitHub branch, and when there is a new commit in this branch, AWS Amplify redeploys the code.

The Amplify application receives configuration parameters like the function URL endpoint (the server URL) using environmental variables.

const amplifyApp = new App(this, `${props.stage}-AmplifyReactShopApp`, {
            sourceCodeProvider: new GitHubSourceCodeProvider({
                owner: config.frontend.owner,
                repository: config.frontend.repository_name,
                oauthToken: SecretValue.secretsManager('github-token'),
            }),
            environmentVariables: {
                REGION: this.region,
                SERVER_URL: props.serverURL,
            },
        });

If you want to see a step-by-step guide on how to make your web layer serverless, you can check this video.

Next steps

However, if you test this migrated app, you will find two issues. The first one is that the user session is not sticky. Every time you log in, you are logged out unexpectedly from the application. The second one is that when you create a new product, you cannot upload new images of that product.

In part two, I analyze each of the problems in detail and find solutions. These issues arise because of the stateless and immutable characteristics of this solution. The next part of this article explains how to solve these issues, also it analyzes costs and performance of the solution.

Conclusion

In this article, you learn if it is possible to migrate a non-serverless web application to a serverless environment without changing much code. You learn different tools that can help you in this process, like the AWS Lambda Web Adaptor and AWS Amplify.

If you want to see the migration in action and learn all the steps for this, there is a playlist that contains all the tutorials for you to follow and learn how this is possible.

For more serverless learning resources, visit Serverless Land.