Tag Archives: Amazon GuardDuty

Journey to Adopt Cloud-Native Architecture Series #5 – Enhancing Threat Detection, Data Protection, and Incident Response

Post Syndicated from Anuj Gupta original https://aws.amazon.com/blogs/architecture/journey-to-adopt-cloud-native-architecture-series-5-enhancing-threat-detection-data-protection-and-incident-response/

In Part 4 of this series, Governing Security at Scale and IAM Baselining, we discussed building a multi-account strategy and improving access management and least privilege to prevent unwanted access and to enforce security controls.

As a refresher from previous posts in this series, our example e-commerce company’s “Shoppers” application runs in the cloud. The company experienced hypergrowth, which posed a number of platform and technology challenges, including enforcing security and governance controls to mitigate security risks.

With the pace of new infrastructure and software deployments, we had to ensure we maintain strong security. This post, Part 5, shows how we detect security misconfigurations, indicators of compromise, and other anomalous activity. We also show how we developed and iterated on our incident response processes.

Threat detection and data protection

With our newly acquired customer base from hypergrowth, we had to make sure we maintained customer trust. We also needed to detect and respond to security events quickly to reduce the scope and impact of any unauthorized activity. We were concerned about vulnerabilities on our public-facing web servers, accidental sensitive data exposure, and other security misconfigurations.

Prior to hypergrowth, application teams scanned for vulnerabilities and maintained the security of their applications. After hypergrowth, we established dedicated security team and identified tools to simplify the management of our cloud security posture. This allowed us to easily identify and prioritize security risks.

Use AWS security services to detect threats and misconfigurations

We use the following AWS security services to simplify the management of cloud security risks and reduce the burden of third-party integrations. This also minimizes the amount of engineering work required by our security team.

Detect threats with Amazon GuardDuty

We use Amazon GuardDuty to keep up with the newest threat actor tactics, techniques, and procedures (TTPs) and indicators of compromise (IOCs).

GuardDuty saves us time and reduces complexity, because we don’t have to continuously engineer detections for new TTPs and IOCs for static events and machine-learning-based detections. This allows our security analysts to focus on building runbooks and quickly responding to security findings.

Discover sensitive data with Amazon Macie for Amazon S3

To host our external website, we use a few public Amazon Simple Storage Service (Amazon S3) buckets with static assets. We don’t want developers to accidentally put sensitive data in these buckets, and we wanted to understand which S3 buckets contain sensitive information, such as financial or personally identifiable information (PII).

We explored building a custom scanner to search for sensitive data, but maintaining the search patterns was too complex. It was also costly to continuously re-scan files each month. Therefore, we use Amazon Macie to continuously scan our S3 buckets for sensitive data. After Macie makes its initial scan, it will only scan new or updated objects in those S3 buckets, which reduces our costs significantly. We added filter rules to exclude files of larger size and S3 prefixes to scan required objects and provided a sampling rate to further cost optimize scanning large S3 buckets (in our case, S3 buckets greater than 1 TB).

Scan for vulnerabilities with Amazon Inspector

Because we use a wide variety of operating systems and software, we must scan our Amazon Elastic Compute Cloud (Amazon EC2) instances for known software vulnerabilities, such as Log4J.

We use Amazon Inspector to run continuous vulnerability scans on our EC2 instances and Amazon Elastic Container Registry (Amazon ECR) container images. With Amazon Inspector, we can continuously detect if our developers are deploying and releasing vulnerable software on our EC2 instances and ECR images without setting up a third-party vulnerability scanner and installing additional endpoint agents.

Aggregate security findings with AWS Security Hub

We don’t want our security analysts to arbitrarily act on one security finding over another. This is time-consuming and does not properly prioritize the highest risks to address. We also need to track ownership, view progress of various findings, and build consistent responses for common security findings.

With AWS Security Hub, our analysts can seamlessly prioritize findings from GuardDuty, Macie, Amazon Inspector, and many other AWS services. Our analysts also use Security Hub’s built-in security checks and insights to identify AWS resources and accounts that have a high number of findings and act on them.

Setting up the threat detection services

This is how we set up these services:

Our security analysts use Security Hub-generated Jira tickets to view, prioritize, and respond to all security findings and misconfigurations across our AWS environment.

Through this configuration, our analysts no longer need to pivot between various AWS accounts, security tool consoles, and Regions, which makes the day-to-day management and operations much easier. Figure 1 depicts the data flow to Security Hub.

Aggregation of security services in security tooling account

Figure 1. Aggregation of security services in security tooling account

Delegated administrator setup

Figure 2. Delegated administrator setup

Incident response

Before hypergrowth, there was no formal way to respond to security incidents. To prevent future security issues, we built incident response plans and processes to quickly address potential security incidents and minimize the impact and exposure. Following the AWS Security Incident Response Guide and NIST framework, we adopted the following best practices.

Playbooks and runbooks for repeatability

We developed incident response playbooks and runbooks for repeatable responses for security events that include:

  • Playbooks for more strategic scenarios and responses based on some of the sample playbooks found here.
  • Runbooks that provide step-by-step guidance for our security analysts to follow in case an event occurs. We used Amazon SageMaker notebooks and AWS Systems Manager Incident Manager runbooks to develop repeatable responses for pre-identified incidents, such as suspected command and control activity on an EC2 instance.

Automation for quicker response time

After developing our repeatable processes, we identified areas where we could accelerate responses to security threats by automating the response. We used the AWS Security Hub Automated Response and Remediation solution as a starting point.

By using this solution, we didn’t need to build our own automated response and remediation workflow. The code is also easy to read, repeat, and centrally deploy through AWS CloudFormation StackSets. We used some of the built-in remediations like disabling active keys that have not been rotated for more than 90 days, making all Amazon Elastic Block Store (Amazon EBS) snapshots private, and many more. With automatic remediation, our analysts can respond quicker and in a more holistic and repeatable way.

Simulations to improve incident response capabilities

We implemented quarterly incident response simulations. These simulations test how well prepared our people, processes, and technologies are for an incident. We included some cloud-specific simulations like an S3 bucket exposure and an externally shared Amazon Relational Database Service (Amazon RDS) snapshot to ensure our security staff are prepared for an incident in the cloud. We use the results of the simulations to iterate on our incident response processes.

Conclusion

In this blog post, we discussed how to prepare for, detect, and respond to security events in an AWS environment. We identified security services to detect security events, vulnerabilities, and misconfigurations. We then discussed how to develop incident response processes through building playbooks and runbooks, performing simulations, and automation. With these new capabilities, we can detect and respond to a security incident throughout hypergrowth.

Looking for more architecture content? AWS Architecture Center provides reference architecture diagrams, vetted architecture solutions, Well-Architected best practices, patterns, icons, and more!

Other blog posts in this series

Top 2021 AWS Security service launches security professionals should review – Part 1

Post Syndicated from Ryan Holland original https://aws.amazon.com/blogs/security/top-2021-aws-security-service-launches-part-1/

Given the speed of Amazon Web Services (AWS) innovation, it can sometimes be challenging to keep up with AWS Security service and feature launches. To help you stay current, here’s an overview of some of the most important 2021 AWS Security launches that security professionals should be aware of. This is the first of two related posts; Part 2 will highlight some of the important 2021 launches that security professionals should be aware of across all AWS services.

Amazon GuardDuty

In 2021, the threat detection service Amazon GuardDuty expanded the internal AWS security intelligence it consumes to use more of the intel that AWS internal threat detection teams collect, including additional nation-state threat intelligence. Sharing more of the important intel that internal AWS teams collect lets you quickly improve your protection. GuardDuty also launched domain reputation modeling. These machine learning models take all the domain requests from across all of AWS, and feed them into a model that allows AWS to categorize previously unseen domains as highly likely to be malicious or benign based on their behavioral characteristics. In practice, AWS is seeing that these models often deliver high-fidelity threat detections, identifying malicious domains 7–14 days before they are identified and available on commercial threat feeds.

AWS also launched second generation anomaly detection for GuardDuty. Shortly after the original GuardDuty launch in 2017, AWS added additional anomaly detection for user behavior analytics and monitoring for unusual activity of AWS Identity and Access Management (IAM) users. After receiving customer feedback that the original feature was a little too noisy, and that it was difficult to understand why some findings were generated, the GuardDuty analytics team rebuilt this functionality on an entirely new machine learning model, considerably reducing the number of detections and generating a more accurate positive-detection rate. The new model also added additional context that security professionals (such as analysts) can use to understand why the model shows findings as suspicious or unusual.

Since its introduction, GuardDuty has detected when AWS EC2 Role credentials are used to call AWS APIs from IP addresses outside of AWS. Beginning in early 2022, GuardDuty now supports detection when credentials are used from other AWS accounts, inside the AWS network. This is a complex problem for customers to solve on their own, which is why the GuardDuty team added this enhancement. The solution considers that there are legitimate reasons why a source IP address that is communicating with AWS services APIs might be different than the Amazon Elastic Compute Cloud (Amazon EC2) instance IP address, or a NAT gateway associated with the instance’s VPC. The enhancement also considers complex network topologies that route traffic to one or multiple VPCs—for example, AWS Transit Gateway or AWS Direct Connect.

Our customers are increasingly running container workloads in production; helping to raise the security posture of these workloads became an AWS development priority in 2021. GuardDuty for EKS Protection is one recent feature that has resulted from this investment. This new GuardDuty feature monitors Amazon Elastic Kubernetes Service (Amazon EKS) cluster control plane activity by analyzing Kubernetes audit logs. GuardDuty is integrated with Amazon EKS, giving it direct access to the Kubernetes audit logs without requiring you to turn on or store these logs. Once a threat is detected, GuardDuty generates a security finding that includes container details such as pod ID, container image ID, and associated tags. See below for details on how the new Amazon Inspector is also helping to protect containers.

Amazon Inspector

At AWS re:Invent 2021, we launched the new Amazon Inspector, a vulnerability management service that continually scans AWS workloads for software vulnerabilities and unintended network exposure. The original Amazon Inspector was completely re-architected in this release to automate vulnerability management and to deliver near real-time findings to minimize the time needed to discover new vulnerabilities. This new Amazon Inspector has simple one-click enablement and multi-account support using AWS Organizations, similar to our other AWS Security services. This launch also introduces a more accurate vulnerability risk score, called the Inspector score. The Inspector score is a highly contextualized risk score that is generated for each finding by correlating Common Vulnerability and Exposures (CVE) metadata with environmental factors for resources such as network accessibility. This makes it easier for you to identify and prioritize your most critical vulnerabilities for immediate remediation. One of the most important new capabilities is that Amazon Inspector automatically discovers running EC2 instances and container images residing in Amazon Elastic Container Registry (Amazon ECR), at any scale, and immediately starts assessing them for known vulnerabilities. Now you can consolidate your vulnerability management solutions for both Amazon EC2 and Amazon ECR into one fully managed service.

AWS Security Hub

In addition to a significant number of smaller enhancements throughout 2021, in October AWS Security Hub, an AWS cloud security posture management service, addressed a top customer enhancement request by adding support for cross-Region finding aggregation. You can now view all your findings from all accounts and all selected Regions in a single console view, and act on them from an Amazon EventBridge feed in a single account and Region. Looking back at 2021, Security Hub added 72 additional best practice checks, four new AWS service integrations, and 13 new external partner integrations. A few of these integrations are Atlassian Jira Service Management, Forcepoint Cloud Security Gateway (CSG), and Amazon Macie. Security Hub also achieved FedRAMP High authorization to enable security posture management for high-impact workloads.

Amazon Macie

Based on customer feedback, data discovery tool Amazon Macie launched a number of enhancements in 2021. One new feature, which made it easier to manage Amazon Simple Storage Service (Amazon S3) buckets for sensitive data, was criteria-based bucket selection. This Macie feature allows you to define runtime criteria to determine which S3 buckets should be included in a sensitive data-discovery job. When a job runs, Macie identifies the S3 buckets that match your criteria, and automatically adds or removes them from the job’s scope. Before this feature, once a job was configured, it was immutable. Now, for example, you can create a policy where if a bucket becomes public in the future, it’s automatically added to the scan, and similarly, if a bucket is no longer public, it will no longer be included in the daily scan.

Originally Macie included all managed data identifiers available for all scans. However, customers wanted more surgical search criteria. For example, they didn’t want to be informed if there were exposed data types in a particular environment. In September 2021, Macie launched the ability to enable/disable managed data identifiers. This allows you to customize the data types you deem sensitive and would like Macie to alert on, in accordance with your organization’s data governance and privacy needs.

Amazon Detective

Amazon Detective is a service to analyze and visualize security findings and related data to rapidly get to the root cause of potential security issues. In January 2021, Amazon Detective added a convenient, time-saving integration that allows you to start security incident investigation workflows directly from the GuardDuty console. This new hyperlink pivot in the GuardDuty console takes findings directly from the GuardDuty console into the Detective console. Another time-saving capability added was the IP address drill down functionality. This new capability can be useful to security forensic teams performing incident investigations, because it helps quickly determine the communications that took place from an EC2 instance under investigation before, during, and after an event.

In December 2021, Detective added support for AWS Organizations to simplify management for security operations and investigations across all existing and future accounts in an organization. This launch allows new and existing Detective customers to onboard and centrally manage the Detective graph database for up to 1,200 AWS accounts.

AWS Key Management Service

In June 2021, AWS Key Management Service (AWS KMS) introduced multi-Region keys, a capability that lets you replicate keys from one AWS Region into another. With multi-Region keys, you can more easily move encrypted data between Regions without having to decrypt and re-encrypt with different keys for each Region. Multi-Region keys are supported for client-side encryption using direct AWS KMS API calls, or in a simplified manner with the AWS Encryption SDK and Amazon DynamoDB Encryption Client.

AWS Secrets Manager

Last year was a busy year for AWS Secrets Manager, with four feature launches to make it easier to manage secrets at scale, not just for client applications, but also for platforms. In March 2021, Secrets Manager launched multi-Region secrets to automatically replicate secrets for multi-Region workloads. Also in March, Secrets Manager added three new rules to AWS Config, to help administrators verify that secrets in Secrets Manager are configured according to organizational requirements. Then in April 2021, Secrets Manager added a CSI driver plug-in, to make it easy to consume secrets from Amazon EKS by using Kubernetes’s standard Secrets Store interface. In November, Secrets Manager introduced a higher secret limit of 500,000 per account to simplify secrets management for independent software vendors (ISVs) that rely on unique secrets for a large number of end customers. Although launched in January 2022, it’s also worth mentioning Secrets Manager’s release of rotation windows to align automatic rotation of secrets with application maintenance windows.

Amazon CodeGuru and Secrets Manager

In November 2021, AWS announced a new secrets detector feature in Amazon CodeGuru that searches your codebase for hardcoded secrets. Amazon CodeGuru is a developer tool powered by machine learning that provides intelligent recommendations to detect security vulnerabilities, improve code quality, and identify an application’s most expensive lines of code.

This new feature can pinpoint locations in your code with usernames and passwords; database connection strings, tokens, and API keys from AWS; and other service providers. When a secret is found in your code, CodeGuru Reviewer provides an actionable recommendation that links to AWS Secrets Manager, where developers can secure the secret with a point-and-click experience.

Looking ahead for 2022

AWS will continue to deliver experiences in 2022 that meet administrators where they govern, developers where they code, and applications where they run. A lot of customers are moving to container and serverless workloads; you can expect to see more work on this in 2022. You can also expect to see more work around integrations, like CodeGuru Secrets Detector identifying plaintext secrets in code (as noted previously).

To stay up-to-date in the year ahead on the latest product and feature launches and security use cases, be sure to read the Security service launch announcements. Additionally, stay tuned to the AWS Security Blog for Part 2 of this blog series, which will provide an overview of some of the important 2021 launches that security professionals should be aware of across all AWS services.

If you’re looking for more opportunities to learn about AWS security services, check out AWS re:Inforce, the AWS conference focused on cloud security, identity, privacy, and compliance, which will take place June 28-29 in Houston, Texas.

If you have feedback about this post, submit comments in the Comments section below. If you have questions about this post, contact AWS Support.

Want more AWS Security news? Follow us on Twitter.

Author

Ryan Holland

Ryan is a Senior Manager with GuardDuty Security Response. His team is responsible for ensuring GuardDuty provides the best security value to customers, including threat intelligence, behavioral analytics, and finding quality.

Author

Marta Taggart

Marta is a Seattle-native and Senior Product Marketing Manager in AWS Security Product Marketing, where she focuses on data protection services. Outside of work you’ll find her trying to convince Jack, her rescue dog, not to chase squirrels and crows (with limited success).

Amazon GuardDuty Enhances Detection of EC2 Instance Credential Exfiltration

Post Syndicated from Sébastien Stormacq original https://aws.amazon.com/blogs/aws/amazon-guardduty-enhances-detection-of-ec2-instance-credential-exfiltration/

Amazon GuardDuty is a threat detection service that continuously monitors for malicious activity and unauthorized behavior to protect your AWS accounts, workloads, and data stored in Amazon Simple Storage Service (Amazon S3). Informed by a multitude of public and AWS-generated data feeds and powered by machine learning, GuardDuty analyzes billions of events in pursuit of trends, patterns, and anomalies that are recognizable signs that something is amiss. You can enable it with a click and see the first findings within minutes.

Today, we are adding to GuardDuty the ability to detect when your Amazon Elastic Compute Cloud (Amazon EC2) instance credentials are being used from another AWS Account. EC2 instance credentials are the temporary credentials made available through the EC2 metadata service to any applications running on an instance, when an AWS Identity and Access Management (IAM) role is attached to it.

What Are the Risks?
When your workloads deployed on EC2 instances access AWS services, they use an access key, a secret access key, and a session token. The secure mechanism to pass access key credentials to your workloads is to define the permissions required by your workload, create one or several IAM policies with the permissions, attach the policies to an IAM role and, finally, attach the role to the instance.

Any process running on an EC2 instance with a role attached can retrieve the security credentials by calling the EC2 metadata service:

curl 169.254.169.254/latest/meta-data/iam/security-credentials/role_name
{
  "Code" : "Success",
  "LastUpdated" : "2021-09-05T18:24:45Z",
  "Type" : "AWS-HMAC",
  "AccessKeyId" : "AS...J5",
  "SecretAccessKey" : "r1...9m",
  "Token" : "IQ...z5Q==",
  "Expiration" : "2021-09-06T00:44:06Z"
}

These credentials are limited in time and in scope. They are valid for a maximum of six hours. They are limited to the scope of the permissions attached to the IAM role associated with the EC2 instance.

All AWS SDK are able to retrieve and renew such credentials automatically. No additional code is necessary in your application.

Now imagine that your application running on the EC2 instance is compromised and a malicious actor managed to access the instance’s meta data service. The malicious actor would extract the credentials. These credentials have the permissions you defined in the IAM role attached to the instance. Depending on your application, attackers might have the possibility to exfiltrate data from S3 or DynamoDB, to start or terminate EC2 instances, or even to create new IAM users or roles.

Since the launch of GuardDuty, it has detected when such credentials are used from IP addresses outside of AWS. Smart attackers therefore might hide their activity from another AWS account to operate outside of the sight of GuardDuty. Starting today, GuardDuty also detects when the credentials are used from other AWS accounts, inside the AWS network.

What Alerts Are Generated?
There are legitimate reasons why the source IP address communicating with AWS Services APIs might be different than the EC2 instance IP address. Think about complex network topologies that route traffic to one or multiple VPCs; AWS Transit Gateway, or AWS Direct Connect for example. In addition, multi-Region configurations, or not using AWS Organizations, makes it non trivial to detect if the AWS account using the credentials belongs to you or not. Large companies have implemented their own solution to detect such security compromises, but these type of solutions are not easy to build and to maintain. Only a handful of organizations have the resources required to tackle this challenge. When they do so, they distract their engineering efforts from their core business. This is why we decided to address this.

Starting today, GuardDuty generates alerts when it detects a misuse of EC2 instance credentials. When the credentials are used from an affiliated account, the alert is labeled as medium-severity. Otherwise, a high-severity alert is generated. Affiliated accounts are accounts monitored by the same GuardDuty administrator account, also known as GuardDuty member accounts. They might be part of your organization or not.

In Practice
To learn how it’s working, let’s capture and exfiltrate a set of EC2 credentials from one of my EC2 instances. I use SSH to connect to one of my instances, and I use curl to retrieve the credentials, as shown earlier:

curl 169.254.169.254/latest/meta-data/iam/security-credentials/role_name
{
  "Code" : "Success",
  "LastUpdated" : "2021-09-05T18:24:45Z",
  "Type" : "AWS-HMAC",
  "AccessKeyId" : "AS...J5",
  "SecretAccessKey" : "r1...9m",
  "Token" : "IQ...z5Q==",
  "Expiration" : "2021-09-06T00:44:06Z"
}

The instance has an IAM role with permissions allowing to read S3 buckets in this AWS account. I copy and paste the credentials. Then I connect to another EC2 instance running in a different AWS account, not affiliated with the same GuardDuty administrator account. I use SSH to connect to that other instance, and then I configure the AWS CLI with the compromised credentials. I attempt to access a private S3 bucket.


# first verify I do not have access 
[ec2-user@ip-1-1-0-79 ~]$ aws s3 ls s3://my-private-bucket

An error occurred (AccessDenied) when calling the ListObjectsV2 operation: Access Denied

# then I configure the CLI using the compromised credentials
[ec2-user@ip-1-1-0-79 ~]$ aws configure
AWS Access Key ID [None]: AS...J5
AWS Secret Access Key [None]: r1...9m
Default region name [None]: us-east-1
Default output format [None]:

[ec2-user@ip-1-1-0-79 ~]$ aws configure set aws_session_token IQ...z5Q==

# Finally, I attempt to access S3 again
[ec2-user@ip-1-1-0-79 ~]$ aws s3 ls s3://my-private-bucket
                     PRE folder1/
                     PRE folder2/
                     PRE folder3/
2021-01-22 16:37:48 6148 .DS_Store

Shortly after, I use the AWS Management Console to access GuardDuty in the AWS account where I stole the credentials. I can verify a high-severity alert was generated.

GuardDuty EC2 credentials exfiltration alarm

And So What?
Attackers may extract credentials when they have remote code execution (RCE), local presence on the instance, or by exploiting application-level vulnerabilities like Server Side Request Forgery (SSRF) and XML External Entity (XXE) injection. There are multiple methods to mitigate RCE or local access, including rebuilding the instances from a secured and patched AMI to eliminate remote access, rotate access credentials, and so on. When the vulnerability is at the application level, you or the application vendor are required to patch the application code to eliminate the vulnerability.

When you receive an alert indicating a risk of compromised credentials, the first thing to do is to verify the account ID. Is it one of your company accounts or not? During the analysis, when the business case allows, you may terminate the compromised instances or shut down the application. This prevents the attacker from extracting renewed instance credentials upon expiration. When in doubt, contact the AWS Trust & Safety team using the Report Amazon AWS abuse form or by contacting [email protected]. Provide all the necessary information, including the suspicious AWS account ID, logs in plaintext, and so on, when you submit your request.

Availability
This new ability is available in all AWS Regions at no additional cost. It is enabled by default when GuardDuty is already enabled on your AWS account.

Otherwise, enable GuardDuty now, and start the 30-day trial period.

— seb

Using AWS security services to protect against, detect, and respond to the Log4j vulnerability

Post Syndicated from Marshall Jones original https://aws.amazon.com/blogs/security/using-aws-security-services-to-protect-against-detect-and-respond-to-the-log4j-vulnerability/

January 7, 2022: The blog post has been updated to include using Network ACL rules to block potential log4j-related outbound traffic.

January 4, 2022: The blog post has been updated to suggest using WAF rules when correct HTTP Host Header FQDN value is not provided in the request.

December 31, 2021: We made a minor update to the second paragraph in the Amazon Route 53 Resolver DNS Firewall section.

December 29, 2021: A paragraph under the Detect section has been added to provide guidance on validating if log4j exists in an environment.

December 23, 2021: The GuardDuty section has been updated to describe new threat labels added to specific finding to give log4j context.

December 21, 2021: The post includes more info about Route 53 Resolver DNS query logging.

December 20, 2021: The post has been updated to include Amazon Route 53 Resolver DNS Firewall info.

December 17, 2021: The post has been updated to include using Athena to query VPC flow logs.

December 16, 2021: The Respond section of the post has been updated to include IMDSv2 and container mitigation info.

This blog post was first published on December 15, 2021.


Overview

In this post we will provide guidance to help customers who are responding to the recently disclosed log4j vulnerability. This covers what you can do to limit the risk of the vulnerability, how you can try to identify if you are susceptible to the issue, and then what you can do to update your infrastructure with the appropriate patches.

The log4j vulnerability (CVE-2021-44228, CVE-2021-45046) is a critical vulnerability (CVSS 3.1 base score of 10.0) in the ubiquitous logging platform Apache Log4j. This vulnerability allows an attacker to perform a remote code execution on the vulnerable platform. Version 2 of log4j, between versions 2.0-beta-9 and 2.15.0, is affected.

The vulnerability uses the Java Naming and Directory Interface (JNDI) which is used by a Java program to find data, typically through a directory, commonly a LDAP directory in the case of this vulnerability.

Figure 1, below, highlights the log4j JNDI attack flow.

Figure 1. Log4j attack progression

Figure 1. Log4j attack progression. Source: GovCERT.ch, the Computer Emergency Response Team (GovCERT) of the Swiss government

As an immediate response, follow this blog and use the tool designed to hotpatch a running JVM using any log4j 2.0+. Steve Schmidt, Chief Information Security Officer for AWS, also discussed this hotpatch.

Protect

You can use multiple AWS services to help limit your risk/exposure from the log4j vulnerability. You can build a layered control approach, and/or pick and choose the controls identified below to help limit your exposure.

AWS WAF

Use AWS Web Application Firewall, following AWS Managed Rules for AWS WAF, to help protect your Amazon CloudFront distribution, Amazon API Gateway REST API, Application Load Balancer, or AWS AppSync GraphQL API resources.

  • AWSManagedRulesKnownBadInputsRuleSet esp. the Log4JRCE rule which helps inspects the request for the presence of the Log4j vulnerability. Example patterns include ${jndi:ldap://example.com/}.
  • AWSManagedRulesAnonymousIpList esp. the AnonymousIPList rule which helps inspect IP addresses of sources known to anonymize client information.
  • AWSManagedRulesCommonRuleSet, esp. the SizeRestrictions_BODY rule to verify that the request body size is at most 8 KB (8,192 bytes).

You should also consider implementing WAF rules that deny access, if the correct HTTP Host Header FQDN value is not provided in the request. This can help reduce the likelihood of scanners that are scanning the internet IP address space from reaching your resources protected by WAF via a request with an incorrect Host Header, like an IP address instead of an FQDN. It’s also possible to use custom Application Load Balancer listener rules to achieve this.

If you’re using AWS WAF Classic, you will need to migrate to AWS WAF or create custom regex match conditions.

Have multiple accounts? Follow these instructions to use AWS Firewall Manager to deploy AWS WAF rules centrally across your AWS organization.

Amazon Route 53 Resolver DNS Firewall

You can use Route 53 Resolver DNS Firewall, following AWS Managed Domain Lists, to help proactively protect resources with outbound public DNS resolution. We recommend associating Route 53 Resolver DNS Firewall with a rule configured to block domains on the AWSManagedDomainsMalwareDomainList, which has been updated in all supported AWS regions with domains identified as hosting malware used in conjunction with the log4j vulnerability. AWS will continue to deliver domain updates for Route 53 Resolver DNS Firewall through this list.

Also, you should consider blocking outbound port 53 to prevent the use of external untrusted DNS servers. This helps force all DNS queries through DNS Firewall and ensures DNS traffic is visible for GuardDuty inspection. Using DNS Firewall to block DNS resolution of certain country code top-level domains (ccTLD) that your VPC resources have no legitimate reason to connect out to, may also help. Examples of ccTLDs you may want to block may be included in the known log4j callback domains IOCs.

We also recommend that you enable DNS query logging, which allows you to identify and audit potentially impacted resources within your VPC, by inspecting the DNS logs for the presence of blocked outbound queries due to the log4j vulnerability, or to other known malicious destinations. DNS query logging is also useful in helping identify EC2 instances vulnerable to log4j that are responding to active log4j scans, which may be originating from malicious actors or from legitimate security researchers. In either case, instances responding to these scans potentially have the log4j vulnerability and should be addressed. GreyNoise is monitoring for log4j scans and sharing the callback domains here. Some notable domains customers may want to examine log activity for, but not necessarily block, are: *interact.sh, *leakix.net, *canarytokens.com, *dnslog.cn, *.dnsbin.net, and *cyberwar.nl. It is very likely that instances resolving these domains are vulnerable to log4j.

AWS Network Firewall

Customers can use Suricata-compatible IDS/IPS rules in AWS Network Firewall to deploy network-based detection and protection. While Suricata doesn’t have a protocol detector for LDAP, it is possible to detect these LDAP calls with Suricata. Open-source Suricata rules addressing Log4j are available from corelight, NCC Group, from ET Labs, and from CrowdStrike. These rules can help identify scanning, as well as post exploitation of the log4j vulnerability. Because there is a large amount of benign scanning happening now, we recommend customers focus their time first on potential post-exploitation activities, such as outbound LDAP traffic from their VPC to untrusted internet destinations.

We also recommend customers consider implementing outbound port/protocol enforcement rules that monitor or prevent instances of protocols like LDAP from using non-standard LDAP ports such as 53, 80, 123, and 443. Monitoring or preventing usage of port 1389 outbound may be particularly helpful in identifying systems that have been triggered by internet scanners to make command and control calls outbound. We also recommend that systems without a legitimate business need to initiate network calls out to the internet not be given that ability by default. Outbound network traffic filtering and monitoring is not only very helpful with log4j, but with identifying other classes of vulnerabilities too.

Network Access Control Lists

Customers may be able to use Network Access Control List rules (NACLs) to block some of the known log4j-related outbound ports to help limit further compromise of successfully exploited systems. We recommend customers consider blocking ports 1389, 1388, 1234, 12344, 9999, 8085, 1343 outbound. As NACLs block traffic at the subnet level, careful consideration should be given to ensure any new rules do not block legitimate communications using these outbound ports across internal subnets. Blocking ports 389 and 88 outbound can also be helpful in mitigating log4j, but those ports are commonly used for legitimate applications, especially in a Windows Active Directory environment. See the VPC flow logs section below to get details on how you can validate any ports being considered.

Use IMDSv2

Through the early days of the log4j vulnerability researchers have noted that, once a host has been compromised with the initial JDNI vulnerability, attackers sometimes try to harvest credentials from the host and send those out via some mechanism such as LDAP, HTTP, or DNS lookups. We recommend customers use IAM roles instead of long-term access keys, and not store sensitive information such as credentials in environment variables. Customers can also leverage AWS Secrets Manager to store and automatically rotate database credentials instead of storing long-term database credentials in a host’s environment variables. See prescriptive guidance here and here on how to implement Secrets Manager in your environment.

To help guard against such attacks in AWS when EC2 Roles may be in use — and to help keep all IMDS data private for that matter — customers should consider requiring the use of Instance MetaData Service version 2 (IMDSv2). Since IMDSv2 is enabled by default, you can require its use by disabling IMDSv1 (which is also enabled by default). With IMDSv2, requests are protected by an initial interaction in which the calling process must first obtain a session token with an HTTP PUT, and subsequent requests must contain the token in an HTTP header. This makes it much more difficult for attackers to harvest credentials or any other data from the IMDS. For more information about using IMDSv2, please refer to this blog and documentation. While all recent AWS SDKs and tools support IMDSv2, as with any potentially non-backwards compatible change, test this change on representative systems before deploying it broadly.

Detect

This post has covered how to potentially limit the ability to exploit this vulnerability. Next, we’ll shift our focus to which AWS services can help to detect whether this vulnerability exists in your environment.

Figure 2. Log4j finding in the Inspector console

Figure 2. Log4j finding in the Inspector console

Amazon Inspector

As shown in Figure 2, the Amazon Inspector team has created coverage for identifying the existence of this vulnerability in your Amazon EC2 instances and Amazon Elastic Container Registry Images (Amazon ECR). With the new Amazon Inspector, scanning is automated and continual. Continual scanning is driven by events such as new software packages, new instances, and new common vulnerability and exposure (CVEs) being published.

For example, once the Inspector team added support for the log4j vulnerability (CVE-2021-44228 & CVE-2021-45046), Inspector immediately began looking for this vulnerability for all supported AWS Systems Manager managed instances where Log4j was installed via OS package managers and where this package was present in Maven-compatible Amazon ECR container images. If this vulnerability is present, findings will begin appearing without any manual action. If you are using Inspector Classic, you will need to ensure you are running an assessment against all of your Amazon EC2 instances. You can follow this documentation to ensure you are creating an assessment target for all of your Amazon EC2 instances. Here are further details on container scanning updates in Amazon ECR private registries.

GuardDuty

In addition to finding the presence of this vulnerability through Inspector, the Amazon GuardDuty team has also begun adding indicators of compromise associated with exploiting the Log4j vulnerability, and will continue to do so. GuardDuty will monitor for attempts to reach known-bad IP addresses or DNS entries, and can also find post-exploit activity through anomaly-based behavioral findings. For example, if an Amazon EC2 instance starts communicating on unusual ports, GuardDuty would detect this activity and create the finding Behavior:EC2/NetworkPortUnusual. This activity is not limited to the NetworkPortUnusual finding, though. GuardDuty has a number of different findings associated with post exploit activity, such as credential compromise, that might be seen in response to a compromised AWS resource. For a list of GuardDuty findings, please refer to this GuardDuty documentation.

To further help you identify and prioritize issues related to CVE-2021-44228 and CVE-2021-45046, the GuardDuty team has added threat labels to the finding detail for the following finding types:

Backdoor:EC2/C&CActivity.B
If the IP queried is Log4j-related, then fields of the associated finding will include the following values:

  • service.additionalInfo.threatListName = Amazon
  • service.additionalInfo.threatName = Log4j Related

Backdoor:EC2/C&CActivity.B!DNS
If the domain name queried is Log4j-related, then the fields of the associated finding will include the following values:

  • service.additionalInfo.threatListName = Amazon
  • service.additionalInfo.threatName = Log4j Related

Behavior:EC2/NetworkPortUnusual
If the EC2 instance communicated on port 389 or port 1389, then the associated finding severity will be modified to High, and the finding fields will include the following value:

  • service.additionalInfo.context = Possible Log4j callback
Figure 3. GuardDuty finding with log4j threat labels

Figure 3. GuardDuty finding with log4j threat labels

Security Hub

Many customers today also use AWS Security Hub with Inspector and GuardDuty to aggregate alerts and enable automatic remediation and response. In the short term, we recommend that you use Security Hub to set up alerting through AWS Chatbot, Amazon Simple Notification Service, or a ticketing system for visibility when Inspector finds this vulnerability in your environment. In the long term, we recommend you use Security Hub to enable automatic remediation and response for security alerts when appropriate. Here are ideas on how to setup automatic remediation and response with Security Hub.

VPC flow logs

Customers can use Athena or CloudWatch Logs Insights queries against their VPC flow logs to help identify VPC resources associated with log4j post exploitation outbound network activity. Version 5 of VPC flow logs is particularly useful, because it includes the “flow-direction” field. We recommend customers start by paying special attention to outbound network calls using destination port 1389 since outbound usage of that port is less common in legitimate applications. Customers should also investigate outbound network calls using destination ports 1388, 1234, 12344, 9999, 8085, 1343, 389, and 88 to untrusted internet destination IP addresses. Free-tier IP reputation services, such as VirusTotal, GreyNoise, NOC.org, and ipinfo.io, can provide helpful insights related to public IP addresses found in the logged activity.

Note: If you have a Microsoft Active Directory environment in the captured VPC flow logs being queried, you might see false positives due to its use of port 389.

Validation with open-source tools

With the evolving nature of the different log4j vulnerabilities, it’s important to validate that upgrades, patches, and mitigations in your environment are indeed working to mitigate potential exploitation of the log4j vulnerability. You can use open-source tools, such as aws_public_ips, to get a list of all your current public IP addresses for an AWS Account, and then actively scan those IPs with log4j-scan using a DNS Canary Token to get notification of which systems still have the log4j vulnerability and can be exploited. We recommend that you run this scan periodically over the next few weeks to validate that any mitigations are still in place, and no new systems are vulnerable to the log4j issue.

Respond

The first two sections have discussed ways to help prevent potential exploitation attempts, and how to detect the presence of the vulnerability and potential exploitation attempts. In this section, we will focus on steps that you can take to mitigate this vulnerability. As we noted in the overview, the immediate response recommended is to follow this blog and use the tool designed to hotpatch a running JVM using any log4j 2.0+. Steve Schmidt, Chief Information Security Officer for AWS, also discussed this hotpatch.

Figure 4. Systems Manager Patch Manager patch baseline approving critical patches immediately

Figure 4. Systems Manager Patch Manager patch baseline approving critical patches immediately

AWS Patch Manager

If you use AWS Systems Manager Patch Manager, and you have critical patches set to install immediately in your patch baseline, your EC2 instances will already have the patch. It is important to note that you’re not done at this point. Next, you will need to update the class path wherever the library is used in your application code, to ensure you are using the most up-to-date version. You can use AWS Patch Manager to patch managed nodes in a hybrid environment. See here for further implementation details.

Container mitigation

To install the hotpatch noted in the overview onto EKS cluster worker nodes AWS has developed an RPM that performs a JVM-level hotpatch which disables JNDI lookups from the log4j2 library. The Apache Log4j2 node agent is an open-source project built by the Kubernetes team at AWS. To learn more about how to install this node agent, please visit the this Github page.

Once identified, ECR container images will need to be updated to use the patched log4j version. Downstream, you will need to ensure that any containers built with a vulnerable ECR container image are updated to use the new image as soon as possible. This can vary depending on the service you are using to deploy these images. For example, if you are using Amazon Elastic Container Service (Amazon ECS), you might want to update the service to force a new deployment, which will pull down the image using the new log4j version. Check the documentation that supports the method you use to deploy containers.

If you’re running Java-based applications on Windows containers, follow Microsoft’s guidance here.

We recommend you vend new application credentials and revoke existing credentials immediately after patching.

Mitigation strategies if you can’t upgrade

In case you either can’t upgrade to a patched version, which disables access to JDNI by default, or if you are still determining your strategy for how you are going to patch your environment, you can mitigate this vulnerability by changing your log4j configuration. To implement this mitigation in releases >=2.10, you will need to remove the JndiLookup class from the classpath: zip -q -d log4j-core-*.jar org/apache/logging/log4j/core/lookup/JndiLookup.class.

For a more comprehensive list about mitigation steps for specific versions, refer to the Apache website.

Conclusion

In this blog post, we outlined key AWS security services that enable you to adopt a layered approach to help protect against, detect, and respond to your risk from the log4j vulnerability. We urge you to continue to monitor our security bulletins; we will continue updating our bulletins with our remediation efforts for our side of the shared-responsibility model.

Given the criticality of this vulnerability, we urge you to pay close attention to the vulnerability, and appropriately prioritize implementing the controls highlighted in this blog.

If you have feedback about this post, submit comments in the Comments section below.

Want more AWS Security news? Follow us on Twitter.

Marshall Jones

Marshall is a Worldwide Security Specialist Solutions Architect at AWS. His background is in AWS consulting and security architecture, focused on a variety of security domains including edge, threat detection, and compliance. Today, he is focused on helping enterprise AWS customers adopt and operationalize AWS security services to increase security effectiveness and reduce risk.

Syed Shareef

Syed is a Senior Security Solutions Architect at AWS. He works with large financial institutions to help them achieve their business goals with AWS, whilst being compliant with regulatory and security requirements.

Correlate security findings with AWS Security Hub and Amazon EventBridge

Post Syndicated from Marshall Jones original https://aws.amazon.com/blogs/security/correlate-security-findings-with-aws-security-hub-and-amazon-eventbridge/

In this blog post, we’ll walk you through deploying a solution to correlate specific AWS Security Hub findings from multiple AWS services that are related to a single AWS resource, which indicates an increased possibility that a security incident has happened.

AWS Security Hub ingests findings from multiple AWS services, including Amazon GuardDuty, Amazon Inspector, Amazon Macie, AWS Firewall Manager, AWS Identity and Access Management (IAM) Access Analyzer, and AWS Systems Manager Patch Manager. Findings from each service are normalized into the AWS Security Finding Format (ASFF), so that you can review findings in a standardized format and take action quickly. You can use AWS Security Hub to provide a single view of all security-related findings, where you can set up alerting, automatic remediation, and ingestion into third-party incident management systems for specific findings.

Although Security Hub can ingest a vast number of integrations and findings, it cannot create correlation rules like a Security Information and Event Management (SIEM) tool can. However, you can create such rules using EventBridge. It’s important to take a closer look when multiple AWS security services generate findings for a single resource, because this potentially indicates elevated risk. Depending on your environment, the initial number of findings in AWS Security Hub findings may be high, so you may need to prioritize which findings require immediate action. AWS Security Hub natively gives you the ability to filter findings by resource, account, and many other details. With the solution in this post, when one of these correlated sets of findings is detected, a new finding is created and pushed to AWS Security Hub by using the Security Hub BatchImportFindings API operation. You can then respond to these new security incident-oriented findings through ticketing, chat, or incident management systems.

Prerequisites

This solution requires that you have AWS Security Hub enabled in your AWS account. In addition to AWS Security Hub, the following services must be enabled and integrated to AWS Security Hub:

Solution overview

In this solution, you will use a combination of AWS Security Hub, Amazon EventBridge, AWS Lambda, and Amazon DynamoDB to ingest and correlate specific findings that indicate a higher likelihood of a security incident. Each correlation is focused on multiple specific AWS security service findings for a single AWS resource.

The following list shows the correlated findings that are detected by this solution. The Description section for each finding correlation provides context for that correlation, the Remediation section provides general recommendations for remediation, and the Prevention/Detection section provides guidance to either prevent or detect one or more findings within the correlation. With the code provided, you can also add more correlations than those listed here by modifying the Cloud Development Kit (CDK) code and AWS Lambda code. The Solution workflow section breaks down the flow of the solution. If you choose to implement automatic remediation, each finding correlation will be created with the following AWS Security Hub Finding Format (ASFF) fields:

- Severity: CRITICAL
- ProductArn: arn:aws:securityhub:<REGION>:<AWS_ACCOUNT_ID>:product/<AWS_ACCOUNT_ID>/default

These correlated findings are created as part of this solution:

  1. Any Amazon GuardDuty Backdoor findings and three critical common vulnerabilities and exposures (CVEs) from Amazon Inspector that are associated with the same Amazon Elastic Compute Cloud (Amazon EC2) instance.
    • Description: Amazon Inspector has found at least three critical CVEs on the EC2 instance. CVEs indicate that the EC2 instance is currently vulnerable or exposed. The EC2 instance is also performing backdoor activities. The combination of these two findings is a stronger indication of an elevated security incident.
    • Remediation: It’s recommended that you isolate the EC2 instance and follow standard protocol to triage the EC2 instance to verify if the instance has been compromised. If the instance has been compromised, follow your standard Incident Response process for post-instance compromise and forensics. Redeploy a backup of the EC2 instance by using an up-to-date hardened Amazon Machine Image (AMI) or apply all security-related patches to the redeployed EC2 instance.
    • Prevention/Detection: To mitigate or prevent an Amazon EC2 instance from missing critical security updates, consider using Amazon Systems Manager Patch Manager to automate installing security-related patching for managed instances. Alternatively, you can provide developers up-to-date hardened Amazon Machine Images (AMI) by using Amazon EC2 Image Builder. For detection, you can set the AMI property called ‘DeprecationTime’ to indicate when the AMI will become outdated and respond accordingly.
  2. An Amazon Macie sensitive data finding and an Amazon GuardDuty S3 exfiltration finding for the same Amazon Simple Storage Service (Amazon S3) bucket.
    • Description: Amazon Macie has scanned an Amazon S3 bucket and found a possible match for sensitive data. Amazon GuardDuty has detected a possible exfiltration finding for the same Amazon S3 bucket. The combination of these findings indicates a higher risk security incident.
    • Remediation: It’s recommended that you review the source IP and/or IAM principal that is making the S3 object reads against the S3 bucket. If the source IP and/or IAM principal is not authorized to access sensitive data within the S3 bucket, follow your standard Incident Response process for post-compromise plan for S3 exfiltration. For example, you can restrict an IAM principal’s permissions, revoke existing credentials or unauthorized sessions, restricting access via the Amazon S3 bucket policy, or using the Amazon S3 Block Public Access feature.
    • Prevention/Detection: To mitigate or prevent exposure of sensitive data within Amazon S3, ensure the Amazon S3 buckets are using least-privilege bucket policies and are not publicly accessible. Alternatively, you can use the Amazon S3 Block Public Access feature. Review your AWS environment to make sure you are following Amazon S3 security best practices. For detection, you can use Amazon Config to track and auto-remediate Amazon S3 buckets that do not have logging and encryption enabled or publicly accessible.
  3. AWS Security Hub detects an EC2 instance with a public IP and unrestricted VPC Security Group; Amazon GuardDuty unusual network traffic behavior finding; and Amazon GuardDuty brute force finding.
    • Description: AWS Security Hub has detected an EC2 instance that has a public IP address attached and a VPC Security Group that allows traffic for ports outside of ports 80 and 443. Amazon GuardDuty has also determined that the EC2 instance has multiple brute force attempts and is communicating with a remote host on an unusual port that the EC2 instance has not previously used for network communication. The correlation of these lower-severity findings indicates a higher-severity security incident.
    • Remediation: It’s recommended that you isolate the EC2 instance and follow standard protocol to triage the EC2 instance to verify if the instance has been compromised. If the instance has been compromised, follow your standard Incident Response process for post-instance compromise and forensics.
    • Prevention/Detection: To mitigate or prevent these events from occurring within your AWS environment, determine whether the EC2 instance requires a public-facing IP address and review the VPC Security Group(s) has only the required rules configured. Review your AWS environment to make sure you are following Amazon EC2 best practices. For detection, consider implementing AWS Firewall Manager to continuously audit and limit VPC Security Groups.

The solution workflow, shown in Figure 1, is as follows:

  1. Security Hub ingests findings from integrated AWS security services.
  2. An EventBridge rule is invoked based on Security Hub findings in GuardDuty, Macie, Amazon Inspector, and Security Hub security standards.
  3. The EventBridge rule invokes a Lambda function to store the Security Hub finding, which is passed via EventBridge, in a DynamoDB table for further analysis.
  4. After the new findings are stored in DynamoDB, another Lambda function is invoked by using Dynamo StreamSets and a time-to-live (TTL) set to delete finding entries that are older than 30 days.
  5. The second Lambda function looks at the resource associated with the new finding entry in the DynamoDB table. The Lambda function checks for specific Security Hub findings that are associated with the same resource.
Figure 1: Architecture diagram describing the flow of the solution

Figure 1: Architecture diagram describing the flow of the solution

Solution deployment

You can deploy the solution through either the AWS Management Console or the AWS Cloud Development Kit (AWS CDK).

To deploy the solution by using the AWS Management Console

In your account, launch the AWS CloudFormation template by choosing the following Launch Stack button. It will take approximately 10 minutes for the CloudFormation stack to complete.
Select the Launch Stack button to launch the template

To deploy the solution by using the AWS CDK

You can find the latest code in the aws-security GitHub repository where you can also contribute to the sample code. The following commands show how to deploy the solution by using the AWS CDK. First, the CDK initializes your environment and uploads the AWS Lambda assets to Amazon S3. Then, you can deploy the solution to your account. For <INSERT_AWS_ACCOUNT>, specify the account number, and for <INSERT_REGION>, specify the AWS Region that you want the solution deployed to.

cdk bootstrap aws://<INSERT_AWS_ACCOUNT>/<INSERT_REGION>

cdk deploy

Conclusion

In this blog post, we walked through a solution to use AWS services, including Amazon EventBridge, AWS Lambda, and Amazon DynamoDB, to correlate AWS Security Hub findings from multiple different AWS security services. The solution provides a framework to prioritize specific sets of findings that indicate a higher likelihood that a security incident has occurred, so that you can prioritize and improve your security response.

If you have feedback about this post, submit comments in the Comments section below. If you have any questions about this post, start a thread on the AWS Security Hub forum.

Want more AWS Security how-to content, news, and feature announcements? Follow us on Twitter.

Author

Marshall Jones

Marshall is a worldwide security specialist solutions architect at AWS. His background is in AWS consulting and security architecture, focused on a variety of security domains including edge, threat detection, and compliance. Today, he is focused on helping enterprise AWS customers adopt and operationalize AWS security services to increase security effectiveness and reduce risk.

Author

Jonathan Nguyen

Jonathan is a shared delivery team senior security consultant at AWS. His background is in AWS security, with a focus on threat detection and incident response. He helps enterprise customers develop a comprehensive AWS security strategy, deploy security solutions at scale, and train customers on AWS security best practices.

How to automate incident response to security events with AWS Systems Manager Incident Manager

Post Syndicated from Sumit Patel original https://aws.amazon.com/blogs/security/how-to-automate-incident-response-to-security-events-with-aws-systems-manager-incident-manager/

Incident response is a core security capability for organizations to develop, and a core element in the AWS Cloud Adoption Framework (AWS CAF). Responding to security incidents quickly is important to minimize their impacts. Automating incident response helps you scale your capabilities, rapidly reduce the scope of compromised resources, and reduce repetitive work by your security team.

In this post, I show you how to use Incident Manager, a capability of AWS Systems Manager, to build an effective automated incident management and response solution to security events.

You’ll walk through three common security-related events and how you can use Incident Manager to automate your response.

  • AWS account root user activity: An Amazon Web Services (AWS) account root user has full access to all your resources for all AWS services, including billing information. It’s therefore elemental to adhere to the best practice of using the root user only to create your first IAM user and securely lock away the root user credentials and use them to perform only a few account and service management tasks. And it is critical to be aware when root user activity occurs in your AWS account.
  • Amazon GuardDuty high severity findings: Amazon GuardDuty is a threat detection service that continuously monitors for malicious or unauthorized behavior to help protect your AWS accounts and workloads. In this blog post, you’ll learn how to initiate an incident response plan whenever a high severity finding is discovered.
  • AWS Config rule change and S3 bucket allowing public access: AWS Config enables continuous monitoring of your AWS resources, making it simple to assess, audit, and record resource configurations and changes. You will use AWS Config to monitor your Amazon Simple Storage Service (S3) bucket ACLs and policies for settings that allow public read or public write access.

Prerequisites

If this is your first time using Incident Manager, follow the initial onboarding steps in Getting prepared with Incident Manager.

Incident Manager can start managing incidents automatically using Amazon CloudWatch or Amazon EventBridge. For the solution in this blog post, you will use EventBridge to capture events and start an incident.

To complete the steps in this walkthrough, you need the following:

Create an Incident Manager response plan

A response plan ties together the contacts, escalation plan, and runbook. When an incident occurs, a response plan defines who to engage, how to engage, which runbook to initiate, and which metrics to monitor. By creating a well-defined response plan, you can save your security team time down the road.

Add contacts

Your contacts should include everyone who might be involved in the incident. Follow these steps to add a contact.

To add contacts

  1. Open the AWS Management Console, and then go to Systems Manager within the console, expand Operations Management, and then expand Incident Manager.
  2. Choose Contacts, and then choose Create contact.

    Figure 1: Adding contact details

    Figure 1: Adding contact details

  3. On Contact information, enter names and define contact channels for your contacts.
  4. Under Contact channel, you can select Email, SMS, or Voice. You can also add multiple contact channels.
  5. In Engagement plan, specify how fast to engage your responders. In the example illustrated below, the incident responder will be engaged through email immediately (0 minutes) when an incident is detected and then through SMS 10 minutes into an incident. Complete the fields and then choose Create.

    Figure 2: Engagement plan

    Figure 2: Engagement plan

Create a response plan

Once you’ve created your contacts, you can create a response plan to define how to respond to incidents. Refer to the Best Practices for Response Plans.

Note: (Optional) You can also create an escalation plan that lets you further define the escalation path for your contacts. You can learn more in Create an escalation plan.

To create a response plan

  1. Open the Incident Manager console, and choose Response plans in the left navigation pane.
  2. Choose Create response plan.
  3. Enter a unique and identifiable name for your response plan.
  4. Enter an incident title. The incident title helps to identify an incident on the incidents home page.
  5. Select an appropriate Impact based on the potential scope of the incident.

    Figure 3: Selecting your impact level

    Figure 3: Selecting your impact level

  6. (Optional) Choose a chat channel for the incident responders to interact in during an incident. For more information about chat channels, see Chat channels.
  7. (Optional) For Engagement, you can choose any number of contacts and escalation plans. For this solution, select the security team responder that you created earlier as one of your contacts.

    Figure 4: Adding engagements

    Figure 4: Adding engagements

  8. (Optional) You can also create a runbook that can drive the incident mitigation and response. For further information, refer to Runbooks and automation.
  9. Under Execution permissions, choose Create an IAM role using a template. Under Role name, select the IAM role you created in the prerequisites that allows Incident Manager to run SSM automation documents, and then choose Create response plan.

Monitor AWS account root activity

When you first create an AWS account, you begin with a single sign-in identity that has complete access to all AWS services and resources in the account. This identity is called the root user and is accessed by signing in with the email address and password that you used to create the account.

An AWS account root user has full access to all your resources for all AWS services, including billing information. It is critical to prevent root user access from unauthorized use and to be aware whenever root user activity occurs in your AWS account. For more information about AWS recommendations, see Security best practices in IAM.

To be certain that all root user activity is authorized and expected, it’s important to monitor root API calls to a given AWS account and to be notified when root user activity is detected.

Create an EventBridge rule

Create and validate an EventBridge rule to capture AWS account root activity.

To create an EventBridge rule

  1. Open the EventBridge console.
  2. In the navigation pane, choose Rules, and then choose Create rule.
  3. Enter a name and description for the rule.
  4. For Define pattern, choose Event pattern.
  5. Choose Custom pattern.
  6. Enter the following event pattern:
    {
      "detail-type": [
        "AWS API Call via CloudTrail",
        "AWS Console Sign In via CloudTrail"
      ],
      "detail": {
        "userIdentity": {
          "type": [
            "Root"
          ]
        }
      }
    }
    

  7. For Select targets, choose Incident Manager response plan.
  8. For Response plan, choose SecurityEventResponsePlan, which you created when you set up Incident Manager.
  9. To create an IAM role automatically, choose Create a new role for this specific resource. To use an existing IAM role, choose Use existing role.
  10. (Optional) Enter one or more tags for the rule.
  11. Choose Create.

To validate the rule

  1. Sign in using root credentials.
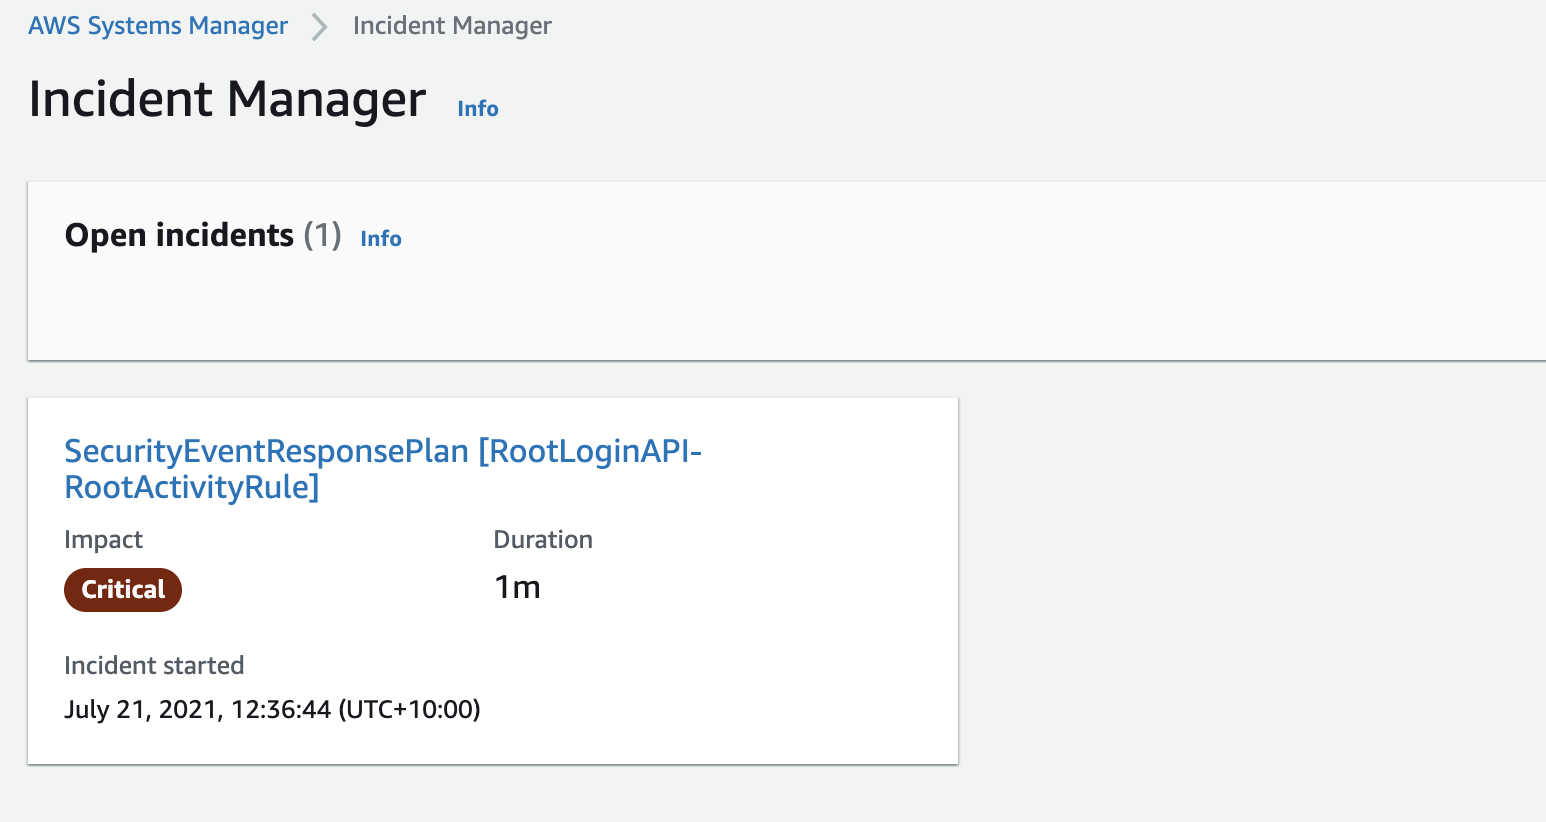
  2. This console login activity by a root user should invoke the Incident Manager response plan and show an open incident as illustrated below. The respective contact channels that you defined earlier in your Engagement Plan, will be engaged.
Figure 5: Incident Manager open incidents

Figure 5: Incident Manager open incidents

Watch for GuardDuty high severity findings

GuardDuty is a monitoring service that analyzes AWS CloudTrail management and Amazon S3 data events, Amazon Virtual Private Cloud (Amazon VPC) flow logs, and Amazon Route 53 DNS logs to generate security findings for your account. Once GuardDuty is enabled, it immediately starts monitoring your environment.

GuardDuty integrates with EventBridge, which can be used to send findings data to other applications and services for processing. With EventBridge, you can use GuardDuty findings to invoke automatic responses to your findings by connecting finding events to targets such as Incident Manager response plan.

Create an EventBridge rule

You’ll use an EventBridge rule to capture GuardDuty high severity findings.

To create an EventBridge rule

  1. Open the EventBridge console.
  2. In the navigation pane, select Rules, and then choose Create rule.
  3. Enter a name and description for the rule.
  4. For Define pattern, choose Event pattern.
  5. Choose Custom pattern
  6. Enter the following event pattern which will filter on GuardDuty high severity findings
    {
      "source": ["aws.guardduty"],
      "detail-type": ["GuardDuty Finding"],
      "detail": {
        "severity": [
          7.0,
          7.1,
          7.2,
          7.3,
          7.4,
          7.5,
          7.6,
          7.7,
          7.8,
          7.9,
          8,
          8.0,
          8.1,
          8.2,
          8.3,
          8.4,
          8.5,
          8.6,
          8.7,
          8.8,
          8.9
        ]
      }
    } 
    

  7. For Select targets, choose Incident Manager response plan.
  8. For Response plan, select SecurityEventResponsePlan, which you created when you set up Incident Manager.
  9. To create an IAM role automatically, choose Create a new role for this specific resource. To use an IAM role that you created before, choose Use existing role.
  10. (Optional) Enter one or more tags for the rule.
  11. Choose Create.

To validate the rule

To test and validate whether the above rule is now functional, you can generate sample findings within the GuardDuty console.

  1. Open the GuardDuty console.
  2. In the navigation pane, choose Settings.
  3. On the Settings page, under Sample findings, choose Generate sample findings.
  4. In the navigation pane, choose Findings. The sample findings are displayed on the Current findings page with the prefix [SAMPLE].

Once you have generated sample findings, your Incident Manager response plan will be invoked almost immediately and the engagement plan with your contacts will begin.

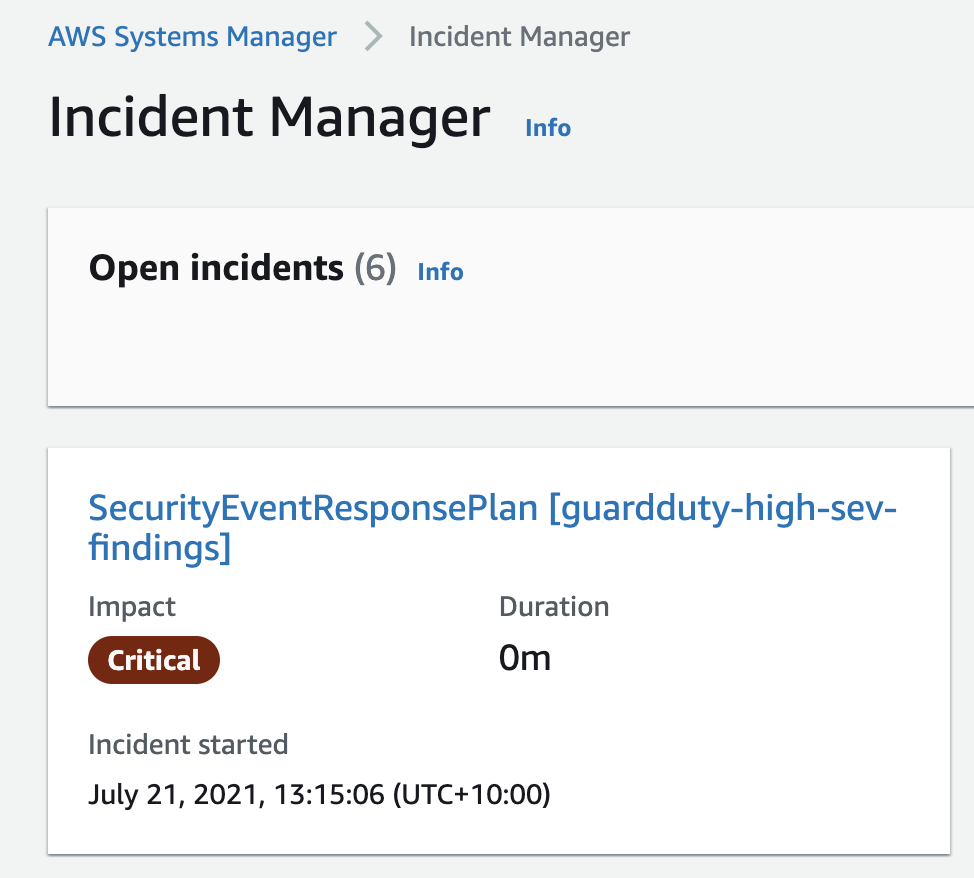
You can select an open incident in the Incident Manager console to see additional details from the GuardDuty finding. Figure 6 shows a high severity finding.

Figure 6: Incident Manager open incident for GuardDuty high severity finding

Figure 6: Incident Manager open incident for GuardDuty high severity finding

Monitor S3 bucket settings for public access

AWS Config enables continuous monitoring of your AWS resources, making it easier to assess, audit, and record resource configurations and changes. AWS Config does this through rules that define the desired configuration state of your AWS resources. AWS Config provides a number of AWS managed rules that address a wide range of security concerns such as checking that your Amazon Elastic Block Store (Amazon EBS) volumes are encrypted, your resources are tagged appropriately, and multi-factor authentication (MFA) is enabled for root accounts.

Set up AWS Config and EventBridge

You will use AWS Config to monitor your S3 bucket ACLs and policies for violations which could allow public read or public write access. If AWS Config finds a policy violation, it will initiate an AWS EventBridge rule to invoke your Incident Manager response plan.

To create the AWS Config rule to capture S3 bucket public access

  1. Sign in to the AWS Config console.
  2. If this is your first time in the AWS Config console, refer to the Getting Started guide for more information.
  3. Select Rules from the menu and choose Add Rule.
  4. On the AWS Config rules page, enter S3 in the search box and select the s3-bucket-public-read-prohibited and s3-bucket-public-write-prohibited rules, and then choose Next.

    Figure 7: AWS Config rules

    Figure 7: AWS Config rules

  5. Leave the Configure rules page as default and select Next.
  6. On the Review page, select Add Rule. AWS Config is now analyzing your S3 buckets, capturing their current configurations, and evaluating the configurations against the rules you selected.

To create the EventBridge rule

  1. Open the Amazon EventBridge console
  2. In the navigation pane, choose Rules, and then choose Create rule.
  3. Enter a name and description for the rule.
  4. For Define pattern, choose Event pattern.
  5. Choose Custom pattern
  6. Enter the following event pattern, which will filter on AWS Config rule s3-bucket-public-write-prohibited being non-compliant.
    {
      "source": ["aws.config"],
      "detail-type": ["Config Rules Compliance Change"],
      "detail": {
        "messageType": ["ComplianceChangeNotification"],
        "configRuleName": ["s3-bucket-public-write-prohibited", ""],
        "newEvaluationResult": {
          "complianceType": [
            "NON_COMPLIANT"
          ]
        }
      }
    }
    

  7. For Select targets, choose Incident Manager response plan.
  8. For Response plan, choose SecurityEventResponsePlan, which you created earlier when setting up Incident Manager.
  9. To create an IAM role automatically, choose Create a new role for this specific resource. To use an existing IAM role, choose Use existing role.
  10. (Optional) Enter one or more tags for the rule.
  11. Choose Create.

To validate the rule

  1. Create a compliant test S3 bucket with no public read or write access through either an ACL or a policy.
  2. Change the ACL of the bucket to allow public listing of objects so that the bucket is non-compliant.

    Figure 8: Amazon S3 console

    Figure 8: Amazon S3 console

  3. After a few minutes, you should see the AWS Config rule initiated which invokes the EventBridge rule and therefore your Incident Manager response plan.

Summary

In this post, I showed you how to use Incident Manager to monitor for security events and invoke a response plan via Amazon CloudWatch or Amazon EventBridge. AWS CloudTrail API activity (for a root account login), Amazon GuardDuty (for high severity findings), and AWS Config (to enforce policies like preventing public write access to an S3 bucket). I demonstrated how you can create an incident management and response plan to ensure you have used the power of cloud to create automations that respond to and mitigate security incidents in a timely manner. To learn more about Incident Manager, see What Is AWS Systems Manager Incident Manager in the AWS documentation.

If you have feedback about this post, submit comments in the comments section below. If you have questions about this post, start a new thread on the Systems Manager forum or contact AWS Support.

Want more AWS Security how-to content, news, and feature announcements? Follow us on Twitter.

Author

Sumit Patel

As a Senior Solutions Architect at AWS, Sumit works with large enterprise customers helping them create innovative solutions to address their cloud challenges. Sumit uses his more than 15 years of enterprise experience to help customers navigate their cloud transformation journey and shape the right dynamics between technology and business.

How to automate forensic disk collection in AWS

Post Syndicated from Matt Duda original https://aws.amazon.com/blogs/security/how-to-automate-forensic-disk-collection-in-aws/

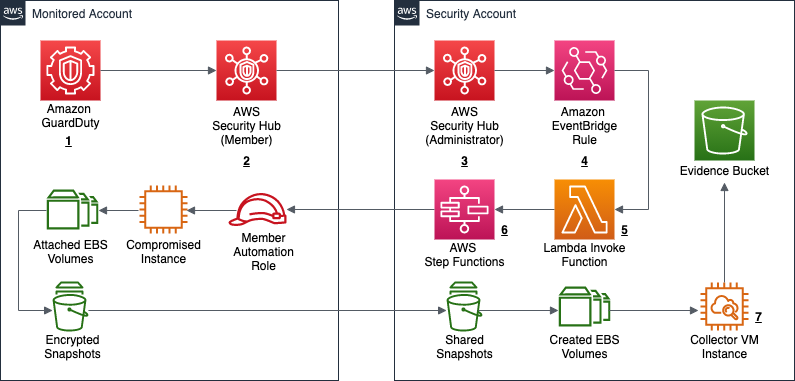
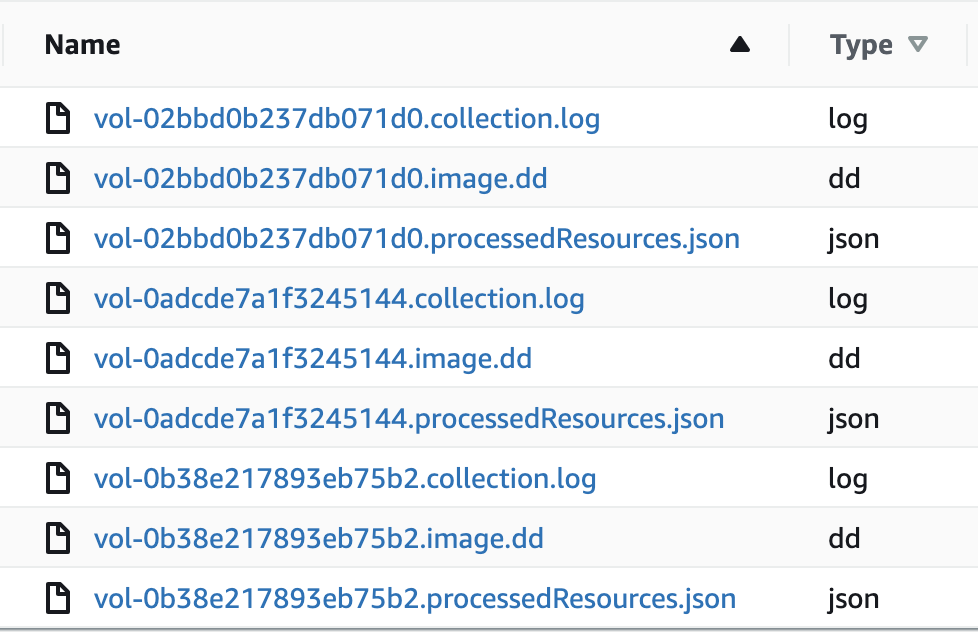
In this blog post you’ll learn about a hands-on solution you can use for automated disk collection across multiple AWS accounts. This solution will help your incident response team set up an automation workflow to capture the disk evidence they need to analyze to determine scope and impact of potential security incidents. This post includes AWS CloudFormation templates and all of the required AWS Lambda functions, so you can deploy this solution in your own environment. This post focuses primarily on two sources as the origination of the evidence collection workflow: AWS Security Hub and Amazon GuardDuty.

Why is automating forensic disk collection important?

AWS offers unique scaling capabilities in our compute environments. As you begin to increase your number of compute instances across multiple AWS accounts or organizations, you will find operational aspects of your business that must also scale. One of these critical operational tasks is the ability to quickly gather forensically sound disk and memory evidence during a security event.

During a security event, your incident response (IR) team must be able to collect and analyze evidence quickly while maintaining accuracy for the time period surrounding the event. It is both challenging and time consuming for the IR team to manually collect all of the relevant evidence in a cloud environment, across a large number of instances and accounts. Additionally, manual collection requires time that could otherwise be spent analyzing and responding to an event. Every role assumption, every console click, and every manual trigger required by the IR team, adds time for an attacker to continue to work through systems to meet their objectives.

Indicators of compromise (IoCs) are pieces of data that IR teams often use to identify potential suspicious activity within networks that might need further investigation. These IoCs can include file hashes, domains, IP addresses, or user agent strings. IoCs are used by services such as GuardDuty to help you discover potentially malicious activity in your accounts. For example, when you are alerted that an Amazon Elastic Compute Cloud (Amazon EC2) instance contains one or more IoCs, your IR team must gather a point-in-time copy of relevant forensic data to determine the root cause, and evaluate the likelihood that the finding requires action. This process involves gathering snapshots of any and all attached volumes, a live dump of the system’s memory, a capture of the instance metadata, and any logs that relate to the instance. These sources help your IR team to identify next steps and work towards a root cause.

It is important to take a point-in-time snapshot of an instance as close in time to the incident as possible. If there is a delay in capturing the snapshot, it can alter or make evidence unusable because the data has changed or been deleted. To take this snapshot quickly, you need a way to automate the collection and delivery of potentially hundreds of disk images while ensuring each snapshot is collected in the same way and without creating a bottleneck in the pipeline that could reduce the integrity of the evidence. In this blog post, I explain the details of the automated disk collection workflow, and explain why you might make different design decisions. You can download the solutions in CloudFormation, so that you can deploy this solution and get started on your own forensic automation workflows.

AWS Security Hub provides an aggregated view of security findings across AWS accounts, including findings produced by GuardDuty, when enabled. Security Hub also provides you with the ability to ingest custom or third-party findings, which makes it an excellent starting place for automation. This blog post uses EC2 GuardDuty findings collected into Security Hub as the example, but you can also use the same process to include custom detection events, or alerts from partner solutions such as CrowdStrike, McAfee, Sophos, Symantec, or others.

Infrastructure overview

The workflow described in this post automates the tasks that an IR team commonly takes during the course of an investigation.

Overview of disk collection workflow

The high-level disk collection workflow steps are as follows:

  1. Create a snapshot of each Amazon Elastic Block Store (Amazon EBS) volume attached to suspected instances.
  2. Create a folder in the Amazon Simple Storage Service (Amazon S3) evidence bucket with the original event data.
  3. Launch one Amazon EC2 instance per EBS volume, to be used in streaming a bit-for-bit copy of the EBS snapshot volume. These EC2 instances are launched without SSH key pairs, to help prevent any unintentional evidence corruption and to ensure consistent processing without user interaction. The EC2 instances use third-party tools dc3dd and incrond to trigger and process volumes.
  4. Write all logs from the workflow and instances to Amazon CloudWatch Logs log groups, for audit purposes.
  5. Include all EBS volumes in the S3 evidence bucket as raw image files (.dd), with the metadata from the automated capture process, as well as hashes for validation and verification.

Overview of AWS services used in the workflow

Another way of looking at this high-level workflow is from the service perspective, as shown in Figure 1.

Figure 1: Service workflow for forensic disk collection

Figure 1: Service workflow for forensic disk collection

The workflow in Figure 1 shows the following steps:

  1. A GuardDuty finding is triggered for an instance in a monitored account. This example focuses on a GuardDuty finding, but the initial detection source can also be a custom event, or an event from a third party.
  2. The Security Hub service in the monitored account receives the GuardDuty finding, and forwards it to the Security Hub service in the security account.
  3. The Security Hub service in the security account receives the monitored account’s finding.
  4. The Security Hub service creates an event over Amazon EventBridge for the GuardDuty findings, which is then caught by an EventBridge rule to forward to the DiskForensicsInvoke Lambda function. The following is the example event rule, which is included in the deployment. This example can be expanded or reduced to fit your use-case. By default, the example is set to disabled in CloudFormation. When you are ready to use the automation, you will need to enable it.
    {
      "detail-type": [
        "Security Hub Findings - Imported"
      ],
      "source": [
        "aws.securityhub"
      ],
      "detail": {
        "findings": {
          "ProductFields": {
            "aws/securityhub/SeverityLabel": [
              "CRITICAL",
              "HIGH",
              "MEDIUM"
            ],
            "aws/securityhub/ProductName": [
              "GuardDuty"
            ]
          }
        }
      }
    }
    

  5. The DiskForensicsInvoke Lambda function receives the event from EventBridge, formats the event, and provides the formatted event as input to AWS Step Functions workflow.
  6. The DiskForensicStepFunction workflow includes ten Lambda functions, from initial snapshot to streaming the evidence to the S3 bucket. After the Step Functions workflow enters the CopySnapshot state, it converts to a map state. This allows the workflow to have one thread per volume submitted, and ensures that each volume will be placed in the evidence bucket as quickly as possible without needing to wait for other steps to complete.
    Figure 2: Forensic disk collection Step Function workflow

    Figure 2: Forensic disk collection Step Function workflow

    As shown in Figure 2, the following are the embedded Lambda functions in the DiskForensicStepFunction workflow:

    1. CreateSnapshot – This function creates the initial snapshots for each EBS volume attached to the instance in question. It also records instance metadata that is included with the snapshot data for each EBS volume.
      Required Environmental Variables: ROLE_NAME, EVIDENCE_BUCKET, LOG_GROUP
    2. CheckSnapshot – This function checks to see if the snapshots from the previous step are completed. If not, the function retries with an exponential backoff.
      Required Environmental Variable: ROLE_NAME
    3. CopySnapshot – This function copies the initial snapshot and ensures that it is using the forensics AWS Key Management Service (AWS KMS) key. This key is stored in the security account and will be used throughout the remainder of the process.
      Required Environmental Variables: ROLE_NAME, KMS_KEY
    4. CheckCopySnapshot – This function checks to see if the snapshot from the previous step is completed. If not, the function retries with exponential backoff.
      Required Environmental Variable: ROLE_NAME
    5. ShareSnapshot – This function takes the copied snapshot using the forensics KMS key, and shares it with the security account.
      Required Environmental Variables: ROLE_NAME, SECURITY_ACCOUNT
    6. FinalCopySnapshot – This function copies the shared snapshot into the security account, as the original shared snapshot is still owned by the monitored account. This ensures that a copy is available, in case it has to be referenced for additional processing later.
      Required Environmental Variable: KMS_KEY
    7. FinalCheckSnapshot – This function checks to see if the snapshot from the previous step is completed. If not, the function fails and it retries with an exponential backoff.
    8. CreateVolume – This function creates an EBS Magnetic volume from the snapshot in the previous step. These volumes created use magnetic disks, because they are required for consistent hash results from the dc3dd process. This volume cannot use a solid state drive (SSD), because the hash would be different each time. If the EBS Magnetic volume size is greater than or equal to 500GB, then Amazon EBS switches from using standard EBS Magnetic volumes to Throughput Optimized HDD (st1) volumes.
      Required Environmental Variables: KMS_KEY, SUPPORTED_AZS
    9. RunInstance – This function launches one EC2 instance per volume, to be used in streaming the volume to the S3 bucket. The AMI passed by the environmental variable needs to be created using the provided Amazon EC2 Image Builder pipeline before deploying the environment. This function also passes some user data to the instance, artifact bucket, source volume name, and the incidentID. This information is used by the instance when placing the evidence into the S3 bucket.
      Required Environmental Variables: AMI_ID, INSTANCE_PROFILE_NAME, VPC_ID, SECURITY_GROUP
    10. CreateInstanceWait – This function creates a 30-second wait, to allow the instance some additional time to spin up.
    11. MountForensicVolume – This function checks the CloudWatch log group ForensicDiskReadiness, to see that the incrond service is running on the instance. If the incrond service is running, the function attaches the volume to the instance and then writes the final logs to the S3 bucket and CloudWatch Logs.
      Required Environmental Variable: LOG_GROUP
  7. The instance that is created has pre-built tools and scripts on it from the template below using Image Builder. This instance uses the incrond tool to monitor /dev/disk/by-label for new devices being attached to the instance. After the MountForensicVolume Lambda function attaches the volume to the instance, a file is created in the /dev/disk/by-label directory for the attached volume. The incrond daemon starts the orchestrator script, which calls the collector script. The collector script uses the dc3dd tool to stream the bit-for-bit copy of the volume to S3. After the copy has completed, the image shuts down and is terminated. All logs from the process are sent to the S3 bucket and CloudWatch Logs.

The solution provided in the post includes the CloudFormation templates you need to get started, except for creation the initial EventBridge rule (which is provided in step 4 of the previous section). The solution includes an isolated VPC, subnets, security groups, roles, and more. The VPC provided does not provide any egress through an internet gateway or NAT gateway, and that is the recommended solution. The only connectivity provided is through the S3 gateway VPC endpoint and the CloudWatch Logs interface VPC endpoint (also deployed in the template).

Deploy the CloudFormation templates

To implement the solution outlined in this post, you need to deploy three separate AWS CloudFormation templates in the order described in this section.

diskForensicImageBuilder (security account)

First, you deploy diskForensicImageBuilder in the security account. This template contains the resources and AMIs needed to create and run the Image Builder pipeline that is required to build the collector VM. This pipeline installs the required binaries, and scripts, and updates the system.

Note: diskForensicImageBuilder is configured to use the default VPC and security group. If you have added restrictions or deleted your default VPC, you will need to modify the template.

To deploy the diskForensicImageBuilder template

  1. To open the AWS CloudFormation console pre-loaded with the template, choose the following Launch Stack button.
    Select the Launch Stack button to launch the template
  2. In the AWS CloudFormation console, on the Specify Details page, enter a name for the stack.
  3. Leave all default settings in place, and choose Next to configure the stack options.
  4. Choose Next to review and scroll to the bottom of the page. Select the check box under the Capabilities section, next to of the acknowledgement:
    • I acknowledge that AWS CloudFormation might create IAM resources with custom names.
  5. Choose Create Stack.
  6. After the Image Builder pipeline has been created, on the Image pipelines page, choose Actions and select Run pipeline to manually run the pipeline to create the base AMI.

    Figure 3: Run the new Image Builder pipeline

    Figure 3: Run the new Image Builder pipeline

diskForensics (security account)

Second, you deploy diskForensics in the security account. This is a nested CloudFormation stack containing four CloudFormation templates. The four CloudFormation templates are as follows:

  1. forensicResources – This stack holds all of the foundation for the solution, including the VPC and networking components, the S3 evidence bucket, CloudWatch log groups, and collectorVM instance profile.

    Figure 4: Forensics VPC

    Figure 4: Forensics VPC

  2. forensicFunctions – This stack contains all of the Lambda functions referenced in the Step Functions workflow as well as the role used by the Lambda functions.
  3. forensicStepFunction – This stack contains the Step Functions code, the role used by the Step Functions service, and the CloudWatch log group used by the service. It also contains an Amazon Simple Notification Service (SNS) topic used to alert on pipeline failure.
  4. forensicStepFunctionInvoke – This stack contains the DiskForensicsInvoke Lambda function and the role used by that Lambda function that allows it to call the Step Function workflow.

Note: You need to have the following required variables to continue:

  • ArtifactBucketName
  • ORGID
  • ForensicsAMI

If your accounts are not using AWS Organizations, you can use a dummy string for now. It adds a condition statement to the forensics KMS key that you can update or remove later.

To deploy the diskForensics stack

  1. To open the AWS CloudFormation console pre-loaded with the template, choose the following Launch Stack button.
    Select the Launch Stack button to launch the template
  2. In the AWS CloudFormation console, on the Specify Details page, enter a name for the stack.
  3. For the ORGID field, enter the AWS Organizations ID.

    Note: If you are not using AWS organizations, leave the default string. If you are deploying as multi-account without AWS Organizations, you will need to update the KMS key policy to remove the principalOrgID condition statements, and add the correct principals.

  4. For the ArtifactBucketName field, enter the S3 bucket name you would like to use for your forensic artifacts.

    Important: The ArtifactBucketName must be a globally unique name.

  5. For the ForensicsAMI field, enter the AMI ID for the image that was created by Image Builder.
  6. For the example in this post, leave the default values for all other fields. Customizing these fields allows you to customize this code example for your own purposes.
  7. Choose Next to configure the stack options and leave all default settings in place.
  8. Choose Next to review and scroll to the bottom of the page. Select the two check boxes under the Capabilities section, next to each of the acknowledgements:
    • I acknowledge that AWS CloudFormation might create IAM resources with custom names.
    • I acknowledge that AWS CloudFormation might require the following capability: CAPABILITY_AUTO_EXPAND.
  9. Choose Create Stack.
  10. After the stack has completed provisioning, subscribe to the Amazon SNS topic to receive pipeline alerts.

diskMember (each monitored account)

Third, you deploy diskMember in each monitored account. This stack contains the role and policy that the automation workflow needs to assume, so that it can create the initial snapshots and share the snapshot with the security account. If you are deploying this solution in a single account, you deploy diskMember in the security account.

Important: Ensure that all KMS keys that could be used to encrypt EBS volumes in each monitored account grant this role the ability to CreateGrant, Encrypt, Decrypt, ReEncrypt*, GenerateDataKey*, and Describe key. The default policy grants the permissions in AWS Identity and Access Management (IAM), but any restrictive resource policies could block the ability to create the initial snapshot and decrypt the snapshot when making the copy.

To deploy the diskMember stack

  1. To open the AWS CloudFormation console pre-loaded with the template, choose the following Launch Stack button.
    Select the Launch Stack button to launch the template
    If deploying across multiple accounts, consider using AWS CloudFormation StackSets for simplified multi-account deployment.
  2. In the AWS CloudFormation console, on the Specify Details page, enter a name for the stack.
  3. For the MasterAccountNum field, enter the account number for your security administrator account.
  4. Choose Next to configure the stack options and leave all default settings in place.
  5. Choose Next to review and scroll to the bottom of the page. Select the check box under the Capabilities section, next to the acknowledgement:
    • I acknowledge that AWS CloudFormation might create IAM resources with custom names.
  6. Choose Create Stack.

Test the solution

Next, you can try this solution with an event sample to start the workflow.

To initiate a test run

  1. Copy the following example GuardDuty event. The example uses the AWS Region us-east-1, but you can update the example to use another Region. Be sure to replace the account ID 0123456789012 with the account number of your monitored account, and replace the instance ID i-99999999 with the instance ID you would like to capture.
    {
      “SchemaVersion”: “2018-10-08”,
      “Id”: “arn:aws:guardduty:us-east-1:0123456789012:detector/f2b82a2b2d8d8541b8c6d2c7d9148e14/finding/b0baa737c3bf7309db2a396651fdb500”,
      “ProductArn”: “arn:aws:securityhub:us-east-1::product/aws/guardduty”,
      “GeneratorId”: “arn:aws:guardduty:us-east-1:0123456789012:detector/f2b82a2b2d8d8541b8c6d2c7d9148e14”,
      “AwsAccountId”: “0123456789012”,
      “Types”: [
        “Effects/Resource Consumption/UnauthorizedAccess:EC2-TorClient”
      ],
      “FirstObservedAt”: “2020-10-22T03:52:13.438Z”,
      “LastObservedAt”: “2020-10-22T03:52:13.438Z”,
      “CreatedAt”: “2020-10-22T03:52:13.438Z”,
      “UpdatedAt”: “2020-10-22T03:52:13.438Z”,
      “Severity”: {
        “Product”: 8,
        “Label”: “HIGH”,
        “Normalized”: 60
      },
      “Title”: “EC2 instance i-99999999 is communicating with Tor Entry node.”,
      “Description”: “EC2 instance i-99999999 is communicating with IP address 198.51.100.0 on the Tor Anonymizing Proxy network marked as an Entry node.”,
      “SourceUrl”: “https://us-east-1.console.aws.amazon.com/guardduty/home?region=us-east-1#/findings?macros=current&fId=b0baa737c3bf7309db2a396651fdb500”,
      “ProductFields”: {
        “aws/guardduty/service/action/networkConnectionAction/remotePortDetails/portName”: “HTTP”,
        “aws/guardduty/service/archived”: “false”,
        “aws/guardduty/service/action/networkConnectionAction/remoteIpDetails/organization/asnOrg”: “GeneratedFindingASNOrg”,
        “aws/guardduty/service/action/networkConnectionAction/remoteIpDetails/Geolocation/lat”: “0”,
        “aws/guardduty/service/action/networkConnectionAction/remoteIpDetails/ipAddressV4”: “198.51.100.0”,
        “aws/guardduty/service/action/networkConnectionAction/remoteIpDetails/Geolocation/lon”: “0”,
        “aws/guardduty/service/action/networkConnectionAction/blocked”: “false”,
        “aws/guardduty/service/action/networkConnectionAction/remotePortDetails/port”: “80”,
        “aws/guardduty/service/action/networkConnectionAction/remoteIpDetails/country/countryName”: “GeneratedFindingCountryName”,
        “aws/guardduty/service/serviceName”: “guardduty”,
        “aws/guardduty/service/action/networkConnectionAction/localIpDetails/ipAddressV4”: “10.0.0.23”,
        “aws/guardduty/service/detectorId”: “f2b82a2b2d8d8541b8c6d2c7d9148e14”,
        “aws/guardduty/service/action/networkConnectionAction/remoteIpDetails/organization/org”: “GeneratedFindingORG”,
        “aws/guardduty/service/action/networkConnectionAction/connectionDirection”: “OUTBOUND”,
        “aws/guardduty/service/eventFirstSeen”: “2020-10-22T03:52:13.438Z”,
        “aws/guardduty/service/eventLastSeen”: “2020-10-22T03:52:13.438Z”,
        “aws/guardduty/service/evidence/threatIntelligenceDetails.0_/threatListName”: “GeneratedFindingThreatListName”,
        “aws/guardduty/service/action/networkConnectionAction/localPortDetails/portName”: “Unknown”,
        “aws/guardduty/service/action/actionType”: “NETWORK_CONNECTION”,
        “aws/guardduty/service/action/networkConnectionAction/remoteIpDetails/city/cityName”: “GeneratedFindingCityName”,
        “aws/guardduty/service/resourceRole”: “TARGET”,
        “aws/guardduty/service/action/networkConnectionAction/localPortDetails/port”: “39677”,
        “aws/guardduty/service/action/networkConnectionAction/protocol”: “TCP”,
        “aws/guardduty/service/count”: “1”,
        “aws/guardduty/service/additionalInfo/sample”: “true”,
        “aws/guardduty/service/action/networkConnectionAction/remoteIpDetails/organization/asn”: “-1”,
        “aws/guardduty/service/action/networkConnectionAction/remoteIpDetails/organization/isp”: “GeneratedFindingISP”,
        “aws/guardduty/service/evidence/threatIntelligenceDetails.0_/threatNames.0_”: “GeneratedFindingThreatName”,
        “aws/securityhub/FindingId”: “arn:aws:securityhub:us-east-1::product/aws/guardduty/arn:aws:guardduty:us-east-1:0123456789012:detector/f2b82a2b2d8d8541b8c6d2c7d9148e14/finding/b0baa737c3bf7309db2a396651fdb500”,
        “aws/securityhub/ProductName”: “GuardDuty”,
        “aws/securityhub/CompanyName”: “Amazon”
      },
      “Resources”: [
        {
          “Type”: “AwsEc2Instance”,
          “Id”: “arn:aws:ec2:us-east-1:0123456789012:instance/i-99999999”,
          “Partition”: “aws”,
          “Region”: “us-east-1”,
          “Tags”: {
            “GeneratedFindingInstaceTag7”: “GeneratedFindingInstaceTagValue7”,
            “GeneratedFindingInstaceTag8”: “GeneratedFindingInstaceTagValue8”,
            “GeneratedFindingInstaceTag9”: “GeneratedFindingInstaceTagValue9”,
            “GeneratedFindingInstaceTag1”: “GeneratedFindingInstaceValue1”,
            “GeneratedFindingInstaceTag2”: “GeneratedFindingInstaceTagValue2”,
            “GeneratedFindingInstaceTag3”: “GeneratedFindingInstaceTagValue3”,
            “GeneratedFindingInstaceTag4”: “GeneratedFindingInstaceTagValue4”,
            “GeneratedFindingInstaceTag5”: “GeneratedFindingInstaceTagValue5”,
            “GeneratedFindingInstaceTag6”: “GeneratedFindingInstaceTagValue6”
          },
          “Details”: {
            “AwsEc2Instance”: {
              “Type”: “m3.xlarge”,
              “ImageId”: “ami-99999999”,
              “IpV4Addresses”: [
                “10.0.0.1”,
                “198.51.100.0”
              ],
              “IamInstanceProfileArn”: “arn:aws:iam::0123456789012:example/instance/profile”,
              “VpcId”: “GeneratedFindingVPCId”,
              “SubnetId”: “GeneratedFindingSubnetId”,
              “LaunchedAt”: “2016-08-02T02:05:06Z”
            }
          }
        }
      ],
      “WorkflowState”: “NEW”,
      “Workflow”: {
        “Status”: “NEW”
      },
      “RecordState”: “ACTIVE”
    }
    

  2. Navigate to the DiskForensicsInvoke Lambda function and add the GuardDuty event as a test event.
  3. Choose Test. You should see a success for the invocation.
  4. Navigate to the Step Functions workflow to monitor its progress. When the instances have terminated, all of the artifacts should be in the S3 bucket with additional logs in CloudWatch Logs.

Expected outputs

The forensic disk collection pipeline maintains logs of the actions throughout the process, and uploads the final artifacts to the S3 artifact bucket and CloudWatch Logs. This enables security teams to send forensic collection logs to log aggregation tools or service management tools for additional integrations. The expected outputs of the solution are detailed in the following sections, organized by destination.

S3 artifact outputs

The S3 artifact bucket is the final destination for all logs and the raw disk images. For each security incident that triggers the Step Functions workflow, a new folder will be created with the name of the IncidentID. Included in this folder will be the JSON file that triggered the capture operation, the image (dd) files for the volumes, the capture log, and the resources associated with the capture operation, as shown in Figure 5.

Figure 5: Forensic artifacts in the S3 bucket

Figure 5: Forensic artifacts in the S3 bucket

Forensic Disk Audit log group

The Forensic Disk Audit CloudWatch log group contains a log of where the Step Functions workflow was after creating the initial snapshots in the CreateSnapshot Lambda function. This includes the high-level finding information, as well as the metadata for each snapshot. Also included in this log group is the completed data around each completed disk collection operation, including all associated resources and the location of the forensic evidence in the S3 bucket. The following event is an example log demonstrating a completed capture. Notice all of the metadata provided under captured snapshots. Be sure to update the example to use the correct AWS Region. Replace the account ID 0123456789012 with the account number of your monitored account, and replace the instance ID i-99999999 with the instance ID you would like to capture.

{
  "AwsAccountId": "0123456789012",
  "Types": [
    "Effects/Resource Consumption/UnauthorizedAccess:EC2-TorClient"
  ],
  "FirstObservedAt": "2020-10-22T03:52:13.438Z",
  "LastObservedAt": "2020-10-22T03:52:13.438Z",
  "CreatedAt": "2020-10-22T03:52:13.438Z",
  "UpdatedAt": "2020-10-22T03:52:13.438Z",
  "Severity": {
    "Product": 8,
    "Label": "HIGH",
    "Normalized": 60
  },
  "Title": "EC2 instance i-99999999 is communicating with Tor Entry node.",
  "Description": "EC2 instance i-99999999 is communicating with IP address 198.51.100.0 on the Tor Anonymizing Proxy network marked as an Entry node.",
  "FindingId": "arn:aws:securityhub:us-east-1::product/aws/guardduty/arn:aws:guardduty:us-east-1:0123456789012:detector/f2b82a2b2d8d8541b8c6d2c7d9148e14/finding/b0baa737c3bf7309db2a396651fdb500",
  "Resource": {
    "Type": "AwsEc2Instance",
    "Arn": "arn:aws:ec2:us-east-1:0123456789012:instance/i-99999999",
    "Id": "i-99999999",
    "Partition": "aws",
    "Region": "us-east-1",
    "Details": {
      "AwsEc2Instance": {
        "Type": "m3.xlarge",
        "ImageId": "ami-99999999",
        "IpV4Addresses": [
          "10.0.0.1",
          "198.51.100.0"
        ],
        "IamInstanceProfileArn": "arn:aws:iam::0123456789012:example/instance/profile",
        "VpcId": "GeneratedFindingVPCId",
        "SubnetId": "GeneratedFindingSubnetId",
        "LaunchedAt": "2016-08-02T02:05:06Z"
      }
    }
  },
  "EvidenceBucket": "forensic-artifact-bucket",
  "IncidentID": "b0baa737c3bf7309db2a396651fdb500",
  "CapturedSnapshots": [
    {
      "SourceSnapshotID": "snap-99999999",
      "SourceVolumeID": "vol-99999999",
      "SourceDeviceName": "/dev/xvda",
      "VolumeSize": 100,
      "InstanceID": "i-99999999",
      "FindingID": "arn:aws:securityhub:us-east-1::product/aws/guardduty/arn:aws:guardduty:us-east-1:0123456789012:detector/f2b82a2b2d8d8541b8c6d2c7d9148e14/finding/b0baa737c3bf7309db2a396651fdb500",
      "IncidentID": "b0baa737c3bf7309db2a396651fdb500",
      "AccountID": "0123456789012",
      "Region": "us-east-1",
      "EvidenceBucket": "forensic-artifact-bucket"
    }
  ]
}
{
  "SourceSnapshotID": "snap-99999999",
  "SourceVolumeID": "vol-99999999",
  "SourceDeviceName": "/dev/sdd",
  "VolumeSize": 100,
  "InstanceID": "i-99999999",
  "FindingID": "arn:aws:securityhub:us-east-1::product/aws/guardduty/arn:aws:guardduty:us-east-1:0123456789012:detector/f2b82a2b2d8d8541b8c6d2c7d9148e14/finding/b0baa737c3bf7309db2a396651fdb500",
  "IncidentID": "b0baa737c3bf7309db2a396651fdb500",
  "AccountID": "0123456789012",
  "Region": "us-east-1",
  "EvidenceBucket": "forensic-artifact-bucket",
  "CopiedSnapshotID": "snap-99999998",
  "EncryptionKey": "arn:aws:kms:us-east-1:0123456789012:key/e793cbd3-ce6a-4b17-a48f-7e78984346f2",
  "FinalCopiedSnapshotID": "snap-99999997",
  "ForensicVolumeID": "vol-99999998",
  "VolumeAZ": "us-east-1a",
  "ForensicInstances": [
    "i-99999998"
  ],
  "DiskImageLocation": "s3://forensic-artifact-bucket/b0baa737c3bf7309db2a396651fdb500/disk_evidence/vol-99999999.image.dd"
}

Forensic Disk Capture log group

The Forensic Disk Capture CloudWatch log group contains the logs from the EC2Collector VM. These logs detail the operations taken by the instance, which include when the dc3dd command was executed, what the transfer speed was to the S3 bucket, what the hash of the volume was, and how long the total operation took to complete. The log example in Figure 6 shows the output of the disk capture on the collector instance.

Figure 6: Forensic Disk Capture logs

Figure 6: Forensic Disk Capture logs

Cost and capture times

This solution may save you money over a traditional system that requires bastion hosts (jump boxes) and forensic instances to be readily available. With AWS, you pay only for the individual services you need, for as long as you use them. The cost of this solution is minimal, because charges are only incurred based on the logs or artifacts that you store in CloudWatch or Amazon S3, and the invocation of the Step Functions workflow. Additionally, resources such as the collectorVM are only created and used when needed.

This solution can also save you time. If an analyst was manually working through this workflow, it could take significantly more time than the automated solution. The following are some examples of collection times. You can see that even when the manual workflow time increases, the automated workflow time stays the same, because of how the solution scales.

Scenario 1: EC2 instance with one 8GB volume

  • Automated workflow: 11 minutes
  • Manual workflow: 15 minutes

Scenario 2: EC2 instance with four 8GB volumes

  • Automated workflow: 11 minutes
  • Manual workflow: 1 hour 10 minutes

Scenario 3: Four EC2 instances with one 8GB volume each

  • Automated workflow: 11 minutes
  • Manual workflow: 1 hour 20 minutes

Clean up and delete artifacts

To clean up the artifacts from the solution in this post, first delete all information in your artifact S3 bucket. Then delete the diskForensics stack, followed by the diskForensicImageBuilder stack, and finally the diskMember stack. You must also manually delete any EBS volumes or EBS snapshots created by the pipeline, these are not deleted automatically. You must also manually delete the AMI and images that are created and published by Image Builder.

Considerations

This solution covers EBS volume storage as the target for forensic disk capture. If your instances use Amazon EC2 Instance Stores in your environment, then you cannot snapshot and copy those volumes, because that data is not included in an EC2 snapshot operation. Instead, you should consider running the commands that are included in collector.sh script with AWS Systems Manager. The collector.sh script is included in the Image Builder recipe and uses dc3dd to stream a copy of the volume to Amazon S3.

Conclusion

Having this solution in place across your AWS accounts will enable fast response times to security events, as it helps ensure that forensic artifacts are collected and stored as quickly as possible. Download the .zip file for the solutions in CloudFormation, so that you can deploy this solution and get started on your own forensic automation workflows. For the talks describing this solution, see the video of SEC306 from Re:Invent 2020 and the AWS Online Tech Talk AWS Digital Forensics Automation at Goldman Sachs.

If you have feedback about this post, submit comments in the Comments section below. If you have questions about this post, start a new thread on the Amazon GuardDuty forum or contact AWS Support.

Want more AWS Security how-to content, news, and feature announcements? Follow us on Twitter.

Author

Matt Duda

Matt is a Senior Cloud Security Architect with AWS Professional Services. He has an extensive background in Cyber Security in the Financial Services Sector. He is obsessed with helping customers improve their ability to prevent, prepare, and respond to potential security events in AWS and utilizing automation wherever possible.

Contributor

Special thanks to Logan Bair who made significant contributions to this post.

Strengthen the security of sensitive data stored in Amazon S3 by using additional AWS services

Post Syndicated from Jerry Mullis original https://aws.amazon.com/blogs/security/strengthen-the-security-of-sensitive-data-stored-in-amazon-s3-by-using-additional-aws-services/

In this post, we describe the AWS services that you can use to both detect and protect your data stored in Amazon Simple Storage Service (Amazon S3). When you analyze security in depth for your Amazon S3 storage, consider doing the following:

Using these additional AWS services along with Amazon S3 can improve your security posture across your accounts.

Audit and restrict Amazon S3 access with IAM Access Analyzer

IAM Access Analyzer allows you to identify unintended access to your resources and data. Users and developers need access to Amazon S3, but it’s important for you to keep users and privileges accurate and up to date.

Amazon S3 can often house sensitive and confidential information. To help secure your data within Amazon S3, you should be using AWS Key Management Service (AWS KMS) with server-side encryption at rest for Amazon S3. It is also important that you secure the S3 buckets so that you only allow access to the developers and users who require that access. Bucket policies and access control lists (ACLs) are the foundation of Amazon S3 security. Your configuration of these policies and lists determines the accessibility of objects within Amazon S3, and it is important to audit them regularly to properly secure and maintain the security of your Amazon S3 bucket.

IAM Access Analyzer can scan all the supported resources within a zone of trust. Access Analyzer then provides you with insight when a bucket policy or ACL allows access to any external entities that are not within your organization or your AWS account’s zone of trust.

To setup and use IAM Access Analyzer, follow the instructions for Enabling Access Analyzer in the AWS IAM User Guide.

The example in Figure 1 shows creating an analyzer with the zone of trust as the current account, but you can also create an analyzer with the organization as the zone of trust.

Figure 1: Creating IAM Access Analyzer and zone of trust

Figure 1: Creating IAM Access Analyzer and zone of trust

After you create your analyzer, IAM Access Analyzer automatically scans the resources in your zone of trust and returns the findings from your Amazon S3 storage environment. The initial scan shown in Figure 2 shows the findings of an unsecured S3 bucket.

Figure 2: Example of unsecured S3 bucket findings

Figure 2: Example of unsecured S3 bucket findings

For each finding, you can decide which action you would like to take. As shown in figure 3, you are given the option to archive (if the finding indicates intended access) or take action to modify bucket permissions (if the finding indicates unintended access).

Figure 3: Displays choice of actions to take

Figure 3: Displays choice of actions to take

After you address the initial findings, Access Analyzer monitors your bucket policies for changes, and notifies you of access issues it finds. Access Analyzer is regional and must be enabled in each AWS Region independently.

Classify and secure sensitive data with Macie

Organizational compliance standards often require the identification and securing of sensitive data. Your organization’s sensitive data might contain personally identifiable information (PII), which includes things such as credit card numbers, birthdates, and addresses.

Macie is a data security and privacy service offered by AWS that uses machine learning and pattern matching to discover the sensitive data stored within Amazon S3. You can define your own custom type of sensitive data category that might be unique to your business or use case. Macie will automatically provide an inventory of S3 buckets and alert you of unprotected sensitive data.

Figure 4 shows a sample result from a Macie scan in which you can see important information regarding Amazon S3 public access, encryption settings, and sharing.

Figure 4: Sample results from a Macie scan

Figure 4: Sample results from a Macie scan

In addition to finding potential sensitive data, Macie also gives you a severity score based on the privacy risk, as shown in the example data in Figure 5.

Figure 5: Example Macie severity scores

Figure 5: Example Macie severity scores

When you use Macie in conjunction with AWS Step Functions, you can also automatically remediate any issues found. You can use this combination to help meet regulations such as General Data Protection Regulation (GDPR) and Health Insurance Portability and Accountability Act (HIPAA). Macie allows you to have constant visibility of sensitive data within your Amazon S3 storage environment.

When you deploy Macie in a multi-account configuration, your usage is rolled up to the master account to provide the total usage for all accounts and a breakdown across the entire organization.

Detect malicious access patterns with GuardDuty

Your customers and users can commit thousands of actions each day on S3 buckets. Discerning access patterns manually can be extremely time consuming as the volume of data increases. GuardDuty uses machine learning, anomaly detection, and integrated threat intelligence to analyze billions of events across multiple accounts and uses data collected in AWS CloudTrail logs for S3 data events as well as S3 access logs, VPC Flow Logs, and DNS logs. GuardDuty can be configured to analyze these logs and notify you of suspicious activity, such as unusual data access patterns, unusual discovery API calls, and more. After you receive a list of findings on these activities, you will be able to make informed decisions to secure your S3 buckets.

Figure 6 shows a sample list of findings returned by GuardDuty which shows the finding type, resource affected, and count of occurrences.

Figure 6: Example GuardDuty list of findings

Figure 6: Example GuardDuty list of findings

You can select one of the results in Figure 6 to see the IP address and details associated from this potential malicious IP caller, as shown in Figure 7.

Figure 7: GuardDuty Malicious IP Caller detailed findings

Figure 7: GuardDuty Malicious IP Caller detailed findings

Monitor and remediate configuration changes with AWS Config

Configuration management is important when securing Amazon S3, to prevent unauthorized users from gaining access. It is important that you monitor the configuration changes of your S3 buckets, whether the changes are intentional or unintentional. AWS Config can track all configuration changes that are made to an S3 bucket. For example, if an S3 bucket had its permissions and configurations unexpectedly changed, using AWS Config allows you to see the changes made, as well as who made them.

With AWS Config, you can set up AWS Config managed rules that serve as a baseline for your S3 bucket. When any bucket has configurations that deviate from this baseline, you can be alerted by Amazon Simple Notification Service (Amazon SNS) of the bucket being noncompliant.

AWS Config can be used in conjunction with a service called AWS Lambda. If an S3 bucket is noncompliant, AWS Config can trigger a preprogrammed Lambda function and then the Lambda function can resolve those issues. This combination can be used to reduce your operational overhead in maintaining compliance within your S3 buckets.

Figure 8 shows a sample of AWS Config managed rules selected for configuration monitoring and gives a brief description of what the rule does.

Figure 8: Sample selections of AWS Managed Rules

Figure 8: Sample selections of AWS Managed Rules

Figure 9 shows a sample result of a non-compliant configuration and resource inventory listing the type of resource affected and the number of occurrences.

Figure 9: Example of AWS Config non-compliant resources

Figure 9: Example of AWS Config non-compliant resources

Conclusion

AWS has many offerings to help you audit and secure your storage environment. In this post, we discussed the particular combination of AWS services that together will help reduce the amount of time and focus your business devotes to security practices. This combination of services will also enable you to automate your responses to any unwanted permission and configuration changes, saving you valuable time and resources to dedicate elsewhere in your organization.

For more information about pricing of the services mentioned in this post, see AWS Free Tier and AWS Pricing. For more information about Amazon S3 security, see Amazon S3 Preventative Security Best Practices in the Amazon S3 User Guide.

If you have feedback about this post, submit comments in the Comments section below.

Want more AWS Security how-to content, news, and feature announcements? Follow us on Twitter.

Author

Jerry Mullis

Jerry is an Associate Solutions Architect at AWS. His interests are in data migration, machine learning, and device automation. Jerry has previous experience in machine learning research and healthcare management. His certifications include AWS Solutions Architect Pro, AWS Developer Associate, AWS Sysops Admin Associate and AWS Certified Cloud Practitioner. In his free time, Jerry enjoys hiking, playing basketball, and spending time with his wife.

Author

Dave Geyer

Dave is an Associate Solutions Architect at AWS. He has a background in data management and organizational design, and is interested in data analytics and infrastructure security. Dave has advised and worked for customers in the commercial and public sectors, providing them with architectural best practices and recommendations. Dave is interested in the aerospace and financial services industries. Outside of work, he is an adrenaline junkie, and is passionate about mountaineering and high altitudes.

Author

Andrew Chen

Andrew is an Associate Solutions Architect with an interest in data analytics, machine learning, and virtualization of infrastructure. Andrew has previous experience in management consulting in which he worked as a technical lead for various cloud migration projects. In his free time, Andrew enjoys fishing, hiking, kayaking, and keeping up with financial markets.

How ERGO implemented an event-driven security remediation architecture on AWS

Post Syndicated from Adam Sikora original https://aws.amazon.com/blogs/architecture/how-ergo-implemented-an-event-driven-security-remediation-architecture-on-aws/

ERGO is one of the major insurance groups in Germany and Europe. Within the ERGO Group, ERGO Technology & Services S.A. (ET&S), a part of ET&SM holding, has competencies in digital transformation, know-how in creating and implementing complex IT systems with focus on the quality of solutions and a portfolio aligned with the entire value chain of the insurance market.

Business Challenge and Solution

ERGO has a multi-account AWS environment where each project team subscribes to a set of AWS accounts that conforms to workload requirements and security best practices. As ERGO began its cloud journey, CIS Foundations Benchmark Standard was used as the key indicator for measuring compliance. The report showed significant room for security posture improvements. ERGO was looking for a solution that could enable the management of security events at scale. At the same time, they needed to centralize the event response and remediation in near-real time. The goal was to improve the CIS compliance metric and overall security posture.

Architecture

ERGO uses AWS Organizations to centrally govern the multi-account AWS environment. Integration of AWS Security Hub with AWS Organizations enables ERGO to designate ERGO’s Security Account as the Security Hub administrator/primary account. Other organization accounts are automatically registered as Security Hub member accounts to send events to the Security Account.

An important aspect of the workflow is to maintain segregation of duties and separation of environments. ERGO uses two separate AWS accounts to implement automatic finding remediation:

  • Security Account – this is the primary account with Security Hub where security alerts (findings) from all the AWS accounts of the project are gathered.
  • Service Account – this is the account that can take action on target project (member) AWS accounts. ERGO uses AWS Lambda functions to run remediation actions through AWS Identity and Access Management (IAM) permissions, VPC resources actions, and more.

Within the Security Account, AWS Security Hub serves as the event aggregation solution that gathers multi-account findings from AWS services such as Amazon GuardDuty. ERGO was able to centralize the security findings. But they still needed to develop a solution that routed the filtered, actionable events to the Service Account. The solution had to automate the response to these events based on ERGO’s security policy. ERGO built this solution with the help of Amazon CloudWatch, AWS Step Functions, and AWS Lambda.

ERGO used the integration of AWS Security Hub with Amazon CloudWatch to send all the security events to CloudWatch. The filtering logic of events was managed at two levels. At the first level, ERGO used CloudWatch Events rules that match event patterns to refine the types of events ERGO wanted to focus on.

The second level of filtering logic was more nuanced and related to the remediation action ERGO wanted to take on a detected event. ERGO chose AWS Step Functions to build a workflow that enabled them to further filter the events, in addition to matching them to the suitable remediation action.

Choosing AWS Step Functions enabled ERGO to orchestrate multiple steps. They could also respond to errors in the overall workflow. For example, one of the issues that ERGO encountered was the sporadic failure of the Archival Lambda function. This was due to the Security Hub API Rate Throttling.

ERGO evaluated several workarounds to deal with this situation. They considered using the automatic retries capability of the AWS SDK to make the API call in the Archival function. However, the built-in mechanism was not sufficient in this case. Another option for dealing with rate limit was to throttle the Archival Lambda functions by applying a low reserved concurrency. Another possibility was to batch the events to be SUPPRESSED and process them as one batch at a time. The benefit was in making a single API call at a time, over several parameters.

After much consideration, ERGO decided to use the “retry on error” mechanism of the Step Function to circumvent this problem. This allowed ERGO to manage the error handling directly in the workflow logic. It wasn’t necessary to change the remediation and archival logic of the Lambda functions. This was a huge advantage. Writing and maintaining error handling logic in each one of the Lambda functions would have been time-intensive and complicated.

Additionally, the remediation actions had to be configured and run from the Service Account. That means the Step Function in the Security Account had to trigger a cross-account resource. ERGO had to find a way to integrate the Remediation Lambda in the Service Account with the state machine of the Security Account. ERGO achieved this integration using a Proxy Lambda in the Security Account.

The Proxy Lambda resides in the Security Account and is initiated by the Step Function. It takes as its argument, the function name and function version to start the Remediation function in the service account.

The Remediation functions in the Service Account have permission to take action on Project accounts. As the next step, the Remediation function is invoked on the impacted accounts. This is filtered by the Step Function, which passes the Account ID to Proxy Lambda, which in turn passes this argument to Remediation Lambda. The Remediation function runs the actions on the Project accounts and returns the output to the Proxy Lambda. This is then passed back to the Step Function.

The role that Lambda assumes using the AssumeRole mechanism, is an Organization Level role. It is deployed on every account and has proper permission to perform the remediation.

ERGO Architecture

Figure 1. Technical Solution implementation

  1. Security Hub service in ERGO Project accounts sends security findings to Administrative Account.
  2. Findings are aggregated and sent to CloudWatch Events for filtering.
  3. CloudWatch rules invoke Step Functions as the target. Step Functions process security events based on the event type and treatment required as per CIS Standards.
  4. For events that need to be suppressed without any dependency on the Project Accounts, the Step Function invokes a Lambda function to archive the findings.
  5. For events that need to be executed on the Project accounts, a Step Function invokes a Proxy Lambda with required parameters.
  6. Proxy Lambda in turn, invokes a cross-account Remediation function in Service Account. This has the permissions to run actions in Project accounts.
  7. Based on the event type, corresponding remediation action is run on the impacted Project Account.
  8. Remediation function passes the execution result back to Proxy Lambda to complete the Security event workflow.

Failed remediations are manually resolved in exceptional conditions.

Summary

By implementing this event-driven solution, ERGO was able to increase and maintain automated compliance with CIS AWS Foundation Benchmark Standard to about 95%. The remaining findings were evaluated on case basis, per specific Project requirements. This measurable improvement in ERGO compliance posture was achieved with an end-to-end serverless workflow. This offloaded any on-going platform maintenance efforts from the ERGO cloud security team. Working closely with our AWS account and service teams, ERGO will continue to evaluate and make improvements to our architecture.

How Security Operation Centers can use Amazon GuardDuty to detect malicious behavior

Post Syndicated from Darren House original https://aws.amazon.com/blogs/security/how-security-operation-centers-can-use-amazon-guardduty-to-detect-malicious-behavior/

The Security Operations Center (SOC) has a tough job. As customers modernize and shift to cloud architectures, the ability to monitor, detect, and respond to risks poses different challenges.

In this post we address how Amazon GuardDuty can address some common concerns of the SOC regarding the number of security tools and the overhead to integrate and manage them. We describe the GuardDuty service, how the SOC can use GuardDuty threat lists, filtering, and suppression rules to tune detections and reduce noise, and the intentional model used to define and categorize GuardDuty finding types to quickly give detailed information about detections.

Today, the typical SOC has between 10 and 60 tools for managing security. Some larger SOCs can have more than 100 tools, which are mostly point solutions that don’t integrate with each other.

The security market is flush with niche security tools you can deploy to monitor, detect, and respond to events. Each tool has technical and operational overhead in the form of designing system uptime, sensor deployment, data aggregation, tool integration, deployment plans, server and software maintenance, and licensing.

Tuning your detection systems is an example of a process with both technical and operational overhead. To improve your signal-to-noise ratio (S/N), the security systems you deploy have to be tuned to your environment and to emerging risks that are relevant to your environment. Improving the S/N matters for SOC teams because it reduces time and effort spent on activities that don’t bring value to an organization. Spending time tuning detection systems reduces the exhaustion factors that impact your SOC analysts. Tuning is highly technical, yet it’s also operational because it’s a process that continues to evolve, which means you need to manage the operations and maintenance lifecycle of the infrastructure and tools that you use in tuning your detections.

Amazon GuardDuty

GuardDuty is a core part of the modern FedRAMP-authorized cloud SOC, because it provides SOC analysts with a broad range of cloud-specific detective capabilities without requiring the overhead associated with a large number of security tools.

GuardDuty is a continuous security monitoring service that analyzes and processes data from Amazon Virtual Private Cloud (VPC) Flow Logs, AWS CloudTrail event logs that record Amazon Web Services (AWS) API calls, and DNS logs to provide analysis and detection using threat intelligence feeds, signatures, anomaly detection, and machine learning in the AWS Cloud. GuardDuty also helps you to protect your data stored in S3. GuardDuty continuously monitors and profiles S3 data access events (usually referred to as data plane operations) and S3 configurations (control plane APIs) to detect suspicious activities. Detections include unusual geo-location, disabling of preventative controls such as S3 block public access, or API call patterns consistent with an attempt to discover misconfigured bucket permissions. For a full list of GuardDuty S3 threat detections, see GuardDuty S3 finding types. GuardDuty integrates threat intelligence feeds from CrowdStrike, Proofpoint, and AWS Security to detect network and API activity from known malicious IP addresses and domains. It uses machine learning to identify unknown and potentially unauthorized and malicious activity within your AWS environment.

The GuardDuty team continually monitors and manages the tuning of detections for threats related to modern cloud deployments, but your SOC can use trusted IP and threat lists and suppression rules to implement your own custom tuning to fit your unique environment.

GuardDuty is integrated with AWS Organizations, and customers can use AWS Organizations to associate member accounts with a GuardDuty management account. AWS Organizations helps automate the process of enabling and disabling GuardDuty simultaneously across a group of AWS accounts that are in your control. Note that, as of this writing, you can have one management account and up to 5,000 member accounts.

Operational overhead is near zero. There are no agents or sensors to deploy or manage. There are no servers to build, deploy, or manage. There’s nothing to patch or upgrade. There aren’t any highly available architectures to build. You don’t have to buy a subscription to a threat intelligence provider, manage the influx of threat data and most importantly, you don’t have to invest in normalizing all of the datasets to facilitate correlation. Your SOC can enable GuardDuty with a single click or API call. It is a multi-account service where you can create a management account, typically in the security account, that can read all findings information from the member accounts for easy centralization of detections. When deployed in a Management/Member design, GuardDuty provides a flexible model for centralizing your enterprise threat detection capability. The management account can control certain member settings, like update intervals for Amazon CloudWatch Events, use of threat and trusted lists, creation of suppression rules, opening tickets, and automating remediations.

Filters and suppression rules

When GuardDuty detects potential malicious activity, it uses a standardized finding format to communicate the details about the specific finding. The details in a finding can be queried in filters, displayed as saved rules, or used for suppression to improve visibility and reduce analyst fatigue.

Suppress findings from vulnerability scanners

A common example of tuning your GuardDuty deployment is to use suppression rules to automatically archive new Recon:EC2/Portscan findings from vulnerability assessment tools in your accounts. This is a best practice designed to reduce S/N and analyst fatigue.

The first criteria in the suppression rule should use the Finding type attribute with a value of Recon:EC2/Portscan. The second filter criteria should match the instance or instances that host these vulnerability assessment tools. You can use the Instance image ID attribute, the Network connection remote IPv4 address, or the Tag value attribute depending on what criteria is identifiable with the instances that host these tools. In the example shown in Figure 1, we used the remote IPv4 address.

Figure 1: GuardDuty filter for vulnerability scanners

Figure 1: GuardDuty filter for vulnerability scanners

Filter on activity that was not blocked by security groups or NACL

If you want visibility into the GuardDuty detections that weren’t blocked by preventative measures such as a network ACL (NACL) or security group, you can filter by the attribute Network connection blocked = False, as shown in Figure 2. This can provide visibility into potential changes in your filtering strategy to reduce your risk.

Figure 2: GuardDuty filter for activity not blocked by security groups on NACLs

Figure 2: GuardDuty filter for activity not blocked by security groups on NACLs

Filter on specific malicious IP addresses

Some customers want to track specific malicious IP addresses to see whether they are generating findings. If you want to see whether a single source IP address is responsible for CloudTrail-based findings, you can filter by the API caller IPv4 address attribute.

Figure 3: GuardDuty filter for specific malicious IP address

Figure 3: GuardDuty filter for specific malicious IP address

Filter on specific threat provider

Maybe you want to know how many findings are generated from a threat intelligence provider or your own threat lists. You can filter by the attribute Threat list name to see if the potential attacker is on a threat list from CrowdStrike, Proofpoint, AWS, or your threat lists that you uploaded to GuardDuty.

Figure 4: GuardDuty filter for specific threat intelligence list provider

Figure 4: GuardDuty filter for specific threat intelligence list provider

Finding types and formats

Now that you know a little more about GuardDuty and tuning findings by using filters and suppression rules, let’s dive into the finding types that are generated by a GuardDuty detection. The first thing to know is that all GuardDuty findings use the following model:


ThreatPurpose:ResourceTypeAffected/ThreatFamilyName.ThreatFamilyVariant!Artifact

This model is intended to communicate core information to security teams on the nature of the potential risk, the AWS resource types that are potentially impacted, and the threat family name, variants, and artifacts of the detected activity in your account. The Threat Purpose field describes the primary purpose of a threat or a potential attempt on your environment.

Let’s take the Backdoor:EC2/C&CActivity.B!DNS finding as an example.


ThreatPurpose:ResourceTypeAffected/ThreatFamilyName.ThreatFamilyVariant!Artifact
Backdoor     :EC2                 /C&CActivity.    .B                  !DNS

The Backdoor threat purpose indicates an attempt to bypass normal security controls on a specific Amazon Elastic Compute Cloud (EC2) instance. In this example, the EC2 instance in your AWS environment is querying a domain name (DNS) associated with a known command and control (C&CActivity) server. This is a high-severity finding, because there are enough indicators that malware is on your host and acting with malicious intent.

GuardDuty, at the time of this writing, supports the following finding types:

  • Backdoor finding types
  • Behavior finding types
  • CryptoCurrency finding types
  • PenTest finding types
  • Persistence finding types
  • Policy finding types
  • PrivilegeEscalation finding types
  • Recon finding types
  • ResourceConsumption finding types
  • Stealth finding types
  • Trojan finding types
  • Unauthorized finding types

OK, now you know about the model for GuardDuty findings, but how does GuardDuty work?

When you enable GuardDuty, the service evaluates events in both a stateless and stateful manner, which allows us to use machine learning and anomaly detection in addition to signatures and threat intelligence. Some stateless examples include the Backdoor:EC2/C&CActivity.B!DNS or the CryptoCurrency:EC2/BitcoinTool.B finding types, where GuardDuty only needs to see a single DNS query, VPC Flow Log entry, or CloudTrail record to detect potentially malicious activity.

Stateful detections are driven by anomaly detection and machine learning models that identify behaviors that deviate from a baseline. The machine learning detections typically require more time to train the models and potentially use multiple events for triggering the detection.

The typical triggers for behavioral detections vary based on the log source and the detection in question. The behavioral detections learn about typical network or user activity to set a baseline, after which the anomaly detections change from a learning mode to an active mode. In active mode, you only see findings generated from these detections if the service observes behavior that suggests a deviation. Some examples of machine learning–based detections include the Backdoor:EC2/DenialOfService.Dns, UnauthorizedAccess:IAMUser/ConsoleLogin, and Behavior:EC2/NetworkPortUnusual finding types.

Why does this matter?

We know the SOC has the tough job of keeping organizations secure with limited resources, and with a high degree of technical and operational overhead due to a large portfolio of tools. This can impact the ability to detect and respond to security events. For example, CrowdStrike tracks the concept of breakout time—the window of time from when an outside party first gains unauthorized access to an endpoint machine, to when they begin moving laterally across your network. They identified average breakout times are between 19 minutes and 10 hours. If the SOC is overburdened with undifferentiated technical and operational overhead, it can struggle to improve monitoring, detection, and response. To act quickly, we have to decrease detection time and the overhead burden on the SOC caused by the numerous tools used. The best way to decrease detection time is with threat intelligence and machine learning. Threat intelligence can provide context to alerts and gives a broader perspective of cyber risk. Machine learning uses baselines to detect what normal looks like, enabling detection of anomalies in user or resource behavior, and heuristic threats that change over time. The best way to reduce SOC overhead is to share the load so that AWS services manage the undifferentiated heavy lifting, while the SOC focuses on more specific tasks that add value to the organization.

GuardDuty is a cost-optimized service that is in scope for the FedRAMP and DoD compliance programs in the US commercial and GovCloud Regions. It leverages threat intelligence and machine learning to provide detection capabilities without you having to manage, maintain, or patch any infrastructure or manage yet another security tool. With a 30-day trial period, there is no risk to evaluate the service and discover how it can support your cyber risk strategy.

If you want to receive automated updates about GuardDuty, you can subscribe to an SNS notification that will email you whenever new features and detections are released.

If you have feedback about this post, submit comments in the Comments section below. If you have questions about this post, start a new thread on the Amazon GuardDuty forum or contact AWS Support.

Want more AWS Security how-to content, news, and feature announcements? Follow us on Twitter.
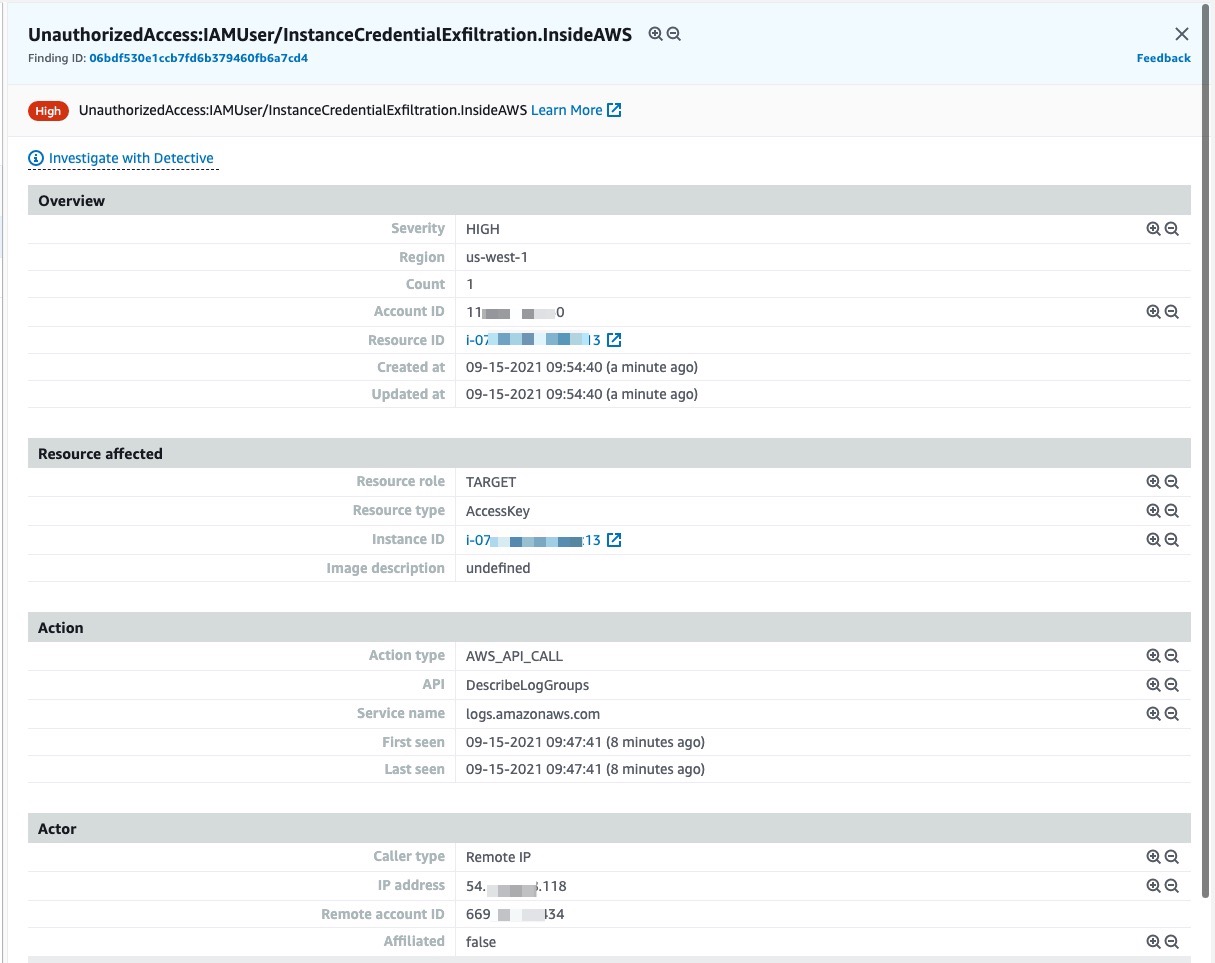
Author

Darren House

Darren brings over 20 years’ experience building secure technology architectures and technical strategies to support customer outcomes. He has held several roles including CTO, Director of Technology Solutions, Technologist, Principal Solutions Architect, and Senior Network Engineer for USMC. Today, he is focused on enabling AWS customers to adopt security services and automations that increase visibility and reduce risk.

Author

Trish Cagliostro

Trish is a leader in the security industry where she has spent 10 years advising public and private sector customers like DISA, DHS, and US Senate and commercial entities like Bank of America and United Airlines. Trish is a subject matter expert on a variety of topics, including integrating threat intelligence and has testified before the House Homeland Security Committee about information sharing.

New third-party test compares Amazon GuardDuty to network intrusion detection systems

Post Syndicated from Tim Winston original https://aws.amazon.com/blogs/security/new-third-party-test-compares-amazon-guardduty-to-network-intrusion-detection-systems/

A new whitepaper is available that summarizes the results of tests by Foregenix comparing Amazon GuardDuty with network intrusion detection systems (IDS) on threat detection of network layer attacks. GuardDuty is a cloud-centric IDS service that uses Amazon Web Services (AWS) data sources to detect a broad range of threat behaviors. Security engineers need to understand how Amazon GuardDuty compares to traditional solutions for network threat detection. Assessors have also asked for clarity on the effectiveness of GuardDuty for meeting compliance requirements, like Payment Card Industry (PCI) Data Security Standard (DSS) requirement 11.4, which requires intrusion detection techniques to be implemented at critical points within a network.

A traditional IDS typically relies on monitoring network traffic at specific network traffic control points, like firewalls and host network interfaces. This allows the IDS to use a set of preconfigured rules to examine incoming data packet information and identify patterns that closely align with network attack types. Traditional IDS have several challenges in the cloud:

  • Networks are virtualized. Data traffic control points are decentralized and traffic flow management is a shared responsibility with the cloud provider. This makes it difficult or impossible to monitor all network traffic for analysis.
  • Cloud applications are dynamic. Features like auto-scaling and load balancing continuously change how a network environment is configured as demand fluctuates.

Most traditional IDS require experienced technicians to maintain their effective operation and avoid the common issue of receiving an overwhelming number of false positive findings. As a compliance assessor, I have often seen IDS intentionally de-tuned to address the false positive finding reporting issue when expert, continuous support isn’t available.

GuardDuty analyzes tens of billions of events across multiple AWS data sources, such as AWS CloudTrail, Amazon Virtual Private Cloud (Amazon VPC) flow logs, and Amazon Route 53 DNS logs. This gives GuardDuty the ability to analyze event data, such as AWS API calls to AWS Identity and Access Management (IAM) login events, which is beyond the capabilities of traditional IDS solutions. Monitoring AWS API calls from CloudTrail also enables threat detection for AWS serverless services, which sets it apart from traditional IDS solutions. However, without inspection of packet contents, the question remained, “Is GuardDuty truly effective in detecting network level attacks that more traditional IDS solutions were specifically designed to detect?”

AWS asked Foregenix to conduct a test that would compare GuardDuty to market-leading IDS to help answer this question for us. AWS didn’t specify any specific attacks or architecture to be implemented within their test. It was left up to the independent tester to determine both the threat space covered by market-leading IDS and how to construct a test for determining the effectiveness of threat detection capabilities of GuardDuty and traditional IDS solutions which included open-source and commercial IDS.

Foregenix configured a lab environment to support tests that used extensive and complex attack playbooks. The lab environment simulated a real-world deployment composed of a web server, a bastion host, and an internal server used for centralized event logging. The environment was left running under normal operating conditions for more than 45 days. This allowed all tested solutions to build up a baseline of normal data traffic patterns prior to the anomaly detection testing exercises that followed this activity.

Foregenix determined that GuardDuty is at least as effective at detecting network level attacks as other market-leading IDS. They found GuardDuty to be simple to deploy and required no specialized skills to configure the service to function effectively. Also, with its inherent capability of analyzing DNS requests, VPC flow logs, and CloudTrail events, they concluded that GuardDuty was able to effectively identify threats that other IDS could not natively detect and required extensive manual customization to detect in the test environment. Foregenix recommended that adding a host-based IDS agent on Amazon Elastic Compute Cloud (Amazon EC2) instances would provide an enhanced level of threat defense when coupled with Amazon GuardDuty.

As a PCI Qualified Security Assessor (QSA) company, Foregenix states that they consider GuardDuty as a qualifying network intrusion technique for meeting PCI DSS requirement 11.4. This is important for AWS customers whose applications must maintain PCI DSS compliance. Customers should be aware that individual PCI QSAs might have different interpretations of the requirement, and should discuss this with their assessor before a PCI assessment.

Customer PCI QSAs can also speak with AWS Security Assurance Services, an AWS Professional Services team of PCI QSAs, to obtain more information on how customers can leverage AWS services to help them maintain PCI DSS Compliance. Customers can request Security Assurance Services support through their AWS Account Manager, Solutions Architect, or other AWS support.

We invite you to download the Foregenix Amazon GuardDuty Security Review whitepaper to see the details of the testing and the conclusions provided by Foregenix.

If you have feedback about this post, submit comments in the Comments section below. If you have questions about this post, start a new thread on the Amazon GuardDuty forum or contact AWS Support.

Want more AWS Security how-to content, news, and feature announcements? Follow us on Twitter.

Author

Tim Winston

Tim is long-time security and compliance consultant and currently a PCI QSA with AWS Security Assurance Services.