AWS recently announced that Amazon SageMaker now offers Amazon Simple Storage Service (Amazon S3) based shared storage as the default project file storage option for new Amazon SageMaker Unified Studio projects. This feature addresses the deprecation of AWS CodeCommit while providing teams with a straightforward and consistent way to collaborate on project files across the integrated development tools in SageMaker.
This new Amazon S3 storage option provides the following benefits:
Simplified collaboration – File sharing between project members directly without Git operations
Clear workspace separation – Built-in personal storage separation with Amazon Elastic Block Store (Amazon EBS) volumes
Global availability – Available in AWS Regions where SageMaker is supported
Although Amazon S3 is the default option for file storage, you can also use Git version control for more robust source control capabilities.
In this post, we discuss this new feature and how to get started using Amazon S3 shared storage in SageMaker Unified Studio.
Solution overview
When you create a new SageMaker Unified Studio domain, the service automatically configures Amazon S3 storage as your default project storage option. Each project receives a dedicated shared location in Amazon S3, accessible to project members, following the structure [bucket]/[domain-id]/[project-id]/shared/.
SageMaker tools JupyterLab and Code Editor provide the following to users:
A personal EBS volume for individual work in JupyterLab and Code Editor tools
A mounted shared folder containing the project’s Amazon S3 shared storage
Clear separation between personal and shared spaces
The shared storage is accessible across SageMaker integrated development tools:
JupyterLab and Code Editor show shared files along with personal files
Query Editor filters for relevant SQL notebooks
Visual ETL provides direct access to shared extract, transform, and load (ETL) workflows
Files saved to the shared location are immediately visible and available to project members. Users can continue working with personal files in their EBS volumes in tools like JupyterLab and Code Editor and explicitly move files to shared storage when ready to collaborate.If you want to use Git for collaboration, you can continue to do so by integrating projects with your GitHub version control, GitLab version control, or managed Bitbucket repositories.
Migration and version control options
For teams currently using Amazon CodeCommit, existing projects will remain fully functional. New projects will default to Amazon S3 storage. If you want to have version control for Amazon S3 based projects, you can enable versioning in Amazon S3 directly.
Prerequisites
You will need to complete the following prerequisites before you can follow the instructions in the next section:
To begin using Amazon S3 shared storage, complete the following steps:
Create a new SageMaker Unified Studio domain.
Create a new project (Amazon S3 storage is the default file storage option).
Open the new project and choose JupyterLab from the Build menu.
Save the new notebook you just created.
Rename the file.
After the project is saved, project users can view the saved notebook in the Project files section under the S3 path [bucket]/[domain-id]/[project-id]/shared/.
Enable version control using Git
To enable version control using Git, complete the following steps:
On the SageMaker console, create a new project profile.
Provide the necessary details for your project profile.
In the Project files storage section, the Amazon S3 option is selected by default. To enable version control for the project, you can use existing Git repository connections by selecting Git repository.
Use shared storage in Query Editor
To use the shared storage feature in Query Editor, complete the following steps:
Choose Query Editor from the Build menu.
Compose your query, and on the Actions menu, choose Save to save the query to shared storage.
Navigate back to the Project files section, where you can view the query notebook files under the S3 path [bucket]/[domain-id]/[project-id]/shared/.
Use shared storage in Visual ETL flows
To use the shared storage feature in Visual ETL flows, complete the following steps:
Choose Visual ETL flows from the Build menu.
Develop your ETL workflow and save the code to the project.
Navigate back to the Project files section, where you can view the files under the S3 path [bucket]/[domain-id]/[project-id]/shared/jobs/uploads/<ETL name>.
Clean up
Make sure you remove the SageMaker Unified Studio resources to mitigate any unexpected costs. This involves a few steps:
Delete the projects.
Delete the domain.
Delete the S3 bucket named amazon-datazone-AWSACCOUNTID-AWSREGION-DOMAINID
Conclusion
The launch of Amazon S3 shared storage in SageMaker represents another step in simplifying the analytics and machine learning (ML) development experience for our customers. By reducing the complexity of Git operations while maintaining robust collaboration capabilities, teams can now focus on building and deploying analytics and ML solutions faster. The feature is now available in Regions where SageMaker is available.
For detailed information about this feature, including setup instructions and best practices, refer to Unified storage in Amazon SageMaker Unified Studio. Share your feedback on this feature in the comments section.
In our previous blog post (Part 1 of our key replication series), Automatically replicate your card payment keys across AWS Regions, we explored an event-driven, serverless architecture using AWS PrivateLink to securely replicate card payment keys across AWS Regions. That solution demonstrated how to build a custom replication framework for payment cryptography keys.
Based on customer feedback requesting a more automated, no-code approach, we’re excited to announce an additional option to this capability with Multi-Region keys for AWS Payment Cryptography in Part 2 of our series.
By using this new feature, you can automatically synchronize payment cryptography keys from a primary Region to other Regions that you select, improving resilience and availability of payment applications. You can also choose between account-level replication or key-level replication, giving more flexibility in how to manage payment keys across Regions.
Multi-Region keys: Overview and benefits
The new Multi-Region key replication feature for AWS Payment Cryptography offers you flexible control over your key replication strategy through the following primary capabilities:
Control whether keys are replicated
Select specific Regions for key replication
Manage replication configuration changes
Configure either account-level or key-level replication to meet business needs
Multi-Region keys help deliver several benefits for global payment operations, including:
Improved availability: Access your payment keys even if a Region becomes unavailable
Disaster recovery: Maintain business continuity with replicated keys across Regions
Global operations: Support payment processing across multiple geographic regions
Simplified management: Centralized control with distributed availability
Consistent key IDs: The same key ID across Regions simplifies application development
Configuration options
Payment Cryptography provides two distinct methods for configuring Multi-Region key replication, giving flexibility to implement a strategy that best fits your organization’s needs. You can choose between a broad, account-level approach or a more granular, key-level method.
Account-level
With account-level configuration, AWS automatically replicates exportable symmetric keys created in your Payment Cryptography account from your designated primary Region to other Regions you specify. This simplifies key management in multi-Region deployments, provides consistent key availability in the Regions that you specify, and reduces the operational overhead of key management.
To configure account-level replication using the AWS Command Line Interface (AWS CLI), use the new enable-default-key-replication-regions API to set the Regions where AWS will replicate your keys. To remove Regions from your default replication list, use the disable-default-key-replication-regions API.
Note: Only symmetric keys created after the account-level replication is enabled will be replicated.
Key-level replication
By using key-level replication, you can achieve more granular control by:
Designating specific keys as multi-Region keys
Defining custom replication targets for each multi-Region key
Maintaining Region-specific keys when needed
Note: Within each Region, Payment Cryptography maintains redundancy of your keys across multiple Availability Zones for high availability. Multi-Region key replication extends across geographic boundaries, giving you additional resilience against Regional outages while maintaining control over where your keys are stored.
You can specify replication Regions during key creation using the --replication-regions parameter, using the AWS CLI, with the create-key or import-key APIs. For existing keys, you can use the new add-key-replication-regions and remove-key-replication-regions APIs to manage which regions receive your replicated keys.
Important: When you specify replication Regions during key creation, these settings take precedence over default replication Regions configured at the account level.
How it works
Figure 1 shows the process when you replicate a key in Payment Cryptography.
The key is created in your designated primary Region
Payment Cryptography automatically replicates the key material asynchronously to the specified replica Regions
The replicated keys maintain the same key ID across Regions; only the Region portion of the Amazon Resource Name (ARN) changes
The key in the primary Region is marked with MultiRegionKeyType: PRIMARY
Keys in replica Regions are marked with MultiRegionKeyType: REPLICA and include a reference to the primary Region
When deleting a key, its deletion cascades from the primary to replica Regions
Figure 1: Representation of key replication from us-east-1 to us-west-2
Example: Creating a multi-Region key at key level
The following is an example of creating a card verification key (CVK) in the primary Region (us-east-1) with replication to us-west-2:
When using multi-Region keys, several important aspects should be considered. Multi-Region key replication supports only symmetric keys with the exportable attribute enabled, and asymmetric keys are not supported. For billing purposes, AWS bills per key per Region, which means replicating to three Regions incurs costs for the primary key plus costs for each key in the replica Regions.
Key aliases and tags require separate management in each Region because they are not part of the replication process. While primary keys support modifications and updates, replica keys are read-only copies that support only cryptographic operations. Modifications must be made to the key in the primary Region, and Payment Cryptography automatically propagates these changes to the replica Regions. Monitor the replication status to confirm successful synchronization of these changes.
The deletion process for multi-Region keys follows specific behavior patterns that are important to understand. When a primary key is scheduled for deletion, associated replica keys are deleted immediately. The primary key enters a pending deletion state with a minimum 3-day waiting period, during which the deletion can be canceled. However, if you restore the primary key by canceling its deletion, you will need to re-enable replication to recreate the replica keys in your desired Regions. After the 3-day waiting period expires, the primary key is permanently deleted and becomes unrecoverable. Note that deleting a replica key affects only that specific Region and does not impact the primary key or other replica keys.
Multi-Region key replication operates with eventual consistency. When creating new keys or making changes to existing keys, these updates might not appear immediately across all Regions. Applications should be designed to handle this eventual consistency model and not assume immediate availability of keys or key changes in replica Regions. If your application requires strong consistency, implement polling mechanisms using the GetKey API to verify that changes have been synchronized before proceeding with key operations.
Logging and monitoring
Payment Cryptography logs API activity through AWS CloudTrail, which now includes new events and attributes specific to Multi-Region key replication.
New CloudTrail event
The service logs a new event type called SynchronizeMultiRegionKey, which appears in primary and replica Regions.
Primary Region events:
Two SynchronizeMultiRegionKey events are logged in the primary Region for each replication Region defined:
To start using Multi-Region key replication in Payment Cryptography:
Determine your primary Region.
Determine your replica Regions and if you will use account-level or key-level configuration.
Create new exportable symmetric keys or update existing keys to use the Multi-Region key replication feature.
Update your applications to use the consistent key IDs across Regions.
Conclusion
The new Multi-Region key replication feature in Payment Cryptography enhances our automatic key replication capabilities, providing improved resilience and simplified management for global payment applications. This feature helps make sure your payment cryptography keys are available when and where you need them, with the flexibility to choose between account-level or key-level replication strategies.
We’re pleased to announce the completion of our annual AWS Outsourced Service Provider’s Audit Report (OSPAR) audit cycle on August 7, 2025, based on the newly enhanced version 2.0 guidelines (OSPAR v2.0). AWS is the first global cloud service provider in Singapore to obtain the report using the new OSPAR v2.0 guidelines.
The Association of Banks in Singapore (ABS) established the Guidelines on Control Objectives and Procedures for Outsourced Service Providers (ABS Guidelines) to provide baseline controls criteria that outsourced service providers (OSPs) operating in Singapore should have in place. ABS enhanced the ABS Guidelines to version 2.0, which OSPs—such as AWS—need to comply with for the audit period commencing on or after January 1, 2025. The enhanced ABS Guidelines integrate key elements from the Monetary Authority of Singapore (MAS) regulatory updates on cyber hygiene, technology risk management, and business continuity management, and include new control domains such as data security, cryptography, software application development and management, and business continuity management.
The 2025 OSPAR certification cycle includes the addition of seven new services in scope, bringing the total number of services in scope to 170 in the AWS Asia Pacific (Singapore) Region. Newly added services in scope include the following:
Successfully completing the OSPAR assessment demonstrates that AWS continues to maintain a robust system of controls to meet these guidelines. This underscores our commitment to fulfill the security expectations for cloud service providers set by the financial services industry in Singapore.Customers can use OSPAR to streamline their due diligence processes, thereby reducing the effort and costs associated with compliance. OSPAR remains a core assurance program for our financial services customers because it is closely aligned with local regulatory requirements from MAS.
As always, we’re committed to bringing new services into the scope of our OSPAR program based on your architectural and regulatory needs. If you have questions about the OSPAR report, contact your AWS account team.
If you have feedback about this post, submit comments in the Comments section below.
Developers and machine learning (ML) engineers can now connect directly to Amazon SageMaker Unified Studio from their local Visual Studio Code (VS Code) editor. With this capability, you can maintain your existing development workflows and personalized integrated development environment (IDE) configurations while accessing Amazon Web Services (AWS) analytics and artificial intelligence and machine learning (AI/ML) services in a unified data and AI development environment. This integration provides seamless access from your local development environment to scalable infrastructure for running data processing, SQL analytics, and ML workflows. By connecting your local IDE to SageMaker Unified Studio, you can optimize your data and AI development workflows without disrupting your established development practices.
In this post, we demonstrate how to connect your local VS Code to SageMaker Unified Studio so you can build complete end-to-end data and AI workflows while working in your preferred development environment.
Solution overview
The solution architecture consists of three main components:
Local computer – Your development machine running VS Code with AWS Toolkit for Visual Studio Code and Microsoft Remote SSH installed. You can connect through the Toolkit for Visual Studio Code extension in VS Code by browsing available SageMaker Unified Studio spaces and selecting their target environment.
SageMaker Unified Studio – Part of the next generation of Amazon SageMaker, SageMaker Unified Studio is a single data and AI development where you can find and access your data and act on it using familiar AWS tools for SQL analytics, data processing, model development, and generative AI application development.
AWS Systems Manager – A secure, scalable remote access and management service that enables seamless connectivity between your local VS Code and SageMaker Unified Studio spaces to streamline data and AI development workflows.
The following diagram shows the interaction between your local IDE and SageMaker Unified Studio spaces.
Prerequisites
To try the remote IDE connection, you must have the following prerequisites:
Access to a SageMaker Unified Studio domain with connectivity to the internet. For domains set up in virtual private cloud (VPC)-only mode, your domain should have a route out to the internet through a proxy or a NAT gateway. If your domain is completely isolated from the internet, refer to the documentation for setting up the remote connection. If you don’t have a SageMaker Unified Studio domain, you can create one using the quick setup or manual setup option.
Access to or can create a SageMaker Unified Studio project.
A JupyterLab or Code Editor compute space with a minimum instance type requirement of 8 GB of memory. In this post, we use an ml.t3.large instance. SageMaker Distribution image version 2.8 or later is supported.
You have the latest stable VS Code with Microsoft Remote SSH (version 0.74.0 or later), and AWS Toolkit (version 3.74.0) extension installed on your local machine.
Solution implementation
To enable remote connectivity and connect to the space from VS Code, complete the following steps. To connect to a SageMaker Unified Studio space remotely, the space must have remote access enabled.
Navigate to your JupyterLab or Code Editor space. If it’s running, stop the space and choose Configure space to enable remote access, as shown in the following screenshot.
Turn on Remote access to enable the feature and choose Save and restart, as shown in the following screenshot.
Navigate to AWS Toolkit in your local VS Code installation.
On the SageMaker Unified Studio tab, choose Sign in to get started and provide your SageMaker Unified Studio domain URL, that is, https://<domain-id>.sagemaker.<region>.on.aws.
You will be prompted to be redirected to your web browser to allow access to AWS IDE extensions. Choose Open to open a new web browser tab.
Choose Allow access to connect to the project through VS Code.
You’ll receive a Request approved notification, indicating that you now have permissions to access the domain remotely.
You can now navigate back to your local VS Code to access your project to continue building ETL jobs and data pipelines, training and deploying ML models, or building generative AI applications. To connect to the project for data processing and ML development, follow these steps:
Choose Select a project to view your data and compute resources. All projects in the domain are listed, but you’re only allowed access to projects where you’re a project member.
You can only view one domain and one project at a time. To switch projects or sign out of a domain, choose the ellipsis icon.
You can also view compute and data resources that you created previously.
Connect your JupyterLab or Code Editor space by selecting the connectivity icon, as shown in the following image. Note: If this option does not show as available, then you may have remote access disabled in the space. If the space is in “Stopped” state, hover over the space and choose the connect button. This should enable remote access, start the space and connect to it. If the space is in “Running” state, the space must be restarted with remote access enabled. You can do this by stopping the space and connecting to it as shown below from the toolkit.
Another VS Code window will open that is connected to your SageMaker Unified Studio space using remote SSH.
Navigate to the Explorer to view your space’s notebooks, files, and scripts. From the AWS Toolkit, you can also view your data sources.
Use your custom VS Code setup with SageMaker Unified Studio resources
When you connect VS Code to SageMaker Unified Studio, you keep all your personal shortcuts and customizations. For example, if you use code snippets to quickly insert common analytics and ML code patterns, these continue to work with SageMaker Unified Studio managed infrastructure.
In the following graphic, we demonstrate using analytics workflow shortcuts. The “show-databases” code snippet queries Athena to show available databases, “show-glue-tables” lists tables in AWS Glue Data Catalog, and “query-ecommerce” retrieves data using Spark SQL for analysis.
You can also use shortcuts to automate building and training an ML model on SageMaker AI. In the below graphic, the code snippets show data processing, configuring, and launching a SageMaker AI training job. This approach demonstrates how data practitioners can maintain their familiar development setup while using managed data and AI resources in SageMaker Unified Studio.
Disabling remote access in SageMaker Unified Studio
As an administrator, if you want to disable this feature for your users, you can enforce it by adding the following policy to your project’s IAM role:
SageMaker Unified Studio by default shuts down idle resources such as JupyterLab and Code Editor spaces after 1 hour. If you’ve created a SageMaker Unified Studio domain for the purposes of this post, remember to delete the domain.
Conclusion
Connecting directly to Amazon SageMaker Unified Studio from your local IDE reduces the friction of moving between local development and scalable data and AI infrastructure. By maintaining your personalized IDE configurations, this reduces the need to adapt between different development environments. Whether you’re processing large datasets, training foundation models (FMs), or building generative AI applications, you can now work from your local setup while accessing the capabilities of SageMaker Unified Studio. Get started today by connecting your local IDE to SageMaker Unified Studio to streamline your data processing workflows and accelerate your ML model development.
Amazon Web Services (AWS) is announcing the availability of universal macOS installers for the AWS Command Line Interface (AWS CLI) v2.
What’s new
Starting with AWS CLI v2 version 2.30.0, the AWS CLI installers will provide universal binary support for macOS that works natively on both Apple silicon and Intel processors with a single download. This eliminates the need for Rosetta translation, a compatibility layer that enables Intel-based applications to run on Apple silicon Macs.
Updating existing AWS CLI installations
If you’re using AWS CLI v2 on an Apple-silicon Mac, we recommend you upgrade to the latest version to install native binaries.
These changes only affect the official AWS CLI installers—building the AWS CLI from source will continue to natively support the host architecture.
When building serverless applications, developers typically focus on three key areas to streamline their testing experience: unit testing, integration testing, and debugging resources running in the cloud. Although AWS Serverless Application Model Command Line Interface (AWS SAM CLI) provides excellent local unit testing capabilities for individual Lambda functions, developers working with event-driven architectures that involve multiple AWS services, such as Amazon Simple Queue Service (Amazon SQS), Amazon EventBridge, and Amazon DynamoDB, need a comprehensive solution for local integration testing. Although LocalStack provided local emulation of AWS services, developers had to previously manage it as a standalone tool, requiring complex configuration and frequent context switching between multiple interfaces, which slowed down the development cycle.
LocalStack integration in AWS Toolkit for VS Code To address these challenges, we’re introducing LocalStack integration so developers can connect AWS Toolkit for VS Code directly to LocalStack endpoints. With this integration, developers can test and debug serverless applications without switching between tools or managing complex LocalStack setups. Developers can now emulate end-to-end event-driven workflows involving services such as Lambda, Amazon SQS, and EventBridge locally, without needing to manage multiple tools, perform complex endpoint configurations, or deal with service boundary issues that previously required connecting to cloud resources.
The key benefit of this integration is that AWS Toolkit for VS Code can now connect to custom endpoints such as LocalStack, something that wasn’t possible before. Previously, to point AWS Toolkit for VS Code to their LocalStack environment, developers had to perform manual configuration and context switching between tools.
Getting started with LocalStack in VS Code is straightforward. Developers can begin with the LocalStack Free version, which provides local emulation for core AWS services ideal for early-stage development and testing. Using the guided application walkthrough in VS Code, developers can install LocalStack directly from the toolkit interface, which automatically installs the LocalStack extension and guides them through the setup process. When it’s configured, developers can deploy serverless applications directly to the emulated environment and test their functions locally, all without leaving their IDE.
Let’s try it out First, I’ll update my copy of the AWS Toolkit for VS Code to the latest version. Once, I’ve done this, I can see a new option when I go to Application Builder and click on Walkthrough of Application Builder. This allows me to install LocalStack with a single click.
Once I’ve completed the setup for LocalStack, I can start it up from the status bar and then I’ll be able to select LocalStack from the list of my configured AWS profiles. In this illustration, I am using Application Composer to build a simple serverless architecture using Amazon API Gateway, Lambda, and DynamoDB. Normally, I’d deploy this to AWS using AWS SAM. In this case, I’m going to use the same AWS SAM command to deploy my stack locally.
I just do `sam deploy –guided –profile localstack` from the command line and follow the usual prompts. Deploying to LocalStack using AWS SAM CLI provides the exact same experience I’m used to when deploying to AWS. In the screenshot below, I can see the standard output from AWS SAM, as well as my new LocalStack resources listed in the AWS Toolkit Explorer.
I can even go in to a Lambda function and edit the function code I’ve deployed locally!
Over on the LocalStack website, I can login and take a look at all the resources I have running locally. In the screenshot below, you can see the local DynamoDB table I just deployed.
Enhanced development workflow These new capabilities complement our recently launched console-to-IDE integration and remote debugging features, creating a comprehensive development experience that addresses different testing needs throughout the development lifecycle. AWS SAM CLI provides excellent local testing for individual Lambda functions, handling unit testing scenarios effectively. For integration testing, the LocalStack integration enables testing of multiservice workflows locally without the complexity of AWS Identity and Access Management (IAM) permissions, Amazon Virtual Private Cloud (Amazon VPC) configurations, or service boundary issues that can slow down development velocity.
When developers need to test using AWS services in development environments, they can use our remote debugging capabilities, which provide full access to Amazon VPC resources and IAM roles. This tiered approach frees up developers to focus on business logic during early development phases using LocalStack, then seamlessly transition to cloud-based testing when they need to validate against AWS service behaviors and configurations. The integration eliminates the need to switch between multiple tools and environments, so developers can identify and fix issues faster while maintaining the flexibility to choose the right testing approach for their specific needs.
Now available You can start using these new features through the AWS Toolkit for VS Code by updating to v3.74.0. The LocalStack integration is available in all commercial AWS Regions except AWS GovCloud (US) Regions. To learn more, visit the AWS Toolkit for VS Code and Lambda documentation.
For developers who need broader service coverage or advanced capabilities, LocalStack offers additional tiers with expanded features. There are no additional costs from AWS for using this integration.
These enhancements represent another significant step forward in our ongoing commitment to simplifying the serverless development experience. Over the past year, we’ve focused on making VS Code the tool of choice for serverless developers, and this LocalStack integration continues that journey by providing tools for developers to build and test serverless applications more efficiently than ever before.
Today, we announce the availability of a Security Technical Implementation Guide (STIG) for Amazon Linux 2023 (AL2023), developed through collaboration between Amazon Web Services (AWS) and the Defense Information Systems Agency (DISA). The STIG guidelines are important for U.S Department of Defense (DOD) and Federal customers needing strict security compliance derived from the National Institute of Standards and Technology (NIST) 800-53 and related documents. This new technical implementation guide provides detailed Operating System (OS) security hardening configurations for organizations deploying AL2023 in DOD environments and other agencies requiring DISA STIG alignment. The AL2023 STIG provides customers with access to an OS guide that complies with stringent government security standards. This guide for implementing STIG configurations will streamline security processes for organizations seeking robust cybersecurity controls, whether they are needed to maintain DOD compliance or voluntarily adopting these best security practices to enhance their security posture.
Implementing the AL2023 DISA STIG with AWS
AWS Systems Manager (SSM) and EC2 Image builder offer native solutions for implementing the AL2023 DISA STIG configurations in your environment. For customers with existing AL2023 EC2 workload, they can utilize AWS Systems Manger (SSM) to streamline the STIG implementation. For customers who would like to build STIG compliant AL2023 EC2 instances to use for deployment, they can utilize EC2 Image Builder and automate the application of the AL2023 DISA STIG.
Customers can utilize EC2 Image builder to enhance and streamline their implementation of the AL2023 DISA STIG. This integrated approach significantly reduces the operational overhead traditionally associated with maintaining STIG compliance. Therefore, our customers can focus on their core missions while maintaining the highest security standards. Our customers can use AWS EC2 Image Builder’s existing Linux hardening components, which now support AL2023 Category I, II, and III findings to automatically create STIG-compliant AL2023 EC2 images with minimal manual intervention. This automation significantly reduces the time and effort typically needed for security hardening implementations. The EC2 Image Builder Linux hardening component extends its proven capabilities to AL2023, providing the same streamlined security configuration process available for other Linux distributions. For more information, refer to the Image Builder documentation.
Automating the STIG for Existing Fleets via Systems Manager
For existing AL2023 EC2 instances, you can use AWS-managed SSM command documents to automate the implementation of the STIG configurations. . These command documents can be executed through the SSM console, API, or AWS Command Line Interface (AWS CLI). The key mechanism here is the AWS managed Systems Manager command document, which contains the pre-defined STIG configurations. By leveraging these command documents through Systems Manager execution capabilities, customers can systematically deploy and maintain AL2023 STIG configurations across their fleet of EC2 instances. This generates consistent security baselines that meet government and enterprise requirements. This solution is particularly effective for environments with existing AL2023 EC2 instances as it allows customers to implement STIG controls without rebuilding or redeploying instances. For more information about the command document, refer to Apply STIG settings with Systems Manager in the EC2 User Guide.
The AL2023 STIG represents the continued commitment of Amazon Linux to providing customers with the security tools and guidance they need to succeed in highly regulated environments. Amazon Linux, in collaboration with DISA is providing their customers with access to authoritative, government-validated security configurations that meet the most demanding compliance requirements.
Ready to implement AL2023 STIG in your environment? Explore our comprehensive documentation and begin streamlining your security compliance journey today. To learn more about STIG hardening for your EC2 instances, refer to STIG compliance for your EC2 instance and for STIG settings that are applied to EC2 Linux instances, refer to the STIG settings for EC2 Linux instances. To apply STIG settings to your AL 2023 EC2 instance, download the AL2023 DISA STIG.
Amazon Q Developer provides generative AI assistance within Amazon SageMaker Unified Studio for data discovery, data processing, SQL analytics, and machine learning workflows. Today, we are announcing improvements to the Amazon Q Developer chat experience in SageMaker Unified Studio JupyterLab integrated development environment (IDE) and adding Amazon Q Developer in the command line in JupyterLab and Code Editor IDEs. By integrating with Model Context Protocol (MCP) servers, Amazon Q Developer is aware of your SageMaker Unified Studio project resources, including data, compute, and code, and provides personalized, relevant responses for data engineering and machine learning development. You can use this improved AI assistance to setup your development environment more quickly, and for tasks like code refactoring, file modification, and troubleshooting while maintaining transparency into how the AI assistant is acting on your behalf.
Solution implementation
In this post, we will walk through how you can use the improved Amazon Q Developer chat and the new built-in Amazon Q Developer CLI in SageMaker Unified Studio for coding ETL tasks, to fix code errors, and generate ML development workflows. Both interfaces use MCP to read files, run commands, and interact with AWS services directly from the IDE. You can also configure additional MCP servers to extend Amazon Q Developer’s capabilities with custom tools and integrations specific to your workflow.
Prerequisites
Before starting this tutorial, you must have the following prerequisites:
Access to a SageMaker Unified Studio domain. If you don’t have a Unified Studio domain, you can create one using the quick setup or manual setup option.
Access to or can create a JupyterLab or Code Editor compute space. We will walk through a JupyterLab IDE example. There is no minimum instance type requirement to use the new features. In this post, we use an ml.t3.medium instance. At launch, SageMaker Distribution images 2.9 (contains Amazon Q Developer chat and Amazon Q Developer CLI) or 3.4 (contains Amazon Q Developer CLI) are required.
Uploading the dataset to an Amazon S3 bucket
Download the Diabetes 130-US hospitals dataset. This dataset contains 10 years (1999–2008) of clinical care data from 130 US hospitals and integrated delivery networks.
On the Data section in the middle of your project page, choose + on the top. This opens Add data on the right.
On Add data, choose Create table.
Select Choose file or drag and drop the diabetic_data CSV file.
Select S3/external table and complete the information in the form.
Select Next to upload the dataset.
Amazon Q Developer chat
Amazon Q Developer chat in SageMaker Unified Studio is an agentic AI assistant that automatically understands your project, including data, compute resources, and code to provide highly relevant suggestions and insights. It helps you answer questions about your project, understand complex datasets, write code, and create notebooks, making it a powerful coding companion for creating ETL workflows, building ML models, or developing generative AI applications. We will walk through user personas, data engineer and ML engineer, to show how to use the Amazon Q Developer chat to do exploratory data analysis, troubleshoot code, and perform predictive analysis. Note: Amazon Q Developer code security scanning will auto-scan the code as it is being written in the IDE and provide recommendations for remediation and in some cases a code fix as well. This helps you proactively identify and remove security vulnerabilities in your codebase, both in existing codebase and in new code as you write it in the IDE.
To launch Amazon Q Developer chat:
Navigate to your project. Access the JupyterLab IDE. At the time of launch, Amazon Q Developer chat is only available in the JupyterLab IDE.
Choose the icon on the left for Amazon Q Developer chat. If this is the first time opening, a message displays for you to acknowledge the AWS policies for responsible AI.
Enter the questions to interact with Amazon Q Developer chat. Enter over the Ask a question… line.
The following are the steps to configure additional MCP servers:
Navigate to Amazon Q Developer chat and select the Configure MCP servers tools icon in the upper right. You also have the option edit the configuration file located at /home/sagemaker-user/.aws/amazonq/agents/default.json to add an MCP sever in Amazon Q Developer chat. You can also navigate to /home/sagemaker-user/.aws/amazonq/mcp.json in the terminal and edit the configuration file to add an MCP server in Amazon Q Developer CLI.
Select the + symbol to Add new MCP server.
Add the following information in the form:
Select the scope: Global
Name: Enter awsdp-mcp
Transport: Select stdio
Command: Enteruvx
Arguments-optional: Enter awslabs.aws-dataprocessing-mcp-server@latest
Choose Save.
Data engineer
As a data engineer, you might build ETL jobs and data pipelines. Amazon Q Developer chat helps reduce setup time and improves workflow efficiency by refactoring code, implementing best practices, and troubleshooting errors. Amazon Q Developer uses AI to provide code recommendations, and this is non-deterministic. The results you get might be different from the ones shown in the following examples. Example prompt:
You are a data engineer. Your responsibility is to perform descriptive and exploratory data analysis.
* Use the diabetic_data dataset in SageMaker Lakehouse.
* Find list of connections and note down their names
* Create a notebook. Use getting_started.ipynb for best practices and as an example notebook.
* Make sure to use correct connection names in cell magic commands
* Make sure to handle missing values, perform descriptive analysis, and feature analysis.
* Create a comprehensive README.md file.
* Create a new working directory under the /src directory.
Run the following steps, after the solution is created.
Go to the notebook.
Run the created notebook and review each section:
Data loading
Descriptive analysis
Correlation matrix
Data preprocessing such as handling missing values
Analyze importance of features
Review the README.md file.
You can make changes on the created files.
You can prompt the Amazon Q Developer chat to make additional changes for you.
Fix errors without specifying the error
You can give instructions in a conversational way to Amazon Q Developer chat. Without the need to specify the error, Amazon Q Developer chat will access your notebook and fix the error.
Open your notebook.
Prompt The notebook isn’t running, can you fix it? Amazon Q Developer chat will identify the error from the notebook.
Review the issue and the solution. Run the notebook again.
ML engineer
As an ML engineer, you might analyze complex datasets and run ML experiments. You can ask Amazon Q Developer chat to take on an ML engineer role and perform a predictive ML model on the dataset. Also, you can ask to take the output from the data engineer into account. Example prompt:
You are a machine learning engineer. Your responsibility is to perform predictive machine learning model on the data. The data engineer performed exploratory analysis. Use the output from the data engineer in your notebook.
- Create a notebook to build a diabetes prediction model using Amazon SageMaker.
- Make sure to have model evaluation.
- Explain your choice for features and model selection.
- Create a comprehensive README.md file
- Do this in the working directory you created
Run the following steps, after the solution is created:
Run the created notebook and review each section:
Note that the notebook is running successfully.
Amazon Q chat incorporated feature engineering section based on data engineer’s output.
Four ML models (Logistic Regression, Random Forest, Gradient Boosting, and XGBoost) were identified for diabetes readmission prediction.
Models were evaluated using a comprehensive metrics suite including accuracy, precision, recall, F1 score, and ROC AUC to help ensure balanced performance.
Feature engineering produced critical predictors such as previous inpatient visits and medication changes, while hyperparameter tuning optimized model performance.
The final implementation balances predictive power with clinical interpretability, enabling effective identification of high-risk patients.
Amazon Q Developer CLI
The Amazon Q Developer CLI also understands your code, data, and compute resources, but is optimized for users who prefer working in the terminal. It helps you execute and automate data processing, model training, and generative AI tasks through natural language prompts.To launch the Amazon Q Developer CLI:
On the top menu of your SageMaker Unified Studio project page, choose Build, and under IDE & APPLICATIONS, choose JupyterLab.
Wait for the space to be ready.
From the Launcher tab, open a new terminal. Or navigate to File > New > Terminal.
Enter q chat
At launch, Anthropic’s Claude Sonnet 4 in Amazon Bedrock is the default large language model (LLM). You can choose other LLMs, depending on your AWS Region. To view the available models or change the models enter /model. MCP tools are executable functions that MCP servers expose to the Amazon Q Developer CLI. They enable Amazon Q Developer to perform actions, process data, and interact with external systems on your behalf. To view the available tools, enter /tools.
Example prompt:
Explore the datasets available in the project’s data catalog and do exploratory analysis.
Clean up
SageMaker Unified Studio by default shuts down idle resources such as JupyterLab and Code Editor spaces after 1 hour. However, you need to delete the Amazon Simple Storage Service (Amazon S3) bucket to stop incurring additional charges. You can delete any real-time endpoints you created using the SageMaker console. For instructions, see Delete Endpoints and Resources.
Conclusion
The improved AI assistance available in JupyterLab and Code Editor IDEs in SageMaker Unified Studio helps streamline data engineering and machine learning workflows by providing answers relevant to your project files, notebooks, data, and compute. Whether you’re a data engineer building ETL pipelines, a data scientist conducting exploratory analysis, or an ML engineer developing predictive models, these features now understand what you’re working on and help you do it more efficiently. This is just the start of our agentic journey in SageMaker Unified Studio. To learn more, review the SageMaker Unified Studio User Guide. We encourage you to explore the MCP capabilities and the AWS MCP Servers repository on GitHub.
About the authors
Lauren Mullennex is a Senior GenAI/ML Specialist Solutions Architect at AWS. She has over a decade of experience in ML, DevOps, and infrastructure. She is a published author of a book on computer vision. Outside of work, you can find her traveling and hiking with her two dogs.
Siddharth Gupta is heading Generative AI within SageMaker’s Unified Experiences. His focus is on driving agentic experiences, where AI systems act autonomously on behalf of users to accomplish complex tasks. Previously, he led edge machine learning solutions at AWS. This cutting-edge work aims to revolutionize how developers and data scientists interact with AI, creating more intuitive data integrations and powerful tools for building and deploying machine learning models. An alumnus of the University of Illinois at Urbana-Champaign, he brings extensive experience from his roles at Yahoo, Glassdoor, and Twitch. You can reach out to him on LinkedIn.
Ishneet Kaur is a Software Development Manager on the Amazon SageMaker Unified Studio team. She leads the engineering team to design and build GenAI capabilities in SageMaker Unified Studio
Mohan Gandhi is a Senior Software Engineer at AWS. He has been with AWS for the last 10 years and has worked on various AWS services like Amazon EMR, Amazon EFA, and Amazon RDS. Currently, he is focused on improving the SageMaker inference experience. In his spare time, he enjoys hiking and marathons.
Mukul Prasad is a Senior Applied Science Manager in the AWS Agentic AI organization. He leads the Data Processing Agents Science team developing DevOps agents to simplify and optimize the customer journey in using AWS Big Data processing services including Amazon EMR, AWS Glue, and Amazon SageMaker Unified Studio. Outside of work, Mukul enjoys food, travel, photography, and Cricket.
Murali Narayanaswamy is a Principal Machine Learning Scientist in the Agentic AI organization in AWS working on products including Amazon Bedrock, Amazon SageMaker Unified Studio, Amazon Redshift and Amazon RDS. His research interests lie at the intersection of AI, optimization, learning and inference particularly using them to understand, model and combat noise and uncertainty in real world applications and Reinforcement Learning in practice and at scale. Broadly, he works on using ideas from online algorithms, optimization under uncertainty, control theory, game theory, artificial intelligence, graphical models and estimation theory to solve important problems at Amazon scale.
Necibe Ahat is a Senior AI/ML Specialist Solutions Architect at AWS, working with Healthcare and Life Sciences customers. Necibe helps customers to advance their generative AI and machine learning journey. She has a background in computer science with 15 years of industry experience helping customers ideate, design, build and deploy solutions at scale. She is a passionate inclusion and diversity advocate.
Vipin Mohan is a Principal Product Manager at Amazon Web Services, where he leads generative AI product strategy. He specializes in building AI/ML products, container platforms, and search technologies that serve thousands of customers. Outside of work, he mentors aspiring product managers, enjoys reading about financial investing and entrepreneurship, and loves exploring the world through the eyes of his two kids.
Code reviews are one of the most valuable rituals in software development. They help ensure quality, maintain consistency, and foster growth as engineers. But they’re also one of the most time consuming steps in the software development lifecycle. A common pattern I’ve seen is a developer opening a pull request (PR), receiving automated or peer comments, and then needing to search through documentation, Slack threads, or past code just to understand why a change was suggested. That search for missing context creates a friction that slows teams down, adds back-and-forth cycles, and often distracts from the bigger picture of building great products.
In the initial preview experience, teams used Amazon Q Developer in GitHub across issues and PRs for feature work, automated code reviews, and common modernization tasks. This kept work inside GitHub and reduced handoffs. Automatic reviews on new or reopened PRs surfaced findings early, but teams still wanted more context and a tighter loop inside the PR.
Today we’re introducing an interactive code review experience for PRs You can ask Amazon Q Developer questions about any finding using /q, see a concise summary with threaded findings, and apply suggested changes without leaving GitHub. Code reviews by Amazon Q Developer now complete quicker than before, which reduces wait time and shortens the review cycle so teams can merge sooner and spend more time building.
What’s new and why it matters
Interactive Conversations in the pull request: Comment with /q to get inline answers, or ask Q Developer to propose a code change you can apply in the PR. For example:/q explain this finding or /q propose a change that replaces class toggles with a data attribute for state.
Code review summaries with threaded findings: Each code review begins with a concise summary and findings are threaded underneath. This makes updates easier to follow and reduces noise.
Faster execution with clearer notifications: Amazon Q Developer completes its analysis quicker and notifications are organized and easier to scan. This reduces wait time and shortens the review cycle. When you create or open a new PR, Amazon Q Developer automatically starts a code review if the code review feature is enabled for your GitHub installation in the Amazon Q Developer console. Subsequent commits do not trigger another automatic review. To run a fresh analysis, post /q review as a new comment on the PR.
Getting Started with Amazon Q Developer in GitHub
To get started, install the Amazon Q Developer GitHub App in your GitHub organization or repository. The app is available through the GitHub Marketplace and can be used without an AWS account during the preview. During installation, you choose whether to provide access to all repositories or only selected repositories in your GitHub organization. You can increase free usage by registering the app installation in the Amazon Q Developer console. For more details on installation, permissions, and configuration options, see the Amazon Q Developer for GitHub documentation. Once the app is installed, you can begin using Q Developer to review PRs automatically.
Using Amazon Q Developer in Pull Requests
To dive deeper, here’s an end-to-end walk-through of the new interactive code review experience using a simple card game I built with Amazon Q Developer.
Create a new pull request : In this example, I started by creating a feature branch and named it demo, added atailwind.css file to the JavaScript and HTML card game app, pushed the branch, and opened a PR for review.
Amazon Q Developer automaticallystarts a code review, analyzing code quality, potential issues, and adherence to best practices. A concise summary appeared at the top, with individual findings threaded underneath. This gave me the big picture and the specifics in one place.
Code review the summary and findings: I reviewed the summary and threaded findings to decide which change to take on first. Seeing both the rationale and the exact lines called out meant I knew where to begin, without hunting through files.
Ask for Clarification with /q : One of the findings suggested using state property to track the card status in my card game application. so I asked Q Developer for clarification. It responded quickly with concrete context and pointers, which reduced back and forth and improved the quality of the review.
Continue the conversation (if needed) : I reviewed Q Developer’s suggestion and responded back stating that I preferred an alternate approach and Q Developer quickly returned a complete implementation I could apply in the PR
Apply Fixes : After reviewing the implementation suggestion, I clicked on Commit suggestion to create a new commit on the PR branch with my username as the author.
Re-run the review : I didn’t need this for my example, but if you push additional changes, you can run a fresh analysis by posting /q review as a new top-level comment. Q Developer will run the review and post updated findings.
With the code review complete and checks passing, I merged. The new interactive code review experience reduced wait time and review cycles and made the “why” behind each finding and suggested change clear.
Conclusion
Amazon Q Developer for GitHub is available today in preview. Whether you are an individual developer or part of a large engineering team, this update helps you ship cleaner code with fewer cycles and makes code reviews something to look forward to rather than avoid. Try it out on your next PR. Type /q, ask a question, and see how smarter conversational reviews transform your workflow.
Security and compliance concerns are key considerations when customers across industries rely on Amazon SageMaker Catalog. Customers use SageMaker Catalog to organize, discover, and govern data and machine learning (ML) assets. A common request from domain administrators is the ability to enforce governance controls on certain metadata terms that carry compliance or policy significance. Examples include terms used to classify assets with sensitive data (such as PHI in healthcare or PCI in financial services) or terms used to trigger automatic access grants based on regulatory or organizational policies.
AWS announced restricted classification terms in SageMaker Catalog. This new capability allows domain administrators to define governance-controlled terms and enforce which teams and users are authorized to apply them. Restricted classification terms are designed to allow organizations to set standards for consistent classification of sensitive data, help prevent misuse of regulatory tags, and enable downstream workflows such as automatic access grants across the enterprise.
Restricted classification (glossary) terms
Customers have told us that the flexibility of applying glossary terms in SageMaker Catalog has been valuable for collaboration and scale. At the same time, many enterprises—especially in regulated industries—wanted an additional layer of control for certain classifications. For example, terms like PHI (Protected Health Information) in healthcare or PCI (payment card industry) in financial services should only be applied by authorized personnel, because they carry compliance and policy significance. Customers also asked for a way to enforce these governance policies without adding operational overhead. As catalogs grow to thousands of assets, forms, and columns, validating tens of thousands of terms can create performance and compliance challenges. A solution was needed to combine the openness of cataloging with governance precision for sensitive use cases.With this launch, SageMaker Catalog introduces a restricted classification terms section on each asset:
Business glossary terms (existing): Open tagging, no restrictions.
Restricted glossary terms (new): Only authorized users or groups can apply terms. Unauthorized users can view and filter assets based on these terms but not assign them.
Customer spotlight
As a large-scale organization with diverse data needs, the Business Data Technologies (BDT) team at Amazon manages thousands of assets across business units. Making sure these assets are consistently classified and governed is critical to maintaining compliance and enabling secure data sharing at scale. With restricted classification terms in SageMaker Catalog, the BDT team can now enforce which groups are authorized to apply terms, such as policy-driven classifications for merchants or payment data, while keeping discovery seamless for users.
“Restricted classification terms are instrumental in helping us scale data onboarding and governance across Amazon. By enforcing who can apply policy-related terms in the Amazon SageMaker Catalog, we’re able to accelerate consolidation of data assets across business units without compromising compliance. This facilitates consistent classification, prevents misuse, and allows us to automate downstream access grants—enabling our builders to innovate quickly while maintaining the highest standards of governance.”
– Gerry Moses, Senior Principal Technologist, Business Data Technologies, Amazon
Key benefits
With the introduction of restricted classification terms, customers gain stronger governance controls without losing the flexibility of open cataloging. This capability is designed to provide customers with the following key benefits:
Governance enforcement – Sensitive terms such as PHI or PCI can only be applied by approved users or groups, supporting compliance with organizational and regulatory policies.
Consistency at scale – Helps prevent misclassification across thousands of assets, maintaining a single source of truth for governed terms across domains and projects.
Automatic access workflows – Restricted terms can trigger downstream policies, such as auto-granting access to regulated projects or routing assets to compliance-approved environments.
Sample use case
A pharmaceutical company uses SageMaker Catalog to manage clinical trial data. They define a glossary called Regulated Data Categories with restricted terms like PHI and Genomic Data. Only compliance-approved data stewards are authorized to apply these terms to assets. When applied, the term PHI can automatically trigger policies that restrict access only to approved research groups or environments with HIPAA compliance enabled. This makes sure clinical datasets containing PHI to be consistently tagged and subject to the right access policies, while still discoverable for approved researchers.
A retail bank manages transaction and credit data in its domain catalog. They create a glossary called Data Sensitivity Levels with restricted terms like PCI and Credit Bureau Data. When an authorized risk officer classifies an asset with PCI, SageMaker Catalog can automatically grant access only to members of the bank’s Payments Compliance project. Other users, such as analysts in marketing, can see the classification exists but cannot apply or override it. This approach helps prevent accidental misuse of sensitive financial terms while automating secure access grants aligned with regulatory requirements.
Solution overview
In this section, we will walk through how to create and apply restricted classification terms.
Prerequisites
To follow this post, you should have an Amazon SageMaker Unified Studio domain set up with a domain owner or domain unit owner privileges. You should also have existing projects or permissions to create new projects and business glossaries. For instructions to create them, see the Getting started guide. In this post, we created a project named Clinical Study Trials.
Create a restricted business glossary
In this step, a compliance officer creates a new glossary called Regulated Data Categories and marks it as restricted. Usage grants are given to the Clinical Data Stewardship project.
Log in to your Amazon SageMaker Unified Studio (off-console) portal. Select the project, navigate to Business Glossaries tab and choose Create Glossary.
Enter a name and description for the glossary. Select Restrict this glossary for governed term use and choose Add projects.
Select the projects that should have permissions to tag governed terms to assets. Choose Add policy grant.
Choose Create to create the restricted business glossary.
The Regulated Data Categories business glossary is created and ready to populate.
Add restricted business glossary terms
In this step you will add two terms: PHI and Genomic Data to the glossary.
Choose Create term.
Enter a Name and Description. Turn on Enabled and choose Create term.
Follow the same steps to add the second term and both terms should be available in the glossary.
Apply restricted glossary terms to classify assets
In this step, a data steward will publish a new asset and apply the restricted terms.
Go to the Data Steward project and navigate to the asset where Restricted Terms should be tagged and choose Add terms.
From Regulated Data Categories select PHI and Genomic Data and choose Add terms.
Restricted terms are attached to the asset.
If a project that doesn’t have grants to use restricted term tries to attach restricted terms, you would receive the error Unable to apply restricted terms.
Search and discovery
Data consumers can search for assets and filter by restricted terms filters on the left filters tab (for example, PHI or PCI) to discover governed assets.
As customers expand their use of SageMaker Catalog, the need for governance becomes clear. From our work with customers in healthcare, life sciences, and financial services, we learned that organizations value the flexibility of open cataloging but need precise controls for terms that carry compliance or policy weight.
Restricted classification terms are designed to bring the best of both worlds: Flexibility for builders to continue tagging and discovering assets, and governance precision to help ensure that sensitive classifications are applied consistently. This capability lays the foundation for future enhancements such as column-level governance and deeper integration with enterprise data governance services. By balancing openness with control, SageMaker Catalog continues to help customers organize, govern, and scale their data and ML assets with confidence.
In March 2025, AWS announced the general availability of the next generation of Amazon SageMaker, including Amazon SageMaker Unified Studio, a single data and AI development environment that brings together the functionality and tools from existing AWS Analytics and AI/ML services, including Amazon EMR, AWS Glue, Amazon Athena, Amazon Redshift, Amazon Bedrock, and Amazon SageMaker AI. You can discover data and AI assets from across your organization, then work together in projects to securely build and share analytics and AI artifacts, including data, models, and generative AI applications in a trusted and secure environment. Governance features including fine-grained access control are built into Amazon SageMaker Unified Studio using Amazon SageMaker Catalog to help you meet enterprise security requirements across your entire data estate. Unified access to your data is provided by a unified, open, and secure data lakehouse architecture built on Apache Iceberg open standards. Whether your data is stored in Amazon Simple Storage Service (Amazon S3) data lakes, Amazon Redshift data warehouses, or third-party and federated data sources, you can access it from one place and use it with Iceberg-compatible engines and tools.
AWS for Financial Services is a pioneer at the intersection of financial services and technology, enabling our customers to optimize operations and push the boundaries of innovation with the broadest set of services and partner solutions—all while maintaining security, compliance, and resilience at scale. Financial institutions are using AI and machine learning (ML), and generative AI services on AWS to transform their organizations faster and in ways never before possible. With Amazon SageMaker Unified Studio, financial services industry (FSI) customers can seamlessly work across different compute resources and clusters using unified notebooks, including generative AI–powered troubleshooting capabilities, and use the built-in SQL editor to query data stored in data lakes, data warehouses, databases, and applications.
Workshops
In this post, we’re excited to announce the release of four Amazon SageMaker Unified Studio publicly available workshops that are specific to each FSI segment: insurance, banking, capital markets, and payments. These workshops can help you learn how to deploy Amazon SageMaker Unified Studio effectively for business use cases. Follow the links for each FSI use case listed in the following table to get started for these self-paced workshops.
In this workshop, you’ll use Amazon SageMaker Unified Studio and analytics services to transform your insurance business challenges into opportunities. It provides hands-on experience in developing data-driven, generative AI–powered solutions for insurance that deliver measurable business value.
In this workshop, you’ll explore how leading retail banks can unlock business value by using Amazon SageMaker Unified Studio to build, scale, and govern end-to-end data analytics and ML workflows. The workshop walks you through a reference architecture and curated banking-specific datasets covering common retail banking use cases, such as customer segmentation, fraud detection, churn prediction, and generative AI applications like personalized communication.
In this workshop, you’ll use Amazon SageMaker Unified Studio to analyze trade and quote data for the S&P 500 stocks to generate insights. The data is stored in various formats across different sources. This solution will unify the data from disparate sources using a lakehouse architecture and offer team members flexibility to access the data using familiar SQL constructs.
In this workshop, you’ll use Amazon SageMaker Unified Studio and analytics services to enable organizations to ingest, store, process, and analyze payment data, supporting needs from data ingestion and storage to big data analytics, streaming analytics, business intelligence, and machine learning.
Conclusion
We appreciate your comments and feedback to help us accelerate adoption of Amazon SageMaker Unified Studio for financial services workloads. Contact your AWS account team to engage a FSI specialist solutions architect if you require additional expert guidance.
Learn more about AWS for financial services, customer case studies, and additional resources on our Financial Services website.
Efficiently integrating and analyzing Salesforce data is essential in today’s business environment. AWS GlueZero ETL (extract, transform, and load) now supports SalesforceBulk API, delivering substantial performance gains compared to Salesforce REST API for large-scale data integration for targets such as Amazon SageMaker lakehouse and Amazon Redshift. You can use this enhancement to process millions of Salesforce records in minutes while efficiently handling wide-column entities with hundreds of fields. In this blog post, we show you how to use Zero-ETL powered by AWS Glue with Salesforce Bulk API to accelerate your data integration processes.
Zero-ETL represents a modern approach to data integration that eliminates the need for traditional ETL processes by establishing direct connections between data sources and destinations. Rather than explicitly extracting data, transforming it, and loading it in separate steps, Zero-ETL handles these operations in the background. Zero-ETL enables direct integration with software as a service (SaaS) applications like Salesforce, automatically synchronizing data while maintaining consistency and eliminating the complexity of manual ETL pipeline development. This approach reduces development time, maintenance overhead, and the potential for errors in data movement processes.
Solution overview
Traditionally, Zero-ETL used Salesforce REST API for data ingestion. While the REST API provides a straightforward way to interact with Salesforce data, it comes with certain limitations, especially when dealing with large datasets. These include request limits, data volume constraints, performance overhead, and concurrency limitations. As of August 2025, depending on the Salesforce edition and license type, you might be limited to between 15,000 and 100,000 API calls per 24-hour period. When retrieving large volumes of data, multiple API calls are required, leading to inefficiency and extended processing times.
To address these limitations and enhance performance, AWS Glue Zero-ETL now supports Salesforce Bulk API. The Bulk API is designed for processing large datasets, offering several advantages over the REST API. It uses asynchronous processing, so you can process much larger data volumes without timing out. Data is processed in batches, which can be parallelized for faster processing. As of August 2025, the Bulk API also has more generous limits; up to 150,000,000 API calls, which is 15,000 batches, per 24-hour period, with each batch containing up to 10,000 records. The following diagram shows a Salesforce Zero-ETL architecture ingesting data through Salesforce Bulk and REST APIs and writing to Amazon SageMaker Lakehouse (in Amazon Simple Storage Service (Amazon S3) or Apache Iceberg) or Amazon Redshift.
The diagram illustrates the Zero-ETL data flow from Salesforce to AWS analytics services. Salesforce data is ingested using smart API processing, which intelligently selects between Bulk API for standard fields and REST API for compound fields. This approach is necessary because, as of now, the Salesforce Bulk API does not support compound fields (such as Address). Therefore, you must use the REST API in such cases for comprehensive data extraction. The solution supports Salesforce wide-column entities containing up to 800 fields, enabling comprehensive data integration. The processed data is then staged in an S3 bucket owned by the service team before being made available in the AWS Glue Data Catalog or Amazon Redshift, ready for analytics and machine learning applications.
AWS Glue Zero-ETL now uses the Salesforce Bulk API by default for most data integration scenarios, delivering superior performance and scalability. This approach optimizes data extraction for most use cases, particularly when dealing with large datasets. However, the solution automatically switches to the REST API when handling compound fields. Compound fields, such as addresses (which include street, city, state, postal code, and country), are automatically processed using the REST API.This intelligent API selection provides efficient processing while maintaining the performance benefits of the Bulk API for standard data extraction. This hybrid approach provides the best of both worlds: the scalability and throughput of the Bulk API for most operations, with the specialized handling capabilities of the REST API where it makes the most sense. The system handles this switch automatically, so you don’t need to worry about which API to use for different scenarios.
Performance details
After implementing Salesforce Bulk API support in AWS Glue Zero-ETL, you can see significant performance improvements that scale dramatically with data volume. To test performance benefits, we created a custom object in our Salesforce account and populated it with 10 million records. We then established a Zero-ETL integration between Salesforce and AWS Glue databases to measure data transfer performance. The most impressive gains are evident with large-scale operations: processing 10 million records now completes in 6 minutes and 20 seconds compared to 28 minutes and 53 seconds with the REST API—representing a 4.6-fold improvement in processing time in our controlled testing environment, as shown in the following figure. Performance improvements can vary depending on factors such as data volume, field complexity, network conditions, and computational resources.
Multi-entity processing scenarios, where four different Salesforce objects are processed simultaneously, demonstrate the solution’s scalability. Even with this concurrent load, 1 million records across multiple entities complete processing in under 3 minutes, showcasing the Bulk API’s superior handling of real-world data integration scenarios, as shown in the following figure.
This performance pattern demonstrates that the Bulk API’s asynchronous, batch-oriented architecture delivers exceptional results when handling the large-scale data volumes that enterprises typically encounter in production Salesforce integrations. The performance advantage scales directly with data volume, making it particularly valuable for organizations processing millions of records in their daily operations. As dataset size increases, the efficiency gains become increasingly pronounced, establishing the Bulk API as the optimal choice for enterprise-scale data processing requirements.Beyond the impressive performance gains with large datasets, our recent enhancements have also unlocked another critical capability: efficient processing of wide-column entities. Our performance benchmarks demonstrate this capability in action, with custom objects containing up to 800 columns and 226 KB record sizes processing in just 2 minutes and 11 seconds, while entities with 500 columns and 140 KB records complete in 2 minutes and 3 seconds, and 100-column entities with 28 KB records process in 1 minute and 56 seconds (shown in the following figure). This remarkable consistency across varying column counts and record sizes demonstrates that Zero-ETL from SaaS applications maintains excellent performance while efficiently ingesting and processing these wide-column entities, which means that you can use your complete Salesforce datasets for analytics and machine learning initiatives.
Impact
The performance improvements, demonstrated by AWS Glue Zero-ETL with Salesforce Bulk API support, offer tangible benefits for businesses managing large volumes of Salesforce data. As mentioned earlier, our controlled testing, demonstrated a 4.6-fold improvement over the REST API when processing 10 million records. With these results, you can significantly reduce your data integration time windows. This faster processing allows for more frequent data updates, potentially enabling you to work with fresher data for your analytics and reporting needs. Additionally, the efficient handling of wide-column entities, such as processing custom objects with up to 800 columns in just over 2 minutes, means that you can more readily use your complete Salesforce datasets without sacrificing performance.
Prerequisites
Before implementing this solution, you need to have the following in place:
A Salesforce Enterprise, Unlimited, or Performance Edition account
An AWS account with administrator access
Create an AWS Glue database with a name such as zero_etl_bulk_demo_db and associate the S3 bucket zeroetl-etl-bulk-demo-bucket as a location of the database.
Create an AWS Identity and Access Management (IAM) role named zero_etl_bulk_role. The IAM role will be used by Zero-ETL to access data from your Saleforce account
Create the secret zero_etl_bulk_demo_secret in AWS Secrets Manager to store Salesforce credentials.
Build and verify the zero-ETL integration
This section covers the steps required to set up a Salesforce connection and using that connection to create a Zero-ETL integration.
Step 1: Set up a connector to your Salesforce instance to enable data access
In the navigation pane, under Data catalog, choose Zero-ETL integrations.
Choose Create zero-ETL integration.
In the Create integration pane, enter Salesforce in Data Sources.
Choose Salesforce.
Choose Next.
Select the connection name that you created in the previous step.
Select the IAM role which you created in the previous step.
For Salesforce object, select the objects you want to perform the ingestion managed by Zero-ETL integration. For this post, select Opportunity.
For Namespace or Database In this example, we use the zero_etl_bulk_demo_db (from the prerequisites).
For Target IAM role, select the zero_etl_demo_role (from the prerequisites).
Choose Next.
In the Integration details section, for Name, enter zero-etl-bulk-demo-integration.
Choose Next.
Review the details and choose Create and launch integration.
The newly created integration will show as Active in about a minute.
Clean up
Note that following these steps will permanently delete the resources created in this post; back up any important data before proceeding.
Delete the Zero-ETL integration zero-etl-bulk-demo-integration.
Delete content from the S3 bucket zeroetl-etl-bulk-demo-bucket.
Delete the Data Catalog database zero_etl_bulk_demo_db.
Delete the Data Catalog connection zero_etl_bulk_demo_conn.
Delete the Secrets Manager secret zero_etl_bulk_demo_secret.
Conclusion
The integration of Salesforce Bulk API support in AWS Glue Zero-ETL marks a significant advancement in our data integration capabilities. By addressing the limitations of the REST API, efficiently handling wide-column entities and compound fields, and implementing robust error handling, you can now use AWS Glue Zero-ETL to ingest larger volumes of Salesforce data more efficiently.This enhancement improves performance and opens up new possibilities for your organization to use their Salesforce data for analytics, machine learning, and other data-driven initiatives. As we continue to evolve AWS Glue Zero-ETL, we remain committed to providing cutting-edge solutions that empower our customers to make the most of their data integration processes.
Summer has drawn to a close here in Utrecht, where I live in the Netherlands. In two weeks, I’ll be attending AWS Community Day 2025, hosted at the Kinepolis Jaarbeurs Utrecht on September 24. The single-day event will bring together over 500 cloud practitioners from across the Netherlands, featuring 25 breakout sessions across five technical tracks. The day will begin with virtual keynotes at 9:00 AM, followed by parallel breakout sessions focused on practical implementations of serverless architectures and container optimization strategies, providing valuable insights regardless of experience level.
Last year’s AWS Community Day Netherlands 2024 brought together a diverse group of cloud practitioners, speakers, and AWS enthusiasts who contributed to making the community-led conference a valuable knowledge-sharing platform. If you’re planning to attend, feel free to find me there to discuss AWS services or share your cloud implementation experiences!
Let’s look at last week’s new announcements.
Last week’s launches
AWS Transform assessments now includes detached storage analysis – AWS Transform has expanded its assessment capabilities to analyze on-premises detached storage infrastructure, helping customers determine migration total cost of ownership (TCO). The assessment now evaluates Storage Area Network (SAN), Network Attached Storage (NAS), file servers, object storage, and virtual environments, providing migration recommendations to appropriate AWS services including Amazon S3, Amazon EBS, and Amazon FSx. The tool delivers a comprehensive TCO comparison between current and AWS environments, along with performance and cost optimization recommendations. With storage accounting for up to 45% of total migration opportunities, this enhancement helps customers visualize various AWS migration options. AWS Transform assessment is available in US East (N. Virginia) and Europe (Frankfurt) Regions.
Amazon Bedrock introduces Global Cross-Region inference for Anthropic Claude Sonnet 4 – Anthropic’s Claude Sonnet 4 model in Amazon Bedrock now supports Global cross-Region inference, allowing inference requests to route to any supported commercial AWS Region for processing. This enhancement optimizes available resources and enables higher model throughput by distributing traffic across multiple Regions. Previously, you could select cross-Region inference profiles tied to specific geographies (US, EU, or APAC). The new Global cross-Region inference profile provides additional flexibility for generative AI use cases that don’t require geography-specific processing, helping manage unplanned traffic bursts and increase model throughput. For detailed implementation guidance, visit the Amazon Bedrock documentation.
Amazon Neptune Database adds Public Endpoints support – Amazon Neptune now supports Public Endpoints, enabling direct connections to Neptune databases from outside the VPC without complex networking configurations. This feature helps developers securely access their graph databases from development desktops without requiring VPN connections or bastion hosts, while maintaining security through IAM authentication, VPC security groups, and encryption in transit. Public Endpoints can be enabled for Neptune clusters running engine version 1.4.6 or above through the AWS Management Console, AWS CLI, or AWS SDK. The feature is available at no additional cost beyond standard Neptune pricing in all AWS Regions where Neptune Database is offered. Implementation details are available in the Amazon Neptune documentation.
ECS Exec now available in AWS Management Console – Amazon ECS now supports ECS Exec directly in the AWS Management Console, enabling secure, interactive shell access to running containers without requiring inbound ports or SSH key management. Previously available only through API, CLI, or SDKs, this feature streamlines troubleshooting by allowing container access directly from the console interface. You can enable ECS Exec when creating or updating services and standalone tasks, then connect to containers by selecting “Connect” on the task details page, which opens an interactive session through CloudShell. The console also displays the underlying AWS CLI command for use in local terminals. This feature is available in all AWS commercial Regions and documented in the ECS developer guide.
Organizational Notification Configurations for AWS User Notifications now generally available – AWS User Notifications now supports Organizational Notification Configurations, helping AWS Organizations users centrally configure and view notifications across their organization. Management accounts or delegated administrators can configure notifications for specific organizational units or all accounts in an organization. The service supports configuring notifications for any supported Amazon EventBridge event, such as console sign-ins without MFA, with notifications appearing in the admin’s Console Notifications Center and AWS Console Mobile Application. User Notifications supports up to five delegated administrators and is available in all AWS Regions where AWS User Notifications is offered. For implementation details, visit the AWS User Notifications user guide.
Upcoming AWS events Check your calendar and sign up for upcoming AWS events.
AWS Summits – Join free online and in-person events that bring the cloud computing community together to connect, collaborate, and learn about AWS. Register in your nearest city: Zurich (September 11), Los Angeles (September 17), and Bogotá (October 9).
AWS re:Invent 2025 – Join us in Las Vegas between December 1–5 as cloud pioneers gather from across the globe for the latest AWS innovations, peer-to-peer learning, expert-led discussions, and invaluable networking opportunities. Don’t forget to explore the event catalog.
AWS Community Days – Join community-led conferences that feature technical discussions, workshops, and hands-on labs led by expert AWS users and industry leaders from around the world: Baltic (September 10), Aotearoa (September 18), South Africa (September 20), Bolivia (September 20), Portugal (September 27).
Encryption of both data at rest and in transit is a non-negotiable feature for most organizations. Furthermore, organizations operating in highly regulated and security-sensitive environments—such as those in the financial sector—often require full control over the cryptographic keys used for their workloads.
Amazon Managed Service for Apache Flink makes it straightforward to process real-time data streams with robust security features, including encryption by default to help protect your data in transit and at rest. The service removes the complexity of managing the key lifecycle and controlling access to the cryptographic material.
If you need to retain full control over your key lifecycle and access, Managed Service for Apache Flink now supports the use of customer managed keys (CMKs) stored in AWS Key Management Service (AWS KMS) for encrypting application data.
This feature helps you manage your own encryption keys and key policies, so you can meet strict compliance requirements and maintain complete control over sensitive data. With CMK integration, you can take advantage of the scalability and ease of use that Managed Service for Apache Flink offers, while meeting your organization’s security and compliance policies.
In this post, we explore how the CMK functionality works with Managed Service for Apache Flink applications, the use cases it unlocks, and key considerations for implementation.
Data encryption in Managed Service for Apache Flink
In Managed Service for Apache Flink, there are multiple aspects where data should be encrypted:
Data at rest directly managed by the service – Durable application storage (checkpoints and snapshots) and running application state storage (disk volumes used by RocksDB state backend) are automatically encrypted
Data in transit internal to the Flink cluster – Automatically encrypted using TLS/HTTPS
Data in transit to and at rest in external systems that your Flink application accesses – For example, an Amazon Managed Streaming for Apache Kafka (Amazon MSK) topic through the Kafka connector or calling an endpoint through a custom AsyncIO); encryption depends on the external service, user settings, and code
For data at rest managed by the service, checkpoints, snapshots, and running application state storage are encrypted by default using AWS owned keys. If your security requirements require you to directly control the encryption keys, you can use the CMK held in AWS KMS.
Key components and roles
To understand how CMKs work in Managed Service for Apache Flink, we first need to introduce the components and roles involved in managing and running an application using CMK encryption:
Customer managed key (CMK):
Resides in AWS KMS within the same AWS account as your application
Has an attached key policy that defines access permissions and usage rights to other components and roles
Encrypts both durable application storage (checkpoints and snapshots) and running application state storage
Managed Service for Apache Flink application:
The application whose storage you want to encrypt using the CMK
The execution role doesn’t have to provide any specific permissions to use the CMK for encryption operations
Key administrator:
Manages the CMK lifecycle (creation, rotation, policy updates, and so on)
Can be an IAM user or IAM role, and used by a human operator or by automation
Requires administrative access to the CMK
Permissions are defined by the attached IAM policies and the key policy
Application operator:
Manages the application lifecycle (start/stop, configuration updates, snapshot management, and so on)
Can be an IAM User or IAM role, and used by a human operator or by automation
Requires permissions to manage the Flink application and use the CMK for encryption operations
Permissions are defined by the attached IAM policies and the key policy
The following diagram illustrates the solution architecture.
Enabling CMK following the principle of least privilege
When deploying applications in production environments or handling sensitive data, you should follow the principle of least privilege. CMK support in Managed Service for Apache Flink has been designed with this principle in mind, so each component receives only the minimum permissions necessary to function.
For detailed information about the permissions required by the application operator and key policy configurations, refer to Key management in Amazon Managed Service for Apache Flink. Although these policies might appear complex at first glance, this complexity is intentional and necessary. For more details about the requirements for implementing the most restrictive key management possible while maintaining functionality, refer to Least-privilege permissions.
For this post, we highlight some important points about CMK permissions:
Application execution role – Requires no additional permissions to use a CMK. You don’t need to change the permissions of an existing application; the service handles CMK operations transparently during runtime.
Application operator permissions – The operator is the user or role who controls the application lifecycle. For the permissions required to operate an application that uses CMK encryption, refer to Key management in Amazon Managed Service for Apache Flink. In addition to these permissions, an operator normally has permissions on actions with the kinesisanalytics prefix. It is a best practice to restrict these permissions to a specific application defining the Resource. The operator must also have the iam:PassRole permission to pass the service execution role to the application.
To simplify managing the permissions of the operator, we recommend creating two separate IAM policies, to be attached to the operator’s role or user:
A base operator policy defining the basic permissions to operate the application lifecycle without a CMK
An additional CMK operator policy that adds permissions to operate the application with a CMK
The following IAM policy example illustrates the permissions that should be included in the base operator policy:
Separating these two policies has an additional benefit of simplifying the process of setting up an application for the CMK, due to the dependencies we illustrate in the following section.
Dependencies between the key policy and CMK operator policy
If you carefully observe the operator’s permissions and the key policy explained in Create a KMS key policy, you will notice some interdependencies, illustrated by the following diagram.
In particular, we highlight the following:
CMK key policy dependencies – The CMK policy requires references to both the application Amazon Resource Name (ARN) and the key administrator or operator IAM roles or users. This policy must be defined at key creation time by the key administrator.
IAM policy dependencies – The operator’s IAM policy must reference both the application ARN and the CMK key itself. The operator role is responsible for various tasks, including configuring the application to use the CMK.
To properly follow the principle of least privilege, each component requires the others to exist before it can be correctly configured. This necessitates a carefully orchestrated deployment sequence.
In the following section, we demonstrate the precise order required to resolve these dependencies while maintaining security best practices.
Sequence of operations to create a new application with a CMK
When deploying a new application that uses CMK encryption, we recommend following this sequenced approach to resolve dependency conflicts while maintaining security best practices:
Create the operator IAM role or user with a base policy that includes application lifecycle permissions. Do not include CMK permissions at this stage, because the key doesn’t exist yet.
The operator creates the application using the default AWS owned key. Keep the application in a stopped state to prevent data creation—there should be no data at rest to encrypt during this phase.
Create the key administrator IAM role or user, if not already available, with permissions to create and manage KMS keys. Refer to Using IAM policies with AWS KMS for detailed permission requirements.
The key administrator creates the CMK in AWS KMS. At this point, you have the required components for the key policy: application ARN, operator IAM role or user ARN, and key administrator IAM role or user ARN.
The operator can now modify the application configuration using the UpdateApplication action, to enable CMK encryption, as illustrated in the following section.
The application is now ready to run with all data at rest encrypted using your CMK.
When setting up CMK encryption in a production environment, you will probably use an automation tool rather than the console. These tools eventually use the AWS API under the hood, and the UpdateApplication action of the kinesisanalyticsv2 API in particular. In this post, we analyze the additions to the API that you can use to control the encryption configuration.
An additional top-level block ApplicationEncryptionConfigurationUpdate has been added to the UpdateApplication request payload. With this block, you can enable and disable the CMK.
You must add the following block to the UpdateApplication request:
Theoretically, you can enable the CMK directly when you first create the application using the CreateApplication action.
A top-level block ApplicationEncryptionConfiguration has been added to the CreateApplication request payload, with a syntax similar to UpdateApplication.
However, due to the interdependencies described in the previous section, you will most often create an application with the default AWS owned key and later use UpdateApplication to enable the CMK.
If you omit ApplicationEncryptionConfiguration when you create the application, the default behavior is using the AWS owned key, for backward compatibility.
Sample CloudFormation templates to create IAM roles and the KMS key
The process you use to create the roles and key and configure the application to use the CMK will vary, depending on the automation you use and your approval and security processes. Any automation example we can provide will likely not fit your processes or tooling.
However, the following GitHub repository provides some example CloudFormation templates to generate some of the IAM policies and the KMS key with the correct key policy:
IAM policy for the key administrator – Allows managing the key
Base IAM policy for the operator – Allows managing the normal application lifecycle operations without the CMK
CMK IAM policy for the operator – Provides additional permissions required to manage the application lifecycle when the CMK is enabled
KMS key policy – Allows the application to encrypt and decrypt the application state and the operator to manage the application operations
CMK operations
We have described the process of creating a new Managed Service for Apache Flink application with CMK. Let’s now examine other common operations you can perform.
Changes to the encryption key become effective when the application is restarted. If you update the configuration of a running application, this causes the application to restart and the new key to be used immediately. Conversely, if you change the key of a READY (not running) application, the new key is not actually used until the application is restarted.
Enable a CMK on an existing application
If you have an application running with an AWS owned key, the process is similar to what we described for creating new applications. In this case, you already have a running application state and older snapshots that are encrypted using the AWS owned key.
Also, if you have a running application, you probably already have an operator role with an IAM policy that you can use to control the operator lifecycle.
The sequence of steps to enable a CMK on an existing and running application is as follows:
If you don’t already have one, create a key administrator IAM role or user with permissions to create and manage keys in AWS KMS. See Using IAM policies with AWS KMS for more details about the permissions required to manage keys.
The key administrator creates the CMK. The key policy references the application ARN, the operator’s ARN, and the key administrator’s role or user ARN.
Create an additional IAM policy that allows the use of the CMK and attach this policy to the operator. Alternatively, modify the operator’s existing IAM policy by adding these permissions.
Finally, the operator can update the application and enable the CMK.The following diagram illustrates the process that occurs when you execute an UpdateApplication action on the running application to enable a CMK.
The workflow consists of the following steps:
When you update the application to set up the CMK, the following happens:
The application running state, at the moment it is encrypted with the AWS owned key, is saved in a snapshot while the application is stopped. This snapshot is encrypted with the default AWS owned key. The running application state storage is volatile and destroyed when the application is stopped.
The application is redeployed, restoring the snapshot into the running application state.
The running application state storage is now encrypted with the CMK.
New snapshots created from this point on are encrypted using the CMK.
You will probably want to delete all the old snapshots, including the one created automatically by the UpdateApplication that enabled the CMK, because they are all encrypted using the AWS owned key.
Rotate the encryption key
As with any cryptographic key, it’s a best practice to rotate the key periodically for enhanced security. Managed Service for Apache Flink does not support AWS KMS automatic key rotation, so you have two primary options for rotating your CMK.
Option 1: Create a new CMK and update the application
The first approach involves creating an entirely new KMS key and then updating your application configuration to use the new key. This method provides a clean separation between the old and new encryption keys, making it easier to track which data was encrypted with which key version.
Let’s assume you have a running application using CMK#1 (the current key) and want to rotate to CMK#2 (the new key) for enhanced security:
Prerequisites and preparation – Before initiating the key rotation process, you must update the operator’s IAM policy to include permissions for both CMK#1 and CMK#2. This dual-key access supports uninterrupted operation during the transition period. After the application configuration has been successfully updated and verified, you can safely remove all permissions to CMK#1.
Application update process – The UpdateApplication operation used to configure CMK#2 automatically triggers an application restart. This restart mechanism makes sure both the application’s running state and any newly created snapshots are encrypted using the new CMK#2, providing immediate security benefits from the updated encryption key.
Important security considerations – Existing snapshots, including the automatic snapshot created during the CMK update process, remain encrypted with the original CMK#1. For complete security hygiene and to minimize your cryptographic footprint, consider deleting these older snapshots after verifying that your application is functioning correctly with the new encryption key.
This approach provides a clean separation between old and new encrypted data while maintaining application availability throughout the key rotation process.
Option 2: Rotate the key material of the existing CMK
The second option is to rotate the cryptographic material within your existing KMS key. For a CMK used for Managed Service for Apache Flink, we recommend using on-demand key material rotation.
The benefit of this approach is simplicity: no change is required to the application configuration nor to the operator’s IAM permissions.
Important security considerations
The new encryption key is used by the Managed Service for Apache Flink application only after the next application restart. To make the new key material effective, immediately after the rotation, you need to stop and start using snapshots to preserve the application state or execute an UpdateApplication, which also forces a stop-and-restart. After the restart, you should consider deleting the old snapshots, including the one taken automatically in the last stop-and-restart.
Switch back to the AWS owned key
At any time, you can decide to switch back to using an AWS owned key. The application state is still encrypted, but using the AWS owned key instead of your CMK.
If you are using the UpdateApplication API or AWS CLI command to switch back to CMK, you must explicitly pass ApplicationEncryptionConfigurationUpdate, setting the key type to AWS_OWNED_KEY as shown in the following snippet:
When you execute UpdateApplication to switch off the CMK, the operator must still have permissions on the CMK. After the application is successfully running using the AWS owned key, you can safely remove any CMK-related permissions from the operator’s IAM policy.
Test the CMK in development environments
In a production environment—or an environment containing sensitive data—you should follow the principle of least privilege and apply the restrictive permissions described so far.
However, if you want to experiment with CMKs in a development setting, such as using the console, strictly following the production process might become cumbersome. In these environments, the roles of key administrator and operator are often filled by the same person.
For testing purposes in development environments, you might want to use a permissive key policy like the following, so you can freely experiment with CMK encryption:
This policy must never be used in an environment containing sensitive data, and especially not in production.
Common caveats and pitfalls
As discussed earlier, this feature is designed to maximize security and promote best practices such as the principle of least privilege. However, this focus can introduce some corner cases you should be aware of.
The CMK must be enabled for the service to encrypt and decrypt snapshots and running state
With AWS KMS, you can disable one key at any time. If you disable the CMK while the application is running, it might cause unpredictable failures. For example, an application will not be able to restore a snapshot if the CMK used to encrypt that snapshot has been disabled. For example, if you attempt to roll back an UpdateApplication that changed the CMK, and the previous key has since been disabled, you might not be able to restore from an old snapshot. Similarly, you might not be able to restart the application from an older snapshot if the corresponding CMK is disabled.
If you encounter these scenarios, the solution is to reenable the required key and retry the operation.
The operator requires permissions to all keys involved
To perform an action on the application (such as Start, Stop, UpdateApplication, or CreateApplicationSnapshot), the operator must have permissions for all CMKs involved in that operation. AWS owned keys don’t require explicit permission.
Some operations implicitly involve two CMKs—for example, when switching from one CMK to another, or when switching from a CMK to an AWS owned key by disabling the CMK. In these cases, the operator must have permissions for both keys for the operation to succeed.
The same rule applies when rolling back an UpdateApplication action that involved multiple CMKs.
A new encryption key takes effect only after restart
A new encryption key is only used after the application is restarted. This is important when you rotate the key material for a CMK. Rotating the key material in AWS KMS doesn’t require updating the Managed Flink application’s configuration. However, you must restart the application as a separate step after rotating the key. If you don’t restart the application, it will continue to use the old encryption key for its running state and snapshots until the next restart.
For this reason, it is recommended not to enable automatic key rotation for the CMK. When automatic rotation is enabled, AWS KMS might rotate the key material at any time, but your application will not start using the new key until it is next restarted.
CMKs are only supported with Flink runtime 1.20 or later
CMKs are only supported when you are using the Flink runtime 1.20 or later. If your application is currently using an older runtime, you should upgrade to Flink 1.20 first. Managed Service for Apache Flink makes it straightforward to upgrade your existing application using the in-place version upgrade.
Conclusion
Managed Service for Apache Flink provides robust security by enabling encryption by default, protecting both the running state and persistently saved state of your applications. For organizations that require full control over their encryption keys (often due to regulatory or internal policy needs), the ability to use a CMK integrated with AWS KMS offers a new level of assurance.
By using CMKs, you can tailor encryption controls to your specific compliance requirements. However, this flexibility comes with the need for careful planning: the CMK feature is intentionally designed to enforce the principle of least privilege and strong role separation, which can introduce complexity around permissions and operational processes.
In this post, we reviewed the key steps for enabling CMKs on existing applications, creating new applications with a CMK, and managing key rotation. Each of these processes gives you greater control over your data security but also requires attention to access management and operational best practices.
Kia ora! Today, I’m pleased to share the general availability of the AWS Asia Pacific (New Zealand) Region with three Availability Zones and API name ap-southeast-6. With the new Region, customers can now run workloads and securely store data in New Zealand while serving end users with even lower latency.
The new AWS Asia Pacific (New Zealand) Region will help organizations run their applications and serve end users while maintaining data residency in New Zealand. The NZD $7.5 billion Amazon Web Services (AWS) investment to establish an AWS Region in New Zealand is expected to contribute NZD $10.8 billion to New Zealand’s gross domestic product (GDP) which is estimated to create 1,000 new jobs annually and will enable Kiwi organizations of all sizes to innovate and scale faster using the most secure and resilient infrastructure.
AWS in New Zealand Since we opened our first office in New Zealand in 2013, we’ve been continuously expanding our infrastructure to better serve Kiwi customers:
Connectivity to the global AWS network – In 2016, AWS enhanced New Zealand’s connectivity to the AWS Global Infrastructure by establishing diverse, high-capacity subsea cable connections, improving network reliability and performance for customers.
Amazon CloudFront – In 2020, AWS expanded its infrastructure footprint in New Zealand by adding two Amazon CloudFront edge locations in Auckland.
AWS Local Zones – To further enhance its infrastructure offerings in New Zealand, AWS introduced an AWS Local Zone in Auckland in 2023 helping customers deliver applications that require single-digit millisecond latency.
AWS Direct Connect – In the same year, AWS also added a Direct Connect location in Auckland to help customers securely link their on-premises networks to AWS resulting in lower networking costs and improved application performance. With this Region launch, AWS is adding another Direct Connect location in Auckland.
Let’s take a look at how AWS customers are leveraging AWS capabilities for diverse needs.
Security and compliance The New Zealand government has a cloud first policy to encourage cloud adoption across the public sector. AWS supports 143 security standards and compliance certifications, including Payment Card Industry Data Security Standard (PCI DSS), Health Insurance Portability and Accountability Act (HIPAA) and Health Information Technology for Economic and Clinical Health (HITECH), Federal Risk and Authorization Management Program (FedRAMP), General Data Protection Regulation (GDPR), Federal Information Processing Standard (FIPS) 140-3, and National Institute of Standards and Technology (NIST) 800-171, helping customers satisfy compliance requirements around the globe and providing a secure cloud infrastructure.
MATTR, a New Zealand-based organization providing infrastructure and digital trust services to businesses and governments, sees significant benefits from the new Region. To learn more about how MATTR and other organizations like Kiwibank and Deloitte plan to use the AWS New Zealand Region, visit this news article.
Accelerating AI innovation in New Zealand AWS delivers the most comprehensive set of capabilities for generative AI at every layer of the stack, including a choice of cutting-edge large language models (LLMs) for implementing generative AI with Amazon Bedrock, and the most capable generative AI assistant to transform how work gets done with Amazon Q.
New Zealand customers are already benefiting from the generative AI capabilities offered by AWS.
Thematic is a New Zealand-based global leader in customer intelligence and feedback analysis. Thematic uses generative AI to turn customer feedback data from multiple channels into curated, accurate, and reliable customer intelligence.
“Using Amazon Bedrock is just so incredibly easy that it just makes sense. Whenever we design a solution, we do test more than 10 large language models (LLMs). Consistently the ones offered by AWS are winning those competitions,” said Nathan Holmberg, CTO and Co-Founder, Thematic.
To learn more on other customers like One NZ utilized generative AI, visit this article.
Building cloud skills together Since signing a memorandum of understanding (MoU) with the New Zealand government in 2022, Amazon has trained more than 50,000 Kiwis toward our goal of 100,000. Amazon is committed to continuing to invest in cloud education through programs including AWS Academy, AWS Skills Builder, AWS Educate, and AWS re/Start. Organizations are using AWS to scale globally while investing in local talent development, supporting New Zealand’s growing demand for cloud expertise.
Xero, a global small business platform helps customers supercharge their business by bringing together the most important small business tools, including accounting, payroll and payments — on one platform. Leveraging AWS since 2016, Xero has scaled its platform globally, enhancing its features and enabling continual innovation.
“Amazon’s commitment to the New Zealand tech industry through their NZD $7.5B investment is promising. It’s a significant vote of confidence that will help connect New Zealand tech exporters with new global opportunities across the AWS ecosystem and the broader Amazon network,” says Bridget Snelling, Xero Country Manager, Aotearoa New Zealand.
Sustainable digital transformation Through The Climate Pledge, Amazon is committed to reaching net-zero carbon across its business by 2040. AWS is committed to supporting New Zealand’s sustainability goals with efficient and responsible operations of its data centers in the country. The AWS Asia Pacific (New Zealand) Region is underpinned by renewable energy from day one through its agreement with Mercury New Zealand.
Energy companies are using AWS to modernize operations while advancing sustainability goals. Sharesies, a wealth development platform, is using AWS to modernize operations while advancing sustainability goals.
“Sharesies is very supportive of storing customer data in-country and being able to use renewable energy, “ says Sharesies Chief Technical Officer Richard Clark. “To do this in New Zealand on the AWS Cloud and have it fully powered by Mercury’s wind energy is a huge step forward. And very exciting!”
AWS partners in New Zealand The AWS Partner Network (APN) in New Zealand includes a growing ecosystem of consulting and technology partners helping customers of all sizes design, architect, build, migrate, and manage their workloads on AWS. AWS Partners like Custom D, Grant Thornton Digital, MongoDB, and Parallo are actively supporting customers to deliver innovative solutions tailored to the unique needs of New Zealand organizations across various industries. With the new Region, these partners can now leverage the full capabilities of AWS cloud services locally.
AWS community in New Zealand New Zealand is also home to one AWS Hero, 26 AWS Community Builders, 6 AWS User Groups and almost 9,000 community members across AWS User Groups in Auckland, Wellington, and Christchurch. If you’re interested in joining AWS User Groups New Zealand, visit their Meetup and social media pages.
Here’s what our AWS Hero Arshad Zackeriya, says about the new Region:
“The launch of the AWS Region in New Zealand is a game-changer for our country. It’s not just about a new set of data centers; it’s about unlocking the potential of New Zealand’s businesses and developer communities, allowing us to build a better, more connected Aotearoa for all.”
Available now The AWS Asia Pacific (New Zealand) Region is the first infrastructure Region in New Zealand and sixteenth Region in Asia Pacific. With this launch, AWS now spans 120 Availability Zones within 38 geographic Regions around the world, with announced plans for 10 more Availability Zones and three more AWS Regions in the Kingdom of Saudi Arabia, Chile, and the European Sovereign Cloud.
The Amazon SageMakerlakehouse architecture has expanded its tag-based access control (TBAC) capabilities to include federated catalogs. This enhancement extends beyond the default AWS Glue Data Catalog resources to encompass Amazon S3 Tables, Amazon Redshift data warehouses. TBAC is also supported on federated catalogs from data sources Amazon DynamoDB, MySQL, PostgreSQL, SQL Server, Oracle, Amazon DocumentDB, Google BigQuery, and Snowflake. TBAC provides you a sophisticated permission management that uses tags to create logical groupings of catalog resources, enabling administrators to implement fine-grained access controls across their entire data landscape without managing individual resource-level permissions.
Traditional data access management often requires manual assignment of permissions at the resource level, creating significant administrative overhead. TBAC solves this by introducing an automated, inheritance-based permission model. When administrators apply tags to data resources, access permissions are automatically inherited, eliminating the need for manual policy modifications when new tables are added. This streamlined approach not only reduces administrative burden but also enhances security consistency across the data ecosystem.
TBAC can be set up through the AWS Lake Formation console, and accessible using Amazon Redshift, Amazon Athena, Amazon EMR, AWS Glue, and Amazon SageMaker Unified Studio. This makes it valuable for organizations managing complex data landscapes with multiple data sources and large datasets. TBAC is especially beneficial for enterprises implementing data mesh architectures, maintaining regulatory compliance, or scaling their data operations across multiple departments. Furthermore, TBAC enables efficient data sharing across different accounts, making it easier to maintain secure collaboration.
In this post, we illustrate how to get started with fine-grained access control of S3 Tables and Redshift tables in the lakehouse using TBAC. We also show how to access these lakehouse tables using your choice of analytics services, such as Athena, Redshift, and Apache Spark in Amazon EMR Serverless in Amazon SageMaker Unified Studio.
Solution overview
For illustration, we consider a fictional company called Example Retail Corp, as covered in the blog post Accelerate your analytics with Amazon S3 Tables and Amazon SageMaker Lakehouse. Example Retail’s leadership has decided to use the SageMaker lakehouse architecture to unify data across S3 Tables and their Redshift data warehouse. With this lakehouse architecture, they can now conduct analyses across their data to identify at-risk customers, understand the impact of personalized marketing campaigns on customer churn, and develop targeted retention and sales strategies.
Alice is a data administrator with the AWS Identity and Access Management (IAM) role LHAdmin in Example Retail Corp, and she wants to implement tag-based access control to scale permissions across their data lake and data warehouse resources. She is using S3 Tables with Iceberg transactional capability to achieve scalability as updates are streamed across billions of customer interactions, while providing the same durability, availability, and performance characteristics that S3 is known for. She already has a Redshift namespace, which contains historical and current data about sales, customers prospects, and churn information. Alice supports an extended team of developers, engineers, and data scientists who require access to the data environment to develop business insights, dashboards, ML models, and knowledge bases. This team includes:
Bob, a data steward with IAM role DataSteward, is the domain owner and manages access to the S3 Tables and warehouse data. He enables other teams who build reports to be shared with leadership.
Charlie, a data analyst with IAM role DataAnalyst, builds ML forecasting models for sales growth using the pipeline or customer conversion across multiple touchpoints, and makes those available to finance and planning teams.
Doug, a BI engineer with IAM role BIEngineer, builds interactive dashboards to funnel customer prospects and their conversions across multiple touchpoints, and makes those available to thousands of sales team members.
Alice decides to use the SageMaker lakehouse architecture to unify data across S3 Tables and Redshift data warehouse. Bob can now bring his domain data into one place and manage access to multiple teams requesting access to his data. Charlie can quickly build Amazon QuickSight dashboards and use his Redshift and Athena expertise to provide quick query results. Doug can build Spark-based processing with AWS Glue or Amazon EMR to build ML forecasting models.
Alice’s goal is to use TBAC to make fine-grained access much more scalable, because they can grant permissions on many resources at once and permissions are updated accordingly when tags for resources are added, changed, or removed.The following diagram illustrates the solution architecture.
Alice as Lakehouse admin and Bob as Data Steward determines that following high-level steps are needed to deploy the solution:
Create an S3 Tables bucket and enable integration with the Data Catalog. This will make the resources available under the federated catalog s3tablescatalog in the lakehouse architecture with Lake Formation for access control. Create a namespace and a table under the table bucket where the data will be stored.
Create a Redshift cluster with tables, publish your data warehouse to the Data Catalog, and create a catalog registering the namespace. This will make the resources available under a federated catalog in the lakehouse architecture with Lake Formation for access control.
Delegate permissions to create tags and grant permissions on Data Catalog resources to DataSteward.
As DataSteward, define tag ontology based on the use case and create Tags. Assign these LF-Tags to the resources (database or table) to logically group lakehouse resources for sharing based on access patterns.
Share the S3 Tables catalog table and Redshift table using tag-based access control to DataAnalyst, who uses Athena for analysis and Redshift Spectrum for generating the report.
Share the S3 Tables catalog table and Redshift table using tag-based access control to BIEngineer, who uses Spark in EMR Serverless to further process the datasets.
Data steward defines the tags and assignment to resources as shown:
Create an IAM role named DataSteward and attach permissions for AWS Glue and Lake Formation access. For instructions, refer to Data lake administrator permissions.
Create an IAM role named DataAnalyst and attach permissions for Amazon Redshift and Athena access. For instructions, refer to Data analyst permissions.
Create an IAM role named BIEngineer and attach permissions for Amazon EMR access. This is also the EMR runtime role that the Spark job will use to access the tables. For instructions on the role permissions, refer to Job runtime roles for EMR serverless.
In the navigation pane, under Data Catalog, choose Catalogs. Under Pending catalog invitations, you will see the invitation initiated from the Redshift Serverless namespace salescluster.
Select the pending invitation and choose Approve and create catalog.
Provide a name for the catalog. For example, redshift_salescatalog.
Under Access from engines, select Access this catalog from Iceberg-compatible engines and choose RedshiftS3DataTransferRole for IAM role.
Choose Next.
Choose Add permissions.
Under Principals, choose the LHAdmin role for IAM users and roles, choose Super user for Catalog permissions, and choose Add.
Choose Create catalog.After you create the catalog redshift_salescatalog, you can inspect the sub-catalog dev, namespace and database sales, and table store_sales underneath it.
Alice has now completed creating an S3table catalog table and Redshift federated catalog table in the Data Catalog.
Delegate LF-Tags creation and resource permission to the DataSteward role
Alice completes the following steps to delegate LF-Tags creation and resource permission to Bob as DataSteward:
In the navigation pane, choose LF Tags and permissions, then choose the LF-Tag creators tab.
Choose Add LF-Tag creators.
Choose DataSteward for IAM users and roles.
Under Permission, select Create LF-Tag and choose Add.
In the navigation pane, choose Data permissions, then choose Grant.
In the Principals section, for IAM users and roles, choose the DataSteward role.
In the LF-Tags or catalog resources section, select Named Data Catalog resources.
Choose <account_id>:s3tablescatalog/tbacblog-customer-bucket and <account_id>:redshift_salescatalog/dev for Catalogs.
In the Catalog permissions section, select Super user for permissions.
Choose Grant.
You can verify permissions for DataSteward on the Data permissions page.
Alice has now completed delegating LF-tags creation and assignment permissions to Bob, the DataSteward. She had also granted catalog level permissions to Bob.
Create LF-Tags
Bob as DataSteward completes the following steps to create LF-Tags:
In the navigation pane, choose LF Tags and permissions, then choose the LF-tags tab.
Choose Add-LF-Tag.
Create LF tags as follows:
Key: Domain and Values: sales, marketing
Key: Sensitivity and Values: true, false
Assign LF-Tags to the S3 Tables database and table
Bob as DataSteward completes the following steps to assign LF-Tags to the S3 Tables database and table:
In the navigation pane, choose Catalogs and choose s3tablescatalog.
Choose tbacblog-customer-bucket and choose tbacblog_namespace.
Choose Edit LF-Tags.
Assign the following tags:
Key: Domain and Value: sales
Key: Sensitivity and Value: false
Choose Save.
On the View dropdown menu, choose Tables.
Choose the customer table and choose the Schema tab.
Choose Edit schema and select the columns c_first_name, c_last_name, c_email_address, and c_birth_year.
Choose Edit LF-Tags and modify the tag value:
Key: Sensitivity and Value: true
Choose Save.
Assign LF-Tags to the Redshift database and table
Bob as DataSteward completes the following steps to assign LF-Tags to the Redshift database and table:
In the navigation pane, choose Catalogs and choose salescatalog.
Choose dev and select sales.
Choose Edit LF-Tags and assign the following tags:
Key: Domain and Value: sales
Key: Sensitivity and Value: false
Choose Save.
Grant catalog permission to the DataAnalyst and BIEngineer roles
Bob as DataSteward completes the following steps to grant catalog permission to the DataAnalyst and BIEngineer roles (Charlie and Doug, respectively):
In the navigation pane, choose Datalake permissions, then choose Grant.
In the Principals section, for IAM users and roles, choose the DataAnalyst and BIEngineer roles.
In the LF-Tags or catalog resources section, select Named Data Catalog resources.
For Catalogs, choose <account_id>:s3tablescatalog/tbacblog-customer-bucket and <account_id>:salescatalog/dev.
In the Catalog permissions section, choose Describe for permissions.
Choose Grant.
Grant permission to the DataAnalyst role for the sales domain and non-sensitive data
Bob as DataSteward completes the following steps to grant permission to the DataAnalyst role (Charlie) for the sales domain for non-sensitive data:
In the navigation pane, choose Datalake permissions, then choose Grant.
In the Principals section, for IAM users and roles, choose the DataAnalyst role.
In the LF-Tags or catalog resources section, select Resources matched by LF-Tags and provide the following values:
Key: Domain and Value: sales
Key: Sensitivity and Value: false
In the Database permissions section, choose Describe for permissions.
In the Table permissions section, select Select and Describe for permissions.
Choose Grant.
Grant permission to the BIEngineer role for sales domain data
Bob as DataSteward completes the following steps to grant permission to the BIEngineer role (Doug) for all sales domain data:
In the navigation pane, choose Datalake permissions, then choose Grant.
In the Principals section, for IAM users and roles, choose the BIEngineer role.
In the LF-Tags or catalog resources section, select Resources matched by LF-Tags and provide the following values:
Key: Domain and Value: sales
In the Database permissions section, choose Describe for permissions.
In the Table permissions section, select Select and Describe for permissions.
Choose Grant.
This completes the steps to grant S3 Tables and Redshift federated tables permissions to various data personas using LF-TBAC.
Verify data access
In this step, we log in as individual data personas and query the lakehouse tables that are available to each persona.
Use Athena to analyze customer information as the DataAnalyst role
Charlie signs in to the Athena console as the DataAnalyst role. He runs the following sample SQL query:
SELECT * FROM
"redshift_salescatalog/dev"."sales"."store_sales" s
JOIN
"s3tablescatalog/tbacblog-customer-bucket"."tbacblog_namespace"."customer" c
ON c.c_customer_sk = s.customer_sk
LIMIT 5;
Run a sample query to access the 4 columns in the S3table customer that DataAnalyst does not have access to. You should receive an error as shown in the screenshot. This verifies column level fine grained access using LF-tags on the lakehouse tables.
Use the Redshift query editor to analyze customer data as the DataAnalyst role
Charlie signs in to the Redshift query editor v2 as the DataAnalyst role and runs the following sample SQL query:
SELECT * FROM
"dev@redshift_salescatalog"."sales"."store_sales" s
JOIN
"tbacblog-customer-bucket@s3tablescatalog"."tbacblog_namespace"."customer" c
ON c.c_customer_sk = s.customer_sk
LIMIT 5;
This verifies the DataAnalyst access to the lakehouse tables with LF-tags based permissions, using Redshift Spectrum
Use Amazon EMR to process customer data as the BIEngineer role
Doug uses Amazon EMR to process customer data with the BIEngineer role:
Sign-in to the EMR Studio as Doug, with BIEngineer role. Ensure EMR Serverless application is attached to the workspace with BIEngineer as the EMR runtime role. Download the PySpark notebook tbacblog_emrs.ipynb. Upload to your studio environment.
Change the account id, AWS Region and resource names as per your setup. Restart kernel and clear output.
Once your pySpark kernel is ready, run the cells and verify access.This verifies access using LF-tags to the lakehouse tables as the EMR runtime role. For demonstration, we are also providing the pySpark script tbacblog_sparkscript.py that you can run as EMR batch job and Glue 5.0 ETL.
Doug has also set up Amazon SageMaker Unified Studio as covered in the blog post Accelerate your analytics with Amazon S3 Tables and Amazon SageMaker Lakehouse. Doug logs in to SageMaker Unified Studio and select previously created project to perform his analysis. He navigates to the Build options and choose JupyterLab under IDE & Applications. He uses the downloaded pyspark notebook and updates it as per his Spark query requirements. He then runs the cells by selecting compute as project.spark.fineGrained.
Doug can now start using Spark SQL and start processing data as per fine grained access controlled by the Tags.
Clean up
Complete the following steps to delete the resources you created to avoid unexpected costs:
Delete the Redshift Serverless associated namespace.
Delete the EMR Studio and EMR Serverless instance.
Delete the AWS Glue catalogs, databases, and tables and Lake Formation permissions.
Delete the S3 Tables bucket.
Empty and delete the S3 bucket.
Delete the IAM roles created for this post.
Conclusion
In this post, we demonstrated how you can use Lake Formation tag-based access control with the SageMaker lakehouse architecture to achieve unified and scalable permissions to your data warehouse and data lake. Now administrators can add access permissions to federated catalogs using attributes and tags, creating automated policy enforcement that scales naturally as new assets are added to the system. This eliminates the operational overhead of manual policy updates. You can use this model for sharing resources across accounts and Regions to facilitate data sharing within and across enterprises.
We encourage AWS data lake customers to try this feature and share your feedback in the comments. To learn more about tag-based access control, visit the Lake Formation documentation.
Acknowledgment: A special thanks to everyone who contributed to the development and launch of TBAC: Joey Ghirardelli, Xinchi Li, Keshav Murthy Ramachandra, Noella Jiang, Purvaja Narayanaswamy, Sandya Krishnanand.
About the Authors
Sandeep Adwankar is a Senior Product Manager with Amazon SageMaker Lakehouse . Based in the California Bay Area, he works with customers around the globe to translate business and technical requirements into products that help customers improve how they manage, secure, and access data.
Srividya Parthasarathy is a Senior Big Data Architect with Amazon SageMaker Lakehouse. She works with the product team and customers to build robust features and solutions for their analytical data platform. She enjoys building data mesh solutions and sharing them with the community.
Aarthi Srinivasan is a Senior Big Data Architect with Amazon SageMaker Lakehouse. She works with AWS customers and partners to architect lakehouse solutions, enhance product features, and establish best practices for data governance.
Amazon’s threat intelligence team has identified and disrupted a watering hole campaign conducted by APT29 (also known as Midnight Blizzard), a threat actor associated with Russia’s Foreign Intelligence Service (SVR). Our investigation uncovered an opportunistic watering hole campaign using compromised websites to redirect visitors to malicious infrastructure designed to trick users into authorizing attacker-controlled devices through Microsoft’s device code authentication flow. This opportunistic approach illustrates APT29’s continued evolution in scaling their operations to cast a wider net in their intelligence collection efforts.
The evolving tactics of APT29
This campaign follows a pattern of activity we’ve previously observed from APT29. In October 2024, Amazon disrupted APT29’s attempt to use domains impersonating AWS to phish users with Remote Desktop Protocol files pointed to actor-controlled resources. Also, in June 2025, Google’s Threat Intelligence Group reported on APT29’s phishing campaigns targeting academics and critics of Russia using application-specific passwords (ASPs). The current campaign shows their continued focus on credential harvesting and intelligence collection, with refinements to their technical approach, and demonstrates an evolution in APT29’s tradecraft through their ability to:
Compromise legitimate websites and initially inject obfuscated JavaScript
Rapidly adapt infrastructure when faced with disruption
On new infrastructure, adjust from use of JavaScript redirects to server-side redirects
Technical details
Amazon identified the activity through an analytic it created for APT29 infrastructure, which led to the discovery of the actor-controlled domain names. Through further investigation, Amazon identified the actor compromised various legitimate websites and injected JavaScript that redirected approximately 10% of visitors to these actor-controlled domains. These domains, including findcloudflare[.]com, mimicked Cloudflare verification pages to appear legitimate. The campaign’s ultimate target was Microsoft’s device code authentication flow. There was no compromise of AWS systems, nor was there a direct impact observed on AWS services or infrastructure.
Analysis of the code revealed evasion techniques, including:
Using randomization to only redirect a small percentage of visitors
Employing base64 encoding to hide malicious code
Setting cookies to prevent repeated redirects of the same visitor
Pivoting to new infrastructure when blocked
Image of compromised page, with domain name removed.
Amazon’s disruption efforts
Amazon remains committed to protecting the security of the internet by actively hunting for and disrupting sophisticated threat actors. We will continue working with industry partners and the security community to share intelligence and mitigate threats. Upon discovering this campaign, Amazon worked quickly to isolate affected EC2 instances, partner with Cloudflare and other providers to disrupt the actor’s domains, and share relevant information with Microsoft.
Despite the actor’s attempts to migrate to new infrastructure, including a move off AWS to another cloud provider, our team continued tracking and disrupting their operations. After our intervention, we observed the actor register additional domains such as cloudflare[.]redirectpartners[.]com, which again attempted to lure victims into Microsoft device code authentication workflows.
Protecting users and organizations
We recommend organizations implement the following protective measures:
For end users:
Be vigilant for suspicious redirect chains, particularly those masquerading as security verification pages.
Always verify the authenticity of device authorization requests before approving them.
Enable multi-factor authentication (MFA) on all accounts, similar to how AWS now requires MFA for root accounts.
Be wary of web pages asking you to copy and paste commands or perform actions in Windows Run dialog (Win+R).
This matches the recently documented “ClickFix” technique where attackers trick users into running malicious commands.
For IT administrators:
Follow Microsoft’s security guidance on device authentication flows and consider disabling this feature if not required.
Enforce conditional access policies that restrict authentication based on device compliance, location, and risk factors.
Implement robust logging and monitoring for authentication events, particularly those involving new device authorizations.
Indicators of compromise (IOCs)
findcloudflare[.]com
cloudflare[.]redirectpartners[.]com
Sample JavaScript code
Decoded JavaScript code, with compromised site removed: “[removed_domain]”
If you have feedback about this post, submit comments in the Comments section below. If you have questions about this post, contact AWS Support.
Amazon Prime Day 2025 was the biggest Amazon Prime Day shopping event ever, setting records for both sales volume and total items sold during the 4-day event. Prime members saved billions while shopping Amazon’s millions of deals during the event.
This year marked a significant transformation in the Prime Day experience through advancements in the generative AI offerings from Amazon and AWS. Customers used Alexa+—the Amazon next-generation personal assistant now available in early access to millions of customers—along with the AI-powered shopping assistant, Rufus, and AI Shopping Guides. These features, built on more than 15 years of cloud innovation and machine learning expertise from AWS, combined with deep retail and consumer experience from Amazon, helped customers quickly discover deals and get product information, complementing the fast, free delivery that Prime members enjoy year-round.
As part of our annual tradition to tell you about how AWS powered Prime Day for record-breaking sales, I want to share the services and chart-topping metrics from AWS that made your amazing shopping experience possible.
Prime Day 2025 – all the numbers During the weeks leading up to big shopping events like Prime Day, Amazon fulfillment centers and delivery stations work to get ready and ensure operations run efficiently and safely. For example, the Amazon automated storage and retrieval system (ASRS) operates a global fleet of industrial mobile robots that move goods around Amazon fulfillment centers.
AWS Outposts, a fully managed service that extends the AWS experience on-premises, powers software applications that manage the command-and-control of Amazon ASRS and supports same-day and next-day deliveries through low-latency processing of critical robotic commands.
During Prime Day 2025, AWS Outposts at one of the largest Amazon fulfillment centers sent more than 524 million commands to over 7,000 robots, reaching peak volumes of 8 million commands per hour—a 160 percent increase compared to Prime Day 2024.
Here are some more interesting, mind-blowing metrics:
Amazon Elastic Compute Cloud (Amazon EC2) – During Prime Day 2025, AWS Graviton, a family of processors designed to deliver the best price performance for cloud workloads running in Amazon EC2, powered more than 40 percent of the Amazon EC2 compute used by Amazon.com. Amazon also deployed over 87,000 AWS Inferentia and AWS Trainium chips – custom silicon chips for deep learning and generative AI training and inference – to power Amazon Rufus for Prime Day.
Amazon SageMaker AI — Amazon SageMaker AI, a fully managed service that brings together a broad set of tools to enable high-performance, low-cost machine learning (ML), processed more than 626 billion inference requests during Prime Day 2025.
Amazon Elastic Container Service (Amazon ECS) and AWS Fargate– Amazon Elastic Container Service (Amazon ECS) is a fully managed container orchestration service that works seamlessly with AWS Fargate, a serverless compute engine for containers. During Prime Day 2025, Amazon ECS launched an average of 18.4 million tasks per day on AWS Fargate, representing a 77 percent increase from the previous year’s Prime Day average.
AWS Fault Injection Service (AWS FIS) – We ran over 6,800 AWS FIS experiments—over eight times more than we conducted in 2024—to test resilience and ensure Amazon.com remains highly available on Prime Day. This significant increase was made possible by two improvements: new Amazon ECS support for network fault injection experiments on AWS Fargate, and the integration of FIS testing in continuous integration and continuous delivery (CI/CD) pipelines.
AWS Lambda – AWS Lambda, a serverless compute service that lets you run code without managing infrastructure, handled over 1.7 trillion invocations per day during Prime Day 2025.
Amazon API Gateway – During Prime Day 2025, Amazon API Gateway, a fully managed service that makes it easy to create, maintain, and secure APIs at any scale, processed over 1 trillion internal service requests—a 30 percent increase in requests on average per day compared to Prime Day 2024.
Amazon CloudFront– Amazon CloudFront, a content delivery network (CDN) service that securely delivers content with low latency and high transfer speeds, delivered over 3 trillion HTTP requests during the global week of Prime Day 2025, a 43 percent increase in requests compared to Prime Day 2024.
Amazon Elastic Block Store (Amazon EBS) – During Prime Day 2025, Amazon EBS, our high-performance block storage service, peaked at 20.3 trillion I/O operations, moving up to an exabyte of data daily.
Amazon Aurora – On Prime Day, Amazon Aurora, a relational database management system (RDBMS) built for high performance and availability at global scale for PostgreSQL, MySQL, and DSQL, processed 500 billion transactions, stored 4,071 terabytes of data, and transferred 999 terabytes of data.
Amazon DynamoDB – Amazon DynamoDB, a serverless, fully managed, distributed NoSQL database, powers multiple high-traffic Amazon properties and systems including Alexa, the Amazon.com sites, and all Amazon fulfillment centers. Over the course of Prime Day, these sources made tens of trillions of calls to the DynamoDB API. DynamoDB maintained high availability while delivering single-digit millisecond responses and peaking at 151 million requests per second.
Amazon ElastiCache – During Prime Day, Amazon ElastiCache, a fully managed caching service delivering microsecond latency, peaked at serving over 1.5 quadrillion daily requests and over 1.4 trillion requests in a minute.
Amazon Kinesis Data Streams – Amazon Kinesis Data Streams, a fully managed serverless data streaming service, processed a peak of 807 million records per second during Prime Day 2025.
Amazon Simple Queue Service (Amazon SQS) – During Prime Day 2025, Amazon SQS – a fully managed message queuing service for microservices, distributed systems, and serverless applications – set a new peak traffic record of 166 million messages per second.
Amazon GuardDuty – During Prime Day 2025, Amazon GuardDuty, an intelligent threat detection service, monitored an average of 8.9 trillion log events per hour, a 48.9 percent increase from last year’s Prime Day.
AWS CloudTrail – AWS CloudTrail, which tracks user activity and API usage on AWS, as well as in hybrid and multicloud environments, processed over 2.5 trillion events during Prime Day 2025, compared to 976 billion events in 2024.
Prepare to scale If you’re preparing for similar business-critical events, product launches, and migrations, I recommend that you take advantage of our newly branded AWS Countdown (formerly known as AWS Infrastructure Event Management, or IEM). This comprehensive support program helps assess operational readiness, identify and mitigate risks, and plan capacity, using proven playbooks developed by AWS experts. We’ve expanded to include: generative AI implementation support to help you confidently launch and scale AI initiatives; migration and modernization support, including mainframe modernization; and infrastructure optimization for specialized sectors including election systems, retail operations, healthcare services, and sports and gaming events.
I look forward to seeing what other records will be broken next year!
Organizations across industries struggle with the economics of data analytics. High entry costs, complex capacity planning, and unpredictable workload demands create barriers that prevent teams from accessing the insights they need. Small businesses abandon analytics initiatives due to prohibitive minimums, and enterprises overprovision resources for development environments, leading to inefficient spending.
Amazon Redshift Serverless now addresses these challenges with 4 RPU configurations, helping you get started with a lower base capacity that runs scalable analytics workloads beginning at $1.50 per hour. This new option transforms the economics of data analytics with the flexibility to scale up automatically based on workload demands. You only pay for the compute capacity you consume, calculated on a per-second basis.
With 64 GB of memory and support for up to 32 TB of managed storage, this lower entry point offering addresses several common customer needs, including development and test environments that maintain separate workloads at lower cost and production workloads with variable demand that need cost-effective scaling. The configuration is particularly useful for test and development environments, departmental data warehouses, periodic reporting workloads, gaming analytics, and data mesh architectures with unpredictable usage patterns. Organizations just starting with cloud analytics can use this low-cost option while getting access to enterprise features like automatic scaling, built-in security, and seamless data lake integration.In this post, we examine how this new sizing option makes Redshift Serverless accessible to smaller organizations while providing enterprises with cost-effective environments for development, testing, and variable workloads.
New 4 RPU minimum base capacity in Redshift Serverless
Redshift Serverless measures compute capacity using Redshift Processing Units (RPUs), where each RPU provides 16 GB of memory. With this new minimum base capacity, the 4 RPU configuration delivers a total of 64 GB of memory. It supports up to 32 TB of managed storage, with a maximum of 100 columns per table. The 4 RPU configuration is cost-efficient, and it’s designed for lighter workloads. When your workload requires additional resources, Redshift Serverless automatically scales up the compute capacity. After you have scaled beyond 4 RPUs, your data warehouse will continue using the higher RPU level to maintain consistent performance. This behavior provides workload stability while preserving the benefits of automatic scaling.
For workloads requiring more resources, such as tables with a large number of columns or higher concurrency requirements, you can choose higher base capacities ranging from 8 RPUs up to 1024 RPUs. This flexibility helps you start small and adjust your resources as your analytics requirements evolve.
Benefits of Redshift Serverless with 4 RPUs
This new feature offers the following benefits:
Cost-effective entry point – The new 4 RPU configuration is a low-cost option for cloud data warehousing, making enterprise-grade analytics accessible to organizations of various sizes, such as startups exploring their first data warehouse or established enterprises optimizing their analytics spending. For example, in the US East (N. Virginia) Region, the compute cost is $0.375 per RPU-hour. For a 4 RPU base capacity, this translates to $1.50 per hour of active workload time. Because you’re only charged when workloads are running, small-scale users can keep costs predictable and low. This configuration helps teams begin their analytics journey with minimal upfront commitment. Development teams can maintain dedicated environments for testing and experimentation without significant cost overhead.
Support for smaller datasets – With support for up to 32 TB of Redshift Managed Storage, the 4 RPU configuration is well-suited for smaller data warehouses. It can handle datasets ranging from a few gigabytes to tens of terabytes, making it ideal for startups, small businesses, or departments with limited data volumes.
Seamless integration with the AWS ecosystem – The 4 RPU configuration integrates seamlessly with other AWS services, such as Amazon Simple Storage Service (Amazon S3) for data lakes, AWS Glue for ETL (extract, transform, and load), and Amazon QuickSight for visualization. This makes it straightforward to build end-to-end analytics pipelines, even for smaller-scale projects. Additionally, Redshift data lake queries on external Amazon S3 data are included in the RPU billing, simplifying cost management.
Use case flexibility – The 4 RPU configuration proves valuable across numerous analytics scenarios. Development and testing environments benefit from cost-effective isolation, and departmental data warehouses can start small and scale as needed. Organizations running periodic reporting workloads or proof-of-concept projects can optimize costs by paying only for actual usage. Even small to medium-sized production workloads can use this configuration effectively.
Regardless of the use case, you can benefit from the full feature set of Redshift Serverless, including built-in security, data lake integration, and automated maintenance.
Use cases for Redshift Serverless with 4 RPU workgroups
The 4 RPU configuration is tailored for scenarios where lightweight compute resources suffice. The following are some practical use cases:
Small business analytics – Small businesses with limited data (less than 32 GB) can analyze sales, customer behavior, or operational metrics with cost-effective data warehouses. Running 10–20 daily ETL queries and occasional one-time queries remains cost-effective at this capacity.
Development and testing environments – The configuration is well-suited for development and test environments where full production resources aren’t needed. Data engineers can experiment with Redshift Serverless, prototype queries, or build proof-of-concept solutions without committing to higher RPU capacities. The 4 RPU configuration lowers the cost of continuous integration and delivery (CI/CD) testing of data pipelines. Teams can run automated integration tests and schema validations in isolated environments that mirror production systems while optimizing costs through per-second billing.
Analytics for startups – Startups can build robust product analytics capabilities without significant upfront investment. Teams can track customer behavior, feature adoption, and KPIs using familiar SQL queries, then connect business intelligence (BI) tools like Quicksight or Tableau for lightweight dashboarding.
Training and experimentation – Organizations can create dedicated sandbox environments for data analysts’ onboarding and experimentation with minimal budget impact. These environments are perfect for exploring analytics powered by large language models (LLMs), semantic layer development, or generative AI applications.
Data quality workflows – The feature efficiently supports scheduled jobs for data quality validation, checking data freshness, integrity, and conformance without dedicating high-capacity environments to routine QA tasks.
Enterprise team enablement – Large organizations can implement decentralized data warehousing strategies. Each department can operate its data warehouse aligned with specific needs and budgets, enabling department-level chargeback models.
Environment isolation – Organizations can create dedicated workgroups per environment (development, test, QA, UAT), providing complete isolation without sharing compute resources or risking cross-environment interference.
Data mesh architecture – Domain teams can operate independently while maintaining cost-efficiency. Each domain runs its workgroup for lightweight transformations, domain-specific marts, and KPI calculations. It offers a flexible sizing option in a data mesh architecture.
Event-driven analytics – Well-suited for short-lived or event-triggered analytics tasks. Organizations can programmatically create workgroups through APIs for A/B test analysis, campaign performance summaries, or machine learning (ML) pipeline validation.
Low-volume one-time reporting – Organizations with infrequent or lightweight reporting needs, such as monthly financial summaries or dashboard refreshes, can use 4 RPUs to minimize costs while maintaining performance.
Cost considerations and best practices
Although the 4 RPU configuration is cost-effective, there are a few considerations to keep in mind to optimize expenses:
Billing – Redshift Serverless bills on a per-second basis with a 60-second minimum per query. For very short queries (such as subsecond), this can inflate costs. To mitigate this, batch queries where possible to maximize resource utilization within the 60-second window. For more information, see Amazon Redshift pricing.
Set usage limits – Use the Redshift Serverless console to set maximum RPU-hour limits (daily, weekly, or monthly) to prevent unexpected costs. You can configure alerts or automatically turn off queries when limits are reached. To learn more, see Setting usage limits, including setting RPU limits.
Monitor with system views – Query the SYS_SERVERLESS_USAGE system table to track RPU consumption and estimate query costs. For example, you can calculate daily costs by aggregating charged seconds and multiplying by the RPU rate.
Close transactions – Make sure transactions are explicitly closed (using COMMIT or ROLLBACK) to avoid idle sessions consuming RPUs, which can lead to unnecessary charges.
The following is a practical example for a 4 RPU workgroup in US East (N. Virginia) at $0.375/RPU-hour for a scenario of a 10-minute query running daily: This is compute costs only. Primary storage capacity is billed as Redshift Managed Storage (RMS).
Although the 4 RPU configuration is cost-efficient, it’s designed for lighter workloads. For complex queries or datasets exceeding 32 TB, you must set up 8 RPUs to 24 RPUs to support up to 128 TB of storage. For more than 128 TB, you need 32 RPUs or more. If query performance is a priority, consider increasing the base capacity or enabling AI-driven scaling and optimization to optimize resources dynamically. Benchmark tests suggest that higher RPUs (such as 32 RPUs) significantly improve performance for complex queries. However, for simpler tasks, 4 RPUs deliver adequate throughput.
Redshift Serverless with 4 RPU represents a significant step forward in making enterprise-grade analytics cheaper and accessible to organizations of different sizes, such as a startup building its first analytics system, a development team looking to optimize testing environments, or an enterprise implementing a data mesh architecture. This new configuration combines the power and flexibility of Redshift Serverless with a cost-effective entry point, so teams can start small and scale seamlessly as their needs grow. The ability to begin with minimal commitment while maintaining access to advanced features like automatic scaling, built-in security, and seamless data lake integration makes this a compelling option for modern data analytics workloads. Combined with pay-per-second billing and intelligent resource management, Redshift Serverless with 4 RPU delivers the ideal balance of cost-efficiency and performance.
To get started with cost-effective analytics, visit the AWS Management Console to create your Redshift Serverless workgroup with 4 RPUs. For more information, refer to the Amazon Redshift Serverless Management Guide or Amazon Redshift best practices. Plan your analytics budget effectively using the AWS Pricing Calculator to estimate costs based on your specific workload patterns, or contact your AWS account team to discuss your particular use case.
In July 2025, Amazon SageMakerannounced support for Amazon Simple Storage Service (Amazon S3) general purpose buckets and prefixes in Amazon SageMaker Catalog that delivers fine-grained access control and permissions through S3 Access Grants. This integration addresses the challenge data teams face when manually managing data discovery and Amazon S3 permissions as separate workflows. Data consumers, such as data scientists, engineers, and business analysts, can now discover and access S3 buckets or prefixes data assets through SageMaker Catalog, while administrators can maintain granular access controls using S3 Access Grants permissions.
Building upon existing SageMaker support for structured data in Amazon S3 Tables buckets, the added support for S3 general purpose buckets makes it straightforward for teams to find, access, and collaborate on different types of data, including unstructured data such as documents, images, audio, and video, while providing access management. Data administrators and data stewards can now implement fine-grained access permissions for a bucket or a prefix using S3 Access Grants, supporting secure and appropriate data usage across their organization.
In this post, we explore how this integration addresses key challenges our customers have shared with us, and how data producers, such as administrators and data engineers, can seamlessly share and govern S3 buckets and prefixes using S3 Access Grants, while making it readily discoverable for data consumers. We walk you through a practical example of bringing Amazon S3 data into your projects and implementing effective governance for both analytics and generative AI workflows.
Challenges in working with unstructured data
Organizations face challenges in maximizing the value of their unstructured data assets. Although customers want to incorporate insights derived from unstructured data for comprehensive analysis, they often resort to building bespoke integrations to extract structured information from unstructured sources, leading to inefficient and fragmented solutions. Three critical roadblocks have historically hindered enterprises:
Organizations struggle to maintain a catalog that offers equal discoverability for both structured and unstructured data, often resulting in separate systems for different data types.
Data consumers throughout organizations want to analyze unstructured data using familiar tools like notebooks, just as they do with structured data, but are forced to use separate interfaces and workflows instead.
Working with unstructured data lacks streamlined access management—users who discover relevant data can’t readily request access from owners, load information into analytics tools, or collaborate with colleagues directly from the workspaces or projects.
Amazon S3 unstructured data as a managed asset in Amazon SageMaker
SageMaker Catalog now supports S3 general purpose buckets. Data producers can publish S3 buckets and prefixes as S3 Object Collection assets, making those assets searchable and discoverable. As managed S3 Object Collection assets in SageMaker Catalog, access permissions are automatically handled using S3 Access Grants when data consumer teams subscribe to cataloged datasets, replacing bespoke data discovery and permission management workflows. Data producers can add business context to technical metadata, including glossary terms and descriptions. Data consumers can search, review, and request access to data assets through a unified workflow. Teams can then collaborate in SageMaker projects, incorporating datasets and conducting analysis while maintaining security and governance standards.The key benefits in the simplified discoverability and access to S3 data in SageMaker Catalog include:
Seamless S3 data integration – You can use existing Amazon S3 data in SageMaker without migration or restructuring
Enhanced cataloging and governance – SageMaker Catalog facilitates data publishing, discovery, and subscription with business metadata and security controls
Improved data sharing – Cataloged Amazon S3 data becomes discoverable organization-wide, accelerating insights and collaboration
Self-service data access – SageMaker provides tools for data preparation, ETL (extract, transform, and load), and connectivity from various sources, supporting faster analytics and AI solution development
With these benefits, you can accelerate time-to-insight and unlock the full potential of organizational data assets across teams.
Customer spotlight
Across industries, the true power of data emerges when organizations can seamlessly connect and analyze different types of information across their operations. Bayer, a leading pharmaceutical and biotechnology company, has vast sets of unstructured data organized across multiple S3 buckets and prefixes.
“Bringing a new drug to market is widely known across the industry to be a lengthy and expensive process, often taking 10–15 years and costing $1–2 billion on average, with a low overall success rate ranging from around 8% to 12%. SageMaker now allows us to easily discover and securely access data, structured and unstructured, while maintaining governance controls using S3 Access Grants. With SageMaker Catalog, we now have a streamlined approach to data management that enables us to combine datasets, both structured and unstructured, reducing research time and increasing productivity throughout the drug development lifecycle,” said Avinash Erupaka, Principal Engineer Lead, Bayer Pharma Drug Innovation Platform.
Solution overview
In life sciences organizations, unstructured and semi-structured data files are prevalent in research, development, bio-manufacturing, and diagnostics divisions. These might include digital pathology images, genetic sequence data, microwell plate readouts, analytical spectra, and chromatograms. Along with unstructured and semi-structured data, data engineers collect various business metadata, including study, project, laboratory protocol, and assay information, and operational metadata, including algorithmic steps, compute tasks, and process outputs.Scientists and business users can use SageMaker Catalog search for data assets using keywords that are found in the associated business metadata and operational metadata that are captured as metadata forms. For example, there might be searches for sample ID, experiment ID, group, platform, file names, dates, or keywords within the experimental description. These searches return a list of data assets that have association with those keywords, which are collections of S3 objects. Scientists and business users are given access to those collections of S3 objects.In the following sections, we walk through the setup step-by-step. We use the example of digital pathology images use case from the life sciences industry to demonstrate how researchers discover and get access to S3 objects using SageMaker.
To follow along with this post, refer to Setting up Amazon SageMaker to set up a domain and create projects. This domain setup and project creation is a prerequisite for the other tasks in SageMaker.
Get data ready in Amazon S3
To store digital pathology images, create an S3 bucket (for example, researchdatafordigitalpathology), create a folder (for example, dpimages) under it, and upload digital pathology images. Ideally, you will have a collection of images under a given prefix, but for this example, we have chosen just one image file (dp_cancer.jpg). For instructions to create a bucket, refer to Creating a general purpose bucket.
Set up a data producer project
For data engineers, create a producer project in Amazon SageMaker Unified Studio to create digital pathology images as data assets. For more details on how to create projects, refer to Create a project. Add data engineers as members of the projects. For instructions to add members, refer to Add project members.
Add an Amazon S3 location
To add the collection of digital pathology images (to bring your own S3 buckets), complete the following steps:
In SageMaker Unified Studio, go to the project where you want to add Amazon S3.
Choose Data in the navigation pane, then choose the plus sign.
On the Add data page, choose Add S3 location, then choose Next.
To obtain the details to create a connection, you can choose from two options:
Using the project role:
You, the project user, retrieves the project role and shares it with the AWS Management Console admin.
Publish data to SageMaker Catalog to make it discoverable
After you add the Amazon S3 location, complete the following steps to publish the data:
In SageMaker Unified Studio, go to your project.
Choose Data in the navigation pane and choose the Amazon S3 location.
On the Actions dropdown menu, choose Publish to Catalog.
After you publish the assets, you can find the assets on the Published tab in the Assets page under Project catalog in the navigation pane.
Create a consumer project
Create a consumer project for researchers to collaborate and bring necessary assets for their analysis and add researchers as members to the project. Consumers can search for available (published) data assets on digital pathology images for cancer research and then subscribe to work with it using JupyterLab notebooks in SageMaker. For more details on how to create projects, refer to Create a project. For instructions to add members, refer to Add project members.
Find relevant assets and request access
Researchers can search the SageMaker Catalog for available (published) data assets using the string digitalpathology. Complete the following steps:
In SageMaker Unified Studio, on the Discover dropdown menu, choose Data Catalog.
Find the asset you want to subscribe to by browsing or entering the name of the asset into the search bar.
Choose Subscribe.
Provide the following information:
The project to which you want to subscribe the asset.
A short justification for your subscription request. This information is used by the data producer to validate the request to grant access.
Choose Request.
After you’re approved, the project will be subscribed to the asset and access is granted automatically. To provide access, SageMaker Catalog uses S3 Access Grants to grant read permission to the subscribing project for the specific S3 bucket or prefix.
To view the status of the subscription request, go to the project with which you subscribed to the asset. Choose Subscription requests in the navigation pane, then choose the Outgoing requests tab. This page lists the assets to which the project has requested access. You can filter the list by the status of the request.
Review and approve the subscription request
The data producer or engineer of the publishing project must receive the request from the researcher and approve the request. After the request is approved, the researcher will have access to the objects for the S3 bucket (or prefix).
Before approving, the data producer can view the details of the subscription request to make sure they know who will get access to the data they own.
After they approve the request, the data producers can audit the different requests they have for the assets they own.
Access the subscribed data in notebooks
After the access request is approved, the researcher can open a JupyterLab notebook from SageMaker Unified Studio and access S3 objects to work on their research.To navigate to the JupyterLab notebook, complete the following steps:
In SageMaker Unified Studio, open your project.
On the Build dropdown menu, choose JupyterLab.
The following is sample Python code to access subscribed data. This sample code retrieves the S3 object that the researcher has been given access to and uses Matplotlib (a comprehensive 2D plotting library for Python language) to display the image in the notebook. In a real-world use case, a researcher typically uses these images for displaying or training machine learning models or performing multimodal analysis.
# Install necessary libraries
pip install aws-s3-access-grants-boto3-plugin
pip install matplotlib pillow

import botocore.session
from aws_s3_access_grants_boto3_plugin.s3_access_grants_plugin import S3AccessGrantsPlugin
session = botocore.session.get_session()
s3 = session.create_client('s3')
plugin = S3AccessGrantsPlugin(s3, fallback_enabled=False, customer_session=session)
plugin.register()

from PIL import Image
import io
import matplotlib.pyplot as plt


# S3 bucket and object details for digital pathology image
bucket_name = '[bucket name]'
object_key = '[prefix]/[object]'

# Get the image object from S3
response = s3.get_object(Bucket=bucket_name, Key=object_key)

# Read the image data
image_data = response['Body'].read()
# Create an image object
image = Image.open(io.BytesIO(image_data))

# Display the image
plt.imshow(image)
plt.axis('off') # Hide axis
plt.show()
SageMaker and S3 Access Grants integrations
The SageMaker Catalog integration with S3 Access Grants facilitates secure data access across Amazon EMR Serverless, AWS Glue, Amazon EMR on Amazon EC2, and JupyterLab notebooks through simple configuration settings. By enabling S3 Access Grants with two properties ('fs.s3.s3AccessGrants.enabled': 'true' and 'fs.s3.s3AccessGrants.fallbackToIAM': 'true'), users gain streamlined access control while maintaining IAM as a fallback option. These configurations are automated in SageMaker Unified Studio. To learn more about S3 Access Grants integrations, see S3 Access Grants integrations, and for Boto3 S3 Access Grants support, refer to the following GitHub repo.
Conclusion
In this post, we discussed the added support for S3 general purpose buckets in SageMaker, and how they can be cataloged in SageMaker Catalog to help users quickly discover and securely manage access when sharing with other teams.
Priya Tiruthani is a Senior Technical Product Manager with Amazon DataZone at AWS. She focuses on improving data discovery and curation required for data analytics. She is passionate about building innovative products to simplify customers’ end-to-end data journey, especially around data governance and analytics. Outside of work, she enjoys being outdoors to hike, capture nature’s beauty, and recently play pickleball.
Subrat Das is a Principal Solutions Architect and part of the Global Healthcare and Life Sciences industry division at AWS. He is passionate about modernizing and architecting complex customer workloads. When he’s not working on technology solutions, he enjoys long hikes and traveling around the world.
Santhosh Padmanabhan is a Software Development Manager at AWS, leading the Amazon SageMaker Catalog engineering team. His team designs, builds, and operates services specializing in data, machine learning, and AI governance. With deep expertise in building distributed data systems at scale, Santhosh plays a key role in advancing AWS’s data governance capabilities.
Yuhang Huang is a Software Development Manager on the Amazon SageMaker Unified Studio team. He leads the engineering team to design, build, and operate scheduling and orchestration capabilities in SageMaker Unified Studio. In his free time, he enjoys playing tennis.
The collective thoughts of the interwebz
Manage Consent
To provide the best experiences, we use technologies like cookies to store and/or access device information. Consenting to these technologies will allow us to process data such as browsing behavior or unique IDs on this site. Not consenting or withdrawing consent, may adversely affect certain features and functions.
Functional
Always active
The technical storage or access is strictly necessary for the legitimate purpose of enabling the use of a specific service explicitly requested by the subscriber or user, or for the sole purpose of carrying out the transmission of a communication over an electronic communications network.
Preferences
The technical storage or access is necessary for the legitimate purpose of storing preferences that are not requested by the subscriber or user.
Statistics
The technical storage or access that is used exclusively for statistical purposes.The technical storage or access that is used exclusively for anonymous statistical purposes. Without a subpoena, voluntary compliance on the part of your Internet Service Provider, or additional records from a third party, information stored or retrieved for this purpose alone cannot usually be used to identify you.
Marketing
The technical storage or access is required to create user profiles to send advertising, or to track the user on a website or across several websites for similar marketing purposes.


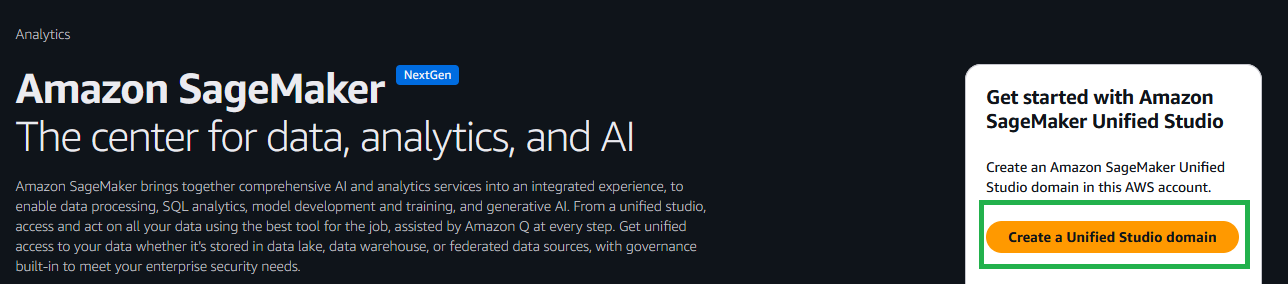
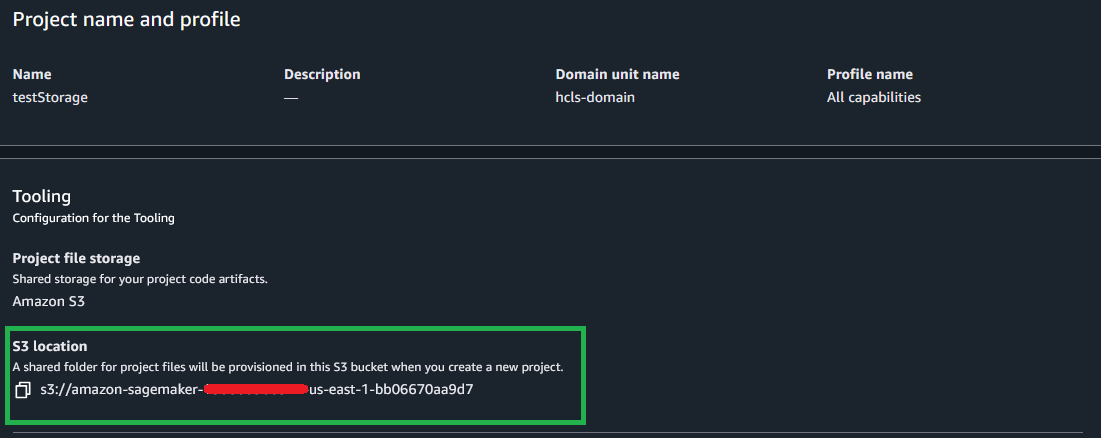
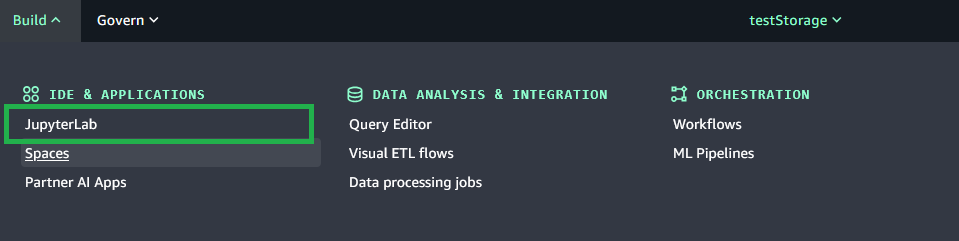
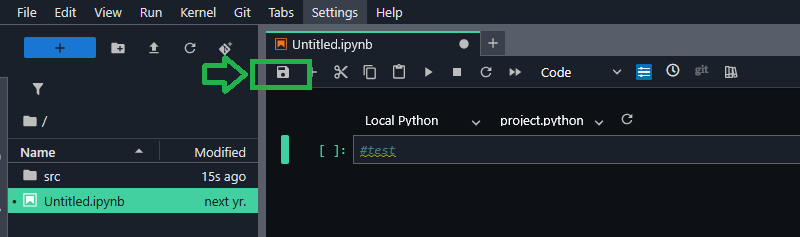
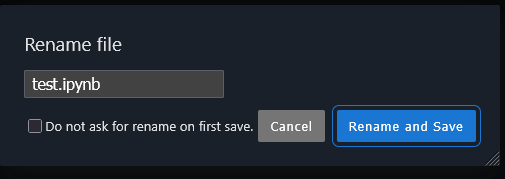
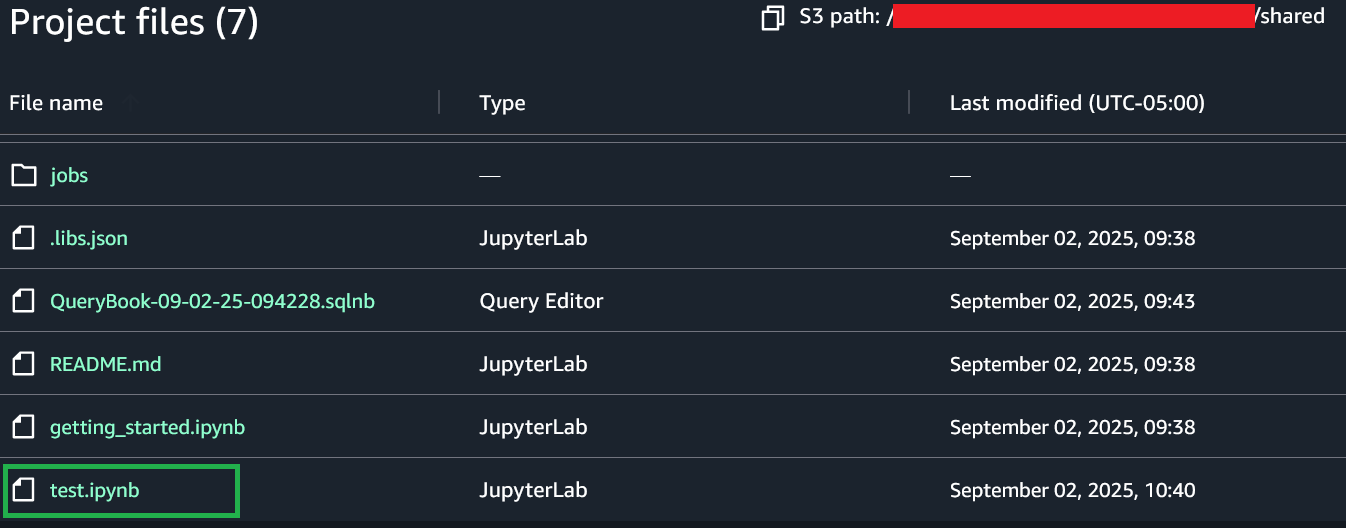


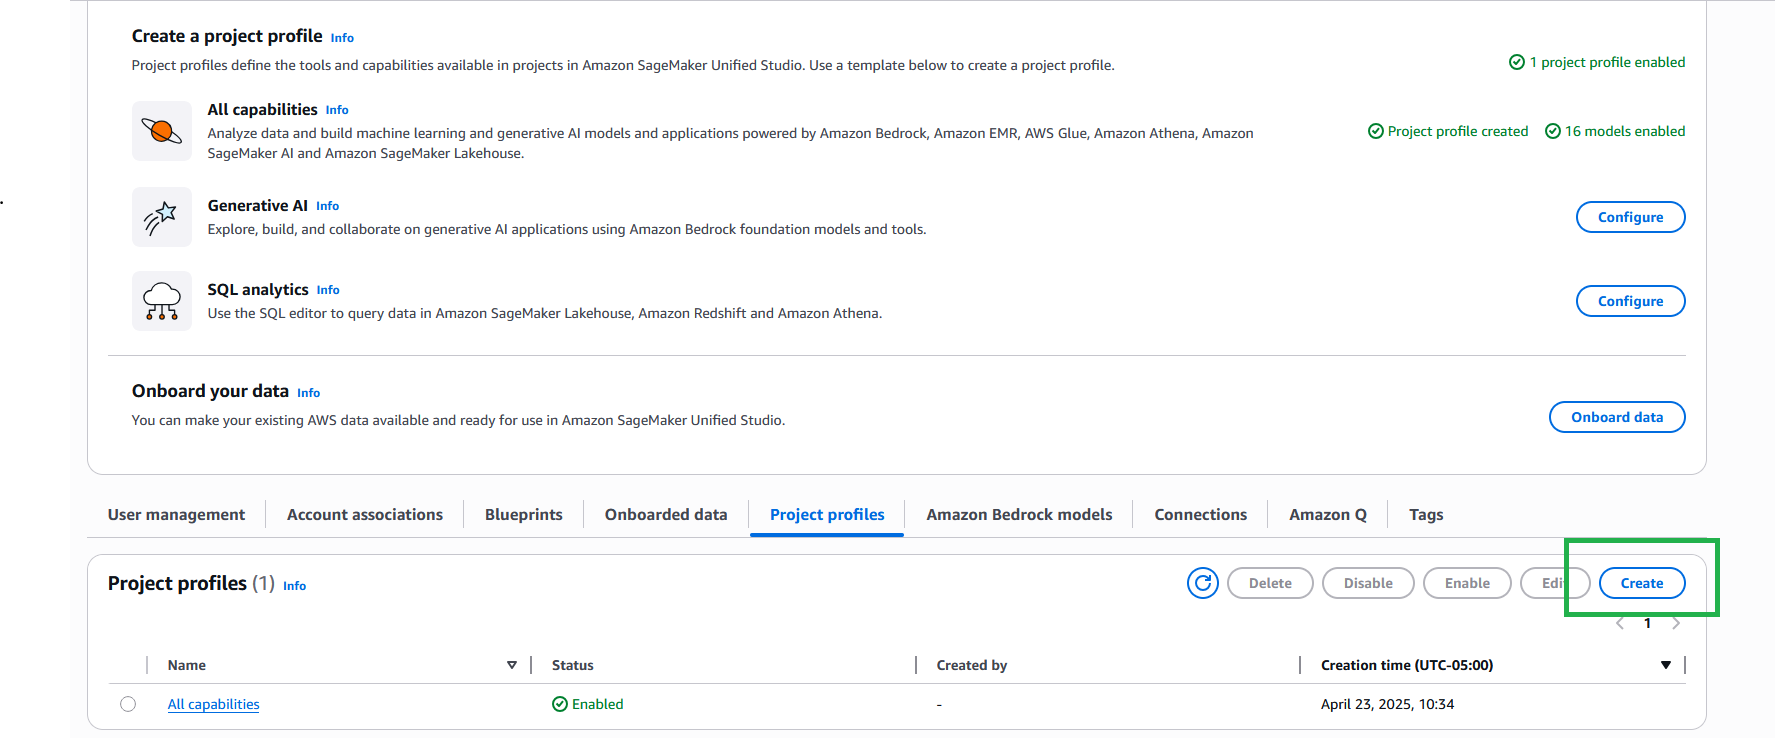
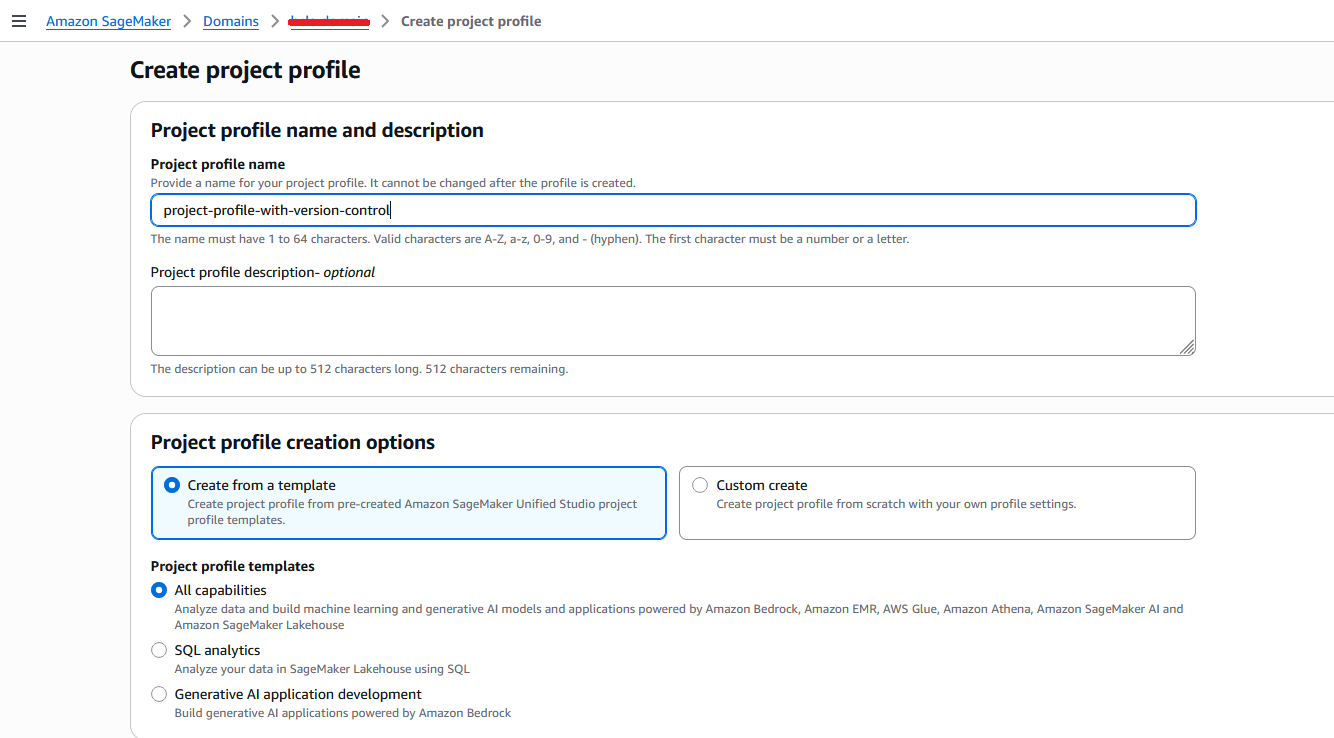
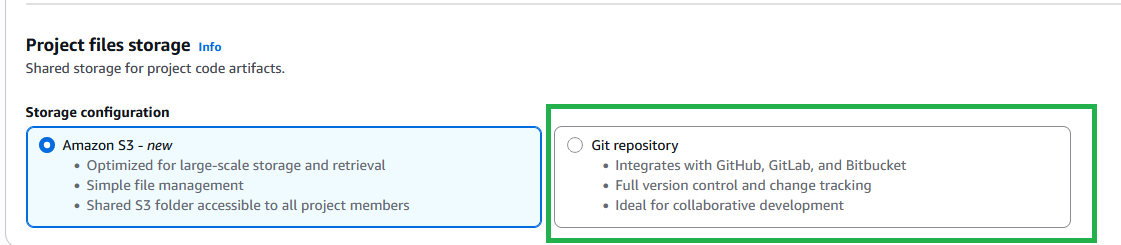


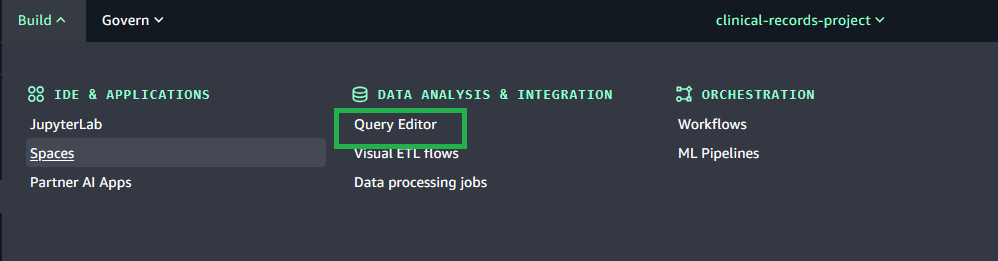
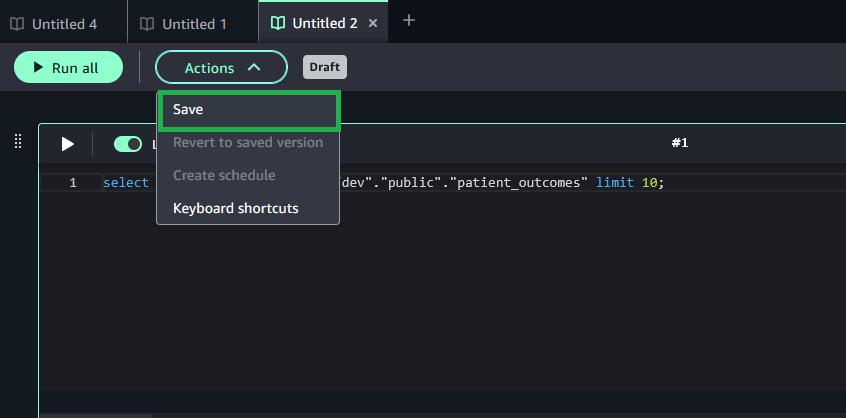
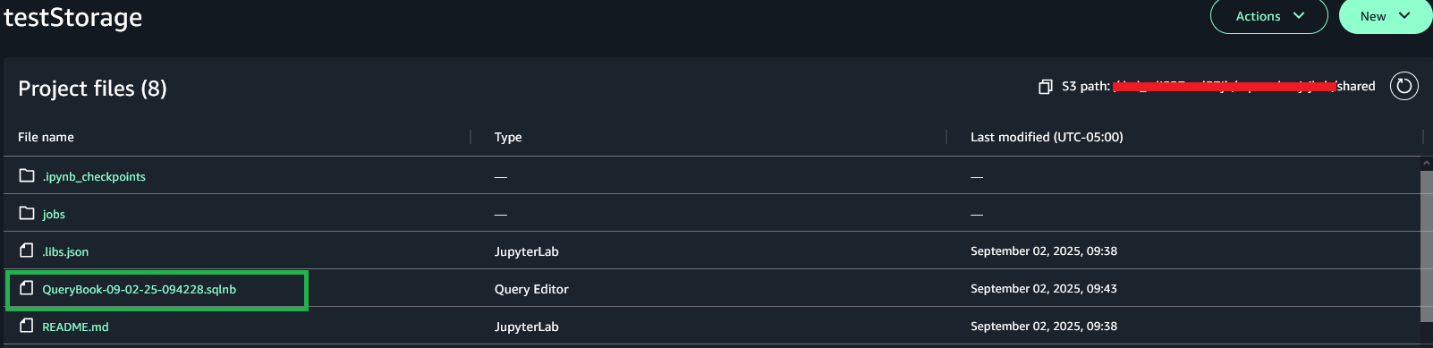


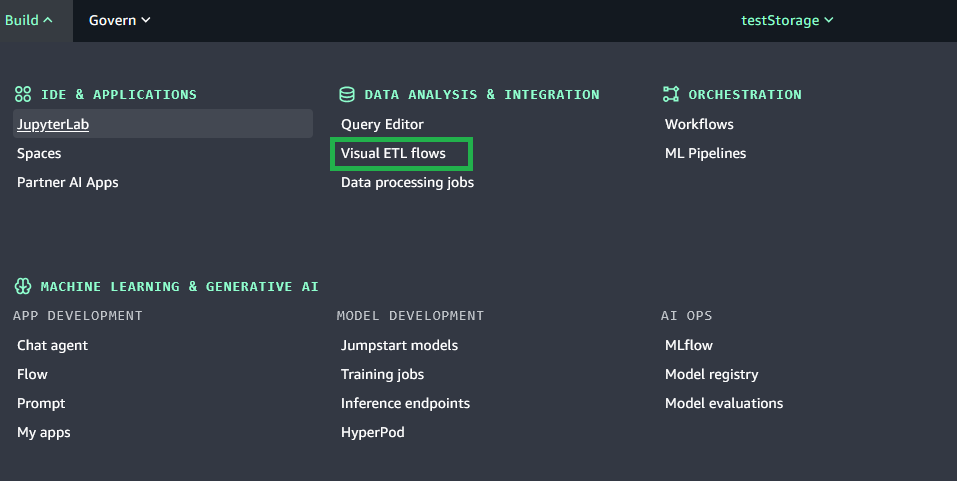


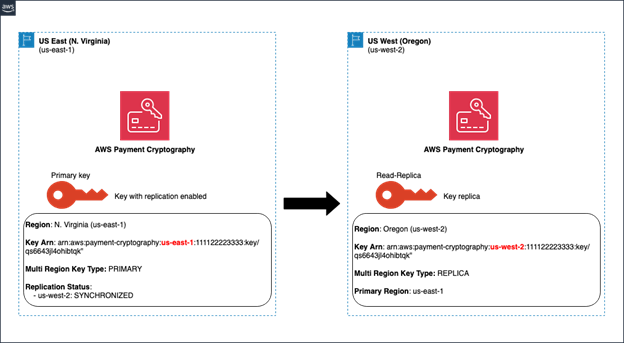
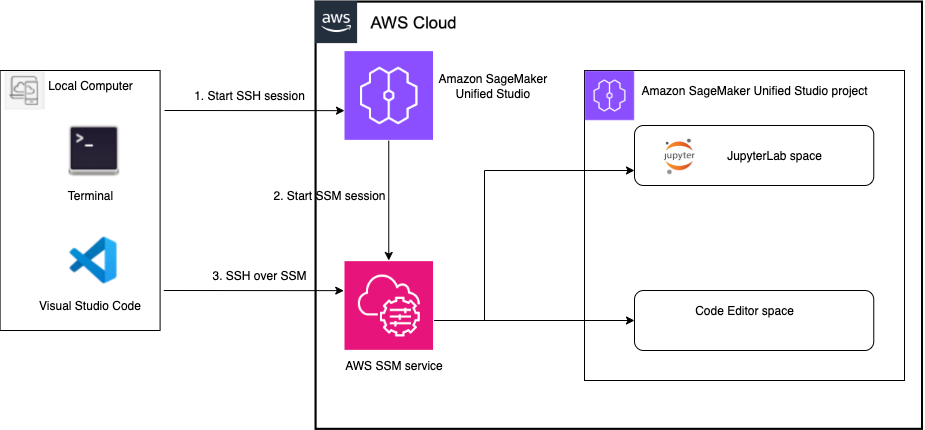

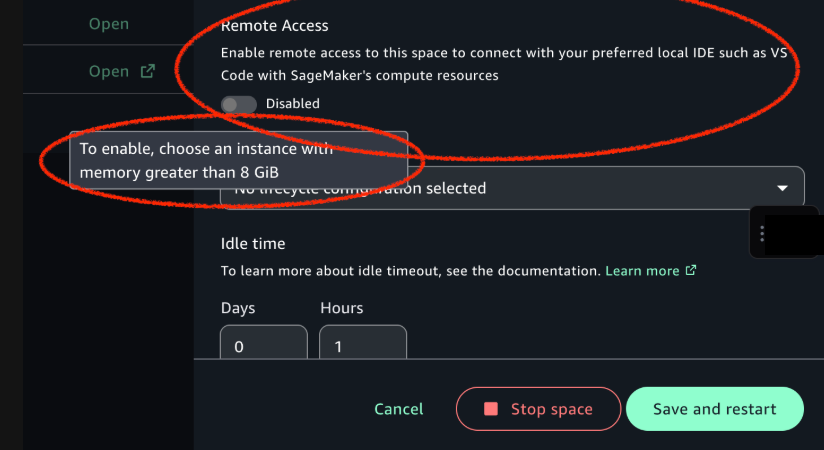
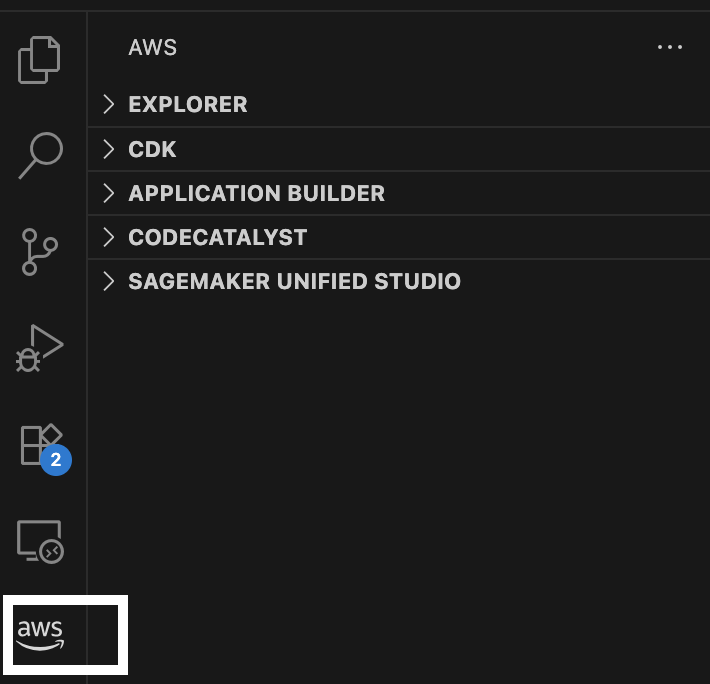
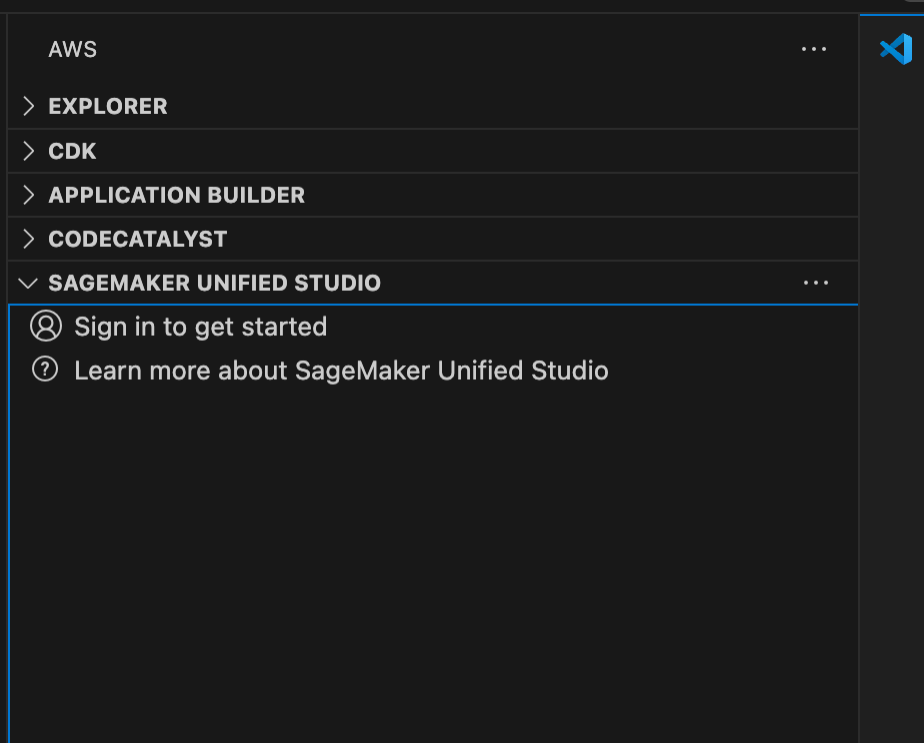
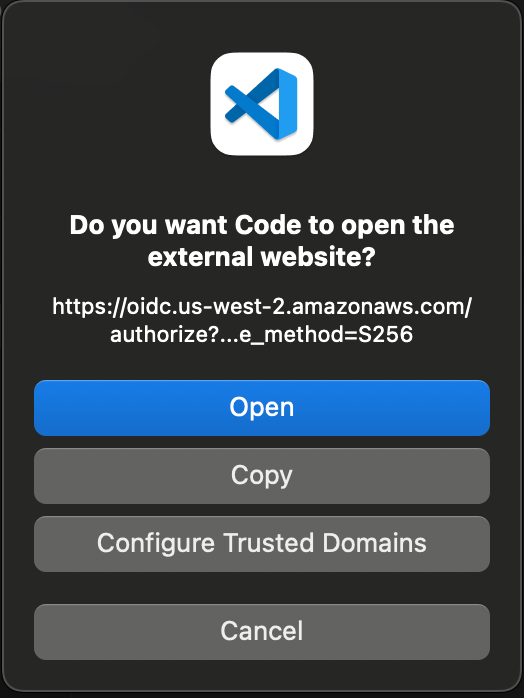
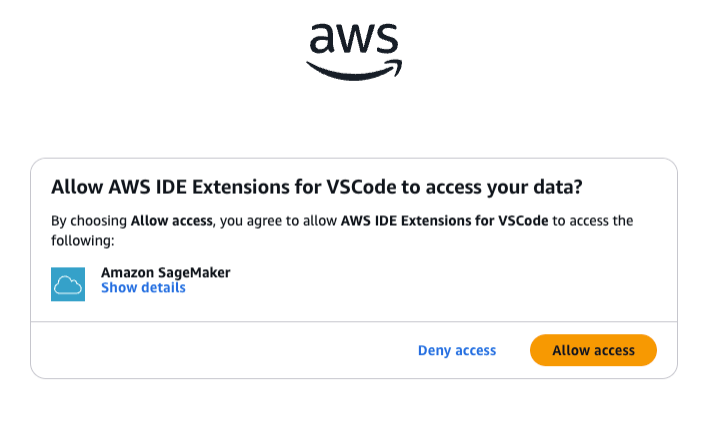
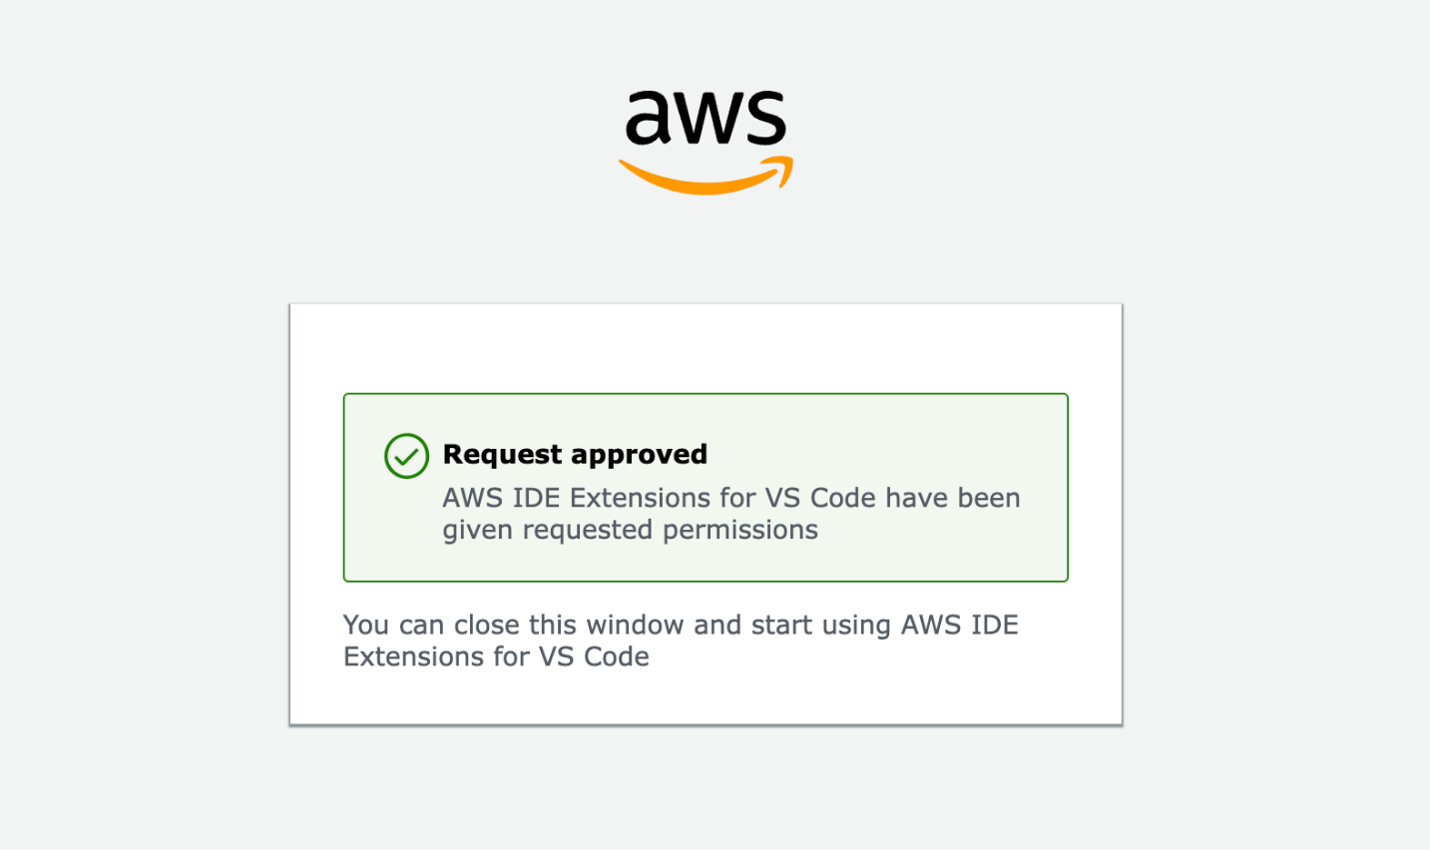
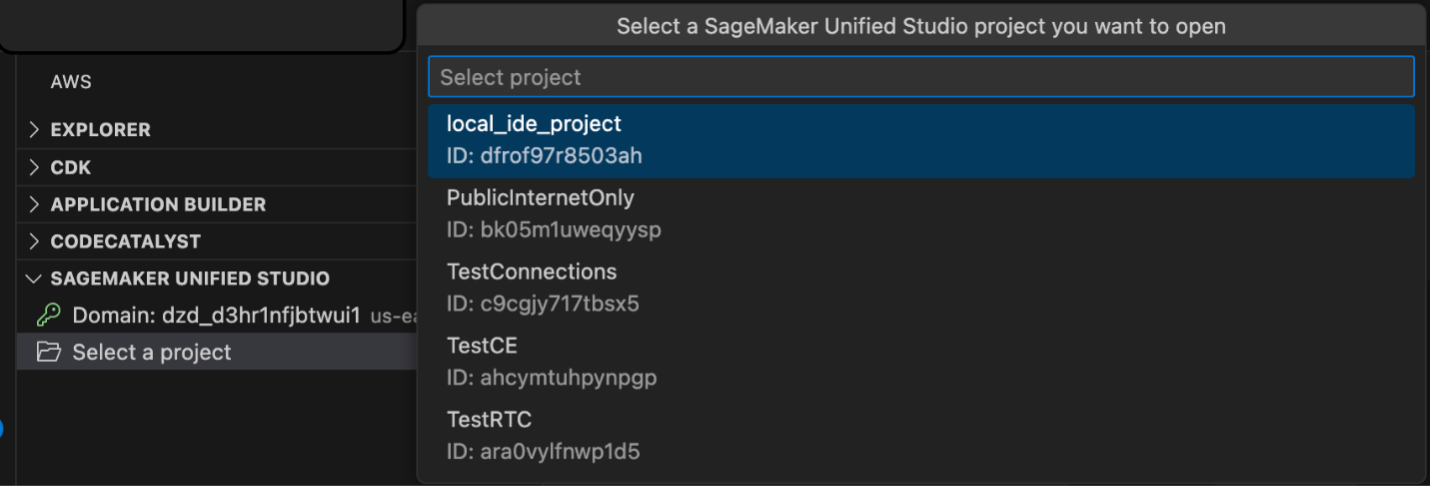
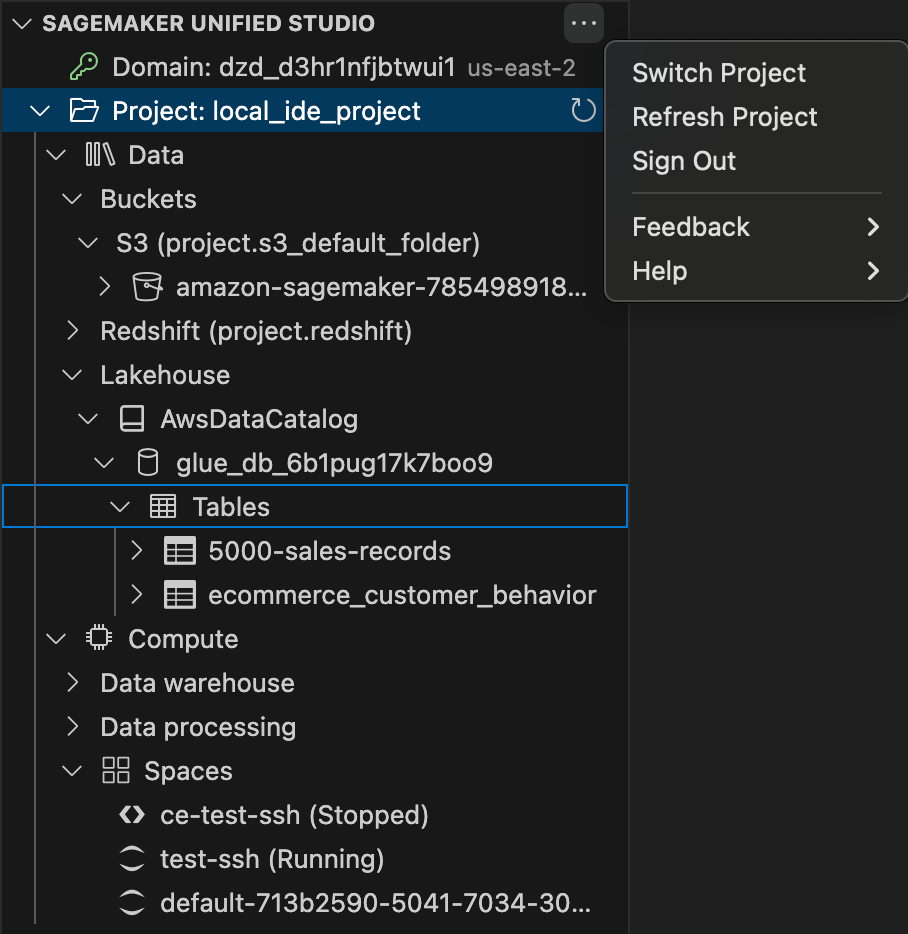
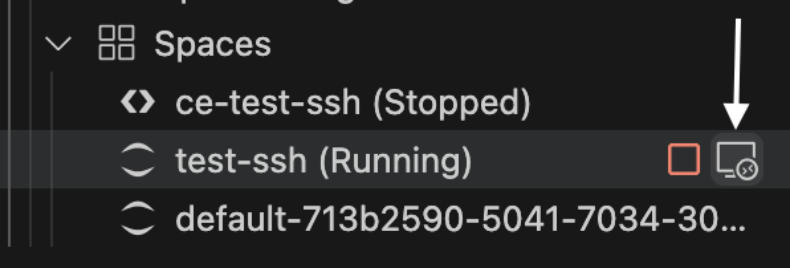
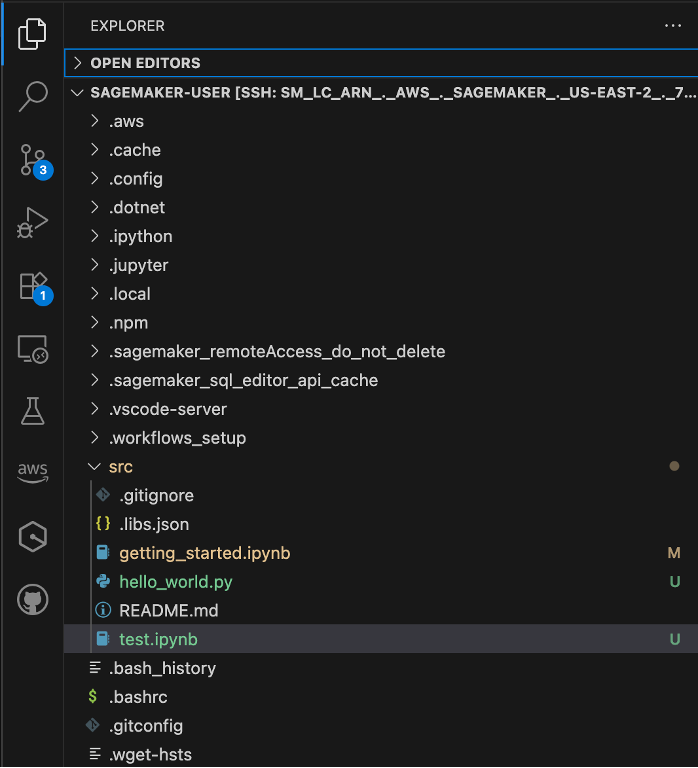

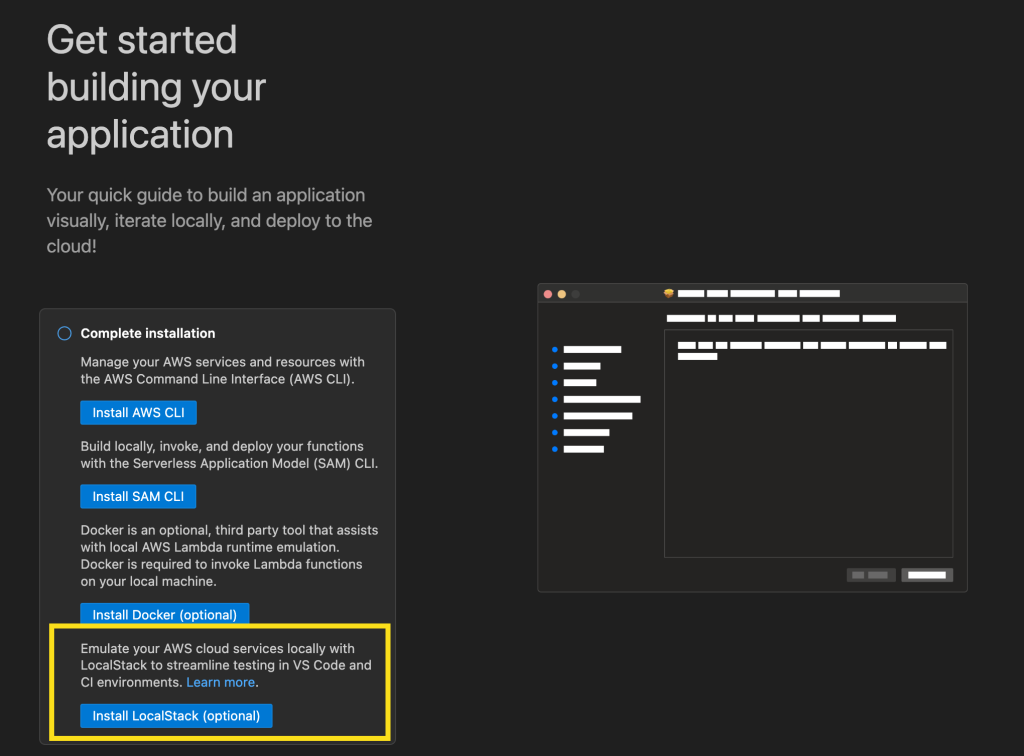
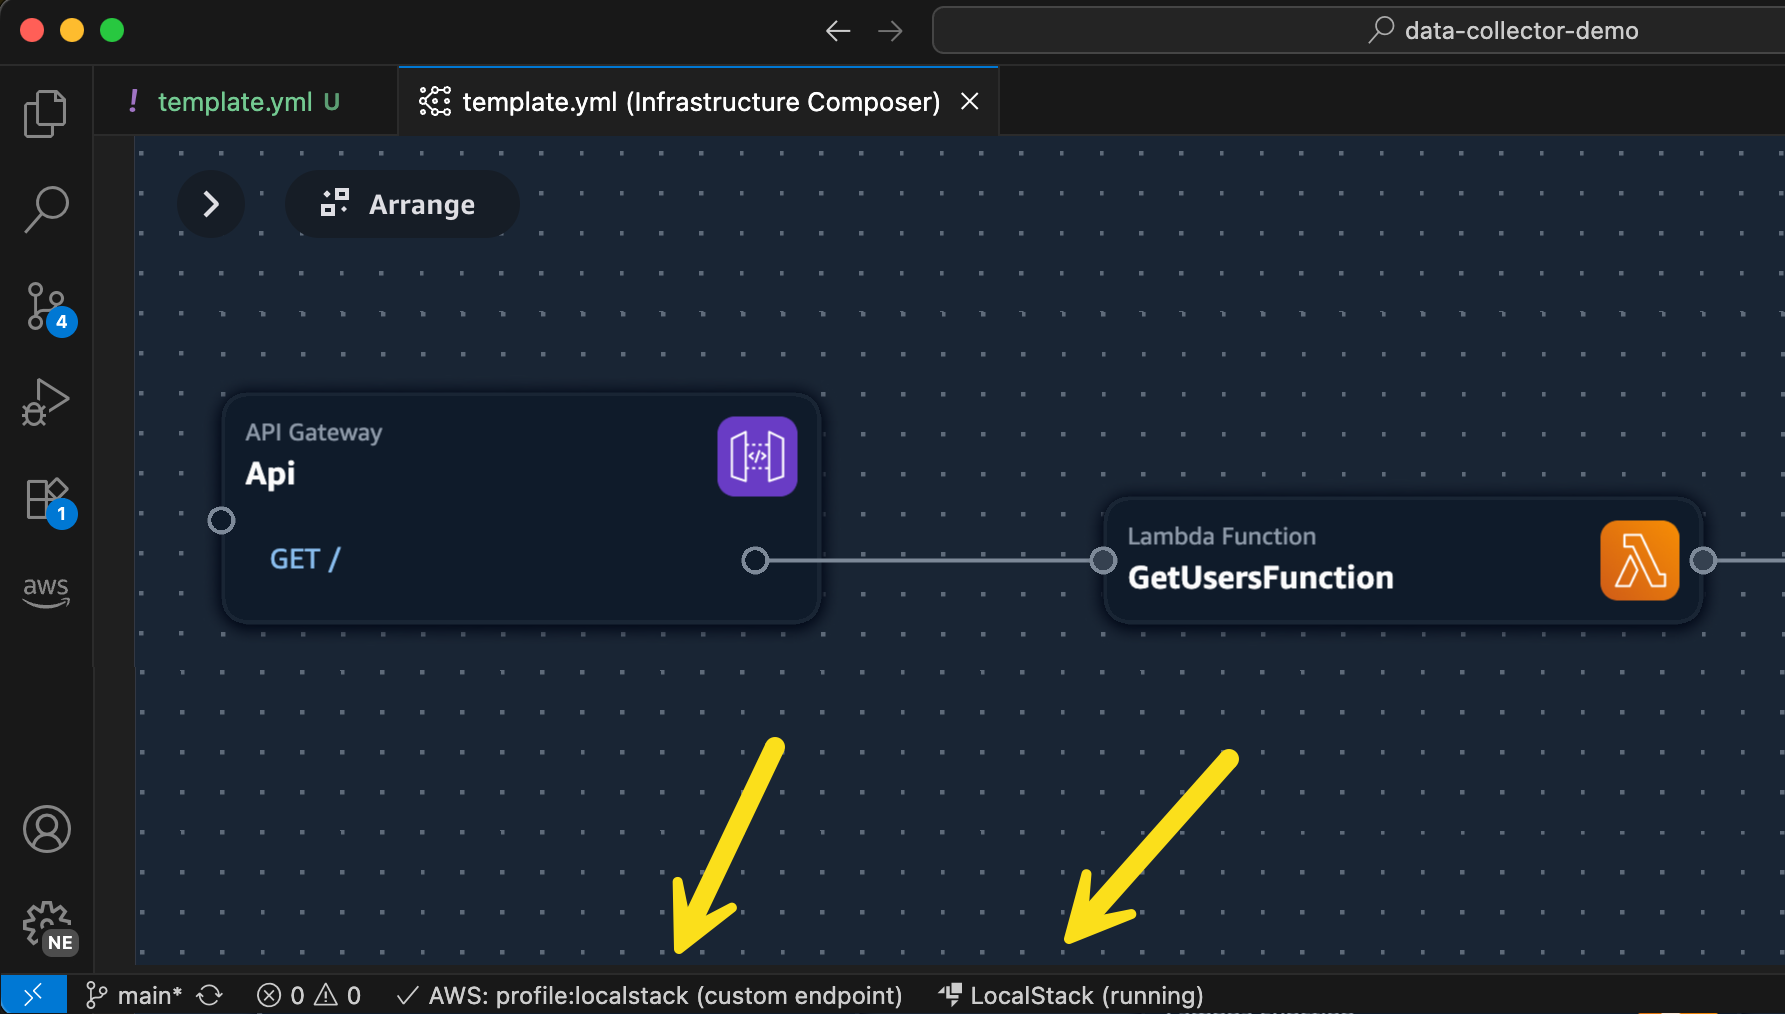
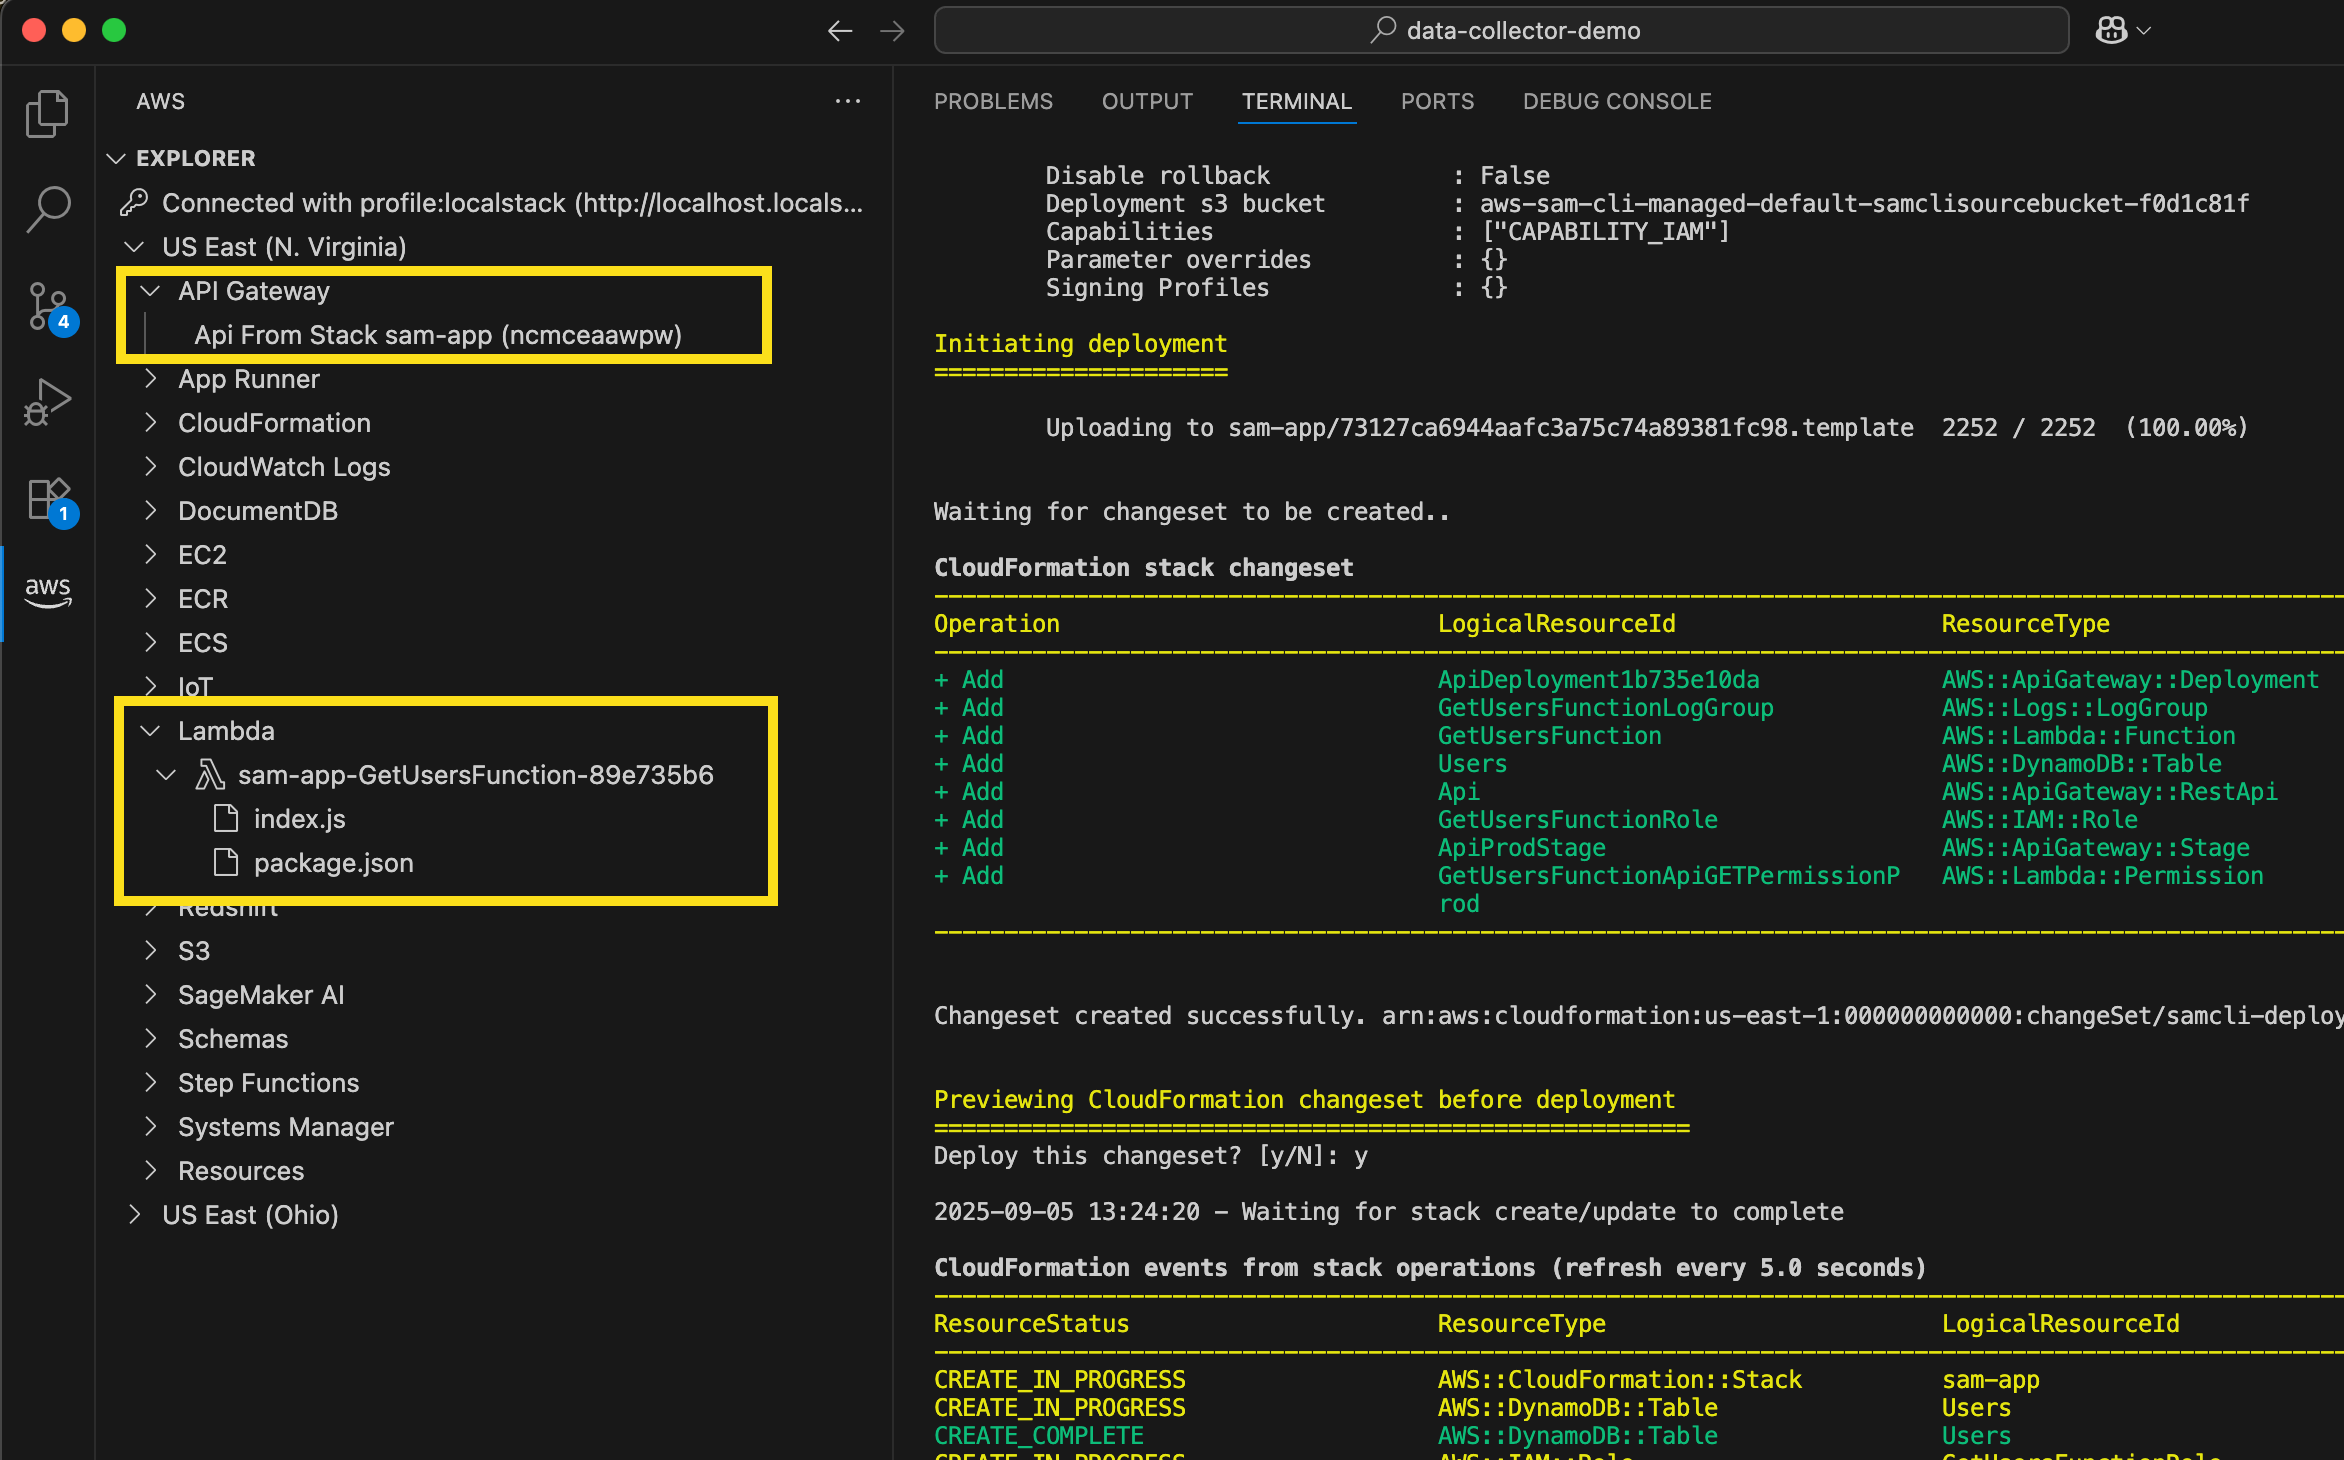

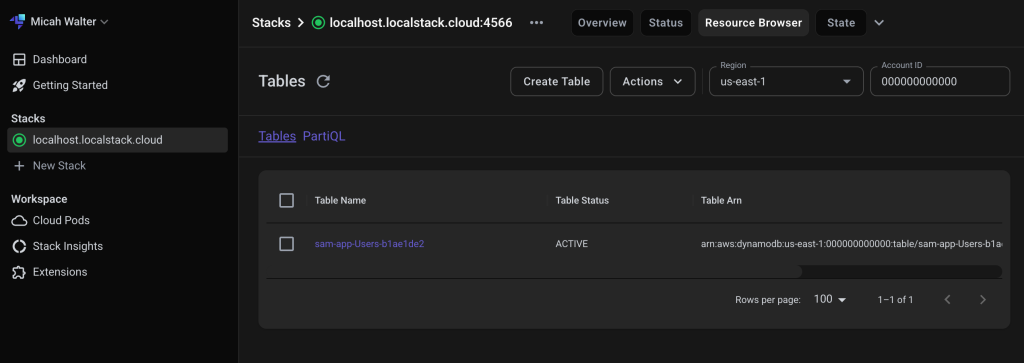
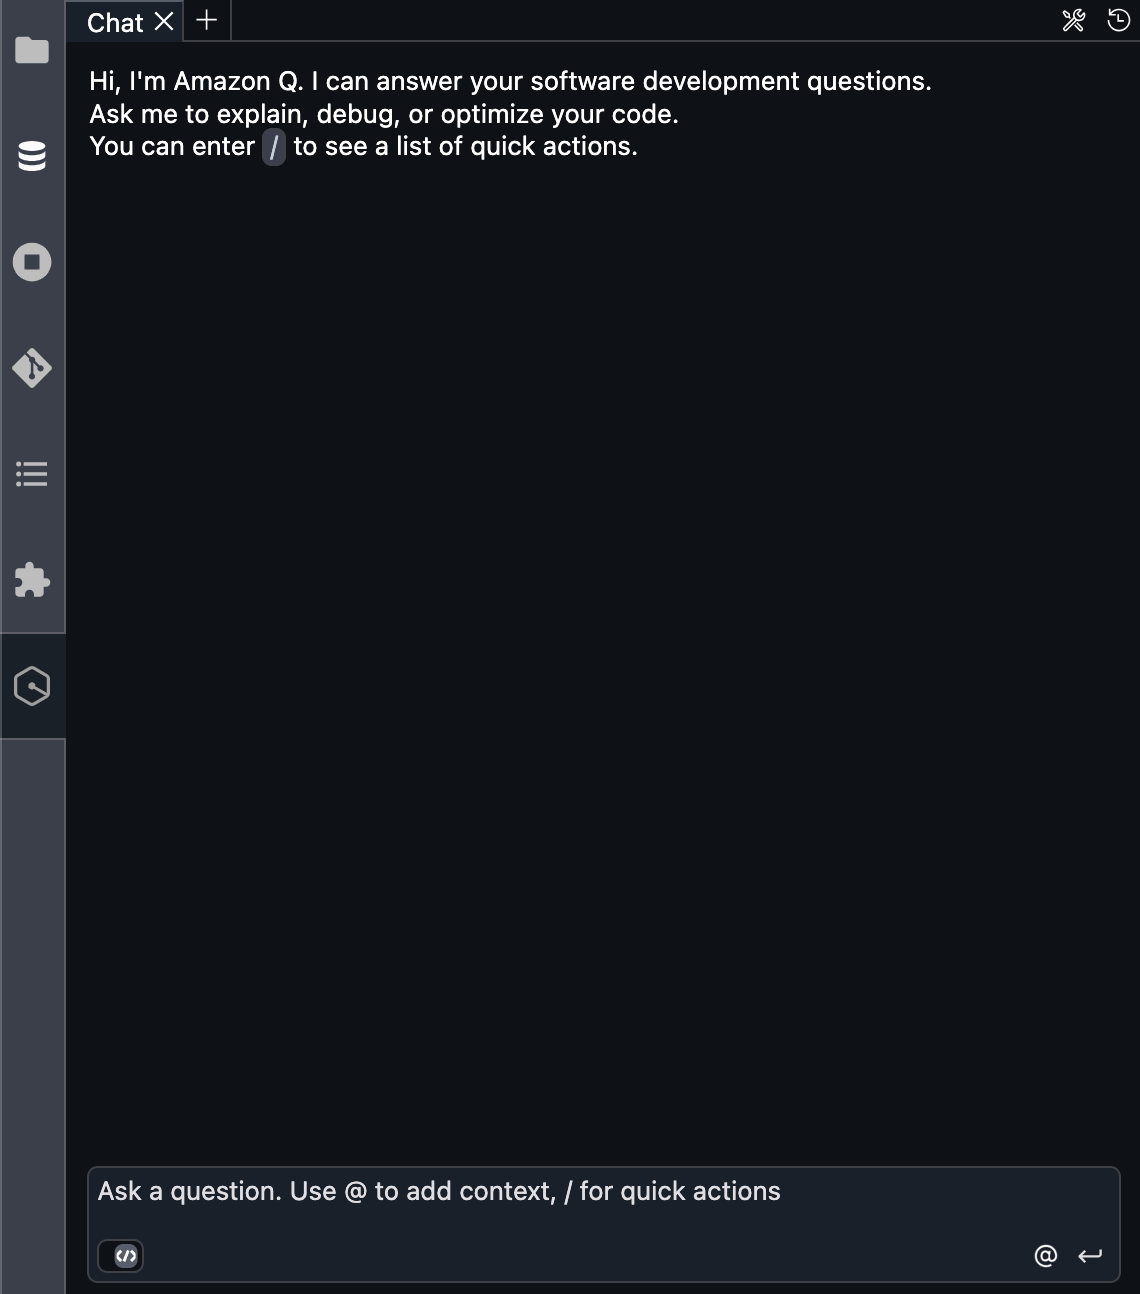
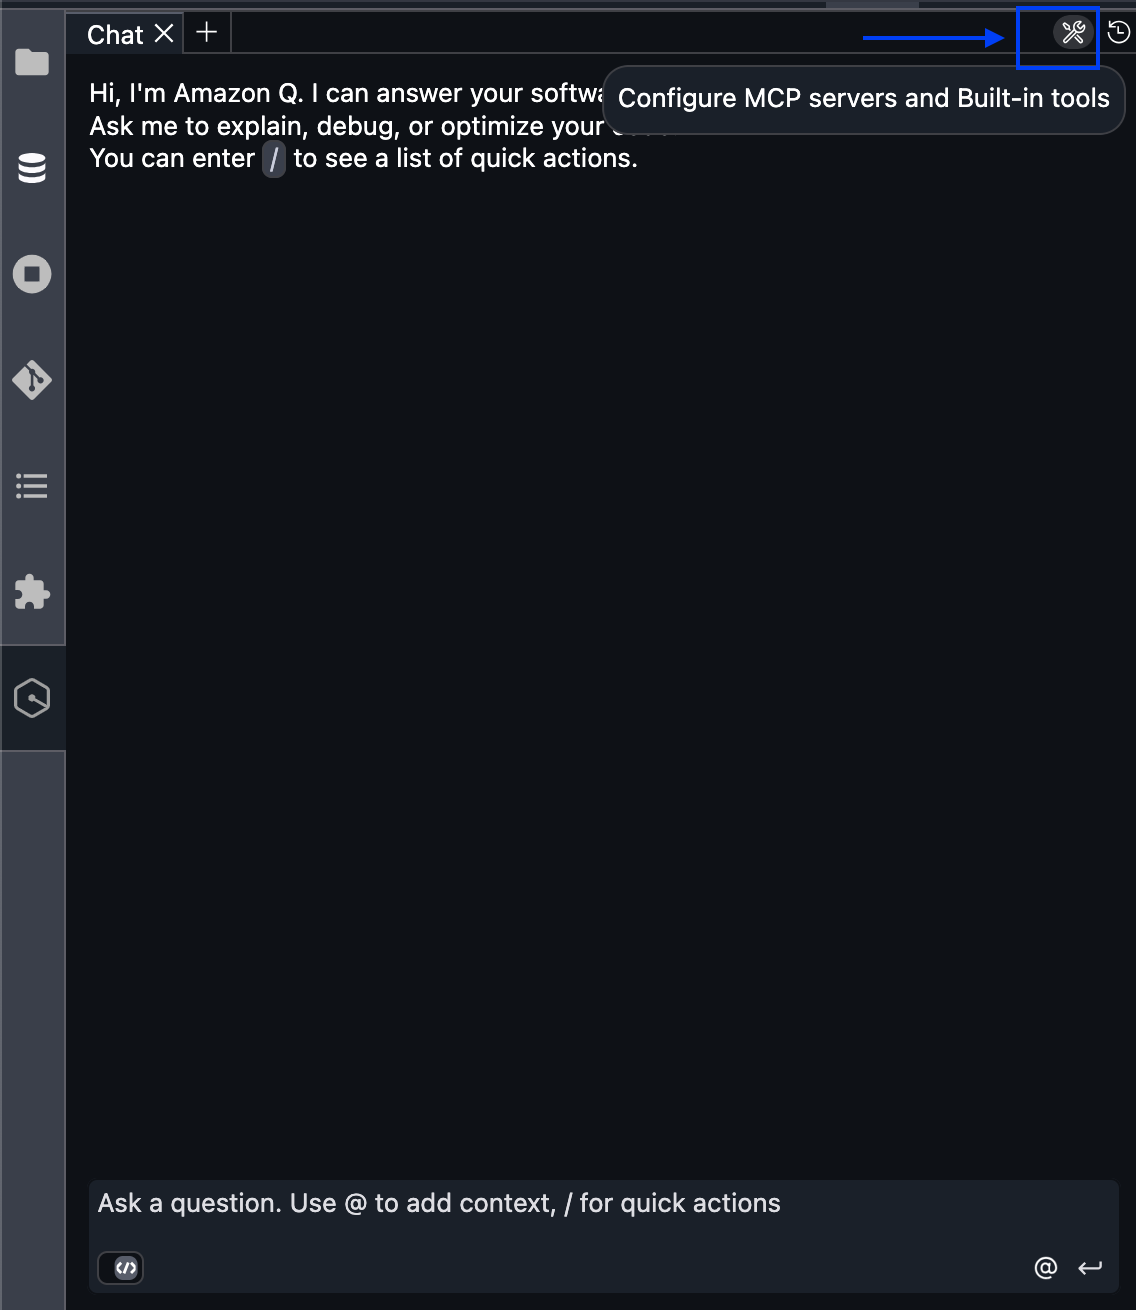
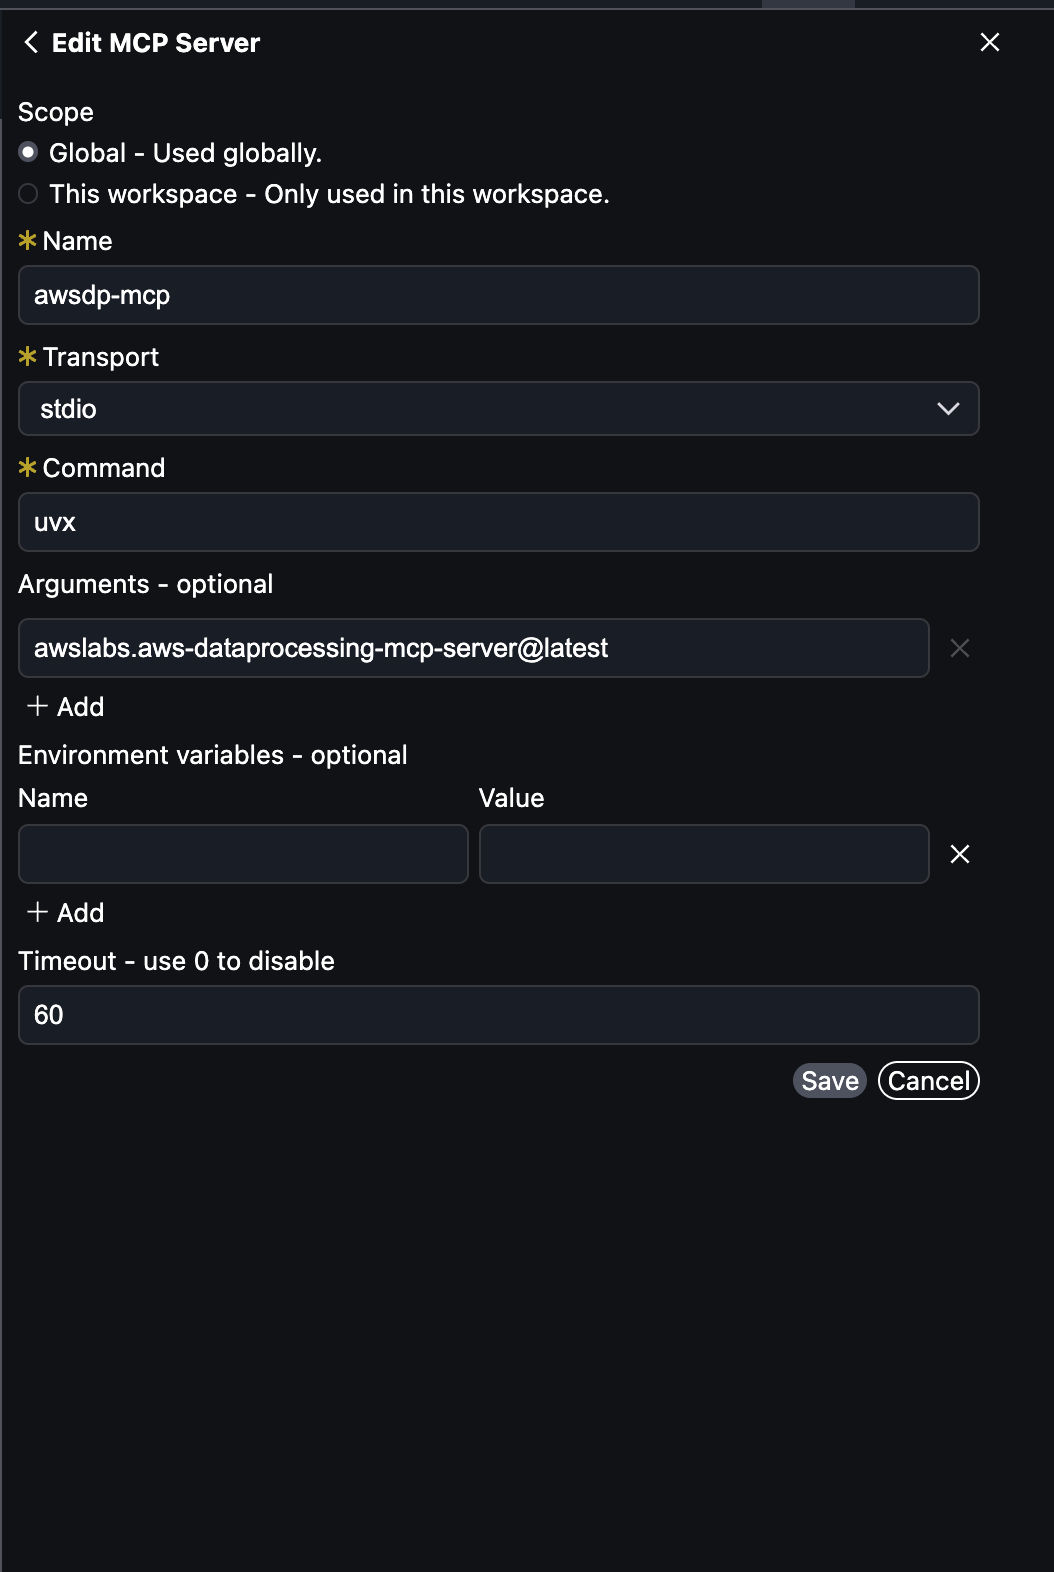
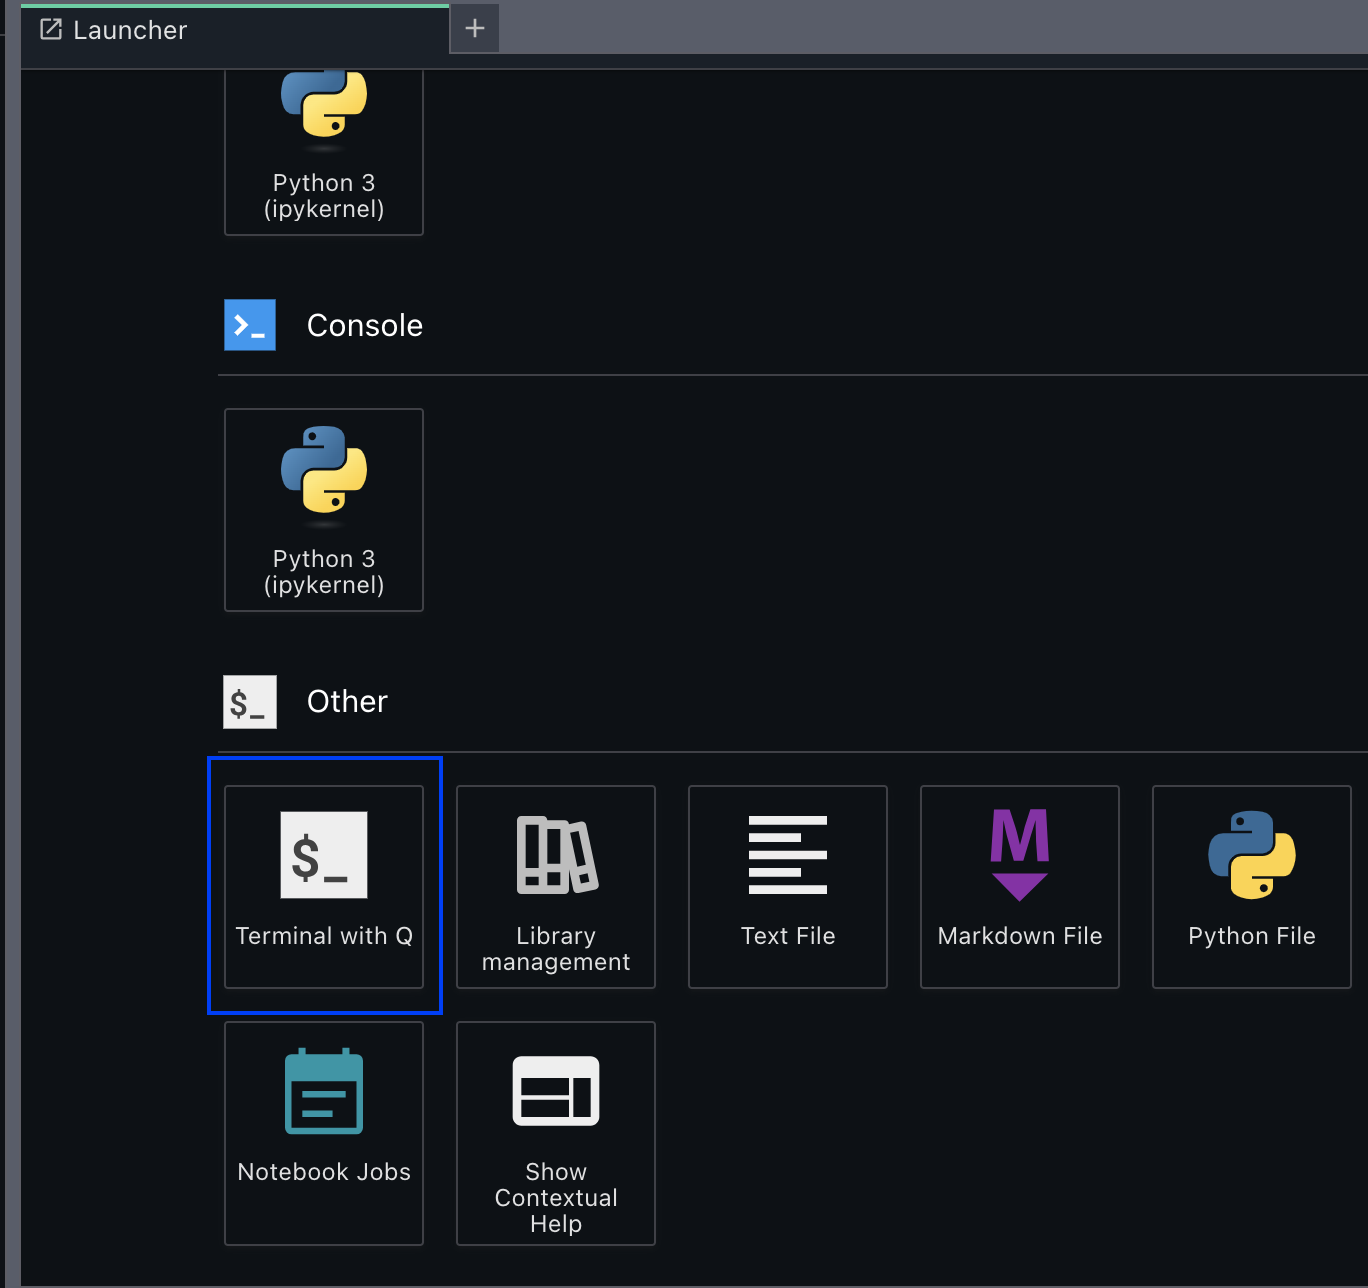
 Lauren Mullennex is a Senior GenAI/ML Specialist Solutions Architect at AWS. She has over a decade of experience in ML, DevOps, and infrastructure. She is a published author of a book on computer vision. Outside of work, you can find her traveling and hiking with her two dogs.
 Siddharth Gupta is heading Generative AI within SageMaker’s Unified Experiences. His focus is on driving agentic experiences, where AI systems act autonomously on behalf of users to accomplish complex tasks. Previously, he led edge machine learning solutions at AWS. This cutting-edge work aims to revolutionize how developers and data scientists interact with AI, creating more intuitive data integrations and powerful tools for building and deploying machine learning models. An alumnus of the University of Illinois at Urbana-Champaign, he brings extensive experience from his roles at Yahoo, Glassdoor, and Twitch. You can reach out to him on LinkedIn.
 Ishneet Kaur is a Software Development Manager on the Amazon SageMaker Unified Studio team. She leads the engineering team to design and build GenAI capabilities in SageMaker Unified Studio
 Mohan Gandhi is a Senior Software Engineer at AWS. He has been with AWS for the last 10 years and has worked on various AWS services like Amazon EMR, Amazon EFA, and Amazon RDS. Currently, he is focused on improving the SageMaker inference experience. In his spare time, he enjoys hiking and marathons.
 Mukul Prasad is a Senior Applied Science Manager in the AWS Agentic AI organization. He leads the Data Processing Agents Science team developing DevOps agents to simplify and optimize the customer journey in using AWS Big Data processing services including Amazon EMR, AWS Glue, and Amazon SageMaker Unified Studio. Outside of work, Mukul enjoys food, travel, photography, and Cricket.
 Murali Narayanaswamy is a Principal Machine Learning Scientist in the Agentic AI organization in AWS working on products including Amazon Bedrock, Amazon SageMaker Unified Studio, Amazon Redshift and Amazon RDS. His research interests lie at the intersection of AI, optimization, learning and inference particularly using them to understand, model and combat noise and uncertainty in real world applications and Reinforcement Learning in practice and at scale. Broadly, he works on using ideas from online algorithms, optimization under uncertainty, control theory, game theory, artificial intelligence, graphical models and estimation theory to solve important problems at Amazon scale.
 Necibe Ahat is a Senior AI/ML Specialist Solutions Architect at AWS, working with Healthcare and Life Sciences customers. Necibe helps customers to advance their generative AI and machine learning journey. She has a background in computer science with 15 years of industry experience helping customers ideate, design, build and deploy solutions at scale. She is a passionate inclusion and diversity advocate.
 Vipin Mohan is a Principal Product Manager at Amazon Web Services, where he leads generative AI product strategy. He specializes in building AI/ML products, container platforms, and search technologies that serve thousands of customers. Outside of work, he mentors aspiring product managers, enjoys reading about financial investing and entrepreneurship, and loves exploring the world through the eyes of his two kids.
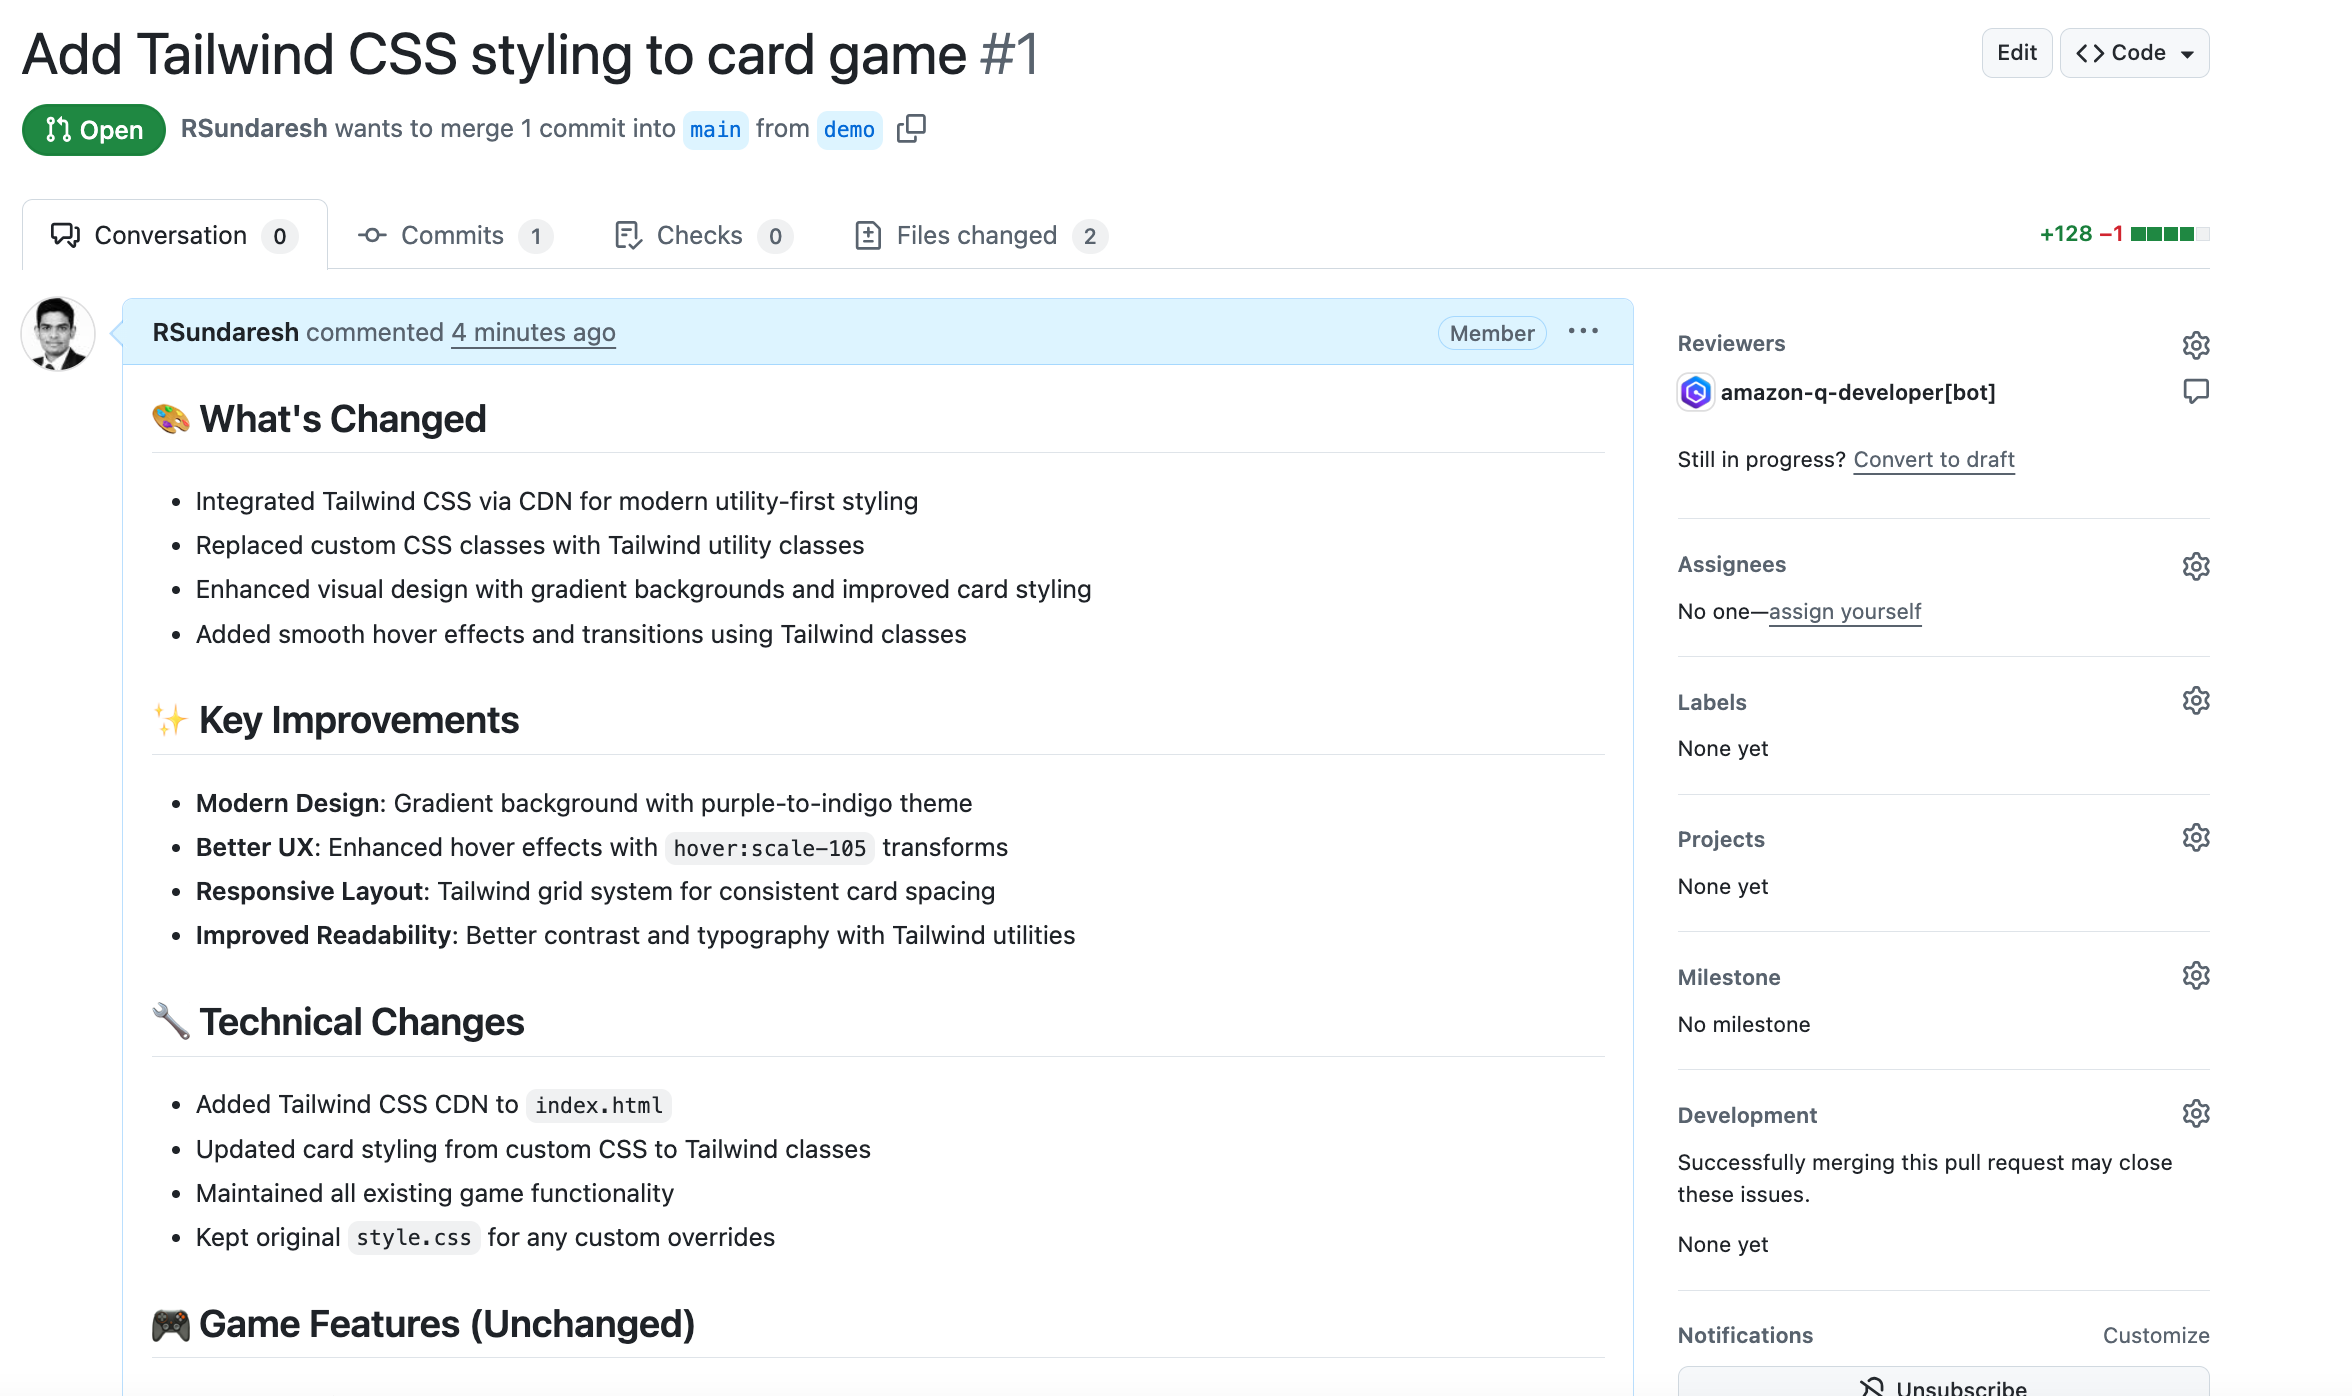
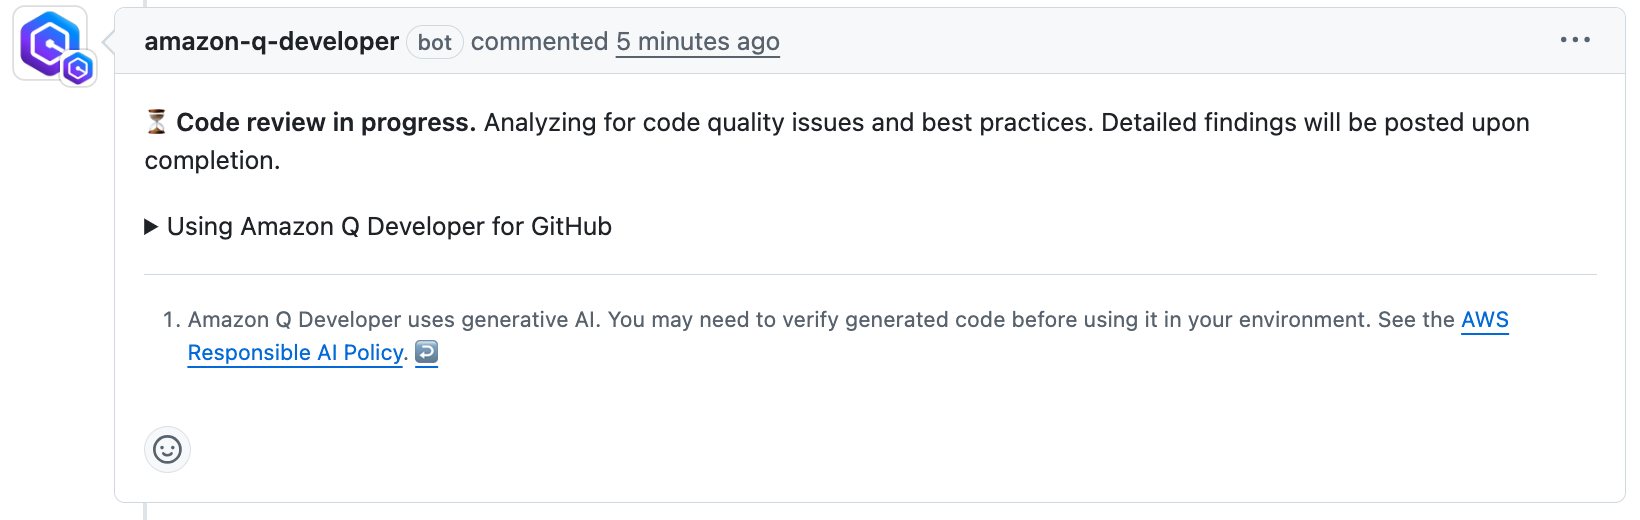
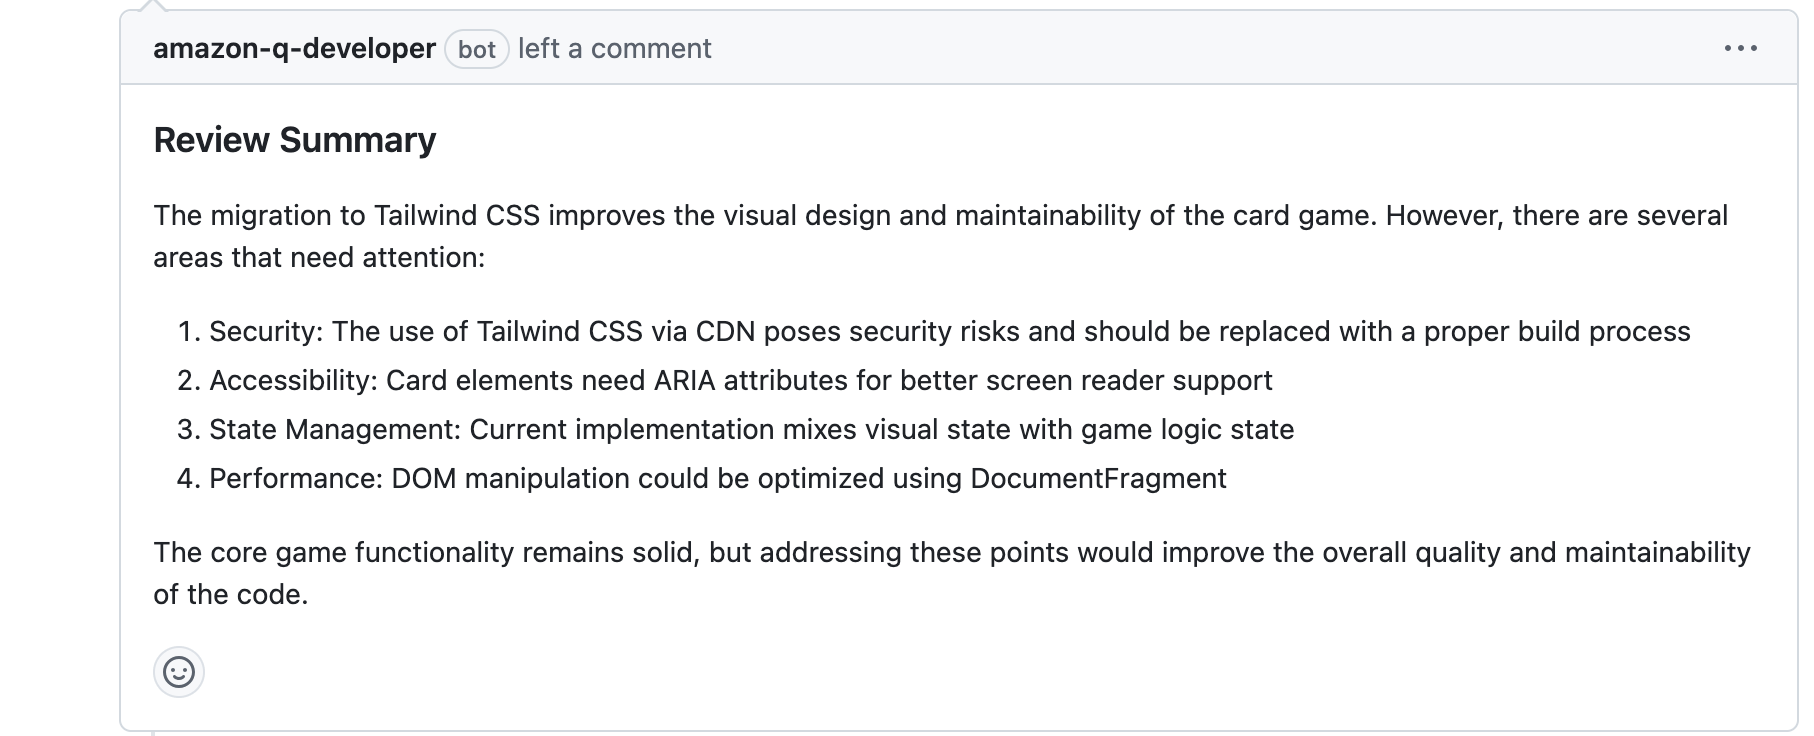

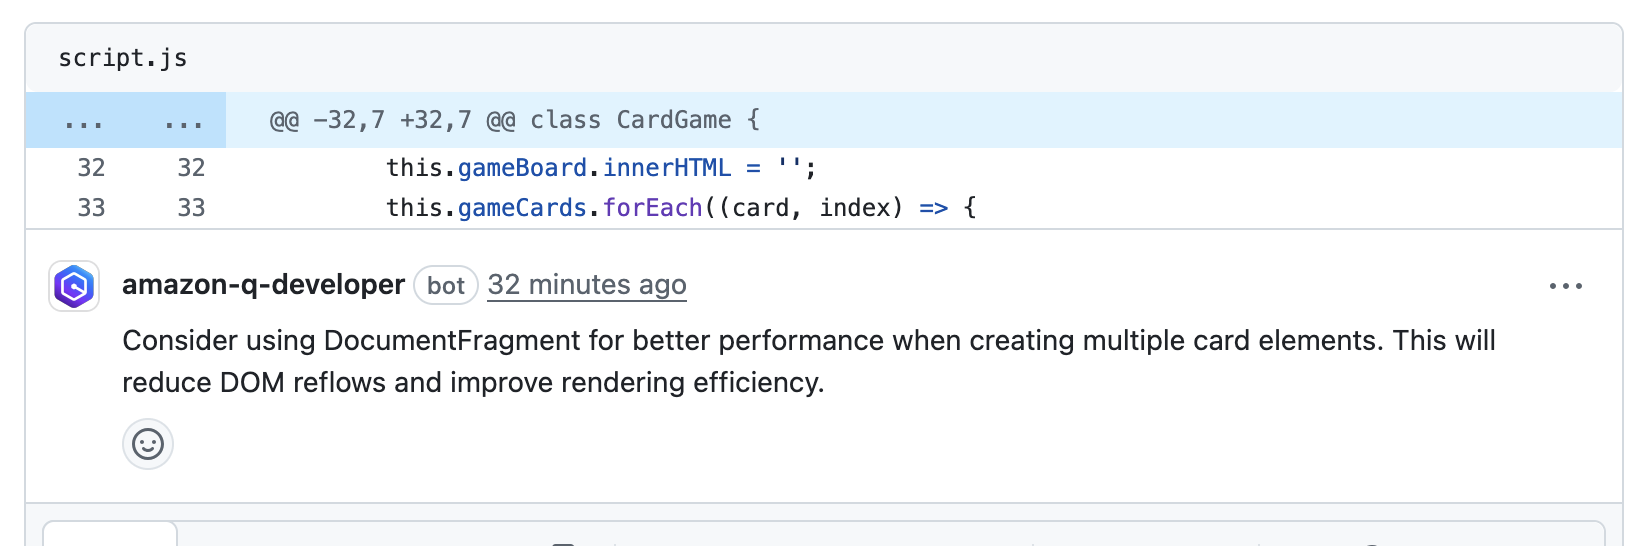
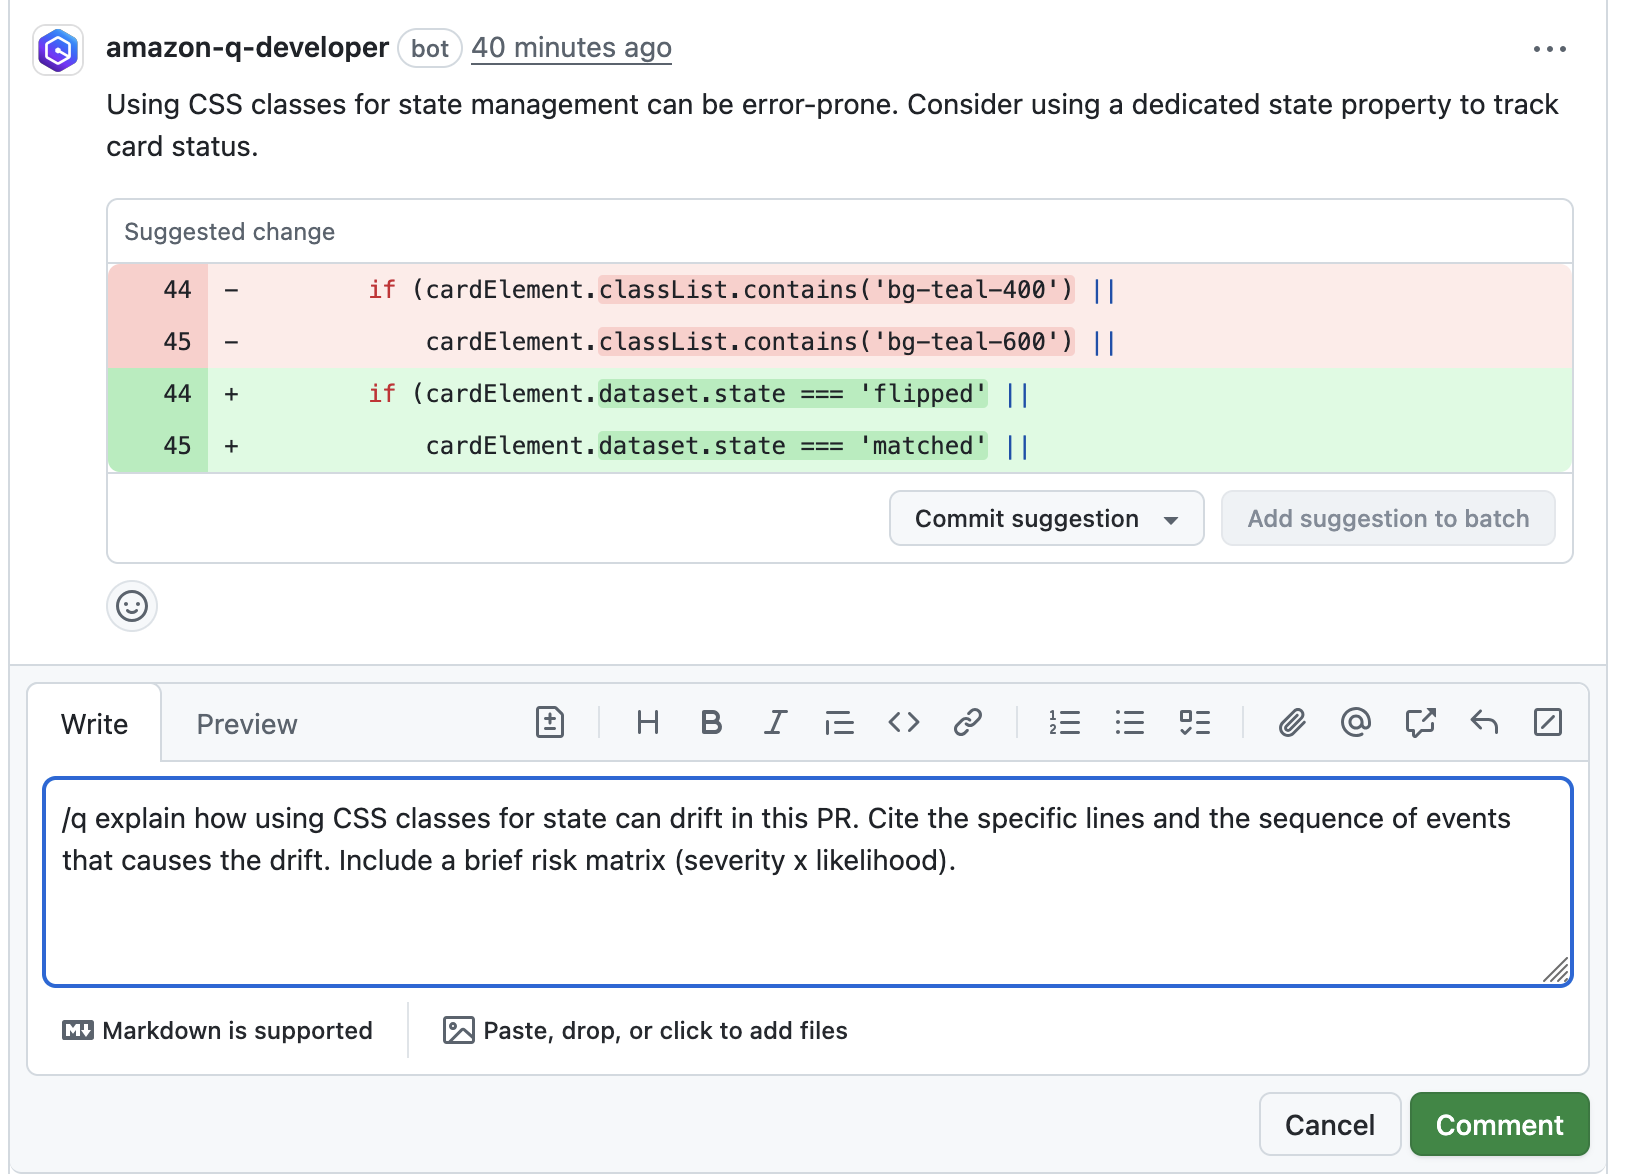
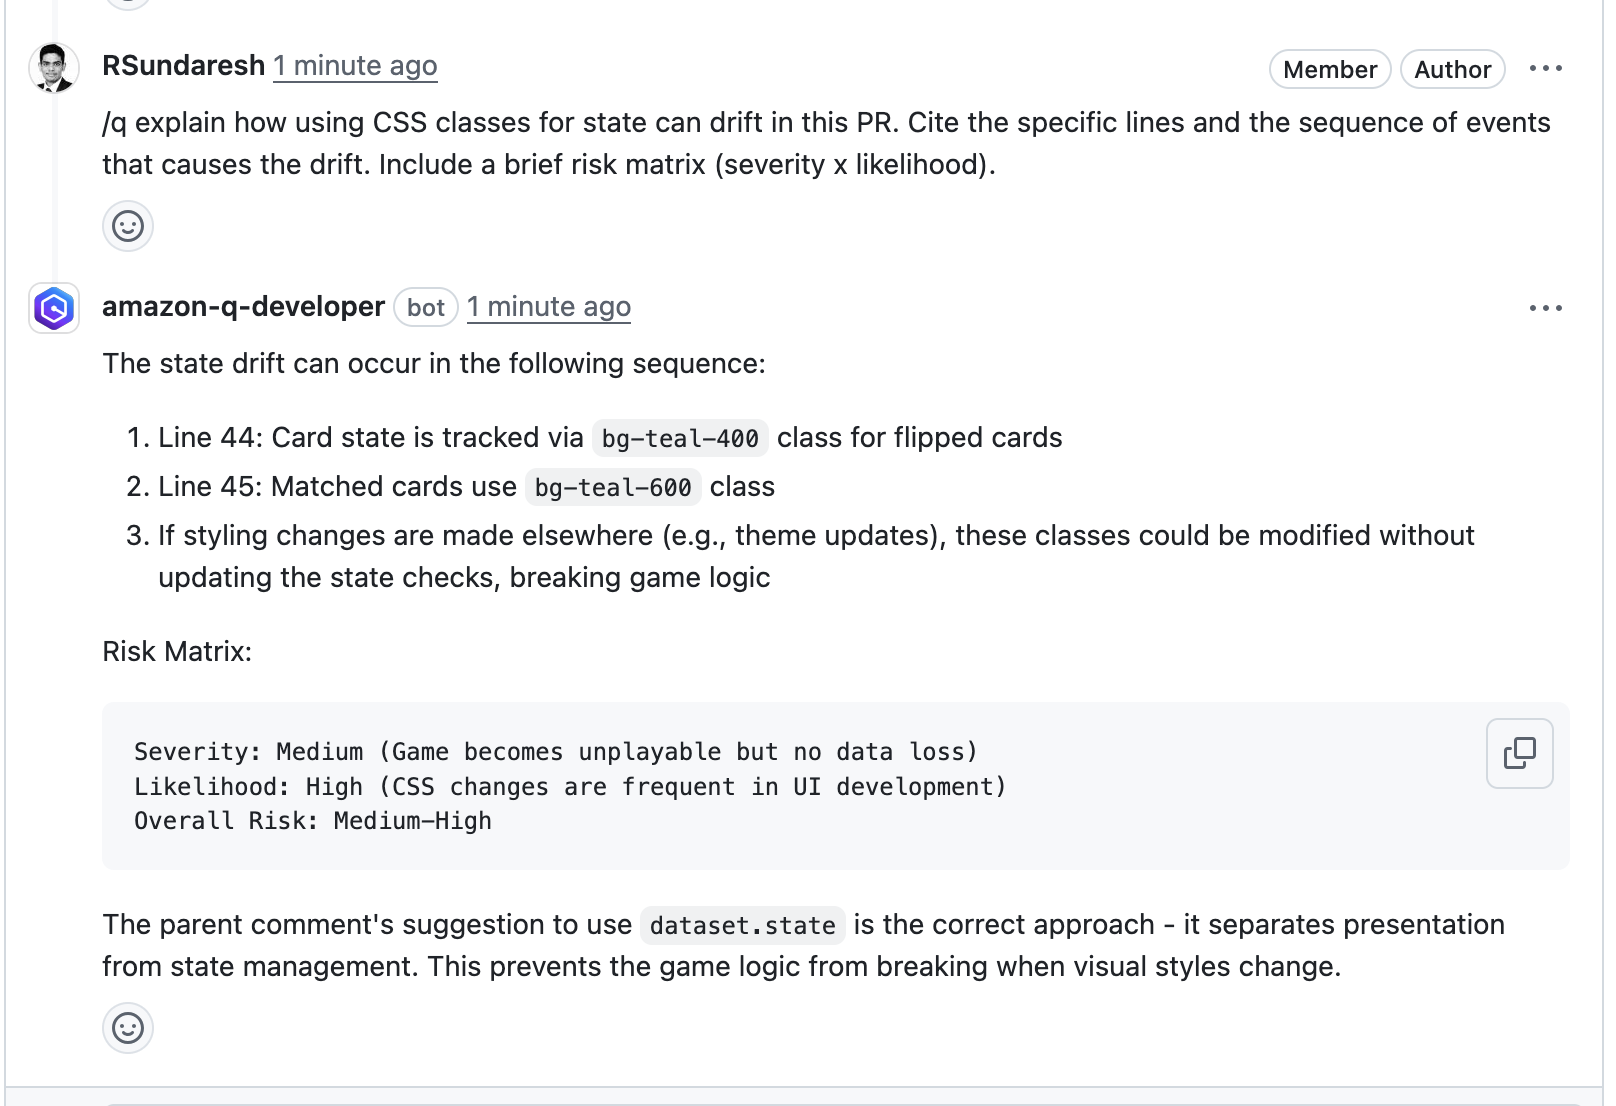
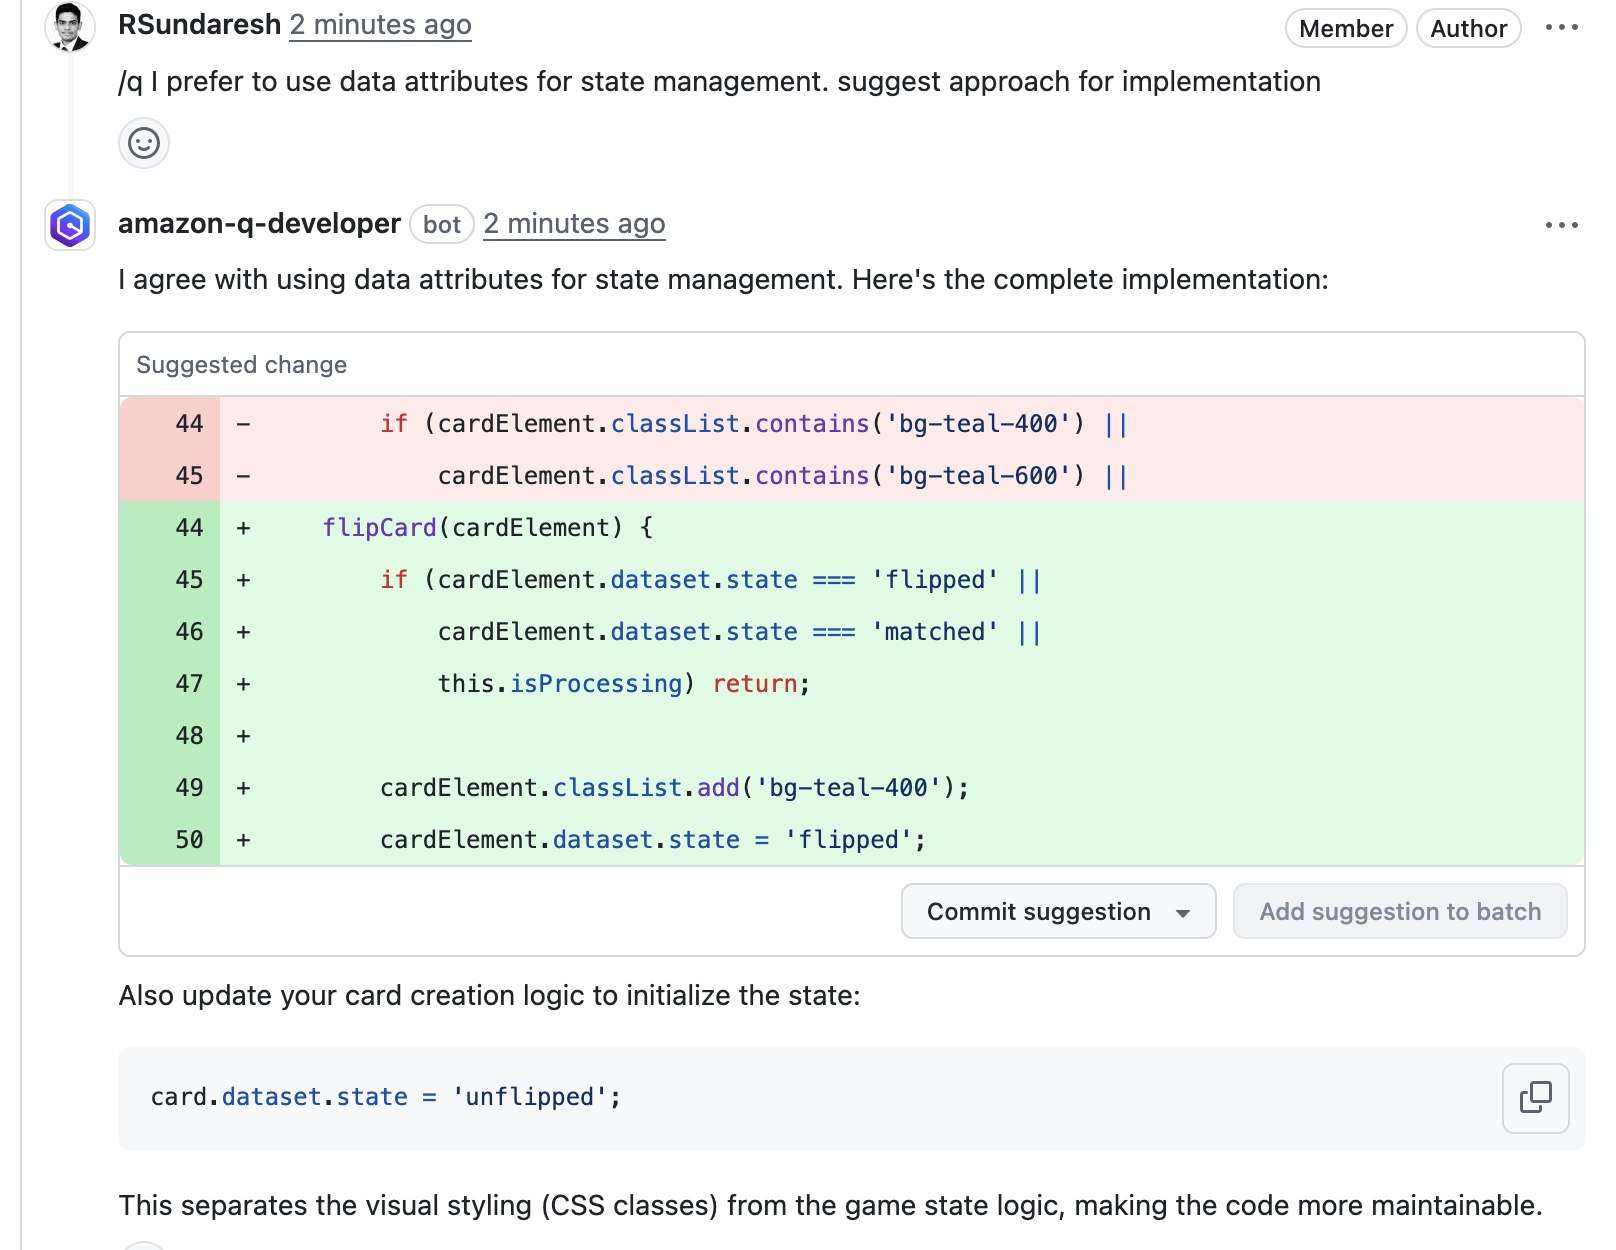
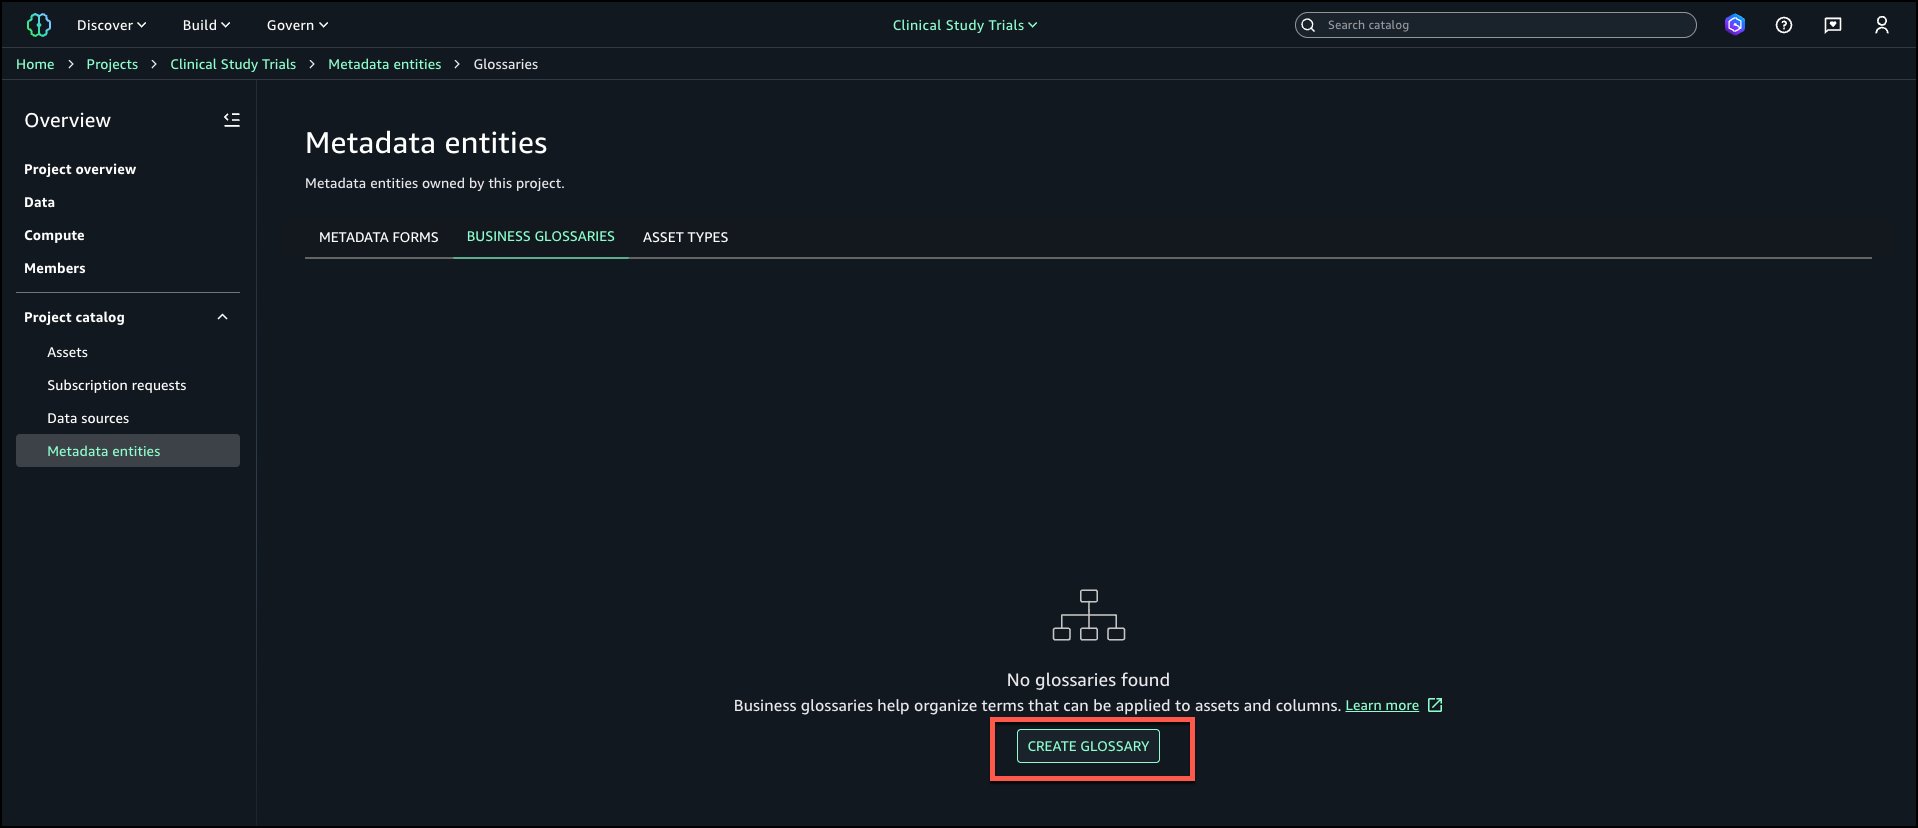
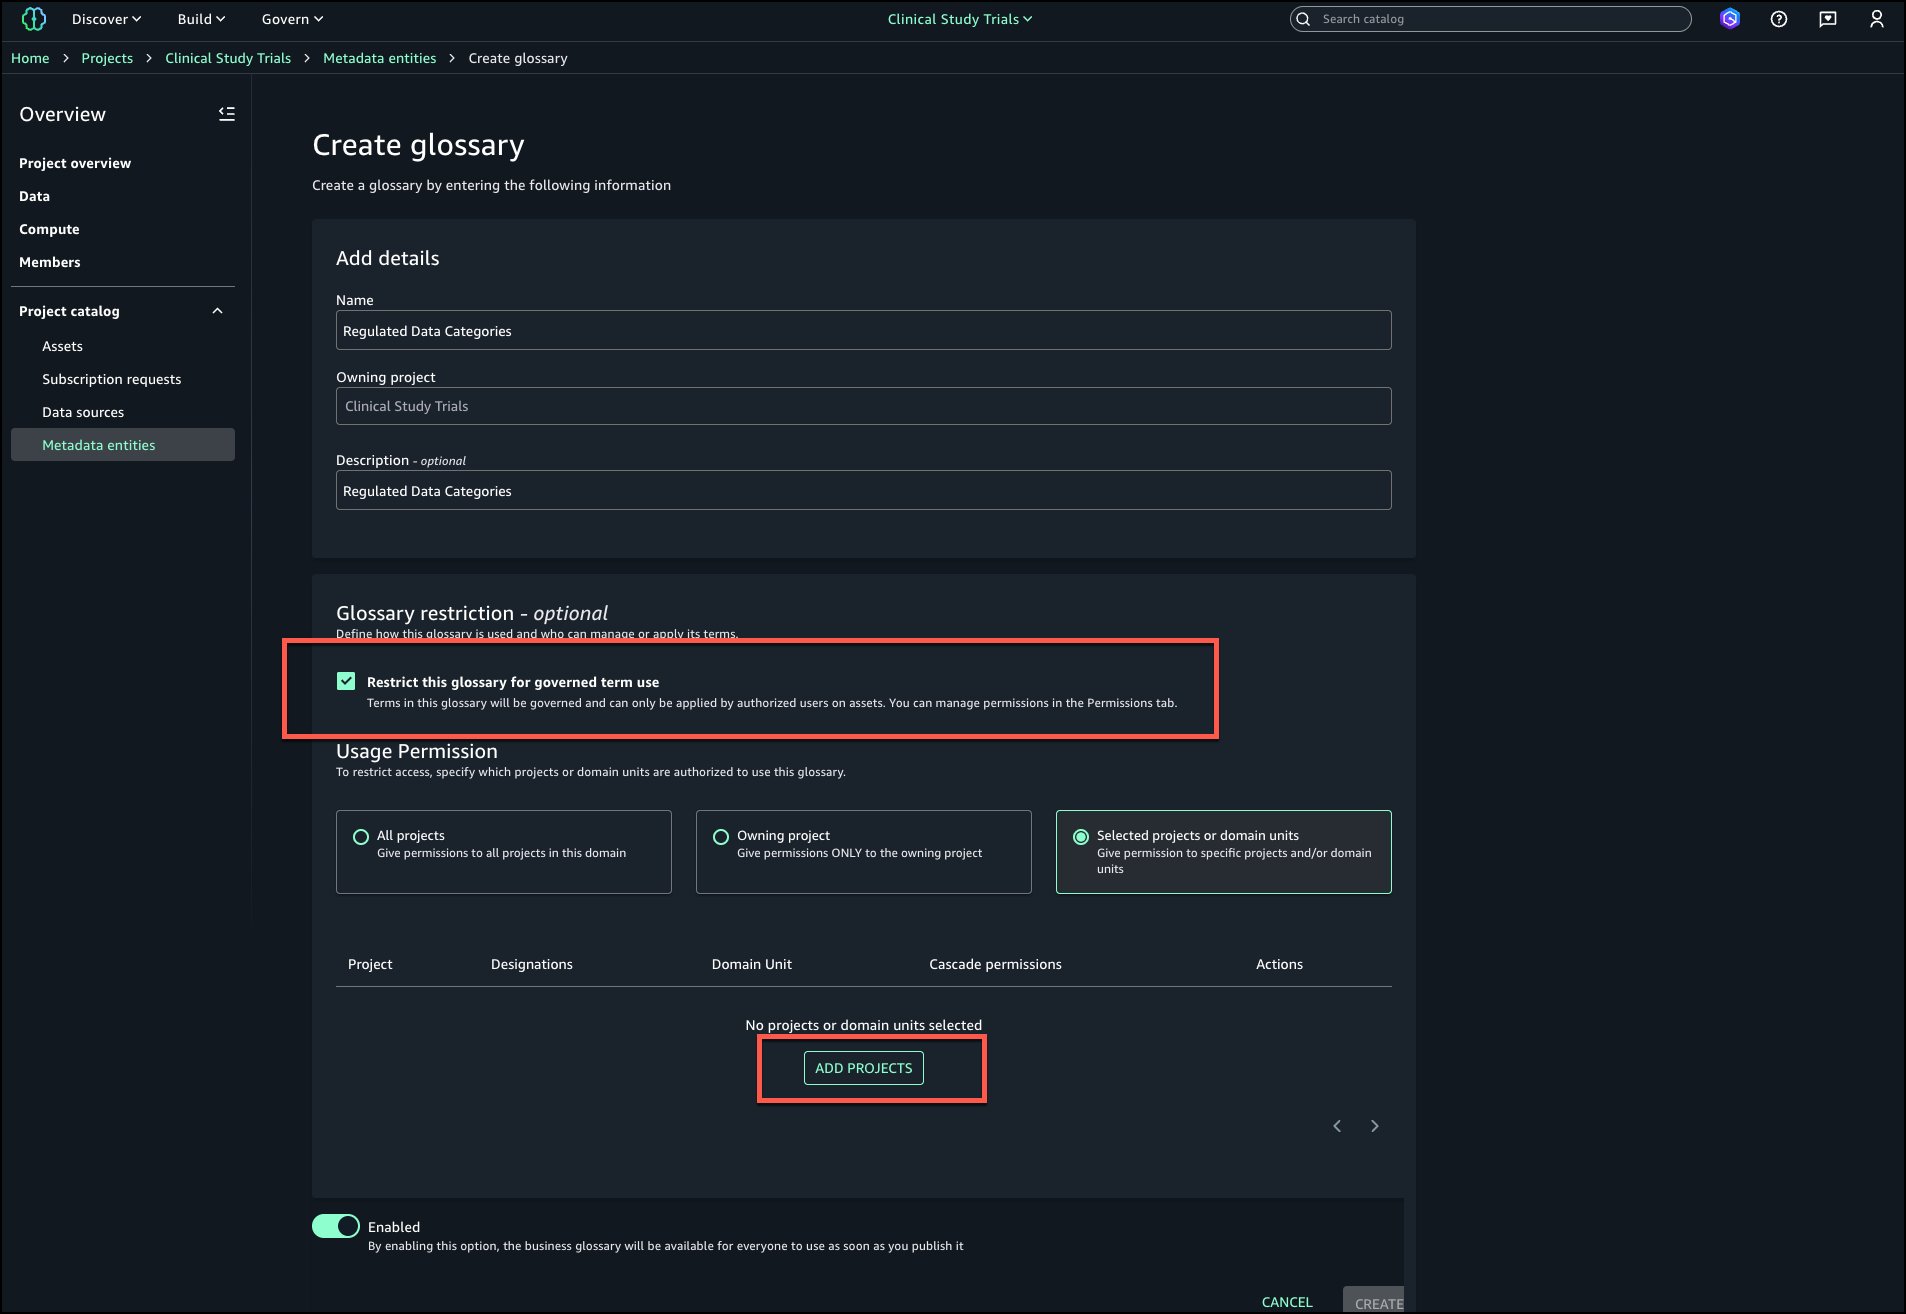
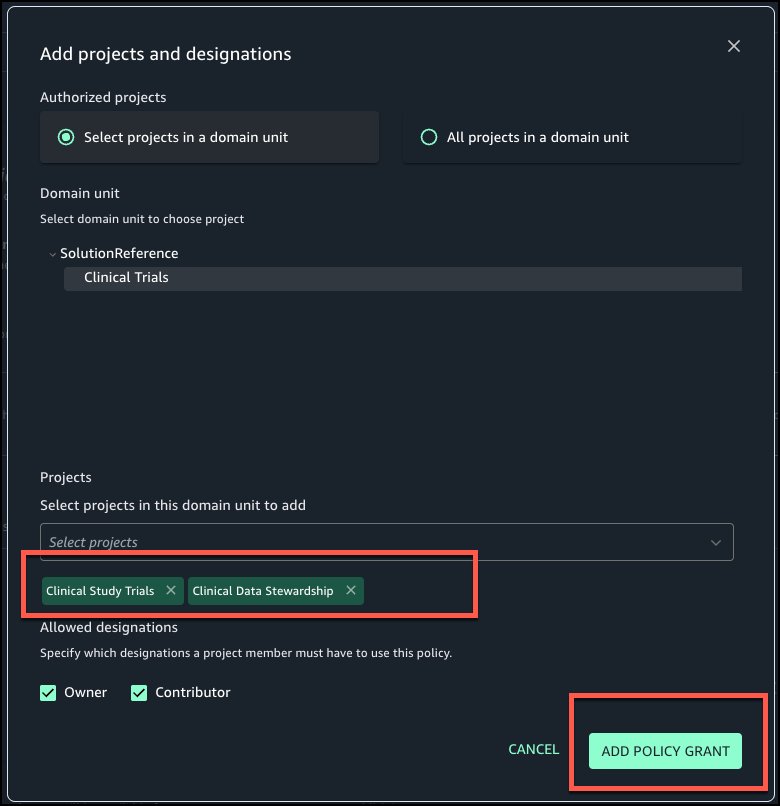
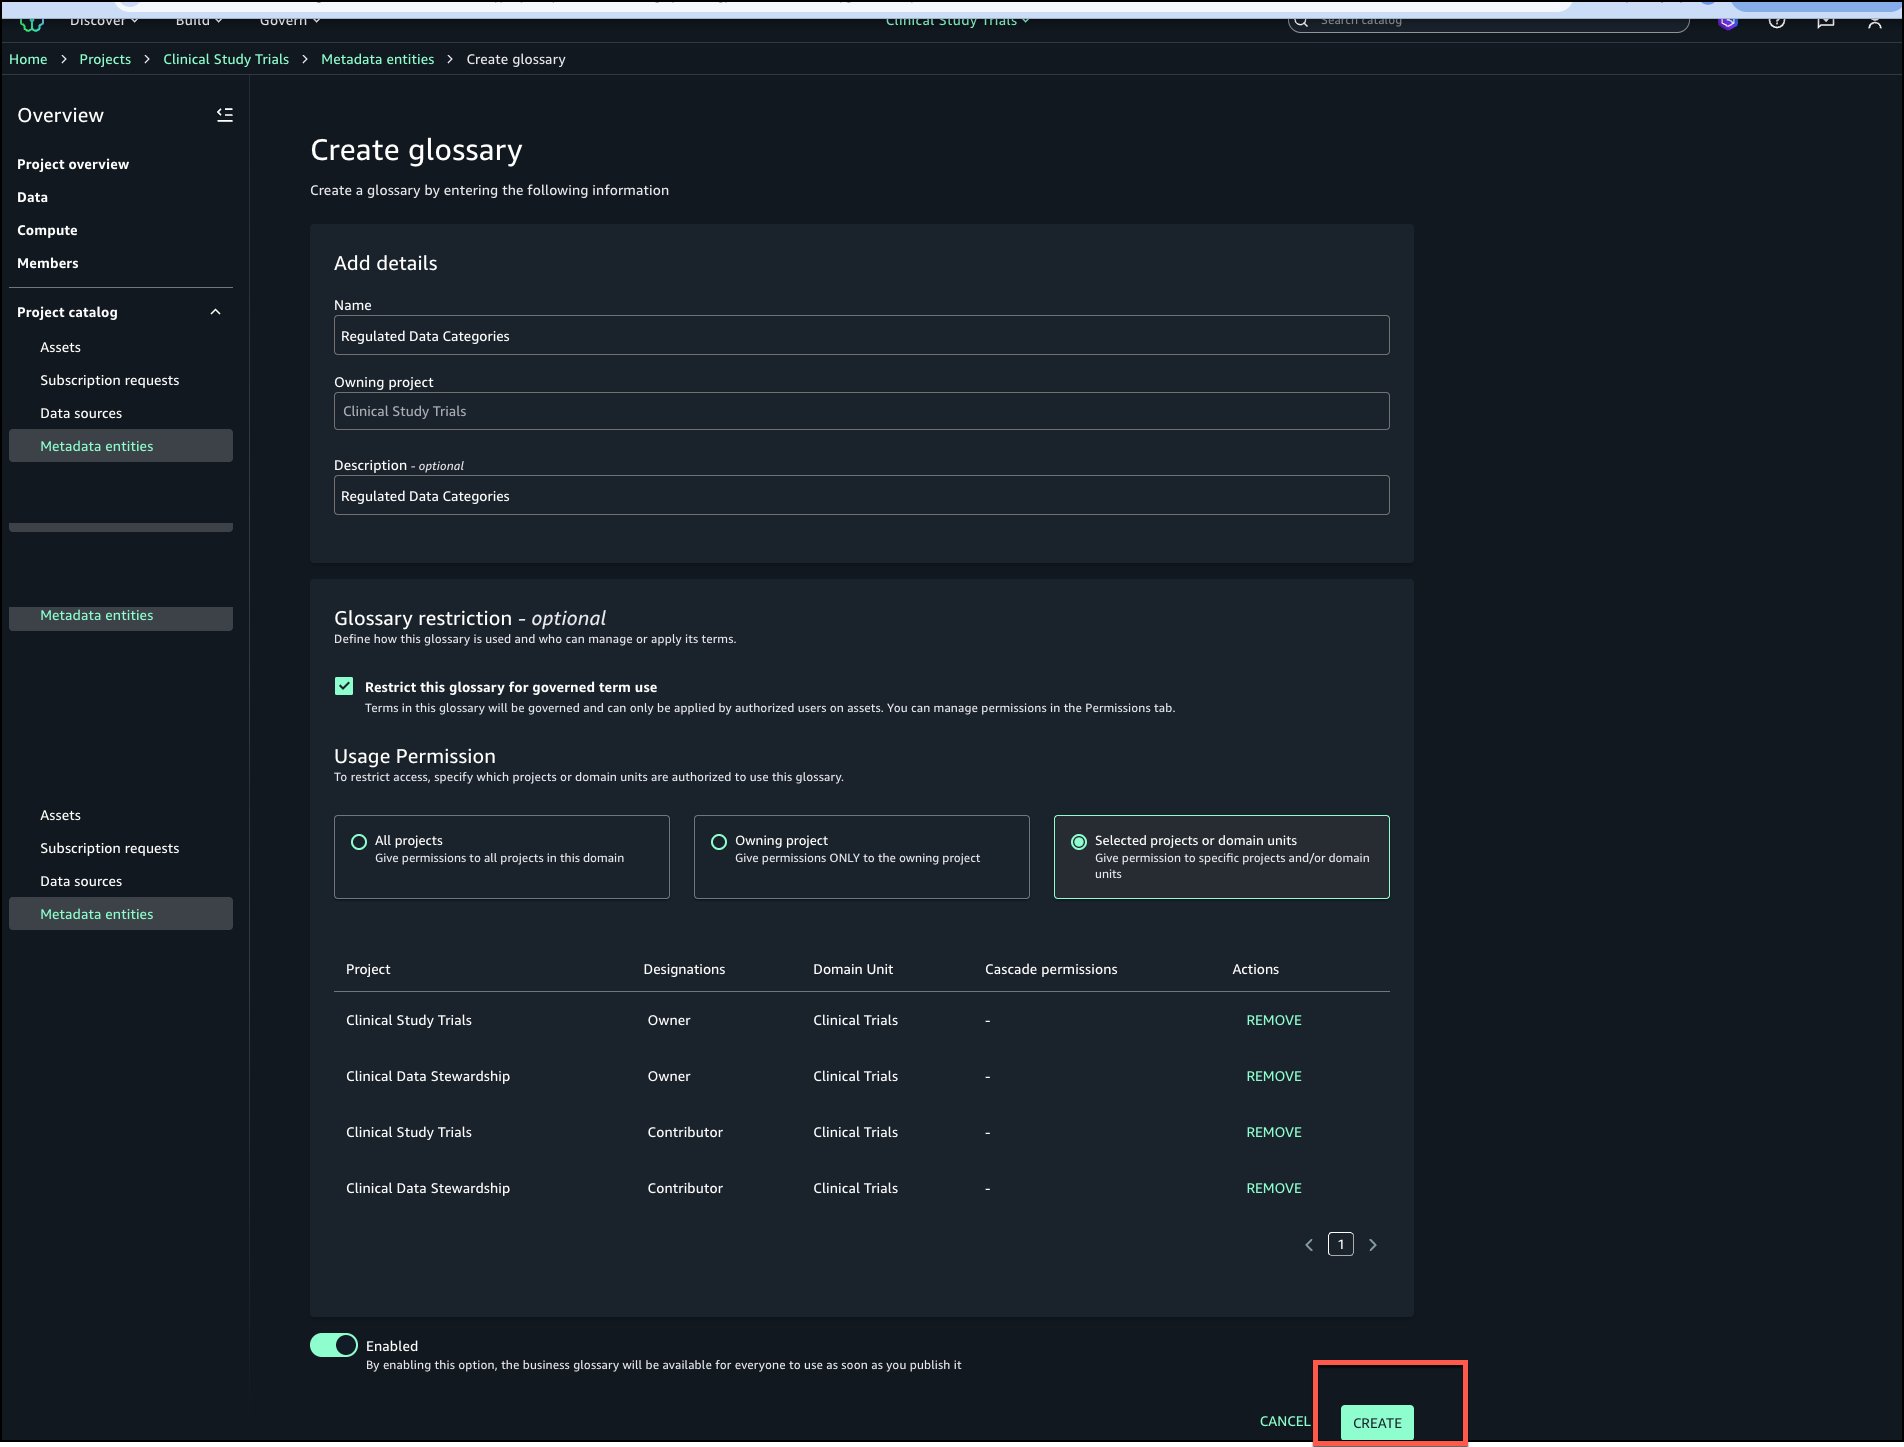
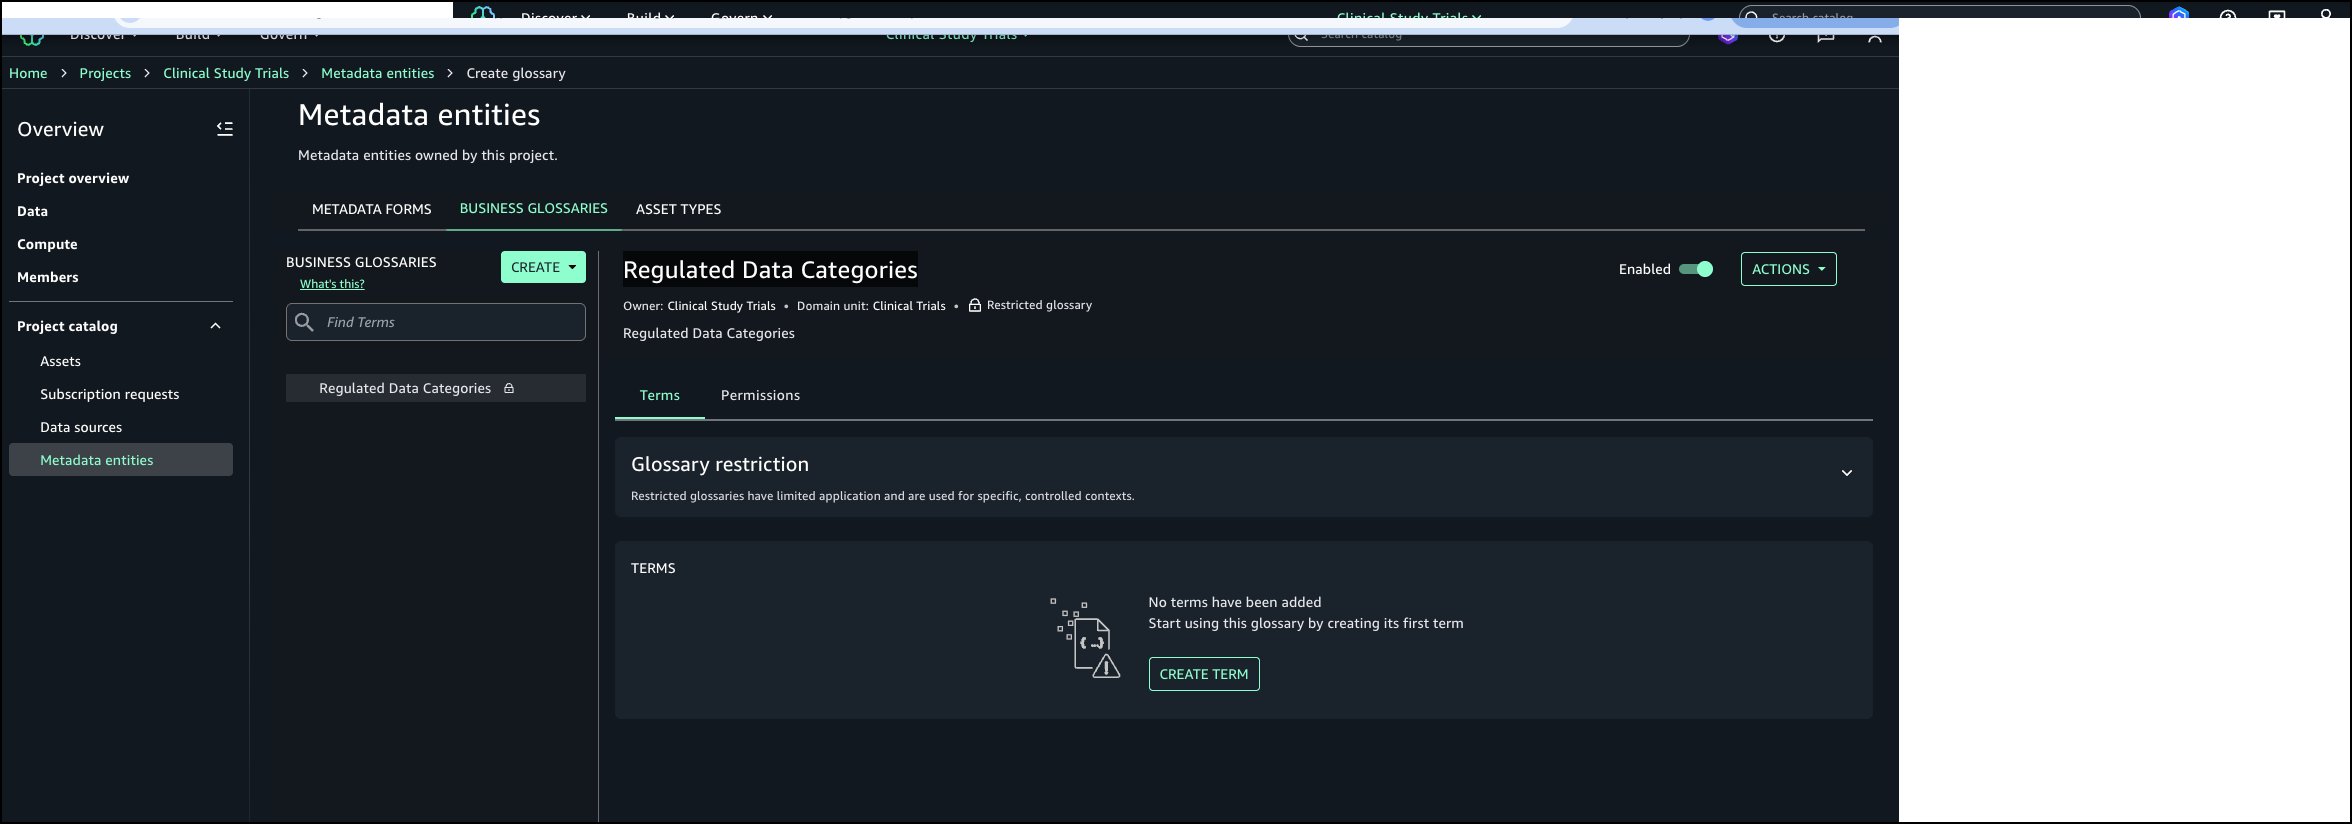
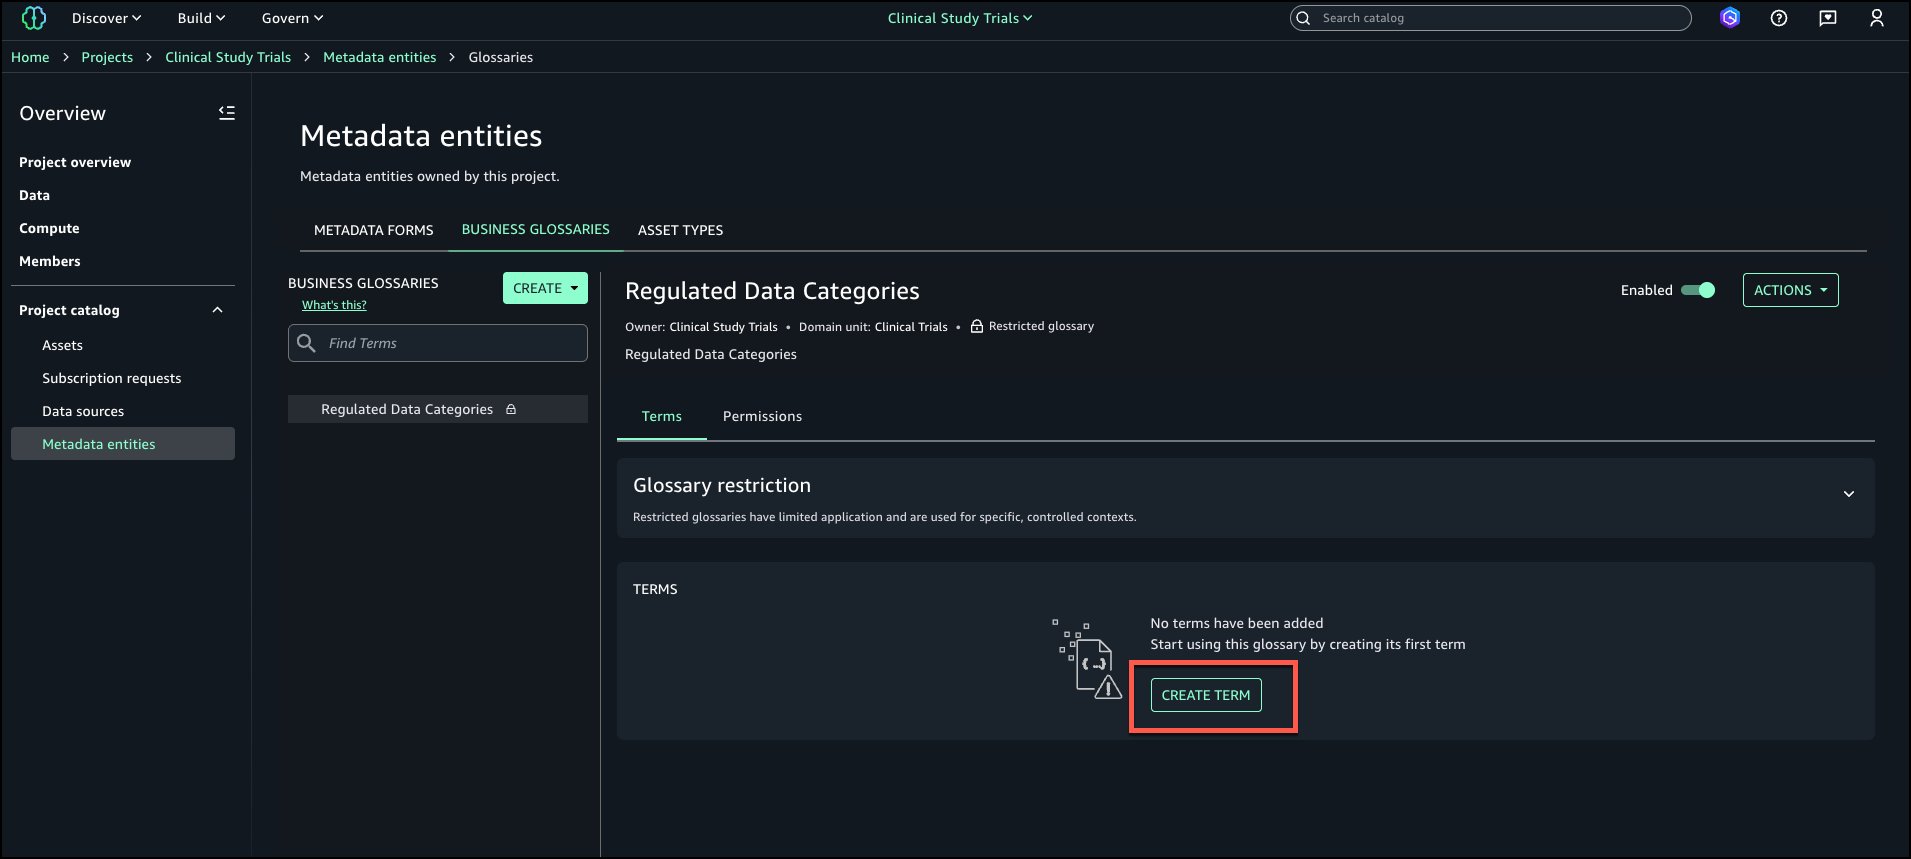
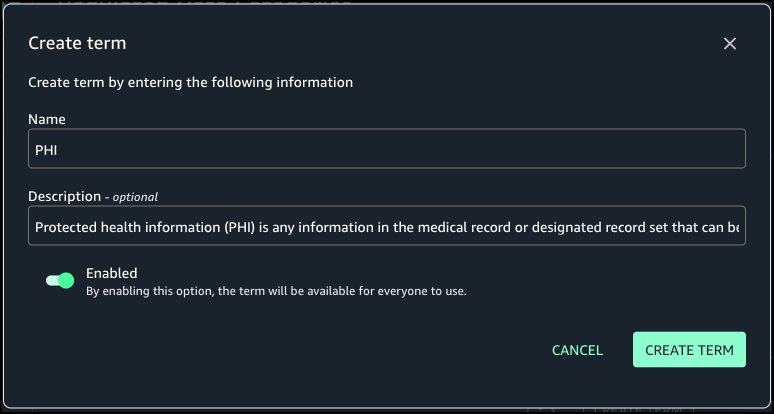
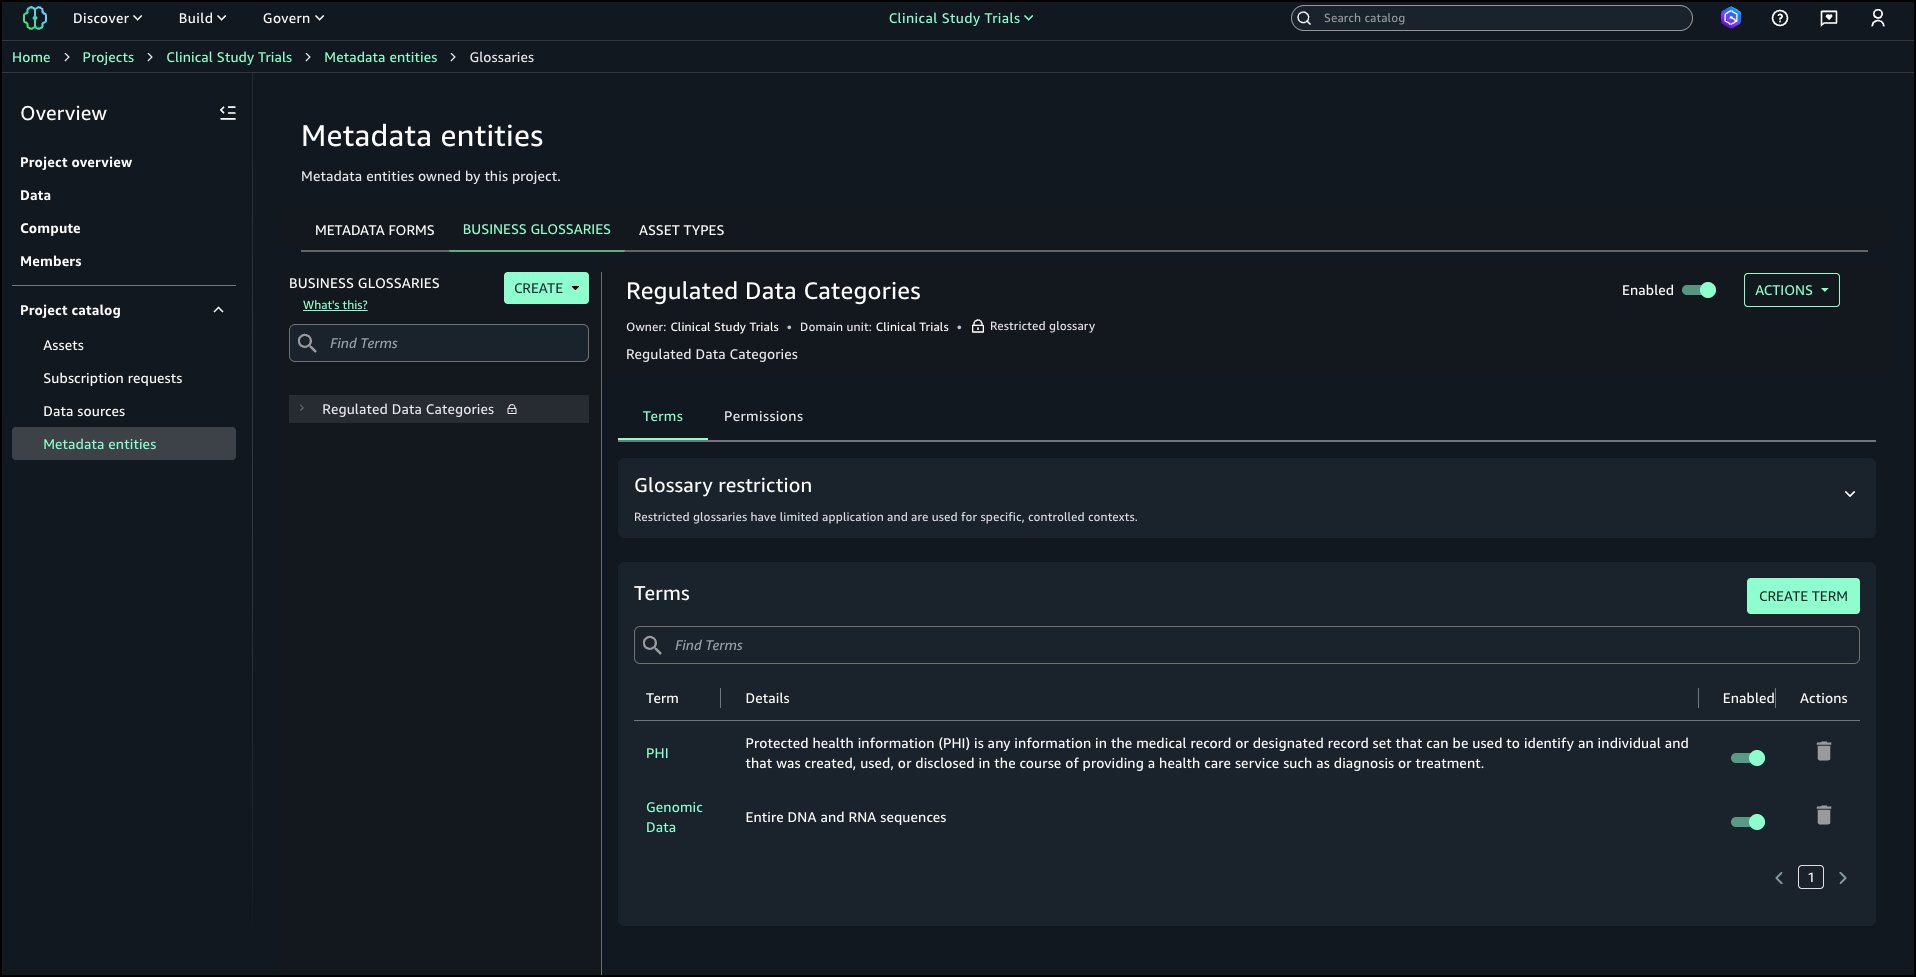
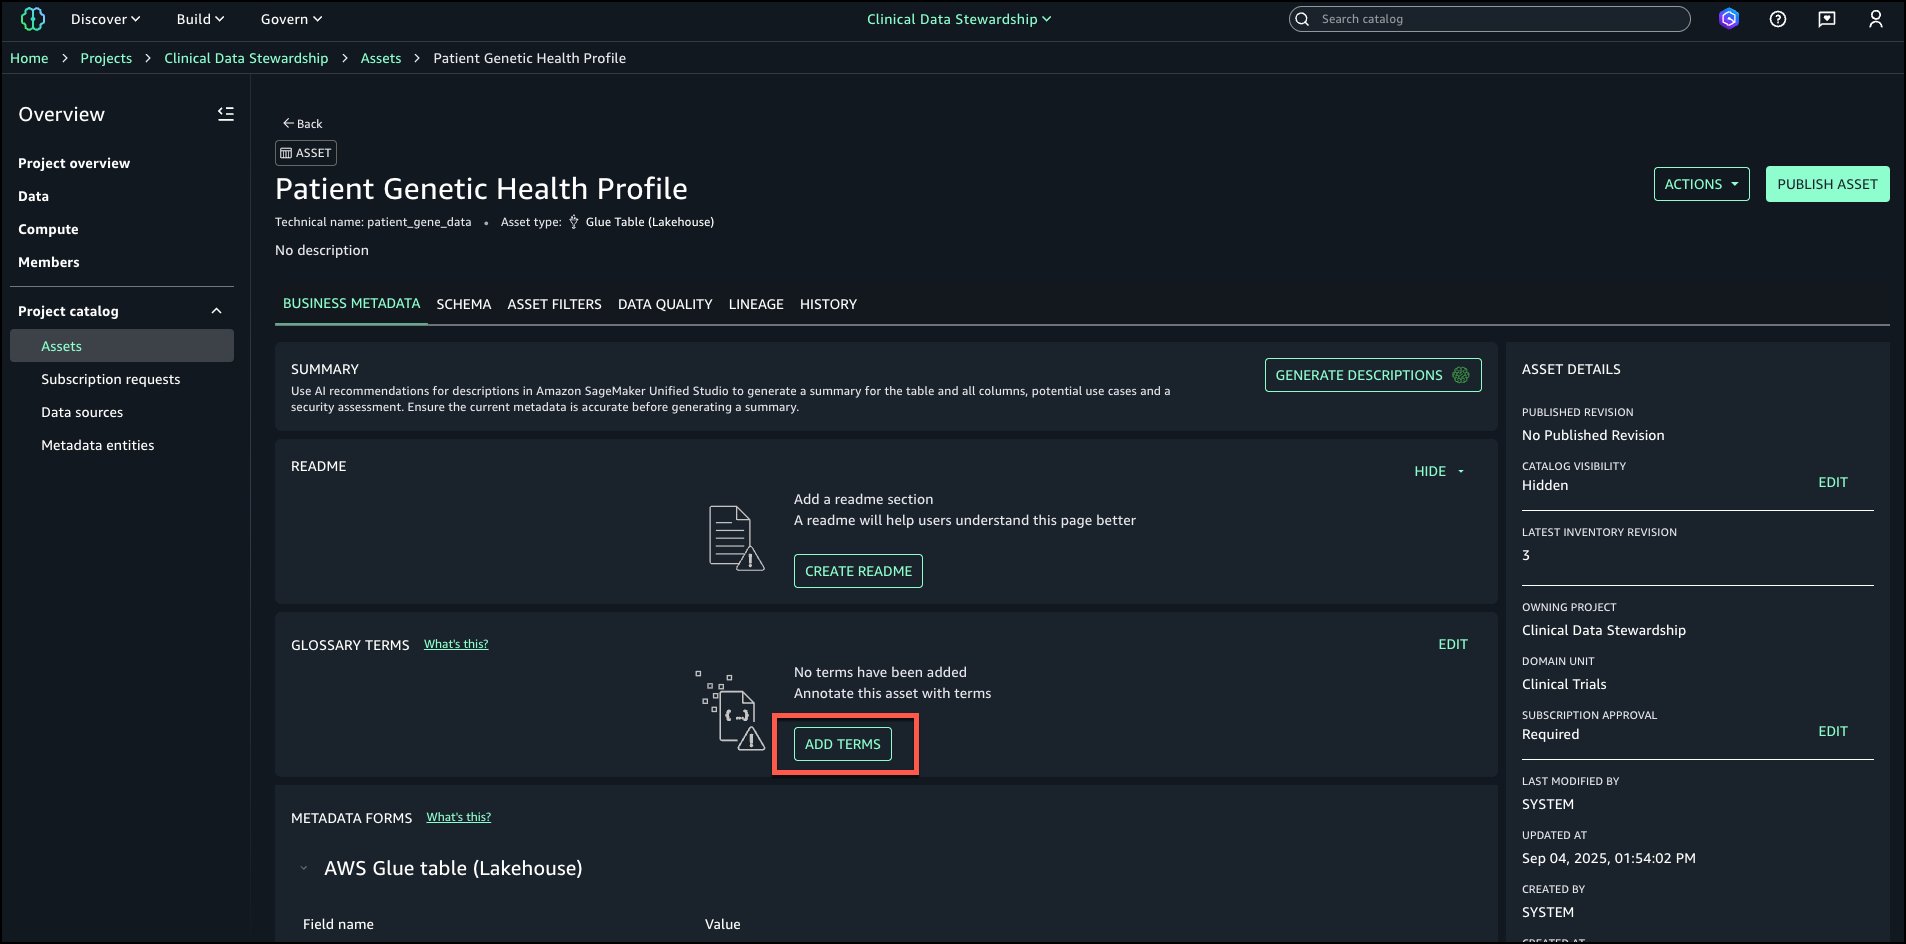
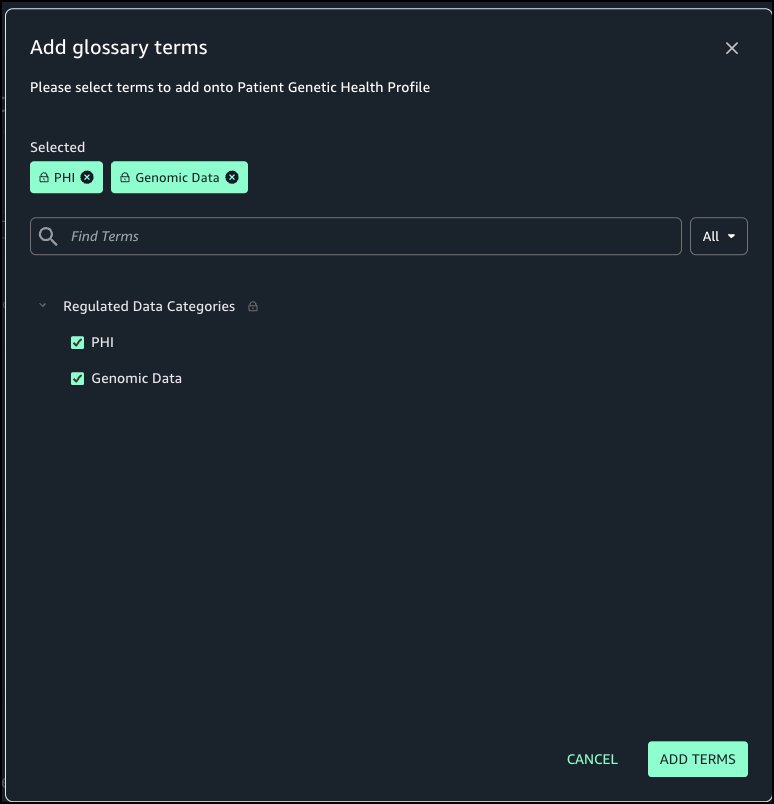
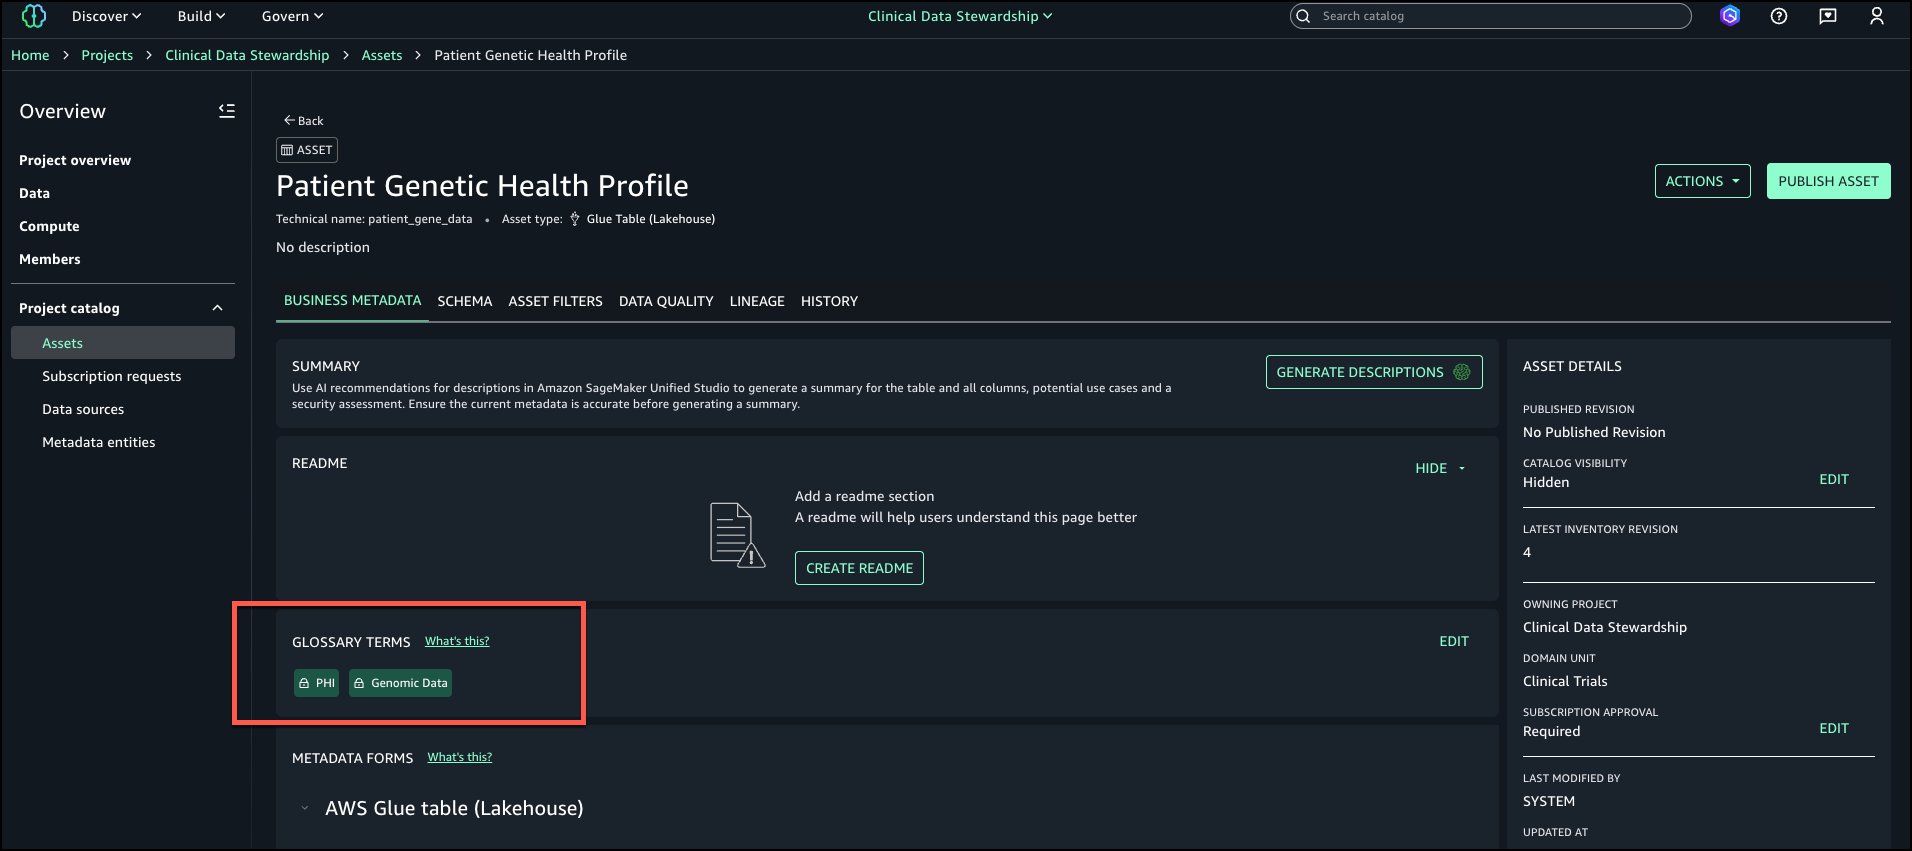

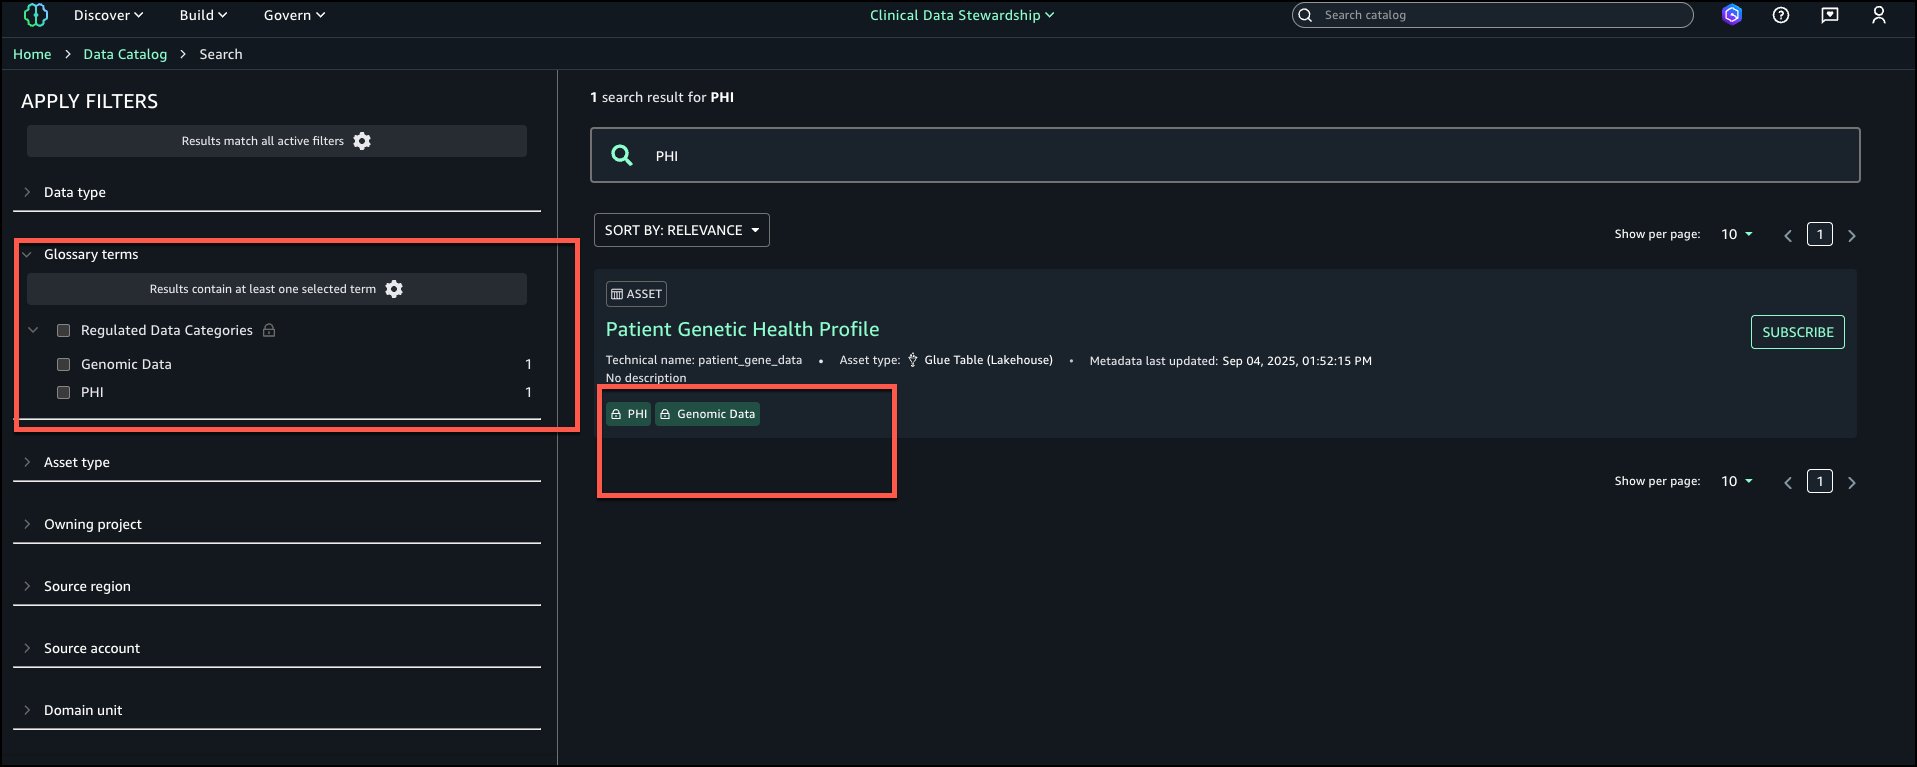
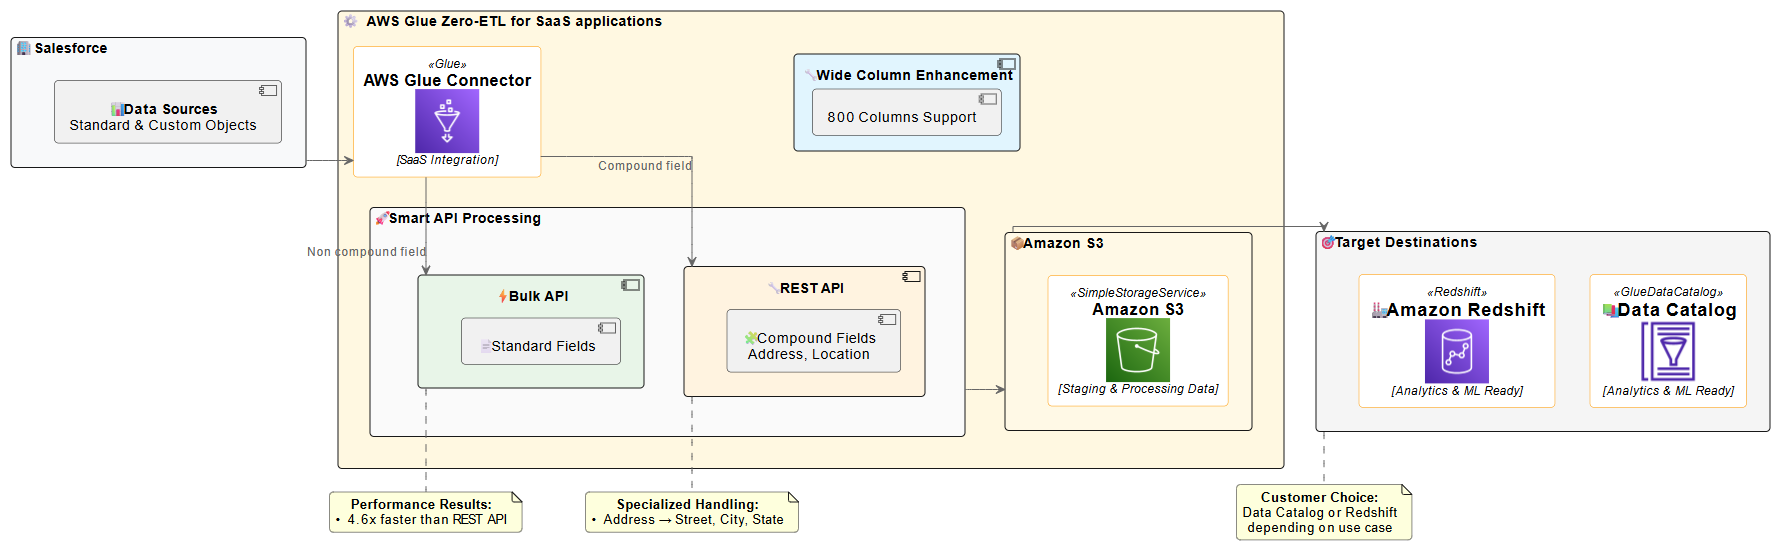
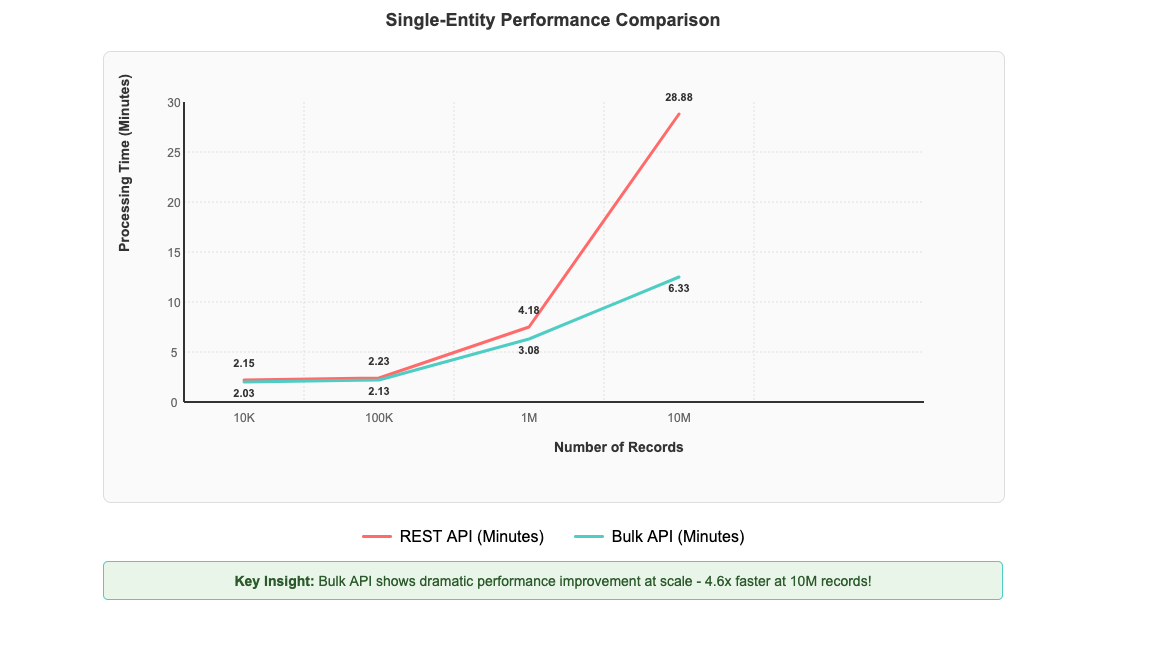
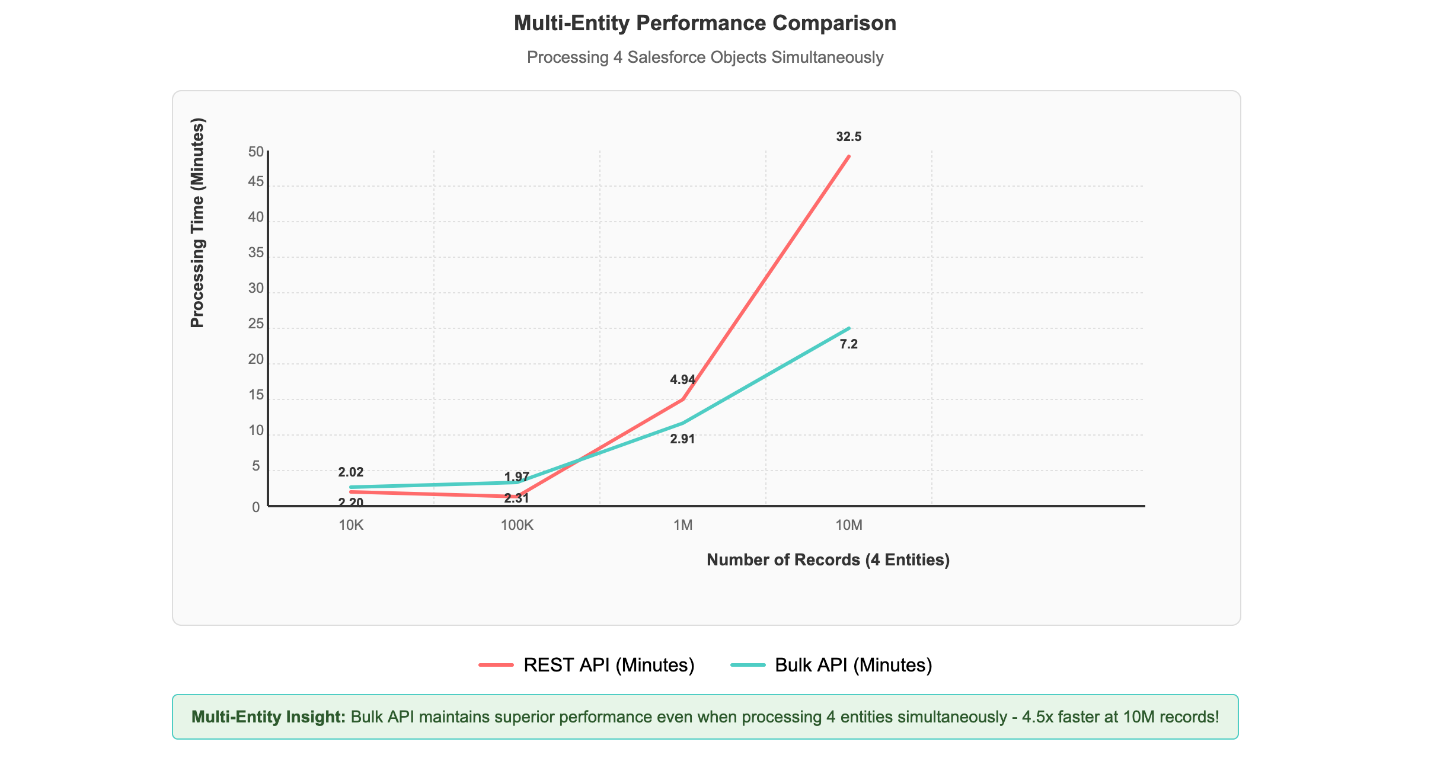
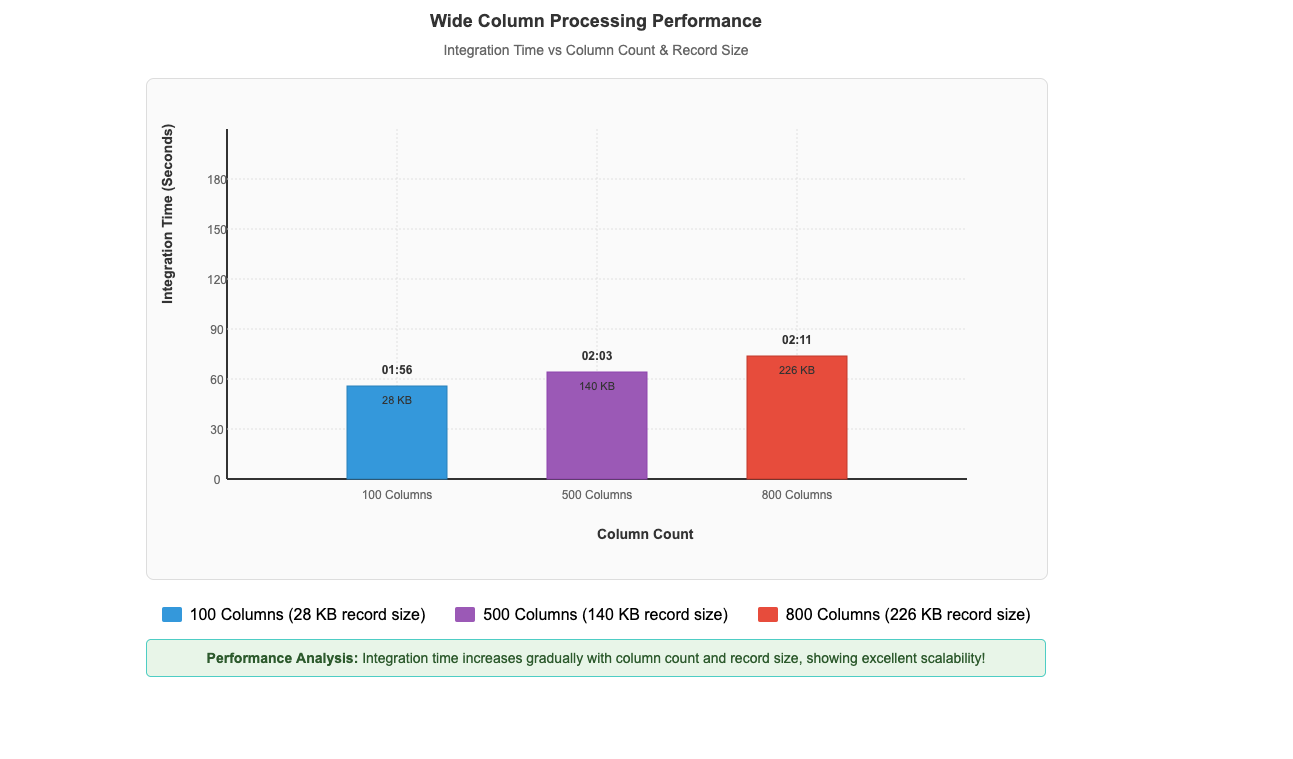
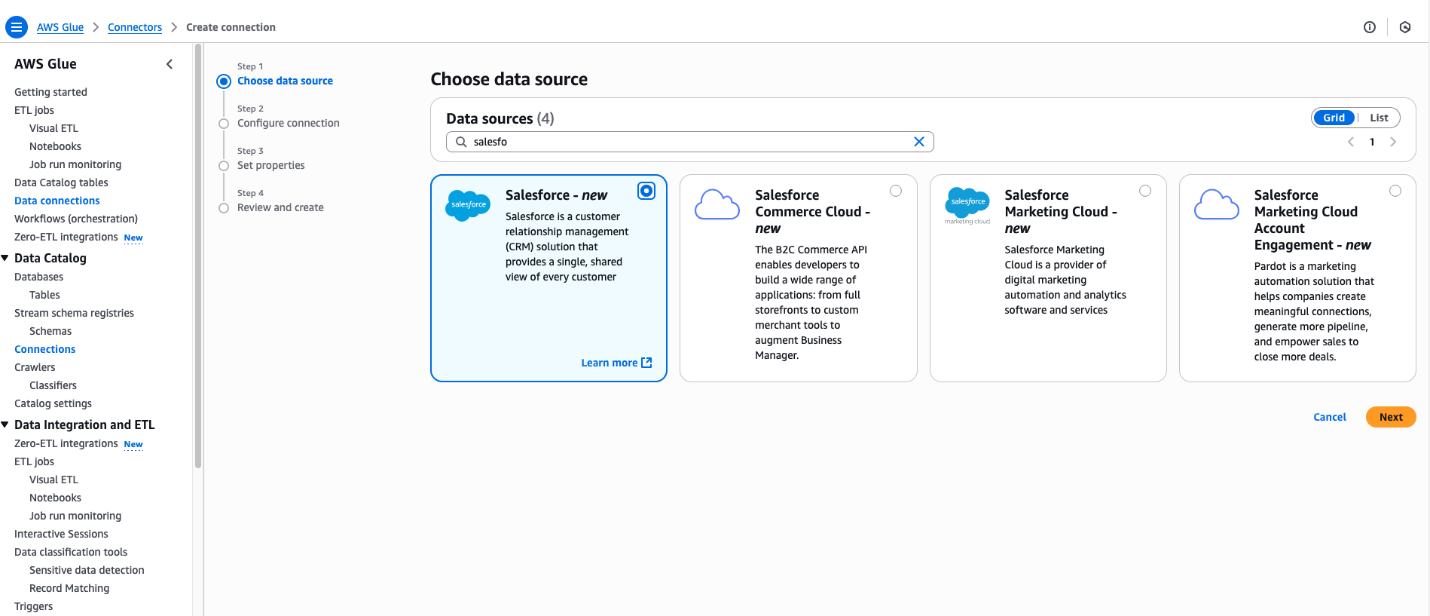
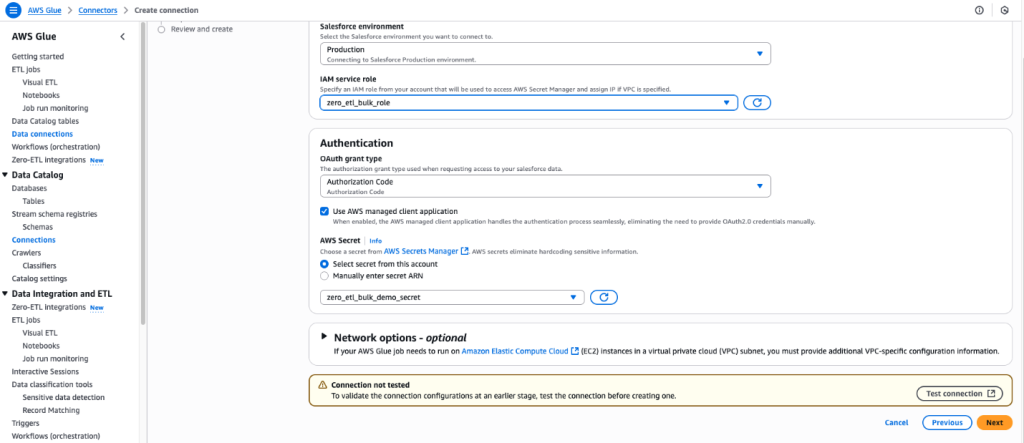

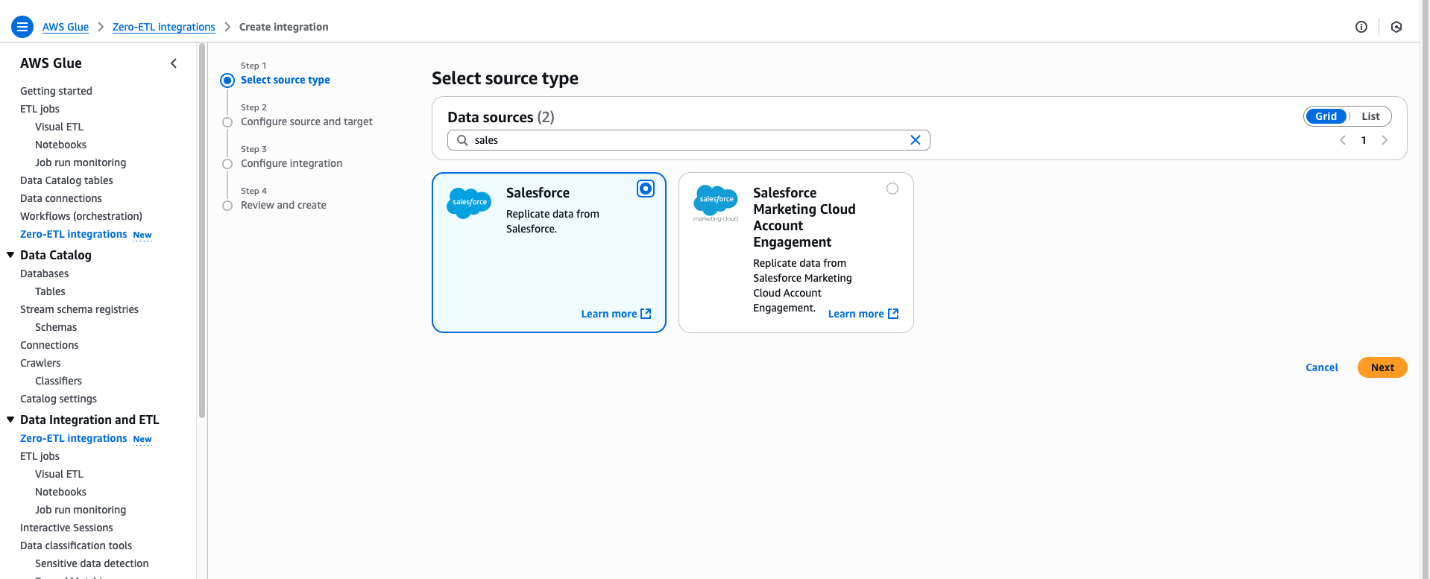
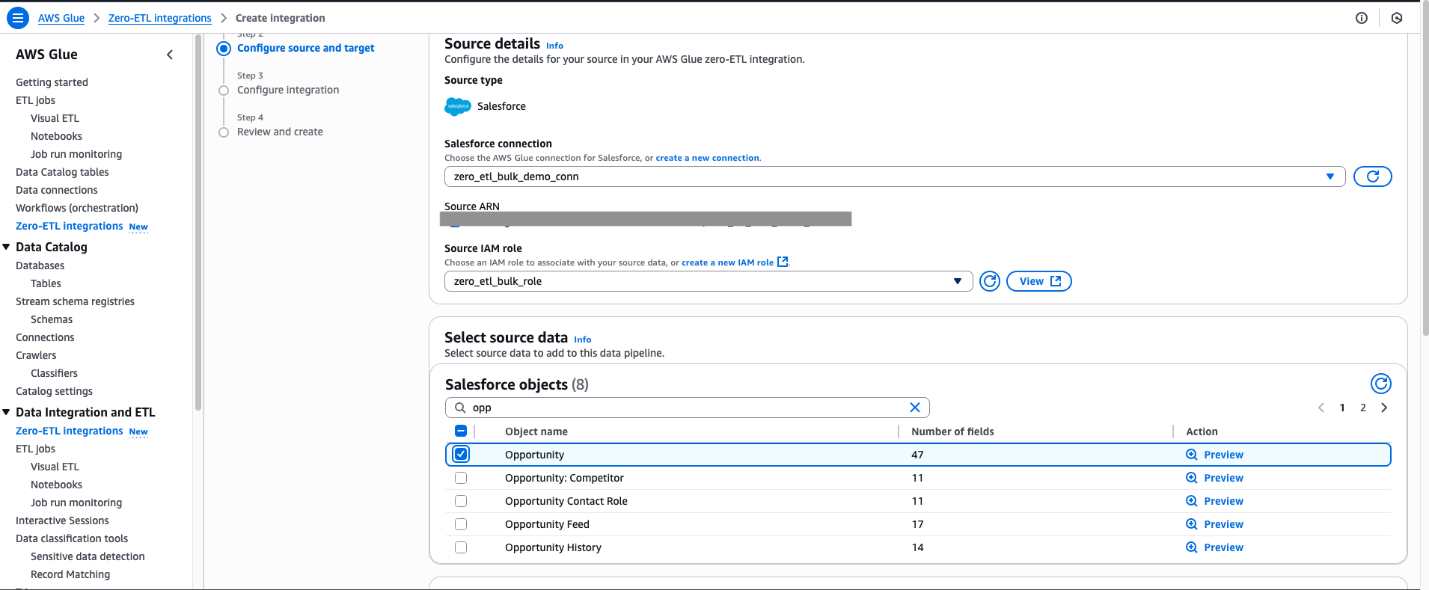
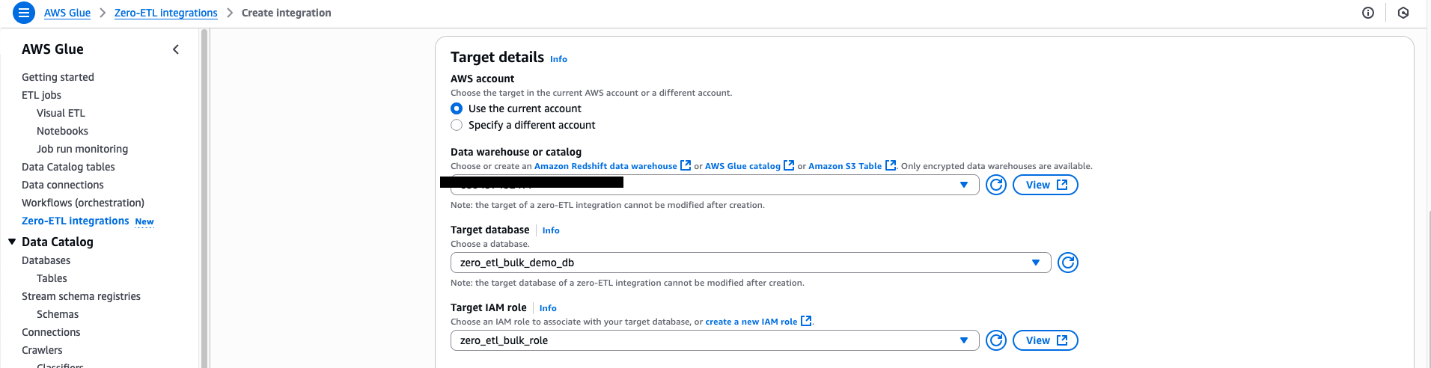
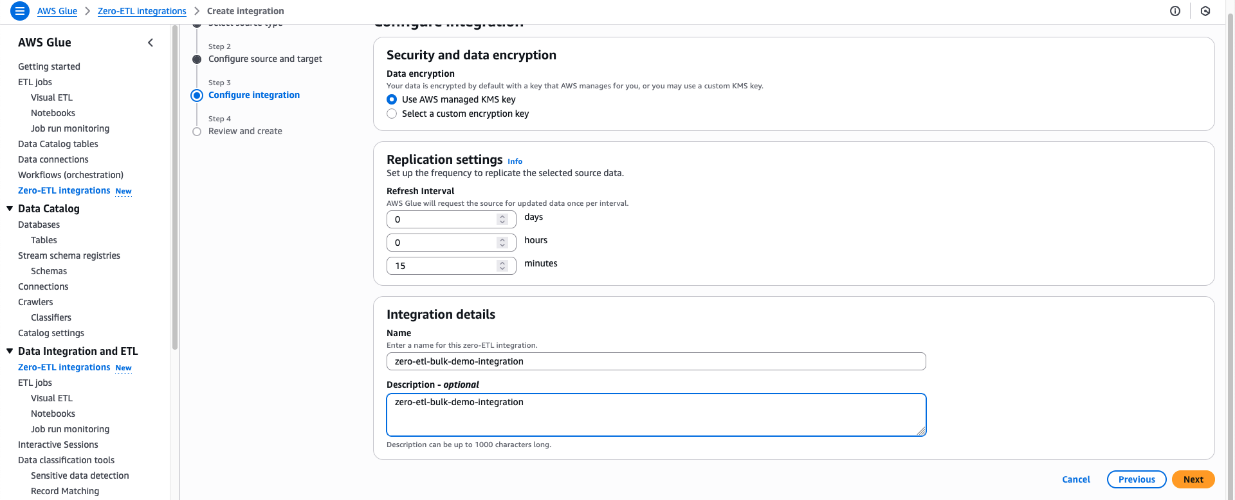


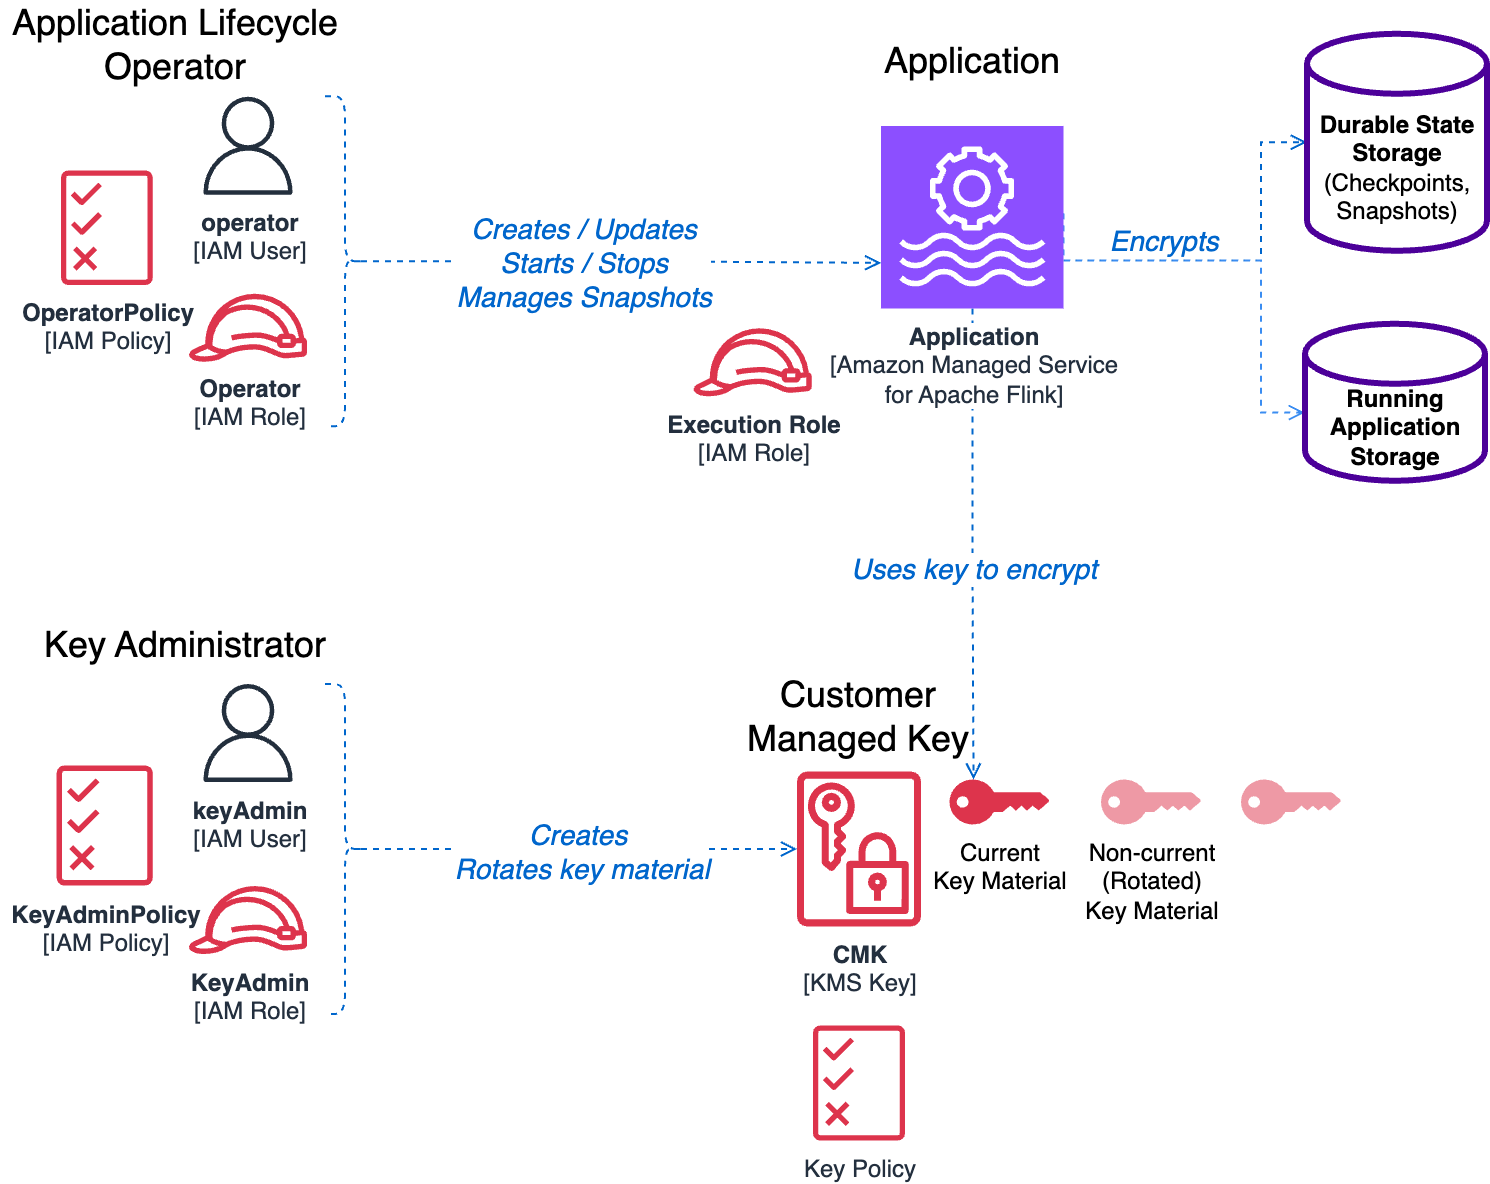

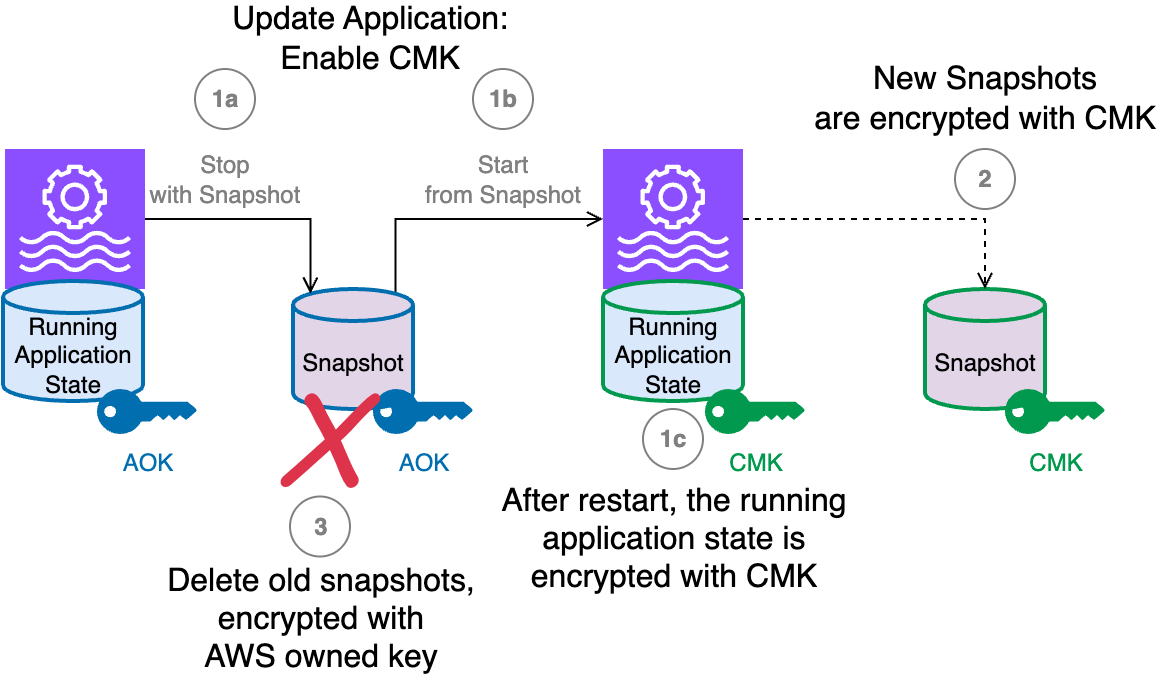

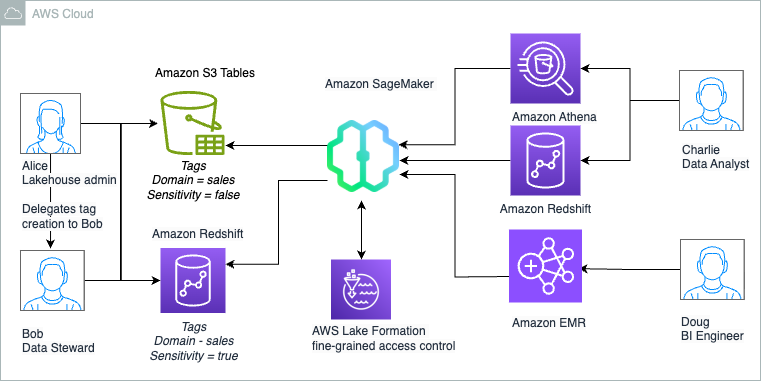
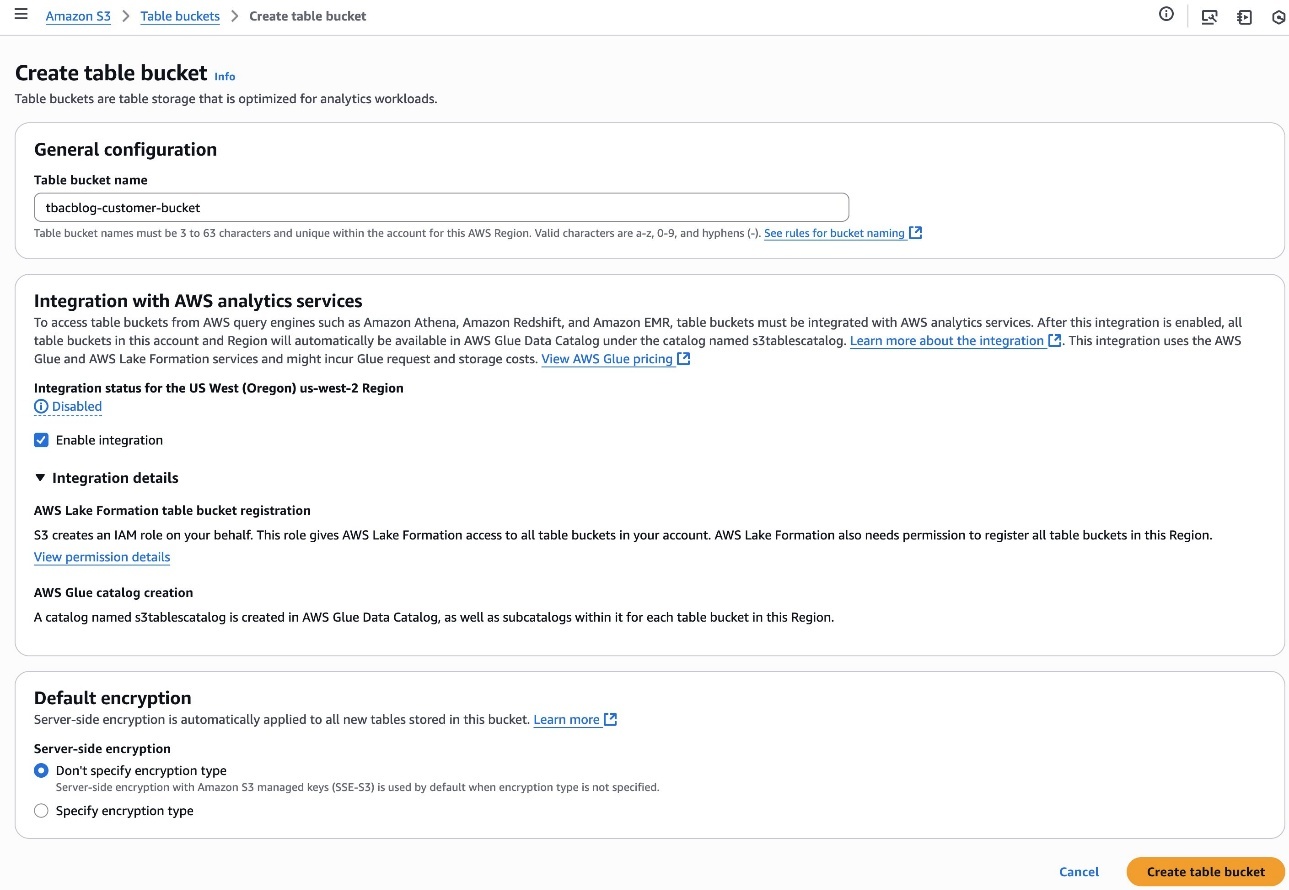
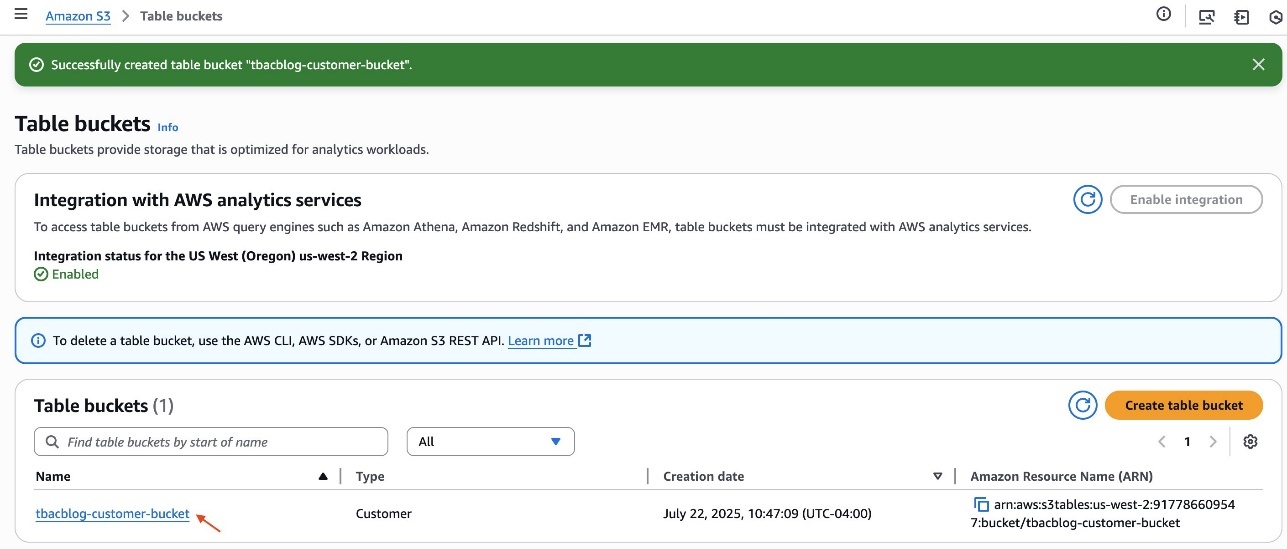
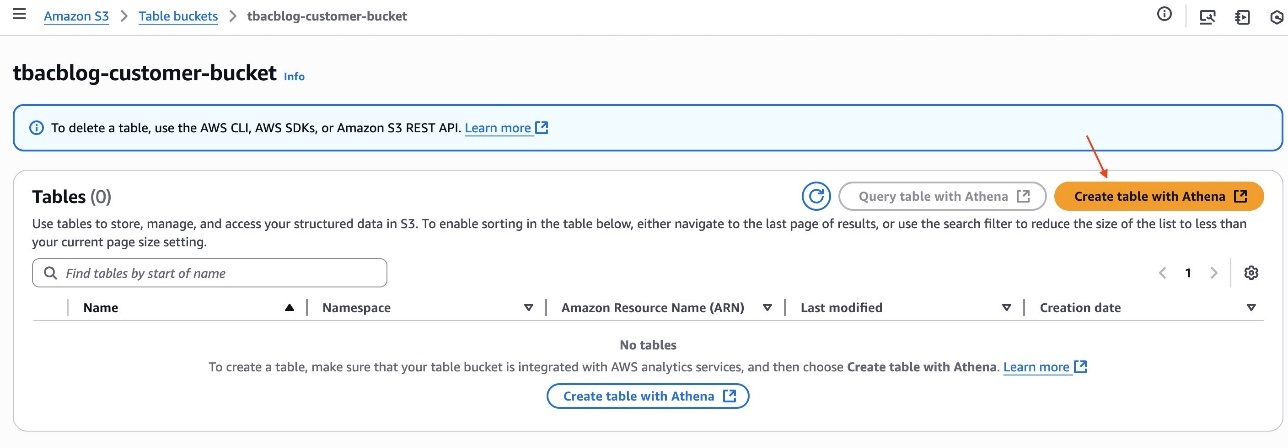
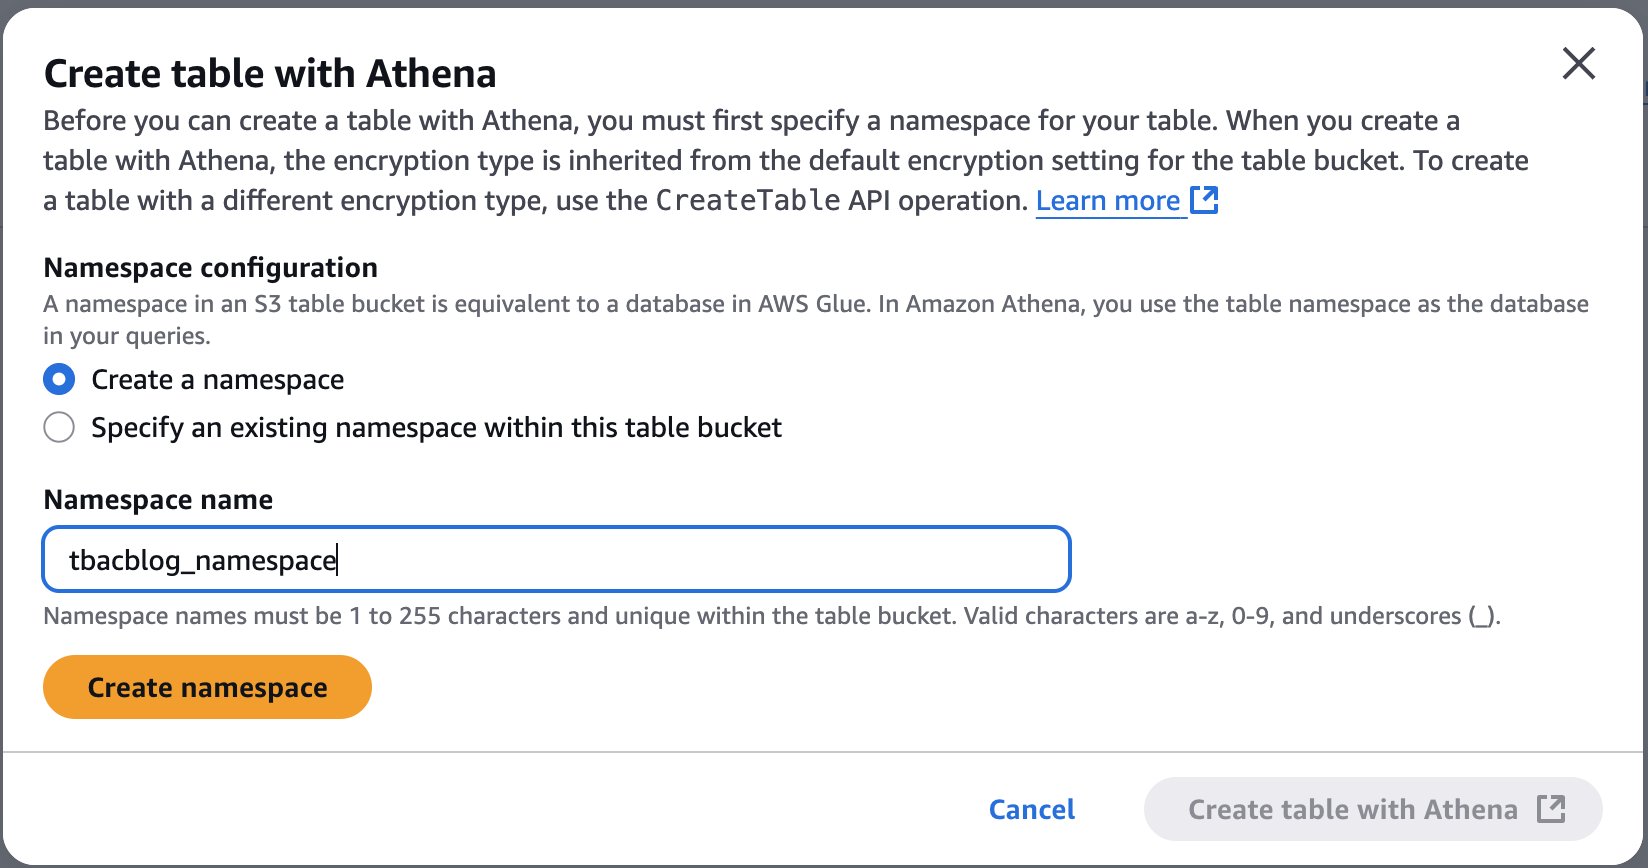
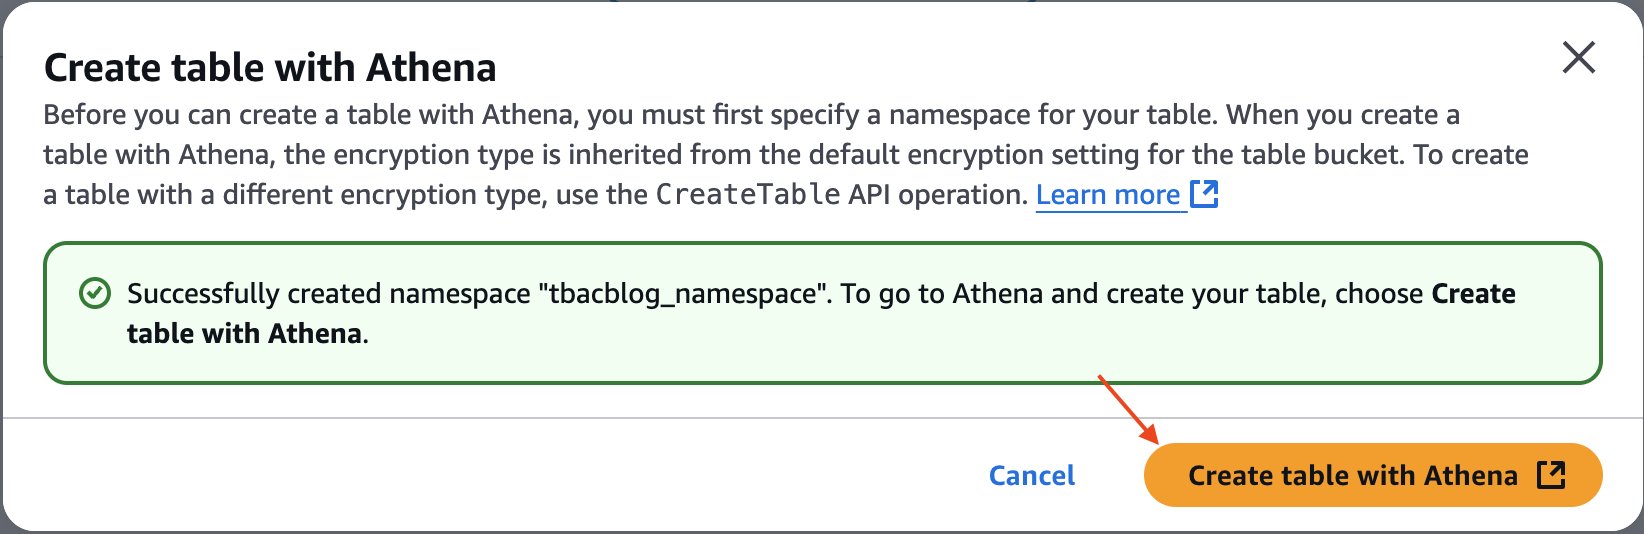
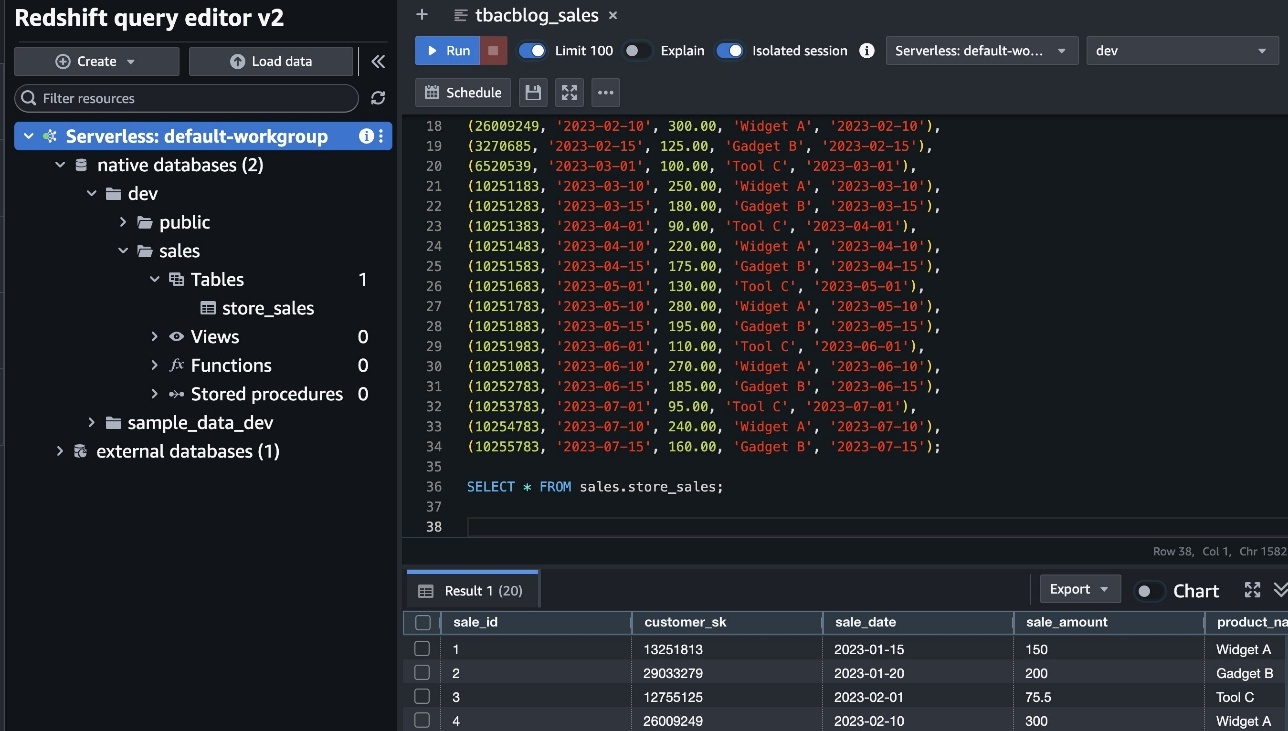
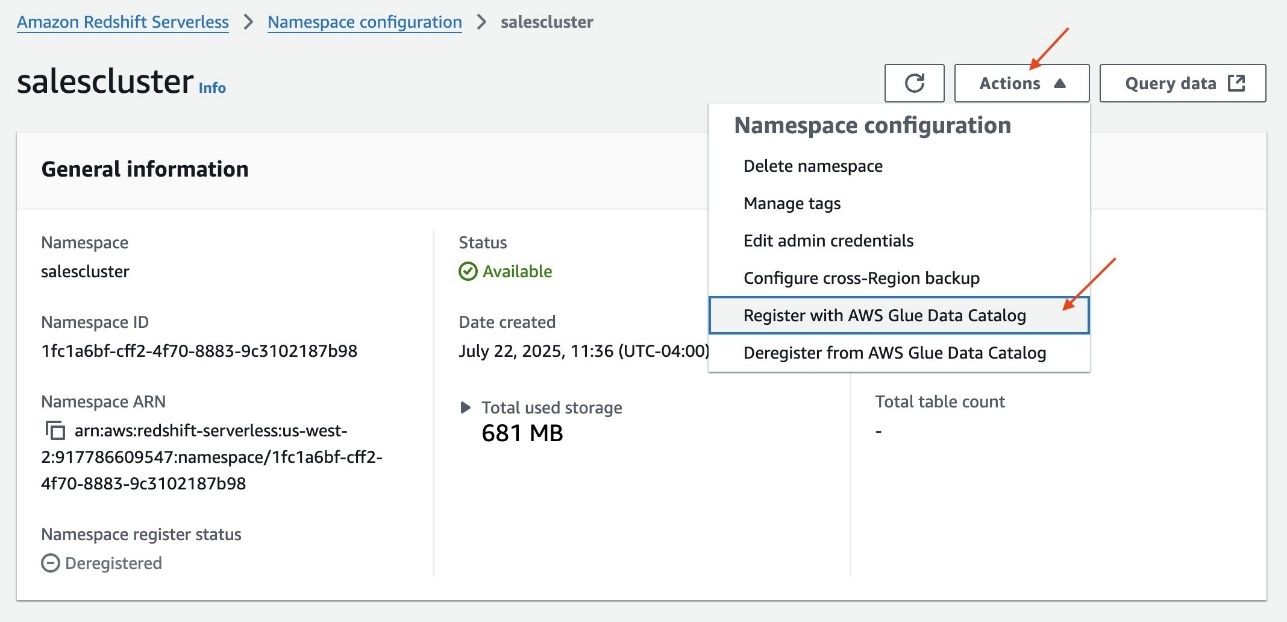
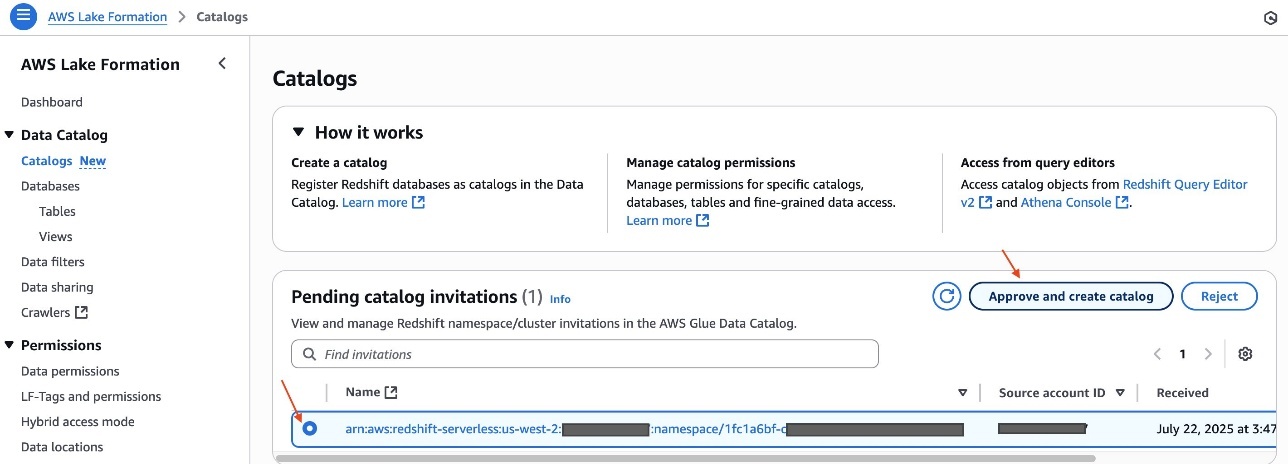
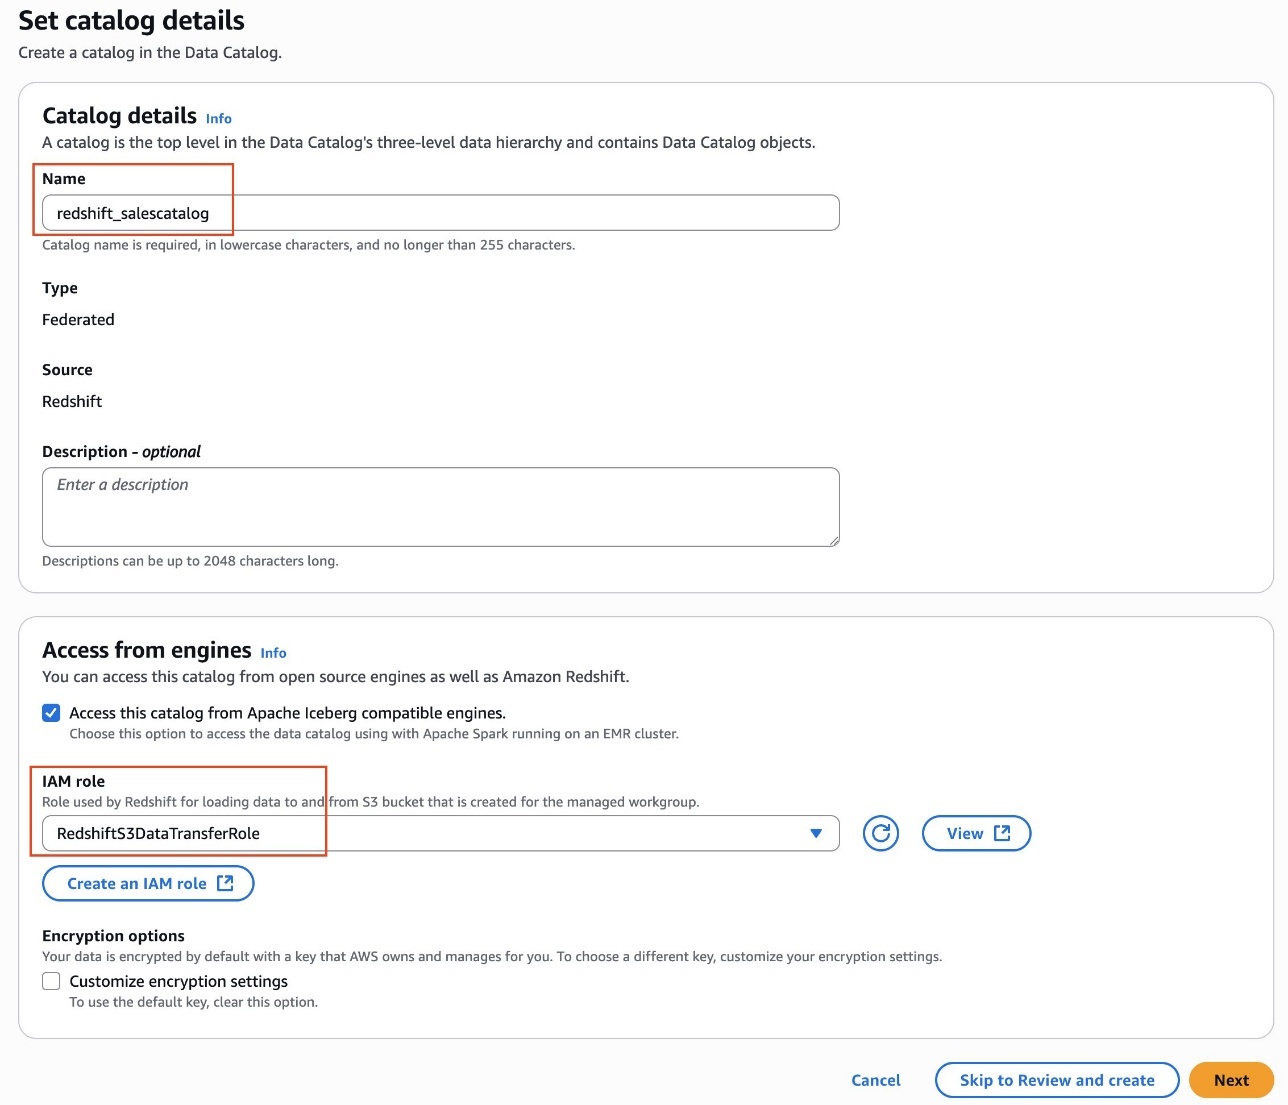
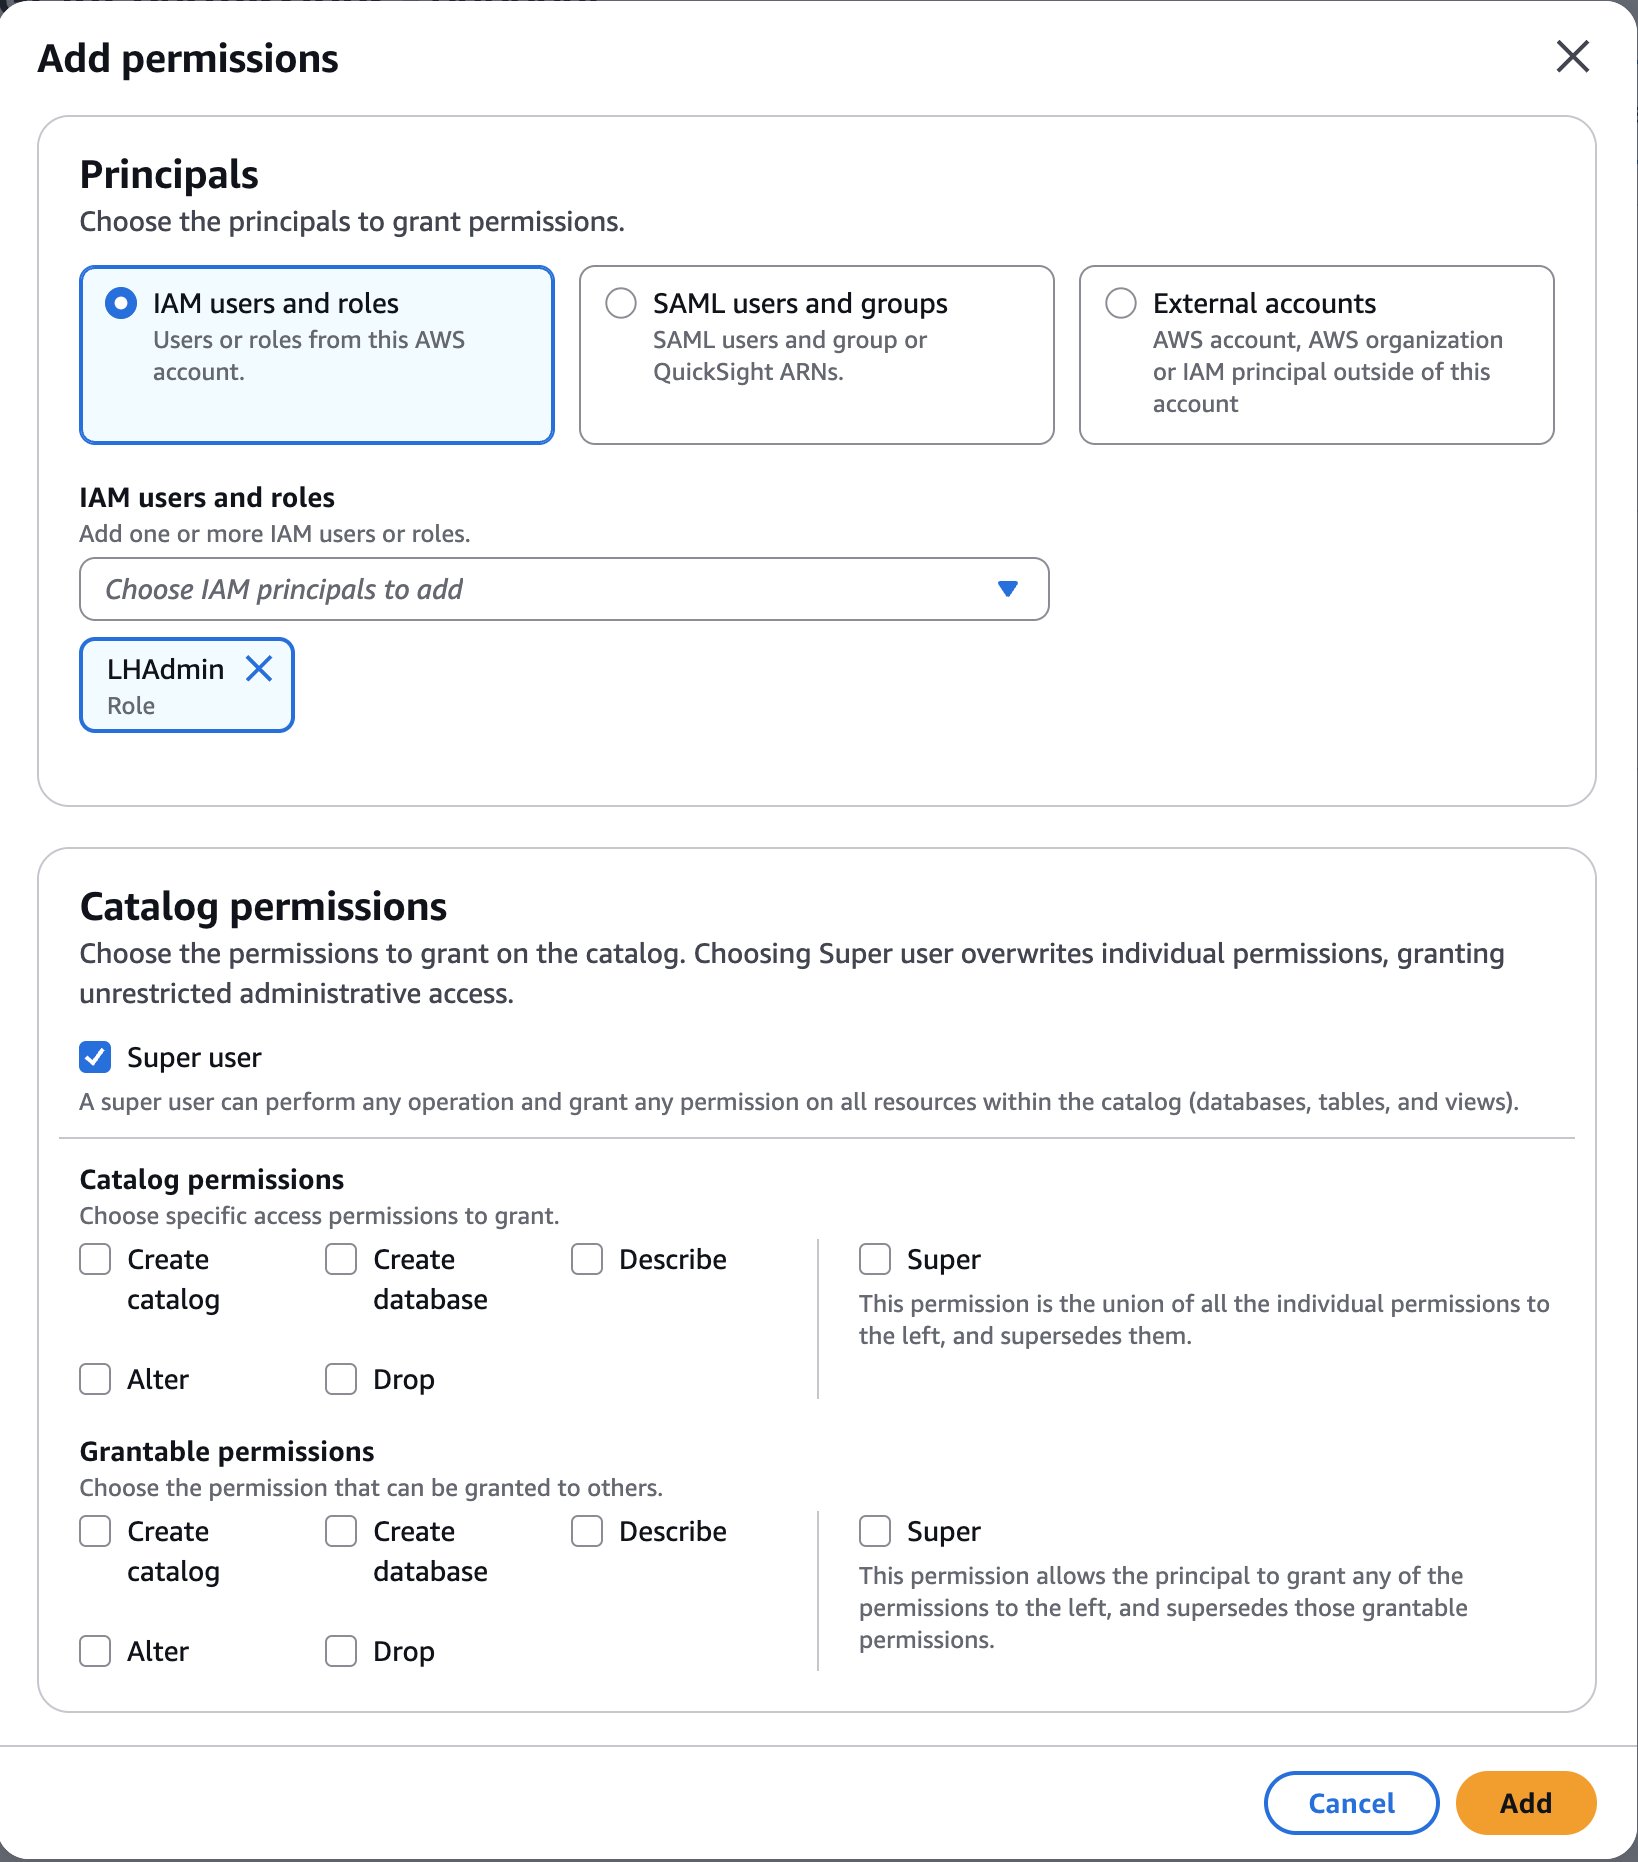
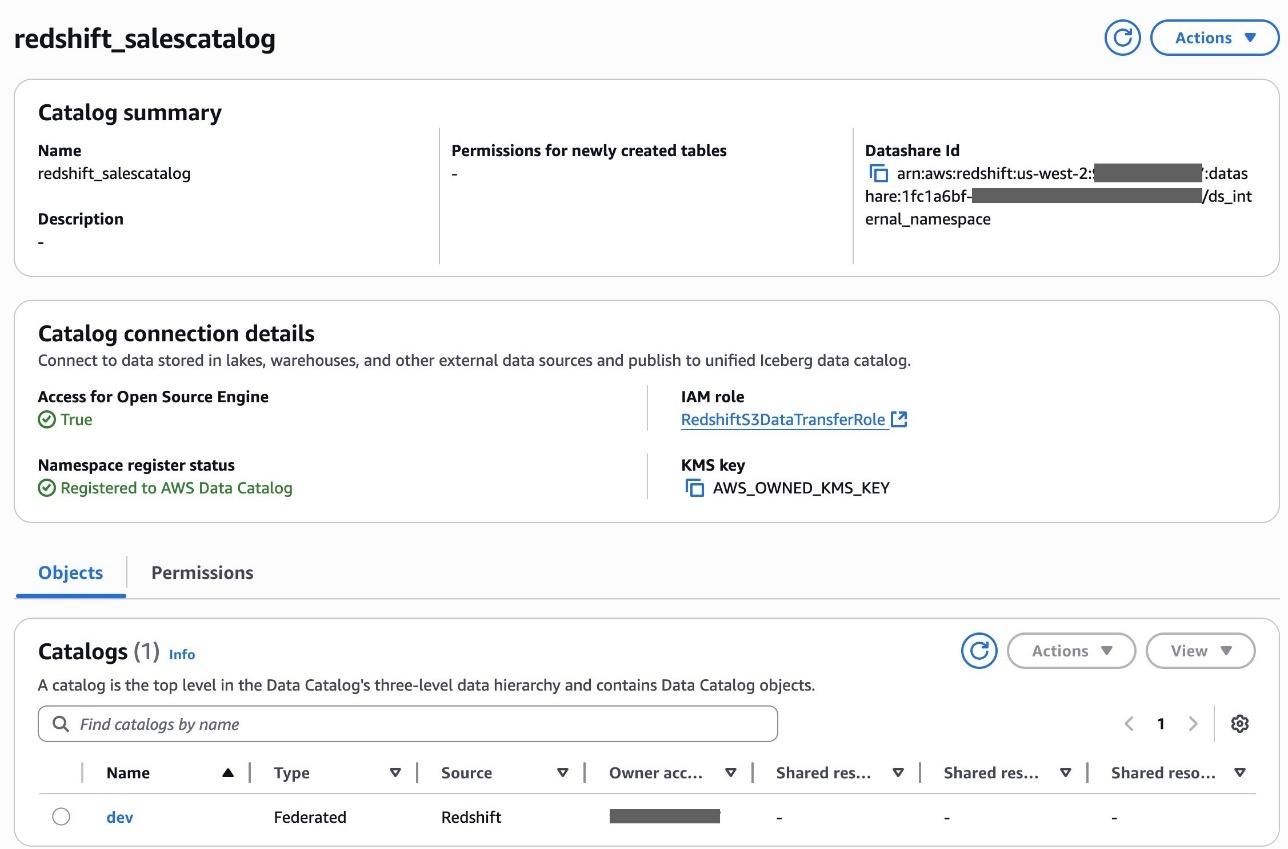
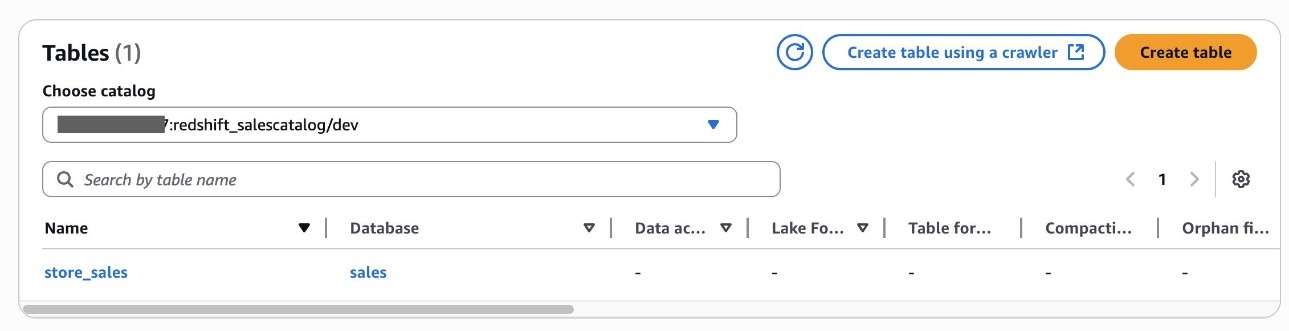
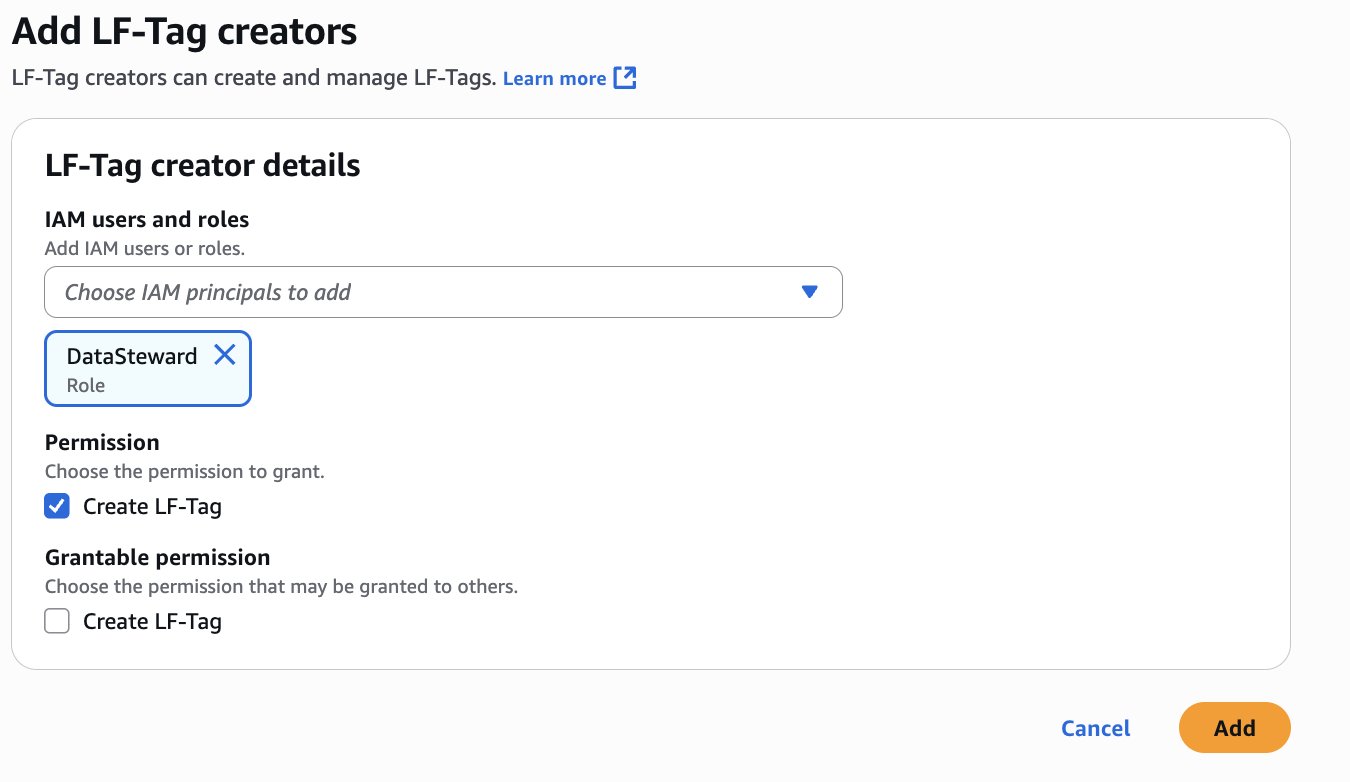
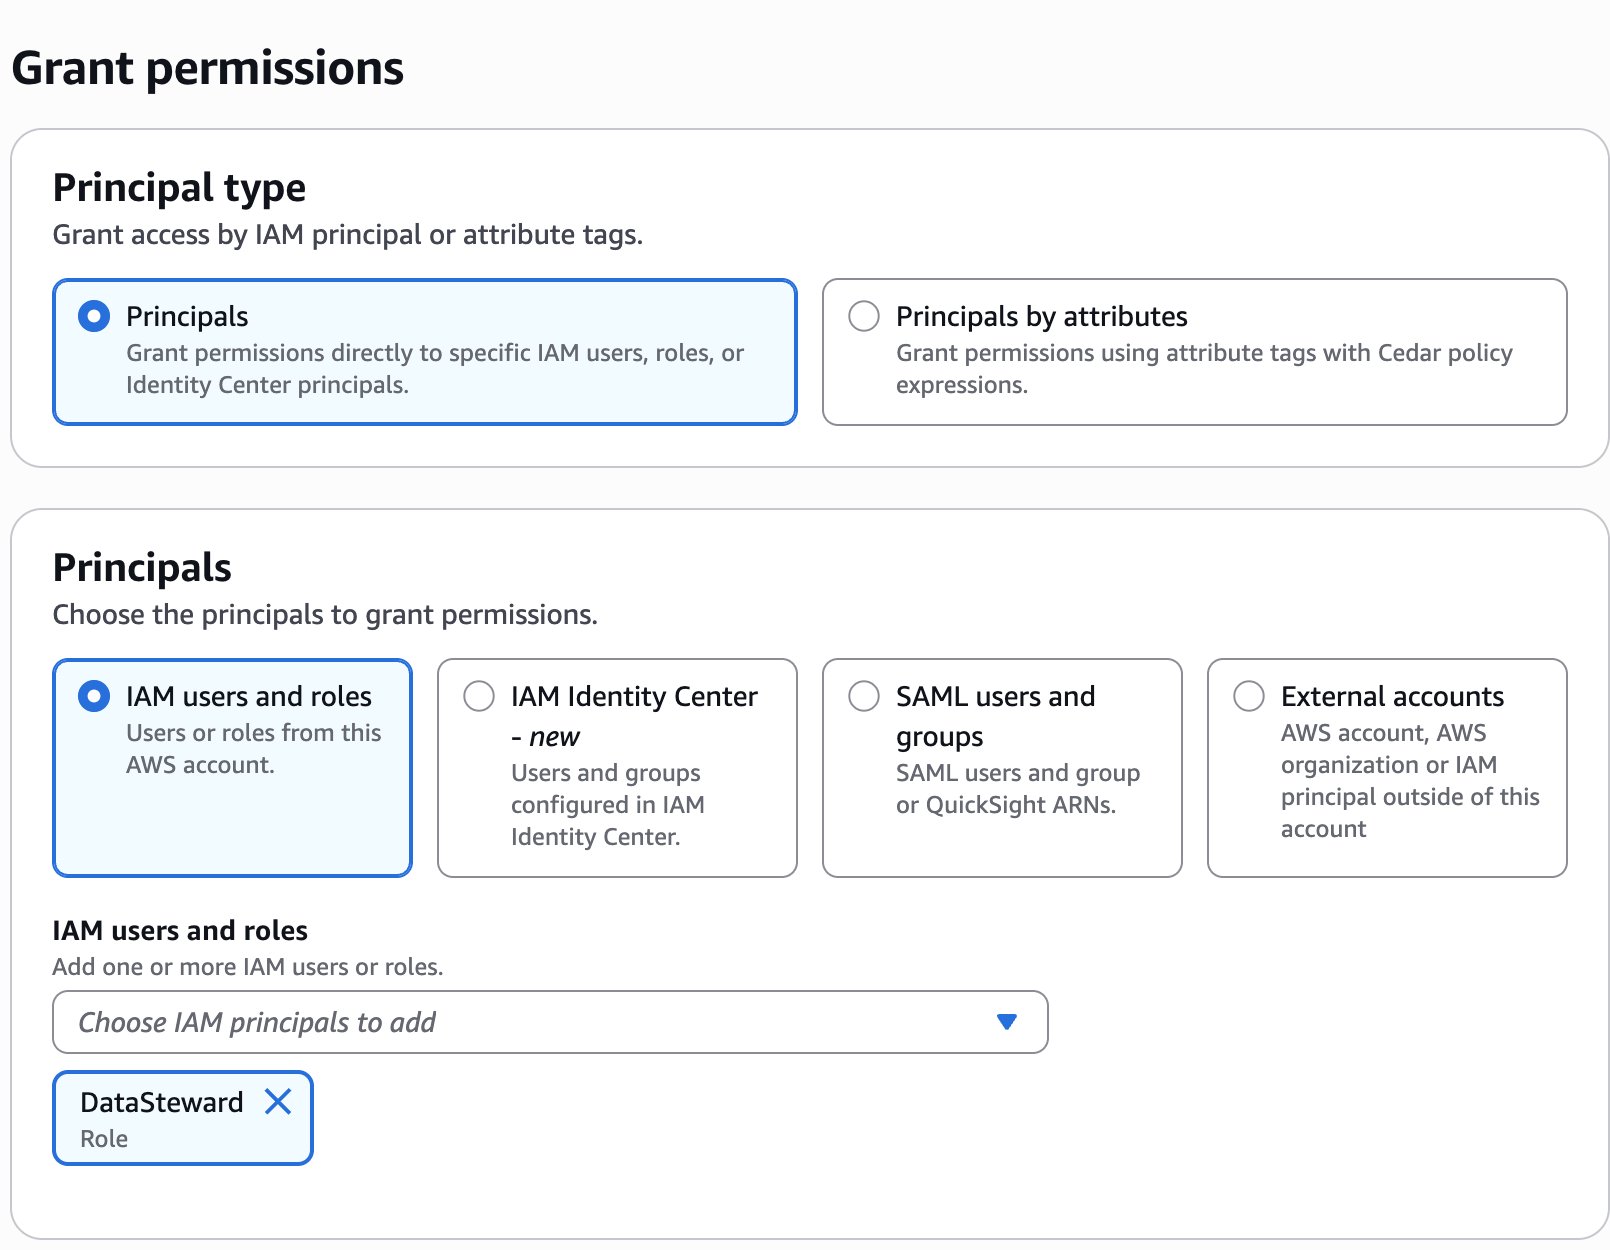
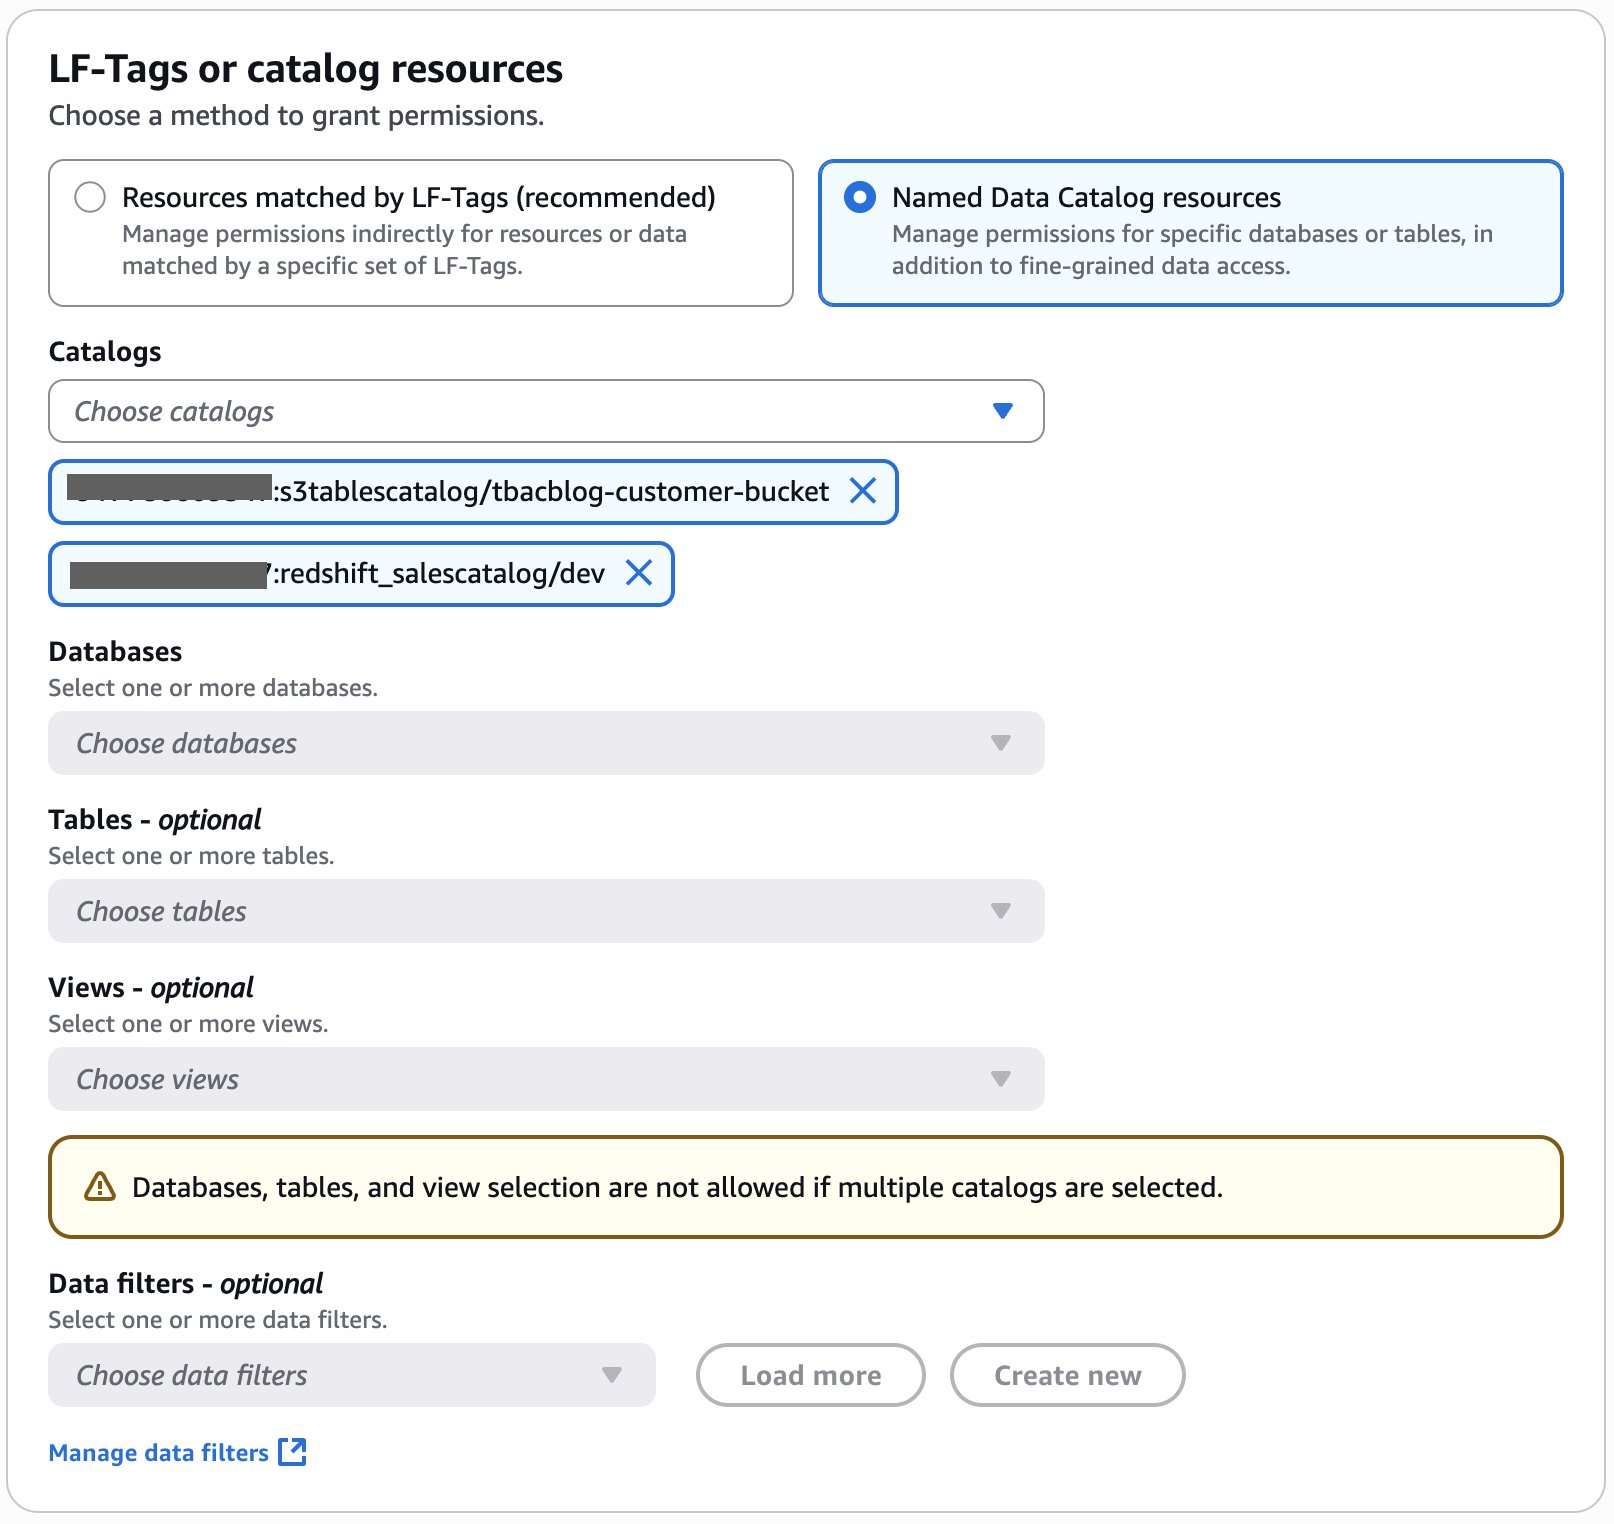
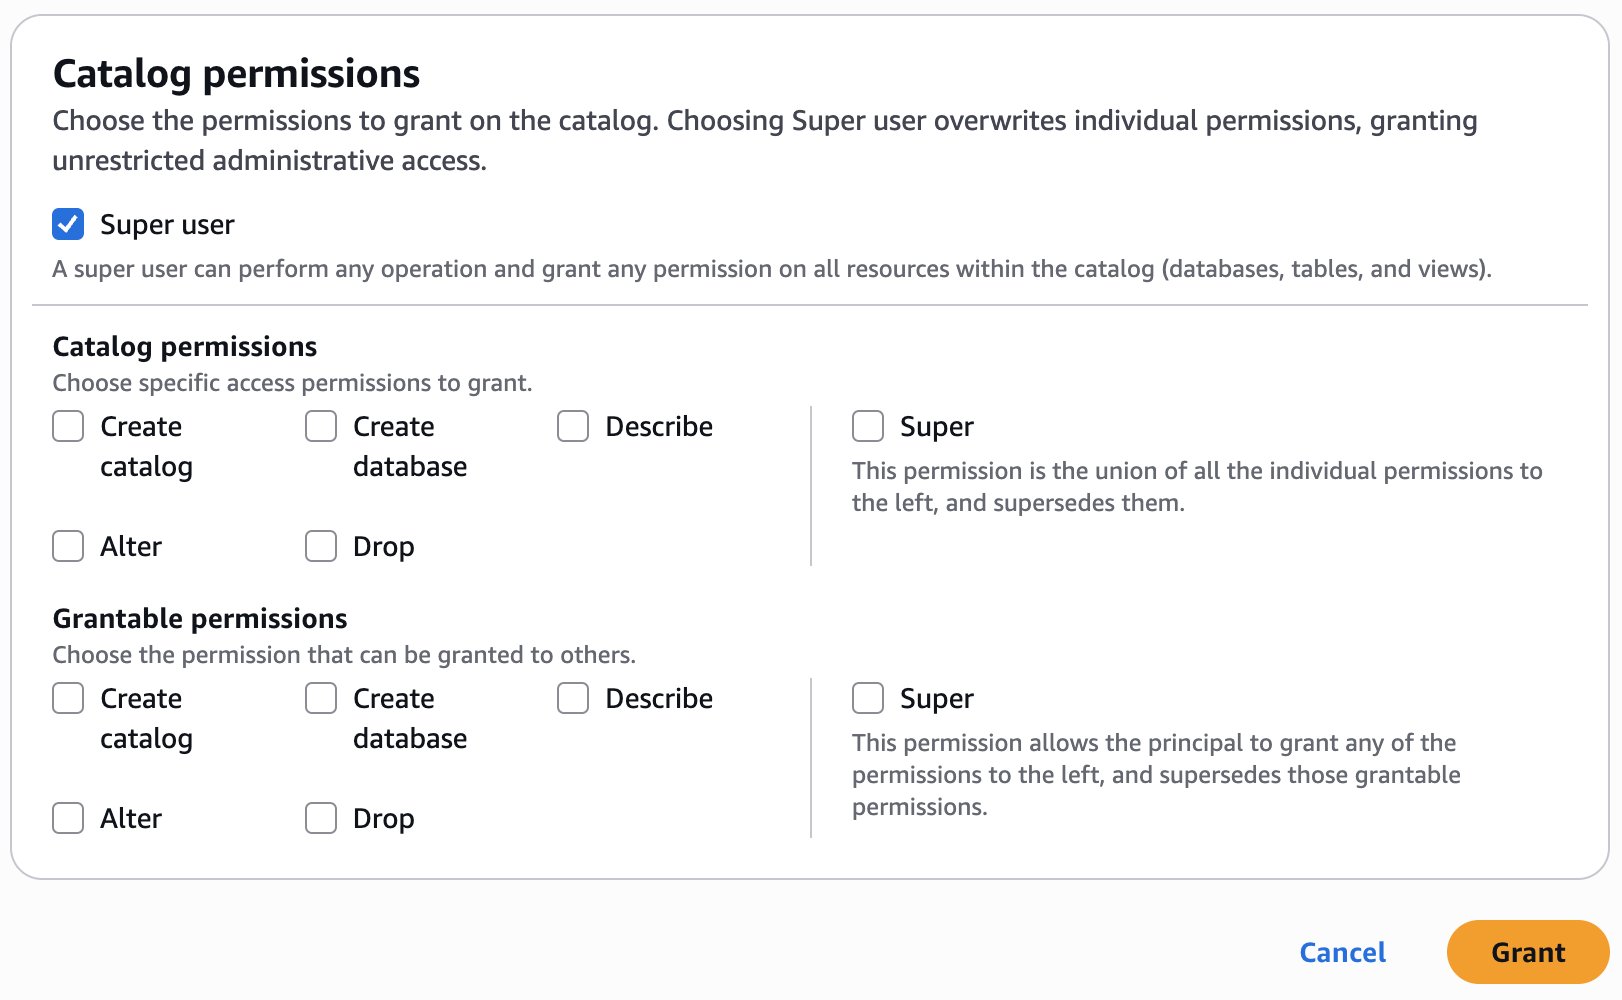
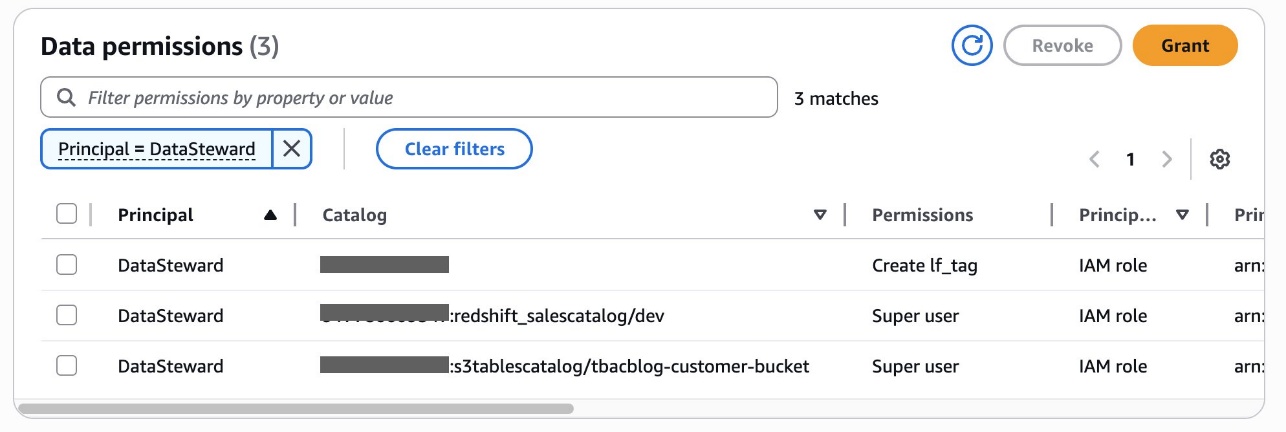
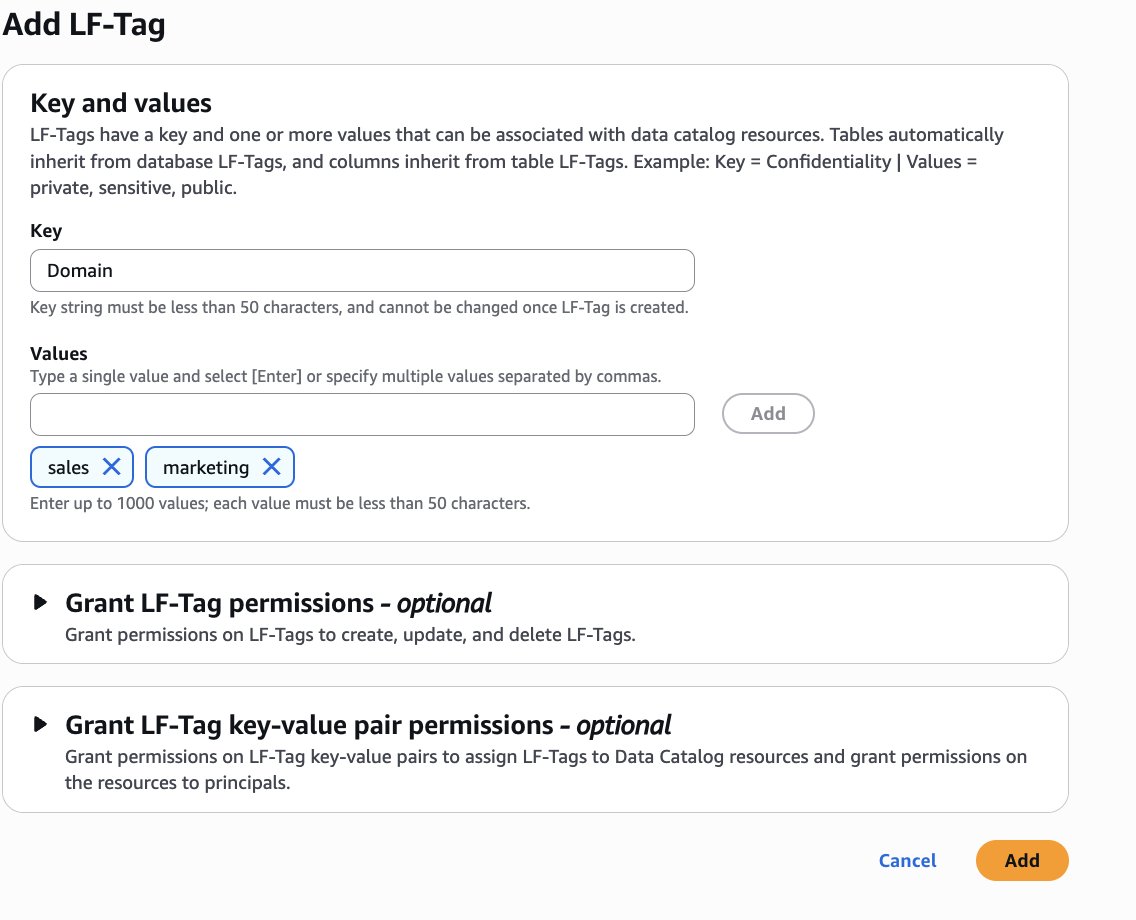
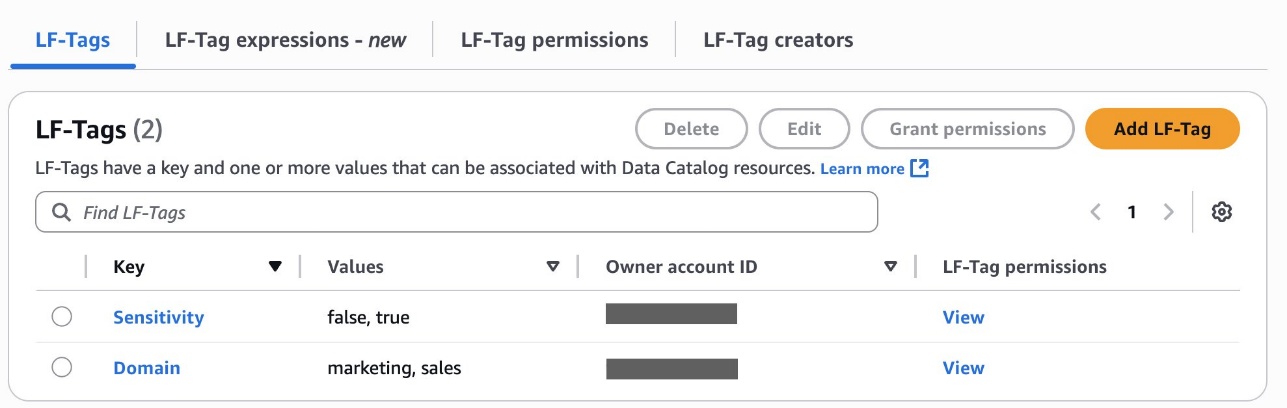

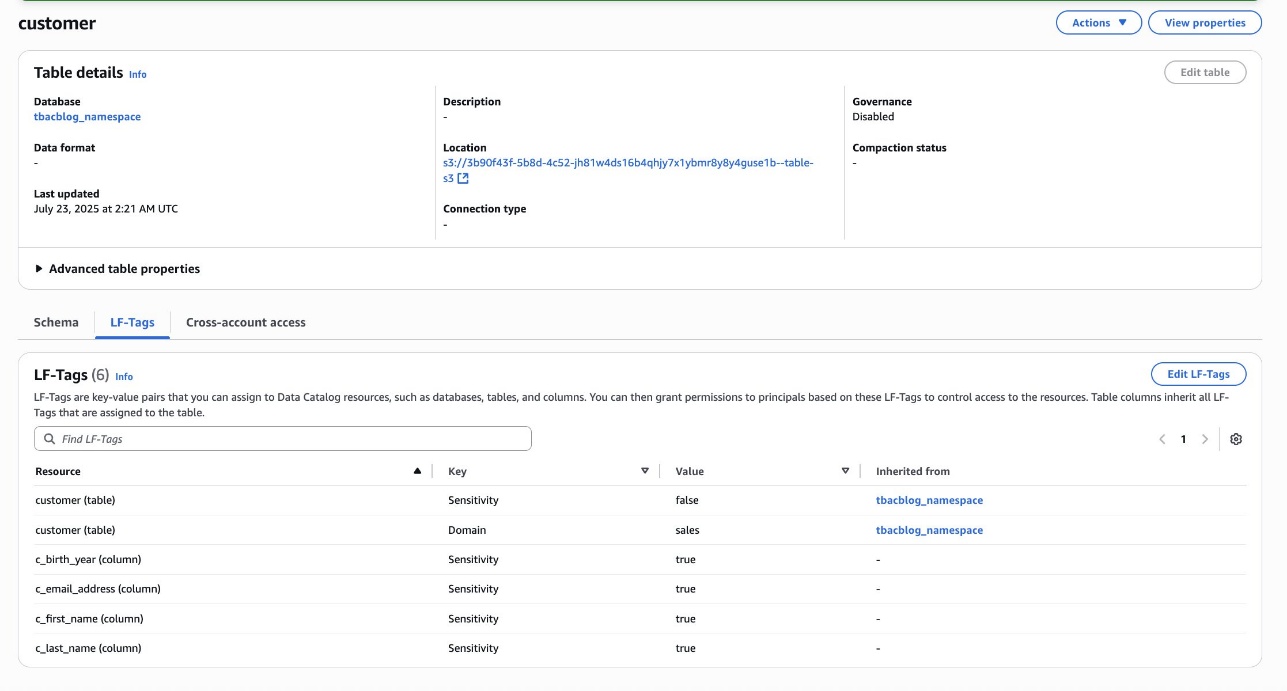
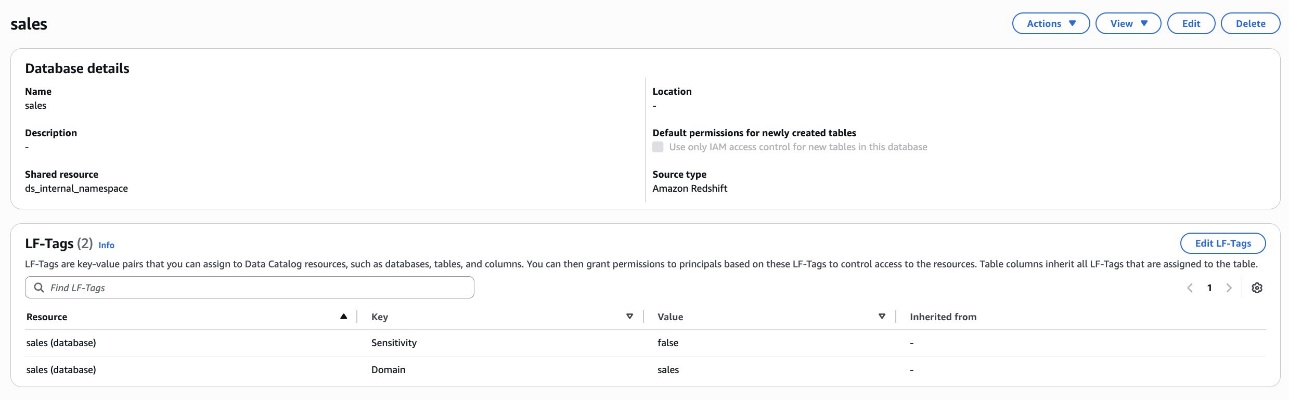
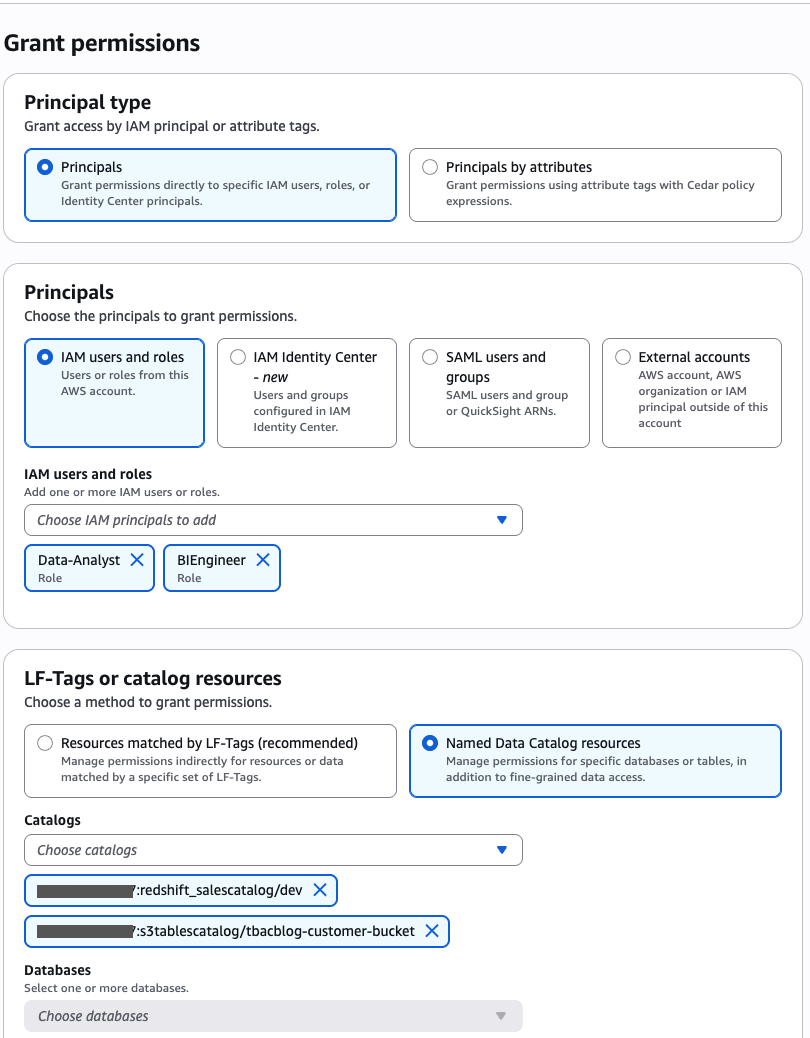
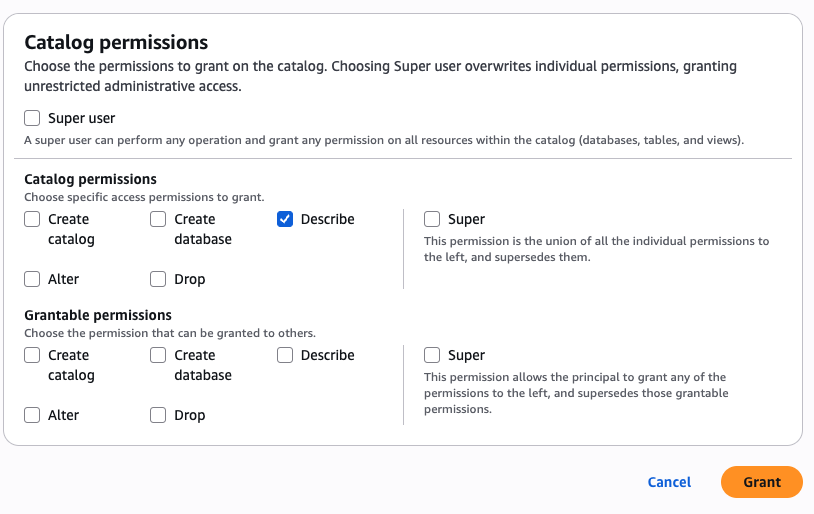
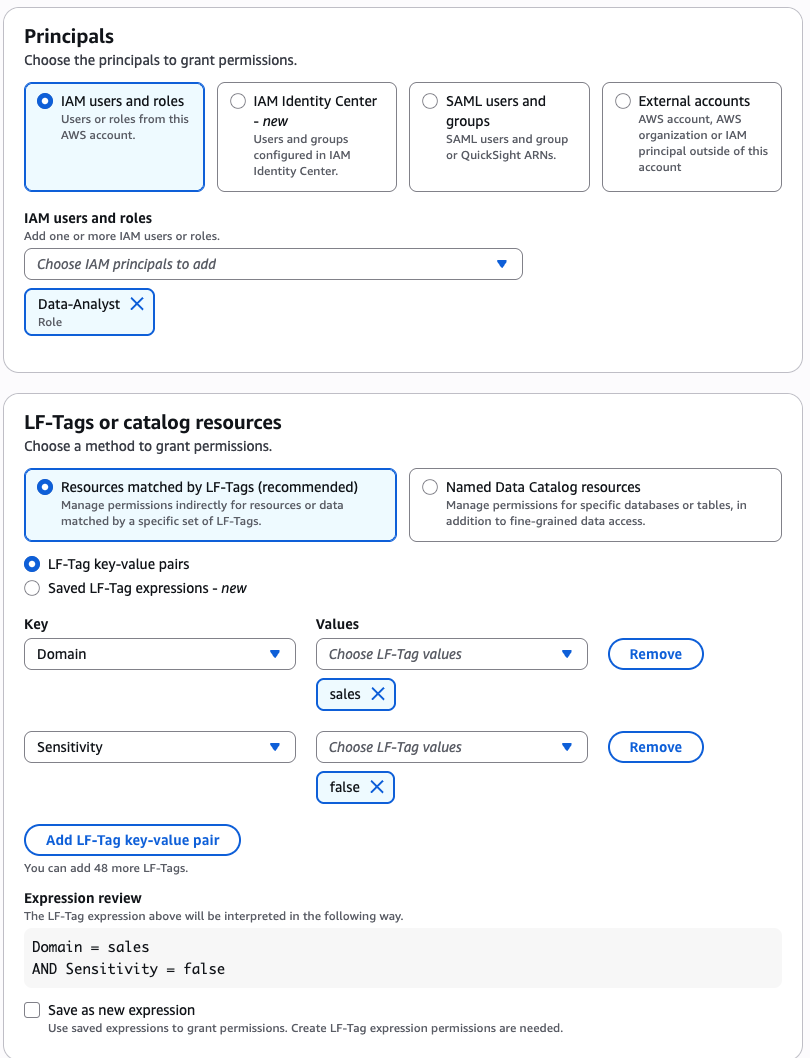

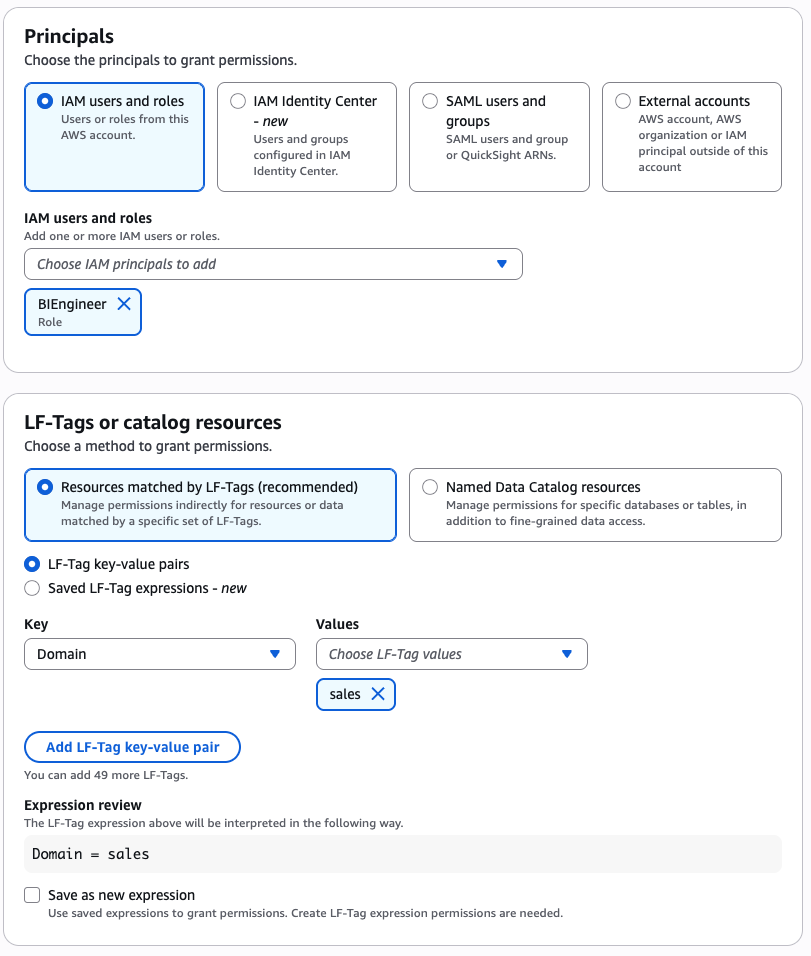
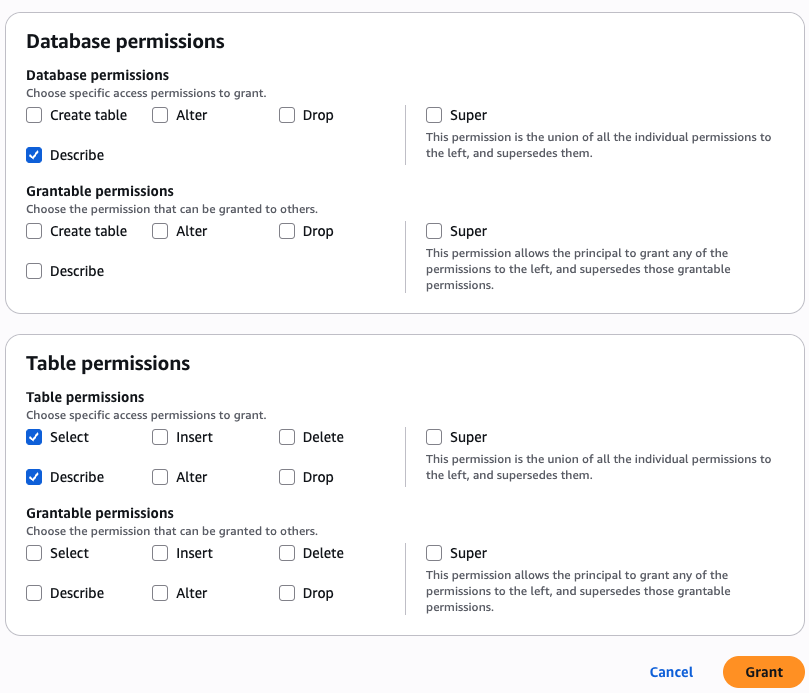
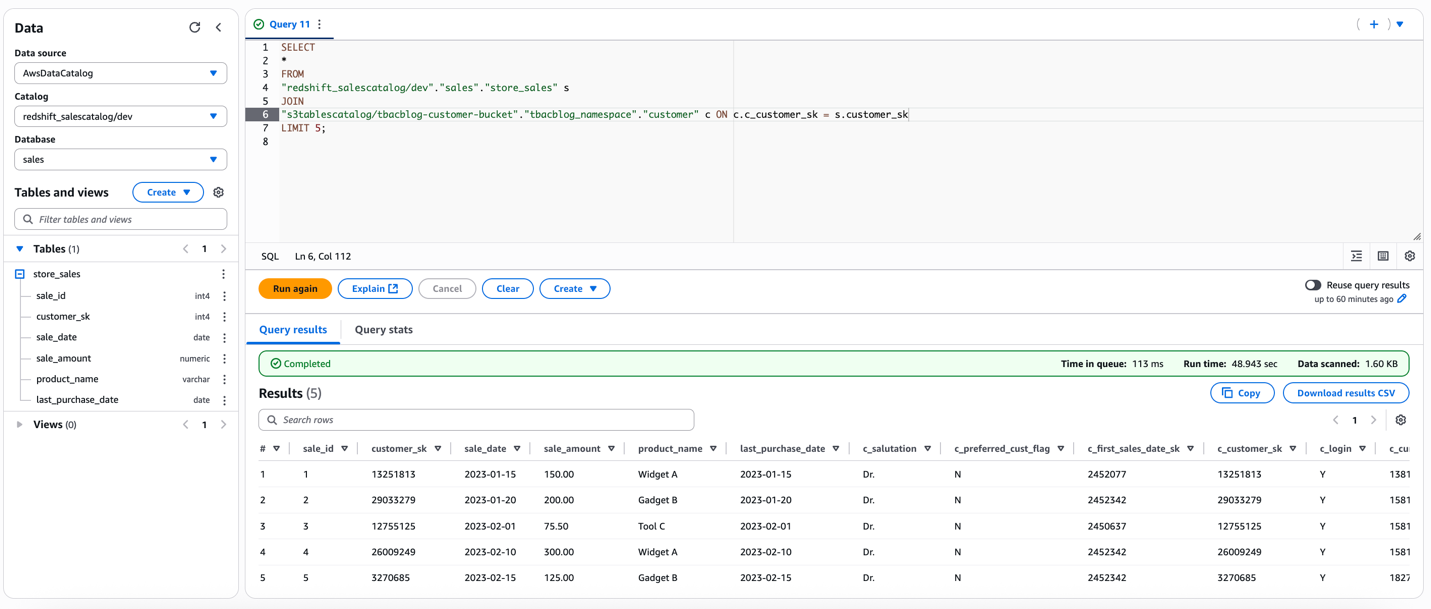
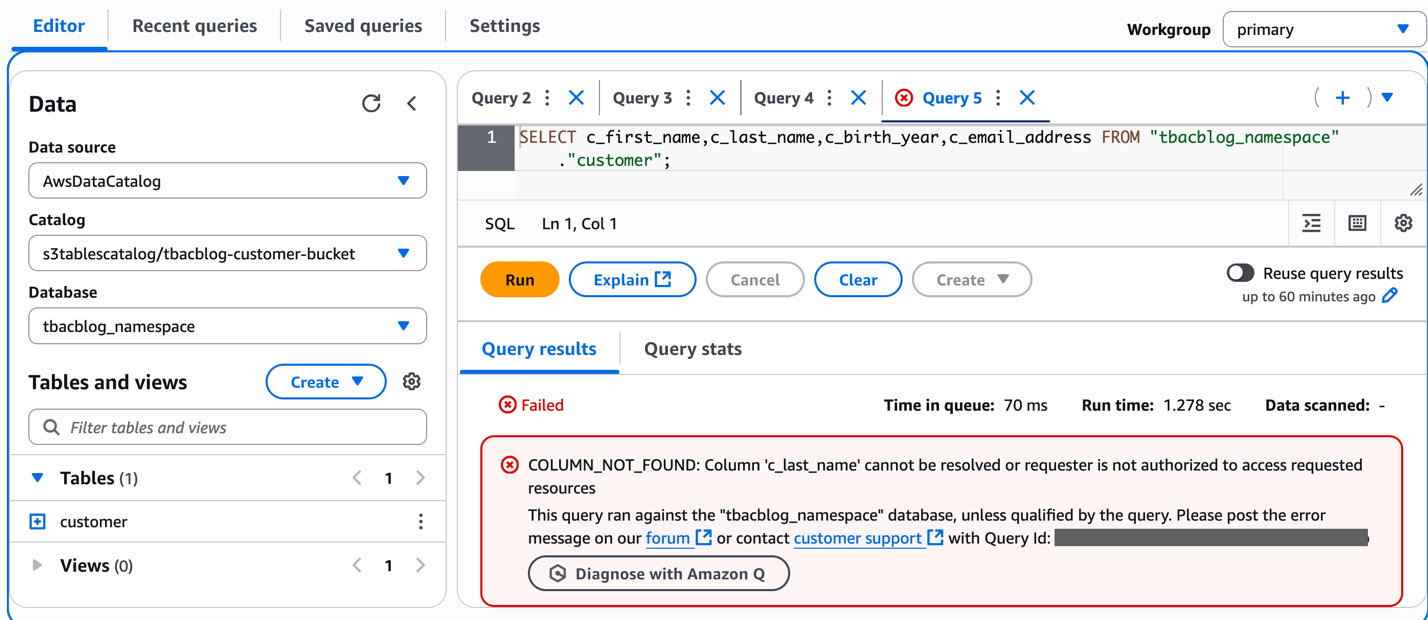
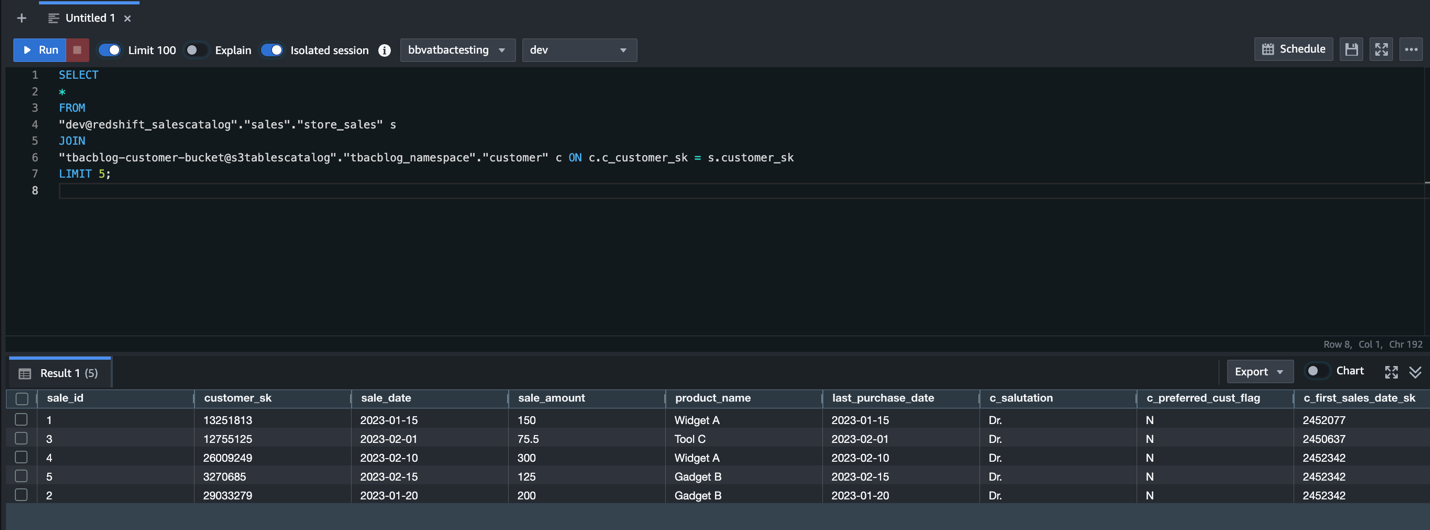
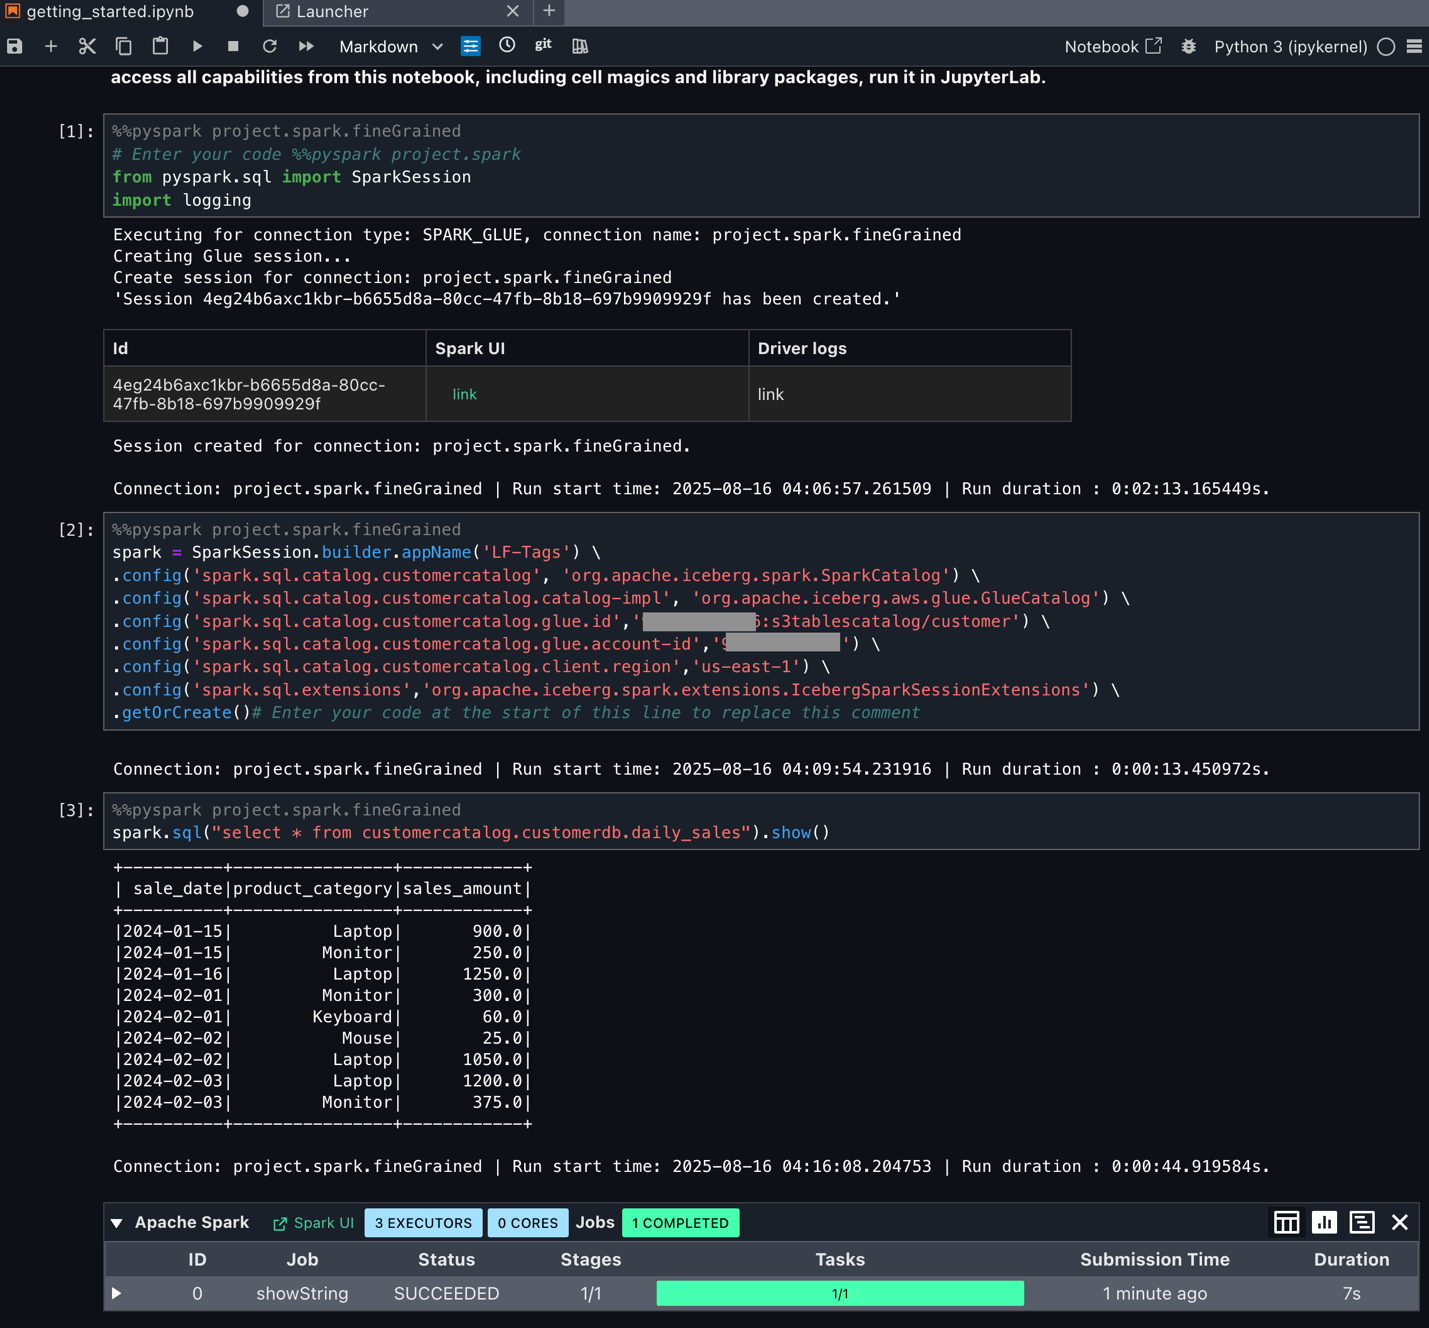
 Sandeep Adwankar is a Senior Product Manager with Amazon SageMaker Lakehouse . Based in the California Bay Area, he works with customers around the globe to translate business and technical requirements into products that help customers improve how they manage, secure, and access data.
 Srividya Parthasarathy is a Senior Big Data Architect with Amazon SageMaker Lakehouse. She works with the product team and customers to build robust features and solutions for their analytical data platform. She enjoys building data mesh solutions and sharing them with the community.
 Aarthi Srinivasan is a Senior Big Data Architect with Amazon SageMaker Lakehouse. She works with AWS customers and partners to architect lakehouse solutions, enhance product features, and establish best practices for data governance.
![Decoded JavaScript code, with compromised site removed: "[removed_domain]"](https://d2908q01vomqb2.cloudfront.net/22d200f8670dbdb3e253a90eee5098477c95c23d/2025/08/29/img2-1.png)


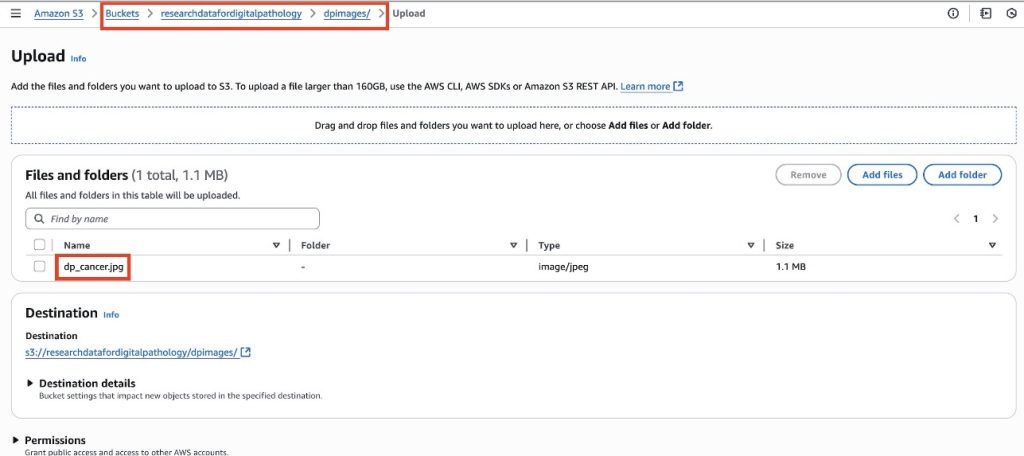
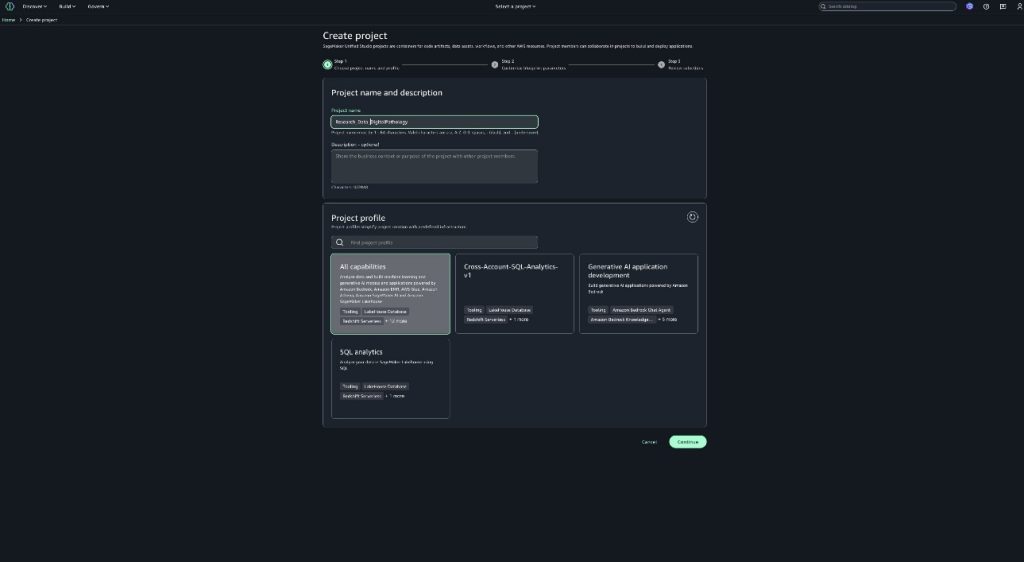
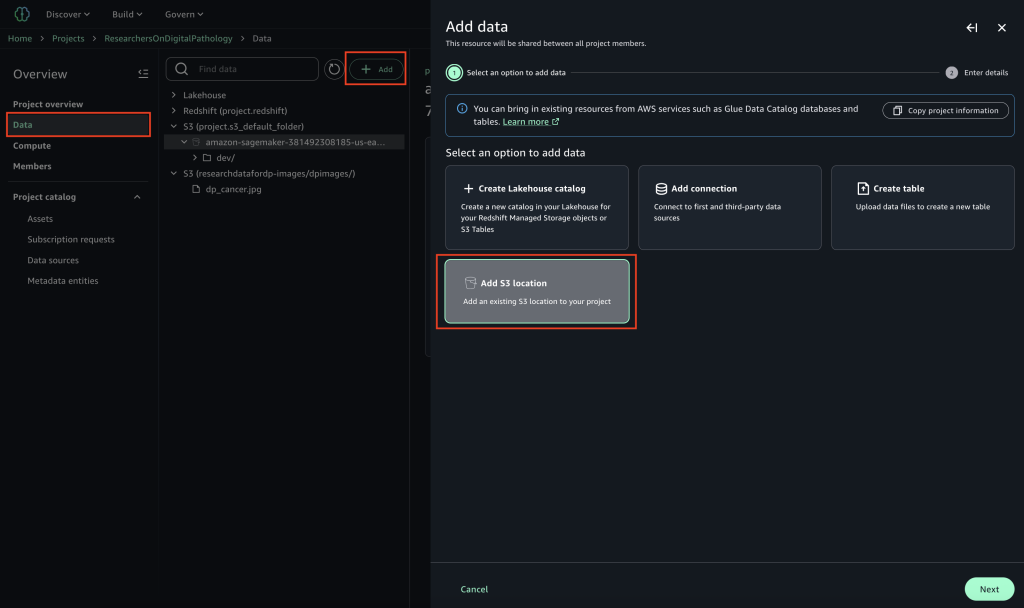
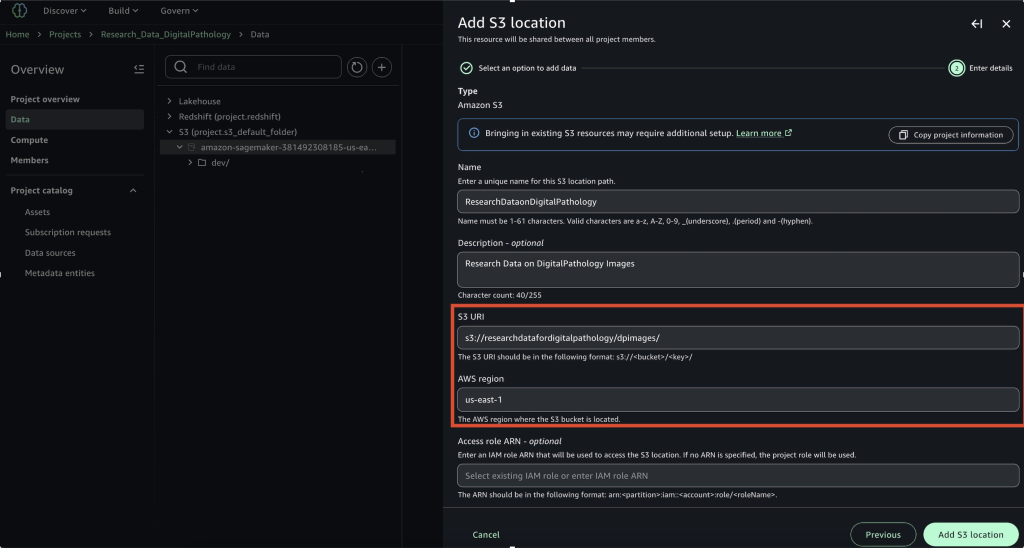
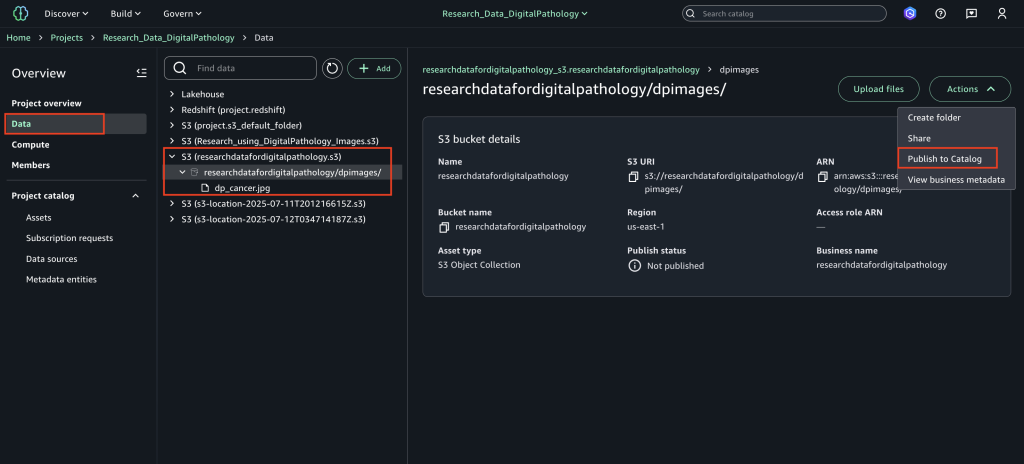
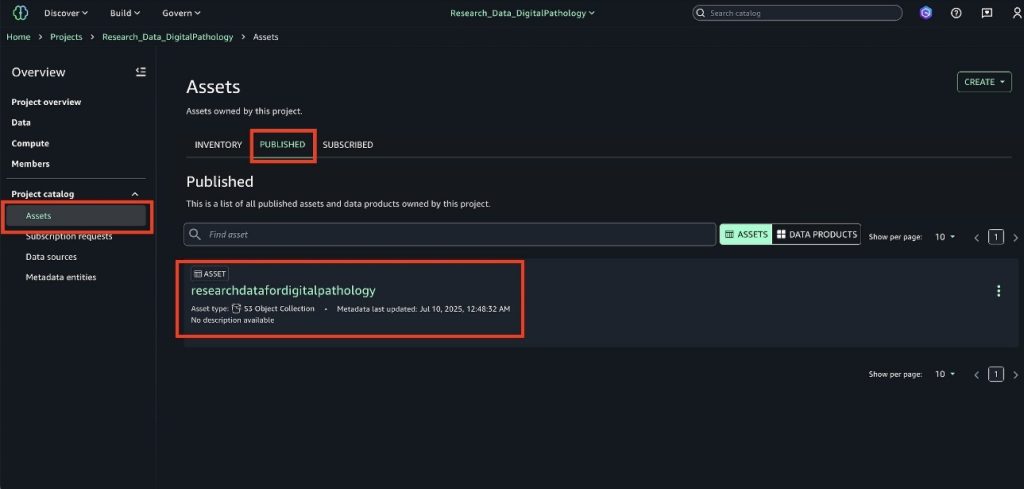
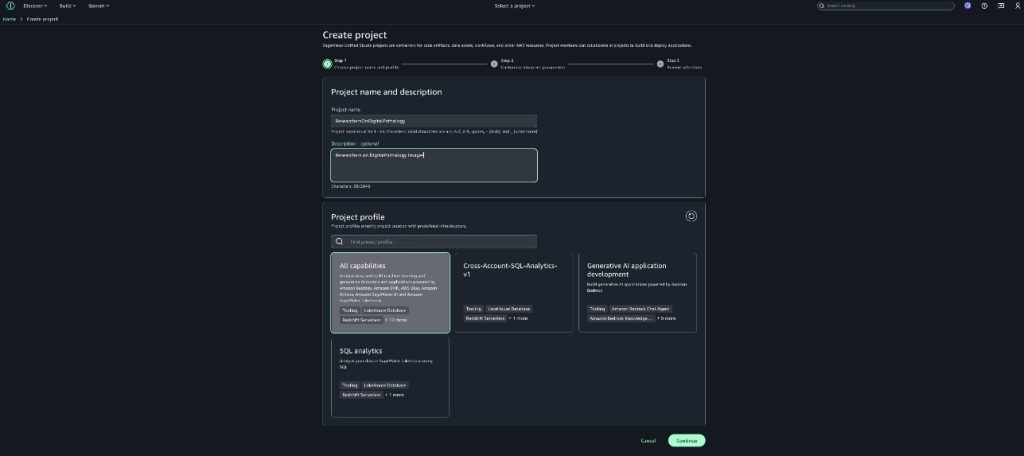
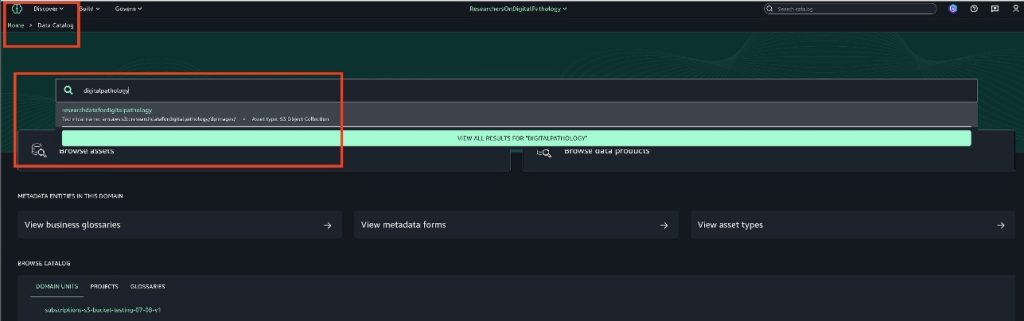
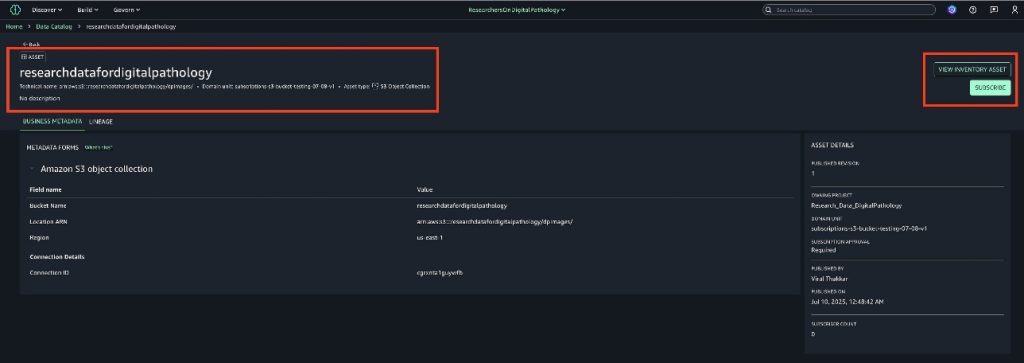
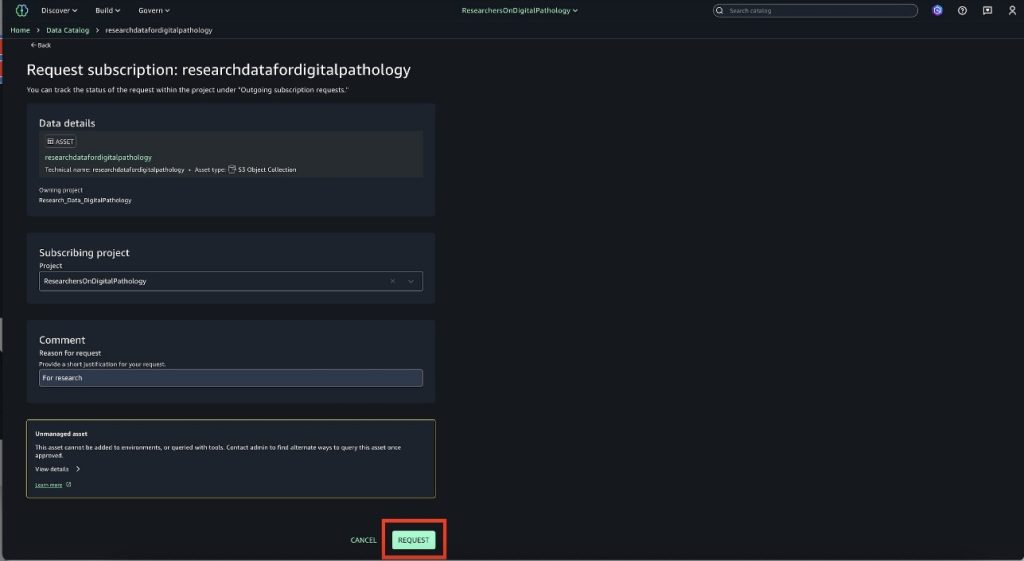
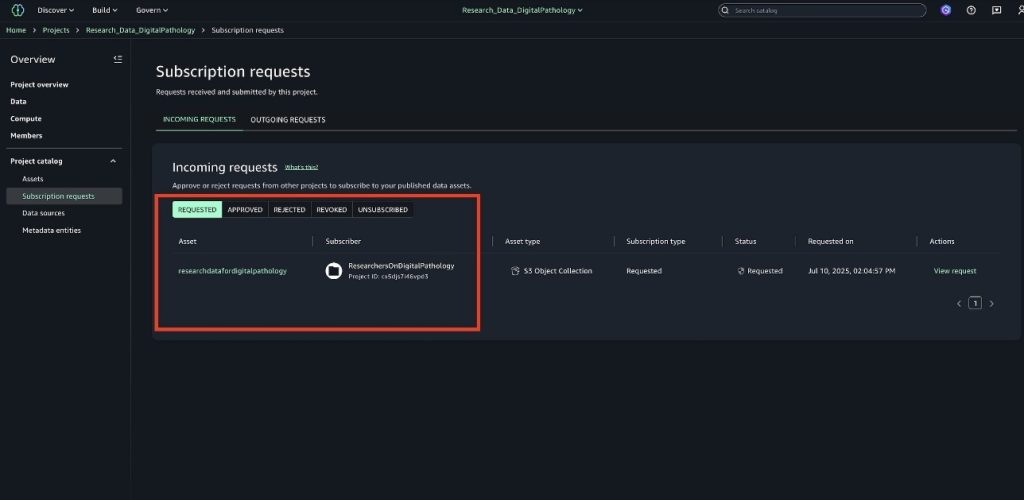
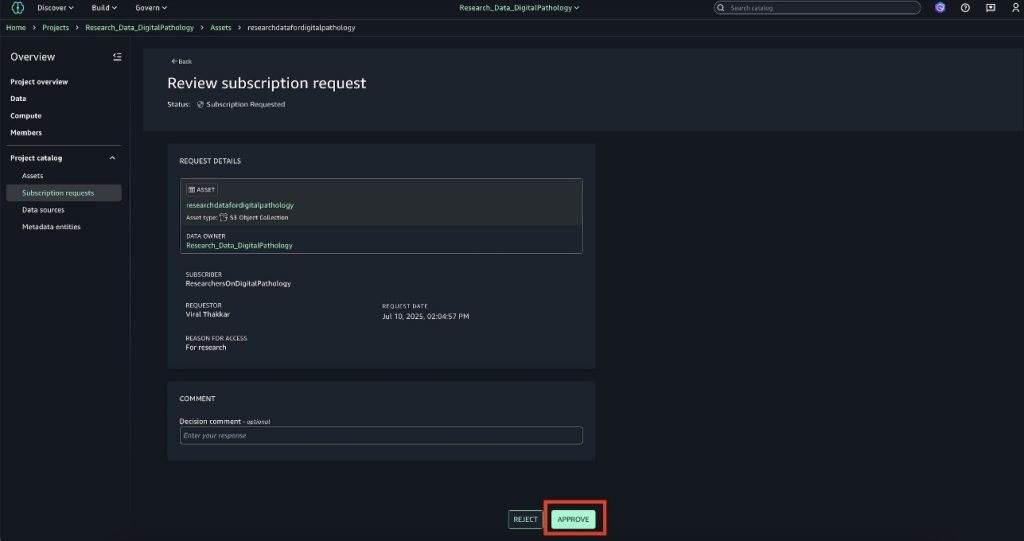
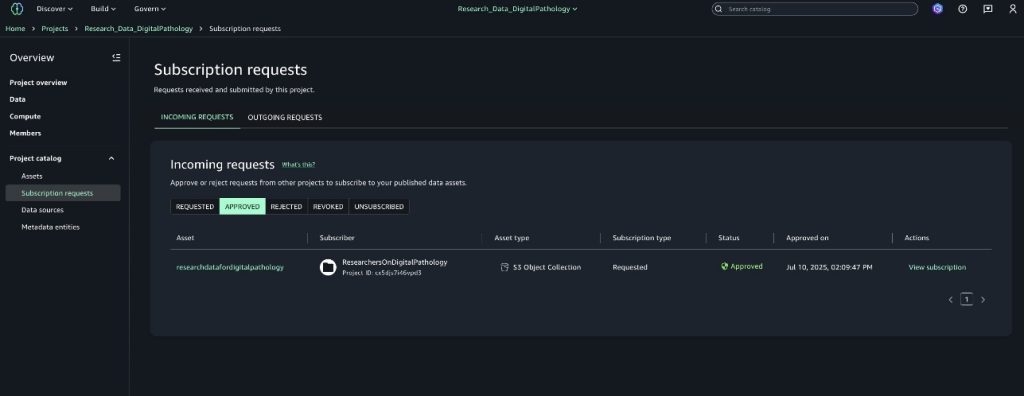
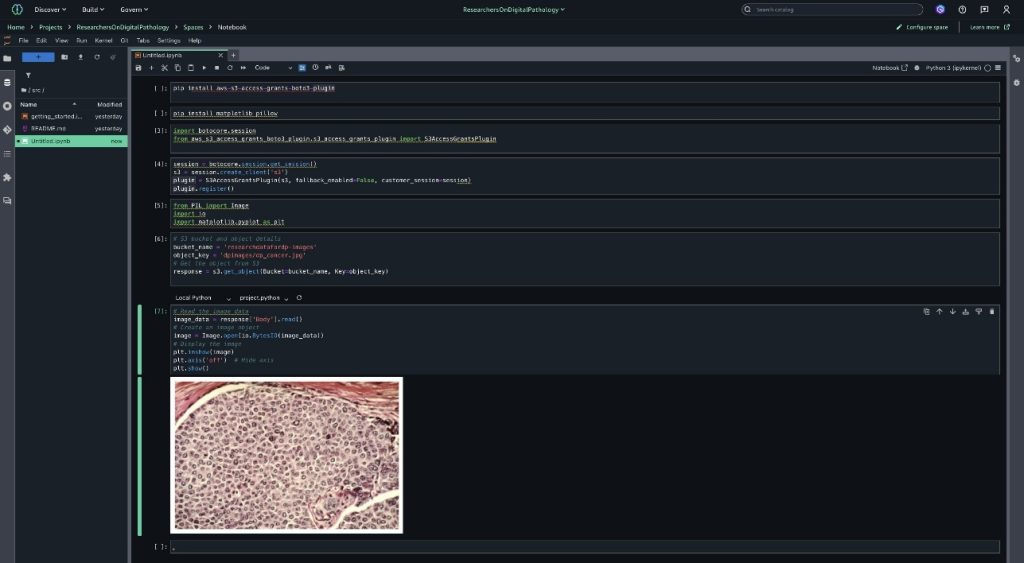
 Priya Tiruthani is a Senior Technical Product Manager with Amazon DataZone at AWS. She focuses on improving data discovery and curation required for data analytics. She is passionate about building innovative products to simplify customers’ end-to-end data journey, especially around data governance and analytics. Outside of work, she enjoys being outdoors to hike, capture nature’s beauty, and recently play pickleball.
 Subrat Das is a Principal Solutions Architect and part of the Global Healthcare and Life Sciences industry division at AWS. He is passionate about modernizing and architecting complex customer workloads. When he’s not working on technology solutions, he enjoys long hikes and traveling around the world.
 Santhosh Padmanabhan is a Software Development Manager at AWS, leading the Amazon SageMaker Catalog engineering team. His team designs, builds, and operates services specializing in data, machine learning, and AI governance. With deep expertise in building distributed data systems at scale, Santhosh plays a key role in advancing AWS’s data governance capabilities.
 Yuhang Huang is a Software Development Manager on the Amazon SageMaker Unified Studio team. He leads the engineering team to design, build, and operate scheduling and orchestration capabilities in SageMaker Unified Studio. In his free time, he enjoys playing tennis.