Last week, a misconfiguration in Google Cloud’s API infrastructure led to a major global outage. Not long before that, IBM Cloud suffered its second significant disruption in a matter of weeks. The incidents impacted everything from enterprise infrastructure to consumer-facing apps—Gmail, Spotify, Cloudflare, and countless internal systems built on top of these platforms.
Understandably, much of the coverage has focused on what went wrong. But the more important question might be: Why does something like this ripple so far and wide in a system supposedly built for resilience?
Single points of failure in a multi-service world
One might assume that as cloud providers scale, their reliability scales with them. However, these outages reveal a critical distinction: the difference between data-layer resilience and control-plane fragility.
The problem is, that robust data layer can be rendered useless if the “front door” is locked. Hyperscale cloud platforms have grown so interdependent and complex that a fault in one layer can bring vast swaths of unrelated services to a halt. This is the risk of vertical integration: When one vendor provides compute, storage, networking, and identity, a simple bug or misconfiguration can cascade through thousands of applications, not because the applications are fragile, but because they’ve all tied themselves to the same operational backbone.
Redundancy, or the illusion of it?
In theory, cloud architecture encourages redundancy. But in practice, many companies—even those using multi-cloud strategies—tend to consolidate key services like authentication and orchestration with a single vendor. When that vendor’s services go down, it doesn’t matter that your data is replicated across three availability zones in the same data center. If you can’t log in to access it, your redundancy becomes purely theoretical.
After last week’s outages, some companies may re-evaluate their cloud strategy—but it’s not as easy as flipping a switch. True diversification is complex, requiring time, engineering resources, and a cultural shift toward designing for failure.
The reality: Fewer assumptions, more contingencies
The knee-jerk reaction to events like these is often to demand better SLAs, more transparency, or faster recovery times. Those are valid asks. But they might miss the deeper lesson: Assumptions about uptime and “X-nines” reliability are only helpful until the moment they aren’t. What users need are not just better guarantees, but clearer paths to self-determination when things break.
That might look like:
Designing for graceful degradation. What can your service do when its cloud provider is partially offline?
Reconsidering dependencies. Are you tying core logic to a provider’s proprietary APIs, or abstracting where possible?
Asking harder questions during vendor selection. Not just, “Can it scale?” but “What happens when it fails?”
Case study: Sardius Media bakes in redundancy
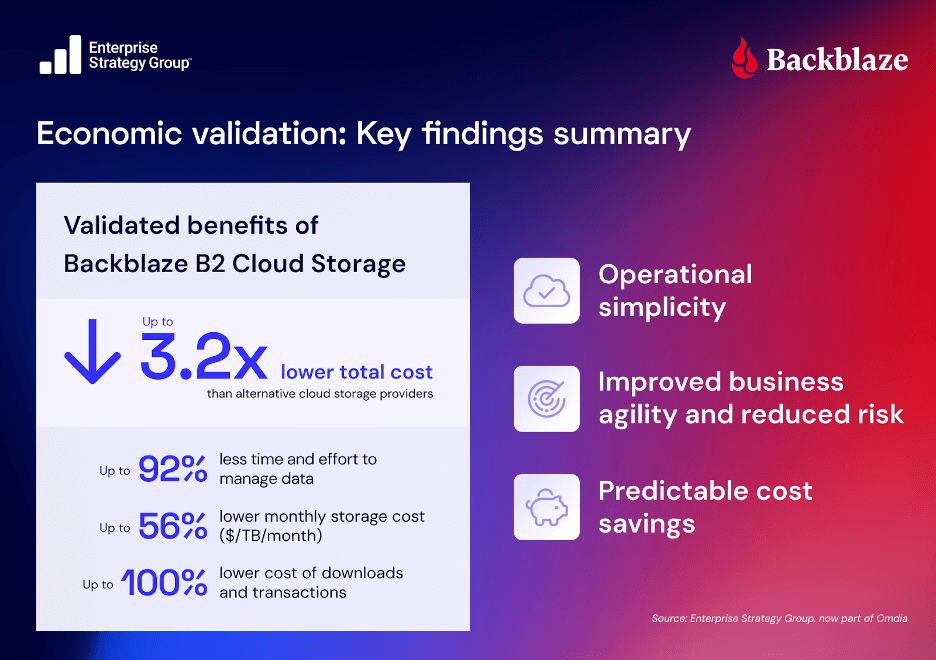
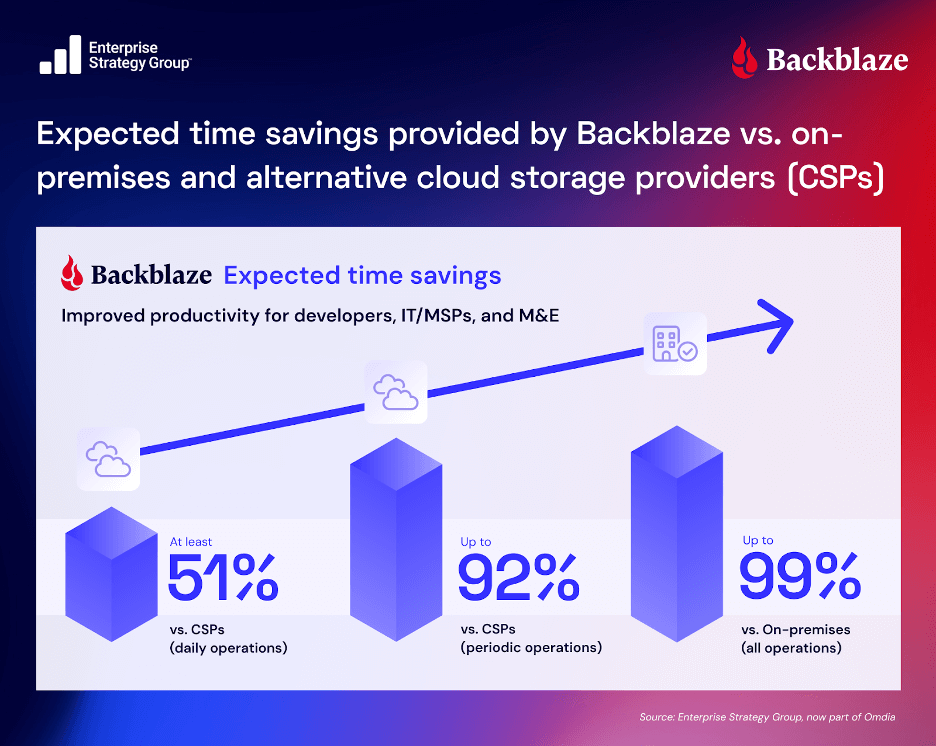
Sardius Media, a global video platform, built cloud redundancy into its DNA. Every piece of media is replicated across multiple S3 compatible storage providers—including Backblaze B2—using a proprietary “race” mechanism that always delivers the fastest, most reliable storage experience for end users. This architecture keeps files available, resilient, and protected, even if one provider has an outage.
No single point of failure: Content lives across multiple clouds
Best performance: Requests race to the fastest provider in real time
Durability, affordability, and global reach—Backblaze B2 wins the race up to 80% of the time globally
Sardius Media’s strategy proves that open, multi-provider storage isn’t just theory—it’s operational resilience in action.
What does that mean for you?
The answer isn’t to abandon the cloud, but to get smarter about how you use it. This means architecting systems that don’t just have data redundancy, but true operational independence.
Maybe that means replicating data to providers who specialize rather than consolidate. Or maybe it just means revisiting architectures that have become too reliant on invisible scaffolding.
What’s clear is this: reliability isn’t a feature you buy from the cloud. It’s a design philosophy that must be shared.
At AWS re:Inforce 2025 (June 16-18, Philadelphia), AWS Vice President and Chief Information Security Officer Amy Herzog delivered the keynote address, announcing new security innovations. Throughout the event, AWS announced additional security capabilities focused on simplifying security at scale and enabling organizations to build more resilient applications in the cloud. Below is a comprehensive roundup of the major security launches and updates announced at this year’s conference.
Verify internal access to critical AWS resources with new IAM Access Analyzer capabilities A new capability in AWS Identity and Access Management Access Analyzer helps security teams verify which principals within their AWS organization have access to critical resources like S3 buckets, DynamoDB tables, and RDS snapshots by using automated reasoning to evaluate multiple policies and provide findings through a unified dashboard.
AWS IAM now enforces MFA for root users across all account types The new Multi-Factor Authentication enforcement prevents over 99% of password-related attacks. You can use a range of supported IAM MFA methods, including FIDO-certified security keys to harden access to your AWS accounts. AWS supports FIDO2 passkeys for a user-friendly MFA implementation and allows you to register up to 8 MFA devices per root and IAM user.
Improve your security posture using Amazon threat intelligence on AWS Network Firewall This new Network Firewall managed rule group offers protection against active threats relevant to workloads in AWS. The feature uses the Amazon threat intelligence system MadPot to continuously track attack infrastructure, including malware hosting URLs, botnet command and control servers, and crypto mining pools, identifying indicators of compromise (IOCs) for active threats.
AWS WAF simplified console experience The new AWS WAF console experience reduces security configuration steps by up to 80% through pre-configured protection packs. Security teams can quickly implement comprehensive protection for specific application types, with consolidated security metrics and customizable controls through an intuitive interface.
New AWS Shield feature discovers network security issues before they can be exploited (Preview) Shield network security posture management automatically discovers and analyzes network resources across AWS accounts, prioritizes security risks based on AWS best practices, and provides actionable remediation recommendations to protect applications against threats like SQL injections and DDoS attacks.
Unify your security with the new AWS Security Hub for risk prioritization and response at scale (Preview) AWS Security Hub has been enhanced to transform security signals into actionable insights, helping security teams prioritize and respond to critical issues at scale. This unified solution provides comprehensive visibility across your cloud environment while reducing the complexity of managing multiple security tools.
Amazon GuardDuty expands Extended Threat Detection coverage to Amazon EKS clusters Amazon GuardDuty Extended Threat Detection now supports Amazon EKS clusters, helping you detect sophisticated multistage attacks by correlating security signals across Kubernetes audit logs, runtime behaviors, and AWS API activities. This enhancement automatically identifies critical attack sequences that might otherwise go unnoticed, enabling faster response to threats.
New categories for the AWS MSSP Competency The AWS MSSP Competency (previously AWS Level 1 MSSP Competency) now includes new categories covering infrastructure security, workload security, application security, data protection, identity and access management, incident response, and cyber recovery. Partners provide 24/7 monitoring and incident response through dedicated Security Operations Centers.
Secure your Express application APIs in minutes with Amazon Verified Permissions Amazon Verified Permissions announced the release of the verified-permissions-express-toolkit, an open-source package that allows developers to implement authorization for Express web application APIs in minutes using Amazon Verified Permissions.
Beyond compute: Shifting vulnerability detection left with Amazon Inspector code security Amazon Inspector code security capabilities are now generally available, helping you secure applications before production by rapidly identifying and prioritizing security vulnerabilities and misconfigurations across application source code, dependencies, and infrastructure as code (IaC).
AWS Backup adds new Multi-party approval for logically air-gapped vaults Multi-party approval for AWS Backup logically air-gapped vaults enables you to recover your backup data even when your AWS account is compromised, by leveraging authorization from a designated approval team of trusted individuals who can enable vault sharing with a recovery account.
Security teams managing Kubernetes workloads often struggle to detect sophisticated multistage attacks that target containerized applications. These attacks can involve container exploitation, privilege escalation, and unauthorized movement within Amazon EKS clusters. Traditional monitoring approaches might detect individual suspicious events, but often miss the broader attack pattern that spans across these different data sources and time periods.
GuardDuty Extended Threat Detection introduces a new critical severity finding type, which automatically correlates security signals across Amazon EKS audit logs, runtime behaviors of processes associated with EKS clusters, malware execution in EKS clusters, and AWS API activity to identify sophisticated attack patterns that might otherwise go unnoticed. For example, GuardDuty can now detect attack sequences in which a threat actor exploits a container application, obtains privileged service account tokens, and then uses these elevated privileges to access sensitive Kubernetes secrets or AWS resources.
This new capability uses GuardDuty correlation algorithms to observe and identify sequences of actions that indicate potential compromise. It evaluates findings across protection plans and other signal sources to identify common and emerging attack patterns. For each attack sequence detected, GuardDuty provides comprehensive details, including potentially impacted resources, timeline of events, actors involved, and indicators used to detect the sequence. The findings also map observed activities to MITRE ATT&CK® tactics and techniques and remediation recommendations based on AWS best practices, helping security teams understand the nature of the threat.
To enable Extended Threat Detection for EKS, you need at least one of these features enabled: EKS Protection or Runtime Monitoring. For maximum detection coverage, we recommend enabling both to enhance detection capabilities. EKS Protection monitors control plane activities through audit logs, and Runtime Monitoring observes behaviors within containers. Together, they create a complete view of your EKS clusters, enabling GuardDuty to detect complex attack patterns.
How it works To use the new Amazon GuardDuty Extended Threat Detection for EKS clusters, go to the GuardDuty console to enable EKS Protection in your account. From the Region selector in the upper-right corner, select the Region where you want to enable EKS Protection. In the navigation pane, choose EKS Protection. On the EKS Protection page, review the current status and choose Enable. Select Confirm to save your selection.
After it’s enabled, GuardDuty immediately starts monitoring EKS audit logs from your EKS clusters without requiring any additional configuration. GuardDuty consumes these audit logs directly from the EKS control plane through an independent stream, which doesn’t affect any existing logging configurations. For multi-account environments, only the delegated GuardDuty administrator account can enable or disable EKS Protection for member accounts and configure auto-enable settings for new accounts joining the organization.
To enable Runtime Monitoring, choose Runtime Monitoring in the navigation pane. Under the Configuration tab, choose Enable to enable Runtime Monitoring for your account.
Now, you can view from the Summary dashboard the attack sequences and critical findings specifically related to Kubernetes cluster compromise. You can observe that GuardDuty identifies complex attack patterns in Kubernetes environments, such as credential compromise events and suspicious activities within EKS clusters. The visual representation of findings by severity, resource impact, and attack types gives you a holistic view of your Amazon EKS security posture. This means you can prioritize the most critical threats to your containerized workloads.
The Findingdetails page provides visibility into complex attack sequences targeting EKS clusters, helping you understand the full scope of potential compromises. GuardDuty correlates signals into a timeline, mapping observed behaviors to MITRE ATT&CK® tactics and techniques such as account manipulation, resource hijacking, and privilege escalation. This granular level of insight reveals exactly how attackers progress through your Amazon EKS environment. It identifies affected resources like EKS workloads and service accounts. The detailed breakdown of indicators, actors, and endpoints provides you with actionable context to understand attack patterns, determine impact, and prioritize remediation efforts. By consolidating these security insights into a cohesive view, you can quickly assess the severity of Amazon EKS security incidents, reduce investigation time, and implement targeted countermeasures to protect your containerized applications.
The Resources section of the Finding details page shows context about the specific assets affected during an attack sequence. This unified resource list provides you with visibility into the exact scope of the compromise—from the initial access to the targeted Kubernetes components. Because GuardDuty includes detailed attributes such as resource types, identifiers, creation dates, and namespace information, you can rapidly assess which components of your containerized infrastructure require immediate attention. This focused approach eliminates guesswork during incident response, so you can prioritize remediation efforts on the most critical affected resources and minimize the potential blast radius of Amazon EKS targeted attacks.
Now available Amazon GuardDuty Extended Threat Detection with expanded coverage for Amazon EKS clusters provides comprehensive security monitoring across your Kubernetes environment. You can use this capability to detect sophisticated multistage attacks by correlating events across different data sources, identifying attack sequences that traditional monitoring might miss.
To start using this expanded coverage, enable EKS Protection in your GuardDuty settings and consider adding Runtime Monitoring for enhanced detection capabilities.
For more information about this new capability, refer to the Amazon GuardDuty Documentation.
Express is a minimal and flexible Node.js web application framework that provides a robust set of features for web and mobile applications. By using this standardized integration with Verified Permissions, developers can externalize authorization using up to 90 percent less code compared to writing their own custom integrations, saving them time and effort and improving application security posture by reducing the amount of custom integration code.
Why externalize authorization?
Traditionally, developers implemented authorization within their application by embedding authorization logic directly into application code. This embedded authorization logic is designed to support a few permissions, but as applications evolve, there is often a need to incrementally update the embedded authorization logic to support more complex use cases, resulting in code that is complex and difficult to maintain. As code complexity increases, further evolving the security model and performing audits of permissions becomes more challenging, resulting in an application that becomes more difficult to maintain over its lifecycle.
By externalizing authorization, you can decouple authorization logic from your application. This yields multiple benefits including freeing up development teams to focus on application logic and simplifying software audits.
One approach to externalize authorization from your application code is to use Cedar. Cedar is an open source language and software development kit (SDK) for writing and enforcing authorization policies for your applications. You specify fine-grained permissions as Cedar policies, and your application authorizes access requests by calling the Cedar SDK. For example, if you’re building a pet store application, you can use the following Cedar policy to control that only a user with a jobLevel of employee can access the POST /pets API.
permit (
	principal,
	action in [Action::"POST /pets"],
	resource
) when {
	principal.jobLevel = "employee"
};
Self-managed Cedar provides the benefits of externalizing authorization but requires ongoing operational management. Organizations are responsible for Cedar version upgrades, applying security patches, managing policies, and auditing authorizations. Another option for using Cedar is to use Verified Permissions. Verified Permissions removes these operational requirements by providing a managed service for Cedar. Verified Permissions manages scaling, simplifies policy governance by supporting centralized policy management, and logs policy changes and authorization requests to simplify auditing.
This post describes how web application developers can use the new Express package to simplify the integration of Express web applications with Verified Permissions. The step-by-step guide uses a sample Pet Store application to show how access to APIs can be restricted based on user groups. You can find the sample Pet Store application in the verifiedpermissions repository on GitHub.
Pet Store application API overview
The Pet Store application is used to manage a pet store. The pet store is built using Express with Node.js and exposes the APIs in the following table.
API
Description
GET /api/pets
Returns the list of available pets
GET /api/pets/{petId}
Returns the specified pet found
POST /api/pets
Adds a pet to the pet store
PUT /api/pets/{petId}
Updates an existing pet
DELETE /api/pets/{petId}
Removes a pet from the pet store
This application doesn’t allow all users to access all APIs. Instead, it enforces the following rules:
Administrators: Full access to pets and management functions
Employees: Can view, create, and update pets
Customers: Can view pets and create new pets
Implementing authorization for the Pet Store APIs
Let’s walk through how to secure your application APIs using Verified Permissions and the new package for Express. The initial application, with no authorization, can be found in the start folder; use this to follow along with the post. You can find a completed version of the application in the finish folder.
When completed, you’ll have implemented the application architecture shown in Figure 1. A React frontend application that uses Amazon Cognito for authentication. The application then includes the identity token returned from Cognito as an authorization header to the Express backend APIs. The Express backend, using the new Verified Permissions authorization middleware package, calls Verified Permissions to authorize the user request.
Figure 1: Architecture of the Pet Store application
Prerequisites
Before you get started, make sure you have the following prerequisites in place.
Step 2: Set up an OpenID Connect identity provider and a database
The Pet Store application uses an OpenID Connect (OIDC) identity provider to manage users. For this example, you use an Amazon Cognito user pool called PetStoreUserPool with three users, one Admin, one Employee, and one Customer.
The application also uses a Amazon DynamoDB database to store the pets.
You can set up Amazon Cognito and DynamoDB in your AWS account by running the following command in the /start directory.
./scripts/setup-infrastructure.sh
The setup script will prompt you to set passwords for the three users (passwords must be at least 8 characters and require at least one number, one uppercase letter, and one lowercase letter).
Note the outputs of running this script because you’ll use them in step 5 of Integrate Verified Permissions.
With the prerequisites in place, the next step is to integrate Verified Permissions. Verified Permissions can be integrated into an Express application in six steps:
Create a Verified Permissions policy store
Add the Cedar and Verified Permissions authorization middleware packages
Create and deploy a Cedar schema
Create and deploy Cedar policies
Connect the Verified Permissions policy store to your OIDC identity provider
Update the application code to call Verified Permissions to authorize API access
The Verified Permissions integration happens with the Express web application backend. All commands in the section should be run in the /start/backend directory.
Step 1: Create a Verified Permissions policy store
Create a policy store in Verified Permissions using the AWS CLI by running the following command
Save the policyStoreId value from the command output to use in step 3.
Step 2: Add the Cedar and Verified Permissions authorization middleware packages
Run the following command to add two new dependencies on @verifiedpermissions/authorization-clients and @cedar-policy/authorization-for-expressjs
npm i --save @verifiedpermissions/authorization-clients
npm i --save @cedar-policy/authorization-for-expressjs
Step 3: Create and deploy the Cedar schema
A Cedar schema defines the authorization model for an application, including the entity types in the application and the actions users are allowed to take. You attach your schema to your Verified Permissions policy stores, and when policies are added or modified, the service automatically validates the policies against the schema.
The @cedar-policy/authorization-for-expressjs package can analyze the OpenAPI specification of your application and generate a Cedar schema. Specifically, the paths object in the OpenAPI schema is required in your specification.
If you don’t have an OpenAPI spec, you can generate one using the tool of your choice. There are several open source libraries that you can use to do this for Express; you might need to add some code to your application, generate the OpenAPI spec, and then remove the code. Alternatively, some generative AI based tools such as the Amazon Q Developer CLI are effective at generating OpenAPI spec documents. Regardless of how you generate the spec, be sure to validate the correct output from the tool.
For the sample application an OpenAPI spec document has been included and is named openapi.json.
Run the following command to generate the Cedar schema.
Cedar schema successfully generated. Your schema files are named: v2.cedarschema.json, v4.cedarschema.json.
v2.cedarschema.json is compatible with Cedar 2.x and 3.x
v4.cedarschema.json is compatible with Cedar 4.x and required by the nodejs Cedar plugins.
Next, format the Cedar schema for use with the AWS CLI. The specific format required is described in the documentation Amazon Verified Permissions policy store schema. To format the Cedar schema run the following command.
Cedar schema prepared successfully: v2.cedarschema.forAVP.json
You can now use it with AWS CLI:
After the schema is formatted, run the following command to upload the schema to Verified Permissions. Note that you need to replace <policy store id> with the actual policy store ID, which is provided as an output from the command in step 1.
aws verifiedpermissions put-schema --definition file://v2.cedarschema.forAVP.json --policy-store-id <policy store id>
If no policies are configured, Cedar denies authorization requests. The next step is to create policies that will allow specific user groups access to specific resources. The Express framework integration helps bootstrap this process by generating example policies based on the previously generated schema. You can then then customize these policies based on your use cases.
Run the following command to generate sample Cedar policies.
Cedar policy successfully generated in policies/policy_1.cedar
Cedar policy successfully generated in policies/policy_2.cedar
Two sample policies are generated in the /policies directory: policy_1.cedar and policy_2.cedar.
policy_1.cedar provides permissions for users in the admin user group to perform any action on any resource.
// policy_1.cedar
// Allows admin usergroup access to everything
permit (
	principal in PetStoreApp::UserGroup::"admin",
	action,
	resource
);
policy_2.cedar provides more access to the individual actions defined in the Cedar schema with a place holder for a specific group.
// policy_2.cedar
// Allows more granular user group control, change actions as needed
permit (
    principal in PetStoreApp::UserGroup::"ENTER_THE_USER_GROUP_HERE",
    action in
        [PetStoreApp::Action::"GET /pets",
         PetStoreApp::Action::"POST /pets",
         PetStoreApp::Action::"GET /pets/{petId}",
         PetStoreApp::Action::"PUT /pets/{petId}",
         PetStoreApp::Action::"DELETE /pets/{petId}"],
    resource
);
Note that if you specified an operationId in the OpenAPI specification, the action names defined in the Cedar Schema will use that operationId instead of the default <HTTP Method> /<PATH> format. In this case, make sure that the naming of your actions in your Cedar policies matches the naming of your actions in your Cedar schema.
For example, if you want to call your action AddPet instead of POST /pets, you could set the operationId in your OpenAPI specification to AddPet. The resulting action in the Cedar policy would be PetStoreApp::Action::"AddPet"
Create a third policy file called policy_3.cedar and then replace the contents of each file with the following policies. Replace <userpoolId> in each policy with the Cognito User Pool Id copied earlier.
Note: In a real use case, consider renaming your Cedar policy files based on their contents, for example, allow_customer_group.cedar.
// Defines permitted administrator user group actions
permit (
    principal in PetStoreApp::UserGroup::"<userPoolId>|administrator",
    action,
    resource
);
// Defines permitted employee user group actions
permit (
    principal in PetStoreApp::UserGroup::"<userPoolId>|employee",
    action in
        [PetStoreApp::Action::"GET /pets",
         PetStoreApp::Action::"POST /pets",
         PetStoreApp::Action::"GET /pets/{petId}",
         PetStoreApp::Action::"PUT /pets/{petId}"],
    resource
);
// Defines permitted customer user group actions
permit (
    principal in PetStoreApp::UserGroup::"<userPoolId>|customer",
    action in
        [PetStoreApp::Action::"GET /pets",
         PetStoreApp::Action::"POST /pets",
         PetStoreApp::Action::"GET /pets/{petId}"],
    resource
);
The policies need to be formatted so that they work with the AWS CLI for Verified Permissions. The specific format is described in the AWS CLI Verified Permissions documentation. Run the following command to format the policies.
../scripts/convert_cedar_policies.sh
Example successful command output:
Converting policies/policy_1.cedar to policies/json/policy_1.json
Created policies/json/policy_1.json
Converting policies/policy_2.cedar to policies/json/policy_2.json
Created policies/json/policy_2.json
Converting policies/policy_3.cedar to policies/json/policy_3.json
Created policies/json/policy_3.json
Conversion complete. JSON policy files are in ../policies/json/
The formatted policies will be output to the backend/policies/json/ directory.
After formatting the policies, run the following three commands, one for each policy, to upload them to Verified Permissions. The policy store ID is returned after completing step 2. Replace <policy store id> with the actual policy store ID.
aws verifiedpermissions create-policy  --definition file://policies/json/policy_1.json --policy-store-id <policy store id>
aws verifiedpermissions create-policy  --definition file://policies/json/policy_2.json --policy-store-id <policy store id>
aws verifiedpermissions create-policy  --definition file://policies/json/policy_3.json --policy-store-id <policy store id>
Alternatively, you can also copy and paste Cedar policies into Verified Permissions in the AWS Management Console.
Step 5: Connect the Verified Permissions policy store to your OIDC identity provider
By default, the Verified Permissions authorizer middleware reads a JSON Web Token (JWT) provided within the authorizationheader of the API request to get user information. Verified Permissions can validate the token in addition to performing authorization policy evaluation.
To do this, create an identity source in Verified Permissions policy store. To simplify formatting in the AWS CLI command, we’ve defined the identity source configuration in identity-source-configuration.txtReplace the <userPoolArn> and <clientId> parameters in the following code block based on the outputs of running the setup-infrastructure.sh script in Step 2 of the prerequisites.
After you update the file, run the following command to update the Verified Permissions policy store. Replace <policy store id> with the actual policy store ID.
Step 6: Update the application code to call Verified Permissions to authorize API access
You now need to update the application to use the @verifiedpermissions/authorization-clients and @cedar-policy/authorization-for-expressjs dependencies. This will allow the application to call Verified Permissions to authorize the API requests.
Add the dependencies and define the CedarAuthorizerMiddleware and AVPAuthorizer in the application by adding the following block of code to line 13 (directly after the import statements) of backend/app.ts. Replace <policystoreId> in the following code block with your actual Verified Permissions policy store ID.
Configure the Express application to use the authorization middleware that you just defined. To do this, add the following line of code to the end of the block of app.use(..) statements that begin after the comment // Configure security and performance middleware (approximately line 48 depending on how you pasted the previous block of code).
app.use(expressAuthorization.middleware);
You’ve now successfully set up authorization in your application by creating a Verified Permissions policy store, writing Cedar policies to define your authorization, and integrating your application with Verified Permissions.
Validating API security
You can use the frontend web application to verify that authorization has been applied to the APIs. In two separate terminals run the following commands in the /start directory
In a browser navigate to http://localhost:3001 and sign in with one of the Amazon Cognito users you created earlier. Validate that the permissions policies are working as expected:
Administrators: Can view, create, update, and delete pets.
Employees: Can view, create, and update pets.
Customers: Can view pets and create new pets.
In the terminal for the Express application, you can see log output that provides additional details about the authorization decisions. For example, following an unauthorized action the terminal outputs the following:
Authorization result: {"type":"deny"}
Conclusion
The new @verifiedpermissions/authorization-clients-js package allows Express developers to integrate their application with Verified Permissions to decouple authorization logic from code. By decoupling your authorization logic and integrating your application with the Verified Permissions, you can improve developer productivity and simplify permissions and access audits.
The framework packages are open source and available on GitHub under the Apache 2.0 license, with distribution through NPM. To learn more, see Amazon Verified Permissions and Cedar.
If you have feedback about this post, submit comments in the Comments section below.
Today, customers use AWS Network Firewall to safeguard their workloads against common security threats. However, they often have to rely on third-party threat feeds and scanners that have limited visibility in AWS workloads to protect against active threats. A self-managed approach to cloud security through traditional threat intelligence feeds and custom rules can result in delayed responses, leaving customers exposed to active threats that are relevant to AWS workloads. Customers are looking for an automated approach to analyzing threats and deploying mitigations across multiple enforcement points to establish consistent defenses and want a unified, AWS-native solution that can rapidly protect against active threats across their entire cloud infrastructure.
This post introduces active threat defense, a new Network Firewall managed rule group that offers protection against active threats relevant to workloads in AWS. Active threat defense uses the AWS global infrastructure visibility and extensive threat intelligence to deliver automated, intelligence-driven security measures. The feature uses the Amazon threat intelligence system MadPot, which continuously tracks attack infrastructure, including malware hosting URLs, botnet command and control servers, and crypto mining pools, identifying indicators of compromise (IOCs) for active threats.
Active threat defense comes as a rule group AttackInfrastructure, which protects against malicious network traffic by blocking communications with detected attack infrastructure. After the managed rule group is configured in your firewall policy, Network Firewall now automatically blocks suspicious traffic to malicious IPs, domains, and URLs for indicator categories such as command-and-control (C2s), malware staging hosts, sinkholes, out-of-band testing (OAST), and mining-pools. It implements comprehensive filtering of both inbound and outbound traffic for various protocols, including TCP, UDP, DNS, HTTPS, and HTTP, and uses specific, verified threat indicators to facilitate high accuracy and minimize false positives.
Network Firewall with active threat defense protects AWS workloads using the following mechanisms:
Threat prevention: Automatically blocks malicious traffic using Amazon threat intelligence to identify and prevent active threats targeting workloads in AWS
Rapid protection: Continuously updates Network Firewall rules based on newly discovered threats, enabling immediate protection against them
Streamlined operations: Findings in GuardDuty marked with the threat list name “Amazon Active Threat Defense” can now be automatically blocked when active threat defense is enabled on Network Firewall
Collective defense: Deep threat inspection (DTI) enables shared threat intelligence, improving protection for active threat defense managed rule group users
Figure 1 illustrates the use of the active threat defense managed rule group with Network Firewall. It shows the automatic creation of stateful rules in the AWS managed rule group using threat data collected from MadPot.
Figure 1: Network Firewall with active threat defense
Getting started
The active threat defense managed rule group can be enabled directly within Network Firewall using the AWS Management Console, AWS Command Line Interface (AWS CLI), or AWS SDK. You can then associate the managed rule group with the Network Firewall policy. The rule group receives regular updates with new threat indicators and signatures, while automatically removing inactive or aged-out signatures.
Prerequisites
To get started with Network Firewall with active threat defense, visit the Network Firewall console or see the AWS Network Firewall Developers Guide. Active threat defense is supported in all AWS Regions where Network Firewall is available today, including the AWS GovCloud (US) Regions and China Regions.
If this is your first time using Network Firewall, make sure to complete the following prerequisites. If you already have a firewall policy and a firewall, you can skip this section.
Set up the active threat defense managed rule group
With the prerequisites in place, you can set up and use the active threat defence managed rule group.
To set up the managed rule group:
In the AWS Network Firewall console, choose Firewall policies in the navigation pane.
Select an existing firewall policy or the policy that you created as part of the prerequisites.
Figure 2: Select the Network Firewall policy
Scroll down to Stateful rule groups. On the right-hand side, choose Actions and select Add managed stateful rule groups.
Figure 3: Add a rule group
On the Add managed stateful rule groups page, scroll down to active threat defense. Select the rule group AttackInfrastructure. Based on your requirements for Deep threat inspection, you can opt out if you don’t want Network Firewall to process service logs. Choose Add to policy.
Figure 4: Add the rule group to the policy
You can verify on the next page the managed rule group was added to the policy.
Figure 5: Verify that the managed rule group was added to the policy
The first consideration is to understand how Network Firewall is more effective in detecting and mitigating threats associated with HTTPS traffic when the TLS inspection feature is used alongside the active threat defense managed rule group. TLS inspection enables active threat defense to analyze the actual content of encrypted connections, allowing it to identify and block malicious URLs that might otherwise pass undetected. This process involves decrypting traffic, inspecting the contents for known malicious URL patterns or behaviors, and then re-encrypting the traffic if it’s deemed safe. For more information on the considerations on TLS inspection, see Considerations for TLS inspection. Organizations must balance the security benefits with potential latency introduction and make sure that they have proper controls in place to handle sensitive decrypted data.
Another consideration is the mitigation of false positives. When you use this managed rule group in your firewall policy, you can edit rule group alert settings to help identify false-positives as part of a mitigation strategy. For more information, see mitigating false-positives.
AWS Security Hub has been a central place for you to view and aggregate security alerts and compliance status across Amazon Web Services (AWS) accounts. Today, we are announcing the preview release of the new AWS Security Hub which offers additional correlation, contextualization, and visualization capabilities. This helps you prioritize critical security issues, respond at scale to reduce risks, improve team productivity, and better protect your cloud environment.
Getting started with the new AWS Security Hub Let me walk you through how to get started with AWS Security Hub.
If you’re a new customer to AWS Security Hub, you need to navigate to the AWS Security Hub console to enable AWS security capabilities and capabilities and start assessing risk across your organization. You can learn more on the Documentation page.
After you have AWS Security Hub enabled, it will automatically consume data from supporting security capabilities you’ve enabled, such as Amazon GuardDuty, Amazon Inspector, Amazon Macie, and AWS Security Hub CSPM. You can navigate to the AWS Security Hub console to view these findings and benefit from insights created through correlation of findings across these capabilities.
As security risks are uncovered, they’re presented in a redesigned Security Hub summary dashboard. The new Security Hub summary dashboard provides a comprehensive, unified view of your AWS security posture. The dashboard organizes security findings into distinct categories, making it easier to identify and prioritize risks.
The new Exposure summary widget helps you identify and prioritize security exposures by analyzing resource relationships and signals from Amazon Inspector, AWS Security Hub CSPM, and Amazon Macie. These exposure findings are automatically generated and are a key part of the new solution, highlighting where your critical security exposures are located. You can learn more about exposure on the Documentation page.
AWS Security Hub now provides a Security coverage widget designed to help you identify potential coverage gaps. You can use this widget to identify where you’re missing coverage by the security capabilities that power Security Hub. This visibility helps you identify which capabilities, accounts, and features you need to address to improve your security coverage.
As you can see on the navigation menu, AWS Security Hub is organized into five key areas to streamline security management:
Exposure: Provides visibility into all exposure findings, a security vulnerability or misconfiguration that could potentially expose an AWS resource or system to unauthorized access or compromise, generated by Security Hub, helping you identify resources that might be accessible from outside your environment
Threats: Consolidates all threat findings generated by Amazon GuardDuty, showing potential malicious activities and intrusion attempts
Vulnerabilities: Displays all vulnerabilities detected by Amazon Inspector, highlighting software flaws and configuration issues
Posture management: Shows all posture management findings from AWS Security Hub Cloud Security Posture Management (CSPM), helping provide compliance with security best practices
Sensitive data: Presents all sensitive data findings identified by Amazon Macie, helping you track and protect your sensitive information
When you navigate to the Exposure page, you’ll see findings grouped by title, with severity levels clearly indicated to help you focus on critical issues first.
To explore specific exposures, you can select any finding to see affected resources. The panel includes key information about the implicated resource, account, Region, and when the issue was detected.
In this panel, you’ll also find an attack path visualization that is particularly useful for understanding complex security relationships. For network exposure paths, you can see all components involved in the path—including virtual private clouds (VPCs), subnets, security groups, network access control lists (ACLs), and load balancers—helping you identify exactly where to implement security controls. The visualization also highlights Identity and Access Management (IAM) relationships, showing how permission configurations might allow privilege escalation or data access. Resources with multiple contributing traits are clearly marked so you can quickly identify which components represent the greatest risk.
The Threats dashboard provides actionable insights into potential malicious activities detected by Amazon GuardDuty, organizing findings by severity so you can quickly identify critical issues like unusual API calls, suspicious network traffic, or potential credential compromises. The dashboard includes GuardDuty Extended Threat Detection findings, with all “Critical” severity threats representing these Extended Threat Detections that require immediate attention.
Similarly, the Vulnerabilities dashboard from Amazon Inspector provides a comprehensive view of software vulnerabilities and network exposure risks. The dashboard highlights vulnerabilities with known exploits, packages requiring urgent updates, and resources with the highest numbers of vulnerabilities.
Another valuable new feature is the Resources view, which provides an inventory of all resources deployed in your organization covered by AWS Security Hub. You can use this view to quickly identify which resources have findings against them and filter by resource type or finding severity. Selecting any resource provides detailed configuration information without needing to pivot to other consoles, streamlining your investigation workflow.
The new Security Hub also offers integration capabilities to help you comprehensively monitor your cloud environments and connect with third-party security solutions. This gives you the flexibility to create a unified security solution tailored to your organization’s specific needs.
For example, with integration capability, when viewing a security finding, you can select the Create ticket option and choose your preferred ticketing integration.
Additional things to know Here are a couple of things to note:
Availability – During this preview period, the new AWS Security Hub is available in following AWS Regions: US East (N. Virginia, Ohio), US West (N. California, Oregon), Africa (Cape Town), Asia Pacific (Hong Kong, Jakarta, Mumbai, Osaka, Seoul, Singapore, Sydney, Tokyo), Canada (Central), Europe (Frankfurt, Ireland, London, Milan, Paris, Stockholm), Middle East (Bahrain), and South America (São Paulo).
Pricing – The new AWS Security Hub is available at no additional charge during the preview period. However, you will still incur costs for the integrated capabilities including Amazon GuardDuty, Amazon Inspector, Amazon Macie, and AWS Security Hub CSPM.
Integration with existing AWS security capabilities – Security Hub integrates with Amazon GuardDuty, Amazon Inspector, AWS Security Hub CSPM, and Amazon Macie, providing a comprehensive security posture without additional operational overhead.
Enhanced data interoperability – The new Security Hub uses the Open Cybersecurity Schema Framework (OCSF), enabling seamless data exchange across your security capabilities with normalized data formats.
To learn more about the enhanced AWS Security Hub and join the preview, visit the AWS Security Hub product page.
Since launch, Amazon Inspector has helped customers automate vulnerability management for their running workloads on Amazon Elastic Compute Cloud (Amazon EC2), container workloads, and AWS Lambda functions. Today, we’re taking a step forward into more proactive security with the latest addition to Amazon Inspector: code security capabilities. By using this powerful new feature you can get a proactive view of the security health of your code. With native integration to source code managers (SCM) such as GitHub and GitLab, Amazon Inspector helps you identify and prioritize security vulnerabilities and misconfigurations across your application source-code, dependencies, and infrastructure as code (IaC).
Even if you make no changes to your code, there can be vulnerabilities in libraries that it depends on, creating risks for you and your users. By scanning repositories, you can continually monitor the security of your code and its dependencies. With Amazon Inspector, you can define consistent security controls throughout your software development lifecycle, so your security and development teams can collaborate effectively while reducing risk and remediation costs.
Overview of Amazon Inspector code security capabilities
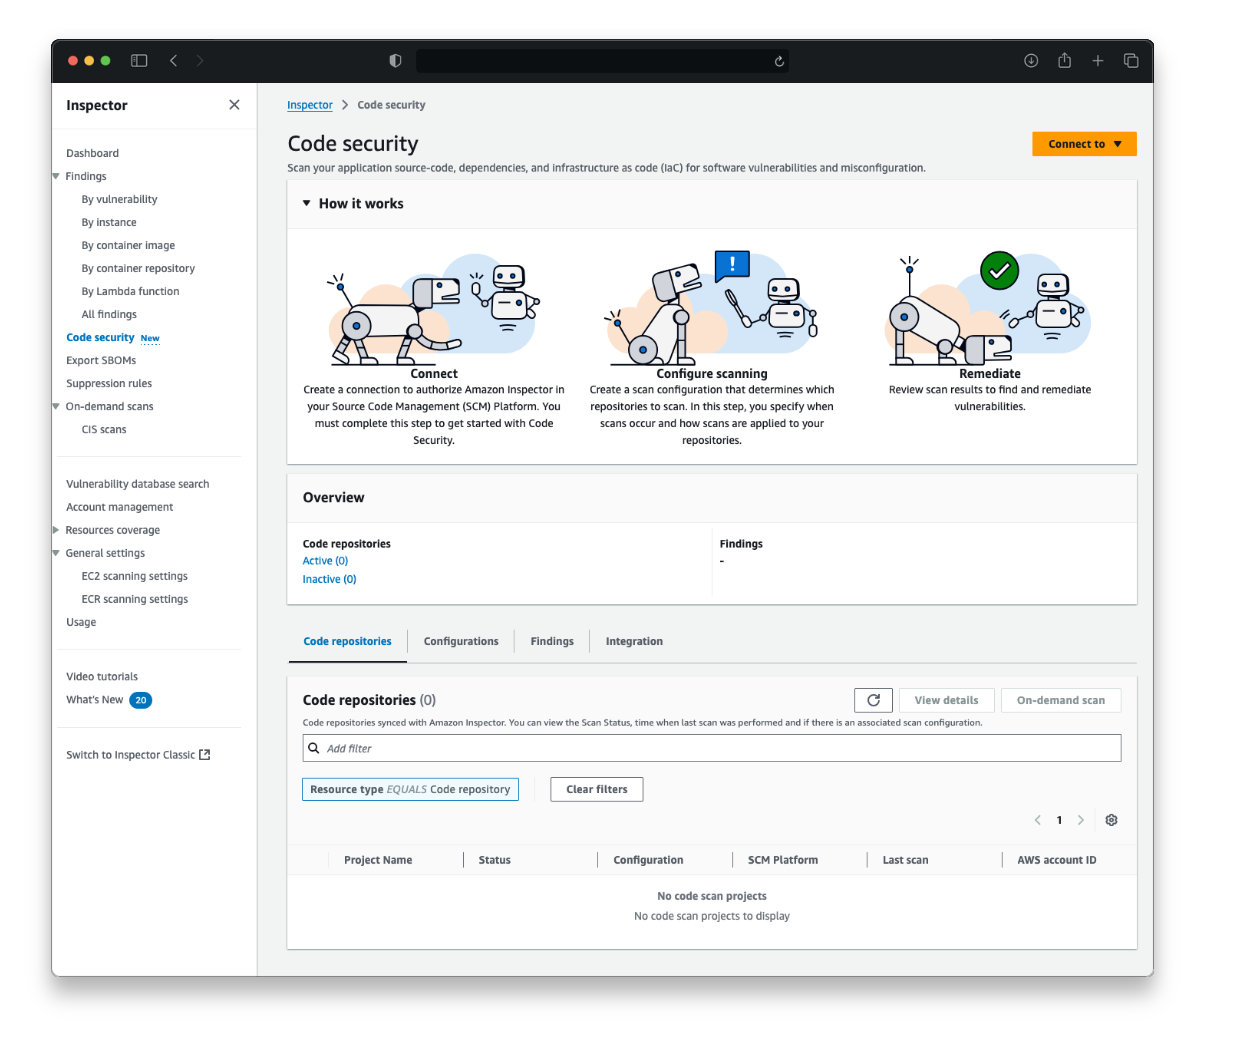
Amazon Inspector now provides three additional security analysis capabilities: static application security testing (SAST), software composition analysis (SCA), and infrastructure as code (IaC) scanning. To use these features, you must establish a connection with your SCM tool (as shown in Figure 1). If you use GitHub, you can get started by installing and configuring the Amazon Inspector App from the GitHub Marketplace, which enables automated code analysis and delivers security findings directly within pull requests. If you use a self-managed GitLab, implementation is straightforward using a personal access token with the necessary permissions.
Figure 1: Code security landing page for Amazon Inspector
Static application security testing
Static application security testing (SAST) is the process of analyzing source code to identify insecure patterns or methods without needing to compile or execute the code. Amazon Inspector SAST scans analyze your source code to identify potential security vulnerabilities such as hardcoded secrets, cross-site scripting, or injection attacks across a wide range of programming languages including, JavaScript, Python, C#. The service also analyzes Bash shell scripts, extending security coverage beyond application code to include deployment and configuration scripts.
Software composition analysis
Software composition analysis (SCA) helps you understand and manage risks related to software dependencies. Every programming language has its own method of finding, importing, and updating contributed libraries. For example, PyPI for Python, NPM for NodeJS, and Cargo for Rust. Sometimes vulnerabilities are discovered in libraries distributed through the language-specific package distributions, or sometimes a library that you’re using depends on another library, and that dependency has the vulnerability. Amazon Inspector supports the major environments for Python, .Net, PHP, JavaScript, Java, Ruby, Rust, and Go. It automatically analyzes dependencies to identify known vulnerabilities and show you which code is affected. When vulnerabilities are detected, Amazon Inspector provides detailed information about the impact, available fixes, and upgrade paths to help you quickly remediate issues.
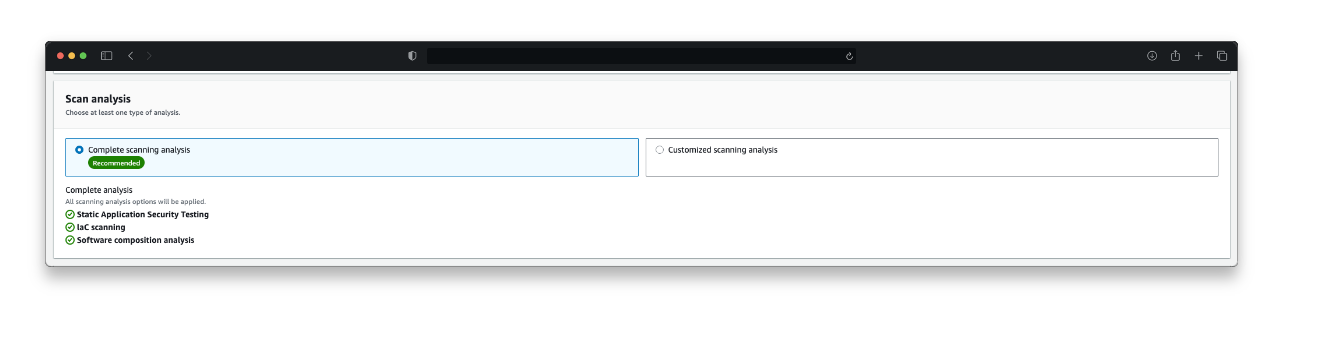
Infrastructure as code security
Just as applications are constructed from code, cloud infrastructure can be deployed and managed through code-based methods. Amazon Inspector now also analyzes IaC templates (as shown in Figure 2) to identify potential security misconfigurations, for example, the use of AWS Identity and Access Management (IAM) wildcards in action statements or disabled Glue Data Catalog encryption. This way identified risks can be fixed before the code is executed and the incorrect infrastructure is deployed. The new feature analyzes AWS CloudFormation, Terraform, and AWS CDK, helping you maintain secure infrastructure definitions throughout their development process. This capability helps make sure that security best practices are followed, and potential issues are caught before the infrastructure is deployed.
For the most up-to-date list of programming languages supported across Amazon Inspector code security capabilities, see the online documentation.
Improved security governance and visibility
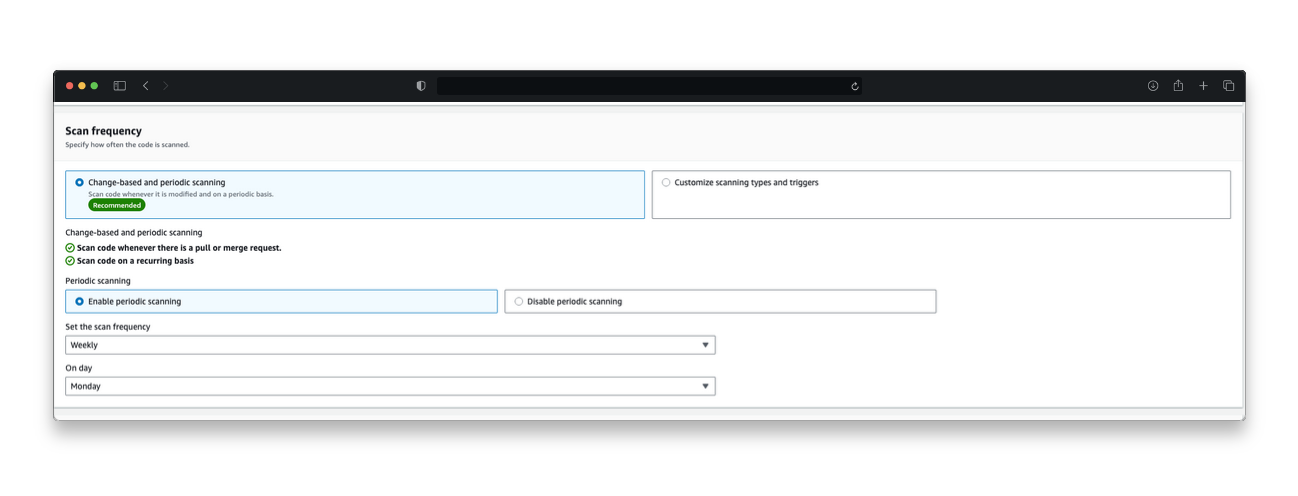
Amazon Inspector lets you choose which scan types to run across which repositories (as shown in Figure 3). You can initiate a scan based on any of the following:
On-demand: Initiates an immediate scan of the selected repository
Change based: Initiates a scan on push to main branch, or on a pull request or merge request
Scheduled: Initiates a scan weekly or monthly
Figure 3: Overview of scan configurations
Amazon Inspector integrates code security findings into a unified dashboard that you can use to manage and enforce scanning policies across repositories using customizable scan configurations. As part of the integration workflow with the SCM platform, you can set up a default scan configuration that can be applied to existing or new repositories. Alternatively, you also have an option to create custom scan configurations that match specific existing repositories through inclusions tags.
Upon successful scheduled or event-based scans, Amazon Inspector generates detailed findings that pinpoint specific lines of code within repositories, including commit IDs and file locations where vulnerabilities are detected. Amazon Inspector empowers your security teams with customizable filtering through intelligent suppression rules. By using these options, you can tailor your security view to match your organization’s unique priorities, showing exactly what matters most to your team while preserving findings data for reporting and auditing. Through native Amazon EventBridge integration, these detailed security findings can be automatically routed into existing security workflows, enabling alerting and response capabilities.
Code fix recommendations
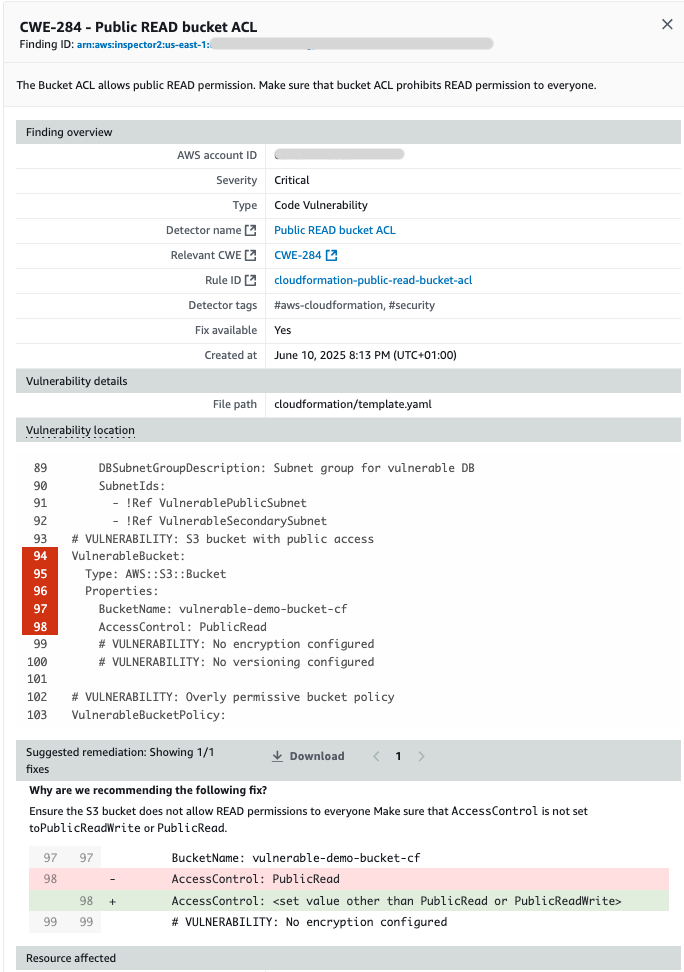
Amazon Inspector streamlines security remediation by providing specific code fix recommendations directly where developers work. The two-way integration with your SCM automatically suggests fixes as comments within pull requests (PRs) and merge requests (MRs) for Critical and High findings, alerting developers to the most important vulnerabilities to address without disrupting their workflow. Simultaneously, security teams benefit from a consolidated dashboard in the Amazon Inspector console that aggregates findings from scheduled or event-based scans across in-scope repositories. Each finding comes with tailored remediation guidance based on scan type (as shown in Figure 4): specific code suggestions for IAC and SAST findings, or recommended version upgrades and dependency update paths for SCA findings.
Figure 4: Code fix recommendation on a finding in the Amazon Inspector dashboard
Conclusion
These expanded security capabilities now deliver end-to-end visibility of the security health of your cloud applications, from initial code development through to production deployment. Security teams can use the unified dashboard in Amazon Inspector to track and manage vulnerabilities across repositories and application components, facilitating consistent security controls throughout the software lifecycle. Meanwhile, development teams receive immediate, actionable feedback within their source code repositories, creating a seamless security experience that bridges both security and development workflows. This approach is designed to help you maintain robust security practices while keeping development velocity high.
To get started with the new capabilities of Amazon Inspector, visit the Amazon Inspector console. For pricing details and implementation guidance, see documentation. These new features are now available in 10 AWS commercial Regions.
Today, we’re announcing the general availability of a new capability that integrates AWS Backup logically air-gapped vaults with Multi-party approval to provide access to your backups even when your AWS account is inaccessible due to inadvertent or malicious events. AWS Backup is a fully managed service that centralizes and automates data protection across AWS services and hybrid workloads. It provides core data protection features, ransomware recovery capabilities, and compliance insights and analytics for data protection policies and operations.
As a backup administrator, you use AWS Backup logically air-gapped vaults to securely share backups across accounts and organizations, logically isolate your backup storage, and support direct restore to help reduce recovery time following an inadvertent or malicious event. However, if a bad or unintended actor gains root access to your backup account or the management account of your organization, your backups suddenly become inaccessible, even though they’re still safely stored in the logically air-gapped vault. While traditional account recovery involved working through support channels, AWS Backup with Multi-party approval delivers immediate access to recovery tools, empowering you with faster resolution times and greater control over your recovery timeline.
Multi-party approval for AWS Backup logically air-gapped vaults adds an additional layer of protection for you to recover your application data even when your AWS account becomes completely inaccessible. Using Multi-party approval, you can create approval teams which consist of highly trusted individuals in your organization, then associate them with your logically air-gapped vault. If you get locked out of your AWS accounts due to inadvertent or malicious actions, you can request your own approval team to authorize sharing of your vault from any account, even those outside your AWS Organizations account. Once approved, you gain authorized access to your backups and can begin your recovery process.
How it works Multi-party approval for AWS Backup logically air-gapped vaults combines the security of logically air-gapped vaults with the governance of Multi-party approval to create a recovery mechanism that works even when your AWS account is compromised. Here’s how it works:
1. Approval team creation First, you create an approval team in your AWS Organizations management account. If the management account is new, first create an AWS Identity and Access Management (IAM) Identity Center instance before creating the approval team. The approval team consists of trusted individuals (IAM Identity Center users) who will be authorized to approve vault sharing requests. Each approver receives an invitation to join the approval team through a new Approval portal.
2. Vault association When your approval team is active, you share it with accounts that own logically air-gapped vaults using AWS Resource Access Manager (AWS RAM) to safeguard against requests for approval from arbitrary accounts. Backup administrators can then associate this approval team with new or existing logically air-gapped vaults.
3. Protection against compromise If your AWS account becomes compromised or inaccessible, you can request access to your backups from a different account (a clean recovery account). This request includes the Amazon Resource Name (ARN) of the logically air-gapped vault in the format arn:aws:backup:<region>:<account>:backup-vault:<name> and an optional vault name and comment.
4. Multi-party approval The request is sent to the approval team, who review it through the approval portal. When the minimum required number of approvers authorize the request, the vault is automatically shared with the requesting account. All requests and approvals are comprehensively logged in AWS CloudTrail.
5. Recovery process With access granted, you can immediately start restoring or copying your data in the new recovery account without waiting for your compromised account to be remediated.
This approach provides an entirely separate authentication path to access and recover your backups, completely independent of your AWS account credentials. Even if the bad actor has root access to your account, they can’t prevent the approval team-based recovery process.
1. Create a new logically air-gapped vault To create a new logically air-gapped vault, provide a name, tags (optional), and vault lock properties. 2. Assign an approval team When the vault has been created, choose Assign approval team to assign it with an existing approval team.
Choose an existing approval team from the drop-down menu then select Submit to finalize the assignment.
Now your approval team is assigned to your logically air-gapped vault.
Good to know It’s essential to test your recovery process before an actual emergency:
From a different AWS account, use the AWS Backup console or API to request sharing of your logically air-gapped vault by providing the vault ID and ARN.
Request approval of your request from the approval team.
Once approved, verify that you can access and restore backups from the vault in your testing account.
As a best practice, monitor the health of your approval team regularly using AWS Backup Audit Manager to ensure they have sufficient active participants to meet your approval threshold.
Multi-party approval for enhanced cloud governance Today, we’re also announcing the general availability of a new capability that AWS account administrators can use to add Multi-party approval to their product offerings. As highlighted in this post, AWS Backup is the first service to integrate this capability. With Multi-party approval, administrators can enable application owners to guard sensitive service operations with a distributed review process.
Good to know Multi-party approval provides several significant security advantages:
Distributed decision-making, eliminating single points of failure
Full auditability through AWS CloudTrail integration
Protection against compromised credentials
Formal governance for compliance-sensitive operations
Consistent approval experience across integrated services
Now available
Multi-party approval is available today in all AWS Regions where AWS Organizations is available. Multi-party approval for AWS Backup logically air-gapped vaults is available in all AWS Regions where AWS Backup is available.
Today, I’m happy to announce AWS Shield network security director (preview), a capability that simplifies identification of configuration issues related to threats such as SQL injections and distributed denial of service (DDoS) events, and proposes remediations. This feature identifies and analyzes network resources, connections, and configurations. It compares them against AWS best practices to create a network topology that highlights resources requiring protection.
Organizations today face significant challenges in maintaining a robust network security posture. Security teams often struggle to efficiently discover all resources in their environments, understand how these resources are interconnected, and identify which security services are currently configured. Additionally, they find determining how well resources are configured relative to AWS best practices requires considerable expertise and effort. Many teams find it difficult to identify which network security services and rule sets would best protect their applications from common and emerging threats.
AWS Shield network security director addresses these challenges through three key capabilities. First, it performs comprehensive analysis to discover resources across your AWS accounts, identify connectivity between resources, and determine which network security services and configurations are currently in place. Second, it prioritizes resources by severity level based on AWS network security best practices and threat intelligence. Finally, it provides specific remediation recommendations such as step-by-step instructions for implementing the right AWS security services, including AWS WAF, Amazon Virtual Private Cloud (Amazon VPC)security groups, and Amazon VPC network access control lists (ACLs) to protect your resources.
The service supports critical network security use cases, including protecting applications against internet-born threats and controlling human access to resources based on port, protocol, or IP address range. It provides network analysis to discover assets and delivers analysis that eliminates time-consuming manual processes for identifying resources that need protection. The service offers resource prioritization by assigning security findings a severity level based on network context and adherence to AWS best practices, helping you focus on what matters most. Additionally, it supplies actionable recommendations with specific guidance on which services and configurations will address each security gap. You can also get answers, in natural language, from AWS Shield network security director from within Amazon Q Developer in the AWS Management Console and chat applications.
Getting started with AWS Shield network security director To use AWS Shield network security director, I need to initiate a network analysis of my AWS resources. I go to the AWS WAF & Shield console and choose Getting started under AWS Shield network security director in the navigation pane. I choose Get started, which takes me to the configuration page. On this page, I can choose how to perform my first network analysis: I can assess findings from across all supported Regions or from my current Region only. I select Start network analysis.
After the analysis is completed, the dashboard page shows a breakdown of resource types by severity level and the most common categories of network security findings associated with their resources. Resources are categorized by type and severity level (critical, high, medium, low, informational), making it easy to identify which areas need immediate attention.
Next, I explore the Resources section to understand the distribution of my assets and filter by severity level in my environment. I can use Resource overview to review a specific severity level, which will redirect me to the Resources under Network security director with the associated severity level filter. I choose the resources that have Medium severity level.
I choose a specific resource to view its network topology map showing how it connects to other resources and associated findings. This visualization helps me understand the potential impact of security configurations and identify exposed paths. I review detailed findings such as “Allows unrestricted inbound access (0.0.0.0/0) on all ports” with severity ratings.
Next, I go to Findings under Network security director, which shows common configuration issues. For each finding, I receive detailed information and recommended remediation steps. The service rates the severity of findings (high, medium, low) to help me prioritize my response. Critical-severity findings such as “CloudFront origin is also internet accessible without CloudFront protections” or high-severity findings such as “Allows unrestricted inbound access (0.0.0.0/0) on all ports” are presented first, followed by medium- and low-severity issues.
You can analyze your network security configurations, in natural language, with AWS Shield network security director within Amazon Q Developer in the AWS Management Console and chat applications. For example, you can say “Do I have any network security issues on my CloudFront distributions?” or “Are any of my resources vulnerable to bots and scrapers?” This integration helps security teams quickly understand their security posture and receive guidance on implementing best practices without having to navigate through extensive documentation.
To explore this capability, I ask “What are my most critical network security issues?” in the Explore with Amazon Q section. Amazon Q analyzes my network security configuration and generates a response based on the security assessment of my AWS environment.
With this comprehensive view of your network security, you can now make data-driven decisions to strengthen your defenses against emerging threats.
Join the preview AWS Shield network security director is available in the US East (N. Virginia) and Europe (Stockholm) Regions. The Amazon Q Developer capability to analyze network security configurations is available in preview in US East (N. Virginia). To begin strengthening your network security, visit the AWS Shield network security director console and initiate your first network security analysis.
Today, we’re announcing a new simplified onboarding experience for Amazon CloudFront that developers can use to accelerate and secure their web applications in seconds. This new experience, along with improvements to the AWS WAF console experience, makes it easier than ever for developers to configure content delivery and security services without requiring deep technical expertise.
Setting up content delivery and security for web applications traditionally required navigating multiple Amazon Web Services (AWS) services and making numerous configuration decisions. With this new CloudFront onboarding experience, developers can now create a fully configured distribution with DNS and a TLS certificate in just a few clicks.
Amazon CloudFront offers compelling benefits for organizations of all sizes looking to deliver content and applications globally. As a content delivery network (CDN), CloudFront significantly improves application performance by serving content from edge locations closest to your users, reducing latency and improving user experience. Beyond performance, CloudFront provides built-in security features that protect your applications from distributed denial of service (DDoS) attacks and other threats at the edge, preventing malicious traffic from reaching your origin infrastructure. The service automatically scales with your traffic demands without requiring any manual intervention, handling both planned and unexpected traffic spikes with ease. Whether you’re running a small website or a large-scale application, the CloudFront integration with other AWS services and the new simplified console experience makes it easier than ever to implement these essential capabilities for your web applications.
Streamlined CloudFront configuration
The new CloudFront console experience guides developers through a simplified workflow that starts with the domain name they want to use for their distribution. When using Amazon Route 53, the experience automatically handles TLS certificate provisioning and DNS record configuration, while incorporating security best practices by default. This unified approach eliminates the need to switch between multiple services like AWS Certificate Manager, Route 53, and AWS WAF, and offers developers a faster time to production without the need to dive deep on the nuanced configuration options of each service.
For example, a developer can now create a secure CloudFront distribution for their applications fronted by a load balancer by entering their domain name and selecting their load balancer as the origin. The console automatically recommends optimal CDN and security configurations based on the application type and requirements, and developers can deploy with confidence knowing they’re following AWS best practices.
For developers who wish to host a static website on Amazon Simple Storage Service (Amazon S3), CloudFront provides several important benefits. First, it improves your website’s performance by caching content at edge locations closer to your users, reducing latency and improving page load times. Second, it helps protect your S3 bucket by acting as a security layer—CloudFront can be configured to be the only way to access your content, preventing direct access to your S3 bucket. The new experience automatically configures these security best practices for you.
Enhanced security integration with AWS WAF
Complementing the new CloudFront experience, we’re also introducing an improved AWS WAF console that features intelligent Rule Packs—curated sets of security rules based on application type and security requirements. These Rule Packs enable developers to implement comprehensive security controls without needing to be security experts.
When creating a CloudFront distribution, developers can now enable AWS WAF protection through an integrated experience that uses these new Rule Packs. The console provides clear recommendations for security configurations that developers can use to preview and validate their settings before deployment.
Web applications face numerous security threats today, including SQL injection attacks, cross-site scripting (XSS), and other OWASP Top 10 vulnerabilities. With the new AWS WAF integration, you automatically get protection against these common attack vectors. The recommended Rule Packs provide immediate protection against malicious bot traffic, common web exploits, and known bad actors while preventing direct-to-origin attacks that could overwhelm your infrastructure.
Let’s take a look
If you’ve ever created an Amazon CloudFront distribution, you’ll immediately notice that things have changed. The new experience is straightforward to follow and understand. For my example, I chose to create a distribution for a static website using Amazon S3 as my origin.
In Step 1, I give my distribution a name and select from Single website or app or the new Multi-tenant architecture option, which I can use to configure distributions that use multiple domains but share a common configuration. I choose Single website or app and enter an optional domain name. With the new experience, I can use the Check domain button to verify I have my domain as a Route 53 zone file.
Next, I select the origin for the distribution, which is where CloudFront will fetch the content to serve and cache. For my Origin type, I select Amazon S3. As the preceding screenshot shows, there are several additional options to choose from. Each of the options is designed to make configuration as straightforward as possible for the most popular use cases. Next, I select my S3 bucket, either by typing in the bucket name or using the Browse S3 button.
Next, I have several settings related to using Amazon S3 as my origin. The Grant CloudFront access to origin option is an important one. This option (selected by default) will update my S3 bucket policy to allow CloudFront to access my bucket and will configure my bucket for origin access control. This way, I can use a completely private bucket and know that assets in my bucket can only be accessed through CloudFront. This is a critical step to keeping my bucket and assets secure.
In the next step, I’m presented with the option to configure AWS WAF. With AWS WAF enabled, my web servers are better protected because it inspects each incoming request for potential threats before allowing them to make their way to my web servers. There is a cost to enabling AWS WAF, and as you can see in the following screenshot, there is a calculator to help estimate additional charges.
Now available
The new CloudFront onboarding experience and enhanced AWS WAF console are available today in all AWS Regions where these services are offered. You can start using these new features through the AWS Management Console. There are no additional charges for using these new experiences—you pay only for the CloudFront and AWS WAF resources you use, based on their respective pricing models.
To learn more about the new CloudFront onboarding experience and AWS WAF improvements, visit the Amazon CloudFront Documentation and AWS WAF Documentation. Start building faster, more secure web applications today with these simplified experiences.
Now you can export public certificates from ACM, get access to the private keys, and use them on any workloads running on Amazon Elastic Compute Cloud (Amazon EC2) instances, containers, or on-premises hosts. The exportable public certificate are valid for 395 days. There is a charge at time of issuance, and again at time of renewal. Public certificates exported from ACM are issued by Amazon Trust Services and are widely trusted by commonly used platforms such as Apple and Microsoft and popular web browsers such as Google Chrome and Mozilla Firefox.
ACM exportable public certificates in action To export a public certificate, you first request a new exportable public certificate. You cannot export previously created public certificates.
To get started, choose Request certificate in the ACM console and choose Enable export in the Allow export section. If you select Disable export, the private key for this certificate will be disallowed for exporting from ACM and this cannot be changed after certificate issuance.
You can also use the request-certificate command to request a public exportable certificate with Export=ENABLED option on the AWS Command Line Interface (AWS CLI).
After you request the public certificate, you must validate your domain name to prove that you own or control the domain for which you are requesting the certificate. The certificate is typically issued within seconds after successful domain validation.
When the certificate enters status Issued, you can export your issued public certificate by choosing Export.
Enter a passphrase for encrypting the private key. You will need the passphrase later to decrypt the private key. To get the public key, Choose Generate PEM Encoding.
You can copy the PEM encoded certificate, certificate chain, and private key or download each to a separate file.
You can use the export-certificate command to export a public certificate and private key. For added security, use a file editor to store your passphrase and output keys to a file to prevent being stored in the command history.
You can now use the exported public certificates for any workload that requires SSL/TLS communication such as Amazon EC2 instances. To learn more, visit Configure SSL/TLS on Amazon Linux in your EC2 instances.
Things to know Here are a couple of things to know about exportable public certificates:
Key security – An administrator of your organization can set AWS IAM policies to authorize roles and users who can request exportable public certificates. ACM users who have current rights to issue a certificate will automatically get rights to issue an exportable certificate. ACM admins can also manage the certificates and take actions such as revoking or deleting the certificates. You should protect exported private keys using secure storage and access controls.
Revocation – You may need to revoke exportable public certificates to comply with your organization’s policies or mitigate key compromise. You can only revoke the certificates that were previously exported. The certificate revocation process is global and permanent. Once revoked, you can’t retrieve revoked certificates to reuse. To learn more, visit Revoke a public certificate in the AWS documentation.
Renewal – You can configure automatic renewal events for exportable public certificates by Amazon EventBridge to monitor certificate renewals and create automation to handle certificate deployment when renewals occur. To learn more, visit Using Amazon EventBridge in the AWS documentation. You can also renew these certificates on-demand. When you renew the certificates, you’re charged for a new certificate issuance. To learn more, visit Force certificate renewal in the AWS documentation.
Now available You can now issue exportable public certificates from ACM and export the certificate with the private keys to use other compute workloads as well as ELB, Amazon CloudFront, and Amazon API Gateway.
You are subject to additional charges for an exportable public certificate when you create it with ACM. It costs $15 per fully qualified domain name and $149 per wildcard domain name. You only pay once during the lifetime of the certificate and will be charged again only when the certificate renews. To learn more, visit the AWS Certificate Manager Service Pricing page.
Today, we’re announcing a new capability in AWS IAM Access Analyzer that helps security teams verify which AWS Identity and Access Management (IAM) roles and users have access to their critical AWS resources. This new feature provides comprehensive visibility into access granted from within your Amazon Web Services (AWS) organization, complementing the existing external access analysis.
Security teams in regulated industries, such as financial services and healthcare, need to verify access to sensitive data stores like Amazon Simple Storage Service (Amazon S3) buckets containing credit card information or healthcare records. Previously, teams had to invest considerable time and resources conducting manual reviews of AWS Identity and Access Management (IAM) policies or rely on pattern-matching tools to understand internal access patterns.
The new IAM Access Analyzer internal access findings identify who within your AWS organization has access to your critical AWS resources. It uses automated reasoning to collectively evaluate multiple policies, including service control policies (SCPs), resource control policies (RCPs), and identity-based policies, and generates findings when a user or role has access to your S3 buckets, Amazon DynamoDB tables, or Amazon Relational Database Service (Amazon RDS) snapshots. The findings are aggregated in a unified dashboard, simplifying access review and management. You can use Amazon EventBridge to automatically notify development teams of new findings to remove unintended access. Internal access findings provide security teams with the visibility to strengthen access controls on their critical resources and help compliance teams demonstrate access control audit requirements.
Let’s try it out
To begin using this new capability, you can enable IAM Access Analyzer to monitor specific resources using the AWS Management Console. Navigate to IAM and select Analyzer settings under the Access reports section of the left-hand navigation menu. From here, select Create analyzer.
From the Create analyzer page, select the option of Resource analysis – Internal access. Under Analyzer details, you can customize your analyzer’s name to whatever you prefer or use the automatically generated name. Next, you need to select your Zone of trust. If your account is the management account for an AWS organization, you can choose to monitor resources across all accounts within your organization or the current account you’re logged in to. If your account is a member account of an AWS organization or a standalone account, then you can monitor resources within your account.
The zone of trust also determines which IAM roles and users are considered in scope for analysis. An organization zone of trust analyzer evaluates all IAM roles and users in the organization for potential access to a resource, whereas an account zone of trust only evaluates the IAM roles and users in that account.
For this first example, we assume our account is the management account and create an analyzer with the organization as the zone of trust.
Next, we need to select the resources we wish to analyze. Selecting Add resources gives us three options. Let’s first examine how we can select resources by identifying the account and resource type for analysis.
You can use Add resources by account dialog to choose resource types through a new interface. Here, we select All supported resource types and select the accounts we wish to monitor. This will create an analyzer that monitors all supported resource types. You can either select accounts through the organization structure (shown in the following screenshot) or paste in account IDs using the Enter AWS account ID option.
You can also choose to use the Define specific resource types dialog, which you can use to pick from a list of supported resource types (as shown in the following screenshot). By creating an analyzer with this configuration, IAM Access Analyzer will continually monitor both existing and new resources of the selected type within the account, checking for internal access.
After you’ve completed your selections, choose Add resources.
Alternatively, you can use the Add resources by resource ARN option.
Or you can use the Add resources by uploading a CSV file option to configure monitoring a list of specific resources at scale.
After you’ve completed the creation of your analyzer, IAM Access Analyzer will analyze policies daily and generate findings that show access granted to IAM roles and users within your organization. The updated IAM Access Analyzer dashboard now provides a resource-centric view. The Active findings section summarizes access into three distinct categories: public access, external access outside of the organization (requires creation of a separate external access analyzer), and access within the organization. The Key resources section highlights the top resources with active findings across the three categories. You can see a list of all analyzed resources by selecting View all active findings or Resource analysis on the left-hand navigation menu.
On the Resource analysis page, you can filter the list of all analyzed resources for further analysis.
When you select a specific resource, any available external access and internal access findings are listed on the Resource details page. Use this feature to evaluate all possible access to your selected resource. For each finding, IAM Access Analyzer provides you with detailed information about allowed IAM actions and their conditions, including the impact of any applicable SCPs and RCPs. This means you can verify that access is appropriately restricted and meets least-privilege requirements.
Pricing and availability
This new IAM Access Analyzer capability is available today in all commercial Regions. Pricing is based on the number of critical AWS resources monitored per month. External access analysis remains available at no additional charge. Pricing for EventBridge applies separately.
To learn more about IAM Access Analyzer and get started with analyzing internal access to your critical resources, visit the IAM Access Analyzer documentation.
Under pressure to do more with less? (Who isn’t, right?)
Whether you’re an IT leader or a startup founder, the last thing you want to do is waste time and money wrestling with expensive, overcomplicated cloud storage. According to a new report from Informa TechTarget’s Enterprise Strategy Group (ESG), you don’t have to. Backblaze B2 Cloud Storage delivers:
Up to 3.2x lower total cost of ownership (TCO)
Up to 56% lower monthly storage costs
Up to 92% less time and effort to manage data
Up to 100% lower download and transaction costs
Up to 91% savings on cloud to cloud (C2C) migration costs
Economic validation: Motivation, results, and methodology
The independent analysis confirms what many Backblaze B2 users already know: Our cloud storage platform is more affordable and easier to manage compared to legacy cloud providers like AWS, Google Cloud Platform, and Azure.
To develop these findings, the ESG analysts talked to customers. They validated use cases. They used our product and verified the accuracy of our listed pricing and cost calculator. And then, they took those results along with the knowledge they’ve gathered over decades of experience to quantify the benefits that organizations can expect by using the Backblaze B2 Cloud Storage platform.
Powerful storage, real savings
The ESG report highlights how Backblaze’s predictable pricing—including at least 3x free egress, if not totally free egress in many cases—can help businesses skip the painful math of legacy storage and start getting more value out of their data. Whether you’re hosting content, training AI models, backing up critical data, or building applications, B2 Cloud Storage gives you freedom without vendor lock-in.
It’s not just about saving money—it’s about reclaiming time and resources to focus on innovation.
Today, Amazon Web Services (AWS) announced that AWS Asia Pacific (Taipei) Region is generally available with three Availability Zones and Region code ap-east-2. The new Region brings AWS infrastructure and services closer to customers in Taiwan.
Skyline of Taipei including the Taipei 101 building
As the first infrastructure Region in Taipei and the fifteenth Region in Asia Pacific, the new Region expands the AWS global footprint to 117 Availability Zones across 37 geographic Regions worldwide. The new AWS Region will help developers, startups, and enterprises, as well as education, entertainment, financial services, healthcare, manufacturing, and nonprofit organizations run their applications and serve end users while maintaining data residency in Taiwan.
AWS in Taiwan
AWS has maintained a presence in Taiwan for more than a decade, starting with the opening of the AWS Taipei office in 2014. Since then, AWS has introduced many infrastructure offerings in Taiwan including:
In 2014, AWS launched the first Amazon CloudFront edge location and added another in 2018, offering customers a secure and efficient content delivery network for accelerating data, video, application, and API delivery worldwide.
In 2018, AWS established two AWS Direct Connect locations in Taiwan to enhance connectivity options. With the launch of the AWS Asia Pacific (Taipei) Region, we’ve added a new Direct Connect location in Taiwan to provide customers with higher speed and bandwidth.
In 2020, AWS launched AWS Outposts in Taiwan, helping customers seamlessly extend AWS infrastructure and services to their on-premises or edge locations for a consistent hybrid experience.
In 2022, AWS launched AWS Local Zone in Taipei to support low-latency applications requiring single-digit millisecond responsiveness.
Today, with the launch of the AWS Asia Pacific (Taipei) Region, we further strengthen our commitment to support innovation in Taiwan. Organizations in regulated industries will be able to store data locally while maintaining complete control over data location and movement. From high-tech manufacturing to semiconductor companies and small and medium enterprises (SMEs), businesses will gain access to the scalable infrastructure needed for growth and innovation.
AWS customers in Taiwan
Organizations across Taiwan are already using AWS to innovate and deliver differentiated experiences to their customers, for example:
Cathay Financial Holdings (CFH) is a leader in financial technology in Taiwan. It continuously introduces the latest technology to create a full-scenario financial service ecosystem. Since 2021, CFH has built a cloud environment on AWS that strengthens its security control and meets compliance requirements.
“Cathay Financial Holdings will continue to accelerate digital transformation in the industry, also improve the stability, security, timeliness, and scalability of our financial services,” said Marcus Yao, senior executive vice president of CFH. “With the new AWS Region in Taiwan, CFH is expected to provide customers with even more diverse and convenient financial services.”
Gamania Group is revolutionizing the entertainment landscape by integrating AI with celebrity IP through their innovative Vyin AI platform. Gamania utilized the robust and scalable infrastructure of AWS to develop secure, responsive AI interactions.
Benjamin Chen, chief strategy officer and head of Innovation Lab, said: “The core goal of Vyin AI is to create a digital identity that is fully interactive, lifelike, and safe to use. This demands technologies that are stable, responsive, and secure. To that end, we rely on the robust and resilient cloud infrastructure of AWS, and look forward to the low-latency advantages offered by the AWS Region in Taiwan. AWS provides a highly stable and secure environment for Vyin AI to provide users with secure and AI hallucination free interactions. AWS Cloud services allow us to focus more on core AI technology innovation and the enhancement of the ‘hyper-personalized interactive’ user experience, thereby accelerating product iteration and optimization.”
Chunghwa Telecom is a leader in cloud network services in Taiwan with the broadest mainstream 5G bandwidth, exceptional network speed, and globally recognized mobile internet capabilities. Chunghwa Telecom utilizes generative AI platforms such as Amazon Bedrock to build innovative services and create intelligent applications for various industries.
Dr. Rong-Shy Lin, president of CHT, stated: “With the launch of the AWS Region in Taiwan, CHT’s partnership with AWS has entered a new phase. We will deepen the integration of key advantages of the AWS Region, such as low latency and local data storage, combining them with CHT’s extensive backbone network, rich cloud experience, and professional team that has obtained multiple AWS Competency certifications. This will allow CHT to provide solutions that meet strict security and compliance requirements for government, financial, critical infrastructure, and highly regulated industries. At the same time, we are utilizing AWS technologies such as Amazon Bedrock to develop innovative applications and accelerate digital transformation and AI adoption. We will continue to provide optimized cloud and network services in Taiwan while supporting customers’ global expansion.”
AWS Partners in Taiwan
The AWS Partner Network in Taiwan plays a crucial role in helping customers adopt cloud technologies and maximize value from the new AWS Asia Pacific (Taipei) Region. These specialized partners combine deep technical expertise with local market knowledge to accelerate digital transformation across industries.
“eCloudvalley Group has always embraced our mission of being a cloud evangelist, driving the adoption of cloud technology across Taiwan’s industries,” said MP Tsai, chairman of eCloudvalley Group. “With over a decade of close collaboration with AWS, we are honored to help more and more customers and industries move to the cloud while being part of customers’ digital transformation journey on AWS. We believe that the launch of the AWS Asia Pacific (Taipei) Region will further support Taiwan companies’ digital transformation and innovation in Taiwan with its world-leading cloud technology, while industries with higher local data residency requirements, such as finance and healthcare, will be able to further advance their cloud transformation journey.”
“The investment of AWS in local infrastructure will help drive the digital transformation of Taiwan companies, boosting the development of various industries spanning from traditional industries to emerging digital sectors,” said Shasta Ho, the CEO of Nextlink Technology Inc. “We look forward to continuing working with AWS to help enterprises across industries deeply utilize the new AWS Asia Pacific (Taipei) Region. This local advantage will address customer needs in data localization, low latency, compliance, and high performance computing workloads. We also look forward to using AWS world-leading cloud technologies to power customers’ digital transformation journeys while contributing to the diversification of Taiwan’s economy.”
SAP has been a strategic partner of AWS for more than a decade, with thousands of enterprise customers worldwide running their SAP workloads on AWS.
“SAP is thrilled to see AWS establish new data centers in Taiwan,” said George Chen, SAP global vice president and managing director for Taiwan, Hong Kong, and Macau. “This investment provides Taiwan enterprises with greater choice, lower service latency, and enhanced operational flexibility. As a long-term strategic partner, SAP is committed to accelerating cloud transformation for these businesses. Through RISE with SAP, we can help customers seamlessly migrate to the cloud, enjoying greater flexibility, scalability, and reduced operational costs. By combining SAP’s enterprise solutions with the robust cloud platform of AWS, we’ll jointly empower Taiwan’s enterprises to unlock innovative AI applications and run their core businesses securely and reliably locally, driving Taiwan enterprise cloud transformation together.”
Supporting sustainable innovation in Taiwan
As Taiwan progresses toward its goal of net-zero emissions by 2050, AWS Cloud solutions are empowering organizations to enhance operational efficiency while reducing environmental impact. The new AWS Asia Pacific (Taipei) Region incorporates the AWS commitment to sustainability, helping organizations meet both technical and environmental objectives.
Ace Energy is a pioneer in Taiwan’s energy management sector. Since 2013, Ace Energy has been using AWS services such as Amazon Simple Storage Service (Amazon S3), Amazon Elastic Compute Cloud (Amazon EC2), and AWS IoT Core to provide innovative energy solutions through their Energy Saving Performance Contract model. Ace Energy has deployed energy management solutions across 1,000 locations, helped a semiconductor manufacturer reduce steam consumption by 65 percent, achieved 22 million new Taiwan dollars in annual energy savings, and decreased carbon emissions by 8,000 tons through their waste heat recovery technology.
Taiwan Power Company (Taipower) is Taiwan’s state power utility and has revolutionized its operations through AWS since 2018. By implementing smart grid technologies with drones, robotics, and virtual reality for smart patrol, Taipower has enhanced customer experience through the “Taiwan Power” application. The company has improved operational efficiency through data-driven decision-making and earned six consecutive Platinum Awards in the Corporate Sustainability category at the Taiwan Corporate Sustainability Awards.
Building cloud skills together
Since 2014, AWS has built comprehensive programs for cloud education and skills development in Taiwan. For example, educational programs such as AWS Academy, AWS Educate, and AWS Skill Builder have helped train more than 200,000 people in Taiwan on cloud skills. These programs will expand alongside our infrastructure investments to build a foundation for Taiwan’s digital future.
Taiwan boasts a vibrant AWS community that welcomes your involvement. Take part in knowledge-sharing and networking at local AWS User Groups in Taipei, engage with the four celebrated AWS Heroes in Taiwan, or consider becoming part of the growing community of AWS enthusiasts by joining the ranks of the 17 AWS Community Builders already contributing to Taiwan’s cloud ecosystem. All these community connections provide valuable opportunities to accelerate your cloud journey through local expertise and collaborative learning.
Stay tuned The AWS Asia Pacific (Taipei) Region is ready to support your business. You can find a detailed list of the services available in this Region on the AWS Services by Region page. For news about AWS Region openings, check out the Regional news of the AWS News Blog.
Start building on the Asia Pacific (Taipei) Region now.
Today, we’re announcing a new publicly available source of API models for Amazon Web Services (AWS). We are now publishing AWS API models on a daily basis to Maven Central and providing open source access to a new repository on GitHub. This repository includes a definitive, up-to-date source of Smithy API models that define AWS public interface definitions and behaviors.
These Smithy models can be used to better understand AWS services and build developer tools like custom software development kits (SDK) and command line interfaces (CLIs) for connecting to AWS or testing tools for validating your application integrations on AWS.
Since 2018, we have been generating SDK clients and CLI tools using Smithy models. All AWS services are modeled in Smithy to thoroughly document the API contract including operations and behaviors like protocols, authentication, request and response types, and errors.
With this public resource, you can build and test your own applications that can integrate directly with AWS services with confidence such as:
Generating API implementations – You can generate server stubs for language-specific framework, even model context protocol (MCP) server configurations for your AI agents. You have built-in validation to ensure you adhere to your own API standards.
Build your own developer tools – You can build your own tools on top of AWS such as mock testing tools, IAM policy generators, or higher-level abstractions for connecting to AWS.
Understand AWS API behaviors – You can concisely and easily investigate your artifact to quickly review and understand how SDKs interpret API calls and the behaviors to expect with those calls.
Learn about AWS API models You can browse the AWS service models directly on GitHub by accessing the api-models-aws repository. This repository contains Smithy models with the JSON AST format for all public AWS API services. All Smithy models consist of shapes and traits. Shapes are instances of types and traits are used to add more information to shapes that might be useful for clients, servers, or documentation.
The AWS models repository contains:
Top-level service directories are named using the <sdk-id> of the service, where <sdk-id> is the value of the model’s sdkId, lowercased and with spaces converted to hyphens
Each service directory contains one directory per <version> of the service, where <version> is the value of the service shape’s version property.
Contained within a service-version directory, a model file named <sdk-id>-<version>.json will be present
For example, when you want to define a RunInstances API in Amazon EC2 service, the model uses service type, an entry point of an API that aggregates resources and operations together. The shape referenced by a member is called its target.
The operation type represents the input, output, traits, and possible errors of an API operation. Operation shapes are bound to resource shapes and service shapes. An operation is defined in the IDL using an operation_statement. In the traits, you can find detailed API information such as documentation, examples, and so on.
"com.amazonaws.ec2#RunInstances": {
      "type": "operation",
      "input": {
        "target": "com.amazonaws.ec2#RunInstancesRequest"
      },
      "output": {
        "target": "com.amazonaws.ec2#Reservation"
      },
      "traits": {
        "smithy.api#documentation": "<p>Launches the specified number of instances using an AMI for which you have....",
        smithy.api#examples": [
          {
            "title": "To launch an instance",
            "documentation": "This example launches an instance using the specified AMI, instance type, security group, subnet, block device mapping, and tags.",
            "input": {
              "BlockDeviceMappings": [
                {
                  "DeviceName": "/dev/sdh",
                  "Ebs": {
                    "VolumeSize": 100
                  }
                }
              ],
              "ImageId": "ami-abc12345",
              "InstanceType": "t2.micro",
              "KeyName": "my-key-pair",
              "MaxCount": 1,
              "MinCount": 1,
              "SecurityGroupIds": [
                "sg-1a2b3c4d"
              ],
              "SubnetId": "subnet-6e7f829e",
              "TagSpecifications": [
                {
                  "ResourceType": "instance",
                  "Tags": [
                    {
                      "Key": "Purpose",
                      "Value": "test"
                    }
                  ]
                }
              ]
            },
            "output": {}
          }
        ]
      }
    },
We use Smithy extensively to model our service APIs and provide the daily releases of the AWS SDKs and AWS CLI. AWS API models can be helpful for implementing server stubs to interact with AWS services.
How to build with AWS API models Smithy API models provide building resources such as build tools, client or server code generators, IDE support, and implementations. For example, with Smithy CLI, you can easily build your models, run ad-hoc validation, compare models for differences, query models, and more. The Smithy CLI makes it easy to get started working with Smithy without setting up Java or using the Smithy Gradle Plugins.
I want to show two examples how to build your own applications with AWS API models and Smithy build tools.
Build a minimal SDK client – This sample project provides a template to get started using Smithy TypeScript to create a minimal AWS SDK client for Amazon DynamoDB. You can build the minimal SDK from the Smithy model, and then run the example code. To learn more, visit the example project here.
Build MCP servers – This sample project provides a template to generate a fat jar which contains all the dependencies required to run a MCP StdIO server using the Smithy CLI. You can find MCPServerExample to build an MCP server by modeling tools as Smithy APIs and ProxyMCPExample to create a proxy MCP Server for any Smithy service. To learn more, visit the GitHub repository.
Now available You can now access AWS API models on a daily basis providing open-source access on the AWS API models repository and service model packages available on Maven Central. You can import models and add dependencies using the maven package of their choice.
Customers across industries are harnessing the power of generative AI on AWS to boost employee productivity, deliver exceptional customer experiences, and streamline business processes. However, the growth in demand for GPU capacity has outpaced industry-wide supply, making GPUs a scarce resource and increasing the cost of securing them.
As Amazon Web Services (AWS) grows, we work hard to lower our costs so that we can pass those savings back to our customers. Regular price reductions on AWS services have been a standard way for AWS to pass on the economic efficiencies gained from our scale back to our customers.
Today, we’re announcing up to 45 percent price reduction for Amazon Elastic Compute Cloud (Amazon EC2) NVIDIA GPU-accelerated instances: P4 (P4d and P4de) and P5 (P5 and P5en) instance types. This price reduction to On-Demand and Savings Plan pricing applies to all Regions where these instances are available. The pricing reduction applies to On-Demand purchases beginning June 1 and to Savings Plan purchases effective after June 4.
Here is a table of price reductions percentage (%) from May 31, 2025 baseline prices by instance types and pricing plans:
Instance type
NVIDIA GPUs
On-Demand
EC2 Instance Savings Plans
Compute Savings Plans
1 year
3 years
1 year
3 years
P4d
A100
33%
31%
25%
31%
–
P4de
A100
33%
31%
25%
31%
–
P5
H100
44%
–
45%
44%
25%
P5en
H200
25%
–
26%
25%
–
Savings Plans are a flexible pricing model that offer low prices on compute usage, in exchange for a commitment to a consistent amount of usage (measured in $/hour) for a 1- or 3- year term. We offers two types of Savings Plans:
EC2 Instance Savings Plans provide the lowest prices, offering savings in exchange for commitment to usage of individual instance families in a Region (for example, P5 usage in the US (N. Virginia) Region).
Compute Savings Plans provide the most flexibility and help to reduce your costs regardless of instance family, size, Availability Zones, and Regions (for example, from P4d to P5en instances, shift a workload between US Regions).
To provide increased accessibility to reduced pricing, we are making at-scale On-Demand capacity available for:
P4d instances in the Asia Pacific (Seoul), Asia Pacific (Sydney), Canada (Central), and Europe (London) Regions
P4de instances in the US East (N. Virginia) Region
P5 instances in the Asia Pacific (Mumbai), Asia Pacific (Tokyo), Asia Pacific (Jakarta), and South America (São Paulo) Regions
P5en instances in the Asia Pacific (Mumbai), Asia Pacific (Tokyo), and Asia Pacific (Jakarta) Regions
We are also now delivering Amazon EC2 P6-B200 instances through Savings Plan to support large scale deployments, which became available on May 15, 2025 at launch only through EC2 Capacity Blocks for ML. EC2 P6-B200 instances, powered by NVIDIA Blackwell GPUs, accelerate a broad range of GPU-enabled workloads but are especially well-suited for large-scale distributed AI training and inferencing.
These pricing updates reflect the AWS commitment to making advanced GPU computing more accessible while passing cost savings directly to customers.
Give Amazon EC2 NVIDIA GPU-accelerated instances a try in the Amazon EC2 console. To learn more about these pricing updates, visit Amazon EC2 Pricing page and send feedback to AWS re:Post for EC2 or through your usual AWS Support contacts.
AI workloads don’t play by the same rules as your average enterprise app, and if you’ve looked at your cloud bill lately, you probably know that already. They have unique demands that make them especially vulnerable to hidden AI storage costs. Think: massive parallel GPU training, nonstop data shuffling, and frequent checkpointing.
The problem? Most cloud pricing models weren’t built for this kind of action. They were designed when workloads were a lot more predictable. So, when you run AI workloads on storage models built by hyperscalers, the costs add up quickly, and often invisibly.
Download the ebook
Struggling to keep AI storage costs under control? Download our free ebook to discover how to optimize cloud storage for AI workloads—without compromising performance.
Here are five reasons your cloud bill for AI workloads could spiral out of control:
1. Death by API call: Soaring costs in AI training pipelines.
AI workloads are packed with transactions. Every ingest of raw data, training round, inference batch, or logging step triggers API calls—PUTs, GETs, LISTs, and COPYs. If you’re training a foundational model like Deepseek v3 or Llama 2, you could be making millions of small transactions a day just by uploading all the raw data you require for training.
Each transaction might cost a fraction of a cent—but they add up.
Example: Let’s assume a model needs 1 trillion pretraining tokens. Different data sources contribute varying numbers of tokens per file. For this exercise, let’s assume the following token counts:
Web pages: ~1,000 tokens/page (e.g., blog posts, articles)
A typical large language model (LLM) training mix might look like this:
Source
% of tokens
Tokens contribution
Files required (approx.)
Web pages
40%
400B tokens
400M files
Books
20%
200B tokens
2M files
Code
15%
150B tokens
300M files
News articles
15%
150B tokens
187.5M files
Academic papers
10%
100B tokens
20M files
Total
100%
1T tokens
~909.5M files
If you’re ingesting 909.5 million files to AWS S3 at $0.005 per 1,000 PUTs (pricing as of April 2025), then you’d be charged:
909,500,000 ÷ 1,000 = 909,500 units
909,500 × $0.005 = $4,547.50
That’s $4,547.50 in just PUT transaction fees—for just collecting all the data you need for training. And that’s not counting GETs, LISTs, or any other operations that are necessary to support the full AI data pipeline.
2. The small file tax: How small files drive up AI cloud storage costs
Models trained on image slices, text tokens, or time-series data can create millions of small files. These not only trigger excessive API calls, but also suffer from the following:
Some providers bill you by minimum object size (e.g., rounding all small files up to 128KB).
Every small object can trigger a full-priced transaction.
Frequent access means you’re paying for reads, not just storage.
This mismatch means your dataset of 100 million 10KB files could behave (and cost) like a much larger, high-churn workload.
3. Why cold storage fails for AI data workloads
Deep archive tiers may be cheap upfront, but they’re a poor fit for iterative AI workflows. Need to rehydrate training data to rerun a model? Get ready to wait hours and pay per retrieval. Need to delete? You could get hit with minimum retention penalties, and pay for that data as if you held onto it for 60, 90, or even 180 days.
AI workflows are iterative. You’re not archiving log files; you’re experimenting, fine-tuning, and reprocessing constantly. Cold storage is rarely compatible with that.
4. Egress fees: The hidden cost of moving AI training data
Egress is a silent killer. It’s the fee you pay every time you move data out of cloud storage. In AI workflows, that’s often necessary for:
Sending training data to a GPU cluster.
Validating models on a local system.
Migrating to another provider.
Collaborating with partners across clouds or regions.
These fees scale linearly with data volume, which is a problem when your AI pipeline is pulling terabytes or petabytes per day.
5. AI data lifecycle rules can backfire
You might set up lifecycle rules to move infrequently accessed data to cheaper tiers—sounds smart, right?
Except:
Lifecycle transitions often come with per-object fees.
Accessing those objects later triggers retrieval fees, or breaks performance expectations.
Deleting or overwriting too early triggers penalties.
And all of this assumes you even know your data’s “temperature” in advance—which, in AI workflows, changes day to day.
Smarter AI Storage
Your AI pipeline isn’t just a compute problem: It’s a data movement and storage orchestration engine. And that’s exactly where traditional cloud pricing models fall short.
If your cloud bill is blowing up, it’s probably not just because you kicked off another training run. It’s the millions of GET requests, the silent egress charges, and those archive tier retrievals you didn’t plan for.
The good news? Once you know where the hidden costs are, you can start building smarter.
Seismic imaging is a geophysical technique used to create detailed pictures of the Earth’s subsurface structure. It works by generating seismic waves that travel into the ground, reflect off various rock layers and structures, and return to the surface where they’re detected by sensitive instruments known as geophones or hydrophones. The huge volumes of acquired data often reach petabytes for a single survey and this presents significant storage, processing, and management challenges for researchers and energy companies.
Customers who run these seismic imaging workloads or other high performance computing (HPC) workloads, such as weather forecasting, advanced driver-assistance system (ADAS) training, or genomics analysis, already store the huge volumes of data on either hard disk drive (HDD)-based or a combination of HDD and solid state drive (SSD) file storage on premises. However, as these on premises datasets and workloads scale, customers find it increasingly challenging and expensive due to the need to make upfront capital investments to keep up with performance needs of their workloads and avoid running out of storage capacity.
Today, we’re announcing the general availability of the Amazon FSx for Lustre Intelligent-Tiering, a new storage class that delivers virtually unlimited scalability, the only fully elastic Lustre file storage, and the lowest cost Lustre file storage in the cloud. With a starting price of less than $0.005 per GB-month, FSx for Lustre Intelligent-Tiering offers the lowest cost high-performance file storage in the cloud, reducing storage costs for infrequently accessed data by up to 96 percent compared to other managed Lustre options. Elasticity means you no longer need to provision storage capacity upfront because your file system will grow and shrink as you add or delete data, and you pay only for the amount of data you store.
FSx for Lustre Intelligent-Tiering automatically optimizes costs by tiering cold data to the applicable lower-cost storage tier based on access patterns and includes an optional SSD read cache to improve performance for your most latency sensitive workloads. Intelligent-Tiering delivers high performance whether you’re starting with gigabytes of experimental data or working with large petabyte-scale datasets for your most demanding artificial intelligence/machine learning (AI/ML) and HPC workloads. With the flexibility to adjust your file system’s performance independent of storage, Intelligent-Tiering delivers up to 34 percent better price performance than on premises HDD file systems. The Intelligent-Tiering storage class is optimized for HDD-based or mixed HDD/SSD workloads that have a combination of hot and cold data. You can migrate and run such workloads to FSx for Lustre Intelligent-Tiering without application changes, eliminating storage capacity planning and management, while paying only for the resources that you use.
Prior to this launch, customers used the FSx for Lustre SSD storage class to accelerate ML and HPC workloads that need all-SSD performance and consistent low-latency access to all data. However, many workloads have a combination of hot and cold data and they don’t need all-SSD storage for colder portions of the data. FSx for Lustre is increasingly used in AI/ML workloads to increase graphics processing unit (GPU) utilization, and now it’s even more cost optimized to be one of the options for these workloads.
FSx for Lustre Intelligent-Tiering Your data moves between three storage tiers (Frequent Access, Infrequent Access, and Archive) with no effort on your part, so you get automatic cost savings with no upfront costs or commitments. The tiering works as follows:
Frequent Access – Data that has been accessed within the last 30 days is stored in this tier.
Infrequent Access – Data that hasn’t been accessed for 30 – 90 days is stored in this tier, at a 44 percent cost reduction from Frequent Access.
Archive – Data that hasn’t been accessed for 90 or more days is stored in this tier, at a 65 percent cost reduction compared to Infrequent Access.
Regardless of the storage tier, your data is stored across multiple AWS Availability Zones for redundancy and availability, compared to typical on-premises implementations, which are usually confined within a single physical location. Additionally, your data can be retrieved instantly in milliseconds.
Now, it’s time to enter the rest of the information to create the file system. I enter a name (veliswa_fsxINT_1) for my file system, and for deployment and storage class, I select Persistent, Intelligent-Tiering. I choose the desired Throughput capacity and the Metadata IOPS. The SSD read cache will be automatically configured by FSx for Lustre based on the specified throughput capacity. I leave the rest as the default, choose Next, and review my choices to create my file system.
With Amazon FSx for Lustre Intelligent-Tiering, you have the flexibility to provision the necessary performance for your workloads without having to provision any underlying storage capacity upfront.
I wanted to know which values were editable after creation, so I paid closer attention before finalizing the creation of the file system. I noted that Throughput capacity, Metadata IOPS, Security groups, SSD read cache, and a few others were editable later. After I start running the ML jobs, it might be necessary to increase the throughput capacity based on the volumes of data I’ll be processing, so this information is important to me.
The file system is now available. Considering that I’ll be running HPC workloads, I anticipate that I’ll be processing high volumes of data later, so I’ll increase the throughput capacity to 24 GB/s. After all, I only pay for the resources I use.
The SSD read cache is scaled automatically as your performance needs increase. You can adjust the cache size any time independently in user-provisioned mode or disable the read cache if you don’t need low-latency access.
Good to know
FSx for Lustre Intelligent-Tiering is designed to deliver up to multiple terabytes per second of total throughput.
FSx for Lustre with Elastic Fabric Adapter (EFA)/GPU Direct Storage (GDS) support provides up to 12x (up to 1200 Gbps) higher per-client throughput compared to the previous FSx for Lustre systems.
It can deliver up to tens of millions of IOPS for writes and cached reads. Data in the SSD read cache has submillisecond time-to-first-byte latencies, and all other data has time-to-first-byte latencies in the range of tens of milliseconds.
Now available Here are a couple of things to keep in mind:
FSx Intelligent-Tiering storage class is available in the new FSx for Lustre file systems in the US East (N. Virginia, Ohio), US West (N. California, Oregon), Canada (Central), Europe (Frankfurt, Ireland, London, Stockholm), and Asia Pacific (Hong Kong, Mumbai, Seoul, Singapore, Sydney, Tokyo) AWS Regions.
You pay for data and metadata you store on your file system (GB/months). When you write data or when you read data that is not in the SSD read cache, you pay per operation. You pay for the total throughput capacity (in MBps/month), metadata IOPS (IOPS/month), and SSD read cache size for data and metadata (GB/month) you provision on your file system. To learn more, visit the Amazon FSx for Lustre Pricing page. To learn more about Amazon FSx for Lustre including this feature, visit the Amazon FSx for Lustre page.
(This survey is hosted by an external company. AWS handles your information as described in the AWS Privacy Notice. AWS will own the data gathered via this survey and will not share the information collected with survey respondents.)
In an earlier blog post, I explained how to build your own LLM with Backblaze B2 + Jupyter Notebook, implementing a simple conversational AI chatbot using the LangChain AI framework to implement retrieval-augmented generation (RAG). The notebook walks you through the process of loading PDF files from a Backblaze B2 Bucket into a vector store, running a local instance of a large language model (LLM) and combining those to form a chatbot that can answer questions on its specialist subject.
That article generated a lot of interest, and a few questions:
“Could you make this into a web app, like ChatGPT?”
“Could you use this with OpenAI? DeepSeek?”
“Could I load multiple collections of documents into this?”
“Could I run multiple LLMs and compare them?”
“Can I add new documents to the vector store as they are uploaded to the bucket?”
The answer to all of these questions is “Yes!”
Today, I’ll present a simple conversational AI chatbot web app with a ChatGPT-style UI that you can easily configure to work with OpenAI, DeepSeek, or any of a range of other LLMs. In future blog posts, I’ll extend this to allow you to configure multiple LLMs and document collections, and integrate with Backblaze B2’s Event Notifications feature to load documents into the vector store within seconds of them being uploaded.
And, here’s a very short video of the chatbot in action:
Retrieval-augmented generation, or RAG for short, is a technique that applies the generative features of an LLM to a collection of documents, resulting in a chatbot that can effectively answer questions based on the content of those documents.
A typical RAG implementation splits each document in the collection into a number of roughly equal-sized, overlapping chunks, and generates an embedding for each chunk. Embeddings are vectors (lists) of floating point numbers with hundreds or thousands of dimensions. The distance between two vectors indicates their similarity. Small distances indicate high similarity and large distances indicate low similarity.
The RAG app then loads each chunk, along with its embedding, into a vector store. The vector store is a special-purpose database that can perform a similarity search–given a piece of text, the vector store can retrieve chunks ranked by their similarity to the query text by comparing the embeddings.
Let’s put the pieces together:
Given a question from the user (1), the RAG app can query the vector store for chunks of text that are similar to the question (2). This will be the context that helps the LLM answer the user’s question. Here’s a concrete example using the Backblaze documentation collection: Given the question, “Tell me about object lock,” the vector store returns four document chunks, each of about 170 words, to the app (3). Here is a link to the text of, and a short extract from, each chunk:
Object Lock: With Object Lock Legal Hold, files are prevented from being changed or deleted, but the immutability does not have a defined retention period.
Object Lock: You can enable Object Lock on a bucket when you create a new bucket or on an existing bucket.
Object Lock: Object Lock in Backblaze B2 was designed with the Immutability feature in Veeam Backup & Replication in mind.
Enable Object Lock with the S3 Compatible API: To enable Object Lock on an existing S3 compatible bucket, add the x-amz-bucket-object-lock-token header with a value of 1 to the S3 Put Object Lock Configuration API call.
Unsurprisingly, three of the four results are extracts from the main documentation article on Object Lock.
In order to provide a conversational experience, the RAG app maintains a chat history in a message store. The RAG app retrieves the message history (4) to form part of the query it will send to the LLM.
A system prompt sets the guidelines for the LLM to generate responses. In a RAG, the system prompt typically specifies that the response should be based on retrieved document data rather than model memorization, and attempts to prevent hallucinations by ensuring that the model does not fabricate information if no relevant documents are found. Here is the system prompt from the RAG app:
Use the following pieces of context and the message history to answer the question at the end. If you don't know the answer, just say that you don't know, don't try to make up an answer.
The RAG submits the system prompt, the context, the last few messages in the conversation, and the user’s question to the LLM (5), which generates a, hopefully useful, response (6). Here’s the answer it provided to the above question:
Object Lock is a feature that allows users to enforce immutability on files stored in cloud storage, specifically in services like Backblaze B2 and AWS S3. Here are the key points about Object Lock:
Immutability: Once a file is locked, it cannot be modified or deleted until a specified retention period expires or a legal hold is lifted.
Retention Periods: Users can set a retention period when locking a file. During this time, the file remains immutable, meaning it cannot be changed or deleted.
Legal Hold: Users can place files under a legal hold, which prevents modifications or deletions indefinitely until the hold is removed.
Enabling Object Lock: Object Lock can be enabled for new buckets or existing ones, but it must be turned on at the bucket level before files are uploaded.
Integrations: Some applications, like Veeam Backup & Replication, offer built-in support for Object Lock, making the process easier for users when they want to ensure file immutability during backups.
No Extra Cost: There is no additional fee for using Object Lock; however, standard storage charges for the locked files still apply.
Mistakes in Locking: If a user locks a file for longer than intended, they may need to contact support to resolve the situation, which could involve closing their storage account in some cases.
Overall, Object Lock is a crucial feature for organizations that need to ensure data integrity and compliance with regulations concerning data retention.
The RAG app adds the user’s question and the LLM’s response to the message store (7), returns the answer to the user (8), and awaits the next question.
A quick tour of the sample app
The sample app is on GitHub at https://github.com/backblaze-b2-samples/ai-rag-app. The app is open source, under the MIT license, so you can use it as a basis for your own experimentation without any restrictions. The app was originally written to demonstrate RAG with Backblaze B2 Cloud Storage, but it works with any S3 compatible object store.
The README file covers configuration and deployment in some detail; in this blog post, I’ll just give you a high-level overview. The sample app is written in Python using the Django web framework. API credentials and related settings are configured via environment variables, while the LLM and vector store are configured via Django’s settings.py file:
# Change source_data_location and vector_store_location to match your environment # search_k is the number of results to return when searching the vector store DOCUMENT_COLLECTION: CollectionSpec = { 'name': 'Docs', 'source_data_location': 's3://blze-ev-ai-rag-app/pdfs', 'vector_store_location': 's3://blze-ev-ai-rag-app/vectordb/docs/openai', 'search_k': 4, 'embeddings': { 'cls': OpenAIEmbeddings, 'init_args': { 'model': "text-embedding-3-large", }, }, }
The sample app is configured to use OpenAI GPT-4o mini, but the README explains how to use different online LLMs such as DeepSeek V3 or Google Gemini 2.0 Flash, or even a local LLM such as Meta Llama 3.1 via the Ollama framework. If you do run a local LLM, be sure to pick a model that fits your hardware. I tried running Meta’s Llama 3.3, which has 70 billion parameters (70B), on my MacBook Pro with the M1 Pro CPU. It took nearly three hours to answer a single question! Llama 3.1 8B was a much better fit, answering questions in less than 30 seconds.
Notice that the document collection is configured with the location of a vector store containing the Backblaze documentation as a sample dataset. The README file contains an application key with read-only access to the PDFs and vector store so you can try the application without having to load your own set of documents.
If you want to use your own document collection, a pair of custom commands allow you to load them from a Backblaze B2 Bucket into the vector store and then query the vector store to test that it all worked.
First, you need to load your data:
% python manage.py load_vector_store
Deleting existing LanceDB vector store at s3://blze-ev-ai-rag-app/vectordb/docs
Creating LanceDB vector store at s3://blze-ev-ai-rag-app/vectordb/docs
Loading data from s3://blze-ev-ai-rag-app/pdfs in pages of 1000 results
Successfully retrieved page 1 containing 618 result(s) from s3://blze-ev-ai-rag-app/pdfs
Skipping pdfs/.bzEmpty
Skipping pdfs/cloud_storage/.bzEmpty
Loading pdfs/cloud_storage/cloud-storage-about-backblaze-b2-cloud-storage.pdf
Loading pdfs/cloud_storage/cloud-storage-add-file-information-with-the-native-api.pdf
Loading pdfs/cloud_storage/cloud-storage-additional-resources.pdf
...
Loading pdfs/v1_api/s3-put-object.pdf
Loading pdfs/v1_api/s3-upload-part-copy.pdf
Loading pdfs/v1_api/s3-upload-part.pdf
Loaded batch of 614 document(s) from page
Split batch into 2758 chunks
[2025-02-28T01:26:11Z WARN  lance_table::io::commit] Using unsafe commit handler. Concurrent writes may result in data loss. Consider providing a commit handler that prevents conflicting writes.
Added chunks to vector store
Added 614 document(s) containing 2758 chunks to vector store; skipped 4 result(s).
Created LanceDB vector store at s3://blze-ev-ai-rag-app/vectordb/docs. "vectorstore" table contains 2758 rows
Now you can verify that the data is stored by querying the vector store. Notice how the raw results from the vector store include an S3 URI identifying the source document:
% python manage.py search_vector_store 'Which B2 native APIs would I use to upload large files?'
2025-03-01 02:38:07,740 ai_rag_app.management.commands.search INFO     Opening vector store at s3://blze-ev-ai-rag-app/vectordb/docs/openai
2025-03-01 02:38:07,740 ai_rag_app.utils.vectorstore DEBUG    Populating AWS environment variables from the b2 profile
Found 4 docs in 2.30 seconds
2025-03-01 02:38:11,074 ai_rag_app.management.commands.search INFO
page_content='Parts of a large file can be uploaded and copied in parallel, which can significantly reduce the time it takes to upload terabytes of data. Each part can be  anywhere from 5 MB to 5 GB, and you can pick the size that is most convenient for your application. For best upload performance, Backblaze recommends that you use the recommendedPartSize parameter that is returned by the b2_authorize_account operation.  To upload larger files and data sets, you can use the command-line interface (CLI), the Native API, or an integration, such as Cyberduck.  Usage for Large Files  Generally, large files are treated the same as small files. The costs for the API calls are the same.  You are charged for storage for the parts that you uploaded or copied. Usage is counted from the time the part is stored. When you call the b2_finish_large_file' metadata={'source': 's3://blze-ev-ai-rag-app/pdfs/cloud_storage/cloud-storage-large-files.pdf'}
...
The core of the sample application is the RAG class. There are several methods that create the basic components of the RAG, but here we’ll look at how the _create_chain() method brings together the system prompt, vector store, message history, and LLM.
First, we define the system prompt, which includes a placeholder for the context—those chunks of text that the RAG will retrieve from the vector store:
# These are the basic instructions for the LLM
system_prompt = (
    "Use the following pieces of context and the message history to "
    "answer the question at the end. If you don't know the answer, "
    "just say that you don't know, don't try to make up an answer. "
    "\n\n"
    "Context: {context}"
)
Then we create a prompt template that brings together the system prompt, message history, and the user’s question:
# The prompt template brings together the system prompt, context, message history and the user's question
prompt_template = ChatPromptTemplate(
    [
        ("system", system_prompt),
        MessagesPlaceholder(variable_name="history", optional=True, n_messages=10),
        ("human", "{question}"),
    ]
)
Now we use LangChain Expression Language (LCEL) to bring the various components together to form a chain. LCEL allows us to define a chain of components declaratively; that is, we provide a high-level representation of the chain we want, rather than specifying how the components should fit together.
Notice the log_data() helper method—it simply logs its input and passes it on to the next component in the chain.
# Create the basic chain
# When loglevel is set to DEBUG, log_input will log the results from the vector store
chain = (
    {
        "context": (
            itemgetter("question")
            | retriever
            | log_data('Documents from vector store', pretty=True)
        ),
        "question": itemgetter("question"),
        "history": itemgetter("history"),
    }
    | prompt_template
    | model
    | log_data('Output from model', pretty=True)
)
Assigning a name to the chain allows us to add instrumentation when we invoke it:
# Give the chain a name so the handler can see it
named_chain: Runnable[Input, Output] = chain.with_config(run_name="my_chain")
Now, we use LangChain’s RunnableWithMessageHistory class to manage adding and retrieving messages from the message store:
The input to the chain is a Python dictionary containing the question, while the config argument configures the chain with the Django session key and a callback that annotates the chain output with its execution time. Since the chain output contains Markdown formatting, the API endpoint that handles requests from the front end uses the open source markdown-it library to render the output to HTML for display.
The remainder of the code is mostly concerned with rendering the web UI. One interesting facet is that the Django view, responsible for rendering the UI as the page loads, uses the RAG’s message store to render the conversation, so if you reload the page, you don’t lose your context.
Take this code and run it!
The sample AI RAG application is open source under the MIT license, and I encourage you to use it as the basis for your own RAG exploration. The README file suggests a few ways you could extend it, and I also draw your attention to conclusion of the README if you are thinking of running the app in production:
[…] in order to get you started quickly, we streamlined the application in several ways. There are a few areas to attend to if you wish to run this app in a production setting:
The app does not use a database for user accounts, or any other data, so there is no authentication. All access is anonymous. If you wished to have users log in, you would need to restore Django’s AuthenticationMiddleware class to the MIDDLEWARE configuration and configure a database.
Similarly, conversation history is stored in memory, so you would need to use a persistent message history implementation, such as RedisChatMessageHistory to run the app in multiple processes or on multiple hosts.
Above all, have fun! AI is a rapidly evolving technology, with vendors and open source projects releasing new capabilities every day. I hope you find this app a useful way of jumping in.
Anthropic launched the next generation of Claude models today—Opus 4 and Sonnet 4—designed for coding, advanced reasoning, and the support of the next generation of capable, autonomous AI agents. Both models are now generally available in Amazon Bedrock, giving developers immediate access to both the model’s advanced reasoning and agentic capabilities.
Amazon Bedrock expands your AI choices with Anthropic’s most advanced models, giving you the freedom to build transformative applications with enterprise-grade security and responsible AI controls. Both models extend what’s possible with AI systems by improving task planning, tool use, and agent steerability.
With Opus 4’s advanced intelligence, you can build agents that handle long-running, high-context tasks like refactoring large codebases, synthesizing research, or coordinating cross-functional enterprise operations. Sonnet 4 is optimized for efficiency at scale, making it a strong fit as a subagent or for high-volume tasks like code reviews, bug fixes, and production-grade content generation.
When building with generative AI, many developers work on long-horizon tasks. These workflows require deep, sustained reasoning, often involving multistep processes, planning across large contexts, and synthesizing diverse inputs over extended timeframes. Good examples of these workflows are developer AI agents that help you to refactor or transform large projects. Existing models may respond quickly and fluently, but maintaining coherence and context over time—especially in areas like coding, research, or enterprise workflows—can still be challenging.
Claude Opus 4 Claude Opus 4 is the most advanced model to date from Anthropic, designed for building sophisticated AI agents that can reason, plan, and execute complex tasks with minimal oversight. Anthropic benchmarks show it is the best coding model available on the market today. It excels in software development scenarios where extended context, deep reasoning, and adaptive execution are critical. Developers can use Opus 4 to write and refactor code across entire projects, manage full-stack architectures, or design agentic systems that break down high-level goals into executable steps. It demonstrates strong performance on coding and agent-focused benchmarks like SWE-bench and TAU-bench, making it a natural choice for building agents that handle multistep development workflows. For example, Opus 4 can analyze technical documentation, plan a software implementation, write the required code, and iteratively refine it—while tracking requirements and architectural context throughout the process.
Claude Sonnet 4 Claude Sonnet 4 complements Opus 4 by balancing performance, responsiveness, and cost, making it well-suited for high-volume production workloads. It’s optimized for everyday development tasks with enhanced performance, such as powering code reviews, implementing bug fixes, and new feature development with immediate feedback loops. It can also power production-ready AI assistants for near real-time applications. Sonnet 4 is a drop-in replacement from Claude Sonnet 3.7. In multi-agent systems, Sonnet 4 performs well as a task-specific subagent—handling responsibilities like targeted code reviews, search and retrieval, or isolated feature development within a broader pipeline. You can also use Sonnet 4 to manage continuous integration and delivery (CI/CD) pipelines, perform bug triage, or integrate APIs, all while maintaining high throughput and developer-aligned output.
Opus 4 and Sonnet 4 are hybrid reasoning models offering two modes: near-instant responses and extended thinking for deeper reasoning. You can choose near-instant responses for interactive applications, or enable extended thinking when a request benefits from deeper analysis and planning. Thinking is especially useful for long-context reasoning tasks in areas like software engineering, math, or scientific research. By configuring the model’s thinking budget—for example, by setting a maximum token count—you can tune the tradeoff between latency and answer depth to fit your workload.
How to get started To see Opus 4 or Sonnet 4 in action, enable the new model in your AWS account. Then, you can start coding using the Bedrock Converse API with model IDanthropic.claude-opus-4-20250514-v1:0 for Opus 4 and anthropic.claude-sonnet-4-20250514-v1:0 for Sonnet 4. We recommend using the Converse API, because it provides a consistent API that works with all Amazon Bedrock models that support messages. This means you can write code one time and use it with different models.
For example, let’s imagine I write an agent to review code before merging changes in a code repository. I write the following code that uses the Bedrock Converse API to send a system and user prompts. Then, the agent consumes the streamed result.
private let modelId = "us.anthropic.claude-sonnet-4-20250514-v1:0"

// Define the system prompt that instructs Claude how to respond
let systemPrompt = """
You are a senior iOS developer with deep expertise in Swift, especially Swift 6 concurrency. Your job is to perform a code review focused on identifying concurrency-related edge cases, potential race conditions, and misuse of Swift concurrency primitives such as Task, TaskGroup, Sendable, @MainActor, and @preconcurrency.

You should review the code carefully and flag any patterns or logic that may cause unexpected behavior in concurrent environments, such as accessing shared mutable state without proper isolation, incorrect actor usage, or non-Sendable types crossing concurrency boundaries.

Explain your reasoning in precise technical terms, and provide recommendations to improve safety, predictability, and correctness. When appropriate, suggest concrete code changes or refactorings using idiomatic Swift 6
"""
let system: BedrockRuntimeClientTypes.SystemContentBlock = .text(systemPrompt)

// Create the user message with text prompt and image
let userPrompt = """
Can you review the following Swift code for concurrency issues? Let me know what could go wrong and how to fix it.
"""
let prompt: BedrockRuntimeClientTypes.ContentBlock = .text(userPrompt)

// Create the user message with both text and image content
let userMessage = BedrockRuntimeClientTypes.Message(
    content: [prompt],
    role: .user
)

// Initialize the messages array with the user message
var messages: [BedrockRuntimeClientTypes.Message] = []
messages.append(userMessage)

// Configure the inference parameters
let inferenceConfig: BedrockRuntimeClientTypes.InferenceConfiguration = .init(maxTokens: 4096, temperature: 0.0)

// Create the input for the Converse API with streaming
let input = ConverseStreamInput(inferenceConfig: inferenceConfig, messages: messages, modelId: modelId, system: [system])

// Make the streaming request
do {
    // Process the stream
    let response = try await bedrockClient.converseStream(input: input)

    // Iterate through the stream events
    for try await event in stream {
        switch event {
        case .messagestart:
            print("AI-assistant started to stream"")

        case let .contentblockdelta(deltaEvent):
            // Handle text content as it arrives
            if case let .text(text) = deltaEvent.delta {
                self.streamedResponse + = text
                print(text, termination: "")
            }

        case .messagestop:
            print("\n\nStream ended")
            // Create a complete assistant message from the streamed response
            let assistantMessage = BedrockRuntimeClientTypes.Message(
                content: [.text(self.streamedResponse)],
                role: .assistant
            )
            messages.append(assistantMessage)

        default:
            break
        }
    }
To help you get started, my colleague Dennis maintains a broad range of code examples for multiple use cases and a variety of programming languages.
Available today in Amazon Bedrock This release gives developers immediate access in Amazon Bedrock, a fully managed, serverless service, to the next generation of Claude models developed by Anthropic. Whether you’re already building with Claude in Amazon Bedrock or just getting started, this seamless access makes it faster to experiment, prototype, and scale with cutting-edge foundation models—without managing infrastructure or complex integrations.
Claude Opus 4 is available in the following AWS Regions in North America: US East (Ohio, N. Virginia) and US West (Oregon). Claude Sonnet 4 is available not only in AWS Regions in North America but also in APAC, and Europe: US East (Ohio, N. Virginia), US West (Oregon), Asia Pacific (Hyderabad, Mumbai, Osaka, Seoul, Singapore, Sydney, Tokyo), and Europe (Spain). You can access the two models through cross-Region inference. Cross-Region inference helps to automatically select the optimal AWS Region within your geography to process your inference request.
Opus 4 tackles your most challenging development tasks, while Sonnet 4 excels at routine work with its optimal balance of speed and capability.
To provide the best experiences, we use technologies like cookies to store and/or access device information. Consenting to these technologies will allow us to process data such as browsing behavior or unique IDs on this site. Not consenting or withdrawing consent, may adversely affect certain features and functions.
Functional
Always active
The technical storage or access is strictly necessary for the legitimate purpose of enabling the use of a specific service explicitly requested by the subscriber or user, or for the sole purpose of carrying out the transmission of a communication over an electronic communications network.
Preferences
The technical storage or access is necessary for the legitimate purpose of storing preferences that are not requested by the subscriber or user.
Statistics
The technical storage or access that is used exclusively for statistical purposes.The technical storage or access that is used exclusively for anonymous statistical purposes. Without a subpoena, voluntary compliance on the part of your Internet Service Provider, or additional records from a third party, information stored or retrieved for this purpose alone cannot usually be used to identify you.
Marketing
The technical storage or access is required to create user profiles to send advertising, or to track the user on a website or across several websites for similar marketing purposes.