Tag Archives: Intermediate (200)

How to subscribe to the new Security Hub Announcements topic for Amazon SNS

Post Syndicated from Mike Saintcross original https://aws.amazon.com/blogs/security/how-to-subscribe-to-the-new-security-hub-announcements-topic-for-amazon-sns/

With AWS Security Hub you are able to manage your security posture in AWS, perform security best practice checks, aggregate alerts, and automate remediation. Now you are able to use Amazon Simple Notification Service (Amazon SNS) to subscribe to the new Security Hub Announcements topic to receive updates about new Security Hub services and features, newly supported standards and controls, and other Security Hub changes.

Introducing the Security Hub Announcements topic

Amazon SNS follows the publish/subscribe (pub/sub) messaging model, in which notifications are delivered to you by using a push mechanism that eliminates the need for you to periodically check or poll for new information and updates. You can now use this push mechanism to receive notifications about Security Hub by subscribing to the dedicated Security Hub Announcements topic.

The Security Hub Announcements topic publishes the following types of notifications:

  • General notifications
  • Upcoming standards and controls
  • New AWS Regions supported
  • New standards and controls
  • Updated standards and controls
  • Retired standards and controls
  • Updates to the AWS Security Finding Format (ASFF)
  • New integrations
  • New features
  • Changes to existing features

How to use the Security Hub Announcements topic

You can subscribe to the SNS topic for Security Hub Announcements to receive notification messages about newly released finding types, updates to the existing finding types, and other functionality changes. By subscribing to the SNS topic, you will receive Security Hub Announcements messages as soon as they are published. The notifications are available in all protocols that Amazon SNS supports, such as email and SMS. For more information about supported protocols in Amazon SNS, see Subscribing to an Amazon SNS topic.

The Security Hub Announcements topic is available in all AWS Regions in the aws and aws-cn partitions, but is not yet available in the AWS GovCloud (US) Regions (the aws-us-gov partition). Later in this post, we’ll show you how to subscribe to the Security Hub Announcements topic in a specific AWS Region by using the topic Amazon Resource Name (ARN) for that Region. The SNS topic messages are the same across Regions in a partition, so you can choose to subscribe to only one Region in a partition to avoid receiving duplicate information.

However, if you want to invoke an AWS Lambda function in reaction to a Security Hub Announcements message, you must subscribe to the topic ARN that is in the same Region as the Lambda function. The Lambda function can receive the SNS topic message payload as an input parameter and manipulate the information in the message, publish the message to other SNS topics, or send the message to other AWS services. For more information, see Subscribing a function to a topic in the Amazon SNS Developer Guide.

The same is true if you want to subscribe an Amazon Simple Queue Service (Amazon SQS) queue to the Security Hub Announcements topic, you must use a topic ARN that is in the same Region as the SQS queue. The SQS queue can be used to persist announcement SNS topic messages in the queue for other applications to process at a later time. For more information, see Subscribing an Amazon SQS queue to an Amazon SNS topic in the Amazon SQS Developer Guide.

IAM permissions

Your user account must have sns::subscribe AWS Identity and Access Management (IAM) permissions to subscribe to an SNS topic. For more information on IAM permissions for Amazon SNS, see Using identity-based policies with Amazon SNS.

Subscribe to the Security Hub Announcements topic

The following is the list of Security Hub Announcements topic ARNs for each currently supported Region. The examples in this post use the US West (Oregon) Region (us-west-2), but you can update the procedures with one of the following ARNs to use a different supported Region.

Security Hub Announcements topic ARNs by Region

arn:aws:sns:us-east-1:088139225913:SecurityHubAnnouncements
arn:aws:sns:us-east-2:291342846459:SecurityHubAnnouncements
arn:aws:sns:us-west-1:137690824926:SecurityHubAnnouncements
arn:aws:sns:us-west-2:393883065485:SecurityHubAnnouncements
arn:aws:sns:eu-central-1:871975303681:SecurityHubAnnouncements
arn:aws:sns:eu-north-1:191971010772:SecurityHubAnnouncements
arn:aws:sns:eu-south-1:151363035580:SecurityHubAnnouncements
arn:aws:sns:eu-west-1:705756202095:SecurityHubAnnouncements
arn:aws:sns:eu-west-2:883600840440:SecurityHubAnnouncements
arn:aws:sns:eu-west-3:313420042571:SecurityHubAnnouncements
arn:aws:sns:ca-central-1:137749997395:SecurityHubAnnouncements
arn:aws:sns:sa-east-1:359811883282:SecurityHubAnnouncements
arn:aws:sns:me-south-1:585146626860:SecurityHubAnnouncements
arn:aws:sns:af-south-1:463142546776:SecurityHubAnnouncements
arn:aws:sns:ap-northeast-1:592469075483:SecurityHubAnnouncements
arn:aws:sns:ap-northeast-2:374299265323:SecurityHubAnnouncements
arn:aws:sns:ap-northeast-3:633550238216:SecurityHubAnnouncements
arn:aws:sns:ap-southeast-1:512267288502:SecurityHubAnnouncements
arn:aws:sns:ap-southeast-2:475730049140:SecurityHubAnnouncements
arn:aws:sns:ap-southeast-3:627843640627:SecurityHubAnnouncements
arn:aws:sns:ap-east-1:464812404305:SecurityHubAnnouncements
arn:aws:sns:ap-south-1:707356269775:SecurityHubAnnouncements
arn:aws-cn:sns:cn-north-1:672341567257:SecurityHubAnnouncements
arn:aws-cn:sns:cn-northwest-1:672534482217:SecurityHubAnnouncements

The two procedures that follow show you how to subscribe an email address to the Security Hub Announcements topic by using the AWS Management Console and the AWS CLI.

To subscribe an email address to the Security Hub Announcements topic (console)

  1. Sign in to the Amazon SNS console.
  2. In the Region list, choose the same Region as the topic ARN to which you want to subscribe. This example uses the us-west-2 Region.
  3. In the left navigation pane, choose Subscriptions, then choose Create subscription.
  4. In the Create subscription dialog box, do the following:
    • For Topic ARN, paste the following topic ARN for the us-west-2 Region, or use one of the ARNs listed above for a different supported Region:

      arn:aws:sns:us-west-2:393883065485:SecurityHubAnnouncements

    • For Protocol, choose Email.
    • For Endpoint, enter an email address that you can use to receive the notification.
  5. Choose Create subscription.
  6. In your email application, open the message from AWS Notifications and open the link to confirm your subscription. Your web browser displays a confirmation response from Amazon SNS, similar to that shown in Figure 1.

    Figure 1: SNS notification subscription confirmation

    Figure 1: SNS notification subscription confirmation

The following steps show you how to subscribe an email address to the Security Hub Announcements topic by using the AWS Command Line Interface (AWS CLI).

To subscribe an email address to the Security Hub Announcements topic (AWS CLI)

  1. Run the following command in the AWS CLI, replacing <[email protected]> with your email address, and optionally replacing the ARN and reference to us-west-2 if you want to use a different Region:
    aws sns --region us-west-2 subscribe --topic-arn arn:aws:sns:us-west-2:393883065485:SecurityHubAnnouncements --protocol email --notification-endpoint <[email protected]>
  2. In your email application, open the message from AWS Notifications and open the link to confirm your subscription.
  3. Your web browser displays a confirmation response from Amazon SNS, similar to that shown in Figure 1.

Example subscription responses

The following sections contain examples of a message announcing new standard controls supported by Security Hub in email and sqs protocol types.

Example message from an email subscription (protocol type: email)

{"AnnouncementType":"NEW_STANDARDS_CONTROLS", “Title”:”[New Controls] 36 new Security Hub controls added to the AWS Foundational Security Best Practices standard”, "Description":"We have added 36 new controls to the AWS Foundational Security Best Practices standard. These include controls for Amazon Auto Scaling (AutoScaling.3, AutoScaling.4, AutoScaling.6), AWS CloudFormation (CloudFormation.1), Amazon CloudFront (CloudFront.10), Amazon Elastic Compute Cloud (Amazon EC2) (EC2.23, EC2.24, EC2.27), Amazon Elastic Container Registry (Amazon ECR) (ECR.1, ECR.2), Amazon Elastic Container Service (Amazon ECS) (ECS.3, ECS.4, ECS.5, ECS.8, ECS.10, ECS.12), Amazon Elastic File System (Amazon EFS) (EFS.3, EFS.4), Amazon Elastic Kubernetes Service (Amazon EKS) (EKS.2), Elastic Load Balancing (ELB.12, ELB.13, ELB.14), Amazon Kinesis (Kinesis.1), AWS Network Firewall (NetworkFirewall.3, NetworkFirewall.4, NetworkFirewall.5), Amazon OpenSearch Service (Opensearch.7), Amazon Redshift (Redshift.9), Amazon Simple Storage Service (Amazon S3) (S3.13), Amazon Simple Notification Service (SNS.2), AWF WAF (WAF.2, WAF.3, WAF.4, WAF.6, WAF.7, WAF.8). If you enabled the AWS Foundational Security Best Practices standard in an account and configured Security Hub to automatically enable new controls, these controls are enabled by default. Availability of controls can vary by Region."}

Example message from an SQS queue subscription (protocol type: sqs)

The following message shows the additional metadata included with an SQS subscription to the Security Hub Announcements topic. For more information about the metadata included in an SNS topic message delivered to an SQS queue, see Fanout to Amazon SQS Queues.

{
  "Type" : "Notification",
  "MessageId" : "c9c03e46-69df-5c3c-84e9-6520708ac394",
  "TopicArn" : "arn:aws:sns:us-west-2:393883065485:SecurityHubAnnouncements",
  "Message" : "{\"AnnouncementType\":\"NEW_STANDARDS_CONTROLS\",\"Title\":\"[New Controls] 36 new Security Hub controls added to the AWS Foundational Security Best Practices standard\",\"Description\":\"We have added 36 new controls to the AWS Foundational Security Best Practices standard. These include controls for Amazon Auto Scaling (AutoScaling.3, AutoScaling.4, AutoScaling.6), AWS CloudFormation (CloudFormation.1), Amazon CloudFront (CloudFront.10), Amazon Elastic Compute Cloud (Amazon EC2) (EC2.23, EC2.24, EC2.27), Amazon Elastic Container Registry (Amazon ECR) (ECR.1, ECR.2), Amazon Elastic Container Service (Amazon ECS) (ECS.3, ECS.4, ECS.5, ECS.8, ECS.10, ECS.12), Amazon Elastic File System (Amazon EFS) (EFS.3, EFS.4), Amazon Elastic Kubernetes Service (Amazon EKS) (EKS.2), Elastic Load Balancing (ELB.12, ELB.13, ELB.14), Amazon Kinesis (Kinesis.1), AWS Network Firewall (NetworkFirewall.3, NetworkFirewall.4, NetworkFirewall.5), Amazon OpenSearch Service (Opensearch.7), Amazon Redshift (Redshift.9), Amazon Simple Storage Service (Amazon S3) (S3.13), Amazon Simple Notification Service (SNS.2), AWF WAF (WAF.2, WAF.3, WAF.4, WAF.6, WAF.7, WAF.8). If you enabled the AWS Foundational Security Best Practices standard in an account and configured Security Hub to automatically enable new controls, these controls are enabled by default. Availability of controls can vary by Region. \"}",
  "Timestamp" : "2022-08-04T18:59:33.319Z",
  "SignatureVersion" : "1",
  "Signature" : "GdKokPEUexpKZn5da5u/p5eZF1cE3JUyL0uPVKmPnDzd3orkk5jJ211VsOflUFi6V9lSXF/V6RBpQN/9f3+JBFBprng7BRQwT9I4jSa1xOn1L3xKXEVGvWI6nl1oDqBl21Pj3owV+NZ+Exd2W0dpgg8B1LG4bYq5T73MjHjWGtelcBa15TpIz/+rynqanXCKCvc/50V/XZLjA5M7gU6Dzs9CULIjkdEpCsw5FvSxbtkEd6Ktx4LH7Zq6FlPKNli3EaEHRKh9uYPo6sR/yvF4RWg3E9O4dVsK7A8uTdR+pwVCU1M601KMRxO1OWF8VIdvyPINJND8Nu/70GRA2L+MRA==",
  "SigningCertURL" : "https://sns.us-west-2.amazonaws.com/SimpleNotificationService-56e67fcb41f6fec09b0196692625d385.pem",
  "UnsubscribeURL" : "https://sns.us-west-2.amazonaws.com/?Action=Unsubscribe&SubscriptionArn=arn:aws:sns:us-west-2:393883065485:SecurityHubAnnouncements:1eb29a83-8726-4366-891c-293ad5e35a53"
}

Note: You need to set up the SQS access policy in order for SNS to push message to the SNS queue. For more information, see Basic examples of Amazon SQS policies.

Available now

The SNS topic for Security Hub Announcements is available today in the Regions described in this post. Subscribe now to stay informed of Security Hub updates. With Amazon SNS, there is no minimum fee, and you pay only for what you use. For more information, see the Amazon SNS pricing page.

If you have feedback about this post, submit comments in the Comments section below. If you have questions about this post, contact AWS Support. You can also start a new thread on AWS Security Hub re:Post to get answers from the community.

Want more AWS Security news? Follow us on Twitter.

Mike Saintcross

Mike Saintcross

Mike Saintcross is a Security Consultant at AWS helping enterprise customers achieve their cloud security goals in an ever-changing threat landscape. His background is in Security Engineering with a focus on deep packet inspection, incident response, security orchestration, and automation.

Neha Joshi

Neha Joshi

Neha Joshi is a Senior Solutions Architect at AWS. She loves to brainstorm and develop solutions to help customers be successful on AWS. Outside of work, she enjoys hiking and audio books.

AWS announces migration plans for NIST 800-53 Revision 5

Post Syndicated from James Mueller original https://aws.amazon.com/blogs/security/aws-announces-migration-plans-for-nist-800-53-revision-5/

Amazon Web Services (AWS) is excited to begin migration plans for National Institute of Standards and Technology (NIST) 800-53 Revision 5.

The NIST 800-53 framework is a regulatory standard that defines the minimum baseline of security controls for U.S. federal information systems. In 2020, NIST released Revision 5 of the framework to improve security standards for industry partners and government agencies. The set of NIST 800-53 controls provides a foundation for additional laws and regulations within the U.S. government.

The Federal Information Security Modernization Act (FISMA) of 2014 is a law that requires federal agencies and contractors to meet information security standards. The Federal Risk and Authorization Management Program (FedRAMP) is a federal government program that provides a standardized approach to security assessment, authorization, and continuous monitoring of cloud services. Both FISMA and FedRAMP rely on the NIST 800-53 framework.

NIST 800-53 Revision 5

AWS meets the NIST 800-53 Revision 4 regulatory standards mandated by government authorities. NIST added numerous security enhancements, such as privacy and supply chain management, to Revision 5 to keep abreast of emerging threats to federal information systems.

In preparation for federal regulators to accept NIST 800-53 Revision 5 as the new requirement standard, AWS has begun efforts to adapt to the new security controls, processes, and procedures. AWS security compliance teams have analyzed the new requirements and launched a project to implement the updates. Although AWS is not required to migrate to the new Revision 5 standard until NIST announces the official regulatory compliance deadline, we are already taking steps to meet the deadline.

To learn more about AWS compliance programs, see the AWS Compliance Programs page.

 
If you have feedback about this post, submit comments in the Comments section below. If you have questions about this post, contact AWS Support.

Want more AWS Security news? Follow us on Twitter.

James Mueller

James Mueller

James is a Security Assurance Manager for AWS. For over 20 years, he has served customers in the private, public, and non-profit sectors delivering innovative information technology solutions. He currently leads security compliance efforts to drive adoption of AWS services.

How to deploy AWS Network Firewall by using AWS Firewall Manager

Post Syndicated from Harith Gaddamanugu original https://aws.amazon.com/blogs/security/how-to-deploy-aws-network-firewall-by-using-aws-firewall-manager/

AWS Network Firewall helps make it easier for you to secure virtual networks at scale inside Amazon Web Services (AWS). Without having to worry about availability, scalability, or network performance, you can now deploy Network Firewall with the AWS Firewall Manager service. Firewall Manager allows administrators in your organization to apply network firewalls across accounts. This post will take you through different deployment models and demonstrate with step-by-step instructions how this can be achieved.

Here’s a quick overview of the services used in this blog post:

  • Amazon Virtual Private Cloud (Amazon VPC) is a logically isolated virtual network. It has inbuilt network security controls and routing between VPC subnets by design. An internet gateway is a horizontally scaled, redundant, and highly available VPC component that allows communication between your VPC and the internet.
  • AWS Transit Gateway is a service that connects your VPCs to each other, to on-premises networks, to virtual private networks (VPNs), and to the internet through a central hub.
  • AWS Network Firewall is a service that secures network traffic at the organization and account levels. AWS Network Firewall policies govern the monitoring and protection behavior of these firewalls. The specifics of these policies are defined in rule groups. A rule group consists of rules that define reusable criteria for inspecting and processing network traffic. Network Firewall can support thousands of rules that can be based on a domain, port, protocol, IP address, or pattern matching.
  • AWS Firewall Manager is a security management service that acts as a central place for you to configure and deploy firewall rules across AWS Regions, accounts, and resources in AWS Organizations. Firewall Manager helps you to ensure that all firewall rules are consistently enforced, even as new accounts and resources are created. Firewall Manager integrates with AWS Network Firewall, Amazon Route 53 Resolver DNS Firewall, AWS WAF, AWS Shield Advanced, and Amazon VPC security groups.

Deployment models overview

When it comes to securing multiple AWS accounts, security teams categorize firewall deployment into centralized or distributed deployment models. Firewall Manager supports Network Firewall deployment in both modes. There are multiple additional deployment models available with Network Firewall. For more information about these models, see the blog post Deployment models for AWS Network Firewall.

Centralized deployment model

Network Firewall can be centrally deployed as an Amazon VPC attachment to a transit gateway that you set up with AWS Transit Gateway. Transit Gateway acts as a network hub and simplifies the connectivity between VPCs as well as on-premises networks. Transit Gateway also provides inter-Region peering capabilities to other transit gateways to establish a global network by using the AWS backbone. In a centralized transit gateway model, Firewall Manager can create one or more firewall endpoints for each Availability Zone within an inspection VPC. Network Firewall deployed in a centralized model covers the following use cases:

  • Filtering and inspecting traffic within a VPC or in transit between VPCs, also known as east-west traffic.
  • Filtering and inspecting ingress and egress traffic to and from the internet or on-premises networks, also known as north-south traffic.

Distributed deployment model

With the distributed deployment model, Firewall Manager creates endpoints into each VPC that requires protection. Each VPC is protected individually and VPC traffic isolation is retained. You can either customize the endpoint location by specifying which Availability Zones to create firewall endpoints in, or Firewall Manager can automatically create endpoints in those Availability Zones that have public subnets. Each VPC does not require connectivity to any other VPC or transit gateway. Network Firewall configured in a distributed model addresses the following use cases:

  • Protect traffic between a workload in a public subnet (for example, an EC2 instance) and the internet. Note that the only recommended workloads that should have a network interface in a public subnet are third-party firewalls, load balancers, and so on.
  • Protect and filter traffic between an AWS resource (for example Application Load Balancers or Network Load Balancers) in a public subnet and the internet.

Deploying Network Firewall in a centralized model with Firewall Manager

The following steps provide a high-level overview of how to configure Network Firewall with Firewall Manager in a centralized model, as shown in Figure 1.

Overview of how to configure a centralized model

  1. Complete the steps described in the AWS Firewall Manager prerequisites.
  2. Create an Inspection VPC in each Firewall Manager member account. Firewall Manager will use these VPCs to create firewalls. Follow the steps to create a VPC.
  3. Create the stateless and stateful rule groups that you want to centrally deploy as an administrator. For more information, see Rule groups in AWS Network Firewall.
  4. Build and deploy Firewall Manager policies for Network Firewall, based on the rule groups you defined previously. Firewall Manager will now create firewalls across these accounts.
  5. Finish deployment by updating the related VPC route tables in the member account, so that traffic gets routed through the firewall for inspection.
    Figure 1: Network Firewall centralized deployment model

    Figure 1: Network Firewall centralized deployment model

The following steps provide a detailed description of how to configure Network Firewall with Firewall Manager in a centralized model.

To deploy network firewall policy centrally with Firewall Manager (console)

  1. Sign in to your Firewall Manager delegated administrator account and open the Firewall Manager console under AWS WAF and Shield services.
  2. In the navigation pane, under AWS Firewall Manager, choose Security policies.
  3. On the Filter menu, select the AWS Region where your application is hosted, and choose Create policy. In this example, we choose US East (N. Virginia).
  4. As shown in Figure 2, under Policy details, choose the following:
    1. For AWS services, choose AWS Network Firewall.
    2. For Deployment model, choose Centralized.
      Figure 2: Network Firewall Manager policy type and Region for centralized deployment

      Figure 2: Network Firewall Manager policy type and Region for centralized deployment

  5. Choose Next.
  6. Enter a policy name.
  7. In the AWS Network Firewall policy configuration pane, you can choose to configure both stateless and stateful rule groups along with their logging configurations. In this example, we are not creating any rule groups and keep the default configurations, as shown in Figure 3. If you would like to add a rule group, you can create rule groups here and add them to the policy.
    Figure 3: AWS Network Firewall policy configuration

    Figure 3: AWS Network Firewall policy configuration

  8. Choose Next.
  9. For Inspection VPC configuration, select the account and add the VPC ID of the inspection VPC in each of the member accounts that you previously created, as shown in Figure 4. In the centralized model, you can only select one VPC under a specific account as the inspection VPC.
    Figure 4: Inspection VPC configuration

    Figure 4: Inspection VPC configuration

  10. For Availability Zones, select the Availability Zones in which you want to create the Network Firewall endpoint(s), as shown in Figure 5. You can select by Availability Zone name or Availability Zone ID. Optionally, if you want to specify the CIDR for each Availability Zone, or specify the subnets for firewall subnets, then you can add the CIDR blocks. If you don’t provide CIDR blocks, Firewall Manager queries your VPCs for available IP addresses to use. If you provide a list of CIDR blocks, Firewall Manager searches for new subnets only in the CIDR blocks that you provide.
    Figure 5: Network Firewall endpoint Availability Zones configuration

    Figure 5: Network Firewall endpoint Availability Zones configuration

  11. Choose Next.
  12. For Policy scope, choose VPC, as shown in Figure 6.
    Figure 6: Firewall Manager policy scope configuration

    Figure 6: Firewall Manager policy scope configuration

  13. For Resource cleanup, choose Automatically remove protections from resources that leave the policy scope. When you select this option, Firewall Manager will automatically remove Firewall Manager managed protections from your resources when a member account or a resource leaves the policy scope. Choose Next.
  14. For Policy tags, you don’t need to add any tags. Choose Next.
  15. Review the security policy, and then choose Create policy.
  16. To route traffic for inspection, you manually update the route configuration in the member accounts. Exactly how you do this depends on your architecture and the traffic that you want to filter. For more information, see Route table configurations for AWS Network Firewall.

Note: In current versions of Firewall Manager, centralized policy only supports one inspection VPC per account. If you want to have multiple inspection VPCs in an account to inspect multiple firewalls, you cannot deploy all of them through Firewall Manager centralized policy. You have to manually deploy to the network firewalls in each inspection VPC.

Deploying Network Firewall in a distributed model with Firewall Manager

The following steps provide a high-level overview of how to configure Network Firewall with Firewall Manager in a distributed model, as shown in Figure 7.

Overview of how to configure a distributed model

  1. Complete the steps described in the AWS Firewall Manager prerequisites.
  2. Create a new VPC with a desired tag in each Firewall Manager member account. Firewall Manager uses these VPC tags to create network firewalls in tagged VPCs. Follow these steps to create a VPC.
  3. Create the stateless and stateful rule groups that you want to centrally deploy as an administrator. For more information, see Rule groups in AWS Network Firewall.
  4. Build and deploy Firewall Manager policy for network firewalls into tagged VPCs based on the rule groups that you defined in the previous step.
  5. Finish deployment by updating the related VPC route tables in the member accounts to begin routing traffic through the firewall for inspection.
    Figure 7: Network Firewall distributed deployment model

    Figure 7: Network Firewall distributed deployment model

The following steps provide a detailed description how to configure Network Firewall with Firewall Manager in a distributed model.

To deploy Network Firewall policy distributed with Firewall Manager (console)

  1. Create new VPCs in member accounts and tag them. In this example, you launch VPCs in the US East (N. Virginia) Region. Create a new VPC in a member account by using the VPC wizard, as follows.
    1. Choose VPC with a Single Public Subnet. For this example, select a subnet in the us-east-1a Availability Zone.
    2. Add a desired tag to this VPC. For this example, use the key Network Firewall and the value yes. Make note of this tag key and value, because you will need this tag to configure the policy in the Policy scope step.
  2. Sign in to your Firewall Manager delegated administrator account and open the Firewall Manager console under AWS WAF and Shield services.
  3. In the navigation pane, under AWS Firewall Manager, choose Security policies.
  4. On the Filter menu, select the AWS Region where you created VPCs previously and choose Create policy. In this example, you choose US East (N. Virginia).
    1. For AWS services, choose AWS Network Firewall.
    2. For Deployment model, choose Distributed, and then choose Next.
      Figure 8: Network Firewall Manager policy type and Region for distributed deployment

      Figure 8: Network Firewall Manager policy type and Region for distributed deployment

  5. Enter a policy name.
  6. On the AWS Network Firewall policy configuration page, you can configure both stateless and stateful rule groups, along with their logging configurations. In this example you are not creating any rule groups, so you choose the default configurations, as shown in Figure 9. If you would like to add a rule group, you can create rule groups here and add them to the policy.
    Figure 9: Network Firewall policy configuration

    Figure 9: Network Firewall policy configuration

  7. Choose Next.
  8. In the Configure AWS Network Firewall Endpoint section, as shown in Figure 10, you can choose Custom endpoint configuration or Automatic endpoint configuration. In this example, you choose Custom endpoint configuration and select the us-east-1a Availability Zone. Optionally, if you want to specify the CIDR for each Availability Zone or specify the subnets for firewall subnets, then you can add the CIDR blocks. If you don’t provide CIDR blocks, Firewall Manager queries your VPCs for available IP addresses to use. If you provide a list of CIDR blocks, Firewall Manager searches for new subnets only in the CIDR blocks that you provide.
    Figure 10: Network Firewall endpoint Availability Zones configuration

    Figure 10: Network Firewall endpoint Availability Zones configuration

  9. Choose Next.
  10. For AWS Network Firewall route configuration, choose the following options, as shown in Figure 11. This will monitor the route configuration using the administrator account, to help ensure that traffic is routed as expected through the network firewalls.
    1. For Route management, choose Monitor.
    2. Under Traffic type, for Internet gateway, choose Add to firewall policy.
    3. Select the checkbox for Allow required cross-AZ traffic, and then choose Next.
      Figure 11: Network Firewall route management configuration

      Figure 11: Network Firewall route management configuration

  11. For Policy scope, select the following options to create network firewalls in previously tagged VPCs, as shown in Figure 12.
    1. For AWS accounts this policy applies to, choose All accounts under my AWS organization.
    2. For Resource type, choose VPC.
    3. For Resources, choose Include only resources that have the specified tags.
    4. For Key, enter Network Firewall. For Value, Enter Yes. The tag you are using here is the same tag defined in step 1.
      Figure 12: AWS Firewall Manager policy scope configuration

      Figure 12: AWS Firewall Manager policy scope configuration

      Important: Be careful when defining the policy scope. Each policy creates Network Firewall endpoints in all the VPCs and their Availability Zones that are within the policy scope. If you select an inappropriate scope, it could result in the creation of a large number of network firewalls and incur significant charges for AWS Network Firewall.

  12. For Resource cleanup, select the Automatically remove protections from resources that leave the policy scope check box, and then choose Next.
    Figure 13: Firewall Manager Resource cleanup configuration

    Figure 13: Firewall Manager Resource cleanup configuration

  13. For Policy tags, you don’t need to add any tags. Choose Next.
  14. Review the security policy, and then choose Create policy.
  15. To route traffic for inspection, you need to manually update the route configuration in the member accounts. Exactly how you do this depends on your architecture and the traffic that you want to filter. For more information, see Route table configurations for AWS Network Firewall.

Clean up

To avoid incurring future charges, delete the resources you created for this solution.

To delete Firewall Manager policy (console)

  1. Sign in to your Firewall Manager delegated administrator account and open the Firewall Manager console under AWS WAF and Shield services
  2. In the navigation pane, choose Security policies.
  3. Choose the option next to the policy that you want to delete.
  4. Choose Delete all policy resources, and then choose Delete. If you do not select Delete all policy resources, then only the firewall policy on the administrator account will be deleted, not network firewalls deployed in the other accounts in AWS Organizations.

To delete the VPCs you created as prerequisites

Conclusion

In this blog post, you learned how you can use either a centralized or a distributed deployment model for Network Firewall, so developers in your organization can build firewall rules, create security policies, and enforce them in a consistent, hierarchical manner across your entire infrastructure. As new applications are created, Firewall Manager makes it easier to bring new applications and resources into a consistent state by enforcing a common set of security rules.

For information about pricing, see the pages for AWS Firewall Manager pricing and AWS Network Firewall pricing. For more information, see the other AWS Network Firewall posts on the AWS Security Blog. Want more AWS Security how-to content, news, and feature announcements? Follow us on Twitter.

If you have feedback about this post, submit comments in the Comments section below. If you have questions about this post, start a new thread on the AWS Firewall Manager re:Post or contact AWS Support.

Want more AWS Security news? Follow us on Twitter.

Harith Gaddamanugu

Harith Gaddamanugu

Harith works at AWS as a Sr. Edge Specialist Solutions Architect. He stays motivated by solving problems for customers across AWS Perimeter Protection and Edge services. When he is not working, he enjoys spending time outdoors with friends and family.

Yang Liu

Yang Liu

Yang works as cloud support engineer II with AWS. On a daily basis, he provides solutions for customers’ cloud architecture questions related to networking infrastructure and the security domain. Outside of work, Yang loves traveling with his family and two Corgis, Cookie and Cache.

How to export AWS Security Hub findings to CSV format

Post Syndicated from Andy Robinson original https://aws.amazon.com/blogs/security/how-to-export-aws-security-hub-findings-to-csv-format/

AWS Security Hub is a central dashboard for security, risk management, and compliance findings from AWS Audit Manager, AWS Firewall Manager, Amazon GuardDuty, IAM Access Analyzer, Amazon Inspector, and many other AWS and third-party services. You can use the insights from Security Hub to get an understanding of your compliance posture across multiple AWS accounts. It is not unusual for a single AWS account to have more than a thousand Security Hub findings. Multi-account and multi-Region environments may have tens or hundreds of thousands of findings. With so many findings, it is important for you to get a summary of the most important ones. Navigating through duplicate findings, false positives, and benign positives can take time.

In this post, we demonstrate how to export those findings to comma separated values (CSV) formatted files in an Amazon Simple Storage Service (Amazon S3) bucket. You can analyze those files by using a spreadsheet, database applications, or other tools. You can use the CSV formatted files to change a set of status and workflow values to align with your organizational requirements, and update many or all findings at once in Security Hub.

The solution described in this post, called CSV Manager for Security Hub, uses an AWS Lambda function to export findings to a CSV object in an S3 bucket, and another Lambda function to update Security Hub findings by modifying selected values in the downloaded CSV file from an S3 bucket. You use an Amazon EventBridge scheduled rule to perform periodic exports (for example, once a week). CSV Manager for Security Hub also has an update function that allows you to update the workflow, customer-specific notation, and other customer-updatable values for many or all findings at once. If you’ve set up a Region aggregator in Security Hub, you should configure the primary CSV Manager for Security Hub stack to export findings only from the aggregator Region. However, you may configure other CSV Manager for Security Hub stacks that export findings from specific Regions or from all applicable Regions in specific accounts. This allows application and account owners to view their own Security Hub findings without having access to other findings for the organization.

How it works

CSV Manager for Security Hub has two main features:

  • Export Security Hub findings to a CSV object in an S3 bucket
  • Update Security Hub findings from a CSV object in an S3 bucket

Overview of the export function

The overview of the export function CsvExporter is shown in Figure 1.

Figure 1: Architecture diagram of the export function

Figure 1: Architecture diagram of the export function

Figure 1 shows the following numbered steps:

  1. In the AWS Management Console, you invoke the CsvExporter Lambda function with a test event.
  2. The export function calls the Security Hub GetFindings API action and gets a list of findings to export from Security Hub.
  3. The export function converts the most important fields to identify and sort findings to a 37-column CSV format (which includes 12 updatable columns) and writes to an S3 bucket.

Overview of the update function

To update existing Security Hub findings that you previously exported, you can use the update function CsvUpdater to modify the respective rows and columns of the CSV file you exported, as shown in Figure 2. There are 12 modifiable columns out of 37 (any changes to other columns are ignored), which are described in more detail in Step 3: View or update findings in the CSV file later in this post.

Figure 2: Architecture diagram of the update function

Figure 2 shows the following numbered steps:

Figure 2 shows the following numbered steps:

  1. You download the CSV file that the CsvExporter function generated from the S3 bucket and update as needed.
  2. You upload the CSV file that contains your updates to the S3 bucket.
  3. In the AWS Management Console, you invoke the CsvUpdater Lambda function with a test event containing the URI of the CSV file.
  4. CsvUpdater reads the updated CSV file from the S3 bucket.
  5. CsvUpdater identifies the minimum set of updates and invokes the Security Hub BatchUpdateFindings API action.

Step 1: Use the CloudFormation template to deploy the solution

You can set up and use CSV Manager for Security Hub by using either AWS CloudFormation or the AWS Cloud Development Kit (AWS CDK).

To deploy the solution (AWS CDK)

You can find the latest code in the aws-security-hub-csv-manager GitHub repository, where you can also contribute to the sample code. The following commands show how to deploy the solution by using the AWS CDK. First, the AWS CDK initializes your environment and uploads the AWS Lambda assets to an S3 bucket. Then, you deploy the solution to your account by using the following commands. Replace <INSERT_AWS_ACCOUNT> with your account number, and replace <INSERT_REGION> with the AWS Region that you want the solution deployed to, for example us-east-1.

cdk bootstrap aws://<INSERT_AWS_ACCOUNT>/<INSERT_REGION>
cdk deploy

To deploy the solution (CloudFormation)

  1. Choose the following Launch Stack button to open the AWS CloudFormation console pre-loaded with the template for this solution:

    Launch Stack

  2. In the Parameters section, as shown in Figure 3, enter your values.
    Figure 3: CloudFormation template variables

    Figure 3: CloudFormation template variables

    1. For What folder for CSV Manager for Security Hub Lambda code, leave the default Code. For What folder for CSV Manager for Security Hub exports, leave the default Findings.

      These are the folders within the S3 bucket that the CSV Manager for Security Hub CloudFormation template creates to store the Lambda code, as well as where the findings are exported by the Lambda function.

    2. For Frequency, for this solution you can leave the default value cron(0 8 ? * SUN *). This default causes automatic exports to occur every Sunday at 8:00 AM local time using an EventBridge scheduled rule. For more information about how to update this value to meet your needs, see Schedule Expressions for Rules in the Amazon CloudWatch Events User Guide.
    3. The values you enter for the Regions field depend on whether you have configured an aggregation Region in Security Hub.
      • If you have configured an aggregation Region, enter only that Region code, for example eu-north-1, as shown in Figure 3.
      • If you haven’t configured an aggregation Region, enter a comma-separated list of Regions in which you have enabled Security Hub, for example us-east-1, eu-west-1, eu-west-2.
      • If you would like to export findings from all Regions where Security Hub is enabled, leave the Regions field blank. Regions where Security Hub is not enabled will generate a message and will be skipped.
  3. Choose Next.

The CloudFormation stack deploys the necessary resources, including an EventBridge scheduling rule, AWS System Managers Automation documents, an S3 bucket, and Lambda functions for exporting and updating Security Hub findings.

After you deploy the CloudFormation stack

After you create the CSV Manager for Security Hub stack, you can do the following:

  1. Perform the export function to write some or all Security Hub findings to a CSV file by following the instructions in Step 2: Export Security Hub findings to a CSV file later in this post.
  2. Perform a bulk update of Security Hub findings by following the instructions in Step 3: View or update findings in the CSV file later in this post. You can make changes to one or more of the 12 updatable columns of the CSV file, and perform the update function to update some or all Security Hub findings.

Step 2: Export Security Hub findings to a CSV file

You can export Security Hub findings from the AWS Lambda console. To do this, you create a test event and invoke the CsvExporter Lambda function. CsvExporter exports all Security Hub findings from all applicable Regions to a single CSV file in the S3 bucket for CSV Manager for Security Hub.

To export Security Hub findings to a CSV file

  1. In the AWS Lambda console, find the CsvExporter Lambda function and select it.
  2. On the Code tab, choose the down arrow at the right of the Test button, as shown in Figure 4, and select Configure test event.
    Figure 4: The down arrow at the right of the Test button

    Figure 4: The down arrow at the right of the Test button

  3. To create an empty test event, on the Configure test event page, do the following:
    1. Choose Create a new event.
    2. Enter an event name; in this example we used testEvent.
    3. For Template, leave the default hello-world.
    4. For Event JSON, enter the JSON object {} as shown in Figure 5.
    Figure 5: Creating an empty test event

    Figure 5: Creating an empty test event

  4. Choose Save to save the empty test event.
  5. To invoke the Lambda function, choose the Test button, as shown in Figure 6.
    Figure 6: Test button to invoke the Lambda function

    Figure 6: Test button to invoke the Lambda function

  6. On the Execution Results tab, note the following details, which you will need for the next step.
    {
    "message": "Export succeeded", 
    "bucket": DOC-EXAMPLE-BUCKET,
    "exportKey”: DOC-EXAMPLE-OBJECT,
    "resultCode": 200
    }

  7. Locate the CSV object that matches the value of “exportKey” (in this example, DOC-EXAMPLE-OBJECT) in the S3 bucket that matches the value of “bucket” (in this example, DOC-EXAMPLE-BUCKET).

Now you can view or update the findings in the CSV file, as described in the next section.

Step 3: (Optional) Using filters to limit CSV results

In your test event, you can specify any filter that is accepted by the GetFindings API action. You do this by adding a filter key to your test event. The filter key can either contain the word HighActive (which is a predefined filter configured as a default for selecting active high-severity and critical findings, as shown in Figure 8), or a JSON filter object.

Figure 8 depicts an example JSON filter that performs the same filtering as the HighActive predefined filter.

To use filters to limit CSV results

  1. In the AWS Lambda console, find the CsvExporter Lambda function and select it.
  2. On the Code tab, choose the down arrow at the right of the Test button, as shown in Figure 7, and select Configure test event.
    Figure 7: The down arrow at the right of the Test button

    Figure 7: The down arrow at the right of the Test button

  3. To create a test event containing a filter, on the Configure test event page, do the following:
    1. Choose Create a new event.
    2. Enter an event name; in this example we used filterEvent.
    3. For Template, select testEvent,
    4. For Event JSON, enter the following JSON object, as shown in Figure 8.
      {
         "SeverityLabel":[
            {
               "Value":"CRITICAL",
               "Comparison":"EQUALS"
            },
            {
               "Value":"HIGH",
               "Comparison":"EQUALS"
            }
         ],
         "RecordState":[
            {
               "Comparison":"EQUALS",
               "Value":"ACTIVE"
            }
         ]
      }

      Figure 8: Test button to invoke the Lambda function

      Figure 8: Test button to invoke the Lambda function

    5. Choose Save.
  4. To invoke the Lambda function, choose the Test button as shown in Figure 9.
    Figure 9: Test button to invoke the Lambda function

    Figure 9: Test button to invoke the Lambda function

  5. On the Execution Results tab, note the following details, which you will need for the next step.
    {
    "message": "Export succeeded", 
    "bucket": DOC-EXAMPLE-BUCKET,
    "exportKey": DOC-EXAMPLE-OBJECT,
    "resultCode": 200
    }

  6. Locate the CSV object that matches the value of “exportKey” (in this example, DOC-EXAMPLE-OBJECT) in the S3 bucket that matches the value of “bucket” (in this example, DOC-EXAMPLE-BUCKET).

The results in this CSV file should be a filtered set of Security Hub findings according to the filter you specified above. You can now proceed to step 4 if you want to view or update findings.

Step 4: View or update findings in the CSV file

You can use any program that allows you to view or edit CSV files, such as Microsoft Excel. The first row in the CSV file are the column names. These column names correspond to fields in the JSON objects that are returned by the GetFindings API action.

Warning: Do not modify the first two columns, Id (column A) or ProductArn (column B). If you modify these columns, Security Hub will not be able to locate the finding to update, and any other changes to that finding will be discarded.

You can locally modify any of the columns in the CSV file, but only 12 columns out of 37 columns will actually be updated if you use CsvUpdater to update Security Hub findings. The following are the 12 columns you can update. These correspond to columns C through N in the CSV file.

Column name Spreadsheet column Description
Criticality C An integer value between 0 and 100.
Confidence D An integer value between 0 and 100.
NoteText E Any text you wish
NoteUpdatedBy F Automatically updated with your AWS principal user ID.
CustomerOwner* G Information identifying the owner of this finding (for example, email address).
CustomerIssue* H A Jira issue or another identifier tracking a specific issue.
CustomerTicket* I A ticket number or other trouble/problem tracking identification.
ProductSeverity** J A floating-point number from 0.0 to 99.9.
NormalizedSeverity** K An integer between 0 and 100.
SeverityLabel L One of the following:

  • INFORMATIONAL
  • LOW
  • MEDIUM
  • HIGH
  • HIGH
  • CRITICAL
VerificationState M One of the following:

  • UNKNOWN — Finding has not been verified yet.
  • TRUE_POSITIVE — This is a valid finding and should be treated as a risk.
  • FALSE_POSITIVE — This an incorrect finding and should be ignored or suppressed.
  • BENIGN_POSITIVE — This is a valid finding, but the risk is not applicable or has been accepted, transferred, or mitigated.
Workflow N One of the following:

  • NEW — This is a new finding that has not been reviewed.
  • NOTIFIED — The responsible party or parties have been notified of this finding.
  • RESOLVED — The finding has been resolved.
  • SUPPRESSED — A false or benign finding has been suppressed so that it does not appear as a current finding in Security Hub.

* These columns are stored inside the UserDefinedFields field of the updated findings. The column names imply a certain kind of information, but you can put any information you wish.

** These columns are stored inside the Severity field of the updated findings. These values have a fixed format and will be rejected if they do not meet that format.

Columns with fixed text values (L, M, N) in the previous table can be specified in mixed case and without underscores—they will be converted to all uppercase and underscores added in the CsvUpdater Lambda function. For example, “false positive” will be converted to “FALSE_POSITIVE”.

Step 5: Create a test event and update Security Hub by using the CSV file

If you want to update Security Hub findings, make your changes to columns C through N as described in the previous table. After you make your changes in the CSV file, you can update the findings in Security Hub by using the CSV file and the CsvUpdater Lambda function.

Use the following procedure to create a test event and run the CsvUpdater Lambda function.

To create a test event and run the CsvUpdater Lambda function

  1. In the AWS Lambda console, find the CsvUpdater Lambda function and select it.
  2. On the Code tab, choose the down arrow to the right of the Test button, as shown in Figure 10, and select Configure test event.
    Figure 10: The down arrow to the right of the Test button

    Figure 10: The down arrow to the right of the Test button

  3. To create a test event as shown in Figure 11, on the Configure test event page, do the following:
    1. Choose Create a new event.
    2. Enter an event name; in this example we used testEvent.
    3. For Template, leave the default hello-world.
    4. For Event JSON, enter the following:
      {
      "input": <s3ObjectUri>,
      "primaryRegion": <aggregationRegionName>
      }

      Replace <s3ObjectUri> with the full URI of the S3 object where the updated CSV file is located.

      Replace <aggregationRegionName> with your Security Hub aggregation Region, or the primary Region in which you initially enabled Security Hub.

      Figure 11: Create and save a test event for the CsvUpdater Lambda function

      Figure 11: Create and save a test event for the CsvUpdater Lambda function

  4. Choose Save.
  5. Choose the Test button, as shown in Figure 12, to invoke the Lambda function.
    Figure 12: Test button to invoke the Lambda function

    Figure 12: Test button to invoke the Lambda function

  6. To verify that the Lambda function ran successfully, on the Execution Results tab, review the results for “message”: “Success”, as shown in the following example. Note that the results may be thousands of lines long.
    {
    "message": "Success",
    "details": {
    "processed": [{"Id": arn:aws:securityhub:us-east-1: 111122223333:subscription/cis-aws-foundations-benchmark/v/1.2.0/1.7/finding/6d543b22-6a3d-405c-ae7f-224469bde7d2, "ProductArn": arn:aws:securityhub:us-east-1::product/aws/securityhub}, … ],
    "unprocessed": [],
    "message": "Updated succeeded",
    "success": true
    },
    "input": s3://DOC-EXAMPLE-BUCKET/DOC-EXAMPLE-OBJECT,
    "resultCode": 200
    }

    The processed array lists every successfully updated finding by Id and ProductArn.

    If any of the findings were not successfully updated, their Id and ProductArn appear in the unprocessed array. In the previous example, no findings were unprocessed.

    The value s3://DOC-EXAMPLE-BUCKET/DOC-EXAMPLE-OBJECT is the URI of the S3 object from which your updates were read.

Cleaning up

To avoid incurring future charges, first delete the CloudFormation stack that you deployed in Step 1: Use the CloudFormation template to deploy the solution. Next, you need to manually delete the S3 bucket deployed with the stack. For instructions, see Deleting a bucket in the Amazon Simple Storage Service User Guide.

Conclusion

In this post, we showed you how you can export Security Hub findings to a CSV file in an S3 bucket and update the exported findings by using CSV Manager for Security Hub. We showed you how you can automate this process by using AWS Lambda, Amazon S3, and AWS Systems Manager. Full documentation for CSV Manager for Security Hub is available in the aws-security-hub-csv-manager GitHub repository. You can also investigate other ways to manage Security Hub findings by checking out our blog posts about Security Hub integration with Amazon OpenSearch Service, Amazon QuickSight, Slack, PagerDuty, Jira, or ServiceNow.

If you have feedback about this post, submit comments in the Comments section below. If you have questions about this post, start a new thread on the Security Hub re:Post. To learn more or get started, visit AWS Security Hub.

Want more AWS Security news? Follow us on Twitter.

Andy Robinson

Andy Robinson

Andy wrote CSV Manager for Security Hub in response to requests from several customers. He is an AWS Professional Services Senior Security Consultant with over 30 years of security, software product management, and software design experience. Andy is also a pilot, scuba instructor, martial arts instructor, ham radio enthusiast, and photographer.

Murat Eksi

Murat Eksi

Murat is a full-stack technologist at AWS Professional Services. He has worked with various industries, including finance, sports, media, gaming, manufacturing, and automotive, to accelerate their business outcomes through application development, security, IoT, analytics, devops and infrastructure. Outside of work, he loves traveling around the world, learning new languages while setting up local events for entrepreneurs and business owners in Stockholm, or taking flight lessons.

Shikhar Mishra

Shikhar Mishra

Shikhar is a Senior Solutions Architect at Amazon Web Services. He is a cloud security enthusiast and enjoys helping customers design secure, reliable, and cost-effective solutions on AWS.

Rohan Raizada

Rohan Raizada

Rohan is a Solutions Architect for Amazon Web Services. He works with enterprises of all sizes with their cloud adoption to build scalable and secure solutions using AWS. During his free time, he likes to spend time with family and go cycling outdoors.

Jonathan Nguyen

Jonathan Nguyen

Jonathan is a Shared Delivery Team Senior Security Consultant at AWS. His background is in AWS Security with a focus on threat detection and incident response. Today, he helps enterprise customers develop a comprehensive security strategy and deploy security solutions at scale, and he trains customers on AWS Security best practices.

How to detect suspicious activity in your AWS account by using private decoy resources

Post Syndicated from Maitreya Ranganath original https://aws.amazon.com/blogs/security/how-to-detect-suspicious-activity-in-your-aws-account-by-using-private-decoy-resources/

As customers mature their security posture on Amazon Web Services (AWS), they are adopting multiple ways to detect suspicious behavior and notify response teams or workflows to take action. One example is using Amazon GuardDuty to monitor AWS accounts and workloads for malicious activity and deliver detailed security findings for visibility and remediation. Another tactic is to deploy decoys, also called honeypots, as an effective way to detect suspicious behavior.

In this blog post, we’ll show how you can create low-cost private decoy AWS resources in your AWS accounts and configure them to generate alerts when they are accessed. These decoy resources appear legitimate but don’t contain any useful or sensitive data and typically are not accessed in the normal course of business by your users and systems. Any attempt to access them is a clear signal of suspicious activity that should be investigated. You can use data sources like AWS CloudTrail, services like Amazon Detective, and your own security incident and event monitoring (SIEM) systems to investigate the activity further. This post is aimed at experienced AWS users and security professionals.

Detecting suspicious activity

Imagine that an unauthorized user has obtained credentials for your account. This could also be an insider, malicious or careless, using their valid credentials inappropriately. The unauthorized user might use these credentials to invoke AWS API calls to list resources in your account. As the next step, they might try to access resources that are commonly used to store sensitive data—such as objects in Amazon Simple Storage Service (Amazon S3) buckets, secrets in AWS Secrets Manager, or items in Amazon DynamoDB. They might also try to elevate their privileges by assuming other Identity and Access Management (IAM) roles in your account. In your role as a security professional, your task is to detect this suspicious behaviour and take actions in response. One approach is to learn the baseline of activities of the IAM users and roles in your account and flag any deviations from the learned baseline—this is the approach taken by GuardDuty when it generates findings such as Discovery:IAMUser/AnomalousBehavior.

This post focuses on another approach of creating private decoy resources in your account that are intended to look legitimate, but don’t have any useful or sensitive data and are not exposed publicly. These decoys are designed to alert you about suspicious activities that could indicate AWS credentials exposure or account compromise. You can use the decoys in conjunction with other techniques, such as creating deception environments and public and private honeypots to better detect suspicious activity in your accounts and applications.

The Fidelity-Isolation-Cost trilemma

In an ACM Queue article titled Lamboozling Attackers: A New Generation of Deception, Kelly Shortridge and Ryan Petrich introduced the Fidelity-Isolation-Cost (FIC) trilemma that “captures the most important dimensions of designing deception systems: fidelity, isolation, and cost.” Using their definition of the FIC trilemma, we see that decoy AWS resources can be well suited to designing deception systems:

  • Fidelity – Because the decoys are actual AWS resources, they behave like other legitimate resources and have high fidelity. For example, a decoy S3 bucket behaves exactly like any other S3 bucket, with the only exception being that the object data it contains is dummy and not useful. However, the unauthorized user only discovers this fact after downloading the object data and generating an automated alert to your security team.
  • Isolation – You can simply isolate the decoy AWS resources from other resources in the same account. For example, an S3 bucket is inherently isolated from other S3 buckets in the same account. An unauthorized user that can read the decoy S3 bucket does not, by doing so, get the ability to access or impact the availability of other resources in the account. The credentials obtained by the unauthorized user might have permissions to actions on other services, but the presence of the decoy S3 bucket doesn’t add to those permissions in any way.
  • Cost – You can keep the cost of deception low by choosing AWS resources that have no cost or low cost to deploy, are deployed by means of automation, and require no further operation or maintenance effort. For example, an S3 bucket with several files that are a few MB in size costs a fraction of a US cent per month for storage. The API request cost should be zero, because the bucket is designed never to be accessed in the normal course of business. Choosing similar zero or low-cost resources can make it cost-effective and feasible to create such decoy resources in multiple accounts, including in Production accounts, where it’s especially important to detect suspicious activity.

Examples of private decoy AWS resources

The following table shows examples of private decoy AWS resources that are high-fidelity, high-isolation, low-cost and are suitable to be deployed in an account that has sensitive data or applications. The table also lists the CloudTrail event fields that provide the source and name for accesses to each resource. You can use these CloudTrail events to create corresponding Amazon EventBridge rules that will generate alerts and notifications.

Private decoy resource CloudTrail event source CloudTrail event names Considerations
S3 bucket and S3 objects with dummy data s3.amazonaws.com GetObject
HeadObject
Ensure that the S3 objects do not contain any sensitive data.

S3 data events must be enabled in CloudTrail for the decoy S3 bucket

IAM role that should never be assumed sts.amazonaws.com AssumeRole Ensure that the IAM policies attached to this role allow access only to decoy resources and no other data or resources.

Ensure that the IAM role’s trust policy only trusts principals in the same account to assume the role.

Secrets Manager secret (See Note at end of table) kms.amazonaws.com Decrypt Ensure that the secret value does not contain any sensitive data.
AWS Systems Manager Parameter Store parameter (See Note at end of table) kms.amazonaws.com Decrypt Ensure that the parameter value does not contain any sensitive data.
DynamoDB table that contains items with dummy data dynamodb.amazonaws.com BatchExecuteStatement
BatchGetItem
BatchWriteItem
DeleteItem
ExecuteStatement
ExecuteTransaction
GetItem
PutItem
Query
Scan
TransactGetItems
TransactWriteItems
UpdateItem
Ensure that the item does not have any sensitive data.

DynamoDB data events must be enabled in CloudTrail for the decoy DynamoDB table.

Note: When CloudTrail Management API events are sent to EventBridge, read-only events such as Get*, List*, and Describe* are filtered out and not processed. In order to get findings for secrets and Systems Manager parameters that are being accessed, you need to alert on GetSecretValue and GetParameter API calls. Since these are not processed by EventBridge, you can instead use the fact that secrets and secure string parameters are encrypted by using AWS Key Management Service (AWS KMS), and match on the corresponding AWS KMS Decrypt API calls. This means that successful calls from an unauthorized user to GetSecretValue and GetParameter are able to be matched and alerted on.

Notifications from matching EventBridge rules can be sent to an AWS Lambda function that generates custom findings in Security Hub. These findings can then be sent to downstream systems that you might have configured in your environment, such as your SIEM system or an automated response workflow in your Security Orchestration, Automation, and Response system. Figure 1 shows this workflow.

Figure 1: Accesses to decoy resources automatically create custom Security Hub findings

Figure 1: Accesses to decoy resources automatically create custom Security Hub findings

Deploy the private decoy resources

We’ve provided an AWS CloudFormation template that you can use to deploy the solution. The template creates the following private decoy AWS resources in your account:

  • DynamoDB table
  • IAM role
  • S3 bucket with a decoy S3 object
  • Systems Manager SecureString parameter
  • Secrets Manager secret

In addition, the CloudFormation template deploys the following resources in your account to detect accesses to the decoys and send custom findings to Security Hub:

  • A CloudTrail data events trail that includes only data events from the decoy S3 bucket and DynamoDB table
  • Six EventBridge rules to match specific CloudTrail API events
  • Two Lambda functions with corresponding IAM roles:
    • The WriteData Lambda function is a CloudFormation custom resource that is used to create the decoy S3 object and the Systems Manager SecureString parameter
    • The Data Lambda function is a target for the EventBridge rules, and it sends custom findings to Security Hub when the decoy resources are accessed

Prerequisites

The prerequisites to deploying the solution are as follows:

  • Security Hub must be enabled in the AWS Regions where the private decoys will be deployed, in order to receive custom findings.
  • You must have created a CloudTrail trail to log management events for the AWS account in the Region where you deploy the private decoys. This trail can be created locally in the account or can be an organization trail. Ensure that you have enabled both read and write events, and enabled all AWS KMS events in the trail (this is the default configuration).

Deploy the solution

After you have the prerequisites set up, you can launch the CloudFormation template to deploy the private decoys.

To launch the template

  1. Choose the following Launch Stack button to launch a CloudFormation stack in your account.

    Launch Stack

    Note: The stack will launch in the N. Virginia (us-east-1) Region. To deploy this solution into other AWS Regions, download the solution’s CloudFormation template, modify it, and deploy it to the selected Region. In order to get maximum coverage for detecting suspicious activity, we recommend that you deploy the solution into your key production accounts and Regions.

  2. On the Specify stack details page, enter the stack name, then choose Next.

    The CloudFormation template will use the stack name as part of the naming of the resources that are created. We recommend that you use your organization’s existing naming conventions for stack names, and not make reference to decoy resources, because this could alert any unauthorized user to the real purpose of the resources they’re attempting to access.

    Figure 2: Specify stack details

    Figure 2: Specify stack details

  3. Configure any tags or other organization-specific stack options you need, or accept the default settings, and then choose Next.
  4. Review the CloudFormation settings and select the box acknowledging that AWS CloudFormation might create IAM resources with custom names, and then choose Create stack.
  5. After the stack has completed deployment, the CloudFormation stack output will show the Amazon Resource Names (ARNs) of the decoy resources that were created.
    Figure 3: CloudFormation stack outputs

    Figure 3: CloudFormation stack outputs

Estimated costs

This solution has been designed to keep costs as low as possible, by using services that have no associated costs (such as IAM roles or any parameters stored in Systems Manager Parameter Store), and keeping the use of paid for services (such as S3 and DynamoDB) to a minimum.

Deploying the solution as outlined in this blog post should result in a cost of less than $1 per month for a single account deployment, however please refer to the AWS Pricing Calculator where you can create a pricing estimate based on your deployment using the most up-to-date pricing information.

Test the alerts

In normal circumstances, after you configure the decoys, there will be no attempted access to these resources, and no findings will be sent to Security Hub in your account. To test that the configuration is working as expected, you can issue the following commands from a device that has programmatic access to your account where the private decoy resources have been deployed. To run each command, replace the bracketed, italicized text with your own information. You can find the details for each of the resources in the outputs section of the CloudFormation stack after it has been deployed successfully.

S3 object access

  • aws s3 cp s3://<bucket_name/object_name> /tmp
  • aws s3 cp s3://<bucket_name/object_name> s3://<any_existing_bucket>

IAM role assumption

  • aws sts assume-role –role-arn <role_name> –role-session-name BlogTestRole

Secrets Manager access

  • aws secretsmanager get-secret-value –secret-id <secret_name>

Parameter Store access

  • aws ssm get-parameters –names <ssm_parameter> –with-decryption

    DynamoDB table scan

  • aws dynamodb scan –table-name <table_name>

An example of what these test-generated findings looks like is shown in Figure 4.

Figure 4: Security Hub findings

Figure 4: Security Hub findings

Considerations

Consider the following as you deploy decoy AWS resources:

  • You should consider decoy AWS resources as enhancements to your foundational security controls. Your foundational controls should include these measures:
    • Help prevent the compromise of AWS credentials and limit the privileges of credentials by implementing strong identity management and permissions management.
    • Identify and investigate alerts generated by decoy resources by implementing detective controls.
    • Implement incident response mechanisms to respond to and mitigate the potential impact of security incidents, such as a decoy AWS resource being accessed.
  • You should ensure that your monitoring services and tools are configured to query the configuration of resources and not the data stored in resources. Otherwise, you might get a large volume of false positives because every time a resource is accessed, a custom finding is created in Security Hub. For example, consider a service like Security Hub Security Standards checks, or a cloud security posture management (CSPM) tool that monitors your S3 buckets by describing the properties of all buckets in your account. Such tools will find the decoy S3 bucket and will interrogate its configuration by making calls such as GetBucketPolicy and GetBucketLogging. However, as long as these tools don’t try to read data in the bucket through calls such as GetObject, the EventBridge rules that are configured as described in this post won’t generate a finding.
  • As a specific example of the previous point, ensure that you don’t run a sensitive data discovery job in Amazon Macie on the decoy S3 bucket, to avoid false alerts. You can configure Amazon Macie to monitor the metadata of your S3 buckets, because those actions won’t generate alerts.
  • The solution generates custom findings in Security Hub only for successful accesses of Secrets Manager secrets and Systems Manager parameters. However, both successful and unsuccessful accesses of S3 objects and DynamoDB items, and IAM role assumption, will generate custom findings in Security Hub.

Conclusion

In this post, we discussed the advantages of using private decoy AWS resources to detect suspicious activities within your account and how these decoys can complement your existing security solutions. You learned how to create private decoys, set up alerting, and ingest (and test) these alerts as custom findings into Security Hub for central visibility across your AWS environment. The solution deployment included a set of common resources as private decoys; however, the necessary code and templates can be found in our GitHub repository, and you can extend and customize these to add other resources that you want to include in your accounts.

If you would also like to learn about using CloudTrail as another method of detecting unexpected behavior within your accounts, see the blog post Using CloudTrail to identify unexpected behaviors in individual workloads for more information.

If you have feedback about this post, submit comments in the Comments section below. If you have questions about this post, contact AWS Support.

Want more AWS Security news? Follow us on Twitter.

Author

Maitreya Ranganath

Maitreya is an AWS Security Solutions Architect. He enjoys helping customers solve security and compliance challenges and architect scalable and cost-effective solutions on AWS.

Mark Keating

Mark Keating

Mark is an AWS Security Solutions Architect based out of the U.K. who works with Global Healthcare & Life Sciences and Automotive customers to solve their security and compliance challenges and help them reduce risk. He has over 20 years of experience working with technology, within in operations, solution, and enterprise architecture roles.

New row and column interactivity options for tables and pivot tables in Amazon QuickSight – Part 1

Post Syndicated from Bhupinder Chadha original https://aws.amazon.com/blogs/big-data/part-1-new-row-and-column-interactivity-options-for-tables-and-pivot-tables-in-amazon-quicksight/

Amazon QuickSight is a fully-managed, cloud-native business intelligence (BI) service that makes it easy to create and deliver insights to everyone in your organization. You can make your data come to life with rich interactive charts and create beautiful dashboards to share with thousands of users, either directly within a QuickSight application, or embedded in web apps and portals.

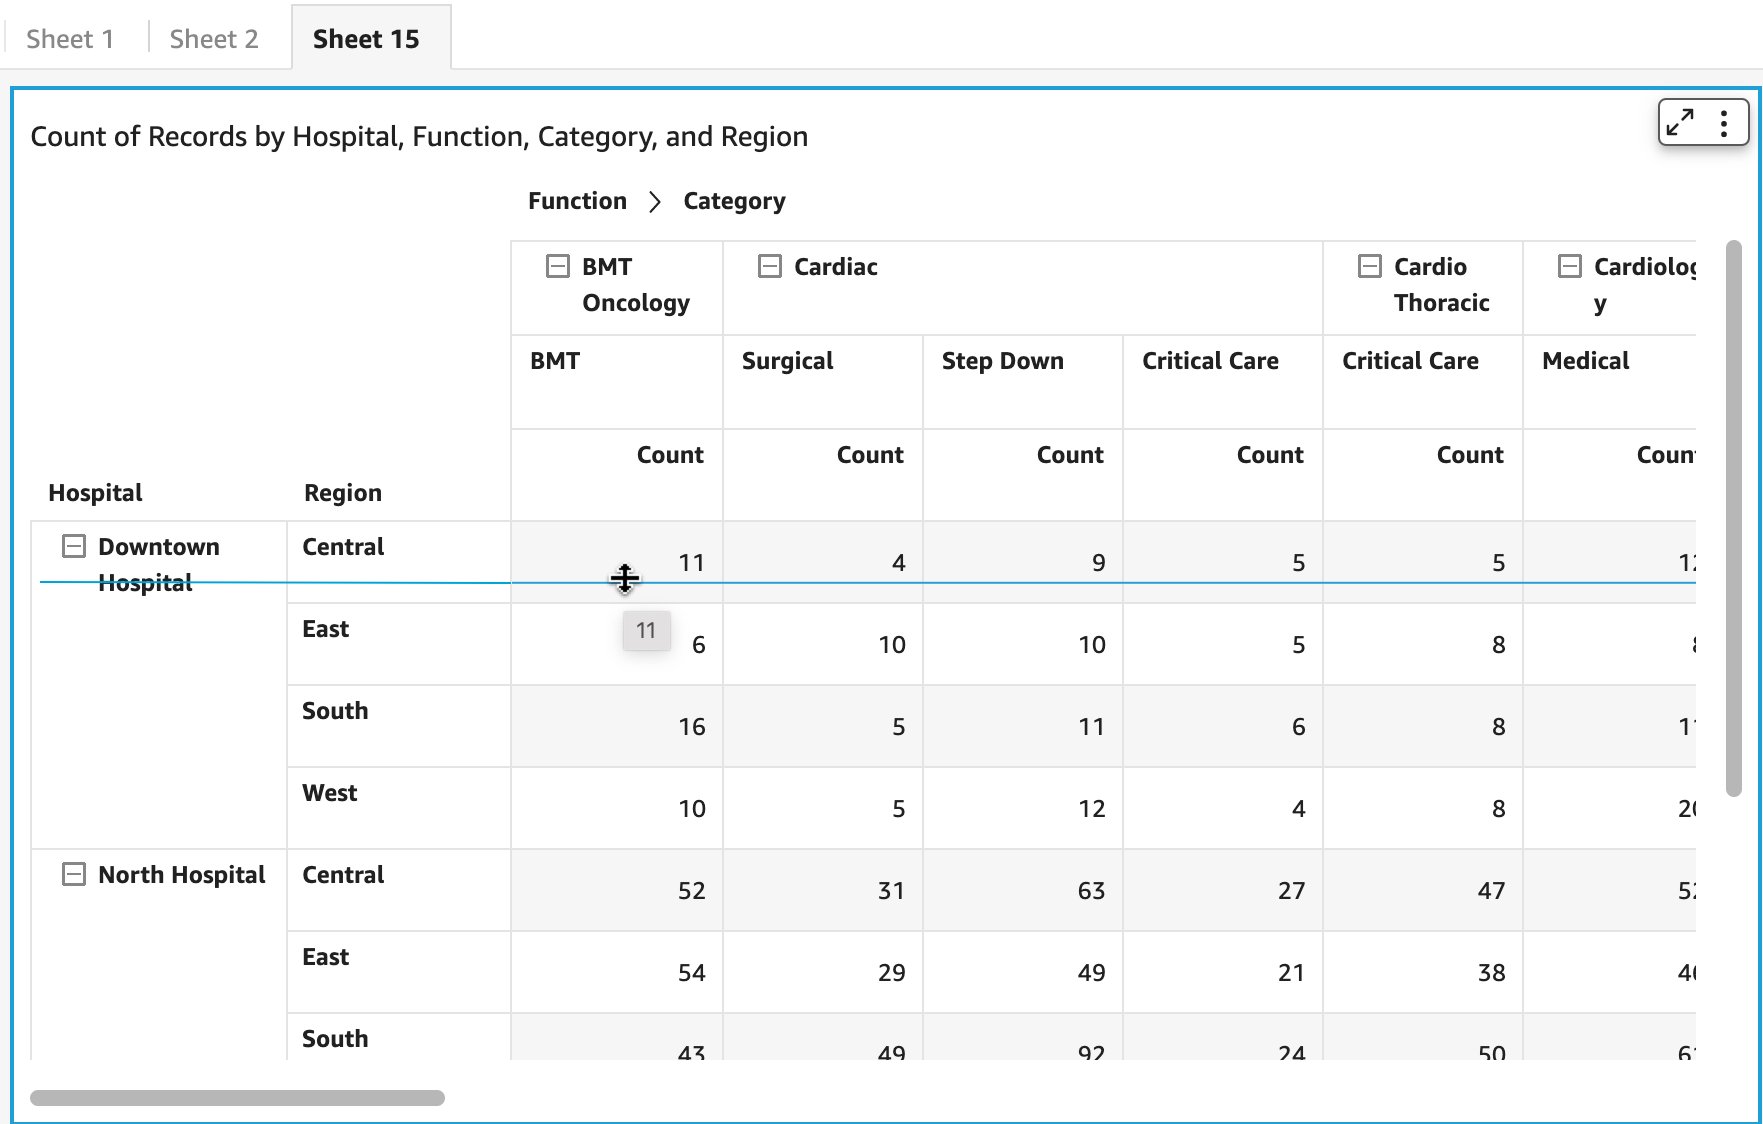
In 2021, as part of table and pivot table customization, we launched the ability for authors to resize row height in tables and pivot tables. Now, we are extending this capability to readers, along with other row and column interactions, such as altering column width and header height for both tables and pivot tables using a drag handler, for consistency between row and column interactions and an improved user experience. Apart from the format pane settings, authors can make quick changes to column, row, and header width for both parent and child nodes by simply dragging the cell, column, or row to the desired setting using the drag handler.

The following are the different interactions that both readers and authors can perform, some of which were already available for tables.

Modify row height

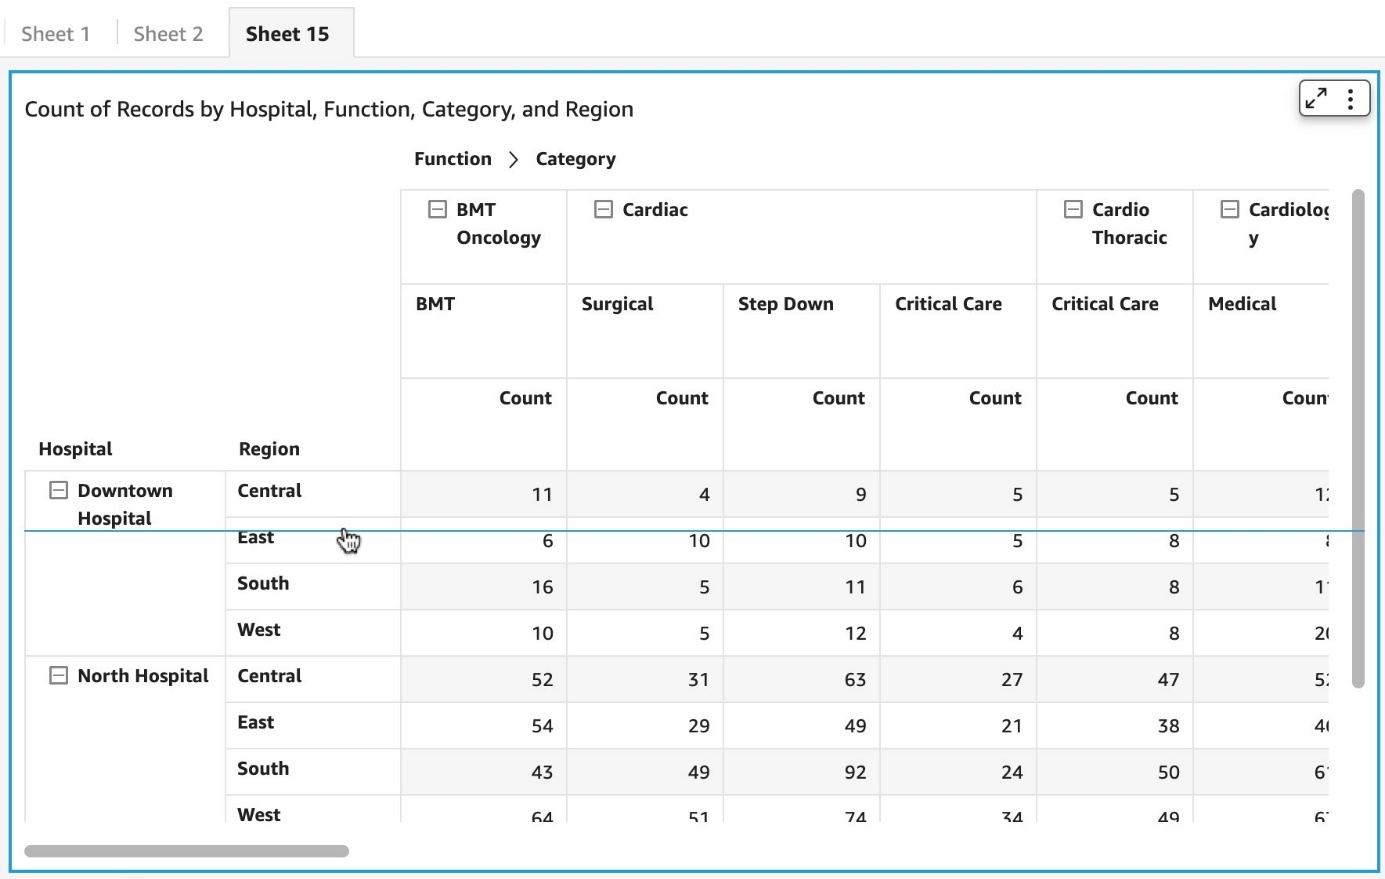
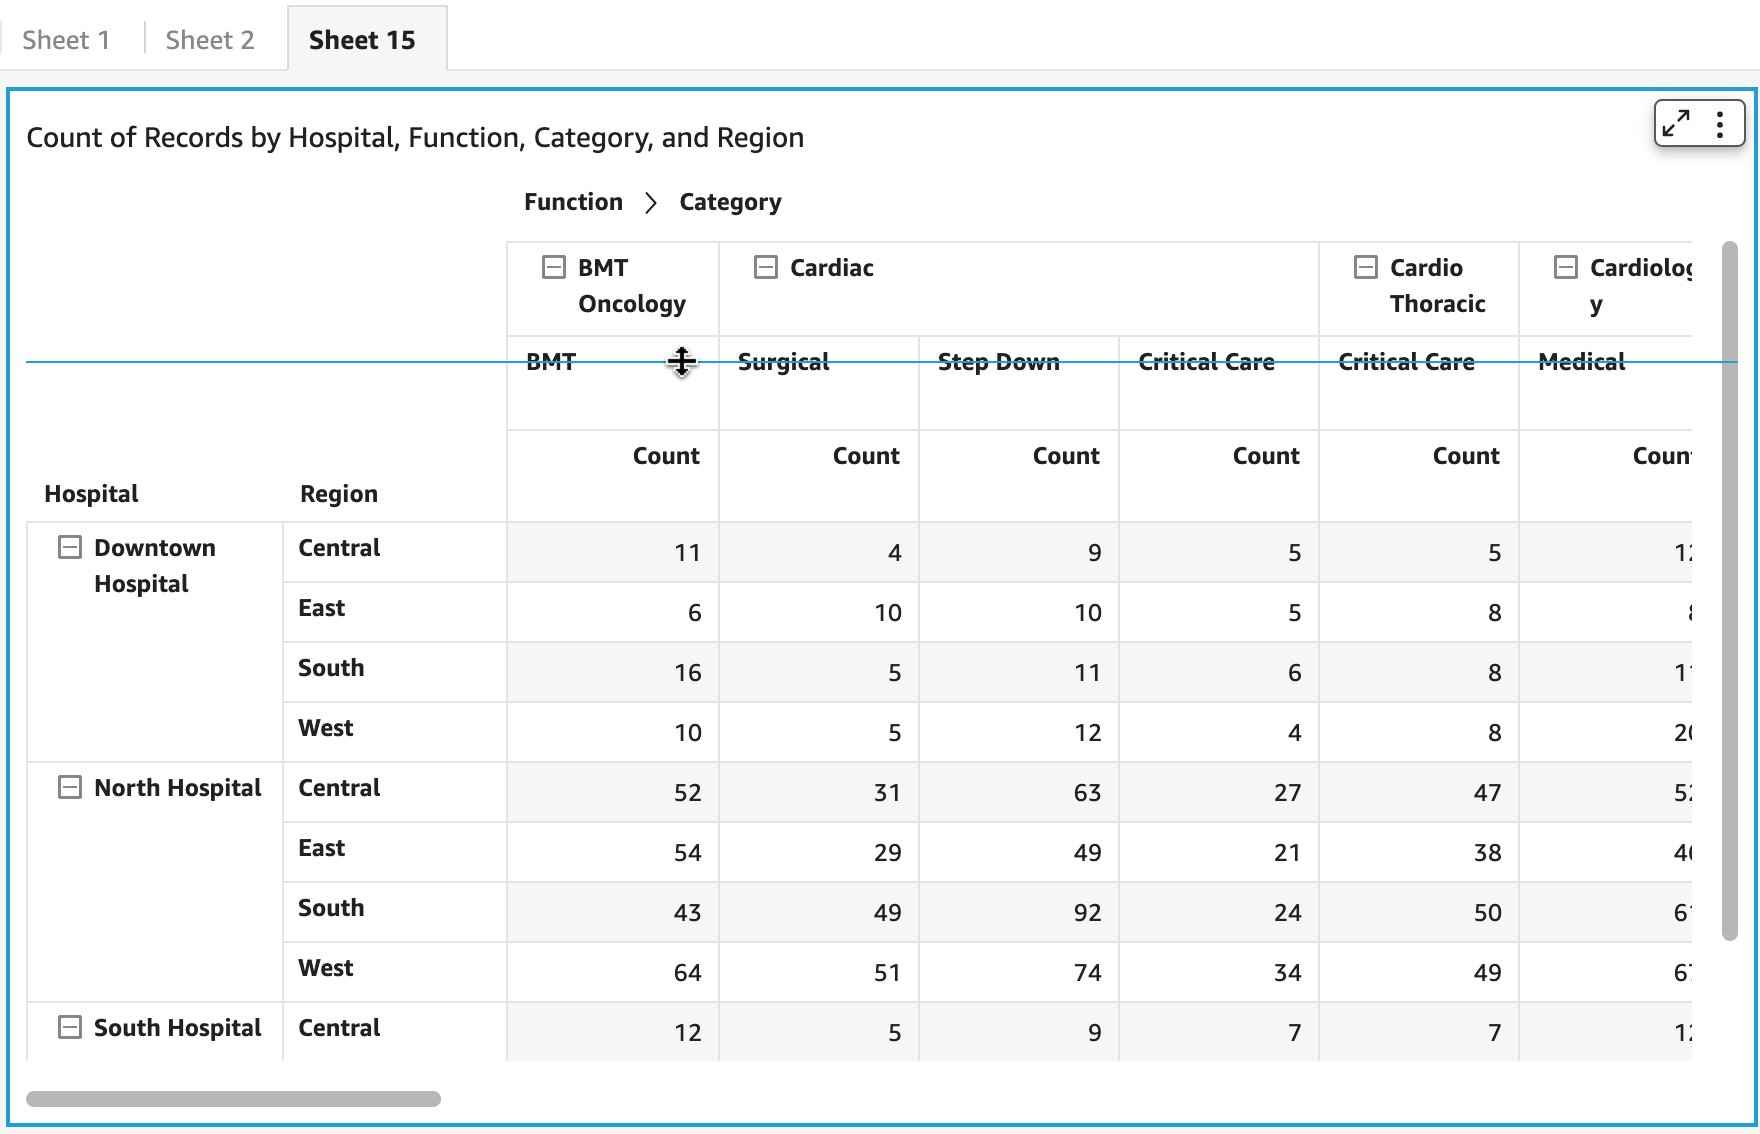
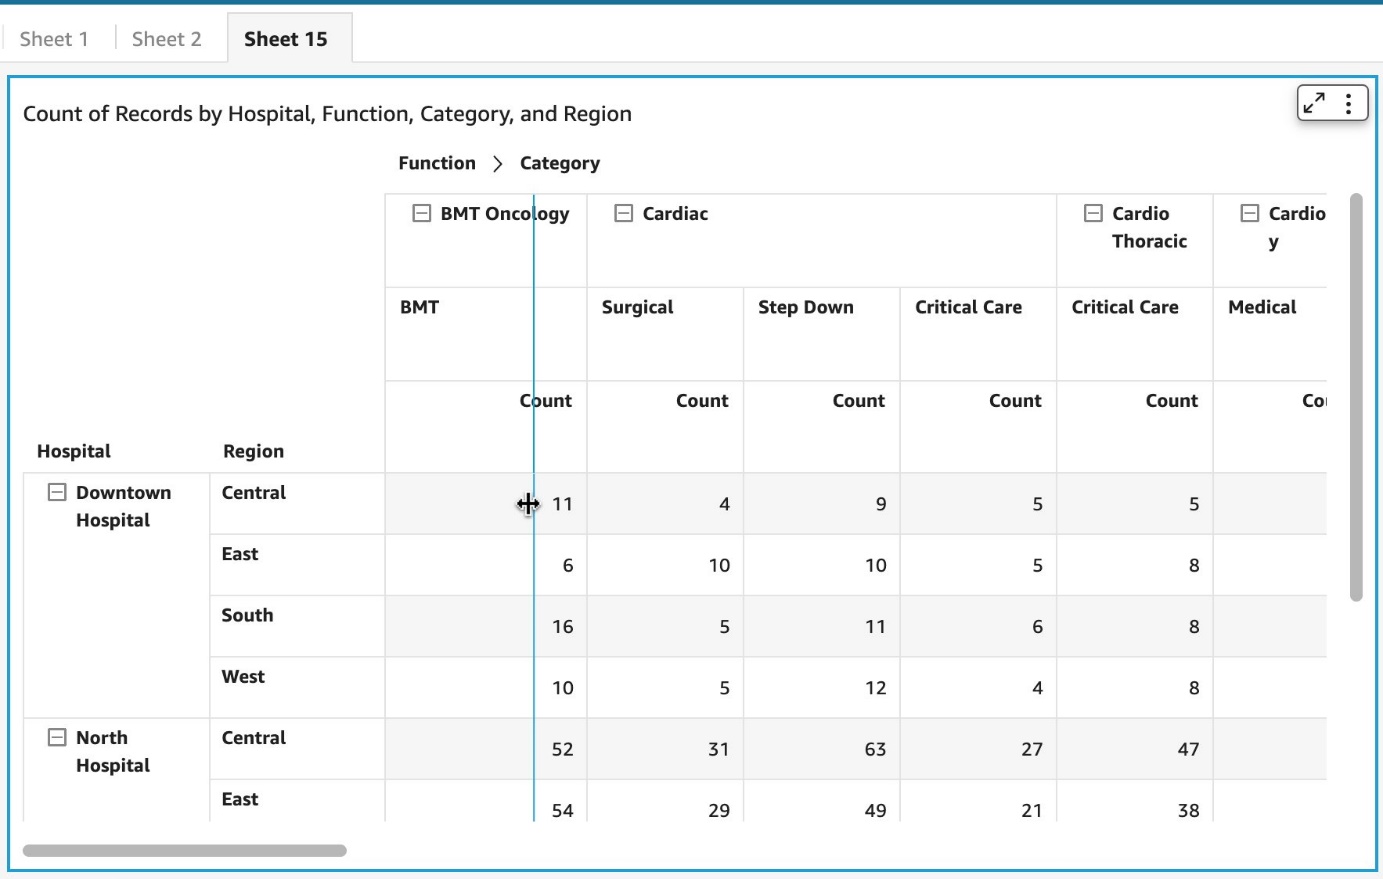
You can modify row height using the drag handler for cells, row headers, or column headers.

The following screenshot illustrates how to alter the row height by dragging from any cell in the table or pivot table.

For row headers, you can only resize row height by dragging the last element (child node), which gets aggregated to define the row height for the parent node.

You can resize the height of the column headers at any level such that you can have different heights at each level for better aesthetics.

Modify column width

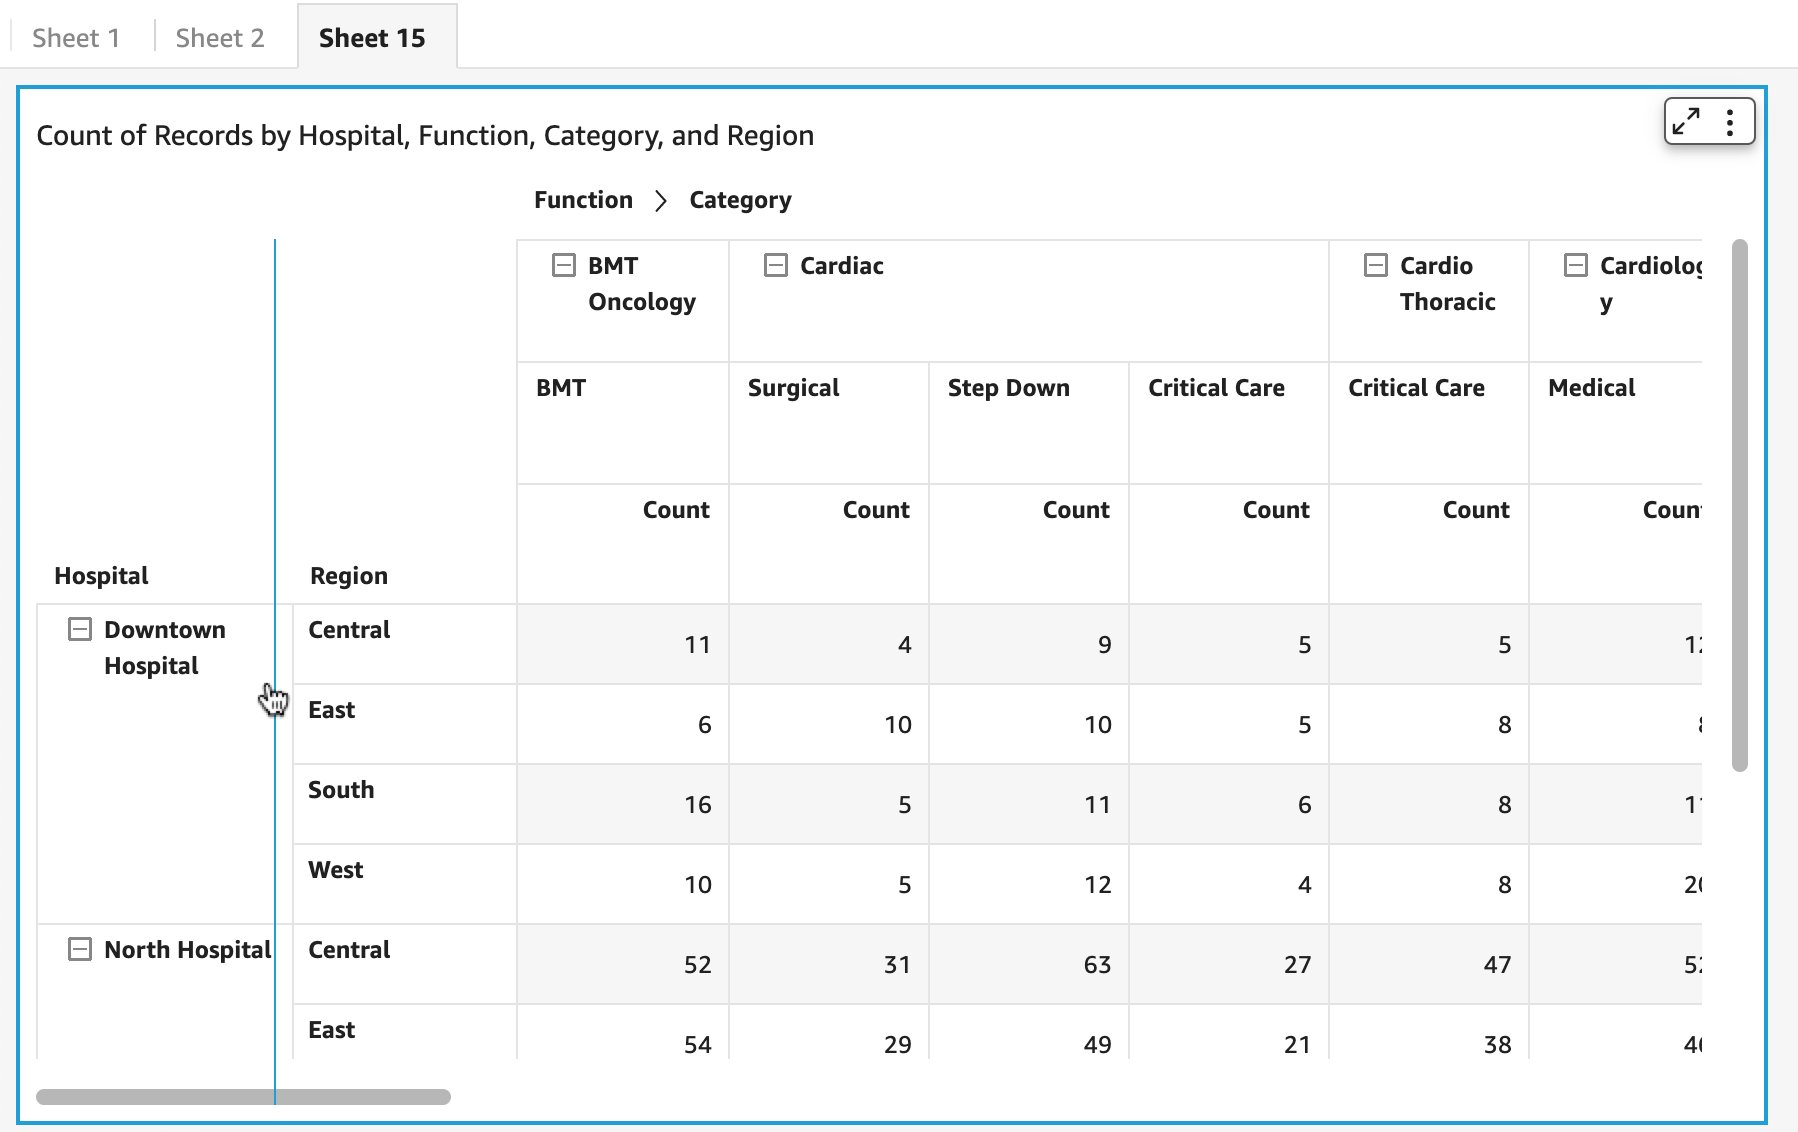
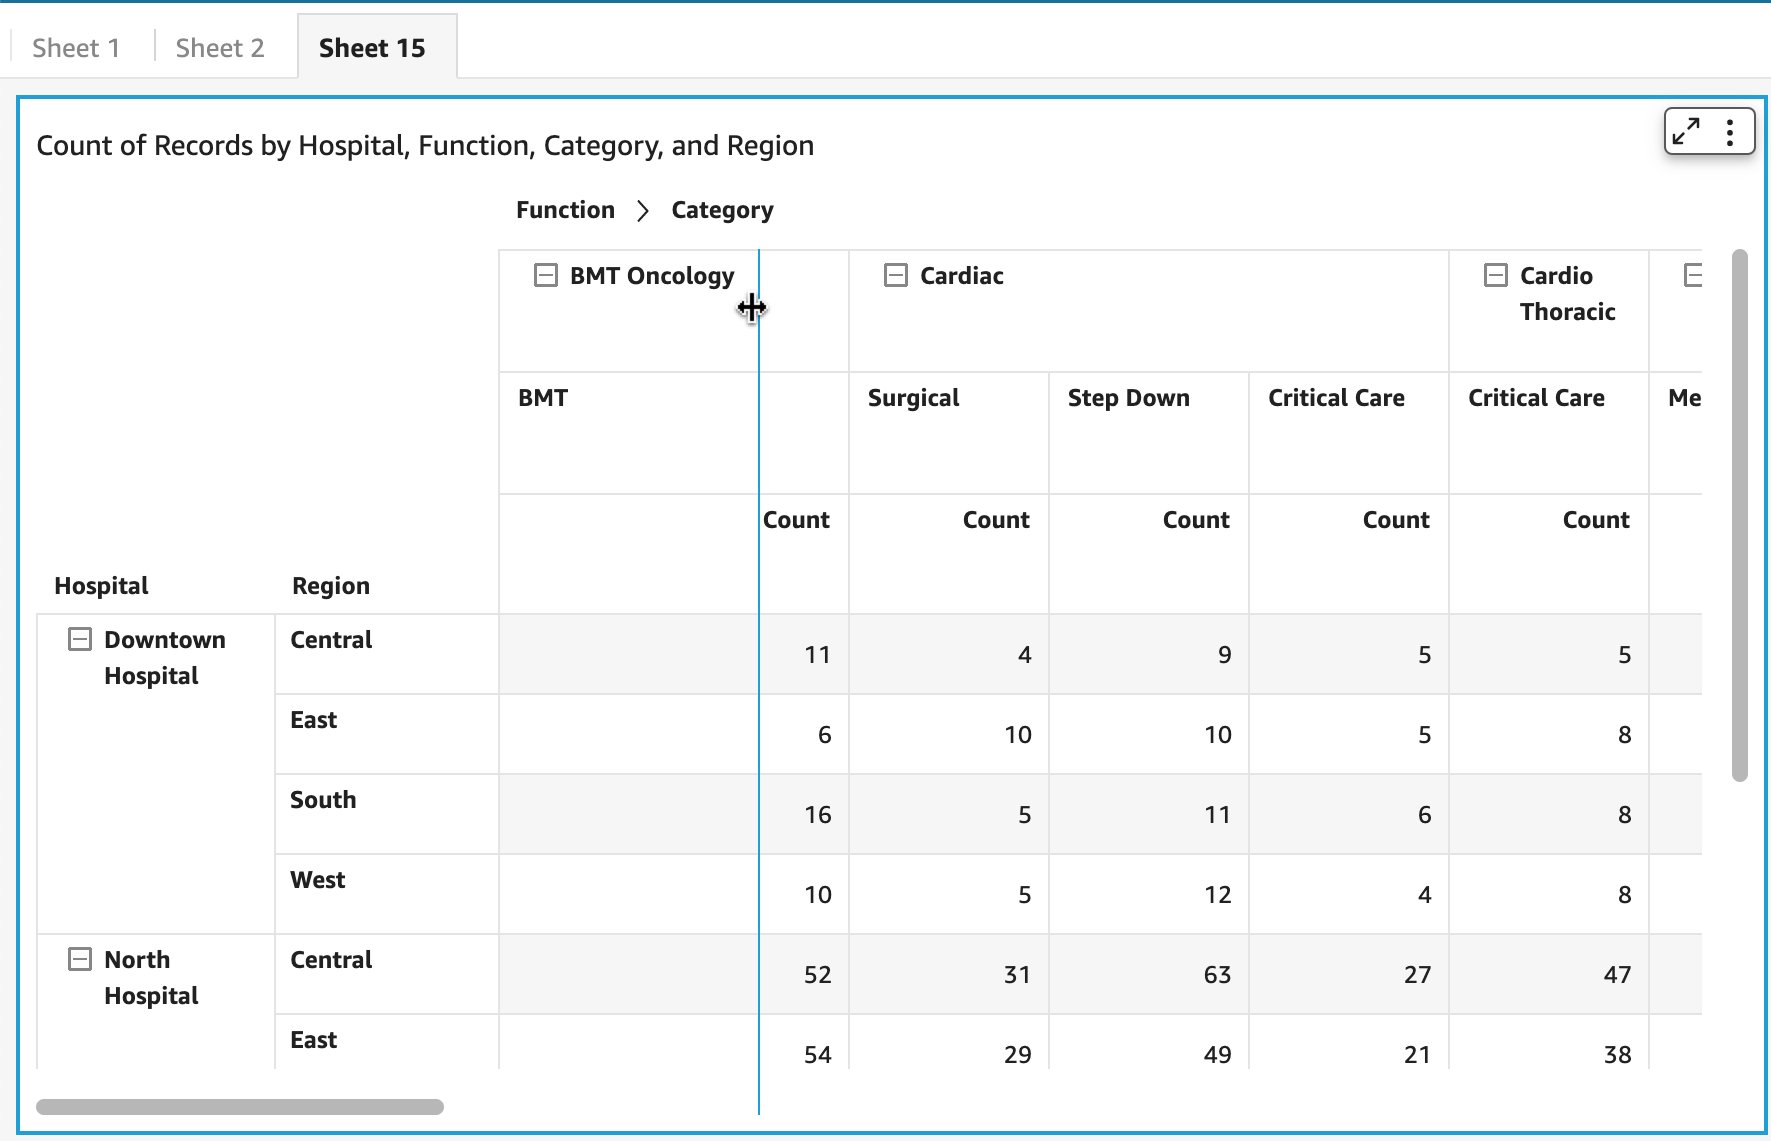
You can also use the drag handler to modify column width for row headers, column headers, or cells.

You can alter column width for any field assigned to rows, as shown in the following screenshot.

You can alter column width for column dimension members both from the parent or leaf node in the case of hierarchy, or column field or values headers in the absence of a column hierarchy.

You now have complete flexibility to resize column width from cells. Depending on which cell, the corresponding column width is adjusted.

Considerations

A few things to note about this new feature:

  • Drag handlers are available for both web and embedded use cases
  • Row height is set in common for all rows and not specific to a particular row

Summary

With the introduction of a drag handler, authors and readers can now quickly alter column width, row height, and header height for tables and pivot tables. This provides a consistent behavior and improved user interaction for both the personas and visuals. To learn more about table and pivot table formatting options, refer to Formatting tables and pivot tables in Amazon QuickSight.

Try out the new feature and share your feedback and questions in the comments section.


About the author

Bhupinder Chadha is a senior product manager for Amazon QuickSight focused on visualization and front end experiences. He is passionate about BI, data visualization and low-code/no-code experiences. Prior to QuickSight he was the lead product manager for Inforiver, responsible for building a enterprise BI product from ground up. Bhupinder started his career in presales, followed by a small gig in consulting and then PM for xViz, an add on visualization product.

How to use customer managed policies in AWS IAM Identity Center for advanced use cases

Post Syndicated from Ron Cully original https://aws.amazon.com/blogs/security/how-to-use-customer-managed-policies-in-aws-single-sign-on-for-advanced-use-cases/

Are you looking for a simpler way to manage permissions across all your AWS accounts? Perhaps you federate your identity provider (IdP) to each account and divide permissions and authorization between cloud and identity teams, but want a simpler administrative model. Maybe you use AWS IAM Identity Center (successor to AWS Single Sign-On) but are running out of room in your permission set policies; or need a way to keep the role models you have while tailoring the policies in each account to reference their specific resources. Or perhaps you are considering IAM Identity Center as an alternative to per-account federation, but need a way to reuse the customer managed policies that you have already created. Great news! Now you can use customer managed policies (CMPs) and permissions boundaries (PBs) to help with these more advanced situations.

In this blog post, we explain how you can use CMPS and PBs with IAM Identity Center to address these considerations. We describe how IAM Identity Center works, how these types of policies work with IAM Identity Center, and how to best use CMPs and PBs with IAM Identity Center. We also show you how to configure and use CMPs in your IAM Identity Center deployment.

IAM Identity Center background

With IAM Identity Center, you can centrally manage access to multiple AWS accounts and business applications, while providing your workplace users a single sign-on experience with your choice of identity system. Rather than manage identity in each account individually, IAM Identity Center provides one place to connect an existing IdP, Microsoft Active Directory Domain Services (AD DS), or workforce users that you create directly in AWS. Because IAM Identity Center integrates with AWS Organizations, it also provides a central place to define your roles, assign them to your users and groups, and give your users a portal where they can access their assigned accounts.

With AWS Identity Center, you manage access to accounts by creating and assigning permission sets. These are AWS Identity and Access Management (IAM) role templates that define (among other things) which policies to include in a role. If you’re just getting started, you can attach AWS managed policies to the permission set. These policies, created by AWS service teams, enable you to get started without having to learn how to author IAM policies in JSON.

For more advanced cases, where you are unable to express policies sufficiently using inline policies, you can create a custom policy in the permission set. When you assign a permission set to users or groups in a specified account, IAM Identity Center creates a role from the template and then controls single sign-on access to the role. During role creation, IAM Identity Center attaches any specified AWS managed policies, and adds any custom policy to the role as an inline policy. These custom policies must be within the 10,240 character IAM quota of inline policies.

IAM provides two other types of custom policies that increase flexibility when managing access in AWS accounts. Customer managed policies (CMPs) are standalone policies that you create and can attach to roles in your AWS accounts to grant or deny access to AWS resources. Permissions boundaries (PBs) provide an advanced feature that specifies the maximum permissions that a role can have. For both CMPs and PBs, you create the custom policy in your account and then attach it to roles. IAM Identity Center now supports attaching both of these to permission sets so you can handle cases where AWS Managed Policies and inline policies may not be enough.

How CMPs and PBs work with IAM Identity Center

Although you can create IAM users to manage access to AWS accounts and resources, AWS recommends that you use roles instead of IAM users for this purpose. Roles act as an identity (sometimes called an IAM principal), and you assign permissions (identity-based policies) to the role. If you use the AWS Management Console or the AWS Command Line Interface to assume a role, you get the permissions of the role that you assumed. With its simpler way to maintain your users and groups in one AWS location and its ability to centrally manage and assign roles, AWS recommends that you use IAM Identity Center to manage access to your AWS accounts.

With this new IAM Identity Center release, you have the option to specify the names of CMPs and one PB in your permission set (role definition). Doing so modifies how IAM Identity Center provisions roles into accounts. When you assign a user or group to a permission set, IAM Identity Center checks the target account to verify that all specified CMPs and the PB are present. If they are all present, IAM Identity Center creates the role in the account and attaches the specified policies. If any of the specified CMPs or the PB are missing, IAM Identity Center fails the role creation.

This all sounds simple enough, but there are important implications to consider.

If you modify the permission set, IAM Identity Center updates the corresponding roles in all accounts to which you assigned the permission set. What is different when using CMPs and PBs is that IAM Identity Center is uninvolved in the creation or maintenance of the CMPs or PBs. It’s your responsibility to make sure that the CMPs and PBs are created and managed in all of the accounts to which you assign permission sets that use the CMPs and PBs. This means that you must be careful in how you name, create, and maintain these policies in your accounts, to avoid unintended consequences. For example, if you do not apply changes to CMPs consistently across all your accounts, the behavior of an IAM Identity Center created role will vary between accounts.

What CMPs do for you

By using CMPs with permission sets, you gain four main benefits:

  1. If you federate to your accounts directly and have CMPs already, you can reuse your CMPs with permission sets in IAM Identity Center. We describe exceptions later in this post.
  2. If you are running out of space in your permission set inline policies, you can add permission sets to increase the aggregate size of your policies.
  3. Policies often need to refer to account-specific resources by Amazon Resource Name (ARN). Designing an inline policy that does this correctly across all your accounts can be challenging and, in some cases, may not be possible. By specifying a CMP in a permission set, you can tailor the CMPs in each of your accounts to reference the resources of the account. When IAM Identity Center creates the role and attaches the CMPs of the account, the policies used by the IAM Identity Center–generated role are now specific to the account. We highlight this example later in this post.
  4. You get the benefit of a central location to define your roles, which gives you visibility of all the policies that are in use across the accounts where you assigned permission sets. This enables you to have a list of CMP and PB names that you should monitor for change across your accounts. This helps you ensure that you are maintaining your policies correctly.

Considerations and best practices

Start simple, avoid complex – If you’re just starting out, try using AWS managed policies first. With managed policies, you don’t need to know JSON policy to get started. If you need more advanced policies, start by creating identity-based inline custom policies in the permission set. These policies are provisioned as inline policies, and they will be identical in all your accounts. If you need larger policies or more advanced capabilities, use CMPs as your next option. In most cases, you can accomplish what you need with inline and customer managed policies. When you can’t achieve your objective using CMPs, use PBs. For information about intended use cases for PBs, see the blog post When and where to use IAM permissions boundaries.

Permissions boundaries don’t constrain IAM Identity Center admins who create permission sets – IAM Identity Center administrators (your staff) that you authorize to create permission sets can create inline policies and attach CMPs and PBs to permission sets, without restrictions. Permissions boundary policies set the maximum permissions of a role and the maximum permissions that the role can grant within an account through IAM only. For example, PBs can set the maximum permissions of a role that uses IAM to create other roles for use by code or services. However, a PB doesn’t set maximum permissions of the IAM Identity Center permission set creator. What does that mean? Suppose you created an IAM Identity Center Admin permission set that has a PB attached, and you assigned it to John Doe. John Doe can then sign in to IAM Identity Center and modify permission sets with any policy, regardless of what you put in the PB. The PB doesn’t restrict the policies that John Doe can put into a permission set.

In short, use PBs only for roles that need to create IAM roles for use by code or services. Don’t use PBs for permission sets that authorize IAM Identity Center admins who create permission sets.

Create and use a policy naming plan – IAM Identity Center doesn’t consider the content of a named policy that you attach to a permission set. If you assign a permission set in multiple accounts, make sure that all referenced policies have the same intent. Failure to do this will result in unexpected and inconsistent role behavior between different accounts. Imagine a CMP named “S3” that grants S3 read access in account A, and another CMP named “S3” that grants S3 administrative permissions over all S3 buckets in account B. A permission set that attaches the S3 policy and is assigned in accounts A and B will be confusing at best, because the level access is quite different in each of the accounts. It’s better to have more specific names, such as “S3Reader” and “S3Admin,” for your policies and ensure they are identical except for the account-specific resource ARNs.

Use automation to provision policies in accounts – Using tools such as AWS CloudFormation stacksets, or other infrastructure-as-code tools, can help ensure that naming and policies are consistent across your accounts. It also helps reduce the potential for administrators to modify policies in undesirable ways.

Policies must match the capabilities of IAM Identity Center – Although IAM Identity Center supports most IAM semantics, there are exceptions:

  1. If you use an identity provider as your identity source, IAM Identity Center passes only PrincipalTag attributes that come through SAML assertions to IAM. IAM Identity Center doesn’t process or forward other SAML assertions to IAM. If you have CMPs or PBs that rely on other information from SAML assertions, they won’t work. For example, IAM Identity Center doesn’t provide multi-factor authentication (MFA) context keys or SourceIdentity.
  2. Resource policies that reference role names or tags as part of trust policies don’t work with IAM Identity Center. You can use resource policies that use attribute-based access control (ABAC). IAM Identity Center role names are not static, and you can’t tag the roles that IAM Identity Center creates from its permission sets.

How to use CMPs with permission sets

Now that you understand permission sets and how they work with CMPs and PBs, let’s take a look at how you can configure a permission set to use CMPs.

In this example, we show you how to use one or more permission sets that attach a CMP that enables Amazon CloudWatch operations to the log group of specified accounts. Specifically, the AllowCloudWatch_permission set attaches a CMP named AllowCloudWatchForOperations. When we assign the permission set in two separate accounts, the assigned users can perform CloudWatch operations against the log groups of the assigned account only. Because the CloudWatch operations policies are in CMPs rather than inline policies, the log groups can be account specific, and you can reuse the CMPs in other permission sets if you want to have CloudWatch operations available through multiple permission sets.

Note: For this blog post, we demonstrate using CMPs by utilizing the IAM Management Console to create policies and assignments. We recommend that after you learn how to do this, you create your policies through automation for production environments. For example, use AWS CloudFormation. The intent of this example is to demonstrate how you can have a policy in two separate accounts that refer to different resources; something that is harder to accomplish using inline policies. The use case itself is not that advanced, but the use of CMPs to have different resources referenced in each account is a more advanced idea. We kept this simple to make it easier to focus on the feature than the use case.

Prerequisites

In this example, we assume that you know how to use the AWS Management Console, create accounts, navigate between accounts, and create customer managed policies. You also need administrative privileges to enable IAM Identity Center and to create policies in your accounts.

Before you begin, enable IAM Identity Center in your AWS Organizations management account in an AWS Region of your choice. You need to create at least two accounts within your AWS Organization. In this example, the account names are member-account and member-account-1. After you set up the accounts, you can optionally configure IAM Identity Center for administration in a delegated member account.

Configure an IAM Identity Center permission set to use a CMP

Follow these four procedures to use a CMP with a permission set:

  1. Create CMPs with consistent names in your target accounts
  2. Create a permission set that references the CMP that you created
  3. Assign groups or users to the permission set in accounts where you created CMPs
  4. Test your assignments

Step 1: Create CMPs with consistent names in your target accounts

In this step, you create a customer managed policy named AllowCloudWatchForOperations in two member accounts. The policy allows your cloud operations users to access a predefined CloudWatch log group in the account.

To create CMPs in your target accounts

  1. Sign into AWS.

    Note: You can sign in to IAM Identity Center if you have existing permission sets that enable you to create policies in member accounts. Alternatively, you can sign in using IAM federation or as an IAM user that has access to roles that enable you to navigate to other accounts where you can create policies. Your sign-in should also give you access to a role that can administer IAM Identity Center permission sets.

  2. Navigate to an AWS Organizations member account.

    Note: If you signed in through IAM Identity Center, use the user portal page to navigate to the account and role. If you signed in by using IAM federation or as an IAM user, choose your sign-in name that is displayed in the upper right corner of the AWS Management Console and then choose switch role, as shown in Figure 1.

    Figure 1: Switch role for IAM user or IAM federation

    Figure 1: Switch role for IAM user or IAM federation

  3. Open the IAM console.
  4. In the navigation pane, choose Policies.
  5. In the upper right of the page, choose Create policy.
  6. On the Create Policy page, choose the JSON tab.
  7. Paste the following policy into the JSON text box. Replace <account-id> with the ID of the account in which the policy is created.

    Tip: To copy your account number, choose your sign-in name that is displayed in the upper right corner of the AWS Management Console, and then choose the copy icon next to the account ID, as shown in Figure 2.

    Figure 2: Copy account number

    Figure 2: Copy account number

    {
        "Version": "2012-10-17",
        "Statement": [
            {
                "Action": [
                    "logs:CreateLogStream",
                    "logs:DescribeLogStreams",
                    "logs:PutLogEvents",
                    "logs:GetLogEvents"
                ],
                "Effect": "Allow",
                "Resource": "arn:aws:logs:us-east-1:<account-id>:log-group:OperationsLogGroup:*"
            },
            {
                "Action": [
                    "logs:DescribeLogGroups"
                ],
                "Effect": "Allow",
                "Resource": "arn:aws:logs:us-east-1:<account-id>:log-group::log-stream:*"
            }
        ]
    }

  8. Choose Next:Tags, and then choose Next:Review.
  9. On the Create Policy/Review Policy page, in the Name field, enter AllowCloudWatchForOperations. This is the name that you will use when you attach the CMP to the permission set in the next procedure (Step 2).
  10. Repeat steps 1 through 7 in at least one other member account. Be sure to replace the <account-id> element in the policy with the account ID of each account where you create the policy. The only difference between the policies in each account is the <account-id> in the policy.

Step 2: Create a permission set that references the CMP that you created

At this point, you have at least two member accounts containing the same policy with the same policy name. However, the ResourceARN in each policy refers to log groups that belong to the respective accounts. In this step, you create a permission set and attach the policy to the permission set. Importantly, you attach only the name of the policy to the permission set. The actual attachment of the policy to the role that IAM Identity Center creates, happens when you assign the permission set to a user or group in Step 3.

To create a permission set that references the CMP

  1. Sign in to the Organizations management account or the IAM Identity Center delegated administration account.
  2. Open the IAM Identity Center console.
  3. In the navigation pane, choose Permission Sets.
  4. On the Select Permission set type screen, select Custom permission Set and choose Next.
    Figure 3: Select custom permission set

    Figure 3: Select custom permission set

  5. On the Specify policies and permissions boundary page, expand the Customer managed policies option, and choose Attach policies.
    Figure 4: Specify policies and permissions boundary

    Figure 4: Specify policies and permissions boundary

  6. For Policy names, enter the name of the policy. This name must match the name of the policy that you created in Step 1. In our example, the name is AllowCloudWatchForOperations. Choose Next.
  7. On the Permission set details page, enter a name for your permission set. In this example, use AllowCloudWatch_PermissionSet. You can alspecify additional details for your permission sets, such as session duration and relay state (these are a link to a specific AWS Management Console page of your choice).
    Figure 5: Permission set details

    Figure 5: Permission set details

  8. Choose Next, and then choose Create.

Step 3: Assign groups or users to the permission set in accounts where you created your CMPs

In the preceding steps, you created a customer managed policy in two or more member accounts, and a permission set with the customer managed policy attached. In this step, you assign users to the permission set in your accounts.

To assign groups or users to the permission set

  1. Sign in to the Organizations management account or the IAM Identity Center delegated administration account.
  2. Open the IAM Identity Center console.
  3. In the navigation pane, choose AWS accounts.
    Figure 6: AWS account

    Figure 6: AWS account

  4. For testing purposes, in the AWS Organization section, select all the accounts where you created the customer managed policy. This means that any users or groups that you assign during the process will have access to the AllowCloudWatch_PermissionSet role in each account. Then, on the top right, choose Assign users or groups.
  5. Choose the Users or Groups tab and then select the users or groups that you want to assign to the permission set. You can select multiple users and multiple groups in this step. For this example, we recommend that you select a single user for which you have credentials, so that you can sign in as that user to test the setup later. After selecting the users or groups that you want to assign, choose Next.
    Figure 7: Assign users and groups to AWS accounts

    Figure 7: Assign users and groups to AWS accounts

  6. Select the permission set that you created in Step 2 and choose Next.
  7. Review the users and groups that you are assigning and choose Submit.
  8. You will see a message that IAM Identity Center is configuring the accounts. In this step, IAM Identity Center creates roles in each of the accounts that you selected. It does this for each account, so it looks in the account for the CMP that you specified in the permission set. If the name of the CMP that you specified in the permission set matches the name that you provided when creating the CMP, IAM Identity Center creates a role from the permission set. If the names don’t match or if the CMP isn’t present in the account to which you assigned the permission set, you see an error message associated with that account. After successful submission, you will see the following message: We reprovisioned your AWS accounts successfully and applied the updated permission set to the accounts.

Step 4: Test your assignments

Congratulations! You have successfully created CMPs in multiple AWS accounts, created a permission set and attached the CMPs by name, and assigned the permission set to users and groups in the accounts. Now it’s time to test the results.

To test your assignments

  1. Go to the IAM Identity Center console.
  2. Navigate to the Settings page.
  3. Copy the user portal URL, and then paste the user portal URL into your browser.
  4. At the sign-in prompt, sign in as one of the users that you assigned to the permission set.
  5. The IAM Identity Center user portal shows the accounts and roles that you can access. In the example shown in Figure 8, the user has access to the AllowCloudWatch_PermissionSet created in two accounts.
    Figure 8: User portal

    Figure 8: User portal

    If you choose AllowCloudWatch_PermissionSet in the member-account, you will have access to the CloudWatch log group in the member-account account. If you choose the role in member-account-1, you will have access to CloudWatch Log group in member-account-1.

  6. Test the access by choosing Management Console for the AllowCloudWatch_PermissionSet in the member-account.
  7. Open the CloudWatch console.
  8. In the navigation pane, choose Log groups. You should be able to access log groups, as shown in Figure 9.
    Figure 9: CloudWatch log groups

    Figure 9: CloudWatch log groups

  9. Open the IAM console. You shouldn’t have permissions to see the details on this console, as shown in figure 10. This is because AllowCloudWatch_PermissionSet only provided CloudWatch log access.
    Figure 10: Blocked access to the IAM console

    Figure 10: Blocked access to the IAM console

  10. Return to the IAM Identity Center user portal.
  11. Repeat steps 4 through 8 using member-account-1.

Answers to key questions

What happens if I delete a CMP or PB that is attached to a role that IAM Identity Center created?
IAM prevents you from deleting policies that are attached to IAM roles.

How can I delete a CMP or PB that is attached to a role that IAM Identity Center created?
Remove the CMP or PB reference from all your permission sets. Then re-provision the roles in your accounts. This detaches the CMP or PB from IAM Identity Center–created roles. If the policies are unused by other IAM roles in your account or by IAM users, you can delete the policy.

What happens if I modify a CMP or PB that is attached to an IAM Identity Center provisioned role?
The IAM Identity Center role picks up the policy change the next time that someone assumes the role.

Conclusion

In this post, you learned how IAM Identity Center works with customer managed policies and permissions boundaries that you create in your AWS accounts. You learned different ways that this capability can help you, and some of the key considerations and best practices to succeed in your deployments. That includes the principle of starting simple and avoiding unnecessarily complex configurations. Remember these four principles:

  1. In most cases, you can accomplish everything you need by starting with custom (inline) policies.
  2. Use customer managed policies for more advanced cases.
  3. Use permissions boundary policies only when necessary.
  4. Use CloudFormation to manage your customer managed policies and permissions boundaries rather than having administrators deploy them manually in accounts.

To learn more about this capability, see the IAM Identity Center User Guide. If you have feedback about this post, submit comments in the Comments section below. If you have questions about this post, start a new thread on the AWS IAM re:Post or contact AWS Support.

Want more AWS Security news? Follow us on Twitter.

Ron Cully

Ron s a Principal Product Manager at AWS where he leads feature and roadmap planning for workforce identity products at AWS. Ron has over 20 years of industry experience in product and program management of networking and directory related products. He is passionate about delivering secure, reliable solutions that help make it easier for customers to migrate directory aware applications and workloads to the cloud.

Nitin Kulkarni

Nitin Kulkarni

Nitin is a Solutions Architect on the AWS Identity Solutions team. He helps customers build secure and scalable solutions on the AWS platform. He also enjoys hiking, baseball and linguistics.

Build a pseudonymization service on AWS to protect sensitive data, part 1

Post Syndicated from Rahul Shaurya original https://aws.amazon.com/blogs/big-data/part-1-build-a-pseudonymization-service-on-aws-to-protect-sensitive-data/

According to an article in MIT Sloan Management Review, 9 out of 10 companies believe their industry will be digitally disrupted. In order to fuel the digital disruption, companies are eager to gather as much data as possible. Given the importance of this new asset, lawmakers are keen to protect the privacy of individuals and prevent any misuse. Organizations often face challenges as they aim to comply with data privacy regulations like Europe’s General Data Protection Regulation (GDPR) and the California Consumer Privacy Act (CCPA). These regulations demand strict access controls to protect sensitive personal data.

This is a two-part post. In part 1, we walk through a solution that uses a microservice-based approach to enable fast and cost-effective pseudonymization of attributes in datasets. The solution uses the AES-GCM-SIV algorithm to pseudonymize sensitive data. In part 2, we will walk through useful patterns for dealing with data protection for varying degrees of data volume, velocity, and variety using Amazon EMR, AWS Glue, and Amazon Athena.

Data privacy and data protection basics

Before diving into the solution architecture, let’s look at some of the basics of data privacy and data protection. Data privacy refers to the handling of personal information and how data should be handled based on its relative importance, consent, data collection, and regulatory compliance. Depending on your regional privacy laws, the terminology and definition in scope of personal information may differ. For example, privacy laws in the United States use personally identifiable information (PII) in their terminology, whereas GDPR in the European Union refers to it as personal data. Techgdpr explains in detail the difference between the two. Through the rest of the post, we use PII and personal data interchangeably.

Data anonymization and pseudonymization can potentially be used to implement data privacy to protect both PII and personal data and still allow organizations to legitimately use the data.

Anonymization vs. pseudonymization

Anonymization refers to a technique of data processing that aims to irreversibly remove PII from a dataset. The dataset is considered anonymized if it can’t be used to directly or indirectly identify an individual.

Pseudonymization is a data sanitization procedure by which PII fields within a data record are replaced by artificial identifiers. A single pseudonym for each replaced field or collection of replaced fields makes the data record less identifiable while remaining suitable for data analysis and data processing. This technique is especially useful because it protects your PII data at record level for analytical purposes such as business intelligence, big data, or machine learning use cases.

The main difference between anonymization and pseudonymization is that the pseudonymized data is reversible (re-identifiable) to authorized users and is still considered personal data.

Solution overview

The following architecture diagram provides an overview of the solution.

Solution overview

This architecture contains two separate accounts:

  • Central pseudonymization service: Account 111111111111 – The pseudonymization service is running in its own dedicated AWS account (right). This is a centrally managed pseudonymization API that provides access to two resources for pseudonymization and reidentification. With this architecture, you can apply authentication, authorization, rate limiting, and other API management tasks in one place. For this solution, we’re using API keys to authenticate and authorize consumers.
  • Compute: Account 222222222222 – The account on the left is referred to as the compute account, where the extract, transform, and load (ETL) workloads are running. This account depicts a consumer of the pseudonymization microservice. The account hosts the various consumer patterns depicted in the architecture diagram. These solutions are covered in detail in part 2 of this series.

The pseudonymization service is built using AWS Lambda and Amazon API Gateway. Lambda enables the serverless microservice features, and API Gateway provides serverless APIs for HTTP or RESTful and WebSocket communication.

We create the solution resources via AWS CloudFormation. The CloudFormation stack template and the source code for the Lambda function are available in GitHub Repository.

We walk you through the following steps:

  1. Deploy the solution resources with AWS CloudFormation.
  2. Generate encryption keys and persist them in AWS Secrets Manager.
  3. Test the service.

Demystifying the pseudonymization service

Pseudonymization logic is written in Java and uses the AES-GCM-SIV algorithm developed by codahale. The source code is hosted in a Lambda function. Secret keys are stored securely in Secrets Manager. AWS Key Management System (AWS KMS) makes sure that secrets and sensitive components are protected at rest. The service is exposed to consumers via API Gateway as a REST API. Consumers are authenticated and authorized to consume the API via API keys. The pseudonymization service is technology agnostic and can be adopted by any form of consumer as long as they’re able to consume REST APIs.

As depicted in the following figure, the API consists of two resources with the POST method:

API Resources

  • Pseudonymization – The pseudonymization resource can be used by authorized users to pseudonymize a given list of plaintexts (identifiers) and replace them with a pseudonym.
  • Reidentification – The reidentification resource can be used by authorized users to convert pseudonyms to plaintexts (identifiers).

The request response model of the API utilizes Java string arrays to store multiple values in a single variable, as depicted in the following code.

Request/Response model

The API supports a Boolean type query parameter to decide whether encryption is deterministic or probabilistic.

The implementation of the algorithm has been modified to add the logic to generate a nonce, which is dependent on the plaintext being pseudonymized. If the incoming query parameters key deterministic has the value True, then the overloaded version of the encrypt function is called. This generates a nonce using the HmacSHA256 function on the plaintext, and takes 12 sub-bytes from a predetermined position for nonce. This nonce is then used for the encryption and prepended to the resulting ciphertext. The following is an example:

  • Identifier – VIN98765432101234
  • Nonce – NjcxMDVjMmQ5OTE5
  • Pseudonym – NjcxMDVjMmQ5OTE5q44vuub5QD4WH3vz1Jj26ZMcVGS+XB9kDpxp/tMinfd9

This approach is useful especially for building analytical systems that may require PII fields to be used for joining datasets with other pseudonymized datasets.

The following code shows an example of deterministic encryption.Deterministic Encryption

If the incoming query parameters key deterministic has the value False, then the encrypt method is called without the deterministic parameter and the nonce generated is a random 12 bytes. This generates a different ciphertext for the same incoming plaintext.

The following code shows an example of probabilistic encryption.

Probabilistic Encryption

The Lambda function utilizes a couple of caching mechanisms to boost the performance of the function. It uses Guava to build a cache to avoid generation of the pseudonym or identifier if it’s already available in the cache. For the probabilistic approach, the cache isn’t utilized. It also uses SecretCache, an in-memory cache for secrets requested from Secrets Manager.

Prerequisites

For this walkthrough, you should have the following prerequisites:

Deploy the solution resources with AWS CloudFormation

The deployment is triggered by running the deploy.sh script. The script runs the following phases:

  1. Checks for dependencies.
  2. Builds the Lambda package.
  3. Builds the CloudFormation stack.
  4. Deploys the CloudFormation stack.
  5. Prints to standard out the stack output.

The following resources are deployed from the stack:

  • An API Gateway REST API with two resources:
    • /pseudonymization
    • /reidentification
  • A Lambda function
  • A Secrets Manager secret
  • A KMS key
  • IAM roles and policies
  • An Amazon CloudWatch Logs group

You need to pass the following parameters to the script for the deployment to be successful:

  • STACK_NAME – The CloudFormation stack name.
  • AWS_REGION – The Region where the solution is deployed.
  • AWS_PROFILE – The named profile that applies to the AWS Command Line Interface (AWS CLI). command
  • ARTEFACT_S3_BUCKET – The S3 bucket where the infrastructure code is stored. The bucket must be created in the same account and Region where the solution lives.

Use the following commands to run the ./deployments_scripts/deploy.sh script:

chmod +x ./deployment_scripts/deploy.sh ./deployment_scripts/deploy.sh -s STACK_NAME -b ARTEFACT_S3_BUCKET -r AWS_REGION -p AWS_PROFILE AWS_REGION

Upon successful deployment, the script displays the stack outputs, as depicted in the following screenshot. Take note of the output, because we use it in subsequent steps.

Stack Output

Generate encryption keys and persist them in Secrets Manager

In this step, we generate the encryption keys required to pseudonymize the plain text data. We generate those keys by calling the KMS key we created in the previous step. Then we persist the keys in a secret. Encryption keys are encrypted at rest and in transit, and exist in plain text only in-memory when the function calls them.

To perform this step, we use the script key_generator.py. You need to pass the following parameters for the script to run successfully:

  • KmsKeyArn – The output value from the previous stack deployment
  • AWS_PROFILE – The named profile that applies to the AWS CLI command
  • AWS_REGION – The Region where the solution is deployed
  • SecretName – The output value from the previous stack deployment

Use the following command to run ./helper_scripts/key_generator.py:

python3 ./helper_scripts/key_generator.py -k KmsKeyArn -s SecretName -p AWS_PROFILE -r AWS_REGION

Upon successful deployment, the secret value should look like the following screenshot.

Encryption Secrets

Test the solution

In this step, we configure Postman and query the REST API, so you need to make sure Postman is installed in your machine. Upon successful authentication, the API returns the requested values.

The following parameters are required to create a complete request in Postman:

  • PseudonymizationUrl – The output value from stack deployment
  • ReidentificationUrl – The output value from stack deployment
  • deterministic – The value True or False for the pseudonymization call
  • API_Key – The API key, which you can retrieve from API Gateway console

Follow these steps to set up Postman:

  1. Start Postman in your machine.
  2. On the File menu, choose Import.
  3. Import the Postman collection.
  4. From the collection folder, navigate to the pseudonymization request.
  5. To test the pseudonymization resource, replace all variables in the sample request with the parameters mentioned earlier.

The request template in the body already has some dummy values provided. You can use the existing one or exchange with your own.

  1. Choose Send to run the request.

The API returns in the body of the response a JSON data type.

Reidentification

  1. From the collection folder, navigate to the reidentification request.
  2. To test the reidentification resource, replace all variables in the sample request with the parameters mentioned earlier.
  3. Pass to the response template in the body the pseudonyms output from earlier.
  4. Choose Send to run the request.

The API returns in the body of the response a JSON data type.

Pseudonyms

Cost and performance

There are many factors that can determine the cost and performance of the service. Performance especially can be influenced by payload size, concurrency, cache hit, and managed service limits on the account level. The cost is mainly influenced by how much the service is being used. For our cost and performance exercise, we consider the following scenario:

The REST API is used to pseudonymize Vehicle Identification Numbers (VINs). On average, consumers request pseudonymization of 1,000 VINs per call. The service processes on average 40 requests per second, or 40,000 encryption or decryption operations per second. The average process time per request is as follows:

  • 15 milliseconds for deterministic encryption
  • 23 milliseconds for probabilistic encryption
  • 6 milliseconds for decryption

The number of calls hitting the service per month is distributed as follows:

  • 50 million calls hitting the pseudonymization resource for deterministic encryption
  • 25 million calls hitting the pseudonymization resource for probabilistic encryption
  • 25 million calls hitting the reidentification resource for decryption

Based on this scenario, the average cost is $415.42 USD per month. You may find the detailed cost breakdown in the estimate generated via the AWS Pricing Calculator.

We use Locust to simulate a similar load to our scenario. Measurements from Amazon CloudWatch metrics are depicted in the following screenshots (network latency isn’t considered during our measurement).

The following screenshot shows API Gateway latency and Lambda duration for deterministic encryption. Latency is high at the beginning due to the cold start, and flattens out over time.

API Gateway Latency & Lamdba Duration for deterministic encryption. Latency is high at the beginning due to the cold start and flattens out over time.

The following screenshot shows metrics for probabilistic encryption.

metrics for probabilistic encryption

The following shows metrics for decryption.

metrics for decryption

Clean up

To avoid incurring future charges, delete the CloudFormation stack by running the destroy.sh script. The following parameters are required to run the script successfully:

  • STACK_NAME – The CloudFormation stack name
  • AWS_REGION – The Region where the solution is deployed
  • AWS_PROFILE – The named profile that applies to the AWS CLI command

Use the following commands to run the ./deployment_scripts/destroy.sh script:

chmod +x ./deployment_scripts/destroy.sh ./deployment_scripts/destroy.sh -s STACK_NAME -r AWS_REGION -p AWS_PROFILE

Conclusion

In this post, we demonstrated how to build a pseudonymization service on AWS. The solution is technology agnostic and can be adopted by any form of consumer as long as they’re able to consume REST APIs. We hope this post helps you in your data protection strategies.

Stay tuned for part 2, which will cover consumption patterns of the pseudonymization service.


About the authors

Edvin Hallvaxhiu is a Senior Global Security Architect with AWS Professional Services and is passionate about cybersecurity and automation. He helps customers build secure and compliant solutions in the cloud. Outside work, he likes traveling and sports.

Rahul Shaurya is a Senior Big Data Architect with AWS Professional Services. He helps and works closely with customers building data platforms and analytical applications on AWS. Outside of work, Rahul loves taking long walks with his dog Barney.

Andrea Montanari is a Big Data Architect with AWS Professional Services. He actively supports customers and partners in building analytics solutions at scale on AWS.

María Guerra is a Big Data Architect with AWS Professional Services. Maria has a background in data analytics and mechanical engineering. She helps customers architecting and developing data related workloads in the cloud.

Pushpraj is a Data Architect with AWS Professional Services. He is passionate about Data and DevOps engineering. He helps customers build data driven applications at scale.

Manage data transformations with dbt in Amazon Redshift

Post Syndicated from Randy Chng original https://aws.amazon.com/blogs/big-data/manage-data-transformations-with-dbt-in-amazon-redshift/

Amazon Redshift is a fully managed, petabyte-scale data warehouse service in the cloud. You can start with just a few hundred gigabytes of data and scale to a petabyte or more. Amazon Redshift enables you to use your data to acquire new insights for your business and customers while keeping costs low.

Together with price-performance, customers want to manage data transformations (SQL Select statements written by data engineers, data analysts, and data scientists) in Amazon Redshift with features including modular programming and data lineage documentation.

dbt (data build tool) is a framework that supports these features and more to manage data transformations in Amazon Redshift. There are two interfaces for dbt:

  • dbt CLI – Available as an open-source project
  • dbt Cloud – A hosted service with added features including an IDE, job scheduling, and more

In this post, we demonstrate some features in dbt that help you manage data transformations in Amazon Redshift. We also provide the dbt CLI and Amazon Redshift workshop to get started using these features.

Manage common logic

dbt enables you to write SQL in a modular fashion. This improves maintainability and productivity because common logic can be consolidated (maintain a single instance of logic) and referenced (build on existing logic instead of starting from scratch).

The following figure is an example showing how dbt consolidates common logic. In this example, two models rely on the same subquery. Instead of replicating the subquery, dbt allows you to create a model for the subquery and reference it later.

Manage common subquery in dbt

Figure 1: Manage common subquery in dbt

The concept of referencing isn’t limited to logic related to subqueries. You can also use referencing for logic related to fields.

The following is an example showing how dbt consolidates common logic related to fields. In this example, a model applies the same case statement on two fields. Instead of replicating the case statement for each field, dbt allows you to create a macro containing the case statement and reference it later.

Manage common case statement in dbt

Figure 2: Manage common case statement in dbt

How is a model in dbt subsequently created in Amazon Redshift? dbt provides you with the command dbt run, which materializes models as views or tables in your targeted Amazon Redshift cluster. You can try this out in the dbt CLI and Amazon Redshift workshop.

Manage common data mappings

Although you can use macros to manage data mappings (for example, mapping “1” to “One” and “2” to “Two”), an alternative is to maintain data mappings in files and manage the files in dbt.

The following is an example of how dbt manages common data mappings. In this example, a model applies one-to-one data mappings on a field. Instead of creating a macro for the one-to-one data mappings, dbt allows you to create a seed for the one-to-one data mappings in the form of a CSV file and then reference it later.

Manage common data mapping in dbt

Figure 3: Manage common data mapping in dbt

You can create or update a seed with a two-step process. After you create or update a CSV seed file, run the command dbt seed to create the CSV seed as a table in your targeted Amazon Redshift cluster before referencing it.

Manage data lineage documentation

After you have created models and seeds in dbt, and used dbt’s referencing capability, dbt provides you with a method to generate documentation on your data transformations.

You can run the command dbt docs generate followed by dbt docs serve to launch a locally hosted website containing documentation on your dbt project. When you choose a model on the locally hosted website, information about the model is displayed, including columns in the final view or table, dependencies to create the model, and the SQL that is compiled to create the view or table. The following screenshot shows an example of this documentation.

Documentation generated by dbt

Figure 4: Documentation generated by dbt

You can also visualize dependencies for improved navigation of documentations during impact analysis. In the following example graph, we can see that model rpt_tech_all_users is built referencing the model base_public_users, which in turn references the table users in the public schema.

Data lineage visualization generated by dbt

Figure 5: Data lineage visualization generated by dbt

Conclusion

This post covered how you can use dbt to manage data transformations in Amazon Redshift. As you explore dbt, you will come across other features like hooks, which you can use to manage administrative tasks, for example, continuous granting of privileges.

For a hands-on experience with dbt CLI and Amazon Redshift, we have a workshop with step-by-step instructions to help you create your first dbt project and explore the features mentioned in this post—models, macros, seeds, and hooks. Visit dbt CLI and Amazon Redshift to get started.

If you have any questions or suggestions, leave your feedback in the comments section. If you need any further assistance to optimize your Amazon Redshift implementation, contact your AWS account team or a trusted AWS partner.


About the authors

Randy Chng is an Analytics Acceleration Lab Solutions Architect at Amazon Web Services. He works with customers to accelerate their Amazon Redshift journey by delivering proof of concepts on key business problems.

Sean Beath is an Analytics Acceleration Lab Solutions Architect at Amazon Web Services. He delivers proof of concepts with customers on Amazon Redshift, helping customers drive analytics value on AWS.

Enable post-quantum key exchange in QUIC with the s2n-quic library

Post Syndicated from Panos Kampanakis original https://aws.amazon.com/blogs/security/enable-post-quantum-key-exchange-in-quic-with-the-s2n-quic-library/

At Amazon Web Services (AWS) we prioritize security, performance, and strong encryption in our cloud services. In order to be prepared for quantum computer advancements, we’ve been investigating the use of quantum-safe algorithms for key exchange in the TLS protocol. In this blog post, we’ll first bring you up to speed on what we’ve been doing on the TLS front. Then, we’ll focus on the QUIC transport protocol and show how you can enable and experiment with the newly released post-quantum (PQ) key exchange by using our s2n-quic library. The s2n-quic library is an open-source implementation of the QUIC protocol.

Why use PQ-hybrid key establishment in s2n-quic?

A large-scale quantum computer could break the current public key cryptography that is used to establish keys for secure communication connections. Although a large-scale quantum computer isn’t available today, traffic that is recorded now could be decrypted by one in the future. With such concerns in mind, the recent US Congress Quantum Computing Cybersecurity Preparedness Act and the White House National Security Memorandum set a goal of a timely and equitable transition of cryptographic systems to quantum-resistant cryptography.

At AWS, we are working to prepare for this future. Recently, AWS Key Management Service (AWS KMS), AWS Certificate Manager (ACM) and AWS Secrets Manager TLS endpoints started supporting post-quantum hybrid (PQ-hybrid) key establishment in TLS connections with three of the post-quantum key encapsulation mechanisms (KEMs) in the NIST Post-Quantum Cryptography (PQC) Project. The three post-quantum KEMs are Kyber (NIST’s Round 3 KEM selection), BIKE and SIKE (NIST’s Round 4 KEM candidates). All three of these AWS services’ support of post-quantum KEMs raises the security bar when making API requests to their endpoints over TLS.

PQ-hybrid key establishment in TLS is a feature that introduces post-quantum KEMs used in conjunction with classical Elliptic Curve Diffie-Hellman (ECDH) key exchange. The client and server still do an ECDH key exchange. Additionally, the server encapsulates a post-quantum shared secret to the client’s post-quantum KEM public key, which is advertised in the ClientHello message. This strategy combines the high assurance of a classical key exchange with the security of the proposed post-quantum key exchanges, to ensure that the handshakes are protected as long as the ECDH or the post-quantum shared secret cannot be broken.

After decapsulating the secret, the client and server have an ECDH and a post-quantum shared secret, which they concatenate and use to derive the symmetric keys that are used in the Authenticated Encryption with Additional Data (AEAD) cipher in TLS. These symmetric keys used by the AEAD cipher for data encryption will be secure against a quantum computer, which means that the TLS communication is secure against a quantum computer. The AWS implementation of TLS is s2n-tls, a streamlined open source implementation of TLS. The s2n-tls implementation already supports PQ-hybrid key exchange with ECDH and three NIST PQC Project KEMs (Kyber, BIKE, and SIKE) for TLS 1.2 and 1.3. The use of KEMs for TLS 1.2 is described in the draft-campagna-tls-bike-sike-hybrid IETF draft, and the use of KEMs for TLS 1.3 is described in the draft-ietf-tls-hybrid-design IETF draft.

Note: The Kyber, BIKE, and SIKE implementations follow the algorithm specifications described in NIST PQ Project Round 3, which are expected to be updated as standardization proceeds.

How PQ-hybrid key exchange works in s2n-quic

AWS recently announced s2n-quic, an open-source Rust implementation of the QUIC protocol. QUIC is an encrypted transport protocol that is designed for performance and is the foundation of HTTP/3. For tunnel establishment, QUIC uses TLS 1.3 carried over QUIC transport. To alleviate the harvest-now-decrypt-later concerns for customers that use s2n-quic, in the next section we show you how to enable PQ-hybrid key establishment in s2n-quic. AWS services and software that use s2n-quic will automatically inherit the ability to support quantum-safe key exchanges in the future when post-quantum algorithms are standardized and are officially supported in s2n-quic.

The s2n-quic implementation is written in the Rust programming language. It can use either s2n-tls (the TLS library for AWS) or rustls (the TLS library in Rust) to perform the TLS handshake. If you build s2n-quic with s2n-tls, then s2n-quic inherits the post-quantum support that is offered in s2n-tls. In turn, s2n-tls is built over other crypto libraries such as the AWS libcrypto (AWS-LC) or alternatively OpenSSL crypto library (libcrypto). AWS-LC is a general-purpose cryptographic library that is maintained by AWS, which will incorporate standardized post-quantum algorithms. Therefore, building s2n-tls with AWS-LC will provide s2n-tls with the post-quantum cryptographic algorithms for use in s2n-quic.

Such a model allows for AWS services and software that use s2n-quic to automatically inherit the standardized post-quantum options as they are implemented in s2n-tls and its underlying crypto libraries. There will be no need to tweak s2n-quic to support post-quantum TLS 1.3 handshakes. The whole stack of protocol implementations is architected in an agile manner without duplication of work.

In the following section, we show you how to run an experimental PQ build of s2n-quic that supports PQ-hybrid key exchange.

Test PQ-hybrid key establishment in s2n-quic

The public s2n-quic GitHub repository includes an example that demonstrates how to build the library with PQ-hybrid key exchange support, along with a server and client to test. The PQ-hybrid key exchange feature test requires CMake in Linux or macOS. The experiments below were run in an Amazon Linux 2 instance with rustc, Cargo, Clang, and CMake installed. Connections that you establish with this experimental build of s2n-quic will support PQ-hybrid key exchange.

To test PQ-hybrid key establishment

  1. Clone s2n-quic by using the following commands:

    git clone https://github.com/aws/s2n-quic
    cd s2n-quic

  2. Run the example post-quantum s2n-quic client and server in the post-quantum directory to confirm that they negotiate a PQ-hybrid key by using the following commands:

    cd examples/post-quantum
    cargo run –bin pq_server
    cargo run –bin pq_client

    Note: Although these examples with the PQ-hybrid feature experimental build of s2n-quic are self-contained, if you want to manually change and build s2n-quic and s2n-tls to enable PQ-hybrid key exchange, you have to update the default_tls13 policy in s2n-tls to point to security_policy_pq_tls_1_0_2021_05_26 in tls/s2n_security_policies.c. Then you rebuild s2n-tls and override the location that s2n-quic links to by setting the S2N_TLS_DIR, S2N_TLS_LIB_DIR, and S2N_TLS_INCLUDE_DIR environment variables at build time.

  3. To confirm the PQ-hybrid key establishment, you capture the QUIC negotiation by using the following tcpdump command:

    sudo tcpdump -i lo port 4433 -w test.pcap

  4. Open the capture by using a packet capture visualization application. First you look at the ClientHello message, as shown in the capture in Figure 1 taken from Wireshark.
    Figure 1: pq_client ClientHello in QUIC

    Figure 1: pq_client ClientHello in QUIC

    In the QUIC CRYPTO frame, you can see the TLS 1.3 cipher suites, and that the TLS version is 1.3 while the supported key exchange groups are classical ECDH (with identifiers 0x0017, 0x0018, 0x001d) and 0x2f39, 0x2f3a, 0x2f37…. 0x2f1f. The 0x2f… groups are the agreed upon identifiers (not standardized yet) for PQ-hybrid key exchange. You also see the PQ-hybrid X25519+Kyber512 (with identifier 12089 or 0x2f39) key share that is offered by the client. That key share includes 32 bytes for the Curve25519 ephemeral ECDH client public key, 800 bytes for the ephemeral Kyber512 public key, and 4 bytes for the identifier and the key share length.

    Note: The post-quantum KEMs implementations at the time of this writing follow the NIST Round 3 Kyber, BIKE, and SIKE specifications. We expect these specifications to change as the NIST PQC Project proceeds with standardization. Post-quantum support in s2n-tls and s2n-quic will be experimental until NIST has selected and published standardized algorithms and identifiers. Pushing the change to the main branch now would mean that s2n-quic clients would be sending a PQ-hybrid key share that won’t be used until the servers on the internet start supporting it. The actual algorithms and their identifiers will still be integrated in future releases of s2n-tls and AWS-LC. Therefore, s2n-quic will still be able to negotiate the NIST and IETF standardized options. Meanwhile, we will continue to experiment with post-quantum QUIC and its potential challenges.

  5. Next, take a look at the server-negotiated keys in the ServerHello message, as shown in Figure 2.
    Figure 2: pq_server ServerHello in QUIC

    Figure 2: pq_server ServerHello in QUIC

You can again see the TLS 1.3 cipher suite, the TLS version being 1.3, and the picked PQ-hybrid X25519+Kyber512 key share. The key share includes 4 bytes for the identifier and the key share length, 32 bytes for the Curve25519 ephemeral ECDH server public key, and 768 bytes for the Kyber512 ciphertext that encapsulates a post-quantum shared secret to the client’s ephemeral Kyber512 public key (included in its ClientHello message).

The rest of the handshake completes successfully by deriving symmetric keys from the X25519 and Kyber512 post-quantum shared secrets (as defined in the draft-ietf-tls-hybrid-design IETF draft) and encrypting the rest of the messages with Advanced Encryption Standard with Galois/Counter Mode (AES-GCM) by using these symmetric keys over QUIC.

Benchmark

Now you can benchmark the post-quantum QUIC client and server by using netbench, a transport protocol benchmarking tool that is available in the s2n-quic repository.

To benchmark the post-quantum QUIC client and server

  1. Go in the netbench directory and build it with the correct flags for the experimental post-quantum QUIC examples, by using the following commands:

    cd s2n-quic/netbench
    RUSTFLAGS=”–cfg s2n_quic_unstable –cfg s2n_quic_enable_pq_tls” cargo build –release

  2. Generate the netbench scenario by using the following commands:

    ./target/release/netbench-scenarios –request_response.connections 10000 –request_response.request_size 1 –request_response.response_size 1

    In this example, you’re trying to create 10,000 sequential QUIC connections. The scenario opens a connection, sends a single byte, receives a single byte, closes it, and repeats 10,000 times.

  3. Run the server by using the following command:

    ./target/release/netbench-driver-s2n-quic-server target/netbench/request_response.json

  4. Run the client by using the following command:

    SERVER_0=localhost:4433 ./target/release/netbench-driver-s2n-quic-client target/netbench/request_response.json

    The drivers read the request_response.json to run the scenario. Then the driver is wrapped in a collector that outputs statistics to another JSON file. At the end of all of the 10,000 runs, the cli feature is used to generate the report.

Figure 3 shows the performance results for X25519, X25519+Kyber512, X25519+BIKE-1, and X25519+SIKEp434 key exchange. All connections used an ECDSA P256 server certificate for authentication.

Figure 3: PQ-hybrid key exchange impact on QUIC connection rates

Figure 3: PQ-hybrid key exchange impact on QUIC connection rates

The x-axis is time in seconds. The y-axis is the number of times send is called—which, for 1 byte per connection, practically means that the diagram shows the connection establishment rate (per second). The absolute performance numbers in these benchmarks are not important, because the results could change based on the netbench scenario parameters. The performance difference between PQ-hybrid key exchange algorithms is what this graph is highlighting.

You can see that the classical X25519 achieves higher connection rates, because it is the most efficient option (that offers no post-quantum protection). The performance of Kyber is competitive and achieves 8% fewer connections per second when used with X25519 in a PQ-hybrid key exchange. BIKE-1 is relatively efficient, but adds some extra latency and introduces two frames for the ClientHello, which leads to 37% fewer connections per second. SIKEp434, although it offers much smaller public keys and ciphertexts, is orders of magnitude slower, which means it offers 95% fewer connections per second. These results match previous results we have shared before and other research works, where the most efficient signature algorithms ended up with higher connection rates and lower connection failure probabilities due to overload.

Conclusion

In this post, we showed how you can use s2n-quic in conjunction with s2n-tls to enable QUIC connections to negotiate encryption keys in a quantum-resistant manner. If you’re interested in learning more about s2n-quic, join us at AWS re:Inforce in July for the breakout session entitled NIS304: Using s2n-quic: Bringing QUIC, the secure transport protocol, to AWS.

As always, if you’re interested in using or contributing to s2n-quic, the source code and documentation are publicly available under the terms of the Apache Software License 2.0 from our s2n-quic GitHub repository. If you package or distribute s2n-quic or s2n-tls, or use it as part of a large multi-user service, you might be eligible for pre-notification of security issues. Contact [email protected] for more information. If you discover a potential security issue in s2n-quic or s2n-tls, we ask that you notify AWS Security by using our vulnerability reporting page.

If you have feedback about this post, submit comments in the Comments section below. If you have questions about this post, contact AWS Support.

Want more AWS Security news? Follow us on Twitter.

Panos Kampanakis

Panos Kampanakis

Panos has extensive experience with cyber security, applied cryptography, security automation, and vulnerability management. In his professional career, he has trained and presented on various security topics at technical events for numerous years. He has co-authored cybersecurity publications and participated in various security standards bodies to provide common interoperable protocols and languages for security information sharing, cryptography, and PKI. Currently, he works with engineers and industry standards partners to provide cryptographically secure tools, protocols, and standards.

Cameron Bytheway

Cameron Bytheway

Cameron is a Software Development Engineer at AWS, based in Salt Lake City, Utah. He leads and contributes to the s2n libraries of AWS, and enjoys using testing, fuzzing, simulations, and statical analysis to improve correctness of programs.

Leverage L2 constructs to reduce the complexity of your AWS CDK application

Post Syndicated from David Boldt original https://aws.amazon.com/blogs/devops/leverage-l2-constructs-to-reduce-the-complexity-of-your-aws-cdk-application/

The AWS Cloud Development Kit (AWS CDK) is an open-source software development framework to define your cloud application resources using familiar programming languages. AWS CDK uses the familiarity and expressive power of programming languages for modeling your applications. Constructs are the basic building blocks of AWS CDK apps. A construct represents a “cloud component” and encapsulates everything that AWS CloudFormation needs to create the component. Furthermore, AWS Construct Library lets you ease the process of building your application using predefined templates and logic. Three levels of constructs exist:

  • L1 – These are low-level constructs called Cfn (short for CloudFormation) resources. They’re periodically generated from the AWS CloudFormation Resource Specification. The name pattern is CfnXyz, where Xyz is name of the resource. When using these constructs, you must configure all of the resource properties. This requires a full understanding of the underlying CloudFormation resource model and its corresponding attributes.
  • L2 – These represent AWS resources with a higher-level, intent-based API. They provide additional functionality with defaults, boilerplate, and glue logic that you’d be writing yourself with L1 constructs. AWS constructs offer convenient defaults and reduce the need to know all of the details about the AWS resources that they represent. This is done while providing convenience methods that make it simpler to work with the resources and as a result creating your application.
  • L3 – These constructs are called patterns. They’re designed to complete common tasks in AWS, often involving multiple types of resources.

In this post, I show a sample architecture and how the complexity of an AWS CDK application is reduced by using L2 constructs.

Overview of the sample architecture

This solution uses Amazon API Gateway, AWS Lambda, and Amazon DynamoDB. I implement a simple serverless web application. The application receives a POST request from a user via API Gateway and forwards it to a Lambda function using proxy integration. The Lambda function writes the request body to a DynamoDB table.

The sample code can be found on GitHub.

The sample code can be found on GitHub.

Walkthrough

You can follow the instructions in the README file of the GitHub repository to deploy the stack. In the following walkthrough, I explain each logical unit and the differences when implementing it using L1 and L2 constructs. Before each code sample, I’ll show the path in the GitHub repository where you can find its source.

Create the DynamoDB table

First, I create a DynamoDB table to store the request content.

L1 construct

With L1 constructs, I must define each attribute of a table separately. For the DynamoDB table, these are keySchema, attributeDefinitions, and provisionedThroughput. They all require detailed CloudFormation knowledge, for example, how a keyType is defined.

lib/level1/database/infrastructure.ts

this.cfnDynamoDbTable = new dynamodb.CfnTable(
   this, 
   "CfnDynamoDbTable", 
   {
      keySchema: [
         {
            attributeName: props.attributeName,
            keyType: "HASH",
         },
      ],
      attributeDefinitions: [
         {
            attributeName: props.attributeName,
            attributeType: "S",
         },
      ],
      provisionedThroughput: {
         readCapacityUnits: 5,
         writeCapacityUnits: 5,
      },
   },
);

L2 construct

The corresponding L2 construct lets me use the default values for readCapacity (5) and writeCapacity (5). To further reduce the complexity, I define the attributes and the partition key simultaneously. In addition, I utilize the dynamodb.AttributeType.STRING enum.

lib/level2/database/infrastructure.ts

this.dynamoDbTable = new dynamodb.Table(
   this, 
   "DynamoDbTable", 
   {
      partitionKey: {
         name: props.attributeName,
         type: dynamodb.AttributeType.STRING,
      },
   },
);

Create the Lambda function

Next, I create a Lambda function which receives the request and stores the content in the DynamoDB table. The runtime code uses Node.js.

L1 construct

When creating a Lambda function using L1 construct, I must specify all of the properties at creation time – the business logic code location, runtime, and the function handler. This includes the role for the Lambda function to assume. As a result, I must provide the Attribute Resource Name (ARN) of the role. In the “Granting permissions” sections later in this post, I show how to create this role.

lib/level1/api/infrastructure.ts

const cfnLambdaFunction = new lambda.CfnFunction(
   this, 
   "CfnLambdaFunction", 
   {
      code: {
         zipFile: fs.readFileSync(
            path.resolve(__dirname, "runtime/index.js"),
            "utf8"
         ),
      },
      role: this.cfnIamLambdaRole.attrArn,
      runtime: "nodejs16.x",
      handler: "index.handler",
      environment: {
         variables: {
            TABLE_NAME: props.dynamoDbTableArn,
         },
      },
   },
);

L2 construct

I can achieve the same result with less complexity by leveraging the NodejsFunction L2 construct for Lambda function. It sets a default version for Node.js runtime unless another one is explicitly specified. The construct creates a Lambda function with automatic transpiling and bundling of TypeScript or Javascript code. This results in smaller Lambda packages that contain only the code and dependencies needed to run the function, and it uses esbuild under the hood. The Lambda function handler code is located in the runtime directory of the API logical unit. I provide the path to the Lambda handler file in the entry property. I don’t have to specify the handler function name, because the NodejsFunction construct uses the handler name by default. Moreover, a Lambda execution role isn’t required to be provided during L2 Lambda construct creation. If no role is specified, then a default one is generated which has permissions for Lambda execution. In the section ‘Granting Permissions’, I describe how to customize the role after creating the construct.

lib/level2/api/infrastructure.ts

this.lambdaFunction = new lambda_nodejs.NodejsFunction(
   this, 
   "LambdaFunction", 
   {
      entry: path.resolve(__dirname, "runtime/index.ts"),
      runtime: lambda.Runtime.NODEJS_16_X,
      environment: {
         TABLE_NAME: props.dynamoDbTableName,
      },
   },
);

Create API Gateway REST API

Next, I define the API Gateway REST API to receive POST requests with Cross-origin resource sharing (CORS) enabled.

L1 construct

Every step, from creating a new API Gateway REST API, to the deployment process, must be configured individually. With an L1 construct, I must have a good understanding of CORS and the exact configuration of headers and methods.

Furthermore, I must know all of the specifics, such as for the Lambda integration type I must know how to construct the URI.

lib/level1/api/infrastructure.ts

const cfnApiGatewayRestApi = new apigateway.CfnRestApi(
   this, 
   "CfnApiGatewayRestApi", 
   {
      name: props.apiName,
   },
);

const cfnApiGatewayPostMethod = new apigateway.CfnMethod(
   this, 
   "CfnApiGatewayPostMethod", 
   {
      httpMethod: "POST",
      resourceId: cfnApiGatewayRestApi.attrRootResourceId,
      restApiId: cfnApiGatewayRestApi.ref,
      authorizationType: "NONE",
      integration: {
         credentials: cfnIamApiGatewayRole.attrArn,
         type: "AWS_PROXY",
         integrationHttpMethod: "ANY",
         uri:
            "arn:aws:apigateway:" +
            Stack.of(this).region +
            ":lambda:path/2015-03-31/functions/" +
            cfnLambdaFunction.attrArn +
            "/invocations",
            passthroughBehavior: "WHEN_NO_MATCH",
      },
   },
);

const CfnApiGatewayOptionsMethod = new apigateway.CfnMethod(
    this,
    "CfnApiGatewayOptionsMethod",
   {    
      // fields omitted
   },
);

const cfnApiGatewayDeployment = new apigateway.CfnDeployment(
    this,
    "cfnApiGatewayDeployment",
    {
      restApiId: cfnApiGatewayRestApi.ref,
      stageName: "prod",
    },
);

L2 construct

Creating an API Gateway REST API with CORS enabled is simpler with L2 constructs. I can leverage the defaultCorsPreflightOptions property and the construct builds the required options method. To set origins and methods, I can use the apigateway.Cors enum. To configure the Lambda proxy option, all I need to do is to set the proxy variable in the method to true. A default deployment is created automatically.

lib/level2/api/infrastructure.ts

this.api = new apigateway.RestApi(
   this, 
   "ApiGatewayRestApi", 
   {
      defaultCorsPreflightOptions: {
         allowOrigins: apigateway.Cors.ALL_ORIGINS,
         allowMethods: apigateway.Cors.ALL_METHODS,
      },
   },
);

this.api.root.addMethod(
    "POST",
    new apigateway.LambdaIntegration(this.lambdaFunction, {
      proxy: true,
    })
);

Granting permissions

In the sample application, I must give permissions to two different resources:

  1.  API Gateway REST API to invoke the Lambda function.
  2. Lambda function to write data to the DynamoDB table.

L1 construct

For both resources, I must define AWS Identity and Access Management (IAM) roles. This requires in-depth knowledge of IAM, how policies are structured, and which actions are required. In the following code snippet, I start by creating the policy documents. Afterward, I create a role for each resource. These are provided at creation time to the corresponding constructs as shown earlier.

lib/level1/api/infrastructure.ts

const cfnLambdaAssumeIamPolicyDocument = {
    // fields omitted
};

this.cfnLambdaIamRole = new iam.CfnRole(
   this, 
   "cfnLambdaIamRole", 
   {
      assumeRolePolicyDocument: cfnLambdaAssumeIamPolicyDocument,
      managedPolicyArns: [
        "arn:aws:iam::aws:policy/service-role/AWSLambdaBasicExecutionRole",
      ],
   },
);
    
const cfnApiGatewayAssumeIamPolicyDocument = {
   // fields omitted
};

const cfnApiGatewayInvokeLambdaIamPolicyDocument = {
   Version: "2012-10-17",
   Statement: [
      {
         Action: ["lambda:InvokeFunction"],
         Resource: [cfnLambdaFunction.attrArn],
         Effect: "Allow",
      },
   ],
};

const cfnApiGatewayIamRole = new iam.CfnRole(
   this, 
   "cfnApiGatewayIamRole", 
   {
      assumeRolePolicyDocument: cfnApiGatewayAssumeIamPolicyDocument,
      policies: [{
         policyDocument: cfnApiGatewayInvokeLambdaIamPolicyDocument,
         policyName: "ApiGatewayInvokeLambdaIamPolicy",
      }],
   },
);

The database construct exposes a function to grant write access to any IAM role. The function creates a policy, which allows dynamodb:PutItem on the database table and adds it as an additional policy to the role.

lib/level1/database/infrastructure.ts

grantWriteData(cfnIamRole: iam.CfnRole) {
   const cfnPutDynamoDbIamPolicyDocument = {
      Version: "2012-10-17",
      Statement: [
         {
            Action: ["dynamodb:PutItem"],
            Resource: [this.cfnDynamoDbTable.attrArn],
            Effect: "Allow",
         },
      ],
   };

    cfnIamRole.policies = [{
        policyDocument: cfnPutDynamoDbIamPolicyDocument,
        policyName: "PutDynamoDbIamPolicy",
    }];
}

At this point, all permissions are in place, except that Lambda function doesn’t have permissions to write data to the DynamoDB table yet. To grant write access, I call the grantWriteData function of the Database construct with the IAM role of the Lambda function.

lib/deployment.ts

database.grantWriteData(api.cfnLambdaIamRole)

L2 construct

Creating an API Gateway REST API with the LambdaIntegration construct generates the IAM role and attaches the role to the API Gateway REST API method. Giving the Lambda function permission to write to the DynamoDB table can be achieved with the following single line:

lib/deployment.ts

database.dynamoDbTable.grantWriteData(api.lambdaFunction);

Using L3 constructs

To reduce complexity even further, I can leverage L3 constructs. In the case of this sample architecture, I can utilize the LambdaRestApi construct. This construct uses a default Lambda proxy integration. It automatically generates a method and a deployment, and grants permissions. As a result, I can achieve the same with even less code.

const restApi = new apigateway.LambdaRestApi(
   this, 
   "restApiLevel3", 
   {
      handler: this.lambdaFunction,
      defaultCorsPreflightOptions: {
         allowOrigins: apigateway.Cors.ALL_ORIGINS,
         allowMethods: apigateway.Cors.ALL_METHODS
      },
   },
);

Cleanup

Many services in this post are available in the AWS Free Tier. However, using this solution may incur costs, and you should tear down the stack if you don’t need it anymore. Cleanup steps are included in the RADME file of the GitHub repository.

Conclusion

In this post, I highlight the difference between using L1 and L2 AWS CDK constructs with an example architecture. Leveraging L2 constructs reduces the complexity of your application by using predefined patterns, boiler plate, and glue logic. They offer convenient defaults and reduce the need to know all of the details about the AWS resources they represent, while providing convenient methods that make it simpler to work with the resource. Additionally, I showed how to reduce complexity for common tasks even further by using an L3 construct.

Visit the AWS CDK documentation to learn more about building resilient, scalable, and cost-efficient architectures with the expressive power of a programming language.

Author:

David Boldt

David Boldt is a Solutions Architect at AWS, based in Hamburg, Germany. David works with customers to enable them with best practices in their cloud journey. He is passionate about the internet of Things and how it can be leveraged to solve different challenges across industries.

Use AWS Chatbot in Slack to remediate security findings from AWS Security Hub

Post Syndicated from Vikas Purohit original https://aws.amazon.com/blogs/security/use-aws-chatbot-in-slack-to-remediate-security-findings-from-aws-security-hub/

You can use AWS Chatbot and its integration with Slack and Amazon Chime to receive and remediate security findings from AWS Security Hub. To learn about how to configure AWS Chatbot to send findings from Security Hub to Slack, see the blog post Enabling AWS Security Hub integration with AWS Chatbot.

In this blog post, you’ll learn how to extend the solution so you can use AWS Chatbot to remediate the findings in your Slack channel. You’ll receive the findings from Security Hub and then run AWS CLI commands from your Slack channel to remediate the reported security findings.

AWS Chatbot works by acting as a subscriber to an Amazon Simple Notification Service (Amazon SNS) topic that can receive notifications from either Amazon CloudWatch or Amazon EventBridge, and have them delivered to the configured Slack channels or Amazon Chime chat rooms. You can apply standard AWS Identity and Access Management (IAM) permissions to the Slack channel or Amazon Chime chatroom, and you can also associate some channel guardrails to provide granular control on what commands can be run from the channel. For example, you may want to allow running commands that would allow getting more details on findings reported from Security Hub, and remediating and archiving those findings, but use channel guardrails to prevent anyone from disabling Security Hub. Another example is that you might want to allow the channel members to query AWS CloudTrail logs in order to get more details on findings, but you use channel guardrails to prevent them from disabling AWS CloudTrail or changing the destination Amazon Simple Storage Services (Amazon S3) bucket.

Overview of ChatOps and ChatSecOps concepts

ChatOps, also known as Chat Operations, refers to using chatbots, tools, and clients to communicate, notify, assign, and launch operational tasks and issues. You can use your existing Slack channels and Amazon Chime chatrooms to receive alerts and notifications about operational issues or tasks, and you can also respond to those incidents or tasks in real time from the same chat room. SecOps is a philosophy of encouraging collaboration between the ITOps and Security teams of an organization. ChatSecOps, also known as Chat Security Operations, uses the ChatOps technology to enable customers to put SecOps in practice.

ChatSecOps facilitates this collaboration by allowing security-related notifications to be delivered to common chat rooms used by SecOps teams, providing visibility on the issues and actions that are taken to investigate and remediate the reported issues. SecOps teams can share threat analysis reports, compliance finding reports, and information on security vulnerabilities in these channels and work closely with DevOps teams to perform further analysis, investigation, and remediation of the issues and findings. This helps to ensure visibility and collaboration across the SecOps and DevOps teams and promotes the philosophy of DevSecOps.

Prerequisites

To get started, you’ll need the following prerequisites:

Set up Slack permissions

You need to grant permissions to the users in Slack channels, which you can do in one of the following ways:

  • Associate a channel IAM role with AWS Chatbot. This method provides similar permissions to all the members of the Slack channel. A channel IAM role is more useful if all your channel members require the same set of permissions. The channel IAM role can also be used to restrict the permissions provided by the user IAM role.
  • Define user roles. User roles require channel members to choose their own roles. This allows different users in your channel to have different sets of permissions. User roles are also useful when you don’t want new channel members to perform actions as soon as they join the channel.

For detailed instructions about setting up AWS Chatbot and defining permissions, see Getting started with AWS Chatbot. For more information about setting boundaries on the permissions that can be allowed by the channel and user IAM roles, see Channel guardrails.

Integrate the Slack channel with AWS Chatbot

After you set up the Slack channel with required permissions, you integrate the ChatOps for AWS app with your channel by using the following steps.

To integrate the Slack channel with AWS Chatbot

  1. Log in to Slack by using either the Slack app or web browser.
  2. In the Slack sidebar, from the Channels section, choose the channel name.
  3. In the right pane, choose the channel name to open the channel configuration window.
  4. Choose the Integrations tab, then choose Add an App.
  5. In the search bar, enter AWS Chatbot. In the search results list, choose the Add button for AWS Chatbot.
  6. On the Integrations tab, under Apps, you should see ChatOps for AWS, as shown in Figure 1.
    Figure 1: Integrate the ChatOps for AWS app with your Slack channel

    Figure 1: Integrate the ChatOps for AWS app with your Slack channel

The step-by-step process for integrating a Slack channel with AWS Chatbot is described in more detail in the blog post Enabling AWS Security Hub integration with AWS Chatbot.

Now you’re ready to start running the commands. Note that you need to add @aws before writing any commands. For more information , see Running AWS CLI commands from Slack channels.

Use case: Amazon S3 Block Public Access enabled at the account level

The Amazon S3 Block Public Access feature provides settings for access points, buckets, and accounts to help you manage public access to Amazon S3 resources. With S3 Block Public Access, account administrators and bucket owners can set up centralized controls to limit public access to your S3 resources. These controls are enforced regardless of how the resources are created.

Amazon GuardDuty tracks and reports S3 Block Public Access feature configurations at the account level, as well as the bucket level. These findings are automatically sent to Security Hub.

For the purpose of this walkthrough, consider the following use case: your organization has compliance requirements to disable public access to all the S3 buckets at the account level. You do not want to allow individual bucket owners to configure this access policy. You get a notification that the S3 Block Public Access feature is disabled at the account level for a specific account. This walkthrough shows how you can run AWS CLI commands from the Slack channel to investigate and remediate this issue.

To remediate finding for Amazon S3 Block Public Access from the Slack channel

  1. You receive a Security Hub notification that Amazon S3 Block Public Access was disabled for an account in your designated Slack channel.
    Figure 2: Notification received from Security Hub in Slack channel

    Figure 2: Notification received from Security Hub in Slack channel

    This notification indicates that S3 Block Public Access was disabled for a specific account.

    Note: Your Slack channel members require permissions to investigate and remediate the findings received in the Slack channel. As described earlier, you can grant permissions using a channel IAM role or a user IAM role. You should follow the principal of least privilege access when granting access and use IAM Access Analyzer to review the permissions that are granted through the channel or user IAM role.

  2. Before you take any action, you need to find the current S3 Block Public Access configuration for the account. To do this, run the following AWS CLI command from the Slack channel, replacing <your_account_id> with the AWS account ID you are investigating.

    @aws s3control get-public-access-block –account-id <your_account_id>

  3. Review the response in the Slack channel.
    Figure 3: AWS CLI command output in Slack channel indicating that S3 Block Public Access is disabled

    Figure 3: AWS CLI command output in Slack channel indicating that S3 Block Public Access is disabled

    You see that the output in Figure 3 shows that all the parameters of PublicAccessBlockConfiguration are set to false, which indicates that the Block Public Access feature is disabled at the account level.

  4. To remediate this issue, run the following AWS CLI command in your Slack channel, replacing <your_account_id> with the AWS account ID you are investigating.

    @aws s3control put-public-access-block –account-id <your_account_id> –public-access-block-configuration {“RestrictPublicBuckets”: true,
    “BlockPublicPolicy”: true,
    “BlockPublicAcls”: true,
    “IgnorePublicAcls”: true

  5. In the response from AWS Chatbot, look for Result was null to verify that the command was run without any errors.
    Figure 4: AWS CLI command run from Slack channel to enable S3 Block Public Access

    Figure 4: AWS CLI command run from Slack channel to enable S3 Block Public Access

  6. To check the current status of the configuration, and to validate whether the issue has been resolved, again run the following AWS CLI command from the Slack channel, replacing <your_account_id> with the AWS account ID you are investigating:

    @aws s3control get-public-access-block –account-id <your_account_id>

  7. In the response, you see that all the parameters of PublicAccessBlockConfiguration are set to false, which indicates that the Block Public Access feature is enabled at the account level.
    Figure 5: AWS CLI command output in Slack channel indicating S3 Block Public Access is enabled

    Figure 5: AWS CLI command output in Slack channel indicating S3 Block Public Access is enabled

Another example use case is that you get a security finding notifying you about unencrypted Amazon Elastic Block Store (Amazon EBS) volumes. You can remediate the finding by running AWS CLI commands to encrypt the volume. In addition to interacting with AWS services by running standard AWS CLI commands in the Slack channel, you can further extend this capability to run operating system (OS)-level commands by using AWS Systems Manager runbooks, using the same mechanism described in this post. For more information, see AWS Systems Manager Runbooks in the AWS Chatbot Administrator Guide.

Conclusion

In this blog post, you learned how to run AWS CLI commands from Slack channels to remediate your security findings. This allows you to receive alerts and notifications from Security Hub and other security services such as Amazon GuardDuty, then investigate and remediate the issues from a single platform. You can integrate AWS Chatbot with your security operation team’s Slack channel or Amazon Chime chatroom, and manage your security operations in a more collaborative, transparent, and automated manner.

If you have any questions about this post, let us know in the Comments section below. For more information about AWS Chatbot, see the AWS Chatbot Administrator Guide.

Want more AWS Security news? Follow us on Twitter.

Vikas Purohit

Vikas Purohit

Vikas works as a Partner Solution Architect with AISPL, India. He is passionate about helping customers and partners in their cloud journeys. He is particularly passionate in Cloud Security, hybrid networking and migrations.

A pathway to the cloud: Analysis of the Reserve Bank of New Zealand’s Guidance on Cyber Resilience

Post Syndicated from Julian Busic original https://aws.amazon.com/blogs/security/a-pathway-to-the-cloud-analysis-of-the-reserve-bank-of-new-zealands-guidance-on-cyber-resilience/

The Reserve Bank of New Zealand’s (RBNZ’s) Guidance on Cyber Resilience (referred to as “Guidance” in this post) acknowledges the benefits of RBNZ-regulated financial services companies in New Zealand (NZ) moving to the cloud, as long as this transition is managed prudently—in other words, as long as entities understand the risks involved and manage them appropriately. In this blog post, I analyze the RBNZ’s thinking as it developed the Guidance, and how the Guidance creates opportunities for NZ financial services customers to accelerate migration of workloads—including critical systems—to the Amazon Web Services (AWS) Cloud.

On page 14 of its Guidance, the RBNZ writes that “[i]f used prudently, third-party services may reduce an entity’s cyber risk, especially for those entities that lack cyber expertise.” This open regulatory stance towards the cloud enables our NZ financial services customers to consider a cloud first strategy for both new and existing systems, including critical workloads. Customers must, however, manage the transition to the cloud prudently, working closely with both their cloud service provider and their regulators.

This blog post is aimed at boards, management, and technology decision-makers, for whom understanding regulatory thinking is a useful input when developing an enterprise cloud strategy.

Operational technology staff and risk practitioners seeking detailed guidance on how AWS helps you align with the RBNZ’s Guidance can download our New Zealand Financial Services whitepaper from our public website and the AWS Reserve Bank of New Zealand Guidance on Cyber Resilience (RBNZ-GCR) Workbook from AWS Artifact, a self-service portal for you to access AWS compliance reports.

Overview and applicability

The RBNZ’s Guidance sets out the RBNZ’s expectations for management of cyber resilience. It’s aimed at all registered banks, licensed non-bank deposit takers, licensed insurers, and designated financial market infrastructures that are regulated by the RBNZ. The Guidance makes a series of non-binding recommendations across four domains—Governance, Capability Building, Information Sharing, and Third-Party Management.

Each section of the Guidance has a short preamble, summarizing the RBNZ’s expectations for effective risk management in each domain and providing insights into why the RBNZ is making specific recommendations.

The Guidance can be tailored to an entity’s individual needs, technology choices, and risk appetite. Boards, management, and technology decision-makers should familiarize themselves with the RBNZ’s Guidance, ascertain how closely their own organization aligns to it, and work to remediate any identified gaps.

Why non-binding guidance and not an enforceable standard?

The RBNZ gives several reasons (see RBNZ Summary of submissions, paragraphs 9-16) for choosing to publish non-binding recommendations rather than legally binding requirements. The RBNZ declares an intent to monitor adoption of its recommendations by industry, and indicates that future policy settings might include developing legally binding standards for cyber resilience. In this respect, the RBNZ’s approach is similar to that of the Australian Prudential Regulation Authority (APRA), which first issued non-binding guidance on management of IT security risk in 2013, before moving to a legally binding standard in 2019.

The RBNZ gives the following reasons for choosing guidance over a standard:

  • The RBNZ’s policy stance of being moderately active in respect to cyber resilience
  • A previous light-touch approach regarding cyber resilience
  • Providing sufficient time for industry to adjust to new policy settings, given the wide range of maturity within financial services organizations in New Zealand
  • The gap between New Zealand’s and other jurisdictions’ cyber readiness
  • The RBNZ’s current ability to effectively monitor and ensure compliance

The RBNZ indicates that it will “work together with the industry to operationalise the finalised Guidance” (RBNZ Summary of submissions, paragraph 10) and that it is “looking to strengthen [its] cyber resilience expertise in [its] financial stability function” although this will “take time to achieve” (RBNZ Summary of submissions, paragraph 9).

RBNZ-regulated entities should already be self-assessing against the Guidance and working to address gaps as a matter of priority. This is not just because the Guidance could become a legally binding standard in the next 3–5 years, but because the RBNZ has created a practical and flexible framework for the management of cyber risk, which will greatly enhance the NZ financial sector’s resilience to cyber incidents. Non–RBNZ-regulated entities looking for a benchmark to measure themselves against can also use the RBNZ’s Guidance to assess and improve the effectiveness of their own control environments.

Comparing rules-based frameworks and principles-based frameworks

There are two main ways that regulators communicate their risk management expectations to their regulated entities. These are a rules-based approach (sometimes called a compliance-based approach) and a principles-based approach. The RBNZ’s Guidance takes a principles-based approach towards the management of cyber risk.

With a rules-based approach, the regulator takes responsibility for identifying risks and lays out explicit and granular controls that regulated entities are required to implement. A rules-based approach is highly prescriptive, meaning that regulated entities can adopt a checklist approach in meeting their regulators’ requirements. This approach, although it gives certainty to regulated entities regarding the controls they are expected to adopt, can have disadvantages for regulators:

  • Creating and maintaining detailed technical rules can be challenging, given the pace at which technology and the threat environment evolve.
  • Regulators have a diverse population of regulated entities, so a rules-based approach can be inflexible or have blind spots.
  • A rules-based approach doesn’t encourage entities to actively identify and manage their own unique set of risks.

By contrast, a principles-based approach describes a set of desired regulatory or risk-management outcomes, but it isn’t prescriptive in how regulated entities achieve these goals. Regulators act in a vendor- and technology-neutral manner, and regulated entities are expected to interpret regulatory requirements or guidance in the context of their individual business models, technology choices, threat environments, and risk appetites.

Under a principles-based approach, an entity must be able to demonstrate to its regulators’ satisfaction that it both understands the current and emerging risks it faces, and that it is managing these risks appropriately. For example, the principle that entities “[…] should develop and maintain a programme for continuing cyber resilience training for staff at all levels” (Guidance, section A3.3 page 6) gives clear direction, but leaves it up to the entity to decide on the approach to take, and how the entity will demonstrate to the RBNZ that this principle is being met.

A principles-based approach avoids the issues with the rules-based approach that I outlined previously—this approach is significantly longer-lived than a rules-based approach, it moves responsibility for effective risk identification and management from the regulator to the entity (which better understands its own risk profile and appetite), and the framework can be applied to a regulated entity population that varies in size, nature, and complexity.

Freedom to innovate under a principles-based approach

The RBNZ says that its Guidance should be employed in a manner “[…] proportionate to the size, structure and operational environment of an entity, as well as the nature, scope, complexity and risk profile of its products and services” (Guidance, page 2).

You can therefore meet the RBNZ’s Guidance in many different ways, as long as you can demonstrate to the RBNZ that your organization understands the risks it is facing and is managing them appropriately. A principles-based approach creates opportunities for innovation, because there are many different ways to meet a set of regulatory principles.

If you are an NZ financial services customer who also operates in Australia, you might note that the RBNZ’s approach aligns to that of the principal financial services regulator in Australia—the Australian Prudential Regulation Authority (APRA). APRA also takes a principles-based approach to its prudential framework, “avoiding excessive prescription where possible to allow for the diversity of practice according to the size, business activity, and sophistication of the institutions being supervised” (APRA’s objectives, Chapter 1).

A cautious green light to the cloud for New Zealand financial services

“If used prudently, third-party services may reduce an entity’s cyber risk, especially for those entities that lack cyber expertise” (Guidance, page 14).

In my view, this statement represents a (cautious) green light for financial services customers in NZ who wish to migrate systems to the AWS Cloud, although as the RBNZ makes clear, you “should be fully aware of the cyber risk associated with third parties and act appropriately to mitigate that risk” (Guidance, page 14). The RBNZ also requests that for critical functions, entities “[…] should inform the Reserve Bank about their outsourcing of critical functions to cloud service providers early in their decision-making process” (Guidance, Section D8.1, page 17).

The RBNZ defines a critical function as “[a]ny activity, function, process, or service, the loss of which (for even a short period of time) would materially affect the continued operation of an entity, the market it serves and the broader financial system, and/or materially affect the data integrity, reputation of an entity and confidence in the financial system” (Guidance, page 19).

Although the RBNZ doesn’t elaborate further on why it requests early notification about outsourcing of critical functions to the cloud, it’s likely that early engagement is requested so that the RBNZ has the opportunity to provide early feedback on any areas of potential concern, before the initiative is significantly progressed and a large amount of resources are committed.

Migration of higher-risk workloads to the cloud will naturally attract higher levels of regulatory scrutiny, but this doesn’t change the RBNZ’s open regulatory stance on cloud security. This stance is further emphasized by the RBNZ’s comment that “If managed prudently, migrating to the cloud presents a number of benefits including geographically dispersed infrastructures, agility to scale more quickly, improved automation, sufficient redundancy, and reduced initial investment costs for individual financial institutions” (Guidance, page 15).

Building innovative, secure, and highly resilient solutions on AWS, and using the high levels of visibility that you have into your environments that are running on AWS, can help you demonstrate to your regulators how you are identifying and managing your cyber resilience risks in line with the RBNZ’s Guidance.

A note on regulatory myths

In conversations with customers, I occasionally encounter “regulatory myths,” such as “certain types of workloads are prohibited in the cloud,” or “my regulator won’t allow me to use multi-region architectures.”

To date, the RBNZ has not made specific recommendations or set specific requirements regarding technology solutions. This includes, but is not limited to, choice of vendors or technology platforms, prescription of particular architectures, or the types of workload that may or may not be migrated to the cloud. Remember, the RBNZ’s Guidance is a principles-based framework, and is vendor-, technology-, and solution-neutral.

We have many examples of financial services companies all over the world successfully running critical workloads in the AWS Cloud, but regulatory myths and misunderstandings can inhibit our customers’ ability to “think big” when developing their cloud strategies. If you believe that you must implement specific technical patterns to meet regulatory expectations, we encourage you to contact the RBNZ to discuss any aspects of the Guidance that require clarification. We also encourage you to contact your AWS account team, who can arrange support from internal AWS risk and regulatory specialists, particularly if critical systems are proposed for migration to AWS.

Conclusion

The RBNZ’s Guidance on Cyber Resilience is an important first step for financial services regulation of cybersecurity in NZ. The Guidance can be considered cloud friendly because it acknowledges that prudent use of third parties (such as AWS) can reduce cyber risk, especially for entities that lack cyber expertise, and outlines several benefits of the cloud over traditional on-premises infrastructure, including resilience and redundancy, ability to scale, and reduced initial investment costs.

The principles-based nature of the RBNZ’s Guidance creates opportunities for you to develop innovative solutions in the AWS Cloud, because there are many different ways to meet the principles contained in the RBNZ’s Guidance. The key consideration is that you demonstrate to your regulators that you both understand the cyber risks you face in moving to the AWS Cloud, and manage them appropriately.

The launch of the AWS Asia Pacific (Auckland) Region in 2024, our wide range of products and services, and the visibility that you have into the AWS control environment (through AWS Artifact) and your own environment (through services like Amazon GuardDuty and AWS Security Hub) can all help you demonstrate to the RBNZ that you are managing cyber risk in accordance with the RBNZ’s expectations.

Next steps

Boards, executives, and technology decision-makers should familiarize themselves with the RBNZ’s Guidance, and if they aren’t already doing so, conduct a self-assessment and initiate a body of work to address identified gaps.

In view of the RBNZ’s cautious green light for prudent migration to the cloud—including for critical systems—NZ financial services customers should review their existing cloud strategies and identify areas where they can both broaden and accelerate their cloud journeys. The AWS Cloud Adoption Framework (AWS CAF) offers guidance and best practices to help organizations develop an efficient and effective plan for their cloud adoption journey. The AWS C-suite Guide to Shared Responsibility for Cloud Security and Data Safe Cloud eBook inform boards and senior management about both the benefits and risks of operating in the cloud.

Operational technology staff and risk practitioners can download our New Zealand Financial Service whitepaper from our public website and the AWS Reserve Bank of New Zealand Guidance on Cyber Resilience (RBNZ-GCR) Workbook from AWS Artifact. The RBNZ-GCR is particularly useful for operational IT staff and risk practitioners because it provides prescriptive guidance on which controls to implement on your side of the shared responsibility model and which AWS controls you inherit from the service.

Finally, contact your AWS representative to discuss how the AWS Partner Network, AWS solution architects, AWS Professional Services teams, and AWS Training and Certification can assist with your cloud adoption journey. If you don’t have an AWS representative, contact us at https://aws.amazon.com/contact-us.

 
If you have feedback about this post, submit comments in the Comments section below. If you have questions about this post, contact AWS Support.

Want more AWS Security news? Follow us on Twitter.

Author

Julian Busic

Julian is a Security Solutions Architect with a focus on regulatory engagement. He works with our customers, their regulators, and AWS teams to help customers raise the bar on secure cloud adoption and usage. Julian has over 15 years of experience working in risk and technology across the financial services industry in Australia and New Zealand.

Use Security Hub custom actions to remediate S3 resources based on Macie discovery results

Post Syndicated from Jonathan Nguyen original https://aws.amazon.com/blogs/security/use-security-hub-custom-actions-to-remediate-s3-resources-based-on-macie-discovery-results/

The amount of data available to be collected, stored and processed within an organization’s AWS environment can grow rapidly and exponentially. This increases the operational complexity and the need to identify and protect sensitive data. If your security teams need to review and remediate security risks manually, it would either take a large team or the actions might not be timely. There is also a chance that with manual operation, a step could be missed or the incorrect action could be taken. As a result, your security teams will need an automated and scalable way to support these operations efficiently.

Amazon Macie is a fully managed data security and data privacy service that uses machine learning and pattern matching to discover and protect your sensitive data in AWS. Macie generates findings for sensitive data in an S3 object or a potential issue with the security or privacy of an S3 bucket. AWS Security Hub allows you to gain a centralized view into the security posture across your AWS environment by aggregating security findings from various AWS services and partner products, including Amazon Macie. Security Hub also includes the custom actions feature, which you can use to create actions for response and remediation to selected findings within the Security Hub console in an efficient and consistent manner.

It is important for your security teams to create effective and standardized mechanisms for taking action against Macie findings to ensure that data remains secure. By using Security Hub custom actions, you can have predefined actions for the security team to take against Macie findings without having to manually find and remediate the resources.

This blog post provides you with an example solution for responding to Macie sensitive data findings and policy findings in Security Hub by using custom actions. I will walk through the components of the solution, as well as opportunities where resources can be customized for your specific use case.

Prerequisites

You must have AWS Security Hub and Amazon Macie enabled in the AWS account where you are deploying this solution.

Solution overview

In this solution, you’ll use a combination of Security Hub custom actions, Amazon EventBridge, and AWS Lambda to take action on Macie findings in Security Hub. You will be working with the findings within the same AWS account where you deployed the solution.

Macie generates two categories of findings relating to different resources, which will require different remediation actions.

  1. Policy finding is a detailed report of a potential policy violation or issue with the security or privacy of an Amazon Simple Storage Service (Amazon S3) bucket.
  2. Sensitive data finding is a detailed report of sensitive data in an S3 object.

A full list of Macie finding types can be found in the Macie User guide.

For the two Macie finding categories, there is an associated Security Hub custom action:

  1. Custom action for sensitive data finding (S3 object) – When the security team selects this custom action, the action invokes a Lambda function that will take the following steps on the S3 object in the Macie finding:
    1. Tag the object with the Security Hub finding ID
    2. Encrypt the S3 object with a different customer-managed KMS key
    3. Update the Security Hub finding workflow status to RESOLVED
  2. Custom action for policy finding (S3 bucket). When you select this this custom action, it invokes a Lambda function that will take the following steps on the S3 bucket in the Macie finding:
    1. Tag the object with the Security Hub finding ID
    2. Update the S3 bucket configuration to:
      • Enable default encryption
      • Enable public access block
    3. Update the Security Hub finding workflow status to RESOLVED

The solution is configured to take action within the AWS account where the finding and corresponding resource is generated. In order to enable cross-account remediation, you will need to deploy an additional IAM role for the automation to assume and provision a KMS key to use for encryption.

Note: The custom actions in this solution are meant to be examples of actions to take against Macie policy and sensitive data findings. These actions will be different depending on your use-case and environment. You will also need to review and update the associated Lambda function execution role IAM policies accordingly.

Solution architecture

Figure 1: Resources deployed in the Security AWS account taking action on resources identified in the Workload AWS account

Figure 1: Resources deployed in the Security AWS account taking action on resources identified in the Workload AWS account

Figure 1 shows the architecture for the solution. The workflow is as follows:

  1. A Macie job runs and creates findings, which are sent to Security Hub in the same AWS account as the Macie finding.
  2. The delegated administrator Security Hub account combines findings across all member Security Hub accounts, including Macie findings.
  3. The security team reviews the Macie findings in the Security Hub delegated administrator account and determines to take remediation actions for a finding by selecting the finding and then selecting the appropriate Security Hub custom action.
  4. The Security Hub custom action sends the finding to the EventBridge rule, which is linked to the Lambda function.
  5. The EventBridge rule invokes the Lambda function to take action against the resources from the Macie finding.
  6. The Lambda function will:
    1. Take action for the S3 resource
    2. Mark the Macie finding as resolved in the delegated administrator Security Hub account

The solution is currently intended to work in a single Region. In order to enable this solution across Regions, you will need to change the Remediation Lambda function code for any regional resources used for remediation actions (i.e. AWS Key Management Service).

Deploy the solution

You can deploy the solution through either the AWS Management Console or the AWS Cloud Development Kit (AWS CDK).

To deploy the solution by using the AWS Management Console

  • In your security tooling account, launch the AWS CloudFormation template by choosing the following Launch Stack button. It will take approximately 10 minutes for the CloudFormation stack to complete.
    Select this image to open a link that starts building the CloudFormation stack

    Note: The stack will launch in the N. Virginia (us-east-1) Region. To deploy this solution into other AWS Regions, download the solution’s CloudFormation template, modify it, and deploy it to the selected Region.

  • (OPTIONAL) If you want to enable cross-account remediation, launch the following AWS CloudFormation template in the AWS account where you want to be able to take remediation actions. You can also use AWS CloudFormation StackSets if deploying to multiple AWS accounts.
    Select this image to open a link that starts building the CloudFormation stack

To deploy the solution by using AWS CDK

You can find the latest code in our GitHub repository, where you can also contribute to the sample code. The following commands show how to deploy the solution by using the AWS CDK. First, the CDK initializes your environment and uploads the AWS Lambda assets to Amazon S3. Then, you can deploy the solution to your account. Make sure to replace <AWS_ACCOUNT> with the account number, and replace <REGION> with the AWS Region that you want the solution deployed to.

  1. Run the following commands in your terminal while authenticated in the security tooling AWS account:

    cdk bootstrap aws://<Security_Tooling_AWS_ACCOUNT>/<REGION>

    cdk deploy MacieRemediationStack

  2. (OPTIONAL) If you want to enable cross-account remediation, Run the following commands in your terminal while authenticated to member AWS account:

    cdk bootstrap aws://<Member_AWS_ACCOUNT>/<REGION>

    cdk deploy MacieRemediationIAMStack –parameters solutionaccount=<Security_Tooling_AWS_ACCOUNT>

Solution walkthrough and validation

Now that you’ve successfully deployed the solution, you can see things in action. You have two options for testing the workflow on your own:

  1. Use a sample event, generated by a Macie finding in Security Hub, and invoke the Lambda function that is tied to the Security Hub custom action.

    Note: If using sample events, you can replace the values for the resources with real resources. Otherwise, you will not be able to see the Lambda function successfully take action because the resource in your sample event may not exist.

  2. Generate demo Macie findings in Security Hub by using this sample data for Amazon Macie.

I have existing findings for Macie generated in my AWS account, and in the procedures in this section, I’ll walk through taking action against these.

Note: If you set up Macie and Security Hub in a delegated administrator and member model that ingests findings from other AWS accounts, the IAM remediation roles for the S3 bucket and S3 objects must be deployed in the member accounts.

Review deployed resources in the AWS console

Before taking action on your sample findings, review the deployed resources that you’ll use.

To review deployed resources

  1. In the AWS account console where the automation was deployed, go to Security Hub, choose Settings, and then choose Custom actions. You should see two custom actions:
    • Macie Policy Finding
      • arn:aws:securityhub:<region>:<account-id>:action/custom/MacieS3BucketPolicy
    • Macie Data Finding
      • arn:aws:securityhub:<region>:<account-id>:action/custom/MacieSensitiveData
        Figure 2: Custom actions in Security Hub

        Figure 2: Custom actions in Security Hub

  2. Navigate to the EventBridge console and then choose Rules. You should see four rules:
    • Disabled – These are disabled by default during deployment
      • Autoremediate_Macie_Policy_Finding
      • Autoremediate_Macie_Sensitive_Data_Finding
        Figure 3: Disabled EventBridge rules for autoremediation of Macie findings in Security Hub

        Figure 3: Disabled EventBridge rules for autoremediation of Macie findings in Security Hub

    • Enabled – These are enabled by default during deployment:
      • Custom_Action_Macie_Policy_Finding
      • Custom_Action_Macie_Sensitive_Data_Finding
        Figure 4: Enabled EventBridge rules tied to the Security Hub custom actions

        Figure 4: Enabled EventBridge rules tied to the Security Hub custom actions

    In the enabled EventBridge rules, you should see the corresponding Security Hub custom action Amazon Resource Names (ARNs) in the rule event pattern.

    Figure 5: Enabled EventBridge rule event pattern for the Security Hub custom action

    Figure 5: Enabled EventBridge rule event pattern for the Security Hub custom action

Take action on an Amazon Macie object or policy finding

Each Security Hub custom action invokes a corresponding Lambda function that is configured as a target in the EventBridge rule. The Lambda function parses the information in the Macie finding from Security Hub to take action.

Each Security Hub custom action is specific to either an S3 object or an S3 bucket. If you attempt a custom action meant for an S3 object against a Macie policy finding, this will successfully initiate the custom action, but the Lambda function that is invoked will be unsuccessful.

If the Macie finding is specific to an S3 object, the title will display “The S3 object …,” whereas if the Macie finding is for a policy finding, the title will display information for an S3 bucket.

To take action on findings

  1. In the AWS account console where the automation was deployed, navigate to AWS Security Hub, and then choose Findings.
  2. Filter the findings by setting Product Name to Macie.
    Figure 6: Filter for Macie findings in Security Hub

    Figure 6: Filter for Macie findings in Security Hub

  3. Select the checkbox for either a Macie policy finding or a sensitive data finding; this will select a custom action. After you select the action, there is no confirmation step, and the action will invoke the Lambda function.
    Figure 7: Validate Custom Action has sent the finding to Amazon CloudWatch Events (EventBridge rule)

    Figure 7: Validate Custom Action has sent the finding to Amazon CloudWatch Events (EventBridge rule)

Review and validate the Security Hub custom action on target resources

In order to validate or troubleshoot the solution, you need to review whether the Lambda function was able to take action against the resources in the Security Hub finding for Macie.

To validate or troubleshoot the custom action

  1. For validation of sensitive data finding remediation, review S3 object configuration:
    1. Navigate to the Amazon S3 console.
    2. Choose the S3 object in the Macie finding.
    3. Choose the Properties tab and review the following fields:
      • Tags should be set to SH_Finding_ID.
      • AWS KMS key ARN should be set to the KMS key with the alias `macie_key`
        1. Click on the KMS key ARN and validate the key’s alias is the key deployed in the solution
  2. For validation of policy finding remediation, review the S3 bucket configuration:
    1. Navigate to the Amazon S3 console.
    2. Choose the S3 bucket in the Macie finding.
    3. Choose the Properties tab and review the following fields:
      • Tags should be set to SH_Finding_ID.
      • Default Encryption should be set to Enabled.
    4. Choose the Permissions tab and review the following fields:
      • Block public access should be set to On.
  3. For troubleshooting, you can review the CloudWatch logs for the Lambda function:
    1. Navigate to the CloudWatch console.
    2. Choose /aws/lambda/Remediate_Macie_S3_Bucket.
    3. Choose the most recent log stream and review the logs to see what actions were taken on the resources.

Next steps and customization

The solution in this post has a custom action for an S3 object and an S3 bucket, and is meant to serve as a template. You could modify the Lambda functions associated with the custom actions to take different or additional actions that are specific to your environment and data classification.

Additionally, I walked through specific Security Hub custom actions for Macie policy (bucket) or sensitive data (objects) findings. If you have defined actions to take for both, you could consolidate the custom actions and invoke a Lambda function that parses information from the Security Hub Macie finding to determine if it is a policy or sensitive data finding.

The two disabled EventBridge rules deployed as part of the solution are examples that can be leveraged for auto-remediation. After you use Security Hub’s custom actions to remediate findings, your security team could start to see a trend where you always want to take specific actions and enable the EventBridge rules to take action without requiring your security team to select a custom action in Security Hub in the AWS console.

  • Autoremediate_Macie_Policy_Finding
  • Autoremediate_Macie_Sensitive_Data_Finding

Conclusion

In this post, you deployed a solution to allow your security team to take automated actions against a Macie sensitive data and policy finding from Security Hub by using custom actions in the AWS console. We walked through what the solution does and how the solution can be customized to your use case.

If you have feedback about this post, submit comments in the Comments section below. If you have any questions about this post, start a thread on the AWS Security Hub forum or Amazon Macie forum.

Want more AWS Security news? Follow us on Twitter.

Jonathan Nguyen

Jonathan Nguyen

Jonathan is a Shared Delivery Team Senior Security Consultant at AWS. His background is in AWS Security with a focus on threat detection and incident response. Today, he helps enterprise customers develop a comprehensive security strategy and deploy security solutions at scale, and he trains customers on AWS Security best practices.

Tighten your package security with CodeArtifact Package Origin Control toolkit

Post Syndicated from Davide Semenzin original https://aws.amazon.com/blogs/devops/tighten-your-package-security-with-codeartifact-package-origin-control-toolkit/

Introduction

AWS CodeArtifact is a fully managed artifact repository service that makes it easy for organizations to securely store and share software packages used for application development. On Jul14 2022 we introduced a new feature called Package Origin Controls which allows customers to protect themselves against “dependency substitution“ or “dependency confusion” attacks.

This class of supply chain attacks can be carried out when an attacker with knowledge of an organization’s internally published package names (for example: Sample-Package=1.0.0) is able to publish such name(s) in a public repository. Package managers contain dependency resolution logic that pulls the latest version of a package. The attacker abuses this logic by publishing a high version number of a package with the same name as the organization’s package (for example: Sample-Package=99.0.0). The package manager then would resolve any requests for that package by pulling the attacker’s package version with malicious code instead of the internally published dependency.

In order for this type of attack to be successful, the organization must source their package versions from both internal and remote repositories at the same time. For example, your pip installation could be configured with multiple package indexes, both internal and external; or, as a CodeArtifact user you may have both the repository containing your private packages as well as an external connection to PyPI in the upstream graph of your current repository. In either case, the package manager is able to obtain package versions from more than one source. This causes the package manager to resolve the higher version number from the remote repository, instead of the trusted internal version.

A few strategies can be used to mitigate this kind of mixing: a simple one is to instruct the package manager to only source from an internal repository. While effective, this is often not practical, because it either significantly degrades developer experience or requires a lot of effort in order to set up, maintain, and vet external dependencies. Another mitigation consists in using explicit version pinning, which is also effective, though it might re-introduce the dependency substitution risk upon dependency upgrade without manual vetting. Some package managers also support namespaces or other types of dependency scoping, which are also helpful in preventing this class of attacks, but when available may not always actionable for existing packages due to the large amount of work required to do the renaming.

CodeArtifact is adding another tool to strengthen your software supply chain by introducing per-package per-repository controls which allow you to more precisely configure and control how package versions are sourced. For each package in your repository, you are now able to decide whether to allow or block sourcing versions from both upstream sources and direct publishing. These flags enable you to prevent mixed versions scenarios for all the types of packages supported by CodeArtifact without the need for additional package manager configuration.

While packages retained or published after the launch of this feature come with tighter-by-default origin configurations, in keeping with the principle of least astonishment we decided not to apply any of these policies retroactively. Therefore, your existing packages in CodeArtifact will not have their origin configuration changed and your setup will continue to work continue to work as it did before the feature was released.

Should you want to leverage this feature to tighten the security posture of your existing packages, we are releasing a toolkit to make it easier to bulk-set policy values in your repositories. This blog post describes how to use it.

Solution overview

The purpose of the Package Origin Control toolkit is to provide repository administrators with an easy way to set Origin Control policies in bulk on packages that have not received the default protection because they pre-date feature release. This can be achieved by blocking upstream versions for internal packages. In this blog post we will focus on this use-case, though the toolkit does support blocking publishing package versions to avoid a potentially vulnerable mixed state for external packages as well.

The toolkit is comprised of two scripts: a first one called generate_package_configurations.py for creating a manifest file listing the packages in a domain alongside their proposed origin configuration to apply, and a second one named apply_package_configurations.py, that reads the manifest file and applies the configuration within.

generate_package_configurations.py can operate on a whole repository, or on a subset of packages (specified either via filters, or though a list) and supports two origin control resolution modes:

  • A manual one where you supply the origin configuration you would like to set for all packages in scope. This is a good option if, for instance, you already maintain a list of internal packages, or if they are published in a consistent internal namespace which allows for them to be easily selected.
  • An automated one, which tries to identify what packages should have their upstreams blocked by analyzing the upstream repository graph and external connections, looking for evidence that package versions are only available from the repository at hand- in which case it determines it can disable sourcing of upstream versions can be done without risk of breaking builds. This is a good option if you want a quick way to tighten your security posture without having to manually analyze your whole repository.

With the manifest created, apply_package_configurations.py takes it as an input and effects the changes specified in it by calling the new PutPackageOriginConfiguration API (link). Precisely because it is meant to set these values in bulk, this script supports backup and revert operations by default, as well as dry-run and step-by-step confirmation options. If you identify an issue after applying origin control changes, you will be able to safely revert to the original, working configuration before trying again.

In this blog post we will cover how to use these tools:

  • To block package versions from upstream sources for all recommended packages in a repository
  • To block upstreams for a list of packages you already have
  • To revert to the original state in case of an incorrect configuration push

Prerequisites

The following prerequisites are required before you begin:

  1. Set up the Package Origin Control toolkit as described in the README on GitHub. You will need a working installation of Python 3.6 or later as well as the ability to install dependencies like the Python AWS SDK. The AWS CLI is not required.
  2. Write permissions on the CodeArtifact repository where you want to add package origin controls (see this link for additional info.)

Procedures

To block package versions from upstream sources for all recommended packages in a repository

Introduction

This procedure should be considered if you have a CodeArtifact repository with a variety of package formats and upstreams, and you want to have the toolkit automatically resolve what packages are safe to block upstreams for. It will block acquisition of new versions from upstreams only if two conditions are met:

  • the target repository doesn’t have access to an external connection
  • no versions of the package are available via any of its upstream repositories (either because the target repository itself doesn’t have any upstreams or because none of the upstreams have the package).

Therefore, we assume there isn’t an immediate External Connection attached to the target repository for the package format(s) you are trying to run this script against (because in that case the script would fall back on leaving things as-is for all packages).

Steps

  1. Make sure you have completed the required prerequisites described above
  2. Identify the target repository in your domain you want to automatically apply origin controls for, e.g. myrepo
  3. Identify the query parameters that define the list of packages you want to target. The script supports the same filters as the ListPackagesAPI.
    1. To match all packages in a repo, run :  python generate_package_configurations.py --region us-west-2 --domain mydomain --repository myrepo
      Please note that you always need to specify the AWS region and CodeArtifact domain alongside the repository.
    2. To match only some packages in a repo, for example only Python packages whose name begins with “internal_software_”:  python generate_package_configurations.py --region us-west-2 --domain mydomain --repository myrepo --format pypi --prefix internal_software_*
  4. If necessary, you can review the produced manifest file, which you will be able to find in the same folder under the name origin-configuration_mydomain_myrepo.csv (unless you have specified a different filename and path via the --output-file option)
  5. If the manifest file looks correct, you can apply the changes by calling the second stage: python apply_package_configurations.py --region us-west-2 --domain mydomain --repository myrepo --input origin-configuration_mydomain_myrepo.csv

To block package versions from upstream sources for all packages in a repository matching a list you maintain

Introduction

This procedure should be considered if you have a set of packages within your repository you know you want to apply origin control restrictions to. Rather than relying on a query, you can use such a list as an input to create a manifest.

Steps

Create a file containing a list of package names (and package names only). Multiple namespaces and formats are not supported and you will need to re-run this procedure for each. The expected file format is one package name per line. In this example we will want to block upstreams for three packages of the npm format (format is always mandatory when specifying a list of packages). As an example, a small input file is going to look something like this:

requests
numpy
django

(more information about this option can be found in the README)

Generate the manifest by supplying this file to the first stage, alongside the desired origin control configuration. In this case, we want to block upstreams for all packages in the supplied list (for more information about the origin control configuration string, consult the documentation): python generate_package_configurations.py --region us-west-2 --domain mydomain --repository myrepo --format npm --from-list inputfile.csv --set-restrictions publish=ALLOW,upstream=BLOCK

If necessary, you can review the produced manifest file, which you will be able to find in the same folder under the name origin-configuration_mydomain_myrepo.csv (unless you have specified a different filename and path via the –output-file option)

Run the apply_package_configurations.py script to update the package origin controls in your repository: apply_package_configurations.py --region us-west-2 --domain mydomain --repository myrepo --input origin-configuration_mydomain_myrepo.csv

To revert to the original state in case of an incorrect configuration push

Introduction

Erroneously bulk-changing your origin configuration can lead to broken builds and confusing failure modes for developers. To mitigate this risk, the toolkit backs up the existing configuration before making any changes and lets you easily revert them if need be.

Steps

Identify the manifest containing the configuration you want to revert. The toolkit automatically creates a backup file t for every input manifest you provide. This is the file produced by the first stage, which by default takes a name like origin-configuration_[domain]_[repository], for example origin-configuration_mydomain_myrepo.csv
Run the second stage script in restore mode:  python apply_package_configurations.py --region us-west-2 --domain mydomain --repository myrepo --input origin-configuration_mydomain_myrepo.csv --restore

Conclusion

In this blog post we have explained how to use the Origin Control toolkit to improve package security, focusing on restricting upstream package versions. We have demonstrated both an automated repository-wide application of the toolkit, which tries to minimize the amount of repository administrator work by applying a restriction heuristic, as well as a manual mode where a repository administrator can effect fine-grained origin control changes. Finally, we showed how these changes can be reverted using the built-in backup feature.

Author:

Davide Semenzin

Davide is a Software Development Engineer on the CodeArtifact team at Amazon Web Services (AWS). Previously he has worked at the Internet Archive building the infrastructure to digitize a million books per year. His interests are distributed systems, platform engineering and mission-critical high availability software. In his free time he likes to read books, fly airplanes, fly on airplanes, think about rockets and play with lasers.

Extend AWS IAM roles to workloads outside of AWS with IAM Roles Anywhere

Post Syndicated from Faraz Angabini original https://aws.amazon.com/blogs/security/extend-aws-iam-roles-to-workloads-outside-of-aws-with-iam-roles-anywhere/

AWS Identity and Access Management (IAM) has now made it easier for you to use IAM roles for your workloads that are running outside of AWS, with the release of IAM Roles Anywhere. This feature extends the capabilities of IAM roles to workloads outside of AWS. You can use IAM Roles Anywhere to provide a secure way for on-premises servers, containers, or applications to obtain temporary AWS credentials and remove the need for creating and managing long-term AWS credentials.

In this post, I will briefly discuss how IAM Roles Anywhere works. I’ll mention some of the common use cases for IAM Roles Anywhere. And finally, I’ll walk you through an example scenario to demonstrate how the implementation works.

Background

To enable your applications to access AWS services and resources, you need to provide the application with valid AWS credentials for making AWS API requests. For workloads running on AWS, you do this by associating an IAM role with Amazon Elastic Compute Cloud (Amazon EC2), Amazon Elastic Container Service (Amazon ECS), Amazon Elastic Kubernetes Service (Amazon EKS), or AWS Lambda resources, depending on the compute platform hosting your application. This is secure and convenient, because you don’t have to distribute and manage AWS credentials for applications running on AWS. Instead, the IAM role supplies temporary credentials that applications can use when they make AWS API calls.

IAM Roles Anywhere enables you to use IAM roles for your applications outside of AWS to access AWS APIs securely, the same way that you use IAM roles for workloads on AWS. With IAM Roles Anywhere, you can deliver short-term credentials to your on-premises servers, containers, or other compute platforms. When you use IAM Roles Anywhere to vend short-term credentials you can remove the need for long-term AWS access keys and secrets, which can help improve security, and remove the operational overhead of managing and rotating the long-term credentials. You can also use IAM Roles Anywhere to provide a consistent experience for managing credentials across hybrid workloads.

In this post, I assume that you have a foundational knowledge of IAM, so I won’t go into the details here about IAM roles. For more information on IAM roles, see the IAM documentation.

How does IAM Roles Anywhere work?

IAM Roles Anywhere relies on public key infrastructure (PKI) to establish trust between your AWS account and certificate authority (CA) that issues certificates to your on-premises workloads. Your workloads outside of AWS use IAM Roles Anywhere to exchange X.509 certificates for temporary AWS credentials. The certificates are issued by a CA that you register as a trust anchor (root of trust) in IAM Roles Anywhere. The CA can be part of your existing PKI system, or can be a CA that you created with AWS Certificate Manager Private Certificate Authority (ACM PCA).

Your application makes an authentication request to IAM Roles Anywhere, sending along its public key (encoded in a certificate) and a signature signed by the corresponding private key. Your application also specifies the role to assume in the request. When IAM Roles Anywhere receives the request, it first validates the signature with the public key, then it validates that the certificate was issued by a trust anchor previously configured in the account. For more details, see the signature validation documentation.

After both validations succeed, your application is now authenticated and IAM Roles Anywhere will create a new role session for the role specified in the request by calling AWS Security Token Service (AWS STS). The effective permissions for this role session are the intersection of the target role’s identity-based policies and the session policies, if specified, in the profile you create in IAM Roles Anywhere. Like any other IAM role session, it is also subject to other policy types that you might have in place, such as permissions boundaries and service control policies (SCPs).

There are typically three main tasks, performed by different personas, that are involved in setting up and using IAM Roles Anywhere:

  • Initial configuration of IAM Roles Anywhere – This task involves creating a trust anchor, configuring the trust policy of the role that IAM Roles Anywhere is going to assume, and defining the role profile. These activities are performed by the AWS account administrator and can be limited by IAM policies.
  • Provisioning of certificates to workloads outside AWS – This task involves ensuring that the X.509 certificate, signed by the CA, is installed and available on the server, container, or application outside of AWS that needs to authenticate. This is performed in your on-premises environment by an infrastructure admin or provisioning actor, typically by using existing automation and configuration management tools.
  • Using IAM Roles Anywhere – This task involves configuring the credential provider chain to use the IAM Roles Anywhere credential helper tool to exchange the certificate for session credentials. This is typically performed by the developer of the application that interacts with AWS APIs.

I’ll go into the details of each task when I walk through the example scenario later in this post.

Common use cases for IAM Roles Anywhere

You can use IAM Roles Anywhere for any workload running in your data center, or in other cloud providers, that requires credentials to access AWS APIs. Here are some of the use cases we think will be interesting to customers based on the conversations and patterns we have seen:

Example scenario and walkthrough

To demonstrate how IAM Roles Anywhere works in action, let’s walk through a simple scenario where you want to call S3 APIs to upload some data from a server in your data center.

Prerequisites

Before you set up IAM Roles Anywhere, you need to have the following requirements in place:

  • The certificate bundle of your own CA, or an active ACM PCA CA in the same AWS Region as IAM Roles Anywhere
  • An end-entity certificate and associated private key available on the on-premises server
  • Administrator permissions for IAM roles and IAM Roles Anywhere

Setup

Here I demonstrate how to perform the setup process by using the IAM Roles Anywhere console. Alternatively, you can use the AWS API or Command Line Interface (CLI) to perform these actions. There are three main activities here:

  • Create a trust anchor
  • Create and configure a role that trusts IAM Roles Anywhere
  • Create a profile

To create a trust anchor

  1. Navigate to the IAM Roles Anywhere console.
  2. Under Trust anchors, choose Create a trust anchor.
  3. On the Create a trust anchor page, enter a name for your trust anchor and select the existing AWS Certificate Manager Private CA from the list. Alternatively, if you want to use your own external CA, choose External certificate bundle and provide the certificate bundle.
Figure 1: Create a trust anchor in IAM Roles Anywhere

Figure 1: Create a trust anchor in IAM Roles Anywhere

To create and configure a role that trusts IAM Roles Anywhere

  1. Using the AWS Command Line Interface (AWS CLI), you are going to create an IAM role with appropriate permissions that you want your on-premises server to assume after authenticating to IAM Roles Anywhere. Save the following trust policy as rolesanywhere-trust-policy.json on your computer.
    {
        "Version": "2012-10-17",
        "Statement": [
            {
                "Effect": "Allow",
                "Principal": {
                    "Service": "rolesanywhere.amazonaws.com"
                },
                "Action": [
                    "sts:AssumeRole",
                    "sts:SetSourceIdentity",
                    "sts:TagSession"
                ]
            }
        ]
    }

  2. Save the following identity-based policy as onpremsrv-permissions-policy.json. This grants the role permissions to write objects into the specified S3 bucket.
    {
        "Version": "2012-10-17",
        "Statement": [
            {
                "Effect": "Allow",
                "Action": "s3:PutObject",
                "Resource": "arn:aws:s3:::<DOC-EXAMPLE-BUCKET>/*"
            }
        ]
    }

  3. Run the following two AWS CLI commands to create the role and attach the permissions policy.
    aws iam create-role \
    --role-name ExampleS3WriteRole \
    --assume-role-policy-document file://<path>/rolesanywhere-trust-policy.json


    aws iam put-role-policy \
    --role-name ExampleS3WriteRole \
    --policy-name onpremsrv-inline-policy \
    --policy-document file://<path>/onpremsrv-permissions-policy.json

You can optionally use condition statements based on the attributes extracted from the X.509 certificate to further restrict the trust policy to control the on-premises resources that can obtain credentials from IAM Roles Anywhere. IAM Roles Anywhere sets the SourceIdentity value to the CN of the subject (onpremsrv01 in my example). It also sets individual session tags (PrincipalTag/) with the derived attributes from the certificate. So, you can use the principal tags in the Condition clause in the trust policy as additional authorization constraints.

For example, the Subject for the certificate I use in this post is as follows.

Subject: … O = Example Corp., OU = SecOps, CN = onpremsrv01

So, I can add condition statements like the following into the trust policy (rolesanywhere-trust-policy.json):

...
    "Condition": {
        "StringEquals": {
            "aws:PrincipalTag/x509Subject/CN": "onpremsrv01",
            "aws:PrincipalTag/x509Subject/OU": "SecOps"
        }
    }
...

To learn more, see the trust policy for IAM Roles Anywhere documentation.

To create a profile

  1. Navigate to the Roles Anywhere console.
  2. Under Profiles, choose Create a profile.
  3. On the Create a profile page, enter a name for the profile.
  4. For Roles, select the role that you created in the previous step (ExampleS3WriteRole).
  5. 5. Optionally, you can define session policies to further scope down the sessions delivered by IAM Roles Anywhere. This is particularly useful when you configure the profile with multiple roles and want to restrict permissions across all the roles. You can add the desired session polices as managed policies or inline policy. Here, for demonstration purpose, I add an inline policy to only allow requests coming from my specified IP address.
Figure 2: Create a profile in IAM Roles Anywhere

Figure 2: Create a profile in IAM Roles Anywhere

At this point, IAM Roles Anywhere setup is complete and you can start using it.

Use IAM Roles Anywhere

IAM Roles Anywhere provides a credential helper tool that can be used with the process credentials functionality that all current AWS SDKs support. This simplifies the signing process for the applications. See the IAM Roles Anywhere documentation to learn how to get the credential helper tool.

To test the functionality first, run the credential helper tool (aws_signing_helper) manually from the on-premises server, as follows.

./aws_signing_helper credential-process \
    --certificate /path/to/certificate.pem \
    --private-key /path/to/private-key.pem \
    --trust-anchor-arn <TA_ARN> \
    --profile-arn <PROFILE_ARN> \
    --role-arn <ExampleS3WriteRole_ARN>
Figure 3: Running the credential helper tool manually

Figure 3: Running the credential helper tool manually

You should successfully receive session credentials from IAM Roles Anywhere, similar to the example in Figure 3. Once you’ve confirmed that the setup works, update or create the ~/.aws/config file and add the signing helper as a credential_process. This will enable unattended access for the on-premises server. To learn more about the AWS CLI configuration file, see Configuration and credential file settings.

# ~/.aws/config content
[default]
 credential_process = ./aws_signing_helper credential-process
    --certificate /path/to/certificate.pem
    --private-key /path/to/private-key.pem
    --trust-anchor-arn <TA_ARN>
    --profile-arn <PROFILE_ARN>
    --role-arn <ExampleS3WriteRole_ARN>

To verify that the config works as expected, call the aws sts get-caller-identity AWS CLI command and confirm that the assumed role is what you configured in IAM Roles Anywhere. You should also see that the role session name contains the Serial Number of the certificate that was used to authenticate (cc:c3:…:85:37 in this example). Finally, you should be able to copy a file to the S3 bucket, as shown in Figure 4.

Figure 4: Verify the assumed role

Figure 4: Verify the assumed role

Audit

As with other AWS services, AWS CloudTrail captures API calls for IAM Roles Anywhere. Let’s look at the corresponding CloudTrail log entries for the activities we performed earlier.

The first log entry I’m interested in is CreateSession, when the on-premises server called IAM Roles Anywhere through the credential helper tool and received session credentials back.

{
    ...
    "eventSource": "rolesanywhere.amazonaws.com",
    "eventName": "CreateSession",
    ...
    "requestParameters": {
        "cert": "MIICiTCCAfICCQD6...mvw3rrszlaEXAMPLE",
        "profileArn": "arn:aws:rolesanywhere:us-west-2:111122223333:profile/PROFILE_ID",
        "roleArn": "arn:aws:iam::111122223333:role/ExampleS3WriteRole",
        ...
    },
    "responseElements": {
        "credentialSet": [
        {
            "assumedRoleUser": {
                "arn": "arn:aws:sts::111122223333:assumed-role/ExampleS3WriteRole/00ccc3a2432f8c5fec93f0fc574f118537",
            },
            "credentials": {
                ...
            },
            ...
            "sourceIdentity": "CN=onpremsrv01"
        }
      ],
    },
    ...
}

You can see that the cert, along with other parameters, is sent to IAM Roles Anywhere and a role session along with temporary credentials is sent back to the server.

The next log entry we want to look at is the one for the s3:PutObject call we made from our on-premises server.

{
    ...
    "eventSource": "s3.amazonaws.com",
    "eventName": "PutObject",
    "userIdentity":{
        "type": "AssumedRole",
        "arn": "arn:aws:sts::111122223333:assumed-role/ExampleS3WriteRole/00ccc3a2432f8c5fec93f0fc574f118537",
        ...
        "sessionContext":
        {
            ...
            "sourceIdentity": "CN=onpremsrv01"
        },
    },
    ...
}

In addition to the CloudTrail logs, there are several metrics and events available for you to use for monitoring purposes. To learn more, see Monitoring IAM Roles Anywhere.

Additional notes

You can disable the trust anchor in IAM Roles Anywhere to immediately stop new sessions being issued to your resources outside of AWS. Certificate revocation is supported through the use of imported certificate revocation lists (CRLs). You can upload a CRL that is generated from your CA, and certificates used for authentication will be checked for their revocation status. IAM Roles Anywhere does not support callbacks to CRL Distribution Points (CDPs) or Online Certificate Status Protocol (OCSP) endpoints.

Another consideration, not specific to IAM Roles Anywhere, is to ensure that you have securely stored the private keys on your server with appropriate file system permissions.

Conclusion

In this post, I discussed how the new IAM Roles Anywhere service helps you enable workloads outside of AWS to interact with AWS APIs securely and conveniently. When you extend the capabilities of IAM roles to your servers, containers, or applications running outside of AWS you can remove the need for long-term AWS credentials, which means no more distribution, storing, and rotation overheads.

I mentioned some of the common use cases for IAM Roles Anywhere. You also learned about the setup process and how to use IAM Roles Anywhere to obtain short-term credentials.

 
If you have any questions, you can start a new thread on AWS re:Post or reach out to AWS Support.

Faraz Angabini

Faraz Angabini

Faraz is a senior security specialist at AWS. He helps AWS strategic customers in their cloud journey. His interests include security, identity and access management, encryption, networking, and infrastructure.

How to tune TLS for hybrid post-quantum cryptography with Kyber

Post Syndicated from Brian Jarvis original https://aws.amazon.com/blogs/security/how-to-tune-tls-for-hybrid-post-quantum-cryptography-with-kyber/

We are excited to offer hybrid post-quantum TLS with Kyber for AWS Key Management Service (AWS KMS) and AWS Certificate Manager (ACM). In this blog post, we share the performance characteristics of our hybrid post-quantum Kyber implementation, show you how to configure a Maven project to use it, and discuss how to prepare your connection settings for Kyber post-quantum cryptography (PQC).

After five years of intensive research and cryptanalysis among partners from academia, the cryptographic community, and the National Institute of Standards and Technology (NIST), NIST has selected Kyber for post-quantum key encapsulation mechanism (KEM) standardization. This marks the beginning of the next generation of public key encryption. In time, the classical key establishment algorithms we use today, like RSA and elliptic curve cryptography (ECC), will be replaced by quantum-secure alternatives. At AWS Cryptography, we’ve been researching and analyzing the candidate KEMs through each round of the NIST selection process. We began supporting Kyber in round 2 and continue that support today.

A cryptographically relevant quantum computer that is capable of breaking RSA and ECC does not yet exist. However, we are offering hybrid post-quantum TLS with Kyber today so that customers can see how the performance differences of PQC affect their workloads. We also believe that the use of PQC raises the already-high security bar for connecting to AWS KMS and ACM, making this feature attractive for customers with long-term confidentiality needs.

Performance of hybrid post-quantum TLS with Kyber

Hybrid post-quantum TLS incurs a latency and bandwidth overhead compared to classical crypto alone. To quantify this overhead, we measured how long S2N-TLS takes to negotiate hybrid post-quantum (ECDHE + Kyber) key establishment compared to ECDHE alone. We performed the tests with the Linux perf subsystem on an Amazon Elastic Compute Cloud (Amazon EC2) c6i.4xlarge instance in the US East (Northern Virginia) AWS Region, and we initiated 2,000 TLS connections to a test server running in the US West (Oregon) Region, to include typical internet latencies.

Figure 1 shows the latencies of a TLS handshake that uses classical ECDHE and hybrid post-quantum (ECDHE + Kyber) key establishment. The columns are separated to illustrate the CPU time spent by the client and server compared to the time spent sending data over the network.

Figure 1: Latency of classical compared to hybrid post-quantum TLS handshake

Figure 1: Latency of classical compared to hybrid post-quantum TLS handshake

Figure 2 shows the bytes sent and received during the TLS handshake, as measured by the client, for both classical ECDHE and hybrid post-quantum (ECDHE + Kyber) key establishment.

Figure 2: Bandwidth of classical compared to hybrid post-quantum TLS handshake

Figure 2: Bandwidth of classical compared to hybrid post-quantum TLS handshake

This data shows that the overhead for using hybrid post-quantum key establishment is 0.25 ms on the client, 0.23 ms on the server, and an additional 2,356 bytes on the wire. Intra-Region tests would result in lower network latency. Your latencies also might vary depending on network conditions, CPU performance, server load, and other variables.

The results show that the performance of Kyber is strong; the additional latency is one of the top contenders among the NIST PQC candidates that we analyzed in a previous blog post. In fact, the performance of these ciphers has improved during our latest test, because x86-64 assembly-optimized versions of these ciphers are now available for use.

Configure a Maven project for hybrid post-quantum TLS

In this section, we provide a Maven configuration and code example that will show you how to get started using our assembly-optimized, hybrid post-quantum TLS configuration with Kyber.

To configure a Maven project for hybrid post-quantum TLS

  1. Get the preview release of the AWS Common Runtime HTTP client for the AWS SDK for Java 2.x. Your Maven dependency configuration should specify version 2.17.69-PREVIEW or newer, as shown in the following code sample.
    <dependency>
        <groupId>software.amazon.awssdk</groupId>
        aws-crt-client
        <version>[2.17.69-PREVIEW,]</version>
    </dependency>

  2. Configure the desired cipher suite in your code’s initialization. The following code sample configures an AWS KMS client to use the latest hybrid post-quantum cipher suite.
    // Check platform support
    if(!TLS_CIPHER_PREF_PQ_TLSv1_0_2021_05.isSupported()){
        throw new RuntimeException(“Hybrid post-quantum cipher suites are not supported.”);
    }
    
    // Configure HTTP client   
    SdkAsyncHttpClient awsCrtHttpClient = AwsCrtAsyncHttpClient.builder()
              .tlsCipherPreference(TLS_CIPHER_PREF_PQ_TLSv1_0_2021_05)
              .build();
    
    // Create the AWS KMS async client
    KmsAsyncClient kmsAsync = KmsAsyncClient.builder()
             .httpClient(awsCrtHttpClient)
             .build();

With that, all calls made with your AWS KMS client will use hybrid post-quantum TLS. You can use the latest hybrid post-quantum cipher suite with ACM by following the preceding example but using an AcmAsyncClient instead.

Tune connection settings for hybrid post-quantum TLS

Although hybrid post-quantum TLS has some latency and bandwidth overhead on the initial handshake, that cost is amortized over the duration of the TLS session, and you can fine-tune your connection settings to help further reduce the cost. In this section, you learn three ways to reduce the impact of hybrid PQC on your TLS connections: connection pooling, connection timeouts, and TLS session resumption.

Connection pooling

Connection pools manage the number of active connections to a server. They allow a connection to be reused without closing and reopening it, which amortizes the cost of connection establishment over time. Part of a connection’s setup time is the TLS handshake, so you can use connection pools to help reduce the impact of an increase in handshake latency.

To illustrate this, we wrote a test application that generates approximately 200 transactions per second to a test server. We varied the maximum concurrency setting of the HTTP client and measured the latency of the test request. In the AWS CRT HTTP client, this is the maxConcurrency setting. If the connection pool doesn’t have an idle connection available, the request latency includes establishing a new connection. Using Wireshark, we captured the network traffic to observe the number of TLS handshakes that took place over the duration of the application. Figure 3 shows the request latency and number of TLS handshakes as the maxConcurrency setting is increased.

Figure 3: Median request latency and number of TLS handshakes as concurrency pool size increases

Figure 3: Median request latency and number of TLS handshakes as concurrency pool size increases

The biggest latency benefit occurred with a maxConcurrency value greater than 1. Beyond that, the latencies were past the point of diminishing returns. For all maxConcurrency values of 10 and below, additional TLS handshakes took place within the connections, but they didn’t have much impact on median latency. These inflection points will depend on your application’s request volume. The takeaway is that connection pooling allows connections to be reused, thereby spreading the cost of any increased TLS negotiation time over many requests.

More detail about using the maxConcurrency option can be found in the AWS SDK for Java API Reference.

Connection timeouts

Connection timeouts work in conjunction with connection pooling. Even if you use a connection pool, there is a limit to how long idle connections stay open before the pool closes them. You can adjust this time limit to save on connection establishment overhead.

A nice way to visualize this setting is to imagine bursty traffic patterns. Despite tuning the connection pool concurrency, your connections keep closing because the burst period is longer than the idle time limit. By increasing the maximum idle time, you can reuse these connections despite bursty behavior.

To simulate the impact of connection timeouts, we wrote a test application that starts 10 threads, each of which activate at the same time on a periodic schedule every 5 seconds for a minute. We set maxConcurrency to 10 to allow each thread to have its own connection. We set connectionMaxIdleTime of the AWS CRT HTTP client to 1 second for the first test; and to 10 seconds for the second test.

When the maximum idle time was 1 second, the connections for all 10 threads closed during the time between each burst. As a result, 100 total connections were formed over the life of the test, causing a median request latency of 20.3 ms. When we changed the maximum idle time to 10 seconds, the 10 initial connections were reused by each subsequent burst, reducing the median request latency to 5.9 ms.

By setting the connectionMaxIdleTime appropriately for your application, you can reduce connection establishment overhead, including TLS negotiation time, to help achieve time savings throughout the life of your application.

More detail about using the connectionMaxIdleTime option can be found in the AWS SDK for Java API Reference.

TLS session resumption

TLS session resumption allows a client and server to bypass the key agreement that is normally performed to arrive at a new shared secret. Instead, communication quickly resumes by using a shared secret that was previously negotiated, or one that was derived from a previous secret (the implementation details depend on the version of TLS in use). This feature requires that both the client and server support it, but if available, TLS session resumption allows the TLS handshake time and bandwidth increases associated with hybrid PQ to be amortized over the life of multiple connections.

Conclusion

As you learned in this post, hybrid post-quantum TLS with Kyber is available for AWS KMS and ACM. This new cipher suite raises the security bar and allows you to prepare your workloads for post-quantum cryptography. Hybrid key agreement has some additional overhead compared to classical ECDHE, but you can mitigate these increases by tuning your connection settings, including connection pooling, connection timeouts, and TLS session resumption. Begin using hybrid key agreement today with AWS KMS and ACM.

 
If you have feedback about this post, submit comments in the Comments section below.

Want more AWS Security news? Follow us on Twitter.

Brian Jarvis

Brian Jarvis

Brian is a Senior Software Engineer at AWS Cryptography. His interests are in post-quantum cryptography and cryptographic hardware. Previously, Brian worked in AWS Security, developing internal services used throughout the company. Brian holds a Bachelor’s degree from Vanderbilt University and a Master’s degree from George Mason University in Computer Engineering. He plans to finish his PhD “some day”.

Get more out of service control policies in a multi-account environment

Post Syndicated from Omar Haq original https://aws.amazon.com/blogs/security/get-more-out-of-service-control-policies-in-a-multi-account-environment/

Many of our customers use AWS Organizations to manage multiple Amazon Web Services (AWS) accounts. There are many benefits to using multiple accounts in your organization, such as grouping workloads with a common business purpose, complying with regulatory frameworks, and establishing strong isolation barriers between applications based on ownership. Customers are even using distinct accounts for development, testing, and production. As these accounts proliferate, customers need a way to centrally set guardrails and controls.

In this blog post, we will walk you through different techniques that you can use to get more out of AWS Organizations service control policies (SCPs) in a multi-account environment. We focus on policy evaluation logic and how SCPs fit into it, show an overview of SCP inheritance, and describe methods for writing compact SCPs. We cover the following five techniques:

  1. Consider the number of policies per entity
  2. Use policy inheritance
  3. Segment by workload type
  4. Combine policies together
  5. Compact your policies

AWS Organizations provides a mechanism to set distinct logical boundaries by using organizational units (OUs). This is useful when you have similar workloads across different AWS accounts that require common guardrails. SCPs are a type of organization policy that you can use to manage permissions in your organization. SCPs offer central control over the maximum available permissions for all accounts in your organization. SCPs help you make sure that your accounts stay within your organization’s access control guidelines. A key distinction of SCPs is that they are useful to set broad guardrails across your environment. You can think of guardrails as a way to enforce specific governance policies at varying levels of your environment, which we will discuss in this post.

Policy evaluation logic and how SCPs fit in

Before we dig into the details, let’s first look at how SCPs work from an overall policy perspective, along with the evaluation logic. An explicit Deny statement in any policy trumps an Allow statement. Organization SCPs that apply to any AWS account that is part of an organization in AWS Organizations require an Allow statement before proceeding in the policy evaluation flow.

For an in-depth look at how policies are evaluated, see Policy evaluation logic in the documentation.

Now, let’s walk through five recommended techniques that can help you get more out of SCPs.

1. Consider the number of policies per entity

An organization is a collection of AWS accounts that you manage together. You can use OUs to group accounts within an organization and administer them as a single unit. This greatly simplifies the management of your accounts. It’s possible to create multiple OUs within a single organization, and you can create OUs within other OUs, otherwise known as nested OUs. You have the flexibility to attach multiple policies to the root of the organization, to an OU, or to an account. For example, in an organization that has the root, one OU, and one account, attaching five SCPs to each of them would produce a total of 15 SCPs (five SCPs at the root, five SCPs at the OU, and five SCPs on the one account).

The number of SCPs that you can apply is limited, and being close to or at the quota could restrict your ability to add more policies in the future. The current published quotas are as follows:

  • Maximum number of SCPs attached to the root: 5
  • Maximum number of SCPs attached to each OU: 5
  • OU maximum nesting in a root: 5 levels of OUs under a root
  • Maximum number of SCPs attached to each account: 5

Note: For the latest information on quotas, see Quotas for AWS Organizations.

Consider the following sample organization structure to understand how you can apply multiple SCPs at different levels in an organization.

Figure 1: A sample organization showing the maximum number of SCPs applicable at each level (root, OU, account)

Figure 1: A sample organization showing the maximum number of SCPs applicable at each level (root, OU, account)

2. Use policy inheritance

Policy inheritance refers to the inheritance of policies that are attached to the organization’s root or to an OU. All accounts that are members of the organization root or OU where a policy is attached are affected by that policy, but inheritance works differently for Allow and Deny statements. For a permission to be allowed for a specified account, every SCP from the root through each OU in the direct path to the account, and even attached to the account itself, must allow that permission. In other words, a statement that allows access needs to exist at every level of a hierarchy; it’s not inherited. However, a Deny statement is inherited and evaluated at each level.

At this point, you should start thinking about the policies from a broader controls perspective: Controls that you want to implement on the whole organization should go into your organization’s root-level SCP. Controls should be more granular as you move down the hierarchy in AWS Organizations.

For example, when a Deny policy is attached to the organization’s root, all accounts in the organization are affected by that policy. When you attach a Deny policy to a specific OU, accounts that are directly under that OU or nested OUs under it are affected by that policy. Because you can attach policies to multiple levels in the organization, accounts might have multiple applicable policy documents, as shown in Figure 2.

Figure 2: Sample organization showing applicable policies

Figure 2: Sample organization showing applicable policies

By default, AWS Organizations attaches an AWS managed SCP named FullAWSAccess to every root and OU when it’s created. This policy allows all services and actions.

Note: Adding an SCP with full AWS access doesn’t give all the principals in an account access to everything. SCPs don’t grant permissions; they are used to filter permissions. Principals still need a policy within the account that grants them access.

Additionally, the policies that are applied to an OU only affect the accounts or the child OUs under it and don’t affect other OUs created under the root. For example, a policy applied to the Sandbox OU doesn’t affect the Workloads OU.

The two tables that follow show examples of the policies that result from inheritance. As discussed previously, if an Allow isn’t present at all levels (root, OU, and account) the account won’t have access to any service. Consider the last example in the Sandbox OU table with a “Deny S3 access” SCP at the root, which limits access to Amazon Simple Storage Service (Amazon S3). Although there is “Allow S3 access” applied to the Sandbox OU and “Full AWS access” at the account level, the resultant policy on account A is “No service access” because there is no policy with an effect of “Allow” in the SCP at the root level.

The following table shows the inheritance of policies in the Sandbox OU.

SCP at root SCP at Sandbox OU SCP at account A Resultant policy at account A Resultant policy at accounts B and C
Full AWS access Full AWS access + deny S3 access Full AWS access + deny EC2 access No S3, no EC2 access No S3 access
Full AWS access Allow Amazon Elastic Compute Cloud (Amazon EC2) access Allow EC2 access Allows EC2 access only Allows EC2 access only
Deny S3 access Allow S3 access Full AWS access No service access No service access

The following table shows the inheritance of policies in the Workloads OU.

SCP at root SCP at Workloads OU SCP at Test OU Resultant policy at account D Resultant policies at production OU/accounts E and F
Full AWS access Full AWS access Full AWS access + deny EC2 access No EC2 access Full AWS access
Full AWS access Full AWS access Allow EC2 access Allows EC2 access Full AWS access
Deny S3 access Full AWS access Allow S3 access No service access No service access

Some examples of common root-level policies are as follows:

For sample SCPs, see Example service control policies. For insight into best practices for applying policies at different levels in an organization, see Best practices for SCPs in a multi-account environment.

3. Segment SCPs by workload type

A key feature of AWS Organizations is the ability to create distinct workload boundaries by using organizational units (OUs). You can think of OUs as a logical boundary where you can directly apply SCPs. You can also nest OUs up to five levels deep and apply different policies at each level. By using OUs, you can segment your workload types and create purpose-driven guardrails to match your security and compliance requirements.

To illustrate this, let’s take an example where there are three distinct workload types divided into three separate OUs: Infrastructure, Sandbox, and Workload, as shown in Figure 3. A best practice would be to tailor your SCPs to each specific OU type. Your security organization wouldn’t want to allow private workloads to be reachable from the internet. However, workloads that serve your external customers would require external network connectivity. To support innovation and experimentation, you can establish a Sandbox OU that has fewer policy restrictions but might limit connectivity back to your corporate data center.

For additional information on how to organize your OUs, see Recommended OUs.

Figure 3: Example organization showing different workloads

Figure 3: Example organization showing different workloads

4. Combine policies together

Similar to AWS Identity and Access Management (IAM) policies, you can have multiple statements within a service control policy. You can combine statements in a single policy to avoid hitting the quota limit of five policies per account, OU, or root. An AWS full access policy is attached by default when you enable SCPs on an organization. You can combine the full access policy with additional controls and combine statements, as shown in the following example policy. Each SCP that you apply can have a policy size of 5,120 bytes. When combining statements, make sure that the resultant statement doesn’t alter your original intent. You can combine the Action elements in an SCP if the policy has the same values for Effect, Resource, and Condition.

AWS full access policy (143 bytes)

{
    "Version": "2012-10-17",
    "Statement": [
        {
            "Effect": "Allow",
            "Action": "*",
            "Resource": "*"
        }
    ]
}

You can combine this full access policy with the following deny policy:

Deny bucket deletion and Security Hub disablement (260 bytes)

{
    "Version": "2012-10-17",
    "Statement": [
        {
            "Effect": "Deny",
            "Action": "s3:DeleteBucket",
            "Resource": "*"
        },
        {
            "Effect": "Deny",
            "Action": "securityhub:Disable*",
            "Resource": "*"
        }
    ]
}

The resulting combined policy is as follows:

Combined policy (274 bytes)

{
   "Version":"2012-10-17",
   "Statement":[
      {
         "Effect":"Allow",
         "Action":"*",
         "Resource":"*"
      },
      {
         "Effect":"Deny",
         "Action":[
            "s3:DeleteBucket",
            "securityhub:Disable*"
         ],
         "Resource":"*"
      }
   ]
}

5. Compact your policies

One difference between IAM policies and SCPs is that whitespace counts against the size quota in SCPs. Compacting related actions in a policy can help you shorten the policy. Following are four methods to compact your policy:

  1. Remove whitespace. If you use the AWS Management Console, whitespace is automatically removed. However, if you don’t want to manually update policies by using the console every time, you can incorporate a script that removes the whitespace. (Method four later in this list provides an example of this type of script.)
  2. Use wildcards and prefixes to combine multiple actions. For example, the following policy denies access to disable configuration in AWS Security Hub.
    {
         "Effect": "Deny",
         "Action":[
            "Securityhub:DisableSecurityHub", 
            "Securityhub:DisableOrganizationAdminAccount",
            "Securityhub:DisableImportFindingsForProduct"
         ],
         "Resource": "*"
        }

    By using wildcards and prefixes, you can rewrite this policy as follows:

      {
        "Effect": "Deny",
        "Action": "Securityhub:Disable*",
        "Resource": "*"
    }

    Important: When you combine actions together as in this example, be aware that there could be a potential impact if new actions are released in the future that start with the Disable keyword, because these actions will be covered by the wildcard and denied.

  3. SCPs can be configured to work as either deny lists or allow lists. For additional details on allow lists and deny lists, see Strategies for using SCPs. We recommend that you use deny lists where possible, because they are more flexible and can help simplify your policies, which will result in less maintenance. To expand on this strategy, deny statements support conditions (as shown in the following example), and for specific resources to be specified. For example, when AWS adds a new service, you don’t have to go back and update your policy if you’ve used a deny statement. To support this, AWS Organizations attaches an AWS managed SCP named FullAWSAccess to every root and OU when it’s created. This policy allows all services and actions. Additionally, deny statements coupled with NotAction statements can help you write shorter policies.

    Consider the following scenario: Your security organization requires that application teams use specific AWS Regions. The recommended approach is to create a deny list that blocks everything except what is in the NotAction block. Following is an example where the SCP denies any operation outside of specified Regions that your organization has authorized for use.

    Note: The list includes AWS global services that cannot be allowlisted based on a Region.

    {
        "Version": "2012-10-17",
        "Statement": [
            {
                "Sid": "DenyAllOutsideEU",
                "Effect": "Deny",
                "NotAction": [
                    "a4b:*",
                    "acm:*",
                    "aws-marketplace-management:*",
                    "aws-marketplace:*",
                    "aws-portal:*",
                    "budgets:*",
                    "ce:*",
                    "chime:*",
                    "cloudfront:*",
                    "config:*",
                    "cur:*",
                    "directconnect:*",
                    "ec2:DescribeRegions",
                    "ec2:DescribeTransitGateways",
                    "ec2:DescribeVpnGateways",
                    "fms:*",
                    "globalaccelerator:*",
                    "health:*",
                    "iam:*",
                    "importexport:*",
                    "kms:*",
                    "mobileanalytics:*",
                    "networkmanager:*",
                    "organizations:*",
                    "pricing:*",
                    "route53:*",
                    "route53domains:*",
                    "s3:GetAccountPublic*",
                    "s3:ListAllMyBuckets",
                    "s3:PutAccountPublic*",
                    "shield:*",
                    "sts:*",
                    "support:*",
                    "trustedadvisor:*",
                    "waf-regional:*",
                    "waf:*",
                    "wafv2:*",
                    "wellarchitected:*"
                ],
                "Resource": "*",
                "Condition": {
                    "StringNotEquals": {
                        "aws:RequestedRegion": [
                            "eu-central-1",
                            "eu-west-1"
                        ]
                    }
                }
            }
        ]
    }

  4. Shorten the Sid value in your policy: The Sid (statement ID) is an optional identifier that you provide for the policy statement. Remove it completely from your policy if it serves no purpose for you. We also have customers who find it effective to maintain a list of SID values and details on corresponding policies in an index file locally.

The following sample Python code can compress a provided policy by removing whitespace and Sid values.

You can export the compressed policy in the file named Compressed_Policy.json or show the output on the terminal by removing # from the following code.

import json
def compress_json(policy):
    statement = policy["Statement"]
    if not isinstance(statement, list):
        statement = [statement]
    for s in statement:
        s.pop("Sid", None)
   
    # json.dumps removes whitespace around separators in a JSON and converts it to a JSON formatted string.
    # To get the most compact representation, specify separators=(item_separator, key_separator)
    policy_without_whitespace = json.dumps(policy, separators=(',', ':'))
   
    return policy_without_whitespace

if __name__ == '__main__':
  path = input("Enter the path to policy file like: \n  /Users/swara/Desktop/policy.json or ./policy.json  \n >  ")
  with open(path) as f:
    policy = json.load(f)
   
original_len = len(str(policy))
mini_policy = compress_json(policy)
#To print the output on the screen
print(mini_policy)
compressed_len = len(str(mini_policy))
print("\n \t original length: {} -> compressed length: {} \n".format(original_len, compressed_len))
#To write output to a file named Compressed_Policy.json
with open("Compressed_Policy.json", "w") as Output_file:
     print(mini_policy, file=Output_file)

Example output on screen:

{"Version":"2012-10-17","Statement":[{"Action":["iam:AttachRolePolicy","iam:DeleteRole","iam:DeleteRolePermissionsBoundary","iam:DeleteRolePolicy","iam:DetachRolePolicy","iam:PutRolePermissionsBoundary","iam:PutRolePolicy","iam:UpdateAssumeRolePolicy","iam:UpdateRole","iam:UpdateRoleDescription"],"Resource":["arn:aws:iam::*:role/role-to-deny"],"Effect":"Deny"}]}

original length: 433 -> compressed length: 364

To download the sample python code and the example policy shown above, download the files compress-policy.py and policy.json.

Conclusion

In this post, we walked you through different techniques that you can use to get more out of service control policies in a multi-account environment. By using these techniques, you can establish a well-considered strategy for how your organization can adopt SCPs in a multi-account environment. You also learned about how SCPs fit into the overall policy landscape for AWS. SCPs are a powerful tool to help customers establish guardrails. As you evaluate your IAM strategy, consider what you’re trying to achieve. If you’re trying to establish broad guardrails for multiple accounts, then we suggest looking at SCPs first.

 
If you have feedback about this post, submit comments in the Comments section below. If you have questions about this post, contact AWS Support.

Want more AWS Security news? Follow us on Twitter.

Omar Haq

Omar Haq

Omar is a senior solutions architect with AWS. He has an interest in workload migrations and modernizations, DevOps, containers, and infrastructure security. Omar has previous experience in management consulting, where he worked as a technical lead for various cloud migration projects.

Swara Gandhi

Swara Gandhi

Swara is a solutions architect on the AWS Identity Solutions team. She works on building secure and scalable end-to-end identity solutions. She is passionate about everything identity, security, and cloud.

IAM policy types: How and when to use them

Post Syndicated from Matt Luttrell original https://aws.amazon.com/blogs/security/iam-policy-types-how-and-when-to-use-them/

You manage access in AWS by creating policies and attaching them to AWS Identity and Access Management (IAM) principals (roles, users, or groups of users) or AWS resources. AWS evaluates these policies when an IAM principal makes a request, such as uploading an object to an Amazon Simple Storage Service (Amazon S3) bucket. Permissions in the policies determine whether the request is allowed or denied.

In this blog post, we will walk you through a scenario and explain when you should use which policy type, and who should own and manage the policy. You will learn when to use the more common policy types: identity-based policies, resource-based policies, permissions boundaries, and AWS Organizations service control policies (SCPs).

Different policy types and when to use them

AWS has different policy types that provide you with powerful flexibility, and it’s important to know how and when to use each policy type. It’s also important for you to understand how to structure your IAM policy ownership to avoid a centralized team from becoming a bottleneck. Explicit policy ownership can allow your teams to move more quickly, while staying within the secure guardrails that are defined centrally.

Service control policies overview

Service control policies (SCPs) are a feature of AWS Organizations. AWS Organizations is a service for grouping and centrally managing the AWS accounts that your business owns. SCPs are policies that specify the maximum permissions for an organization, organizational unit (OU), or an individual account. An SCP can limit permissions for principals in member accounts, including the AWS account root user.

SCPs are meant to be used as coarse-grained guardrails, and they don’t directly grant access. The primary function of SCPs is to enforce security invariants across AWS accounts and OUs in an organization. Security invariants are control objectives or configurations that you apply to multiple accounts, OUs, or the whole AWS organization. For example, you can use an SCP to prevent member accounts from leaving your organization or to enforce that AWS resources can only be deployed to certain Regions.

Permissions boundaries overview

Permissions boundaries are an advanced IAM feature in which you set the maximum permissions that an identity-based policy can grant to an IAM principal. When you set a permissions boundary for a principal, the principal can perform only the actions that are allowed by both its identity-based policies and its permissions boundaries.

A permissions boundary is a type of identity-based policy that doesn’t directly grant access. Instead, like an SCP, a permissions boundary acts as a guardrail for your IAM principals that allows you to set coarse-grained access controls. A permissions boundary is typically used to delegate the creation of IAM principals. Delegation enables other individuals in your accounts to create new IAM principals, but limits the permissions that can be granted to the new IAM principals.

Identity-based policies overview

Identity-based policies are policy documents that you attach to a principal (roles, users, and groups of users) to control what actions a principal can perform, on which resources, and under what conditions. Identity-based policies can be further categorized into AWS managed policies, customer managed policies, and inline policies. AWS managed policies are reusable identity-based policies that are created and managed by AWS. You can use AWS managed policies as a starting point for building your own identity-based policies that are specific to your organization. Customer managed policies are reusable identity-based policies that can be attached to multiple identities. Customer managed policies are useful when you have multiple principals with identical access requirements. Inline policies are identity-based policies that are attached to a single principal. Use inline-policies when you want to create least-privilege permissions that are specific to a particular principal.

You will have many identity-based policies in your AWS account that are used to enable access in scenarios such as human access, application access, machine learning workloads, and deployment pipelines. These policies should be fine-grained. You use these policies to directly apply least privilege permissions to your IAM principals. You should write the policies with permissions for the specific task that the principal needs to accomplish.

Resource-based policies overview

Resource-based policies are policy documents that you attach to a resource such as an S3 bucket. These policies grant the specified principal permission to perform specific actions on that resource and define under what conditions this permission applies. Resource-based policies are inline policies. For a list of AWS services that support resource-based policies, see AWS services that work with IAM.

Resource-based policies are optional for many workloads that don’t span multiple AWS accounts. Fine-grained access within a single AWS account is typically granted with identity-based policies. AWS Key Management Service (AWS KMS) keys and IAM role trust policies are two exceptions, and both of these resources must have a resource-based policy even when the principal and the KMS key or IAM role are in the same account. IAM roles and KMS keys behave this way as an extra layer of protection that requires the owner of the resource (key or role) to explicitly allow or deny principals from using the resource. For other resources that support resource-based policies, here are some use cases where they are most commonly used:

  1. Granting cross-account access to your AWS resource.
  2. Granting an AWS service access to your resource when the AWS service uses an AWS service principal. For example, when using AWS CloudTrail, you must explicitly grant the CloudTrail service principal access to write files to an Amazon S3 bucket.
  3. Applying broad access guardrails to your AWS resources. You can see some examples in the blog post IAM makes it easier for you to manage permissions for AWS services accessing your resources.
  4. Applying an additional layer of protection for resources that store sensitive data, such as AWS Secrets Manager secrets or an S3 bucket with sensitive data. You can use a resource-based policy to deny access to IAM principals that shouldn’t have access to sensitive data, even if granted access by an identity-based policy. An explicit deny in an IAM policy always overrides an allow.

How to implement different policy types

In this section, we will walk you through an example of a design that includes all four of the policy types explained in this post.

The example that follows shows an application that runs on an Amazon Elastic Compute Cloud (Amazon EC2) instance and needs to read from and write files to an S3 bucket in the same account. The application also reads (but doesn’t write) files from an S3 bucket in a different account. The company in this example, Example Corp, uses a multi-account strategy, and each application has its own AWS account. The architecture of the application is shown in Figure 1.

Figure 1: Sample application architecture that needs to access S3 buckets in two different AWS accounts

Figure 1: Sample application architecture that needs to access S3 buckets in two different AWS accounts

There are three teams that participate in this example: the Central Cloud Team, the Application Team, and the Data Lake Team. The Central Cloud Team is responsible for the overall security and governance of the AWS environment across all AWS accounts at Example Corp. The Application Team is responsible for building, deploying, and running their application within the application account (111111111111) that they own and manage. Likewise, the Data Lake Team owns and manages the data lake account (222222222222) that hosts a data lake at Example Corp.

With that background in mind, we will walk you through an implementation for each of the four policy types and include an explanation of which team we recommend own each policy. The policy owner is the team that is responsible for creating and maintaining the policy.

Service control policies

The Central Cloud Team owns the implementation of the security controls that should apply broadly to all of Example Corp’s AWS accounts. At Example Corp, the Central Cloud Team has two security requirements that they want to apply to all accounts in their organization:

  1. All AWS API calls must be encrypted in transit.
  2. Accounts can’t leave the organization on their own.

The Central Cloud Team chooses to implement these security invariants using SCPs and applies the SCPs to the root of the organization. The first statement in Policy 1 denies all requests that are not sent using SSL (TLS). The second statement in Policy 1 prevents an account from leaving the organization.

This is only a subset of the SCP statements that Example Corp uses. Example Corp uses a deny list strategy, and there must also be an accompanying statement with an Effect of Allow at every level of the organization that isn’t shown in the SCP in Policy 1.

Policy 1: SCP attached to AWS Organizations organization root

{
    "Id": "ServiceControlPolicy",
    "Version": "2012-10-17",
    "Statement": [{
        "Sid": "DenyIfRequestIsNotUsingSSL",    
        "Effect": "Deny",    
        "Action": "*",    
        "Resource": "*",    
        "Condition": {
            "BoolIfExists": {
                "aws:SecureTransport": "false"        
            }
        }
    },
    {
        "Sid": "PreventLeavingTheOrganization",
        "Effect": "Deny",
        "Action": "organizations:LeaveOrganization",
        "Resource": "*"
    }]
}

Permissions boundary policies

The Central Cloud Team wants to make sure that they don’t become a bottleneck for the Application Team. They want to allow the Application Team to deploy their own IAM principals and policies for their applications. The Central Cloud Team also wants to make sure that any principals created by the Application Team can only use AWS APIs that the Central Cloud Team has approved.

At Example Corp, the Application Team deploys to their production AWS environment through a continuous integration/continuous deployment (CI/CD) pipeline. The pipeline itself has broad access to create AWS resources needed to run applications, including permissions to create additional IAM roles. The Central Cloud Team implements a control that requires that all IAM roles created by the pipeline must have a permissions boundary attached. This allows the pipeline to create additional IAM roles, but limits the permissions that the newly created roles can have to what is allowed by the permissions boundary. This delegation strikes a balance for the Central Cloud Team. They can avoid becoming a bottleneck to the Application Team by allowing the Application Team to create their own IAM roles and policies, while ensuring that those IAM roles and policies are not overly privileged.

An example of the permissions boundary policy that the Central Cloud Team attaches to IAM roles created by the CI/CD pipeline is shown below. This same permissions boundary policy can be centrally managed and attached to IAM roles created by other pipelines at Example Corp. The policy describes the maximum possible permissions that additional roles created by the Application Team are allowed to have, and it limits those permissions to some Amazon S3 and Amazon Simple Queue Service (Amazon SQS) data access actions. It’s common for a permissions boundary policy to include data access actions when used to delegate role creation. This is because most applications only need permissions to read and write data (for example, writing an object to an S3 bucket or reading a message from an SQS queue) and only sometimes need permission to modify infrastructure (for example, creating an S3 bucket or deleting an SQS queue). As Example Corp adopts additional AWS services, the Central Cloud Team updates this permissions boundary with actions from those services.

Policy 2: Permissions boundary policy attached to IAM roles created by the CI/CD pipeline

{
    "Id": "PermissionsBoundaryPolicy",
    "Version": "2012-10-17",
    "Statement": [{   
        "Effect": "Allow",    
        "Action": [
            "s3:PutObject",
            "s3:GetObject",
            "sqs:ChangeMessageVisibility",
            "sqs:DeleteMessage",
            "sqs:ReceiveMessage",
            "sqs:SendMessage",
            "sqs:PurgeQueue",
            "sqs:GetQueueUrl",
            "logs:PutLogEvents"        
         ],    
        "Resource": "*"
    }]
}

In the next section, you will learn how to enforce that this permissions boundary is attached to IAM roles created by your CI/CD pipeline.

Identity-based policies

In this example, teams at Example Corp are only allowed to modify the production AWS environment through their CI/CD pipeline. Write access to the production environment is not allowed otherwise. To support the different personas that need to have access to an application account in Example Corp, three baseline IAM roles with identity-based policies are created in the application accounts:

  • A role for the CI/CD pipeline to use to deploy application resources.
  • A read-only role for the Central Cloud Team, with a process for temporary elevated access.
  • A read-only role for members of the Application Team.

All three of these baseline roles are owned, managed, and deployed by the Central Cloud Team.

The Central Cloud Team is given a default read-only role (CentralCloudTeamReadonlyRole) that allows read access to all resources within the account. This is accomplished by attaching the AWS managed ReadOnlyAccess policy to the Central Cloud Team role. You can use the IAM console to attach the ReadOnlyAccess policy, which grants read-only access to all services. When a member of the team needs to perform an action that is not covered by this policy, they follow a temporary elevated access process to make sure that this access is valid and recorded.

A read-only role is also given to developers in the Application Team (DeveloperReadOnlyRole) for analysis and troubleshooting. At Example Corp, developers are allowed to have read-only access to Amazon EC2, Amazon S3, Amazon SQS, AWS CloudFormation, and Amazon CloudWatch. Your requirements for read-only access might differ. Several AWS services offer their own read-only managed policies, and there is also the previously mentioned AWS managed ReadOnlyAccess policy that grants read only access to all services. To customize read-only access in an identity-based policy, you can use the AWS managed policies as a starting point and limit the actions to the services that your organization uses. The customized identity-based policy for Example Corp’s DeveloperReadOnlyRole role is shown below.

Policy 3: Identity-based policy attached to a developer read-only role to support human access and troubleshooting

{
    "Id": "DeveloperRoleBaselinePolicy",
    "Version": "2012-10-17",
    "Statement": [
        {
            "Effect": "Allow",
            "Action": [
                "cloudformation:Describe*",
                "cloudformation:Get*",
                "cloudformation:List*",
                "cloudwatch:Describe*",
                "cloudwatch:Get*",
                "cloudwatch:List*",
                "ec2:Describe*",
                "ec2:Get*",
                "ec2:List*",
                "ec2:Search*",
                "s3:Describe*",
                "s3:Get*",
                "s3:List*",
                "sqs:Get*",
                "sqs:List*",
                "logs:Describe*",
                "logs:FilterLogEvents",
                "logs:Get*",
                "logs:List*",
                "logs:StartQuery",
                "logs:StopQuery"
            ],
            "Resource": "*"
        }
    ]
}

The CI/CD pipeline role has broad access to the account to create resources. Access to deploy through the CI/CD pipeline should be tightly controlled and monitored. The CI/CD pipeline is allowed to create new IAM roles for use with the application, but those roles are limited to only the actions allowed by the previously discussed permissions boundary. The roles, policies, and EC2 instance profiles that the pipeline creates should also be restricted to specific role paths. This enables you to enforce that the pipeline can only modify roles and policies or pass roles that it has created. This helps prevent the pipeline, and roles created by the pipeline, from elevating privileges by modifying or passing a more privileged role. Pay careful attention to the role and policy paths in the Resource element of the following CI/CD pipeline role policy (Policy 4). The CI/CD pipeline role policy also provides some example statements that allow the passing and creation of a limited set of service-linked roles (which are created in the path /aws-service-role/). You can add other service-linked roles to these statements as your organization adopts additional AWS services.

Policy 4: Identity-based policy attached to CI/CD pipeline role

{
    "Id": "CICDPipelineBaselinePolicy",
    "Version": "2012-10-17",
    "Statement": [{
        "Effect": "Allow",    
        "Action": [
            "ec2:*",
            "sqs:*",
            "s3:*",
            "cloudwatch:*",
            "cloudformation:*",
            "logs:*",
            "autoscaling:*"           
        ],
        "Resource": "*"
    },
    {
        "Effect": "Allow",
        "Action": "ssm:GetParameter*",
        "Resource": "arn:aws:ssm:*::parameter/aws/service/*"
    },
    {
        "Effect": "Allow",
        "Action": [
            "iam:CreateRole",
            "iam:PutRolePolicy",
            "iam:DeleteRolePolicy"
        ],
        "Resource": "arn:aws:iam::111111111111:role/application-roles/*",
        "Condition": {
            "ArnEquals": {
                "iam:PermissionsBoundary": "arn:aws:iam::111111111111:policy/PermissionsBoundary"
            }            
        }
    }, 
    {
        "Effect": "Allow",
        "Action": [
            "iam:AttachRolePolicy",
            "iam:DetachRolePolicy"
        ],
        "Resource": "arn:aws:iam::111111111111:role/application-roles/*",
        "Condition": {
            "ArnEquals": {
                "iam:PermissionsBoundary": "arn:aws:iam::111111111111:policy/PermissionsBoundary"
            },
            "ArnLike": {
                "iam:PolicyARN": "arn:aws:iam::111111111111:policy/application-role-policies/*"
            }          
        }
    }, 
    {
        "Effect": "Allow",
        "Action": [
            "iam:DeleteRole",
            "iam:TagRole",
            "iam:UntagRole",
            "iam:GetRole",
            "iam:GetRolePolicy"
        ],
        "Resource": "arn:aws:iam::111111111111:role/application-roles/*"
    },
      
    {
        "Effect": "Allow",
        "Action": [
            "iam:CreatePolicy",
            "iam:DeletePolicy",
            "iam:CreatePolicyVersion",            
            "iam:DeletePolicyVersion",
            "iam:GetPolicy",
            "iam:TagPolicy",
            "iam:UntagPolicy",
            "iam:SetDefaultPolicyVersion",
            "iam:ListPolicyVersions"
         ],
        "Resource": "arn:aws:iam::111111111111:policy/application-role-policies/*"
    },
    {
        "Effect": "Allow",
        "Action": [
            "iam:CreateInstanceProfile",
            "iam:AddRoleToInstanceProfile",
            "iam:RemoveRoleFromInstanceProfile",
            "iam:DeleteInstanceProfile"
        ],
        "Resource": "arn:aws:iam::111111111111:instance-profile/application-instance-profiles/*"
    },
    {
        "Effect": "Allow",
        "Action": "iam:PassRole",
        "Resource": [
            "arn:aws:iam::111111111111:role/application-roles/*",
            "arn:aws:iam::111111111111:role/aws-service-role/autoscaling.amazonaws.com/AWSServiceRoleForAutoScaling*"
        ]
    },
    {
        "Effect": "Allow",
        "Action": "iam:CreateServiceLinkedRole",
        "Resource": "arn:aws:iam::111111111111:role/aws-service-role/*",
        "Condition": {
            "StringEquals": {
                "iam:AWSServiceName": "autoscaling.amazonaws.com"
            }
        }
    },
    {
        "Effect": "Allow",
        "Action": [
            "iam:DeleteServiceLinkedRole",
            "iam:GetServiceLinkedRoleDeletionStatus"
        ],
        "Resource": "arn:aws:iam::111111111111:role/aws-service-role/autoscaling.amazonaws.com/AWSServiceRoleForAutoScaling*"
    },
    {
        "Effect": "Allow",
        "Action": "iam:ListRoles",
        "Resource": "*"
    },
    {
        "Effect": "Allow",
        "Action": "iam:GetRole",
        "Resource": [
            "arn:aws:iam::111111111111:role/application-roles/*",
            "arn:aws:iam::111111111111:role/aws-service-role/*"
        ]
    }]
}

In addition to the three baseline roles with identity-based policies in place that you’ve seen so far, there’s one additional IAM role that the Application Team creates using the CI/CD pipeline. This is the role that the application running on the EC2 instance will use to get and put objects from the S3 buckets in Figure 1. Explicit ownership allows the Application Team to create this identity-based policy that fits their needs without having to wait and depend on the Central Cloud Team. Because the CI/CD pipeline can only create roles that have the permissions boundary policy attached, Policy 5 cannot grant more access than the permissions boundary policy allows (Policy 2).

If you compare the identity-based policy attached to the EC2 instance’s role (Policy 5 on left) with the permissions boundary policy described previously (Policy 2 on the right), you can see that the actions allowed by the EC2 instance’s role are also allowed by the permissions boundary policy. Actions must be allowed by both policies for the EC2 instance to perform the s3:GetObject and s3:PutObject actions. Access to create a bucket would be denied even if the role attached to the EC2 instance was given permission to perform the s3:CreateBucket action because the s3:CreateBucket action exceeds the permissions allowed by the permissions boundary.

Policy 5: Identity-based policy bound by permissions boundary and attached to the application’s EC2 instance

{
"Id": "ApplicationRolePolicy",
"Version": "2012-10-17",
"Statement": [{   
 "Effect": "Allow",    
 "Action": [
    "s3:PutObject",
    "s3:GetObject"
 ],    
 "Resource": "arn:aws:s3:::DOC-EXAMPLE-
 BUCKET1/*"
},
{   
 "Effect": "Allow",    
 "Action": [
    "s3:GetObject"
 ],    
 "Resource": "arn:aws:s3:::DOC-EXAMPLE-
 BUCKET2/*"
}]
}

Policy 2: Permissions boundary policy attached to IAM roles created by the CI/CD pipeline.

{
    "Id": "PermissionsBoundaryPolicy"
    "Version": "2012-10-17",
    "Statement": [{   
        "Effect": "Allow",    
        "Action": [
            "s3:PutObject",
            "s3:GetObject",
            "sqs:ChangeMessageVisibility",
            "sqs:DeleteMessage",
            "sqs:ReceiveMessage",
            "sqs:SendMessage",
            "sqs:PurgeQueue",
            "sqs:GetQueueUrl",
            "logs:PutLogEvents"        
         ],    
        "Resource": "*"
    }]
}

Resource-based policies

The only resource-based policy needed in this example is attached to the bucket in the account external to the application account (DOC-EXAMPLE-BUCKET2 in the data lake account in Figure 1). Both the identity-based policy and resource-based policy must grant access to an action on the S3 bucket for access to be allowed in a cross-account scenario. The bucket policy below only allows the GetObject action to be performed on the bucket, regardless of what permissions the application’s role (ApplicationRole) is granted from its identity-based policy (Policy 5).

This resource-based policy is owned by the Data Lake Team that owns and manages the data lake account (222222222222) and the policy (Policy 6). This allows the Data Lake Team to have complete control over what teams external to their AWS account can access their S3 bucket.

Policy 6: Resource-based policy attached to S3 bucket in external data lake account (222222222222)

{
    "Version": "2012-10-17",
    "Statement": [{
        "Principal": {
            "AWS": "arn:aws:iam::111111111111:role/application-roles/ApplicationRole"
        },
        "Effect": "Allow",    
        "Action": [
            "s3:GetObject"
        ],    
        "Resource": "arn:aws:s3:::DOC-EXAMPLE-BUCKET2/*"
    }]
}

No resource-based policy is needed on the S3 bucket in the application account (DOC-EXAMPLE-BUCKET1 in Figure 1). Access for the application is granted to the S3 bucket in the application account by the identity-based policy on its own. Access can be granted by either an identity-based policy or a resource-based policy when access is within the same AWS account.

Putting it all together

Figure 2 shows the architecture and includes the seven different policies and the resources they are attached to. The table that follows summarizes the various IAM policies that are deployed to the Example Corp AWS environment, and specifies what team is responsible for each of the policies.

Figure 2: Sample application architecture with CI/CD pipeline used to deploy infrastructure

Figure 2: Sample application architecture with CI/CD pipeline used to deploy infrastructure

The numbered policies in Figure 2 correspond to the policy numbers in the following table.

Policy number Policy description Policy type Policy owner Attached to
1 Enforce SSL and prevent member accounts from leaving the organization for all principals in the organization Service control policy (SCP) Central Cloud Team Organization root
2 Restrict maximum permissions for roles created by CI/CD pipeline Permissions boundary Central Cloud Team All roles created by the pipeline (ApplicationRole)
3 Scoped read-only policy Identity-based policy Central Cloud Team DeveloperReadOnlyRole IAM role
4 CI/CD pipeline policy Identity-based policy Central Cloud Team CICDPipelineRole IAM role
5 Policy used by running application to read and write to S3 buckets Identity-based policy Application Team ApplicationRole on EC2 instance
6 Bucket policy in data lake account that grants access to a role in application account Resource-based policy Data Lake Team S3 Bucket in data lake account
7 Broad read-only policy Identity-based policy Central Cloud Team CentralCloudTeamReadonlyRole IAM role

Conclusion

In this blog post, you learned about four different policy types: identity-based policies, resource-based policies, service control policies (SCPs), and permissions boundary policies. You saw examples of situations where each policy type is commonly applied. Then, you walked through a real-life example that describes an implementation that uses these policy types.

You can use this blog post as a starting point for developing your organization’s IAM strategy. You might decide that you don’t need all of the policy types explained in this post, and that’s OK. Not every organization needs to use every policy type. You might need to implement policies differently in a production environment than a sandbox environment. The important concepts to take away from this post are the situations where each policy type is applicable, and the importance of explicit policy ownership. We also recommend taking advantage of policy validation in AWS IAM Access Analyzer when writing IAM policies to validate your policies against IAM policy grammar and best practices.

For more information, including the policies described in this solution and the sample application, see the how-and-when-to-use-aws-iam-policy-blog-samples GitHub respository. The repository walks through an example implementation using a CI/CD pipeline with AWS CodePipeline.

 
If you have any questions, please post them in the AWS Identity and Access Management re:Post topic or reach out to AWS Support.

Want more AWS Security news? Follow us on Twitter.

Author

Matt Luttrell

Matt is a Sr. Solutions Architect on the AWS Identity Solutions team. When he’s not spending time chasing his kids around, he enjoys skiing, cycling, and the occasional video game.

Josh Joy

Josh is a Senior Identity Security Engineer with AWS Identity helping to ensure the safety and security of AWS Auth integration points. Josh enjoys diving deep and working backwards in order to help customers achieve positive outcomes. 

Build a strong identity foundation that uses your existing on-premises Active Directory

Post Syndicated from Michael Miller original https://aws.amazon.com/blogs/security/build-a-strong-identity-foundation-that-uses-your-existing-on-premises-active-directory/

This blog post outlines how to use your existing Microsoft Active Directory (AD) to reliably authenticate access to your Amazon Web Services (AWS) accounts, infrastructure running on AWS, and third-party applications. The architecture we describe is designed to be highly available and extends access to your existing AD to AWS, enabling your users to use their existing credentials to access authorized AWS resources and applications.

Many customers rely on AD as their single source of truth for IT identity management. HR automation processes are often already in place to automatically add, update, and remove employee access within an organization’s AD as staffing changes occur. Using a single source of truth as the basis for all authentication and authorization, both on-premises and in the cloud, makes it easier to manage access across multiple applications and services, because you are creating, managing, and revoking access from a single location. For example, if someone leaves your organization, you can revoke access for all applications and services (including AWS accounts) from one location. Additionally, this reduces risks associated with stranded or forgotten credentials, or users needing to remember multiple different sets of credentials.

Microsoft Active Directory (AD) is deployed on Microsoft Windows Server servers called domain controllers, which replicate the contents of the directory between the domain controllers that are hosting the AD domain. Multiple domain controllers are deployed within a domain to improve the availability and performance of the directory. The AD infrastructure should be designed to provide sufficiently high levels of availability and performance, because it governs access to your organization’s IT resources. This typically requires the placement of at least one domain controller in every customer hosting location, because the lack of availability of your identity store is likely to cause authentication and authorization failures, which in turn prevent access to resources.

These design principles align with the Security Pillar of the AWS Well-Architected Framework, which is focused on implementing a strong identity foundation. The Security Pillar guidance states that you should centralize identity management and aim to eliminate reliance on long-term static credentials. By using your existing AD, you can benefit from centralized identity management and your existing group-based permissions for access to your AWS accounts. Applications that are running on domain-joined servers can use their AD service account credentials when they access other domain-joined resources, which removes the need for those credentials to be stored in application configuration files. As your AWS usage grows, it is important to give serious consideration to effective identity management, both for access to AWS and AWS resources, and for your instances that are running on AWS.

By extending your existing Active Directory to AWS, you can continue to use your existing Active Directory user credentials and group policies to manage your Microsoft Windows Server servers, whether those servers are running on-premises or on AWS, and extend these capabilities to authenticate and authorize access to the AWS Management Console and third-party applications.

This post covers networking requirements and connectivity setup to enable network connectivity to your on-premises AD; the approach to extending your AD to AWS; integrating AWS Single Sign-On with your AD; and joining Amazon Elastic Compute Cloud (Amazon EC2) instances to AD. As part of the setup, you will add additional domain controllers running on Amazon EC2 instances to your existing AD, for availability and latency reasons. You will also build a resource forest to enable your existing AD identities to access AD-integrated AWS services and resources. This enables you to have a highly available single identity source as the source of truth for your user authentication.

Networking prerequisites to extend your Active Directory to AWS

To enable Active Directory–related network communication, network connectivity needs to be established between your on-premises network and your AWS environment. You need to ensure there is connectivity between the on-premises network that is hosting your existing domain controllers and the Amazon Virtual Private Cloud (Amazon VPC) VPC that will host your AD infrastructure on AWS. Typically, hybrid network connectivity is configured within a network account within your organization, where the multiple AWS accounts within your organization are managed by using AWS Organizations. This network account effectively sits between your on-premises network and the resources, including the AD infrastructure, that are deployed in AWS.

You can provide connectivity between your on-premises network and your network account by using AWS Site-to-Site VPN or AWS Direct Connect connections. For an overview of the options to connect your on-premises network to AWS, refer to Amazon Virtual Private Cloud Connectivity Options. The necessary routing and firewall rules need to be configured to allow connectivity between these subnets and the on-premises network that is hosting your existing domain controllers. AWS recommends that you have highly resilient, fault-tolerant connectivity with dynamic routing between your on-premises network and your AWS network. You can achieve high resiliency through the use of redundant AWS Direct Connect connections, or, for less critical workloads, a VPN connection might offer sufficient resilience.

We recommend AWS Transit Gateway to provide connectivity between your AWS accounts. A transit gateway will be in your network account and then shared with your other AWS accounts that have VPCs that require access to on-premises networks or other VPCs. This enables a hub and spoke network architecture, which is used to provide connectivity both between your VPCs as needed and between your VPCs and your on-premises network. You will create a VPC, which we will refer to within this blog as the endpoint VPC, with subnets across two Availability Zones, within the network account. This endpoint VPC will be used later by Amazon Route 53 outbound endpoints for DNS resolution of AD-hosted DNS zones. Other documentation might refer to this endpoint VPC by alternative names, such as outbound VPC or egress VPC.

Your AD infrastructure that is running on AWS is typically deployed within a shared services account, sometimes referred to as an operations account. Within this shared services account, you will create a shared services VPC with at least two subnets within different Availability Zones to host your domain controller infrastructure on AWS. Your domain controller availability is increased when your architecture is configured to use multiple Availability Zones. You will attach this shared services VPC to the transit gateway that is shared from your network account. This VPC attachment provides connectivity between this VPC and your on-premises network through the transit gateway and network account. You will need to configure the subnet route table(s) and transit gateway route table(s) appropriately to provide IP connectivity between the shared services VPC and your on-premises network.

The sample architecture shown in Figure 1 illustrates the use of a transit gateway with two AWS Direct Connect connections to provide resilient connectivity between an on-premises network, the network account, and a VPC within the shared services account.

Figure 1: Foundational network connectivity between on-premises and AWS VPCs

Figure 1: Foundational network connectivity between on-premises and AWS VPCs

Active Directory relies heavily on Domain Name System (DNS) services and typically hosts its own DNS services on domain controllers. To establish name resolution of your AD-hosted DNS domains from within your VPCs, you should use Route 53 Resolver with outbound resolver endpoints and forwarding rules. Forwarding rules specify the domain name queries to forward from your VPCs to DNS servers that are authoritative for your AD DNS names. The queries will be forwarded through the outbound endpoints. The outbound endpoints will be configured in the network account on the endpoint VPC, and use the previously configured network connectivity to communicate with your existing DNS servers. You will configure your existing DNS servers as targets in the forwarding rules. Configuring Route 53 Resolver with the appropriate forwarding rules will help to enable seamless DNS resolution between your on-premises and AWS hosted resources. You need to share the Route 53 Resolver rules with your organization so that they can be used by your other AWS accounts. These shared rules are then associated with your VPCs, which need to be able to resolve names within AD-hosted DNS domains. Refer to the AWS Hybrid DNS with Active Directory technical guide for detailed step-by-step configuration guidance.

Figure 2 shows a sample flow of a DNS query from an Amazon Elastic Compute Cloud (Amazon EC2) instance through Route 53 Resolver and an outbound interface when resolving an on-premises domain name that matches a forwarding rule. In this example, the domain controllers are also the DNS servers, but splitting the DNS and AD servers is also fully supported.

Figure 2: Flow of a DNS query matching a forwarding rule through a Route 53 outbound endpoint

Figure 2: Flow of a DNS query matching a forwarding rule through a Route 53 outbound endpoint

The flow is as follows:

  1. An Amazon EC2 instance sends a DNS request for an internal name, such as ad.example.com, to the Route 53 Resolver address within the VPC.
  2. Route 53 matches this query against a forwarding rule and directs the query through the configured outbound interface.
  3. The query is sent from the outbound interface towards the target IP address, configured in the forwarding rule, of a server that is authoritative for the domain name.
  4. This target DNS server receives the query and responds.

Extend your Active Directory to AWS

AWS offers multiple options for hosting Active Directory on AWS, which are discussed in detail in the Active Directory Domain Services on AWS Design and Planning Guide. This blog post incorporates both the option of running Active Directory on Amazon EC2 and the AWS Managed Microsoft Active Directory option from that guide. The architecture covered in this post is recommended if:

To extend your existing AD to AWS, domain controllers on Amazon EC2 instances are required, because AWS Managed Microsoft AD does not support being added to an existing forest. An AWS Managed Microsoft AD resource forest is required to enable integration with AWS services that offer AD integration. This is discussed in more detail in the following sections.

Extend your on-premises AD to AWS

Your first step is to build additional AD domain controllers for your existing AD domain(s) on Amazon EC2 instances that are running Microsoft Windows Server. You would then manage these domain controllers along with your existing domain controllers. By running additional domain controllers within AWS, you remove dependencies on network links and improve reliability and performance of your directory for infrastructure that is running within AWS. Communication between the domain controllers and other domain-joined resources within AWS is designed to remain within the AWS Region. AWS recommends that a minimum of two domain controllers, spread across multiple Availability Zones for resilience, are deployed. You should deploy the domain controllers into the subnets within the shared services VPC.

Depending on your capacity planning considerations and availability goals, you may choose to deploy more than two domain controllers. The number of users, servers, and applications that access your directory will influence the required number of domain controllers. Security considerations, including the required TCP/IP ports, and management options are discussed in the blog post Securely extend and access on-premises Active Directory domain controllers in AWS.

These new domain controllers will be in a new AD site, which includes all your VPC CIDR blocks within your chosen AWS Region. In Active Directory, a site represents a group of IP subnets that are connected with fast and highly reliable network connectivity. Site information is used to locate domain controllers closest to the client, to reduce latency and unnecessary network traffic. AWS recommends that your VPCs within an AWS Region belong to the same new Active Directory site, consisting only of your IP ranges within the chosen AWS Region, and that consistent site names are used in all AD forests that are connected by trusts. Further details are available in the section Designing Active Directory sites and services topology in Active Directory Domain Services on AWS and in Designing the Site Topology.

Update targets in Route 53 Resolver rules

After you have deployed AD-integrated DNS servers to these domain controllers and opened the required TCP/IP ports on the associated security groups, you can update the targets in your Route 53 Resolver forwarding rules to use the IP addresses of these servers. This will improve performance and reliability of DNS resolution, by removing the need for DNS resolution traffic to flow between AWS and on-premises infrastructure.

Figure 3 shows Amazon EC2 instances that are configured as AD domain controllers within a shared services VPC. After they are configured, these domain controllers will replicate with the on-premises domain controllers, using the connectivity that is provided through the transit gateway.

Figure 3: On-premises AD extended to AWS by deploying additional domain controllers

Figure 3: On-premises AD extended to AWS by deploying additional domain controllers

Build a resource forest for AWS hosted infrastructure and applications

To benefit from seamless domain joins for Windows-based or Linux-based EC2 instances, Amazon RDS Windows-based authentication, and support for AWS services such as Amazon Chime and Amazon WorkSpaces, you must build a resource forest on AWS by using AWS Directory Service for Microsoft Active Directory, also referred to as AWS Managed Microsoft AD. You first set up an AWS Managed Microsoft AD directory as a resource forest, and then configure a trust with your existing on-premises AD forest.

When you select and launch this directory type, it is created as a highly available pair of domain controllers that are connected to your virtual private cloud (VPC). The domain controllers run in different Availability Zones in your choice of AWS Region. Host monitoring and recovery, data replication, snapshots, and software updates are automatically configured and managed for you. AWS Managed Microsoft AD is available in Standard and Enterprise Editions.

Enterprise Edition is recommended for all but the smallest environments, because the directory can then be shared with a larger number of AWS accounts. Enterprise Edition also allows the AWS Managed Microsoft AD directory to be replicated across multiple AWS Regions if required. This AWS Managed Microsoft AD should be deployed into your shared services account. The domain controllers should be deployed into the subnets within the shared services VPC. After you have deployed your AWS Managed Microsoft AD directory, you create a trust between this new forest and your existing on-premises forest, to enable access by existing AD users to resources within the new directory. Further information about trusts and AWS Managed Microsoft AD is available at Everything you wanted to know about trusts with AWS Managed Microsoft AD, including when to use a one-way or two-way trust. A two-way trust is recommended, because it will allow your AWS accounts to use a wider range of AD-integrated AWS services, such as AWS Single Sign-On, Amazon Chime, Amazon Connect, Amazon QuickSight, Amazon WorkSpaces, and AWS Transfer Family. Ensure that you update the default AD site name to match the name of the site for your AWS Region in your existing forest, and ensure that your sites have the correct site links and subnet associations to enable efficient location of domain controllers.

The AWS Managed Microsoft AD will be shared with your accounts within your organization to enable your other AWS accounts to access this directory and benefit from the features and services outlined previously.

With correct AD site configuration in both forests, communication between the AWS Managed Microsoft AD domain controllers and other domain-joined resources within AWS, and your existing domain’s domain controllers, remains within the chosen AWS Region. This is designed to keep your data within AWS in the country of your chosen AWS Region, to help to address possible data residency concerns.

An example of this architecture is depicted in Figure 4.

Figure 4: AWS Managed Microsoft AD resource forest with trust to on-premises AD

Figure 4: AWS Managed Microsoft AD resource forest with trust to on-premises AD

Manage access to your AWS accounts

AWS Single Sign-On (AWS SSO) enables you to centrally manage access across your AWS organization. You can choose to manage access just to your AWS accounts, or to your cloud applications as well. You can create user identities directly in AWS SSO, access your existing identifies by connecting AWS SSO to your existing Active Directory domain, or you can federate them from your Active Directory Federation Services (AD FS) or a standards-based identity provider, such as Okta Universal Directory or Azure AD. Your workforce users get a user portal to access all of their assigned AWS accounts or cloud applications. AWS SSO can be flexibly configured to run alongside or replace AWS account access management through AWS Identity and Access Management (IAM).

Identity federation is a system of trust between two parties for the purpose of authenticating third parties, such as users, and conveying information that is needed to authorize their access to resources. In this system, an identity provider (IdP) is responsible for user authentication, and a service provider (SP), such as a service or an application, controls access to resources. AWS SSO automates the setup of the identity federation that is used to provide authorized users access to your AWS accounts. AWS SSO is acting as an IdP when AWS SSO is connected to your AD and used to give access to your AWS accounts.

Although you can create users and groups directly within AWS SSO, a best practice is to use your existing identity single source of truth to simplify user and permission management. Connecting AWS SSO through to your Active Directory, which has been extended to AWS, will allow authentication of users for access to your AWS accounts to take place entirely within the AWS Region. This practice is designed to reduce dependencies on hybrid networking and resources located on-premises or in other hosting locations.

You should enforce secure access to the user portal, AWS SSO integrated apps, and the AWS CLI by enabling multi-factor authentication (MFA). AWS SSO MFA supports various MFA types, including client-side authenticator apps, security keys, and built-in authenticators. Using MFA is recommended as part of configuring strong sign-in mechanisms.

Connect AWS SSO to your Active Directory

You can connect AWS SSO to your Active Directory on AWS by using AD Connector, or through an AWS Managed Microsoft AD. Using AD Connector is often the primary mechanism considered by customers, but given the lack of support for multi-domain environments as used in this post, this blog post recommends using AWS Managed Microsoft AD.

When you use AWS Managed Microsoft AD with AWS SSO, AWS SSO requires two-way trusts to be in place between this AWS Managed Microsoft AD forest and any other forest that contains the user identities that will authenticate through AWS SSO.

Before AWS SSO supported delegated administration, AWS SSO had to be configured within the management account of your AWS organization, and required the connected AWS Managed Microsoft AD directory to also be within your organization’s management account.

With the announcement of AWS SSO delegated administration support, AWS SSO and the connected AWS Managed Microsoft AD can be configured in an account other than your management account. This post recommends using your shared services account as the AWS SSO delegated administration account. Doing so will enable AWS SSO to use the AWS Managed Microsoft AD that you configured within the shared services account in the preceding Build a resource forest for AWS hosted infrastructure and applications section.

This follows the AWS guidance to avoid deploying workloads to the organization’s management account and to limit access to the management account. Using a delegated administration account for AWS SSO reduces the need for regular access to the management account.

From within your management account, your shared services account needs to be registered as the AWS SSO delegated administration account. You can then configure and manage AWS SSO from within your shared services account. The AWS SSO delegated administration account can manage permissions across your organization, apart from assigning permissions to access the management account. Assignment of permissions to access the management account through AWS SSO needs to be configured from within the management account itself.

You should configure AWS SSO to use the AWS Managed Microsoft AD directory that is deployed in the shared services account. If you are using AWS Control Tower, or have previously configured AWS SSO, see Considerations for changing your identity source before you change the default identity source from AWS SSO to Active Directory. After this is complete, you can set up SSO access to your AWS accounts within your organization from the AWS SSO console.

Assign permission sets to Active Directory groups

Permission sets are a way to define permissions centrally in AWS SSO so that they can be applied to all your AWS accounts. After you have created your permission sets, you will assign them to your Active Directory groups to grant access to the respective AWS accounts, using the defined permission set persona. Your users will then use the AWS SSO user portal to authenticate with their AD credentials and can choose which of the assigned AWS accounts and personas they wish to access. Users can configure AWS CLI to use AWS SSO to access the roles they have been assigned.

Figure 5 shows the complete architecture covered in this blog post. The diagram includes AWS SSO within the shared services account connected to the AWS Managed Microsoft AD that is used to provide access to the forests that contain your user identities.

Figure 5: Complete AD architecture with trusts and AWS SSO using AD as the identity source

Figure 5: Complete AD architecture with trusts and AWS SSO using AD as the identity source

Access domain-joined infrastructure resources

By joining your Windows Server servers to your Active Directory resource domain, you can centralize the management of your servers by using native Microsoft tooling. Joining your Amazon EC2 Windows instances to your domain enables you to continue using existing tools, such as group policies, to manage your server estate both on-premises and in AWS.

VPCs with workloads that need to be domain joined, to access on-premises networks, or to access other VPCs will need appropriate network connectivity and DNS configuration in place. You can enable network connectivity between workload VPCs and the shared services VPC and other on-premises networks by attaching your VPCs to the transit gateway shared from the networking account. You can enable DNS resolution of your AD domains by attaching the Route 53 Resolver rules, shared from the networking account, to your workload VPCs.

Join instances to your AD domain

Amazon EC2 Windows instances can be manually or seamlessly joined to your resource domain. Manually joining an instance involves the same steps that you would follow on-premises. Seamlessly joining instances requires the AWS Systems Manager agent, which is installed by default in AWS provided Windows AMIs, on the Amazon EC2 instance and an attached instance profile with sufficient permissions. This instance profile should include the AmazonSSMManagedInstanceCore and AmazonSSMDirectoryServiceAccess policies.

In order to join the domain, either manually or seamlessly, the Amazon EC2 instance must be able to resolve the DNS name for your AD domain. This DNS resolution was enabled by the attachment of the correctly configured shared Route 53 Resolver rules to the workload VPCs. Seamlessly joining instances to the domain also requires that your shared services account AWS Managed Microsoft AD directory be shared with the workload account that contains the Amazon EC2 instances.

After your instances are joined to the domain, applications running on the servers will be able to access other domain-joined resources, if authorized by AD, through the connectivity that is provided by the transit gateway attachment on the workload VPC.

Applications that need to access AWS resources that are not domain joined, such as objects in Amazon Simple Storage Service (Amazon S3), should make use of temporary credentials associated with the attached instance profile to access AWS resources. By using these IAM temporary credentials, you can avoid using static long-term credentials. When an application requires access to credentials or other secrets, and cannot use AD or IAM temporary credentials, such as for database logins or for third-party API tokens, use a service designed to handle management of secrets, such as AWS Secrets Manager. See the AWS Well-Architected Security Pillar Identity Management documentation for further guidance.

Figure 6 shows Active Directory access through the transit gateway. The Route 53 forwarding rules, which are shared from the shared services account, are associated with the workload VPCs to enable DNS resolution of Active Directory–integrated DNS domains. Not shown in the diagram is the sharing of the AWS Managed Microsoft AD for the resource forest with the workload accounts.

Figure 6: Flow of AD network traffic through the transit gateway within the network account

Figure 6: Flow of AD network traffic through the transit gateway within the network account

Access applications and third-party services

You might have existing applications that rely on Active Directory or LDAP for user authentication. When you extend your Active Directory environment to AWS, these existing applications can be deployed to your AWS environment, and they will be able to authenticate the users of the application against your AD.

A modern approach for web-based applications is to use identity federation for user authentication. AWS SSO can serve as an identity provider to authenticate users to your AWS SSO-integrated or SAML 2.0 applications. An example of an AWS SSO SAML 2.0 integration is to use AWS SSO to authenticate your VPN users to AWS Client VPN.

You might already be using a third-party identity provider, such as Azure AD or Okta, to provide your users with access to AWS services such as AWS Client VPN or to third-party business applications such as those on the AWS SSO Cloud applications page. These third-party identity providers will typically offer an agent to replicate or synchronize necessary user information from your Active Directory to their service, in order to offer federated authentication for your users. Using these agents to replicate from your existing Active Directory means that you are still using your Active Directory as the single source of truth. To ensure reliable authentication, you should follow the vendor’s recommendations for the high-availability setup of their agent.

Figure 7 shows the steps that occur when you use AWS SSO to provide identity federation to a web application.

Figure 7: Example flow for identify federation that uses AWS SSO

Figure 7: Example flow for identify federation that uses AWS SSO

Conclusion

This post highlights the importance of implementing a cloud authentication and authorization architecture that addresses the variety of requirements for an organization’s AWS Cloud environment. In addition to console access, this post highlights the importance of considering how you will:

  • Perform authentication to AWS based Windows and Linux instances
  • Integrate AWS services that need Windows-based authentication capabilities
  • Integrate authentication for internal user applications
  • Provide a single identity source as the source of truth for all AWS user authentication
  • Enable MFA for user authentication

The proposed approach provides a highly available Active Directory (AD) infrastructure, running on AWS and integrated with your existing AD, which addresses these considerations. The approach helps you to attain reduced latencies and higher levels of availability by removing dependencies on on-premises resources, other hosting locations, and external network links. This design stores the identity information that is contained within your existing AD in your chosen AWS Region and country, across multiple Availability Zones, which can also help you meet your data residency requirements.

 
If you have feedback about this post, submit comments in the Comments section below. If you have questions about this post, contact AWS Support.

Want more AWS Security news? Follow us on Twitter.

Michael Miller

Michael Miller

Michael is a Senior Solutions Architect based in Ireland. He helps public sector customers across the UK and Ireland accelerate their cloud adoption journey. In prior roles, Michael has been responsible for designing architectures and supporting implementations across various sectors including service providers, consultancies and financial services organisations.

Brian Mycroft

Brian Mycroft

Brian Mycroft is a Chief Technologist at AWS, based in Ottawa (Canada), specializing in national security, intelligence, and the Canadian federal government. Brian is the lead architect of the AWS Secure Environment Accelerator (ASEA) and focuses on removing public sector barriers to cloud adoption.