Tag Archives: Intermediate (200)

Getting started with AWS SSO delegated administration

Post Syndicated from Chris Mercer original https://aws.amazon.com/blogs/security/getting-started-with-aws-sso-delegated-administration/

Recently, AWS launched the ability to delegate administration of AWS Single Sign-On (AWS SSO) in your AWS Organizations organization to a member account (an account other than the management account). This post will show you a practical approach to using this new feature. For the documentation for this feature, see Delegated administration in the AWS Single Sign-On User Guide.

With AWS Organizations, your enterprise organization can manage your accounts more securely and at scale. One of the benefits of Organizations is that it integrates with many other AWS services, so you can centrally manage accounts and how the services in those accounts can be used.

AWS SSO is where you can create, or connect, your workforce identities in AWS just once, and then manage access centrally across your AWS organization. You can create user identities directly in AWS SSO, or you can bring them from your Microsoft Active Directory or a standards-based identity provider, such as Okta Universal Directory or Azure AD. With AWS SSO, you get a unified administration experience to define, customize, and assign fine-grained access.

By default, the management account in an AWS organization has the power and authority to manage member accounts in the organization. Because of these additional permissions, it is important to exercise least privilege and tightly control access to the management account. AWS recommends that enterprises create one or more accounts specifically designated for security of the organization, with proper controls and access management policies in place. AWS provides a method in which many services can be administered for the organization from a member account; this is usually referred to as a delegated administrator account. These accounts can reside in a security organizational unit (OU), where administrators can enforce organizational policies. Figure 1 is an example of a recommended set of OUs in Organizations.

Figure 1: Recommended AWS Organizations OUs

Figure 1: Recommended AWS Organizations OUs

Many AWS services support this delegated administrator model, including Amazon GuardDuty, AWS Security Hub, and Amazon Macie. For an up-to-date complete list, see AWS services that you can use with AWS Organizations. AWS SSO is now the most recent addition to the list of services in which you can delegate administration of your users, groups, and permissions, including third-party applications, to a member account of your organization.

How to configure a delegated administrator account

In this scenario, your enterprise AnyCompany has an organization consisting of a management account, an account for managing security, as well as a few member accounts. You have enabled AWS SSO in the organization, but you want to enable the security team to manage permissions for accounts and roles in the organization. AnyCompany doesn’t want you to give the security team access to the management account, and they also want to make sure the security team can’t delete the AWS SSO configuration or manage access to that account, so you decide to delegate the administration of AWS SSO to the security account.

Note: There are a few things to consider when making this change, which you should review before you enable delegated administration. These items are covered in the console during the process, and are described in the section Considerations when delegating AWS SSO administration in this post.

To delegate AWS SSO administration to a security account

  1. In the AWS Organizations console, log in to the management account with a user or role that has permission to use organizations:RegisterDelegatedAdministrator, as well as AWS SSO management permissions.
  2. In the AWS SSO console, navigate to the Region in which AWS SSO is enabled.
  3. Choose Settings on the left navigation pane, and then choose the Management tab on the right side.
  4. Under Delegated administrator, choose Register account, as shown in Figure 2.
    Figure 2: The registered account button in AWS SSO

    Figure 2: The Register account button in AWS SSO

  5. Consider the implications of designating a delegated administrator account (as described in the section Considerations when delegating AWS SSO administration). Select the account you want to be able to manage AWS SSO, and then choose Register account, as shown in Figure 3.
    Figure 3: Choosing a delegated administrator account in AWS SSO

    Figure 3: Choosing a delegated administrator account in AWS SSO

You should see a success message to indicate that the AWS SSO delegated administrator account is now setup.

To remove delegated AWS SSO administration from an account

  1. In the AWS Organizations console, log in to the management account with a user or role that has permission to use organizations:DeregisterDelegatedAdministrator.
  2. In the AWS SSO console, navigate to the Region in which AWS SSO is enabled.
  3. Choose Settings on the left navigation pane, and then choose the Management tab on the right side.
  4. Under Delegated administrator, select Deregister account, as shown in Figure 4.
    Figure 4: The Deregister account button in AWS SSO

    Figure 4: The Deregister account button in AWS SSO

  5. Consider the implications of removing a delegated administrator account (as described in the section Considerations when delegating AWS SSO administration), then enter the account name that is currently administering AWS SSO, and choose Deregister account, as shown in Figure 5.
    Figure 5: Considerations of deregistering a delegated administrator in AWS SSO

    Figure 5: Considerations of deregistering a delegated administrator in AWS SSO

Considerations when delegating AWS SSO administration

There are a few considerations you should keep in mind when you delegate AWS SSO administration. The first consideration is that the delegated administrator account will not be able to perform the following actions:

  • Delete the AWS SSO configuration.
  • Delegate (to other accounts) administration of AWS SSO.
  • Manage user or group access to the management account.
  • Manage permission sets that are provisioned (have a user or group assigned) in the organization management account.

For examples of those last two actions, consider the following scenarios:

In the first scenario, you are managing AWS SSO from the delegated administrator account. You would like to give your colleague Saanvi access to all the accounts in the organization, including the management account. This action would not be allowed, since the delegated administrator account cannot manage access to the management account. You would need to log in to the management account (with a user or role that has proper permissions) to provision that access.

In a second scenario, you would like to change the permissions Paulo has in the management account by modifying the policy attached to a ManagementAccountAdmin permission set, which Paulo currently has access to. In this scenario, you would also have to do this from inside the management account, since the delegated administrator account does not have permissions to modify the permission set, because it is provisioned to a user in the management account.

With those caveats in mind, users with proper access in the delegated administrator account will be able to control permissions and assignments for users and groups throughout the AWS organization. For more information about limiting that control, see Allow a user to administer AWS SSO for specific accounts in the AWS Single Sign-On User Guide.

Deregistering an AWS SSO delegated administrator account will not affect any permissions or assignments in AWS SSO, but it will remove the ability for users in the delegated account to manage AWS SSO from that account.

Additional considerations if you use Microsoft Active Directory

There are additional considerations for you to keep in mind if you use Microsoft Active Directory (AD) as an identity provider, specifically if you use AWS SSO configurable AD sync, and which AWS account the directory resides in. In order to use AWS SSO delegated administration when the identity source is set to Active Directory, AWS SSO configurable AD sync must be enabled for the directory. Your organization’s administrators must synchronize Active Directory users and groups you want to grant access to into an AWS SSO identity store. When you enable AWS SSO configurable AD sync, a new feature that launched in April, Active Directory administrators can choose which users and groups get synced into AWS SSO, similar to how other external identity providers work today when using the System for Cross-domain Identity Management (SCIM) v2.0 protocol. This way, AWS SSO knows about users and groups even before they are granted access to specific accounts or roles, and AWS SSO administrators don’t have to manually search for them.

Another thing to consider when delegating AWS SSO administration when using AD as an identity source is where your directory resides, that is which AWS account owns the directory. If you decide to change the AWS SSO identity source from any other source to Active Directory, or change it from Active Directory to any other source, then the directory must reside in (be owned by) the account that the change is being performed in. For example, if you are currently signed in to the management account, you can only change the identity source to or from directories that reside in (are owned by) the management account. For more information, see Manage your identity source in the AWS Single Sign-On User Guide.

Best practices for managing AWS SSO with delegated administration

AWS recommends the following best practices when using delegated administration for AWS SSO:

  • Maintain separate permission sets for use in the organization management account (versus the rest of the accounts). This way, permissions can be kept separate and managed from within the management account without causing confusion among the delegated administrators.
  • When granting access to the organization management account, grant the access to groups (and permission sets) specifically for access in that account. This helps enable the principal of least privilege for this important account, and helps ensure that AWS SSO delegated administrators are able to manage the rest of the organization as efficiently as possible (by reducing the number of users, groups, and permission sets that are off limits to them).
  • If you plan on using one of the AWS Directory Services for Microsoft Active Directory (AWS Managed Microsoft AD or AD Connector) as your AWS SSO identity source, locate the directory and the AWS SSO delegated administrator account in the same AWS account.

Conclusion

In this post, you learned about a helpful new feature of AWS SSO, the ability to delegate administration of your users and permissions to a member account of your organization. AWS recommends as a best practice that the management account of an AWS organization be secured by a least privilege access model, in which as few people as possible have access to the account. You can enable delegated administration for supported AWS services, including AWS SSO, as a useful tool to help your organization minimize access to the management account by moving that control into an AWS account designated specifically for security or identity services. We encourage you to consider AWS SSO delegated administration for administrating access in AWS. To learn more about the new feature, see Delegated administration in the AWS Single Sign-On User Guide.

If you have feedback about this post, submit comments in the Comments section below. If you have questions about this post, start a new thread on the AWS IAM forum or contact AWS Support.

Want more AWS Security how-to content, news, and feature announcements? Follow us on Twitter.

Author

Chris Mercer

Chris is a security specialist solutions architect. He helps AWS customers implement sophisticated, scalable, and secure solutions to business challenges. He has experience in penetration testing, security architecture, and running military IT systems and networks. Chris holds a Master’s Degree in Cybersecurity, several AWS certifications, OSCP, and CISSP. Outside of AWS, he is a professor, student pilot, and Cub Scout leader.

Establishing a data perimeter on AWS

Post Syndicated from Ilya Epshteyn original https://aws.amazon.com/blogs/security/establishing-a-data-perimeter-on-aws/

For your sensitive data on AWS, you should implement security controls, including identity and access management, infrastructure security, and data protection. Amazon Web Services (AWS) recommends that you set up multiple accounts as your workloads grow to isolate applications and data that have specific security requirements. AWS tools can help you establish a data perimeter between your multiple accounts, while blocking unintended access from outside of your organization. Data perimeters on AWS span many different features and capabilities. Based on your security requirements, you should decide which capabilities are appropriate for your organization. In this first blog post on data perimeters, I discuss which AWS Identity and Access Management (IAM) features and capabilities you can use to establish a data perimeter on AWS. Subsequent posts will provide implementation guidance and IAM policy examples for establishing your identity, resource, and network data perimeters.

A data perimeter is a set of preventive guardrails that help ensure that only your trusted identities are accessing trusted resources from expected networks. These terms are defined as follows:

  • Trusted identities – Principals (IAM roles or users) within your AWS accounts, or AWS services that are acting on your behalf
  • Trusted resources – Resources that are owned by your AWS accounts, or by AWS services that are acting on your behalf
  • Expected networks – Your on-premises data centers and virtual private clouds (VPCs), or networks of AWS services that are acting on your behalf

Data perimeter guardrails

You typically implement data perimeter guardrails as coarse-grained controls that apply across a broad set of AWS accounts and resources. When you implement a data perimeter, consider the following six primary control objectives.

Data perimeter Control objective
Identity Only trusted identities can access my resources.
Only trusted identities are allowed from my network.
Resource My identities can access only trusted resources.
Only trusted resources can be accessed from my network.
Network My identities can access resources only from expected networks.
My resources can only be accessed from expected networks.

Note that the controls in the preceding table are coarse in nature and are meant to serve as always-on boundaries. You can think of data perimeters as creating a firm boundary around your data to prevent unintended access patterns. Although data perimeters can prevent broad unintended access, you still need to make fine-grained access control decisions. Establishing a data perimeter does not diminish the need to continuously fine-tune permissions by using tools such as IAM Access Analyzer as part of your journey to least privilege.

To implement the preceding control objectives on AWS, use three primary capabilities:

Let’s expand the previous table to include the corresponding policies you would use to implement the controls for each of the control objectives.

Data perimeter Control objective Implemented by using
Identity Only trusted identities can access my resources. Resource-based policies
Only trusted identities are allowed from my network. VPC endpoint policies
Resource My identities can access only trusted resources. SCPs
Only trusted resources can be accessed from my network. VPC endpoint policies
Network My identities can access resources only from expected networks. SCPs
My resources can only be accessed from expected networks. Resource-based policies

As you can see in the preceding table, the correct policy for each control objective depends on which resource you are trying to secure. Resource-based policies, which are applied to resources such as Amazon S3 buckets, can be used to filter access based on the calling principal and the network from which they are making a call. VPC endpoint policies are used to inspect the principal that is making the API call and the resource they are trying to access. And SCPs are used to restrict your identities from accessing resources outside your control or from outside your network. Note that SCPs apply only to your principals within your AWS organization, whereas resource policies can be used to limit access to all principals.

The last components are the specific IAM controls or condition keys that enforce the control objective. For effective data perimeter controls, use the following primary IAM condition keys, including the new resource owner condition keys:

  • aws:PrincipalOrgID – Use this condition key to restrict access to trusted identities, your principals (roles or users) that belong to your organization. In the context of a data perimeter, you will use this condition key with your resource-based policies and VPC endpoint policies.
  • aws:ResourceOrgID – Use this condition key to restrict access to resources that belong to your AWS organization. To establish a data perimeter, you will use this condition key within SCPs and VPC endpoint policies.
  • aws:SourceIp, aws:SourceVpc, aws:SourceVpce – Use these condition keys to restrict access to expected network locations, such as your corporate network or your VPCs. In the context of a data perimeter, you will use these keys within identity and resource-based policies.

We can now complete the table that we’ve been developing throughout this post.

Data perimeter Control objective Implemented by using Primary IAM capability
Identity Only trusted identities can access my resources. Resource-based policies aws:PrincipalOrgID
aws:PrincipalIsAWSService
Only trusted identities are allowed from my network. VPC endpoint policies aws:PrincipalOrgID
Resource My identities can access only trusted resources. SCPs aws:ResourceOrgID
Only trusted resources can be accessed from my network. VPC endpoint policies aws:ResourceOrgID
Network My identities can access resources only from expected networks. SCPs aws:SourceIp
aws:SourceVpc
aws:SourceVpce
aws:ViaAWSService
My resources can only be accessed from expected networks. Resource-based policies aws:SourceIp
aws:SourceVpc
aws:SourceVpce
aws:ViaAWSService
aws:PrincipalIsAWSService

For the identity data perimeter, the primary condition key is aws:PrincipalOrgID, which you can use in resource-based policies and VPC endpoint policies so that only your identities are allowed access. Use aws:PrincipalIsAWSService to allow AWS services to access your resources by using their own identities—for example, AWS CloudTrail can use this access to write data to your bucket.

For the resource data perimeter, the primary condition key is aws:ResourceOrgID, which you can use in an SCP policy or VPC endpoint policy to allow your identities and network to access only the resources that belong to your AWS organization.

Last, for the network perimeter, use the aws:SourceIp, aws:SourceVpc, and aws:SourceVpce condition keys in SCPs and resource-based policies to make sure that your identities and resources are accessed only from your trusted network. Use the aws:PrincipalIsAWSService and aws:ViaAWSService condition keys to allow AWS services to access your resources from outside your network locations. For example, CloudTrail can use this access to write data to one of your S3 buckets, or Amazon Athena can query data in your S3 buckets. For more information about using these keys as part of your data perimeter strategy, see the blog post IAM makes it easier for you to manage permissions for AWS services accessing your resources.

Conclusion

In this blog post, you learned the foundational elements that are needed to implement an identity, resource, and network data perimeter on AWS, including the primary IAM capabilities that are used to implement each of the control objectives. Stay tuned to the follow-up posts in this series, which will provide prescriptive guidance on establishing your identity, resource, and network data perimeters.

Following are additional resources that will help you further explore the data perimeter topic, including a whitepaper and a hands-on-workshop. We have also curated several blog posts related to the key IAM capabilities discussed in this post.

If you have any questions, comments, or concerns, contact AWS Support or start a new thread on the IAM forum. If you have feedback about this post, submit comments in the Comments section below.

Want more AWS Security news? Follow us on Twitter.

Author

Ilya Epshteyn

Ilya is a Senior Manager of Identity Solutions in AWS Identity. He helps customers to innovate on AWS by building highly secure, available, and scalable architectures. He enjoys spending time outdoors and building Lego creations with his kids.

How to let builders create IAM resources while improving security and agility for your organization

Post Syndicated from Jeb Benson original https://aws.amazon.com/blogs/security/how-to-let-builders-create-iam-resources-while-improving-security-and-agility-for-your-organization/

Many organizations restrict permissions to create and manage AWS Identity and Access Management (IAM) resources to a group of privileged users or a central team. This post explains how you can safely grant these permissions to builders – the people who are developing, testing, launching, and managing cloud infrastructure – to speed up your development, increase your agility, and improve your application security. In addition, you will use an example application stack to see how IAM permissions boundaries can help establish a secure, yet agile work environment for builders.

An example application stack

Defining and creating IAM resources within the application stack allows your builders to craft policies and roles that grant least privilege to application resources. When builders are entitled to create IAM resources, it is straightforward for them to scope policies by referencing the application resources directly in the IAM policies in the same template.

To illustrate this point you will build a simple “hello world” serverless application. The application includes an AWS Step Functions state machine that, once executed, will invoke an AWS Lambda function. You will use this example application along with some IAM policies and IAM roles to illustrate how you can use permissions boundaries to safely grant IAM privileges to builders.

In this example AWS CloudFormation template, the Resource element in MyStateMachineExecutionRole, which is specified as the role for MyStateMachine, includes a reference to the Amazon Resource Name (ARN) of MyLambdaFunction. This is a great example of the principle of least privilege as MyStateMachine will only have permissions to invoke MyLambdaFunction. Making this association is straightforward because the IAM, Step Functions, and Lambda resources are defined together in the same template.

Example application template

AWSTemplateFormatVersion: 2010-09-09
Description: builder-application

Resources:

MyLambdaFunctionExecutionRole:
	Type: AWS::IAM::Role
    Properties:
		AssumeRolePolicyDocument:
			Version: 2012-10-17
			Statement:
				- Effect: Allow
				Principal:
				Service:
					- lambda.amazonaws.com
				Action: sts:AssumeRole
		Policies:
			- PolicyName: MyLambdaFunctionBasicExecutionPolicy
			PolicyDocument:
				Version: 2012-10-17
				Statement:
					- Effect: Allow
					Action:
						- logs:CreateLogGroup
						- logs:CreateLogStream
						- logs:PutLogEvents
					Resource: !Sub arn:${AWS::Partition}:logs:${AWS::Region}:${AWS::AccountId}:log-group:*


MyLambdaFunction:
  	Type: AWS::Lambda::Function
	Properties:
		Runtime: python3.8
		Role: !GetAtt MyLambdaFunctionExecutionRole.Arn
		Handler: index.handler
		Code:
			ZipFile: |
				def handler(event, context):
					return("Hello Builder!")
		Timeout: 30

MyStateMachineExecutionRole:
	Type: AWS::IAM::Role
	Properties:
		AssumeRolePolicyDocument:
			Version: 2012-10-17
			Statement:
				- Effect: Allow
				Principal:
				Service:
					- states.amazonaws.com
				Action: sts:AssumeRole
		Policies:
			- PolicyName: StateMachineExecutionPolicy
			PolicyDocument:
				Version: 2012-10-17
				Statement:
					- Effect: Allow
					Action:
						- lambda:InvokeFunction
					Resource: !GetAtt MyLambdaFunction.Arn
      
MyStateMachine:
	Type: AWS::StepFunctions::StateMachine
	Properties:
		DefinitionString: !Sub |
          {
            "StartAt": "State1",
            "States": {
              "State1": {
                "Type": "Task",
                "Resource": "${MyLambdaFunction.Arn}",
                "End": true
              }
            }
          }
		RoleArn: !GetAtt MyStateMachineExecutionRole.Arn

MyLambdaFunctionPermission:
	Type: AWS::Lambda::Permission
	Properties:
	  Action: lambda:InvokeFunction
	  FunctionName: !Ref MyLambdaFunction
	  Principal: states.amazonaws.com
	  SourceArn: !Ref MyStateMachine

In an organization that uses a centralized approach to IAM management, a builder would not be able to deploy this example application because the roles the builders are granted prohibit IAM actions related to creating and managing roles and policies. This creates three key challenges for the organization:

  1. Builders often rely on a security or cloud team to create IAM resources. This approach adds an additional burden to that team which slows down development while builders wait for the roles and policies to be created, and encourages the team to grant overly-broad permissions so that they don’t have to be involved in the precise details of changes on a daily basis.
  2. IAM resources must be created before the rest of the stack, which makes it much more difficult to create least-privilege policies and roles.
  3. The code for IAM and application infrastructure is maintained separately, which requires extra coordination when creating and updating workloads.

Removing these challenges can simplify your cloud development, lower the amount of overhead and coordination required across your organization, and improve your security posture. Further, reducing the burden on your security team can free up time for them to focus on enforcing additional data perimeters and implementing best practices from the security pillar of the AWS Well-Architected Framework.

Use permissions boundaries on application roles created by builders

So how can your organization shift to a decentralized approach to IAM management and allow builders to safely create application IAM policies and roles, as well as prevent builders from being able to escalate their own privileges? This is a scenario where permissions boundaries should be used.

Permissions boundaries allow an IAM policy to be attached to an IAM role to enforce limits on the permissions that role can be granted. The permissions boundary itself does not grant any permissions – it’s just a guardrail that defines the maximum entitlements. You can create a builder policy that requires a specified permissions boundary be attached to any application roles that a builder creates, effectively setting the maximum permissions on any role that a builder can generate. The permissions for any application roles created will be the intersection of the application policies and the permissions boundary associated with the application role. Said another way, a permission granted in the application policy must also be granted in the permissions boundary, or else it will be implicitly denied according to the policy evaluation logic.

The set of permissions required for builder roles (assumed by actual people or CI/CD pipelines) to deploy infrastructure and develop applications are different than those required for application roles (assumed by workloads/applications) to execute within applications and workflows. If you think of permissions in terms of control plane actions involved in creating, deleting, and modifying resources, versus data plane actions needed to execute the daily business of those resources, builder and application roles typically operate more on the control plane and data plane, respectively. While permissions policies attached to application roles should be tightly scoped to include only those actions needed to perform a specific task, policies for permissions boundaries should be highly reusable and include a broad set of permissions across a suite of services that a variety of applications might need. In addition, it is a best practice to not share roles between humans and services. To summarize, policies for builder and application roles should be designed with the following criteria in mind:

Policy Role Permissions Scope Reusability User
builder builder control plane broad high human
application application data plane specific low service
application-boundary application data plane broad high application role

Following the steps in this section, you will create:

  1. A builder policy that grants builders permissions for services needed to deploy and manage applications, and to create and manage IAM policies and roles for those applications.
  2. An application-boundary policy that defines the extent of the permissions any application role created by a builder can have.
  3. A builder role with the builder policy attached as the permissions policy, the application-boundary policy attached as a permissions boundary, and a trust policy that allows anyone in the account to assume the builder role.

Create the builder IAM resources

In this first procedure, you will use CloudFormation to create the builder and application-boundary IAM policies, and the builder IAM role.

To launch the builder IAM stack

  1. Open a Linux terminal with the AWS Command Line Interface (CLI) installed and AWS credentials configured for a user or role that has permissions to create IAM resources.
  2. Launch the builder IAM stack by using the following command:
    aws cloudformation create-stack \
    --stack-name builder-iam \
    --template-url https://awsiammedia.s3.amazonaws.com/public/sample/993-grant-IAM-permissions-for-builders+/builder-iam.json \
    --capabilities CAPABILITY_NAMED_IAM

The builder policy you created uses paths to organize IAM policies and roles into isolated “spaces” that can be specified as resource constraints. It also requires roles to have a permissions boundary attached. This approach helps manage role delegation and prevents builders from escalating their privileges or modifying roles that may be used by other teams.

Note that paths can only be added to IAM resources using the AWS CLI or APIs – not via the console. If this is an issue, another option is to specify that policies and roles start with a specific phrase, for example “application-roles-*”. Just be sure to use different phrases for the builder, application, and permissions boundaries resources to maintain isolation and prevent builders from being able to escalate their privileges.

The builder policy also includes some basic control plane permissions, while the application-boundary policy you created includes permissions used across a suite of services that a typical serverless application might need. However, both policies are only meant to demonstrate the concepts in this blog post. In practice, you will need to create policies that more accurately reflect the permissions needed by builder and application roles in your organization. See the example-permissions-boundaries repository on the AWS Samples GitHub site for more ideas.

Use the builder role to launch an application stack

In this section you will assume the builder role and verify that you can launch the application stack, including the application roles, but only if the required permissions boundary and path are specified.

To test launching a stack that creates application roles

  1. Assume the builder role by using the following set of commands (copy and paste into the terminal as a single block). This step uses the jq program, which is available in most operating system package repositories.
    export AWS_DEFAULT_OUTPUT="json"; \
    role=builder; \
    aws_role=$(aws iam get-role --role-name $role); \
    role_arn=$(echo $aws_role|jq '.Role.Arn'|tr -d '"'); \
    aws_credentials=$(aws sts assume-role --role-arn $role_arn --role-session-name builder-test); \
    export AWS_ACCESS_KEY_ID=$(echo $aws_credentials|jq '.Credentials.AccessKeyId'|tr -d '"'); \
    export AWS_SECRET_ACCESS_KEY=$(echo $aws_credentials|jq '.Credentials.SecretAccessKey'|tr -d '"'); \
    export AWS_SESSION_TOKEN=$(echo $aws_credentials|jq '.Credentials.SessionToken'|tr -d '"')

    You will use this role for all of the following procedures up until the “Clean up” section. If, during the course of this exercise, you get an error that “The security token included in the request is expired”, create a new terminal and repeat this step to get a fresh set of credentials.

    The trust policy for the builder role allows any principal in the account to assume it. You can use a combination of the Principal and Condition attributes to further reduce its scope. Normally builder roles are assumed directly via federation or AWS SSO.

  2. Check that the you have now assumed the builder role by using the following command:
    aws sts get-caller-identity

  3. Launch the example application stack by using the following command:
    aws cloudformation create-stack \
    --stack-name builder-application \
    --template-url https://awsiammedia.s3.amazonaws.com/public/sample/993-grant-IAM-permissions-for-builders+/builder-application-1.yml \
    --capabilities CAPABILITY_NAMED_IAM

  4. If things are set up correctly, the stack will fail. To confirm, check the StackStatus by using the following command – it should show ROLLBACK_IN_PROGRESS or ROLLBACK_COMPLETE.
    aws cloudformation describe-stacks \
    --stack-name builder-application | jq '.Stacks[].StackStatus'

  5. The stack failed to create because the builder role you assumed does not have permissions to create the two application roles without specifying the /application_roles/ path and attaching a permissions boundary with /permissions_boundaries/ in the path. To see the details, use the following command:
    aws cloudformation describe-stack-events \
    --stack-name builder-application | jq '.StackEvents[] | select(.ResourceStatus=="CREATE_FAILED") | .ResourceStatusReason'

  6. If the original stack did not create successfully, you will not be able to update it, so you will need to delete it instead by using the following command:
    aws cloudformation delete-stack \
    --stack-name builder-application

  7. Launch a new stack with an updated template that includes the required path and permissions boundary by using the following command:
    aws cloudformation create-stack \
    --stack-name builder-application \
    --template-url https://awsiammedia.s3.amazonaws.com/public/sample/993-grant-IAM-permissions-for-builders+/builder-application-2.yml \
    --capabilities CAPABILITY_NAMED_IAM

  8. After a few minutes, confirm the stack was successfully created by using the following command and verifying StackStatus is CREATE_COMPLETE:
    aws cloudformation describe-stacks \
    --stack-name builder-application | jq '.Stacks[].StackStatus'

To verify the application is working

  1. Start an execution of the state machine and verify the application is working by using the following commands. Run them one at a time to allow the execution to finish.
    state_machine_arn=$(aws cloudformation describe-stack-resources --stack-name builder-application | jq '.StackResources[] | select (.LogicalResourceId=="MyStateMachine") | .PhysicalResourceId' | tr -d '"')
    
    execution_arn=$(aws stepfunctions start-execution --state-machine-arn $state_machine_arn | jq '.executionArn' | tr -d '"')
    
    aws stepfunctions describe-execution --execution-arn $execution_arn | jq '.output'

    If the output is “\”Hello Builder!\””, then the application is working.

Test that a builder can’t escalate their privileges

In this section, you will test scenarios where a builder attempts, intentionally or not, to escalate their privileges by first modifying the policies attached to the builder role and then extending the permissions of an application role beyond the permissions boundary.

To test updating a builder policy attached to the builder role

  1. Create an environment variable for your AWS account number, which will be used in several of the steps below, using the following command:
    export AWS_ACCOUNT=$(aws sts get-caller-identity | jq '.Account' | tr -d '"')

  2. Retrieve the builder policy and save it to a file by using the following command:
    aws iam get-policy-version \
    --policy-arn arn:aws:iam::$AWS_ACCOUNT:policy/builder_policies/builder \
    --version-id v1 | jq '.PolicyVersion.Document' > builder-policy.json

  3. Add the following JSON block to the “Statement” array in the builder-policy.json file and save the changes.
    {
    	"Sid": "SneakyBuilder",
    	"Effect": "Allow",
    	"Action": "*",
    	"Resource": "*"
    }

  4. Try to update the builder policy and set it as the default version by using the following command:
    aws iam create-policy-version \
    --policy-arn arn:aws:iam::$AWS_ACCOUNT:policy/builder_policies/builder \
    --policy-document file://builder-policy.json \
    --set-as-default

    You should get an AccessDenied error because the builder role can only modify policies in the /application_policies/ space.

To test adding an application policy to the builder role

  1. Save a copy of builder-policy.json as a new file called sneaky-policy.json using the following command:
    cp builder-policy.json sneaky-policy.json

  2. Create the new policy using the following command:
    aws iam create-policy \
    --policy-name sneaky-policy \
    --path /application_policies/ \
    --policy-document file://sneaky-policy.json

    You should not get an error in this step because you are creating a new policy that complies with the resource constraint for the statement that includes the iam:CreatePolicy permission in the builder policy. But, it’s just a policy for now – it can’t have any effect unless attached to a role.

  3. Now try to attach this new policy to the builder role by using the following command:
    aws iam attach-role-policy \
    --role-name builder \
    --policy-arn arn:aws:iam::$AWS_ACCOUNT:policy/application_policies/sneaky-policy

    You should get an error because you’re attempting to attach a policy to a role that’s not in the /application-roles/ space, in this case the builder role.

To test modifying an application role with actions outside the permissions boundary

In this procedure, you will attempt to escalate the privileges of the MyLambdaFunctionExecutionRole by adding an action (s3:CreateBucket) that is outside of the permissions boundary attached to the role and then attempting to execute that action when MyLambdaFunction is invoked.

  1. Update the builder-application stack by using the following command:
    aws cloudformation update-stack \
    --stack-name builder-application \
    --template-url https://awsiammedia.s3.amazonaws.com/public/sample/993-grant-IAM-permissions-for-builders+/builder-application-3.yml \
    --capabilities CAPABILITY_NAMED_IAM

  2. After a few minutes, confirm the stack was successfully updated by using the following command and verifying StackStatus is UPDATE_COMPLETE:
    aws cloudformation describe-stacks \
    --stack-name builder-application | jq '.Stacks[].StackStatus'

  3. Start an execution of the state machine and verify the result by using the following commands. Run them one at a time to allow the execution to finish.
    state_machine_arn=$(aws cloudformation describe-stack-resources --stack-name builder-application | jq '.StackResources[] | select (.LogicalResourceId=="MyStateMachine") | .PhysicalResourceId' | tr -d '"')
    
    execution_arn=$(aws stepfunctions start-execution --state-machine-arn $state_machine_arn | jq '.executionArn' | tr -d '"')
    
    aws stepfunctions describe-execution --execution-arn $execution_arn | jq '.status'

    The status should be FAILED. Remember – the effective permissions for any application roles will be the intersection of the attached permissions policies and the permissions boundary. Thus, this execution failed because even though you were able to modify the inline policy of the Lambda function to add s3:CreateBucket, since that action is not allowed in the application-boundary policy attached to the Lambda as a permissions boundary, the request to create an S3 bucket was denied.

  4. Get the name of the latest log stream by using the following commands:
    lambda_function_name=$(aws cloudformation describe-stack-resources --stack-name builder-application | jq '.StackResources[] | select (.LogicalResourceId=="MyLambdaFunction") | .PhysicalResourceId' | tr -d '"')
    
    aws logs describe-log-streams \
    --log-group-name /aws/lambda/$lambda_function_name \
    --order-by LastEventTime \
    --descending | jq -r '.logStreams[0].logStreamName'

  5. To verify the actual error was due to a lack of permissions, get the event message by using the following command, replacing <value> with the value of the log stream copied in the step above. If using a bash terminal, you will need to escape any dollar signs in <value> with a backslash character:
    aws logs get-log-events \
    --log-group-name /aws/lambda/$lambda_function_name \
    --log-stream-name <value> | jq '.events[] | select (.message | contains("[ERROR]"))'

    The error should read [ERROR] ClientError: An error occurred (AccessDenied) when calling the CreateBucket operation: Access Denied, which confirms that the permissions boundary prevented you from escalating your privileges as a builder via an application role.

You have now verified that you can safely allow builders to create IAM policies and roles!

Clean up

After you have finished testing, clean up the resources created in this example. Because the builder role does not have permissions to delete builder policies and roles, you will need to assume a different role that can manage IAM resources to complete step 3 below. If you create a new terminal session, make sure the AWS_ACCOUNT environment variable is set.

To clean up

  1. Delete the builder-application stack by using the following command:
    aws cloudformation delete-stack --stack-name builder-application

  2. Delete the sneaky-policy by using the following command:
    aws iam delete-policy \
    --policy-arn arn:aws:iam::$AWS_ACCOUNT:policy/application_policies/sneaky-policy

  3. Delete the builder-iam stack by using the following command:
    aws cloudformation delete-stack --stack-name builder-iam

Service control policies

Permissions boundaries are applied to individual IAM users or roles within an account. If your organization has multiple accounts, you must create and maintain these boundaries in each account for each individual user or role. But what if you’d like to apply a subset of these rules or others across some or all of your accounts? In this case, you could use service control policies (SCPs), which are a feature of AWS Organizations, to provide central control over the maximum available permissions for multiple accounts in your organization. By organizing accounts into organizational units (OUs), which are groups of accounts that serve an application or service, you can apply service control policies (SCPs) to create targeted governance boundaries for your OUs. To learn more about creating SCPs, see Get more out of service control policies in a multi-account environment in the AWS Security Blog.

Additional tools

Creating and managing tightly scoped policies and roles is an ongoing process that requires a lot of thought and attention to detail. AWS IAM enables fine-grained access control to AWS services, and permissions boundaries are an advanced feature. There is no substitute for actual testing like you performed in the “Test that a builder can’t escalate their privileges” section above, however you can also use the IAM Policy Simulator as a tool to test policies and determine whether or not specific actions are allowed for a given user, group, or role. Additional tools you can use to create, audit, and update IAM policies include:

  • Access Advisor – to review when services and actions were last accessed.
  • Access Analyzer – to help identify resources in your organization and accounts that are shared with an external identity, validate IAM policies against policy grammar and best practices, and generate IAM policies based on access activity in your AWS CloudTrail logs.
  • AWS Cloud Development Kit (CDK) – has built-in convenience methods to help you follow best practices, including the ability to generate least-privilege policies for cloud applications with a single line of code.
  • Open Source tools like cfn-nag and cdk-nag – to inspect CloudFormation templates and CDK applications for patterns that may indicate insecure infrastructure, for example IAM policies that are too permissive.

Conclusion

In this post, you learned how to put policies and guardrails in place that will allow your organization to grant IAM permissions to builders. These changes will enable your builders to develop and deploy cloud infrastructure and applications more rapidly, and will help strengthen your organization’s security culture by extending the responsibility to a broader group. To learn more about creating, testing, and refining IAM policies and permissions boundaries, see Creating IAM policies, Testing IAM policies, and Refining permissions using access information in the IAM User Guide, and IAM policy types: How and when to use them in the AWS Security Blog.

Chaos experiments on Amazon RDS using AWS Fault Injection Simulator

Post Syndicated from Anup Sivadas original https://aws.amazon.com/blogs/devops/chaos-experiments-on-amazon-rds-using-aws-fault-injection-simulator/

Performing controlled chaos experiments on your Amazon Relational Database Service (RDS) database instances and validating the application behavior is essential to making sure that your application stack is resilient. How does the application behave when there is a database failover? Will the connection pooling solution or tools being used gracefully connect after a database failover is successful? Will there be a cascading failure if the database node gets rebooted for a few seconds? These are some of the fundamental questions that you should consider when evaluating the resiliency of your database stack. Chaos engineering is a way to effectively answer these questions.

Traditionally, database failure conditions, such as a failover or a node reboot, are often triggered using a script or 3rd party tools. However, at scale, these external dependencies often become a bottleneck and are hard to maintain and manage. Scripts and 3rd party tools can fail when called, whereas a web service is highly available. The scripts and 3rd party tools also tend to require elevated permissions to work, which is a management overhead and insecure from a least privilege access model perspective. This is where AWS Fault Injection Simulator (FIS) comes to the rescue.

AWS Fault Injection Simulator (AWS FIS) is a fully managed service for running fault injection experiments on AWS that makes it easier to improve an application’s performance, observability, and resiliency. Fault injection experiments are used in chaos engineering, which is the practice of stressing an application in testing or production environments by creating disruptive events, such as a sudden increase in CPU or memory consumption, database failover and observing how the system responds, and implementing improvements.

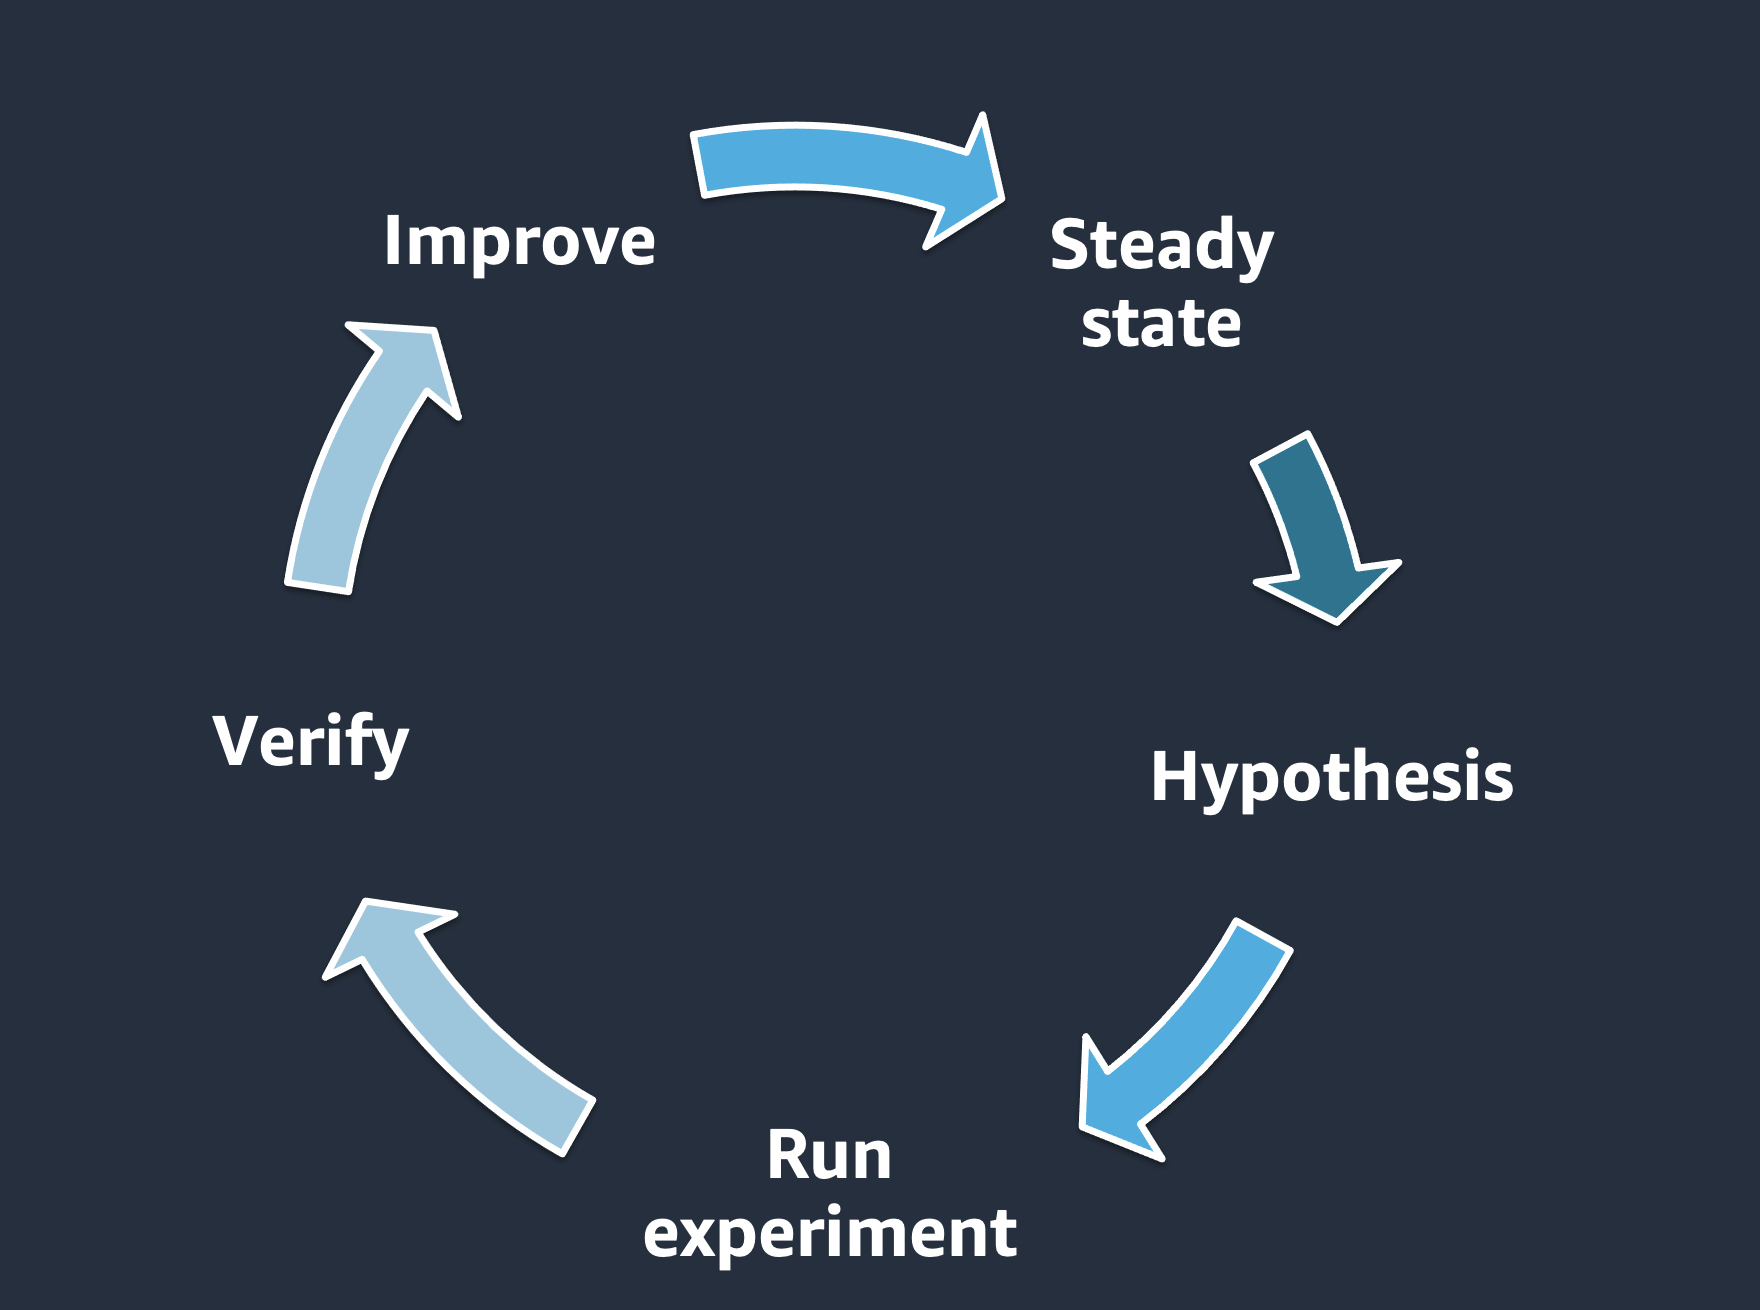
We can define the key phases of chaos engineering as identifying the steady state of the workload, defining a hypothesis, running the experiment, verifying the experiment results and making necessary improvements based on the experiment results. These phases will confirm that you are injecting failures in a controlled environment through well-planned experiments in order to build confidence in the workloads and tools we are using to withstand turbulent conditions.

This diagram explains the phases of chaos engineering. We start with identifying the steady state, defining a hypothesis, run the experiment, verify the experiment results and improve. This is a cycle.

Example—

  • Baseline: we have a managed database with a replica and automatic failover enabled.
  • Hypothesis: failure of a single database instance / replica may slow down a few requests but will not adversely affect our application.
  • Run experiment: trigger a DB failover.
  • Verify: confirm/dis-confirm the hypothesis by looking at KPIs for the application (e.g., via CloudWatch metric/alarm).

Methodology and Walkthrough

Let’s look at how you can configure AWS FIS to perform failure conditions for your RDS database instances. For this walkthrough, we’ll look at injecting a cluster failover for Amazon Aurora PostgreSQL. You can leverage an existing Aurora PostgreSQL cluster or you can launch a new cluster by following the steps in the Create an Aurora PostgreSQL DB Cluster documentation.

Step 1: Select the Aurora Cluster.

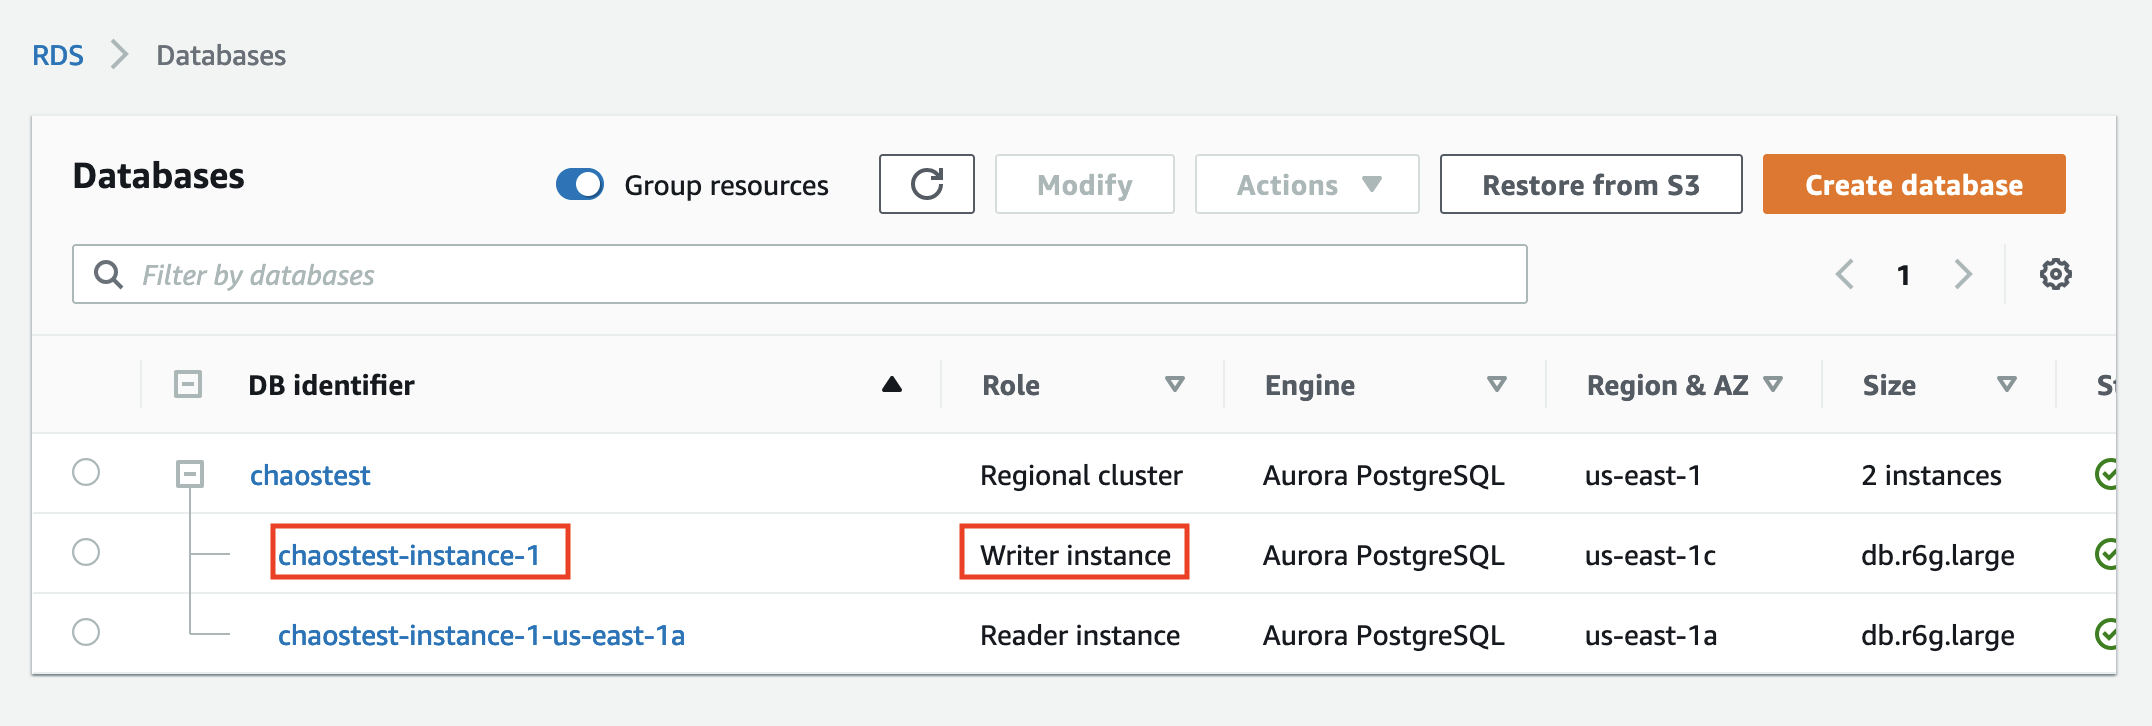
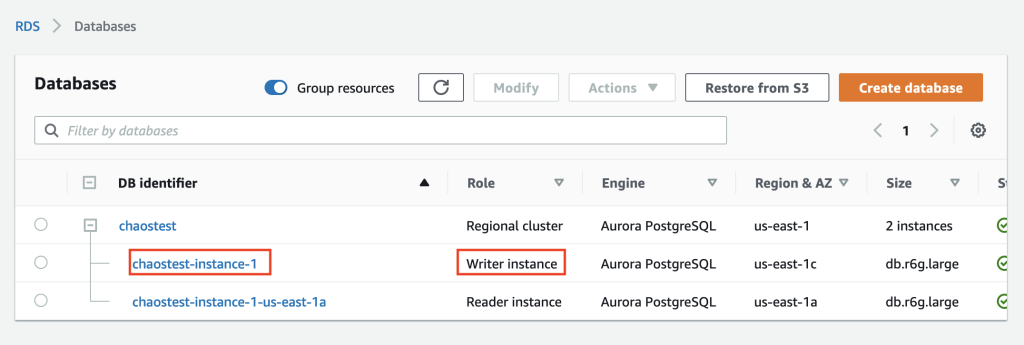
The Aurora PostgreSQL instance that we’ll use for this walkthrough is provisioned in us-east-1 (N. Virginia), and it’s a cluster with two instances. There is one writer instance and another reader instance (Aurora replica). The cluster is named chaostest, the writer instance is named chaostest-instance-1, and the reader is named chaostest-intance-1-us-east-1a.

Under RDS Databases Section, the cluster named chaostest is selected. Under the cluster there are two instances which is available. Chaostest-instance-1 is the writer instance and chaostest-instance-1-us-east-1a is the reader instance.

The goal is to simulate a failover for this Aurora PostgreSQL cluster so that the existing chaostest-intance-1-us-east-1a reader instance will switch roles and then be promoted as the writer, and the existing chaostest-instance-1 will become the reader.

Step 2: Navigate to the AWS FIS console.

We will now navigate to the AWS FIS console to create an experiment template. Select Create experiment template.

Under FIS console, Create experiment template needs to be selected.

Step 3: Complete the AWS FIS template pre-requisites.

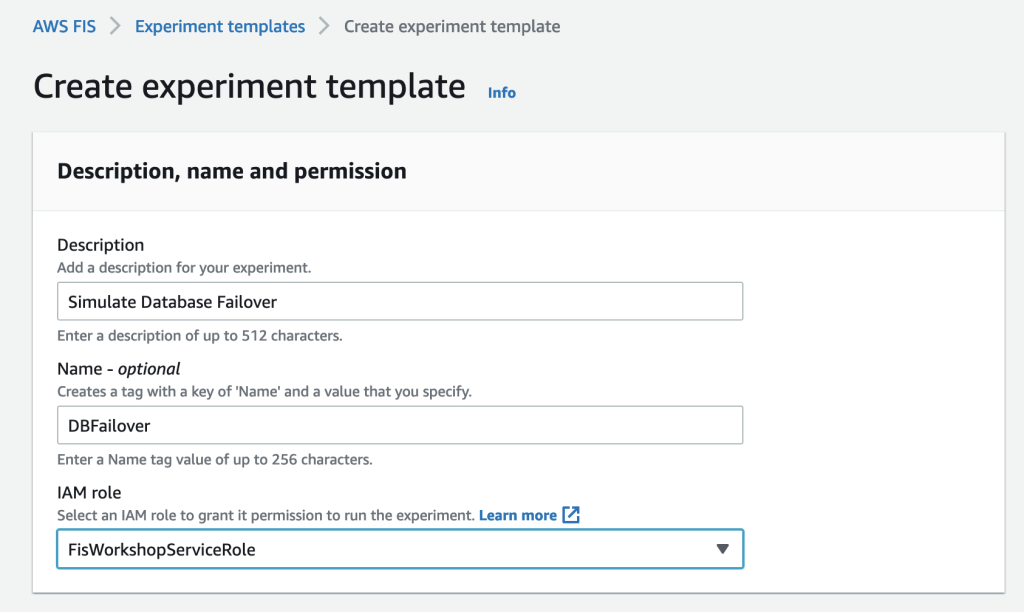
Enter a Description, Name, and select the AWS IAM Role for the experiment template.

Under create experiment template section, Simulate Database Failover is entered for the Description field. DBFailover is entered for the Name field(Optional). FISWorkshopServiceRole is selected for the IAM role drop down field.

The IAM role selected above was pre-created. To use AWS FIS, you must create an IAM role that grants AWS FIS the permissions required so that the service can run experiments on your behalf. The role follows the least privileged model and includes permissions to act on your database clusters like trigger a failover. AWS FIS only uses the permissions that have been delegated explicitly for the role. To learn more about how to create an IAM role with the required permissions for AWS FIS, refer to the FIS documentation.

Step 4: Navigate to the Actions, Target, Stop Condition section of the template.

The next key section of AWS FIS is Action, Target, and Stop Condition.

Action, Target and Stop Conditions section is highlighted in the image.

Action—An action is an activity that AWS FIS performs on an AWS resource during an experiment. AWS FIS provides a set of pre-configured actions based on the AWS resource type. Each Action runs for a specified duration during an experiment, or until you stop the experiment. An action can run sequentially or in parallel.

For our experiment, the Action will be aws:rds:failover-db-cluster.

Target—A target is one or more AWS resources on which AWS FIS performs an action during an experiment. You can choose specific resources or select a group of resources based on specific criteria, such as tags or state.

For our experiment, the target will be the chaostest Aurora PostgreSQL cluster.

Stop Condition—AWS FIS provides the controls and guardrails that you need to run experiments safely on your AWS workloads. A stop condition is a mechanism to stop an experiment if it reaches a threshold that you define as an Amazon CloudWatch alarm. If a stop condition is triggered while the experiment is running, then AWS FIS stops the experiment.

For our experiment, we won’t be defining a stop condition. This is because this simple experiment contains only one action. Stop conditions are especially useful for experiments with a series of actions, to prevent them from continuing if something goes wrong.

Step 5: Configure Action.

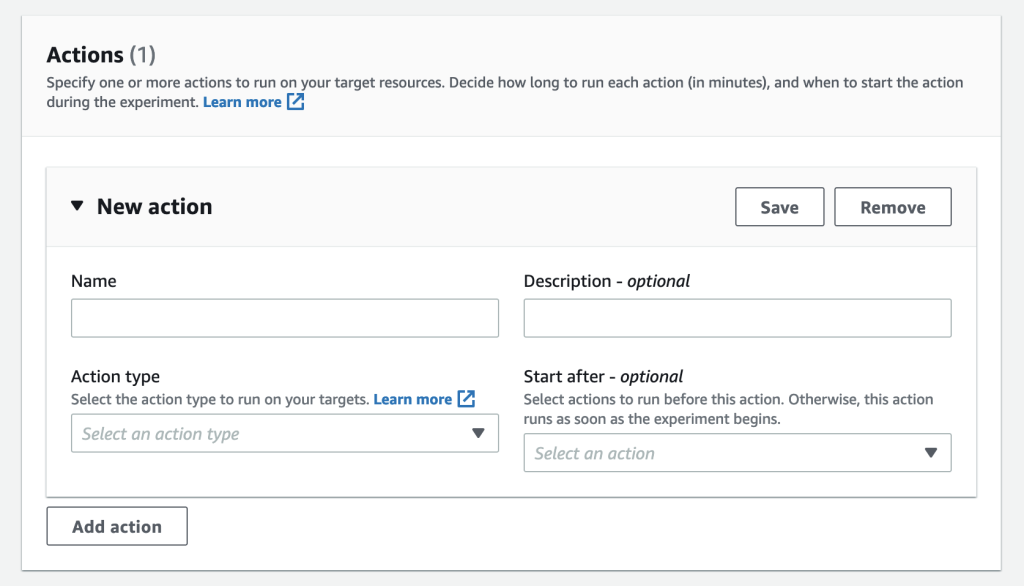
Now, let’s configure the Action and Target for our experiment template. Under the Actions section, we will select Add action to get the New action window.

The action section displays Name,Description, Action Type and Start After fields. There is a Add action button that needs to be selected.

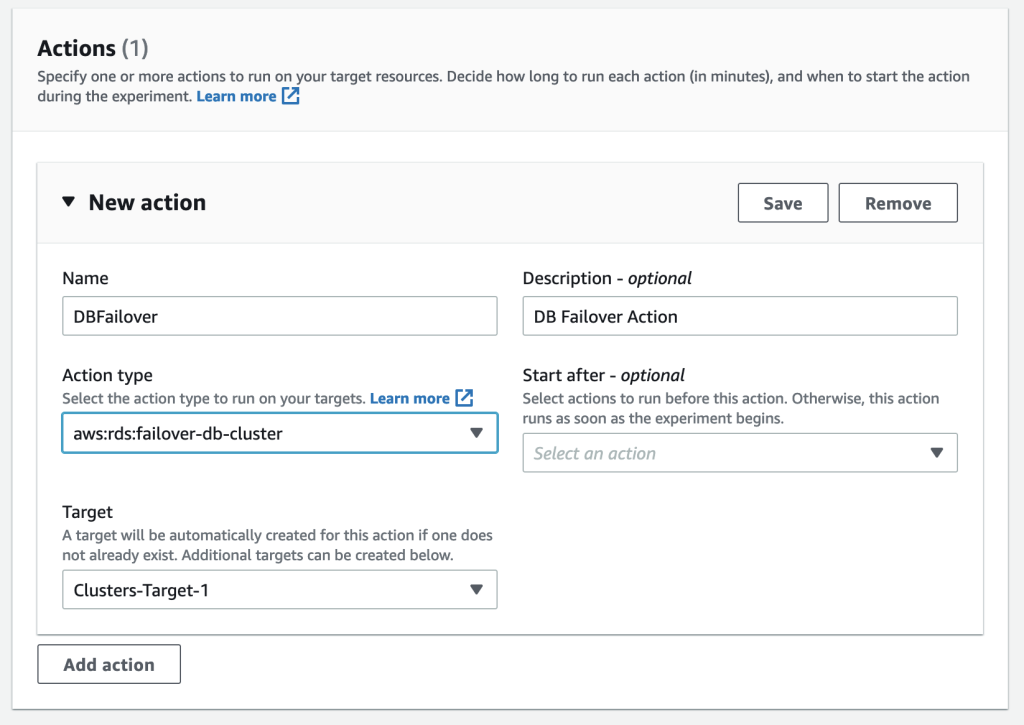
Enter a Name, a Description, and select Action type aws:rds:failover-db-cluster. Start after is an optional setting. This setting allows you to specify an action that should precede the one we are currently configuring.

Under Actions section, DBFailover is entered for the Name field. DB Failover Action is entered for the Description field. aws:rds:failover-db-cluster is entered for the Action Type field. Start after field is left blank and Clusters-Target-1 is selected for the Target field. The save button will save the info entered for the respective fields.

Step 6: Configure Target.

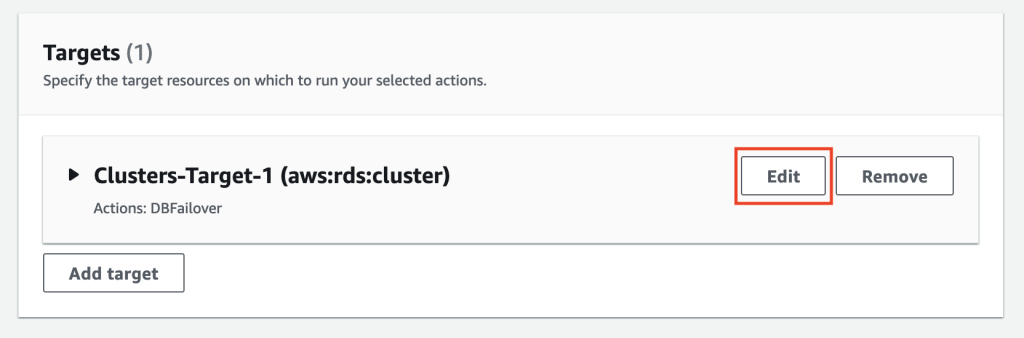
Note that a Target has been automatically created with the name Clusters-Target-1. Select Save to save the action.

Next, you will edit the Clusters-Target-1 target to select the target, i.e., the Aurora PostgreSQL cluster.

Under Targets section, the edit button for Clusters-Target-1 is highlighted.

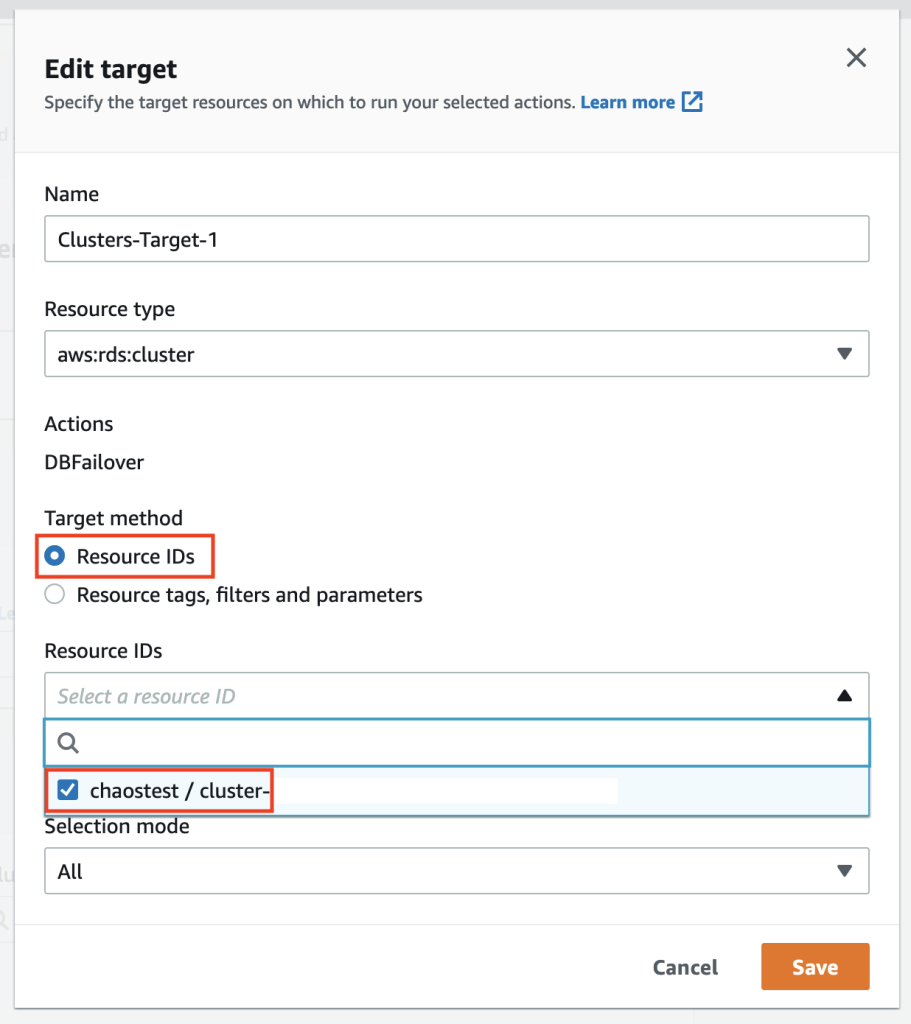
Select Target method as Resource IDs, and select the chaostest cluster.  If you are interested to select a group of resources, then select Resource tags, filters and parameters option.

Under Edit Target section, Clusters-Target-1 is selected for the Name field. aws:rds:cluster is selected for the Resource type field. Action is set as DBFailover. Resource IDs is selected for the Target Method field. Chaostest cluster is selected for the Resource IDs drop down box. Save button is also available in this section to save the configuration.

Step 7: Create the experiment template to complete this stage.

We will wrap up the process by selecting the create experiment template.

Create experiment template option is highlighted. The user will click this button to proceed creating a template.

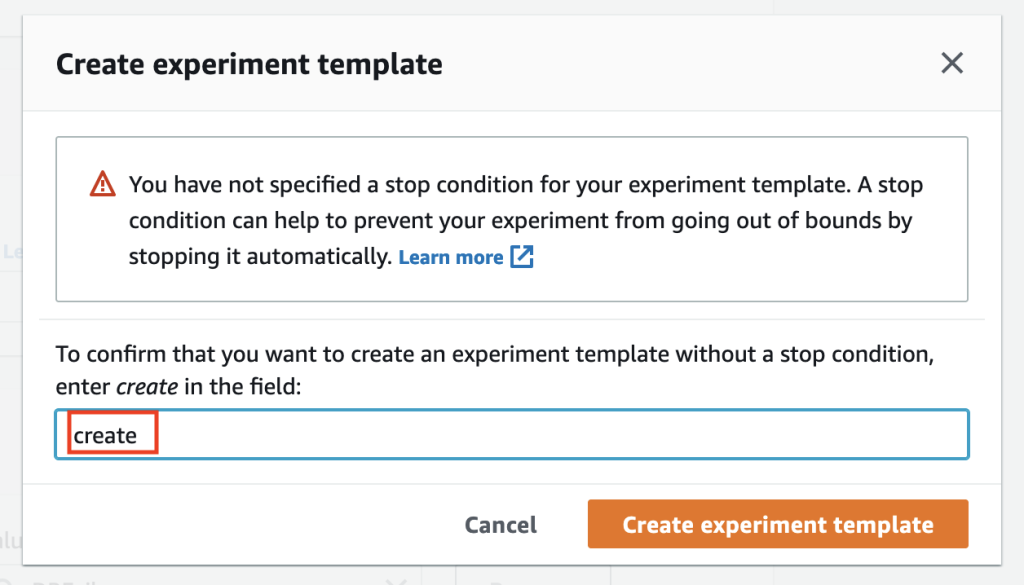
We will get a warning stating that a stop condition isn’t defined. We’ll enter create in the provided field to create the template.

After selecting the create experiment template option in the previous screen, the user is prompted to enter "create" in the field to proceed.

We will get a success message if the entries are correct and the template will be successfully created.

"You successfully created experiment template" success message is displayed in the screen and its highlighted in green color.

Step 8: Verify the Aurora Cluster.

Before we run the experiment, let’s double-check the chaostest Aurora Cluster to confirm which instance is the writer and which is the reader.

Under the RDS section, chaos cluster is listed. The user is confirming that chaostest-instance-1 is the writer and chaostest-instance-1-us-east-1a is the reader.

We confirmed that chaostest-instance-1 is the writer and chaostest-instance-1-us-east-1a is the reader.

Step 9: Run the AWS FIS experiment.

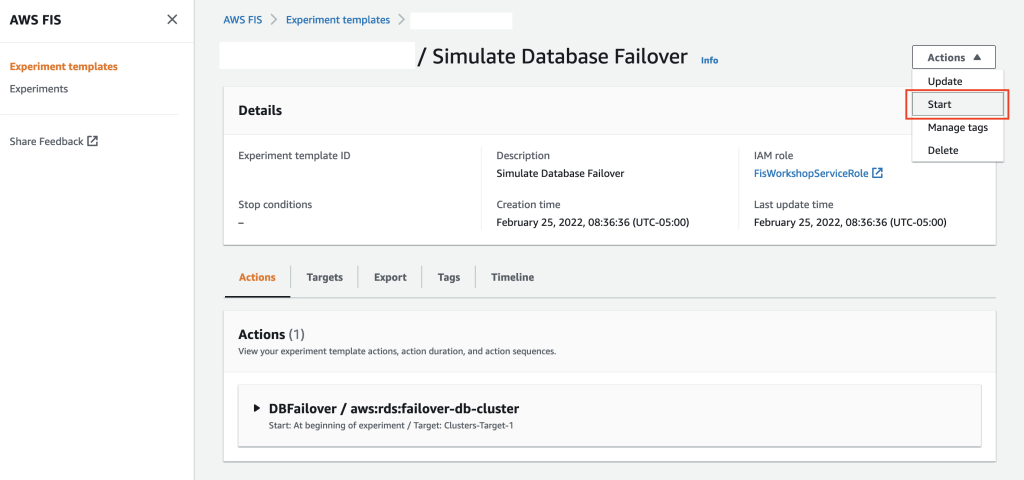
Now we’ll run the FIS experiment. Select Actions, and then select Start for the experiment template.

Under the experiment template section, the Simulate Database Failover template is selection. Under the actions section, option Start is selected to start the experiment. The other options under Actions section includes Update, Manage tags and Delete.

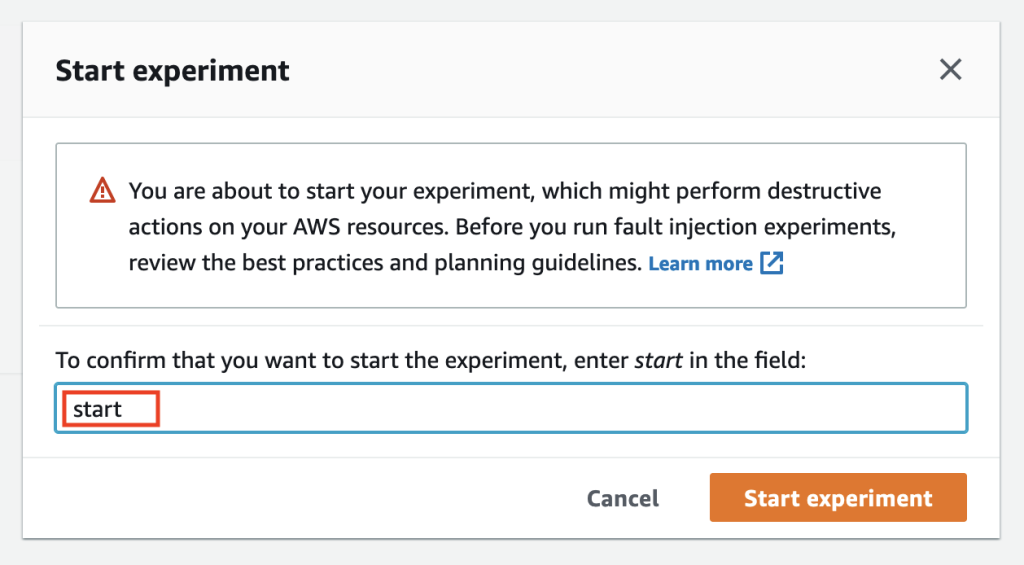
Select Start experiment and you’ll get another warning to confirm if you really want to start this experiment. Confirm by entering start say Start experiment.

Under the Start Experiement section, user is promoted to enter "start" in the field to start the experiement.

Step 10: Observe the various stages of the experiment.

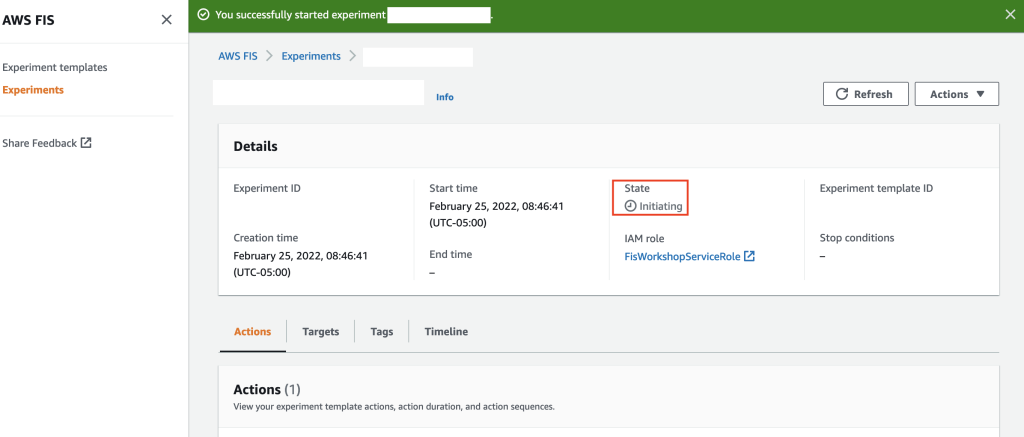
The experiment will be in initiating, running and will eventually be in completed states.

The experiment is in initiating state.

The experiment is in Complete state.

Step 11: Verify the Aurora Cluster to confirm failover.

Now let’s look at the chaostest Aurora PostgreSQL cluster to check the state. Note that a failover was indeed triggered by FIS and chaostest-instance-1-us-east-1a is the newly promoted writer and chaostest-instance-1 is the reader now.

Under RDS Section, Chaostest cluster is shown. This time, the writer is chaostest-instance-1-us-east-1a.

Step 12: Verify the Aurora Cluster logs.

We can also confirm the failover action by looking at the Logs and events section of the Aurora Cluster.

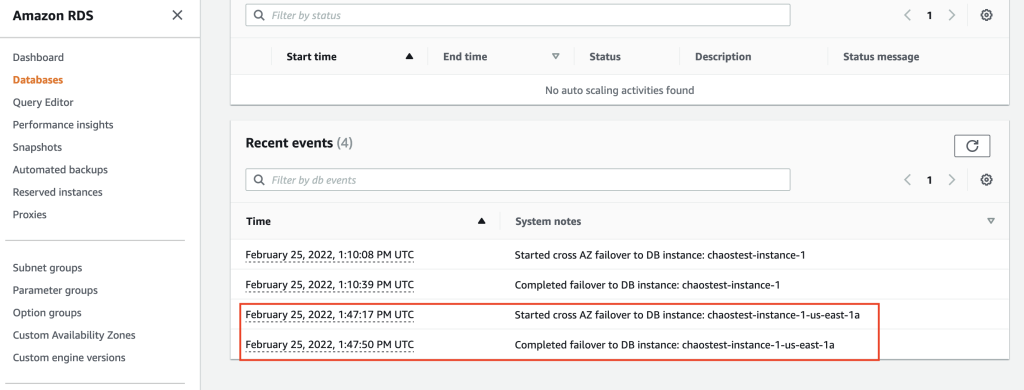
Under the Recent Events section of the chaos-test cluster, the failover messages is displayed. One of the messages lists "Started cross AZ failover to DB instance:chaostest-instance-1-us-east-1a. This confirms that the experiment was successful.

Clean up

If you created a new Aurora PostgreSQL cluster for this walkthrough, then you can terminate the cluster to optimize the costs by following the steps in the Deleting an Aurora DB cluster documentation.

You can also delete the AWS FIS experiment template by following the steps in the Delete an experiment template documentation.

You can refer to the AWS FIS documentation to learn more about the service. If you want to know more about chaos engineering, check out the AWS re:Invent session Testing resiliency using chaos engineering and The Chaos Engineering Collection. Finally, check out the following GitHub repo for additional example experiments, and how you can work with AWS FIS using the AWS Cloud Development Kit (AWS CDK).

Conclusion

In this walkthrough, you learned how you can leverage AWS FIS to inject failures into your RDS Instances. To get started with AWS Fault Injection Service for Amazon RDS, refer to the service documentation.

Author:

Anup Sivadas

Anup Sivadas is a Principal Solutions Architect at Amazon Web Services and is based out of Arlington, Virginia. With 18 + years in technology, Anup enjoys working with AWS customers and helps them craft highly scalable, performing, resilient, secure, sustainable and cost-effective cloud architectures. Outside work, Anup’s passion is to travel and explore the nature with his family.

Deploy .NET Blazor WebAssembly Application to AWS Amplify

Post Syndicated from Adilson Perinei original https://aws.amazon.com/blogs/devops/deploy-net-blazor-webassembly-application-to-aws-amplify/

Blazor can run your client-side C# code directly in the browser, using WebAssembly. It is a .NET running on WebAssembly, and you can reuse code and libraries from the server-side parts of your application.

Overview of solution

In this post, you will deploy a Blazor WebAssembly Application from git repository to AWS Amplify. We will use .NET 6. to create a Blazor WebAssembly on local machine using AWS Command Line Interface (AWS CLI), use GitHub as a git repository, and deploy the application to Amplify.

Follow this post on: Windows 10, Windows 11/Ubuntu 20.04 LTS/macOS 10.15 “Catalina”, macOS 11.0 “Big Sur”, or macOS 12.0 “Monterey”.

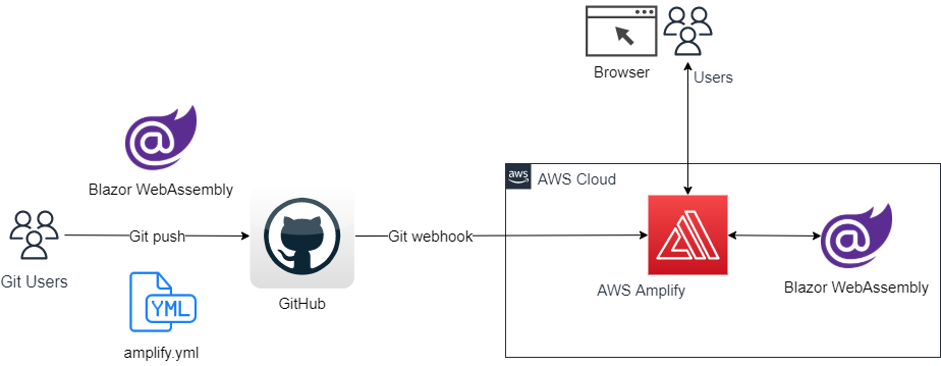
User pushes Blazor WebAssembly code and amplify.yml to Github. This action will trigger the amplify pipeline that will use amplify.yml to build and deploy the application.

Walkthrough

We will walk through the following steps:

  • Create Blazor WebAssembly application on our local machine using AWS CLI
  • Test /run the application locally
  • Create a new repository on Github
  • Create a local repository
  • Setup Amplify
  • Test /run the application on AWS

Prerequisites

For this walkthrough, you should have the following prerequisites:

Let’s start creating a Blazor WebAssembly application on our local machine using CLI:

    1. Open the command line interface
    2. Create a directory for your application running the following command:

mkdir BlazorWebApp

    1. Change to the application directory running the following command:

cd BlazorWebApp

    1.  Create the Blazor WebAssembly Application running the following command:

dotnet new blazorwasm

    1. Run the application:

dotnet run

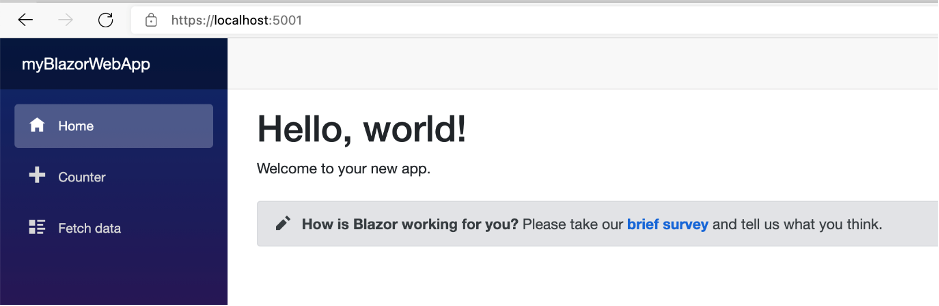
    1. Copy the URL after “Now listening on:”, and paste it on your browser.
      Example: http://localhost:5152 (port might be different in your CLI)

Sample app

    1. After testing your application, go back to the terminal and press <ctrl> + c to stop the application.
    2. Create a gitignore for your project running the following command:

dotnet new gitignore

    1. Create a file called “amplify.yml” in the root directory of your application. The name must be exactly “amplify.yml”. This file contains the commands to build your application used by AWS CodeBuild.
    2. Copy and paste the following code to the file amplify.yml.

version: 1
frontend:
phases:
preBuild:
commands:
- curl -sSL https://dot.net/v1/dotnet-install.sh > dotnet-install.sh
- chmod +x *.sh
- ./dotnet-install.sh -c 6.0 -InstallDir ./dotnet6
- ./dotnet6/dotnet --version
build:
commands:
- ./dotnet6/dotnet publish -c Release -o release
artifacts:
baseDirectory: /release/wwwroot
files:
- '**/*'
cache:
paths: []

Create a new repository on Github:

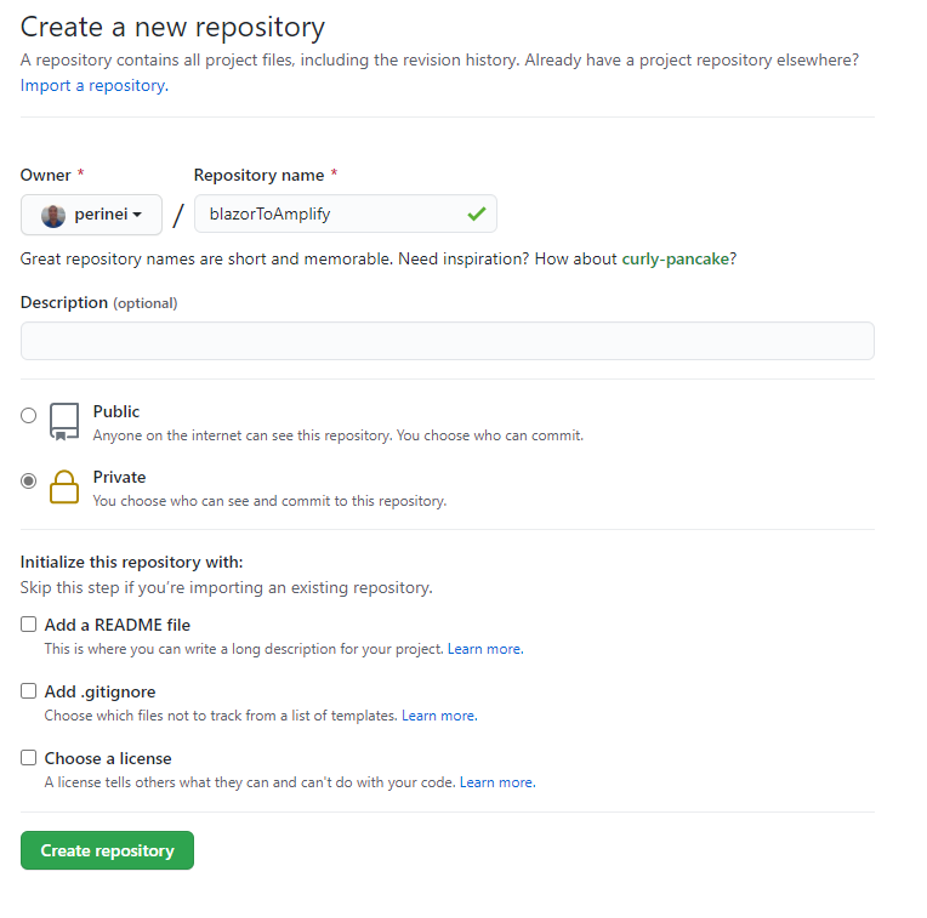
      1. Log in to the Github website and create a new repository:

Create Github repo

      1. Type a name for your repository, choose private, and add a read.me file as shown in the following screenshot:

Create repo

Create a local repository for your application:

      1. On the root folder of your application enter the following commands. Make sure that you have configured git CLI with email and user

git add --all
git commit -m “first commit”
git branch -M main
git remote add origin https://github.com/perinei/blazorToAmplify.git
(replace red text with your repo)
for ssh authentication use:
git remote add origin [email protected]: perinei/blazorToAmplify.git
git push -u origin main

Setup Amplify:

      1. Log in to the AWS account
      2. Go to AWS Amplify Service
      3. On the left panel, choose All apps
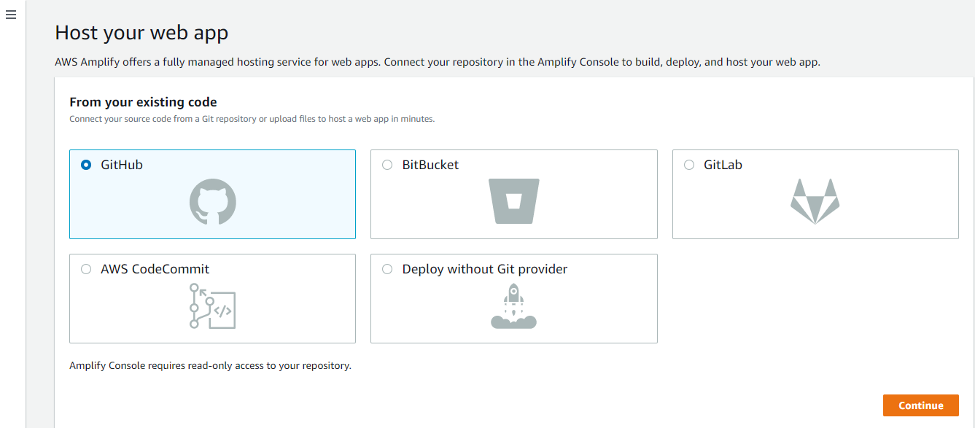
      4. Select New app as per the following screen
      5. Select Host Web App from the dropdown list

      1. Choose Github

      1. Select Continue. If you are still logged in on your Github account, then the page will automatically authenticate you, otherwise select the Authenticate Button
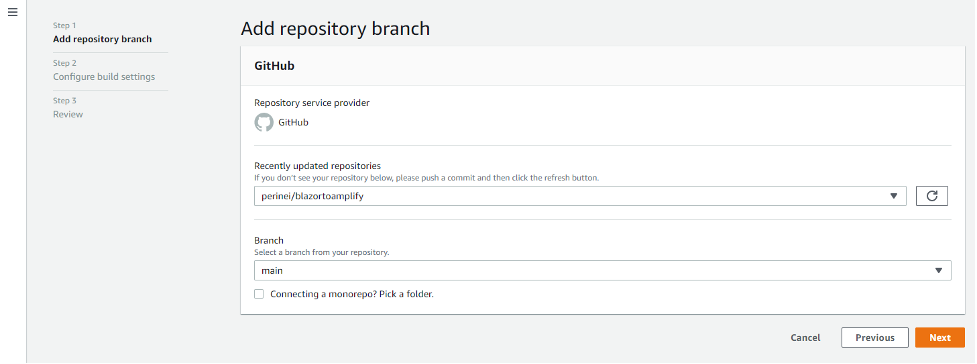
      2. Choose your repository: in my case, perinei/bazortoamplify
      3. Branch: main
      4. Select next

      1. Give your app a name
      2. amplify.yml will be automatically detected and will be used to build the application on AWS

      1. Select Next to review the configuration
      2. Select Save and Deploy
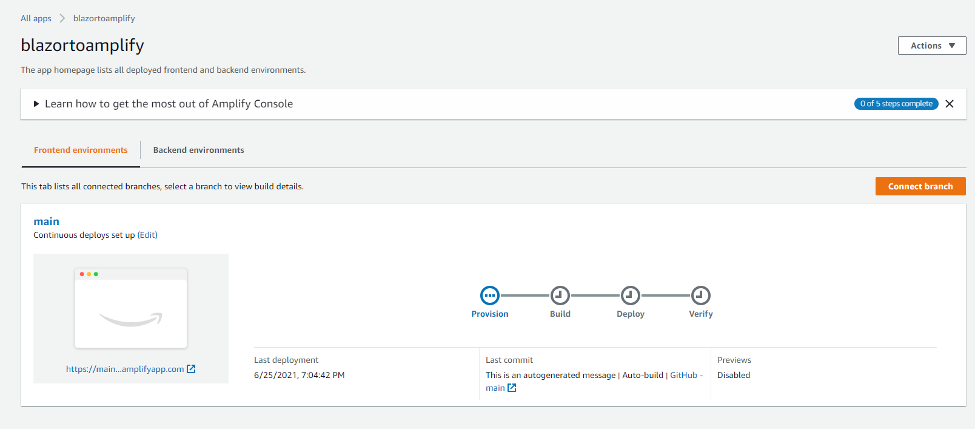
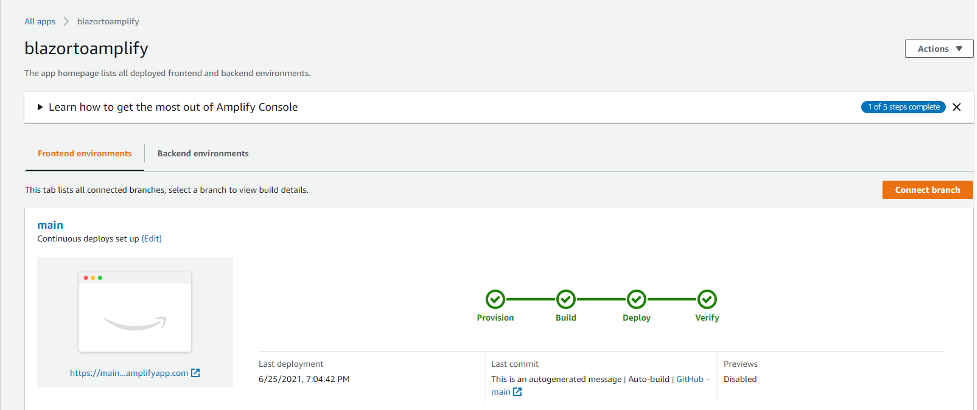
      3. Amplify will provision, build, deploy, and verify the application

      1. When the process is complete, select the URL of your application and test the application.

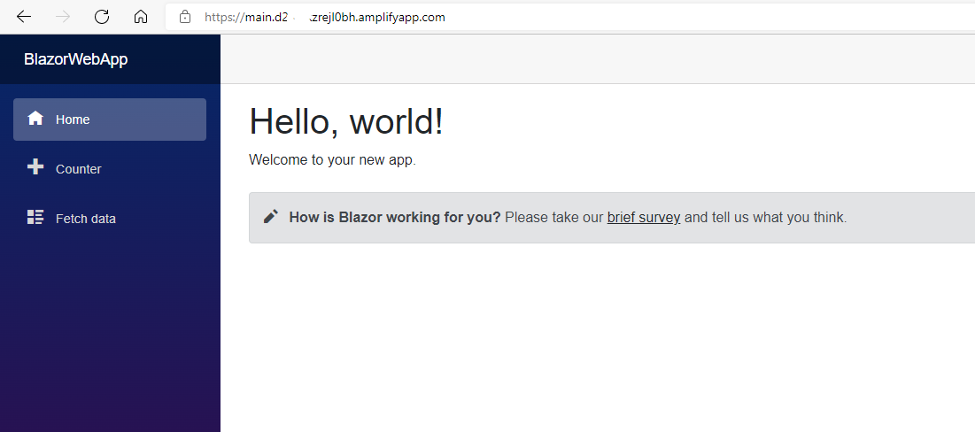
      1. Congratulations! Your Blazor WebAssembly is running on Amplify.

Cleaning up

To avoid incurring future charges, delete the resources. On Amplify, choose your app name on the left panel, select action, and then delete app.

Conclusion

Congratulations, you deployed your first Blazor Webassembly Application to AWS Amplify.

In this blog post you learned how to easily build a full CI/CD pipeline for a Blazor WebAssembly using the AWS amplify. It was only necessary to specify the repository and the commands build the application on the file amplify.yml that should be include on the root folder of repository. You can also easily add a custom domain to your application. Visit Set up custom domains on AWS Amplify Hosting

AWS can help you to migrate .NET applications to the Cloud. Visit .NET on AWS.

The .NET on AWS YouTube playlist is the place to get the latest .NET on AWS videos, including AWS re:Invent sessions.

To learn more about how to amplify.yml to build your application, visit Configuring build settings – AWS Amplify.

Adilson Perinei

Adilson Perinei is an AWS Consultant with six AWS certifications and loves to develop serverless applications using AWS infrastructure..

How to protect HMACs inside AWS KMS

Post Syndicated from Jeremy Stieglitz original https://aws.amazon.com/blogs/security/how-to-protect-hmacs-inside-aws-kms/

Today AWS Key Management Service (AWS KMS) is introducing new APIs to generate and verify hash-based message authentication codes (HMACs) using the Federal Information Processing Standard (FIPS) 140-2 validated hardware security modules (HSMs) in AWS KMS. HMACs are a powerful cryptographic building block that incorporate secret key material in a hash function to create a unique, keyed message authentication code.

In this post, you will learn the basics of the HMAC algorithm as a cryptographic building block, including how HMACs are used. In the second part of this post, you will see a few real-world use cases that show an application builder’s perspective on using the AWS KMS HMAC APIs.

HMACs provide a fast way to tokenize or sign data such as web API requests, credit cards, bank routing information, or personally identifiable information (PII).They are commonly used in several internet standards and communication protocols such as JSON Web Tokens (JWT), and are even an important security component for how you sign AWS API requests.

HMAC as a cryptographic building block

You can consider an HMAC, sometimes referred to as a keyed hash, to be a combination function that fuses the following elements:

  • A standard hash function such as SHA-256 to produce a message authentication code (MAC).
  • A secret key that binds this MAC to that key’s unique value.

Combining these two elements creates a unique, authenticated version of the digest of a message. Because the HMAC construction allows interchangeable hash functions as well as different secret key sizes, one of the benefits of HMACs is the easy replaceability of the underlying hash function (in case faster or more secure hash functions are required), as well as the ability to add more security by lengthening the size of the secret key used in the HMAC over time. The AWS KMS HMAC API is launching with support for SHA-224, SHA-256, SHA-384, and SHA-512 algorithms to provide a good balance of key sizes and performance trade-offs in the implementation. For more information about HMAC algorithms supported by AWS KMS, see HMAC keys in AWS KMS in the AWS KMS Developer Guide.

HMACs offer two distinct benefits:

  1. Message integrity: As with all hash functions, the output of an HMAC will result in precisely one unique digest of the message’s content. If there is any change to the data object (for example you modify the purchase price in a contract by just one digit: from “$350,000” to “$950,000”), then the verification of the original digest will fail.
  2. Message authenticity: What distinguishes HMAC from other hash methods is the use of a secret key to provide message authenticity. Only message hashes that were created with the specific secret key material will produce the same HMAC output. This dependence on secret key material ensures that no third party can substitute their own message content and create a valid HMAC without the intended verifier detecting the change.

HMAC in the real world

HMACs have widespread applications and industry adoption because they are fast, high performance, and simple to use. HMACs are particularly popular in the JSON Web Token (JWT) open standard as a means of securing web applications, and have replaced older technologies such as cookies and sessions. In fact, Amazon implements a custom authentication scheme, Signature Version 4 (SigV4), to sign AWS API requests based on a keyed-HMAC. To authenticate a request, you first concatenate selected elements of the request to form a string. You then use your AWS secret key material to calculate the HMAC of that string. Informally, this process is called signing the request, and the output of the HMAC algorithm is informally known as the signature, because it simulates the security properties of a real signature in that it represents your identity and your intent.

Advantages of using HMACs in AWS KMS

AWS KMS HMAC APIs provide several advantages over implementing HMACs in application software because the key material for the HMACs is generated in AWS KMS hardware security modules (HSMs) that are certified under the FIPS 140-2 program and never leave AWS KMS unencrypted. In addition, the HMAC keys in AWS KMS can be managed with the same access control mechanisms and auditing features that AWS KMS provides on all AWS KMS keys. These security controls ensure that any HMAC created in AWS KMS can only ever be verified in AWS KMS using the same KMS key. Lastly, the HMAC keys and the HMAC algorithms that AWS KMS uses conform to industry standards defined in RFC 2104 HMAC: Keyed-Hashing for Message Authentication.

Use HMAC keys in AWS KMS to create JSON Web Tokens

The JSON Web Token (JWT) open standard is a common use of HMAC. The standard defines a portable and secure means to communicate a set of statements, known as claims, between parties. HMAC is useful for applications that need an authorization mechanism, in which claims are validated to determine whether an identity has permission to perform some action. Such an application can only work if a validator can trust the integrity of claims in a JWT. Signing JWTs with an HMAC is one way to assert their integrity. Verifiers with access to an HMAC key can cryptographically assert that the claims and signature of a JWT were produced by an issuer using the same key.

This section will walk you through an example of how you can use HMAC keys from AWS KMS to sign JWTs. The example uses the AWS SDK for Python (Boto3) and implements simple JWT encoding and decoding operations. This example shows the ease with which you can integrate HMAC keys in AWS KMS into your JWT application, even if your application is in another language or uses a more formal JWT library.

Create an HMAC key in AWS KMS

Begin by creating an HMAC key in AWS KMS. You can use the AWS KMS console or call the CreateKey API action. The following example shows creation of a 256-bit HMAC key:

import boto3

kms = boto3.client('kms')

# Use CreateKey API to create a 256-bit key for HMAC
key_id = kms.create_key(
	KeySpec='HMAC_256',
	KeyUsage='GENERATE_VERIFY_MAC'
)['KeyMetadata']['KeyId']

Use the HMAC key to encode a signed JWT

Next, you use the HMAC key to encode a signed JWT. There are three components to a JWT token: the set of claims, header, and signature. The claims are the very application-specific statements to be authenticated. The header describes how the JWT is signed. Lastly, the MAC (signature) is the output of applying the header’s described operation to the message (the combination of the claims and header). All these are packed into a URL-safe string according to the JWT standard.

The following example uses the previously created HMAC key in AWS KMS within the construction of a JWT. The example’s claims simply consist of a small claim and an issuance timestamp. The header contains key ID of the HMAC key and the name of the HMAC algorithm used. Note that HS256 is the JWT convention used to represent HMAC with SHA-256 digest. You can generate the MAC using the new GenerateMac API action in AWS KMS.

import base64
import json
import time

def base64_url_encode(data):
	return base64.b64encode(data, b'-_').rstrip(b'=')

# Payload contains simple claim and an issuance timestamp
payload = json.dumps({
	"does_kms_support_hmac": "yes",
	"iat": int(time.time())
}).encode("utf8")

# Header describes the algorithm and AWS KMS key ID to be used for signing
header = json.dumps({
	"typ": "JWT",
	"alg": "HS256",
	"kid": key_id #This key_id is from the “Create an HMAC key in AWS KMS” #example. The “Verify the signed JWT” example will later #assert that the input header has the same value of the #key_id 
}).encode("utf8")

# Message to sign is of form <header_b64>.<payload_b64>
message = base64_url_encode(header) + b'.' + base64_url_encode(payload)

# Generate MAC using GenerateMac API of AWS KMS
MAC = kms.generate_mac(
	KeyId=key_id, #This key_id is from the “Create an HMAC key in AWS KMS” 
				 #example
	MacAlgorithm='HMAC_SHA_256',
	Message=message
)['Mac']

# Form JWT token of form <header_b64>.<payload_b64>.<mac_b64>
jwt_token = message + b'.' + base64_url_encode(mac)

Verify the signed JWT

Now that you have a signed JWT, you can verify it using the same KMS HMAC key. The example below uses the new VerifyMac API action to validate the MAC (signature) of the JWT. If the MAC is invalid, AWS KMS returns an error response and the AWS SDK throws an exception. If the MAC is valid, the request succeeds and the application can continue to do further processing on the token and its claims.

def base64_url_decode(data):
	return base64.b64decode(data + b'=' * (4 - len(data) % 4), b'-_')

# Parse out encoded header, payload, and MAC from the token
message, mac_b64 = jwt_token.rsplit(b'.', 1)
header_b64, payload_b64 = message.rsplit(b'.', 1)

# Decode header and verify its contents match expectations
header_map = json.loads(base64_url_decode(header_b64).decode("utf8"))
assert header_map == {
	"typ": "JWT",
	"alg": "HS256",
	"kid": key_id #This key_id is from the “Create an HMAC key in AWS KMS” 
				 #example
}

# Verify the MAC using VerifyMac API of AWS KMS. # If the verification fails, this will throw an error.
kms.verify_mac(
	KeyId=key_id, #This key_id is from the “Create an HMAC key in AWS KMS” 
				 #example
	MacAlgorithm='HMAC_SHA_256',
	Message=message,
	Mac=base64_url_decode(mac_b64)
)

# Decode payload for use application-specific validation/processing
payload_map = json.loads(base64_url_decode(payload_b64).decode("utf8"))

Create separate roles to control who has access to generate HMACs and who has access to validate HMACs

It’s often helpful to have separate JWT creators and validators so that you can distinguish between the roles that are allowed to create tokens and the roles that are allowed to verify tokens. HMAC signatures performed outside of AWS-KMS don’t work well for this because you can’t isolate creators and verifiers if they both must have a copy of the same key. However, this is not an issue for HMAC keys in AWS KMS. You can use key policies to separate out who has permission to ask AWS KMS to generate HMACs and who has permission to ask AWS KMS to validate. Each party uses their own unique access keys to access the HMAC key in AWS KMS. Only HSMs in AWS KMS will ever have access to the actual key material. See the following example key policy statements that separate out GenerateMac and VerifyMac permissions:

{
	"Id": "example-jwt-policy",
	"Version": "2012-10-17",
	"Statement": [
		{
			"Sid": "Allow use of the key for creating JWTs",
			"Effect": "Allow",
			"Principal": {
				"AWS": "arn:aws:iam::111122223333:role/JwtProducer"
			},
			"Action": [
				"kms:GenerateMac"
			],
			"Resource": "*"
		},
		{
			"Sid": "Allow use of the key for validating JWTs",
			"Effect": "Allow",
			"Principal": {
				"AWS": "arn:aws:iam::111122223333:role/JwtConsumer"
			},
			"Action": [
				"kms:VerifyMac"
			],
			"Resource": "*"
		}
	]
}

Conclusion

In this post, you learned about the new HMAC APIs in AWS KMS (GenerateMac and VerifyMac). These APIs complement existing AWS KMS cryptographic operations: symmetric key encryption, asymmetric key encryption and signing, and data key creation and key enveloping. You can use HMACs for JWTs, tokenization, URL and API signing, as a key derivation function (KDF), as well as in new designs that we haven’t even thought of yet. To learn more about HMAC functionality and design, see HMAC keys in AWS KMS in the AWS KMS Developer Guide.

If you have feedback about this post, submit comments in the Comments section below. If you have questions about this post, start a new thread on the KMS re:Post or contact AWS Support.
Want more AWS Security news? Follow us on Twitter.

Author

Jeremy Stieglitz

Jeremy is the Principal Product Manager for AWS Key Management Service (KMS) where he drives global product strategy and roadmap for AWS KMS. Jeremy has more than 20 years of experience defining new products and platforms, launching and scaling cryptography solutions, and driving end-to-end product strategies. Jeremy is the author or co-author of 23 patents in network security, user authentication and network automation and control.

Author

Peter Zieske

Peter is a Senior Software Developer on the AWS Key Management Service team, where he works on developing features on the service-side front-end. Outside of work, he enjoys building with LEGO, gaming, and spending time with family.

Save Cost and Improve Lambda Application Performance with Proactive Insights from Amazon DevOps Guru

Post Syndicated from Venkata Moparthi original https://aws.amazon.com/blogs/devops/save-cost-and-improve-lambda-application-performance-with-proactive-insights-from-amazon-devops-guru/

AWS customers, regardless of size and market segment, constantly seek to improve application performance while reducing operational costs. Today, Amazon DevOps Guru generates proactive insights that enable you to reduce the cost and improve the performance of your AWS Lambda application. By proactively analyzing your application and making these cost-saving and/or performance-improving recommendations, DevOps Guru frees up your operations team to focus on other value-adding activities.

DevOps Guru is a machine learning (ML)-powered service that helps you effectively monitor your application by ingesting application metrics, learning your application’s behavior over time, and then detecting operational anomalies. Once an anomaly is detected, DevOps Guru generates insights that include specific recommendations of how to fix the underlying problem.

To make sure that AWS customers remain ahead of potential issues, DevOps Guru detects some applications issues proactively and provides recommendations that let customers correct them before customer-impacting events actually occur. These Proactive Insights are created by analyzing operational data and application metrics with ML algorithms that can identify early signals that are linked with future operational issues.

In this post, we’ll review a scenario in which the provisioned concurrency capacity for a Lambda function was set too low. This put the customer at risk of dropped requests (throttling), which degrade application performance and deliver poor user experience during traffic spikes.

Prerequisites

In the scenario under review, we have an account with DevOps Guru set up to monitor a Lambda-based application stack. Enabling DevOps Guru and setting it up to monitor a Lambda function is straightforward, and you can refer to this post to see how this is done. For the Lambda function in this account, we have set the provisioned concurrency set too low. This Lambda documentation page covers how to estimate the appropriate concurrency levels for your function.

Architecture Overview

The reference architecture for our scenario can be seen in the following image.

In this simple serverless architecture, the Lambda-based application vends the metrics to Amazon CloudWatch. Then, DevOps Guru ingests the metrics from CloudWatch for analysis.

Architecture diagram explained in post.

By default, DevOps Guru ingests vended metrics via CloudWatch at no cost to customers.

Baselining

The first time that you enable and configure DevOps Guru to monitor resources, it starts baselining your resources to determine your application’s normal behavior. Unlike rule-based alarming systems, DevOps Guru utilizes dynamic thresholds that are controlled by ML algorithms and calibrated to the specifics of your application to reduce noise. For a simple serverless stack, baselining can be completed in two hours. However, in a production environment baselining can take up to 24-hours depending upon the number of resources being monitored. After initial baselining, analysis becomes continuous and baselining is no longer required.

Proactive Insight Generation

Once baselining is complete, DevOps Guru analyzes the baselined operational and generates insights where present. These insights can be found on the Insights page of the DevOps Guru console. To view the available insights, navigate to Insights, and select the Proactive Insights or Reactive Insights. In this scenario, we’re reviewing a Proactive Insight.

Devops guru Insights page. Four proactive insights with status of ongoing

On this tab, note that the LambdaAuthorizer -1HQG1OD function has a concurrency spillover invocation. For a given Lambda function, concurrency spillover is invoked when the number of concurrent requests reaches the provisioned concurrency limit. When this occurs, Lambda either begins to run on unreserved concurrency (leading to cold starts) or rejects additional incoming requests, depending on your function scaling configuration.

By selecting the relevant insight from the list, we open the insight detail page. The insight overview card provides an overview of the insight, with high-level information such as insight description, severity, status, and the number of affected applications as shown in the following screenshot.

Insight detail page. Shows insight overview, previously explained in post.

The metrics card presents a graph plotted against time. In this case, provisioned concurrency invocation, which toggles from 0 to 1 when concurrency spillover occurs, was triggered because the Lambda function received more concurrent requests than were provisioned for.

Metric card with graph plotted against time.

The relevant events card is useful in situations where more than one application is affected, or when the initial event triggers additional events. This card plots all of the events from different related applications on a time axis. Therefore, we can pinpoint which event triggered the chain of events.

Relevent events card, previously explained in post.

Recommendations

The recommendation section of the insight page provides specific and actionable guidance on what actions customers should take to fix the underlying cause of the issue. In this case, DevOps Guru recommends that the customer set the provisioned concurrency to 264 to keep the utilization balanced at 65%. Providing such specific guidance takes away any ambiguity and significantly reduces troubleshooting time.

Recommendations section previously explained in post.

Other Lambda-related Proactive Insights

While this scenario alerts customers to an issue that impacts application performance, DevOps Guru also provides alerts for cost-optimization issues. Some additional cost and performance-related issues that DevOps Guru identifies include:

  • Lambda Provisioned with No Autoscaling, which is triggered when autoscaling isn’t enabled, thereby putting the application at risk of degraded performance when requests are throttled during a traffic spike.
  • Low Lambda Provision Concurrency Utilization, which is triggered when provisioned concurrency is consistently higher than required, driving unnecessary cloud spend.
  • Over-provisioned Amazon DynamoDB Stream Shards, which is triggered when provisioned Amazon DynamoDB stream shards is consistently higher than required, driving unnecessary cloud spend.

DevOps Guru continues to expand its library of proactive insight use cases to deliver cost and performance improvements continuously to AWS customers.

Conclusion

As seen in the example above, DevOps Guru can proactively detect issues with your Lambda applications, tie these issues to related events, and provide precise remedial actions using its pre-trained ML models. As a customer, you can start leveraging these capabilities to improve the performance of your Lambda applications by simply enabling DevOps Guru—a process that requires minimal configuration and no previous ML expertise.

Start using DevOps Guru to monitor your Lambda Applications today!

About the authors

Mohit Gadkari

Mohit Gadkari is a Solutions Architect at Amazon Web Services (AWS) supporting SMB customers. He has been professionally using AWS since 2015 specializing in DevOps and Cloud Security and currently he is using this experience to help customers navigate the cloud.

Venkata Moparthi

Venkata Moparthi is a Cloud Infrastructure Architect at Amazon Web Services. He helps customers on their cloud adoption journey. He is passionate about technology and enjoys collaborating with customers architecting and implementing highly scalable and secure solutions.

Streamlining evidence collection with AWS Audit Manager

Post Syndicated from Nicholas Parks original https://aws.amazon.com/blogs/security/streamlining-evidence-collection-with-aws-audit-manager/

In this post, we will show you how to deploy a solution into your Amazon Web Services (AWS) account that enables you to simply attach manual evidence to controls using AWS Audit Manager. Making evidence-collection as seamless as possible minimizes audit fatigue and helps you maintain a strong compliance posture.

As an AWS customer, you can use APIs to deliver high quality software at a rapid pace. If you have compliance-focused teams that rely on manual, ticket-based processes, you might find it difficult to document audit changes as those changes increase in velocity and volume.

As your organization works to meet audit and regulatory obligations, you can save time by incorporating audit compliance processes into a DevOps model. You can use modern services like Audit Manager to make this easier. Audit Manager automates evidence collection and generates reports, which helps reduce manual auditing efforts and enables you to scale your cloud auditing capabilities along with your business.

AWS Audit Manager uses services such as AWS Security Hub, AWS Config, and AWS CloudTrail to automatically collect and organize evidence, such as resource configuration snapshots, user activity, and compliance check results. However, for controls represented in your software or processes without an AWS service-specific metric to gather, you need to manually create and provide documentation as evidence to demonstrate that you have established organizational processes to maintain compliance. The solution in this blog post streamlines these types of activities.

Solution architecture

This solution creates an HTTPS API endpoint, which allows integration with other software development lifecycle (SDLC) solutions, IT service management (ITSM) products, and clinical trial management systems (CTMS) solutions that capture trial process change amendment documentation (in the case of pharmaceutical companies who use AWS to build robust pharmacovigilance solutions). The endpoint can also be a backend microservice to an application that allows contract research organizations (CRO) investigators to add their compliance supporting documentation.

In this solution’s current form, you can submit an evidence file payload along with the assessment and control details to the API and this solution will tie all the information together for the audit report. This post and solution is directed towards engineering teams who are looking for a way to accelerate evidence collection. To maximize the effectiveness of this solution, your engineering team will also need to collaborate with cross-functional groups, such as audit and business stakeholders, to design a process and service that constructs and sends the message(s) to the API and to scale out usage across the organization.

To download the code for this solution, and the configuration that enables you to set up auto-ingestion of manual evidence, see the aws-audit-manager-manual-evidence-automation GitHub repository.

Architecture overview

In this solution, you use AWS Serverless Application Model (AWS SAM) templates to build the solution and deploy to your AWS account. See Figure 1 for an illustration of the high-level architecture.

Figure 1. The architecture of the AWS Audit Manager automation solution

Figure 1. The architecture of the AWS Audit Manager automation solution

The SAM template creates resources that support the following workflow:

  1. A client can call an Amazon API Gateway endpoint by sending a payload that includes assessment details and the evidence payload.
  2. An AWS Lambda function implements the API to handle the request.
  3. The Lambda function uploads the evidence to an Amazon Simple Storage Service (Amazon S3) bucket (3a) and uses AWS Key Management Service (AWS KMS) to encrypt the data (3b).
  4. The Lambda function also initializes the AWS Step Functions workflow.
  5. Within the Step Functions workflow, a Standard Workflow calls two Lambda functions. The first looks for a matching control within an assessment, and the second updates the control within the assessment with the evidence.
  6. When the Step Functions workflow concludes, it sends a notification for success or failure to subscribers of an Amazon Simple Notification Service (Amazon SNS) topic.

Deploy the solution

The project available in the aws-audit-manager-manual-evidence-automation GitHub repository contains source code and supporting files for a serverless application you can deploy with the AWS SAM command line interface (CLI). It includes the following files and folders:

src Code for the application’s Lambda implementation of the Step Functions workflow.
It also includes a Step Functions definition file.
template.yml A template that defines the application’s AWS resources.

Resources for this project are defined in the template.yml file. You can update the template to add AWS resources through the same deployment process that updates your application code.

Prerequisites

This solution assumes the following:

  1. AWS Audit Manager is enabled.
  2. You have already created an assessment in AWS Audit Manager.
  3. You have the necessary tools to use the AWS SAM CLI (see details in the table that follows).

For more information about setting up Audit Manager and selecting a framework, see Getting started with Audit Manager in the blog post AWS Audit Manager Simplifies Audit Preparation.

The AWS SAM CLI is an extension of the AWS CLI that adds functionality for building and testing Lambda applications. The AWS SAM CLI uses Docker to run your functions in an Amazon Linux environment that matches Lambda. It can also emulate your application’s build environment and API.

To use the AWS SAM CLI, you need the following tools:

AWS SAM CLI Install the AWS SAM CLI
Node.js Install Node.js 14, including the npm package management tool
Docker Install Docker community edition

To deploy the solution

  1. Open your terminal and use the following command to create a folder to clone the project into, then navigate to that folder. Be sure to replace <FolderName> with your own value.

    mkdir Desktop/<FolderName> && cd $_

  2. Clone the project into the folder you just created by using the following command.

    git clone https://github.com/aws-samples/aws-audit-manager-manual-evidence-automation.git

  3. Navigate into the newly created project folder by using the following command.

    cd aws-audit-manager-manual-evidence-automation

  4. In the AWS SAM shell, use the following command to build the source of your application.

    sam build

  5. In the AWS SAM shell, use the following command to package and deploy your application to AWS. Be sure to replace <DOC-EXAMPLE-BUCKET> with your own unique S3 bucket name.

    sam deploy –guided –parameter-overrides paramBucketName=<DOC-EXAMPLE-BUCKET>

  6. When prompted, enter the AWS Region where AWS Audit Manager was configured. For the rest of the prompts, leave the default values.
  7. To activate the IAM authentication feature for API gateway, override the default value by using the following command.

    paramUseIAMwithGateway=AWS_IAM

To test the deployed solution

After you deploy the solution, run an invocation like the one below for an assessment (using curl). Be sure to replace <YOURAPIENDPOINT> and <AWS REGION> with your own values.

curl –location –request POST
‘https://<YOURAPIENDPOINT>.execute-api.<AWS REGION>.amazonaws.com/Prod’ \
–header ‘x-api-key: ‘ \
–form ‘payload=@”<PATH TO FILE>”‘ \
–form ‘AssessmentName=”GxP21cfr11″‘ \
–form ‘ControlSetName=”General requirements”‘ \
–form ‘ControlIdName=”11.100(a)”‘

Check to see that your file is correctly attached to the control for your assessment.

Form-data interface parameters

The API implements a form-data interface that expects four parameters:

  1. AssessmentName: The name for the assessment in Audit Manager. In this example, the AssessmentName is GxP21cfr11.
  2. ControlSetName: The display name for a control set within an assessment. In this example, the ControlSetName is General requirements.
  3. ControlIdName: this is a particular control within a control set. In this example, the ControlIdName is 11.100(a).
  4. Payload: this is the file representing evidence to be uploaded.

As a refresher of Audit Manager concepts, evidence is collected for a particular control. Controls are grouped into control sets. Control sets can be grouped into a particular framework. The assessment is considered an implementation, or an instance, of the framework. For more information, see AWS Audit Manager concepts and terminology.

To clean up the deployed solution

To clean up the solution, use the following commands to delete the AWS CloudFormation stack and your S3 bucket. Be sure to replace <YourStackId> and <DOC-EXAMPLE-BUCKET> with your own values.

aws cloudformation delete-stack –stack-name <YourStackId>
aws s3 rb s3://<DOC-EXAMPLE-BUCKET> –force

Conclusion

This solution provides a way to allow for better coordination between your software delivery organization and compliance professionals. This allows your organization to continuously deliver new updates without overwhelming your security professionals with manual audit review tasks.

Next steps

There are various ways to extend this solution.

  1. Update the API Lambda implementation to be a webhook for your favorite software development lifecycle (SDLC) or IT service management (ITSM) solution.
  2. Modify the steps within the Step Functions state machine to more closely match your unique compliance processes.
  3. Use AWS CodePipeline to start Step Functions state machines natively, or integrate a variation of this solution with any continuous compliance workflow that you have.

Learn more AWS Audit Manager, DevOps, and AWS for Health and start building!

 
If you have feedback about this post, submit comments in the Comments section below. If you have questions about this post, contact AWS Support.

Want more AWS Security news? Follow us on Twitter.

Nicholas Parks

Nicholas Parks

Nicholas has been using AWS since 2010 across various enterprise verticals including healthcare, life sciences, financial, retail, and telecommunications. Nicholas focuses on modernizations in pursuit of new revenue as well as application migrations. He specializes in Lean, DevOps cultural change, and Continuous Delivery.

Brian Tang

Brian Tang

Brian Tang is an AWS Solutions Architect based out of Boston, MA. He has 10 years of experience helping enterprise customers across a wide range of industries complete digital transformations by migrating business-critical workloads to the cloud. His core interests include DevOps and serverless-based solutions. Outside of work, he loves rock climbing and playing guitar.

Control access to Amazon Elastic Container Service resources by using ABAC policies

Post Syndicated from Kriti Heda original https://aws.amazon.com/blogs/security/control-access-to-amazon-elastic-container-service-resources-by-using-abac-policies/

As an AWS customer, if you use multiple Amazon Elastic Container Service (Amazon ECS) services/tasks to achieve better isolation, you often have the challenge of how to manage access to these containers. In such cases, using tags can enable you to categorize these services in different ways, such as by owner or environment.

This blog post shows you how tags allow conditional access to Amazon ECS resources. You can use attribute-based access control (ABAC) policies to grant access rights to users through the use of policies that combine attributes together. ABAC can be helpful in rapidly-growing environments, where policy management can become cumbersome. This blog post uses ECS resource tags (owner tag and environment tag) as the attributes that are used to control access in the policies.

Amazon ECS resources have many attributes, such as tags, which can be used to control permissions. You can attach tags to AWS Identity and Access Management (IAM) principals, and create either a single ABAC policy, or a small set of policies for your IAM principals. These ABAC policies can be designed to allow operations when the principal tag (a tag that exists on the user or role making the call) matches the resource tag. They can be used to simplify permission management at scale. A single Amazon ECS policy can enforce permissions across a range of applications, without having to update the policy each time you create new Amazon ECS resources.

This post provides a step-by-step procedure for creating ABAC policies for controlling access to Amazon ECS containers. As the team adds ECS resources to its projects, permissions are automatically applied based on the owner tag and the environment tag. As a result, no policy update is required for each new resource. Using this approach can save time and help improve security, because it relies on granular permissions rules.

Condition key mappings

It’s important to note that each IAM permission in Amazon ECS supports different types of tagging condition keys. The following table maps each condition key to its ECS actions.

Condition key Description ECS actions
aws:RequestTag/${TagKey} Set this tag value to require that a specific tag be used (or not used) when making an API request to create or modify a resource that allows tags. ecs:CreateCluster,
ecs:TagResource,
ecs:CreateCapacityProvider
aws:ResourceTag/${TagKey} Set this tag value to allow or deny user actions on resources with specific tags. ecs:PutAttributes,
ecs:StopTask,
ecs:DeleteCluster,
ecs:DeleteService,
ecs:CreateTaskSet,
ecs:DeleteAttributes,
ecs:DeleteTaskSet,
ecs:DeregisterContainerInstance
aws:RequestTag/${TagKey}
and
aws:ResourceTag/${TagKey}
Supports both RequestTag and ResourceTag ecs:CreateService,
ecs:RunTask,
ecs:StartTask,
ecs:RegisterContainerInstance

For a detailed guide of Amazon ECS actions and the resource types and condition keys they support, see Actions, resources, and condition keys for Amazon Elastic Container Service.

Tutorial overview

The following tutorial gives you a step-by-step process to create and test an Amazon ECS policy that allows IAM roles with principal tags to access resources with matching tags. When a principal makes a request to AWS, their permissions are granted based on whether the principal and resource tags match. This strategy allows individuals to view or edit only the ECS resources required for their jobs.

Scenario

Example Corp. has multiple Amazon ECS containers created for different applications. Each of these containers are created by different owners within the company. The permissions for each of the Amazon ECS resources must be restricted based on the owner of the container, and also based on the environment where the action is performed.

Assume that you’re a lead developer at this company, and you’re an experienced IAM administrator. You’re familiar with creating and managing IAM users, roles, and policies. You want to ensure that the development engineering team members can access only the containers they own. You also need a strategy that will scale as your company grows.

For this scenario, you choose to use AWS resource tags and IAM role principal tags to implement an ABAC strategy for Amazon ECS resources. The condition key mappings table shows which tagging condition keys you can use in a policy for each Amazon ECS action and resources. You can define the tags in the role you created. For this scenario, you define two tags Owner and Environment. These tags restrict permissions in the role based on the tags you defined.

Prerequisites

To perform the steps in this tutorial, you must already have the following:

  • An IAM role or user with sufficient privileges for services like IAM and ECS. Following the security best practices the role should have a minimum set of permissions and grant additional permissions as necessary. You can add the AWS managed policies IAMFullAccess and AmazonECS_FullAccess to create the IAM role to provide permissions for creating IAM and ECS resources.
  • An AWS account that you can sign in to as an IAM role or user.
  • Experience creating and editing IAM users, roles, and policies in the AWS Management Console. For more information, see Tutorial to create IAM resources.

Create an ABAC policy for Amazon ECS resources

After you complete the prerequisites for the tutorial, you will need to define which Amazon ECS privileges and access controls you want in place for the users, and configure the tags needed for creating the ABAC policies. This tutorial focuses on providing step-by-step instructions for creating test users, defining the ABAC policies for the Amazon ECS resources, creating a role, and defining tags for the implementation.

To create the ABAC policy

You create an ABAC policy that defines permissions based on attributes. In AWS, these attributes are called tags.

The sample ABAC policy that follows provides ECS permissions to users when the principal’s tag matches the resource tag.

Sample ABAC policy for ECS resources

The sample ECS ABAC policy that follows allows the user to perform action on the ECS resources, but only when those resources are tagged with the same key-pairs as the principal.

  1. Download the sample ECS policy. This policy allows principals to create, read, edit, and delete resources, but only when those resources are tagged with the same key-value pairs as the principal.
  2. Use the downloaded ECS policy to create the ECS ABAC policy, and name your new policy ECSABAC policy. For more information, see Creating IAM policies.

This sample policy provides permission to each ECS action based on the condition key that action supports. See to the condition key mappings table for a mapping of the ECS actions and the condition key they support.

What does this policy do?

  • The ECSCreateCluster statement allows users to create cluster, create and tag resources. These ECS actions only support the RequestTag condition key. This condition block returns true if every tag passed (tags: owner and environment) in the request is included in the specified list. This is done using the StringEquals condition operator. If an incorrect tag key other than owner or environment tag is passed, or incorrect value for the tags are passed, then the condition returns false. The ECS actions within these statements do not have a specific requirement of a resource type.
  • The ECSDeletion, ECSUpdate, and ECSDescribe statements allow users to update, delete or list/describe ECS resources. The ECS actions under these statements only support the ResourceTag condition key. Statements return true if the specified tag keys are present on the ECS resource and their values match the principal’s tags. These statements return false for mismatched tags (in this policy, the only acceptable tags are owner and environment), or for an incorrect value for the owner and environment tag passed to the ECS resources. They also return false for any ECS action that does not support resource tagging.
  • The ECSCreateService, ECSTaskControl, and ECSRegistration statements contain ECS actions that allow users to create a service, start or run tasks and register container instances in ECS. The ECS actions within these statements support both Request and Resource tag condition keys.

Create IAM roles

Create the following IAM roles and attach the ECSABAC policy you created in the previous procedure. You can create the roles and add tags to them using the AWS console, through the role creation flow, as shown in the following steps.

To create IAM roles

  1. Sign in to the AWS Management Console and navigate to the IAM console.
  2. In the left navigation pane, select Roles, and then select Create Role.
  3. Choose the Another AWS account role type.
  4. For Account ID, enter the AWS account ID mentioned in the prerequisites to which you want to grant access to your resources.
  5. Choose Next: Permissions.
  6. IAM includes a list of the AWS managed and customer managed policies in your account. Select the ECSABAC policy you created previously from the dropdown menu to use for the permissions policy. Alternatively, you can choose Create policy to open a new browser tab and create a new policy, as shown in Figure 1.
    Figure 1. Attach the ECS ABAC policy to the role

    Figure 1. Attach the ECS ABAC policy to the role

  7. Choose Next: Tags.
  8. Add metadata to the role by attaching tags as key-value pairs. Add the following tags to the role: for Key owner, enter Value mock_owner; and for Key environment, enter development, as shown in Figure 2.
    Figure 2. Define the tags in the IAM role

    Figure 2. Define the tags in the IAM role

  9. Choose Next: Review.
  10. For Role name, enter a name for your role. Role names must be unique within your AWS account.
  11. Review the role and then choose Create role.

Test the solution

The following sections present some positive and negative test cases that show how tags can provide fine-grained permission to users through ABAC policies.

Prerequisites for the negative and positive testing

Before you can perform the positive and negative tests, you must first do these steps in the AWS Management Console:

  1. Follow the procedures above for creating IAM role and the ABAC policy.
  2. Switch the role from the role assumed in the prerequisites to the role you created in To create IAM Roles above, following the steps in the documentation Switching to a role.

Perform negative testing

For the negative testing, three test cases are presented here that show how the ABAC policies prevent successful creation of the ECS resources if the owner or environment tags are missing, or if an incorrect tag is used for the creation of the ECS resource.

Negative test case 1: Create cluster without the required tags

In this test case, you check if an ECS cluster is successfully created without any tags. Create an Amazon ECS cluster without any tags (in other words, without adding the owner and environment tag).

To create a cluster without the required tags

  1. Sign in to the AWS Management Console and navigate to the IAM console.
  2. From the navigation bar, select the Region to use.
  3. In the navigation pane, choose Clusters.
  4. On the Clusters page, choose Create Cluster.
  5. For Select cluster compatibility, choose Networking only, then choose Next Step.
  6. On the Configure cluster page, enter a cluster name. For Provisioning Model, choose On-Demand Instance, as shown in Figure 3.
    Figure 3. Create a cluster

    Figure 3. Create a cluster

  7. In the Networking section, configure the VPC for your cluster.
  8. Don’t add any tags in the Tags section, as shown in Figure 4.
    Figure 4. No tags added to the cluster

    Figure 4. No tags added to the cluster

  9. Choose Create.

Expected result of negative test case 1

Because the owner and the environment tags are absent, the ABAC policy prevents the creation of the cluster and throws an error, as shown in Figure 5.

Figure 5. Unsuccessful creation of the ECS cluster due to missing tags

Figure 5. Unsuccessful creation of the ECS cluster due to missing tags

Negative test case 2: Create cluster with a missing tag

In this test case, you check whether an ECS cluster is successfully created missing a single tag. You create a cluster similar to the one created in Negative test case 1. However, in this test case, in the Tags section, you enter only the owner tag. The environment tag is missing, as shown in Figure 6.

To create a cluster with a missing tag

  1. Repeat steps 1-7 from the Negative test case 1 procedure.
  2. In the Tags section, add the owner tag and enter its value as mock_user.
    Figure 6. Create a cluster with the environment tag missing

    Figure 6. Create a cluster with the environment tag missing

Expected result of negative test case 2

The ABAC policy prevents the creation of the cluster, due to the missing environment tag in the cluster. This results in an error, as shown in Figure 7.

Figure 7. Unsuccessful creation of the ECS cluster due to missing tag

Figure 7. Unsuccessful creation of the ECS cluster due to missing tag

Negative test case 3: Create cluster with incorrect tag values

In this test case, you check whether an ECS cluster is successfully created with incorrect tag-value pairs. Create a cluster similar to the one in Negative test case 1. However, in this test case, in the Tags section, enter incorrect values for the owner and the environment tag keys, as shown in Figure 8.

To create a cluster with incorrect tag values

  1. Repeat steps 1-7 from the Negative test case 1 procedure.
  2. In the Tags section, add the owner tag and enter the value as test_user; add the environment tag and enter the value as production.
    Figure 8. Create a cluster with the incorrect values for the tags

    Figure 8. Create a cluster with the incorrect values for the tags

Expected result of negative test case 3

The ABAC policy prevents the creation of the cluster, due to incorrect values for the owner and environment tags in the cluster. This results in an error, as shown in Figure 9.

Figure 9. Unsuccessful creation of the ECS cluster due to incorrect value for the tags

Figure 9. Unsuccessful creation of the ECS cluster due to incorrect value for the tags

Perform positive testing

For the positive testing, two test cases are provided here that show how the ABAC policies allow successful creation of ECS resources, such as ECS clusters and ECS tasks, if the correct tags with correct values are provided as input for the ECS resources.

Positive test case 1: Create cluster with all the correct tag-value pairs

This test case checks whether an ECS cluster is successfully created with the correct tag-value pairs when you create a cluster with both the owner and environment tag that matches the ABAC policy you created earlier.

To create a cluster with all the correct tag-value pairs

  1. Repeat steps 1-7 from the Negative test case 1 procedure.
  2. In the Tags section, add the owner tag and enter the value as mock_user; add the environment tag and enter the value as development, as shown in Figure 10.
    Figure 10. Add correct tags to the cluster

    Figure 10. Add correct tags to the cluster

Expected result of positive test case 1

Because both the owner and the environment tags were input correctly, the ABAC policy allows the successful creation of the cluster without throwing an error, as shown in Figure 11.

Figure 11. Successful creation of the cluster

Figure 11. Successful creation of the cluster

Positive test case 2: Create standalone task with all the correct tag-value pairs

Deploying your application as a standalone task can be ideal in certain situations. For example, suppose you’re developing an application, but you aren’t ready to deploy it with the service scheduler. Maybe your application is a one-time or periodic batch job, and it doesn’t make sense to keep running it, or to restart when it finishes.

For this test case, you run a standalone task with the correct owner and environment tags that match the ABAC policy.

To create a standalone task with all the correct tag-value pairs

  1. To run a standalone task, see Run a standalone task in the Amazon ECS Developer Guide. Figure 12 shows the beginning of the Run Task process.
    Figure 12. Run a standalone task

    Figure 12. Run a standalone task

  2. In the Task tagging configuration section, under Tags, add the owner tag and enter the value as mock_user; add the environment tag and enter the value as development, as shown in Figure 13.
    Figure 13. Creation of the task with the correct tag

    Figure 13. Creation of the task with the correct tag

Expected result of positive test case 2

Because you applied the correct tags in the creation phase, the task is created successfully, as shown in Figure 14.

Figure 14. Successful creation of the task

Figure 14. Successful creation of the task

Cleanup

To avoid incurring future charges, after completing testing, delete any resources you created for this solution that are no longer needed. See the following links for step-by-step instructions for deleting the resources you created in this blog post.

  1. Deregistering an ECS Task Definition
  2. Deleting ECS Clusters
  3. Deleting IAM Policies
  4. Deleting IAM Roles and Instance Profiles

Conclusion

This post demonstrates the basics of how to use ABAC policies to provide fine-grained permissions to users based on attributes such as tags. You learned how to create ABAC policies to restrict permissions to users by associating tags with each ECS resource you create. You can use tags to manage and secure access to ECS resources, including ECS clusters, ECS tasks, ECS task definitions, and ECS services.

For more information about the ECS resources that support tagging, see the Amazon Elastic Container Service Guide.

 
If you have feedback about this blog post, submit comments in the Comments section below. If you have questions about this blog post, start a new thread on AWS Secrets Manager re:Post or contact AWS Support.

Want more AWS Security news? Follow us on Twitter.

hedakrit

Kriti Heda

Kriti is a NJ-based Security Transformation Consultant in the SRC team at AWS. She’s a technology enthusiast who enjoys helping customers find innovative solutions to complex security challenges. She spends her day working to builds and deploy security infrastructure, and automate security operations for the customers. Outside of work, she enjoys adventures, sports, and dancing.

Automate code reviews with Amazon CodeGuru Reviewer

Post Syndicated from Dhiraj Thakur original https://aws.amazon.com/blogs/devops/automate-code-reviews-with-amazon-codeguru-reviewer/

A common problem in software development is accidentally or unintentionally merging code with bugs, defects, or security vulnerabilities into your main branch. Finding and mitigating these faulty lines of code deployed to the production environment can cause severe outages in running applications and can cost unnecessary time and effort to fix.

Amazon CodeGuru Reviewer tackles this issue using automated code reviews, which allows developers to fix the issue based on automated CodeGuru recommendations before the code moves to production.

This post demonstrates how to use CodeGuru for automated code reviews and uses an AWS CodeCommit approval process to set up a code approval governance model.

Solution overview

In this post, you create an end-to-end code approval workflow and add required approvers to your repository pull requests. This can help you identify and mitigate issues before they’re merged into your main branches.

Let’s discuss the core services highlighted in our solution. CodeGuru Reviewer is a machine learning-based service for automated code reviews and application performance recommendations. CodeCommit is a fully managed and secure source control repository service. It eliminates the need to scale infrastructure to support highly available and critical code repository systems. CodeCommit allows you to configure approval rules on pull requests. Approval rules act as a gatekeeper on your source code changes. Pull requests that fail to satisfy the required approvals can’t be merged into your main branch for production deployment.

The following diagram illustrates the architecture of this solution.

With CodeCommit repository, creating a pull request and approval rule. Then run the workflow to test the code, review CodeGuru recommendations to make appropriate changes, and run the workflow again to confirm that the code is ready to be merged

The solution has three personas:

  • Repository admin – Sets up the code repository in CodeCommit
  • Developer – Develops the code and uses pull requests in the main branch to move the code to production
  • Code approver – Completes the code review based on the recommendations from CodeGuru and either approves the code or asks for fixes for the issue

The solution workflow contains the following steps:

  1. The repository admin sets up the workflow, including a code repository in CodeCommit for the development group, required access to check in their code to the dev branch, integration of the CodeCommit repository with CodeGuru, and approval details.
  2. Developers develop the code and check in their code in the dev branch. This creates a pull request to merge the code in the main branch.
  3. CodeGuru analyzes the code and reports any issues, along with recommendations based on the code quality.
  4. The code approver analyzes the CodeGuru recommendations and provides comments for how to fix the issue in the code.
  5. The developers fix the issue based on the feedback they received from the code approver.
  6. The code approver analyzes the CodeGuru recommendations of the updated code. They approve the code to merge if everything is okay.
  7. The code gets merged in the main branch upon approval from all approvers.
  8. An AWS CodePipeline pipeline is triggered to move the code to the preproduction or production environment based on its configuration.

In the following sections, we walk you through configuring the CodeCommit repository and creating a pull request and approval rule. We then run the workflow to test the code, review recommendations and make appropriate changes, and run the workflow again to confirm that the code is ready to be merged.

Prerequisites

Before we get started, we create an AWS Cloud9 development environment, which we use to check in the Python code for this solution. The sample Python code for the exercise is available at the link. Download the .py files to a local folder.

Complete the following steps to set up the prerequisite resources:

  1. Set up your AWS Cloud9 environment and access the bash terminal, preferably in the us-east-1 Region.
  2. Create three AWS Identity and Access Management (IAM) users and its roles for the repository admin, developer, and approver by running the AWS CloudFormation template.

Configuring IAM roles and users

  1. Sign in to the AWS Management Console.
  2. Download ‘Persona_Users.yaml’ from github
  3. Navigate to AWS CloudFormation and click on Create Stack drop down to choose With new resouces (Standard).
  4. click on Upload a template file to upload file form local.
  5. Enter a Stack Name such as ‘Automate-code-reviews-codeguru-blog’.
  6. Enter IAM user’s temp password.
  7. Click Next to all the other default options.
  8. Check mark I acknowledge that AWS CloudFormation might create IAM resources with custom names. Click Create Stack.

This template creates three IAM users for Repository admin, Code Approver, Developer that are required at different steps while following this blog.

Configure the CodeCommit repository

Let’s start with CodeCommit repository. The repository works as the source control for the Java and Python code.

  1. Sign in to the AWS Management Console as the repository admin.
  2. On the CodeCommit console, choose Getting started in the navigation pane.
  3. Choose Create repository.

Creating AWS CodeCommit create a new repository using AWS Console

  1. For Repository name, enter transaction_alert_repo.
  2. Select Enable Amazon CodeGuru Reviewer for Java and Python – optional.
  3. Choose Create.

create CodeCommit repository named transaction_alert_repo, check box on Enable Amazon CodeGuru Reviewer for Java and Python

The repository is created.

  1. On the repository details page, choose Clone HTTPS on the Clone URL menu.

clone HTTPS link for CodeCommit repo transaction_alert_repo using clone URL menu

  1. Copy the URL to use in the next step to clone the repository in the development environment.

Clone link for HTTPS for CodeCommit repo transaction_alert_repo is avaiable to copy

  1. On the CodeGuru console, choose Repositories in the navigation pane under Reviewer.

You can see our CodeCommit repository is associated with CodeGuru.

CodeCommit repository is to be associated with CodeGuru

  1. Sign in to the console as the developer.
  2. On the AWS Cloud9 console, clone the repository, using the URL that you copied in the previous step.

This action clones the repository and creates the transaction_alert_repo folder in the environment.

git clone https://git-codecommit.us-east-.amazonaws.com/v1/repos/transaction_alert_repo
cd transaction_alert_repo
echo "This is a test file" > README.md
git add -A
git commit -m "initial setup"
git push

git clone CodeCommit repo to Cloud9 using git clone command, readme.md file is created locally and pushed back to CodeCommit repo]

  1. Check the file in CodeCommit to confirm that the README.md file is copied and available in the CodeCommit repository.

CodeCommit repo is now pushed with readme.md file

  1. In the AWS Cloud9 environment, choose the transaction_alert_repo folder.
  2. On the File menu, choose Upload Local Files to upload the Python files from your local folder (which you downloaded earlier).

Upload downloaded python test files that we are going to use for this blog from local system to Cloud9

  1. Choose Select files and upload read_file.py and read_rule.py.

Drag and drop python files on cloud9 upload UI

  1. You can see that both files are copied in the AWS Cloud9 environment under the transaction_alert_repo folder:
git checkout -b dev
git add -A
git commit -m "initial import of files"
git push --set-upstream origin dev

Push python local files are pushed to CodeCommit repo using git push command

  1. Check the CodeCommit console to confirm that the read_file.py and read_rule.py files are copied in the repository.

Check the CodeCommit console to verify these pushed files are available

Create a pull request

Now we create our pull request.

  1. On the CodeCommit console, navigate to your repository and choose Pull requests in the navigation pane.
  2. Choose Create pull request.

Create pull request for the new files added

  1. For Destination, choose master.
  2. For Source, choose dev.
  3. Choose Compare to see any conflict details in merging the request.

Pull request is visible to master branch, ready to merge

  1. If the environments are mergeable, enter a title and description.
  2. Choose Create pull request.

Pull request is merged and CodeGuru recommendation is triggered

Create an approval rule

We now create an approval rule as the repository admin.

  1. Sign in to the console as the repository admin.
  2. On the CodeCommit console, navigate to the pull request you created.
  3. On the Approvals tab, choose Create approval rule.

Creating new Approval rule for any merge action

  1. For Rule name, enter Require an approval before merge.
  2. For Number of approvals needed, enter 1.
  3. Under Approval pool members, provide an IAM ARN value for the code approver.
  4. Choose Create.

Approval Rule mentions, requires an approval before merge

Review recommendations

We can now view any recommendations regarding our pull request code review.

  1. As the repository admin, on the CodeGuru console, choose Code reviews in the navigation pane.
  2. On the Pull request tab, confirm that the code review is completed, as it might take some time to process.
  3. To review recommendations, choose the completed code review.

Check CodeGuru recommendation to see avaiable recommendation

You can now review the recommendation details, as shown in the following screenshot.

Review CodeGuru review recommendation details

  1. Sign in to the console as the code approver.
  2. Navigate to the pull request to view its details.

check pull request in detail, check stauts and Approval status

  1. On the Changes tab, confirm that the CodeGuru recommendation files are available.

confirm that the CodeGuru recommendation files are available

  1. Check the details of each recommendation and provide any comments in the New comment section.

The developer can see this comment as feedback from the approver to fix the issue.

  1. Choose Save.

In CodeGuru console developer can see this comment as feedback from the approver to fix the issue

  1. Enter any overall comments regarding the changes and choose Save.

Enter any overall comments regarding the changes and choose save

  1. Sign in to the console as the developer.
  2. On the CodeCommit console, navigate to the pull request -> select the request -> click on Changes to review the approver feedback.

click on Changes to review the approver feedback in CodeCommit console

Make changes, rerun the code review, and merge the environments

Let’s say the developer makes the required changes in the code to address the issue and uploads the new code in the AWS Cloud9 environment. If CodeGuru doesn’t find additional issues, we can merge the environments.

  1. Run the following command to push the updated code to CodeCommit:
git add -A
git commit -m "code-fixed"
git push --set-upstream origin dev

git clone CodeCommit repo to Cloud9 using git clone command, readme.md file is created locally and pushed back to CodeCommit repo

  1. Sign in to the console as the approver.
  2. Navigate to the code review.

CodeGuru hasn’t found any issue in the updated code, so there are no recommendations.

CodeGuru hasn’t found any issue in the updated code, so there are no recommendations avaiable this time

  1. On the CodeCommit console, you can verify the code and provide your approval comment.
  2. Choose Save.

Using CodeCommit console, code can be now verified for approval

  1. On the pull request details page, choose Approve.

New code is found with no conflict and can be approved

Now the developer can see on the CodeCommit console that the pull request is approved.

Code pull request is in Approved status

  1. Sign in to the console as the developer. On the pull request details page, choose Merge.

Approved code is ready to be merged

  1. Select your merge strategy. For this post, we select Fast forward merge.
  2. Choose Merge pull request.

Fast and forward merge is used to merge the code

You can see a success message.

Success message is generated for successful merge

  1. On the CodeCommit console, choose Code in the navigation pane for your repository.
  2. Choose master from the branch list.

The read_file.py and read_rule.py files are available under the main branch.

the new files are also avaiable in main branch beacuse of the successful merge

Clean up the resources

To avoid incurring future charges, remove the resources created by this solution by

Conclusion

This post highlighted the benefits of CodeGuru automated code reviews. You created an end-to-end code approval workflow and added required approvers to your repository pull requests. This solution can help you identify and mitigate issues before they’re merged into your main branches.

You can get started from the CodeGuru console by integrating CodeGuru Reviewer with your supported CI/CD pipeline.

For more information about automating code reviews and check out the documentation.

About the Authors

Dhiraj Thakur

Dhiraj Thakur is a Solutions Architect with Amazon Web Services. He works with AWS customers and partners to provide guidance on enterprise cloud adoption, migration, and strategy. He is passionate about technology and enjoys building and experimenting in the analytics and AI/ML space.

Akshay Goel

Akshay is a Cloud Support Associate with Amazon Web Services working closing with all AWS deployment services. He loves to play, test, create, modify and simplify the solution which makes the task easy and interesting.

Sameer Goel

Sameer is a Sr. Solutions Architect in Netherlands, who drives customer success by building prototypes on cutting-edge initiatives. Prior to joining AWS, Sameer graduated with a master’s degree from NEU Boston, with a concentration in data science. He enjoys building and experimenting with AI/ML projects on Raspberry Pi.

How to configure rotation and rotation windows for secrets stored in AWS Secrets Manager

Post Syndicated from Fatima Ahmed original https://aws.amazon.com/blogs/security/how-to-configure-rotation-windows-for-secrets-stored-in-aws-secrets-manager/

November 21, 2022: We updated this post to reflect the fact that AWS Secrets Manager now supports rotating secrets as often as every four hours.

AWS Secrets Manager helps you manage, retrieve, and rotate database credentials, API keys, and other secrets throughout their lifecycles. You can specify a rotation window for your secrets, allowing you to rotate secrets during non-critical business hours or scheduled maintenance windows for your application. Secrets Manager now supports rotation of secrets as often as every four hours, on a predefined schedule you can configure to conform to your existing maintenance windows. Previously, you could only specify the rotation interval in days. AWS Secrets Manager would then rotate the secret within the last 24 hours of the scheduled rotation interval. You can rotate your secrets using an AWS Lambda rotation function provided by AWS, or create a custom Lambda rotation function.

With this release, you can now use Secrets Manager to automate the rotation of credentials and access tokens that must be refreshed more than once per day. This enables greater flexibility for common developer workflows through a single managed service. Additionally, you can continue to use integrations with AWS Config and AWS CloudTrail to manage and monitor your secret rotation configurations in accordance with your organization’s security and compliance requirements. Support for secrets rotation as often as every four hours is provided at no additional cost.

Why might you want to rotate secrets more than once a day? Rotating secrets more frequently can provide a number of benefits, including: discouraging the use of hard-coded credentials in your applications, reducing the scope of impact of a stolen credential, or helping you meet organizational requirements around secret rotation.

Hard-coding application secrets is not recommended, because it can increase the risk of credentials being written in logs, or accidentally exposed in code repositories. Using short-lived secrets limits your ability to hard-code credentials in your application. Short-lived secrets are rotated on a frequent basis: for example, every four hours – meaning even a hard-coded credential can only be used for a short period of time before it needs to be refreshed. This also means that if a credential is compromised, the impact is much smaller — the secret is only valid for a short period of time before the secret is rotated.

Secrets Manager supports familiar cron and rate expressions to specify rotation frequency and rotation windows. In this blog post, we will demonstrate how you can configure a secret to be rotated every four hours, how to specify a custom rotation window for your secret using a cron expression, and how you can set up a custom rotation window for existing secrets. This post describes the following processes:

  1. Create a new secret and configure it to rotate every four hours using the schedule expression builder
  2. Set up rotation window by directly specifying a cron expression
  3. Enabling a custom rotation window for an existing secret

Use case 1: Create a new secret and configure it to rotate every four hours using the schedule expression builder

Let’s assume that your organization has a requirement to rotate GitHub credentials every four hours. To meet this requirement, we will create a new secret in Secrets Manager to store the GitHub credentials, and use the schedule expression builder to configure rotation of the secret at a four-hour interval.

The schedule expression builder enables you to configure your rotation window to help you meet your organization’s specific requirements, without requiring knowledge of cron expressions. AWS Secrets Manager also supports directly entering a cron expression to configure the rotation window, which we will demonstrate later in this post.

To create a new secret and configure a four-hour secret rotation schedule

  1. Sign in to the AWS Management Console, and navigate to the Secrets Manager service.
  2. Choose Store a new secret.
    Figure 1: Store a secret in AWS Secrets Manager

    Figure 1: Store a secret in AWS Secrets Manager

  3. In the Secret type section, choose Other type of secret.
    Figure 2: Choose a secret type in Secrets Manager

    Figure 2: Choose a secret type in Secrets Manager

  4. In the Key/value pairs section, enter the GitHub credentials that you wish to store.
  5. Select your preferred encryption key to protect the secret, and then choose Next. In this example, we are using an AWS managed key.

    Note: Find more information to help you decide what encryption key is right for you.

  6. Enter a secret name of your choice in the Secret name field. You can optionally provide a Description of the secret, create tags, and add resource permissions to the secret. If desired, you can also replicate the secret to another region to help you meet your organization’s disaster recovery requirements by following the procedure in this blog post.
  7. Choose Next.
    Figure 3:Create a secret to store your Git credentials

    Figure 3:Create a secret to store your Git credentials

  8. Turn on Automatic rotation to enable rotation for the secret.
  9. Under Rotation schedule, choose Schedule expression builder.
    1. For Time unit, choose Hours, then enter a value of 4.
    2. Leave the Window duration field blank as the secret is to be rotated every 4 hours.
    3. For this example, keep the Rotate immediately when the secret is stored check box selected to rotate the secret immediately after creation
      Figure 4: Enable automatic rotation using the schedule expression builder

      Figure 4: Enable automatic rotation using the schedule expression builder

    4. Under Rotation function, choose your Lambda rotation function from the drop down menu.
    5. Choose Next.
    6. On the Secret review page, you are provided with an overview of the secret. Review the secret and scroll down to the Rotation schedule section.
    7. Confirm the Rotation schedule and Next rotation date meet your requirements.
      Figure 5:  Rotation schedule with a summary of the configured custom rotation window

      Figure 5: Rotation schedule with a summary of the configured custom rotation window

    8. Choose Store secret.
    9. To view the Rotation configuration for the secret, select the secret you created.
    10. On the Secrets details page, scroll down to the Rotation configuration section. The Rotation status is Enabled and the Rotation schedule is rate(4 hours). The name of your Lambda function being used for rotation is displayed.
      Figure 6: Rotation configuration of your secret

      Figure 6: Rotation configuration of your secret

You have now successfully stored a secret using the interactive schedule expression builder. This option provides a simple mechanism to configure rotation windows, and does not require expertise with cron expressions.

In the next example, we will be using the schedule expression option to directly enter a cron expression, to achieve a more complex rotation interval.

Use case 2: Set up a custom rotation window using a cron expression

The procedures described in the next two sections of this blog post require that you complete the following prerequisites:

  1. Configure an Amazon Relational Database Service (Amazon RDS) DB instance, including creating a database user.
  2. Sign in to the AWS Management Console using a role that has SecretsManagerReadWrite permission.
  3. Configure the Lambda function to connect with the Amazon RDS database and Secrets Manager by following the procedure in this blog post.

Configuring complicated rotation windows for secrets may be more effective using the schedule expression option, rather than the schedule expression builder. The schedule expression option allows you to directly enter a cron expression using a string of six inputs. Directly entering cron expressions provides more flexibility when defining a rotation schedule that is more complex.

Let’s suppose you have another secret in your organization which does not need to be rotated as frequently as others. Consequently, you’ve been asked to set up rotation for every last Sunday of the quarter and during the off-peak hours of 1:00 AM to 4:00 AM UTC to avoid application downtime. Due to the complex nature of the requirements, you will need to use the schedule expression option to write a cron job to achieve your use case.

Cron expressions consist of the following 6 required fields which are separated by a white space; Minutes, Hours, Day of month, Month, Day of week, and Year. Each required field has the following values using the syntax cron(fields).

Fields Values Wildcards
Minutes Must be 0 None
Hours 0-23 /
Day-of-month 1 – 31 , – * ? / L
Month 1-12 or JAN-DEC , – * /
Day-of-week 1-7 or SUN-SAT , – * ? L #
Year * accepts * only

Table 1: Secrets Manager supported cron expression fields and corresponding values

Wildcard Description
, The , (comma) wildcard includes additional values. In the Month field, JAN,FEB,MAR would include January, February, and March.
– The – (dash) wildcard specifies ranges. In the Day field, 1-15 would include days 1 through 15 of the specified month.
* The * (asterisk) wildcard includes all values in the field. In the Month field, * would include every month.
/ The / (forward slash) wildcard specifies increments In the Month field, you could enter 1/3 to specify every 3rd month, starting from January. So 1/3 specifies the January, April, July, Oct.
? The ? (question mark) wildcard specifies one or another. In the day-of-month field you could enter 7 and then enter ? in the day-of-week field since the 7th of a month could be any day of a given week.
L The L wildcard in the Day-of-month or Day-of-week fields specifies the last day of the month or week. For example, in the week Sun-Sat, you can state 5L to specify the last Thursday in the month.
# The # wildcard in the Day-of-week field specifies a certain instance of the specified day of the week within a month. For example, 3#2 would be the second Tuesday of the month: the 3 refers to Tuesday because it is the third day of each week, and the 2 refers to the second day of that type within the month.

Table 2: Description of supported wilds cards for cron expression

As the use case is to setup a custom rotation window for the last Sunday of the quarter from 1:00 AM to 4:00 AM UTC, you’ll need to carry out the following steps:

To deploy the solution

  1. To store a new secret in Secrets Manager repeat steps 1-6 above.
  2. Once you’re on the Secret Rotation section of the Store a new secret screen, click on Automatic rotation to enable rotation for the secret.
  3. Under Rotation schedule, choose Schedule expression.
  4. In the Schedule expression field box, enter cron(0 1 ? 3/3 1L *).

    Fields Values Explanation
    Minutes 0 The use case does not have a specific minute requirement
    Hours 1 Ensures the rotation window starts from 1am UTC
    Day-of-month ? The use case does not require rotation to occur on a specific date in the month
    Month 3/3 Sets rotation to occur on the last month in a quarter
    Day-of-week 1L Ensures rotation occurs on the last Sunday of the month
    Year * Allows the rotation window pattern to be repeated yearly

    Table 3: Using cron expressions to achieve your rotation requirements

Figure 7: Enable automatic rotation using the schedule expression

Figure 7: Enable automatic rotation using the schedule expression

  1. On the Rotation function section choose your Lambda rotation function from the drop down menu.
  2. Choose Next.
  3. On the Secret review page, review the secret and scroll down to the Rotation schedule section. Confirm the Rotation schedule and Next rotation date meets your requirements.
    Figure 8: Rotation schedule with a summary of your custom rotation window

    Figure 8: Rotation schedule with a summary of your custom rotation window

  4. Choose Store.
  5. To view the Rotation configuration for this secret, select it from the Secrets page.
  6. On the Secrets details page, scroll down to the Rotation configuration section. The Rotation status is Enabled, the Rotation schedule is cron(0 1 ? 3/3 1L *) and the name of your Lambda function being used for your custom rotation is displayed.
    Figure 9: Rotation configuration section with a rotation status of Enabled

    Figure 9: Rotation configuration section with a rotation status of Enabled

Use case 3: Enabling a custom rotation window for an existing secret

If you already use AWS Secrets Manager as a way to store and rotate secrets for your Organization, you might want to take advantage of custom scheduled rotation on existing secrets. For this use case, to meet your business needs the secret must be rotated bi-weekly, every Saturday from 12am to 5am.

To deploy the solution

  1. On the Secrets page of the Secrets Manager console, chose the existing secret you want to configure rotation for.
  2. Scroll down to the Rotation configuration section of the Secret details page, choose Edit rotation.
    Figure 10: Rotation configuration section with a rotation status of Disabled

    Figure 10: Rotation configuration section with a rotation status of Disabled

  3. On the Edit rotation configuration pop-up window, turn on Automatic rotation to enable rotation for the secret.
  4. Under Rotation Schedule choose Schedule expression builder, optionally you can use the Schedule expression to create the custom rotation window.
    1. For the Time Unit choose Weeks, then enter a value of 2.
    2. For the Day of week choose Saturday from the drop-down menu.
    3. In the Start time field type 00. This ensures rotation does not start until 00:00 AM UTC.
    4. In the Window duration field type 5h. This provides Secrets Manager with a 5hr period to rotate the secret.
    5. For this example, keep the check box marked to rotate the secret immediately.
      Figure 11: Edit rotation configuration pop-up window

      Figure 11: Edit rotation configuration pop-up window

    6. Under Rotation function, choose the Lambda function which will be used to rotate the secret.
    7. Choose Save.
    8. On the Secrets details page, scroll down to the Rotation configuration section. The Rotation status is Enabled, the Rotation schedule is cron(0 00 ? * 7#2,7#4 *) and the name of the custom rotation Lambda function is visible.
      Figure 12:Rotation configuration section with a rotation status of Enabled

      Figure 12:Rotation configuration section with a rotation status of Enabled

Summary

Regular rotation of secrets is a Secrets Manager best practice that helps you to meet compliance requirements, for example for PCI DSS, which mandates the rotation of application secrets every 90 days, and to improve your security posture for databases and credentials. The ability to rotate secrets as often as every four hours helps you rotate secrets more frequently, and the rotation window feature helps you adhere to rotation best practices while still having the flexibility to choose a rotation window that suits your organizational needs. This allows you to use AWS Secrets Manager as a centralized location to store, retrieve, and rotate your secrets regardless of their lifespan, providing a uniform approach for secrets management. At the same time, the custom rotation window feature alleviates the need for applications to continuously refresh secret caches and manage retries for secrets that were rotated, as rotation will occur during your specified window when the application usage is low.

In this blog post, we showed you how to create a secret and configure the secret to be rotated every four hours using the schedule expression builder. The use case examples show how each feature can be used to achieve different rotation requirements within an organization, including using the schedule expression builder option to create your cron expression, as well as using the schedule expression feature to help meet more specific rotation requirements.

You can start using this feature through the AWS Secrets Manager console, AWS Command Line Interface (AWS CLI), AWS SDK, or AWS CloudFormation. To learn more about this feature, see the AWS Secrets Manager documentation. If you have feedback about this blog post, submit comments in the Comments section below. If you have questions about this blog post, start a new thread on AWS Secrets Manager re:Post or contact AWS Support.

Want more AWS Security news? Follow us on Twitter.

Faith Isichei

Faith Isichei

Faith is a Premium Support Security Engineer at AWS. She helps provide tailored secure solutions for a broad spectrum of technical issues faced by customers. She is interested in cybersecurity, cryptography, and governance. Outside of work, she enjoys travel, spending time with family, wordsearches, and sudoku.

Zach Miller

Zach Miller

Zach is a Senior Security Specialist Solutions Architect at AWS. His background is in data protection and security architecture, focused on a variety of security domains, including cryptography, secrets management, and data classification. Today, he is focused on helping enterprise AWS customers adopt and operationalize AWS security services to increase security effectiveness and reduce risk.

Fatima Ahmed

Fatima is a Global Security Solutions Architect at AWS. She is passionate about cybersecurity and helping customers build secure solutions in the AWS Cloud. When she is not working, she enjoys time with her cat or solving cryptic puzzles.

How to deploy AWS Network Firewall to help protect your network from malware

Post Syndicated from Ajit Puthiyavettle original https://aws.amazon.com/blogs/security/how-to-deploy-aws-network-firewall-to-help-protect-your-network-from-malware/

Protecting your network and computers from security events requires multi-level strategies, and you can use network level traffic filtration as one level of defense. Users need access to the internet for business reasons, but they can inadvertently download malware, which can impact network and data security. This post describes how to use custom Suricata Rules with AWS Network Firewall to add protections that prevent users from downloading malware. You can use your own internal list, or a list from commercial or open-source threat intelligence feeds.

Network Firewall is a managed service that makes it easy to deploy essential network protection for all of your Amazon Virtual Private Cloud (Amazon VPC) Infrastructure. Network Firewall’s flexible rules engine lets you define firewall rules, giving you fine-grained control over network traffic, such as blocking outbound requests to prevent the spread of potential malware.

Features of Network Firewall

This section describes features of Network Firewall that help improve the overall security of your network.

Network Firewall:

  • Is a managed Amazon Web Services (AWS) service, so you don’t have to build and maintain the infrastructure to host the network firewall.
  • Integrates with AWS Firewall Manager, which allows you to centrally manage security policies and automatically enforce mandatory security policies across existing and newly created accounts and virtual private clouds (VPCs).
  • Protects application availability by filtering inbound internet traffic using tools such as access control list (ACL) rules, stateful inspection, protocol detection, and intrusion prevention.
  • Provides URL, IP address, and domain-based outbound traffic filtering to help you meet compliance requirements, stop potential data leaks, and block communication with known malware hosts.
  • Gives you control and visibility of VPC-to-VPC traffic to logically separate networks that host sensitive applications or line-of-business resources.
  • Complements existing network and application security services on AWS by providing control and visibility to layer 3 through 7 network traffic for your entire VPC.

Automating deployment of Network Firewall and management of Network Firewall rules support management at-scale and help in timely response, as Network Firewall is designed to block access to insecure sites before they impact your resources. For the solution in this blog post, you’ll use an AWS CloudFormation template to deploy the network architecture with Network Firewall.

Solution architecture

Figure 1 shows a sample architecture to demonstrate how users are able to download malware files, and how you can prevent this using network firewall rules.

Network Firewall is deployed in a single VPC architecture, where it is placed in line with the traffic to and from the internet.

Figure 1. Network architecture diagram

Figure 1. Network architecture diagram

The network architecture shown in Figure 1 includes three subnets:

  1. A network firewall subnet
    Hosts the Network Firewall endpoint interface. All outbound traffic from this network goes through the internet gateway.
  2. A public subnet
    Hosts a NAT gateway. The next hop from the public subnet is the Network Firewall endpoint, where all traffic can be inspected before being forwarded to the internet.
  3. A private network subnet
    Used to host the client instances. All outbound traffic from this network goes to the NAT gateway endpoint.

In the network architecture shown in Figure 1, only one AZ is shown for simplicity, but best practices recommend deploying infrastructure across multiple AZs

To run the CloudFormation deployment template

  1. To set up the architecture shown in Figure 1, launch the provided CloudFormation deployment template using the Launch stack button in step 2 below.
    This CloudFormation template:

    • Sets up VPCs and appropriate subnets as required by the network architecture.
    • Creates a route table with appropriate routes and attaches it to the appropriate subnet (i.e. private subnet, firewall subnet, public subnet).
    • Creates a test instance with appropriate security groups.
    • Deploys Network Firewall with firewall policy.
    • Creates a Rule Group SampleStatefulRulegroupName with Suricata rules, which is not attached to a firewall policy
  2. To launch the stack, click the Launch Stack button below.
  3. Select the Launch Stack button to launch the template

  4. Name the newly created stack (for example, nfw-stack).
  5. The template will also install two sample rules that will be used to protect against accessing two sample malware site URLs, but it will not automatically attach them to a firewall policy
  6. You can see that Network Firewall with firewall policy was deployed as part of the basic CloudFormation deployment. It also created Suricata rules in rule groups, but is not yet attached to the firewall policy.

    Note: Unless you attach the rule to the Network Firewall, it will not provide the required protection.

Example: confirming vulnerability

We have identified two sample URLs that contain malware to use for demonstration.

In the example screen shot below, we tested vulnerability by logging into test instance using AWS Session Manager. and at the shell prompt, used wget to access and download a malware file.

Figure 2 that follows is a screenshot of how a user could access and download two different malware files.

Note: Since these URLs contain malware files, we do not recommend users perform this test, but are providing a screenshot as a demonstration. If you wish to actually test ability to download files, use URLs you know are safe for testing.

Figure 2. Insecure URL access

Figure 2. Insecure URL access

Network Firewall policies

Before the template creates the Network Firewall rule group, it creates a Network Firewall policy and attaches it to the Network Firewall. An AWS Network Firewall firewall policy defines the monitoring and protection behavior for a firewall. The details of the behavior are defined in the rule groups that you add to your policy.

Network Firewall rules

A Network Firewall rule group is a reusable set of criteria for inspecting and handling network traffic. You can add one or more rule groups to a firewall policy as part of policy configuration. The included template does this for you.

Network Firewall rule groups are either stateless or stateful. Stateless rule groups evaluate packets in isolation, while stateful rule groups evaluate them in the context of their traffic flow. Network Firewall uses a Suricata rules engine to process all stateful rules.

Suricata rules can be used to create a Network Firewall stateful rule to prevent insecure URL access. Figure 3 shows the Suricata rules that the template adds and attaches to the Network Firewall policy in order to block access to the sample malware URLs used in the previous example.

Figure 3. Suricata rules in a Network Firewall rule group

Figure 3. Suricata rules in a Network Firewall rule group

Attach the rule group to the Network Firewall policy

When you launched the CloudFormation template, it automatically created these rules in the rule group. You will now be attaching this rule group to the firewall policy in order to enable the protection. You will need similar rules to block the test URLs that are used for your testing.

Figure 3 shows two Suricata rules that have been configured to block the insecure malware URLs.

To add Suricata rules to Network Firewall

To improve site security and protect against downloading malware, you can add Suricata rules to Network Firewall to secure your site. You’ll do this by:

  1. Creating and attaching a firewall policy to the Network Firewall.
  2. Creating rules as part of rule groups, which are attached to the firewall policy
  3. Testing to verify that access to malware URLs from the instance is blocked.

Let’s review Suricata Rules that are created, which can be attached to Network Firewall.

Suricata rule parts

Each Suricata rule has three parts:

  1. Action
  2. drop action that should be taken

  3. Header
  4. http this is the traffic protocol

    $HOME_NET anywhere $HOME_NET is a Suricata variable. By default it is set to the CIDR range of the VPC where Network Firewall is deployed and any refers to any source port

    $EXTERNAL_NET 80 where $EXTERNAL_NET 80 is a Suricata standard variable that refers to traffic destination, and 80 refers to the destination port

    -> is the direction that tells in which direction the signature has to match

  5. Options
  6. msg “MALWARE custom solution” – gives textual information about the signature and the possible alert

    flow to_server,established – it is used to match on the direction of the flow and established refers to match on established connections

    classtype trojan-activity – gives information about the classification of rules and alerts

    sid:xxxxx gives every signature its own id

    content “xxxx” – This keyword is very important and it identifies the pattern that your signature should match.

    http_uri is a content modifier that helps you match specifically and only on the request URI

    rev:xxx this goes along with sid keyword. It represents the version of the signature

The signatures in the Suricate rule shown in Figure 3 will block traffic that matches the http_uri contents /data/js_crypto_miner.html and /data/java_jre17_exec.html when the traffic is initiated from the VPC to the public network.

To attach a rule group to an existing Network Firewall

In Figure 4, the Network Firewall has a policy attached. but it does not have a rule group

Figure 4. A policy is attached, but not a rule group

Figure 4. A policy is attached, but not a rule group

  1. As shown in Figure 5, choose Add rule group to start adding your Suricata rule to the Network Firewall.
  2. Choose Add from existing stateful rule groups to attach an already created Suricata rule group.
  3. Figure 5. Choose Add rule group

    Figure 5. Choose Add rule group

  4. Figure 6 shows the Suriacata rule groups that are already created. SampleStatefulRulegroupName is the rule group created by the CloudFormation template.
  5. Select the rule group and choose Add stateful rule group to finish adding the rule group to Network Firewall.
  6. Figure 6. Review the rule groups that are already created

    Figure 6. Review the rule groups that are already created

  7. Figure 7 shows that the rule group SampleStatefulRulegroupName is now part of the Stateful rule group section of Network Firewall screen, which completes adding Suricata rules to Network Firewall.
  8. Figure 7. Shows the new rule group is now added

    Figure 7. Shows the new rule group is now added

Example: validating the solution

Your Network Firewall is now configured to block malware URLs that are defined in the rulegroup SampleStatefulRulegroupName.

As in the example above where we confirmed vulnerability, Figure 8 shows how to validate that the solution is now protecting your users from accessing malware sites.

Figure 8 shows a user trying to access the same insecure URLs we tested earlier and shows that the URLs are now blocked and the attempted connection times out.

Note: Since these URLs contain malware files, we do not recommend users perform this test, but are providing a screenshot as a demonstration. If you wish to actually test ability to download files, use URLs you know are safe for testing.

Figure 8. Insecure URL access blocked

Figure 8. Insecure URL access blocked

Validating blocking access helps your security team ensure that users or applications on your network cannot download malware. You can add similar rules for any URLs you identify as insecure. SOC operators are typically not familiar with updating CloudFormation templates, but you can use a deployment pipeline where the data required for the rule is stored in Amazon DynamoDB and use AWS Lambda functions to automate updating rules.

Now that you have an example running, you should implement a complete rule set that meets your requirement from a publicly available malware list such as CISSECURITY MALWARE LIST.

Cleanup

AWS resources created for testing can result in additional costs. Since this environment used a CloudFormation template, you can remove all AWS resources associated with the solution by deleting the CloudFormation stack you named previously (for example, nfw-stack).

Conclusion

This blog describes an approach for preventing users from downloading malware. The solution presented uses AWS Network Firewall to secure your environment by blocking access to the specified malware URLs. The supplied CloudFormation template can be used to automate this protection, and to easily set up a test environment to simulate the scenario.

For additional best practice information, see:

If you have feedback about this post, submit comments in the Comments section below. If you have questions about this post, contact AWS Support.

.

Want more AWS Security news? Follow us on Twitter.

Author

Ajit Puthiyavettle

Ajit is a Solution Architect working with enterprise clients, architecting solutions to achieve business outcomes. He is passionate about solving customer challenges with innovative solutions. His experience is with leading DevOps and security teams for enterprise and SaaS (Software as a Service) companies.

Building Resilient and High Performing Cloud-based Applications in Hawaii

Post Syndicated from Marie Yap original https://aws.amazon.com/blogs/architecture/building-resilient-and-high-performing-cloud-based-applications-in-hawaii/

Hawaii is building a digital economy for a sustainable future. Many local businesses are already embarking on their journey to the cloud to meet their customers’ growing demand for digital services. To access Amazon Web Services (AWS) on the US mainland, customers’ data must traverse through submarine fiber-optic cable networks approximately 2,800 miles across the Pacific Ocean. As a result, organizations have two primary concerns:

  • Resiliency concerns about multiple outage events that could arise from breaks in the submarine cables.
  • Latency concerns for mission-critical applications driven by physical distance.

These problems can be solved by architecting the workloads for reliability, secure connectivity, and high performance.

Designing network connectivity that is reliable, secure, and highly performant

A typical workload in AWS can be broken down into three layers – Network, Infrastructure, and Application. For each layer, we can design for resiliency and latency concerns. Starting at the network layer, there are two recommended options for connecting the on-premises network within the island to AWS.

  • Use of AWS Direct Connect over a physical connection. AWS Direct Connect is a dedicated network connection that connects your on-premises environment to AWS Regions. In this case, the connection is traversing the fiber-optic cable across the Pacific Ocean to the mainland’s meet-me-point facilities. It can be provisioned from 50 Mbps up to 100 Gbps. This provides you with a presence in an AWS Direct Connect location, a third-party colocation facility, or an Internet Service Provider (ISP) that provides last-mile connectivity to AWS. In addition, the Direct Connect location establishes dedicated connectivity to Amazon Virtual Private Clouds (VPC). This improves application performance and addresses latency concerns by connecting directly to AWS and bypassing the public internet.
  • Use of AWS VPN over an internet connection. As a secondary option to Direct Connect, AWS Site-to-Site VPN provide connectivity into AWS over the public internet using VPN encryption technologies. The Site-to-Site VPN connects on-premises sites to AWS resources in an Amazon VPC. As a result, you can securely connect your on-premises network to AWS using an internet connection.

We recommend choosing the us-west-2 AWS Region in Oregon to build high performant connectivity closest to Hawaii. The us-west-2 Region generally provides more AWS services at a lower cost versus us-west-1. In addition, there are various options for AWS Direct Connect Locations in the US West Region. Many of these locations support up to 100 Gbps and support MACsec, which is an IEEE standard for security encryption in wired Ethernet LANs. Typically, customers will use multiple 10-Gbps connections for higher throughput and redundancy.

Subsea Cable Hawaii Cable Landing Station Mainland Cable Landing Station Nearest Direct Connect Location
Southern Cross Cable Network (SCCN)
Kahe Point (Oahu) Morro Bay, CA CoreSite, Equinix
Southern Cross Cable Network (SCCN) Kahe Point (Oahu) Hillsboro, OR Equnix, EdgeConnex, Pittock Block, CoreSite, T5, TierPoint
Hawaiki Kapolei (Oahu) Hillsboro, OR Equnix, EdgeConnex, Pittock Block, CoreSite, T5, TierPoint
Asia-America Gateway (AAG) Keawaula (Oahu) San Luis Obispo, CA CoreSite, Equinix
Japan-US Cable Network (JUS) Makaha (Oahu) Morro Bay, CA CoreSite, Equinix
SEA-US Makaha (Oahu) Hermosa Beach, CA CoreSite, Equinix, T5

Table 1. Subsea fiber-optic cables connecting Hawaii to the US mainland

(Source: Submarine Cable Map from TeleGeography)

To build resilient connectivity, six cables connect Hawaii to the mainland US: Hawaiki, SEA-US, Asia-America Gateway (AAG), Japan-US (JUS), and two Southern Cross (SCCN) cables. In addition, these cables connect to various locations on the US West Coast. If you require high resiliency, we recommend a minimum of two physically redundant Direct Connect connections into AWS. In addition, we recommend designing four Direct Connect connections that span two Direct Connect locations for maximum resiliency. If you build your architecture following these recommendations, AWS offers this published service level agreement (SLA).

Figure 1. Redundant direct connection from Hawaii to the US mainland

Figure 1. Redundant direct connection from Hawaii to the US mainland

Most customers select an ISP to get them connectivity across the Pacific Ocean to an AWS Direct location. The Direct Connect locations are third-party colocation providers who act as meet-me points for AWS customers and the AWS Regions.  For example, our local AWS Partner DRFortress connects multiple ISPs in a data center in Hawaii to the AWS US West Region. We recommend having at least two ISPs for resilient applications, each providing connectivity across a separate subsea cable from Hawaii to the mainland. If one cable should fail for any reason, connectivity to AWS would still be available. The red links in figure 2 are the ISP-provided connectivity that spans the Pacific Ocean. This is a minimum starting point for business-critical applications and should be designed with additional Direct Connect links for greater resiliency.

Architecting for high performance and resiliency

Moving from the network to the infrastructure and application layer, organizations have the option in building their application all in the cloud or in combination with an on-premises environment. An example of an application built all in the cloud is the LumiSight platform in AWS built by local AWS Partner, DataHouse. LumiSight has helped dozens of organizations quickly and securely reopen safely during the pandemic.

Other customers need a hybrid cloud architecture solution. These organizations require that their data processing and locally hosted applications analysis is close to other components within the island’s data center. With this proximity, they can deliver near real-time responses to their end users. AWS Outposts Family extends the capabilities of an AWS Region to the island. This enables local businesses to build and run low latency applications on-premises on an AWS fully managed infrastructure. You can now deploy Compute, Storage, Containers, Data Analytics clusters, Relational, and Cache databases in high performance, redundant and secure infrastructure maintained by AWS. Outposts can be shipped to Hawaii, connecting to the us-west-1 or us-west-2 Regions.

Another option for improving application performance is providing an efficient virtual desktop to access their applications anywhere. Amazon WorkSpaces provides a secure, managed cloud-based virtual desktop experience. Many workers who bring their own device (BYOD) or work remotely use Workspaces to access their corporate applications securely. Workspaces use streaming protocols that provide a secure and responsive desktop experience to end users located in remote Regions, like Hawaii. Workspaces can quickly provide a virtual desktop without managing the infrastructure, OS versions, and patches. You can test your connection to Workspaces from Hawaii, or anywhere else in the world, at the Connection Health Check page.

Architecting for resiliency in the infrastructure and application stack is vital for Business Continuity and Disaster Recovery (BCDR) plans. Organizations in Hawaii who are already using VMware can take advantage of creating a recovery site using VMware Cloud on AWS as their solution for disaster recovery. The VMware Cloud on AWS is a fully managed VMware software-defined Data Center (SDDC) running on AWS, which provides access to native AWS services. Organizations can pair their on-premises vCenter and virtual machines to the fully managed vCenter and virtual machines residing in the cloud. The active Site Recovery Manager provides the automation of failing over and failing back applications between on-premises to the cloud DR site and vice versa. Additionally, organizations can define their SDDC in the us-west-2 Region using AWS Direct Connect to minimize the latency of replicating the data from and to the data centers in the islands.

Conclusion

Organizations in Hawaii can build resilient and high performant cloud-based workloads with the help of AWS services in each layer of their workloads. Starting with the network layer, you can establish reliable and lower latency connectivity through redundant AWS Direct Connect connections. Next, for low latency, hybrid applications, we extend infrastructure capabilities locally through AWS Outposts. We also improve the user experience in accessing cloud-based applications by providing Amazon WorkSpaces as the virtual desktop. Finally, we build resilient infrastructure and applications using a familiar solution called VMware Cloud on AWS.

To start learning the fundamentals and building on AWS, visit the Getting Started Resource Center.

Best practices for cross-Region aggregation of security findings

Post Syndicated from Marshall Jones original https://aws.amazon.com/blogs/security/best-practices-for-cross-region-aggregation-of-security-findings/

AWS Security Hub enables customers to have a centralized view into the security posture across their AWS environment by aggregating your security alerts from various AWS services and partner products in a standardized format so that you can more easily take action on them. To facilitate that central view, Security Hub allows you to designate an aggregation Region, which links some or all Regions to a single aggregated Region in a delegated administrator AWS account. All your findings across all of your accounts and all of your linked Regions will be processed by Security Hub in this one Region. With this feature, you can take advantage of many configurations when ingesting findings into Security Hub, that will benefit you operationally and provide cost savings.

This blog post provides you with a set of best practices when using Security Hub across multiple Regions. After implementing the recommendations in this blog post, you’ll have an optimized and centralized view of Security Hub findings from all integrated AWS services and partner products across all Regions in a single AWS account and Region.

Enable cross-Region aggregation

To enable cross-Region aggregation in Security Hub, you must first enable finding aggregation in Security Hub from the Region that will become the aggregation Region. You cannot use a Region that is disabled by default as your aggregation Region. For a list of Regions that are disabled by default, see Enabling a Region in the AWS General Reference.

You can enable AWS Security Hub finding aggregation using either the console or CLI. You must enable finding aggregation from the Region that will be the aggregation Region.

To enable Security Hub finding aggregation from the console

To enable AWS Security Hub finding aggregation using the AWS console:

  1. Start by navigating to the AWS Security Hub console and select Settings on the left side of the screen. Once on the settings page, choose the Regions tab.
Figure 1. Enabling finding aggregation

Figure 1. Enabling finding aggregation

  1. Check the checkbox to Link future Regions. As AWS releases new Regions, their results will automatically be aggregated into your designated Region. If this checkbox is not checked, any new Region that is released will not aggregate Security Hub findings to the aggregation Region.

To enable Security Hub finding aggregation using the CLI

Alternatively, you can enable AWS Security Hub finding aggregation using the CLI by using the following command:

aws securityhub create-finding-aggregator –region <aggregation Region> –region-linking-mode ALL_REGIONS | ALL_REGIONS_EXCEPT_SPECIFIED | SPECIFIED_REGIONS –regions <Region list>

Here’s a sample CLI command to enable AWS Security Hub finding aggregation:

aws securityhub create-finding-aggregator –region us-east-1 –region-linking-mode SPECIFIED_REGIONS –regions us-west-1,us-west-2

For more details around AWS Security Hub cross-region aggregation, see Aggregating findings across regions.

Consolidating downstream SIEM and ticketing integrations

Security Hub findings for all AWS accounts in your environment should be integrated into a Security Information and Event Management (SIEM) solution, such as Amazon OpenSearch Service or an APN partner SIEM, or a standardized ticketing system such as JIRA or ServiceNow.

You should send all Security Hub findings to a SIEM or ticketing solution from a single aggregation point to simplify operational overhead. Although integration architectures vary, as an example, this might mean configuring an Amazon EventBridge rule to parse and send findings to AWS Lambda or Amazon Kinesis for a custom integration point with the SIEM or ticketing solution.

You should to configure this integration point in a single delegated administrator account across all member AWS accounts and aggregated Regions. You should avoid having multiple integration points between each Security Hub Region and your SIEM or ticketing solution to avoid unnecessary operational overhead and costs of managing multiple integration points and resources required to stream findings to your SIEM.

Collecting Security Hub findings in a SIEM or ticketing solution can help you correlate findings across many other logs sources. For example, you might use a SIEM solution to analyze operating system logs from an Amazon Elastic Compute Cloud (Amazon EC2) instance to correlate with GuardDuty findings collected by Security Hub to investigate suspicious activity. You could also use ServiceNow or JIRA to create an automated, bidirectional integration between these ticketing solutions that keeps your Security Hub findings and issues in sync.

Auto-archive GuardDuty findings associated with global resources

Amazon GuardDuty creates findings associated with AWS IAM resources. IAM resources are global resources, which means that they are not Region-specific. If GuardDuty generates a finding for an IAM API call that is not Region-specific, such as ListGroups (for example, PenTest:IAMUser/KaliLinux) that finding is created in all GuardDuty Regions and ingested into Security Hub in every Region. You want to implement suppression rules in GuardDuty so that you don’t have multiple copies of this finding in your Security Hub delegated administrator account finding aggregation Region.

To implement AWS GuardDuty suppression rules (Console)

To reduce the duplication of findings in Security Hub, suppress global GuardDuty findings in all Regions except the Security Hub aggregation Region. For example, if you are aggregating Security Hub findings in us-east-1 and your environment uses all commercial AWS Regions in the United States, you would add a suppression rule in GuardDuty in us-east-2, us-west-1, and us-west-2.

To create AWS GuardDuty suppression rules using the AWS console:

  1. Navigate to the GuardDuty console and select the Findings link on the left side of the screen.
Figure 2. Creating GuardDuty suppression rules

Figure 2. Creating GuardDuty suppression rules

  1. Filter to search for the findings you want to suppress, and click Save / edit in the search bar.
  2. Enter a name and description for the suppression rule and save it.

To implement AWS GuardDuty suppression rules (CLI)

Alternatively, you can create AWS GuardDuty suppression rules using the CreateFilter API via CLI.

  1. Create a JSON file with your desired suppression filter criteria for the suppression rule.
  2. The following CLI command will test your filter criteria for AWS GuardDuty findings that will be suppressed:
  3. aws guardduty list-findings –detector-id 12abc34d567e8fa901bc2d34e56789f0 –finding-criteria file://criteria.json

  4. The following CLI command will create a filter for AWS GuardDuty findings that will be suppressed:
  5. aws guardduty create-filter –action ARCHIVE –detector-id 12abc34d567e8fa901bc2d34e56789f0 –name yourfiltername –finding-criteria file://criteria.json

For more details for creating AWS GuardDuty suppression rules, see Creating AWS GuardDuty suppression rules.

Reduce AWS Config cost by recording global resources in one Region

Like GuardDuty, AWS Config also records supported types of global resources, which are not tied to a specific Region and can be used in all Regions. The global resource types that AWS Config supports are IAM users, groups, roles, and customer managed policies. The configuration details for a specific global resource are the same in all Regions. If you have AWS Security Hub AWS Foundational Best Practices enabled, the feature has certain checks for global resources in AWS Config that you need to disable in all Regions except the aggregated Region.

Customize AWS Config for global resources

If you customize AWS Config in multiple Regions to record global resources, AWS Config creates multiple configuration items each time a global resource changes, one configuration item for each Region. Costs for each configuration item can be found on AWS Config pricing. These configuration items will contain identical data. To prevent duplicate configuration items, consider customizing AWS Config in only one Region to record global resources, unless you want those configuration items to be available in multiple Regions. See this blog post for a comprehensive list of additional AWS Config best practices.

To customize AWS Config for global resources (Console)

Follow the steps below to change the AWS Config global resource configuration in the AWS Console.

  1. Navigate to the AWS Config console and select Settings on the left side of the screen
  2. Click Edit in the top right corner
  3. Uncheck the Include global resources checkbox.
  4. Repeat these steps for each Region AWS Config is enabled, except the Region where you would like to track global resources.
Figure 3. AWS Config global resource setting

Figure 3. AWS Config global resource setting

To customize AWS Config for global resources (CLI)

Alternatively, you can disable the global resource tracking in AWS Config using the CLI.

aws configservice put-configuration-recorder –configuration-recorder name=default,roleARN=arn:aws:iam::123456789012:role/config-role –recording-group allSupported=true,includeGlobalResourceTypes=false

If you have deployed AWS Config using these CloudFormation templates, you would set the IncludeGlobalResourceTypes to False under the AWS::Config::ConfigurationRecorder for the Regions you do not want to track global resources, and set the value to True in the aggregated Region where you would like to use to track global resources. You can use the CloudFormation StackSets multiple AWS Region deployment feature to deploy the CloudFormation template in all AWS Regions where AWS Config is enabled.

For more details for AWS Config global resources, see Selecting AWS Config resources to record.

Disable AWS Security Hub AWS Foundational Best Practices periodic controls associated with global resources

AWS Security Hub AWS Foundational Best Practices perform checks against the resources in your AWS environment utilizing AWS Config rules. After you have disabled the AWS Config global resources in all Regions except for the Region that runs global recording, disable the Security Hub controls that deal with global resources as shown in Figure 5 below.

You can disable AWS Security Hub controls relating to global resources using the console or CLI.

To disable AWS Security Hub controls (Console)

Follow the steps below to disable Security Hub controls that deal with global resources in the AWS Console.

  1. Navigate to the Security Hub console and select Security Standards on the left side of the screen.
  2. Click on the AWS Foundation Security Best Practices v.1.0.0 security standard.
  3. Then use the filter box to search for IAM. Now you should be able to see security controls IAM.1-IAM.7, which are Security Hub global controls.
  4. Figure 4. Security Hub global controls

    Figure 4. Security Hub global controls

  5. Click on each control and select Disable in the top right corner
  6. After you have disabled resources, add a reason for disabling and choose Disable.
Figure 5. Disabling Security Hub control

Figure 5. Disabling Security Hub control

To disable AWS Security Hub controls (CLI)

Alternatively, you can disable Security Hub controls that deal with global resources using the CLI.

aws securityhub update-standards-control –standards-control-arn <control ARN> –control-status “DISABLED” –disabled-reason <description of reason to disable>

This sample CLI command disables Security Hub controls that deal with global resources:

aws securityhub update-standards-control –standards-control-arn “arn:aws:securityhub:us-east-1:123456789012:control/aws-foundational-security-best-practices/v/1.0.0/ACM.1” –control-status “DISABLED” –disabled-reason “Not applicable for my service”

You can also follow instructions to implement a solution to disable specific Security Hub controls for multiple AWS accounts.

Be sure to only disable the Security Hub controls in the Regions where global recording is also disabled. Verify the Security Hub controls associated with global resources are enabled in the same Region where AWS Config global resources are enabled.

After you have completed disabling these controls and recording of global resources, proceed to disable the [Config.1] AWS Config should be enabled control. This specific control requires recording of global resources in order to pass, which is not required to have enabled in multiple Regions.

For more details for AWS Security Hub controls, see Disabling and enabling individual AWS Security Hub controls .

Implement automatic remediation from a central Region

Once findings are consolidated and ingested into Security Hub across all your organization’s AWS accounts, you should implement auto-remediation where possible, including everything from resource misconfigurations to automated quarantine of infected EC2 instances. Security Hub provides multiple ways to achieve this through end-to-end automation with EventBridge or through human-triggered automation with Security Hub Custom Actions. You can deploy automatic remediation solutions in a single Region to perform cross-Region remediation. This helps you deploy fewer resources, saving money and operational overhead. For more information on how to enable the solution for Security Hub Automated Response and Remediation, see this blog post.

If you have automation currently in place, it’s important to understand how findings from multiple Regions triggering your automation might be affected. For example, you might have a Lambda function that remediates problems with S3 buckets, where it assumes it is being invoked in the same Region as the S3 bucket it needs to remediate. With cross-Region aggregation, your Lambda might need to make a cross-Region AWS SDK call. The Lambda function will run in the Region where the aggregation occurs, but the bucket could be in another Region, so you might have to adjust your function to handle that situation. Also, the role associated with the Lambda function could have its privileges limited to a single Region. If you intend the same function to work in all Regions, you might need change the IAM policy for the IAM role used by the Lambda. Make sure to check Service Control Policies in AWS Organizations, if you use them, because they can also deny actions in one Region while allowing them in another Region.

When enabling cross-Region finding aggregation, you’ll need to understand how any automatic remediation that might be in place today could be affected. Be sure to test your remediation functions on resources in various Regions, to be sure remediation works in all Regions you monitor.

Conclusion

This blog post highlights configurations you can take advantage of to reduce operational overhead and provide cost savings by using cross-Region finding aggregation in Security Hub. The examples given apply to the majority of AWS environments, and are meant to be action items you can use to improve the overall security and operational effectiveness of your AWS environment.

If you have feedback about this post, submit comments in the Comments section below. If you have any questions about this post, start a thread on the re:Post forum.

Want more AWS Security news? Follow us on Twitter.

Author

Marshall Jones

Marshall is a Worldwide Security Specialist Solutions Architect at AWS. His background is in AWS consulting and security architecture, focused on a variety of security domains including edge, threat detection, and compliance. Today, he is focused on helping enterprise AWS customers adopt and operationalize AWS security services to increase security effectiveness and reduce risk.

Author

Jonathan Nguyen

Jonathan is a Shared Delivery Team Senior Security Consultant at AWS. His background is in AWS Security with a focus on Threat Detection and Incident Response. Today, he helps enterprise customers develop a comprehensive AWS Security strategy, deploy security solutions at scale, and train customers on AWS Security best practices.

Continuous compliance monitoring using custom audit controls and frameworks with AWS Audit Manager

Post Syndicated from Deenadayaalan Thirugnanasambandam original https://aws.amazon.com/blogs/security/continuous-compliance-monitoring-using-custom-audit-controls-and-frameworks-with-aws-audit-manager/

For most customers today, security compliance auditing can be a very cumbersome and costly process. This activity within a security program often comes with a dependency on third party audit firms and robust security teams, to periodically assess risk and raise compliance gaps aligned with applicable industry requirements. Due to the nature of how audits are now performed, many corporate IT environments are left exposed to threats until the next manual audit is scheduled, performed, and the findings report is presented.

AWS Audit Manager can help you continuously audit your AWS usage and simplify how you assess IT risks and compliance gaps aligned with industry regulations and standards. Audit Manager automates evidence collection to reduce the “all hands-on deck” manual effort that often happens for audits, while enabling you to scale your audit capability in the cloud as your business grows. Customized control frameworks help customers evaluate IT environments against their own established assessment baseline, enabling them to discern how aligned they are with a set of compliance requirements tailored to their business needs. Custom controls can be defined to collect evidence from specific data sources, helping rate the IT environment against internally defined audit and compliance requirements. Each piece of evidence collected during the compliance assessment becomes a record that can be used to demonstrate compliance with predefined requirements specified by a control.

In this post, you will learn how to leverage AWS Audit Manager to create a tailored audit framework to continuously evaluate your organization’s AWS infrastructure against the relevant industry compliance requirements your organization needs to adhere to. By implementing this solution, you can simplify yet accelerate the detection of security risks present in your AWS environment, which are relevant to your organization, while providing your teams with the information needed to remedy reported compliance gaps.

Solution overview

This solution utilizes an event-driven architecture to provide agility while reducing manual administration effort.

  • AWS Audit Manager–AWS Audit Manager helps you continuously audit your AWS usage to simplify how you assess risk and compliance with regulations and industry standards.
  • AWS Lambda–AWS Lambda is a serverless compute service that lets you run code without provisioning or managing servers, in response to events such as changes in data, application state or user actions.
  • Amazon Simple Storage Service (Amazon S3) –Amazon S3 is object storage built to store and retrieve any amount of data from anywhere, that offers industry leading availability, performance, security, and virtually unlimited scalability at very low costs.
  • AWS Cloud Development Kit (AWS CDK)–AWS Cloud Development Kit is a software development framework for provisioning your cloud infrastructure in code through AWS CloudFormation.

Architecture

This solution enables automated controls management using event-driven architecture with AWS Services such as AWS Audit Manager, AWS Lambda and Amazon S3, in integration with code management services like GitHub and AWS CodeCommit. The Controls owner can design, manage, monitor and roll out custom controls in GitHub with a simple custom controls configuration file, as illustrated in Figure 1. Once the controls configuration file is placed in an Amazon S3 bucket, the on-commit event of the file triggers a control pipeline to load controls in audit manager using a Lambda function. 

Figure 1: Solution workflow

Figure 1: Solution workflow

Solution workflow overview

  1. The Control owner loads the controls as code (Controls and Framework) into an Amazon S3 bucket.
  2. Uploading the Controls yaml file into the S3 bucket triggers a Lambda function to process the control file.
  3. The Lambda function processes the Controls file, and creates a new control (or updates an existing control) in the Audit Manager.
  4. Uploading the Controls Framework yaml file into the S3 bucket triggers a Lambda function to process the Controls Framework file.
  5. The Lambda function validates the Controls Framework file, and updates the Controls Framework library in Audit Manager

This solution can be extended to create custom frameworks based on the controls, and to run an assessment framework against the controls.

Prerequisite steps

  1. Sign in to your AWS Account
  2. Login to the AWS console and choose the appropriate AWS Region.
  3. In the Search tab, search for AWS Audit Manager
  4. Figure 2. AWS Audit Manager

    Figure 2. AWS Audit Manager

  5. Choose Set up AWS Audit Manager.

Keep the default configurations from this page, such as Permissions and Data encryption. When done choose Complete setup.

Before deploying the solution, please ensure that the following software packages and their dependencies are installed on your local machine:

Node.js v12 or above https://nodejs.org/en/
AWS CLI version 2 https://docs.aws.amazon.com/cli/latest/userguide/install-cliv2.html
AWS CDK https://docs.aws.amazon.com/cdk/latest/guide/getting_started.html
jq https://stedolan.github.io/jq/
git https://git-scm.com/
AWS CLI configuration https://docs.aws.amazon.com/cli/latest/userguide/cli-configure-quickstart.html

Solution details

To provision the enterprise control catalog with AWS Audit Manager, start by cloning the sample code from the aws-samples repository on GitHub, followed by running the installation script (included in this repository) with sample controls and framework from your AWS Account.

To clone the sample code from the repository

On your development terminal, git clone the source code of this blog post from the AWS public repository:

git clone [email protected]:aws-samples/enterprise-controls-catalog-via-aws-audit-manager.git

To bootstrap CDK and run the deploy script

The CDK Toolkit Stack will be created by cdk bootstrap and will manage resources necessary to enable deployment of Cloud Applications with AWS CDK.

cdk bootstrap aws://<AWS Account Number>/<Region> # Bootstrap CDK in the specified account and region

cd audit-manager-blog

./deploy.sh

Workflow

Figure 3 illustrates the overall deployment workflow. The deployment script triggers the NPM package manager, and invokes AWS CDK to create necessary infrastructure using AWS CloudFormation. The CloudFormation template offers an easy way to provision and manage lifecycles, by treating infrastructure as code.
 

Figure 3: Detailed workflow lifecycle

Figure 3: Detailed workflow lifecycle

Once the solution is successfully deployed, you can view two custom controls and one custom framework available in AWS Audit Manager. The custom controls use a combination of manual and automated evidence collection, using compliance checks for resource configurations from AWS Config.

To verify the newly created custom data security controls

  1. In the AWS console, go to AWS Audit Manager and select Control library
  2. Choose Custom controls to view the controls DataSecurity-DatainTransit and DataSecurity-DataAtRest
Figure 4. View custom controls

Figure 4. View custom controls

To verify the newly created custom framework

  1. In the AWS console, go to AWS Audit Manager and select Framework library.
  2. Choose Custom frameworks to view the following framework:
Figure 5. Custom frameworks list

Figure 5. Custom frameworks list

You have now successfully created the custom controls and framework using the proposed solution.

Next, you can create your own controls and add to your frameworks using a simple configuration file, and let the implemented solution do the automated provisioning.

To set up error reporting

Before you begin creating your own controls and frameworks, you should complete the error reporting configuration. The solution automatically sets up the error reporting capability using Amazon SNS, a web service that enables sending and receiving notifications from the cloud.

  1. In the AWS Console, go to Amazon SNS > Topics > AuditManagerBlogNotification
  2. Select Create subscription and choose Email as your preferred endpoint to subscribe.
  3. This will trigger an automated email on subscription confirmation. Upon confirmation, you will begin receiving any error notifications by email.

To create your own custom control as code

Follow these steps to create your own controls and frameworks:

  1. Create a new control file named example-control.yaml with contents as shown below. This creates a custom control to check whether all public access to data in Amazon S3 is prohibited:
  2. name:
    DataSecurity-PublicAccessProhibited

    description:
    Information and records (data) are managed consistent with the organization’s risk strategy to protect the confidentiality, integrity, and availability of information.

    actionPlanTitle:
    All public access block settings are enabled at account level

    actionPlanInstructions:
    Ensure all Amazon S3 resources have public access prohibited

    testingInformation:
    Test attestations – preventive and detective controls for prohibiting public access

    tags:
    ID: PRDS-3Subcategory: Public-Access-Prohibited
    Category: Data Security-PRDS
    CIS: CIS17
    COBIT: COBIT 5 APO07-03
    NIST: NIST SP 800-53 Rev 4

    datasources:
    sourceName: Config attestation
    sourceDescription: Config attestation
    sourceSetUpOption: System_Controls_Mapping
    sourceType: AWS_Config

    sourceKeyword:
    keywordInputType: SELECT_FROM_LIST
    keywordValue: S3_ACCOUNT_LEVEL_PUBLIC_ACCESS_BLOCKS

  3. Go to AWS Console > AWS CloudFormation > Stacks. Select AuditManagerBlogStack and choose Outputs.
  4. Make note of the bucketOutput name that starts with auditmanagerblogstack-
  5. Upload the example-control.yaml file into the auditmanagerblogstack- bucket noted in step 3, inside the controls folder
  6. The event-driven architecture is deployed as part of the solution. Uploading the file to the Amazon S3 bucket triggers an automated event to create the new custom control in AWS Audit Manager.

To validate your new custom control is automatically provisioned in AWS Audit Manager

  1. In the AWS console, go to AWS Audit Manager and select Control library
  2. Choose Custom controls to view the following controls:
Figure 6. Audit Manager custom controls are listed as Custom controls

Figure 6. Audit Manager custom controls are listed as Custom controls

To create your own custom framework as code

  1. Create a new framework file named example-framework.yaml with contents as shown below:
  2. name:
    Sample DataSecurity Framework

    description:
    A sample data security framework to prohibit public access to data

    complianceType:
    NIST

    controlSets:
    – name: Prohibit public access
    controls:
    – DataSecurity-PublicAccessProhibited

    tags:
    Tag1: DataSecurity
    Tag2: PublicAccessProhibited

  3. Go to AWS Console > AWS CloudFormation > Stacks. Select AuditManagerBlogStack and choose Outputs.
  4. Make note of the bucketOutput name that starts with auditmanagerblogstack-
  5. Upload the example-framework.yaml file into the bucket noted in step 3 above, inside the frameworks folder
  6. The event driven architecture is deployed as part of the blog. The file upload to Amazon S3 triggers an automated event to create the new custom framework in AWS Audit Manager.

To validate your new custom framework automatically provisioned in AWS Audit Manager

  1. Go to AWS Audit Manager in the AWS console and select Control library
  2. Click Custom controls and you should be able to see the following controls:
Figure 7. View custom controls created via custom repo

Figure 7. View custom controls created via custom repo

Congratulations, you have successfully created your new custom control and framework using the proposed solution.

Next steps

An Audit Manager assessment is based on a framework, which is a grouping of controls. Using the framework of your choice as a starting point, you can create an assessment that collects evidence for the controls in that framework. In your assessment, you can also define the scope of your audit. This includes specifying which AWS accounts and services you want to collect evidence for. You can create an assessment from a custom framework  you build yourself, using steps from the Audit Manager documentation.

Conclusion

The solution provides the dynamic ability to design, develop and monitor capabilities that can be extended as a standardized enterprise IT controls catalogue for your company. With AWS Audit Manager, you can build compliance controls as code, with capability to audit your environment on a daily, weekly, or monthly basis. You can use this solution to improve the dynamic nature of assessments with AWS Audit Manager’s compliance audit, on time with reduced manual effort. To learn more about our standard frameworks to assist you, see Supported frameworks in AWS Audit Manager which provides prebuilt frameworks based on AWS best practices.

Author

Deenadayaalan Thirugnanasambandam

Deenadayaalan is a Solution Architect at Amazon Web Services. He provides prescriptive architectural guidance and consulting that enable and accelerate customers’ adoption of AWS.

Author

Hu Jin

Hu is a Software Development Engineer at AWS. He helps customers build secure and scalable solutions on AWS Cloud to realise business value faster.

Author

Vinodh Shankar

Vinodh is a Sr. Specialist SA at Amazon Web Services. He helps customers with defining their transformation road map, assessing readiness, creating business case and mapping future state business transformation on cloud.

Author

Hafiz Saadullah

Hafiz is a Senior Technical Product Manager with AWS focused on AWS Solutions.

Top 10 security best practices for securing backups in AWS

Post Syndicated from Ibukun Oyewumi original https://aws.amazon.com/blogs/security/top-10-security-best-practices-for-securing-backups-in-aws/

Security is a shared responsibility between AWS and the customer. Customers have asked for ways to secure their backups in AWS. This post will guide you through a curated list of the top ten security best practices to secure your backup data and operations in AWS. While this blog post focuses on backup data and operations in AWS Backup service, the recommended security best practices can be leveraged by organizations that utilize other backup solutions, such as backup tools from the AWS Marketplace.

Since security practices constantly evolve to mitigate new risks, it’s important that you conduct regular risk assessments to determine the applicability of security controls, and implement multiple layers of controls to mitigate risks to your data.

#1 – Implement a backup strategy

A comprehensive backup strategy is an essential part of an organization’s data protection plan to withstand, recover, and reduce any impact that might be sustained due to a security event. You should create an extensive backup strategy that defines which data must be backed up, how often data must be backed up, and monitoring of backup and recovery tasks. When you develop a comprehensive strategy for backing up and restoring data, you should first identify interruptions that may occur, and their potential business impact.

Your objective should be building a recovery strategy that brings your workload back up or avoids downtime within the acceptable Recovery Time Objective (RTO) and Recovery Point Objective (RPO). RTO is the acceptable delay between the interruption of service and restoration of service, and RPO is the acceptable amount of time since the last data recovery point. You should consider a granular backup strategy that includes all of the following: continuous backup cadence, Point-in-Time Recovery (PITR), file-level recovery, application data–level recovery, volume-level recovery, instance-level recovery, etc.

A well-designed backup strategy should include actions that can protect and recover your resources from ransomware, with detailed recovery requirements for your applications and their data dependencies. For example, while you establish preventive and detective controls to mitigate the risk of ransomware, you should also design the appropriate level of granularity for cross-region and/or cross-account copy and restore patterns, to ensure that administrators do not restore corrupt backup data in the event of a security event.

In some industries, when developing a backup strategy, you must also consider the regulations for data retention requirements. You should make sure your backup strategy is designed with the necessary retention requirements (per data classification level and/or resource type) sufficient to meet your regulatory needs.

Consult your security compliance teams to validate whether your backup resources and operations should be included or segmented from the scope of your compliance programs. In my experience as a PCI DSS Qualified Security Assessor (QSA), I’ve seen successful/more mature customers include backup and recovery as critical parts of their security program. This helps them understand where data is across their environment and appropriately define compliance scope.

Refer to Backup and Recovery Approaches Using AWS and the Reliability Pillar of the AWS Well-Architected Framework for architectural best practices for designing and operating reliable, secure, efficient, and cost-effective workloads in the cloud.

#2 – Incorporate backup in DR and BCP

Disaster recovery (DR) is the process of preparing, responding, and recovering from a disaster. It is an important part of your resiliency strategy, and concerns how your workload responds when a disaster strikes. A disaster could be a technical failure, human action, or natural event. A Business Continuity Plan (BCP) outlines how an organization intends to continue normal business operations during an unplanned disruption.

Your disaster recovery plan should be a subset of your organization’s business continuity plan (BCP) and you should incorporate AWS Backup procedures in your enterprise business continuity plan. For example, a security event that affects production data might require you to invoke a disaster recovery plan that fails over to backup data from another AWS Region. You should ensure that your employees are familiar with and have practiced using AWS Backup along with your organizational procedures, so that if disaster strikes, your organization can continue its normal operations with little or no service disruption.

#3 – Automate backup operations

Organizations should configure their backup plans and resource assignments to reflect their enterprise data protection policies. Automating and deploying backup policies or organization-wide backup plans allows you to standardize and scale your backup strategy. You can leverage AWS Organizations to centrally automate backup policies to implement, configure, manage, and govern backup activity across supported AWS resources by scheduling backup operations.

You should consider implementing infrastructure as code (IaC) and event-driven architecture as essential parts of your digital transformation and backup strategy, to improve productivity and govern infrastructure operations across multi-account environments. Automating backups allows you to reduce manual overhead from time-consuming configuration of your backups, minimizes the risk for errors, provides visibility on drift detection, and enhances backup policy compliance across multiple AWS workloads or accounts.

Implementing backup policies as code can help you meet data protection regulations, by configuring different requirements for your resource types, scaling your enterprise data protection strategy, and implementing lifecycle rules to specify how long before a recovery point either transitions to cold storage or is deleted, which can help optimize your costs.

When automating your backup operations, you can scale resource assignment options using AWS Tags and Resource IDs to automatically identify the AWS resources that store data for your business-critical applications and protect your data using immutable backups. This can help you prioritize security controls, such as access permissions and backup plans or policies.

#4 – Implement access control mechanisms

When thinking about security in the cloud, your foundational strategy should begin with a strong identity foundation to ensure a user has the right permissions to access data. Appropriate authentication and authorization can mitigate the risk of security events. The shared responsibility model requires AWS customers to implement access control policies. You can use AWS Identity and Access Management (IAM) service to create and manage access policies at scale.

When configuring access rights and permissions, you should implement the principle of least privilege by ensuring each user or system accessing your backup data or Vault is only given the permissions necessary to fulfill their job duties. Using AWS Backup, you should implement access control policies by setting access policies on backup vaults to protect your cloud workloads.

For example, implementing access control policies allows you to grant users access to create backup plans and on-demand backups, but still limit their ability to delete recovery points once they’ve been created. Using vault access policies, you can share a destination backup vault with a source AWS Account, user, or IAM role, as required by your business needs. Access policy can also allow you to share a backup vault with one or multiple accounts, or with your entire organization in AWS Organizations.

As you scale your workloads or migrate into AWS, you may need to centrally manage permissions to your backup vaults and operations. You should use service control policies (SCPs) to implement centralized control over the maximum available permissions for all accounts in your organization. This offers defense in depth, and ensures your users stay within the defined access control guidelines. To learn more, read how you can secure your AWS Backup data and operations using service control policies (SCPs).

To mitigate security risks such as unintended access to your backup resources and data, use AWS IAM Access Analyzer to identify any AWS Backup IAM role shared with an external entity such as AWS account, a root user, an IAM user or role, a federated user, an AWS service, an anonymous user, or other entity that you can use to create a filter.

#5 – Encrypt backup data and vault

Organizations increasingly need to improve their data security strategy, and may be required to meet data protection regulations as they scale in the cloud. The correct implementation of encryption methods can provide an additional layer of protection above foundational access control mechanisms providing a mitigation if your primary access control policies fail.

For example, if you configure overly permissive access control policies on your Backup data, your key management system or process can mitigate the maximum impact of a security event, since there are separate authorization mechanisms to access your data and encryption key which means that the backup data is only viewable as cipher text.

To get the most from AWS cloud encryption, you should encrypt data both in transit and at rest. To protect data in transit, AWS uses published API calls to access AWS Backup through the network using Transport Layer Security (TLS) protocol to provide encryption between you, your application and the Backup service. To protect data at rest, AWS offers cloud-native options of using AWS Key Managed System (KMS) or AWS CloudHSM which leverages Advanced Encryption Standard (AES) with 256-bit keys (AES-256), a strong industry-adopted algorithm for encrypting data. You should evaluate your data governance and regulatory requirements, and select the appropriate encryption service to encrypt your cloud data and backup vaults.

Encryption configuration differs depending on the resource type and backup operations across accounts or Regions. Certain resource types support the ability to encrypt your backups using a separate encryption key from the key used to encrypt the source resource. Since you are responsible for managing access controls to determine who can access your Backup data or vault encryption keys and under which conditions, you should use the policy language offered by AWS KMS to define access controls on keys. You can also use AWS Backup Audit Manager to confirm that your backup is properly encrypted.

To learn more, refer to the documentation on encryption for backups and backup copies.

AWS KMS multi-Region keys allows you to replicate keys from one Region into another. Multi-Region keys are designed to simplify encryption management when your encrypted data has to be copied into other Regions for disaster recovery. You should evaluate the need to implement multi-region KMS keys as part of your overall backup strategy.

#6 – Safeguard backups using immutable storage

Immutable storage allows organizations to write data in a Write Once Read Many (WORM) state. While in a WORM state, data can be written one time, read and used as often as needed after it has been committed or written to the storage medium. Immutable storage ensures data integrity is maintained and provides protection against deletes, overwrites, inadvertent and unauthorized access, ransomware compromise etc. Immutable storage offers an efficient mechanism to address potential security events with real impacts on your business operations.

Immutable storage can be used for better governance when paired with strong SCP restrictions, or can be used in a compliance WORM mode when the letter of the law (such as a legal hold) requires access to immutable data.

You can maintain data availability and integrity with AWS Backup Vault Lock to protect your backups* such that unauthorized entities cannot erase, alter or corrupt your customer or business data during the required retention period. AWS Backup Vault Lock helps you meet your organization’s data protection policies by preventing deletions by privileged users (including the AWS account root user), changes to your backup lifecycle settings, and updates that alter your defined retention period.

AWS Backup Vault Lock ensures immutability and adds an additional layer of defense that protects backups (recovery points) in your Backup Vaults, especially in highly- regulated industries with stringent integrity needs for backups and archives. AWS Backup Vault Lock makes sure your data is preserved along with a backup to recover from in case of unintended or malicious actions.

*The feature has not yet been assessed for compliance with the Securities and Exchange Commission (SEC) rule 17a-4(f) and the Commodity Futures Trading Commission (CFTC) in regulation 17 C.F.R. 1.31(b)-(c).

#7 – Implement backup monitoring and alerting

Backup jobs can fail. A failed job, such as backup, restore, or copy task, may have impact on subsequent steps in a process. When the initial backup job fails, there’s a high probability that other succeeding tasks will also fail. In such a scenario, you can best understand the course of events through monitoring and notification.

Enabling and configuring notifications to generate emails to monitor AWS Backup jobs gives you awareness of your backup activities, ensures you meet critical service-level agreements (SLAs), enhances your business-as-usual monitoring, and helps you meet compliance obligations. You can implement backup monitoring for your workloads by integrating AWS Backup with other AWS services and ticketing systems to perform automated investigation and escalation flows.

For example, use Amazon CloudWatch to track metrics, create alarms, and view dashboards, Amazon EventBridge to monitor AWS Backup processes and events, AWS CloudTrail to monitor AWS Backup API calls with detailed information on the time, source IP, users, and accounts making those calls, and Amazon Simple Notification Service (Amazon SNS) to subscribe to AWS Backup-related topics such as backup, restore, and copy events. Monitoring and alerting can provide organizational awareness for your backup jobs, which helps you respond to backup failures.

You can use AWS Backup Audit Manager to automatically generate evidence of your daily backup audit reports per account and Region. You can also scale your backup monitoring across multiple accounts by using a set of automation templates and dashboards (known as the backup observer solution) to obtain aggregated daily cross-account multi-Region AWS Backup reporting.

#8 – Audit backup configuration

Organizations should audit the compliance of AWS Backup policies against defined controls such as defined backup frequency. You should continuously and automatically track your backup activity and generate automatic reports to find and investigate backup operations or resources which are not compliant with your business requirements.

AWS Backup Audit Manager provides built-in, customizable, compliance controls that align with your business compliance and regulatory requirements. AWS Backup Audit Manager provides five backup governance control templates, including backup resources protected by backup plans, backup plan with a minimum frequency and minimum retention, etc. If you leverage infrastructure-as-code automation, you can use AWS Backup Audit Manager with AWS CloudFormation.

AWS Security Hub provides you with a comprehensive view of your security state in AWS and helps you check your environment against security best practices and industry standards such as AWS Foundational Security Best Practices controls. If you leverage AWS Security Hub within your cloud environment, we recommend you enable the AWS Foundational Security Best Practices, as it includes detective controls that can help with securing backups in AWS. The detective controls in AWS Backup Audit Manager and Security Hub are also mostly available as AWS managed rules in AWS Config.

#9 – Test data recovery capabilities

Ideally, any data stored as a backup must be able to be successfully restored when required. Your backup strategy must include testing your backups. A backup strategy is not effective if backed up data cannot be restored. You should regularly test your ability to find certain recovery points and restore them. While AWS Backup automatically copies tags from the resources it protects to the recovery points, tags are not copied from recovery points to the corresponding restored resources. To scale your inventory management and locate recovery points, you should consider retaining your tags on resources created by AWS Backup restore jobs, using AWS Backup events to trigger a tag replication process.

You can start your data recovery workflow by establishing data recovery patterns and then regularly test them. You should create a simple and repeatable process that allows you to perform continuous data recovery testing to increase confidence in your ability to recover backup data. For example, you can create a pattern to test a cross-account, cross-region restore operation from a central DR backup vault encrypted with a customer-managed KMS key to a source account backup vault encrypted with a different customer-managed KMS key.

If you don’t frequently test such restore operations, you may find that your assumptions on KMS encryption for cross-account, cross-region operations are incorrect. Oftentimes, the only backup recovery pattern that actually works is the path you test frequently. Through routine testing of supported backup resource types, you can spot early warnings that could potentially cause future disturbances and loss of critical data. If possible, maintain a limited but feasible number of recovery paths and patterns to prevent wasted storage space, optimize costs, and save time. It’s easier to fix the problem when a recovery test fails than losing valuable or critical data.

#10 – Incorporate backup in incident response plan

Security Incident Response Simulations (SIRS) are internal events that provide a structured opportunity to practice your incident response plan and procedures during a realistic scenario. It’s valuable to test your backup data and operations in creative SIRS activities to test yourself against the unexpected. This helps you validate your organizational readiness and develop comfort with the rare and unexpected. Your simulations must be realistic, and should involve cross-functional organizational teams required to respond to events.

Start with basic and easy simulation exercises, and work towards a full, complex event. For example, you can build a realistic model that consists of an Amazon Virtual Private Cloud and associated resources that simulate inadvertent overexposure of information or a potential data breach due to changes to policies and access control lists. Document lessons learned to evaluate how well your incident response plan worked, and to identify improvements that need to be made to future response procedures.

You can use AWS Backup to set up automated instance-level backups as AMIs and volume-level backups as snapshots across multiple AWS accounts. This can help your incident response team enhance their forensic process such as automated forensic disk collection, by providing a restore point that could reduce the scope and impact of potential security events such as ransomware.

Conclusion

In this blog post, I showed you the top ten security best practices and controls to protect your backup data in AWS. I encourage you to use these best practices to design and implement a backup and recovery strategy and architecture with multiple layers of controls that scales and achieves your business needs. To learn more about AWS Backup, refer to the AWS Backup documentation.

If you have feedback about this post, submit comments in the Comments section below. If you have questions about this post, start a new thread on the AWS Backup forum or contact AWS Support.

Further reading

Additional resources to consider:

Prescriptive Guidance: Backup and recovery approaches on AWS

Blog: Automate centralized backup at scale across AWS services using AWS Backup

Blog: Disaster Recovery (DR) Architecture on AWS, Part I: Strategies for Recovery in the Cloud

Blog: The importance of encryption and how AWS can help

Blog: Enhance the security posture of your backups with AWS Backup Vault Lock

Blog: Monitor, Evaluate, and Demonstrate Backup Compliance with AWS Backup Audit Manager

Blog: Create and share encrypted backups across accounts and Regions using AWS Backup

Blog: Simplify auditing your data protection policies with AWS Backup Audit Manager

Blog: Managing access to backups using service control policies with AWS Backup

Blog: Obtain aggregated daily cross-account multi-Region AWS Backup reporting

Want more AWS Security news? Follow us on Twitter.

Author

Ibukun Oyewumi

Ibukun is a Security Assurance Consultant at AWS. He focuses on helping customers architect, build, scale, and optimize security controls, risk management, and compliance.

2021 AWS security-focused workshops

Post Syndicated from Temi Adebambo original https://aws.amazon.com/blogs/security/2021-aws-security-focused-workshops/

Every year, Amazon Web Services (AWS) looks to help our customers gain more experience and knowledge of our services through hands-on workshops. In 2021, we unfortunately couldn’t connect with you in person as much as we would have liked, so we wanted to create and share new ways to learn and build on AWS. We built and published several security-focused workshops that help you learn how to use or configure new services and features securely. Workshops are hands-on learning modules designed to teach or introduce practical skills, techniques, or concepts you can use to solve business problems.

In this blog post, we highlight the newest AWS security-focused workshops below. There are also several other workshops that were developed before 2021; you can find them on AWS Workshops, AWS Security Workshops, and AWS Samples. Here’s the list:

Data Protection and Privacy

Workshop Title

Abstract

Data discovery and classification with Amazon Macie

In this workshop, get familiar with Amazon Macie and learn to scan and classify data in your Amazon Simple Storage Service (Amazon S3) buckets. Work with Macie (data classification) and AWS Security Hub (centralized security view) to see how data in your environment is stored, and to understand any changes in S3 bucket policies that may affect your security posture. Learn to create a custom data identifier and to create and scope data discovery and classification jobs in Macie. Finally, use Macie to filter and investigate the results from the scans you create.

Scaling your encryption at rest capabilities with AWS KMS

AWS makes it easy to protect your data with encryption. This hands-on workshop provides an opportunity to dive deep into encryption at rest options with AWS. Learn AWS server-side encryption with AWS Key Management Service (AWS KMS) for services such as Amazon S3, Amazon Elastic Block Store (Amazon EBS), and Amazon Relational Database Service (Amazon RDS). Also, learn best practices for using AWS KMS across multiple accounts and Regions and how to scale while optimizing for performance.

Store, retrieve, and manage sensitive credentials in AWS Secrets Manager

In this workshop, learn how to integrate AWS Secrets Manager in your development platform, backed by serverless applications. Work through a sample application, and use Secrets Manager to retrieve credentials as well as work with attribute-based access control using tags. Also, learn how to monitor the compliance of secrets and implement incident response workflows that will rotate the secret, restore the resource policy, alert the SOC, and deny access to the offender.

Building and operating a Private Certificate Authority on AWS

This workshop covers private certificate management on AWS, employing the concepts of least privilege, separation of duties, monitoring, and automation. Participants learn operational aspects of creating a complete certificate authority (CA) hierarchy, building a simple web application, and issuing private certificates. It also covers how job functions—including CA administrators, application developers, and security administrators—can follow the principle of least privilege to perform various functions associated with certificate management. Finally, learn about IoT certificates, code-signing, and certificate templates to enable all your use cases.

Amazon S3 security and access settings and controls

Amazon S3 provides many security and access settings to help you secure your data, controls that ensure that those settings remain in place, and features to help you audit those settings and controls. This workshop walks you through these Amazon S3 capabilities and scenarios, to help you apply them for different security requirements.

Redact data as needed using Amazon S3 Object Lambda

Amazon S3 Object Lambda works with your existing applications, and allows you to add your own code using AWS Lambda functions to automatically process and transform data from Amazon S3 before returning it to an application. This enables different views of the same object depending on user identity, such as restricting access to confidential information, or disallowing access to personally identifiable information (PII) data. In this workshop, learn how to use Amazon S3 Object Lambda to modify objects during GET requests, so you no longer need to store multiple views of the same document.

Using AWS Nitro Enclaves to process highly sensitive data

In this hands-on workshop, learn how to use AWS Nitro Enclaves to isolate highly-sensitive data from your users, applications, and third-party libraries on your Amazon Elastic Compute Cloud (Amazon EC2) instances. Explore AWS Nitro Enclaves, discuss common use cases, and build and run your own enclave. During this workshop, learn about enclave isolation, cryptographic attestation, enclave image files, local Vsock communication channels, common debugging scenarios, and the enclave lifecycle.

Ransomware prevention strategies in Amazon S3

Learn how to use the protective, detective and monitoring controls in AWS to protect your data in S3 from ransomware threats. Set up Amazon GuardDuty for S3 and AWS Identity and Access Management (IAM) Access Analyzer, and learn to read and respond to findings and create IAM invariants. Create a tiered storage approach to backup and recovery, and learn to use Amazon S3 Object Lock, versioning, and replication to provide immutable storage and protect against accidental or malicious deletion.

Governance, Risk, and Compliance

Operating securely in a multi-account environment

Operating multiple AWS accounts under an organization is how many users consume AWS Cloud services. In this workshop, learn how to build foundational security monitoring in multi-account environments. Walk through an initial setup of AWS Security Hub for centralized aggregation of findings across your AWS Organizations organization. Additionally, learn how to centralize Amazon GuardDuty findings, Amazon Detective functions, AWS Identity and Access Management (IAM) Access Analyzer findings (if available), AWS Config rule evaluations, and AWS CloudTrail logs into the central security monitoring account (security tools account). Finally, implement a service control policy (SCP) that denies the ability to disable these security controls.

Building remediation workflows to simplify compliance

Automation and simplification are key to managing compliance at scale. Remediation is one of the essential elements of simplifying and managing risk. In this workshop, see how to build a remediation workflow using AWS Config and AWS Systems Manager automation. Learn how this workflow can be deployed at scale and monitored with AWS Security Hub to oversee the entire organization and how to use AWS Audit Manager to easily access evidence of risk management.

Identity and Access Management

Integrating IAM Access Analyzer into a CI/CD pipeline

Want to analyze Identity and Access Management (IAM) policies at scale? Want to help your developers write secure IAM policies? This workshop provides you the hands-on opportunity to run IAM Access Analyzer policy validation on your AWS CloudFormation templates in a continuous integration/continuous deployment (CI/CD) pipeline.

Data perimeter workshop

In this workshop, learn how to create a data perimeter by building controls that allow access to data only from expected network locations and by trusted identities. The workshop consists of five modules, each designed to illustrate a different Identity and Access Management (IAM) or network control. Learn where and how to implement the appropriate controls based on different risk scenarios. Discover how to implement these controls as service control policies, identity- and resource-based policies, and Amazon Virtual Private Cloud (Amazon VPC) endpoint policies.

Network and Infrastructure Security

Build a Zero Trust architecture for service-to-service workloads on AWS

In this workshop, get hands-on experience implementing a Zero Trust architecture for service-to-service workloads on AWS. Learn how to use services such as Amazon API Gateway and Virtual Private Cloud (Amazon VPC) endpoints to integrate network and identity controls while using Amazon GuardDuty, Lambda, and Amazon DynamoDB to take advantage of native service controls. Learn how these services allow you to authorize specific flows between components to reduce lateral network mobility risk and improve the overall security posture of your workload.

Securing deployment of third-party ML models

Enterprise users adopting machine learning (ML) on AWS often look for prescriptive guidance on implementing security best practices, establishing governance, securing their ML models, and meeting compliance standards. Building a repeatable solution provides users with standardization and governance over what gets provisioned in their AWS account. In this workshop, learn steps you can take to secure third-party ML model deployments. We provide cloud infrastructure-as-code templates to automate the setup of a hardened Amazon SageMaker environment. These templates include private networking, VPC endpoints, end-to-end encryption, logging and monitoring, and enhanced governance and access controls through AWS Service Catalog.

Building Prowler into a QuickSight-powered AWS security dashboard

In this workshop, get hands-on experience with Prowler, AWS Security Hub, and Amazon QuickSight by building a custom security dashboard for the AWS environment. Using a multi-account deployment of Prowler integrated into Security Hub, learn to identify and analyze Prowler findings and integrate QuickSight to visualize the information. Discover how to get the most from QuickSight and Prowler with automatically created datasets.

Threat Detection and Incident Response

Integration, prioritization, and response with AWS Security Hub

This workshop is designed to get you familiar with AWS Security Hub, so you can better understand how to use it in your own AWS environment. This workshop has two sections. The first section demonstrates the features and functions of AWS Security Hub. The second section shows you how to use AWS Security Hub to import findings from different data sources, analyze findings so you can prioritize response work, and implement responses to findings to help improve your security posture.

Building an AWS incident response plan using Jupyter notebooks

This workshop guides you through building an incident response plan for your AWS environment using Jupyter notebooks. Walk through an easy-to-follow sample incident, using building blocks as a ready-to-use playbook in a Jupyter notebook. Then, follow simple steps to add additional programmatic and documented steps to your incident response plan.

Scaling threat detection and response on AWS

In this hands-on workshop, learn about several AWS services involved in threat detection and response as you walk through real-world threat scenarios. Learn about the threat detection capabilities of Amazon GuardDuty, Amazon Macie, and AWS Security Hub and the available response options. For each hands-on scenario, review methods to detect and respond to threats using the following services: AWS CloudTrail, Virtual Private Cloud (Amazon VPC) Flow Logs, Amazon CloudWatch Events, AWS Lambda, Amazon Inspector, Amazon GuardDuty, and AWS Security Hub.

Building incident response playbooks for AWS

In this workshop, learn how to develop incident response playbooks. Explore the incident response lifecycle, including preparation, detection and analysis, containment, eradication and recovery, and post-incident activity. To get the most out of this workshop, you should have advanced experience with AWS services and responsibilities aligned with incident response frameworks such as NIST SP 800-61 R2.

This list is representative of the security workshops created in 2021 to help customers on their journey in AWS. If you’d like to find more workshops, please go to AWS Workshops and select Security in the top navigation bar, or you can also check out AWS Security Workshops for a subset of workshops curated by AWS Security Specialists. We hope you enjoy these workshops!

 
If you have feedback about this post, submit comments in the Comments section below.

Want more AWS Security news? Follow us on Twitter.
Author

Temi Adebambo

Temi leads the Security and Network Solutions Architecture team at AWS. His team is focused on working with customers on cloud migration and modernization, cybersecurity strategy, architecture best practices, and innovation in the cloud. Before AWS, he spent over 14 years as a consultant, advising CISOs and security leaders.

Monitor AWS resources created by Terraform in Amazon DevOps Guru using tfdevops

Post Syndicated from Harish Vaswani original https://aws.amazon.com/blogs/devops/monitor-aws-resources-created-by-terraform-in-amazon-devops-guru-using-tfdevops/

This post was written in collaboration with Kapil Thangavelu, CTO at Stacklet


Amazon DevOps Guru is a machine learning (ML) powered service that helps developers and operators automatically detect anomalies and improve application availability. DevOps Guru utilizes machine learning models, informed by years of Amazon.com and AWS operational excellence to identify anomalous application behavior (e.g., increased latency, error rates, resource constraints) and surface critical issues that could cause potential outages or service disruptions. DevOps Guru’s anomaly detectors can also proactively detect anomalous behavior even before it occurs, helping you address issues before they happen; insights provide recommendations to mitigate anomalous behavior.

When you enable DevOps Guru, you can configure its coverage to determine which AWS resources you want to analyze. As an option, you can define the coverage boundary by selecting specific AWS CloudFormation stacks. For each stack you choose, DevOps Guru analyzes operational data from the supported resources to detect anomalous behavior. See Working with AWS CloudFormation stacks in DevOps Guru for more details.

For Terraform users, Stacklet developed an open-source tool called tfdevops, which converts Terraform state to an importable CloudFormation stack, which allows DevOps Guru to start monitoring the encapsulated AWS resources. Note that tfdevops is not a tool to convert Terraform into CloudFormation. Instead, it creates the CloudFormation stack containing the imported resources that are specified in the Terraform module and enables DevOps Guru to monitor the resources in that CloudFormation stack.

In this blog post, we will explain how you can configure and use tfdevops, to easily enable DevOps Guru for your existing AWS resources created by Terraform.

Solution overview

tfdevops performs the following steps to import resources into Amazon DevOps Guru:

  • It translates terraform state into an AWS CloudFormation template with a retain deletion policy
  • It creates an AWS CloudFormation stack with imported resources
  • It enrolls the stack into Amazon DevOps Guru

For illustration purposes, we will use a sample serverless application that includes some of the components DevOps Guru and tfdevops supports. This application consists of an Amazon Simple Queue Service (SQS) queue, and an AWS Lambda function that processes messages in the SQS queue. It also includes an Amazon DynamoDB table that the Lambda function uses to persist or to read data, and an Amazon Simple Notification Service (SNS) topic to where the Lambda function publishes the results of its processing. The following diagram depicts our sample application:

The architecture diagram shows a sample application containing an Amazon SQS queue, an AWS Lambda function, an Amazon SNS topic and an Amazon DynamoDB table.

Prerequisites

Before getting started, make sure you have these prerequisites:

Walkthrough

Follow these steps to monitor your AWS resources created with Terraform templates by using tfdevops:

  1. Install tfdevops following the instructions on GitHub
  2. Create a Terraform module with the resources supported by tfdevops
  3. Deploy the Terraform to your AWS account to create the resources in your account

Below is a sample Terraform module to create a sample AWS Lambda function, an Amazon DynamoDB table, an Amazon SNS topic and an Amazon SQS queue.

# IAM role for the lambda function
resource "aws_iam_role" "lambda_role" {
 name   = "iam_role_lambda_function"
 assume_role_policy = <<EOF
{
  "Version": "2012-10-17",
  "Statement": [
    {
      "Action": "sts:AssumeRole",
      "Principal": {
        "Service": "lambda.amazonaws.com"
      },
      "Effect": "Allow",
      "Sid": ""
    }
  ]
}
EOF
}

# IAM policy for logging from the lambda function
resource "aws_iam_policy" "lambda_logging" {

  name         = "iam_policy_lambda_logging_function"
  path         = "/"
  description  = "IAM policy for logging from a lambda"
  policy = <<EOF
{
  "Version": "2012-10-17",
  "Statement": [
    {
      "Action": [
        "logs:CreateLogGroup",
        "logs:CreateLogStream",
        "logs:PutLogEvents"
      ],
      "Resource": "arn:aws:logs:*:*:*",
      "Effect": "Allow"
    }
  ]
}
EOF
}

# Policy attachment for the role
resource "aws_iam_role_policy_attachment" "policy_attach" {
  role        = aws_iam_role.lambda_role.name
  policy_arn  = aws_iam_policy.lambda_logging.arn
}

# Generates an archive from the source
data "archive_file" "default" {
  type        = "zip"
  source_dir  = "${path.module}/src/"
  output_path = "${path.module}/myzip/python.zip"
}

# Create a lambda function
resource "aws_lambda_function" "basic_lambda_function" {
  filename                       = "${path.module}/myzip/python.zip"
  function_name                  = "basic_lambda_function"
  role                           = aws_iam_role.lambda_role.arn
  handler                        = "index.lambda_handler"
  runtime                        = "python3.8"
  depends_on                     = [aws_iam_role_policy_attachment.policy_attach]
}

# Create a DynamoDB table
resource "aws_dynamodb_table" "sample_dynamodb_table" {
  name           = "sample_dynamodb_table"
  hash_key       = "sampleHashKey"
  billing_mode   = "PAY_PER_REQUEST"

  attribute {
    name = "sampleHashKey"
    type = "S"
  }
}

# Create an SQS queue
resource "aws_sqs_queue" "sample_sqs_queue" {
  name          = "sample_sqs_queue"
}

# Create an SNS topic
resource "aws_sns_topic" "sample_sns_topic" {
  name = "sample_sns_topic"
}
  1. Run tfdevops to convert to CloudFormation template, deploy the stack and enable DevOps Guru

The following command generates a CloudFormation template locally from a Terraform state file:

tfdevops cfn -d ~/path/to/terraform/module --template mycfn.json --resources importable-ids.json

The following command deploys the CloudFormation template, creates a CloudFormation stack, imports resources, and activates DevOps Guru on the stack:

tfdevops deploy --template mycfn.json --resources importable-ids.json
  1. After tfdevopsfinishes the deployment, you can already see the stack in the CloudFormation dashboard.

CloudFormation dashboard showing the stack, GuruStack, created by tfdevops

tfdevops imports the existing resources in the Terraform module into AWS CloudFormation. Note, that these are not new resources and would have no additional cost implications for the resources itself. See Bringing existing resources into CloudFormation management to learn more about importing resources into CloudFormation.

Resources view for GuruStack listing the imported resources in GuruStack

  1. Your stack also appears at the DevOps Guru dashboard, indicating that DevOps Guru is monitoring your resources, and will alarm in case it detects anomalous behavior. Insights are co-related sequence of events and trails, grouped together to provide you with prescriptive guidance and recommendations to root-cause and resolve issues more quickly. See Working with insights in DevOps Guru to learn more about DevOps Guru insights.

Amazon DevOps Guru Dashboard displays the system health summary and system health overview of each CloudFormation stack. GuruStack is marked as healthy with 0 reactive insights and 0 proactive insights.

Note that when you use the tfdevops tool, it automatically enables DevOps Guru on the imported stack.

Amazon DevOps Guru Analyze resources displays the analysis coverage option selected. GuruStack is the selected stack for analysis

  1. Clean up – delete the stack

CloudFormation Stacks menu showing GuruStack as selected. The stack can be deleted by pressing the Delete button.

Conclusion

This blog post demonstrated how to enable DevOps Guru to monitor your AWS resources created by Terraform. Using the Stacklet’s tfdevops tool, you can create a CloudFormation stack from your Terraform state, and use that to define the coverage boundary for DevOps Guru. With that, if your resources have unexpected or unusual behavior, DevOps Guru will notify you and provide prescriptive recommendations to help you quickly fix the issue.

If you want to experiment DevOps Guru, AWS offers a free tier for the first three months that includes 7,200 AWS resource hours per month for free on each resource group A and B. Also, you can Estimate Amazon DevOps Guru resource analysis costs from the AWS Management Console. This feature scans selected resources to automatically generate a monthly cost estimate. Furthermore, refer to Gaining operational insights with AIOps using Amazon DevOps Guru to learn more about how DevOps Guru helps you increase your applications’ availability, and check out this workshop for a hands-on walkthrough of DevOps Guru’s main features and capabilities. To learn more about proactive insights, see Generating DevOps Guru Proactive Insights for Amazon ECS. To learn more about anomaly detection, see Anomaly Detection in AWS Lambda using Amazon DevOps Guru’s ML-powered insights.

About the authors

Harish Vaswani

Harish Vaswani is a Senior Cloud Application Architect at Amazon Web Services. He specializes in architecting and building cloud native applications and enables customers with best practices in their cloud journey. He is a DevOps and Machine Learning enthusiast. Harish lives in New Jersey and enjoys spending time with this family, filmmaking and music production.

Rafael Ramos

Rafael is a Solutions Architect at AWS, where he helps ISVs on their journey to the cloud. He spent over 13 years working as a software developer, and is passionate about DevOps and serverless. Outside of work, he enjoys playing tabletop RPG, cooking and running marathons.

How Meshify Built an Insurance-focused IoT Solution on AWS

Post Syndicated from Grant Fisher original https://aws.amazon.com/blogs/architecture/how-meshify-built-an-insurance-focused-iot-solution-on-aws/

The ability to analyze your Internet of Things (IoT) data can help you prevent loss, improve safety, boost productivity, and even develop an entirely new business model. This data is even more valuable, with the ever-increasing number of connected devices. Companies use Amazon Web Services (AWS) IoT services to build innovative solutions, including secure edge device connectivity, ingestion, storage, and IoT data analytics.

This post describes Meshify’s IoT sensor solution, built on AWS, that helps businesses and organizations prevent property damage and avoid loss for the property-casualty insurance industry. The solution uses real-time data insights, which result in fewer claims, better customer experience, and innovative new insurance products.

Through low-power, long-range IoT sensors, and dedicated applications, Meshify can notify customers of potential problems like rapid temperature decreases that could result in freeze damage, or rising humidity levels that could lead to mold. These risks can then be averted, instead of leading to costly damage that can impact small businesses and the insurer’s bottom line.

Architecture building blocks

The three building blocks of this technical architecture are the edge portfolio, data ingestion, and data processing and analytics, shown in Figure 1.

Figure 1. Building blocks of Meshify’s technical architecture

Figure 1. Building blocks of Meshify’s technical architecture

I. Edge portfolio (EP)

Starting with the edge sensors, the Meshify edge portfolio covers two types of sensors:

  • LoRaWAN (Low power, long range WAN) sensor suite. This sensor provides the long connectivity range (> 1000 feet) and extended battery life (~ 5 years) needed for enterprise environments.
  • Cellular-based sensors. This sensor is a narrow band/LTE-M device that operates at LTE-M band 2/4/12 radio frequency and uses edge intelligence to conserve battery life.

II. Data ingestion (DI)

For the LoRaWAN solution, aggregated sensor data at the Meshify gateway is sent to AWS using AWS IoT Core and Meshify’s REST service endpoints. AWS IoT Core is a managed cloud platform that lets IoT devices easily and securely connect using multiple protocols like HTTP, MQTT, and WebSockets. It expands its protocol coverage through a new fully managed feature called AWS IoT Core for LoRaWAN. This gives Meshify the ability to connect LoRaWAN wireless devices with the AWS Cloud. AWS IoT Core for LoRaWAN delivers a LoRaWAN network server (LNS) that provides gateway management using the Configuration and Update Server (CUPS) and Firmware Updates Over-The-Air (FUOTA) capabilities.

III. Data processing and analytics (DPA)

Initial processing of the data is done at the ingestion layer, using Meshify REST API endpoints and the Rules Engine of AWS IoT Core. Meshify applies filtering logic to route relevant events to Amazon Managed Streaming for Apache Kafka (Amazon MSK). Amazon MSK is an AWS streaming data service that manages Apache Kafka infrastructure and operations, streamlining the process of running Apache Kafka applications on AWS.
Meshify’s applications then consume the events from Amazon MSK per the configured topic subscription. They enrich and correlate the events with the records with a managed service, Amazon Relational Database Service (RDS). These applications run as scalable containers on another managed service, Amazon Elastic Kubernetes Service (EKS), which runs container applications.

Bringing it all together – technical workflow

In Figure 2, we illustrate the technical workflow from the ingestion of field events to their processing, enrichment, and persistence. Finally, we use these events to power risk avoidance decision-making.

Figure 2. Technical workflow for Meshify IoT architecture

Figure 2. Technical workflow for Meshify IoT architecture

  1. After installation, Meshify-designed LoRa sensors transmit information to the cloud through Meshify’s gateways. LoRaWAN capabilities create connectivity between the sensors and the gateways. They establish a low power, wide area network protocol that securely transmits data over a long distance, through walls and floors of even the largest buildings.
  2. The Meshify Gateway is a redundant edge system, capable of sending sensor data from various sensors to the Meshify cloud environment. Once the LoRa sensor information is received by the Meshify Gateway, it converts the incoming radio frequency (RF) signals, which support faster transfer rate to Meshify’s cloud environment.
  3. Data from the Meshify Gateway and sensors is initially processed at Meshify’s AWS IoT Core and REST service endpoints. These destinations for IoT streaming data help with the initial intake and introduce field data to the Meshify cloud environment. The initial ingestion points can scale automatically based upon the volume of sensor data received. This enables rapid scaling and ease of implementation.
  4. After the data has entered the Meshify cloud environment, Meshify uses Amazon EKS and Amazon MSK to process the incoming data stream. Amazon MSK producer and consumer applications within the EKS systems enrich the data streams for the end users and systems to consume.
  5. Producer applications running on EKS send processed events to the Amazon MSK service. These events include storing and retrieval of raw data, enriched data, and system-level data.
  6. Consumer applications hosted on the EKS pods receive events per the subscribed Amazon MSK topic. Web, mobile, and analytic applications enrich and use these data streams to display data to end users, business teams, and systems operations.
  7. Processed events are persisted in Amazon RDS. The databases are used for reporting, machine learning, and other analytics and processing services.

Building a scalable IoT solution

Meshify first began work on the Meshify sensors and hosted platform in 2012. In the ensuing decade, Meshify has successfully created a platform to auto-scale upon demand with steady, predictable performance. This gave Meshify both the ability to use only the resources needed, and still have the capacity to handle unexpected voluminous data.

As the platform scaled, so did the volume of sensor data, operations and diagnostics data, and metadata from installations and deployments. Building an end-to-end data pipeline that integrates these different data sources and delivers co-related insights at low latency was time well spent.

Conclusion

In this post, we’ve shown how Meshify is using AWS services to power their suite of IoT sensors, software, and data platforms. Meshify’s most important architectural enhancements have involved the introduction of managed services, notably AWS IoT Core for LoRaWAN and Amazon MSK. These improvements have primarily focused on the data ingestion, data processing, and analytics stages.

Meshify continues to power the data revolution at the intersection of IoT and insurance at the edge, using AWS. Looking ahead, Meshify and HSB are excited at the prospect of scaling the relationship with AWS from cloud computing to the world of edge devices.
Learn more about how emerging startups and large enterprises are using AWS IoT services to build differentiated products.

Meshify is an IoT technology company and subsidiary of HSB, based in Austin, TX. Meshify builds pioneering sensor hardware, software, and data analytics solutions that protect businesses from property and equipment damage.

Define application boundary using AWS resources tags in Amazon DevOps Guru

Post Syndicated from Suneel Joshi original https://aws.amazon.com/blogs/devops/define-application-boundary-using-aws-resources-tags-in-amazon-devops-guru/

Amazon DevOps Guru is an ML powered service that makes it easy to improve an application’s operational performance and availability. By analyzing application metrics, logs, events and traces, DevOps Guru identifies behaviors that deviate from normal operating patterns and creates insights that you can use to improve your application.

At re:Invent 2021, we announced a new tagging feature in DevOps Guru. This feature allows you to organize resources into logical applications, using AWS resources tags so that you can have more control over how applications are defined. Well-defined applications enable DevOps Guru to group related anomalies together to better identify problems and to provide more meaningful recommendations. A tag is a label consisting of a user-defined key and a value. Previously, the coverage boundary consisted of an entire AWS account or specific resources defined by AWS CloudFormation stacks.

Getting Started

Define Resources to analyze using AWS resources tags

An AWS resource tag is a label that consists of a key and a value. A key-value pair can create useful grouping of resources into different applications. For DevOps Guru, you specify one tag key across all your applications. Resources with the same tag value are grouped together into a logical application. The tag key needs to be prefixed with the string “devops-guru-”. Note that the prefix string is not case sensitive. The tag value can be any value you define. The next section describes how you can use tag values to define coverage boundary for your applications.

You can add tags to your resources using the AWS service to which each resource belongs, or use the Tag Editor. To manage tags using your resource’s service, you can use the console, AWS CLI or SDK of the service.

Define Application boundary using AWS resources tag values

For DevOps Guru, we define an application as a group of instantiated AWS resources (Amazon EC2, AWS Lambda, Amazon RDS, etc.) that your workload is running on. You assign the same tag value to all resources that make up your application. DevOps Guru will analyze each resource separately, and will also look at metrics and events across all resources in your application to detect anomalies and generate insights. For example, see the diagram below.

You can have one tag key across all your applications. For each application, assign a different tag value. All resources that make up an application should have the same tag value.

App 1 consists of 2 different resources for a database application – an EC2 instance and a database instance. Assigning the same tag value of RDS to both of the resources. I have another serverless application in App 2, which has a Lambda function and a DynamoDB instance. I assign a different tag value of serverless-app-1 to both of the App 2 resources.

Example Test Scenario

I am going to create a test scenario with an application server running in an EC2 instance. The application server is connected to an Aurora MySQL-Compatible database instance. I will instrument my application to introduce a misbehaving SQL query to create a performance anomaly.

In my example below, I tagged my EC2 instance and database instance with the tag value of RDS. I am interested in detecting performance issues in my Database instance and I want DevOps Guru to provide recommendations to fix those issues.

Manage DevOpsGuru Analysis Coverage

Next, I define the coverage boundary in DevOps Guru Console. In the Settings options in navigation pane, I select Analyzed resources and choose Edit.

To define coverage boundary in the DevOps Guru Console, select the “Settings” option in navigation pane, select “Analyzed resources“ and choose Edit.

Next, I select the “devops-guru-applications” as tag key from the dropdown menu. I am going to select RDS as the tag value, since I am interested in looking at performance issues in my Amazon Aurora database instance.

In the “Edit analyzed resources” screen, choose your tag key in the “Tag key” dropdown menu. Next, press the radio button for choosing specific tag values and then select the tag values to define the coverage boundary of your application.

Filter insights by tags

Next, I created my test scenario. Once DevOps Guru generated an insight, I am able to filter the insights by tag key or tag values. To display insights for my database instance, I select “Affected applications” from the search menu bar on insights page as shown below:

Insights generated by DevOps Guru can be filtered based on the tag values. Select “Affected applications” in the search menu bar in insights page.

Next, I select “Affected applications” as RDS in the above dropdown menu. Below is the Insight overview screen that gets displayed.

The metrics section of the Insights page provides a summary of the Anomaly detected. It also displays a graphical representation of the time window when the anomaly was detected as well as the detailed metric the anomaly was based upon.

The insights generated by DevOps Guru for my Amazon Aurora instances are enabled by Amazon DevOps Guru for RDS, a new feature we announced at re:Invent 2021. It allows developers to easily detect, diagnose, and resolve performance and operational issues in Amazon Aurora. For more information on Amazon DevOps Guru for RDS, see a related news blog written by my colleague, Marcia Villalba.

The insight summary indicates that there is high DB load, ten times above baseline. DevOps Guru for RDS uses anomaly detection on the database load (DB load) performance metric to detect issues. DB load is measured in units of Average Active Sessions (AAS). DB load measures the level of activity in your database, making it a great metric to understand the health of your database.

If you continue scrolling on the DevOps Guru for RDS analysis page, you can discover the cause for the problem and some recommendations to fix it. DevOps Guru for RDS detected there was a high load of wait events, and one SQL query was found to require further investigation. You can even see the exact SQL query if you click on the SQL digest IDs. The insight’s analysis and recommendation section is full of information on how to investigate further and fix the issue.

The easy-to-understand recommendations made by DevOps Guru for RDS means that as a DevOps engineer, you do not need to rely on a database administrator (DBA) or use any third party tools.

DevOps Guru for RDS provides specific recommendations to fix the performance issues detected. In this example, specific wait events contributing to high DB load were identified and specific SQL query ID was identified as a major contributor

Conclusion

AWS resources tags give you one more way to specify the resource analysis coverage boundary, in addition to existing methods of an entire AWS account or specific AWS CloudFormation stacks. AWS tags allows you to better isolate the applications you want DevOps Guru to analyze. In this post, we used AWS tags to define the coverage boundary for a database application. We reduced unrelated and unnecessary resource coverage from our analysis, thereby controlling our resource analysis costs.  Visit the DevOps Guru documentation to learn more about how to use tags to identify resources in your DevOps Guru applications.

About the author

Suneel Joshi

Suneel is an Enterprise Support Lead at Amazon Web Services. He provides advocacy and guidance to customers in their cloud journey as they plan and build cloud solutions. He is a DevOps and Machine Learning enthusiast. Among other things, he helps customers build intelligence in their applications using AI services.