Tag Archives: storage

Augmentation patterns to modernize a mainframe on AWS

Post Syndicated from Lewis Tang original https://aws.amazon.com/blogs/architecture/augmentation-patterns-to-modernize-a-mainframe-on-aws/

Customers with mainframes want to use Amazon Web Services (AWS) to increase agility, maximize the value of their investments, and innovate faster. On June 8, 2022, AWS announced the general availability of AWS Mainframe Modernization, a new service that makes it faster and simpler for customers to modernize mainframe-based workloads.

In this post, we discuss the common use cases and the augmentation architecture patterns that help liberate data from mainframe for modern data analytics, get rid of expensive and unsupported tape storage solutions for mainframe, build new capabilities that integrate with core mainframe workloads, and enable agile development and testing by adopting CI/CD for mainframe.

Pattern 1: Augment mainframe data retention with backup and archival on AWS

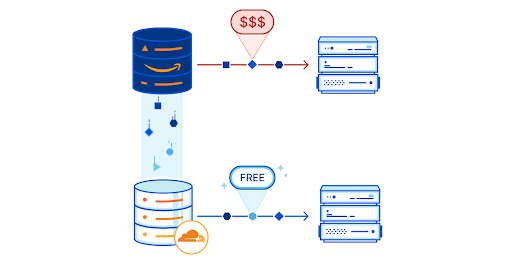
Mainframes process and generate the most business-critical data. It’s imperative to provide data protection via solutions, such as data backup, archiving, and disaster recovery. Mainframes usually use automated tape libraries—virtual tape libraries for backup and archive. These tapes need to be stored, organized, and transported to vaults and disaster recovery sites. All this can be very expensive and rigid.

There is a more cost-effective approach that helps simplify the operations of tape libraries:  leverage AWS partner tools, such as Model9, to transparently migrate the data on tape storage to AWS.

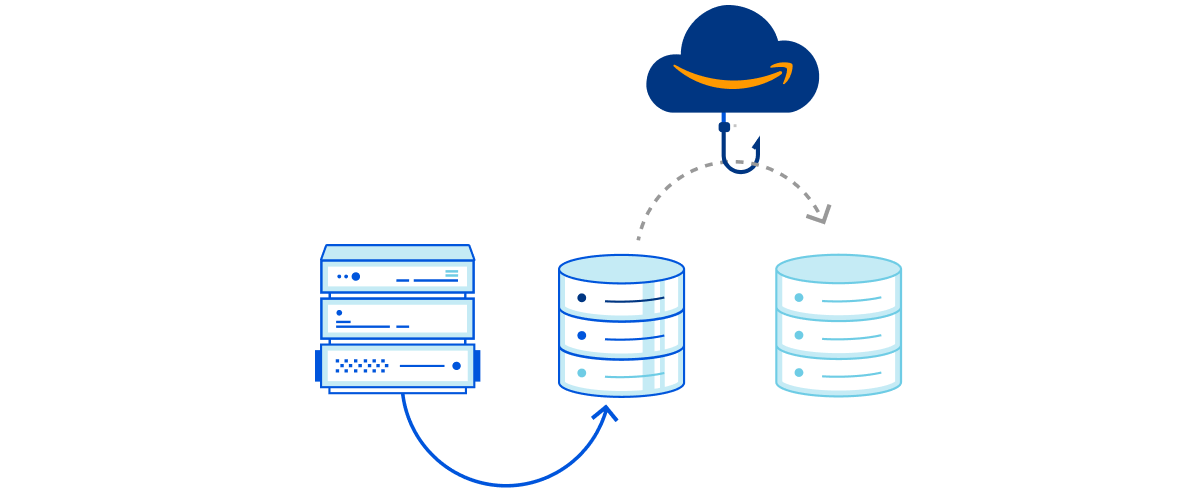
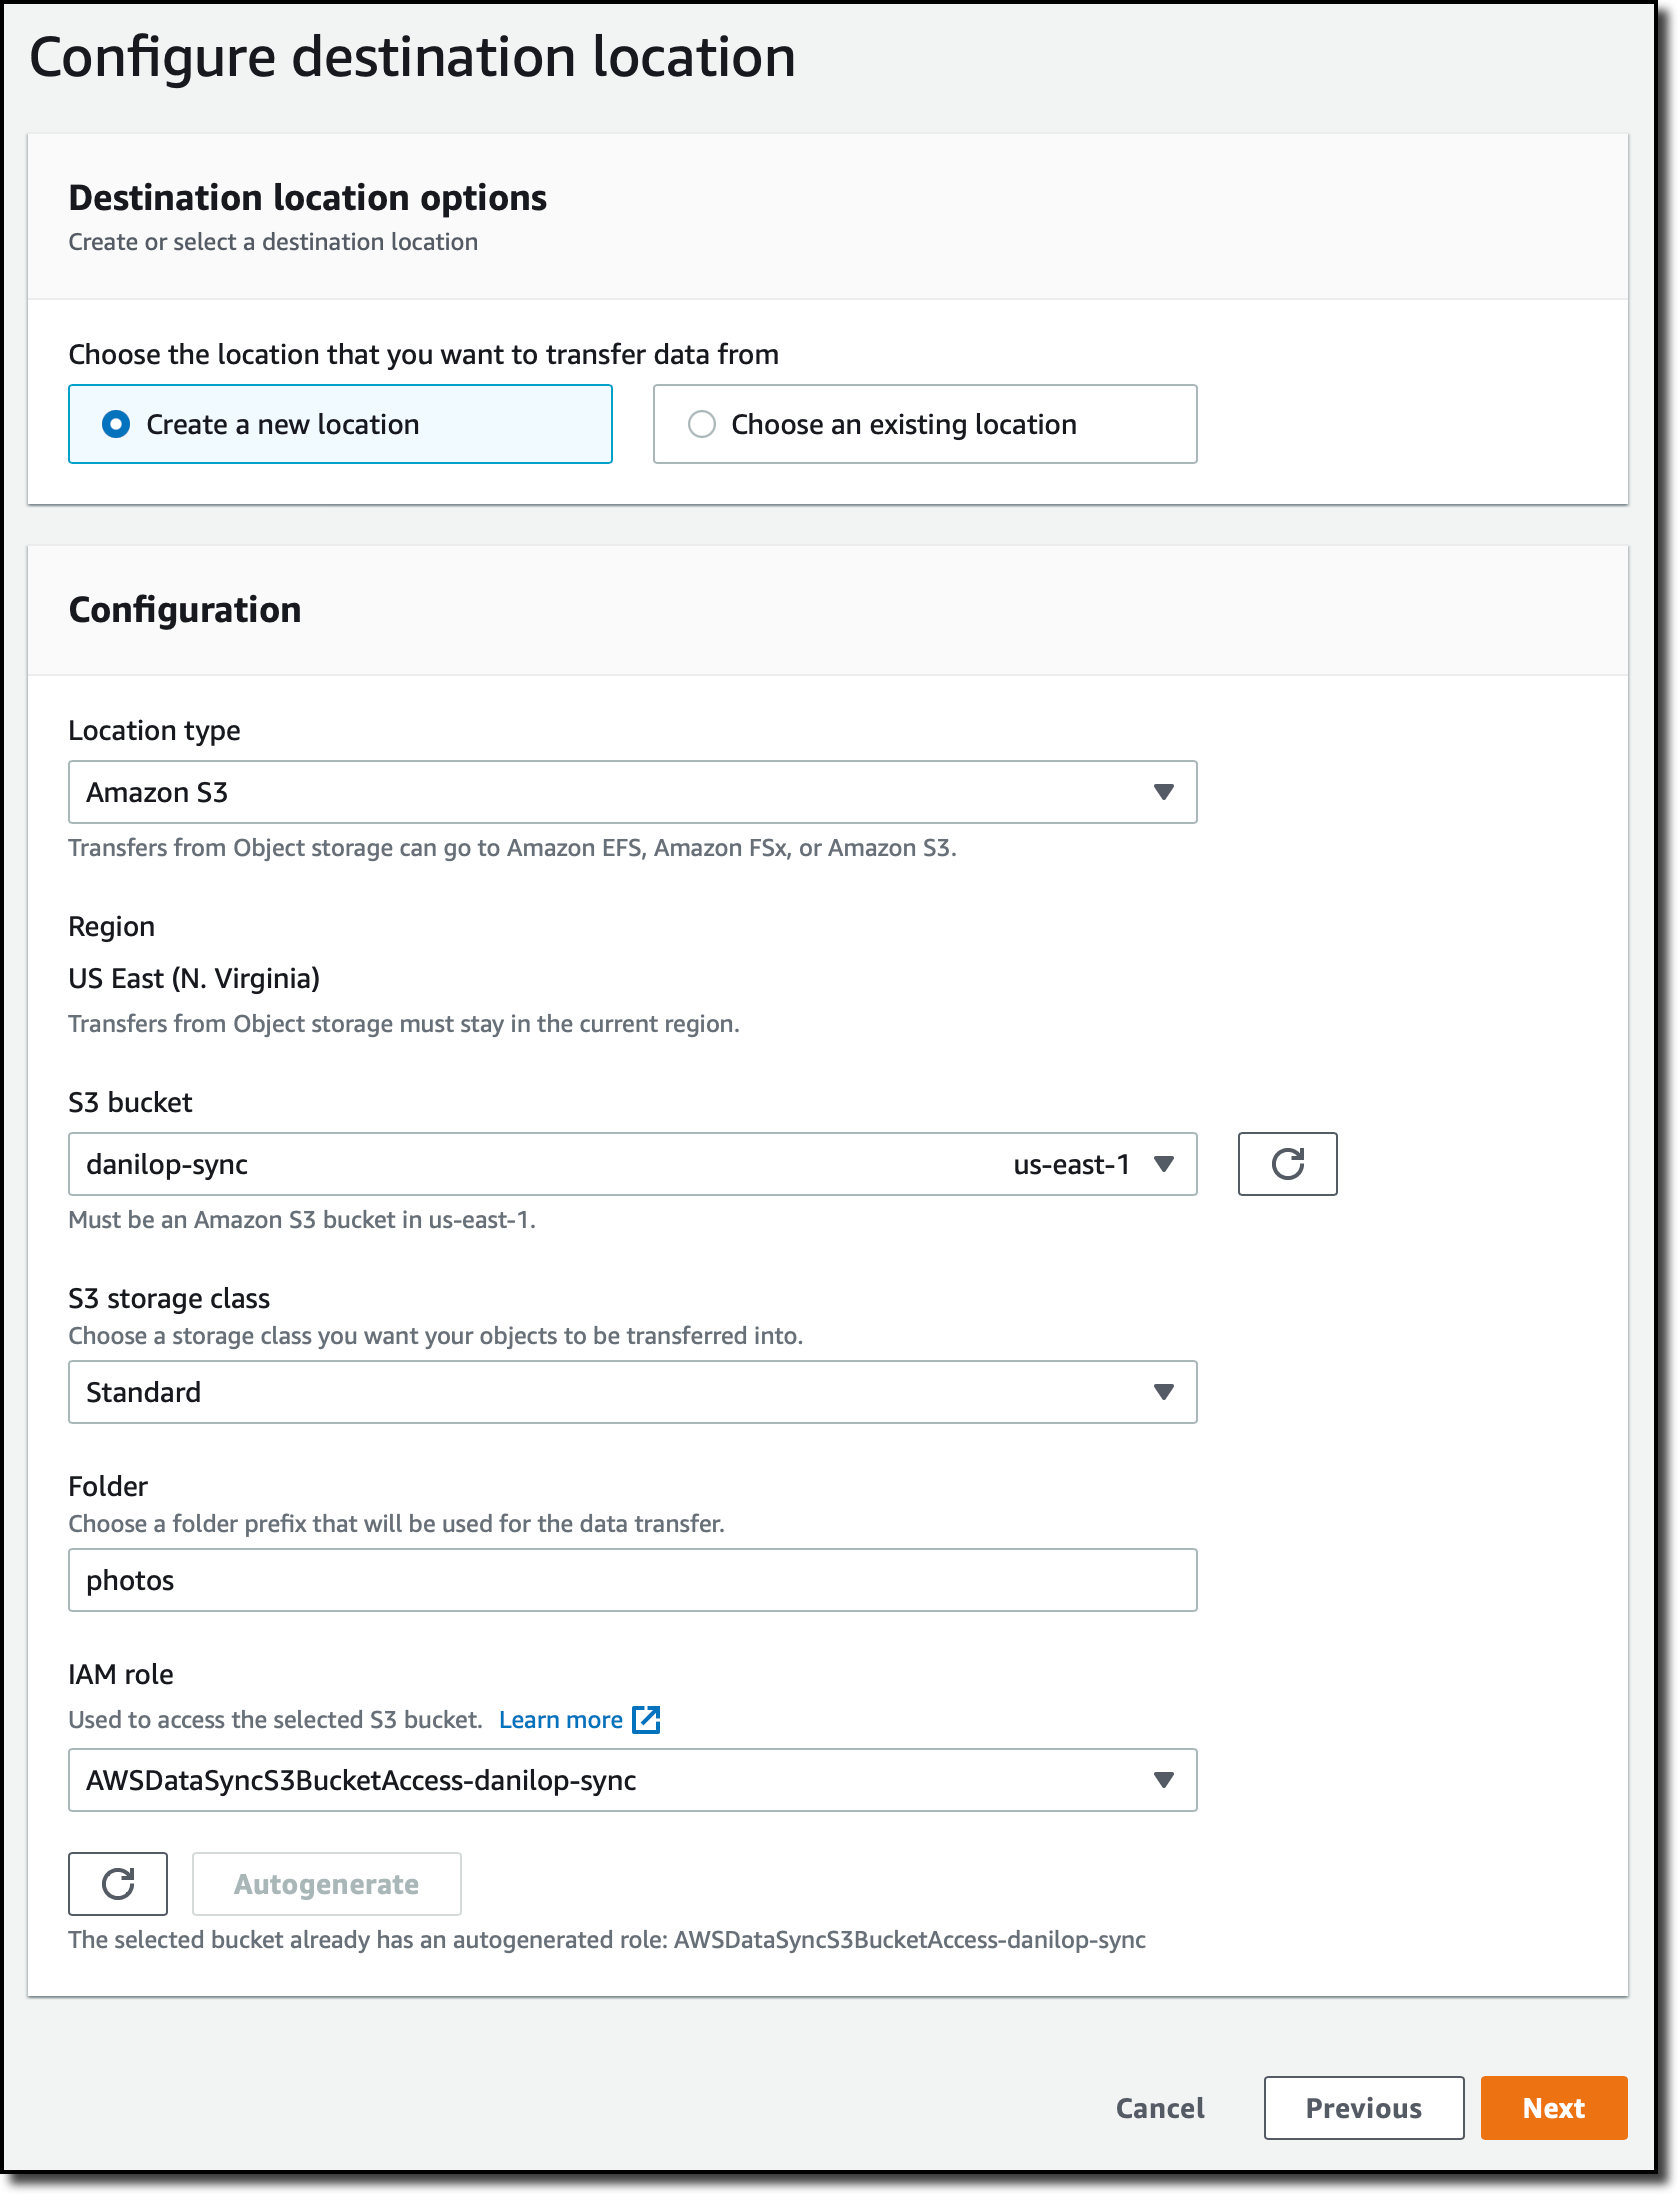
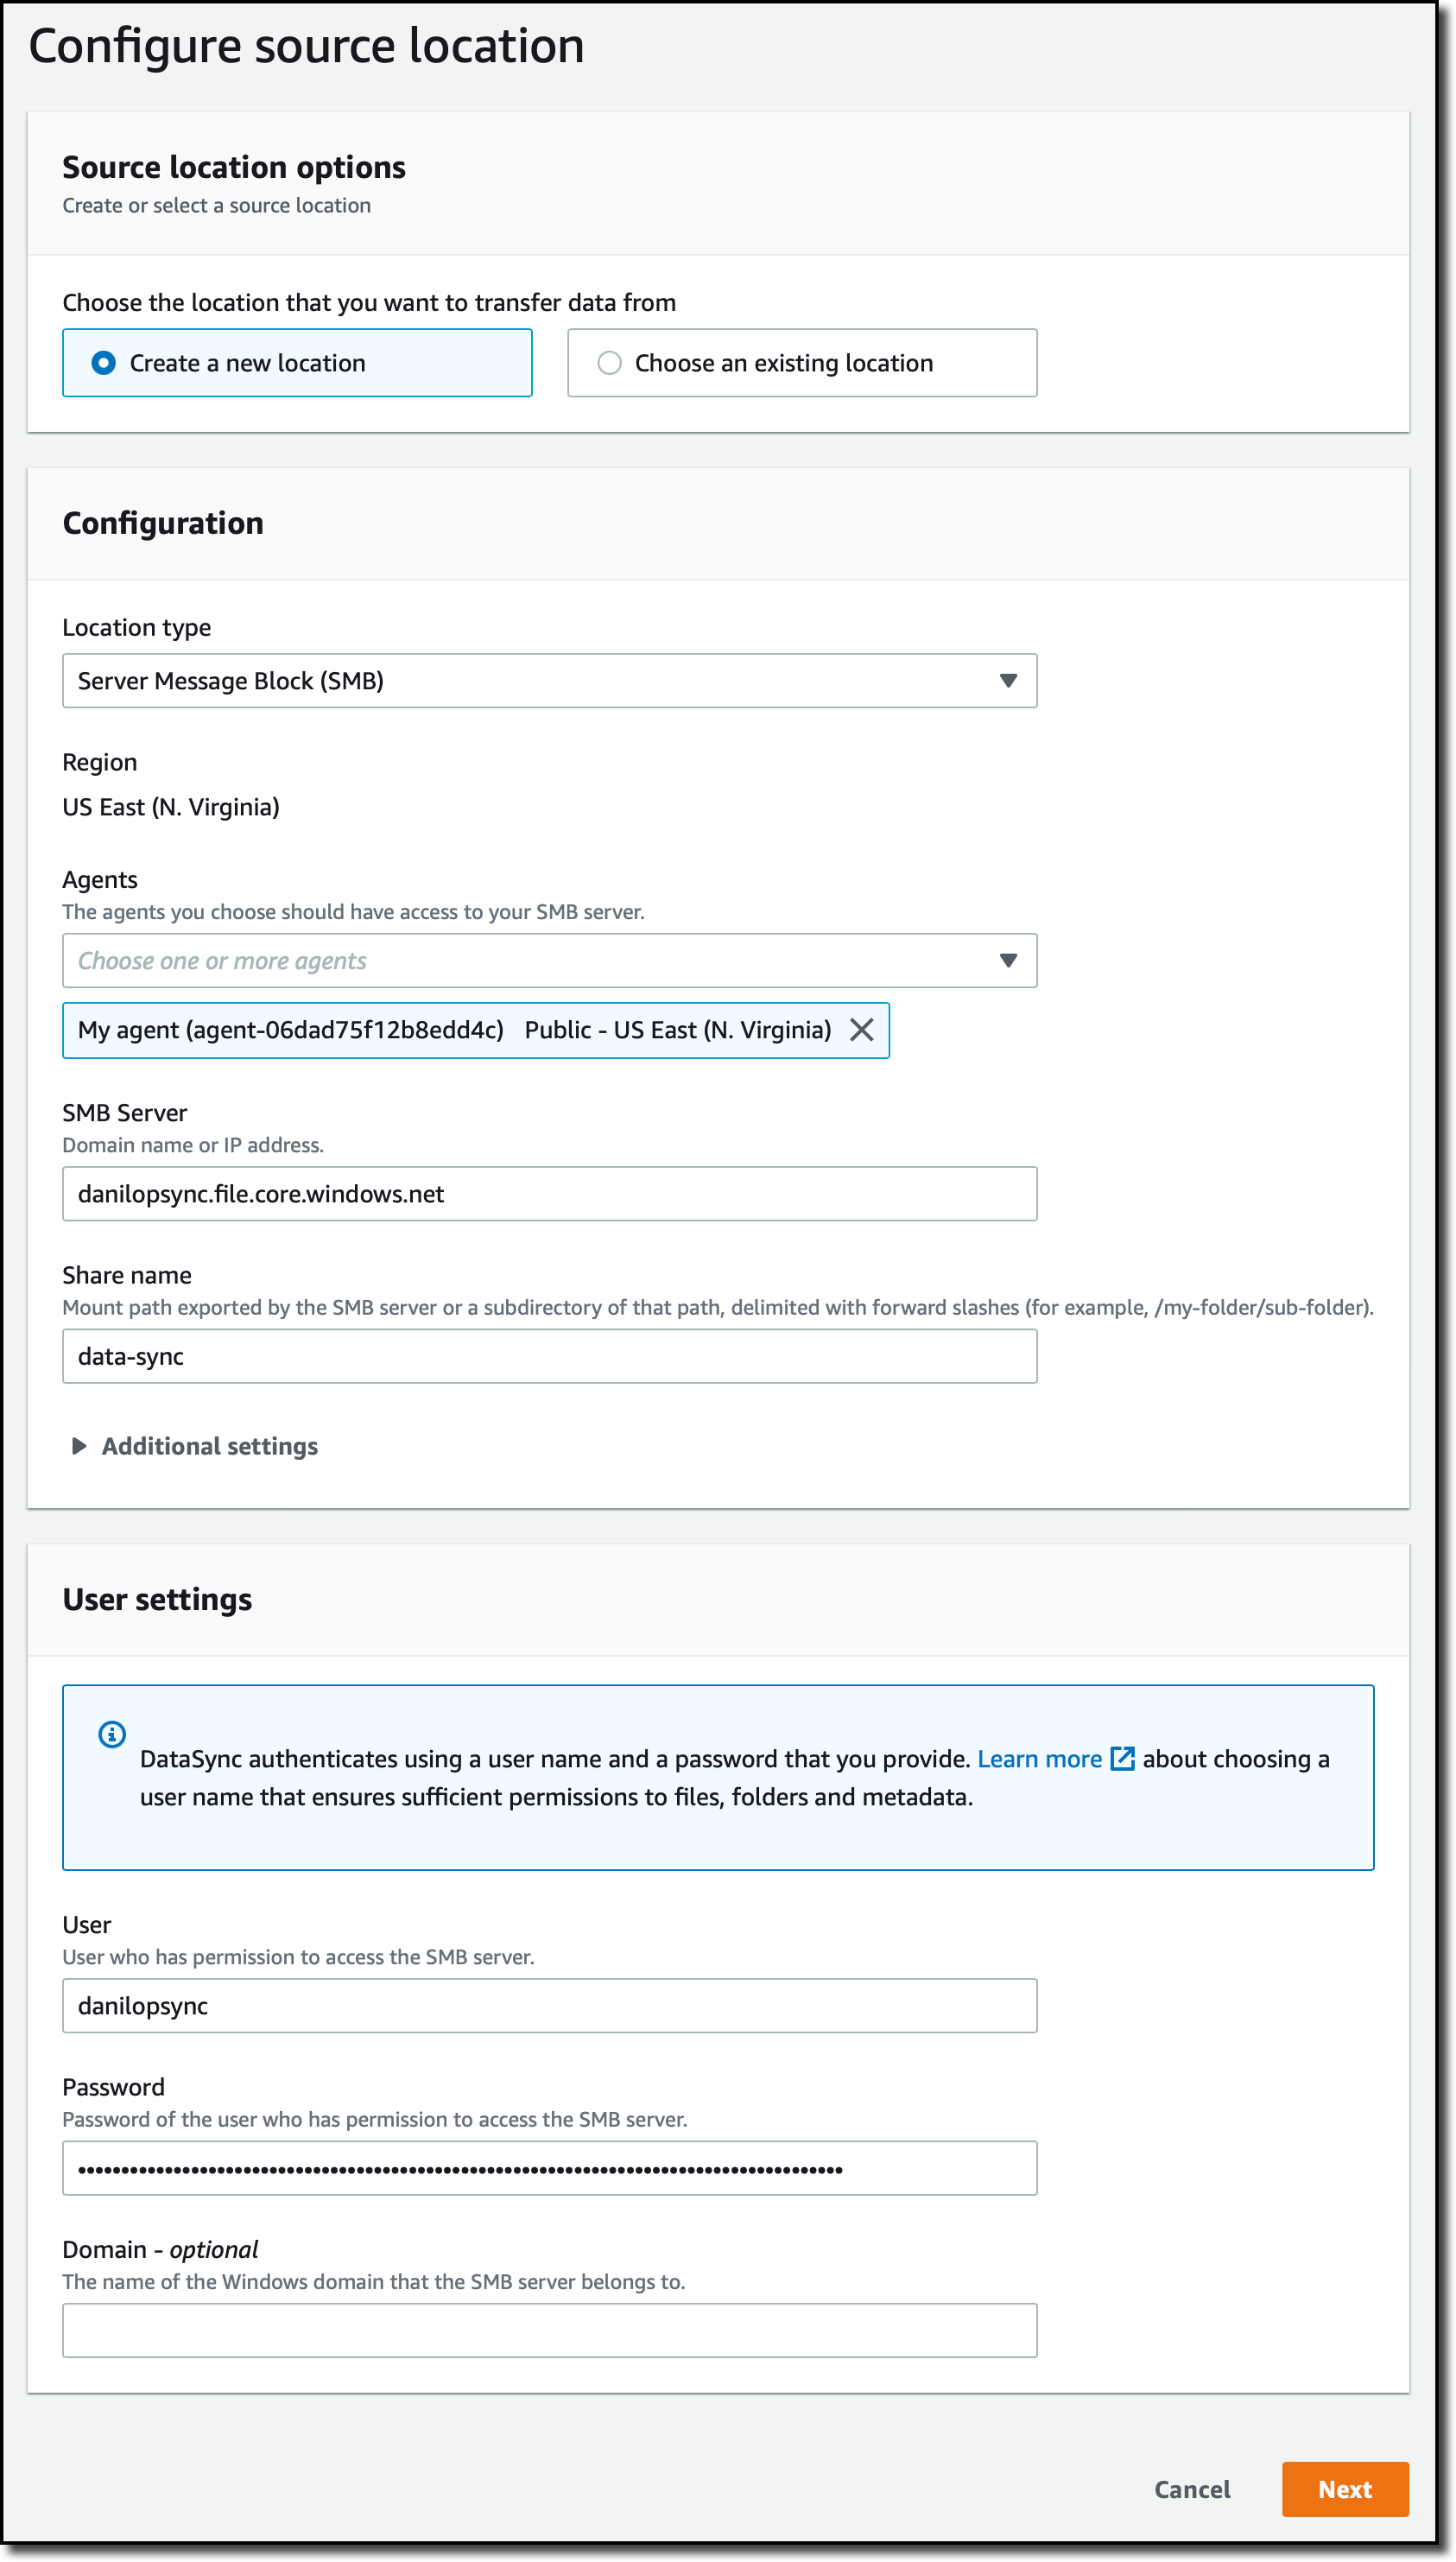
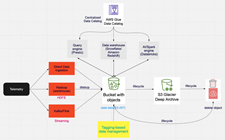
As depicted in Figure 1, mainframe data can be transferred via the secured network connection using AWS Transfer Family services or AWS DataSync to AWS cloud storage services, such as Amazon Elastic File System, Amazon Elastic Block Store, and Amazon Simple Storage Service (S3). After data is stored in AWS cloud, you can configure and move data among these services to meet with the business data processing need. Depending on data storage requirements, data storage costs can be further optimized by configuring S3 Lifecyle policies to move data among Amazon S3 storage classes. For long-term data archiving purpose, you can choose S3 Glacier storage class to achieve durability, resilience, and the optimal cost effectiveness.

Mainframe data backup and archival augmentation

Figure 1. Mainframe data backup and archival augmentation

Pattern 2: Augment mainframe with agile development and test environments including CI/CD pipeline on AWS

For any business-critical business application, a typical mainframe workload requires development and test environments to support production workloads. It’s common to see the lengthy application development lifecycle, a lack of automated testing, and an absent CI/CD pipeline with most of mainframes. Furthermore, the existing mainframe development processes and tools are outdated, as they are unable to keep up with the business pace, resulting in a growing backlog. Organizations with mainframes look for application development solutions to solve these challenges.

As demonstrated in Figure 2, AWS developer tools orchestrate code compilation, testing, and deployment among mainframe test environments. Mainframe test environments are either provided by the mainframe vendors as emulators or by AWS partners, such as Micro Focus. You can load the preferred developer tools and run an integrated development environment (IDE) from Amazon WorkSpaces or Amazon AppStream 2.0. Developers create or modify code in the IDE, and then commit and push their code to AWS CodeCommit. As soon as the code is pushed, an event is generated and triggers the pipeline in AWS CodePipeline to build the new code in a compilation environment via AWS CodeBuild. The pipeline pushes the new code to the test environment.

To optimize cost, you can scale the test environment capacity to meet needs. The tests are executed, and the test environment can be shut down when not in use. When the tests are successful, the pipeline pushes the code back to the mainframe via AWS CodeDeploy and an intermediary server. On the mainframe side, the code can go through a recompilation and final testing before being pushed to production.

You can further optimize operations and licensing cost of mainframe emulator by leveraging the managed integrated development and test environment provided by AWS Mainframe Modernization service.

Mainframe CI/CD augmentation

Figure 2. Mainframe CI/CD augmentation

Pattern 3: Augment mainframe with agile data analytics on AWS

Core business applications running on mainframes generate a lot of data throughout the years. Decades of historical business transactions and massive amounts of user data present an opportunity to develop deep business insight. By creating a data lake using the AWS big data services, you can gain faster analytics capabilities and better insight into core business data originated from mainframe applications.

Figure 3 depicts data being pulled from relational, hierarchical, or mainframe file-based data stores on mainframes. These data are presented in various formats and stored as DB2 for z/OS, VSAM, IMS DB, IDMS, DMS, or other formats. You can use AWS partners data replication and change data capture tools from AWS Marketplace or AWS cloud services, such as Amazon Managed Streaming for Apache Kafka for near real-time data streaming, Transfer Family services, and DataSync for moving data in batch from mainframes to AWS.

Once data are replicated to AWS, you can further process data using the services like AWS Lambda, or Amazon Elastic Container Service and store the processed data on various AWS storage services, such as Amazon DynamoDB, Amazon Relational Database Service, and Amazon S3.

By using AWS big data and data analytics services, such as Amazon EMR, Amazon Redshift, Amazon Athena, AWS Glue, and Amazon QuickSight, you can develop deep business insight and present flexible visuals to your customers. Read more about mainframe data integration.

Mainframe data analytics augmentation

Figure 3. Mainframe data analytics augmentation

Pattern 4: Augment mainframe with new functions and channels on AWS

Organizations with a mainframe use AWS to innovate and iterate quickly, as they often lack agility. For example, a common scenario for a bank could be providing a mobile application for customer engagements, such as supporting a marketing campaign for a new credit card.

As depicted in Figure 4, with the data replicated from mainframes to AWS cloud and analyzed by AWS big data and analytics services, new business functions can be developed on cloud-native applications by using Amazon API Gateway, AWS Lambda, and AWS Fargate. These new business applications can interact with mainframe data, and the combination can give deep business insight.

To add new innovation capabilities, with time-series data generated by the new business function applications, using Amazon Forecast can predict domain-specific metrics, such as inventory, workforce, web traffic, and finances. Amazon Lex can build virtual agents, automate informational response to customer enquiries, and improve business productivity. Adding Amazon SageMaker, you can prepare data gathered from mainframe and new business applications at scale to build, train, and deploy machine learning models for any business cases.

You can further improve customer engagement by incorporating Amazon Connect and Amazon Pinpoint to build multichannel communications.

Mainframe new functions and channels augmentation

Figure 4. Mainframe new functions and channels augmentation

Conclusion

To increase agility, maximize the value of investments, and innovate faster, organizations can adopt the patterns discussed in this post to augment mainframes by using AWS services to build resilient data protection solution, provision agile CI/CD integrated development and test environment, liberate mainframe data and developing innovation solutions for new digital customer experience. With AWS Mainframe Modernization service, you can accelerate this journey and innovate faster.

Amazon Prime Day 2022 – AWS for the Win!

Post Syndicated from Jeff Barr original https://aws.amazon.com/blogs/aws/amazon-prime-day-2022-aws-for-the-win/

As part of my annual tradition to tell you about how AWS makes Prime Day possible, I am happy to be able to share some chart-topping metrics (check out my 2016, 2017, 2019, 2020, and 2021 posts for a look back).

My purchases this year included a first aid kit, some wood brown filament for my 3D printer, and a non-stick frying pan! According to our official news release, Prime members worldwide purchased more than 100,000 items per minute during Prime Day, with best-selling categories including Amazon Devices, Consumer Electronics, and Home.

Powered by AWS
As always, AWS played a critical role in making Prime Day a success. A multitude of two-pizza teams worked together to make sure that every part of our infrastructure was scaled, tested, and ready to serve our customers. Here are a few examples:

Amazon Aurora – On Prime Day, 5,326 database instances running the PostgreSQL-compatible and MySQL-compatible editions of Amazon Aurora processed 288 billion transactions, stored 1,849 terabytes of data, and transferred 749 terabytes of data.

Amazon EC2 – For Prime Day 2022, Amazon increased the total number of normalized instances (an internal measure of compute power) on Amazon Elastic Compute Cloud (Amazon EC2) by 12%. This resulted in an overall server equivalent footprint that was only 7% larger than that of Cyber Monday 2021 due to the increased adoption of AWS Graviton2 processors.

Amazon EBS – For Prime Day, the Amazon team added 152 petabytes of EBS storage. The resulting fleet handled 11.4 trillion requests per day and transferred 532 petabytes of data per day. Interestingly enough, due to increased efficiency of some of the internal Amazon services used to run Prime Day, Amazon actually used about 4% less EBS storage and transferred 13% less data than it did during Prime Day last year. Here’s a graph that shows the increase in data transfer during Prime Day:

Amazon SES – In order to keep Prime Day shoppers aware of the deals and to deliver order confirmations, Amazon Simple Email Service (SES) peaked at 33,000 Prime Day email messages per second.

Amazon SQS – During Prime Day, Amazon Simple Queue Service (SQS) set a new traffic record by processing 70.5 million messages per second at peak:

Amazon DynamoDB – DynamoDB powers multiple high-traffic Amazon properties and systems including Alexa, the Amazon.com sites, and all Amazon fulfillment centers. Over the course of Prime Day, these sources made trillions of calls to the DynamoDB API. DynamoDB maintained high availability while delivering single-digit millisecond responses and peaking at 105.2 million requests per second.

Amazon SageMaker – The Amazon Robotics Pick Time Estimator, which uses Amazon SageMaker to train a machine learning model to predict the amount of time future pick operations will take, processed more than 100 million transactions during Prime Day 2022.

Package Planning – In North America, and on the highest traffic Prime 2022 day, package-planning systems performed 60 million AWS Lambda invocations, processed 17 terabytes of compressed data in Amazon Simple Storage Service (Amazon S3), stored 64 million items across Amazon DynamoDB and Amazon ElastiCache, served 200 million events over Amazon Kinesis, and handled 50 million Amazon Simple Queue Service events.

Prepare to Scale
Every year I reiterate the same message: rigorous preparation is key to the success of Prime Day and our other large-scale events. If you are preparing for a similar chart-topping event of your own, I strongly recommend that you take advantage of AWS Infrastructure Event Management (IEM). As part of an IEM engagement, my colleagues will provide you with architectural and operational guidance that will help you to execute your event with confidence!

Jeff;

New for AWS DataSync – Move Data Between AWS and Google Cloud Storage or AWS and Microsoft Azure Files

Post Syndicated from Danilo Poccia original https://aws.amazon.com/blogs/aws/new-for-aws-datasync-move-data-between-aws-and-google-cloud-storage-or-aws-and-microsoft-azure-files/

Moving data to and from AWS Storage services can be automated and accelerated with AWS DataSync. For example, you can use DataSync to migrate data to AWS, replicate data for business continuity, and move data for analysis and processing in the cloud. You can use DataSync to transfer data to and from AWS Storage services, including Amazon Simple Storage Service (Amazon S3), Amazon Elastic File System (Amazon EFS), and Amazon FSx. DataSync also integrates with Amazon CloudWatch and AWS CloudTrail for logging, monitoring, and alerting.

Today, we added to DataSync the capability to migrate data between AWS Storage services and either Google Cloud Storage or Microsoft Azure Files. In this way, you can simplify your data processing or storage consolidation tasks. This also helps if you need to import, share, and exchange data with customers, vendors, or partners who use Google Cloud Storage or Microsoft Azure Files. DataSync provides end-to-end security, including encryption and integrity validation, to ensure your data arrives securely, intact, and ready to use.

Let’s see how this works in practice.

Preparing the DataSync Agent
First, I need a DataSync agent to read from, or write to, storage located in Google Cloud Storage or Azure Files. I deploy the agent on an Amazon Elastic Compute Cloud (Amazon EC2) instance. The latest DataSync Amazon Machine Image (AMI) ID is stored in the Parameter Store, a capability of AWS Systems Manager. I use the AWS Command Line Interface (CLI) to get the value of the /aws/service/datasync/ami parameter:

aws ssm get-parameter --name /aws/service/datasync/ami --region us-east-1
{
    "Parameter": {
        "Name": "/aws/service/datasync/ami",
        "Type": "String",
        "Value": "ami-0e244fe801cf5a510",
        "Version": 54,
        "LastModifiedDate": "2022-05-11T14:08:09.319000+01:00",
        "ARN": "arn:aws:ssm:us-east-1::parameter/aws/service/datasync/ami",
        "DataType": "text"
    }
}

Using the EC2 console, I start an EC2 instance using the AMI ID specified in the Value property of the parameter. For networking, I use a public subnet and the option to auto-assign a public IP address. The EC2 instance needs network access to both the source and the destination of a data moving task. Another requirement for the instance is to be able to receive HTTP traffic from DataSync to activate the agent.

When using AWS DataSync in a virtual private cloud (VPC) based on the Amazon VPC service, it is a best practice to use VPC endpoints to connect the agent with the DataSync service. In the VPC console, I choose Endpoints on the navigation pane and then Create endpoint. I enter a name for the endpoint and select the AWS services category.

Console screenshot.

In the Services section, I look for DataSync.

Console screenshot.

Then, I select the same VPC where I started the EC2 instance.

Console screenshot.

To reduce cross-AZ traffic, I choose the same subnet used for the EC2 instance.

Console screenshot.

The DataSync agent running on the EC2 instance needs network access to the VPC endpoint. For simplicity, I use the default security group of the VPC for both. I create the VPC endpoint and, after a few minutes, it’s ready to be used.

Console screenshot.

In the AWS DataSync console, I choose Agents from the navigation pane and then Create agent. I select Amazon EC2 for the Hypervisor.

Console screenshot.

I choose VPC endpoints using AWS PrivateLink for the Endpoint type. I select the VPC endpoint I created before and the same Subnet and Security group I used for the VPC endpoint.

I choose the option to Automatically get the activation key and type the public IP of the EC2 instance. Then, I choose Get key.

Console screenshot.

After the DataSync agent has been activated, I don’t need HTTP access anymore, and I remove that from the security groups of the EC2 instance. Now that the DataSync agent is active, I can configure tasks and locations to move my data.

Moving Data from Google Cloud Storage to Amazon S3
I have a few images in a Google Cloud Storage bucket, and I want to synchronize those files with an S3 bucket. In the Google Cloud console, I open the settings of the bucket. There, I create a service account with Storage Object Viewer permissions and write down the credentials (access key and secret) to access the bucket programmatically.

Back in the AWS DataSync console, I choose Tasks and then Create task.

To configure the source of the task, I create a location. I select Object storage for the Location type and choose the agent I just created. For the Server, I use storage.googleapis.com. Then, I enter the name of the Google Cloud bucket and the folder where my images are stored.

Console screenshot.

For authentication, I enter the access key and the secret I retrieved when I created the service account. I choose Next.

Console screenshot.

To configure the destination of the task, I create another location. This time, I select Amazon S3 for the Location Type. I choose the destination S3 bucket and enter a folder that will be used as a prefix for the files transferred to the bucket. I use the Autogenerate button to create the IAM role that will give DataSync permissions to access the S3 bucket.

Console screenshot.

In the next step, I configure the task settings. I enter a name for the task. Optionally, I can fine-tune how DataSync verifies the integrity of the transferred data or allocate a bandwidth for the task.

Console screenshot.

I can also choose what data to scan and what to transfer. By default, all source data is scanned, and only data that has changed is transferred. In the Additional settings, I disable Copy object tags because tags are currently not supported with Google Cloud Storage.

Console screenshot.

I can select the schedule used to run this task. For now, I leave it Not scheduled, and I will start it manually.

Console screenshot.

For logging, I use the Autogenerate button to create a log group for DataSync. I choose Next.

Console screenshot.

I review the configurations and create the task. Now, I start the data moving task from the console. After a few minutes, the files are synced with my S3 bucket and I can access them from the S3 console.

Console screenshot.

Moving Data from Azure Files to Amazon FSx for Windows File Server
I take a lot of pictures, and I also have a few images in an Azure file share. I want to synchronize those files with an Amazon FSx for Windows file system. In the Azure console, I select the file share and choose the Connect button to generate a PowerShell script that checks if this storage account is accessible over the network.

$connectTestResult = Test-NetConnection -ComputerName <SMB_SERVER> -Port 445
if ($connectTestResult.TcpTestSucceeded) {
    # Save the password so the drive will persist on reboot
    cmd.exe /C "cmdkey /add:`"danilopsync.file.core.windows.net`" /user:`"localhost\<USER>`" /pass:`"<PASSWORD>`""
    # Mount the drive
    New-PSDrive -Name Z -PSProvider FileSystem -Root "\\danilopsync.file.core.windows.net\<SHARE_NAME>" -Persist
} else {
    Write-Error -Message "Unable to reach the Azure storage account via port 445. Check to make sure your organization or ISP is not blocking port 445, or use Azure P2S VPN, Azure S2S VPN, or Express Route to tunnel SMB traffic over a different port."
}

From this script, I grab the information I need to configure the DataSync location:

  • SMB Server
  • Share Name
  • User
  • Password

Back in the AWS DataSync console, I choose Tasks and then Create task.

To configure the source of the task, I create a location. I select Server Message Block (SMB) for the Location Type and the agent I created before. Then, I use the information I found in the script to enter the SMB Server address, the Share name, and the User/Password to use for authentication.

Console screenshot.

To configure the destination of the task, I again create a location. This time, I choose Amazon FSx for the Location type. I select an FSx for Windows file system that I created before and use the default share name. I use the default security group to connect to the file system. Because I am using AWS Directory Service for Microsoft Active Directory with FSx for Windows File Server, I use the credentials of a user member of the AWS Delegated FSx Administrators and Domain Admins groups. For more information, see Creating a location for FSx for Windows File Server in the documentation.

Console screenshot.

In the next step, I enter a name for the task and leave all other options to their default values in the same way I did for the previous task.

Console screenshot.

I review the configurations and create the task. Now, I start the data moving task from the console. After a few minutes, the files are synched with my FSx for Windows file system share. I mount the file system share with a Windows EC2 instance and see that my images are there.

EC2 screenshot.

When creating a task, I can reuse existing locations. For example, if I want to synchronize files from Azure Files to my S3 bucket, I can quickly select the two corresponding locations I created for this post.

Availability and Pricing
You can move your data using the AWS DataSync console, AWS Command Line Interface (CLI), or AWS SDKs to create tasks that move data between AWS storage and Google Cloud Storage buckets or Azure Files file systems. As your tasks run, you can monitor progress from the DataSync console or by using CloudWatch.

There are no changes to DataSync pricing with these new capabilities. Moving data to and from Google Cloud or Microsoft Azure is charged at the same rate as all other data sources supported by DataSync today.

You may be subject to data transfer out fees by Google Cloud or Microsoft Azure. Because DataSync compresses data in flight when copying between the agent and AWS, you may be able to reduce egress fees by deploying the DataSync agent in a Google Cloud or Microsoft Azure environment.

When using DataSync to move data from AWS to Google Cloud or Microsoft Azure, you are charged for data transfer out from EC2 to the internet. See Amazon EC2 pricing for more information.

Automate and accelerate the way you move data with AWS DataSync.

Danilo

A New Hope for Object Storage: R2 enters open beta

Post Syndicated from Greg McKeon original https://blog.cloudflare.com/r2-open-beta/

A New Hope for Object Storage: R2 enters open beta

A New Hope for Object Storage: R2 enters open beta

In September, we announced that we were building our own object storage solution: Cloudflare R2. R2 is our answer to egregious egress charges from incumbent cloud providers, letting developers store as much data as they want without worrying about the cost of accessing that data.

The response has been overwhelming.

  • Independent developers had bills too small for cloud providers to negotiate fair egress rates with them. Egress charges were the largest line-item on their cloud bills, strangling side projects and the new businesses they were building.
  • Large corporations had written off multi-cloud storage – and thus multi-cloud itself – as a pipe dream. They came to us with excitement, pitching new products that integrated data with partner companies.
  • Non-profit research organizations were paying massive egress fees just to share experiment data with one another. Egress fees were having a real impact on their ability to collaborate, driving silos between organizations and restricting the experiments and analyses they could run.

Cloudflare exists to help build a better Internet. Today, the Internet gets what it deserves: R2 is now in open beta.

Self-serve customers can enable R2 in the Cloudflare dashboard. Enterprise accounts can reach out to their CSM for onboarding.

Internal and external APIs

R2 has two APIs: an API accessible only from within Workers, which we call the In-Worker API, and an S3-compatible API, which exposes your bucket on a URL of the form bucket.account.r2storage.com. Before you can make requests to R2, you’ll need to be authenticated — R2 buckets are private by default.

In-Worker API

With the in-Worker API, a bucket is “bound” to a specific Worker, which can then perform PUT, GET, DELETE and LIST operations against the bucket.

S3-compatible API

For the S3-compatible API, authentication is done the same way as on S3: SigV4 against an R2 URL. SigV4 signs requests using a secret key to authenticate them to R2. This means public access to R2 over the Internet is only possible today by hosting a Worker, connecting it to R2, and routing requests through it.

The easiest way to test the S3-compatible API is to use an S3 client. One of the most popular S3 clients is the boto3 SDK.

In Python, copy the following script and fill in the account_id, access_key, and secret_access_key fields with your R2 account credentials.

#!/usr/bin/env python
import boto3
import pprint
from botocore.client import Config
 
account_id = ''
access_key_id = ''
secret_access_key = ''
endpoint = f'https://{account_id}.r2.cloudflarestorage.com'
 
cl = boto3.client(
    's3',
    aws_access_key_id=access_key_id,
    aws_secret_access_key=secret_access_key,
    endpoint_url=endpoint,
    config=Config(
        region_name = endpoints[endpoint_name].get('region', 'auto'),
        s3={'addressing_style': 'path'},
        retries=dict( max_attempts=0 ),
    ),
)
 
printer = pprint.PrettyPrinter().pprint
 
printer(cl.head_bucket(Bucket='some bucket'))
printer(cl.create_bucket(Bucket='some other bucket'))
printer(cl.put_object(Bucket='some bucket', Key='my object', Body='some payload'))

Features

R2 comes with support for all basic create/read/update/delete S3 features through both of its APIs.

During the open beta period, we’re targeting R2 to sustain 1,000 GET operations per second and 100 PUT operations per second, per bucket. R2 supports objects up to approximately 5 TB in size, with individual parts limited to 5 GB of data.

R2 provides strongly consistent access to data. Once a PUT is confirmed by R2, future GET operations will always reflect the new key/value pair. The only exception to this is when deleting a bucket. For a short period of time following deletion, the bucket may still exist and continue to allow reads/writes.

Pricing

When we initially announced R2, we included preliminary pricing numbers. One of our main goals with R2 has been to serve the developers who can’t negotiate large discounts with cloud vendors. To that end, we’re also announcing a forever-free tier that lets developers start building on R2 with no charges at all.

R2 charges depend on the total volume of data stored and the type of operation performed on the data:

  • Storage is priced at \$0.015 / GB, per month.
  • Class A operations (including writes and lists) cost \$4.50 / million.
  • Class B operations cost \$0.36 / million.

Class A operations tend to mutate state, such as creating a bucket, listing objects in a bucket, or writing an object. Class B operations tend to read existing state, for example reading an object from a bucket. You can find more information on pricing and a full list of operation types in the docs.

Of course, there is no charge for egress bandwidth from R2. You can access your bucket to your heart’s content.

R2’s forever-free tier includes:

  • 10 GB-months of stored data
  • 1,000,000 Class A operations, per month
  • 10,000,000 Class B operations, per month

Free usage resets each month. While in the open beta phase, R2 usage over the free tier will be billed.

Future plans

We’ve spent the past six months in closed beta with a number of design partners, building out our storage solution. Backed by Durable Objects, R2’s novel architecture delivers both high availability and consistent performance.

While we’ve made great progress on R2, we still have plenty left to build in the coming months.

Improving performance

Our first priority is to improve performance and reliability. While we’ve thrown internal usage and our design partner’s demands at R2, there’s no substitute for live production traffic.

During the open beta period, R2 can sustain a maximum of 1,000 GET operations per second and 100 PUT operations per second, per bucket. We’ll look to raise these limits as we get comfortable operating the system. If you have higher needs, reach out to us!

When you create a bucket, you won’t see a region selector. Our vision for R2 includes automatically globally distributed storage, where R2 seamlessly places each object into the storage region closest to where the request comes from. Today, R2 primarily stores data in North America, which can lead to higher latencies when accessing content from other regions. We’ll first look to address this by adding additional regions where objects can be created, before adding automatic migration of existing objects across regions. Similar to what we’ve built with jurisdictional restrictions for Durable Objects, we’ll also enable restricting where an R2 bucket places data to comply with privacy regulations.

Expanding R2’s feature set

We’ll then focus on expanding R2 capabilities beyond the basic S3 API. In the near term, we’re focused on delivering:

  • Support for TTLs, so data can automatically be deleted from buckets over time.
  • Public buckets, so a bucket can be exposed to the internet without writing a Worker
  • Pre-signed URL support, which delegates read and write access for a specific key to a token.
  • Integration with Cloudflare’s cache, to scale read requests and provide global distribution of data.

If you have additional feature requests that aren’t listed above, we want to hear from you! Reach out and let us know what you need to make R2 your new, zero-cost egress object store.

AWS Lambda Now Supports Up to 10 GB Ephemeral Storage

Post Syndicated from Channy Yun original https://aws.amazon.com/blogs/aws/aws-lambda-now-supports-up-to-10-gb-ephemeral-storage/

Serverless applications are event-driven, using ephemeral compute functions ranging from web APIs, mobile backends, and streaming analytics to data processing stages in machine learning (ML) and high-performance applications. While AWS Lambda includes a 512 MB temporary file system (/tmp) for your code, this is an ephemeral scratch resource not intended for durable storage such as Amazon Elastic File System (Amazon EFS).

However, extract, transform, and load (ETL) jobs and content generation workflows such as creating PDF files or media transcoding require fast, scalable local storage to process large amounts of data quickly. Data-intensive applications require large amounts of temporary data specific to the invocation or cached data that can be reused for all invocation in the same execution environment in a highly performant manner. With the previous limit of 512 MB, customers had to selectively load data from Amazon Simple Storage Service (Amazon S3) and Amazon EFS, or increase the allocated function memory and thus increase their cost, just to handle large objects downloaded from Amazon S3. Since customers could not cache larger data locally in the Lambda execution environment, every function invoke had to read data in parallel, which made scaling out harder for customers.

Today, we are announcing that AWS Lambda now allows you to configure ephemeral storage (/tmp) between 512 MB and 10,240 MB. You can now control the amount of ephemeral storage a function gets for reading or writing data, allowing you to use AWS Lambda for ETL jobs, ML inference, or other data-intensive workloads.

With increased AWS Lambda ephemeral storage, you get access to a secure, low-latency ephemeral file system up to 10 GB. You can continue to use up to 512 MB for free and are charged for the amount of storage you configure over the free limit for the duration of invokes.

Setting Larger Ephemeral Storage for Your Lambda Function
To configure your Lambda function with larger ephemeral storage, choose the Configuration tab under the General Configuration section in the AWS Lambda Console. You will see a new configuration for Ephemeral storage setting at 512MB by default.

When you click the Edit button, you can configure the ephemeral storage from 512 MB to 10,240 MB in 1 MB increments for your Lambda functions.

With AWS Command Line Interface (AWS CLI), you can update your desired size of ephemeral storage using theupdate-function-configuration command.

$ aws lambda update-function-configuration --function-name PDFGenerator \
              --ephemeral-storage '{"Size": 10240}'

You can configure ephemeral storage using Lambda API via AWS SDK and AWS CloudFormation. To learn more, see Configuring function options in the AWS Documentation.

As a review, AWS Lambda provides a comprehensive range of storage options. To learn more, see a great blog post, Choosing between AWS Lambda data storage options in web apps, written by my colleague James Beswick. I want to quote the table to show the differences between these options and common use-cases to help you choose the right one for your own applications.

Features Ephemeral Storage (/tmp) Lambda Layers Amazon EFS Amazon S3
Maximum size 10,240 MB 50 MB (direct upload) Elastic Elastic
Persistence Ephemeral Durable Durable Durable
Content Dynamic Static Dynamic Dynamic
Storage type File system Archive File system Object
Lambda event source integration N/A N/A N/A Native
Operations supported Any file system operation Immutable Any file system operation Atomic with versioning
Object tagging and metadata
N N N Y
Pricing model Included in Lambda
(Charged over 512MB)
Included in Lambda Storage + data transfer + throughput Storage + requests + data transfer
Shared across all invocations N Y Y Y
Sharing/permissions model Function-only IAM IAM + NFS IAM
Source for AWS Glue and Amazon Quicksight
N N N Y
Relative data access speed from Lambda Fastest Fastest Very fast Fast

Available Now
You can now configure up to 10 GB of ephemeral storage per Lambda function instance in all Regions where AWS Lambda is available. With 10 GB container image support, 10 GB function memory, and now 10 GB of ephemeral function storage, you can support workloads such as using large temporal files, data and media processing, machine learning inference, and financial analysis.

Support is also available through many AWS Lambda Partners such as HashiCorp (Terraform), Pulumi, Datadog, Splunk (SignalFx), Lumigo, Thundra, Dynatrace, Slalom, Cloudwiry, and Contino.

For this feature, you are charged for the storage you configure over the 512 MB free limit for the duration of your function invokes. To learn more, visit AWS Lambda product and pricing page and send feedback through the AWS re:Post for AWS Lambda or your usual AWS Support contacts.

Channy

Welcome to AWS Pi Day 2022

Post Syndicated from Jeff Barr original https://aws.amazon.com/blogs/aws/welcome-to-aws-pi-day-2022/

We launched Amazon Simple Storage Service (Amazon S3) sixteen years ago today!

As I often told my audiences in the early days, I wanted them to think big thoughts and dream big dreams! Looking back, I think it is safe to say that the launch of S3 empowered them to do just that, and initiated a wave of innovation that continues to this day.

Bigger, Busier, and more Cost-Effective
Our customers count on Amazon S3 to provide them with reliable and highly durable object storage that scales to meet their needs, while growing more and more cost-effective over time. We’ve met those needs and many others; here are some new metrics that prove my point:

Object Storage – Amazon S3 now holds more than 200 trillion (2 x 10¹⁴) objects. That’s almost 29,000 objects for each resident of planet Earth. Counting at one object per second, it would take 6.342 million years to reach this number! According to Ethan Siegel, there are about 2 trillion galaxies in the visible Universe, so that’s 100 objects per galaxy! Shortly after the 2006 launch of S3, I was happy to announce the then-impressive metric of 800 million stored objects, so the object count has grown by a factor of 250,000 in less than 16 years.

Request Rate – Amazon S3 now averages over 100 million requests per second.

Cost Effective – Over time we have added multiple storage classes to S3 in order to optimize cost and performance for many different workloads. For example, AWS customers are making great use of Amazon S3 Intelligent Tiering (the only cloud storage class that delivers automatic storage cost savings when data access patterns change), and have saved more than $250 million in storage costs as compared to Amazon S3 Standard. When I first wrote about this storage class in 2018, I said:

In order to make it easier for you to take advantage of S3 without having to develop a deep understanding of your access patterns, we are launching a new storage class, S3 Intelligent-Tiering.

With the improved cost optimizations for small and short-lived objects and the archiving capabilities that we launched late last year, you can now use S3 Intelligent-Tiering as the default storage class for just about every workload, especially data lakes, analytics use cases, and new applications.

Customer Innovation
As you can see from the metrics above, our customers use S3 to store and protect vast amounts of data in support of an equally vast number of use cases and applications. Here are just a few of the ways that our customers are innovating:

NASCARAfter spending 15 years collecting video, image, and audio assets representing over 70 years of motor sports history, NASCAR built a media library that encompassed over 8,600 LTO 6 tapes and a few thousand LTO 4 tapes, with a growth rate of between 1.5 PB and 2 PB per year. Over the course of 18 months they migrated all of this content (a total of 15 PB) to AWS, making use of the Amazon S3 Standard, Amazon S3 Glacier Flexible Retrieval, and Amazon S3 Glacier Deep Archive storage classes. To learn more about how they migrated this massive and invaluable archive, read Modernizing NASCAR’s multi-PB media archive at speed with AWS Storage.

Electronic Arts
This game maker’s core telemetry systems handle tens of petabytes of data, tens of thousands of tables, and over 2 billion objects. As their games became more popular and the volume of data grew, they were facing challenges around data growth, cost management, retention, and data usage. In a series of updates, they moved archival data to Amazon S3 Glacier Deep Archive, implemented tag-driven retention management, and implemented Amazon S3 Intelligent-Tiering. They have reduced their costs and made their data assets more accessible; read
Electronic Arts optimizes storage costs and operations using Amazon S3 Intelligent-Tiering and S3 Glacier to learn more.

NRGene / CRISPR-IL
This team came together to build a best-in-class gene-editing prediction platform. CRISPR (
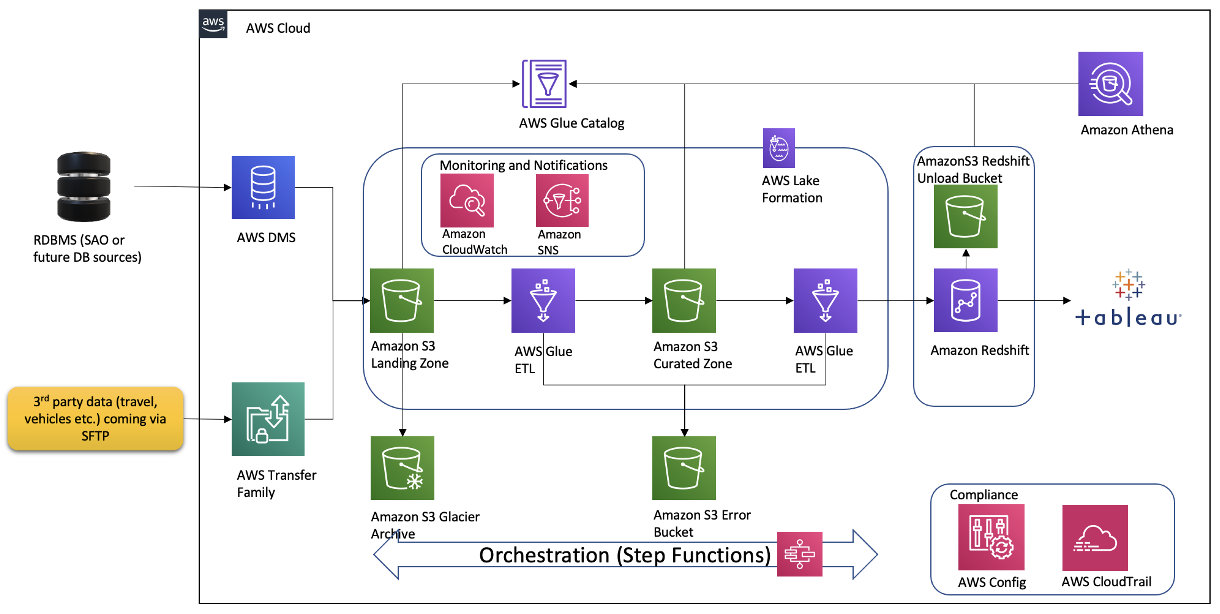
A Crack In Creation is a great introduction) is a very new and very precise way to edit genes and effect changes to an organism’s genetic makeup. The CRISPR-IL consortium is built around an iterative learning process that allows researchers to send results to a predictive engine that helps to shape the next round of experiments. As described in
A gene-editing prediction engine with iterative learning cycles built on AWS, the team identified five key challenges and then used AWS to build GoGenome, a web service that performs predictions and delivers the results to users. GoGenome stores over 20 terabytes of raw sequencing data, and hundreds of millions of feature vectors, making use of Amazon S3 and other
AWS storage services as the foundation of their data lake.

Some other cool recent S3 success stories include Liberty Mutual (How Liberty Mutual built a highly scalable and cost-effective document management solution), Discovery (Discovery Accelerates Innovation, Cuts Linear Playout Infrastructure Costs by 61% on AWS), and Pinterest (How Pinterest worked with AWS to create a new way to manage data access).

Join Us Online Today
In celebration of AWS Pi Day 2022 we have put together an entire day of educational sessions, live demos, and even a launch or two. We will also take a look at some of the newest S3 launches including Amazon S3 Glacier Instant Retrieval, Amazon S3 Batch Replication and AWS Backup Support for Amazon S3.

Designed for system administrators, engineers, developers, and architects, our sessions will bring you the latest and greatest information on security, backup, archiving, certification, and more. Join us at 9:30 AM PT on Twitch for Kevin Miller’s kickoff keynote, and stick around for the entire day to learn a lot more about how you can put Amazon S3 to use in your applications. See you there!

Jeff;

How the Georgia Data Analytics Center built a cloud analytics solution from scratch with the AWS Data Lab

Post Syndicated from Kanti Chalasani original https://aws.amazon.com/blogs/big-data/how-the-georgia-data-analytics-center-built-a-cloud-analytics-solution-from-scratch-with-the-aws-data-lab/

This is a guest post by Kanti Chalasani, Division Director at Georgia Data Analytics Center (GDAC). GDAC is housed within the Georgia Office of Planning and Budget to facilitate governed data sharing between various state agencies and departments.

The Office of Planning and Budget (OPB) established the Georgia Data Analytics Center (GDAC) with the intent to provide data accountability and transparency in Georgia. GDAC strives to support the state’s government agencies, academic institutions, researchers, and taxpayers with their data needs. Georgia’s modern data analytics center will help to securely harvest, integrate, anonymize, and aggregate data.

In this post, we share how GDAC created an analytics platform from scratch using AWS services and how GDAC collaborated with the AWS Data Lab to accelerate this project from design to build in record time. The pre-planning sessions, technical immersions, pre-build sessions, and post-build sessions helped us focus on our objectives and tangible deliverables. We built a prototype with a modern data architecture and quickly ingested additional data into the data lake and the data warehouse. The purpose-built data and analytics services allowed us to quickly ingest additional data and deliver data analytics dashboards. It was extremely rewarding to officially release the GDAC public website within only 4 months.

A combination of clear direction from OPB executive stakeholders, input from the knowledgeable and driven AWS team, and the GDAC team’s drive and commitment to learning played a huge role in this success story. GDAC’s partner agencies helped tremendously through timely data delivery, data validation, and review.

We had a two-tiered engagement with the AWS Data Lab. In the first tier, we participated in a Design Lab to discuss our near-to-long-term requirements and create a best-fit architecture. We discussed the pros and cons of various services that can help us meet those requirements. We also had meaningful engagement with AWS subject matter experts from various AWS services to dive deeper into the best practices.

The Design Lab was followed by a Build Lab, where we took a smaller cross section of the bigger architecture and implemented a prototype in 4 days. During the Build Lab, we worked in GDAC AWS accounts, using GDAC data and GDAC resources. This not only helped us build the prototype, but also helped us gain hands-on experience in building it. This experience also helped us better maintain the product after we went live. We were able to continually build on this hands-on experience and share the knowledge with other agencies in Georgia.

Our Design and Build Lab experiences are detailed below.

Step 1: Design Lab

We wanted to stand up a platform that can meet the data and analytics needs for the Georgia Data Analytics Center (GDAC) and potentially serve as a gold standard for other government agencies in Georgia. Our objective with the AWS Data Design Lab was to come up with an architecture that meets initial data needs and provides ample scope for future expansion, as our user base and data volume increased. We wanted each component of the architecture to scale independently, with tighter controls on data access. Our objective was to enable easy exploration of data with faster response times using Tableau data analytics as well as build data capital for Georgia. This would allow us to empower our policymakers to make data-driven decisions in a timely manner and allow State agencies to share data and definitions within and across agencies through data governance. We also stressed on data security, classification, obfuscation, auditing, monitoring, logging, and compliance needs. We wanted to use purpose-built tools meant for specialized objectives.

Over the course of the 2-day Design Lab, we defined our overall architecture and picked a scaled-down version to explore. The following diagram illustrates the architecture of our prototype.

The architecture contains the following key components:

  • Amazon Simple Storage Service (Amazon S3) for raw data landing and curated data staging.
  • AWS Glue for extract, transform, and load (ETL) jobs to move data from the Amazon S3 landing zone to Amazon S3 curated zone in optimal format and layout. We used an AWS Glue crawler to update the AWS Glue Data Catalog.
  • AWS Step Functions for AWS Glue job orchestration.
  • Amazon Athena as a powerful tool for a quick and extensive SQL data analysis and to build a logical layer on the landing zone.
  • Amazon Redshift to create a federated data warehouse with conformed dimensions and star schemas for consumption by Tableau data analytics.

Step 2: Pre-Build Lab

We started with planning sessions to build foundational components of our infrastructure: AWS accounts, Amazon Elastic Compute Cloud (Amazon EC2) instances, an Amazon Redshift cluster, a virtual private cloud (VPC), route tables, security groups, encryption keys, access rules, internet gateways, a bastion host, and more. Additionally, we set up AWS Identity and Access Management (IAM) roles and policies, AWS Glue connections, dev endpoints, and notebooks. Files were ingested via secure FTP, or from a database to Amazon S3 using AWS Command Line Interface (AWS CLI). We crawled Amazon S3 via AWS Glue crawlers to build Data Catalog schemas and tables for quick SQL access in Athena.

The GDAC team participated in Immersion Days for training in AWS Glue, AWS Lake Formation, and Amazon Redshift in preparation for the Build Lab.

We defined the following as the success criteria for the Build Lab:

  • Create ETL pipelines from source (Amazon S3 raw) to target (Amazon Redshift). These ETL pipelines should create and load dimensions and facts in Amazon Redshift.
  • Have a mechanism to test the accuracy of the data loaded through our pipelines.
  • Set up Amazon Redshift in a private subnet of a VPC, with appropriate users and roles identified.
  • Connect from AWS Glue to Amazon S3 to Amazon Redshift without going over the internet.
  • Set up row-level filtering in Amazon Redshift based on user login.
  • Data pipelines orchestration using Step Functions.
  • Build and publish Tableau analytics with connections to our star schema in Amazon Redshift.
  • Automate the deployment using AWS CloudFormation.
  • Set up column-level security for the data in Amazon S3 using Lake Formation. This allows for differential access to data based on user roles to users using both Athena and Amazon Redshift Spectrum.

Step 3: Four-day Build Lab

Following a series of implementation sessions with our architect, we formed the GDAC data lake and organized downstream data pulls for the data warehouse with governed data access. Data was ingested in the raw data landing lake and then curated into a staging lake, where data was compressed and partitioned in Parquet format.

It was empowering for us to build PySpark Extract Transform Loads (ETL) AWS Glue jobs with our meticulous AWS Data Lab architect. We built reusable glue jobs for the data ingestion and curation using the code snippets provided. The days were rigorous and long, but we were thrilled to see our centralized data repository come into fruition so rapidly. Cataloging data and using Athena queries proved to be a fast and cost-effective way for data exploration and data wrangling.

The serverless orchestration with Step Functions allowed us to put AWS Glue jobs into a simple readable data workflow. We spent time designing for performance and partitioning data to minimize cost and increase efficiency.

Database access from Tableau and SQL Workbench/J were set up for my team. Our excitement only grew as we began building data analytics and dashboards using our dimensional data models.

Step 4: Post-Build Lab

During our post-Build Lab session, we closed several loose ends and built additional AWS Glue jobs for initial and historic loads and append vs. overwrite strategies. These strategies were picked based on the nature of the data in various tables. We returned for a second Build Lab to work on building data migration tasks from Oracle Database via VPC peering, file processing using AWS Glue DataBrew, and AWS CloudFormation for automated AWS Glue job generation. If you have a team of 4–8 builders looking for a fast and easy foundation for a complete data analytics system, I would highly recommend the AWS Data Lab.

Conclusion

All in all, with a very small team we were able to set up a sustainable framework on AWS infrastructure with elastic scaling to handle future capacity without compromising quality. With this framework in place, we are moving rapidly with new data feeds. This would not have been possible without the assistance of the AWS Data Lab team throughout the project lifecycle. With this quick win, we decided to move forward and build AWS Control Tower with multiple accounts in our landing zone. We brought in professionals to help set up infrastructure and data compliance guardrails and security policies. We are thrilled to continually improve our cloud infrastructure, services and data engineering processes. This strong initial foundation has paved the pathway to endless data projects in Georgia.


About the Author

Kanti Chalasani serves as the Division Director for the Georgia Data Analytics Center (GDAC) at the Office of Planning and Budget (OPB). Kanti is responsible for GDAC’s data management, analytics, security, compliance, and governance activities. She strives to work with state agencies to improve data sharing, data literacy, and data quality through this modern data engineering platform. With over 26 years of experience in IT management, hands-on data warehousing, and analytics experience, she thrives for excellence.

Vishal Pathak is an AWS Data Lab Solutions Architect. Vishal works with customers on their use cases, architects solutions to solve their business problems, and helps them build scalable prototypes. Prior to his journey with AWS, Vishal helped customers implement BI, data warehousing, and data lake projects in the US and Australia.

New – Additional Checksum Algorithms for Amazon S3

Post Syndicated from Jeff Barr original https://aws.amazon.com/blogs/aws/new-additional-checksum-algorithms-for-amazon-s3/

Amazon Simple Storage Service (Amazon S3) is designed to provide 99.999999999% (11 9s) of durability for your objects and for the metadata associated with your objects. You can rest assured that S3 stores exactly what you PUT, and returns exactly what is stored when you GET. In order to make sure that the object is transmitted back-and-forth properly, S3 uses checksums, basically a kind of digital fingerprint.

S3’s PutObject function already allows you to pass the MD5 checksum of the object, and only accepts the operation if the value that you supply matches the one computed by S3. While this allows S3 to detect data transmission errors, it does mean that you need to compute the checksum before you call PutObject or after you call GetObject. Further, computing checksums for large (multi-GB or even multi-TB) objects can be computationally intensive, and can lead to bottlenecks. In fact, some large S3 users have built special-purpose EC2 fleets solely to compute and validate checksums.

New Checksum Support
Today I am happy to tell you about S3’s new support for four checksum algorithms. It is now very easy for you to calculate and store checksums for data stored in Amazon S3 and to use the checksums to check the integrity of your upload and download requests. You can use this new feature to implement the digital preservation best practices and controls that are specific to your industry. In particular, you can specify the use of any one of four widely used checksum algorithms (SHA-1, SHA-256, CRC-32, and CRC-32C) when you upload each of your objects to S3.

Here are the principal aspects of this new feature:

Object Upload – The newest versions of the AWS SDKs compute the specified checksum as part of the upload, and include it in an HTTP trailer at the conclusion of the upload. You also have the option to supply a precomputed checksum. Either way, S3 will verify the checksum and accept the operation if the value in the request matches the one computed by S3. In combination with the use of HTTP trailers, this feature can greatly accelerate client-side integrity checking.

Multipart Object Upload – The AWS SDKs now take advantage of client-side parallelism and compute checksums for each part of a multipart upload. The checksums for all of the parts are themselves checksummed and this checksum-of-checksums is transmitted to S3 when the upload is finalized.

Checksum Storage & Persistence – The verified checksum, along with the specified algorithm, are stored as part of the object’s metadata. If Server-Side Encryption with KMS Keys is requested for the object, then the checksum is stored in encrypted form. The algorithm and the checksum stick to the object throughout its lifetime, even if it changes storage classes or is superseded by a newer version. They are also transferred as part of S3 Replication.

Checksum Retrieval – The new GetObjectAttributes function returns the checksum for the object and (if applicable) for each part.

Checksums in Action
You can access this feature from the AWS Command Line Interface (CLI), AWS SDKs, or the S3 Console. In the console, I enable the Additional Checksums option when I prepare to upload an object:

Then I choose a Checksum function:

If I have already computed the checksum I can enter it, otherwise the console will compute it.

After the upload is complete I can view the object’s properties to see the checksum:

The checksum function for each object is also listed in the S3 Inventory Report.

From my own code, the SDK can compute the checksum for me:

with open(file_path, 'rb') as file:
    r = s3.put_object(
        Bucket=bucket,
        Key=key,
        Body=file,
        ChecksumAlgorithm='sha1'
    )

Or I can compute the checksum myself and pass it to put_object:

with open(file_path, 'rb') as file:
    r = s3.put_object(
        Bucket=bucket,
        Key=key,
        Body=file,
        ChecksumSHA1='fUM9R+mPkIokxBJK7zU5QfeAHSy='
    )

When I retrieve the object, I specify checksum mode to indicate that I want the returned object validated:

r = s3.get_object(Bucket=bucket, Key=key, ChecksumMode='ENABLED')

The actual validation happens when I read the object from r['Body'], and an exception will be raised if there’s a mismatch.

Watch the Demo
Here’s a demo (first shown at re:Invent 2021) of this new feature in action:

Available Now
The four additional checksums are now available in all commercial AWS Regions and you can start using them today at no extra charge.

Jeff;

NEW – Replicate Existing Objects with Amazon S3 Batch Replication

Post Syndicated from Marcia Villalba original https://aws.amazon.com/blogs/aws/new-replicate-existing-objects-with-amazon-s3-batch-replication/

Starting today, you can replicate existing Amazon Simple Storage Service (Amazon S3) objects and synchronize your buckets using the new Amazon S3 Batch Replication feature.

Amazon S3 Replication supports several customer use cases. For example, you can use it to minimize latency by maintaining copies of your data in AWS Regions geographically closer to your users, to meet compliance and data sovereignty requirements, and to create additional resiliency for disaster recovery planning. S3 Replication is a fully managed, low-cost feature that replicates newly uploaded objects between buckets. The buckets can belong to the same or different accounts. Objects may be replicated to a single destination bucket or to multiple destination buckets. Destination buckets can be in different AWS Regions (Cross-Region Replication) or within the same Region as the source bucket (Same-Region Replication).

Replication flow

But until today, S3 Replication could not replicate existing objects; now you can do it with S3 Batch Replication.

There are many reasons why customers will want to replicate existing objects. For example, customers might want to copy their data to a new AWS Region for a disaster recovery setup. To do that, they will need to populate the new destination bucket with existing data. Another reason to copy existing data comes from organizations that are expanding around the world. For example, imagine a US-based animation company now opens a new studio in Singapore. To reduce latency for their employees, they will need to replicate all the internal files and in-progress media files to the Asia Pacific (Singapore) Region. One other common use case we see is customers going through mergers and acquisitions where they need to transfer ownership of existing data from one AWS account to another.

To replicate existing objects between buckets, customers end up creating complex processes. In addition, copying objects between buckets does not preserve the metadata of objects such as version ID and object creation time.

Today we are happy to launch S3 Batch Replication, a new capability offered through S3 Batch Operations that removes the need for customers to develop their own solutions for copying existing objects between buckets. It provides a simple way to replicate existing data from a source bucket to one or more destinations. With this capability, you can replicate any number of objects with a single job.

When to Use Amazon S3 Batch Replication
S3 Batch Replication can be used to:

  • Replicate existing objects – use S3 Batch Replication to replicate objects that were added to the bucket before the replication rules were configured.
  • Replicate objects that previously failed to replicate – retry replicating objects that failed to replicate previously with the S3 Replication rules due to insufficient permissions or other reasons.
  • Replicate objects that were already replicated to another destination – you might need to store multiple copies of your data in separate AWS accounts or Regions. S3 Batch Replication can replicate objects that were already replicated to new destinations.
  • Replicate replicas of objects that were created from a replication rule – S3 Replication creates replicas of objects in destination buckets. Replicas of objects cannot be replicated again with live replication. These replica objects can only be replicated with S3 Batch Replication.

Get started with S3 Batch Replication
There are many ways to get started with S3 Batch Replication from the S3 console. You can create a job from the Replication configuration page or the Batch Operations create job page. You will also get prompted to replicate existing objects when you create a new replication rule or add a new destination bucket.

For this demo, imagine that you are creating a replication rule in a bucket that has existing objects. When you finish creating the rule, you will get prompted with a message asking you if you want to replicate existing objects.

Prompt asking if you want to replicate existing objects

If you answer yes, then you will be directed to a simplified Create Batch Operations job page. If you want this job to execute automatically after the job is ready, you can leave the default option. If you want to review the manifest or the job details before running the job, select Wait to run the job when it’s ready.

This method of creating the job automatically generates the manifest of objects to replicate. A manifest is a list of objects in a given source bucket to apply the replication rules. The generated manifest report has the same format as an Amazon S3 Inventory Report.

Create a Batch Operations job view

S3 Batch Replication creates a Completion report, similar to other Batch Operations jobs, with information on the results of the replication job. It is highly recommended to select this option and to specify a bucket to store this report.

Completion report configuration

The final step is to configure permissions for creating this batch job. If you keep the default settings, Amazon S3 will create a new AWS Identity and Access Management (IAM) role for you.

Permissions configurations

After you save this job, check the status of the job on the Batch Operations page. You will see the job changing status as it progresses, the percentage of files that have been replicated, and the total number of files that have failed the replication.

Keep in mind that existing objects can take longer to replicate than new objects, and the replication speed largely depends on the AWS Regions, size of data, object count, and encryption type.

Job status page

When the Batch Replication job completes, you can navigate to the bucket where you saved the completion report to check the status of object replication. The reports have the same format as an Amazon S3 Inventory Report.

Finding the report and manifest

Pricing and availability
When using this feature, you will be charged replication fees for request and data transfer for cross Region, for the
batch operations, and a manifest generation fee if you opted for it.

Additionally, you will be charged the storage cost of storing the replicated data in the destination bucket and AWS KMS charges if your objects are replicated with AWS KMS. Check the Replication tab on the S3 pricing page to learn all the details.

S3 Batch Replication is available in all AWS Regions, including the AWS GovCloud Regions, the AWS China (Beijing) Region, operated by Sinnet, and the AWS China (Ningxia) Region, operated by NWCD. And you can get started using the Amazon S3 console, CLI, S3 API, or AWS SDKs client.

To learn more about S3 Batch Replication, check out the Amazon S3 User Guide.

Marcia

Demonstrate your AWS Cloud Storage knowledge and skills with new digital badges!

Post Syndicated from Steve Roberts original https://aws.amazon.com/blogs/aws/demonstrate-your-aws-cloud-storage-knowledge-and-skills-with-new-digital-badges/

Are you a cloud storage professional or an on-premises storage pro who’s curious about cloud storage? Are you interested in demonstrating your AWS Storage knowledge and skills with potential employers and your community of peers? If so, I’d like to bring to your attention the recent launch of digital badges aligned to Learning Plans for Block Storage and Object Storage on AWS Skill Builder. In this 2021 blog post by Indeed, cloud-computing is the number one in-demand skill employers are looking for.

The new, verifiable, digital badges are available to everyone who scores at least 80 percent in the assessments associated with Learning Plans. The badges prove your knowledge and skills for Object Storage and/or Block Storage in the AWS Cloud. Badges, distributed and managed through Credly, carry with them metadata that enables verification of the issuer and the credential and lists the skills and knowledge demonstrated by the holder. Sharing badges on your résumé, peer community, and via social media assists in developing your career in cloud computing and celebrates your achievements. Some of you may be familiar with AWS re:Post, which launched during re:Invent 2021—your badges can be showcased in your AWS re:Post user profile too.

Object and Block Storage digital badges

AWS Skill Builder Learning Plans and digital badges for Block and Object Storage
Digital badges are available today for the Block Storage and Object Storage Learning Plans on AWS Skill Builder. Block Storage has a focus on Amazon Elastic Block Store (EBS), while Object Storage is focused on Amazon Simple Storage Service (Amazon S3). Both plans contain free learning content to help you build your knowledge in each of these areas and get ready for the assessments.

AWS Skill Builder offers a range of Learning Plans related to cloud computing skills. Learning Plans correspond to roles (architect, developer, etc.) and domain (databases, storage, etc.); each one is specifically designed to build your knowledge with a clear set of outcomes for you to achieve. Freely available, the Learning Plans and related assessments can be taken anywhere, anytime, providing equal and fair learning for all.

Badge assessments are linked to curriculum standards and are developed by service teams, field subject matter experts (SMEs), and content/curriculum SMEs. Therefore, employers can feel satisfied that the badges attained by a potential employee were awarded due to actual demonstrated skills and knowledge for Block and/or Object Storage. By the way, if you feel you have existing skills and knowledge and would prefer to skip straight to the assessment, you can. If you don’t pass, you’ll be guided to fill in your knowledge gaps, and you can then retake the assessment after 24 hours. To earn a badge, you need to score a minimum of 80 percent in the assessment.

The Block Storage and Object Storage Learning Plans are designed for you to take on your own, and you can track your own progress, making it easier to learn in your own time and manage your own learning development. They’re a great opportunity to refresh your skills, check your skills, or learn new ones.

Start collecting digital storage learning badges today
The Learning Plans and new digital badges for Block Storage and Object Storage help you showcase your in-demand knowledge and skills related to AWS Storage. As I mentioned earlier, enrollment for Learning Plans, and the subsequent assessments, are free for everyone. Find out more, and get started, at https://aws.amazon.com/training/badges. And be sure to share your accomplishment by posting on social media with the hashtag #AWSTraining and show off your badges!

— Steve

Preview – AWS Backup Adds Support for Amazon S3

Post Syndicated from Sébastien Stormacq original https://aws.amazon.com/blogs/aws/preview-aws-backup-adds-support-for-amazon-s3/

Starting today, you can preview AWS Backup for Amazon Simple Storage Service (Amazon S3).

AWS Backup is a fully managed, policy-based service that lets you to centralize and automate the backup and restore of your applications spanning across 12 AWS services: Amazon Elastic Compute Cloud (Amazon EC2) instances, Amazon Elastic Block Store (EBS) volumes, Amazon Relational Database Service (RDS) databases (including Amazon Aurora clusters), Amazon DynamoDB tables, Amazon Neptune databases, Amazon DocumentDB (with MongoDB compatibility) databases, Amazon Elastic File System (Amazon EFS) file systems, Amazon FSx for Lustre file systems, Amazon FSx for Windows File Server file systems, AWS Storage Gateway volumes, and now Amazon S3 (in preview).

Modern workloads and systems are leveraging different storage options for different functionalities. In the 21st century, it is normal to build applications relying on non-relational and relational databases, shared file storage, and object storage, just to name of few. When operating and managing these applications, you told us that you wanted centralized protection and provable compliance for application data stored in S3 alongside other AWS services for storage, compute, and databases.

I can see three benefits when integrating Amazon Simple Storage Service (Amazon S3) with your data protection policies in AWS Backup.

First, it lets you centrally manage your applications backups: AWS Backup provides an automated solution to centrally configure backup policies, thereby helping you simplify backup lifecycle management. This also makes it easy to ensure that your application data across AWS services (including S3) is centrally backed up.

Second, it lets you easily restore your data: AWS Backup provides a single-click-restore experience for your S3 data. This lets you perform point-in-time restores of your S3 buckets and objects to a new or existing S3 bucket.

Finally, it improves backup compliance: AWS Backup provides built-in dashboards that let you to track backup and restore operations for S3.

AWS Backup for S3 (Preview) lets you create continuous point-in-time backups along with periodic backups of S3 buckets, including object data, object tags, access control lists (ACLs), and user-defined metadata. The first backup is a full snapshot, while subsequent backups are incremental. If there is a data disruption event, then you choose a backup from the backup vault, and restore an S3 bucket (or individual S3 objects) to a new or existing S3 bucket. AWS Backup is integrated with AWS Organizations, which let you use a single policy across AWS accounts (within your Organizations) to automate backup creation and backup access management.

Furthermore, you can turn on AWS Backup Vault Lock to enable delete protection of the data that you protect with AWS Backup, and thereby improving protection of your immutable backups from accidental deletion or malicious re-encryption.

How to Get Started
AWS Backup works with versioned S3 buckets. Before you get started, turn on S3 Versioning on your buckets to backup.

I must enable S3 in AWS Backup Settings when I use this feature for the first time. Using the AWS Management Console, I navigate to AWS Backup, then select Settings and Configure resources. I enable S3, and select Confirm. This is a one-time operation.

AWS Backup - optin S3

For this demo, I already have an existing backup plan, and I want to add an S3 bucket to this plan. If you want to create a new backup plan, then you can refer to AWS Backup‘s technical documentation.

To start including my S3 objects in my backup plan, I open the AWS Management Console, navigate to Backup plans, and select Assign resources.

AWS Backup Add Resources

I give a name to my Resource assignment. I select Include specific resources types, then I select S3 as Resource type and one or several S3 Bucket names. When I am done, I select Assign resources.

Alternatively, I may use tags or resource IDs to assign S3 resources.

If you have thousands of S3 buckets, I recommend using tags to assign the S3 buckets to a backup plan. AWS Backup matches the tags in S3 buckets to the ones assigned to the backup plan, and it centrally backs up the S3 resources along with other AWS services that your application uses.

The other options are not different from what you know already.

AWS Backup - backup plan for S3

The Bucket names list in the previous screenshot only shows the S3 buckets in the same Region.

Alternatively, I may also create on-demand backups. I navigate to the Protected resources section, and select Create on-demand backup.

I select S3 as the Resource type, and select the Bucket name. As per usual, I choose a Backup Window, a Retention period, a Backup vault, and an IAM role. Then, I select Create on-demand backup.

AWS Backup - on-demand backup for S3After a while, depending on the size of my bucket, the backup is ✅ Completed.

AWS Backup for S3 - Backup completed

All of the backups are encrypted and stored securely in a backup vault that I selected in the backup plan.

A backup vault (or backup storage vault) is an encrypted logical construct in my AWS account that stores and organizes my backups (recovery points). I may create new backup vaults in every AWS Region where AWS Backup is available. I may enable AWS Backup Vault Lock (delete-protection capability) on the backup vault to avoid accidental deletions and prevent malicious actors from re-encrypting my data. AWS Backup stores my continuous backups and periodic snapshots in the backup vault of my preference, and it lets me browse and restore as per my requirements.

How to Restore Objects
Let’s try to restore this backup.

The restore operation is very flexible. I may restore entire S3 buckets or individual S3 objects. I may restore the backups to the source S3 bucket, or to another existing bucket. Furthermore, I may create a new S3 bucket during restore. The S3 buckets must have Versioning enabled. Also, I may change the encryption key during restore.

I navigate to Backup vaults to restore the S3 bucket I just backed up. In the Backups section, I select the Recovery point ID that I want to restore, and I select Restore from the Actions menu.

AWS Backup for S3 - restore

Before starting the restore, I may select a few options:

  • The Restore time: I may restore my continuous backup to a point-in-time in the last 35 days, while I can restore my periodic backups to their original state.
  • The Restore type: I may choose to restore the entire bucket or a subset of objects within it.
  • The Restore destination: I may choose to restore on the same bucket, on another one, or create a new bucket during restore.
  • The Restored object encryption: this lets me select the key I want to use to encrypt the restored objects in the bucket.

I select Restore backup to start the restore.

AWS Backup for S3 - restore optionsI can monitor the progress in the Jobs section, under the Restore jobs tab.

AWS Backup S3 - restore Jobs

When the status turns green to ✅ Completed, my objects are ready to use!

Generally, the most comprehensive data-protection strategies include regular testing and validation of your restore procedures before you need them. Testing your restores also helps to prepare and maintain recovery runbooks. In turn, that ensures operational readiness during a disaster recovery exercise, or an actual data loss scenario.

Availability and Pricing
The preview is available in the US West (Oregon) Region only.

During the preview, there are no charges for creating and storing backups. You will pay the AWS charges for underlying resources, such as S3 storage, API usage, and versioning.

Send us an email at [email protected] including your AWS account ID to register for the preview.

Go ahead and apply to the preview program today.

— seb

Amazon S3 Glacier is the Best Place to Archive Your Data – Introducing the S3 Glacier Instant Retrieval Storage Class

Post Syndicated from Marcia Villalba original https://aws.amazon.com/blogs/aws/amazon-s3-glacier-is-the-best-place-to-archive-your-data-introducing-the-s3-glacier-instant-retrieval-storage-class/

Today we are announcing the Amazon S3 Glacier Instant Retrieval storage class. This new archive storage class delivers the lowest cost storage for long-lived data that is rarely accessed and requires millisecond retrieval.

We are also excited to announce that S3 Intelligent-Tiering now automatically optimizes storage costs for rarely accessed data that needs immediate retrieval with the new Archive Instant Access tier, which is ideal for data with unknown or changing access patterns. For existing customers, this will provide an immediate savings of 68 percent for data that hasn’t been accessed for more than 90 days, with no action needed. The Frequent, Infrequent, and now Archive Instant Access tiers are designed for the same milliseconds access time and high-throughput performance.

In addition, we are announcing the new name for the existing Amazon S3 Glacier storage class and several price reductions.

Amazon S3 Glacier Instant Retrieval
The Amazon S3 Glacier storage classes are extremely low-cost and built for data archiving. They are secure and durable, and they are designed to provide the lowest cost for data that does not require immediate access, with retrieval options from minutes to hours.

Many customers need to store rarely accessed data for several years. However the data must be highly available and immediately accessible. Today, these customers use the S3 Standard-Infrequent Access (S3 Standard-IA) storage class. This storage class offers low cost for storage and allows customers to retrieve their data instantly.

S3 Glacier Instant Retrieval is a new storage class that delivers the fastest access to archive storage, with the same low latency and high-throughput performance as the S3 Standard and S3 Standard-IA storage classes. You can save up to 68 percent on storage costs as compared with using the S3 Standard-IA storage class when you use the S3 Glacier Instant Retrieval storage class and pay a low price to retrieve data. For example, in the US East (N. Virginia) Region, S3 Glacier Instant Retrieval storage pricing is $0.004 per GB-month and data retrieval is $0.03 per GB. Learn more about pricing for your Region.

Media archives, medical images, or user-generated content are just a few examples of ideal use cases for S3 Glacier Instant Retrieval. Once created, this content is rarely accessed, but when it is needed it must be available in milliseconds.

To get started using the new storage class from the Amazon S3 console, upload an object as you would normally, and select the S3 Glacier Instant Retrieval storage class.

Upload object with the new storage class

This feature is available programmatically from AWS SDKs, AWS Command Line Interface (CLI), and AWS CloudFormation.

In my opinion, the easiest way to store data in S3 Glacier Instant Retrieval is to use the S3 PUT API using the CLI. When using this API, set the storage class to GLACIER_IR.

aws s3api put-object --bucket <bucket-name> --key <object-key> --body <name-file> --storage-class GLACIER_IR

When the object is uploaded to Amazon S3, verify the storage class in the list of objects or on the object details page.

Storage classes

For data that already exists in Amazon S3, you can use S3 Lifecycle to transition data from the S3 Standard and S3 Standard-IA storage classes into S3 Glacier Instant Retrieval.

New Archive Instant Access Tier in S3 Intelligent-Tiering
S3 Intelligent-Tiering is a storage class that automatically moves objects between access tiers to optimize costs. This is the recommended storage class for data with unpredictable or changing access patterns, such as in data lakes, analytics, or user-generated content.

Until today, there were two low latency access tiers optimized for frequent and infrequent access, and two optional archive access tiers designed for asynchronous access optimized for rare access at a low cost.

Beginning today, the Archive Instant Access tier is added as a new access tier in the S3 Intelligent-Tiering storage class. You will start seeing automatic costs savings for your storage in S3 Intelligent-Tiering for rarely accessed objects.

The Archive Instant Access tier joins the group of low latency access tiers. This new tier is optimized for data that is not accessed for months at a time but, when it is needed, is available within milliseconds.

S3 Intelligent-Tiering automatically stores objects in three access tiers that deliver the same performance as the S3 Standard storage class:

  • Frequent Access tier
  • Infrequent Access tier
  • Archive Instant Access (new)

For a small monitoring and automation charge, S3 Intelligent-Tiering monitors access patterns and moves objects between the different access tiers. Objects that have not been accessed for 30 consecutive days are moved from the Frequent Access tier to the Infrequent Access tier for savings of 40 percent. When an object hasn’t been accessed for 90 consecutive days, S3 Intelligent-Tiering will move the object from the Infrequent Access tier to the Archive Instant Access tier, with a savings of 68 percent. If the data is accessed later, it is automatically moved back to the Frequent Access tier. No tiering charges apply when objects are moved between access tiers within the S3 Intelligent-Tiering storage class.

S3 Intelligent-Tiering access tiers

To get started with this new access tier, select Intelligent-Tiering as the storage class for an object when uploading an object using the S3 console. After 90 days of inactivity (30 days in Frequent Access tier and 60 days in Infrequent Access tier), S3 Intelligent-Tiering will automatically move the object to the Archive Instant Access tier. The introduction of the new Archive Instant Access tier has no impact on performance when you retrieve objects.

New name for the Amazon S3 Glacier storage class – S3 Glacier Flexible Retrieval
The existing Amazon S3 Glacier storage class is now named S3 Glacier Flexible Retrieval. This storage class now has free bulk retrievals in 5 to 12 hours, and the storage price has been reduced by 10 percent in all Regions, effective December 1, 2021. S3 Glacier Flexible Retrieval is now even more cost-effective, and the free bulk retrievals make it ideal for retrieving large data volumes.

These are the Amazon S3 archive storage classes:

  • S3 Glacier Instant Retrieval: The newest storage class is optimized for long-lived data that is rarely accessed (typically once per quarter). However when data is needed, it is available within milliseconds. For example, medical images and news media assets are perfect for this storage class.
  • S3 Glacier Flexible Retrieval: This newly renamed storage class is optimized for archiving data that can be retrieved in minutes or with free bulk retrievals in 5 to 12 hours. This storage class is ideal for backups and disaster recovery use cases, where you have large amounts of long-term, rarely accessed data, and you don’t want to worry about retrieval costs when you need the data.
  • S3 Glacier Deep Archive: This storage class is the lowest-cost storage in the cloud and is optimized for archiving data that can be restored in at least 12 hours. It’s great for storing your compliance archives or for digital media preservation.

Amazon S3 has reduced storage prices!
We are excited to announce that Amazon S3 has reduced storage prices of up to 31 percent in the S3 Standard-IA and S3 One Zone-IA storage classes across 9 AWS Regions: US West (N. California), Asia Pacific (Hong Kong), Asia Pacific (Mumbai), Asia Pacific (Osaka), Asia Pacific (Seoul), Asia Pacific (Singapore), Asia Pacific (Sydney), Asia Pacific (Tokyo), and South America (São Paulo). These price reductions are effective December 1, 2021.

Learn more about price reduction details.

Available Now
The new storage class, S3 Glacier Instant Retrieval, and the new Archive Instant Access tier in S3 Intelligent-Tiering are available today (November 30, 2021) in all AWS Regions.

The price cut for S3 Glacier and free bulk retrievals in all AWS Regions, and the S3 Standard-Infrequent Access/One Zone-Infrequent storage class in nine Regions will be effective on December 1, 2021.

Learn more about the storage classes changes and all the storage classes.

Marcia

New – Simplify Access Management for Data Stored in Amazon S3

Post Syndicated from Marcia Villalba original https://aws.amazon.com/blogs/aws/new-simplify-access-management-for-data-stored-in-amazon-s3/

Today, we are introducing a couple new features that simplify access management for data stored in Amazon Simple Storage Service (Amazon S3). First, we are introducing a new Amazon S3 Object Ownership setting that lets you disable access control lists (ACLs) to simplify access management for data stored in Amazon S3. Second, the Amazon S3 console policy editor now reports security warnings, errors, and suggestions powered by IAM Access Analyzer as you author your S3 policies.

Since launching 15 years ago, Amazon S3 buckets have been private by default. At first, the only way to grant access to objects was using ACLs. In 2011, AWS Identity and Access Management (IAM) was announced, which allowed the use of policies to define permissions and control access to buckets and objects in Amazon S3. Nowadays, you have several ways to control access to your data in Amazon S3, including IAM policies, S3 bucket policies, S3 Access Points policies, S3 Block Public Access, and ACLs.

ACLs are an access control mechanism in which each bucket and object has an ACL attached to it. ACLs define which AWS accounts or groups are granted access as well as the type of access. When an object is created, the ownership of it belongs to the creator.  This ownership information is embedded in the object ACL. When you upload an object to a bucket owned by another AWS account, and you want the bucket owner to access the object, then permissions need to be granted in the ACL. In many cases, ACLs and other kinds of policies are used within the same bucket.

The new Amazon S3 Object Ownership setting, Bucket owner enforced, lets you disable all of the ACLs associated with a bucket and the objects in it. When you apply this bucket-level setting, all of the objects in the bucket become owned by the AWS account that created the bucket, and ACLs are no longer used to grant access. Once applied, ownership changes automatically, and applications that write data to the bucket no longer need to specify any ACL. As a result, access to your data is based on policies. This simplifies access management for data stored in Amazon S3.

With this launch, when creating a new bucket in the Amazon S3 console, you can choose whether ACLs are enabled or disabled. In the Amazon S3 console, when you create a bucket, the default selection is that ACLs are disabled. If you wish to keep ACLs enabled, you can choose other configurations for Object Ownership, specifically:

  • Bucket owner preferred: All new objects written to this bucket with the bucket-owner-full-controlled canned ACL will be owned by the bucket owner. ACLs are still used for access control.
  • Object writer: The object writer remains the object owner. ACLs are still used for access control.

Options for object ownership

For existing buckets, you can view and manage this setting in the Permissions tab.

Before enabling the Bucket owner enforced setting for Object Ownership on an existing bucket, you must migrate access granted to other AWS accounts from the bucket ACL to the bucket policy. Otherwise, you will receive an error when enabling the setting. This helps you ensure applications writing data to your bucket are uninterrupted. Make sure to test your applications after you migrate the access.

Policy validation in the Amazon S3 console
We are also introducing policy validation in the Amazon S3 console to help you out when writing resource-based policies for Amazon S3. This simplifies authoring access control policies for Amazon S3 buckets and access points with over 100 actionable policy checks powered by IAM Access Analyzer.

To access policy validation in the Amazon S3 console, first go to the detail page for a bucket. Then, go to the Permissions tab and edit the bucket policy.

Accessing the IAM Policy Validation in S3 consoleWhen you start writing your policy, you see that, as you type, different findings appear at the bottom of the screen. Policy checks from IAM Access Analyzer are designed to validate your policies and report security warnings, errors, and suggestions as findings based on their impact to help you make your policy more secure.

You can also perform these checks and validations using the IAM Access Analyzer’s ValidatePolicy API.

Example of policy suggestion

Availability
Amazon S3 Object Ownership is available at no additional cost in all AWS Regions, excluding the AWS China Regions and AWS GovCloud Regions. IAM Access Analyzer policy validation in the Amazon S3 console is available at no additional cost in all AWS Regions, including the AWS China Regions and AWS GovCloud Regions.

Get started with Amazon S3 Object Ownership through the Amazon S3 console, AWS Command Line Interface (CLI), Amazon S3 REST API, AWS SDKs, or AWS CloudFormation. Learn more about this feature on the documentation page.

And to learn more and get started with policy validation in the Amazon S3 console, see the Access Analyzer policy validation documentation.

Marcia

New for AWS Backup – Support for VMware and VMware Cloud on AWS

Post Syndicated from Danilo Poccia original https://aws.amazon.com/blogs/aws/new-for-aws-backup-support-for-vmware-and-vmware-cloud-on-aws/

Today, I am happy to announce AWS Backup support for VMware, a new capability that enables you to centralize and automate data protection of virtual machines (VMs) running on VMware on premises and VMware CloudTM on AWS. You can now use a single, centrally managed policy in AWS Backup to protect these VMware environments together with 12 AWS compute, storage, and database services already supported by AWS Backup. You can then use AWS Backup to restore VMware workloads to on-premises data centers and VMware Cloud on AWS.

While doing so, AWS Backup Audit Manager lets you consistently demonstrate compliance by monitoring backup, copy, and restore operations and generating auditor-ready reports to satisfy your data governance and regulatory requirements.

Let’s see how this works in practice.

Using AWS Backup Support for VMware
There are three steps to back up VMware virtual machines (VMs) with AWS Backup:

  1. Create a gateway to connect AWS Backup to your hypervisor.
  2. Connect to your hypervisor through the gateway.
  3. Assign virtual machines managed by your hypervisor to a backup plan.

AWS Back Support for VMware diagram

On the left pane of the AWS Backup console, there is a new External resources section. There, I choose Gateways and then Create gateway. This AWS Backup gateway helps with discovery of the on-premises VMware environment and acts as a cloud gateway to send and receive data.

I download the Open Virtualization Format (OVF) file of the AWS Backup gateway and follow the instructions to deploy the gateway using the VMware vSphere client. I am using an internal test and development VMware environment for this walkthrough.

VMware vCenter screenshot.

After deploying the gateway in my VMware environment, I come back to the AWS Backup console. I write a name for the gateway (for simplicity, I use the same name of the gateway VM) and the IP address of the gateway VM. Optionally, I can add tags to help organize and track my setup. I go on and create the gateway.

Console screenshot.

Now, I choose Add hypervisor. I write a name for the hypervisor and the IP address of the VMware vCenter server host.

Console screenshot.

I enter the username and password of a service account that I created for AWS Backup on the Active Directory domain. The username should include the domain (for example, username@domain). Then, I choose the encryption key to protect the service account credentials. If I don’t choose my own AWS Key Management Service (KMS) key, AWS Backup encrypts the username and password using a key that AWS owns and manages.

Console screenshot.

I select the gateway to connect to the hypervisor and choose Test gateway connection. This test helps ensure that the gateway can communicate with the hypervisor before I complete the configuration. Optionally, I can add tags to help organize and track my setup. I go on and add the hypervisor.

Console screenshot.

After a few minutes, the hypervisor is online, and I see the VMs managed by vCenter in the AWS Backup console. I can now use these virtual machines as resources in my backup plans in the same way as the other AWS compute, storage, and database resources supported by AWS Backup.

Console screenshot.

I create a new backup plan and start with a template. The rules of the template enforce daily backups with five weeks of retention and monthly backups with one year of retention. I can customize these rules based on my requirements.

Console screenshot.

Then, I choose to assign resources to the backup plan, and I select three VMs.

Console screenshot.

If you need, you can create an on-demand backup in the Protected resources section of the console. For example, here I am starting the on-demand backup for one of the VMs.

Console screenshot.

When a backup is complete, VMs are added to the list of the protected resources, and I can initiate a restore.

Console screenshot.

I select the backup and choose Restore. Then, I enter the restore location, which can be the same VMware environment I used for the backup or another (for example, on VMware Cloud on AWS). Below, I specify name, path, compute resource name, and datastore to use for the restore. Then, I choose Restore backup.

Console screenshot.

I monitor the status of my backup and restore jobs from the AWS Backup console. To monitor backup and restore metrics over a period of time, I can use Amazon CloudWatch metrics, logs, and alarms. I can also send events to Amazon EventBridge to receive notifications once a job completes or fails.

Availability and Pricing
AWS Backup support for VMware is available in the US East (N. Virginia, Ohio), US West (N. California, Oregon), GovCloud (US-East, US-West), Canada (Central), Europe (Frankfurt, Ireland, London, Milan, Paris, Stockholm), South America (São Paulo), Asia Pacific (Hong Kong, Mumbai, Seoul, Singapore, Sydney, Tokyo, Osaka), Middle East (Bahrain), and Africa (Cape Town) Regions. Please see the AWS Regional Services List for more information.

AWS Backup supports VMware ESXi 6.7.x and 7.0.x VMs running on NFS, VMFS, and VSAN data stores on premises and in VMware Cloud on AWS. In addition, AWS Backup supports both SCSI Hot-Add and Network Block Device (NBD) transport modes for copying data from source VMs to AWS.

With AWS Backup support for VMware, you pay using the same dimensions that AWS Backup uses today: backup storage, restore, and cross-region data transfer. For more information, see the AWS Backup pricing page.

Your VM backups are stored in a backup vault. All backups stored and managed by AWS Backup are replicated to 3 Availability Zones (AZs) in the Region and designed for 99.999999999 percent (11 9s) durability and 99.99 percent (4 9s) of service availability.

AWS Backup supports first full, then incremental-forever, backups of VMs that you can create on-demand or via a schedule configured in your backup plan. AWS Backup always does full restores even though backups are stored as incremental, enabling you to benefit from storage efficiency cost savings while easily performing restores.

Centrally protect your VMware environments and your AWS compute, storage, and database resources with AWS Backup.

Danilo

New – Amazon EBS Snapshots Archive

Post Syndicated from Sébastien Stormacq original https://aws.amazon.com/blogs/aws/new-amazon-ebs-snapshots-archive/

I am pleased to announce the availability of Amazon EBS Snapshots Archive, a new storage tier for the long-term retention of Amazon Elastic Block Store (EBS) snapshots of your EBS volumes.

In a nutshell, EBS is an easy-to-use high-performance block storage service for your Amazon Elastic Compute Cloud (Amazon EC2) instances. An EBS volume mounted to your EC2 instances lets you boot an operating system and store data for your most performance-demanding workloads. You may use EBS snapshots to create point-in-time copies of your volume data. The first snapshot of a volume contains all of the data written into that volume. Subsequent snapshots are incremental. Snapshots are stored on Amazon Simple Storage Service (Amazon S3), and they may be shared between AWS accounts and AWS Regions.

The ability to take frequent snapshots and easily restore volumes makes EBS snapshots an obvious choice for your data management strategy, alongside other backup options. The incremental nature of snapshots makes them cost-effective for daily and weekly backups that need immediate restores. However, you were telling us that business compliance and regulatory needs have meant that you needed to retain EBS snapshots for longer periods of time (months or years). For example, snapshots taken at the end of a project, or snapshots for test and development preserved for future project releases. The vast majority of these snapshots are taken and never read. For these snapshots, you are looking to lower your storage costs. Today, to benefit from lower storage costs, you may have written complex scripts involving temporary EC2 instances to restore snapshots, mount the corresponding volumes, and transfer the data to lower-cost storage tiers, such as Amazon Glacier.

EBS Snapshots Archive provides a low-cost storage tier to archive full, point-in-time copies of EBS Snapshots that you must retain for 90 days or more for regulatory and compliance reasons, or for future project releases. Now, you can easily archive and manage EBS Snapshots, thereby eliminating the need for custom scripts and third-party tools to manage these snapshots. This lets you move your rarely accessed snapshots to EBS Snapshots Archive to achieve up to 75% lower storage costs, and avoid licensing costs for third-party tools. Furthermore, you can retrieve an archived snapshot within 24-72 hours, and, once restored, use the snapshot to recover an EBS volume.

As per usual, let me show you how it works.

How to Get Started
I have a snapshot available in the US East (N. Virginia) Region, and I want to archive this snapshot for compliance reasons. I open the AWS Management Console, navigate to EC2, then to Snapshots. I select the snapshot I want to archive, and select the Actions menu. I select the Archive snapshot menu option.

EBS Snapshot Archive - create snapshot

I carefully read the confirmation message :-), and I select Archive snapshot.

EBS Snapshot Archive - create snapshot - confirmation

I may monitor the progress of the archive operation with the new Storage Tier tab at the bottom of the screen. After some time, depending on the size of the snapshot, the Tiering status becomes ✅ Archival completed.

EBS Snapshot Archive - create snapshot - archival completedArchived snapshots stay visible in the console. The new Storage tier column indicates the tier used for storage (Standard or Archive).

How do I Restore a Volume?
Restoring a volume from EBS Snapshots Archive is a two-step process. First, I retrieve the snapshot from EBS Snapshots Archive to its original snapshot ID, using RestoreSnapshotTier API call or the management console. It takes between 24-72 hours to retrieve the snapshot from the archive, depending on the snapshot size. Once retrieved, the snapshot appears as a regular snapshot on my account. At this stage, I hydrate the retrieved snapshot into an EBS volume using the default snapshot restore or Fast Snapshot Restore (FSR) for expedited restores, just like usual.

A CloudWatch event is generated when the snapshot is restored. You may listen to this event to avoid pulling the status with the API.

A CreateVolume API call on an archived snapshot will fail. You must restore a snapshot from archive before you use it to create a volume.

Using the AWS Management Console, I select the snapshot that I want to restore, I select the Actions menu, and then I select the Restore snapshot from archive menu option.

EBS Snapshot Archive - create snapshot - restore archive

I have the choice to restore the snapshot permanently, or just temporarily. At the end of the temporary duration, the standard tier snapshot is deleted, and only the archive is preserved.

EBS Snapshot Archive - create snapshot - restore archive - confirmation

After a while, depending on the snapshot size, the archive is restored to standard storage and may be used to recreate a volume, just like usual. I may monitor the progress of the retrieval and the lifetime for temporarily restored archives in the new Storage tier tab in the bottom half of the screen. Temporary restored snapshots may be kept for up to 180 days.

Pricing and Availability
EBS Snapshots Archive is available for you today in 17 AWS Regions. At the time of launch, it is not available in the two Regions in China, Asia Pacific (Seoul), Asia Pacific (Osaka), Canada (Central), and South America (São Paulo).

As per usual, you pay as-you-go, with no minimum or fixed fees. There are two metrics that influence EBS Snapshots Archive billing: data storage and data retrieval. We charge you $0.0125 per GB-month of stored data and $0.03 per GB retrieved. You are charged for a 90-day period at minimum. This means that if you delete a snapshot archive or permanently restore it less than 90 days after creation, then we charge for the full 90-day period. The EBS pricing page has the details.

Go ahead and start to configure your long term storage for EBS snaphots today.

— seb

New for AWS Compute Optimizer – Resource Efficiency Metrics to Estimate Savings Opportunities and Performance Risks

Post Syndicated from Danilo Poccia original https://aws.amazon.com/blogs/aws/new-for-aws-compute-optimizer-resource-efficiency-metrics-to-estimate-savings-opportunities-and-performance-risks/

By applying the knowledge drawn from Amazon’s experience running diverse workloads in the cloud, AWS Compute Optimizer identifies workload patterns and recommends optimal AWS resources.

Today, I am happy to share that AWS Compute Optimizer now delivers resource efficiency metrics alongside its recommendations to help you assess how efficiently you are using AWS resources:

  • A dashboard shows you savings and performance improvement opportunities at the account level. You can dive into resource types and individual resources from the dashboard.
  • The Estimated monthly savings (On-Demand) and Savings opportunity (%) columns estimate the possible savings for over-provisioned resources. You can sort your recommendations using these two columns to quickly find the resources on which to focus your optimization efforts.
  • The Current performance risk column estimates the bottleneck risk with the current configuration for under-provisioned resources.

These efficiency metrics are available for Amazon Elastic Compute Cloud (Amazon EC2), AWS Lambda, and Amazon Elastic Block Store (EBS) at the resource and AWS account levels.

For multi-account environments, Compute Optimizer continuously calculates resource efficiency metrics at individual account level in an AWS organization to help identify teams with low cost-efficiency or possible performance risks. This lets you to create goals and track progress over time. You can quickly understand just how resource-efficient teams and applications are, easily prioritize recommendation evaluation and adoption by engineering team, and establish a mechanism that drives a cost-aware culture and accountability across engineering teams.

Using Resource Efficiency Metrics in AWS Compute Optimizer
You can opt in using the AWS Management Console or the AWS Command Line Interface (CLI) to start using Compute Optimizer. You can enroll the account that you’re currently signed in to or all of the accounts within your organization. Depending on your choice, Compute Optimizer analyzes resources that are in your individual account or for each account in your organization, and then generates optimization recommendations for those resources.

To see your savings opportunity in Compute Optimizer, you should also opt in to AWS Cost Explorer and enable the rightsizing recommendations in the AWS Cost Explorer preferences page. For more details, see Getting started with rightsizing recommendations.

I already enrolled some time ago, and in the Compute Optimizer console I see the overall savings opportunity for my account.

Console screenshot.

Below that, I have a recap of the performance improvement opportunity. This includes an overview of the under-provisioned resources, as well as the performance risks that they pose by resource type.

Console screenshot.

Let’s dive into some of those savings. In the EC2 instances section, Compute Optimizer found 37 over-provisioned instances.

Console screenshot.

I follow the 37 instances link to get recommendations for those resources, and then sort the table by Estimated monthly savings (On-Demand) descending.

Console screenshot.

On the right, in the same table, I see which is the current instance type, the recommended instance type based on Computer Optimizer estimates, the difference in pricing, and if there are platform differences between the current and recommended instance types.

Console screenshot.

I can select each instance to further drill down into the metrics collected, as well as the other possible instance types suggested by Computer Optimizer.

Back to the Compute Optimizer Dashboard, in the Lambda functions section, I see that eight functions have under-provisioned memory.

Console screenshot.

Again, I follow the 8 functions link to get recommendations for those resources, and then sort the table by Current performance risk. In my case, the risk is always low, but different values can help prioritize your activities.

Console screenshot.

Here, I see the current and recommended configured memory for those Lambda functions. I can select each function to get a view of the metrics collected. Choosing the memory allocated to Lambda functions is an optimization process that balances speed (duration) and cost. See Profiling functions with AWS Lambda Power Tuning in the documentation for more information.

Availability and Pricing
You can use resource efficiency metrics with AWS Compute Optimizer in any AWS Region where it is offered. For more information, see the AWS Regional Services List. There is no additional charge for this new capability. See the AWS Compute Optimizer pricing page for more information.

This new feature lets you implement a periodic workflow to optimize your costs:

  • You can start by reviewing savings opportunities for all of your accounts to identify which accounts have the highest savings opportunity.
  • Then, you can drill into those accounts with the highest savings opportunity. You can refer to the estimated monthly savings to see which recommendations can drive the largest absolute cost impact.
  • Finally, you can communicate optimization opportunities and priority order to the teams using those accounts.

Start using AWS Compute Optimizer today to find and prioritize savings opportunities in your AWS account or organization.

Danilo

Scalable, Cost-Effective Disaster Recovery in the Cloud

Post Syndicated from Steve Roberts original https://aws.amazon.com/blogs/aws/scalable-cost-effective-disaster-recovery-in-the-cloud/

Should disaster strike, business continuity can require more than just periodic data backups. A full recovery that meets the business’s recovery time objectives (RTOs) must also include the infrastructure, operating systems, applications, and configurations used to process their data. The growing threats of ransomware highlight the need to be able to perform a full point-in-time recovery. For businesses affected by a ransomware attack, restoration of data from an old, possibly manual, backup will not be sufficient.

Previously, businesses have elected to provision separate, physical disaster recovery (DR) infrastructure. However, customers tell us this can be both space- and cost-prohibitive, involving capital expenditure on hardware and facilities that remain idle until called upon. The infrastructure also incurs overhead in terms of regular inspection and maintenance, typically manual, to ensure that should it ever be called upon, it’s ready and able to handle the current business load, which may have grown considerably since initial provisioning. This also makes testing difficult and expensive.

Today, I am happy to announce AWS Elastic Disaster Recovery (DRS) a fully scalable, cost-effective disaster recovery service for physical, virtual, and cloud servers, based on CloudEndure Disaster Recovery. DRS enables customers to use AWS as an elastic recovery site without needing to invest in on-premises DR infrastructure that lies idle until needed. Once enabled, DRS maintains a constant replication posture for your operating systems, applications, and databases. This helps businesses meet recovery point objectives (RPOs) of seconds, and RTOs of minutes, after disaster strikes. In cases of ransomware attacks, for example, DRS also allows recovery to a previous point in time.

DRS provides for recovery that scales as needed to match your current setup and does not need any time-consuming manual processes to maintain that readiness. It also offers the ability to perform disaster recovery readiness drills. Just as it’s important to test restoration of data from backups, being able to conduct recovery drills in a cost-effective manner without impacting ongoing replication or user activities can help give confidence that you can meet your objectives and customer expectations should you need to call on a recovery.

AWS Elastic Disaster Recovery console home

Elastic Disaster Recovery in Action
Once enabled, DRS continuously replicates block storage volumes from physical, virtual, or cloud-based servers, allowing it to support business RPOs measured in seconds. Recovery includes applications running on physical infrastructure, VMware vSphere, Microsoft Hyper-V, and cloud infrastructure to AWS. You’re able to recover all your applications and databases that run on supported Windows and Linux operating systems, with DRS orchestrating the recovery process for your servers on AWS to support an RTO measured in minutes.

Using an agent that you install on your servers, DRS securely replicates the data to a staging area subnet in a selected Region in your AWS account. The staging area subnet reduces costs to you, using affordable storage and minimal compute resources. Within the DRS console, you can recover Amazon Elastic Compute Cloud (Amazon EC2) instances in a different AWS Region if required. With DRS automating replication and recovery procedures, you can set up, test, and operate your disaster recovery capability using a single process without the need for specialized skill sets.

DRS gives you the flexibility to pay on an hourly basis, instead of needing to commit to a long-term contract or a set number of servers, a benefit over on-premises or data center recovery solutions. DRS charges hourly, on a pay-as-you-go basis. You can find specific details on pricing at the product page.

Exploring Elastic Disaster Recovery
To set up disaster recovery for my resources I first need to configure my default replication settings. As I mentioned earlier, DRS can be used with physical, virtual, and cloud servers. For this post, I’m going to use a collection of EC2 instances as my source servers for disaster recovery.

From the DRS console home, shown earlier, choosing Set default replication settings takes me to a short initialization wizard. In the wizard, I first need to select an Amazon Virtual Private Cloud (VPC) subnet that will be used for staging. This subnet does not need to be in the same VPC as my resources, but I need to select one that is not private or blocked to the world. Below, I’ve chosen a subnet from my default VPC in my Region. I can also change the instance type used for the replication instance. I chose to keep the suggested default and clicked Next to proceed.

Choosing the staging area subnet and replication instance type for DRS

I also left the default settings unchanged for the next two pages. In Volumes and security groups, the wizard suggests I use the general-purpose SSD (gp3) Amazon Elastic Block Store (EBS) storage type and to use a security group provided by DRS. On the Additional settings page I can elect to use a private IP for data replication instead of routing over the public internet, and set the snapshot retention period, which defaults to seven days. Clicking Next one final time, I arrive at the Review and create page of the wizard. Choosing Create default completes the process of configuring my default replication settings.

Finalizing default replication settings for DRS

With my replication settings finalized (I can edit them later if I wish, from the Actions menu on the Source servers console page) it’s time to set up my servers. I’m running a test fleet in EC2 that includes two Windows Server 2019 instances, and three Amazon Linux 2 instances. The DRS User Guide contains full instructions on how to obtain and set up the agent on each server type, so I won’t repeat them here. As I run and configure the agent on each of my server instances, the Source servers list automatically updates to include the new source server. The status of the initial sync, and future replication and recovery status of each source server, are summarized in this view.

Replication sync activity on servers

Selecting a hostname entry in the list takes me to a detail page. Here I can view a recovery dashboard, information on the underlying server, disk settings (including the ability to change the staging disk type from the default gp3 type selected by the initialization wizard, or whatever you choose during setup), and launch settings, shown below, that govern the recovery instance that will be created if I choose to initiate a drill or an actual recovery job.

DRS launch settings for a recovery server

Just like data backups, where established best practice is to periodically verify that the backups can actually be used to restore data, we recommend a similar best practice for disaster recovery. So, with my servers all configured and fully replicated, I decided to start a drill for a point-in-time (PIT) recovery for two of my servers. On these instances, following initial replication, I’d installed some additional software. In my scenario, perhaps this installation had gone badly wrong, or I’d fallen victim to a ransomware attack. Either way, I wanted to know and be confident that I could recover my servers if and when needed.

In the Source servers list I selected the two servers that I’d modified and from the Initiate recovery job drop-down menu, chose Initiate drill. Next, I can choose the recovery PIT I’m interested in. This view defaults to Any, meaning it lists all recovery PIT snapshots for the servers I selected. Or, I can choose to filter to All, meaning only PIT snapshots that apply to all the selected servers will be listed. Selecting All, I chose a time just after I’d completed installing additional software on the instances, and clicked Initiate drill.

Selecting a recovery point-in-time for multiple servers

I’m returned to the Source servers list, which shows status as the recovery proceeds. However, I switched to the Recovery job history view for more detail.

In-progress recovery drill

Clicking the job ID, I can drill down further to view a detail page of the source servers involved in the recovery (and can drill down further for each), as well as an overall recovery job log.

Viewing the recovery job log

Note – during a drill, or an actual recovery, if you go to the EC2 console you’ll notice one or more additional instances, started by DRS, running in your account (in addition to the replication server). These temporary instances, named AWS Elastic Disaster Recovery Conversion Server, are used to process the PIT snapshots onto the actual recovery instance(s) and will be terminated when the job is complete.

Once the recovery is complete, I can see two new instances in my EC2 environment. These are in the state matching the point-in-time recovery I selected, and are using the instance types I selected earlier in the DRS initialization wizard. I can now connect to them to verify that the recovery drill performed as expected before terminating them. Had this been a real recovery, I would have the option of terminating the original instances to replace them with the recovery versions, or handle whatever other tasks are needed to complete the disaster recovery for my business.

New instances matching my point-in-time recovery selection

Set Up Your Disaster Recovery Environment Today
AWS Elastic Disaster Recovery is generally available now in the US East (N. Virginia), US East (Ohio), US West (Oregon), Asia Pacific (Singapore), Asia Pacific (Sydney), Asia Pacific (Tokyo), Europe (Frankfurt), Europe (Ireland), and Europe (London) Regions. Review the AWS Elastic Disaster Recovery User Guide for more details on setup and operation, and get started today with DRS to eliminate idle recovery site resources, enjoy pay-as-you-go billing, and simplify your deployments to improve your disaster recovery objectives.

— Steve

Announcing Cloudflare R2 Storage: Rapid and Reliable Object Storage, minus the egress fees

Post Syndicated from Greg McKeon original https://blog.cloudflare.com/introducing-r2-object-storage/

Announcing Cloudflare R2 Storage: Rapid and Reliable Object Storage, minus the egress fees

Announcing Cloudflare R2 Storage: Rapid and Reliable Object Storage, minus the egress fees

We’re excited to announce Cloudflare R2 Storage! By giving developers the ability to store large amounts of unstructured data, we’re expanding what’s possible with Cloudflare while slashing the egress bandwidth fees associated with typical cloud storage services to zero.

Cloudflare R2 Storage includes full S3 API compatibility, working with existing tools and applications as built.

Let’s get into the R2 details.

R2 means “Really Requestable”

Object Storage, sometimes referred to as blob storage, stores arbitrarily large, unstructured files. Object storage is well suited to storing everything from media files or log files to application-specific metadata, all retrievable with consistent latency, high durability, and limitless capacity.

The most familiar API for Object Storage, and the API R2 implements, is Amazon’s Simple Storage Service (S3). When S3 launched in 2006, cloud storage services were a godsend for developers. It didn’t happen overnight, but over the last fifteen years, developers have embraced cloud storage and its promise of infinite storage space.

As transformative as cloud storage has been, a downside emerged: actually getting your data back. Over time, companies have amassed massive amounts of data on cloud provider networks. When they go to retrieve that data, they’re hit with massive egress fees that don’t correspond to any customer value — just a tax developers have grown accustomed to paying.

Enter R2.

Announcing Cloudflare R2 Storage: Rapid and Reliable Object Storage, minus the egress fees

Traditional object storage charges developers for three things: bandwidth, storage size and storage operations.

R2 builds on Cloudflare’s commitment to the Bandwidth Alliance, providing zero-cost egress for stored objects — no matter your request rate.  Egress bandwidth is often the largest charge for developers utilizing object storage and is also the hardest charge to predict.  Eliminating it is a huge win for open-access to data stored in the cloud.

That doesn’t mean we are shifting bandwidth costs elsewhere. Cloudflare R2 will be priced at $0.015 per GB of data stored per month — significantly cheaper than major incumbent providers.

Infrequent access to objects is often trivial for providers to support yet incurs the same per-operation charges. We don’t think it’s fair that typical object storage bills a developer making one request a second the same rate as an enterprise making thousands of requests a second — or frequently a higher rate when considering negotiated volume discounts.

On the flip side, providers designed for infrequent access typically can’t scale to heavy usage.

R2 will zero-rate infrequent storage operations under a threshold — currently planned to be in the single digit requests per second range. Above this range, R2 will charge significantly less per-operation than the major providers. Our object storage will be extremely inexpensive for infrequent access and yet capable of and cheaper than major incumbent providers at scale.

This cheaper price doesn’t come with reduced scalability. Behind the scenes, R2 automatically and intelligently manages the tiering of data to drive both performance at peak load and low-cost for infrequently requested objects.  We’ve gotten rid of complex, manual tiering policies in favor of what developers have always wanted out of object storage: limitless scale at the lowest possible cost.

R2 means “Repositioning Records”

Zero egress means you can get objects out easily, but what about putting objects in? Migrating data across cloud providers, even if they both support the complete S3 API, is error-prone and costly.

To make this easy for you, without requiring you to change any of your tooling, Cloudflare R2 will include automatic migration from other S3-compatible cloud storage services. Migrations are designed to be dead simple. After specifying an existing storage bucket, R2 will serve requests for objects from the existing bucket, egressing the object only once before copying and serving from R2. Our easy-to-use migrator will reduce egress costs from the second you turn it on in the Cloudflare dashboard.

Announcing Cloudflare R2 Storage: Rapid and Reliable Object Storage, minus the egress fees

Our vision for R2 includes multi-region storage that automatically replicates objects to the locations they’re frequently requested from. As with Durable Objects, we plan on introducing jurisdictional restrictions that allow developers to comply with complex data sovereignty requirements via a simple API.

R2 means “Ridiculously Reliable”

The core of what makes Object Storage great is reliability — we designed R2 for data durability and resilience at its core. R2 will provide 99.999999999% (eleven 9’s) of annual durability, which describes the likelihood of data loss. If you store 1,000,000 objects on R2, you can expect to lose one once every 100,000 years — the same level of durability as other major providers. R2 will be resistant to regional failures, replicating objects multiple times for high availability.

R2 is designed with redundancy across a large number of regions for reliability. We plan on starting from automatic global distribution and adding back region-specific controls for when data has to be stored locally, as described above.

R2 means “Radically Reprogrammable”

R2 is fully integrated with the Cloudflare Workers serverless runtime. You can bind a Worker to a specific bucket, dynamically transforming objects as they are written to or read from storage buckets. The deep integration between Workers and R2 makes building data pipelines and manipulating objects incredibly easy.

Cloudflare R2 is designed to easily integrate with the rest of Cloudflare’s products. As a few examples, our plan is to allow Durable Objects to be configured with R2 as a backup target, and provide automatic integration between R2 and Cloudflare cache to greatly extend cache lifetimes for infrequently changing objects.

What will you be able to build with Cloudflare R2?

There’s a lot you can do with long-term storage, especially with access to the Workers compute platform just alongside it.

For example, streaming data from a large number of IoT devices becomes a breeze with R2. Starting with a Worker to transform and manipulate the data, R2 can ingest large volumes of sensor data and store it at low cost. With no egress fees, it becomes simple to migrate volumes of data to multiple databases and analytics solutions as needed, dramatically reducing storage costs. With the ability to run a Worker on the outgoing data as well, the data pipeline itself is more flexible.

R2 is also a great place for CDN assets and large media files. For large files, R2 can significantly extend cache lifetimes while dramatically slashing egress bills. Combined with the Cache API and Workers, content can be dynamically cached for low-latency access around the globe.

More than anything, R2’s lack of egress bandwidth charges makes it ideal for storing content that’s accessed frequently. Today, R2 scales well to handle heavy request loads, dynamically tiering your objects to provide the best performance at the lowest cost. This dynamic tiering allows us to offer the lowest prices while supporting peak performance — with no user configuration required.

Accessing Cloudflare R2

R2 is currently under development — you can sign up here to join the waitlist for access. We’re excited to work with a number of earlier users to refine and test the product. We’ll be announcing an open beta where any user will be able to sign up for the service soon.

We’re excited to continue to build the product and push towards open beta, and we have big ideas for what the future of storage at Cloudflare’s edge could look like. If you’re a distributed systems engineer who wants to help us build the future of state at the edge, come work with us!

Enabling parallel file systems in the cloud with Amazon EC2 (Part I: BeeGFS)

Post Syndicated from Ben Peven original https://aws.amazon.com/blogs/compute/enabling-parallel-file-systems-in-the-cloud-with-amazon-ec2-part-i-beegfs/

This post was authored by AWS Solutions Architects Ray Zaman, David Desroches, and Ameer Hakme.

In this blog series, you will discover how to build and manage your own Parallel Virtual File System (PVFS) on AWS. In this post you will learn how to deploy the popular open source parallel file system, BeeGFS, using AWS D3en and I3en EC2 instances. We will also provide a CloudFormation template to automate this BeeGFS deployment.

A PVFS is a type of distributed file system that distributes file data across multiple servers and provides concurrent data access to multiple execution tasks of an application. PVFS focuses on high-performance access to large datasets. It consists of a server process and a client library, which allows the file system to be mounted and used with standard utilities. PVFS on the Linux OS originated in the 1990’s and today several projects are available including Lustre, GlusterFS, and BeeGFS. Workloads such as shared storage for video transcoding and export, batch processing jobs, high frequency online transaction processing (OLTP) systems, and scratch storage for high performance computing (HPC) benefit from the high throughput and performance provided by PVFS.

Implementation of a PVFS can be complex and expensive. There are many variables you will want to take into account when designing a PVFS cluster including the number of nodes, node size (CPU, memory), cluster size, storage characteristics (size, performance), and network bandwidth. Due to the difficulty in estimating the correct configuration, systems procured for on-premises data centers are typically oversized, resulting in additional costs, and underutilized resources. In addition, the hardware procurement process is lengthy and the installation and maintenance of the hardware adds additional overhead.

AWS makes it easy to run and fully manage your parallel file systems by allowing you to choose from a variety of Amazon Elastic Compute Cloud (EC2) instances. EC2 instances are available on-demand and allow you to scale your workload as needed. AWS storage-optimized EC2 instances offer up to 60 TB of NVMe SSD storage per instance and up to 336 TB of local HDD storage per instance. With storage-optimized instances, you can easily deploy PVFS to support workloads requiring high-performance access to large datasets. You can test and iterate on different instances to find the optimal size for your workloads.

D3en instances leverage 2nd-generation Intel Xeon Scalable Processors (Cascade Lake) and provide a sustained all core frequency up to 3.1 GHz. These instances provide up to 336 TB of local HDD storage (which is the highest local storage capacity in EC2), up to 6.2 GiBps of disk throughput, and up to 75 Gbps of network bandwidth.

I3en instances are powered by 1st or 2nd generation Intel® Xeon® Scalable (Skylake or Cascade Lake) processors with 3.1 GHz sustained all-core turbo performance. These instances provide up to 60 TB of NVMe storage, up to 16 GB/s of sequential disk throughput, and up to 100 Gbps of network bandwidth.

BeeGFS, originally released by ThinkParQ in 2014, is an open source, software defined PVFS that runs on Linux. You can scale the size and performance of the BeeGFS file-system by configuring the number of servers and disks in the clusters up to thousands of nodes.

BeeGFS architecture

D3en instances offer HDD storage while I3en instances offer NVMe SSD storage. This diversity allows you to create tiers of storage based on performance requirements. In the example presented in this post you will use four D3en.8xlarge (32 vCPU, 128 GB, 16x14TB HDD, 50 Gbit) and two I3en.12xlarge (48 vCPU, 384 GB, 4 x 7.5-TB NVMe) instances to create two storage tiers. You may choose different sizes and quantities to meet your needs. The I3en instances, with SSD, will be configured as tier 1 and the D3en instances, with HDD, will be configured as tier 2. One disk from each instance will be formatted as ext4 and used for metadata while the remaining disks will be formatted as XFS and used for storage. You may choose to separate metadata and storage on different hosts for workloads where these must scale independently. The array will be configured RAID 0, since it will provide maximum performance. Software replication or other RAID types can be employed for higher durability.

BeeGFS architecture

Figure 1: BeeGFS architecture

You will deploy all instances within a single VPC in the same Availability Zone and subnet to minimize latency. Security groups must be configured to allow the following ports:

  • Management service (beegfs-mgmtd): 8008
  • Metadata service (beegfs-meta): 8005
  • Storage service (beegfs-storage): 8003
  • Client service (beegfs-client): 8004

You will use the Debian Quick Start Amazon Machine Image (AMI) as it supports BeeGFS. You can enable Amazon CloudWatch to capture metrics.

How to deploy the BeeGFS architecture

Follow the steps below to create the PVFS described above. For automated deployment, use the CloudFormation template located at AWS Samples.

  1. Use the AWS Management Console or CLI to deploy one D3en.8xlarge instance into a VPC as described above.
  2. Log in to the instance and update the system:
    • sudo apt update
    • sudo apt upgrade
  3. Install the XFS utilities and load the kernel module:
    • sudo apt-get -y install xfsprogs
    • sudo modprobe -v xfs

Format the first disk ext4 as it is used for metadata, the rest are formatted xfs. The disks will appear as “nvme???” which actually represent the HDD drives on the D3en instances.

4. View a listing of available disks:

    • sudo lsblk

5. Format hard disks:

    • sudo mkfs -t ext4 /dev/nvme0n1
    • sudo mkfs -t xfs /dev/nvme1n1
    • Repeat this command for disks nvme2n1 through nvme15n1

6. Create file system mount points:

    • sudo mkdir /disk00
    • sudo mkdir /disk01
    • Repeat this command for disks disk02 through disk15

7. Mount the filesystems:

    • sudo mount /dev/nvme0n1 /disk00
    • sudo mount /dev/nvme0n1 /disk01
    • Repeat this command for disks disk02 through disk15

Repeat steps 1 through 7 on the remaining nodes. Remember to account for fewer disks for i3en.12xlarge instances or if you decide to use different instance sizes.

8. Add the BeeGFS Repo to each node:

    • sudo apt-get -y install gnupg
    • wget https://www.beegfs.io/release/beegfs_7.2.3/dists/beegfs-deb10.list
    • sudo cp beegfs-deb10.list /etc/apt/sources.list.d/
    • sudo wget -q https://www.beegfs.io/release/latest-stable/gpg/DEB-GPG-KEY-beegfs -O- | sudo apt-key add -
    • sudo apt update

9. Install BeeGFS management (node 1 only):

    • sudo apt-get -y install beegfs-mgmtd
    • sudo mkdir /beegfs-mgmt
    • sudo /opt/beegfs/sbin/beegfs-setup-mgmtd -p /beegfs-mgmt/beegfs/beegfs_mgmtd

10. Install BeeGFS metadata and storage (all nodes):

    • sudo apt-get -y install beegfs-meta beegfs-storage beegfs-meta beegfs-client beegfs-helperd beegfs-utils
    • # -s is unique ID based on node - change this!, -m is hostname of management server
    • sudo /opt/beegfs/sbin/beegfs-setup-meta -p /disk00/beegfs/beegfs_meta -s 1 -m ip-XXX-XXX-XXX-XXX
    • # Change -s to nodeID and -i to (nodeid)0(disk), -m is hostname of management server
    • sudo /opt/beegfs/sbin/beegfs-setup-storage -p /disk01/beegfs_storage -s 1 -i 101 -m ip-XXX-XXX-XXX-XXX
    • sudo /opt/beegfs/sbin/beegfs-setup-storage -p /disk02/beegfs_storage -s 1 -i 102 -m ip-XXX-XXX-XXX-XXX
    • Repeat this last command for the remaining disks disk03 through disk15

11. Start the services:

    • #Only on node1
    • sudo systemctl start beegfs-mgmtd
    • #All servers
    • sudo systemctl start beegfs-meta
    • sudo systemctl start beegfs-storage

At this point, your BeeGFS cluster is running and ready for use by a client system. The client system requires BeeGFS client software in order to mount the cluster.

12. Deploy an m5n.2xlarge instance into the same subnet as the PVFS cluster.

13. Log in to the instance, install, and configure the client:

    • sudo apt update
    • sudo apt upgrade
    • sudo apt-get -y install gnupg
    • #Need linux sources for client compilation
    • sudo apt-get -y install linux-source
    • sudo apt-get -y install linux-headers-4.19.0-14-all
    • wget https://www.beegfs.io/release/beegfs_7.2.3/dists/beegfs-deb10.list
    • sudo cp beegfs-deb10.list /etc/apt/sources.list.d/
    • sudo wget -q https://www.beegfs.io/release/latest-stable/gpg/DEB-GPG-KEY-beegfs -O- | sudo apt-key add -
    • sudo apt update
    • sudo apt-get -y install beegfs-client beegfs-helperd beegfs-utils
    • sudo /opt/beegfs/sbin/beegfs-setup-client -m ip-XXX-XXX-XXX-XX # use the ip address of the management node
    • sudo systemctl start beegfs-helperd
    • sudo systemctl start beegfs-client

14. Create the storage pools:

    • sudo beegfs-ctl --addstoragepool —desc="tier1" —targets=501,502,503,601,602,603
    • sudo beegfs-ctl --addstoragepool --desc="tier2" --targets=101,102,103,104,105,106,107,108,109,110,111,112,113,114,115,201,202,203,204,205,206,207,208,209,210,
      211,212,213,214,215,301,302,303,304,305,306,307,308,309,310,311,312,313,314,315,401,402,403,404,405,406,407,
      408,409,410,411,412,413,414,415
    • sudo beegfs-ctl --liststoragepools
    • Pool ID Pool Description                      Targets                 Buddy Groups
    • ======= ================== ============================ ============================
      • Default
      • tier1 501,502,503,601,602,603
      • tier2 101,102,103,104,105,106,107,
        • 108,109,110,111,112,113,114,
        • 115,201,202,203,204,205,206,
        • 207,208,209,210,211,212,213,
        • 214,215,301,302,303,304,305,
        • 306,307,308,309,310,311,312,
        • 313,314,315,401,402,403,404,
        • 405,406,407,408,409,410,411,
        • 412,413,414,415

15. Mount the pools to the file system:

    • sudo beegfs-ctl --setpattern --storagepoolid=2 /mnt/beegfs/tier1
    • sudo beegfs-ctl --setpattern --storagepoolid=3 /mnt/beegfs/tier2

The BeeGFS PVFS is now ready to be used by the client system.

How to test your new BeeGFS PVFS

BeeGFS provides StorageBench to evaluate the performance of BeeGFS on the storage targets. This benchmark measures the streaming throughput of the underlying file system and devices independent of the network performance. To simulate client I/O, this benchmark generates read/write locally on the servers without any client communication.

It is possible to benchmark specific targets or all targets together using the “servers” parameter. A “read” or “write” parameter sets the type pf test to perform. The “threads” parameter is set to the number of storage devices.

Try the following commands to test performance:

Write test (1x d3en):

sudo beegfs-ctl --storagebench --servers=1 --write --blocksize=512K —size=20G —threads=15

Write test (4x d3en):

sudo beegfs-ctl --storagebench --alltargets --write --blocksize=512K —size=20G —threads=15

Read test (4x d3en):

sudo beegfs-ctl --storagebench --servers=1,2,3,4 --read --blocksize=512K --size=20G --threads=15

Write test (1x i3en):

sudo beegfs-ctl --storagebench --servers=5 --write --blocksize=512K --size=20G --threads=3

Read test (2x i3en):

sudo beegfs-ctl --storagebench --servers=5,6 --read --blocksize=512K —size=20G —threads=3

StorageBench is a great way to test what the potential performance of a given environment looks like by reducing variables like network throughput and latency, but you may want to test in a more real-world fashion. For this, tools like ‘fio’ can generate mixed read/write workloads against files on the client BeeGFS mountpoint.

First, we need to define which directory goes to which Storage Pool (tier) by setting a pattern:

sudo beegfs-ctl --setpattern --storagepoolid=2 /mnt/beegfs/tier1 sudo beegfs-ctl --setpattern --storagepoolid=3 /mnt/beegfs/tier2

You can see how a file gets striped across the various disks in a pool by adding a file and running the command:

sudo beegfs-ctl —getentryinfo /mnt/beegfs/tier1/myfile.bin

Install fio:

sudo apt-get install -y fio

Now you can run a fio test against one of the tiers.  This example command runs eight threads running a 75/25 read/write workload against a 10-GB file:

sudo fio --numjobs=8 --randrepeat=1 --ioengine=libaio --direct=1 --gtod_reduce=1 --name=test --filename=/mnt/beegfs/tier1/test --bs=512k --iodepth=64 --size=10G --readwrite=randrw --rwmixread=75

Cleaning up

To avoid ongoing charges for resources you created, you should:

Conclusion

In this blog post we demonstrated how to build and manage your own BeeGFS Parallel Virtual File System on AWS. In this example, you created two storage tiers using the I3en and D3en. The I3en was used as the first tier for SSD storage and the D3en was used as a second tier for HDD storage. By using two different tiers, you can optimize performance to meet your application requirements.

Amazon EC2 storage-optimized instances make it easy to deploy the BeeGFS Parallel Virtual File System. Using combinations of SSD and HDD storage available on the I3en and D3en instance types, you can achieve the capacity and performance needed to run the most demanding workloads. Read more about the D3en and I3en instances.

Welcome to AWS Storage Day 2021

Post Syndicated from Marcia Villalba original https://aws.amazon.com/blogs/aws/welcome-to-aws-storage-day-2021/

Welcome to the third annual AWS Storage Day 2021! During Storage Day 2020 and the first-ever Storage Day 2019 we made many impactful announcements for our customers and this year will be no different. The one-day, free AWS Storage Day 2021 virtual event will be hosted on the AWS channel on Twitch. You’ll hear from experts about announcements, leadership insights, and educational content related to AWS Storage services.

AWS Storage DayThe first part of the day is the leadership track. Wayne Duso, VP of Storage, Edge, and Data Governance, will be presenting a live keynote. He’ll share information about what’s new in AWS Cloud Storage and how these services can help businesses increase agility and accelerate innovation. The keynote will be followed by live interviews with the AWS Storage leadership team, including Mai-Lan Tomsen Bukovec, VP of AWS Block and Object Storage.

The second part of the day is a technical track in which you’ll learn more about Amazon Simple Storage Service (Amazon S3), Amazon Elastic Block Store (EBS), Amazon Elastic File System (Amazon EFS), AWS Backup, Cloud Data Migration, AWS Transfer Family and Amazon FSx.

To register for the event, visit the AWS Storage Day 2021 event page.

Now as Jeff Barr likes to say, let’s get into the announcements.

Amazon FSx for NetApp ONTAP
Today, we are pleased to announce Amazon FSx for NetApp ONTAP, a new storage service that allows you to launch and run fully managed NetApp ONTAP file systems in the cloud. Amazon FSx for NetApp ONTAP joins Amazon FSx for Lustre and Amazon FSx for Windows File Server as the newest file system offered by Amazon FSx.

Amazon FSx for NetApp ONTAP provides the full ONTAP experience with capabilities and APIs that make it easy to run applications that rely on NetApp or network-attached storage (NAS) appliances on AWS without changing your application code or how you manage your data. To learn more, read New – Amazon FSx for NetApp ONTAP.

Amazon S3
Amazon S3 Multi-Region Access Points is a new S3 feature that allows you to define global endpoints that span buckets in multiple AWS Regions. Using this feature, you can now build multi-region applications without adding complexity to your applications, with the same system architecture as if you were using a single AWS Region.

S3 Multi-Region Access Points is built on top of AWS Global Accelerator and routes S3 requests over the global AWS network. S3 Multi-Region Access Points dynamically routes your requests to the lowest latency copy of your data, so the upload and download performance can increase by 60 percent. It’s a great solution for applications that rely on reading files from S3 and also for applications like autonomous vehicles that need to write a lot of data to S3. To learn more about this new launch, read How to Accelerate Performance and Availability of Multi-Region Applications with Amazon S3 Multi-Region Access Points.

Creating a multi-region access point

There’s also great news about the Amazon S3 Intelligent-Tiering storage class! The conditions of usage have been updated. There is no longer a minimum storage duration for all objects stored in S3 Intelligent-Tiering, and monitoring and automation charges for objects smaller than 128 KB have been removed. Smaller objects (128 KB or less) are not eligible for auto-tiering when stored in S3 Intelligent-Tiering. Now that there is no monitoring and automation charge for small objects and no minimum storage duration, you can use the S3 Intelligent-Tiering storage class by default for all your workloads with unknown or changing access patterns. To learn more about this announcement, read Amazon S3 Intelligent-Tiering – Improved Cost Optimizations for Short-Lived and Small Objects.

Amazon EFS
Amazon EFS Intelligent Tiering is a new capability that makes it easier to optimize costs for shared file storage when access patterns change. When you enable Amazon EFS Intelligent-Tiering, it will store the files in the appropriate storage class at the right time. For example, if you have a file that is not used for a period of time, EFS Intelligent-Tiering will move the file to the Infrequent Access (IA) storage class. If the file is accessed again, Intelligent-Tiering will automatically move it back to the Standard storage class.

To get started with Intelligent-Tiering, enable lifecycle management in a new or existing file system and choose a lifecycle policy to automatically transition files between different storage classes. Amazon EFS Intelligent-Tiering is perfect for workloads with changing or unknown access patterns, such as machine learning inference and training, analytics, content management and media assets. To learn more about this launch, read Amazon EFS Intelligent-Tiering Optimizes Costs for Workloads with Changing Access Patterns.

AWS Backup
AWS Backup Audit Manager allows you to simplify data governance and compliance management of your backups across supported AWS services. It provides customizable controls and parameters, like backup frequency or retention period. You can also audit your backups to see if they satisfy your organizational and regulatory requirements. If one of your monitored backups drifts from your predefined parameters, AWS Backup Audit Manager will let you know so you can take corrective action. This new feature also enables you to generate reports to share with auditors and regulators. To learn more, read How to Monitor, Evaluate, and Demonstrate Backup Compliance with AWS Backup Audit Manager.

Amazon EBS
Amazon EBS direct APIs now support creating 64 TB EBS Snapshots directly from any block storage data, including on-premises. This was increased from 16 TB to 64 TB, allowing customers to create the largest snapshots and recover them to Amazon EBS io2 Block Express Volumes. To learn more, read Amazon EBS direct API documentation.

AWS Transfer Family
AWS Transfer Family Managed Workflows is a new feature that allows you to reduce the manual tasks of preprocessing your data. Managed Workflows does a lot of the heavy lifting for you, like setting up the infrastructure to run your code upon file arrival, continuously monitoring for errors, and verifying that all the changes to the data are logged. Managed Workflows helps you handle error scenarios so that failsafe modes trigger when needed.

AWS Transfer Family Managed Workflows allows you to configure all the necessary tasks at once so that tasks can automatically run in the background. Managed Workflows is available today in the AWS Transfer Family Management Console. To learn more, read Transfer Family FAQ.

Storage Day 2021 Join us online for more!
Don’t forget to register and join us for the AWS Storage Day 2021 virtual event. The event will be live at 8:30 AM Pacific Time (11:30 AM Eastern Time) on September 2. The event will immediately re-stream for the Asia-Pacific audience with live Q&A moderators on Friday, September 3, at 8:30 AM Singapore Time. All sessions will be available on demand next week.

We look forward to seeing you there!

Marcia