Post Syndicated from Talks at Google original https://www.youtube.com/watch?v=TJCazuOLkbk
Cro: Maintain it With Zig
Post Syndicated from original https://lwn.net/Articles/868781/rss
This blog post by
Loris Cro makes the claim that the Zig
language is
the solution to a lot of low-level programming problems:
Freeing the art of systems programming from the grips of C/C++
cruft is the only way to push for real change in our industry, but
rewriting everything is not the answer. In the Zig project we’re
making the C/C++ ecosystem more fun and productive. Today we have a
compiler, a linker and a build system, and soon we’ll also have a
package manager, making Zig a complete toolchain that can fetch
dependencies and build C/C++/Zig projects from any target, for any
target.
(LWN looked at Zig last year).
Embed multi-tenant dashboards in SaaS apps using Amazon QuickSight without provisioning or managing users
Post Syndicated from Raji Sivasubramaniam original https://aws.amazon.com/blogs/big-data/embed-multi-tenant-dashboards-in-saas-apps-using-amazon-quicksight-without-provisioning-or-managing-users/
Amazon QuickSight is a fully-managed, cloud-native business intelligence (BI) service that makes it easy to connect to your data, create interactive dashboards, and share these with tens of thousands of users, either within QuickSight itself, or embedded in software as a service (SaaS) apps.
QuickSight Enterprise Edition recently added row-level security (RLS) using tags, a new feature that allows developers to share a single dashboard with tens of thousands of users, while ensuring that each user can only see and have access to particular data. This means that when an independent software vendor (ISV) adds a QuickSight-embedded dashboard in their app, they don’t have to provision their end-users in QuickSight, and can simply set up tags to filter data based on who the dashboard is being served to. For example, if an ISV wanted to set up a dashboard that was to be shared with 20,000 users across 100 customers of an app, with all users within a customer having access to identical data, this new feature allows you to share a single dashboard for all users, without having to set up or manage the 20,000 users in QuickSight.
RLS enforced using tags makes sure that each end-user only sees data that is relevant to them, while QuickSight automatically scales to meet user concurrency to ensure every end-user sees consistently fast performance. In this post, we look at how this can be implemented.
Solution overview
To embed dashboards without user provisioning, we use the API GenerateEmbedURLForAnonymousUser, which works with QuickSight’s session capacity pricing. With this API, the embedding server (logic in the SaaS app) determines and manages the identity of the user to whom the dashboard is being displayed (as opposed to this identity being provisioned and managed within QuickSight).
The following diagram shows an example workflow of embedded dashboards that secures data based on who is accessing the application using RLS with tags.
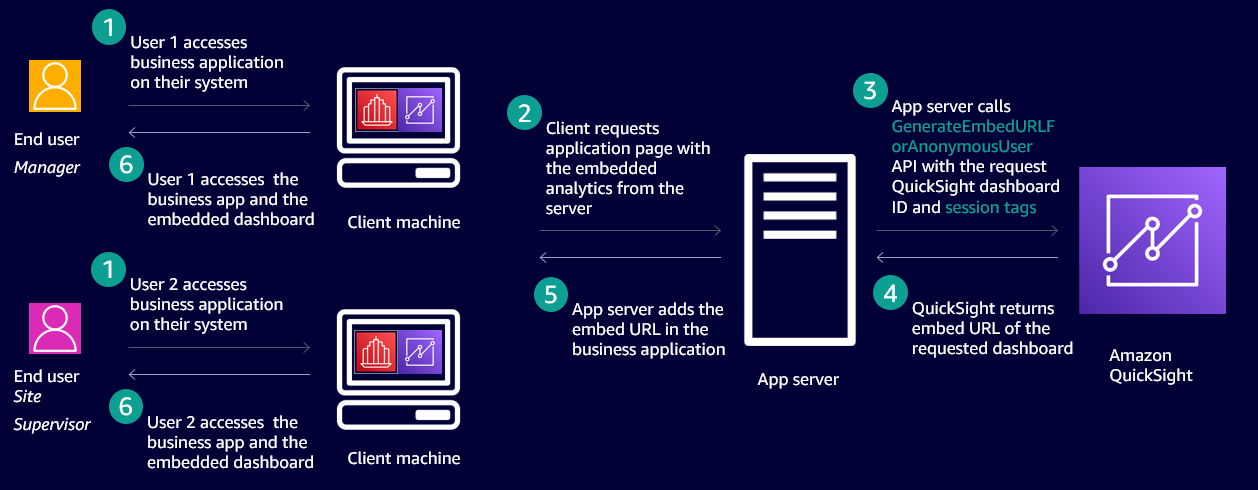
In this case, an ISV has a SaaS application that is accessed by two end-users. One is a manager and other is a site supervisor. Both users access the same application and the same QuickSight dashboard embedded in the application and they’re not provisioned in QuickSight. When the site supervisor accesses the dashboard, they only see data pertaining to their site, and when the manager accesses the dashboard, they see data pertaining to all the sites they manage.
To achieve this behavior, we use a new feature that enables configuring the row-level security using tags. This method of securing data on embedded dashboards works only when dashboards are embedded without user provisioning (also called anonymous embedding). The process includes two steps:
- Set up tag keys on the columns of the datasets used to build the dashboard.
- Set values for the tag keys at runtime when embedding the dashboard anonymously.
Set up tag keys on columns in the datasets used to build the dashboard
ISVs or developers can set columns on the datasets using the CreateDataset or UpdateDataset APIs as follows:
In the preceding example code, row-level-permission-tag-configuration is the element that you can use to define tag keys on the columns of a dataset. For each tag, you can define the following optional items:
- TagMultiValueDelimiter – This option when set on a column enables you to pass more than one value to the tag at runtime, and the values are delimited by the string set for this option. In this sample, a comma is set as a delimiter string.
- MatchAllValue – This option when set on a column enables you to pass all values of a column at runtime, and the values are represented by the string set for this option. In this sample, an asterisk is set as a match all string.
After we define our tags, we can enable or disable these rules using the Status element of the API. In this case the value is set to ENABLED. To disable the rules, the value is DISABLED. After the tags are enabled, we can pass values to the tags at runtime to secure the data displayed based on who is accessing the dashboard.
Each dataset can have up to 50 tag keys.
We receive the following response for the CreateDataset or UpdateDataset API:
Enable authors to access data protected by tag keys when authoring analysis
After tags keys are set and enabled on the dataset, it is secured. Authors when using this dataset to author a dashboard don’t see any data. They must be given permissions to see any of the data in the dataset when authoring a dashboard. To give QuickSight authors permission to see data in the dataset, create a permissions file or a rules dataset. For more information, see Creating Dataset Rules for Row-Level Security. The following is an example rules dataset.
| UserName | column_name_1 | column_name_2 | column_name_3 |
| admin/sampleauthor |
In this sample dataset, we have the author’s username listed in the UserName column. The other three columns are the columns from the dataset on which we set tag keys. The values are left empty for these columns for the author added to this table. This enables the author to see all the data in these columns without any restriction when they’re authoring analyses.
Set values to the tag keys at runtime when embedding the dashboard
After the tag keys are set for columns of the datasets, developers set values to the keys at runtime when embedding the dashboard. Developers call the API GenerateDashboardEmbedURLForAnonymousUser to embed the dashboard and pass values to the tag keys in the element SessionTags, as shown in the following example code:
Because this feature secures data for users not provisioned in QuickSight, the API call is for AnonymousUser only and therefore this feature works only with the API GenerateDashboardEmbedURLForAnonymousUser.
The preceding example code has the following components:
- For
tag_name_1, you set two values (value1andvalue2) using theTagMultiValueDelimiterdefined when setting the tag keys (in this case, a comma). - For
tag_name_2, you set one value as an asterisk. This enables this tag key to have all values for that column assigned because we defined asterisk as theMatchAllValuewhen setting a tag key on the column earlier. - For
tag_name_3, you set one value (value3).
API response definition
The response of the API has the EmbedURL, Status, and RequestID. You can embed this URL in your HTML page. Data in this dashboard is secured based on the values passed to the tag keys when calling the embedding API GenerateDashboardEmbedURLForAnonymousUser:
- EmbedUrl (string) – A single-use URL that you can put into your server-side webpage to embed your dashboard. This URL is valid for 5 minutes. The API operation provides the URL with an
auth_codevalue that enables one (and only one) sign-on to a user session that is valid for up to 10 hours. This URL renders the dashboard with RLS rules applied based on the values set for the RLS tag keys. - Status (integer) – The HTTP status of the request.
- RequestId (string) – The AWS request ID for this operation.
Fine-grained access control
You can achieve fine-grained access control by using dynamic AWS Identity and Access Management (IAM) policy generation. For more information, see Isolating SaaS Tenants with Dynamically Generated IAM Policies. When using the GenerateEmbedUrlForAnonymousUser API for embedding, you need to mention two resource types in the IAM policy: the namespace ARNs your anonymous users virtually belong to, and the dashboard ARNs that can be used in the AuthorizedResourceArns input parameter value. The sessions generated using this API can access the authorized resources and the ones (dashboards) shared with the namespace.
Because anonymous users are part of a namespace, any dashboards shared with the namespace are accessible to them, regardless of whether they are passed explicitly via the AuthorizedResourceArns parameter.
To allow the caller identity to generate a URL for any user and any dashboard, the Resource block of the policy can be set to *. To allow the caller identity to generate a URL for any anonymous user in a specific namespace (such as Tenant1), the Resource part of the policy can be set to arn:aws:quicksight:us-east-1:<YOUR_AWS_ACCOUNT_ID>:namespace/Tenant1. This is the same for the dashboard ID. For dynamic policy generation, you can also use placeholders for the namespace and users.
The following code is an example IAM policy:
Use case
OkTank is an ISV in the healthcare space. They have a SaaS application that is used by different hospitals across different regions of the country to manage their revenue. OkTank has thousands of healthcare employees accessing their application and has embedded operations related to their business in a QuickSight dashboard in their application. OkTank doesn’t want to manage their users in QuickSight separately, and wants to secure data based on which user from which hospital is accessing their application. OkTank is securing the data on the dashboards at runtime using row-level security using tags.
OkTank has hospitals (North Hospital, South Hospital, and Downtown Hospital) in regions Central, East, South, and West.
In this example, the following users access OkTank’s application and the embedded dashboard. Each user has a certain level of restriction rules that define what data they can access in the dashboards. PowerUser is a super user that can see the data for all hospitals and regions.
| OkTank’s application’s user | Hospital | Region |
| NorthUser | North Hospital | Central and East |
| NorthAdmin | North Hospital | All regions |
| SouthUser | South Hospital | South |
| SouthAdmin | South Hospital | All regions |
| PowerUser | All hospitals | All regions |
None of these users have been provisioned in QuickSight. OkTank manages these users in its own application and therefore knows which region and hospital each user belongs to. When any of these users access the embedded QuickSight dashboard in the application, OkTank must secure the data on the dashboard so that users can only see the data for their region and hospital.
First, OkTank created tag keys on the dataset they’re using to power the dashboard. In their UpdateDataset API call, the RowLevelPermissionTagConfiguration element on the dataset is as follows:
Second, at runtime when embedding the dashboard via the GenerateDashboardEmbedURLForAnonymousUser API, they set SessionTags for each user.
SessionTags for NorthUser in the GenerateDashboardEmbedURLForAnonymousUser API call are as follows:
SessionTags for NorthAdmin are as follows:
SessionTags for SouthUser are as follows:
SessionTags for SouthAdmin are as follows:
SessionTags for PowerUser are as follows:
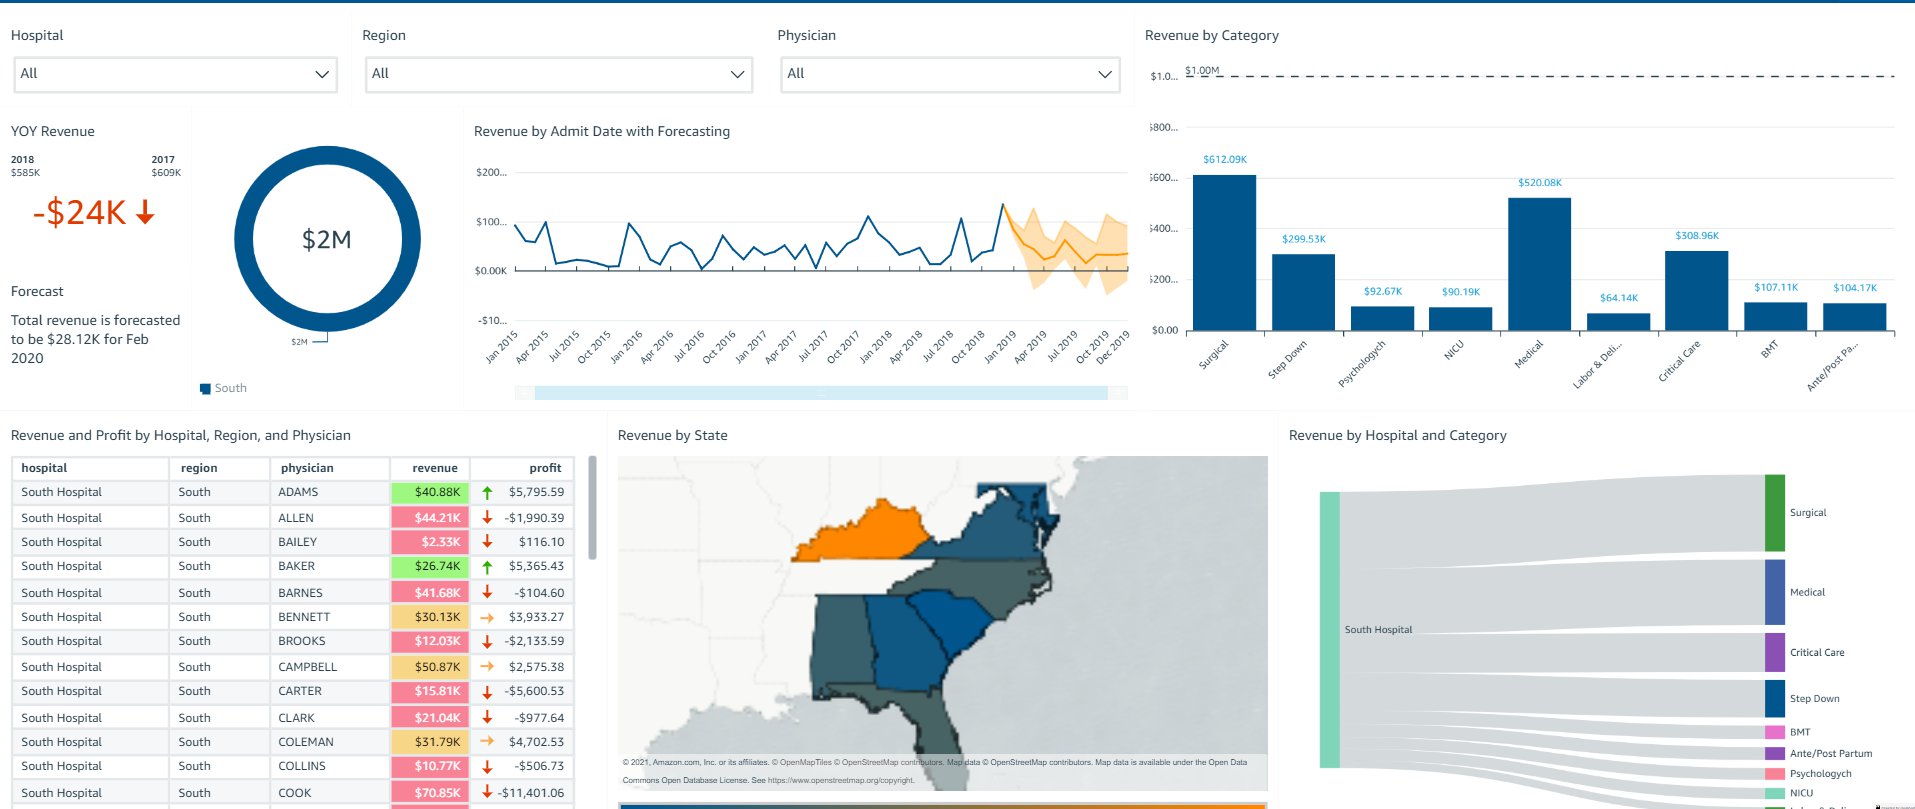
The following screenshot shows what SouthUser sees pertaining to South Hospital in the South region.
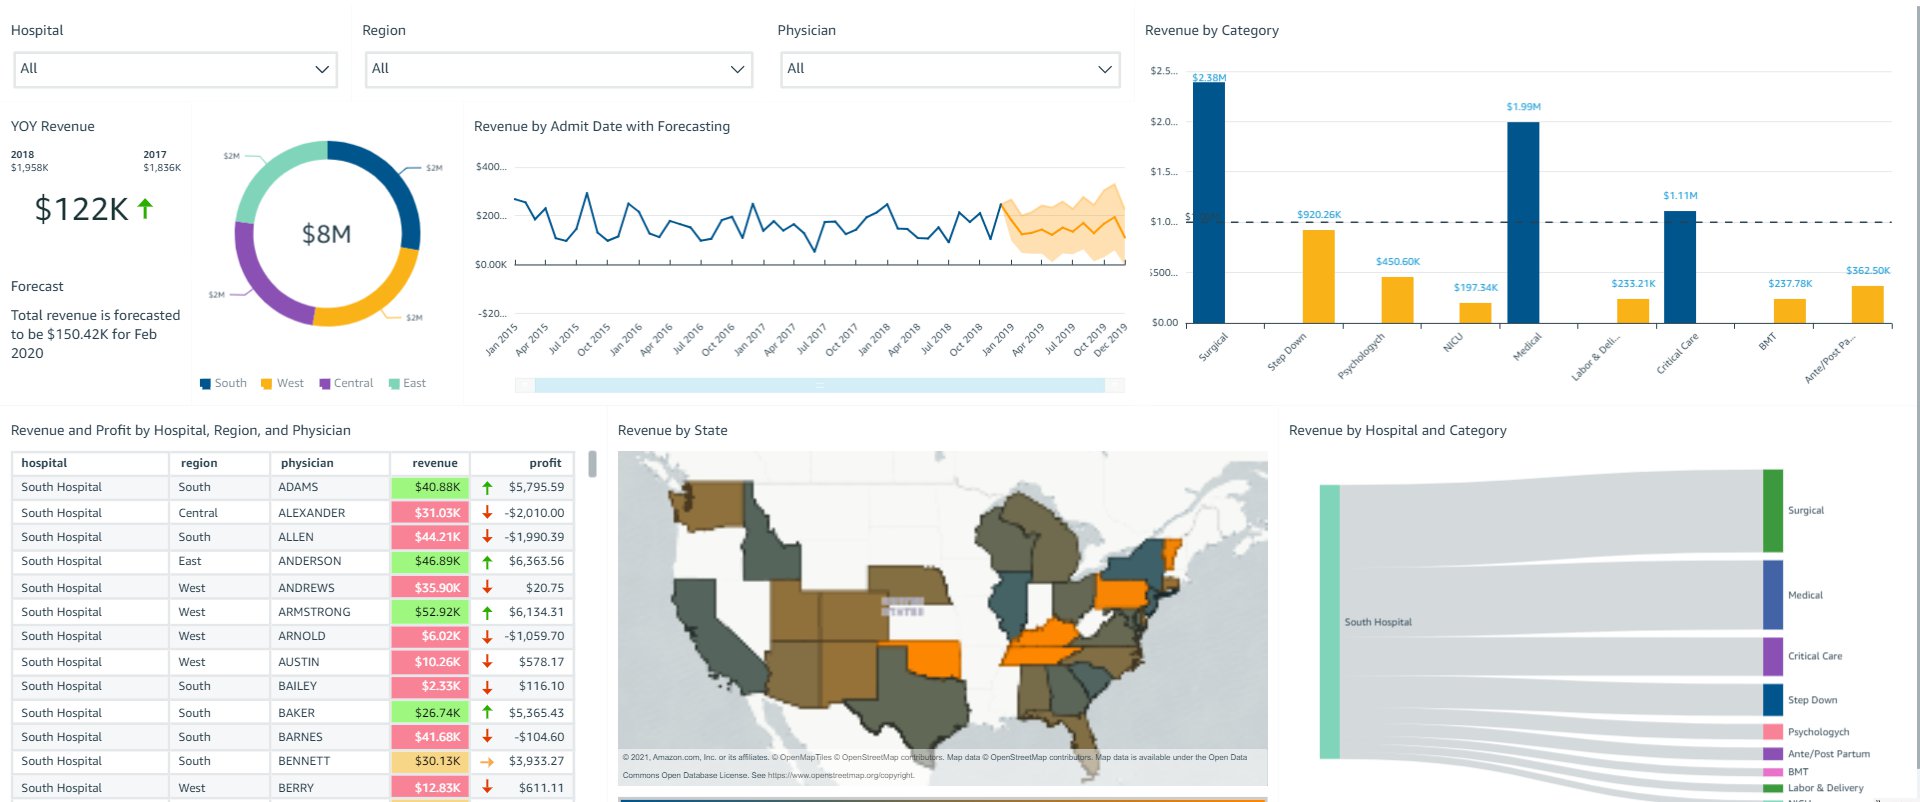
The following screenshot shows what SouthAdmin sees pertaining to South Hospital in all regions.
The following screenshot shows what PowerUser sees pertaining to all hospitals in all regions.
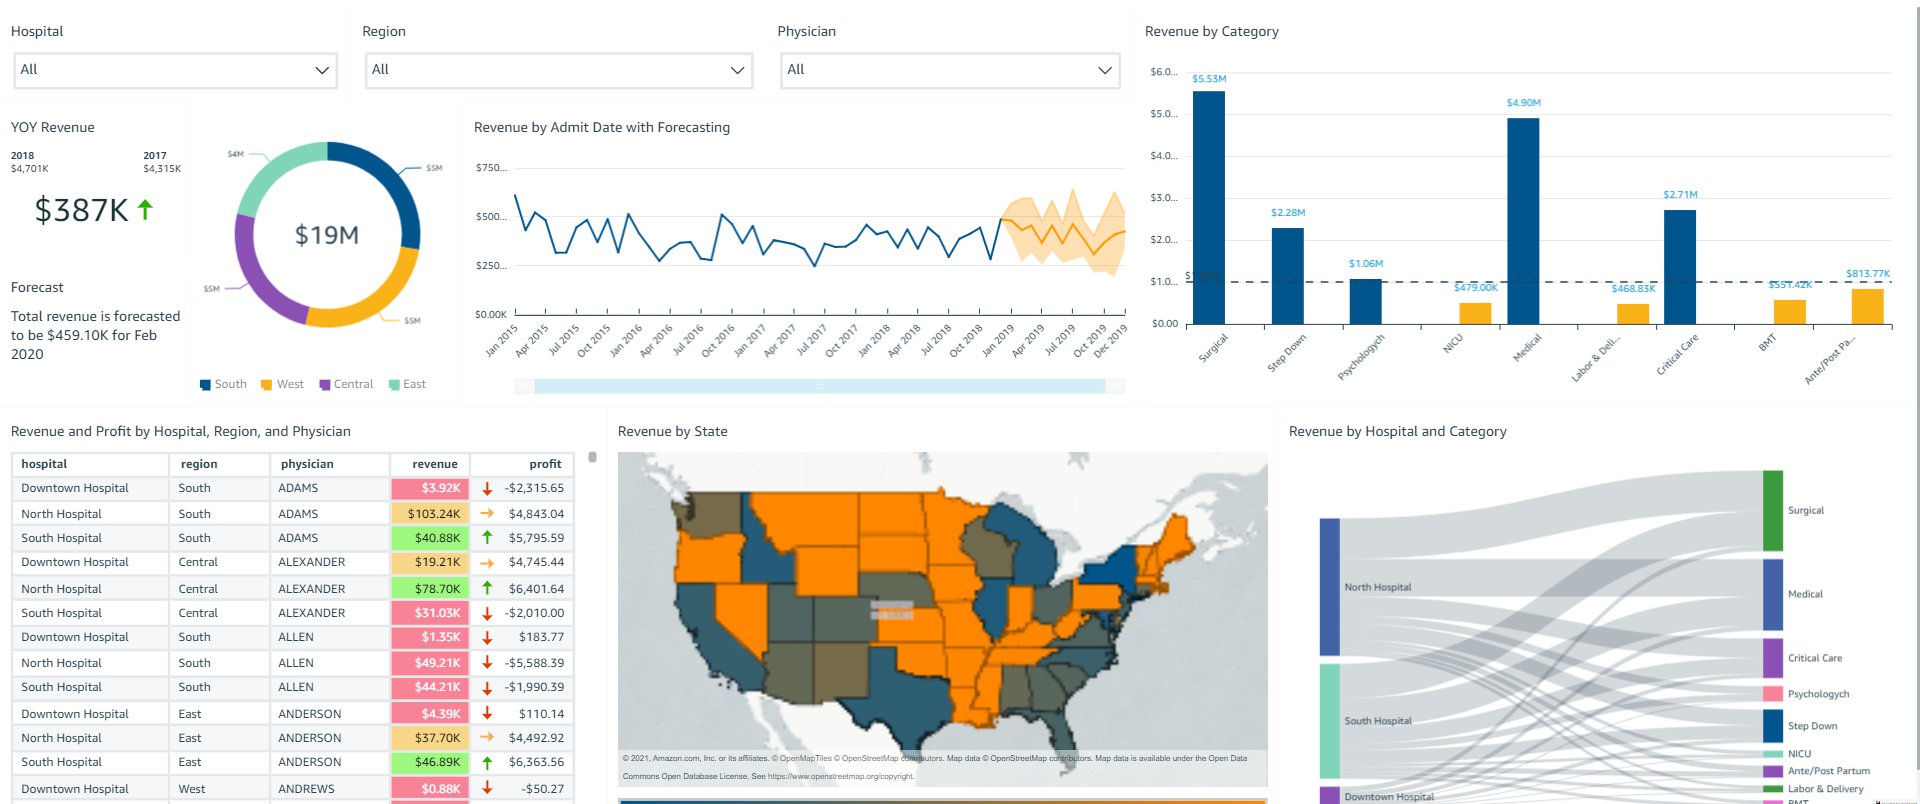
Based on session tags, OkTank has secured data on the embedded dashboards such that each user only sees specific data based on their access. You can access the dashboard as one of the users (by changing the user in the drop-down menu on the top right) and see how the data changes based on the user selected.
Overall, with row-level security using tags, OkTank is able to provide a compelling analytics experience within their SaaS application, while making sure that each user only sees the appropriate data without having to provision and manage users in QuickSight. QuickSight provides a highly scalable, secure analytics option that you can set up and roll out to production in days, instead of weeks or months previously.
Conclusion
The combination of embedding dashboard for users not provisioned in QuickSight and row-level security using tags enables developers and ISVs to quickly and easily set up sophisticated, customized analytics for their application users—all without any infrastructure setup or management while scaling to millions of users. For more updates from QuickSight embedded analytics, see What’s New in the Amazon QuickSight User Guide.
About the Authors
Raji Sivasubram aniam is a Specialist Solutions Architect at AWS, focusing on Analytics. Raji has 20 years of experience in architecting end-to-end Enterprise Data Management, Business Intelligence and Analytics solutions for Fortune 500 and Fortune 100 companies across the globe. She has in-depth experience in integrated healthcare data and analytics with wide variety of healthcare datasets including managed market, physician targeting and patient analytics. In her spare time, Raji enjoys hiking, yoga and gardening.
 Srikanth Baheti is a Specialized World Wide Sr. Solution Architect for Amazon QuickSight. He started his career as a consultant and worked for multiple private and government organizations. Later he worked for PerkinElmer Health and Sciences & eResearch Technology Inc, where he was responsible for designing and developing high traffic web applications, highly scalable and maintainable data pipelines for reporting platforms using AWS services and Serverless computing.
 Kareem Syed-Mohammed is a Product Manager at Amazon QuickSight. He focuses on embedded analytics, APIs, and developer experience. Prior to QuickSight he has been with AWS Marketplace and Amazon retail as a PM. Kareem started his career as a developer and then PM for call center technologies, Local Expert and Ads for Expedia. He worked as a consultant with McKinsey and Company for a short while.
Sukhinder Singh Cassidy | Choose Possibility: Take Risks and Thrive | Talks at Google
Post Syndicated from Talks at Google original https://www.youtube.com/watch?v=N4-7UZZ8M1Q
Super Cheap Surveillance – Blink Outdoor Camera Review
Post Syndicated from Crosstalk Solutions original https://www.youtube.com/watch?v=CIK0izk_3AI
The True Cost of Ransomware
Post Syndicated from Molly Clancy original https://www.backblaze.com/blog/the-true-cost-of-ransomware/
Editor’s Note
This article has been updated since it was originally published in 2021.
When we first published this article, a $70 million ransom demand was unprecedented. Today, demands have reached as high as $240 million, a sum that the Hive ransomware group opened negotiations with in an attack on MediaMarkt, Europe’s largest consumer electronics retailer.
But then, as now, the ransoms themselves are just a portion, and often a small portion, of the overall cost of ransomware. Ransomware attacks are crimes of opportunity, and there’s a lot more opportunity in the mid-market, where the odd $1 million demand doesn’t make headlines and the victims are less likely to be adequately prepared to recover. And, the cost of those recoveries is what we’ll get into today.
In this post, we’re breaking down the true cost of ransomware and the drivers of those costs.
Read More About Ransomware
This post is a part of our ongoing series on ransomware. Take a look at our other posts for more information on how businesses can defend themselves against a ransomware attack, important industry trends, and more.

Ransom Payments Are the First Line Item
The Sophos State of Ransomware 2023 report, a survey of 3,000 IT decision makers from mid-sized organizations in 14 countries, found the average ransom payment was $1.54 million. This is almost double the 2022 figure of $812,380, and almost 10 times the 2020 average of $170,404, when we last published this article. Coveware, a security consulting firm, found that the average ransom payment for Q2 2023 was $740,144, also representing a big spike over previous quarters. While the specific numbers vary depending on sampling, both reports point to ransoms going up and up.

But, Ransoms Are Far From the Only Cost
Sophos found that the mean recovery cost excluding the ransom payment was $2.6 million when the targeted organization paid the ransom and got their data back. And, that cost was still $1.6 million when businesses used backups to restore data.
The cost of recovery comes from a wide range of factors, including:
- Downtime.
- People hours.
- Investment in stronger cybersecurity protections.
- Repeat attacks.
- Higher insurance premiums.
- Legal defense and settlements.
- Lost reputation.
- Lost business.
Downtime
When a company’s systems and data are compromised and operations come to a halt, the consequences are felt across the organization. Financially, downtime results in immediate revenue loss. And, productivity takes a significant hit as employees are unable to access critical resources, leading to missed deadlines and disrupted workflows. According to Coveware, the average downtime in Q2 2022 (the last quarter they collected data on downtime) amounted to over three weeks (24 days). And according to Sophos, 53% of survey respondents took more than one month to recover from the attack. This time should be factored in when calculating the true cost of ransomware.
People Hours
In the aftermath of a ransomware attack, a significant portion, if not all, of a company’s resources will be channeled towards the recovery process. The IT department will be at the forefront, working around the clock to restore systems to full functionality. The marketing and communications teams will shoulder the responsibility of managing crisis communications, while the finance team may find themselves in negotiations with the ransomware perpetrators. Meanwhile, human resources will be addressing employee inquiries and concerns stemming from the incident. Calculating the total hours spent on recovery may not be possible, but it’s a factor to consider in planning.
After recovery, the long term effects of a cybersecurity breach can still be felt in the workforce. In a study of the mental health impacts of cybersecurity on employees, Northwave found that physical and mental health symptoms were still existent up to a year after the cybersecurity attack, and affected both employee morale and business goals.
Investment in Stronger Cybersecurity Protections
It is highly probable that a company will allocate a greater portion of its budget towards bolstering its cybersecurity measures after being attacked by ransomware, and rightfully so. It’s a prudent and necessary response. As attacks continue to increase in frequency, cyber insurance providers will continue to tighten requirements for coverage. In order to maintain coverage, companies will need to bring systems up to speed.

Repeat Attacks
One of the cruel realities of being attacked by ransomware is that it makes businesses a target for repeat attacks. Unsurprisingly, cybercriminals don’t always keep their promises when companies pay ransoms. In fact, paying ransoms lets cybercriminals know you’re an easy future mark. They know you’re willing to pay.
Repeat attacks happen when the vulnerability that allowed cybercriminals access to systems remained susceptible to exploitation. Copycat ransomware operators can easily exploit vulnerabilities that go unaddressed even for a few days.
Higher Insurance Premiums
As more and more companies file claims for ransomware attacks and recoveries and ransom demands continue to increase, insurers are upping their premiums. In essence, insurers have been confronted with the stark reality that the financial toll exacted by ransomware incidents far exceeds what was once anticipated. In response to this growing financial strain, insurance providers are left with little choice but to raise their premiums. This uptick in premiums reflects the increasing risk landscape of the digital age, where the ever-evolving tactics and sophistication of cybercriminals necessitate a recalibration of risk assessment models and pricing structures within the insurance industry.
Legal Defense and Settlements
When attacks affect consumers or customers, victims can expect to hear from the lawyers. After a 2021 ransomware attack, payroll services provider UKG agreed to a $6 million settlement. And, big box stores like Target and Home Depot both paid settlements in the tens of millions of dollars following breaches. Even if your information security practices would hold up in court, for most companies, it’s cheaper to settle than to suffer a protracted legal battle.
Lost Reputation and Lost Business
When ransomware attacks make headlines and draw public attention, they can erode trust among customers, partners, and stakeholders. The perception that a company’s cybersecurity measures were insufficient to protect sensitive data and systems can lead to a loss of credibility. Customers may question the safety of their personal information.
Rebuilding a damaged reputation is a challenging and time-consuming process, requiring transparent communication, proactive security improvements, and a commitment to regaining trust. Ultimately, the impact of reputation loss goes beyond financial losses, as it can significantly affect an organization’s long-term viability and competitiveness in the market.

What You Can Do About It: Defending Against Ransomware
The business of ransomware is booming with no signs of slowing down, and the cost of recovery is enough to put some ill-prepared companies out of business. If it feels like the cost of a ransomware recovery is out of reach, that’s all the more reason to invest in harder security protocols and disaster recovery planning sooner rather than later.
For more information on the ransomware economy, the threat small to mid-sized businesses (SMBs) are facing, and steps you can take to protect your business, download The Complete Guide to Ransomware.

Cost of Ransomware FAQs
1. What is the highest ransomware ransom ever demanded?
Today, ransom demands have reached as high as $240 million, a sum demanded by the Hive ransomware group in an attack on MediaMarkt, Europe’s largest consumer electronics retailer.
2. What is the average ransom payment in 2023?
Average ransom payments vary depending on how reporting entities sample data. Some estimates put the average ransom payment in 2023 in the hundreds of thousands of dollars up to over half a million dollars.
3. How much does ransomware recovery cost?
Ransomware recovery can easily cost in the multiple millions of dollars. The cost of recovery comes from a wide range of factors, including downtime, people hours, investment in stronger cybersecurity protections, repeat attacks, higher insurance premiums, legal defense, lost reputation, and lost business.
4. How long does ransomware recovery take?
When a company’s systems and data are compromised, and operations come to a halt, the consequences are felt across the organization. Ransomware recovery can take anywhere from a few days, if you’re well prepared, or up to six months or longer.
The post The True Cost of Ransomware appeared first on Backblaze Blog | Cloud Storage & Cloud Backup.
Using AWS Serverless to Power Event Management Applications
Post Syndicated from Cheryl Joseph original https://aws.amazon.com/blogs/architecture/using-aws-serverless-to-power-event-management-applications/
Most large events have common activities such as event registration, check-in upon arrival, and requesting of amenities. When designing applications, factors such as high availability, low latency, reliability, and security must be considered.
In this blog post, we’d like to show how Amazon Web Services (AWS) can assist you in event planning activities. We’ll share an architecture that follows best practices, and one that can be used in developing other solutions.
Serverless to the Rescue
Serverless architecture enables you to focus on your application development without having to worry about managing servers and runtimes. You can quickly build, fix, and add new features to your applications. A microservices-based approach provides you the ability to scale and optimize each component of your event management application.
Let’s start by looking at some activities that an event guest might perform, and how they might be displayed in a mobile application:
- Event registration: A guest can register either from a website or from a mobile device, see Figure 1. Events might have heavy traffic initially, or a large push toward the end. This requires building applications that are highly scalable.

Figure 1. Event registration
- Check-In: Check-In can be a manual and cumbersome process – some mobile options are shown in Figure 2. Attendees must queue up to register, pick up badges, receive agendas, and collect other meeting materials.

Figure 2. Guest check-in kiosk
- Guest requests: While the event is underway, a participant might request hand-outs or want to purchase food or beverages, see Figure 3.

Figure 3. Guest requests
- Session notification: At popular events, there are some sessions that fill up quickly. Guests must queue up to get into the session. Figure 4 shows a notification screen.

Figure 4. Session notification on guest device
Solution overview for event planning
The serverless architecture presented here is highly scalable and provides low latency. It follows the Serverless Application Lens of the AWS Well-Architected Framework. This enables you to build secure, high-performing, resilient, and efficient applications.
Frontend user interface using AWS Amplify
The event website is hosted on AWS Amplify. Amplify provides a fully managed service for deploying and hosting applications with built-in CI/CD workflows. An alternative for hosting the event website could be Amazon Simple Storage Service (S3) or even by provisioning Amazon EC2 instances. However, Amplify is well suited for native mobile apps and JavaScript-based web apps.
The event website uses Amazon Cognito for management of user authentication and authorization. Amazon Cognito is a good choice here as it allows federating with external identity providers.
Backend serverless microservices
The backend of the event management application uses Amazon API Gateway and AWS Lambda. They provide the ability to expose API operations. If the application has a flurry of requests coming in together, the backend serverless microservices will scale up or down seamlessly. However, there are service limits, and it is important to keep these in mind while designing your applications.
Amazon DynamoDB is the NoSQL database, which saves the guest registration data and other event-related information. DynamoDB is a good fit here, as it delivers single-digit millisecond performance at any scale and provides high availability, fault tolerance, and automatic capacity scaling.
Amazon Pinpoint is used to send notifications to guests via email and SMS. Amazon Pinpoint allows your app to connect with customers over channels like email, SMS, push, or voice.
Let’s take a closer look at some of the activities we’ve outlined.
Solution architecture – Event registration and check-in

Figure 5. Event registration and check-in
Numbered items following refer to Figure 5:
- Developers upload code to AWS CodeCommit
- CodeCommit pushes the code to Amplify
- Guests access the website via Amazon Route 53
- Route 53 resolves incoming requests and forwards them to Amplify
- Guest authentication is performed by Amazon Cognito user pools
- Amplify sends the REST API requests to API Gateway
- API Gateway uses Amazon Cognito user pools as the authorizer
- API Gateway proxies the request to Lambda
- Lambda stores guest data in DynamoDB
- Lambda uses Amazon Pinpoint to notify the guest
The guest registration process begins with loading the web application hosted on Amplify. The application creates the user in the Amazon Cognito user pool and routes the request to API Gateway to complete the registration process. Amazon Cognito integrates with third-party authentication systems such as Google, Facebook, and Amazon. This allows guests to use their existing social media accounts to register.
The guest check-in process consists of loading a web application onto kiosks. Guest information is saved in a DynamoDB table. Upon registration, a QR code is sent to the guests, then scanned upon arrival at a kiosk. Guest information is then retrieved from a DynamoDB table. This allows guests to print their badges and other event materials.
Well-Architected guidance:
- Enable active tracing with AWS X-Ray to provide distributed tracing capabilities and visual service maps for faster troubleshooting of the backend APIs.
- For Lambda functions, follow least-privileged access and only allow the access required to perform a given operation.
- Throttle API operations to enforce access patterns established by the event management application service contract.
- Set appropriate logging levels and remove unnecessary logging information to optimize log ingestion. Use environment variables to control application logging level.
Solution architecture – Guest requests

Figure 6. Guest requests
Numbered items refer to Figure 6:
- Guests access the website via Route 53
- Route 53 resolves incoming requests and forwards them to Amplify
- Guest authentication is performed by Amazon Cognito user pools
- Amplify sends the REST API requests to API Gateway
- API Gateway uses Amazon Cognito user pools as the authorizer
- API Gateway proxies the request to Lambda
- Lambda validates and stores guest data in DynamoDB
- Lambda uses Amazon Pinpoint to notify the guest
- Amazon DynamoDB Streams are enabled which triggers a Lambda function
- Lambda notifies the employees via Amazon Simple Notification Service (SNS) to fulfill the request
Once a guest request is made for session handouts or food or beverages, it is stored in DynamoDB. DynamoDB Streams are enabled, see Figure 7, which captures a time-ordered sequence of item-level modifications in a DynamoDB table. It durably stores the information for up to 24 hours. This generates an event, which triggers a Lambda function. The Lambda function sends an SNS notification via SMS or email to the event employees who can address the guest requests.

Figure 7. Sample DynamoDB Streams record
Well-Architected guidance:
- Standardize application logging across components, and business outcomes
- Enable caching on API Gateway to improve application performance
- Use an On-Demand Instance for DynamoDB when traffic is unpredictable, otherwise use provisioned mode when consistent
- Amazon DynamoDB Accelerator (DAX) can be used as an in-memory cache to improve read performance
Solution architecture – Session notification

Figure 8. Session notification
Numbered items refer to Figure 8:
- An Amazon EventBridge rule runs on a schedule and invokes a Lambda function
- Lambda retrieves guest and session information from DynamoDB
- Lambda notifies the guest via Amazon Pinpoint
Amazon Pinpoint can send notifications to registered guests to let them know when to queue up for the session.
Conclusion
This solution provides a powerful approach for deploying highly scalable applications, while providing low latency and low cost. Build a Serverless Web Application can get you started. Large events require a considerable amount of planning and coordination. We hope the guidance provided here will help you build a scalable and a robust event management application.
[$] Extended attributes for special files
Post Syndicated from original https://lwn.net/Articles/868505/rss
The Linux extended-attribute mechanism allows the attachment of metadata to
files within a filesystem. It tends to be little used — at least, in the
absence of a security module like SELinux. There is interest in how these
attributes work, though, as evidenced by the discussions that have
followed the posting of revisions of this
patch by Vivek Goyal, which seeks to make a seemingly small change to
the rules regarding extended attributes and special files.
Cloud Challenges in the Age of Remote Work: Rapid7’s 2021 Cloud Misconfigurations Report
Post Syndicated from Shelby Matthews original https://blog.rapid7.com/2021/09/09/cloud-challenges-in-the-age-of-remote-work-rapid7s-2021-cloud-misconfigurations-report/

A lot changed in 2020, and the way businesses use the cloud was no exception. According to one study, 90% of organizations plan to increase their use of cloud infrastructure following the COVID-19 pandemic, and 61% are planning to optimize the way they currently use the cloud. The move to the cloud has increased organizations’ ability to innovate, but it’s also significantly impacted security risks.
Cloud misconfigurations have been among the leading sources of attacks and data breaches in recent years. One report found the top causes of cloud misconfigurations were lack of awareness of cloud security and policies, lack of adequate controls and oversight, and the presence of too many APIs and interfaces. As employees started working from home, the problem only got worse. IBM’s 2021 Cost of a Data Breach report found the difference in cost of a data breach involving remote work was 24.2% higher than those involving non-remote work.
What’s causing misconfigurations?
Rapid7 researchers found and studied 121 publicly reported cases of data exposures in 2020 that were directly caused by a misconfiguration in the organization’s cloud environment. The good news is that 62% of these cases were discovered by independent researchers and not hackers. The bad news? There are likely many more data exposures that hackers have found but the impacted organizations still don’t know about.
Here are some of our key findings:
- A lot of misconfigurations happen because an organization wants to make access to a resource easier
- The top three industries impacted by data exposure incidents were information, entertainment, and healthcare.
- AWS S3 and ElasticSearch databases accounted for 45% of the incidents.
- On average, there were 10 reported incidents a month across 15 industries.
- The median data exposure was 10 million records.
Traditionally, security has been at the end of the cycle, allowing for vulnerabilities to get missed — but we’re here to help. InsightCloudSec is a cloud-native security platform meant to help you shift your cloud security programs left to allow security to become an earlier part of the cycle along with increasing workflow automation and reducing noise in your cloud environment.
Check out our full report that goes deeper into how and why these data breaches are occurring.
The Open Source Initiative’s new executive director
Post Syndicated from original https://lwn.net/Articles/868744/rss
The Open Source Initiative has announced the
appointment of Stefano Maffulli as its executive director.
“‘Bringing Stefano Maffulli on board as OSI’s first Executive
Director is the culmination of a years-long march toward
professionalization, so that OSI can be a stronger and more responsive
advocate for open source,’ says Joshua Simmons, Board Chair of OSI.”
Security updates for Thursday
Post Syndicated from original https://lwn.net/Articles/868743/rss
Security updates have been issued by Fedora (lynx, matrix-synapse, and proftpd), openSUSE (ntfs-3g_ntfsprogs), Oracle (kernel), Red Hat (RHV-H), Scientific Linux (kernel), and Ubuntu (libapache2-mod-auth-mellon, linux, linux-aws, linux-aws-5.11, linux-azure, linux-azure-5.11, linux-gcp, linux-hwe-5.11, linux-kvm, linux-oracle, linux-oracle-5.11, linux-raspi, linux, linux-aws, linux-aws-5.4, linux-azure, linux-azure-5.4, linux-gcp, linux-gcp-5.4, linux-gke, linux-gke-5.4, linux-gkeop, linux-gkeop-5.4, linux-kvm, linux-oracle, linux-oracle-5.4, and linux-azure-5.8, linux-oem-5.10).
Setting up manual ticket creation using Zabbix frontend scripts
Post Syndicated from Nathan Liefting original https://blog.zabbix.com/setting-up-manual-ticket-creation-using-zabbix-frontend-scripts/15550/
In this blog post, you will learn how to set up manual ticket creation through the use of Zabbix frontend scripts. We will use Jira Service Desk as an example, but this guide should work for any type of service desk or help desk system, as we can apply this technique for other systems in a similar fashion.
Introduction
Zabbix already has the ability to automatically create tickets through the use of Media Types and Actions. This way we can filter out certain issues based on host groups, severity, tags and a lot more. But what if your action misses a problem because of your filters? Or what if you simply want to limit the number of tickets that are created by actions? That’s when we can use Zabbix Frontend Scripts to manually create a ticket from the Zabbix Frontend, while automatically filling in the ticket info with a click of a button.
Let’s check take a look at how we can achieve this.
How to
Setting up Jira
As mentioned, in this example we’ll use Jira. Why? Simply because personally I am a big fan of the Atlassian product suite and it’s what I had available on hand. Feel free to apply this technique to any service desk system out there though, as we are definitely not limited to Jira Service Desk.
To make the frontend script work we are going to need a working integration (Media Type in Zabbix terminology). You can check out https://zabbix.com/integrations to see if the service desk system of your choosing is already available out of the box. If not, you can always use a community solution or build your own integration. Jira Service Desk is already available though, meaning we can use the settings pre-defined in Zabbix. For Jira Service Desk we’ll need:
- jira_url – The actual URL of your Jira instance. For example: https://company.atlassian.net/
- jira_user– Jira user login, in our instance this is my email.
- jira_project_key– Numeric key of the Jira project. We can find this in the URL once we go to our Jira Service Desk project settings. For example: pid=10054
- jira_issue_type– Number of the issue type to be used when creating new issues from Zabbix. Check out the Project Settings -> Request types and use the number in the URL for the request type you’d like to use.
- jira_password– Password or API token. We can create this at: https://id.atlassian.com/manage/api-tokens
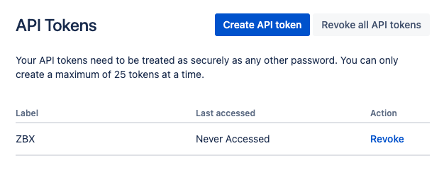
Make sure to save the API token somewhere, as you can only copy it over once.
Setting up the frontend script
Now once you have set up everything on the Jira (or which ever other service desk you use) side, we can continue with the next step which is setting up the Frontend script. If we look at the particular Zabbix Media Type, we can see something interesting.
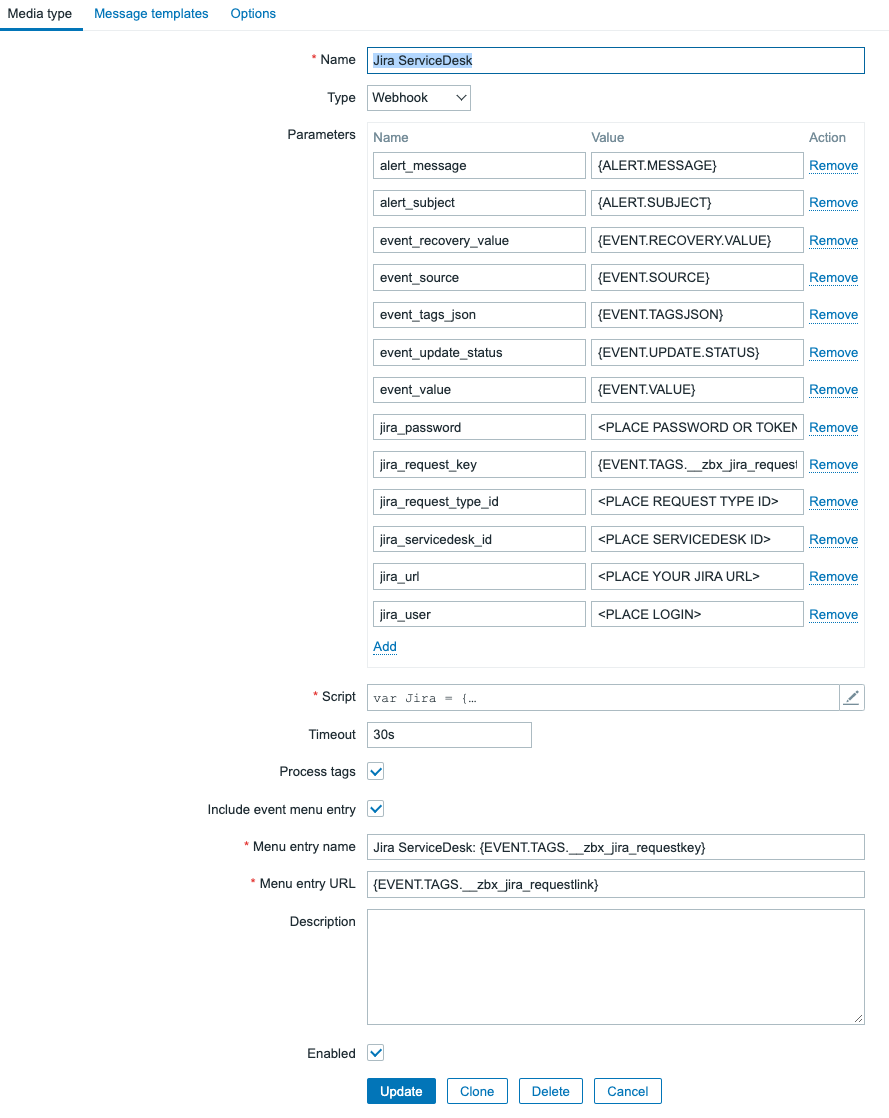
The Jira ServiceDesk default Media Type is of course already set up, but that’s not the most interesting part – although super useful nevertheless. Looking at the Media Type we have our Parameters and the Javascript script. If we take a look at the Frontend Script configuration and compare it with our Media Type, that’s when it gets interesting:
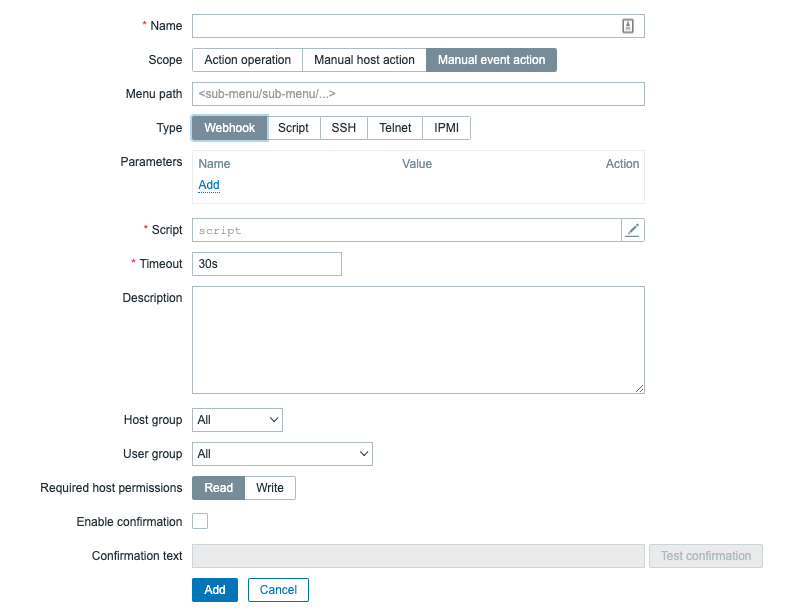
With release of Zabbix 5.4 it is now possible possible for us to execute webhooks directly with a Frontend script, as we can see we have the same Parameter and Script options available in this section. Meaning that most of what we have to do is navigate to Administration -> Scripts and copy over the Media Type Parameters and script. So, let’s do that and fill in the parameters with default values:

Do not forget to do the same thing for the script part:
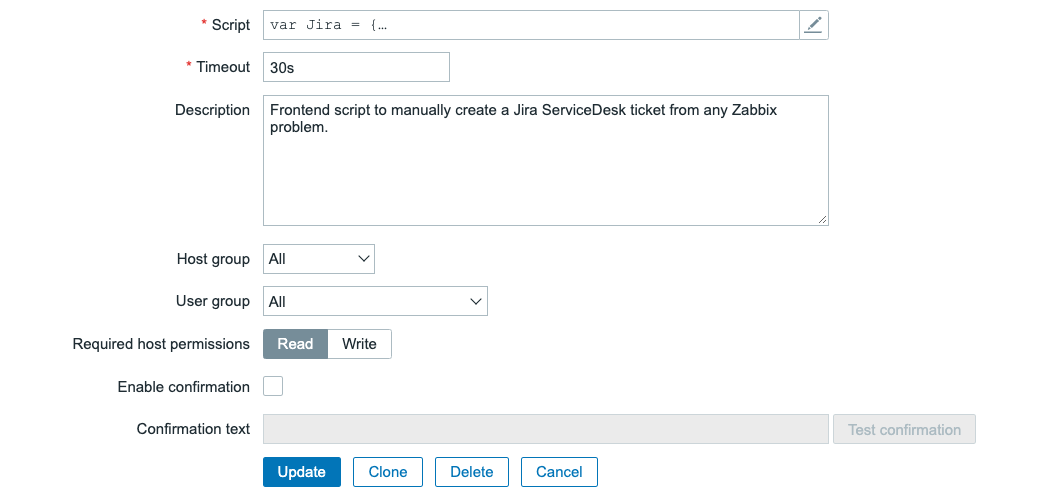
Once you’ve set this up, we aren’t completely done yet. We have copied the default parameter values as defined by Zabbix in the default Jira ServiceDesk Media Type. Now that we’ve copied those from the Media Type to the Frontend script, we still need to edit them to reflect our Jira ServiceDesk parameters. We need to edit the following fields:
alert_message: We can add our own alert message here, which will be filling out the body of our Jira Service Desk ticket. Use the Zabbix built-in macro’s wisely here. Something like:
There is a problem on {HOST.HOST} - {EVENT.NAME} with severity: {EVENT.SEVERITY} since {EVENT.DATE}
alert_subject: This will be the subject of our Jira ticket, again heavily reliant on Built-in Macro’s. It can be something like:
Severity:{EVENT.SEVERITY} Problem on:{HOST.HOST} - {EVENT.NAME}
event_source: We set this to 0, meaning it is a problem. Normally this is dynamic, but we can make it static for the script.
0
Then, as discussed in the earlier part of this post we need to edit the following parameters:
jira_password
jira_request_type_id
jira_servicedesk_id
jira_url
jira_user
Once you have set up all of those parameters, it should now look like this:
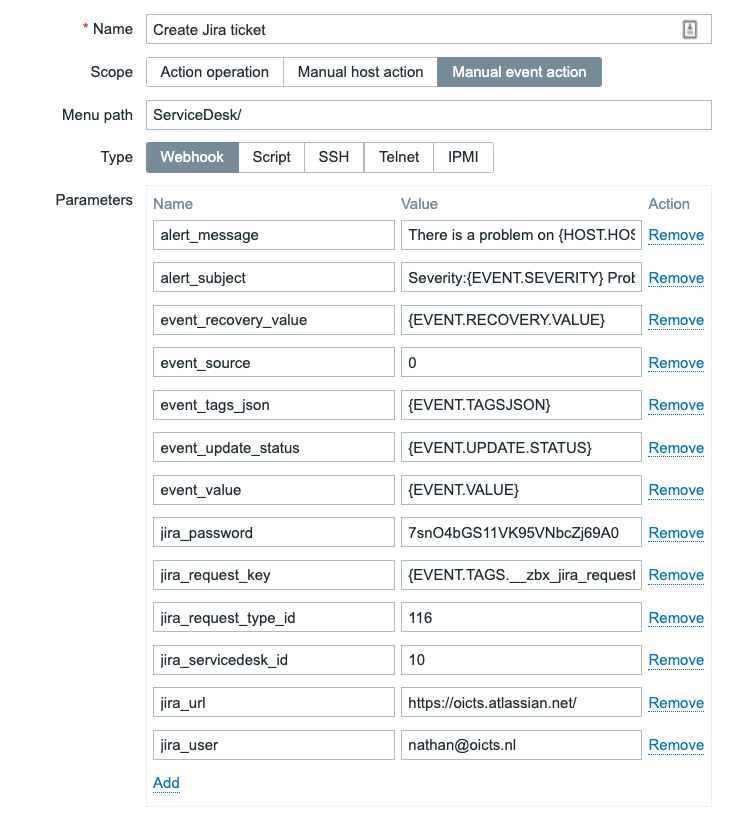
The result
Now, if all of the information from the previous steps is filled in, we can test the integration. Navigate to Monitoring -> Problems and click on any of the problem names:
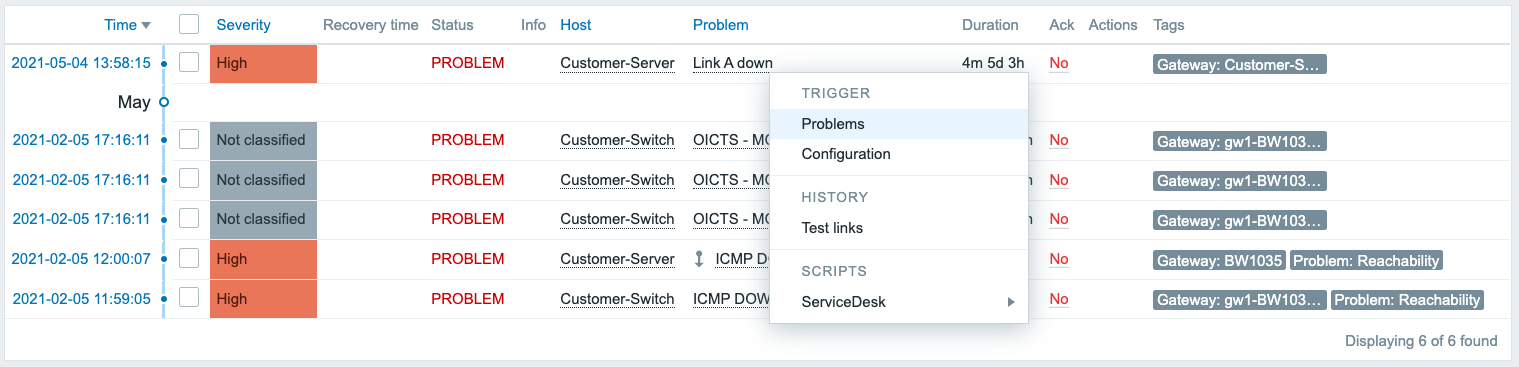
Which will open a dropdown menu. Go to ServiceDesk and click the Create Jira ticket button.
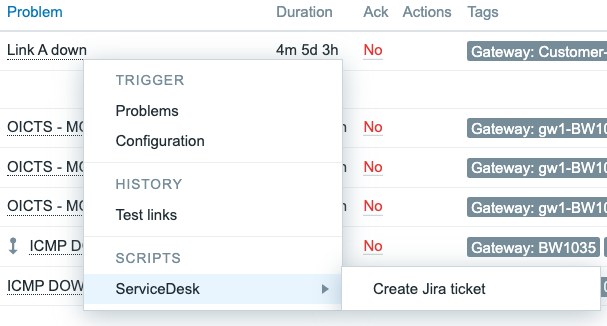
This will then kick of our new Zabbix frontend script. The webhook script will be using the Jira API to create a ticket and voila:

A ticket is created, right from the frontend. It’s just that easy.
Conclusion
Using Media Types is great and I would definitely recommend using them. If you have set up the correct filtering using host groups, severities, tags and perhaps more than that, you can already keep the ticket count to a minimum. But there’s always a downside to using a lot of filters, you might miss something. That’s where our Frontend Script implementation kicks in. Maybe your filter missed a ticket, maybe you don’t want automated tickets at all. We can use the script to manually create tickets, quickly from the frontend and solve that issue.
You’ve now got a powerful way to do so, fully compatible with Zabbix most of the times out of the box! As Zabbix adds more and more of this functionality it becomes easier and easier to do so, if you just know where to look.
I hope you enjoyed reading this blog post and if you have any questions or need help configuring anything on your Zabbix setup feel free to contact me and the team at Opensource ICT Solutions. We build a ton of cool integrations like this and much more!
Nathan Liefting

TheHistoryGuy.com
Post Syndicated from The History Guy: History Deserves to Be Remembered original https://www.youtube.com/watch?v=cftiHJKQSP0
Native Rust support on Cloudflare Workers
Post Syndicated from Steve Manuel original https://blog.cloudflare.com/workers-rust-sdk/


You can now write Cloudflare Workers in 100% Rust, no JavaScript required. Try it out: https://github.com/cloudflare/workers-rs
Cloudflare Workers has long supported the building blocks to run many languages using WebAssembly. However, there has always been a challenging “trampoline” step required to allow languages like Rust to talk to JavaScript APIs such as fetch().
In addition to the sizable amount of boilerplate needed, lots of “off the shelf” bindings between languages don’t include support for Cloudflare APIs such as KV and Durable Objects. What we wanted was a way to write a Worker in idiomatic Rust, quickly, and without needing knowledge of the host JavaScript environment. While we had a nice “starter” template that made it easy enough to pull in some Rust libraries and use them from JavaScript, the barrier was still too high if your goal was to write a full program in Rust and ship it to our edge.
Not anymore!
Introducing the worker crate, available on GitHub and crates.io, which makes Rust developers feel right at home on the Workers platform by running code inside the V8 WebAssembly engine. In the snippet below, you can see how the worker crate does all the heavy lifting by providing Rustacean-friendly Workers APIs.
use worker::*;

#[event(fetch)]
pub async fn main(req: Request, env: Env) -> Result<Response> {
    console_log!(
        "{} {}, located at: {:?}, within: {}",
        req.method().to_string(),
        req.path(),
        req.cf().coordinates().unwrap_or_default(),
        req.cf().region().unwrap_or("unknown region".into())
    );

    if !matches!(req.method(), Method::Post) {
        return Response::error("Method Not Allowed", 405);
    }

    if let Some(file) = req.form_data().await?.get("file") {
        return match file {
            FormEntry::File(buf) => {
                Response::ok(&format!("size = {}", buf.bytes().await?.len()))
            }
            _ => Response::error("`file` part of POST form must be a file", 400),
        };
    }

    Response::error("Bad Request", 400)
}
Get your own Worker in Rust started with a single command:
# see installation instructions for our `wrangler` CLI at https://github.com/cloudflare/wrangler
# (requires v1.19.2 or higher)
$ wrangler generate --type=rust my-project
We’ve stripped away all the glue code, provided an ergonomic HTTP framework, and baked in what you need to build small scripts or full-fledged Workers apps in Rust. You’ll find fetch, a router, easy-to-use HTTP functionality, Workers KV stores and Durable Objects, secrets, and environment variables too. It’s all open source, and we’d love your feedback!
Why are we doing this?
Cloudflare Workers is on a mission to simplify the developer experience. When we took a hard look at the previous experience writing non-JavaScript Workers, we knew we could do better. Rust happens to be a great language for us to kick-start our mission: it has first-class support for WebAssembly, and a wonderful, growing ecosystem. Tools like wasm-bindgen, libraries like web-sys, and Rust’s powerful macro system gave us a significant starting-off point. Plus, Rust’s popularity is growing rapidly, and if our own use of Rust at Cloudflare is any indication, there is no question that Rust is staking its claim as a must-have in the developer toolbox.
So give it a try, leave some feedback, even open a PR! By the way, we’re always on the lookout for great people to join us, and we are hiring for many open roles (including Rust engineers!) — take a look.
More Detail on the Juniper Hack and the NSA PRNG Backdoor
Post Syndicated from Bruce Schneier original https://www.schneier.com/blog/archives/2021/09/more-detail-on-the-juniper-hack-and-the-nsa-prng-backdoor.html
We knew the basics of this story, but it’s good to have more detail.
Here’s me in 2015 about this Juniper hack. Here’s me in 2007 on the NSA backdoor.
Какви са проблемите на системата за преброяването?
Post Syndicated from Bozho original https://blog.bozho.net/blog/3811
Проблемите на НСИ са сложни и многопластови и не могат да се обяснят просто с посочване на някого с пръст. Трябва, обаче, да търсят дългосрочни решения, а не оправдания.
Струва ми се, обаче, в ИТ общността си представя нещата малко по-просто, отколкото са. Това не е „един уебсайт“, на който просто трябва да сложиш достатъчно хардуер, за да работи. Ето няколко публично известни факта, които да помогнат интерпретацията:
- НСИ е направил поръчка за готова система за преброяване, а не за разработка на такава. Като цяло разумно решение. Местният партньор на шведската фирма „производител“ е СкейлФокус, които е трябвало да направят инсталация, конфигурация и поддръжка. Много често компании предпочитат да имат местни партньори, при които отива процент от продажбата, т.нар. two tier (или понякога three tier) distribution model. Цената е за лиценз, инсталация и конфигурация и като цяло изглежда разумна. Функционалностите са доста повече от
онлайн форми (на който му е интересно, техническото задание, предложението и договорът са на сайта на НСИ) - DDoS атаката е сериозна – ако наистина 250 гигабита в секунда са се „изсипали“ срещу системата, то на чисто софтуерно ниво няма какво да се направи – „тръбата“ се запушва, дори приложението да може да обработи данните. Засега няма причина да смятаме, че тази информация е грешна, най-много да е малко преувеличена, но дори да е наполовина, пак е значителна. Не съм съгласен, че „какво толкова сложно има да се защити една система“ – това не е софтуерен проблем, а мрежови. И няма прости и евтини решения.
- НСИ не са били подготвени за такава атака, а е трябвало. Ползването на CloudFlare е недостатъчна мярка за критичността и репутационните щети. Обикновено проблемът с CloudFlare е не самият CloudFlare, а това, че по други данни (исторически и настоящи DNS записи и просто логическо мислене) може да се прескочи CloudFlare.
- Тук обаче ще вдигна нещата едно ниво по-нагоре – това не е проект на НСИ, това е национален проект. НСИ просто е натоварен с неговото изпълнение. На ниво държава изгелжда липсва адекватна подготовка за защита от DDoS. Държавна агенция „Електронно управление“ и ресорните вицепремиери до момента е трябвало да осигурят такава не само на НСИ, но и за всички системи. Тя не е евтина, но работи (чрез т.нар. scrubbing центрове, които „почистват“ мръсния трафик преди да го изпратят към системите.) Кадровото осигуряване също е важна тема – колко ИТ експерти има НСИ и на какво заплащане и можем ли да очакваме да свършат всичко? Това също е системен проблем в държавата.
- DDoS атаките рядко водят до изтичане на данни (сами по себе си – никога, но понякога се ползват за димна завеса, прикрирваща други действия; засега не изглежда да е такъв случаят).
- съдейки по съобщенията за грешка, които излизаха в предните два дни, е имало и чисто интеграционни проблеми за проверката на въведените лични данни. За тези проблеми няма добро оправдание, а причината е липсата на координация между институциите и липсата на отговорен за процеса.
На следващото заседание на комисията по дигитализация в Народното събрание ще изясним всички тези въпроси. А следващото постоянно правителство трябва да ги реши системно.
Материалът Какви са проблемите на системата за преброяването? е публикуван за пръв път на БЛОГодаря.
Remembering Intel 740 | Custom PC #218
Post Syndicated from Ben Hardwidge original https://www.raspberrypi.org/blog/remembering-intel-740-custom-pc-218/
With Intel attempting to get into 3D gaming graphics again, Custom PC’s Ben Hardwidge looks at the time it failed to take on 3dfx in the late 1990s.
Back in the late 1990s, I worked at a computer shop in Derby, where we sold components over the counter, while pointing to a sign that said ‘components are sold on the basis that the customer is competent to fit it themselves’. There were often compatibility issues between components, but there were two cards I’d always try to steer customers away from, as they nearly always came back to the shop, accompanied by a tired, angry face and colourful vocabulary.

One was a PCI soft modem that required an MMX CPU and refused to cooperate with Freeserve, Dixons’ free ISP that was taking the UK by storm. The other was Express 3D graphics card, based on Intel’s 740 gaming chip.
This was before Nvidia had coined the term ‘GPU’ for its first GeForce cards, which could take the burden of transform and lighting calculations away from the CPU. The CPU was still expected to do a fair bit of work in the 3D pipeline, but you bought a 3D card to speed up the process and make games look much smoother than software rendering.
However, unlike the 3dfx Voodoo and VideoLogic PowerVR cards at the time, which required a 2D card to output to a monitor, the i740 wasn’t a sole 3D card – it could function as a 2D and a 3D card in one unit, and at £30 it was also cheap. You can see why people were drawn to it.
Another factor in its popularity was being made by Intel; thanks to the company’s relentless marketing campaigns, this meant people assumed it would just work without problems. It also used the brand-new Accelerated Graphics Port (AGP) interface, which people often assumed meant it would be faster than the PCI-based 3D accelerator cards.
The problem for us was that people who wanted cheap graphics cards usually also wanted cheap CPUs and motherboards, which meant going for an AMD K6 or Cyrix 6×86 CPU and a non-Intel motherboard chipset. The i740 didn’t like the AGP implementation on non-Intel chipsets very much, and it particularly didn’t like the ALi Aladdin chipset on which our most popular Super Socket 7 motherboards were based.
If you wanted the i740 to run properly, you really needed a Pentium II CPU and Intel 440LX or 440BX motherboard, and they were expensive. Then, once you’d paired your cheap graphics card with your expensive foundation gear, the i740 wasn’t actually that great, with comparably poor performance and still a load of compatibility issues. However, it had some interesting tech and history behind it that’s worth revisiting.
Aerospace beginnings
Intel didn’t have much in the way of graphics tech in the 1990s, but it had spotted a big market for 3D acceleration. The ATX motherboards for its latest Pentium II CPUs also came with an AGP slot, and a 3D AGP graphics card could potentially encourage people to upgrade (more on this later).

With little 3D accelerator expertise in house, Intel teamed up with US aerospace company Lockheed Martin to develop a consumer graphics card. That might seem a bit left field, but Lockheed Martin had acquired a variety of assets through various mergers and takeovers. In 1993, GE Aerospace was sold to Martin Marietta, and in 1995, Martin Marietta merged with Lockheed to form Lockheed Martin.
GE Aerospace was a division of General Electric, and its main business was providing systems and electronic gear to the aerospace and military industries, including simulators. In 1994, it started to branch out, working with Sega to produce the hardware for its Model 2 arcade machines, including 3D graphics tech for texture-mapped polygons and texture filtering. It was used for titles such as Daytona USA and Virtua Fighter 2.
In 1995, Lockheed Martin created a spin-off dedicated to consumer 3D graphics tech called Real3D, mostly using employees from GE Aerospace. Real3D worked with Sega on the 3D graphics hardware in its Model 3 cabinet, which was released in 1996, and then later began working with Intel to produce a consumer 3D graphics card, codenamed ‘Auburn’, which would become the 740.
An AGP showcase?
Intel had clear aims for the i740 when it was released in 1998 – it needed to be cheap and it needed to showcase the new AGP interface featured on the latest Pentium II motherboards. AGP had huge potential.
Although AGP was mainly based on the existing PCI interface, it had a direct connection to the CPU, as opposed to sharing the PCI bus with other cards. This not only freed up bandwidth, but also meant the AGP bus could run at a higher clock speed than the PCI bus.
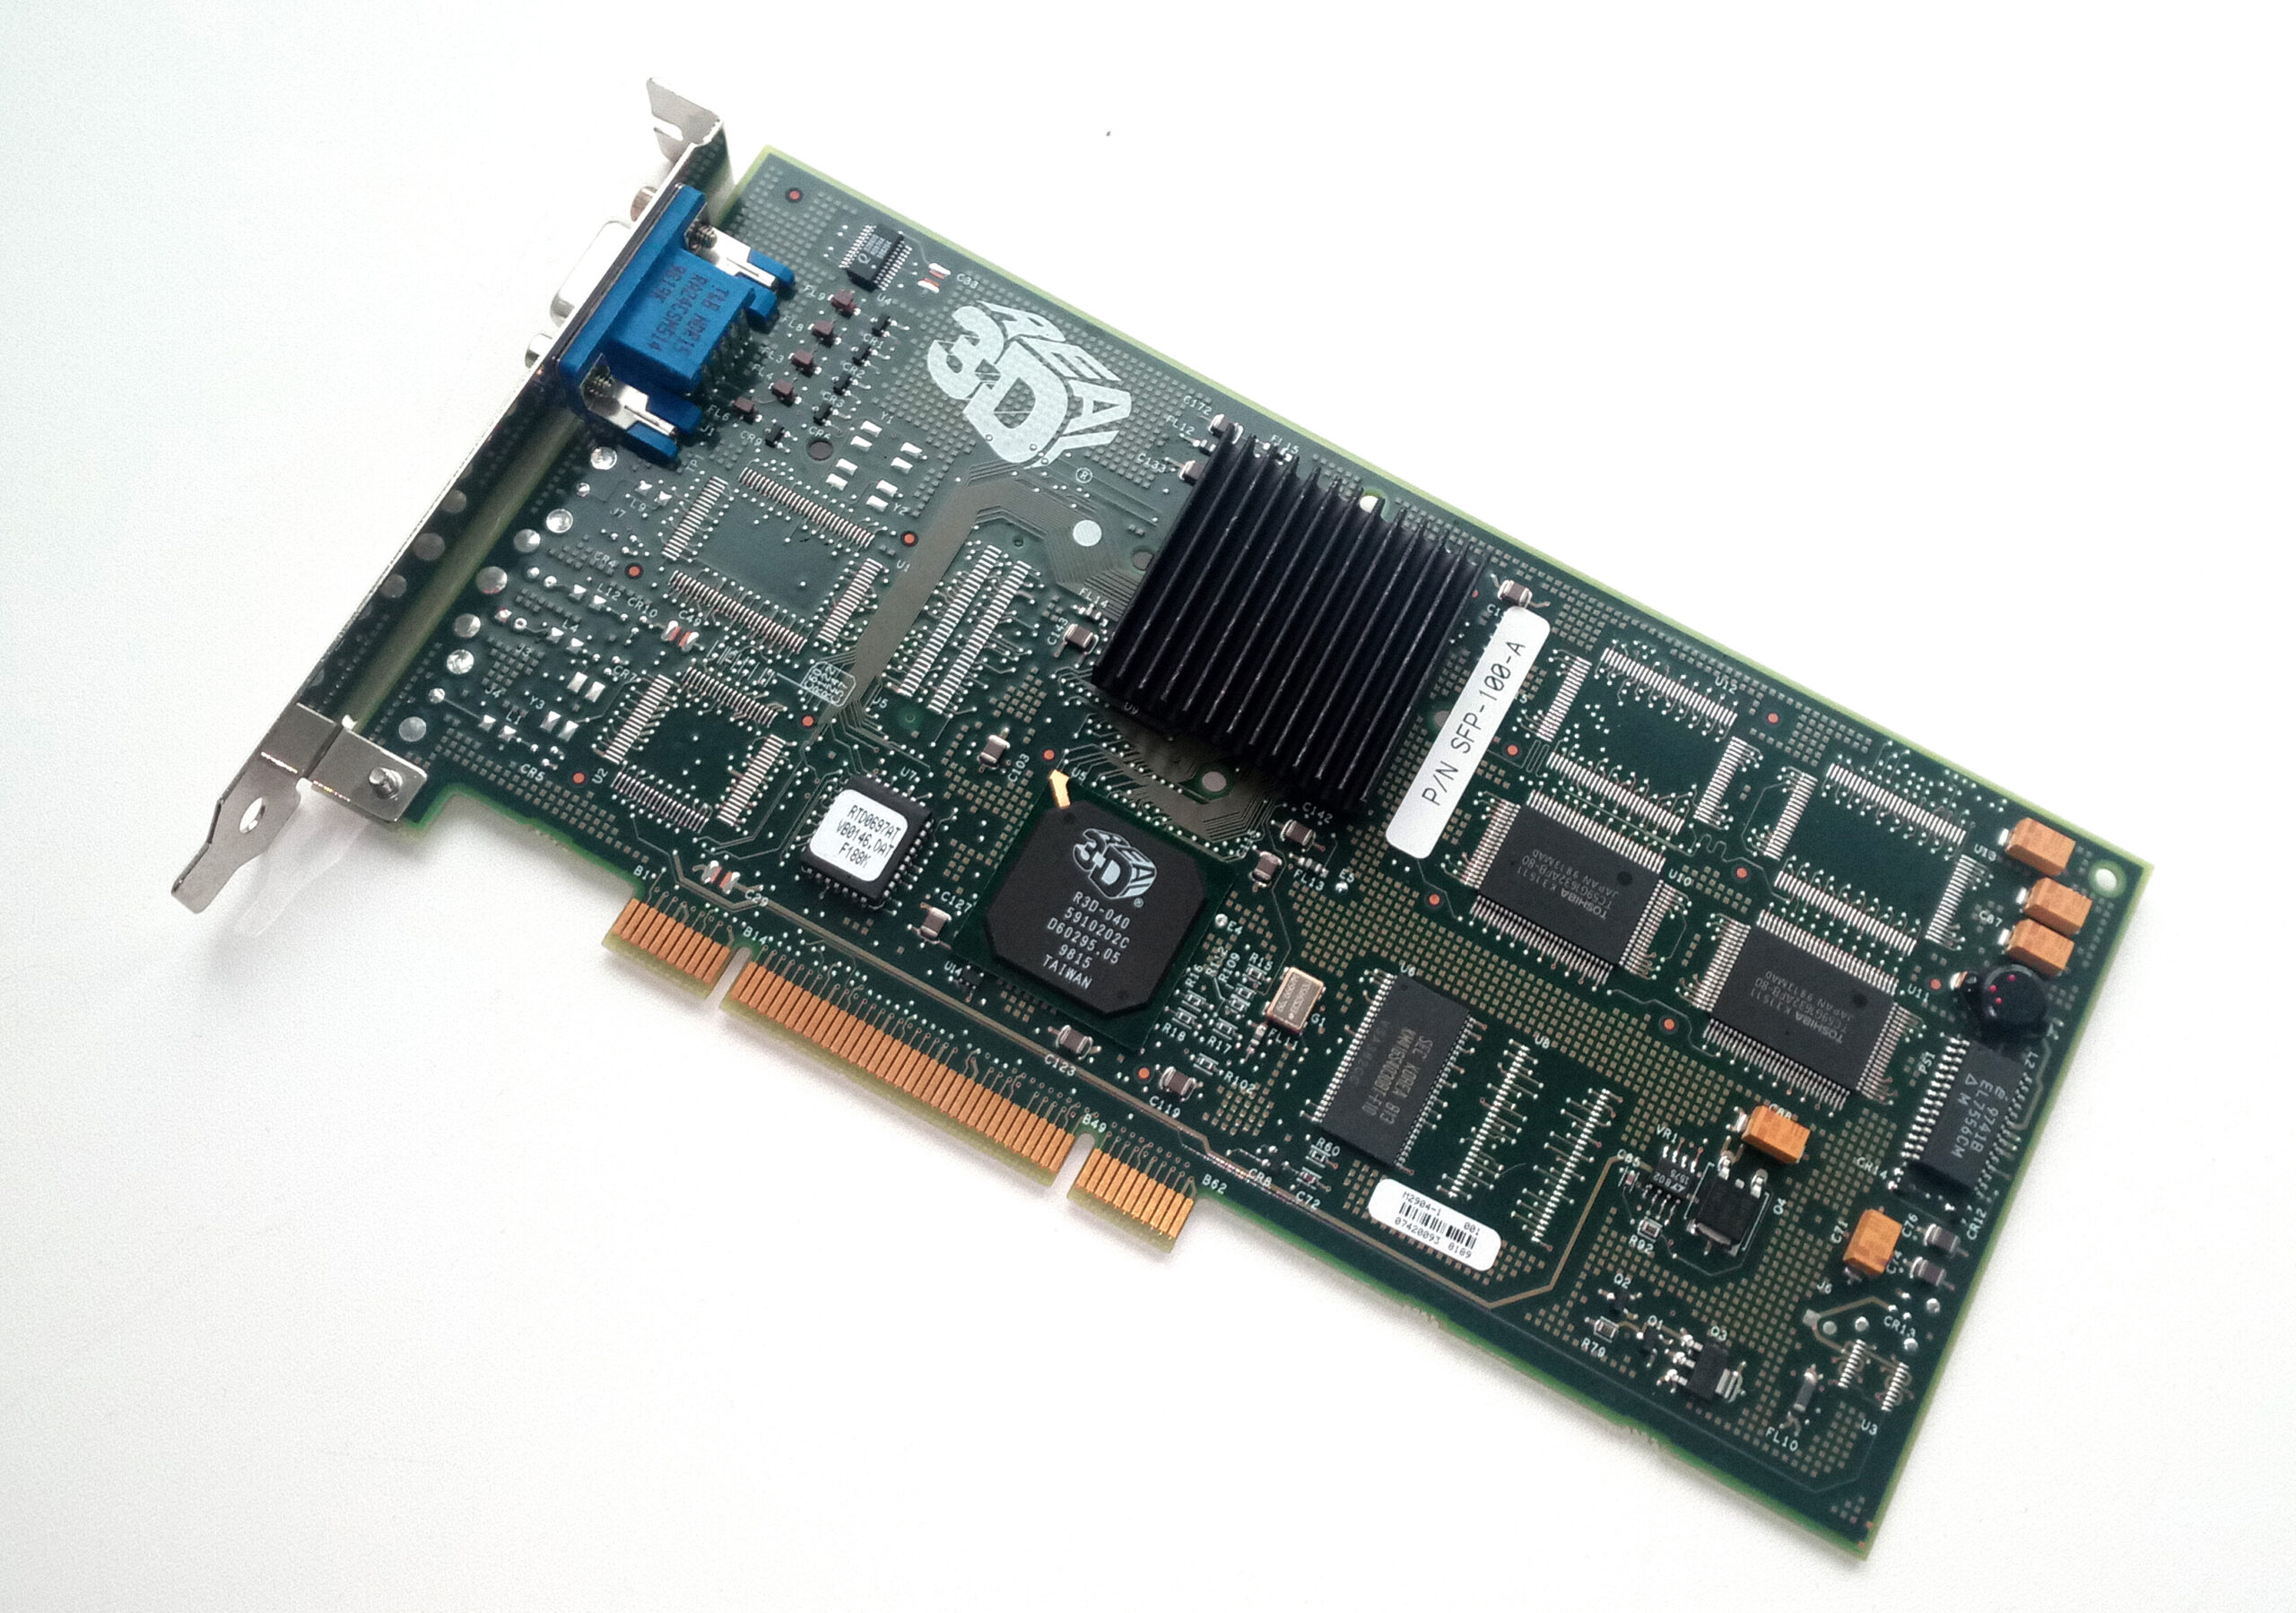
Another one of its benefits was sideband addressing via a dedicated bus, meaning that all the usual address/data lines could be used solely for data throughput rather than both addressing and data functions, with the sideband bus handling address requests.
This massively increased the speed at which an AGP card could read from system memory compared with a PCI card, and meant an AGP card could practically use system memory as well as its on-board memory. You may remember the ‘AGP aperture’ setting in old motherboard BIOS screens – that was the amount of system memory you could allocate to your graphics card.
Most 3D cards didn’t rely on this feature, instead being piled with fast on-board memory to maximise performance, but Intel decided to go all out on it with the i740. The result was a card that only used its on-board memory as a frame buffer, with textures being stored in system memory.
This meant Intel could save money on memory (the cheapest i740 cards only came with 2MB compared to 8MB on the cheapest Voodoo2 cards), while also ensuring the cards required the new AGP interface.
The first problem, of course, was that using system memory and its interface wasn’t anywhere near as fast as using on-board graphics memory. The other problem was that the need for the graphics card to constantly access system memory ended up starving the CPU of memory bandwidth.
That was a big problem at a time when the CPU was still doing a fair bit of the work in the 3D pipeline. The growing use of larger textures in 3D games to improve detail made the situation even worse. What’s more, as I mentioned earlier, the AGP implementations on most Super Socket 7 motherboards just weren’t designed with a card such as the i740 in mind.
It also didn’t help that some board makers (including Real3D under the Starfighter brand) started making PCI versions of the i740 with a bridge chip and more on-board memory, and these cards were usually faster than the AGP equivalents, as they didn’t rely on system memory for texture storage.
Curtains for the i740
What seems bizarre now is that, at the time, I remember a lot of discussion before the launch about how Intel’s work with Real3D was going to result in Intel having a monopoly on 3D graphics, and putting the likes of ATi, 3dfx and VideoLogic out of business.
Intel had access to huge silicon manufacturing facilities, it had a massive research and development budget, and it had the proven expertise of Real3D at its disposal. In reality, the i740 was soon cancelled and almost completely forgotten by the end of 1999.
Custom PC #218 out NOW!
Get your hands on the latest issue of Custom PC at your usual outlet, or online from the Raspberry Pi Press store.

You can also download a PDF of Custom PC #218 for the bargain price of £0.00.
The post Remembering Intel 740 | Custom PC #218 appeared first on Raspberry Pi.
[$] LWN.net Weekly Edition for September 9, 2021
Post Syndicated from original https://lwn.net/Articles/868156/rss
The LWN.net Weekly Edition for September 9, 2021 is available.
17 additional AWS services authorized for DoD workloads in the AWS GovCloud Regions
Post Syndicated from Tyler Harding original https://aws.amazon.com/blogs/security/17-additional-aws-services-authorized-for-dod-workloads-in-the-aws-govcloud-regions/
I’m pleased to announce that the Defense Information Systems Agency (DISA) has authorized 17 additional Amazon Web Services (AWS) services and features in the AWS GovCloud (US) Regions, bringing the total to 105 services and major features that are authorized for use by the U.S. Department of Defense (DoD). AWS now offers additional services to DoD mission owners in these categories: business applications; computing; containers; cost management; developer tools; management and governance; media services; security, identity, and compliance; and storage.
Why does authorization matter?
DISA authorization of 17 new cloud services enables mission owners to build secure innovative solutions to include systems that process unclassified national security data (for example, Impact Level 5). DISA’s authorization demonstrates that AWS effectively implemented more than 421 security controls by using applicable criteria from NIST SP 800-53 Revision 4, the US General Services Administration’s FedRAMP High baseline, and the DoD Cloud Computing Security Requirements Guide.
Recently authorized AWS services at DoD Impact Levels (IL) 4 and 5 include the following:
Business Applications
- Amazon Simple Email Service (Amazon SES) – Inbound and outbound cloud email
- Amazon Pinpoint – Multichannel marketing communication
- AWS Marketplace – A digital catalog with thousands of software listings from independent software vendors that you can use to find, test, buy, and deploy software that runs on AWS
Compute
- AWS Fargate (a feature of Amazon Elastic Container Service (Amazon ECS) and Amazon Elastic Kubernetes Service (Amazon EKS)) – A serverless compute engine for containers
Containers
- Amazon Elastic Kubernetes Service (Amazon EKS) – A trusted way to run Kubernetes
Cost Management
- AWS Budgets – Set custom budgets to track your cost and usage, from the simplest to the most complex use cases
- AWS Cost Explorer – An interface that lets you visualize, understand, and manage your AWS costs and usage over time
- AWS Cost & Usage Report – Itemize usage at the account or organization level by product code, usage type, and operation
Developer Tools
- AWS CodePipeline – Automate continuous delivery pipelines for fast and reliable updates
- AWS X-Ray – Analyze and debug production and distributed applications, such as those built using a microservices architecture
Management & Governance
- AWS License Manager – Manage your software licenses from vendors
- AWS Personal Health Dashboard – Provide alerts and guidance for AWS events that might affect your environment
- AWS Systems Manager – An operations hub for AWS
Media Services
- Amazon Textract – Extract printed text, handwriting, and data from virtually any document
Security, Identity & Compliance
- Amazon Cognito – Secure user sign-up, sign-in, and access control
- AWS Security Hub – Centrally view and manage security alerts and automate security checks
Storage
- AWS Backup – Centrally manage and automate backups across AWS services
Figure 1 shows the IL 4 and IL 5 AWS services that are now authorized for DoD workloads, broken out into functional categories.

Figure 1: The AWS services newly authorized by DISA
To learn more about AWS solutions for the DoD, see our AWS solution offerings. Follow the AWS Security Blog for updates on our Services in Scope by Compliance Program. If you have feedback about this blog post, let us know in the Comments section below.
Want more AWS Security how-to content, news, and feature announcements? Follow us on Twitter.
Amazon Elasticsearch Service Is Now Amazon OpenSearch Service and Supports OpenSearch 1.0
Post Syndicated from Channy Yun original https://aws.amazon.com/blogs/aws/amazon-elasticsearch-service-is-now-amazon-opensearch-service-and-supports-opensearch-10/
In 2015, we launched Amazon Elasticsearch Service (Amazon ES), a fully managed service that makes it easy for you to perform interactive log analytics, real-time application monitoring, website search, and more.
Amazon ES has been a popular service for log analytics because of its ability to ingest high volumes of log data. Additionally, with UltraWarm and cold storage tiers, you can lower costs to one-tenth of traditional hot storage on Amazon ES. Because Amazon ES integrates with Logstash, Amazon Kinesis Data Firehose, Amazon CloudWatch Logs, and AWS IoT, you can select the secure data ingestion tool that meets your use case requirements.
Developers embrace open-source software for many reasons. One of the most important reasons is the freedom to use that software where and how they want. On January 21, 2021, Elastic NV announced that they would change their software licensing strategy. After Elasticsearch version 7.10.2 and Kibana 7.10.2, they will not release new versions of Elasticsearch and Kibana under the permissive 2.0 version of the Apache License (ALv2). Instead, Elastic NV is releasing Elasticsearch and Kibana under the Elastic license, with source code available under the Elastic License or Server Side Public License (SSPL). These licenses are not open source and do not offer users the same freedom.
For this reason, we decided to create and maintain OpenSearch, a community-driven, open-source fork from the last ALv2 version of Elasticsearch and Kibana. We are making a long-term investment in the OpenSearch project and recently released version 1.0.
OpenSearch provides a highly scalable system for providing fast access and response to large volumes of data with an integrated visualization tool, OpenSearch Dashboards, that makes it easy for users to explore their data. OpenSearch and OpenSearch Dashboards were originally derived from Elasticsearch 7.10.2 and Kibana 7.10.2. Like Elasticsearch and Apache Solr, OpenSearch is powered by the Apache Lucene search library.
Announcing Amazon OpenSearch Service
Today, we rename Amazon Elasticsearch Service to Amazon OpenSearch Service because the service now supports OpenSearch 1.0. Although the name has changed, we will continue to deliver the same experiences without any negative impact to ongoing operations, development methodology, or business use.
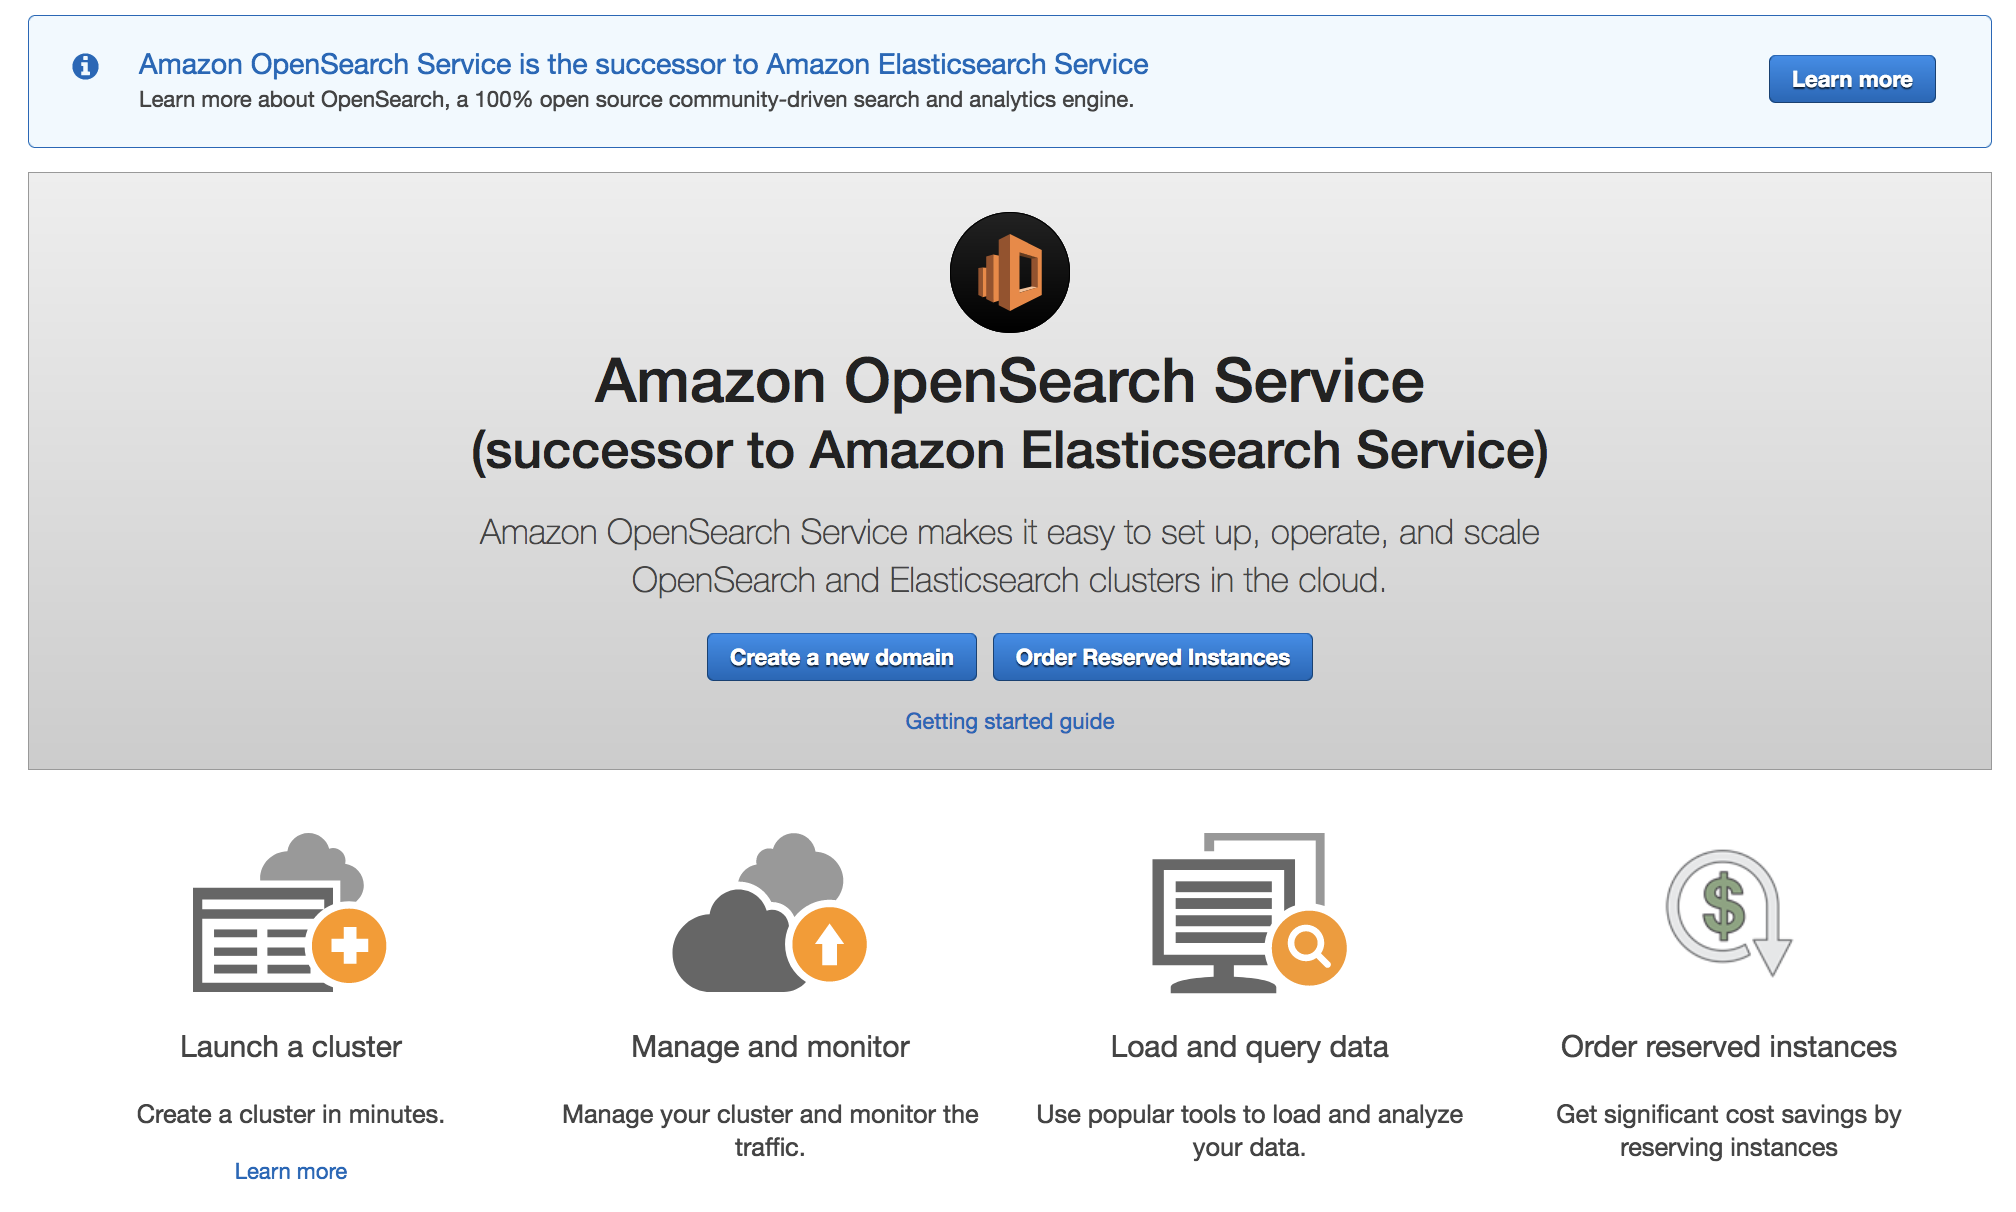
Amazon OpenSearch Service offers a choice of open-source engines to deploy and run, including the currently available 19 versions of ALv2 Elasticsearch 7.10 and earlier and OpenSearch 1.0. We will continue to support and maintain the ALv2 Elasticsearch versions with security and bug fixes. We will deliver all-new features and functionality through OpenSearch and OpenSearch Dashboards. Amazon OpenSearch Service APIs will be backward-compatible with the existing service APIs, so there is no need for you to update your current client code or applications. We will keep clients of OpenSearch compatible with open source.
To get started, in the AWS Management Console, choose Create a domain. In Step 1: Choose deployment type, select OpenSearch 1.0 (latest).
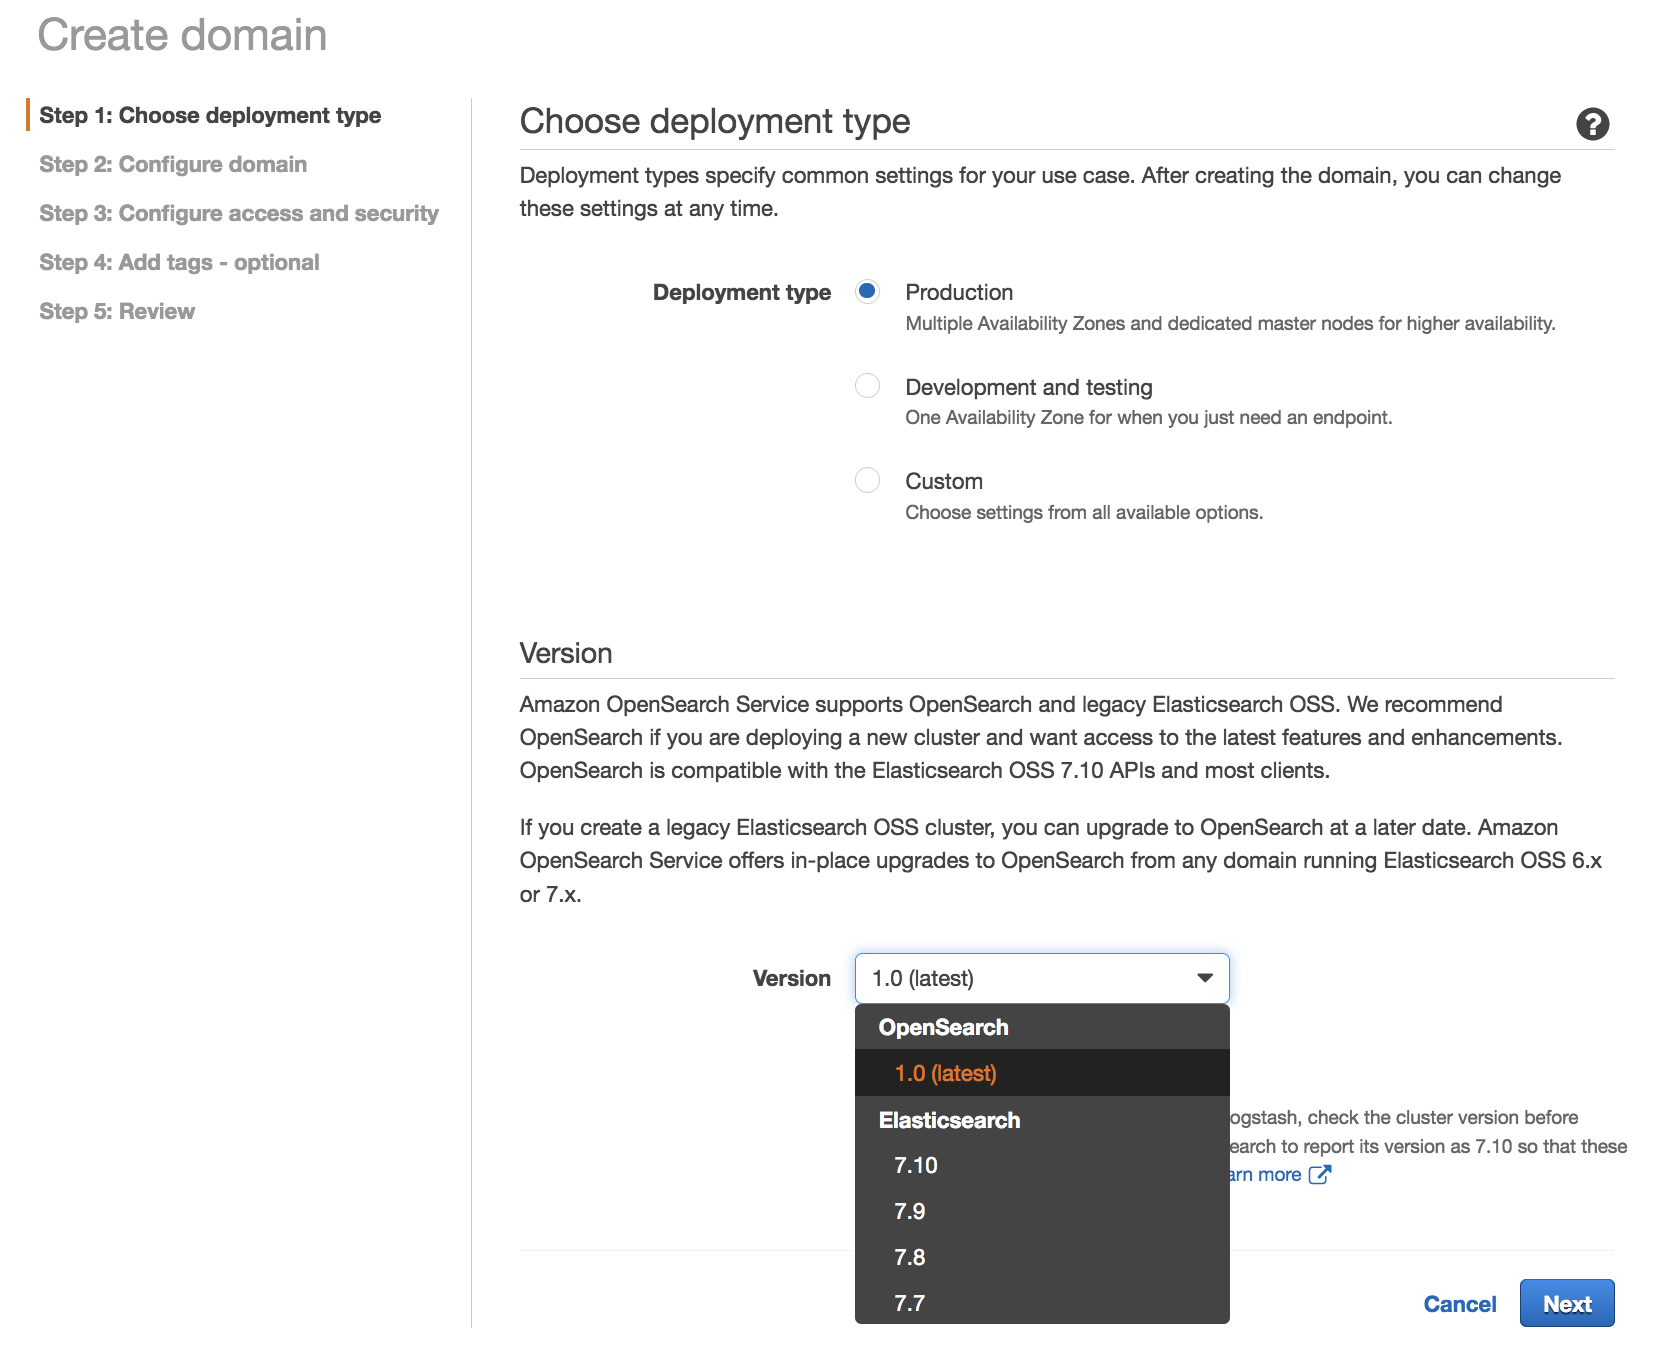
We recommend OpenSearch 1.0 if you are deploying a new cluster and want access to the latest features and enhancements. OpenSearch 1.0 is compatible with the open-source Elasticsearch 7.10 APIs and most clients.
Upgrading to OpenSearch 1.0
Amazon OpenSearch Service offers a seamless in-place upgrade path from existing Elasticsearch 6.x and 7.x managed clusters to OpenSearch. To upgrade a domain to OpenSearch 1.0 in the AWS Management Console, choose the domain that you want to upgrade, choose Actions, and then select Upgrade domain.
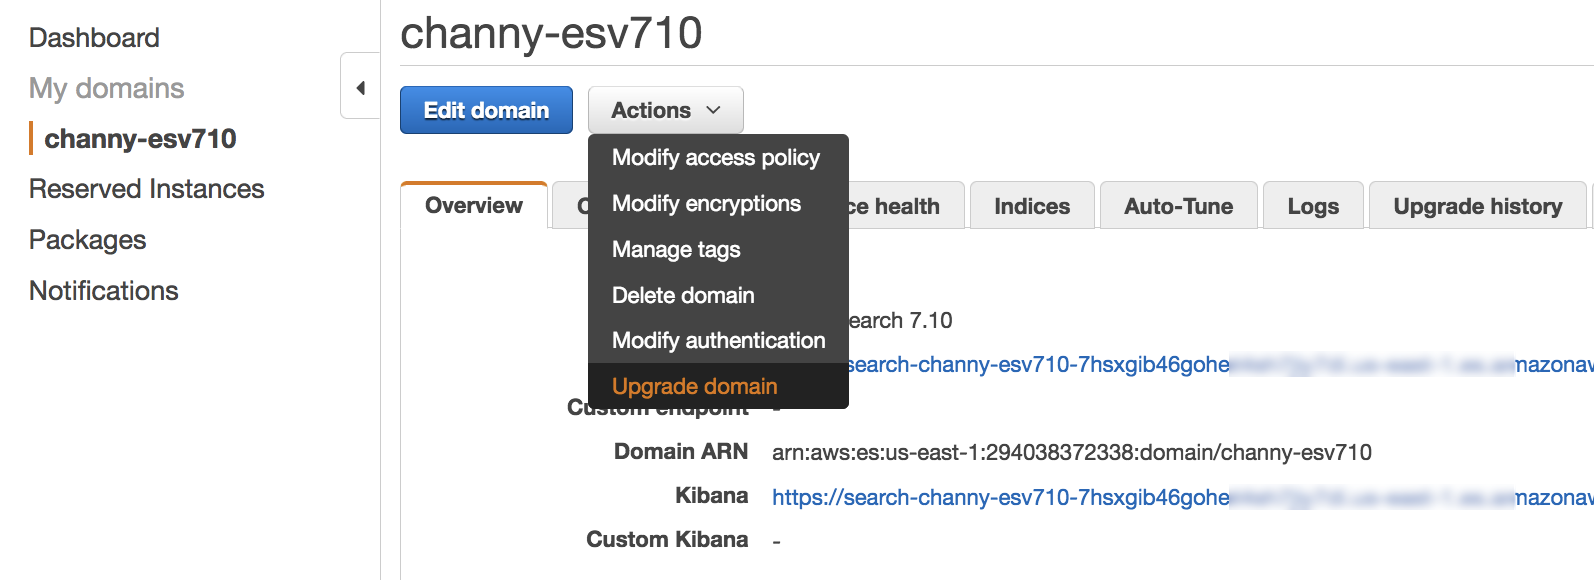
Next, you can select a version to upgrade to OpenSearch 1.0 for your existing domain without creating a separate domain and migrating your data.
The upgrade process is irreversible. It can’t be paused or canceled. During an upgrade, you can’t make configuration changes to the domain. Before you start an upgrade, you can perform the pre-upgrade checks for issues that can block an upgrade and take a snapshot of the cluster by selecting Check upgrade eligibility.
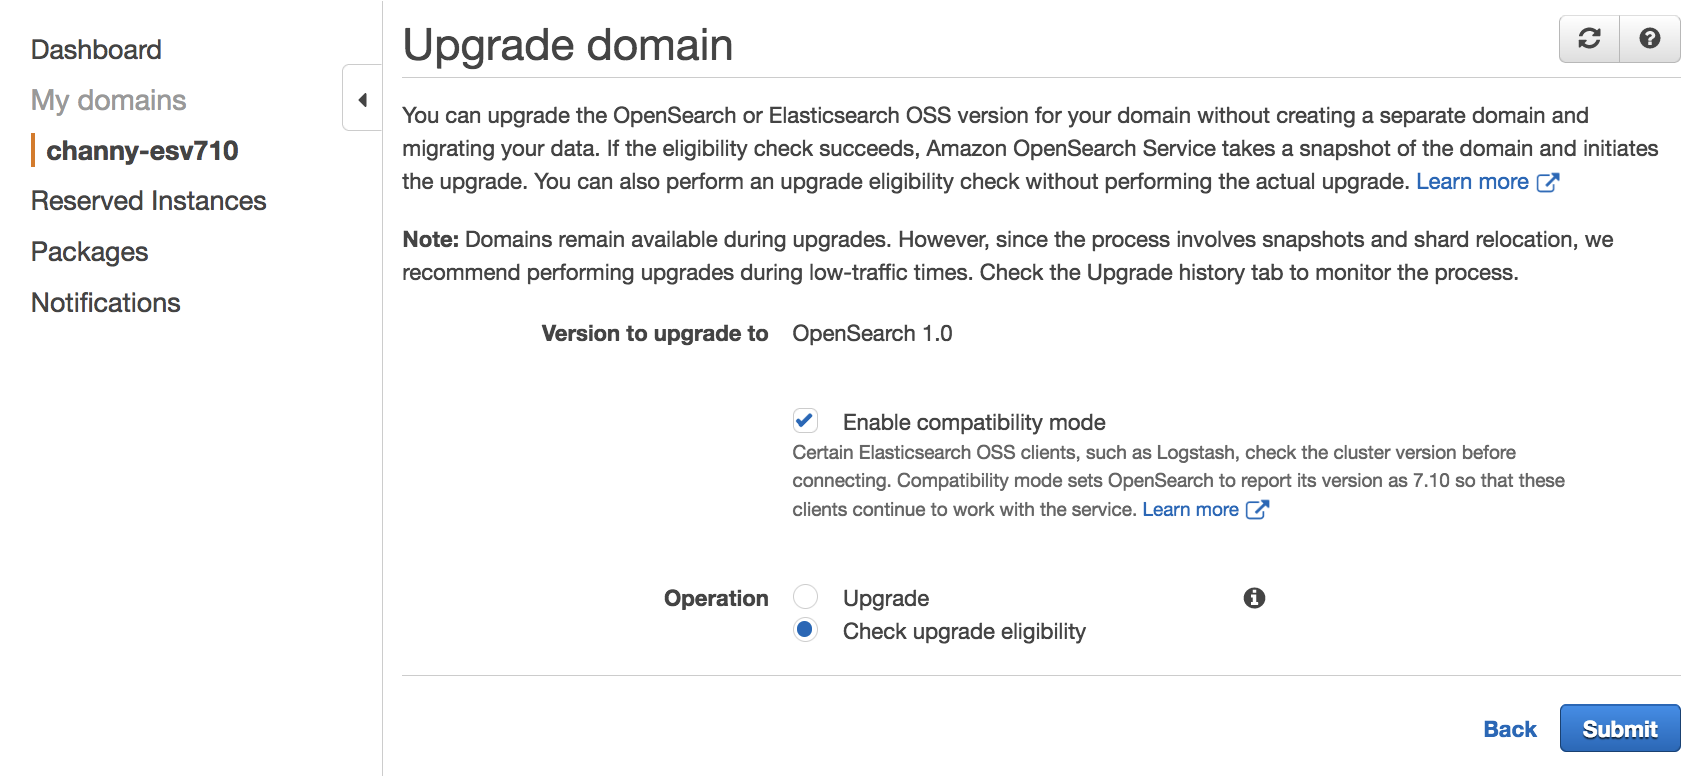
Amazon OpenSearch Services starts the upgrade, which can take from 15 minutes to several hours to complete. To learn more, see Upgrading Elasticsearch and Service Software Updates in Amazon OpenSearch Service Developer Guide.
OpenSearch Features
OpenSearch provides the following features that were not previously available in open-source Elasticsearch.
| Features | Description |
| Advanced Security | Offers encryption, authentication, authorization, and auditing features. They include integrations with Active Directory, LDAP, SAML, Kerberos, JSON web tokens, and more. OpenSearch also provides fine-grained, role-based access control to indices, documents, and fields. |
| SQL Query Syntax | Provides the familiar SQL query syntax. Use aggregations, group by, and where clauses to investigate your data. Read data as JSON documents or CSV tables so you have the flexibility to use the format that works best for you. |
| Reporting | Schedule, export, and share reports from dashboards, saved searches, alerts, and visualizations. |
| Anomaly Detection | Use machine learning anomaly detection based on the Random Cut Forest (RCF) algorithm to automatically detect anomalies as your data is ingested. Combine with alerting to monitor data in near real time and send alert notifications automatically. |
| Index Management | Define custom policies to automate routine index management tasks, such as rollover and delete, apply them to indices and index patterns, and transforms. |
| Performance Analyzer and RCA Framework | Query numerous cluster performance metrics and aggregations. Use PerfTop, the command line interface (CLI) to quickly display and analyze those metrics. Use the root cause analysis (RCA) framework to investigate performance and reliability issues in clusters. |
| Asynchronous Search | Run complex queries without worrying about the query timing out with Asynchronous Search queries running in the background. Track query progress and retrieve partial results as they become available. |
| Trace Analytics | Ingest and visualize OpenTelemetry data for distributed applications. Visualize the flow of events between these applications to identify performance problems. |
| Alerting | Automatically monitor data and send alert notifications to stakeholders. With an intuitive interface and a powerful API, easily set up, manage, and monitor alerts. Craft highly specific alert conditions using OpenSearch’s full query language and scripting capabilities. |
| k-NN search | Using machine learning, run the nearest neighbor search algorithm on billions of documents across thousands of dimensions with the same ease as running any regular OpenSearch query. Use aggregations and filter clauses to further refine similarity search operations. k-NN similarity search powers use cases such as product recommendations, fraud detection, image and video search, related document search, and more. |
| Piped Processing Language | Provides a familiar query syntax with a comprehensive set of commands delimited by pipes (|) to query data. |
| Dashboard Notebooks | Combine dashboards, visualizations, text, and more to provide context and detailed explanations when analyzing data. |
OpenSearch 1.0 supports three new features that are not available in the existing Elasticsearch versions supported on Amazon OpenSearch Service: Transforms, Data Streams, and Notebooks in OpenSearch Dashboards.
To engage with the OpenSearch community, we welcome pull requests through GitHub to fix bugs, improve performance and stability, or add new features. You can leave feedback in the OpenSearch community forum.
Now Available
Starting today, Amazon Elasticsearch Service has been renamed to Amazon OpenSearch Service in all AWS Regions. For more information, see the Amazon OpenSearch Service page.
You can send feedback to the AWS forum for Amazon OpenSearch Service or through your usual AWS Support contacts.
— Channy