Tag Archives: How-to

Out-of-the-box database monitoring

Post Syndicated from Renats Valiahmetovs original https://blog.zabbix.com/out-of-the-box-database-monitoring/13957/

From this post and the video, you’ll learn about the possibilities of database monitoring using out-of-the-box Zabbix functionality without having to install additional tools, additional applications, or additional software that might not be allowed by your company.

Contents

I. Classic ODBC monitoring (0:22)

II. Synthetic MySQL monitoring (11:13)
III. DB monitoring with Zabbix Agent 2 (13:48)

IV. LLD for DB monitoring (17:03)

V. Questions & Answers (21:09)

Classic ODBC monitoring

What is ODBC?

ODBC stands for open database connectivity. There are a couple of ODBC drivers available for different database management systems (DBMS):

    • Oracle,
    • PostgreSQL,
    • MySQL,
    • Microsoft SQL Server,
    • Sybase ASE,
    • SAP HANA,
    • DB2.

All of these databases have different ODBCs specifically tailored for them. They offer slightly different functionality. So, even if you have set up the database monitoring for one database it might not necessarily work just as good for the other, as the functionality used to monitor one database might not exist for the other. In addition, as different technologies have different capabilities, most ODBC drivers do not implement all functionality defined in the ODBC standard.

What to monitor?

When we are planning to use ODBC for monitoring, what kind of data we can expect to receive? The answer ultimately depends on your own preferences, needs, or your proficiency in a specific database. You can monitor any possible database performance metrics and incidents using Zabbix templates.

Generally, monitoring of the following areas is of interest:

    • database performance
    • engine availability
    • configuration changes that you need to be aware of

To make the process easier, we provide ready-to-use templates, which can be applied to a host where your database is deployed. You can browse a full list of available metrics in these templates’ descriptions. So, you don’t have to perform configuration completely from scratch, which is good news.

How does it work?

Without diving too deep into the transport layer and all of the technical details, the ODBC driver accesses the database over the network using the database API. So, there is no direct connection between Zabbix and the database. Zabbix only creates a query passed to the ODBC manager for processing, which then moves the request over to the ODBC driver that connects to the database management system and then executes the query. Here, Zabbix does not limit the query execution timeout, and the timeout parameter is used as the ODBC login timeout.

Chain of processes

ODBC configuration is based on two files:

  • odbc.ini — holds a list of installed ODBC database drivers, which are used for specific communication.
  • odbcinst.ini — holds the definitions of data sources so that we know to which database we are going to connect.

Where to start?

What do we need to do in order to start using this ODBC monitoring approach?

  1. First, we will need to install the ODBC driver relevant to the database we are going to monitor. A simple yum command will suffice if we’re working with CentOS.
# yum -y install unixODBC unixODBC-devel
  1. Then we need to specify the package (driver) we want to install and modify the ODBC driver files.
  • odbc.ini:
[root@localhost ~]# cat /etc/odbc.ini
[MySQL]
Description=NewDatabase
Driver=MariaDB
Server=localhost
User=root
Password=VerySecurePassword
Port=3306
Database=DatabaseName
  • odbcinst.ini:
[root@localhost ~]# cat /etc/odbcinst.ini
[MySQL]
Description=ODBC for MySQL
Driver=/usr/lib/libmyodbc5.so
Setup=/usr/lib/libodbcmyS.so
Driver64=/usr/lib64/libmyodbc8a.so
Setup64=/usr/lib64/libmyodbc8a.so
FileUsage=1

Then we need to populate them with the necessary information. So, in this case, DSN (data source name) is used to call a specific connection. We need to get this part correctly, otherwise, the connection will not work out, for instance, in case of a typo.

  1. After we have installed the ODBC driver and configured the configuration files, we don’t really need to go ahead into Zabbix to create a new item and see if it works. We can test the ODBC configuration using isql to connect or at least attempt to connect to a particular database using the specified configuration.

Using isql to test ODBC configuration

If we receive an output that you have been connected then the communication is correct. You can also execute a sort of query, for instance, select some information from the database. If you get the result, then you do have the necessary permissions to access that data, and the connection, that is the ODBC driver, is working fine. Then you can proceed to the frontend.

  1. In the frontend, we will need to create an item of the ‘Database monitor’ type on a particular host or a template and specify one of the two keys available for ODBC monitoring: db.odbc.select or db.odbc.get.

Creating ‘Database monitor’ item

The difference between these item keys is pretty simple — select will return only one value and get will return values in bulk. So, get is more efficient and allows for reducing the load on the database if we are working with a lot of data. Within the key parameters, we need to specify the same DSN that we have defined in our odbc.ini file.

We need to make sure that the first parameter is unique so that this particular item key is unique and does not duplicate anything else, and the second parameter is the DSN.

  1. After we have specified everything, we specify the query, which is a part of the item configuration.
  2. We test the item using the test form in the Zabbix frontend. If the test form returns a value or does not return an error message, then everything is fine and we can proceed with this item or create more items.

Testing the item

ODBC templates

  1. There are a couple of built-in templates. If the metrics obtained through these templates are sufficient, we obviously don’t need to create these items from scratch or configure them. We can simply assign the templates we need to the host, on which we are monitoring the database. All we need to do is to tweak a little, if necessary, modify the macro related to the DSN, and then start monitoring.

Assigning a template

NOTE. The easiest way to get the templates is to upgrade to the latest Zabbix with our official templates already built in. If you don’t have the needed templates for any reason, you can download them from Zabbix official repository or Zabbix integrations. If you still need a specific template, you can definitely check out the community-created templates.

  1. Finally, we can execute discovery rules:

and check the Latest data:

Synthetic MySQL monitoring

Synthetic MySQL monitoring approach is using capabilities of the Zabbix Agent. Though that is not something that Zabbix Agent is doing out of the box, still we don’t need to install anything or perform some super difficult manipulations to make it work as it is a part of Zabbix functionality.

As you might already know, the Zabbix Agent functionality can be extended using custom UserParameters and then used for database monitoring.

  1. So, we can create new UserParameters, which invoke native MySQL administration client commands providing output, which can then be used to calculate performance metrics.
UserParameter=mysql.ping[*], mysqladmin -h"$1" -P"$2" ping
UserParameter=mysql.get_status_variables[*], mysql -h"$1" -P"$2" -sNX -e "show
global status"
UserParameter=mysql.version[*], mysqladmin -s -h"$1" -P"$2" version
UserParameter=mysql.db.discovery[*], mysql -h"$1" -P"$2" -sN -e "show
databases"
  1. It is a good practice to test the commands themselves to make sure that they work and to test the UserParameter keys, for instance using the zabbix_get utility.
  2. Then you might want to use our official MySQL monitoring template by creating an additional file .my.cnf under /var/lib/zabbix (default location) as follows:
[client] 
user='zbx_monitor' 
password='<password>'
  1. Then we need to provide credentials for the user to confirm that the user has the necessary permissions to access the database.
  2. If everything is working, assign MySQL by Zabbix agent template.

In this case, we are not actually logging in to the database. We execute commands from the terminal by using Zabbix Agent and extending the functionality beyond the built-in functions.

DB monitoring with Zabbix Agent 2

Why Zabbix Agent 2?

What are the benefits of Zabbix Agent 2 in relation to database monitoring?

  • Zabbix Agent 2 is the improved version of our original Zabbix Agent, which is now written in Go.
  • Zabbix Agent 2 is more efficient and supports some new functions that Zabbix Agent 1 does not, for instance, custom intervals with active checks as Zabbix Agent 2 is using the Scheduler plugin and is capable of keeping track of time when certain checks need to be executed;
  • Older configuration is also supported. So, if we switch from Zabbix Agent 1 to Zabbix Agent 2, we do not need to rewrite the whole configuration file in order for Zabbix Agent 2 to work.
  • Zabbix Agent 2 is installed simply with one-line command just like Zabbix Agent 1, we need just to specify a different package.
# yum -y install zabbix-agent2
  • Zabbix Agent 2 is based on plugins, so you do not need to install it with ODBC drivers, as plugins do the work, or anything extra as Zabbix Agent 2 has out-of-the-box database-specific plugins to monitor your database, including MySQL, Oracle, and PostgreSQL.
  • Plugins are also written in Go.
  • We have created Zabbix Agent 2-specific templates, which we can assign to the host. So, if you decide to use Zabbix Agent 2, you need to perform even fewer manipulations in order to get your database monitored by Zabbix.

Built-in Zabbix Agent 2 templates

Configuration

The configuration is very simple. We need to decide whether we specify the necessary parameters within the item keys or, if we prefer named sessions, we edit the configuration file of Zabbix Agent 2 to define those and use the session name as the first parameter of the key.

  1. So, we specify the key according to the documentation page. In the first case, we can specify essentially the location of our database and provide the credentials.

In the second case, we simply need to provide the DSN in order to connect to the database using Zabbix Agent 2 built-in plugins.

Plugins.Mysql.Sessions.Prod.Uri=tcp://192.168.1.1:3306

Plugins.Mysql.Sessions.Prod.User=<UserForProd>

Plugins.Mysql.Sessions.Prod.Password=<PasswordForProd>
  1. After we have created these items or applied a template, we can definitely test them out and see whether they are working fine.

NOTE. Check available MySQL-related item keys documentation page.

LLD for DB monitoring

Why LLD?

Finally, you can definitely use low-level discovery for database monitoring. LLD is a very efficient and powerful tool within Zabbix. You can definitely use either built-in discovery keys, which utilize Zabbix Agent, or other sources such as custom scripts to pass the payload to your low-level discovery rule.

LLD:

    • Automatically creates items, triggers, and graphs from different entities on a host.
    • Parses data received in Zabbix-specific JSON format.
    • Different sources for LLD can be used, such as:
      • Built-in discovery keys,
      • Dependent on a built-in item key,
      • Dependent on a custom script/custom UserParameter.

Here we have a script providing our JSON-formatted payload, which is sent by the Data sender Zabbix utility to the Master trapper item within our Zabbix instance, while our LLD rule depends on this particular Master trapper item.

So, we just populate this trapper item with the JSON payload, LLD rule creates new entities based on the prototypes, and then the items created by those prototypes are collecting the data from that master trapper item each time a new payload comes in.

How to configure custom LLD?

In general, to create LLD from scratch:

  1. First, you will need to decide on the actual payload delivery method (Zabbix Agent, script, Zabbix sender, or UserParameter).
  2. Make sure that your payload is in JSON that is structurally sound so that Zabbix can accept and parse it.
[{"{#DATABASE}":"information_schema"},{"{#DATABASE}":"mysql"},{"{#DATABASE}":"p erformance_schema"},{"{#DATABASE}":"sys"},{"{#DATABASE}":"zabbix"}]
  1. Create LLD rule with type according to delivery method.
  2. Test the rule (if available for passive checks) to see JSON you receive.
  3. Create filters or overrides, if necessary.
  4. Create prototypes, based on which your entities will be created.

If we don’t want to create LLD rules from scratch, we can definitely modify the built-in templates without wasting time creating custom LLD rules:

    • Modify/create new entities;
    • Clone the templates;
    • Refer to templated discovery rule configuration.

Modifying LLD rules of official templates

Questions & Answers

Question. Can we monitor the database using active checks or passive checks?

Answer. As I have mentioned, everything depends on your preferences and, ultimately, on the way you want to pass this output to Zabbix Server. If we’re talking about active checks, you can utilize Zabbix sender, for instance. So, it will be a trapper item on the Zabbix Server side waiting for data. In case of passive checks, we can use Zabbix Agent. So, we can use both types of checks for database monitoring.

Question. Can we establish a secure connection between the ODBC gateway and the database, which is somewhere on a distant machine?

Answer. Yes, this can be done though it does require a little bit of finesse. It is an extensive topic, and the security of the connection is highly dependent on the driver, which should support a secure connection. Some older databases might not have this functionality.

Question. Are ODBC checks influencing the performance of the master server?

Answer. It depends on what kind of data you are collecting. If you have a lot of items utilizing db.odbc.get item key, which retrieves just one value from the database, this might impact your database performance. You might not notice this impact if your hardware is powerful enough. However, it is advisable to use the odbc.select key in order to collect this information in bulk. Otherwise, you might be locking up some entries within your database that could potentially lead to problems.

Question. So, we provide two solutions with one of them using ODBC agentless checks ODBC. In addition, we have the agent tool. Will you briefly describe the advantages of ODBC and Agent checks?

Answer. If we’re talking about the ODBC database monitoring method, the most obvious difference is that you don’t need to install an agent. From the data collection perspective, there is not much difference. Everything depends on your specific needs.


MySQL performance tuning 101 for Zabbix

Post Syndicated from Vittorio Cioe original https://blog.zabbix.com/mysql-performance-tuning-101-for-zabbix/13899/

In this post and the video, you will learn about a proper approach to getting the most out of Zabbix and optimizing the underlying MySQL Database configuration to improve performance while working with a database-intensive application such as Zabbix.

Contents

I. Zabbix and MySQL (1:12)
II. Optimizing MySQL for Zabbix (2:09)

III. Conclusion (15:43)

Zabbix and MySQL

Zabbix and MySQL love each other. Half of the Zabbix installations are running on MySQL. However, Zabbix is quite a write-intensive application, so we need to optimize the database configuration and usage to work smoothly with Zabbix that reads the database and writes to the database a lot.

Optimizing MySQL for Zabbix

Balancing the load on several disks

So, how can we optimize MySQL configuration to work with Zabbix? First of all, it is very important to balance the load on several hard drives by using:

    • datadir to specify the default location, that is to dedicate the hard drives to the data directory;
    • datadir innodb_data_file_path to define size, and attributes of InnoDB system tablespace data files;
    • innodb_undo_directory to specify the path to the InnoDB undo tablespaces;
    • innodb_log_group_home_dir to specify the path to the InnoDB redo log files;
    • log-bin to enable binary logging and set path/file name prefix (dual functionality); and
    • tmpdir (Random, SSD, tmpfs).

The key here is to split the load as much as possible across different hard drives in order to avoid different operations fighting for resources.

Viewing your MySQL configuration

Now, we can jump straight to MySQL configuration. It is important to start from your current configuration and check who and when has changed this configuration.

SELECT t1.*, VARIABLE_VALUE FROM performance_schema.variables_info t1 JOIN
performance_schema.global_variables t2 ON t2.VARIABLE_NAME=t1.VARIABLE_NAME WHERE
t1.VARIABLE_SOURCE not like "COMPILED"

This query can help you to understand who has changed the configuration. However, when the configuration is changing is also important to keep track of these changes.

Viewing MySQL configuration

MySQL key variables to optimize in your configuration

InnoDB buffer pool

The king of all of the variables to be optimized is InnoDB buffer pool, which is the main parameter determining the memory for storing the DB pages — MySQL buffer pool — an area in main memory MySQL where InnoDB caches table and index data as it is accessed.

  • InnoDB default value is to log, for production 50-75% of available memory on the dedicated database server.
  • Since MySQL 5.7, innodb_buffer_pool_size can be changed dynamically.

Judging from experience, 50 percent of available memory will be enough for the majority of databases with a lot of connections or activities, as many other indicators are used, which occupy memory. So, 50 percent is a good though conservative parameter.

To check InnoDB Buffer Pool usage (in %) and if you need to allocate more memory for the InnoDB Buffer Pool, you can use the query, which allows you to see the current usage as a percentage (though there are many queries to monitor the InnoDB Buffer Pool).

SELECT CONCAT(FORMAT(DataPages*100.0/TotalPages,2),
' %') BufferPoolDataPercentage
FROM (SELECT variable_value DataPages FROM information_schema.global_status
WHERE variable_name = 'Innodb_buffer_pool_pages_data') A,
(SELECT variable_value TotalPages FROM information_schema.global_status
WHERE variable_name = 'Innodb_buffer_pool_pages_total') B;

Binary logs

Binary logs contain events that describe changes, provide data changes sent to replicas, and are used for data recovery operations.

If you work with replication, you might know that binary logs require special attention apart from having them on a separate disk. You should size the binary logs properly, set the proper expiration time (1 month by default), and the maximum size, for instance, of 1 GB so that you will be able to write 1 GB of data per day.

We can have about 30 log files in the binary logs. However, you should check the activities of your system to consider increasing this number, as well as the expiration of the binary logs, if you need to keep more data for operations, such as finding time recovery, for instance.

How to control binary logs:

    • log_bin, max_binlog_size, binlog_expire_logs_seconds, etc.
    • PURGE BINARY LOGS TO|BEFORE to delete all the binary log files listed in the log index file prior to the specified log file name or date.
    • In addition, consider using GTID for replication to keep track of transactions.

InnoDB redo logs

This is yet another beast, which we want to keep control of — the redo and undo logs, which get written prior to flushing the data to the disk.

    • innodb_log_file_size

– The size of redo logs will impact the writing speed over the time to recover.
– The default value is too low, so consider using at least 512 MB for production.
– Total redo log capacity is determined by innodb_log_files_in_group (default value 2). For write-intensive systems, consider increasing innodb_log_files_in_group and keeping them on in a separate disk.

NOTE. Here, the related parameters are innodb_log_file_size and innodb_log_files_in_group.

Trading performance over consistency (ACID)

Associated with the redo and undo log discussion is the trading performance over consistency discussion about when InnoDB should flush/sync committed truncations.

innodb_flush_log_at_trx_commit defines how ofter InnoDB flushes the logs to the disk. This variable can have different values:

    • 0 — transactions are written to redo logs once per second;
    • 1 — (default value) fully ACID-compliant with redo logs written and flushed to disk at transaction commit;
    • 2 — transactions are written to redo logs at commit, and redo logs are flushed once per second.

If the system is write-intensive, you might consider setting this value to 2 to keep redo logs at every commit with the data written to disk once per second. This is a very good compromise between data integrity and performance successfully used in a number of write-intensive setups. This is a relief for the disk subsystem allowing you to gain that extra performance.

NOTE. I recommend using default (1) settings unless you are bulk-loading data, set session variable to 2 during load, experiencing an unforeseen peak in workload (hitting your disk system) and need to survive until you can
solve the problem, or you use the latest MySQL 8.0. You can also disable redo-logging completely. 

table_open_cache and max_connections

Opening the cache discussions, we will start from the max_connections parameter, which sets the maximum number of connections that we want to accept on the MySQL server, and the table_open_cache parameter, which sets the value of the cache of open tables we want to keep. Both parameters affect the maximum number of files the server keeps open:

    • table_open_cache value — 2,000 (default), which means that by default you can keep 2,000 tables open per connection.
    • max_connections value — 151 (default).

If you increase both values too much, you may easily run out of memory. So, the total number of open tables in MySQL is:

N of opened tables = N of connections x N (max number of tables per join)

NOTE. This number is related to the joins operated by your database per connection.

So, having an insight into what Zabbix does and which queries it executes can help you fine-tune this parameter. In addition, you can go by the rule of thumb checking if the table_open_cache sheets are full. To do that, you can check the global status like ‘opened_tables‘ to understand what is going on.

In addition, if you are going to increase the table up and cache on the maximum number of connections, you can check open_files_limit in MySQL and ulimit — the maximum number of open files in the operating system, as new connections are kept as open files in Linux. So, this is a parameter to fine-tune as well.

Open buffers per client connection

There are other buffers that depend on the number of connections (max_connections), such as:

    • read_buffer_size,
    • read_rnd_buffer_size,
    • join_buffer_size,
    • sort_buffer_size,
    • binlog_cache_size (if binary logging is enabled),
    • net_buffer_length.

Depending on how often you get connections to the Zabbix database, you might want to increase these parameters. It is recommended to monitor your database to see how these buffers are being filled up.

You also need to reserve some extra memory for these buffers if you have many connections. That is why it is recommended to reserve 50 percent of available memory for InnoDB buffer pool, so that you can use these spare 25 percent for extra buffers.

However, there might be another solution.

Enabling Automatic Configuration for a Dedicated MySQL Server

In MySQL 8.0, innodb_dedicated_server automatically configures the following variables:

    • innodb_buffer_pool_size,
    • innodb_log_file_size,
    • innodb_log_files_in_group, and
    • innodb_flush_method.

I would enable this variable as it configures the innodb_flush_ method which has a dependency with the file system.

NOTE. Enabling innodb_dedicated_server is not recommended if the MySQL instance shares system resources with other applications, as this variable enabled implicitly means that we are running only MySQL on the machine.

Conclusion

Now, you are ready to fine-tune your configuration step by step, starting from innodb_buffer_pool, max_connections, and table_open_cache, and see if your performance improves. Eventually, you can do further analysis and go further to really fine-tune your system up to your needs.

In general, 3-5 core parameters would be enough for operating with Zabbix in the vast majority of cases. If you tune those parameters keeping in mind dealing with a write-intensive application, you can achieve good results, especially if you separate the resources at a hardware level or at a VM level.

Performance tuning dos and don’ts

  • For a high-level performance tuning 101, think carefully and consider the whole stack together with the application.
  • In addition, think methodically:
    1. define what you are trying to solve, starting from the core of variables, which you want to fine-tune;
    2. argue why the proposed change will work;
    3. create an action plan; and
    4. verify the change worked.
  • To make things work:

— don’t micromanage;
— do not optimize too much;
— do not optimize everything; and, most importantly,
— do not take best practices as gospel truth, but try to adjust any practices to your particular environment.


Low-Level Discovery with Dependent items

Post Syndicated from Brian van Baekel original https://blog.zabbix.com/low-level-discovery-with-dependent-items/13634/

The low-level discovery was introduced in Zabbix 2.0 and still belongs to one of the all-time favorites. Before LLD was available, adding items was all manual work. For example adding new disks, new interfaces, network ports on switches and everything else was all manual labor. And then LLD came around and suddenly we were able to ‘discover’ entities, and based on those discovered entities we can add new items, triggers, and such automatically.

Contents

  • Low-Level Discovery setup
  • Dependent items
  • Combing Low-Level Discovery and Dependent items
  • Conclusion

For a video guide, check out the Zabbix YouTube here: Zabbix: Low Level Discovery with Dependent items – YouTube

Low-Level Discovery setup

Let’s go over the idea of Low-Level Discovery first.

For the sake of clarity, we will stick with the default Zabbix agent item. Of course, as we will discover it’s only the format that matters for Zabbix to consider a response as LLD information. Let’s use built-in agent key: vfs.fs.discovery. Once we force the Zabbix agent to execute this item, it will reply with something like this:

[{"{#FSNAME}":"/sys","{#FSTYPE}":"sysfs"},{"{#FSNAME}":"/proc","{#FSTYPE}":"proc"},{"{#FSNAME}":"/dev","{#FSTYPE}":"devtmpfs"},{"{#FSNAME}":"/sys/kernel/security","{#FSTYPE}":"securityfs"},{"{#FSNAME}":"/dev/shm","{#FSTYPE}":"tmpfs"},{"{#FSNAME}":"/dev/pts","{#FSTYPE}":"devpts"},{"{#FSNAME}":"/run","{#FSTYPE}":"tmpfs"},{"{#FSNAME}":"/sys/fs/cgroup","{#FSTYPE}":"tmpfs"},{"{#FSNAME}":"/sys/fs/cgroup/systemd","{#FSTYPE}":"cgroup"},{"{#FSNAME}":"/sys/fs/pstore","{#FSTYPE}":"pstore"},{"{#FSNAME}":"/sys/firmware/efi/efivars","{#FSTYPE}":"efivarfs"},{"{#FSNAME}":"/sys/fs/bpf","{#FSTYPE}":"bpf"},{"{#FSNAME}":"/sys/fs/cgroup/net_cls,net_prio","{#FSTYPE}":"cgroup"},{"{#FSNAME}":"/sys/fs/cgroup/devices","{#FSTYPE}":"cgroup"},{"{#FSNAME}":"/sys/fs/cgroup/hugetlb","{#FSTYPE}":"cgroup"},{"{#FSNAME}":"/sys/fs/cgroup/memory","{#FSTYPE}":"cgroup"},{"{#FSNAME}":"/sys/fs/cgroup/rdma","{#FSTYPE}":"cgroup"},{"{#FSNAME}":"/sys/fs/cgroup/freezer","{#FSTYPE}":"cgroup"},{"{#FSNAME}":"/sys/fs/cgroup/cpu,cpuacct","{#FSTYPE}":"cgroup"},{"{#FSNAME}":"/sys/fs/cgroup/cpuset","{#FSTYPE}":"cgroup"},{"{#FSNAME}":"/sys/fs/cgroup/perf_event","{#FSTYPE}":"cgroup"},{"{#FSNAME}":"/sys/fs/cgroup/blkio","{#FSTYPE}":"cgroup"},{"{#FSNAME}":"/sys/fs/cgroup/pids","{#FSTYPE}":"cgroup"},{"{#FSNAME}":"/sys/kernel/tracing","{#FSTYPE}":"tracefs"},{"{#FSNAME}":"/sys/kernel/config","{#FSTYPE}":"configfs"},{"{#FSNAME}":"/","{#FSTYPE}":"xfs"},{"{#FSNAME}":"/sys/fs/selinux","{#FSTYPE}":"selinuxfs"},{"{#FSNAME}":"/proc/sys/fs/binfmt_misc","{#FSTYPE}":"autofs"},{"{#FSNAME}":"/dev/hugepages","{#FSTYPE}":"hugetlbfs"},{"{#FSNAME}":"/dev/mqueue","{#FSTYPE}":"mqueue"},{"{#FSNAME}":"/sys/kernel/debug","{#FSTYPE}":"debugfs"},{"{#FSNAME}":"/sys/fs/fuse/connections","{#FSTYPE}":"fusectl"},{"{#FSNAME}":"/boot","{#FSTYPE}":"ext4"},{"{#FSNAME}":"/boot/efi","{#FSTYPE}":"vfat"},{"{#FSNAME}":"/home","{#FSTYPE}":"xfs"},{"{#FSNAME}":"/run/user/0","{#FSTYPE}":"tmpfs"}]

When we put this in a more readable format (truncated) it will look like this:

[
{
"{#FSNAME}":"/sys",
"{#FSTYPE}":"sysfs"
},
{
"{#FSNAME}":"/proc",
"{#FSTYPE}":"proc"
},
{
"{#FSNAME}":"/dev",
"{#FSTYPE}":"devtmpfs"
},
{
"{#FSNAME}":"/sys/kernel/config",
"{#FSTYPE}":"configfs"
},
{
"{#FSNAME}":"/",
"{#FSTYPE}":"xfs"
},
{
"{#FSNAME}":"/boot",
"{#FSTYPE}":"ext4"
},
{
"{#FSNAME}":"/home",
"{#FSTYPE}":"xfs"
}
]

In this format it suddenly becomes clear, we have the {#FSNAME} macro, with the name of a filesystem, combined with the type, captured in {#FSTYPE}.

Perfect! We feed this information into Zabbix, and LLD magic will happen.
Based on the Item prototypes, new items per {#FSNAME} will be added, and monitoring will start on those items.

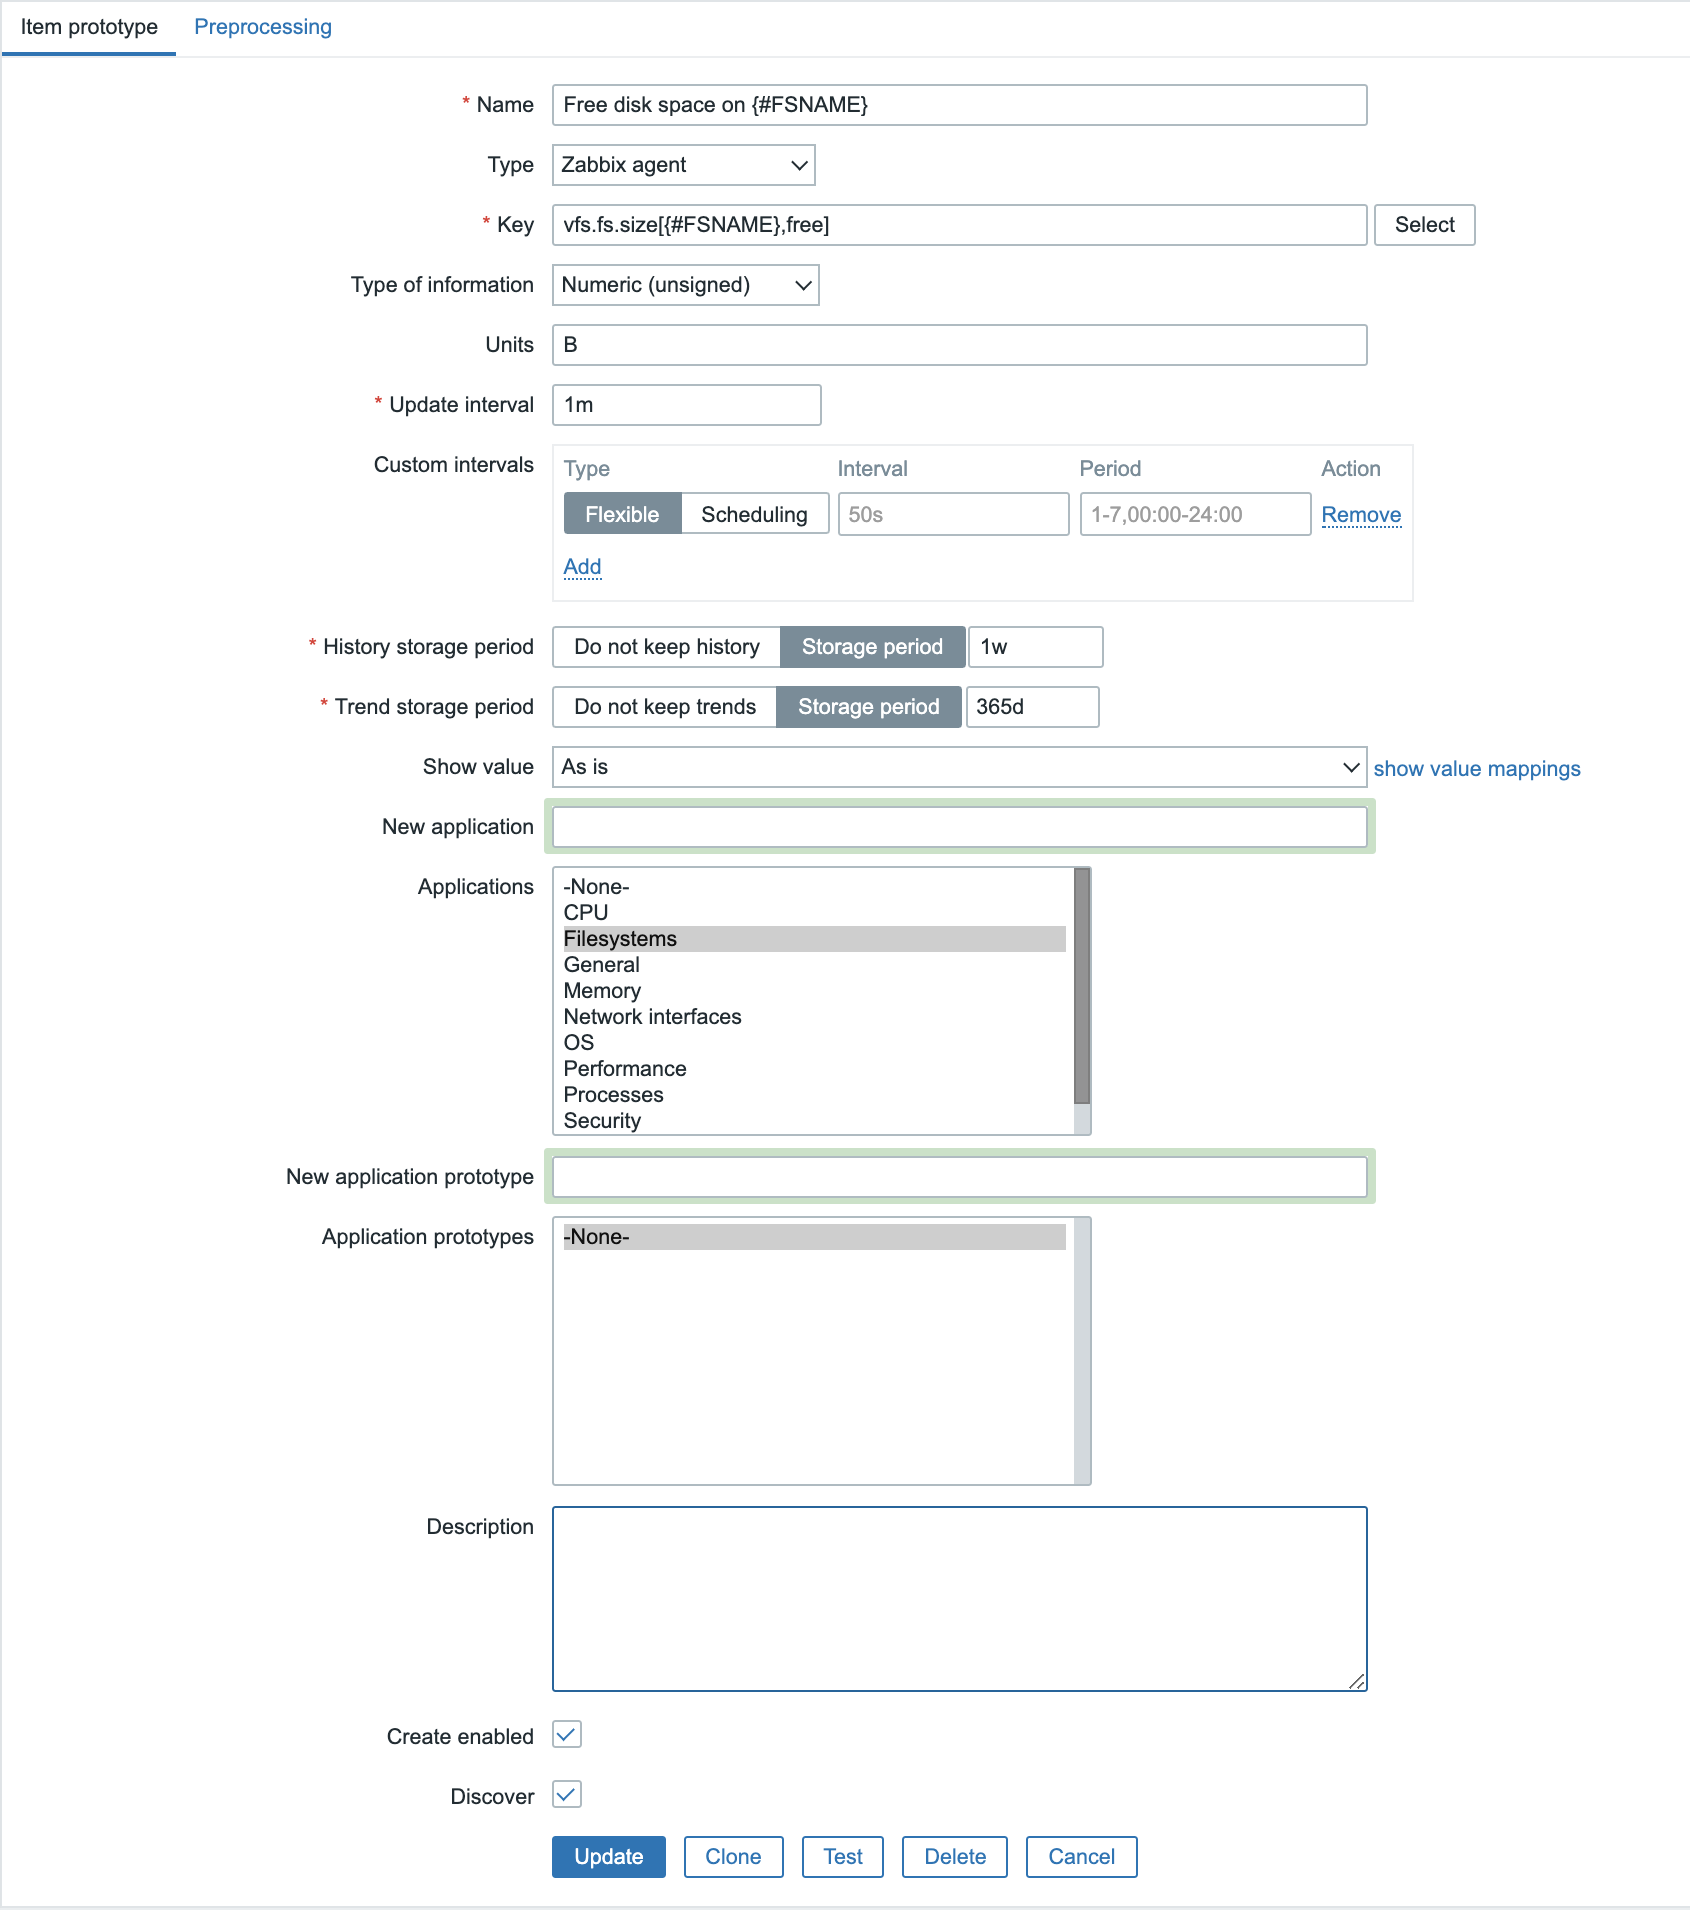
Looking at the Item prototypes, they look a lot like normal items:

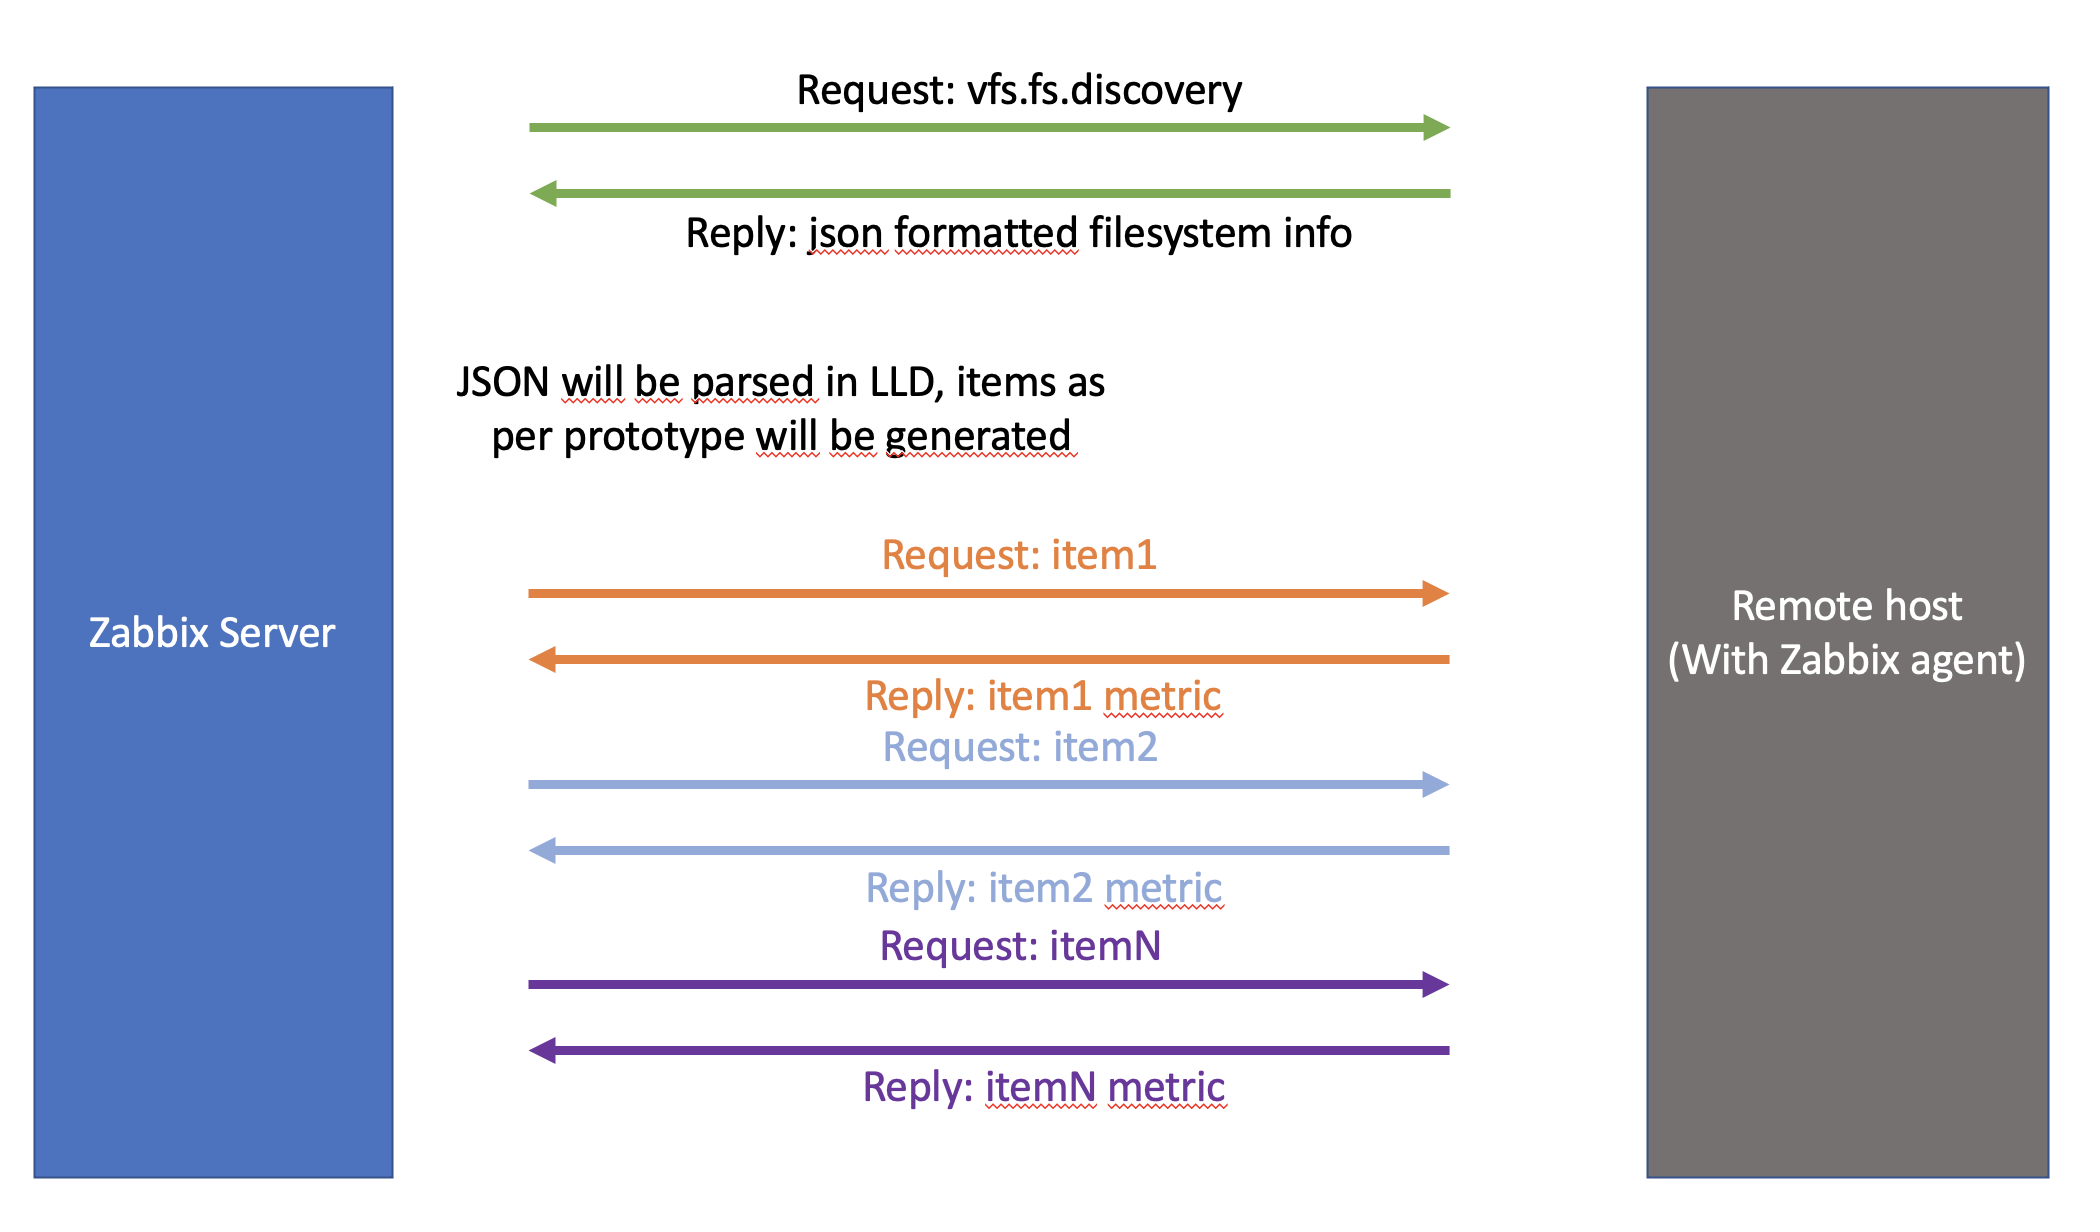
So, we have one item prototype that is responsible for providing the LLD information, and then the created ‘normal’ items to query the filesystem statistics. As you can imagine, with just 5 filesystems and 1 metric per filesystem, queried once per minute, no problem. But what if we have 50 filesystems, 7 metrics per filesystem and they get queried every 10 seconds… That’s a lot of queries against the host! Not only does that add load to the Zabbix server, but obviously also to the monitored host. It works, but is it ideal? It certainly isn’t!

So we’ve basically just setup this:

Dependent items

But then Zabbix introduced dependent items. Let’s take a quick look at dependent items and what they are

We have one master item that gathers all information (in bulk) and propagates that information to all the dependent items. On those dependent items we just do the cherry picking and filtering of the relevant metrics. Let’s put this to work and see how that goes.

So we create an item, with, in this case, the http agent type, which will collect the following information regarding the server status in a single request:

ServerVersion: Apache/2.4.37 (centos)
ServerMPM: event
Server Built: Nov  4 2020 03:20:37
CurrentTime: Monday, 08-Mar-2021 14:35:20 CET
RestartTime: Monday, 08-Mar-2021 11:04:09 CET
ParentServerConfigGeneration: 1
ParentServerMPMGeneration: 0
ServerUptimeSeconds: 12671
ServerUptime: 3 hours 31 minutes 11 seconds
Load1: 0.01
Load5: 0.03
Load15: 0.00
Total Accesses: 1182
Total kBytes: 10829
Total Duration: 95552
CPUUser: 5.01
CPUSystem: 7.34
CPUChildrenUser: 0
CPUChildrenSystem: 0
CPULoad: .0974667
Uptime: 12671
ReqPerSec: .0932839
BytesPerSec: 875.14
BytesPerReq: 9381.47
DurationPerReq: 80.8393
BusyWorkers: 1
IdleWorkers: 99
Processes: 4
Stopping: 0
BusyWorkers: 1
IdleWorkers: 99
ConnsTotal: 4
ConnsAsyncWriting: 0
ConnsAsyncKeepAlive: 0
ConnsAsyncClosing: 0
Scoreboard: _________________________________________________________________________________________W__________............................................................................................................................................................................................................................................................................................................


Now, we create some dependent items, that depend on that first item (which we will call the Master item). Every time the Master item receives information, the complete reply will be pushed to the dependent items, without any altering of that data. So the master and dependent items are identical when no preprocessing is applied. That’s why on the dependent items we apply preprocessing to filter relevant information, for example, the BusyWorkers:

Perfect. So querying a host once, getting all the metrics in bulk, and then parsing it in Zabbix using preprocessing. Say bye to excessive load on the monitored host… (and due to preprocessing processes within Zabbix, no problem on the Zabbix server side).

Combining Low-Level Discovery and Dependent items

Ok, and what if we combine these to concepts? LLD with Dependent items? Wouldn’t that be the ultimate goal? Automatically creating new items without putting extra load to the monitored host? Let’s get this going!

To stick with the first example of LLD, we will discover filesystems, but now without the vfs.fs.discovery key, but the newly introduced vfs.fs.get key. Once we force the agent to execute this key, we will see this reply:

[{"fsname":"/dev","fstype":"devtmpfs","bytes":{"total":1940963328,"free":1940963328,"used":0,"pfree":100.000000,"pused":0.000000},"inodes":{"total":473868,"free":473487,"used":381,"pfree":99.919598,"pused":0.080402}},{"fsname":"/dev/shm","fstype":"tmpfs","bytes":{"total":1958469632,"free":1958469632,"used":0,"pfree":100.000000,"pused":0.000000},"inodes":{"total":478142,"free":478141,"used":1,"pfree":99.999791,"pused":0.000209}},{"fsname":"/run","fstype":"tmpfs","bytes":{"total":1958469632,"free":1892040704,"used":66428928,"pfree":96.608121,"pused":3.391879},"inodes":{"total":478142,"free":477519,"used":623,"pfree":99.869704,"pused":0.130296}},{"fsname":"/sys/fs/cgroup","fstype":"tmpfs","bytes":{"total":1958469632,"free":1958469632,"used":0,"pfree":100.000000,"pused":0.000000},"inodes":{"total":478142,"free":478125,"used":17,"pfree":99.996445,"pused":0.003555}},{"fsname":"/","fstype":"xfs","bytes":{"total":95516360704,"free":55329644544,"used":40186716160,"pfree":57.926877,"pused":42.073123},"inodes":{"total":46661632,"free":46535047,"used":126585,"pfree":99.728717,"pused":0.271283}},{"fsname":"/boot","fstype":"ext4","bytes":{"total":1023303680,"free":705544192,"used":247296000,"pfree":74.046435,"pused":25.953565},"inodes":{"total":65536,"free":65497,"used":39,"pfree":99.940491,"pused":0.059509}},{"fsname":"/home","fstype":"xfs","bytes":{"total":5358223360,"free":5286903808,"used":71319552,"pfree":98.668970,"pused":1.331030},"inodes":{"total":2621440,"free":2621428,"used":12,"pfree":99.999542,"pused":0.000458}},{"fsname":"/run/user/0","fstype":"tmpfs","bytes":{"total":391692288,"free":391692288,"used":0,"pfree":100.000000,"pused":0.000000},"inodes":{"total":478142,"free":478137,"used":5,"pfree":99.998954,"pused":0.001046}}]

And if we format it to be more readable, it will look like this (truncated):

[
  {
    "fsname":"/",
    "fstype":"xfs",
    "bytes":{
      "total":95516360704,
      "free":55329644544,
      "used":40186716160,
      "pfree":57.926877,
      "pused":42.073123
    },
    "inodes":{
      "total":46661632,
      "free":46535047,
      "used":126585,
      "pfree":99.728717,
      "pused":0.271283
    }
  },
  {
    "fsname":"/home",
    "fstype":"xfs",
    "bytes":{
      "total":5358223360,
      "free":5286903808,
      "used":71319552,
      "pfree":98.668970,
      "pused":1.331030
    },
    "inodes":{
      "total":2621440,
      "free":2621428,
      "used":12,
      "pfree":99.999542,
      "pused":0.000458
    }
  }
]

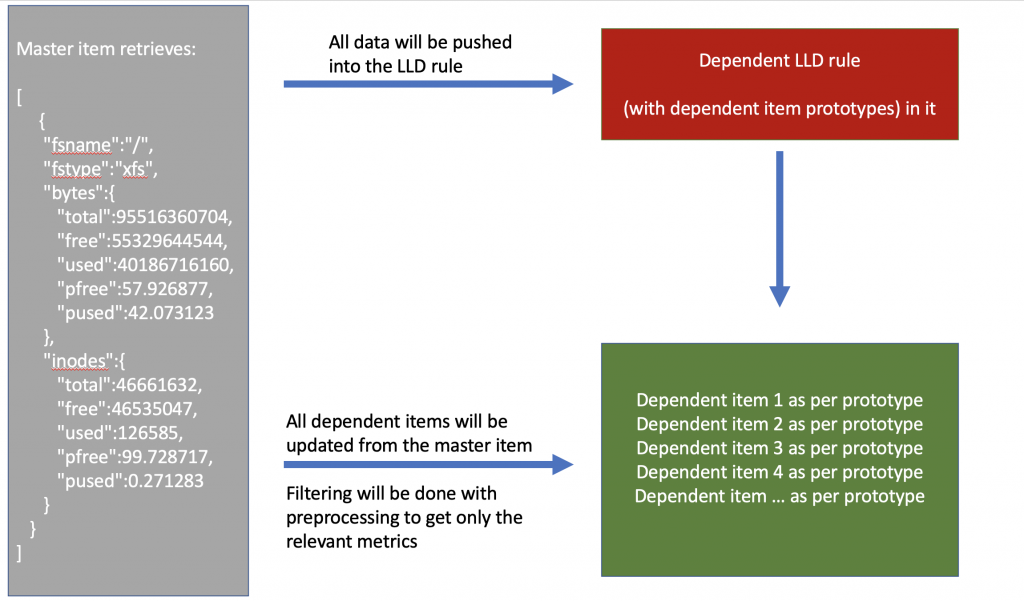
Per filesystem, we get the original information FSNAME and FSTYPE, but also the statistics of these filesystems… bulk metrics! So, we create a normal item (Which will serve as the master item) getting out all those metrics in a single query:

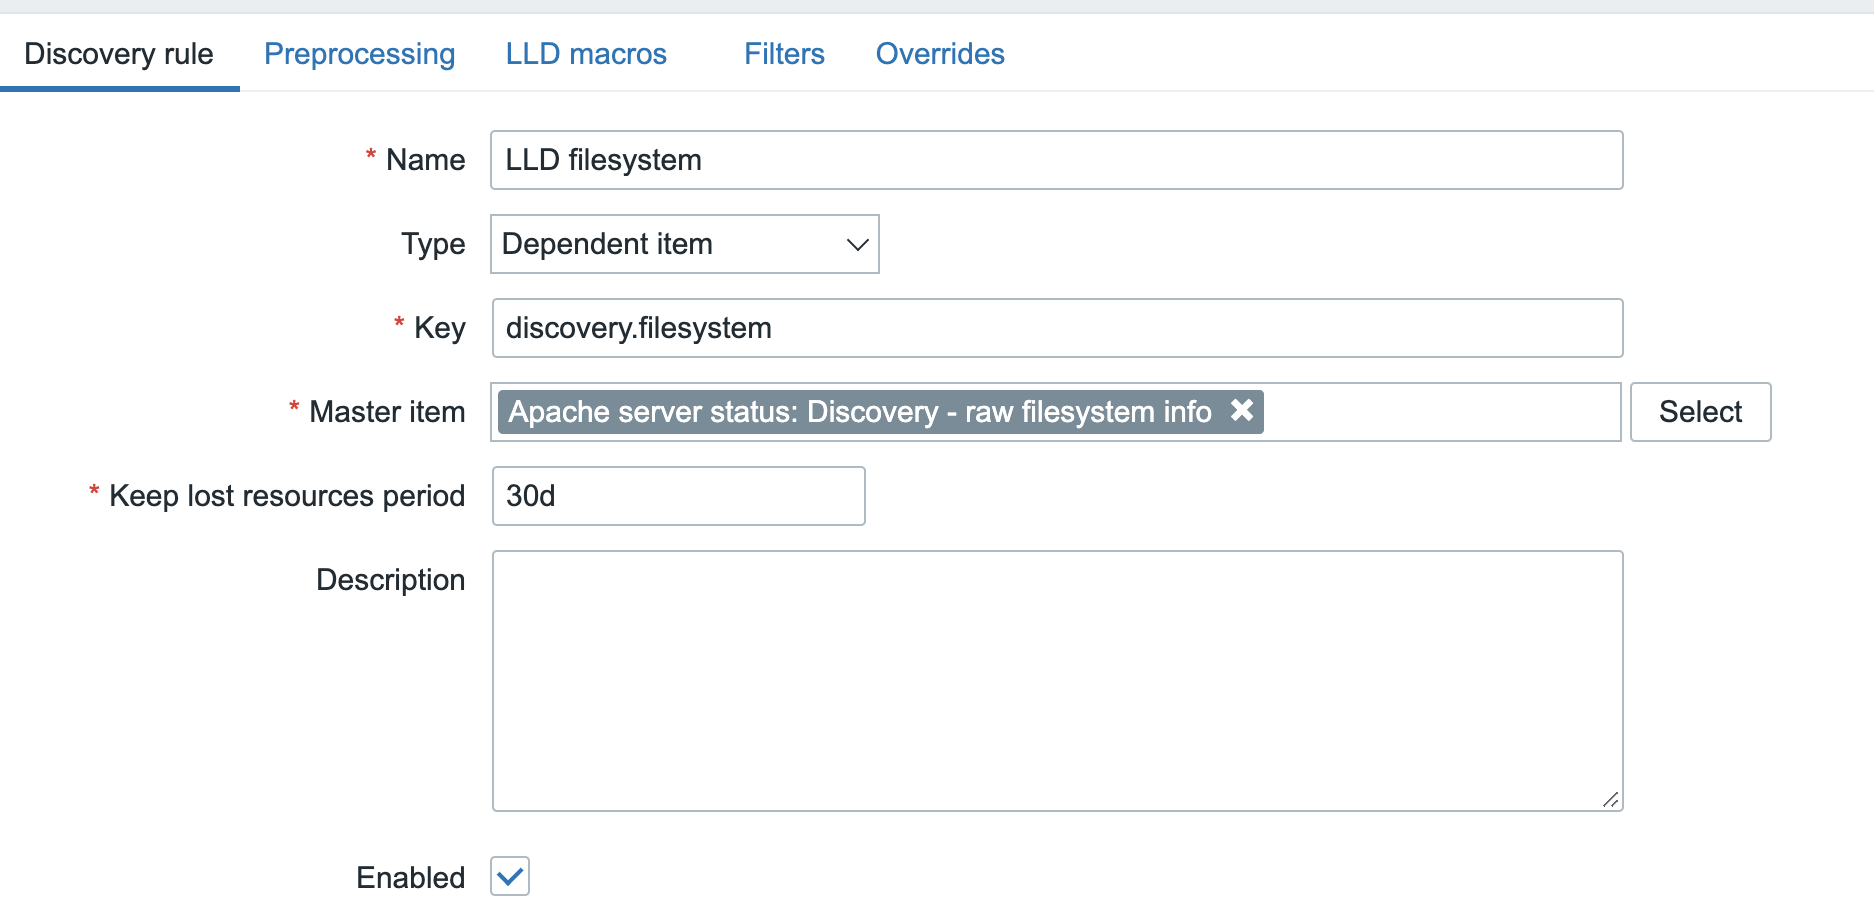
Once we’ve got this data in Zabbix, we feed it into the LLD rule, giving this LLD rule the dependent LLD type:

Of course there are no ready to use LLD macros in this data, but since it is in JSON format, it shouldn’t be too hard to create the LLD macros with the ‘LLD macros’ option in the frontend and the relevant JSONPath expression:

Note: Technically we do not need to create the {#FSTYPE} macro to get this working!

Once this is done, we should be ready to create the item prototypes for this LLD rule. The data is there, macros are available, nothing is going to stop us now!

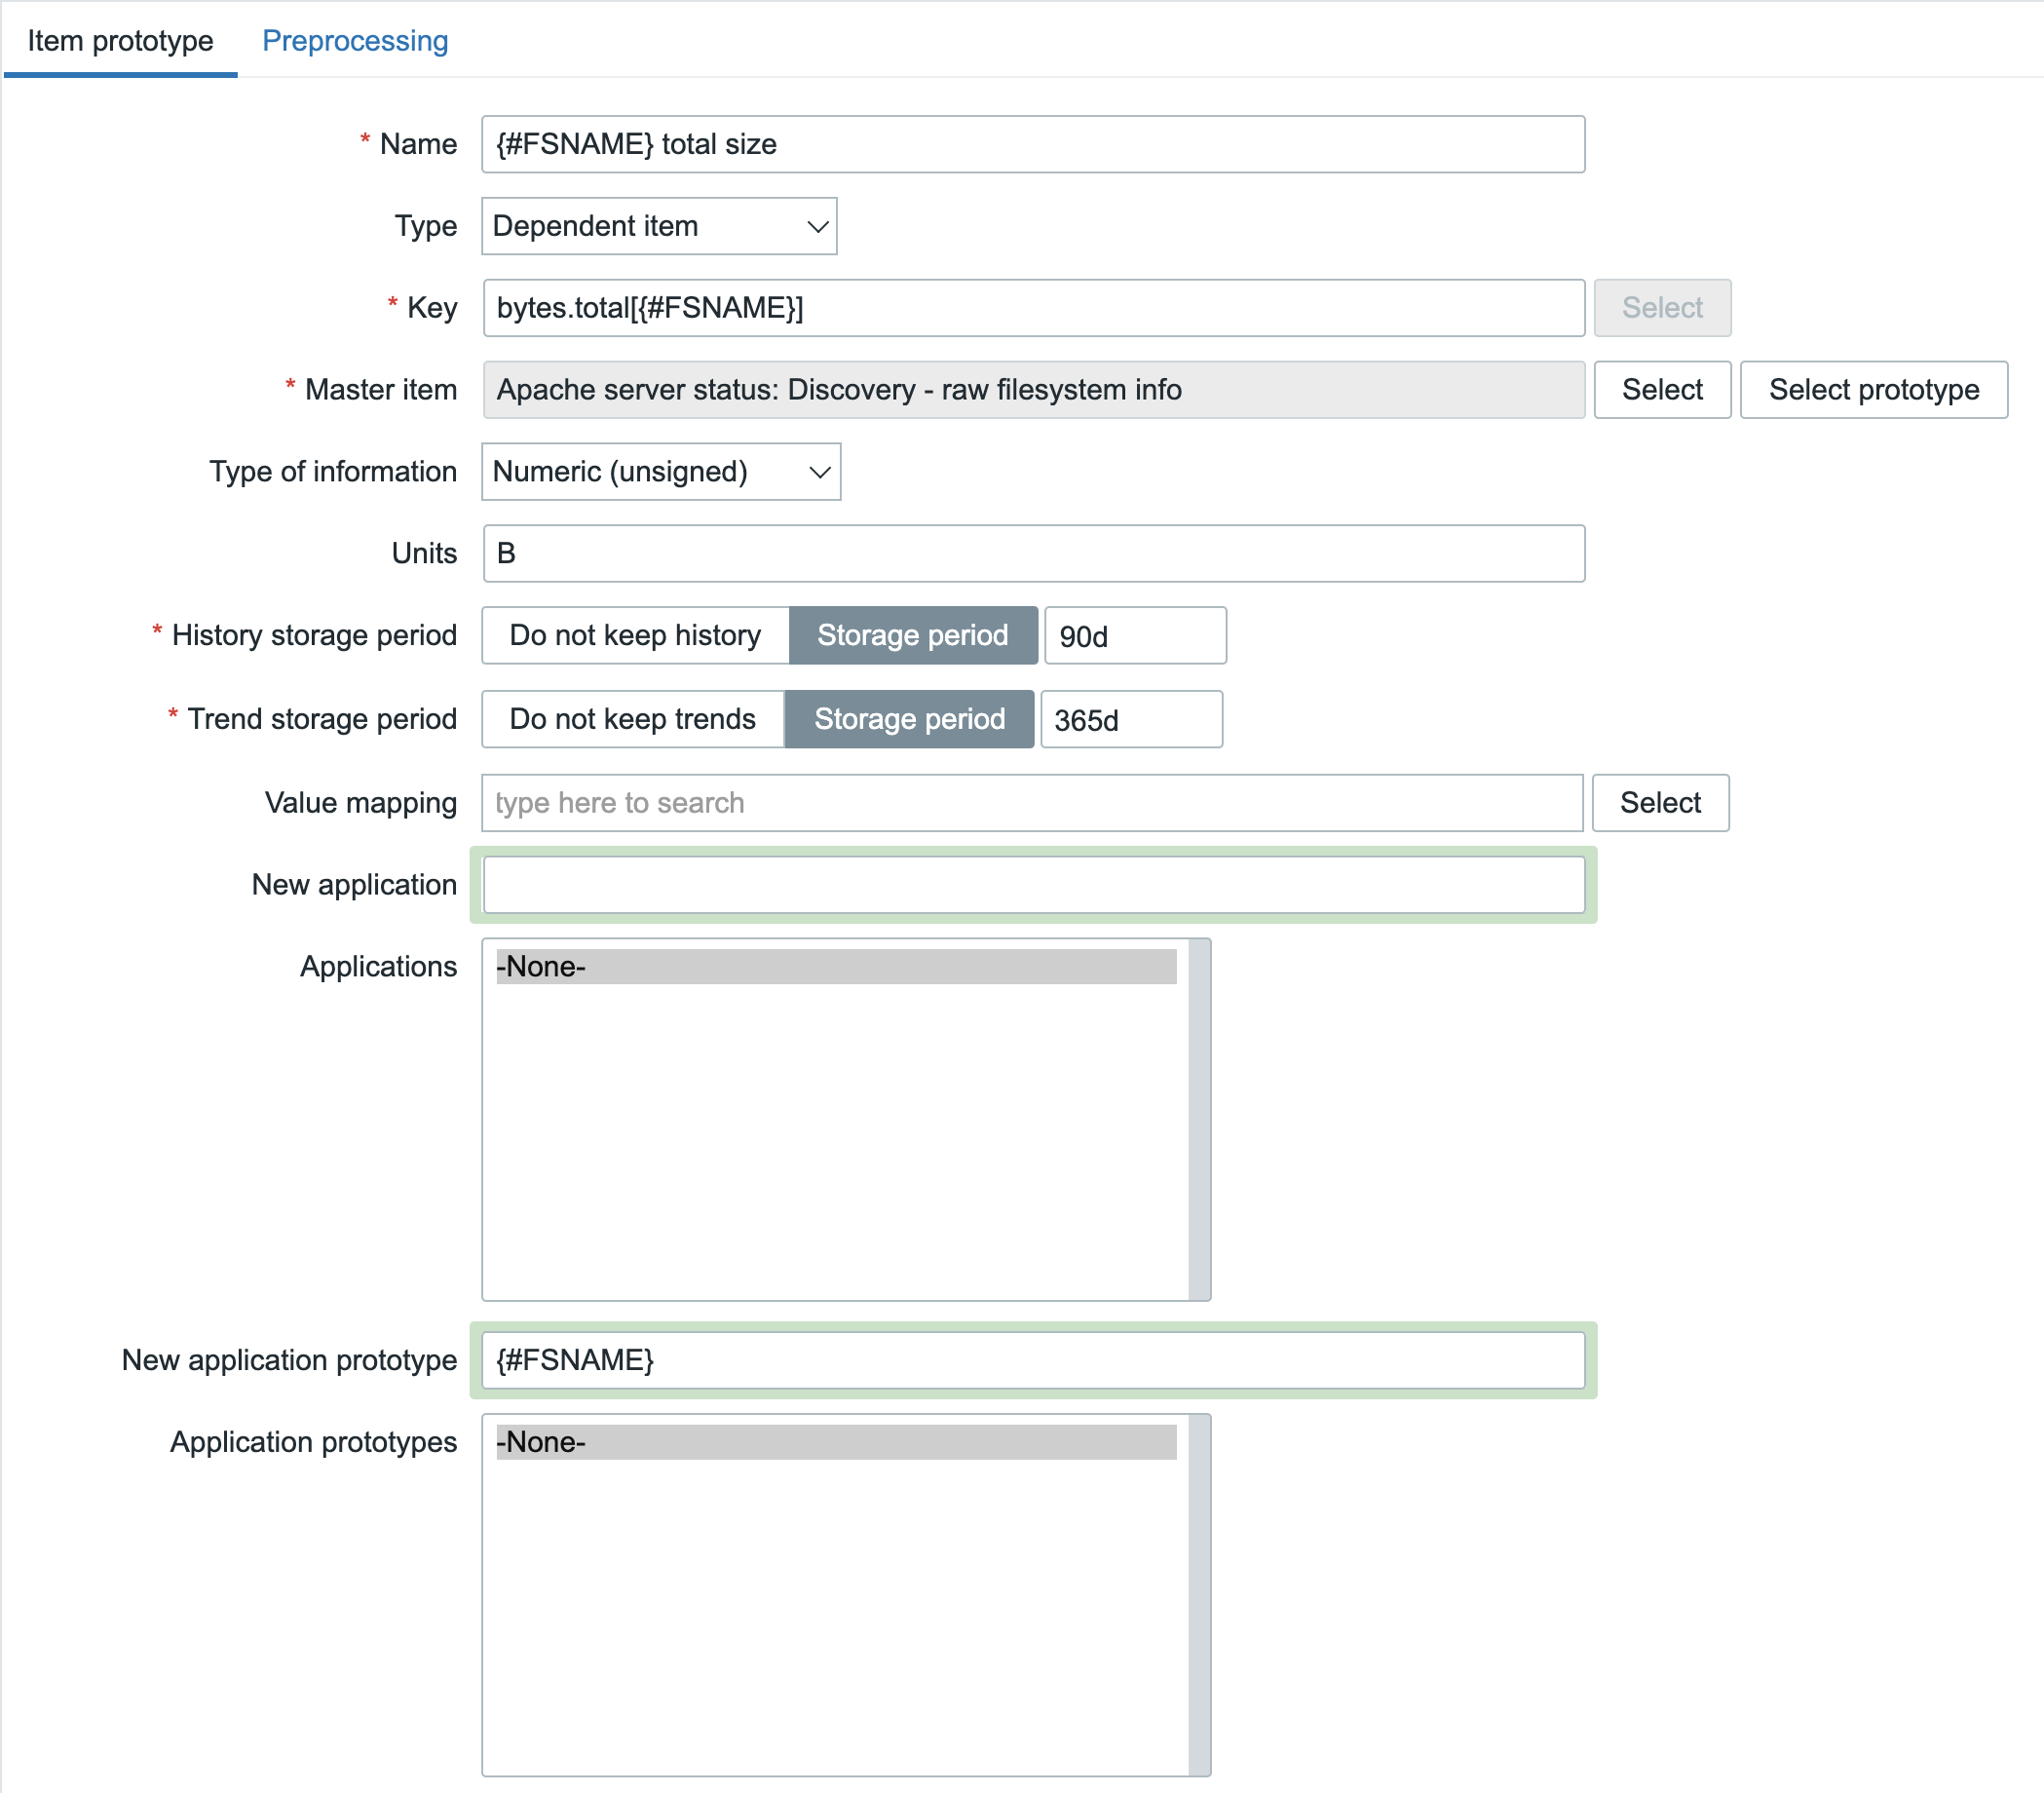
Let’s move on to item prototypes. But of course, we do not want to poll that remote host again per discovered filesystem. That means we will make this item prototype of the dependent item type as well, pointing it back to the master item we’ve created.

For the first item prototype, we want to obtain the total size per filesystem:

But, as I mentioned earlier: a dependent item without any preprocessing is identical to the master item and of course that would be wrong in this case. We just want to see the total bytes per filesystem and not all the collected statistics. In the configuration above we already know what to get out, so the Type of information and Units are filled already. What is not visible on that screenshot is the preprocessing rule that we need. Here the ‘JSONPath’ preprocessing step comes in handy since we receive JSON data. We would like to get out this part for our item (truncated):

[
  {
    "fsname":"/",
    "fstype":"xfs",
    "bytes":{
      "total":95516360704,
      "free":55329644544,
       "used":40186716160,
      "pfree":57.926877,
      "pused":42.073123

So, if we try to get this information out using JSONPath, it should look like: $.bytes.total.first() but this will match on any filesystem, so we need to configure it a bit more specific like: $[?(@.fsname==’/’)].bytes.total.first() 

As you can see, the JSONPath is a bit more complex here. We are forcing it to match on @.fsname==’/’ and from that entity, get out the bytes.total. Now, to make it even more complex we shouldn’t configure the filesystem hardcoded in the JSONPath since we’re working with Item prototypes. It should be the LLD Macro {#FSNAME} instead!

Now we save this item prototype, grab a cup of coffee (or just force a config_cache_reload on the server) and just wait for the magic to happen.

We’ve now built this setup:


So the master item will get values (i.e. obtain bulk data every minute) and push it into the LLD rule. From there, as per item prototypes, items will be created and those are populated from the master item as well, filtering out only the relevant metrics using Preprocessing.

So far, so good, but we have one small problem to solve: We want to get metrics every minute or so, but since all those metrics will get pushed into the LLD rule, we might be adding unnecessary extra load due to the high frequency. Luckily, solving that problem is no too hard. Navigate to the discovery rule, go to the ‘Preprocessing tab’ and select ‘Discard unchanged with heartbeat’ parameter: 1h or even larger interval!

This is insane! With just one poll/query to a host, we will utilize the power of LLD and dependent items, getting all metrics without adding minimal extra load on that host.


Conclusion

That’s it. If you’ve setup everything correctly, you should now get out quite a few filesystem metrics without adding any extra performance overhead on the host by performing unnecessary data requests.

Of course, if you need help optimizing your Zabbix environment, support contracts, consultancy, or training, we from Opensource ICT Solutions are always available to assist you in every possible way, worldwide, 24×7.

Thanks for reading this blog post, see you in the next one.

Finalizing the installation of Zabbix Agent with Ansible

Post Syndicated from Werner Dijkerman original https://blog.zabbix.com/finalizing-the-installation-of-zabbix-agent-with-ansible/13321/

In the previous blog posts, we created a Zabbix Server with a new user, a media type, and an action. In the 2nd blog post, we continued with creating and configuring a Zabbix Proxy. In the last part of this series of blog posts, we will install the Zabbix Agent on all of the 3 nodes we have running.

This blog post is the 3rd part of a 3 part series of blog posts where Werner Dijkerman gives us an example of how to set up your Zabbix infrastructure by using Ansible.
You can find part 1 of the blog post by clicking here.

To summarize, so far we have a Zabbix Server and a Zabbix Proxy. The Zabbix Server has a MySQL instance running on a separate node, the MySQL instance for the Zabbix Proxy runs on the same node. But we are missing one component right now, and that is something we will install with the help of this blog post. We will install the Zabbix Agent on the 3 nodes.

A git repository containing the code used in these blog posts is available on https://github.com/dj-wasabi/blog-installing-zabbix-with-ansible. Before we run Ansible, we need to make sure we have opened a shell on the “bastion” node. We can do that with the following command:

$ vagrant ssh bastion

Once we have opened the shell, go to the “/ansible” directory where we have all of our Ansible files present.

$ cd /ansible

In the previous blog post, we executed the “zabbix-proxy.yml” playbook. Now we are going to use the “zabbix-agent.yml” playbook. The playbook will install the Zabbix Agent on all nodes (“node-1”, “node-2” and “node-3”). Next up, on both the “node-1” and “node-3”, we will add a user parameters file specifically for MySQL. With this user parameters file, we are able to monitor the MySQL instances.

$ ansible-playbook -i hosts zabbix-agent.yml

This playbook will run for a few minutes installing the Zabbix Agent on the nodes. It will install the zabbix-agent package and add the configuration file, but it will also make a connection to the Zabbix Server API. We will automatically create a host with the correct IP information and the correct templates! When the Ansible playbook has finished running, the hosts can immediately be found in the Frontend. And better yet, it is automatically correctly configured, so the hosts will be monitored immediately!

We have several configurations spread over multiple files to make this work. We first start with the “all” file.

The file “/ansible/group_vars/all” contains the properties that will apply to all hosts. Here we have the majority of essential properties configured that are overriding the default properties of the Ansible Roles. Each role has some default configuration, which will work out of the box. But in our case, we need to override these, and we will discuss some of these properties next.

zabbix_url

This is the URL on which the Zabbix Frontend is available and thus also the API. This property is for example used when we create the hosts via the API as part of the Proxy and Agent installation.

zabbix_proxy

The Zabbix Agents will be monitored by the Zabbix Proxy unless the Agent runs on the Zabbix Server or the host running the database for the Zabbix Server. Like with the previous blog post, we will also use some Ansible notation to get the IP address of the host running the Zabbix Proxy to configure the Zabbix Agent.

zabbix_proxy: node-3
zabbix_agent_server: "{{ hostvars[zabbix_proxy]['ansible_host'] }}"
zabbix_agent_serveractive: "{{ hostvars[zabbix_proxy]['ansible_host'] }}"

With the above configuration, we configure both the Server and ServerActive in the Zabbix Agent’s configuration file to use the IP address of the host running the Zabbix Proxy. If you look at the files “/ansible/group_vars/zabbix_database” and “/ansible/group_vars/zabbix_server/generic” you would see that these contain the following:

zabbix_agent_server: "{{ hostvars['node-1']['ansible_host'] }}"
zabbix_agent_serveractive: "{{ hostvars['node-1']['ansible_host'] }}"

The Zabbix Agent on the Zabbix Server and on its database is using the IP address of the Zabbix Server to be used as the value for both the “Server” and “ActiveServer” configuration settings for the Zabbix Agent.

zabbix_api_user & zabbix_api_pass

These are the default in the roles, but I have added them here so it is clear that they exist. When you change the Admin user password, don’t forget to change them here as well.

zabbix_api_create_hosts & zabbix_api_create_hostgroups 

Because we automatically want to create the Zabbix Frontend hosts via the API, we need to set both these properties to true. Firstly, we create the host groups that can be found with the property named “zabbix_host_groups”. After that, as part of the Zabbix Agent installation, the hosts will be created via the API because of the property zabbix_api_create_hosts.

Now we need to know what kind of information we want these hosts created with. Let’s go through some of them.

zabbix_agent_interfaces

This property contains a list of all interfaces that are used to monitoring the host. This is relatively simple in our case, as the hosts only have 1 interface available. You can find some more information about what to use when you have other interfaces like IPMI or SNMP: https://github.com/ansible-collections/community.zabbix/blob/main/docs/ZABBIX_AGENT_ROLE.md#other-interfaces We use the interface with the value from property “ansible_host” for port 10050.

zabbix_host_groups

This property was also discussed before – we automatically assign our new host to these host groups. Again, we have a fundamental setup, and thus it is an effortless property.

zabbix_link_templates

We provide a list of all Zabbix Templates we will want to assign to the hosts with this property. This property seems a bit complicated, but no worries – let’s dive in!

zabbix_link_templates:
  - "{{ zabbix_link_templates_append if zabbix_link_templates_append is defined else [] }}"
  - "{{ zabbix_link_templates_default }}"

With the first line, we add the property’s value “zabbix_link_templates_append”, but we only do that if that property exists. If Ansible can not find that property, then we basically add an empty list. So where can we find this property? We can check the files in the other directories in the group_vars directory. If we check, for example “/ansible/group_vars/database/generic”, we will find the property:

zabbix_link_templates_append:
  - 'MySQL by Zabbix agent'

So on all nodes that are part of the database group, we add the value to the property “zabbix_link_templates”. All of the database servers will get this template attached to the host. If we would check the file “/ansible/group_vars/zabbix_server/generic”, then we will find the following:

zabbix_link_templates_append:
  - 'Zabbix Server'

As you probably understand now, when we create the Zabbix Server host, we will add the “Zabbix Server” template to the host, because this file is only used for the hosts that are part of the zabbix_server group.

With this setup, we can configure specific templates for the specific groups, but there is also at least 1 template that we always want to add. We don’t want to add the template to each file as that is a lot of configuration, so we use a new property for this named “zabbix_link_templates_default”. In our case, we only have Linux hosts, so we always want to add the templates:

zabbix_link_templates_default:
  - "Linux by Zabbix agent active"

On the Zabbix Server, we both assign the “Zabbix Server” template and the template “Linux by Zabbix agent active” to the host.

But what if we have Macros?

zabbix_macros

As part of some extra tasks in this playbook execution, we also need to provide a macro for some hosts. This macro is needed to make the Zabbix Template we assign to the hosts work. For the hosts running a MySQL database, we need to add a macro, which can be found with the property zabbix_macros_append in the file “/ansible/group_vars/database/generic”.

zabbix_macros_append:
  - macro_key: "MYSQL.HOST"
    macro_value: "{{ ansible_host }}"

We will create 1 macro with the key name “MYSQL.HOST” and assign a value that will be equal to the contents of the property ansible_host (For the “node-2” host, the host running the database for the Zabbix Server), which is “10.10.1.12”.

User parameters

The “problem” with assigning the MySQL template is that it also requires some UserParameter entries set. The Zabbix Agent role can deploy files containing UserParameters to the given hosts. In “/ansible/group_vars/database/generic” we can find the following properties:

zabbix_agent_userparameters_templates_src: "{{ inventory_dir }}/files/zabbix/mysql"
zabbix_agent_userparameters:
  - name: template_db_mysql.conf

The first property “zabbix_agent_userparameters_templates_src” will let Ansible know where to find the files. The “{{ inventory_dir }}” will be translated to “/ansible” and here you will find a directory named “files” (and you will find the group_vars directory as well) and further drilling down the directories, you will find the file “template_db_mysql.conf”.

With the second property “zabbix_agent_userparameters” we let Ansible know which file we want to deploy to the host. In this case, the only file found in the directory named “template_db_mysql.conf”.

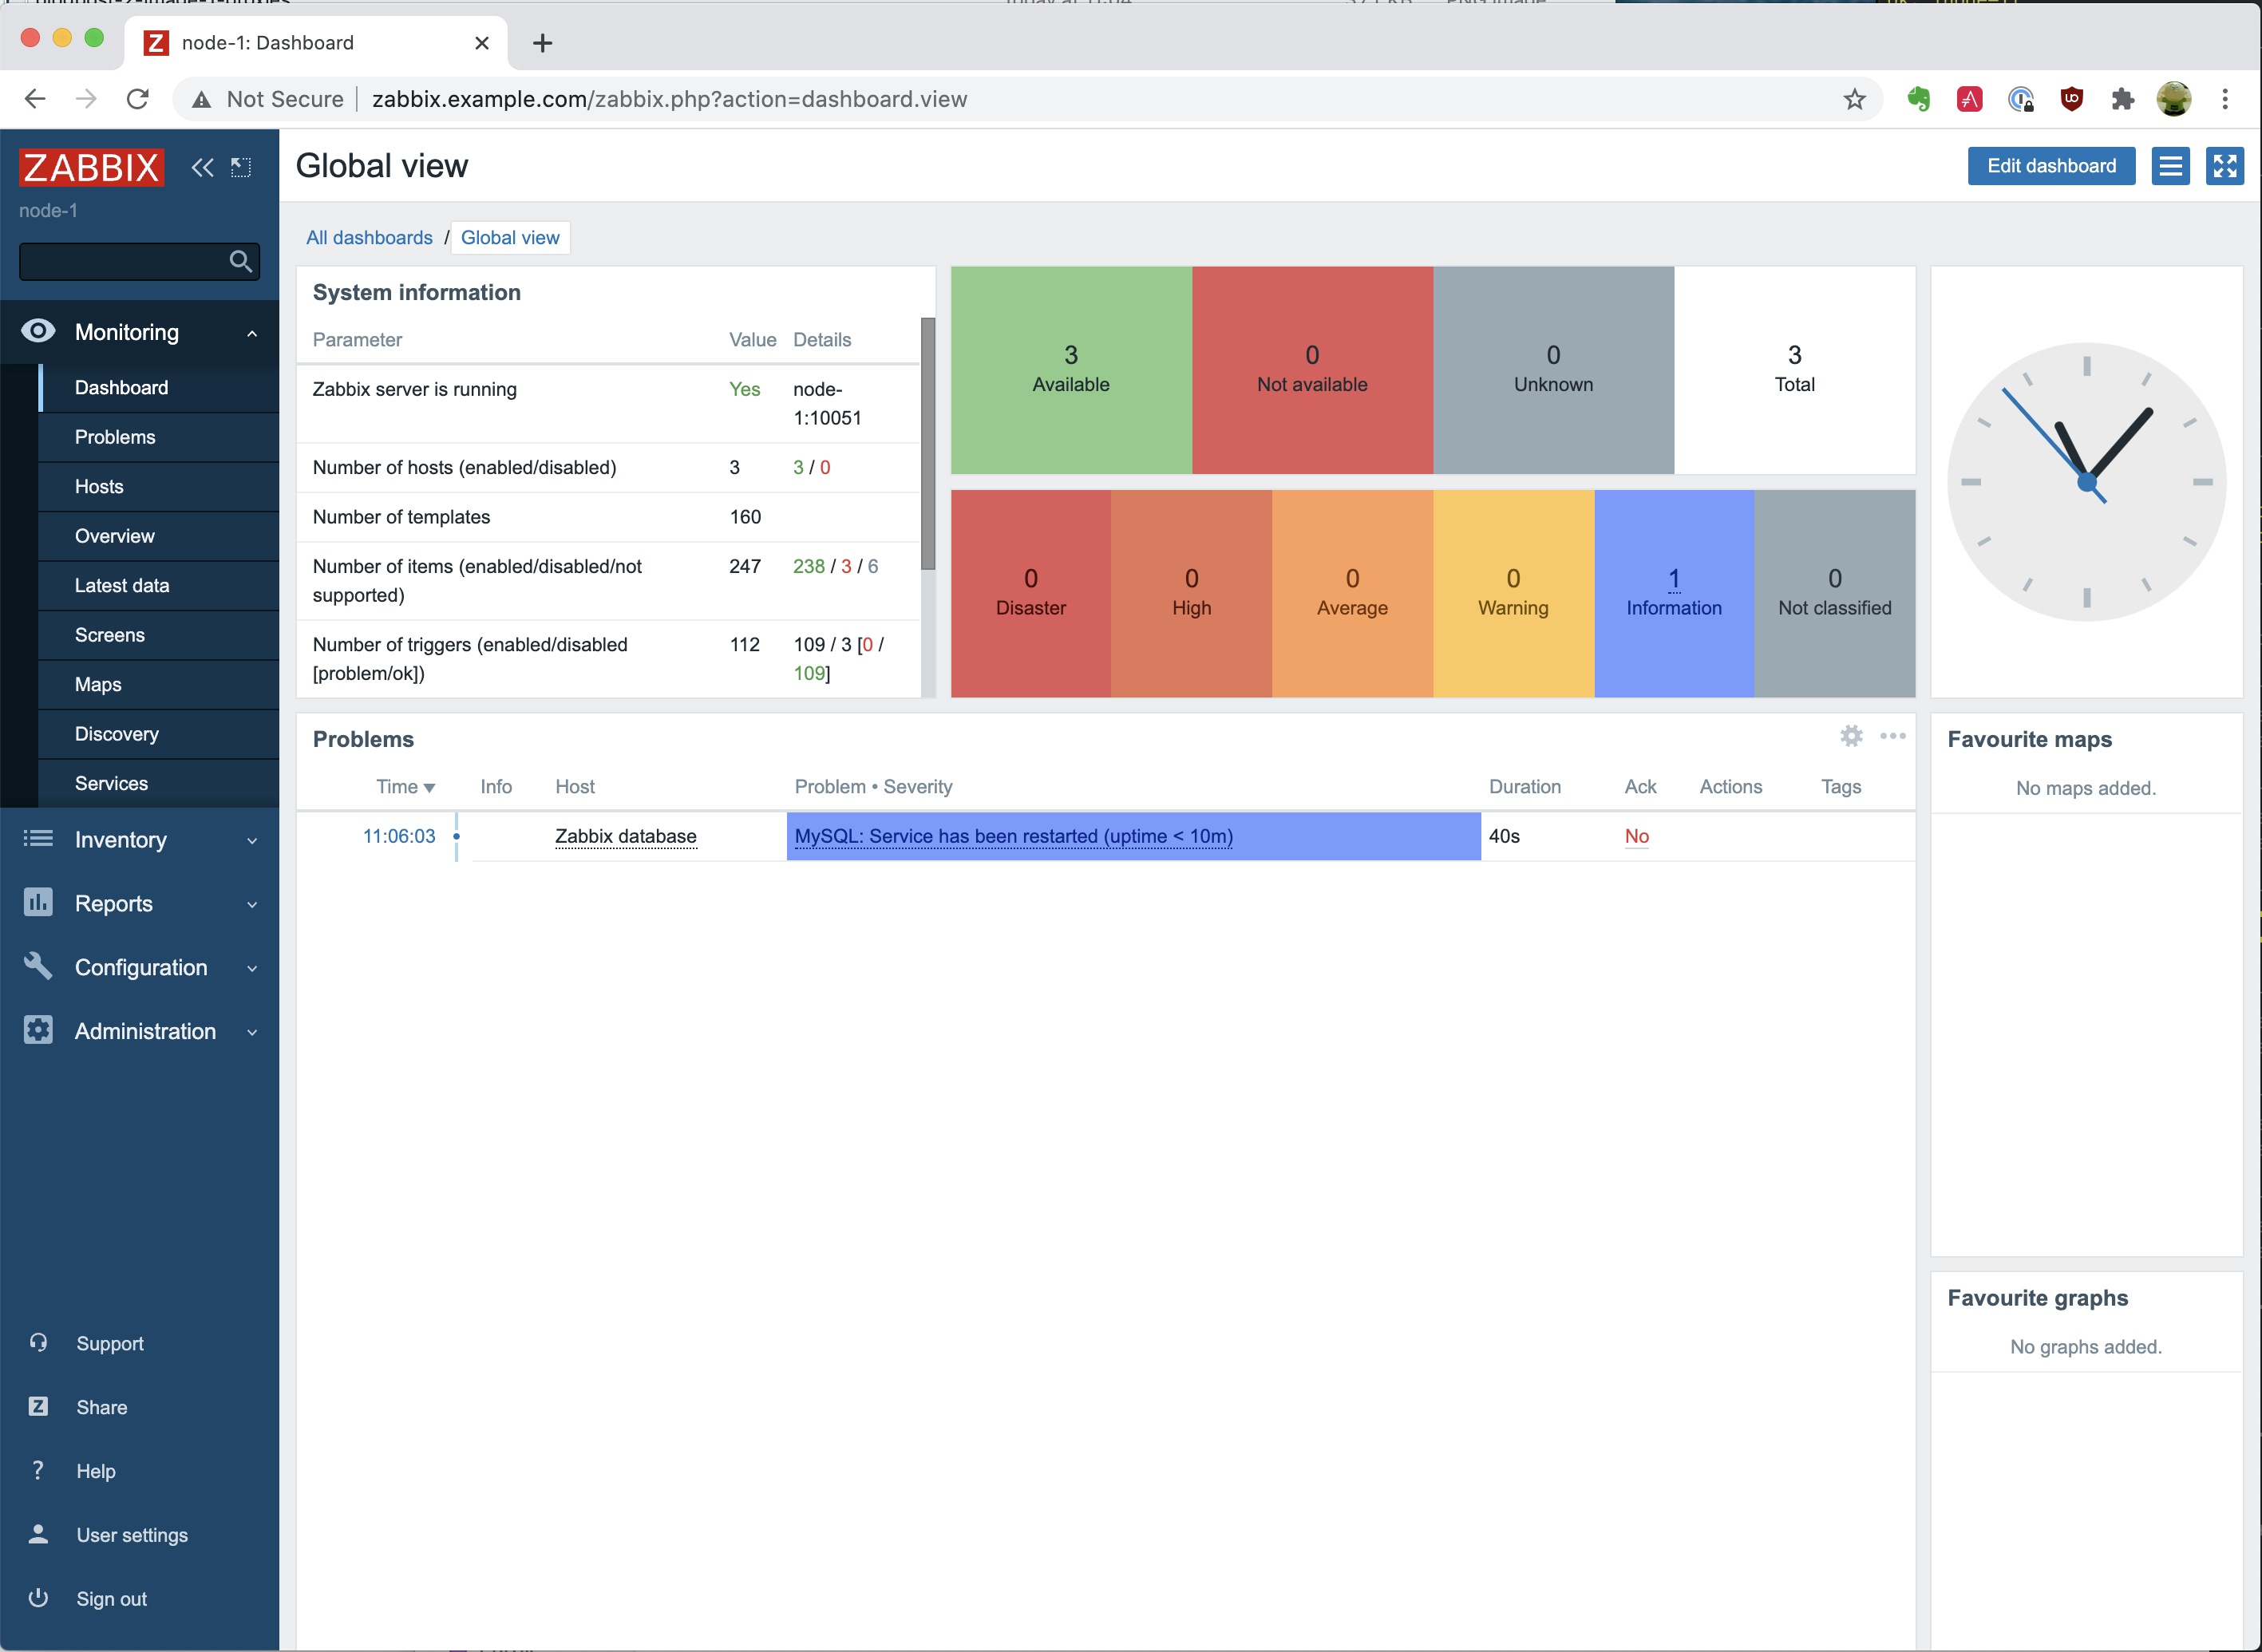
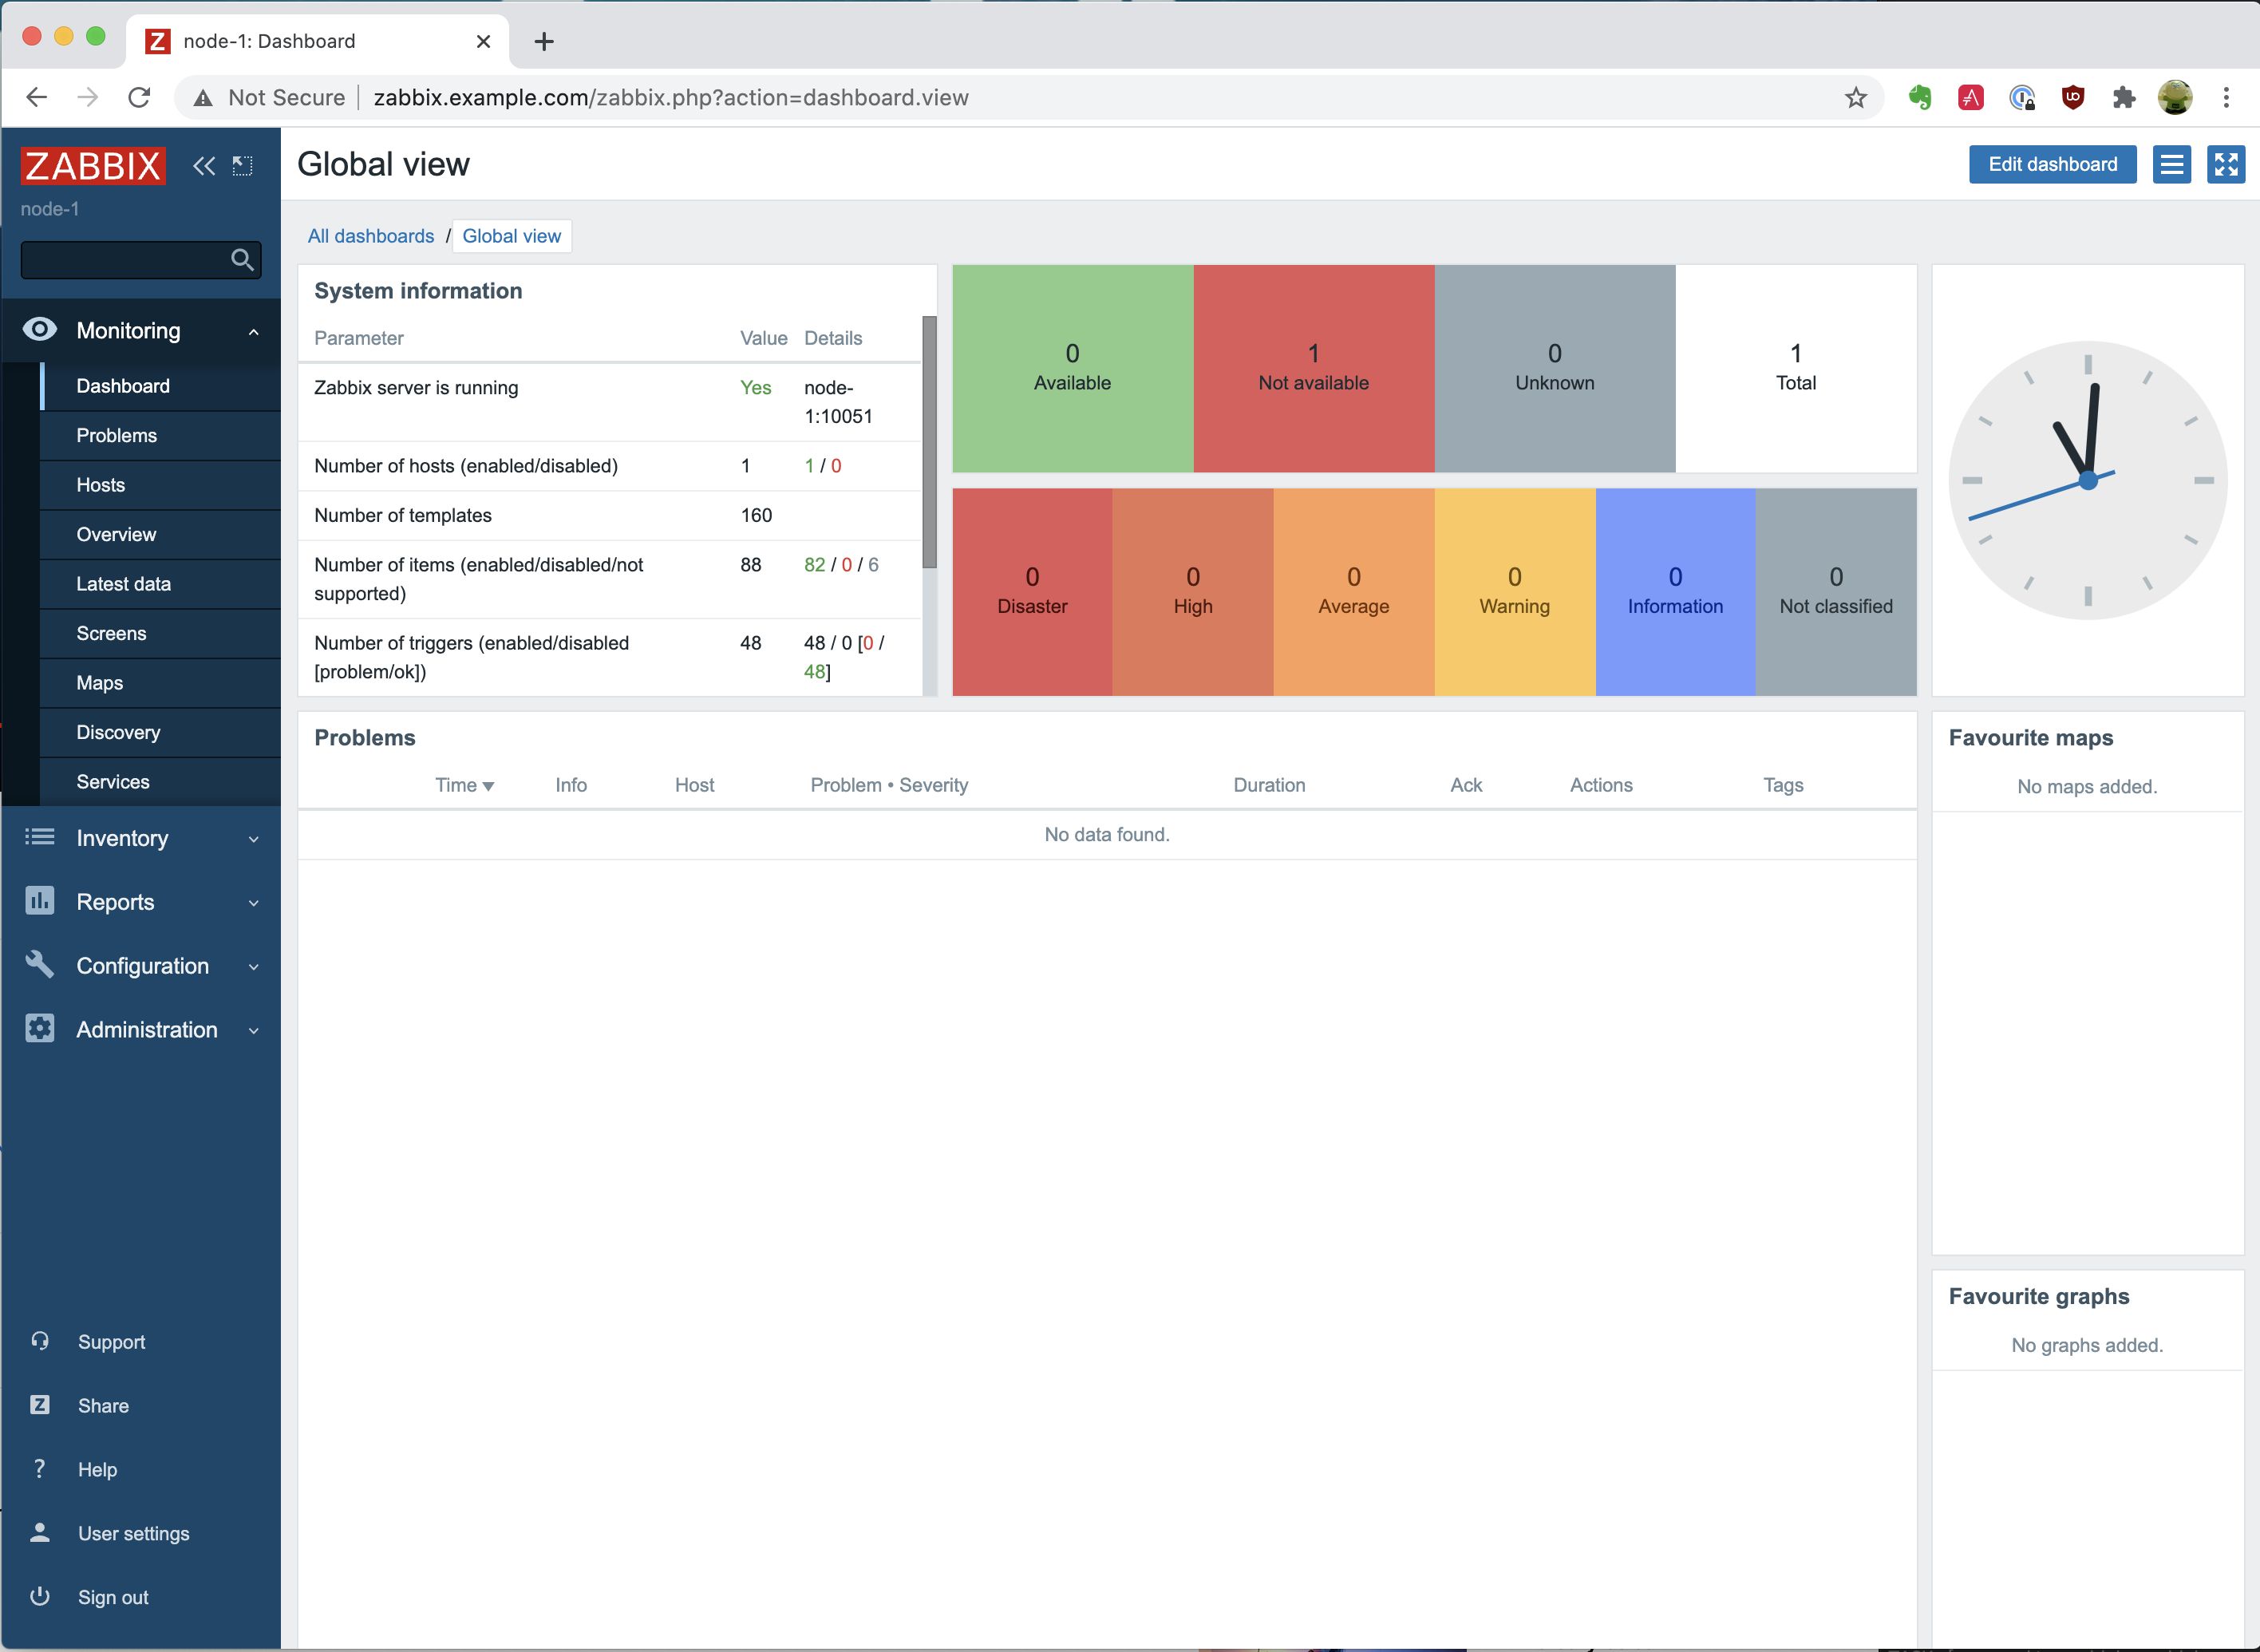
When the Zabbix agent role is fully executed, we have everything set to monitor all the hosts automatically. Open the dashboard, and you will see something like the following:

It provides an overview, and on the right side, you will notice we have a total of 3 nodes of which 3 are available. Maybe you will see a “Problem” like in the screenshot above, but it will go away.

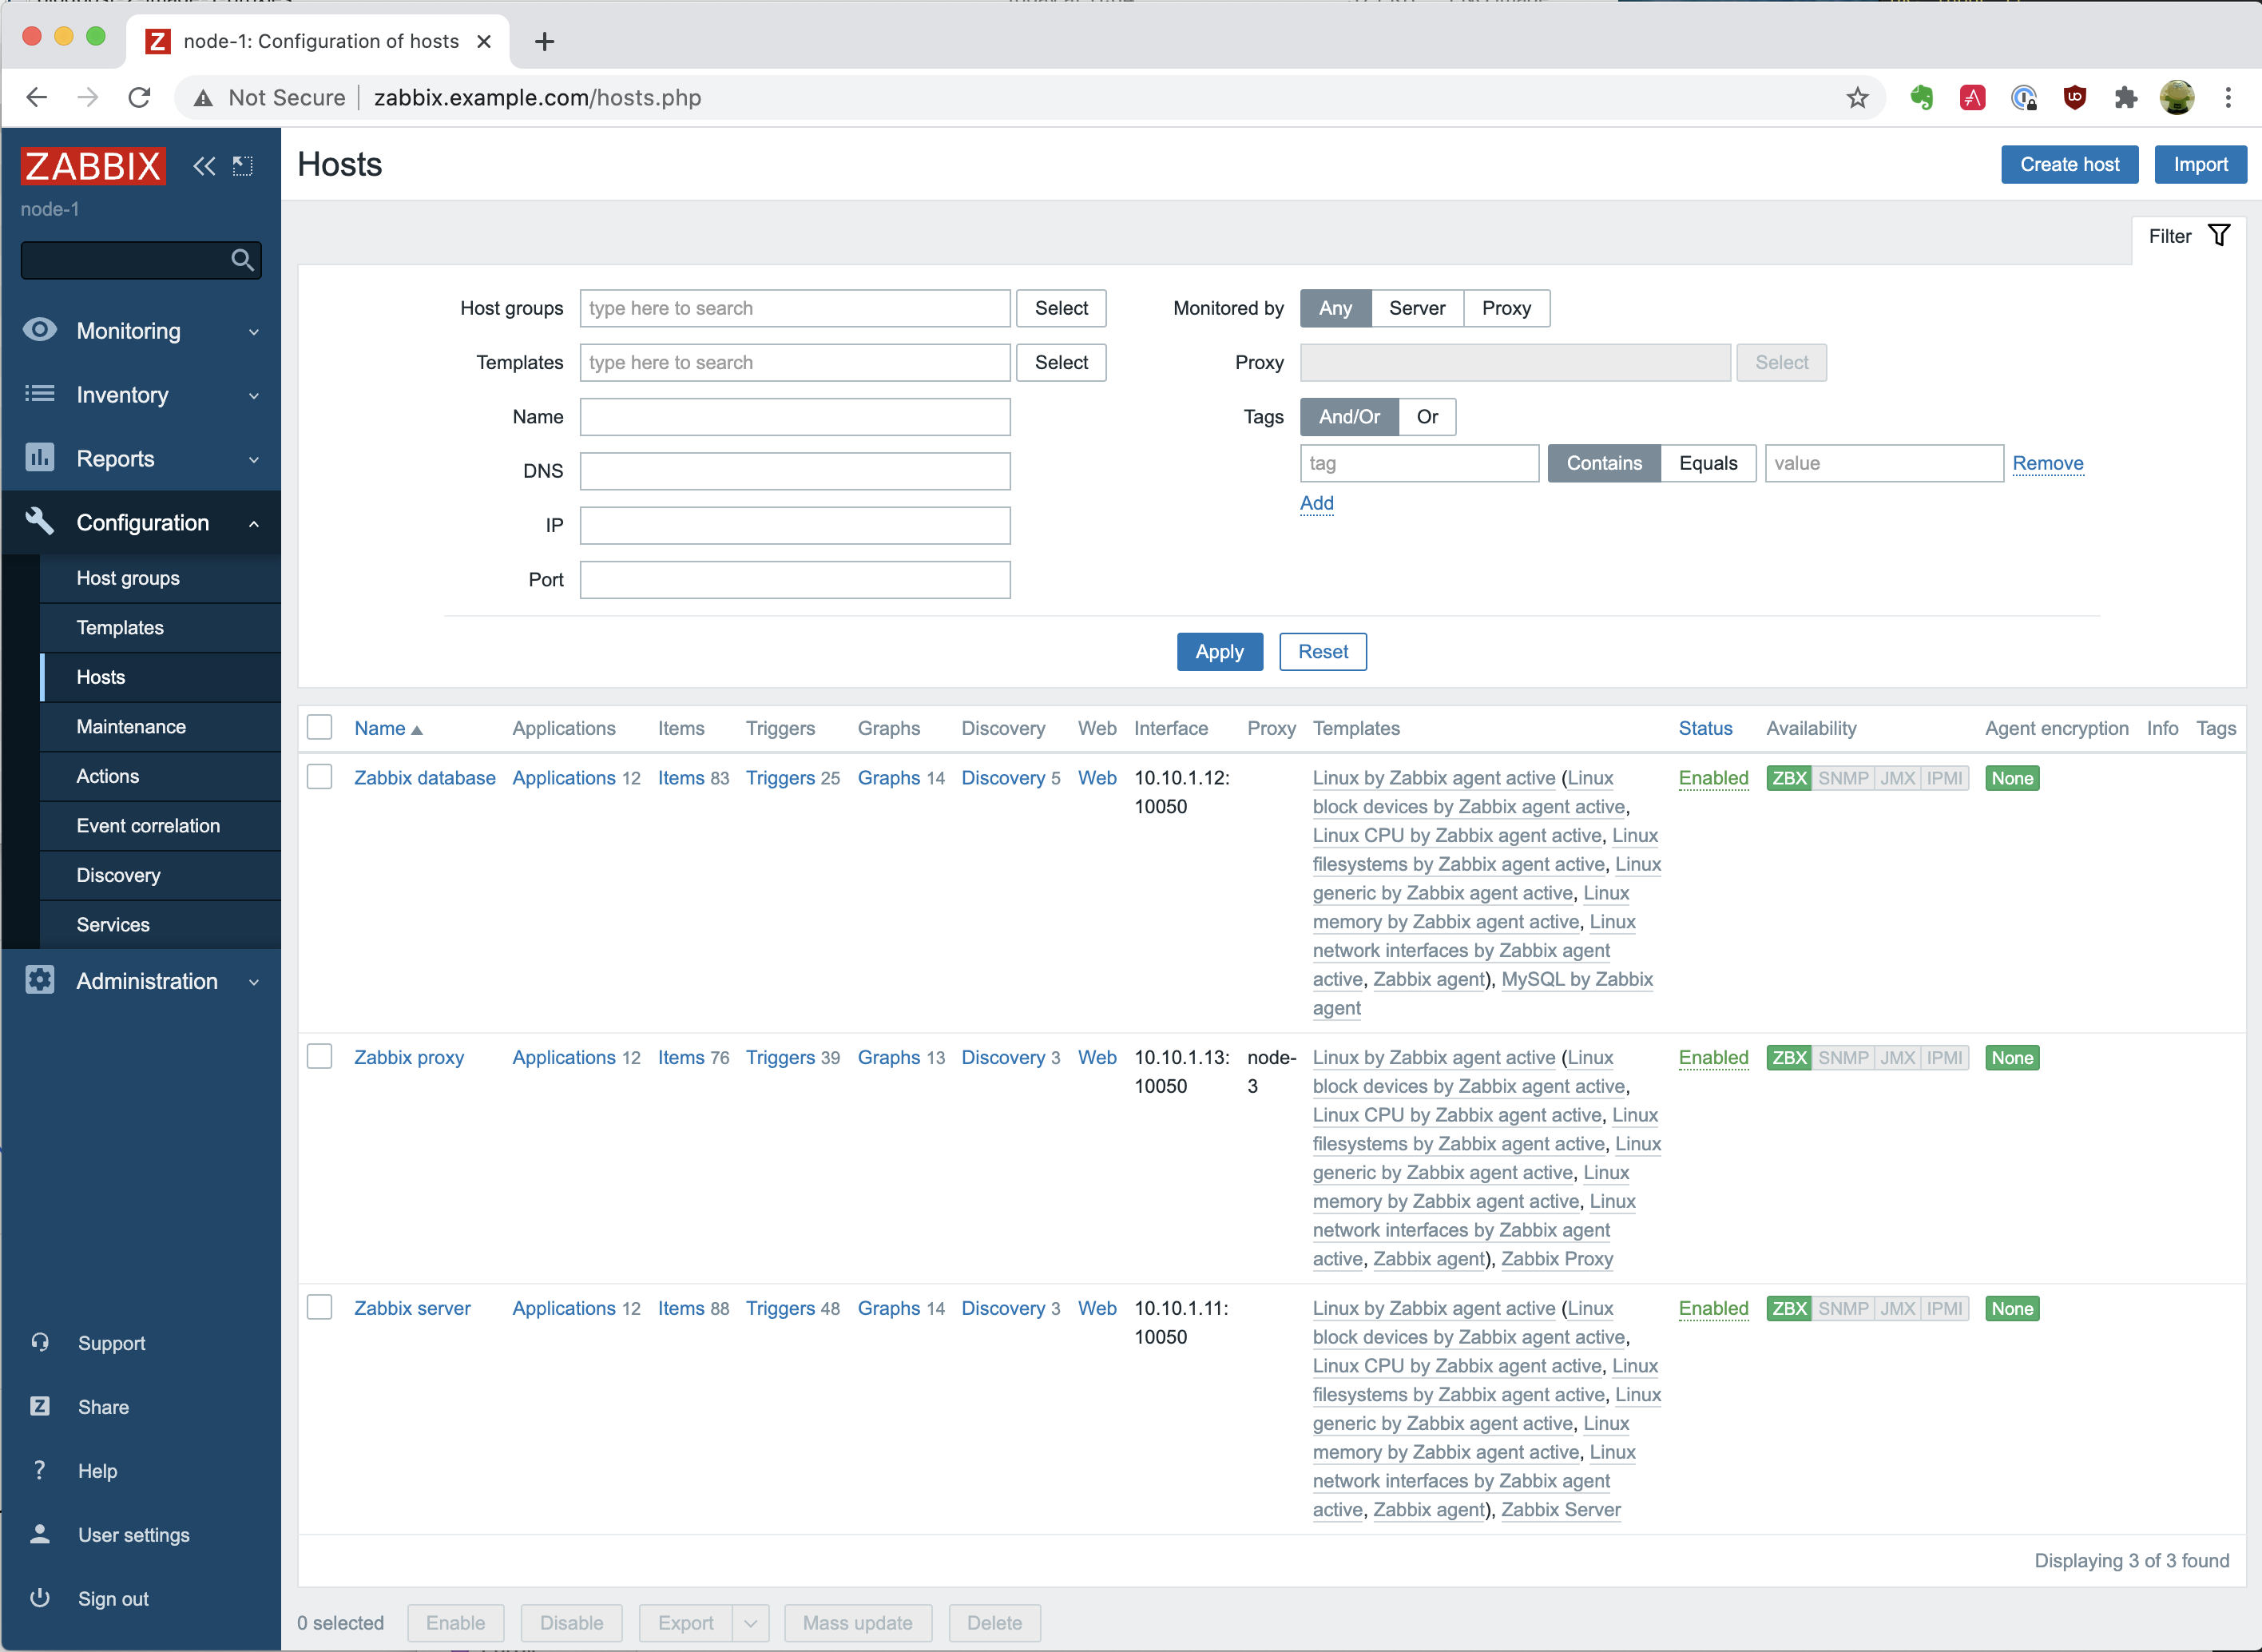
If we go to “Configuration” and “Hosts,” we will see that we have the 3 nodes, and they have the status “Enabled” and the “ZBX” icon is green, so we have a proper connection.

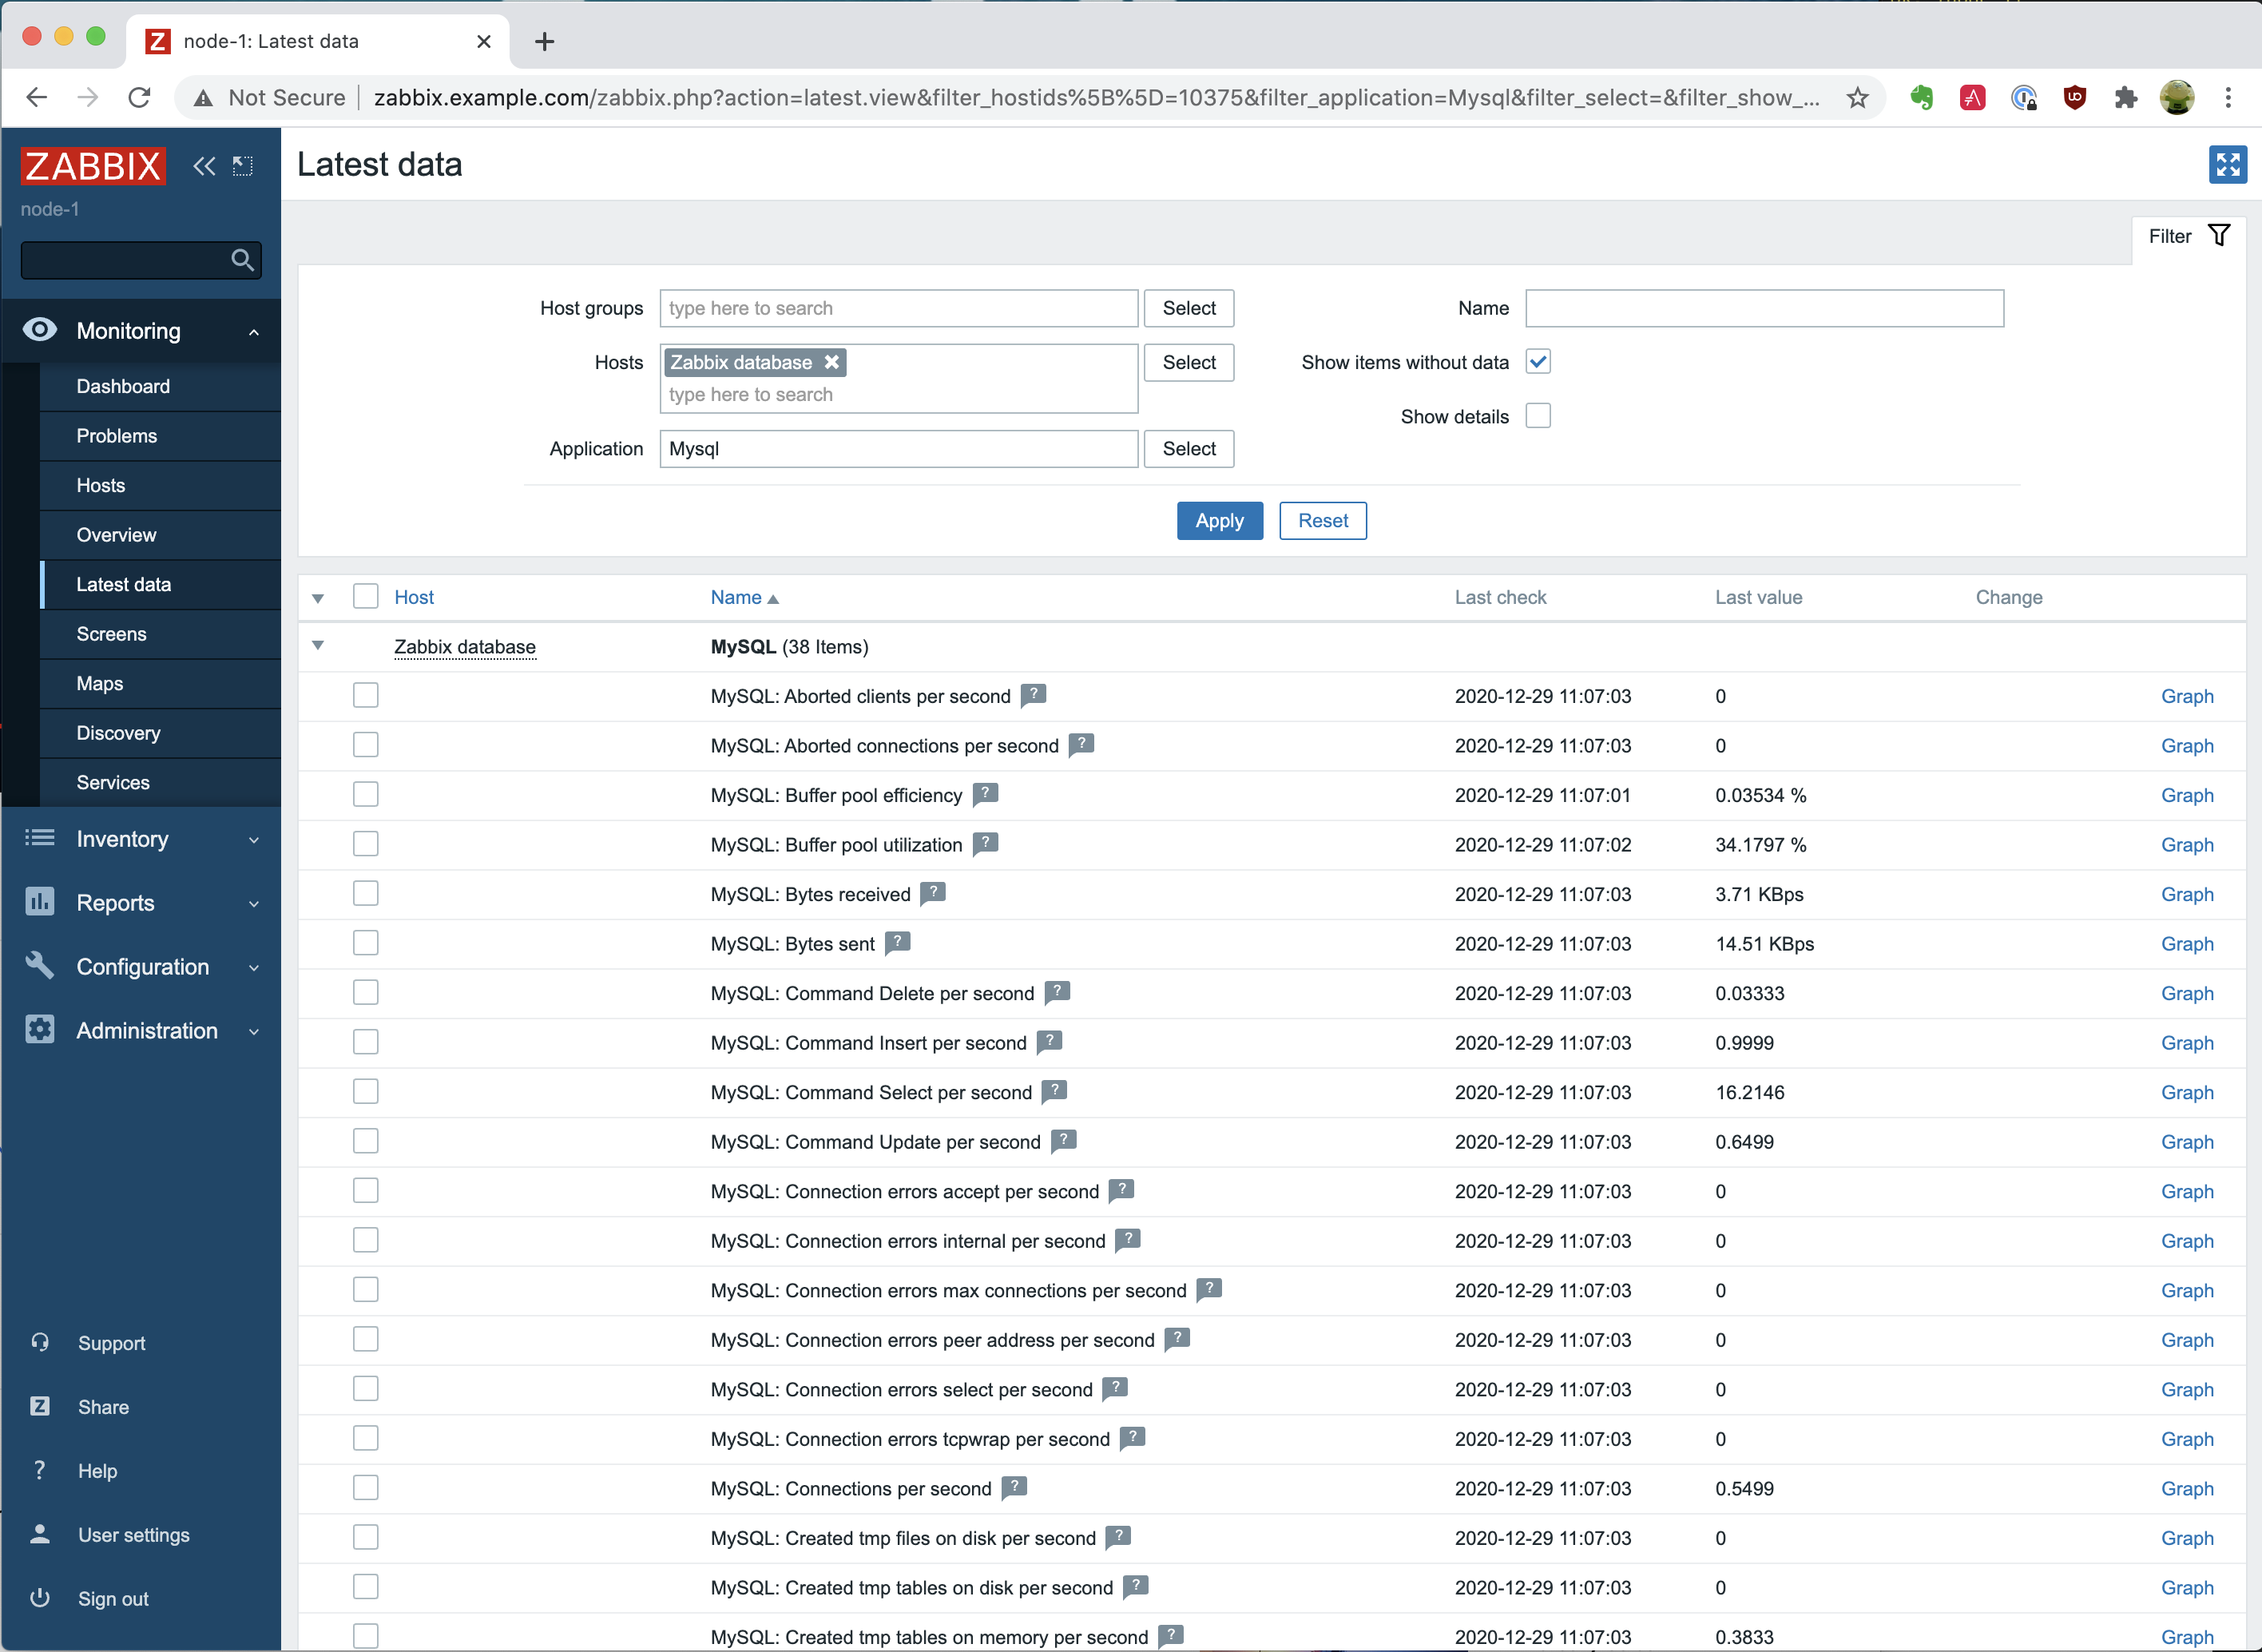
We should verify that we have some data, so go to “Monitoring” and click on “Latest data.” We select in the Host form field the “Zabbix database,” and we select “MySQL” as Application and click on “Apply.” If everything is right, it should provide us with some information and values, just like the following screenshot. If not, please wait a few minutes and try again.

Summary

This is the end of a 3 part blog post in creating a fully working Zabbix environment with a Zabbix Server, Proxy, and Agent. With these 3 blogposts you were able to see how you can install and configure a complete Zabbix environment with Ansible. Keep in mind that the code shown was for demo purposes and it is not something you can immediately use for the Production environment. We also used some of the available functionality of the Ansible collection for Zabbix, there are many more possibilities like creating a maintenance period or a discovery rule. Not everything is possible, if you do miss a task or functionality of a role that Ansible should do or configure, please create an issue on Github so we can make it happen.

Don’t forget to execute the following command:

$ vagrant destroy -f

With this, we clean up our environment and delete our 4 nodes, thus finishing with the task at hand!

Swing into action with an homage to Pitfall! | Wireframe #48

Post Syndicated from Ryan Lambie original https://www.raspberrypi.org/blog/swing-into-action-with-an-homage-to-pitfall-wireframe-48/

Grab onto ropes and swing across chasms in our Python rendition of an Atari 2600 classic. Mark Vanstone has the code

Whether it was because of the design brilliance of the game itself or because Raiders of the Lost Ark had just hit the box office, Pitfall Harry became a popular character on the Atari 2600 in 1982.

His hazardous attempts to collect treasure struck a chord with eighties gamers, and saw Pitfall!, released by Activision, sell over four million copies. A sequel, Pitfall II: The Lost Caverns quickly followed the next year, and the game was ported to several other systems, even making its way to smartphones and tablets in the 21st century.

Pitfall

Designed by David Crane, Pitfall! was released for the Atari 2600 and published by Activision in 1982

The game itself is a quest to find 32 items of treasure within a 20-minute time limit. There are a variety of hazards for Pitfall Harry to navigate around and over, including rolling logs, animals, and holes in the ground. Some of these holes can be jumped over, but some are too wide and have a convenient rope swinging from a tree to aid our explorer in getting to the other side of the screen. Harry must jump towards the rope as it moves towards him and then hang on as it swings him over the pit, releasing his grip at the other end to land safely back on firm ground.

For this code sample, we’ll concentrate on the rope swinging (and catching) mechanic. Using Pygame Zero, we can get our basic display set up quickly. In this case, we can split the background into three layers: the background, including the back of the pathway and the tree trunks, the treetops, and the front of the pathway. With these layers we can have a rope swinging with its pivot point behind the leaves of the trees, and, if Harry gets a jump wrong, it will look like he falls down the hole in the ground. The order in which we draw these to the screen is background, rope, tree-tops, Harry, and finally the front of the pathway.

Now, let’s get our rope swinging. We can create an Actor and anchor it to the centre and top of its bounding box. If we rotate it by changing the angle property of the Actor, then it will rotate at the top of the Actor rather than the mid-point. We can make the rope swing between -45 degrees and 45 degrees by increments of 1, but if we do this, we get a rather robotic sort of movement. To fix this, we add an ‘easing’ value which we can calculate using a square root to make the rope slow down as it reaches the extremes of the swing.

Our homage to the classic Pitfall! Atari game. Can you add some rolling logs and other hazards?

Our Harry character will need to be able to run backwards and forwards, so we’ll need a few frames of animation. There are several ways of coding this, but for now, we can take the x coordinate and work out which frame to display as the x value changes. If we have four frames of running animation, then we would use the %4 operator and value on the x coordinate to give us animation frames of 0, 1, 2, and 3. We use these frames for running to the right, and if he’s running to the left, we just mirror the images. We can check to see if Harry is on the ground or over the pit, and if he needs to be falling downward, we add to his y coordinate. If he’s jumping (by pressing the SPACE bar), we reduce his y coordinate.

We now need to check if Harry has reached the rope, so after a collision, we check to see if he’s connected with it, and if he has, we mark him as attached and then move him with the end of the rope until the player presses the SPACE bar and he can jump off at the other side. If he’s swung far enough, he should land safely and not fall down the pit. If he falls, then the player can have another go by pressing the SPACE bar to reset Harry back to the start.

That should get Pitfall Harry over one particular obstacle, but the original game had several other challenges to tackle – we’ll leave you to add those for yourselves.

Pitfall Python code

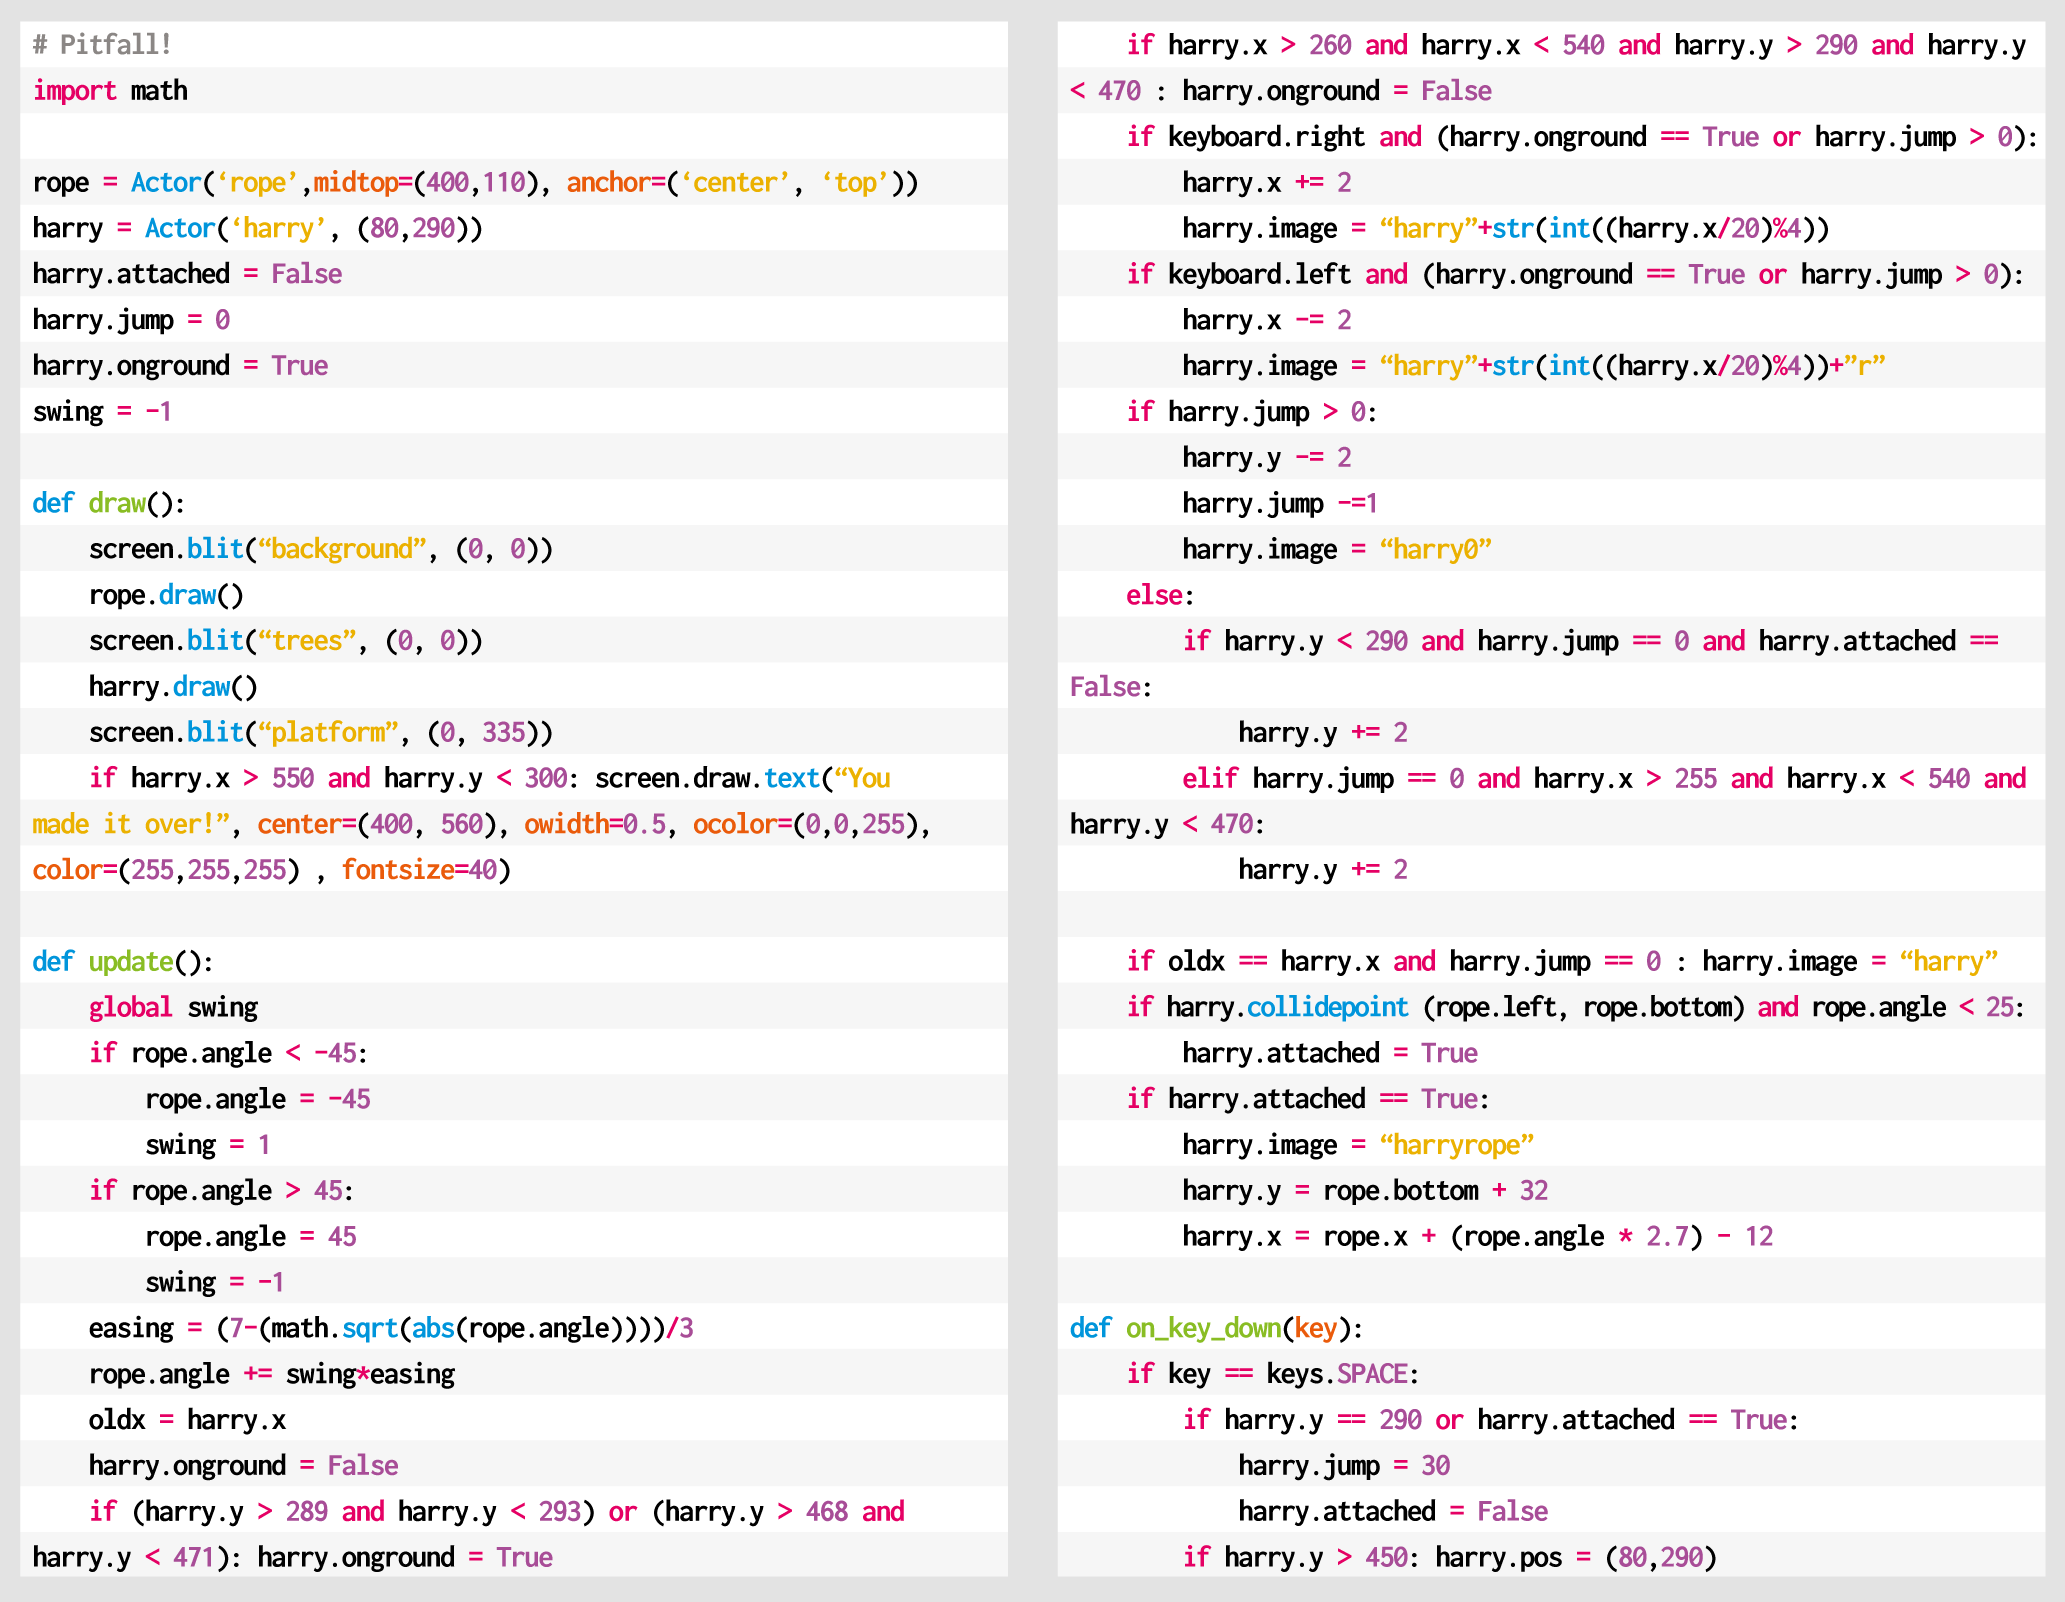
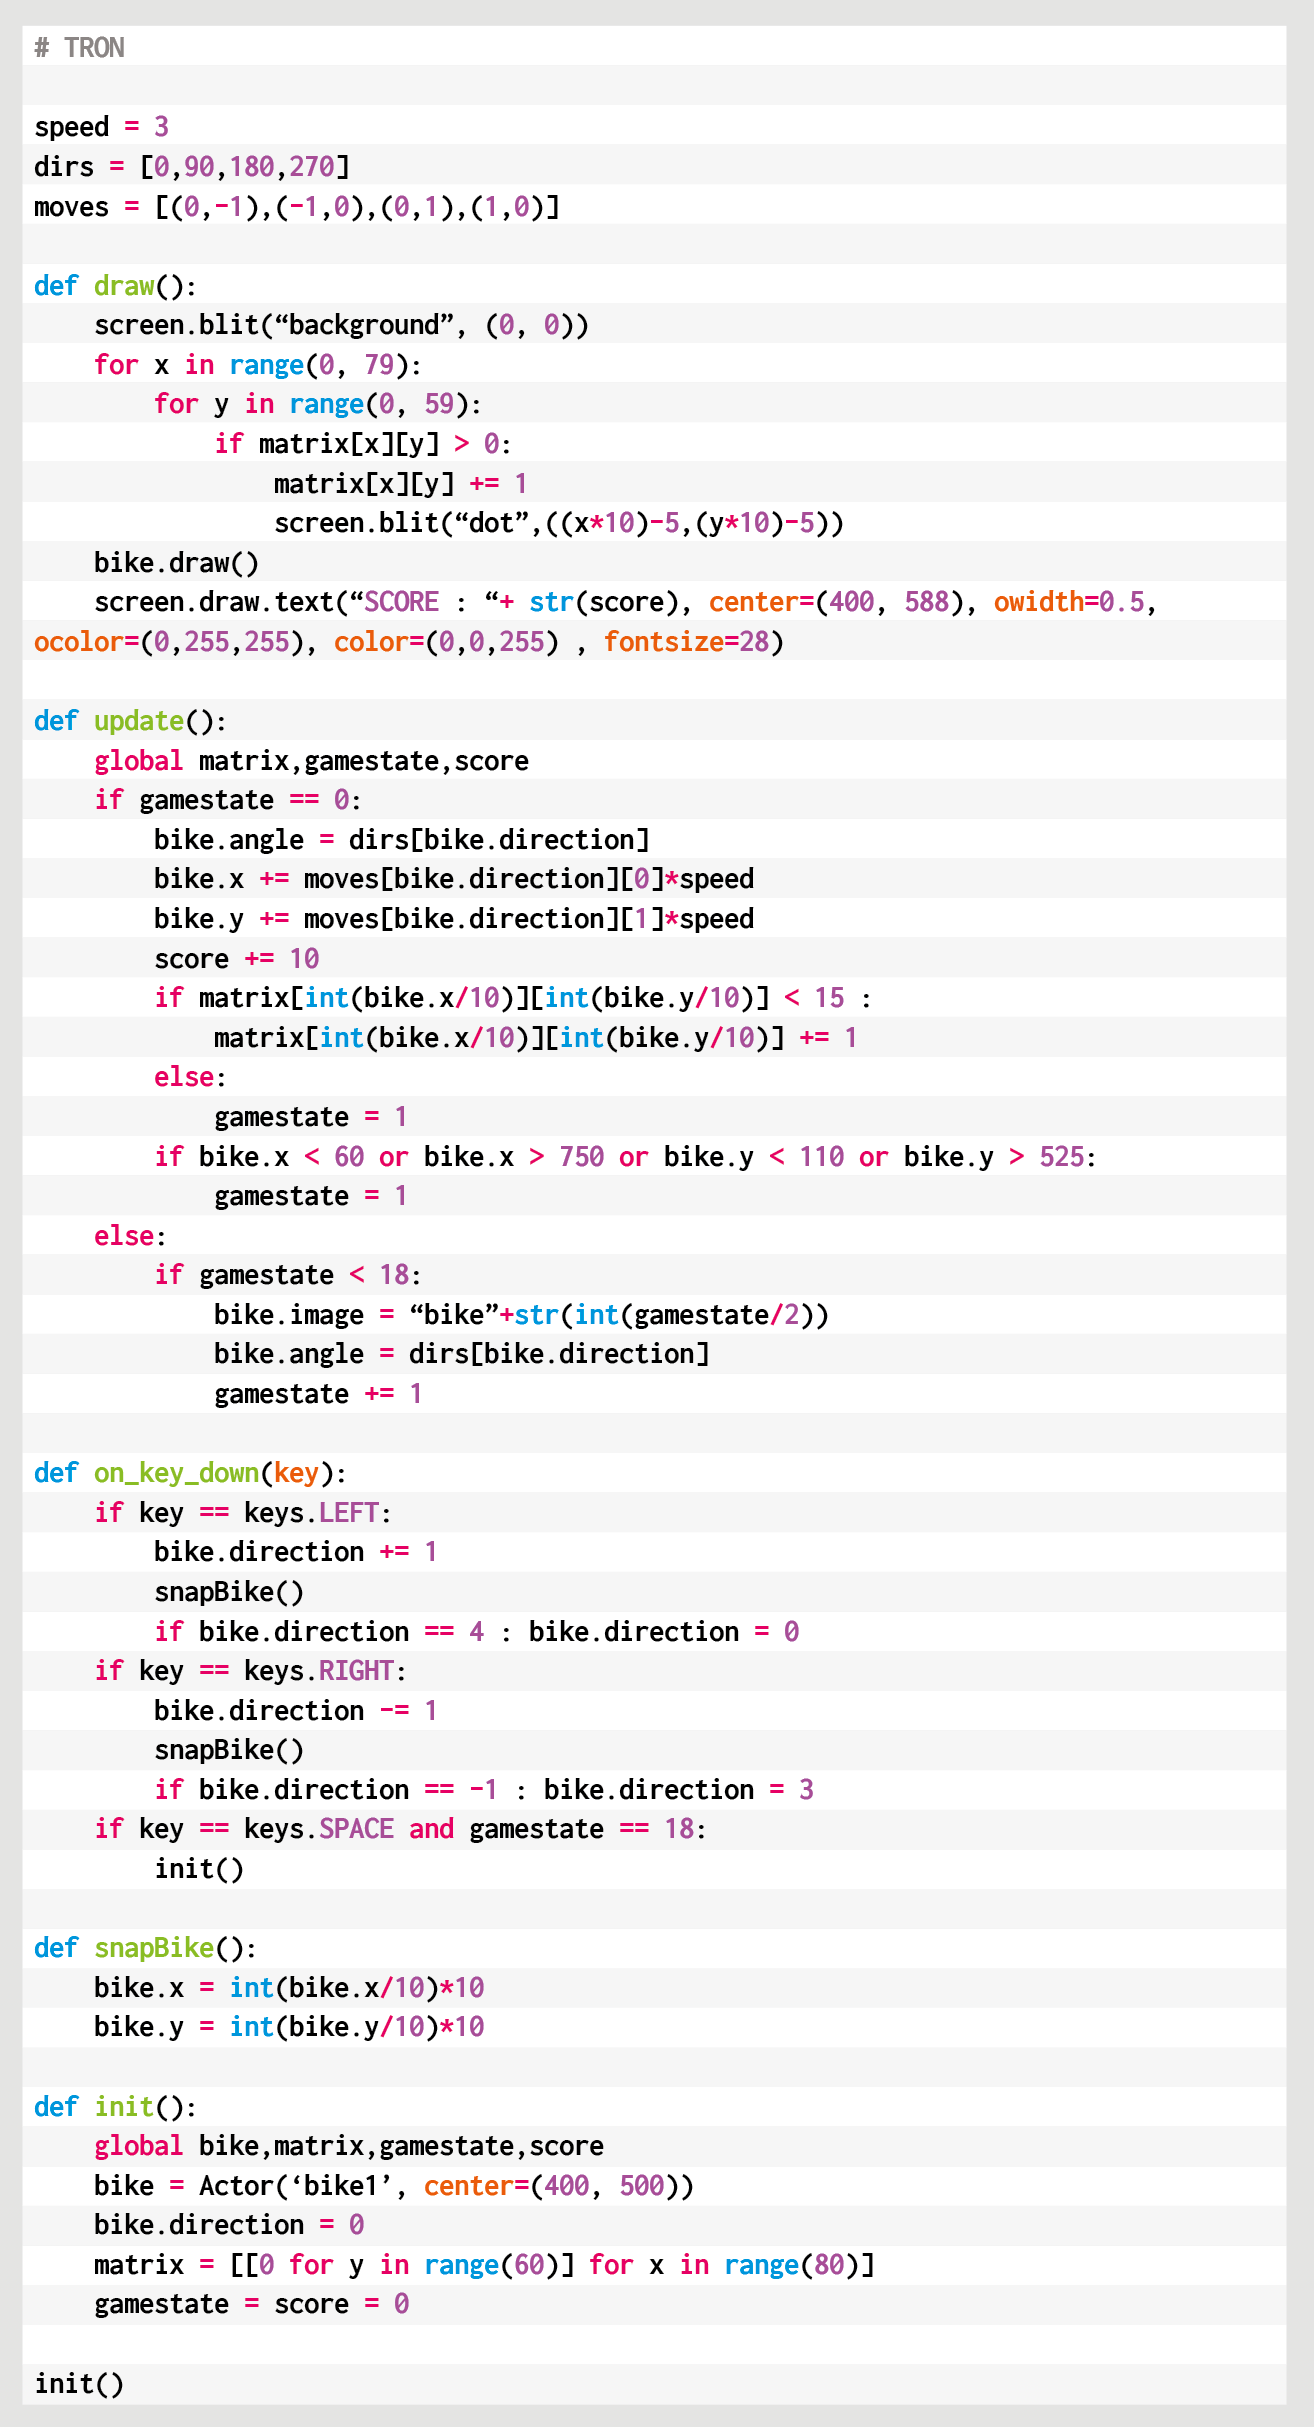
Here’s Mark’s code for a Pitfall!-style platformer. To get it working on your system, you’ll need to  install Pygame Zero.  And to download the full code and assets, head here.

Get your copy of Wireframe issue 48

You can read more features like this one in Wireframe issue 48, available directly from Raspberry Pi Press — we deliver worldwide.
Wireframe issue 48
And if you’d like a handy digital version of the magazine, you can also download issue 48 for free in PDF format.
A banner with the words "Be a Pi Day donor today"

The post Swing into action with an homage to Pitfall! | Wireframe #48 appeared first on Raspberry Pi.

Installing and configuring the Zabbix Proxy

Post Syndicated from Werner Dijkerman original https://blog.zabbix.com/installing-and-configuring-the-zabbix-proxy/13319/

In the previous blog post, we created a Zabbix Server setup, created several users, a media type, and an action. But today, we will install on a 3rd node the Zabbix Proxy. This Zabbix Proxy will have its database running on the same host, so the “node-3” host has both the MySQL and Zabbix Proxy running.

This blog post is the 2nd part of a 3 part series of blog posts where Werner Dijkerman gives us an example of how to set up your Zabbix infrastructure by using Ansible.
You can find part 1 of the blog post by clicking Here

A git repository containing the code of these blog posts is available, which can be found on https://github.com/dj-wasabi/blog-installing-zabbix-with-ansible. Before we run Ansible, we have opened a shell on the “bastion” node. We do that with the following command:

$ vagrant ssh bastion

Once we have opened the shell, go to the “/ansible” directory where we have all of our Ansible files present.

$ cd /ansible

With the previous blog post, we executed the “zabbix-server.yml” playbook. Now we use the “zabbix-proxy.yml” playbook. The playbook will deploy a MySQL database on “node-3” and also installs the Zabbix Proxy on the same host.

$ ansible-playbook -i hosts zabbix-proxy.yml

This playbook will run for a few minutes creating all services on the node. While it is running, we will explain some of the configuration options we have set.

The configuration which we will talk about can be found in “/ansible/group_vars/zabbix_proxy” directory. This is the directory that is only used when we deploy the Zabbix proxy and contains 2 files. 1 file called “secret”, and a file called “generic”. It doesn’t really matter what names the files have in this directory. I used a file called the “secret” for letting you know that this file contains secrets and should be encrypted with a tool like ansible-vault. As this is out of scope for this blog, I simply made sure the file is in plain text. So how do we know that this directory is used for the Zabbix Proxy node?

In the previous blog post, we mentioned that with the “-I” argument, we provided the location for the inventory file. This inventory file contains the hostnames and the groups that Ansible is using. If we open the inventory file “hosts”, we can see a group called “zabbix_proxy.” So Ansible uses the information in the “/ansible/group_vars/zabbix_proxy” directory as input for variables. But how does the “/ansible/zabbix-proxy.yml” file know which host or groups to use? At the beginning of this file, you will notice the following:

- hosts: zabbix_proxy
  become: true
  collections:
    - community.zabbix

Here you will see the that “hosts” key contains the value “zabbix_proxy”. All tasks and roles that we have configured in this play will be applied to all of the hosts that are part of the zabbix_proxy group. In our case, we have only 1 host part of the group. If you would have for example 4 different datacenters and within each datacenter you want to have a Zabbix Proxy running, executing this playbook will be done on these 4 hosts and at the end of the run you would have 4 Zabbix Proxy servers running.

Within the “/ansible/group_vars/zabbix_proxy/generic” the file, we have several options configured. Let’s discuss the following options:

* zabbix_server_host
* zabbix_proxy_name
* zabbix_api_create_proxy
* zabbix_proxy_configfrequency

zabbix_server_host

The first one, the “zabbix_server_host” property tells us where the Zabbix Proxy can find the Zabbix Server. This will allow the Zabbix Proxy and the Zabbix Server to communicate with each other. Normally you would have to configure the firewall (Iptables or Firewalld) as well to allow the traffic, but in this case, there is no need for that. Everything inside our environment which we have created with Vagrant has full access. When you are going to deploy a production-like environment, don’t forget to configure the firewall (Currently this configuration of the firewalls are not yet available as part of the Ansible Zabbix Collection for both the Zabbix Server and the Zabbix Proxy. So for now you should be creating a playbook in order to configure the local firewall to allow/deny traffic).

As you will notice, we didn’t configure the property with a value like an IP address or FQDN. We use some Ansible notation to do that for us, so we only have the Zabbix Server information in one place instead of multiple places. In this case, Ansible will get the information by reading the inventory file and looking for a host entry with the name “node-1” (Which is the hostname that is running the Zabbix Server), and we use the value found by the property named “ansible_host” (Which has a value “10.10.1.11”).

zabbix_proxy_name

This is the name of the Zabbix Proxy host, which will be shown in the Zabbix frontend. We will see this later in this blog when we will create a new host to be monitored. When you create a new host, you can configure if that new host should be monitored by a proxy and if so, you will see this name.

zabbix_api_create_proxy

When we deploy the Zabbix Proxy role, we will not only install the Zabbix Proxy package, the configuration file and start the service. We also perform an API call to the Zabbix Server to create a Zabbix Proxy entry. With this API call, we can configure hosts to be monitored via this new Zabbix Proxy.

zabbix_proxy_configfrequency

The last one is just for demonstration purposes. With a default installation/configuration of the Zabbix Proxy, it has a basic value of 3600. This means that the Zabbix Server sends the configuration every 3600 to the Zabbix Proxy. Because we are running a small demo here in this Vagrant setup, we have set this to 60 seconds.

Now the deployment of our Zabbix Proxy will be ready.

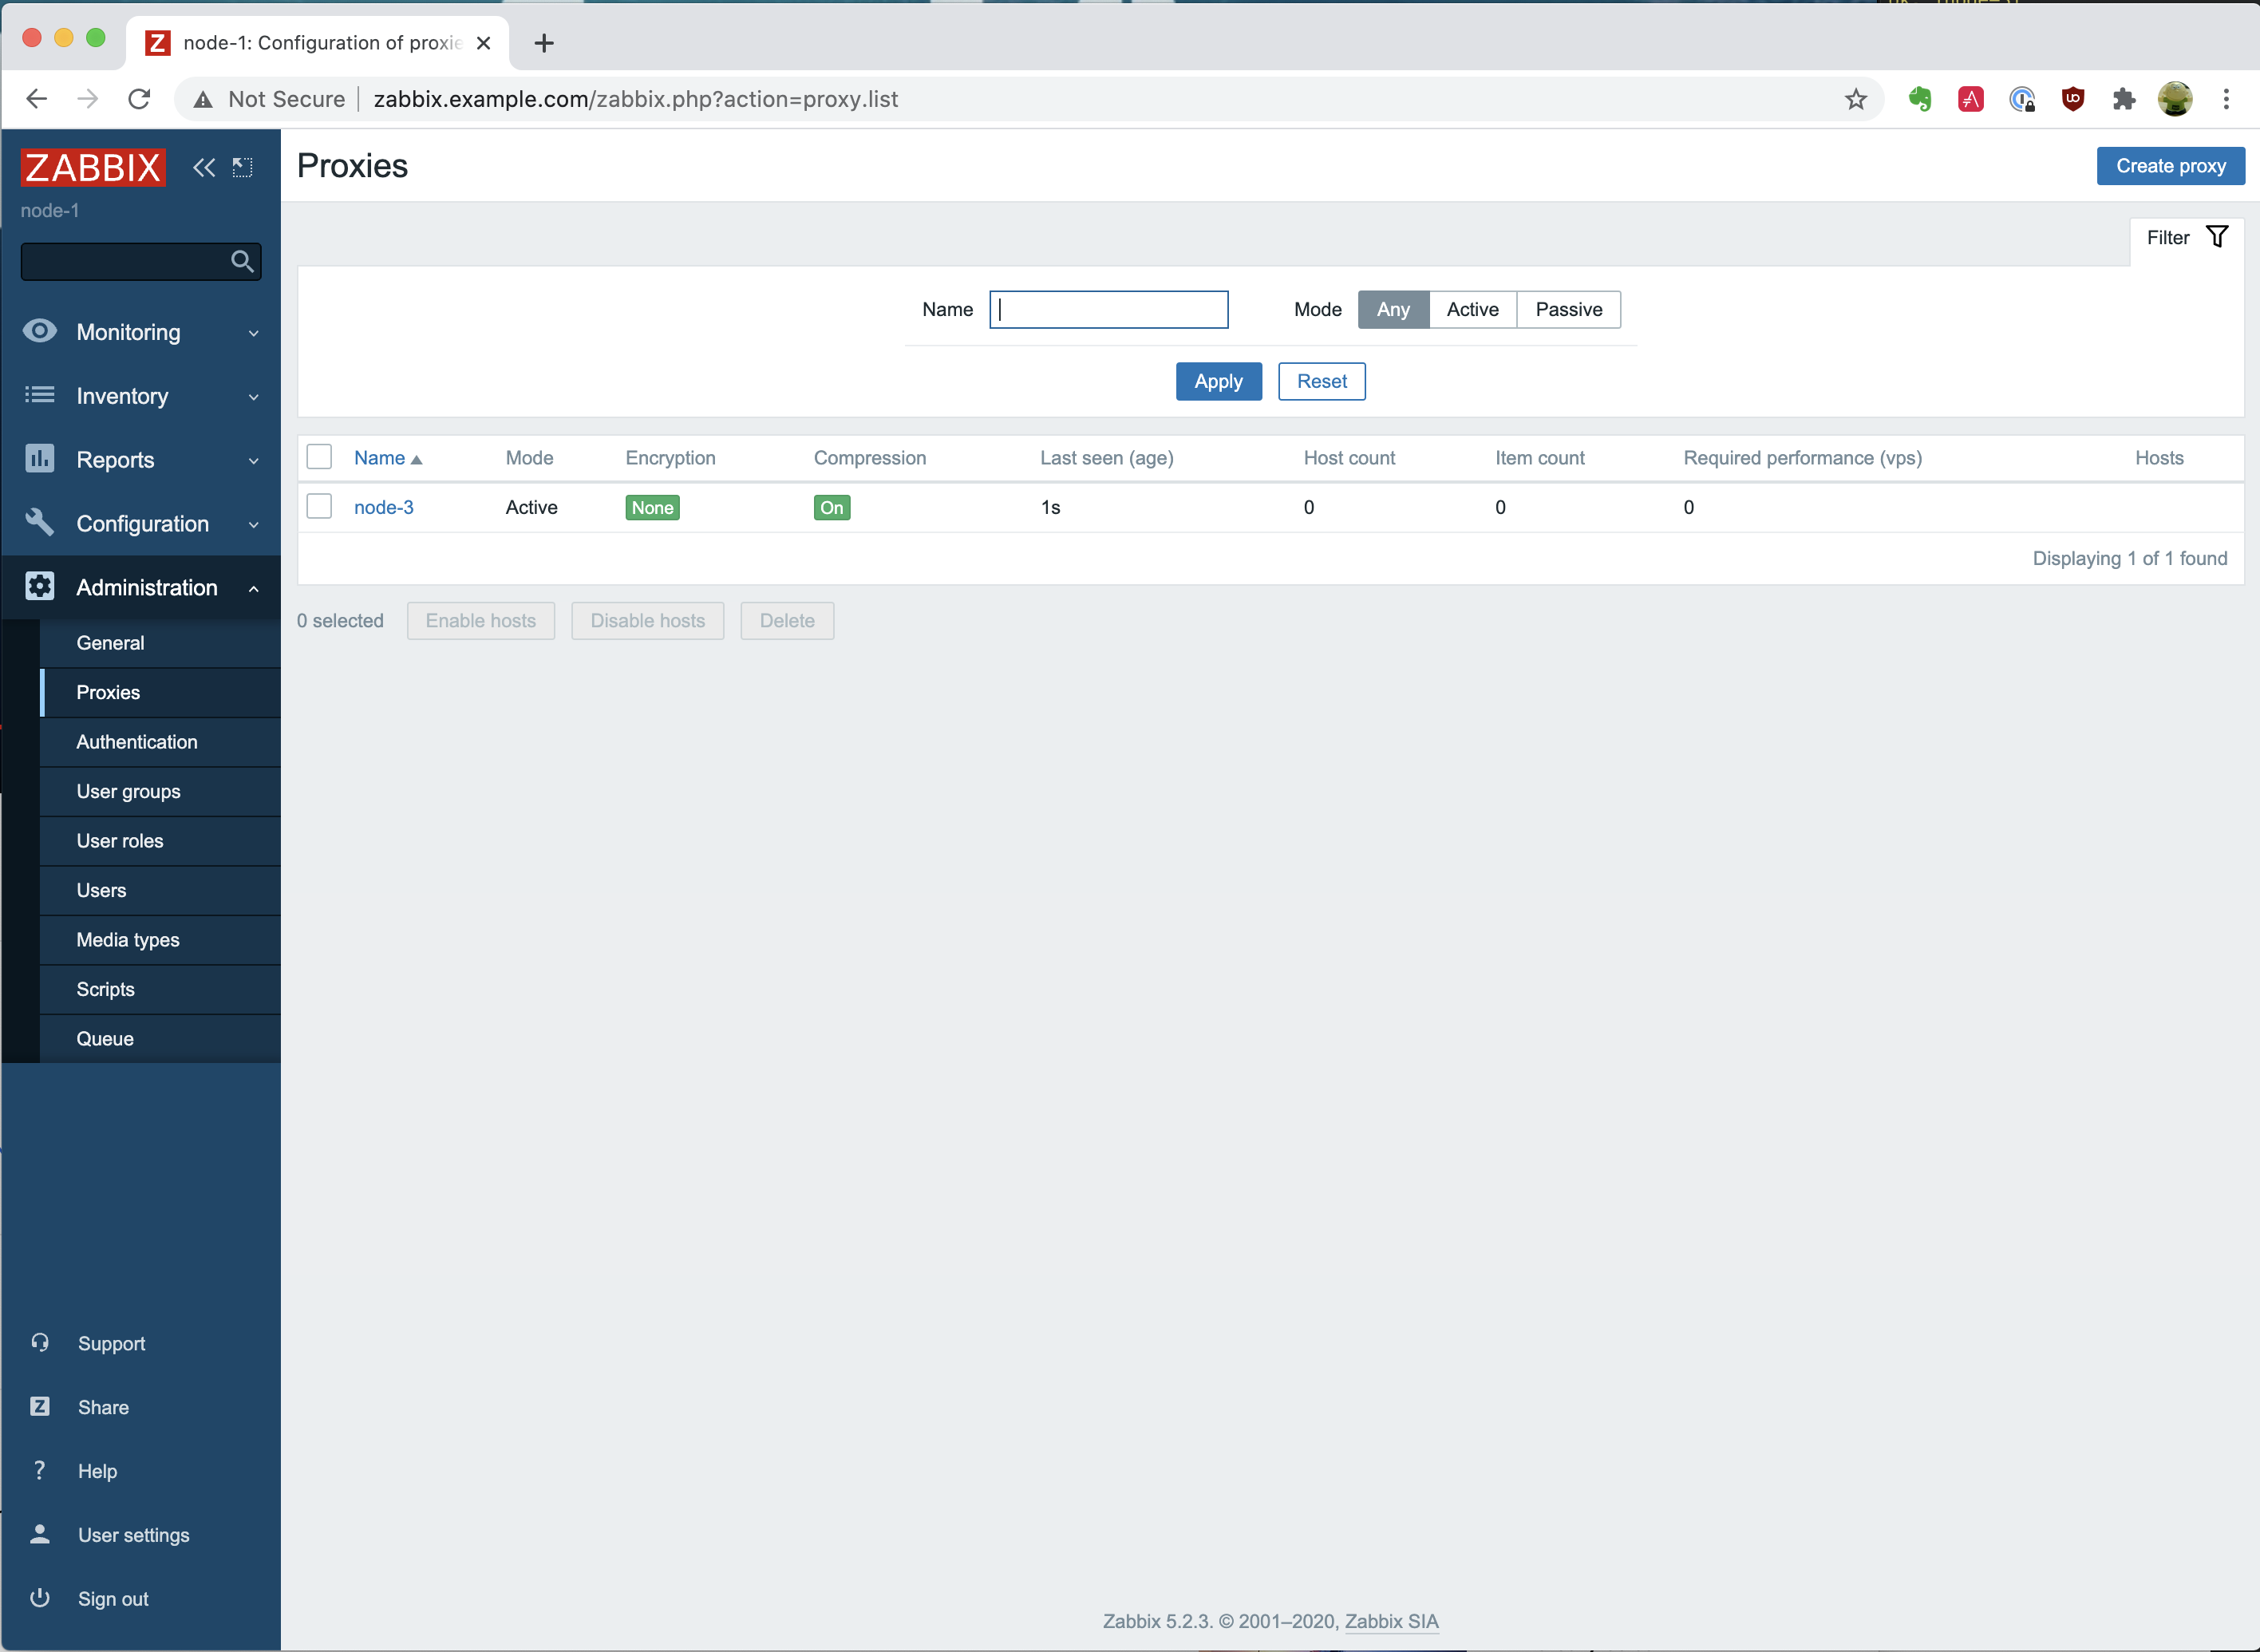
When we open the Zabbix Web interface again, we go to “Administration” and click on “Proxies”. Here we see the following:

We see an overview of all proxies available, and in our case, we only have 1. We have “node-3” configured, which has an “Active” mode. When you want to configure a “Passive” mode proxy, you’ll have to update the “/ansible/group_vars/zabbix_proxy” file and add somewhere in the file the following entry: “zabbix_proxy_status: passive”. Once you have updated and saved the file, you’ll have to rerun the “ansible-playbook -i hosts zabbix-proxy.yml” command. If you will then recheck the page, you will notice that it now has the “Passive” mode.

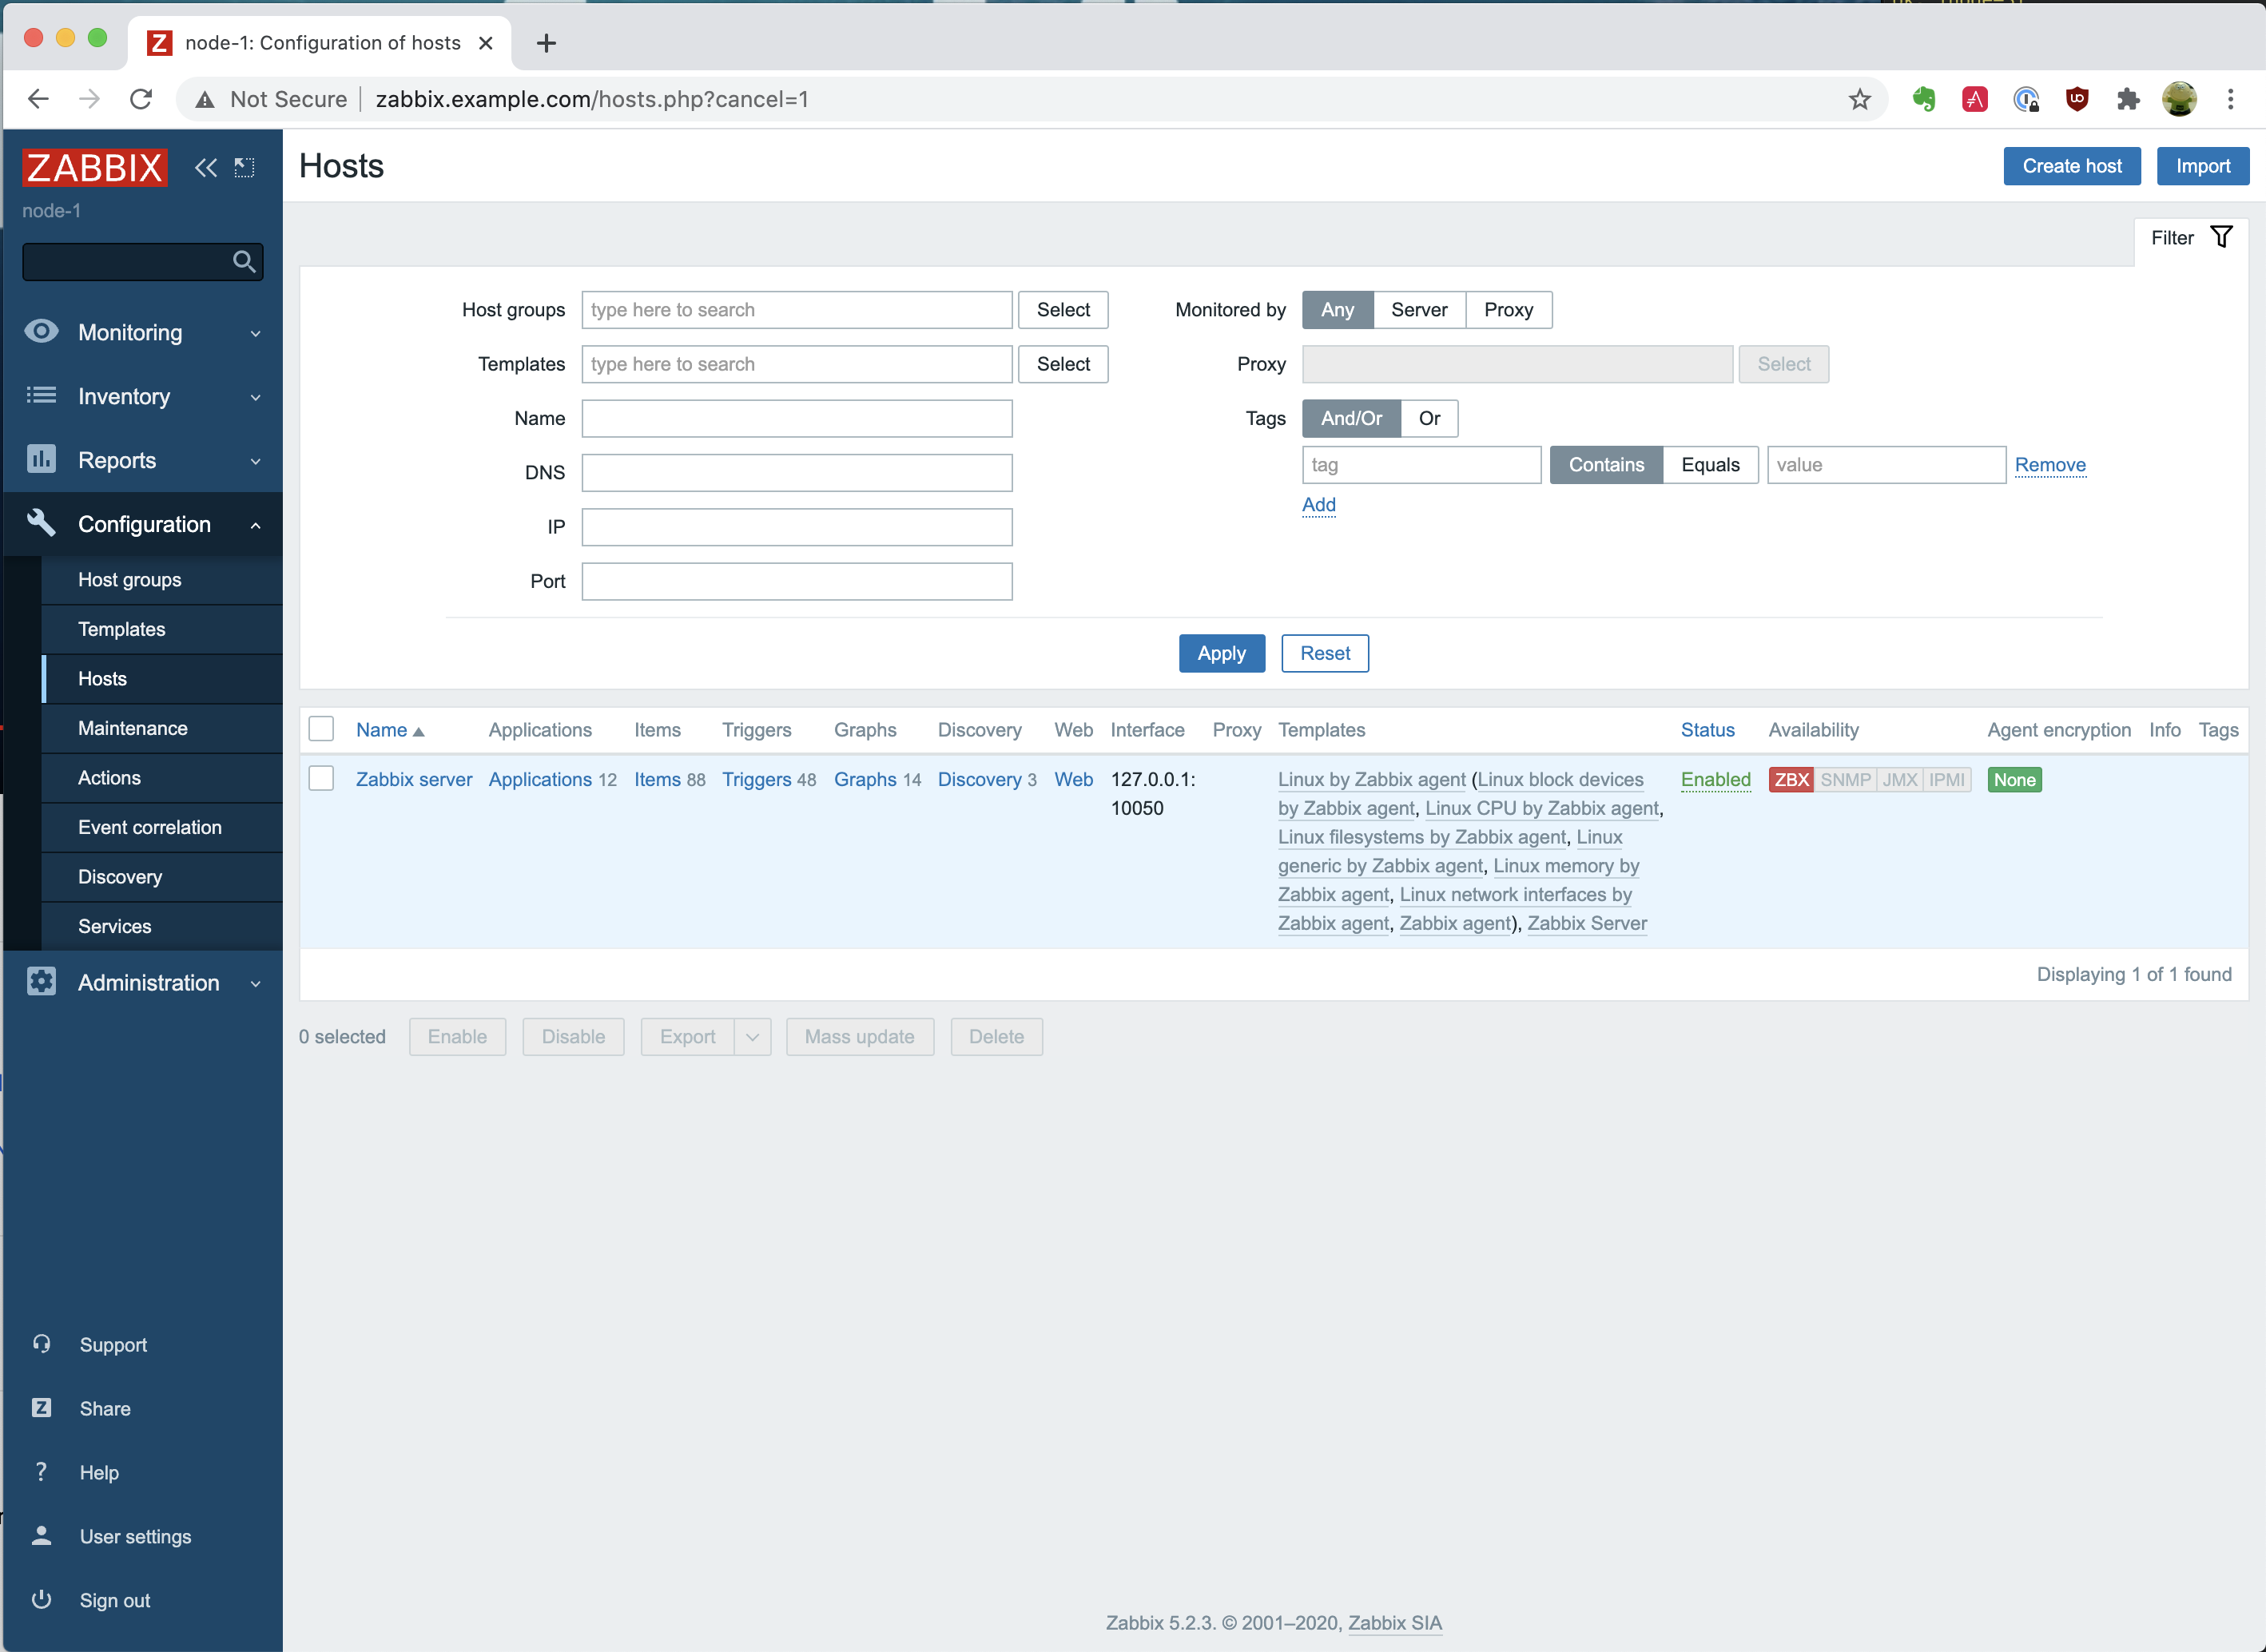
So let’s go to “Configuration” – “Hosts”. At the moment, you will only see 1 host, which is the “Zabbix server,” like in the following picture.

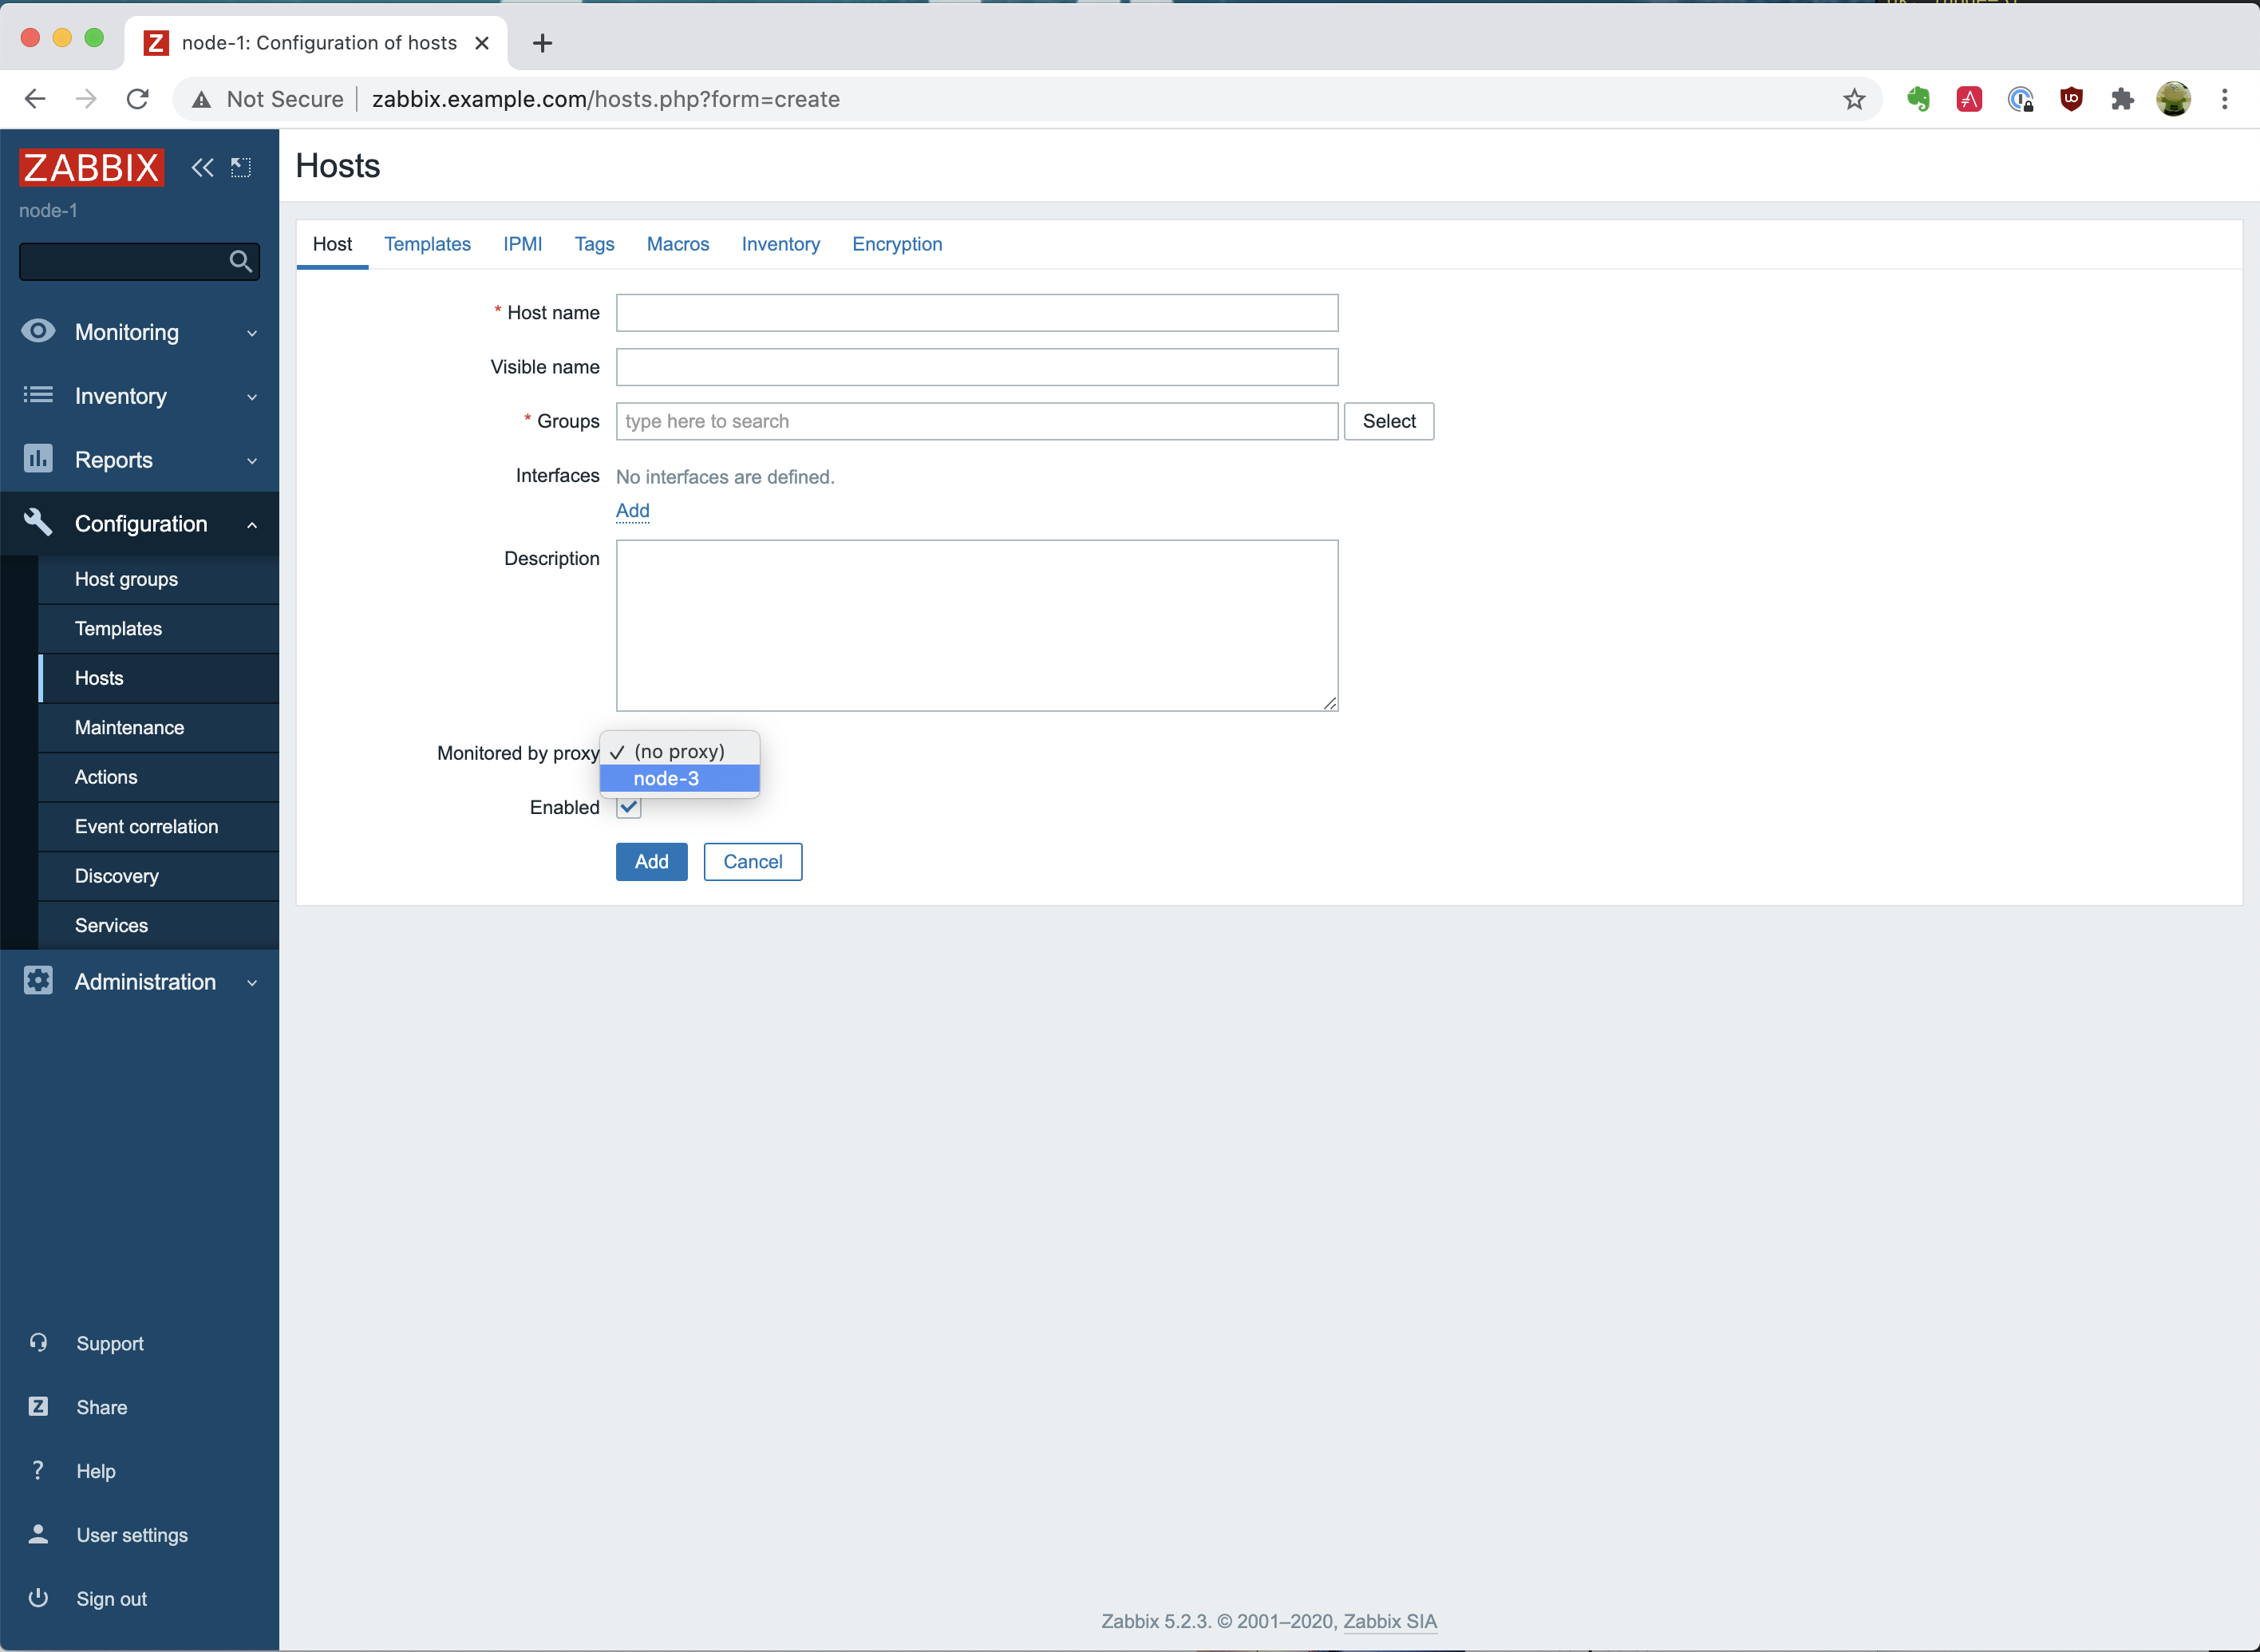
Let’s open the host creation page to demonstrate that you can now set the host to be monitored by a proxy. The actual creation of a host is something that we will do automatically when we deploy the Zabbix Agent with Ansible and not something we should do manually. 😉 As you will notice, you are able to click on the dropdown menu with the option “Monitored by proxy” and see the “node-3” appear. That is very good!
Summary

We have installed and configured both a Zabbix Server and a Zabbix Proxy, and we are all set now. With the Zabbix Proxy, we have installed both the MySQL database and the Zabbix Proxy on the same node. Whereas we did install them separately with the Zabbix Server. With the following blog post, we will go and install the Zabbix Agent on all nodes.

Installing the Zabbix Server with Ansible

Post Syndicated from Werner Dijkerman original https://blog.zabbix.com/installing-the-zabbix-server-with-ansible/13317/

Today we are focusing more on the automation of installation and software configuration instead of using the manual approach. Installing and configuring software the manual way takes a lot more time, you can easily make more errors by forgetting steps or making typos, and it will probably be a bit boring when you need to do this for a large number of servers.

In this blog post, I will demonstrate how to install and configure a Zabbix environment with Ansible. Ansible has the potential to simplify many of your day-to-day tasks. As an alternative to Ansible, you may also opt in to use Puppet, Chef, and SaltStack to install and configure your Zabbix environment.

Ansible does not have any specific infrastructure requirements for it to do its job. We just need to make sure that the user exists on the target host, preferably configured with SSH keys. With tools like Puppet or Chef, you need to have a server running somewhere, and you will need to deploy an agent on your nodes. You can learn more about Ansible here:  https://docs.ansible.com/ansible/latest/index.html.

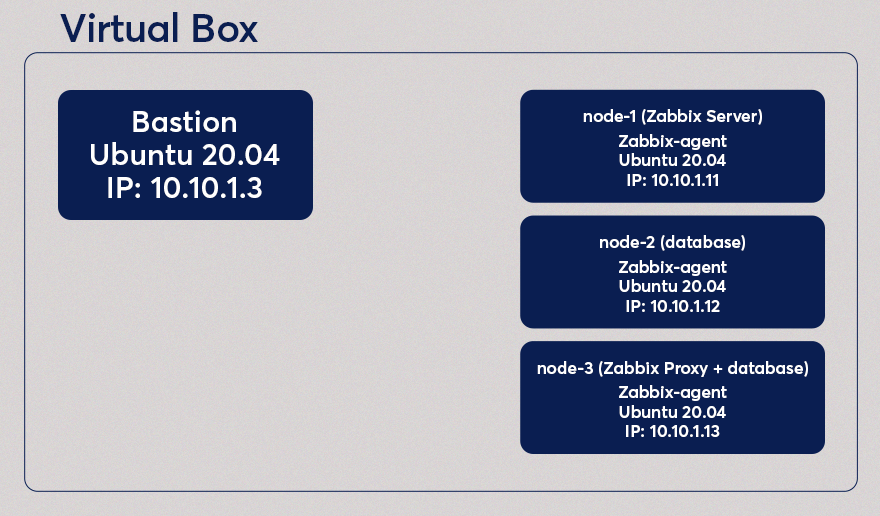
This post is the first in a series of three articles. We will set up a (MySQL) Database running on 1 node (“node-2”), Zabbix Server incl. Frontend, which will be running on a separate node (“node-1”). Once we have built this, we configure an action, media and we will create some users. In the following image you will see the environment we will create.

Our environment we will create.
The environment we will create.

In the 2nd blog post, we will set up a Zabbix Proxy and a MySQL database on a new but the same node (“node-3”). In the 3rd blog post, we will install the Zabbix Agent on all of the 3 nodes we were using so far and configure some user parameters. Where the Zabbix Agent on “node-3” is using the Zabbix Proxy, the Zabbix Agent on the nodes “node-1” and “node-2” will be monitored by the Zabbix Server.

Preparations

A git repository containing the code used in these blog posts is available, which can be found on https://github.com/dj-wasabi/blog-installing-zabbix-with-ansible. Before we can do anything, we have to install Vagrant (https://www.vagrantup.com/downloads.html) and Virtualbox (https://www.virtualbox.org/wiki/Downloads). Once you have done that, please clone the earlier mentioned git repository somewhere on your host. For this demo, we will not run the Zabbix Frontend with TLS certificates.

We have to update the hosts file. With the following line, we need to make sure that we can access the Zabbix Frontend.

10.10.1.11 zabbix.example.com

In the “ROOT” directory of the git repository which you cloned some moments ago, where you can also find the Vagrantfile, This Vagrantfile contains the configuration of the virtual machine of our setup. We will create 4 Virtual Machine’s running Ubuntu 20.04, each with 1 CPU and 1 GB of Ram which you can see in the first “config” block. In the 2nd config block, we configure our “bastion” host, which we discuss later. This node will get the ip 10.10.1.3 and we also mount the ansible directory in this Virtual Machine on location “/ansible”. For installing and configuring this node we will use a playbook bastion.yml to do this. With this playbook, we will install some packages like Python, git and Ansible inside this bastion virtual machine.

The 3rd config block is part of a loop that will configure and it will create 3 Virtual Machines. Each virtual machine is also an Ubuntu node, had its own ip (respectively 10.10.1.11 for the first node, 10.10.1.12 for the second and 10.10.1.13 for the 3rd node) and just like the “bastion” node, they have each 1 CPU and 1 GB of RAM.

You will have to execute the following command:

$ vagrant up

With this command, we will start our Virtual Machine’s. This might take a while, as it will download a VirtualBox image containing Ubuntu. The “vagrant up” command will start the “bastion” node and all other nodes as a part of this demo. Once that is done, we need to access a shell on the “bastion” node:

$ vagrant ssh bastion

This “bastion” node is a fundamental node on which we will execute Ansible, but we will not be installing anything on this host. We have opened a shell in the Virtual Machine we just created. You can compare it with creating an “ssh” connection. We have to go to the following directory before we can download the dependencies:

$ cd /ansible

As mentioned before, we have to download the Ansible dependencies. The installation depends on several Ansible Roles and an Ansible Collection. With the Ansible Roles and the Ansible Collection, we can install MySQL, Apache, and the Zabbix components. We have to execute the following command to download the dependencies:

$ ansible-galaxy install -r requirements.yml
Starting galaxy role install process
- downloading role 'mysql', owned by geerlingguy
- downloading role from https://github.com/geerlingguy/ansible-role-mysql/archive/3.3.0.tar.gz
- extracting geerlingguy.mysql to /home/vagrant/.ansible/roles/geerlingguy.mysql
- geerlingguy.mysql (3.3.0) was installed successfully
- downloading role 'apache', owned by geerlingguy
- downloading role from https://github.com/geerlingguy/ansible-role-apache/archive/3.1.4.tar.gz
- extracting geerlingguy.apache to /home/vagrant/.ansible/roles/geerlingguy.apache
- geerlingguy.apache (3.1.4) was installed successfully
- extracting wdijkerman.php to /home/vagrant/.ansible/roles/wdijkerman.php
- wdijkerman.php was installed successfully
Starting galaxy collection install process
Process install dependency map
Starting collection install process
Installing 'community.zabbix:1.2.0' to '/home/vagrant/.ansible/collections/ansible_collections/community/zabbix'
Created collection for community.zabbix at /home/vagrant/.ansible/collections/ansible_collections/community/zabbix
community.zabbix (1.2.0) was installed successfully

Your output may vary because of versions that might have been updated already since writing this blog post. We now have downloaded the dependencies and are ready to install the rest of our environment. But why do we need to download a role for MySQL, Apache and php? A role contains all the neccecerry tasks and files to configure that specific service. So in the case for the MySQL Ansible role, it will install the MySQL-server and all other packages that MySQL requires on the host, it will configure that the mysqld service is created and is running, but it will also create the databases, create and configure MySQL users and configure the root password. Using a role will help us install our environment and we don’t have to figure out ourselves on installing and configuring a MySQL server manually.

So what about the collection, the Ansible Community Zabbix Collection? Ansible has introduced this concept with Ansible 2.10 and is basically a “collection” of plugins, modules and roles for a specific service. In our case, with the Zabbix Collection, the collection contains the roles for installing the Zabbix Server, Proxy, Agent, Javagateway and the Frond-end. But it also contains a plugin to use a Zabbix environment as our inventory and contains modules for creating resources in Zabbix. All of these modules will work with the Zabbix API to configure these resources, like actions, triggers, groups. templates, proxies etc. Basically, everything we want to create and use can be done with a role or a collection.

Installing Zabbix Server

Now we can execute the following command, which will install the MySQL database on “node-2” and installs the Zabbix Server on “node-1”:

$ ansible-playbook -i hosts zabbix-server.yml

This might take a while, a minute, or 10 depending on the performance of your host. We execute the “ansible-playbook” command, and then “-i” we provide the location of the inventory file. Here you see the contents of the inventory file:

[zabbix_server]
node-1 ansible_host=10.10.1.11

[zabbix_database]
node-2 ansible_host=10.10.1.12

[zabbix_proxy]
node-3 ansible_host=10.10.1.13

[database:children]
zabbix_database
zabbix_proxy

This inventory file contains basically all of our nodes and to which group the hosts belong. We can see in that file that there is a group called “zabbix_server” (The value between [] square brackets is the name for the group) and contains the “node-1” host. Because we have a group called “zabbix_server,” we also have a directory containing some files. These are all the properties (or variables) that will be used for all hosts (in our case, only the “node-1”) in the “zabbix_server” group.

Web Interface

Now you can open your favorite browser and open “zabbix.example.com”, and you will see the Zabbix login screen. Please enter the default credentials:

Username: Admin
Password: zabbix

On the Dashboard, you will probably notice that it complains that it can not connect to the Zabbix Agent running on the Zabbix Server, which is fine as we haven’t  installed it yet. We will do this in a later blog post.

Dashboard overview

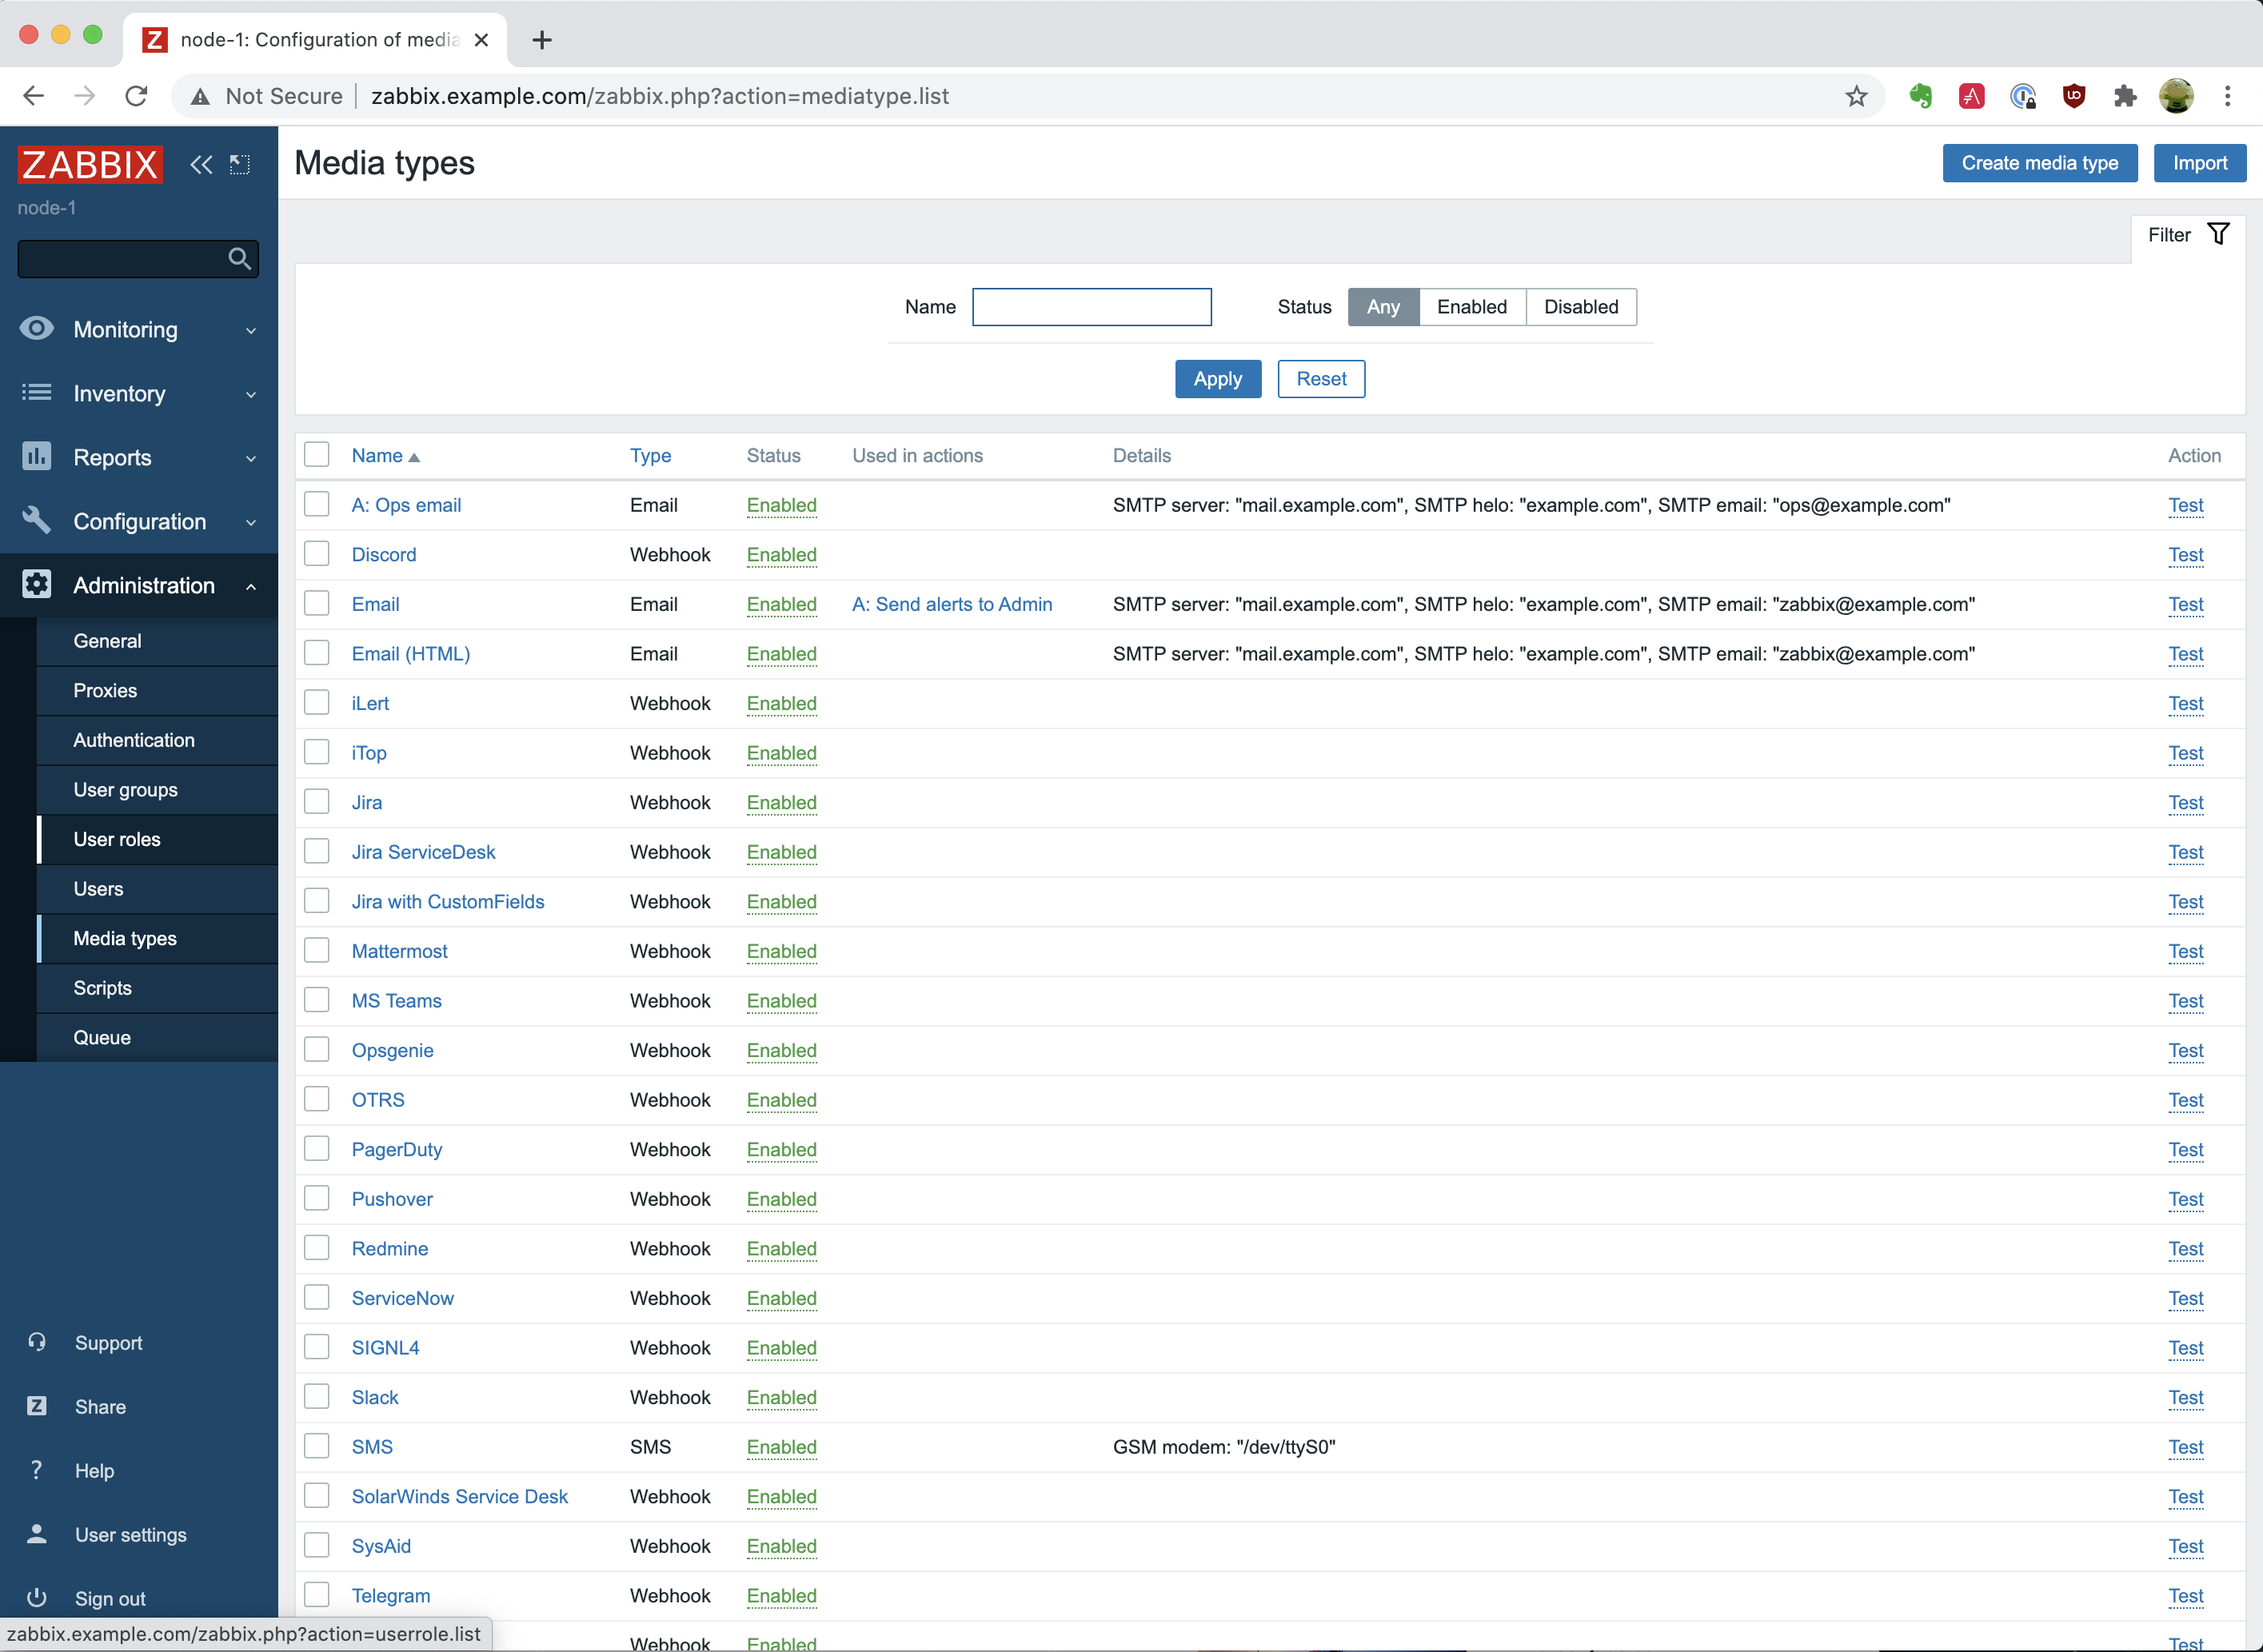
When we go to “Administration” and click on “Media types,” we will see a media type called “A: Ops email.” That is the one we have created. We can open the “/ansible/zabbix-server.yml” file and go to line 33, where we have configured the creation of the Mediatype. In this case, we have configured multiple templates for sending emails via the “mail.example.com” SMTP server.

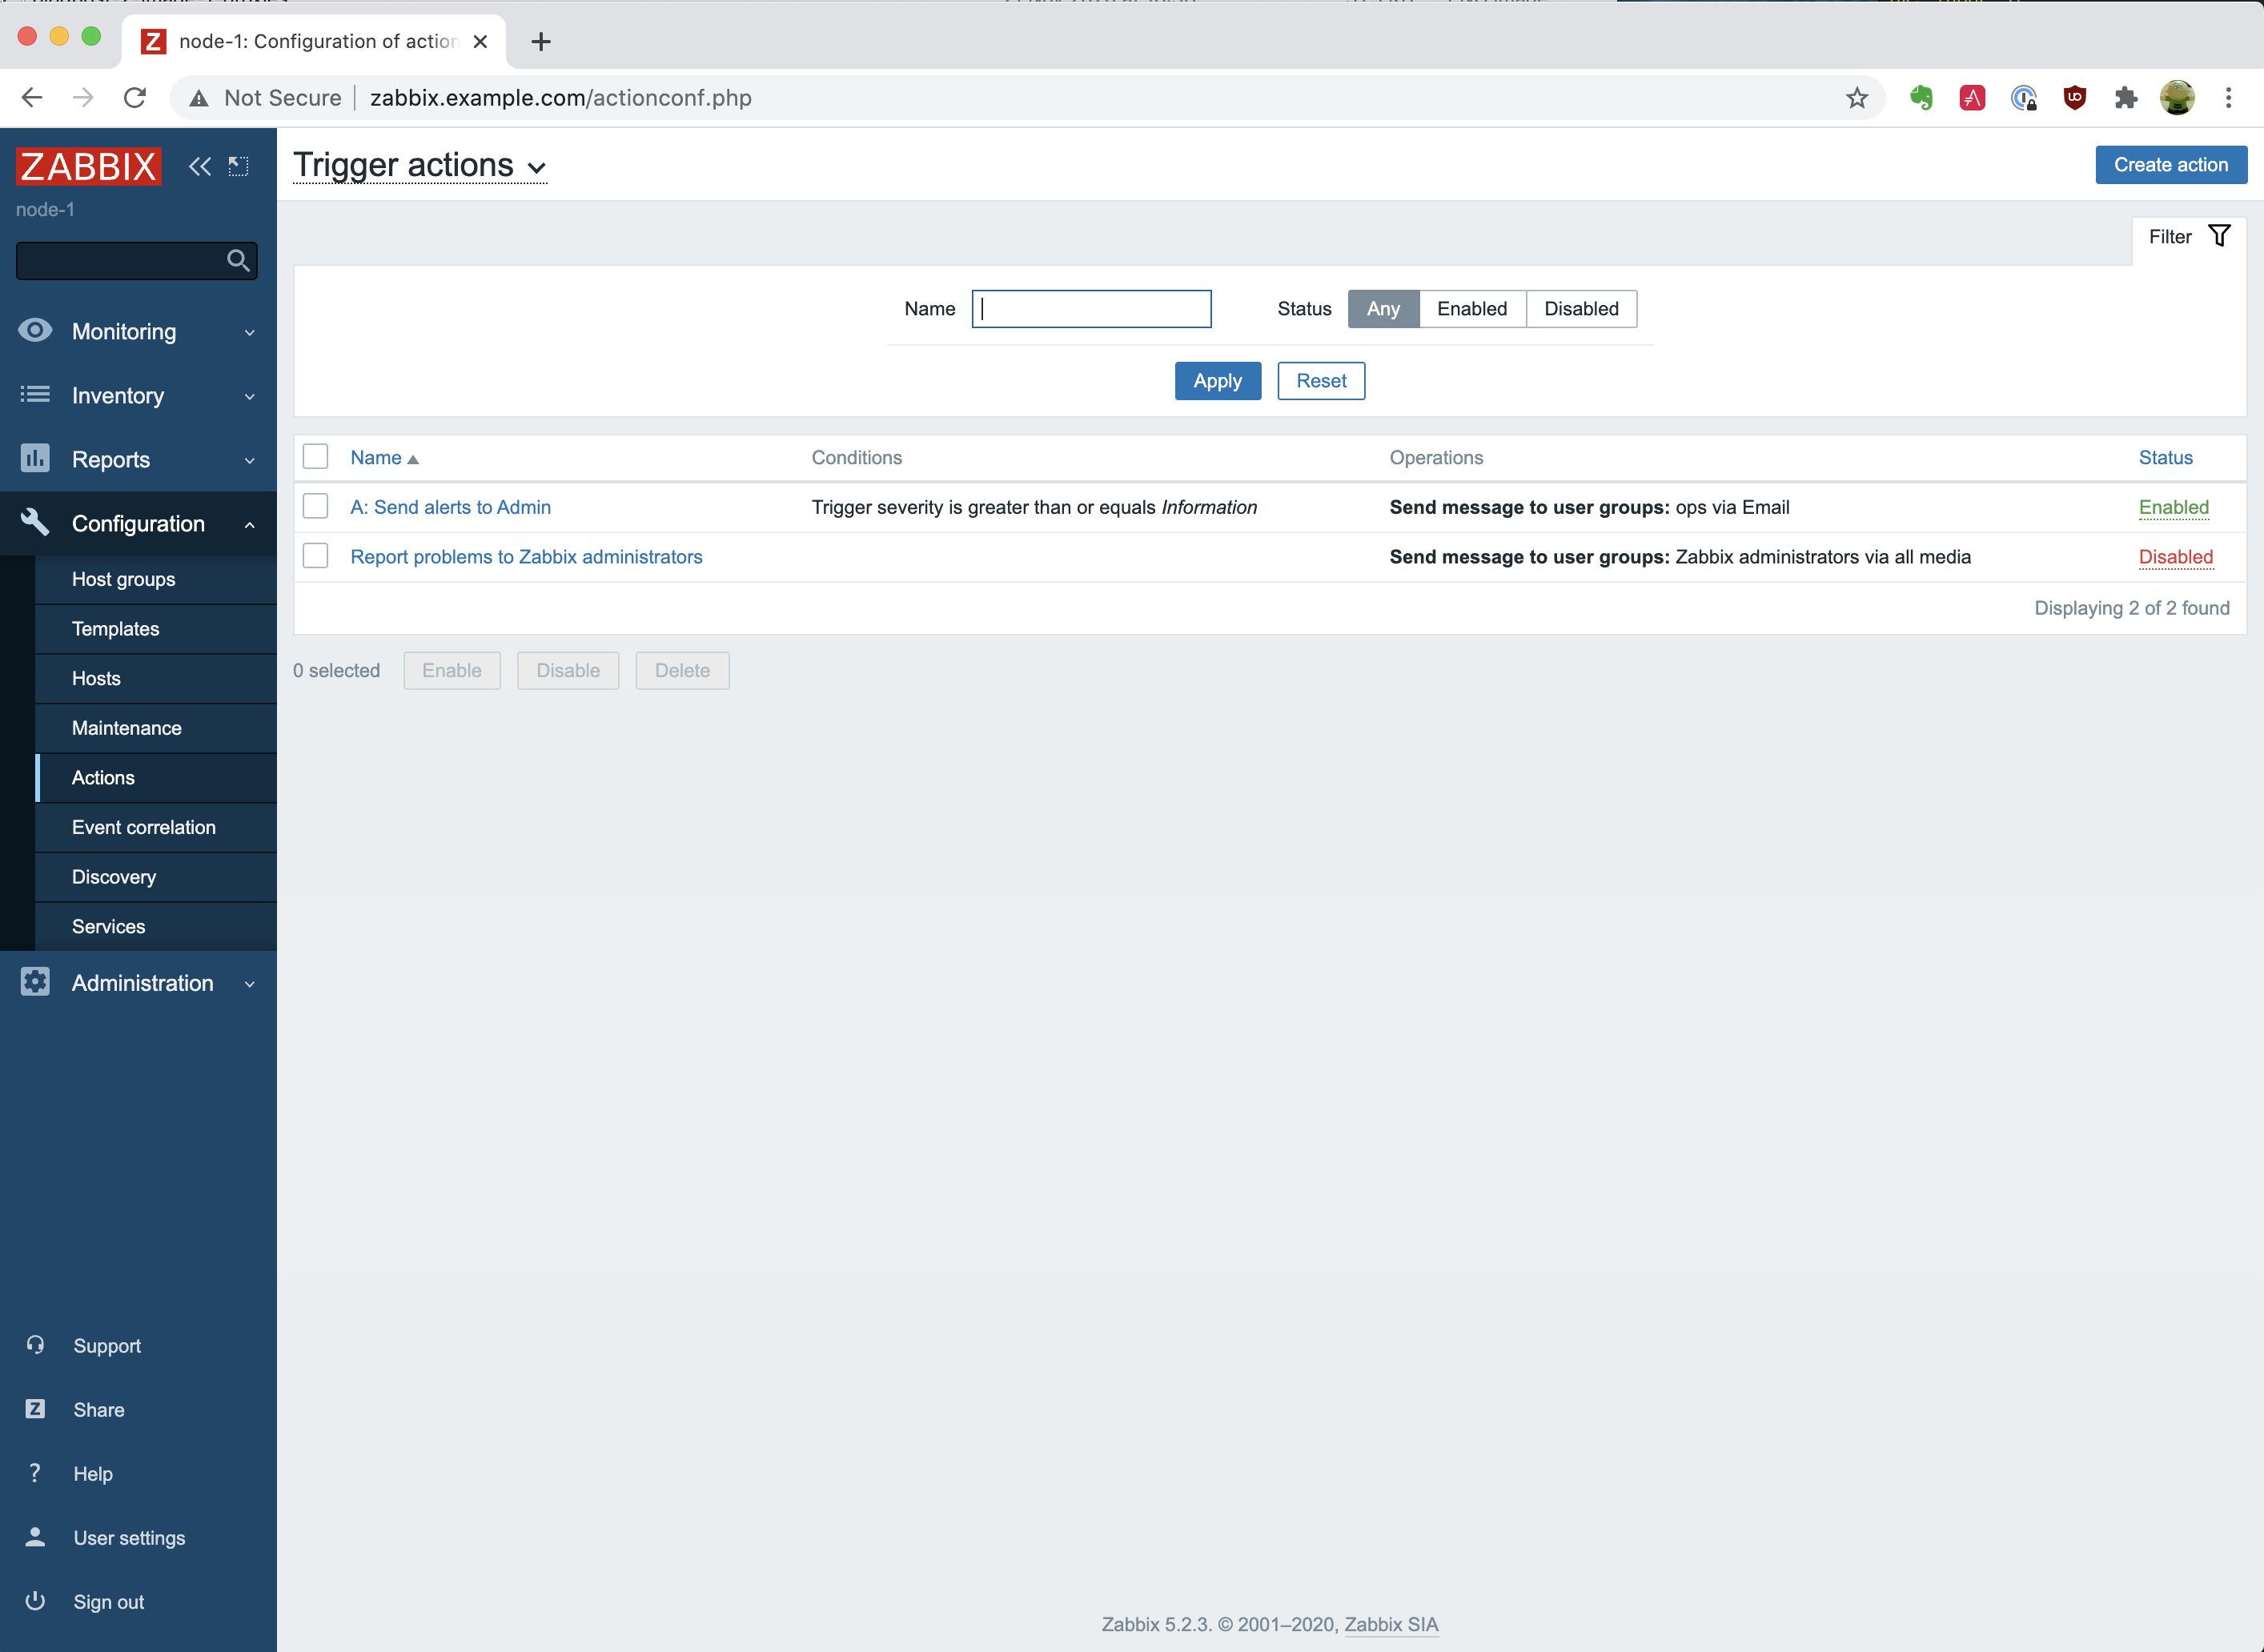
Now we have seen the media type, we will look at the trigger we just created. This trigger makes use of the media type we just saw. The trigger can be found in the “/ansible/zabbix-server.yml” file on line 69. When you go to “Configuration” and “Actions,” you will see our created trigger “A: Send alerts to Admin”. But we don’t want to run this in Production, and for demonstrating purposes, we have selected to be triggered when the severity is Information or higher.

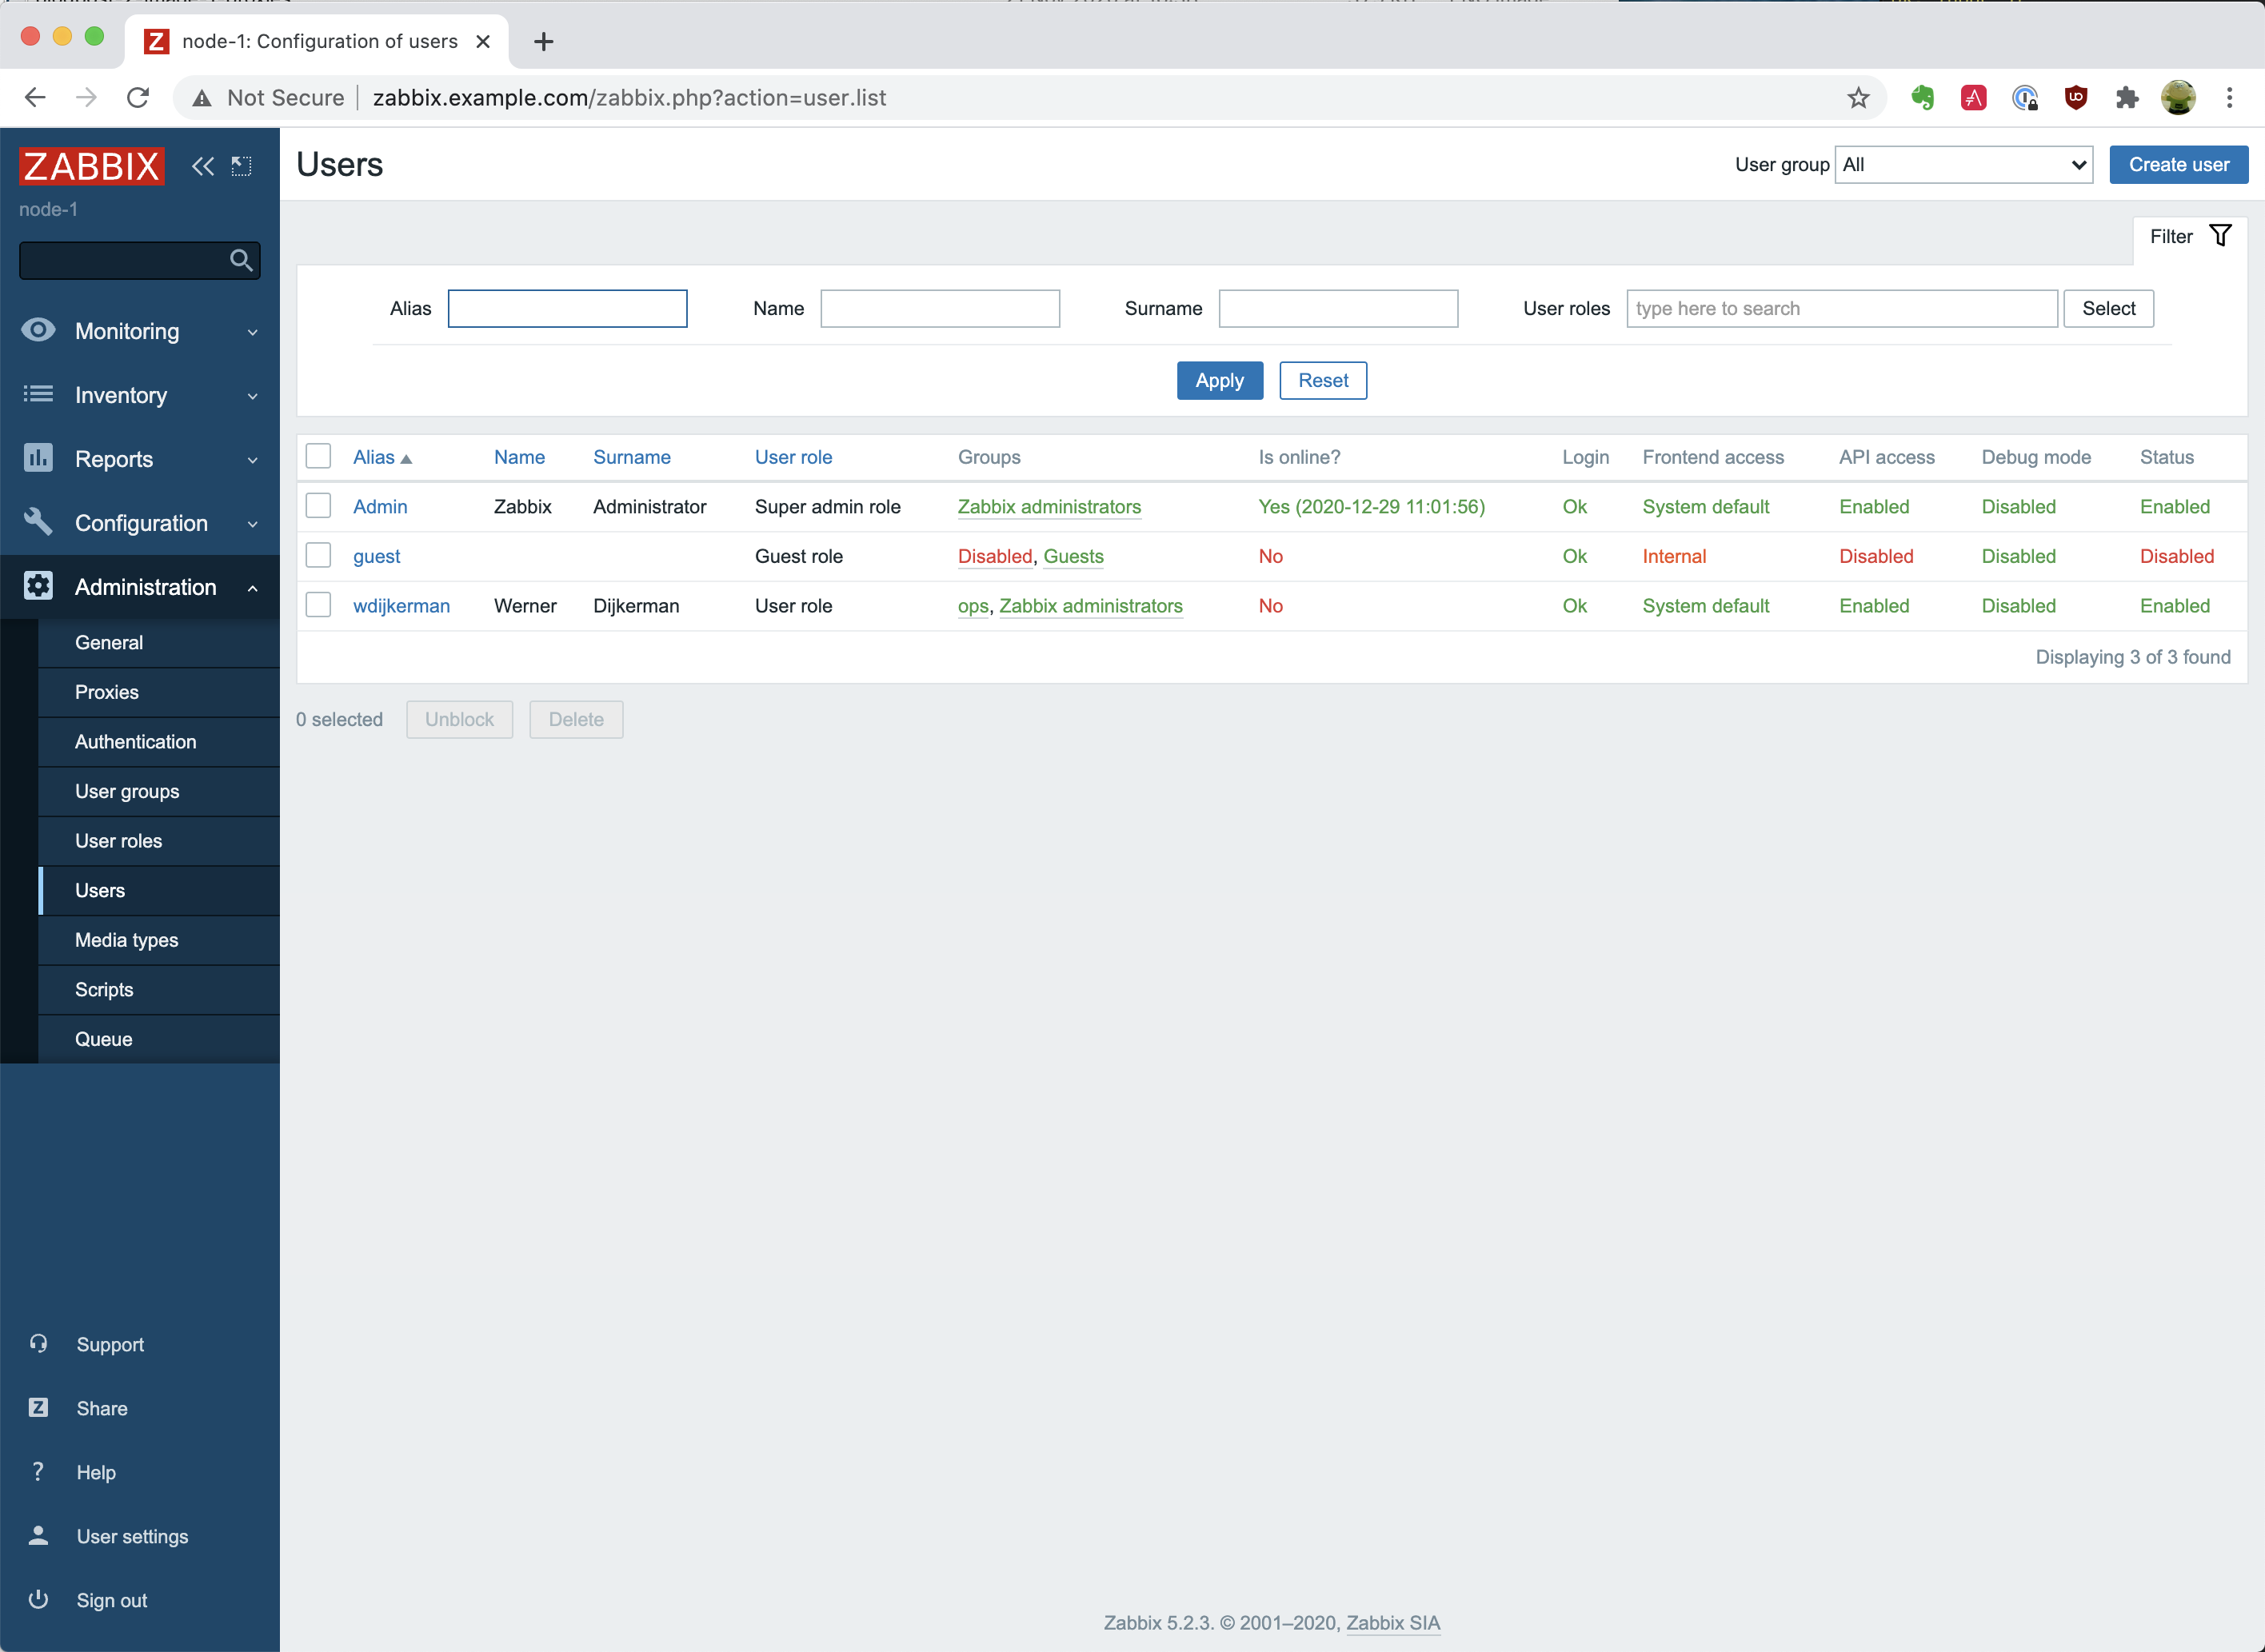
And lastly, we are going to see that we have also created new internal users. Navigate to “Administration” – “Users,” and you will see that we have created a user called “wdijkerman”, which can be found in the “/ansible/zabbix-server.yml” file on line 95. This user will be part of a group created earlier called “ops,”. The user type is Zabbix super admin and we have configured the email media type to be used 24×7.

We have defined a default password for this user – “password”. When you have changed the password in the Zabbix Frontend UI, executing the playbook would not change the password back again to “password.” So don’t worry about it. But if you would have removed – let’s say – the “ops” group, then, when you execute the playbook again, the group will be re-added to the user.

Summary

As you see, it is effortless to create and configure a Zabbix environment with Ansible. We didn’t have to do anything manually, and all installations and configurations were applied automatically when we executed the ansible-playbook command. You can find more information on either the Ansible page https://docs.ansible.com/ansible/latest/collections/community/zabbix/ or on the Github page https://github.com/ansible-collections/community.zabbix.

In the next post, we will install and configure the Zabbix Proxy.

Managing complexity in Zabbix installations with Splunk

Post Syndicated from Christian Anton original https://blog.zabbix.com/managing-complexity-in-zabbix-installations-with-splunk/13053/

A big data analytics engine can be used to optimize large and complex Zabbix installations: keeping track of the amount and kind of problems over time, top alert producers, and much more. You can employ Splunk to optimize and analyze vital Zabbix runtime parameters, such as ‘unsupported items,’ repeatedly happening host availability issues, misconfigured agents, and Zabbix Queue entries.

Contents

I. Complexity (1:15)
II. Zabbix entity inventory (8:28)
III. Use cases (15:16)
IV. Conclusion (20:09)
V. Questions & Answers (21:41)

secadm GmbH is a service provider located in the south of Germany. The company with a strong background in monitoring and automation, network infrastructure, and security software development supports customers of all sizes to manage their IT infrastructures. secadm GmbH is a Zabbix partner and also a Zabbix training partner.

Complexity

Operating a Zabbix deployment of a specific size comes with some challenges:

  • A huge number of hosts, templates, items, host groups, macros, and configuration elements inside your Zabbix instance.
  • LLD rules/unsupported items — items that are unable to fetch information, for example, a wrong password or a wrong path, in an external check. It is often hard to get a hold of how many of those you have and in which of the various error states. Therefore, it’s also difficult to fix them.
  • Host availability/network issues — errors that you see only in the logs — things going up and down, losing their connectivity, but getting back in time before issuing an alert.
  • Queue entries. In larger Zabbix installations, you might have ten thousand or even more items in this service queue. Zabbix actually tells you that some items do not receive their data in time. Zabbix shows that something is really wrong, though it doesn’t give a hint about what is wrong.
  • Zabbix as a monitoring tool is there to actually generate problems and alerts out of these problems. Many problems often cause ‘alert fatigue’ when people start ignoring monitoring results because of too many alerts.

Therefore, we receive a lot of questions from our customers, such as:

  • Where do all these problems come from?
  • What are the hosts generating most of the problems, at what times, and generated by what templates?
  • Did the latest change/upgrade have any negative impact on our monitoring?
  • Can you get rid of unsupported items?
  • How many hosts have specific problems (for instance, caused by a known bug in an old version of an agent that behaves strangely with a specific version of the Zabbix server), and what would be the effect if we fixed those problems?
  • Where do all these queue entries come from?

Zabbix is a transparent and predictable monitoring tool that offers great ways to organize the monitored elements with templates and macros. Zabbix also offers excellent visualization capabilities. However, Zabbix is not an analytical utility offering a flexible query language to gather the required information in the required format, having on-demand statistical functions, and allowing you to enrich and correlate data with the data from arbitrary sources. So, extra tools will have to do the extra work.

Secadm GmbH being the partner of Zabbix and Splunk, has concluded that it’s obvious to use Splunk for such extra work. Splunk is offering many possibilities to onboard data in the platform far beyond the simple indexing of log data, looking up the Key-Value store, implementing scripts and programs inside the Splunk platform to fetch data in real-time and on-demand out of other systems without having to store and to index any kind of information, as well as performing custom search commands.

Zabbix entity inventory

The most important Zabbix data used for analysis — the inventory of all elements inside Zabbix that do not often change, such as:

  • Hosts,
  • Items,
  • Proxies,
  • Templates,
  • Triggers,
  • Discovery rules (LLD),
  • Item Prototypes, and
  • Trigger Prototypes.

As this data is not changing constantly, we fetch this data from Splunk with the scheduled search and custom search command directly from the API endpoints in Zabbix. Then we can store this information inside the Splunk KV Store, which is, in fact, the MongoDB allowing us to perform searches in milliseconds without having to index any data and quickly get the results.

Zabbix entity inventory

So, you can get statistics on status and state to drill down on the unsupported items for a list of all of the items. You can further identify the correlation for the hostnames instead of host IDs, which are not human-readable. The hostnames are available at the KV Store, which stores the hosts with their metadata. You can also identify how many unsupported items there are on each host.

You can also get information on the hostnames, hosts, item names, item types, and errors. You can categorize the problems as SNMP problems, shell problems such as wrong paths, and see how often certain problems happen and what hosts are assigned to what templates and host groups, and so on. This information may also be aggregated or correlated with information from UCMDB.

More data

More fun than having data within a data analytics platform has more data.

  • Indexing the Zabbix Server / Proxy Logs logs, categorizing events to identify availability issues, item problems, preprocessing problems, housekeepers statistics, etc.

  • A module to fetch information from Zabbix (item, host, trigger) in real-time.

  • Gathering metrics (History / Trends data) directly from Zabbix in real-time without the need to store these metrics in any place other than the Zabbix database. We can still use the data for graphing, correlations, calculations, etc.

  • Onboarding the Zabbix problems into Splunk by using the new custom Media types — Webhook.

Custom Media type

  • Correlation of the alert logs, which are new and available through the API since Zabbix 5.0.
  • Working on the queue items to solve these questions.

Use cases

Zabbix queue

Zabbix queue may be a real headache as you can wait for a Zabbix installation with 20,000-50,000 items for 5 or 10 minutes or even longer.

In this dashboard, the same view is displayed in Zabbix: items are categorized by overtime, item type, proxy, etc. Splunk here offers what Zabbix fails — the history so that you can see the spikes when things have changed dramatically. For instance, when more significant network changes happen, the network slows down, and the queues grow dramatically. You can see whether these queues have gone back down or remained up. This information is complicated to analyze in Zabbix.

You can also drill down to see the items correlated with their actual status and the host’s status inside Zabbix. So, you can clearly see, for instance, that an item is on the host that is down or in the queue as it’s not supported and doesn’t get any data.

Here, there is also an Ignore list. So you can get statistics for the remaining items and group them, for instance, by Item type. You can go further and analyze and fix the problems.

Zabbix problems analytics

Zabbix problems dashboard

In this dashboard, Zabbix problems are displayed by system categories. For instance, we can see that over the last 24 hours, Windows caused most of the problems.

Here, we can also drill down to see, for instance, if there are many similar problems. You can go further to identify a single issue that has caused many alerts or problems. You can see that one host is creating almost all of the problems. So, if you switch this one host off, you would have fewer problems.

Zabbix data for management visibility

We can use Zabbix data for greater management visibility, such as:

  • Correlation of data to generate meaningful dashboards:

— Zabbix (metrics, status, problems, etc.),
— application logs,
— other data sources,
— inventory (CMDB, …)

  • Business-level visualization.

Conclusion

Splunk is open-source software and is distributed for free. We are currently in the process of integrating Splunk with Zabbix.

If you are interested in Splunk, you can send a request to [email protected]  or look for Christian Anton on LinkedIn or Instagram.

Questions & Answers

Question. If we use this kind of integration, are there any performance issues caused by Splunk or some misconfiguration?

Answer. We have been using Splunk for installations with several tens of thousands of monitored hosts and from hundreds of thousands up to millions of items and have not seen any performance implications.

Question. How does this connector work under the hood? Does it use the API or direct queries to the database?

Answer. We rely on the API. Besides, we can fetch the data directly from the database.


Setting up Zabbix Agent 2 for PostgreSQL monitoring and revealing how it works

Post Syndicated from Daria Vilkova original https://blog.zabbix.com/setting-up-zabbix-agent-2-for-postgresql-monitoring-and-revealing-how-it-works/13208/

This article will recall the most important theses about the plugin for PostgreSQL monitoring for Zabbix Agent 2. Here you’ll find the explanation of how the plugin works under the hood illustrated with a simple example. You will also get familiar with a new mechanism of custom queries that let you collect metrics from separate SQL files on PC.

Contents

I.Zabbix Agent plugin (2:40)

    1. Implementation (3:10)
    2. Basic features (4:24)
    3. How to get a simple metric? (11:07)

II. Custom metrics (14:05)
III. Conclusion (17:58)
IV. Questions & Answers (19:20)


Zabbix Agent plugin

As a rule, Zabbix Agent is installed on the Zabbix Server machine. It gathers data, which is lately collected by the Zabbix Server. The user can have full access to it via the web interface.

Implementation

  • The plugin uses github.com/jackc/pgx — PG driver and toolkit for Go to connect to Postgres. The plugin supports the database/sql interface, which is a universal interface in Golang for SQL-like databases. Connections in the upcoming version of these databases are made via this database/sql interface.
  • The handler is the basic unit of the plugin, and all queries are executed in separate handlers and then sent to the Zabbix Server. We have made an effort to create an efficient connection to, and to optimize operations of the database.
  • Some metrics are generated in JSON and grouped as dependency items and discovery rules.

Basic features

  • Zabbix Agent 2 allows for keeping a permanent connection to the PostgreSQL database. In earlier versions, to connect to PostgreSQL, we had to make psql calls affecting the server load.
  • Zabbix Agent 2 provides for flexible polling intervals, which can be customized in templates.
  • The plugin is compatible with PostgreSQL 10+ and Zabbix Server version 4.4+ and Zabbix Agent.
  • In the latest plugin release, a new feature is introduced to allow for monitoring several PostgreSQL instances by one Agent using sessions.

Plugin connection parameters

There are three levels of the plugin connection parameters:

  • Global (global for all Zabbix Agent plugins).
  • Macros.
  • Sessions.

Macros and Sessions parameters are used to define a connection to the database.

Macros level

Macros should be familiar to all users of the first Zabbix Agent. In the template, we can define macros for the user, database, etc.

Filling in the template

Then we need to fill in the Key definition as a parameter.

Key definition as a parameter

Here, the sequence is important — URI, USER, and PASSWORD. The first two parameters are mandatory. If no password is given, an empty string is used as a password. If there is no database name, the default database name is used — ‘Postgres

NOTE. There may be parameters No. 5, 6, 7, etc., which can be used as parameters for dynamic queries in the handler.

This way to connect to the database is considered as default. In the official template for PostgreSQL monitoring on the Zabbix website, macros and keys are already specified, so the setup can be done in no time.

Sessions level

Each session has its own connection parameters. So, by creating multiple sessions, we can create multiple connections to several databases.

Sessions are defined in the Zabbix Agent configuration file — zabbix_agent2.conf.

Defining four parameters for session ‘Test’

  • To define the session ‘Test’, in the configuration file, you need to go to:
# Plugins.Postgres.Sessions.
  • Then, you fill in the name of the session:
# Plugins.Postgres.Sessions.Test.Uri=tcp://localhost:5432
  • Then, you do the same for the other three parameters and define macros for the session in the template:

Defining connection parameters and the name of the session in {$PG.SESSION}.

  • You need to fill in the session Name as the only parameter for the Key:

Now the agent will automatically pick up the connection parameters for this session name from the configuration file and start running.

Metrics monitored by the plugin

In the upcoming release, the plugin will be able to gather more than 98 metrics covering almost all the important parameters in the database, including:

  • number of connections,
  • database size,
  • info about archive files,
  • number of ‘bloating’ tables,
  • replication status,
  • background writer processes activity, etc.

Some of these metrics are not very informative without the operating system parameters. However, Zabbix Agent 2 can already gather all these metrics using the operational system plugin. In zabbix.connect, we have all the needed templates to get a full picture of the database health.


How to get a simple metric?

1. Create a handler (file) to get a new metric, for instance, the uptime metric: — zabbix/src/go/plugins/postgres/handler_uptime.go.

NOTE. The handler definitions for the current and the upcoming version are available in the article on the PostgreSQL monitoring plugin.

2. Import package to work with Postgres and specify the unique key for the new metric:

package postgres
const (
keyPostgresUptime = "pgsql.uptime"
)

3. Find the handler with the following query:

func uptimeHandler(ctx context.Context, conn PostgresClient, _ string, _
map[string]string, _ ...string) (interface{}, error) {
var uptime float64
query := `SELECT date_part('epoch', now() - pg_postmaster_start_time());

4. Define the variable, which will hold the result.

NOTE. The matching between the Golang variables and the Postgres variables can be found on the pgx documentation page.

5. Define the query for the new metric:

row, err := conn.QueryRow(ctx, query)
if err != nil {
...
}
err = row.Scan(&uptime)
if err != nil {
...
}
return uptime, nil

Here, we:

  • perform the query,
  • check if there are any errors,
  • scan the results for the Golang variable,
  • scan for errors again, and
  • finally, return the results.

6. Register the key of your new metric in metrics.go:

var metrics = metric.MetricSet{
....,
keyPostgresUptime: metric.New("Returns uptime.",
[]*metric.Param{paramURI, paramUsername,
paramPassword,paramDatabase}, false),
}

In the metrics variable, all the metrics in the plugin are defined. Here, we need to add the description of the new metric.

Now, we need to recompile the agent and start it running as we’ll have all the new metrics on board.

Custom metrics

In the upcoming version, the agent will be able to execute queries in separate sql files located on your local machine and return the result to the Zabbix Server alongside the default metrics. To create the sql file with the query:

  • in zabbix_agent2.conf, specify the path to the directory with the sql files named Plugins.Postgres.CustomQueriesPath.
  • in the template, provide the name for the sql file as the 5th parameter for the new key — pgsql.query.custom and specify the additional parameters for this query if needed.

Custom metric example

1. Let’s consider a simple table containing three rows.

  • # CREATE table example (phrase text, year int );
  • # SELECT * FROM example;

2. I have created two files retrieving data from this table:

  • $touch custom2.sql.
    — $echo “SELECT * FROM example;” > custom2.sql.
  • $touch custom1.sql.
    — $echo “SELECT phrase FROM example WHERE year=$1;” > custom1.sql.

In the first file, no parameters are required, while the ‘WHERE’ statements is specified in the second file, so we’ll need one additional parameter.

3. I have added the path to the sql files in zabbix_agent2.conf:

Plugins.Postgres.CustomQueriesPath=/path/to/file

4. In the templates, I need to create the key — pgsql.query.custom. Here, the first four parameters are connection parameters, and the name of the file containing the query is defined as the parameter (in this case, custom2).

Then, it is necessary to do the same for the second file. However, the second query requires some additional parameters. These parameters are specified as parameter 6. Here, for the custom1 file, the ‘2021’ parameter will be used for the query.

After these two keys are created, Zabbix Agent will automatically find them, execute them, and soon the results will appear in the Latest data.

The result for each query appears in text format

As the first one starts in 2020 and the second one — in 2021, the parameter has been used for the second key.

Conclusion

The new version of the plugin with custom metrics will hopefully become available with the next Zabbix Server release.

Questions & Answers

Question. What is the point of specifying the database name in that key? Are any metrics stored there? Should we create a separate database for Zabbix?

Answer. You can use the Postgres default database, but it is recommended to create a separate database as it is more secure to get monitoring metrics from a separate database. 

Question. Does the Zabbix user both in the OS and in the database need any special permissions to get this going? 

Answer. Two permissions should be defined. These permissions are specified in the instruction for the PostrgeSQL monitoring plugin for Zabbix. 

Question. Will Zabbix work independently of the pg_stat_statements module? 

Answer. It gathers some data from the pg_stat_statements module. Without this module installed, we will not be able to get some crucial metrics from it, though the module itself will be running.

Question. Can the plugin work in the passive mode or in the active mode only?

Answer. The plugin is working similar to the Zabbix Agent — it pushes the data.

Question. Does this Postgres plugin work automatically against the Zabbix backend if we use Postgres as Zabbix backend?

Answer. If you use Agent 2 with this plugin, then it will work out of the box though you’ll have to apply templates and create items, etc. Otherwise, you’ll have to update it.

Question. What is the advantage of using the plugin over Zabbix user parameters, which are custom scripts that the agent can execute?

Answer. If you use user parameters, connections to Postgres are established through psql calls. This can create additional server load. The plugin establishes a permanent connection entailing fewer overheads.

Supercharge Zabbix with powerful insights

Post Syndicated from alexk original https://blog.zabbix.com/supercharge-zabbix-with-powerful-insights/12841/

A new set of trigger functions for long-term analysis of trend data will allow Zabbix to analyze historical data and generate alerts on detected anomalies.

Contents

I. Types of monitoring (0:39)

II. Zabbix 5.2 new functions (5:34)

III. In a nutshell (13:28)
IV. Questions & Answers (14:17)

Types of monitoring

Let’s start with a philosophical observation. In many cases, configuring monitoring entities is a pretty straightforward exercise. For instance, we know that computers should have some free disk space as applications won’t work otherwise; that CPU should not run at 100oC; that user-facing application should respond in less than a couple of seconds, otherwise, users will notice and complain. To be alerted when any of these expectations fail, we need to use triggers. A trigger can be as simple as {Host:cpu.temp.avg(5m)} > 100.

However, in some situations, it is difficult to decide right from wrong. Some cases can’t be evaluated without a proper context. For instance, is it OK if RAM is 70% full?  The answer is our favorite ‘it depends’. If RAM was just 20% full a week ago, chances are big that some application is leaking and your memory usage will continue growing. But if your RAM usage stays at 70% for three years in a row, there are even better chances that it stays so for another three years.

Another it-depends example is web traffic monitoring. Intuitively, we know that it’s perfectly normal to have uneven traffic distribution across days of week or months. But every website has its usage patterns, so even when we figure out what is normal and what’s not for one specific website, it’s difficult to scale this knowledge to other websites.

Web traffic monitoring

So, in the grand scheme of things, it all boils down to finding a good baseline for parameters we want to monitor. And baselines are usually defined by previous knowledge.

So, in such cases, instead of figuring out a fixed threshold (some fixed value or percentage), we need to figure out data points in the past that we want to compare to our current data points.

  • Compare values to known thresholds.
{Host:cpu.temp.avg(5m)} > 100
  • Baseline — compare to unknown thresholds.

Finding the right points in the past (or rather, finding a good interval to look back to) is still something that the user must supply manually, even though we are also working on automating this in the future. But Zabbix 5.2 gives you some tools to make comparisons to baseline way easier.

Web traffic monitoring example

Let’s consider a history of website visits for an imaginary commerce site — shop.example.com.

Commercial site web traffic monitoring

The numbers are different at any given point in time, yet all these are normal in a certain context. Overall, we see a growing trend in 2020 as compared to 2019. But there are seasonal traffic spikes. The biggest ones are around Christmas.

Site administrators like to be informed of any traffic anomalies (such as fraud traffic, for example), but hate false positives caused by seasonal spikes.

If we want to detect anomalies here, we can get an average for some period and compare it to an average for the same period a year before.

If we know that our organic year-to-year growth is not likely to exceed, for instance, 15 %, then it’s seemingly easy to do this in virtually any version of Zabbix: we take the average traffic over 30 days and check if it exceeds the same period a year ago by more than 15 %.

However, there are a few problems with this trigger expression.

1. First, we look 1 year back in history. But if we look into Zabbix 5.0 documentation about triggers, we see this:

This means that we need to keep a full and detailed history for at least 1 year (13 months, in this specific case). It is a passable solution if we ingest the traffic data daily. But what if we do it every minute? What if we do it every minute for a thousand websites?

2. In Zabbix, we specify time as 30d and 365d. As you may know, in Zabbix, this is just a fancy way to specify 187,200 and 68,328,000 seconds. Zabbix 5.0 doesn’t have the time suffix for a month and a year just because this cannot be simply translated to the number of seconds. Even though 30d is very close to 28d and 31d, it’s still not the same.

3. The result of avg() function with or without the second time shift parameter always depends on the specific time of the calculation. This is because Zabbix calculates time shifts by subtracting the interval from the current time. This makes it impossible to calculate aggregates between, for instance, the first and the last day of a week, a month, or a year.

Zabbix 5.2 new functions

That is why we introduce new trigger functions, which address all the specified issues. We also added few other trigger features, which improve event presentation. These functions are similar to the non-trend counterparts but are optimized for baseline monitoring use cases.

trendavg(period, period_shift)
trendcount(period, period_shift)
trenddelta(period, period_shift)
trendmax(period, period_shift)
trendmin(period, period_shift)
  • The new functions use trends tables instead of history (do not forget to set proper trend storage period):

  • period and period_shift parameters use the Gregorian calendar instead of the number of seconds.

h (hour), d (day), w (week), M (month), and y (year).

  • These functions are easy on system resources because they do calculations only when a period ends.

In addition to the new trigger functions, we also added the ability to set customized event name.

The customized event name lets you fine-tune how the event looks in the Zabbix UI (in screens like problems and problem widget) and include trigger expression calculation results.

This field is optional, you can continue using the trigger Name field instead.

There is also a new macro {? … }. It can be used for expressions inside the event name.

Triggers

Let’s reconfigure our trigger in the Zabbix 5.2 style.

Zabbix 5.2-style triggers

Let’s see what are the arguments for trendavg() function: 1M and now/M.

  • The first argument means that we use calendar month as an aggregation period. So, depending on the month’s trendavg() will be doing calculations for, it will pick up the first and the last date of the month. The same goes for other possible interval suffixes — h for hour, d for day, w for week, and y for year.
  • The second parameter, as in regular aggregate functions, means a time shift. But to distinguish between old and new types of shifts, we call them period shifts. The period shift denotes the last point in the timeline for our aggregation.

For instance, for October 13, 2020, trendavg(1M) will calculate the value for the period from September 1, 2020, to September 30, 2020, and trendavg(1M, 1M-1y) will calculate the value for the period from September 1, 2019, to September 30, 2019.

Event name field

In Zabbix 5.2, you can continue using the Name field with the content copied to the Event name field. But if you specify the Event name, it will be used for all corresponding events instead.

The Event name supports the new macro {?…}, so you can put another trigger expression inside this macro to show some related calculations. We call it the expression macro. For instance, the Event name will be displayed on the Problem screen as follows:

Formatting functions

This trigger generates problems like this:

It’s already very useful, but this percentage will look better if we could round it up. It wouldn’t hurt to show what month we compare our traffic against. To do that, we have added two formatting functions:

  • fmtnum(digits)

— applicable to ITEM.VALUE, ITEM.LASTVALUE, and expression macros.
fmtnum(2) gives 14.85 instead of 14.8512345.

  • fmttime(format, time_shift)

— applicable to {TIME}.
— uses strftime format codes.
— formats time, for instance, {TIME}.fmttime(“%B,%Y”) gives October,2020.

Let’s see how we can improve our Event name with new formatting functions:

It looks somewhat scary on the trigger configuration screen, but Zabbix will reward us by generating events like this:

But the new functions are not limited to a single use case of comparing some data from a recent period to some past period.

Cloud budget monitoring example

Let’s consider another real-world example. Imagine that your IT department runs some very important services in the Cloud. And, of course, your finance department sends a monthly budget you don’t want to overrun. You receive cloud usage records from one or more cloud providers and ingest this data periodically into monitoring.

You could set up a trigger with a trendsum() by one month to check whether you exceeded your fixed budget in the previous months or not. But you want to know about the budget overrun ASAP. If you exceed your monthly budget in the middle of a month, your quick reaction might save the company money.

In the chart, we see the even distribution of cloud usage costs up to the last dates of September. Then the usage starts going up. When should you start worrying?

Again, the new trend functions come to the rescue.

The solution is to use the period_shift parameter, just not in the past, but rather in the future. For instance, if today’s date is October 22, this expression will calculate the sum() from October 1 to October 31.

  • trendsum(1M,now/M+1M)

There is one problem, though. To save precious computing resources, Zabbix evaluates these functions in triggers only when the period is over. However, these functions are also available in calculated items, and we can use arbitrary calculation intervals there.

So, the solution is to set up a calculated item, use trendsum() in the formula, and specify some reasonable update interval (for instance, one hour or one day).

Here, on the right-hand side of the chart, we see the current period, which is not over yet. Let’s take a look at the item definition.

This is the formula to calculate the current calendar period. Then, we can add a simple trigger referencing this calculated item:

Formula to calculate the current calendar period

You can also use the new expression macro in this trigger. You don’t need to have trend functions anywhere in the formula for this.


Once the trigger fires, you will see the following problem on the Problem screen — a nice and clean message containing all the information we need.

Use cases

There are many more possible applications for the new functions besides the examples above. Generally, these trend functions can be applied not only to IT metrics but also to many other real-world KPIs, for example:

— Business performance (to calculate annual revenue, profitability, etc.).
— Sales and marketing (for instance, monthly average, customer acquisition costs, sales target rate).
— Warehousing (such as weekly shipments, return rates, etc.).
— Human resources (for instance, annual training costs, overtime hours, etc.).
— Customer support (such as average response time or the number of issues per month).

We expect these functions to pave the way for Zabbix to new territories, which have been previously occupied by CRMs and other business analytics systems.

In a nutshell

  • Zabbix trend functions — a new way to analyze history without storing historical data.
  • Zabbix trend functions support calendar hours, days, weeks, months, and years.
  • New trigger field Event name – lets us display events with context.
  • New formatting functions let us present numbers and dates in a flexible manner.
  • Long-term data analysis just got easier and better with the new Zabbix 5.2.

Questions & Answers

Question. What’s the maximum time period for these new trigger functions? For how long can we analyze the data?

Answer. The maximum time period is not limited by any hardcoded values. The only limit you should keep in mind is just the size of your trend data history. But there are no limitations in the code whatsoever that would limit this use. You also should keep in mind that the longer is the period the bigger the database load is. That’s also a factor to consider.

Question. Is this trend data that we’re analyzing also going to be stored in the value cache or some other place?

Answer. it’s not stored in the value cache at the moment. These trigger functions recalculate their values only after the period is over. So it’s not of much use for value cache. But if this is required by some demanding applications, we’ll add this in the later versions.

Scaling Zabbix with containers

Post Syndicated from Robert Silva original https://blog.zabbix.com/scaling-zabbix-with-containers/13155/

In this post, a new approach with Zabbix in High Availability is explained, as well as discussed challenges when implementing Zabbix using Docker Swarm with CI / CD and such technologies as Containers, Docker Swarm, Gitlab, and CI/CD.

Contents

I. Zabbix project requirements (0:33)
II. New approach (3:06)

III. Compose file and Deploy (8:08)
IV. Notes (16:32)
V. Gitlab CI/CD (20:34)
VI. Benefits of the architecture (24:57)
VII. Questions & Answers (25:53)

Zabbix project requirements

The first time using Docker was a challenge. The Zabbix environment needed to meet the following requirements:

  • to monitor more than 3,000 NVPS;
  • to be fault-tolerant;
  • to be resilient;
  • to scale the environment horizontally.

There are five ways to install Zabbix — using packages, compiling, Docker, cloud, or appliance.

We used virtual machines or physical servers to install Zabbix directly on the operation system. In this scenario, it is necessary to install the operating system and update it to improve performance. Then you need to install Zabbix, configure the backup of the configuration files and the database.

However, with such an installation, when the services are unavailable as Zabbix Server or Zabbix frontend is down, the usual solution is a human intervention to restart the service or the server, create a new instance, or restore the backup.

Still, we don’t need to assign a specialist to manually solve such issues. The services must be able to restore themselves.

To create a more intelligent environment, we can use some standard solutions — Corosync and Pacemaker. However, there are better solutions for High Availability.

New approach

Zabbix can be deployed using advanced technologies, such as:

  • Docker,
  • Docker Swarm,
  • Reverse Proxy,
  • GIT,
  • CI/CD.

Initially, the instance was divided into various components.

Initial architecture

HAProxy

HAProxy is responsible for receiving incoming connections and directing them to the nodes of the Docker Swarm cluster. So, with each attempt to access the Zabbix frontend, the request is sent to the HAProxy. And it will detect where there is the service listening to HAProxy and redirect the request.

Accessing the frontend.domain

We are sending the request to the HAProxy address to check which nodes are available. If a node is unavailable, the HAProxy will not send the requests to these nodes anymore.

HAProxy configuration file (haproxy.cfg)

When you configure load balancing using HAProxy, two types of nodes need to be defined: frontend and backend. Here, the traefik service is used as an example.

HAProxy listens for connections by the frontend node. In the frontend, we configure the port to receive communications and associate the backend to it.

frontend traefik
mode http
bind 0.0.0.0:80
option forwardfor
monitor-uri /health
default_backend backend_traefik

HAProxy can forward requests by the backend nodes. In the backend we define, which services are using the traefik service, the check mode, the servers running the application, and the port to listen to. 

backend backend_traefik
mode http
cookie Zabbix prefix
server DOCKERHOST1 10.250.6.52:8080 cookie DOCKERHOST1 check
server DOCKERHOST2 10.250.6.53:8080 cookie DOCKERHOST2 check
server DOCKERHOST3 10.250.6.54:8080 cookie DOCKERHOST3 check
stats admin if TRUE
option tcp-check

We also can define where the Zabbix Server can run. Here, we have only one Zabbix Server container running.

frontend zabbix_server
mode tcp
bind 0.0.0.0:10051
default_backend backend_zabbix_server
backend backend_zabbix_server
mode tcp
server DOCKERHOST1 10.250.6.52:10051 check
server DOCKERHOST2 10.250.6.53:10051 check
server DOCKERHOST3 10.250.6.54:10051 check
stats admin if TRUE
option tcp-check

NFS Server

NFS Server is responsible for storing the mapped files in the containers.

NFS Server

After installing the packages, you need to run the following commands to configure the NFS Server and NFS Client:

NFS Server

mkdir /data/data-docker
vim /etc/exports
/data/data-docker/ *(rw,sync,no_root_squash,no_subtree_check)

NFS Client

vim /etc/fstab :/data/data-docker /mnt/data-docker nfs defaults 0 0

Hosts Docker and Docker Swarm

Hosts Docker and Docker Swarm are responsible for running and orchestrating the containers.

Swarm consists of one or more nodes. The cluster can be of two types:

  • Managers that are responsible for managing the cluster and can perform workloads.
  • Workers that are responsible for performing the services or the loads.

Reverse Proxy

Reverse Proxy, another essential component of this architecture, is responsible for receiving an HTTP and HTTPS connections, identifying destinations, and redirecting to the responsible containers.

Reverse Proxy can be executed using nginx and traefik.

In this example, we have three containers running traefik. After receiving the connection from HAProxy, it will search for a destination container and send the package to it.

Compose file and Deploy

The Compose file — ./docker-compose.yml — a YAML file defining services, networks, and volumes. In this file, we determine what image of Zabbix Server is used, what network the container is going to connect to, what are the service names, and other necessary service settings.

Reverse Proxy

Here is the example of configuring Reverse Proxy using traefik.

traefik:
image: traefik:v2.2.8
deploy:
placement:
constraints:
- node.role == manager
replicas: 1
restart_policy:
condition: on-failure
labels:
# Dashboard traefik
- "traefik.enable=true"
- "traefik.http.services.justAdummyService.loadbalancer.server.port=1337"
- "traefik.http.routers.traefik.tls=true"
- "traefik.http.routers.traefik.rule=Host(`zabbix-traefik.mydomain`)"
- "traefik.http.routers.traefik.service=api@internal"

where:

traefik: — the name of the service (in the first line).
image: — here, we can define which image we can use.
deploy: — rules for creating the deploy.
constraints: — a place of deployment.
replicas: — how many replicas we can create for this service.
restart_policy: — which policy to use if the service has a problem.
labels: — defining labels for traefik, including the rules for calling the service.

Then we can define how to configure authentication for the dashboard and how to redirect all HTTP connections to HTTPS.

# Auth Dashboard - "traefik.http.routers.traefik.middlewares=traefik-auth" - "traefik.http.middlewares.traefik-auth.basicauth.users=admin:" 
# Redirect all HTTP to HTTPS permanently - "traefik.http.routers.http_catchall.rule=HostRegexp(`{any:.+}`)" - "traefik.http.routers.http_catchall.entrypoints=web" - "traefik.http.routers.http_catchall.middlewares=https_redirect" - "traefik.http.middlewares.https_redirect.redirectscheme.scheme=https" - "traefik.http.middlewares.https_redirect.redirectscheme.permanent=true"

Finally, we define the command to be executed after the container is started.

command:
- "--api=true"
- "--log.level=INFO"
- "--providers.docker.endpoint=unix:///var/run/docker.sock"
- "--providers.docker.swarmMode=true"
- "--providers.docker.exposedbydefault=false"
- "--providers.file.directory=/etc/traefik/dynamic"
- "--entrypoints.web.address=:80"
- "--entrypoints.websecure.address=:443"

Zabbix Server

Zabbix Server configuration can be defined in this environment — the name of the Zabbix Server, image, OS, etc.

zabbix-server:
image: zabbix/zabbix-server-mysql:centos-5.0-latest
env_file:
- ./envs/zabbix-server/common.env
networks:
- "monitoring-network"
volumes:
- /mnt/data-docker/zabbix-server/externalscripts:/usr/lib/zabbix/externalscripts:ro
- /mnt/data-docker/zabbix-server/alertscripts:/usr/lib/zabbix/alertscripts:ro
ports:
- "10051:10051"
deploy:
<<: *template-deploy
labels:
- "traefik.enable=false"

In this case, we can use environment 5.0. Here, we can define, for instance, database address, database username, number of pollers we will start, the path for external and alert scripts, and other options.

In this example, we use two volumes — for external scripts and for alert scripts that must be stored in the NFS Server.

For this Zabbix, Server traefik is not enabled.

Frontend

For the frontend, we have another option, for instance, using the Zabbix image.

zabbix-frontend:
image: zabbix/zabbix-web-nginx-mysql:alpine-5.0.1
env_file:
- ./envs/zabbix-frontend/common.env
networks:
- "monitoring-network"
deploy:
<<: *template-deploy
replicas: 5
labels:
- "traefik.enable=true"
- "traefik.http.routers.zabbix-frontend.tls=true"
- "traefik.http.routers.zabbix-frontend.rule=Host(`frontend.domain`)"
- "traefik.http.routers.zabbix-frontend.entrypoints=web"
- "traefik.http.routers.zabbix-frontend.entrypoints=websecure"
- "traefik.http.services.zabbix-frontend.loadbalancer.server.port=8080"

Here, 5 replicas mean that we can start 5 Zabbix frontends. This can be used for more extensive environments, which also means that we have 5 containers and 5 connections.

Here, to access the frontend, we can use the ‘frontend.domain‘ name. If we use a different name, access to the frontend will not be available.

The load balancer server port defines to which port the container is listening and where the official Zabbix frontend image is stored.

Deploy

Up to now, deployment has been done manually. You needed to connect to one of the services with the Docker Swarm Manager function, enter the NFS directory, and deploy the service:

# docker stack deploy -c docker-compose.yaml zabbix

where -c defines the compose file’s name and ‘zabbix‘ — the name of the stack.

Notes

Docker Image

Typically, Docker official images from Zabbix are used. However, for the Zabbix Server and Zabbix Proxy is not enough. In production environments, additional patches are needed — scripts, ODBC drivers to monitor the database. You should learn to work with Docker and to create custom images.

Networks

When creating environments using Docker, you should be careful. The Docker environment has some internal networks, which can be in conflict with the physical network. So, it is necessary to change the default networks — Docker network overlay and Docker bridge.

Custom image

Example of customizing the Zabbix image to install ODBC drive.

ARG ZABBIX_BASE=centos 
ARG ZABBIX_VERSION=5.0.3 
FROM zabbix/zabbix-proxy-sqlite3:${ZABBIX_BASE}-${ZABBIX_VERSION}
ENV ORACLE_HOME=/usr/lib/oracle/12.2/client64
ENV LD_LIBRARY_PATH=$LD_LIBRARY_PATH:/usr/lib/oracle/12.2/client64/lib
ENV PATH=$PATH:/usr/lib/oracle/12.2/client64/lib

Then we install ODBC drivers. This script allows for using ODBC drivers for Oracle, MySQL, etc.

# Install ODBC 
COPY ./drivers-oracle-12.2.0.1.0 /root/ 
COPY odbc.sh /root 
RUN chmod +x /root/odbc.sh && \ 
/root/odbc.sh

Then we install Python packages.

# Install Python3 
COPY requirements.txt /requirements.txt
WORKDIR /
RUN yum install -y epel-release && \ 
yum search python3 && \ 
yum install -y python36 python36-pip && \ 
python3 -m pip install -r requirements.txt
# Install SNMP 
RUN yum install -y net-snmp-utils net-snmp wget vim telnet traceroute

With this image, we can monitor databases, network devices, HTTP connections, etc.

To complete the image customization, we need to:

  1. build the image,
  2. push to the registry,
  3. deploy the services.

This process is performed manually and should be automated.

Gitlab CI/CD

With CI/CD, you don’t need to run the process manually to create the image and deploy the services.

1. Create a repository for each component.

  • Zabbix Server
  • Frontend
  • Zabbix Proxy

2. Enable pipelines.
3. Create .gitlab-ci.yml.

Creating .gitlab-ci.yml file

Benefits of the architecture

  • If any Zabbix component stops, Docker Swarm will automatically start a new service/container.
  • We don’t need to connect to the terminal to start the environment.
  • Simple deployment.
  • Simple administration.

Questions & Answers

Question. Can such a Docker approach be used in extremely large environments?

Answer. Docker Swarm is already used to monitor extremely large environments with over 90,000 and over 50 proxies.

Question. Do you think it’s possible to set up a similar environment with Kubernetes?

Answer. I think it is possible, though scaling Zabbix with Kubernetes is more complex than with Docker Swarm. 

Save 2 clicks, test data preprocessing

Post Syndicated from Aigars Kadiķis original https://blog.zabbix.com/save-2-clicks-test-data-preprocessing/13249/

This topic is related to template development from scratch, bulk data input, and a lot of dependable items having different preprocessing steps each.

If these keywords resonate with you, keep reading.

Story stars back in a day when a “Test now” button was invented inside the item preprocessing section. In this way, we can simulate the entire preprocessing stack. A very cool feature to have.

Nevertheless, we tend to copy over and over again the data input:

While this is fine for small projects with simple preprocessing steps which match our knowledge league. It is not so OK in we have ambition to solve the impossible. Figure out a data preprocessing rule(s) which suit our needs.

For a template development process, the solution is to skip data input and inject a static value in the very first preprocessing step. Let me introduce the concept.

JavaScript preprocessing step 1:

return 'this is input text';

JavaScript preprocessing step 2:

return value.replace("text","data");

Now we have static input, no need to spend time to “click” the input data.

Sometimes the input is not just one line but multiple lines, and tabs, and spaces and double quotes and single quotes and special characters. To respect all these things, we must get our hands dirty with the base64 format.

To prepare input data as base64 string, on windows systems it can be easily done with Notepad++. Just select all text and select “Plugin commands” => “Base64 Encode” (functionality is not there with a lite version of Notepad++):

After that, we need to copy all content to clipboard:

Create the first JavasSript preprocessing with the content from the clipboard. Here is the same example:

return 'PD94bWwgdmVyc2lvbj0iMS4wIiBlbmNvZGluZz0iVVRGLTE2Ij8+DQo8am9ibG9nPg0KICA8am9iX2xvZ192ZXJzaW9uIHZlcnNpb249IjIuMCIvPg0KICA8aGVhZGVyPg0KICAgIDxzdGFydF90aW1lPkpvYiBzdGFydGVkOiBNb25kYXksIEF1Z3VzdCAxMCwgMjAyMCBhdCAxOjAwOjA1IFBNPC9zdGFydF90aW1lPg0KICA8L2hlYWRlcj4NCiAgPGZvb3Rlcj4NCiAgICA8ZW5kX3RpbWU+Sm9iIGVuZGVkOiBNb25kYXksIEF1Z3VzdCAxMCwgMjAyMCBhdCAzOjE3OjUwIFBNPC9lbmRfdGltZT4NCiAgICA8T3BlcmF0aW9uRXJyb3JzIFR5cGU9ImpvYmZ0cl9qb2Jjb21wbF9zaHV0ZG93biI+Sm9iIGNvbXBsZXRpb24gc3RhdHVzOiBDYW5jZWxlZCBieSBzZXJ2aWNlIHNodXRkb3duPC9PcGVyYXRpb25FcnJvcnM+DQogICAgPGNvbXBsZXRlU3RhdHVzPjE8L2NvbXBsZXRlU3RhdHVzPg0KICAgIDxhYm9ydFVzZXJOYW1lPlRoZSBqb2Igd2FzIGNhbmNlbGVkIGJlY2F1c2UgdGhlIHJlc3BvbnNlIHRvIGEgbWVkaWEgcmVxdWVzdCBhbGVydCB3YXMgQ2FuY2VsLCBvciBiZWNhdXNlIHRoZSBhbGVydCB3YXMgY29uZmlndXJlZCB0byBhdXRvbWF0aWNhbGx5IHJlc3BvbmQgd2l0aCBDYW5jZWwsIG9yIGJlY2F1c2UgdGhlIEJhY2t1cCBFeGVjIEpvYiBFbmdpbmUgc2VydmljZSB3YXMgc3RvcHBlZC48L2Fib3J0VXNlck5hbWU+DQogIDwvZm9vdGVyPg0KPC9qb2Jsb2c+DQo=';

In the next step, there must be decoding scheduled. Kindly copy the code 1:1. Configure it as a second preprocessing step:

var k = "ABCDEFGHIJKLMNOPQRSTUVWXYZabcdefghijklmnopqrstuvwxyz0123456789+/="
function d(e) {
    var t, n, o, r, a = "",
        i = "",
        c = "",
        l = 0;
    for (/[^A-Za-z0-9+/=]/g.exec(e) && alert("1"), e = e.replace(/[^A-Za-z0-9+/=]/g, ""); t = k.indexOf(e.charAt(l++)) << 2 | (o = k.indexOf(e.charAt(l++))) >> 4, n = (15 & o) << 4 | (r = k.indexOf(e.charAt(l++))) >> 2, i = (3 & r) << 6 | (c = k.indexOf(e.charAt(l++))), a += String.fromCharCode(t), 64 != r && (a += String.fromCharCode(n)), 64 != c && (a += String.fromCharCode(i)), t = n = i = "", o = r = c = "", l < e.length;);
    return unescape(a)
}
return d(value);

This is how it looks like:

Go to testing section and ensure the data in Zabbix is similar as it was in Notepad++:

Data has been successfully decoded. Multiple lines, quite original stuff. The tabs are not visible with a naked human eye but they are there, I promise!

Now we can “play” out the next preprocessing steps and try out different things:

When one preprocessing has been figured out, just clone the item and start to developing a next one. Sure, if we succeed the ambition, it will be required to spend 5 minutes to go through all items, remove first 2 steps and link the item to master key 😉

Ok. That is it for today. Bye.

By the way, on Linux system to have base64 string we only need:

  1. A command where the output entertains us
  2. Pipe it to ‘base64 -w0’
systemctl list-unit-files --type=service | base64 -w0

Code a Light Cycle arcade minigame | Wireframe #47

Post Syndicated from Ryan Lambie original https://www.raspberrypi.org/blog/code-a-light-cycle-arcade-minigame-wireframe-47/

Speed around an arena, avoiding walls and deadly trails in this Light Cycle minigame. Mark Vanstone has the code.

Battle against AI enemies in the original arcade classic.

At the beginning of the 1980s, Disney made plans for an entirely new kind of animated movie that used cutting-edge computer graphics. The resulting film was 1982’s TRON, and it inevitably sparked one of the earliest tie-in arcade machines.

The game featured several minigames, including one based on the Light Cycle section of the movie, where players speed around an arena on high-tech motorbikes, which leave a deadly trail of light in their wake. If competitors hit any walls or cross the path of any trails, then it’s game over.

Players progress through the twelve levels which were all named after programming languages. In the Light Cycle game, the players compete against AI players who drive yellow Light Cycles around the arena. As the levels progress, more AI Players are added.

The TRON game, distributed by Bally Midway, was well-received in arcades, and even won Electronic Games Magazine’s (presumably) coveted Coin-operated Game of the Year gong.

Although the arcade game wasn’t ported to home computers at the time, several similar games – and outright clones – emerged, such as the unsubtly named Light Cycle for the BBC Micro, Oric, and ZX Spectrum.

The Light Cycle minigame is essentially a variation on Snake, with the player leaving a trail behind them as they move around the screen. There are various ways to code this with Pygame Zero.

In this sample, we’ll focus on the movement of the player Light Cycle and creating the trails that are left behind as it moves around the screen. We could use line drawing functions for the trail behind the bike, or go for a system like Snake, where blocks are added to the trail as the player moves.

In this example, though, we’re going to use a two-dimensional list as a matrix of positions on the screen. This means that wherever the player moves on the screen, we can set the position as visited or check to see if it’s been visited before and, if so, trigger an end-game event.

Our homage to the TRON Light Cycle classic arcade game.

For the main draw() function, we first blit our background image which is the cross-hatched arena, then we iterate through our two-dimensional list of screen positions (each 10 pixels square) displaying a square anywhere the Cycle has been. The Cycle is then drawn and we can add a display of the score.

The update() function contains code to move the Cycle and check for collisions. We use a list of directions in degrees to control the angle the player is pointing, and another list of x and y increments for each direction. Each update we add x and y coordinates to the Cycle actor to move it in the direction that it’s pointing multiplied by our speed variable.

We have an on_key_down() function defined to handle changing the direction of the Cycle actor with the arrow keys. We need to wait a while before checking for collisions on the current position, as the Cycle won’t have moved away for several updates, so each screen position in the matrix is actually a counter of how many updates it’s been there for.

We can then test to see if 15 updates have happened before testing the square for collisions, which gives our Cycle enough time to clear the area. If we do detect a collision, then we can start the game-end sequence.

We set the gamestate variable to 1, which then means the update() function uses that variable as a counter to run through the frames of animation for the Cycle’s explosion. Once it reaches the end of the sequence, the game stops.

We have a key press defined (the SPACE bar) in the on_key_down() function to call our init() function, which will not only set up variables when the game starts but sets things back to their starting state.

Here’s Mark’s code for a TRON-style Light Cycle minigame. To get it working on your system, you’ll need to install Pygame Zero. And to download the full code and assets, head here.

So that’s the fundamentals of the player Light Cycle movement and collision checking. To make it more like the original arcade game, why not try experimenting with the code and adding a few computer-controlled rivals?

Get your copy of Wireframe issue 47

You can read more features like this one in Wireframe issue 47, available directly from Raspberry Pi Press — we deliver worldwide.

And if you’d like a handy digital version of the magazine, you can also download issue 47 for free in PDF format.

The post Code a Light Cycle arcade minigame | Wireframe #47 appeared first on Raspberry Pi.

What takes disk space

Post Syndicated from Aigars Kadiķis original https://blog.zabbix.com/what-takes-disk-space/13349/

In today’s class let’s talk about where the disk space goes. Which items and hosts objects consume the disk space the most.

The post will cover things like:
Biggest tables in a database
Biggest data coming to the instance right now
Biggest data inside one partition of the DB table
Print hosts and items which consumes the most disk space

Biggest tables

In general, the leading tables are:

history
history_uint
history_str
history_text
history_log
events

‘history_uint’ will store integers. ‘history’ will store decimal numbers.
‘history_str’, ‘history_text’, ‘history_log’ stores textual data.
In the table ‘events’ goes problem events, internal events, agent auto-registration events, discovery events.

Have a look yourself in a database which tables take the most space. On MySQL:

SELECT table_name,
       table_rows,
       data_length,
       index_length,
       round(((data_length + index_length) / 1024 / 1024 / 1024),2) "Size in GB"
FROM information_schema.tables
WHERE table_schema = "zabbix"
ORDER BY round(((data_length + index_length) / 1024 / 1024 / 1024),2) DESC
LIMIT 8;

On PostgreSQL:

SELECT *, pg_size_pretty(total_bytes) AS total , pg_size_pretty(index_bytes) AS index ,
       pg_size_pretty(toast_bytes) AS toast , pg_size_pretty(table_bytes) AS table
FROM (SELECT *, total_bytes-index_bytes-coalesce(toast_bytes, 0) AS table_bytes
   FROM (SELECT c.oid,
             nspname AS table_schema,
             relname AS table_name ,
             c.reltuples AS row_estimate ,
             pg_total_relation_size(c.oid) AS total_bytes ,
             pg_indexes_size(c.oid) AS index_bytes ,
             pg_total_relation_size(reltoastrelid) AS toast_bytes
      FROM pg_class c
      LEFT JOIN pg_namespace n ON n.oid = c.relnamespace
      WHERE relkind = 'r' ) a) a;

Detect big data coming to instance right now

Analyze ‘history_log’ table for the last 30 minutes:

SELECT hosts.host,items.itemid,items.key_,
COUNT(history_log.itemid)  AS 'count', AVG(LENGTH(history_log.value)) AS 'avg size',
(COUNT(history_log.itemid) * AVG(LENGTH(history_log.value))) AS 'Count x AVG'
FROM history_log 
JOIN items ON (items.itemid=history_log.itemid)
JOIN hosts ON (hosts.hostid=items.hostid)
WHERE clock > UNIX_TIMESTAMP(NOW() - INTERVAL 30 MINUTE)
GROUP BY hosts.host,history_log.itemid
ORDER BY 6 DESC
LIMIT 1\G

With PostgreSQL:

SELECT hosts.host,history_log.itemid,items.key_,
COUNT(history_log.itemid) AS "count", AVG(LENGTH(history_log.value))::NUMERIC(10,2) AS "avg size",
(COUNT(history_log.itemid) * AVG(LENGTH(history_log.value)))::NUMERIC(10,2) AS "Count x AVG"
FROM history_log 
JOIN items ON (items.itemid=history_log.itemid)
JOIN hosts ON (hosts.hostid=items.hostid)
WHERE clock > EXTRACT(epoch FROM NOW()-INTERVAL '30 MINUTE')
GROUP BY hosts.host,history_log.itemid,items.key_
ORDER BY 6 DESC
LIMIT 5
\gx

Re-run the same query but replace ‘history_log’ (in all places) with ‘history_text’ or ‘history_str’.

Which hosts consume the most space

This is a very heavy query. We will go back one day and analyze 6 minutes of that data:

SELECT ho.hostid, ho.name, count(*) AS records, 
(count(*)* (SELECT AVG_ROW_LENGTH FROM information_schema.tables 
WHERE TABLE_NAME = 'history_text' and TABLE_SCHEMA = 'zabbix')/1024/1024) AS 'Total size average (Mb)', 
sum(length(history_text.value))/1024/1024 + sum(length(history_text.clock))/1024/1024 + sum(length(history_text.ns))/1024/1024 + sum(length(history_text.itemid))/1024/1024 AS 'history_text Column Size (Mb)'
FROM history_text
LEFT OUTER JOIN items i on history_text.itemid = i.itemid 
LEFT OUTER JOIN hosts ho on i.hostid = ho.hostid 
WHERE ho.status IN (0,1)
AND clock > UNIX_TIMESTAMP(now() - INTERVAL 1 DAY - INTERVAL 6 MINUTE)
AND clock < UNIX_TIMESTAMP(now() - INTERVAL 1 DAY)
GROUP BY ho.hostid
ORDER BY 4 DESC
LIMIT 5\G

If “6-minute query” works in a relatively good time frame, try “INTERVAL 60 MINUTE”.
If “INTERVAL 60 MINUTE” works good, try “INTERVAL 600 MINUTE”.

Analyze in partition level (MySQL)

On MySQL, if database table partitioning is enabled we can list the biggest partitions on a filesystem:

ls -lh history_log#*

It will print:

-rw-r-----. 1 mysql mysql  44M Jan 24 20:23 history_log#p#p2021_02w.ibd
-rw-r-----. 1 mysql mysql  24M Jan 24 21:20 history_log#p#p2021_03w.ibd
-rw-r-----. 1 mysql mysql 128K Jan 11 00:59 history_log#p#p2021_04w.ibd

From previous output, we can take partition name ‘p2021_02w’ and use it in a query:

SELECT ho.hostid, ho.name, count(*) AS records, 
(count(*)* (SELECT AVG_ROW_LENGTH FROM information_schema.tables 
WHERE TABLE_NAME = 'history_log' and TABLE_SCHEMA = 'zabbix')/1024/1024) AS 'Total size average (Mb)', 
sum(length(history_log.value))/1024/1024 + 
sum(length(history_log.clock))/1024/1024 +
sum(length(history_log.ns))/1024/1024 + 
sum(length(history_log.itemid))/1024/1024 AS 'history_log Column Size (Mb)'
FROM history_log PARTITION (p2021_02w)
LEFT OUTER JOIN items i on history_log.itemid = i.itemid 
LEFT OUTER JOIN hosts ho on i.hostid = ho.hostid 
WHERE ho.status IN (0,1)
GROUP BY ho.hostid
ORDER BY 4 DESC
LIMIT 10;

You can reproduce a similar scenario while listing:

ls -lh history_text#*
ls -lh history_str#*

Free up disk space (MySQL)

Deleting a host in GUI will not free up data space on MySQL. It will create empty rows in table where the new data can be inserted. If you want to really free up disk space, we can rebuild partition. At first list all possible partition names:

SHOW CREATE TABLE history\G

To rebuild partition:

ALTER TABLE history REBUILD PARTITION p202101160000;

Free up disk space (PostgreSQL)

On PostgreSQL, there is a process which is responsible for vacuuming the table. To ensure a vacuum has been done lately, kindly run:

SELECT schemaname, relname, n_live_tup, n_dead_tup, last_autovacuum
FROM pg_stat_all_tables
WHERE n_dead_tup > 0
ORDER BY n_dead_tup DESC;

In output, we look at ‘n_dead_tup’ it means a dead tuple.
If the last auto vacuum has not occurred in last 10 days, it’s bad. We have to install a different definition. We can increase vacuum priority by having:

vacuum_cost_page_miss = 10
vacuum_cost_page_dirty = 20
autovacuum_vacuum_threshold = 50
autovacuum_vacuum_scale_factor = 0.01
autovacuum_vacuum_cost_delay = 20ms
autovacuum_vacuum_cost_limit = 3000
autovacuum_max_workers = 6

Alright. That is it for today.

Getting your notifications via Signal

Post Syndicated from Brian van Baekel original https://blog.zabbix.com/getting-your-notifications-via-signal/13286/

Recently, Whatsapp pushed their new privacy policy where they announced to share more data with Facebook, causing an exodus to other platforms, where Signal is one of the more popular ones, among Telegram. Both are great alternatives, but I prefer Signal due to the open-source part, end to end encryption, and last but not least: their business model (living on donations instead of selling your data).

Typically, Zabbix is sending notifications to whatever medium you’ve chosen if a problem is detected. We all know the Email messages, the various webhook integrations with Slack/MS Teams/ Jira, etc, perhaps even some text message integrations and such. Now, if we’re migrating to Signal, we suddenly have access to the Signal API and can utilize it to receive Zabbix notifications. Nice!

There is only one drawback. You need a separate phone number to register against Signal. Don’t use your own phone number – unless you want to lose the ability to use Signal ;(

There are various ways to get a phone number for this purpose:

  • Use the phone number of your current SMS gateway
  • Use the company phone number (a lot of cloud PBX are providing the option to receive the verification email)
  • Purchase a prepaid phone number.
  • Use a service like Twilio

You just need to receive one text message, the rest of the communications will go via the internet

Time to get rid of Whatsapp and move to Signal! But… How to use Signal to get your notifications?

Signal-cli

Although we could built everything from scratch, talking to the API of Signal, there is a nice implementation available in order to talk to Signal within a few minutes: Signal-cli

Although this github page is very comprehensive in order to get Signal-cli installed, but of course it is not doing anything with Zabbix.

Configuration tasks

For this guide, we’re using:

  • Centos 8
  • Zabbix 5.2

signal-cli installation

First, lets install the Signal-cli utility, and in order to do so we need to resolve the dependency of Java by installing the openjdk application:

dnf -y install java-11-openjdk-devel.x86_64

After this installation, we should be good to continue with the installation of signal-cli. According to their installation guide, this should be sufficient:

export VERSION="0.7.3"
wget https://github.com/AsamK/signal-cli/releases/download/v"${VERSION}"/signal-cli-"${VERSION}".tar.gz
sudo tar xf signal-cli-"${VERSION}".tar.gz -C /opt
sudo ln -sf /opt/signal-cli-"${VERSION}"/bin/signal-cli /usr/local/bin/

At the time of writing, the most recent version is 0.7.3, and that’s what we’re installing here. If in the future a new version is released, of course you should install that!

If everything went as expected, we should be able to register ourself to Signal.

signal-cli registration

Since we want to execute these commands by Zabbix, we must make sure the registration is done with the correct user on the Zabbix server, otherwise you will get the following error message:

Unregistered user error

(ERROR App – User +19293771253 is not registered.)

In order to prevent this error, lets do the authentication against Signal as Zabbix user:

Important: The USERNAME (your phone number) must include the country calling code, i.e. the number must start with a “+” sign and you must replace everything between the  < > in the following examples with your own values

runuser -l zabbix -c 'signal-cli -u <NUMBER> register'

Now, check for incoming test messages on this phone number. Within seconds you should receive a 6 digit code in the following format: xxx-xxx

Once you’ve received the text, it’s time to complete the registration:

runuser -l zabbix -c 'signal-cli -u <NUMBER> verify <CODE>'

Since we’re running these commands as a different user, we won’t see the output of them. Let’s just test!

Sending messages from the command line is straight forward:

runuser -l zabbix -c 'signal-cli -u <NUMBER> send -m <MESSAGE> <RECEIVER NUMBER>'

You will see the message id as output. Simply ignore it, since it’s not relevant at this point.

Within seconds:

It works! Great.

So now we’ve got this part covered, time to get the AlertScript set up, before heading to the frontend.

Zabbix AlertScript setup

Ok, so now we’ve got the registration done, we need to make sure Zabbix can utilise it. In order to do so, we use a very old method. Although it would’ve made more sense to use the webhook option, that means I had to built the communication with Signal from scratch.

So AlertScripts it is. In your terminal/SSH session with the Zabbix server open a new file with this command: vi /usr/lib/zabbix/alertscripts/signal.sh and insert the following contents:

#!/bin/bash
signal-cli -u '+19293771253' send -m "$1" $2

 That’s right. just 2 lines. After saving the file, change the owner and set the permissions:

chown zabbix:zabbix /usr/lib/zabbix/alertscripts/signal.sh
chmod 7000 /usr/lib/zabbix/alertscripts/signal.sh

and it’s time to move to our frontend.

Zabbix mediatype configuration

In the frontend, go to Administration -> Mediatypes and create a new mediatype:

Signal Mediatype

Name: Signal
Type: Script
Script name: signal.sh
Script parameters:
    {ALERT.MESSAGE}
    {ALERT.SENDTO}

don’t forget to configure some Message templates as well (second tab in the Mediatype configuration). You can just use the defaults if you click on ‘add’

Zabbix media configuration

Next step. Navigate to Administration -> Users (or just open your own user profile) and create a new media:

new-media

Type: Signal
Sendto: <your number>
When active / severity as per needs

Important: The USERNAME (your phone number) must include the country calling code, i.e. the number must start with a “+” sign

We’re almost there, just some configuration on the actions

Zabbix action configuration

This step is only needed if you are sending notifications right now via a specific mediatype. If you configured the ‘send only to’ option to ‘- All -‘ there is nothing to change, and it will work straight away!

Otherwise, navigate to Configuration -> Actions and find the action you want to change, and in the Operations, Recovery operations and Update operations change the ‘send only to’ option to ‘Signal’

Save your action and it’s time to test – Generate some problem to confirm the implementation actually works.

Wrap up

That’s it. By now you should have a working implementation where Zabbix is sending notifications to Signal. The setup was extremely straight forward and easy to configure. Nevertheless, if you need help getting this going, we (Opensource ICT Solutions) offer consultancy services as well, and are more than happy to help you out!


Examine Data Overview

Post Syndicated from Aigars Kadiķis original https://blog.zabbix.com/examine-data-overview/13225/

In this lab, let’s practice to create an on-screen report of the data (most recent metrics) which is very important for us.

This post represents one technique how to advance from functionality under:
“Monitoring” => “Overview”.

To create a report of the things you are fancy, we need to somehow mark those things. We need to mark items to belong under a specific application. The best way is to modify the name of an existing application and add some extra keywords inside. Please don’t create a second application. I will explain later why to not do so.

Here is a thought process of how to mark items under a single application.

Sample 1:

Total Memory
Total amount of CPU cores

Sample 2:

Current usage CPU
Current usage Memory

Sample 3:

TCP state ESTABLISHED
TCP state LISTEN
TCP state TIME_WAIT
...

It’s always only one application. Notice that each group has a common keyword: “Total”, “Current usage”, “TCP state”.

Now to list the data coming from a specific application:

  1. “Monitoring” => “Overview”
  2. Select “Data overview”
  3. Pick a “Host groups”
  4. Set an “Application”
  5. On the right top corner set Hosts location: “Left”
  6. Apply

It is always quite challenging to think of a naming system which is very independent and not overlapping. Good luck and keep “challenge accepted” running in your heart.

Of course, you can create an “extra” application for each item, for example, an application “Overview1”, but that will create a duplicate entry while browsing data under:
“Monitoring” => “Latest data”.

It’s possible to reach some limitations in the “Data overview” page if there are more than 50 entries to represent. We will see the message at the bottom of the page:

Not all results are displayed. Please provide more specific search criteria.

To solve this problem starting with 5.2 there is an option to configure the limit (default is 50):

On version 5.0 to customize this, have to modify ‘defines.inc.php’

# cd /usr/share/zabbix/include
# grep ZBX_MAX_TABLE_COLUMNS defines.inc.php
define('ZBX_MAX_TABLE_COLUMNS', 50);

Summarize devices that are not reachable

Post Syndicated from Aigars Kadiķis original https://blog.zabbix.com/summarize-devices-that-are-not-reachable/13219/

In this lab, we will list all devices which are not reachable by a monitoring tool. This is good when we want to improve the overall monitoring experience and decrease the size queue (metrics which has not been arrived at the instance).

Tools required for the job: Access to a database server or a Windows computer with PowerShell

To summarize devices that are not reachable at the moment we can use a database query. Tested and works on 4.0, 5.0, on MySQL and PostgreSQL:

SELECT hosts.host,
       interface.ip,
       interface.dns,
       interface.useip,
       CASE interface.type
           WHEN 1 THEN 'ZBX'
           WHEN 2 THEN 'SNMP'
           WHEN 3 THEN 'IPMI'
           WHEN 4 THEN 'JMX'
       END AS "type",
       hosts.error
FROM hosts
JOIN interface ON interface.hostid=hosts.hostid
WHERE hosts.available=2
  AND interface.main=1
  AND hosts.status=0;

A very similar (but not exactly the same) outcome can be obtained via Windows PowerShell by contacting Zabbix API. Try this snippet:

$headers = New-Object "System.Collections.Generic.Dictionary[[String],[String]]"
$headers.Add("Content-Type", "application/json")
$url = 'http://192.168.1.101/api_jsonrpc.php'
$user = 'api'
$password = 'zabbix'

# authorization
$key = Invoke-RestMethod $url -Method 'POST' -Headers $headers -Body "
{
    `"jsonrpc`": `"2.0`",
    `"method`": `"user.login`",
    `"params`": {
        `"user`": `"$user`",
        `"password`": `"$password`"
    },
    `"id`": 1
}
" | foreach { $_.result }
echo $key

# filter out unreachable Agent, SNMP, JMX, IPMI hosts
Invoke-RestMethod $url -Method 'POST' -Headers $headers -Body "
{
    `"jsonrpc`": `"2.0`",
    `"method`": `"host.get`",
    `"params`": {
        `"output`": [`"interfaces`",`"host`",`"proxy_hostid`",`"disable_until`",`"lastaccess`",`"errors_from`",`"error`"],
        `"selectInterfaces`": `"extend`",
        `"filter`": {`"available`": `"2`",`"status`":`"0`"}
    },
    `"auth`": `"$key`",
    `"id`": 1
}
" | foreach { $_.result }  | foreach { $_.interfaces } | Out-GridView

# log out
Invoke-RestMethod $url -Method 'POST' -Headers $headers -Body "
{
    `"jsonrpc`": `"2.0`",
    `"method`": `"user.logout`",
    `"params`": [],
    `"id`": 1,
    `"auth`": `"$key`"
}
"

Set a valid credential (URL, username, password) on the top of the code before executing it.

The benefit of PowerShell here is that we can use some on-the-fly filtering:

What is the exact meaning of the field ‘type’ we can understand by looking on the previous database query:

       CASE interface.type
           WHEN 1 THEN 'ZBX'
           WHEN 2 THEN 'SNMP'
           WHEN 3 THEN 'IPMI'
           WHEN 4 THEN 'JMX'
       END AS "type",

On Windows PowerShell, it is possible to download the unreachable hosts directly to CSV file. To do that, in the code above, we need to change:

Out-GridView

to

Export-Csv c:\temp\unavailable.hosts.csv

Alright, this was the knowledge bit today. Let’s keep Zabbixing!

Code your own Pipe Mania puzzler | Wireframe #46

Post Syndicated from Ryan Lambie original https://www.raspberrypi.org/blog/code-your-own-pipe-mania-puzzler-wireframe-46/

Create a network of pipes before the water starts to flow in our re-creation of a classic puzzler. Jordi Santonja shows you how.

A screen grab of the game in motion
Pipe Mania’s design is so effective, it’s appeared in various guises elsewhere – even as a minigame in BioShock.

Pipe Mania, also called Pipe Dream in the US, is a puzzle game developed by The Assembly Line in 1989 for Amiga, Atari ST, and PC, and later ported to other platforms, including arcades. The player must place randomly generated sections of pipe onto a grid. When a counter reaches zero, water starts to flow and must reach the longest possible distance through the connected pipes.

Let’s look at how to recreate Pipe Dream in Python and Pygame Zero. The variable start is decremented at each frame. It begins with a value of 60*30, so it reaches zero after 30 seconds if our monitor runs at 60 frames per second. In that time, the player can place tiles on the grid to build a path. Every time the user clicks on the grid, the last tile from nextTiles is placed on the play area and a new random tile appears at the top of the next tiles. randint(2,8) computes a random value between 2 and 8.

Our Pipe Mania homage. Build a pipeline before the water escapes, and see if you can beat your own score.

grid and nextTiles are lists of tile values, from 0 to 8, and are copied to the screen in the draw function with the screen.blit operation. grid is a two-dimensional list, with sizes gridWidth=10 and gridHeight=7. Every pipe piece is placed in grid with a mouse click. This is managed with the Pygame functions on_mouse_move and on_mouse_down, where the variable pos contains the mouse position in the window. panelPosition defines the position of the top-left corner of the grid in the window. To get the grid cell, panelPosition is subtracted from pos, and the result is divided by tileSize with the integer division //. tileMouse stores the resulting cell element, but it is set to (-1,-1) when the mouse lies outside the grid.

The images folder contains the PNGs with the tile images, two for every tile: the graphical image and the path image. The tiles list contains the name of every tile, and adding to it _block or _path obtains the name of the file. The values stored in nextTiles and grid are the indexes of the elements in tiles.

wfmag46code
Here’s Jordi’s code for a Pipemania-style puzzler. To get it working on your system, you’ll need to install Pygame Zero. And to download the full code and assets, head here.

The image waterPath isn’t shown to the user, but it stores the paths that the water is going to follow. The first point of the water path is located in the starting tile, and it’s stored in currentPoint. update calls the function CheckNextPointDeleteCurrent, when the water starts flowing. That function finds the next point in the water path, erases it, and adds a new point to the waterFlow list. waterFlow is shown to the user in the draw function.

pointsToCheck contains a list of relative positions, offsets, that define a step of two pixels from currentPoint in every direction to find the next point. Why two pixels? To be able to define the ‘cross’ tile, where two lines cross each other. In a ‘cross’ tile the water flow must follow a straight line, and this is how the only points found are the next points in the same direction. When no next point is found, the game ends and the score is shown: the number of points in the water path, playState is set to 0, and no more updates are done.

Get your copy of Wireframe issue 46

You can read more features like this one in Wireframe issue 46, available directly from Raspberry Pi Press — we deliver worldwide.

wfcover

And if you’d like a handy digital version of the magazine, you can also download issue 46 for free in PDF format.

The post Code your own Pipe Mania puzzler | Wireframe #46 appeared first on Raspberry Pi.

Let me subscribe – Zabbix masters IoT topics

Post Syndicated from Wolfgang Alper original https://blog.zabbix.com/let-me-subscribe-zabbix-masters-iot-topics/12710/

Zabbix 5.2 supports two important protocols used in the world of the Internet of Things — MQTT and Modbus. Now we can benefit from the newest Zabbix features and integrate Zabbix network monitoring in the world of IoT.

Contents

I. What is MQTT? (3:32:13)
II. MQTT and Zabbix integration (3:39:48)

1.MQTT setup (3:40:03)
2.Node-RED (3:42:12)
3.Splitting data (3:45:45)
4.Publishing data from Zabbix (3:52:23)

III. Questions & Answers (3:55:42)

What is MQTT?

MQTT — the Message Queuing Telemetry Transport was invented in 1999, and designed to be bandwidth-efficient and lightweight, thus battery efficient. Initially, it was developed to allow for monitoring oil pipelines.

It is a well-defined ISO standard — ISO/IEC 20922, and it is getting increasingly adopted due to its suitability for the Internet of Things (IoT), sensor networks, home automation, machine-to-machine (M2M), and mobile applications. MQTT usually uses TCP/IP as the transport protocol — over ports 1883, and can be encrypted using TLS transport mechanism with 8883 as the default port.

There is a variation of MQTT available — MQTT-SN (MQTT for Sensor Networks) used for non-TCP/IP networks, such as Zigbee (IEEE 80215.4 radio-based protocol) or other UDP / Bluetooth-based implementations.

There are 2 types of network entities available: ‘Message broker‘ and ‘Clients‘.

MQTT supports 3 Quality-of Service levels:

— 0: At most once – “Fire and forget” where you might or might not receive the message.
— 1: At least once – The message can be sent/delivered multiple times.
— 2: Exactly once – Safest and slowest service.

MQTT is based on a ‘publish’ / ‘subscribe-to-topic’ mechanism:

1. Publish/subscribe.

Publish/subscribe pattern

MQTT Message Broker consumes messages published by clients (on the left) using two-level ‘Topics‘ (such as, for instance, office temperature, office humidity, or indoor air quality). The clients on the rights side act as subscribers receiving any information published on a particular topic. Every time a message is published to the broker, the broker notifies all of the subscribers (Clients 3 and 4), and these clients get the sensor value.

2. Combined publishing/subscribing

Combined pub/sub

A client can be a subscriber and a publisher at the same time. So, in this example, Client 1 is publishing a brightness value and Client 3 has a subscription for that brightness value. Client 3 may decide that the brightness, for instance, of 1,500 might be too low, so it can publish a new message to the topic ‘office’ to let the light controller know that it should increase the brightness, while Client 2, for instance, the light controller with a subscription, may change the brightness level on receipt of the message.

3. Wildcards subs

+ = single-level, # = multi-level

Wildcards in MQTT are easy. So, you can have, for instance, ‘office + brightness’ topic,  where the ‘+’ sign can be substituted by any topic name. If the ‘+’ sign substitutes just one level in our topic, then it is a single-level wildcard. While the pound sign works for a multi-level wildcard.

MQTT features:

  • Clients can publish and subscribe to one or more topics.
  • One client can publish and subscribe at the same time.
  • Clients can subscribe using single/multi-level wildcards.
  • Clients can choose between three different QoS levels.

MQTT advanced features:

  • Messages can be retained by the broker for new subscribers. So, if a new client subscribes to a particular topic, then the publisher can mark its messages as ‘Retained‘ so that the new subscriber gets the last retained message.
  • Clients can provide a “last will and testament” that will be published by the broker when the client “dies”.

MQTT and Zabbix integration

MQTT setup

Integrating Zabbix into the multiple-client mix

Integrated structure:

1. Four sensors:

    • Server room.
    • Training room.
    • Sales room.
    • Support room.

2. Four different topics:

    • office
    • bielefeld (home town)
    • serverroom
    • trainingroom

3. Mosquitto MQTT Message Broker, which is one of the well-known message brokers.

So, the sensors are publishing the data to the Mosquitto Message Broker, where any MQTT-enabled device or system can pick those values up. In our case, it’s the home automation system, which subscribes to the Message Broker and has access to all of the values published by the sensors.

Thanks to MQTT support in Zabbix 5.2, Zabbix can now subscribe to the Mosquitto Message Broker and immediately get access to all of the sensors publishing their values to the broker.

As we can have multiple subscribers, multiple clients can subscribe to one topic on the Message Broker. So the home automation system can subscribe to the same values published to the Message Broker, as well as Zabbix.

Node-RED

Sooner or later, you will need Node-RED, which is a flow-based programming tool allowing you to subscribe to the broker and to publish messages to the broker acting as the client, as well as to work with the data.

Data Processing in Node-RED

This setup might be useful, if, for instance, some Zabbix trigger fires and passes the information over to the MQTT to publish the outcome of the trigger to the Message Broker, which will be then picked up by the home automation system.

Zabbix publishes data to the broker

You can have two different Zabbix instances subscribing to the same Message Broker acting just as two different clients.

Multiple Zabbix servers sharing the same data

Node-RED:

    • Construction kit for the Internet of Things and home automation.
    • Acts as MQTT client able to publish and subscribe.
    • Flow-based tool for visual programming based on Node.js.
    • Graphical web editor.
    • Supports input, processing, and output nodes.
    • Extensible with plugins and custom function nodes.

Different types of nodes can be connected in the workspace. For instance, the nodes subscribing to a topic and transforming the data, or the nodes writing the data to a log file.

Node-RED

We can get the data from the sensors as the raw JSON string containing 20-30 metrics in a payload, and as a parsed JSON object in the Node-RED Debug node with easy-to-read metrics, such as, for instance, temperature, humidity, WiFi quality, indoor air quality, etc.

Multiple metrics in one message

Splitting data

We have different options for data splitting available:

  • Split on MQTT level: use Node-RED to split metrics and then publish them in their own topics (it’s good to set up when other clients can handle only a single metric at a time).

Splitting data in Node-RED


  • Split on Zabbix level: set up an MQTT item as a master item and use Zabbix JSON preprocessing with corresponding dependent items. Its more efficient because Zabbix would need only one subscription.

We can get the data with the brand-new mqtt.get item in Zabbix 5.2:

— Requires Agent 2.
— Requires active checks. As every time a client publishes a message to the topic, we need the broker to push that data to us, we need active checks, so mqtt.get must listen to the subscription and get notified when the new data comes in.
— Broker URL default is localhost.
— User name and password are optional.
— Uses Eclipse Paho Go client library.

One Zabbix agent in active mode sending data to multiple hosts

For our setup with four sensors: in Sales Room, Server Room, Support Room, and Training Room, we need four hosts in Zabbix. Traditionally, you need four different agents to handle them as each agent running as active needs to configure its own hostname. However in our setup, we need just one agent installed and handling different hosts by subscribing to multiple topics.

This is possible because of the the new feature  running active agent checks from multiple hosts which is now available in Zabbix 5.2. All we need is:

—  to set up hosts in Zabbix (as usual),
—  to define our MQTT items (as usual),
—  to set up just one agent with all of the hostnames the agent should be responsible for (the new feature),
—  to set up the master item, which is our mqtt.get item,
—  to define several dependent items and preprocessing for each of the dependent items, and
—  to start preprocessing with JSONPath.

NOTE. Every time the master item gets an update, so do all of the dependent items in Zabbix.

Master item and dependent items

  • Combine both methods: let other clients subscribe to a single metric using their specific topic, but publish all sensor data for Zabbix in one topic.

NOTEData received and displayed on the dashboard is based on the MQTT item, the payload, and the MQTT messages received from the Message Broker.

Sensor data dashboard

Publishing data from Zabbix

Now you want to publish the outcome of a Zabbix trigger, so it can be consumed by other MQTT-enabled devices. Any MQTT subscriber, like Node-RED, should receive the alert. To do that, you need:

  • to define a new media type to send problems to the topic, that is, to pass the data over to the Message Broker:
  • to use the command-line tool for Mosquitto — mosquitto_pub allowing us to publish the message.
#!/bin/sh
mosquitto_pub -h yourbroker.io -m "$1" -t "zabbix/problems/$2"

  • to make sure that the data is sent to the broker in the right format. In this case, we use JSON as transport and define a JSON problem template and a JSON problem recovery template.


In Zabbix, you’ll see the problem, the actions, and the media type firing using the subscription, and in the Debug node of Note-RED, you’ll see that the data is received from Zabbix.

Zabbix problems  published via MQTT

This model with Node-RED can be used to create sophisticated setups. For instance, you can take the data from Zabbix, forward it by actions and media types, preprocess them in Node-RED, and transform the data in many different ways.

IoT devices and other subscribers can react to issues detected by Zabbix using Node-RED

NOTE. To try out the MQTT setup and new Zabbix features, you can use the Live broker available on IntelliTrend new GitHub account, getting data from Zabbix sensors every 10 minutes. You’ll also find templates,  access data, address of the broker, etc. —  everything you need to to get started.

Questions & Answers

Question. If the MQTT client gets overloaded due to high message frequency on subscribe topics, how will that affect Zabbix?

Answer. Here the broker might be overloaded or the Zabbix agent might not be able to follow up. If for the problem with the broker, the quality of service levels is defined in the MQTT protocol, more specifically — QoS level 2, which guarantees delivery. So if QoS2 is used as a QoS level, the messages won’t get lost but would be resent in case of failure.

Question. What else would you expect from the IoT side of Zabbix? What kind of protocols or things would get added? 

Answer. There’s always room for improvement. You can use third-party tools, custom scripts, or any tools to enhance Zabbix. I’m sure that using user script parameters was an excellent design decision. But the official support of MQTT is a quantum leap for Zabbix because it opens the door to most IoT infrastructures, as MQTT is the most important IoT protocol so far.

For instance, one of our customers is monitoring the infrastructure of electricity generators, production systems, etc. They use their own monitoring platform provided by vendors. The request was to integrate alerts or some metrics into Zabbix. The customer’s monitoring platform used MQTT protocol. So, all we had to do was to make their monitoring platform use external scripts and MQTT support.

Optimizing AWS Lambda cost and performance using AWS Compute Optimizer

Post Syndicated from Chad Schmutzer original https://aws.amazon.com/blogs/compute/optimizing-aws-lambda-cost-and-performance-using-aws-compute-optimizer/

This post is authored by Brooke Chen, Senior Product Manager for AWS Compute Optimizer, Letian Feng, Principal Product Manager for AWS Compute Optimizer, and Chad Schmutzer, Principal Developer Advocate for Amazon EC2

Optimizing compute resources is a critical component of any application architecture. Over-provisioning compute can lead to unnecessary infrastructure costs, while under-provisioning compute can lead to poor application performance.

Launched in December 2019, AWS Compute Optimizer is a recommendation service for optimizing the cost and performance of AWS compute resources. It generates actionable optimization recommendations tailored to your specific workloads. Over the last year, thousands of AWS customers reduced compute costs up to 25% by using Compute Optimizer to help choose the optimal Amazon EC2 instance types for their workloads.

One of the most frequent requests from customers is for AWS Lambda recommendations in Compute Optimizer. Today, we announce that Compute Optimizer now supports memory size recommendations for Lambda functions. This allows you to reduce costs and increase performance for your Lambda-based serverless workloads. To get started, opt in for Compute Optimizer to start finding recommendations.

Overview

With Lambda, there are no servers to manage, it scales automatically, and you only pay for what you use. However, choosing the right memory size settings for a Lambda function is still an important task. Computer Optimizer uses machine-learning based memory recommendations to help with this task.

These recommendations are available through the Compute Optimizer console, AWS CLI, AWS SDK, and the Lambda console. Compute Optimizer continuously monitors Lambda functions, using historical performance metrics to improve recommendations over time. In this blog post, we walk through an example to show how to use this feature.

Using Compute Optimizer for Lambda

This tutorial uses the AWS CLI v2 and the AWS Management Console.

In this tutorial, we setup two compute jobs that run every minute in AWS Region US East (N. Virginia). One job is more CPU intensive than the other. Initial tests show that the invocation times for both jobs typically last for less than 60 seconds. The goal is to either reduce cost without much increase in duration, or reduce the duration in a cost-efficient manner.

Based on these requirements, a serverless solution can help with this task. Amazon EventBridge can schedule the Lambda functions using rules. To ensure that the functions are optimized for cost and performance, you can use the memory recommendation support in Compute Optimizer.

In your AWS account, opt in to Compute Optimizer to start analyzing AWS resources. Ensure you have the appropriate IAM permissions configured – follow these steps for guidance. If you prefer to use the console to opt in, follow these steps. To opt in, enter the following command in a terminal window:

$ aws compute-optimizer update-enrollment-status --status Active

Once you enable Compute Optimizer, it starts to scan for functions that have been invoked for at least 50 times over the trailing 14 days. The next section shows two example scheduled Lambda functions for analysis.

Example Lambda functions

The code for the non-CPU intensive job is below. A Lambda function named lambda-recommendation-test-sleep is created with memory size configured as 1024 MB. An EventBridge rule is created to trigger the function on a recurring 1-minute schedule:

import json
import time

def lambda_handler(event, context):
  time.sleep(30)
  x=[0]*100000000
  return {
    'statusCode': 200,
    'body': json.dumps('Hello World!')
  }

The code for the CPU intensive job is below. A Lambda function named lambda-recommendation-test-busy is created with memory size configured as 128 MB. An EventBridge rule is created to trigger the function on a recurring 1-minute schedule:

import json
import random

def lambda_handler(event, context):
  random.seed(1)
  x=0
  for i in range(0, 20000000):
    x+=random.random()

  return {
    'statusCode': 200,
    'body': json.dumps('Sum:' + str(x))
  }

Understanding the Compute Optimizer recommendations

Compute Optimizer needs a history of at least 50 invocations of a Lambda function over the trailing 14 days to deliver recommendations. Recommendations are created by analyzing function metadata such as memory size, timeout, and runtime, in addition to CloudWatch metrics such as number of invocations, duration, error count, and success rate.

Compute Optimizer will gather the necessary information to provide memory recommendations for Lambda functions, and make them available within 48 hours. Afterwards, these recommendations will be refreshed daily.

These are recent invocations for the non-CPU intensive function:

Recent invocations for the non-CPU intensive function

Function duration is approximately 31.3 seconds with a memory setting of 1024 MB, resulting in a duration cost of about $0.00052 per invocation. Here are the recommendations for this function in the Compute Optimizer console:

Recommendations for this function in the Compute Optimizer console

The function is Not optimized with a reason of Memory over-provisioned. You can also fetch the same recommendation information via the CLI:

$ aws compute-optimizer \
  get-lambda-function-recommendations \
  --function-arns arn:aws:lambda:us-east-1:123456789012:function:lambda-recommendation-test-sleep
{
    "lambdaFunctionRecommendations": [
        {
            "utilizationMetrics": [
                {
                    "name": "Duration",
                    "value": 31333.63587049883,
                    "statistic": "Average"
                },
                {
                    "name": "Duration",
                    "value": 32522.04,
                    "statistic": "Maximum"
                },
                {
                    "name": "Memory",
                    "value": 817.67049838188,
                    "statistic": "Average"
                },
                {
                    "name": "Memory",
                    "value": 819.0,
                    "statistic": "Maximum"
                }
            ],
            "currentMemorySize": 1024,
            "lastRefreshTimestamp": 1608735952.385,
            "numberOfInvocations": 3090,
            "functionArn": "arn:aws:lambda:us-east-1:123456789012:function:lambda-recommendation-test-sleep:$LATEST",
            "memorySizeRecommendationOptions": [
                {
                    "projectedUtilizationMetrics": [
                        {
                            "name": "Duration",
                            "value": 30015.113193697029,
                            "statistic": "LowerBound"
                        },
                        {
                            "name": "Duration",
                            "value": 31515.86878891883,
                            "statistic": "Expected"
                        },
                        {
                            "name": "Duration",
                            "value": 33091.662123300975,
                            "statistic": "UpperBound"
                        }
                    ],
                    "memorySize": 900,
                    "rank": 1
                }
            ],
            "functionVersion": "$LATEST",
            "finding": "NotOptimized",
            "findingReasonCodes": [
                "MemoryOverprovisioned"
            ],
            "lookbackPeriodInDays": 14.0,
            "accountId": "123456789012"
        }
    ]
}

The Compute Optimizer recommendation contains useful information about the function. Most importantly, it has determined that the function is over-provisioned for memory. The attribute findingReasonCodes shows the value MemoryOverprovisioned. In memorySizeRecommendationOptions, Compute Optimizer has found that using a memory size of 900 MB results in an expected invocation duration of approximately 31.5 seconds.

For non-CPU intensive jobs, reducing the memory setting of the function often doesn’t have a negative impact on function duration. The recommendation confirms that you can reduce the memory size from 1024 MB to 900 MB, saving cost without significantly impacting duration. The new duration cost per invocation saves approximately 12%.

The Compute Optimizer console validates these calculations:

Compute Optimizer console validates these calculations

These are recent invocations for the second function which is CPU-intensive:

Recent invocations for the second function which is CPU-intensive

The function duration is about 37.5 seconds with a memory setting of 128 MB, resulting in a duration cost of about $0.000078 per invocation. The recommendations for this function appear in the Compute Optimizer console:

recommendations for this function appear in the Compute Optimizer console

The function is also Not optimized with a reason of Memory under-provisioned. The same recommendation information is available via the CLI:

$ aws compute-optimizer \
  get-lambda-function-recommendations \
  --function-arns arn:aws:lambda:us-east-1:123456789012:function:lambda-recommendation-test-busy
{
    "lambdaFunctionRecommendations": [
        {
            "utilizationMetrics": [
                {
                    "name": "Duration",
                    "value": 36006.85851551957,
                    "statistic": "Average"
                },
                {
                    "name": "Duration",
                    "value": 38540.43,
                    "statistic": "Maximum"
                },
                {
                    "name": "Memory",
                    "value": 53.75978407557355,
                    "statistic": "Average"
                },
                {
                    "name": "Memory",
                    "value": 55.0,
                    "statistic": "Maximum"
                }
            ],
            "currentMemorySize": 128,
            "lastRefreshTimestamp": 1608725151.752,
            "numberOfInvocations": 741,
            "functionArn": "arn:aws:lambda:us-east-1:123456789012:function:lambda-recommendation-test-busy:$LATEST",
            "memorySizeRecommendationOptions": [
                {
                    "projectedUtilizationMetrics": [
                        {
                            "name": "Duration",
                            "value": 27340.37604781184,
                            "statistic": "LowerBound"
                        },
                        {
                            "name": "Duration",
                            "value": 28707.394850202432,
                            "statistic": "Expected"
                        },
                        {
                            "name": "Duration",
                            "value": 30142.764592712556,
                            "statistic": "UpperBound"
                        }
                    ],
                    "memorySize": 160,
                    "rank": 1
                }
            ],
            "functionVersion": "$LATEST",
            "finding": "NotOptimized",
            "findingReasonCodes": [
                "MemoryUnderprovisioned"
            ],
            "lookbackPeriodInDays": 14.0,
            "accountId": "123456789012"
        }
    ]
}

For this function, Compute Optimizer has determined that the function’s memory is under-provisioned. The value of findingReasonCodes is MemoryUnderprovisioned. The recommendation is to increase the memory from 128 MB to 160 MB.

This recommendation may seem counter-intuitive, since the function only uses 55 MB of memory per invocation. However, Lambda allocates CPU and other resources linearly in proportion to the amount of memory configured. This means that increasing the memory allocation to 160 MB also reduces the expected duration to around 28.7 seconds. This is because a CPU-intensive task also benefits from the increased CPU performance that comes with the additional memory.

After applying this recommendation, the new expected duration cost per invocation is approximately $0.000075. This means that for almost no change in duration cost, the job latency is reduced from 37.5 seconds to 28.7 seconds.

The Compute Optimizer console validates these calculations:

Compute Optimizer console validates these calculations

Applying the Compute Optimizer recommendations

To optimize the Lambda functions using Compute Optimizer recommendations, use the following CLI command:

$ aws lambda update-function-configuration \
  --function-name lambda-recommendation-test-sleep \
  --memory-size 900

After invoking the function multiple times, we can see metrics of these invocations in the console. This shows that the function duration has not changed significantly after reducing the memory size from 1024 MB to 900 MB. The Lambda function has been successfully cost-optimized without increasing job duration:

Console shows the metrics from recent invocations

To apply the recommendation to the CPU-intensive function, use the following CLI command:

$ aws lambda update-function-configuration \
  --function-name lambda-recommendation-test-busy \
  --memory-size 160

After invoking the function multiple times, the console shows that the invocation duration is reduced to about 28 seconds. This matches the recommendation’s expected duration. This shows that the function is now performance-optimized without a significant cost increase:

Console shows that the invocation duration is reduced to about 28 seconds

Final notes

A couple of final notes:

  • Not every function will receive a recommendation. Compute optimizer only delivers recommendations when it has high confidence that these recommendations may help reduce cost or reduce execution duration.
  • As with any changes you make to an environment, we strongly advise that you test recommended memory size configurations before applying them into production.

Conclusion

You can now use Compute Optimizer for serverless workloads using Lambda functions. This can help identify the optimal Lambda function configuration options for your workloads. Compute Optimizer supports memory size recommendations for Lambda functions in all AWS Regions where Compute Optimizer is available. These recommendations are available to you at no additional cost. You can get started with Compute Optimizer from the console.

To learn more visit Getting started with AWS Compute Optimizer.