In the previous blog post, we installed the Zabbix Agent Helm Chart and set up official Kubernetes templates to monitor a cluster in Zabbix. In this edition, part 2, we will explore the functionality provided by the Kubernetes integration in Zabbix and discuss use cases for monitoring and alerting on events in a cluster. (This post assumes that the Kubernetes integration has been set up in at least one cluster using the helm chart and provided templates.)
Following integration setup, the templates will discover control plane components, each node, and the kubelet associated with it using the Kubernetes API via a “Script” item type.
Note:
In the last blog post, I showed a managed EKS cluster. Control plane components cannot be discovered in an EKS cluster because AWS does not make them directly available through the API. For the sake of demonstrating the full capabilities of the integration, this post will use screenshots depicting a cluster that was created using the kubeadm utility.
In the latest version of Zabbix (6.2 at the time of writing), control plane components are discovered via node labels added only for clusters created with kubeadm. Depending on your setup, you may be able to add the same node labels to your own control plane nodes or modify the template to use your specific labels.
This example cluster has 4 worker nodes and 1 master node. The control plane runs entirely on the master node.
Zabbix’s “Low-Level Discovery” is the backbone of the Kubernetes integration. Zabbix discovers each node and creates two hosts to represent them in the cluster. The first host attaches the “Linux by Zabbix Agent” template to it, and the second attaches a custom Kubelet template called “Kubernetes Kubelet by HTTP. Zabbix also creates items for most standard objects like pods, deployments, replicasets, job, cronjob, etc.
Node and Kubernetes Performance Metrics
In this example, there are four discovered worker nodes with the “Linux by Zabbix Agent” template attached to them. The template will provide metrics about the machines running in the cluster.
Each worker host’s “System performance” dashboard shows system load, CPU usage, and memory usage metrics.
Zabbix will also collect Kubernetes-specific metrics related to the nodes. “Latest Data” for the Kubernetes Nodes host shows metrics such as the Allocatable CPU available to pods and the node’s memory capacity.
Alerts are generated for events such as the allocation of too much CPU. This could indicate that capacity should be increased, assuming that the memory and CPU limits set on the pod label are accurate.
The Kubernetes integration also monitors object states. As a best practice, any tool used to monitor Kubernetes should be monitoring and alerting critical status changes within the cluster. The image above shows the triggers related to the health of a pod. There are also triggers when certain conditions are detected by the nodes, like memory or CPU pressure.
Zabbix discovers objects like pods, deployments, and Replicasets, and triggers on object states. For example, pods that are not up or deployments that do not have the correct number of replicas up.
In this example, a cluster is running a Kubernetes dashboard deployment with 3 replicas. By running the following command, we can see that all 3 replicas are up. Under “Latest Data,” Zabbix shows those 3 replicas available out of the 3 desired.
kubectl get deployment kubernetes-dashboard
To mimic a pod crashing, the pod is edited to use an invalid image tag.
kubectl edit pod <pod name>
The image tag is changed to “invalid.tag, “ which is unavailable for the image. This causes the pod to fail because it can no longer pull the image. Output now shows that one pod is no longer ready.
Looking at the data in Zabbix, the number of available replicas is only 3, while the number of unavailable replicas is now 1.
On the problems page, there are two new problems. Both alerted that there is a mismatch between the number of replicas for the dashboard and the number of desired replicas.
Changing the tag back to a valid one should cause those problems to be resolved.
The Kubernetes templates offer many metrics and triggers, including most provided by Prometheus and Alert Manager. With some Zabbix experience and the ability to navigate kube-state-metrics and Kubernetes APIs, creating new items is possible.
What’s Next?
Above is an example of the output from the kube-state-metrics API. Unlike most APIs that return data in JSON format, the kube-state-metrics API uses the Prometheus data model to supply metrics.
As you get comfortable with Kubernetes monitoring in Zabbix, you may want to parse your own metrics from kube-state-metrics and create new items.
In the next video, we will learn how to monitor applications with Prometheus in Zabbix.
About the Author
Michaela DeForest is a Platform Engineer for The ATS Group. She is a Zabbix Certified Specialist on Zabbix 6.0 with additional areas of expertise, including Terraform, Amazon Web Services (AWS), Ansible, and Kubernetes, to name a few. As ATS’s resident authority in DevOps, Michaela is critical in delivering cutting-edge solutions that help businesses improve efficiency, reduce errors, and achieve a faster ROI.
About ATS Group:The ATS Group provides a fully inclusive set of technology services and tools designed to innovate and transform IT. Their systems integration, business resiliency, cloud enablement, infrastructure intelligence, and managed services help businesses of all sizes “get IT done.” With over 20 years in business, ATS has become the trusted advisor to nearly 500 customers across multiple industries. They have built their reputation around honesty, integrity, and technical expertise unrivaled by the competition.
As you know, a picture is worth a thousand words. Therefore, I would like to share the process of creating a webhook from scratch. In this article, we will walk through the creation process step by step – starting with studying the target service with which Zabbix will integrate and finishing with tests for sending events from Zabbix. Although it may seem complicated, writing your own integrations is not so difficult.
Preparation
First, we need to decide what we want to see as a result of the webhook. In most cases, the services to which we will send events are divided into 2 types:
Messengers to which you can send messages. For example, Telegram, Slack, Discord, etc.
Service Desks where you can open, close, and update tickets. For example, Jira, Redmine, ServiceNow, etc.
In both cases, the principle of creating a webhook will not differ – the difference is only in the complexity of one type from the other.
In this article, I will describe the process of creating a webhook for messengers – and specifically for Line messenger.
After we have decided on the type, we need to find out whether this service supports the possibility of API requests and, if it does, what is required for this. Usually, all the services you want to integrate Zabbix with have somewhat detailed documentation about the API methods they support. By the way, Zabbix also has its own API, which is documented in detail.
After we are done studying the Line documentation, we find out that messages are sent using the POST method to the https://api.line.me/v2/bot/message/push endpoint, using the Line bot token in the request header for authorization and passing a specially formatted JSON in the request body with the content of the message. Confused? No problem. Let’s take a closer look.
HTTP requests
The operation of the API is based on HTTP requests, which are executed with parameters provided by the developers of this API.
Several types of HTTP requests are used more often than others:
GET – is perhaps the most common one that all of us encounter on a daily basis. This request only involves getting data. For example, the browser used a GET request from the web server to fetch the article you are currently reading.
POST – is a request that sends data to a resource. This is exactly the case when we want to pass something to the service using API requests.
PUT – is much less common than the previous 2, but no less important. This query replaces the values in a resource.
These are not all HTTP request methods, but these three will suffice for a general introduction.
We are done with methods. Let’s move on to the endpoint.
An endpoint is a permanent address of a resource via which we transfer, receive, or change data. In this case, https://api.line.me/v2/bot/message/push is the endpoint that accepts POST requests to send messages.
So, the method and the endpoint are defined. What’s next?
Generally, any HTTP request consists of:
URL
Method
Headers
Body
HTTP request structure
We have already dealt with the first two, but the headers and the request body remain.
Headers usually contain service information that allows you to process a request correctly. For example, the Content-Type: application/json header implies that our request body should be interpreted as a json object. Also, quite often, authorization information is passed in the headers. As in the case of Line, the Authorization: Bearer {channel access token} header contains the authorization token of the bot on behalf of which messages will be sent.
The request body usually contains the information we want to pass on to the service. In our case, this will be the subject and body of the event in Zabbix.
Checking the service API
The documentation is good, but it is necessary to check that everything we read works exactly how it is documented. It is not uncommon that a service can be developed faster than the documentation can keep up with it. So field testing never hurts. Excluding unexpected behavior will significantly reduce the time spent searching for problems.
I recommend using Postman to work with API requests – a handy tool that saves time. But for this article, we will use cURL due to its prevalence and ease of use.
I will not describe the process of creating the Line Bot API token because this is not directly related to the article. However, for those interested in this process, I will leave a link here.
As we have already found out, the request type will be POST, the access point URL is https://api.line.me/v2/bot/message/push, and additional headers must be passed: Content-Type: application/json which specifies the type of data to be sent (in our case it is JSON) and Authorization: Bearer {token value}. And the messages themselves are in JSON format. For example, I used 2 messages – “Hello, world1” and “Hello, world2”. As a result, I got the following query:
After executing the request, we got the expected result of 2 messages that came to the messenger, which were in the request body.
Excellent! So half of the work has already been done: there is a ready-made request that works in manual mode and successfully sends messages to Line. The only thing left is to put the necessary information in the right places and automate the process using JS and Zabbix.
Integration with Zabbix
After successfully completing the tests, go to Zabbix, create a new notification method in the Administration section, select the webhook type, and name it Line.
For webhook integrations with external services, Zabbix uses the built-in JavaScript engine on Duktape. Parameters are passed to the script, which is used to build the logic of the webhook. As a result of the script, tags can be returned that will be assigned to the event. This is usually necessary in case of integration with service desks in order to be able to update the status of tickets.
Let’s take a closer look at the webhook setup interface.
The Media type section contains the general settings for the new media type:
Name – Name of the media type.
Type – The type of media type. There are 4 types: email, SMS, webhook, and script.
Parameters – This is a list of variables passed to the code. All necessary data can be passed through parameters: event id, event type, trigger severity, event source, etc. You can specify macros and text values in parameters. The parameters are passed as a JSON string, accessible through the built-in variable value.
Script – JS script describing the logic of the webhook.
Timeout – The time after which the script will be terminated.
Process tags – If this option is enabled, the webhook will support generating tags for events sent using this hook.
Include event menu entry – This option makes the Menu Entry Name and Menu Entry URL fields available for use.
Menu entry name – The text displayed in the event dropdown menu for the Menu entry URL submitted using this hook.
Menu entry URL – A link to an external resource in the event menu.
Description – A text field that contains a description of the notification method.
Enabled – an Option that allows enabling or disabling the media type.
The Message templates section contains templates that are used by webhook to send alerts. Each template contains:
Message type – The event type to which the message will apply. For example, Problem – when the trigger fires and Problem recovery – when the problem is resolved.
Subject – The headline of the message.
Message – A message template that contains useful information about the event. For example, event time, date, event name, host name, etc.
The Options section contains additional options:
Concurrent sessions – The number of concurrent sessions to send an alert.
Attempts – The number of retries in case of send failure.
Attempt interval – The frequency of attempts to send an alert.
When writing your own webhook, you can take an existing one as a basis – Zabbix has more than thirty ready-made webhook solutions of varying complexity. All basic functions are usually repeated from hook to hook with little or no change at all, as are the parameters passed to them.
Let’s set the following parameters:
It is convenient to set parameter values with macros. A macro is a variable in Zabbix that contains a specific value. Macros allow you to optimize and automate your work. They can be used in various places, such as triggers, filters, alerts, and so on.
A little more about each macro separately in order to understand why each of them is needed:
{ALERT.SUBJECT} – The subject of the event message. This value is taken from the Subject field of the corresponding Message template type.
{ALERT.MESSAGE} – The event message body. This value is taken from the Message field of the corresponding Message template type.
{EVENT.ID} – The event id in Zabbix. Could be used for generating a link to an event
{EVENT.NSEVERITY} – The numerical definition of the event’s severity from 0-5. We will use this to change the message in case of different severity.
{EVENT.SOURCE} – The event source. Needed to handle events correctly. In most cases, we are interested in triggers; this corresponds to source value 0.
{EVENT.UPDATE.STATUS} – Returns 1 if it is an update event. For example, in case of acknowledge operations or a change in severity.
{EVENT.VALUE} – The event state. 0 for recovery and 1 for the problem.
{ALERT.SENDTO} – The field from the media type assigned to the user. It returns the ID of the user or group in the Line, where it will be necessary to send a message
{TRIGGER.DESCRIPTION} – A macro that will be expanded if the event source is a trigger. Returns the description of the trigger
{TRIGGER.ID} – The trigger ID. Required to generate a link to an event in Zabbix
Webhooks can use other macros if needed. A list of all macros can be viewed on the documentation page. Be careful – not all macros can be used in webhooks.
Writing the script
Before writing the script, let’s define the main points that the webhook will need to be able to perform:
the script should describe the logic for sending messages
handle possible errors
logging for debugging
I will not describe the entire code in order not to repeat the same type of blocks and concentrate only on important aspects.
To send messages, let’s write a function that will accept messages and params variables. We got the following function:
function sendMessage(messages, params) {
    // Declaring variables
    var response,
        request = new HttpRequest();

    // Adding the required headers to the request
    request.addHeader('Content-Type: application/json');
    request.addHeader('Authorization: Bearer ' + params.bot_token);

    // Forming the request that will send the message
    response = request.post('https://api.line.me/v2/bot/message/push', JSON.stringify({
        "to": params.send_to,
        "messages": messages
    }));

    // If the response is different from 200 (OK), return an error with the content of the response
    if (request.getStatus() !== 200) {
        throw "API request failed: " + response;
    }
}
Of course, this is not a reference function, and depending on the requirements for the request may differ. There may be other required headers and a different request body. In some cases, it may be necessary to add an additional step to obtain authorization data through another API request.
In this case, the request to send a message returns an empty {} object, so it makes no sense to return it from the function. But for example, when sending a message to Telegram, an object with data about this message is returned. If you pass this data to tags, you can write logic that will change the already sent message – for example, in case of closing or updating the problem.
Now let’s describe a function that will accept webhook parameters and validate their values. In the example, we will not describe all the conditions because they are of the same type:
function validateParams(params) {
    // Checking that the bot_token parameter is a string and not empty
    if (typeof params.bot_token !== 'string' || params.bot_token.trim() === '') {
        throw 'Field "bot_token" cannot be empty';
    }

    // Checking that the event_source parameter is only a number from 0-3
    if ([0, 1, 2, 3].indexOf(parseInt(params.event_source)) === -1) {
        throw 'Incorrect "event_source" parameter given: "' + params.event_source + '".nMust be 0-3.';
    }

    // If an event of type "Discovery" or "Autoregistration" set event_value 1,
    // which means "Problem", and we will process these events same as problems
    if (params.event_source === '1' || params.event_source === '2') {
        params.event_value = '1';
    }

    ...

    // Checking that trigger_id is a number and not equal to zero
    if (isNaN(params.trigger_id) && params.event_source === '0') {
        throw 'field "trigger_id" is not a number';
    }
}
As you can see from the code, in most cases these are simple checks that allow you to avoid errors associated with the input data. Validation is necessary because there is no guarantee that the expected value will be in the parameter.
The main block of code is placed inside the try…catch block in order to correctly handle errors:
try {
    // Declaring the params variable and writing the webhook parameters to it
    var params = JSON.parse(value);

    // Calling the validation function and passing parameters to it for verification
    validateParams(params);

    // If the event is a trigger and it is in the problem status, compose the message body
    if (params.event_source === '0' && params.event_value === '1') {
        var line_message = [
            {
                "type": "text",
                "text": params.alert_subject + 'nn' +
                    params.alert_message + 'n' + params.trigger_description
            }
        ];
    }

    ...

    // Sending a composed message
    sendMessage(line_message, params);

    // Returning OK so that the webhook understands that the script has completed with OK status
    return 'OK';
}
catch (err) {
    // Adding a log function so in case of problems you can see the error in the Zabbix server console
    Zabbix.log(4, '[ Line Webhook ] Line notification failed : ' + err);

    // In case of an error, return it from the webhook
    throw 'Line notification failed : ' + err;
}
Here we assign parameter values to the params variable, then validate them using the validateParams() function, describe the main conditions for generating a message, and send this message to the messenger. At the same time, the try…catch block allows you to catch all errors, log them to Zabbix and return them in a readable form to the user in the web interface.
For writing webhooks in Zabbix, there is a guideline dedicated to this topic. Please read this information because it will help you write better code and avoid common mistakes.
Testing
After we’ve finished with the webhook script, it’s time to test how our code works. To do this, Zabbix provides a function to send test messages. Go to the Administration → Media types, find Line, and click on the Test button opposite it. In the window that appears, fill in all the fields with the necessary data and press the Test button. Check the messenger and see that the message came with the data we specified in the test.
Ready-made Line integration can be found in the Zabbix git repository and in all recent Zabbix instance builds.
Troubleshooting
Of course, everything in the article looks like I did it on the first attempt and did not encounter a single error or problem. Naturally, this is not the case in practice. Work with each new product includes Research & Development. How can you catch errors and, most importantly, understand the problem?
Well, as I wrote earlier – read the documentation and test all requests before writing code. At this stage, it is easiest to catch all the problems. The response to the HTTP request will explicitly describe the error. For example, if you make a mistake in the request body and send an object with incorrect values, the service will return the body with an error description and the response status 400 (Bad request).
There are several options for debugging in case of errors that may occur when writing a webhook script:
Focus on the errors displayed when the notification method is executed. For example, if you mistyped or set the wrong name of the function and variable.
Include logging in the code for displaying service information. For example, while you are in the script development stage, the result of the function can be logged using the Zabbix.log() function. Zabbix supports 6 debug levels (0-5), which can be set in this function. Usually, webhooks use level 4, which contains information for debugging.
Use the zabbix_js utility. You can transfer a file with a script and parameters to it. You can read more about it here.
Conclusion
I hope this article has helped you better understand how webhooks work in Zabbix and highlighted the basic steps for creating, diagnosing, and preparing to write your integration. The Zabbix community is constantly adding custom templates and media types. I expect that after reading this article, more people will be interested in creating their own webhooks and sharing them with the community. We appreciate any contribution to the development and expansion of the base of integration solutions.
Questions
Q: I don’t know JS, but I know other languages. Is native support of other languages planned in Zabbix, such as Python?
A: For now, there are no such plans.
Q: Are there any restrictions with writing a JS script for a webhook?
A: Yes, there are. The built-in Duktape engine is used to execute the code, and it does not have all the functionality that is available in the latest JS releases. Therefore, I recommend that you read the documentation of this engine and the built-in objects to learn more about the available methods.
There are many options available for monitoring Kubernetes and cloud-native applications. In this multi-part blog series, we’ll explore how to use Zabbix to monitor a Kubernetes cluster and understand the metrics generated within Zabbix. We’ll also learn how to exploit Prometheus endpoints exposed by applications to monitor application-specific metrics.
Before choosing Zabbix as a Kubernetes monitoring tool, we asked ourselves, “why would we choose to use Zabbix rather than Prometheus, Grafana, and alertmanager?” After all, they have become the standard monitoring tools in the cloud ecosystem. We decided that our minimum criteria for Zabbix would be that it was just as effective as Prometheus for monitoring both Kubernetes and cloud-native applications.
Through our discovery process, we concluded that Zabbix meets (and exceeds) this minimum requirement. Zabbix provides similar metrics and triggers as Prometheus, alert manager, and Grafana for Kubernetes, as they both use the same backend tools to do this. However, Zabbix can do this in one product while still maintaining flexibility and allowing you to monitor pretty much anything you can write code to collect. Regarding application monitoring, Zabbix can transform Prometheus metrics fed to it by Prometheus exporters and endpoints. In addition, because Zabbix can make calls to any HTTP endpoint, it can monitor applications that do not have a dedicated Prometheus endpoint, unlike Prometheus.
The Zabbix Helm Chart
Zabbix monitors Kubernetes by collecting metrics exposed via the Kubernetes API and kube-state-metrics. The components necessary to monitor a cluster are installed within the cluster using this helm chart provided by Zabbix. The helm chart includes the Zabbix agent installed as a daemon set and is used to monitor local resources and applications on each node. A Zabbix proxy is also installed to collect monitoring data and transfer it to the external Zabbix server.
Only the Zabbix proxy needs access to the Zabbix server, while the agents can send data to the proxy installed in the same namespace as each agent. A cluster role allows Zabbix to access resources in the cluster via the Kubernetes API. While the cluster role could be modified to restrict privileges given to Zabbix, this will result in some items becoming unsupported. We recommend keeping this the same if you want to get the most out of Kubernetes monitoring with Zabbix.
The Zabbix helm chart installs the kube-state-metrics project as a dependency. You may already be familiar with this project under the Kubernetes organization, which generates Prometheus format metrics based on the current state of the Kubernetes resources. In addition, if you have experience using Prometheus to monitor a cluster, you may already have this installed. If that is the case, you can point to this deployment rather than installing another one.
In this tutorial, we will install kube-state-metrics via the Zabbix helm chart.
For more information on skipping this step, refer to the values file in the Zabbix Kubernetes helm chart.
Installing the Zabbix Helm Chart
Now that we’ve explained how the Zabbix helm chart works, let’s go ahead and install it. In this example, we will assume that you have a running Zabbix 6.0 (or higher) instance that is reachable from the cluster you wish to monitor. I am running a 6.0 instance in a different cluster than the one we want to monitor. The server is reachable via the DNS name mdeforest.zabbix.atsgroup.io with a non-standard port of 31103.
We will start by installing the latest Zabbix helm chart. I recommend visiting zabbix.com/integrations/kubernetes to get any sources that may be referred to in this tutorial. There you will find a link to the Zabbix helm chart and templates. For the most part, we will follow the steps outlined in the readme.
Using a terminal window, I am going to make sure the active cluster is set to the cluster that I want to monitor:
kubectl config use-context <cluster context name>
I’m then going to add the Zabbix chart repo to my local helm repository:
If you’re running Zabbix 6.2 or newer, change the references to 6.0 in this command to 6.2.
Depending on your circumstances, you will need to set a few values for the installation. In most cases, you only need to set a few environment variables for the Zabbix agent and the proxy. The complete list of values and environment variables is available in the helm chart repo, alongside the agent and proxy images on Docker Hub.
In this case, I’m setting the passive server environment variable for the agent to allow any IP to connect. For the proxy, I am setting the server host accessible from the proxy alongside the non-standard port. I’ve also set here some variables related to cache size. These variables may depend on your cluster size, so you may need to play around with them to find the correct values.
Now that I have the values file ready, I’m ready to install the chart. So, we’ll use the following command. Of course, the chart path might vary depending on what version of the chart you’re using.
You can also optionally add a namespace. You must wait until everything is running, so I’ll check just that with the following:
watch kubectl get pods
Now that everything is installed, we’re ready to set up hosts in Zabbix that will be associated with the cluster. The last step before we have all the information we need is to obtain the token created via the service account installed with the helm chart. We’ll get this by running the next command, which is the name of the service account that was created:
kubectl get secret -o jsonpath={.data.token} zabbix service-account | base64 -d
This will get the secret created for the service account and grab just the token from that, which is passed to the base64 utility to decode it. Be sure to copy that value somewhere because you’ll need it for later.
You’ll also need the Kubernetes API endpoint. In most cases, you’ll use the proxy installed rather than the server directly or a proxy outside the cluster. If this is the case, you can use the service DNS for the API. We should be able to reach it by pointing to https://kubernetes.default.svc.cluster.local:443/api.
If this is not the case, you can use the output from the command:
kubectl cluster-info
Now, let’s head over to the Zabbix UI. All the templates we need are shipped in Zabbix 6. If for some reason, you can’t find them, they are available for download and import by visiting the integrations page that I pointed out earlier on the Zabbix site.
Adding the Proxy
We will add our proxy by heading to Administration -> Proxies:
Click Create Proxy. Because this is an active proxy by default, we only need to specify the proxy name. If you didn’t make any changes to the helm chart, this should default to zabbix-proxy. If you’d like to name this differently, you can change the environment variable zbx_hostname for the proxy in the helm chart. We’re going to leave it as the default for now. You’re going to enter this name and then click “Add.” After a few minutes, you’ll start to see that it says that the proxy has been seen.
Create a Host Group to put hosts related to Kubernetes. For this example, let’s create one, which we’ll call Kubernetes.
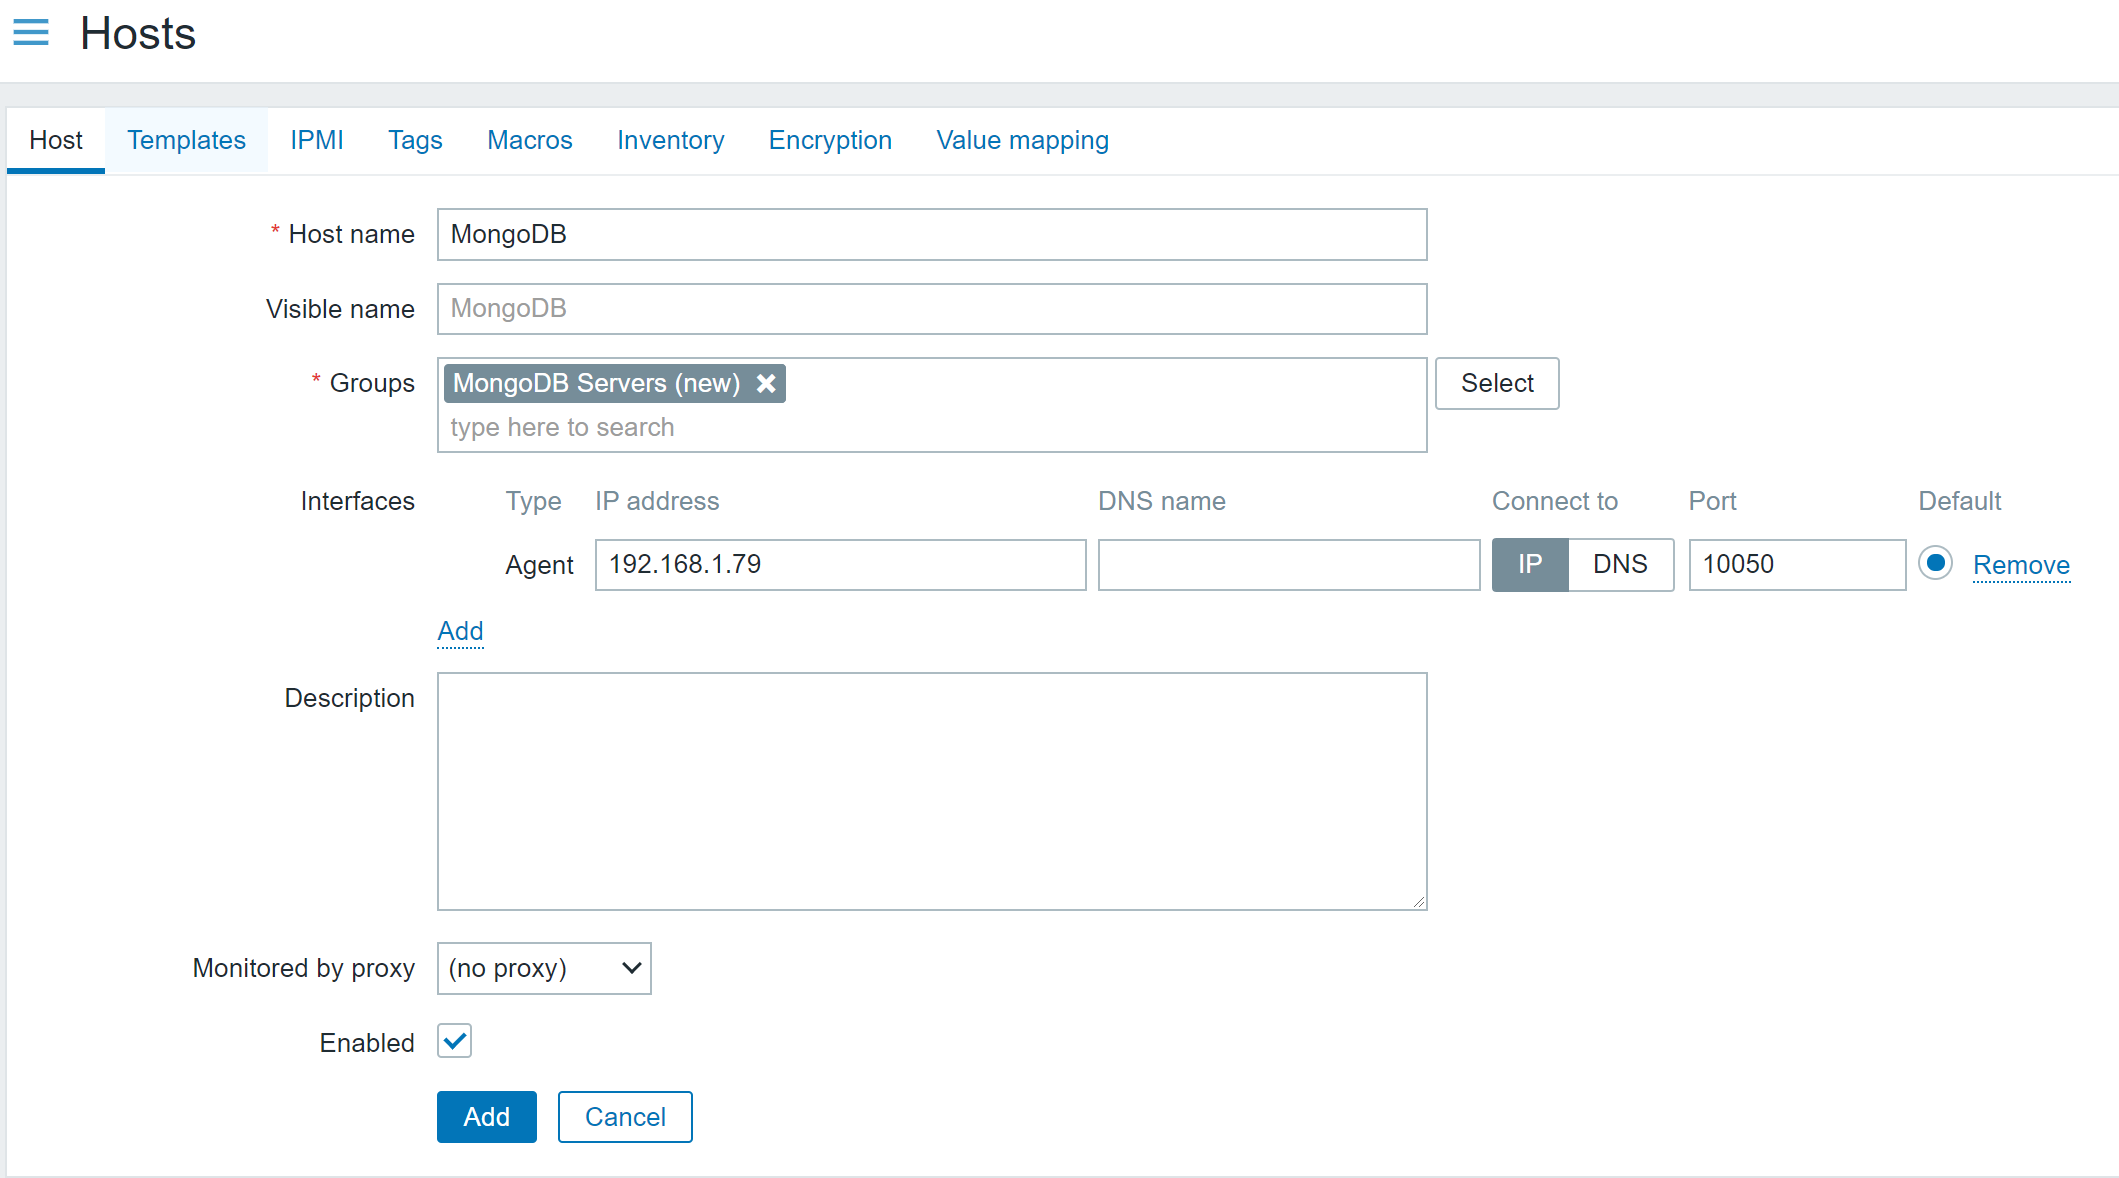
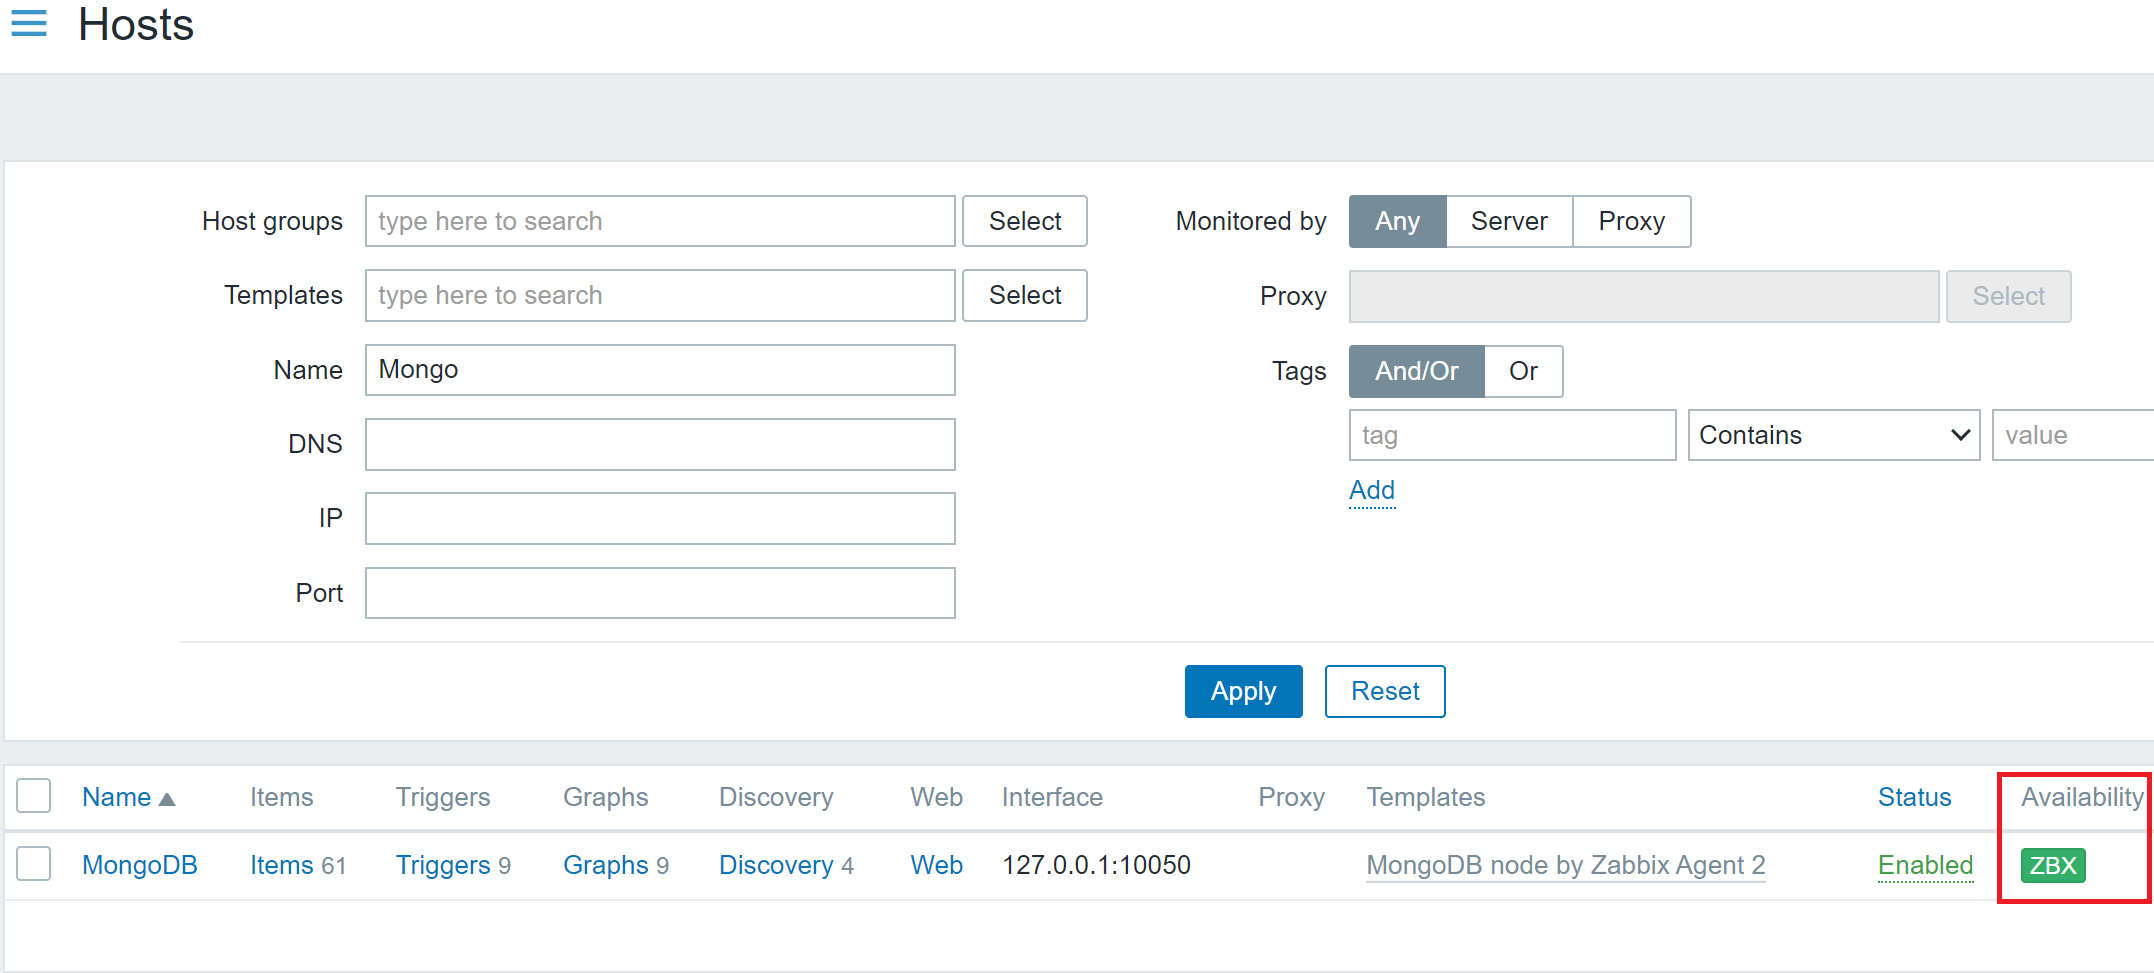
Head to the host page under configuration and click Create Host. The first host will collect metrics related to monitoring Kubernetes nodes, and we’ll discover nodes and create new hosts using Zabbix low-level discovery.
Give this host the name Kubernetes Nodes. We’ll also assign this host to the Kubernetes host group we created and attach the template Kubernetes nodes by HTTP.
Change the line “Monitored by proxy” to the proxy created earlier, called zabbix-proxy.
Click the Macros tab and select “Inherited and host macros.” You should be able to see all the macros that may be set to influence what is monitored in your cluster. In this case, we need to change the first two macros. The first, {KUBE.API.ENDPOINT.URL}, should be set to the Kubernetes API endpoint. In our case, we can set it to what I mentioned earlier: default.svc.cluster.local:443/api. Next, the token should be set to the previously retrieved value from the command line.
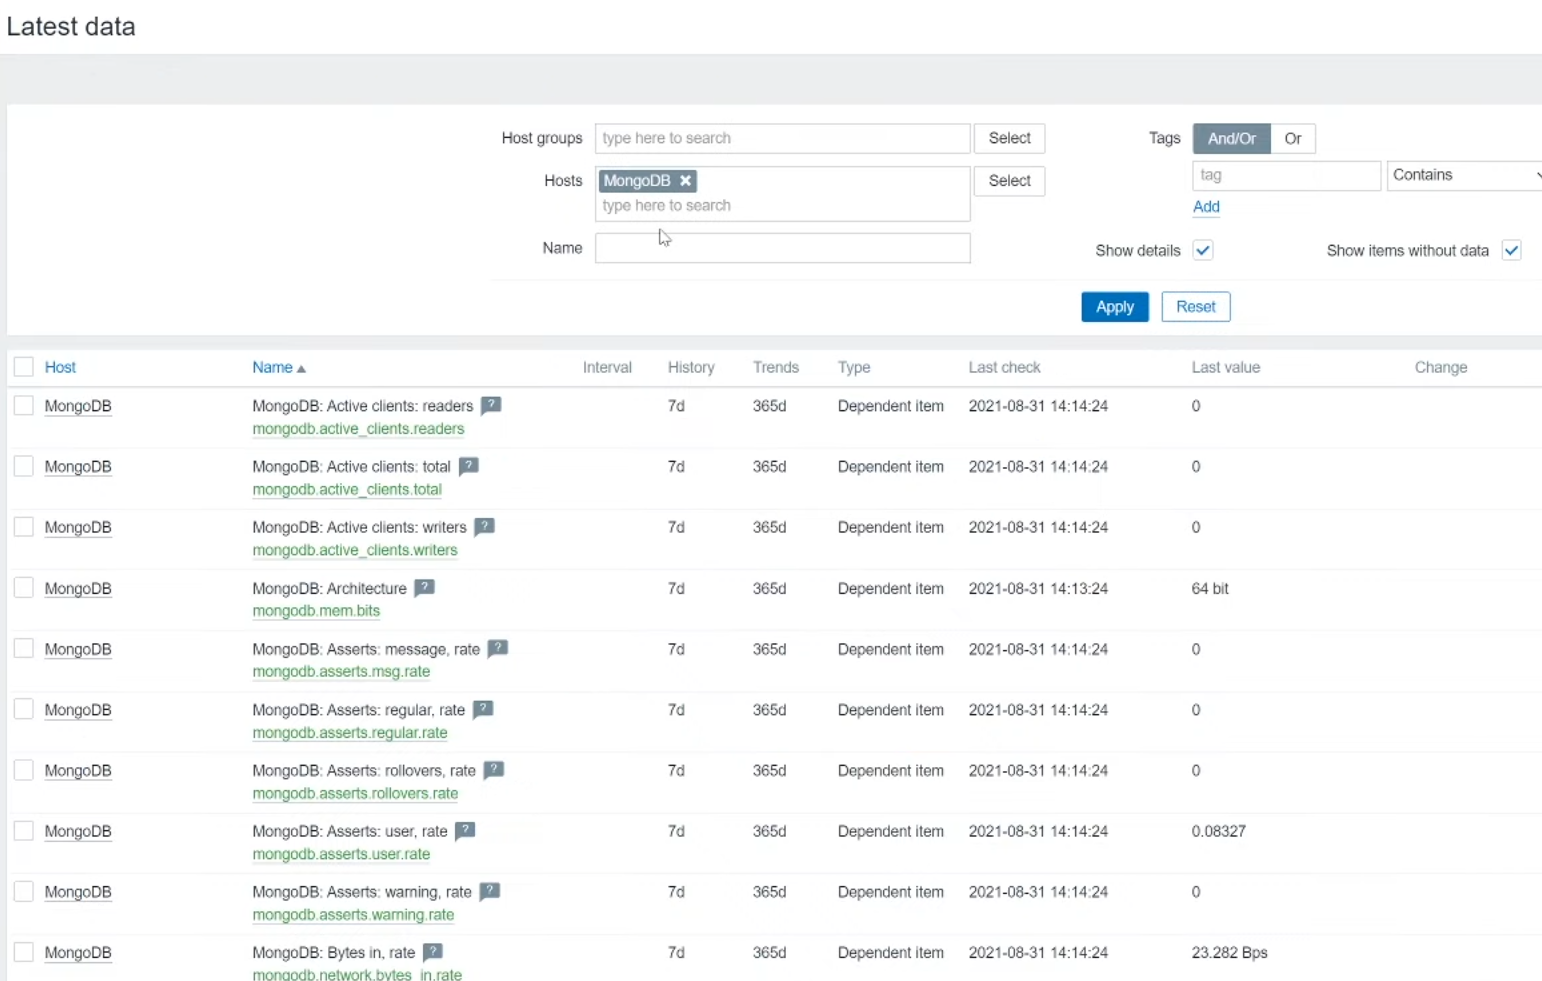
lick Add. After a few minutes, you should start seeing data on the latest data page and new hosts on the host page representing each node.
Creating an Additional Host
Now let’s create another host that will represent the metrics available via the Kubernetes API and the kube-state-metrics endpoint.
Click Create Host again, name this host Kubernetes Cluster State, and add it to the Kubernetes group again.
Let’s also attach the Kubernetes Cluster State template by HTTP. Again, we’re going to choose the proxy that we created earlier.
In the Macro section, change the kube.api.url to the same thing we used before, but this time leave off the /api at the end. Simply: default.svc.cluster.local:443. Be sure to set the token as we did before.
Assuming nothing else was changed in the installation of the helm chart, we can now add that host.
After a few minutes, you should receive metrics related to the cluster state, including hosts representing the kubelet on each node.
What’s Next?
Now you’re all set to start monitoring your Kubernetes cluster in Zabbix! Give it a try, and let us know your thoughts in the comments.
In the next blog post, we’ll look at what you can do with your newly monitored cluster and how to get the most out of it.
Michaela DeForest is a Platform Engineer for The ATS Group. She is a Zabbix Certified Specialist on Zabbix 6.0 with additional areas of expertise, including Terraform, Amazon Web Services (AWS), Ansible, and Kubernetes, to name a few. As ATS’s resident authority in DevOps, Michaela is critical in delivering cutting-edge solutions that help businesses improve efficiency, reduce errors, and achieve a faster ROI.
About ATS Group:The ATS Group provides a fully inclusive set of technology services and tools designed to innovate and transform IT. Their systems integration, business resiliency, cloud enablement, infrastructure intelligence, and managed services help businesses of all sizes “get IT done.” With over 20 years in business, ATS has become the trusted advisor to nearly 500 customers across multiple industries. They have built their reputation around honesty, integrity, and technical expertise unrivaled by the competition.
In this post, we show how to use MSK Connect for MirrorMaker 2 deployment with AWS Identity and Access Management (IAM) authentication. We create an MSK Connect custom plugin and IAM role, and then replicate the data between two existing Amazon Managed Streaming for Apache Kafka (Amazon MSK) clusters. The goal is to have replication successfully running between two MSK clusters that are using IAM as an authentication mechanism. It’s important to note that although we’re using IAM authentication in this solution, this can be accomplished using no authentication for the MSK authentication mechanism.
Solution overview
This solution can help Amazon MSK users run MirrorMaker 2 on MSK Connect, which eases the administrative and operational burden because the service handles the underlying resources, enabling you to focus on the connectors and data to ensure correctness. The following diagram illustrates the solution architecture.
Apache Kafka is an open-source platform for streaming data. You can use it to build building various workloads like IoT connectivity, data analytic pipelines, or event-based architectures.
Kafka Connect is a component of Apache Kafka that provides a framework to stream data between systems like databases, object stores, and even other Kafka clusters, into and out of Kafka. Connectors are the executable applications that you can deploy on top of the Kafka Connect framework to stream data into or out of Kafka.
MirrorMaker is the cross-cluster data mirroring mechanism that Apache Kafka provides to replicate data between two clusters. You can deploy this mirroring process as a connector in the Kafka Connect framework to improve the scalability, monitoring, and availability of the mirroring application. Replication between two clusters is a common scenario when needing to improve data availability, migrate to a new cluster, aggregate data from edge clusters into a central cluster, copy data between Regions, and more. In KIP-382, MirrorMaker 2 (MM2) is documented with all the available configurations, design patterns, and deployment options available to users. It’s worthwhile to familiarize yourself with the configurations because there are many options that can impact your unique needs.
MSK Connect is a managed Kafka Connect service that allows you to deploy Kafka connectors into your environment with seamless integrations with AWS services like IAM, Amazon MSK, and Amazon CloudWatch.
In the following sections, we walk you through the steps to configure this solution:
Create an IAM policy and role.
Upload your data.
Create a custom plugin.
Create and deploy connectors.
Create an IAM policy and role for authentication
IAM helps users securely control access to AWS resources. In this step, we create an IAM policy and role that has two critical permissions:
MSK Connect can assume the created role (see the following trust policy example)
A common mistake made when creating an IAM role and policy needed for common Kafka tasks (publishing to a topic, listing topics) is to assume that the AWS managed policy AmazonMSKFullAccess (arn:aws:iam::aws:policy/AmazonMSKFullAccess) will suffice for permissions.
The following is an example of a policy with both full Kafka and Amazon MSK access:
This policy supports the creation of the cluster within the AWS account infrastructure and grants access to the components that make up the cluster anatomy like Amazon Elastic Compute Cloud (Amazon EC2), Amazon Virtual Private Cloud (Amazon VPC), logs, and kafka:*. There is no managed policy for a Kafka administrator to have full access on the cluster itself.
After you create the KafkaAdminFullAccess policy, create a role and attach the policy to it. You need two entries on the role’s Trust relationships tab:
The first statement allows Kafka Connect to assume this role and connect to the cluster.
The second statement follows the pattern arn:aws:sts::(YOUR ACCOUNT NUMBER):assumed-role/(YOUR ROLE NAME)/(YOUR ACCOUNT NUMBER). Your account number should be the same account number where MSK Connect and the role are being created in. This role is the role you’re editing the trust entity on. In the following example code, I’m editing a role called MSKConnectExample in my account. This is so that when MSK Connect assumes the role, the assumed user can assume the role again to publish and consume records on the target cluster.
In the following example trust policy, provide your own account number and role name:
MSK Connect custom plugins accept a file or folder with a .jar or .zip ending. For this step, create a dummy folder or file and compress it. Then upload the .zip object to your Amazon Simple Storage Service (Amazon S3) bucket:
mkdir mm2
zip mm2.zip mm2
aws s3 cp mm2.zip s3://mytestbucket/
Because Kafka and subsequently Kafka Connect have MirrorMaker libraries built in, you don’t need to add additional JAR files for this functionality. MSK Connect has a prerequisite that a custom plugin needs to be present at connector creation, so we have to create an empty one just for reference. It doesn’t matter what the contents of the file are or what the folder contains, as long as there is an object in Amazon S3 that is accessible to MSK Connect, so MSK Connect has access to MM2 classes.
Create a custom plugin
On the Amazon MSK console, follow the steps to create a custom plugin from the .zip file. Enter the object’s Amazon S3 URI and for this post, and name the plugin Mirror-Maker-2.
Create and deploy connectors
You need to deploy three connectors for a successful mirroring operation:
MirrorSourceConnector
MirrorHeartbeatConnector
MirrorCheckpointConnector
Complete the following steps for each connector:
On the Amazon MSK console, choose Create connector.
For Connector name, enter the name of your first connector.
Select the target MSK cluster that the data is mirrored to as a destination.
Choose IAM as the authentication mechanism.
Pass the config into the connector.
Connector config files are JSON-formatted config maps for the Kafka Connect framework to use in passing configurations to the executable JAR. When using the MSK Connect console, we must convert the config file from a JSON config file to single-lined key=value (with no spaces) file.
You need to change some values within the configs for deployment, namely bootstrap.server, sasl.jaas.config and tasks.max. Note the placeholders in the following code for all three configs.
The following code is for MirrorHeartBeatConnector:
A general guideline for the number of tasks for a MirrorSourceConnector is one task per up to 10 partitions to be mirrored. For example, if a Kafka cluster has 15 topics with 12 partitions each for a total partition count of 180 partitions, we deploy at least 18 tasks for mirroring the workload.
Exceeding the recommended number of tasks for the source connector may lead to offsets that aren’t translated (negative consumer group offsets). For more information about this issue and its workarounds, refer to MM2 may not sync partition offsets correctly.
For the heartbeat and checkpoint connectors, use provisioned scale with one worker, because there is only one task running for each of them.
For the source connector, we set the maximum number of workers to the value decided for the tasks.max property. Note that we use the defaults of the auto scaling threshold settings for now.
Although it’s possible to pass custom worker configurations, let’s leave the default option selected.
In the Access permissions section, we use the IAM role that we created earlier that has a trust relationship with kafkaconnect.amazonaws.com and kafka-cluster:* permissions. Warning signs display above and below the drop-down menu. These are to remind you that IAM roles and attached policies is a common reason why connectors fail. If you never get any log output upon connector creation, that is a good indicator of an improperly configured IAM role or policy permission problem. On the bottom of this page is a warning box telling us not to use the aptly named AWSServiceRoleForKafkaConnect role. This is an AWS managed service role that MSK Connect needs to perform critical, behind-the-scenes functions upon connector creation. For more information, refer to Using Service-Linked Roles for MSK Connect.
Choose Next. Depending on the authorization mechanism chosen when aligning the connector with a specific cluster (we chose IAM), the options in the Security section are preset and unchangeable. If no authentication was chosen and your cluster allows plaintext communication, that option is available under Encryption – in transit.
Choose Next to move to the next page.
Choose your preferred logging destination for MSK Connect logs. For this post, I select Deliver to Amazon CloudWatch Logs and choose the log group ARN for my MSK Connect logs.
Choose Next.
Review your connector settings and choose Create connector.
A message appears indicating either a successful start to the creation process or immediate failure. You can now navigate to the Log groups page on the CloudWatch console and wait for the log stream to appear.
The CloudWatch logs indicate when connectors are successful or have failed faster than on the Amazon MSK console. You can see a log stream in your chosen log group get created within a few minutes after you create your connector. If your log stream never appears, this is an indicator that there was a misconfiguration in your connector config or IAM role and it won’t work.
Verify that the connector launched successfully
In this section, we walk through two confirmation steps to determine a successful launch.
Check the log stream
Open the log stream that your connector is writing to. In the log, you can check if the connector has successfully launched and is publishing data to the cluster. In the following screenshot, we can confirm data is being published.
Mirror data
The second step is to create a producer to send data to the source cluster. We use the console producer and consumer that Kafka ships with. You can follow Step 1 from the Apache Kafka quickstart.
Download the latest stable JAR for IAM authentication from the repository. As of this writing, it is 1.1.3:
cd libs/
wget https://github.com/aws/aws-msk-iam-auth/releases/download/v1.1.3/aws-msk-iam-auth-1.1.3-all.jar
Next, we need to create our client.properties file that defines our connection properties for the clients. For instructions, refer to Configure clients for IAM access control. Copy the following example of the client.properties file:
You can place this properties file anywhere on your machine. For ease of use and simple referencing, I place mine inside kafka_2.13-3.1.0/bin. After we create the client.properties file and place the JAR in the libs directory, we’re ready to create the topic for our replication test.
From the bin folder, run the kafka-topics.sh script:
The details of the command are as follows: –bootstrap-server – Your bootstrap server of the source cluster. –topic – The topic name you want to create. –create – The action for the script to perform. –replication-factor – The replication factor for the topic. –partitions – Total number of partitions to create for the topic. –command-config – Additional configurations needed for successful running. Here is where we pass in the client.properties file we created in the previous step.
We can list all the topics to see that it was successfully created:
When defining bootstrap servers, it’s recommended to use one broker from each Availability Zone. For example:
export bss=broker1:9098,broker2:9098,broker3:9098
Similar to the create topic command, the preceding step simply calls list to show all topics available on the cluster. We can run this same command on our target cluster to see if MirrorMaker has replicated the topic. With our topic created, let’s start the consumer. This consumer is consuming from the target cluster. When the topic is mirrored with the default replication policy, it will have a source. prefixed to it.
For our topic, we consume from source.MirrorMakerTest as shown in the following code:
The details of the code are as follows: –bootstrap-server – Your target MSK bootstrap servers –topic – The mirrored topic –consumer.config – Where we pass in our client.properties file again to instruct the client how to authenticate to the MSK cluster After this step is successful, it leaves a consumer running all the time on the console until we either close the client connection or close our terminal session. You won’t see any messages flowing yet because we haven’t started producing to the source topic on the source cluster.
Open a new terminal window, leaving the consumer open, and start the producer:
The details of the code are as follows: –bootstrap-server – The source MSK bootstrap servers –topic – The topic we’re producing to –producer.config – The client.properties file indicating which IAM authentication properties to use
After this is successful, the console returns >, which indicates that it’s ready to produce what we type. Let’s produce some messages, as shown in the following screenshot. After each message, press Enter to have the client produce to the topic.
Switching back to the consumer’s terminal window, you should see the same messages being replicated and now showing on your console’s output.
Clean up
We can close the client connections now by pressing Ctrl+C to close the connections or by simply closing the terminal windows.
We can delete the topics on both clusters by running the following code:
Delete the source cluster topic first, then the target cluster topic.
Finally, we can delete the three connectors via the Amazon MSK console by selecting them from the list of connectors and choosing Delete.
Conclusion
In this post, we showed how to use MSK Connect for MM2 deployment with IAM authentication. We successfully deployed the Amazon MSK custom plugin, and created the MM2 connector along with the accompanying IAM role. Then we deployed the MM2 connector onto our MSK Connect instances and watched as data was replicated successfully between two MSK clusters.
Using MSK Connect to deploy MM2 eases the administrative and operational burden of Kafka Connect and MM2, because the service handles the underlying resources, enabling you to focus on the connectors and data. The solution removes the need to have a dedicated infrastructure of a Kafka Connect cluster hosted on Amazon services like Amazon Elastic Compute Cloud (Amazon EC2), AWS Fargate, or Amazon EKS. The solution also automatically scales the resources for you (if configured to do so), which eliminates the need for the administers to check if the resources are scaling to meet demand. Additionally, using the Amazon managed service MSK Connect allows for easier compliance and security adherence for Kafka teams.
If you have any feedback or questions, please leave a comment.
About the Authors
Tanner Pratt is a Practice Manager at Amazon Web Services. Tanner is leading a team of consultants focusing on Amazon streaming services like Managed Streaming for Apache Kafka, Kinesis Data Streams/Firehose and Kinesis Data Analytics.
Ed Berezitsky is a Senior Data Architect at Amazon Web Services.Ed helps customers design and implement solutions using streaming technologies, and specializes on Amazon MSK and Apache Kafka.
In this blog post, you will learn how to set up backups for your Zabbix environment. There’s a wide variety of different options when it comes to taking backups of our Zabbix environment, for us, it will just be a matter of choosing the right fit.
Introduction
Monitoring is an important part of our IT infrastructure and often times when our monitoring isn’t working for a certain period, we feel like we are blind as to what is going on with our different IT components. As such, taking backups of our Zabbix environment is an important part of running a production Zabbix environment, as we do want to be prepared for a possible issue that might corrupt or even lose our data. It’s always a possibility and as such we should be prepared.
For Zabbix, there are a few different methods on how to take backups and it all starts at the database level. Both the Zabbix frontend as well as the Zabbix server write their data into the Zabbix database as we can see in the illustration below:
This means that both our configuration as well as all of our collected values are present in the same Zabbix database and if we take a database backup, we back up (almost) everything we need. So, let’s start there and have a look at how we can make a database backup.
How to
MySQL backups
Let’s start with the most used variant of Zabbix databases: MySQL and it’s forks like MariaDB and Percona. All of them can easily be backed up using built-in functionality like the MySQLDump command and we can then use other industry standards to get things going. First, we have to understand the tables in our database though. Most of the tables in your Zabbix environment contain configuration data and as such, they are all important to backup. There are a few tables that we need to consider, however, as they can contain Giga or even Terabytes of data. These are the History, Trends and Events tables:
It is possible to omit these tables from your backup and make smaller, more manageable backups. To make the backup we can then start using tools like MySQLDump:
Once we have taken a backup, we can easily import that back into our environment using the MySQLImport command or simply using the cat command:
Do not forget, taking and importing large backups can take a long time. This completely depends on your MySQL database performance tuning settings as well as the underlying resources like CPU, Memory and Disk I/O. Also, make sure to check out the MySQL documentation:
Alternatively, it’s also possible to create backups using tools like xtrabackup and mariadbbackup.
PostgreSQL backups
We can actually use the same kinds of methods for the PostgreSQL backups. Keep the required tables in mind and fire away with the built-in tools:
Then we can restore it by loading the file into postgres:
What about the configuration files?
Once we have a database backup, everything is backed up, right? Well, almost everything. With just a database backup we are quite safe, but (and this is oftentimes overlooked) there are a lot of configuration files and perhaps even custom scripts we need to take into account! There are three parts to this story – the Zabbix server, the Zabbix frontend, and also the Zabbix additional components. All of them have their own set of configuration files and locations that are used for storing custom scripts.
The Zabbix frontend location and configuration files can be different, depending on the environment, as we have a few choices to make. Are we running Apache or Nginx? On what Linux distribution? All of these have to be considered when making configuration backups. In general, the locations for the configuration would be:
/etc/nginx/
/etc/httpd/
/etc/apache2
There’s also a symlink to the Zabbix frontend configuration file located in /etc/zabbix/ but we will get to that one in a bit.
Then we have the Zabbix server itself, which keeps its configuration in /etc/zabbix/ and if we’re following best practices any script should be placed in /usr/lib/zabbix. So we need:
/etc/zabbix/
/usr/lib/zabbix
Let’s add them to the list and find a method to back up these files. Crontab is a built-in tool that we can use, but there are definitely other (perhaps better) solutions out there. Let’s add the following to cron:
I also added a find command here, which will serve as our roll-over or rotation toll. It will find files older than 180 days and delete them from /mnt/backup/config_files/. Make sure to pick a good (network) folder to store these files as it’s important to keep these safe. Feel free to change the number of days you’d like to store the files for.
What about the additional components like Zabbix proxy, Zabbix Java gateway and Zabbix web service (used for PDF reporting)?. Well, these have configuration files as well. Make sure to run a backup on the devices running these additional components. As for Zabbix proxies – they have the same file locations as Zabbix server:
For Zabbix Java gateway and Zabbix web service, we can omit the /usr/lib/zabbix/ folder.
Don’t forget the import/export files!
In general, database backups are slow to make, but also slow to import back unless we do not include the history/trends in the backup. But even then, restoring an entire database simply because someone made an error on a single template is a hassle. Zabbix ships with the built-in frontend export functionality, allowing us to export (and then import) entire parts of the configuration instantly! We can use these for a number of different parts of the configuration:
Hosts
Templates
Media types
Maps
images
Host groups (API ONLY)
Template groups (API ONLY)
All of these are available through the Zabbix API allowing us to choose whether we do a manual configuration backup from the frontend, as well as providing us with automation options using that API. You could even manage and update your Zabbix configuration from GIT entirely if you write the right scripts for this.
Frontend backups
To run an export from the frontend simply go to one of the supported sections like Configuration | Templates and select the export data format. When selecting multiple entities, keep in mind that they will all be exported to a single file.
We can then make our edits and import files from the frontend as well:
For Templates this will even result in a nice diff pop-up window, detailing all the changes, deletes and additions to the templates:
API backups
For the API things get a little more complicated as we need to select a mode of execution. Of course, it’s possible to do a curl command from the CLI or even use something like Postman:
Request body
The response will then look something like this:
But this feature really starts to shine once we combine it with our own automation scripts. Use it wisely!
High availability
So, what about high availability? Isn’t that some form of a backup?
Well yes and no. High availability is not an “IT backup” in the form of making sure we can recover something that is broken. But it is a backup in the way that if a Zabbix server instance fails, another one takes over for it. HA is somewhat out of scope for this blog post, but it’s still worth mentioning. There are several solutions to set up Zabbix as a full high availability cluster. For MySQL we can use a Primary/Primary setup, for the frontend we can use load balancing techniques like HAProxy and for the Zabbix server, we can use the built-in high availability method. Combine all of these together and you’ll definitely be able to serve your every (production ready!) need.
Conclusion
To conclude, there are many options to start taking backups of our Zabbix environment. It all starts at the database and these backups are definitely vital to keep things safe in case of disaster. When making the backups, do not forget about the configuration files and custom scripts as well as the frontend backup option. Combining all of these solutions will safeguard our environment, but if that isn’t enough – do not forget about industry standards like snapshots. Even further safeguarding our environment on multiple levels.
I hope you enjoyed reading this blog post. If you have any questions or need help configuring anything on your Zabbix setup feel free to contact me and the team at Opensource ICT Solutions. We build a ton of cool integrations like this and much more!
You go to a website or service, but before access is granted, there’s a visual challenge that forces you to select bikes, buses or traffic lights in a set of images. That can be an exasperating experience. Now, if you have iOS 16 on your iPhone, those days could be over and are just a one-time toggle enabled away.
CAPTCHA = “Completely Automated Public Turing test to tell Computers and Humans Apart”
In 2021, we took direct steps to end the madnessthat wastes humanity about 500 years per day called CAPTCHAs, that have been making sure you’re human and not a bot. In August 2022, we announced Private Access Tokens. With that, we’re able to eliminate CAPTCHAs on iPhones, iPads and Macs (and more to come) with open privacy-preserving standards.
On September 12, iOS 16 became generally available (iPad 16 and macOS 13 should arrive in October) and on the settings of your device there’s a toggle that can enable the Private Access Token (PAT) technology that will eliminate the need for those CAPTCHAs, and automatically validate that you are a real human visiting a site. If you already have iOS 16, here’s what you should do to confirm that the toggle is “on” (usually it is):
Settings > Apple ID > Password & Security > Automatic Verification (should be enabled)
What will you get? A completely invisible, private way to validate yourself, and for a website, a way to automatically verify that real users are visiting the site without the horrible CAPTCHA user experience.
Visitors using operating systems that support these tokens, including the upcoming versions of iPad and macOS, can now prove they’re human without completing a CAPTCHA or giving up personal data.
Let’s recap from our August 2022 announcement blog post what this means for different users:
If you’re an Internet user:
We’re helping make your mobile web experience more pleasant and more private.
You won’t see a CAPTCHA on a supported iOS or Mac device (other devices coming soon!) accessing the Cloudflare network.
If you’re a web or application developer:
You’ll know your users are humans coming from an authentic device and signed application, verified by the device vendor directly.
And you’ll validate users without maintaining a cumbersome SDK.
If you’re a Cloudflare customer:
You don’t have to do anything! Cloudflare will automatically ask for and use Private Access Tokens when using Managed Challenge.
Your visitors won’t see a CAPTCHA.
It’s all about simplicity, without compromising on privacy. The work done over a year was a collaboration between Cloudflare and Apple, Google, and other industry leaders to extend the Privacy Pass protocol with support for a new cryptographic token.
These tokens simplify application security for developers and security teams, and obsolete legacy, third-party SDK-based approaches for determining if a human is using a device. They work for browsers, APIs called by browsers, and APIs called within apps. After Apple announced in August that PATs would be incorporated into iOS 16, iPad 16, and macOS 13, the process of ending CAPTCHAs got a big boost. And we expect additional vendors to announce support in the near future.
Cloudflare has already incorporated PATs into our Managed Challenge platform, so any customer using this feature will automatically take advantage of this new technology to improve the browsing experience for supported devices.
In our August in-depth blog post about PATs, you can learn more about how CAPTCHAs don’t work in mobile environments and PATs remove the need for them, and how when sites can’t challenge a visitor with a CAPTCHA, they collect private data.
Improved privacy
In that blog post, we also explain how Private Access Tokens vastly improve privacy by validating without fingerprinting. So, by partnering with third parties like device manufacturers, who already have the data that would help us validate a device, we are able to abstract portions of the validation process, and confirm data without actually collecting, touching, or storing that data ourselves. Rather than interrogating a device directly, we ask the device vendor to do it for us.
Most customers won’t have to do anything to utilize Private Access Tokens. Why? To take advantage of PATs, all you have to do is choose Managed Challenge rather than Legacy CAPTCHA as a response option in a Firewall rule. More than 65% of Cloudflare customers are already doing this.
Now, if you have iOS 16 on your iPhone, it’s your turn.
AWS CloudFormation custom resource provides mechanisms to provision AWS resources that don’t have built-in support from CloudFormation. It lets us write custom provisioning logic for resources that aren’t supported as resource types under CloudFormation. This post focusses on the use cases where CloudFormation custom resource is used to implement a long running task/job. With custom resources, you can manage these custom tasks (which are one-off in nature) as deployment stack resources.
The routine pattern used for implementing custom resources is via AWS Lambda function. However, when using the Lambda function as the custom resource provider, you must consider its trade-offs, such as its 15 minute timeout. Tasks involved in the provisioning of certain AWS resources can be long running and could span beyond the Lambda timeout. In these scenarios, you must look beyond the conventional Lambda function-based approach for custom resources.
In this post, I’ll demonstrate how to use AWS Step Functions to implement custom resources using AWS Cloud Development Kit (AWS CDK). Step Functions allow complex deployment tasks to be orchestrated as a step-by-step workflow. It also offers direct integration with any AWS service via AWS SDK integrations. By default the CloudFormation stack waits for 1 hour before timing out. The timeout can be increased to maximum 12 hours using wait conditions. In this post, you’ll also see how to use wait conditions with custom resource to run long running deployment tasks as part of a CloudFormation stack.
Prerequisites
Before proceeding any further, you must identify and designate an AWS account required for the solution to work. You must also create an AWS account profile in ~/.aws/credentials for the designated AWS account, if you don’t already have one. The profile must have sufficient permissions to run an AWS CDK stack. It should be your private profile and only be used during the course of this post. Therefore, it should be fine if you want to use admin privileges. Don’t share the profile details, especially if it has admin privileges. I recommend removing the profile when you’re finished with this walkthrough. For more information about creating an AWS account profile, see Configuring the AWS CLI.
Services and frameworks used in the post include CloudFormation, Step Functions, Lambda, DynamoDB, Amazon S3, and AWS CDK.
Solution overview
The following architecture diagram shows the application of Step Functions to implement custom resources.
Figure 1. Architecture diagram
The user deploys a CloudFormation stack that includes a custom resource implementation.
The CloudFormation custom resource triggers a Lambda function with the appropriate event which can be CREATE/UPDATE/DELETE.
The custom resource Lambda function invokes Step Functions workflow and offloads the event handling responsibility. The CloudFormation event and context are wrapped inside the Step Function input at the time of invocation.
The custom resource Lambda function returns SUCCESS back to CloudFormation stack indicating that the custom resource provisioning has begun. CloudFormation stack then goes into waiting mode where it waits for a SUCCESS or FAILURE signal to continue.
In the interim, Step Functions workflow handles the custom resource event through one or more steps.
Step Functions workflow prepares the response to be sent back to CloudFormation stack.
Send Response Lambda function sends a success/failure response back to CloudFormation stack. This propels CloudFormation stack out of the waiting mode and into completion.
Solution deep dive
In this section I will get into the details of several key aspects of the solution
Custom Resource Definition
Following code snippet shows the custom resource definition which can be found here. Please note that we also define AWS::CloudFormation::WaitCondition and AWS::CloudFormation::WaitConditionHandle alongside the custom resource. AWS::CloudFormation::WaitConditionHandle resource sets up a pre-signed URL which is passed into the CallbackUrl property of the Custom Resource.
The final completion signal for the custom resource i.e. SUCCESS/FAILURE is received over this CallbackUrl. To learn more about wait conditions please refer to its user guide here. Note that, when updating the custom resource, you cannot use the existing WaitCondition-WaitConditionHandle resource pair. You need to create a new pair for tracking each update/delete operation on the custom resource.
/************************** Custom Resource Definition *****************************/
// When you intend to update CustomResource make sure that a new WaitCondition and
// a new WaitConditionHandle resource is created to track CustomResource update.
// The strategy we are using here is to create a hash of Custom Resource properties.
// The resource names for WaitCondition and WaitConditionHandle carry this hash.
// Anytime there is an update to the custom resource properties, a new hash is generated,
// which automatically leads to new WaitCondition and WaitConditionHandle resources.
const resourceName: string = getNormalizedResourceName('DemoCustomResource');
const demoData = {
    pk: 'demo-sfn',
    sk: resourceName,
    ts: Date.now().toString()
};
const dataHash = hash(demoData);
const wcHandle = new CfnWaitConditionHandle(
    this,
    'WCHandle'.concat(dataHash)
)
const customResource = new CustomResource(this, resourceName, {
    serviceToken: customResourceLambda.functionArn,
    properties: {
        DDBTable: String(demoTable.tableName),
        Data: JSON.stringify(demoData),
        CallbackUrl: wcHandle.ref
    }
});

// Note: AWS::CloudFormation::WaitCondition resource type does not support updates.
new CfnWaitCondition(
    this,
    'WC'.concat(dataHash),
    {
        count: 1,
        timeout: '300',
        handle: wcHandle.ref
    }
).node.addDependency(customResource)
/**************************************************************************************/
Custom Resource Lambda
Following code snippet shows how the custom resource lambda function passes the CloudFormation event as an input into the StepFunction at the time of invocation. CloudFormation event contains the CallbackUrl resource property I discussed in the previous section.
The StepFunction handles the CloudFormation event based on the event type. The CloudFormation event containing CallbackUrl is passed down the stages of StepFunction all the way to the final step. The last step of the StepFunction sends back the response over CallbackUrl via send-cfn-response lambda function as shown in the following code snippet.
Clone the GitHub repo cfn-custom-resource-using-step-functions and navigate to the folder cfn-custom-resource-using-step-functions. Now, execute the script script-deploy.sh by passing the name of the AWS profile that you created in the prerequisites section above. This should deploy the solution. The commands are shown as follows for your reference. Note that if you don’t pass the AWS profile name ‘default’ the profile will be used for deployment.
git clone
cd cfn-custom-resource-using-step-functions
./script-deploy.sh "<AWS- ACCOUNT-PROFILE-NAME>"
The deployed solution consists of 2 stacks as shown in the following screenshot
cfn-custom-resource-common-lib: Deploys common components
DynamoDB table that custom resources write to during their lifecycle events
For demo purposes, I implemented a custom resource that inserts data into the DynamoDB table. When you deploy the solution for the first time, like you just did in the previous step, it initiates a CREATE event resulting in the creation of a new custom resource using Step Functions. You should see a new record with unix epoch timestamp in the DynamoDB table, indicating that the resource was created as shown in the following screenshot. You can find the DynamoDB table name/arn from the SSM Parameter Store /CUSTOM_RESOURCE_PATTERNS/DYNAMODB/ARN
Figure 3. DynamoDB record indicating custom resource creation
Now, execute the script script-deploy.sh again. This should initiate an UPDATE event, resulting in the update of custom resources. The code also automatically creates new WaitConditionHandle and WaitCondition resources required to wait for the update event to finish. Now you should see that the records in the DynamoDb table have been updated with new values for lastOperation and ts attributes as follows.
Figure 4. DynamoDB record indicating custom resource update
Cleaning up
To remove all of the stacks, run the script script-undeploy.sh as follows.
In this post I showed how to look beyond the conventional approach of building CloudFormation custom resources using a Lambda function. I discussed implementing custom resources using Step Functions and CloudFormation wait conditions. Try this solution in scenarios where you must execute a long running deployment task/job as part of your CloudFormation stack deployment.
In this blog post, I will cover Docker container monitoring with Zabbix. We will use the official Docker by Zabbix agent 2 template to make things as simple as possible. The template download link and configuration steps can be found on the Zabbix Integrations page. If you require a visual guide, I invite you to check out my video covering this topic.
Importing the official Docker template
Importing the Docker by Zabbix agent 2 template
Since we will be using the official Docker by Zabbix agent 2 template, first, we need to make sure that the template is actually available in our Zabbix instance. The template is available for Zabbix versions 5.0, 5.4, and 6.0. If you cannot find this template under Configuration – Templates, chances are that you haven’t imported it into your environment after upgrading Zabbix to one of the aforementioned versions. Remember that Zabbix does not modify or import any templates during the upgrade process, so we will have to import the template manually. If that is so, simply download the template from the official Zabbix git page (or use the link in the introduction) and import it into your Zabbix instance by using the Import button in the Configuration – Templates section.
Installing and configuring Zabbix agent 2
Before we get started with configuring our host, we first have to install Zabbix agent 2 and configure it according to the template guidelines. Follow the steps in the download section of the Zabbix website and install the zabbix-agent2 package. Feel free to use any other agent deployment methods if you want to (like compiling the agent from the source files)
Installing Zabbix agent2 from packages takes just a few simple steps:
Configure the Server parameter by populating it with your Zabbix server/proxy address
vi /etc/zabbix/zabbix_agent2.conf
### Option: Server
# List of comma delimited IP addresses, optionally in CIDR notation, or DNS names of Zabbix servers and Zabbix proxies.
# Incoming connections will be accepted only from the hosts listed here.
# If IPv6 support is enabled then '127.0.0.1', '::127.0.0.1', '::ffff:127.0.0.1' are treated equally
# and '::/0' will allow any IPv4 or IPv6 address.
# '0.0.0.0/0' can be used to allow any IPv4 address.
# Example: Server=127.0.0.1,192.168.1.0/24,::1,2001:db8::/32,zabbix.example.com
#
# Mandatory: yes, if StartAgents is not explicitly set to 0
# Default:
# Server=

Server=192.168.50.49
Plugin specific Zabbix agent 2 configuration
Zabbix agent 2 provides plugin-specific configuration parameters. Mostly these are optional parameters related to a specific plugin. You can find the full list of plugin-specific configuration parameters in the Zabbix documentation. In the newer versions of Zabbix agent 2, the plugin-specific parameters are defined in separate plugin configuration files, located in /etc/zabbix/zabbix_agent2.d/plugins.d/, while in older versions, they are defined directly in the zabbix_agent2.conf file.
For the Zabbix agent 2 Docker plugin, we have to provide the Docker daemon unix-socket location. This can be done by specifying the following plugin parameter:
### Option: Plugins.Docker.Endpoint
# Docker API endpoint.
#
# Mandatory: no
# Default: unix:///var/run/docker.sock
# Plugins.Docker.Endpoint=unix:///var/run/docker.sock
The default socket location will be correct for your Docker environment – in that case, you can leave the configuration file as-is.
Once we have made the necessary changes in the Zabbix agent 2 configuration files, start and enable the agent:
systemctl enable zabbix-agent2 --now
Check if the Zabbix agent2 is running:
tail -f /var/log/zabbix/zabbix_agent2.log
Before we move on to Zabbix frontend, I would like to point your attention to the Docker socket file permission – the zabbix user needs to have access to the Docker socket file. The zabbix user should be added to the docker group to resolve the following error messages.
You can add the zabbix user to the Docker group by executing the following command:
usermod -aG docker zabbix
Configuring the docker host
Configuring the host representing our Docker environment
After importing the template, we have to create a host which will represent our Docker instance. Give the host a name and assign it to a Host group – I will assign it to the Linux servers host group. Assign the Docker by Zabbix agent 2 template to the host. Since the template uses Zabbix agent 2 to collect the metrics, we also have to add an agent interface on this host. The address of the interface should point to the machine running your Docker containers. Finish up the host configuration by clicking the Add button.
Docker by Zabbix agent 2 template
Regular docker template items
The template contains a set of regular items for the general Docker instance metrics, such as the number of available images, Docker architecture information, the total number of containers, and more.
Docker tempalte Low-level discovery rules
On top of that, the template also gathers container and image-specific information by using low-level discovery rules.
Once Zabbix discovers your containers and images, these low-level discovery rules will then be used to create items, triggers, and graphs from prototypes for each of your containers and images. This way, we can monitor container or image-specific metrics, such as container memory, network information, container status, and more.
To verify that the agent and the host are configured correctly, we can use Zabbix getcommand-line tool and try to poll our agent. If you haven’t installed Zabbix get, do so on your Zabbix server or Zabbix proxy host:
dnf install zabbix-get
Now we can use zabbix-get to verify that our agent can obtain the Docker-related metrics. Execute the following command:
zabbix_get -s docker-host -k docker.info
Use the -s parameter to specify your agent host’s host name or IP address. The -k parameter specifies the item key for which we wish to obtain the metrics by polling the agent with Zabbix get.
zabbix_get -s 192.168.50.141 -k docker.info

{"Id":"SJYT:SATE:7XZE:7GEC:XFUD:KZO5:NYFI:L7M5:4RGO:P2KX:QJFD:TAVY","Containers":2,"ContainersRunning":2,"ContainersPaused":0,"ContainersStopped":0,"Images":2,"Driver":"overlay2","MemoryLimit":true,"SwapLimit":true,"KernelMemory":true,"KernelMemoryTCP":true,"CpuCfsPeriod":true,"CpuCfsQuota":true,"CPUShares":true,"CPUSet":true,"PidsLimit":true,"IPv4Forwarding":true,"BridgeNfIptables":true,"BridgeNfIP6tables":true,"Debug":false,"NFd":39,"OomKillDisable":true,"NGoroutines":43,"LoggingDriver":"json-file","CgroupDriver":"cgroupfs","NEventsListener":0,"KernelVersion":"5.4.17-2136.300.7.el8uek.x86_64","OperatingSystem":"Oracle Linux Server 8.5","OSVersion":"8.5","OSType":"linux","Architecture":"x86_64","IndexServerAddress":"https://index.docker.io/v1/","NCPU":1,"MemTotal":1776848896,"DockerRootDir":"/var/lib/docker","Name":"localhost.localdomain","ExperimentalBuild":false,"ServerVersion":"20.10.14","ClusterStore":"","ClusterAdvertise":"","DefaultRuntime":"runc","LiveRestoreEnabled":false,"InitBinary":"docker-init","SecurityOptions":["name=seccomp,profile=default"],"Warnings":null}
In addition, we can also use the low-level discovery key – docker.containers.discovery[false] to check the result of the low-level discovery.
We can see that Zabbix will discover and start monitoring two containers – apache-server and mysql-server. Any agent low-level discovery rule or item can be checked with Zabbix get.
Docker template in action
Discovered items on our Docker host
Now that we have configured our agent and host, applied the Docker template, and verified that everything is working, we should be able to see the discovered entities in the frontend.
Collected Docker container metrics
In addition, our metrics should have also started coming in. We can check the Latest data section and verify that they are indeed getting collected.
Macros inherited from the Docker template
Lastly, we have a few additional options for further modifying the template and the results of our low-level discovery. If you open the Macros section of your host and select Inherited and host macros, you will notice that there are 4 macros inherited from the Docker template. These macros are responsible for filtering in/out the discovered containers and images. Feel free to modify these values if you wish to filter in/out the discovery of these entities as per your requirements.
Notice that the container discovery item also has one parameter, which is defined as false on the template:
docker.containers.discovery[false] – Discover only running containers
docker.containers.discovery[true] – Discover all containers, no matter their state.
And that’s it! We successfully imported the template, installed and configured Zabbix agent 2, created a host, and applied the Docker template. Finally – our Zabbix instance is now monitoring our Docker environment! If you have any other questions or comments, feel free to leave a response in the comments section of this post.
Zabbix is not only a flexible and versatile monitoring system but also a convenient tool for generating alerts and integrating with existing service desks.Among the various integration methods, webhooks have become the most popular.In this blog post, we will take a look at what are webhooks, how they can be used to integrate Zabbix with an external solution, and also take a look at some use case examples for webhook integrations.
What is a webhook?
Generally speaking, a webhook is a method of augmenting or altering the behavior of a web page or web application with custom callbacks. But to put it simply, a webhook is an automatic reaction to an event.If an event occurs (for example, a problem appears), then the webhook makes a call (via HTTP / HTTPS) to a third-party service to notify it about the event.Many existing solutions provide an API that allows you to interact with them via webhooks.
The webhook in Zabbix is implemented using JavaScript, so writing code does not require knowledge of a specific Zabbix syntax, and due to the prevalence of the JavaScript language, you can find many examples, tips, and guides on the Internet.
How does a webhook work?
Essentially, a webhook is code that makes a sequence of calls to achieve some result.In the case of Zabbix, a JavaScript code is executed that accesses the service API and transfers, updates, and retrieves data from there.For example, we need to open a ticket at the service desk and leave a comment on the ticket, which will contain information about the problem.For this we need:
Log in to the service and get a token
Make a request with the token to create a ticket
Create a comment on the newly created ticket using a token
In different services, the details may differ, but the general idea will be preserved from service to service.
How to use it?
Our integration team constantly communicates with the community and monitors the most popular services to develop official out-of-the-box integrations for them. At the moment, Zabbix provides a vast selection of out-of-the-box webhooks for the most popular services, and we review new ones and improve current ones every day.
In most cases, setting up a ready-made webhook comes down to 3-4 steps, which are described in the README file in the Zabbix repository. Usually, it is necessary to generate an API key in the service, set it in Zabbix, set the URL to the service endpoint URL, and specify a couple of parameters required for the webhook to work.
In addition to ready-made solutions, there is a Github community repository where custom templates and webhooks are laid out!If you are the author of a webhook or a template, please share it with the community by submitting it to this repository!
Example – Telegram webhook
The theory is good, but we are all interested in how it is implemented in practice.Let’s look at a Telegram webhook as an example.Now this messenger is very popular and it will be relevant to use it as an example.
First of all, let’s go to the Zabbix repository or navigate to the Zabbix website integrations section to read the setup instructions. In the repository, all templates and notification methods are located in the /templates folder, and for each of them, there is a README file with a detailed description.
From the Telegram side, we need to create a bot and get its token following the instructions and set it in the Token parameter.
After that, we create a user, set up a Telegram media type for this user, and in the “Send to” field we write the id of the user or group chat.
Voila! Your webhook is set up and ready to send notifications or event information!
As you may have noticed, the setup did not take much time and did not require deep knowledge. Naturally, for finer tuning, it is possible to edit the content of messages, the type of problems, intervals, and other parameters. But even without additional changes, notifications are already ready to go.
Is it difficult to write a webhook on your own?
Of course, creating a webhook requires certain skills.
First of all, knowledge of JavaScript is required. The language itself is not difficult and can be mastered relatively quickly. The Zabbix documentation site has a guideline for writing webhooks with recommendations and best practices.
Secondly, understanding how Zabbix works. This does not require an in-depth understanding of Zabbix and the ability to follow basic instructions will be enough. You can read more about setting up notification methods in the official documentation. It is important to properly configure the webhook itself, grant rights to users, and set up a notification action for the necessary triggers.
And thirdly, study the documentation of the service for which the webhook will be written. Although all APIs work on the same principle, they can differ greatly from each other in methods and request structure. It is also necessary to understand the service itself to understand how it works. It is difficult to write an integration if it is not clear how Zabbix should properly interact with the service being integrated.
Summarizing
Webhook is a modern and flexible way of integration that allows Zabbix to be a universal solution. Since the realities of our world imply a large number of different systems, and as a result – many people working together – webhooks are becoming an indispensable tool in notification automation. A properly written and configured webhook is an effective solution for flexible notifications.
In the next article, together we will learn the basic methods and requests that are needed to send alerts, receive updates and assign tags. For this purpose, we will completely inspect some webhook in close detail.
Questions
Q: We have a ready-made notification system built on scripts. Does it make sense to rewrite it to a webhook?
A: Certainly. Firstly, the webhook is executed natively in Zabbix, which will be much more productive than in an external script. Secondly, the webhook is much more flexible, more functional, and much easier to make changes to.
Q: We have a service for which we would like to write an integration, but we do not have qualified specialists who could do it. Is it possible to request such integration from Zabbix?
A: Yes, if you are a Zabbix partner, you can leave a request to create such integration.
Starting from Zabbix 5.4, item tags have completely replaced applications. This design decision has allowed us to implement many new usability improvements – from providing additional information and classification to the tagged entities, to defining action conditions and security permissions by referencing specific tags and their values. Let’s take a look at how tags are defined in the official Zabbix templates and some of the potential tag use cases when configuring actions and access permissions.
Tag usage in Zabbix 6.0
The outdated “applications” have been replaced by tags, which I wanted to talk about in more detail today.
The main difference between tags and applications is that tags are defined using a name and a value, which greatly expands their scope of usage. Now tags are used in items, triggers, hosts, services, user groups for permission configuration, actions, and more. I am sure that their scope will expand with each new release.
Due to the structural difference between “applications” and tags, filtering tools had to be adapted. For example, in the “Latest data” section in Zabbix 6.0, sub-filters have been redesigned to support tags and provide granular filtering options. Grouping tags by name allowed to save space and made using sub-filters more intuitive.
To optimize the work with tags, we have developed several standards for different template elements.
Template
Now each template contains the mandatory class and target tags. Using these tags will allow distribution templates by class, such as application, database, network, etc., and by the target.
Items
Mandatory component tag that describes whether the data element belongs to a particular system or type. If a metric belongs to several types at once, it is necessary to use several component tags to describe the relevant component assignment as best as possible.
Custom tags are also allowed for low-level discovery data elements using LLD macros.
Triggers
The scope tag is assigned to the trigger based on the issue type. The general idea is to organize triggers into 5 groups: availability, performance, notification, security and capacity.
Hosts
For a host, the service tag is used, which defines a single service or multiple services running on this host.
Example of tagging on a ClickHouse by HTTP template
Let’s start with the tags of the template itself. It has class: database and target: clickhouse tags assigned to it. You shouldn’t assign too many tags on the template level, because each of these tags will be inherited by template elements, which can create unnecessary redundancy, and as a result, a “mess” of tags.
Let’s take a look at a few metrics and triggers from this template.
The “ClickHouse: Check port availability” metric is assigned the component: health and component: network tags, as it contains information about the health of the service and the checks are performed over the network. Problems on this metric can be displayed to the group responsible for the network
The “ClickHouse: Get information about dictionaries” metric has a tag component: dictionaries because it explicitly refers to dictionaries, and a tag component: raw, because it is a master metric, and dependent metrics get data from it.
The metrics from the low-level discovery “Replicas” rule contain the component: replication, database: {#DB}, and table: {#TABLE} tags. LLD metrics allow custom tags as they allow the use of low-level discovery macros for grouping flexibility.
Trigger “ClickHouse: Version has changed (new version: {ITEM.VALUE}” with scope: notice tag implies a simple notification that does not contain critical information related to system unavailability and performance. At the same time, trigger “ClickHouse: Port {$CLICKHOUSE. PORT} is unavailable” means the system is unavailable and has the tag scope: availability.
How to use tags?
As I wrote earlier, right now we are using tags for the majority of Zabbix components, so they become a functional and flexible tool for managing monitoring. One of the latest such implementations is Services – now they can also have tags assigned to them.
Of course, one of the most obvious use cases is the logical grouping of some elements. This allows filtering triggers and metrics by given parameters.
The next use case is also of significant importance – it’s the extension of the rights management functionality. With the help of tags, it is possible to add a layer of granularity so a Zabbix user can view problems for a particular service. For example, we need to provide access to Nginx servers that are in the Webservers group. To do this, just add the read permissions for the Webservers group in the Permissions section of a User group and select the Webservers group in the Tag Filter section and add the service: nginx tag. You can find more information about user groups on our official Zabbix documentation page.
Using tags in permissions
Let’s look at the use of rights with a practical example. Suppose there are 3 user groups:
Hardware team – a team of administrators that is responsible for hardware
Network team – a team of administrators that is responsible for the network and network hardware
Software team – a team of administrators that is responsible for software
For each group assign the following permissions:
for the Hardware team, set the read permissions for the Hardware group
In the tag filters, set the tag and tag value to scope: availabilityin the tag filter because we want the team to see only availability problems.
for the Network team, set the read permissions for the Database, Hardware, Linux servers, Network groups
In the tag filters for the Database, Hardware and Linux servers set the tag and tag value to component: network in the tag filter, because for these groups it is necessary to see only problems related to the network.
in the tag filters for the Network host group, we have to set “All tags” since we’re interested in seeing all of the problems related to hosts in this host group.
for the Software team, set the read permissions for the Databases and Linux servers groups
In the tag filters set, the tag and tag value to class: software for each group to see events exclusively related to software.
With this configuration, each user group will see only those problems that fall under the respective permissions and tag filters.
Remember, that a Super admin user will see all of the problems created in Zabbix
While users belonging to User roles of type Administrator or User will see a restricted set of problems based on their permissions:
Users from the Hardware team group will only see problems for hosts from the Hardware group and triggers with the tag scope: availability.
A user who is in the Network team will see all problems with the component: network tag and all triggers for the Network host group.
And users of the Software team only have access to problems with the class: software tag.
Using tags in actions
And of course the use of tags in actions. Pretty often required to set up quite complex conditions which may become confusing and hard to maintain. Tags, as a universal tool, add another entity that you can use when creating actions.
For example, if we want to send notifications about network availability problems with a severity greater than Warning to network administrators, we can specify the following conditions for our action:
value of tag class equals network
value of tag scope equals availability
Trigger severity is greater than or equal to Warning
Questions
Q: Are tags a full-featured replacement for “applications” or are there any downsides?
A: Of course, they not only replace the functional “applications” but also extend the functionality of using tags in various aspects of Zabbix.
Q: Is the current implementation of tags finalized or is there more to come?
A: No, we are working every day to improve the experience gained from using Zabbix, and tags in particular, so we are listening to the opinion of the community and adapting the functionality for the best result. If you have any ideas or comments, please use the official Zabbix forum and the Zabbix support portal to share them with us!
Q: Is there a document describing the best practice approach of using tags?
A: Yes, there is a guideline section on the documentation site that contains recommendations for best tags usage in Zabbix.
This post is written by Yi-Kang Wang, Senior Hybrid Specialist SA.
AWS Outposts rack is a fully managed service that delivers the same AWS infrastructure, AWS services, APIs, and tools to virtually any on-premises datacenter or co-location space for a truly consistent hybrid experience. AWS Outposts rack is ideal for workloads that require low latency access to on-premises systems, local data processing, data residency, and migration of applications with local system interdependencies. In addition to these benefits, we have started to see many of you need to share Outposts rack resources across business units and projects within your organization. This blog post will discuss how you can share Outposts rack resources by creating computing quotas on Outposts with Amazon Elastic Compute Cloud (Amazon EC2) Capacity Reservations sharing.
In AWS Regions, you can set up and govern a multi-account AWS environment using AWS Organizations and AWS Control Tower. The natural boundaries of accounts provide some built-in security controls, and AWS provides additional governance tooling to help you achieve your goals of managing a secure and scalable cloud environment. And while Outposts can consistently use organizational structures for security purposes, Outposts introduces another layer to consider in designing that structure. When an Outpost is shared within an Organization, the utilization of the purchased capacity also needs to be managed and tracked within the organization. The account that owns the Outpost resource can use AWS Resource Access Manager (RAM) to create resource shares for member accounts within their organization. An Outposts administrator (admin) can share the ability to launch instances on the Outpost itself, access to the local gateways (LGW) route tables, and/or access to customer-owned IPs (CoIP). Once the Outpost capacity is shared, the admin needs a mechanism to control the usage and prevent over utilization by individual accounts. With the introduction of Capacity Reservations on Outposts, we can now set up a mechanism for computing quotas.
Concept of computing quotas on Outposts rack
In the AWS Regions, Capacity Reservations enable you to reserve compute capacity for your Amazon EC2 instances in a specific Availability Zone for any duration you need. On May 24, 2021, Capacity Reservations were enabled for Outposts rack. It supports not only EC2 but Outposts services running over EC2 instances such as Amazon Elastic Kubernetes (EKS), Amazon Elastic Container Service (ECS) and Amazon EMR. The computing power of above services could be covered in your resource planning as well. For example, you’d like to launch an EKS cluster with two self-managed worker nodes for high availability. You can reserve two instances with Capacity Reservations to secure computing power for the requirement.
Here I’ll describe a method for thinking about resource pools that an admin can use to manage resource allocation. I’ll use three resource pools, that I’ve named reservation pool, bulk and attic, to effectively and extensibly manage the Outpost capacity.
A reservation pool is a resource pool reserved for a specified member account. An admin creates a Capacity Reservation to match member account’s need, and shares the Capacity Reservation with the member account through AWS RAM.
A bulk pool is an unreserved resource pool that is used when member accounts run out of compute capacity such as EC2, EKS, or other services using EC2 as underlay. All compute capacity in the bulk pool can be requested to launch until it is exhausted. Compute capacity that is not under a reservation pool belongs to the bulk pool by default.
An attic is a resource pool created to hold the compute capacity that the admin wouldn’t like to share with member accounts. The compute capacity remains in control by admin, and can be released to the bulk pool when needed. Admin creates a Capacity Reservation for the attic and owns the Capacity Reservation.
The following diagram shows how the admin uses Capacity Reservations with AWS RAM to manage computing quotas for two member accounts on an Outpost equipped with twenty-four m5.xlarge. Here, I’m going to break the idea into several pieces to help you understand easily.
There are three Capacity Reservations created by admin. CR #1 reserves eight m5.xlarge for the attic, CR #2 reserves four m5.xlarge instances for account A and CR #3 reserves six m5.xlarge instances for account B.
The admin shares Capacity Reservation CR #2 and CR #3 with account A and B respectively.
Since eighteen m5.xlarge instances are reserved, the remaining compute capacity in the bulk pool will be six m5.xlarge.
Both Account A and B can continue to launch instances exceeding the amount in their Capacity Reservation, by utilizing the instances available to everyone in the bulk pool.
Once the bulk pool is exhausted, account A and B won’t be able to launch extra instances from the bulk pool.
The admin can release more compute capacity from the attic to refill the bulk pool, or directly share more capacity with CR#2 and CR#3. The following diagram demonstrates how it works.
Based on this concept, we realize that compute capacity can be securely and efficiently allocated among multiple AWS accounts. Reservation pools allow every member account to have sufficient resources to meet consistent demand. Making the bulk pool empty indirectly sets the maximum quota of each member account. The attic plays as a provider that is able to release compute capacity into the bulk pool for temporary demand. Here are the major benefits of computing quotas.
Centralized compute capacity management
Reserving minimum compute capacity for consistent demand
Resizable bulk pool for temporary demand
Limiting maximum compute capacity to avoid resource congestion.
Configuration process
To take you through the process of configuring computing quotas in the AWS console, I have simplified the environment like the following architecture. There are four m5.4xlarge instances in total. An admin account holds two of the m5.4xlarge in the attic, and a member account gets the other two m5.4xlarge for the reservation pool, which results in no extra instance in the bulk pool for temporary demand.
Prerequisites
The admin and the member account are within the same AWS Organization.
The Outpost ID, LGW and CoIP have been shared with the member account.
Creating a Capacity Reservation for the member account
Sign in to AWS console of the admin account and navigate to the AWS Outposts page. Select the Outpost ID you want to share with the member account, choose Actions, and then select Create Capacity Reservation. In this case, reserve two m5.4xlarge instances.
In the Reservation details, you can terminate the Capacity Reservation by manually enabling or selecting a specific time. The first option of Instance eligibility will automatically count the number of instances against the Capacity Reservation without specifying a reservation ID. To avoid misconfiguration from member accounts, I suggest you select Any instance with matching details in most use cases.
Sharing the Capacity Reservation through AWS RAM
Go to the RAM page, choose Create resource share under Resource shares page. Search and select the Capacity Reservation you just created for the member account.
Choose a principal that is an AWS ID of the member account.
Creating a Capacity Reservation for attic
Create a Capacity Reservation like step 1 without sharing with anyone. This reservation will just be owned by the admin account. After that, check Capacity Reservations under the EC2 page, and the two Capacity Reservations there, both with availability of two m5.4xlarge instances.
Launching EC2 instances
Log in to the member account, select the Outpost ID the admin shared in step 2 then choose Actions and select Launch instance. Follow AWS Outposts User Guide to launch two m5.4xlarge on the Outpost. When the two instances are in Running state, you can see a Capacity Reservation ID on Details page. In this case, it’s cr-0381467c286b3d900.
So far, the member account has run out of two m5.4xlarge instances that the admin reserved for. If you try to launch the third m5.4xlarge instance, the following failure message will show you there is not enough capacity.
Allocating more compute capacity in bulk pool
Go back to the admin console, select the Capacity Reservation ID of the attic on EC2 page and choose Edit. Modify the value of Quantity from 2 to 1 and choose Save, which means the admin is going to release one more m5.4xlarge instance from the attic to the bulk pool.
Launching more instances from bulk pool
Switch to the member account console, and repeat step 4 but only launch one more m5.4xlarge instance. With the resource release on step 5, the member account successfully gets the third instance. The compute capacity is coming from the bulk pool, so when you check the Details page of the third instance, the Capacity Reservation ID is blank.
Cleaning up
Terminate the three EC2 instances in the member account.
Unshare the Capacity Reservation in RAM and delete it in the admin account.
Unshare the Outpost ID, LGW and CoIP in RAM to get the Outposts resources back to the admin.
Conclusion
In this blog post, the admin can dynamically adjust compute capacity allocation on Outposts rack for purpose-built member accounts with an AWS Organization. The bulk pool offers an option to fulfill flexibility of resource planning among member accounts if the maximum instance need per member account is unpredictable. By contrast, if resource forecast is feasible, the admin can revise both the reservation pool and the attic to set a hard limit per member account without using the bulk pool. In addition, I only showed you how to create a Capacity Reservation of m5.4xlarge for the member account, but in fact an admin can create multiple Capacity Reservations with various instance types or sizes for a member account to customize the reservation pool. Lastly, if you would like to securely share Amazon S3 on Outposts with your member accounts, check out Amazon S3 on Outposts now supports sharing across multiple accounts to get more details.
With the rapid evolution and proliferation of different cloud services, many organizations have decided to move parts of their infrastructures from on-prem to cloud. As an essential part of your infrastructure, Zabbix is no exception – you always have the option to either deploy Zabbix on-prem or select from one of the many supported cloud service providers to deploy your Zabbix Server or Zabbix Proxy on.
In this blog post, let’s look at how we can quickly deploy Zabbix Server and Zabbix Proxy nodes in Amazon Web Services cloud platform.
Deploying the Zabbix Server in AWS
Let’s begin with the Zabbix download page. Under the Zabbix Cloud Images section, select the AWS cloud vendor and then the Cloud Image you wish to deploy. Let’s start with Zabbix Server 5.0 with MySQL DB backend and Nginx Web server backend for our frontend.
Next, we will be redirected to the AWS marketplace, where we will have to subscribe to the Zabbix Server 5.0 image.
Once we have subscribed to the Zabbix Server image, we can continue with the deployment configuration.
Next, we must select our Region, Zabbix minor version (usually the latest available), and the Fulfillment option. Once that is done, we can finalize the launch configuration.
Select the preferred Launch option, EC2 Instance Type, VPC, and Subent settings on the Launch page.
Next – We have to select or create a security group.
We also have to select or generate EC 2 Key pair – make sure to save your private key in a safe location!
Note that creating a security group based on seller settings does not guarantee that the group will have an inbound SSH access rule! Make sure to double-check the security group and manually add the SSH inbound rule if it hasn’t yet been added. We will need to access this instance via SSH to obtain the initial frontend login credentials!
Once you click on the Launch button, the deployment process for your Zabbix application will be initiated.
Accessing the application
Let’s open up the Instances section and open our newly deployed Zabbix instance
We can access the Zabbix Frontend by opening the Public IPv4 address or Public IPv4 DNS of the Zabbix instance
Note that the Zabbix frontend password is still unknown to us. Recall how I mention that we will need to access the instance via SSH to obtain the frontend password. Let’s do so now.
Write down the login credentials and use them to log in to the Zabbix instance.
Accessing the database
In case we wish to access the Zabbix database backend, we can do so from the command line. Zabbix database can be accessed by using the root user. By default, it can be used without a password.
The MySQL root password is stored in /root/.my.cnf configuration file.
Modifying the Zabbix Frontend timezone
By default, the Zabbix frontend uses the “UTC” timezone. If you need to change it, edit php_value[date.timezone] PHP variable in /etc/php-fpm.d/zabbix.conf and restart php-fpm process:
systemctl restart php-fpm
Zabbix proxy
If you wish to deploy a Zabbix proxy instance in your AWS cloud, the deployment steps are very much the same. Most likely, you will still require SSH access if you wish to perform some configuration changes in the Zabbix proxy configuration file.
Note, that by default, the SQLite proxy database is stored in /tmp/zabbix_proxy.sqlite3
As always, don’t forget the point the proxy at your Zabbix server instance by modifying the Server parameter in the Zabbix proxy configuration file, located in /etc/zabbix/zabbix_proxy.conf
And that’s all! With just a few clicks, we are able to deploy a fully functional Zabbix instance or a small Zabbix proxy to distribute or scale our monitoring. Don’t forget that AWS is just one of the many cloud service providers you can use with Official Zabbix images. If you have any questions about the AWS deployment – you are very much encouraged to leave a comment under this blog post.
As your monitoring infrastructures evolve, you might hit a point when there’s no avoiding using the Zabbix API. The Zabbix API can be used to automate a particular part of your day-to-day workflow, troubleshoot your monitoring or to simply analyze or get statistics about a specific set of entities.
In this blog post, we will take a look at some of the more advanced API methods and specific method parameters and learn how they can be used to improve your API workflows.
1. Count entities with CountOutput
Let’s start with gathering some statistics. Let’s say you have to count the number of some matching entities – here we can use the CountOutput parameter. For a more advanced use case – what if we have to count the number of events for some time period? Let’s combine countOutput with time_from and time_till (in unixtime) and get the number of events created for the month of November. Let’s get all of the events for the month of November that have the Disaster severity:
Now let’s copy and paste the result of the export and import the template into another environment. It’s extremely important to remember that for this method to work exactly as we intend to, we need to include the parameters that specify the behavior of particular entities contained in the configuration string, such as items/value maps/templates, etc. For example, if I exclude the templates parameter here, no templates will be imported.
3. Expand trigger functions and macros with expand parameters
Using trigger.get to obtain information about a particular set of triggers is a relatively common practice. One particular caveat that we have to consider is that by default macros in trigger name, expression or descriptions are not expanded. To expand the available macros we need to use the expand parameters:
4. Obtaining additional LLD information for a discovered item
If we wish to display additional LLD information for a discovered entity, in this case – an item, we can use the selectDiscoveryRule and selectItemDiscovery parameters.
While selectDiscoveryRule will provide the ID of the LLD rule that created the item, selectItemDiscovery can point us at the parent item prototype id from which the item was created, last discovery time, item prototype key, and more.
The example below will return the item details and will also provide the LLD rule and Item prototype IDs, the time when the lost item will be deleted and the last time the item was discovered:
5. Searching through the matched entities with search parameters
Zabbix API provides a couple of standard parameters for performing a search. With search parameter, we can search string or text fields and try to find objects based on a single or multiple entries. searchByAny parameter is capable of extending the search – if you set this as true, we will search by ANY of the criteria in the search array, instead of trying to find an entity that matches ALL of them (default behavior).
The following API call will find items that match agent and Zabbix keys on a particular template:
Feel free to take the above examples, change them around so they fit your use case and you should be able to quite easily implement them in your environment. There are many other use cases that we might potentially cover down the line – if you have a specific API use case that you wish for us to cover, feel free to leave a comment under this post and we just might cover it in one of the upcoming blog posts!
Zabbix API enables you to collect any and all information from your Zabbix instance by using a multitude of API methods. You can even utilize Zabbix API calls in your HTTP items. For example, this can be used to monitor the number of particular sets of metrics and visualize their growth over time. With named Zabbix API tokens, such use cases are a lot more simple to implement.
Before Zabbix 5.4 we had to perform the user.login API call to obtain the authentication token. Once the user session was closed, we had to relog, obtain the new authentication token and use it in the subsequent API calls.
With the pre-defined named Zabbix API tokens, you don’t have to constantly check if the authentication token needs to be updated. Starting from Zabbix 5.4 you can simply create a new named Zabbix API token with an expiration date and use it in your API calls.
Creating a new named Zabbix API token
The Zabbix API token creation process is extremely simple. All you have to do is navigate to Administration – General – API tokens and create a new API token. The named API tokens are created for a particular user and can have an optional expiration date and time – otherwise, the tokens are defined without an expiry date.
You can create a named API token in the API tokens section, under Administration – General
Once the Token has been created, make sure to store it somewhere safe, since you won’t be able to recover it afterward. If the token is lost – you will have to recreate it.
Make sure to store the auth token!
Don’t forget, that when defining a role for the particular API user, we can restrict which API methods this user has access to.
Simplifying API tasks with the named API token
There are many different use cases where you could implement Zabbix API calls to collect some additional information. For this blog post, I will create an HTTP item that uses item.get API call to monitor the number of unsupported items.
To achieve that, I will create an HTTP item on a host (This can be the default Zabbix server host or a host dedicated to collecting metrics via Zabbix API calls) and provide the API call in the request body. Since the named API token now provides a static authentication token until it expires, I can simply use it in my API call without the need to constantly keep it updated.
An HTTP agent item that uses a Zabbix API call in its request body
HTTP item request body, which returns a count of unsupported items
I will also use regular expression preprocessing to obtain the numeric value from the API call result – otherwise, we won’t be able to graph our value or calculate trends for it.
Regular expression preprocessing step to obtain a numeric value from our Zabbix API call result
Utilizing Zabbix API scripts in Actions
In one of our previous blog posts, we covered resolving problems automatically with the event.acknowledge API method. The logic defined in the blog post was quite complex since we needed to keep an eye out for the authentication tokens and use a custom script to keep them up to date. With named Zabbix API tokens, this use case is a lot more simple.
All I have to do is create an Action operation script containing my API call and pass it to an action operation.
Action operation script that invokes Zabbix event.acknowledge API method
curl -sk -X POST -H "Content-Type: application/json" -d "
{
\"jsonrpc\": \"2.0\",
\"method\": \"event.acknowledge\",
\"params\": {
\"eventids\": \"{EVENT.ID}\",
\"action\": 1,
\"message\": \"Problem resolved.\"
},
\"auth\": \"<Place your authentication token here>",
\"id\": 2
}" <Place your Zabbix API endpoint URL here>
Problem remediation script example
Now my problems will get closed automatically after the time period which I have defined in my action.
Action operation which runs our event.acknowledge Zabbix API script
These are but a few examples that we can now achieve by using API tokens. A lot of information can be obtained and filtered in a unique way via Zabbix API, thus providing you with a granular analysis of your monitored environment. If you have recently upgraded to Zabbix 5.4 or plan to upgrade to Zabbix 6.0 LTS in the future, I would recommend implementing named Zabbix API tokens to simplify your day-to-day workflow and consider the possibilities that this new feature opens up for you.
If you have any questions or if you wish to share your particular use case for data collection or task automation with Zabbix API – feel free to share them in the comments section below!
There are many design choices to consider when we build our monitoring environment for high-frequency monitoring. How to minimize performance impact? What are the data retention policies with storage space in mind? What are the available out-of-the-box features to solve these potential problems?
In this blog post, we will discuss when you should use preprocessing and when it is better to use the “Do not keep history” option for your metrics, and what are the pros and cons for both of these approaches.
Throttling and other preprocessing steps
We’ve discussed throttling previously as the go-to approach for high-frequency monitoring. Indeed, with throttling, you can discard repeated values and do so with a heartbeat. This is extremely useful with metrics that come as discreet values – services states, network port statuses, and so on.
Example of throttling with and without heartbeat
In addition, since starting from Zabbix 4.2 all preprocessing is also performed by Zabbix proxies. This means we can discard the repeated values before they reach the Zabbix server. This can help us both with the performance (fewer metrics to insert in the Zabbix server DB) and reduce the DB size (Fewer metrics stored in the DB. This also helps with improving overall Zabbix performance)
There are a few caveats with this approach – since metrics get discarded before they reach the Zabbix server, the triggers will not react on these metrics (This is where having a heartbeat is useful) and, since trends are calculated by Zabbix server based on the received history data, there could be a lack of trend information for these metrics. Keep in mind that this applies not only to throttling preprocessing rules – any preprocessing can be done on the proxy and any preprocessing rules can be used to transform your data.
Understanding “Do not keep history” option
The behavior of “Do not keep history” which we can define when configuring an item is a bit different though. If we collect an item by a Proxy and configure the item with “Do not keep history”, the history won’t always get discarded! There are a couple of reasons for this.
First off, let’s not forget that some of our values can populate host inventory! If the particular item is configured to populate an inventory field – it will be forwarded to the Zabbix server, but it will not get stored in the history tables.
If the item does not populate an inventory field – the text data such as character, log and text will indeed get discarded before reaching the Zabbix server, but Numeric values – both float and integer, will get forwarded to the server. The reason for that is deriving trend information from the numeric values. Mind that the numeric data will still not get stored in the history tables, only trends will be available for these items.
Note: This behavior has been properly implemented starting from Zabbix 5.2. See ZBX-17548
Setting the “Do not keep history” option for an item
Using trend functions with high-frequency monitoring
With the specifics of “Do not keep history” in mind, we should now recall that starting from Zabbix 5.2 we have trend functions available at our disposal!
History functions such as trendavg, trendcount, trendmax, trendmin, trendsum allow us to perform different kinds of trend calculations – from counting the number of trend values to retrieving min/max/avg trend values for a time period.
This means, that if we require only the metric trend for specific time periods (hours, days, weeks, etc) we can use these trend functions together with “Do not keep history” option, thus discarding unnecessary data and improving our Zabbix server performance!
There are two approaches two using trend functions:
If you wish to collect and display the trend data, you need to create the item which will collect the metrics (say, a net.if.in Agent item for collecting incoming network traffic) and then create a separate calculated item that uses the trend function to calculate the avg/min/max value for the trend over a time period. The original item can then have “Do not keep history” option selected for it.
trendavg item for calculating hourly trends from the net.if.in[ifHCInOctets.5] item
If you wish to simply define triggers and react on long-term trends and are not required to collect the trend values, then we can skip the creation of the calculated item and simply use the trend function on the original item in the trigger.
This trigger fires if the hourly average trend value exceeds 100M. Note: In this case only the original item is required.
By combining these approaches in our environment – using preprocessing when we wish to discard or transform the data and also implementing opting out of storing the history data, whenever this is appropriate, we can minimize the performance impact on our Zabbix instance. Add a layer of distributed Zabbix proxies on top of this and you can truly achieve a large, scalable Zabbix infrastructure optimized for high-frequency ingestion and processing of your data.
Have you recently updated your Zabbix environment but are still wondering – why haven’t the templates been updated? Where can I obtain the latest official Zabbix templates, and how should I update them? In this blog post, we will discuss why it is vital to keep your templates up to date and how we the template update process looks like.
Updating your templates
“Will updating Zabbix also update my templates?” is a question that I receive quite often. The answer to that question is – no changes are made to your templates whenever you update your Zabbix instance – be it a minor or a major update. The reasoning behind that is quite simple – we always recommend that you tune the out-of-the-box templates as per your particular requirements. That may consist of changing update intervals, disabling items/triggers, or even changing the existing trigger expressions or adding whole new entities to the template.
This is where the current behavior with template updates starts to make more sense. If Zabbix were to automatically update your templates, there could be a chance of overwriting your custom changes and could potentially disrupt the monitoring of your environment. That is something that we definitely wish to avoid.
The question still stands – Then how am I supposed to update my templates?
The answer – you can find the latest official Zabbix templates on our official git page – https://git.zabbix.com/
First, navigate to the Zabbix repository and open the Templates folder. Then, select the release branch that matches your Zabbix instance version. Here you can find all of our official templates and also the official media types under the media folder. All you have to do now is open the template up and download the raw template file.
Zabbix 5.4 release git templates/db folder
Once that is done, we can import the template into our Zabbix environment
Template template_db_oracle_agent2 import
Don’t forget to back up your existing templates, especially if you have made some custom changes to them! Ideally – add a prefix to their names, so the new and old templates can live side by side, and you can then manually copy over the changes from the latest official template to your custom template.
The benefits of keeping templates up to date
But what is the point of updating your templates – what do you get out of it? Well, that varies on the specific fixes or improvements we make to the particular template over time. Sometimes the updated template will provide improved trigger expressions or preprocessing logic. Other times the updated template will provide extra value to your monitoring with completely new items and triggers. In the case of Webhook media types – the updates usually contain fixes or improvements for some particular use cases, for example – fixing a compatibility issue for a specific OS.
You can always track these changes either in the release notes of a particular Zabbix version or by looking up a specific bug or a feature request in our bug tracker – https://support.zabbix.com
Some of the template changes in Zabbix 5.4 major update
Zabbix self-monitoring templates
Another key aspect of why it’s important to keep your templates up to date is so you can implement the changes made to the Zabbix self-monitoring templates. For example, if we compare Zabbix 5.0 to Zabbix 5.4, there are multiple new Zabbix processes and caches added to Zabbix 5.4, such as report writer/manager process, availability manager process, trend function caches, and other new components.
Zabbix server health template version 5.0 and 5.4 difference in the number of entities
So, if you update from Zabbix 5.0 to 5.4 (or Zabbix 6.0 if you’re sticking with LTS versions), you WILL NOT be monitoring these processes and caches if you don’t update your Zabbix server and Zabbix proxy templates to the current Zabbix versions. This means that you will be completely unaware of any potential performance issues related to these processes or caches.
Tracking template changes
With Zabbix 5.4 and later, you will notice some great improvements to the template import process. If you’re wondering what has changed when comparing an older template version with a newer one, you will now be able to see the changes during the import process. The added and removed elements will be highlighted in red or green accordingly.
Preview of the changes made during the template import process
How often should you update the templates? Ideally, you would follow the Zabbix update release notes and take note of any changes made to the templates that are of use in your environment. At the very least – definitely check for changes in the self-monitoring templates when moving to a newer major version of Zabbix. Otherwise, you risk losing track of potential issues in your Zabbix environment.
Now that you know the answer to the question “How can I update my Zabbix templates?” try and think back to when you last updated your Zabbix instance to a new version – did you also check the official templates for updates? If not, then don’t hesitate and visit https://git.zabbix.com/ to find the latest templates for your Zabbix version. Chances are that you will be pleasantly surprised with a set of new and updated templates for your monitoring endpoints and new webhook media types to help you integrate Zabbix with your existing systems.
Many organizations have data sitting in various data sources in a variety of formats. Even though data is a critical component of decision-making, for many organizations this data is spread across multiple public clouds. Organizations are looking for tools that make it easy and cost-effective to copy large datasets across cloud vendors. With Amazon EMR and the Hadoop file copy tools Apache DistCp and S3DistCp, we can migrate large datasets from Google Cloud Storage (GCS) to Amazon Simple Storage Service (Amazon S3).
Apache DistCp is an open-source tool for Hadoop clusters that you can use to perform data transfers and inter-cluster or intra-cluster file transfers. AWS provides an extension of that tool called S3DistCp, which is optimized to work with Amazon S3. Both these tools use Hadoop MapReduce to parallelize the copy of files and directories in a distributed manner. Data migration between GCS and Amazon S3 is possible by utilizing Hadoop’s native support for S3 object storage and using a Google-provided Hadoop connector for GCS. This post demonstrates how to configure an EMR cluster for DistCp and S3DistCP, goes over the settings and parameters for both tools, performs a copy of a test 9.4 TB dataset, and compares the performance of the copy.
Prerequisites
The following are the prerequisites for configuring the EMR cluster:
Create an S3 bucket to store the configuration files, bootstrap shell script, and the GCS connector JAR file. Make sure that you create a bucket in the same Region as where you plan to launch your EMR cluster.
Create a shell script (sh) to copy the GCS connector JAR file and the Google Cloud Platform (GCP) credentials to the EMR cluster’s local storage during the bootstrapping phase. Upload the shell script to your bucket location: s3://<S3 BUCKET>/copygcsjar.sh. The following is an example shell script:
Download the GCS connector JAR file for Hadoop 3.x (if using a different version, you need to find the JAR file for your version) to allow reading of files from GCS.
Upload the file to s3://<S3 BUCKET>/gcs-connector-hadoop3-latest.jar.
Create GCP credentials for a service account that has access to the source GCS bucket. The credentials should be named json and be in JSON format.
Upload the key to s3://<S3 BUCKET>/gcs.json. The following is a sample key:
Create a JSON file named gcsconfiguration.json to enable the GCS connector in Amazon EMR. Make sure the file is in the same directory as where you plan to run your AWS CLI commands. The following is an example configuration file:
For our test dataset, we start with a basic cluster consisting of one primary node and four core nodes for a total of five c5n.xlarge instances. You should iterate on your copy workload by adding more core nodes and check on your copy job timings in order to determine the proper cluster sizing for your dataset.
We use the AWS CLI to launch and configure our EMR cluster (see the following basic create-cluster command):
Create a custom bootstrap action to be performed at cluster creation to copy the GCS connector JAR file and GCP credentials to the EMR cluster’s local storage. You can add the following parameter to the create-cluster command to configure your custom bootstrap action:
To override the default configurations for your cluster, you need to supply a configuration object. You can add the following parameter to the create-cluster command to specify the configuration object:
Putting it all together, the following code is an example of a command to launch and configure an EMR cluster that can perform migrations from GCS to Amazon S3:
Submit S3DistCp or DistCp as a step to an EMR cluster
You can run the S3DistCp or DistCp tool in several ways.
When the cluster is up and running, you can SSH to the primary node and run the command in a terminal window, as mentioned in this post.
You can also start the job as part of the cluster launch. After the job finishes, the cluster can either continue running or be stopped. You can do this by submitting a step directly via the AWS Management Console when creating a cluster. Provide the following details:
We can always submit a new step to the existing cluster. The syntax here is slightly different than in previous examples. We separate arguments by commas. In the case of a complex pattern, we shield the whole step option with single quotation marks:
Both parameters determine the size of the map containers that are used to parallelize the transfer. Setting this value in line with the cluster resources and the number of maps defined is key to ensuring efficient memory usage. You can calculate the number of launched containers by using the following formula:
Total number of launched containers = Total memory of cluster / Map container memory
The dynamic strategy settings determine how DistCp splits up the copy task into dynamic chunk files. Each of these chunks is a subset of the source file listing. The map containers then draw from this pool of chunks. If a container finishes early, it can get another unit of work. This makes sure that containers finish the copy job faster and perform more work than slower containers. The two tunable settings are split ratio and max chunks tolerable. The split ratio determines how many chunks are created from the number of maps. The max chunks tolerable setting determines the maximum number of chunks to allow. The setting is determined by the ratio and the number of maps defined:
Number of chunks = Split ratio * Number of maps
Max chunks tolerable must be > Number of chunks
Map settings
We use the following map setting:
-m 640
This determines the number of map containers to launch.
List status settings
We use the following list status setting:
-numListstatusThreads 15
This determines the number of threads to perform the file listing of the source GCS bucket.
Sample command
The following is a sample command when running with 96 core or task nodes in the EMR cluster:
When running large copies from GCS using S3DistCP, make sure you have the parameter fs.gs.status.parallel.enable (also shown earlier in the sample Amazon EMR application configuration object) set in core-site.xml. This helps parallelize getFileStatus and listStatus methods to reduce latency associated with file listing. You can also adjust the number of reducers to maximize your cluster utilization. The following is a sample command when running with 24 core or task nodes in the EMR cluster:
To test the performance of DistCp with S3DistCp, we used a test dataset of 9.4 TB (157,000 files) stored in a multi-Region GCS bucket. Both the EMR cluster and S3 bucket were located in us-west-2. The number of core nodes that we used in our testing varied from 24–120.
The results show that S3DistCP performed slightly better than DistCP for our test dataset. In terms of node count, we stopped at 120 nodes because we were satisfied with the performance of the copy. Increasing nodes might yield better performance if required for your dataset. You should iterate through your node counts to determine the proper number for your dataset.
Using Spot Instances for task nodes
Amazon EMR supports the capacity-optimized allocation strategy for EC2 Spot Instances for launching Spot Instances from the most available Spot Instance capacity pools by analyzing capacity metrics in real time. You can now specify up to 15 instance types in your EMR task instance fleet configuration. For more information, see Optimizing Amazon EMR for resilience and cost with capacity-optimized Spot Instances.
Clean up
Make sure to delete the cluster when the copy job is complete unless the copy job was a step at the cluster launch and the cluster was set up to stop automatically after the completion of the copy job.
Conclusion
In this post, we showed how you can copy large datasets from GCS to Amazon S3 using an EMR cluster and two Hadoop file copy tools: DistCp and S3DistCp.
We also compared the performance of DistCp with S3DistCp with a test dataset stored in a multi-Region GCS bucket. As a follow-up to this post, we will run the same test on Graviton instances to compare the performance/cost of the latest x86 based instances vs. Graviton 2 instances.
You should conduct your own tests to evaluate both tools and find the best one for your specific dataset. Try copying a dataset using this solution and let us know your experience by submitting a comment or starting a new thread on one of our forums.
About the Authors
Hammad Ausaf is a Sr Solutions Architect in the M&E space. He is a passionate builder and strives to provide the best solutions to AWS customers.
Andrew Lee is a Solutions Architect on the Snap Account, and is based in Los Angeles, CA.
In this blog post, we would like to show you a new theme that might seem a little familiar to you. Let’s take a little nostalgic trip down memory lane and take a look at this special frontend theme for Zabbix 5.4 reminiscent of Zabbix 1.8.
How it looks
Although the old Zabbix 1.8 design understandably has an outdated look, the colors have a nice feel to them, especially the old shade of blue.
The Zabbix 5.4 design is up to date with current standards and has a modern look and feel to it. It is meant to be simplistic with a lot of white and barely any color except for the navigation bar and widgets like the problems and availability.
My theme combines the two. It is up to date with modern standards, and it has a trusted feel to it with the old color scheme. The old color scheme gives us a nostalgic look, which will hopefully bring some joy both to the veterans and newcomers to Zabbix!
How it works
The way I made this was fairly simple. I copied a css file from the styles folder, placed it in the same folder, and renamed it. I also put the image used to change the appearance into the same folder so it is easy to find.
To figure out which changes should be made, I had the Zabbix GUI open in a web browser with the element inspect function. in the css file I would find the same tag/name/class/etc as in the web browser and change it to look like the appearance of version 1.8.
.menu-main > li {
line-height: 16px; }
.menu-main > li.is-selected > a {
background: url(../styles/table_head2.gif) repeat-x top left;
border-left-color: #87d1ff;
color: #ffffff; }
.menu-main > li.is-expanded > a, .menu-main > li.is-expanded > a:focus {
border-left-color: transparent;
color: #ffffff; }
.menu-main > li:not(.is-expanded) .submenu {
max-height: 0 !important; }
.menu-main > li > a {
background:url(../styles/table_head2.gif) repeat-x top left;
color: #ffffff; }
For example here is where I changed the background of the dropdowns from the side menu into the image from Zabbix 1.8 which gives the menu an appealing new look.
For the theme to show up in the User settings it uses an add-on for the APP.php.
class APP extends ZBase {
public static function getThemes() { return array_merge(parent::getThemes(), ['oldisnew' => _('Old is New')]);}
}
The add-on is included in our Github Repository, you can copy and paste it into the APP.php file.
I hope you like the theme. It is available for download at the Opensource ICT Solutions Github. Just follow the link below:
The Github contains an up-to-date Readme for installation, but, here is a short explanation on how to install it:
1. Navigate to the link above. 2. Download the three files: (oldisnew.css),(tablehead2.gif) and (APP_add_on.text). 3. On your Zabbix server CLI there should be a directory called /usr/share/zabbix/assets/styles/. Put the (oldsinew.css) and (tablehead2.gif) files here. 4. For (APP_add_on.txt) add the text to the APP.php located at the directory /usr/share/zabbix/include/classes/core/ inside of (class APP extends ZBase). (this allows you to actually see the theme inside of the dropdown.) 5. Now, at the Zabbix GUI navigate to Profile under User settings and change the theme. 6. Enjoy your new theme!
Zabbix Agent 2 enables our users to monitor a whole set of new systems with minimal configuration required on the monitored systems. Forget about writing custom monitoring scripts, deploying additional packages, or configuring ODBC. A great use-case for Zabbix Agent 2 is monitoring one of the most popular NoSQL DB backends – MongoDB. Below, you can read a detailed description and step-by-step guide through the use case or refer to the video available here.
Zabbix MongoDB template
For this example, we will be using Zabbix version 5.4, but MongoDB monitoring by Zabbix Agent 2 is supported starting from version 5.0. If you have a fresh deployment of Zabbix version 5.0 or newer, you will be able to find the MongoDB template in your ‘Configuration‘ – ‘Templates‘ section.
MongoDB Node and Cluster templates
On the other hand, if you have an instance that you deployed before the release of Zabbix 5.0 and then upgraded to Zabbix 5.0 or newer, you will have to import the template manually from our git page. Let’s remember that Zabbix DOES NOT apply new templates or modify existing templates during an upgrade. Therefore, newly released templates have to be IMPORTED MANUALLY!
We can see that we have two MongoDB templates – ‘MongoDB cluster by Zabbix Agent 2’ and ‘MongoDB node by Zabbix agent 2’. Depending on your MongoDB setup – individual nodes or a cluster, apply the corresponding template. Note that the MongoDB cluster template can automatically create hosts for your config servers and shards and apply the MongoDB node template on these hosts.
Host prototypes for config servers and shards
Deploying Zabbix Agent 2 on your Host
Since the data collection is done by Zabbix Agent 2, first, let’s deploy Zabbix Agent 2 on our MongoDB node or cluster host. Let’s start with adding the Zabbix 5.4 repository and install the Zabbix Agent 2 via a package.
What if you already have the regular Zabbix Agent running on this machine? In this case, we have two options for how we can proceed. We can simply remove the regular Zabbix Agent and Deploy Zabbix Agent 2. In this case, make sure you make a backup of the Zabbix Agent configuration file and migrate all of the changes to the Zabbix Agent 2 configuration file.
The second option is running both of the Zabbix Agents in parallel. In this case, we need to make sure that both agents – Zabbix Agent and Zabbix Agent 2 are listening on their own specific ports because, by default, both agents are listening for connections on port 10050. This can be configured in the Zabbix Agent configuration file by changing the ‘ListenPort’ parameter.
Don’t forget to specify the ‘Server‘ parameter in the Zabbix Agent 2 configuration file. This parameter should contain your Zabbix Server address or DNS name. By defining it here, you will allow Zabbix Agent 2 to accept the metric poll requests from Zabbix Server.
After you have made the configuration changes in the Zabbix Agent 2 configuration file, don’t forget to restart Zabbix Agent 2 to apply the changes:
systemctl restart zabbix-agent2
Creating a MongoDB user for monitoring
Once the agent has been deployed and configured, you need to ensure that you have a MongoDB database user that we can use for monitoring purposes. Below you can find a brief example of how you can create a MongoDB user:
Access the MongoDB shell:
mongosh
Switch to the MongoDB admin database:
use admin
Create a user with ‘userAdminAnyDatabase‘ permissions:
The username for the newly created user is ‘zabbix_mon’. The password is also ‘zabbix_mon‘ – feel free to change these as per your security policy.
Creating and configuring a MongoDB host
Next, you need to open your Zabbix frontend and create a new host representing your MongoDB node. You can see that in our example, we called our node ‘MongoDB’ and assigned it to a ‘MongoDB Servers’ host group. You can use more detailed naming in a production environment and use your own host group assignment logic. But remember – a host needs to belong to AT LEAST a single host group!
Since the metrics are collected by Zabbix Agent 2, you must also create an Agent interface on the host. Zabbix Server will connect to this interface and request the metrics from the Zabbix Agent 2. Define the IP address or DNS name of your MongoDB host, where you previously deployed Zabbix Agent 2. Mind the port – by default, we have port 10050 defined over here, but if you have modified the ‘ListenPort’ parameter in the Zabbix Agent 2 config and changed the value from the default one (10050) to something else, you also need to use the same port number here.
MongoDB host configuration example
Next, navigate to the ‘Templates’ tab and assign the corresponding template – either ‘MongoDB node by Zabbix agent 2’ or‘MongoDB cluster by Zabbix Agent 2’. In our example, we will assign the MongoDB node template.
Before adding the host, you also need to provide authentication and connection parameters by editing the corresponding User Macros. These User Macros are used by the items that specify which metrics should we be collecting. Essentially, we are forwarding the connectivity and authentication information to Zabbix Agent 2, telling it to use these values when collecting the metrics from our MongoDB instance.
To do this, navigate to the ‘Macros’ tab in the host configuration screen. Then, select ‘Inherited and host macros’ to display macros inherited from the MongoDB template.
We can see a bunch of macros here – some of them are related to trigger thresholds and discovery filters, but what we’re interested in right now are the following macros:
{$MONGODB.PASSWORD} – MongoDB username. For our example, we will set this to zabbix_mon
{$MONGODB.USER} – MongoDB password. For our example, we will set this to zabbix_mon
{$MONGODB.CONNSTRING} – MongoDB connection string. Specify the MongoDB address and port here to which the Zabbix Agent 2 should connect and perform the metric collection
Now we are ready to add the host. Once the host has been added, we might have to wait for a minute or so before Zabbix begins to monitor the host. This is because Zabbix Server doesn’t instantly pick up the configuration changes. By default, Zabbix Server updates the Configuration Cache once a minute.
Fine-tuning MongoDB monitoring
At this point, we should see a green ZBX Icon next to our MongoDB host.
Data collection on the MongoDB host has started – note the green ‘ZBX’icon.
This means that the Zabbix Server has successfully connected to our Zabbix Agent 2, and the metric collection has begun. You can now navigate to the ‘Monitoring’ – ‘Latest data’ section, filter the view by your MongoDB host, and you should see all of the collected metrics here.
MongoDB metrics in ‘Monitoring’ – ‘Latest data’
The final task is to tune the MongoDB monitoring on your hosts, collecting only the required metrics. Navigate to ‘Configuration’ – ‘Hosts’, find your MongoDB hosts, and go through the different entity types on the host – items, triggers, discovery rules. See an item that you don’t wish to collect metrics for? Feel free to disable it. Open up the discovery rules – change the update intervals on them or disable the unnecessary ones.
Note: Be careful not to disable master items. Many of the items and discovery rules here are of type ‘Dependent item’ which means, that they require a so-called ‘Master item’. Feel free to read more about dependent items here.
Remember the ‘Macros’ section in the host configuration? Let’s return to it. here we can see some macros which are used in our trigger thresholds, like:
{$MONGODB.REPL.LAG.MAX.WARN} – Maximum replication lag in seconds
{$MONGODB.CURSOR.OPEN.MAX.WARN} – Maximum number of open cursors
Feel free to change these as per your problem threshold requirements.
One last thing here – we can filter which elements get discovered by our discovery rules. This is once again defined by user macros like:
{$MONGODB.LLD.FILTER.DB.MATCHES} – Databases that should be discovered (By default, the value here is ‘.*’, which will match everything)
{$MONGODB.LLD.FILTER.DB.NOT_MATCHES} – Databases that should be excluded from the discovery
And that’s it! After some additional tuning has been applied, we are good to go – our MongoDB entities are being discovered, metrics are getting collected, and problem thresholds have been defined. And all of it has been done with the native Zabbix Agent 2 functionality and an out-of-the-box MongoDB template!
The ability to define and execute scripts on different Zabbix components in different scenarios can be extremely powerful. There are many different use cases where we can execute these scripts – to remediate an issue, forward our alerts to an external system, and much more. In this post, we will cover one of the lesser-known use cases – creating a control panel of sorts in which we can execute different scripts directly from our frontend.
Configuration cache
Let’s use two very popular Zabbix runtime commands for our use case – ‘zabbix_server -R config_cache_reload’ and ‘zabbix_proxy -R config_cache_reload’. These commands can be used to force the Zabbix server and Zabbix proxy components to load the configuration changes on demand.
First, let’s discuss how these commands work:
It all starts with the configuration cache frequency, which is configured for the central Zabbix server. Have a look at the output:
With a stock installation we have ‘CacheUpdateFrequency=60‘ for ‘zabbix-server‘ and we have ‘ConfigFrequency=3600‘ for ‘zabbix-proxy‘. This parameter represents how fast the Zabbix component will pick up the configuration changes that we have made in the GUI.
Apart from the frequency, we have also another variable which is: how long it actually takes to run one configuration sync cycle. To find the precise time value, we can use this command:
ps auxww | egrep -o "[s]ynced.*sec"
The output will produce a line like:
synced configuration in 14.295782 sec, idle 60 sec
This means that it takes approximately 14 seconds to load the configuration cache from the database. Then there is a break for the next 60 seconds. After that, the process repeats.
When the monitoring infrastructure gets big, we might need to start using larger values for ‘CacheUpdateFrequency‘ and ‘ConfigFrequency‘. By reducing the configuration reload frequency, we can offload our database. The best possible configuration performance-wise is to install ‘CacheUpdateFrequency=3600‘ in ‘zabbix_server.conf‘ and use ‘ConfigFrequency=3600‘ (it’s the default value) in ‘zabbix_proxy.conf‘.
Some repercussions arise with such a configuration. When we use values that are this large, there will be a delay of one hour until newly created entities are monitored or changes are applied to the existing entities.
Setting up the scripts
I would like to introduce a way we can force the configuration to be reloaded via GUI.
Some prerequisites must be configured:
1) Make sure the ‘Zabbix server‘ host belongs to the “Zabbix servers” host group.
2) On the server where service ‘zabbix-server‘ runs, install a new sudoers rule:
cd /etc/sudoers.d
echo 'zabbix ALL=(ALL) NOPASSWD: /usr/sbin/zabbix_server -R config_cache_reload' | sudo tee zabbix_server_config_cache_reload
chmod 0440 zabbix_server_config_cache_reload
The sudoers file is required because out of the box the service ‘zabbix-server‘ runs with user ‘zabbix‘ which does not have access to interact with the local system.
3) We will also create Zabbix hosts representing our Zabbix proxies. These hosts must belong to the ‘Zabbix proxies’ host group.
Notice that in the screenshot the host ‘127.0.0.1′ is using ‘Monitored by proxy‘. This is extremely important since we do not care about the agent interface in the use case with proxies – the interface can contain an arbitrary address/DNS name. What we care about is the ‘Monitored by proxy’ field. Our command will be executed on the proxy that we select here.
4) On the server where service ‘zabbix-proxy‘ runs, install a new sudoers rule:
cd /etc/sudoers.d
echo 'zabbix ALL=(ALL) NOPASSWD: /usr/sbin/zabbix_proxy -R config_cache_reload' | sudo tee zabbix_proxy_config_cache_reload
chmod 0440 zabbix_proxy_config_cache_reload
5) Make the following changes in the ‘/etc/zabbix/zabbix_proxy.conf‘ proxy configuration file: ‘EnableRemoteCommands=1‘. Restart the ‘zabbix-proxy’ service afterwards.
6) Open ‘Administration’ => ‘Scripts’ and define the following commands:
For the ‘Zabbix servers’ host group:
Since this is a custom command that we will execute, the type of the script will be ‘Script’. The first script will be executed on the Zabbix server – we are forcing the central Zabbix server to reload its configuration cache. In this example, all users with at least ‘Read’ access to the Zabbix server host will be able to execute the script. You can limit this as per your internal Zabbix policies.
The only thing that we change for the proxy script is the ‘Command’ and ‘Execute on’ parameters, since now the command will be executed on the Zabbix proxy which is monitoring the target host:
Frontend as a control panel
I prefer to add an additional host group “Control panel” which contains the central Zabbix server and all Zabbix proxies.
Now when we need to reload our configuration cache, we can open ‘Monitoring’ => ‘Hosts‘ and filter out host group ‘Control panel’. Then click on the proxy host in question and select ‘config cache reload proxy’:
It takes 5 seconds to complete and then we will see the result of script execution. In this case – ‘command sent successfully’:
By the way, we can bookmark this page too
With this approach, you can create ‘Control panel’host groups and scripts for different types of tasks that you can execute directly from the Zabbix frontend! This allows us to use our Zabbix frontend not just for configuration and data overview, but also as a control panel of sorts for our hosts.
If you have any questions, comments, or wish to share your use cases for using scripts in the frontend – leave us a comment! Your use case could be the one to inspire many other Zabbix community members to give it a try.
The collective thoughts of the interwebz
Manage Consent
To provide the best experiences, we use technologies like cookies to store and/or access device information. Consenting to these technologies will allow us to process data such as browsing behavior or unique IDs on this site. Not consenting or withdrawing consent, may adversely affect certain features and functions.
Functional
Always active
The technical storage or access is strictly necessary for the legitimate purpose of enabling the use of a specific service explicitly requested by the subscriber or user, or for the sole purpose of carrying out the transmission of a communication over an electronic communications network.
Preferences
The technical storage or access is necessary for the legitimate purpose of storing preferences that are not requested by the subscriber or user.
Statistics
The technical storage or access that is used exclusively for statistical purposes.The technical storage or access that is used exclusively for anonymous statistical purposes. Without a subpoena, voluntary compliance on the part of your Internet Service Provider, or additional records from a third party, information stored or retrieved for this purpose alone cannot usually be used to identify you.
Marketing
The technical storage or access is required to create user profiles to send advertising, or to track the user on a website or across several websites for similar marketing purposes.


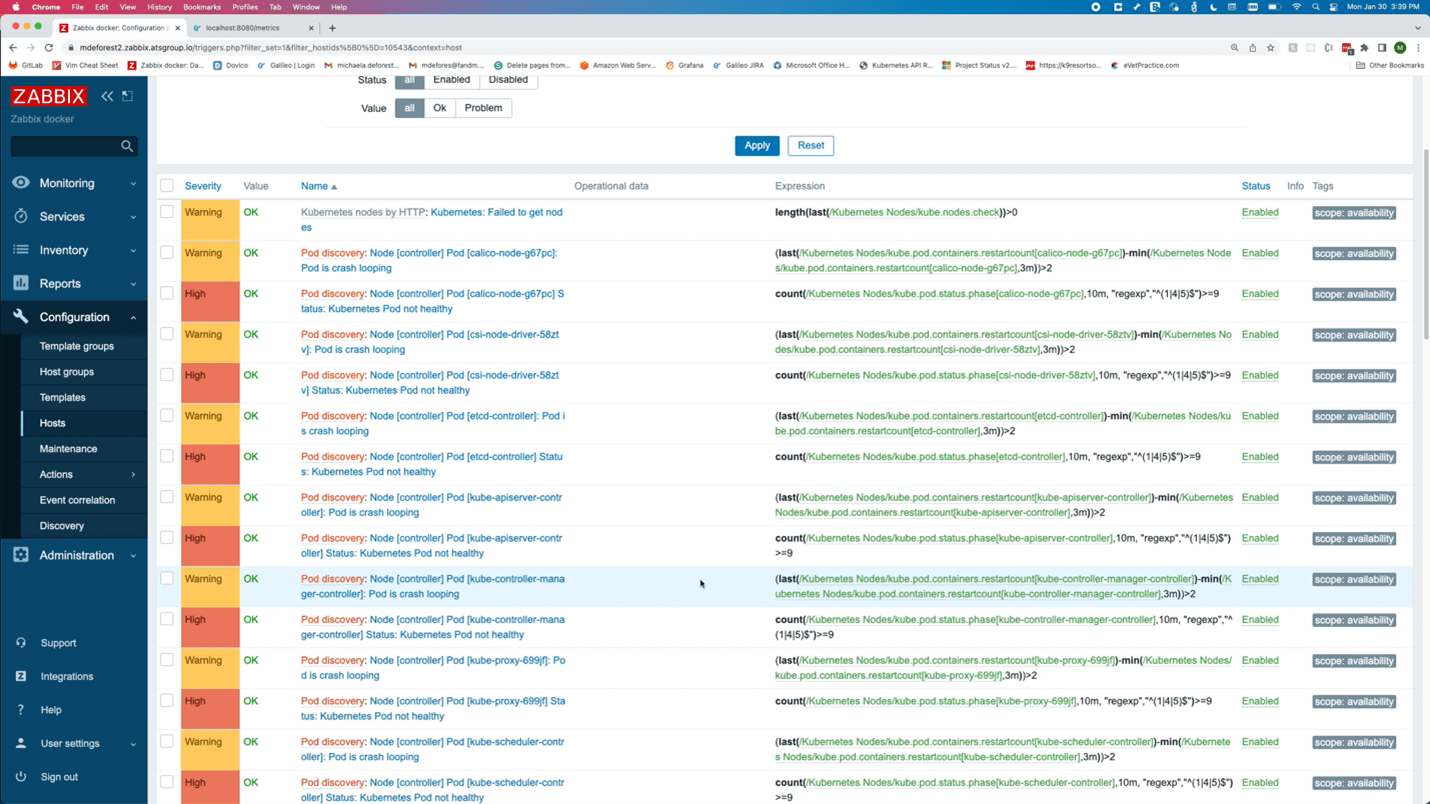


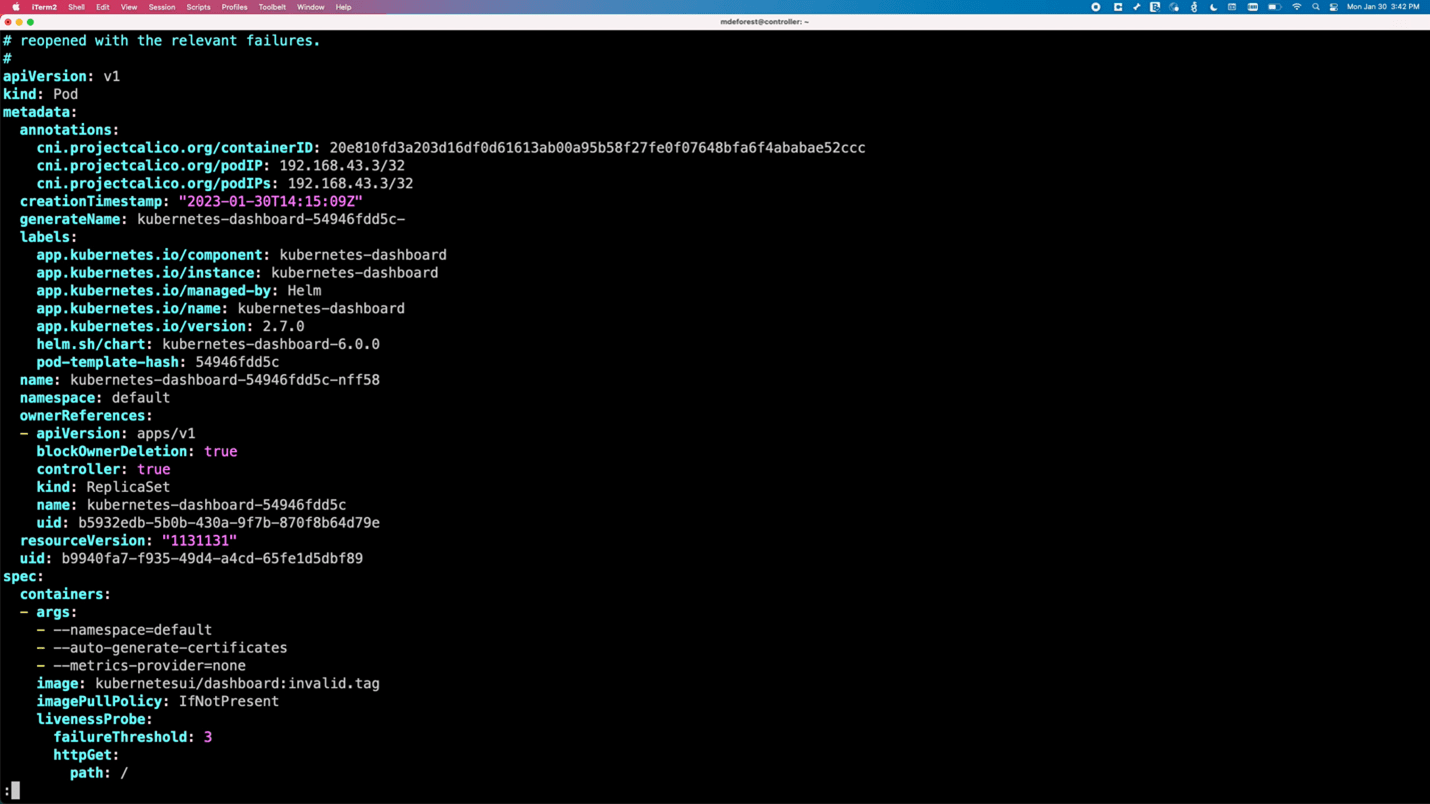


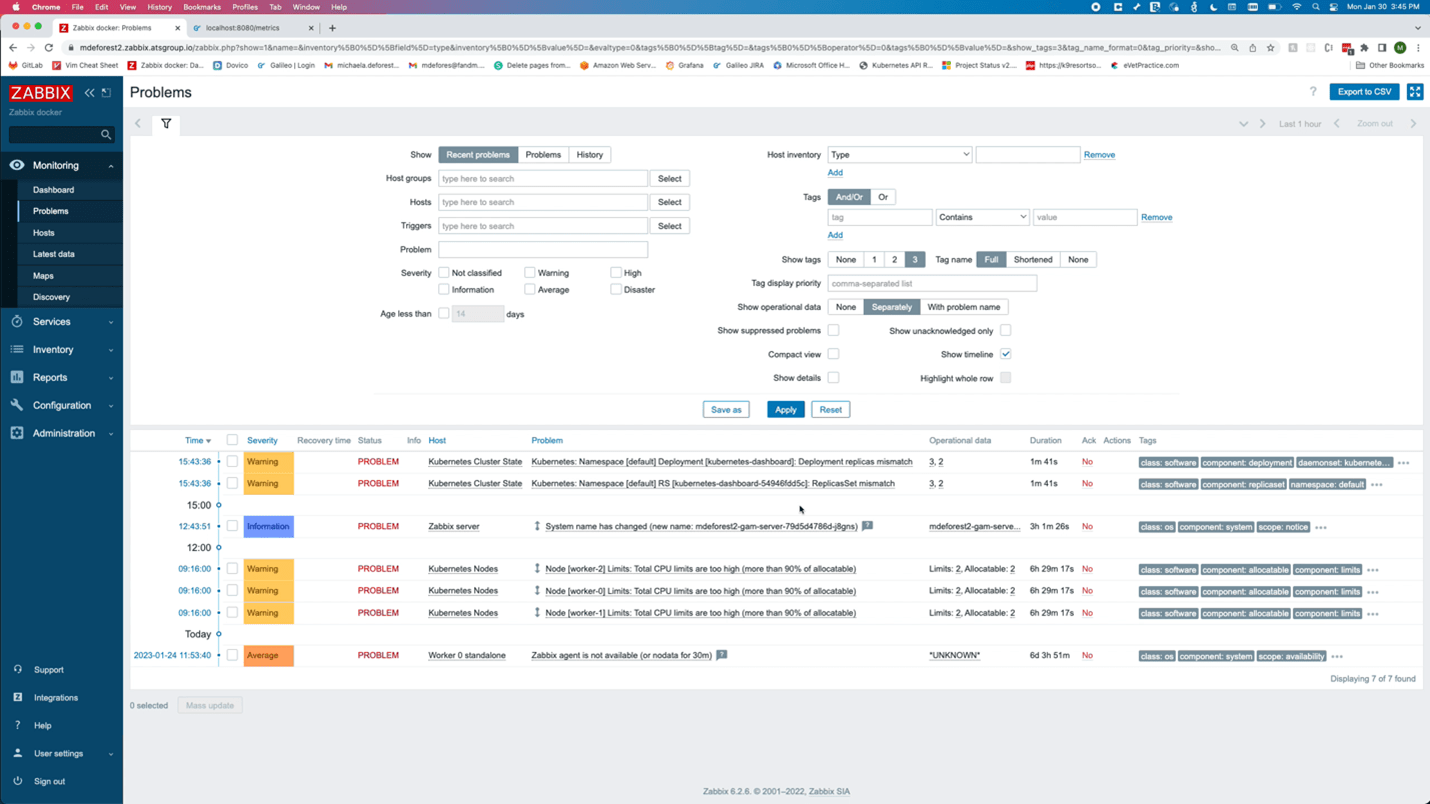


 Tanner Pratt is a Practice Manager at Amazon Web Services. Tanner is leading a team of consultants focusing on Amazon streaming services like Managed Streaming for Apache Kafka, Kinesis Data Streams/Firehose and Kinesis Data Analytics.
 Ed Berezitsky is a Senior Data Architect at Amazon Web Services.Ed helps customers design and implement solutions using streaming technologies, and specializes on Amazon MSK and Apache Kafka.


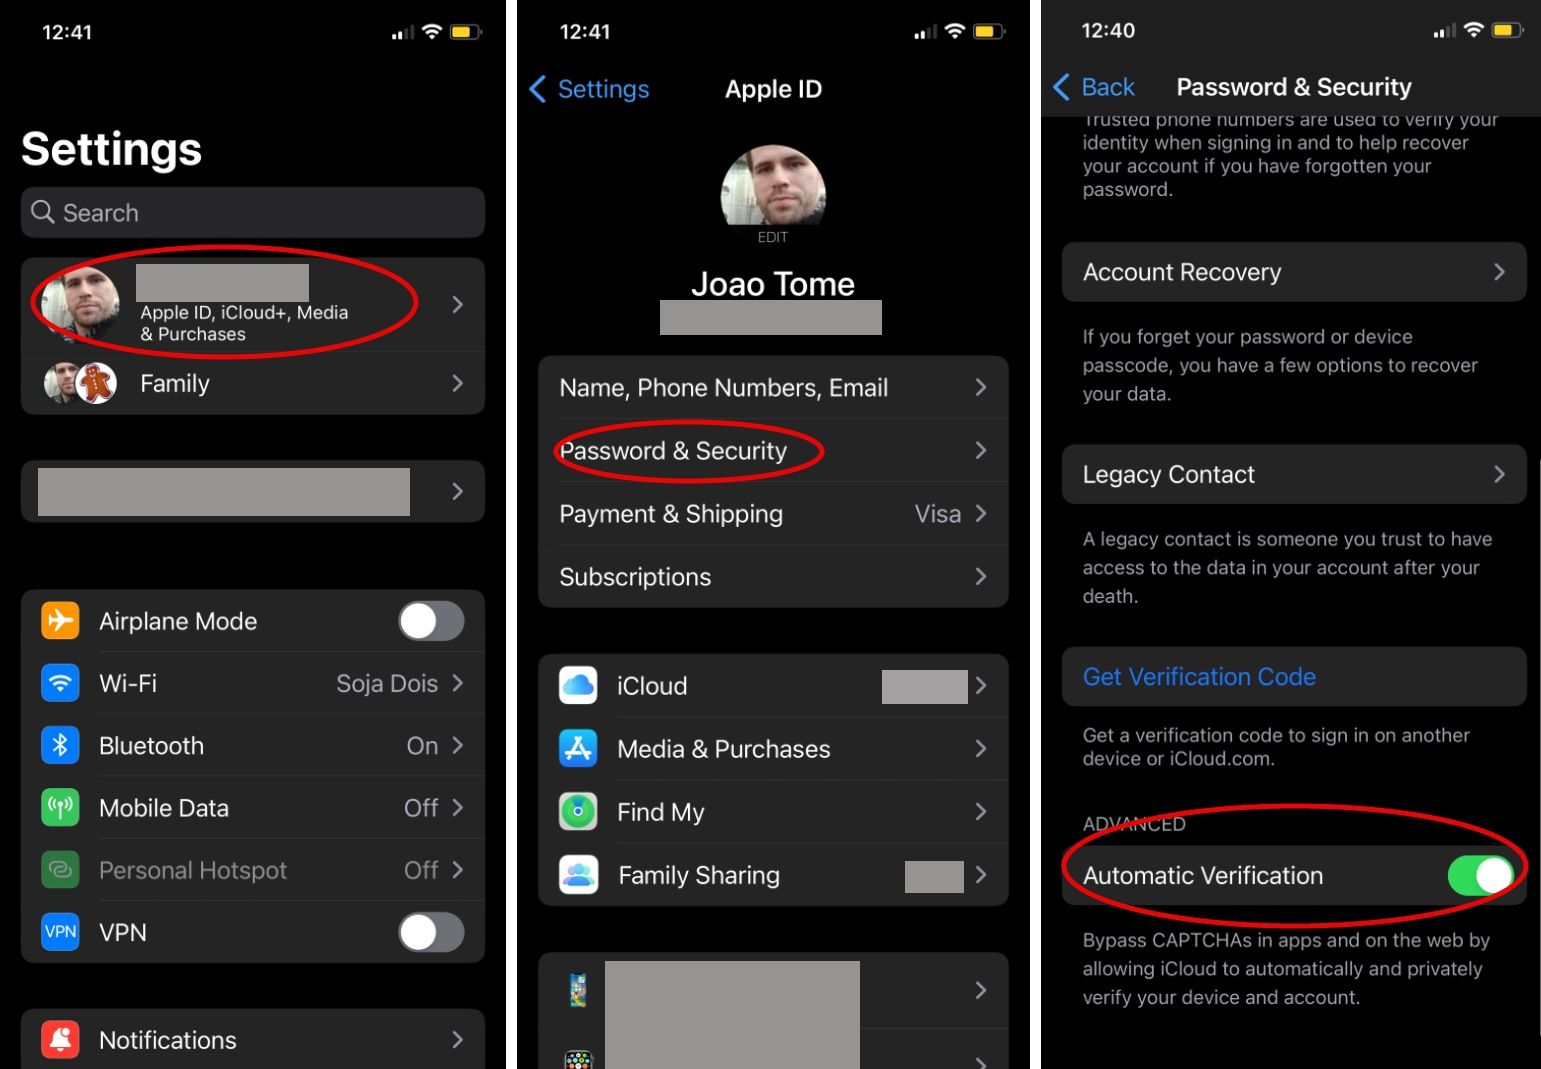


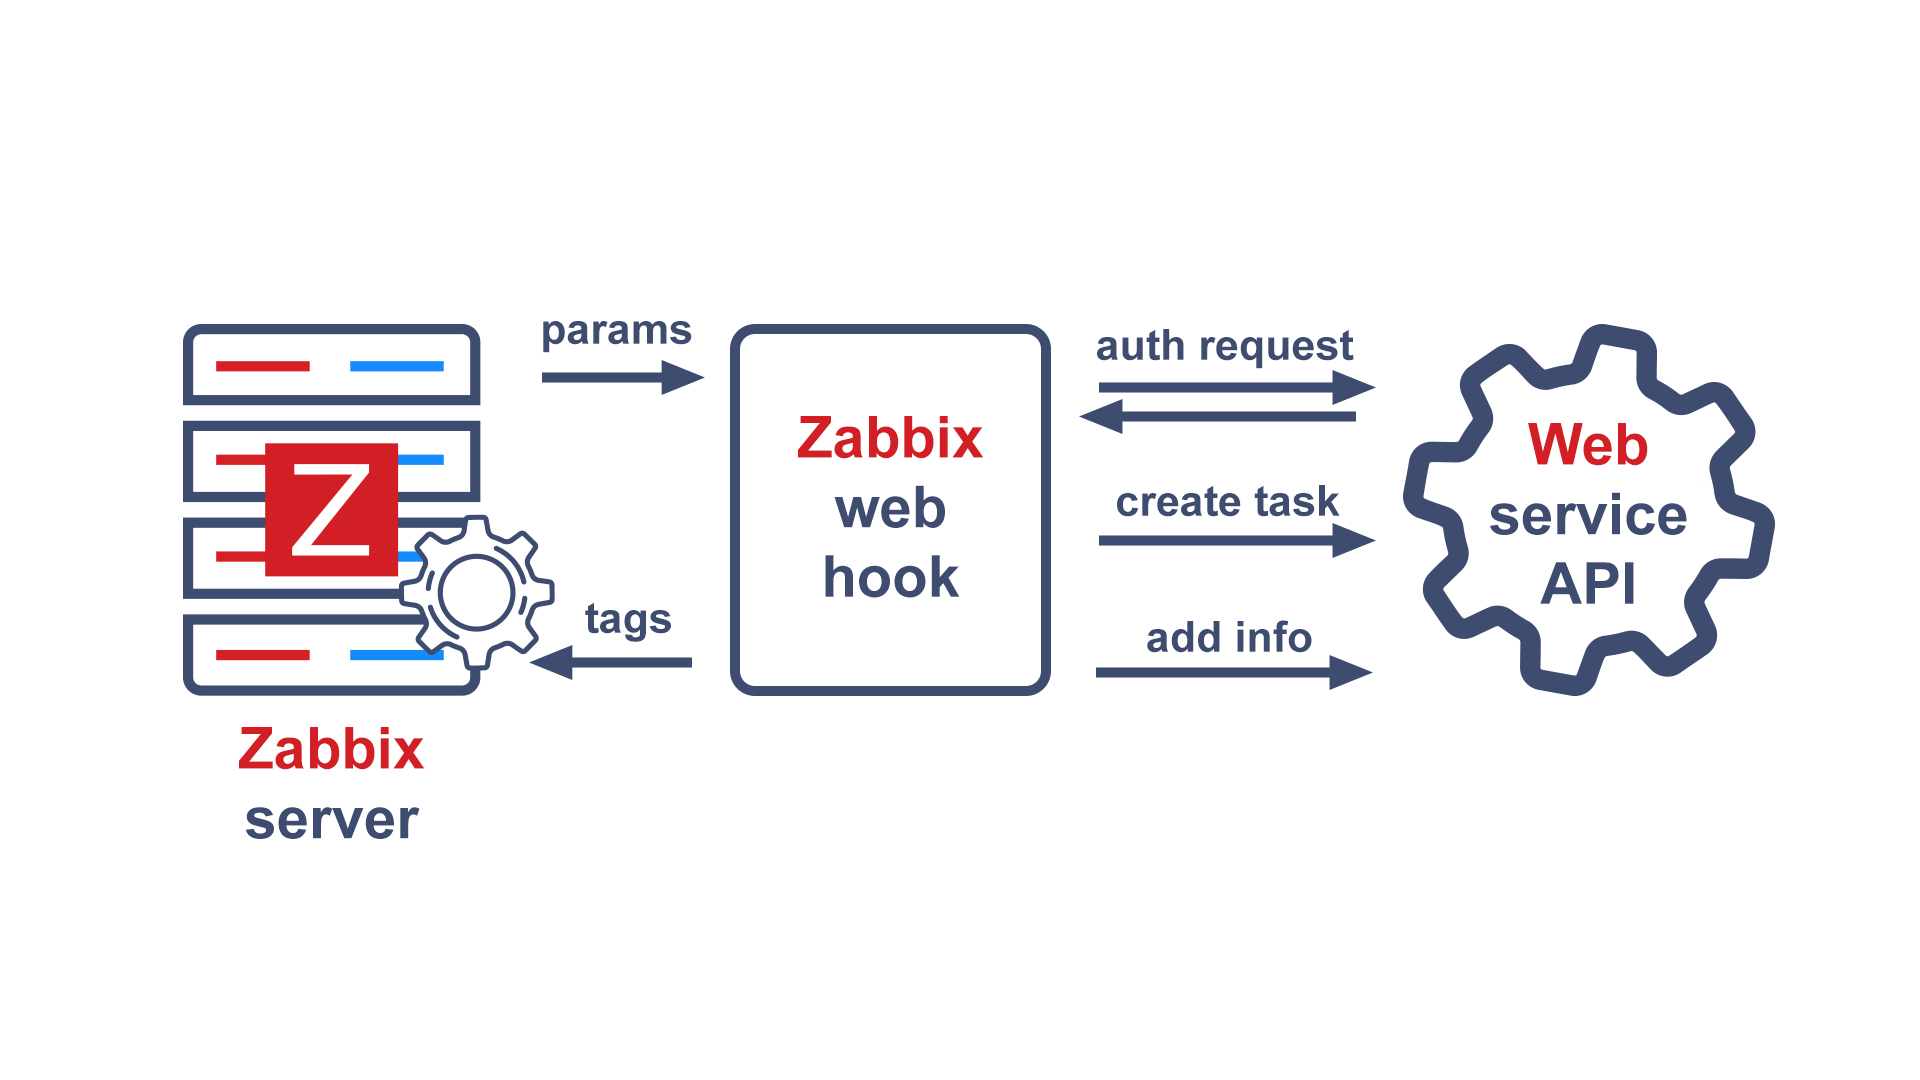
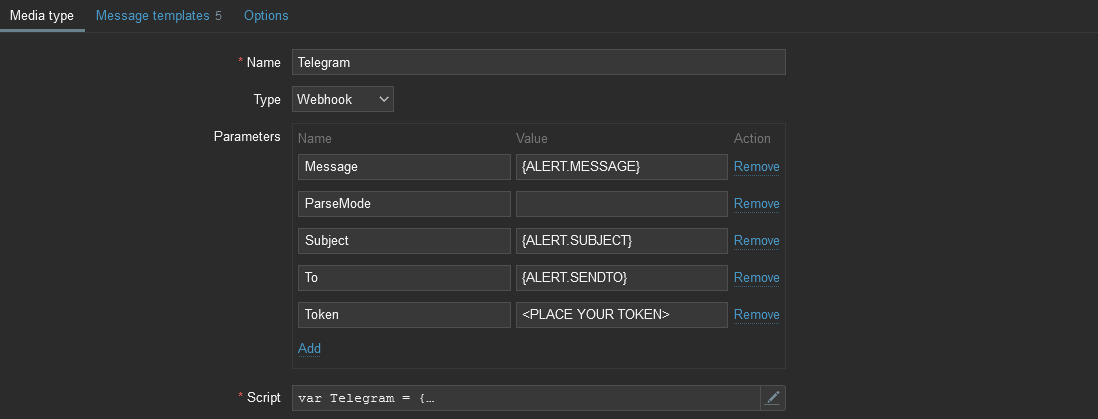
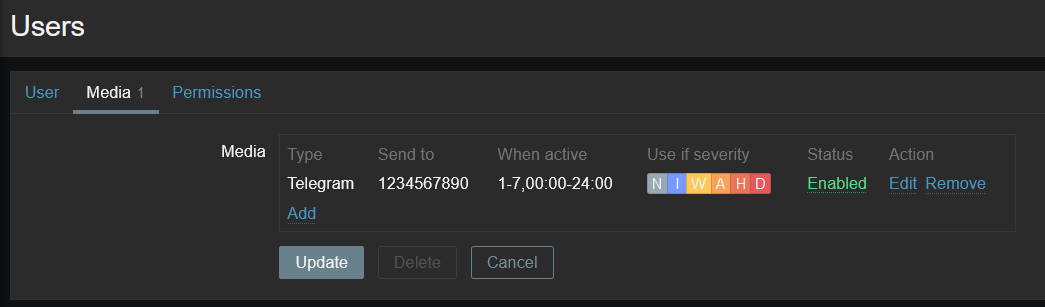


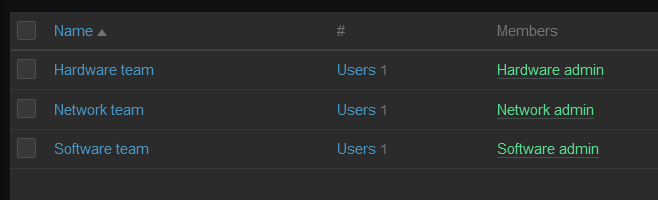
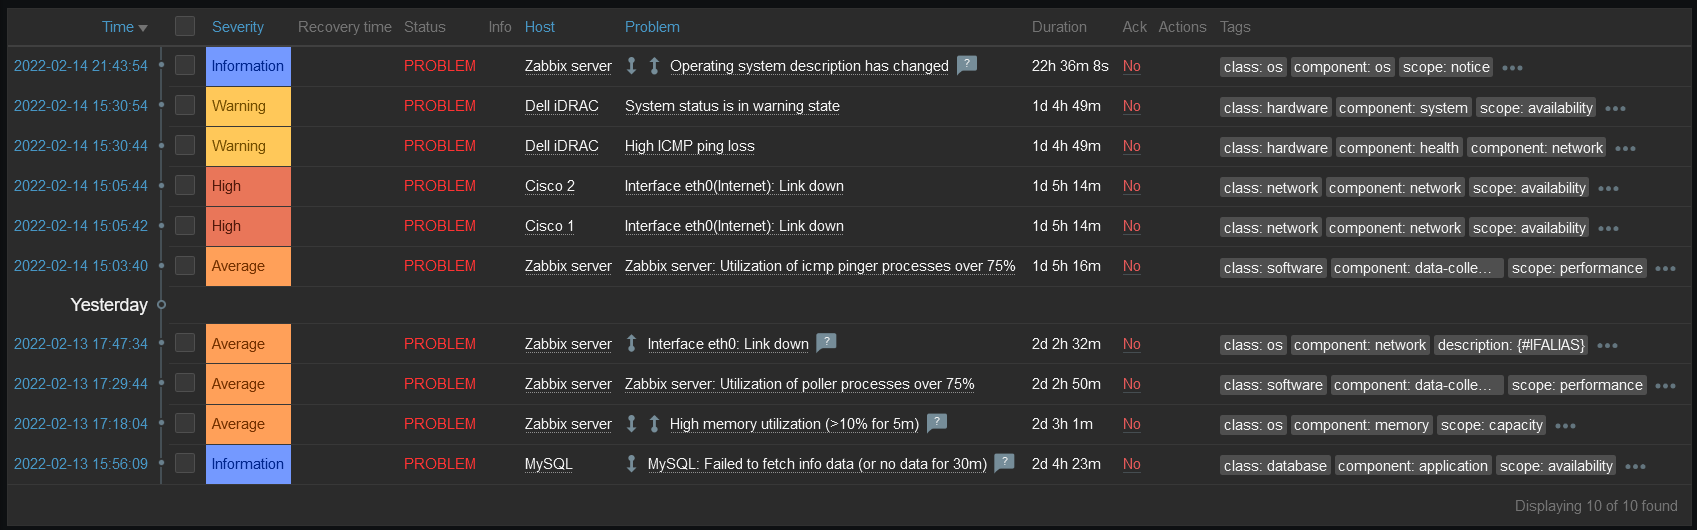


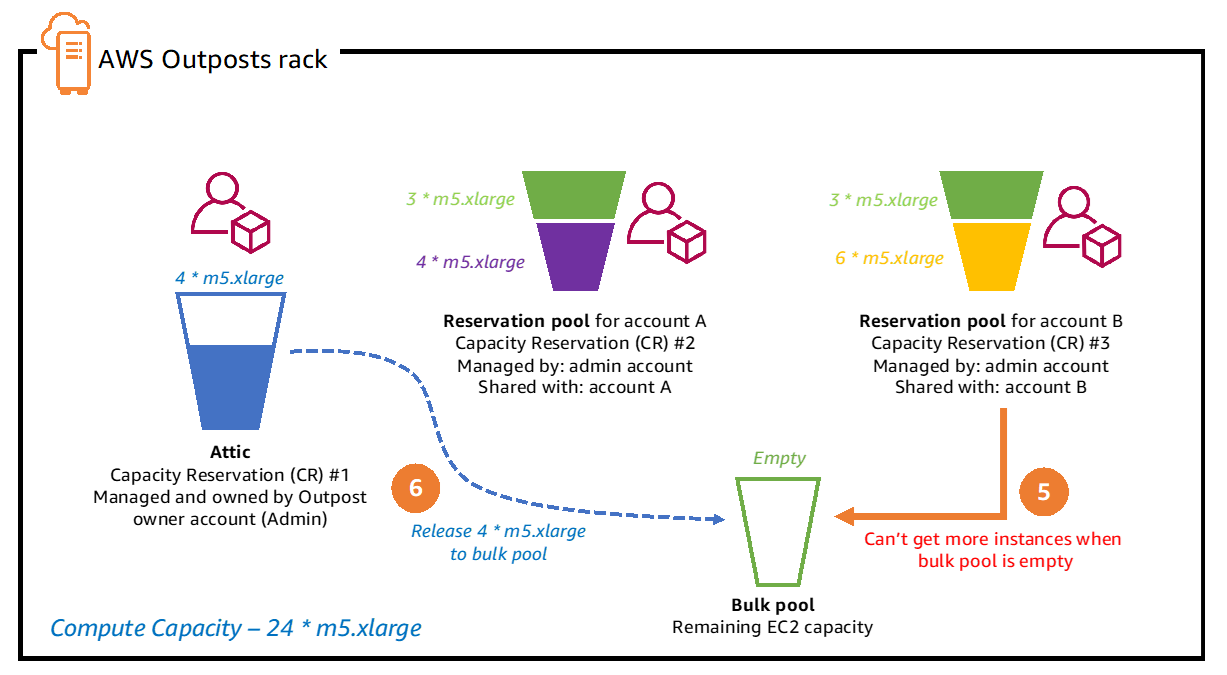
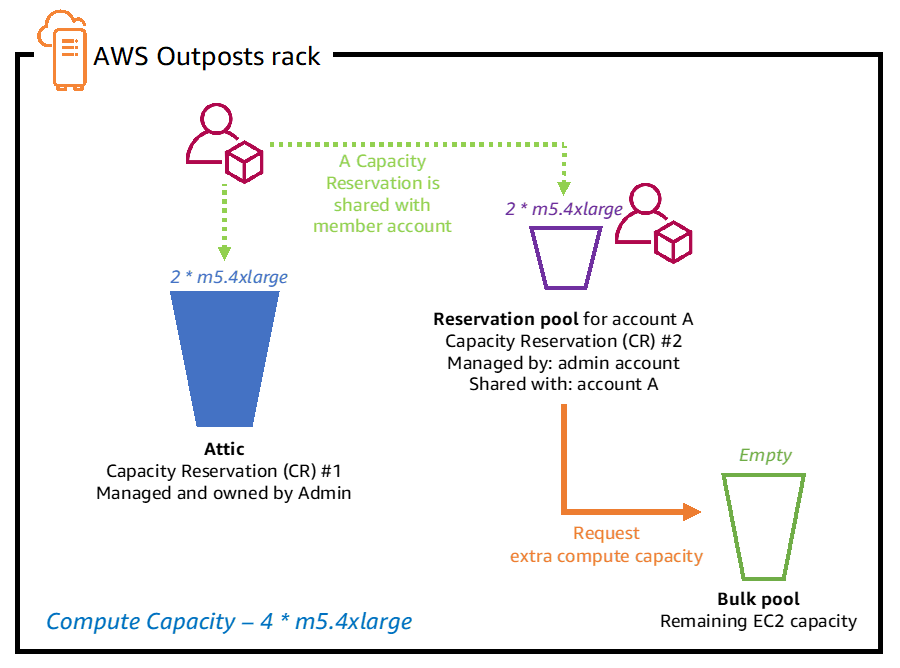
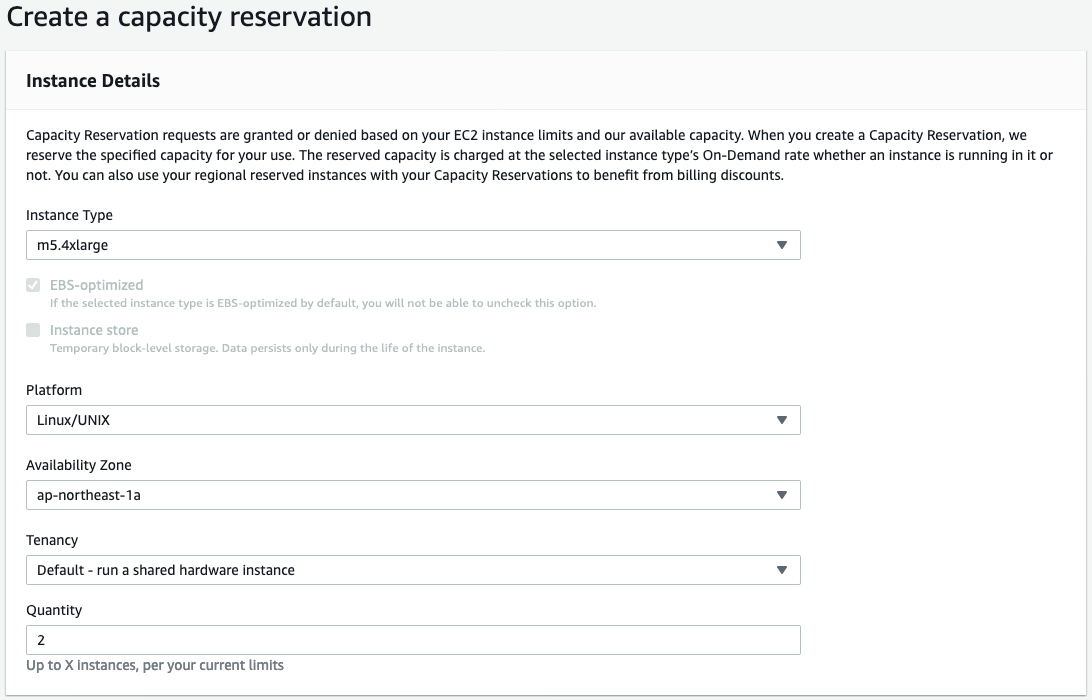
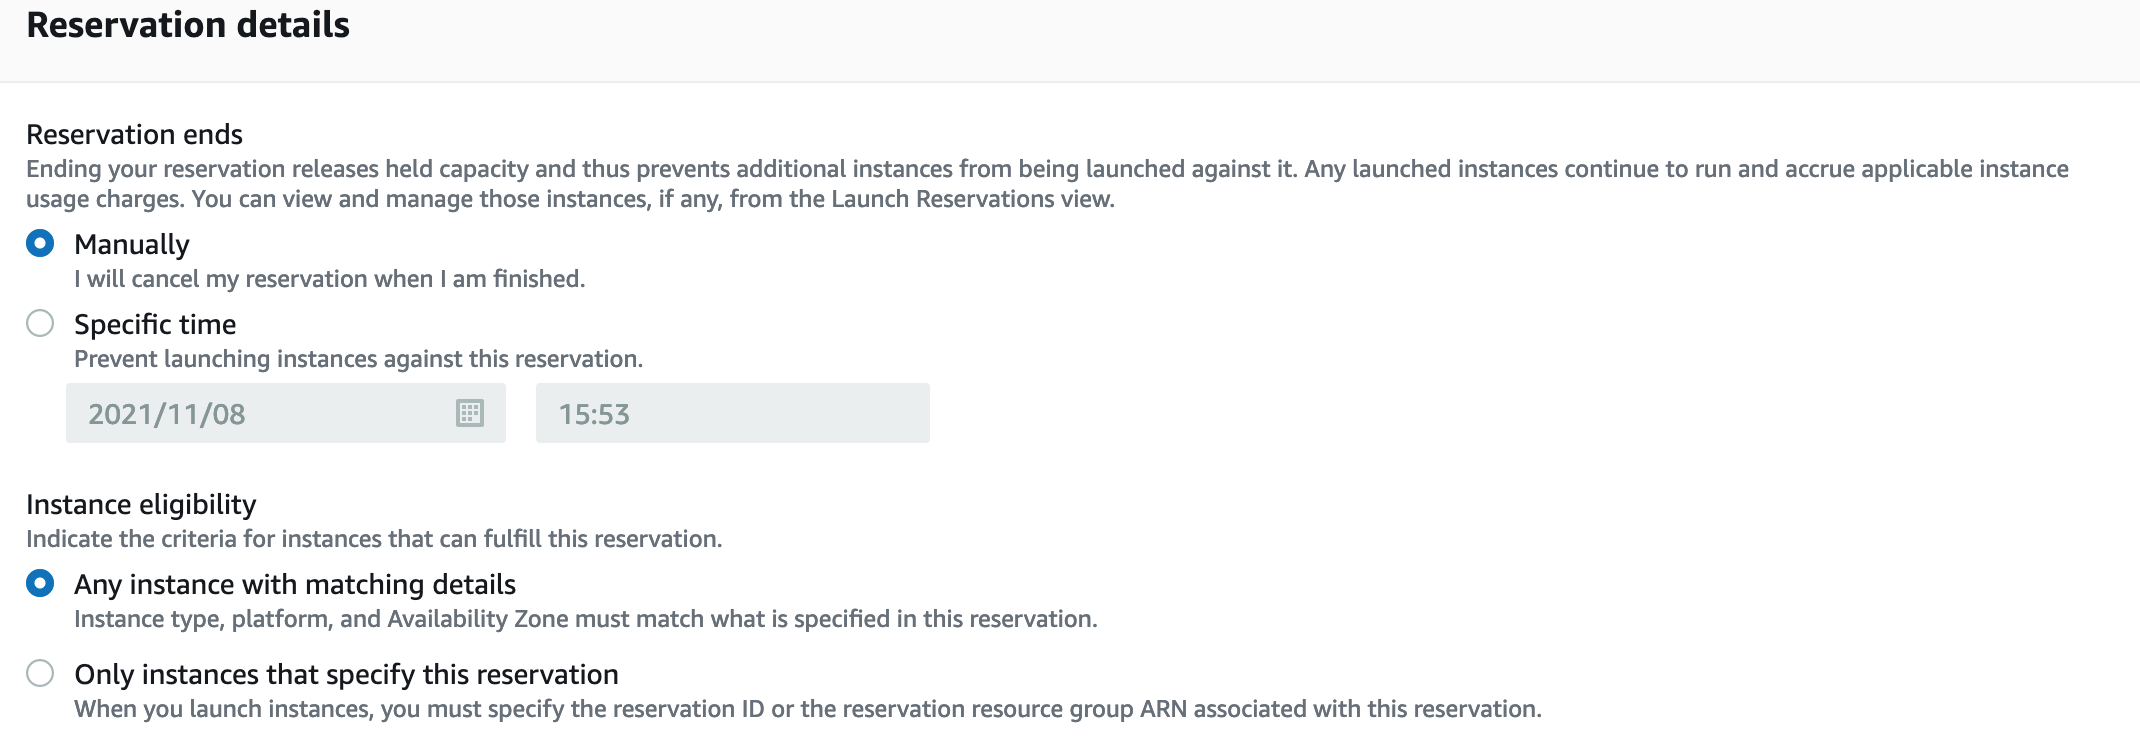
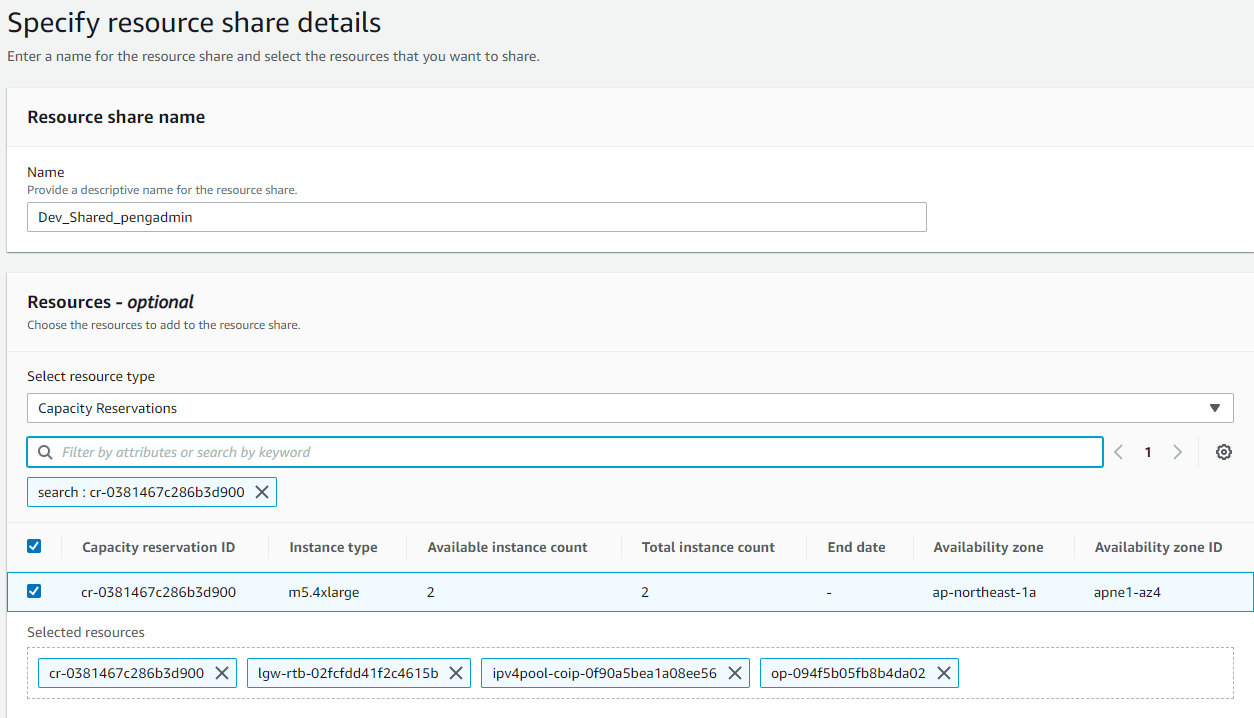
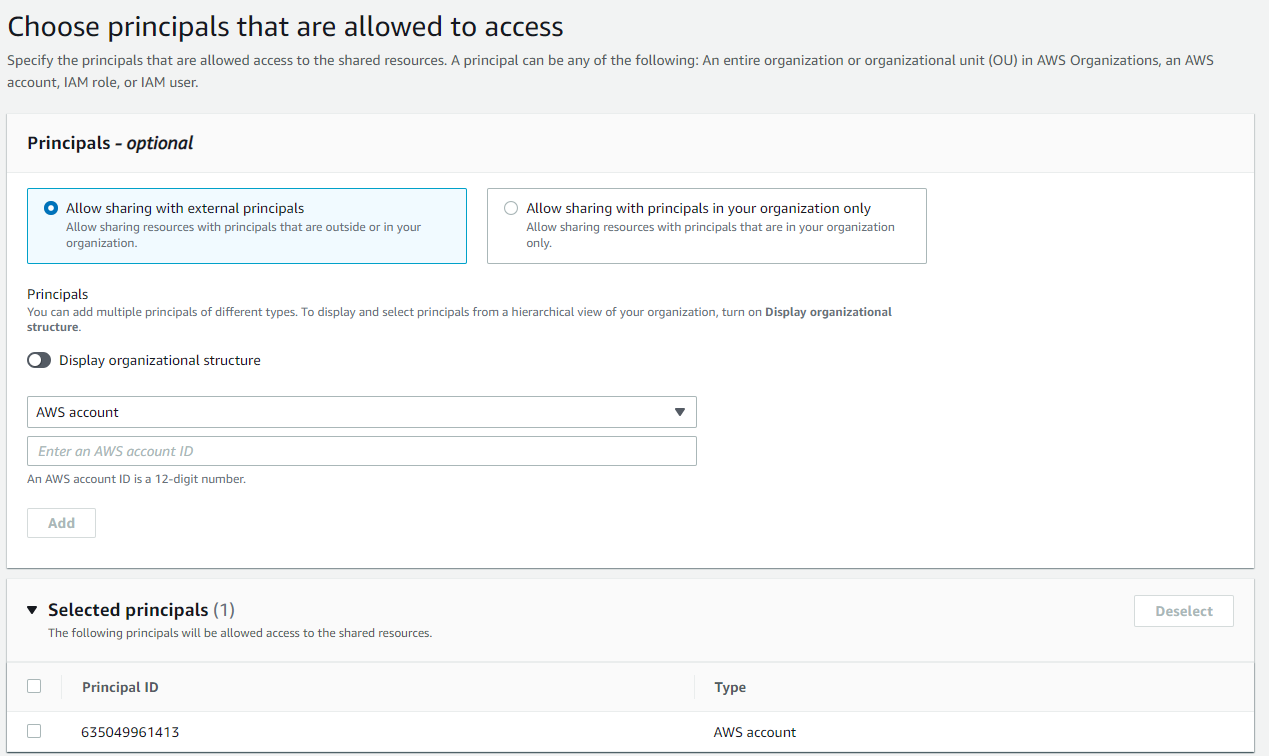

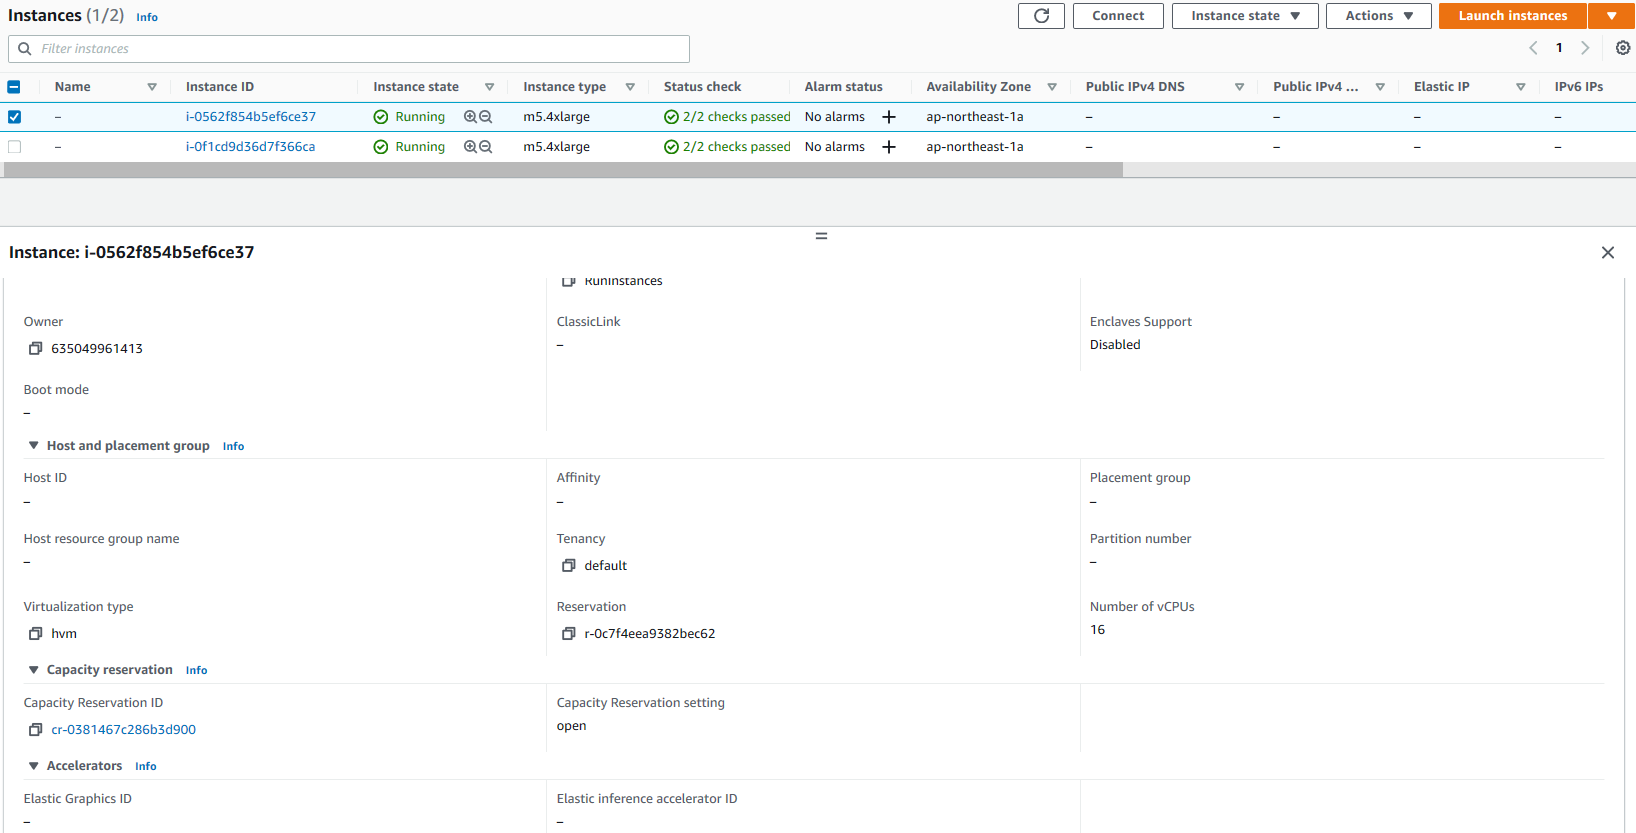

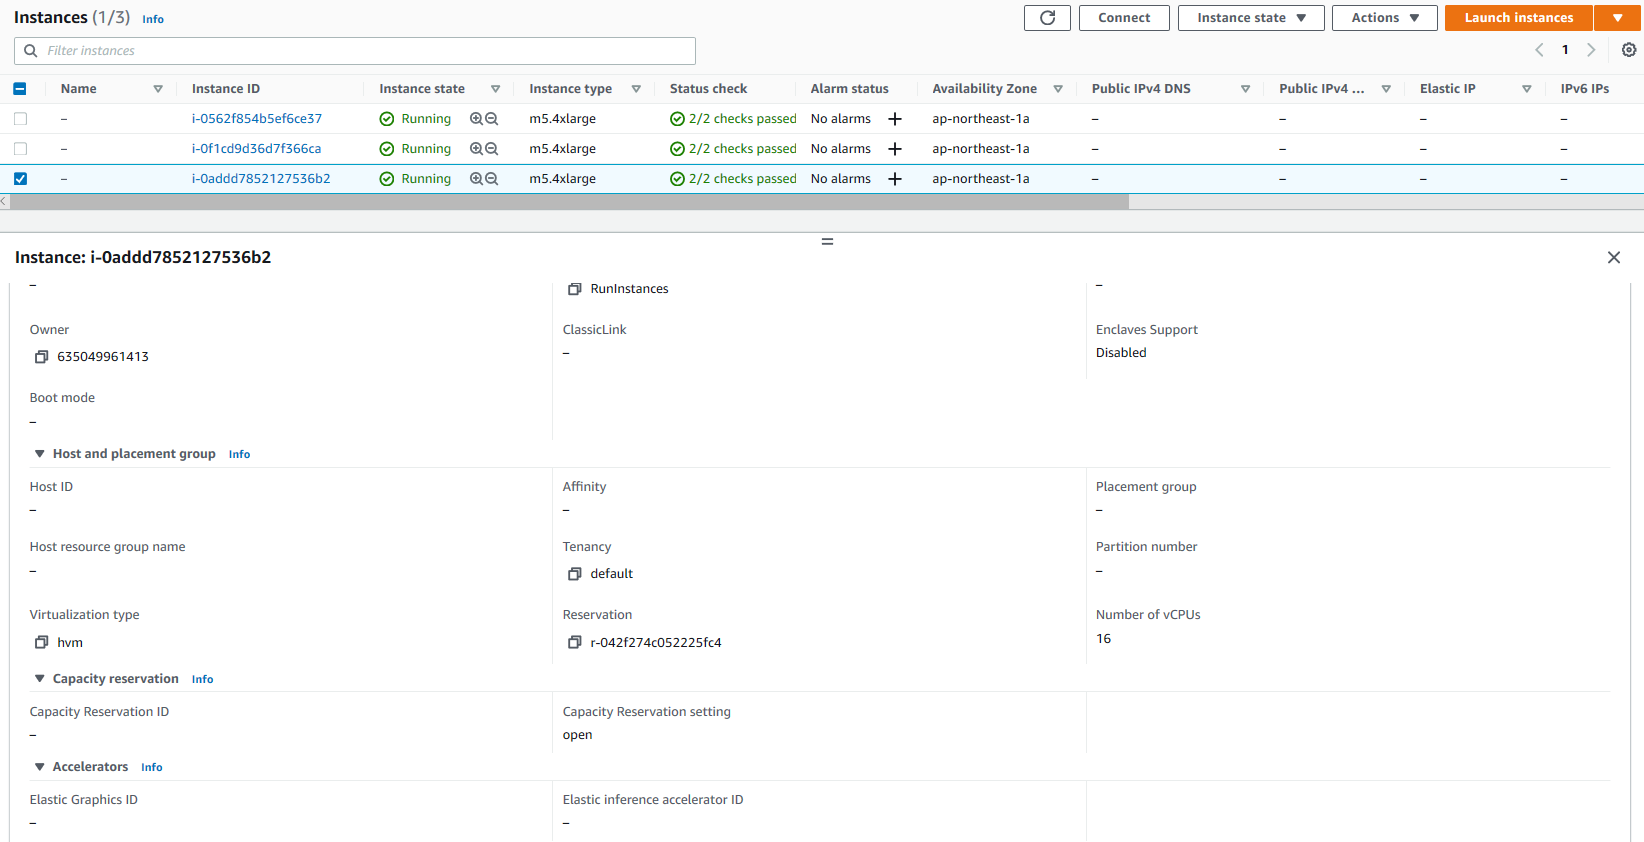


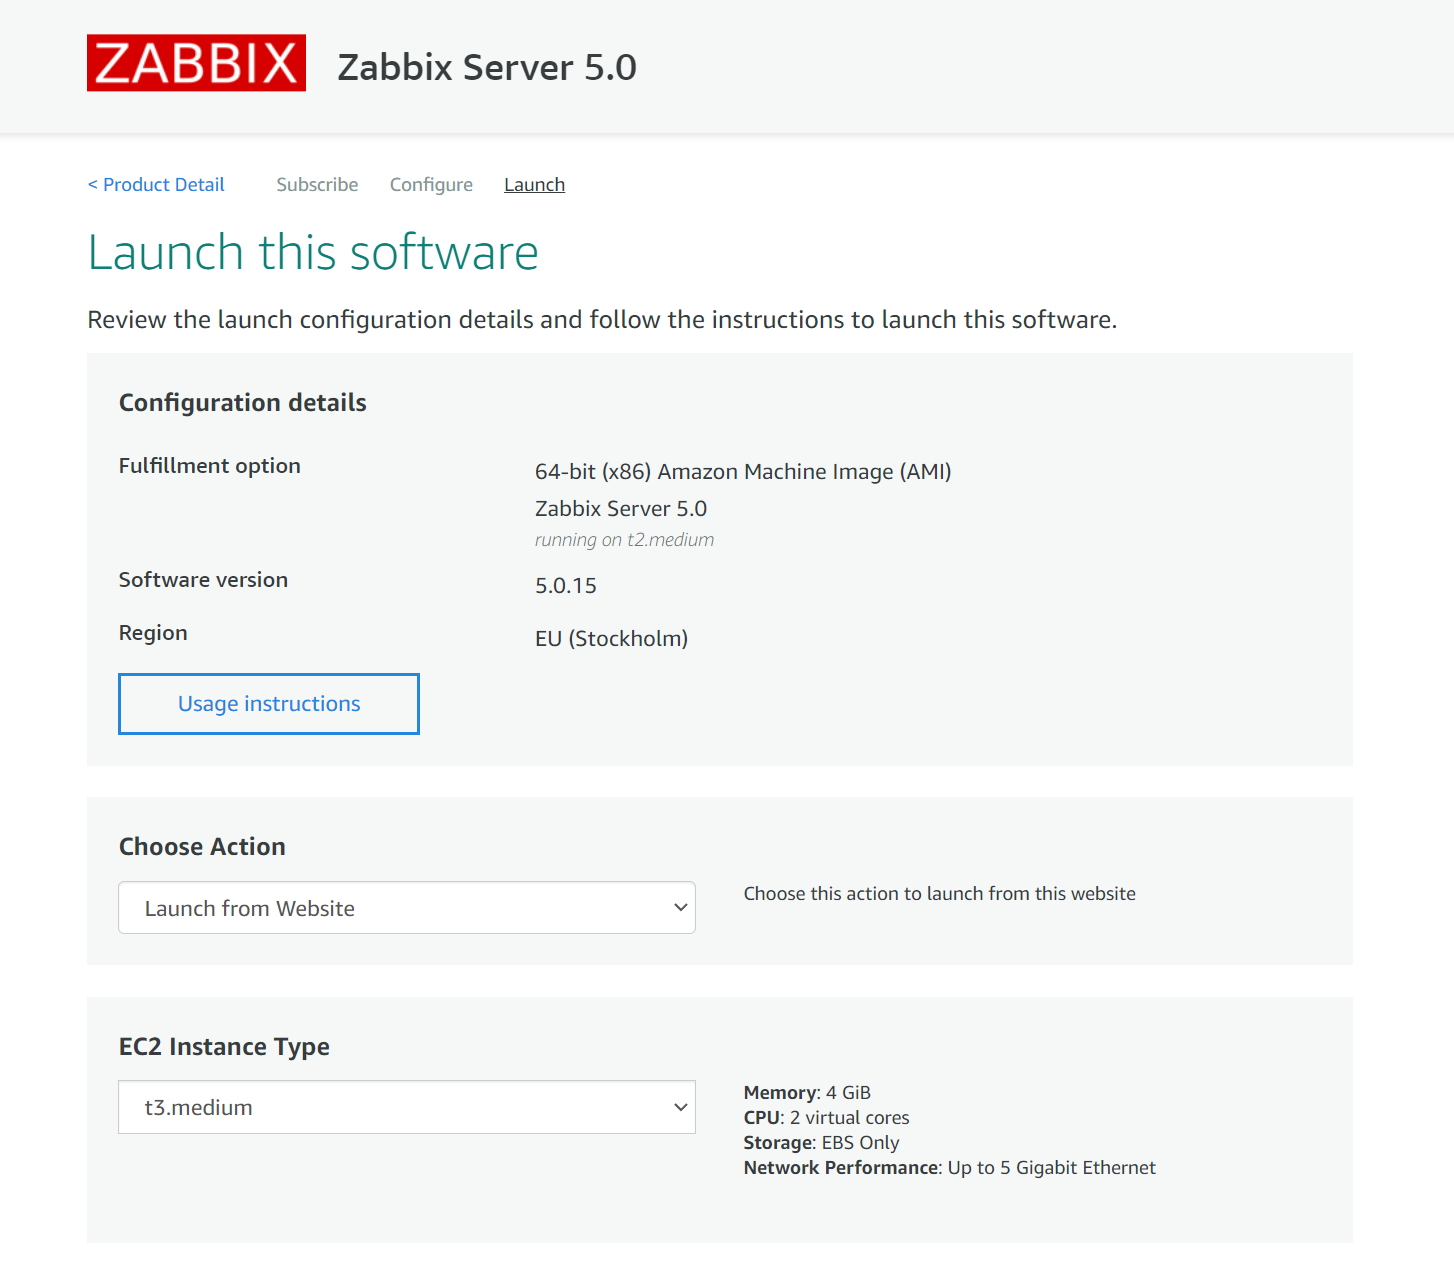
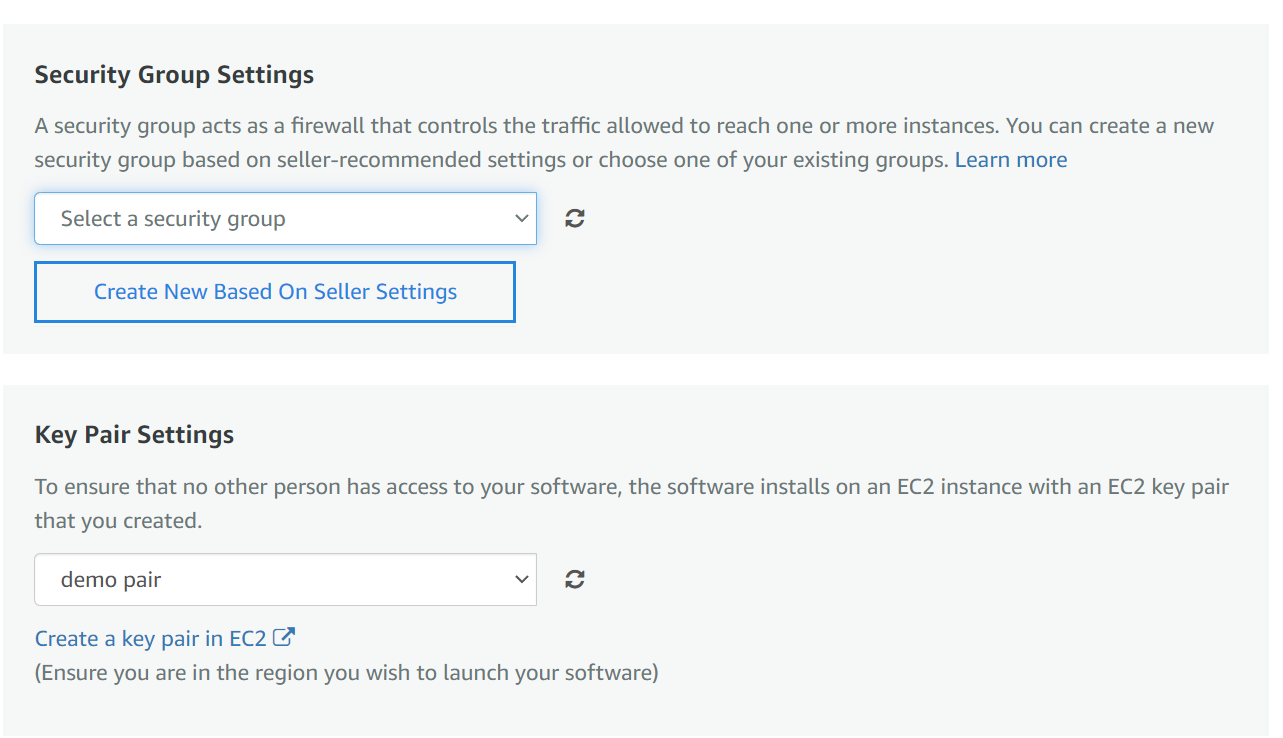
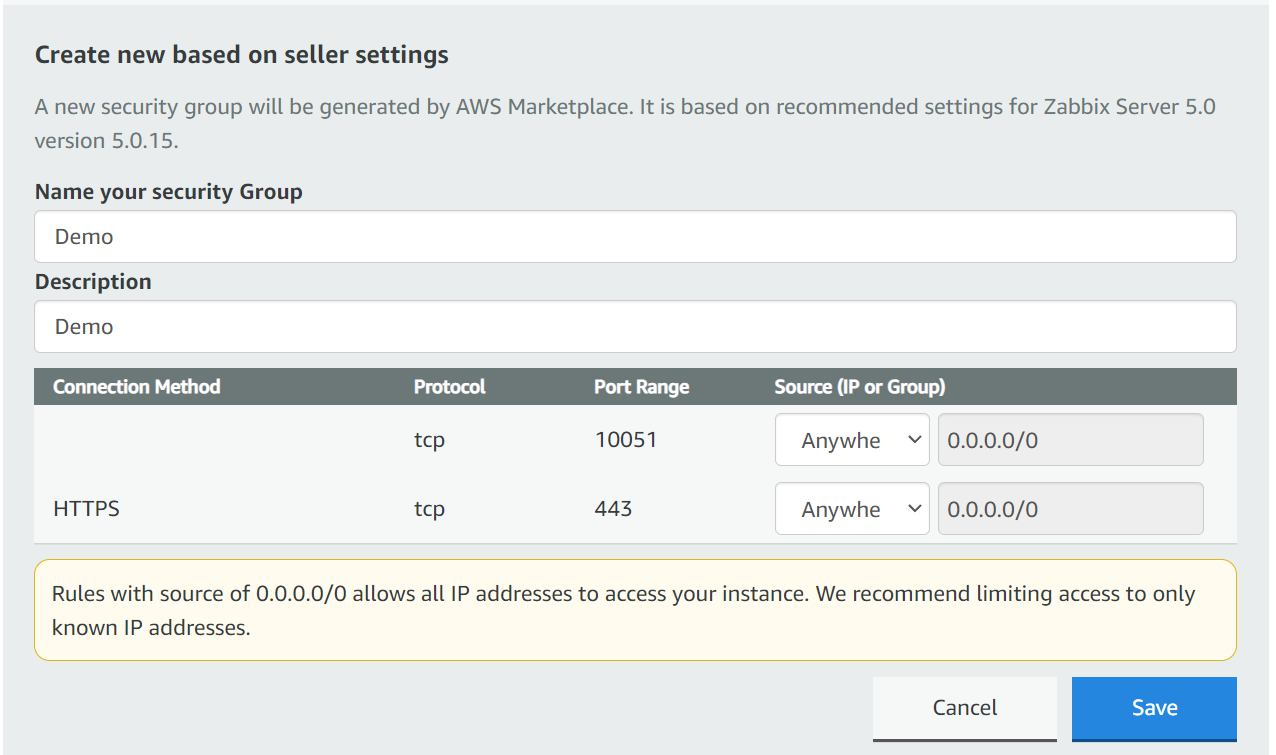
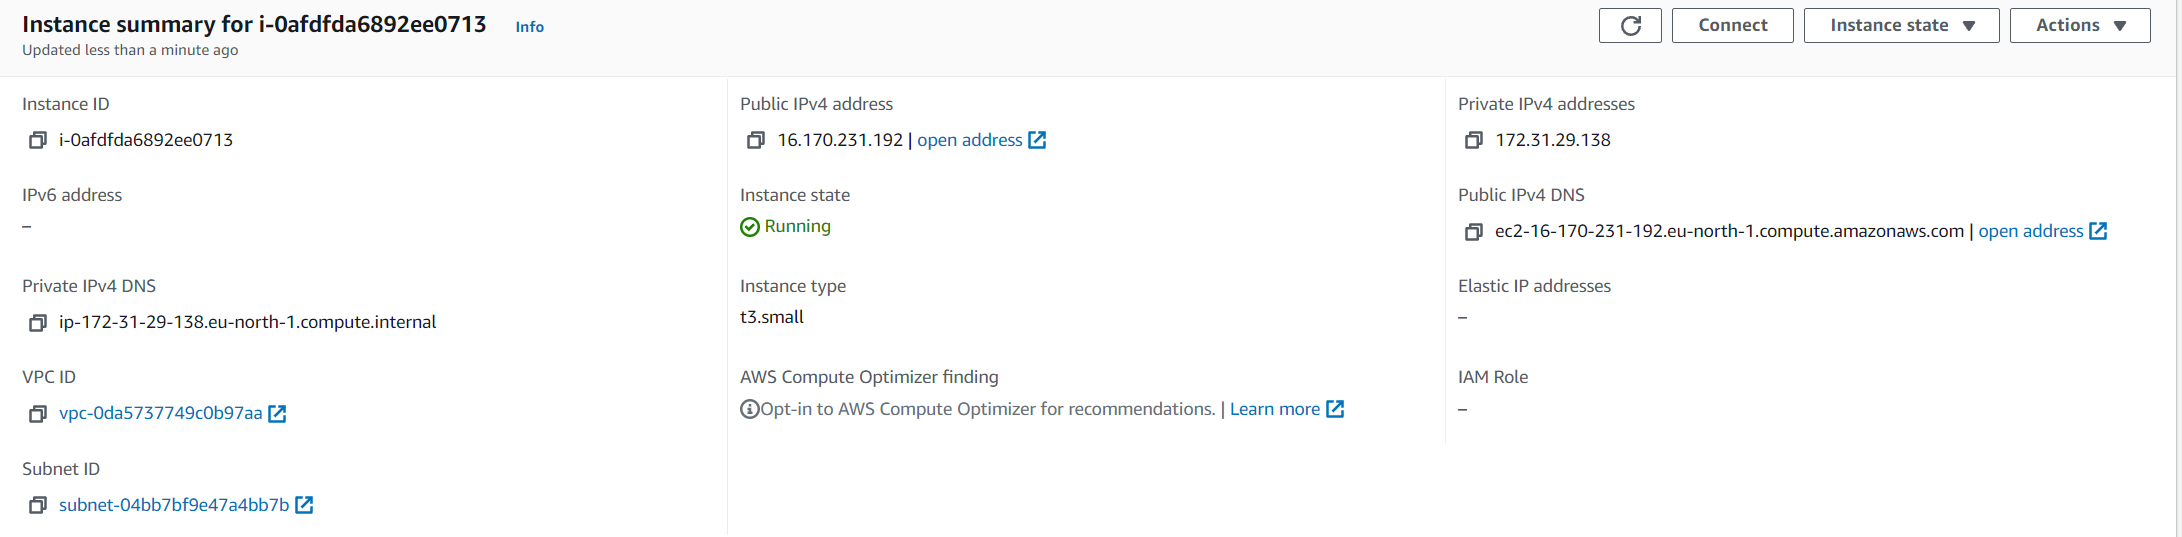


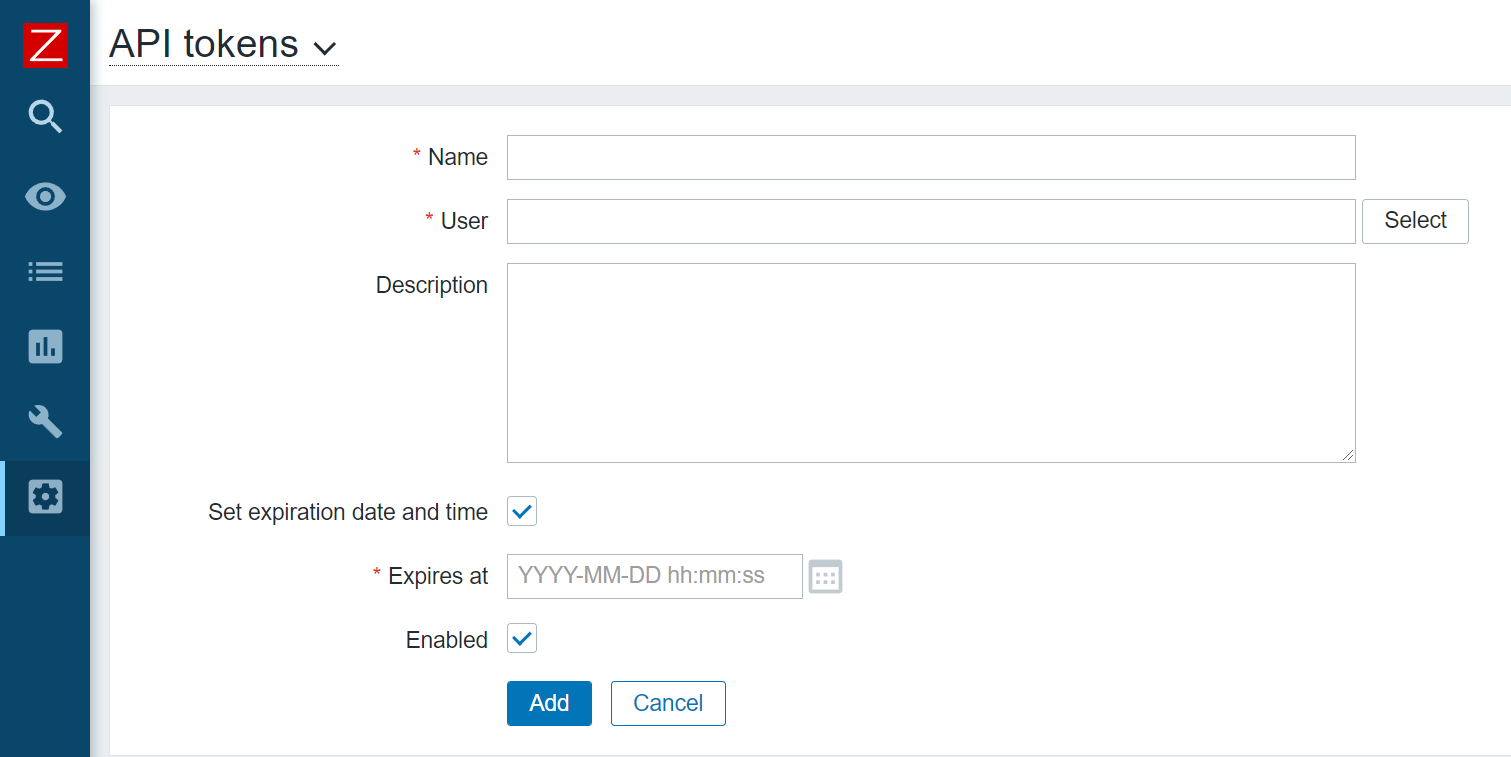
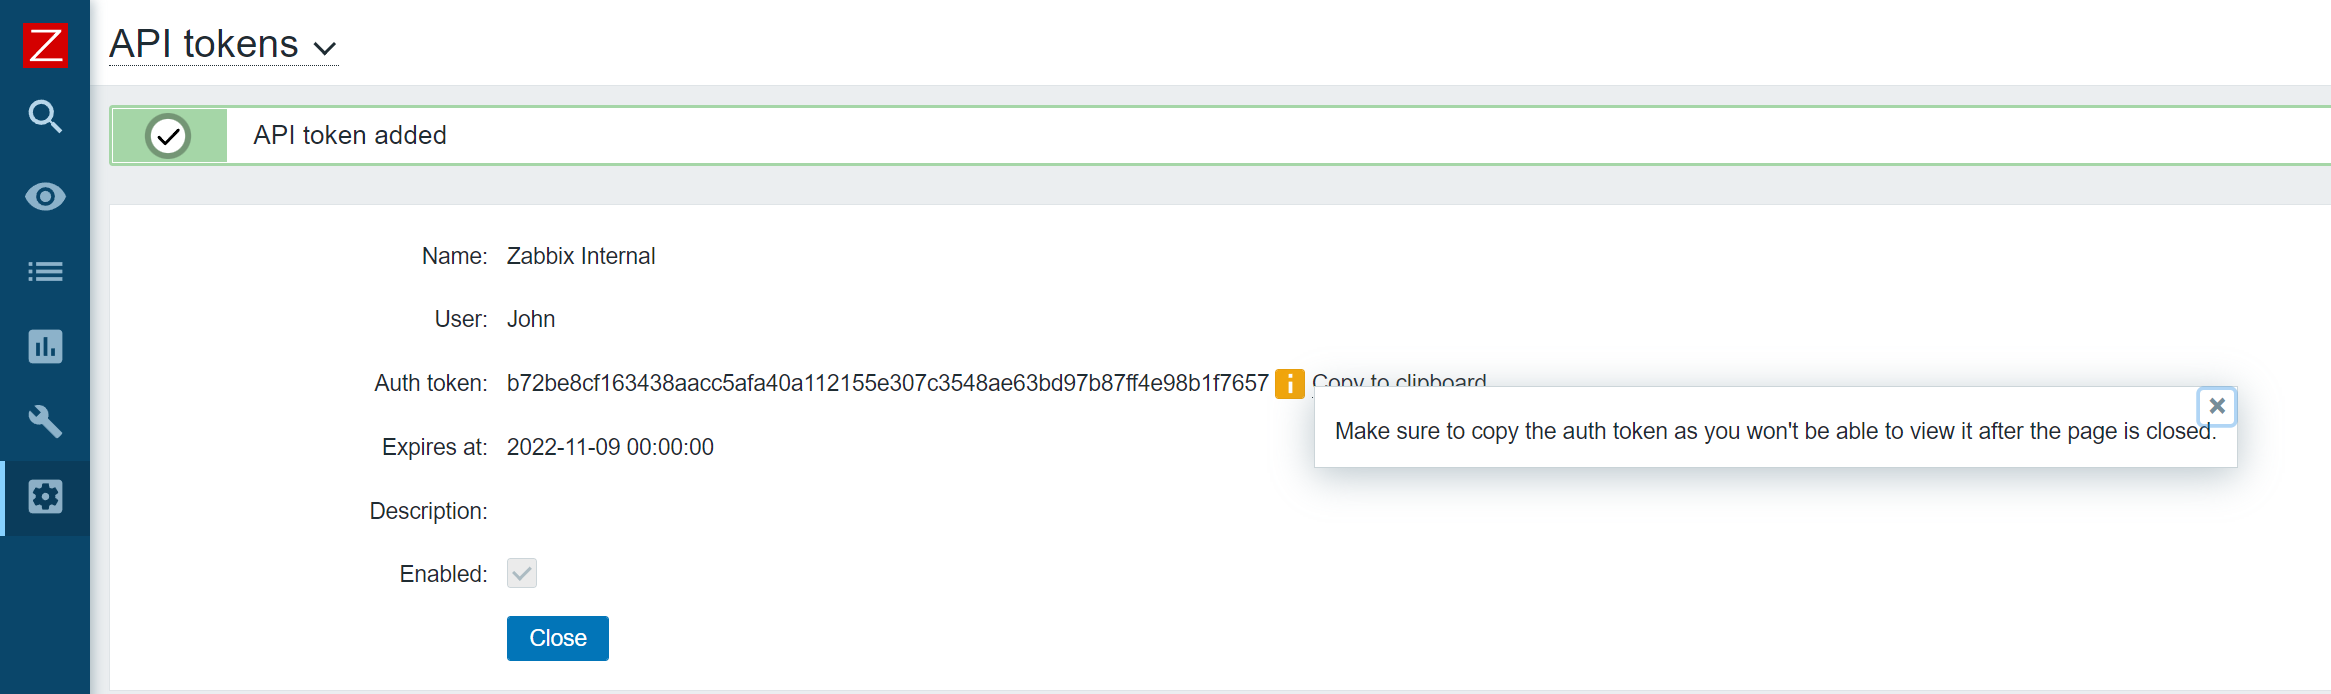
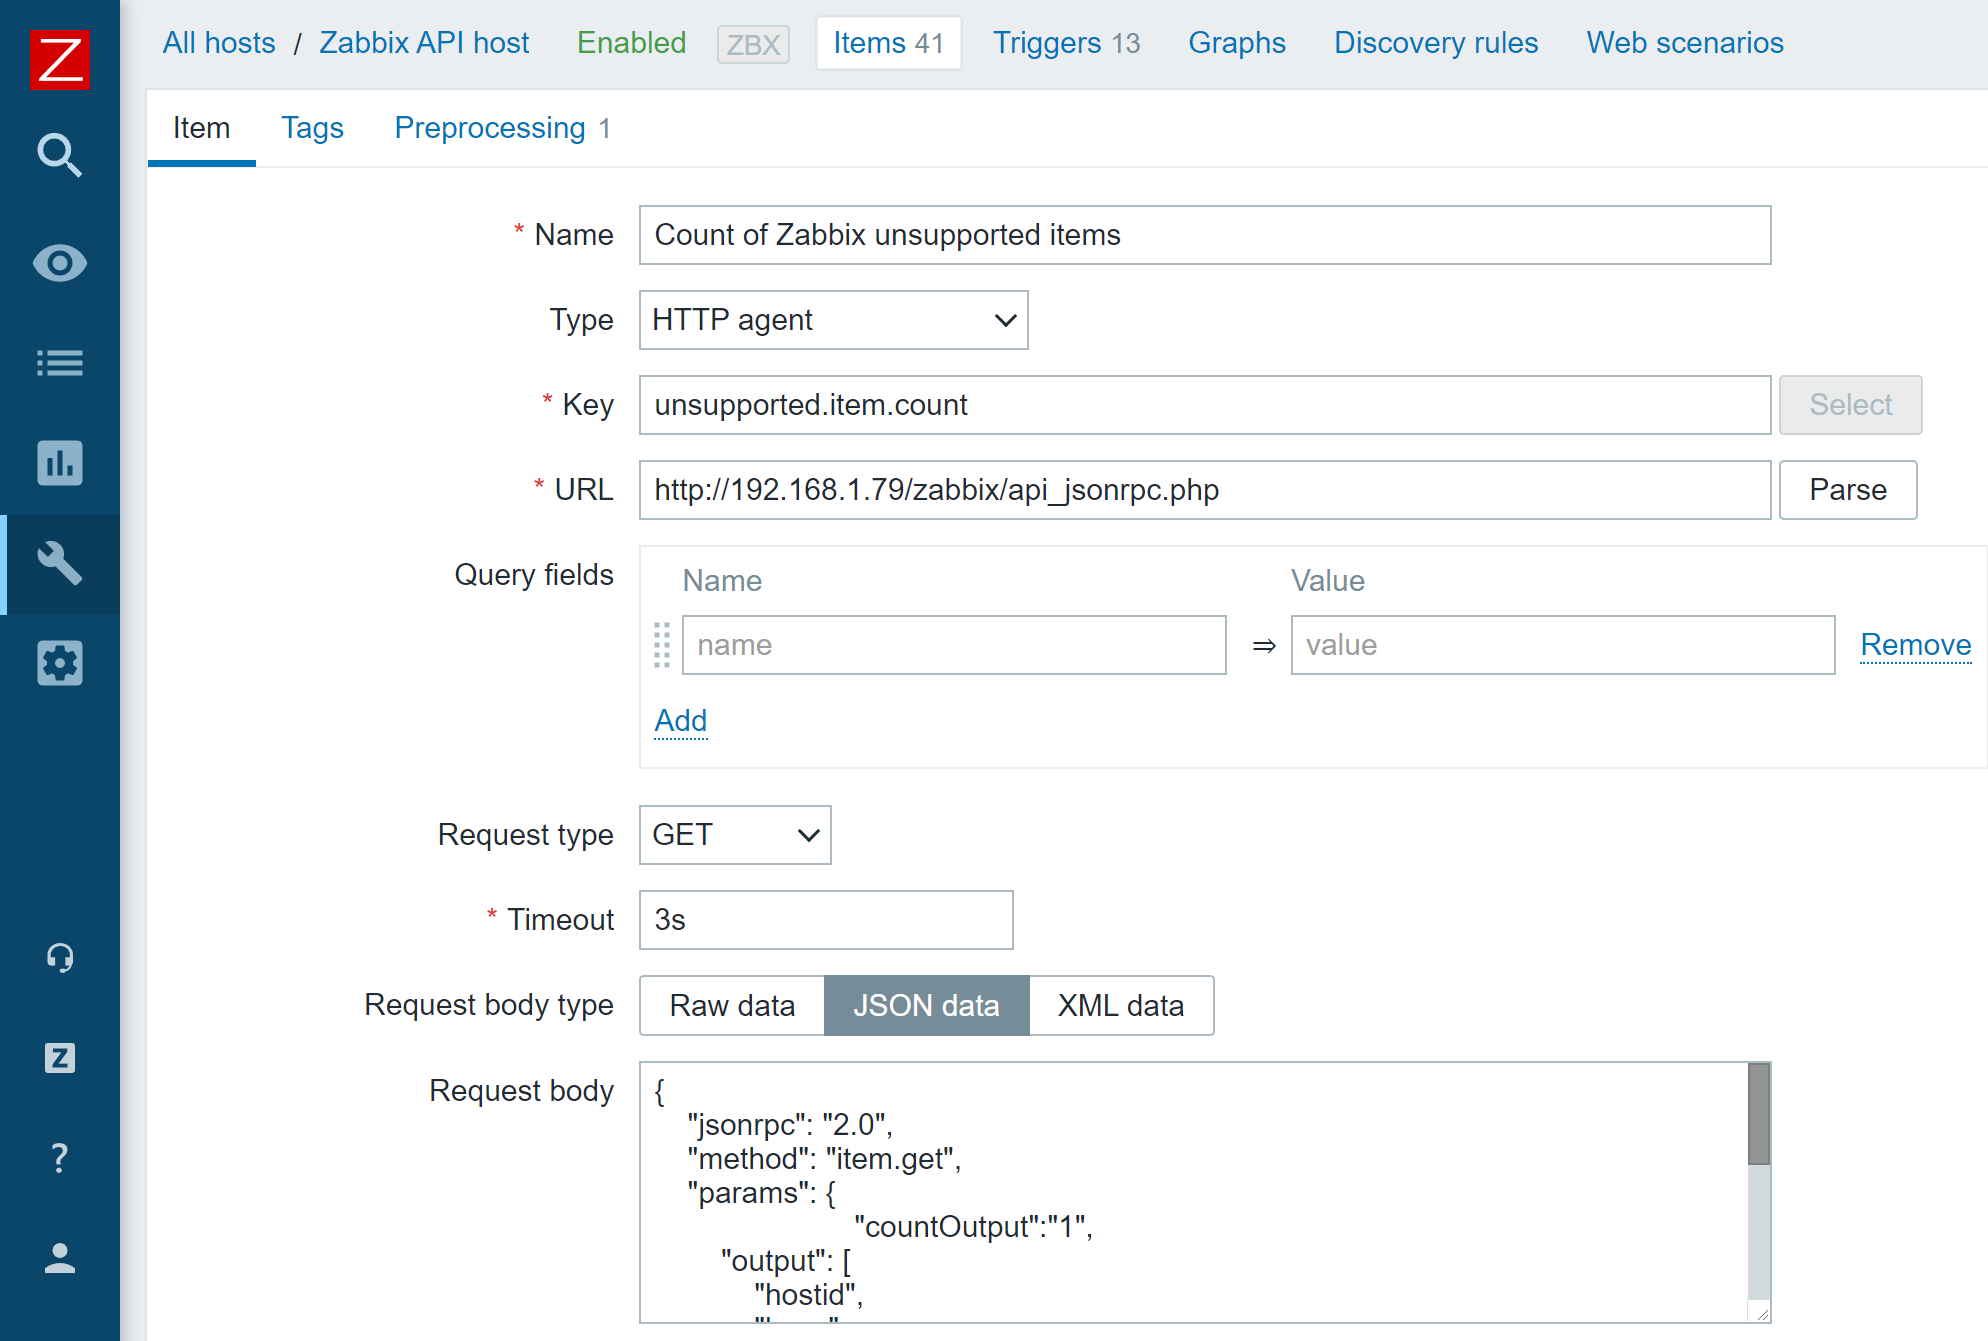

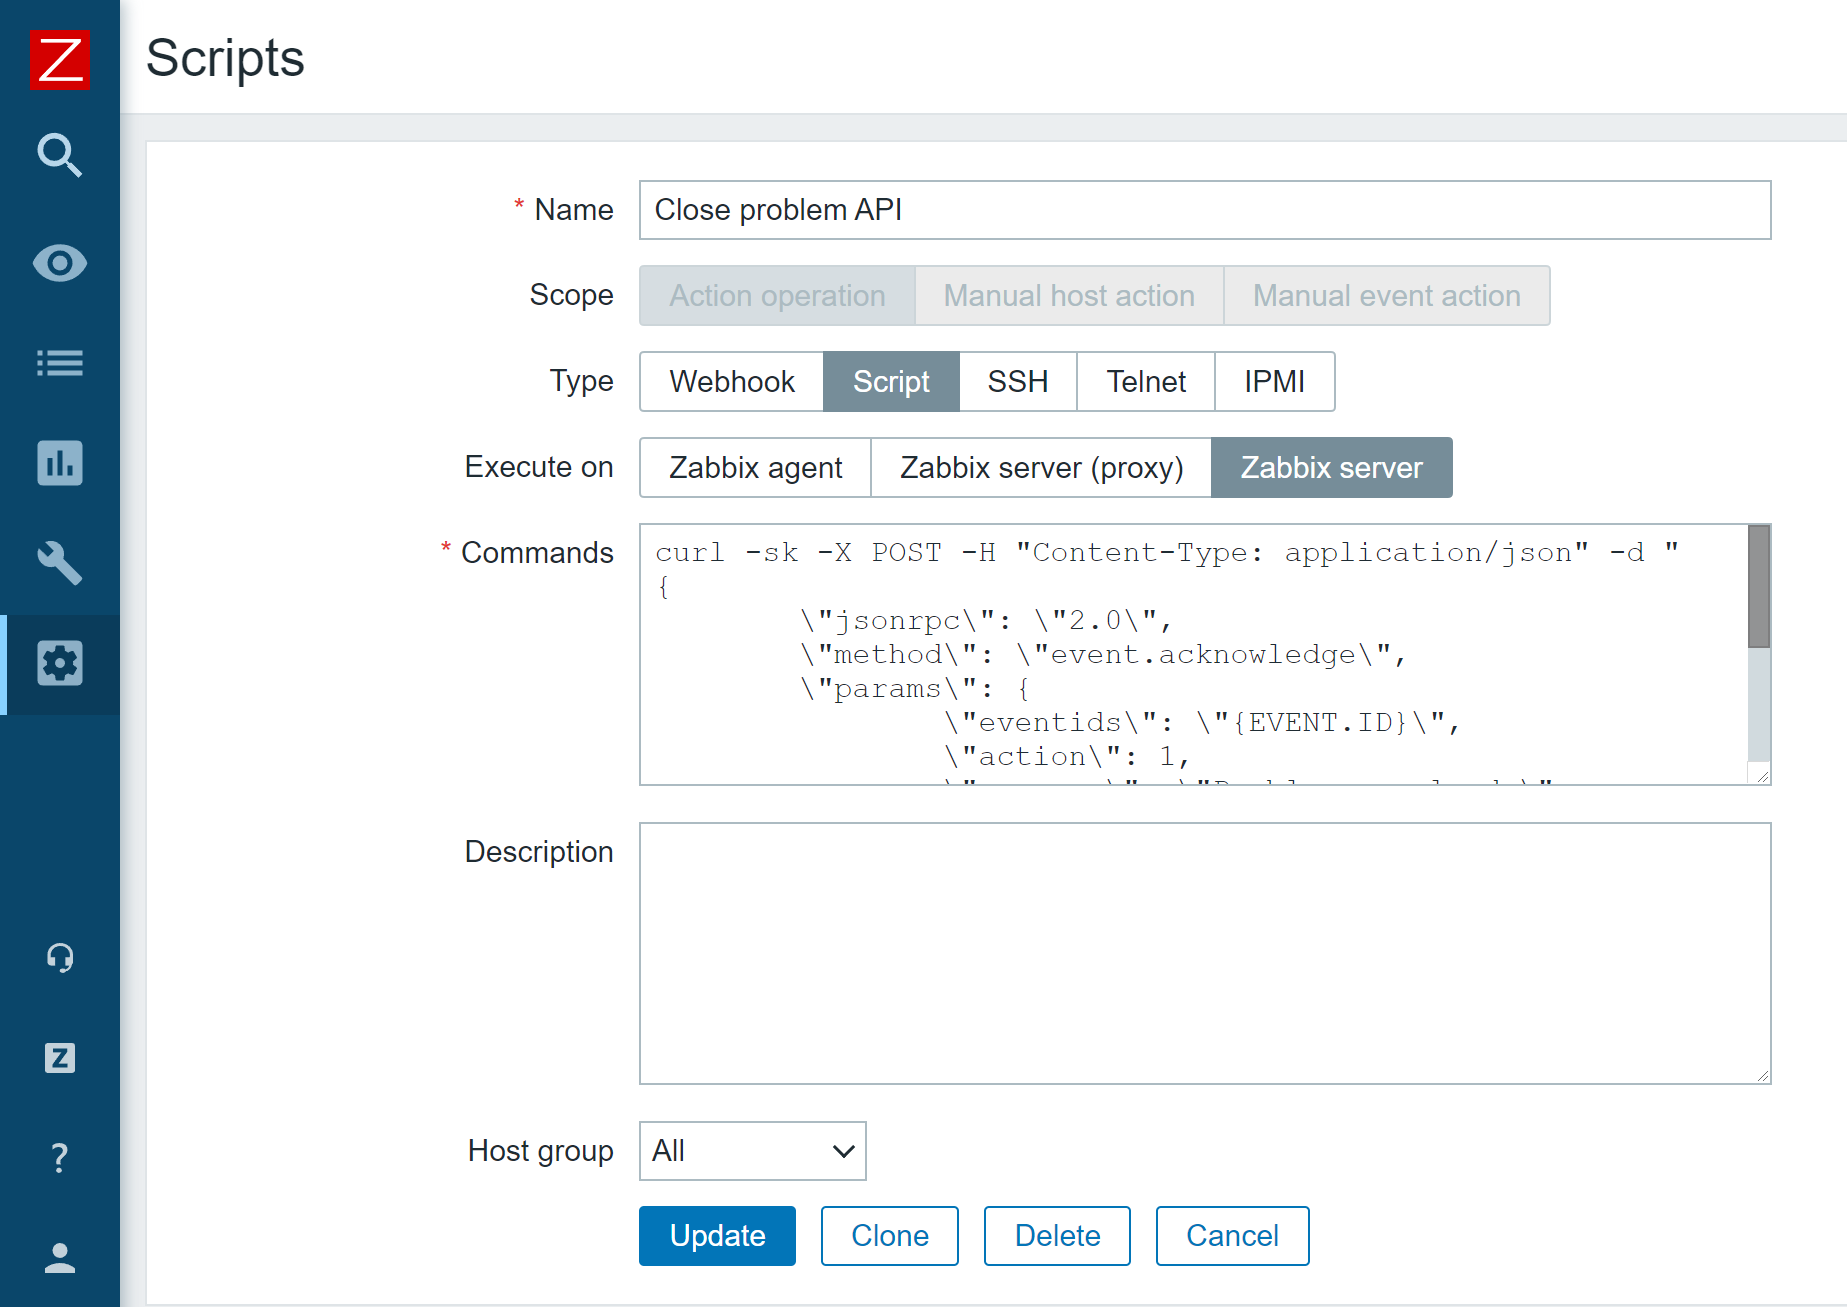
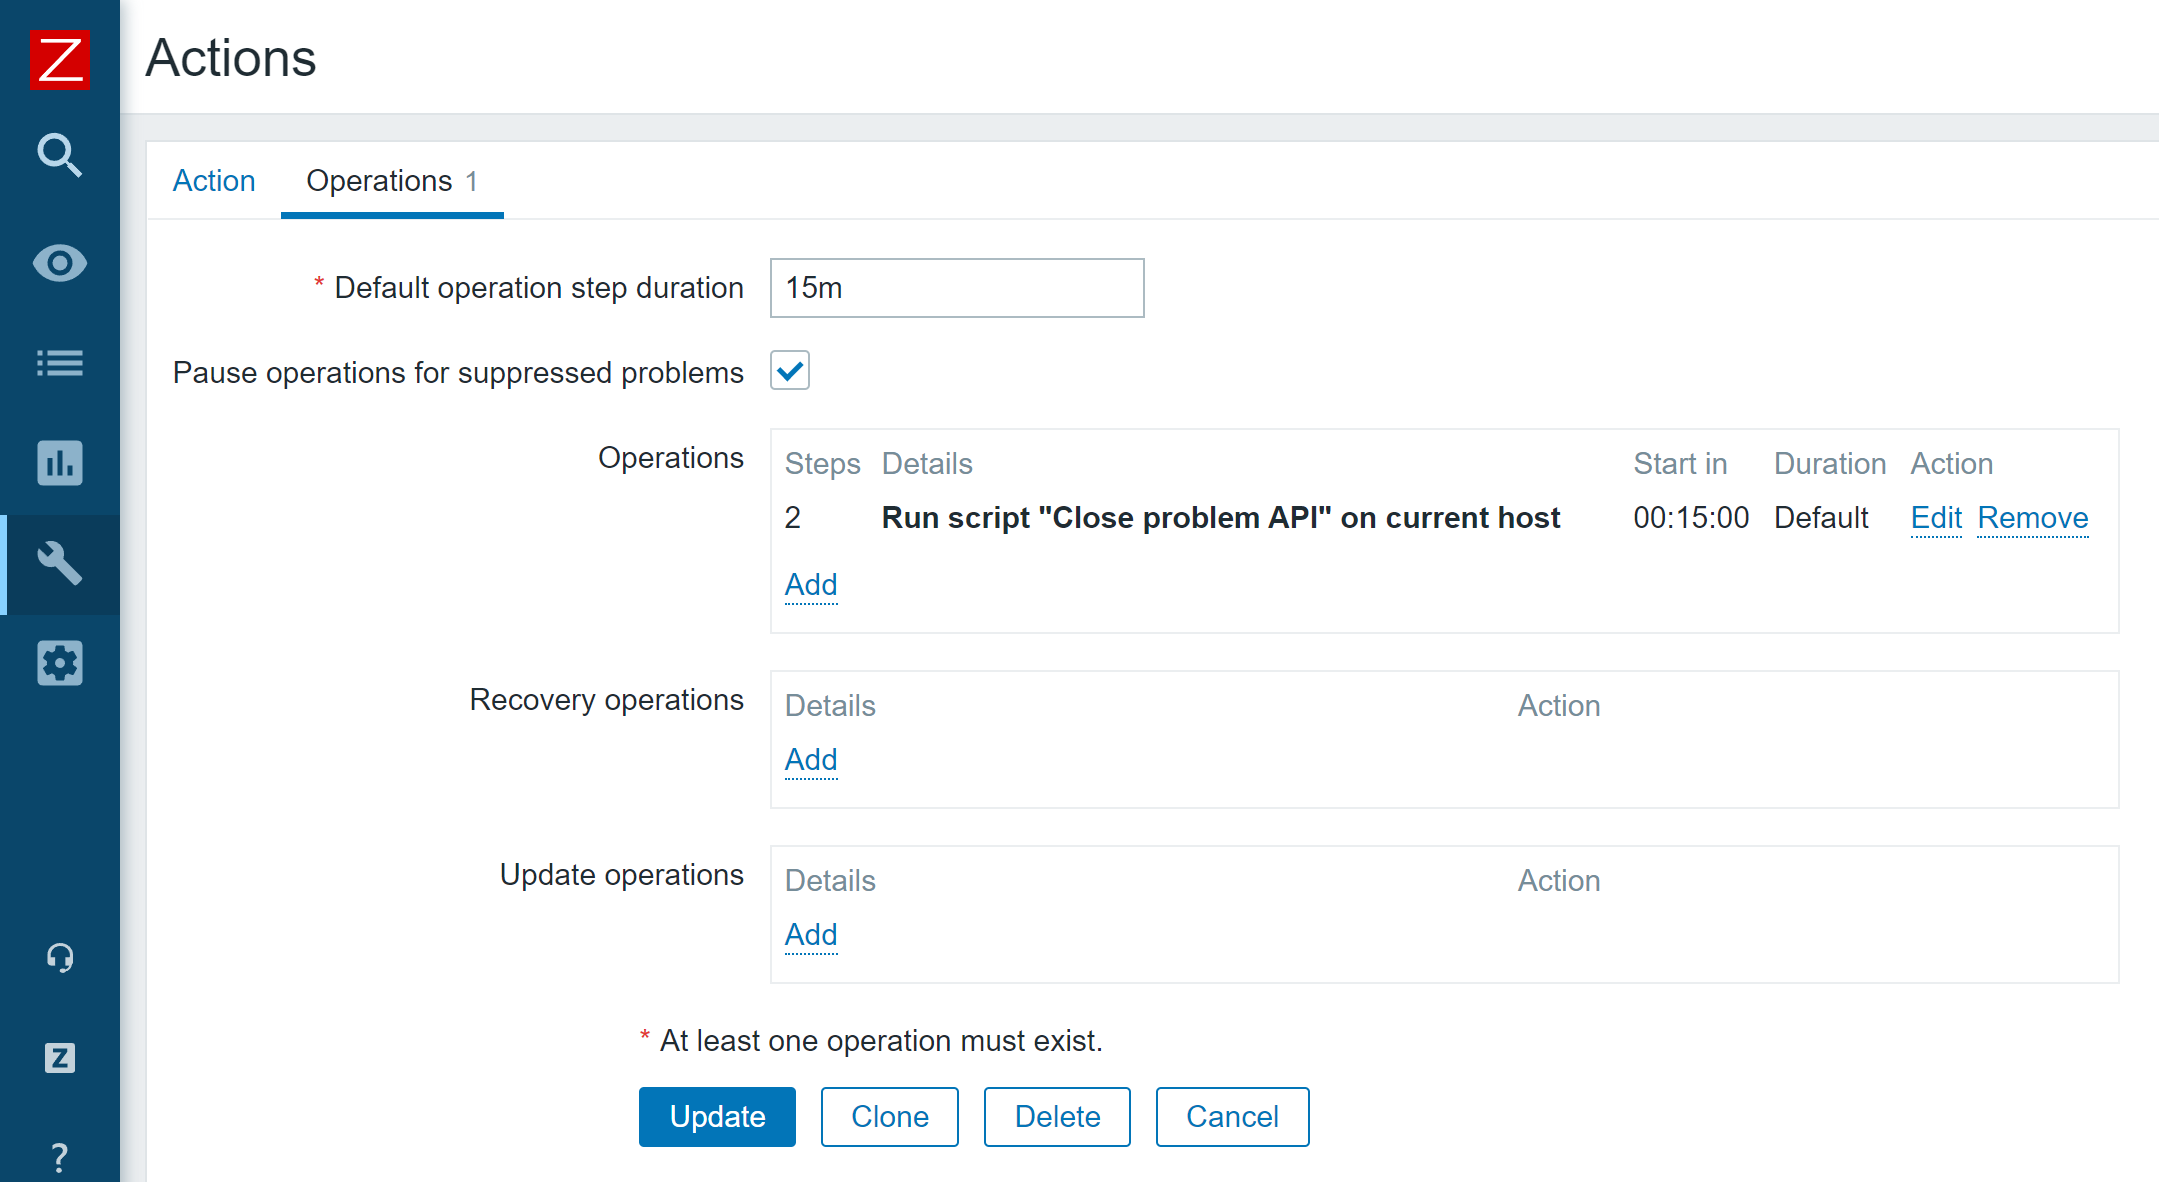
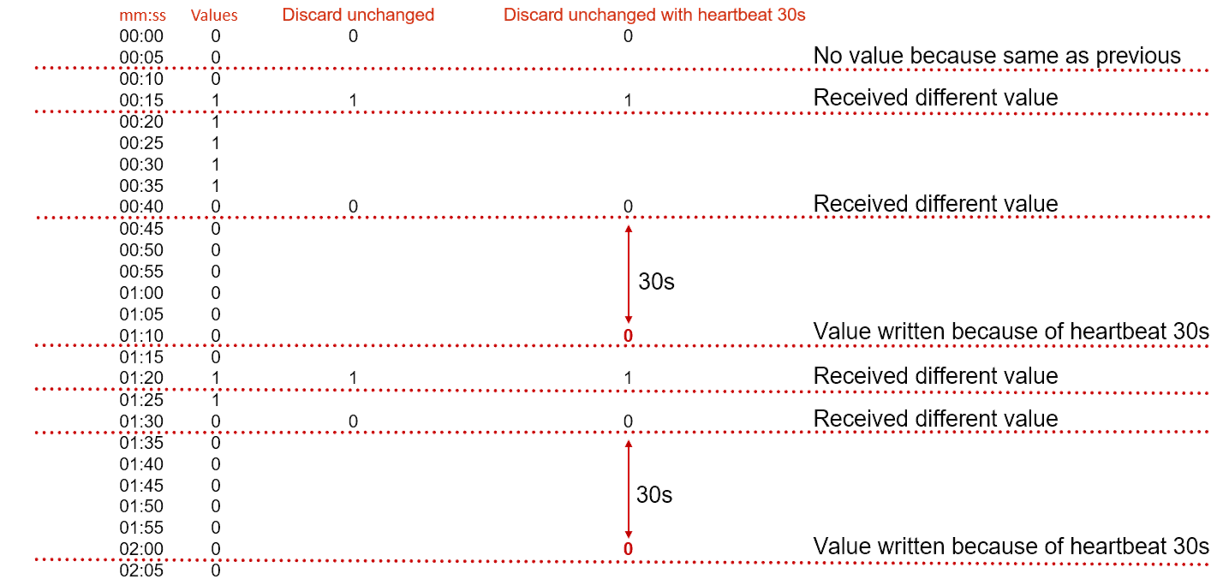


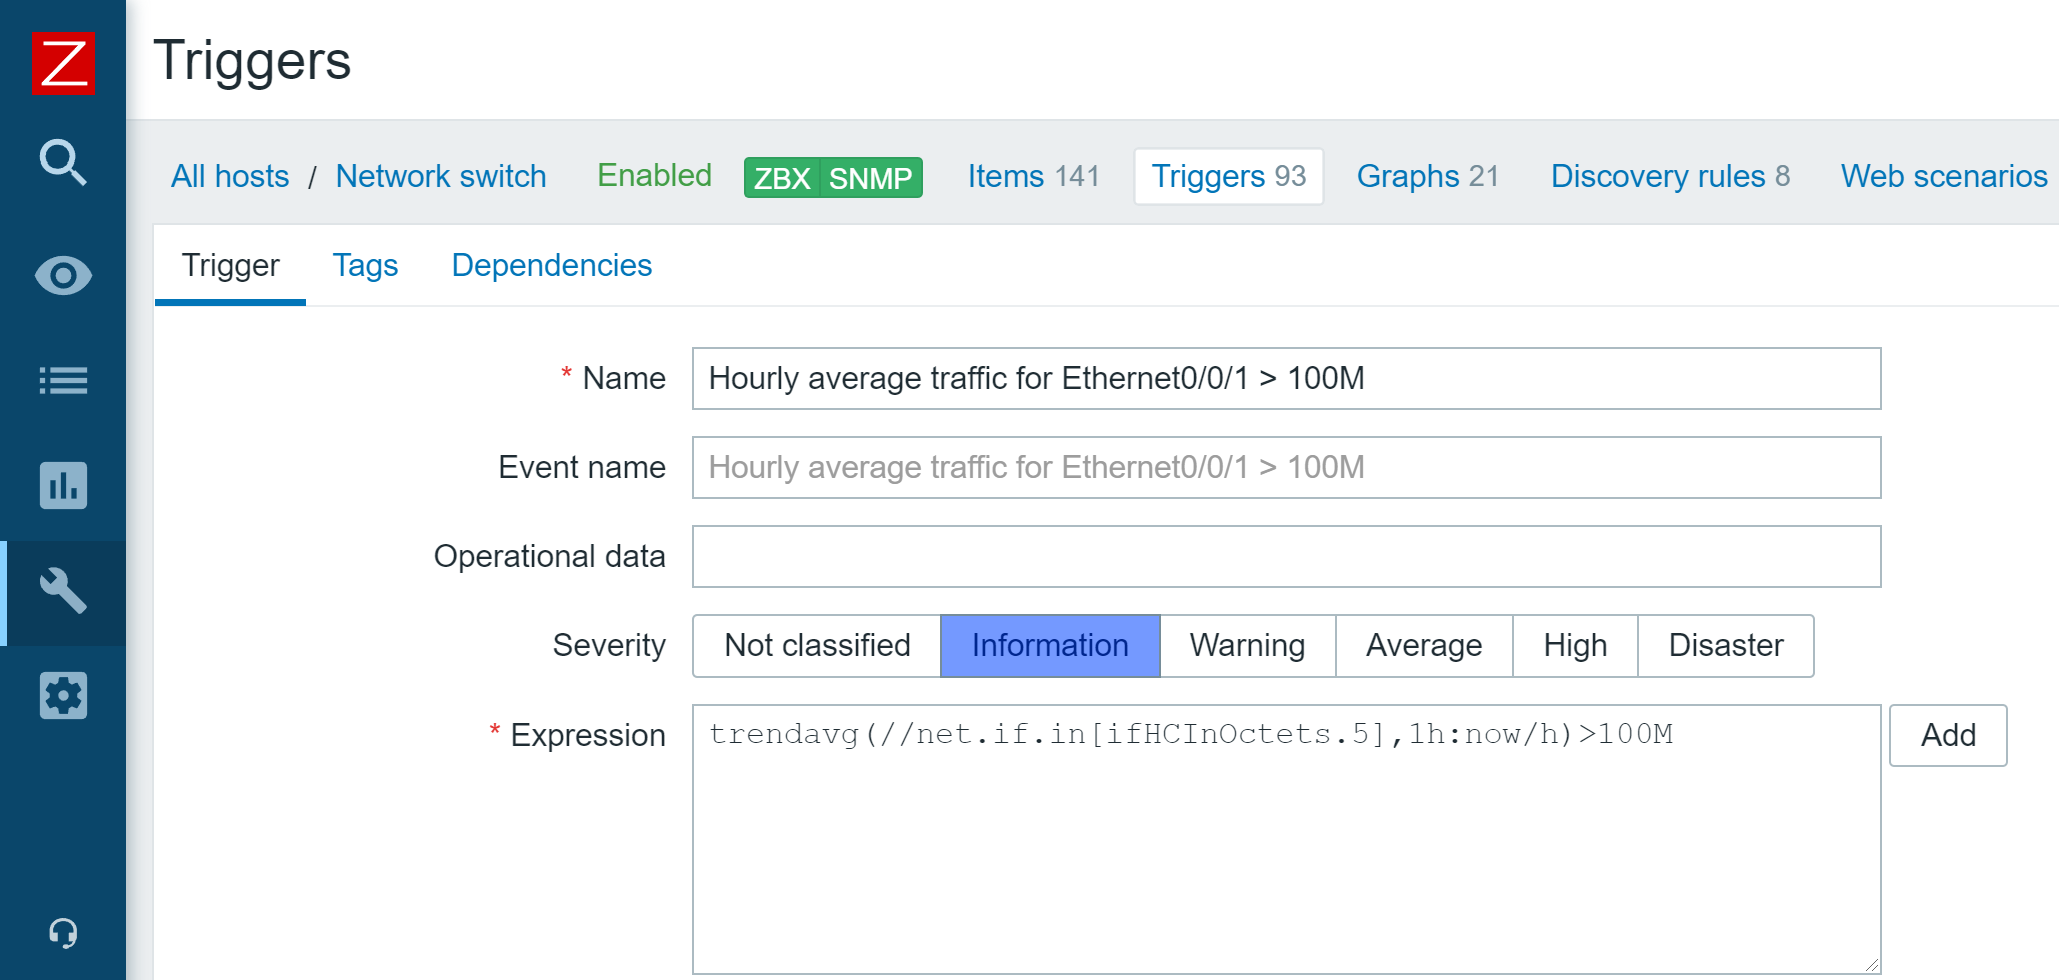
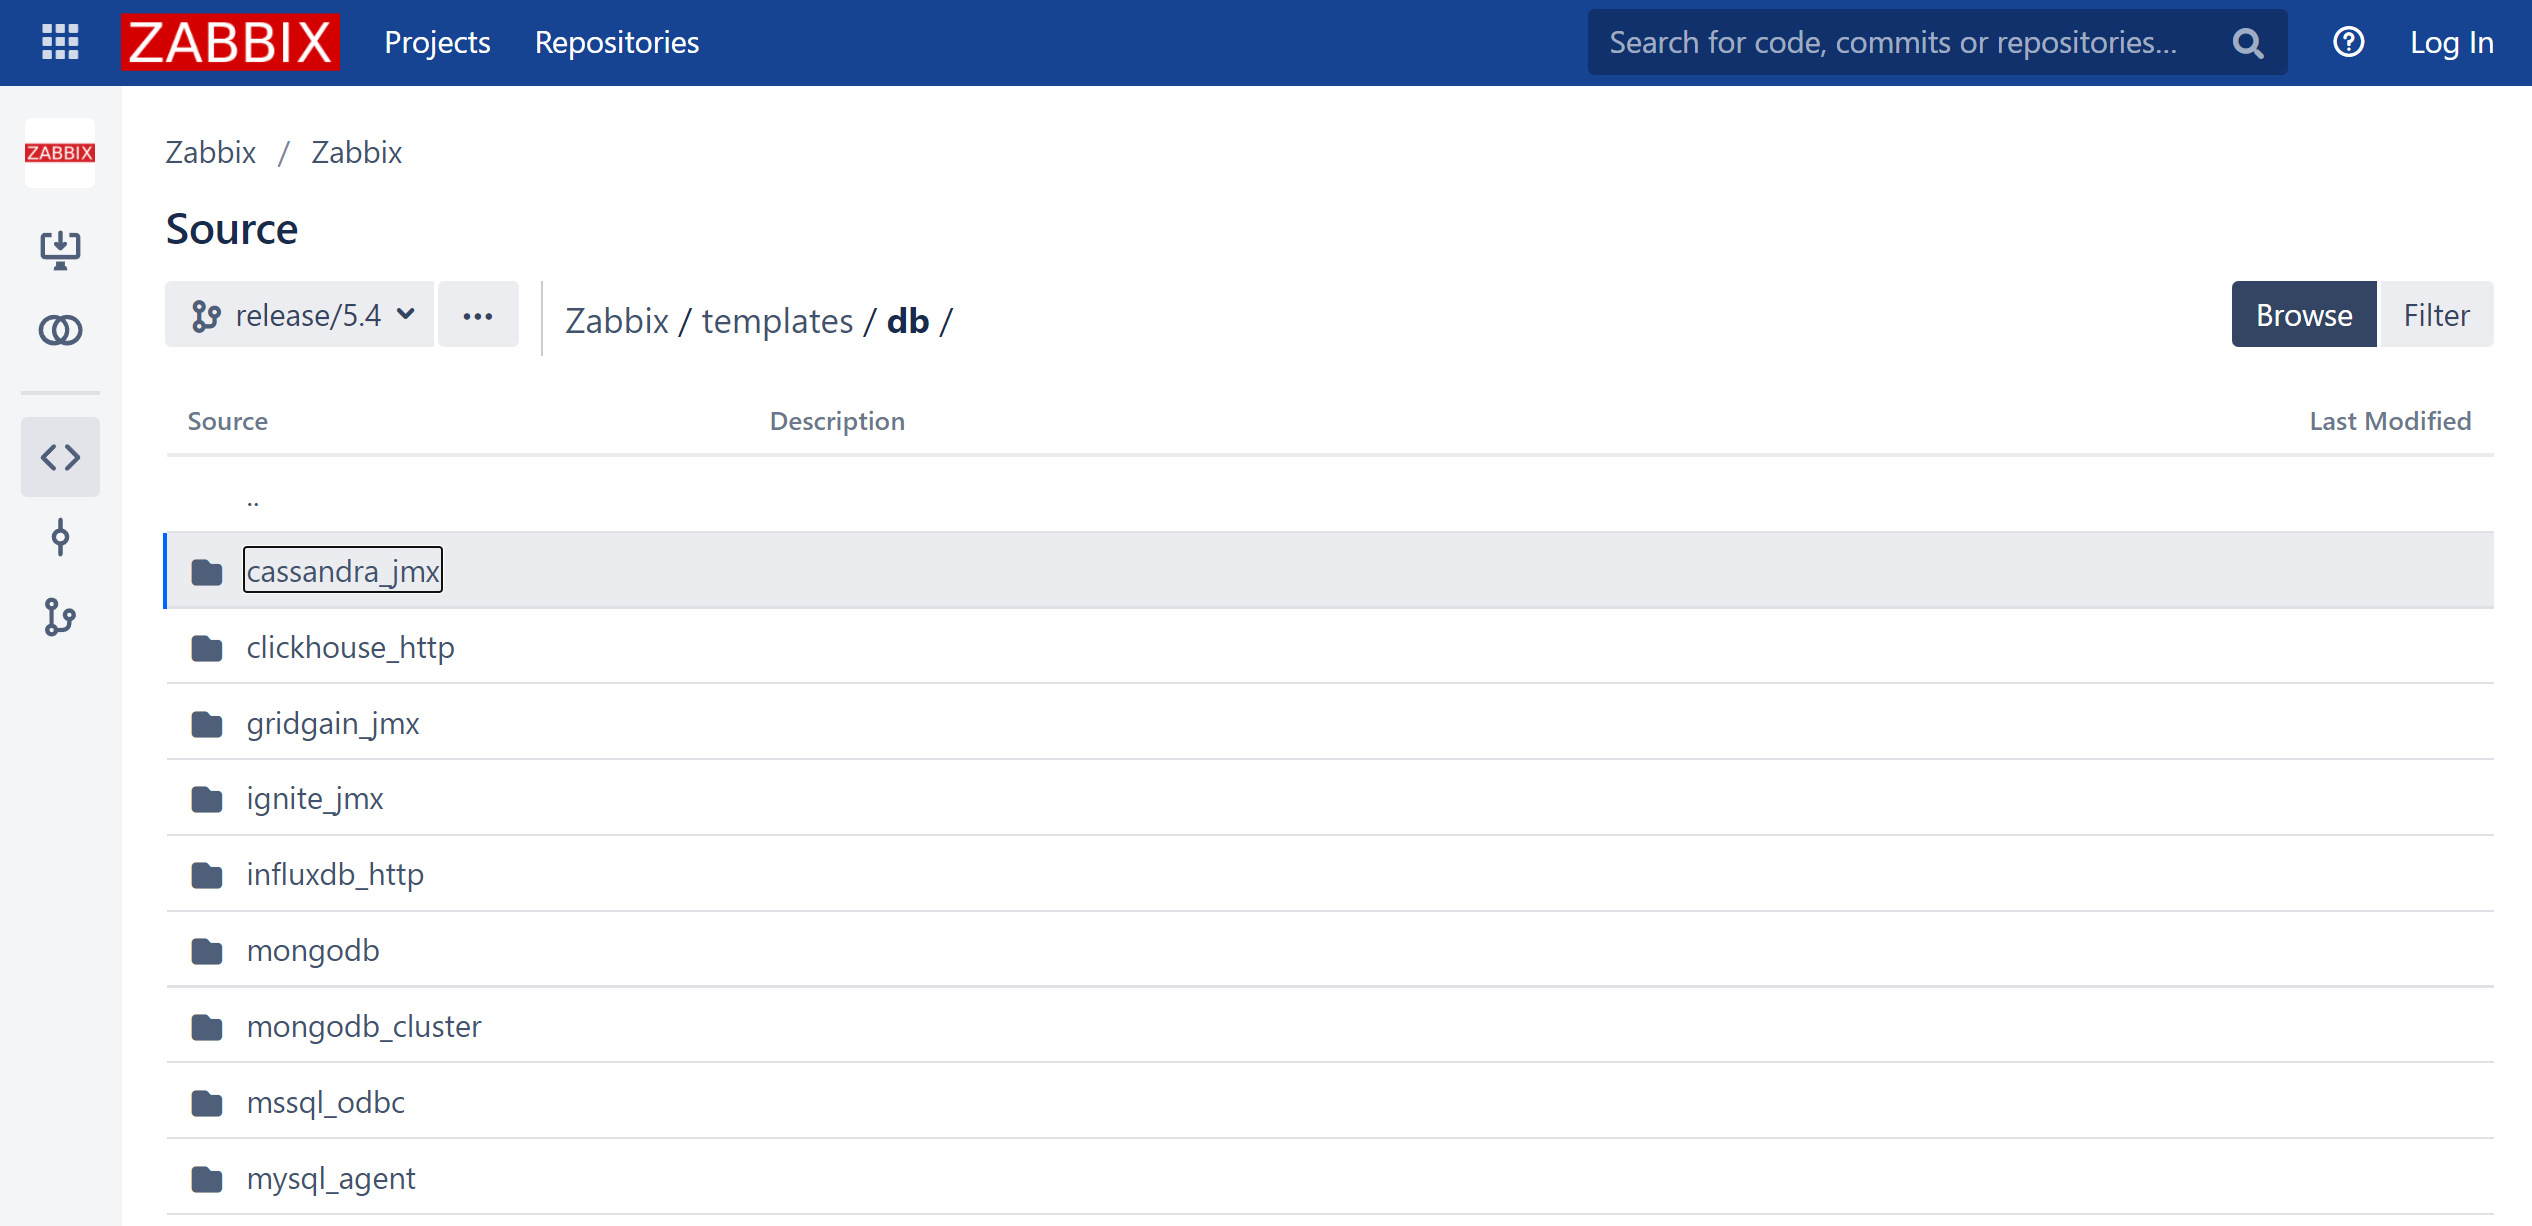
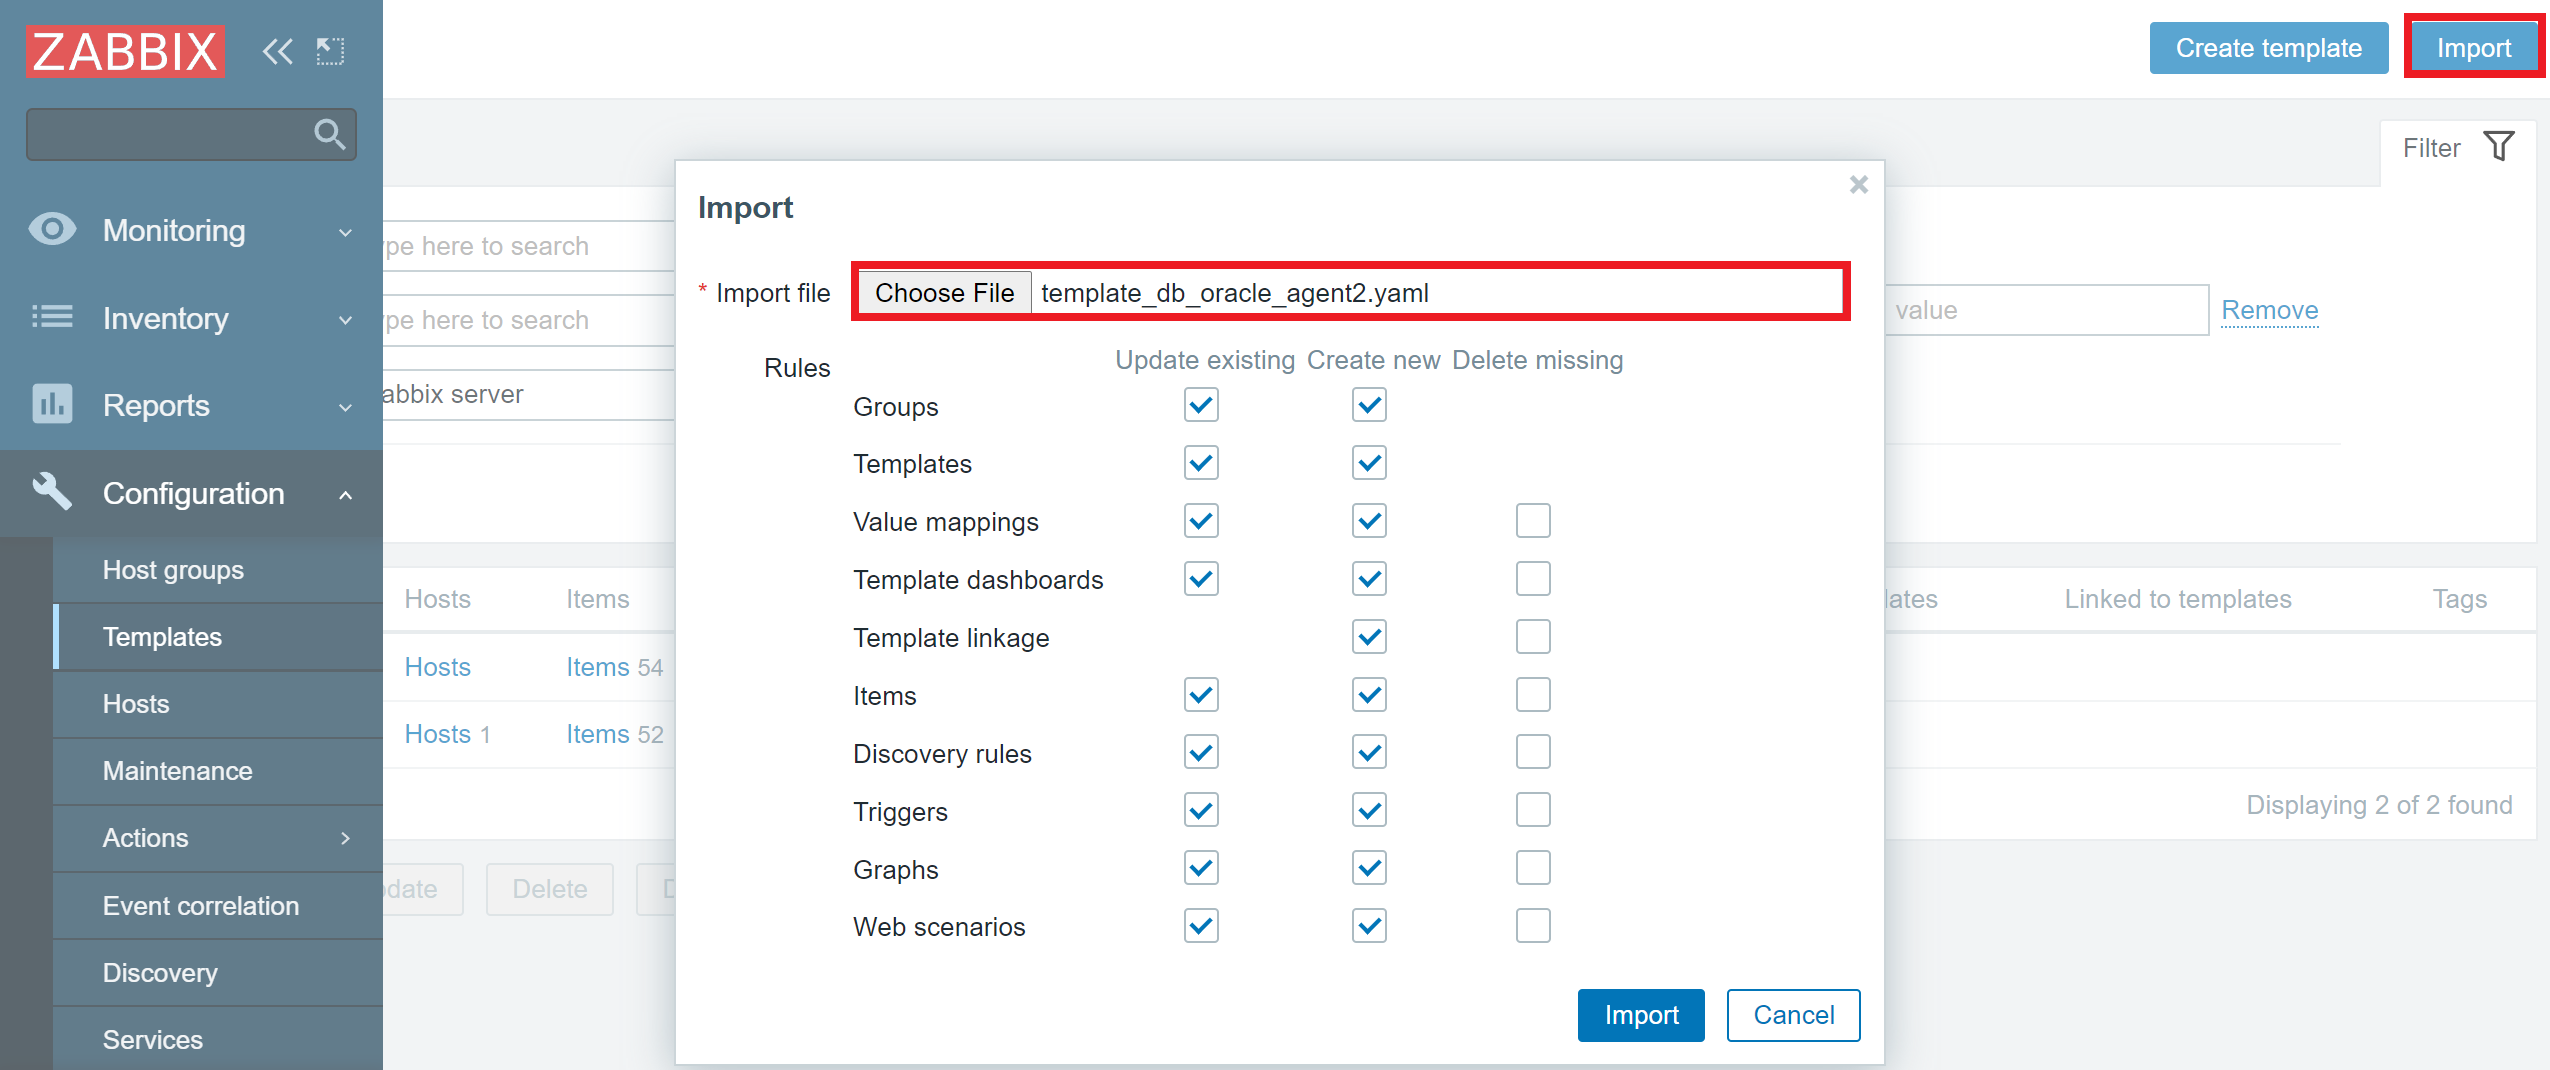


 Hammad Ausaf is a Sr Solutions Architect in the M&E space. He is a passionate builder and strives to provide the best solutions to AWS customers.
 Andrew Lee is a Solutions Architect on the Snap Account, and is based in Los Angeles, CA.