Tag Archives: messaging

Three ways to boost your email security and brand reputation with AWS

Post Syndicated from Michael Davie original https://aws.amazon.com/blogs/security/three-ways-to-boost-your-email-security-and-brand-reputation-with-aws/

If you own a domain that you use for email, you want to maintain the reputation and goodwill of your domain’s brand. Several industry-standard mechanisms can help prevent your domain from being used as part of a phishing attack. In this post, we’ll show you how to deploy three of these mechanisms, which visually authenticate emails sent from your domain to users and verify that emails are encrypted in transit. It can take as little as 15 minutes to deploy these mechanisms on Amazon Web Services (AWS), and the result can help to provide immediate and long-term improvements to your organization’s email security.

Phishing through email remains one of the most common ways that bad actors try to compromise computer systems. Incidents of phishing and related crimes far outnumber the incidents of other categories of internet crime, according to the most recent FBI Internet Crime Report. Phishing has consistently led to large annual financial losses in the US and globally.

Overview of BIMI, MTA-STS, and TLS reporting

An earlier post has covered how you can use Amazon Simple Email Service (Amazon SES) to send emails that align with best practices, including the IETF internet standards: Sender Policy Framework (SPF), DomainKeys Identified Mail (DKIM), and Domain-based Message Authentication, Reporting, and Conformance (DMARC). This post will show you how to build on this foundation and configure your domains to align with additional email security standards, including the following:

  • Brand Indicators for Message Identification (BIMI) – This standard allows you to associate a logo with your email domain, which some email clients will display to users in their inbox. Visit the BIMI Group’s Where is my BIMI Logo Displayed? webpage to see how logos are displayed in the user interfaces of BIMI-supporting mailbox providers; Figure 1 shows a mock-up of a typical layout that contains a logo.
  • Mail Transfer Agent Strict Transport Security (MTA-STS) – This standard helps ensure that email servers always use TLS encryption and certificate-based authentication when they send messages to your domain, to protect the confidentiality and integrity of email in transit.
  • SMTP TLS reporting – This reporting allows you to receive reports and monitor your domain’s TLS security posture, identify problems, and learn about attacks that might be occurring.
Figure 1: A mock-up of how BIMI enables branded logos to be displayed in email user interfaces

Figure 1: A mock-up of how BIMI enables branded logos to be displayed in email user interfaces

These three standards require your Domain Name System (DNS) to publish specific records, for example by using Amazon Route 53, that point to web pages that have additional information. You can host this information without having to maintain a web server by storing it in Amazon Simple Storage Service (Amazon S3) and delivering it through Amazon CloudFront, secured with a certificate provisioned from AWS Certificate Manager (ACM).

Note: This AWS solution works for DKIM, BIMI, and DMARC, regardless of what you use to serve the actual email for your domains, which services you use to send email, and where you host DNS. For purposes of clarity, this post assumes that you are using Route 53 for DNS. If you use a different DNS hosting provider, you will manually configure DNS records in your existing hosting provider.

Solution architecture

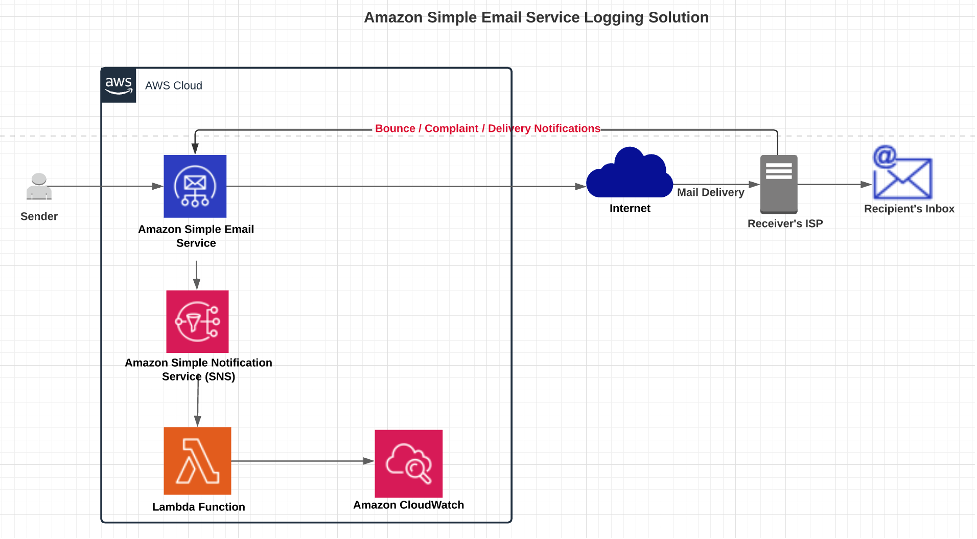
The architecture for this solution is depicted in Figure 2.

Figure 2: The architecture diagram showing how the solution components interact

Figure 2: The architecture diagram showing how the solution components interact

The interaction points are as follows:

  1. The web content is stored in an S3 bucket, and CloudFront has access to this bucket through an origin access identity, a mechanism of AWS Identity and Access Management (IAM).
  2. As described in more detail in the BIMI section of this blog post, the Verified Mark Certificate is obtained from a BIMI-qualified certificate authority and stored in the S3 bucket.
  3. When an external email system receives a message claiming to be from your domain, it looks up BIMI records for your domain in DNS. As depicted in the diagram, a DNS request is sent to Route 53.
  4. To retrieve the BIMI logo image and Verified Mark Certificate, the external email system will make HTTPS requests to a URL published in the BIMI DNS record. In this solution, the URL points to the CloudFront distribution, which has a TLS certificate provisioned with ACM.

A few important warnings

Email is a complex system of interoperating technologies. It is also brittle: a typo or a missing DNS record can make the difference between whether an email is delivered or not. Pay close attention to your email server and the users of your email systems when implementing the solution in this blog post. The main indicator that something is wrong is the absence of email. Instead of seeing an error in your email server’s log, users will tell you that they’re expecting to receive an email from somewhere and it’s not arriving. Or they will tell you that they sent an email, and their recipient can’t find it.

The DNS uses a lot of caching and time-out values to improve its efficiency. That makes DNS records slow and a little unpredictable as they propagate across the internet. So keep in mind that as you monitor your systems, it can be hours or even more than a day before the DNS record changes have an effect that you can detect.

This solution uses AWS Cloud Development Kit (CDK) custom resources, which are supported by AWS Lambda functions that will be created as part of the deployment. These functions are configured to use CDK-selected runtimes, which will eventually pass out of support and require you to update them.

Prerequisites

You will need permission in an AWS account to create and configure the following resources:

  • An Amazon S3 bucket to store the files and access logs
  • A CloudFront distribution to publicly deliver the files from the S3 bucket
  • A TLS certificate in ACM
  • An origin access identity in IAM that CloudFront will use to access files in Amazon S3
  • Lambda functions, IAM roles, and IAM policies created by CDK custom resources

You might also want to enable these optional services:

  • Amazon Route 53 for setting the necessary DNS records. If your domain is hosted by another DNS provider, you will set these DNS records manually.
  • Amazon SES or an Amazon WorkMail organization with a single mailbox. You can configure either service with a subdomain (for example, [email protected]) such that the existing domain is not disrupted, or you can create new email addresses by using your existing email mailbox provider.

BIMI has some additional requirements:

  • BIMI requires an email domain to have implemented a strong DMARC policy so that recipients can be confident in the authenticity of the branded logos. Your email domain must have a DMARC policy of p=quarantine or p=reject. Additionally, the domain’s policy cannot have sp=none or pct<100.

    Note: Do not adjust the DMARC policy of your domain without careful testing, because this can disrupt mail delivery.

  • You must have your brand’s logo in Scaled Vector Graphics (SVG) format that conforms to the BIMI standard. For more information, see Creating BIMI SVG Logo Files on the BIMI Group website.
  • Purchase a Verified Mark Certificate (VMC) issued by a third-party certificate authority. This certificate attests that the logo, organization, and domain are associated with each other, based on a legal trademark registration. Many email hosting providers require this additional certificate before they will show your branded logo to their users. Others do not currently support BIMI, and others might have alternative mechanisms to determine whether to show your logo. For more information about purchasing a Verified Mark Certificate, see the BIMI Group website.

    Note: If you are not ready to purchase a VMC, you can deploy this solution and validate that BIMI is correctly configured for your domain, but your branded logo will not display to recipients at major email providers.

What gets deployed in this solution?

This solution deploys the DNS records and supporting files that are required to implement BIMI, MTA-STS, and SMTP TLS reporting for an email domain. We’ll look at the deployment in more detail in the following sections.

BIMI

BIMI is described by the Internet Engineering Task Force (IETF) as follows:

Brand Indicators for Message Identification (BIMI) permits Domain Owners to coordinate with Mail User Agents (MUAs) to display brand-specific Indicators next to properly authenticated messages. There are two aspects of BIMI coordination: a scalable mechanism for Domain Owners to publish their desired Indicators, and a mechanism for Mail Transfer Agents (MTAs) to verify the authenticity of the Indicator. This document specifies how Domain Owners communicate their desired Indicators through the BIMI Assertion Record in DNS and how that record is to be interpreted by MTAs and MUAs. MUAs and mail-receiving organizations are free to define their own policies for making use of BIMI data and for Indicator display as they see fit.

If your organization has a trademark-protected logo, you can set up BIMI to have that logo displayed to recipients in their email inboxes. This can have a positive impact on your brand and indicates to end users that your email is more trustworthy. The BIMI Group shows examples of how brand logos are displayed in user inboxes, as well as a list of known email service providers that support the display of BIMI logos.

As a domain owner, you can implement BIMI by publishing the relevant DNS records and hosting the relevant files. To have your logo displayed by most email hosting providers, you will need to purchase a Verified Mark Certificate from a BIMI-qualified certificate authority.

This solution will deploy a valid BIMI record in Route 53 (or tell you what to publish in the DNS if you’re not using Route 53) and will store your provided SVG logo and Verified Mark Certificate files in Amazon S3, to be delivered through CloudFront with a valid TLS certificate from ACM.

To support BIMI, the solution makes the following changes to your resources:

  1. A DNS record of type TXT is published at the following host:
    default._bimi.<your-domain>. The value of this record is: v=BIMI1; l=<url-of-your-logo> a=<url-of-verified-mark-certificate>. The value of <your-domain> refers to the domain that is used in the From header of messages that your organization sends.
  2. The logo and optional Verified Mark Certificate are hosted publicly at the HTTPS locations defined by <url-of-your-logo> and <url-of-verified-mark-certificate>, respectively.

MTA-STS

MTA-STS is described by the IETF in RFC 8461 as follows:

SMTP (Simple Mail Transport Protocol) MTA Strict Transport Security (MTA-STS) is a mechanism enabling mail service providers to declare their ability to receive Transport Layer Security (TLS) secure SMTP connections and to specify whether sending SMTP servers should refuse to deliver to MX hosts that do not offer TLS with a trusted server certificate.

Put simply, MTA-STS helps ensure that email servers always use encryption and certificate-based authentication when sending email to your domains, so that message integrity and confidentiality are preserved while in transit across the internet. MTA-STS also helps to ensure that messages are only sent to authorized servers.

This solution will deploy a valid MTA-STS policy record in Route 53 (or tell you what value to publish in the DNS if you’re not using Route 53) and will create an MTA-STS policy document to be hosted on S3 and delivered through CloudFront with a valid TLS certificate from ACM.

To support MTA-STS, the solution makes the following changes to your resources:

  1. A DNS record of type TXT is published at the following host: _mta-sts.<your-domain>. The value of this record is: v=STSv1; id=<unique value used for cache invalidation>.
  2. The MTA-STS policy document is hosted at and obtained from the following location: https://mta-sts.<your-domain>/.well-known/mta-sts.txt.
  3. The value of <your-domain> in both cases is the domain that is used for routing inbound mail to your organization and is typically the same domain that is used in the From header of messages that your organization sends externally. Depending on the complexity of your organization, you might receive inbound mail for multiple domains, and you might choose to publish MTA-STS policies for each domain.

Is it ever bad to encrypt everything?

In the example MTA-STS policy file provided in the GitHub repository and explained later in this post, the MTA-STS policy mode is set to testing. This means that your email server is advertising its willingness to negotiate encrypted email connections, but it does not require TLS. Servers that want to send mail to you are allowed to connect and deliver mail even if there are problems in the TLS connection, as long as you’re in testing mode. You should expect reports when servers try to connect through TLS to your mail server and fail to do so.

Be fully prepared before you change the MTA-STS policy to enforce. After this policy is set to enforce, servers that follow the MTA-STS policy and that experience an enforceable TLS-related error when they try to connect to your mail server will not deliver mail to your mail server. This is a difficult situation to detect. You will simply stop receiving email from servers that comply with the policy. You might receive reports from them indicating what errors they encountered, but it is not guaranteed. Be sure that the email address you provide in SMTP TLS reporting (in the following section) is functional and monitored by people who can take action to fix issues. If you miss TLS failure reports, you probably won’t receive email. If the TLS certificate that you use on your email server expires, and your MTA-STS policy is set to enforce, this will become an urgent issue and will disrupt the flow of email until it is fixed.

SMTP TLS reporting

SMTP TLS reporting is described by the IETF in RFC 8460 as follows:

A number of protocols exist for establishing encrypted channels between SMTP Mail Transfer Agents (MTAs), including STARTTLS, DNS-Based Authentication of Named Entities (DANE) TLSA, and MTA Strict Transport Security (MTA-STS). These protocols can fail due to misconfiguration or active attack, leading to undelivered messages or delivery over unencrypted or unauthenticated channels. This document describes a reporting mechanism and format by which sending systems can share statistics and specific information about potential failures with recipient domains. Recipient domains can then use this information to both detect potential attacks and diagnose unintentional misconfigurations.

As you gain the security benefits of MTA-STS, SMTP TLS reporting will allow you to receive reports from other internet email providers. These reports contain information that is valuable when monitoring your TLS security posture, identifying problems, and learning about attacks that might be occurring.

This solution will deploy a valid SMTP TLS reporting record on Route 53 (or provide you with the value to publish in the DNS if you are not using Route 53).

To support SMTP TLS reporting, the solution makes the following changes to your resources:

  1. A DNS record of type TXT is published at the following host: _smtp._tls.<your-domain>. The value of this record is: v=TLSRPTv1; rua=mailto:<report-receiver-email-address>
  2. The value of <report-receiver-email-address> might be an address in your domain or in a third-party provider. Automated systems that process these reports must be capable of processing GZIP compressed files and parsing JSON.

Deploy the solution with the AWS CDK

In this section, you’ll learn how to deploy the solution to create the previously described AWS resources in your account.

  1. Clone the following GitHub repository:

    git clone https://github.com/aws-samples/serverless-mail
    cd serverless-mail/email-security-records

  2. Edit CONFIG.py to reflect your desired settings, as follows:
    1. If no Verified Mark Certificate is provided, set VMC_FILENAME = None.
    2. If your DNS zone is not hosted on Route 53, or if you do not want this app to manage Route 53 DNS records, set ROUTE_53_HOSTED = False. In this case, you will need to set TLS_CERTIFICATE_ARN to the Amazon Resource Name (ARN) of a certificate hosted on ACM in us-east-1. This certificate is used by CloudFront and must support two subdomains: mta-sts and your configured BIMI_ASSET_SUBDOMAIN.
  3. Finalize the preparation, as follows:
    1. Place your BIMI logo and Verified Mark Certificate files in the assets folder.
    2. Create an MTA-STS policy file at assets/.well-known/mta-sts.txt to reflect your mail exchange (MX) servers and policy requirements. An example file is provided at assets/.well-known/mta-sts.txt.example
  4. Deploy the solution, as follows:
    1. Open a terminal in the email-security-records folder.
    2. (Recommended) Create and activate a virtual environment by running the following commands.
      python3 -m venv .venv
      source .venv/bin/activate
    3. Install the Python requirements in your environment with the following command.
      pip install -r requirements.txt
    4. Assume a role in the target account that has the permissions outlined in the Prerequisites section of this post.

      Using AWS CDK version 2.17.0 or later, deploy the bootstrap in the target account by running the following command. To learn more, see Bootstrapping in the AWS CDK Developer Guide.
      cdk bootstrap

    5. Run the following command to synthesize the CloudFormation template. Review the output of this command to verify what will be deployed.
      cdk synth
    6. Run the following command to deploy the CloudFormation template. You will be prompted to accept the IAM changes that will be applied to your account.
      cdk deploy

      Note: If you use Route53, these records are created and activated in your DNS zones as soon as the CDK finishes deploying. As the records propagate through the DNS, they will gradually start affecting the email in the affected domains.

    7. If you’re not using Route53 and instead are using a third-party DNS provider, create the CNAME and TXT records as indicated. In this case, your email is not affected by this solution until you create the records in DNS.

Testing and troubleshooting

After you have deployed the CDK solution, you can test it to confirm that the DNS records and web resources are published correctly.

BIMI

  1. Query the BIMI DNS TXT record for your domain by using the dig or nslookup command in your terminal.

    dig +short TXT default._bimi.<your-domain.example>

    Verify the response. For example:

    "v=BIMI1; l=https://bimi-assets.<your-domain.example>/logo.svg"

  2. In your web browser, open the URL from that response (for example, https://bimi-assets.<your-domain.example>/logo.svg) to verify that the logo is available and that the HTTPS certificate is valid.
  3. The BIMI group provides a tool to validate your BIMI configuration. This tool will also validate your VMC if you have purchased one.

MTA-STS

  1. Query the MTA-STS DNS TXT record for your domain.

    dig +short TXT _mta-sts.<your-domain.example>

    The value of this record is as follows:

    v=STSv1; id=<unique value used for cache invalidation>

  2. You can load the MTA-STS policy document using your web browser. For example, https://mta-sts.<your-domain.example>/.well-known/mta-sts.txt
  3. You can also use third party tools to examine your MTA-STS configuration, such as MX Toolbox.

TLS reporting

  1. Query the TLS reporting DNS TXT record for your domain.

    dig +short TXT _smtp._tls.<your-domain.example>

    Verify the response. For example:

    "v=TLSRPTv1; rua=mailto:<your email address>"

  2. You can also use third party tools to examine your TLS reporting configuration, such as Easy DMARC.

Depending on which domains you communicate with on the internet, you will begin to see TLS reports arriving at the email address that you have defined in the TLS reporting DNS record. We recommend that you closely examine the TLS reports, and use automated analytical techniques over an extended period of time before changing the default testing value of your domain’s MTA-STS policy. Not every email provider will send TLS reports, but examining the reports in aggregate will give you a good perspective for making changes to your MTA-STS policy.

Cleanup

To remove the resources created by this solution:

  1. Open a terminal in the cdk-email-security-records folder.
  2. Assume a role in the target account with permission to delete resources.
  3. Run cdk destroy.

Note: The asset and log buckets are automatically emptied and deleted by the cdk destroy command.

Conclusion

When external systems send email to or receive email from your domains they will now query your new DNS records and will look up your domain’s BIMI, MTA-STS, and TLS reporting information from your new CloudFront distribution. By adopting the email domain security mechanisms outlined in this post, you can improve the overall security posture of your email environment, as well as the perception of your brand.

 
If you have feedback about this post, submit comments in the Comments section below. If you have questions about this post, contact AWS Support.

Want more AWS Security news? Follow us on Twitter.

Michael Davie

Michael Davie

Michael is a Senior Industry Specialist with AWS Security Assurance. He works with our customers, their regulators, and AWS teams to help raise the bar on secure cloud adoption and usage. Michael has over 20 years of experience working in the defence, intelligence, and technology sectors in Canada and is a licensed professional engineer.

Jesse Thompson

Jesse Thompson

Jesse is an Email Deliverability Manager with the Amazon Simple Email Service team. His background is in enterprise IT development and operations, with a focus on email abuse mitigation and encouragement of authenticity practices with open standard protocols. Jesse’s favorite activity outside of technology is recreational curling.

Migrating to token-based authentication for iOS applications with Amazon SNS

Post Syndicated from Pascal Vogel original https://aws.amazon.com/blogs/compute/migrating-to-token-based-authentication-for-ios-applications-with-amazon-sns/

This post is written by Yashlin Naidoo, Cloud Support Engineer.

Amazon Simple Notification Service (Amazon SNS) enables you to send notifications directly to a mobile push endpoint. For iOS apps, Amazon SNS dispatches the notification on your application’s behalf to the Apple Push Notification service (APNs).

To send mobile push notifications via Amazon SNS, you must provide a set of credentials to connect to the APNs (see Prerequisites for Amazon SNS user notifications).

Amazon SNS supports two methods for authenticating with iOS mobile push endpoints when sending a mobile push notification via the APNs:

  • Certificate-based authentication
  • Token-based authentication

To use certificate-based authentication, you must configure Amazon SNS with a provider certificate. Amazon SNS will use this certificate on your behalf to establish a secure connection with the APNs to dispatch your mobile push notifications. For each application that you support, you will need to provide unique certificates.

As the number of applications you manage grows, you will also need to create and manage an increasing number of certificates. Furthermore, certificates expire yearly, and you must renew them to ensure that Amazon SNS can continue to send mobile push notifications on your behalf. To learn more about how to use certificate-based authentication, see Certificate-based authentication for iOS applications with Amazon SNS on the AWS Compute Blog.

For new and existing iOS applications, we recommend that you use token-based authentication. To learn more about how to use token-based authentication, see Token-Based authentication for iOS applications with Amazon SNS on the AWS Compute Blog.

There are several benefits in using token-based authentication:

  • You can use a single token that is shared among all of your applications.
  • You can remove the need for yearly certificate renewal for certificate-based authentication.
  • You can improve the security of your application by using token-based requests. For these requests, your credentials are never transferred from Amazon SNS to your mobile push notification provider, making the communication less likely to be compromised.

Token-based authentication is the latest authentication method provided by the APNs that improves security for your applications, requires less management effort, and is more efficient. We recommend migrating as soon as possible to ensure the security and ease of operations of your applications.

This blog post provides step-by-step instructions for migrating your iOS application from certificate-based authentication to token-based authentication with Amazon SNS. You will learn how to create a new token using your Apple developer account. Next, you will migrate your platform application to token-based authentication. Finally, you will test your application by sending a test push notification via Amazon SNS to a device to confirm the successful migration.

Prerequisites

  • XCode IDE
  • iOS application with a valid p.12 certificate

Before proceeding with this migration, we recommend to stop sending push notifications to your applications until the migration is complete to avoid any disruptions in your message delivery workloads.

Walkthrough

You can also create a test platform application with token-based authentication to ensure that the Amazon SNS platform application is created successfully. Finally, you can create a device token and send a test push notification to it. Once confirmed that the application works correctly, you can migrate your main platform application to token-based authentication.

Creating a .p8 token to upload to Amazon SNS

  1. Log in to your Apple Developer account.
  2. Choose Certificates, Identifiers & Profiles.
  3. In the Keys section, choose the Add button (+).
  4. Under Register a New Key, for Key Name, type the token key name and tick the box for Apple Push Notifications service (APNs) for the key services.
  5. Select Continue.
  6. In the Register a New Key section, check that all values were entered correctly.
  7. Select Register to register the new token key.
  8. Download your token key. Store it in a safe location, as you can’t download the token key again.

Migrating your platform application from certificate-based authentication to token-based authentication

  1. Navigate to the Amazon SNS console. Expand the Mobile menu and choose Push Notification.
  2. Choose your platform application.
  3. Choose Edit. Under Apple credentials section choose Token:
    1. Under Token, select Choose file to upload the .p8 token key file.
    2. Provide values for signing key ID, team ID and bundle ID. These values can be found in your Apple Developer account. Ensure that your bundle ID is identical to the ID used for this application with certificate-based authentication.
  4. Event notifications – optional: refer to the following guide for enabling event notifications: Mobile app events
  5. Delivery status logging – optional: refer to the following guide for enabling delivery status logging: How do I access Amazon SNS topic delivery logs for push notifications? Find more information on these steps can in the Mobile push notifications best practices.
    Apple credential settings
  6. Choose Save changes. This changes your platform application to token-based authentication.

Testing push notification delivery to your device

In this section, you will test sending a push notification to your device using the Amazon SNS console and the AWS Command Line Interface (AWS CLI).

Amazon SNS console

  1. From the Amazon SNS console, navigate to your platform endpoint and choose Publish message.
  2. For message body, select Custom payload for each delivery protocol to send to the endpoint. This example uses a custom payload that allows you to provide additional APNs headers:
    Custom payload for each delivery model configuration
  3. Choose Publish message.
  4. The push notification is delivered to your device:
    iOS sample notification message

AWS CLI

Note: If you receive errors when running AWS CLI commands, make sure that you’re using the most recent AWS CLI version.
Run the following command. For target-arn, specify your platform application endpoint ARN:

aws sns publish \
    --target-arn arn:aws:sns:us-west-2:191418023309:endpoint/APNS_SANDBOX/computeblogdemo/ba7a35f8-c73d-364f-9edd-5c438add0533 \
    --message '{"APNS_SANDBOX": "{\"aps\":{\"alert\":\"Sample message for iOS development endpoints\"}}"}' \
    --message-attributes '{"AWS.SNS.MOBILE.APNS.PUSH_TYPE":{"DataType":"String","StringValue":"alert"}}' \
    --message-structure json
  1. An output containing a MessageId is shown in case of successful delivery:
    {
        "MessageId": "83ecb3a1-c728-5b7c-96e5-e8417d5cd4f4"
    }
  2. The push notification is delivered to your device:
    iOS sample notification message

Troubleshooting

You might encounter various errors when migrating to token-based authentication. This section explains how to troubleshoot these errors.

If a message is not delivered after publishing it to your platform application endpoint, refer to the Amazon CloudWatch failed logs of your platform application. These logs are named sns/your-aws-region/your-accountID/app/platform_name/application_name/Failure.

Once you have navigated to your platform application’s CloudWatch failed log group, click on one of the log streams based on the time that you published the message. Focus on the following attributes:

  • statusCode: error messages are grouped according to the status code.
  • status : shows whether a message was delivered successfully to the provider or if it failed to deliver.
  • providerResponse: provides the response message from the provider and is only shown in case a message failed to deliver.

We will look through messages that failed to deliver because of the following errors:

InvalidProviderToken

"providerResponse": "{\"reason\":\"InvalidProviderToken\"}",
"statusCode": 403,
"status": "FAILURE"

The cause of this error can be an incorrect token key ID, team ID or if the token is invalid.

To resolve this issue, go to your Apple Developer account and ensure that you are providing the correct token ID, team ID and that your token key exists.

TopicDisallowed

"providerResponse": "{\"reason\":\"TopicDisallowed\"}",
"statusCode": 400,
"status": "FAILURE"

The cause of this error can be an incorrect bundle ID or a device token that was created with the wrong bundle ID.

To resolve this issue, go to your Apple Developer account and navigate to your existing certificate used when migrating to token-based authentication. Confirm the bundle ID assigned to this certificate and ensure you are using the same ID for your platform application and also for your device tokens.

Conclusion

Developers can send mobile push notifications for the APNs using token-based authentication by using a .p8 key to authenticate an Apple device endpoint. This is the recommended authentication method due to improved security and lower management effort by removing the need for annual certificate renewal and by being able to share tokens among multiple applications.

To learn more about APNs token-based authentication with Amazon SNS, visit the Amazon SNS Developer Guide.

For more serverless learning resources, visit Serverless Land.

Email delta cost usage report in a multi-account organization using AWS Lambda

Post Syndicated from Ashutosh Dubey original https://aws.amazon.com/blogs/architecture/email-delta-cost-usage-report-in-a-multi-account-organization-using-aws-lambda/

Overview of solution

AWS Organizations gives customers the ability to consolidate their billing across accounts. This reduces billing complexity and centralizes cost reporting to a single account. These reports and cost information are available only to users with billing access to the primary AWS account.

In many cases, there are members of senior leadership or finance decision makers who don’t have access to AWS accounts, and therefore depend on individuals or additional custom processes to share billing information. This task becomes specifically complicated when there is a complex account organization structure in place.

In such cases, you can email cost reports periodically and automatically to these groups or individuals using AWS Lambda. In this blog post, you’ll learn how to send automated emails for AWS billing usage and consumption drifts from previous days.

Solution architecture

Account structure and architecture diagram

Figure 1. Account structure and architecture diagram

AWS provides the Cost Explorer API to enable you to programmatically query data for cost and usage of AWS services. This solution uses a Lambda function to query aggregated data from the API, format that data and send it to a defined list of recipients.

  1. Amazon EventBridge (Amazon CloudWatch Events) is configured to cue the Lambda function at a specific time.
  2. The function uses the AWS Cost Explorer API to fetch the cost details for each account.
  3. The Lambda function calculates the change in cost over time and formats the information to be sent in an email.
  4. The formatted information is passed to Amazon Simple Email Service (Amazon SES).
  5. The report is emailed to the recipients configured in the environment variables of the function.

Prerequisites

For this walkthrough, you should have the following prerequisites:

Walkthrough

  • Download the AWS CloudFormation template from this link: AWS CloudFormation template
  • Once downloaded, open the template in your favorite text editor
  • Update account-specific variables in the template. You need to update the tuple, dictionary, display list, and display list monthly sections of the script for all the accounts which you want to appear in the daily report email. Refer to Figure 2 for an example of some dummy account IDs and email IDs.
A screenshot showing account IDs in AWS Lambda

Figure 2. Account IDs in AWS Lambda

  • Optionally, locate “def send_report_email” in the template. The subject variable controls the subject line of the email. This can be modified to something meaningful to the recipients.

After these changes are made according to your requirements, you can deploy the CloudFormation template:

  1. Log in to the Cloud Formation console.
  2. Choose Create Stack. From the dropdown, choose With new resources (standard).
  3. On the next screen under Specify Template, choose Upload a template file.
  4. Click Choose file. Choose the local template you modified earlier, then choose Next.
  5. Fill out the parameter fields with valid email address. For SchduleExpression, use a valid Cron expression for when you would like the report sent. Choose Next.
    Here is an example for a cron schedule:  18 11 * * ? *
    (This example cron expression sets the schedule to send every day at 11:18 UTC time.)
    This creates the Lambda function and needed AWS Identity and Access Management (AWS IAM) roles.

You will now need to make a few modifications to the created resources.

  1. Log in to the IAM console.
  2. Choose Roles.
  3. Locate the role created by the CloudFormation template called “daily-services-usage-lambdarole
  4. Under the Permissions tab, choose Add Permissions. From the dropdown., choose Attach Policy.
  5. In the search bar, search for “Billing”.
  6. Select the check box next to the AWS Managed Billing Policy and then choose Attach Policy.
  7. Log in to the AWS Lambda console.
  8. Choose the DailyServicesUsage function.
  9. Choose the Configuration tab.
  10. In the options that appear, choose General Configuration.
  11. Choose the Edit button.
  12. Change the timeout option to 10 seconds, because the default of three seconds may not be enough time to run the function to retrieve the cost details from multiple accounts.
  13. Choose Save.
  14. Still under the General Configuration tab, choose the Permissions option and validate the execution role.
    The edited IAM execution role should display the Resource details for which the access has been gained. Figure 3 shows that the allow actions to aws-portal for Billing, Usage, PaymentMethods, and ViewBilling are enabled. If the Resource summary does not show these permissions, the IAM role is likely not correct. Go back to the IAM console and confirm that you updated the correct role with billing access.
A screenshot of the AWS Lambda console showing Lambda role permissions

Figure 3. Lambda role permissions

  • Optionally, in the left navigation pane, choose Environment variables. Here you will see the email recipients you configured in the Cloud Formation template. If changes are needed to the list in the future, you can add or remove recipients by editing the environment variables. You can skip this step if you’re satisfied with the parameters you specified earlier.

Next, you will create a few Amazon SES identities for the email addresses that were provided as environment variables for the sender and recipients:

  1. Log in to the SES console.
  2. Under Configuration, choose Verified Identities.
  3. Choose Create Identity.
  4. Choose the identity type Email Address, fill out the Email address field with the sender email, and choose Create Identify.
  5. Repeat this step for all receiver emails.

The email IDs included will receive an email for the confirmation. Once confirmed, the status shows as verified in the Verified Identities tab of the SES console. The verified email IDs will start receiving the email with the cost reports.

Amazon EventBridge (CloudWatch) event configuration

To configure events:

    1. Go to the Amazon EventBridge console.
    2. Choose Create rule.
    3. Fill out the rule details with meaningful descriptions.
    4. Under Rule Type, choose Schedule.
    5. Schedule the cron pattern from when you would like the report to run.

Figure 4 shows that the highlighted rule is configured to run the Lambda function every 24 hours.

A screenshot of the Amazon EventBridge console showing an EventBridge rule

Figure 4. EventBridge rule

An example AWS Daily Cost Report email

From[email protected] (the email ID mentioned as “sender”)
Sent: Tuesday, April 12, 2022 1:43 PM
To[email protected] (the email ID mentioned as “receiver”)
Subject: AWS Daily Cost Report for Selected Accounts (the subject of email as set in the Lambda function)

Figure 5 shows the first part of the cost report. It provides the cost summary and delta of the cost variance percentage compare to the previous day. You can also see the trend based on the last seven days from the same table. This helps in understanding a pattern around cost and usage.

This summary is broken down per account, and then totaled, in order to help you understand the accounts contributing to the cost changes. The daily change percentages are also color coded to highlight significant variations.

AWS Daily Cost Report email body part 1

Figure 5. AWS Daily Cost Report email body part 1

The second part of the report in the email provides the service-related cost breakup for each account configured in the Account dictionary section of the function. This is a further drilldown report; you will get these for all configured accounts.

AWS Daily Cost Report email body part 2

Figure 6. AWS Daily Cost Report email body part 2

Cleanup

  • Delete the Amazon CloudFormation stack.
  • Delete the identities on Amazon SES.
  • Delete the Amazon EventBridge (CloudWatch) event rule.

Conclusion

The blog demonstrates how you can automatically and seamlessly share your AWS accounts’ billing and change information with your leadership and finance teams daily (or on any schedule you choose). While the solution was designed for accounts that are part of an organization in the service AWS organizations, it could also be deployed in a standalone account without making any changes. This allows information sharing without the need to provide account access to the recipients, and avoids any dependency on other manual processes. As a next step, you can also store these reports in Amazon Simple Storage Service (Amazon S3), generate a historical trend summary for consumption, and continue making informed decisions.

Additional reading

Amazon Simple Email Service (SES) helps improve inbox deliverability with new features

Post Syndicated from Lauren Cudney original https://aws.amazon.com/blogs/messaging-and-targeting/amazon-simple-email-service-ses-helps-improve-inbox-deliverability-with-new-features/

Email remains the core of any company’s communication stack, but emails cannot deliver maximum ROI unless they land in recipients’ inboxes. Email deliverability, or ensuring emails land in the inbox instead of spam, challenges senders because deliverability can be impacted by a number of variables, like sending identity, campaign setup, or email configuration. Today, email senders rely on dashboard metrics or deliverability consultants to optimize the inbox placement of their messages. However, the deliverability dashboards available today do not provide specific recommendations to improve deliverability. Consultants provide bespoke solutions, but can cost hundreds of dollars per hour and are not scalable.


That’s why, today, we’re proud to announce virtual deliverability manager, a suite of new deliverability features in Amazon Simple Email Service (SES) that improve deliverability insights and recommendations. A new deliverability dashboard gives email senders more insights through a detailed dashboard of metrics on email deliverability. The “advisor” feature provides configuration recommendations to help improve inbox placement. SES’ “Guardian” can implement changes to email sending to help increase the percent of messages that land in the inbox. Deliverability metrics and recommendations are generated in real-time through Amazon SES, without the need for a human consultant or agency.

AWS Simple Email Service deliverability insights dashboard

The new SES feature reports email insights at-a-glance with metrics like open and click rate, but can also give deeper insights into individual ISP and configuration performance. SES will deliver specific configuration recommendations to improve deliverability based on a specific campaign’s setup, like DMARC (Domain-based Message Authentication Reporting and Conformance) or DKIM (DomainKeys Identified Mail) for a specific domain. Senders can turn on automatic implementation, which allows SES to intelligently adjust email sending configuration to maximize inbox placement.

AWS Simple Email Service deliverability recommendations to improve email sending
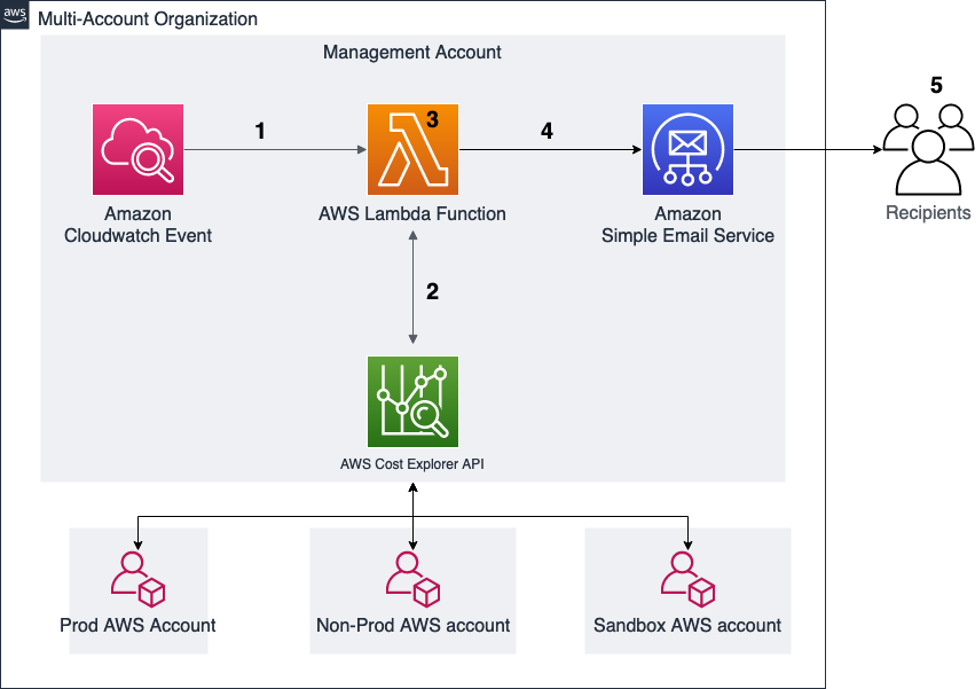
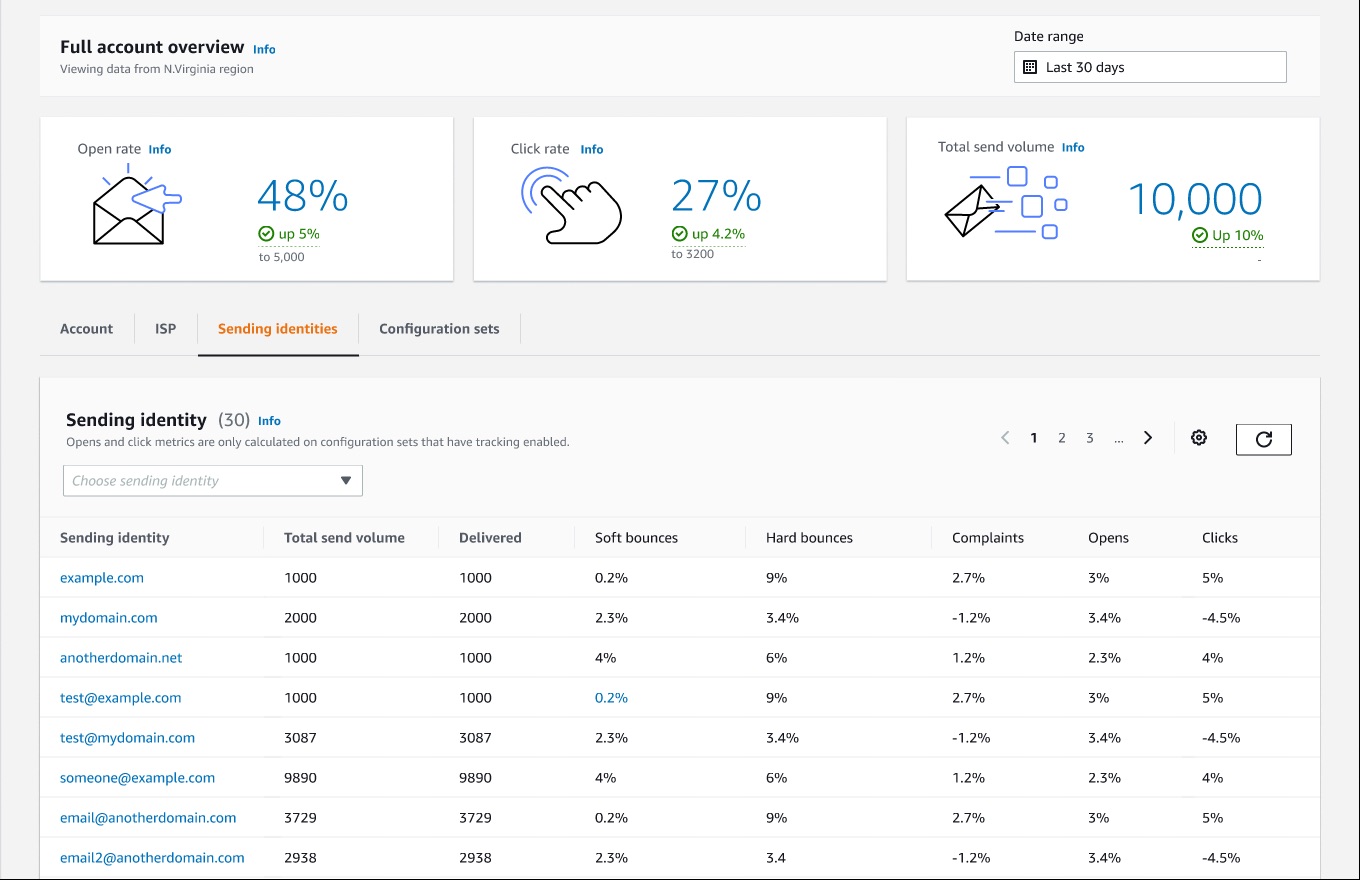
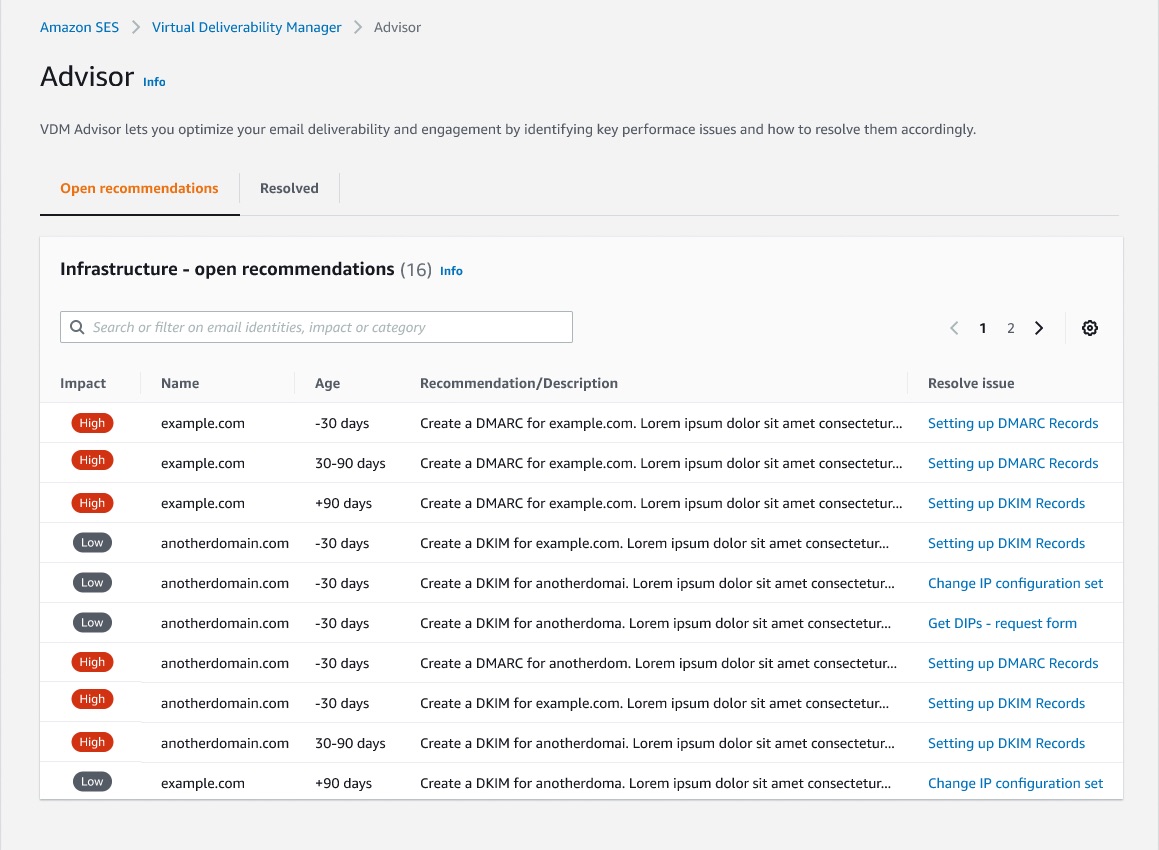
Applying new deliverability features is simple in the AWS console. Senders can log into their SES account dashboard to enable the virtual deliverability manager features. The features are billed as monthly subscription and can be turned on or off at any time. Once the features are activated, SES provides deliverability insights and recommendations in real time, allowing senders to improve performance of future sending batches or campaigns. Senders using Simple Email Service (SES) get reliable, scalable email at the lowest industry prices. SES is backed by AWS’ data security, and email through SES supports  compliance with HIPAA-eligible, FedRAMP-, GDPR-, and ISO-certified options.

To learn more about virtual deliverability manager, visit https://aws.amazon.com/ses

Retry delivering failed SMS using Amazon Pinpoint

Post Syndicated from satyaso original https://aws.amazon.com/blogs/messaging-and-targeting/how-to-utilise-amazon-pinpoint-to-retry-unsuccessful-sms-delivery/

Organizations in many sectors and verticals have user bases to whom they send transactional SMS messages such as OTPs (one-time passwords), Notices, or transaction/purchase confirmations, among other things. Amazon Pinpoint enables customers to send transactional SMS messages to a global audience through a single API endpoint, and the messages are routed to recipients by the service. Amazon Pinpoint relies on downstream SMS providers and telecom operators to deliver the messages to end user’s device. While most of the times the SMS messages gets delivered to recipients but sometimes these messages could not get delivered due to  carrier/telecom related issues which are transient in nature. This impacts customer’s brand name. As a result, customers need to implement a solution that allows them to retry the transmission of SMS messages that fail due to transitory problems caused by downstream SMS providers or telecom operators.

In this blog post, you will discover how to retry sending unsuccessfully delivered SMS messages caused by transitory problems at the downstream SMS provider or telecom operator side.

Prerequisites

For this post, you should be familiar with the following:

Managing an AWS account
Amazon Pinpoint
Amazon Pinpoint SMS events
AWS Lambda
AWS CloudFormation
Amazon Kinesis Firehose
Kinesis Streams
Amazon DynamoDB WCU and RCU accordingly

Architecture Overview

The architecture depicted below is a potential architecture for re-sending unsuccessful SMS messages at real time. The application sends the SMS message to Amazon Pinpoint for delivery using sendMessge API. Pinpoint receives the message and returns a receipt notification with the Message ID; the application records the message content and ID to a Datastore or DynamoDB. Amazon Pinpoint delivers messages to users and then receives SMS engagement events. The same SMS engagement events are provided to Amazon Kinesis Data Streams which as an event source for Lambda function that validates the event type, If the event type indicates that the SMS message was unable to be sent and it make sense to retry, the Lambda function logic retrieves respective “message id” from the SMS events and then retrieves the message body from the database. Then it sends the SMS message to Amazon  Pinpoint for redelivery, you can choose same or an alternative origination number as origination identity while resending the SMS to end users. We recommend configuring the number of retries and adding a retry message tag within Pinpoint to analyse retries and also to avoid infinite loops. All events are also sent to Amazon Kinesis Firehose which then saved to your S3 data lake for later audit and analytics purpose.

Note: The Lambda concurrency and DynamoDB WCU/RCUs need to be provisioned accordingly. The AWS CloudFormation template provided in this post automatically sets up the different architecture components required to retry unsuccessful SMS messages

Retry delivering failed SMS using Amazon Pinpoint

At the same time, if you use Amazon Kinesis Firehose delivery stream instead of Kinesis data stream to stream data to a storage location, you might consider utilising Transformation lambda as part of the kinesis Firehose delivery stream to retry unsuccessful messages. The architecture is as follows; application sends the SMS payload to Amazon Pinpoint using SendMessage API/SDK while also writing the message body to a persistent data store, in this case a DynamoDB database. The SMS related events are then sent to Amazon Kinesis Firehose, where a   transformation lambda is setup. In essence, if SMS event type returns no errors, the event is returned to Firehose as-is. However, if an event type fails and it makes sense to retry, lambda logic sends another SendMessage until the retry count (specified to 5 within the code) is reached. If just one retry attempt is made, S3 storage is not loaded with an event (thus the result=Dropped). Since Pinpoint event do not contain actual SMS content, a call to DynamoDB is made to get the message body for a new SendMessage.

Retry SMS diagram

Amazon Pinpoint provides event response for each transactional SMS communications for retrying unsuccessful SMS connections, there are primarily two factors to consider in this architecture. 1/ Type of event (event_type) 2/ Record Status (record_status). So whenever the event_type is “_SMS.FAILURE” and record_status is any of “UNREACHABLE”, “UNKNOWN”, “CARRIER_UNREACHABLE”, “EXPIRED”. Then surely customer application need to retry the SMS message delivery. Following pseudo code snippet explains the conditional flow for failed SMS sending logic within the lambda function.

Code Sample:
If event.event_type = '_SMS.FAILURE': and event.record_status == 'UNREACHABLE' 
	'| UNKNOWN | CARRIER_UNREACHABLE | TTL_EXPIRED'
	sendMessage(message content, Destination) # resend the SMS message then 
	output_record = { "recordId": record["recordId"], 'result': 'Dropped', 'data': 
		base64.b64encode(payload.encode('utf-8')) } 
else 
	output_record = { "recordId": record["recordId"], 'result': 'Ok', 
						'data': base64.b64encode(payload.encode('utf-8')) }

Getting started with solution deployment

Prerequisite tasks to be completed before deploying the logging solution

  1. Go to CloudFormation Console and Click Create Stack.
  2. Select Amazon S3 Url redio button and provide the cloud formation linkAWS console creating a Pinpoint template
  3. Click Next on Create Stack screen.
  4. Specify Stack Name, for example “SMS-retry-stack”
  5. Specify event stream configuration option, this will trigger the respective child cloud formation stack . There are three Event stream configuration you can choose from.
    • No Existing event stream setup – Select this option if you don’t have any event stream setup for Amazon Pinpoint.
    • Event stream setup with Amazon Kinesis Stream – Select this option if your Amazon Pinpoint project already have Amazon Kinesis as event stream destination.
    • Event stream setup with Amazon Kinesis Firehose – Select this option if you have configured Kinesis Firehose delivery stream as event stream destination.AWS console specifying Pinpoint stack details
  6. Specify the Amazon Pinpoint project app ID (Pinpoint project ID), and click Next.
  7. Click Next on Configure stack options screen.
  8. Select “I acknowledge that AWS CloudFormation might create IAM resources” and click Create Stack.
  9. Wait for the CloudFormation template to complete and then verify resources in the CloudFormation stack has been created. Click on individual resources and verify.
    • Parent stack-SMS retry parent stack
    • Child Stack –SMS retry child stack
  10. As described in the architectural overview session, the maxRetries configuration inside “RetryLambdaFunction” ensures that unsuccessful SMS messages are tried resending repeatedly. This number is set to 3 by default.” If you want to adjust the maxRetry count, go to the settings “RetryLambdaFunction” and change it to the desired number.SMS retry lambda

Notes :- The Cloudformation link in the blog specifically points to the parent cloudformation template, which has links to the child Cloudformation stack, these child stacks will be deployed automatically as you go through the patent stack.

Testing the solution

You can test the solution using “PinpointDDBProducerLambdaFunction” and SMS simulator numbers . PinpointDDBProducerLambdaFunction has sample code that shall trigger the SMS using Amazon Pinpoint.

testing SMS retry solution

Now follow the steps below to test the solution.

  1. Go to environment variables for PinpointDDBProducerLambdaFunction­­
  2. Update “destinationNumber” and “pinpointApplicationID,” where destination number is the recipient number for whom you wish to send the SMS as a failed attempt and Amazon Pinpoint application id is the Pinpoint Project ID for which the Pinpoint SMS channel has already been configured.
  3. Deploy and test the Lambda function.
  4. Check the “Pinpoint Message state” DyanamoDB table and open the Latest table ITEM.
  5. If you observe the table Items, it states the retry_count=2 (SMS send retry has been attempted 2 times and all_retries_failed=true ( for both of the times the SMS could not get delivered.)
Notes :
  • If existing Kinesis stream has pre-defined destination lambda then current stack will not replace it but exit gracefully.
  • If existing Kinesis firehose has pre-existing transformation lambda then current stack shall not replace the current stack.

Remarks

This SMS retry solution is based on best effort. This means that the solution is dependent on event response data from SMS aggregators. If the SMS aggregator data is incorrect, this slotion may not produce the desired effec

Cost

Considering that the retry mechanism is applicable for 1000000 unsuccessful SMS messages per month, this solution will approximately cost around $20 per month. Here is AWS calculator link for reference

Clean up

When you’re done with this exercise, complete the following steps to delete your resources and stop incurring costs:

  • On the CloudFormation console, select your stack and choose Delete.
  • This cleans up all the resources created by the stack.

Conclusion

In this blog post, we have demonstrated how customers can retry sending the undelivered/failed SMS messages via Amazon Pinpoint. We explained how to leverage the Amazon kinesis data streams and AWS Lambda functions to assess the status of unsuccessful SMS messages and retry delivering them in an automatic manner.

Extending the solution

This blog provides a rightful frame work to Implement a solution to retry sending failed SMS messages. You can download the AWS Cloudformation templates, code, and scripts for this solution from our GitHub repository and modify it to fit your needs.


About the Authors
Satyasovan Tripathy works as a Senior Specialist Solution Architect at AWS. He is situated in Bengaluru, India, and focuses on the AWS Digital User Engagement product portfolio. He enjoys reading and travelling outside of work.

Nikhil Khokhar is a Solutions Architect at AWS. He specializes in building and supporting data streaming solutions that help customers analyze and get value out of their data. In his free time, he makes use of his 3D printing skills to solve everyday problems.

Using certificate-based authentication for iOS applications with Amazon SNS

Post Syndicated from Sam Dengler original https://aws.amazon.com/blogs/compute/using-certificate-based-authentication-for-ios-applications-with-amazon-sns/

This blog post is written by Yashlin Naidoo, Arnav Thakur, Kim Read, Guilherme Silva.

Amazon SNS enables you to send notifications to a mobile push endpoint using a platform application endpoint by dispatching the notification on your application’s behalf. Push notifications for iOS apps are sent using Apple Push Notification Service (APNs).

To send push notifications using SNS for APNS certificate-based authentication, you must provide a set of credentials for connecting to the Apple Push Notification Service (see prerequisites for push). SNS supports using certificate-based authentication (.p12), in addition to the new token-based authentication (.p8).

Certificate-based authentication uses a provider certificate to establish a secure connection between your provider and APNs. These certificates are tied to a single application and are used to send notifications to this application. This approach can be useful when you haven’t migrated to the new token-based authentication.

For new applications, we recommend using token-based authentication as it provides improved security. It removes the need for yearly renewal of the certificates and can also be shared amongst multiple applications. To learn about how to use token-based authentication, visit Token-Based authentication for iOS applications with Amazon SNS in the AWS Compute Blog.

This blog shows step-by-step instructions on how to build an iOS application. You learn how to create a new certificate from your Apple developer account, and set up a platform application and endpoint in the SNS console. Next, you will learn how to test your application by sending a push notification via SNS to your device. Finally, you view the push notification delivered to your device.

Setting up your iOS application

This section will go over:

  • Creating an iOS application.
  • Creating a .p12 certificate to upload to SNS.

Prerequisites:

Creating an iOS application

  1. Create a new XCode project. Select iOS as the platform.

    New XCode project

    New XCode project

  2. Select your Apple Developer Account team and organization identifier.

    Select your Apple Developer Account team

    Select your Apple Developer Account team

  3. In your project, go to Signing & Capabilities. Under signing, ensure that “Automatically manage signing” is checked and your team is selected.

    Signing & Capabilities

    Signing & Capabilities

  4. To add the push notification capability to your application, select “+” and select Push Notifications.
    Add push notification capability

    Add push notification capability

    This step creates resources on your Apple Developer Account (the App ID and adds Push notification capability to it). You can also verify this in your Apple Developer Account.

  5. Add the following code to AppDelegate.swift:
        import UIKit
        import UserNotifications
    
        @main
        class AppDelegate: UIResponder, UIApplicationDelegate {
    
        func application(_ application: UIApplication, didFinishLaunchingWithOptions launchOptions: [UIApplication.LaunchOptionsKey: Any]?) -> Bool {
        // Override point for customization after application launch
    
        //Call to register for push notifications when launched
        registerForPushNotifications()
    
        return true
        }
    
        // MARK: UISceneSession Lifecycle
    
        func application(_ application: UIApplication, configurationForConnecting connectingSceneSession: UISceneSession, options: UIScene.ConnectionOptions) -> UISceneConfiguration {
        // Called when a new scene session is being created.
        // Use this method to select a configuration to create the new scene with.
        return UISceneConfiguration(name: "Default Configuration", sessionRole: connectingSceneSession.role)
        }
    
        func application(_ application: UIApplication, didDiscardSceneSessions sceneSessions: Set<UISceneSession>) {
        // Called when the user discards a scene session.
        // If any sessions were discarded while the application was not running, this will be called shortly after application:didFinishLaunchingWithOptions.
        // Use this method to release any resources that were specific to the discarded scenes, as they will not return.
        }
    
        func getNotificationSettings() {
        UNUserNotificationCenter.current().getNotificationSettings { settings in
        print("Notification settings: \(settings)")
    
        guard settings.authorizationStatus == .authorized else { return }
        DispatchQueue.main.async {
        UIApplication.shared.registerForRemoteNotifications()
        }
    
        }
        }
    
        func registerForPushNotifications() {
        //1 this handles all notification-related activities in the app including push notifications
        UNUserNotificationCenter.current()
    
        //2 this requests authorization to send the types of notifications specifies in the options
        .requestAuthorization(
        options: [.alert, .sound, .badge]) { [weak self] granted, _ in
        print("Permission granted: \(granted)")
        guard granted else { return }
        self?.getNotificationSettings()
        }
    
        }
    
        func application(
        _ application: UIApplication,
        didRegisterForRemoteNotificationsWithDeviceToken deviceToken: Data
        ) {
        let tokenParts = deviceToken.map { data in String(format: "%02.2hhx", data) }
        let token = tokenParts.joined()
        print("Device Token: \(token)")
        }
    
        func application(
        _ application: UIApplication,
        didFailToRegisterForRemoteNotificationsWithError error: Error
        ) {
        print("Failed to register: \(error)")
        }
    
        }
  6. Build and run the application on an iPhone. Note that the push notification feature does not work with a simulator.
  7. On your phone, select “Allow” when prompted to allow push notifications.

    Allow push notifications

    Allow push notifications

  8. The debugger prints “Permission granted: true” if successful and returns the Device Token.

    Device token

    Device token

You have now configured an iOS application that can receive push notifications. Next, use the application to test sending push notifications with SNS using certificate-based authentication.

Creating a .p12 certificate to upload to SNS

After completing the previous step, you need:

  • An app identifier
  • A certificate signing request (CSR)
  • An SSL certificate

Create an identifier

  1. Log in to your Apple Developer Account.
  2. Choose Certificates, Identifiers & Profiles.
  3. In the Identifiers section, choose the Add button (+).
  4. In the Register a new identifier section, choose App IDs and select Continue.
  5. In the Select a type section, choose App, and select Continue.
  6. For Description, type the application description.
  7. For Bundle ID, use the Bundle ID assigned to your application. You can find this ID under Signing & Capabilities of your application in XCode (see step 3 under “Creating an application”).
  8. Under Capabilities, choose Push Notifications.
  9. Select Continue. In the Confirm your App ID panel, check that all values were entered correctly. The identifier should match your app ID and bundle ID.
  10. Select Register to register the new app ID.

Create a certificate signing request (CSR)

  1. Open Keychain Access located in /Applications/Utilities or search for it on Finder.
  2. Once opened, choose the tab Keychain Access Tab (next to the Apple icon). Navigate to Certificate Assistant and choose Request a Certificate from a Certificate Authority.
  3. Enter the Username, Email Address, Common Name and leave CA Email Address empty.
  4. Choose Saved to disk and choose Continue.

Create a certificate

  1. Log in to your Apple Developer Account.
  2. Choose Certificates, Identifiers & Profiles.
  3. In the Certificate section, select Create new certificate.
  4. Under services, choose your certificate: Apple Push Notification service SSL (Sandbox)/Apple Push Notification service SSL (Sandbox & Production).
  5. Keep Platform as iOS and choose App ID (Identifier) created previously.
  6. Upload the Certificate Signing Request created in the previous step and Download your certificate.

Create .p12 certificate to upload to SNS

  1. Once your certificate.cer file is downloaded (for example, “aps_development.cer”), open it to show in keychain access. Find Apple Development iOS Push Services: (Your Identifier Name/App ID Name) and ensure that the file is placed in the “Login” folder.
  2. Right-click and choose Export as file format .p12 and choose Save. Optionally, set a password.

Creating a new platform application using APNs certificate-based authentication

Prerequisites

To implement APNs certificate-based authentication from SNS, you must have:

  • An Apple Developer Account
  • An iOS mobile application

For creating a new SNS Platform Application that is used to store Push Notification Platform credentials, configurations and related configurations:

  1. Navigate to the SNS Console. Expand the Mobile menu and choose Create platform application.
  2. For the Application name field, enter an application name such as “myfirstiOSapp”. For Push Notification Platform, select Apple iOS/ VoIP/ macOS.

    Create platform application

    Create platform application

  3. Under the Apple Credentials section:
    1. If your application is in development, select the radio button for Used for development in sandbox. If your application is in production, uncheck Used for development in sandbox.
    2. For Push service, choose iOS and for Authentication method, choose Certificate.
    3. Under Certificate, select Choose file to upload the .p12 certificate file.
    4. If you configured a password while creating the certificate, enter this in the Certificate Password field.
    5. Choose Load Credentials from File to extract the Certificate and private key components.
  4. Event Notifications, Delivery Status Logging – Optional: Refer to the guide for enabling Delivery Status logs and the guide to set up Mobile Event related Notifications. More on this step can also be found in the best practices guide.

    Enter Apple credentials

    Enter Apple credentials

  5. Choose Create Platform Application. This creates a certificate-based authentication APNs Platform Application for iOS.

    Create platform application

    Create platform application

Creating a new platform endpoint using APNs token-based authentication

To send Push Notifications using SNS, a platform endpoint resource is created to store the destination address of the corresponding iOS application that is associated with the SNS platform application.

A destination address of a user’s device with the iOS application installed is identified by an unique device token. It is obtained once the app has registered successfully with APNs to receive push notifications. The details of the device token captured in the Platform Endpoint resource along with the configurations in the SNS Platform application are used in conjunction by the service to deliver a push notification message.

In the following steps, you create a new platform endpoint for a destination device that has the iOS application installed and is capable of receiving push notifications.

  1. Open your Platform Application. Choose Create Application Endpoint.

    Application endpoints list

    Application endpoints list

  2. Locate the Device token in the application logs of the iOS app provisioned earlier. Enter it in the Device Token Field.
  3. To store any additional arbitrary data for the endpoint, you can include in the User data field and choose Create application endpoint.

    Create application endpoint

    Create application endpoint

  4. Choose Create application endpoint and the details are shown on the console.

    Application endpoint detail

    Application endpoint detail

Testing a push notification from your device

In this section, you test sending a push notification to your device.

  1. From the SNS console, navigate to your platform endpoint and choose Publish message.
  2. Enter a message to send. This example uses a custom payload that allows you to provide additional APNs headers.

    Publish message

    Publish message

  3. Choose Publish message.
  4. The push notification is delivered to your device.

    Notification

    Notification

Conclusion

Developers send mobile push notifications for APNs certificate-based authentication by using a .p12 certificate to authenticate an Apple device endpoint. Certificate-based authentication ensures a secure connection through TLS (Transport Layer Security). The provider (SNS) initiates the request to APNs and validation from the provider and APNS is required to complete the secure connection.

Certificates expire annually and must be renewed to ensure that SNS can continue to deliver to the endpoint. In this post, you learn how to create an iOS application for APNs certificate-based authentication and integrate it with SNS to send push notifications to your device using a .p12 certificate to authenticate your application with the mobile endpoint.

To learn more about APNs certificate-based authentication with Amazon SNS, visit the Amazon SNS Developer Guide.

For more serverless learning resources, visit Serverless Land.

Amazon Prime Day 2022 – AWS for the Win!

Post Syndicated from Jeff Barr original https://aws.amazon.com/blogs/aws/amazon-prime-day-2022-aws-for-the-win/

As part of my annual tradition to tell you about how AWS makes Prime Day possible, I am happy to be able to share some chart-topping metrics (check out my 2016, 2017, 2019, 2020, and 2021 posts for a look back).

My purchases this year included a first aid kit, some wood brown filament for my 3D printer, and a non-stick frying pan! According to our official news release, Prime members worldwide purchased more than 100,000 items per minute during Prime Day, with best-selling categories including Amazon Devices, Consumer Electronics, and Home.

Powered by AWS
As always, AWS played a critical role in making Prime Day a success. A multitude of two-pizza teams worked together to make sure that every part of our infrastructure was scaled, tested, and ready to serve our customers. Here are a few examples:

Amazon Aurora – On Prime Day, 5,326 database instances running the PostgreSQL-compatible and MySQL-compatible editions of Amazon Aurora processed 288 billion transactions, stored 1,849 terabytes of data, and transferred 749 terabytes of data.

Amazon EC2 – For Prime Day 2022, Amazon increased the total number of normalized instances (an internal measure of compute power) on Amazon Elastic Compute Cloud (Amazon EC2) by 12%. This resulted in an overall server equivalent footprint that was only 7% larger than that of Cyber Monday 2021 due to the increased adoption of AWS Graviton2 processors.

Amazon EBS – For Prime Day, the Amazon team added 152 petabytes of EBS storage. The resulting fleet handled 11.4 trillion requests per day and transferred 532 petabytes of data per day. Interestingly enough, due to increased efficiency of some of the internal Amazon services used to run Prime Day, Amazon actually used about 4% less EBS storage and transferred 13% less data than it did during Prime Day last year. Here’s a graph that shows the increase in data transfer during Prime Day:

Amazon SES – In order to keep Prime Day shoppers aware of the deals and to deliver order confirmations, Amazon Simple Email Service (SES) peaked at 33,000 Prime Day email messages per second.

Amazon SQS – During Prime Day, Amazon Simple Queue Service (SQS) set a new traffic record by processing 70.5 million messages per second at peak:

Amazon DynamoDB – DynamoDB powers multiple high-traffic Amazon properties and systems including Alexa, the Amazon.com sites, and all Amazon fulfillment centers. Over the course of Prime Day, these sources made trillions of calls to the DynamoDB API. DynamoDB maintained high availability while delivering single-digit millisecond responses and peaking at 105.2 million requests per second.

Amazon SageMaker – The Amazon Robotics Pick Time Estimator, which uses Amazon SageMaker to train a machine learning model to predict the amount of time future pick operations will take, processed more than 100 million transactions during Prime Day 2022.

Package Planning – In North America, and on the highest traffic Prime 2022 day, package-planning systems performed 60 million AWS Lambda invocations, processed 17 terabytes of compressed data in Amazon Simple Storage Service (Amazon S3), stored 64 million items across Amazon DynamoDB and Amazon ElastiCache, served 200 million events over Amazon Kinesis, and handled 50 million Amazon Simple Queue Service events.

Prepare to Scale
Every year I reiterate the same message: rigorous preparation is key to the success of Prime Day and our other large-scale events. If you are preparing for a similar chart-topping event of your own, I strongly recommend that you take advantage of AWS Infrastructure Event Management (IEM). As part of an IEM engagement, my colleagues will provide you with architectural and operational guidance that will help you to execute your event with confidence!

Jeff;

Registering SMS Sender IDs in Singapore

Post Syndicated from Brent Meyer original https://aws.amazon.com/blogs/messaging-and-targeting/registering-sms-sender-ids-in-singapore/

A few weeks ago, we published a blog post about the process of registering alphanumeric Sender IDs. Today, we’re announcing support for registering Sender IDs in Singapore.

About Sender ID registration in Singapore

Singapore’s Infocomm Media Development Authority (IMDA) has created a Sender ID registry to protect consumers from fraudulent and malicious SMS messages. This registry is called the Singapore SMS Sender ID Registry (SSIR).

The government of Singapore encourages all government agencies and financial institutions to register with SSIR. Organizations and businesses outside of these industries can also register with SSIR.

Currently, there is no requirement to register your Sender ID. However, when you register with the SSIR, your Sender ID becomes a “Protected Sender ID.” Protected Sender IDs help to protect you and your customers by preventing other senders from using your Sender ID.

Note that in order to complete this registration process, your business or organization must have a Unique Entity Number (UEN). Businesses and other organizations receive a UEN when they register with Singapore’s Accounting and Corporate Regulatory Authority.

Registering your Sender ID

The first step in the registration process is to create a Protected Sender ID through the Singapore Network Information Centre (SGNIC). To initiate the registration process, send an email to [email protected]. In your message, include the name of your business, the Sender IDs that you want to register, and a description of your use case. SGNIC may contact you for additional information.

After you register with SGNIC, open a ticket in the AWS Support Center. You can find the procedure for opening a case in the Amazon Pinpoint User Guide. The AWS Support team will respond to your case within 24 hours. Their response includes a template for a letter that shows your intent to register a Sender ID.

The next step is to modify the contents of this letter. The regulatory groups in Singapore require a copy of this letter in order to allow AWS to send messages using your Sender ID. Begin by placing the contents of the letter on your company’s letterhead. Next, modify the fields that are highlighted in yellow. These fields include the following:

  • <Place>: The address of your company or organization.
  • <Brand Owner Company Name>: The name of your company or organization.
  • <Number>: Your Unique Entity Number.
  • <Signature>, <Name>, <Title>: The personal signature, name, and job title of the person who is submitting the request on behalf of your company or organization.
  • <ExampleSenderId1>, <ExampleSenderId2>: The Sender IDs that you intend to register with SGNIC. You can add or remove lines here depending on how many Sender IDs you plan to register.

Once you finish modifying the letter, submit it by attaching it to your existing case in the AWS Support Center.

What happens next?

IMDA regularly sends us lists of new Sender ID registrations. When we receive confirmation that your Sender ID has been registered, we update your account to allow it to send SMS messages through your Sender ID. We will also comment on your Support case to indicate that the process is complete.

Wrapping up

We continue to monitor changes to Sender ID registration requirements around the world. We’re working closely with carriers and organizations around the world to make the registration processes as straightforward as possible for our customers. Check in on this blog regularly to learn more about future regulatory changes.

For more information about registering Sender IDs in Singapore, see Special requirements for Singapore in the Amazon Pinpoint User Guide.

Queueing Amazon Pinpoint API calls to distribute SMS spikes

Post Syndicated from satyaso original https://aws.amazon.com/blogs/messaging-and-targeting/queueing-amazon-pinpoint-api-calls-to-distribute-sms-spikes/

Organizations across industries and verticals have user bases spread around the globe. Amazon Pinpoint enables them to send SMS messages to a global audience through a single API endpoint, and the messages are routed to destination countries by the service. Amazon Pinpoint utilizes downstream SMS providers to deliver the messages and these SMS providers offer a limited country specific threshold for sending SMS (referred to as Transactions Per Second or TPS). These thresholds are imposed by telecom regulators in each country to prohibit spamming. If customer applications send more messages than the threshold for a country, downstream SMS providers may reject the delivery.

Such scenarios can be avoided by ensuring that upstream systems do not send more than the permitted number of messages per second. This can be achieved using one of the following mechanisms:

  • Implement rate-limiting on upstream systems which call Amazon Pinpoint APIs.
  • Implement queueing and consume jobs at a pre-configured rate.

While rate-limiting and exponential backoffs are regarded best practices for many use cases, they can cause significant delays in message delivery in particular instances when message throughput is very high. Furthermore, utilizing solely a rate-limiting technique eliminates the potential to maximize throughput per country and priorities communications accordingly. In this blog post, we evaluate a solution based on Amazon SQS queues and how they can be leveraged to ensure that messages are sent with predictable delays.

Solution Overview

The solution consists of an Amazon SNS topic that filters and fans-out incoming messages to set of Amazon SQS queues based on a country parameter on the incoming JSON payload. The messages from the queues are then processed by AWS Lambda functions that in-turn invoke the Amazon Pinpoint APIs across one or more Amazon Pinpoint projects or accounts. The following diagram illustrates the architecture:

Step 1: Ingesting message requests

Upstream applications post messages to a pre-configured SNS topic instead of calling the Amazon Pinpoint APIs directly. This allows applications to post messages at a rate that is higher than Amazon Pinpoint’s TPS limits per country. For applications that are hosted externally, an Amazon API Gateway can also be configured to receive the requests and publish them to the SNS topic – allowing features such as routing and authentication.

Step 2: Queueing and prioritization

The SNS topic implements message filtering based on the country parameter and sends incoming JSON messages to separate SQS queues. This allows configuring downstream consumers based on the priority of individual queues and processing these messages at different rates.

The algorithm and attribute used for implementing message filtering can vary based on requirements. Similarly, filtering can be enabled based on business use-cases such as “REMINDERS”,   “VERIFICATION”, “OFFERS”, “EVENT NOTIFICATIONS” etc. as well. In this example, the messages are filtered based on a country attribute shown below:

Based on the filtering logic implemented, the messages are delivered to the corresponding SQS queues for further processing. Delivery failures are handled through a Dead Letter Queue (DLQ), enabling messages to be retried and pushed back into the queues.

Step 3: Consuming queue messages at fixed-rate

The messages from SQS queues are consumed by AWS Lambda functions that are configured per queue. These are light-weight functions that read messages in pre-configured batch sizes and call the Amazon Pinpoint Send Messages API. API call failures are handled through 1/ Exponential Backoff within the AWS SDK calls and 2/ DLQs setup as Destination Configs on the Lambda functions. The Amazon Pinpoint Send Messages API is a batch API that allows sending messages to 100 recipients at a time. As such, it is possible to have requests succeed partially – messages, within a single API call, that fail/throttle should also be sent to the DLQ and retried again.

The Lambda functions are configured to run at a fixed reserve concurrency value. This ensures that a fixed rate of messages is fetched from the queue and processed at any point of time. For example, a Lambda function receives messages from an SQS queue and calls the Amazon Pinpoint APIs. It has a reserved concurrency of 10 with a batch size of 10 items. The SQS queue rapidly receives 1,000 messages. The Lambda function scales up to 10 concurrent instances, each processing 10 messages from the queue. While it takes longer to process the entire queue, this results in a consistent rate of API invocations for Amazon Pinpoint.

Step 4: Monitoring and observability

Monitoring tools record performance statistics over time so that usage patterns can be identified. Timely detection of a problem (ideally before it affects end users) is the first step in observability. Detection should be proactive and multi-faceted, including alarms when performance thresholds are breached. For the architecture proposed in this blog, observability is enabled by using Amazon Cloudwatch and AWS X-Ray.

Some of the key metrics that are monitored using Amazon Cloudwatch are as follows:

  • Amazon Pinpoint
    • DirectSendMessagePermanentFailure
    • DirectSendMessageTemporaryFailure
    • DirectSendMessageThrottled
  • AWS Lambda
    • Invocations
    • Errors
    • Throttles
    • Duration
    • ConcurrentExecutions
  • Amazon SQS
    • ApproximateAgeOfOldestMessage
    • NumberOfMessagesSent
    • NumberOfMessagesReceived
  • Amazon SNS
    • NumberOfMessagesPublished
    • NumberOfNotificationsDelivered
    • NumberOfNotificationsFailed
    • NumberOfNotificationsRedrivenToDlq

AWS X-Ray helps developers analyze and debug production, distributed applications, such as those built using a microservices architecture. With X-Ray, you can understand how the application and its underlying services are performing, to identify and troubleshoot the root cause of performance issues and errors. X-Ray provides an end-to-end view of requests as they travel through your application, and shows a map of your application’s underlying components.

Notes:

  1. If you are using Amazon Pinpoint’s Campaign or Journey feature to deliver SMS to recipients in various countries, you do not need to implement this solution. Amazon Pinpoint will drain messages depending on the MessagesPerSecond configuration pre-defined in the campaign/journey settings.
  2. If you need to send transactional SMS to a small number of countries (one or two), you should work with AWS support to define your SMS sending throughput for those countries to accommodate spikey SMS message traffic instead.

Conclusion

This post shows how customers can leverage Amazon Pinpoint along with Amazon SQS and AWS Lambda to build, regulate and prioritize SMS deliveries across multiple countries or business use-cases. This leads to predictable delays in message deliveries and provides customers with the ability to control the rate and priority of messages sent using Amazon Pinpoint.


About the Authors

Satyasovan Tripathy works as a Senior Specialist Solution Architect at AWS. He is situated in Bengaluru, India, and focuses on the AWS Digital User Engagement product portfolio. He enjoys reading and travelling outside of work.

Rajdeep Tarat is a Senior Solutions Architect at AWS. He lives in Bengaluru, India and helps customers architect and optimize applications on AWS. In his spare time, he enjoys music, programming, and reading.

How to set up Amazon Quicksight dashboard for Amazon Pinpoint and Amazon SES engagement events

Post Syndicated from satyaso original https://aws.amazon.com/blogs/messaging-and-targeting/how-to-set-up-amazon-quicksight-dashboard-for-amazon-pinpoint-and-amazon-ses-events/

In this post, we will walk through using Amazon Pinpoint and Amazon Quicksight to create customizable messaging campaign reports. Amazon Pinpoint is a flexible and scalable outbound and inbound marketing communications service that allows customers to connect with users over channels like email, SMS, push, or voice. Amazon QuickSight is a scalable, serverless, embeddable, machine learning-powered business intelligence (BI) service built for the cloud. This solution allows event and user data from Amazon Pinpoint to flow into Amazon Quicksight. Once in Quicksight, customers can build their own reports that shows campaign performance on a more granular level.

Engagement Event Dashboard

Customers want to view the results of their messaging campaigns in ever increasing levels of granularity and ensure their users see value from the email, SMS or push notifications they receive. Customers also want to analyze how different user segments respond to different messages, and how to optimize subsequent user communication. Previously, customers could only view this data in Amazon Pinpoint analytics, which offers robust reporting on: events, funnels, and campaigns. However, does not allow analysis across these different parameters and the building of custom reports. For example, show campaign revenue across different user segments, or show what events were generated after a user viewed a campaign in a funnel analysis. Customers would need to extract this data themselves and do the analysis in excel.

Prerequisites

  • Digital user engagement event database solution must be setup at 1st.
  • Customers should be prepared to purchase Amazon Quicksight because it has its own set of costs which is not covered within Amazon Pinpoint cost.

Solution Overview

This Solution uses the Athena tables created by Digital user engagement events database solution. The AWS CloudFormation template given in this post automatically sets up the different architecture components, to capture detailed notifications about Amazon Pinpoint engagement events and log those in Amazon Athena in the form of Athena views. You still need to manually configure Amazon Quicksight dashboards to link to these newly generated Athena views. Please follow the steps below in order for further information.

Use case(s)

Event dashboard solutions have following use cases: –

  • Deep dive into engagement insights. (eg: SMS events, Email events, Campaign events, Journey events)
  • The ability to view engagement events at the individual user level.
  • Data/process mining turn raw event data into useful marking insights.
  • User engagement benchmarking and end user event funneling.
  • Compute campaign conversions (post campaign user analysis to show campaign effectiveness)
  • Build funnels that shows user progression.

Getting started with solution deployment

Prerequisite tasks to be completed before deploying the logging solution

Step 1 – Create AWS account, Pinpoint Project, Implement Event-Database-Solution.
As part of this step customers need to implement DUE Event database solution as the current solution (DUE event dashboard) is an extension of DUE event database solution. The basic assumption here is that the customer has already configured Amazon Pinpoint project or Amazon SES within the required AWS region before implementing this step.

The steps required to implement an event dashboard solution are as follows.

a/Follow the steps mentioned in Event database solution to implement the complete stack. Prior installing the complete stack copy and save the name Athena events database name as shown in the diagram. For my case it is due_eventdb. Database name is required as an input parameter for the current Event Dashboard solution.

b/Once the solution is deployed, navigate to the output page of the cloud formation stack, and copy, and save the following information, which will be required as input parameters in step 2 of the current Event Dashboard solution.

Step 2 – Deploy Cloud formation template for Event dashboard solution
This step generates a number of new Amazon Athena views that will serve as a data source for Amazon Quicksight. Continue with the following actions.

  • Download the cloud formation template(“Event-dashboard.yaml”) from AWS samples.
  • Navigate to Cloud formation page in AWS console, click up right on “Create stack” and select the option “With new resources (standard)”
  • Leave the “Prerequisite – Prepare template” to “Template is ready” and for the “Specify template” option, select “Upload a template file”. On the same page, click on “Choose file”, browse to find the file “Event-dashboard.yaml” file and select it. Once the file is uploaded, click “Next” and deploy the stack.

  • Enter following information under the section “Specify stack details”:
    • EventAthenaDatabaseName – As mentioned in Step 1-a.
    • S3DataLogBucket- As mentioned in Step 1-b
    • This solution will create additional 5 Athena views which are
      • All_email_events
      • All_SMS_events
      • All_custom_events (Custom events can be Mobile app/WebApp/Push Events)
      • All_campaign_events
      • All_journey_events

Step 3 – Create Amazon Quicksight engagement Dashboard
This step walks you through the process of creating an Amazon Quicksight dashboard for Amazon Pinpoint engagement events using the Athena views you created in step-2

  1. To Setup Amazon Quicksight for the 1st time please follow this link (this process is not needed if you have already setup Amazon Quicksight). Please make sure you are an Amazon Quicksight Administrator.
  2. Go/search Amazon Quicksight on AWS console.
  3. Create New Analysis and then select “New dataset”
  4. Select Athena as data source
  5. As a next step, you need to select what all analysis you need for respective events. This solution provides option to create 5 different set of analysis as mentioned in Step 2. They are a/All email events, b/All SMS Events, c/All Custom Events (Mobile/Web App, web push etc), d/ All Campaign events, e/All Journey events. Dashboard can be created from Quicksight analysis and same can be shared among the organization stake holders. Following are the steps to create analysis and dashboards for different type of events.
  6. Email Events –
    • For all email events, name the analysis “All-emails-events” (this can be any kind of customer preferred nomenclature), select Athena workgroup as primary, and then create a data source.
    • Once you create the data source Quicksight lists all the views and tables available under the specified database (in our case it is:-  due_eventdb). Select the email_all_events view as data source.
    • Select the event data location for analysis. There are mainly two options available which are a/ Import to Spice quicker analysis b/ Directly query your data. Please select the preferred options and then click on “visualize the data”.
    • Import to Spice quicker analysis – SPICE is the Amazon QuickSight Super-fast, Parallel, In-memory Calculation Engine. It’s engineered to rapidly perform advanced calculations and serve data. In Enterprise edition, data stored in SPICE is encrypted at rest. (1 GB of storage is available for free for extra storage customer need to pay extra, please refer cost section in this document )
    • Directly query your data – This process enables Quicksight to query directly to the Athena or source database (In the current case it is Athena) and Quicksight will not store any data.
    • Now that you have selected a data source, you will be taken to a blank quick sight canvas (Blank analysis page) as shown in the following Image, please drag and drop what visualization type you need to visualize onto the auto-graph pane. Please note that Amazon QuickSight is a Busines intelligence platform, so customers are free to choose the desired visualization types to observe the individual engagement events.
    • As part of this blog, we have displayed how to create some simple analysis graphs to visualize the engagement events.
    • As an initial step please Select tabular Visualization as shown in the Image.
    • Select all the event dimensions that you want to put it as part of the Table in X axis. Amazon Quicksight table can be extended to show as many as tables columns, this completely depends upon the business requirement how much data marketers want to visualize.
    • Further filtering on the table can be done using Quicksight filters, you can apply the filter on specific granular values to enable further filtering. For Eg – If you want to apply filtering on the destination email Id then 1/Select the filter from left hand menu 2/Add destination field as the filtering criterion 3/ Tick on the destination field you are trying to filter or search for the Destination email ID that 4/ All the result in the table gets further filtered as per the filter criterion
    • As a next step please add another visual from top left corner “Add -> Add Visual”, then select the Donut Chart from Visual types pane. Donut charts are always used for displaying aggregation.
    • Then select the “event_type” as the Group to visualize the aggregated events, this helps marketers/business users to figure out how many email events occurred and what are the aggregated success ratio, click ratio, complain ratio or bounce ratio etc for the emails/Campaign that’s sent to end users.
    • To create a Quicksight dashboards from the Quicksight analysis click Share menu option at the top right corner then select publish dashboard”. Provide required dashboard name while publishing the dashboard”. Same dashboard can be shared with multiple audiences in the Organization.
    • Following is the final version of the dashboard. As mentioned above Quicksight dashboards can be shared with other stakeholders and also complete dashboard can be exported as excel sheet.
  7. SMS Events-
    • As shown above SMS events can be analyzed using Quicksight and dash boards can be created out of the analysis. Please repeat all of the sub-steps listed in step 6. Following is a sample SMS dashboard.
  8. Custom Events-
    • After you integrate your application (app) with Amazon Pinpoint, Amazon Pinpoint can stream event data about user activity, different type custom events, and message deliveries for the app. Eg :- Session.start, Product_page_view, _session.stop etc. Do repeat all of the sub-steps listed in step 6 create a custom event dashboards.
  9. Campaign events
    • As shown before campaign also can be included in the same dashboard or you can create new dashboard only for campaign events.

Cost for Event dashboard solution
You are responsible for the cost of the AWS services used while running this solution. As of the date of publication, the cost for running this solution with default settings in the US West (Oregon) Region is approximately $65 a month. The cost estimate includes the cost of AWS Lambda, Amazon Athena, Amazon Quicksight. The estimate assumes querying 1TB of data in a month, and two authors managing Amazon Quicksight every month, four Amazon Quicksight readers witnessing the events dashboard unlimited times in a month, and a Quicksight spice capacity is 50 GB per month. Prices are subject to change. For full details, see the pricing webpage for each AWS service you will be using in this solution.

Clean up

When you’re done with this exercise, complete the following steps to delete your resources and stop incurring costs:

  1. On the CloudFormation console, select your stack and choose Delete. This cleans up all the resources created by the stack,
  2. Delete the Amazon Quicksight Dashboards and data sets that you have created.

Conclusion

In this blog post, I have demonstrated how marketers, business users, and business analysts can utilize Amazon Quicksight dashboards to evaluate and exploit user engagement data from Amazon SES and Pinpoint event streams. Customers can also utilize this solution to understand how Amazon Pinpoint campaigns lead to business conversions, in addition to analyzing multi-channel communication metrics at the individual user level.

Next steps

The personas for this blog are both the tech team and the marketing analyst team, as it involves a code deployment to create very simple Athena views, as well as the steps to create an Amazon Quicksight dashboard to analyse Amazon SES and Amazon Pinpoint engagement events at the individual user level. Customers may then create their own Amazon Quicksight dashboards to illustrate the conversion ratio and propensity trends in real time by integrating campaign events with app-level events such as purchase conversions, order placement, and so on.

Extending the solution

You can download the AWS Cloudformation templates, code for this solution from our public GitHub repository and modify it to fit your needs.


About the Author


Satyasovan Tripathy works at Amazon Web Services as a Senior Specialist Solution Architect. He is based in Bengaluru, India, and specialises on the AWS Digital User Engagement product portfolio. He likes reading and travelling outside of work.

Token-based authentication for iOS applications with Amazon SNS

Post Syndicated from Talia Nassi original https://aws.amazon.com/blogs/compute/token-based-authentication-for-ios-applications-with-amazon-sns/

This post is co-written by Karen Hong, Software Development Engineer, AWS Messaging.

To use Amazon SNS to send mobile push notifications, you must provide a set of credentials for connecting to the supported push notification service (see prerequisites for push). For the Apple Push Notification service (APNs), SNS now supports using token-based authentication (.p8), in addition to the existing certificate-based method.

You can now use a .p8 file to create or update a platform application resource through the SNS console or programmatically. You can publish messages (directly or from a topic) to platform application endpoints configured for token-based authentication.

In this tutorial, you set up an example iOS application. You retrieve information from your Apple developer account and learn how to register a new signing key. Next, you use the SNS console to set up a platform application and a platform endpoint. Finally, you test the setup and watch a push notification arrive on your device.

Advantages of token-based authentication

Token-based authentication has several benefits compared to using certificates. The first is that you can use the same signing key from multiple provider servers (iOS,VoIP, and MacOS), and you can use one signing key to distribute notifications for all of your company’s application environments (sandbox, production). In contrast, a certificate is only associated with a particular subset of these channels.

A pain point for customers using certificate-based authentication is the need to renew certificates annually, an inconvenient procedure which can lead to production issues when forgotten. Your signing key for token-based authentication, on the other hand, does not expire.

Token-based authentication improves the security of your certificates. Unlike certificate-based authentication, the credential does not transfer. Hence, it is less likely to be compromised. You establish trust through encrypted tokens that are frequently regenerated. SNS manages the creation and management of these tokens.

You configure APNs platform applications for use with both .p8 and .p12 certificates, but only 1 authentication method is active at any given time.

Setting up your iOS application

To use token-based authentication, you must set up your application.

Prerequisites: An Apple developer account

  1. Create a new XCode project. Select iOS as the platform and use the App template.
    xcode project
  2. Select your Apple Developer Account team and your organization identifier.
    vscode details
  3. Go to Signing & Capabilities and select + Capability. This step creates resources on your Apple Developer Account.
    step 3
  4. Add the Push Notification Capability.
  5. In SNSPushDemoApp.swift , add the following code to print the device token and receive push notifications.
    import SwiftUI
    
    @main
    struct SNSPushDemoApp: App {
        
        @UIApplicationDelegateAdaptor private var appDelegate: AppDelegate
        
        var body: some Scene {
            WindowGroup {
                ContentView()
            }
        }
    }
    
    class AppDelegate: NSObject, UIApplicationDelegate, UNUserNotificationCenterDelegate {
        
        func application(_ application: UIApplication,
                         didFinishLaunchingWithOptions launchOptions: [UIApplication.LaunchOptionsKey : Any]? = nil) -> Bool {
            UNUserNotificationCenter.current().delegate = self
            return true
        }
        
        func application(_ application: UIApplication,
                         didRegisterForRemoteNotificationsWithDeviceToken deviceToken: Data) {
            let tokenParts = deviceToken.map { data in String(format: "%02.2hhx", data) }
            let token = tokenParts.joined()
            print("Device Token: \(token)")
        };
        
        func application(_ application: UIApplication, didFailToRegisterForRemoteNotificationsWithError error: Error) {
           print(error.localizedDescription)
        }
        
        func userNotificationCenter(_ center: UNUserNotificationCenter, willPresent notification: UNNotification, withCompletionHandler completionHandler: @escaping (UNNotificationPresentationOptions) -> Void) {
            completionHandler([.banner, .badge, .sound])
        }
    }
    
  6. In ContentView.swift, add the code to request authorization for push notifications and register for notifications.
    import SwiftUI
    
    struct ContentView: View {
        init() {
            requestPushAuthorization();
        }
        
        var body: some View {
            Button("Register") {
                registerForNotifications();
            }
        }
    }
    
    struct ContentView_Previews: PreviewProvider {
        static var previews: some View {
            ContentView()
        }
    }
    
    func requestPushAuthorization() {
        UNUserNotificationCenter.current().requestAuthorization(options: [.alert, .badge, .sound]) { success, error in
            if success {
                print("Push notifications allowed")
            } else if let error = error {
                print(error.localizedDescription)
            }
        }
    }
    
    func registerForNotifications() {
        UIApplication.shared.registerForRemoteNotifications()
    }
    
  7. Build and run the app on an iPhone. The push notification feature does not work with a simulator.
  8. On your phone, select allow notifications when the prompt appears. The debugger prints out “Push notifications allowed” if it is successful.
    allow notifications
  9. On your phone, choose the Register button. The debugger prints out the device token.
  10. You have set up an iOS application that can receive push notifications and prints the device token. We can now use this app to test sending push notifications with SNS configured for token-based authentication.

Retrieving your Apple resources

After setting up your application, you retrieve your Apple resources from your Apple developer account. There are four pieces of information you need from your Apple Developer Account: Bundle ID, Team ID, Signing Key, and Signing Key ID.

The signing key and signing key ID are credentials that you manage through your Apple Developer Account. You can register a new key by selecting the Keys tab under the Certificates, Identifiers & Profiles menu. Your Apple developer account provides the signing key in the form of a text file with a .p8 extension.

certs

Find the team ID under Membership Details. The bundle ID is the unique identifier that you set up when creating your application. Find this value in the Identifiers section under the Certificates, Identifiers & Profiles menu.

Amazon SNS uses a token constructed from the team ID, signing key, and signing key ID to authenticate with APNs for every push notification that you send. Amazon SNS manages tokens on your behalf and renews them when necessary (within an hour). The request header includes the bundle ID and helps identify where the notification goes.

Creating a new platform application using APNs token-based authentication

Prerequisites

In order to implement APNs token-based authentication, you must have:

  • An Apple Developer Account
  • A mobile application

To create a new platform application:

  1. Navigate to the Amazon SNS console and choose Push notifications. Then choose Create platform application.
    sns console
  2. Enter a name for your application. In the Push notification platform dropdown, choose Apple iOS/VoIP/Mac.
    sns name
  3. For the Push service, choose iOS, and for the Authentication method, choose Token. Select the check box labeled Used for development in sandbox. Then, input the fields from your Apple Developer Account.
    step 3
  4. You have successfully created a platform application using APNs token-based authentication.

Creating a new platform endpoint using APNs token-based authentication

A platform application stores credentials, sending configuration, and other settings but does not contain an exact sending destination. Create a platform endpoint resource to store the information to allow SNS to target push notifications to the proper application on the correct mobile device.

Any iOS application that is capable of receiving push notifications must register with APNs. Upon successful registration, APNs returns a device token that uniquely identifies an instance of an app. SNS needs this device token in order to send to that app. Each platform endpoint belongs to a specific platform application and uses the credentials and settings set in the platform application to complete the sending.

In this tutorial, you create the platform endpoint manually through the SNS console. In a real system, upon receiving the device token, you programmatically call SNS from your application server to create or update your platform endpoints.

These are the steps to create a new platform endpoint:

  1. From the details page of the platform application in the SNS console, choose Create application endpoint.
    appliation endpont
  2. From the iOS app that you set up previously, find the device token in the application logs. Enter the device token and choose Create application endpoint.
    application endpont details
  3. You have successfully created a platform application endpoint.
    application endpoint

Testing a push notification from your device

In this section, you test a push notification from your device.

  1. From the details page of the application endpoint you just created, (this is the page you end up at immediately after creating the endpoint), choose Publish message.
  2. Enter a message to send and choose Publish message.
    testing app
  3. The notification arrives on your iOS app.
    testing the app

Conclusion

Developers sending mobile push notifications can now use a .p8 key to authenticate an Apple device endpoint. Token-based authentication is more secure, and reduces operational burden of renewing the certificates every year. In this post, you learn how to set up your iOS application for mobile push using token-based authentication, by creating and configuring a new platform endpoint in the Amazon SNS console.

To learn more about APNs token-based authentication with Amazon SNS, visit the Amazon SNS Developer Guide. For more serverless content, visit Serverless Land.

Creating a costs analytics view to email campaign generated by Amazon Pinpoint

Post Syndicated from rafaaws original https://aws.amazon.com/blogs/messaging-and-targeting/creating-a-costs-analytics-view-to-email-campaign-generated-by-amazon-pinpoint/

Introduction

Many companies have multiple departments using different campaigns in the same AWS account on Amazon Pinpoint and need to split costs at the end of each month between the owners of each campaign. To do this, companies need an easy way to find how much each campaign has generated of cost, since the Amazon Pinpoint console doesn’t have this information. To solution this, it is possible combine some AWS services to find out these costs.

In this post, I will demonstrate how AWS analytics and storage services such as Amazon Kinesis, AWS Glue, Amazon Athena, Amazon Quicksight and Amazon Simple Storage Service (Amazon S3) can help you create an analytical view of the costs generated by emails sent through each campaign on Amazon Pinpoint. Not include transactional and Amazon Journey e-mails on the example.

Amazon Pinpoint is an AWS service that helps companies to engage their customers across multiple channels. You can use the Amazon Pinpoint to send email, SMS, push notifications and voice messages to deliver one-off demands or across campaigns.

In this blog, you will learn how to create a dashboard with total cost of emails sent and MTA (Monthly Targeted Audience) by each campaign. With this information, you will be able to distribute costs internally to each department responsible for each campaign on Amazon Pinpoint.

Solution Overview

To create this dashboard, we will take advantage of the Digital User Engagement Events Database solution. We can use an AWS CloudFormation template that set up Amazon Pinpoint event flow. This solution uses the Amazon Kinesis to stream all events about campaigns to a bucket on Amazon S3. After that, a data processing task is performed by AWS Lambda and cataloged on AWS Glue. Some views will be created on Amazon Athena to organize all data and we will use them to calculating and analyzing the Pinpoint costs. For more information about the solution, architecture and how AWS CloudFormation template works to automate the deployment, please visit the Implementation Guide page.

During the deployment process, you will have the option to create a new Amazon Pinpoint project to manage your campaigns or use an existing one.

Prerequisites

1. Complete the Digital User Engagement Events Database implementation.

2. Have an e-mail campaign on Amazon Pinpoint created with some emails already sent.

Analytics View

All events created by Amazon Pinpoint through the campaigns after the Digital Use Engagement Events Database implementation is complete should be appearing in parquet file format in the Amazon S3. If your campaign did not generate any events after the AWS CloudFormation was completed, I recommend creating and executing a new email campaign just to test this solution. Any test email sent during the implementation of this solution will incur charges. The email costs will be explained during this blog.

After the entire Amazon Pinpoint event flow has worked correctly, some modifications on the views created in Amazon Athena must be made. These changes will help to access the information about the quantity of endpoints registered by each campaign of your project. For this, the following steps are required:

To create a new view

1. Open the Amazon Athena console.

2. Under Database, choose the database name created by AWS CloudFormation template.

You will notice a table called “all events” and some views, eg. campaign_send, email_open, email_send and others. These views are responsible to improve the organization of data sent by Amazon Pinpoint, eg. in the campaign_send view it is possible to see all informations about all events that Amazon Pinpoint sends across the campaign by multiple channels.

3. Choose Create view.

A tab will be added on the center page so you can add your command which will be responsible to created a new view.

4. Replace the existing text to the command below and choose Run query.

CREATE OR REPLACE VIEW endpoint_unit AS
SELECT DISTINCT
client.client_id endpoint_id
, "min"("from_unixtime"((event_timestamp / 1000))) event_timestamp
, "month"("from_unixtime"((event_timestamp / 1000))) month_data
, "year"("from_unixtime"((event_timestamp / 1000))) year_data
FROM
all_events
WHERE (event_type = '_campaign.send')
GROUP BY client.client_id, "month"("from_unixtime"((event_timestamp / 1000))), "year"("from_unixtime"((event_timestamp / 1000)))

In this command we are creating a new view, grouping all the endpoints already used by campaigns, along with the earliest date and time that the endpoint was registered. This command will help you identify the first campaign that used the endpoint in each month and year.

Once the new view is created, you will notice that it is listed in the views pane with the name endpoint_unit. You can run this view to check which values are returned.

5. Choose Preview in the endpoint_unit view to return the results.

Example:

The data displayed refer only to the information of the endpoints used in campaigns after the implementation of the Digital User Engagement Events Database.

Now is the time to create the analytical view in Amazon Quicksight.

To check Amazon Quicksight Region

1. Open the Amazon Quicksight console.

If this is your first time using Amazon Quicksight, a page will appear to subscribe to the services, feel free to choose the best option for your business.

Warning: Some costs might occur by using Amazon Quicksight. Check the Amazon Quicksight Pricing page for more information.

2. On top of the screen, choose <Role>/<Account-Name> and select the region where you have the Amazon Pinpoint project.

To check Amazon Quicksight Permissions

Check the permission of the Amazon Quicksight to enable the access to Amazon S3 bucket.

1. On top of the screen, choose <Role>/<Account-Name>, Manage Quicksight.

2. In navigation pane, choose Security & permissions.

3. Under QuickSight access to AWS services, choose Add or remove.

4. Inside the QuickSight access to AWS services table, under Amazon S3, choose Details.

5. Choose Select S3 buckets.

6. Check if the Amazon S3 bucket name checkbox containing all stream files is selected. If not, select the checkbox and choose Finish and Update.

Create a Dataset for Campaign cost

1. Back to the Amazon Quicksight main page.

2. In the navigation page, choose Datasets, New dataset.

3. Choose Athena.

Now, let’s add the table containing information regarding the number of emails sent per Amazon Pinpoint campaign.

4. In the New Athena data source dialog box, do the following:

a. For Data source name, type a name.

b. Choose Create data source.

5. In the Choose your table dialog box, do the following:

a. Choose Use custom SQL.

b. In first field, enter a name for the custom SQL.

c. In second field, paste the command below.

SELECT * FROM "due_eventdb"."campaign_send" where (message_tags['delivery_type'] = 'EMAIL')

This command is filtering only events of campaign based on emails.

d. Choose Confirm query.

6. In the Finish dataset creation dialog box, you will be asked to select between storing a copy of the data of this table in SPICE or performing a query directly from data source. Feel free to choose the best option for your business.

7. Choose Visualize.

After creating the dataset, you will be redirected to the Amazon Quicksight analytics creation page.

As the information sent by Amazon Pinpoint does not have the unit cost of each email sent, we will use three features called Parameters, Control and Calculated Field to calculate these amounts.

Parameters are named variables that can transfer a value for use by an action or an object. To make the parameters accessible to the dashboard viewer, you add a parameter control.

The calculated fields help you to transform your data by using one or more of the actions: Operators, Functions, Aggregate functions, Fields that contain data or other calculated fields.

Create an Amazon QuickSight parameter

1. In the navigation bar, choose + Add at the top of the screen.

2. Choose Add parameter.

3. In the Create new parameter dialog box, do the following:

a. For Name, type the name for the parameter, eg. Costemail.

b. For Data type, choose number.

c. For Values, select Single value.

d. For Static default value enter the unit cost of email. The cost of each Amazon Pinpoint email can be found on Amazon Pinpoint Pricing page.

e. Choose Create and Close.

Important: All costs in this blog will be calculated in USD.

After creating the first parameters, we need to create a manual control of these costs.

Create an Amazon QuickSight control

1. In the navigation pane, choose Parameters.

2. Under the name of parameters that you previously created, choose Add control.

3.  In the Add control dialog box, do the following:

a. For Display name, enter a name.

b. For Style, choose Text field.

c. Choose Add.

This control will help you in the future if you need to change the unit price without changing the Parameters configuration.

We now need to create the Calculate Field. It multiplying the total sent emails value by the unit costs.

Create an Amazon QuickSight calculated field

1. In the navigation bar, choose + Add at the top of the screen again.

2. Choose add calculated field.

3. In add name field, type a name.

4. Paste the expression below.

count({pinpoint_campaign_id}) * ${name_parameters}

5. Replace the “name_parameters” in the expression with the name of the Parameter you created earlier.

6. Choose Save.

We now have all fields available to create the chart on Quicksight.

Create an Amazon QuickSight dashboard

1. In the navigation page, choose Visualize.

2. Under Visual type, choose Vertical bar chart.

Note: If you prefer, you can change it later to other visual type.

3. Choose the fields pinpoint_campaign_id, calculated field that you just created and event_timestamp. Drag each field to X axis, value and group/color to create the chart.

Example:

In this example, you can see the cost in USD x Amazon Pinpoint Campaign ID between April and May 2021.

If you prefer, you can customize your chart in Format Visual. You can also build another view to show the amount of emails sent per campaign.

4. In the navigation bar, choose Share.

5. Choose Publish dashboard.

6. In the Publish a dashboard dialog box, under Publish new dashboard as, type a name.

7. Choose Publish dashboard.

If you want, you can share your dashboard with other username, group, or email address.

Now that we have the total costs of emails per each campaign, let’s create the chart for the total endpoint cost for each campaign.

Create a Dataset for MTA cost

1. Back to the Amazon Quicksight main page.

2. In the navigation page, choose Datasets, New dataset.

3. Choose Athena.

4. In the New Athena data source dialog box, do the following:

a. For Data source name, type a name.

b. Choose Create data source.

5. In the Choose your table dialog box, do the following:

a. Choose Use custom SQL.

b. In first field, enter a name for the custom SQL.

c. In second field, paste the command below.

SELECT distinct c.endpoint_id, e.pinpoint_campaign_id, c.event_timestamp
FROM "due_eventdb"."campaign_send" e
INNER JOIN "due_eventdb"."endpoint_unit" c ON c.event_timestamp = e.event_timestamp

d. Choose Confirm query.

6. In the Finish dataset creation dialog box, you will be asked to select between storing a copy of the data of this table in SPICE or performing a query directly from data source. Feel free to choose the best option for your business.

7. Choose Visualize.

This command is responsible to join the pinpoint_campaign view with the endpoint_unit view. This command will return the campaign ID responsible for contacting the endpoint for the first time on each month.

8. After the dataset is created, repeat the same steps to create a new Parameter, Control and Calculated Field on section Create an Amazon QuickSight parameter, Create an Amazon QuickSight control and Create an Amazon QuickSight calculated field, but when creating a new Parameter, you will use the unit cost of each endpoint, currently it is described on the Amazon Pinpoint Pricing page as Monthly Targeted Audience (MTA).

If you send messages from an Amazon Pinpoint campaign or journey, the unique endpoints you contact are known as a monthly targeted audience (MTA). You are charged on the number of MTAs targeted in a calendar month.

Important: In this calculation we are not considering the subtraction of the free tier values.

In the process of creating Calculated Field, use the following expression:

count({endpoint_id}) * ${name_parameters}

Also remember to replace the name_parameters field in the expression with the name of the parameter that you previously created in point 8 on Create a Dataset for MTA cost section to calculate the costs of endpoints.
In this expression you are calculating the MTA for the distinct endpoint contacted per month.

After this, you will also have all the required fields to create your total cost chart of endpoint per campaign. In this case, use the fields pinpoint_campaign_id, calculated field that you created earlier and event_timestamp.

Example:

In this example, you can see the MTA cost in USD x Amazon Pinpoint Campaign ID between April and May 2021.

Some customers usually have tens or hundreds of campaigns, on this case you can use the Filter option in the navigation pane to a specify a range of date.

Optional: If you prefer you can combine the email and MTA cost in the same Analyses and Dashboard.

Add more datasets in the same Analyses and Dashboard

1. Back to the Amazon Quicksight main page.

2. In the navigation page, choose Analyses.

3. Choose the email cost Analyses that you created on section Create an Amazon QuickSight dashboard.

4. Choose the pencil icon on Dataset option near to the Navigation page.

5. Choose add dataset.

6. In the Choose dataset to add dialog box, choose the dataset you created on section Create a Dataset for MTA cost.

7. Choose Select.

Now you can create each parameter, control and calculated field per dataset on the same Analyses and publish all charts on same dashboard.

Cleanup

To avoid incurring charges, navigate to AWS Cloudformation console and delete the stack that you used on Digital User Engagement Events Database solutions procedure.

After the stack is deleted, you also need to delete your dashboards, analyses and datasets on Amazon Quicksight. You can also delete the stream events data in your Amazon S3 bucket.

Conclusion

In this blog, we used the total cost of email sent and endpoints to create the charts, but it is possible to obtain several analyses in Quicksight using the views that became available in the Digital User Engagement Events Database solution, such as costs for push notifications and other types of channels.

Also try creating dashboards with other Amazon Pinpoint channels

To do this, use this same procedure, explore the view campaign_send to find all data about other channels and modify the SQL queries on Amazon Quicksight to create your dashboards.


About the Author

Rafael Rodrigues is an Enterprise Solution Architect for AWS based in Sao Paulo, Brazil. He helps customers innovate with modern IT architecture on cloud computing.

Amazon Simple Email Service Celebrates 50 Years of Email

Post Syndicated from Matt Strzelecki original https://aws.amazon.com/blogs/messaging-and-targeting/amazon-simple-email-service-celebrates-50-years-of-email/

Email as we know it turns 50 years old this month (October 2021). The first email sent over a network — the beginning of email as we use it today — was sent in October 1971, by MIT graduate Ray Tomlinson (April 23, 1941–March 5, 2016). Tomlinson was the first to use the @ symbol to identify a message recipient on a remote computer system. Using this address format, he became the first person to send an email between two computers. That first email traveled 10 feet between two computers in Cambridge, Massachusetts. Tomlinson stated when interviewed that the first email was “something like QWERTYUIOP”.

Tomlinson leveraged existing software at the time, including SNDMSG and CPYNET, which allowed people to send messages to others who used the same computer, to send the first email over a network – back then multiple users would share computers, rather than having their own dedicated computers. His work enabled the exchange of messages between computers for the first time. Creating email was a side project at work for Tomlinson, and when he showed his work to another employee for the first time, he reportedly said: “Don’t tell anyone! This isn’t what we’re supposed to be working on.”

Ray Tomlinson was inducted into the Internet Hall of Fame in 2012, and his work is ranked fourth in Boston Globe’s top 150 MIT-related “Ideas, Inventions, and Innovators”.

According to the Guinness Book of Records, the first unsolicited email was sent in May 1978 to 397 recipients advertising an upcoming a product demonstration of computers. That’s right—spam is almost as old as email itself! In 1991, the first email was sent from space by astronauts on the NASA shuttle Atlantis. That message began with “Hello Earth!” and was delivered to Mission Control at the Johnson Space Center in Houston, Texas.

Over the past 50 years, there’s been a lot of firsts in email. For us at Amazon Simple Email Service (Amazon SES), our email first was when we launched our service back in January 2011. We initially started as a service that delivered email for Amazon.com, and grew over time into launching as a public service in Amazon Web Services (AWS).

Customers told us that building large-scale email solutions to send marketing and transactional messages was often a complex and costly challenge for businesses. Amazon SES eliminates these challenges and enables businesses to benefit from the years of experience and sophisticated email infrastructure Amazon.com has built to serve its own large-scale customer base. With Amazon.com being our first customer, from day one – scalability, reliability, and deliverability have been our highest priorities. This same service has also powered the email sending capabilities of Amazon Pinpoint since 2017, as well as email-related features in several other AWS services.

Today, Amazon SES is a cost-effective, flexible, and scalable email service that enables developers to send mail from within any application – supporting multiple email use cases, including transactional, marketing, or mass email communications, as well as inbound email.

We encourage our readers to share their own stories of their email firsts, or any other interesting email anecdotes. #QWERTYUIOP #50yrsofemail

How to use domain with Amazon SES in multiple accounts or regions

Post Syndicated from Leonardo Azize original https://aws.amazon.com/blogs/messaging-and-targeting/how-to-use-domain-with-amazon-ses-in-multiple-accounts-or-regions/

Sometimes customers want to use their email domain with Amazon Simples Email Service (Amazon SES) across multiple accounts, or the same account but across multiple regions.

For example, AnyCompany is an insurance company with marketing and operations business units. The operations department sends transactional emails every time customers perform insurance simulations. The marketing department sends email advertisements to existing and prospective customers. Since they are different organizations inside AnyCompany, they want to have their own Amazon SES billing. At the same time, they still want to use the same AnyCompany domain.

Other use-cases include customers who want to setup multi-region redundancy, need to satisfy data residency requirements, or need to send emails on behalf of several different clients. In all of these cases, customers can use different regions, in the same or across different accounts.

This post shows how to verify and configure your domain on Amazon SES across multiple accounts or multiple regions.

Overview of solution

You can use the same domain with Amazon SES across multiple accounts or regions. Your options are: different accounts but the same region, different accounts and different regions, and the same account but different regions.

In all of these scenarios, you will have two SES instances running, each sending email for example.com domain – let’s call them SES1 and SES2. Every time you configure a domain in Amazon SES it will generate a series of DNS records you will have to add on your domain authoritative DNS server, which is unique for your domain. Those records are different for each SES instance.

You will need to modify your DNS to add one TXT record, with multiple values, for domain verification. If you decide to use DomainKeys Identified Mail (DKIM), you will modify your DNS to add six CNAME records, three records from each SES instance.

When you configure a domain on Amazon SES, you can also configure a MAIL FROM domain. If you decide to do so, you will need to modify your DNS to add one TXT record for Sender Policy Framework (SPF) and one MX record for bounce and complaint notifications that email providers send you.

Furthermore, your domain can be configured to support DMAC for email spoofing detection. It will rely on SPF or DKIM configured above. Below we walk you through these steps.

  • Verify domain
    You will take TXT values from both SES1 and SES2 instances and add them in DNS, so SES can validate you own the domain
  • Complying with DMAC
    You will add a TXT value with DMAC policy that applies to your domain. This is not tied to any specific SES instance
  • Custom MAIL FROM Domain and SPF
    You will take TXT and MX records related from your MAIL FROM domain from both SES1 and SES2 instances and add them in DNS, so SES can comply with DMARC

Here is a sample matrix of the various configurations:

Two accounts, same region Two accounts, different regions One account, two regions
TXT records for domain verification*

1 record with multiple values

_amazonses.example.com = “VALUE FROM SES1”
“VALUE FROM SES2”

CNAMES for DKIM verification

6 records, 3 from each SES instance

record1-SES1._domainkey.example.com = VALUE FROM SES1
record2-SES1._domainkey.example.com = VALUE FROM SES1
record3-SES1._domainkey.example.com = VALUE FROM SES1
record1-SES2._domainkey.example.com = VALUE FROM SES2
record2-SES2._domainkey.example.com = VALUE FROM SES2
record3-SES2._domainkey.example.com = VALUE FROM SES2

TXT record for DMARC

1 record. It is not related to SES instance or region

_dmarc.example.com = DMARC VALUE

MAIL FROM MX record to define message sender for SES

1 record for entire region

mail.example.com = 10 feedback-smtp.us-east-1.amazonses.com

2 records, one for each region

mail1.example.com = 10 feedback-smtp.us-east-1.amazonses.com
mail2.example.com = 10 feedback-smtp.eu-west-1.amazonses.com

MAIL FROM TXT record for SPF

1 record for entire region

mail.example.com = “v=spf1 include:amazonses.com ~all”

2 records, one for each region

mail1.example.com = “v=spf1 include:amazonses.com ~all”
mail2.example.com = “v=spf1 include:amazonses.com ~all”

* Considering your DNS supports multiple values for a TXT record

Setup SES1 and SES2

In this blog, we call SES1 your primary or existing SES instance. We assume that you have already setup SES, but if not, you can still follow the instructions and setup both at the same time. The settings on SES2 will differ slightly, and therefore you will need to add new DNS entries to support the two-instance setup.

In this document we will use configurations from the “Verification,” “DKIM,” and “Mail FROM Domain” sections of the SES Domains screen and configure SES2 and setup DNS correctly for the two-instance configuration.

Verify domain

Amazon SES requires that you verify, in DNS, your domain, to confirm that you own it and to prevent others from using it. When you verify an entire domain, you are verifying all email addresses from that domain, so you don’t need to verify email addresses from that domain individually.

You can instruct multiple SES instances, across multiple accounts or regions to verify your domain.  The process to verify your domain requires you to add some records in your DNS provider. In this post I am assuming Amazon Route 53 is an authoritative DNS server for example.com domain.

Verifying a domain for SES purposes involves initiating the verification in SES console, and adding DNS records and values to confirm you have ownership of the domain. SES will automatically check DNS to complete the verification process. We assume you have done this step for SES1 instance, and have a _amazonses.example.com TXT record with one value already in your DNS. In this section you will add a second value, from SES2, to the TXT record. If you do not have SES1 setup in DNS, complete these steps twice, once for SES1 and again for SES2. This will prove to both SES instances that you own the domain and are entitled to send email from them.

Initiate Verification in SES Console

Just like you have done on SES1, in the second SES instance (SES2) initiate a verification process for the same domain; in our case example.com

  1. Sign in to the AWS Management Console and open the Amazon SES console.
  2. In the navigation pane, under Identity Management, choose Domains.
  3. Choose Verify a New Domain.
  4. In the Verify a New Domain dialog box, enter the domain name (i.e. example.com).
  5. If you want to set up DKIM signing for this domain, choose Generate DKIM Settings.
  6. Click on Verify This Domain.
  7. In the Verify a New Domain dialog box, you will see a Domain Verification Record Set containing a Name, a Type, and a Value. Copy Name and Value and store them for the step below, where you will add this value to DNS.
    (This information is also available by choosing the domain name after you close the dialog box.)

To complete domain verification, add a TXT record with the displayed Name and Value to your domain’s DNS server. For information about Amazon SES TXT records and general guidance about how to add a TXT record to a DNS server, see Amazon SES domain verification TXT records.

Add DNS Values for SES2

To complete domain verification for your second account, edit current _amazonses TXT record and add the Value from the SES2 to it. If you do not have an _amazonses TXT record create it, and add the Domain Verification values from both SES1 and SES2 to it. We are showing how to add record to Route 53 DNS, but the steps should be similar in any DNS management service you use.

  1. Sign in to the AWS Management Console and open the Amazon Route 53 console.
  2. In the navigation pane, choose Hosted zones.
  3. Choose the domain name you are verifying.
  4. Choose the _amazonses TXT record you created when you verified your domain for SES1.
  5. Under Record details, choose Edit record.
  6. In the Value box, go to the end of the existing attribute value, and then press Enter.
  7. Add the attribute value for the additional account or region.
  8. Choose Save.
  9. To validate, run the following command:
    dig TXT _amazonses.example.com +short
  10. You should see the two values returned:
    "4AjLMzUu4nSjrz4QVqDD8rXq8X2AHr+JhGSl4foiMmU="
    "abcde12345Sjrz4QVqDD8rXq8X2AHr+JhGSl4foiMmU="

Please note:

  1. if your DNS provider does not allow underscores in record names, you can omit _amazonses from the Name.
  2. to help you easily identify this record within your domain’s DNS settings, you can optionally prefix the Value with “amazonses:”.
  3. some DNS providers automatically append the domain name to DNS record names. To avoid duplication of the domain name, you can add a period to the end of the domain name in the DNS record. This indicates that the record name is fully qualified and the DNS provider need not append an additional domain name.
  4. if your DNS server does not support two values for a TXT record, you can have one record named _amazonses.example.com and another one called example.com.

Finally, after some time SES will complete its validation of the domain name and you should see the “pending validation” change to “verified”.

Verify DKIM

DomainKeys Identified Mail (DKIM) is a standard that allows senders to sign their email messages with a cryptographic key. Email providers then use these signatures to verify that the messages weren’t modified by a third party while in transit.

An email message that is sent using DKIM includes a DKIM-Signature header field that contains a cryptographically signed representation of the message. A provider that receives the message can use a public key, which is published in the sender’s DNS record, to decode the signature. Email providers then use this information to determine whether messages are authentic.

When you enable DKIM it generates CNAME records you need to add into your DNS. As it generates different values for each SES instance, you can use DKIM with multiple accounts and regions.

To complete the DKIM verification, copy the three (3) DKIM Names and Values from SES1 and three (3) from SES2 and add them to your DNS authoritative server as CNAME records.

You will know you are successful because, after some time SES will complete the DKIM verification and the “pending verification” will change to “verified”.

Configuring for DMARC compliance

Domain-based Message Authentication, Reporting and Conformance (DMARC) is an email authentication protocol that uses Sender Policy Framework (SPF) and/or DomainKeys Identified Mail (DKIM) to detect email spoofing. In order to comply with DMARC, you need to setup a “_dmarc” DNS record and either SPF or DKIM, or both. The DNS record for compliance with DMARC is setup once per domain, but SPF and DKIM require DNS records for each SES instance.

  1. Setup “_dmarc” record in DNS for your domain; one time per domain. See instructions here
  2. To validate it, run the following command:
    dig TXT _dmarc.example.com +short
    "v=DMARC1;p=quarantine;pct=25;rua=mailto:[email protected]"
  3. For DKIM and SPF follow the instructions below

Custom MAIL FROM Domain and SPF

Sender Policy Framework (SPF) is an email validation standard that’s designed to prevent email spoofing. Domain owners use SPF to tell email providers which servers are allowed to send email from their domains. SPF is defined in RFC 7208.

To comply with Sender Policy Framework (SPF) you will need to use a custom MAIL FROM domain. When you enable MAIL FROM domain in SES console, the service generates two records you need to configure in your DNS to document who is authorized to send messages for your domain. One record is MX and another TXT; see screenshot for mail.example.com. Save these records and enter them in your DNS authoritative server for example.com.

Configure MAIL FROM Domain for SES2

  1. Open the Amazon SES console at https://console.aws.amazon.com/ses/.
  2. In the navigation pane, under Identity Management, choose Domains.
  3. In the list of domains, choose the domain and proceed to the next step.
  4. Under MAIL FROM Domain, choose Set MAIL FROM Domain.
  5. On the Set MAIL FROM Domain window, do the following:
    • For MAIL FROM domain, enter the subdomain that you want to use as the MAIL FROM domain. In our case mail.example.com.
    • For Behavior if MX record not found, choose one of the following options:
      • Use amazonses.com as MAIL FROM – If the custom MAIL FROM domain’s MX record is not set up correctly, Amazon SES will use a subdomain of amazonses.com. The subdomain varies based on the AWS Region in which you use Amazon SES.
      • Reject message – If the custom MAIL FROM domain’s MX record is not set up correctly, Amazon SES will return a MailFromDomainNotVerified error. Emails that you attempt to send from this domain will be automatically rejected.
    • Click Set MAIL FROM Domain.

You will need to complete this step on SES1, as well as SES2. The MAIL FROM records are regional and you will need to add them both to your DNS authoritative server.

Set MAIL FROM records in DNS

From both SES1 and SES2, take the MX and TXT records provided by the MAIL FROM configuration and add them to the DNS authoritative server. If SES1 and SES2 are in the same region (us-east-1 in our example) you will publish exactly one MX record (mail.example.com in our example) into DNS, pointing to endpoint for that region. If SES1 and SES2 are in different regions, you will create two different records (mail1.example.com and mail2.example.com) into DNS, each pointing to endpoint for specific region.

Verify MX record

Example of MX record where SES1 and SES2 are in the same region

dig MX mail.example.com +short
10 feedback-smtp.us-east-1.amazonses.com.

Example of MX records where SES1 and SES2 are in different regions

dig MX mail1.example.com +short
10 feedback-smtp.us-east-1.amazonses.com.

dig MX mail2.example.com +short
10 feedback-smtp.eu-west-1.amazonses.com.

Verify if it works

On both SES instances (SES1 and SES2), check that validations are complete. In the SES Console:

  • In Verification section, Status should be “verified” (in green color)
  • In DKIM section, DKIM Verification Status should be “verified” (in green color)
  • In MAIL FROM Domain section, MAIL FROM domain status should be “verified” (in green color)

If you have it all verified on both accounts or regions, it is correctly configured and ready to use.

Conclusion

In this post, we explained how to verify and use the same domain for Amazon SES in multiple account and regions and maintaining the DMARC, DKIM and SPF compliance and security features related to email exchange.

While each customer has different necessities, Amazon SES is flexible to allow customers decide, organize, and be in control about how they want to uses Amazon SES to send email.

Author bio

Leonardo Azize Martins is a Cloud Infrastructure Architect at Professional Services for Public Sector.

His background is on development and infrastructure for web applications, working on large enterprises.

When not working, Leonardo enjoys time with family, read technical content, watch movies and series, and play with his daughter.

Contributor

Daniel Tet is a senior solutions architect at AWS specializing in Low-Code and No-Code solutions. For over twenty years, he has worked on projects for Franklin Templeton, Blackrock, Stanford Children’s Hospital, Napster, and Twitter. He has a Bachelor of Science in Computer Science and an MBA. He is passionate about making technology easy for common people; he enjoys camping and adventures in nature.


Amazon Pinpoint achieves HITRUST certification

Post Syndicated from Srini Sekaran original https://aws.amazon.com/blogs/messaging-and-targeting/amazon-pinpoint-achieves-hitrust-certification/

Securing the storage and flow of data is increasingly critical to the healthcare industry. More stringent security and compliance needs, along with mandates like HIPAA, help the industry mitigate risk but navigating multiple frameworks makes the process complex.

The Health Information Trust Alliance Common Security Framework (HITRUST CSF) reduces complexity for organizations by providing a single framework to create a comprehensive set of baseline security and privacy controls. HITRUST CSF leverages nationally and international standards: GDPR, ISO, NIST, PCI, and HIPAA. As a result, many healthcare networks and hospitals view HITRUST as a widely accepted framework to reduce risk.

Today, we’re announcing that Amazon Pinpoint has achieved HITRUST CSF v9.4, helping our customers in the healthcare industry, such as Care Connectors, continue to engage with their constituents at scale—securely.

Using HITRUST certified services means you can take a consistent approach to managing compliance as well as assessing and reporting against multiple sets of requirements. This can also help in getting your own HITRUST certification.

For more information on HITRUST and what it means for your organization, visit https://aws.amazon.com/compliance/hitrust/.

For more on how you can engage with your constituents reliably, securely, and at scale, visit https://aws.amazon.com/pinpoint/.

Amazon SES configuration for an external SMTP provider with Auth0

Post Syndicated from Raghavarao Sodabathina original https://aws.amazon.com/blogs/messaging-and-targeting/amazon-ses-configuration-for-an-external-smtp-provider-with-auth0/

Many organizations are using an external identity provider to manage user identities. With an identity provider (IdP), customers can manage their user identities outside of AWS and give these external user identities permissions to use AWS resources in customer AWS accounts. The most common requirement when setting up an external identity provider is sending outgoing emails, such as verification e-mails using a link or code, welcome e-mails, MFA enrollment, password changes and blocked account e-mails. This said, most external identity providers’ existing e-mail infrastructure is limited to testing e-mails only and customers need to set up an external SMTP provider for outgoing e-mails.

Managing and running e-mail servers on-premises or deploying an EC2 instance dedicated to run a SMTP server is costly and complex. Customers have to manage operational issues such as hardware, software installation, configuration, patching, and backups.

In this blog post, we will provide step-by-step guidance showing how you can set up Amazon SES as an external SMTP provider with Auth0 to take advantage of Amazon SES capabilities like sending email securely, globally, and at scale.

Amazon Simple Email Service (SES) is a cost-effective, flexible, and scalable email service that enables developers to send email from within any application. You can configure Amazon SES quickly to support several email use cases, including transactional, marketing, or mass email communications.

Auth0 is an identity provider that provides flexible, drop-in solution to add authentication and authorization services (Identity as a Service, or IDaaS) to customer applications. Auth0’s built-in email infrastructure should be used for testing emails only. Auth0 allows you to configure your own SMTP email provider so you can more completely manage, monitor, and troubleshoot your email communications.

Overview of solution

In this blog post, we’ll show you how to perform the below steps to complete the integration between Amazon SES and Auth0

  • Amazon SES setup for sending emails with SMTP credentials and API credentials
  • Auth0 setup to configure Amazon SES as an external SMTP provider
  • Testing the Configuration

The following diagram shows the architecture of the solution.

Prerequisites

Amazon SES Setup

As first step, you must configure a “Sandbox” account within Amazon SES and verify a sender email address for initial testing. Once all the setup steps are successful, you can convert this account into Production and the SES service will be accepting all emails and for more details on this topic, please see the Amazon SES documentation.

1. Log in to the Amazon SES console and choose the Verify a New Email Address button.

2. Once the verification is completed, the Verification Status will change to green under Verification Status  

3. You need to create SMTP credentials which will be used by Auth0 for sending emails.  To create the credentials, click on SMTP settings from left menu and press the Create My SMTP Credentials button.

Please note down the Server Name as it will be required during Auth0 setup.

4. Enter a meaningful username like autho-ses-user and click on Create bottom in the bottom-right page

5. You can see the SMTP username and password on the screen and also, you can download SMTP credentials into a csv file as shown below.

Please note the SMTP User name and SMTP Password as it will be required during Auth0 setup.

6. You need Access key ID and Secret access key of the SES IAM user autho-ses-user as created in step 3 for configuring Amazon SES with API credentials in Auth0.

  • Navigate to the AWS IAM console and click on Users in left menu
  • Double click on autho-ses-user IAM user and then, click on Security credentials

  • Choose on Create access key button to create new Access key ID and Secret access key. You can see the Access key ID and Secret access key on the screen and also, you can download them into a csv file as shown below.

Please note down the Access key ID and Secret access key as it will be required during Auth0 setup.

Auth0 Setup

To ensure that emails can be sent from Auth0 to your Amazon SES SMTP, you need to configure Amazon SES details into Auth0. There are two ways you can use Amazon SES credentials with Auth0, one with SMTP and the other with API credentials.

1. Navigate to auth0 Dashboard, Select Branding and then, Email Provider from left menu. Enable Use my own email provider button as shown below.

2. Let us start with Auth0 configuration with Amazon SES SMTP credentials.

  • Click on SMTP Provider option as shown below

  • Provide below SMTP Provider settings as shown below and then, click on Save button complete the setup.
    • From: Your from email address.
    • Host: Your Amazon SES Server name as created in step 2 of Amazon SES setup. For this example, it is email-smtp.us-west-1.amazonaws.com
    • Port: 465
    • User Name: Your Amazon SES SMTP user name as created in step 4 of Amazon SES setup.
    • Password: Your Amazon SES SMTP password as created in step 4 of Amazon SES setup.

  • Choose on Send test email button to test Auth0 configuration with Amazon SES SMTP credentials.
  • You can look at Autho logs to validate your test as shown below.

  • If you have configured it successfully, you should receive an email from auth0 as shown below.

3. Now, complete Auth0 configuration with Amazon SES API credentials.

  • Click on Amazon SES as shown below

  • Provide Amazon SES settings as shown below and then, click on Save button complete the setup.
    • From: Your from email address.
    • KeyKey Id: Your autho-ses-user IAM user’s Access key ID as created in step 5 of Amazon SES setup.
    • Secret access key: Your autho-ses-user IAM user’s Secret access key as created in step 5 of Amazon SES setup.
    • Region: For this example, choose us-west-1.

  • Click on the Send test email button to test Auth0 configuration with Amazon SES API credentials.
  • You can look at Auth0 logs and If you have configured successfully, you should receive an email from auth0 as illustrated in Auth0 configuration with Amazon SES SMTP credentials section.

Conclusion

In this blog post, we have demonstrated how to setup Amazon SES as an external SMTP email provider with Auth0 as Auth0’s built-in email infrastructure is limited for testing emails. We have also demonstrated how quickly and easily you can setup Amazon SES with SMTP credentials and API credentials. With this solution you can setup your own Amazon SES with Auth0 as an email provider. You can also get a JumpStart by checking the Amazon SES Developer guide, which provides guidance on Amazon SES that provides an easy, cost-effective way for you to send and receive email using your own email addresses and domains.

About the authors

Raghavarao Sodabathina

Raghavarao Sodabathina

Raghavarao Sodabathina is an Enterprise Solutions Architect at AWS. His areas of focus are Data Analytics, AI/ML, and the Serverless Platform. He engages with customers to create innovative solutions that address customer business problems and accelerate the adoption of AWS services. In his spare time, Raghavarao enjoys spending time with his family, reading books, and watching movies.


Pawan Matta

Pawan Matta is a Boston-based Gametech Solutions Architect for AWS. He enjoys working closely with customers and supporting their digital native business. His core areas of focus are management and governance and cost optimization. In his free time, Pawan loves watching cricket and playing video games with friends.

Apple Mail’s iOS15 Privacy Protection Impact to Senders

Post Syndicated from Matt Strzelecki original https://aws.amazon.com/blogs/messaging-and-targeting/apple-mails-ios15-privacy-protection-impact-to-senders-2/

On June 7th at Apple’s Worldwide Developer’s Conference (WWDC 2021) Apple announced that Apple Mail users can now choose to use Apple Mail Privacy Protection. Apple Mail Privacy Protection will allow iOS to privately load remote message content which will hide recipient’s mail activity information like IP and user agent information, including geolocation and device(s) used to engage with the message. Apple Mail Privacy Protection will eliminate the open as being a reliable metric to evaluate user engagement on the sender’s side as all tracking pixels and images will be cached and fired as it hits Apple Mail. Apple is doing this in order to protect user information and increase privacy while also helping to facilitate a richer user experience as Apple Mail user can confidently open, read and engage with messages without all their email interactions are being tracked through remote images and tracking pixels. This will result in all messages that have the Apple Mail Privacy Protection enabled to register an open regardless of whether the recipient has read the email message or not. The end user will also have more confidence in the security of the message including its links.

When a user starts Apple Mail on their iOS device, emails to that user are initiated for download to their device but are first cached by Apple including all images and pixels, to a proxy server that does not expose individual recipient IP addresses but rather a generic IP of the Apple Cache. This happens regardless of if the user actually opens the mail at that time or not. If the user opens the email it pulls the message from the Apple Cache rather than from the original sending source, typically an email service provider (ESP). As a result, senders will not have open tracking insight as all tracking images and pixels will fire as the messages are downloaded to the Apple Cache.

Apple Mail Privacy Protection will apply to email opened on the Apple Mail app. If a user engages messages through another mail application such as the Gmail app, Apple Mail Privacy Protection will not be applied. Apple Mail Privacy Protection is not enabled by default but as you launch the Apple Mail app in iOS 15 initially, the user will be prompted to enable privacy protection which most users will choose to turn on.

Impact to Marketers

There will be a major impact to marketers who rely heavily on open rates as a conversion metric for user engagement as open data will be skewed as messages containing tracking links will fire regardless of if a recipient actually engages with the message or not. However, other data points and user activity will still be available such as click-through rates, onsite activity, and conversion history. These types of metrics will need to be relied upon to supplement open tracking data. Additionally, email deliverability best practices will be more important than ever to help maintain healthy lists and a responsive user base. Best practices such as confirmed opt-in list building, list maintenance & hygiene, consistent sending patterns and cadence, and honoring opt-outs and complaints will be even more important for marketers to adhere to as they adjust to the new Mail Privacy Protection feature.

While Mail Privacy Protection reduces visibility of open rates there are benefits to the user experience as user trust increases in the messages received through Apple Mail. For example, previous users who chose to receive text-only based messages to protect their privacy will now receive the more rich content of the full message providing a better user experience while engaging with the message. Full load of images and content will be sent to the recipients who will have a much higher sense of security in reading/ingesting/actioning the email and its content. Prior to Apple Mail Privacy Protection there could be skepticism of URLs and links within the messages leading to more deletes or false positive, potentially also resulting in more complaints and/or unsubscribes.

There are other benefits of Apple’s Mail Privacy Protection to marketers such as validation of email addresses. Since emails are cached as the messages are initiated for download to a device, and as a result it is downloaded to the Apple Cache and the tracking image or pixel is fired, it validates the existence of that email address. This does not mean you should use this feature as a validation tool as mailbox providers such as Gmail will still evaluate senders in part on list hygiene and high invalid requests will still lead to negative sender reputation with those providers. Confirmed opt-in practices are going to be even more crucial for managing healthy and long-term lists for marketers than it was prior to Apple Mail Privacy Protection. If a marketer is unsure about opt-in status, look into creating a re-confirmation campaign and only add back in recipients that re-confirm the opt-in by clicking a confirmation link in the message.

Conclusion

Email is still the most used tool to communicate whether that’s business-to-business, business-to-consumer or peer-to-peer, especially when it comes to marketing. Marketers need to continue to evolve and be creative when sending messages to their recipients because email, as it it relates to privacy & security, will continue evolve and leave marketers who don’t keep pace behind. While Apple’s Mail Privacy Protection reduces open rate visibility it does provide its user base with more security and confidence in messages passed to their devices. That confidence can allow marketers to focus on developing richer content for a better user experience and drive conversions rather than just opens.

Developing and managing a list with proper confirmed opt-in methods are crucial to developing long-term email lists and the trust of your recipients. The implementation of Apple Mail Privacy Protection reinforces this principle.

Lastly, email privacy & security will continue to advance forward and marketers along with email service providers should not be trying to “get around” these privacy features, rather they need to understand that these features are intended to help the end user and your customers. Work within the ideology of providing the customers what they want to receive and nothing more or less, and you can help your emails thrive. Stay tuned for more updates as they become available.

Orchestrating and Monitoring Multichannel Messaging with Amazon Pinpoint

Post Syndicated from Hamilton Oliveira original https://aws.amazon.com/blogs/messaging-and-targeting/orchestrating-and-monitoring-multichannel-messaging-with-amazon-pinpoint/

The union of marketing and technology (MarTech) has contributed to making communications and customers interactions more dynamic and personalized. In a multichannel environment with increasingly connected customers, it is essential for a MarTech system to orchestrate a digital marketing strategy using customers’ preferred channels in addition to monitoring their effectiveness during these engagements.

Companies in a variety of industries, from financial and retail to manufacturing seek to communicate with customers in the most efficient way, at the right time and channels. One way to facilitate this communication is to engage the customer in a personalized multi-step experience, or journeys. Amazon Pinpoint is a tool that gives marketers the flexibility to create multi-channel campaigns and monitor end user interactions such as email opens and clicks.

In this blog post we’ll go deeper into how Amazon Pinpoint can be configured for customer interactions and orchestration. We’ll also learn how to monitor and observe the results of these interactions through other AWS services that complement the MarTech stack.

Enabling Multi-Channel on Amazon Pinpoint

Sign in to the Amazon Pinpoint console and choose a region where the service is available. To organize the settings, campaigns, segments, and data, marketers can create a project on Amazon Pinpoint. To do this, simply specify a name for the project in the Get started box and select Create a Project.

After creating the project, a number of options related to the newly created project will appear on the menu on the left.

The first step to getting a project running is to activate the desired channels. A channel represents the platform through which you engage your audience segment with messages.  Currently Amazon Pinpoint supports push notifications, email, SMS, voice and the creation of custom channels such as WhatsApp, Facebook Messenger or any other service that allows API integrations. In this blog post we will use the native Amazon Pinpoint channels: email, push notifications and SMS.

Let’s start by configuring the e-mail channel. From the menu related to the newly created project, navigate to Settings → Email and follow step 5 of the Creating an Amazon Pinpoint project with email support.

After configuring the email channel, we will start with configuring the SMS channel by navigating to Settings → SMS and Voice. Follow the walkthrough available in Setting up the Amazon Pinpoint SMS channel from the step 5. Then activate a phone number for the SMS service by following the steps on Requesting a number.

Note that Amazon Pinpoint supports more types of phone numbers in the United States than in other countries. Please review the available numbers within the United States and other countries. For testing in the United States a Toll Free Number (TFN) can be provisioned to the account immediately.

Remember that the usage of AWS services may incur costs and for detailed information about the costs regarding each service, by region, please visit this .

(Optional) Activate the push notification channel by going to, Settings → Push notifications and follow from Step 5 of the guide Setting up Amazon Pinpoint mobile push channels.

At the end of the settings, when accessing the Settings menu of the created project, you will see a similar screen like the following image.

We’ve now finished the channel configuration and are ready to move onto building Amazon Pinpoint Journeys.

Configuring Multi-Channel Experiences on Amazon Pinpoint Journeys

Now, let’s create a multichannel journey based on an external event. A journey is a personalized engagement experience made up of multiple steps across multiple channels. For example, in the case of a financial institution that wants to communicate with a customer over their preferred channel to notify the customer to activate a travel notice.

To simulate this use case, we will insert some endpoints. An Endpoint represents a destination that you can send messages, and a user can have one or more endpoints.

The example below is a json-document with 4 endpoints for 3 users, since the same user has two endpoints for two different channels. You should change the addresses to your own test email addresses, phone numbers, and push tokens, before using the example below.

Note that if your account is still in the sandbox these will need to be verified email addresses.

If you only have access to a single email address you can use labels by adding a plus sign (+) followed by a string of text after the local part of the address and before the at (@) sign.  For example: [email protected] and [email protected]

Then, the following steps:

  1. Create a json file based on the example below.
  2. Update the Address fields with your test email addresses and phone numbers.
  3. Run AWS CLI to import the JSON file created in step 1.
{
    "Item": [
        {
            "ChannelType": "EMAIL",
            "Address": "[email protected]",
            "Attributes": {
                "PreferredChannel": ["N"]
            },
            "Id": "example_endpoint_1",
            "User": {
                "UserId": "example_user_1",
                "UserAttributes": {
                    "FirstName": ["Richard"],
                    "LastName": ["Roe"]
                }
            }
        },
        {
            "ChannelType": "SMS",
            "Address": "+16145550100",
            "Attributes": {
                "PreferredChannel": ["Y"]
            },
            "Id": "example_endpoint_1b",
            "User": {
                "UserId": "example_user_1",
                "UserAttributes": {
                    "FirstName": ["Richard"],
                    "LastName": ["Roe"]
                }
            }
        },
        {
            "ChannelType": "SMS",
            "Address": "+16145550102",
            "Attributes": {
                "PreferredChannel": ["Y"]
            },
            "Id": "example_endpoint_2",
            "User": {
                "UserId": "example_user_2",
                "UserAttributes": {
                    "FirstName": ["Mary"],
                    "LastName": ["Major"]
                }
            }
        },
        {
            "ChannelType": "APNS",
            "Address": "1a2b3c4d5e6f7g8h9i0j1k2l3m4n5o6p7q8r9s0t1u2v3w4x5y6z7a8b9c0d1e2f",
            "Attributes": {
                "PreferredChannel": ["Y"]
            },
            "Id": "example_endpoint_3",
            "User": {
                "UserId": "example_user_3",
                "UserAttributes": {
                    "FirstName": ["Wang"],
                    "LastName": ["Xiulan"]
                }
            }
        }
    ]
}

Once the endpoints are inserted, let’s create 3 segments to represent each preferred channel — Email, Push Notifications, and SMS:

  1. Navigate to your project in the Amazon Pinpoint Console, choose Segments and then Create a segment.
  2. Select Build a segment.
  3. Provide a name for your segment, for example, SMS Preferred.
  4. Configure Segment Group 1 following the steps below to filter the endpoints where the preferred channel is SMS.
    1. Under Base segments, select Include any audiences
    2. Choose Add criteria and choose Channel Types → SMS.
    3. Choose Add filter, select Custom Endpoint AttributesPreferredChannel, Operator Is, and on the dropdown choose Y.

Follow the same steps above for the Push and Email channels, choosing each of these channels in step 4.2. When you finish the configuration, you will have a result similar to the one presented below.

Next, let’s create the message templates for each of the channels. Follow the step-by-step in the User Guide for each of the following channels:

You should see the following:

Next, lets create the journey to notify users when a travel notice event occurs.

  1. Under your project Amazon Pinpoint Console, navigate to Journeys and choose Create journey.
    1. If this is your first time creating a Journey, click through the help messages
  2. Name your journey Travel Notice.
  3. Choose Set entry condition
    1. In Choose how to start the journey, select: Add participants when they perform an activity.
    2. In the field Events enter TravelNoticeAlert
    3. Choose Save.
  4. Click Add activity under the Journey Entry box and select Multivariate split
    1. Add 2 new branches by selecting Add Another Branch
    2. For the Branch A, under Choose a condition type, select Segment and for Segments choose E-mail Preferred
    3. For the Branch B, under Choose a condition type select Segment and for Segments choose SMSPreferred
    4. For the Branch C, under Choose a condition type select Segment and for Segments choose Push Preferred
    5. Leave everything else as the default values and select Save
  5. Finally, add a message sending activity for each segment.
    1. Under Branch A, select Add Activity, choose Send an email, then Choose an email template and select the template you created before for email channel.
    2. Choose Save.
    3. Under Branch B, select Add Activity, choose Send an SMS message, then Choose an SMS template and select the template you created before for SMS channel.
    4. Under Origination phone number, select the phone you configured when creating the SMS Channel
    5. Choose Save.
    6. Under Branch C, select Add Activity, choose Send a push notification activity, then Choose a push notification template and select the template you created before for push channel.
    7. Choose Save.
    8. When you complete these steps your journey will have a similar structure to the one presented below.
  6. Choose
    1. Under Review your journey choose Next, Mark as reviewed and finally Publish.
    2. Wait for the Journey to begin before continuing.

Installing Event Monitoring Components on Amazon Pinpoint

We can monitor and analysys the events generated by Amazon Pinpoint in real time by installing the Digital User Engagement Events Database solution, which is a reference implementation that installs the necessary services to track and query Amazon Pinpoint events.

To install this solution, follow the walkthrough available at Digital User Engagement Events Database Automated Deployment making sure to select the same region you used to configure Pinpoint earlier.

In Step 1. Launch the stack, for the Amazon Pinpoint Project ID field enter the Project ID that you created earlier, and leave the other fields as default. Wait for the end of the solution deployment. It will create a bucket in Amazon S3, a delivery stream in Amazon Kinesis Firehose, and a database and views in Amazon Athena, plus an AWS Lambda function responsible for partitioning the data.

Remember that the usage of AWS services may incur costs and for detailed information about the costs regarding the Digital User Engagement Events Database, please refer to the solution cost page.

Validating Your Multi-Channel Journey

Finally, we will use the commands below, to validate the event that triggers the journey and monitoring.

Note that we are using an Endpoint ID and not User ID.  Amazon Pinpoint will see that the endpoint is associated with a user and as such use the appropriate Preferred Channel for that user.

For the following commands you can use AWS CLI.

aws pinpoint put-events\
--application-id application-id\
--events-request '{"BatchItem": { "example_endpoint_1": { "Endpoint": {}, "Events": { "TravelNoticeAlert": {"EventType": "TravelNoticeAlert", "Timestamp": "2021-03-09T08:00:00Z"}}}}}'
aws pinpoint put-events\
--application-id application-id\
--events-request '{"BatchItem": { "example_endpoint_2": { "Endpoint": {}, "Events": { "TravelNoticeAlert": {"EventType": "TravelNoticeAlert", "Timestamp": "2021-03-09T08:00:00Z"}}}}}'
aws pinpoint put-events\
--application-id application-id\
--events-request '{"BatchItem": { "example_endpoint_3": { "Endpoint": {}, "Events": { "TravelNoticeAlert": {"EventType": "TravelNoticeAlert", "Timestamp": "2021-03-09T08:00:00Z"}}}}}'

application-id is your Amazon Pinpoint project ID. It can be accessed within AWS Pinpoint Console.

The value for the EventType parameter is the same you defined during the configuration of the Event field within the journey. In our example the value is TravelNoticeAlert.

Monitoring the Events of Your Multi-Channel Journey

Amazon Pinpoint natively offers a set of dashboards that can be accessed through the Analytics menu. However, with the architecture proposed in this blogpost it is possible to extract more detailed analysis. Navigate to the Amazon Athena console.

  1. Choose the Database due_eventdb that was configured by the solution above.
  2. Under New query tab copy and paste the statement below and choose Run query. The statement below creates a view that returns all endpoints to which SMS messages have been sent, with the status of sending at the telephone carrier. For more information about Views, access the topic Working With Views in Amazon Athena User Guide. Note that you may need to configure an S3 Bucket to store Athena Query Results.
    CREATE OR REPLACE VIEW sms_carrier_delivery AS
    SELECT event_type,
            client.client_id,
            from_unixtime(event_timestamp/1000) event_date,
            attributes['journey_activity_id'] journey_activity_id,
            attributes['destination_phone_number'] destination_phone_number, 
            attributes['record_status'] record_status
    FROM "due_eventdb"."all_events"
    WHERE event_type = '_SMS.SUCCESS'
    ORDER BY event_timestamp
  3. Open a new tab, copy and paste the following query, and select Run query. The command below creates a view that returns all endpoints to which SMS were sent, the message type (transactional or promotional), and the cost of sending.
    CREATE OR REPLACE VIEW sms_pricing AS
    SELECT event_type,
            client.client_id,
            from_unixtime(event_timestamp/1000) event_date,
            attributes['destination_phone_number'] destination_phone_number, 
            attributes['message_type'] message_type,
            metrics.price_in_millicents_usd/100000 sms_message_price
    FROM "due_eventdb"."all_events"
    WHERE event_type = '_SMS.SUCCESS'
    ORDER BY event_timestamp

To see all of the events available please refer to the Events Database Data Dictionary.

Finally, let’s further explore other monitoring options by creating dashboards in Amazon Quicksight.

From the AWS console, go to Amazon Quicksight and, if necessary, sign up.

  1. Select the top left menu where your username is and then Manage QuickSight.
    1. Select Security & permissions
    2. On QuickSight access to AWS services, select Add or remove.
    3. Check the option Amazon Athena, access Next and in S3 S3 Buckets Linked To QuickSight Account.
      1. If the check box is clear, enable the check box next to Amazon S3.
      2. If the check box is already enabled, choose Details, and then choose Select S3 buckets.
    4. Check the S3 bucket created by the Digital User Engagement Events Database solution. If you have questions about the bucket name, check the Outputs tab for the value for the Dues3DataLakeName key of the CloudFormation stack you created.
    5. Select Finish and Update.
  2. Go back to the Amazon QuickSight home screen and select Datasets and then New dataset.
  3. Choose Athena.
  4. In Data source name field enter Pinpoint Dataset.
  5. Choose Validate connection, and Create data source.
    1. In the window Choose your table, in the Database: contain sets of tables select due_eventdb and the table sms_carrier_delivery.
    2. Select Edit/Preview data
    3. On the dataset definition screen press Save button.
  6. Choose Dataset
    1. Press the button New dataset.
    2. Scroll down to FROM EXISTING DATA SOURCES and access Pinpoint Dataset.
    3. Select Create dataset
    4. In the window Choose your table, in the Database: contain sets of tables select due_eventdb and the table sms_pricing.
    5. Select Edit/Preview data
    6. On the dataset definition screen press Save
    7. Repeat these steps again but select the journey_send table for the step
  7. Choose Analyses
    1. Press the button New analysis.
    2. For Your Datasets, choose journey_send and then access Create analysis. This view was created by Digital User Engagement Events Database solution.
    3. Under Field lists choose journey_send_status. Amazon QuickSight will draw a chart showing journeys events by status.
    4. Select the pen symbol next to Dataset and press the button Add dataset.
    5. Choose sms_carrier_delivery and Select.
    6. Choose the field record_status.
    7. Under Visual types, choose Pie chart. This chart will display message delivery status on your carrier.
    8. Press the pencil symbol next to Dataset and press the button Add dataset.
    9. Check sms_pricing and
    10. Choose sms_message_price and message_type
    11. Under Visual types, select Donut chart. This graph will display costs by transactional or promotional message type.

The final result will be something close to the one shown in the image below:

Conclusion

In this blogpost we walked through how to set up Amazon Pinpoint for an end-to-end scenario. We defined the basic components to a multichannel journey and monitoring, introduced AWS services as a MarTech solution that allows companies to send notifications to their customers preferred channels and also monitor their engagement data using Amazon Pinpoint events.

Clean up

  1. Choose AWS CloudFormation.
    1. Delete and Delete stack
  2. Navigate to Amazon Pinpoint console.
    1. Go to SettingsSMS and voice, select the number created during the execution of this blogpost and choose Remove phone number.
    2. Under All projects, open the created project and then in the menu on the left select SettingsGeneral settings. Choose Delete project and confirm the deletion by filling “delete” in the indicated field and select Delete.
  3. Choose Amazon Quicksight.
    1. Delete your user.

How to Log Amazon SES details using Amazon CloudWatch

Post Syndicated from Rajat Kashyap original https://aws.amazon.com/blogs/messaging-and-targeting/how-to-log-amazon-ses-details-using-amazon-cloudwatch/

One of the use cases Amazon Simple Email Service (Amazon SES) users try to implement is to centralize various SES notifications from different domains or email addresses to get insights about how many of those emails were delivered, bounced or complaint. If you have these details, they can be valuable to help you take appropriate business decisions to further strengthen your mail delivery process. Currently SES provides various metrics like number of sends, reject etc. but there is no direct way to log information like From email identity, recipient email identity, Subject, timestamp, source IP address, messageId etc. when sending emails.

In this blog post, you will learn how to capture detailed notifications about your bounces, complaints, and deliveries and log those in Amazon CloudWatch. With a centralized logging solution, customers can keep track of domains or email addresses from which they received complaints, identify email issues, stay informed, and even build custom dashboard capabilities. Logging the notifications in CloudWatch will help you to store these notifications for the long term and also will allow you to set up a process to back up this data and setup life-cycle policies for data retention.

Let’s quickly understand how Amazon SES categorizes if any email got delivered, bounced or received a complaint.

Types of notifications

Bounce occurs when a message cannot be delivered to the intended recipient. And there are two types of Bounce, hard bounce and soft bounce.

  • Hard bounces occur when email cannot be delivered because of a persistent issue, such as when a recipient’s email address or domain does not exist and Amazon SES will no longer attempt to deliver the message.
  • Soft bounces occur when there is a temporary issue preventing the email from being delivered, such as when the recipient’s mailbox is full, when the connection to the receiving email server times out, or when there are too many simultaneous connections to the receiving mail server. When there are soft bounces, Amazon will attempt to redeliver it again.

Complaint occurs when a recipient,

  • Reports that they don’t want to receive an email.
  • Clicks the “Report spam” button in their email client, and complains to their email provider that such emails belong to the Spam category.

Delivery occurs when,

  • An email is delivered successfully to recipient’s mail server.

Prerequisites

For this post, you should be familiar with the following:

Architecture Overview

The AWS CloudFormation template given in this post automatically sets up the different architecture components, to capture detailed notifications about your bounces, complaints, and deliveries and log those in Amazon CloudWatch. You still have to perform some manual tasks of configuring and validating components. For details, please follow the below steps in sequence.


Getting Started with Solution Deployment

Prerequisite tasks to be completed before deploying the logging solution:

  1. Domain and Email Address are verified
  2.  Creation of Amazon Simple Notification Service (Amazon SNS) Topic to capture detailed notifications for bounces, complaints or deliveries, please refer Create SNS Topic.
  3. Setup notifications at domain or from email address level, for the notifications you want to log into CloudWatch.
    1. Click on the Verified Identity domain name you want to setup bounce notifications.
    2. In the Notifications tab, click on Feedback Notifications section -> Click edit button to navigate on next page.
    3. From the drop down select and Update Bounce Notifications topic with the SNS Topic ARN that you created in prior step and click Save Changes.

Note: For this blog post, you will learn how to log bounce notifications. To capture complaints or delivery notifications you can configure SNS topic and redeploy the CloudFormation template multiple times choosing the Complaint and Delivery event types to capture all notifications.

Once the prerequisite tasks are completed, the logging solution is ready to be deployed.

As a very first step, download ses_bounce_logging_blog.yml CloudFormation file from the below given link, once you saved this on your local machine, follow the next steps to install this solution.

https://github.com/aws-samples/digital-user-engagement-reference architectures/blob/master/cloudformation/ses_bounce_logging_blog.yml

Steps to run the CloudFormation template:

  1. Go to CloudFormation Console and Click Create Stack.
  2. Select Upload template file radio button and Click Choose file to upload ses_bounce_logging_blog.yml file you downloaded earlier.
  3. Click Next on Create Stack screen.
  4. Specify Stack Name, for example ses-bounce-logging.
  5. Change default value of CloudWatchGroupName if needed.
  6. Select the Event TypeBounce”, “Complaint”, or “Delivery” you wish to track.
  7. Enter Amazon Resource Name (ARN) of Amazon SNS topic created in prior step, to capture bounce notification in SNSTopicName parameters field, and click Next.
  8. Click Next on Configure stack options screen.
  9. Select “I acknowledge that AWS CloudFormation might create IAM resources” and click Create Stack.

Wait for the CloudFormation template to complete and then verify resources in the CloudFormation stack has been created. Click on individual resources and verify.

  • IAM Role was created.
  • Lambda function to log capture bounce notification was created.
  • Verify that Lambda function subscription to SNS topic has been created and confirmed.

  • You can also verify SNS and Lambda integration in Lambda console.

How to test the solution?

You can test the Bounce scenario using Amazon SES mailbox simulators. When you send an email to selected mailbox simulator scenario, you will get a simulated detailed notification back to the Amazon SNS topic configured in the notification section described in the pre-requisite section. You can use AWS CLI, an AWS SDK, or Amazon SES console for the particular domain that you have configured to receive notifications.

[email protected] (In scope of this blog post and applies to test bounce notifications)

Use below in case you want to test other scenario:

[email protected]

[email protected]

Screenshots showing how to send bounce email using AWS Console

  1. Go to Amazon SES -> Select Verified Domain Identity Checkbox.
  2. Click on Send a Test Email Button.
  3. Fill in the required information, as given in the below snapshot like From-address, test Scenario (Bounce) and click Send Test Email.
  4. As soon as bounce notification is received in the SNS topic it will be sent to the Lambda function and finally logged in the /aws /ses/bounce_logs CloudWatch log group.

Clean up

When you’re done with this exercise, complete the following steps to delete your resources and stop incurring costs:

  1. Delete the SNS topic that you created.
  2. On the CloudFormation console, select your stack and choose Delete.

This cleans up all the resources created by the stack.

Conclusion

In this blog post, we have shown you how to capture and build a solution for Bounce notifications. We explained how to combine Amazon Simple Notification Service, AWS Lambda, and Amazon CloudWatch to create the logging solution. To enhance the visualization, you can filter Metrics in Amazon CloudWatch, allowing you to graph metrics and make it searchable. As the notifications are stored in Amazon CloudWatch, you can export the logs to Amazon S3 for the long term. You can modify the CloudFormation template in this blog and deploy it multiple times to capture complaints or delivery notifications for your business use cases.


About the Authors

Rajat Kashyap is a Solutions Architect at AWS. He is Containers, DevOps, BigData, Analytics and AI/ML enthusiast and loves helping customers design secure, reliable, scalable and cost-effective solutions on AWS. As a trusted customer advisor, he help organizations understand best practices for advanced AWS cloud-based solutions and help them in migration and modernization of their workload using Well Architected design principles and best practices.


Ashish Mehra is a Solutions Architecture Manager at AWS. He is a Middleware, Serverless, IoT and Containers enthusiast and loves helping customers design secure, reliable and cost-effective solutions on AWS.