Tag Archives: Advanced (300)

A hybrid approach in healthcare data warehousing with Amazon Redshift

Post Syndicated from Bindhu Chinnadurai original https://aws.amazon.com/blogs/big-data/a-hybrid-approach-in-healthcare-data-warehousing-with-amazon-redshift/

Data warehouses play a vital role in healthcare decision-making and serve as a repository of historical data. A healthcare data warehouse can be a single source of truth for clinical quality control systems. Data warehouses are mostly built using the dimensional model approach, which has consistently met business needs.

Loading complex multi-point datasets into a dimensional model, identifying issues, and validating data integrity of the aggregated and merged data points are the biggest challenges that clinical quality management systems face. Additionally, scalability of the dimensional model is complex and poses a high risk of data integrity issues.

The data vault approach solves most of the problems associated with dimensional models, but it brings other challenges in clinical quality control applications and regulatory reports. Because data is closer to the source and stored in raw format, it has to be transformed before it can be used for reporting and other application purposes. This is one of the biggest hurdles with the data vault approach.

In this post, we discuss some of the main challenges enterprise data warehouses face when working with dimensional models and data vaults. We dive deep into a hybrid approach that aims to circumvent the issues posed by these two and also provide recommendations to take advantage of this approach for healthcare data warehouses using Amazon Redshift.

What is a dimensional data model?

Dimensional modeling is a strategy for storing data in a data warehouse using dimensions and facts. It optimizes the database for faster data retrieval. Dimensional models have a distinct structure and organize data to provide reports that increase performance.

In a dimensional model, a transaction record is divided either into facts (often numerical), additive transactional data, or dimensions (referential information that gives context to the facts). This categorization of data into facts and dimensions, as well as the entity-relationship framework of the dimensional model, presents complex business processes in a way that is easy for analysts to understand.

A dimensional model in data warehousing is designed for reading, summarizing, and analyzing numerical information such as patient vital stats, lab reading values, counts, and so on. Regardless of the division or use case it is related to, dimensional data models can be used to store data obtained from tracking various processes like patient encounters, provider practice metrics, aftercare surveys, and more.

The majority of healthcare clinical quality data warehouses are built on top of dimensional modeling techniques. The benefit of using dimensional data modeling is that, when data is stored in a data warehouse, it’s easier to persist and extract it.

Although it’s a competent data structure technique, there are challenges in scalability, source tracking, and troubleshooting with the dimensional modeling approach. Tracking and validating the source of aggregated and compute data points is important in clinical quality regulatory reporting systems. Any mistake in regulatory reports may result in a large penalty from regulatory and compliance agencies. These challenges exist because the data points are labeled using meaningless numeric surrogate keys, and any minor error can impair prediction accuracy, and consequently affect the quality of judgments. The ways to countervail these challenges are by refactoring and bridging the dimensions. But that adds data noise over time and reduces accuracy.

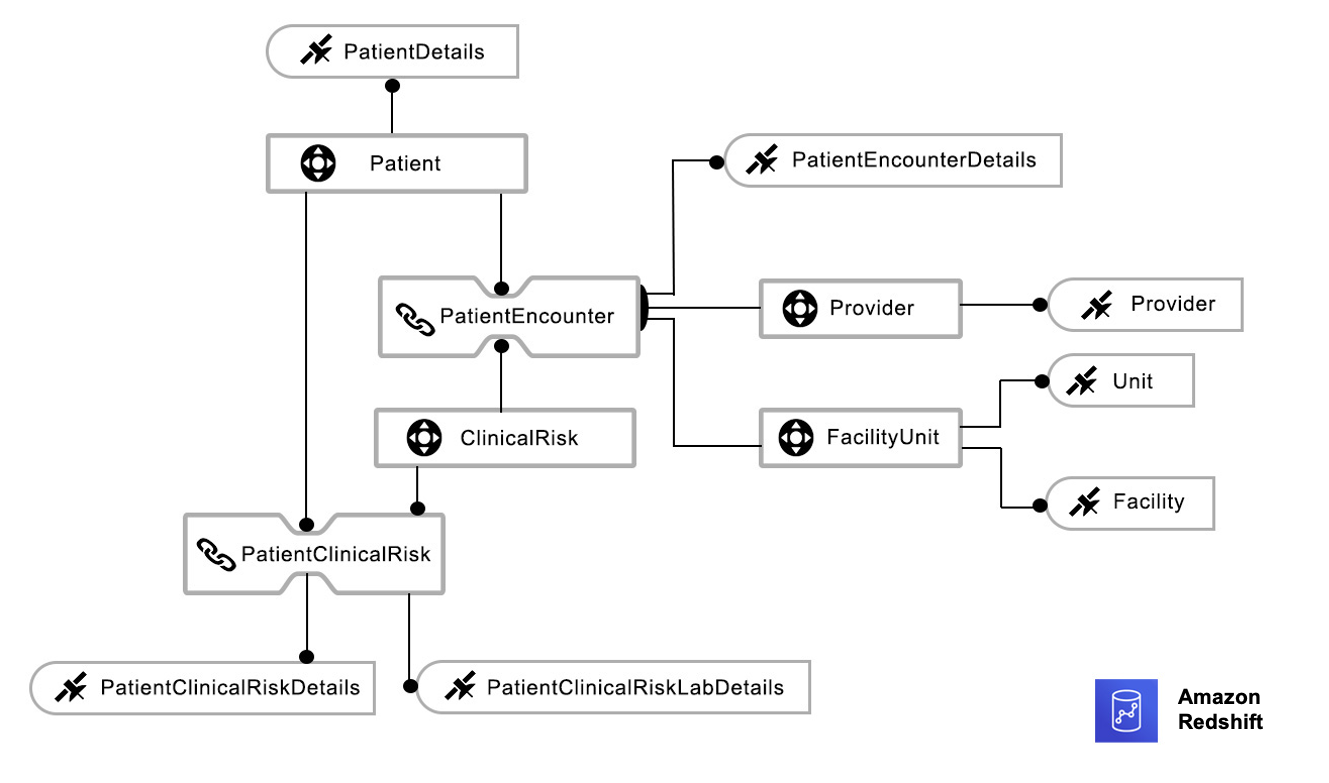
Let’s look at an example of a typical dimensional data warehouse architecture in healthcare, as shown in the following logical model.

The following diagram illustrates a sample dimensional model entity-relationship diagram.

This data model contains dimensions and fact tables. You can use the following query to retrieve basic provider and patient relationship data from the dimensional model:

SELECT * FROM Fac_PatientEncounter FP

JOIN Dim_PatientEncounter DP ON FP.EncounterKey = DP.EncounterKey

JOIN Dim_Provider PR ON PR.ProviderKey = FP.ProviderKey

Challenges of dimensional modeling

Dimensional modeling requires data preprocessing before generating a star schema, which involves a large amount of data processing. Any change to the dimension definition results in a lengthy and time-consuming reprocessing of the dimension data, which often results in data redundancy.

Another issue is that, when relying merely on dimensional modeling, analysts can’t assure the consistency and accuracy of data sources. Especially in healthcare, where lineage, compliance, history, and traceability are of prime importance because of the regulations in place.

A data vault seeks to provide an enterprise data warehouse while solving the shortcomings of dimensional modeling approaches. It is a data modeling methodology designed for large-scale data warehouse platforms.

What is a data vault?

The data vault approach is a method and architectural framework for providing a business with data analytics services to support business intelligence, data warehousing, analytics, and data science needs. The data vault is built around business keys (hubs) defined by the company; the keys obtained from the sources are not the same.

Amazon Redshift RA3 instances and Amazon Redshift Serverless are perfect choices for a data vault. And when combined with Amazon Redshift Spectrum, a data vault can deliver more value.

There are three layers to the data vault:

  • Staging
  • Data vault
  • Business vault

Staging involves the creation of a replica of the original data, which is primarily used to aid the process of transporting data from various sources to the data warehouse. There are no restrictions on this layer, and it is typically not persistent. It is 1:1 with the source systems, generally in the same format as that of the sources.

The data vault is based on business keys (hubs), which are defined by the business. All in-scope data is loaded, and auditability is maintained. At the heart of all data warehousing is integration, and this layer contains integrated data from multiple sources built around the enterprise-wide business keys. Although data lakes resemble data vaults, a data vault provides more features of a data warehouse. However, it combines the functionalities of both.

The business vault stores the outcome of business rules, including deduplication, conforming results, and even computations. When results are calculated for two or more data marts, this helps eliminate redundant computation and associated inconsistencies.

Because business vaults still don’t satisfy reporting needs, enterprises create a data mart after the business vault to satisfy dashboarding needs.

Data marts are ephemeral views that can be implemented directly on top of the business and raw vaults. This makes it easy to adapt over time and eliminates the danger of inconsistent results. If views don’t give the required level of performance, the results can be stored in a table. This is the presentation layer and is designed to be requirements-driven and scope-specific subsets of the warehouse data. Although dimensional modeling is commonly used to deliver this layer, marts can also be flat files, .xml files, or in other forms.

The following diagram shows the typical data vault model used in clinical quality repositories.

When the dimensional model as shown earlier is converted into a data vault using the same structure, it can be represented as follows.

Advantages of a data vault

Although any data warehouse should be built within the context of an overarching company strategy, data vaults permit incremental delivery. You can start small and gradually add more sources over time, just like Kimball’s dimensional design technique.

With a data vault, you don’t have to redesign the structure when adding new sources, unlike dimensional modeling. Business rules can be easily changed because raw and business-generated data is kept independent of each other in a data vault.

A data vault isolates technical data reorganization from business rules, thereby facilitating the separation of these potentially tricky processes. Similarly, data cleaning can be maintained separately from data import.

A data vault accommodates changes over time. Unlike a pure dimensional design, a data vault separates raw and business-generated data and accepts changes from both sources.

Data vaults make it easy to maintain data lineage because it includes metadata identifying the source systems. In contrast to dimensional design, where data is cleansed before loading, data vault updates are always gradual, and results are never lost, providing an automatic audit trail.

When raw data is stored in a data vault, historical attributes that weren’t initially available can be added to the presentation area. Data marts can be implemented as views by adding a new column to an existing view.

In data vault 2.0, hash keys eliminate data load dependencies, which allows near-real-time data loading, as well as concurrent data loads of terabytes to petabytes. The process of mastering both entity-relationship modeling and dimensional design takes time and practice, but the process of automating a data vault is easier.

Challenges of a data vault

A data vault is not a one-size-fits-all solution for data warehouses, and it does have a few limitations.

To begin with, when directly feeding the data vault model into a report on one subject area, you need to combine multiple types of data. Due to the incapability of reporting technologies to perform such data processing, this integration can reduce report performance and increase the risk of errors. However, data vault models could improve report performance by incorporating dimensional models or adding additional reporting layers. And for data models that can be directly reported, a dimensional model can be developed.

Additionally, if the data is static or if it comes from a single source, it reduces the efficacy of data vaults. They often negate many benefits of data vaults, and require more business logic, which can be avoided.

The storage requirement for a data vault is also significantly higher. Three separate tables for the same subject area can effectively increase the number of tables by three, and when they are inserts only. If the data is basic, you can achieve the benefits listed here with a simpler dimensional model rather than deploying a data vault.

The following sample query retrieves provider and patient data from a data vault using the sample model we discussed in this section:

SELECT * FROM Lnk_PatientEncounter LP

JOIN Hub_Provider HP ON LP.ProviderKey = HP.ProviderKey

JOIN Dim_Sat_Provider DSP ON HP.ProviderKey = DSP.ProviderKey AND _Current=1

JOIN Hub_Patient Pt ON Pt.PatientEncounterKey = LP.PatientEncounterKey

JOIN Dim_Sat_PatientEncounter DPt ON DPt.PatientEncounterKey = Pt.PatientEncounterKey AND _Current=1

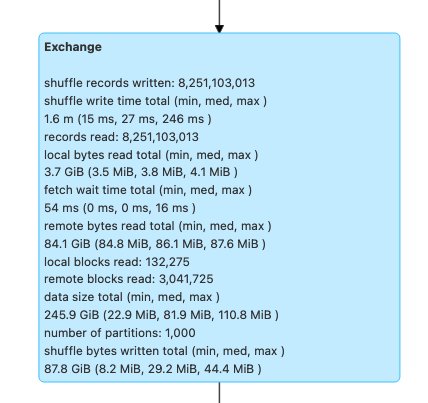
The query involves many joins, which increases the depth and time for the query run, as illustrated in the following chart.

This following table shows that the SQL depth and runtime is proportional, where depth is the number of joins. If the number of joins increase, then the runtime also increases and therefore the cost.

SQL Depth Runtime in Seconds Cost per Query in Seconds
14 80 40,000
12 60 30,000
5 30 15,000
3 25 12,500

The hybrid model addresses major issues raised by the data vault and dimensional model approaches that we’ve discussed in this post, while also allowing improvements in data collection, including IoT data streaming.

What is a hybrid model?

The hybrid model combines the data vault and a portion of the star schema to provide the advantages of both the data vault and dimensional model, and is mainly intended for logical enterprise data warehouses.

The hybrid approach is designed from the bottom up to be gradual and modular, and it can be used for big data, structured, and unstructured datasets. The primary data contains the business rules and enterprise-level data standards norms, as well as additional metadata needed to transform, validate, and enrich data for dimensional approaches. In this model, data processes from left to right provide data vault advantages, and data processes from right to left provide dimensional model advantages. Here, the data vault satellite tables serve as both satellite tables and dimensional tables.

After combining the dimensional and the data vault models, the hybrid model can be viewed as follows.

The following is an example entity-relation diagram of the hybrid model, which consists of a fact table from the dimensional model and all other entities from the data vault. The satellite entity from the data vault plays the dual role. When it’s connected to a data vault, it acts as a sat table, and when connected to a fact table, it acts as a dimension table. To serve this dual purpose, sat tables have two keys: a foreign key to connect with the data vault, and a primary key to connect with the fact table.

The following diagram illustrates the physical hybrid data model.

The following diagram illustrates a typical hybrid data warehouse architecture.

The following query retrieves provider and patient data from the hybrid model:

SELECT * FROM Fac_PatientEncounter FP

JOIN Dim_Sat_Provider DSP ON FP.DimProviderID =DSP.DimProviderID

JOIN Dim_Sat_PatientEncounter DPt ON DPt.DimPatientEncounterID = Pt.DimPatientEncounterID

The number of joins is reduced from five to three by using the hybrid model.

Advantages of using the hybrid model

With this model, structural information is segregated from descriptive information to promote flexibility and avoid re-engineering in the event of a change. It maintains data integrity, allowing organizations to avoid hefty fines when data integrity is compromised.

The hybrid paradigm enables non-data professionals to interact with raw data by allowing users to update or create metadata and data enrichment rules. The hybrid approach simplifies the process of gathering and evaluating datasets for business applications. It enables concurrent data loading and eliminates the need for a corporate vault.

The hybrid model also benefits from the fact that there is no dependency between objects in the data storage. With hybrid data warehousing, scalability is multiplied.

You can build the hybrid model on AWS and take advantage of the benefits of Amazon Redshift, which is a fully managed, scalable cloud data warehouse that accelerates your time to insights with fast, simple, and secure analytics at scale. Amazon Redshift continuously adds features that make it faster, more elastic, and easier to use:

  • Amazon Redshift data sharing enhances the hybrid model by eliminating the need for copying data across departments. It also simplifies the work of keeping the single source of truth, saving memory and limiting redundancy. It enables instant, granular, and fast data access across Amazon Redshift clusters without the need to copy or move it. Data sharing provides live access to data so that users always see the most up-to-date and consistent information as it’s updated in the data warehouse.
  • Redshift Spectrum enables you to query open format data directly in the Amazon Simple Storage Service (Amazon S3) data lake without having to load the data or duplicate your infrastructure, and it integrates well with the data lake.
  • With Amazon Redshift concurrency scaling, you can get consistently fast performance for thousands of concurrent queries and users. It instantly adds capacity to support additional users and removes it when the load subsides, with nothing to manage at your end.
  • To realize the benefits of using a hybrid model on AWS, you can get started today without needing to provision and manage data warehouse clusters using Redshift Serverless. All the related services that Amazon Redshift integrates with (such as Amazon Kinesis, AWS Lambda, Amazon QuickSight, Amazon SageMaker, Amazon EMR, AWS Lake Formation, and AWS Glue) are available to work with Redshift Serverless.

Conclusion

With the hybrid model, data can be transformed and loaded into a target data model efficiently and transparently. With this approach, data partners can research data networks more efficiently and promote comparative effectiveness. And with the several newly introduced features of Amazon Redshift, a lot of heavy lifting is done by AWS to handle your workload demands, and you only pay for what you use.

You can get started with the following steps:

  1. Create an Amazon Redshift RA3 instance for your primary clinical data repository and data marts.
  2. Build a data vault schema for the raw vault and create materialized views for the business vault.
  3. Enable Amazon Redshift data shares to share data between the producer cluster and consumer cluster.
  4. Load the structed and unstructured data into the producer cluster data vault for business use.

About the Authors

Bindhu Chinnadurai is a Senior Partner Solutions Architect in AWS based out of London, United Kingdom. She has spent 18+ years working in everything for large scale enterprise environments. Currently she engages with AWS partner to help customers migrate their workloads to AWS with focus on scalability, resiliency, performance and sustainability. Her expertise is DevSecOps.

 Sarathi Balakrishnan was the Global Partner Solutions Architect, specializing in Data, Analytics and AI/ML at AWS. He worked closely with AWS partner globally to build solutions and platforms on AWS to accelerate customers’ business outcomes with state-of-the-art cloud technologies and achieve more in their cloud explorations. He helped with solution architecture, technical guidance, and best practices to build cloud-native solutions. He joined AWS with over 20 years of large enterprise experience in agriculture, insurance, health care and life science, marketing and advertisement industries to develop and implement data and AI strategies.

Automate deployment of an Amazon QuickSight analysis connecting to an Amazon Redshift data warehouse with an AWS CloudFormation template

Post Syndicated from Sandeep Bajwa original https://aws.amazon.com/blogs/big-data/automate-deployment-of-an-amazon-quicksight-analysis-connecting-to-an-amazon-redshift-data-warehouse-with-an-aws-cloudformation-template/

Amazon Redshift is the most widely used data warehouse in the cloud, best suited for analyzing exabytes of data and running complex analytical queries. Amazon QuickSight is a fast business analytics service to build visualizations, perform ad hoc analysis, and quickly get business insights from your data. QuickSight provides easy integration with Amazon Redshift, providing native access to all your data and enabling organizations to scale their business analytics capabilities to hundreds of thousands of users. QuickSight delivers fast and responsive query performance by using a robust in-memory engine (SPICE).

As a QuickSight administrator, you can use AWS CloudFormation templates to migrate assets between distinct environments from development, to test, to production. AWS CloudFormation helps you model and set up your AWS resources so you can spend less time managing those resources and more time focusing on your applications that run in AWS. You no longer need to create data sources or analyses manually. You create a template that describes all the AWS resources that you want, and AWS CloudFormation takes care of provisioning and configuring those resources for you. In addition, with versioning, you have your previous assets, which provides the flexibility to roll back deployments if the need arises. For more details, refer to Amazon QuickSight resource type reference.

In this post, we show how to automate the deployment of a QuickSight analysis connecting to an Amazon Redshift data warehouse with a CloudFormation template.

Solution overview

Our solution consists of the following steps:

  1. Create a QuickSight analysis using an Amazon Redshift data source.
  2. Create a QuickSight template for your analysis.
  3. Create a CloudFormation template for your analysis using the AWS Command Line Interface (AWS CLI).
  4. Use the generated CloudFormation template to deploy a QuickSight analysis to a target environment.

The following diagram shows the architecture of how you can have multiple AWS accounts, each with its own QuickSight environment connected to its own Amazon Redshift data source. In this post, we outline the steps involved in migrating QuickSight assets in the dev account to the prod account. For this post, we use Amazon Redshift as the data source and create a QuickSight visualization using the Amazon Redshift sample TICKIT database.

The following diagram illustrates flow of the high-level steps.

Prerequisites

Before setting up the CloudFormation stacks, you must have an AWS account and an AWS Identity and Access Management (IAM) user with sufficient permissions to interact with the AWS Management Console and the services listed in the architecture.

The migration requires the following prerequisites:

Create a QuickSight analysis in your dev environment

In this section, we walk through the steps to set up your QuickSight analysis using an Amazon Redshift data source.

Create an Amazon Redshift data source

To connect to your Amazon Redshift data warehouse, you need to create a data source in QuickSight. As shown in the following screenshot, you have two options:

  • Auto-discovered
  • Manual connect

QuickSight auto-discovers Amazon Redshift clusters that are associated with your AWS account. These resources must be located in the same Region as your QuickSight account.

For more details, refer to Authorizing connections from Amazon QuickSight to Amazon Redshift clusters.

You can also manually connect and create a data source.

Create an Amazon Redshift dataset

The next step is to create a QuickSight dataset, which identifies the specific data in a data source you want to use.

For this post, we use the TICKIT database created in an Amazon Redshift data warehouse, which consists of seven tables: two fact tables and five dimensions, as shown in the following figure.

This sample database application helps analysts track sales activity for the fictional TICKIT website, where users buy and sell tickets online for sporting events, shows, and concerts.

  1. On the Datasets page, choose New dataset.
  2. Choose the data source you created in the previous step.
  3. Choose Use custom SQL.
  4. Enter the custom SQL as shown in the following screenshot.

The following screenshot shows our completed data source.

Create a QuickSight analysis

The next step is to create an analysis that utilizes this dataset. In QuickSight, you analyze and visualize your data in analyses. When you’re finished, you can publish your analysis as a dashboard to share with others in your organization.

  1. On the All analyses tab of the QuickSight start page, choose New analysis.

The Datasets page opens.

  1. Choose a dataset, then choose Use in analysis.

  1. Create a visual. For more information about creating visuals, see Adding visuals to Amazon QuickSight analyses.

Create a QuickSight template from your analysis

A QuickSight template is a named object in your AWS account that contains the definition of your analysis and references to the datasets used. You can create a template using the QuickSight API by providing the details of the source analysis via a parameter file. You can use templates to easily create a new analysis.

You can use AWS Cloud9 from the console to run AWS CLI commands.

The following AWS CLI command demonstrates how to create a QuickSight template based on the sales analysis you created (provide your AWS account ID for your dev account):

aws quicksight create-template --aws-account-id  <DEVACCOUNT>--template-id QS-RS-SalesAnalysis-Template --cli-input-json file://parameters.json

The parameter.json file contains the following details (provide your source QuickSight user ARN, analysis ARN, and dataset ARN):

{
    "Name": "QS-RS-SalesAnalysis-Temp",
    "Permissions": [
        {"Principal": "<QS-USER-ARN>", 
          "Actions": [ "quicksight:CreateTemplate",
                       "quicksight:DescribeTemplate",                   
                       "quicksight:DescribeTemplatePermissions",
                       "quicksight:UpdateTemplate"         
            ] } ] ,
     "SourceEntity": {
       "SourceAnalysis": {
         "Arn": "<QS-ANALYSIS-ARN>",
         "DataSetReferences": [
           {
             "DataSetPlaceholder": "sales",
             "DataSetArn": "<QS-DATASET-ARN>"
           }
         ]
       }
     },
     "VersionDescription": "1"
    }

You can use the AWS CLI describe-user, describe_analysis, and describe_dataset commands to get the required ARNs.

To upload the updated parameter.json file to AWS Cloud9, choose File from the tool bar and choose Upload local file.

The QuickSight template is created in the background. QuickSight templates aren’t visible within the QuickSight UI; they’re a developer-managed or admin-managed asset that is only accessible via the AWS CLI or APIs.

To check the status of the template, run the describe-template command:

aws quicksight describe-template --aws-account-id <DEVACCOUNT> --template-id "QS-RS-SalesAnalysis-Temp"

The following code shows command output:

Copy the template ARN; we need it later to create a template in the production account.

The QuickSight template permissions in the dev account need to be updated to give access to the prod account. Run the following command to update the QuickSight template. This provides the describe privilege to the target account to extract details of the template from the source account:

aws quicksight update-template-permissions --aws-account-id <DEVACCOUNT> --template-id “QS-RS-SalesAnalysis-Temp” --grant-permissions file://TemplatePermission.json

The file TemplatePermission.json contains the following details (provide your target AWS account ID):

[
  {
    "Principal": "arn:aws:iam::<TARGET ACCOUNT>",
    "Actions": [
      "quicksight:UpdateTemplatePermissions",
      "quicksight:DescribeTemplate"
    ]
  }
]

To upload the updated TemplatePermission.json file to AWS Cloud9, choose the File menu from the tool bar and choose Upload local file.

Create a CloudFormation template

In this section, we create a CloudFormation template containing our QuickSight assets. In this example, we use a YAML formatted template saved on our local machine. We update the following different sections of the template:

  • AWS::QuickSight::DataSource
  • AWS::QuickSight::DataSet
  • AWS::QuickSight::Template
  • AWS::QuickSight::Analysis

Some of the information required to complete the CloudFormation template can be gathered from the source QuickSight account via the describe AWS CLI commands, and some information needs to be updated for the target account.

Create an Amazon Redshift data source in AWS CloudFormation

In this step, we add the AWS::QuickSight::DataSource section of the CloudFormation template.

Gather the following information on the Amazon Redshift cluster in the target AWS account (production environment):

  • VPC connection ARN
  • Host
  • Port
  • Database
  • User
  • Password
  • Cluster ID

You have the option to create a custom DataSourceID. This ID is unique per Region for each AWS account.

Add the following information to the template:

Resources:
  RedshiftBuildQSDataSource:
    Type: 'AWS::QuickSight::DataSource'
    Properties:  
      DataSourceId: "RS-Sales-DW"      
      AwsAccountId: !Sub ${AWS::ACCOUNT ID}
      VpcConnectionProperties:
        VpcConnectionArn: <VPC-CONNECTION-ARN>      
      Type: REDSHIFT   
      DataSourceParameters:
        RedshiftParameters:     
          Host: "<HOST>"
          Port: <PORT>
          Clusterid: "<CLUSTER ID>"
          Database: "<DATABASE>"    
      Name: "RS-Sales-DW"
      Credentials:
        CredentialPair:
          Username: <USER>
          Password: <PASSWORD>
      Permissions:

Create an Amazon Redshift dataset in AWS CloudFormation

In this step, we add the AWS::QuickSight::DataSet section in the CloudFormation template to match the dataset definition from the source account.

Gather the dataset details and run the list-data-sets command to get all datasets from the source account (provide your source dev account ID):

aws quicksight list-data-sets  --aws-account-id <DEVACCOUNT>

The following code is the output:

Run the describe-data-set command, specifying the dataset ID from the previous command’s response:

aws quicksight describe-data-set --aws-account-id <DEVACCOUNT> --data-set-id "<YOUR-DATASET-ID>"

The following code shows partial output:

Based on the dataset description, add the AWS::Quicksight::DataSet resource in the CloudFormation template, as shown in the following code. Note that you can also create a custom DataSetID. This ID is unique per Region for each AWS account.

QSRSBuildQSDataSet:
    Type: 'AWS::QuickSight::DataSet'
    Properties:
      DataSetId: "RS-Sales-DW" 
      Name: "sales" 
      AwsAccountId: !Sub ${AWS::ACCOUNT ID}
      PhysicalTableMap:
        PhysicalTable1:          
          CustomSql:
            SqlQuery: "select sellerid, username, (firstname ||' '|| lastname) as name,city, sum(qtysold) as sales
              from sales, date, users
              where sales.sellerid = users.userid and sales.dateid = date.dateid and year = 2008
              group by sellerid, username, name, city
              order by 5 desc
              limit 10"
            DataSourceArn: !GetAtt RedshiftBuildQSDataSource.Arn
            Name"RS-Sales-DW"
            Columns:
            - Type: INTEGER
              Name: sellerid
            - Type: STRING
              Name: username
            - Type: STRING
              Name: name
            - Type: STRING
              Name: city
            - Type: DECIMAL
              Name: sales                                     
      LogicalTableMap:
        LogicalTable1:
          Alias: sales
          Source:
            PhysicalTableId: PhysicalTable1
          DataTransforms:
          - CastColumnTypeOperation:
              ColumnName: sales
              NewColumnType: DECIMAL
      Permissions:
        - Principal: !Join 
            - ''
            - - 'arn:aws:quicksight:'
              - !Ref QuickSightIdentityRegion
              - ':'
              - !Ref 'AWS::AccountId'
              - ':user/default/'
              - !Ref QuickSightUser
          Actions:
            - 'quicksight:UpdateDataSetPermissions'
            - 'quicksight:DescribeDataSet'
            - 'quicksight:DescribeDataSetPermissions'
            - 'quicksight:PassDataSet'
            - 'quicksight:DescribeIngestion'
            - 'quicksight:ListIngestions'
            - 'quicksight:UpdateDataSet'
            - 'quicksight:DeleteDataSet'
            - 'quicksight:CreateIngestion'
            - 'quicksight:CancelIngestion'
      ImportMode: DIRECT_QUERY

You can specify ImportMode to choose between Direct_Query or Spice.

Create a QuickSight template in AWS CloudFormation

In this step, we add the AWS::QuickSight::Template section in the CloudFormation template, representing the analysis template.

Use the source template ARN you created earlier and add the AWS::Quicksight::Template resource in the CloudFormation template:

QSTCFBuildQSTemplate:
    Type: 'AWS::QuickSight::Template'
    Properties:
      TemplateId: "QS-RS-SalesAnalysis-Temp"
      Name: "QS-RS-SalesAnalysis-Temp"
      AwsAccountId:!Sub ${AWS::ACCOUNT ID}
      SourceEntity:
        SourceTemplate:
          Arn: '<SOURCE-TEMPLATE-ARN>'          
      Permissions:
        - Principal: !Join 
            - ''
            - - 'arn:aws:quicksight:'
              - !Ref QuickSightIdentityRegion
              - ':'
              - !Ref 'AWS::AccountId'
              - ':user/default/'
              - !Ref QuickSightUser
          Actions:
            - 'quicksight:DescribeTemplate'
      VersionDescription: Initial version - Copied over from AWS account.

Create a QuickSight analysis

In this last step, we add the AWS::QuickSight::Analysis section in the CloudFormation template. The analysis is linked to the template created in the target account.

Add the AWS::Quicksight::Analysis resource in the CloudFormation template as shown in the following code:

QSRSBuildQSAnalysis:
    Type: 'AWS::QuickSight::Analysis'
    Properties:
      AnalysisId: 'Sales-Analysis'
      Name: 'Sales-Analysis'
      AwsAccountId:!Sub ${AWS::ACCOUNT ID}
      SourceEntity:
        SourceTemplate:
          Arn: !GetAtt  QSTCFBuildQSTemplate.Arn
          DataSetReferences:
            - DataSetPlaceholder: 'sales'
              DataSetArn: !GetAtt QSRSBuildQSDataSet.Arn
      Permissions:
        - Principal: !Join 
            - ''
            - - 'arn:aws:quicksight:'
              - !Ref QuickSightIdentityRegion
              - ':'
              - !Ref 'AWS::AccountId'
              - ':user/default/'
              - !Ref QuickSightUser
          Actions:
            - 'quicksight:RestoreAnalysis'
            - 'quicksight:UpdateAnalysisPermissions'
            - 'quicksight:DeleteAnalysis'
            - 'quicksight:DescribeAnalysisPermissions'
            - 'quicksight:QueryAnalysis'
            - 'quicksight:DescribeAnalysis'
            - 'quicksight:UpdateAnalysis'      

Deploy the CloudFormation template in the production account

To create a new CloudFormation stack that uses the preceding template via the AWS CloudFormation console, complete the following steps:

  1. On the AWS CloudFormation console, choose Create Stack.
  2. On the drop-down menu, choose with new resources (standard).
  3. For Prepare template, select Template is ready.
  4. For Specify template, choose Upload a template file.
  5. Save the provided CloudFormation template in a .yaml file and upload it.
  6. Choose Next.
  7. Enter a name for the stack. For this post, we use QS-RS-CF-Stack.
  8. Choose Next.
  9. Choose Next again.
  10. Choose Create Stack.

The status of the stack changes to CREATE_IN_PROGRESS, then to CREATE_COMPLETE.

Verify the QuickSight objects in the following table have been created in the production environment.

QuickSight Object Type Object Name (Dev) Object Name ( Prod)
Data Source RS-Sales-DW RS-Sales-DW
Dataset Sales Sales
Template QS-RS-Sales-Temp QS-RS-SalesAnalysis-Temp
Analysis Sales Analysis Sales-Analysis

The following example shows that Sales Analysis was created in the target account.

Conclusion

This post demonstrated an approach to migrate a QuickSight analysis with an Amazon Redshift data source from one QuickSight account to another with a CloudFormation template.

For more information about automating dashboard deployment, customizing access to the QuickSight console, configuring for team collaboration, and implementing multi-tenancy and client user segregation, check out the videos Virtual Admin Workshop: Working with Amazon QuickSight APIs and Admin Level-Up Virtual Workshop, V2 on YouTube.


About the author

Sandeep Bajwa is a Sr. Analytics Specialist based out of Northern Virginia, specialized in the design and implementation of analytics and data lake solutions.

Amazon EMR Serverless supports larger worker sizes to run more compute and memory-intensive workloads

Post Syndicated from Veena Vasudevan original https://aws.amazon.com/blogs/big-data/amazon-emr-serverless-supports-larger-worker-sizes-to-run-more-compute-and-memory-intensive-workloads/

Amazon EMR Serverless allows you to run open-source big data frameworks such as Apache Spark and Apache Hive without managing clusters and servers. With EMR Serverless, you can run analytics workloads at any scale with automatic scaling that resizes resources in seconds to meet changing data volumes and processing requirements. EMR Serverless automatically scales resources up and down to provide just the right amount of capacity for your application.

We are excited to announce that EMR Serverless now offers worker configurations of 8 vCPUs with up to 60 GB memory and 16 vCPUs with up to 120 GB memory, allowing you to run more compute and memory-intensive workloads on EMR Serverless. An EMR Serverless application internally uses workers to execute workloads. and you can configure different worker configurations based on your workload requirements. Previously, the largest worker configuration available on EMR Serverless was 4 vCPUs with up to 30 GB memory. This capability is especially beneficial for the following common scenarios:

  • Shuffle-heavy workloads
  • Memory-intensive workloads

Let’s look at each of these use cases and the benefits of having larger worker sizes.

Benefits of using large workers for shuffle-intensive workloads

In Spark and Hive, shuffle occurs when data needs to be redistributed across the cluster during a computation. When your application performs wide transformations or reduce operations such as join, groupBy, sortBy, or repartition, Spark and Hive triggers a shuffle. Also, every Spark stage and Tez vertex is bounded by a shuffle operation. Taking Spark as an example, by default, there are 200 partitions for every Spark job defined by spark.sql.shuffle.partitions. However, Spark will compute the number of tasks on the fly based on the data size and the operation being performed. When a wide transformation is performed on top of a large dataset, there could be GBs or even TBs of data that need to be fetched by all the tasks.

Shuffles are typically expensive in terms of both time and resources, and can lead to performance bottlenecks. Therefore, optimizing shuffles can have a significant impact on the performance and cost of a Spark job. With large workers, more data can be allocated to each executor’s memory, which minimizes the data shuffled across executors. This in turn leads to increased shuffle read performance because more data will be fetched locally from the same worker and less data will be fetched remotely from other workers.

Experiments

To demonstrate the benefits of using large workers for shuffle-intensive queries, let’s use q78 from TPC-DS, which is a shuffle-heavy Spark query that shuffles 167 GB of data over 12 Spark stages. Let’s perform two iterations of the same query with different configurations.

The configurations for Test 1 are as follows:

  • Size of executor requested while creating EMR Serverless application = 4 vCPUs, 8 GB memory, 200 GB disk
  • Spark job config:
    • spark.executor.cores = 4
    • spark.executor.memory = 8
    • spark.executor.instances = 48
    • Parallelism = 192 (spark.executor.instances * spark.executor.cores)

The configurations for Test 2 are as follows:

  • Size of executor requested while creating EMR Serverless application = 8 vCPUs, 16 GB memory, 200 GB disk
  • Spark job config:
    • spark.executor.cores = 8
    • spark.executor.memory = 16
    • spark.executor.instances = 24
    • Parallelism = 192 (spark.executor.instances * spark.executor.cores)

Let’s also disable dynamic allocation by setting spark.dynamicAllocation.enabled to false for both tests to avoid any potential noise due to variable executor launch times and keep the resource utilization consistent for both tests. We use Spark Measure, which is an open-source tool that simplifies the collection and analysis of Spark performance metrics. Because we’re using a fixed number of executors, the total number of vCPUs and memory requested are the same for both the tests. The following table summarizes the observations from the metrics collected with Spark Measure.

. Total Time Taken for Query in milliseconds shuffleLocalBlocksFetched shuffleRemoteBlocksFetched shuffleLocalBytesRead shuffleRemoteBytesRead shuffleFetchWaitTime shuffleWriteTime
Test 1 153244 114175 5291825 3.5 GB 163.1 GB 1.9 hr 4.7 min
Test 2 108136 225448 5185552 6.9 GB 159.7 GB 3.2 min 5.2 min

As seen from the table, there is a significant difference in performance due to shuffle improvements. Test 2, with half the number of executors that are twice as large as Test 1, ran 29.44% faster, with 1.97 times more shuffle data fetched locally compared to Test 1 for the same query, same parallelism, and same aggregate vCPU and memory resources. Therefore, you can benefit from improved performance without compromising on cost or job parallelism with the help of large executors. We have observed similar performance benefits for other shuffle-intensive TPC-DS queries such as q23a and q23b.

Recommendations

To determine if the large workers will benefit your shuffle-intensive Spark applications, consider the following:

  • Check the Stages tab from the Spark History Server UI of your EMR Serverless application. For example, from the following screenshot of Spark History Server, we can determine that this Spark job wrote and read 167 GB of shuffle data aggregated across 12 stages, looking at the Shuffle Read and Shuffle Write columns. If your jobs shuffle over 50 GB of data, you may potentially benefit from using larger workers with 8 or 16 vCPUs or spark.executor.cores.

  • Check the SQL / DataFrame tab from the Spark History Server UI of your EMR Serverless application (only for Dataframe and Dataset APIs). When you choose the Spark action performed, such as collect, take, showString, or save, you will see an aggregated DAG for all stages separated by the exchanges. Every exchange in the DAG corresponds to a shuffle operation, and it will contain the local and remote bytes and blocks shuffled, as seen in the following screenshot. If the local shuffle blocks or bytes fetched is much less compared to the remote blocks or bytes fetched, you can rerun your application with larger workers (with 8 or 16 vCPUs or spark.executor.cores) and review these exchange metrics in a DAG to see if there is any improvement.

  • Use the Spark Measure tool with your Spark query to obtain the shuffle metrics in the Spark driver’s stdout logs, as shown in the following log for a Spark job. Review the time taken for shuffle reads (shuffleFetchWaitTime) and shuffle writes (shuffleWriteTime), and the ratio of the local bytes fetched to the remote bytes fetched. If the shuffle operation takes more than 2 minutes, rerun your application with larger workers (with 8 or 16 vCPUs or spark.executor.cores) with Spark Measure to track the improvement in shuffle performance and the overall job runtime.
Time taken: 177647 ms

Scheduling mode = FIFO
Spark Context default degree of parallelism = 192

Aggregated Spark stage metrics:
numStages => 22
numTasks => 10156
elapsedTime => 159894 (2.7 min)
stageDuration => 456893 (7.6 min)
executorRunTime => 28418517 (7.9 h)
executorCpuTime => 20276736 (5.6 h)
executorDeserializeTime => 326486 (5.4 min)
executorDeserializeCpuTime => 124323 (2.1 min)
resultSerializationTime => 534 (0.5 s)
jvmGCTime => 648809 (11 min)
shuffleFetchWaitTime => 340880 (5.7 min)
shuffleWriteTime => 245918 (4.1 min)
resultSize => 23199434 (22.1 MB)
diskBytesSpilled => 0 (0 Bytes)
memoryBytesSpilled => 0 (0 Bytes)
peakExecutionMemory => 1794288453176
recordsRead => 18696929278
bytesRead => 77354154397 (72.0 GB)
recordsWritten => 0
bytesWritten => 0 (0 Bytes)
shuffleRecordsRead => 14124240761
shuffleTotalBlocksFetched => 5571316
shuffleLocalBlocksFetched => 117321
shuffleRemoteBlocksFetched => 5453995
shuffleTotalBytesRead => 158582120627 (147.7 GB)
shuffleLocalBytesRead => 3337930126 (3.1 GB)
shuffleRemoteBytesRead => 155244190501 (144.6 GB)
shuffleRemoteBytesReadToDisk => 0 (0 Bytes)
shuffleBytesWritten => 156913371886 (146.1 GB)
shuffleRecordsWritten => 13867102620

Benefits of using large workers for memory-intensive workloads

Certain types of workloads are memory-intensive and may benefit from more memory configured per worker. In this section, we discuss common scenarios where large workers could be beneficial for running memory-intensive workloads.

Data skew

Data skews commonly occur in several types of datasets. Some common examples are fraud detection, population analysis, and income distribution. For example, when you want to detect anomalies in your data, it’s expected that only less than 1% of the data is abnormal. If you want to perform some aggregation on top of normal vs. abnormal records, 99% of the data will be processed by a single worker, which may lead to that worker running out of memory. Data skews may be observed for memory-intensive transformations like groupBy, orderBy, join, window functions, collect_list, collect_set, and so on. Join types such as BroadcastNestedLoopJoin and Cartesan product are also inherently memory-intensive and susceptible to data skews. Similarly, if your input data is Gzip compressed, a single Gzip file can’t be read by more than one task because the Gzip compression type is unsplittable. When there are a few very large Gzip files in the input, your job may run out of memory because a single task may have to read a huge Gzip file that doesn’t fit in the executor memory.

Failures due to data skew can be mitigated by applying strategies such as salting. However, this often requires extensive changes to the code, which may not be feasible for a production workload that failed due to an unprecedented data skew caused by a sudden surge in incoming data volume. For a simpler workaround, you may just want to increase the worker memory. Using larger workers with more spark.executor.memory allows you to handle data skew without making any changes to your application code.

Caching

In order to improve performance, Spark allows you to cache the data frames, datasets, and RDDs in memory. This enables you to reuse a data frame multiple times in your application without having to recompute it. By default, up to 50% of your executor’s JVM is used to cache the data frames based on the property spark.memory.storageFraction. For example, if your spark.executor.memory is set to 30 GB, then 15 GB is used for cache storage that is immune to eviction.

The default storage level of cache operation is DISK_AND_MEMORY. If the size of the data frame you are trying to cache doesn’t fit in the executor’s memory, a portion of the cache spills to disk. If there isn’t enough space to write the cached data in disk, the blocks are evicted and you don’t get the benefits of caching. Using larger workers allows you to cache more data in memory, boosting job performance by retrieving cached blocks from memory rather than the underlying storage.

Experiments

For example, the following PySpark job leads to a skew, with one executor processing 99.95% of the data with memory-intensive aggregates like collect_list. The job also caches a very large data frame (2.2 TB). Let’s run two iterations of the same job on EMR Serverless with the following vCPU and memory configurations.

Let’s run Test 3 with the previously largest possible worker configurations:

  • Size of executor set while creating EMR Serverless application = 4 vCPUs, 30 GB memory, 200 GB disk
  • Spark job config:
    • spark.executor.cores = 4
    • spark.executor.memory = 27 G

Let’s run Test 4 with the newly released large worker configurations:

  • Size of executor set in while creating EMR Serverless application = 8 vCPUs, 60 GB memory, 200 GB disk
  • Spark job config:
    • spark.executor.cores = 8
    • spark.executor.memory = 54 G

Test 3 failed with FetchFailedException, which resulted due to the executor memory not being sufficient for the job.

Also, from the Spark UI of Test 3, we see that the reserved storage memory of the executors was fully utilized for caching the data frames.

The remaining blocks to cache were spilled to disk, as seen in the executor’s stderr logs:

23/02/06 16:06:58 INFO MemoryStore: Will not store rdd_4_1810
23/02/06 16:06:58 WARN MemoryStore: Not enough space to cache rdd_4_1810 in memory! (computed 134.1 MiB so far)
23/02/06 16:06:58 INFO MemoryStore: Memory use = 14.8 GiB (blocks) + 507.5 MiB (scratch space shared across 4 tasks(s)) = 15.3 GiB. Storage limit = 15.3 GiB.
23/02/06 16:06:58 WARN BlockManager: Persisting block rdd_4_1810 to disk instead.

Around 33% of the persisted data frame was cached on disk, as seen on the Storage tab of the Spark UI.

Test 4 with larger executors and vCores ran successfully without throwing any memory-related errors. Also, only about 2.2% of the data frame was cached to disk. Therefore, cached blocks of a data frame will be retrieved from memory rather than from disk, offering better performance.

Recommendations

To determine if the large workers will benefit your memory-intensive Spark applications, consider the following:

  • Determine if your Spark application has any data skews by looking at the Spark UI. The following screenshot of the Spark UI shows an example data skew scenario where one task processes most of the data (145.2 GB), looking at the Shuffle Read size. If one or fewer tasks process significantly more data than other tasks, rerun your application with larger workers with 60–120 G of memory (spark.executor.memory set anywhere from 54–109 GB factoring in 10% of spark.executor.memoryOverhead).

  • Check the Storage tab of the Spark History Server to review the ratio of data cached in memory to disk from the Size in memory and Size in disk columns. If more than 10% of your data is cached to disk, rerun your application with larger workers to increase the amount of data cached in memory.
  • Another way to preemptively determine if your job needs more memory is by monitoring Peak JVM Memory on the Spark UI Executors tab. If the peak JVM memory used is close to the executor or driver memory, you can create an application with a larger worker and configure a higher value for spark.executor.memory or spark.driver.memory. For example, in the following screenshot, the maximum value of peak JVM memory usage is 26 GB and spark.executor.memory is set to 27 G. In this case, it may be beneficial to use larger workers with 60 GB memory and spark.executor.memory set to 54 G.

Considerations

Although large vCPUs help increase the locality of the shuffle blocks, there are other factors involved such as disk throughput, disk IOPS (input/output operations per second), and network bandwidth. In some cases, more small workers with more disks could offer higher disk IOPS, throughput, and network bandwidth overall compared to fewer large workers. We encourage you to benchmark your workloads against suitable vCPU configurations to choose the best configuration for your workload.

For shuffle-heavy jobs, it’s recommended to use large disks. You can attach up to 200 GB disk to each worker when you create your application. Using large vCPUs (spark.executor.cores) per executor may increase the disk utilization on each worker. If your application fails with “No space left on device” due to the inability to fit shuffle data in the disk, use more smaller workers with 200 GB disk.

Conclusion

In this post, you learned about the benefits of using large executors for your EMR Serverless jobs. For more information about different worker configurations, refer to Worker configurations. Large worker configurations are available in all Regions where EMR Serverless is available.


About the Author

Veena Vasudevan is a Senior Partner Solutions Architect and an Amazon EMR specialist at AWS focusing on big data and analytics. She helps customers and partners build highly optimized, scalable, and secure solutions; modernize their architectures; and migrate their big data workloads to AWS.

Automate replication of relational sources into a transactional data lake with Apache Iceberg and AWS Glue

Post Syndicated from Luis Gerardo Baeza original https://aws.amazon.com/blogs/big-data/automate-replication-of-relational-sources-into-a-transactional-data-lake-with-apache-iceberg-and-aws-glue/

Organizations have chosen to build data lakes on top of Amazon Simple Storage Service (Amazon S3) for many years. A data lake is the most popular choice for organizations to store all their organizational data generated by different teams, across business domains, from all different formats, and even over history. According to a study, the average company is seeing the volume of their data growing at a rate that exceeds 50% per year, usually managing an average of 33 unique data sources for analysis.

Teams often try to replicate thousands of jobs from relational databases with the same extract, transform, and load (ETL) pattern. There is lot of effort in maintaining the job states and scheduling these individual jobs. This approach helps the teams add tables with few changes and also maintains the job status with minimum effort. This can lead to a huge improvement in the development timeline and tracking the jobs with ease.

In this post, we show you how to easily replicate all your relational data stores into a transactional data lake in an automated fashion with a single ETL job using Apache Iceberg and AWS Glue.

Solution architecture

Data lakes are usually organized using separate S3 buckets for three layers of data: the raw layer containing data in its original form, the stage layer containing intermediate processed data optimized for consumption, and the analytics layer containing aggregated data for specific use cases. In the raw layer, tables usually are organized based on their data sources, whereas tables in the stage layer are organized based on the business domains they belong to.

This post provides an AWS CloudFormation template that deploys an AWS Glue job that reads an Amazon S3 path for one data source of the data lake raw layer, and ingests the data into Apache Iceberg tables on the stage layer using AWS Glue support for data lake frameworks. The job expects tables in the raw layer to be structured in the way AWS Database Migration Service (AWS DMS) ingests them: schema, then table, then data files.

This solution uses AWS Systems Manager Parameter Store for table configuration. You should modify this parameter specifying the tables you want to process and how, including information such as primary key, partitions, and the business domain associated. The job uses this information to automatically create a database (if it doesn’t already exist) for every business domain, create the Iceberg tables, and perform the data loading.

Finally, we can use Amazon Athena to query the data in the Iceberg tables.

The following diagram illustrates this architecture.

Solution architecture

This implementation has the following considerations:

  • All tables from the data source must have a primary key to be replicated using this solution. The primary key can be a single column or a composite key with more than one column.
  • If the data lake contains tables that don’t need upserts or don’t have a primary key, you can exclude them from the parameter configuration and implement traditional ETL processes to ingest them into the data lake. That’s outside of the scope of this post.
  • If there are additional data sources that need to be ingested, you can deploy multiple CloudFormation stacks, one to handle each data source.
  • The AWS Glue job is designed to process data in two phases: the initial load that runs after AWS DMS finishes the full load task, and the incremental load that runs on a schedule that applies change data capture (CDC) files captured by AWS DMS. Incremental processing is performed using an AWS Glue job bookmark.

There are nine steps to complete this tutorial:

  1. Set up a source endpoint for AWS DMS.
  2. Deploy the solution using AWS CloudFormation.
  3. Review the AWS DMS replication task.
  4. Optionally, add permissions for encryption and decryption or AWS Lake Formation.
  5. Review the table configuration on Parameter Store.
  6. Perform initial data loading.
  7. Perform incremental data loading.
  8. Monitor table ingestion.
  9. Schedule incremental batch data loading.

Prerequisites

Before starting this tutorial, you should already be familiar with Iceberg. If you’re not, you can get started by replicating a single table following the instructions in Implement a CDC-based UPSERT in a data lake using Apache Iceberg and AWS Glue. Additionally, set up the following:

Set up a source endpoint for AWS DMS

Before we create our AWS DMS task, we need to set up a source endpoint to connect to the source database:

  1. On the AWS DMS console, choose Endpoints in the navigation pane.
  2. Choose Create endpoint.
  3. If your database is running on Amazon RDS, choose Select RDS DB instance, then choose the instance from the list. Otherwise, choose the source engine and provide the connection information either through AWS Secrets Manager or manually.
  4. For Endpoint identifier, enter a name for the endpoint; for example, source-postgresql.
  5. Choose Create endpoint.

Deploy the solution using AWS CloudFormation

Create a CloudFormation stack using the provided template. Complete the following steps:

  1. Choose Launch Stack:
  2. Choose Next.
  3. Provide a stack name, such as transactionaldl-postgresql.
  4. Enter the required parameters:
    1. DMSS3EndpointIAMRoleARN – The IAM role ARN for AWS DMS to write data into Amazon S3.
    2. ReplicationInstanceArn – The AWS DMS replication instance ARN.
    3. S3BucketStage – The name of the existing bucket used for the stage layer of the data lake.
    4. S3BucketGlue – The name of the existing S3 bucket for storing AWS Glue scripts.
    5. S3BucketRaw – The name of the existing bucket used for the raw layer of the data lake.
    6. SourceEndpointArn – The AWS DMS endpoint ARN that you created earlier.
    7. SourceName – The arbitrary identifier of the data source to replicate (for example, postgres). This is used to define the S3 path of the data lake (raw layer) where data will be stored.
  5. Do not modify the following parameters:
    1. SourceS3BucketBlog – The bucket name where the provided AWS Glue script is stored.
    2. SourceS3BucketPrefix – The bucket prefix name where the provided AWS Glue script is stored.
  6. Choose Next twice.
  7. Select I acknowledge that AWS CloudFormation might create IAM resources with custom names.
  8. Choose Create stack.

After approximately 5 minutes, the CloudFormation stack is deployed.

Review the AWS DMS replication task

The AWS CloudFormation deployment created an AWS DMS target endpoint for you. Because of two specific endpoint settings, the data will be ingested as we need it on Amazon S3.

  1. On the AWS DMS console, choose Endpoints in the navigation pane.
  2. Search for and choose the endpoint that begins with dmsIcebergs3endpoint.
  3. Review the endpoint settings:
    1. DataFormat is specified as parquet.
    2. TimestampColumnName will add the column last_update_time with the date of creation of the records on Amazon S3.

AWS DMS endpoint settings

The deployment also creates an AWS DMS replication task that begins with dmsicebergtask.

  1. Choose Replication tasks in the navigation pane and search for the task.

You will see that the Task Type is marked as Full load, ongoing replication. AWS DMS will perform an initial full load of existing data, and then create incremental files with changes performed to the source database.

On the Mapping Rules tab, there are two types of rules:

  • A selection rule with the name of the source schema and tables that will be ingested from the source database. By default, it uses the sample database provided in the prerequisites, dms_sample, and all tables with the keyword %.
  • Two transformation rules that include in the target files on Amazon S3 the schema name and table name as columns. This is used by our AWS Glue job to know to which tables the files in the data lake correspond.

To learn more about how to customize this for your own data sources, refer to Selection rules and actions.

AWS mapping rules

Let’s change some configurations to finish our task preparation.

  1. On the Actions menu, choose Modify.
  2. In the Task Settings section, under Stop task after full load completes, choose Stop after applying cached changes.

This way, we can control the initial load and incremental file generation as two different steps. We use this two-step approach to run the AWS Glue job once per each step.

  1. Under Task logs, choose Turn on CloudWatch logs.
  2. Choose Save.
  3. Wait about 1 minute for the database migration task status to show as Ready.

Add permissions for encryption and decryption or Lake Formation

Optionally, you can add permissions for encryption and decryption or Lake Formation.

Add encryption and decryption permissions

If your S3 buckets used for the raw and stage layers are encrypted using AWS Key Management Service (AWS KMS) customer managed keys, you need to add permissions to allow the AWS Glue job to access the data:

Add Lake Formation permissions

If you’re managing permissions using Lake Formation, you need to allow your AWS Glue job to create your domain’s databases and tables through the IAM role GlueJobRole.

  1. Grant permissions to create databases (for instructions, refer to Creating a Database).
  2. Grant SUPER permissions to the default database.
  3. Grant data location permissions.
  4. If you create databases manually, grant permissions on all databases to create tables. Refer to Granting table permissions using the Lake Formation console and the named resource method or Granting Data Catalog permissions using the LF-TBAC method according to your use case.

After you complete the later step of performing the initial data load, make sure to also add permissions for consumers to query the tables. The job role will become the owner of all the tables created, and the data lake admin can then perform grants to additional users.

Review table configuration in Parameter Store

The AWS Glue job that performs the data ingestion into Iceberg tables uses the table specification provided in Parameter Store. Complete the following steps to review the parameter store that was configured automatically for you. If needed, modify according to your own needs.

  1. On the Parameter Store console, choose My parameters in the navigation pane.

The CloudFormation stack created two parameters:

  • iceberg-config for job configurations
  • iceberg-tables for table configuration
  1. Choose the parameter iceberg-tables.

The JSON structure contains information that AWS Glue uses to read data and write the Iceberg tables on the target domain:

  • One object per table – The name of the object is created using the schema name, a period, and the table name; for example, schema.table.
  • primaryKey – This should be specified for every source table. You can provide a single column or a comma-separated list of columns (without spaces).
  • partitionCols – This optionally partitions columns for target tables. If you don’t want to create partitioned tables, provide an empty string. Otherwise, provide a single column or a comma-separated list of columns to be used (without spaces).
  1. If you want to use your own data source, use the following JSON code and replace the text in CAPS from the template provided. If you’re using the sample data source provided, keep the default settings:
{
    "SCHEMA_NAME.TABLE_NAME_1": {
        "primaryKey": "ONLY_PRIMARY_KEY",
        "domain": "TARGET_DOMAIN",
        "partitionCols": ""
    },
    "SCHEMA_NAME.TABLE_NAME_2": {
        "primaryKey": "FIRST_PRIMARY_KEY,SECOND_PRIMARY_KEY",
        "domain": "TARGET_DOMAIN",
        "partitionCols": "PARTITION_COLUMN_ONE,PARTITION_COLUMN_TWO"
    }
}
  1. Choose Save changes.

Perform initial data loading

Now that the required configuration is finished, we ingest the initial data. This step includes three parts: ingesting the data from the source relational database into the raw layer of the data lake, creating the Iceberg tables on the stage layer of the data lake, and verifying results using Athena.

Ingest data into the raw layer of the data lake

To ingest data from the relational data source (PostgreSQL if you are using the sample provided) to our transactional data lake using Iceberg, complete the following steps:

  1. On the AWS DMS console, choose Database migration tasks in the navigation pane.
  2. Select the replication task you created and on the Actions menu, choose Restart/Resume.
  3. Wait about 5 minutes for the replication task to complete. You can monitor the tables ingested on the Statistics tab of the replication task.

AWS DMS full load statistics

After some minutes, the task finishes with the message Full load complete.

  1. On the Amazon S3 console, choose the bucket you defined as the raw layer.

Under the S3 prefix defined on AWS DMS (for example, postgres), you should see a hierarchy of folders with the following structure:

  • Schema
    • Table name
      • LOAD00000001.parquet
      • LOAD0000000N.parquet

AWS DMS full load objects created on S3

If your S3 bucket is empty, review Troubleshooting migration tasks in AWS Database Migration Service before running the AWS Glue job.

Create and ingest data into Iceberg tables

Before running the job, let’s navigate the script of the AWS Glue job provided as part of the CloudFormation stack to understand its behavior.

  1. On the AWS Glue Studio console, choose Jobs in the navigation pane.
  2. Search for the job that starts with IcebergJob- and a suffix of your CloudFormation stack name (for example, IcebergJob-transactionaldl-postgresql).
  3. Choose the job.

AWS Glue ETL job review

The job script gets the configuration it needs from Parameter Store. The function getConfigFromSSM() returns job-related configurations such as source and target buckets from where the data needs to be read and written. The variable ssmparam_table_values contain table-related information like the data domain, table name, partition columns, and primary key of the tables that needs to be ingested. See the following Python code:

# Main application
args = getResolvedOptions(sys.argv, ['JOB_NAME', 'stackName'])
SSM_PARAMETER_NAME = f"{args['stackName']}-iceberg-config"
SSM_TABLE_PARAMETER_NAME = f"{args['stackName']}-iceberg-tables"

# Parameters for job
rawS3BucketName, rawBucketPrefix, stageS3BucketName, warehouse_path = getConfigFromSSM(SSM_PARAMETER_NAME)
ssm_param_table_values = json.loads(ssmClient.get_parameter(Name = SSM_TABLE_PARAMETER_NAME)['Parameter']['Value'])
dropColumnList = ['db','table_name', 'schema_name','Op', 'last_update_time', 'max_op_date']

The script uses an arbitrary catalog name for Iceberg that is defined as my_catalog. This is implemented on the AWS Glue Data Catalog using Spark configurations, so a SQL operation pointing to my_catalog will be applied on the Data Catalog. See the following code:

catalog_name = 'my_catalog'
errored_table_list = []

# Iceberg configuration
spark = SparkSession.builder \
    .config('spark.sql.warehouse.dir', warehouse_path) \
    .config(f'spark.sql.catalog.{catalog_name}', 'org.apache.iceberg.spark.SparkCatalog') \
    .config(f'spark.sql.catalog.{catalog_name}.warehouse', warehouse_path) \
    .config(f'spark.sql.catalog.{catalog_name}.catalog-impl', 'org.apache.iceberg.aws.glue.GlueCatalog') \
    .config(f'spark.sql.catalog.{catalog_name}.io-impl', 'org.apache.iceberg.aws.s3.S3FileIO') \
    .config('spark.sql.extensions', 'org.apache.iceberg.spark.extensions.IcebergSparkSessionExtensions') \
    .getOrCreate()

The script iterates over the tables defined in Parameter Store and performs the logic for detecting if the table exists and if the incoming data is an initial load or an upsert:

# Iteration over tables stored on Parameter Store
for key in ssm_param_table_values:
    # Get table data
    isTableExists = False
    schemaName, tableName = key.split('.')
    logger.info(f'Processing table : {tableName}')

The initialLoadRecordsSparkSQL() function loads initial data when no operation column is present in the S3 files. AWS DMS adds this column only to Parquet data files produced by the continuous replication (CDC). The data loading is performed using the INSERT INTO command with SparkSQL. See the following code:

sqltemp = Template("""
    INSERT INTO $catalog_name.$dbName.$tableName  ($insertTableColumnList)
    SELECT $insertTableColumnList FROM insertTable $partitionStrSQL
""")
SQLQUERY = sqltemp.substitute(
    catalog_name = catalog_name, 
    dbName = dbName, 
    tableName = tableName,
    insertTableColumnList = insertTableColumnList[ : -1],
    partitionStrSQL = partitionStrSQL)

logger.info(f'****SQL QUERY IS : {SQLQUERY}')
spark.sql(SQLQUERY)

Now we run the AWS Glue job to ingest the initial data into the Iceberg tables. The CloudFormation stack adds the --datalake-formats parameter, adding the required Iceberg libraries to the job.

  1. Choose Run job.
  2. Choose Job Runs to monitor the status. Wait until the status is Run Succeeded.

Verify the data loaded

To confirm that the job processed the data as expected, complete the following steps:

  1. On the Athena console, choose Query Editor in the navigation pane.
  2. Verify AwsDataCatalog is selected as the data source.
  3. Under Database, choose the data domain that you want to explore, based on the configuration you defined in the parameter store. If using the sample database provided, use sports.

Under Tables and views, we can see the list of tables that were created by the AWS Glue job.

  1. Choose the options menu (three dots) next to the first table name, then choose Preview Data.

You can see the data loaded into Iceberg tables. Amazon Athena review initial data loaded

Perform incremental data loading

Now we start capturing changes from our relational database and applying them to the transactional data lake. This step is also divided in three parts: capturing the changes, applying them to the Iceberg tables, and verifying the results.

Capture changes from the relational database

Due to the configuration we specified, the replication task stopped after running the full load phase. Now we restart the task to add incremental files with changes into the raw layer of the data lake.

  1. On the AWS DMS console, select the task we created and ran before.
  2. On the Actions menu, choose Resume.
  3. Choose Start task to start capturing changes.
  4. To trigger new file creation on the data lake, perform inserts, updates, or deletes on the tables of your source database using your preferred database administration tool. If using the sample database provided, you could run the following SQL commands:
UPDATE dms_sample.nfl_stadium_data_upd
SET seatin_capacity=93703
WHERE team = 'Los Angeles Rams' and sport_location_id = '31';

update  dms_sample.mlb_data 
set bats = 'R'
where mlb_id=506560 and bats='L';

update dms_sample.sporting_event 
set start_date  = current_date 
where id=11 and sold_out=0;
  1. On the AWS DMS task details page, choose the Table statistics tab to see the changes captured.
    AWS DMS CDC statistics
  2. Open the raw layer of the data lake to find a new file holding the incremental changes inside every table’s prefix, for example under the sporting_event prefix.

The record with changes for the sporting_event table looks like the following screenshot.

AWS DMS objects migrated into S3 with CDC

Notice the Op column in the beginning identified with an update (U). Also, the second date/time value is the control column added by AWS DMS with the time the change was captured.

CDC file schema on Amazon S3

Apply changes on the Iceberg tables using AWS Glue

Now we run the AWS Glue job again, and it will automatically process only the new incremental files since the job bookmark is enabled. Let’s review how it works.

The dedupCDCRecords() function performs deduplication of data because multiple changes to a single record ID could be captured within the same data file on Amazon S3. Deduplication is performed based on the last_update_time column added by AWS DMS that indicates the timestamp of when the change was captured. See the following Python code:

def dedupCDCRecords(inputDf, keylist):
    IDWindowDF = Window.partitionBy(*keylist).orderBy(inputDf.last_update_time).rangeBetween(-sys.maxsize, sys.maxsize)
    inputDFWithTS = inputDf.withColumn('max_op_date', max(inputDf.last_update_time).over(IDWindowDF))
    
    NewInsertsDF = inputDFWithTS.filter('last_update_time=max_op_date').filter("op='I'")
    UpdateDeleteDf = inputDFWithTS.filter('last_update_time=max_op_date').filter("op IN ('U','D')")
    finalInputDF = NewInsertsDF.unionAll(UpdateDeleteDf)

    return finalInputDF

On line 99, the upsertRecordsSparkSQL() function performs the upsert in a similar fashion to the initial load, but this time with a SQL MERGE command.

Review the applied changes

Open the Athena console and run a query that selects the changed records on the source database. If using the provided sample database, use one the following SQL queries:

SELECT * FROM "sports"."nfl_stadiu_data_upd"
WHERE team = 'Los Angeles Rams' and sport_location_id = 31
LIMIT 1;

Amazon Athena review cdc data loaded

Monitor table ingestion

The AWS Glue job script is coded with simple Python exception handling to catch errors during processing a specific table. The job bookmark is saved after each table finishes processing successfully, to avoid reprocessing tables if the job run is retried for the tables with errors.

The AWS Command Line Interface (AWS CLI) provides a get-job-bookmark command for AWS Glue that provides insight into the status of the bookmark for each table processed.

  1. On the AWS Glue Studio console, choose the ETL job.
  2. Choose the Job Runs tab and copy the job run ID.
  3. Run the following command on a terminal authenticated for the AWS CLI, replacing <GLUE_JOB_RUN_ID> on line 1 with the value you copied. If your CloudFormation stack is not named transactionaldl-postgresql, provide the name of your job on line 2 of the script:
jobrun=<GLUE_JOB_RUN_ID>
jobname=IcebergJob-transactionaldl-postgresql
aws glue get-job-bookmark --job-name jobname --run-id $jobrun

In this solution, when a table processing causes an exception, the AWS Glue job will not fail according to this logic. Instead, the table will be added into an array that is printed after the job is complete. In such scenario, the job will be marked as failed after it tries to process the rest of the tables detected on the raw data source. This way, tables without errors don’t have to wait until the user identifies and solves the problem on the conflicting tables. The user can quickly detect job runs that had issues using the AWS Glue job run status, and identify which specific tables are causing the problem using the CloudWatch logs for the job run.

  1. The job script implements this feature with the following Python code:
# Performed for every table
        try:
            # Table processing logic
        except Exception as e:
            logger.info(f'There is an issue with table: {tableName}')
            logger.info(f'The exception is : {e}')
            errored_table_list.append(tableName)
            continue
        job.commit()
if (len(errored_table_list)):
    logger.info('Total number of errored tables are ',len(errored_table_list))
    logger.info('Tables that failed during processing are ', *errored_table_list, sep=', ')
    raise Exception(f'***** Some tables failed to process.')

The following screenshot shows how the CloudWatch logs look for tables that cause errors on processing.

AWS Glue job monitoring with logs

Aligned with the AWS Well-Architected Framework Data Analytics Lens practices, you can adapt more sophisticated control mechanisms to identify and notify stakeholders when errors appear on the data pipelines. For example, you can use an Amazon DynamoDB control table to store all tables and job runs with errors, or using Amazon Simple Notification Service (Amazon SNS) to send alerts to operators when certain criteria is met.

Schedule incremental batch data loading

The CloudFormation stack deploys an Amazon EventBridge rule (disabled by default) that can trigger the AWS Glue job to run on a schedule. To provide your own schedule and enable the rule, complete the following steps:

  1. On the EventBridge console, choose Rules in the navigation pane.
  2. Search for the rule prefixed with the name of your CloudFormation stack followed by JobTrigger (for example, transactionaldl-postgresql-JobTrigger-randomvalue).
  3. Choose the rule.
  4. Under Event Schedule, choose Edit.

The default schedule is configured to trigger every hour.

  1. Provide the schedule you want to run the job.
  2. Additionally, you can use an EventBridge cron expression by selecting A fine-grained schedule.
    Amazon EventBridge schedule ETL job
  3. When you finish setting up the cron expression, choose Next three times, and finally choose Update Rule to save changes.

The rule is created disabled by default to allow you to run the initial data load first.

  1. Activate the rule by choosing Enable.

You can use the Monitoring tab to view rule invocations, or directly on the AWS Glue Job Run details.

Conclusion

After deploying this solution, you have automated the ingestion of your tables on a single relational data source. Organizations using a data lake as their central data platform usually need to handle multiple, sometimes even tens of data sources. Also, more and more use cases require organizations to implement transactional capabilities to the data lake. You can use this solution to accelerate the adoption of such capabilities across all your relational data sources to enable new business use cases, automating the implementation process to derive more value from your data.


About the Authors

Luis Gerardo BaezaLuis Gerardo Baeza is a Big Data Architect in the Amazon Web Services (AWS) Data Lab. He has 12 years of experience helping organizations in the healthcare, financial and education sectors to adopt enterprise architecture programs, cloud computing, and data analytics capabilities. Luis currently helps organizations across Latin America to accelerate strategic data initiatives.

SaiKiran Reddy AenuguSaiKiran Reddy Aenugu is a Data Architect in the Amazon Web Services (AWS) Data Lab. He has 10 years of experience implementing data loading, transformation, and visualization processes. SaiKiran currently helps organizations in North America to adopt modern data architectures such as data lakes and data mesh. He has experience in the retail, airline, and finance sectors.

Narendra MerlaNarendra Merla is a Data Architect in the Amazon Web Services (AWS) Data Lab. He has 12 years of experience in designing and productionalizing both real-time and batch-oriented data pipelines and building data lakes on both cloud and on-premises environments. Narendra currently helps organizations in North America to build and design robust data architectures, and has experience in the telecom and finance sectors.

How to visualize IAM Access Analyzer policy validation findings with QuickSight

Post Syndicated from Mostefa Brougui original https://aws.amazon.com/blogs/security/how-to-visualize-iam-access-analyzer-policy-validation-findings-with-quicksight/

In this blog post, we show you how to create an Amazon QuickSight dashboard to visualize the policy validation findings from AWS Identity and Access Management (IAM) Access Analyzer. You can use this dashboard to better understand your policies and how to achieve least privilege by periodically validating your IAM roles against IAM best practices. This blog post walks you through the deployment for a multi-account environment using AWS Organizations.

Achieving least privilege is a continuous cycle to grant only the permissions that your users and systems require. To achieve least privilege, you start by setting fine-grained permissions. Then, you verify that the existing access meets your intent. Finally, you refine permissions by removing unused access. To learn more, see IAM Access Analyzer makes it easier to implement least privilege permissions by generating IAM policies based on access activity.

Policy validation is a feature of IAM Access Analyzer that guides you to author and validate secure and functional policies with more than 100 policy checks. You can use these checks when creating new policies or to validate existing policies. To learn how to use IAM Access Analyzer policy validation APIs when creating new policies, see Validate IAM policies in CloudFormation templates using IAM Access Analyzer. In this post, we focus on how to validate existing IAM policies.

Approach to visualize IAM Access Analyzer findings

As shown in Figure 1, there are four high-level steps to build the visualization.

Figure 1: Steps to visualize IAM Access Analyzer findings

Figure 1: Steps to visualize IAM Access Analyzer findings

  1. Collect IAM policies

    To validate your IAM policies with IAM Access Analyzer in your organization, start by periodically sending the content of your IAM policies (inline and customer-managed) to a central account, such as your Security Tooling account.

  2. Validate IAM policies

    After you collect the IAM policies in a central account, run an IAM Access Analyzer ValidatePolicy API call on each policy. The API calls return a list of findings. The findings can help you identify issues, provide actionable recommendations to resolve the issues, and enable you to author functional policies that can meet security best practices. The findings are stored in an Amazon Simple Storage Service (Amazon S3) bucket. To learn about different findings, see Access Analyzer policy check reference.

  3. Visualize findings

    IAM Access Analyzer policy validation findings are stored centrally in an S3 bucket. The S3 bucket is owned by the central (hub) account of your choosing. You can use Amazon Athena to query the findings from the S3 bucket, and then create a QuickSight analysis to visualize the findings.

  4. Publish dashboards

    Finally, you can publish a shareable QuickSight dashboard. Figure 2 shows an example of the dashboard.

    Figure 2: Dashboard overview

    Figure 2: Dashboard overview

Design overview

This implementation is a serverless job initiated by Amazon EventBridge rules. It collects IAM policies into a hub account (such as your Security Tooling account), validates the policies, stores the validation results in an S3 bucket, and uses Athena to query the findings and QuickSight to visualize them. Figure 3 gives a design overview of our implementation.

Figure 3: Design overview of the implementation

Figure 3: Design overview of the implementation

As shown in Figure 3, the implementation includes the following steps:

  1. A time-based rule is set to run daily. The rule triggers an AWS Lambda function that lists the IAM policies of the AWS account it is running in.
  2. For each IAM policy, the function sends a message to an Amazon Simple Queue Service (Amazon SQS) queue. The message contains the IAM policy Amazon Resource Name (ARN), and the policy document.
  3. When new messages are received, the Amazon SQS queue initiates the second Lambda function. For each message, the Lambda function extracts the policy document and validates it by using the IAM Access Analyzer ValidatePolicy API call.
  4. The Lambda function stores validation results in an S3 bucket.
  5. An AWS Glue table contains the schema for the IAM Access Analyzer findings. Athena natively uses the AWS Glue Data Catalog.
  6. Athena queries the findings stored in the S3 bucket.
  7. QuickSight uses Athena as a data source to visualize IAM Access Analyzer findings.

Benefits of the implementation

By implementing this solution, you can achieve the following benefits:

  • Store your IAM Access Analyzer policy validation results in a scalable and cost-effective manner with Amazon S3.
  • Add scalability and fault tolerance to your validation workflow with Amazon SQS.
  • Partition your evaluation results in Athena and restrict the amount of data scanned by each query, helping to improve performance and reduce cost.
  • Gain insights from IAM Access Analyzer policy validation findings with QuickSight dashboards. You can use the dashboard to identify IAM policies that don’t comply with AWS best practices and then take action to correct them.

Prerequisites

Before you implement the solution, make sure you’ve completed the following steps:

  1. Install a Git client, such as GitHub Desktop.
  2. Install the AWS Command Line Interface (AWS CLI). For instructions, see Installing or updating the latest version of the AWS CLI.
  3. If you plan to deploy the implementation in a multi-account environment using Organizations, enable all features and enable trusted access with Organizations to operate a service-managed stack set.
  4. Get a QuickSight subscription to the Enterprise edition. When you first subscribe to the Enterprise edition, you get a free trial for four users for 30 days. Trial authors are automatically converted to month-to-month subscription upon trial expiry. For more details, see Signing up for an Amazon QuickSight subscription, Amazon QuickSight Enterprise edition and the Amazon QuickSight Pricing Calculator.

Note: This implementation works in accounts that don’t have AWS Lake Formation enabled. If Lake Formation is enabled in your account, you might need to grant Lake Formation permissions in addition to the implementation IAM permissions. For details, see Lake Formation access control overview.

Walkthrough

In this section, we will show you how to deploy an AWS CloudFormation template to your central account (such as your Security Tooling account), which is the hub for IAM Access Analyzer findings. The central account collects, validates, and visualizes your findings.

To deploy the implementation to your multi-account environment

  1. Deploy the CloudFormation stack to your central account.

    Important: Do not deploy the template to the organization’s management account; see design principles for organizing your AWS accounts. You can choose the Security Tooling account as a hub account.

    In your central account, run the following commands in a terminal. These commands clone the GitHub repository and deploy the CloudFormation stack to your central account.

    # A) Clone the repository
    git clone https://github.com/aws-samples/visualize-iam-access-analyzer-policy-validation-findings.git
      # B) Switch to the repository's directory cd visualize-iam-access-analyzer-policy-validation-findings
      # C) Deploy the CloudFormation stack to your central security account (hub). For <AWSRegion> enter your AWS Region without quotes. make deploy-hub aws-region=<AWSRegion>

    If you want to send IAM policies from other member accounts to your central account, you will need to make note of the CloudFormation stack outputs for SQSQueueUrl and KMSKeyArn when the deployment is complete.

    make describe-hub-outputs aws-region=<AWSRegion>

  2. Switch to your organization’s management account and deploy the stack sets to the member accounts. For <SQSQueueUrl> and <KMSKeyArn>, use the values from the previous step.
    # Create a CloudFormation stack set to deploy the resources to the member accounts.
      make deploy-members SQSQueueUrl=<SQSQueueUrl> KMSKeyArn=<KMSKeyArn< aws-region=<AWSRegion>

To deploy the QuickSight dashboard to your central account

  1. Make sure that QuickSight is using the IAM role aws-quicksight-service-role.
    1. In QuickSight, in the navigation bar at the top right, choose your account (indicated by a person icon) and then choose Manage QuickSight.
    2. On the Manage QuickSight page, in the menu at the left, choose Security & Permissions.
    3. On the Security & Permissions page, under QuickSight access to AWS services, choose Manage.
    4. For IAM role, choose Use an existing role, and then do one of the following:
      • If you see a list of existing IAM roles, choose the role

        arn:aws:iam::<account-id>:role/service-role/aws-quicksight-service-role.

      • If you don’t see a list of existing IAM roles, enter the IAM ARN for the role in the following format:

        arn:aws:iam::<account-id>:role/service-role/aws-quicksight-service-role.

    5. Choose Save.
  2. Retrieve the QuickSight users.
    # <aws-region> your Quicksight main Region, for example eu-west-1
    # <account-id> The ID of your account, for example 123456789012
    # <namespace-name> Quicksight namespace, for example default.
    # You can list the namespaces by using aws quicksight list-namespaces --aws-account-id <account-id>
      aws quicksight list-users --region <aws-region> --aws-account-id <account-id> --namespace <namespace-name>

  3. Make a note of the user’s ARN that you want to grant permissions to list, describe, or update the QuickSight dashboard. This information is found in the arn element. For example, arn:aws:quicksight:us-east-1:111122223333:user/default/User1
  4. To launch the deployment stack for the QuickSight dashboard, run the following command. Replace <quicksight-user-arn> with the user’s ARN from the previous step.
    make deploy-dashboard-hub aws-region=<AWSRegion> quicksight-user-arn=<quicksight-user-arn>

Publish and share the QuickSight dashboard with the policy validation findings

You can publish your QuickSight dashboard and then share it with other QuickSight users for reporting purposes. The dashboard preserves the configuration of the analysis at the time that it’s published and reflects the current data in the datasets used by the analysis.

To publish the QuickSight dashboard

  1. In the QuickSight console, choose Analyses and then choose access-analyzer-validation-findings.
  2. (Optional) Modify the visuals of the analysis. For more information, see Tutorial: Modify Amazon QuickSight visuals.
  3. Share the QuickSight dashboard.
    1. In your analysis, in the application bar at the upper right, choose Share, and then choose Publish dashboard.
    2. On the Publish dashboard page, choose Publish new dashboard as and enter IAM Access Analyzer Policy Validation.
    3. Choose Publish dashboard. The dashboard is now published.
  4. On the QuickSight start page, choose Dashboards.
  5. Select the IAM Access Analyzer Policy Validation dashboard. IAM Access Analyzer policy validation findings will appear within the next 24 hours.

    Note: If you don’t want to wait until the Lambda function is initiated automatically, you can invoke the function that lists customer-managed policies and inline policies by using the aws lambda invoke AWS CLI command on the hub account and wait one to two minutes to see the policy validation findings:

    aws lambda invoke –function-name access-analyzer-list-iam-policy –invocation-type Event –cli-binary-format raw-in-base64-out –payload {} response.json

  6. (Optional) To export your dashboard as a PDF, see Exporting Amazon QuickSight analyses or dashboards as PDFs.

To share the QuickSight dashboard

  1. In the QuickSight console, choose Dashboards and then choose IAM Access Analyzer Policy Validation.
  2. In your dashboard, in the application bar at the upper right, choose Share, and then choose Share dashboard.
  3. On the Share dashboard page that opens, do the following:
    1. For Invite users and groups to dashboard on the left pane, enter a user email or group name in the search box. Users or groups that match your query appear in a list below the search box. Only active users and groups appear in the list.
    2. For the user or group that you want to grant access to the dashboard, choose Add. Then choose the level of permissions that you want them to have.
  4. After you grant users access to a dashboard, you can copy a link to it and send it to them.

For more details, see Sharing dashboards or Sharing your view of a dashboard.

Your teams can use this dashboard to better understand their IAM policies and how to move toward least-privilege permissions, as outlined in the section Validate your IAM roles of the blog post Top 10 security items to improve in your AWS account.

Clean up

To avoid incurring additional charges in your accounts, remove the resources that you created in this walkthrough.

Before deleting the CloudFormation stacks and stack sets in your accounts, make sure that the S3 buckets that you created are empty. To delete everything (including old versioned objects) in a versioned bucket, we recommend emptying the bucket through the console. Before deleting the CloudFormation stack from the central account, delete the Athena workgroup.

To delete remaining resources from your AWS accounts

  1. Delete the CloudFormation stack from your central account by running the following command. Make sure to replace <AWSRegion> with your own Region.
    make delete-hub aws-region=<AWSRegion>

  2. Delete the CloudFormation stack set instances and stack sets by running the following command using your organization’s management account credentials. Make sure to replace <AWSRegion> with your own Region.
    make delete-stackset-instances aws-region=<AWSRegion>
      # Wait for the operation to finish. You can check its progress on the CloudFormation console.
      make delete-stackset aws-region=<AWSRegion>

  3. Delete the QuickSight dashboard by running the following command using the central account credentials. Make sure to replace <AWSRegion> with your own Region.
    make delete-dashboard aws-region=<AWSRegion>

  4. To cancel your QuickSight subscription and close the account, see Canceling your Amazon QuickSight subscription and closing the account.

Conclusion

In this post, you learned how to validate your existing IAM policies by using the IAM Access Analyzer ValidatePolicy API and visualizing the results with AWS analytics tools. By using the implementation, you can better understand your IAM policies and work to reach least privilege in a scalable, fault-tolerant, and cost-effective way. This will help you identify opportunities to tighten your permissions and to grant the right fine-grained permissions to help enhance your overall security posture.

To learn more about IAM Access Analyzer, see previous blog posts on IAM Access Analyzer.

To download the CloudFormation templates, see the visualize-iam-access-analyzer-policy-validation-findings GitHub repository. For information about pricing, see Amazon SQS pricing, AWS Lambda pricing, Amazon Athena pricing and Amazon QuickSight pricing.

If you have feedback about this post, submit comments in the Comments section below. If you have questions about this post, start a new thread on the AWS Security, Identity, & Compliance re:Post.

Want more AWS Security news? Follow us on Twitter.

Mostefa Brougui

Mostefa Brougui

Mostefa is a Sr. Security Consultant in Professional Services at Amazon Web Services. He works with AWS enterprise customers to design, build, and optimize their security architecture to drive business outcomes.

Tobias Nickl

Tobias Nickl

Tobias works in Professional Services at Amazon Web Services as a Security Engineer. In addition to building custom AWS solutions, he advises AWS enterprise customers on how to reach their business objectives and accelerate their cloud transformation.

Monitor Apache HBase on Amazon EMR using Amazon Managed Service for Prometheus and Amazon Managed Grafana

Post Syndicated from Anubhav Awasthi original https://aws.amazon.com/blogs/big-data/monitor-apache-hbase-on-amazon-emr-using-amazon-managed-service-for-prometheus-and-amazon-managed-grafana/

Amazon EMR provides a managed Apache Hadoop framework that makes it straightforward, fast, and cost-effective to run Apache HBase. Apache HBase is a massively scalable, distributed big data store in the Apache Hadoop ecosystem. It is an open-source, non-relational, versioned database that runs on top of the Apache Hadoop Distributed File System (HDFS). It’s built for random, strictly consistent, real-time access for tables with billions of rows and millions of columns. Monitoring HBase clusters is critical in order to identify stability and performance bottlenecks and proactively preempt them. In this post, we discuss how you can use Amazon Managed Service for Prometheus and Amazon Managed Grafana to monitor, alert, and visualize HBase metrics.

HBase has built-in support for exporting metrics via the Hadoop metrics subsystem to files or Ganglia or via JMX. You can either use AWS Distro for OpenTelemetry or Prometheus JMX exporters to collect metrics exposed by HBase. In this post, we show how to use Prometheus exporters. These exporters behave like small webservers that convert internal application metrics to Prometheus format and serve it at /metrics path. A Prometheus server running on an Amazon Elastic Compute Cloud (Amazon EC2) instance collects these metrics and remote writes to an Amazon Managed Service for Prometheus workspace. We then use Amazon Managed Grafana to create dashboards and view these metrics using an Amazon Managed Service for Prometheus workspace as its data source.

This solution can be extended to other big data platforms such as Apache Spark and Apache Presto that also use JMX to expose their metrics.

Solution overview

The following diagram illustrates our solution architecture.

Solution Architecture

This post uses an AWS CloudFormation template to perform below actions:

  1. Install an open-source Prometheus server on an EC2 instance.
  2. Create appropriate AWS Identity and Access Management (IAM) roles and security group for the EC2 instance running the Prometheus server.
  3. Create an EMR cluster with an HBase on Amazon S3 configuration.
  4. Install JMX exporters on all EMR nodes.
  5. Create additional security groups for the EMR master and worker nodes to connect with the Prometheus server running on the EC2 instance.
  6. Create a workspace in Amazon Managed Service for Prometheus.

Prerequisites

To implement this solution, make sure you have the following prerequisites:

aws emr create-default-roles

Deploy the CloudFormation template

Deploy the CloudFormation template in the us-east-1 Region:

Launch Stack

It will take 15–20 minutes for the template to complete. The template requires the following fields:

  • Stack Name – Enter a name for the stack
  • VPC – Choose an existing VPC
  • Subnet – Choose an existing subnet
  • EMRClusterName – Use EMRHBase
  • HBaseRootDir – Provide a new HBase root directory (for example, s3://hbase-root-dir/).
  • MasterInstanceType – Use m5x.large
  • CoreInstanceType – Use m5x.large
  • CoreInstanceCount – Enter 2
  • SSHIPRange – Use <your ip address>/32 (you can go to https://checkip.amazonaws.com/ to check your IP address)
  • EMRKeyName – Choose a key pair for the EMR cluster
  • EMRRleaseLabel – Use emr-6.9.0
  • InstanceType – Use the EC2 instance type for installing the Prometheus server

cloud formation parameters

Enable remote writes on the Prometheus server

The Prometheus server is running on an EC2 instance. You can find the instance hostname in the CloudFormation stack’s Outputs tab for key PrometheusServerPublicDNSName.

  1. SSH into the EC2 instance using the key pair:
    ssh -i <sshKey.pem> ec2-user@<Public IPv4 DNS of EC2 instance running Prometheus server>

  2. Copy the value for Endpoint – remote write URL from the Amazon Managed Service for Prometheus workspace console.

  1. Edit remote_write url in /etc/prometheus/conf/prometheus.yml:
sudo vi /etc/prometheus/conf/prometheus.yml

It should look like the following code:

  1. Now we need to restart the Prometheus server to pick up the changes:
sudo systemctl restart prometheus

Enable Amazon Managed Grafana to read from an Amazon Managed Service for Prometheus workspace

We need to add the Amazon Managed Prometheus workspace as a data source in Amazon Managed Grafana. You can skip directly to step 3 if you already have an existing Amazon Managed Grafana workspace and want to use it for HBase metrics.

  1. First, let’s create a workspace on Amazon Managed Grafana. You can follow the appendix to create a workspace using the Amazon Managed Grafana console or run the following API from your terminal (provide your role ARN):
aws grafana create-workspace \
--account-access-type CURRENT_ACCOUNT \
--authentication-providers AWS_SSO \
--permission-type CUSTOMER_MANAGED \
--workspace-data-sources PROMETHEUS \
--workspace-name emr-metrics \
--workspace-role-arn <role-ARN> \
--workspace-notification-destinations SNS
  1. On the Amazon Managed Grafana console, choose Configure users and select a user you want to allow to log in to Grafana dashboards.

Make sure your IAM Identity Center user type is admin. We need this to create dashboards. You can assign the viewer role to all the other users.

  1. Log in to the Amazon Managed Grafana workspace URL using your admin credentials.
  2. Choose AWS Data Sources in the navigation pane.

  1. For Service, choose Amazon Managed Service for Prometheus.

  1. For Regions, choose US East (N. Virginia).

Create an HBase dashboard

Grafana labs has an open-source dashboard that you can use. For example, you can follow the guidance from the following HBase dashboard. Start creating your dashboard and chose the import option. Provide the URL of the dashboard or enter 12722 and choose Load. Make sure your Prometheus workspace is selected on the next page. You should see HBase metrics showing up on the dashboard.

Key HBase metrics to monitor

HBase has a wide range of metrics for HMaster and RegionServer. The following are a few important metrics to keep in mind.

HMASTER Metric Name Metric Description
. hadoop_HBase_numregionservers Number of live region servers
. hadoop_HBase_numdeadregionservers Number of dead region servers
. hadoop_HBase_ritcount Number of regions in transition
. hadoop_HBase_ritcountoverthreshold Number of regions that have been in transition longer than a threshold time (default: 60 seconds)
. hadoop_HBase_ritduration_99th_percentile Maximum time taken by 99% of the regions to remain in transition state
REGIONSERVER Metric Name Metric Description
. hadoop_HBase_regioncount Number of regions hosted by the region server
. hadoop_HBase_storefilecount Number of store files currently managed by the region server
. hadoop_HBase_storefilesize Aggregate size of the store files
. hadoop_HBase_hlogfilecount Number of write-ahead logs not yet archived
. hadoop_HBase_hlogfilesize Size of all write-ahead log files
. hadoop_HBase_totalrequestcount Total number of requests received
. hadoop_HBase_readrequestcount Number of read requests received
. hadoop_HBase_writerequestcount Number of write requests received
. hadoop_HBase_numopenconnections Number of open connections at the RPC layer
. hadoop_HBase_numactivehandler Number of RPC handlers actively servicing requests
Memstore . .
. hadoop_HBase_memstoresize Total memstore memory size of the region server
. hadoop_HBase_flushqueuelength Current depth of the memstore flush queue (if increasing, we are falling behind with clearing memstores out to Amazon S3)
. hadoop_HBase_flushtime_99th_percentile 99th percentile latency for flush operation
. hadoop_HBase_updatesblockedtime Number of milliseconds updates have been blocked so the memstore can be flushed
Block Cache . .
. hadoop_HBase_blockcachesize Block cache size
. hadoop_HBase_blockcachefreesize Block cache free size
. hadoop_HBase_blockcachehitcount Number of block cache hits
. hadoop_HBase_blockcachemisscount Number of block cache misses
. hadoop_HBase_blockcacheexpresshitpercent Percentage of the time that requests with the cache turned on hit the cache
. hadoop_HBase_blockcachecounthitpercent Percentage of block cache hits
. hadoop_HBase_blockcacheevictioncount Number of block cache evictions in the region server
. hadoop_HBase_l2cachehitratio Local disk-based bucket cache hit ratio
. hadoop_HBase_l2cachemissratio Bucket cache miss ratio
Compaction . .
. hadoop_HBase_majorcompactiontime_99th_percentile Time in milliseconds taken for major compaction
. hadoop_HBase_compactiontime_99th_percentile Time in milliseconds taken for minor compaction
. hadoop_HBase_compactionqueuelength Current depth of the compaction request queue (if increasing, we are falling behind with storefile compaction)
. flush queue length Number of flush operations waiting to be processed in the region server (a higher number indicates flush operations are slow)
IPC Queues . .
. hadoop_HBase_queuesize Total data size of all RPC calls in the RPC queues in the region server
. hadoop_HBase_numcallsingeneralqueue Number of RPC calls in the general processing queue in the region server
. hadoop_HBase_processcalltime_99th_percentile 99th percentile latency for RPC calls to be processed in the region server
. hadoop_HBase_queuecalltime_99th_percentile 99th percentile latency for RPC calls to stay in the RPC queue in the region server
JVM and GC . .
. hadoop_HBase_memheapusedm Heap used
. hadoop_HBase_memheapmaxm Total heap
. hadoop_HBase_pausetimewithgc_99th_percentile Pause time in milliseconds
. hadoop_HBase_gccount Garbage collection count
. hadoop_HBase_gctimemillis Time spent in garbage collection, in milliseconds
Latencies . .
. HBase.regionserver.<op>_<measure> Operation latencies, where <op> is Append, Delete, Mutate, Get, Replay, or Increment, and <measure> is min, max, mean, median, 75th_percentile, 95th_percentile, or 99th_percentile
. HBase.regionserver.slow<op>Count Number of operations we thought were slow, where <op> is one of the preceding list
Bulk Load . .
. Bulkload_99th_percentile hadoop_HBase_bulkload_99th_percentile
I/O . .
. FsWriteTime_99th_percentile hadoop_HBase_fswritetime_99th_percentile
. FsReadTime_99th_percentile hadoop_HBase_fsreadtime_99th_percentile
Exceptions . .
. exceptions.RegionTooBusyException .
. exceptions.callQueueTooBig .
. exceptions.NotServingRegionException .

Considerations and limitations

Note the following when using this solution:

  • You can set up alerts on Amazon Managed Service for Prometheus and visualize them in Amazon Managed Grafana.
  • This architecture can be easily extended to include other open-source frameworks such as Apache Spark, Apache Presto, and Apache Hive.
  • Refer to the pricing details for Amazon Managed Service for Prometheus and Amazon Managed Grafana.
  • These scripts are for guidance purposes only and aren’t ready for production deployments. Make sure to perform thorough testing.

Clean up

To avoid ongoing charges, delete the CloudFormation stack and workspaces created in Amazon Managed Grafana and Amazon Managed Service for Prometheus.

Conclusion

In this post, you learned how to monitor EMR HBase clusters and set up dashboards to visualize key metrics. This solution can serve as a unified monitoring platform for multiple EMR clusters and other applications. For more information on EMR HBase, see Release Guide and HBase Migration whitepaper.


Appendix

Complete the following steps to create a workspace on Amazon Managed Grafana:

  1. Log in to the Amazon Managed Grafana console and choose Create workspace.

  1. For Authentication access, select AWS IAM Identity Center.

If you don’t have IAM Identity Center enabled, refer to Enable IAM Identity Center.

  1. Optionally, to view Prometheus alerts in your Grafana workspace, select Turn Grafana alerting on.

  1. On the next page, select Amazon Managed Service for Prometheus as the data source.

  1. After the workspace is created, assign users to access Amazon Managed Grafana.

  1. For a first-time setup, assign admin privileges to the user.

You can add other users with only viewer access.

Make sure you are able to log in to the Grafana workspace URL using your IAM Identity Center user credentials.


About the Author

Anubhav Awasthi is a Sr. Big Data Specialist Solutions Architect at AWS. He works with customers to provide architectural guidance for running analytics solutions on Amazon EMR, Amazon Athena, AWS Glue, and AWS Lake Formation.

How OLX Group migrated to Amazon Redshift RA3 for simpler, faster, and more cost-effective analytics

Post Syndicated from Miguel Chin original https://aws.amazon.com/blogs/big-data/how-olx-group-migrated-to-amazon-redshift-ra3-for-simpler-faster-and-more-cost-effective-analytics/

This is a guest post by Miguel Chin, Data Engineering Manager at OLX Group and David Greenshtein, Specialist Solutions Architect for Analytics, AWS.

OLX Group is one of the world’s fastest-growing networks of online marketplaces, operating in over 30 countries around the world. We help people buy and sell cars, find housing, get jobs, buy and sell household goods, and much more.

We live in a data-producing world, and as companies want to become data driven, there is the need to analyze more and more data. These analyses are often done using data warehouses. However, a common data warehouse issue with ever-growing volumes of data is storage limitations and the degrading performance that comes with it. This scenario is very familiar to us in OLX Group. Our data warehouse is built using Amazon Redshift and is used by multiple internal teams to power their products and data-driven business decisions. As such, it’s crucial to maintain a cluster with high availability and performance while also being storage cost-efficient.

In this post, we share how we modernized our Amazon Redshift data warehouse by migrating to RA3 nodes and how it enabled us to achieve our business expectations. Hopefully you can learn from our experience in case you are considering doing the same.

Status quo before migration

Here at OLX Group, Amazon Redshift has been our choice for data warehouse for over 5 years. We started with a small Amazon Redshift cluster of 7 DC2.8xlarge nodes, and as its popularity and adoption increased inside the OLX Group data community, this cluster naturally grew.

Before migrating to RA3, we were using a 16 DC2.8xlarge nodes cluster with a highly tuned workload management (WLM), and performance wasn’t an issue at all. However, we kept facing challenges with storage demand due to having more users, more data sources, and more prepared data. Almost every day we would get an alert that our disk space was close to 100%, which was about 40 TB worth of data.

Our usual method to solve storage problems used to be to simply increase the number of nodes. Overall, we reached a cluster size of 18 nodes. However, this solution wasn’t cost-efficient enough because we were adding compute capacity to the cluster even though computation power was underutilized. We saw this as a temporary solution, and we mainly did it to buy some time to explore other cost-effective alternatives, such as RA3 nodes.

Amazon Redshift RA3 nodes along with Redshift Managed Storage (RMS) provided separation of storage and compute, enabling us to scale storage and compute separately to better meet our business requirements.

Our data warehouse had the following configuration before the migration:

  • 18 x DC2.8xlarge nodes
  • 250 monthly active users, consistently increasing
  • 10,000 queries per hour, 30 queries in parallel
  • 40 TB of data, consistently increasing
  • 100% disk space utilization

This cluster’s performance was generally good, ETL (extract, transform, and load) and interactive queries barely had any queue time, and 80% of them would finish in under 5 minutes.

Evaluating the performance of Amazon Redshift clusters with RA3 nodes

In this section, we discuss how we conducted a performance evaluation of RA3 nodes with an Amazon Redshift cluster.

Test environment

In order to be confident with the performance of the RA3 nodes, we decided to stress test them in a controlled environment before making the decision to migrate. To assess the nodes and find an optimal RA3 cluster configuration, we collaborated with AllCloud, the AWS premier consulting partner. The following figures illustrate the approach we took to evaluate the performance of RA3.

Test setup

This strategy aims to replicate a realistic workload in different RA3 cluster configurations and compare them with our DC2 configuration. To do this, we required the following:

  • A reference cluster snapshot – This ensures that we can replay any tests starting from the same state.
  • A set of queries from the production cluster – This set can be reconstructed from the Amazon Redshift logs (STL_QUERYTEXT) and enriched by metadata (STL_QUERY). It should be noted that we only took into consideration SELECT and FETCH query types (to simplify this first stage of performance tests). The following chart shows what the profile of our test set looked like.

  • A replay tool to orchestrate all the query operations – AllCloud developed a Python application for us for this purpose.

For more details about approach we used, including using the Amazon Redshift Simple Replay utility, refer to Compare different node types for your workload using Amazon Redshift.

Next, we picked which cluster configurations we wanted to test, which RA3 type, and how many nodes. For the specifications of each node type, refer to Amazon Redshift pricing.

First, we decided to test the same DC2 cluster we had in production as a way to validate our test environment, followed by RA3 clusters using RA3.4xlarge nodes with various numbers of nodes. We used RA3.4xlarge because it gives us more flexibility to fine-tune how many nodes we need compared to the RA3.16xlarge instance (1 x RA3.16xlarge node is equivalent to 4 x RA3.4xlarge nodes in terms of CPU and memory). With this in mind, we tested the following cluster configurations and used the replay tool to take measurements of the performance of each cluster.

18 x DC2

(Reference)

18 x RA3

(Before Classic Resize)

18 x RA3 6 x RA3
Queries Number 1560 1560 1560 1560
Timeouts 25 66 127
Duration/s Mean 1.214 1.037 1.167 1.921
Std. 2.268 2.026 2.525 3.488
Min. 0.003 0.000 0.002 0.002
Q 25% 0.005 0.004 0.004 0.004
Q 50% 0.344 0.163 0.118 0.183
Q 75% 1.040 0.746 1.076 2.566
Max. 25.411 15.492 19.770 19.132

These results show how the DC2 cluster compares with other RA3 configurations. For 50% of the faster queries (quantile 50%) they ran faster than on DC2. Regarding the number of RA3 nodes, six nodes were clearly slower, particularly noticeable on quantile 75% of query durations.

We used the following steps to deploy different clusters:

  1. Use 18 x DC2.8xlarge, restored from the original snapshot (18 x DC2.8xlarge).
  2. Take measurements 18 x DC2.
  3. Use 18 x RA3.4xlarge, restored from the original snapshot (18 x DC2.8xlarge).
  4. Take measurements 18 x RA3 (before classic resize).
  5. Use 6 x RA3.4xlarge, classic resize from 18 x RA3.4xlarge.
  6. Take snapshot from 6 x RA3.4xlarge.
  7. Take measurements 6 x RA3.
  8. Use 6 x RA3.4xlarge, restored from 6 x RA3.4xlarge snapshot.
  9. Use 18 x RA3.4xlarge, elastic resize from 6 x RA3.4xlarge.
  10. Take measurements 18x RA3.

Although these are promising results, there were some limitations in the test environment setup. We were concerned that we weren’t stressing the clusters enough, queries were only running in sequence using a single client, and the fact that we were using only SELECT and FETCH query types moved us away from a realistic workload. Therefore, we proceeded to the second stage of our tests.

Concurrency stress test

To stress the clusters, we changed our replay tool to run multiple queries in parallel. Queries extracted from the log files were queued with the same frequency as they were originally run in the reference cluster. Up to 50 clients take queries from the queue and send them to Amazon Redshift. The timing of all queries is recorded for comparison with the reference cluster.

The cluster performance is evaluated by measuring the temporal course of the query concurrency. If a cluster is equally performant as the reference cluster, the concurrency will closely follow the concurrency of the reference cluster. Queries pushed to the query queue are immediately picked up by a client and sent to the cluster. If the cluster isn’t capable of handling the queries as fast as the reference cluster, the number of running concurrent queries will increase when compared to the reference cluster. We also decided to keep concurrency scaling disabled during this test because we wanted to focus on node types instead of cluster features.

The following table shows the concurrent queries running on a DC2 and RA3 (both 18 nodes) with two different query test sets (3:00 AM and 1:00 PM). These were selected so we could test both our day and overnight workloads. 3:00 AM is when we have a peak of automated ETL jobs running, and 1:00 PM is when we have high user activity.

The median of running concurrent queries on the RA3 cluster is much higher than the DC2 one. This led us to conclude that a cluster of 18 RA3.4xlarge might not be enough to handle this workload reliably.

Concurrency 18 x DC2.8xlarge 18 x RA3.4xlarge
Starting 3:00 AM 1:00 PM 3:00 AM 1:00 PM
Mean 5 7 10 5
STD 11 13 7 4
25% 1 1 5 2
50% 2 2 8 4
75% 4 4 13 7
Max 50 50 50 27

RA3.16xlarge

Initially, we chose the RA3.4xlarge node type for more granular control in fine-tuning the number of nodes. However, we overlooked one important detail: the same instance type is used for worker and leader nodes. A leader node needs to manage all the parallel processing happening in the cluster, and a single RA3.4xlarge wasn’t enough to do so.

With this in mind, we tested two more cluster configurations: 6 x RA3.16xlarge and 8 x RA3.16xlarge, and once again measured concurrency. This time the results were much better; RA3.16xlarge was able to keep up with the reference concurrency, and the sweet spot seemed to be between 6–8 nodes.

Concurrency 18 x DC2.8xlarge 18 x RA3.4xlarge 6 x RA3.16xlarge 8 x RA3.16xlarge
Starting 3:00 AM 1:00 PM 3:00 AM 1:00 PM 3:00 AM 3:00 AM
Mean 5 7 10 5 3 1
STD 11 13 7 4 4 1
25% 1 1 5 2 2 0
50% 2 2 8 4 3 1
75% 4 4 13 7 4 2
Max 50 50 50 27 38 9

Things were looking better and our target configuration was now a 7 x RA3.16xlarge cluster. We were now confident enough to proceed with the migration.

The migration

Regardless of how excited we were to proceed, we still wanted to do a calculated migration. It’s best practice to have a playbook for migrations—a step-by-step guide on what needs to be done and also a contingency plan that includes a rollback plan. For simplicity reasons, we list here only the relevant steps in case you are looking for inspiration.

Migration plan

The migration plan included the following key steps:

  1. Remove the DNS from the current cluster, in our case in Amazon Route 53. No users should be able to query after this.
  2. Check if any sessions are still running a query, and decide to wait or stop it. This strongly indicates these users are using the direct cluster URL to connect.
    1. To check running sessions, use SELECT * FROM STV_SESSIONS.
    2. To check stopped sessions, use SELECT PG_TERMINATE_BACKEND(xxxxx);.
  3. Create a snapshot of the DC2 cluster.
  4. Pause the DC2 cluster.
  5. Create an RA3 cluster from the snapshot with the following configuration:
    1. Node type – RA3.16xlarge
    2. Number of nodes – 7
    3. Database name – Same as the DC2
    4. Associated IAM roles – Same as the DC2
    5. VPC – Same as the DC2
    6. VPC security groups – Same as the DC2
    7. Parameter groups – Same as the DC2
  6. Wait for SELECT COUNT(1) FROM STV_UNDERREPPED_BLOCKS to return 0. This is related to the hydration process of the cluster.
  7. Point the DNS to the RA3 cluster.
  8. Users can now query the cluster again.

Contingency plan

In case the performance of hourly and daily ETL is not acceptable, the contingency plan is triggered:

  1. Add one more node to deal with the unexpected workload.
  2. Increase the limit of concurrency scaling hours.
  3. Reassess the parameter group.

Following this plan, we migrated from DC2 to RA3 nodes in roughly 3.5 hours, from stopping the old cluster to booting the new one and letting our processes fully synchronize. We then proceeded to monitor performance for a couple of hours. Storage capacity was looking great and everything was running smoothly, but we were curious to see how the overnight processes would perform.

The next morning, we woke up to what we dreaded: a slow cluster. We triggered our contingency plan and in the following few days we ended up implementing all three actions we had in the contingency plan.

Adding one extra node itself didn’t provide much help, however users did experience good performance during the hours concurrency scaling was on. The concurrency scaling feature allows Amazon Redshift to temporarily increase cluster capacity whenever the workload requires it. We configured it to allow a maximum of 4 hours per day—1 hour for free and 3 hours paid. We chose this particular value because price-wise it is equivalent to adding one more node (taking us to nine nodes) with the added advantage of only using and paying for it when the workload requires it.

The last action we took was related to the parameter group, in particular, the WLM. As initially stated, we had a manually fine-tuned WLM, but it proved to be inefficient for this new RA3 cluster. Therefore, we decided to try auto WLM with the following configuration.

Manual WLM before introducing auto WLM Queue 1 Data Team ETL queue (daily and hourly), admin, monitoring, data quality queries
Queue 2 Users queue (for both their ETL and ad hoc queries)
Auto WLM Queue 1: Priority highest Daily Data Team ETL queue
Queue 2: Priority high Admin queries
Queue 3: Priority normal User queries and hourly Data Team ETL
Queue 4: Priority low Monitoring, data quality queries

Manual WLM requires you to manually allocate a percentage of resources and define a number of slots per queue. Although this gives you resource segregation, it also means resources are constantly allocated and can go to waste if they’re not used. Auto WLM dynamically sets these variables depending on each queue’s priority and workload. This means that a query in the highest priority queue will get all the resources allocated to it, while lower priority queues will need to wait for available resources. With this in mind, we split our ETL depending on its priority: daily ETL to highest, hourly ETL to normal (to give a fair chance for user queries to compete for resources), and monitoring and data quality to low.

After applying concurrency scaling and auto WLM, we achieved stable performance for a whole week, and considered the migration a success.

Status quo after migration

Almost a year has passed since we migrated to RA3 nodes, and we couldn’t be more satisfied. Thanks to Redshift Managed Storage (RMS), our disk space issues are a thing of the past, and performance has been generally great compared to our previous DC2 cluster. We are now at 300 monthly active users. Cluster costs did increase due to the new node type and concurrency scaling, but we now feel prepared for the future and don’t expect any cluster resizing anytime soon.

Looking back, we wanted to have a carefully planned and prepared migration, and we were able to learn more about RA3 with our test environment. However, our experience also shows that test environments aren’t always bulletproof, and some details may be overlooked. In the end, these are our main takeaways from the migration to RA3 nodes:

  • Pick the right node type according to your workload. An RA3.16xlarge cluster provides more powerful leader and worker nodes.
  • Use concurrency scaling to provision more resources when the workload demands it. Adding a new node is not always the most cost-efficient solution.
  • Manual WLM requires a lot of adjustments; using auto WLM allows for a better and fairer distribution of cluster resources.

Conclusion

In this post, we covered how OLX Group modernized our Amazon Redshift data warehouse by migrating to RA3 nodes. We detailed how we tested before migration, the migration itself, and the outcome. We are now starting to explore the possibilities provided by the RA3 nodes. In particular, the data sharing capabilities together with Redshift Serverless open the door for exciting architecture setups that we are looking forward to.

If you are going through the same storage issues we used to face with your Amazon Redshift cluster, we highly recommend migrating to RA3 nodes. Its RMS feature decouples the scalability of compute and storage power, providing a more cost-efficient solution.

Thanks for reading this post and hopefully you found it useful. If you’re going through the same scenario and have any questions, feel free to reach out.


About the author

Miguel Chin is a Data Engineering Manager at OLX Group, one of the world’s fastest-growing networks of trading platforms. He is responsible for managing a domain-oriented team of data engineers that helps shape the company’s data ecosystem by evangelizing cutting-edge data concepts like data mesh.

David Greenshtein is a Specialist Solutions Architect for Analytics at AWS with a passion for ETL and automation. He works with AWS customers to design and build analytics solutions enabling business to make data-driven decisions. In his free time, he likes jogging and riding bikes with his son.

Synchronize your Salesforce and Snowflake data to speed up your time to insight with Amazon AppFlow

Post Syndicated from Ramesh Ranganathan original https://aws.amazon.com/blogs/big-data/synchronize-your-salesforce-and-snowflake-data-to-speed-up-your-time-to-insight-with-amazon-appflow/

This post was co-written with Amit Shah, Principal Consultant at Atos.

Customers across industries seek meaningful insights from the data captured in their Customer Relationship Management (CRM) systems. To achieve this, they combine their CRM data with a wealth of information already available in their data warehouse, enterprise systems, or other software as a service (SaaS) applications. One widely used approach is getting the CRM data into your data warehouse and keeping it up to date through frequent data synchronization.

Integrating third-party SaaS applications is often complicated and requires significant effort and development. Developers need to understand the application APIs, write implementation and test code, and maintain the code for future API changes. Amazon AppFlow, which is a low-code/no-code AWS service, addresses this challenge.

Amazon AppFlow is a fully managed integration service that enables you to securely transfer data between SaaS applications, like Salesforce, SAP, Zendesk, Slack, and ServiceNow, and AWS services like Amazon Simple Storage Service (Amazon S3) and Amazon Redshift in just a few clicks. With Amazon AppFlow, you can run data flows at enterprise scale at the frequency you choose—on a schedule, in response to a business event, or on demand.

In this post, we focus on synchronizing your data from Salesforce to Snowflake (on AWS) without writing code. This post walks you through the steps to set up a data flow to address full and incremental data load using an example use case.

Solution overview

Our use case involves the synchronization of the Account object from Salesforce into Snowflake. In this architecture, you use Amazon AppFlow to filter and transfer the data to your Snowflake data warehouse.

You can configure Amazon AppFlow to run your data ingestion in three different ways:

  • On-demand – You can manually run the flow through the AWS Management Console, API, or SDK call.
  • Event-driven – Amazon AppFlow can subscribe and listen to change data capture (CDC) events from the source SaaS application.
  • Scheduled – Amazon AppFlow can run schedule-triggered flows based on a pre-defined schedule rule. With scheduled flows, you can choose either full or incremental data transfer:
    • With full transfer, Amazon AppFlow transfers a snapshot of all records at the time of the flow run from the source to the destination.
    • With incremental transfer, Amazon AppFlow transfers only the records that have been added or changed since the last successful flow run. To determine the incremental delta of your data, AppFlow requires you to specify a source timestamp field to instruct how Amazon AppFlow identifies new or updated records.

We use the on-demand trigger for the initial load of data from Salesforce to Snowflake, because it helps you pull all the records, irrespective of their creation. To then synchronize data periodically with Snowflake, after we run the on-demand trigger, we configure a scheduled trigger with incremental transfer. With this approach, Amazon AppFlow pulls the records based on a chosen timestamp field from the Salesforce Account object periodically, based on the time interval specified in the flow.

The Account_Staging table is created in Snowflake to act as a temporary storage that can be used to identify the data change events. Then the permanent table (Account) is updated from the staging table by running a SQL stored procedure that contains the incremental update logic. The following figure depicts the various components of the architecture and the data flow from the source to the target.

The data flow contains the following steps:

  1. First, the flow is run with on-demand and full transfer mode to load the full data into Snowflake.
  2. The Amazon AppFlow Salesforce connector pulls the data from Salesforce and stores it in the Account Data S3 bucket in CSV format.
  3. The Amazon AppFlow Snowflake connector loads the data into the Account_Staging table.
  4. A scheduled task, running at regular intervals in Snowflake, triggers a stored procedure.
  5. The stored procedure starts an atomic transaction that loads the data into the Account table and then deletes the data from the Account_Staging table.
  6. After the initial data is loaded, you update the flow to capture incremental updates from Salesforce. The flow trigger configuration is changed to scheduled, to capture data changes in Salesforce. This enables Snowflake to get all updates, deletes, and inserts in Salesforce at configured intervals.
  7. The flow uses the configured LastModifiedDate field to determine incremental changes.
  8. Steps 3, 4, and 5 are run again to load the incremental updates into the Snowflake Accounts table.

Prerequisites

To get started, you need the following prerequisites:

  • A Salesforce user account with sufficient privileges to install connected apps. Amazon AppFlow uses a connected app to communicate with Salesforce APIs. If you don’t have a Salesforce account, you can sign up for a developer account.
  • A Snowflake account with sufficient permissions to create and configure the integration, external stage, table, stored procedures, and tasks.
  • An AWS account with access to AWS Identity and Access Management (IAM), Amazon AppFlow, and Amazon S3.

Set up Snowflake configuration and Amazon S3 data

Complete the following steps to configure Snowflake and set up your data in Amazon S3:

  1. Create two S3 buckets in your AWS account: one for holding the data coming from Salesforce, and another for holding error records.

A best practice when creating your S3 bucket is to make sure you block public access to the bucket to ensure your data is not accessible by unauthorized users.

  1. Create an IAM policy named snowflake-access that allows listing the bucket contents and reading S3 objects inside the bucket.

Follow the instructions for steps 1 and 2 in Configuring a Snowflake Storage Integration to Access Amazon S3 to create an IAM policy and role. Replace the placeholders with your S3 bucket names.

  1. Log in to your Snowflake account and create a new warehouse called SALESFORCE and database called SALESTEST.
  2. Specify the format in which data will be available in Amazon S3 for Snowflake to load (for this post, CSV):
USE DATABASE SALESTEST;
CREATE or REPLACE file format my_csv_format
type = csv
field_delimiter = ','
Y skip_header = 1
null_if = ('NULL', 'null')
empty_field_as_null = true
compression = gzip;
  1. Amazon AppFlow uses the Snowflake COPY command to move data using an S3 bucket. To configure this integration, follow steps 3–6 in Configuring a Snowflake Storage Integration to Access Amazon S3.

These steps create a storage integration with your S3 bucket, update IAM roles with Snowflake account and user details, and creates an external stage.

This completes the setup in Snowflake. In the next section, you create the required objects in Snowflake.

Create schemas and procedures in Snowflake

In your Snowflake account, complete the following steps to create the tables, stored procedures, and tasks for implementing the use case:

  1. In your Snowflake account, open a worksheet and run the following DDL scripts to create the Account and Account_staging tables:
CREATE or REPLACE TABLE ACCOUNT_STAGING (
ACCOUNT_NUMBER STRING NOT NULL,
ACCOUNT_NAME STRING,
ACCOUNT_TYPE STRING,
ANNUAL_REVENUE NUMBER,
ACTIVE BOOLEAN NOT NULL,
DELETED BOOLEAN,
LAST_MODIFIED_DATE STRING,
primary key (ACCOUNT_NUMBER)
);

CREATE or REPLACE TABLE ACCOUNT (
ACCOUNT_NUMBER STRING NOT NULL,
ACCOUNT_NAME STRING,
ACCOUNT_TYPE STRING,
ANNUAL_REVENUE NUMBER,
ACTIVE BOOLEAN NOT NULL,
LAST_MODIFIED_DATE STRING,
primary key (ACCOUNT_NUMBER)
);
  1. Create a stored procedure in Snowflake to load data from staging to the Account table:
CREATE or REPLACE procedure sp_account_load( )
returns varchar not null
language sql
as
$$
begin
Begin transaction;
merge into ACCOUNT using ACCOUNT_STAGING
on ACCOUNT.ACCOUNT_NUMBER = ACCOUNT_STAGING.ACCOUNT_NUMBER
when matched AND ACCOUNT_STAGING.DELETED=TRUE then delete
when matched then UPDATE SET
ACCOUNT.ACCOUNT_NAME = ACCOUNT_STAGING.ACCOUNT_NAME,
ACCOUNT.ACCOUNT_TYPE = ACCOUNT_STAGING.ACCOUNT_TYPE,
ACCOUNT.ANNUAL_REVENUE = ACCOUNT_STAGING.ANNUAL_REVENUE,
ACCOUNT.ACTIVE = ACCOUNT_STAGING.ACTIVE,
ACCOUNT.LAST_MODIFIED_DATE = ACCOUNT_STAGING.LAST_MODIFIED_DATE
when NOT matched then
INSERT (
ACCOUNT.ACCOUNT_NUMBER,
ACCOUNT.ACCOUNT_NAME,
ACCOUNT.ACCOUNT_TYPE,
ACCOUNT.ANNUAL_REVENUE,
ACCOUNT.ACTIVE,
ACCOUNT.LAST_MODIFIED_DATE
)
values(
ACCOUNT_STAGING.ACCOUNT_NUMBER,
ACCOUNT_STAGING.ACCOUNT_NAME,
ACCOUNT_STAGING.ACCOUNT_TYPE,
ACCOUNT_STAGING.ANNUAL_REVENUE,
ACCOUNT_STAGING.ACTIVE,
ACCOUNT_STAGING.LAST_MODIFIED_DATE
) ;

Delete from ACCOUNT_STAGING;
Commit;
end;
$$
;

This stored procedure determines whether the data contains new records that need to be inserted or existing records that need to be updated or deleted. After a successful run, the stored procedure clears any data from your staging table.

  1. Create a task in Snowflake to trigger the stored procedure. Make sure that the time interval for this task is more than the time interval configured in Amazon AppFlow for pulling the incremental changes from Salesforce. The time interval should be sufficient for data to be processed.
CREATE OR REPLACE TASK TASK_ACCOUNT_LOAD
WAREHOUSE = SALESFORCE
SCHEDULE = 'USING CRON 5 * * * * America/Los_Angeles'
AS
call sp_account_load();
  1. Provide the required permissions to run the task and resume the task:
show tasks;
  • As soon as task is created it will be suspended state so needs to resume it manually first time
ALTER TASK TASK_ACCOUNT_LOAD RESUME;
  • If the role which is assigned to us doesn’t have proper access to resume/execute task needs to grant execute task privilege to that role
GRANT EXECUTE TASK, EXECUTE MANAGED TASK ON ACCOUNT TO ROLE SYSADMIN;

This completes the Snowflake part of configuration and setup.

Create a Salesforce connection

First, let’s create a Salesforce connection that can be used by AppFlow to authenticate and pull records from your Salesforce instance. On the AWS console, make sure you are in the same Region where your Snowflake instance is running.

  1. On the Amazon AppFlow console, choose Connections in the navigation pane.
  2. From the list of connectors, select Salesforce.
  3. Choose Create connection.
  4. For Connection name, enter a name of your choice (for example, Salesforce-blog).
  5. Leave the rest of the fields as default and choose Continue.
  6. You’re redirected to a sign-in page, where you need to log in to your Salesforce instance.
  7. After you allow Amazon AppFlow access to your Salesforce account, your connection is successfully created.
           

 Create a Snowflake connection

Complete the following steps to create your Snowflake connection:

  1. On the Connections menu, choose Snowflake.
  2. Choose Create connection.
  3. Provide information for the Warehouse, Stage name, and Bucket details fields.
  4. Enter your credential details.

  1. For Region, choose the same Region where Snowflake is running.
  2. For Connection name, name your connection Snowflake-blog.
  3. Leave the rest of the fields as default and choose Connect.

Create a flow in Amazon AppFlow

Now you create a flow in Amazon AppFlow to load the data from Salesforce to Snowflake. Complete the following steps:

  1. On the Amazon AppFlow console, choose Flows in the navigation pane.
  2. Choose Create flow.
  3. On the Specify flow details page, enter a name for the flow (for example, AccountData-SalesforceToSnowflake).
  4. Optionally, provide a description for the flow and tags.
  5. Choose Next.

  1. On the Configure flow page, for Source name¸ choose Salesforce.
  2. Choose the Salesforce connection we created in the previous step (Salesforce-blog).
  3. For Choose Salesforce object, choose Account.
  4. For Destination name, choose Snowflake.
  5. Choose the newly created Snowflake connection.
  6. For Choose Snowflake object, choose the staging table you created earlier (SALESTEST.PUBLIC. ACCOUNT_STAGING).

  1. In the Error handling section, provide your error S3 bucket.
  2. For Choose how to trigger the flow¸ select Run on demand.
  3. Choose Next.

  1. Select Manually map fields to map the fields between your source and destination.
  2. Choose the fields Account Number, Account Name, Account Type, Annual Revenue, Active, Deleted, and Last Modified Date.

  1. Map each source field to its corresponding destination field.
  2. Under Additional settings, leave the Import deleted records unchecked (default setting).

  1. In the Validations section, add validations for the data you’re pulling from Salesforce.

Because the schema for the Account_Staging table in Snowflake database has a NOT NULL constraint for the fields Account_Number and Active, records containing a null value for these fields should be ignored.

  1. Choose Add Validation to configure validations for these fields.
  2. Choose Next.

  1. Leave everything else as default, proceed to the final page, and choose Create Flow.
  2. After the flow is created, choose Run flow.

When the flow run completes successfully, it will bring all records into your Snowflake staging table.

Verify data in Snowflake

The data will be loaded into the Account_staging table. To verify that data is loaded in Snowflake, complete the following steps:

  1. Validate the number of records by querying the ACCOUNT_STAGING table in Snowflake.
  2. Wait for your Snowflake task to run based on the configured schedule.
  3. Verify that all the data is transferred to the ACCOUNT table and the ACCOUNT_STAGING table is truncated.

Configure an incremental data load from Salesforce

Now let’s configure an incremental data load from Salesforce:

  1. On the Amazon AppFlow console, select your flow, and choose Edit.
  2. Go to the Edit configuration step and change to Run flow on schedule.
  3. Set the flow to run every 5 minutes, and provide a start date of Today, with a start time in the future.
  4. Choose Incremental transfer and choose the LastModifiedDate field.
  5. Choose Next.
  6. In the Additional settings section, select Import deleted records.

This ensures that deleted records from the source are also ingested.

  1. Choose Save and then choose Activate flow.

Now your flow is configured to capture all incremental changes.

Test the solution

Log in to your Salesforce account, and edit any record in the Account object.

Within 5 minutes or less, a scheduled flow will pick up your change and write the changed record into your Snowflake staging table and trigger the synchronization process.

You can see the details of the run, including number of records transferred, on the Run History tab of your flow.

Clean up

Clean up the resources in your AWS account by completing the following steps:

  1. On the Amazon AppFlow console, choose Flows in the navigation pane.
  2. From the list of flows, select the flow AccountData-SalesforceToSnowflakeand delete it.
  3. Enter delete to delete the flow.
  4. Choose Connections in the navigation pane.
  5. Choose Salesforce from the list of connectors, select Salesforce-blog, and delete it.
  6. Enter delete to delete the connector.
  7. On the Connections page, choose Snowflake from the list of connectors, select Snowflake-blog, and delete it.
  8. Enter delete to delete the connector.
  9. On the IAM console, choose Roles in the navigation page, then select the role you created for Snowflake and delete it.
  10. Choose Policies in the navigation pane, select the policy you created for Snowflake, and delete it.
  11. On the Amazon S3 console, search for the data bucket you created, choose Empty to delete the objects, then delete the bucket.
  12. Search for the error bucket you created, choose Empty to delete the objects, then delete the bucket.
  13. Clean up resources in your Snowflake account:
  • Delete the task TASK_ACCOUNT_LOAD:
ALTER TASK TASK_ACCOUNT_LOAD SUSPEND;
DROP TASK TASK_ACCOUNT_LOAD;
  • Delete the stored procedure sp_account_load:
DROP procedure sp_account_load();
  • Delete the tables ACCOUNT_STAGING and ACCOUNT:
DROP TABLE ACCOUNT_STAGING;
DROP TABLE ACCOUNT;

Conclusion

In this post, we walked you through how to integrate and synchronize your data from Salesforce to Snowflake using Amazon AppFlow. This demonstrates how you can set up your ETL jobs without having to learn new programming languages by using Amazon AppFlow and your familiar SQL language. This is a proof of concept, but you can try to handle edge cases like failure of Snowflake tasks or understand how incremental transfer works by making multiple changes to a Salesforce record within the scheduled time interval.

For more information on Amazon AppFlow, visit Amazon AppFlow.


About the authors

Ramesh Ranganathan is a Senior Partner Solution Architect at AWS. He works with AWS customers and partners to provide guidance on enterprise cloud adoption, application modernization and cloud native development. He is passionate about technology and enjoys experimenting with AWS Serverless services.

Kamen Sharlandjiev is an Analytics Specialist Solutions Architect and Amazon AppFlow expert. He’s on a mission to make life easier for customers who are facing complex data integration challenges. His secret weapon? Fully managed, low-code AWS services that can get the job done with minimal effort and no coding.

Amit Shah is a cloud based modern data architecture expert and currently leading AWS Data Analytics practice in Atos. Based in Pune in India, he has 20+ years of experience in data strategy, architecture, design and development. He is on a mission to help organization become data-driven.

Using GitHub Actions with Amazon CodeCatalyst

Post Syndicated from Dr. Rahul Sharad Gaikwad original https://aws.amazon.com/blogs/devops/using-github-actions-with-amazon-codecatalyst/

An Amazon CodeCatalyst workflow is an automated procedure that describes how to build, test, and deploy your code as part of a continuous integration and continuous delivery (CI/CD) system. You can use GitHub Actions alongside native CodeCatalyst actions in a CodeCatalyst workflow.

Introduction:

In a prior post in this series, Using Workflows to Build, Test, and Deploy with Amazon CodeCatalyst, I discussed creating CI/CD pipelines in CodeCatalyst and how that relates to The Unicorn Project’s main protagonist, Maxine. CodeCatalyst workflows help you reliably deliver high-quality application updates frequently, quickly, and securely. CodeCatalyst allows you to quickly assemble and configure actions to compose workflows that automate your CI/CD pipeline, test reporting, and other manual processes. Workflows use provisioned compute, Lambda compute, custom container images, and a managed build infrastructure to scale execution easily without sacrificing flexibility. In this post, I will return to workflows and discuss running GitHub Actions alongside native CodeCatalyst actions.

Prerequisites

If you would like to follow along with this walkthrough, you will need to:

Walkthrough

As with the previous posts in the CodeCatalyst series, I am going to use the Modern Three-tier Web Application blueprint. Blueprints provide sample code and CI/CD workflows to help you get started easily across different combinations of programming languages and architectures. To follow along, you can re-use a project you created previously, or you can refer to a previous post that walks through creating a project using the Three-tier blueprint.

As the team has grown, I have noticed that code quality has decreased. Therefore, I would like to add a few additional tools to validate code quality when a new pull request is submitted. In addition, I would like to create a Software Bill of Materials (SBOM) for each pull request so I know what components are used by the code. In the previous post on workflows, I focused on the deployment workflow. In this post, I will focus on the OnPullRequest workflow. You can view the OnPullRequest pipeline by expanding CI/CD from the left navigation, and choosing Workflows. Next, choose OnPullRequest and you will be presented with the workflow shown in the following screenshot. This workflow runs when a new pull request is submitted and currently uses Amazon CodeGuru to perform an automated code review.

OnPullRequest Workflow with CodeGuru code review

Figure 1. OnPullRequest Workflow with CodeGuru code review

While CodeGuru provides intelligent recommendations to improve code quality, it does not check style. I would like to add a linter to ensure developers follow our coding standards. While CodeCatalyst supports a rich collection of native actions, this does not currently include a linter. Fortunately, CodeCatalyst also supports GitHub Actions. Let’s use a GitHub Action to add a linter to the workflow.

Select Edit in the top right corner of the Workflow screen. If the editor opens in YAML mode, switch to Visual mode using the toggle above the code. Next, select “+ Actions” to show the list of actions. Then, change from Amazon CodeCatalyst to GitHub using the dropdown. At the time this blog was published, CodeCatalyst includes about a dozen curated GitHub Actions. Note that you are not limited to the list of curated actions. I’ll show you how to add GitHub Actions that are not on the list later in this post. For now, I am going to use Super-Linter to check coding style in pull requests. Find Super-Linter in the curated list and click the plus icon to add it to the workflow.

Super-Linter action with add icon

Figure 2. Super-Linter action with add icon

This will add a new action to the workflow and open the configuration dialog box. There is no further configuration needed, so you can simply close the configuration dialog box. The workflow should now look like this.

Workflow with the new Super-Linter action

Figure 3. Workflow with the new Super-Linter action

Notice that the actions are configured to run in parallel. In the previous post, when I discussed the deployment workflow, the steps were sequential. This made sense since each step built on the previous step. For the pull request workflow, the actions are independent, and I will allow them to run in parallel so they complete faster. I select Validate, and assuming there are no issues, I select Commit to save my changes to the repository.

While CodeCatalyst will start the workflow when a pull request is submitted, I do not have a pull request to submit. Therefore, I select Run to test the workflow. A notification at the top of the screen includes a link to view the run. As expected, Super Linter fails because it has found issues in the application code. I click on the Super Linter action and review the logs. Here are few issues that Super Linter reported regarding app.py used by the backend application. Note that the log has been modified slightly to fit on a single line.

/app.py:2:1: F401 'os' imported but unused
/app.py:2:1: F401 'time' imported but unused
/app.py:2:1: F401 'json' imported but unused
/app.py:2:10: E401 multiple imports on one line
/app.py:4:1: F401 'boto3' imported but unused
/app.py:6:9: E225 missing whitespace around operator
/app.py:8:1: E402 module level import not at top of file
/app.py:10:1: E402 module level import not at top of file
/app.py:15:35: W291 trailing whitespace
/app.py:16:5: E128 continuation line under-indented for visual indent
/app.py:17:5: E128 continuation line under-indented for visual indent
/app.py:25:5: E128 continuation line under-indented for visual indent
/app.py:26:5: E128 continuation line under-indented for visual indent
/app.py:33:12: W292 no newline at end of file

With Super-Linter working, I turn my attention to creating a Software Bill of Materials
(SBOM). I am going to use OWASP CycloneDX to create the SBOM. While there is a GitHub Action for CycloneDX, at the time I am writing this post, it is not available from the list of curated GitHub Actions in CodeCatalyst. Fortunately, CodeCatalyst is not limited to the curated list. I can use most any GitHub Action in CodeCatalyst. To add a GitHub Action that is not in the curated list, I return to edit mode, find GitHub Actions in the list of curated actions, and click the plus icon to add it to the workflow.

Figure 4. GitHub Action with add icon

Figure 4. GitHub Action with add icon

CodeCatalyst will add a new action to the workflow and open the configuration dialog box. I choose the Configuration tab and use the pencil icon to change the Action Name to Software-Bill-of-Materials. Then, I scroll down to the configuration section, and change the GitHub Action YAML. Note that you can copy the YAML from the GitHub Actions Marketplace, including the latest version number. In addition, the CycloneDX action expects you to pass the path to the Python requirements file as an input parameter.

GitHub Action YAML configuration

Figure 5. GitHub Action YAML configuration

Since I am using the generic GitHub Action, I must tell CodeCatalyst which artifacts are produced by the action and should be collected after execution. CycloneDX creates an XML file called bom.xml which I configure as an artifact. Note that a CodeCatalyst artifact is the output of a workflow action, and typically consists of a folder or archive of files. You can share artifacts with subsequent actions.

Artifact configuration with the path to bom.xml

Figure 6. Artifact configuration with the path to bom.xml

Once again, I select Validate, and assuming there are no issues, I select Commit to save my changes to the repository. I now have three actions that run in parallel when a pull request is submitted: CodeGuru, Super-Linter, and Software Bill of Materials.

Figure 7. Workflow including the software bill of materials

Figure 7. Workflow including the software bill of materials

As before, I select Run to test my workflow and click the view link in the notification. As expected, the workflow fails because Super-Linter is still reporting issues. However, the new Software Bill of Materials has completed successfully. From the artifacts tab I can download the SBOM.

Figure 8. Artifacts tab listing code review and SBOM

Figure 8. Artifacts tab listing code review and SBOM

The artifact is a zip archive that includes the bom.xml created by CycloneDX. This includes, among other information, a list of components used in the backend application.

    <components>
        <component type="library" bom-ref="7474f0f6-8aa2-46db-bebf-a7648cff84e1">
            <name>Jinja2</name>
            <version>3.1.2</version>
            <purl>pkg:pypi/[email protected]</purl>
        </component>
        <component type="library" bom-ref="fad0708b-d007-4f98-a80c-056b136015df">
            <name>aws-cdk-lib</name>
            <version>2.43.0</version>
            <purl>pkg:pypi/[email protected]</purl>
        </component>
        <component type="library" bom-ref="23e3aaae-b4e1-4f3b-b026-fcd298c9cb9b">
            <name>aws-cdk.aws-apigatewayv2-alpha</name>
            <version>2.43.0a0</version>
            <purl>pkg:pypi/[email protected]</purl>
        </component>
        <component type="library" bom-ref="d283cf17-9125-422c-b55c-cabb64d18f79">
            <name>aws-cdk.aws-apigatewayv2-integrations-alpha</name>
            <version>2.43.0a0</version>
            <purl>pkg:pypi/[email protected]</purl>
        </component>
        <component type="library" bom-ref="0f095c84-c9e9-4d6c-a4ed-c4a6c7605426">
            <name>aws-cdk.aws-lambda-python-alpha</name>
            <version>2.43.0a0</version>
            <purl>pkg:pypi/[email protected]</purl>
        </component>
        <component type="library" bom-ref="b248b85b-ba27-4796-bcdf-6bd82ad47295">
            <name>constructs</name>
            <version>&gt;=10.0.0,&lt;11.0.0</version>
            <purl>pkg:pypi/constructs@%3E%3D10.0.0%2C%3C11.0.0</purl>
        </component>
        <component type="library" bom-ref="72b1da33-19c2-4b5c-bd58-7f719dafc28a">
            <name>simplejson</name>
            <version>3.17.6</version>
            <purl>pkg:pypi/[email protected]</purl>
        </component>
    </components>

The workflow is now enforcing code quality and generating a SBOM like I wanted. Note that while this is a great start, there is still room for improvement. First, I could collect reports generated by the actions in my workflow, and define success criteria for code quality. Second, I could scan the SBOM for known security vulnerabilities using a Software Composition Analysis (SCA) solution. I will be covering this in a future post in this series.

Cleanup

If you have been following along with this workflow, you should delete the resources you deployed so you do not continue to incur charges. First, delete the two stacks that CDK deployed using the AWS CloudFormation console in the AWS account you associated when you launched the blueprint. These stacks will have names like mysfitsXXXXXWebStack and mysfitsXXXXXAppStack. Second, delete the project from CodeCatalyst by navigating to Project settings and choosing Delete project.

Conclusion

In this post, you learned how to add GitHub Actions to a CodeCatalyst workflow. I used GitHub Actions alongside native CodeCatalyst actions in my workflow. I also discussed adding actions from both the curated list of actions and others not in the curated list. Read the documentation to learn more about using GitHub Actions in CodeCatalyst.

About the authors:

Dr. Rahul Gaikwad

Dr. Rahul is a DevOps Lead Consultant at AWS. He helps customers to migrate and modernize workloads to AWS Cloud with a special focus on DevOps and IaC. He is passionate about building innovative solutions using technology and enjoys collaborating with customers and peers. He contributes to open-source community projects. Outside of work, Rahul has completed Ph.D. in AIOps and he enjoys travelling and spending time with his family.

Anirudh Sharma

Anirudh is a Cloud Support Engineer 2 with an extensive background in DevOps offerings at AWS, he is also a Subject Matter Expert in AWS ElasticBeanstalk and AWS CodeDeploy services. He loves helping customers and learning new services and technologies. He also loves travelling and has a goal to visit Japan someday, is a Golden State Warriors fan and loves spending time with his family.

Navdeep Pareek

Navdeep is Lead Migration Consultant at AWS. He helps customer to migrate and modernize customer workloads to AWS Cloud and have specialisation in automation, DevOps. In his spare time, he enjoys travelling, cooking and spending time with family and friends.

Automate schema evolution at scale with Apache Hudi in AWS Glue

Post Syndicated from Subhro Bose original https://aws.amazon.com/blogs/big-data/automate-schema-evolution-at-scale-with-apache-hudi-in-aws-glue/

In the data analytics space, organizations often deal with many tables in different databases and file formats to hold data for different business functions. Business needs often drive table structure, such as schema evolution (the addition of new columns, removal of existing columns, update of column names, and so on) for some of these tables in one business function that requires other business functions to replicate the same. This post focuses on such schema changes in file-based tables and shows how to automatically replicate the schema evolution of structured data from table formats in databases to the tables stored as files in cost-effective way.

AWS Glue is a serverless data integration service that makes it easy to discover, prepare, and combine data for analytics, machine learning (ML), and application development. In this post, we show how to use Apache Hudi, a self-managing database layer on file-based data lakes, in AWS Glue to automatically represent data in relational form and manage their schema evolution at scale using Amazon Simple Storage Service (Amazon S3), AWS Database Migration Service (AWS DMS), AWS Lambda, AWS Glue, Amazon DynamoDB, Amazon Aurora, and Amazon Athena to automatically identify schema evolution and apply it to manage data load at petabyte scale.

Apache Hudi supports ACID transactions and CRUD operations on a data lake. This lays the foundation of a data lake architecture by enabling transaction support and schema evolution and management, decoupling storage from compute, and ensuring support for accessibility through business intelligence (BI) tools. In this post, we implement an architecture to build a transactional data lake built on the aforementioned Hudi features.

Solution overview

This post assumes a scenario where multiple tables are present in a source database, and we want to replicate any schema changes in any of those tables in Apache Hudi tables in the data lake. It uses the native support for Apache Hudi on AWS Glue for Apache Spark.

In this post, the schema evolution of source tables in the Aurora database is captured via the AWS DMS incremental load or change data capture (CDC) mechanism, and the same schema evolution is replicated in Apache Hudi tables stored in Amazon S3. Apache Hudi tables are discovered by the AWS Glue Data Catalog and queried by Athena. An AWS Glue job, supported by an orchestration pipeline using Lambda and a DynamoDB table, takes care of the automated replication of schema evolution in the Apache Hudi tables.

We use Aurora as a sample data source, but any data source that supports Create, Read, Update, and Delete (CRUD) operations can replace Aurora in your use case.

The following diagram illustrates our solution architecture.

The flow of the solution is as follows:

  1. Aurora, as a sample data source, contains a RDBMS table with multiple rows, and AWS DMS does the full load of that data to an S3 bucket (which we call the raw bucket). We expect that you may have multiple source tables, but for demonstration purposes, we only use one source table in this post.
  2. We trigger a Lambda function with the source table name as an event so that the corresponding parameters of the source table are read from DynamoDB. To schedule this operation for specific time intervals, we schedule Amazon EventBridge to trigger the Lambda with the table name as a parameter.
  3. There are many tables in the source database, and we want to run one AWS Glue job for each source table for simplicity in operations. Because we use each AWS Glue job to update each Apache Hudi table, this post uses a DynamoDB table to hold the configuration parameters used by each AWS Glue job for each Apache Hudi table. The DynamoDB table contains each Apache Hudi table name, corresponding AWS Glue job name, AWS Glue job status, load status (full or delta), partition key, record key, and schema to pass to the corresponding table’s AWS Glue Job. The values in the DynamoDB table are static values.
  4. To trigger each AWS Glue job (10 G.1X DPUs) in parallel to run an Apache Hudi specific code to insert data in the corresponding Hudi tables, Lambda passes each Apache Hudi table specific parameters read from DynamoDB to each AWS Glue job. The source data comes from tables in the Aurora source database via AWS DMS with full load and incremental load or CDC.

Create resources with AWS CloudFormation

We provide an AWS CloudFormation template to create the following resources:

  • Lambda and DynamoDB as the data load management orchestrators
  • S3 buckets for the raw, refined zone, and assets for holding code for schema evolution
  • An AWS Glue job to update the Hudi tables and perform schema evolution, both forward- and backward-compatible

The Aurora table and AWS DMS replication instance is not provisioned via this stack. For instructions to set up Aurora, refer to Creating an Amazon Aurora DB cluster.

Launch the following stack and provide your stack name.

eu-west-1

Schema evolution

To access your Aurora database, refer to How do I connect to my Amazon RDS for MySQL instance by using MySQL Workbench. Then complete the following steps:

  1. Create a table named object following the queries in the Aurora database and change its schema so that we can see the schema evolution is reflected at the data lake level:
create database db;
create table db.object ( 
object_name varchar(255),
object_description varchar(255),
new_column_add varchar(255), 
new_field_1 varchar(255), 
object_id int);
insert into object 
values("obj1","Object-1","","",1);

After you create the stacks, some manual steps are needed to prepare the solution end to end.

  1. Create an AWS DMS instance, AWS DMS endpoints, and AWS DMS task with the following configurations:
    • Add dataFormat as Parquet in the target endpoint.
    • Point the target endpoint of AWS DMS to the raw bucket, which is formatted as raw-bucket-<account_number>-<region_name>, and the folder name should be POC.
  2. Start the AWS DMS task.
  3. Create a test event in the HudiLambda Lambda function with the content of the event JSON as POC.db and save it.
  4. Run the Lambda function.

In this post, the schema evolution is reflected through Hudi Hive sync in AWS Glue. You don’t alter queries separately in the data lake.

Now we complete the following steps to change the schema at the source. Trigger the Lambda function after each step to generate a file in the POC/db/object folder within the raw bucket. AWS DMS almost instantly picks up the schema changes and reports to the raw bucket.

  1. Add a column called test_column to the source table object in your Aurora database:
alter table db.object add column test_column int after object_name;
insert into object 
values("obj2",22,"test-2","","",2);
  1. Rename the column new_field_1 to new_field_2 in the source table object:
alter table db.object change new_field_1 new_field_2 varchar(10);
insert into object 
values("obj3",33,"test-3","","new-3",3);

The column new_field_1 is expected to stay in the Hudi table but without any new values being populated to it anymore.

  1. Delete the column new_field_2 from the source table object:
alter table db.object drop column new_field_2;
insert into object 
values("obj4",44,"test-4","",4);

Similar to the previous operation, the column new_field_2 is expected to stay in the Hudi table but without any new values being populated to it anymore.

If you already have AWS Lake Formation data permissions set up in your account, you may encounter permission issues. In that case, grant full permission (Super) to the default database (before triggering the Lambda function) and all tables in the POC.db database (after the load is complete).

Review the results

When the aforementioned run happens after schema changes, the following results are generated in the refined bucket. We can view the Apache Hudi tables with its contents in Athena. To set up Athena, refer to Getting started.

The table and the database are available in the AWS Glue Data Catalog and ready for browsing the schema.

Before the schema change, the Athena results look like the following screenshot.

After you add the column test_column and insert a value in the test_column field in the object table in the Aurora database, the new column (test_column) is reflected in its corresponding Apache Hudi table in the data lake.

The following screenshot shows the results in Athena.

After you rename the column new_field_1 to new_field_2 and insert a value in the new_field_2 field in the object table, the renamed column (new_field_2) is reflected in its corresponding Apache Hudi table in the data lake, and new_field_1 remains in the schema, having no new value populated to the column.

The following screenshot shows the results in Athena.

After you delete the column new_field_2 in the object table and insert or update any values under any columns in the object table, the deleted column (new_field_2) remains in the corresponding Apache Hudi table schema, having no new value populated to the column.

The following screenshot shows the results in Athena.

Clean up

When you’re done with this solution, delete the sample data in the raw and refined S3 buckets and delete the buckets.

Also, delete the CloudFormation stack to remove all the service resources used in this solution.

Conclusion

This post showed how to implement schema evolution with an open-source solution using Apache Hudi in an AWS environment with an orchestration pipeline.

You can explore the different configurations of AWS Glue to change the AWS Glue job structures and implement it for your data analytics and other use cases.


About the Authors

Subhro Bose is a Senior Data Architect in Emergent Technologies and Intelligence Platform in Amazon. He loves solving science problems with emergent technologies such as AI/ML, big data, quantum, and more to help businesses across different industry verticals succeed within their innovation journey. In his spare time, he enjoys playing table tennis, learn theories of environmental economics and explore the best muffins across the city.

Ketan Karalkar is a Big Data Solutions Consultant at AWS. He has nearly 2 decades of experience helping customers design and build data analytics, and database solutions. He believes in using technology as an enabler to solve real life business problems.

Eva Fang is a Data Scientist within Professional Services in AWS. She is passionate about using the technology to provide value to customers and achieve business outcomes. She is based in London, in her spare time, she likes to watch movies and musicals.

Migrate your indexes to Amazon OpenSearch Serverless with Logstash

Post Syndicated from Prashant Agrawal original https://aws.amazon.com/blogs/big-data/migrate-your-indexes-to-amazon-opensearch-serverless-with-logstash/

We recently announced the general availability of Amazon OpenSearch Serverless , a new option for Amazon OpenSearch Service that makes it easy run large-scale search and analytics workloads without having to configure, manage, or scale OpenSearch clusters. With OpenSearch Serverless, you get the same interactive millisecond response times as OpenSearch Service with the simplicity of a serverless environment.

In this post, you’ll learn how to migrate your existing indices from an OpenSearch Service managed cluster domain to a serverless collection using Logstash.

With OpenSearch domains, you get dedicated, secure clusters configured and optimized for your workloads in minutes. You have full control over the configuration of compute, memory, and storage resources in clusters to optimize cost and performance for your applications. OpenSearch Serverless provides an even simpler way to run search and analytics workloads—without ever having to think about clusters. You simply create a collection and a group of indexes, and can start ingesting and querying the data.

Solution overview

Logstash is open-source software that provides ETL (extract, transform, and load) for your data. You can configure Logstash to connect to a source and a destination via input and output plugins. In between, you configure filters that can transform your data. This post walks you through the steps you need to set up Logstash to connect an OpenSearch Service domain (input) to an OpenSearch Serverless collection (output).

You set the source and destination plugins in Logstash’s config file. The config file has sections for Input, Filter, and Output. Once configured, Logstash will send a request to the OpenSearch Service domain and read the data according to the query you put in the input section. After data is read from OpenSearch Service, you can optionally send it to the next stage Filter for transformations such as adding or removing a field from the input data or updating a field with different values. In this example, you won’t use the Filter plugin. Next is the Output plugin. The open-source version of Logstash (Logstash OSS) provides a convenient way to use the bulk API to upload data to your collections. OpenSearch Serverless supports the logstash-output-opensearch output plugin, which supports AWS Identity and Access Management (IAM) credentials for data access control.

The following diagram illustrates our solution workflow.

Prerequisites

Before getting started, make sure you have completed the following prerequisites:

  1. Note down your OpenSearch Service domain’s ARN, user name, and password.
  2. Create an OpenSearch Serverless collection. If you’re new to OpenSearch Serverless, refer to Log analytics the easy way with Amazon OpenSearch Serverless for details on how to set up your collection.

Set up Logstash and the input and output plugins for OpenSearch

Complete the following steps to set up Logstash and your plugins:

  1. Download logstash-oss-with-opensearch-output-plugin. (This example uses the distro for macos-x64. For other distros, refer to the artifacts.)
    wget https://artifacts.opensearch.org/logstash/logstash-oss-with-opensearch-output-plugin-8.4.0-macos-x64.tar.gz

  2. Extract the downloaded tarball:
    tar -zxvf logstash-oss-with-opensearch-output-plugin-8.4.0-macos-x64.tar.gz
    cd logstash-8.4.0/

  3. Update the logstash-output-opensearch plugin to the latest version:
    <path/to/your/logstash/root/directory>/bin/logstash-plugin update logstash-output-opensearch

  4. Install the logstash-input-opensearch plugin:
    <path/to/your/logstash/root/directory>/bin/logstash-plugin install logstash-input-opensearch

Test the plugin

Let’s get into action and see how the plugin works. The following config file retrieves data from the movies index in your OpenSearch Service domain and indexes that data in your OpenSearch Serverless collection with same index name, movies.

Create a new file and add the following content, then save the file as opensearch-serverless-migration.conf. Provide the values for the OpenSearch Service domain endpoint under HOST, USERNAME, and PASSWORD in the input section, and the OpenSearch Serverless collection endpoint details under HOST along with REGION, AWS_ACCESS_KEY_ID, and AWS_SECRET_ACCESS_KEY in the output section.

input {
    opensearch {
        hosts =>  ["https://<HOST>:443"]
        user  =>  "<USERNAME>"
        password  =>  "<PASSWORD>"
        index =>  "movies"
        query =>  '{ "query": { "match_all": {}} }'
    }
}
output {
    opensearch {
        ecs_compatibility => disabled
        index => "movies"
        hosts => "<HOST>:443"
        auth_type => {
            type => 'aws_iam'
            aws_access_key_id => '<AWS_ACCESS_KEY_ID>'
            aws_secret_access_key => '<AWS_SECRET_ACCESS_KEY>'
            region => '<REGION>'
            service_name => 'aoss'
            }
        legacy_template => false
        default_server_major_version => 2
    }
}

You can specify a query in the input section of the preceding config. The match_all query matches all data in the movies index. You can change the query if you want to select a subset of the data. You can also use the query to parallelize the data transfer by running multiple Logstash processes with configs that specify different data slices. You can also parallelize by running Logstash processes against multiple indexes if you have them.

Start Logstash

Use the following command to start Logstash:

<path/to/your/logstash/root/directory>/bin/logstash -f <path/to/your/config/file>

After you run the command, Logstash will retrieve the data from the source index from your OpenSearch Service domain, and write to the destination index in your OpenSearch Serverless collection. When the data transfer is complete, Logstash shuts down. See the following code:

[2023-01-24T20:14:28,965][INFO][logstash.agent] Successfully
started Logstash API endpoint {:port=>9600, :ssl_enabled=>false}
…
…
[2023-01-24T20:14:38,852][INFO][logstash.javapipeline][main] Pipeline terminated {"pipeline.id"=>"main"}
[2023-01-24T20:14:39,374][INFO][logstash.pipelinesregistry] Removed pipeline from registry successfully {:pipeline_id=>:main}
[2023-01-24T20:14:39,399][INFO][logstash.runner] Logstash shut down.

Verify the data in OpenSearch Serverless

You can verify that Logstash copied all your data by comparing the document count in your domain and your collection. Run the following query either from the Dev tools tab, or with curl, postman, or a similar HTTP client. The following query helps you search all documents from the movies index and returns the top documents along with the count. By default, OpenSearch will return the document count up to a maximum of 10,000. Adding the track_total_hits flag helps you get the exact count of documents if the document count exceeds 10,000.

GET movies/_search
{
  "query": {
    "match_all": {}
  },
  "track_total_hits" : true
}

Conclusion

In this post, you migrated data from your OpenSearch Service domain to your OpenSearch Serverless collection using Logstash’s OpenSearch input and output plugins.

Stay tuned for a series of posts focusing on the various options available for you to build effective log analytics and search solutions using OpenSearch Serverless. You can also refer the Getting started with Amazon OpenSearch Serverless workshop to know more about OpenSearch Serverless.

If you have feedback about this post, submit it in the comments section. If you have questions about this post, start a new thread on the Amazon OpenSearch Service forum or contact AWS Support.


About the authors

Prashant Agrawal is a Sr. Search Specialist Solutions Architect with Amazon OpenSearch Service. He works closely with customers to help them migrate their workloads to the cloud and helps existing customers fine-tune their clusters to achieve better performance and save on cost. Before joining AWS, he helped various customers use OpenSearch and Elasticsearch for their search and log analytics use cases. When not working, you can find him traveling and exploring new places. In short, he likes doing Eat → Travel → Repeat.

Jon Handler (@_searchgeek) is a Sr. Principal Solutions Architect at Amazon Web Services based in Palo Alto, CA. Jon works closely with the CloudSearch and Elasticsearch teams, providing help and guidance to a broad range of customers who have search workloads that they want to move to the AWS Cloud. Prior to joining AWS, Jon’s career as a software developer included four years of coding a large-scale, eCommerce search engine.

Serverless logging with Amazon OpenSearch Service and Amazon Kinesis Data Firehose

Post Syndicated from Jon Handler original https://aws.amazon.com/blogs/big-data/serverless-logging-with-amazon-opensearch-service-and-amazon-kinesis-data-firehose/

In this post, you will learn how you can use Amazon Kinesis Data Firehose to build a log ingestion pipeline to send VPC flow logs to Amazon OpenSearch Serverless. First, you create the OpenSearch Serverless collection you use to store VPC flow logs, then you create a Kinesis Data Firehose delivery pipeline that forwards the flow logs to OpenSearch Serverless. Finally, you enable delivery of VPC flow logs to your Firehose delivery stream. The following diagram illustrates the solution workflow.

OpenSearch Serverless is a new serverless option offered by Amazon OpenSearch Service. OpenSearch Serverless makes it simple to run petabyte-scale search and analytics workloads without having to configure, manage, or scale OpenSearch clusters. OpenSearch Serverless automatically provisions and scales the underlying resources to deliver fast data ingestion and query responses for even the most demanding and unpredictable workloads.

Kinesis Data Firehose is a popular service that delivers streaming data from over 20 AWS services to over 15 analytical and observability tools such as OpenSearch Serverless. Kinesis Data Firehose is great for those looking for a fast and easy way to send your VPC flow logs data to your OpenSearch Serverless collection in minutes without a single line of code and without building or managing your own data ingestion and delivery infrastructure.

VPC flow logs capture the traffic information going to and from your network interfaces in your VPC. With the launch of Kinesis Data Firehose support to OpenSearch Serverless, it makes an easy solution to analyze your VPC flow logs with just a few clicks. Kinesis Data Firehose provides a true end-to-end serverless mechanism to deliver your flow logs to OpenSearch Serverless, where you can use OpenSearch Dashboards to search through those logs, create dashboards, detect anomalies, and send alerts. VPC flow logs helps you to answer questions like:

  • What percentage of your traffic is getting dropped?
  • How much traffic is getting generated for specific sources and destinations?

Create your OpenSearch Serverless collection

To get started, you first create a collection. An OpenSearch Serverless collection is a logical grouping of one or more indexes that represent an analytics workload. Complete the following steps:

  1. On the OpenSearch Service console, choose Collections under Serverless in the navigation pane.
  2. Choose Create a collection.
  3. For Collection name, enter a name (for example, vpc-flow-logs).
  4. For Collection type¸ choose Time series.
  5. For Encryption, choose your preferred encryption setting:
    1. Choose Use AWS owned key to use an AWS managed key.
    2. Choose a different AWS KMS key to use your own AWS Key Management Service (AWS KMS) key.
  6. For Network access settings, choose your preferred setting:
    1. Choose VPC to use a VPC endpoint.
    2. Choose Public to use a public endpoint.

AWS recommends that you use a VPC endpoint for all production workloads. For this walkthrough, select Public.

  1. Choose Create.

It should take couple of minutes to create the collection.

The following graphic gives a quick demonstration of creating the OpenSearch Serverless collection via the preceding steps.

At this point, you have successfully created a collection for OpenSearch Serverless. Next, you create a delivery pipeline for Kinesis Data Firehose.

Create a Kinesis Data Firehose delivery stream

To set up a delivery stream for Kinesis Data Firehose, complete the following steps:

  1. On the Kinesis Data Firehose console, choose Create delivery stream.
  2. For Source, specify Direct PUT.

Check out Source, Destination, and Name to learn more about different sources supported by Kinesis Data Firehose.

  1. For Destination, choose Amazon OpenSearch Serverless.
  2. For Delivery stream name, enter a name (for example, vpc-flow-logs).
  3. Under Destination settings, in the OpenSearch Serverless collection settings, choose Browse.
  4. Select vpc-flow-logs.
  5. Choose Choose.

If your collection is still creating, wait a few minutes and try again.

  1. For Index, specify vpc-flow-logs.
  2. In the Backup settings section, select Failed data only for the Source record backup in Amazon S3.

Kinesis Data Firehose uses Amazon Simple Storage Service (Amazon S3) to back up failed data that it attempts to deliver to your chosen destination. If you want to keep all data, select All data.

  1. For S3 Backup Bucket, choose Browse to select an existing S3 bucket, or choose Create to create a new bucket.
  2. Choose Create delivery stream.

The following graphic gives a quick demonstration of creating the Kinesis Data Firehose delivery stream via the preceding steps.

At this point, you have successfully created a delivery stream for Kinesis Data Firehose, which you will use to stream data from your VPC flow logs and send it to your OpenSearch Serverless collection.

Set up the data access policy for your OpenSearch Serverless collection

Before you send any logs to OpenSearch Serverless, you need to create a data access policy within OpenSearch Serverless that allows Kinesis Data Firehose to write to the vpc-flow-logs index in your collection. Complete the following steps:

  1. On the Kinesis Data Firehose console, choose the Configuration tab on the details page for the vpc-flow-logs delivery stream you just created.
  2. In the Permissions section, note down the AWS Identity and Access Management (IAM) role.
  3. Navigate to the vpc-flow-logs collection details page on the OpenSearch Serverless dashboard.
  4. Under Data access, choose Manage data access.
  5. Choose Create access policy.
  6. In the Name and description section, specify an access policy name, add a description, and select JSON as the policy definition method.
  7. Add the following policy in the JSON editor. Provide the collection name and index you specified during the delivery stream creation in the policy. Provide the IAM role name that you got from the permissions page of the Firehose delivery stream, and the account ID for your AWS account.
    [
      {
        "Rules": [
          {
            "ResourceType": "index",
            "Resource": [
              "index/<collection-name>/<index-name>"
            ],
            "Permission": [
              "aoss:WriteDocument",
              "aoss:CreateIndex",
              "aoss:UpdateIndex"
            ]
          }
        ],
        "Principal": [
          "arn:aws:sts::<aws-account-id>:assumed-role/<IAM-role-name>/*"
        ]
      }
    ]

  8. Choose Create.

The following graphic gives a quick demonstration of creating the data access policy via the preceding steps.

Set up VPC flow logs

In the final step of this post, you enable flow logs for your VPC with the destination as Kinesis Data Firehose, which sends the data to OpenSearch Serverless.

  1. Navigate to the AWS Management Console.
  2. Search for “VPC” and then choose Your VPCs in the search result (hover over the VPC rectangle to reveal the link).
  3. Choose the VPC ID link for one of your VPCs.
  4. On the Flow Logs tab, choose Create flow log.
  5. For Name, enter a name.
  6. Leave the Filter set to All. You can limit the traffic by selecting Accept or Reject.
  7. Under Destination, select Send to Kinesis Firehose in the same account.
  8. For Kinesis Firehose delivery stream name, choose vpc-flow-logs.
  9. Choose Create flow log.

The following graphic gives a quick demonstration of creating a flow log for your VPC following the preceding steps.

Examine the VPC flow logs data in your collection using OpenSearch Dashboards

You won’t be able to access your collection data until you configure data access. Data access policies allow users to access the actual data within a collection.

To create a data access policy for OpenSearch Dashboards, complete the following steps:

  1. Navigate to the vpc-flow-logs collection details page on the OpenSearch Serverless dashboard.
  2. Under Data access, choose Manage data access.
  3. Choose Create access policy.
  4. In the Name and description section, specify an access policy name, add a description, and select JSON as the policy definition method.
  5. Add the following policy in the JSON editor. Provide the collection name and index you specified during the delivery stream creation in the policy. Additionally, provide the IAM user and the account ID for your AWS account. You need to make sure that you have the AWS access and secret keys for the principal that you specified as an IAM user.
    [
      {
        "Rules": [
          {
            "Resource": [
              "index/<collection-name>/<index-name>"
            ],
            "Permission": [
              "aoss:ReadDocument"
            ],
            "ResourceType": "index"
          }
        ],
        "Principal": [
          "arn:aws:iam::<aws-account-id>:user/<IAM-user-name>"
        ]
      }
    ]

  6. Choose Create.
  7. Navigate to OpenSearch Serverless and choose the collection you created (vpc-flow-logs).
  8. Choose the OpenSearch Dashboards URL and log in with your IAM access key and secret key for the user you specified under Principal.
  9. Navigate to dev tools within OpenSearch Dashboards and run the following query to retrieve the VPC flow logs for your VPC:
    GET <index-name>/_search
    {
      "query": {
        "match_all": {}
      }
    }

The query returns the data as shown in the following screenshot, which contains information such as account ID, interface ID, source IP address, destination IP address, and more.

Create dashboards

After the data is flowing into OpenSearch Serverless, you can easily create dashboards to monitor the activity in your VPC. The following example dashboard shows overall traffic, accepted and rejected traffic, bytes transmitted, and some charts with the top sources and destinations.

Clean up

If you don’t want to continue using the solution, be sure to delete the resources you created:

  1. Return to the AWS console and in the VPCs section, disable the flow logs for your VPC.
  2. In the OpenSearch Serverless dashboard, delete your vpc-flow-logs collection.
  3. On the Kinesis Data Firehose console, delete your vpc-flow-logs delivery stream.

Conclusion

In this post, you created an end-to-end serverless pipeline to deliver your VPC flow logs to OpenSearch Serverless using Kinesis Data Firehose. In this example, you built a delivery pipeline for your VPC flow logs, but you can also use Kinesis Data Firehose to send logs from Amazon Kinesis Data Streams and Amazon CloudWatch, which in turn can be sent to OpenSearch Serverless collections for running analytics on those logs. With serverless solutions on AWS, you can focus on your application development rather than worrying about the ingestion pipeline and tools to visualize your logs.

Get hands-on with OpenSearch Serverless by taking the Getting Started with Amazon OpenSearch Serverless workshop and check out other pipelines for analyzing your logs.

If you have feedback about this post, share it in the comments section. If you have questions about this post, start a new thread on the Amazon OpenSearch Service forum or contact AWS Support.


About the authors

Jon Handler (@_searchgeek) is a Principal Solutions Architect at Amazon Web Services based in Palo Alto, CA. Jon works closely with the CloudSearch and Elasticsearch teams, providing help and guidance to a broad range of customers who have search workloads that they want to move to the AWS Cloud. Prior to joining AWS, Jon’s career as a software developer included four years of coding a large-scale, eCommerce search engine.

Prashant Agrawal is a Sr. Search Specialist Solutions Architect with Amazon OpenSearch Service. He works closely with customers to help them migrate their workloads to the cloud and helps existing customers fine-tune their clusters to achieve better performance and save on cost. Before joining AWS, he helped various customers use OpenSearch and Elasticsearch for their search and log analytics use cases. When not working, you can find him traveling and exploring new places. In short, he likes doing Eat → Travel → Repeat.

How to set up ongoing replication from your third-party secrets manager to AWS Secrets Manager

Post Syndicated from Laurens Brinker original https://aws.amazon.com/blogs/security/how-to-set-up-ongoing-replication-from-your-third-party-secrets-manager-to-aws-secrets-manager/

Secrets managers are a great tool to securely store your secrets and provide access to secret material to a set of individuals, applications, or systems that you trust. Across your environments, you might have multiple secrets managers hosted on different providers, which can increase the complexity of maintaining a consistent operating model for your secrets. In these situations, centralizing your secrets in a single source of truth, and replicating subsets of secrets across your other secrets managers, can simplify your operating model.

This blog post explains how you can use your third-party secrets manager as the source of truth for your secrets, while replicating a subset of these secrets to AWS Secrets Manager. By doing this, you will be able to use secrets that originate and are managed from your third-party secrets manager in Amazon Web Services (AWS) applications or in AWS services that use Secrets Manager secrets.

I’ll demonstrate this approach in this post by setting up a sample open-source HashiCorp Vault to create and maintain secrets and create a replication mechanism that enables you to use these secrets in AWS by using AWS Secrets Manager. Although this post uses HashiCorp Vault as an example, you can also modify the replication mechanism to use secrets managers from other providers.

Important: This blog post is intended to provide guidance that you can use when planning and implementing a secrets replication mechanism. The examples in this post are not intended to be run directly in production, and you will need to take security hardening requirements into consideration before deploying this solution. As an example, HashiCorp provides tutorials on hardening production vaults.

You can use these links to navigate through this post:

Why and when to consider replicating secrets
Two approaches to secrets replication
Replicate secrets to AWS Secrets Manager with the pull model
Solution overview
Set up the solution
Step 1: Deploy the solution by using the AWS CDK toolkit
Step 2: Initialize the HashiCorp Vault
Step 3: Update the Vault connection secret
Step 4: (Optional) Set up email notifications for replication failures
Test your secret replication
Update a secret
Secret replication logic
Use your secret
Manage permissions
Options for customizing the sample solution

Why and when to consider replicating secrets

The primary use case for this post is for customers who are running applications on AWS and are currently using a third-party secrets manager to manage their secrets, hosted on-premises, in the AWS Cloud, or with a third-party provider. These customers typically have existing secrets vending processes, deployment pipelines, and procedures and processes around the management of these secrets. Customers with such a setup might want to keep their existing third-party secrets manager and have a set of secrets that are accessible to workloads running outside of AWS, as well as workloads running within AWS, by using AWS Secrets Manager.

Another use case is for customers who are in the process of migrating workloads to the AWS Cloud and want to maintain a (temporary) hybrid form of secrets management. By replicating secrets from an existing third-party secrets manager, customers can migrate their secrets to the AWS Cloud one-by-one, test that they work, integrate the secrets with the intended applications and systems, and once the migration is complete, remove the third-party secrets manager.

Additionally, some AWS services, such as Amazon Relational Database Service (Amazon RDS) Proxy, AWS Direct Connect MACsec, and AD Connector seamless join (Linux), only support secrets from AWS Secrets Manager. Customers can use secret replication if they have a third-party secrets manager and want to be able to use third-party secrets in services that require integration with AWS Secrets Manager. That way, customers don’t have to manage secrets in two places.

Two approaches to secrets replication

In this post, I’ll discuss two main models to replicate secrets from an external third-party secrets manager to AWS Secrets Manager: a pull model and a push model.

Pull model
In a pull model, you can use AWS services such as Amazon EventBridge and AWS Lambda to periodically call your external secrets manager to fetch secrets and updates to those secrets. The main benefit of this model is that it doesn’t require any major configuration to your third-party secrets manager. The AWS resources and mechanism used for pulling secrets must have appropriate permissions and network access to those secrets. However, there could be a delay between the time a secret is created and updated and when it’s picked up for replication, depending on the time interval configured between pulls from AWS to the external secrets manager.

Push model
In this model, rather than periodically polling for updates, the external secrets manager pushes updates to AWS Secrets Manager as soon as a secret is added or changed. The main benefit of this is that there is minimal delay between secret creation, or secret updating, and when that data is available in AWS Secrets Manager. The push model also minimizes the network traffic required for replication since it’s a unidirectional flow. However, this model adds a layer of complexity to the replication, because it requires additional configuration in the third-party secrets manager. More specifically, the push model is dependent on the third-party secrets manager’s ability to run event-based push integrations with AWS resources. This will require a custom integration to be developed and managed on the third-party secrets manager’s side.

This blog post focuses on the pull model to provide an example integration that requires no additional configuration on the third-party secrets manager.

Replicate secrets to AWS Secrets Manager with the pull model

In this section, I’ll walk through an example of how to use the pull model to replicate your secrets from an external secrets manager to AWS Secrets Manager.

Solution overview

Figure 1: Secret replication architecture diagram

Figure 1: Secret replication architecture diagram

The architecture shown in Figure 1 consists of the following main steps, numbered in the diagram:

  1. A Cron expression in Amazon EventBridge invokes an AWS Lambda function every 30 minutes.
  2. To connect to the third-party secrets manager, the Lambda function, written in NodeJS, fetches a set of user-defined API keys belonging to the secrets manager from AWS Secrets Manager. These API keys have been scoped down to give read-only access to secrets that should be replicated, to adhere to the principle of least privilege. There is more information on this in Step 3: Update the Vault connection secret.
  3. The third step has two variants depending on where your third-party secrets manager is hosted:
    1. The Lambda function is configured to fetch secrets from a third-party secrets manager that is hosted outside AWS. This requires sufficient networking and routing to allow communication from the Lambda function.

      Note: Depending on the location of your third-party secrets manager, you might have to consider different networking topologies. For example, you might need to set up hybrid connectivity between your external environment and the AWS Cloud by using AWS Site-to-Site VPN or AWS Direct Connect, or both.

    2. The Lambda function is configured to fetch secrets from a third-party secrets manager running on Amazon Elastic Compute Cloud (Amazon EC2).

    Important: To simplify the deployment of this example integration, I’ll use a secrets manager hosted on a publicly available Amazon EC2 instance within the same VPC as the Lambda function (3b). This minimizes the additional networking components required to interact with the secrets manager. More specifically, the EC2 instance runs an open-source HashiCorp Vault. In the rest of this post, I’ll refer to the HashiCorp Vault’s API keys as Vault tokens.

  4. The Lambda function compares the version of the secret that it just fetched from the third-party secrets manager against the version of the secret that it has in AWS Secrets Manager (by tag). The function will create a new secret in AWS Secrets Manager if the secret does not exist yet, and will update it if there is a new version. The Lambda function will only consider secrets from the third-party secrets manager for replication if they match a specified prefix. For example, hybrid-aws-secrets/.
  5. In case there is an error synchronizing the secret, an email notification is sent to the email addresses which are subscribed to the Amazon Simple Notification Service (Amazon SNS) Topic deployed. This sample application uses email notifications with Amazon SNS as an example, but you could also integrate with services like ServiceNow, Jira, Slack, or PagerDuty. Learn more about how to use webhooks to publish Amazon SNS messages to external services.

Set up the solution

In this section, I walk through deploying the pull model solution displayed in Figure 1 using the following steps:
Step 1: Deploy the solution by using the AWS CDK toolkit
Step 2: Initialize the HashiCorp Vault
Step 3: Update the Vault connection secret
Step 4: (Optional) Set up email notifications for replication failures

Step 1: Deploy the solution by using the AWS CDK toolkit

For this blog post, I’ve created an AWS Cloud Development Kit (AWS CDK) script, which can be found in this AWS GitHub repository. Using the AWS CDK, I’ve defined the infrastructure depicted in Figure 1 as Infrastructure as Code (IaC), written in TypeScript, ready for you to deploy and try out. The AWS CDK is an open-source software development framework that allows you to write your cloud application infrastructure as code using common programming languages such as TypeScript, Python, Java, Go, and so on.

Prerequisites:

To deploy the solution, the following should be in place on your system:

  1. Git
  2. Node (version 16 or higher)
  3. jq
  4. AWS CDK Toolkit. Install using npm (included in Node setup) by running npm install -g aws-cdk in a local terminal.
  5. An AWS access key ID and secret access key configured as this setup will interact with your AWS account. See Configuration basics in the AWS Command Line Interface User Guide for more details.
  6. Docker installed and running on your machine

To deploy the solution

  1. Clone the CDK script for secret replication.
    git clone https://github.com/aws-samples/aws-secrets-manager-hybrid-secret-replication-from-hashicorp-vault.git SecretReplication
  2. Use the cloned project as the working directory.
    cd SecretReplication
  3. Install the required dependencies to deploy the application.
    npm install
  4. Adjust any configuration values for your setup in the cdk.json file. For example, you can adjust the secretsPrefix value to change which prefix is used by the Lambda function to determine the subset of secrets that should be replicated from the third-party secrets manager.
  5. Bootstrap your AWS environments with some resources that are required to deploy the solution. With correctly configured AWS credentials, run the following command.
    cdk bootstrap

    The core resources created by bootstrapping are an Amazon Elastic Container Registry (Amazon ECR) repository for the AWS Lambda Docker image, an Amazon Simple Storage Service (Amazon S3) bucket for static assets, and AWS Identity and Access Management (IAM) roles with corresponding IAM policies. You can find a full list of the resources by going to the CDKToolkit stack in AWS CloudFormation after the command has finished.

  6. Deploy the infrastructure.
    cdk deploy

    This command deploys the infrastructure shown in Figure 1 for you by using AWS CloudFormation. For a full list of resources, you can view the SecretsManagerReplicationStack in AWS CloudFormation after the deployment has completed.

Note: If your local environment does not have a terminal that allows you to run these commands, consider using AWS Cloud9 or AWS CloudShell.

After the deployment has finished, you should see an output in your terminal that looks like the one shown in Figure 2. If successful, the output provides the IP address of the sample HashiCorp Vault and its web interface.

Figure 2: AWS CDK deployment output

Figure 2: AWS CDK deployment output

Step 2: Initialize the HashiCorp Vault

As part of the output of the deployment script, you will be given a URL to access the user interface of the open-source HashiCorp Vault. To simplify accessibility, the URL points to a publicly available Amazon EC2 instance running the HashiCorp Vault user interface as shown in step 3b in Figure 1.

Let’s look at the HashiCorp Vault that was just created. Go to the URL in your browser, and you should see the Raft Storage initialize page, as shown in Figure 3.

Figure 3: HashiCorp Vault Raft Storage initialize page

Figure 3: HashiCorp Vault Raft Storage initialize page

The vault requires an initial configuration to set up storage and get the initial set of root keys. You can go through the steps manually in the HashiCorp Vault’s user interface, but I recommend that you use the initialise_vault.sh script that is included as part of the SecretsManagerReplication project instead.

Using the HashiCorp Vault API, the initialization script will automatically do the following:

  1. Initialize the Raft storage to allow the Vault to store secrets locally on the instance.
  2. Create an initial set of unseal keys for the Vault. Importantly, for demo purposes, the script uses a single key share. For production environments, it’s recommended to use multiple key shares so that multiple shares are needed to reconstruct the root key, in case of an emergency.
  3. Store the unseal keys in init/vault_init_output.json in your project.
  4. Unseals the HashiCorp Vault by using the unseal keys generated earlier.
  5. Enables two key-value secrets engines:
    1. An engine named after the prefix that you’re using for replication, defined in the cdk.json file. In this example, this is hybrid-aws-secrets. We’re going to use the secrets in this engine for replication to AWS Secrets Manager.
    2. An engine called super-secret-engine, which you’re going to use to show that your replication mechanism does not have access to secrets outside the engine used for replication.
  6. Creates three example secrets, two in hybrid-aws-secrets, and one in super-secret-engine.
  7. Creates a read-only policy, which you can see in the init/replication-policy-payload.json file after the script has finished running, that allows read-only access to only the secrets that should be replicated.
  8. Creates a new vault token that has the read-only policy attached so that it can be used by the AWS Lambda function later on to fetch secrets for replication.

To run the initialization script, go back to your terminal, and run the following command.
./initialise_vault.sh

The script will then ask you for the IP address of your HashiCorp Vault. Provide the IP address (excluding the port) and choose Enter. Input y so that the script creates a couple of sample secrets.

If everything is successful, you should see an output that includes tokens to access your HashiCorp Vault, similar to that shown in Figure 4.

Figure 4: Initialize HashiCorp Vault bash script output

Figure 4: Initialize HashiCorp Vault bash script output

The setup script has outputted two tokens: one root token that you will use for administrator tasks, and a read-only token that will be used to read secret information for replication. Make sure that you can access these tokens while you’re following the rest of the steps in this post.

Note: The root token is only used for demonstration purposes in this post. In your production environments, you should not use root tokens for regular administrator actions. Instead, you should use scoped down roles depending on your organizational needs. In this case, the root token is used to highlight that there are secrets under super-secret-engine/ which are not meant for replication. These secrets cannot be seen, or accessed, by the read-only token.

Go back to your browser and refresh your HashiCorp Vault UI. You should now see the Sign in to Vault page. Sign in using the Token method, and use the root token. If you don’t have the root token in your terminal anymore, you can find it in the init/vault_init_output.json file.

After you sign in, you should see the overview page with three secrets engines enabled for you, as shown in Figure 5.

Figure 5: HashiCorp Vault secrets engines overview

Figure 5: HashiCorp Vault secrets engines overview

If you explore hybrid-aws-secrets and super-secret-engine, you can see the secrets that were automatically created by the initialization script. For example, first-secret-for-replication, which contains a sample key-value secret with the key secrets and value manager.

If you navigate to Policies in the top navigation bar, you can also see the aws-replication-read-only policy, as shown in Figure 6. This policy provides read-only access to only the hybrid-aws-secrets path.

Figure 6: Read-only HashiCorp Vault token policy

Figure 6: Read-only HashiCorp Vault token policy

The read-only policy is attached to the read-only token that we’re going to use in the secret replication Lambda function. This policy is important because it scopes down the access that the Lambda function obtains by using the token to a specific prefix meant for replication. For secret replication we only need to perform read operations. This policy ensures that we can read, but cannot add, alter, or delete any secrets in HashiCorp Vault using the token.

You can verify the read-only token permissions by signing into the HashiCorp Vault user interface using the read-only token rather than the root token. Now, you should only see hybrid-aws-secrets. You no longer have access to super-secret-engine, which you saw in Figure 5. If you try to create or update a secret, you will get a permission denied error.

Great! Your HashiCorp Vault is now ready to have its secrets replicated from hybrid-aws-secrets to AWS Secrets Manager. The next section describes a final configuration that you need to do to allow access to the secrets in HashiCorp Vault by the replication mechanism in AWS.

Step 3: Update the Vault connection secret

To allow secret replication, you must give the AWS Lambda function access to the HashiCorp Vault read-only token that was created by the initialization script. To do that, you need to update the vault-connection-secret that was initialized in AWS Secrets Manager as part of your AWS CDK deployment.

For demonstration purposes, I’ll show you how to do that by using the AWS Management Console, but you can also do it programmatically by using the AWS Command Line Interface (AWS CLI) or AWS SDK with the update-secret command.

To update the Vault connection secret (console)

  1. In the AWS Management Console, go to AWS Secrets Manager > Secrets > hybrid-aws-secrets/vault-connection-secret.
  2. Under Secret Value, choose Retrieve Secret Value, and then choose Edit.
  3. Update the vaultToken value to contain the read-only token that was generated by the initialization script.
Figure 7: AWS Secrets Manager - Vault connection secret page

Figure 7: AWS Secrets Manager – Vault connection secret page

Step 4: (Optional) Set up email notifications for replication failures

As highlighted in Figure 1, the Lambda function will send an email by using Amazon SNS to a designated email address whenever one or more secrets fails to be replicated. You will need to configure the solution to use the correct email address. To do this, go to the cdk.json file at the root of the SecretReplication folder and adjust the notificationEmail parameter to an email address that you own. Once done, deploy the changes using the cdk deploy command. Within a few minutes, you’ll get an email requesting you to confirm the subscription. Going forward, you will receive an email notification if one or more secrets fails to replicate.

Test your secret replication

You can either wait up to 30 minutes for the Lambda function to be invoked automatically to replicate the secrets, or you can manually invoke the function.

To test your secret replication

  1. Open the AWS Lambda console and find the Secret Replication function (the name starts with SecretsManagerReplication-SecretReplication).
  2. Navigate to the Test tab.
  3. For the text event action, select Create new event, create an event using the default parameters, and then choose the Test button on the right-hand side, as shown in Figure 8.
Figure 8: AWS Lambda - Test page to manually invoke the function

Figure 8: AWS Lambda – Test page to manually invoke the function

This will run the function. You should see a success message, as shown in Figure 9. If this is the first time the Lambda function has been invoked, you will see in the results that two secrets have been created.

Figure 9: AWS Lambda function output

Figure 9: AWS Lambda function output

You can find the corresponding logs for the Lambda function invocation in a Log group in AWS CloudWatch matching the name /aws/lambda/SecretsManagerReplication-SecretReplicationLambdaF-XXXX.

To verify that the secrets were added, navigate to AWS Secrets Manager in the console, and in addition to the vault-connection-secret that you edited before, you should now also see the two new secrets with the same hybrid-aws-secrets prefix, as shown in Figure 10.

Figure 10: AWS Secrets Manager overview - New replicated secrets

Figure 10: AWS Secrets Manager overview – New replicated secrets

For example, if you look at first-secret-for-replication, you can see the first version of the secret, with the secret key secrets and secret value manager, as shown in Figure 11.

Figure 11: AWS Secrets Manager – New secret overview showing values and version number

Figure 11: AWS Secrets Manager – New secret overview showing values and version number

Success! You now have access to the secret values that originate from HashiCorp Vault in AWS Secrets Manager. Also, notice how there is a version tag attached to the secret. This is something that is necessary to update the secret, which you will learn more about in the next two sections.

Update a secret

It’s a recommended security practice to rotate secrets frequently. The Lambda function in this solution not only replicates secrets when they are created — it also periodically checks if existing secrets in AWS Secrets Manager should be updated when the third-party secrets manager (HashiCorp Vault in this case) has a new version of the secret. To validate that this works, you can manually update a secret in your HashiCorp Vault and observe its replication in AWS Secrets Manager in the same way as described in the previous section. You will notice that the version tag of your secret gets updated automatically when there is a new secret replication from the third-party secrets manager to AWS Secrets Manager.

Secret replication logic

This section will explain in more detail the logic behind the secret replication. Consider the following sequence diagram, which explains the overall logic implemented in the Lambda function.

Figure 12: State diagram for secret replication logic

Figure 12: State diagram for secret replication logic

This diagram highlights that the Lambda function will first fetch a list of secret names from the HashiCorp Vault. Then, the function will get a list of secrets from AWS Secrets Manager, matching the prefix that was configured for replication. AWS Secrets Manager will return a list of the secrets that match this prefix and will also return their metadata and tags. Note that the function has not fetched any secret material yet.

Next, the function will loop through each secret name that HashiCorp Vault gave and will check if the secret exists in AWS Secrets Manager:

  • If there is no secret that matches that name, the function will fetch the secret material from HashiCorp Vault, including the version number, and create a new secret in AWS Secrets Manager. It will also add a version tag to the secret to match the version.
  • If there is a secret matching that name in AWS Secrets Manager already, the Lambda function will first fetch the metadata from that secret in HashiCorp Vault. This is required to get the version number of the secret, because the version number was not exposed when the function got the list of secrets from HashiCorp Vault initially. If the secret version from HashiCorp Vault does not match the version value of the secret in AWS Secrets Manager (for example, the version in HashiCorp vault is 2, and the version in AWS Secrets manager is 1), an update is required to get the values synchronized again. Only now will the Lambda function fetch the actual secret material from HashiCorp Vault and update the secret in AWS Secrets Manager, including the version number in the tag.

The Lambda function fetches metadata about the secrets, rather than just fetching the secret material from HashiCorp Vault straight away. Typically, secrets don’t update very often. If this Lambda function is called every 30 minutes, then it should not have to add or update any secrets in the majority of invocations. By using metadata to determine whether you need the secret material to create or update secrets, you minimize the number of times secret material is fetched both from HashiCorp Vault and AWS Secrets Manager.

Note: The AWS Lambda function has permissions to pull certain secrets from HashiCorp Vault. It is important to thoroughly review the Lambda code and any subsequent changes to it to prevent leakage of secrets. For example, you should ensure that the Lambda function does not get updated with code that unintentionally logs secret material outside the Lambda function.

Use your secret

Now that you have created and replicated your secrets, you can use them in your AWS applications or AWS services that are integrated with Secrets Manager. For example, you can use the secrets when you set up connectivity for a proxy in Amazon RDS, as follows.

To use a secret when creating a proxy in Amazon RDS

  1. Go to the Amazon RDS service in the console.
  2. In the left navigation pane, choose Proxies, and then choose Create Proxy.
  3. On the Connectivity tab, you can now select first-secret-for-replication or second-secret-for-replication, which were created by the Lambda function after replicating them from the HashiCorp Vault.
Figure 13: Amazon RDS Proxy - Example of using replicated AWS Secrets Manager secrets

Figure 13: Amazon RDS Proxy – Example of using replicated AWS Secrets Manager secrets

It is important to remember that the consumers of the replicated secrets in AWS Secrets Manager will require scoped-down IAM permissions to use the secrets and AWS Key Management Service (AWS KMS) keys that were used to encrypt the secrets. For example, see Step 3: Create IAM role and policy on the Set up shared database connections with Amazon RDS Proxy page.

Manage permissions

Due to the sensitive nature of the secrets, it is important that you scope down the permissions to the least amount required to prevent inadvertent access to your secrets. The setup adopts a least-privilege permission strategy, where only the necessary actions are explicitly allowed on the resources that are required for replication. However, the permissions should be reviewed in accordance to your security standards.

In the architecture of this solution, there are two main places where you control access to the management of your secrets in Secrets Manager.

Lambda execution IAM role: The IAM role assumed by the Lambda function during execution contains the appropriate permissions for secret replication. There is an additional safety measure, which explicitly denies any action to a resource that is not required for the replication. For example, the Lambda function only has permission to publish to the Amazon SNS topic that is created for the failed replications, and will explicitly deny a publish action to any other topic. Even if someone accidentally adds an allow to the policy for a different topic, the explicit deny will still block this action.

AWS KMS key policy: When other services need to access the replicated secret in AWS Secrets Manager, they need permission to use the hybrid-aws-secrets-encryption-key AWS KMS key. You need to allow the principal these permissions through the AWS KMS key policy. Additionally, you can manage permissions to the AWS KMS key for the principal through an identity policy. For example, this is required when accessing AWS KMS keys across AWS accounts. See Permissions for AWS services in key policies and Specifying KMS keys in IAM policy statements in the AWS KMS Developer Guide.

Options for customizing the sample solution

The solution that was covered in this post provides an example for replication of secrets from HashiCorp Vault to AWS Secrets Manager using the pull model. This section contains additional customization options that you can consider when setting up the solution, or your own variation of it.

  1. Depending on the solution that you’re using, you might have access to different metadata attached to the secrets, which you can use to determine if a secret should be updated. For example, if you have access to data that represents a last_updated_datetime property, you could use this to infer whether or not a secret ought to be updated.
  2. It is a recommended practice to not use long-lived tokens wherever possible. In this sample, I used a static vault token to give the Lambda function access to the HashiCorp Vault. Depending on the solution that you’re using, you might be able to implement better authentication and authorization mechanisms. For example, HashiCorp Vault allows you to use IAM auth by using AWS IAM, rather than a static token.
  3. This post addressed the creation of secrets and updating of secrets, but for your production setup, you should also consider deletion of secrets. Depending on your requirements, you can choose to implement a strategy that works best for you to handle secrets in AWS Secrets Manager once the original secret in HashiCorp Vault has been deleted. In the pull model, you could consider removing a secret in AWS Secrets Manager if the corresponding secret in your external secrets manager is no longer present.
  4. In the sample setup, the same AWS KMS key is used to encrypt both the environment variables of the Lambda function, and the secrets in AWS Secrets Manager. You could choose to add an additional AWS KMS key (which would incur additional cost), to have two separate keys for these tasks. This would allow you to apply more granular permissions for the two keys in the corresponding KMS key policies or IAM identity policies that use the keys.

Conclusion

In this blog post, you’ve seen how you can approach replicating your secrets from an external secrets manager to AWS Secrets Manager. This post focused on a pull model, where the solution periodically fetched secrets from an external HashiCorp Vault and automatically created or updated the corresponding secret in AWS Secrets Manager. By using this model, you can now use your external secrets in your AWS Cloud applications or services that have an integration with AWS Secrets Manager.

If you have feedback about this post, submit comments in the Comments section below. If you have questions about this post, start a new thread on the AWS Secrets Manager re:Post or contact AWS Support.

Want more AWS Security news? Follow us on Twitter.

Laurens Brinker

Laurens Brinker

Laurens is a Software Development Engineer working for AWS Security and is based in London. Previously, Laurens worked as a Security Solutions Architect at AWS, where he helped customers running their workloads securely in the AWS Cloud. Outside of work, Laurens enjoys cycling, a casual game of chess, and building open source projects.

Reduce risk by implementing HttpOnly cookie authentication in Amazon API Gateway

Post Syndicated from Marc Borntraeger original https://aws.amazon.com/blogs/security/reduce-risk-by-implementing-httponly-cookie-authentication-in-amazon-api-gateway/

Some web applications need to protect their authentication tokens or session IDs from cross-site scripting (XSS). It’s an Open Web Application Security Project (OWASP) best practice for session management to store secrets in the browsers’ cookie store with the HttpOnly attribute enabled. When cookies have the HttpOnly attribute set, the browser will prevent client-side JavaScript code from accessing the value. This reduces the risk of secrets being compromised.

In this blog post, you’ll learn how to store access tokens and authenticate with HttpOnly cookies in your own workloads when using Amazon API Gateway as the client-facing endpoint. The tutorial in this post will show you a solution to store OAuth2 access tokens in the browser cookie store, and verify user authentication through Amazon API Gateway. This post describes how to use Amazon Cognito to issue OAuth2 access tokens, but the solution is not limited to OAuth2. You can use other kinds of tokens or session IDs.

The solution consists of two decoupled parts:

  1. OAuth2 flow
  2. Authentication check

Note: This tutorial takes you through detailed step-by-step instructions to deploy an example solution. If you prefer to deploy the solution with a script, see the api-gw-http-only-cookie-auth GitHub repository.

Prerequisites

No costs should incur when you deploy the application from this tutorial because the services you’re going to use are included in the AWS Free Tier. However, be aware that small charges may apply if you have other workloads running in your AWS account and exceed the free tier. Make sure to clean up your resources from this tutorial after deployment.

Solution architecture

This solution uses Amazon Cognito, Amazon API Gateway, and AWS Lambda to build a solution that persists OAuth2 access tokens in the browser cookie store. Figure 1 illustrates the solution architecture for the OAuth2 flow.

Figure 1: OAuth2 flow solution architecture

Figure 1: OAuth2 flow solution architecture

  1. A user authenticates by using Amazon Cognito.
  2. Amazon Cognito has an OAuth2 redirect URI pointing to your API Gateway endpoint and invokes the integrated Lambda function oAuth2Callback.
  3. The oAuth2Callback Lambda function makes a request to the Amazon Cognito token endpoint with the OAuth2 authorization code to get the access token.
  4. The Lambda function returns a response with the Set-Cookie header, instructing the web browser to persist the access token as an HttpOnly cookie. The browser will automatically interpret the Set-Cookie header, because it’s a web standard. HttpOnly cookies can’t be accessed through JavaScript—they can only be set through the Set-Cookie header.

After the OAuth2 flow, you are set up to issue and store access tokens. Next, you need to verify that users are authenticated before they are allowed to access your protected backend. Figure 2 illustrates how the authentication check is handled.

Figure 2: Authentication check solution architecture

Figure 2: Authentication check solution architecture

  1. A user requests a protected backend resource. The browser automatically attaches HttpOnly cookies to every request, as defined in the web standard.
  2. The Lambda function oAuth2Authorizer acts as the Lambda authorizer for HTTP APIs. It validates whether requests are authenticated. If requests include the proper access token in the request cookie header, then it allows the request.
  3. API Gateway only passes through requests that are authenticated.

Amazon Cognito is not involved in the authentication check, because the Lambda function can validate the OAuth2 access tokens by using a JSON Web Token (JWT) validation check.

1. Deploying the OAuth2 flow

In this section, you’ll deploy the first part of the solution, which is the OAuth2 flow. The OAuth2 flow is responsible for issuing and persisting OAuth2 access tokens in the browser’s cookie store.

1.1. Create a mock protected backend

As shown in in Figure 2, you need to protect a backend. For the purposes of this post, you create a mock backend by creating a simple Lambda function with a default response.

To create the Lambda function

  1. In the Lambda console, choose Create function.

    Note: Make sure to select your desired AWS Region.

  2. Choose Author from scratch as the option to create the function.
  3. In the Basic information section as shown in , enter or select the following values:
  4. Choose Create function.
    Figure 3: Configuring the getProtectedResource Lambda function

    Figure 3: Configuring the getProtectedResource Lambda function

The default Lambda function code returns a simple Hello from Lambda message, which is sufficient to demonstrate the concept of this solution.

1.2. Create an HTTP API in Amazon API Gateway

Next, you create an HTTP API by using API Gateway. Either an HTTP API or a REST API will work. In this example, choose HTTP API because it’s offered at a lower price point (for this tutorial you will stay within the free tier).

To create the API Gateway API

  1. In the API Gateway console, under HTTP API, choose Build.
  2. On the Create and configure integrations page, as shown in Figure 4, choose Add integration, then enter or select the following values:
    • Select Lambda.
    • For Lambda function, select the getProtectedResource Lambda function that you created in the previous section.
    • For API name, enter a name. In this example, I used MyApp.
    • Choose Next.
    Figure 4: Configuring API Gateway integrations and API name

    Figure 4: Configuring API Gateway integrations and API name

  3. On the Configure routes page, as shown in Figure 5, enter or select the following values:
    • For Method, select GET.
    • For Resource path, enter / (a single forward slash).
    • For Integration target, select the getProtectedResource Lambda function.
    • Choose Next.
    Figure 5: Configuring API Gateway routes

    Figure 5: Configuring API Gateway routes

  4. On the Configure stages page, keep all the default options, and choose Next.
  5. On the Review and create page, choose Create.
  6. Note down the value of Invoke URL, as shown in Figure 6.
    Figure 6: Note down the invoke URL

    Figure 6: Note down the invoke URL

Now it’s time to test your API Gateway API. Paste the value of Invoke URL into your browser. You’ll see the following message from your Lambda function: Hello from Lambda.

1.3. Use Amazon Cognito

You’ll use Amazon Cognito user pools to create and maintain a user directory, and add sign-up and sign-in to your web application.

To create an Amazon Cognito user pool

  1. In the Amazon Cognito console, choose Create user pool.
  2. On the Authentication providers page, as shown in Figure 7, for Cognito user pool sign-in options, select Email, then choose Next.
    Figure 7: Configuring authentication providers

    Figure 7: Configuring authentication providers

  3. In the Multi-factor authentication pane of the Configure Security requirements page, as shown in Figure 8, choose your MFA enforcement. For this example, choose No MFA to make it simpler for you to test your solution. However, in production for data sensitive workloads you should choose Require MFA – Recommended. Choose Next.
    Figure 8: Configuring MFA

    Figure 8: Configuring MFA

  4. On the Configure sign-up experience page, keep all the default options and choose Next.
  5. On the Configure message delivery page, as shown in Figure 9, choose your email provider. For this example, choose Send email with Cognito to make it simple to test your solution. In production workloads, you should choose Send email with Amazon SES – Recommended. Choose Next.
    Figure 9: Configuring email

    Figure 9: Configuring email

  6. In the User pool name section of the Integrate your app page, as shown in Figure 10, enter or select the following values:
    1. For User pool name, enter a name. In this example, I used MyUserPool.
      Figure 10: Configuring user pool name

      Figure 10: Configuring user pool name

    2. In the Hosted authentication pages section, as shown in Figure 11, select Use the Cognito Hosted UI.
      Figure 11: Configuring hosted authentication pages

      Figure 11: Configuring hosted authentication pages

    3. In the Domain section, as shown in Figure 12, for Domain type, choose Use a Cognito domain. For Cognito domain, enter a domain name. Note that domains in Cognito must be unique. Make sure to enter a unique name, for example by appending random numbers at the end of your domain name. For this example, I used https://http-only-cookie-secured-app.
      Figure 12: Configuring an Amazon Cognito domain

      Figure 12: Configuring an Amazon Cognito domain

    4. In the Initial app client section, as shown in Figure 13, enter or select the following values:
      • For App type, keep the default setting Public client.
      • For App client name, enter a friendly name. In this example, I used MyAppClient.
      • For Client secret, keep the default setting Don’t generate a client secret.
      • For Allowed callback URLs, enter <API_GW_INVOKE_URL>/oauth2/callback, replacing <API_GW_INVOKE_URL> with the invoke URL you noted down from API Gateway in the previous section.
        Figure 13: Configuring the initial app client

        Figure 13: Configuring the initial app client

    5. Choose Next.
  7. Choose Create user pool.

Next, you need to retrieve some Amazon Cognito information for later use.

To note down Amazon Cognito information

  1. In the Amazon Cognito console, choose the user pool you created in the previous steps.
  2. Under User pool overview, make note of the User pool ID value.
  3. On the App integration tab, under Cognito Domain, make note of the Domain value.
  4. Under App client list, make note of the Client ID value.
  5. Under App client list, choose the app client name you created in the previous steps.
  6. Under Hosted UI, make note of the Allowed callback URLs value.

Next, create the user that you will use in a later section of this post to run your test.

To create a user

  1. In the Amazon Cognito console, choose the user pool you created in the previous steps.
  2. Under Users, choose Create user.
  3. For Email address, enter [email protected]. For this tutorial, you don’t need to send out actual emails, so the email address does not need to actually exist.
  4. Choose Mark email address as verified.
  5. For password, enter a password you can remember (or even better: use a password generator).
  6. Remember the email and password for later use.
  7. Choose Create user.

1.4. Create the Lambda function oAuth2Callback

Next, you create the Lambda function oAuth2Callback, which is responsible for issuing and persisting the OAuth2 access tokens.

To create the Lambda function oAuth2Callback

  1. In the Lambda console, choose Create function.

    Note: Make sure to select your desired Region.

  2. For Function name, enter oAuth2Callback.
  3. For Runtime, select Node.js 16.x.
  4. For Architecture, select arm64.
  5. Choose Create function.

After you create the Lambda function, you need to add the code. Create a new folder on your local machine and open it with your preferred integrated development environment (IDE). Add the package.json and index.js files, as shown in the following examples.

package.json

{
  "name": "oAuth2Callback",
  "version": "0.0.1",
  "dependencies": {
    "axios": "^0.27.2",
    "qs": "^6.11.0"
  }
}

In a terminal at the root of your created folder, run the following command.

$ npm install

In the index.js example code that follows, be sure to replace the placeholders with your values.

index.js

const qs = require("qs");
const axios = require("axios").default;
exports.handler = async function (event) {
  const code = event.queryStringParameters?.code;
  if (code == null) {
    return {
      statusCode: 400,
      body: "code query param required",
    };
  }
  const data = {
    grant_type: "authorization_code",
    client_id: "<your client ID from Cognito>",
    // The redirect has already happened, but you still need to pass the URI for validation, so a valid oAuth2 access token can be generated
    redirect_uri: encodeURI("<your callback URL from Cognito>"),
    code: code,
  };
  // Every Cognito instance has its own token endpoints. For more information check the documentation: https://docs.aws.amazon.com/cognito/latest/developerguide/token-endpoint.html
  const res = await axios.post(
    "<your App Client Cognito domain>/oauth2/token",
    qs.stringify(data),
    {
      headers: {
        "Content-Type": "application/x-www-form-urlencoded",
      },
    }
  );
  return {
    statusCode: 302,
    // These headers are returned as part of the response to the browser.
    headers: {
      // The Location header tells the browser it should redirect to the root of the URL
      Location: "/",
      // The Set-Cookie header tells the browser to persist the access token in the cookie store
      "Set-Cookie": `accessToken=${res.data.access_token}; Secure; HttpOnly; SameSite=Lax; Path=/`,
    },
  };
};

Along with the HttpOnly attribute, you pass along two additional cookie attributes:

  • Secure – Indicates that cookies are only sent by the browser to the server when a request is made with the https: scheme.
  • SameSite – Controls whether or not a cookie is sent with cross-site requests, providing protection against cross-site request forgery attacks. You set the value to Lax because you want the cookie to be set when the user is forwarded from Amazon Cognito to your web application (which runs under a different URL).

For more information, see Using HTTP cookies on the MDN Web Docs site.

Afterwards, upload the code to the oAuth2Callback Lambda function as described in Upload a Lambda Function in the AWS Toolkit for VS Code User Guide.

1.5. Configure an OAuth2 callback route in API Gateway

Now, you configure API Gateway to use your new Lambda function through a Lambda proxy integration.

To configure API Gateway to use your Lambda function

  1. In the API Gateway console, under APIs, choose your API name. For me, the name is MyApp.
  2. Under Develop, choose Routes.
  3. Choose Create.
  4. Enter or select the following values:
    • For method, select GET.
    • For path, enter /oauth2/callback.
  5. Choose Create.
  6. Choose GET under /oauth2/callback, and then choose Attach integration.
  7. Choose Create and attach an integration.
    • For Integration type, choose Lambda function.
    • For Lambda function, choose oAuth2Callback from the last step.
  8. Choose Create.

Your route configuration in API Gateway should now look like Figure 14.

Figure 14: Routes for API Gateway

Figure 14: Routes for API Gateway

2. Testing the OAuth2 flow

Now that you have the components in place, you can test your OAuth2 flow. You test the OAuth2 flow by invoking the login on your browser.

To test the OAuth2 flow

  1. In the Amazon Cognito console, choose your user pool name. For me, the name is MyUserPool.
  2. Under the navigation tabs, choose App integration.
  3. Under App client list, choose your app client name. For me, the name is MyAppClient.
  4. Choose View Hosted UI.
  5. In the newly opened browser tab, open your developer tools, so you can inspect the network requests.
  6. Log in with the email address and password you set in the previous section. Change your password, if you’re asked to do so. You can also choose the same password as you set in the previous section.
  7. You should see your Hello from Lambda message.

To test that the cookie was accurately set

  1. Check your browser network tab in the browser developer settings. You’ll see the /oauth2/callback request, as shown in Figure 15.
    Figure 15: Callback network request

    Figure 15: Callback network request

    The response headers should include a set-cookie header, as you specified in your Lambda function. With the set-cookie header, your OAuth2 access token is set as an HttpOnly cookie in the browser, and access is prohibited from any client-side code.

  2. Alternatively, you can inspect the cookie in the browser cookie storage, as shown in Figure 16.

  3. If you want to retry the authentication, navigate in your browser to your Amazon Cognito domain that you chose in the previous section and clear all site data in the browser developer tools. Do the same with your API Gateway invoke URL. Now you can restart the test with a clean state.

3. Deploying the authentication check

In this section, you’ll deploy the second part of your application: the authentication check. The authentication check makes it so that only authenticated users can access your protected backend. The authentication check works with the HttpOnly cookie, which is stored in the user’s cookie store.

3.1. Create the Lambda function oAuth2Authorizer

This Lambda function checks that requests are authenticated.

To create the Lambda function

  1. In the Lambda console, choose Create function.

    Note: Make sure to select your desired Region.

  2. For Function name, enter oAuth2Authorizer.
  3. For Runtime, select Node.js 16.x.
  4. For Architecture, select arm64.
  5. Choose Create function.

After you create the Lambda function, you need to add the code. Create a new folder on your local machine and open it with your preferred IDE. Add the package.json and index.js files as shown in the following examples.

package.json

{
  "name": "oAuth2Authorizer",
  "version": "0.0.1",
  "dependencies": {
    "aws-jwt-verify": "^3.1.0"
  }
}

In a terminal at the root of your created folder, run the following command.

$ npm install

In the index.js example code, be sure to replace the placeholders with your values.

index.js

const { CognitoJwtVerifier } = require("aws-jwt-verify");
function getAccessTokenFromCookies(cookiesArray) {
  // cookieStr contains the full cookie definition string: "accessToken=abc"
  for (const cookieStr of cookiesArray) {
    const cookieArr = cookieStr.split("accessToken=");
    // After splitting you should get an array with 2 entries: ["", "abc"] - Or only 1 entry in case it was a different cookie string: ["test=test"]
    if (cookieArr[1] != null) {
      return cookieArr[1]; // Returning only the value of the access token without cookie name
    }
  }
  return null;
}
// Create the verifier outside the Lambda handler (= during cold start),
// so the cache can be reused for subsequent invocations. Then, only during the
// first invocation, will the verifier actually need to fetch the JWKS.
const verifier = CognitoJwtVerifier.create({
  userPoolId: "<your user pool ID from Cognito>",
  tokenUse: "access",
  clientId: "<your client ID from Cognito>",
});
exports.handler = async (event) => {
  if (event.cookies == null) {
    console.log("No cookies found");
    return {
      isAuthorized: false,
    };
  }
  // Cookies array looks something like this: ["accessToken=abc", "otherCookie=Random Value"]
  const accessToken = getAccessTokenFromCookies(event.cookies);
  if (accessToken == null) {
    console.log("Access token not found in cookies");
    return {
      isAuthorized: false,
    };
  }
  try {
    await verifier.verify(accessToken);
    return {
      isAuthorized: true,
    };
  } catch (e) {
    console.error(e);
    return {
      isAuthorized: false,
    };
  }
};

After you add the package.json and index.js files, upload the code to the oAuth2Authorizer Lambda function as described in Upload a Lambda Function in the AWS Toolkit for VS Code User Guide.

3.2. Configure the Lambda authorizer in API Gateway

Next, you configure your authorizer Lambda function to protect your backend. This way you control access to your HTTP API.

To configure the authorizer Lambda function

  1. In the API Gateway console, under APIs, choose your API name. For me, the name is MyApp.
  2. Under Develop, choose Routes.
  3. Under / (a single forward slash) GET, choose Attach authorization.
  4. Choose Create and attach an authorizer.
  5. Choose Lambda.
  6. Enter or select the following values:
    • For Name, enter oAuth2Authorizer.
    • For Lambda function, choose oAuth2Authorizer.
    • Clear Authorizer caching. For this tutorial, you disable authorizer caching to make testing simpler. See the section Bonus: Enabling authorizer caching for more information about enabling caching to increase performance.
    • Under Identity sources, choose Remove.

      Note: Identity sources are ignored for your Lambda authorizer. These are only used for caching.

    • Choose Create and attach.
  7. Under Develop, choose Routes to inspect all routes.

Now your API Gateway route /oauth2/callback should be configured as shown in Figure 17.

Figure 17: API Gateway route configuration

Figure 17: API Gateway route configuration

4. Testing the OAuth2 authorizer

You did it! From your last test, you should still be authenticated. So, if you open the API Gateway Invoke URL in your browser, you’ll be greeted from your protected backend.

In case you are not authenticated anymore, you’ll have to follow the steps again from the section Testing the OAuth2 flow to authenticate.

When you inspect the HTTP request that your browser makes in the developer tools as shown in Figure 18, you can see that authentication works because the HttpOnly cookie is automatically attached to every request.

Figure 18: Browser requests include HttpOnly cookies

Figure 18: Browser requests include HttpOnly cookies

To verify that your authorizer Lambda function works correctly, paste the same Invoke URL you noted previously in an incognito window. Incognito windows do not share the cookie store with your browser session, so you see a {"message":"Forbidden"} error message with HTTP response code 403 – Forbidden.

Cleanup

Delete all unwanted resources to avoid incurring costs.

To delete the Amazon Cognito domain and user pool

  1. In the Amazon Cognito console, choose your user pool name. For me, the name is MyUserPool.
  2. Under the navigation tabs, choose App integration.
  3. Under Domain, choose Actions, then choose Delete Cognito domain.
  4. Confirm by entering your custom Amazon Cognito domain, and choose Delete.
  5. Choose Delete user pool.
  6. Confirm by entering your user pool name (in my case, MyUserPool), and then choose Delete.

To delete your API Gateway resource

  1. In the API Gateway console, select your API name. For me, the name is MyApp.
  2. Under Actions, choose Delete and confirm your deletion.

To delete the AWS Lambda functions

  1. In the Lambda console, select all three of the Lambda functions you created.
  2. Under Actions, choose Delete and confirm your deletion.

Bonus: Enabling authorizer caching

As mentioned earlier, you can enable authorizer caching to help improve your performance. When caching is enabled for an authorizer, API Gateway uses the authorizer’s identity sources as the cache key. If a client specifies the same parameters in identity sources within the configured Time to Live (TTL), then API Gateway uses the cached authorizer result, rather than invoking your Lambda function.

To enable caching, your authorizer must have at least one identity source. To cache by the cookie request header, you specify $request.header.cookie as the identity source. Be aware that caching will be affected if you pass along additional HttpOnly cookies apart from the access token.

For more information, see Working with AWS Lambda authorizers for HTTP APIs in the Amazon API Gateway Developer Guide.

Conclusion

In this blog post, you learned how to implement authentication by using HttpOnly cookies. You used Amazon API Gateway and AWS Lambda to persist and validate the HttpOnly cookies, and you used Amazon Cognito to issue OAuth2 access tokens. If you want to try an automated deployment of this solution with a script, see the api-gw-http-only-cookie-auth GitHub repository.

The application of this solution to protect your secrets from potential cross-site scripting (XSS) attacks is not limited to OAuth2. You can protect other kinds of tokens, sessions, or tracking IDs with HttpOnly cookies.

In this solution, you used NodeJS for your Lambda functions to implement authentication. But HttpOnly cookies are widely supported by many programing frameworks. You can find more implementation options on the OWASP Secure Cookie Attribute page.

Although this blog post gives you a tutorial on how to implement HttpOnly cookie authentication in API Gateway, it may not meet all your security and functional requirements. Make sure to check your business requirements and talk to your stakeholders before you adopt techniques from this blog post.

Furthermore, it’s a good idea to continuously test your web application, so that cookies are only set with your approved security attributes. For more information, see the OWASP Testing for Cookies Attributes page.

 
If you have feedback about this post, submit comments in the Comments section below. If you have questions about this post, start a new thread on the Amazon API Gateway re:Post or contact AWS Support.

Want more AWS Security news? Follow us on Twitter.

Marc Borntraeger

Marc Borntraeger

Marc is a Solutions Architect in healthcare, based in Zurich, Switzerland. He helps security-sensitive customers such as hospitals to re-innovate themselves with AWS.

Handle UPSERT data operations using open-source Delta Lake and AWS Glue

Post Syndicated from Praveen Allam original https://aws.amazon.com/blogs/big-data/handle-upsert-data-operations-using-open-source-delta-lake-and-aws-glue/

Many customers need an ACID transaction (atomic, consistent, isolated, durable) data lake that can log change data capture (CDC) from operational data sources. There is also demand for merging real-time data into batch data. Delta Lake framework provides these two capabilities. In this post, we discuss how to handle UPSERTs (updates and inserts) of the operational data using natively integrated Delta Lake with AWS Glue, and query the Delta Lake using Amazon Athena.

We examine a hypothetical insurance organization that issues commercial policies to small- and medium-scale businesses. The insurance prices vary based on several criteria, such as where the business is located, business type, earthquake or flood coverage, and so on. This organization is planning to build a data analytical platform, and the insurance policy data is one of the inputs to this platform. Because the business is growing, hundreds and thousands of new insurance policies are being enrolled and renewed every month. Therefore, all this operational data needs to be sent to Delta Lake in near-real time so that the organization can perform various analytics, and build machine learning (ML) models to serve their customers in a more efficient and cost-effective way.

Solution overview

The data can originate from any source, but typically customers want to bring operational data to data lakes to perform data analytics. One of the solutions is to bring the relational data by using AWS Database Migration Service (AWS DMS). AWS DMS tasks can be configured to copy the full load as well as ongoing changes (CDC). The full load and CDC load can be brought into the raw and curated (Delta Lake) storage layers in the data lake. To keep it simple, in this post we opt out of the data sources and ingestion layer; the assumption is that the data is already copied to the raw bucket in the form of CSV files. An AWS Glue ETL job does the necessary transformation and copies the data to the Delta Lake layer. The Delta Lake layer ensures ACID compliance of the source data.

The following diagram illustrates the solution architecture.
Architecture diagram

The use case we use in this post is about a commercial insurance company. We use a simple dataset that contains the following columns:

  • Policy – Policy number, entered as text
  • Expiry – Date that policy expires
  • Location – Location type (Urban or Rural)
  • State – Name of state where property is located
  • Region – Geographic region where property is located
  • Insured Value – Property value
  • Business Type – Business use type for property, such as Farming or Retail
  • Earthquake – Is earthquake coverage included (Y or N)
  • Flood – Is flood coverage included (Y or N)

The dataset contains a sample of 25 insurance policies. In the case of a production dataset, it may contain millions of records.

policy_id,expiry_date,location_name,state_code,region_name,insured_value,business_type,earthquake,flood
200242,2023-01-02,Urban,NY,East,1617630,Retail,N,N
200314,2023-01-02,Urban,NY,East,8678500,Apartment,Y,Y
200359,2023-01-02,Rural,WI,Midwest,2052660,Farming,N,N
200315,2023-01-02,Urban,NY,East,17580000,Apartment,Y,Y
200385,2023-01-02,Urban,NY,East,1925000,Hospitality,N,N
200388,2023-01-04,Urban,IL,Midwest,12934500,Apartment,Y,Y
200358,2023-01-05,Urban,WI,Midwest,928300,Office Bldg,N,N
200264,2023-01-07,Rural,NY,East,2219900,Farming,N,N
200265,2023-01-07,Urban,NY,East,14100000,Apartment,Y,Y
100582,2023-03-25,Urban,NJ,East,4651680,Apartment,Y,Y
100487,2023-03-25,Urban,NY,East,5990067,Apartment,N,N
100519,2023-03-25,Rural,NY,East,4102500,Farming,N,N
100462,2023-03-25,Urban,NY,East,3400000,Construction,Y,Y
100486,2023-03-26,Urban,NY,East,9973900,Apartment,Y,Y
100463,2023-03-27,Urban,NY,East,15480000,Office Bldg,Y,Y
100595,2023-03-27,Rural,NY,East,2446600,Farming,N,N
100617,2023-03-27,Urban,VT,Northeast,8861500,Office Bldg,N,N
100580,2023-03-30,Urban,NH,Northeast,97920,Office Bldg,Y,Y
100581,2023-03-30,Urban,NY,East,5150000,Apartment,Y,Y
100475,2023-03-31,Rural,WI,Midwest,1451662,Farming,N,N
100503,2023-03-31,Urban,NJ,East,1761960,Office Bldg,N,N
100504,2023-03-31,Rural,NY,East,1649105,Farming,N,N
100616,2023-03-31,Urban,NY,East,2329500,Apartment,N,N
100611,2023-04-25,Urban,NJ,East,1595500,Office Bldg,Y,Y
100621,2023-04-25,Urban,MI,Central,394220,Retail,N,N

In the following sections, we walk through the steps to perform the Delta Lake UPSERT operations. We use the AWS Management Console to perform all the steps. However, you can also automate these steps using tools like AWS CloudFormation, the AWS Cloud Development Kit (AWS CDK), Terraforms, and so on.

Prerequisites

This post is focused towards architects, engineers, developers, and data scientists who build, design, and build analytical solutions on AWS. We expect a basic understanding of the console, AWS Glue, Amazon Simple Storage Service (Amazon S3), and Athena. Additionally, the persona is able to create AWS Identity and Access Management (IAM) policies and roles, create and run AWS Glue jobs and crawlers, and is able work with the Athena query editor.

Use Athena query engine version 3 to query delta lake tables, later in the section “Query the full load using Athena”.

Athena QE V3

Set up an S3 bucket for full and CDC load data feeds

To set up your S3 bucket, complete the following steps:

  1. Log in to your AWS account and choose a Region nearest to you.
  2. On the Amazon S3 console, create a new bucket. Make sure the name is unique (for example, delta-lake-cdc-blog-<some random number>).
  3. Create the following folders:
    1. $bucket_name/fullload – This folder is used for a one-time full load from the upstream data source
    2. $bucket_name/cdcload – This folder is used for copying the upstream data changes
    3. $bucket_name/delta – This folder holds the Delta Lake data files
  4. Copy the sample dataset and save it in a file called full-load.csv to your local machine.
  5. Upload the file using the Amazon S3 console into the folder $bucket_name/fullload.

s3 folders

Set up an IAM policy and role

In this section, we create an IAM policy for the S3 bucket access and a role for AWS Glue jobs to run, and also use the same role for querying the Delta Lake using Athena.

  1. On the IAM console, choose Polices in the navigation pane.
  2. Choose Create policy.
  3. Select JSON tab and paste the following policy code. Replace the {bucket_name} you created in the earlier step.
{
    "Version": "2012-10-17",
    "Statement": [
        {
            "Sid": "AllowListingOfFolders",
            "Action": [
                "s3:ListBucket",
                "s3:GetBucketLocation"
            ],
            "Effect": "Allow",
            "Resource": [
                "arn:aws:s3:::{bucket_name}"
            ]
        },
        {
            "Sid": "ObjectAccessInBucket",
            "Effect": "Allow",
            "Action": [
                "s3:PutObject",
                "s3:GetObject",
                "s3:DeleteObject"
            ],
            "Resource": "arn:aws:s3:::{bucket_name}/*"
        }
    ]
}
  1. Name the policy delta-lake-cdc-blog-policy and select Create policy.
  2. On the IAM console, choose Roles in the navigation pane.
  3. Choose Create role.
  4. Select AWS Glue as your trusted entity and choose Next.
  5. Select the policy you just created, and with two additional AWS managed policies:
    1. delta-lake-cdc-blog-policy
    2. AWSGlueServiceRole
    3. CloudWatchFullAccess
  1. Choose Next.
  2. Give the role a name (for example, delta-lake-cdc-blog-role).

IAM role

Set up AWS Glue jobs

In this section, we set up two AWS Glue jobs: one for full load and one for the CDC load. Let’s start with the full load job.

  1. On the AWS Glue console, under Data Integration and ETL in the navigation pane, choose Jobs. AWS Glue Studio opens in a new tab.
  2. Select Spark script editor and choose Create.

Glue Studio Editor

  1. In the script editor, replace the code with the following code snippet
import sys
from awsglue.utils import getResolvedOptions
from pyspark.sql.session import SparkSession
from pyspark.sql.types import *

## @params: [JOB_NAME]
args = getResolvedOptions(sys.argv, ['JOB_NAME','s3_bucket'])

# Initialize Spark Session with Delta Lake
spark = SparkSession \
.builder \
.config("spark.sql.extensions", "io.delta.sql.DeltaSparkSessionExtension") \
.config("spark.sql.catalog.spark_catalog", "org.apache.spark.sql.delta.catalog.DeltaCatalog") \
.getOrCreate()

#Define the table schema
schema = StructType() \
      .add("policy_id",IntegerType(),True) \
      .add("expiry_date",DateType(),True) \
      .add("location_name",StringType(),True) \
      .add("state_code",StringType(),True) \
      .add("region_name",StringType(),True) \
      .add("insured_value",IntegerType(),True) \
      .add("business_type",StringType(),True) \
      .add("earthquake_coverage",StringType(),True) \
      .add("flood_coverage",StringType(),True) 

# Read the full load
sdf = spark.read.format("csv").option("header",True).schema(schema).load("s3://"+ args['s3_bucket']+"/fullload/")
sdf.printSchema()

# Write data as DELTA TABLE
sdf.write.format("delta").mode("overwrite").save("s3://"+ args['s3_bucket']+"/delta/insurance/")
  1. Navigate to the Job details tab.
  2. Provide a name for the job (for example, Full-Load-Job).
  3. For IAM Role¸ choose the role delta-lake-cdc-blog-role that you created earlier.
  4. For Worker type¸ choose G 2X.
  5. For Job bookmark, choose Disable.
  6. Set Number of retries to 0.
  7. Under Advanced properties¸ keep the default values, but provide the delta core JAR file path for Python library path and Dependent JARs path.
  8. Under Job parameters:
    1. Add the key --s3_bucket with the bucket name you created earlier as the value.
    2. Add the key --datalake-formats  and give the value delta
  9. Keep the remaining default values and choose Save.

Job details

Now let’s create the CDC load job.

  1. Create a second job called CDC-Load-Job.
  2. Follow the steps on the Job details tab as with the previous job.
  3. Alternatively, you may choose “Clone job” option from the Full-Load-Job, this will carry all the job details from the full load job.
  4. In the script editor, enter the following code snippet for the CDC logic:
import sys
from awsglue.utils import getResolvedOptions
from awsglue.context import GlueContext
from pyspark.sql.session import SparkSession
from pyspark.sql.functions import col
from pyspark.sql.functions import expr

## For Delta lake
from delta.tables import DeltaTable


## @params: [JOB_NAME]
args = getResolvedOptions(sys.argv, ['JOB_NAME','s3_bucket'])

# Initialize Spark Session with Delta Lake
spark = SparkSession \
.builder \
.config("spark.sql.extensions", "io.delta.sql.DeltaSparkSessionExtension") \
.config("spark.sql.catalog.spark_catalog", "org.apache.spark.sql.delta.catalog.DeltaCatalog") \
.getOrCreate()

# Read the CDC load
cdc_df = spark.read.csv("s3://"+ args['s3_bucket']+"/cdcload")
cdc_df.show(5,True)

# now read the full load (latest data) as delta table
delta_df = DeltaTable.forPath(spark, "s3://"+ args['s3_bucket']+"/delta/insurance/")
delta_df.toDF().show(5,True)

# UPSERT process if matches on the condition the update else insert
# if there is no keyword then create a data set with Insert, Update and Delete flag and do it separately.
# for delete it has to run in loop with delete condition, this script do not handle deletes.
    
final_df = delta_df.alias("prev_df").merge( \
source = cdc_df.alias("append_df"), \
#matching on primarykey
condition = expr("prev_df.policy_id = append_df._c1"))\
.whenMatchedUpdate(set= {
    "prev_df.expiry_date"           : col("append_df._c2"), 
    "prev_df.location_name"         : col("append_df._c3"),
    "prev_df.state_code"            : col("append_df._c4"),
    "prev_df.region_name"           : col("append_df._c5"), 
    "prev_df.insured_value"         : col("append_df._c6"),
    "prev_df.business_type"         : col("append_df._c7"),
    "prev_df.earthquake_coverage"   : col("append_df._c8"), 
    "prev_df.flood_coverage"        : col("append_df._c9")} )\
.whenNotMatchedInsert(values =
#inserting a new row to Delta table
{   "prev_df.policy_id"             : col("append_df._c1"),
    "prev_df.expiry_date"           : col("append_df._c2"), 
    "prev_df.location_name"         : col("append_df._c3"),
    "prev_df.state_code"            : col("append_df._c4"),
    "prev_df.region_name"           : col("append_df._c5"), 
    "prev_df.insured_value"         : col("append_df._c6"),
    "prev_df.business_type"         : col("append_df._c7"),
    "prev_df.earthquake_coverage"   : col("append_df._c8"), 
    "prev_df.flood_coverage"        : col("append_df._c9")
})\
.execute()

Run the full load job

On the AWS Glue console, open full-load-job and choose Run. The job takes about 2 minutes to complete, and the job run status changes to Succeeded. Go to $bucket_name and open the delta folder, which contains the insurance folder. You can note the Delta Lake files in it. Delta location on S3

Create and run the AWS Glue crawler

In this step, we create an AWS Glue crawler with Delta Lake as the data source type. After successfully running the crawler, we inspect the data using Athena.

  1. On the AWS Glue console, choose Crawlers in the navigation pane.
  2. Choose Create crawler.
  3. Provide a name (for example, delta-lake-crawler) and choose Next.
  4. Choose Add a data source and choose Delta Lake as your data source.
  5. Copy your delta folder URI (for example, s3://delta-lake-cdc-blog-123456789/delta/insurance) and enter the Delta Lake table path location.
  6. Keep the default selection Create Native tables, and choose Add a Delta Lake data source.
  7. Choose Next.
  8. Choose the IAM role you created earlier, then choose Next.
  9. Select the default target database, and provide delta_ for the table name prefix. If no default database exist, you may create one.
  10. Choose Next.
  11. Choose Create crawler.
  12. Run the newly created crawler. After the crawler is complete, the delta_insurance table is available under Databases/Tables.
  13. Open the table to check the table overview.

You can observe nine columns and their data types. Glue table

Query the full load using Athena

In the earlier step, we created the delta_insurance table by running a crawler against the Delta Lake location. In this section, we query the delta_insurance table using Athena. Note that if you’re using Athena for the first time, set the query output folder to store the Athena query results (for example, s3://<your-s3-bucket>/query-output/).

  1. On the Athena console, open the query editor.
  2. Keep the default selections for Data source and Database.
  3. Run the query SELECT * FROM delta_insurance;. This query returns a total of 25 rows, the same as what was in the full load data feed.
  4. For the CDC comparison, run the following query and store the results in a location where you can compare these results later:
SELECT * FROM delta_insurance
WHERE policy_id IN (100462,100463,100475,110001,110002)
order by policy_id;

The following screenshot shows the Athena query result.

Query results from full load

Upload the CDC data feed and run the CDC job

In this section, we update three insurance policies and insert two new policies.

  1. Copy the following insurance policy data and save it locally as cdc-load.csv:
U,100462,2024-12-31,Urban,NY,East,3400000,Construction,Y,Y
U,100463,2023-03-27,Urban,NY,East,1000000,Office Bldg,Y,Y
U,100475,2023-03-31,Rural,WI,Midwest,1451662,Farming,N,Y
I,110001,2024-03-31,Urban,CA,WEST,210000,Office Bldg,N,N
I,110002,2024-03-31,Rural,FL,East,975000,Retail,N,Y

The first column in the CDC feed describes the UPSERT operations. U is for updating an existing record, and I is for inserting a new record.

  1. Upload the cdc-load.csv file to the $bucket_name/cdcload/ folder.
  2. On the AWS Glue console, run CDC-Load-Job. This job takes care of updating the Delta Lake accordingly.

The change details are as follows:

  • 100462 – Expiry date changes to 12/31/2024
  • 100463 – Insured value changes to 1 million
  • 100475 – This policy is now under a new flood zone
  • 110001 and 110002 – New policies added to the table
  1. Run the query again:
SELECT * FROM delta_insurance
WHERE policy_id IN (100462, 100463,100475,110001,110002)
order by policy_id;

As shown in the following screenshot, the changes in the CDC data feed are reflected in the Athena query results.
Athena query results

Clean up

In this solution, we used all managed services, and there is no cost if AWS Glue jobs aren’t running. However, if you want to clean up the tasks, you can delete the two AWS Glue jobs, AWS Glue table, and S3 bucket.

Conclusion

Organizations are continuously looking at high performance, cost-effective, and scalable analytical solutions to extract the value of their operational data sources in near-real time. The analytical platform should be ready to receive changes in the operational data as soon as they occur. Typical data lake solutions face challenges to handle the changes in source data; the Delta Lake framework can close this gap. This post demonstrated how to build data lakes for UPSERT operations using AWS Glue and native Delta Lake tables, and how to query AWS Glue tables from Athena. You can implement your large scale UPSERT data operations using AWS Glue, Delta Lake and perform analytics using Amazon Athena.

References


About the Authors

 Praveen Allam is a Solutions Architect at AWS. He helps customers design scalable, better cost-perfromant enterprise-grade applications using the AWS Cloud. He builds solutions to help organizations make data-driven decisions.

Vivek Singh is Senior Solutions Architect with the AWS Data Lab team. He helps customers unblock their data journey on the AWS ecosystem. His interest areas are data pipeline automation, data quality and data governance, data lakes, and lake house architectures.

Deliver Operational Insights to Atlassian Opsgenie using DevOps Guru

Post Syndicated from Brendan Jenkins original https://aws.amazon.com/blogs/devops/deliver-operational-insights-to-atlassian-opsgenie-using-devops-guru/

As organizations continue to grow and scale their applications, the need for teams to be able to quickly and autonomously detect anomalous operational behaviors becomes increasingly important. Amazon DevOps Guru offers a fully managed AIOps service that enables you to improve application availability and resolve operational issues quickly. DevOps Guru helps ease this process by leveraging machine learning (ML) powered recommendations to detect operational insights, identify the exhaustion of resources, and provide suggestions to remediate issues. Many organizations running business critical applications use different tools to be notified about anomalous events in real-time for the remediation of critical issues. Atlassian is a modern team collaboration and productivity software suite that helps teams organize, discuss, and complete shared work. You can deliver these insights in near-real time to DevOps teams by integrating DevOps Guru with Atlassian Opsgenie. Opsgenie is a modern incident management platform that receives alerts from your monitoring systems and custom applications and categorizes each alert based on importance and timing.

This blog post walks you through how to integrate Amazon DevOps Guru with Atlassian Opsgenie to
receive notifications for new operational insights detected by DevOps Guru with more flexibility and customization using Amazon EventBridge and AWS Lambda. The Lambda function will be used to demonstrate how to customize insights sent to Opsgenie.

Solution overview

Figure 1: Amazon EventBridge Integration with Opsgenie using AWS Lambda

Figure 1: Amazon EventBridge Integration with Opsgenie using AWS Lambda

Amazon DevOps Guru directly integrates with Amazon EventBridge to notify you of events relating to generated insights and updates to insights. To begin routing these notifications to Opsgenie, you can configure routing rules to determine where to send notifications. As outlined below, you can also use pre-defined DevOps Guru patterns to only send notifications or trigger actions that match that pattern. You can select any of the following pre-defined patterns to filter events to trigger actions in a supported AWS resource. Here are the following predefined patterns supported by DevOps Guru:

  • DevOps Guru New Insight Open
  • DevOps Guru New Anomaly Association
  • DevOps Guru Insight Severity Upgraded
  • DevOps Guru New Recommendation Created
  • DevOps Guru Insight Closed

By default, the patterns referenced above are enabled so we will leave all patterns operational in this implementation.  However, you do have flexibility to change which of these patterns to choose to send to Opsgenie. When EventBridge receives an event, the EventBridge rule matches incoming events and sends it to a target, such as AWS Lambda, to process and send the insight to Opsgenie.

Prerequisites

The following prerequisites are required for this walkthrough:

Push Insights using Amazon EventBridge & AWS Lambda

In this tutorial, you will perform the following steps:

  1. Create an Opsgenie integration
  2. Launch the SAM template to deploy the solution
  3. Test the solution

Create an Opsgenie integration

In this step, you will navigate to Opsgenie to create the integration with DevOps Guru and to obtain the API key and team name within your account. These parameters will be used as inputs in a later section of this blog.

  1. Navigate to Teams, and take note of the team name you have as shown below, as you will need this parameter in a later section.
Figure 2: Opsgenie team names

Figure 2: Opsgenie team names

  1. Click on the team to proceed and navigate to Integrations on the left-hand pane. Click on Add Integration and select the Amazon DevOps Guru option.
Figure 3: Integration option for DevOps Guru

Figure 3: Integration option for DevOps Guru

  1. Now, scroll down and take note of the API Key for this integration and copy it to your notes as it will be needed in a later section. Click Save Integration at the bottom of the page to proceed.

­­­

 Figure 4: API Key for DevOps Guru Integration

Figure 4: API Key for DevOps Guru Integration

  1. Now, the Opsgenie integration has been created and we’ve obtained the API key and team name. The email of any team member will be used in the next section as well.

Review & launch the AWS SAM template to deploy the solution

In this step, you will review & launch the SAM template. The template will deploy an AWS Lambda function that is triggered by an Amazon EventBridge rule when Amazon DevOps Guru generates a new event. The Lambda function will retrieve the parameters obtained from the deployment and pushes the events to Opsgenie via an API.

Reviewing the template

Below is the SAM template that will be deployed in the next step. This template launches a few key components specified earlier in the blog. The Transform section of the template allows us takes an entire template written in the AWS Serverless Application Model (AWS SAM) syntax and transforms and expands it into a compliant CloudFormation template. Under the Resources section this solution will deploy an AWS Lamba function using the Java runtime as well as an Amazon EventBridge Rule/Pattern. Another key aspect of the template are the Parameters. As shown below, the ApiKey, Email, and TeamName are parameters we will use for this CloudFormation template which will then be used as environment variables for our Lambda function to pass to OpsGenie.

Figure 5: Review of SAM Template

Figure 5: Review of SAM Template

Launching the Template

  1. Navigate to the directory of choice within a terminal and clone the GitHub repository with the following command:
  1. Change directories with the command below to navigate to the directory of the SAM template.
cd amazon-devops-guru-connector-opsgenie/OpsGenieServerlessTemplate
  1. From the CLI, use the AWS SAM to build and process your AWS SAM template file, application code, and any applicable language-specific files and dependencies.
sam build
  1. From the CLI, use the AWS SAM to deploy the AWS resources for the pattern as specified in the template.yml file.
sam deploy --guided
  1. You will now be prompted to enter the following information below. Use the information obtained from the previous section to enter the Parameter ApiKey, Parameter Email, and Parameter TeamName fields.
  •  Stack Name
  • AWS Region
  • Parameter ApiKey
  • Parameter Email
  • Parameter TeamName
  • Allow SAM CLI IAM Role Creation

Test the solution

  1. Follow this blog to enable DevOps Guru and generate an operational insight.
  2. When DevOps Guru detects a new insight, it will generate an event in EventBridge. EventBridge then triggers Lambda and sends the event to Opsgenie as shown below.
Figure 6: Event Published to Opsgenie with details such as the source, alert type, insight type, and a URL to the insight in the AWS console.

Figure 6: Event Published to Opsgenie with details such as the source, alert type, insight type, and a URL to the insight in the AWS console.enecccdgruicnuelinbbbigebgtfcgdjknrjnjfglclt

Cleaning up

To avoid incurring future charges, delete the resources.

  1. Delete resources deployed from this blog.
  2. From the command line, use AWS SAM to delete the serverless application along with its dependencies.
sam delete

Customizing Insights published using Amazon EventBridge & AWS Lambda

The foundation of the DevOps Guru and Opsgenie integration is based on Amazon EventBridge and AWS Lambda which allows you the flexibility to implement several customizations. An example of this would be the ability to generate an Opsgenie alert when a DevOps Guru insight severity is high. Another example would be the ability to forward appropriate notifications to the AIOps team when there is a serverless-related resource issue or forwarding a database-related resource issue to your DBA team. This section will walk you through how these customizations can be done.

EventBridge customization

EventBridge rules can be used to select specific events by using event patterns. As detailed below, you can trigger the lambda function only if a new insight is opened and the severity is high. The advantage of this kind of customization is that the Lambda function will only be invoked when needed.

{
  "source": [
    "aws.devops-guru"
  ],
  "detail-type": [
    "DevOps Guru New Insight Open"
  ],
  "detail": {
    "insightSeverity": [
         "high"
         ]
  }
}

Applying EventBridge customization

  1. Open the file template.yaml reviewed in the previous section and implement the changes as highlighted below under the Events section within resources (original file on the left, changes on the right hand side).
Figure 7: CloudFormation template file changed so that the EventBridge rule is only triggered when the alert type is "DevOps Guru New Insight Open" and insightSeverity is “high”.

Figure 7: CloudFormation template file changed so that the EventBridge rule is only triggered when the alert type is “DevOps Guru New Insight Open” and insightSeverity is “high”.

  1. Save the changes and use the following command to apply the changes
sam deploy --template-file template.yaml
  1. Accept the changeset deployment

Determining the Ops team based on the resource type

Another customization would be to change the Lambda code to route and control how alerts will be managed.  Let’s say you want to get your DBA team involved whenever DevOps Guru raises an insight related to an Amazon RDS resource. You can change the AlertType Java class as follows:

  1. To begin this customization of the Lambda code, the following changes need to be made within the AlertType.java file:
  • At the beginning of the file, the standard java.util.List and java.util.ArrayList packages were imported
  • Line 60: created a list of CloudWatch metrics namespaces
  • Line 74: Assigned the dataIdentifiers JsonNode to the variable dataIdentifiersNode
  • Line 75: Assigned the namespace JsonNode to a variable namespaceNode
  • Line 77: Added the namespace to the list for each DevOps Insight which is always raised as an EventBridge event with the structure detail►anomalies►0►sourceDetails►0►dataIdentifiers►namespace
  • Line 88: Assigned the default responder team to the variable defaultResponderTeam
  • Line 89: Created the list of responders and assigned it to the variable respondersTeam
  • Line 92: Check if there is at least one AWS/RDS namespace
  • Line 93: Assigned the DBAOps_Team to the variable dbaopsTeam
  • Line 93: Included the DBAOps_Team team as part of the responders list
  • Line 97: Set the OpsGenie request teams to be the responders list
Figure 8: java.util.List and java.util.ArrayList packages were imported

Figure 8: java.util.List and java.util.ArrayList packages were imported


Figure 9: AlertType Java class customized to include DBAOps_Team for RDS-related DevOps Guru insights.

Figure 9: AlertType Java class customized to include DBAOps_Team for RDS-related DevOps Guru insights.


  1. You then need to generate the jar file by using the mvn clean package command.
  • The function needs to be updated with:
    • FUNCTION_NAME=$(aws lambda
      list-functions –query ‘Functions[?contains(FunctionName, `DevOps-Guru`) ==
      `true`].FunctionName’ –output text)
    • aws lambda update-function-code –region
      us-east-1 –function-name $FUNCTION_NAME –zip-file fileb://target/Functions-1.0.jar
  1. As result, the DBAOps_Team will be assigned to the Opsgenie alert in the case a DevOps Guru Insight is related to RDS.
Figure 10: Opsgenie alert assigned to both DBAOps_Team and AIOps_Team.

Figure 10: Opsgenie alert assigned to both DBAOps_Team and AIOps_Team.

Conclusion

In this post, you learned how Amazon DevOps Guru integrates with Amazon EventBridge and publishes insights to Opsgenie using AWS Lambda. By creating an Opsgenie integration with DevOps Guru, you can now leverage Opsgenie strengths, incident management, team communication, and collaboration when responding to an insight. All of the insight data can be viewed and addressed in Opsgenie’s Incident Command Center (ICC).  By customizing the data sent to Opsgenie via Lambda, you can empower your organization even more by fine tuning and displaying the most relevant data thus decreasing the MTTR (mean time to resolve) of the responding operations team.

About the authors:

Brendan Jenkins

Brendan Jenkins is a solutions architect working with Enterprise AWS customers providing them with technical guidance and helping achieve their business goals. He has an area of interest around DevOps and Machine Learning technology. He enjoys building solutions for customers whenever he can in his spare time.

Pablo Silva

Pablo Silva is a Sr. DevOps consultant that guide customers in their decisions on technology strategy, business model, operating model, technical architecture, and investments.

He holds a master’s degree in Artificial Intelligence and has more than 10 years of experience with telecommunication and financial companies.

Joseph Simon

Joseph Simon is a solutions architect working with mid to large Enterprise AWS customers. He has been in technology for 13 years with 5 of those centered around DevOps. He has a passion for Cloud, DevOps and Automation and in his spare time, likes to travel and spend time with his family.

Super-charged pivot tables in Amazon QuickSight

Post Syndicated from Bhupinder Chadha original https://aws.amazon.com/blogs/big-data/super-charged-pivot-tables-in-amazon-quicksight/

Amazon QuickSight is a fast and cloud-powered business intelligence (BI) service that makes it easy to create and deliver insights to everyone in your organization without any servers or infrastructure. QuickSight dashboards can also be embedded into applications and portals to deliver insights to external stakeholders. Additionally, with Amazon QuickSight Q, end-users can simply ask questions in natural language to get machine learning (ML)-powered visual responses to their questions.

Recently, Amazon FinTech migrated all their financial reporting to QuickSight. This involved migrating complex tables and pivot tables, helping them slice and dice large datasets and deliver pixel-perfect views of their data to their stakeholders. Amazon FinTech, like all QuickSight customers, needs fast performance on very large pivot tables in order to drive adoption of their dashboards. We have specifically launched two new features focused on scaling our pivot tables with the following improvements:

  • Faster loading of pivot tables during expand and collapse operations
  • Increased field limits for rows, columns, and values

In this post, we discuss these improvements to pivot tables in QuickSight.

Blazing fast pivot tables during expand and collapse operations

Today, QuickSight pivot tables work as an infinite load. As users scroll vertically or horizontally on the visual, new queries are run to fetch additional rows and columns of data with fixed row and column configurations for every query request.

For example, in the following table, we would load all carrier/city combinations nested under Dec 7, 2014 before we can continue querying the next date. Let’s say we have more than 500 carrier/city rows for a specific date; this will take more than a single query to get to the next date. The count of queries run depends on the cardinality of the dimension used in the pivot table.

In the following example of a collapsed pivot table, since the reader doesn’t see anything beyond the flight dates, having all carrier/city rows doesn’t change what is actively displayed on the pivot table. Even though individual SQL queries can be fast, users can perceive this table to load slowly due to the sheer number of queries being fired to load the hidden (collapsed) data. Therefore, loading every single row up to the Destination City field isn’t very useful when the pivot table in the collapsed state.

Therefore, to make our pivot tables load faster, we now only fetch the data for visible fields (expanded fields) along with a small subset of values under the collapsed field. This makes sure that data fetched in every new query is used to render new values that can be displayed immediately. We have seen customers improve their load time from 2–10 times faster depending on the complexity of their dataset.

This new behavior is automatically enabled, without requiring users to do anything on their side. Please note that while we plan to support all kinds of pivot tables to use this optimization, our current rollout only includes pivot tables with only row or only column fields not sorted by any metric.

Increased field limits for pivot tables

With the ever-growing depth and granularity of data being collected, our customers asked us to increase the number of fields and data points they can display in their visuals. We have been actively listening to your needs, and just like supporting more data points in line charts, we now are increasing our field limits for pivot tables.

The value field well limits have been increased from 20 to 40, and rows and columns have been increased from 20 each to a combined limit of 40. For example, if the user has 34 fields in rows, then they can add up to 6 fields to the column field well.

This will help unblock use cases requiring increased limits such as:

  • Metrics reporting – Monthly and weekly business reporting often requires having dozens of metrics presented in tabular formats. With the updated limits, you can display detailed, robust financial reports in a single pivot table rather than having to split it across multiple pivot tables.
  • Migration from legacy BI and reporting tools – Existing reports in these legacy systems require displaying and slicing across a large number of row hierarchies, for example a cost center expense analysis.
  • Custom use cases – These are specific industry and organization use cases where you can add dozens of values and row fields to display additional attributes. For example, a customer 360 report sliced by different regions.

As soon as you hit the limit, you receive an error message to indicate that the limit has been reached for that field well. For more details, refer to here.

Get started and stay updated!

Learn more about our new features in our newly launched QuickSight community’s Announcement section and supercharge your dashboards with the latest features from QuickSight!


About the authors

Bhupinder Chadha is a senior product manager for Amazon QuickSight focused on visualization and front end experiences. He is passionate about BI, data visualization and low-code/no-code experiences. Prior to QuickSight he was the lead product manager for Inforiver, responsible for building a enterprise BI product from ground up. Bhupinder started his career in presales, followed by a small gig in consulting and then PM for xViz, an add on visualization product.

Igal Mizrahi is a Senior Software Engineer for AWS QuickSight Charting team. He has been part of the team for the past 3 years, and previously worked on Amazon’s mobile shopping application for 4 years.

Build a multi-Region and highly resilient modern data architecture using AWS Glue and AWS Lake Formation

Post Syndicated from Vivek Shrivastava original https://aws.amazon.com/blogs/big-data/build-a-multi-region-and-highly-resilient-modern-data-architecture-using-aws-glue-and-aws-lake-formation/

AWS Lake Formation helps with enterprise data governance and is important for a data mesh architecture. It works with the AWS Glue Data Catalog to enforce data access and governance. Both services provide reliable data storage, but some customers want replicated storage, catalog, and permissions for compliance purposes.

This post explains how to create a design that automatically backs up Amazon Simple Storage Service (Amazon S3), the AWS Glue Data Catalog, and Lake Formation permissions in different Regions and provides backup and restore options for disaster recovery. These mechanisms can be customized for your organization’s processes. The utility for cloning and experimentation is available in the open-sourced GitHub repository.

This solution only replicates metadata in the Data Catalog, not the actual underlying data. To have a redundant data lake using Lake Formation and AWS Glue in an additional Region, we recommend replicating the Amazon S3-based storage using S3 replication, S3 sync, aws-s3-copy-sync-using-batch or S3 Batch replication process. This ensures that the data lake will still be functional in another Region if Lake Formation has an availability issue. The Data Catalog setup (tables, databases, resource links) and Lake Formation setup (permissions, settings) must also be replicated in the backup Region.

Solution overview

This post shows how to create a backup of the Lake Formation permissions and AWS Glue Data Catalog from one Region to another in the same account. The solution doesn’t create or modify AWS Identity and Access Management (IAM) roles, which are available in all Regions. There are three steps to creating a multi-Region data lake:

  1. Migrate Lake Formation data permissions.
  2. Migrate AWS Glue databases and tables.
  3. Migrate Amazon S3 data.

In the following sections, we look at each migration step in more detail.

Lake Formation permissions

In Lake Formation, there are two types of permissions: metadata access and data access.

Metadata access permissions allow users to create, read, update, and delete metadata databases and tables in the Data Catalog.

Data access permissions allow users to read and write data to specific locations in Amazon S3. Data access permissions are managed using data location permissions, which allow users to create and alter metadata databases and tables that point to specific Amazon S3 locations.

When data is migrated from one Region to another, only the metadata access permissions are replicated. This means that if data is moved from a bucket in the source Region to another bucket in the target Region, the data access permissions need to be reapplied in the target Region.

AWS Glue Data Catalog

The AWS Glue Data Catalog is a central repository of metadata about data stored in your data lake. It contains references to data that is used as sources and targets in AWS Glue ETL (extract, transform, and load) jobs, and stores information about the location, schema, and runtime metrics of your data. The Data Catalog organizes this information in the form of metadata tables and databases. A table in the Data Catalog is a metadata definition that represents the data in a data lake, and databases are used to organize these metadata tables.

Lake Formation permissions can only be applied to objects that already exist in the Data Catalog in the target Region. Therefore, in order to apply these permissions, the underlying Data Catalog databases and tables must already exist in the target Region. To meet this requirement, this utility migrates both the AWS Glue databases and tables from the source Region to the target Region.

Amazon S3 data

The data that underlies an AWS Glue table can be stored in an S3 bucket in any Region, so replication of the data itself isn’t necessary. However, if the data has already been replicated to the target Region, this utility has the option to update the table’s location to point to the replicated data in the target Region. If the location of the data is changed, the utility updates the S3 bucket name and keeps the rest of the prefix hierarchy unchanged.

This utility doesn’t include the migration of data from the source Region to the target Region. Data migration must be performed separately using methods such as S3 replication, S3 sync, aws-s3-copy-sync-using-batch or S3 Batch replication.

This utility has two modes for replicating Lake Formation and Data Catalog metadata: on-demand and real-time. The on-demand mode is a batch replication that takes a snapshot of the metadata at a specific point in time and uses it to synchronize the metadata. The real-time mode replicates changes made to the Lake Formation permissions or Data Catalog in near-real time.

The on-demand mode of this utility is recommended for creating existing Lake Formation permissions and Data Catalogs because it replicates a snapshot of the metadata. After the Lake Formation and Data Catalogs are synchronized, you can use real-time mode to replicate any ongoing changes. This creates a mirror image of the source Region in the target Region and keeps it up to date as changes are made in the source Region. These two modes can be used independently of each other, and the operations are idempotent.

The code for the on-demand and real-time modes is available in the GitHub repository. Let’s look at each mode in more detail.

On-demand mode

On-demand mode is used to copy the Lake Formation permissions and Data Catalog at a specific point in time. The code is deployed using the AWS Cloud Development Kit (AWS CDK). The following diagram shows the solution architecture for this mode.

The AWS CDK deploys an AWS Glue job to perform the replication. The job retrieves configuration information from a file stored in an S3 bucket. This file includes details such as the source and target Regions, an optional list of databases to replicate, and options for moving data to a different S3 bucket. More information about these options and deployment instructions is available in the GitHub repository.

The AWS Glue job retrieves the Lake Formation permissions and Data Catalog object metadata from the source Region and stores it in a JSON file in an S3 bucket. The same job then uses this file to create the Lake Formation permissions and Data Catalog databases and tables in the target Region.

This tool can be run on demand by running the AWS Glue job. It copies the Lake Formation permissions and Data Catalog object metadata from the source Region to the target Region. If you run the tool again after making changes to the target Region, the changes are replaced with the latest Lake Formation permissions and Data Catalog from the source Region.

This utility can detect any changes made to the Data Catalog metadata, databases, tables, and columns while replicating the Data Catalog from the source to the target Region. If a change is detected in the source Region, the latest version of the AWS Glue object is applied to the target Region. The utility reports the number of objects modified during its run.

The Lake Formation permissions are copied from the source to the target Region, so any new permissions are replicated in the target Region. If a permission is removed from the source Region, it is not removed from the target Region.

Real-time mode

Real-time mode replicates the Lake Formation permissions and Data Catalog at a regular interval. The default interval is 1 minute, but it can be modified during deployment. The code is deployed using the AWS CDK. The following diagram shows the solution architecture for this mode.

The AWS CDK deploys two AWS Lambda jobs and creates an Amazon DynamoDB table to store AWS CloudTrail events and an Amazon EventBridge rule to run the replication at a regular interval. The Lambda jobs retrieve the configuration information from a file stored in an S3 bucket. This file includes details such as the source and target Regions, options for moving data to a different S3 bucket, and the lookback period for CloudTrail in hours. More information about these options and deployment instructions is available in the GitHub repository.

The EventBridge rule triggers a Lambda job at a fixed interval. This job retrieves the configuration information and queries CloudTrail events related to the Data Catalog and Lake Formation that occurred in the past hour (the duration is configurable). All relevant events are then stored in a DynamoDB table.

After the event information is inserted into the DynamoDB table, another Lambda job is triggered. This job retrieves the configuration information and queries the DynamoDB table. It then applies all the changes to the target Region. If the tool is run again after making changes to the target Region, the changes are replaced with the latest Lake Formation permissions and Data Catalog from the source Region. Unlike on-demand mode, this utility also removes any Lake Formation permissions that were removed from the source Region from the target Region.

Limitations

This utility is designed to replicate permissions within a single account only. The on-demand mode replicates a snapshot and doesn’t remove existing permissions, so it doesn’t perform delete operations. The API currently doesn’t support replicating changes to row and column permissions.

Conclusion

In this post, we showed how you can use this utility to migrate the AWS Glue Data Catalog and Lake Formation permissions from one Region to another. It can also keep the source and target Regions synchronized if any changes are made to the Data Catalog or the Lake Formation permissions. Implementing it across Regions (multi-Region) is a good option if you are looking for the most separation and complete independence of your globally diverse data workloads. Also consider the trade-offs. Implementing and operating this strategy, particularly using multi-Region, can be more complicated and more expensive, than other DR strategies.

To get started, checkout the github repo. For more resources, refer to the following:


About the authors

Vivek Shrivastava is a Principal Data Architect, Data Lake in AWS Professional Services. He is a Bigdata enthusiast and holds 13 AWS Certifications. He is passionate about helping customers build scalable and high-performance data analytics solutions in the cloud. In his spare time, he loves reading and finds areas for home automation

Raza Hafeez is a Senior Data Architect within the Shared Delivery Practice of AWS Professional Services. He has over 12 years of professional experience building and optimizing enterprise data warehouses and is passionate about enabling customers to realize the power of their data. He specializes in migrating enterprise data warehouses to AWS Modern Data Architecture.

Nivas Shankar  is a Principal Product Manager for AWS Lake Formation. He works with customers around the globe to translate business and technical requirements into products that enable customers to improve how they manage, secure and access data lake. Also leads several data and analytics initiatives within AWS including support for Data Mesh.

Build a serverless analytics application with Amazon Redshift and Amazon API Gateway

Post Syndicated from David Zhang original https://aws.amazon.com/blogs/big-data/build-a-serverless-analytics-application-with-amazon-redshift-and-amazon-api-gateway/

Serverless applications are a modernized way to perform analytics among business departments and engineering teams. Business teams can gain meaningful insights by simplifying their reporting through web applications and distributing it to a broader audience.

Use cases can include the following:

  • Dashboarding – A webpage consisting of tables and charts where each component can offer insights to a specific business department.
  • Reporting and analysis – An application where you can trigger large analytical queries with dynamic inputs and then view or download the results.
  • Management systems – An application that provides a holistic view of the internal company resources and systems.
  • ETL workflows – A webpage where internal company individuals can trigger specific extract, transform, and load (ETL) workloads in a user-friendly environment with dynamic inputs.
  • Data abstraction – Decouple and refactor underlying data structure and infrastructure.
  • Ease of use – An application where you want to give a large set of user-controlled access to analytics without having to onboard each user to a technical platform. Query updates can be completed in an organized manner and maintenance has minimal overhead.

In this post, you will learn how to build a serverless analytics application using Amazon Redshift Data API and Amazon API Gateway WebSocket and REST APIs.

Amazon Redshift is fully managed by AWS, so you no longer need to worry about data warehouse management tasks such as hardware provisioning, software patching, setup, configuration, monitoring nodes and drives to recover from failures, or backups. The Data API simplifies access to Amazon Redshift because you don’t need to configure drivers and manage database connections. Instead, you can run SQL commands to an Amazon Redshift cluster by simply calling a secured API endpoint provided by the Data API. The Data API takes care of managing database connections and buffering data. The Data API is asynchronous, so you can retrieve your results later.

API Gateway is a fully managed service that makes it easy for developers to publish, maintain, monitor, and secure APIs at any scale. With API Gateway, you can create RESTful APIs and WebSocket APIs that enable real-time two-way communication applications. API Gateway supports containerized and serverless workloads, as well as web applications. API Gateway acts as a reverse proxy to many of the compute resources that AWS offers.

Event-driven model

Event-driven applications are increasingly popular among customers. Analytical reporting web applications can be implemented through an event-driven model. The applications run in response to events such as user actions and unpredictable query events. Decoupling the producer and consumer processes allows greater flexibility in application design and building decoupled processes. This design can be achieved with the Data API and API Gateway WebSocket and REST APIs.

Both REST API calls and WebSocket establish communication between the client and the backend. Due to the popularity of REST, you may wonder why WebSockets are present and how they contribute to an event-driven design.

What are WebSockets and why do we need them?

Unidirectional communication is customary when building analytical web solutions. In traditional environments, the client initiates a REST API call to run a query on the backend and either synchronously or asynchronously waits for the query to complete. The “wait” aspect is engineered to apply the concept of polling. Polling in this context is when the client doesn’t know when a backend process will complete. Therefore, the client will consistently make a request to the backend and check.

What is the problem with polling? Main challenges include the following:

  • Increased traffic in your network bandwidth – A large number of users performing empty checks will impact your backend resources and doesn’t scale well.
  • Cost usage – Empty requests don’t deliver any value to the business. You pay for the unnecessary cost of resources.
  • Delayed response – Polling is scheduled in time intervals. If the query is complete in-between these intervals, the user can only see the results after the next check. This delay impacts the user experience and, in some cases, may result in UI deadlocks.

For more information on polling, check out From Poll to Push: Transform APIs using Amazon API Gateway REST APIs and WebSockets.

WebSockets is another approach compared to REST when establishing communication between the front end and backend. WebSockets enable you to create a full duplex communication channel between the client and the server. In this bidirectional scenario, the client can make a request to the server and is notified when the process is complete. The connection remains open, with minimal network overhead, until the response is received.

You may wonder why REST is present, since you can transfer response data with WebSockets. A WebSocket is a light weight protocol designed for real-time messaging between systems. The protocol is not designed for handling large analytical query data and in API Gateway, each frame’s payload can only hold up to 32 KB. Therefore, the REST API performs large data retrieval.

By using the Data API and API Gateway, you can build decoupled event-driven web applications for your data analytical needs. You can create WebSocket APIs with API Gateway and establish a connection between the client and your backend services. You can then initiate requests to perform analytical queries with the Data API. Due to the Data API’s asynchronous nature, the query completion generates an event to notify the client through the WebSocket channel. The client can decide to either retrieve the query results through a REST API call or perform other follow-up actions. The event-driven architecture enables bidirectional interoperable messages and data while keeping your system components agnostic.

Solution overview

In this post, we show how to create a serverless event-driven web application by querying with the Data API in the backend, establishing a bidirectional communication channel between the user and the backend with the WebSocket feature in API Gateway, and retrieving the results using its REST API feature. Instead of designing an application with long-running API calls, you can use the Data API. The Data API allows you to run SQL queries asynchronously, removing the need to hold long, persistent database connections.

The web application is protected using Amazon Cognito, which is used to authenticate the users before they can utilize the web app and also authorize the REST API calls when made from the application.

Other relevant AWS services in this solution include AWS Lambda and Amazon EventBridge. Lambda is a serverless, event-driven compute resource that enables you to run code without provisioning or managing servers. EventBridge is a serverless event bus allowing you to build event-driven applications.

The solution creates a lightweight WebSocket connection between the browser and the backend. When a user submits a request using WebSockets to the backend, a query is submitted to the Data API. When the query is complete, the Data API sends an event notification to EventBridge. EventBridge signals the system that the data is available and notifies the client. Afterwards, a REST API call is performed to retrieve the query results for the client to view.

We have published this solution on the AWS Samples GitHub repository and will be referencing it during the rest of this post.

The following architecture diagram highlights the end-to-end solution, which you can provision automatically with AWS CloudFormation templates run as part of the shell script with some parameter variables.

The application performs the following steps (note the corresponding numbered steps in the process flow):

  1. A web application is provisioned on AWS Amplify; the user needs to sign up first by providing their email and a password to access the site.
  2. The user verifies their credentials using a pin sent to their email. This step is mandatory for the user to then log in to the application and continue access to the other features of the application.
  3. After the user is signed up and verified, they can sign in to the application and requests data through their web or mobile clients with input parameters. This initiates a WebSocket connection in API Gateway. (Flow 1, 2)
  4. The connection request is handled by a Lambda function, OnConnect, which initiates an asynchronous database query in Amazon Redshift using the Data API. The SQL query is taken from a SQL script in Amazon Simple Storage Service (Amazon S3) with dynamic input from the client. (Flow 3, 4, 6, 7)
  5. In addition, the OnConnect Lambda function stores the connection, statement identifier, and topic name in an Amazon DynamoDB database. The topic name is an extra parameter that can be used if users want to implement multiple reports on the same webpage. This allows the front end to map responses to the correct report. (Flow 3, 4, 5)
  6. The Data API runs the query, mentioned in step 2. When the operation is complete, an event notification is sent to EventBridge. (Flow 8)
  7. EventBridge activates an event rule to redirect that event to another Lambda function, SendMessage. (Flow 9)
  8. The SendMessage function notifies the client that the SQL query is complete via API Gateway. (Flow 10, 11, 12)
  9. After the notification is received, the client performs a REST API call (GET) to fetch the results. (Flow 13, 14, 15, 16)
  10. The GetResult function is triggered, which retrieves the SQL query result and returns it to the client.
  11. The user is now able to view the results on the webpage.
  12. When clients disconnect from their browser, API Gateway automatically deletes the connection information from the DynamoDB table using the onDisconnect function. (Flow 17, 18,19)

Prerequisites

Prior to deploying your event-driven web application, ensure you have the following:

  • An Amazon Redshift cluster in your AWS environment – This is your backend data warehousing solution to run your analytical queries. For instructions to create your Amazon Redshift cluster, refer to Getting started with Amazon Redshift.
  • An S3 bucket that you have access to – The S3 bucket will be your object storage solution where you can store your SQL scripts. To create your S3 bucket, refer to Create your first S3 bucket.

Deploy CloudFormation templates

The code associated to the design is available in the following GitHub repository. You can clone the repository inside an AWS Cloud9 environment in our AWS account. The AWS Cloud9 environment comes with AWS Command Line Interface (AWS CLI) installed, which is used to run the CloudFormation templates to set up the AWS infrastructure. Make sure that the jQuery library is installed; we use it to parse the JSON output during the run of the script.

The complete architecture is set up using three CloudFormation templates:

  • cognito-setup.yaml – Creates the Amazon Cognito user pool to web app client, which is used for authentication and protecting the REST API
  • backend-setup.yaml – Creates all the required Lambda functions and the WebSocket and Rest APIs, and configures them on API Gateway
  • webapp-setup.yaml – Creates the web application hosting using Amplify to connect and communicate with the WebSocket and Rest APIs.

These CloudFormation templates are run using the script.sh shell script, which takes care of all the dependencies as required.

A generic template is provided for you to customize your own DDL SQL scripts as well as your own query SQL scripts. We have created sample scripts for you to follow along.

  1. Download the sample DDL script and upload it to an existing S3 bucket.
  2. Change the IAM role value to your Amazon Redshift cluster’s IAM role with permissions to AmazonS3ReadOnlyAccess.

For this post, we copy the New York Taxi Data 2015 dataset from a public S3 bucket.

  1. Download the sample query script and upload it to an existing S3 bucket.
  2. Upload the modified sample DDL script and the sample query script into a preexisting S3 bucket that you own, and note down the S3 URI path.

If you want to run your own customized version, modify the DDL and query script to fit your scenario.

  1. Edit the script.sh file before you run it and set the values for the following parameters:
    • RedshiftClusterEndpoint (aws_redshift_cluster_ep) – Your Amazon Redshift cluster endpoint available on the AWS Management Console
    • DBUsername (aws_dbuser_name) – Your Amazon Redshift database user name
    • DDBTableName (aws_ddbtable_name) – The name of your DynamoDB table name that will be created
    • WebsocketEndpointSSMParameterName (aws_wsep_param_name) – The parameter name that stores the WebSocket endpoint in AWS Systems Manager Parameter Store.
    • RestApiEndpointSSMParameterName (aws_rapiep_param_name) – The parameter name that stores the REST API endpoint in Parameter Store.
    • DDLScriptS3Path (aws_ddl_script_path) – The S3 URI to the DDL script that you uploaded.
    • QueryScriptS3Path (aws_query_script_path) – The S3 URI to the query script that you uploaded.
    • AWSRegion (aws_region) – The Region where the AWS infrastructure is being set up.
    • CognitoPoolName (aws_user_pool_name) – The name you want to give to your Amazon Cognito user pool
    • ClientAppName (aws_client_app_name) – The name of the client app to be configured for the web app to handle the user authentication for the users

The default acceptable values are already provided as part of the downloaded code.

  1. Run the script using the following command:
./script.sh

During deployment, AWS CloudFormation creates and triggers the Lambda function SetupRedshiftLambdaFunction, which sets up an Amazon Redshift database table and populates data into the table. The following diagram illustrates this process.

Use the demo app

When the shell script is complete, you can start interacting with the demo web app:

  1. On the Amplify console, under All apps in the navigation pane, choose DemoApp.
  2. Choose Run build.

The DemoApp web application goes through a phase of Provision, Build, Deploy.

  1. When it’s complete, use the URL provided to access the web application.

The following screenshot shows the web application page. It has minimal functionality: you can sign in, sign up, or verify a user.

  1. Choose Sign Up.

  1. For Email ID, enter an email.
  2. For Password, enter a password that is at least eight characters long, has at least one uppercase and lowercase letter, at least one number, and at least one special character.
  3. Choose Let’s Enroll.

The Verify your Login to Demo App page opens.

  1. Enter your email and the verification code sent to the email you specified.
  2. Choose Verify.


You’re redirected to a login page.

  1. Sign in using your credentials.

You’re redirected to the demoPage.html website.

  1. Choose Open Connection.

You now have an active WebSocket connection between your browser and your backend AWS environment.

  1. For Trip Month, specify a month (for this example, December) and choose Submit.

You have now defined the month and year you want to query your data upon. After a few seconds, you can to see the output delivered from the WebSocket.

You may continue using the active WebSocket connection for additional queries—just choose a different month and choose Submit again.

  1. When you’re done, choose Close Connection to close the WebSocket connection.

For exploratory purposes, while your WebSocket connection is active, you can navigate to your DynamoDB table on the DynamoDB console to view the items that are currently stored. After the WebSocket connection is closed, the items stored in DynamoDB are deleted.

Clean up

To clean up your resources, complete the following steps:

  1. On the Amazon S3 console, navigate to the S3 bucket containing the sample DDL script and query script and delete them from the bucket.
  2. On the Amazon Redshift console, navigate to your Amazon Redshift cluster and delete the data you copied over from the sample DDL script.
    1. Run truncate nyc_yellow_taxi;
    2. Run drop table nyc_yellow_taxi;
  3. On the AWS CloudFormation console, navigate to the CloudFormation stacks and choose Delete. Delete the stacks in the following order:
    1. WebappSetup
    2. BackendSetup
    3. CognitoSetup

All resources created in this solution will be deleted.

Monitoring

You can monitor your event-driven web application events, user activity, and API usage with Amazon CloudWatch and AWS CloudTrail. Most areas of this solution already have logging enabled. To view your API Gateway logs, you can turn on CloudWatch Logs. Lambda comes with default logging and monitoring and can be accessed with CloudWatch.

Security

You can secure access to the application using Amazon Cognito, which is a developer-centric and cost-effective customer authentication, authorization, and user management solution. It provides both identity store and federation options that can scale easily. Amazon Cognito supports logins with social identity providers and SAML or OIDC-based identity providers, and supports various compliance standards. It operates on open identity standards (OAuth2.0, SAML 2.0, and OpenID Connect). You can also integrate it with API Gateway to authenticate and authorize the REST API calls either using the Amazon Cognito client app or a Lambda function.

Considerations

The nature of this application includes a front-end client initializing SQL queries to Amazon Redshift. An important component to consider are potential malicious activities that the client can perform, such as SQL injections. With the current implementation, that is not possible. In this solution, the SQL queries preexist in your AWS environment and are DQL statements (they don’t alter the data or structure). However, as you develop this application to fit your business, you should evaluate these areas of risk.

AWS offers a variety of security services to help you secure your workloads and applications in the cloud, including AWS Shield, AWS Network Firewall, AWS Web Application Firewall, and more. For more information and a full list, refer to Security, Identity, and Compliance on AWS.

Cost optimization

The AWS services that the CloudFormation templates provision in this solution are all serverless. In terms of cost optimization, you only pay for what you use. This model also allows you to scale without manual intervention. Review the following pages to determine the associated pricing for each service:

Conclusion

In this post, we showed you how to create an event-driven application using the Amazon Redshift Data API and API Gateway WebSocket and REST APIs. The solution helps you build data analytical web applications in an event-driven architecture, decouple your application, optimize long-running database queries processes, and avoid unnecessary polling requests between the client and the backend.

You also used severless technologies, API Gateway, Lambda, DynamoDB, and EventBridge. You didn’t have to manage or provision any servers throughout this process.

This event-driven, serverless architecture offers greater extensibility and simplicity, making it easier to maintain and release new features. Adding new components or third-party products is also simplified.

With the instructions in this post and the generic CloudFormation templates we provided, you can customize your own event-driven application tailored to your business. For feedback or contributions, we welcome you to contact us through the AWS Samples GitHub Repository by creating an issue.


About the Authors

David Zhang is an AWS Data Architect in Global Financial Services. He specializes in designing and implementing serverless analytics infrastructure, data management, ETL, and big data systems. He helps customers modernize their data platforms on AWS. David is also an active speaker and contributor to AWS conferences, technical content, and open-source initiatives. During his free time, he enjoys playing volleyball, tennis, and weightlifting. Feel free to connect with him on LinkedIn.

Manash Deb is a Software Development Manager in the AWS Directory Service team. With over 18 years of software dev experience, his passion is designing and delivering highly scalable, secure, zero-maintenance applications in the AWS identity and data analytics space. He loves mentoring and coaching others and to act as a catalyst and force multiplier, leading highly motivated engineering teams, and building large-scale distributed systems.

Pavan Kumar Vadupu Lakshman Manikya is an AWS Solutions Architect who helps customers design robust, scalable solutions across multiple industries. With a background in enterprise architecture and software development, Pavan has contributed in creating solutions to handle API security, API management, microservices, and geospatial information system use cases for his customers. He is passionate about learning new technologies and solving, automating, and simplifying customer problems using these solutions.

Managing Dev Environments with Amazon CodeCatalyst

Post Syndicated from Ryan Bachman original https://aws.amazon.com/blogs/devops/managing-dev-environments-with-amazon-codecatalyst/

An Amazon CodeCatalyst Dev Environment is a cloud-based development environment that you can use in CodeCatalyst to quickly work on the code stored in the source repositories of your project. The project tools and application libraries included in your Dev Environment are defined by a devfile in the source repository of your project.

Introduction

In the previous CodeCatalyst post, Team Collaboration with Amazon CodeCatalyst, I focused on CodeCatalyst’s collaboration capabilities and how that related to The Unicorn Project’s main protaganist. At the beginning of Chapter 2, Maxine is struggling to configure her development environment. She is two days into her new job and still cannot build the application code. She has identified over 100 dependencies she is missing. The documentation is out of date and nobody seems to know where the dependencies are stored. I can sympathize with Maxine. In this post, I will focus on managing development environments to show how CodeCatalyst removes the burden of managing workload specific configurations and produces reliable on-demand development environments.

Prerequisites

If you would like to follow along with this walkthrough, you will need to:

Have an AWS Builder ID for signing in to CodeCatalyst.

Belong to a space and have the space administrator role assigned to you in that space. For more information, see Creating a space in CodeCatalystManaging members of your space, and Space administrator role.

Have an AWS account associated with your space and have the IAM role in that account. For more information about the role and role policy, see Creating a CodeCatalyst service role.

Walkthrough

As with the previous posts in our CodeCatalyst series, I am going to use the Modern Three-tier Web Application blueprint.  Blueprints provide sample code and CI/CD workflows to help make getting started easier across different combinations of programming languages and architectures. To follow along, you can re-use a project you created previously, or you can refer to a previous post that walks through creating a project using the blueprint.

One of the most difficult aspects of my time spent as a developer was finding ways to quickly contribute to a new project. Whenever I found myself working on a new project, getting to the point where I could meaningfully contribute to a project’s code base was always more difficult than writing the actual code. A major contributor to this inefficiency, was the lack of process managing my local development environment. I will be exploring how CodeCatalyst can help solve this challenge.  For this walkthrough, I want to add a new test that will allow local testing of Amazon DynamoDB. To achieve this, I will use a CodeCatalyst dev environment.

CodeCatalyst Dev Environments are managed cloud-based development environments that you can use to access and modify code stored in a source repository. You can launch a project specific dev environment that will automate check-out of your project’s repo or you can launch an empty environment to use for accessing third-party source providers.  You can learn more about CodeCatalyst Dev Environments in the CodeCatalyst User Guide.

CodeCatalyst user interface showing Create Dev Environment

Figure 1. Creating a new Dev Environment

To begin, I navigate to the Dev Environments page under the Code section of the navigaiton menu.  I then use the Create Dev Environment to launch my environment.  For this post, I am using the AWS Cloud9 IDE, but you can follow along with the IDE you are most comfortable using.  In the next screen, I select Work in New Branch and assign local_testing for the new branch name, and I am branching from main.  I leave the remaining default options and Create.

Create Dev Environment user interface with work in a new branch selected

Figure 2. Dev Environment Create Options

After waiting less than a minute, my IDE is ready in a new tab and I am ready to begin work.  The first thing I see in my dev environment is an information window asking me if I want to navigate to the Dev Environment Settings.  Because I need to enable local testing of Dynamodb, not only for myself, but other developers that will collaborate on this project, I need to update the project’s devfile.  I select to navigate to the settings tab because I know that contains information on the project’s devfile and allows me to access the file to edit.

AWS Toolkit prompting to Open Dev Environment Settings.

Figure 3. Toolkit Welcome Banner

Devfiles allow you to model a Dev Environment’s configuration and dependencies so that you can re-produce consisent Dev Environments and reduce the manual effort in setting up future environments.  The tools and application libraries included in your Dev Environment are defined by the devfile in the source repository of your project.  Since this project was created from a blueprint, there is one provided.  For blank projects, a default CodeCatalyst devfile is created when you first launch an environment.  To learn more about the devfile, see https://devfile.io.

In the settings tab, I find a link to the devfile that is configured.  When I click the edit button, a new file tab launches and I can now make changes.  I first add an env section to the container that hosts our dev environment.  By adding an environment variable and value, anytime a new dev environment is created from this project’s repository, that value will be included.  Next, I add a second container to the dev environment that will run DynamoDB locally.  I can do this by adding a new container component.  I use Amazon’s verified DynamoDB docker image for my environment. Attaching additional images allow you to extend the dev environment and include tools or services that can be made available locally.  My updates are highlighted in the green sections below.

Devfile.yaml with environment variable and DynamoDB container added

Figure 4. Example Devfile

I save my changes and navigate back to the Dev Environment Settings tab. I notice that my changes were automatically detected and I am prompted to restart my development environment for the changes to take effect.  Modifications to the devfile requires a restart. You can restart a dev environment using the toolkit, or from the CodeCatalyst UI.

AWS Toolkit prompt asking to restart the dev environment

Figure 5. Dev Environment Settings

After waiting a few seconds for my dev environment to restart, I am ready to write my test.  I use the IDE’s file explorer, expand the repo’s ./tests/unit folder, and create a new file named test_dynamodb.py.  Using the IS_LOCAL environment variable I configured in the devfile, I can include a conditional in my test that sets the endpoint that Amazon’s python SDK ( Boto3 ) will use to connect to the Dynamodb service.  This way, I can run tests locally before pushing my changes and still have tests complete successfully in my project’s workflow.  My full test file is included below.

Python unit test with local code added

Figure 6. Dynamodb test file

Now that I have completed my changes to the dev environment using the devfile and added a test, I am ready to run my test locally to verify.  I will use pytest to ensure the tests are passing before pushing any changes.  From the repo’s root folder, I run the command pip install -r requirements-dev.txt.  Once my dependencies are installed, I then issue the command pytest -k unit.  All tests pass as I expect.

Result of the pytest shown at the command line

Figure 7. Pytest test results

Rather than manually installing my development dependencies in each environment, I could also use the devfile to include commands and automate the execution of those commands during the dev environment lifecycle events.  You can refer to the links for commands and events for more information.

Finally, I am ready to push my changes back to my CodeCatalyst source repository.  I use the git extension of Cloud9 to review my changes.  After reviewing my changes are what I expect, I use the git extension to stage, commit, and push the new test file and the modified devfile so other collaborators can adopt the improvements I made.

Figure 8.  Changes reviewed in CodeCatalyst Cloud9 git extension.

Figure 8.  Changes reviewed in CodeCatalyst Cloud9 git extension.

Cleanup

If you have been following along with this workflow, you  should delete the resources you deployed so you do not continue to incur  charges. First, delete the two stacks that CDK deployed using the AWS CloudFormation console in the AWS account you associated when you launched the blueprint. These stacks will have names like mysfitsXXXXXWebStack and mysfitsXXXXXAppStack. Second, delete the project from CodeCatalyst by navigating to Project settings and choosing Delete project.

Conclusion

In this post, you learned how CodeCatalyst provides configurable on-demand dev environments.  You also learned how devfiles help you define a consistent experience for developing within a CodeCatalyst project.  Please follow our DevOps blog channel as I continue to explore how CodeCatalyst solve Maxine’s and other builders’ challenges.

About the author:

Ryan Bachman

Ryan Bachman is a Sr. Specialist Solutions Architect at AWS, and specializes in working with customers to improve their DevOps practices. Ryan has over 20 years of professional experience as a technologist, and has held roles in many different domains to include development, networking architecture, and technical product management. He is passionate about automation and helping customers increase software development productivity.