Tag Archives: announcements

New for App Runner – VPC Support

Post Syndicated from Danilo Poccia original https://aws.amazon.com/blogs/aws/new-for-app-runner-vpc-support/

With AWS App Runner, you can quickly deploy web applications and APIs at any scale. You can start with your source code or a container image, and App Runner will fully manage all infrastructure including servers, networking, and load balancing for your application. If you want, App Runner can also configure a deployment pipeline for you.

Starting today, App Runner enables your services to communicate with databases and other applications hosted in an Amazon Virtual Private Cloud (VPC). For example, you can now connect App Runner services to databases in Amazon Relational Database Service (RDS), Redis or Memcached caches in Amazon ElastiCache, or your own applications running in Amazon Elastic Container Service (Amazon ECS), Amazon Elastic Kubernetes Service (EKS), Amazon Elastic Compute Cloud (Amazon EC2), or on-premises and connected via AWS Direct Connect.

Previously, in order for your App Runner application to connect to these resources, they needed to be publicly accessible over the internet. With this feature, App Runner applications can connect to private endpoints in your VPC, and you can enable a more secure and compliant environment by removing public access to these resources.

Within App Runner, you can now create VPC connectors that specify which VPC, subnets, and security groups to use for private networking. Once configured, you can use a VPC connector with one or more App Runner services.

When connected to a VPC, all outbound traffic from your AppRunner service will be routed based on the VPC routing rules. Services will not have access to the public internet (including AWS APIs) unless allowed by a route to a NAT Gateway. You can also set up VPC endpoints to connect to AWS APIs such as Amazon Simple Storage Service (Amazon S3) and Amazon DynamoDB to avoid NAT traffic.

The VPC connectors in App Runner work similarly to VPC networking in AWS Lambda and are based on AWS Hyperplane, the internal Amazon network function virtualization system behind AWS services and resources like Network Load Balancer, NAT Gateway, and AWS PrivateLink.

Let’s see how this works in practice with a web application connected to an RDS database.

Preparing the Amazon RDS Database
I start by configuring a database for my application. To simplify capacity management for this database, I use Amazon Aurora Serverless. In the RDS console, I create an Amazon Aurora MySQL-Compatible database. For the Capacity type, I choose Serverless. For networking, I use my default VPC and the default security group. I don’t need to make the database publicly accessible because I am going to connect using private VPC networking. To simplify connecting later, I enable AWS Identity and Access Management (IAM) database authentication.

I start an Amazon Linux EC2 instance in the same VPC. To connect from the EC2 instance to the database, I need a MySQL client. I install MariaDB, a community-developed branch of MySQL:

sudo yum install mariadb

Then, I connect to the database using the admin user.

mysql -h <DATABASE_HOST> -u admin -P

I enter the admin user password to log in. Then, I create a new user (bookuser) that is configured to use IAM authentication.

CREATE USER bookuser IDENTIFIED WITH AWSAuthenticationPlugin AS 'RDS'; 

I create the bookcase database and give permissions to the bookuser user to query the bookcase database.

CREATE DATABASE bookcase;
GRANT SELECT ON bookcase.* TO 'bookuser'@'%’;

To store information about some of my books, I create the authors and books tables.

CREATE TABLE authors (
  authorId INT,
  name varchar(255)
 );

CREATE TABLE books (
  bookId INT,
  authorId INT,
  title varchar(255),
  year INT
);

Then, I insert some values in the two tables:

INSERT INTO authors VALUES (1, "Issac Asimov");
INSERT INTO authors VALUES (2, "Robert A. Heinlein");
INSERT INTO books VALUES (1, 1, "Foundation", 1951);
INSERT INTO books VALUES (2, 1, "Foundation and Empire", 1952);
INSERT INTO books VALUES (3, 1, "Second Foundation", 1953);
INSERT INTO books VALUES (4, 2, "Stranger in a Strange Land", 1961);

Preparing the Application Source Code Repository
With App Runner, I can deploy a new service from code hosted in a source code repository or using a container image. In this example, I use a private project that I have on GitHub.

It’s a very simple Python web application connecting to the database I just created. This is the source code of the app (server.py):

from wsgiref.simple_server import make_server
from pyramid.config import Configurator
from pyramid.response import Response
import os
import boto3
import mysql.connector

import os

DATABASE_REGION = 'us-east-1'
DATABASE_CERT = 'cert/us-east-1-bundle.pem'
DATABASE_HOST = os.environ['DATABASE_HOST']
DATABASE_PORT = os.environ['DATABASE_PORT']
DATABASE_USER = os.environ['DATABASE_USER']
DATABASE_NAME = os.environ['DATABASE_NAME']

os.environ['LIBMYSQL_ENABLE_CLEARTEXT_PLUGIN'] = '1'

PORT = int(os.environ.get('PORT'))

rds = boto3.client('rds')

try:
    token = rds.generate_db_auth_token(
        DBHostname=DATABASE_HOST,
        Port=DATABASE_PORT,
        DBUsername=DATABASE_USER,
        Region=DATABASE_REGION
    )
    mydb =  mysql.connector.connect(
        host=DATABASE_HOST,
        user=DATABASE_USER,
        passwd=token,
        port=DATABASE_PORT,
        database=DATABASE_NAME,
        ssl_ca=DATABASE_CERT
    )
except Exception as e:
    print('Database connection failed due to {}'.format(e))          

def all_books(request):
    mycursor = mydb.cursor()
    mycursor.execute('SELECT name, title, year FROM authors, books WHERE authors.authorId = books.authorId ORDER BY year')
    title = 'Books'
    message = '<html><head><title>' + title + '</title></head><body>'
    message += '<h1>' + title + '</h1>'
    message += '<ul>'
    for (name, title, year) in mycursor:
        message += '<li>' + name + ' - ' + title + ' (' + str(year) + ')</li>'
    message += '</ul>'
    message += '</body></html>'
    return Response(message)

if __name__ == '__main__':

    with Configurator() as config:
        config.add_route('all_books', '/')
        config.add_view(all_books, route_name='all_books')
        app = config.make_wsgi_app()
    server = make_server('0.0.0.0', PORT, app)
    server.serve_forever()

The application uses the AWS SDK for Python (boto3) for IAM database authentication, the Pyramid web framework, and the MySQL connector for Python. The requirements.txt file describes the application dependencies:

boto3
pyramid==2.0
mysql-connector-python

To use SSL/TLS encryption when connecting to the database, I download a certificate bundle and add it to my source code repository.

Using VPC Support in AWS App Runner
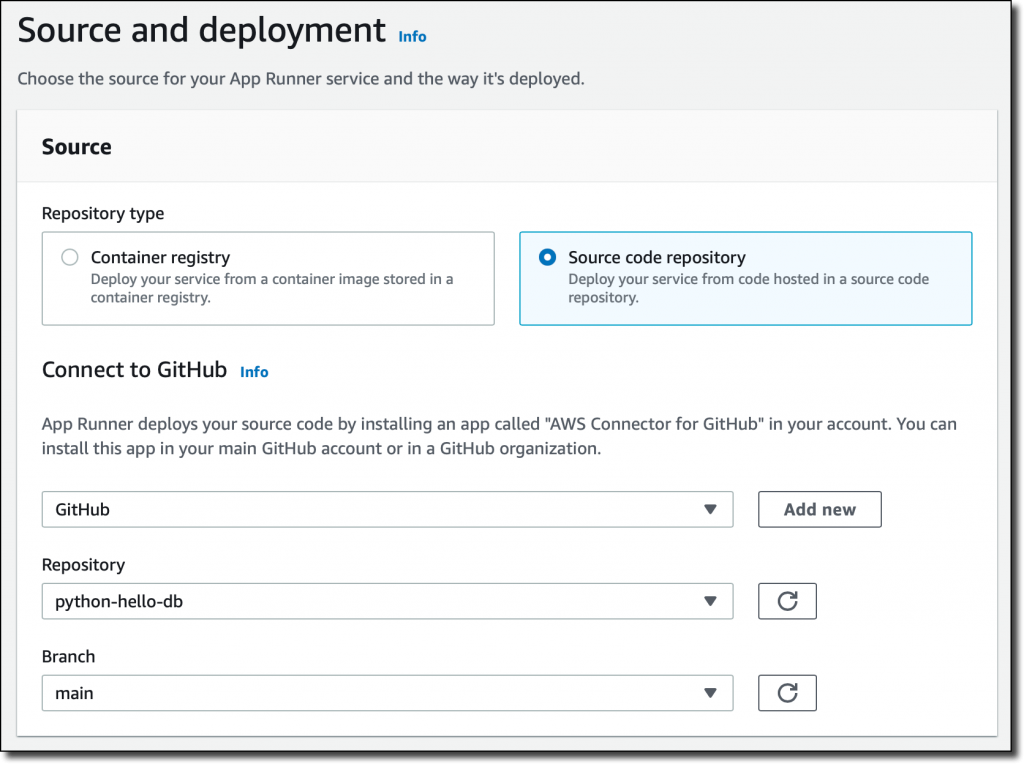
In the App Runner console, I select Source code repository and the branch to use.

Console screenshot.

For the deployment settings, I choose Manual. Optionally, I could have selected the Automatic deployment trigger to have every push to this branch deploy a new version of my service.

Console screenshot.

Then, I configure the build. This is a very simple application, so I pass the build and start commands in the console:

Build commandpip install -r requirements.txt
Start commandpython server.py

For more advanced use cases, I would add an apprunner.yaml configuration file to my repository as in this sample application.

Console screenshot.

In the service configuration, I add the environment variables used by the application to connect to the database. I don’t need to pass a database password here because I am using IAM authentication.

Console screenshot.

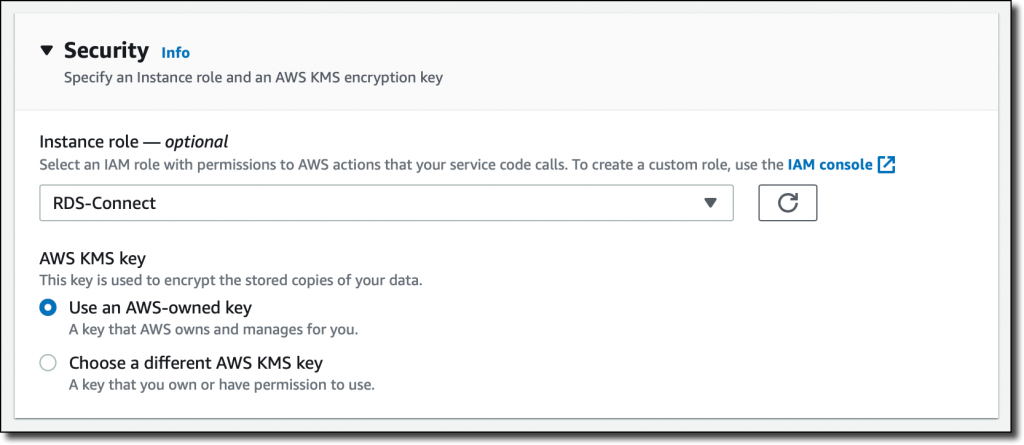
In the Security section, I select an IAM role that gives permissions to connect to the database using IAM database authentication as described in Creating and using an IAM policy for IAM database access.

Console screenshot.

Here’s the syntax of the IAM role. I find the database Resource ID in the Configuration tab of the RDS console.

{
    "Version": "2012-10-17",
    "Statement": [
        {
            "Effect": "Allow",
            "Action": [
                "rds-db:connect"
            ],
            "Resource": [
                "arn:aws:rds-db:<REGION>:<ACCOUNT>:dbuser:<DB_RESOURCE_ID>/<DB_USER>"
            ]
        }
    ]
}

For the role trust policy,   I follow the instruction for instance roles in How App Runner works with IAM.

{
  "Version": "2012-10-17",
  "Statement": [
    {
      "Effect": "Allow",
      "Principal": {
        "Service": "tasks.apprunner.amazonaws.com"
      },
      "Action": "sts:AssumeRole"
    }
  ]
}

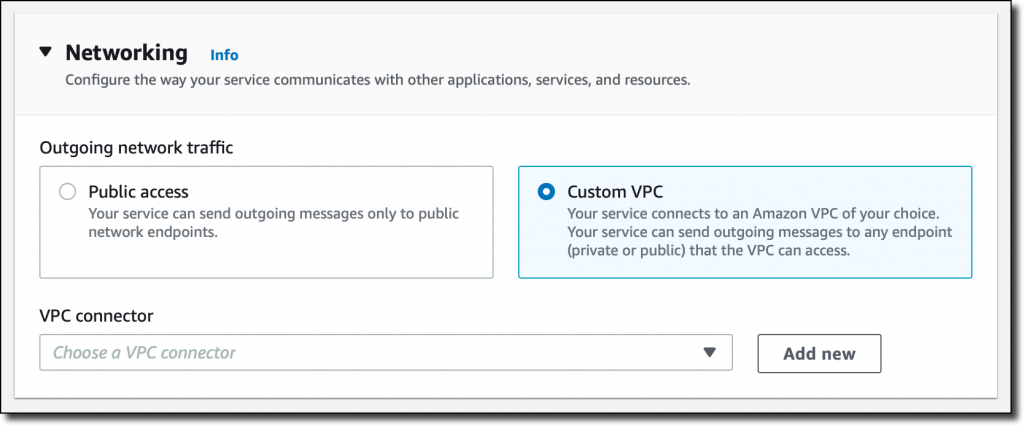
For Networking, I select the new option to use a Custom VPC for outgoing network traffic and then add a new VPC connector.

Console screenshot.

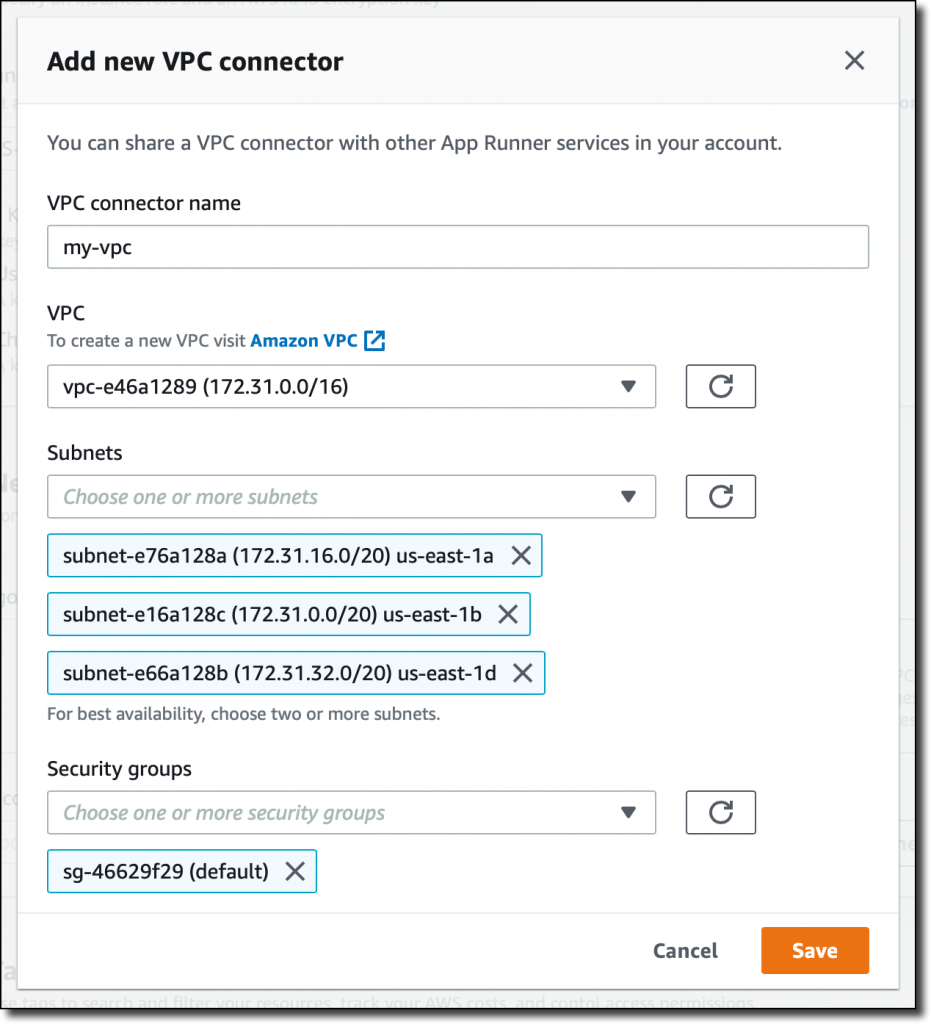
To add a new VPC connector, I write down a name and then select the VPC, subnets, and security groups to use. Here, I select all the subnets of my default VPC and the default security group. In this way, the App Runner service will be able to connect to the RDS database.

Console screenshot.

The next time, when configuring another application with the same VPC networking requirements, I can just select the VPC connector I created before.
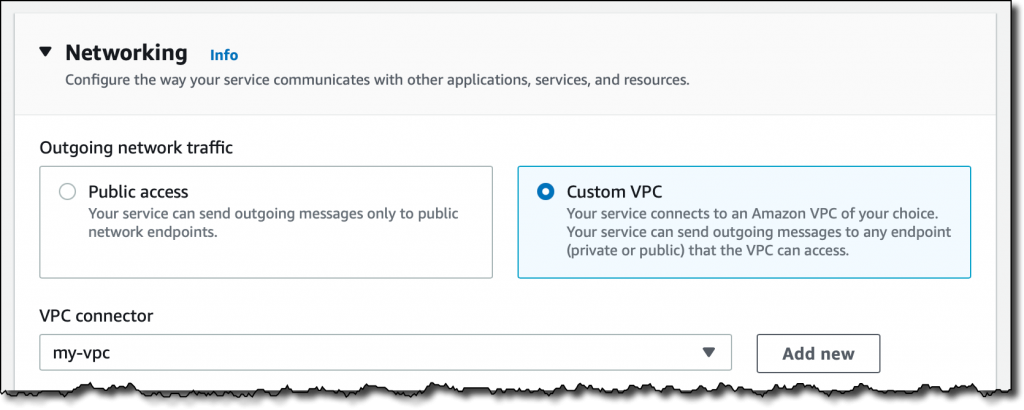
Console screenshot. I review all the settings and then create and deploy the service.

After a few minutes, the service is running, and I choose the default domain to open a new tab in my browser. The application is connected to the database using VPC networking and performs a SQL query to join the books and authors tables and provide some reading suggestions. It works!

Browser screenshot.

Availability and Pricing
VPC connectors are available in all AWS Regions where AWS App Runner is offered. For more information, see the Regional Services List. There is no additional cost for using this feature, but you pay the standard pricing for data transmission or any NAT gateway or VPC endpoints you set up. You can set up VPC connectors with the AWS Management Console, AWS Command Line Interface (CLI), AWS SDKs, and AWS CloudFormation.

With VPC connectors, you can deploy your applications using App Runner and connect them to your private databases, caches, and applications running in a VPC or on-premises and connected via AWS Direct Connect.

Build and run web applications at any scale and connect to your private VPC resources with AWS App Runner.

Danilo

NEW – Replicate Existing Objects with Amazon S3 Batch Replication

Post Syndicated from Marcia Villalba original https://aws.amazon.com/blogs/aws/new-replicate-existing-objects-with-amazon-s3-batch-replication/

Starting today, you can replicate existing Amazon Simple Storage Service (Amazon S3) objects and synchronize your buckets using the new Amazon S3 Batch Replication feature.

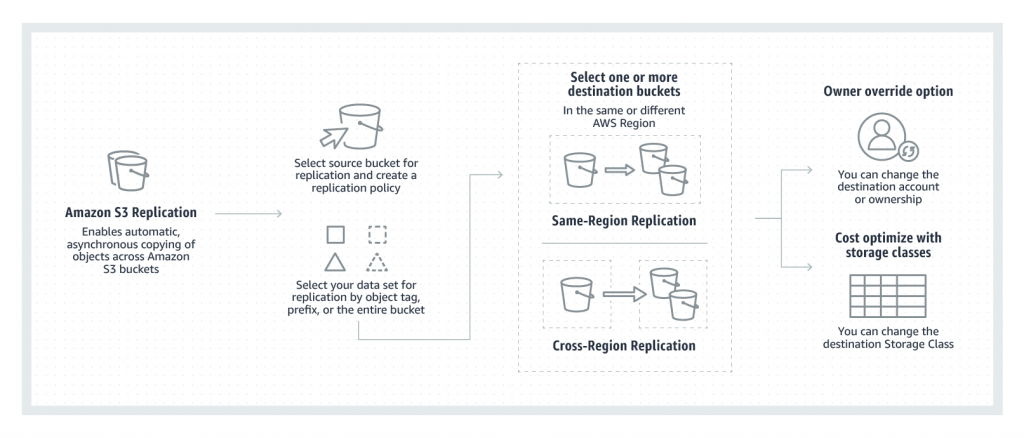
Amazon S3 Replication supports several customer use cases. For example, you can use it to minimize latency by maintaining copies of your data in AWS Regions geographically closer to your users, to meet compliance and data sovereignty requirements, and to create additional resiliency for disaster recovery planning. S3 Replication is a fully managed, low-cost feature that replicates newly uploaded objects between buckets. The buckets can belong to the same or different accounts. Objects may be replicated to a single destination bucket or to multiple destination buckets. Destination buckets can be in different AWS Regions (Cross-Region Replication) or within the same Region as the source bucket (Same-Region Replication).

Replication flow

But until today, S3 Replication could not replicate existing objects; now you can do it with S3 Batch Replication.

There are many reasons why customers will want to replicate existing objects. For example, customers might want to copy their data to a new AWS Region for a disaster recovery setup. To do that, they will need to populate the new destination bucket with existing data. Another reason to copy existing data comes from organizations that are expanding around the world. For example, imagine a US-based animation company now opens a new studio in Singapore. To reduce latency for their employees, they will need to replicate all the internal files and in-progress media files to the Asia Pacific (Singapore) Region. One other common use case we see is customers going through mergers and acquisitions where they need to transfer ownership of existing data from one AWS account to another.

To replicate existing objects between buckets, customers end up creating complex processes. In addition, copying objects between buckets does not preserve the metadata of objects such as version ID and object creation time.

Today we are happy to launch S3 Batch Replication, a new capability offered through S3 Batch Operations that removes the need for customers to develop their own solutions for copying existing objects between buckets. It provides a simple way to replicate existing data from a source bucket to one or more destinations. With this capability, you can replicate any number of objects with a single job.

When to Use Amazon S3 Batch Replication
S3 Batch Replication can be used to:

  • Replicate existing objects – use S3 Batch Replication to replicate objects that were added to the bucket before the replication rules were configured.
  • Replicate objects that previously failed to replicate – retry replicating objects that failed to replicate previously with the S3 Replication rules due to insufficient permissions or other reasons.
  • Replicate objects that were already replicated to another destination – you might need to store multiple copies of your data in separate AWS accounts or Regions. S3 Batch Replication can replicate objects that were already replicated to new destinations.
  • Replicate replicas of objects that were created from a replication rule – S3 Replication creates replicas of objects in destination buckets. Replicas of objects cannot be replicated again with live replication. These replica objects can only be replicated with S3 Batch Replication.

Get started with S3 Batch Replication
There are many ways to get started with S3 Batch Replication from the S3 console. You can create a job from the Replication configuration page or the Batch Operations create job page. You will also get prompted to replicate existing objects when you create a new replication rule or add a new destination bucket.

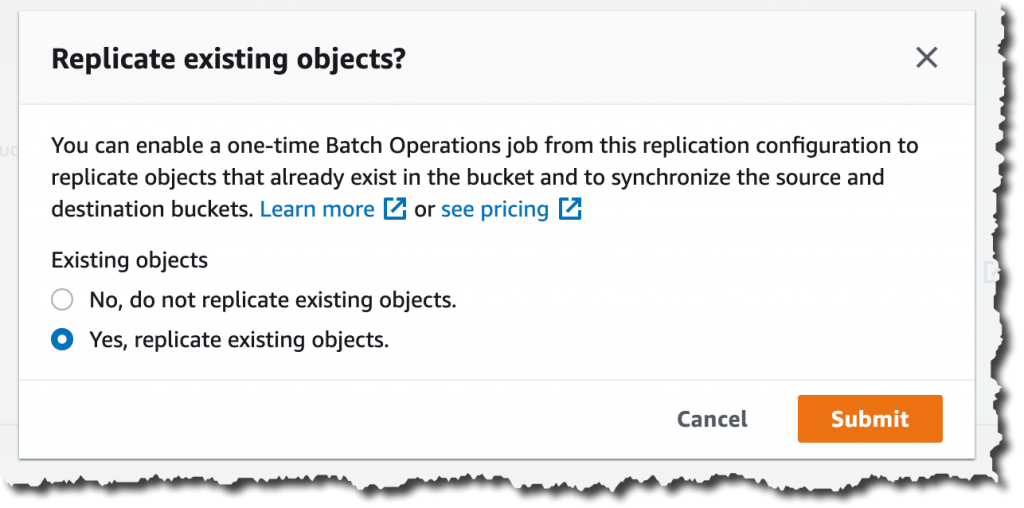
For this demo, imagine that you are creating a replication rule in a bucket that has existing objects. When you finish creating the rule, you will get prompted with a message asking you if you want to replicate existing objects.

Prompt asking if you want to replicate existing objects

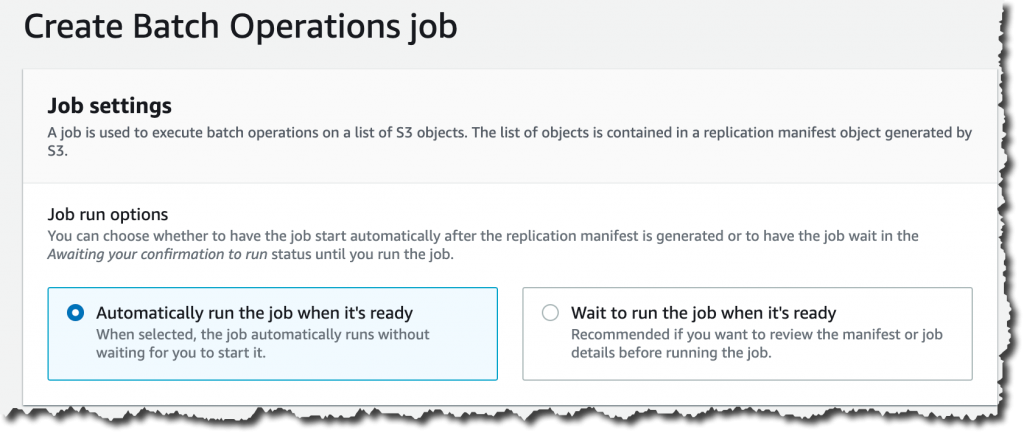
If you answer yes, then you will be directed to a simplified Create Batch Operations job page. If you want this job to execute automatically after the job is ready, you can leave the default option. If you want to review the manifest or the job details before running the job, select Wait to run the job when it’s ready.

This method of creating the job automatically generates the manifest of objects to replicate. A manifest is a list of objects in a given source bucket to apply the replication rules. The generated manifest report has the same format as an Amazon S3 Inventory Report.

Create a Batch Operations job view

S3 Batch Replication creates a Completion report, similar to other Batch Operations jobs, with information on the results of the replication job. It is highly recommended to select this option and to specify a bucket to store this report.

Completion report configuration

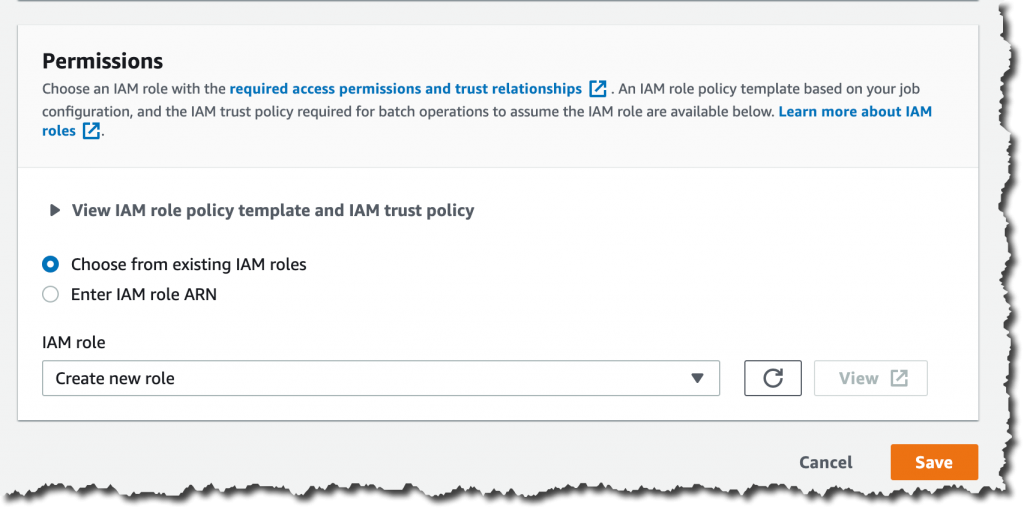
The final step is to configure permissions for creating this batch job. If you keep the default settings, Amazon S3 will create a new AWS Identity and Access Management (IAM) role for you.

Permissions configurations

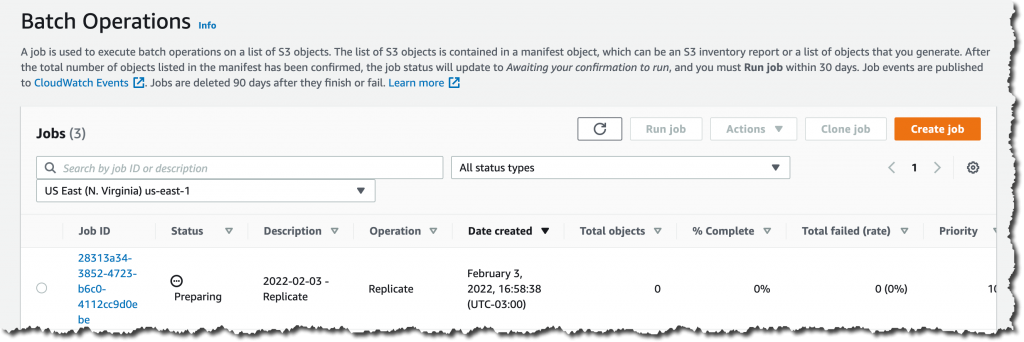
After you save this job, check the status of the job on the Batch Operations page. You will see the job changing status as it progresses, the percentage of files that have been replicated, and the total number of files that have failed the replication.

Keep in mind that existing objects can take longer to replicate than new objects, and the replication speed largely depends on the AWS Regions, size of data, object count, and encryption type.

Job status page

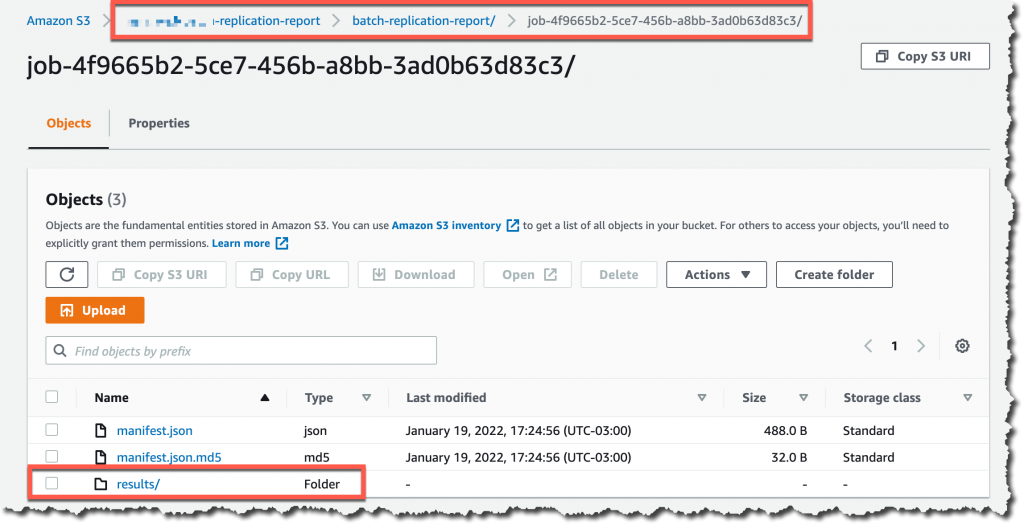
When the Batch Replication job completes, you can navigate to the bucket where you saved the completion report to check the status of object replication. The reports have the same format as an Amazon S3 Inventory Report.

Finding the report and manifest

Pricing and availability
When using this feature, you will be charged replication fees for request and data transfer for cross Region, for the
batch operations, and a manifest generation fee if you opted for it.

Additionally, you will be charged the storage cost of storing the replicated data in the destination bucket and AWS KMS charges if your objects are replicated with AWS KMS. Check the Replication tab on the S3 pricing page to learn all the details.

S3 Batch Replication is available in all AWS Regions, including the AWS GovCloud Regions, the AWS China (Beijing) Region, operated by Sinnet, and the AWS China (Ningxia) Region, operated by NWCD. And you can get started using the Amazon S3 console, CLI, S3 API, or AWS SDKs client.

To learn more about S3 Batch Replication, check out the Amazon S3 User Guide.

Marcia

AWS cloud services adhere to CISPE Data Protection Code of Conduct for added GDPR assurance

Post Syndicated from Chad Woolf original https://aws.amazon.com/blogs/security/aws-cloud-services-adhere-to-cispe-data-protection-code-of-conduct/

French version
German version

I’m happy to announce that AWS has declared 52 services under the Cloud Infrastructure Service Providers Europe Data Protection Code of Conduct (CISPE Code). This provides an independent verification and an added level of assurance to our customers that our cloud services can be used in compliance with the General Data Protection Regulation (GDPR).

Validated by the European Data Protection Board (EDPB) and approved by the French Data Protection Authority (CNIL), the CISPE Code assures organizations that their cloud infrastructure service provider meets the requirements applicable to personal data processed on their behalf (customer data) under the GDPR. The CISPE Code also raises the bar on data protection and privacy for cloud services in Europe, going beyond current GDPR requirements. For example:

  • Data in Europe: The CISPE Code goes beyond GDPR compliance by requiring cloud infrastructure service providers to give customers the choice to use services to store and process customer data exclusively in the European Economic Area (EEA).
  • Data privacy: The CISPE Code prohibits cloud infrastructure service providers from using customer data for data mining, profiling, or direct marketing.
  • Cloud infrastructure focused: The CISPE Code addresses the specific roles and responsibilities of cloud infrastructure service providers (not represented in more general codes).

These 52 AWS services have now been independently verified as complying with the CISPE Code. The verification process was conducted by Ernst & Young CertifyPoint (EY CertifyPoint), an independent, globally recognized monitoring body accredited by CNIL. AWS is bound by the CISPE Code’s requirements for the 52 declared services, and we are committed to bringing additional services into the scope of the CISPE compliance program.

About the CISPE Data Protection Code of Conduct

The CISPE Code is the first pan-European data protection code of conduct for cloud infrastructure service providers. In May 2021, the CISPE Code was approved by the EDPB, acting on behalf of the 27 data protection authorities across Europe; and in June 2021, the Code was formally adopted by the CNIL, acting as the lead supervisory authority.

EY CertifyPoint is accredited as an independent monitoring body for the CISPE Code by CNIL, based on criteria approved by the EDPB. EY CertifyPoint is responsible for supervising AWS’s ongoing compliance with the CISPE Code for all declared services.

AWS and the GDPR

To earn and maintain customer trust, AWS is committed to providing customers and partners an environment to deploy AWS services in compliance with the GDPR, and to build their own GDPR-compliant products, services, and solutions.

For more information, see the AWS General Data Protection Regulation (GDPR) Center.

Further information

A list of the 52 AWS services that are verified as compliant with the CISPE Code is available on the CISPE Public Register site.

AWS helps customers accelerate cloud-driven innovation and succeed at home and globally. You can read more about our ongoing commitments to protect EU customers’ data on our EU data protection section of the AWS Cloud Security site.

.


Les services cloud d’AWS adhèrent au code de conduite du CISPE sur la protection des données pour une garantie de conformité supplémentaire au RGPD.

par Chad Woolf

Je suis heureux d’annoncer qu’AWS a déclaré 52 services sous le Code de conduite sur la protection des données des fournisseurs de services d’infrastructure cloud en Europe (Code CISPE). Ceci donne une vérification indépendante et un niveau d’assurance supplémentaire à nos clients quant à la conformité de nos services cloud qu’ils utilisent avec le Règlement Général sur la Protection des Données (RGPD).

Validé par le Conseil Européen de la Protection des Données (CEPD) et approuvé par la Commission Nationale de l’Informatique et des Libertés (CNIL), le Code CISPE assure aux organisations que leur fournisseur de services d’infrastructure cloud répond aux exigences applicables aux données personnelles traitées en leur nom (données clients) sur base du RGPD. Le Code CISPE met la barre plus haut en matière de protection des données et de vie privée pour les services cloud en Europe, allant au-delà des exigences actuelles du RGPD. Par exemple :

  • Données en Europe : Le Code CISPE va au-delà de la conformité au RGPD en exigeant des fournisseurs de services d’infrastructure cloud qu’ils donnent aux clients le choix d’utiliser les services de stockage et de traitement des données clients exclusivement dans l’Espace Economique Européen (EEE).
  • Confidentialité des données : Le Code CISPE interdit aux fournisseurs de services d’infrastructure cloud d’utiliser les données clients pour l’exploration de données, le profilage ou le marketing direct.
  • Ciblage sur l’infrastructure cloud : Le Code CISPE traite des rôles et des responsabilités spécifiques des fournisseurs de services d’infrastructure cloud (non représentés dans des codes plus généraux).

Ces 52 services AWS ont aujourd’hui été vérifiés de manière indépendante comme étant conformes au Code CISPE. Le processus de vérification a été mené par Ernst & Young CertifyPoint (EY CertifyPoint), un organisme de contrôle indépendant et mondialement reconnu, accrédité par la CNIL. AWS est lié par les exigences du Code CISPE pour les 52 services déclarés, et nous nous engageons à faire entrer des services supplémentaires dans le champ d’application du programme de conformité CISPE.

À propos du Code de conduite sur la protection des données du CISPE

Le Code CISPE est le premier code de conduite paneuropéen sur la protection des données destiné aux fournisseurs de services d’infrastructure cloud. En mai 2021, le Code CISPE a été approuvé par le CEPD, agissant au nom des 27 autorités de protection des données à travers l’Europe ; et en juin 2021, le Code a été formellement adopté par la CNIL, agissant en tant qu’autorité de contrôle principale.

EY CertifyPoint est accrédité en tant qu’organisme indépendant de contrôle du Code CISPE par la CNIL, sur la base de critères approuvés par le CEPD. EY CertifyPoint est chargé de superviser la conformité permanente d’AWS au Code CISPE pour tous les services déclarés.

AWS et le GDPR

Pour gagner et conserver la confiance des clients, AWS s’engage à fournir aux clients et aux partenaires un environnement permettant de déployer les services AWS en conformité avec le RGPD, et de créer leurs propres produits, services et solutions conformes au RGPD.

Pour plus d’informations, consultez le Centre AWS sur le Règlement Générale sur la Protection des Données (RGPD).

Informations complémentaires

Une liste des 52 services AWS qui ont été vérifiés comme étant conformes au code CISPE est disponible sur le site du registre public CISPE.

AWS aide ses clients à accélérer l’innovation basée sur le cloud et à réussir chez eux et dans le monde entier. Vous pouvez en savoir plus sur nos engagements continus en matière de protection des données des clients de l’UE sur section Protection des Données de l’UE du site AWS Cloud Security.

.


AWS-Cloud-Dienste befolgen den CISPE-Verhaltenskodex für Datenschutz als zusätzliche Sicherheit bezüglich DSGVO

von Chad Woolf

Mit großer Freude darf ich verkünden, dass AWS 52 Dienste als im Einklang mit dem Verhaltenskodex für Cloud-Infrastruktur-Dienstanbieter in Europa (CISPE-Kodex) deklariert hat. Dies bietet unseren Kunden eine unabhängige Verifizierung und ein zusätzliches Maß an Sicherheit, dass unsere Cloud-Dienste in Übereinstimmung mit der Datenschutz-Grundverordnung (DSGVO) genutzt werden können.

Der CISPE-Kodex wurde vom Europäischen Datenschutzausschuss (EDSA) geprüft und von der französischen Datenschutzbehörde (CNIL) genehmigt. Er bietet Unternehmen die Sicherheit, dass ihr Cloud-Infrastruktur-Dienstanbieter die Anforderungen erfüllt, die für in ihrem Auftrag verarbeitete personenbezogene Daten (Kundendaten) gemäß der DSGVO gelten. Der CISPE-Kodex erhöht auch die Messlatte für Datenschutz für Cloud-Dienste in Europa, indem er über die aktuellen DSGVO-Anforderungen hinausgeht. Zum Beispiel:

  • Daten in Europa: Der CISPE-Kodex geht über die DSGVO-Konformität hinaus, indem er Cloud-Infrastruktur-Dienstanbieter dazu verpflichtet, ihren Kunden die Wahl zu geben, Dienste zur Speicherung und Verarbeitung von Kundendaten ausschließlich im Europäischen Wirtschaftsraum (EWR) zu nutzen.
  • Datenschutz: Der CISPE-Kodex verbietet Cloud-Infrastruktur-Dienstanbietern, Kundendaten für Data Mining, Profiling oder Direktmarketing zu verwenden.
  • Schwerpunkt auf Cloud-Infrastruktur: Der CISPE-Code adressiert die spezifischen Rollen und Verantwortlichkeiten von Cloud-Infrastruktur-Dienstanbietern (dies ist in allgemeineren Kodizes nicht abgebildet).

Für diese 52 AWS-Dienste wurde nun unabhängig verifiziert, dass sie mit dem CISPE-Kodex konform sind. Der Überprüfungsprozess wurde von Ernst & Young CertifyPoint (EY CertifyPoint) durchgeführt, einer unabhängigen, weltweit anerkannten Überprüfungsstelle, die von der CNIL akkreditiert ist. AWS ist an die Anforderungen des CISPE-Kodex für die 52 deklarierten Dienste gebunden, und wir sind bestrebt, zusätzliche Dienste in den Umfang des CISPE-Compliance-Programms aufzunehmen.

Über den CISPE-Verhaltenskodex für Datenschutz

Beim CISPE-Kodex handelt es sich um die ersten europaweiten Verhaltensregeln für Cloud-Infrastruktur-Dienstanbieter. Im Mai 2021 wurde der CISPE-Kodex vom EDSA im Namen der 27 Datenschutzbehörden aus ganz Europa genehmigt. Im Juni 2021 wurde der Kodex von der CNIL als federführende Aufsichtsbehörde offiziell verabschiedet.

EY CertifyPoint ist von der CNIL als unabhängige Überprüfungsstelle für den CISPE-Kodex auf der Grundlage der vom EDSA genehmigten Kriterien akkreditiert. EY CertifyPoint ist für die Überwachung der laufenden Einhaltung des CISPE-Kodex durch AWS für alle deklarierten Dienste verantwortlich.

AWS und die DSGVO

Um das Vertrauen von Kunden zu gewinnen und aufrechtzuerhalten, verpflichtet sich AWS, Kunden und Partnern eine Umgebung zu bieten, in der sie AWS-Dienste in Übereinstimmung mit der DSGVO verwenden und ihre eigenen DSGVO-konformen Produkte, Dienste und Lösungen entwickeln können.

Weitere Informationen finden Sie im AWS General Data Protection Regulation (GDPR) Center.

Weitere Informationen

Eine Liste der 52 AWS-Dienste, die als mit dem CISPE-Kodex konform verifiziert wurden, ist auf der CISPE Public Register Website verfügbar.

AWS hilft Kunden dabei, Cloud-getriebene Innovationen zu beschleunigen und sowohl zu Hause als auch weltweit erfolgreich zu sein. Weitere Informationen zu unserem kontinuierlichen Bestreben zum Schutz der Daten von EU-Kunden finden Sie in unserem Abschnitt zum EU-Datenschutz auf der AWS Cloud Security Website.


If you have feedback about this post, submit comments in the Comments section below. If you have questions about this post, contact AWS Support.

Want more AWS Security news? Follow us on Twitter.

Author

Chad Woolf

Chad joined Amazon in 2010 and built the AWS compliance functions from the ground up, including audit and certifications, privacy, contract compliance, control automation engineering and security process monitoring. Chad’s work also includes enabling public sector and regulated industry adoption of the AWS cloud and leads the AWS trade and product compliance team.


How to configure rotation and rotation windows for secrets stored in AWS Secrets Manager

Post Syndicated from Fatima Ahmed original https://aws.amazon.com/blogs/security/how-to-configure-rotation-windows-for-secrets-stored-in-aws-secrets-manager/

November 21, 2022: We updated this post to reflect the fact that AWS Secrets Manager now supports rotating secrets as often as every four hours.

AWS Secrets Manager helps you manage, retrieve, and rotate database credentials, API keys, and other secrets throughout their lifecycles. You can specify a rotation window for your secrets, allowing you to rotate secrets during non-critical business hours or scheduled maintenance windows for your application. Secrets Manager now supports rotation of secrets as often as every four hours, on a predefined schedule you can configure to conform to your existing maintenance windows. Previously, you could only specify the rotation interval in days. AWS Secrets Manager would then rotate the secret within the last 24 hours of the scheduled rotation interval. You can rotate your secrets using an AWS Lambda rotation function provided by AWS, or create a custom Lambda rotation function.

With this release, you can now use Secrets Manager to automate the rotation of credentials and access tokens that must be refreshed more than once per day. This enables greater flexibility for common developer workflows through a single managed service. Additionally, you can continue to use integrations with AWS Config and AWS CloudTrail to manage and monitor your secret rotation configurations in accordance with your organization’s security and compliance requirements. Support for secrets rotation as often as every four hours is provided at no additional cost.

Why might you want to rotate secrets more than once a day? Rotating secrets more frequently can provide a number of benefits, including: discouraging the use of hard-coded credentials in your applications, reducing the scope of impact of a stolen credential, or helping you meet organizational requirements around secret rotation.

Hard-coding application secrets is not recommended, because it can increase the risk of credentials being written in logs, or accidentally exposed in code repositories. Using short-lived secrets limits your ability to hard-code credentials in your application. Short-lived secrets are rotated on a frequent basis: for example, every four hours – meaning even a hard-coded credential can only be used for a short period of time before it needs to be refreshed. This also means that if a credential is compromised, the impact is much smaller — the secret is only valid for a short period of time before the secret is rotated.

Secrets Manager supports familiar cron and rate expressions to specify rotation frequency and rotation windows. In this blog post, we will demonstrate how you can configure a secret to be rotated every four hours, how to specify a custom rotation window for your secret using a cron expression, and how you can set up a custom rotation window for existing secrets. This post describes the following processes:

  1. Create a new secret and configure it to rotate every four hours using the schedule expression builder
  2. Set up rotation window by directly specifying a cron expression
  3. Enabling a custom rotation window for an existing secret

Use case 1: Create a new secret and configure it to rotate every four hours using the schedule expression builder

Let’s assume that your organization has a requirement to rotate GitHub credentials every four hours. To meet this requirement, we will create a new secret in Secrets Manager to store the GitHub credentials, and use the schedule expression builder to configure rotation of the secret at a four-hour interval.

The schedule expression builder enables you to configure your rotation window to help you meet your organization’s specific requirements, without requiring knowledge of cron expressions. AWS Secrets Manager also supports directly entering a cron expression to configure the rotation window, which we will demonstrate later in this post.

To create a new secret and configure a four-hour secret rotation schedule

  1. Sign in to the AWS Management Console, and navigate to the Secrets Manager service.
  2. Choose Store a new secret.
    Figure 1: Store a secret in AWS Secrets Manager

    Figure 1: Store a secret in AWS Secrets Manager

  3. In the Secret type section, choose Other type of secret.
    Figure 2: Choose a secret type in Secrets Manager

    Figure 2: Choose a secret type in Secrets Manager

  4. In the Key/value pairs section, enter the GitHub credentials that you wish to store.
  5. Select your preferred encryption key to protect the secret, and then choose Next. In this example, we are using an AWS managed key.

    Note: Find more information to help you decide what encryption key is right for you.

  6. Enter a secret name of your choice in the Secret name field. You can optionally provide a Description of the secret, create tags, and add resource permissions to the secret. If desired, you can also replicate the secret to another region to help you meet your organization’s disaster recovery requirements by following the procedure in this blog post.
  7. Choose Next.
    Figure 3:Create a secret to store your Git credentials

    Figure 3:Create a secret to store your Git credentials

  8. Turn on Automatic rotation to enable rotation for the secret.
  9. Under Rotation schedule, choose Schedule expression builder.
    1. For Time unit, choose Hours, then enter a value of 4.
    2. Leave the Window duration field blank as the secret is to be rotated every 4 hours.
    3. For this example, keep the Rotate immediately when the secret is stored check box selected to rotate the secret immediately after creation
      Figure 4: Enable automatic rotation using the schedule expression builder

      Figure 4: Enable automatic rotation using the schedule expression builder

    4. Under Rotation function, choose your Lambda rotation function from the drop down menu.
    5. Choose Next.
    6. On the Secret review page, you are provided with an overview of the secret. Review the secret and scroll down to the Rotation schedule section.
    7. Confirm the Rotation schedule and Next rotation date meet your requirements.
      Figure 5:  Rotation schedule with a summary of the configured custom rotation window

      Figure 5: Rotation schedule with a summary of the configured custom rotation window

    8. Choose Store secret.
    9. To view the Rotation configuration for the secret, select the secret you created.
    10. On the Secrets details page, scroll down to the Rotation configuration section. The Rotation status is Enabled and the Rotation schedule is rate(4 hours). The name of your Lambda function being used for rotation is displayed.
      Figure 6: Rotation configuration of your secret

      Figure 6: Rotation configuration of your secret

You have now successfully stored a secret using the interactive schedule expression builder. This option provides a simple mechanism to configure rotation windows, and does not require expertise with cron expressions.

In the next example, we will be using the schedule expression option to directly enter a cron expression, to achieve a more complex rotation interval.

Use case 2: Set up a custom rotation window using a cron expression

The procedures described in the next two sections of this blog post require that you complete the following prerequisites:

  1. Configure an Amazon Relational Database Service (Amazon RDS) DB instance, including creating a database user.
  2. Sign in to the AWS Management Console using a role that has SecretsManagerReadWrite permission.
  3. Configure the Lambda function to connect with the Amazon RDS database and Secrets Manager by following the procedure in this blog post.

Configuring complicated rotation windows for secrets may be more effective using the schedule expression option, rather than the schedule expression builder. The schedule expression option allows you to directly enter a cron expression using a string of six inputs. Directly entering cron expressions provides more flexibility when defining a rotation schedule that is more complex.

Let’s suppose you have another secret in your organization which does not need to be rotated as frequently as others. Consequently, you’ve been asked to set up rotation for every last Sunday of the quarter and during the off-peak hours of 1:00 AM to 4:00 AM UTC to avoid application downtime. Due to the complex nature of the requirements, you will need to use the schedule expression option to write a cron job to achieve your use case.

Cron expressions consist of the following 6 required fields which are separated by a white space; Minutes, Hours, Day of month, Month, Day of week, and Year. Each required field has the following values using the syntax cron(fields).

Fields Values Wildcards
Minutes Must be 0 None
Hours 0-23 /
Day-of-month 1 – 31 , – * ? / L
Month 1-12 or JAN-DEC , – * /
Day-of-week 1-7 or SUN-SAT , – * ? L #
Year * accepts * only

Table 1: Secrets Manager supported cron expression fields and corresponding values

Wildcard Description
, The , (comma) wildcard includes additional values. In the Month field, JAN,FEB,MAR would include January, February, and March.
The – (dash) wildcard specifies ranges. In the Day field, 1-15 would include days 1 through 15 of the specified month.
* The * (asterisk) wildcard includes all values in the field. In the Month field, * would include every month.
/ The / (forward slash) wildcard specifies increments In the Month field, you could enter 1/3 to specify every 3rd month, starting from January. So 1/3 specifies the January, April, July, Oct.
? The ? (question mark) wildcard specifies one or another. In the day-of-month field you could enter 7 and then enter ? in the day-of-week field since the 7th of a month could be any day of a given week.
L The L wildcard in the Day-of-month or Day-of-week fields specifies the last day of the month or week. For example, in the week Sun-Sat, you can state 5L to specify the last Thursday in the month.
# The # wildcard in the Day-of-week field specifies a certain instance of the specified day of the week within a month. For example, 3#2 would be the second Tuesday of the month: the 3 refers to Tuesday because it is the third day of each week, and the 2 refers to the second day of that type within the month.

Table 2: Description of supported wilds cards for cron expression

As the use case is to setup a custom rotation window for the last Sunday of the quarter from 1:00 AM to 4:00 AM UTC, you’ll need to carry out the following steps:

To deploy the solution

  1. To store a new secret in Secrets Manager repeat steps 1-6 above.
  2. Once you’re on the Secret Rotation section of the Store a new secret screen, click on Automatic rotation to enable rotation for the secret.
  3. Under Rotation schedule, choose Schedule expression.
  4. In the Schedule expression field box, enter cron(0 1 ? 3/3 1L *).

    Fields Values Explanation
    Minutes 0 The use case does not have a specific minute requirement
    Hours 1 Ensures the rotation window starts from 1am UTC
    Day-of-month ? The use case does not require rotation to occur on a specific date in the month
    Month 3/3 Sets rotation to occur on the last month in a quarter
    Day-of-week 1L Ensures rotation occurs on the last Sunday of the month
    Year * Allows the rotation window pattern to be repeated yearly

    Table 3: Using cron expressions to achieve your rotation requirements

Figure 7: Enable automatic rotation using the schedule expression

Figure 7: Enable automatic rotation using the schedule expression

  1. On the Rotation function section choose your Lambda rotation function from the drop down menu.
  2. Choose Next.
  3. On the Secret review page, review the secret and scroll down to the Rotation schedule section. Confirm the Rotation schedule and Next rotation date meets your requirements.
    Figure 8: Rotation schedule with a summary of your custom rotation window

    Figure 8: Rotation schedule with a summary of your custom rotation window

  4. Choose Store.
  5. To view the Rotation configuration for this secret, select it from the Secrets page.
  6. On the Secrets details page, scroll down to the Rotation configuration section. The Rotation status is Enabled, the Rotation schedule is cron(0 1 ? 3/3 1L *) and the name of your Lambda function being used for your custom rotation is displayed.
    Figure 9: Rotation configuration section with a rotation status of Enabled

    Figure 9: Rotation configuration section with a rotation status of Enabled

Use case 3: Enabling a custom rotation window for an existing secret

If you already use AWS Secrets Manager as a way to store and rotate secrets for your Organization, you might want to take advantage of custom scheduled rotation on existing secrets. For this use case, to meet your business needs the secret must be rotated bi-weekly, every Saturday from 12am to 5am.

To deploy the solution

  1. On the Secrets page of the Secrets Manager console, chose the existing secret you want to configure rotation for.
  2. Scroll down to the Rotation configuration section of the Secret details page, choose Edit rotation.
    Figure 10: Rotation configuration section with a rotation status of Disabled

    Figure 10: Rotation configuration section with a rotation status of Disabled

  3. On the Edit rotation configuration pop-up window, turn on Automatic rotation to enable rotation for the secret.
  4. Under Rotation Schedule choose Schedule expression builder, optionally you can use the Schedule expression to create the custom rotation window.
    1. For the Time Unit choose Weeks, then enter a value of 2.
    2. For the Day of week choose Saturday from the drop-down menu.
    3. In the Start time field type 00. This ensures rotation does not start until 00:00 AM UTC.
    4. In the Window duration field type 5h. This provides Secrets Manager with a 5hr period to rotate the secret.
    5. For this example, keep the check box marked to rotate the secret immediately.
      Figure 11: Edit rotation configuration pop-up window

      Figure 11: Edit rotation configuration pop-up window

    6. Under Rotation function, choose the Lambda function which will be used to rotate the secret.
    7. Choose Save.
    8. On the Secrets details page, scroll down to the Rotation configuration section. The Rotation status is Enabled, the Rotation schedule is cron(0 00 ? * 7#2,7#4 *) and the name of the custom rotation Lambda function is visible.
      Figure 12:Rotation configuration section with a rotation status of Enabled

      Figure 12:Rotation configuration section with a rotation status of Enabled

Summary

Regular rotation of secrets is a Secrets Manager best practice that helps you to meet compliance requirements, for example for PCI DSS, which mandates the rotation of application secrets every 90 days, and to improve your security posture for databases and credentials. The ability to rotate secrets as often as every four hours helps you rotate secrets more frequently, and the rotation window feature helps you adhere to rotation best practices while still having the flexibility to choose a rotation window that suits your organizational needs. This allows you to use AWS Secrets Manager as a centralized location to store, retrieve, and rotate your secrets regardless of their lifespan, providing a uniform approach for secrets management. At the same time, the custom rotation window feature alleviates the need for applications to continuously refresh secret caches and manage retries for secrets that were rotated, as rotation will occur during your specified window when the application usage is low.

In this blog post, we showed you how to create a secret and configure the secret to be rotated every four hours using the schedule expression builder. The use case examples show how each feature can be used to achieve different rotation requirements within an organization, including using the schedule expression builder option to create your cron expression, as well as using the schedule expression feature to help meet more specific rotation requirements.

You can start using this feature through the AWS Secrets Manager console, AWS Command Line Interface (AWS CLI), AWS SDK, or AWS CloudFormation. To learn more about this feature, see the AWS Secrets Manager documentation. If you have feedback about this blog post, submit comments in the Comments section below. If you have questions about this blog post, start a new thread on AWS Secrets Manager re:Post or contact AWS Support.

Want more AWS Security news? Follow us on Twitter.

Faith Isichei

Faith Isichei

Faith is a Premium Support Security Engineer at AWS. She helps provide tailored secure solutions for a broad spectrum of technical issues faced by customers. She is interested in cybersecurity, cryptography, and governance. Outside of work, she enjoys travel, spending time with family, wordsearches, and sudoku.

Zach Miller

Zach Miller

Zach is a Senior Security Specialist Solutions Architect at AWS. His background is in data protection and security architecture, focused on a variety of security domains, including cryptography, secrets management, and data classification. Today, he is focused on helping enterprise AWS customers adopt and operationalize AWS security services to increase security effectiveness and reduce risk.

Fatima Ahmed

Fatima is a Global Security Solutions Architect at AWS. She is passionate about cybersecurity and helping customers build secure solutions in the AWS Cloud. When she is not working, she enjoys time with her cat or solving cryptic puzzles.

Fall 2021 PCI DSS report now available with 7 services added to compliance scope

Post Syndicated from Michael Oyeniya original https://aws.amazon.com/blogs/security/fall-2021-pci-dss-report-now-available-with-7-services-added-to-compliance-scope/

We’re continuing to expand the scope of our assurance programs at Amazon Web Services (AWS) and are pleased to announce that seven new services have been added to the scope of our Payment Card Industry Data Security Standard (PCI DSS) certification. These new services provide our customers with more options to process and store their payment card data and to architect their cardholder data environment (CDE) securely in AWS.

You can see the full list of services on our Services in Scope by Compliance program page. The seven new services are:

The Asia-Pacific (Jakarta) Region was newly added to scope, and assessed as PCI compliant as part of the Fall 2021 PCI assessment.

We were evaluated by Coalfire, a third-party Qualified Security Assessor (QSA). The Attestation of Compliance (AOC) that shows AWS PCI compliance status is available through AWS Artifact.

We value your feedback and questions—feel free to reach out to our team or give feedback about this post through our Contact Us page.

If you have feedback about this post, submit comments in the Comments section below.

Want more AWS Security news? Follow us on Twitter.

Author

Michael Oyeniya

Michael is a Compliance Program Manager at AWS on the Global Audits team, managing the PCI compliance program. He holds a Master’s degree in management and has over 18 years of experience in information technology security risk and control.

2021 AWS security-focused workshops

Post Syndicated from Temi Adebambo original https://aws.amazon.com/blogs/security/2021-aws-security-focused-workshops/

Every year, Amazon Web Services (AWS) looks to help our customers gain more experience and knowledge of our services through hands-on workshops. In 2021, we unfortunately couldn’t connect with you in person as much as we would have liked, so we wanted to create and share new ways to learn and build on AWS. We built and published several security-focused workshops that help you learn how to use or configure new services and features securely. Workshops are hands-on learning modules designed to teach or introduce practical skills, techniques, or concepts you can use to solve business problems.

In this blog post, we highlight the newest AWS security-focused workshops below. There are also several other workshops that were developed before 2021; you can find them on AWS Workshops, AWS Security Workshops, and AWS Samples. Here’s the list:

Data Protection and Privacy

Workshop Title

Abstract

Data discovery and classification with Amazon Macie

In this workshop, get familiar with Amazon Macie and learn to scan and classify data in your Amazon Simple Storage Service (Amazon S3) buckets. Work with Macie (data classification) and AWS Security Hub (centralized security view) to see how data in your environment is stored, and to understand any changes in S3 bucket policies that may affect your security posture. Learn to create a custom data identifier and to create and scope data discovery and classification jobs in Macie. Finally, use Macie to filter and investigate the results from the scans you create.

Scaling your encryption at rest capabilities with AWS KMS

AWS makes it easy to protect your data with encryption. This hands-on workshop provides an opportunity to dive deep into encryption at rest options with AWS. Learn AWS server-side encryption with AWS Key Management Service (AWS KMS) for services such as Amazon S3, Amazon Elastic Block Store (Amazon EBS), and Amazon Relational Database Service (Amazon RDS). Also, learn best practices for using AWS KMS across multiple accounts and Regions and how to scale while optimizing for performance.

Store, retrieve, and manage sensitive credentials in AWS Secrets Manager

In this workshop, learn how to integrate AWS Secrets Manager in your development platform, backed by serverless applications. Work through a sample application, and use Secrets Manager to retrieve credentials as well as work with attribute-based access control using tags. Also, learn how to monitor the compliance of secrets and implement incident response workflows that will rotate the secret, restore the resource policy, alert the SOC, and deny access to the offender.

Building and operating a Private Certificate Authority on AWS

This workshop covers private certificate management on AWS, employing the concepts of least privilege, separation of duties, monitoring, and automation. Participants learn operational aspects of creating a complete certificate authority (CA) hierarchy, building a simple web application, and issuing private certificates. It also covers how job functions—including CA administrators, application developers, and security administrators—can follow the principle of least privilege to perform various functions associated with certificate management. Finally, learn about IoT certificates, code-signing, and certificate templates to enable all your use cases.

Amazon S3 security and access settings and controls

Amazon S3 provides many security and access settings to help you secure your data, controls that ensure that those settings remain in place, and features to help you audit those settings and controls. This workshop walks you through these Amazon S3 capabilities and scenarios, to help you apply them for different security requirements.

Redact data as needed using Amazon S3 Object Lambda

Amazon S3 Object Lambda works with your existing applications, and allows you to add your own code using AWS Lambda functions to automatically process and transform data from Amazon S3 before returning it to an application. This enables different views of the same object depending on user identity, such as restricting access to confidential information, or disallowing access to personally identifiable information (PII) data. In this workshop, learn how to use Amazon S3 Object Lambda to modify objects during GET requests, so you no longer need to store multiple views of the same document.

Using AWS Nitro Enclaves to process highly sensitive data

In this hands-on workshop, learn how to use AWS Nitro Enclaves to isolate highly-sensitive data from your users, applications, and third-party libraries on your Amazon Elastic Compute Cloud (Amazon EC2) instances. Explore AWS Nitro Enclaves, discuss common use cases, and build and run your own enclave. During this workshop, learn about enclave isolation, cryptographic attestation, enclave image files, local Vsock communication channels, common debugging scenarios, and the enclave lifecycle.

Ransomware prevention strategies in Amazon S3

Learn how to use the protective, detective and monitoring controls in AWS to protect your data in S3 from ransomware threats. Set up Amazon GuardDuty for S3 and AWS Identity and Access Management (IAM) Access Analyzer, and learn to read and respond to findings and create IAM invariants. Create a tiered storage approach to backup and recovery, and learn to use Amazon S3 Object Lock, versioning, and replication to provide immutable storage and protect against accidental or malicious deletion.

Governance, Risk, and Compliance

Operating securely in a multi-account environment

Operating multiple AWS accounts under an organization is how many users consume AWS Cloud services. In this workshop, learn how to build foundational security monitoring in multi-account environments. Walk through an initial setup of AWS Security Hub for centralized aggregation of findings across your AWS Organizations organization. Additionally, learn how to centralize Amazon GuardDuty findings, Amazon Detective functions, AWS Identity and Access Management (IAM) Access Analyzer findings (if available), AWS Config rule evaluations, and AWS CloudTrail logs into the central security monitoring account (security tools account). Finally, implement a service control policy (SCP) that denies the ability to disable these security controls.

Building remediation workflows to simplify compliance

Automation and simplification are key to managing compliance at scale. Remediation is one of the essential elements of simplifying and managing risk. In this workshop, see how to build a remediation workflow using AWS Config and AWS Systems Manager automation. Learn how this workflow can be deployed at scale and monitored with AWS Security Hub to oversee the entire organization and how to use AWS Audit Manager to easily access evidence of risk management.

Identity and Access Management

Integrating IAM Access Analyzer into a CI/CD pipeline

Want to analyze Identity and Access Management (IAM) policies at scale? Want to help your developers write secure IAM policies? This workshop provides you the hands-on opportunity to run IAM Access Analyzer policy validation on your AWS CloudFormation templates in a continuous integration/continuous deployment (CI/CD) pipeline.

Data perimeter workshop

In this workshop, learn how to create a data perimeter by building controls that allow access to data only from expected network locations and by trusted identities. The workshop consists of five modules, each designed to illustrate a different Identity and Access Management (IAM) or network control. Learn where and how to implement the appropriate controls based on different risk scenarios. Discover how to implement these controls as service control policies, identity- and resource-based policies, and Amazon Virtual Private Cloud (Amazon VPC) endpoint policies.

Network and Infrastructure Security

Build a Zero Trust architecture for service-to-service workloads on AWS

In this workshop, get hands-on experience implementing a Zero Trust architecture for service-to-service workloads on AWS. Learn how to use services such as Amazon API Gateway and Virtual Private Cloud (Amazon VPC) endpoints to integrate network and identity controls while using Amazon GuardDuty, Lambda, and Amazon DynamoDB to take advantage of native service controls. Learn how these services allow you to authorize specific flows between components to reduce lateral network mobility risk and improve the overall security posture of your workload.

Securing deployment of third-party ML models

Enterprise users adopting machine learning (ML) on AWS often look for prescriptive guidance on implementing security best practices, establishing governance, securing their ML models, and meeting compliance standards. Building a repeatable solution provides users with standardization and governance over what gets provisioned in their AWS account. In this workshop, learn steps you can take to secure third-party ML model deployments. We provide cloud infrastructure-as-code templates to automate the setup of a hardened Amazon SageMaker environment. These templates include private networking, VPC endpoints, end-to-end encryption, logging and monitoring, and enhanced governance and access controls through AWS Service Catalog.

Building Prowler into a QuickSight-powered AWS security dashboard

In this workshop, get hands-on experience with Prowler, AWS Security Hub, and Amazon QuickSight by building a custom security dashboard for the AWS environment. Using a multi-account deployment of Prowler integrated into Security Hub, learn to identify and analyze Prowler findings and integrate QuickSight to visualize the information. Discover how to get the most from QuickSight and Prowler with automatically created datasets.

Threat Detection and Incident Response

Integration, prioritization, and response with AWS Security Hub

This workshop is designed to get you familiar with AWS Security Hub, so you can better understand how to use it in your own AWS environment. This workshop has two sections. The first section demonstrates the features and functions of AWS Security Hub. The second section shows you how to use AWS Security Hub to import findings from different data sources, analyze findings so you can prioritize response work, and implement responses to findings to help improve your security posture.

Building an AWS incident response plan using Jupyter notebooks

This workshop guides you through building an incident response plan for your AWS environment using Jupyter notebooks. Walk through an easy-to-follow sample incident, using building blocks as a ready-to-use playbook in a Jupyter notebook. Then, follow simple steps to add additional programmatic and documented steps to your incident response plan.

Scaling threat detection and response on AWS

In this hands-on workshop, learn about several AWS services involved in threat detection and response as you walk through real-world threat scenarios. Learn about the threat detection capabilities of Amazon GuardDuty, Amazon Macie, and AWS Security Hub and the available response options. For each hands-on scenario, review methods to detect and respond to threats using the following services: AWS CloudTrail, Virtual Private Cloud (Amazon VPC) Flow Logs, Amazon CloudWatch Events, AWS Lambda, Amazon Inspector, Amazon GuardDuty, and AWS Security Hub.

Building incident response playbooks for AWS

In this workshop, learn how to develop incident response playbooks. Explore the incident response lifecycle, including preparation, detection and analysis, containment, eradication and recovery, and post-incident activity. To get the most out of this workshop, you should have advanced experience with AWS services and responsibilities aligned with incident response frameworks such as NIST SP 800-61 R2.

This list is representative of the security workshops created in 2021 to help customers on their journey in AWS. If you’d like to find more workshops, please go to AWS Workshops and select Security in the top navigation bar, or you can also check out AWS Security Workshops for a subset of workshops curated by AWS Security Specialists. We hope you enjoy these workshops!

 
If you have feedback about this post, submit comments in the Comments section below.

Want more AWS Security news? Follow us on Twitter.

Author

Temi Adebambo

Temi leads the Security and Network Solutions Architecture team at AWS. His team is focused on working with customers on cloud migration and modernization, cybersecurity strategy, architecture best practices, and innovation in the cloud. Before AWS, he spent over 14 years as a consultant, advising CISOs and security leaders.

New IRAP full assessment report is now available on AWS Artifact for Australian customers

Post Syndicated from Clara Lim original https://aws.amazon.com/blogs/security/new-irap-full-assessment-report-is-now-available-on-aws-artifact-for-australian-customers/

We are excited to announce that a new Information Security Registered Assessors Program (IRAP) report is now available on AWS Artifact, after a successful full assessment completed in December 2021 by an independent ASD (Australian Signals Directorate) certified IRAP assessor.

The new IRAP report includes reassessment of the existing 111 services which are already in scope for IRAP, as well as the 14 additional services listed below, and the new Melbourne region. For the full list of in-scope services, see the AWS Services in Scope page on the IRAP tab. All services in scope are available in the Asia Pacific (Sydney) Region.

The IRAP assessment report is developed in accordance with the Australian Cyber Security Centre (ACSC) Cloud Security Guidance and their Anatomy of a Cloud Assessment and Authorisation framework, which addresses guidance within the Australian Government Information Security Manual (ISM), the Attorney-General’s Department Protective Security Policy Framework (PSPF), and the Digital Transformation Agency (DTA) Secure Cloud Strategy.

We have created the IRAP documentation pack on AWS Artifact, which includes the AWS Consumer Guide and the whitepaper Reference Architectures for ISM PROTECTED Workloads in the AWS Cloud, which was created to help Australian government agencies and their partners plan, architect, and risk assess workloads based on AWS Cloud services.

Please reach out to your AWS representatives to let us know which additional services you would like to see in scope for coming IRAP assessments. We strive to bring more services into the scope of the IRAP PROTECTED level, based on your requirements.

 
If you have feedback about this post, submit comments in the Comments section below.

Want more AWS Security how-to content, news, and feature announcements? Follow us on Twitter.

Author

Clara Lim

Clara is the APJ-Lead Strategist supporting the compliance programs for the Asia Pacific Region, leading multiple security certification programs. Clara is passionate about leveraging her decade-long experience to deliver compliance programs that provide assurance and build trust with customers.

Comprehensive Cyber Security Framework for Primary (Urban) Cooperative Banks (UCBs)

Post Syndicated from Vikas Purohit original https://aws.amazon.com/blogs/security/comprehensive-cyber-security-framework-for-primary-urban-cooperative-banks/

We are pleased to announce a new Amazon Web Services (AWS) workbook designed to help India Primary (UCBs) customers align with the Reserve Bank of India (RBI) guidance in Comprehensive Cyber Security Framework for Primary (Urban) Cooperative Banks (UCBs) – A Graded Approach.

In addition to RBI’s basic cyber security framework for Primary (Urban) Cooperative Banks (UCBs), RBI issued guidance on its comprehensive cyber security framework, which sets the expectations for the Indian Primary UCBs regarding their cyber security frameworks. This guidance divides the framework into four levels, starting with a common level that applies to all UCBs; the remaining levels apply to specific UCBs based upon their digital depth, and interconnectedness to the payment systems landscape based on RBI-defined criteria. The guidance aims to increase the awareness among the Primary UCBs in India of the controls they should look for as they progress on their digital journey.

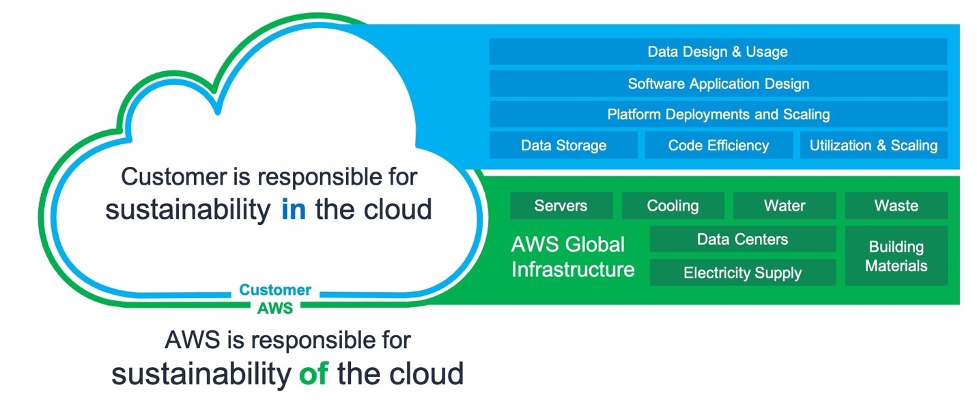
Security and compliance is a shared responsibility between AWS and the customer. This differentiation of responsibility is commonly referred to as the AWS Shared Responsibility Model, in which AWS is responsible for security of the cloud, and the customer is responsible for their security in the cloud.

The new AWS Comprehensive Cyber Security Framework for Primary (Urban) Cooperative Banks (UCBs) – A Graded Approach workbook helps customers align with the RBI cyber security framework by providing control mappings for the following:

The downloadable AWS RBI Comprehensive Cyber Security Framework for Primary UCBs workbook is available in AWS Artifact, a self-service portal for on-demand access to AWS Compliance Reports, and it contains two embedded formats:

  • Microsoft Excel: Coverage includes AWS responsibility control statements and Well-Architected Framework best practices
  • Dynamic HTML: Coverage is the same as in the Microsoft Excel format, with the added feature that the Well Architected Framework best practices are mapped to AWS Config managed rules and Amazon GuardDuty findings, where available or applicable.

The AWS RBI Comprehensive Cyber Security Framework for Primary UCBs and AWS RBI Basic Cyber Security Framework for Primary UCBs Workbook are available for download in AWS Artifact. Sign into AWS Artifact via the AWS Management Console, or learn more at Getting Started with AWS Artifact.

If you have feedback about this post, submit comments in the Comments section below.

Want more AWS Security news? Follow us on Twitter.

Vikas Purohit

Vikas Purohit

Vikas works as a Partner Solution Architect with AISPL, India. He helps about helping customers and partners in their cloud journeys. He is particularly passionate in Cloud Security, hybrid networking and migrations.

AWS publishes PiTuKri ISAE3000 Type II Attestation Report for Finnish customers

Post Syndicated from Niyaz Noor original https://aws.amazon.com/blogs/security/aws-publishes-pitukri-isae3000-type-ii-attestation-report-for-finnish-customers/

Gaining and maintaining customer trust is an ongoing commitment at Amazon Web Services (AWS). Our customers’ industry security requirements drive the scope and portfolio of compliance reports, attestations, and certifications we pursue. AWS is pleased to announce the issuance of the Criteria to Assess the Information Security of Cloud Services (PiTuKri) ISAE 3000 Type 2 attestation report. The scope of this report includes 141 AWS services and associated AWS global infrastructure, such as Regions and Edge Locations supporting these services.

Criteria for Assessing the Information Security of Cloud Services (PiTuKri) is a guidance document published by the Finnish Transport and Communications Agency (Traficom) Cyber Security Centre for assessing the security of cloud computing services, such as AWS. The PiTuKri criteria covers a total of 11 subdivisions such as security management, personnel security and physical security which cloud service providers are expected to implement. AWS has engaged with an independent third-party audit firm to examine whether the AWS control environment is appropriately designed and implemented to align with PiTuKri requirements. Additionally, the report provides customers with important guidance on complementary user entity controls (CUECs), which customers should consider implementing as part of the shared responsibility model to help them comply with PiTuKri requirements. The report covers the period from October 1, 2020 to September 30, 2021. A full list of certified services and Regions is presented within the published PiTuKri ISAE3000 report.

The alignment of AWS with PiTuKri requirements demonstrates our continuous commitment to meeting the heightened expectations for cloud service providers set by Traficom. Customers can use the AWS’ PiTuKri ISAE 3000 report as a tool to conduct their due diligence on AWS, which may minimize the effort and costs required for compliance. The report is now available free of charge to AWS customers from AWS Artifact. More information on how to download the report is available here.

As always, AWS is committed to bringing new services into the scope of our PiTuKri program in the future, based on customers’ architectural and regulatory needs. Please reach out to your AWS account team if you have questions about the PiTuKri report. You can also download this blog post translated into Finnish.

 
If you have feedback about this post, submit comments in the Comments section below.

Want more AWS Security news? Follow us on Twitter.

Author

Niyaz Noor

Niyaz is the Security Audit Program Manager at AWS. Niyaz leads multiple security certification programs across Europe and other regions. During his professional career, he has helped multiple cloud service providers in obtaining global and regional security certification. He is passionate about delivering programs that build customers’ trust and provide them assurance on cloud security.

Using AWS security services to protect against, detect, and respond to the Log4j vulnerability

Post Syndicated from Marshall Jones original https://aws.amazon.com/blogs/security/using-aws-security-services-to-protect-against-detect-and-respond-to-the-log4j-vulnerability/

January 7, 2022: The blog post has been updated to include using Network ACL rules to block potential log4j-related outbound traffic.

January 4, 2022: The blog post has been updated to suggest using WAF rules when correct HTTP Host Header FQDN value is not provided in the request.

December 31, 2021: We made a minor update to the second paragraph in the Amazon Route 53 Resolver DNS Firewall section.

December 29, 2021: A paragraph under the Detect section has been added to provide guidance on validating if log4j exists in an environment.

December 23, 2021: The GuardDuty section has been updated to describe new threat labels added to specific finding to give log4j context.

December 21, 2021: The post includes more info about Route 53 Resolver DNS query logging.

December 20, 2021: The post has been updated to include Amazon Route 53 Resolver DNS Firewall info.

December 17, 2021: The post has been updated to include using Athena to query VPC flow logs.

December 16, 2021: The Respond section of the post has been updated to include IMDSv2 and container mitigation info.

This blog post was first published on December 15, 2021.


Overview

In this post we will provide guidance to help customers who are responding to the recently disclosed log4j vulnerability. This covers what you can do to limit the risk of the vulnerability, how you can try to identify if you are susceptible to the issue, and then what you can do to update your infrastructure with the appropriate patches.

The log4j vulnerability (CVE-2021-44228, CVE-2021-45046) is a critical vulnerability (CVSS 3.1 base score of 10.0) in the ubiquitous logging platform Apache Log4j. This vulnerability allows an attacker to perform a remote code execution on the vulnerable platform. Version 2 of log4j, between versions 2.0-beta-9 and 2.15.0, is affected.

The vulnerability uses the Java Naming and Directory Interface (JNDI) which is used by a Java program to find data, typically through a directory, commonly a LDAP directory in the case of this vulnerability.

Figure 1, below, highlights the log4j JNDI attack flow.

Figure 1. Log4j attack progression

Figure 1. Log4j attack progression. Source: GovCERT.ch, the Computer Emergency Response Team (GovCERT) of the Swiss government

As an immediate response, follow this blog and use the tool designed to hotpatch a running JVM using any log4j 2.0+. Steve Schmidt, Chief Information Security Officer for AWS, also discussed this hotpatch.

Protect

You can use multiple AWS services to help limit your risk/exposure from the log4j vulnerability. You can build a layered control approach, and/or pick and choose the controls identified below to help limit your exposure.

AWS WAF

Use AWS Web Application Firewall, following AWS Managed Rules for AWS WAF, to help protect your Amazon CloudFront distribution, Amazon API Gateway REST API, Application Load Balancer, or AWS AppSync GraphQL API resources.

  • AWSManagedRulesKnownBadInputsRuleSet esp. the Log4JRCE rule which helps inspects the request for the presence of the Log4j vulnerability. Example patterns include ${jndi:ldap://example.com/}.
  • AWSManagedRulesAnonymousIpList esp. the AnonymousIPList rule which helps inspect IP addresses of sources known to anonymize client information.
  • AWSManagedRulesCommonRuleSet, esp. the SizeRestrictions_BODY rule to verify that the request body size is at most 8 KB (8,192 bytes).

You should also consider implementing WAF rules that deny access, if the correct HTTP Host Header FQDN value is not provided in the request. This can help reduce the likelihood of scanners that are scanning the internet IP address space from reaching your resources protected by WAF via a request with an incorrect Host Header, like an IP address instead of an FQDN. It’s also possible to use custom Application Load Balancer listener rules to achieve this.

If you’re using AWS WAF Classic, you will need to migrate to AWS WAF or create custom regex match conditions.

Have multiple accounts? Follow these instructions to use AWS Firewall Manager to deploy AWS WAF rules centrally across your AWS organization.

Amazon Route 53 Resolver DNS Firewall

You can use Route 53 Resolver DNS Firewall, following AWS Managed Domain Lists, to help proactively protect resources with outbound public DNS resolution. We recommend associating Route 53 Resolver DNS Firewall with a rule configured to block domains on the AWSManagedDomainsMalwareDomainList, which has been updated in all supported AWS regions with domains identified as hosting malware used in conjunction with the log4j vulnerability. AWS will continue to deliver domain updates for Route 53 Resolver DNS Firewall through this list.

Also, you should consider blocking outbound port 53 to prevent the use of external untrusted DNS servers. This helps force all DNS queries through DNS Firewall and ensures DNS traffic is visible for GuardDuty inspection. Using DNS Firewall to block DNS resolution of certain country code top-level domains (ccTLD) that your VPC resources have no legitimate reason to connect out to, may also help. Examples of ccTLDs you may want to block may be included in the known log4j callback domains IOCs.

We also recommend that you enable DNS query logging, which allows you to identify and audit potentially impacted resources within your VPC, by inspecting the DNS logs for the presence of blocked outbound queries due to the log4j vulnerability, or to other known malicious destinations. DNS query logging is also useful in helping identify EC2 instances vulnerable to log4j that are responding to active log4j scans, which may be originating from malicious actors or from legitimate security researchers. In either case, instances responding to these scans potentially have the log4j vulnerability and should be addressed. GreyNoise is monitoring for log4j scans and sharing the callback domains here. Some notable domains customers may want to examine log activity for, but not necessarily block, are: *interact.sh, *leakix.net, *canarytokens.com, *dnslog.cn, *.dnsbin.net, and *cyberwar.nl. It is very likely that instances resolving these domains are vulnerable to log4j.

AWS Network Firewall

Customers can use Suricata-compatible IDS/IPS rules in AWS Network Firewall to deploy network-based detection and protection. While Suricata doesn’t have a protocol detector for LDAP, it is possible to detect these LDAP calls with Suricata. Open-source Suricata rules addressing Log4j are available from corelight, NCC Group, from ET Labs, and from CrowdStrike. These rules can help identify scanning, as well as post exploitation of the log4j vulnerability. Because there is a large amount of benign scanning happening now, we recommend customers focus their time first on potential post-exploitation activities, such as outbound LDAP traffic from their VPC to untrusted internet destinations.

We also recommend customers consider implementing outbound port/protocol enforcement rules that monitor or prevent instances of protocols like LDAP from using non-standard LDAP ports such as 53, 80, 123, and 443. Monitoring or preventing usage of port 1389 outbound may be particularly helpful in identifying systems that have been triggered by internet scanners to make command and control calls outbound. We also recommend that systems without a legitimate business need to initiate network calls out to the internet not be given that ability by default. Outbound network traffic filtering and monitoring is not only very helpful with log4j, but with identifying other classes of vulnerabilities too.

Network Access Control Lists

Customers may be able to use Network Access Control List rules (NACLs) to block some of the known log4j-related outbound ports to help limit further compromise of successfully exploited systems. We recommend customers consider blocking ports 1389, 1388, 1234, 12344, 9999, 8085, 1343 outbound. As NACLs block traffic at the subnet level, careful consideration should be given to ensure any new rules do not block legitimate communications using these outbound ports across internal subnets. Blocking ports 389 and 88 outbound can also be helpful in mitigating log4j, but those ports are commonly used for legitimate applications, especially in a Windows Active Directory environment. See the VPC flow logs section below to get details on how you can validate any ports being considered.

Use IMDSv2

Through the early days of the log4j vulnerability researchers have noted that, once a host has been compromised with the initial JDNI vulnerability, attackers sometimes try to harvest credentials from the host and send those out via some mechanism such as LDAP, HTTP, or DNS lookups. We recommend customers use IAM roles instead of long-term access keys, and not store sensitive information such as credentials in environment variables. Customers can also leverage AWS Secrets Manager to store and automatically rotate database credentials instead of storing long-term database credentials in a host’s environment variables. See prescriptive guidance here and here on how to implement Secrets Manager in your environment.

To help guard against such attacks in AWS when EC2 Roles may be in use — and to help keep all IMDS data private for that matter — customers should consider requiring the use of Instance MetaData Service version 2 (IMDSv2). Since IMDSv2 is enabled by default, you can require its use by disabling IMDSv1 (which is also enabled by default). With IMDSv2, requests are protected by an initial interaction in which the calling process must first obtain a session token with an HTTP PUT, and subsequent requests must contain the token in an HTTP header. This makes it much more difficult for attackers to harvest credentials or any other data from the IMDS. For more information about using IMDSv2, please refer to this blog and documentation. While all recent AWS SDKs and tools support IMDSv2, as with any potentially non-backwards compatible change, test this change on representative systems before deploying it broadly.

Detect

This post has covered how to potentially limit the ability to exploit this vulnerability. Next, we’ll shift our focus to which AWS services can help to detect whether this vulnerability exists in your environment.

Figure 2. Log4j finding in the Inspector console

Figure 2. Log4j finding in the Inspector console

Amazon Inspector

As shown in Figure 2, the Amazon Inspector team has created coverage for identifying the existence of this vulnerability in your Amazon EC2 instances and Amazon Elastic Container Registry Images (Amazon ECR). With the new Amazon Inspector, scanning is automated and continual. Continual scanning is driven by events such as new software packages, new instances, and new common vulnerability and exposure (CVEs) being published.

For example, once the Inspector team added support for the log4j vulnerability (CVE-2021-44228 & CVE-2021-45046), Inspector immediately began looking for this vulnerability for all supported AWS Systems Manager managed instances where Log4j was installed via OS package managers and where this package was present in Maven-compatible Amazon ECR container images. If this vulnerability is present, findings will begin appearing without any manual action. If you are using Inspector Classic, you will need to ensure you are running an assessment against all of your Amazon EC2 instances. You can follow this documentation to ensure you are creating an assessment target for all of your Amazon EC2 instances. Here are further details on container scanning updates in Amazon ECR private registries.

GuardDuty

In addition to finding the presence of this vulnerability through Inspector, the Amazon GuardDuty team has also begun adding indicators of compromise associated with exploiting the Log4j vulnerability, and will continue to do so. GuardDuty will monitor for attempts to reach known-bad IP addresses or DNS entries, and can also find post-exploit activity through anomaly-based behavioral findings. For example, if an Amazon EC2 instance starts communicating on unusual ports, GuardDuty would detect this activity and create the finding Behavior:EC2/NetworkPortUnusual. This activity is not limited to the NetworkPortUnusual finding, though. GuardDuty has a number of different findings associated with post exploit activity, such as credential compromise, that might be seen in response to a compromised AWS resource. For a list of GuardDuty findings, please refer to this GuardDuty documentation.

To further help you identify and prioritize issues related to CVE-2021-44228 and CVE-2021-45046, the GuardDuty team has added threat labels to the finding detail for the following finding types:

Backdoor:EC2/C&CActivity.B
If the IP queried is Log4j-related, then fields of the associated finding will include the following values:

  • service.additionalInfo.threatListName = Amazon
  • service.additionalInfo.threatName = Log4j Related

Backdoor:EC2/C&CActivity.B!DNS
If the domain name queried is Log4j-related, then the fields of the associated finding will include the following values:

  • service.additionalInfo.threatListName = Amazon
  • service.additionalInfo.threatName = Log4j Related

Behavior:EC2/NetworkPortUnusual
If the EC2 instance communicated on port 389 or port 1389, then the associated finding severity will be modified to High, and the finding fields will include the following value:

  • service.additionalInfo.context = Possible Log4j callback
Figure 3. GuardDuty finding with log4j threat labels

Figure 3. GuardDuty finding with log4j threat labels

Security Hub

Many customers today also use AWS Security Hub with Inspector and GuardDuty to aggregate alerts and enable automatic remediation and response. In the short term, we recommend that you use Security Hub to set up alerting through AWS Chatbot, Amazon Simple Notification Service, or a ticketing system for visibility when Inspector finds this vulnerability in your environment. In the long term, we recommend you use Security Hub to enable automatic remediation and response for security alerts when appropriate. Here are ideas on how to setup automatic remediation and response with Security Hub.

VPC flow logs

Customers can use Athena or CloudWatch Logs Insights queries against their VPC flow logs to help identify VPC resources associated with log4j post exploitation outbound network activity. Version 5 of VPC flow logs is particularly useful, because it includes the “flow-direction” field. We recommend customers start by paying special attention to outbound network calls using destination port 1389 since outbound usage of that port is less common in legitimate applications. Customers should also investigate outbound network calls using destination ports 1388, 1234, 12344, 9999, 8085, 1343, 389, and 88 to untrusted internet destination IP addresses. Free-tier IP reputation services, such as VirusTotal, GreyNoise, NOC.org, and ipinfo.io, can provide helpful insights related to public IP addresses found in the logged activity.

Note: If you have a Microsoft Active Directory environment in the captured VPC flow logs being queried, you might see false positives due to its use of port 389.

Validation with open-source tools

With the evolving nature of the different log4j vulnerabilities, it’s important to validate that upgrades, patches, and mitigations in your environment are indeed working to mitigate potential exploitation of the log4j vulnerability. You can use open-source tools, such as aws_public_ips, to get a list of all your current public IP addresses for an AWS Account, and then actively scan those IPs with log4j-scan using a DNS Canary Token to get notification of which systems still have the log4j vulnerability and can be exploited. We recommend that you run this scan periodically over the next few weeks to validate that any mitigations are still in place, and no new systems are vulnerable to the log4j issue.

Respond

The first two sections have discussed ways to help prevent potential exploitation attempts, and how to detect the presence of the vulnerability and potential exploitation attempts. In this section, we will focus on steps that you can take to mitigate this vulnerability. As we noted in the overview, the immediate response recommended is to follow this blog and use the tool designed to hotpatch a running JVM using any log4j 2.0+. Steve Schmidt, Chief Information Security Officer for AWS, also discussed this hotpatch.

Figure 4. Systems Manager Patch Manager patch baseline approving critical patches immediately

Figure 4. Systems Manager Patch Manager patch baseline approving critical patches immediately

AWS Patch Manager

If you use AWS Systems Manager Patch Manager, and you have critical patches set to install immediately in your patch baseline, your EC2 instances will already have the patch. It is important to note that you’re not done at this point. Next, you will need to update the class path wherever the library is used in your application code, to ensure you are using the most up-to-date version. You can use AWS Patch Manager to patch managed nodes in a hybrid environment. See here for further implementation details.

Container mitigation

To install the hotpatch noted in the overview onto EKS cluster worker nodes AWS has developed an RPM that performs a JVM-level hotpatch which disables JNDI lookups from the log4j2 library. The Apache Log4j2 node agent is an open-source project built by the Kubernetes team at AWS. To learn more about how to install this node agent, please visit the this Github page.

Once identified, ECR container images will need to be updated to use the patched log4j version. Downstream, you will need to ensure that any containers built with a vulnerable ECR container image are updated to use the new image as soon as possible. This can vary depending on the service you are using to deploy these images. For example, if you are using Amazon Elastic Container Service (Amazon ECS), you might want to update the service to force a new deployment, which will pull down the image using the new log4j version. Check the documentation that supports the method you use to deploy containers.

If you’re running Java-based applications on Windows containers, follow Microsoft’s guidance here.

We recommend you vend new application credentials and revoke existing credentials immediately after patching.

Mitigation strategies if you can’t upgrade

In case you either can’t upgrade to a patched version, which disables access to JDNI by default, or if you are still determining your strategy for how you are going to patch your environment, you can mitigate this vulnerability by changing your log4j configuration. To implement this mitigation in releases >=2.10, you will need to remove the JndiLookup class from the classpath: zip -q -d log4j-core-*.jar org/apache/logging/log4j/core/lookup/JndiLookup.class.

For a more comprehensive list about mitigation steps for specific versions, refer to the Apache website.

Conclusion

In this blog post, we outlined key AWS security services that enable you to adopt a layered approach to help protect against, detect, and respond to your risk from the log4j vulnerability. We urge you to continue to monitor our security bulletins; we will continue updating our bulletins with our remediation efforts for our side of the shared-responsibility model.

Given the criticality of this vulnerability, we urge you to pay close attention to the vulnerability, and appropriately prioritize implementing the controls highlighted in this blog.

If you have feedback about this post, submit comments in the Comments section below.

Want more AWS Security news? Follow us on Twitter.

Marshall Jones

Marshall is a Worldwide Security Specialist Solutions Architect at AWS. His background is in AWS consulting and security architecture, focused on a variety of security domains including edge, threat detection, and compliance. Today, he is focused on helping enterprise AWS customers adopt and operationalize AWS security services to increase security effectiveness and reduce risk.

Syed Shareef

Syed is a Senior Security Solutions Architect at AWS. He works with large financial institutions to help them achieve their business goals with AWS, whilst being compliant with regulatory and security requirements.

Architecture Monthly Magazine: Agriculture

Post Syndicated from Bonnie McClure original https://aws.amazon.com/blogs/architecture/architecture-monthly-magazine-agriculture/

Amazon Web Services (AWS) helps agriculture customers forecast supply and demand and create and maintain responsive, resilient food systems. This edition of Architecture Monthly focuses on the agriculture industry and their role in providing products to the world that are nutritious, healthy, accessible, affordable, and sustainable.

We’d like to thank our expert, Karen Hildebrand, Worldwide Tech Lead for Agriculture at AWS, for her contributions to the Ask an Expert column.

Please give us your feedback! Include your comments on the Amazon Kindle page. You can view past issues and reach out to [email protected] any time with your questions and comments.

In this month’s issue:

  • Ask an Expert: Karen Hildebrand, PhD, Worldwide Tech Lead for Agriculture at AWS
  • Case Study: AGCO Lowers Costs, Boosts Speed, and Increases Retention Using Amazon Kinesis Services
  • Quick Start: Machine to Cloud Connectivity Framework
  • Blog: Building a Controlled Environment Agriculture Platform
  • Case Study: ProRefrigeration Extends Their AWS IoT Capabilities to the Edge with CEI America
  • Quick Start: Genomics Tertiary Analysis and Machine Learning Using Amazon SageMaker
  • Solution: Improving Forecast Accuracy with Machine Learning
  • Blog: Building Machine Learning at the Edge Applications using Amazon SageMaker Edge Manager and IoT Greengrass v2
  • Blog: Processing satellite imagery with serverless architecture
  • Videos:
    • The Future of Fresh Fruit Harvest: A Talk with FFRobotics
    • Seeing is Believing – the Rise of Data & Analytics in Agriculture
    • The Season for Vintner Innovation: Viticulture & More with E.J. Gallo Winery
    • Farming Innovation in Ireland: A Talk with Herdwatch
    • Voice Activated Agriculture
    • Amazon Prime – Clarkson’s Farm Season 1

How to access the magazine

We hope you’re enjoying Architecture Monthly, and we’d like to hear from you—leave us a star rating and comment on the Kindle Newsstand page or contact us anytime at [email protected].

This month, we’re also asking you to take a 10-question survey about your experiences with this magazine. Please take a few moments to give us your opinions.

Open source hotpatch for Apache Log4j vulnerability

Post Syndicated from Steve Schmidt original https://aws.amazon.com/blogs/security/open-source-hotpatch-for-apache-log4j-vulnerability/

At Amazon Web Services (AWS), security remains our top priority. As we addressed the Apache Log4j vulnerability this weekend, I’m pleased to note that our team created and released a hotpatch as an interim mitigation step. This tool may help you mitigate the risk when updating is not immediately possible.

It’s important that you review, patch, or mitigate this vulnerability as soon as possible. We still recommend that you update Log4j to version 2.15 as a mitigation, but we know that can take some time, depending on your resources. To take immediate action, we recommend that you implement this newly created tool to hotpatch your Log4j deployments. A huge thanks to the Amazon Corretto team for spending days, nights, and the weekend to write, harden, and ship this code. This tool is available now at GitHub.

Caveats

As with all open source software, you’re using this at your own risk. Note that the hotpatch has been tested with JDK8 and JDK11 on Linux. On JDK17, only the static agent mode works. A full list of caveats can be found in the README.

Want more AWS Security how-to content, news, and feature announcements? Follow us on Twitter.

Steve Schmidt

Steve is Vice President and Chief Information Security Officer for AWS. His duties include leading product design, management, and engineering development efforts focused on bringing the competitive, economic, and security benefits of cloud computing to business and government customers. Prior to AWS, he had an extensive career at the Federal Bureau of Investigation, where he served as a senior executive and section chief. He currently holds 11 patents in the field of cloud security architecture. Follow Steve on Twitter.

How to customize behavior of AWS Managed Rules for AWS WAF

Post Syndicated from Madhu Kondur original https://aws.amazon.com/blogs/security/how-to-customize-behavior-of-aws-managed-rules-for-aws-waf/

AWS Managed Rules for AWS WAF provides a group of rules created by AWS that can be used help protect you against common application vulnerabilities and other unwanted access to your systems without having to write your own rules. AWS Threat Research Team updates AWS Managed Rules to respond to an ever-changing threat landscape in order to protect your applications.

Recently, AWS WAF launched four new features that are centered on rule customization:

  • Labels – Metadata that can be added to web requests when a rule is matched. Labels can be used to alter the behavior or default action of managed rules.
  • Version management – You can select a specific version of a managed rule group. Versioning can be used to return to previously tested versions.
  • Scope-down statements – Use to narrow the scope of the requests that a rule group evaluates.
  • Custom responses – Send a custom HTTP response back to the client from AWS WAF when a rule blocks a connection request.

In this blog, we go through four use cases to demonstrate how you can use these features to improve your security posture by customizing managed rules.

Case 1: Control automatic updates for a managed rule group by selecting a specific version

By default, managed rule groups are updated automatically as updates become available. This ensures you have the latest protection as soon as it’s available. With the version management feature, you can choose to stay on a specific version, meaning that it won’t update until you explicitly move to a newer version. This allows you to test a new version and promote it to your web ACL when you’re ready, and to return to a previously tested version if necessary.

Note: It’s recommended that you use a version as close as possible to the latest.

To select a managed rule group version

  1. In your AWS WAF console, navigate to the web ACL where you’ve added a managed rule group.
  2. Select the managed rule group whose version you want to set, and choose Edit.
  3. In the Version selection drop down, select the version you want to use. You’ll remain on this version until the version expires or you select another version—you’ll learn how to manage version expiration later in this post.

Note: If you want to receive updates automatically, select Default as the version.

  1. Choose Save Rule to save the configuration.

Figure 1: Console screenshot showing the AWS Managed Rules version drop downFigure 1: Console screenshot showing the AWS Managed Rules version drop down

Set up notifications

You can use Amazon Simple Notification Service (Amazon SNS) to get notifications of updates to a managed rule group. You can subscribe to the SNS topic using the ARN of the managed rule group. Every SNS notification for AWS Managed Rules updates uses the same message format, which enables you to consume these updates programmatically. For more details on the SNS notification message format, see Getting notified of new versions and updates to a managed rule group.

To set up email notifications on new rule updates through Amazon SNS

  1. In your AWS WAF console, navigate to the web ACL where you added the managed rule group.
  2. Select the managed rule group that you want to receive notifications for, and choose Edit.
  3. On the Core rule set page, look for the Amazon SNS topic ARN. Select the link to go to the Amazon SNS console. Make a note of the topic ARN to use in step 4.

Figure 2: Console screenshot highlighting the SNS topic ARNFigure 2: Console screenshot highlighting the SNS topic ARN

  1. On the Create subscription page, enter the following information:
    Topic ARN: Enter the SNS topic ARN from step 3.
    Protocol: Select Email.
    Endpoint: Enter the email address where you want notifications sent.

Figure 3: SNS Create subscription console screenshotFigure 3: SNS Create subscription console screenshot

  1. Choose Create subscription.
  2. Watch for a confirmation email from Amazon SNS. Choose the confirm subscription link in the email to complete the subscription.

Set up a version expiration alert using a CloudWatch alarm

When you stay on a specific version of managed rule group for a long time, there is a risk that you may miss important updates. To ensure you do not stay on a stale version for long time, you should set up an alarm to alert you when a version is close to expiring. When a version expires, the managed rule group automatically switches to the default version. To be notified when a version is about to expire, set up an alert using an Amazon CloudWatch alarm based on DaysToExpiry. You can use the following procedure to set up a notification 60 days before a specific version of the rule set you’re using expires.

To set up a CloudWatch alarm

This will notify you 60 days before a specific version of a rule set expires

  1. Navigate to the CloudWatch console.
  2. Select All metrics from the left navigation pane, and then select WAFV2 from the list of namespaces.
  3. Choose ManagedRuleGroup, Region, Vendor, Version.
  4. Select the managed rule group whose expiration you want to monitor. This example uses AWSManagedRulesCommonRuleSet and Version_1.0.
  5. Select Graphed metric and select the bell alarm icon on the lower right, under Actions. Selecting this icon will take you to the CloudWatch alarms console.

Figure 4: CloudWatch Graphed metrics tabFigure 4: CloudWatch Graphed metrics tab

  1. Configure the CloudWatch alarm with the following details, and then choose Next:
    Statistic: Select Minimum
    Period: Select 5 minutes
    Threshold Type: Select Static
    Operator: Select Lower/Equal (<=threshold)
    Threshold: Enter the value as 60
    Datapoints to alarm: Enter the lower value as 1 and higher value as 1
    Missing data treatment: Select Treat missing data as good (not breaching threshold)
  2. Select the SNS topic that you want to be launched when the configured alarm goes to ALARM state and choose Next.
  3. Enter a name and description for the Alarm. Choose Next to preview the configuration and choose Create Alarm to complete the CloudWatch alarm creation process.

Additional tips

  • If the version of a managed rule group that you’re using has expired, AWS WAF will prevent any configuration change to the web ACL until you select a valid version. You should move onto the newest version as soon as possible so you are covered against the latest threats.
  • You will only receive the DaysToExpiry metric when there is traffic flowing through your web ACL.
  • You can use two different versions of a managed rule group in a web ACL. This can be useful if you want to test two different versions simultaneously to see how they will affect your traffic once deployed—for example, have one version in count mode and the other in block mode.

Note: This workflow is supported through the JSON rule editor and API, but not through the console.

Case 2: Use labels to mitigate false positives caused by a rule in a managed rule group

A label is metadata that a rule can add to matching web requests, regardless of the action associated with the rule. The latest version of AWS Managed Rules supports labels. By creating custom rules that match requests that have labels, you can change the behavior or default action of rules inside a managed rule group.

For example, if you have a rule that’s causing a false positive in a managed rule group, you can mitigate it by overriding the managed rule to Count and writing a custom rule with logic similar to the following:

IF (Statement 1) AND NOT (Statement 2) THEN Block
Statement 1 matches on the label generated from the rule causing a false positive.
Statement 2 contains exception conditions for when you don’t want the rule to evaluate because it’s causing false positives.

Consider a scenario where redirection requests to your application are blocked due to the rule GenericRFI_QUERYARGUMENTS in the managed rule group you’re using. This rule inspects the value of all query parameters and blocks requests that attempt to exploit remote file inclusion (RFI) in web applications, such as :// embedded midway through a URL. An example of a legitimate redirection request that could be blocked due to the characters :// present in the query argument scope could be as follows:

https://ourdomain.com/sso/complete?scope=email profile https://www.redirect-domain.com/auth/email https://www.redirect-domain.com/auth/profile

To prevent similar legitimate requests from being blocked, you can write a custom rule to match based on the label.

Step 1: Set the specific managed rule group to count mode

The first step is to set the specific managed rule to count mode, so that labels are added to the matching requests. Next, the priority of the managed rule must be set higher than the priority of the custom rule.

To set the specific managed rule group to count mode

  1. In your AWS WAF console, navigate to your web ACL and select the Rules tab. Choose Add Rule, and then select Add managed rule groups.
  2. Select AWS managed rule groups.
  3. Under Free rule groups, look for Core rule set and add it to your web ACL by selecting the toggle Add to web ACL.
  4. Choose Edit.
  5. From the list of rules, set the rule generating false positives to the Count action, by selecting the Count toggle beside the rule. This example changes the action for the rule GenericRFI_QUERYARGUMENTS to Count. This ensures that all the matching requests are sent to the subsequent WAF rules in order of priority and adds the label awswaf:managed:aws:commonruleset:GenericRFI_QueryArguments whenever there’s a matching request.
  6. Choose on Save rule.
  7. Choose Add rules again to go to the next window where you can set the rule priority. The managed rule must have a higher priority than the custom rule that you will create in the next steps.
  8. Choose Save to save the configuration.

Step 2: Add a custom rule to the web ACL with lower priority than the managed rule

Create a custom rule in the web ACL that blocks requests if it has the label that you are looking for and doesn’t have the exception condition that caused the false positive. The priority of this custom rule should be set lower than the managed rule.

To add a custom rule with lower priority than the managed rule

  1. In your AWS WAF console, navigate to your web ACL Rules tab and choose Add Rule and select Add my own rules and rule groups.
  2. Select Rule Builder for the rule type.
  3. Enter a Rule Name and select Regular Rule as the Type.
  4. Use the If a request drop down to select matches all the statements (AND).
  5. Statement 1 checks if the request has the label that you’re looking for. In this example it is configured with the following details:
    Inspect: Select Has a label
    Labels: Select Label
    Match key: Select awswaf:managed:aws:commonruleset:GenericRFI_QueryArguments
  6. All subsequent statements must be negated so that the requests don’t match the statement criteria and will be treated as legitimate requests. In this example, we set NOT Statement 2, that checks if the request contains https://www.redirect-domain.com/ in its query string:
    Enable: Select Negate statement results
    Inspect: Select All query parameters
    Match type: Select Contains string
    String to Match: Enter https://www.redirect-domain.com/
    Text transformation: Select None
  7. Under Action, select Block and choose Add rule.
  8. In the Set rule Priority window, set the rule priority of your custom rule to lower than the AWS Managed Rules rule.
  9. Choose Save.

Case 3: Use a scope-down statement to narrow the scope of traffic matching a managed rule group

A scope-down statement can be added to any rule group to narrow the scope of the requests that a rule group evaluates. This allows you to either filter in the requests that you want the rule group to inspect or filter out any requests that doesn’t meet the criteria.

Consider a case where you have a list of trusted IP address that you don’t want to be evaluated against AmazonIPReputationList. You can avoid blocking these trusted IP addresses by using a scope-down statement to exclude the traffic from evaluation.

Step 1: Create the IP set for allowed list of IPs

The first step is to create an IP set that contains the allowed list of IPs. The IP set can be created for a particular AWS Region, or can be global if the web ACL is associated with an Amazon CloudFront distribution.

To create an IP set

  1. Choose IP sets in the AWS WAF console and then choose Create IP set.
  2. In IP set name enter Allowed IPs. Enter the IPs that you want to allow in IP addresses. Choose Create IP set when done.

Figure 5: Console screenshot creating an IP setFigure 5: Console screenshot creating an IP set

Step 2: Add a scope-down statement to the managed rule group

Once you have created the IP set, you can add a scope down statement in your managed rule group so that traffic originating from the IPs in the IP set aren’t evaluated against the rules in the managed rule group.

To add a scope-down statement

  1. On the Rules tab of you your web ACL, choose Add Rule and select Add managed rule groups.
  2. Select AWS managed rule groups.
  3. Under Free rule groups, turn on Amazon IP reputation list to add it to the web ACL and choose Edit.
  4. Select Enable scope-down statement.

Figure 6: Console screenshot showing enabling the scope-down statementFigure 6: Console screenshot showing enabling the scope-down statement

  1. Add the condition so that only the requests that don’t originate from the allowed IPs list created earlier are evaluated for this rule group. Use the If a request drop down to select doesn’t match the statements (NOT).
    Inspect: Select Originates from an IP address in
    IP set: Select Allowed-IPs
    IP address to use as the originating address: Select Source IP address

Figure 7: Scope down statement configuration console screenshotFigure 7: Scope down statement configuration console screenshot

  1. Choose Save rule to add this rule to your web ACL.

Case 4: Use custom responses to change the default block action for a managed rule group

AWS WAF sends back response code 403 (forbidden) when it blocks an incoming request. You can use the custom response feature to instead send a custom HTTP response back to the client when the rule blocks access. Using the custom response, you can customize the status code, response headers, and response body.

Let’s say you want to respond back to a client who might be connecting to your application over VPN. You want to use a custom response to inform the user that this behavior is discouraged, by sending error code 400 (Bad Request) and a static body message (“Please don’t try to connect over a VPN”). To do this, you can use the AWS Managed Rule group AWSManagedRulesAnonymousIpList and then set up custom rules using the label awswaf:managed:aws:anonymous-ip-list:AnonymousIPList.

Step 1: Create a custom response body

The first step in creating a custom response is to create a custom response body. This is the message that will be shown when the custom response is sent.

To create a custom response body

  1. In the AWS WAF console, open your web ACL and select the Custom response bodies tab.
  2. Choose Create custom response body.
  3. In Response body object name, enter a name for this response—for example, Custom-body-IP-list.
  4. Choose a Content type for the response body.
  5. In Response body, enter the response that you want to send back to the client.
  6. Choose Save.

Figure 8: Custom response body creation on the AWS WAF consoleFigure 8: Custom response body creation on the AWS WAF console

Step 2: Override the actions of the managed rule group

The rule you use to send your custom response should be in count mode. This will ensure that all the matching requests are sent to the subsequent WAF rules in priority order. In the following example, the rule AnonymousIPList in the managed rule group AWSManagedRulesAnonymousIpList is set to count mode. For more details on how to override the action of a managed rule group, see Overriding the actions of a rule group or its rules.

Figure 9: console screenshot overriding an AWS Managed Rules ruleFigure 9: console screenshot overriding an AWS Managed Rules rule

Step 3: Create a rule to block the request and send a custom response back to the client

You’ll use the AWS WAF labels feature for this step. As explained in Case 2 above, you need to create a custom rule that matches the label generated by the managed rule. In this case the, custom rule should be configured to send your custom response.

To create a custom rule

  1. Expand the Custom response section and select Enable.
  2. Under Response code, enter the custom HTTP status code you want to send back to the client.
  3. (Optional) Use the Response headers section if you wish to add a custom response header
  4. Under Choose how you would like to specify the response body, select the custom response body you created in Step 1.
  5. (Optional) If you wish to generate additional labels to track activity in logs, you can use Add label.
  6. Choose Add rule.
  7. Set the rule priority of your custom rule to lower than the AWS Managed Rules rule.
  8. Choose Save.

Figure 10: Console screenshot configuring a custom response body for a ruleFigure 10: Console screenshot configuring a custom response body for a rule
Summary

In this post, we demonstrated how the new AWS WAF features such as labels, version management, scope-down statements, and custom responses can help you customize the behavior of AWS Managed Rules to protect your web applications and minimize risk. You can use these features in various ways, such as customizing AWS Managed Rules by combining labels and request properties to allow or block requests, and using labels to help filter logs.

You can learn more about AWS WAF in other AWS WAF–related Security Blog posts.

 
If you have feedback about this post, submit comments in the Comments section below.

Want more AWS Security news? Follow us on Twitter.

Madhu Kondur

Madhu Kondur

Madhu is a cloud support engineer at AWS. He’s passionate about helping customers solve their AWS issues. He specializes in network security and enjoys helping customers get the best cloud experience possible through AWS.

Venugopal Pai

Venugopal Pai

Venugopal is a solutions architect at AWS. He lives in Bengaluru, India, and helps customers scale and optimize their applications in AWS.

Privacy video: Innovating securely

Post Syndicated from Chad Woolf original https://aws.amazon.com/blogs/security/privacy-video-innovating-securely/

I’m pleased to share a video of a conversation about privacy I had with my colleague Laura Dawson, the North American Lead at the AWS Institute. Privacy is becoming more of a strategic issue for our customers, similar to how security is today. We discussed how, while the two topics are similar in some ways, they also have important differences. We also talked about the importance of building a strong privacy program, and how AWS helps customers safeguard privacy while still taking advantage of digital modernization opportunities.

The differences between security and privacy aren’t fully understood in some industries. Security principles are better known in the industry – security involves considering the confidentiality, integrity, and availability of information. It’s about keeping unauthorized parties away from your data, and about making sure access to your systems and data is appropriate. Similarly, privacy is about control of data through its entire lifecycle, specifically personal identifiable information (PII). That includes the collection, use, transmission, and deletion of that data. Properly managing the privacy of PII is like security when you consider the “access control” aspect, but privacy is about making sure you always have granular control of what is happening to that PII from formation/gathering through to deletion.

Unlike security, which is now commonly recognized as a core business function, privacy practices and principles are still in the early stages of being widely accepted. This is why AWS advocates for organizations to follow the principles of Privacy by Design, to ensure that privacy processes and controls are baked into everything you do.

I also discussed with Laura some of the privacy trends I see happening in the tech industry right now, such as homomorphic encryption, anonymization, and PII discovery tools. The privacy challenges organizations face today, however, aren’t just technology challenges; they’re also business challenges, of how to get value from the data you control, in a way that meets privacy best practices and accounts for your customers’ interests.

For more about these and other privacy topics, check out the video of my conversation with Laura. To learn more about privacy at AWS, check out the Data Privacy Center and Data Protection at AWS.

Author

Chad Woolf

Chad joined Amazon in 2010 and built the AWS compliance functions from the ground up, including audit and certifications, privacy, contract compliance, control automation engineering and security process monitoring. Chad’s work also includes enabling public sector and regulated industry adoption of the AWS cloud and leads the AWS trade and product compliance team.

AWS attained MTCS Level 3 certification under the new SS584:2020 standard

Post Syndicated from Clara Lim original https://aws.amazon.com/blogs/security/aws-attained-mtcs-level-3-certification-under-the-new-ss5842020-standard/

We’re excited to announce the completion of the Multi-Tier Cloud Security (MTCS) Level 3 certification under the new SS584:2020 standard in November 2021 for three Amazon Web Services (AWS) Regions: Singapore, Korea, and United States, excluding AWS GovCloud (US) Regions. The new standard, released in October 2020, includes more stringent controls for greater assurance as compared to the prior version SS584:2015, and a new CSP Self-Disclosure Form to provide to cloud service customers (CSC) for transparency. With the MTCS Level 3 certification, customers can be assured AWS security processes meet the stringent security controls set forth by the new MTCS SS 584:2020 standard for hosting their sensitive workloads.

AWS was the first cloud service provider (CSP) to attain the MTCS Level 3 certification for Singapore, in 2014, and is now one of the first few CSPs certified under the new SS584:2020 Level 3 standard. The services in scope have increased from 130 to 145, about a 10% increase since the last audit (September 2020).

The following services are newly added as in scope:

  1. Amazon Augmented AI (Amazon A2I)
  2. Amazon CloudWatch SDK Metrics for Enterprise Support
  3. Amazon Detective
  4. Amazon Finspace
  5. Amazon Kendra
  6. Amazon Keyspaces (for Apache Cassandra)
  7. Amazon Timestream
  8. AWS App Mesh
  9. AWS Audit Manager
  10. AWS Cloud Map
  11. AWS Device Farm
  12. AWS Glue DataBrew
  13. AWS Ground Station
  14. AWS Personal Health Dashboard

MTCS was the world’s first cloud security standard to specify a management system for cloud security that covers multiple tiers, and it can be applied by CSPs to meet differing cloud user needs for data sensitivity and business criticality. An intent of MTCS is for certified CSPs to be able to better specify the levels of security they can offer their users. AWS achieved this through third-party certification and fulfillment of the self-disclosure requirement for CSPs that covers service-oriented information normally captured in service level agreements. The MTCS framework establishes that the different levels of security help local businesses to pick the right CSP, and use of MTCS is mandated by the Singapore government as a requirement for public sector agencies and regulated organizations.

MTCS has three levels of security, Level 1 being the base and Level 3 the most stringent:

  • Level 1 was designed for non–business critical data and systems with basic security controls, to counter certain risks and threats targeting low-impact information systems (for example, a website that hosts public information).
  • Level 2 addresses the needs of organizations that run their business-critical data and systems in public or third-party cloud systems (for example, confidential business data and email).
  • Level 3 was designed for regulated organizations with specific and more stringent security requirements. Industry-specific regulations can be applied in addition to the baseline controls, to help supplement and address security risks and threats in high-impact information systems (for example, highly confidential business data, financial records, and medical records).

Benefits of MTCS Level 3 certification

AWS’s certification enables Singapore customers in regulated industries with the strictest security requirements to securely host applications and systems with highly sensitive information, ranging from confidential business data to financial and medical records, in a level-3-compliant MTCS environment. With the scope extended beyond Singapore to AWS Regions in Korea and the United States, it provides an alternative for Singapore government agencies to leverage AWS services which haven’t yet launched locally, and also provides resiliency and recovery use cases.

Financial Services Industry (FSI) customers in Korea are able to accelerate cloud adoption with MTCS controls that cover relevant regulations (the Financial Security Institute’s Guideline on Use of Cloud Computing Services in the Financial Industry, and the Regulation on Supervision on Electronic Financial Transactions (RSEFT)).

With increasing cloud adoption across different industries, MTCS certification has the potential to provide assurance to customers globally. Please reach out to your AWS representative if you have any services or Regions you would like to see in scope for the next MTCS audit.

You can now download the latest MTCS certificates and the MTCS Self-Disclosure Form in AWS Artifact.

If you have feedback about this post, submit comments in the Comments section below.

Want more AWS Security how-to content, news, and feature announcements? Follow us on Twitter.

Author

Clara Lim

Clara is the APJ-Lead Strategist supporting the compliance programs for the Asia Pacific Region, leading multiple security certification programs. Clara is passionate about leveraging her decade-long experience to deliver compliance programs that provide assurance and build trust with customers.

AWS re:Post – A Reimagined Q&A Experience for the AWS Community

Post Syndicated from Steve Roberts original https://aws.amazon.com/blogs/aws/aws-repost-a-reimagined-qa-experience-for-the-aws-community/

The internet is an excellent resource for well-intentioned guidance and answers. However, it can sometimes be hard to tell if what you’re reading is, in fact, advice you should follow. Also, some users have a preference toward using a single, trusted online community rather than the open internet to provide them with reliable, vetted, and up-to-date answers to their questions.

Today, I’m happy to announce AWS re:Post, a new, question and answer (Q&A) service, part of the AWS Free Tier, that is driven by the community of AWS customers, partners, and employees. AWS re:Post is an AWS-managed Q&A service offering crowd-sourced, expert-reviewed answers to your technical questions about AWS that replaces the original AWS Forums. Community members can earn reputation points to build up their community expert status by providing accepted answers and reviewing answers from other users, helping to continually expand the availability of public knowledge across all AWS services.

AWS re:Post home page

You’ll find AWS re:Post to be an ideal resource when:

  • You are building an application using AWS, and you have a technical question about an AWS service or best practices.
  • You are learning about AWS or preparing for an AWS certification, and you have a question on an AWS service.
  • Your team is debating issues related to design, development, deployment, or operations on AWS.
  • You’d like to share your AWS expertise with the community and build a reputation as a community expert.

Example of a question and answer in AWS re:Post

There is no requirement to sign in to AWS re:Post to browse the content. For users who do choose to sign in, using their AWS account, there is the opportunity to create a profile, post questions and answers, and interact with the community. Profiles enable users to link their AWS certifications through Credly and to indicate interests in specific AWS technology domains, services, and experts. AWS re:Post automatically shares new questions with these community experts based on their areas of expertise, improving the accuracy of responses as well as encouraging responses for unanswered questions. An opt-in email is also available to receive email notifications to help users stay informed.

User profile in the re:Post community

Over the last four years, AWS re:Post has been used internally by AWS employees helping customers with their cloud journeys. Today, that same trusted technical guidance becomes available to the entire AWS community. Additionally, all active users from the previous AWS Forums have been migrated onto AWS re:Post, as well as the most-viewed content.

Questions from AWS Premium Support customers that do not receive a response from the community are passed on to AWS Support engineers. If the question is related to a customer-specific workload, AWS support will open a support case to take the conversation into a private setting. Note, however, that AWS re:Post is not intended to be used for questions that are time-sensitive or involve any proprietary information, such as customer account details, personally identifiable information, or AWS account resource data.

AWS Support Engineer presence on re:Post

Have Questions? Need Answers? Try AWS re:Post Today
If you have a technical question about an AWS service or product or are eager to get started on your journey to becoming a recognized community expert, I invite you to get started with AWS re:Post today!

New – Sustainability Pillar for AWS Well-Architected Framework

Post Syndicated from Alex Casalboni original https://aws.amazon.com/blogs/aws/sustainability-pillar-well-architected-framework/

The AWS Well-Architected Framework has been helping AWS customers improve their cloud architectures since 2015. The framework consists of design principles, questions, and best practices across multiple pillars: Operational Excellence, Security, Reliability, Performance Efficiency, and Cost Optimization.

Today we are introducing a new Sustainability Pillar to help organizations learn, measure, and improve their workloads using environmental best practices for cloud computing.

Similar to the other pillars, the Sustainability Pillar contains questions aimed at evaluating the design, architecture, and implementation of your workloads to reduce their energy consumption and improve their efficiency. The pillar is designed as a tool to track your progress toward policies and best practices that support a more sustainable future, not just a simple checklist.

The Shared Responsibility Model of Cloud Sustainability
The shared responsibility model also applies to sustainability. AWS is responsible for the sustainability of the cloud, while AWS customers are responsible for sustainability in the cloud.

The sustainability of the cloud allows AWS customers to reduce associated energy usage by nearly 80% with respect to a typical on-premises deployment. This is possible because of the much higher server utilization, power and cooling efficiency, custom data center design, and continued progress on the path to powering AWS operations with 100% renewable energy by 2025. But we can achieve much more by collectively designing sustainable architectures.

We are introducing the new Sustainability Pillar to help organizations improve their sustainability in the cloud. This is a continuous effort focused on energy reduction and efficiency of all types of workloads. In practice, the pillar helps developers and cloud architects surface the trade-offs, highlight patterns and best practices, and avoid anti-patterns. For example, selecting an efficient programming language, adopting modern algorithms, using efficient data storage techniques, and deploying correctly sized and efficient infrastructure.

Specifically, the pillar is designed to support organizations in developing a better understanding of the state of their workloads, as well as the impact related to defined sustainability targets, how to measure against these targets, and how to model where they cannot directly measure.

In addition to building sustainable workloads in the cloud, you can use AWS technology to solve broader sustainability challenges. For example, reducing the environmental incidents caused by industrial equipment failure using Amazon Monitron to detect abnormal behavior and conduct preventative maintenance. We call this sustainability through the cloud.

Well-Architected Design Principles for Sustainability in the Cloud
The Sustainability Pillar includes design principles and operational guidance, as well as architectural and software patterns.

The design principles will facilitate good design for sustainability:

  • Understand your impact – Measure business outcomes and the related sustainability impact to establish performance indicators, evaluate improvements, and estimate the impact of proposed changes over time.
  • Establish sustainability goals – Set long-term goals for each workload, model return on investment (ROI) and give owners the resources to invest in sustainability goals. Plan for growth and design your architecture to reduce the impact per unit of work such as per user or per operation.
  • Maximize utilization – Right size each workload to maximize the energy efficiency of the underlying hardware, and minimize idle resources.
  • Anticipate and adopt new, more efficient hardware and software offerings – Support upstream improvements by your partners, continually evaluate hardware and software choices for efficiencies, and design for flexibility to adopt new technologies over time.
  • Use managed services – Shared services reduce the amount of infrastructure needed to support a broad range of workloads. Leverage managed services to help minimize your impact and automate sustainability best practices such as moving infrequent accessed data to cold storage and adjusting compute capacity.
  • Reduce the downstream impact of your cloud workloads – Reduce the amount of energy or resources required to use your services and reduce the need for your customers to upgrade their devices; test using device farms to measure impact and test directly with customers to understand the actual impact on them.

Well-Architected Best Practices for Sustainability
The design principles summarized above correspond to concrete architectural best practices that development teams can apply every day.

Some examples of architectural best practices for sustainability:

  • Optimize geographic placement of workloads for user locations
  • Optimize areas of code that consume the most time or resources
  • Optimize impact on customer devices and equipment
  • Implement a data classification policy
  • Use lifecycle policies to delete unnecessary data
  • Minimize data movement across networks
  • Optimize your use of GPUs
  • Adopt development and testing methods that allow rapid introduction of potential sustainability improvements
  • Increase the utilization of your build environments

Many of these best practices are generic and apply to all workloads, while others are specific to some use cases, verticals, and compute platforms. I’d highly encourage you to dive into these practices and identify the areas where you can achieve the most impact immediately.

Transforming sustainability into a non-functional requirement can result in cost effective solutions and directly translate to cost savings on AWS, as you only pay for what you use. In some cases, meeting these non-functional targets might involve tradeoffs in terms of uptime, availability, or response time. Where minor tradeoffs are required, the sustainability improvements are likely to outweigh the change in quality of service. It’s important to encourage teams to continuously experiment with sustainability improvements and embed proxy metrics in their team goals.

Available Now
The AWS Well-Architected Sustainability Pillar is a new addition to the existing framework. By using the design principles and best practices defined in the Sustainability Pillar Whitepaper, you can make informed decisions balancing security, cost, performance, reliability, and operational excellence with sustainability outcomes for your workloads on AWS.

Learn more about the new Sustainability Pillar.

Alex

Announcing General Availability of Construct Hub and AWS Cloud Development Kit Version 2

Post Syndicated from Steve Roberts original https://aws.amazon.com/blogs/aws/announcing-general-availability-of-construct-hub-and-aws-cloud-development-kit-version-2/

Today, I’m happy to announce that both the Construct Hub and AWS Cloud Development Kit (AWS CDK) version 2 are now generally available (GA).

The AWS CDK is an open-source framework that simplifies working with cloud resources using familiar programming languages: C#, TypeScript, Java, Python, and Go (in developer preview). Within their applications, developers create and configure cloud resources using reusable types called constructs, which they use just as they would any other types in their chosen language. It’s also possible to write custom constructs, which can then be shared across your teams and organization.

With the new releases generally available today, defining your cloud resources using the CDK is now even more simple and convenient, and the Construct Hub enables sharing of open-source construct libraries within the wider cloud development community.

Construct Hub home page

AWS Cloud Development Kit (AWS CDK) Version 2
Version 2 of the AWS CDK focuses on productivity improvements for developers working with CDK projects. The individual packages (libraries) used in version 1 to distribute and consume the constructs available for each AWS service have been consolidated into a single monolithic package. This simplifies dependency management in your CDK applications and when publishing construct libraries. It also makes working with CDK projects that reference constructs from multiple services more convenient, especially when those services have peer dependencies (for example, an Amazon Simple Storage Service (Amazon S3) bucket that needs to be configured with an AWS Key Management Service (KMS) key).

Version 1 of the CDK contained some APIs that were experimental. Over time, some of these were marked as deprecated in favor of other preferred approaches based on community experience and feedback. The deprecated APIs have been removed in version 2 to aid clarity for developers working with construct properties and methods. Additionally, the CDK team has adopted a new release process for creating and releasing experimental constructs without needing to include them in the monolithic GA package. From version 2 onwards, the monolithic CDK package will contain only stable APIs that customers can always rely on. Experimental APIs will be shipped in separate packages, making it easier for the team and community to revise them and ensure customers don’t incur the accidental breaking changes that caused some issues in version 1.

You can read about all the changes in version 2 of the AWS CDK, and how you can update your CDK applications to use it, in the Developer Guide.

Construct Hub
The Construct Hub is a single home where the open-source community, AWS, and cloud technology providers can discover and share construct libraries for all CDKs. The most popular CDKs today are AWS CDK, which generates AWS CloudFormation templates; cdk8s, which generates Kubernetes manifests; and cdktf, which generates Terraform JSON files. Anyone can create a CDK, and we are open to adding other construct-based tools as they evolve!

As of this post’s publication, the Construct Hub contains over 700 CDK libraries, including core AWS CDK modules, to help customers build their cloud applications using their preferred programming languages, for their preferred use case, and with their preferred provisioning engine (CloudFormation, Terraform, or Kubernetes). For example, there are 99 libraries for working with containers, 210 libraries for serverless development, 53 libraries for websites, 65 libraries for integrations with cloud services providers like Datadog, Logz.io, Cloudflare, Snyk, and more, and dozens of additional libraries which integrate with Slack, Twitter, GitLab, Grafana, Prometheus, WordPress, Next.js, and more. Many of these were created by the open-source community.

Anyone can contribute construct libraries to the Construct Hub. New libraries that you wish to share need to be published to the npm public registry and tagged. The Construct Hub will automatically detect the published libraries and make them visible and discoverable to consumers on the hub. Consumers can search and filter for construct libraries for familiar technologies, third-party integrations, AWS services, and use cases such as compliance, monitoring, websites, containers, serverless, and more. Filters are available for publisher, language, CDK type, and keywords. In the screenshot below, I’m searching the hub for .NET and TypeScript libraries related to databases and Kubernetes across all CDKs. I could also filter to a specific CDK or a CDK version.

Searching across publishers

Publishers determine which programming languages should be supported by their packages. Construct Hub then automatically generates API references for all the supported languages and transliterates all code samples the authors provide to those supported languages. The screenshots below show an example of language-specific API documentation for the cdk-spa-deploy construct library, which you can use to deploy a single-page web application (SPA). First, the documentation for .NET developers working with the library:

Generated sample code and documentation for a .NET construct library

The second image below shows the generated documentation for the same construct library, but this time for TypeScript developers:

Generated sample code and documentation for the same library in TypeScript

All construct libraries published to the Construct Hub must be open-source. This enables users to exercise their good judgment and perform due diligence to verify that the libraries meet their security and compliance needs, just as they would with any other third-party package source consumed in their applications. Issues with a published construct library can be raised on the library’s GitHub repository using convenient links accessible from the hub entry for the library.

The Construct Hub employs a trust-through-transparency model. Users can report libraries for abuse by clicking the ‘Report abuse’ link in the hub, which will engage AWS Support teams to investigate the issue and remove the offending packages from Construct Hub listings if problems are found. Users can also send us feedback by clicking a ‘Provide feedback to Construct Hub’ link, which allows them to open an issue on our GitHub repository. And last but not least, they can click ‘Provide feedback to publisher’, which redirects to the repository the publisher provided with the package.

Feedback links in the Construct Hub

Just like the AWS CDK, the Construct Hub is open-source, built as a construct, and is, in fact, itself available on the Construct Hub! If you’re interested, you can see how the CDK team uses the CDK to develop the hub in their GitHub repository.

Construct Hub - on the Construct Hub!

Get Started with the AWS CDK Version 2 and the Construct Hub, Today
If you’ve built CDK applications to define your cloud infrastructure using version 1 of the AWS Cloud Development Kit (AWS CDK), then I encourage you to take a look at the documented changes for version 2 and see how the new version can help simplify your project setup going forward. And, if you’re interested in sharing new constructs with the wider community, please get involved with the Construct Hub.

— Steve

Use New Amazon EC2 M1 Mac Instances to Build & Test Apps for iPhone, iPad, Mac, Apple Watch, and Apple TV

Post Syndicated from Sébastien Stormacq original https://aws.amazon.com/blogs/aws/use-amazon-ec2-m1-mac-instances-to-build-test-macos-ios-ipados-tvos-and-watchos-apps/

Last year at AWS re:Invent, Jeff Barr wrote about the exciting availability of Amazon Elastic Compute Cloud (Amazon EC2) Mac instances. Today, we’re announcing the preview of a new EC2 M1 Mac instance.

The introduction of EC2 Mac instances brought the flexibility, scalability, and cost benefits of AWS to all Apple developers. EC2 Mac instances are dedicated Mac mini computers attached through Thunderbolt to the AWS Nitro System, which lets the Mac mini appear and behave like another EC2 instance. It connects to your Amazon Virtual Private Cloud (VPC), boot from Amazon Elastic Block Store (EBS) volumes, and leverage EBS snapshots, security groups and other AWS services. EC2 Mac instances let you scale your build and test fleets of Macs, paying as you go. There is no hypervisor involved, and you get full bare metal performance of the underlying Mac mini. An EC2 dedicated host reserves a Mac mini for your usage.

The availability (in preview) of EC2 M1 Mac instances lets you access machines built around the Apple-designed M1 System on Chip (SoC). If you are a Mac developer and re-architecting your apps to natively support Macs with Apple silicon, you may now build and test your apps and take advantage of all the benefits of AWS. Developers building for iPhone, iPad, Apple Watch, and Apple TV will also benefit from faster builds. EC2 M1 Mac instances deliver up to 60% better price performance over the x86-based EC2 Mac instances for iPhone and Mac app build workloads.

EC2 M1 Mac instances are powered by a combination of two hardware components:

  • The Mac mini, featuring M1 SoC with 8 CPU cores, 8 GPU cores, 16 GiB of memory, and a 16 core Apple Neural Engine.
  • The AWS Nitro System, providing up to 10 Gbps of VPC network bandwidth and 8 Gbps of EBS storage bandwidth through a high-speed Thunderbolt connection.

How to Get Started
As I explained previously, when using EC2 Mac instances, there is no virtual machine involved. These are running on bare metal servers, each hosting a Mac mini. The first step, therefore, involves grabbing a dedicated server. I open the AWS Management Console, navigate to the Amazon EC2 section, then I select Dedicated Hosts. I select Allocate Dedicated Host to allocate a server to my AWS account.

EC2 Mac2 Instances - Dedicated Hosts

Alternatively, I may use the AWS Command Line Interface (CLI).

➜  ~ aws ec2 allocate-hosts                  \
         --instance-type mac2.metal          \
         --availability-zone us-east-2b      \
         --quantity 1 
{
    "HostIds": [
        "h-0fxxxxxxx90"
    ]
}

Once the host is allocated, I start an EC2 instance on it. The procedure is no different from starting any EC2 instance type. I just have to ensure I select a macOS AMI version that suits my requirements. I select the mac2.metal instance type and select host Tenancy and the dedicated Host I just created.

EC2 Dedicated TenancyAlternatively, I may use the CLI.

➜ ~ aws ec2 run-instances                                     \
	    --instance-type mac2.metal                             \
        --key-name my_key                                      \
        --placement HostId=h-0fxxxxxxx90                       \
        --security-group-ids sg-01000000000000032              \
        --image-id AWS_OR_YOUR_AMI_ID
{
    "Groups": [],
    "Instances": [
        {
            "AmiLaunchIndex": 0,
            "ImageId": "ami-01xxxxbd",
            "InstanceId": "i-08xxxxx5c",
            "InstanceType": "mac2.metal",
            "KeyName": "my_key",
            "LaunchTime": "2021-11-08T16:47:39+00:00",
            "Monitoring": {
                "State": "disabled"
            },
... redacted for brevity ....

When you use EC2 Mac instances for the first time, you’re likely to ask questions such as, “How do I connect through Apple Remote Desktop?” or “How do I increase the size of the APFS file system on the EBS volume?” The EC2 Mac documentation covers the answers for you and provides examples of commands to run on macOS to perform these common tasks.

I use SSH to connect to the newly launched instance as usual.

EC2 Mac M1 Instance uname -a

I may enable Apple Remote Desktop and start a VNC session to the EC2 instance. The EC2 Mac instance documentation page has the details.

mac2 GUI VNC

Availability and Pricing
EC2 M1 Mac instances are now available in preview in US East (N. Virginia) and US West (Oregon), with other AWS Regions coming at launch.

Pricing metrics are similar to the previous generation of EC2 Mac instances. You are charged per hour of reservation of the dedicated host, not for the time the instance is running, and there is a minimum charge of 24 hours for reserving a dedicated host.

In the two preview Regions, the on-demand price is $0.6498 per hour. You can save up to 42 percent over the on-demand price with Savings Plans. Check our Dedicated Host on-demand pricing page, as well as the Savings Plans page to learn the details.

You can sign up for the preview of EC2 Mac M1 instances today!

— seb

Introducing Amazon Simple Queue Service dead-letter queue redrive to source queues

Post Syndicated from Julian Wood original https://aws.amazon.com/blogs/compute/introducing-amazon-simple-queue-service-dead-letter-queue-redrive-to-source-queues/

This blog post is written by Mark Richman, a Senior Solutions Architect for SMB.

Today AWS is launching a new capability to enhance the dead-letter queue (DLQ) management experience for Amazon Simple Queue Service (SQS). DLQ redrive to source queues allows SQS to manage the lifecycle of unconsumed messages stored in DLQs.

SQS is a fully managed message queuing service that enables you to decouple and scale microservices, distributed systems, and serverless applications. Using Amazon SQS, you can send, store, and receive messages between software components at any volume without losing messages or requiring other services to be available.

To use SQS, a producer sends messages to an SQS queue, and a consumer pulls the messages from the queue. Sometimes, messages can’t be processed due to a number of possible issues. These can include logic errors in consumers that cause message processing to fail, network connectivity issues, or downstream service failures. This can result in unconsumed messages remaining in the queue.

Understanding SQS dead-letter queues (DLQs)

SQS allows you to manage the life cycle of the unconsumed messages using dead-letter queues (DLQs).

A DLQ is a separate SQS queue that one or many source queues can send messages that can’t be processed or consumed. DLQs allow you to debug your application by letting you isolate messages that can’t be processed correctly to determine why their processing didn’t succeed. Use a DLQ to handle message consumption failures gracefully.

When you create a source queue, you can specify a DLQ and the condition under which SQS moves messages from the source queue to the DLQ. This is called the redrive policy. The redrive policy condition specifies the maxReceiveCount. When a producer places messages on an SQS queue, the ReceiveCount tracks the number of times a consumer tries to process the message. When the ReceiveCount for a message exceeds the maxReceiveCount for a queue, SQS moves the message to the DLQ. The original message ID is retained.

For example, a source queue has a redrive policy with maxReceiveCount set to 5. If the consumer of the source queue receives a message 6, without successfully consuming it, SQS moves the message to the dead-letter queue.

You can configure an alarm to alert you when any messages are delivered to a DLQ. You can then examine logs for exceptions that might have caused them to be delivered to the DLQ. You can analyze the message contents to diagnose consumer application issues. Once the issue has been resolved and the consumer application recovers, these messages can be redriven from the DLQ back to the source queue to process them successfully.

Previously, this required dedicated operational cycles to review and redrive these messages back to their source queue.

DLQ redrive to source queues

DLQ redrive to source queues enables SQS to manage the second part of the lifecycle of unconsumed messages that are stored in DLQs. Once the consumer application is available to consume the failed messages, you can now redrive the messages from the DLQ back to the source queue. You can optionally review a sample of the available messages in the DLQ. You redrive the messages using the Amazon SQS console. This allows you to more easily recover from application failures.

Using redrive to source queues

To show how to use the new functionality there is an existing standard source SQS queue called MySourceQueue.

SQS does not create DLQs automatically. You must first create an SQS queue and then use it as a DLQ. The DLQ must be in the same region as the source queue.

Create DLQ

  1. Navigate to the SQS Management Console and create a standard SQS queue for the DLQ called MyDLQ. Use the default configuration. Refer to the SQS documentation for instructions on creating a queue.
  2. Navigate to MySourceQueue and choose Edit.
  3. Navigate to the Dead-letter queue section and choose Enabled.
  4. Select the Amazon Resource Name (ARN) of the MyDLQ queue you created previously.
  5. You can configure the number of times that a message can be received before being sent to a DLQ by setting Set Maximum receives to a value between 1 and 1,000. For this demo enter a value of 1 to immediately drive messages to the DLQ.
  6. Choose Save.
Configure source queue with DLQ

Configure source queue with DLQ

The console displays the Details page for the queue. Within the Dead-letter queue tab, you can see the Maximum receives value and DLQ ARN.

DLQ configuration

DLQ configuration

Send and receive test messages

You can send messages to test the functionality in the SQS console.

  1. Navigate to MySourceQueue and choose Send and receive messages
  2. Send a number of test messages by entering the message content in Message body and choosing Send message.
  3. Send and receive messages

    Send and receive messages

  4. Navigate to the Receive messages section where you can see the number of messages available.
  5. Choose Poll for messages. The Maximum message count is set to 10 by default If you sent more than 10 test messages, poll multiple times to receive all the messages.
Poll for messages

Poll for messages

All the received messages are sent to the DLQ because the maxReceiveCount is set to 1. At this stage you would normally review the messages. You would determine why their processing didn’t succeed and resolve the issue.

Redrive messages to source queue

Navigate to the list of all queues and filter if required to view the DLQ. The queue displays the approximate number of messages available in the DLQ. For standard queues, the result is approximate because of the distributed architecture of SQS. In most cases, the count should be close to the actual number of messages in the queue.

Messages available in DLQ

Messages available in DLQ

  1. Select the DLQ and choose Start DLQ redrive.
  2. DLQ redrive

    DLQ redrive

    SQS allows you to redrive messages either to their source queue(s) or to a custom destination queue.

  3. Choose to Redrive to source queue(s), which is the default.
  4. Redrive has two velocity control settings.

  • System optimized sends messages back to the source queue as fast as possible
  • Custom max velocity allows SQS to redrive messages with a custom maximum rate of messages per second. This feature is useful for minimizing the impact to normal processing of messages in the source queue.

You can optionally inspect messages prior to redrive.

  • To redrive the messages back to the source queue, choose DLQ redrive.
  • DLQ redrive

    DLQ redrive

    The Dead-letter queue redrive status panel shows the status of the redrive and percentage processed. You can refresh the display or cancel the redrive.

    Dead-letter queue redrive status

    Dead-letter queue redrive status

    Once the redrive is complete, which takes a few seconds in this example, the status reads Successfully completed.

    Redrive status completed

    Redrive status completed

  • Navigate back to the source queue and you can see all the messages are redriven back from the DLQ to the source queue.
  • Messages redriven from DLQ to source queue

    Messages redriven from DLQ to source queue

    Conclusion

    Dead-letter queue redrive to source queues allows you to effectively manage the life cycle of unconsumed messages stored in dead-letter queues. You can build applications with the confidence that you can easily examine unconsumed messages, recover from errors, and reprocess failed messages.

    You can redrive messages from their DLQs to their source queues using the Amazon SQS console.

    Dead-letter queue redrive to source queues is available in all commercial regions, and coming soon to GovCloud.

    To get started, visit https://aws.amazon.com/sqs/

    For more serverless learning resources, visit Serverless Land.