Web development teams are tasked with delivering feature-rich applications at lightning speeds. To help them, there are thousands of pre-built JavaScript libraries that they can integrate with little effort.
Not always, however, are these libraries backed with hardened security measures to ensure the code they provide is not tampered with by malicious actors. This ultimately leads to an increased risk of an application being compromised.
Starting today, tackling the risk of external JavaScript libraries just got easier. We are adding a new feature to our client side security solution: Page Shield policies. Using policies you can now ensure only allowed and vetted libraries are executed by your application by simply reviewing a checklist.
Client side libraries
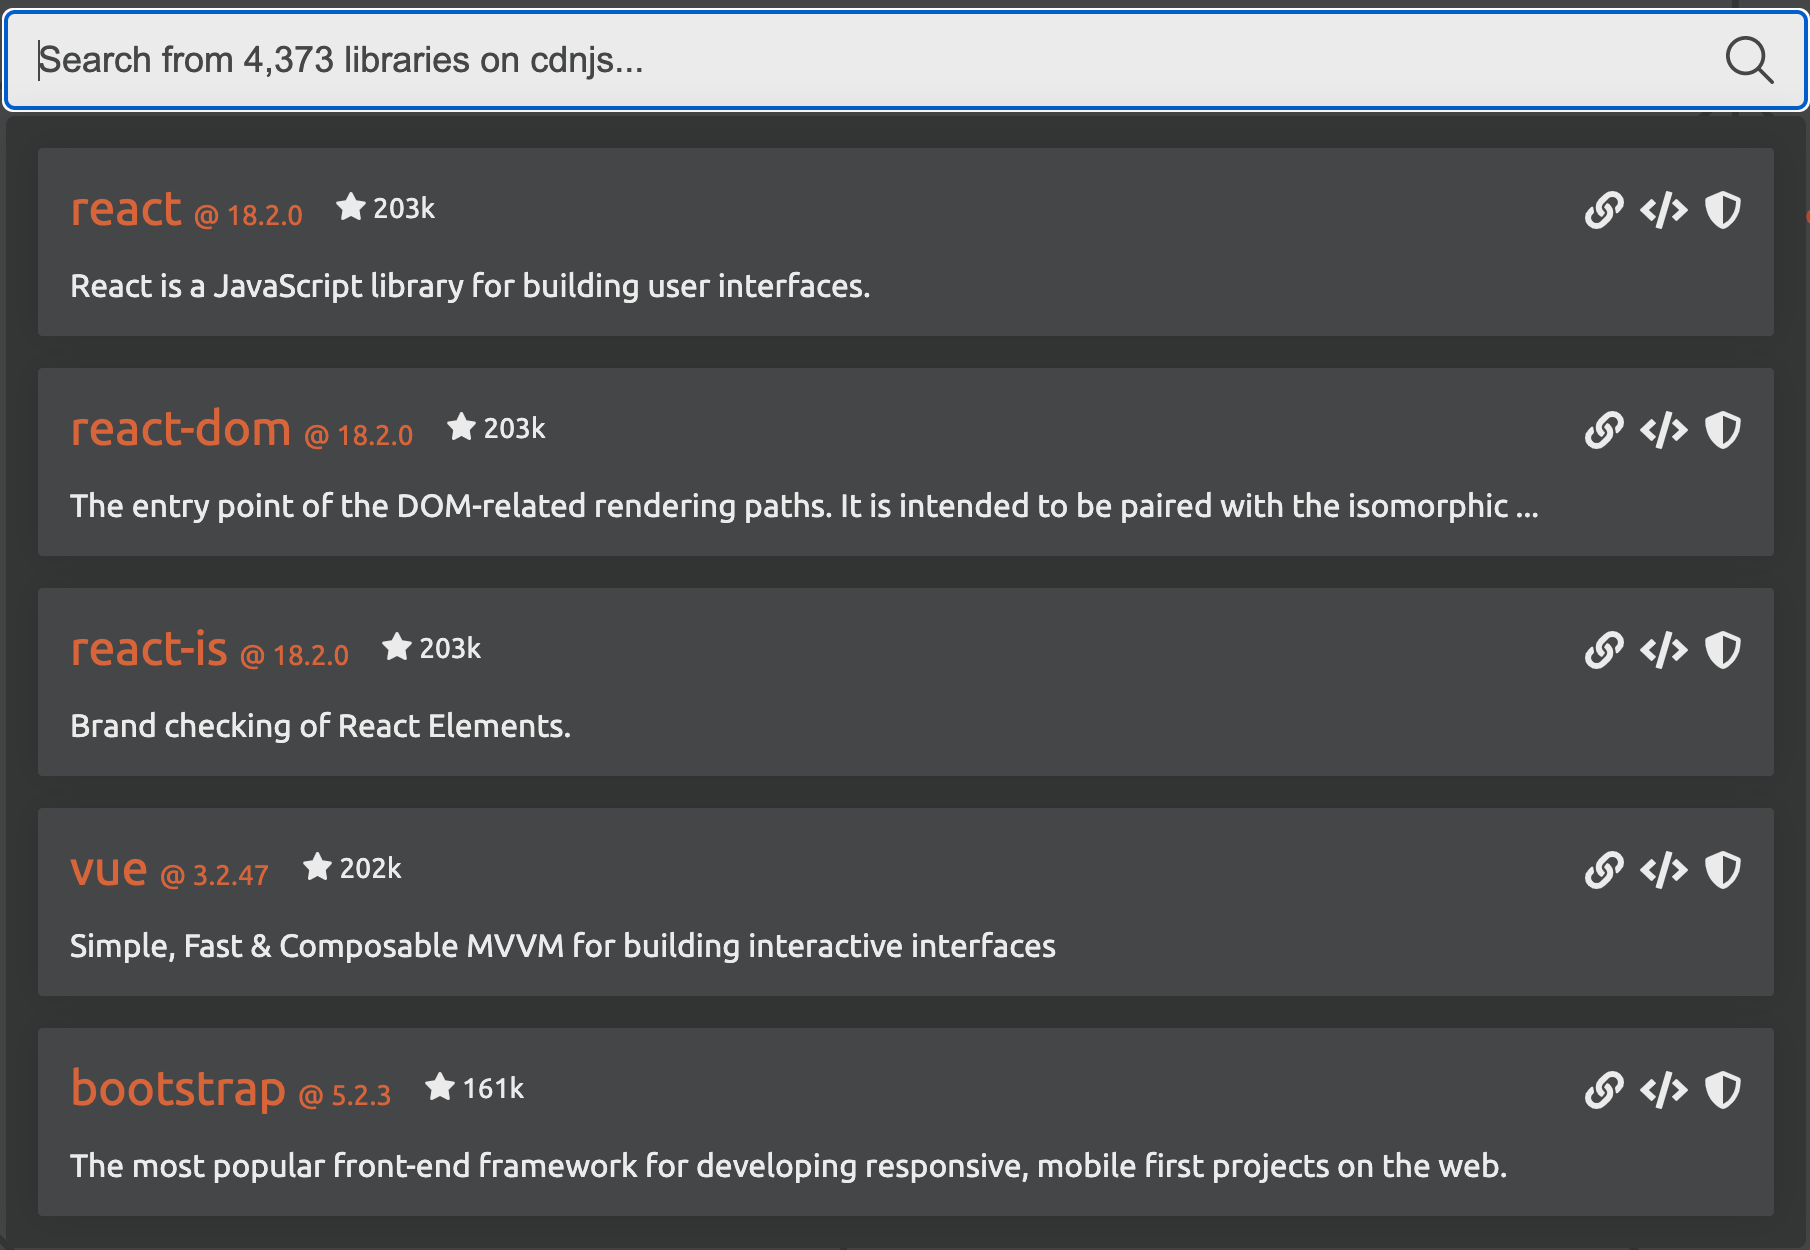
There are more than 4,373 libraries available on cdnjs, a popular JavaScript repository, at the time of writing. These libraries provide access to pre-built functionality to build web applications. The screenshot below shows the most popular on the platform such as React, Vue.js and Bootstrap. Bootstrap alone, according to W3Techs, is used on more than 20% of all websites.
In addition to library repositories like cdnjs, there are thousands of plugins provided directly by SaaS platforms including from names such as Google, Meta, Microsoft, and more.
According to our Page Shield data, any large enterprise application is loading AND connecting to tens if not hundreds of different destinations for analytics, payments, real user monitoring, conversion tracking, customer relationship management, and many other features that internal teams “must have”.
Script hosts (JavaScript loaded from…)
Connection hosts (Data sent to…)
Google
Google
Facebook
Facebook
Cloudflare
Microsoft
Salesforce
Hotjar
Prospect One
OneTrust
Open JS Foundation
Pinterest
Microsoft
TikTok
Hotjar
PayPal
hCaptcha
Snapchat
Fly.io
NewRelic
Ultimately, it is hard for most organizations to not rely on external JavaScript libraries.
Yet another vector for attackers
Although there are good reasons to embed external JavaScript in an application, the proliferation of client side libraries, especially from SaaS providers, has increased scrutiny from malicious actors seeking new ways to exploit web applications. A single compromised SaaS provider that offers a client side library can provide direct access to thousands of applications drastically increasing return on “hacker” investment.
Client side security issues are not new. Attacks such as “web skimming”, also referred to as “Magecart-style” when in the context of payment pages, have been around for a long time. Yet, core application security products often focus on protecting the underlying web application rather than the end user data resulting in a large attack surface that most security teams simply have no visibility on. This gap in visibility, caused by “supply chains”, led us to build Page Shield, Cloudflare’s native client-side security solution.
Although the risk of supply chain attacks is becoming widely known, they are still very much an active threat. New research is being published monthly from vendors in this space highlighting ongoing attack campaigns. The Payment Card Industry Security Standards Council has also introduced new requirements in PCI DSS 4.0* that enforce companies to have systems and processes in place to tackle client side security threats.
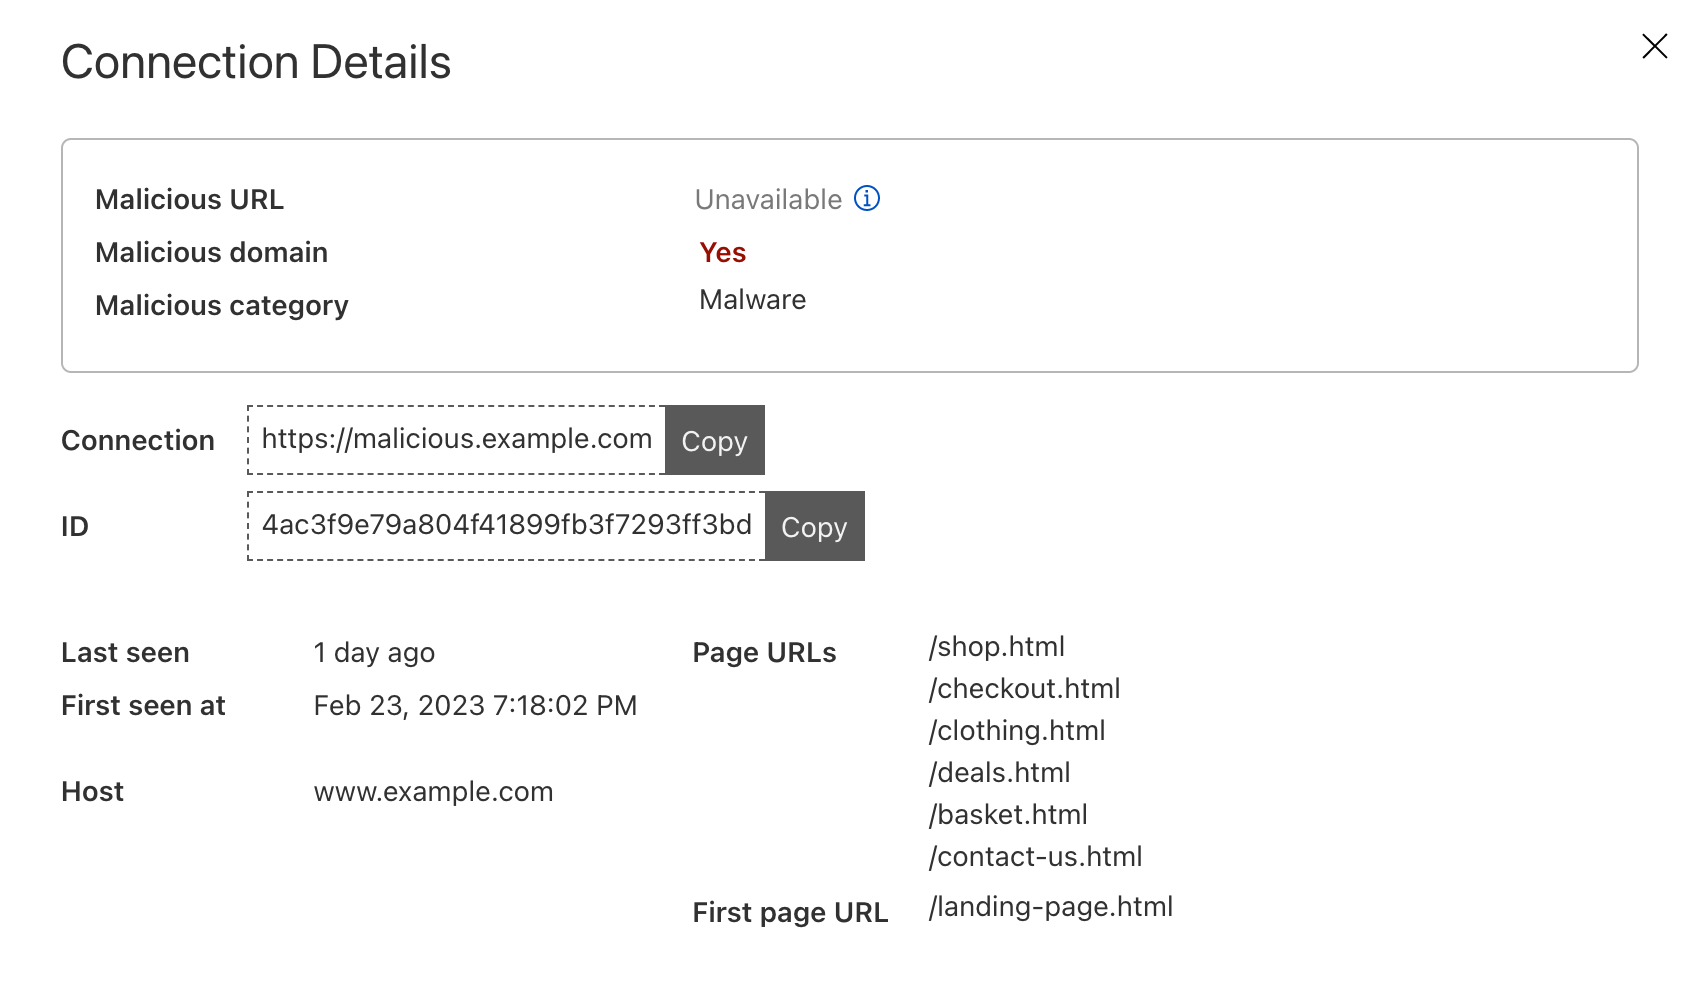
Page Shield itself has already been effective at warning customers of ongoing attacks on their applications, such as the screenshot below highlighting an active malicious outbound connection from a Magecart-style attack on a customer e-commerce application.
* PCI DSS 4.0 requirements 6.4.3 and 11.6.1 are just two examples focusing on client side security.
Reducing the attack surface
Page Shield aims to detect and alert whenever malicious activity is found within the client environment. That’s still a core focus as we improve detection capabilities further.
We are now also looking at expanding capabilities to also reduce the opportunity for an attacker to compromise an application in the first place. In other words, prevent attacks happening by reducing the attack surface available.
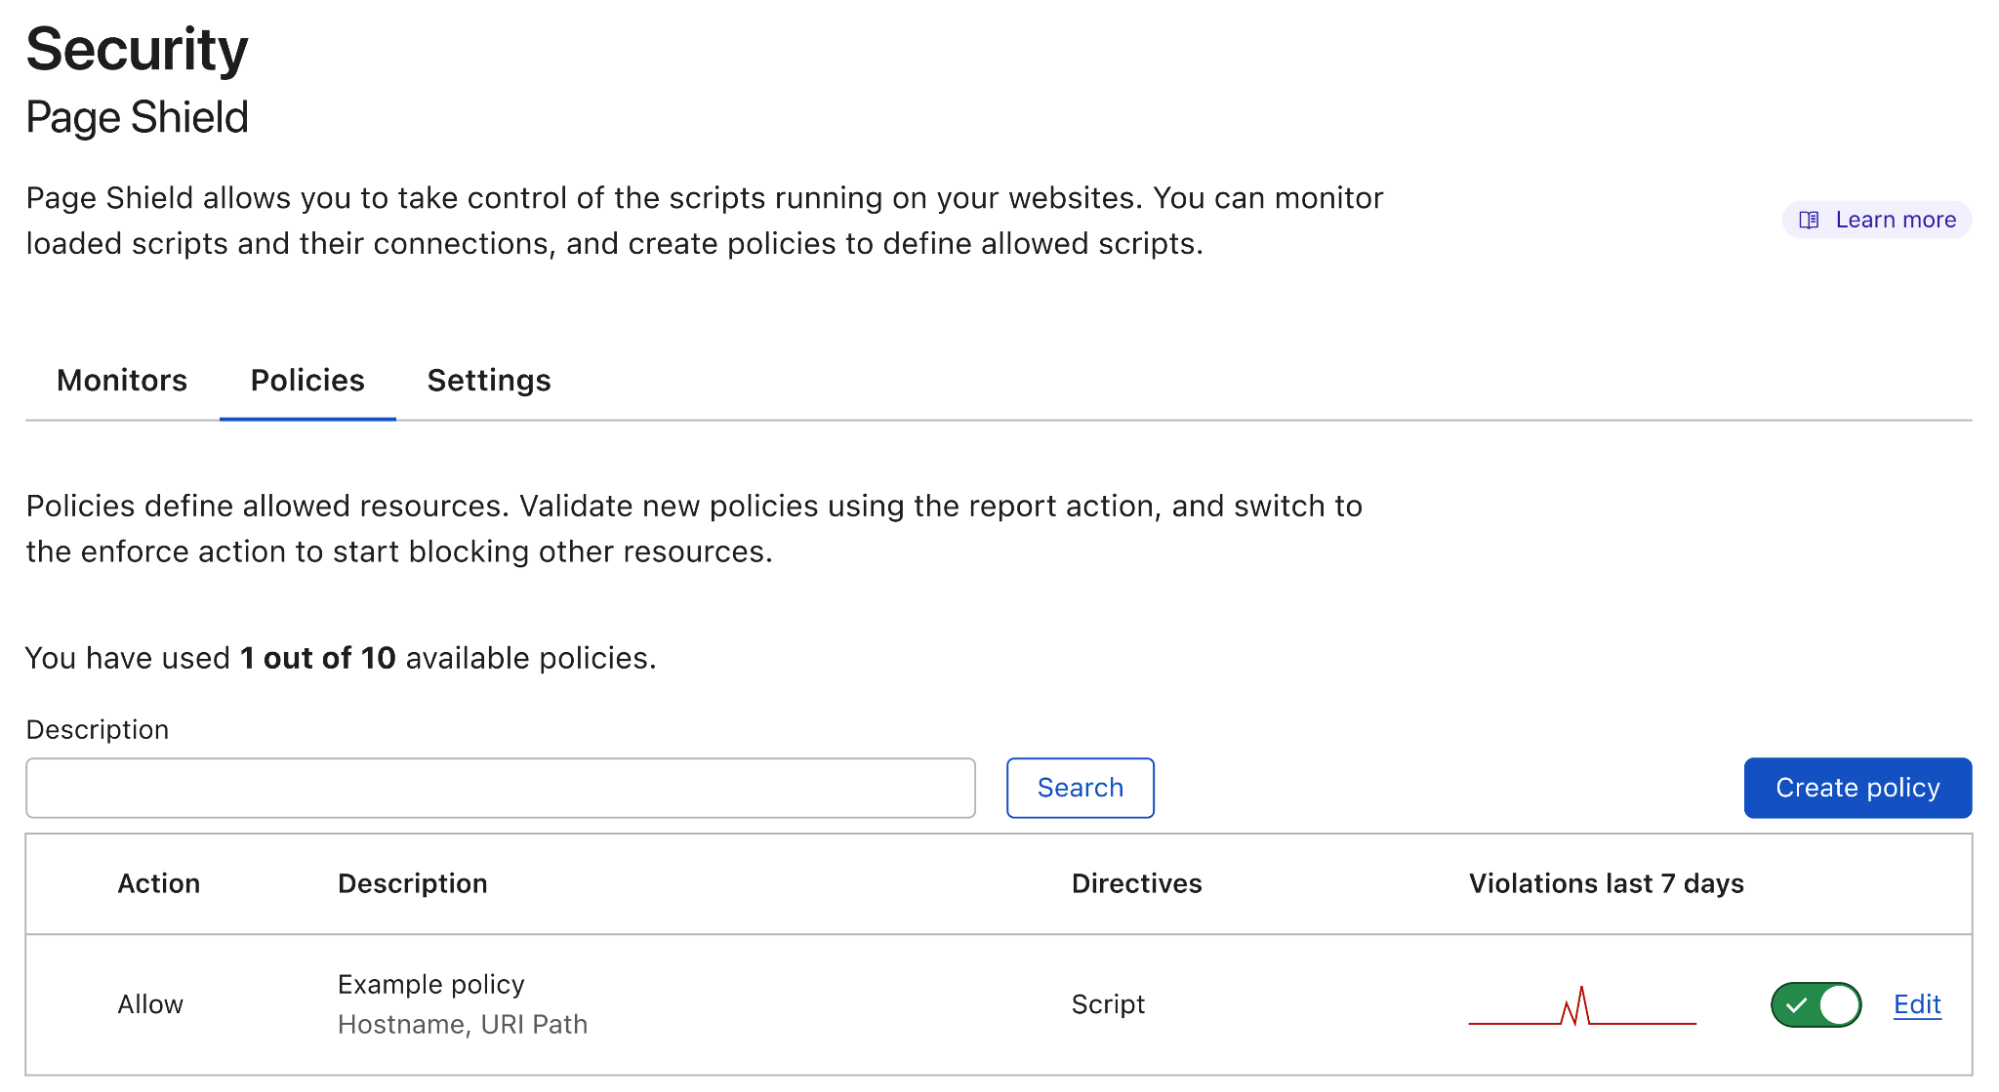
Today we are announcing our first major feature in this space: Page Shield policies. Here’s what it looks like:
Positive blocking policies
By leveraging our position in the network stack as a reverse proxy, and by using Page Shield policies, you can now enforce client browsers to load and execute JavaScript libraries only from your pre-approved list of allowed sources implementing a positive security model.
This ensures that an attacker that is able to inject a script in a page, won’t be successful in compromising users, as browsers will refuse to load it. At the same time, vetted tools will run without issues.
Policies will also soon allow you to specify data destinations (connection endpoints) also enforcing not only where JavaScript files are being loaded from, but also where the browser can send data to drastically reduce the risk of “Magecart-style” attacks.
CSPs as the core mechanism
Page Shield policies are currently implemented with Content Security Policies (CSPs), a feature natively supported by all major browsers.
CSPs are specially formatted HTTP response headers that are added to HTML page loads. These headers may contain one or more directives that instruct the browser how to and what to execute in the context of the given page.
From today Page Shield policies support the script-src directive. This directive lets application owners specify “where” JavaScript files are allowed to be loaded from. Support for the connect-src directive is also being finalized which behaves similarly to script-src, but specifies where the browser is allowed to send data “to”.
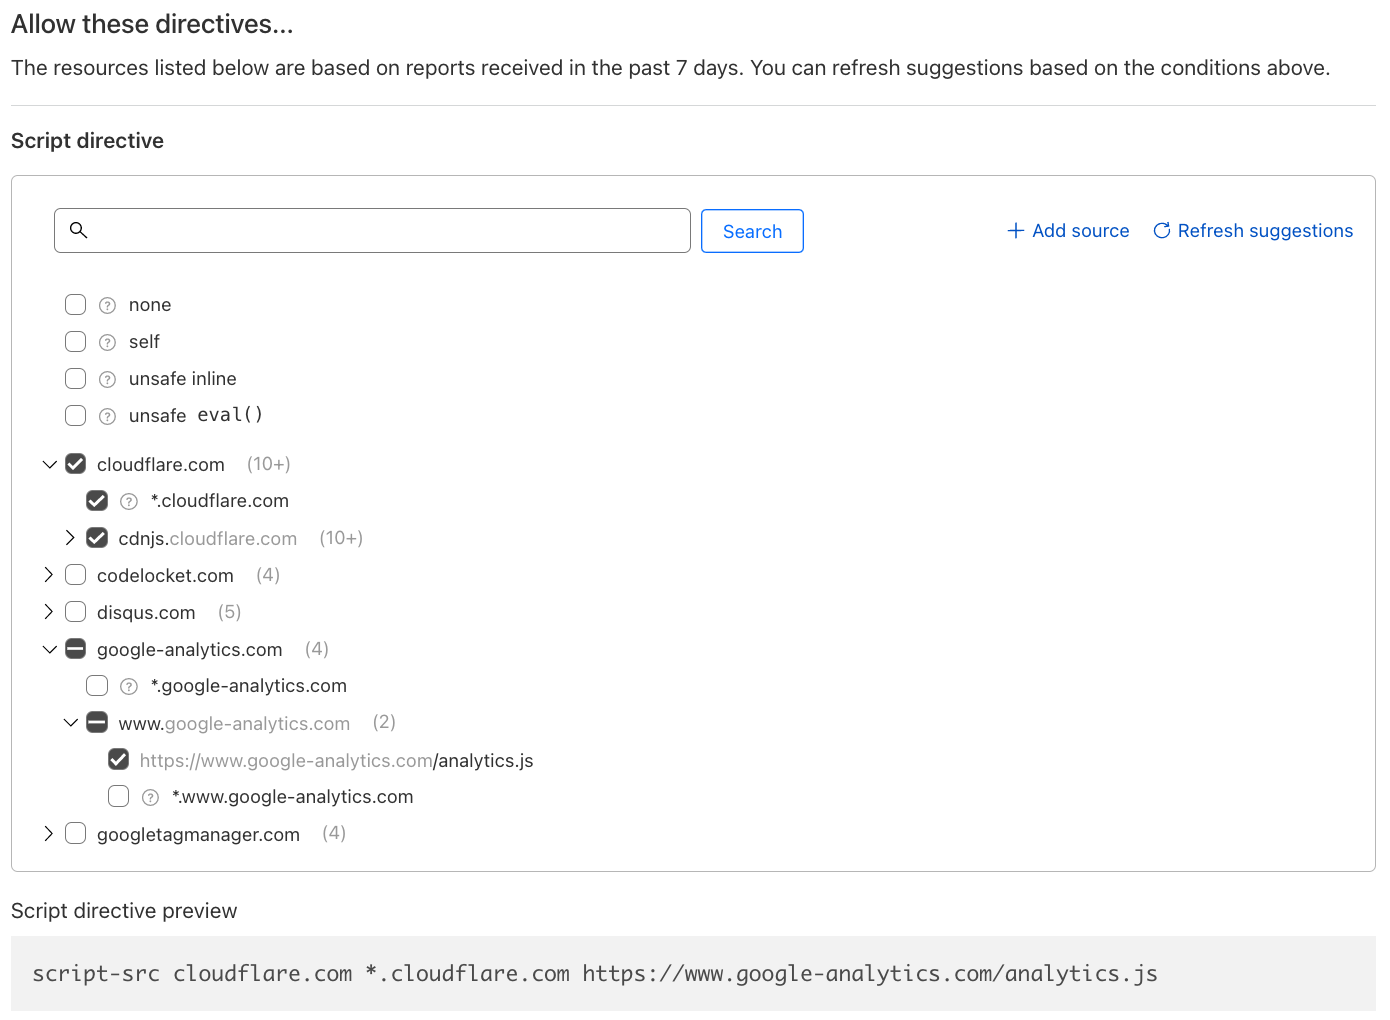
Let’s take a look at a one example and assume we were opening the following web page www.example.com/index.html and the browser received a CSP header as below:
The header instructs the browser to allow scripts (defined by the use of the script-src directive) to be loaded from the same hostname as the page itself (defined by self) as well as from any subdomain (*.example.com). It is additionally allowing any script under cdnjs and only a specific script for Google Analytics and no other scripts under the Google owned domain.
This ensures that any attacker injected script from different hosts would not be executed, drastically reducing the attack surface available.
If rather than Content-Security-Policy we had received a Content-Security-Policy-Report-Only header, the policy would not be enforced, but browsers would only send violation reports letting you know what is outside of policy.
This is useful when testing and when investigating new scripts that have been added to your application.
Additional statements are also available and supported by Page Shield within the script-src directive to block inline JavaScript (unsafe-inline) or normally unsafe function calls (unsafe-eval). These directives help prevent other attack types such as cross site scripting attacks (XSS).
Making policy management easy
CSPs, the underlying system used by Page Shield policies, are great but hard to manage. The larger the application, the more complex CSPs become while also causing a bottleneck for application development teams. This leads to CSPs becoming ineffective as security teams broaden the list of allowed hosts to the point that their purpose becomes debatable.
Making policy management easy, and ensuring they are effective, was a core goal of our design process. This led us to build a suggestions feature.
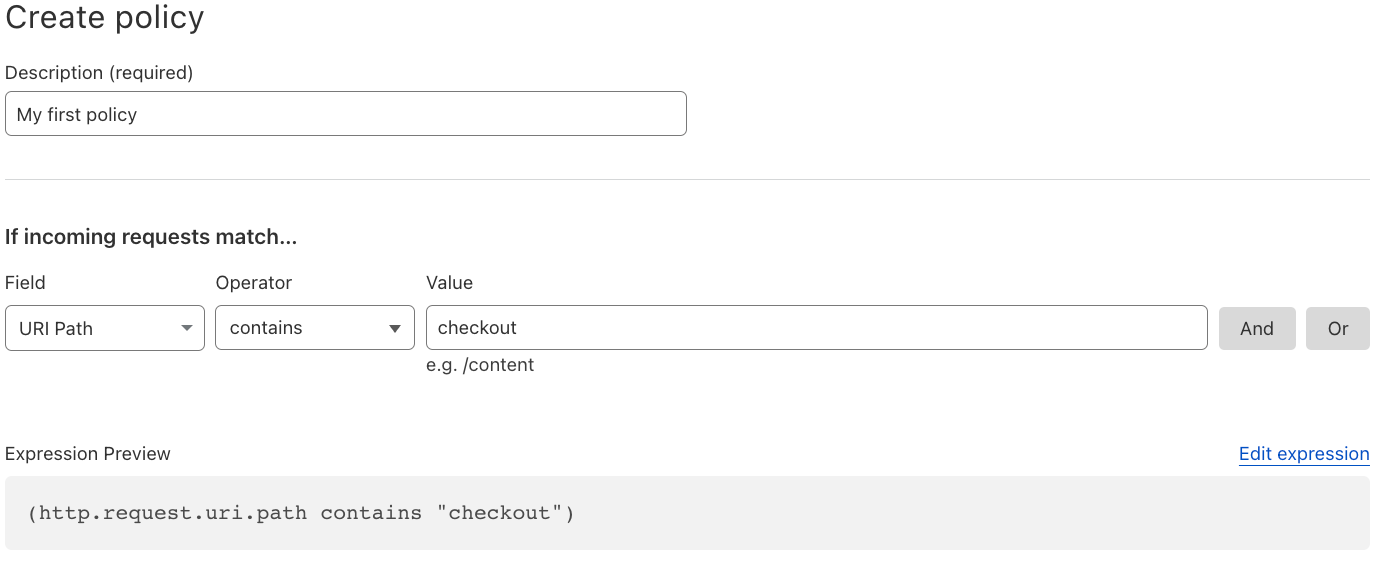
When deploying a policy, the first step is deciding “where” will the policy be applied to. Typical examples may include only your checkout flow or admin pages. This is done using wirefilter syntax, the same syntax that powers Cloudflare’s WAF.
Once the filter is specified, using the data already collected by Page Shield, the interface will provide a list of suggested directive values, making it very easy to build the simplest and most effective policy for your application. No need to worry about syntax, the policy preview will be shown before committing.
Finally, policies can be deployed both in “report only/log” and “enforce/allow”, letting you control and test as required.
We are currently finishing work on our alerting backend to warn you whenever we notice a spike in violation reports. This lets you easily return to the policy builder and update it with any newly seen script that may have been added by your development team.
Positive blocking policies are not enough
It is important not to forget that CSPs provide no security or malicious activity detection within the list of allowed endpoints. They are meant to reduce the likelihood of an attack happening by reducing the attack surface available. For this reason, Page Shield’s automated malicious activity detection will continue to function in the background regardless of any policy being deployed.
Secure your end user data today
All Cloudflare paid customers have access to a subset of Page Shield features today. Turning on Page Shield is as simple as clicking a button. Head over to Security > Page Shield and give it a go!
If you are an enterprise customer and are interested in Page Shield policies, reach out to your account team to get access to the full feature set.
In today’s digital world, security is a top priority for businesses. Whether you’re a Fortune 500 company or a startup just taking off, it’s essential to implement security measures in order to protect sensitive information. Security starts inside an organization; it starts with having Zero Trust principles that protect access to resources.
Mutual TLS (mTLS) is useful in a Zero Trust world to secure a wide range of network services and applications: APIs, web applications, microservices, databases and IoT devices. Cloudflare has products that enforce mTLS: API Shield uses it to secure API endpoints and Cloudflare Access uses it to secure applications. Now, with mTLS support for Workers you can use Workers to authenticate to services secured by mTLS directly. mTLS for Workers is now generally available for all Workers customers!
A recap on how TLS works
Before diving into mTLS, let’s first understand what TLS (Transport Layer Security) is. Any website that uses HTTPS, like the one you’re reading this blog on, uses TLS encryption. TLS is used to create private communications on the Internet – it gives users assurance that the website you’re connecting to is legitimate and any information passed to it is encrypted.
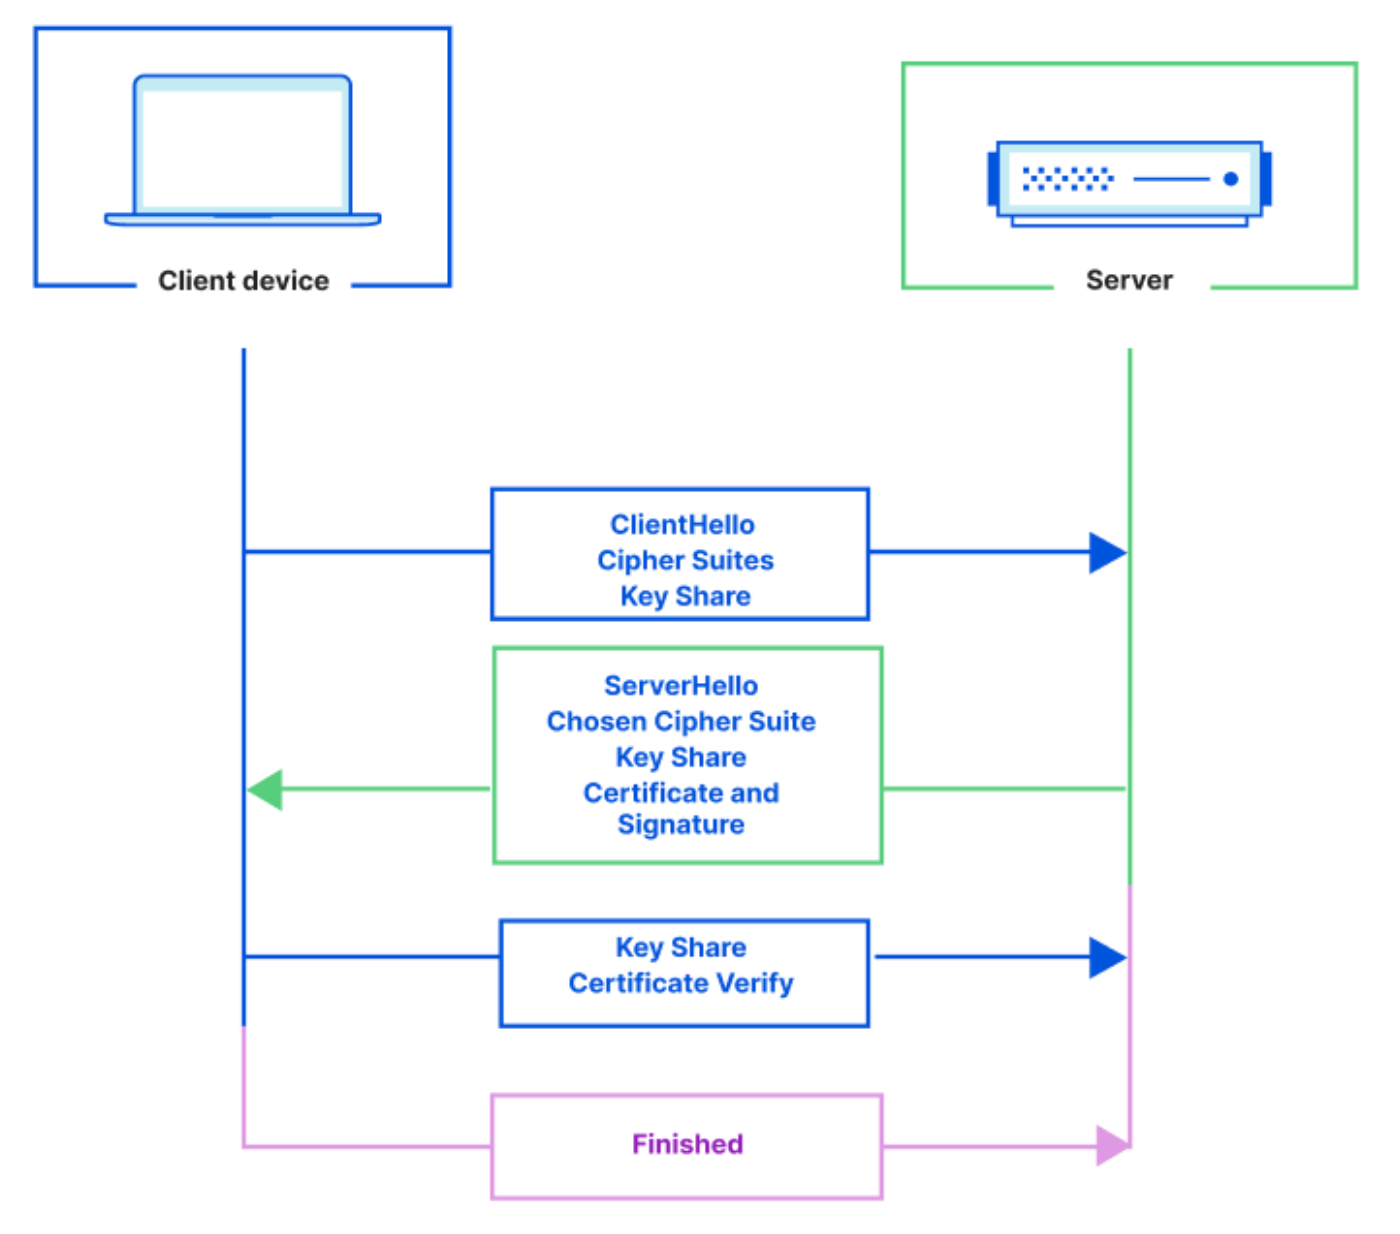
TLS is enforced through a TLS handshake where the client and server exchange messages in order to create a secure connection. The handshake consists of several steps outlined below:
The client and server exchange cryptographic keys, the client authenticates the server’s identity and the client and server generate a secret key that’s used to create an encrypted connection.
For most connections over the public Internet TLS is sufficient. If you have a website, for example a landing page, storefront or documentation, you want any user to be able to navigate to it – validating the identity of the client isn’t necessary. But, if you have services that run on a corporate network or private/sensitive applications you may want access to be locked down to only authorized clients.
Enter mTLS
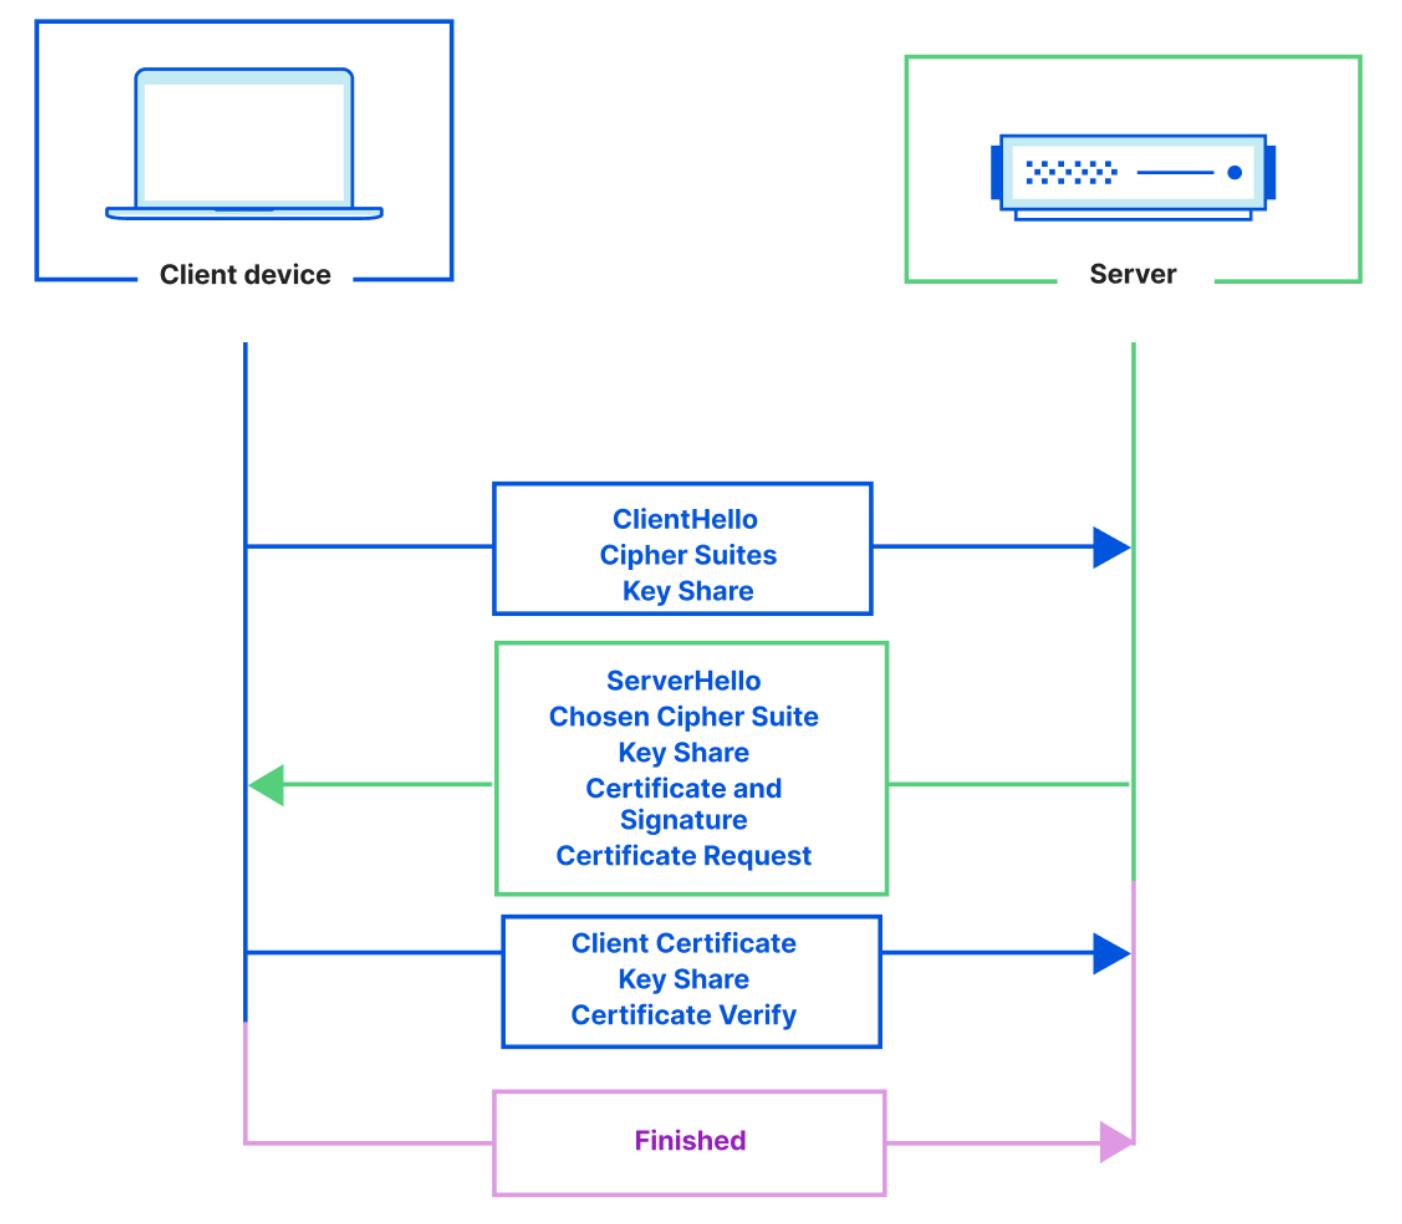
With mTLS, both the client and server present a digital certificate during the TLS handshake to mutually verify each other’s credentials and prove identities. mTLS adds additional steps to the TLS handshake in order to authenticate the client as well as the server.
In comparison to TLS, with mTLS the server also sends a ‘Certificate Request’ message that contains a list of parties that it trusts and it tells the client to respond with its certificate. The mTLS authentication process is outlined below:
mTLS is typically used when a managed list of clients (eg. users, devices) need access to a server. It uses cryptographically signed certificates for authentication, which are harder to spoof than passwords or tokens. Some common use cases include: communications between APIs or microservices, database connections from authorized hosts, and machine-to-machine IoT connections.
Introducing mTLS on Workers
With mTLS support on Workers, your Workers can now communicate with resources that enforce an mTLS connection. mTLS through Workers can be configured in just a few easy steps:
1. Upload a client certificate and private key obtained from your service that enforces mTLS using wrangler
To get per-request granularity, you can configure multiple mTLS certificates if you’re connecting to multiple hosts within the same Worker. There’s a limit of 1,000 certificates that can be uploaded per account. Contact your account team or reach out through the Cloudflare Developer Discord if you need more certificates.
Try it yourself
It’s that easy! For more information and to try it yourself, refer to our developer documentation – client authentication with mTLS.
We love to see what you’re developing on Workers. Join our Discord community and show us what you’re building!
As you wake up in the morning feeling sleepy and preoccupied, you receive an urgent email from a seemingly familiar source, and without much thought, you click on a link that you shouldn’t have. Sometimes it’s that simple, and this more than 30-year-old phishing method means chaos breaks loose – whether it’s your personal bank account or social media, where an attacker also begins to trick your family and friends; or at your company, with what could mean systems and data being compromised, services being disrupted, and all other subsequent consequences. Following up on our “Top 50 Most Impersonated Brands in phishing attacks” post, here are some tips to catch these scams before you fall for them.
We’re all human, and responding to or interacting with a malicious email remains the primary way to breach organizations. According to CISA, 90% of cyber attacks begin with a phishing email, and losses from a similar type of phishing attack, known as business email compromise (BEC), are a $43 billion problem facing organizations. One thing is for sure, phishing attacks are getting more sophisticated every day thanks to emerging tools like AI chatbots and the expanded usage of various communication apps (Teams, Google Chat, Slack, LinkedIn, etc.).
What is phishing? Where it starts (the hacker’s foot in the door)
Seems simple, but it is always good to remind everyone in simple terms. Email phishing is a deceptive technique where the attacker uses various types of bait, such as a convincing email or link, to trick victims into providing sensitive information or downloading malware. If the bait works — the attacker only needs it to work once — and the victim clicks on that link, the attacker now has a foot in the door to carry out further attacks with potentially devastating consequences. Anyone can be fooled by a general “phish” — but these attacks can also be focused on a single target, with specific information about the victim, called spear phishing.
Some alerts to bear in mind include the UK’s National Cyber Security Centre (NCSC), that phishing attacks are targeting individuals and organizations in a range of sectors. The White House National Cybersecurity Strategy (Cloudflare is ready for that) also highlights those risks. Germany, Japan or Australia are working on a similar approach.
Without further ado, here are some tips to protect yourself from phishing attacks.
Tips for Staying Safe Online: How to Avoid Being Reeled in By Phishing Scams
Don’t click strategy. If you get an email from your bank or government agencies like the IRS, instead of clicking on a link in the email, go directly to the website itself.
Look out for misspellings or strange characters in the sender’s email address. Phishing attempts often rely on look-alike domains or ‘from’ emails to encourage clicks. Common tactics are extra or switched letters (microsogft[.]com), omissions (microsft[.]com) or characters that look alike (the letter o and 0, or micr0soft[.]com).
Here’s a classic brand impersonation phish, using Chase as the trusted lure:
The link in the text body appears to be a Chase domain, but when clicked, it actually opens a SendGrid URL (a known email delivery platform). It then redirects the user to a phishing site impersonating Chase.
Think before clicking links to “unlock account” or “update payment details.” Technology services were one of the top industries to be used in phishing campaigns, due to the personal information that can be found in our email, online storage, and social media accounts. Hover over a link and confirm it’s a URL you’re familiar with before clicking.
Be wary of financial-related messages. Financial institutions are the most likely industry to be phished, so pause and assess any messages asking to accept or make a payment.
Look out for messages that create a sense of urgency. Emails or text messages that warn of a final chance to pick up a package, or last chance to confirm an account, are likely fake. The rise in online shopping during the pandemic has made retail and logistics/shipping companies a hot target for these types of phishing attempts.
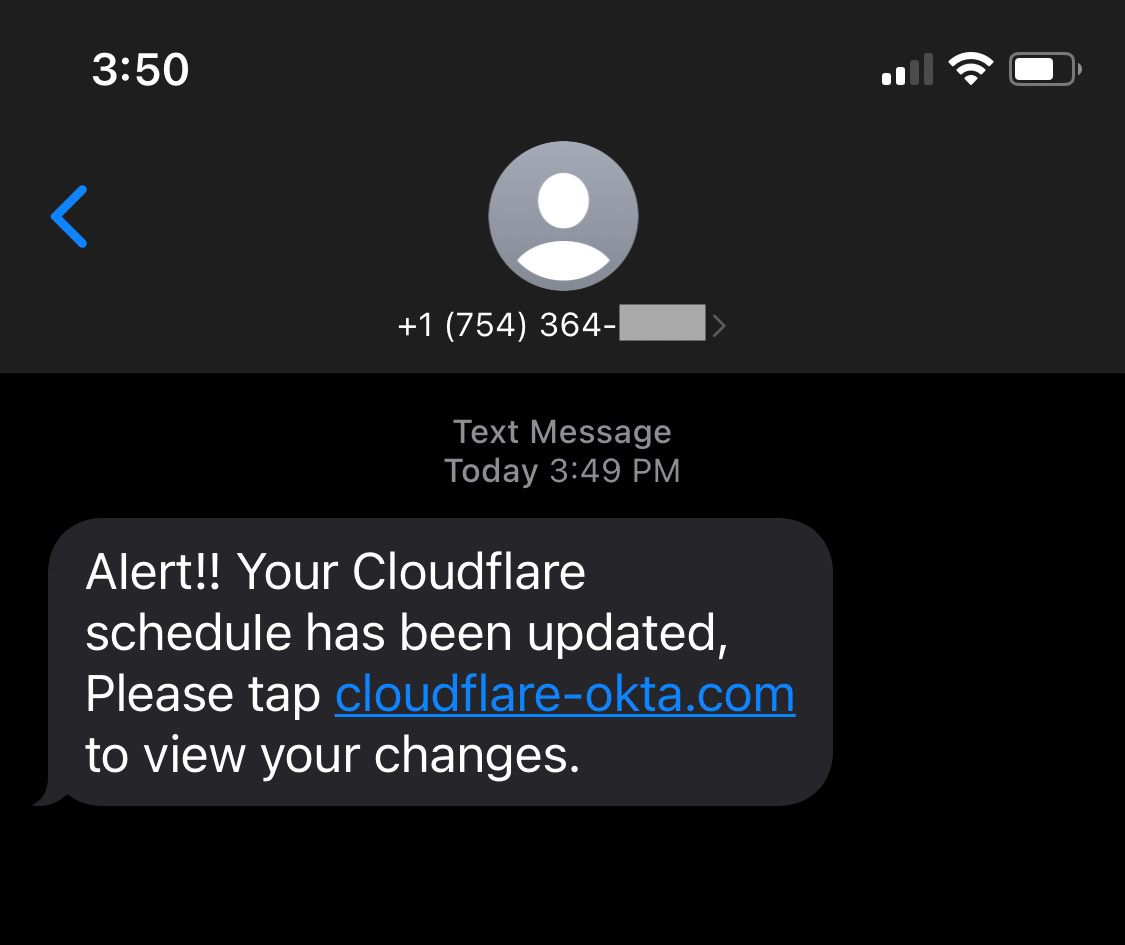
Both financial and package delivery scams typically use the SMS phishing attack, or smishing, and are related to the attacker’s use of SMS messages to lure the victims. Cloudflare was the target of this type of phishing a few months ago (it was stopped). Next, we show you an example of a text message from that thwarted attack:
If things sound too good to be true, they probably are. Beware of “limited time offers” for free gifts, exclusive services, or great deals on trips to Hawaii or the Maldives. Phishing emails target our senses of satisfaction, pleasure, and excitement to compel us to make split second decisions without thinking things through. These types of tactics are lures for a user to click on a link or provide sensitive information. Pause, even if it’s for a few seconds, and quickly look up the offer online to see if others have received similar offers.
Very important message from a very important… Phishing emails sometimes mimic high-ranking individuals, urging urgent action such as money transfers or credential sharing. Scrutinize emails with such requests, and verify their authenticity. Contact your manager if the sender is a CEO. For unfamiliar politicians, assess the request’s feasibility before responding.
The message body is full of errors (but beware of AI tools). Poor grammar, spelling, and sentence structure may indicate that an email is not from a reputable source. That said, recent AI text tools have made it easier for hackers or bad actors to create convincing and error-free copies.
Romance scam emails. These are emails where scammers adopt a fake online identity to gain a victim’s affection and trust. They may also send an email that appears to have been sent in error, prompting the recipient to respond and initiating a conversation with the fraudster. This tactic is used to lure victims.
Use a password manager. Password managers will verify if the domain name matches what you expect, and will warn you if you try to fill in your password on the wrong domain name.
If you want to apply even greater scrutiny to a potential phishing email, you can check out our learning center to understand what happens when an email does not pass standard authentication methods like SPF, DKIM, or DMARC.
A few more Cloudflare related trends, besides the Top 50 Most Impersonated Brands, comes from Cloudflare Area 1. In 2022, our services focused on email protection identified and kept 2.3 billion unwanted messages out of customer inboxes. On average, we blocked 6.3 million messages per day. That’s almost 44,000 every 10 minutes, which is the time it takes to read a blog post like this one.
Typically, the type of email threats most used (looking at our Area 1 January 2023 data) are: identity deception, malicious links, brand impersonation, malicious attachments, scam, extortion, account compromise. And there’s also voice phishing.
Voice phishing, also known as vishing, is another common threat and is related to the practice of tricking people into sharing sensitive information through telephone calls. Victims are led to believe they are talking to a trusted entity, such as the tax authority, their employer, or an airline they use. Here, you can learn more about protecting yourself or your company from voice phishing.
Another type of attack is the watering hole attack, where hackers identify websites frequented by users within a targeted organization and then compromise those websites to distribute malware. Those are often times associated with supply chain exploitation.
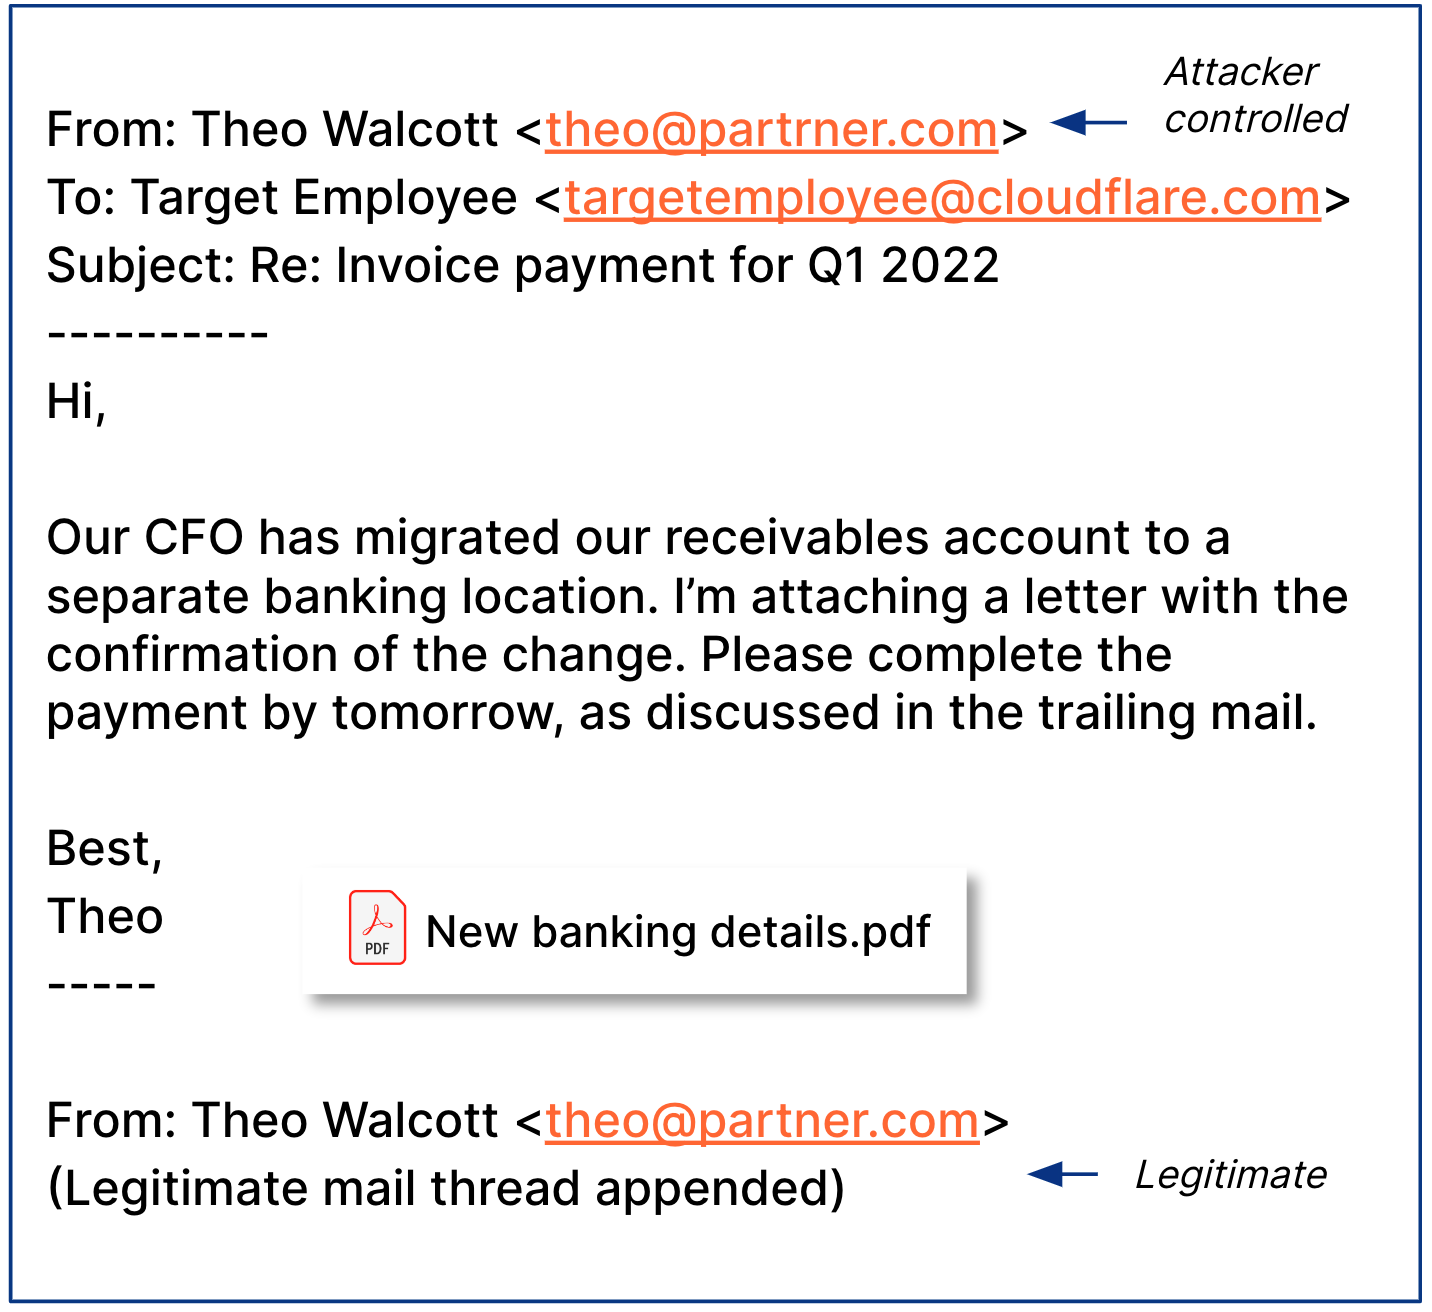
Next, we show a phishing email example that was received from a real vendor that got an email account hacked in what is called vendor invoice fraud:
Last but not least in our list of examples, there’s also Calendar phishing, where a fraudster could potentially use a cloud email account to inject fake invites into target employee calendars. Those are detected and avoided with products in our Cloudflare Zero Trust product.
Email Link Isolation approach: a safety net for phishing attacks
As we wrote recently for CIO Week, there’s also a possible safety net, even if the best trained user mistakes a good link from a bad link. Leveraging the Cloudflare Browser Isolation service, Email Link Isolation turns Cloudflare’s cloud email security into the most comprehensive solution when it comes to protecting against phishing attacks that go beyond just email. It rewrites and isolates links that could be exploited, keeps users vigilant by alerting them of the uncertainty around the website they’re about to visit, and protects against malware and vulnerabilities. Also, in true Cloudflare fashion, it’s a one-click deployment. Check the related blog post to learn more.
That said, not all malicious links come from emails. If you’re concerned about malicious links that may come through Instant Messaging or other communication tools (Slack, iMessage, Facebook, Instagram, WhatsApp, etc), Zero Trust and Remote Browser Isolation are an effective way to go.
Conclusion: better safe than sorry
As we saw, email is one of the most ubiquitous and also most exploited tools that businesses use every single day. Baiting users into clicking malicious links within an email has been a particularly long-standing tactic for the vast majority of bad actors, from the most sophisticated criminal organizations to the least experienced attackers. So, remember, when online:
If you want to learn more about email security, you can visit our Learning Center or reach out for a complimentary phishing risk assessment for your organization.
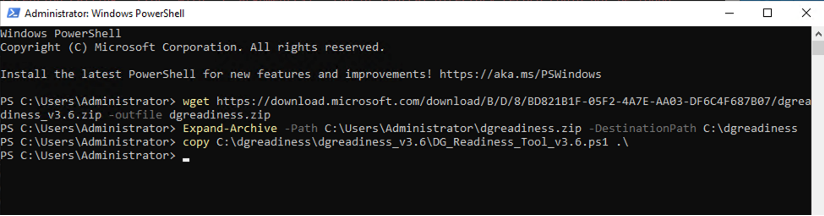
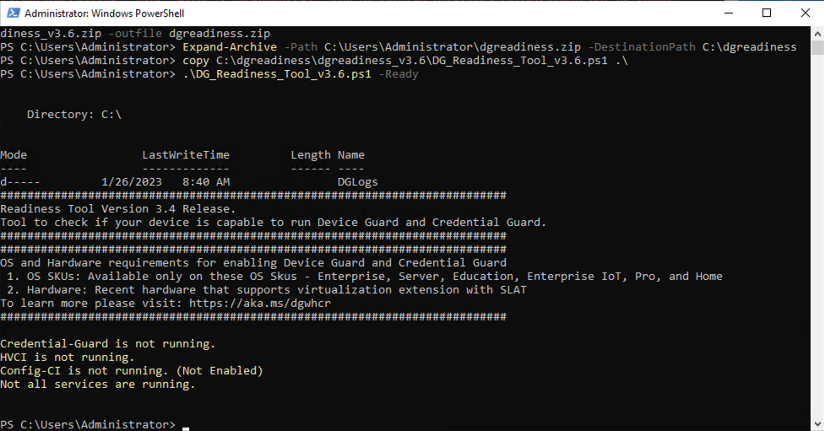
As a security company, it’s critical that we have good processes for dealing with security issues. We regularly release software to our servers – on a daily basis even – which includes new features, bug fixes, and as required, security patches. But just as critical is the software which is embedded into the server hardware, known as firmware. Primarily of interest is the BIOS and Baseboard Management Controller (BMC), but many other components also have firmware such as Network Interface Cards (NICs).
As the world becomes more digital, software which needs updating is appearing in more and more devices. As well as my computer, over the last year, I have waited patiently while firmware has updated in my TV, vacuum cleaner, lawn mower and light bulbs. It can be a cumbersome process, including obtaining the firmware, deploying it to the device which needs updating, navigating menus and other commands to initiate the update, and then waiting several minutes for the update to complete.
Firmware updates can be annoying even if you only have a couple of devices. We have more than a few devices at Cloudflare. We have a huge number of servers of varying kinds, from varying vendors, spread over 285 cities worldwide. We need to be able to rapidly deploy various types of firmware updates to all of them, reliably, and automatically, without any kind of manual intervention.
In this blog post I will outline the methods that we use to automate firmware deployment to our entire fleet. We have been using this method for several years now, and have deployed firmware without interrupting our SRE team, entirely automatically.
Background
A key component of our ability to deploy firmware at scale is the iPXE, an open source boot loader. iPXE is the glue which operates between the server and operating system, and is responsible for loading the operating system after the server has completed the Power On Self Test (POST). It is very flexible and contains a scripting language. With iPXE, we can write boot scripts which query the firmware version, continue booting if the correct firmware version is deployed, or if not, boot into a flashing environment to flash the correct firmware.
We only deploy new firmware when our systems are out of production, so we need a method to coordinate deployment only on out of production systems. The simplest way to do this is when they are rebooting, because by definition they are out of production then. We reboot our entire fleet every month, and have the ability to schedule reboots more urgently if required to deal with a security issue. Regularly rebooting our fleets has many advantages. We can deploy the latest Linux kernel, base operating system, and ensure that we do not have any breaking changes in our operating system and configuration management environment that breaks on fresh boot.
Our entire fleet operates in UEFI mode. UEFI is a modern replacement for the BIOS and offers more features and more security, such as Secure Boot. A full description of all of these changes is outside the scope of this article, but essentially UEFI provides a minimal environment and shell capable of executing binaries. Secure Boot ensures that the binaries are signed with keys embedded in the system, to prevent a bad actor from tampering with our software.
How we update the BIOS
We are able to update the BIOS without booting any operating system, purely by taking advantage of features offered by iPXE and the UEFI shell. This requires a flashing binary written for the UEFI environment.
Upon boot, iPXE is started. Through iPXE’s built-in variable ${smbios/0.5.0} it is possible to query the current BIOS version, and compare it to the latest version, and trigger a flash only if there is a mis-match. iPXE then downloads the files required for the firmware update to a ramdisk.
The following is an example of a very basic iPXE script which performs such an action:
# Check whether the BIOS version is 2.03
iseq ${smbios/0.5.0} 2.03 || goto biosupdate
echo Nothing to do for {{ model }}
exit 0

:biosupdate
echo Trying to update BIOS/UEFI...
echo Current: ${smbios/0.5.0}
echo New: 2.03

imgfetch ${boot_prefix}/tools/x64/shell.efi || goto unexpected_error
imgfetch startup.nsh || goto unexpected_error

imgfetch AfuEfix64.efi || goto unexpected_error
imgfetch bios-2.03.bin || goto unexpected_error

imgexec shell.efi || goto unexpected_error
Meanwhile, startup.nsh contains the binary to run and command line arguments to effect the flash:
After rebooting, the machine will boot using its new BIOS firmware, version 2.03. Since ${smbios/0.5.0} now contains 2.03, the machine continues to boot and enter production.
Other firmware updates such as BMC, network cards and more
Unfortunately, the number of vendors that support firmware updates with UEFI flashing binaries is limited. There are a large number of other updates that we need to perform such as BMC and NIC.
Consequently, we need another way to flash these binaries. Thankfully, these vendors invariably support flashing from Linux. Consequently we can perform flashing from a minimal Linux environment. Since vendor firmware updates are typically closed source utilities and vendors are often highly secretive about firmware flashing, we can ensure that the flashing environment does not provide an attackable surface by ensuring that the network is not configured. If it’s not on the network, it can’t be attacked and exploited.
Not being on the network means that we need to inject files into the boot process when the machine boots. We can accomplish this with an initial ramdisk (initrd), and iPXE makes it easy to add additional initrd to the boot.
Creating an initrd is as simple as creating an archive of the files using cpio using the newc archive format.
Let’s imagine we are going to flash Broadcom NIC firmware. We’ll use the bnxtnvm firmware update utility, the firmware image firmware.pkg, and a shell script called flash to automate the task.
The files are laid out in the file system like this:
cd broadcom
find .
./opt/preflight
./opt/preflight/scripts
./opt/preflight/scripts/flash
./opt/broadcom
./opt/broadcom/firmware.pkg
./opt/broadcom/bnxtnvm
Now we compress all of these files into an image called broadcom.img.
This is the first step completed; we have the firmware packaged up into an initrd.
Since it’s challenging to read, say, the firmware version of the NIC, from the EFI shell, we store firmware versions as UEFI variables. These can be written from Linux via efivars, the UEFI variable file system, and then read by iPXE on boot.
An example of writing an EFI variable from Linux looks like this:
declare -r fw_path='/sys/firmware/efi/efivars/broadcom-fw-9ca25c23-368a-4c21-943f-7d91f2b76008'
declare -r efi_header='\x07\x00\x00\x00'
declare -r version='1.05'

/bin/mount -o remount,rw,nosuid,nodev,noexec,noatime none /sys/firmware/efi/efivars

# Files on efivarfs are immutable by default, so remove the immutable flag so that we can write to it: https://docs.kernel.org/filesystems/efivarfs.html
if [ -f "${fw_path}" ] ; then
    /usr/bin/chattr -i "${fw_path}"
fi

echo -n -e "${efi_header}${version}" >| "$fw_path"
Then we can write an iPXE configuration file to load the flashing kernel, userland and flashing utilities.
set cf/guid 9ca25c23-368a-4c21-943f-7d91f2b76008

iseq ${efivar/broadcom-fw-${cf/guid}} 1.05 && echo Not flashing broadcom firmware, version already at 1.05 || goto update
exit

:update
echo Starting broadcom firmware update
kernel ${boot_prefix}/vmlinuz initrd=baseimg.img initrd=linux-initramfs-modules.img initrd=broadcom.img
initrd ${boot_prefix}/baseimg.img
initrd ${boot_prefix}/linux-initramfs-modules.img
initrd ${boot_prefix}/firmware/broadcom.img
Flashing scripts are deposited into /opt/preflight/scripts and we use systemd to execute them with run-parts on boot:
/etc/systemd/system/preflight.service:
[Unit]
Description=Pre-salt checks and simple configurations on boot
Before=salt-highstate.service
After=network.target

[Service]
Type=oneshot
RemainAfterExit=yes
ExecStart=/bin/run-parts --verbose /opt/preflight/scripts

[Install]
WantedBy=multi-user.target
RequiredBy=salt-highstate.service
An example flashing script in /opt/preflight/scripts might look like:
#!/bin/bash

trap 'catch $? $LINENO' ERR
catch(){
    #error handling goes here
    echo "Error $1 occured on line $2"
}

declare -r fw_path='/sys/firmware/efi/efivars/broadcom-fw-9ca25c23-368a-4c21-943f-7d91f2b76008'
declare -r efi_header='\x07\x00\x00\x00'
declare -r version='1.05'

lspci | grep -q Broadcom
if [ $? -eq 0 ]; then
    echo "Broadcom firmware flashing starting"
    if [ ! -f "$fw_path" ] ; then
        chmod +x /opt/broadcom/bnxtnvm
        declare -r interface=$(/opt/broadcom/bnxtnvm listdev | grep "Device Interface Name" | awk -F ": " '{print $2}')
        /opt/broadcom/bnxtnvm -dev=${interface} -force -y install /opt/broadcom/BCM957414M4142C.pkg
        declare -r status=$?
        declare -r currentversion=$(/opt/broadcom/bnxtnvm -dev=${interface} device_info | grep "Package version on NVM" | awk -F ": " '{print $2}')
        declare -r expectedversion=$(echo $version | awk '{print $2}')
        if [ $status -eq 0 -a "$currentversion" = "$expectedversion" ]; then
            echo "Broadcom firmware $version flashed successfully"
            /bin/mount -o remount,rw,nosuid,nodev,noexec,noatime none /sys/firmware/efi/efivars
            echo -n -e "${efi_header}${version}" >| "$fw_path"
            echo "Created $fw_path"
        else
            echo "Failed to flash Broadcom firmware $version"
            /opt/broadcom/bnxtnvm -dev=${interface} device_info
        fi
    else
        echo "Broadcom firmware up-to-date"
    fi
else
    echo "No Broadcom NIC installed"
    /bin/mount -o remount,rw,nosuid,nodev,noexec,noatime none /sys/firmware/efi/efivars
    if [ -f "${fw_path}" ] ; then
        /usr/bin/chattr -i "${fw_path}"
    fi
    echo -n -e "${efi_header}${version}" >| "$fw_path"
    echo "Created $fw_path"
fi

if [ -f "${fw_path}" ]; then
    echo "rebooting in 60 seconds"
    sleep 60
    /sbin/reboot
fi
Conclusion
Whether you manage just your laptop or desktop computer, or a fleet of servers, it’s important to keep the firmware updated to ensure that the availability, performance and security of the devices is maintained.
If you have a few devices and would benefit from automating the deployment process, we hope that we have inspired you to have a go by making use of some basic open source tools such as the iPXE boot loader and some scripting.
Final thanks to my colleague Ignat Korchagin who did a large amount of the original work on the UEFI BIOS firmware flashing infrastructure.
Grab has always regarded security as one of our top priorities; this is especially important for data platform teams. We need to control access to data and resources in order to protect our consumers and ensure compliance with various, continuously evolving security standards.
Additionally, we want to keep the process convenient, simple, and easily scalable for teams. However, as Grab continues to grow, we have more services and resources to manage and it becomes increasingly difficult to keep the process frictionless. That’s why we decided to move from Role-Based Access Control (RBAC) to Attribute-Based Access Control (ABAC) for our Kafka Control Plane (KCP).
In this article, you will learn how Grab’s streaming data platform team (Coban) deleted manual role and permission management of hundreds of roles and resources, and reduced operational overhead of requesting or approving permissions to zero by moving from RBAC to ABAC.
Introduction
Kafka is widely used across Grab teams as a streaming platform. For decentralised Kafka resource (e.g. topic) management, teams have the right to create, update, or delete based on their needs. As the data platform team, we implemented a KCP to ensure that these operations are only performed by authorised parties, especially on multi-tenant Kafka clusters.
For internal access management, Grab uses its own Identity and Access Management (IAM) service, based on RBAC, to support authentication and authorisation processes:
Authentication verifies the identity of a user or service, for example, if the provided token is valid or expired.
Authorisation determines their access rights, for example, whether users can only update and/or delete their own Kafka topics.
In RBAC, roles, permissions, actions, resources, and the relationships between them need to be defined in the IAM service. They are used to determine whether a user can access a certain resource.
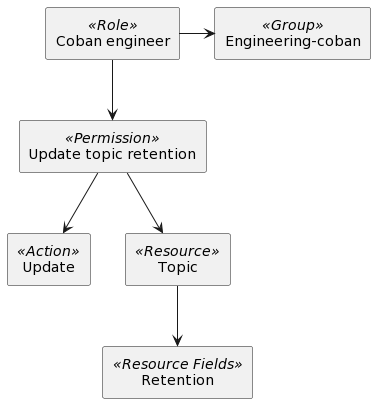
In the following example, we can see how IAM concepts come together. The Coban engineer role belongs to the Engineering-coban group and has permission to update the retention topic. Any engineer added to the Engineering-coban group will also be able to update the topic retention.
Following the same concept, each team using the KCP has its own roles, permissions, and resources created in the system. However, there are some disadvantages to this approach:
It leads to a significant growth in the number of access control artifacts both platform and user teams need to manage, and increased time and effort to debug access control issues. We start off by finding which group the engineer belongs to and locating the group that should be used for KCP, and then trace to role and permissions.
All group membership access requests of new joiners need to be reviewed and approved by their direct managers. This leads to a lot of backlog as new joiners might have multiple groups to join and managers might not be able to review them timely. In some cases, roles need to be re-applied or renewed every 90 days, which further adds to the delay.
Group memberships are not updated to reflect active members in the team, leaving some engineers with access they don’t need and others with access they should have but don’t.
Solution
With ABAC, access management becomes a lot easier. Any new joiner to a specific team gets the same access rights as everyone on that team – no need for manual approval from a manager. However, for ABAC to work, we need these components in place:
User attributes: Who is the subject (actor) of a request?
Resource attributes: Which object (resource) does the actor want to deal with?
Evaluation engine: How do we decide if the actor is allowed to perform the action on the resource?
User attributes
All users have certain attributes depending on the department or team they belong to. This data is then stored and synced automatically with the human resource management system (HRMS) tool, which acts as a source of truth for Grab-wide data, every time a user switches teams, roles, or leaves the company.
Resource attributes
Resource provisioning is an authenticated operation. This means that KCP knows who sent the requests and what each request/action is about. Similarly, resource attributes can be derived from their creators. For new resource provisioning, it is possible to capture the resource tags and store them after authentication. For existing resources, a major challenge was the need to backfill the tagging and ensure a seamless transition from the user’s perspective. In the past, all resource provisioning operations were done by a centralised platform team and most of the existing resource attributes are still under platform team’s ownership.
Evaluation engine
We chose to use Open Policy Agent (OPA) as our policy evaluation engine mainly for its wide community support, applicable feature set, and extensibility to other tools and platforms in our system. This is also currently used by our team for Kafka authorisation. The policies are written in Rego, the default language supported by OPA.
Architecture and implementation
With ABAC, the access control process looks like this:
User attributes
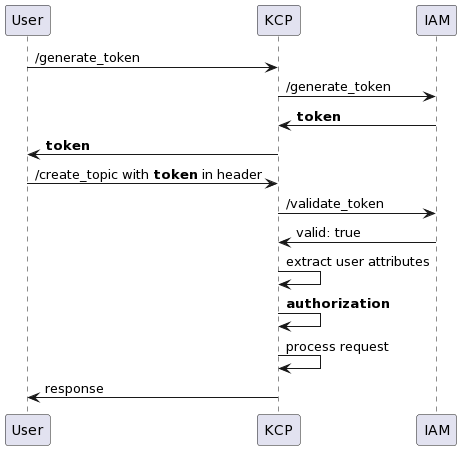
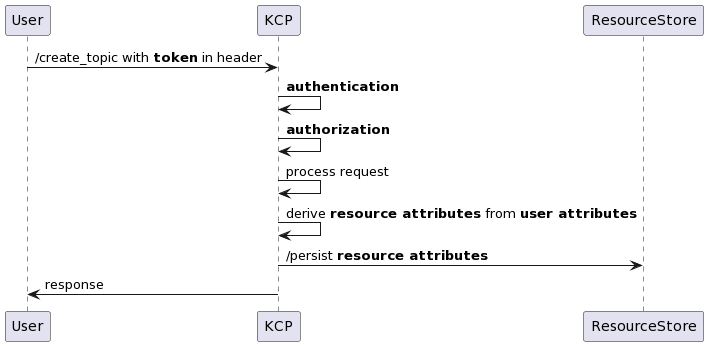
Authentication is handled by the IAM service. In the /generate_token call, a user requests an authentication token from KCP before calling an authenticated endpoint. KCP then calls IAM to generate a token and returns it to the user.
In the /create_topic call, the user includes the generated token in the request header. KCP takes the token and verifies the token validity with IAM. User attributes are then extracted from the token payload for later use in request authorisation.
Some of the common attributes we use for our policy are user identifier, department code, and team code, which provide details like a user’s department and work scope.
When it comes to data governance and central platform and identity teams, one of the major challenges was standardising the set of attributes to be used for clear and consistent ABAC policies across platforms so that their lifecycle and changes could be governed. This was an important shift in the mental model for attribute management over the RBAC model.
Resource attributes
For newly created resources, attributes will be derived from user attributes that are captured during the authentication process.
Previously with RBAC, existing resources did not have the required attributes. Since migrating to ABAC, the implementation has tagged newly created resources and ensured that their attributes are up to standard. IAM was also still doing the actual authorisation using RBAC.
It is also important to note that we collaborated with data governance teams to backfill Kafka resource ownership. Having accurate ownership of resources like data lake or Kafka topics enabled us to move toward a self-service model and remove bottlenecks from centralised platform teams.
After identifying most of the resource ownership, we started switching over to ABAC. The transition was smooth and had no impact on user experience. The remaining unidentified resources were tagged to lost-and-found and could be reclaimed by service teams when they needed permission to manage them.
Open Policy Agent
The most common question when implementing the policy is “how do you define ownership by attributes?”. With respect to the principle of least privilege, each policy must be sufficiently strict to limit access to only the relevant parties. In the end, we aligned as an organisation on defining ownership by department and team.
We created a simple example below to demonstrate how to define a policy:
In this example, we start with denying access to everyone. If the updateTopic endpoint is called and the department and team attributes between user and resource are matched, access is allowed.
With a similar scenario, we would need 1 role, 1 action, 1 resource, and 1 mapping (a.k.a permission) between action and resource. We will need to keep adding resources and permissions when we have new resources created. Compared to the policy above, no other changes are required.
With ABAC, there are no further setup or access requests needed when a user changes teams. The user will be tagged to different attributes, automatically granted access to the new team’s resources, and excluded from the previous team’s resources.
Another consideration we had was making sure that the policy is well-written and transparent in terms of change history. We decided to include this as part of our application code so every change is accounted for in the unit test and review process.
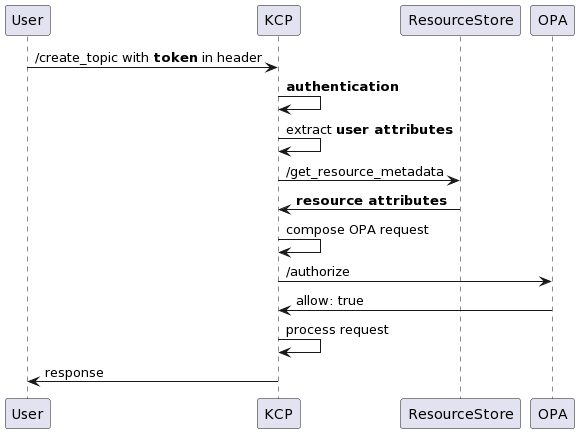
Authorisation
The last part of the ABAC process is authorisation logic. We added the logic to the middleware so that we could make a call to OPA for authorisation.
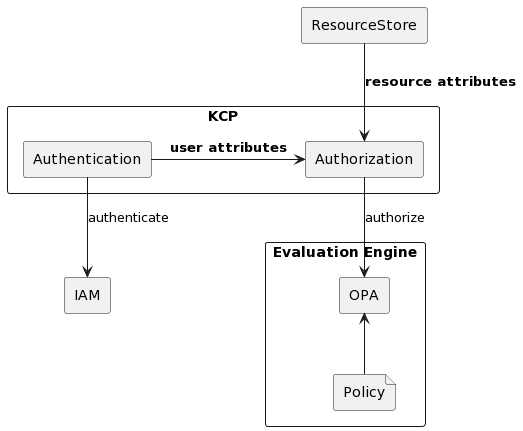
To ensure token validity after authentication, KCP extracts user attributes from the token payload and fetches resource attributes from the resource store. It combines the request metadata such as method and endpoint, along with the user and resource attributes into an OPA request. OPA then evaluates the request based on the redefined policy above and returns a response.
Auditability
For ABAC authorisation, there are two key areas of consideration:
Who made changes to the policy, who deployed, and when the change was made
Who accessed what resource and when
We manage policies in a dedicated GitLab repository and changes are submitted via merge requests. Based on the commit history, we can easily tell who made changes, reviewed, approved, and deployed the policy.
For resource access, OPA produces a decision log containing user attributes, resource attributes, and the authorisation decision for every call it serves. The log is kept for five days in Kibana for debugging purposes, then moved to S3 where it is kept for 28 days.
Impact
The move to ABAC authorisation has improved our controls as compared to the previous RBAC model, with the biggest impact being fewer resources to manage. Some other benefits include:
Optimised resource allocation: Discarded over 200 roles, 200 permissions, and almost 3000 unused resources from IAM services, simplifying our debugging process. Now, we can simply check the user and resource attributes as needed.
Simplified resource management: In the three months we have been using ABAC, about 600 resources have been added without any increase in complexity for authorisation, which is significantly lesser than the RBAC model.
Reduction in delays and waiting time: Engineers no longer have to wait for approval for KCP access.
Better governance over resource ownership and costs: ABAC allowed us to have a standardised and accurate tagging system of almost 3000 resources.
Learnings
Although ABAC does provide significant improvements over RBAC, it comes with its own caveats:
It needs a reliable and comprehensive attribute tagging system to function properly. This only became possible after roughly three months of identifying and tagging the ownership of existing resources by both automated and manual methods.
Tags should be kept up to date with the company’s growth. Teams could lose access to their resources if they are wrongly tagged. It needs a mechanism to keep up with changes, or people will unexpectedly lose access when user and resource attributes are changed.
What’s next?
To keep up with organisational growth, KCP needs to start listening to the IAM stream, which is where all IAM changes are published. This will allow KCP to regularly update user attributes and refresh resource attributes when restructuring occurs, allowing authorisation to be done with the right data.
Constant collaboration with HR to ensure that we maintain sufficient user attributes (no extra unused information) that remain clean so ABAC works as expected.
Grab is the leading superapp platform in Southeast Asia, providing everyday services that matter to consumers. More than just a ride-hailing and food delivery app, Grab offers a wide range of on-demand services in the region, including mobility, food, package and grocery delivery services, mobile payments, and financial services across 428 cities in eight countries.
Powered by technology and driven by heart, our mission is to drive Southeast Asia forward by creating economic empowerment for everyone. If this mission speaks to you, join our team today!
The new IRAP report includes an additional six AWS services, as well as the new AWS Melbourne Region, that are now assessed at the PROTECTED level under IRAP. This brings the total number of services assessed at the PROTECTED level to 139.
The following are the six newly assessed services:
AWS has developed an IRAP documentation pack to assist Australian government agencies and their partners to plan, architect, and assess risk for their workloads when they use AWS Cloud services.
The IRAP pack on AWS Artifact also includes newly updated versions of the AWS Consumer Guide and the whitepaper Reference Architectures for ISM PROTECTED Workloads in the AWS Cloud.
Reach out to your AWS representatives to let us know which additional services you would like to see in scope for upcoming IRAP assessments. We strive to bring more services into scope at the PROTECTED level under IRAP to support your requirements.
If you have feedback about this post, submit comments in the Comments section below. If you have questions about this post, contact AWS Support.
Want more AWS Security news? Follow us on Twitter.
On March 20, 2023, we will be launching an updated navigation in the Zero Trust dashboard, offering all of our Zero Trust users a more seamless experience across Cloudflare as a whole. This change will allow you to more easily manage your Zero Trust organization alongside your application and network services, developer tools, and more.
As part of this upcoming release, you will see three key changes:
Quicker navigation
Instead of opening another window or typing in a URL, you can go back to the Cloudflare dashboard in one click.
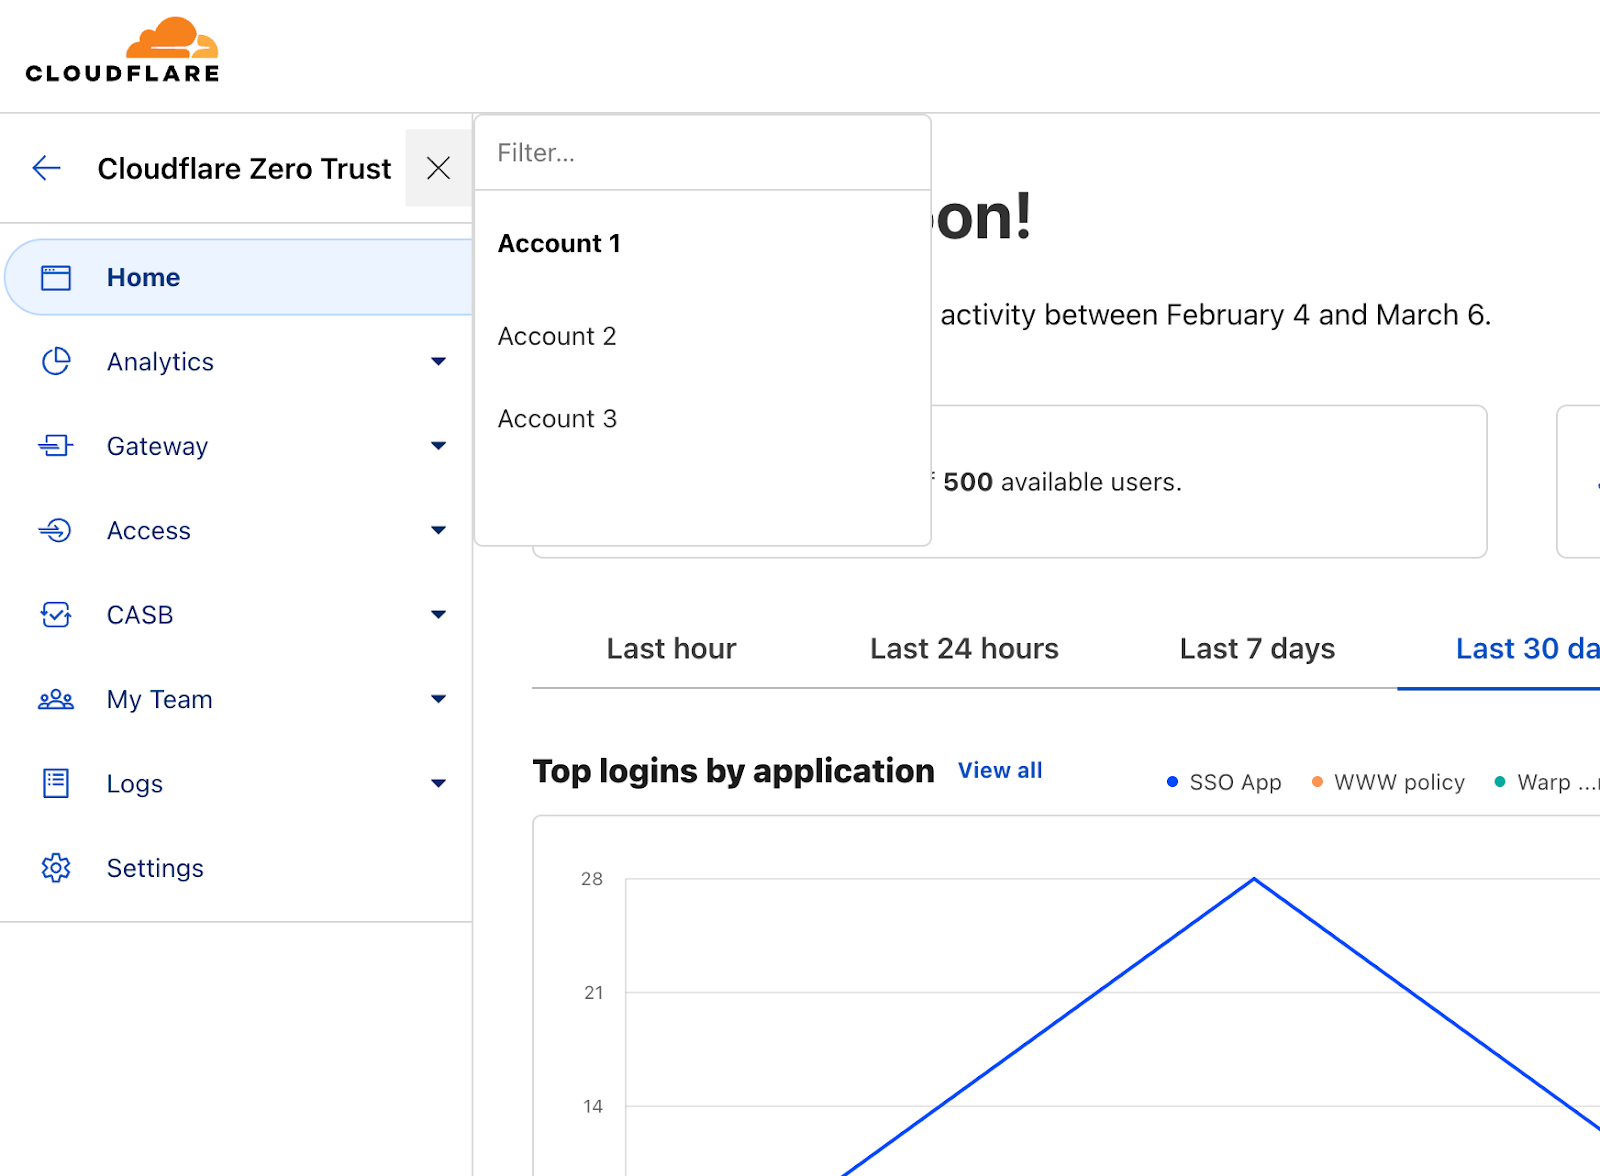
Switch accounts with ease
View and switch accounts at the top of your sidebar.
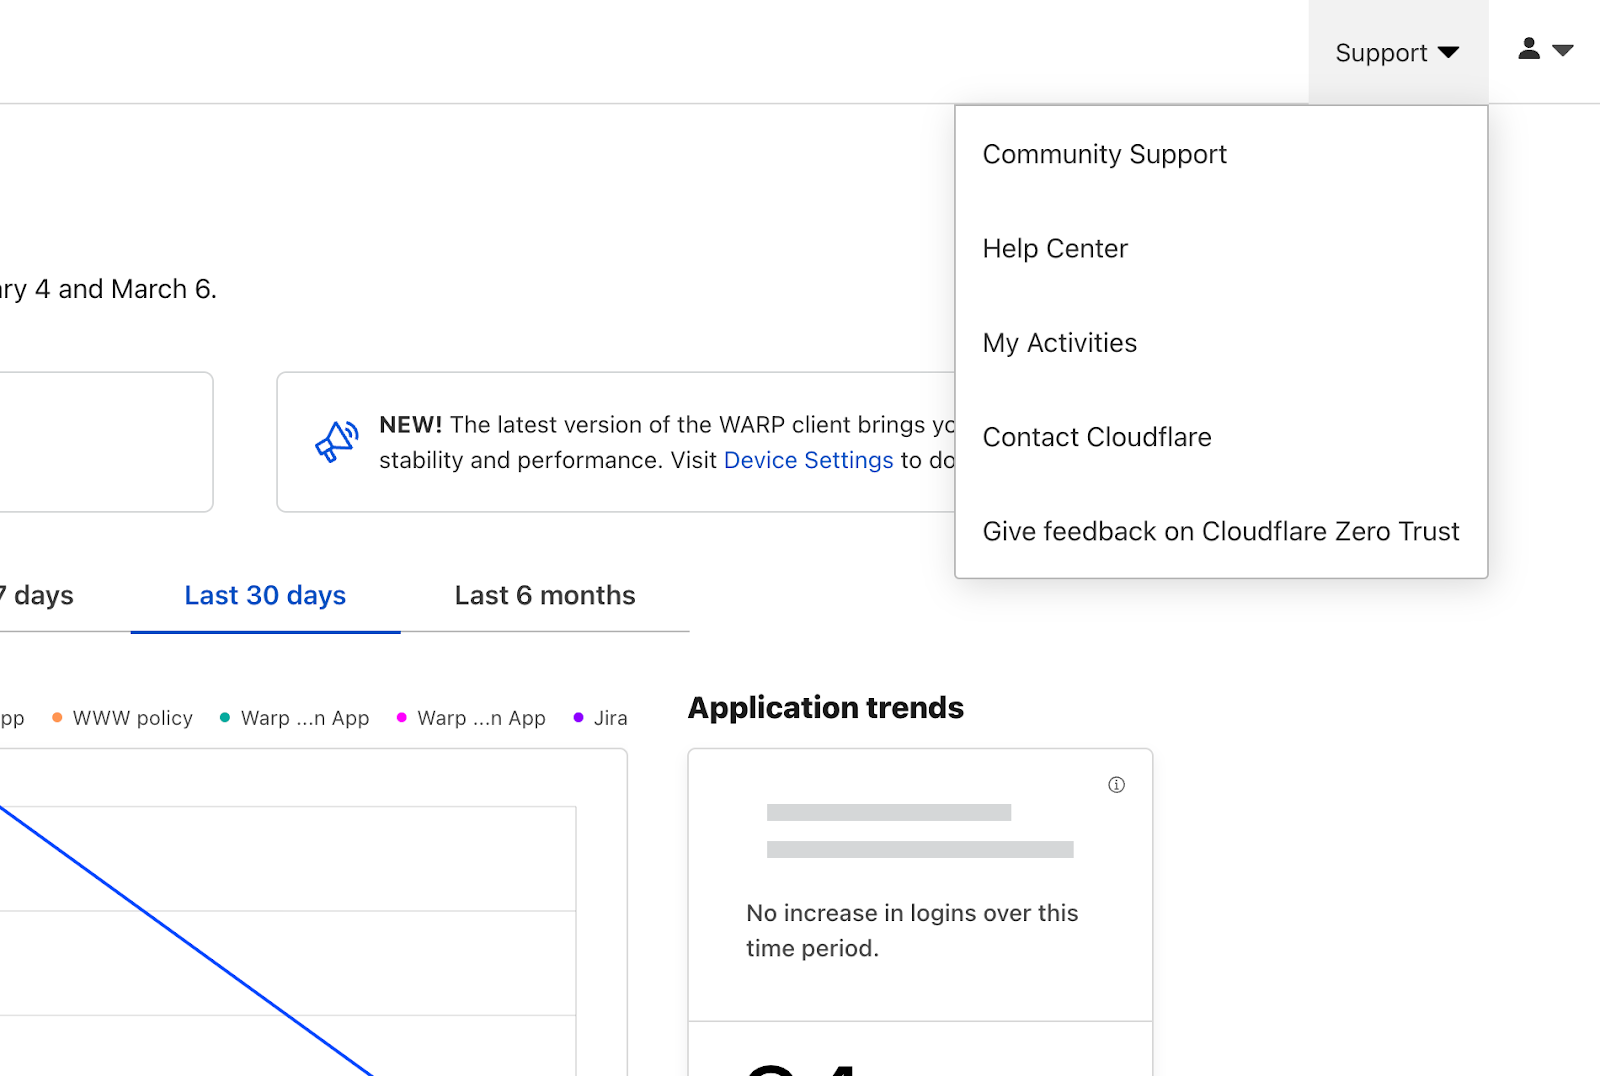
Resources and support
Find helpful links to our Community, developer documentation, and support team at the top of your navigation bar.
Why we’re updating the Zero Trust navigation
In 2020, Gateway was broadly released as the first Cloudflare product that didn’t require a site hosted on Cloudflare’s infrastructure. In other words, Gateway was unconstrained by the site-specific model most other Cloudflare products relied on at the time, while also used in close conjunction with Access. And so, the Cloudflare for Teams dashboard was built on a new model, designed from scratch, to give our customers a designated home—consolidated under a single roof—to manage their Teams products and accounts.
Fast forward to today and Zero Trust has grown tremendously, both in capability and reach. Many of our customers are using multiple Cloudflare products together, including Cloudflare One and Zero Trust products. Our home has grown, and this navigation change is one step toward expanding our roof to cover Cloudflare’s rapidly expanding footprint.
A focus on user experience
We have heard from many of you about the pains you experience when using multiple Cloudflare products, including Zero Trust. Your voice matters to us, and we’re invested in building a world-class user experience to make your time with Cloudflare an easy and enjoyable one. Our user experience improvements are based on three core principles: Consistency, Interconnectivity, and Discoverability.
We aim to offer a consistent and predictable user experience across the entire Cloudflare ecosystem so you never have to think twice about where you are in your journey, whether performing your familiar daily tasks or discovering our new ground-breaking products and features.
What else?
This navigation change we’re announcing today isn’t the only user experience improvement we’ve built! You may have noticed a few more optimizations recently:
User authorization and loading experience
Remember the days of the recurrent loading screen? Or perhaps when your Zero Trust account didn’t match the one you had logged in with to manage, say, your DNS? Those days are over! Our team has built a smarter, faster, and more seamless user and account authorization experience.
New tables
Tables are table stakes when it comes to presenting large quantities of data and information. (Yes, pun intended.) Tables are a common UI element across Cloudflare, and now Zero Trust uses the same tables UI as you will see when managing other products and features.
UI consistency
A slight change in color scheme and page layout brings the Zero Trust dashboard into the same visual family as the broader Cloudflare experience. Now, when you navigate to Zero Trust, we want you to know that you’re still under our one single Cloudflare roof.
We’re as excited about these improvements as you are! And we hope the upcoming navigation and page improvements come as a welcome addition to the changes noted above.
What’s next?
The user experience changes we’ve covered today go a long way toward creating a more consistent, seamless and user-friendly interface to make your work on Cloudflare as easy and efficient as possible. We know there’s always room for further improvement (we already have quite a few big improvements on our radar!).
To ensure we’re solving your biggest problems, we’d like to hear from you. Please consider filling out a short survey to share the most pressing user experience improvements you’d like to see next.
On Thursday, March 2, 2023, the Biden-Harris Administration released the National Cybersecurity Strategy aimed at securing the Internet. Cloudflare welcomes the Strategy, and congratulates the White House on this comprehensive, much-needed policy initiative. The goal of the Strategy is to make the digital ecosystem defensible, resistant, and values-aligned. This is a goal that Cloudflare fully supports. The Strategy recognizes the vital role that the private sector has to play in defending the United States against cyber attacks.
The Strategy aims to make a fundamental shift and transformation of roles, responsibilities, and resources in cyberspace by (1) rebalancing the responsibility to defend cyberspace by shifting the burden away from individuals, small businesses, and local governments, and onto organizations that are most capable and best-positioned to reduce risks, like data holders and technology providers; and (2) realigning incentives to favor long-term investments by balancing defending the United States against urgent threats today and simultaneously investing in a resilient future. The Strategy envisions attaining these goals through five collaborative pillars:
Pillar One: defending critical infrastructure;
Pillar Two: disrupting and dismantling threat actors;
Pillar Three: shaping market forces to drive security and resilience;
Pillar Four: investing in a resilient future; and
Pillar Five: forging international partnerships to pursue shared goals.
Through the Strategy, the U.S. Government is committed to preserving and extending the open, free, global, interoperable, reliable, and secure Internet. Cloudflare shares this commitment, and has built tools and products that are easily deployed and accessible to everyone that help make it a reality. Here are a few things that stand out to us in the Strategy, and how Cloudflare has contributed to the goals we share.
Defending Critical Infrastructure: Shields Up and Zero Trust
Importantly, Pillar One of the Strategy is focused on defending critical infrastructure. Critical infrastructure is vital to the functioning of society, and includes things like gas pipelines, railways, utilities, clean water, hospitals, and electricity, among others. In the aftermath of Russia’s invasion of Ukraine, the United States, the United Kingdom, Japan, and others issued warnings about the increased risk of cyber attacks. There was widespread concern by private sector and government cybersecurity experts about potential retaliation in the United States to the sanctions that resulted from the Russian invasion of Ukraine. In response, the Cybersecurity Infrastructure & Security Agency (CISA) announced its Shields Up initiative. When Shields Up was announced, we wrote about the essential tools that Cloudflare offers – for free – for protecting an online presence. We also published a Shields Up reading list.
One way we responded to the increased risk to critical infrastructure was the Critical Infrastructure Defense Project (CIDP), which we launched in partnership with Crowdstrike and Ping Identity, and offered a broad suite of products for free for four months to any United States-based hospital, or energy or water utility. Thankfully, the retaliation did not materialize at the level experts and officials were expecting. But that does not mean that the fear was not well-founded nor that malicious actors do not continue to have designs on critical infrastructure in the United States or around the world.
In addition to Shields Up, the Strategy doubles down on the Zero Trust Framework to guard against cyber attacks, a strategy first announced by the White House in January 2022 when it instructed federal agencies to move towards Zero Trust cybersecurity principles. These principles are rooted in the fundamental principle of “never trust, always verify;” no one is trusted by default from inside or outside of a network, and verification is required from everyone trying to gain access to resources on the network.
We could not agree more with the US government’s decision to modernize by grounding its federal defenses with Zero Trust principles. Zero Trust is not just a buzzword. Cloudflare has been championing Zero Trust for years, and we think it is so important for cybersecurity that we believe that a Chief Zero Trust Officer will become increasingly common over the next year. And because we know how important Zero Trust tools are, we recently announced that civil society and government participants in Project Galileo and the Athenian Project will have free access to Zero Trust products because we believe that qualified vulnerable public interest organizations should have access to Enterprise-level cyber security products no matter their size and budgets.
Disrupting and dismantling threat actors
Pillar Three of the Strategy is focused on disrupting and dismantling threat actors. As a member of the Joint Cyber Defense Collaborative, Cloudflare partners with the US government and cyber defenders from organizations across the Internet ecosystem to help increase visibility of malicious activity and threats, and drive collective action. Our network is large, learns from each attack, and is global, providing the best defense against attacks. The more we deal with attacks, the more we know how to stop them, and the easier it gets to find and deal with new threats. We block an average of 136 billion cyber threats per day. Just last month, Cloudflare mitigated a record-breaking 71 million request-per-second DDoS attack, the largest reported HTTP DDoS attack on record, more than 54% higher than the previous reported record of 46M rps in June 2022.
Privacy Preserving Technologies
Pillar Four focuses on investing in a resilient future, partly through supporting privacy-preserving technologies. The Internet was not built with privacy and security in mind, but a more private Internet is a better Internet. Even with encryption, information about consumer IP addresses and the names of websites they visit leak from protocols that weren’t designed to preserve privacy. We believe that reducing the availability of that information can help consumers regain control over their data.
Cloudflare has therefore worked to develop technologies to help build a more privacy-preserving Internet. We’ve been working on technologies that encourage and enable website operators and app developers to build privacy into their products at the protocol level. We’ve released or support a number of services that deploy state-of-the-art, privacy-enhancing technologies for DNS and other communications to help individuals, large corporations, small-businesses, and governments alike. These products include: Privacy Gateway, a fully managed, scalable, and performant Oblivious HTTP (OHTTP) relay, which is designed so that Internet Service Providers don’t know the websites their subscribers are visiting, and likewise websites don’t know the true IP address of their visitors; Private Relay, a version of Privacy Gateway that includes a second relay server that conveys data to websites and applications which hides a device’s true IP address; Cloudflare WARP, a free proxy application that encrypts traffic on the user’s device, routes it through the Cloudflare network, and then routes it on to its intended destination; and 1.1.1.1, our free, public Domain Name System (DNS) resolver, which helps make Internet traffic more private.
Preparing for the Post-Quantum Future and Safer Internet Protocols
As part of its goal of investing in a resilient future, one of the Strategic Objectives of the Strategy is to prepare for the post-quantum future whereby the government will increase investment in post-quantum. Likewise, the US government encourages the private sector to prepare its systems for the future. Cloudflare is already prepared, and although quantum computers are a future state, Cloudflare is helping to make sure the Internet is ready for when they arrive. Here and here, we describe the impact of quantum computing on cryptography, and how to use stronger algorithms resistant to the power of quantum computing. In October, we announced that by default, all websites and APIs served through Cloudflare now support post-quantum hybrid key agreement. And because we strongly believe that post-quantum security should be the new baseline for the Internet, we offer this post-quantum cryptography free of charge.
We were happy to see some focus in the Strategy on improving Internet protocols, which are important for ensuring that the Internet is functional, safe, and secure. The Strategy envisions a “clean-up effort” of the technical foundations of the Internet including Border Gateway Protocol (BGP) vulnerabilities, unencrypted DNS, and the slow adoption of IPv6. Cloudflare has been a long time supporter of security and privacy improvements to these foundational protocols, and wholeheartedly endorses this clean up effort. We have written about our support for improving the security of these protocols, including securing BGP through the use of RPKI and improving DNS privacy by launching support for DNS over HTTPS, DNS over TLS and Oblivious DNS over HTTPS.
Building International Partnerships and Assisting Allies and Partners
Pillar 5 of the Strategy commits the United States to forging international partnerships to pursue shared goals. Cyber attacks by their very nature are borderless, which means that protecting against cyber attacks cannot mean only protecting entities within one’s borders. Cyber defense is an international effort, and we cannot preserve and extend the open, free, global, interoperable, reliable and secure Internet if we do not help to defend, as well as build the capacity of, other countries through coalition building. The Strategy aims to assist allies and partners. With the invasion of Ukraine, Cloudflare has directly witnessed the importance of private sector collaboration [link to article] in efforts to assist allies and partners. Cloudflare is proud of the role we have played in helping protect Ukraine from cyberattack, which we described here, here, and here. Another way that we are working to provide support to vulnerable infrastructure outside of the United States is through Project Safekeeping, modeled after CIDP. In December, as part of Impact Week, we announced that we would be providing our enterprise-level Zero Trust cybersecurity solution to eligible entities in Australia, Germany, Japan, Portugal, and the United Kingdom, at no cost, with no time limit.
We again congratulate the White House on the National Cybersecurity Strategy. We have partnered with the US government in the past to help the federal government defend itself against cyberattacks, and we look forward to continuing our collaboration with the US government and other private sector entities for a more safe and secure Internet.
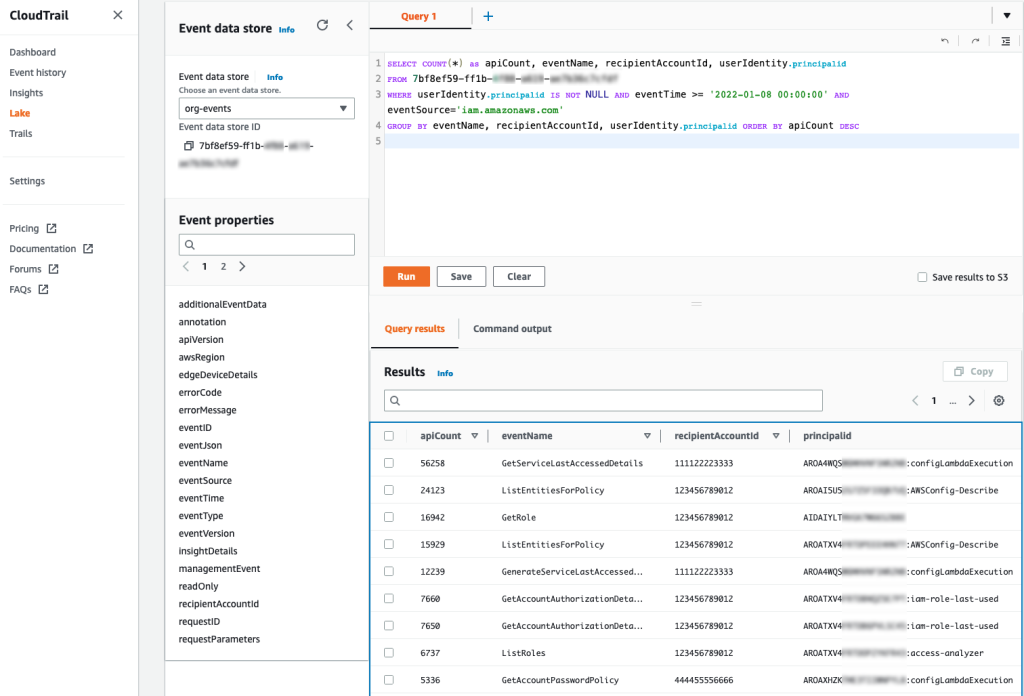
Today AWS launched two new global condition context keys that make it simpler for you to write policies in which Amazon Elastic Compute Cloud (Amazon EC2) instance credentials work only when used on the instance to which they are issued. These new condition keys are available today in all AWS Regions, as well as AWS GovCloud and China partitions.
Using these new condition keys, you can write service control policies (SCPs) or AWS Identity and Access Management (IAM) policies that restrict the virtual private clouds (VPCs) and private IP addresses from which your EC2 instance credentials can be used, without hard-coding VPC IDs or IP addresses in the policy. Previously, you had to list specific VPC IDs and IP addresses in the policy if you wanted to use it to restrict where EC2 credentials were used. With this new approach, you can use less policy space and reduce the time spent on updates when your list of VPCs and network ranges changes.
In this blog post, we will show you how to use these new condition keys in an SCP and a resource policy to help ensure that the IAM role credentials assigned to your EC2 instances can only be used from the instances to which they were issued.
New global condition keys
The two new condition keys are as follows:
aws:EC2InstanceSourceVPC — This single-valued condition key contains the VPC ID to which an EC2 instance is deployed.
aws:EC2InstanceSourcePrivateIPv4 — This single-valued condition key contains the primary IPv4 address of an EC2 instance.
These new conditions are available only for use with credentials issued to an EC2 instance. You don’t have to make configuration changes to activate the new condition keys.
Let’s start by reviewing some existing IAM conditions and how to combine them with the new conditions. When requests are made to an AWS service over a VPC endpoint, the value of the aws:SourceVpc condition key is the ID of the VPC into which the endpoint is deployed. The value of the aws:VpcSourceIP condition key is the IP address from which the endpoint receives the request. The aws:SourceVpc and aws:VpcSourceIP keys are null when requests are made through AWS public service endpoints. These condition keys relate to dynamic properties of the network path by which your AWS Signature Version 4-signed request reached the API endpoint. For a list of AWS services that support VPC endpoints, see AWS services that integrate with AWS PrivateLink.
The two new condition keys relate to dynamic properties of the EC2 role credential itself. By using the two new credential-relative condition keys with the existing network path-relative aws:SourceVPC and aws:VpcSourceIP condition keys, you can create SCPs to help ensure that credentials for EC2 instances are only used from the EC2 instances to which they were issued. By writing policies that compare the two sets of dynamic values, you can configure your environment such that requests signed with an EC2 instance credential are denied if they are used anywhere other than the EC2 instance to which they were issued.
Policy examples
In the following SCP example, access is denied if the value of aws:SourceVpc is not equal to the value of aws:ec2InstanceSourceVPC, or if the value of aws:VpcSourceIp is not equal to the value of aws:ec2InstanceSourcePrivateIPv4. The policy uses aws:ViaAWSService to allow certain AWS services to take action on your behalf when they use your role’s identity to call services, such as when Amazon Athena queries Amazon Simple Storage Service (Amazon S3).
Because we encase aws:SourceVpc and aws:VpcSourceIp in “${}” in these policies, they are treated as a variable using the value in the request being made. However, in the IAM policy language, the operator on the left side of a comparison is implicitly treated as a variable, while the operator on the right side must be explicitly declared as a variable. The “Null” operator on the ec2:SourceInstanceARN condition key is designed to ensure that this policy only applies to EC2 instance roles, and not roles used for other purposes, such as those used in AWS Lambda functions.
The two deny statements in this example form a logical “or” statement, such that either a request from a different VPC or a different IP address evaluates in a deny. But functionally, they act in an “and” fashion. To be allowed, a request must satisfy both the VPC-based and the IP-based conditions because failure of either denies the call. Because VPC IDs are globally unique values, it’s reasonable to use the VPC-based condition without the private IP condition. However, you should avoid evaluating only the private IP condition without also evaluating the VPC condition. Private IPs can be the same across different environments, so aws:ec2InstanceSourcePrivateIPv4 is safe to use only in conjunction with the VPC-based condition.
If you have specific EC2 instance roles that you want to exclude from the statement, you can apply exception logic through tags or role names.
The following example applies to roles used as EC2 instance roles, except those with a tag of exception-to-vpc-ip where the value is equal to true by using the aws:PrincipalTag condition key. The three condition operators (StringNotEquals, Null, and BoolIfExists) in the same condition block are evaluated with a logical AND operation, and if either of the tests doesn’t evaluate, then the deny statement doesn’t apply. Hence, EC2 instance roles with a principal tag of exception-to-vpc-ip equal to true are not subject to this SCP.
You can apply exception logic to other attributes of your IAM roles. For example, you can use the aws:PrincipalArn condition key to exempt certain roles based on their AWS account. You can also specify where you want this SCP to be applied in your AWS Organizations organization. You can apply SCPs directly to accounts, organizational units, or organizational roots. For more information about inheritance when applying SCPs in Organizations, see Understanding policy inheritance.
You can also apply exception logic to your SCP statements at the IAM Action. The following example statement restricts an EC2 instance’s credential usage to only the instance from which it was issued, except for calls to IAM by using a NotAction element. You should use this exception logic if an AWS service doesn’t have a VPC endpoint, or if you don’t want to use VPC endpoints to access a particular service.
Because these new condition keys are global condition keys, you can use the keys in all relevant AWS policy types, such as the following policy for an S3 bucket. When using this as a bucket policy, make sure to replace <DOC-EXAMPLE-BUCKET> with the ARN of your S3 bucket.
This policy restricts access to your S3 bucket to EC2 instance roles that are used only from the instance to which they were vended. Like the previous policy examples, there are two deny statements in this example to form a logical “or” statement but a functional “and” statement, because a request must come from the same VPC and same IP address of the instance that it was issued to, or else it evaluates to a deny.
Conclusion
In this blog post, you learned about the newly launchedaws:ec2InstanceSourceVPC and aws:ec2InstanceSourcePrivateIPv4 condition keys. You also learned how to use them with SCPs and resource policies to limit the usage of your EC2 instance roles to the instances from which they originated when requests are made over VPC endpoints. Because these new condition keys are global condition keys, you can use them in all relevant AWS policy types. These new condition keys are available today in all Regions, as well as AWS GovCloud and China partitions.
If you own a domain that you use for email, you want to maintain the reputation and goodwill of your domain’s brand. Several industry-standard mechanisms can help prevent your domain from being used as part of a phishing attack. In this post, we’ll show you how to deploy three of these mechanisms, which visually authenticate emails sent from your domain to users and verify that emails are encrypted in transit. It can take as little as 15 minutes to deploy these mechanisms on Amazon Web Services (AWS), and the result can help to provide immediate and long-term improvements to your organization’s email security.
Phishing through email remains one of the most common ways that bad actors try to compromise computer systems. Incidents of phishing and related crimes far outnumber the incidents of other categories of internet crime, according to the most recent FBI Internet Crime Report. Phishing has consistently led to large annual financial losses in the US and globally.
Brand Indicators for Message Identification (BIMI) – This standard allows you to associate a logo with your email domain, which some email clients will display to users in their inbox. Visit the BIMI Group’s Where is my BIMI Logo Displayed? webpage to see how logos are displayed in the user interfaces of BIMI-supporting mailbox providers; Figure 1 shows a mock-up of a typical layout that contains a logo.
Mail Transfer Agent Strict Transport Security (MTA-STS) – This standard helps ensure that email servers always use TLS encryption and certificate-based authentication when they send messages to your domain, to protect the confidentiality and integrity of email in transit.
SMTP TLS reporting – This reporting allows you to receive reports and monitor your domain’s TLS security posture, identify problems, and learn about attacks that might be occurring.
Figure 1: A mock-up of how BIMI enables branded logos to be displayed in email user interfaces
These three standards require your Domain Name System (DNS) to publish specific records, for example by using Amazon Route 53, that point to web pages that have additional information. You can host this information without having to maintain a web server by storing it in Amazon Simple Storage Service (Amazon S3) and delivering it through Amazon CloudFront, secured with a certificate provisioned from AWS Certificate Manager (ACM).
Note: This AWS solution works for DKIM, BIMI, and DMARC, regardless of what you use to serve the actual email for your domains, which services you use to send email, and where you host DNS. For purposes of clarity, this post assumes that you are using Route 53 for DNS. If you use a different DNS hosting provider, you will manually configure DNS records in your existing hosting provider.
Solution architecture
The architecture for this solution is depicted in Figure 2.
Figure 2: The architecture diagram showing how the solution components interact
As described in more detail in the BIMI section of this blog post, the Verified Mark Certificate is obtained from a BIMI-qualified certificate authority and stored in the S3 bucket.
When an external email system receives a message claiming to be from your domain, it looks up BIMI records for your domain in DNS. As depicted in the diagram, a DNS request is sent to Route 53.
To retrieve the BIMI logo image and Verified Mark Certificate, the external email system will make HTTPS requests to a URL published in the BIMI DNS record. In this solution, the URL points to the CloudFront distribution, which has a TLS certificate provisioned with ACM.
A few important warnings
Email is a complex system of interoperating technologies. It is also brittle: a typo or a missing DNS record can make the difference between whether an email is delivered or not. Pay close attention to your email server and the users of your email systems when implementing the solution in this blog post. The main indicator that something is wrong is the absence of email. Instead of seeing an error in your email server’s log, users will tell you that they’re expecting to receive an email from somewhere and it’s not arriving. Or they will tell you that they sent an email, and their recipient can’t find it.
The DNS uses a lot of caching and time-out values to improve its efficiency. That makes DNS records slow and a little unpredictable as they propagate across the internet. So keep in mind that as you monitor your systems, it can be hours or even more than a day before the DNS record changes have an effect that you can detect.
This solution uses AWS Cloud Development Kit (CDK) custom resources, which are supported by AWS Lambda functions that will be created as part of the deployment. These functions are configured to use CDK-selected runtimes, which will eventually pass out of support and require you to update them.
Prerequisites
You will need permission in an AWS account to create and configure the following resources:
An Amazon S3 bucket to store the files and access logs
A CloudFront distribution to publicly deliver the files from the S3 bucket
A TLS certificate in ACM
An origin access identity in IAM that CloudFront will use to access files in Amazon S3
Lambda functions, IAM roles, and IAM policies created by CDK custom resources
You might also want to enable these optional services:
Amazon Route 53 for setting the necessary DNS records. If your domain is hosted by another DNS provider, you will set these DNS records manually.
Amazon SES or an Amazon WorkMail organization with a single mailbox. You can configure either service with a subdomain (for example, [email protected]) such that the existing domain is not disrupted, or you can create new email addresses by using your existing email mailbox provider.
BIMI has some additional requirements:
BIMI requires an email domain to have implemented a strong DMARC policy so that recipients can be confident in the authenticity of the branded logos. Your email domain must have a DMARC policy of p=quarantine or p=reject. Additionally, the domain’s policy cannot have sp=none or pct<100.
Note: Do not adjust the DMARC policy of your domain without careful testing, because this can disrupt mail delivery.
You must have your brand’s logo in Scaled Vector Graphics (SVG) format that conforms to the BIMI standard. For more information, see Creating BIMI SVG Logo Files on the BIMI Group website.
Purchase a Verified Mark Certificate (VMC) issued by a third-party certificate authority. This certificate attests that the logo, organization, and domain are associated with each other, based on a legal trademark registration. Many email hosting providers require this additional certificate before they will show your branded logo to their users. Others do not currently support BIMI, and others might have alternative mechanisms to determine whether to show your logo. For more information about purchasing a Verified Mark Certificate, see the BIMI Group website.
Note: If you are not ready to purchase a VMC, you can deploy this solution and validate that BIMI is correctly configured for your domain, but your branded logo will not display to recipients at major email providers.
What gets deployed in this solution?
This solution deploys the DNS records and supporting files that are required to implement BIMI, MTA-STS, and SMTP TLS reporting for an email domain. We’ll look at the deployment in more detail in the following sections.
Brand Indicators for Message Identification (BIMI) permits Domain Owners to coordinate with Mail User Agents (MUAs) to display brand-specific Indicators next to properly authenticated messages. There are two aspects of BIMI coordination: a scalable mechanism for Domain Owners to publish their desired Indicators, and a mechanism for Mail Transfer Agents (MTAs) to verify the authenticity of the Indicator. This document specifies how Domain Owners communicate their desired Indicators through the BIMI Assertion Record in DNS and how that record is to be interpreted by MTAs and MUAs. MUAs and mail-receiving organizations are free to define their own policies for making use of BIMI data and for Indicator display as they see fit.
If your organization has a trademark-protected logo, you can set up BIMI to have that logo displayed to recipients in their email inboxes. This can have a positive impact on your brand and indicates to end users that your email is more trustworthy. The BIMI Group shows examples of how brand logos are displayed in user inboxes, as well as a list of known email service providers that support the display of BIMI logos.
As a domain owner, you can implement BIMI by publishing the relevant DNS records and hosting the relevant files. To have your logo displayed by most email hosting providers, you will need to purchase a Verified Mark Certificate from a BIMI-qualified certificate authority.
This solution will deploy a valid BIMI record in Route 53 (or tell you what to publish in the DNS if you’re not using Route 53) and will store your provided SVG logo and Verified Mark Certificate files in Amazon S3, to be delivered through CloudFront with a valid TLS certificate from ACM.
To support BIMI, the solution makes the following changes to your resources:
A DNS record of type TXT is published at the following host: default._bimi.<your-domain>. The value of this record is: v=BIMI1; l=<url-of-your-logo> a=<url-of-verified-mark-certificate>. The value of <your-domain> refers to the domain that is used in the From header of messages that your organization sends.
The logo and optional Verified Mark Certificate are hosted publicly at the HTTPS locations defined by <url-of-your-logo> and <url-of-verified-mark-certificate>, respectively.
SMTP (Simple Mail Transport Protocol) MTA Strict Transport Security (MTA-STS) is a mechanism enabling mail service providers to declare their ability to receive Transport Layer Security (TLS) secure SMTP connections and to specify whether sending SMTP servers should refuse to deliver to MX hosts that do not offer TLS with a trusted server certificate.
Put simply, MTA-STS helps ensure that email servers always use encryption and certificate-based authentication when sending email to your domains, so that message integrity and confidentiality are preserved while in transit across the internet. MTA-STS also helps to ensure that messages are only sent to authorized servers.
This solution will deploy a valid MTA-STS policy record in Route 53 (or tell you what value to publish in the DNS if you’re not using Route 53) and will create an MTA-STS policy document to be hosted on S3 and delivered through CloudFront with a valid TLS certificate from ACM.
To support MTA-STS, the solution makes the following changes to your resources:
A DNS record of type TXT is published at the following host: _mta-sts.<your-domain>. The value of this record is: v=STSv1; id=<unique value used for cache invalidation>.
The MTA-STS policy document is hosted at and obtained from the following location: https://mta-sts.<your-domain>/.well-known/mta-sts.txt.
The value of <your-domain> in both cases is the domain that is used for routing inbound mail to your organization and is typically the same domain that is used in the From header of messages that your organization sends externally. Depending on the complexity of your organization, you might receive inbound mail for multiple domains, and you might choose to publish MTA-STS policies for each domain.
Is it ever bad to encrypt everything?
In the example MTA-STS policy file provided in the GitHub repository and explained later in this post, the MTA-STS policy mode is set to testing. This means that your email server is advertising its willingness to negotiate encrypted email connections, but it does not require TLS. Servers that want to send mail to you are allowed to connect and deliver mail even if there are problems in the TLS connection, as long as you’re in testing mode. You should expect reports when servers try to connect through TLS to your mail server and fail to do so.
Be fully prepared before you change the MTA-STS policy to enforce. After this policy is set to enforce, servers that follow the MTA-STS policy and that experience an enforceable TLS-related error when they try to connect to your mail server will not deliver mail to your mail server. This is a difficult situation to detect. You will simply stop receiving email from servers that comply with the policy. You might receive reports from them indicating what errors they encountered, but it is not guaranteed. Be sure that the email address you provide in SMTP TLS reporting (in the following section) is functional and monitored by people who can take action to fix issues. If you miss TLS failure reports, you probably won’t receive email. If the TLS certificate that you use on your email server expires, and your MTA-STS policy is set to enforce, this will become an urgent issue and will disrupt the flow of email until it is fixed.
A number of protocols exist for establishing encrypted channels between SMTP Mail Transfer Agents (MTAs), including STARTTLS, DNS-Based Authentication of Named Entities (DANE) TLSA, and MTA Strict Transport Security (MTA-STS). These protocols can fail due to misconfiguration or active attack, leading to undelivered messages or delivery over unencrypted or unauthenticated channels. This document describes a reporting mechanism and format by which sending systems can share statistics and specific information about potential failures with recipient domains. Recipient domains can then use this information to both detect potential attacks and diagnose unintentional misconfigurations.
As you gain the security benefits of MTA-STS, SMTP TLS reporting will allow you to receive reports from other internet email providers. These reports contain information that is valuable when monitoring your TLS security posture, identifying problems, and learning about attacks that might be occurring.
This solution will deploy a valid SMTP TLS reporting record on Route 53 (or provide you with the value to publish in the DNS if you are not using Route 53).
To support SMTP TLS reporting, the solution makes the following changes to your resources:
A DNS record of type TXT is published at the following host: _smtp._tls.<your-domain>. The value of this record is: v=TLSRPTv1; rua=mailto:<report-receiver-email-address>
The value of <report-receiver-email-address> might be an address in your domain or in a third-party provider. Automated systems that process these reports must be capable of processing GZIP compressed files and parsing JSON.
Deploy the solution with the AWS CDK
In this section, you’ll learn how to deploy the solution to create the previously described AWS resources in your account.
Clone the following GitHub repository:
git clone https://github.com/aws-samples/serverless-mail
 cd serverless-mail/email-security-records
Edit CONFIG.py to reflect your desired settings, as follows:
If no Verified Mark Certificate is provided, set VMC_FILENAME = None.
If your DNS zone is not hosted on Route 53, or if you do not want this app to manage Route 53 DNS records, set ROUTE_53_HOSTED = False. In this case, you will need to set TLS_CERTIFICATE_ARN to the Amazon Resource Name (ARN) of a certificate hosted on ACM in us-east-1. This certificate is used by CloudFront and must support two subdomains: mta-sts and your configured BIMI_ASSET_SUBDOMAIN.
Finalize the preparation, as follows:
Place your BIMI logo and Verified Mark Certificate files in the assets folder.
Create an MTA-STS policy file at assets/.well-known/mta-sts.txt to reflect your mail exchange (MX) servers and policy requirements. An example file is provided at assets/.well-known/mta-sts.txt.example
Deploy the solution, as follows:
Open a terminal in the email-security-records folder.
(Recommended) Create and activate a virtual environment by running the following commands. python3 -m venv .venv source .venv/bin/activate
Install the Python requirements in your environment with the following command. pip install -r requirements.txt
Assume a role in the target account that has the permissions outlined in the Prerequisites section of this post.
Using AWS CDK version 2.17.0 or later, deploy the bootstrap in the target account by running the following command. To learn more, see Bootstrapping in the AWS CDK Developer Guide. cdk bootstrap
Run the following command to synthesize the CloudFormation template. Review the output of this command to verify what will be deployed. cdk synth
Run the following command to deploy the CloudFormation template. You will be prompted to accept the IAM changes that will be applied to your account. cdk deploy
Note: If you use Route53, these records are created and activated in your DNS zones as soon as the CDK finishes deploying. As the records propagate through the DNS, they will gradually start affecting the email in the affected domains.
If you’re not using Route53 and instead are using a third-party DNS provider, create the CNAME and TXT records as indicated. In this case, your email is not affected by this solution until you create the records in DNS.
Testing and troubleshooting
After you have deployed the CDK solution, you can test it to confirm that the DNS records and web resources are published correctly.
BIMI
Query the BIMI DNS TXT record for your domain by using the dig or nslookup command in your terminal.
In your web browser, open the URL from that response (for example, https://bimi-assets.<your-domain.example>/logo.svg) to verify that the logo is available and that the HTTPS certificate is valid.
The BIMI group provides a tool to validate your BIMI configuration. This tool will also validate your VMC if you have purchased one.
MTA-STS
Query the MTA-STS DNS TXT record for your domain.
dig +short TXT _mta-sts.<your-domain.example>
The value of this record is as follows:
v=STSv1; id=<unique value used for cache invalidation>
You can load the MTA-STS policy document using your web browser. For example, https://mta-sts.<your-domain.example>/.well-known/mta-sts.txt
You can also use third party tools to examine your MTA-STS configuration, such as MX Toolbox.
TLS reporting
Query the TLS reporting DNS TXT record for your domain.
dig +short TXT _smtp._tls.<your-domain.example>
Verify the response. For example:
"v=TLSRPTv1; rua=mailto:<your email address>"
You can also use third party tools to examine your TLS reporting configuration, such as Easy DMARC.
Depending on which domains you communicate with on the internet, you will begin to see TLS reports arriving at the email address that you have defined in the TLS reporting DNS record. We recommend that you closely examine the TLS reports, and use automated analytical techniques over an extended period of time before changing the default testing value of your domain’s MTA-STS policy. Not every email provider will send TLS reports, but examining the reports in aggregate will give you a good perspective for making changes to your MTA-STS policy.
Cleanup
To remove the resources created by this solution:
Open a terminal in the cdk-email-security-records folder.
Assume a role in the target account with permission to delete resources.
Run cdk destroy.
Note: The asset and log buckets are automatically emptied and deleted by the cdk destroy command.
Conclusion
When external systems send email to or receive email from your domains they will now query your new DNS records and will look up your domain’s BIMI, MTA-STS, and TLS reporting information from your new CloudFront distribution. By adopting the email domain security mechanisms outlined in this post, you can improve the overall security posture of your email environment, as well as the perception of your brand.
If you have feedback about this post, submit comments in the Comments section below. If you have questions about this post, contact AWS Support.
Want more AWS Security news? Follow us on Twitter.
Welcome back. If you’re joining this series for the first time, we recommend that you read the first blog post in this series, Considerations for security operations in the cloud, for some context on what we will discuss and deploy in this blog post. In the earlier post, we talked through the different operating models (centralized, decentralized, or hybrid) that you can deploy for a Security Operations Center (SOC) function when you operate in the cloud. We covered the advantages of each model and some of the potential drawbacks you might see when you start to scale up operations within the cloud.
This post will focus on the Amazon Web Services (AWS) native security service, AWS Security Hub, that you can use to deploy in different SOC operating models. AWS Security Hub is a cloud security posture management service that SOC teams can use to perform security best practice checks and aggregate alerts. AWS Security Hub accepts findings from multiple sources, whether native to AWS, from the pre-built integrations, or from your own sources converted into the AWS Security Finding Format (ASFF). The data collected in Security Hub facilitates response and remediation actions.
Although the models we describe here use services that are native to AWS, the reference architectures that correspond to each operating model can be applied to a variety of deployments, including multi-cloud and traditional on-premises deployments. The majority of this post will focus on the decentralized and hybrid models—the centralized model is well documented and has reference architectures already available for you today.
Each organization is different, and no one operating model will fit everyone. You should choose the model that works best for your organizational landscape, with an understanding that the landscape will change and evolve over time. Using feedback loops and being open to change is important to help you meet the continued needs of your business. Additional factors to consider include, but are not limited to: staff skills, compliance requirements, previous operating model, and budget.
The centralized model
The centralized operating model for the SOC is well documented and frequently discussed, both at AWS and in the security community. According to AWS best practices, typically you designate a central security tooling account that is dedicated to operating security services, monitoring AWS accounts, and automating security alerting and response. The security tooling account serves as the administrator account for security services that are managed in an administrator/member structure across your AWS accounts. The key objectives for establishing a security tooling account are the following:
Provide a dedicated enclave with controlled access for managing security guardrails, monitoring, and response.
Maintain the appropriate centralized security infrastructure to monitor security operations data and maintain traceability across the security lifecycle.
Figure 1 demonstrates the variety of AWS security services that you can deploy in the central security account. For example, Security Hub within the security tooling account can act as the administrator to enable Security Hub in the member accounts, as well as view findings, view insights, and set security standards across member accounts, which can help simplify security posture management across your existing and future accounts.
Figure 1: Reference architecture for the security tooling account in a centralized model
As mentioned earlier, you can enable Security Hub to administer and enable member accounts. This is achieved by using AWS Organizations and the delegated administrator functionality. In addition, you can use Security Hub cross-Region aggregation within the delegated administrator account to aggregate findings, finding updates, insights, control compliance statuses, and security scores from multiple Regions to a single aggregation Region. You can then manage this data from the aggregation Region. Figure 2 shows the reference architecture for this functionality.
Figure 2: Reference architecture for Security Hub in the delegated administrator model
The AWS Security Reference Architecture (AWS SRA) is a great starting point for establishing the centralized security operations model. The AWS SRA is a holistic set of guidelines for deploying the full complement of AWS security services in a multi-account environment. You can use it to help design, implement, and manage AWS security services so that they align with AWS best practices. The AWS SRA’s Security Hub Organization solution provides deployable templates and examples that automate the process of enabling Security Hub by delegating administration to an account and configuring Security Hub for the existing and future AWS Organizations accounts.
The decentralized and hybrid models
As mentioned in Considerations for security operations in the cloud, the decentralized and hybrid SOC models provide many benefits for organizations. The flexibility of these operating models allows organizational units (OUs) to control how they deal with security-related incidents while still having organization-wide visibility into security posture. This flexibility is important as organizations start to scale up activities within the cloud.
The reference architecture in Figure 3 shows how the benefits we discussed in our earlier blog post can be architected in the decentralized and hybrid operating models in the AWS Cloud.
Figure 3: Reference architecture for the decentralized and hybrid operating models in AWS
The key features of this architecture are as follows:
Dedicated accounts have been created for each OU for the Security Hub administration. The model we will use for this deployment is the invite model. In this reference architecture and as an example, we’re using Amazon GuardDuty to flow findings into Security Hub. When you use this model, each OU can manage findings for that OU. This gives you flexibility to work from the Security Hub admin with full visibility of the OU and accounts associated with that OU, or to work in each member account and view findings for that account only.
(Optional, for use with the hybrid model) Each OU’s Security Hub member accounts first send events to their Security Hub admin account. The Security Hub admin account will then send events for that OU to the local Amazon EventBridge bus. You can then set up rules to forward events to a central EventBridge bus in a dedicated AWS account. In the architecture in Figure 3, this account is named SecAnalytics. This step will follow a similar flow as the one described in this AWS Cloud Operations & Migrations blog post.
(Optional, for use with the hybrid model) After the OUs have sent data to the central bus, you can use a capability similar to the one in this AWS Architecture Blog post to start organizing the findings and gain organization-wide visibility. The solution in the earlier post used Amazon QuickSight to visualize the data, but you can use another tool or pre-existing data pipeline.
Items 3 and 4 labeled with (Optional) are capabilities that enable the hybrid model; these are not required if you only want to enable the decentralized model.
Considerations for all deployments
Keep the following considerations in mind for all deployments:
Steady state operations should be considered for whichever model you deploy in. For the centralized model, you can use functionality within AWS Organizations to automatically enable Security Hub for accounts within the organization. In the decentralized and hybrid models, you will need to build out this capability or use a similar capability as described in this repo.
Alert fatigue happens when humans work on the same repetitive tasks’ day in and day out. To help reduce this, within the reference architecture and solution overview, we’ve added the capability described in this Security Blog post to automatically suppress findings based on criteria set by you. For the centralized model, you can add this capability in the delegated admin account for Security Hub. For the decentralized and hybrid models, we recommend that you put the auto-suppression capability in the Security Hub admin account, and then centralize the rules for suppression for that OU at the Security Hub admin level. This will reduce the overhead for deploying suppression rules multiple times and give a single location where rules are placed for that OU.
Context is key. Within the reference architecture and solution overview for decentralized and hybrid deployments, we’ve added the capability described in this Security Blog post. This capability will add additional context, such as the account name, the OU associated with the account, security contact information, and account tags. This information is pulled from AWS Organizations to enrich Security Hub findings. This additional context can also be used in the centralized model.
Deploy the decentralized and hybrid models
In this section, we’ll walk you through the deployment that reflects the reference architecture for the decentralized and hybrid models. Figure 4 shows the solution architecture, including the solution that needs to be deployed in the Security Hub admin account and in the aggregation Region for each business unit within the organization. The solution provides the capability to suppress Security Hub findings, enrich the findings, and propagate findings to central security accounts.
Figure 4: Reference architecture for the decentralized and hybrid deployment
The solution architecture consists of the following:
An EventBridge rule to invoke a Lambda function (Suppression Lambda) as the target to suppress any findings based on specific generator IDs within specific member accounts.
Note: The Security Hub Generator IDs and AWS Account IDs in the EventBridge rule are left as placeholders so that you can fill based on your needs.
An EventBridge rule to invoke a Lambda function (Enrichment Lambda) as the target to enrich the findings with AWS account and OU related metadata, along with alternate contact information to better prioritize the findings. The API calls to AWS Organizations and AWS account management services are optimized by caching the metadata in an Amazon DynamoDB table with a time-to-live (TTL) value of 24 hours.
An EventBridge rule to post the enriched findings that were not suppressed to a custom EventBridge event bus in the organization-level Security Tooling/SecAnalytics account.
Prerequisites
The following are the prerequisites for this deployment:
AWS Organizations is utilized across the business. In this scenario, AWS Organizations will be used to group AWS accounts into OUs, as well as to provide enrichment data for Security Hub findings.
Alternative contacts for AWS accounts have been filled out with the most up-to-date information. This is a best practice recommendation. This information will be used for enrichment of the Security Hub findings.
Your organization already has a pipeline in place for indexing Security Hub findings and visualizing them.
Security Hub is set up in the invite model. OU-level Security Hub accounts have been invited and accepted to be managed by the OU-level Security Hub admin account.
The grouping of findings across multiple OU-level Security Hub admin accounts uses Amazon EventBridge to forward events to a centralized bus. You should have the event bus set up ready for this deployment.
Deploy the solution
This solution deployment consists of two parts:
Create an IAM role in your Organizations management account that allows BU-level Security Hub admin to access account metadata, as described in the Create the IAM role procedure that follows.
Deploy the Enrichment Lambda function, the Suppression Lambda function, and the associated EventBridge event rules within the BU-level Security Hub administrator account.
Create the IAM role
Follow the instructions in Creating a role to delegate permissions to an IAM user to create an IAM role by using the IAM console, AWS Command Line Interface (AWS CLI), or AWS API. Create the role in the AWS Organizations management account with the role name as account-contact-readonly, based on the following trust and permission policy templates. You will need the account ID of your BU-level Security Hub administrator account.
The IAM trust policy allows the Security Hub administrator account to assume the role in your Organizations management account.
Note: The following trust policy shows only one BU Security admin account. You will need to add all BU Security admin accounts to the trust policy.
Note: Replace <BU SecHubAdmin Account ID> with the account ID of your decentralized BU-level Security Hub administrator account. After the solution is deployed, you should update the principal in the preceding trust policy to use the new IAM role created for the solution.
The IAM permission policy allows the Security Hub administrator account to look up the alternate contact information for the member accounts.
Make a note of the role Amazon Resource Name (ARN) for the IAM role, which will be similar to this format: arn:aws:iam::<Org Management Account ID>:role/account-contact-readonly.
You will need this ARN when you deploy the solution in the next procedure.
Deploy the solution to your BU-level Security Hub administrator account
After you have the IAM role created, you can deploy the solution either from the AWS Management Console, or from our GitHub repository by using the AWS SAM CLI.
Note: If you’ve designated an aggregation Region within the BU-level Security Hub administrator account, you can deploy this solution only in the aggregation Region. Otherwise, you need to deploy this solution separately in each Region of the BU-level Security Hub administrator account where Security Hub is enabled.
To deploy the solution by using the AWS Management Console
In your Security Hub administrator account, launch the template by choosing the following Launch Stack button, which creates the stack the in us-east-1 Region.
Note: If your Security Hub aggregation Region is different than us-east-1 or you want to deploy the solution in a different AWS Region, you can deploy the solution from the GitHub repository described in the next section.
On the Quick create stack page, for Stack name, enter a unique stack name for this account; for example, aws-security-hub-decentralized-deployment-stack.
Figure 5: Quick create CloudFormation stack for the solution
For SecurityToolingAccountEventBus, provide the EventBus ARN in the security tooling account to post the Security Hub findings from the BU-level Security Hub administrator account.
For OrgManagementAccountContactRole, enter the role ARN of the role you created previously in the Create IAM role procedure.
Choose Create stack.
After the stack is created, go to the Resources tab and take note of the name of the IAM role that was created.
Update the principal element of the IAM role trust policy that you previously created in the Organizations management account in the Create the IAM role procedure, replacing the existing value with the role name you noted down.
Download or clone the GitHub repository by using the following commands.
git clone https://github.com/aws-samples/aws-securityhub-decentralized-operations-solution.git
 cd aws-securityhub-decentralized-operations-solution
Update the content of the profile.txt file with the profile name you want to use for the deployment.
To create a new bucket for deployment artifacts, run create-bucket.sh by specifying the Region as argument.
$ ./create-bucket.sh us-east-1
Deploy the solution to the account by running the deploy.sh script by specifying the Region as argument.
$ ./deploy.sh us-east-1
After the stack is created, go to the Resources tab and take note of the name of the IAM role that was created.
Update the principal element of the IAM role trust policy that you previously created in the Organizations management account in the Create the IAM role procedure, replacing it with the role name you noted down.
"AWS": "arn:aws:iam::<BU SH Delegated Account ID>: role/<Role Name>"
Note: The EventBridge rule to invoke the findings suppression Lambda function uses placeholders for the generator IDs and AWS account IDs. You need to update the EventBridge rule to meet your specific organizational requirements.
Further enhancements and conclusion
Beyond what is described in the decentralized and hybrid models, you can extend the solution to include the following aspects to meet your security operational needs:
In Considerations for security operations in the cloud, we spoke about the role of ChatOps. AWS Chatbot can enable OUs to set up rules to post notifications directly into chat rooms such as Amazon Chime or Slack. You can define rules to send only certain severity notifications or findings that are important to your OU to the chat room.
SCPs give organizations a level of control and governance. See this blog post for some best practices for deploying SCPs, as well as example policies that could be beneficial for your organization in any model you operate in.
We’ve performed testing of the decentralized and hybrid models in the reference architecture within one AWS Region. Although we don’t see any reason why this solution would not work in multiple Regions, if you do operate in multiple Regions you would need to deploy the CloudFormation template in each Region that you operate in. At this stage, you can keep findings within a Region or choose to centralize across multiple Regions by sending to the single central bus in Amazon EventBridge—the flexibility is yours.
The decentralized and hybrid models can also be extended if you operate in multiple organizations in AWS Organizations or have standalone accounts outside of your organization that you want to monitor. Interesting use cases could be in mergers and acquisitions scenarios, when newly acquired accounts need to be monitored to understand their posture before bringing them fully into the organization.
Throughout this two-part blog series, we’ve explored the role of the Security Operations Center (SOC) function, both traditionally in an on-premises environment and in the cloud. We’ve explored different operating models, from the traditional centralized deployment to the decentralized and hybrid models. We’ve also demonstrated, with reference architectures and deployable solutions, how you can achieve the different operating models in the AWS Cloud by using native AWS services. In the end, you should choose the model that works best for your environment and the security landscape you work in.
If you have feedback about this post, submit comments in the Comments section below. If you have questions about this post, contact AWS Support.
Want more AWS Security news? Follow us on Twitter.
We know that maintaining security and resiliency to keep critical data and infrastructure safe is a top priority for the Australian Government and all our customers in Australia. The Strategic Certification of both the existing Sydney and the new Melbourne Regions reinforces our ongoing commitment to meet security expectations for cloud service providers and means Australian citizens can now have even greater confidence that the Government is securing their data.
The HCF provides guidance to government customers to identify cloud providers that meet enhanced privacy, sovereignty, and security requirements. The expanded scope of the AWS HCF Strategic Certification gives Australian Government customers additional architectural options, including the ability to store backup data in geographically separated locations within Australia.
Our AWS infrastructure is custom-built for the cloud and designed to meet the most stringent security requirements in the world, and is monitored 24/7 to help support the confidentiality, integrity, and availability of customers’ data. All data flowing across the AWS global network that interconnects our data centers and Regions is automatically encrypted at the physical layer before it leaves our secured facilities. We will continue to expand the scope of our security assurance programs at AWS and are pleased that Australian Government customers can continue to innovate at a rapid pace and be confident AWS meets the Government’s requirements to support the secure management of government systems and data.
The Melbourne Region was officially added to the AWS HCF Strategic Certification on December 21, 2022, and the Sydney Region was certified in October 2021. AWS compliance status is available on the HCF Certified Service Providers website, and the Certificate of Compliance is available through AWS Artifact. AWS Artifact is a self-service portal for on-demand access to AWS compliance reports. Sign in to AWS Artifact in the AWS Management Console, or learn more at Getting Started with AWS Artifact. AWS has also achieved many international certifications and accreditations, demonstrating compliance with third-party assurance frameworks such as ISO 27017 for cloud security, ISO 27018 for cloud privacy, and SOC 1, SOC 2, and SOC 3.
To learn more about our compliance and security programs, see AWS Compliance Programs. As always, we value your feedback and questions; reach out to the AWS Compliance team through the Contact Us page.
Please reach out to your AWS account team if you have questions or feedback about HCF compliance.
If you have feedback about this post, submit comments in the Comments section below.
Want more AWS Security how-to content, news, and feature announcements? Follow us on Twitter.
In the previous blog, Setting the foundations for compliance, we set the groundwork for developer-enabled compliance that will keep your teams happy, in the flow, secure, compliant, and auditable.
Today, we’ll walk through three practical ways that you can start meeting your compliance requirements without having to revolutionize or transform the culture in your company—all while enabling your developers to be more productive and happy.
1. Do the basics well and often
The first way to start meeting your compliance requirements is often overlooked because it’s so simple. No matter what industry you are in, whether it’s finance, automotive, government, or tech, there are some basic quick compliance wins that may be part of your existing developer workflows and culture.
Code review
A key part of writing clean code is code review. But having a repeatable and traceable code review process is also a foundational component of your compliance program. This ensures risks within software delivery are found and mitigated early—and are also auditable for future reviews.
GitHub makes code review easy, since pull requests are part of the existing workflow that millions of developers use every day. GitHub also makes it easy for compliance testers and auditors to review pull requests with access to immutable audit logs in a central location.
Separation of duties
In some enterprises, separation of duties has been defined as a person having too much manual control over transactions or processes. This can lead to apprehension when modern cloud native practices are introduced.
Thankfully, there is guidance from the Industry that supports a more modern approach to separation of duties. The PCI-DSS requirements guide avoids the term person and provides a more cloud native friendly approach by focusing on functions and accounts:
“The purpose of this requirement is to separate the development and test functions from the production functions. For example, a developer can use an administrator-level account with elevated privileges in the development environment and have a separate account with user-level access to the production environment.”
This approach aligns well with the 12 factor application methodology for cloud native. The Build, release, run factor explanation states, “Each release must enforce a strict separation across the build, release, and run stages. Each should be tagged with a unique ID and support the ability to roll back.” Teams can fully automate their delivery to production, without having to worry about a person manually exceeding too much control, as long as there is separation of functions and traceability back to unique IDs. With the added assurance that they are aligned to industry best practices and requirements, such as PCI-DSS.
To enable separation of duties, you have to have a clear identity and access management strategy. Thankfully, we don’t have to reinvent the wheel. GitHub Enterprise has several options to help you manage access to your overall development environment:
You can configure SAML single sign-on for your enterprise. This is an additional check, allowing you to confirm the authenticity of your users against your own identity provider (while still using your own GitHub account).
You can then synchronize team memberships with groups in your identity provider. As a result, group membership changes in your identity provider update the team membership (and therefore associated access) in GitHub.
Alternatively, you could adopt GitHub Enterprise Managed Users (EMUs). This is a flavor of GitHub Enterprise where you can only log in with an account that is centrally managed through your identity provider. The user does not have to log in to GitHub with a personal account and use single sign on to access company resources. (For more information on this, check out this blog post on exploring EMUs and the benefits they can bring.)
AI-powered compliance
In our last blog we briefly covered AI-enabled compliance and some of the existing opportunities for security, manufacturing, and banks. There are also several other opportunities on the horizon that could further optimize the basics of compliance.
It is entirely possible that a generative AI tool could soon be leveraged to help ensure that separation of duties is enforced in a declarative DevOps workflow by creating unit tests on its own. Because of the non-deterministic nature of generative AI, each time it runs it may have a different result and the unit tests may include risk scenarios that nobody has thought of yet. This can add an amazing level of true risk-based compliance.
One of the major benefits of addressing compliance often in your delivery is an increased level of trust. But quantifying trust can be extremely difficult—especially within a regulated industry that wants to leverage deep learning solutions. There is work being driven by AI results to help provide trust quantification for these types of solutions, which will not only enable continuous compliance but will also help enterprises implement new technologies that can increase business value.
Dependency management
Companies are increasing their reliance on open source software in their supply chain. As a result, optimized, repeatable, and audible controls for dependency management are becoming a cornerstone of compliance programs across industries.
From a GitHub perspective, Dependabot can provide confidence that your supply chain is secure. When Dependabot is configured, developers are alerted as soon as a security threat is found and gives them the ability to take action in their normal workflows.
By leveraging Dependabot, you will receive an immutable and auditable alert when a repository uses a software dependency with a known vulnerability. Pull requests can be triggered by either your developers or security teams, which give you another set of auditable artifacts for future review.
There could be many control points in your delivery pipeline that may require approval, such as sign-off of requirements, testing results, security reviews, or production operational readiness confirmations before a release.
Depending on your internal structure and alignment, you may require teams to provide sign-off at different stages throughout the process. In your build and test stage, you can use manual approvals in a pull request to gather the needed reviews.
Once your builds and tests are complete, it’s time to release your code into your infrastructure. Talking about deployment patterns and strategies is beyond the scope of this post. However, you may require approvals as part of the deployment process.
To obtain these approvals, you should use environments for your deployments. Environments are used to describe a deployment target (such as staging, testing, and production). By using environments, you can require a manual approval to take place before GitHub Actions begins the deployment job.
In both instances, remember that there is a tradeoff when deciding the number of approvals required. Setting the number of required reviews too high means that you may impact your pace of delivery, as manual intervention is required. Where possible, consider automating checks to reduce the manual overhead, thereby optimizing your overall agility.
2. Have a common understanding of concepts and terms
Again, this may be overlooked since it sounds so obvious. But there are probably many concepts and terms that developers, DevOps and cloud native practitioners use on a daily basis that may be totally incomprehensible to compliance testers and auditors.
Back in 2015, the author of The Phoenix Project, Gene Kim, and several other authors, created the DevOps Audit Defense Toolkit. As we mentioned in our first blog, the goal of this document was to “educate IT management and practitioners on the audit process so they can demonstrate to auditors they understand the business risks and are properly mitigating those risks.” But where do you start?
Below is a basic cheat-sheet of terms for GitHub related control objectives and a mapping to the world of compliance, regulations, risk, and audit. This could be a good place to start building a common understanding between developers and your compliance and audit friends.
Objective
Control
Financial Reporting
Industry Frameworks
The Code Review Control ensures that security requirements have been addressed and that the code is understandable, maintainable, and properly formatted.
Pull requests let you tell others about changes you’ve pushed to a branch in a repository on GitHub.Once a pull request is opened, you can discuss and review the potential changes with collaborators and add follow-up commits before your changes are merged into the base branch.
SOX: Change Management
COSO: Control Activities—Conduct application change management.
NIST Cyber: DE.CM-4 —Malicious code is detected.
PCI-DSS: 6.3.2: Review all custom code for vulnerabilities, manually or via automation.
SLSA: Two-person review is an industry best practice for catching mistakes and deterring bad behavior.
Controls and processes should be in place to scan code repositories for passwords and security tokens. Prevention measures should be enforced to ensure secrets do not reach production.
Secret scanning will scan your entire Git history on all branches present in your GitHub repository for secrets. GitHub push protection will check for high-confidence secrets as developers push code and block the push if a secret is identified.
SOX: IT Security
COSO: Control Activities—Improve security
NIST Cyber: PR.DS-5: Protections against data leaks are implemented.
PCI-DSS: 6.5.3: Protect against all insufficiently secure cryptographic key storage.
To help bring this together, there is a great example of the benefits of a common understanding between developers and compliance testers and auditors in the latest Forrester report on the economic impact of GitHub Enterprise Cloud and Advanced Security. The report highlights one of the benefits of an automated documentation process that both helps developers and auditors:
“These new, standardized documentation structures made it easier for auditors to find and compile the documentation necessary to be compliant. This helped the interviewees’ organizations save time preparing for industry compliance and security audits.”
3. Helping developers understand where they fit into the three lines of defense
The three lines of defense is a model used for risk management and governance. It helps clarify the roles and responsibilities of teams involved in addressing risk.
Think of the engineering team and engineering leads as the first line of defense, as they continue shipping software to their end-users. Making sure this team has the appropriate level of skills to identify risk within their solution is crucial.
The second line of defense is typically achieved at scale through frameworks, policies, and tools at an organizational level. This acts as oversight for the first line of defense on how well they are implementing risk mitigation techniques and consistently measuring and defining risk across the organization.
Internal audit is the third line of defense. Just like a red team and blue team compliment each other, you can think of internal audit as the final puzzle piece in the three lines of defense. They evaluate the effectiveness of risk management and governance, working with senior management and external regulators to raise awareness of the controls being executed.
Let’s use an analogy. A hockey team is not just structured to score goals but also prevent goals being scored against them.
Forwards: they are there to score and assist on goals. But they can be called on to work with the other positions in defense. Think of them as the first line of defense. Their job is to create solutions which provide business value, but are also secure.
Defenders: their main role is clearly preventing goals. But they partner with the forwards on the current priority (offense or defense). They are like the second line of defense, providing risk oversight and collaborating with the engineering teams.
Goaltender: the last line of defense. They can be thought of as the equivalent of an internal audit. They are independent of the forwards and defenders with different responsibilities, tools, and perspective.
Hockey teams that have very strong forwards but weak defenders and goalkeepers are rarely successful. Teams with a strong defense but weak offense are rarely successful, either. It takes all three aspects working in harmony to be successful.
This applies in business, too. If your solutions meet your customers’ requirements but are insecure, your business will fail. If your solutions are secure but aren’t user friendly or providing value, it will result in failure. Success is achieved by finding the right balance of value and risk management.
Developers can see that they are there to score goals for their team; creating the software that runs our world. But they need to support the defensive capabilities of the team, ensuring their software is secure. Their success is dependent on the success of the wider team, without having to take on additional responsibilities.
This is only one step in solving the problem. A common language between compliance and DevOps practitioners is crucial in demonstrating the implemented measures. With that common language, it is clear that everyone must think about compliance; engineering teams are a part of the three lines of defense.
Next up in the series, we’ll be talking about how to ensure compliance in developer workflows.
Ready to increase developer velocity and collaboration while remaining secure and compliant? See how GitHub Enterprise can help.
In November 2022, AWS introduced support for granular geographic (geo) match conditions in AWS WAF. This blog post demonstrates how you can use this new feature to customize your AWS WAF implementation and improve the security posture of your protected application.
AWS WAF provides inline inspection of inbound traffic at the application layer. You can use AWS WAF to detect and filter common web exploits and bots that could affect application availability or security, or consume excessive resources. Inbound traffic is inspected against web access control list (web ACL) rules. A web ACL rule consists of rule statements that instruct AWS WAF on how to inspect a web request.
The AWS WAF geographic match rule statement functionality allows you to restrict application access based on the location of your viewers. This feature is crucial for use cases like licensing and legal regulations that limit the delivery of your applications outside of specific geographic areas.
AWS recently released a new feature that you can use to build precise geographic rules based on International Organization for Standardization (ISO) 3166 country and area codes. With this release, you can now manage access at the ISO 3166 region level. This capability is available across AWS Regions where AWS WAF is offered and for all AWS WAF supported services. In this post, you will learn how to use this new feature with Amazon CloudFront and Elastic Load Balancing (ELB) origin types.
Summary of concepts
Before we discuss use cases and setup instructions, make sure that you are familiar with the following AWS services and concepts:
Amazon CloudFront: CloudFront is a web service that gives businesses and web application developers a cost-effective way to distribute content with low latency and high data transfer speeds.
Amazon Simple Storage Service (Amazon S3):Amazon S3 is an object storage service built to store and retrieve large amounts of data from anywhere.
AWS WAF labels: Labels contain metadata that can be added to web requests when a rule is matched. Labels can alter the behavior or default action of managed rules.
ISO (International Organization for Standardization) 3166 codes:ISO codes are internationally recognized codes that designate for every country and most of the dependent areas a two- or three-letter combination. Each code consists of two parts, separated by a hyphen. For example, in the code AU-QLD, AU is the ISO 3166 alpha-2 code for Australia, and QLD is the subdivision code of the state or territory—in this case, Queensland.
How granular geo labels work
Previously, geo match statements in AWS WAF were used to allow or block access to applications based on country of origin of web requests. With updated geographic match rule statements, you can control access at the region level.
In a web ACL rule with a geo match statement, AWS WAF determines the country and region of a request based on its IP address. After inspection, AWS WAF adds labels to each request to indicate the ISO 3166 country and region codes. You can use labels generated in the geo match statement to create a label match rule statement to control access.
AWS WAF generates two types of labels based on origin IP or a forwarded IP configuration that is defined in the AWS WAF geo match rule. These labels are the country and region labels.
By default, AWS WAF uses the IP address of the web request’s origin. You can instruct AWS WAF to use an IP address from an alternate request header, like X-Forwarded-For, by enabling forwarded IP configuration in the rule statement settings. For example, the country label for the United States with origin IP and forwarded IP configuration are awswaf:clientip:geo:country:US and awswaf:forwardedip:geo:country:US, respectively. Similarly, the region labels for a request originating in Oregon (US) with origin and forwarded IP configuration are awswaf:clientip:geo:region:US-OR and awswaf:forwardedip:geo:region:US-OR, respectively.
To demonstrate this AWS WAF feature, we will outline two distinct use cases.
Use case 1: Restrict content for copyright compliance using AWS WAF and CloudFront
Licensing agreements might prevent you from distributing content in some geographical locations, regions, states, or entire countries. You can deploy the following setup to geo-block content in specific regions to help meet these requirements.
In this example, we will use an AWS WAF web ACL that is applied to a CloudFront distribution with an S3 bucket origin. The web ACL contains a geo match rule to tag requests from Australia with labels, followed by a label match rule to block requests from the Queensland region. All other requests with source IP originating from Australia are allowed.
To configure the AWS WAF web ACL rule for granular geo restriction
In the navigation pane, choose Web ACLs, select Global (CloudFront) from the dropdown list, and then choose Create web ACL.
For Name, enter a name to identify this web ACL.
For Resource type, choose the CloudFront distribution that you created in step 1, and then choose Add.
Choose Next.
Choose Add rules, and then choose Add my own rules and rule groups.
For Name, enter a name to identify this rule.
For Rule type, choose Regular rule.
Configure a rule statement for a request that matches the statement Originates from a Country and select the Australia (AU) country code from the dropdown list.
Set the IP inspection configuration parameter to Source IP address.
Under Action, choose Count, and then choose Add Rule.
Create a new rule by following the same actions as in step 7 and enter a name to identify the rule.
For Rule type, choose Regular rule.
Configure a rule statement for a request that matches the statement Has a Label and enter awswaf:clientip:geo:region:AU-QLD for the match key.
Set the action to Block and choose Add rule.
For Actions, keep the default action of Allow.
For Amazon CloudWatch metrics, select the AWS WAF rules that you created in steps 8 and 14.
For Request sampling options, choose Enable sampled requests, and then choose Next.
Review and create the web ACL rule.
After the web ACL is created, you should see the web ACL configuration, as shown in the following figures. Figure 1 shows the geo match rule configuration.
Figure 1: Web ACL rule configuration
Figure 2 shows the Queensland regional geo restriction.
Figure 2: Queensland regional geo restriction – web ACL configuration<
The setup is now complete—you have a web ACL with two regular rules. The first rule matches requests that originate from Australia and adds geographic labels automatically. The label match rule statement inspects requests with Queensland granular geo labels and blocks them. To understand where requests are originating from, you can configure logging on the AWS WAF web ACL.
You can test this setup by making requests from Queensland, Australia, to the DNS name of the CloudFront distribution to invoke a block. CloudFront will return a 403 error, similar to the following example.
As shown in these test results, requests originating from Queensland, Australia, are blocked.
Use case 2: Allow incoming traffic from specific regions with AWS WAF and Application Load Balancer
We recently had a customer ask us how to allow traffic from only one region, and deny the traffic from other regions within a country. You might have similar requirements, and the following section will explain how to achieve that. In the example, we will show you how to allow only visitors from Washington state, while disabling traffic from the rest of the US.
This example uses an AWS WAF web ACL applied to an application load balancer in the US East (N. Virginia) Region with an Amazon EC2 instance as the target. The web ACL contains a geo match rule to tag requests from the US with labels. After we enable forwarded IP configuration, we will inspect the X-Forwarded-For header to determine the origin IP of web requests. Next, we will add a label match rule to allow requests from the Washington region. All other requests from the United States are blocked.
To configure the AWS WAF web ACL rule for granular geo restriction
After the application load balancer is created, open the AWS WAF console.
In the navigation pane, choose Web ACLs, and then choose Create web ACL in the US east (N. Virginia) Region.
For Name, enter a name to identify this web ACL.
For Resource type, choose the application load balancer that you created in step 1 of this section, and then choose Add.
Choose Next.
Choose Add rules, and then choose Add my own rules and rule groups.
For Name, enter a name to identify this rule.
For Rule type, choose Regular rule.
Configure a rule statement for a request that matches the statement Originates from a Country in, and then select the United States (US) country code from the dropdown list.
Set the IP inspection configuration parameter to IP address in Header.
Enter the Header field name as X-Forwarded-For.
For Match, choose Fallback for missing IP address. Web requests without a valid IP address in the header will be treated as a match and will be allowed.
Under Action, choose Count, and then choose Add Rule.
Create a new rule by following the same actions as in step 7 of this section, and enter a name to identify the rule.
For Rule type, choose Regular rule.
Configure a rule statement for a request that matches the statement Has a Label, and for the match key, enter awswaf:forwardedip:geo:region:US-WA.
Set the action to Allow and add choose Add Rule.
For Default web ACL action for requests that don’t match any rules, set the Action to Block.
For Amazon CloudWatch metrics, select the AWS WAF rules that you created in steps 8 and 14 of this section.
For Request sampling options, choose Enable sampled requests, and then choose Next.
Review and create the web ACL rule.
After the web ACL is created, you should see the web ACL configuration, as shown in the following figures. Figure 3 shows the geo match rule
Figure 3: Geo match rule
Figure 4 shows the Washington regional geo restriction.
Figure 4: Washington regional geo restriction – web ACL configuration
The following is a JSON representation of the rule:
The setup is now complete—you have a web ACL with two regular rules. The first rule matches requests that originate from the US after inspecting the origin IP in the X-Forwarded-For header, and adds geographic labels. The label match rule statement inspects requests with the Washington region granular geo labels and allows these requests.
If a user makes a web request from outside of the Washington region, the request will be blocked and a HTTP 403 error response will be returned, similar to the following.
AWS WAF now supports the ability to restrict traffic based on granular geographic labels. This gives you further control based on geographic location within a country.
In this post, we demonstrated two different use cases that show how this feature can be applied with CloudFront distributions and application load balancers. Note that, apart from CloudFront and application load balancers, this feature is supported by other origin types that are supported by AWS WAF, such as Amazon API Gateway and Amazon Cognito.
If you have feedback about this post, submit comments in the Comments section below. If you have questions about this post, start a new thread on the AWS WAF re:Post or contact AWS Support.
Want more AWS Security news? Follow us on Twitter.
This blog post is written by Jason Nicholls, Principal Solutions Architect AWS.
In this post we show you how to enable that Windows Defender Credential Guard (Credential Guard) on Amazon Elastic Compute Cloud (Amazon EC2) running Microsoft Windows Server. Credential Guard, when enabled on Amazon EC2 Windows Instances protects sensitive user login information from being extracted from the Operating System (OS) memory.
Microsoft Windows stores credential material such as authentication tokens in the Local Security Authority (LSA), a process in the Microsoft Windows operating system that is responsible for enforcing the security policy of the system. Traditionally these credentials are stored in LSA’s process memory accessible to the rest of the OS, making it possible for a privileged user to extract these credentials. The use of complex passwords, limiting privileged account use, and training users not to use the same password across multiple systems are steps that limit the use of credentials extracted from the LSA, but customers want to isolate these credentials from other rest of the OS.
With Credential Guard enabled, the LSA is isolated by Windows virtualization-based security (VBS). VBS is a suite of Windows security mechanisms that use hardware virtualization features to create an isolated compute environment to store user credentials referred to as the isolated LSA. The isolated LSA is inaccessible to the rest of the OS.
When UEFI Secure Boot and NitroTPM are enabled for the AMI, “TpmSupport“: “v2.0“, and “BootMode”: “uefi” appear in the output respectively, such as in the following example.
Before launching the AMI verify that the instance type you want to launch supports UEFI boot mode and uses the Nitro System by using the DescribeInstanceTypes API call. Using the AWS CLI and calling describe-instance-types as follows:
Use the Amazon EC2 console or AWS Command Line Interface (AWS CLI) to launch an Amazon EC2 instance which has “uefi” boot mode enabled. Administrator access to the Amazon EC2 instance is required to enable Credential Guard.
Launch an Amazon EC2 Windows Instance using a Windows AMI preconfigured to enable UEFI Secure Boot with Microsoft Windows Secure Boot Keys on an instance type that supports UEFI Secure Boot.
You can use the launch wizard in the Amazon EC2 console or run-instances command via the AWS CLI to launch an instance that can support Credential Guard. You need a compatible AMI ID for launching your instance which is unique for each AWS Region. You can use the following link to discover and launch instances with compatible Amazon-provided AMIs in the Amazon EC2 console:
Option 1: Enabling Credential Guard via the Windows Registry
Start the Amazon EC2 instance using an AMI that has the BootMode set to “uefi“. Windows AMI must be preconfigured to enable UEFI Secure Boot with Microsoft Windows Secure Boot keys as we defined earlier. Once you’re connected to the instance use the Windows System Information tool to check that Credential Guard isn’t running on the instance:
Select Start, type msinfo32.exe, and then select System Information.
Select System Summary on the left.
Confirm that Virtualization-based security is Not Enabled.
Figure 1 Overview of System Information in Windows
Figure 2 System Information confirming that Credential Guard is Not Enabled
4. Open the Windows Command Shell by selecting Start, type cmd.exe, and then press Enter.
5. Run the following commands from the Windows Command Shell to enable Credential Guard using the Windows Registry:
Figure 3 Update the Windows Registry to enable Credential Guard
6. Once the changes have been made, reboot the instance.
7. When the instance is back up, reconnect to the instance and select Start, type msinfo32.exe, and then select System Information.
8. Select System Summary on the left.
9. Note that Virtualisation-based security is now changed to Running, and that Secure Boot and Credential Guard are enabled.
Figure 4 Overview of System Information showing Credential Guard is Enabled
Figure 5 System Information shows Credential Guard is now Enabled
Option 2: Enabling Credential Guard via the DG-Readiness tool
Option 1 requires a remote desktop session to your Windows Instance. Option 2 is run via PowerShell which can either be done in a remote desktop session as described here or via a remote PowerShell session.
Start the Amazon EC2 instance using an AMI that has the BootMode set to “uefi“. Windows AMI must be preconfigured to enable UEFI Secure Boot with Microsoft Windows Secure Boot keys as we defined earlier. Once you’re connected to the instance start a PowerShell session:
Select Start, type PowerShell, and then click Windows PowerShell.
Figure 6 Start PowerShell via the Start Bar
2. Download the DG-Readiness tool by running the command:
Figure 8 Copy the DG-Readiness tool to the current folder
Confirm that Credential Guard is disabled by running the DG-Readiness tool with the -Ready option, as follows:
DG_Readiness_Tool_v3.6.ps1 -Ready
Figure 9 Using the DG-Readiness tool to confirm Credential Guard is not enabled
Enable Credential Guard using the -Enable -CG options as follows:
DG_Readiness_Tool_v3.6.ps1 -Enable -CG
Reboot the instance
Reconnect to the instance after the reboot and confirm that Credential Guard is now running by running the command:
DG_Readiness_Tool_v3.6.ps1 -Ready
Figure 10 DG Readiness Tool shows Credential Guard is enabled and running
Conclusion
With support for Windows Defender Credential Guard on Amazon EC2 Windows Instances customers can create an isolated compute environment that is inaccessible to the rest of the OS. Credential Guard requires UEFI Secure Boot support. Credential Guard can leverage NitroTPM to further secure credentials.
To learn more about the support of Credential Guard visit documentation.
In this post, we continue with our recommendations for using AWS Identity and Access Management (IAM) APIs. In part 1 of this two-part series, we described how you could create IAM resources and use them soon after for authorization decisions. We also described options for monitoring and responding to IAM resource changes for entire accounts. Now, in part 2 of this post, we’ll cover the API throttling behavior of IAM and AWS Security Token Service (AWS STS) and how you can effectively plan your usage of these APIs. We’ll also cover the features of IAM that enable you to right-size the permissions granted to principals in your organization and assess external access to your resources.
Increase your usage of IAM APIs
If you’re a developer or a security engineer, you might find yourself writing more and more automation that interacts with IAM APIs. Other engineers, teams, or applications might also call the IAM APIs within the same account or cross-account. Over time, anyone calling the APIs in your account incrementally increases the number of requests per second. If so, IAM might send a “Rate exceeded” error that indicates you have exceeded a certain threshold of API calls per second. This is called API throttling.
Understand IAM API throttling
API throttling occurs when you exceed the call rate limits for an API. AWS uses API throttling to limit requests to a service. Like many AWS services, IAM limits API requests to maintain the performance of the service, and to ensure fair usage across customers. IAM and AWS STS independently implement a token bucket algorithm for throttling, in which a bucket of virtual tokens is refilled every second. Each token represents a non-throttled API call that you can make. The number of tokens that a bucket holds and the refill rate depends on the API. For each IAM API, a number of token buckets might apply.
We refer to this simply as rate-limiting criteria. Essentially, there are several rate-limiting criteria that are considered when evaluating whether a customer is generating more traffic than the service allows. The following are some examples of these criteria:
The account where the API is called
The account for read or write APIs (depending on whether the API is a read or write operation)
The account from which AssumeRole was called prior to the API call (for example, third-party cross-account calls)
The account from which AssumeRole was called prior to the API call for read APIs
The API and organization where the API is called
Understand STS API throttling
Although IAM has criteria pertaining to the account from which AssumeRole was called, IAM has its own API rate limits that are distinct from AWS STS. Therefore, the preceding criteria are IAM-specific and are separate from the throttling that can occur if you call STS APIs. IAM is also a global service, and the limits are not Region-aware. In contrast, while STS has a single global endpoint, every Region has its own STS endpoint with its own limits.
The STS rate-limiting criteria pertain to each account and endpoint for API calls. For example, if you call the AssumeRole API against the sts.ap-northeast-1.amazonaws.com endpoint, STS will evaluate the rate-limiting criteria associated with that account and the ap-northeast-1 endpoint. Other STS API requests that you perform under the same account and endpoint will also count towards these criteria. However, if you make a request from the same account to a different regional endpoint or the global endpoint, that request will count against different criteria.
Note: AWS recommends that you use the STS regional endpoints instead of the STS global endpoint. Regional endpoints have several benefits, including redundancy and reduced latency. To learn more about other benefits, see Managing AWS STS in an AWS Region.
How multiple criteria affect throttling
The preceding examples show the different ways that IAM and STS can independently limit requests. Limits might be applied at the account level and across read or write APIs. More than one rate-limiting criterion is typically associated with an API call, with each request counted against each rate-limiting criterion independently. This means that if the requests-per-second exceeds the applicable criteria, then API throttling occurs and returns a rate-limiting error.
How to address IAM and STS API throttling
In this section, we’ll walk you through some strategies to reduce IAM and STS API throttling.
Query for top callers
With AWS CloudTrail Lake, your organization can aggregate, store, and query events recorded by CloudTrail for auditing, security investigation, and operational troubleshooting. To monitor API throttling, you can run a simple query that identifies the top callers of IAM and STS.
For example, you can make a SQL-based query in the CloudTrail console to identify the top callers of IAM, as shown in Figure 1. This query includes the API count, API event name, and more that are made to IAM (shown under eventSource). In this example, the top result is a call to GetServiceLastAccessedDetails, which occurred 163 times. The result includes the account ID and principal ID that made those requests.
To reduce call throttling, you need to know when you exceed a rate limit. You can identify when you are being throttled by catching the RateLimitExceeded exception in your API calls. Or, you can send your application logs to Amazon CloudWatch Logs and then configure a metric filter to record each time that throttling occurs, for later analysis or notification. Ideally, you should do this across your applications, and log this information centrally so that you can investigate whether calls from a specific account (such as your central monitoring account) are affecting API availability across your other accounts by exceeding a rate-limiting criterion in those accounts.
Call your APIs with a less aggressive retry strategy
In the AWS SDKs, you can use the existing retry library and provide a custom base for the initial sleep done between API calls. For example, you can set a custom configuration for the backoff or edit the defaults directly. The default SDK_DEFAULT_THROTTLED_BASE_DELAY is 500 milliseconds (ms) in the relevant Java SDK file, but if you’re experiencing throttling consistently, we recommend a minimum 1000 ms for the throttled base delay. You can change this value or implement a custom configuration through the PredefinedBackoffStrategies.SDKDefaultBackoffStrategy() class, which is referenced in the same file. As another example, in the Javascript SDK, you can edit the base retry of the retryDelayOptions configuration in the AWS.Config class, as described in the documentation.
The difference between making these changes and using the SDK defaults is that the custom base provides a less aggressive retry. You shouldn’t retry multiple requests that are throttled during the same one-second window. If the API has other applicable rate-limiting criteria, you can potentially exceed those limits as well, preventing other calls in your account from performing requests. Lastly, be careful that you don’t implement your own retry or backoff logic on top of the SDK retry or backoff logic because this could make throttling worse — instead, you should override the SDK defaults.
Reduce the number of requests by using max items
For some APIs, you can increase the number of items returned by a single API call. Consider the example of the GetServiceLastAccessedDetails API. This API returns a lot of data, but the results are truncated by default to 100 items, ordered alphabetically by the service namespace. If the number of items returned is greater than 100, then the results are paginated, and you need to make multiple requests to retrieve the paginated results individually. But if you increase the value of the MaxItems parameter, you can decrease the number of requests that you need to make to obtain paginated results.
AWS has hundreds of services, so you should set the value of the MaxItems parameter no higher than your application can handle (the response size could be large). At the time of our testing, the results were no longer truncated when this value was 300. For this particular API, IAM might return fewer results, even when more results are available. This means that your code still needs to check whether the results are paginated and make an additional request if paginated results are available.
Consistent use of the MaxItems parameter across AWS APIs can help reduce your total number of API requests. The MaxItems parameter is also available through the GetOrganizationsAccessReport operation, which defaults to 100 items but offers a maximum of 1000 items, with the same caveat that fewer results might be returned, so check for paginated results.
Smooth your high burst traffic
In the table from part 1 of this post, we stated that you should evaluate IAM resources every 24 hours. However, if you use a simple script to perform this check, you could initiate a throttling event. Consider the following fictional example:
As a member of ExampleCorp’s Security team, you are working on a task to evaluate the company’s IAM resources through some custom evaluation scripts. The scripts run in a central security account. ExampleCorp has 1000 accounts. You write automation that assumes a role in every account to run the GetAccountAuthorizationDetails API call. Everything works fine during development on a few accounts, but you later build a dashboard to graph the data. To get the results faster for the dashboard, you update your code to run concurrently every hour. But after this change, you notice that many requests result in the throttling error “Rate exceeded.” Other security teams see “Rate exceeded” errors in their application logs, too.
Can you guess what happened? When you tried to make the requests faster, you used concurrency to make the requests run in parallel. By initiating this large number of requests simultaneously, you exceeded the rate-limiting criteria for the security account from which the sts:AssumeRole action was called prior to the GetAccountAuthorizationDetails API call.
To address scenarios like this, we recommend that you set your own client-side limitations when you need to make a large number of API requests. You can spread these calls out so that they happen sequentially and avoid large spikes. For example, if you run checks every 24 hours, make sure that the calls don’t happen at exactly midnight. Figure 2 shows two different ways to distribute API volume over time:
Figure 2: Call volume that periodically spikes compared to evenly-distributed call volume
The graph on the left represents a large, recurring API call volume, with calls occurring at roughly the same time each day—such as 1000 requests at midnight every 24 hours. However, if you intend to make these 1000 requests consistently every 24 hours, you can spread them out over the 24-hour period. This means that you could make about 41 requests every hour, so that 41 accounts are queried at 00:00 UTC, another 41 the next hour, and so on. By using this strategy, you can make these requests blend into your other traffic, as shown in the graph on the right, rather than create large spikes. In summary, your automation scheduler should avoid large spikes and distribute API requests evenly over the 24-hour period. Using queues such as those provided by Amazon Simple Queue Service (Amazon SQS) can also help, and when errors are identified, you can put them in a dead letter queue to try again later.
Some IAM APIs have rate-limiting criteria for API requests made from the account from which the AssumeRole was called prior to the call. We recommend that you serially iterate over the accounts in your organization to avoid throttling. To continue with our example, you should iterate the 41 accounts one-by-one each hour, rather than running 41 calls at once, to reduce spikes in your request rates.
Recommendations specific to STS
You can adjust how you use AWS STS to reduce your number of API calls. When you write code that calls the AssumeRole API, you can reuse the returned credentials for future requests because the credentials might still be valid. Imagine that you have an event-driven application running in a central account that assumes a role in a target account and does an API call for each event that occurs in that account. You should consider reusing the credentials returned by the AssumeRole call for each subsequent call in the target account, especially if calls in the central accounts are being throttled. You can do this for AssumeRole calls because there is no service-side limit to the number of credentials that you can create and use. Whether it’s one credential or many, you need to use and store these carefully. You can also adjust the role session duration, which determines how long the role’s credentials are valid. This value can be up to 12 hours, depending on the maximum session duration configured on the role. If you reuse short-term credentials or adjust the session duration, make sure that you evaluate these changes from a security perspective as you optimize your use of STS to reduce API call volume.
Use case #3: Pare down permissions for least-privileged access
Let’s assume that you want to evaluate your organization’s IAM resources with some custom evaluation scripts. AWS has native functionality that can reduce your need for a custom solution. Let’s take a look at some of these that can help you accomplish these goals.
Identify unintended external sharing
To identify whether resources in your accounts, such as IAM roles and S3 buckets, have been shared with external entities, you can use IAM Access Analyzer instead of writing your own checks. With IAM Access Analyzer, you can identify whether resources are accessible outside your account or even your entire organization. Not only can you identify these resources on-demand, but IAM Access Analyzer proactively re-analyzes resources when their policies change, and reports new findings. This can help you feel confident that you will be notified of new external sharing of supported resources, so that you can act quickly to investigate. For more details, see the IAM Access Analyzer user guide.
Right-size permissions
You can also use IAM Access Analyzer to help right-size the permissions policies for key roles in your accounts. IAM Access Analyzer has a policy generation feature that allows you to generate a policy by analyzing your CloudTrail logs to identify actions used from over 140 services. You can compare this generated policy with the existing policy to see if permissions are unused, and if so, remove them.
You can perform policy generation through the API or the IAM console. For example, you can use the console to navigate to the role that you want to analyze, and then choose Generate policy to start analyzing the actions used over a specified period. Actions that are missing from the generated policy are permissions that can be potentially removed from the existing policy, after you confirm your changes with those who administer the IAM role. To learn more about generating policies based on CloudTrail activity, see IAM Access Analyzer makes it easier to implement least privilege permissions by generating IAM policies based on access activity.
Conclusion
In this two-part series, you learned more about how to use IAM so that you can test and query IAM more efficiently. In this post, you learned about the rate-limiting criteria for IAM and STS, to help you address API throttling when increasing your usage of these services. You also learned how IAM Access Analyzer helps you identify unintended resource sharing while also generating policies that serve as a baseline for principals in your account. In part 1, you learned how to quickly create IAM resources and use them when refining permissions. You also learned how to get information about IAM resources and respond to IAM changes through the various services integrated with IAM. Lastly, when calling IAM directly, you learned about bulk APIs, which help you efficiently retrieve the state of your principals and policies. We hope these posts give you valuable insights about IAM to help you better monitor, review, and secure access to your AWS cloud environment!
In this two-part blog post, we’ll provide recommendations for using AWS Identity and Access Management (IAM) APIs, and we’ll share useful details on how IAM works so that you can use it more effectively. For example, you might be creating new IAM resources such as roles and policies through automation and notice a delay for resource propagations. Or you might be building a custom cloud security monitoring solution that uses IAM APIs to evaluate the security and compliance of your AWS accounts, and you want to know how to do that without exceeding limits. Although these are just a few example use cases, the insights described in this post are intended to help you avoid anti-patterns when building scalable cloud services that use IAM APIs.
In this post, we describe how to create IAM resources and use them soon after for authorization decisions. We also describe options for monitoring and responding to IAM resource changes for entire accounts. In part 2, we’ll cover the API throttling behavior of IAM and AWS Security Token Service (AWS STS) and how you can effectively plan your usage of these APIs. Let’s dive in!
Use case 1: Create IAM resources and attempt to use them immediately
If you’re a cloud developer, you create and use IAM resources when you develop applications on AWS. For your application to interact with AWS services, you need to grant IAM permissions to your application. Your application—whether it runs on AWS Lambda, Amazon Elastic Compute Cloud (Amazon EC2), or another service—will need an associated IAM role and policy that provide the necessary permissions.
Imagine that you want to create least privilege policies for your application. You begin by deploying new or updated IAM resources, such as roles and policies, along with your application updates, and you automate this process to speed up testing and development.
During development, you begin removing unnecessary policy permissions, with your automation testing the updated permissions. However, you notice that some of your updates do not immediately take effect. The following sections address why this occurs and provide insights to help you architect for other scenarios.
Understand the IAM control plane and data plane
Let’s first learn more about the control plane and data plane in IAM. The control plane involves operations to create, read, update, and delete IAM resources, and it’s how you get the current state of IAM. When you invoke IAM APIs, you interact with the control plane. This includes any API that falls under the iam:* namespace. The data plane, in contrast, consists of the authorization system that is used at scale to grant access to the broader set of AWS services and resources. This includes the AWS STS APIs, which have their own sts:* namespace.
When you call the IAM control plane APIs to create, update, or delete resources, you can expect a read-after-write consistent response. This means that you can retrieve (read) the resource and its latest updates immediately after it’s written. In contrast, the IAM data plane, where authorizations occur, is eventually consistent. This means that there will be a delay for IAM resource changes, such as updates to roles and policies, to propagate and reflect in the authorizations that follow. The delay can be several seconds or longer. Because of this, you need to allow for propagation time when you test changes to IAM resources. To learn more about the control plane and data plane of IAM, see Resilience in AWS Identity and Access Management.
Note: Because calls to AWS APIs rely on IAM to check permissions, the availability and scalability of the data plane are paramount. In 2011, the “can the caller do this?” function handled a couple of thousand requests per second. Today, as new services continue to launch and the number of AWS customers increases, AWS Identity handles over half a billion API calls per second worldwide, and the number is growing. Eventually consistent design enables the IAM data plane to maintain the high availability and low latency needed to evaluate permissions on AWS.
This is why when architecting your application, we recommend that you don’t depend on control plane actions such as resource updates for critical parts of your application’s workflow. Instead, you should architect to take advantage of the data plane, which includes STS and the authorization system of IAM. In the next section, we describe how you can do this.
Test permissions with STS scope-down policies
IAM role sessions have a feature called a session policy, which takes effect immediately when a role is assumed. This is an optional policy that you can provide to scope down the role’s existing identity policies, with the permissions being the intersection of the role’s identity-based policies and the session policy. By using session policies, you get specific, scoped-down credentials from a single pre-existing role without having to create new roles or identity policies for each particular session’s use case. You can use session policies for your application or when you test which least privilege policies are best for your application.
Let’s walk through an example of when to use session policies for permissions testing. Imagine that you need permissions that require very specific, fine-grained conditions to attain your ideal least privilege policy. You might iterate on the policy several times, making updates and testing the changes over and over again. If you update a policy attached to a role, you need to wait for these changes to propagate to the IAM data plane. But if you instead specify a scope-down policy when assuming the pre-existing role prior to testing, you can immediately test and observe the effects of your permissions changes. Immediate testing is possible because your role and its original policy have already propagated to the data plane, enabling you to iterate over various scoped-down session policies that operate against the IAM data plane.
Use STS session policies to assume a role with the AWS CLI
There are two ways to provide a session policy during the AssumeRole process: you can provide an inline policy document or the Amazon Resource Names (ARNs) of managed session policies. The following example shows how to do this through the AWS Command Line Interface (AWS CLI), by passing in a policy document along with the AssumeRole call. If you use this example policy, make sure to replace <123456789012> and <DOC-EXAMPLE-BUCKET> with your own information.
In this example, we provide a previously created role ARN named s3-full-access, which provides full access to Amazon Simple Storage Service (Amazon S3). We can further restrict the role’s permissions by supplying a policy with the optional --policy option. The inline policy document only allows the GetObject request against the S3 bucket named <DOC-EXAMPLE-BUCKET>. The effective permissions for the returned session are the intersection of the role’s identity-based policies and our provided session policy. Therefore, the role session’s permissions are limited to only performing the GetObject request against the <DOC-EXAMPLE-BUCKET>.
Note: The combined size of the passed inline policy document and all passed managed policy ARN characters cannot exceed 2,048 characters. You can reduce the size of the JSON policy document by removing unnecessary whitespace and shortening or removing tags associated with your session.
Use case 2: Monitor and respond to IAM resources for entire accounts
You might need to periodically audit the state of your IAM resources, such as roles and policies, including whether these IAM resources have changed, in a single account or across your entire organization. For example, you might want to check whether roles have overly broad access to actions and resources. Or you might want to monitor IAM resource creation and updates to respond to security-relevant permission changes. In this section, you will learn how to choose the right tool for auditing and monitoring IAM resources across accounts. You will learn about the AWS services that support this use case, the benefits of polling compared to event-based architectures, and powerful APIs that aggregate common information.
Respond to configuration changes with an event-driven approach
Sometimes you might need to perform actions relatively quickly based on IAM changes. For example, you might need to check if a trust policy for a newly created or updated role allows cross-account access. In cases like this, you can use AWS Config rules, AWS CloudTrail, or Amazon EventBridge to detect state changes and perform actions based on these state changes. You can use AWS Config rules to evaluate whether a resource complies with the conditions that you specify. If it doesn’t comply, you can provide a workflow to remediate the non-compliance. With CloudTrail, you can monitor your account’s API calls, and log API calls for your accounts with AWS Organizations integration. EventBridge works closely with CloudTrail and helps you create rules that match incoming events and send them to targets, such as Lambda, where your code can perform analysis or automated remediation. You can even filter out events from your accounts and send them to a central account’s event bus for processing. For an example of how to use EventBridge with IAM Access Analyzer to remediate cross-account access in a role’s trust policy, see Automate resolution for IAM Access Analyzer cross-account access findings on IAM roles. Which feature you choose depends on whether you need to monitor one account or all accounts in your organization, as well as which solution you are more comfortable building with.
One caveat to an event-driven approach is that if many events occur over a short period and your application responds to each event with an IAM API call of its own, you could eventually be throttled by IAM. To address this, you can queue up your responding API calls, distribute them over a longer period, or aggregate them to reduce API call volume. For example, if some of your calls are write APIs (such as UpdateAssumeRolePolicy or CreatePolicyVersion) or read APIs (such as GetRole or GetRolePolicy), you can call them serially with a delay between calls. If you need the latest status on a large number of principals and policies, you can call IAM bulk APIs such as GetAccountAuthorizationDetails, which will return data to you for principals and policies and their relationships in your organization. This approach helps you avoid throttling and querying the IAM control plane with unnecessary and redundant API calls. You will learn more about throttling and how to address it in part two of this post.
Retrieve point-in-time resource information with AWS Config
AWS Config helps you assess, audit, and evaluate the configuration of your AWS resources. It also offers multi-account, multi-Region data aggregation and is integrated with AWS Organizations. With AWS Config, you can create rules that detect and respond to changes. AWS Config also keeps an inventory of AWS resource configurations that you can query through its API, so that you don’t need to make direct API calls to each resource’s service. AWS Config also offers the ability to return the status of resources from multiple accounts and AWS Regions. As shown in Figure 1, you can use the AWS Config console to run a simple SQL-like statement for details on the IAM roles in your entire organization.
Figure 1: Run a query on IAM roles in AWS Config
The preceding results also show associated resources, such as the inline and attached policies for the IAM roles. Alternatively, you can obtain these results from the SDK or CLI. The following query that uses the CLI is equivalent to the preceding query that uses the console. If you use this query, make sure to replace DOC-EXAMPLE-CONFIG-AGGREGATOR> with your AWS Config aggregator.
The preceding command returns the details of roles in your organization’s accounts, including the full policy document for the associated inline policy. It also returns the customer-managed policy names and their ARNs, for which you can view the policy documents and versions by using the BatchGetResourceConfig API. Note that AWS Config doesn’t provide the AWS-managed policy documents. However, these are common across accounts, and we will show you how to query that data later in this section.
To query the status of roles in your organization, you need to have AWS Config enabled in each account. You also need an aggregator to monitor your accounts with your organization’s management account or a delegated administrator account. For more details on how to set up AWS Config, see the AWS Config developer guide. After you set up AWS Config, you can periodically call the AWS Config APIs to get a snapshot of the current or prior state of your resources. Furthermore, you can periodically pull the snapshot records and evaluate this information in other tools outside of AWS Config. So before you directly use the IAM APIs to get IAM information, consider using AWS Config—this is what it’s for!
Retrieve IAM resource information directly from IAM
As previously noted, AWS Config can give you a bulk view of your AWS and IAM resources. Additionally, CloudTrail and EventBridge can detect AWS and IAM resource changes and help you act on them. If you need data from IAM beyond what these services offer, you can query the IAM APIs directly to get the latest information on your resources.
A few key APIs can help you audit IAM resources more efficiently, especially in bulk. The first is GetAccountAuthorizationDetails, which enables you to retrieve the principals in your account, their associated inline policy documents (if any), attached managed policies, and their relationships to each other. This API reduces the need to individually call ListRolePolicies and ListAttachedRolePolicies for each role in an account. GetAccountAuthorizationDetails also returns the role trust policy document for roles in the results. Finally, GetAccountAuthorizationDetails allows you to filter the result set. For example, if you don’t need information relating to groups or AWS managed policies, you can exclude these from the API response. You can do this by using the filter parameter to only include the details that you need at the time.
Another useful API is GenerateServiceLastAccessedDetails. This API gives you details about when an IAM resource (user, group, role, or policy) was last used in an attempt to access AWS services. You can use this API to identify roles that are unused and remove them if you don’t need them. IAM Access Analyzer, which you will learn about later in this post, also uses the same information.
The following table summarizes the key APIs that you can use, rather than building your own code that loops for this information individually.
Submit a job through the GenerateServiceLastAccessedDetails API which returns a JobId; then retrieve the results after the job completes. Pass ACTION_LEVEL as the required Granularity parameter.
Spread total number of requests evenly across 24 hours
Note: In the table, we suggest that you perform some of these API requests once every 24 hours as a starting point. You might prefer to perform your own analysis at a longer time interval, such as every 48 hours, but we don’t recommend requesting it more often than every 24 hours because these resources (and therefore the details in the responses) don’t change often. These APIs are suitable for periodic, point-in-time collection of information. If you need faster detection of information from GetAccountAuthorizationDetails, consider whether AWS Config rules or EventBridge will fit your needs. For GetServiceLastAccessedDetails, recent activity usually appears within four hours, so more frequent requests are unlikely to provide much value.
Use of these APIs can help you avoid writing code that loops through results to make individual read API calls for each principal, policy, and policy version in an account, which could result in tens of thousands of API requests and call throttling. Instead of iterating over each resource, you should use solutions that return bulk data, such as GetAccountAuthorizationDetails, AWS Config, or an AWS Partner Network solution. However, if you’re experiencing throttling, you will learn some practical considerations on how to handle that later in this post.
Inspect IAM resources across multiple accounts and organizations
Your use case might require that you inspect IAM resources across multiple accounts in your organization. Or perhaps you are an independent software vendor and need to build a software-as-a-service tool to evaluate IAM resources across many organizations. The following considerations can help you address use cases like these.
AWS Organizations integration
Previously, you learned of the benefits of the “service last accessed data” that the GenerateServiceLastAccessedDetails and GetServiceLastAccessedDetails APIs provide. But what if you want to pull this data for multiple accounts in your organization? IAM has bulk APIs that support querying this data across your entire organization, so you don’t need to assume a role in each account to generate the request. To generate a report for entities (organization root, organizational unit, or account) or policies in your organization, use the GenerateOrganizationsAccessReport operation, which returns a JobId that is passed as a parameter to the GetOrganizationsAccessReport operation to check if the report has been generated. When the job status is marked complete, you can retrieve the report.
AWS managed policies
Many customers use AWS managed policies because they align to common job functions. AWS creates and administers these policies, which have their own ARNs, such as arn:aws:iam::aws:policy/AWSCodeCommitPowerUser. AWS managed policies are available for every account, and they are the same for every account. AWS updates them when new services and API operations are introduced. Updated policies are recorded and visible as a new version, so you only need to query for the current AWS managed policies once per evaluation cycle, rather than once per account. Therefore, if you’re evaluating hundreds or thousands of accounts, you shouldn’t include the AWS managed policies and their policy versions in your query. Doing so would result in thousands of redundant API requests and could cause throttling. Instead, you can query the AWS managed policies once and then reuse the results across your analysis and evaluation by caching the results for a period of time (for example, every 24 hours) in your application before requesting them again to check for updates. Because AWS managed policies are available through the GetAccountAuthorizationDetails API, you don’t need to query for the AWS managed policies or their versions as a separate action.
Multi-account limits
The preceding table lists the frequency of API requests as “per account” in many places. If you’re calling IAM APIs by assuming a role in other accounts from a central account, some IAM APIs have rate-limiting criteria that apply to API requests performed from the assuming account (the central account). To query data from multiple accounts, we recommend that you serially iterate over the accounts one-by-one to avoid throttling. You’ll learn more about this strategy, as well as throttling, in part 2 of this blog post.
Conclusion
In this post, you learned about different aspects of IAM and best practices to test and query IAM efficiently. With STS session policies, you can test different policies to help achieve least privilege access. With AWS Config, EventBridge, CloudTrail, and CloudTrail Lake, you can audit your IAM resources and respond to changes while reducing the number of IAM API calls that you make. If you need to call IAM directly, you can use IAM bulk APIs for more efficient retrieval of your resource state. You can learn more about IAM and best practices in part 2 of blog post: How to monitor and query IAM resources at scale – Part 2.
AWS Private Certificate Authority (AWS Private CA) is a highly available, fully managed private certificate authority (CA) service that you can use to create CA hierarchies and issue private X.509 certificates. You can use these private certificates to establish endpoints for TLS encryption, cryptographically sign code, authenticate users, and more.
Based on customer feedback for prorated certificate pricing options, AWS Private CA now offers short-lived certificate mode, a lower cost mode of AWS Private CA that is designed to issue short-lived certificates. In this blog post, we will compare the original general-purpose and new short-lived CA modes and discuss use cases for each of them.
The general-purpose mode of AWS Private CA supports certificates of any validity period. The addition of short-lived CA mode is intended to facilitate use cases where you want certificates with a short validity period, defined as 7 days or less. Keep in mind this doesn’t mean that the root CA certificate must also be short lived. Although a typical root CA certificate is valid for 10 years, you can customize the certificate validity period for CAs in either mode when you install the CA certificate.
You select the CA mode when you create a certificate authority. The CA mode cannot be changed for an existing CA. Both modes (general-purpose and short-lived) have distinct pricing for the different use cases that they support.
The short-lived CA mode offers an accessible pricing model for customers who need to issue certificates with a short-term validity period. You can use these short-lived certificates for on-demand AWS workloads and align the validity of the certificate with the lifetime of the certificate holder. For example, if you’re using certificate-based authentication for a virtual workstation that is rebuilt each day, you can configure your certificates to expire after 24 hours.
In this blog post, we will compare the two CA modes, examine their pricing models, and discuss several potential use cases for short-lived certificates. We will also provide a walkthrough that shows you how to create a short-lived mode CA by using the AWS Command Line Interface (AWS CLI). To create a short-lived mode CA using the AWS Management Console, see Procedure for creating a CA (console).
Comparing general-purpose mode CAs to short-lived mode CAs
You might be wondering, “How is the short-lived CA mode different from the general-purpose CA mode? I can already create certificates with a short validity period by using AWS Private CA.” The key difference between these two CA modes is cost. Short-lived CA mode is priced to better serve use cases where you reissue private certificates frequently, such as for certificate-based authentication (CBA).
With CBA, users can authenticate once and then seamlessly access resources, including Amazon WorkSpaces and Amazon AppStream 2.0, without re-entering their credentials. This use case demonstrates the security value of short-lived certificates. A short validity period for the certificate reduces the impact of a compromised certificate because the certificate can only be used for authentication during a small window before it’s automatically invalidated. This method of authentication is useful for customers who are looking to adopt a Zero Trust security strategy.
Before the release of the short-lived CA mode, using AWS Private CA for CBA could be cost prohibitive for some customers. This is because CBA needs a new certificate for each user at regular intervals, which can require issuing a high volume of certificates. The best practice for CBA is to use short-lived CA mode, which can issue certificates at a lower cost that can be used to authenticate a user and then expire shortly afterward.
Let’s take a closer look at the pricing models for the two CA modes that are available when you use AWS Private CA.
Pricing model comparison
You can issue short-lived certificates from both the general-purpose and short-lived CA modes of AWS Private CA. However, the general-purpose mode CAs incur a monthly charge of $400 per CA. The cost of issuing certificates from a general-purpose mode CA is based on the number of certificates that you issue per month, per AWS Region.
The following table shows the pricing tiers for certificates issued by AWS Private CA by using a general-purpose mode CA.
Number of private certificates created each month (per Region)
Price (per certificate)
1–1,000
$0.75 USD
1,001–10,000
$0.35 USD
10,001 and above
$0.001 USD
The short-lived mode CA will only incur a monthly charge of $50 per CA. The cost of issuing certificates from a short-lived mode CA is the same regardless of the volume of certificates issued: $0.058 per certificate. This pricing structure is more cost effective than general-purpose mode if you need to frequently issue new, short-lived certificates for a use case like certificate-based authentication. Figure 1 compares costs between modes at different certificate volumes.
Figure 1: Cost comparison of AWS Private CA modes
It’s important to note that if you already issue a high volume of certificates each month from AWS Private CA, the short-lived CA mode might not be more cost effective than the general-purpose mode. Consider a customer who has one CA and issues 80,000 certificates per month using the general-purpose CA mode: This will incur a total monthly cost of $4,370. A breakdown of the total cost per month in this scenario is as follows.
1 private CA x 400 USD per month = 400 USD per month for operation of AWS Private CA
Tiered price for 80,000 issued certificates: 1,000 issued certificates x 0.75 USD = 750 USD 9,000 issued certificates x 0.35 USD = 3,150 USD 70,000 issued certificates x 0.001 USD = 70 USD Total tier cost: 750 USD + 3,150 USD + 70 USD = 3,970 USD per month for certificates issued 400 USD for instances + 3,970 USD for certificate issued = 4,370 USD Total cost (monthly): 4,370 USD
Now imagine that same customer chose to use a short-lived mode CA to issue the same number of private certificates. Although the cost per month of the short-lived mode CA instance is lower, the price of issuing short-lived certificates would still be greater than the 70,000 certificates issued at a cost of $0.001 with the general-purpose mode CA. The total cost of issuing this many certificates from a single short-lived mode CA is $4,690. A breakdown of the total cost per month in this scenario is as follows.
1 private CA x 50 USD per month = 50 USD per month for operation of AWS Private CA (short-lived CA mode)
Price for 80,000 issued certificates (short-lived CA mode): 80,000 issued certificates x 0.058 USD = 4,640 USD 50 USD for instances + 4,640 USD for certificate issued = 4,690 USD Total cost (monthly): 4,690 USD
At very high volumes of certificate issuance, the short-lived CA mode is not as cost effective as the general-purpose CA mode. It’s important to consider the volume of certificates that your organization will be issuing when you decide which CA mode to use. Figure 1 shows the cost difference at various volumes of certificate issuance. This difference will vary based on the number of certificates issued, as well as the number of CAs that your organization used.
You should also evaluate the various use cases that your organization has for using private certificates. For example, private certificates that are used to terminate TLS traffic typically have a validity of a year or more, meaning that the short-lived CA mode could not facilitate this use case. The short-lived CA mode can only issue certificates with a validity of 7 days or less.
However, you can create multiple private CAs and select the appropriate certificate authority mode for each CA based on your requirements. We recommend that you evaluate your use cases and estimate your certificate volume when you consider which CA mode to use.
In general, you should use the new short-lived CA mode for use cases where you require certificates with a short validity period (less than 7 days) and you are not planning to issue more than 75,000 certificates per month. You should use the general-purpose CA mode for scenarios where you need to issue certificates with a validity period of more than 7 days, or when you need short-lived certificates but will be issuing very high volumes of certificates each month (for example, over 75,000).
For customers who use AWS Identity and Access Management (IAM) Roles Anywhere, you might want to reduce the time period for which a certificate can be used to retrieve temporary credentials to assume an IAM role. If you frequently issue X.509 certificates to servers outside of AWS for use with IAM Roles Anywhere, and you want to use short-lived certificates, the pricing model for short-lived CA mode will be more cost effective in most cases (see Figure 1).
Short-lived credentials are useful for administrative personas that have broad permissions to AWS resources. For instance, you might use IAM Roles Anywhere to allow an entity outside AWS to assume an IAM role with the AdministratorAccess AWS managed policy attached. To help manage the risk of this access pattern, we want the certificate to expire relatively quickly, which reduces the time period during which a compromised certificate could potentially be used to authenticate to a highly privileged IAM role.
Furthermore, IAM Roles Anywhere requires that you manually upload a certificate revocation list (CRL), and does not support the CRL and Online Certificate Status Protocol (OCSP) mechanisms that are native to AWS Private CA. Using short-lived certificates is a way to reduce the impact of a potential credential compromise without needing to configure revocation for IAM Roles Anywhere. The need for certificate revocation is greatly reduced if the certificates are only valid for a single day and can’t be used to retrieve temporary credentials to assume an IAM role after the certificate expires.
Mutual TLS between workloads
Consider a highly sensitive workload running on Amazon Elastic Kubernetes Service (Amazon EKS). AWS Private CA supports an open-source plugin for cert-manager, a widely adopted solution for TLS certificate management in Kubernetes, that offers a more secure CA solution for Kubernetes containers. You can use cert-manager and AWS Private CA to issue certificates to identify cluster resources and encrypt data in transit with TLS.
If you use mutual TLS (mTLS) to protect network traffic between Kubernetes pods, you might want to align the validity period of the private certificates with the lifetime of the pods. For example, if you rebuild the worker nodes for your EKS cluster each day, you can issue certificates that expire after 24 hours and configure your application to request a new short-lived certificate before the current certificate expires.
This enables resource identification and mTLS between pods without requiring frequent revocation of certificates that were issued to resources that no longer exist. As stated previously, this method of issuing short-lived certificates is possible with the general-purpose CA mode—but using the new short-lived CA mode makes this use case more cost effective for customers who issue fewer than 75,000 certificates each month.
Create a short-lived mode CA by using the AWS CLI
In this section, we show you how to use the AWS CLI to create a new private certificate authority with the usage mode set to SHORT_LIVED_CERTIFICATE. If you don’t specify a usage mode, AWS Private CA creates a general-purpose mode CA by default. We won’t use a form of revocation, because the short-lived CA mode makes revocation less useful. The certificates expire quickly as part of normal operations. For more examples of how to create CAs with the AWS CLI, see Procedure for creating a CA (CLI). For instructions to create short-lived mode CAs with the AWS console, see Procedure for creating a CA (Console).
This walkthrough has the following prerequisites:
A terminal with the .aws configuration directory set up with a valid default Region, endpoint, and credentials. For information about configuring your AWS CLI environment, see Configuration and credential file settings.
A certificate authority configuration file to supply when you create the CA. This file provides the subject details for the CA certificate, as well as the key and signing algorithm configuration.
Note: We provide an example CA configuration file, but you will need to modify this example to meet your requirements.
To use the create-certificate-authority command with the AWS CLI
We will use the following ca_config.txt file to create the certificate authority. You will need to modify this example to meet your requirements.
Use the describe-certificate-authority command to view the status of your new root CA. The status will show Pending_Certificate, until you install a self-signed root CA certificate. You will need to replace the certificate authority Amazon Resource Name (ARN) in the following command with your own CA ARN.
Generate a certificate signing request for your root CA certificate by running the following command. Make sure to replace the certificate authority ARN in the command with your own CA ARN.
Using the ca.csr file from the previous step as the argument for the --csr parameter, issue the root certificate with the following command. Make sure to replace the certificate authority ARN in the command with your own CA ARN.
The response will include the CertificateArn for the issued root CA certificate. Next, use your CA ARN and the certificate ARN provided in the response to retrieve the certificate by using the get-certificate CLI command, as follows.
Notice that we created a new file, cert.pem, that contains the certificate we retrieved in the previous command. We will import this certificate to our short-lived mode root CA by running the following command. Make sure to replace the certificate authority ARN in the command with your own CA ARN.
Check the status of your short-lived mode CA again by using the describe-certificate-authority command. Make sure to replace the certificate authority ARN in the following command with your own CA ARN.
Great! As shown in the output from the preceding command, the new short-lived mode root CA has a status of ACTIVE, meaning it can now issue certificates. This certificate authority will be able to issue end-entity certificates that have a validity period of up to 7 days, as shown in the UsageMode: SHORT_LIVED_CERTIFICATE parameter.
Conclusion
In this post, we introduced the short-lived CA mode that is offered by AWS Private CA, explained how it differs from the general-purpose CA mode, and compared the pricing models for both CA modes. We also provided some recommendations for choosing the appropriate CA mode based on your certificate issuance volume and use cases. Finally, we showed you how to create a short-lived mode CA by using the AWS CLI.
If you have feedback about this post, submit comments in the Comments section below. If you have questions about this post, start a new thread on the AWS Certificate Manager re:Post or contact AWS Support.
Want more AWS Security news? Follow us on Twitter.
We are excited to announce that Amazon Web Services (AWS) has completed its annual Collaborative Cloud Audit Group (CCAG) Cloud Community audit with European financial service institutions (FSIs).
Security at AWS is the highest priority. As customers embrace the scalability and flexibility of AWS, we are helping them evolve security, identity, and compliance into key business enablers. At AWS, we are obsessed with earning and maintaining customer trust, and providing our FSI customers and their regulatory bodies with the assurance that AWS has the necessary controls in place to protect their most sensitive material and regulated workloads. The AWS Compliance Program helps customers understand the robust controls that are in place at AWS. By tying together governance-focused, audit-friendly service features with applicable compliance or audit standards, AWS Compliance helps customers to set up and operate in an AWS security control environment.
An example of how AWS supports customers’ risk management and regulatory efforts is our annual audit engagement with the CCAG. For the fourth year, the CCAG pooled audit thoroughly assessed the AWS controls that enable us to help protect our customers’ data and material workloads, while satisfying strict European and national regulatory obligations. CCAG currently represents more than 50 leading European FSIs and has grown steadily since its inception in 2017. Given the importance of cloud computing for the operations of FSI customers, the financial industry is coming under greater regulatory scrutiny. Similar to prior years, the CCAG 2022 audit was conducted based on customers’ right to conduct an audit of their service providers under European Banking Authority (EBA) outsourcing recommendations to cloud service providers (CSPs). The EBA suggests using pooled audits to use audit resources more efficiently and to decrease the organizational burden on both the clients and the CSP. Figure 1 illustrates the improved cost-effectiveness of pooled audits as compared to individual audits.
Figure 1: Efforts and costs are shared and reduced when a collaborative approach is followed
CCAG audit process
Although there are many security frameworks available, CCAG uses the Cloud Controls Matrix (CCM) of the Cloud Security Alliance (CSA) as the framework of reference for their CSP audits. The CSA is a not-for-profit organization with a mission, as stated on its website, to “promote the use of best practices for providing security assurance within cloud computing, and to provide education on the uses of cloud computing to help secure all other forms of computing.” CCM is specifically designed to provide fundamental security principles to guide cloud vendors and to assist cloud customers in assessing the overall security risk of a cloud provider.
Between February and December 2022, CCAG audited the AWS controls environment by following a hybrid approach, remotely and onsite in Seattle (USA), Dublin (IRL), and Frankfurt (DEU). For the scope of the 2022 CCAG audit, the participating auditors assessed AWS measures with regards to (1) keeping customer data sovereign, secure, and private, (2) effectively managing threats and vulnerabilities, (3) offering a highly available and resilient infrastructure, (4) preventing and responding rapidly to security events, and (5) enforcing strong authentication mechanisms and strict identity and access management constraint conditions to grant access to resources only under the need-to-know and need-to-have principles.
The scope of the audit encompassed individual services provided by AWS, and the policies, controls, and procedures for (and practice of) managing and maintaining them. Customers will still need to have their auditors assess the environments they create by using these services, and their policies and procedures for (and practices of) managing and maintaining these environments, on their side of the shared responsibility lines of demarcation for the AWS services involved.
CCAG audit results
CCAG members expressed their gratitude to AWS for the audit experience:
“The AWS Security Assurance team provided CCAG auditors with the needed logistical and technical assistance, by navigating the AWS organization to find the required information, performing advocacy of the CCAG audit rights, creating awareness and education, as well as exercising constant pressure for the timely delivery of information.”
The results of the CCAG pooled audit are available to the participants and their respective regulators only, and provide CCAG members with assurance regarding the AWS controls environment, enabling members to work to remove compliance blockers, accelerate their adoption of AWS services, and obtain confidence and trust in the security controls of AWS.
If you have feedback about this post, submit comments in the Comments section below. If you have questions about this post, contact AWS Support.
Want more AWS Security news? Follow us on Twitter.
We continue to expand the scope of our assurance programs at Amazon Web Services (AWS) and are pleased to announce that our Middle East (UAE) Region is now certified by the Dubai Electronic Security Centre (DESC) to operate as a Tier 1 cloud service provider (CSP). This alignment with DESC requirements demonstrates our continuous commitment to adhere to the heightened expectations for CSPs. AWS government customers can run their applications in the AWS Cloud certified Regions in confidence.
AWS was evaluated by independent third-party auditor BSI on behalf of DESC on January 23, 2023. The Certificate of Compliance illustrating the AWS compliance status is available through AWS Artifact. AWS Artifact is a self-service portal for on-demand access to AWS compliance reports. Sign in to AWS Artifact in the AWS Management Console, or learn more at Getting Started with AWS Artifact.
As of this writing, 62 services offered in the Middle East (UAE) Region are in scope of this certification. For up-to-date information, including when additional services are added, visit the AWS Services in Scope by Compliance Program webpage and choose DESC CSP.
AWS strives to continuously bring services into scope of its compliance programs to help you meet your architectural and regulatory needs. Please reach out to your AWS account team if you have questions or feedback about DESC compliance.
To learn more about our compliance and security programs, see AWS Compliance Programs. As always, we value your feedback and questions; reach out to the AWS Compliance team through the Contact Us page.
If you have feedback about this post, submit comments in the Comments section below.
Want more AWS Security how-to content, news, and feature announcements? Follow us on Twitter.
The collective thoughts of the interwebz
Manage Consent
To provide the best experiences, we use technologies like cookies to store and/or access device information. Consenting to these technologies will allow us to process data such as browsing behavior or unique IDs on this site. Not consenting or withdrawing consent, may adversely affect certain features and functions.
Functional
Always active
The technical storage or access is strictly necessary for the legitimate purpose of enabling the use of a specific service explicitly requested by the subscriber or user, or for the sole purpose of carrying out the transmission of a communication over an electronic communications network.
Preferences
The technical storage or access is necessary for the legitimate purpose of storing preferences that are not requested by the subscriber or user.
Statistics
The technical storage or access that is used exclusively for statistical purposes.The technical storage or access that is used exclusively for anonymous statistical purposes. Without a subpoena, voluntary compliance on the part of your Internet Service Provider, or additional records from a third party, information stored or retrieved for this purpose alone cannot usually be used to identify you.
Marketing
The technical storage or access is required to create user profiles to send advertising, or to track the user on a website or across several websites for similar marketing purposes.