This post was written by Michael Hume – AWS Solutions Architect Public Sector UKIR.
Customers often want to use Amazon API Gateway REST APIs to send requests to private resources. This feature is useful for building secure architectures using Amazon EC2 instances or container-based services on Amazon ECS or Amazon EKS, which reside within a VPC.
You can configure HTTP APIs with a private integration as the front door or entry point to an application. This enables HTTPS resources within an Amazon VPC to be accessed by clients outside of the VPC. This architecture also provides an application with additional HTTP API features such as throttling, cross-origin resource sharing (CORS), and authorization. These features are then managed by the service instead of an application.
HTTP APIs and Application Load Balancers
In the following architecture, an HTTP APIs endpoint is deployed between the client and private backend resources.
HTTP APIs to ALB example
A VPC link encapsulates connections between API Gateway and targeted VPC resources. HTTP APIs private integration methods only allow access via a VPC link to private subnets. When a VPC link is created, API Gateway creates and manages the elastic network interfaces in a user account. VPC links are shared across different routes and APIs.
Application Load Balancers can support containerized applications. This allows ECS to select an unused port when scheduling a task and then registers that task with a target group and port. For private integrations, an internal load balancer routes a request to targets using private IP addresses to resources that reside within private subnets. As the Application Load Balancer receives a request from an HTTP APIs endpoint, it looks up the listener rule to identify a protocol and port. A target group then forwards requests to an Amazon ECS cluster, with resources on underlying EC2 instances. Targets are added and removed automatically as traffic to an application changes over time. This increases the availability of an application and provides efficient use of an ECS cluster.
Configuration with an ALB
To configure a private integration with an Application Load Balancer.
Create an HTTP APIs endpoint, choose a route and method, and attach an integration to a route using a private resource.
Attach integration to route
Provide a target service to send the request to an ALB/NLB.
Modern applications connect to a broader range of resources. This can become complex to manage as network locations dynamically change based on automatic scaling, versioning, and service disruptions. Its challenging, as each service must quickly find the infrastructure location of the resources it needs. Efficient service discovery of any dynamically changing resources is important for application availability.
If an application scales to hundreds or even thousands of services, then a load balancer may not be appropriate. In this case, HTTP APIs private integration with AWS Cloud Map maybe a better choice. AWS Cloud Map is a resource discovery service that provides a dynamic map of the cloud. It does this by registering application resources such as databases, queues, microservices, and other resources with custom names.
For server-side service discovery, if an application uses a load balancer, it must know the load balancer’s endpoint. This endpoint is used as a proxy, which adds additional latency. As AWS Cloud Map provides client-side service discovery, you can replace the load balancer with a service registry. Now, connections are routed directly to backend resources, instead of being proxied. This involves fewer components, making deployments safer and with less management, and reducing complexity.
Configuration with AWS Cloud Map
HTTP APIs to AWS CloudMap example
In this architecture, the Amazon ECS service has been configured to use Amazon ECS Service Discovery. Service discovery uses the AWS Cloud Map API and Amazon Route 53 to create a namespace. This is a logical name for a group of services. It also creates a service, which is a logical group of resources or instances. In this example, it’s a group of ECS clusters. This allows the service to be discoverable via DNS. These resources work together, to provide a service.
Service discovery configuration
To configure a private integration with AWS Cloud Map:
Create an HTTP API, choose a route and method, and attach an integration to a route using a private resource. This is as shown previously for an Application Load Balancer.
Provide a target service to send requests to resources registered with AWS Cloud Map.
This post discusses the benefits of using API Gateway’s HTTP APIs to access private resources that reside within a VPC, and how HTTP APIs provides three different private integration targets for different use cases.
If a load balancer is required, the application operates at layer 7 (HTTP, HTTPS), requires flexible application management and registering of AWS Lambda functions as targets, then use an Application Load Balancer. However, if the application operates at layer 4 (TCP, UDP, TLS), uses non-HTTP protocols, requires extreme performance and a static IP, then use a Network Load Balancer.
As HTTP APIs private integration methods to both an ALB and NLB only allow access via a VPC link. This enhances security, as resources are isolated within private subnets with no direct access from the internet.
If a service does not need a load balancer, then HTTP APIs provide further private integration flexibility with AWS Cloud Map, which automatically registers resources in a service registry. AWS Cloud Map enables filtering by providing attributes when service discovery is enabled. These can then be used as HTTP APIs integration settings to specify query parameters and filter specific resources.
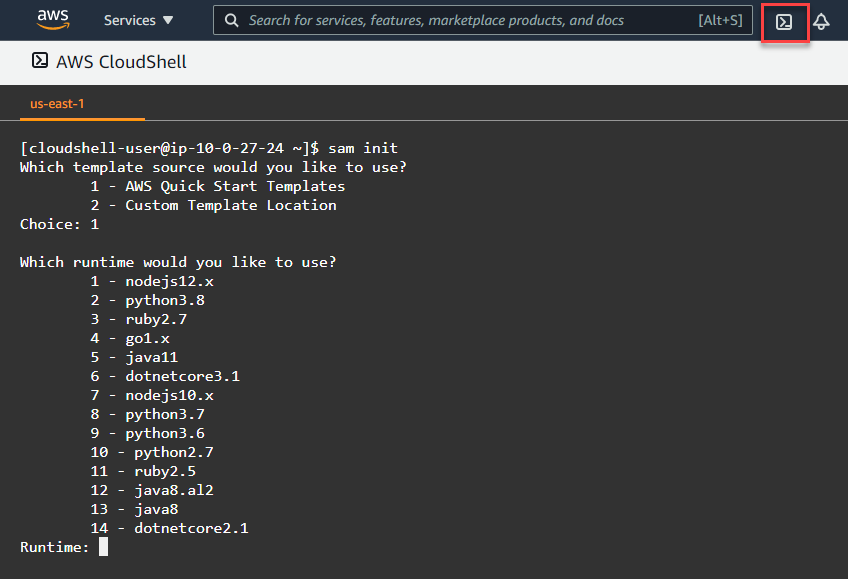
You can now develop AWS Lambda functions using the Node.js 14.x runtime. This is the current Long Term Support (LTS) version of Node.js. Start using this new version today by specifying a runtime parameter value of nodejs14.x when creating or updating functions or by using the appropriate managed runtime base image.
Node.js 14.x is powered by V8 version 8.1, which is a significant upgrade from the V8 7.4 engine powering the previous Node.js 12.x. This upgrade brings performance enhancements and some notable new features:
Nullish Coalescing ??– A logical operator that returns its right-hand side operand when its left-hand side operand is not defined or null.
const newVersion = null ?? ‘this works great’ ;
console.log(newVersion);
// expected output: "this works great"

const nullishTest = 0 ?? 36;
console.log(nullishTest);
// expected output: 0 because 0 is not the same as null or undefined
This new operator is useful for debugging and error handling in your Lambda functions when values unexpectedly return null or undefined.
Intl.DateTimeFormat – This feature enables numberingSystem and calendar options.
const newVersion = null ?? ‘this works great’ ;
console.log(newVersion);
// expected output: "this works great"

const nullishTest = 0 ?? 36;
console.log(nullishTest);
// expected output: 0 because 0 is not the same as null or undefined
Intl.DisplayNames – Offers the consistent translation of region, language, and script display names.
const date = new Date(Date.UTC(2021, 01, 20, 3, 23, 16, 738));
// Results below assume UTC timezone - your results may vary

// Specify date formatting for language
console.log(new Intl.DateTimeFormat('en-US').format(date));
// expected output: "2/20/2021"
Optional Chaining ?. – Use this operator to access a property’s value within a chain without needing to validate each reference. This removes the requirement of checking for the existence of a deeply nested property using the && operator or lodash.get:
const player = {
  name: 'Roxie',
  superpower: {
    value: 'flight',
  }
};

// Using the && operator
if (player && player.superpower && player.superpower.value) {
  // do something with player.superpower.value
}

// Using the ?. operator
if (player?.superpower?.value) {
  // do something with player.superpower.value
}
Diagnostic reporting
Diagnostic reporting is now a stable feature in Node.js 14. This option allows you to generate a JSON-formatted report on demand or when certain events occur. This helps to diagnose problems such as slow performance, memory leaks, unexpected errors, and more.
The following example generates a report from within a Lambda function, and outputs the results to Amazon Cloudwatch for further inspection.
const report = process.report.getReport();
console.log(typeof report === 'object'); // true

// Similar to process.report.writeReport() output
console.log(JSON.stringify(report, null, 2));
See the official docs on diagnostic reporting in Node.js to learn other ways to use the command.
Updated node streams
The streams APIs has been updated to help remove ambiguity and streamline behaviours across the various parts of Node.js core.
Runtime Updates
To help keep Lambda functions secure, AWS updates Node.js 14 with all minor updates released by the Node.js community when using the zip archive format. For Lambda functions packaged as a container image, pull, rebuild and deploy the latest base image from DockerHub or Amazon ECR Public.
Deprecation schedule
AWS will be deprecating Node.js 10 according to the end of life schedule provided by the community. Node.js 10 reaches end of life on April 30, 2021. After March 30, 2021 you can no longer create a Node.js 10 Lambda function. The ability to update a function will be disabled after May 28, 2021 . More information on can be found in the runtime support policy.
You can migrate Existing Node.js 12 functions to the new runtime by making any necessary changes to code for compatibility with Node.js 14, and changing the function’s runtime configuration to “nodejs14.x”. Lambda functions running on Node.js 14 will have 2 full years of support.
Amazon Linux 2
Node.js 14 managed runtime, like Node.js 12, Java 11, and Python 3.8, is based on an Amazon Linux 2 execution environment. Amazon Linux 2 provides a secure, stable, and high-performance execution environment to develop and run cloud and enterprise applications.
Next steps
Get started building with Node.js 14 today by specifying a runtime parameter value of nodejs14.x when creating your Lambda functions using the zip archive packaging format. You can also build Lambda functions in Node.js 14 by deploying your function code as a container image using the Node.js 14 AWS base image for Lambda. You can read about the Node.js programming model in the AWS Lambda documentation to learn more about writing functions in Node.js 14.
For existing Node.js functions, migrate to the new runtime by changing the function’s runtime configuration to nodejs14.x
In the Operating Lambda series, I cover important topics for developers, architects, and systems administrators who are managing AWS Lambda-based applications. This three-part series discusses application design for Lambda-based applications.
A well-architected event-driven application uses a combination of AWS services and custom code to process and manage requests and data. This series on Lambda-specific topics in application design, and how Lambda interacts with other services. There are many important considerations for serverless architects when designing applications for busy production systems.
Part 1 shows how to work with Service Quotas, when to request increases, and architecting with quotas in mind. It also explains how to control traffic for downstream server-based resources.
Understanding quotas
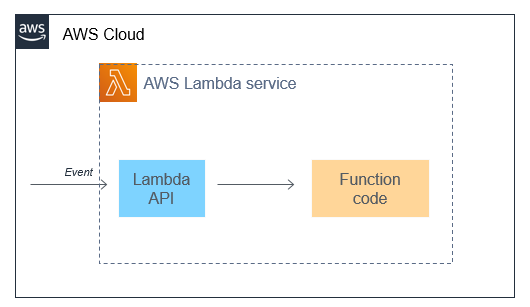
The Lambda service is designed for short-lived compute tasks that do not retain or rely upon state between invocations. The Lambda service invokes your custom code on demand in response to events from other AWS services, or requests via the AWS CLI or AWS SDKs. Code can run for up to 15 minutes in a single invocation and a single function can use up to 10,240 MB of memory.
Lambda is designed to scale rapidly to meet demand, allowing your functions to scale up to serve traffic in your application. Other AWS services frequently used in serverless applications, such as Amazon API Gateway, Amazon SNS, and AWS Step Functions, also scale up in response to increased load. This has enabled our largest customers to build applications that scale to millions of requests quickly without having to manage underlying infrastructure.
However, before you scale an application to these levels, it’s important to understand the guardrails that are put in place to protect your account and the workloads of other customers. Service Quotas exist in all AWS services and consist of hard limits, which you cannot change, and soft limits, which you can request increases for.
By default, all new accounts are assigned a quota profile that allows exploration of the services. However, the values may need to be raised to support medium-to-large application workloads. Typically, customers request increases for their accounts as they start to expand usage of their applications. This allows the quotas to grow with usage, and help protect the account from unexpected costs caused by unintended usage.
Different AWS services have different quotas. These quotas may apply at the Region level, or account level, and may also include time-interval restrictions, such as requests per second. For example, the maximum number of IAM roles is an account-based quota, whereas the maximum number of concurrent Lambda executions is a per-Region quota.
To see the quotas that apply to your account, navigate to the Service Quotas dashboard. This allows you to view your Service Quotas, request a service quota increase, and view current utilization. From here, you can drill down to a specific AWS service, such as Lambda:
In this example, sorted by the Adjustable column, this shows that Concurrent executions, Elastic network interfaces per VPC, and Function and layer storage are all adjustable limits. You could request a quota increase for any of these via the AWS Support Center. The other items provide a useful reference for other limits applying to the service.
Architecting with Service Quotas
Most serverless applications use multiple AWS services, and different services have different quotas for different features. Once you have a serverless architecture designed and know which services your application uses, you can compare the different quotas across services and find any potential issues.
In this example, API Gateway has a default throttle limit of 10,000 requests per second. Many applications use API Gateway endpoints to invoke Lambda functions. Lambda has a default concurrency limit of 1,000. Since API Gateway to Lambda is a synchronous invocation, it’s possible to have more incoming requests than could be handled simultaneously by a Lambda function, when using the default limits. This can be resolved by requesting to have the Lambda concurrency limit raised for this account to match the expected level of traffic.
Another common challenge is handling payload sizes in different services. Consider an application moving a payload from API Gateway to Lambda to Amazon SQS. API Gateway supports payloads up to 10 Mb, while Lambda’s payload limit is 6 Mb and the SQS message size limit is 256 Kb. In this example, you could instead store the payload in an Amazon S3 bucket instead of uploading to API Gateway, and pass a reference token across the services. The token size is much smaller than any payload limit and may provide a more efficient design for your workload, depending upon the use-case.
Load testing your serverless application also allows you to monitor the performance of an application before it is deployed to production. Serverless applications can be relatively simple to load test, thanks to the automatic scaling built into many of the services. During a load test, you can identify any quotas that may act as a limiting factor for the traffic levels you expect and take action accordingly.
There are several tools available for serverless developers to perform this task. One of the most popular is Artillery Community Edition, which is an open-source tool for testing serverless APIs. You configure the number of requests per second and overall test duration and it uses a headless Chromium browser to run tests. Other popular tools include Nordstrom’s Serverless-Artillery and Gatling.
Using multiple AWS accounts for managing quotas
Many customers have multiple workloads running in the AWS Cloud but many quotas are set at the account level. This means that as you add more serverless workloads, some quotas are shared across more workloads, reducing the quotas available for each workload. Additionally, if you have development resources in the same account as production workloads, quotas are shared across both. It’s possible for development activity to exhaust resources unintentionally that you may want to reserve only for production.
An effective way to solve this issue is to use multiple AWS accounts, dedicating workloads to their own specific account. This prevents quotas from being shared with other workloads or non-production resources. Using AWS Organizations, you can centrally manage the billing, compliance, and security of these accounts. You can attach policies to groups of accounts to avoid custom scripts and manual processes.
One common approach is to provide each developer with an AWS account, and then use separate accounts for a beta deployment stage and production:
The developer accounts can contain copies of production resources and provide the developer with admin-level permissions to these resources. Each developer has their own set of limits for the account, so their usage does not impact your production environment. Individual developers can deploy AWS CloudFormation stacks and AWS Serverless Application Model (AWS SAM) templates into these accounts with minimal risk to production assets.
This approach allows developers to test Lambda functions locally on their development machines against live cloud resources in their individual accounts. It can help create a robust unit testing process, and developers can then push code to a repository like AWS CodeCommit when ready.
By integrating with AWS Secrets Manager, you can store different sets of secrets in each environment and replace any need for credentials stored in code. As code is promoted from developer account through to the beta and production accounts, the correct set of credentials is automatically used. You do not need to share environment-level credentials with individual developers.
Controlling traffic flow for server-based resources
While Lambda can scale up quickly in response to traffic, many non-serverless services cannot. If your Lambda functions interact with those services downstream, it’s possible to overwhelm those services with data or connection requests.
Amazon RDS is one of the most common Lambda integrations that relies on a server-based resource. However, relational databases are connection-based, so they are intended to work with a few long-lived clients, such as web servers. By contrast, Lambda functions are ephemeral and short-lived, so their database connections are numerous and brief. If Lambda scales up to hundreds or thousands of instances, you may overwhelm downstream relational databases with connection requests. This is typically only an issue for moderately busy applications. If you are using a Lambda function for low-volume tasks, such as running daily SQL reports, you do not experience this behavior.
The Amazon RDS Proxy service is built to solve the high-volume use-case. It pools the connections between the Lambda service and the downstream Amazon RDS database. This means that a scaling Lambda function is able to reuse connections via the proxy. As a result, the relational database is not overwhelmed with connections requests from individual Lambda functions. This does not require code changes in many cases. You only need to replace the database endpoint with the proxy endpoint in your Lambda function.
For other downstream server-based resources, APIs, or third-party services, it’s important to know the limits around connections, transactions, and data transfer. If your serverless workload has the capacity to overwhelm those resources, use an SQS queue to decouple the Lambda function from the target. This allows the server-based resource to process messages from the queue at a steady rate. The queue also durably stores the requests if the downstream resource becomes unavailable.
Conclusion
Lambda works with other AWS services to process and manage requests and data. This post explains how to understand and manage Service Quotas, when to request increases, and architecting with quotas in mind. It also explains how to control traffic for downstream server-based resources.
Part 2 of this series will discuss scaling and concurrency in Lambda and the different behaviors of on-demand and Provisioned Concurrency.
Field Notes is a series of posts within the Architecture blog channel which provide hands-on technical guidance from AWS Solutions Architects, consultants, and technical account managers, based on their experiences in the field solving real-world business problems for customers.
We would like to thank you, our readers, for spending time on our blog this last year. Much appreciation also goes to our hard-working AWS Solutions Architects and other blog post writers. Below are the top 15 Architecture & Field Notes blog posts written in 2020.
#15: Field Notes: Choosing a Rehost Migration Tool – CloudEndure or AWS SMS
by Ebrahim (EB) Khiyami
In this post, Ebrahim provides some considerations and patterns where it’s recommended based on your migration requirements to choose one tool over the other.
In this post, Marwan explains how to architect your solution or application to reliably scale, when to scale and how to avoid complexity. He discusses several principles including modularity, horizontal scaling, automation, filtering and security.
#13: Field Notes: Building an Autonomous Driving and ADAS Data Lake on AWS
by Junjie Tang and Dean Phillips
In this post, Junjie and Dean explain how to build an Autonomous Driving Data Lake using this Reference Architecture. They cover all steps in the workflow from how to ingest the data, to moving it into an organized data lake construct.
#12: Building a Self-Service, Secure, & Continually Compliant Environment on AWS
by Japjot Walia and Jonathan Shapiro-Ward
In this post, Jopjot and Jonathan provide a reference architecture for highly regulated Enterprise organizations to help them maintain their security and compliance posture. This blog post provides an overview of a solution in which AWS Professional Services engaged with a major Global systemically important bank (G-SIB) customer to help develop ML capabilities and implement a Defense in Depth (DiD) security strategy.
#11: Introduction to Messaging for Modern Cloud Architecture
by Sam Dengler
In this post, Sam focuses on best practices when introducing messaging patterns into your applications. He reviews some core messaging concepts and shows how they can be used to address challenges when designing modern cloud architectures.
#10: Building a Scalable Document Pre-Processing Pipeline
by Joel Knight
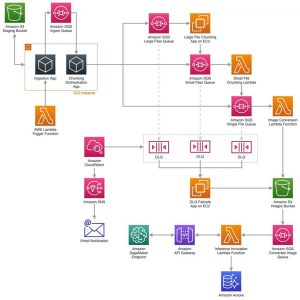
In this post, Joel presents an overview of an architecture built for Quantiphi Inc. This pipeline performs pre-processing of documents, and is reusable for a wide array of document processing workloads.
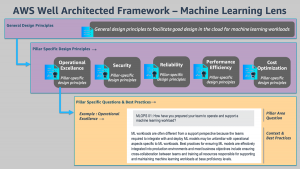
#9: Introducing the Well-Architected Framework for Machine Learning
by by Shelbee Eigenbrode, Bardia Nikpourian, Sireesha Muppala, and Christian Williams
In the Machine Learning Lens whitepaper, the authors focus on how to design, deploy, and architect your machine learning workloads in the AWS Cloud. The whitepaper describes the general design principles and the five pillars of the Framework as they relate to ML workloads.
#8: BBVA: Helping Global Remote Working with Amazon AppStream 2.0
by Jose Luis Prieto
In this post, Jose explains why BBVA chose Amazon AppStream 2.0 to accommodate the remote work experience. BBVA built a global solution reducing implementation time by 90% compared to on-premises projects, and is meeting its operational and security requirements.
#7: Field Notes: Serverless Container-based APIs with Amazon ECS and Amazon API Gateway
by Simone Pomata
In this post, Simone guides you through the details of the option based on Amazon API Gateway and AWS Cloud Map, and how to implement it. First you learn how the different components (Amazon ECS, AWS Cloud Map, API Gateway, etc.) work together, then you launch and test a sample container-based API.
#6: Mercado Libre: How to Block Malicious Traffic in a Dynamic Environment
by Gaston Ansaldo and Matias Ezequiel De Santi
In this post, readers will learn how to architect a solution that can ingest, store, analyze, detect and block malicious traffic in an environment that is dynamic and distributed in nature by leveraging various AWS services like Amazon CloudFront, Amazon Athena and AWS WAF.
#5: Announcing the New Version of the Well-Architected Framework
by Rodney Lester
In this post, Rodney announces the availability of a new version of the AWS Well-Architected Framework, and focuses on such issues as removing perceived repetition, adding content areas to explicitly call out previously implied best practices, and revising best practices to provide clarity.
#4: Serverless Stream-Based Processing for Real-Time Insights
by Justin Pirtle
In this post, Justin provides an overview of streaming messaging services and AWS Serverless stream processing capabilities. He shows how it helps you achieve low-latency, near real-time data processing in your applications.
#3: Field Notes: Working with Route Tables in AWS Transit Gateway
by Prabhakaran Thirumeni
In this post, Prabhakaran explains the packet flow if both source and destination network are associated to the same or different AWS Transit Gateway Route Table. He outlines a scenario with a substantial number of VPCs, and how to make it easier for your network team to manage access for a growing environment.
#2: Using VPC Sharing for a Cost-Effective Multi-Account Microservice Architecture
by Anandprasanna Gaitonde and Mohit Malik
Anand and Mohit present a cost-effective approach for microservices that require a high degree of interconnectivity and are within the same trust boundaries. This approach requires less VPC management while still using separate accounts for billing and access control, and does not sacrifice scalability, high availability, fault tolerance, and security.
#1: Serverless Architecture for a Web Scraping Solution
by Dzidas Martinaitis
You may wonder whether serverless architectures are cost-effective or expensive. In this post, Dzidas analyzes a web scraping solution. The project can be considered as a standard extract, transform, load process without a user interface and can be packed into a self-containing function or a library.
This post is courtesy of Roman Boiko, Solutions Architect.
React is a popular front-end framework used to create single-page applications (SPAs). It is rendered and run on the client-side in the browser. However, for SEO or performance reasons, you may need to render parts of a React application on the server. This is where the server-side rendering (SSR) is useful.
This post introduces the concepts and demonstrates rendering a React application with AWS Lambda. To deploy this solution and to provision the AWS resources, I use the AWS Cloud Development Kit (CDK). This is an open-source framework, which helps you reduce the amount of code required to automate deployment.
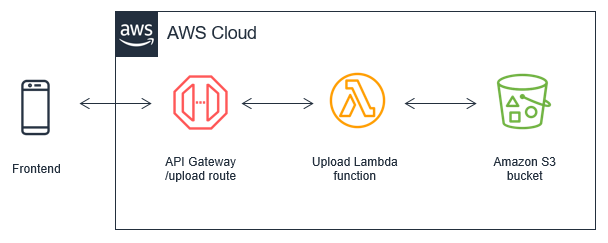
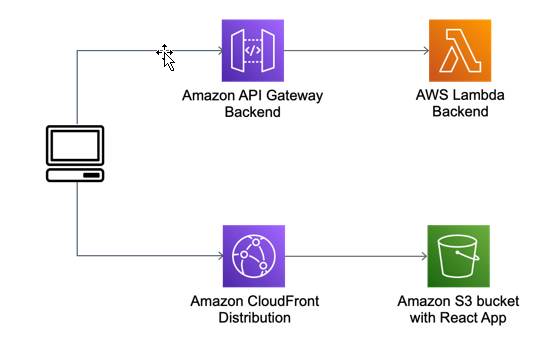
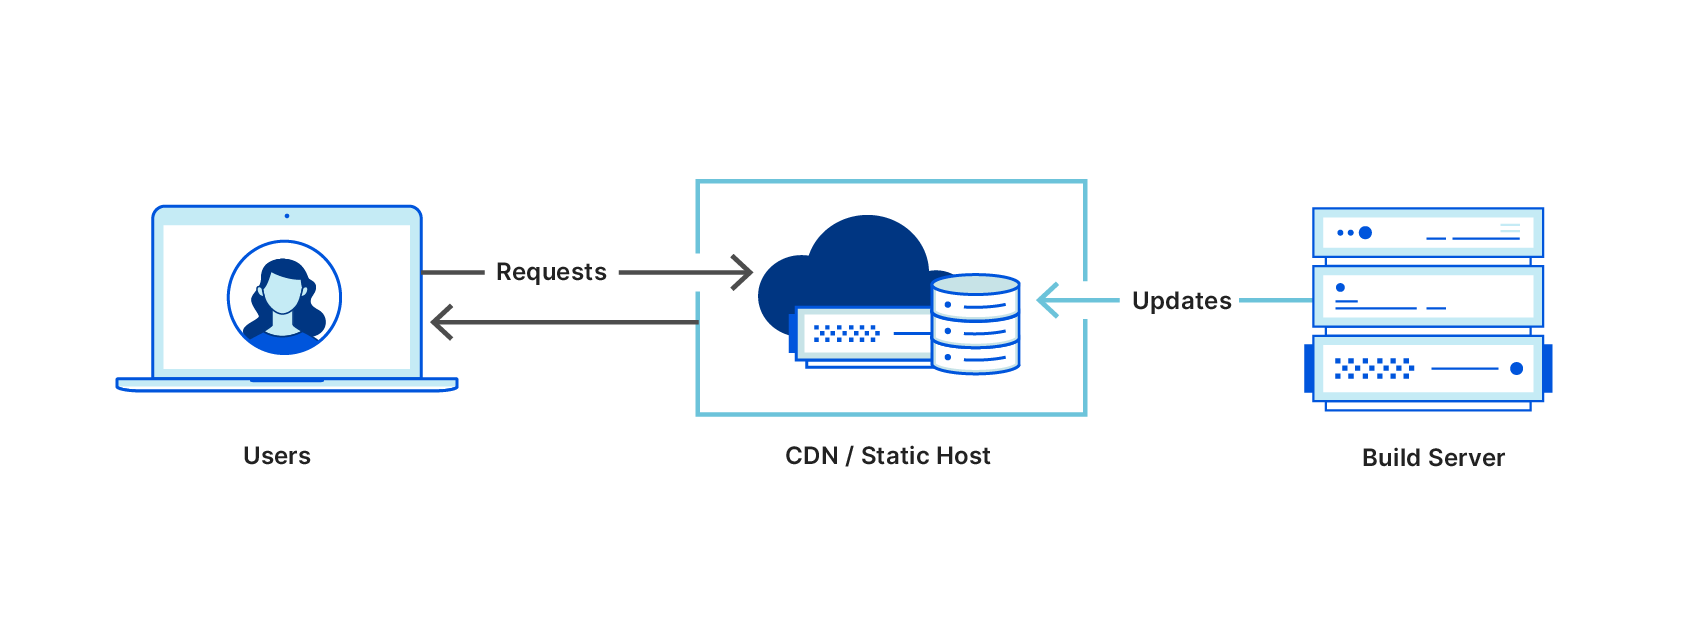
1. A static React app hosted in an S3 bucket with a CloudFront distribution in front of the website. The backend is running behind API Gateway, implemented as a Lambda function. Here, the application is fully downloaded to the client and rendered in a web browser. It sends requests to the backend.
2. The React app is rendered with a Lambda function. The CloudFront distribution is configured to forward requests from the /ssr path to the API Gateway endpoint. This calls the Lambda function where the rendering is happening. While rendering the requested page, the Lambda function calls the backend API to fetch the data. It returns a static HTML page with all the data. This page may be cached in CloudFront to optimize subsequent requests.
3. The React app is rendered with a Lambda@Edge function. This scenario is similar but rendering happens at edge locations. The requests to /edgessr are handled by the Lambda@Edge function. This sends requests to the backend and returns a static HTML page.
Walkthrough
The example application shows how the preceding scenarios are implemented with the AWS CDK. This solution requires:
This solution deploys a Lambda@Edge function so it must be provisioned in the US East (N. Virginia) Region.
To get started, download and configure the sample:
From a terminal, clone the GitHub repository: git clone https://github.com/aws-samples/react-ssr-lambda
Provide a unique name for the S3 bucket, which is created by the stack and used for React application hosting. Change the placeholder <your bucket name> to your bucket name. To install the solution, run:
cd react-ssr-lambda
cd ./cdk
npm install
npm run build
cdk bootstrap
cdk deploy SSRApiStack --outputs-file ../simple-ssr/src/config.json

cd ../simple-ssr
npm install
npm run build-all
cd ../cdk
cdk deploy SSRAppStack --parameters mySiteBucketName=<your bucket name>
Note the following values from the output:
SSRAppStack.CFURL – the URL of the CloudFront distribution. Its root path returns the React application stored in S3.
SSRAppStack.LambdaSSRURL – the URL of the CloudFront /ssr distribution, which returns a page rendered by the Lambda function.
SSRAppStack.LambdaEdgeSSRURL – the URL of the CloudFront /edgessr distribution, which returns a page rendered by Lambda@Edge function.
In a browser, open each of the URLs from step 3. You see the same page with a different footer, indicating how it is rendered.
Understanding the React app
The application is created by the create-react-app utility. You can run and test this application locally by navigating to the simple-ssr directory and running the npm start command.
This small application consists of two components that render the list of products received from the backend. The App.js file sends the request, parses the result, and passes it to the component.
To support SSR, I change the preceding application using several Lambda functions with the implementation. As I change the way data is retrieved from the backend, I remove this code from App.js. Instead, the data is retrieved in the Lambda function and injected into the application during the rendering process.
Next, I implement SSR logic in the Lambda function. For simplicity, I use React’s built-in renderToString method, which returns an HTML string. You can find the corresponding file in the simple-ssr/src/server/index.js. The handler function fetches data from the backend, renders the React components, and injects them into the HTML template. It returns the response to API Gateway, which responds to the client.
For rendering the same code on Lambda@Edge, I change the code to work with CloudFront events and also modify the response format. This function searches for a specific path (/edgessr). All other logic stays the same. You can view the full code at simple-ssr/src/edge/index.js:
The create-react-app utility configures tools such as Babel and webpack for the client-side React application. However, it is not designed to work with SSR. To make the functions work as expected, I transpile these into CommonJS format in addition to transpiling React JSX files. The standard tool for this task is Babel. To add it to this project, I create the configuration file .babelrc.json with instructions to transpile the functions into Node.js v12 format:
I also include all the dependencies. I use the popular frontend tool webpack, which also works with Lambda functions. It adds only the necessary dependencies and minimizes the package size. For this purpose, I create configurations for both functions. You can find these in the webpack.edge.js and webpack.server.js files:
The result of running webpack is one file for each build. I use these files to deploy the Lambda and Lambda@Edge functions. To automate the build process, I add several scripts to package.json.
After the application successfully builds, I deploy to the AWS Cloud. I use AWS CDK for an infrastructure as code approach. The code is located in cdk/lib/ssr-stack.ts.
First, I create an S3 bucket for storing the static content and I pass the name of the bucket as a parameter. To ensure only CloudFront can access my S3 bucket, I use an access identity configuration:
const mySiteBucketName = new CfnParameter(this, "mySiteBucketName", {
      type: "String",
      description: "The name of S3 bucket to upload react application"
    });

const mySiteBucket = new s3.Bucket(this, "ssr-site", {
      bucketName: mySiteBucketName.valueAsString,
      websiteIndexDocument: "index.html",
      websiteErrorDocument: "error.html",
      publicReadAccess: false,
      //only for demo not to use in production
      removalPolicy: cdk.RemovalPolicy.DESTROY
    });

new s3deploy.BucketDeployment(this, "Client-side React app", {
      sources: [s3deploy.Source.asset("../simple-ssr/build/")],
      destinationBucket: mySiteBucket
    });

const originAccessIdentity = new cloudfront.OriginAccessIdentity(
      this,
      "ssr-oia"
    );
    mySiteBucket.grantRead(originAccessIdentity);
I deploy the Lambda function from the build directory and configure an integration with API Gateway. I also note the API Gateway domain name for later use in the CloudFront distribution.
The template is now ready for deployment. This approach allows you to use this code in your Continuous Integration and Continuous Delivery/Deployment (CI/CD) pipelines to automate deployments of your SSR applications. Also, you can create a CDK construct to reuse this code in different applications.
Cleaning up
To delete all the resources used in this solution, run:
cd react-ssr-lambda/cdk
cdk destroy SSRApiStack
cdk destroy SSRAppStack
Conclusion
This post demonstrates two ways you can implement and deploy a solution for server-side rendering in React applications, by using Lambda or Lambda@Edge.
It also shows how to use open-source tools and AWS CDK to automate the building and deployment of such applications.
For more serverless learning resources, visit Serverless Land.
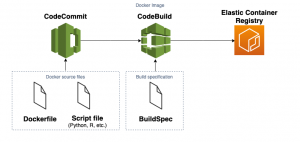
This tutorial uses Jenkins Pipeline plugin. A commit to the main branch of the repository starts and deploys the application, using the AWS SAM CLI. This tutorial deploys a small serverless API application called HelloWorldApi.
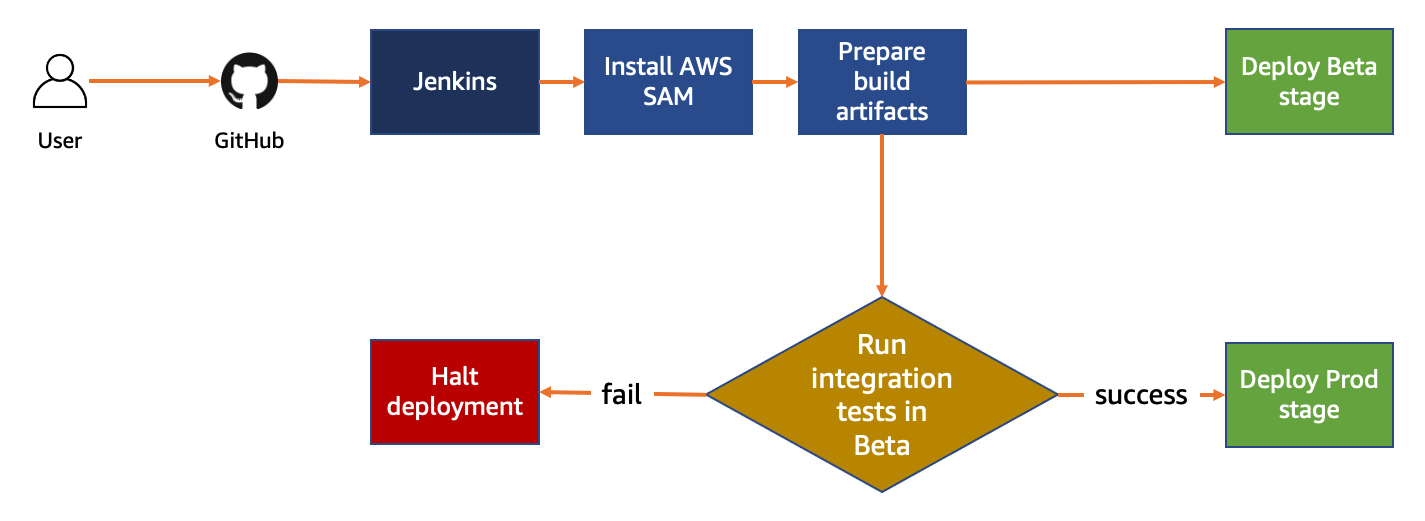
The pipeline consists of stages to build and deploy the application. Jenkins first ensures that the build environment is set up and installs any necessary tools. Next, Jenkins prepares the build artifacts. It promotes the artifacts to the next stage, where they are deployed to a beta environment using the AWS SAM CLI. Integration tests are run after deployment. If the tests pass, the application is deployed to the production environment.
CICD workflow diagram
The following prerequisites are required:
A working Jenkins setup with version 2.249.3 or greater.
Setting up the backend application and development stack
Using AWS CloudFormation to define the infrastructure, you can create multiple environments or stacks from the same infrastructure definition. A “dev stack” is a copy of production infrastructure deployed to a developer account for testing purposes.
As serverless services use a pay-for-value model, it can be cost effective to use a high-fidelity copy of your production stack. Dev stacks are created by each developer as needed and deleted without having any negative impact on production.
For complex applications, it may not be feasible for every developer to have their own stack. However, for this tutorial, setting up the dev stack first for testing is recommended. Setting up a dev stack takes you through a manual process of how a stack is created. Later, this process is used to automate the setup using Jenkins.
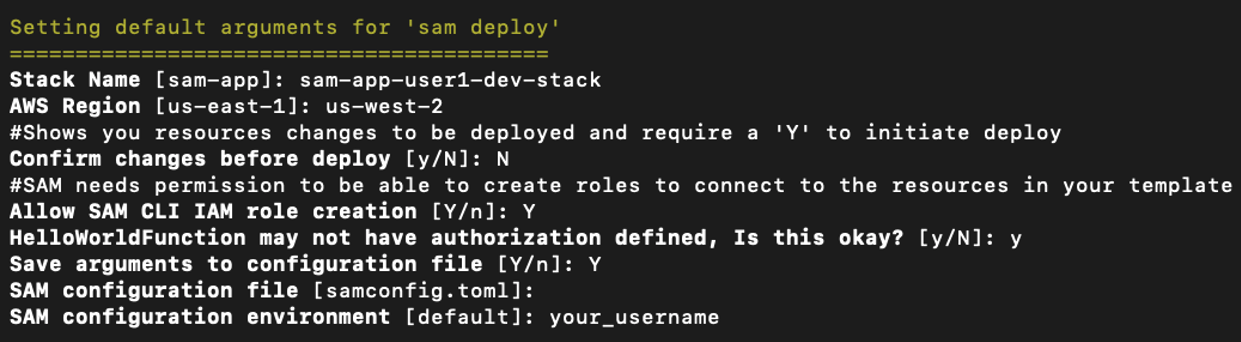
Build the application and run the guided deploy command: cd aws-sam-jenkins-pipeline-tutorial sam build sam deploy --guided
AWS SAM guided deploy output
This sets up a development stack and saves the settings in the samconfig.toml file with configuration environment specific to a user. This also triggers a deployment.
After deployment, make a small code change. For example, in the file hello-world/app.js change the message Hello world to Hello world from user <your name>.
Deploy the updated code: sam build sam deploy -–config-env <your_username>
With this command, each developer can create their own configuration environment. They can use this for deploying to their development stack and testing changes before pushing changes to the repository.
Once deployment finishes, the API endpoint is displayed in the console output. You can use this endpoint to make GET requests and test the API manually.
Deployment output
To update and run the integration test:
Open the hello-world/tests/integ/test-integ-api.js file.
Update the assert statement in line 32 to include <your name> from the previous step:
it("verifies if response contains my username", async () => {
  assert.include(apiResponse.data.message, "<your name>");
});
From the terminal, run the following commands: cd hello-world npm install AWS_REGION=us-west-2 STACK_NAME=sam-app-user1-dev-stack npm run integ-test If you are using Microsoft Windows, instead run: cd hello-world npm install set AWS_REGION=us-west-2 set STACK_NAME=sam-app-user1-dev-stack npm run integ-test
Test results
You have deployed a fully configured development stack with working integration tests. To push the code to GitHub:
Create a new repository in GitHub.
From the GitHub account homepage, choose New.
Enter a repository name and choose Create Repository.
Copy the repository URL.
From the root directory of the AWS SAM project, run: git init git commit -am “first commit” git remote add origin <your-repository-url> git push -u origin main
Creating an IAM user for Jenkins
To create an IAM user for the Jenkins deployment:
Sign in to the AWS Management Console and navigate to IAM.
Select Users from side navigation and choose Add user.
Enter the User name as sam-jenkins-demo-credentials and grant Programmatic access to this user.
On the next page, select Attach existing policies directlyand choose Create Policy.
Select the JSON tab and enter the following policy. Replace <YOUR_ACCOUNT_ID> with your AWS account ID:
Choose Review Policy and add a policy name on the next page.
Choose Create Policy button.
Return to the previous tab to continue creating the IAM user. Choose Refresh and search for the policy name you created. Select the policy.
Choose Next Tags and then Review.
Choose Create user and save the Access key ID and Secret access key.
Configuring Jenkins
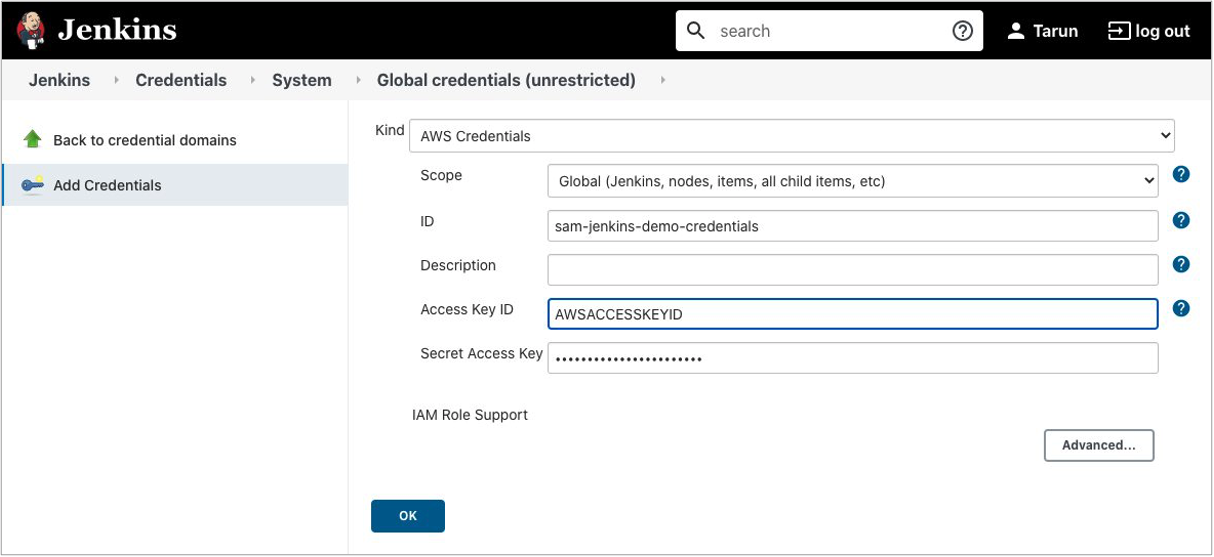
To configure AWS credentials in Jenkins:
On the Jenkins dashboard, go to Manage Jenkins > Manage Plugins in the Available tab. Search for the Pipeline: AWS Steps plugin and choose Install without restart.
Navigate to Manage Jenkins > Manage Credentials > Jenkins (global) > Global Credentials > Add Credentials.
Select Kind as AWS credentials and use the ID sam-jenkins-demo-credentials.
Enter the access key ID and secret access key and choose OK.
Jenkins credential configuration
Create Amazon S3 buckets for each Region in the pipeline. S3 bucket names must be unique within a partition: aws s3 mb s3://sam-jenkins-demo-us-west-2-<your_name> --region us-west-2 aws s3 mb s3://sam-jenkins-demo-us-east-1-<your_name> --region us-east-1
Create a file named Jenkinsfile at the root of the project and add:
Commit and push the code to the GitHub repository by running following commands: git commit -am “Adding Jenkins pipeline config.” git push origin -u main
Next, create a Jenkins Pipeline project:
From the Jenkins dashboard, choose New Item, select Pipeline, and enter the project name sam-jenkins-demo-pipeline.
Jenkins Pipeline creation wizard
Under Build Triggers, select Poll SCM and enter * * * * *. This polls the repository for changes every minute.
Jenkins build triggers configuration
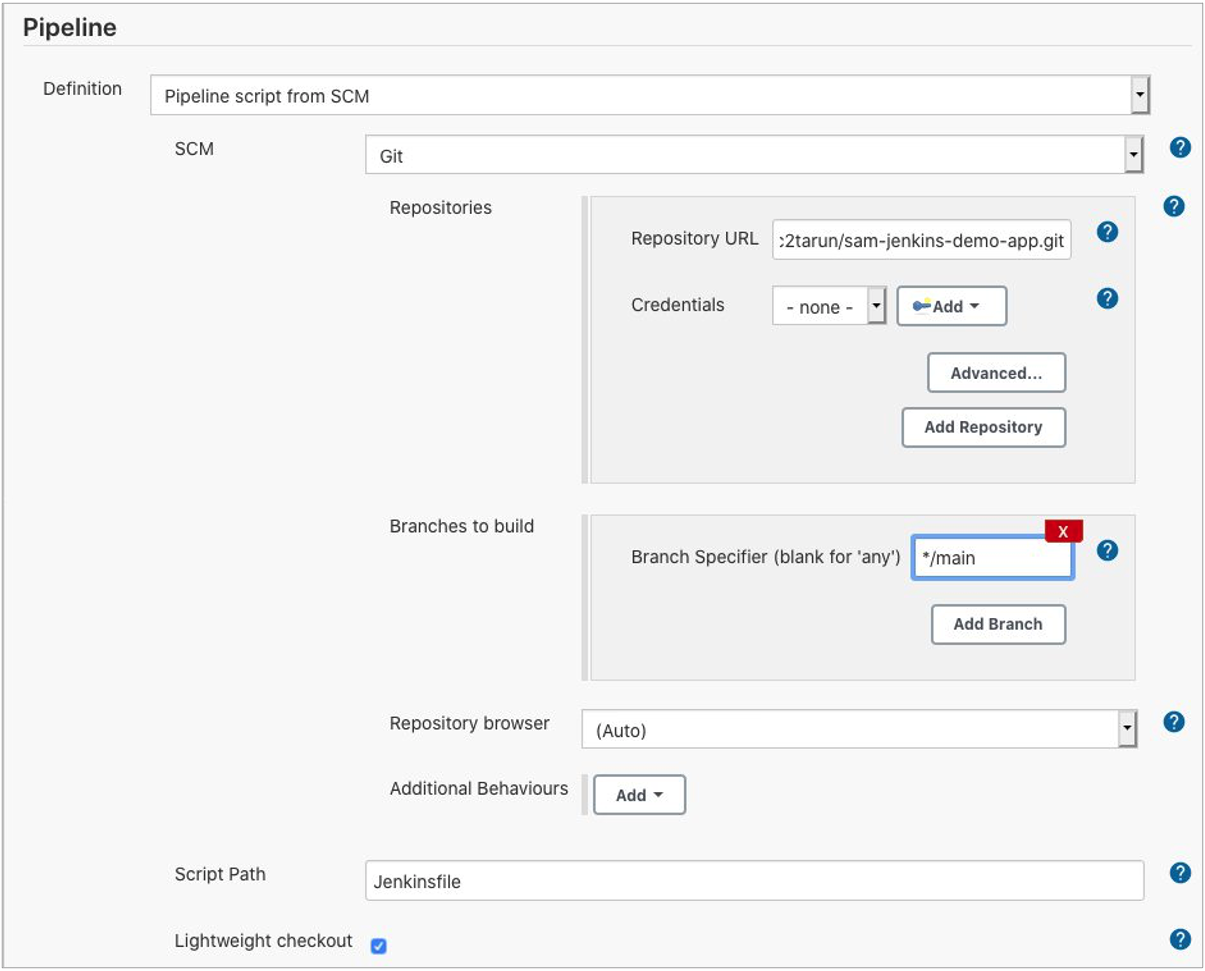
Under the Pipeline section, select Definition as Pipeline script from SCM.
Select GIT under SCM and enter the repository URL.
Set Branches to build to */main.
Set the Script Path to Jenkinsfile.
Jenkins pipeline configuration
Save the project.
After the build finishes, you see the pipeline:
Jenkins pipeline stages
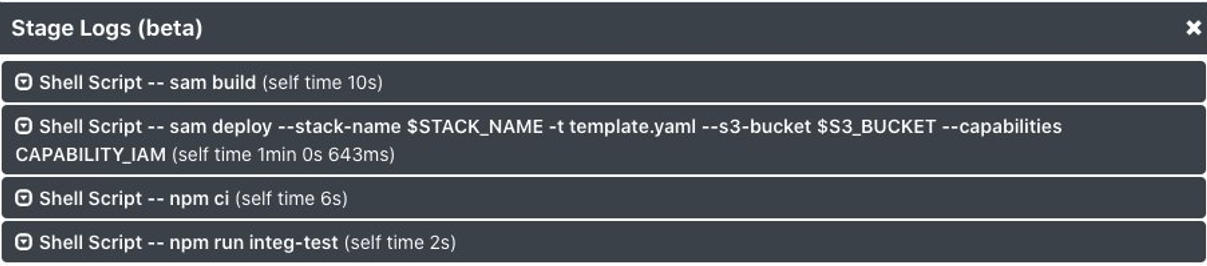
Review the logs for the beta stage to check that the integration test is completed successfully.
Jenkins stage logs
Conclusion
This tutorial uses a Jenkins Pipeline to add an automated CI/CD pipeline to an AWS SAM-generated example application. Jenkins automatically builds, tests, and deploys the changes after each commit to the repository.
Using Jenkins, developers can gain the benefits of continuous integration and continuous deployment of serverless applications to the AWS Cloud with minimal configuration.
We want to hear your feedback! Is this approach useful for your organization? Do you want to see another implementation? Contact us on Twitter @edjgeek or via comments!
In the Operating Lambda series, I cover important topics for developers, architects, and systems administrators who are managing AWS Lambda-based applications. This three-part section discusses event-driven architectures and how these relate to Lambda-based applications.
Part 1 covers the benefits of the event-driven paradigm and how it can improve throughput, scale, and extensibility. Part 2 explains some of the design principles and best practices that can help developers gain the benefits of building Lambda-based applications. This post explores anti-patterns in event-driven architectures.
Lambda is not a prescriptive service and provides broad functionality for you to build applications as needed. While this flexibility is important to customers, there are some designs that are technically functional but suboptimal from an architecture standpoint.
The Lambda monolith
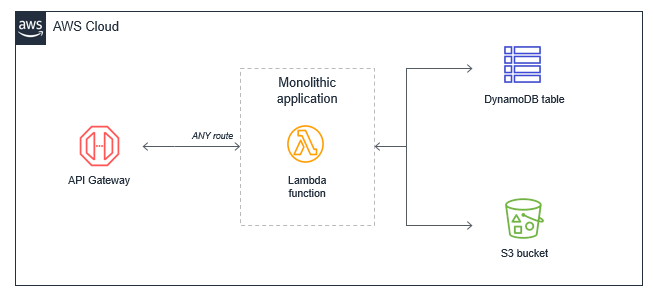
In many applications migrated from traditional servers, Amazon EC2 instances or AWS Elastic Beanstalk applications, developers “lift and shift” existing code. Frequently, this results in a single Lambda function that contains all of the application logic that is triggered for all events. For a basic web application, for example, a monolithic Lambda function handles all Amazon API Gateway routes and integrates with all necessary downstream resources:
This approach has several drawbacks:
Package size: The Lambda function may be much larger because it contains all possible code for all paths, which makes it slower for the Lambda service to download and run.
Harder to enforce least privilege: The function’s IAM role must grant permissions for all resources needed for all paths, making the permissions very broad. Many paths in the functional monolith do not need all the permissions that have been granted.
Harder to upgrade: In a production system, any upgrades to the single function are more risky and could cause the entire application to stop working. Upgrading a single path in the Lambda function is an upgrade to the entire function.
Harder to maintain: It’s more difficult to have multiple developers working on the service since it’s a monolithic code repository. It also increases the cognitive burden on developers and makes it harder to create appropriate test coverage for code.
Harder to reuse code: Typically, it can be harder to separate libraries from monoliths, making code reuse more difficult. As you develop and support more projects, this can make it harder to support the code and scale your team’s velocity.
Harder to test: As the lines of code increase, it becomes harder to unit all the possible combinations of inputs and entry points in the code base. It’s generally easier to implement unit testing for smaller services with less code.
The preferred alternative is to decompose the monolithic Lambda function into individual microservices, mapping a single Lambda function to a single, well-defined task. In this example web application with a few API endpoints, the resulting microservice-based architecture is based on the API routes.
The process of decomposing a monolith depends upon the complexity of your workload. Using strategies like the strangler pattern, you can migrate code from larger code bases to microservices. There are many potential benefits to running a Lambda-based application this way:
Package sizes can be optimized for only the code needed for a single task, which helps make the function more performant, and may reduce running cost.
IAM roles can be scoped to precisely the access needed by the microservice, making it easier to enforce the principles of least privilege. In controlling the blast radius, using IAM roles this way can give your application a stronger security posture.
Easier to upgrade: you can apply upgrades at a microservice level without impacting the entire workload. Upgrades occur at the functional level, not at the application level, and you can implement canary releases to control the rollout.
Easier to maintain: adding new features is usually easier when working with a single small service than a monolithic with significant coupling. Frequently, you implement features by adding new Lambda functions without modifying existing code.
Easier to reuse code: when you have specialized functions that perform a single task, it’s often easier to copy these across multiple projects. Building a library of generic specialized functions can help accelerate development in future projects.
Easier to test: unit testing is easier when there are few lines of code and the range of potential inputs for a function is smaller.
Lower cognitive load for developers since each development team has a smaller surface area of the application to understand. This can help accelerate onboarding for new developers.
Many business workflows result in complex workflow logic, where the flow of operations depends on multiple factors. In an ecommerce example, a payments service is an example of a complex workflow:
A payment type may be cash, check, or credit card, all of which have different processes.
A credit card payment has many possible states, from successful to declined.
The service may need to issue refunds or credits for a portion or the entire amount.
A third-party service that processes credit cards may be unavailable due to an outage.
Some payments may take multiple days to process.
Implementing this logic in a Lambda function can result in ‘spaghetti code’ that’s different to read, understand, and maintain. It can also become fragile in production systems. The complexity is compounded if you must handle error handling, retry logic, and inputs and outputs processing. These types of orchestration functions are an anti-pattern in Lambda-based applications.
Instead, use AWS Step Functions to orchestrate these workflows using a versionable, JSON-defined state machine. State machines can handle nested workflow logic, errors, and retries. A workflow can also run for up to 1 year, and the service can maintain different versions of workflows, allowing you to upgrade production systems in place. Using this approach also results in less custom code, making an application easier to test and maintain.
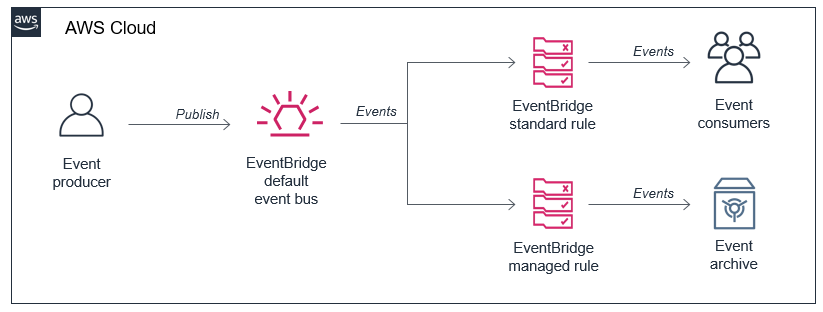
While Step Functions is generally best-suited for workflows within a bounded context or microservice, to coordinate state changes across multiple services, instead use Amazon EventBridge. This is a serverless event bus that routes events based upon rules, and simplifies orchestration between microservices.
Recursive patterns that cause invocation loops
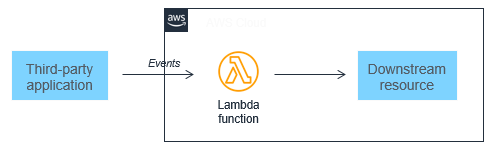
AWS services generate events that invoke Lambda functions, and Lambda functions can send messages to AWS services. Generally, the service or resource that invokes a Lambda function should be different to the service or resource that the function outputs to. Failure to manage this can result in invocation loops.
For example, a Lambda function writes an object to an Amazon S3 object, which in turn invokes the same Lambda function via a put event. The invocation causes a second object to be written to the bucket, which invokes the same Lambda function:
While the potential for infinite loops exists in most programming languages, this anti-pattern has the potential to consume more resources in serverless applications. Both Lambda and S3 automatically scale based upon traffic, so the loop may cause Lambda to scale to consume all available concurrency and S3 to continue to write objects and generate more events for Lambda. In this situation, you can press the “Throttle” button in the Lambda console to scale the function concurrency down to zero and break the recursion cycle.
This example uses S3 but the risk of recursive loops also exists in Amazon SNS, Amazon SQS, Amazon DynamoDB, and other services. In most cases, it is safer to separate the resources that produce and consume events from Lambda. However, if you need a Lambda function to write data back to the same resource that invoked the function, ensure that you:
Use a positive trigger: For example, an S3 object trigger may use a naming convention or meta tag that is only triggered on the first invocation. This prevents objects written from the Lambda function from invoking the same Lambda function again. See the S3-to-Lambda translation application for an example of this mechanism.
Use reserved concurrency: Setting the function’s reserved concurrency to a lower limit prevents the function from scaling concurrently beyond that limit. It does not prevent the recursion, but limits the resources consumed as a safety mechanism. This can be useful during the development and test phases.
Use Amazon CloudWatch monitoring and alarming: By setting an alarm on a function’s concurrency metric, you can receive alerts if the concurrency suddenly spikes and take appropriate action.
Lambda functions calling Lambda functions
Functions enable encapsulation and code reuse. Most programming languages support the concept of code synchronously calling functions within a code base. In this case, the caller waits until the function returns a response. This model does not generally adapt well to serverless development.
For example, consider a simple ecommerce application consisting of three Lambda functions that process an order:
In this case, the Create order function calls the Process payment function, which in turn calls the Create invoice function. While this synchronous flow may work within a single application on a server, it introduces several avoidable problems in a distributed serverless architecture:
Cost: With Lambda, you pay for the duration of an invocation. In this example, while the Create invoice functions runs, two other functions are also running in a wait state, shown in red on the diagram.
Error handling: In nested invocations, error handling can become more complex. Either errors are thrown to parent functions to handle at the top-level function, or functions require custom handling. For example, an error in Create invoice might require the Process payment function to reverse the charge, or it may instead retry the Create invoice process.
Tight coupling: Processing a payment typically takes longer than creating an invoice. In this model, the availability of the entire workflow is limited by the slowest function.
Scaling: The concurrency of all three functions must be equal. In a busy system, this uses more concurrency than would otherwise be needed.
In serverless applications, there are two common approaches to avoid this pattern. First, use an SQS queue between Lambda functions. If a downstream process is slower than an upstream process, the queue durably persists messages and decouples the two functions. In this example, the Create order function publishes a message to an SQS queue, and the Process payment function consumes messages from the queue.
The second approach is to use AWS Step Functions. For complex processes with multiple types of failure and retry logic, Step Functions can help reduce the amount of custom code needed to orchestrate the workflow. As a result, Step Functions orchestrates the work and robustly handles errors and retries, and the Lambda functions contain only business logic.
Synchronous waiting within a single Lambda function
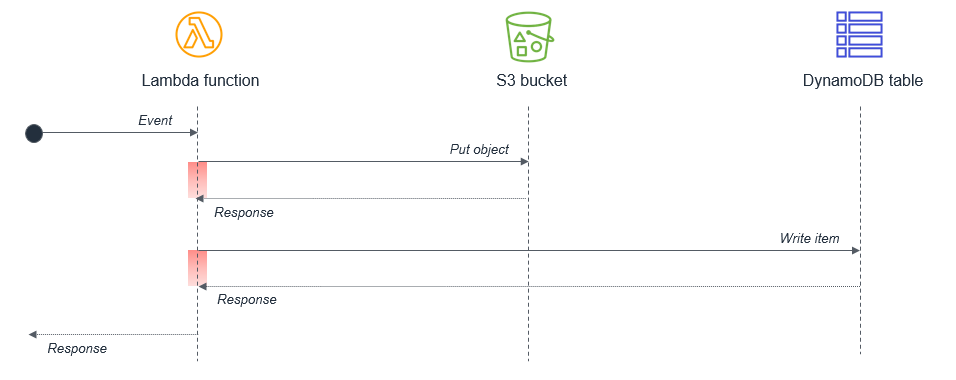
Within a single Lambda, ensure that any potentially concurrent activities are not scheduled synchronously. For example, a Lambda function might write to an S3 bucket and then write to a DynamoDB table:
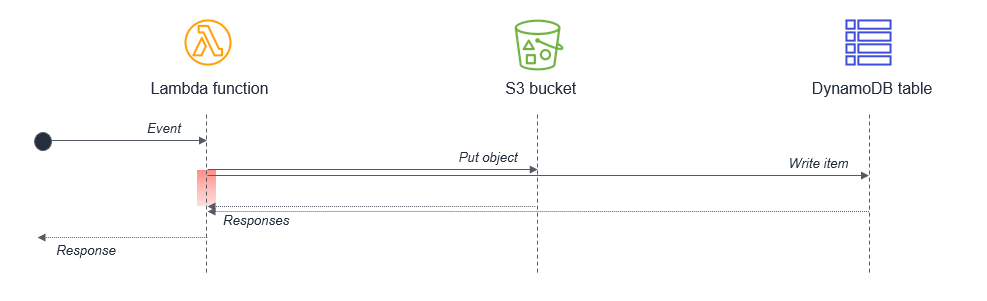
The wait states, shown in red in the diagram, are compounded because the activities are sequential. If the tasks are independent, they can be run in parallel, which results in the total wait time being set by the longest-running task.
In cases where the second task depends on the completion of the first task, you may be able to reduce the total waiting time and the cost of execution by splitting the Lambda functions:
In this design, the first Lambda function responds immediately after putting the object to the S3 bucket. The S3 service invokes the second Lambda function, which then writes data to the DynamoDB table. This approach minimizes the total wait time in the Lambda function executions.
This post discusses anti-patterns in event-driven architectures using Lambda. I show some of the issues when using monolithic Lambda functions or custom code to orchestrate workflows. I explain how to avoid recursive architectures that may cause invocation loops and why you should avoid calling functions from functions. I also explain different approaches to handling waiting in functions to minimize cost.
For more serverless learning resources, visit Serverless Land.
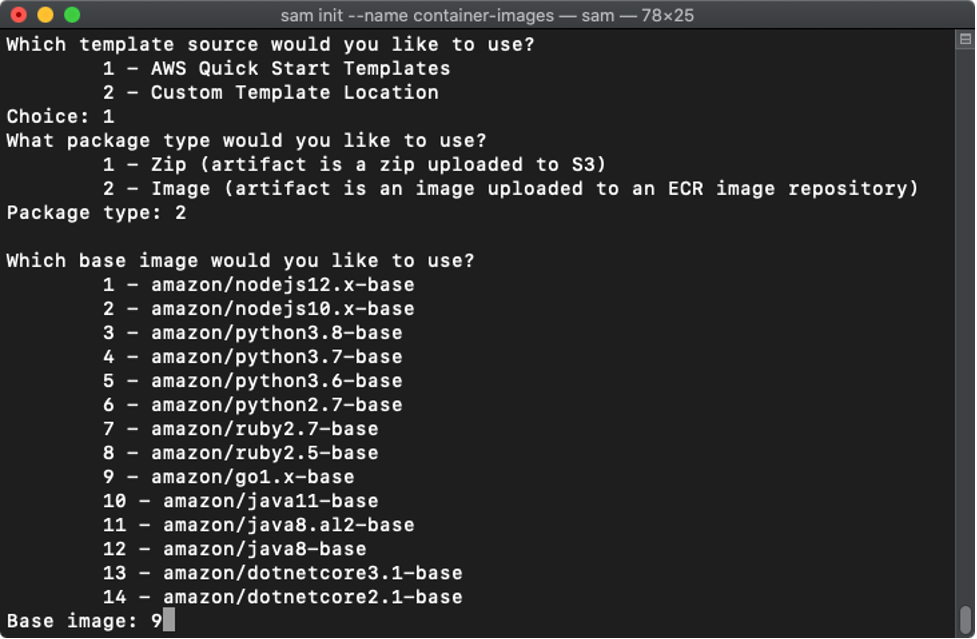
At re:Invent 2020, AWS announced that you can package and deploy AWS Lambda functions as container images. Packaging AWS Lambda functions as container images brings some notable benefits for developers running custom runtimes, such as PHP. This blog post explains those benefits and shows how to use the new container image support for Lambda functions to build serverless PHP applications.
Overview
Many PHP developers are familiar with building applications as containers to create a portable artifact for easier deployment. Packaging applications as containers helps to maintain consistent PHP versions, package versions, and configurations settings across multiple environments.
The new container image support for Lambda allows you to use familiar container tooling to build your applications. It also allows you to transition your applications into a serverless event-driven model. This brings the benefits of having no infrastructure to manage, automated scalability and a pay-per-use billing.
The advantages of an event-driven model for PHP applications are explained across the blog series “The serverless LAMP stack”. It explores the concepts, methods, and reasons for creating serverless applications with PHP. The architectural patterns and service limits in this blog series apply to functions packaged using both container image and zip archive formats, with some key exceptions:
Zip archive
Container image
Maximum package size
250 MB
10 GB
Lambda layers
Supported
Include in image
Lambda Extensions
Supported
Include in image
Custom runtimes with container images
For custom runtimes such as PHP, Lambda provides base images containing the required Amazon Linux or Amazon Linux 2 operating system. Extend this to include your own runtime by implementing the Lambda Runtime API in a bootstrap file.
Before container image support for Lambda, a custom runtime is packaged using the .zip format. This required the developer to:
Set up an Amazon Linux environment compatible with the Lambda execution environment.
Install compilation dependencies and compile a version of PHP.
Save the compiled PHP binary together with a bootstrap file and package as a .zip.
Publish the .zip as a runtime layer.
Add the runtime layer to a Lambda function.
Any edits to the custom runtime such as new packages, PHP versions, modules, or dependences require the process to be repeated. This process can be time consuming and prone to error.
Creating a custom PHP runtime using the new container image support for Lambda can simplify changing the runtime environment. Dockerfiles allow you to have a fully scripted, faster, and portable build process without setting up an Amazon Linux environment.
This GitHub repository contains a custom PHP runtime for Lambda functions packaged as a container image. The following Dockerfile uses the base image for Amazon Linux provided by AWS. The instructions perform the following:
Install system-wide Linux packages (zip, curl, tar).
Download and compile PHP.
Download and install composer dependency manager and dependencies.
Move PHP binaries, bootstrap, and vendor dependencies into a directory that Lambda can read from.
Set the container entrypoint.
#Lambda base image Amazon Linux
FROM public.ecr.aws/lambda/provided as builder
# Set desired PHP Version
ARG php_version="7.3.6"
RUN yum clean all && \
    yum install -y autoconf \
                bison \
                bzip2-devel \
                gcc \
                gcc-c++ \
                git \
                gzip \
                libcurl-devel \
                libxml2-devel \
                make \
                openssl-devel \
                tar \
                unzip \
                zip

# Download the PHP source, compile, and install both PHP and Composer
RUN curl -sL https://github.com/php/php-src/archive/php-${php_version}.tar.gz | tar -xvz && \
    cd php-src-php-${php_version} && \
    ./buildconf --force && \
    ./configure --prefix=/opt/php-7-bin/ --with-openssl --with-curl --with-zlib --without-pear --enable-bcmath --with-bz2 --enable-mbstring --with-mysqli && \
    make -j 5 && \
    make install && \
    /opt/php-7-bin/bin/php -v && \
    curl -sS https://getcomposer.org/installer | /opt/php-7-bin/bin/php -- --install-dir=/opt/php-7-bin/bin/ --filename=composer

# Prepare runtime files
# RUN mkdir -p /lambda-php-runtime/bin && \
    # cp /opt/php-7-bin/bin/php /lambda-php-runtime/bin/php
COPY runtime/bootstrap /lambda-php-runtime/
RUN chmod 0755 /lambda-php-runtime/bootstrap

# Install Guzzle, prepare vendor files
RUN mkdir /lambda-php-vendor && \
    cd /lambda-php-vendor && \
    /opt/php-7-bin/bin/php /opt/php-7-bin/bin/composer require guzzlehttp/guzzle

###### Create runtime image ######
FROM public.ecr.aws/lambda/provided as runtime
# Layer 1: PHP Binaries
COPY --from=builder /opt/php-7-bin /var/lang
# Layer 2: Runtime Interface Client
COPY --from=builder /lambda-php-runtime /var/runtime
# Layer 3: Vendor
COPY --from=builder /lambda-php-vendor/vendor /opt/vendor

COPY src/ /var/task/

CMD [ "index" ]
To deploy this Lambda function, follow the instructions in the GitHub repository.
All runtime-related instructions are saved in the Dockerfile, which makes the custom runtime simpler to manage, update, and test. You can add additional Linux packages by appending to the yuminstall command. To install alternative PHP versions, change the php_version argument. Import additional PHP modules by adding to the compile command.
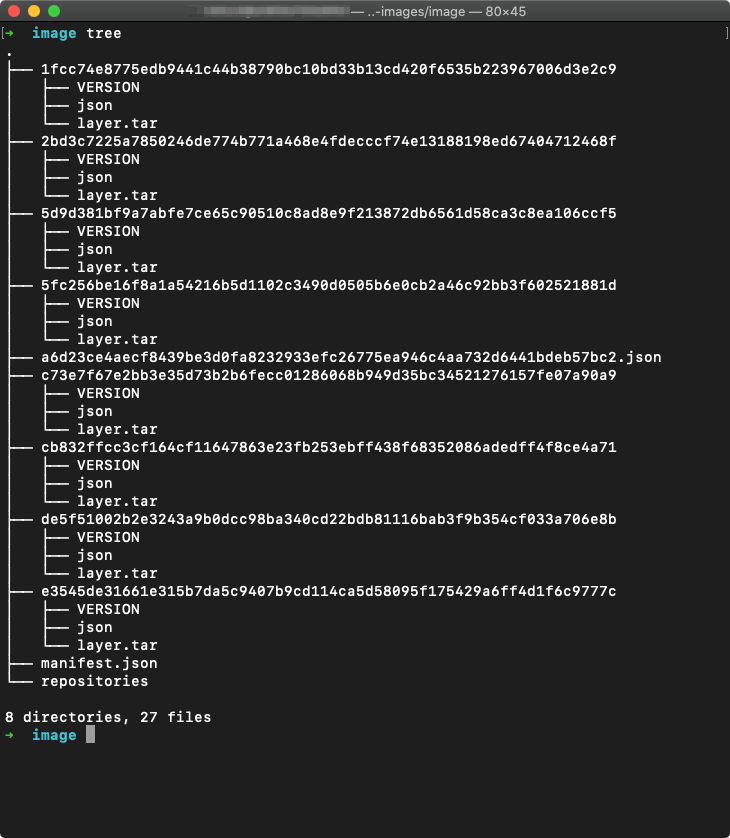
View the complete application in the following file tree:
The Lambda function code is stored in the src directory in a file named index.php. This contains the Lambda function handler “index()”.
A bootstrap file is in the ‘runtime’ directory. This uses the Lambda runtime API to communicate with the Lambda execution environment.
The shebang hash sequence at the beginning of the bootstrap script instructs Lambda to run the file with the PHP executable, set by the Dockerfile.
All environmentvariables used in the bootstrap are set by the Lambda execution environment when running in the AWS Cloud. When running locally, the Lambda Runtime Interface Emulator (RIE) sets these values.
#!/var/lang/bin/php
Testing locally with the Lambda RIE
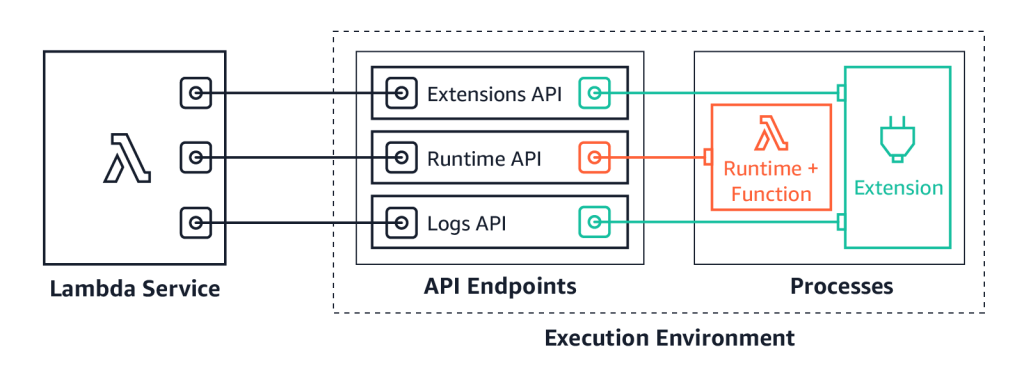
Using container image support for Lambda makes it easier for PHP developers to test Lambda functions locally. The previous container image example builds from the Lambda base image provided by AWS. This base image contains the Lambda RIE.
This is a proxy for Lambda’s Runtime and Extensions APIs. It acts as a lightweight web server that converts HTTP requests to JSON events and maintains functional parity with the Lambda Runtime API in the AWS Cloud. This allows developers to test functions locally using familiar tools such as cURL and the Docker CLI.
Build the previous custom runtime image using the Docker build command: docker build -t phpmyfuntion .
Run the function locally using the Docker run command, bound to port 9000: docker run -p 9000:8080 phpmyfuntion:latest
This command starts up a local endpoint at: localhost:9000/2015-03-31/functions/function/invocations
Post an event to this endpoint using a curl command. The Lambda function payload is provided by using the -d flag. This is a valid Json object required by the Runtime Interface Emulator: curl "http://localhost:9000/2015-03-31/functions/function/invocations" -d '{"queryStringParameters": {"name":"Ben"}}'
A 200 status response is returned:
Building web applications with Bref container images
Bref is an open source runtime Lambda layer for PHP. Using the bref-fpm layer, you can build applications with traditional PHP frameworks such as Symfony and Laravel. Bref’s implementation of the FastCGI protocol returns an HTTP response instead of a JSON response. When using the zip archive format to package Lambda functions, Bref’s custom runtime is provided to the function as a Lambda layer. Functions packaged as container images do not support adding Lambda layers to the function configuration. In addition to runtime layers, Bref also provides a number of Docker images. These images use the Lambda runtime API to form a runtime interface client that communicates with the Lambda execution environment.
The following example shows how to compose a Dockerfile that uses the bref php-74-fpm container image:
# Uses PHP 74-fpm.0, as the base image
FROM bref/php-74-fpm
# download composer for dependency management
RUN curl -s https://getcomposer.org/installer | php
# install bref using composer
RUN php composer.phar require bref/bref
# copy the project files into a Location that the Lambda service can read from
COPY . /var/task
#set the function handler entry point
CMD _HANDLER=index.php /opt/bootstrap
The new container image support for Lambda functions allows developers to package Lambda functions of up to 10 GB in size. Using the container image format and a Dockerfile can make it easier to build and update functions with custom runtimes such as PHP.
Developers can include specific language versions, modules, and package dependencies. The Amazon Linux and Amazon Linux 2 base images give developers a starting point to customize the runtime. With the Lambda Runtime Interface Emulator, it’s simpler for developers to test Lambda functions locally. PHP developers can use existing third-party images, such as bref-fpm, to create web applications in a single Lambda function.
Visit serverlessland.com for more information on building serverless PHP applications.
In the Operating Lambda series, I cover important topics for developers, architects, and systems administrators who are managing AWS Lambda-based applications. This three-part section discusses event-driven architectures and how these relate to Lambda-based applications.
Part 1 covers the benefits of the event-driven paradigm and how it can improve throughput, scale and extensibility. This post explains some of the design principles and best practices that can help developers gain the benefits of building Lambda-based applications.
Overview
Many of the best practices that apply to software development and distributed systems also apply to serverless application development. The broad principles are consistent with the Well-Architected Framework. The overall goal is to develop workloads that are:
Reliable: offering your end users a high level of availability. AWS serverless services are reliable because they are also designed for failure.
Durable: providing storage options that meet the durability needs of your workload.
Secure: following best practices and using the tools provided to secure access to workloads and limit the blast radius, if any issues occur.
Performant: using computing resources efficiently and meeting the performance needs of your end users.
Cost-efficient: designing architectures that avoid unnecessary cost that can scale without overspending, and also be decommissioned, if necessary, without significant overhead.
When you develop Lambda-based applications, there are several important design principles that can help you build workloads that meet these goals. You may not apply every principle to every architecture and you have considerable flexibility in how you approach building with Lambda. However, they should guide you in general architecture decisions.
Use services instead of custom code
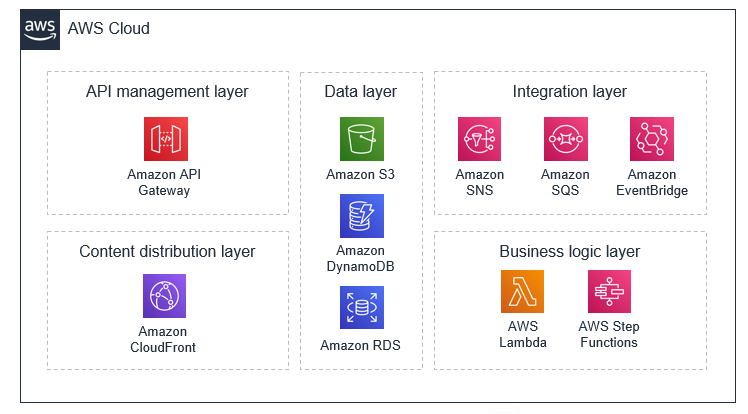
Serverless applications usually comprise several AWS services, integrated with custom code run in Lambda functions. While Lambda can be integrated with most AWS services, the services most commonly used in serverless applications are:
There are many well-established, common patterns in distributed architectures that you can build yourself or implement using AWS services. For most customers, there is little commercial value in investing time to develop these patterns from scratch. When your application needs one of these patterns, use the corresponding AWS service:
Pattern
AWS service
Queue
Amazon SQS
Event bus
Amazon EventBridge
Publish/subscribe (fan-out)
Amazon SNS
Orchestration
AWS Step Functions
API
Amazon API Gateway
Event streams
Amazon Kinesis
These services are designed to integrate with Lambda and you can use infrastructure as code (IaC) to create and discard resources in the services. You can use any of these services via the AWS SDK without needing to install applications or configure servers. Becoming proficient with using these services via code in your Lambda functions is an important step to producing well-designed serverless applications.
Understanding the level of abstraction
The Lambda service limits your access to the underlying operating systems, hypervisors, and hardware running your Lambda functions. The service continuously improves and changes infrastructure to add features, reduce cost and make the service more performant. Your code should assume no knowledge of how Lambda is architected and assume no hardware affinity.
Similarly, the integration of other services with Lambda is managed by AWS with only a small number of configuration options exposed. For example, when API Gateway and Lambda interact, there is no concept of load balancing available since it is entirely managed by the services. You also have no direct control over which Availability Zones the services use when invoking functions at any point in time, or how and when Lambda execution environments are scaled up or destroyed.
This abstraction allows you to focus on the integration aspects of your application, the flow of data, and the business logic where your workload provides value to your end users. Allowing the services to manage the underlying mechanics helps you develop applications more quickly with less custom code to maintain.
Implementing statelessness in functions
When building Lambda functions, you should assume that the environment exists only for a single invocation. The function should initialize any required state when it is first started – for example, fetching a shopping cart from a DynamoDB table. It should commit any permanent data changes before exiting to a durable store such as S3, DynamoDB, or SQS. It should not rely on any existing data structures or temporary files, or any internal state that would be managed by multiple invocations (such as counters or other calculated, aggregate values).
Lambda provides an initializer before the handler where you can initialize database connections, libraries, and other resources. Since execution environments are reused where possible to improve performance, you can amortize the time taken to initialize these resources over multiple invocations. However, you should not store any variables or data used in the function within this global scope.
Lambda function design
Most architectures should prefer many, shorter functions over fewer, larger ones. Making Lambda functions highly specialized for your workload means that they are concise and generally result in shorter executions. The purpose of each function should be to handle the event passed into the function, with no knowledge or expectations of the overall workflow or volume of transactions. This makes the function agnostic to the source of the event with minimal coupling to other services.
Any global-scope constants that change infrequently should be implemented as environment variables to allow updates without deployments. Any secrets or sensitive information should be stored in AWS Systems Manager Parameter Store or AWS Secrets Manager and loaded by the function. Since these resources are account-specific, this allows you to create build pipelines across multiple accounts. The pipelines load the appropriate secrets per environment, without exposing these to developers or requiring any code changes.
Building for on-demand data instead of batches
Many traditional systems are designed to run periodically and process batches of transactions that have built up over time. For example, a banking application may run every hour to process ATM transactions into central ledgers. In Lambda-based applications, the custom processing should be triggered by every event, allowing the service to scale up concurrency as needed, to provide near-real time processing of transactions.
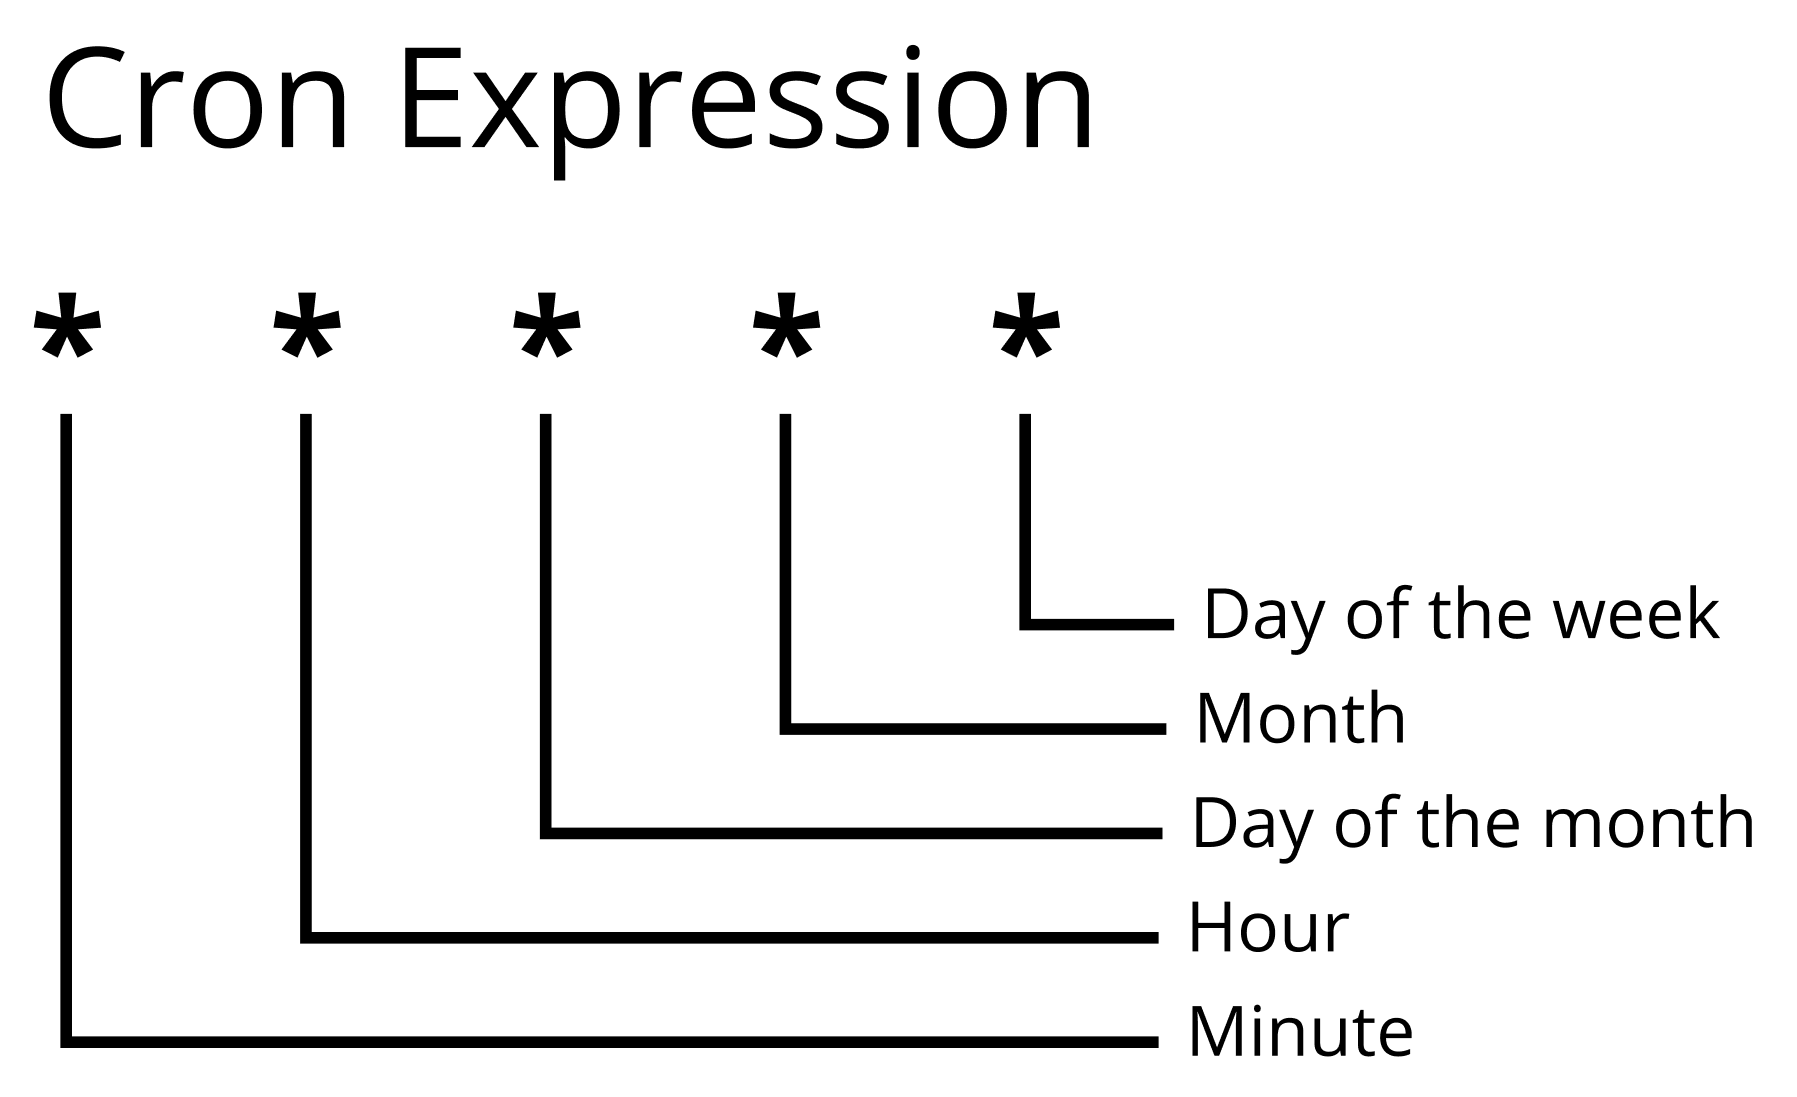
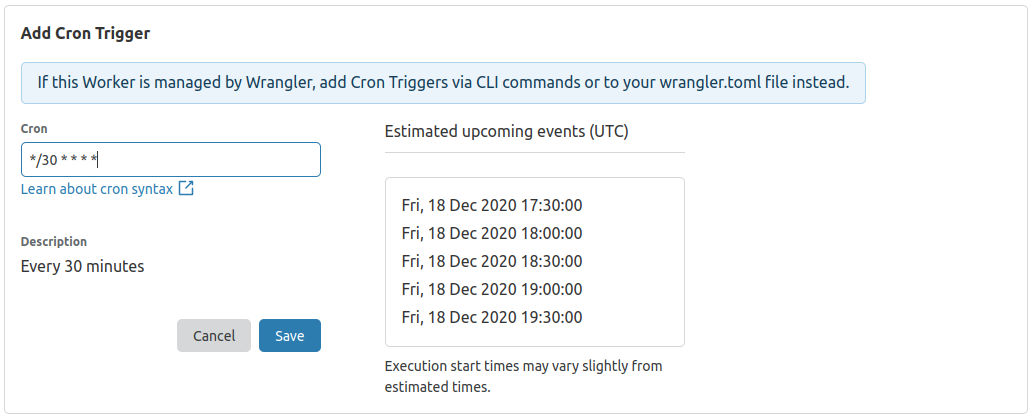
While you can run cron tasks in serverless applications by using scheduled expressions for rules in Amazon EventBridge, these should be used sparingly or as a last-resort. In any scheduled task that processes a batch, there is the potential for the volume of transactions to grow beyond what can be processed within the 15-minute Lambda timeout. If the limitations of external systems force you to use a scheduler, you should generally schedule for the shortest reasonable recurring time period.
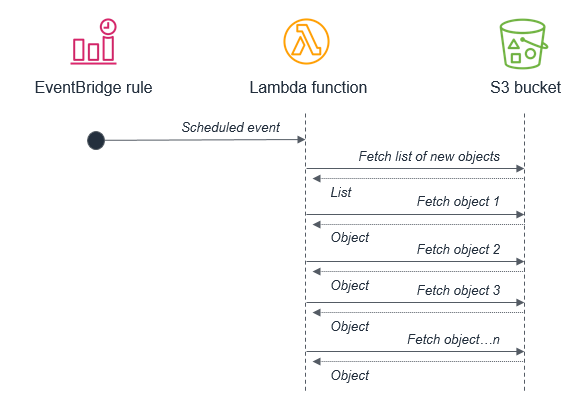
For example, it’s not best practice to use a batch process that triggers a Lambda function to fetch a list of new S3 objects. This is because the service may receive more new objects in between batches than can be processed within a 15-minute Lambda function.
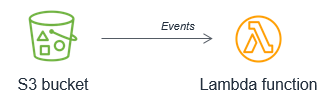
Instead, the Lambda function should be invoked by the S3 service each time a new object is put into the S3 bucket. This approach is significantly more scalable and also invokes processing in near-real time.
Orchestrating workflows
Workflows that involve branching logic, different types of failure models and retry logic typically use an orchestrator to keep track of the state of the overall execution. Avoid using Lambda functions for this purpose, since it results in tightly coupled groups of functions and services and complex code handling routing and exceptions.
With AWS Step Functions, you use state machines to manage orchestration. This extracts the error handling, routing, and branching logic from your code, replacing it with state machines declared using JSON. Apart from making workflows more robust and observable, it allows you to add versioning to workflows and make the state machine a codified resource that you can add to a code repository.
It’s common for simpler workflows in Lambda functions to become more complex over time, and for developers to use a Lambda function to orchestrate the flow. When operating a production serverless application, it’s important to identify when this is happening, so you can migrate this logic to a state machine.
Developing for retries and failures
AWS serverless services, including Lambda, are fault-tolerant and designed to handle failures. In the case of Lambda, if a service invokes a Lambda function and there is a service disruption, Lambda invokes your function in a different Availability Zone. If your function throws an error, the Lambda service retries your function.
Since the same event may be received more than once, functions should be designed to be idempotent. This means that receiving the same event multiple times does not change the result beyond the first time the event was received.
For example, if a credit card transaction is attempted twice due to a retry, the Lambda function should process the payment on the first receipt. On the second retry, either the Lambda function should discard the event or the downstream service it uses should be idempotent.
A Lambda function implements idempotency typically by using a DynamoDB table to track recently processed identifiers to determine if the transaction has been handled previously. The DynamoDB table usually implements a Time To Live (TTL) value to expire items to limit the storage space used.
For failures within the custom code of a Lambda function, the service offers a number of features to help preserve and retry the event, and provide monitoring to capture that the failure has occurred. Using these approaches can help you develop workloads that are resilient to failure and improve the durability of events as they are processed by Lambda functions.
Conclusion
This post discusses the design principles that can help you develop well-architected serverless applications. I explain why using services instead of code can help improve your application’s agility and scalability. I also show how statelessness and function design also contribute to good application architecture. I cover how using events instead of batches helps serverless development, and how to plan for retries and failures in your Lambda-based applications.
Part 3 of this series will look at common anti-patterns in event-driven architectures and how to avoid building these into your microservices.
For more serverless learning resources, visit Serverless Land.
This blog post is courtesy of Sebastian Caceres (AWS Consultant, DevOps), Otavio Ferreira (Sr. Manager, Amazon SNS), Prachi Sharma and Mary Gao (Software Engineers, Amazon SNS).
Today, we are announcing the release of a message delivery protocol for Amazon SNS based on Amazon Kinesis Data Firehose. This is a new way to integrate SNS with storage and analytics services, without writing custom code.
Previously, custom code was required to create data pipelines, using general-purpose SNS subscription endpoints, such as Amazon SQS queues or AWS Lambda functions. You had to manage data transformation, data buffering, data compression, and the upload to data stores.
Overview
With the new native integration between SNS and Kinesis Data Firehose, you can send messages to storage and analytics services, using a purpose-built SNS subscription type.
Once you configure a subscription, messages published to the SNS topic are sent to the subscribed Kinesis Data Firehose delivery stream. The messages are then delivered to the destination endpoint configured in the delivery stream, which can be an Amazon S3 bucket, an Amazon Redshift table, or an Amazon Elasticsearch Service index.
You can also use a third-party service provider as the destination of a delivery stream, including Datadog, New Relic, MongoDB, and Splunk. No custom code is required to bridge the services. For more information, see Fanout to Kinesis Data Firehose streams, in the SNS Developer Guide.
The new Kinesis Data Firehose subscription type and its destinations are part of the application-to-application (A2A) messaging offering of SNS. The addition of this subscription type expands the SNS A2A offering to include the following use cases:
Run analytics on SNS messages, using Amazon Kinesis Data Analytics, Amazon Elasticsearch Service, or Amazon Redshift as a delivery stream destination. You can use this option to gain insights and detect anomalies in workloads.
Index and search SNS messages, using Amazon Elasticsearch Service as a delivery stream destination. From there, you can create dashboards using Kibana, a data visualization and exploration tool.
Store SNS messages for backup and auditing purposes, using S3 as a destination of choice. You can then use Amazon Athena to query the S3 bucket for analytics purposes.
Apply transformation to SNS messages. For example, you may obfuscate personally identifiable information (PII) or protected health information (PHI) using a Lambda function invoked by the delivery stream.
Feed SNS messages into cloud-based application monitoring and observability tools, using Datadog, New Relic, or Splunk as a destination. You can choose this option to enrich DevOps or marketing workflows.
As with all supported message delivery protocols, you can filter, monitor, and encrypt messages.
To simplify architecture and further avoid custom code, you can use an SNS subscription filter policy. This enables you to route only the relevant subset of SNS messages to the Kinesis Data Firehose delivery stream. For more information, see SNS message filtering.
To monitor the throughput, you can check the NumberOfMessagesPublished and the NumberOfNotificationsDelivered metrics for SNS, and the IncomingBytes, IncomingRecords, DeliveryToS3.Records and DeliveryToS3.Success metrics for Kinesis Data Firehose. For additional information, see Monitoring SNS topics using CloudWatch and Monitoring Kinesis Data Firehose using CloudWatch.
For security purposes, you can choose to have data encrypted at rest, using server-side encryption (SSE), in addition to encrypted in transit using HTTPS. For more information, see SNS SSE, Kinesis Data Firehose SSE, and S3 SSE.
Applying SNS message archiving and analytics in a use case
For example, consider an airline ticketing platform that operates in a regulated environment. The compliance framework requires that the company archives all ticket sales for at least 5 years.
The platform is based on an event-driven serverless architecture. It has a ticket seller Lambda function that publishes an event to an SNS topic for every ticket sold. The SNS topic fans out the event to subscribed systems that are interested in processing this type of event. In the preceding diagram, two systems are interested: one focused on payment processing, and another on fraud control. Each subscribed system is invoked by an SQS queue and an event processing Lambda function.
To meet the compliance goal on data retention, the airline company subscribes a Kinesis Data Firehose delivery stream to their existing SNS topic. They use an S3 bucket as the stream destination. After this, all events published to the SNS topic are archived in the S3 bucket.
The company can then use Athena to query the S3 bucket with standard SQL to run analytics and gain insights on ticket sales. For example, they can query for the most popular flight destinations or the most frequent flyers.
Subscribing a Kinesis Data Firehose stream to an SNS topic
After testing, avoid incurring usage charges by deleting the resources you created during the walkthrough. If you used the CloudFormation template, delete all the objects from the S3 bucket before deleting the stack.
Conclusion
In this post, we show how SNS delivery to Kinesis Data Firehose enables you to integrate SNS with storage and analytics services. The example shows how to create an SNS subscription to use a Kinesis Data Firehose delivery stream to store SNS messages in an S3 bucket.
You can adapt this configuration for your needs for storage, encryption, data transformation, and data pipeline architecture. For more information, see Fanout to Kinesis Data Firehose streams in the SNS Developer Guide.
AWS Lambda launched support for packaging and deploying functions as container images at re:Invent 2020. In this post you learn how to build container images that reduce image size as well as build, deployment, and update time. Lambda container images have unique characteristics to consider for optimization. This means that the techniques you use to optimize container images for Lambda functions are slightly different from those you use for other environments.
To understand how to optimize container images, it helps to understand how container images are packaged, as well as how the Lambda service retrieves, caches, deploys, and retires container images.
Pre-requisites and assumptions
This post assumes you have access to an IAM user or role in an AWS account and a version of the tar utility on your machine. You must also install Docker and the AWS SAM CLI and start Docker.
Lambda container image packaging
Lambda container images are packaged according to the Open Container Initiative (OCI) Image Format specification. The specification defines how programs build and package individual layers into a single container image. To explore an example of the OCI Image Format, open a terminal and perform the following steps:
Create an AWS SAM application.
sam init –name container-images
Choose 1 to select an AWS quick start template, then choose 2 to select container image as the packaging format, and finally choose 9 to use the amazon-go1.x-base image.
After the AWS SAM CLI generates the application, enter the following commands to change into the new directory and build the Lambda container image
cd container-images
sam build
AWS SAM builds your function and packages it as helloworldfunction:go1.x-v1. Export this container image to a tar archive and extract the filesystem into a new directory to explore the image format.
docker save helloworldfunction:go1.x-v1 > oci-image.tar
mkdir -p image
tar xf oci-image.tar -C image
The image directory contains several subdirectories, a container metadata JSON file, a manifest JSON file, and a repositories JSON file. Each subdirectory represents a single layer, and contains a version file, its own metadata JSON file, and a tar archive of the files that make up the layer.
The manifest.json file contains a single JSON object with the name of the container metadata file, a list of repository tags, and a list of included layers. The list of included layers is ordered according to the build order in your Dockerfile. The metadata JSON file in each subfolder also contains a mapping from each layer to its parent layer or final container.
Your function should have layers similar to the following. A separate layer is created any time files are added to the container image. This includes FROM, RUN, ADD, and COPY statements in your Dockerfile and base image Dockerfiles. Note that the specific layer IDs, layer sizes, number, and composition of layers may change over time.
ID
Size
Description
Your function’s Dockerfile step
5fc256be…
641 MB
Amazon Linux
c73e7f67…
320 KB
Third-party licenses
de5f5100…
12 KB
Lambda entrypoint script
2bd3c722…
7.8 MB
AWS Lambda RIE
5d9d381b…
10.0 MB
AWS Lambda runtime
cb832ffc…
12 KB
Bootstrap link
1fcc74e8…
560 KB
Lambda runtime library
FROM public.ecr.aws/lambda/go:1
acb8dall…
9.6 MB
Function code
COPY –from=build-image /go/bin/ /var/task/
Runtimes generate a filesystem image by destructively overlaying each image layer over its parent. This means that any changes to one layer require all child layers to be recreated. In the following example, if you change the layer cb832ffc... then the layers 1fcc74e8… and acb8da111… are also considered “dirty” and must be recreated from the new parent image. This results in a new container image with eight layers, the first five the same as the original image, and the last three newly built, each with new IDs and parents.
The layered structure of container images informs several decisions you make when optimizing your container images.
Strategies for optimizing container images
There are four main strategies for optimizing your container images. First, wherever possible, use the AWS-provided base images as a starting point for your container images. Second, use multi-stage builds to avoid adding unnecessary layers and files to your final image. Third, order the operations in your Dockerfile from most stable to most frequently changing. Fourth, if your application uses one or more large layers across all of your functions, store all of your functions in a single repository.
Use AWS-provided base images
If you have experience packaging traditional applications for container runtimes, using AWS-provided base images may seem counterintuitive. The AWS-provided base images are typically larger than other minimal container base images. For example, the AWS-provided base image for the Go runtime public.ecr.aws/lambda/go:1 is 670 MB, while alpine:latest, a popular starting point for building minimal container images, is only 5.58 MB. However, using the AWS-provided base images offers three advantages.
First, the AWS-provided base images are cached pro-actively by the Lambda service. This means that the base image is either nearby in another upstream cache or already in the worker instance cache. Despite being much larger, the deployment time may still be shorter when compared to third-party base images, which may not be cached. For additional details on how the Lambda service caches container images, see the re:Invent 2021 talk Deep dive into AWS Lambda security: Function isolation.
Second, the AWS-provided base images are stable. As the base image is at the bottom layer of the container image, any changes require every other layer to be rebuilt and redeployed. Fewer changes to your base image mean fewer rebuilds and redeployments, which can reduce build cost.
Finally, the AWS-provided base images are built on Amazon Linux and Amazon Linux 2. Depending on your chosen runtime, they may already contain a number of utilities and libraries that your functions may need. This means that you do not need to add them in later, saving you from creating additional layers that can cause more build steps leading to increased costs.
Use multi-stage builds
Multi-stage builds allow you to build your code in larger preliminary images, copy only the artifacts you need into your final container image, and discard the preliminary build steps. This means you can run any arbitrarily large number of commands and add or copy files into the intermediate image, but still only create one additional layer in your container image for the artifact. This reduces both the final size and the attack surface of your container image by excluding build-time dependencies from your runtime image.
AWS SAM CLI generates Dockerfiles that use multi-stage builds.
FROM golang:1.14 as build-image
WORKDIR /go/src
COPY go.mod main.go ./
RUN go build -o ../bin

FROM public.ecr.aws/lambda/go:1
COPY --from=build-image /go/bin/ /var/task/

# Command can be overwritten by providing a different command in the template directly.
CMD ["hello-world"]
This Dockerfile defines a two-stage build. First, it pulls the golang:1.14 container image and names it build-image. Naming intermediate stages is optional, but it makes it easier to refer to previous stages when packaging your final container image. Note that the golang:1.14 image is 810 MB, is not likely to be cached by the Lambda service, and contains a number of build tools that you should not include in your production images. The build-image stage then builds your function and saves it in /go/bin.
The second and final stage begins from the public.ecr.aws/lambda/go:1 base image. This image is 670 MB, but because it is an AWS-provided image, it is more likely to be cached on worker instances. The COPY command copies the contents of /go/bin from the build-image stage into /var/task in the container image, and discards the intermediate stage.
Build from stable to frequently changing
Any time a layer in an image changes, all layers that follow must be rebuilt, repackaged, redeployed, and recached by the Lambda service. In practice, this means that you should make your most frequently occurring changes as late in your Dockerfile as possible.
For example, if you have a stable Lambda function that uses a frequently updated machine learning model to make predictions, add your function to the container image before adding the machine learning model. However, if you have a function that changes frequently but relies on a stable Lambda extension, copy the extension into the image first.
If you put the frequently changing component early in your Dockerfile, all the build steps that follow must be re-run every time that component changes. If one of those actions is costly, for example, compiling a large library or running a complex simulation, these repetitions add unnecessary time and cost to your deployment pipeline.
Use a single repository for functions with large layers
When you create an application with multiple Lambda functions, you either store the container images in a single Amazon ECR repository or in multiple repositories, one for each function. If your application uses one or more large layers across all of your functions, store all of your functions in a single repository.
ECR repositories compare each layer of a container image when it is pushed to avoid uploading and storing duplicates. If each function in your application uses the same large layer, such as a custom runtime or machine learning model, that layer is stored exactly once in a shared repository. If you use a separate repository for each function, that layer is duplicated across repositories and must be uploaded separately to each one. This costs you time and network bandwidth.
Conclusion
Packaging your Lambda functions as container images enables you to use familiar tooling and take advantage of larger deployment limits. In this post you learn how to build container images that reduce image size as well as build, deployment, and update time. You learn some of the unique characteristics of Lambda container images that impact optimization. Finally, you learn how to think differently about image optimization for Lambda functions when compared to packaging traditional applications for container runtimes.
For more information on how to build serverless applications, including source code, blogs, videos, and more, visit the Serverless Land website.
In the Operating Lambda series, I cover important topics for developers, architects, and systems administrators who are managing AWS Lambda-based applications. This three-part series discusses event-driven architectures and how these relate to serverless applications.
Part 1 covers the benefits of the event-driven paradigm and how it can improve throughput, scale and extensibility, while also reducing complexity and the overall amount of code in an application.
Event-driven architectures have grown in popularity because they help address some of the inherent challenges in building the complex systems commonly used in modern organizations. This approach promotes the use of microservices, which are small, specialized services performing a narrow set of functions. A well-designed, Lambda-based application is compatible with the principles of microservice architectures.
How Lambda fits into the event-driven paradigm
Lambda is an on-demand compute service that runs custom code in response to events. Most AWS services generate events, and many can act as an event source for Lambda. Within Lambda, your code is stored in a code deployment package and contains an event handler. All interaction with the code occurs through the Lambda API and there is no direct invocation of functions from outside of the service. The main purpose of Lambda functions is to process events.
Unlike traditional servers, Lambda functions do not run constantly. When a function is triggered by an event, this is called an invocation. Lambda functions are purposefully limited to 15 minutes in duration but on average, across all AWS customers, most invocations only last for less than a second. In some intensive compute operations, it may take several minutes to process a single event but in the majority of cases the duration is brief.
An event triggering a Lambda function could be almost anything, from an HTTP request via Amazon API Gateway, a schedule managed by an Amazon EventBridge rule, or an Amazon S3 notification. Even the simplest Lambda-based application uses at least one event.
The event itself is a JSON object that contains information about what happened. Events are facts about a change in the system state, they are immutable, and the time when they happen is significant. The first parameter of every Lambda handler contains the event. An event could be custom-generated from another microservice, such as new order generated in an ecommerce application:
The event may also be generated by an AWS service, such as Amazon SQS when a new message is available in a queue:
In either case, the event is passed to the Lambda function as the first parameter in the Lambda handler:
The code outside of the handler, also known as “INIT” code, is run before the handler. This is used for tasks like importing libraries or declaring and initializing global objects.
The handler itself is a function that takes the event object. Regardless of runtime used in the Lambda function, the event is a JSON object.
For smaller applications, the difference between event-driven and request-driven applications may not be clear. As your applications develop more functionality and handle more traffic, this becomes more apparent. Request-driven applications typically use directed commands to coordinate downstream functions to complete an activity and are often tightly coupled. Event-driven applications create events that are observable by other services and systems, but the event producer is unaware of which consumers, if any, are listening. Typically, these are loosely coupled.
Most Lambda-based applications use a combination of AWS services for durably storing data and integrating with other system and services. In these applications, Lambda acts as glue between the services, providing business logic to transform data as it moves between services.
Building Lambda-based applications follows many of the best practices of building any event-based architecture. A number of development approaches have emerged to help developers create event-driven systems. Event storming, which is an interactive approach to domain-driven design (DDD), is one popular methodology. As you explore the events in your workload, you can group these as bounded contexts to develop the boundaries of the microservices in your application.
Many traditional architectures frequently use polling and webhook mechanisms to communicate state between different components. Polling can be highly inefficient for fetching updates since there is a lag between new data becoming available and synchronization with downstream services. Webhooks are not always supported by other microservices that you want to integrate with. They may also require custom authorization and authentication configurations. In both cases, these integration methods are challenging to scale on-demand without additional work by development teams.
Both of these mechanisms can be replaced by events, which can be filtered, routed, and pushed downstream to consuming microservices. This approach can result in less bandwidth consumption, CPU utilization, and potentially lower cost. These architectures can reduce complexity, since each functional unit is smaller and there is often less code.
Event-driven architectures can also make it easier to design near-real-time systems, helping organizations move away from batch-based processing. Events are generated at the time when state in the application changes, so the custom code of a microservice should be designed to handle the processing of a single event. Since scaling is handled by the Lambda service, this architecture can handle significant increases in traffic without changing custom code. As events scale up, so does the compute layer that processes events.
Reducing complexity
Microservices enable developers and architects to decompose complex workflows. For example, an ecommerce monolith may be broken down into order acceptance and payment processes with separate inventory, fulfillment and accounting services. What may be complex to manage and orchestrate in a monolith becomes a series of decoupled services that communicate asynchronously with event messages.
This approach also makes it possible to assemble services that process data at different rates. In this case, an order acceptance microservice can store high volumes of incoming orders by buffering the messages in an Amazon SQS queue.
A payment processing service, which is typically slower due to the complexity of handling payments, can take a steady stream of messages from the SQS queue. It can orchestrate complex retry and error handling logic using AWS Step Functions, and coordinate active payment workflows for hundreds of thousands of orders.
Improving scalability and extensibility
Microservices generate events that are typically published to messaging services like Amazon SNS and SQS. These behave like an elastic buffer between microservices and help handle scaling when traffic increases. Services like EventBridge can then filter and route messages depending upon the content of the event, as defined in rules. As a result, event-based applications can be more scalable and offer greater redundancy than monolithic applications.
This system is also highly extensible, allowing other teams to extend features and add functionality without impacting the order processing and payment processing microservices. By publishing events using EventBridge, this application integrates with existing systems, such as the inventory microservice, but also enables any future application to integrate as an event consumer. Producers of events have no knowledge of event consumers, which can help simplify the microservice logic.
Unlike monolithic applications, which may process everything within the same memory space on a single device, event-driven applications communicate across networks. This design introduces variable latency. While it’s possible to engineer applications to minimize latency, monolithic applications can almost always be optimized for lower latency at the expense of scalability and availability.
The serverless services in AWS are highly available, meaning that they operate in more than one Availability Zone in a Region. In the event of a service disruption, services automatically fail over to alternative Availability Zones and retry transactions. As a result, instead of a transaction failing, it may be completed successfully but with higher latency.
Workloads that require consistent low-latency performance, such as high-frequency trading applications in banks or submillisecond robotics automation in warehouses, are not good candidates for event-driven architecture.
Eventual consistency
An event represents a change in state. With many events flowing through different services in an architecture at any given point of time, such workloads are often eventually consistent. This makes it more complex to process transactions, handle duplicates, or determine the exact overall state of a system.
Some workloads are not well suited for event-driven architecture, due to the need for ACID properties. However, many workloads contain a combination of requirements that are eventually consistent (for example, total orders in the current hour) or strongly consistent (for example, current inventory). For those features needing strong data consistency, there are architecture patterns to support this.
Event-based architectures are designed around individual events instead of large batches of data. Generally, workflows are designed to manage the steps of an individual event or execution flow instead of operating on multiple events simultaneously. Real-time event processing is preferred to batch processing in event-driven systems, replacing a batch with many small incremental updates. While this can make workloads more available and scalable, it also makes it more challenging for events to have awareness of other events.
Returning values to callers
In many cases, event-based applications are asynchronous. This means that caller services do not wait for requests from other services before continuing with other work. This is a fundamental characteristic of event-driven architectures that enables scalability and flexibility. This means that passing return values or the result of a workflow is often more complex than in synchronous execution flows.
Most Lambda invocations in productions systems are asynchronous, responding to events from services like S3 or SQS. In these cases, the success or failure of processing an event is often more important than returning a value. Features such as dead letter queues (DLQs) in Lambda are provided to ensure you can identify and retry failed events, without needing to notify the caller.
For interactive workloads, such as web and mobile applications, the end user usually expects to receive a return value or a current status of a transaction. For these workloads, there are several design patterns that can provide rich eventing back to the caller. However, these implementations are more complex than using a traditional asynchronous return value.
Debugging across services and functions
Debugging event-driven systems is also different to solving problems with a monolithic application. With different systems and services passing events, it is often not possible to record and reproduce the exact state of multiple services when an error occurs. Since each service and function invocation has separate log files, it can be more complicated to determine what happened to a specific event that caused an error.
Event-driven architectures have grown in popularity in modern organizations. This approach promotes the use of microservices, which can be designed as Lambda-based applications. This post discusses the benefits of the event-driven approach, along with the trade-offs involved.
Part 2 of this series will discuss design principles and the best practices for developing Lambda-based applications.
The Cloudflare Workers team is excited to announce the opening of our Discord channel! You can join right away by going here.
Through our Discord channel, you can now connect with the team to ask questions, show off what you’re building, and discuss the platform with other developers.
Sometimes you just need to talk to another human being. Our developer docs will always be the source of truth on the mechanics of Workers, but we want to provide quicker help if you need it.
Growing The Workers Community
Over the past three years, Cloudflare Workers evolved from an initial sandbox for enterprise customers writing edge code to a developer platform for creating new applications and systems.
“We bet our whole business on Workers and it paid off big time,” said Hamlet Batista, CEO of RankSense, a SEO automation platform. “We’ve been saving a lot of money on infrastructure costs and DevOps resources we no longer need.”
Our team is constantly surprised by the palette of use cases from those developing on Workers. For example, a developer in Belgium created a static Workers site that teaches an online tutorial in three different languages on how to make your own face mask, which earned the approval of the Belgian government.
Why Discord?
Discord provides a medium that allows users to openly share their thoughts while maintaining anonymity. It’s also really fast — partially due to Discord’s use of Workers and Cloudflare’s network.
“Workers are in the path of virtually all Discord requests,” said Mark Smith, Director of Infrastructure at Discord. “We are longtime users of Workers and big fans of the power and flexibility they give us to continue building great things for our users.”
As we continue to build the ecosystem of developer tools, we’d love to hear what you’re building, whether it’s a personal site of your pet or an API gateway. Come say hi today.
This post is courtesy of Markus Ziller, Solutions Architect.
Today, git is a de facto standard for version control in modern software engineering. The workflows enabled by git’s branching capabilities are a major reason for this. However, with git’s distributed nature, it can be difficult to reliably remove changes that have been committed from all copies of the repository. This is problematic when secrets such as API keys have been accidentally committed into version control. The longer it takes to identify and remove secrets from git, the more likely that the secret has been checked out by another user.
This post shows a solution that automatically identifies credentials pushed to AWS CodeCommit in near-real-time. I also show three remediation measures that you can use to reduce the impact of secrets pushed into CodeCommit:
Notify users about the leaked credentials.
Lock the repository for non-admins.
Hard reset the CodeCommit repository to a healthy state.
I use the AWS Cloud Development Kit (CDK). This is an open source software development framework to model and provision cloud application resources. Using the CDK can reduce the complexity and amount of code needed to automate the deployment of resources.
Overview of solution
The services in this solution are AWS Lambda, AWS CodeCommit, Amazon EventBridge, and Amazon SNS. These services are part of the AWS serverless platform. They help reduce undifferentiated work around managing servers, infrastructure, and the parts of the application that add less value to your customers. With serverless, the solution scales automatically, has built-in high availability, and you only pay for the resources you use.
This diagram outlines the workflow implemented in this blog:
After a developer pushes changes to CodeCommit, it emits an event to an event bus.
A rule defined on the event bus routes this event to a Lambda function.
The Lambda function uses the AWS SDK for JavaScript to get the changes introduced by commits pushed to the repository.
It analyzes the changes for secrets. If secrets are found, it publishes another event to the event bus.
Rules associated with this event type then trigger invocations of three Lambda functions A, B, and C with information about the problematic changes.
Each of the Lambda functions runs a remediation measure:
Function A sends out a notification to an SNS topic that informs users about the situation (A1).
Function B locks the repository by setting a tag with the AWS SDK (B2). It sends out a notification about this action (B2).
Function C runs git commands that remove the problematic commit from the CodeCommit repository (C2). It also sends out a notification (C1).
Walkthrough
The following walkthrough explains the required components, their interactions and how the provisioning can be automated via CDK.
Open the repository in a local editor and review the contents of cdk/lib/resources.ts, src/handlers/commits.ts, and src/handlers/remediations.ts.
Follow the instructions in the README.md to deploy the stack.
The CDK will deploy resources for the following services in your account.
Using CodeCommit to manage your git repositories
The CDK creates a new empty repository called TestRepository and adds a tag RepoState with an initial value of ok. You later use this tag in the LockRepo remediation strategy to restrict access.
It also creates two IAM groups with one user in each. Members of the CodeCommitSuperUsers group are always able to access the repository, while members of the CodeCommitUsers group can only access the repository when the value of the tag RepoState is not locked.
I also import the CodeCommitSystemUser into the CDK. Since the user requires git credentials in a downloaded CSV file, it cannot be created by the CDK. Instead it must be created as described in the README file.
The following CDK code sets up all the described resources:
Using EventBridge to pass events between components
I use EventBridge, a serverless event bus, to connect the Lambda functions together. Many AWS services like CodeCommit are natively integrated into EventBridge and publish events about changes in their environment.
repo.onCommit is a higher-level CDK construct. It creates the required resources to invoke a Lambda function for every commit to a given repository. The created events rule looks like this:
Note that this event rule only matches commit events in TestRepository. To send commits of all repositories in that account to the inspecting Lambda function, remove the resources filter in the event pattern.
CodeCommit Repository State Change is a default event that is published by CodeCommit if changes are made to a repository. In addition, I define CodeCommit Security Event, a custom event, which Lambda publishes to the same event bus if secrets are discovered in the inspected code.
The sample below shows how you can set up Lambda functions as targets for both type of events.
const DETAIL_TYPE = "CodeCommit Security Event";
const eventBus = new EventBus(this, "CodeCommitEventBus", {
    eventBusName: "CodeCommitSecurityEvents"
});

repo.onCommit("AnyCommitEvent", {
    ruleName: "CallLambdaOnAnyCodeCommitEvent",
    target: new targets.LambdaFunction(commitInspectLambda)
});


new Rule(this, "CodeCommitSecurityEvent", {
    eventBus,
    enabled: true,
    ruleName: "CodeCommitSecurityEventRule",
    eventPattern: {
        detailType: [DETAIL_TYPE]
    },
    targets: [
        new targets.LambdaFunction(lockRepositoryLambda),
        new targets.LambdaFunction(raiseAlertLambda),
        new targets.LambdaFunction(forcefulRevertLambda)
    ]
});
Using Lambda functions to run remediation measures
AWS Lambda functions allow you to run code in response to events. The example defines four Lambda functions.
By comparing the delta to its predecessor, the commitInspectLambda function analyzes if secrets are introduced by a commit. With the CDK, you can create a Lambda function with:
const myLambdaInCDK = new Function(this, "UniqueIdentifierRequiredByCDK", {
    runtime: Runtime.NODEJS_12_X,
    handler: "<handlerfile>.<function name>",
    code: Code.fromAsset(path.join(__dirname, "..", "..", "src", "handlers")),
    // See git repository for complete code
});
The code for this Lambda function uses the AWS SDK for JavaScript to fetch the details of the commit, the differences introduced, and the new content.
The code checks each modified file line by line with a regular expression that matches typical secret formats. In src/handlers/regex.json, I provide a few regular expressions that match common secrets. You can extend this with your own patterns.
If a secret is discovered, a CodeCommit Security Event is published to the event bus. EventBridge then invokes all Lambda functions that are registered as targets with this event. This demo triggers three remediation measures.
The raiseAlertLambda function uses the AWS SDK for JavaScript to send out a notification to all subscribers (that is, CodeCommit administrators) on an SNS topic. It takes no further action.
The lockRepositoryLambda function uses the AWS SDK for JavaScript to change the RepoState tag from ok to locked. This restricts access to members of the CodeCommitSuperUsers IAM group.
These commands reset the repository to the last accepted commit, by forcefully removing the respective commit from the git history of your CodeCommit repo. I advise you to handle this with care and only activate it on a real project if you fully understand the consequences of rewriting git history.
The Node.js v12 runtime for Lambda does not have a git runtime installed by default. You can add one by using the git-lambda2 Lambda layer. This allows you to run git commands from within the Lambda function.
Finally, this Lambda function also sends out a notification. The complete code is available in the GitHub repo.
Using SNS to notify users
To notify users about secrets discovered and actions taken, you create an SNS topic and subscribe to it via email.
const topic = new Topic(this, "CodeCommitSecurityEventNotification", {
    displayName: "CodeCommitSecurityEventNotification",
});

topic.addSubscription(new subs.EmailSubscription(/* your email address */));
Testing the solution
You can test the deployed solution by running these two sets of commands. First, add a file with no credentials:
This first command creates, commits and pushes an unproblematic file clean_file.txt that will pass the checks of commitInspectLambda. The second command creates, commits, and pushes problematic_file.txt, which matches the regular expressions and triggers the remediation measures.
If you check your email, you soon receive notifications about actions taken by the Lambda functions.
Cleaning up
To avoid incurring charges, delete the resources by running cdk destroy and confirming the deletion.
Conclusion
This post demonstrates how you can implement a solution to discover secrets in commits to AWS CodeCommit repositories. It also defines different strategies to remediate this.
The CDK code to set up all components is minimal and can be extended for remediation measures. The template is portable between Regions and uses serverless technologies to minimize cost and complexity.
For more serverless learning resources, visit Serverless Land.
Welcome to the 12th edition of the AWS Serverless ICYMI (in case you missed it) quarterly recap. Every quarter, we share all of the most recent product launches, feature enhancements, blog posts, webinars, Twitch live streams, and other interesting things that you might have missed!
In case you missed our last ICYMI, check out what happened last quarter here.
AWS re:Invent
re:Invent was entirely virtual in 2020 and free to all attendees. The conference had a record number of registrants and featured over 700 sessions. The serverless developer advocacy team presented a number of talks to help developers build their skills. These are now available on-demand:
There were three major Lambda announcements at re:Invent. Lambda duration billing changed granularity from 100 ms to 1 ms, which is shown in the December billing statement. All functions benefit from this change automatically, and it’s especially beneficial for sub-100ms Lambda functions.
Lambda has also increased the maximum memory available to 10 GB. Since memory also controls CPU allocation in Lambda, this means that functions now have up to 6 vCPU cores available for processing. Finally, Lambda now supports container images as a packaging format, enabling teams to use familiar container tooling, such as Docker CLI. Container images are stored in Amazon ECR.
We launched Lambda Extensions in preview, enabling you to more easily integrate monitoring, security, and governance tools into Lambda functions. You can also build your own extensions that run code during Lambda lifecycle events. See this example extensions repo for starting development.
Lambda launched support for Amazon MQ as an event source. Amazon MQ is a managed broker service for Apache ActiveMQ that simplifies deploying and scaling queues. The event source operates in a similar way to using Amazon SQS or Amazon Kinesis. In all cases, the Lambda service manages an internal poller to invoke the target Lambda function.
Lambda announced support for AWS PrivateLink. This allows you to invoke Lambda functions from a VPC without traversing the public internet. It provides private connectivity between your VPCs and AWS services. By using VPC endpoints to access the Lambda API from your VPC, this can replace the need for an Internet Gateway or NAT Gateway.
For developers building machine learning inferencing, media processing, high performance computing (HPC), scientific simulations, and financial modeling in Lambda, you can now use AVX2 support to help reduce duration and lower cost. In this blog post’s example, enabling AVX2 for an image-processing function increased performance by 32-43%.
Lambda now supports batch windows of up to 5 minutes when using SQS as an event source. This is useful for workloads that are not time-sensitive, allowing developers to reduce the number of Lambda invocations from queues. Additionally, the batch size has been increased from 10 to 10,000. This is now the same batch size as Kinesis as an event source, helping Lambda-based applications process more data per invocation.
Synchronous Express Workflows have been launched for AWS Step Functions, providing a new way to run high-throughput Express Workflows. This feature allows developers to receive workflow responses without needing to poll services or build custom solutions. This is useful for high-volume microservice orchestration and fast compute tasks communicating via HTTPS.
Step Functions now also supports Amazon EKS service integration. This allows you to build workflows with steps that synchronously launch tasks in EKS and wait for a response. The service also announced support for Amazon Athena, so workflows can now query data in your S3 data lakes.
Amazon API Gateway
API Gateway now supports mutual TLS authentication, which is commonly used for business-to-business applications and standards such as Open Banking. This is provided at no additional cost. You can now also disable the default REST API endpoint when deploying APIs using custom domain names.
X-Ray now integrates with Amazon S3 to trace upstream requests. If a Lambda function uses the X-Ray SDK, S3 sends tracing headers to downstream event subscribers. This allows you to use the X-Ray service map to view connections between S3 and other services used to process an application request.
X-Ray announced support for end-to-end tracing in Step Functions to make it easier to trace requests across multiple AWS services. It also launched X-Ray Insights in preview, which generates actionable insights based on anomalies detected in an application. For Java developers, the services released an auto-instrumentation agent, for collecting instrumentation without modifying existing code.
Additionally, the AWS Distro for Open Telemetry is now in preview. OpenTelemetry is a collaborative effort by tracing solution providers to create common approaches to instrumentation.
Amazon EventBridge
You can now use event replay to archive and replay events with Amazon EventBridge. After configuring an archive, EventBridge automatically stores all events or filtered events, based upon event pattern matching logic. Event replay can help with testing new features or changes in your code, or hydrating development or test environments.
EventBridge also launched resource policies that simplify managing access to events across multiple AWS accounts. Resource policies provide a powerful mechanism for modeling event buses across multiple account and providing fine-grained access control to EventBridge API actions.
EventBridge announced support for Server-Side Encryption (SSE). Events are encrypted using AES-256 at no additional cost for customers. EventBridge also increased PutEvent quotas to 10,000 transactions per second in US East (N. Virginia), US West (Oregon), and Europe (Ireland). This helps support workloads with high throughput.
Developer tools
The AWS SDK for JavaScript v3 was launched and includes first-class TypeScript support and a modular architecture. This makes it easier to import only the services needed to minimize deployment package sizes.
The AWS Serverless Application Model (AWS SAM) is an AWS CloudFormation extension that makes it easier to build, manage, and maintain serverless applications. The latest versions include support for cached and parallel builds, together with container image support for Lambda functions.
You can use AWS SAM in the new AWS CloudShell, which provides a browser-based shell in the AWS Management Console. This can help run a subset of AWS SAM CLI commands as an alternative to using a dedicated instance or AWS Cloud9 terminal.
For customers using DynamoDB global tables, you can now use your own encryption keys. While all data in DynamoDB is encrypted by default, this feature enables you to use customer managed keys (CMKs). DynamoDB also announced the ability to export table data to data lakes in Amazon S3. This enables you to use services like Amazon Athena and AWS Lake Formation to analyze DynamoDB data with no custom code required.
AWS Amplify and AWS AppSync
You can now use existing Amazon Cognito user pools and identity pools for Amplify projects, making it easier to build new applications for an existing user base. With the new AWS Amplify Admin UI, you can configure application backends without using the AWS Management Console.
AWS AppSync enabled AWS WAF integration, making it easier to protect GraphQL APIs against common web exploits. You can also implement rate-based rules to help slow down brute force attacks. Using AWS Managed Rules for AWS WAF provides a faster way to configure application protection without creating the rules directly.
We hold AWS Online Tech Talks covering serverless topics throughout the year. These are listed in the Serverless section of the AWS Online Tech Talks page. We also regularly deliver talks at conferences and events around the world, speak on podcasts, and record videos you can find to learn in bite-sized chunks.
To help developers find serverless learning resources, we have curated a list of serverless blogs, videos, events, and training programs at a new site, Serverless Land. This is regularly updated with new information – you can subscribe to the RSS feed for automatic updates or follow the LinkedIn page.
Still looking for more?
The Serverless landing page has lots of information. The Lambda resources page contains case studies, webinars, whitepapers, customer stories, reference architectures, and even more Getting Started tutorials.
You can also follow all of us on Twitter to see latest news, follow conversations, and interact with the team.
As part of the development for Cron Triggers on Cloudflare Workers, we had an interesting problem to tackle relating to parsers and the cron expression format. Cron expressions are the format used to write schedules in Cron Triggers, and extensions for cron expressions are everywhere. They vary between parsers and platforms as well, and aren’t standardized by a governing body, which means most parsers out there support many different feature sets, which isn’t good if you’d like something off the shelf that just works.
It can be tough to find the right parser for each part of the Cron Triggers stack, when its user interface, API, and edge service are all written in different languages. On top of that, it isn’t practical to reinvent the wheel multiple times by writing the same parser in different languages and make sure they all match perfectly. So you’re likely stuck with a less-than-perfect solution.
However, in the end, because we wrote our backend service in Rust, it took much less effort to solve this problem. Rust has a great ecosystem for working across multiple languages, which allows us to write a parser once and pull it from the backend to the frontend and everywhere in between with minimal glue code.
The Trouble with Cron
Cron expressions are a set of fields that represent a set of times. They act as a pattern that matches over the minute, hour, day of the month, month, and day of the week of a given time. Since cron is a simple format, it’s easy to extend with extra fields, so some parsers and platforms allow specifying seconds and years as well. However, seconds are a bit too granular and years are a bit too long, so we opted to not support them as part of Cron Triggers.
In the original cron program, the expressions supported were simple, each field could contain either:
A star (‘*’) representing all values,
A value (a number for all fields or a 3 letter abbreviation for months or days of the week, like JUN or FRI)
A range of values (i.e. ‘0-30’), or
A set of ranges and/or values (i.e. ‘0-15,30,45-50,55’)
This is a good start for specifying most time patterns, but many extensions exist out there to fill in some gaps. For example,
‘L’ can be used for the day of the month position to specify the last day of the month, or in the day of the week position with a day value to specify the last of that weekday during the month (i.e. 7L, the last Saturday of the month).
‘W’ can be used for the day of the month, and lets you specify “the closest weekday (MON-FRI) to a given day”, like 15W, or the closest weekday to the 15th of the month.
‘/’ can be used for step values in any field. For example, */5 in the minute field is every 5th minute in the hour. This can be combined with a range to specify things such as ‘30-59/5’, or every 5th minute from minute 30 to minute 59 in the hour.
‘#’ can be used with a day of the week value to specify the “nth day of the month”, such as ‘5#3’, or the 3rd Thursday of the month.
So far I’ve only listed extensions we currently support on Workers, but others exist such as ‘H’ in Jenkins and ‘?’ in some cron implementations for start-up time. Most libraries don’t support said extensions, however ‘?’ is used in some implementations in certain circumstances, but not as start-up time. With all these extensions and a lack of standardization, some libraries aren’t guaranteed to support them all.
The Multitude of Libraries
During the development of Cron Triggers, we needed some things to just work, and to do that, we opted to pull some libraries off the shelf from package repositories for different parts of the stack.
In the Rust backend, we needed a cron library that supported all the extensions we wanted, while also leaving off other field extensions like seconds and years, and had an API that let us simply check if a given time matched the expression pattern. None of the crates on crates.io offered these, so we had to write it ourselves. Using the nom crate, it was easy to draft a simple, fast, safe parser, named ‘saffron’. As time went on and we got closer to release, it became clearer which extensions we really wanted to support. It was incredibly easy to add support for the new features without worrying about safety since the compiler checked it for us, so all we had to do was extensive logic testing. Last offset weekdays (“L-XW”) and leap years were difficult to get right the first time, but testing them was easy with Rust.
However, the UI had a different set of requirements. It didn’t need to know whether a given time matched a cron pattern — we wanted to provide information to the user about the cron expression they’d written, so it needed to provide a more human readable translation (description) of their cron expression and show them their next five executions (future times). But we were on a limited time budget — we needed something off the shelf.
We used two different JavaScript libraries for displaying info about given cron expressions: one gave us descriptions, the other gave us future times. Since these two libraries were tasked with parsing cron expressions, they also acted as validation; however, just using these two libraries for validation proved to be less than optimal. Both of the libraries supported extensions that were different both from each other and from the backend. Because of that they’d sometimes allow users to add schedules that would be rejected by the API on submit, which doesn’t translate into a good user experience. This validation should happen while the user writes their cron expression, not after they already hit submit! Because of this fracture in extension support, the UI parsers also sometimes didn’t parse expressions that should be supported and were accepted by the API!
Before release on the API side, we simply used a Go library for validation. This proved to be an easy solution, but we quickly noticed that the API accepted more than the schedule runner supported. This caused some triggers to be successfully added to the schedule, but were ignored by the runner because they failed to parse.
So before launch, we were using four completely different parsers! This probably wouldn’t be much of an issue if cron expressions were standardized. But because they aren’t, inconsistencies could exist at every step in the trigger creation process: between the two libraries we used on the frontend, between the frontend and API, and between the API and the backend.
To solve these issues in the UI and API before release, we synced the API and backend with another schedule runner entrypoint that simply read a cron expression from stdio, parsed it, and returned whether it was valid, to make sure they perfectly matched. We also added a validation endpoint to the API that could be used by the UI to check a cron expression, to make sure the backend actually accepted it. This fixed all cases of the API and UI being too accepting of expressions that weren’t supported, but neither of these solutions were optimal.
For one, they weren’t performant. Each time we wanted to validate a cron expression in the UI, we’d have to parse the expression twice in JavaScript (once for a description, and again for future times) and make an request to the API, which would start an instance of the schedule runner, parse the expression, and return whether it properly parsed.
Another reason this was nonoptimal is we were still limited in the features we supported by one library. One of our UI libraries didn’t support the ‘L’ and ‘W’ extensions, and since we also programmed the UI to accept expressions based on whether all parsers accepted it, expressions that used those extensions couldn’t be added.
So even though we dropped it to three parsers before release, it still didn’t seem good enough. Soon after release, I made plans to remedy it and started working on saffron (originally this project was called cfron but Cloudflare’s CTO couldn’t resist suggesting renaming it to saffron because he loves puns) to fill in for the one library holding us back in the UI. It would’ve been OK if missing extension support was the only thing wrong after release, but soon some other issues came up.
Off By One
Saffron is based on the Quartz open source scheduler’s cron parser, which makes days of the week when specified as integers start from 1 (Sunday) and go to 7 (Saturday). Both parsers on the frontend follow the original values for cron, where days start from 0 and go to 6, and 7 could be used for Sunday as well. So when users entered 1-5, the UI told them they were entering a schedule from Monday to Friday, and the backend ended up executing Sunday to Thursday! This was missed when testing Cron Triggers initially and was caught by observant community members on the forum.
Fixing the issue turned out to be a bit difficult. While the library we were using for descriptions had the option to simply switch from 0-6 to 1-7 days of the week, our future times library did not have that option. Luckily, development was already halfway through with replacing it in Saffron. However, we couldn’t place it directly on the frontend yet, since web bindings didn’t exist and I didn’t have time to write them. We needed something easier to develop quickly.
Reintroducing: Cloudflare Workers!
Workers made it incredibly easy to take the existing code, add some wasm entry points for a makeshift API, and call with JavaScript. No need to build a whole separate API in Go! Just take your existing code and put it directly within 100ms of nearly everyone on the Internet. Why call all the way back home when the nearest PoP works just as well?
Plus, we don’t have to worry about building and publishing, wrangler does it for us! For example, our validation code is all written in Rust:
#[wasm_bindgen]
#[derive(Clone, Debug)]
pub struct ValidationResult {
   errors: Option<Vec<String>>,
}

#[wasm_bindgen]
pub fn validate(crons: JsArray) -> ValidationResult {
   set_panic_hook();

   let len = crons.length();
   let mut map = HashMap::with_capacity(len as usize);
   for i in 0..len {
       let string = match crons.get(i).as_string() {
           Some(string) => string,
           None => {
               return ValidationResult {
                   errors: Some(vec![format!("Element '{}' is not a string", i)]),
               }
           }
       };

       let cron: Cron = match string.parse() {
           Ok(cron) => cron,
           Err(err) => {
               return ValidationResult {
                   errors: Some(vec![format!(
                       "Failed to parse expression at index '{}': {}",
                       i, err
                   )]),
               }
           }
       };

       if let Some(old_str) = map.insert(cron, string.clone()) {
           return ValidationResult {
               errors: Some(vec![format!(
                   "Expression '{}' already exists in the form of '{}'",
                   string, old_str
               )]),
           };
       }
   }

   ValidationResult { errors: None }
}
and our code to handle processing the request and response is written in JavaScript:
  const path = new URL(request.url).pathname;
 switch (path) {
   case "/validate": {
     let body;
     try {
       body = await request.json()
     } catch (e) {
       return status(400, "Bad Request");
     }
     let crons = body.crons;
     if (!Array.isArray(crons)) {
       return status(400, "Bad Request");
     }

     let result = validate(crons).errors();
     let success = result == null;
     return apiResponse({}, success, result);
   }
After a week of dedicated development, a Worker was written, the future times were calculated, and the UI was fixed! On top of that, we also implicitly introduced support for more extensions by removing the old parser and replacing it with the same one used on the backend as part of the fix itself. But we’re still using two parsers, so inconsistencies may still exist out there that we haven’t seen yet (that we don’t already know about).
For example, this expression “0 0 L-1W 2 *”, or “12:00 AM on the closest weekday to the 2nd to last day of the month in February” cannot be parsed by the parser we use for descriptions, but it’s accepted by the API, backend, and Worker, so you can use it in your cron triggers, but the UI won’t give you a description for it.
The Quest for the One True Parser
This brings us to today. In the search of better and faster, we want to bring the number of parsers down from two to one. One source of truth for the entire stack. To make it all faster, we should do parsing on the frontend locally instead of making a call to a remote Worker (if possible). In the API, the separate entry point was a nice easy solution, but starting the schedule runner just to check if a cron string is valid every time a user adds one doesn’t seem like it’s the best it could be.
Luckily Rust has a vibrant ecosystem that can meet all these needs! To bring the parser to the UI, we can compile saffron to wasm and use generated bindings created with wasm-pack. This can be easily integrated with our existing webpack setup, making it simple to get future times and create descriptions of cron strings on the frontend. Then, to bring the parser closer to the API, we can use Rust’s ability to create C APIs that we can then integrate with Go using cgo.
With our parser everywhere, we can then focus exclusively on cron descriptions to replace the one other parser we’re using in the UI. At that point we will have one parser for the whole stack, a single source of truth that anyone can reference to understand how the frontend, API, and backend all work together. It also simplifies our graph. Now instead of multiple libraries written in different languages, we have one library with multiple language wrappers, each serving a different part of the stack. No inconsistencies will exist since they’re all using the same parser!
However, we wanted to do something before that…
We made it open source!
I think this project serves as a great example of Rust’s type system, its safety, and its extensibility across the entire stack. The project itself is simple, easy to understand, and easy to port and provide bindings for. By open sourcing, we can publish packages for these bindings on npm and crates.io, allowing anyone to use these bindings for whatever they want. It also means you can also follow along with development to see the finishing touches get added and maybe make some suggestions for future improvements in the UI and the parser itself.
This post is authored by Brooke Chen, Senior Product Manager for AWS Compute Optimizer, Letian Feng, Principal Product Manager for AWS Compute Optimizer, and Chad Schmutzer, Principal Developer Advocate for Amazon EC2
Optimizing compute resources is a critical component of any application architecture. Over-provisioning compute can lead to unnecessary infrastructure costs, while under-provisioning compute can lead to poor application performance.
Launched in December 2019, AWS Compute Optimizer is a recommendation service for optimizing the cost and performance of AWS compute resources. It generates actionable optimization recommendations tailored to your specific workloads. Over the last year, thousands of AWS customers reduced compute costs up to 25% by using Compute Optimizer to help choose the optimal Amazon EC2 instance types for their workloads.
One of the most frequent requests from customers is for AWS Lambda recommendations in Compute Optimizer. Today, we announce that Compute Optimizer now supports memory size recommendations for Lambda functions. This allows you to reduce costs and increase performance for your Lambda-based serverless workloads. To get started, opt in for Compute Optimizer to start finding recommendations.
Overview
With Lambda, there are no servers to manage, it scales automatically, and you only pay for what you use. However, choosing the right memory size settings for a Lambda function is still an important task. Computer Optimizer uses machine-learning based memory recommendations to help with this task.
These recommendations are available through the Compute Optimizer console, AWS CLI, AWS SDK, and the Lambda console. Compute Optimizer continuously monitors Lambda functions, using historical performance metrics to improve recommendations over time. In this blog post, we walk through an example to show how to use this feature.
Using Compute Optimizer for Lambda
This tutorial uses the AWS CLI v2 and the AWS Management Console.
In this tutorial, we setup two compute jobs that run every minute in AWS Region US East (N. Virginia). One job is more CPU intensive than the other. Initial tests show that the invocation times for both jobs typically last for less than 60 seconds. The goal is to either reduce cost without much increase in duration, or reduce the duration in a cost-efficient manner.
Based on these requirements, a serverless solution can help with this task. Amazon EventBridge can schedule the Lambda functions using rules. To ensure that the functions are optimized for cost and performance, you can use the memory recommendation support in Compute Optimizer.
In your AWS account, opt in to Compute Optimizer to start analyzing AWS resources. Ensure you have the appropriate IAM permissions configured – follow these steps for guidance. If you prefer to use the console to opt in, follow these steps. To opt in, enter the following command in a terminal window:
$ aws compute-optimizer update-enrollment-status --status Active
Once you enable Compute Optimizer, it starts to scan for functions that have been invoked for at least 50 times over the trailing 14 days. The next section shows two example scheduled Lambda functions for analysis.
Example Lambda functions
The code for the non-CPU intensive job is below. A Lambda function named lambda-recommendation-test-sleep is created with memory size configured as 1024 MB. An EventBridge rule is created to trigger the function on a recurring 1-minute schedule:
The code for the CPU intensive job is below. A Lambda function named lambda-recommendation-test-busy is created with memory size configured as 128 MB. An EventBridge rule is created to trigger the function on a recurring 1-minute schedule:
import json
import random

def lambda_handler(event, context):
  random.seed(1)
  x=0
  for i in range(0, 20000000):
    x+=random.random()

  return {
    'statusCode': 200,
    'body': json.dumps('Sum:' + str(x))
  }
Understanding the Compute Optimizer recommendations
Compute Optimizer needs a history of at least 50 invocations of a Lambda function over the trailing 14 days to deliver recommendations. Recommendations are created by analyzing function metadata such as memory size, timeout, and runtime, in addition to CloudWatch metrics such as number of invocations, duration, error count, and success rate.
Compute Optimizer will gather the necessary information to provide memory recommendations for Lambda functions, and make them available within 48 hours. Afterwards, these recommendations will be refreshed daily.
These are recent invocations for the non-CPU intensive function:
Function duration is approximately 31.3 seconds with a memory setting of 1024 MB, resulting in a duration cost of about $0.00052 per invocation. Here are the recommendations for this function in the Compute Optimizer console:
The function is Not optimized with a reason of Memory over-provisioned. You can also fetch the same recommendation information via the CLI:
The Compute Optimizer recommendation contains useful information about the function. Most importantly, it has determined that the function is over-provisioned for memory. The attribute findingReasonCodes shows the value MemoryOverprovisioned. In memorySizeRecommendationOptions, Compute Optimizer has found that using a memory size of 900 MB results in an expected invocation duration of approximately 31.5 seconds.
For non-CPU intensive jobs, reducing the memory setting of the function often doesn’t have a negative impact on function duration. The recommendation confirms that you can reduce the memory size from 1024 MB to 900 MB, saving cost without significantly impacting duration. The new duration cost per invocation saves approximately 12%.
The Compute Optimizer console validates these calculations:
These are recent invocations for the second function which is CPU-intensive:
The function duration is about 37.5 seconds with a memory setting of 128 MB, resulting in a duration cost of about $0.000078 per invocation. The recommendations for this function appear in the Compute Optimizer console:
The function is also Not optimized with a reason of Memory under-provisioned. The same recommendation information is available via the CLI:
For this function, Compute Optimizer has determined that the function’s memory is under-provisioned. The value of findingReasonCodes is MemoryUnderprovisioned. The recommendation is to increase the memory from 128 MB to 160 MB.
This recommendation may seem counter-intuitive, since the function only uses 55 MB of memory per invocation. However, Lambda allocates CPU and other resources linearly in proportion to the amount of memory configured. This means that increasing the memory allocation to 160 MB also reduces the expected duration to around 28.7 seconds. This is because a CPU-intensive task also benefits from the increased CPU performance that comes with the additional memory.
After applying this recommendation, the new expected duration cost per invocation is approximately $0.000075. This means that for almost no change in duration cost, the job latency is reduced from 37.5 seconds to 28.7 seconds.
The Compute Optimizer console validates these calculations:
Applying the Compute Optimizer recommendations
To optimize the Lambda functions using Compute Optimizer recommendations, use the following CLI command:
After invoking the function multiple times, we can see metrics of these invocations in the console. This shows that the function duration has not changed significantly after reducing the memory size from 1024 MB to 900 MB. The Lambda function has been successfully cost-optimized without increasing job duration:
To apply the recommendation to the CPU-intensive function, use the following CLI command:
After invoking the function multiple times, the console shows that the invocation duration is reduced to about 28 seconds. This matches the recommendation’s expected duration. This shows that the function is now performance-optimized without a significant cost increase:
Final notes
A couple of final notes:
Not every function will receive a recommendation. Compute optimizer only delivers recommendations when it has high confidence that these recommendations may help reduce cost or reduce execution duration.
As with any changes you make to an environment, we strongly advise that you test recommended memory size configurations before applying them into production.
Conclusion
You can now use Compute Optimizer for serverless workloads using Lambda functions. This can help identify the optimal Lambda function configuration options for your workloads. Compute Optimizer supports memory size recommendations for Lambda functions in all AWS Regions where Compute Optimizer is available. These recommendations are available to you at no additional cost. You can get started with Compute Optimizer from the console.
This post is courtesy of Gopalakrishnan Ramaswamy, Solutions Architect
Amazon EventBridge is a serverless event bus that makes it easier to connect applications together using data from your own applications, integrated software as a service (SaaS) applications, and AWS services. It does so by delivering a stream of real-time data from various event sources. You can set up routing rules to send data to targets like AWS Lambda and build loosely coupled application architectures that react in near-real time to data sources.
MongoDB is a document database, which means it stores data in JSON-like documents. It provides a query language and has support for multi-document ACID transactions. MongoDB Atlas is a fully managed MongoDB database service hosted on the cloud. It can be used as a globally distributed database that automates administrative tasks such as database configuration, infrastructure provisioning, patching, scaling, and backups.
With EventBridge, you can use data from MongoDB to trigger workflows for customer support, business operations and more. In this post, I walk through the process of connecting MongoDB Atlas with the AWS Cloud and triggering events from changes in the MongoDB collections data.
Overview
The following diagram shows the high-level architecture of an example scenario to ingest MongoDB data into the AWS Cloud using Amazon EventBridge.
MongoDB stores data records as BSON documents, which are gathered together in collections. A database stores one or more collections of documents.
This walkthrough shows you how to:
Create a MongoDB cluster and load sample data.
Create a database trigger associated to a collection.
Create an event bus in AWS, linked to the partner event source.
Create a Lambda function and the associated role with permissions.
Create an EventBridge rule and associate it to the Lambda function.
Navigate to the clusters view by choosing Clusters in the left navigation pane.
Select the cluster, choose the ellipses (…) button, and Load Sample Dataset.
Create MongoDB database trigger
MongoDB database triggers allow you to run server-side logic when a document is added, updated, or removed in a linked cluster. Use database triggers to implement complex data interactions, including updating information in one document when a related document changes or interacting with an external service when a new document is inserted.
Choose Add Trigger to open the trigger configuration page.
Select Database for Trigger Type.
Enter a name for the trigger.
In the Trigger Source Details section:
Select the cluster with sample data loaded (for example, Cluster0) for Cluster Name.
For Database Name select sample_analytics.
Select customers for Collection Name.
Check Insert, Update, Delete, and Replace for Operation Type.
In the Function section:
For Select An Event Type, Select EventBridge.
Enter your AWS Account ID. Learn how to find your account ID in this documentation.
Select an AWS Region where the event bus will be created.
Choose Save.
Once a MongoDB Atlas trigger is created, it creates a corresponding partner event source in the Amazon EventBridge console. Initially, these event sources show as Pending with no event bus associated to them.
Next, use the AWS SAM template in the GitHub repo to create the event bus, Lambda function, and event rule.
Clone the GitHub repo and deploy the AWS SAM template:
git clone https://github.com/aws-samples/amazon-eventbridge-partnerevent-example
cd ./amazon-eventbridge-partnerevent-example
sam deploy --guided
Choose a stack name and enter the partner event source name.
The next section explains the steps that are performed by the AWS SAM template.
Creating the event bus
To receive events from SaaS partners, an event bus must be created that is associated to the partner event source:
The partner event source name and the name of the event bus are derived from the parameter entered when running the template.
Once you create an event bus associated with a partner event source, the status of the partner event source changes to Active. A new event bus with the same name as the partner event source is created. You can see this in the EventBridge console, in Event buses in the left-hand panel.
Creating the Lambda function
The following section of the template creates a Lambda function that is invoked by an event rule:
The following section in the template creates an event rule that triggers the preceding Lambda function. The event pattern used by the rule, selects and routes events to targets.
After deploying the AWS SAM template, verify that the EventBridge integration works by inserting test data into the source MongoDB collection. After adding this data, the event is sent to the event bus, which invokes the Lambda function. This is shown in the CloudWatch logs for the event payload.
Navigate to CloudWatch in the AWS console and choose Log groups in the left-hand panel.
Search for the log group/aws/lambda/myeventfunction and choose the event stream.
Expand the log items to reveal the event. This contains the payload that was sent from MongoDB Atlas to EventBridge.
Conclusion
This post demonstrates how to connect MongoDB Atlas data with the AWS Cloud using Amazon EventBridge. EventBridge helps you connect data from a range of SaaS applications using minimal code. It can help reduce operational overhead and build powerful event-driven architectures more easily. For more information about integrating data between SaaS applications, see Amazon EventBridge.
For more serverless learning resources, visit Serverless Land.
Mutual TLS is commonly used for business-to-business (B2B) applications. It’s used in standards such as Open Banking, which enables secure open API integrations for financial institutions. It’s also common for Internet of Things (IoT) applications to authenticate devices using digital certificates.
This post covers automating the mTLS setup for API Gateway HTTP APIs, but the same steps can also be used for REST APIs as well. Download the code used in this walkthrough from the project’s GitHub repo.
Overview
To enable mutual TLS, you must create an API with a valid custom domain name. Mutual TLS is available for both regional REST APIs and the newer HTTP APIs. To set up mutual TLS with API Gateway, you must upload a certificate authority (CA) public key certificate to Amazon S3. This is called a truststore and is used for validating client certificates.
The AWS Certificate Manager Private Certificate Authority (ACM Private CA) is a highly available private CA service. I am using the ACM Private CA as a certificate authority to configure HTTP APIs and to distribute certificates to clients.
Deploying the solution
To deploy the application, the solution uses the AWS Serverless Application Model (AWS SAM). AWS SAM provides shorthand syntax to define functions, APIs, databases, and event source mappings. As a prerequisite, you must have AWS SAM CLI and Java 8 installed. You must also have the AWS CLI configured.
To deploy the solution:
Clone the GitHub repository and build the application with the AWS SAM CLI. Run the following commands in a terminal:
git clone https://github.com/aws-samples/api-gateway-auth.git
cd api-gateway-auth
sam build
Deploy the application:
sam deploy --guided
Provide a stack name and preferred AWS Region for the deployment process. The template requires three parameters:
HostedZoneId: The template uses an Amazon Route 53 public hosted zone to configure the custom domain. Provide the hosted zone ID where the record set must be created.
DomainName: The custom domain name for the API Gateway HTTP API.
TruststoreKey: The name for the trust store file in S3 bucket, which is used by API Gateway for mTLS. By default its truststore.pem.
After deployment, the stack outputs the ARN of a test client certificate (ClientOneCertArn). This is used to validate the setup later. The API Gateway HTTP API endpoint is also provided as output.
You have now created an API Gateway HTTP APIs endpoint using mTLS.
Setting up the ACM Private CA
The AWS SAM template starts with setting up the ACM Private CA. This enables you to create a hierarchy of certificate authorities with up to five levels. A well-designed CA hierarchy offers benefits such as granular security controls and division of administrative tasks. To learn more about the CA hierarchy, visit designing a CA hierarchy. The ACM Private CA is used to configure HTTP APIs and to distribute certificates to clients.
First, a root CA is created and activated, followed by a subordinate CA following best practices. The subordinate CA is used to configure mTLS for the API and distribute the client certificates.
The ACM Private CA is ready for configuring mTLS on the API. The configuration uses an S3 object as its truststore to validate client certificates. To automate this, an AWS Lambda backed custom resource copies the public certificate chain of the ACM Private CA to the S3 bucket:
The example custom resource is written in Java but it could also be written in another language runtime. The custom resource is invoked with the public certificate details of the private root CA, subordinate CAs, and the target S3 bucket. The Lambda function then concatenates the certificate chain and stores the object in the S3 bucket.
Configuring Amazon API Gateway HTTP APIs with mTLS
With a valid truststore object in the S3 bucket, you can set up the API. A valid custom domain must be configured for API Gateway to enable mTLS. The following code creates and sets up a custom domain for HTTP APIs. See template.yaml for a complete example.
An Amazon Route 53 public hosted zone is used to configure the custom domain. This must be set up in your AWS account separately and you must provide the hosted zone ID as a parameter to the template.
Since the HTTP APIs default endpoint does not require mutual TLS, it is disabled via DisableExecuteApiEndpoint. This helps to ensure that mTLS authentication is enforced for all traffic to the API.
The sample API invokes a Lambda function and returns the request payload as the response.
Testing and validating the setup
To validate the setup, first export the client certificate created earlier. You can export the certificate by using the AWS Management Console or AWS CLI. This example uses the AWS CLI to export the certificate. To learn how to do this via the console, see exporting a private certificate using the console.
Export the base64 PEM-encoded certificate to a local file, client.pem.aws acm export-certificate --certificate-arn <<Certificat ARN from stack output>> --passphrase $(echo -n 'your paraphrase' | base64) --region us-east-2 | jq -r '"\(.Certificate)"' > client.pem
Export the encrypted private key associated with the public key in the certificate and save it to a local file client.encrypted.key. You must provide a passphrase to associate with the encrypted private key. This is used to decrypt the exported private key.aws acm export-certificate --certificate-arn <<Certificat ARN from stack output>> --passphrase $(echo -n 'your paraphrase' | base64) --region us-east-2| jq -r '"\(.PrivateKey)"' > client.encrypted.key
Decrypt the exported private key using passphrase and OpenSSL:openssl rsa -in client.encrypted.key -out client.decrypted.key
Access the API using mutual TLS:curl -v --cert client.pem --key client.decrypted.key https://demo-api.example.com
CRL is a way for certificate authority (CA) to make it known that one or more of their digital certificates is no longer trustworthy. When they revoke a certificate, they invalidate the certificate ahead of its expiration date. The certificate authority can revoke an issued certificate for several reasons, the most common one being that the certificate’s private key are compromised.
API Gateway HTTP APIs mTLS setup can be used along with all existing API Gateway authorizer options. You can further extend validation to AWS Lambda authorizers, which can be configured to validate the client certificates against this certificate revocation list (CRL). For example:
Mutual TLS (mTLS) for API Gateway is now generally available at no additional cost. This post shows how to automate mutual TLS for Amazon API Gateway HTTP APIs using the AWS Certificate Manager Private Certificate Authority as a private CA. Using infrastructure as code (IaC) enables you to develop, deploy, and scale cloud applications, often with greater speed, less risk, and reduced cost.
Cloudflare has always been about democratizing the Internet. For us, that means bringing the most powerful tools used by the largest of enterprises to the smallest development shops. Sometimes that looks like putting our global network to work defending against large-scale attacks. Other times it looks like giving Internet users simple and reliable privacy services like 1.1.1.1. Last week, it looked like Cloudflare Pages — a fast, secure and free way to build and host your JAMstack sites.
We see a huge opportunity with Cloudflare Pages. It goes beyond making it as easy as possible to deploy static sites, and extending that same ease of use to building full dynamic applications. By creating a seamless integration between Pages and Cloudflare Workers, we will be able to host the frontend and backend together, at the edge of the Internet and close to your users. The Linc team is joining Cloudflare to help us do just that.
Today, we’re excited to announce the acquisition of Linc, an automation platform to help front-end developers collaborate and build powerful applications. Linc has done amazing work with Frontend Application Bundles (FABs), making dynamic backends more accessible to frontend developers. Their approach offers a straightforward path to building end-to-end applications on Pages, with both frontend logic and powerful backend logic in one bundle. With the addition of Linc, we will accelerate Pages to enable richer and more powerful full-stack applications.
Combining Cloudflare’s edge network with Linc’s approach to server-side rendering, we’re able to set a new standard for performance on the web by delivering the speed of powerful servers close to users. Now, I’ll hand it over to Glen Maddern, who was the CTO of Linc, to share why they joined Cloudflare.
Linc and the Frontend Application Bundle (FAB) specification were designed with a single goal in mind: to give frontend developers the best possible tools to build, review, refine, and deploy their applications. An important piece of that is making server-side logic and rendering much more accessible, regardless of what type of app you’re building.
Static vs Dynamic frontends
One of the biggest problems in frontend web development today is the dramatic difference in complexity when moving from generating static sites (e.g. building a directory full of HTML, JS, and CSS files) to hosting a full application (traditionally using NodeJS and a web server like Express). While you gain the flexibility of being able to render everything on-demand and customised for the current user, you increase your maintenance cost — you now have servers that you need to keep running. And unless you’re operating at a global scale already, you’ll often see worse end-user performance as your requests are only being served from one or maybe a couple of locations worldwide.
While serverless platforms have arisen to solve these problems for backend services and can be brought to bear on frontend apps, they’re much less cost-effective than using static hosting, especially if the bulk of your frontend assets are static. As such, we’ve seen a rise of technologies under the umbrella term of “JAMstack”; they aim at making static sites more powerful (like rebuilding based off CMS updates), or at making it possible to deploy small pieces of server-side APIs as “cloud functions”, along with each update of your app. But it’s still fundamentally a limited architecture — you always have a static layer between you and your users, so the more dynamic your needs, the more complex your build pipeline becomes, or the more you’re forced to rely on client-side logic.
FABs took a different approach: a deployment artefact that could support the full range of server-side needs, from entirely static sites, apps with some API routes or cloud functions, all the way to full server-side streaming rendering. We also made it compatible with all the cloud hosting providers you might want, so that deploying becomes as easy as uploading a ZIP file. Then, as your needs change, as dynamic content becomes more important, as new frameworks arise that offer increasing performance or you look at moving which provider you’re hosting with, you never need to change your tooling and deployment processes.
The FAB approach
Regardless of what framework you’re working with, the FAB compiler generates a fab.zip file that has two components: a server.js file that acts as a server-side entry point, and an _assets directory that stores the HTML, CSS, JS, images, and fonts that are sent to the client.
This simple structure gives us enough flexibility to handle all kinds of apps. For example, a static site will have a server.js of only a few auto-generated lines of server-side code, just enough to add redirects for any files outside the _assets directory. On the other end of the spectrum, an app with full server rendering looks and works exactly the same. It just has a lot more code inside its server.js file.
On a server running NodeJS, serving a compiled FAB is as easy as fab serve fab.zip, but FABs are really designed with production class hosting in mind. They make use of world-class CDNs and the best serverless hosting platforms around.
When a FAB is deployed, it’s often split into these component parts and deployed separately. Assets are sent to a low-cost object storage platform with a CDN in front of it, and the server component is sent to dedicated serverless hosting. It’s all deployed in an atomic, idempotent manner that feels as simple as uploading static files, but completely unlocks dynamic server-side code as part of your architecture.
That generic architecture works great and is compatible with virtually every hosting platform around, but it works slightly differently on Cloudflare Workers.
Workers, unlike other serverless platforms, truly runs at the edge: there is no CDN or load balancer in front of it to split off /_assets routes and send them directly to the Assets storage. This means that every request hits the worker, whether it’s triggering a full page render or piping through the bytes for an image file. It might feel like a downside, but with Workers’ performance and cost profile, it’s quite the opposite — it actually gives us much more flexibility in what we end up building, and gets us closer to the goal of fully unlocking server-side code.
To give just one example, we no longer need to store our asset files on a dedicated static file host — instead, we can use Cloudflare’s global key-value storage: Workers KV. Our server.js running inside a Worker can then map /_assets requests directly into the KV store and stream the result to the user. This results in significantly better performance than proxying to a third-party asset host.
What we’ve found is that Cloudflare offered the most “FAB-native” hosting option, and so it’s very exciting to have the opportunity to further develop what they can do.
Linc + Cloudflare
As we stated above, Linc’s goal was to give frontend developers the best tooling to build and refine their apps, regardless of which hosting they were using. But we started to notice an important trend — if a team had a free choice for where to host their frontend, they inevitably chose Cloudflare Workers. In some cases, for a period, teams even used Linc to deploy a FAB to Workers alongside their existing hosting to demonstrate the performance improvement before migrating permanently.
At the same time, we started to see more and more opportunities to fully embrace edge-rendering and make global serverless hosting more powerful and accessible. But the most exciting ideas required deep integration with the hosting providers themselves. Which is why, when we started talking to Cloudflare, everything fell into place.
We’re so excited to join the Cloudflare effort and work on expanding Cloudflare Pages to cover the full spectrum of applications. Not only do they share our goal of bringing sophisticated technology to every development team, but with innovations like Durable Objects starting to offer new storage paradigms, the potential for a truly next-generation deployment, review & hosting platform is tantalisingly close.
The collective thoughts of the interwebz
Manage Consent
To provide the best experiences, we use technologies like cookies to store and/or access device information. Consenting to these technologies will allow us to process data such as browsing behavior or unique IDs on this site. Not consenting or withdrawing consent, may adversely affect certain features and functions.
Functional
Always active
The technical storage or access is strictly necessary for the legitimate purpose of enabling the use of a specific service explicitly requested by the subscriber or user, or for the sole purpose of carrying out the transmission of a communication over an electronic communications network.
Preferences
The technical storage or access is necessary for the legitimate purpose of storing preferences that are not requested by the subscriber or user.
Statistics
The technical storage or access that is used exclusively for statistical purposes.The technical storage or access that is used exclusively for anonymous statistical purposes. Without a subpoena, voluntary compliance on the part of your Internet Service Provider, or additional records from a third party, information stored or retrieved for this purpose alone cannot usually be used to identify you.
Marketing
The technical storage or access is required to create user profiles to send advertising, or to track the user on a website or across several websites for similar marketing purposes.