Tag Archives: serverless

Introducing Cloudflare Pages: the best way to build JAMstack websites

Post Syndicated from Rita Kozlov original https://blog.cloudflare.com/cloudflare-pages/

Introducing Cloudflare Pages: the best way to build JAMstack websites

Introducing Cloudflare Pages: the best way to build JAMstack websites

Across multiple cultures around the world, this time of year is a time of celebration and sharing of gifts with the people we care the most about. In that spirit, we thought we’d take this time to give back to the developer community that has been so supportive of Cloudflare for the last 10 years.

Today, we’re excited to announce Cloudflare Pages: a fast, secure and free way to build and host your JAMstack sites.

Today, the path from an idea to a website is paved with good intentions

Websites are the way we express ourselves on the web. It doesn’t matter if you’re a hobbyist with a blog, or the largest of corporations with millions of customers — if you want to reach people outside the confines of 140 280 characters, the web is the place to be.

As a frontend developer, it’s your responsibility to bring this expression to life. And make no mistake — with so many frontend frameworks, tooling, and static site generators at your disposal — it’s a great time to be in your line of work.

That is, of course, right up until the point when you’re ready to show your work off to the world. That’s when things can start to get a little hairy.

At this point, continuing to keep things local rather than committing to source starts to become… irresponsible. But then: how do you quickly iterate and maintain momentum? As you change things, you need to make sure those changes don’t get lost — saving them to source control — while keeping in sync with what’s currently deployed to production.

There are no great solutions.

If you’re in a larger organization, you might have a DevOps organization devoted to exactly that: automating deployments using Continuous Integration (CI) tooling.

Most CI tooling, however, is quite cumbersome, and for good reason — to allow organizations to customize their automation, regardless of their stack and setup. But for the purpose of developing a website, it can still feel like an unnecessary and frustrating diversion on the road to delivering your web project. Configuring a .yaml file, adding and removing commands, waiting minutes for each build to run, and praying to the CI gods at each one that these are the right commands. Hopelessly rerunning the same build over and over, and expecting a different result.  

Often, hours are lost. The process stands in the way of you and doing your best work.

Cloudflare Pages: letting frontend devs do what they do best

We think there’s a better way.

With Cloudflare Pages, we set out to simplify every step along the journey by tying deployment to your existing development workflow.

Seamless Git integration, with builds built-in

With Cloudflare Pages, all you have to do is select your repo, and tell us which framework you’re using. We’ll take care of chanting CI incantations on your behalf, while you keep doing what you were already doing: git commit and git push your changes — we’ll build and deploy them for you.

As the project grows, so do the stakes, and the number of collaborators.

For a site in production, changes need to be reviewed thoroughly. As the reviewer, looking at the code, and skimming for red flags only gets you so far. To thoroughly review, you have to commit or git stash your changes, pull down locally, get it running to make sure it actually works — looking at code alone won’t catch everything!

The other developers on the team are not the only stakeholders. There are designers, marketers, PMs who want to provide feedback before the changes go out.

Unique preview URLs

With Cloudflare Pages, each commit gets its own unique URL. Preview URLs make it easier to get meaningful code reviews without the overhead of pulling down the branch. They also make it easier to get feedback from PMs, designers and marketers on the latest iteration, bridging the gap between mocks and code.

Infinite staging

“Does anyone mind if I take over staging?” might also sound like a familiar question. With Cloudflare Pages, each feature branch will have its own dedicated consistent alias, allowing you to have a consistent URL for the latest changes.

With Preview and Production environments, all feature branches and preview links will be built with preview variables, so you can experiment without impacting production data.

When you’re ready to deploy to production, we’ll redeploy to production for you with the updated production environment variables.

Collaboration for all

Collaboration is the key to building amazing websites and products — the more the merrier! As a security company, we definitely don’t want you sharing password and credentials. Which is why we provide multi user access for free for unlimited users — invite all your friends, on us!

Modern sites with modern standards

We all know premature optimization is a cardinal sin, but once your project is in front of customers you want to have the best performance possible. If it’s successful, you also want it to be available!

Today, this is time you have to spend optimizing performance (chasing those 100 lighthouse scores), and scaling, from a few to millions of users.

Luckily, we happen to know a thing or two about running a global network of 200 data centers though, so we’ve got you covered.

With Pages, your site is deployed directly to our edge, milliseconds away from customers, and at global scale.

The latest web standards are fun to read about on Hacker News but not fun to implement yourself. With Cloudflare Pages, we’ll do the heavy lifting to keep you ahead of the curve: IPv6, HTTP/3, TLS 1.3, all the latest image formats.

Oh, and one more thing

We’re really excited for developers and their teams to use Cloudflare Pages to collaborate on the best static sites together. There’s just one thing that didn’t sit quite right with us: why stop at static sites?

What if we could make building full-blown, dynamic applications just as easy?

Although APIs are a core part of the JAMstack, today that refers primarily to the robust API economy developers have access to. And while that’s great, it’s not always enough. If you want to build your own APIs, and store user or application data, you need more than third party APIs. What to do, though?

Well, this is the point at which it’s mighty helpful we’ve already built a global serverless platform: Cloudflare Workers. Workers allows frontend developers to easily write scalable backends to their applications in the same language as the frontend, JavaScript.

Over the coming months, we’ll be working on integrating Workers and Pages into a seamless experience. It’ll work the exact same way Pages does: just write your code, git push, and we’ll deploy it for you. The only difference is, it won’t just be your frontend, it’ll be your backend, too. And just to be clear: this is not just for stateless functions. With Workers KV and Durable Objects, we see a huge opportunity to really enable any web application to be built on this platform.

We’re super excited about the future of Pages, and how with the power of Cloudflare Workers behind it, it represents a bold vision for how new applications are going to be built on the web.

But you know the thing about gifts? They’re no good without someone to receive them. We’d love for you to sign up for our beta and try out Cloudflare Pages!

PS: we’re hiring!

Want to help us shape the future of development on the web? Join our team.

Using container image support for AWS Lambda with AWS SAM

Post Syndicated from Eric Johnson original https://aws.amazon.com/blogs/compute/using-container-image-support-for-aws-lambda-with-aws-sam/

At AWS re:Invent 2020, AWS Lambda released Container Image Support for Lambda functions. This new feature allows developers to package and deploy Lambda functions as container images of up to 10 GB in size. With this release, AWS SAM also added support to manage, build, and deploy Lambda functions using container images.

In this blog post, I walk through building a simple serverless application that uses Lambda functions packaged as container images with AWS SAM. I demonstrate creating a new application and highlight changes to the AWS SAM template specific to container image support. I then cover building the image locally for debugging in addition to eventual deployment. Finally, I show using AWS SAM to handle packaging and deploying Lambda functions from a developer’s machine or a CI/CD pipeline.

Push to invoke lifecycle

Push to invoke lifecycle

The process for creating a Lambda function packaged as a container requires only a few steps. A developer first creates the container image and tags that image with the appropriate label. The image is then uploaded to an Amazon Elastic Container Registry (ECR) repository using docker push.

During the Lambda create or update process, the Lambda service pulls the image from ECR, optimizes the image for use, and deploys the image to the Lambda service. Once this, and any other configuration processes are complete, the Lambda function is then in Active status and ready to be invoked. The AWS SAM CLI manages most of these steps for you.

Prerequisites

The following tools are required in this walkthrough:

Create the application

Use the terminal and follow these steps to create a serverless application:

  1. Enter sam init.
  2. For Template source, select option one for AWS Quick Start Templates.
  3. For Package type, choose option two for Image.
  4. For Base image, select option one for amazon/nodejs12.x-base.
  5. Name the application demo-app.
Demonstration of sam init

Demonstration of sam init

Exploring the application

Open the template.yaml file in the root of the project to see the new options available for container image support. The AWS SAM template has two new values that are required when working with container images. PackageType: Image tells AWS SAM that this function is using container images for packaging.

AWS SAM template

AWS SAM template

The second set of required data is in the Metadata section that helps AWS SAM manage the container images. When a container is created, a new tag is added to help identify that image. By default, Docker uses the tag, latest. However, AWS SAM passes an explicit tag name to help differentiate between functions. That tag name is a combination of the Lambda function resource name, and the DockerTag value found in the Metadata. Additionally, the DockerContext points to the folder containing the function code and Dockerfile identifies the name of the Dockerfile used in building the container image.

In addition to changes in the template.yaml file, AWS SAM also uses the Docker CLI to build container images. Each Lambda function has a Dockerfile that instructs Docker how to construct the container image for that function. The Dockerfile for the HelloWorldFunction is at hello-world/Dockerfile.

Local development of the application

AWS SAM provides local development support for zip-based and container-based Lambda functions. When using container-based images, as you modify your code, update the local container image using sam build. AWS SAM then calls docker build using the Dockerfile for instructions.

Dockerfile for Lambda function

Dockerfile for Lambda function

In the case of the HelloWorldFunction that uses Node.js, the Docker command:

  1. Pulls the latest container base image for nodejs12.x from the Amazon Elastic Container Registry Public.
  2. Copies the app.js code and package.json files to the container image.
  3. Installs the dependencies inside the container image.
  4. Sets the invocation handler.
  5. Creates and tags new version of the local container image.

To build your application locally on your machine, enter:

sam build

The results are:

Results for sam build

Results for sam build

Now test the code by locally invoking the HelloWorldFunction using the following command:

sam local invoke HelloWorldFunction

The results are:

Results for sam local invoke

Results for sam local invoke

You can also combine these commands and add flags for cached and parallel builds:

sam build --cached --parallel && sam local invoke HelloWorldFunction

Deploying the application

There are two ways to deploy container-based Lambda functions with AWS SAM. The first option is to deploy from AWS SAM using the sam deploy command. The deploy command tags the local container image, uploads it to ECR, and then creates or updates your Lambda function. The second method is the sam package command used in continuous integration and continuous delivery or deployment (CI/CD) pipelines, where the deployment process is separate from the artifact creation process.

AWS SAM package tags and uploads the container image to ECR but does not deploy the application. Instead, it creates a modified version of the template.yaml file with the newly created container image location. This modified template is later used to deploy the serverless application using AWS CloudFormation.

Deploying from AWS SAM with the guided flag

Before you can deploy the application, use the AWS CLI to create a new ECR repository to store the container image for the HelloWorldFunction.

Run the following command from a terminal:

aws ecr create-repository --repository-name demo-app-hello-world \
--image-tag-mutability IMMUTABLE --image-scanning-configuration scanOnPush=true

This command creates a new ECR repository called demo-app-hello-world. The –image-tag-mutability IMMUTABLE option prevents overwriting tags. The –image-scanning-configuration scanOnPush=true enables automated vulnerability scanning whenever a new image is pushed to the repository. The output is:

Amazon ECR creation output

Amazon ECR creation output

Make a note of the repositoryUri as you need it in the next step.

Before you can push your images to this new repository, ensure that you have logged in to the managed Docker service that ECR provides. Update the bracketed tokens with your information and run the following command in the terminal:

aws ecr get-login-password --region <region> | docker login --username AWS \
--password-stdin <account id>.dkr.ecr.<region>.amazonaws.com

You can also install the Amazon ECR credentials helper to help facilitate Docker authentication with Amazon ECR.

After building the application locally and creating a repository for the container image, you can deploy the application. The first time you deploy an application, use the guided version of the sam deploy command and follow these steps:

  1. Type sam deploy --guided, or sam deploy -g.
  2. For Stack Name, enter demo-app.
  3. Choose the same Region that you created the ECR repository in.
  4. Enter the Image Repository for the HelloWorldFunction (this is the repositoryUri of the ECR repository).
  5. For Confirm changes before deploy and Allow SAM CLI IAM role creation, keep the defaults.
  6. For HelloWorldFunction may not have authorization defined, Is this okay? Select Y.
  7. Keep the defaults for the remaining prompts.
Results of sam deploy --guided

Results of sam deploy –guided

AWS SAM uploads the container images to the ECR repo and deploys the application. During this process, you see a changeset along with the status of the deployment. When the deployment is complete, the stack outputs are then displayed. Use the HelloWorldApi endpoint to test your application in production.

Deploy outputs

Deploy outputs

When you use the guided version, AWS SAM saves the entered data to the samconfig.toml file. For subsequent deployments with the same parameters, use sam deploy. If you want to make a change, use the guided deployment again.

This example demonstrates deploying a serverless application with a single, container-based Lambda function in it. However, most serverless applications contain more than one Lambda function. To work with an application that has more than one Lambda function, follow these steps to add a second Lambda function to your application:

  1. Copy the hello-world directory using the terminal command cp -R hello-world hola-world
  2. Replace the contents of the template.yaml file with the following
    AWSTemplateFormatVersion: '2010-09-09'
    Transform: AWS::Serverless-2016-10-31
    Description: demo app
      
    Globals:
      Function:
        Timeout: 3
    
    Resources:
      HelloWorldFunction:
        Type: AWS::Serverless::Function
        Properties:
          PackageType: Image
          Events:
            HelloWorld:
              Type: Api
              Properties:
                Path: /hello
                Method: get
        Metadata:
          DockerTag: nodejs12.x-v1
          DockerContext: ./hello-world
          Dockerfile: Dockerfile
          
      HolaWorldFunction:
        Type: AWS::Serverless::Function
        Properties:
          PackageType: Image
          Events:
            HolaWorld:
              Type: Api
              Properties:
                Path: /hola
                Method: get
        Metadata:
          DockerTag: nodejs12.x-v1
          DockerContext: ./hola-world
          Dockerfile: Dockerfile
    
    Outputs:
      HelloWorldApi:
        Description: "API Gateway endpoint URL for Prod stage for Hello World function"
        Value: !Sub "https://${ServerlessRestApi}.execute-api.${AWS::Region}.amazonaws.com/Prod/hello/"
      HolaWorldApi:
        Description: "API Gateway endpoint URL for Prod stage for Hola World function"
        Value: !Sub "https://${ServerlessRestApi}.execute-api.${AWS::Region}.amazonaws.com/Prod/hola/"
  3. Replace the contents of hola-world/app.js with the following
    let response;
    exports.lambdaHandler = async(event, context) => {
        try {
            response = {
                'statusCode': 200,
                'body': JSON.stringify({
                    message: 'hola world',
                })
            }
        }
        catch (err) {
            console.log(err);
            return err;
        }
        return response
    };
  4. Create an ECR repository for the HolaWorldFunction
    aws ecr create-repository --repository-name demo-app-hola-world \
    --image-tag-mutability IMMUTABLE --image-scanning-configuration scanOnPush=true
  5. Run the guided deploy to add the second repository:
    sam deploy -g

The AWS SAM guided deploy process allows you to provide the information again but prepopulates the defaults with previous values. Update the following:

  1. Keep the same stack name, Region, and Image Repository for HelloWorldFunction.
  2. Use the new repository for HolaWorldFunction.
  3. For the remaining steps, use the same values from before. For Lambda functions not to have authorization defined, enter Y.
Results of sam deploy --guided

Results of sam deploy –guided

Deploying in a CI/CD pipeline

Companies use continuous integration and continuous delivery (CI/CD) pipelines to automate application deployment. Because the process is automated, using an interactive process like a guided AWS SAM deployment is not possible.

Developers can use the packaging process in AWS SAM to prepare the artifacts for deployment and produce a separate template usable by AWS CloudFormation. The package command is:

sam package --output-template-file packaged-template.yaml \
--image-repository 5555555555.dkr.ecr.us-west-2.amazonaws.com/demo-app

For multiple repositories:

sam package --output-template-file packaged-template.yaml \ 
--image-repositories HelloWorldFunction=5555555555.dkr.ecr.us-west-2.amazonaws.com/demo-app-hello-world \
--image-repositories HolaWorldFunction=5555555555.dkr.ecr.us-west-2.amazonaws.com/demo-app-hola-world

Both cases create a file called packaged-template.yaml. The Lambda functions in this template have an added tag called ImageUri that points to the ECR repository and a tag for the Lambda function.

Packaged template

Packaged template

Using sam package to generate a separate CloudFormation template enables developers to separate artifact creation from application deployment. The deployment process can then be placed in an isolated stage allowing for greater customization and observability of the pipeline.

Conclusion

Container image support for Lambda enables larger application artifacts and the ability to use container tooling to manage Lambda images. AWS SAM simplifies application management by bringing these tools into the serverless development workflow.

In this post, you create a container-based serverless application in using command lines in the terminal. You create ECR repositories and associate them with functions in the application. You deploy the application from your local machine and package the artifacts for separate deployment in a CI/CD pipeline.

To learn more about serverless and AWS SAM, visit the Sessions with SAM series at s12d.com/sws and find more resources at serverlessland.com.

#ServerlessForEveryone

Optimizing batch processing with custom checkpoints in AWS Lambda

Post Syndicated from James Beswick original https://aws.amazon.com/blogs/compute/optimizing-batch-processing-with-custom-checkpoints-in-aws-lambda/

AWS Lambda can process batches of messages from sources like Amazon Kinesis Data Streams or Amazon DynamoDB Streams. In normal operation, the processing function moves from one batch to the next to consume messages from the stream.

However, when an error occurs in one of the items in the batch, this can result in reprocessing some of the same messages in that batch. With the new custom checkpoint feature, there is now much greater control over how you choose to process batches containing failed messages.

This blog post explains the default behavior of batch failures and options available to developers to handle this error state. I also cover how to use this new checkpoint capability and show the benefits of using this feature in your stream processing functions.

Overview

When using a Lambda function to consume messages from a stream, the batch size property controls the maximum number of messages passed in each event.

The stream manages two internal pointers: a checkpoint and a current iterator. The checkpoint is the last known item position that was successfully processed. The current iterator is the position in the stream for the next read operation. In a successful operation, here are two batches processed from a stream with a batch size of 10:

Checkpoints and current iterators

  1. The first batch delivered to the Lambda function contains items 1–10. The function processes these items without error.
  2. The checkpoint moves to item 11. The next batch delivered to the Lambda function contains items 11–20.

In default operation, the processing of the entire batch must succeed or fail. If a single item fails processing and the function returns an error, the batch fails. The entire batch is then retried until the maximum retries is reached. This can result in the same failure occurring multiple times and unnecessary processing of individual messages.

You can also enable the BisectBatchOnFunctonError property in the event source mapping. If there is a batch failure, the calling service splits the failed batch into two and retries the half-batches separately. The process continues recursively until there is a single item in a batch or messages are processed successfully. For example, in a batch of 10 messages, where item number 5 is failing, the processing occurs as follows:

Bisect batch on error processing

  1. Batch 1 fails. It’s split into batches 2 and 3.
  2. Batch 2 fails, and batch 3 succeeds. Batch 2 is split into batches 4 and 5.
  3. Batch 4 fails and batch 5 succeeds. Batch 4 is split into batches 6 and 7.
  4. Batch 6 fails and batch 7 succeeds.

While this provides a way to process messages in a batch with one failing message, it results in multiple invocations of the function. In this example, message number 4 is processed four times before succeeding.

With the new custom checkpoint feature, you can return the sequence identifier for the failed messages. This provides more precise control over how to choose to continue processing the stream. For example, in a batch of 10 messages where the sixth message fails:

Custom checkpoint behavior

  1. Lambda processes the batch of messages, items 1–10. The sixth message fails and the function returns the failed sequence identifier.
  2. The checkpoint in the stream is moved to the position of the failed message. The batch is retried for only messages 6–10.

Existing stream processing behaviors

In the following examples, I use a DynamoDB table with a Lambda function that is invoked by the stream for the table. You can also use a Kinesis data stream if preferred, as the behavior is the same. The event source mapping is set to a batch size of 10 items so all the stream messages are passed in the event to a single Lambda invocation.

Architecture diagram

I use the following Node.js script to generate batches of 10 items in the table.

const AWS = require('aws-sdk')
AWS.config.update({ region: 'us-east-1' })
const docClient = new AWS.DynamoDB.DocumentClient()

const ddbTable = 'ddbTableName'
const BATCH_SIZE = 10

const createRecords = async () => {
  // Create envelope
  const params = {
    RequestItems: {}
  }
  params.RequestItems[ddbTable] = []

  // Add items to batch and write to DDB
  for (let i = 0; i < BATCH_SIZE; i++) {
    params.RequestItems[ddbTable].push({
      PutRequest: {
        Item: {
          ID: Date.now() + i
        }
      }
    })
  }
  await docClient.batchWrite(params).promise()
}

const main = async() => await createRecords()
main()

After running this script, there are 10 items in the DynamoDB table, which are then put into the DynamoDB stream for processing.

10 items in DynamoDB table

The processing Lambda function uses the following code. This contains a constant called FAILED_MESSAGE_NUM to force an error on the message with the corresponding index in the event batch:

exports.handler = async (event) => {
  console.log(JSON.stringify(event, null, 2))
  console.log('Records: ', event.Records.length)
  const FAILED_MESSAGE_NUM = 6
  
  let recordNum = 1
  let batchItemFailures = []

  event.Records.map((record) => {
    const sequenceNumber = record.dynamodb.SequenceNumber
    
    if ( recordNum === FAILED_MESSAGE_NUM ) {
      console.log('Error! ', sequenceNumber)
      throw new Error('kaboom')
    }
    console.log('Success: ', sequenceNumber)
    recordNum++
  })
}

The code uses the DynamoDB item’s sequence number, which is provided in each record of the stream event:

Item sequence number in event

In the default configuration of the event source mapping, the failure of message 6 causes the whole batch to fail. The entire batch is then retried multiple times. This appears in the CloudWatch Logs for the function:

Logs with retried batches

Next, I enable the bisect-on-error feature in the function’s event trigger. The first invocation fails as before but this causes two subsequent invocations with batches of five messages. The original batch is bisected. These batches complete processing successfully.

Logs with bisected batches

Configuring a custom checkpoint

Finally, I enable the custom checkpoint feature. This is configured in the Lambda function console by selecting the “Report batch item failures” check box in the DynamoDB trigger:

Add trigger settings

I update the processing Lambda function with the following code:

exports.handler = async (event) => {
  console.log(JSON.stringify(event, null, 2))
  console.log('Records: ', event.Records.length)
  const FAILED_MESSAGE_NUM = 4
  
  let recordNum = 1
  let sequenceNumber = 0
    
  try {
    event.Records.map((record) => {
      sequenceNumber = record.dynamodb.SequenceNumber
  
      if ( recordNum === FAILED_MESSAGE_NUM ) {
        throw new Error('kaboom')
      }
      console.log('Success: ', sequenceNumber)
      recordNum++
    })
  } catch (err) {
    // Return failed sequence number to the caller
    console.log('Failure: ', sequenceNumber)
    return { "batchItemFailures": [ {"itemIdentifier": sequenceNumber} ]  }
  }
}

In this version of the code, the processing of each message is wrapped in a try…catch block. When processing fails, the function stops processing any remaining messages. It returns the sequence number of the failed message in a JSON object:

{ 
  "batchItemFailures": [ 
    {
      "itemIdentifier": sequenceNumber
    }
  ]
}

The calling service then updates the checkpoint value with the sequence number provided. If the batchItemFailures array is empty, the caller assumes all messages have been processed correctly. If the batchItemFailures array contains multiple items, the lowest sequence number is used as the checkpoint.

In this example, I also modify the FAILED_MESSAGE_NUM constant to 4 in the Lambda function. This causes the fourth message in every batch to throw an error. After adding 10 items to the DynamoDB table, the CloudWatch log for the processing function shows:

Lambda function logs

This is how the stream of 10 messages has been processed using the custom checkpoint:

Custom checkpointing walkthrough

  1. In the first invocation, all 10 messages are in the batch. The fourth message throws an error. The function returns this position as the checkpoint.
  2. In the second invocation, messages 4–10 are in the batch. Message 7 throws an error and its sequence number is returned as the checkpoint.
  3. In the third invocation, the batch contains messages 7–10. Message 10 throws an error and its sequence number is now the returned checkpoint.
  4. The final invocation contains only message 10, which is successfully processed.

Using this approach, subsequent invocations do not receive messages that have been successfully processed previously.

Conclusion

The default behavior for stream processing in Lambda functions enables entire batches of messages to succeed or fail. You can also use batch bisecting functionality to retry batches iteratively if a single message fails. Now with custom checkpoints, you have more control over handling failed messages.

This post explains the three different processing modes and shows example code for handling failed messages. Depending upon your use-case, you can choose the appropriate mode for your workload. This can help reduce unnecessary Lambda invocations and prevent reprocessing of the same messages in batches containing failures.

To learn more about how to use this feature, read the developer documentation. To learn more about building with serverless technology, visit Serverless Land.

Using AWS Lambda for streaming analytics

Post Syndicated from James Beswick original https://aws.amazon.com/blogs/compute/using-aws-lambda-for-streaming-analytics/

AWS Lambda now supports streaming analytics calculations for Amazon Kinesis and Amazon DynamoDB. This allows developers to calculate aggregates in near-real time and pass state across multiple Lambda invocations. This feature provides an alternative way to build analytics in addition to services like Amazon Kinesis Data Analytics.

In this blog post, I explain how this feature works with Kinesis Data Streams and DynamoDB Streams, together with example use-cases.

Overview

For workloads using streaming data, data arrives continuously, often from different sources, and is processed incrementally. Discrete data processing tasks, such as operating on files, have a known beginning and end boundary for the data. For applications with streaming data, the processing function does not know when the data stream starts or ends. Consequently, this type of data is commonly processed in batches or windows.

Before this feature, Lambda-based stream processing was limited to working on the incoming batch of data. For example, in Amazon Kinesis Data Firehose, a Lambda function transforms the current batch of records with no information or state from previous batches. This is also the same for processing DynamoDB streams using Lambda functions. This existing approach works well for MapReduce or tasks focused exclusively on the date in the current batch.

Comparing DynamoDB and Kinesis streams

  1. DynamoDB streams invoke a processing Lambda function asynchronously. After processing, the function may then store the results in a downstream service, such as Amazon S3.
  2. Kinesis Data Firehose invokes a transformation Lambda function synchronously, which returns the transformed data back to the service.

This new feature introduces the concept of a tumbling window, which is a fixed-size, non-overlapping time interval of up to 15 minutes. To use this, you specify a tumbling window duration in the event-source mapping between the stream and the Lambda function. When you apply a tumbling window to a stream, items in the stream are grouped by window and sent to the processing Lambda function. The function returns a state value that is passed to the next tumbling window.

You can use this to calculate aggregates over multiple windows. For example, you can calculate the total value of a data item in a stream using 30-second tumbling windows:

Tumbling windows

  1. Integer data arrives in the stream at irregular time intervals.
  2. The first tumbling window consists of data in the 0–30 second range, passed to the Lambda function. It adds the items and returns the total of 6 as a state value.
  3. The second tumbling window invokes the Lambda function with the state value of 6 and the 30–60 second batch of stream data. This adds the items to the existing total, returning 18.
  4. The third tumbling window invokes the Lambda function with a state value of 18 and the next window of values. The running total is now 28 and returned as the state value.
  5. The fourth tumbling window invokes the Lambda function with a state value of 28 and the 90–120 second batch of data. The final total is 32.

This feature is useful in workloads where you need to calculate aggregates continuously. For example, for a retailer streaming order information from point-of-sale systems, it can generate near-live sales data for downstream reporting. Using Lambda to generate aggregates only requires minimal code, and the function can access other AWS services as needed.

Using tumbling windows with Lambda functions

When you configure an event source mapping between Kinesis or DynamoDB and a Lambda function, use the new setting, Tumbling window duration. This appears in the trigger configuration in the Lambda console:

Trigger configuration

You can also set this value in AWS CloudFormation and AWS SAM templates. After the event source mapping is created, events delivered to the Lambda function have several new attributes:

New attributes in events

These include:

  • Window start and end: the beginning and ending timestamps for the current tumbling window.
  • State: an object containing the state returned from the previous window, which is initially empty. The state object can contain up to 1 MB of data.
  • isFinalInvokeForWindow: indicates if this is the last invocation for the tumbling window. This only occurs once per window period.
  • isWindowTerminatedEarly: a window ends early only if the state exceeds the maximum allowed size of 1 MB.

In any tumbling window, there is a series of Lambda invocations following this pattern:

Tumbling window process in Lambda

  1. The first invocation contains an empty state object in the event. The function returns a state object containing custom attributes that are specific to the custom logic in the aggregation.
  2. The second invocation contains the state object provided by the first Lambda invocation. This function returns an updated state object with new aggregated values. Subsequent invocations follow this same sequence.
  3. The final invocation in the tumbling window has the isFinalInvokeForWindow flag set to the true. This contains the state returned by the most recent Lambda invocation. This invocation is responsible for storing the result in S3 or in another data store, such as a DynamoDB table. There is no state returned in this final invocation.

Using tumbling windows with DynamoDB

DynamoDB streams can invoke Lambda function using tumbling windows, enabling you to generate aggregates per shard. In this example, an ecommerce workload saves orders in a DynamoDB table and uses a tumbling window to calculate the near-real time sales total.

First, I create a DynamoDB table to capture the order data and a second DynamoDB table to store the aggregate calculation. I create a Lambda function with a trigger from the first orders table. The event source mapping is created with a Tumbling window duration of 30 seconds:

DynamoDB trigger configuration

I use the following code in the Lambda function:

const AWS = require('aws-sdk')
AWS.config.update({ region: process.env.AWS_REGION })
const docClient = new AWS.DynamoDB.DocumentClient()
const TableName = 'tumblingWindowsAggregation'

function isEmpty(obj) { return Object.keys(obj).length === 0 }

exports.handler = async (event) => {
    // Save aggregation result in the final invocation
    if (event.isFinalInvokeForWindow) {
        console.log('Final: ', event)
        
        const params = {
          TableName,
          Item: {
            windowEnd: event.window.end,
            windowStart: event.window.start,
            sales: event.state.sales,
            shardId: event.shardId
          }
        }
        return await docClient.put(params).promise()
    }
    console.log(event)
    
    // Create the state object on first invocation or use state passed in
    let state = event.state

    if (isEmpty (state)) {
        state = {
            sales: 0
        }
    }
    console.log('Existing: ', state)

    // Process records with custom aggregation logic

    event.Records.map((item) => {
        // Only processing INSERTs
        if (item.eventName != "INSERT") return
        
        // Add sales to total
        let value = parseFloat(item.dynamodb.NewImage.sales.N)
        console.log('Adding: ', value)
        state.sales += value
    })

    // Return the state for the next invocation
    console.log('Returning state: ', state)
    return { state: state }
}

This function code processes the incoming event to aggregate a sales attribute, and return this aggregated result in a state object. In the final invocation, it stores the aggregated value in another DynamoDB table.

I then use this Node.js script to generate random sample order data:

const AWS = require('aws-sdk')
AWS.config.update({ region: 'us-east-1' })
const docClient = new AWS.DynamoDB.DocumentClient()

const TableName = 'tumblingWindows'
const ITERATIONS = 100
const SLEEP_MS = 100

let totalSales = 0

function sleep(ms) { 
  return new Promise(resolve => setTimeout(resolve, ms));
}

const createSales = async () => {
  for (let i = 0; i < ITERATIONS; i++) {

    let sales = Math.round (parseFloat(100 * Math.random()))
    totalSales += sales
    console.log ({i, sales, totalSales})

    await docClient.put ({
      TableName,
      Item: {
        ID: Date.now().toString(),
        sales,
        ITERATIONStamp: new Date().toString()
      }
    }).promise()
    await sleep(SLEEP_MS)
  }
}

const main = async() => {
  await createSales()
  console.log('Total Sales: ', totalSales)
}

main()

Once the script is complete, the console shows the individual order transactions and the total sales:

Script output

After the tumbling window duration is finished, the second DynamoDB table shows the aggregate values calculated and stored by the Lambda function:

Aggregate values in second DynamoDB table

Since aggregation for each shard is independent, the totals are stored by shardId. If I continue to run the test data script, the aggregation function continues to calculate and store more totals per tumbling window period.

Using tumbling windows with Kinesis

Kinesis data streams can also invoke a Lambda function using a tumbling window in a similar way. The biggest difference is that you control how many shards are used in the data stream. Since aggregation occurs per shard, this controls the total number aggregate results per tumbling window.

Using the same sales example, first I create a Kinesis data stream with one shard. I use the same DynamoDB tables from the previous example, then create a Lambda function with a trigger from the first orders table. The event source mapping is created with a Tumbling window duration of 30 seconds:

Kinesis trigger configuration

I use the following code in the Lambda function, modified to process the incoming Kinesis data event:

const AWS = require('aws-sdk')
AWS.config.update({ region: process.env.AWS_REGION })
const docClient = new AWS.DynamoDB.DocumentClient()
const TableName = 'tumblingWindowsAggregation'

function isEmpty(obj) {
    return Object.keys(obj).length === 0
}

exports.handler = async (event) => {

    // Save aggregation result in the final invocation
    if (event.isFinalInvokeForWindow) {
        console.log('Final: ', event)
        
        const params = {
          TableName,
          Item: {
            windowEnd: event.window.end,
            windowStart: event.window.start,
            sales: event.state.sales,
            shardId: event.shardId
          }
        }
        console.log({ params })
        await docClient.put(params).promise()

    }
    console.log(JSON.stringify(event, null, 2))
    
    // Create the state object on first invocation or use state passed in
    let state = event.state

    if (isEmpty (state)) {
        state = {
            sales: 0
        }
    }
    console.log('Existing: ', state)

    // Process records with custom aggregation logic

    event.Records.map((record) => {
        const payload = Buffer.from(record.kinesis.data, 'base64').toString('ascii')
        const item = JSON.parse(payload).Item

        // // Add sales to total
        let value = parseFloat(item.sales)
        console.log('Adding: ', value)
        state.sales += value
    })

    // Return the state for the next invocation
    console.log('Returning state: ', state)
    return { state: state }
}

This function code processes the incoming event in the same way as the previous example. I then use this Node.js script to generate random sample order data, modified to put the data on the Kinesis stream:

const AWS = require('aws-sdk')
AWS.config.update({ region: 'us-east-1' })
const kinesis = new AWS.Kinesis()

const StreamName = 'testStream'
const ITERATIONS = 100
const SLEEP_MS = 10

let totalSales = 0

function sleep(ms) { 
  return new Promise(resolve => setTimeout(resolve, ms));
}

const createSales = async() => {

  for (let i = 0; i < ITERATIONS; i++) {

    let sales = Math.round (parseFloat(100 * Math.random()))
    totalSales += sales
    console.log ({i, sales, totalSales})

    const data = {
      Item: {
        ID: Date.now().toString(),
        sales,
        timeStamp: new Date().toString()
      }
    }

    await kinesis.putRecord({
      Data: Buffer.from(JSON.stringify(data)),
      PartitionKey: 'PK1',
      StreamName
    }).promise()
    await sleep(SLEEP_MS)
  }
}

const main = async() => {
  await createSales()
}

main()

Once the script is complete, the console shows the individual order transactions and the total sales:

Console output

After the tumbling window duration is finished, the second DynamoDB table shows the aggregate values calculated and stored by the Lambda function:

Aggregate values in second DynamoDB table

As there is only one shard in this Kinesis stream, there is only one aggregation value for all the data items in the test.

Conclusion

With tumbling windows, you can calculate aggregate values in near-real time for Kinesis data streams and DynamoDB streams. Unlike existing stream-based invocations, state can be passed forward by Lambda invocations. This makes it easier to calculate sums, averages, and counts on values across multiple batches of data.

In this post, I walk through an example that aggregates sales data stored in Kinesis and DynamoDB. In each case, I create an aggregation function with an event source mapping that uses the new tumbling window duration attribute. I show how state is passed between invocations and how to persist the aggregated value at the end of the tumbling window.

To learn more about how to use this feature, read the developer documentation. To learn more about building with serverless technology, visit Serverless Land.

Using self-hosted Apache Kafka as an event source for AWS Lambda

Post Syndicated from James Beswick original https://aws.amazon.com/blogs/compute/using-self-hosted-apache-kafka-as-an-event-source-for-aws-lambda/

Apache Kafka is an open source event streaming platform used to support workloads such as data pipelines and streaming analytics. Apache Kafka is a distributed streaming platform that it is conceptually similar to Amazon Kinesis.

With the launch of Kafka as an event source for Lambda, you can now consume messages from a topic in a Lambda function. This makes it easier to integrate your self-hosted Kafka clusters with downstream serverless workflows.

In this blog post, I explain how to set up an Apache Kafka cluster on Amazon EC2 and configure key elements in the networking configuration. I also show how to create a Lambda function to consume messages from a Kafka topic. Although the process is similar to using Amazon Managed Streaming for Apache Kafka (Amazon MSK) as an event source, there are also some important differences.

Overview

Using Kafka as an event source operates in a similar way to using Amazon SQS or Amazon Kinesis. In all cases, the Lambda service internally polls for new records or messages from the event source, and then synchronously invokes the target Lambda function. Lambda reads the messages in batches and provides the message batches to your function in the event payload.

Lambda is a consumer application for your Kafka topic. It processes records from one or more partitions and sends the payload to the target function. Lambda continues to process batches until there are no more messages in the topic.

Configuring networking for self-hosted Kafka

It’s best practice to deploy the Amazon EC2 instances running Kafka in private subnets. For the Lambda function to poll the Kafka instances, you must ensure that there is a NAT Gateway running in the public subnet of each Region.

It’s possible to route the traffic to a single NAT Gateway in one AZ for test and development workloads. For redundancy in production workloads, it’s recommended that there is one NAT Gateway available in each Availability Zone. This walkthrough creates the following architecture:

Self-hosted Kafka architecture

  1. Deploy a VPC with public and private subnets and a NAT Gateway that enables internet access. To configure this infrastructure with AWS CloudFormation, deploy this template.
  2. From the VPC console, edit the default security group created by this template to provide inbound access to the following ports:
    • Custom TCP: ports 2888–3888 from all sources.
    • SSH (port 22), restricted to your own IP address.
    • Custom TCP: port 2181 from all sources.
    • Custom TCP: port 9092 from all sources.
    • All traffic from the same security group identifier.

Security Group configuration

Deploying the EC2 instances and installing Kafka

Next, you deploy the EC2 instances using this network configuration and install the Kafka application:

  1. From the EC2 console, deploy an instance running Ubuntu Server 18.04 LTS. Ensure that there is one instance in each private subnet, in different Availability Zones. Assign the default security group configured by the template.
  2. Next, deploy another EC2 instance in either of the public subnets. This is a bastion host used to access the private instances. Assign the default security group configured by the template.EC2 instances
  3. Connect to the bastion host, then SSH to the first private EC2 instance using the method for your preferred operating system. This post explains different methods. Repeat the process in another terminal for the second private instance.EC2 terminals
  4. On each instance, install Java:
    sudo add-apt-repository ppa:webupd8team/java
    sudo apt update
    sudo apt install openjdk-8-jdk
    java –version
  5. On each instance, install Kafka:
    wget http://www-us.apache.org/dist/kafka/2.3.1/kafka_2.12-2.3.1.tgz
    tar xzf kafka_2.12-2.3.1.tgz
    ln -s kafka_2.12-2.3.1 kafka

Configure and start Zookeeper

Configure and start the Zookeeper service that manages the Kafka brokers:

  1. On the first instance, configure the Zookeeper ID:
    cd kafka
    mkdir /tmp/zookeeper
    touch /tmp/zookeeper/myid
    echo "1" >> /tmp/zookeeper/myid
  2. Repeat the process on the second instance, using a different ID value:
    cd kafka
    mkdir /tmp/zookeeper
    touch /tmp/zookeeper/myid
    echo "2" >> /tmp/zookeeper/myid
  3. On the first instance, edit the config/zookeeper.properties file, adding the private IP address of the second instance:
    initLimit=5
    syncLimit=2
    tickTime=2000
    # list of servers: <ip>:2888:3888
    server.1=0.0.0.0:2888:3888 
    server.2=<<IP address of second instance>>:2888:3888
    
  4. On the second instance, edit the config/zookeeper.properties file, adding the private IP address of the first instance:
    initLimit=5
    syncLimit=2
    tickTime=2000
    # list of servers: <ip>:2888:3888
    server.1=<<IP address of first instance>>:2888:3888 
    server.2=0.0.0.0:2888:3888
  5. On each instance, start Zookeeper:bin/zookeeper-server-start.sh config/zookeeper.properties

Configure and start Kafka

Configure and start the Kafka broker:

  1. On the first instance, edit the config/server.properties file:
    broker.id=1
    zookeeper.connect=0.0.0.0:2181, =<<IP address of second instance>>:2181
  2. On the second instance, edit the config/server.properties file:
    broker.id=2
    zookeeper.connect=0.0.0.0:2181, =<<IP address of first instance>>:2181
  3. Start Kafka on each instance:
    bin/kafka-server-start.sh config/server.properties

At the end of this process, Zookeeper and Kafka are running on both instances. If you use separate terminals, it looks like this:

Zookeeper and Kafka terminals

Configuring and publishing to a topic

Kafka organizes channels of messages around topics, which are virtual groups of one or many partitions across Kafka brokers in a cluster. Multiple producers can send messages to Kafka topics, which can then be routed to and processed by multiple consumers. Producers publish to the tail of a topic and consumers read the topic at their own pace.

From either of the two instances:

  1. Create a new topic called test:
    bin/kafka-topics.sh --create --bootstrap-server localhost:9092 --replication-factor 2 --partitions 2 --topic test
  2. Start a producer:
    bin/kafka-console-producer.sh --broker-list localhost:9092 –topic
  3. Enter test messages to check for successful publication:Sending messages to the Kafka topic

At this point, you can successfully publish messages to your self-hosted Kafka cluster. Next, you configure a Lambda function as a consumer for the test topic on this cluster.

Configuring the Lambda function and event source mapping

You can create the Lambda event source mapping using the AWS CLI or AWS SDK, which provide the CreateEventSourceMapping API. In this walkthrough, you use the AWS Management Console to create the event source mapping.

Create a Lambda function that uses the self-hosted cluster and topic as an event source:

  1. From the Lambda console, select Create function.
  2. Enter a function name, and select Node.js 12.x as the runtime.
  3. Select the Permissions tab, and select the role name in the Execution role panel to open the IAM console.
  4. Choose Add inline policy and create a new policy called SelfHostedKafkaPolicy with the following permissions. Replace the resource example with the ARNs of your instances:
    {
        "Version": "2012-10-17",
        "Statement": [
            {
                "Effect": "Allow",
                "Action": [
                    "ec2:CreateNetworkInterface",
                    "ec2:DescribeNetworkInterfaces",
                    "ec2:DescribeVpcs",
                    "ec2:DeleteNetworkInterface",
                    "ec2:DescribeSubnets",
                    "ec2:DescribeSecurityGroups",
                    "logs:CreateLogGroup",
                    "logs:CreateLogStream",
                    "logs:PutLogEvents"
                ],
                "Resource": " arn:aws:ec2:<REGION>:<ACCOUNT_ID>:instance/<instance-id>"
            }
        ]
    }
    

    Create policy

  5. Choose Create policy and ensure that the policy appears in Permissions policies.IAM role page
  6. Back in the Lambda function, select the Configuration tab. In the Designer panel, choose Add trigger.
  7. In the dropdown, select Apache Kafka:
    • For Bootstrap servers, add each of the two instances private IPv4 DNS addresses with port 9092 appended.
    • For Topic name, enter ‘test’.
    • Enter your preferred batch size and starting position values (see this documentation for more information).
    • For VPC, select the VPC created by the template.
    • For VPC subnets, select the two private subnets.
    • For VPC security groups, select the default security group.
    • Choose Add.

Add trigger configuration

The trigger’s status changes to Enabled in the Lambda console after a few seconds. It then takes several minutes for the trigger to receive messages from the Kafka cluster.

Testing the Lambda function

At this point, you have created a VPC with two private and public subnets and a NAT Gateway. You have created a Kafka cluster on two EC2 instances in private subnets. You set up a target Lambda function with the necessary IAM permissions. Next, you publish messages to the test topic in Kafka and see the resulting invocation in the logs for the Lambda function.

  1. In the Function code panel, replace the contents of index.js with the following code and choose Deploy:
    exports.handler = async (event) => {
        // Iterate through keys
        for (let key in event.records) {
          console.log('Key: ', key)
          // Iterate through records
          event.records[key].map((record) => {
            console.log('Record: ', record)
            // Decode base64
            const msg = Buffer.from(record.value, 'base64').toString()
            console.log('Message:', msg)
          }) 
        }
    }
  2. Back in the terminal with the producer script running, enter a test message:Send test message in Kafka
  3. In the Lambda function console, select the Monitoring tab then choose View logs in CloudWatch. In the latest log stream, you see the original event and the decoded message:Log events output

Using Lambda as event source

The Lambda function target in the event source mapping does not need to be connected to a VPC to receive messages from the private instance hosting Kafka. However, you must provide details of the VPC, subnets, and security groups in the event source mapping for the Kafka cluster.

The Lambda function must have permission to describe VPCs and security groups, and manage elastic network interfaces. These execution roles permissions are:

  • ec2:CreateNetworkInterface
  • ec2:DescribeNetworkInterfaces
  • ec2:DescribeVpcs
  • ec2:DeleteNetworkInterface
  • ec2:DescribeSubnets
  • ec2:DescribeSecurityGroups

The event payload for the Lambda function contains an array of records. Each array item contains details of the topic and Kafka partition identifier, together with a timestamp and base64 encoded message:

Event payload example

There is an important difference in the way the Lambda service connects to the self-hosted Kafka cluster compared with Amazon MSK. MSK encrypts data in transit by default so the broker connection defaults to using TLS. With a self-hosted cluster, TLS authentication is not supported when using the Apache Kafka event source. Instead, if accessing brokers over the internet, the event source uses SASL/SCRAM authentication, which can be configured in the event source mapping:

SASL/SCRAM configuration

To learn how to configure SASL/SCRAM authentication your self-hosted Kafka cluster, see this documentation.

Conclusion

Lambda now supports self-hosted Kafka as an event source so you can invoke Lambda functions from messages in Kafka topics to integrate into other downstream serverless workflows.

This post shows how to configure a self-hosted Kafka cluster on EC2 and set up the network configuration. I also cover how to set up the event source mapping in Lambda and test a function to decode the messages sent from Kafka.

To learn more about how to use this feature, read the documentation. For more serverless learning resource, visit Serverless Land.

Supporting Jurisdictional Restrictions for Durable Objects

Post Syndicated from Greg McKeon original https://blog.cloudflare.com/supporting-jurisdictional-restrictions-for-durable-objects/

Supporting Jurisdictional Restrictions for Durable Objects

Supporting Jurisdictional Restrictions for Durable Objects

Over the past week, you’ve heard how Cloudflare is making it easy for our customers to control where their data is stored and protected.

We’re not the only ones building these data controls. Around the world, companies are working to figure out where and how to store customer data in a way that is compliant with data localization obligations. For developers, this means new deployment models and new headaches — wrangling infrastructure in multiple regions, partitioning user data based on location, and staying on top of the latest rules from regulators.

Durable Objects, currently in limited beta, already make it easy for customers to manage state on Cloudflare Workers without worrying about provisioning infrastructure. Today, we’re announcing Jurisdictional Restrictions for Durable Objects, which ensure that a Durable Object only stores and processes data in a given geographical region. Jurisdictional Restrictions make it easy for developers to build serverless, stateful applications that not only comply with today’s regulations, but can handle new and updated policies as new regulations are added.

How Jurisdictional Restrictions Work

When creating a Durable Object, developers generate a unique ID that lets a Cloudflare Worker communicate with the Object.

Let’s say I want to create a Durable Object that represents a specific user of my application:

async function handle(request) {
    let objectId = USERS.newUniqueId();
    let user = await USERS.get(objectId);
}

The unique ID encodes metadata for the Workers runtime, including a mapping to a specific Cloudflare data center. That data center is responsible for handling the creation of the Object and maintaining a routing table entry, so that a Worker can communicate with the Object if the Object migrates to another Cloudflare data center.

If the user is an EU data subject, I may want to ensure that the Durable Object that handles their data only stores and processes data inside of the EU. I can do that when I generate their Object ID, which encodes a restriction that this Durable Object can only be handled by a data center in the EU.

async function handle(request) {
    let objectId = USERS.newUniqueId({jurisdiction: "eu"});
    let user = await USERS.get(objectId);
}

There are no servers to spin up and no databases to maintain. Handling a new set of regional restrictions will be as easy as passing a different string at ID generation.

Today, we only support the EU jurisdiction, but we’ll be adding more based on developer demand.

By setting restrictions at a per-object level, it becomes easy to ensure compliance without sacrificing developer productivity. Applications running on Durable Objects just need to identify the jurisdictional rules a given Object should follow and set the corresponding rule at creation time. Gone is the need to run multiple clusters of infrastructure across cloud provider regions to stay compliant — Durable Objects are both globally accessible and capable of partitioning state with no infrastructure overhead.

In the future, we’ll add additional features to Jurisdictional Restrictions — including the ability to migrate your Objects between Jurisdictions to handle changes in regulations.

Under the hood with Durable Object ID generation

Durable Objects support two types of IDs: system-generated, where the system creates a unique ID for you, and user-generated, where a user passes in an identifier to access the Durable Object. You can think of the user-provided identifier as a seed to a hash function that determines the data center the object starts in.

By default with system-generated IDs, we construct the ID so that it maps to a data center near the Worker that generated the ID. This data center is responsible for creating the Object and storing a routing record if that Object migrates.

If the user passes in a Jurisdictional Restriction, we instead encode in the ID a mapping to a jurisdiction, which encodes a list of data centers that adhere to the rules of the Jurisdictional Restriction. We guarantee that the data center we select for creating the Object is in this list and that we will not migrate the Object to a data center that isn’t in this list. In the case of the ‘eu’ jurisdiction, that maps to one of Cloudflare’s data centers in the EU.

For user-generated IDs, though, we cannot encode this data in the ID, since we must use the string the user passed us to generate the ID! This is because requests may originate anywhere in the world, and they need to know where to find an Object without depending on coordination. For now, this means we do not support Jurisdictional Restrictions in combination with user-generated IDs.

Join the Durable Objects limited beta

Durable Objects are currently in an invite-only beta, while we scale up our systems and build out additional features. If you’re interested in using Durable Objects to meet your compliance requirements, reach out to us with your use case!

Request a beta invite

Use Macie to discover sensitive data as part of automated data pipelines

Post Syndicated from Brandon Wu original https://aws.amazon.com/blogs/security/use-macie-to-discover-sensitive-data-as-part-of-automated-data-pipelines/

Data is a crucial part of every business and is used for strategic decision making at all levels of an organization. To extract value from their data more quickly, Amazon Web Services (AWS) customers are building automated data pipelines—from data ingestion to transformation and analytics. As part of this process, my customers often ask how to prevent sensitive data, such as personally identifiable information, from being ingested into data lakes when it’s not needed. They highlight that this challenge is compounded when ingesting unstructured data—such as files from process reporting, text files from chat transcripts, and emails. They also mention that identifying sensitive data inadvertently stored in structured data fields—such as in a comment field stored in a database—is also a challenge.

In this post, I show you how to integrate Amazon Macie as part of the data ingestion step in your data pipeline. This solution provides an additional checkpoint that sensitive data has been appropriately redacted or tokenized prior to ingestion. Macie is a fully managed data security and privacy service that uses machine learning and pattern matching to discover sensitive data in AWS.

When Macie discovers sensitive data, the solution notifies an administrator to review the data and decide whether to allow the data pipeline to continue ingesting the objects. If allowed, the objects will be tagged with an Amazon Simple Storage Service (Amazon S3) object tag to identify that sensitive data was found in the object before progressing to the next stage of the pipeline.

This combination of automation and manual review helps reduce the risk that sensitive data—such as personally identifiable information—will be ingested into a data lake. This solution can be extended to fit your use case and workflows. For example, you can define custom data identifiers as part of your scans, add additional validation steps, create Macie suppression rules to archive findings automatically, or only request manual approvals for findings that meet certain criteria (such as high severity findings).

Solution overview

Many of my customers are building serverless data lakes with Amazon S3 as the primary data store. Their data pipelines commonly use different S3 buckets at each stage of the pipeline. I refer to the S3 bucket for the first stage of ingestion as the raw data bucket. A typical pipeline might have separate buckets for raw, curated, and processed data representing different stages as part of their data analytics pipeline.

Typically, customers will perform validation and clean their data before moving it to a raw data zone. This solution adds validation steps to that pipeline after preliminary quality checks and data cleaning is performed, noted in blue (in layer 3) of Figure 1. The layers outlined in the pipeline are:

  1. Ingestion – Brings data into the data lake.
  2. Storage – Provides durable, scalable, and secure components to store the data—typically using S3 buckets.
  3. Processing – Transforms data into a consumable state through data validation, cleanup, normalization, transformation, and enrichment. This processing layer is where the additional validation steps are added to identify instances of sensitive data that haven’t been appropriately redacted or tokenized prior to consumption.
  4. Consumption – Provides tools to gain insights from the data in the data lake.


Figure 1: Data pipeline with sensitive data scan

Figure 1: Data pipeline with sensitive data scan

The application runs on a scheduled basis (four times a day, every 6 hours by default) to process data that is added to the raw data S3 bucket. You can customize the application to perform a sensitive data discovery scan during any stage of the pipeline. Because most customers do their extract, transform, and load (ETL) daily, the application scans for sensitive data on a scheduled basis before any crawler jobs run to catalog the data and after typical validation and data redaction or tokenization processes complete.

You can expect that this additional validation will add 5–10 minutes to your pipeline execution at a minimum. The validation processing time will scale linearly based on object size, but there is a start-up time per job that is constant.

If sensitive data is found in the objects, an email is sent to the designated administrator requesting an approval decision, which they indicate by selecting the link corresponding to their decision to approve or deny the next step. In most cases, the reviewer will choose to adjust the sensitive data cleanup processes to remove the sensitive data, deny the progression of the files, and re-ingest the files in the pipeline.

Additional considerations for deploying this application for regular use are discussed at the end of the blog post.

Application components

The following resources are created as part of the application:

Note: the application uses various AWS services, and there are costs associated with these resources after the Free Tier usage. See AWS Pricing for details. The primary drivers of the solution cost will be the amount of data ingested through the pipeline, both for Amazon S3 storage and data processed for sensitive data discovery with Macie.

The architecture of the application is shown in Figure 2 and described in the text that follows.
 

Figure 2: Application architecture and logic

Figure 2: Application architecture and logic

Application logic

  1. Objects are uploaded to the raw data S3 bucket as part of the data ingestion process.
  2. A scheduled EventBridge rule runs the sensitive data scan Step Functions workflow.
  3. triggerMacieScan Lambda function moves objects from the raw data S3 bucket to the scan stage S3 bucket.
  4. triggerMacieScan Lambda function creates a Macie sensitive data discovery job on the scan stage S3 bucket.
  5. checkMacieStatus Lambda function checks the status of the Macie sensitive data discovery job.
  6. isMacieStatusCompleteChoice Step Functions Choice state checks whether the Macie sensitive data discovery job is complete.
    1. If yes, the getMacieFindingsCount Lambda function runs.
    2. If no, the Step Functions Wait state waits 60 seconds and then restarts Step 5.
  7. getMacieFindingsCount Lambda function counts all of the findings from the Macie sensitive data discovery job.
  8. isSensitiveDataFound Step Functions Choice state checks whether sensitive data was found in the Macie sensitive data discovery job.
    1. If there was sensitive data discovered, run the triggerManualApproval Lambda function.
    2. If there was no sensitive data discovered, run the moveAllScanStageS3Files Lambda function.
  9. moveAllScanStageS3Files Lambda function moves all of the objects from the scan stage S3 bucket to the scanned data S3 bucket.
  10. triggerManualApproval Lambda function tags and moves objects with sensitive data discovered to the manual review S3 bucket, and moves objects with no sensitive data discovered to the scanned data S3 bucket. The function then sends a notification to the ApprovalRequestNotification Amazon SNS topic as a notification that manual review is required.
  11. Email is sent to the email address that’s subscribed to the ApprovalRequestNotification Amazon SNS topic (from the application deployment template) for the manual review user with the option to Approve or Deny pipeline ingestion for these objects.
  12. Manual review user assesses the objects with sensitive data in the manual review S3 bucket and selects the Approve or Deny links in the email.
  13. The decision request is sent from the Amazon API Gateway to the receiveApprovalDecision Lambda function.
  14. manualApprovalChoice Step Functions Choice state checks the decision from the manual review user.
    1. If denied, run the deleteManualReviewS3Files Lambda function.
    2. If approved, run the moveToScannedDataS3Files Lambda function.
  15. deleteManualReviewS3Files Lambda function deletes the objects from the manual review S3 bucket.
  16. moveToScannedDataS3Files Lambda function moves the objects from the manual review S3 bucket to the scanned data S3 bucket.
  17. The next step of the automated data pipeline will begin with the objects in the scanned data S3 bucket.

Prerequisites

For this application, you need the following prerequisites:

You can use AWS Cloud9 to deploy the application. AWS Cloud9 includes the AWS CLI and AWS SAM CLI to simplify setting up your development environment.

Deploy the application with AWS SAM CLI

You can deploy this application using the AWS SAM CLI. AWS SAM uses AWS CloudFormation as the underlying deployment mechanism. AWS SAM is an open-source framework that you can use to build serverless applications on AWS.

To deploy the application

  1. Initialize the serverless application using the AWS SAM CLI from the GitHub project in the aws-samples repository. This will clone the project locally which includes the source code for the Lambda functions, Step Functions state machine definition file, and the AWS SAM template. On the command line, run the following:
    sam init --location gh: aws-samples/amazonmacie-datapipeline-scan
    

    Alternatively, you can clone the Github project directly.

  2. Deploy your application to your AWS account. On the command line, run the following:
    sam deploy --guided
    

    Complete the prompts during the guided interactive deployment. The first deployment prompt is shown in the following example.

    Configuring SAM deploy
    ======================
    
            Looking for config file [samconfig.toml] :  Found
            Reading default arguments  :  Success
    
            Setting default arguments for 'sam deploy'
            =========================================
            Stack Name [maciepipelinescan]:
    

  3. Settings:
    • Stack Name – Name of the CloudFormation stack to be created.
    • AWS RegionRegion—for example, us-west-2, eu-west-1, ap-southeast-1—to deploy the application to. This application was tested in the us-west-2 and ap-southeast-1 Regions. Before selecting a Region, verify that the services you need are available in those Regions (for example, Macie and Step Functions).
    • Parameter StepFunctionName – Name of the Step Functions state machine to be created—for example, maciepipelinescanstatemachine).
    • Parameter BucketNamePrefix – Prefix to apply to the S3 buckets to be created (S3 bucket names are globally unique, so choosing a random prefix helps ensure uniqueness).
    • Parameter ApprovalEmailDestination – Email address to receive the manual review notification.
    • Parameter EnableMacie – Whether you need Macie enabled in your account or Region. You can select yes or no; select yes if you need Macie to be enabled for you as part of this template, select no, if you already have Macie enabled.
  4. Confirm changes and provide approval for AWS SAM CLI to deploy the resources to your AWS account by responding y to prompts, as shown in the following example. You can accept the defaults for the SAM configuration file and SAM configuration environment prompts.
    #Shows you resources changes to be deployed and require a 'Y' to initiate deploy
    Confirm changes before deploy [y/N]: y
    #SAM needs permission to be able to create roles to connect to the resources in your template
    Allow SAM CLI IAM role creation [Y/n]: y
    ReceiveApprovalDecisionAPI may not have authorization defined, Is this okay? [y/N]: y
    ReceiveApprovalDecisionAPI may not have authorization defined, Is this okay? [y/N]: y
    Save arguments to configuration file [Y/n]: y
    SAM configuration file [samconfig.toml]: 
    SAM configuration environment [default]:
    

    Note: This application deploys an Amazon API Gateway with two REST API resources without authorization defined to receive the decision from the manual review step. You will be prompted to accept each resource without authorization. A token (Step Functions taskToken) is used to authenticate the requests.

  5. This creates an AWS CloudFormation changeset. Once the changeset creation is complete, you must provide a final confirmation of y to Deploy the changeset? [y/N] when prompted as shown in the following example.
    Changeset created successfully. arn:aws:cloudformation:ap-southeast-1:XXXXXXXXXXXX:changeSet/samcli-deploy1605213119/db681961-3635-4305-b1c7-dcc754c7XXXX
    
    
    Previewing CloudFormation changeset before deployment
    ======================================================
    Deploy this changeset? [y/N]:
    

Your application is deployed to your account using AWS CloudFormation. You can track the deployment events in the command prompt or via the AWS CloudFormation console.

After the application deployment is complete, you must confirm the subscription to the Amazon SNS topic. An email will be sent to the email address entered in Step 3 with a link that you need to select to confirm the subscription. This confirmation provides opt-in consent for AWS to send emails to you via the specified Amazon SNS topic. The emails will be notifications of potentially sensitive data that need to be approved. If you don’t see the verification email, be sure to check your spam folder.

Test the application

The application uses an EventBridge scheduled rule to start the sensitive data scan workflow, which runs every 6 hours. You can manually start an execution of the workflow to verify that it’s working. To test the function, you will need a file that contains data that matches your rules for sensitive data. For example, it is easy to create a spreadsheet, document, or text file that contains names, addresses, and numbers formatted like credit card numbers. You can also use this generated sample data to test Macie.

We will test by uploading a file to our S3 bucket via the AWS web console. If you know how to copy objects from the command line, that also works.

Upload test objects to the S3 bucket

  1. Navigate to the Amazon S3 console and upload one or more test objects to the <BucketNamePrefix>-data-pipeline-raw bucket. <BucketNamePrefix> is the prefix you entered when deploying the application in the AWS SAM CLI prompts. You can use any objects as long as they’re a supported file type for Amazon Macie. I suggest uploading multiple objects, some with and some without sensitive data, in order to see how the workflow processes each.

Start the Scan State Machine

  1. Navigate to the Step Functions state machines console. If you don’t see your state machine, make sure you’re connected to the same region that you deployed your application to.
  2. Choose the state machine you created using the AWS SAM CLI as seen in Figure 3. The example state machine is maciepipelinescanstatemachine, but you might have used a different name in your deployment.
     
    Figure 3: AWS Step Functions state machines console

    Figure 3: AWS Step Functions state machines console

  3. Select the Start execution button and copy the value from the Enter an execution name – optional box. Change the Input – optional value replacing <execution id> with the value just copied as follows:
    {
        “id”: “<execution id>”
    }
    

    In my example, the <execution id> is fa985a4f-866b-b58b-d91b-8a47d068aa0c from the Enter an execution name – optional box as shown in Figure 4. You can choose a different ID value if you prefer. This ID is used by the workflow to tag the objects being processed to ensure that only objects that are scanned continue through the pipeline. When the EventBridge scheduled event starts the workflow as scheduled, an ID is included in the input to the Step Functions workflow. Then select Start execution again.
     

    Figure 4: New execution dialog box

    Figure 4: New execution dialog box

  4. You can see the status of your workflow execution in the Graph inspector as shown in Figure 5. In the figure, the workflow is at the pollForCompletionWait step.
     
    Figure 5: AWS Step Functions graph inspector

    Figure 5: AWS Step Functions graph inspector

The sensitive discovery job should run for about five to ten minutes. The jobs scale linearly based on object size, but there is a start-up time per job that is constant. If sensitive data is found in the objects uploaded to the <BucketNamePrefix>-data-pipeline-upload S3 bucket, an email is sent to the address provided during the AWS SAM deployment step, notifying the recipient requesting of the need for an approval decision, which they indicate by selecting the link corresponding to their decision to approve or deny the next step as shown in Figure 6.
 

Figure 6: Sensitive data identified email

Figure 6: Sensitive data identified email

When you receive this notification, you can investigate the findings by reviewing the objects in the <BucketNamePrefix>-data-pipeline-manual-review S3 bucket. Based on your review, you can either apply remediation steps to remove any sensitive data or allow the data to proceed to the next step of the data ingestion pipeline. You should define a standard response process to address discovery of sensitive data in the data pipeline. Common remediation steps include review of the files for sensitive data, deleting the files that you do not want to progress, and updating the ETL process to redact or tokenize sensitive data when re-ingesting into the pipeline. When you re-ingest the files into the pipeline without sensitive data, the files will not be flagged by Macie.

The workflow performs the following:

  • If you select Approve, the files are moved to the <BucketNamePrefix>-data-pipeline-scanned-data S3 bucket with an Amazon S3 SensitiveDataFound object tag with a value of true.
  • If you select Deny, the files are deleted from the <BucketNamePrefix>-data-pipeline-manual-review S3 bucket.
  • If no action is taken, the Step Functions workflow execution times out after five days and the file will automatically be deleted from the <BucketNamePrefix>-data-pipeline-manual-review S3 bucket after 10 days.

Clean up the application

You’ve successfully deployed and tested the sensitive data pipeline scan workflow. To avoid ongoing charges for resources you created, you should delete all associated resources by deleting the CloudFormation stack. In order to delete the CloudFormation stack, you must first delete all objects that are stored in the S3 buckets that you created for the application.

To delete the application

  1. Empty the S3 buckets created in this application (<BucketNamePrefix>-data-pipeline-raw S3 bucket, <BucketNamePrefix>-data-pipeline-scan-stage, <BucketNamePrefix>-data-pipeline-manual-review, and <BucketNamePrefix>-data-pipeline-scanned-data).
  2. Delete the CloudFormation stack used to deploy the application.

Considerations for regular use

Before using this application in a production data pipeline, you will need to stop and consider some practical matters. First, the notification mechanism used when sensitive data is identified in the objects is email. Email doesn’t scale: you should expand this solution to integrate with your ticketing or workflow management system. If you choose to use email, subscribe a mailing list so that the work of reviewing and responding to alerts is shared across a team.

Second, the application is run on a scheduled basis (every 6 hours by default). You should consider starting the application when your preliminary validations have completed and are ready to perform a sensitive data scan on the data as part of your pipeline. You can modify the EventBridge Event Rule to run in response to an Amazon EventBridge event instead of a scheduled basis.

Third, the application currently uses a 60 second Step Functions Wait state when polling for the Macie discovery job completion. In real world scenarios, the discovery scan will take 10 minutes at a minimum, likely several orders of magnitude longer. You should evaluate the typical execution times for your application execution and tune the polling period accordingly. This will help reduce costs related to running Lambda functions and log storage within CloudWatch Logs. The polling period is defined in the Step Functions state machine definition file (macie_pipeline_scan.asl.json) under the pollForCompletionWait state.

Fourth, the application currently doesn’t account for false positives in the sensitive data discovery job results. Also, the application will progress or delete all objects identified based on the decision by the reviewer. You should consider expanding the application to handle false positives through automation rather than manual review / intervention (such as deleting the files from the manual review bucket or removing the sensitive data tags applied).

Last, the solution will stop the ingestion of a subset of objects into your pipeline. This behavior is similar to other validation and data quality checks that most customers perform as part of the data pipeline. However, you should test to ensure that this will not cause unexpected outcomes and address them in your downstream application logic accordingly.

Conclusion

In this post, I showed you how to integrate sensitive data discovery using Macie as an additional validation step in an automated data pipeline. You’ve reviewed the components of the application, deployed it using the AWS SAM CLI, tested to validate that the application functions as expected, and cleaned up by removing deployed resources.

You now know how to integrate sensitive data scanning into your ETL pipeline. You can use automation and—where required—manual review to help reduce the risk of sensitive data, such as personally identifiable information, being inadvertently ingested into a data lake. You can take this application and customize it to fit your use case and workflows, such as using custom data identifiers as part of your scans, adding additional validation steps, creating Macie suppression rules to define cases to archive findings automatically, or only request manual approvals for findings that meet certain criteria (such as high severity findings).

If you have feedback about this post, submit comments in the Comments section below. If you have questions about this post, start a new thread on the Amazon Macie forum.

Want more AWS Security how-to content, news, and feature announcements? Follow us on Twitter.

Author

Brandon Wu

Brandon is a security solutions architect helping financial services organizations secure their critical workloads on AWS. In his spare time, he enjoys exploring outdoors and experimenting in the kitchen.

Working with Lambda layers and extensions in container images

Post Syndicated from Julian Wood original https://aws.amazon.com/blogs/compute/working-with-lambda-layers-and-extensions-in-container-images/

In this post, I explain how to use AWS Lambda layers and extensions with Lambda functions packaged and deployed as container images.

Previously, Lambda functions were packaged only as .zip archives. This includes functions created in the AWS Management Console. You can now also package and deploy Lambda functions as container images.

You can use familiar container tooling such as the Docker CLI with a Dockerfile to build, test, and tag images locally. Lambda functions built using container images can be up to 10 GB in size. You push images to an Amazon Elastic Container Registry (ECR) repository, a managed AWS container image registry service. You create your Lambda function, specifying the source code as the ECR image URL from the registry.

Lambda container image support

Lambda container image support

Lambda functions packaged as container images do not support adding Lambda layers to the function configuration. However, there are a number of solutions to use the functionality of Lambda layers with container images. You take on the responsible for packaging your preferred runtimes and dependencies as a part of the container image during the build process.

Understanding how Lambda layers and extensions work as .zip archives

If you deploy function code using a .zip archive, you can use Lambda layers as a distribution mechanism for libraries, custom runtimes, and other function dependencies.

When you include one or more layers in a function, during initialization, the contents of each layer are extracted in order to the /opt directory in the function execution environment. Each runtime then looks for libraries in a different location under /opt, depending on the language. You can include up to five layers per function, which count towards the unzipped deployment package size limit of 250 MB. Layers are automatically set as private, but they can be shared with other AWS accounts, or shared publicly.

Lambda Extensions are a way to augment your Lambda functions and are deployed as Lambda layers. You can use Lambda Extensions to integrate functions with your preferred monitoring, observability, security, and governance tools. You can choose from a broad set of tools provided by AWS, AWS Lambda Ready Partners, and AWS Partners, or create your own Lambda Extensions. For more information, see “Introducing AWS Lambda Extensions – In preview.”

Extensions can run in either of two modes, internal and external. An external extension runs as an independent process in the execution environment. They can start before the runtime process, and can continue after the function invocation is fully processed. Internal extensions run as part of the runtime process, in-process with your code.

Lambda searches the /opt/extensions directory and starts initializing any extensions found. Extensions must be executable as binaries or scripts. As the function code directory is read-only, extensions cannot modify function code.

It helps to understand that Lambda layers and extensions are just files copied into specific file paths in the execution environment during the function initialization. The files are read-only in the execution environment.

Understanding container images with Lambda

A container image is a packaged template built from a Dockerfile. The image is assembled or built from commands in the Dockerfile, starting from a parent or base image, or from scratch. Each command then creates a new layer in the image, which is stacked in order on top of the previous layer. Once built from the packaged template, a container image is immutable and read-only.

For Lambda, a container image includes the base operating system, the runtime, any Lambda extensions, your application code, and its dependencies. Lambda provides a set of open-source base images that you can use to build your container image. Lambda uses the image to construct the execution environment during function initialization. You can use the AWS Serverless Application Model (AWS SAM) CLI or native container tools such as the Docker CLI to build and test container images locally.

Using Lambda layers in container images

Container layers are added to a container image, similar to how Lambda layers are added to a .zip archive function.

There are a number of ways to use container image layering to add the functionality of Lambda layers to your Lambda function container images.

Use a container image version of a Lambda layer

A Lambda layer publisher may have a container image format equivalent of a Lambda layer. To maintain the same file path as Lambda layers, the published container images must have the equivalent files located in the /opt directory. An image containing an extension must include the files in the /opt/extensions directory.

An example Lambda function, packaged as a .zip archive, is created with two layers. One layer contains shared libraries, and the other layer is a Lambda extension from an AWS Partner.

aws lambda create-function –region us-east-1 –function-name my-function \

aws lambda create-function --region us-east-1 --function-name my-function \  
    --role arn:aws:iam::123456789012:role/lambda-role \
    --layers \
        "arn:aws:lambda:us-east-1:123456789012:layer:shared-lib-layer:1" \
        "arn:aws:lambda:us-east-1:987654321987:extensions-layer:1" \
    …

The corresponding Dockerfile syntax for a function packaged as a container image includes the following lines. These pull the container image versions of the Lambda layers and copy them into the function image. The shared library image is pulled from ECR and the extension image is pulled from Docker Hub.

FROM public.ecr.aws/myrepo/shared-lib-layer:1 AS shared-lib-layer
# Layer code
WORKDIR /opt
COPY --from=shared-lib-layer /opt/ .

FROM aws-partner/extensions-layer:1 as extensions-layer
# Extension  code
WORKDIR /opt/extensions
COPY --from=extensions-layer /opt/extensions/ .

Copy the contents of a Lambda layer into a container image

You can use existing Lambda layers, and copy the contents of the layers into the function container image /opt directory during docker build.

You need to build a Dockerfile that includes the AWS Command Line Interface to copy the layer files from Amazon S3.

The Dockerfile to add two layers into a single image includes the following lines to copy the Lambda layer contents.

FROM alpine:latest

ARG AWS_DEFAULT_REGION=${AWS_DEFAULT_REGION:-"us-east-1"}
ARG AWS_ACCESS_KEY_ID=${AWS_ACCESS_KEY_ID:-""}
ARG AWS_SECRET_ACCESS_KEY=${AWS_SECRET_ACCESS_KEY:-""}
ENV AWS_DEFAULT_REGION=${AWS_DEFAULT_REGION}
ENV AWS_ACCESS_KEY_ID=${AWS_ACCESS_KEY_ID}
ENV AWS_SECRET_ACCESS_KEY=${AWS_SECRET_ACCESS_KEY}

RUN apk add aws-cli curl unzip

RUN mkdir -p /opt

RUN curl $(aws lambda get-layer-version-by-arn --arn arn:aws:lambda:us-east-1:1234567890123:layer:shared-lib-layer:1 --query 'Content.Location' --output text) --output layer.zip
RUN unzip layer.zip -d /opt
RUN rm layer.zip

RUN curl $(aws lambda get-layer-version-by-arn --arn arn:aws:lambda:us-east-1:987654321987:extensions-layer:1 --query 'Content.Location' --output text) --output layer.zip
RUN unzip layer.zip -d /opt
RUN rm layer.zip

To run the AWS CLI, specify your AWS_ACCESS_KEY, and AWS_SECRET_ACCESS_KEY, and include the required AWS_DEFAULT_REGION as command-line arguments.

docker build . -t layer-image1:latest \
--build-arg AWS_DEFAULT_REGION=us-east-1 \
--build-arg AWS_ACCESS_KEY_ID=AKIAIOSFODNN7EXAMPLE \
--build-arg AWS_SECRET_ACCESS_KEY=wJalrXUtnFEMI/K7MDENG/bPxRfiCYEXAMPLEKEY

This creates a container image containing the existing Lambda layer and extension files. This can be pushed to ECR and used in a function.

Build a container image from a Lambda layer

You can repackage and publish Lambda layer file content as container images. Creating separate container images for different layers allows you to add them to multiple functions, and share them in a similar way as Lambda layers.

You can create a separate container image containing the files from a single layer, or combine the files from multiple layers into a single image. If you create separate container images for layer files, you then add these images into your function image.

There are two ways to manage language code dependencies. You can pre-build the dependencies and copy the files into the container image, or build the dependencies during docker build.

In this example, I migrate an existing Python application. This comprises a Lambda function and extension, from a .zip archive to separate function and extension container images. The extension writes logs to S3.

You can choose how to store images in repositories. You can either push both images to the same ECR repository with different image tags, or push to different repositories. In this example, I use separate ECR repositories.

To set up the example, visit the GitHub repo and follow the instructions in the README.md file.

The existing example extension uses a makefile to install boto3 using pip install with a requirements.txt file. This is migrated to the docker build process. I must add a Python runtime to be able to run pip install as part of the build process. I use python:3.8-alpine as a minimal base image.

I create separate Dockerfiles for the function and extension. The extension Dockerfile contains the following lines.

FROM python:3.8-alpine AS installer
#Layer Code
COPY extensionssrc /opt/
COPY extensionssrc/requirements.txt /opt/
RUN pip install -r /opt/requirements.txt -t /opt/extensions/lib

FROM scratch AS base
WORKDIR /opt/extensions
COPY --from=installer /opt/extensions .

I build, tag, login, and push the extension container image to an existing ECR repository.

docker build -t log-extension-image:latest  .
docker tag log-extension-image:latest 123456789012.dkr.ecr.us-east-1.amazonaws.com/log-extension-image:latest
aws ecr get-login-password --region us-east-1 | docker login --username AWS --password-stdin 123456789012.dkr.ecr.us-east-1.amazonaws.com
docker push 123456789012.dkr.ecr.us-east-1.amazonaws.com/log-extension-image:latest

The function Dockerfile contains the following lines, which add the files from the previously created extension image to the function image. There is no need to run pip install for the function as it does not require any additional dependencies.

FROM 123456789012.dkr.ecr.us-east-1.amazonaws.com/log-extension-image:latest AS layer
FROM public.ecr.aws/lambda/python:3.8
# Layer code
WORKDIR /opt
COPY --from=layer /opt/ .
# Function code
WORKDIR /var/task
COPY app.py .
CMD ["app.lambda_handler"]

I build, tag, and push the function container image to a separate existing ECR repository. This creates an immutable image of the Lambda function.

docker build -t log-extension-function:latest  .
docker tag log-extension-function:latest 123456789012.dkr.ecr.us-east-1.amazonaws.com/log-extension-function:latest
docker push 123456789012.dkr.ecr.us-east-1.amazonaws.com/log-extension-function:latest

The function requires a unique S3 bucket to store the logs files, which I create in the S3 console. I create a Lambda function from the ECR repository image, and specify the bucket name as a Lambda environment variable.

aws lambda create-function --region us-east-1  --function-name log-extension-function \
--package-type Image --code ImageUri=123456789012.dkr.ecr.us-east-1.amazonaws.com/log-extension-function:latest \
--role "arn:aws:iam:: 123456789012:role/lambda-role" \
--environment  "Variables": {"S3_BUCKET_NAME": "s3-logs-extension-demo-logextensionsbucket-us-east-1"}

For subsequent extension code changes, I need to update both the extension and function images. If only the function code changes, I need to update the function image. I push the function image as the :latest image to ECR. I then update the function code deployment to use the updated :latest ECR image.

aws lambda update-function-code --function-name log-extension-function --image-uri 123456789012.dkr.ecr.us-east-1.amazonaws.com/log-extension-function:latest

Using custom runtimes with container images

With .zip archive functions, custom runtimes are added using Lambda layers. With container images, you no longer need to copy in Lambda layer code for custom runtimes.

You can build your own custom runtime images starting with AWS provided base images for custom runtimes. You can add your preferred runtime, dependencies, and code to these images. To communicate with Lambda, the image must implement the Lambda Runtime API. We provide Lambda runtime interface clients for all supported runtimes, or you can implement your own for additional runtimes.

Running extensions in container images

A Lambda extension running in a function packaged as a container image works in the same way as a .zip archive function. You build a function container image including the extension files, or adding an extension image layer. Lambda looks for any external extensions in the /opt/extensions directory and starts initializing them. Extensions must be executable as binaries or scripts.

Internal extensions modify the Lambda runtime startup behavior using language-specific environment variables, or wrapper scripts. For language-specific environment variables, you can set the following environment variables in your function configuration to augment the runtime command line.

  • JAVA_TOOL_OPTIONS (Java Corretto 8 and 11)
  • NODE_OPTIONS (Node.js 10 and 12)
  • DOTNET_STARTUP_HOOKS (.NET Core 3.1)

An example Lambda environment variable for JAVA_TOOL_OPTIONS:

-javaagent:"/opt/ExampleAgent-0.0.jar"

Wrapper scripts delegate the runtime start-up to a script. The script can inject and alter arguments, set environment variables, or capture metrics, errors, and other diagnostic information. The following runtimes support wrapper scripts: Node.js 10 and 12, Python 3.8, Ruby 2.7, Java 8 and 11, and .NET Core 3.1

You specify the script by setting the value of the AWS_LAMBDA_EXEC_WRAPPER environment variable as the file system path of an executable binary or script, for example:

/opt/wrapper_script

Conclusion

You can now package and deploy Lambda functions as container images in addition to .zip archives. Lambda functions packaged as container images do not directly support adding Lambda layers to the function configuration as .zip archives do.

In this post, I show a number of solutions to use the functionality of Lambda layers and extensions with container images, including example Dockerfiles.

I show how to migrate an existing Lambda function and extension from a .zip archive to separate function and extension container images. Follow the instructions in the README.md file in the GitHub repository.

For more serverless learning resources, visit https://serverlessland.com.

New for AWS Lambda – Container Image Support

Post Syndicated from Danilo Poccia original https://aws.amazon.com/blogs/aws/new-for-aws-lambda-container-image-support/

With AWS Lambda, you upload your code and run it without thinking about servers. Many customers enjoy the way this works, but if you’ve invested in container tooling for your development workflows, it’s not easy to use the same approach to build applications using Lambda.

To help you with that, you can now package and deploy Lambda functions as container images of up to 10 GB in size. In this way, you can also easily build and deploy larger workloads that rely on sizable dependencies, such as machine learning or data intensive workloads. Just like functions packaged as ZIP archives, functions deployed as container images benefit from the same operational simplicity, automatic scaling, high availability, and native integrations with many services.

We are providing base images for all the supported Lambda runtimes (Python, Node.js, Java, .NET, Go, Ruby) so that you can easily add your code and dependencies. We also have base images for custom runtimes based on Amazon Linux that you can extend to include your own runtime implementing the Lambda Runtime API.

You can deploy your own arbitrary base images to Lambda, for example images based on Alpine or Debian Linux. To work with Lambda, these images must implement the Lambda Runtime API. To make it easier to build your own base images, we are releasing Lambda Runtime Interface Clients implementing the Runtime API for all supported runtimes. These implementations are available via native package managers, so that you can easily pick them up in your images, and are being shared with the community using an open source license.

We are also releasing as open source a Lambda Runtime Interface Emulator that enables you to perform local testing of the container image and check that it will run when deployed to Lambda. The Lambda Runtime Interface Emulator is included in all AWS-provided base images and can be used with arbitrary images as well.

Your container images can also use the Lambda Extensions API to integrate monitoring, security and other tools with the Lambda execution environment.

To deploy a container image, you select one from an Amazon Elastic Container Registry repository. Let’s see how this works in practice with a couple of examples, first using an AWS-provided image for Node.js, and then building a custom image for Python.

Using the AWS-Provided Base Image for Node.js
Here’s the code (app.js) for a simple Node.js Lambda function generating a PDF file using the PDFKit module. Each time it is invoked, it creates a new mail containing random data generated by the faker.js module. The output of the function is using the syntax of the Amazon API Gateway to return the PDF file.

const PDFDocument = require('pdfkit');
const faker = require('faker');
const getStream = require('get-stream');

exports.lambdaHandler = async (event) => {

    const doc = new PDFDocument();

    const randomName = faker.name.findName();

    doc.text(randomName, { align: 'right' });
    doc.text(faker.address.streetAddress(), { align: 'right' });
    doc.text(faker.address.secondaryAddress(), { align: 'right' });
    doc.text(faker.address.zipCode() + ' ' + faker.address.city(), { align: 'right' });
    doc.moveDown();
    doc.text('Dear ' + randomName + ',');
    doc.moveDown();
    for(let i = 0; i < 3; i++) {
        doc.text(faker.lorem.paragraph());
        doc.moveDown();
    }
    doc.text(faker.name.findName(), { align: 'right' });
    doc.end();

    pdfBuffer = await getStream.buffer(doc);
    pdfBase64 = pdfBuffer.toString('base64');

    const response = {
        statusCode: 200,
        headers: {
            'Content-Length': Buffer.byteLength(pdfBase64),
            'Content-Type': 'application/pdf',
            'Content-disposition': 'attachment;filename=test.pdf'
        },
        isBase64Encoded: true,
        body: pdfBase64
    };
    return response;
};

I use npm to initialize the package and add the three dependencies I need in the package.json file. In this way, I also create the package-lock.json file. I am going to add it to the container image to have a more predictable result.

$ npm init
$ npm install pdfkit
$ npm install faker
$ npm install get-stream

Now, I create a Dockerfile to create the container image for my Lambda function, starting from the AWS provided base image for the nodejs12.x runtime:

FROM amazon/aws-lambda-nodejs:12
COPY app.js package*.json ./
RUN npm install
CMD [ "app.lambdaHandler" ]

The Dockerfile is adding the source code (app.js) and the files describing the package and the dependencies (package.json and package-lock.json) to the base image. Then, I run npm to install the dependencies. I set the CMD to the function handler, but this could also be done later as a parameter override when configuring the Lambda function.

I use the Docker CLI to build the random-letter container image locally:

$ docker build -t random-letter .

To check if this is working, I start the container image locally using the Lambda Runtime Interface Emulator:

$ docker run -p 9000:8080 random-letter:latest

Now, I test a function invocation with cURL. Here, I am passing an empty JSON payload.

$ curl -XPOST "http://localhost:9000/2015-03-31/functions/function/invocations" -d '{}'

If there are errors, I can fix them locally. When it works, I move to the next step.

To upload the container image, I create a new ECR repository in my account and tag the local image to push it to ECR. To help me identify software vulnerabilities in my container images, I enable ECR image scanning.

$ aws ecr create-repository --repository-name random-letter --image-scanning-configuration scanOnPush=true
$ docker tag random-letter:latest 123412341234.dkr.ecr.sa-east-1.amazonaws.com/random-letter:latest
$ aws ecr get-login-password | docker login --username AWS --password-stdin 123412341234.dkr.ecr.sa-east-1.amazonaws.com
$ docker push 123412341234.dkr.ecr.sa-east-1.amazonaws.com/random-letter:latest

Here I am using the AWS Management Console to complete the creation of the function. You can also use the AWS Serverless Application Model, that has been updated to add support for container images.

In the Lambda console, I click on Create function. I select Container image, give the function a name, and then Browse images to look for the right image in my ECR repositories.

Screenshot of the console.

After I select the repository, I use the latest image I uploaded. When I select the image, the Lambda is translating that to the underlying image digest (on the right of the tag in the image below). You can see the digest of your images locally with the docker images --digests command. In this way, the function is using the same image even if the latest tag is passed to a newer one, and you are protected from unintentional deployments. You can update the image to use in the function code. Updating the function configuration has no impact on the image used, even if the tag was reassigned to another image in the meantime.

Screenshot of the console.

Optionally, I can override some of the container image values. I am not doing this now, but in this way I can create images that can be used for different functions, for example by overriding the function handler in the CMD value.

Screenshot of the console.

I leave all other options to their default and select Create function.

When creating or updating the code of a function, the Lambda platform optimizes new and updated container images to prepare them to receive invocations. This optimization takes a few seconds or minutes, depending on the size of the image. After that, the function is ready to be invoked. I test the function in the console.

Screenshot of the console.

It’s working! Now let’s add the API Gateway as trigger. I select Add Trigger and add the API Gateway using an HTTP API. For simplicity, I leave the authentication of the API open.

Screenshot of the console.

Now, I click on the API endpoint a few times and download a few random mails.

Screenshot of the console.

It works as expected! Here are a few of the PDF files that are generated with random data from the faker.js module.

Output of the sample application.


Building a Custom Image for Python
Sometimes you need to use your custom container images, for example to follow your company guidelines or to use a runtime version that we don’t support.

In this case, I want to build an image to use Python 3.9. The code (app.py) of my function is very simple, I just want to say hello and the version of Python that is being used.

import sys
def handler(event, context): 
    return 'Hello from AWS Lambda using Python' + sys.version + '!'

As I mentioned before, we are sharing with you open source implementations of the Lambda Runtime Interface Clients (which implement the Runtime API) for all the supported runtimes. In this case, I start with a Python image based on Alpine Linux. Then, I add the Lambda Runtime Interface Client for Python (link coming soon) to the image. Here’s the Dockerfile:

# Define global args
ARG FUNCTION_DIR="/home/app/"
ARG RUNTIME_VERSION="3.9"
ARG DISTRO_VERSION="3.12"

# Stage 1 - bundle base image + runtime
# Grab a fresh copy of the image and install GCC
FROM python:${RUNTIME_VERSION}-alpine${DISTRO_VERSION} AS python-alpine
# Install GCC (Alpine uses musl but we compile and link dependencies with GCC)
RUN apk add --no-cache \
    libstdc++

# Stage 2 - build function and dependencies
FROM python-alpine AS build-image
# Install aws-lambda-cpp build dependencies
RUN apk add --no-cache \
    build-base \
    libtool \
    autoconf \
    automake \
    libexecinfo-dev \
    make \
    cmake \
    libcurl
# Include global args in this stage of the build
ARG FUNCTION_DIR
ARG RUNTIME_VERSION
# Create function directory
RUN mkdir -p ${FUNCTION_DIR}
# Copy handler function
COPY app/* ${FUNCTION_DIR}
# Optional – Install the function's dependencies
# RUN python${RUNTIME_VERSION} -m pip install -r requirements.txt --target ${FUNCTION_DIR}
# Install Lambda Runtime Interface Client for Python
RUN python${RUNTIME_VERSION} -m pip install awslambdaric --target ${FUNCTION_DIR}

# Stage 3 - final runtime image
# Grab a fresh copy of the Python image
FROM python-alpine
# Include global arg in this stage of the build
ARG FUNCTION_DIR
# Set working directory to function root directory
WORKDIR ${FUNCTION_DIR}
# Copy in the built dependencies
COPY --from=build-image ${FUNCTION_DIR} ${FUNCTION_DIR}
# (Optional) Add Lambda Runtime Interface Emulator and use a script in the ENTRYPOINT for simpler local runs
COPY https://github.com/aws/aws-lambda-runtime-interface-emulator/releases/latest/download/aws-lambda-rie /usr/bin/aws-lambda-rie
RUN chmod 755 /usr/bin/aws-lambda-rie
COPY entry.sh /
ENTRYPOINT [ "/entry.sh" ]
CMD [ "app.handler" ]

The Dockerfile this time is more articulated, building the final image in three stages, following the Docker best practices of multi-stage builds. You can use this three-stage approach to build your own custom images:

  • Stage 1 is building the base image with the runtime, Python 3.9 in this case, plus GCC that we use to compile and link dependencies in stage 2.
  • Stage 2 is installing the Lambda Runtime Interface Client and building function and dependencies.
  • Stage 3 is creating the final image adding the output from stage 2 to the base image built in stage 1. Here I am also adding the Lambda Runtime Interface Emulator, but this is optional, see below.

I create the entry.sh script below to use it as ENTRYPOINT. It executes the Lambda Runtime Interface Client for Python. If the execution is local, the Runtime Interface Client is wrapped by the Lambda Runtime Interface Emulator.

#!/bin/sh
if [ -z "${AWS_LAMBDA_RUNTIME_API}" ]; then
    exec /usr/bin/aws-lambda-rie /usr/local/bin/python -m awslambdaric
else
    exec /usr/local/bin/python -m awslambdaric
fi

Now, I can use the Lambda Runtime Interface Emulator to check locally if the function and the container image are working correctly:

$ docker run -p 9000:8080 lambda/python:3.9-alpine3.12

Not Including the Lambda Runtime Interface Emulator in the Container Image
It’s optional to add the Lambda Runtime Interface Emulator to a custom container image. If I don’t include it, I can test locally by installing the Lambda Runtime Interface Emulator in my local machine following these steps:

  • In Stage 3 of the Dockerfile, I remove the commands copying the Lambda Runtime Interface Emulator (aws-lambda-rie) and the entry.sh script. I don’t need the entry.sh script in this case.
  • I use this ENTRYPOINT to start by default the Lambda Runtime Interface Client:
    ENTRYPOINT [ "/usr/local/bin/python", “-m”, “awslambdaric” ]
  • I run these commands to install the Lambda Runtime Interface Emulator in my local machine, for example under ~/.aws-lambda-rie:
mkdir -p ~/.aws-lambda-rie
curl -Lo ~/.aws-lambda-rie/aws-lambda-rie https://github.com/aws/aws-lambda-runtime-interface-emulator/releases/latest/download/aws-lambda-rie
chmod +x ~/.aws-lambda-rie/aws-lambda-rie

When the Lambda Runtime Interface Emulator is installed on my local machine, I can mount it when starting the container. The command to start the container locally now is (assuming the Lambda Runtime Interface Emulator is at ~/.aws-lambda-rie):

docker run -d -v ~/.aws-lambda-rie:/aws-lambda -p 9000:8080 \
       --entrypoint /aws-lambda/aws-lambda-rie lambda/python:3.9-alpine3.12
       /lambda-entrypoint.sh app.handler

Testing the Custom Image for Python
Either way, when the container is running locally, I can test a function invocation with cURL:

curl -XPOST "http://localhost:9000/2015-03-31/functions/function/invocations" -d '{}'

The output is what I am expecting!

"Hello from AWS Lambda using Python3.9.0 (default, Oct 22 2020, 05:03:39) \n[GCC 9.3.0]!"

I push the image to ECR and create the function as before. Here’s my test in the console:

Screenshot of the console.

My custom container image based on Alpine is running Python 3.9 on Lambda!

Available Now
You can use container images to deploy your Lambda functions today in US East (N. Virginia), US East (Ohio), US West (Oregon), Asia Pacific (Tokyo), Asia Pacific (Singapore), Europe (Ireland), Europe (Frankfurt), South America (São Paulo). We are working to add support in more Regions soon. The container image support is offered in addition to ZIP archives and we will continue to support the ZIP packaging format.

There are no additional costs to use this feature. You pay for the ECR repository and the usual Lambda pricing.

You can use container image support in AWS Lambda with the console, AWS Command Line Interface (CLI), AWS SDKs, AWS Serverless Application Model, and solutions from AWS Partners, including Aqua Security, Datadog, Epsagon, HashiCorp Terraform, Honeycomb, Lumigo, Pulumi, Stackery, Sumo Logic, and Thundra.

This new capability opens up new scenarios, simplifies the integration with your development pipeline, and makes it easier to use custom images and your favorite programming platforms to build serverless applications.

Learn more and start using container images with AWS Lambda.

Danilo

Preview: AWS Proton – Automated Management for Container and Serverless Deployments

Post Syndicated from Alex Casalboni original https://aws.amazon.com/blogs/aws/preview-aws-proton-automated-management-for-container-and-serverless-deployments/

Today, we are excited to announce the public preview of AWS Proton, a new service that helps you automate and manage infrastructure provisioning and code deployments for serverless and container-based applications.

Maintaining hundreds – or sometimes thousands – of microservices with constantly changing infrastructure resources and configurations is a challenging task for even the most capable teams.

AWS Proton enables infrastructure teams to define standard templates centrally and make them available for developers in their organization. This allows infrastructure teams to manage and update infrastructure without impacting developer productivity.

How AWS Proton Works
The process of defining a service template involves the definition of cloud resources, continuous integration and continuous delivery (CI/CD) pipelines, and observability tools. AWS Proton will integrate with commonly used CI/CD pipelines and observability tools such as CodePipeline and CloudWatch. It also provides curated templates that follow AWS best practices for common use cases such as web services running on AWS Fargate or stream processing apps built on AWS Lambda.

Infrastructure teams can visualize and manage the list of service templates in the AWS Management Console.

This is what the list of templates looks like.

AWS Proton also collects information about the deployment status of the application such as the last date it was successfully deployed. When a template changes, AWS Proton identifies all the existing applications using the old version and allows infrastructure teams to upgrade them to the most recent definition, while monitoring application health during the upgrade so it can be rolled-back in case of issues.

This is what a service template looks like, with its versions and running instances.

Once service templates have been defined, developers can select and deploy services in a self-service fashion. AWS Proton will take care of provisioning cloud resources, deploying the code, and health monitoring, while providing visibility into the status of all the deployed applications and their pipelines.

This way, developers can focus on building and shipping application code for serverless and container-based applications without having to learn, configure, and maintain the underlying resources.

This is what the list of deployed services looks like.

Available in Preview
AWS Proton is now available in preview in US East (N. Virginia), US East (Ohio), US West (Oregon), Asia Pacific (Tokyo), and Europe (Ireland); it’s free of charge, as you only pay for the underlying services and resources. Check out the technical documentation.

You can get started using the AWS Management Console here.

Alex

New for AWS Lambda – Functions with Up to 10 GB of Memory and 6 vCPUs

Post Syndicated from Danilo Poccia original https://aws.amazon.com/blogs/aws/new-for-aws-lambda-functions-with-up-to-10-gb-of-memory-and-6-vcpus/

AWS Lambda runs your code on an highly available and scalable compute infrastructure so that you can focus on what you want to build. Do you want to get the advantages of Lambda for workloads that are memory or computationally intensive? Wait no more!

Starting today, you can allocate up to 10 GB of memory to a Lambda function. This is more than a 3x increase compared to previous limits. Lambda allocates CPU and other resources linearly in proportion to the amount of memory configured. That means you can now have access to up to 6 vCPUs in each execution environment. In this way, your multithreaded and multiprocess applications run faster. Since Lambda charges are proportional to memory configured and function duration (GB-seconds), the additional costs for using more memory may be offset by lower duration. I have more on this in the example below.

With more memory and CPU power, and support for the AVX2 instruction set, new use cases — such as machine learning applications; batch and extract, transform, load (ETL) jobs; modelling; genomics; gaming; high-performance computing (HPC); and media processing — become easier to implement and scale with Lambda functions.

Let’s see how this works in practice!

Lambda Function Performance as Memory Increases
When I first wrote about the capability of mounting a shared Amazon Elastic File System (EFS) for Lambda functions, one of the examples I used was a function doing machine learning inference to classify images of birds. The function is using PyTorch to run the inference, applying a pre-trained machine learning model.

Now, I can execute the same function in the updated Lambda execution environment. Let’s see how increasing memory affects the duration of the function. Here are the results of using memory configurations between 1 and 10 GB. To get these numbers, I ran 20 invocations for each memory configuration. Then, I computed the average duration, discarding function initializations. To avoid possible outliers, I also excluded from the average the top and bottom 10% of reported durations. Based on the results, I estimated the charges I would have for 1 million invocations with each configuration.

Graph showing Function Duration and Charges for 1M Invocations as Memory Increases

As you can see, the function is able to use the additional CPU power that comes with more memory, decreasing the duration of the invocations. What is interesting is the impact of increasing memory on my costs.

Lambda charges are related to memory and duration, so if I increase memory and this is reducing duration by the same proportion, the overall charges are about the same. For example, looking at the graph above, when I configure 5 GB of memory, I have the same costs as when I have 1 GB of memory (about $61 for one million invocations), but the function is 5x faster. If I need lower latency, I can increase memory up to 10 GB, where the function is 7.6x faster and I pay a little more ($80 for one million invocations).

Depending on your code and business case, you can find out which memory configuration gives the optimal trade-off between cost and performance. To help you with that, my colleague and friend Alex Casalboni started the AWS Lambda Power Tuning project to help you optimize your Lambda functions in a data-driven way. This open source tool is really useful and has been improved by the support of many contributors. Give it a try!

In my tests, PyTorch is also using the optimizations of the Advanced Vector Extensions 2 (AVX2) instruction set, now available in the Lambda execution environment. With the AVX2 instruction set, the processor allows running a certain set of operations simultaneously. This is extremely beneficial for applications with operations that can run in parallel such as matrix multiplication. As a result, using AVX2 can improve performance by increasing CPU throughput per cycle. This typically helps compute intensive workloads such as machine learning inference, multimedia processing, scientific simulations, and financial modeling applications.

Available Now
AWS Lambda support for larger functions is available in Africa (Cape Town), Asia Pacific (Mumbai), Asia Pacific (Seoul), Asia Pacific (Singapore), Asia Pacific (Sydney), Asia Pacific (Tokyo), Canada (Central), EU (Frankfurt), EU (Ireland), EU (London), EU (Milano), EU (Paris), EU (Stockholm), South America (Sao Paulo), US East (N. Virginia), US East (Ohio), US West (N. California), US West (Oregon).

You can configure up to 10 GB of memory for new or existing Lambda functions using the AWS Management Console, AWS Command Line Interface (CLI), AWS SDKs, and Serverless Application Model.

Here’s a snapshot of the new console experience. We replaced the slider with a field, and you can now configure memory in 1 MB increments (it was 64MB increments before). In this way, the console works similarly to the Lambda API that always accepted memory configurations with 1MB granularity.

There is no change in Lambda pricing, you pay for requests and usage, with duration and Provisioned Concurrency charged at a rate proportional to the amount of memory configured.

Start using Lambda functions with up to 10 GB of memory and 6 vCPUs today.

Danilo

New for AWS Lambda – 1ms Billing Granularity Adds Cost Savings

Post Syndicated from Danilo Poccia original https://aws.amazon.com/blogs/aws/new-for-aws-lambda-1ms-billing-granularity-adds-cost-savings/

What I like about AWS Lambda is that it lets you run code without provisioning or managing servers, and you pay only for what you use. Since we launched Lambda in 2014, you have been charged for the number of times your code is triggered (requests) and for the time your code executes, rounded up to the nearest 100ms (duration).

Starting today, we are rounding up duration to the nearest millisecond with no minimum execution time.

With this new pricing, you are going to pay less most of the time, but it’s going to be more noticeable when you have functions whose execution time is much lower than 100ms, such as low latency APIs.

For example, let’s look at a simple web app that I have running. In the Amazon CloudWatch Logs, for each invocation there is a REPORT line. To improve readability, I am breaking the REPORT line into three lines here:

REPORT RequestId: 35a7e0cb-4902-490d-b8d3-eb315dded660
Duration: 27.40 ms  Billed Duration: 100 ms Memory Size: 1024 MB  Max Memory Used: 472 MB

With 1ms billing granularity that becomes:

REPORT RequestId: a24d03b5-429d-4ca3-a490-878a52a0182f
Duration: 27.55 ms  Billed Duration: 28 ms Memory Size: 1024 MB  Max Memory Used: 472 MB

My application doesn’t have a lot of traffic, so let’s do a simple production scenario. Let’s say I have 100,000 users for a web/mobile app. I expect each user to call this function via the web/mobile app about 20 times per day. The duration of those invocations is on average 28ms. Each month, I should expect:

  • 100,000 users * 20 invocations * 30 days = 60 million invocations.

Let’s estimate the costs in US East (N. Virginia). For simplicity, I am not considering the Lambda free tier.

The Lambda monthly request charges are unchanged:

  • 60 million invocations * $0.20 per 1M requests = $12

To that, I have to add compute charges based on duration.

The Lambda monthly compute charges with the old 100ms rounded up pricing would have been:

  • 60 million invocations* 100ms * 1G memory * $0.0000166667 for every GB-second = $100

With the new 1ms billing granularity, the duration costs are:

  • 60 million invocations * 28ms * 1G memory * $0.0000166667 for every GB-second = $28

For this scenario, overall costs including request and compute charges are much cheaper ($40) than before ($112).

With this pricing, there is now more of an incentive to optimize the duration of functions even if it is already well below 100ms. Your engineering efforts can reduce costs even more.

If you increase memory to get more CPU power and speed up your functions, you now get the benefit of a lower billed duration below 100ms as well. That means that increasing performance and reducing latency is going to be cheaper than before.

We are applying 1ms billing granularity for duration, including when you have Provisioned Concurrency enabled, in all AWS Regions with the exception of those based in China starting with the December 2020 billing period. Regions in China will get the change from January.

Enjoy the new pricing!

Danilo

A Thanksgiving 2020 Reading List

Post Syndicated from Val Vesa original https://blog.cloudflare.com/a-thanksgiving-2020-reading-list/

A Thanksgiving 2020 Reading List

While our colleagues in the US are celebrating Thanksgiving this week and taking a long weekend off, there is a lot going on at Cloudflare. The EMEA team is having a full day on CloudflareTV with a series of live shows celebrating #CloudflareCareersDay.

So if you want to relax in an active and learning way this weekend, here are some of the topics we’ve covered on the Cloudflare blog this past week that you may find interesting.

Improving Performance and Search Rankings with Cloudflare for Fun and Profit

Making things fast is one of the things we do at Cloudflare. More responsive websites, apps, APIs, and networks directly translate into improved conversion and user experience. On November 10, Google announced that Google Search will directly take web performance and page experience data into account when ranking results on their search engine results pages (SERPs), beginning in May 2021.

Rustam Lalkaka and Rita Kozlov explain in this blog post how Google Search will prioritize results based on how pages score on Core Web Vitals, a measurement methodology Cloudflare has worked closely with Google to establish, and we have implemented support for in our analytics tools. Read the full blog post.

Getting to the Core: Benchmarking Cloudflare’s Latest Server Hardware

At the Cloudflare Core, we process logs to analyze attacks and compute analytics. In 2020, our Core servers were in need of a refresh, so we decided to redesign the hardware to be more in line with our Gen X edge servers. We designed two major server variants for the core. The first is Core Compute 2020, an AMD-based server for analytics and general-purpose compute paired with solid-state storage drives. The second is Core Storage 2020, an Intel-based server with twelve spinning disks to run database workloads. This is a refresh of the hardware that Cloudflare uses to run analytics provided big efficiency improvements.

Read the full blog post by Brian Bassett

Moving Quicksilver into production

We previously explained how and why we built Quicksilver. Quicksilver is the data store responsible for storing and distributing the billions of KV pairs used to configure the millions of sites and Internet services which use Cloudflare. This second blog post is about the long journey to production which culminates with Kyoto Tycoon removal from Cloudflare infrastructure and points to the first signs of obsolescence.

Geoffrey Plouviez takes you through the entire story of real-world engineering challenges and what it’s like to replace one of Cloudflare’s oldest critical components: read the full blog post here.

Building Black Friday e-commerce experiences with JAMstack and Cloudflare Workers

In this blog post, we explore how Cloudflare Workers continues to excel as a JAMstack deployment platform, and how it can be used to power e-commerce experiences, integrating with familiar tools like Stripe, as well as new technologies like Nuxt.js, and Sanity.io.

Read the full blog post and get all the details and open-source code from Kristian Freeman.

A Byzantine failure in the real world

When we review design documents at Cloudflare, we are always on the lookout for Single Points of Failure (SPOFs). In this post, we present a timeline of a real-world incident, and how an interesting failure mode known as a Byzantine fault played a role in a cascading series of events.

Tom Lianza and Chris Snook’s full blog post describes the consequences of a malfunctioning switch on a system built for reliability.

ASICs at the Edge

At Cloudflare, we pride ourselves in our global network that spans more than 200 cities in over 100 countries. To accelerate all that traffic through our network, there are multiple technologies at play. So let’s have a look at one of the cornerstones that makes all of this work.

Tom Strickx’ epic deep dive into ASICs is here.

Let us know your thoughts and comments below or feel free to also reach out to us via our social media channels. And because we talked about careers in the beginning of this blog post, check out our available jobs if you are interested to join Cloudflare.

ICYMI: Serverless pre:Invent 2020

Post Syndicated from James Beswick original https://aws.amazon.com/blogs/compute/icymi-serverless-preinvent-2020/

During the last few weeks, the AWS serverless team has been releasing a wave of new features in the build-up to AWS re:Invent 2020. This post recaps some of the most important releases for serverless developers.

re:Invent is virtual and free to all attendees in 2020 – register here. See the complete list of serverless sessions planned and join the serverless DA team live on Twitch. Also, follow your DAs on Twitter for live recaps and Q&A during the event.

AWS re:Invent 2020

AWS Lambda

We launched Lambda Extensions in preview, enabling you to more easily integrate monitoring, security, and governance tools into Lambda functions. You can also build your own extensions that run code during Lambda lifecycle events, and there is an example extensions repo for starting development.

You can now send logs from Lambda functions to custom destinations by using Lambda Extensions and the new Lambda Logs API. Previously, you could only forward logs after they were written to Amazon CloudWatch Logs. Now, logging tools can receive log streams directly from the Lambda execution environment. This makes it easier to use your preferred tools for log management and analysis, including Datadog, Lumigo, New Relic, Coralogix, Honeycomb, or Sumo Logic.

Lambda Extensions API

Lambda launched support for Amazon MQ as an event source. Amazon MQ is a managed broker service for Apache ActiveMQ that simplifies deploying and scaling queues. This integration increases the range of messaging services that customers can use to build serverless applications. The event source operates in a similar way to using Amazon SQS or Amazon Kinesis. In all cases, the Lambda service manages an internal poller to invoke the target Lambda function.

We also released a new layer to make it simpler to integrate Amazon CodeGuru Profiler. This service helps identify the most expensive lines of code in a function and provides recommendations to help reduce cost. With this update, you can enable the profiler by adding the new layer and setting environment variables. There are no changes needed to the custom code in the Lambda function.

Lambda announced support for AWS PrivateLink. This allows you to invoke Lambda functions from a VPC without traversing the public internet. It provides private connectivity between your VPCs and AWS services. By using VPC endpoints to access the Lambda API from your VPC, this can replace the need for an Internet Gateway or NAT Gateway.

For developers building machine learning inferencing, media processing, high performance computing (HPC), scientific simulations, and financial modeling in Lambda, you can now use AVX2 support to help reduce duration and lower cost. By using packages compiled for AVX2 or compiling libraries with the appropriate flags, your code can then benefit from using AVX2 instructions to accelerate computation. In the blog post’s example, enabling AVX2 for an image-processing function increased performance by 32-43%.

Lambda now supports batch windows of up to 5 minutes when using SQS as an event source. This is useful for workloads that are not time-sensitive, allowing developers to reduce the number of Lambda invocations from queues. Additionally, the batch size has been increased from 10 to 10,000. This is now the same as the batch size for Kinesis as an event source, helping Lambda-based applications process more data per invocation.

Code signing is now available for Lambda, using AWS Signer. This allows account administrators to ensure that Lambda functions only accept signed code for deployment. Using signing profiles for functions, this provides granular control over code execution within the Lambda service. You can learn more about using this new feature in the developer documentation.

Amazon EventBridge

You can now use event replay to archive and replay events with Amazon EventBridge. After configuring an archive, EventBridge automatically stores all events or filtered events, based upon event pattern matching logic. You can configure a retention policy for archives to delete events automatically after a specified number of days. Event replay can help with testing new features or changes in your code, or hydrating development or test environments.

EventBridge archived events

EventBridge also launched resource policies that simplify managing access to events across multiple AWS accounts. This expands the use of a policy associated with event buses to authorize API calls. Resource policies provide a powerful mechanism for modeling event buses across multiple account and providing fine-grained access control to EventBridge API actions.

EventBridge resource policies

EventBridge announced support for Server-Side Encryption (SSE). Events are encrypted using AES-256 at no additional cost for customers. EventBridge also increased PutEvent quotas to 10,000 transactions per second in US East (N. Virginia), US West (Oregon), and Europe (Ireland). This helps support workloads with high throughput.

AWS Step Functions

Synchronous Express Workflows have been launched for AWS Step Functions, providing a new way to run high-throughput Express Workflows. This feature allows developers to receive workflow responses without needing to poll services or build custom solutions. This is useful for high-volume microservice orchestration and fast compute tasks communicating via HTTPS.

The Step Functions service recently added support for other AWS services in workflows. You can now integrate API Gateway REST and HTTP APIs. This enables you to call API Gateway directly from a state machine as an asynchronous service integration.

Step Functions now also supports Amazon EKS service integration. This allows you to build workflows with steps that synchronously launch tasks in EKS and wait for a response. In October, the service also announced support for Amazon Athena, so workflows can now query data in your S3 data lakes.

These new integrations help minimize custom code and provide built-in error handling, parameter passing, and applying recommended security settings.

AWS SAM CLI

The AWS Serverless Application Model (AWS SAM) is an AWS CloudFormation extension that makes it easier to build, manage, and maintains serverless applications. On November 10, the AWS SAM CLI tool released version 1.9.0 with support for cached and parallel builds.

By using sam build --cached, AWS SAM no longer rebuilds functions and layers that have not changed since the last build. Additionally, you can use sam build --parallel to build functions in parallel, instead of sequentially. Both of these new features can substantially reduce the build time of larger applications defined with AWS SAM.

Amazon SNS

Amazon SNS announced support for First-In-First-Out (FIFO) topics. These are used with SQS FIFO queues for applications that require strict message ordering with exactly once processing and message deduplication. This is designed for workloads that perform tasks like bank transaction logging or inventory management. You can also use message filtering in FIFO topics to publish updates selectively.

SNS FIFO

AWS X-Ray

X-Ray now integrates with Amazon S3 to trace upstream requests. If a Lambda function uses the X-Ray SDK, S3 sends tracing headers to downstream event subscribers. With this, you can use the X-Ray service map to view connections between S3 and other services used to process an application request.

AWS CloudFormation

AWS CloudFormation announced support for nested stacks in change sets. This allows you to preview changes in your application and infrastructure across the entire nested stack hierarchy. You can then review those changes before confirming a deployment. This is available in all Regions supporting CloudFormation at no extra charge.

The new CloudFormation modules feature was released on November 24. This helps you develop building blocks with embedded best practices and common patterns that you can reuse in CloudFormation templates. Modules are available in the CloudFormation registry and can be used in the same way as any native resource.

Amazon DynamoDB

For customers using DynamoDB global tables, you can now use your own encryption keys. While all data in DynamoDB is encrypted by default, this feature enables you to use customer managed keys (CMKs). DynamoDB also announced support for global tables in the Europe (Milan) and Europe (Stockholm) Regions. This feature enables you to scale global applications for local access in workloads running in different Regions and replicate tables for higher availability and disaster recovery (DR).

The DynamoDB service announced the ability to export table data to data lakes in Amazon S3. This enables you to use services like Amazon Athena and AWS Lake Formation to analyze DynamoDB data with no custom code required. This feature does not consume table capacity and does not impact performance and availability. To learn how to use this feature, see this documentation.

AWS Amplify and AWS AppSync

You can now use existing Amazon Cognito user pools and identity pools for Amplify projects, making it easier to build new applications for an existing user base. AWS Amplify Console, which provides a fully managed static web hosting service, is now available in the Europe (Milan), Middle East (Bahrain), and Asia Pacific (Hong Kong) Regions. This service makes it simpler to bring automation to deploying and hosting single-page applications and static sites.

AWS AppSync enabled AWS WAF integration, making it easier to protect GraphQL APIs against common web exploits. You can also implement rate-based rules to help slow down brute force attacks. Using AWS Managed Rules for AWS WAF provides a faster way to configure application protection without creating the rules directly. AWS AppSync also recently expanded service availability to the Asia Pacific (Hong Kong), Middle East (Bahrain), and China (Ningxia) Regions, making the service now available in 21 Regions globally.

Still looking for more?

Join the AWS Serverless Developer Advocates on Twitch throughout re:Invent for live Q&A, session recaps, and more! See this page for the full schedule.

For more serverless learning resources, visit Serverless Land.

Building Black Friday e-commerce experiences with JAMstack and Cloudflare Workers

Post Syndicated from Kristian Freeman original https://blog.cloudflare.com/building-black-friday-e-commerce-experiences-with-jamstack-and-cloudflare-workers/

Building Black Friday e-commerce experiences with JAMstack and Cloudflare Workers

The idea of serverless is to allow developers to focus on writing code rather than operations — the hardest of which is scaling applications. A predictably great deal of traffic that flows through Cloudflare’s network every year is Black Friday. As John wrote at the end of last year, Black Friday is the Internet’s biggest online shopping day. In a past case study, we talked about how Cordial, a marketing automation platform, used Cloudflare Workers to reduce their API server latency and handle the busiest shopping day of the year without breaking a sweat.

The ability to handle immense scale is well-trodden territory for us on the Cloudflare blog, but scale is not always the first thing developers think about when building an application — developer experience is likely to come first. And developer experience is something Workers does just as well; through Wrangler and APIs like Workers KV, Workers is an awesome place to hack on new projects.

Over the past few weeks, I’ve been working on a sample open-source e-commerce app for selling software, educational products, and bundles. Inspired by Humble Bundle, it’s built entirely on Workers, and it integrates powerfully with all kinds of first-class modern tooling: Stripe, an API for accepting payments (both from customers and to authors, as we’ll see later), and Sanity.io, a headless CMS for data management.

This kind of project is perfectly suited for Workers. We can lean into Workers as a static site hosting platform (via Workers Sites), API server, and webhook consumer, all within a single codebase, and deployed instantly around the world on Cloudflare’s network.

If you want to see a deployed version of this template, check out ecommerce-example.signalnerve.workers.dev.

Building Black Friday e-commerce experiences with JAMstack and Cloudflare Workers
The frontend of the e-commerce Workers template.

In this blog post, I’ll dive deeper into the implementation details of the site, covering how Workers continues to excel as a JAMstack deployment platform. I’ll also cover some new territory in integrating Workers with Stripe. The project is open-source on GitHub, and I’m actively working on improving the documentation, so that you can take the codebase and build on it for your own e-commerce sites and use cases.

The frontend

As I wrote last year, Workers continues to be an amazing platform for JAMstack apps. When I started building this template, I wanted to use some things I already knew — Sanity.io for managing data, and of course, Workers Sites for deploying — but some new tools as well.

Workers Sites is incredibly simple to use: just point it at a directory of static assets, and you’re good to go. With this project, I decided to try out Nuxt.js, a Vue-based static site generator, to power the frontend for the application.

Using Sanity.io, the data representing the bundles (and the products inside of those bundles) is stored on Sanity.io’s own CDN, and retrieved client-side by the Nuxt.js application.

Building Black Friday e-commerce experiences with JAMstack and Cloudflare Workers
Managing data inside Sanity.io’s headless CMS interface.

When a potential customer visits a bundle, they’ll see a list of products from Sanity.io, and a checkout button provided by Stripe.

Responding to new checkout sessions and purchases

Making API requests with Stripe’s Node SDK isn’t currently supported in Workers (check out the GitHub issue where we’re discussing a fix), but because it’s just REST underneath, we can easily make REST requests using the library.

When a user clicks the checkout button on a bundle page, it makes a request to the Cloudflare Workers API, and securely generates a new session for the user to checkout with Stripe.

import { json, stripe } from '../helpers'

export default async (request) => {
  const body = await request.json()
  const { price_id } = body

  const session = await stripe('/checkout/sessions', {
    payment_method_types: ['card'],
    line_items: [{
        price: price_id,
        quantity: 1,
      }],
    mode: 'payment'
  }, 'POST')

  return json({ session_id: session.id })
}

This is where Workers excels as a JAMstack platform. Yes, it can do static site hosting, but with just a few extra lines of routing code, I can deploy a highly scalable API right alongside my Nuxt.js application.

Webhooks and working with external services

This idea extends throughout the rest of the checkout process. When a customer is successfully charged for their purchase, Stripe sends a webhook back to Cloudflare Workers. In order to complete the transaction on our end, the Workers application:

  • Validates the incoming data from Stripe to ensure that it’s legitimate. This means that every incoming webhook request is explicitly validated using your Stripe account details, and can be confirmed to be valid before the function acts on it.
  • Distributes payments to the authors using Stripe Connect. When a customer buys a bundle for $20, that $20 (minus Stripe fees) gets distributed evenly between the authors in that bundle — all of this calculation and the associated transfer requests happen inside the Worker.
  • Sends a unique download link to the customer. Using Workers KV, a unique token is set up that corresponds to the customer’s email, which can be used to retrieve the content the customer purchased. This integration uses Mailgun to construct an email and send it entirely over REST APIs.

By the time the purchase is complete, the Workers serverless API will have interfaced with four distinct APIs, persisting records, sending emails, and handling and distributing payments to everyone involved in the e-commerce transaction. With Workers, this all happens in a single codebase, with low latency and a superb developer experience. The entire API is type-checked and validated before it ever gets shipped to production, thanks to our TypeScript template.

Building Black Friday e-commerce experiences with JAMstack and Cloudflare Workers

Each of these tasks involves a pretty serious level of complexity, but by using Workers, we can abstract each of them into smaller pieces of functionality, and compose powerful, on-demand, and infinitely scalable webhooks directly on the serverless edge.

Conclusion

I’m really excited about the launch of this template and, of course, it wouldn’t have been possible to ship something like this in just a few weeks without using Cloudflare Workers. If you’re interested in digging into how any of the above stuff works, check out the project on GitHub!

With the recent announcement of our Workers KV free tier, this project is perfect to fork and build your own e-commerce products with. Let me know what you build and say hi on Twitter!

Serving Content Using a Fully Managed Reverse Proxy Architecture in AWS

Post Syndicated from Leonardo Machado original https://aws.amazon.com/blogs/architecture/serving-content-using-fully-managed-reverse-proxy-architecture/

With the trends to autonomous teams and microservice style architectures, web frontend tiers are challenged to become more flexible and integrate different components with independent architectures and technology stacks. Two scenarios are prominent:

  • Micro-Frontends, where there is a single page application and components within this page are owned by different teams
  • Web portals, where there is a landing page and subsections of the presence are owned by different teams. In the following we will refer to these as components as well.

What these scenarios have in common is that they consist of loosely coupled components that are seamlessly hidden to the end user behind a common interface. Often, a reverse proxy serves content from one single entry domain but retrieves the content from different origins. In the example in Figure 1 (below) we want to address one specific domain name, and depending on the path prefix, we retrieve the content from an on-premises webserver, from a webserver running on Amazon Elastic Cloud Compute (EC2), or from Amazon S3 Static Hosting, in the figure represented by the prefixes /hotels, /pets, and /cars, respectively. If we forward the path to the webserver without the path prefix, the component would not know what prefix it is run under and the prefix could be changed any time without impacting the component, thus making the component context-unaware.

Figure 1 - Architecture, AWS Amplify Console

Figure 1: Architecture, AWS Amplify Console

Some common requirements to these approaches are:

  • Components should be technology-agnostic, each component should be able to choose the technology stack independently.
  • Each component can be maintained by a dedicated autonomous team without depending on other teams.
  • All components are served from the same domain name. For example, this could have implications on search engine optimization.
  • Components should be unaware of the context where it is used.

The traditional approach would be to run a reverse proxy tier with rewrite rules to different origins. In this post we look into managed alternatives in AWS that take away the heavy lifting of running and scaling the proxy infrastructure.

Note: AWS Application Load Balancer can be used as a reverse proxy, but it only supports static targets (fixed IP address), no dynamic targets (domain name). Thus, we do not consider it here.

AWS Amplify Console

The AWS Amplify Console provides a Git-based workflow for hosting fullstack serverless web apps with continuous deployment. Amplify Console also offers a rewrites and redirects feature, which can be used for forwarding incoming requests with different path patterns to different origins (see Figure 2).

Figure 2 - Dashboard, AWS Amplify Console (rewrites and redirects feature)

Figure 2: Dashboard, AWS Amplify Console (rewrites and redirects feature)

Note: In Figure 2, <*> stands for a wildcard that matches any pattern. Target addresses must be HTTPS (no HTTP allowed).

This architectural option is the simplest to setup and manage and is the best approach for teams looking for the least management effort. AWS Amplify Console offers a simple interface for easily mapping incoming patterns to target addresses. It also makes it easy to serve additional static content if needed. Configuration options are limited and more complex scenarios cannot be implemented.

If you want to rewrite paths to remove the path prefix, you can accomplish this by using the wildcard pattern. The source address would contain the path prefix, but the target address would omit the prefix as seen in Figure 2.

When looking at pricing compared to the other approaches it is important to look at the outgoing traffic. With higher volumes, this can get expensive.

Amazon API Gateway

Amazon API Gateway is a fully managed service that makes it easy for developers to create, publish, maintain, monitor, and secure APIs at any scale. API Gateway’s REST API type allows users to setup HTTP proxy integrations, which can be used for forwarding incoming requests with different path patterns to different origin servers according to the API specifications (Figure 3).

Figure 3 - Dashboard, Amazon API Gateway (HTTP proxy integration)

Figure 3: Dashboard, Amazon API Gateway (HTTP proxy integration)

Note: In Figure 3, {proxy+} and {proxy} stand for the same wildcard pattern.

API Gateway, in comparison to Amplify Console, is better suited when looking for a higher customization degree. API Gateway offers multiple customization and monitoring features, such as custom gateway responses and dashboard monitoring.

Similar to Amplify Console, API Gateway provides a feature to rewrite paths and thus remove context from the path using the {proxy} wildcard.

API Gateway REST API pricing is based on the number of API calls as well as any external data transfers. External data transfers are charged at the EC2 data transfer rate.

Note: The HTTP integration type in API Gateway REST APIs does not support forwarding trailing slashes. If this is needed for your application, consider other integration types such as AWS Lambda integration or AWS service integration.

Amazon CloudFront and AWS Lambda@Edge

Amazon CloudFront is a fast content delivery network (CDN) service that securely delivers data, videos, applications, and APIs to customers globally with low latency and high transfer speeds. CloudFront is able to route incoming requests with different path patterns to different origins or origin groups by configuring its cache behavior rules (Figure 4).

Figure 4 - Dashboard, CloudFront (Cache Behavior)

Figure 4: Dashboard, CloudFront (Cache Behavior)

Additionally, Amazon CloudFront allows for integration with AWS Lambda@Edge functions. Lambda@Edge runs your code in response to events generated by CloudFront. In this scenario we can use Lambda@Edge to change the path pattern before forwarding a request to the origin and thus removing the context. For details on see this detailed re:Invent session.

This approach offers most control over caching behavior and customization. Being able to add your own custom code through a custom Lambda function adds an entire new range of possibilities when processing your request. This enables you to do everything from simple HTTP request and response processing at the edge to more advanced functionality, such as website security, real-time image transformation, intelligent bot mitigation, and search engine optimization.

Amazon CloudFront is charged by request and by Lambda@Edge invocation. The data traffic out is charged with the CloudFront regional data transfer out pricing.

Conclusion

With AWS Amplify Console, Amazon API Gateway, and Amazon CloudFront, we have seen three approaches to implement a reverse proxy pattern using managed services from AWS. The easiest approach to start with is AWS Amplify Console. If you run into more complex scenarios consider API Gateway. For most flexibility and when data traffic cost becomes a factor look into Amazon CloudFront with Lambda@Edge.

Using Amazon SQS dead-letter queues to replay messages

Post Syndicated from James Beswick original https://aws.amazon.com/blogs/compute/using-amazon-sqs-dead-letter-queues-to-replay-messages/

Amazon Simple Queue Service (Amazon SQS) is a fully managed message queuing service. It enables you to decouple and scale microservices, distributed systems, and serverless applications. A commonly used feature of Amazon SQS is dead-letter queues. The DLQ (dead-letter queue) is used to store messages that can’t be processed (consumed) successfully.

This post describes how to add automated resilience to an existing SQS queue. It monitors the dead-letter queue and moves a message back to the main queue to see if it can be processed again. It also uses a specific algorithm to make sure this is not repeated forever. Each time it attempts to reprocess the message, the replay time increases until the message is finally considered dead.

I use Amazon SQS dead-letter queues, AWS Lambda, and a specific algorithm to decrease the rate of retries for failed messages. I then package and publish this serverless solution in the AWS Serverless Application Repository.

Dead-letter queues and message replay

The main task of a dead-letter queue (DLQ) is to handle message failure. It allows you to set aside and isolate non-processed messages to determine why processing failed. Often these failed messages are caused by application errors. For example, a consumer application fails to parse a message correctly and throws an unhandled exception. This exception then triggers an error response that sends the message to the DLQ. The AWS documentation contains a tutorial detailing the configuration of an Amazon SQS dead-letter queue.

To process the failed messages, I build a retry mechanism by implementing an exponential backoff algorithm. The idea behind exponential backoff is to use progressively longer waits between retries for consecutive error responses. Most exponential backoff algorithms use jitter (randomized delay) to prevent successive collisions. This spreads the message retries more evenly across time, allowing them to be processed more efficiently.

Solution overview

Solution architecture

The flow of the message sent by the producer to SQS is as follows:

  1. The producer application sends a message to an SQS queue
  2. The consumer application fails to process the message in the same SQS queue
  3. The message is moved from the main SQS queue to the default dead-letter queue as per the component settings.
  4. A Lambda function is configured with the SQS main dead-letter queue as an event source. It receives and sends back the message to the original queue adding a message timer.
  5. The message timer is defined by the exponential backoff and jitter algorithm.
  6. You can limit the number of retries. If the message exceeds this limit, the message is moved to a second DLQ where an operator processes it manually.

How the replay function works

Each time the SQS dead-letter queue receives a message, it triggers Lambda to run the replay function. The replay code uses an SQS message attribute `sqs-dlq-replay-nb` as a persistent counter for the current number of retries attempted. The number of retries is compared to the maximum number (defined in the application configuration file). If it exceeds the maximum, the message is moved to the human operated queue. If not, the function uses the AWS Lambda event data to build a new message for the Amazon SQS main queue. Finally it updates the retry counter, adds a new message timer to the message, and it sends the message back (replays) to the main queue.

def handler(event, context):
    """Lambda function handler."""
    for record in event['Records']:
        nbReplay = 0
        # number of replay
        if 'sqs-dlq-replay-nb' in record['messageAttributes']:
            nbReplay = int(record['messageAttributes']['sqs-dlq-replay-nb']["stringValue"])

        nbReplay += 1
        if nbReplay > config.MAX_ATTEMPS:
            raise MaxAttempsError(replay=nbReplay, max=config.MAX_ATTEMPS)

        # SQS attributes
        attributes = record['messageAttributes']
        attributes.update({'sqs-dlq-replay-nb': {'StringValue': str(nbReplay), 'DataType': 'Number'}})

        _sqs_attributes_cleaner(attributes)

        # Backoff
        b = backoff.ExpoBackoffFullJitter(base=config.BACKOFF_RATE, cap=config.MESSAGE_RETENTION_PERIOD)
        delaySeconds = b.backoff(n=int(nbReplay))

        # SQS
        SQS.send_message(
            QueueUrl=config.SQS_MAIN_URL,
            MessageBody=record['body'],
            DelaySeconds=int(delaySeconds),
            MessageAttributes=record['messageAttributes']
        )

How to use the application

You can use this serverless application via:

  • The Lambda console: choose the “Browse serverless app repository” option to create a function. Select “amazon-sqs-dlq-replay-backoff” application in the public applications repository. Then, configure the application with the default SQS parameters and the replay feature parameters.
  • The Serverless Framework, as described by Yan Cui in this blog post.
  • An AWS CloudFormation template by using the AWS::ServerlessRepo::Application resource, as described in the documentation.

Here is an example of a CloudFormation template using the AWS Serverless Application Repository application:

AWSTemplateFormatVersion: '2010-09-09'
Transform: AWS::Serverless-2016-10-31

Resources:
  ReplaySqsQueue:
    Type: AWS::Serverless::Application
    Properties:
      Location: 
        ApplicationId: arn:aws:serverlessrepo:eu-west-1:1234123412:applications~sqs-dlq-replay
        SemanticVersion: 1.0.0
      Parameters:
        BackoffRate: "2"
        MaxAttempts: "3"

Conclusion

I describe how an exponential backoff algorithm (with jitter) enhances the message processing capabilities of an Amazon SQS queue. You can now find the amazon-sqs-dlq-replay-backoff application in the AWS Serverless Application Repository. Download the code from this GitHub repository.

To get started with dead-letter queues in Amazon SQS, read:

To implement replay mechanisms, see:

For more serverless learning resources, visit https://serverlessland.com.

New Synchronous Express Workflows for AWS Step Functions

Post Syndicated from Benjamin Smith original https://aws.amazon.com/blogs/compute/new-synchronous-express-workflows-for-aws-step-functions/

Today, AWS is introducing Synchronous Express Workflows for AWS Step Functions. This is a new way to run Express Workflows to orchestrate AWS services at high-throughput.

Developers have been using asynchronous Express Workflows since December 2019 for workloads that require higher event rates and shorter durations. Customers were looking for ways to receive an immediate response from their Express Workflows without having to write additional code or introduce additional services.

What’s new?

Synchronous Express Workflows allow developers to quickly receive the workflow response without needing to poll additional services or build a custom solution. This is useful for high-volume microservice orchestration and fast compute tasks that communicate via HTTPS.

Getting started

You can build and run Synchronous Express Workflows using the AWS Management Console, the AWS Serverless Application Model (AWS SAM), the AWS Cloud Development Kit (AWS CDK), AWS CLI, or AWS CloudFormation.

To create Synchronous Express Workflows from the AWS Management Console:

  1. Navigate to the Step Functions console and choose Create State machine.
  2. Choose Author with code snippets. Choose Express.
    This generates a sample workflow definition that you can change once the workflow is created.
  3. Choose Next, then choose Create state machine. It may take a moment for the workflow to deploy.

Starting Synchronous Express Workflows

When starting an Express Workflow, a new Type parameter is required. To start a synchronous workflow from the AWS Management Console:

  1. Navigate to the Step Functions console.
  2. Choose an Express Workflow from the list.
  3. Choose Start execution.

    Here you have an option to run the Express Workflow as a synchronous or asynchronous type.
  4. Choose Synchronous and choose Start execution.

  5. Expand Details in the results message to view the output.

Monitoring, logging and tracing

Enable logging to inspect and debug Synchronous Express Workflows. All execution history is sent to CloudWatch Logs. Use the Monitoring and Logging tabs in the Step Functions console to gain visibility into Express Workflow executions.

The Monitoring tab shows six graphs with CloudWatch metrics for Execution Errors, Execution Succeeded, Execution Duration, Billed Duration, Billed Memory, and Executions Started. The Logging tab shows recent logs and the logging configuration, with a link to CloudWatch Logs.

Enable X-Ray tracing to view trace maps and timelines of the underlying components that make up a workflow. This helps to discover performance issues, detect permission problems, and track requests made to and from other AWS services.

Creating an example workflow

The following example uses Amazon API Gateway HTTP APIs to start an Express Workflow synchronously. The workflow analyses web form submissions for negative sentiment. It generates a case reference number and saves the data in an Amazon DynamoDB table. The workflow returns the case reference number and message sentiment score.

  1. The API endpoint is generated by an API Gateway HTTP APIs. A POST request is made to the API which invokes the workflow. It contains the contact form’s message body.
  2. The message sentiment is analyzed by Amazon Comprehend.
  3. The Lambda function generates a case reference number, which is recorded in the DynamoDB table.
  4. The workflow choice state branches based on the detected sentiment.
  5. If a negative sentiment is detected, a notification is sent to an administrator via Amazon Simple Email Service (SES).
  6. When the workflow completes, it returns a ticketID to API Gateway.
  7. API Gateway returns the ticketID in the API response.

The code for this application can be found in this GitHub repository. Three important files define the application and its resources:

Deploying the application

Clone the GitHub repository and deploy with the AWS SAM CLI:

$ git clone https://github.com/aws-samples/contact-form-processing-with-synchronous-express-workflows.git
$ cd contact-form-processing-with-synchronous-express-workflows 
$ sam build 
$ sam deploy -g

This deploys 12 resources, including a Synchronous Express Workflow, three Lambda functions, an API Gateway HTTP API endpoint, and all the AWS Identity & Access Management (IAM) roles and permissions required for the application to run.

Note the HTTP APIs endpoint and workflow ARN outputs.

Testing Synchronous Express Workflows:

A new StartSyncExecution AWS CLI command is used to run the synchronous Express Workflow:

aws stepfunctions start-sync-execution \
--state-machine-arn <your-workflow-arn> \
--input "{\"message\" : \"This is bad service\"}"

The response is received once the workflow completes. It contains the workflow output (sentiment and ticketid), the executionARN, and some execution metadata.

Starting the workflow from HTTP API Gateway:

The application deploys an API Gateway HTTP API, with a Step Functions integration. This is configured in the api.yaml file. It starts the state machine with the POST body provided as the input payload.

Trigger the workflow with a POST request, using the API HTTP API endpoint generated from the deploy step. Enter the following CURL command into the terminal:

curl --location --request POST '<YOUR-HTTP-API-ENDPOINT>' \
--header 'Content-Type: application/json' \
--data-raw '{"message":" This is bad service"}'

The POST request returns a 200 status response. The output field of the response contains the sentiment results (negative) and the generated ticketId (jc4t8i).

Putting it all together

You can use this application to power a web form backend to help expedite customer complaints. In the following example, a frontend application submits form data via an AJAX POST request. The application waits for the response, and presents the user with a message appropriate to the detected sentiment, and a case reference number.

If a negative sentiment is returned in the API response, the user is informed of their case number:

Setting IAM permissions

Before a user or service can start a Synchronous Express Workflow, it must be granted permission to perform the states:StartSyncExecution API operation. This is a new state-machine level permission. Existing Express Workflows can be run synchronously once the correct IAM permissions for StartSyncExecution are granted.

The example application applies this to a policy within the HttpApiRole in the AWS SAM template. This role is added to the HTTP API integration within the api.yaml file.

Conclusion

Step Functions Synchronous Express Workflows allow developers to receive a workflow response without having to poll additional services. This helps developers orchestrate microservices without needing to write additional code to handle errors, retries, and run parallel tasks. They can be invoked in response to events such as HTTP requests via API Gateway, from a parent state machine, or by calling the StartSyncExecution API action.

This feature is available in all Regions where AWS Step Functions is available. View the AWS Regions table to learn more.

For more serverless learning resources, visit Serverless Land.

Creating faster AWS Lambda functions with AVX2

Post Syndicated from James Beswick original https://aws.amazon.com/blogs/compute/creating-faster-aws-lambda-functions-with-avx2/

Customers use AWS Lambda to build a wide range of applications, including mission-critical and compute-intensive applications. The most demanding workloads include machine learning inferencing, media processing, high performance computing (HPC), scientific simulations, and financial modeling. With the release of Advanced Vector Extensions 2 (AVX2) support for Lambda, builders can benefit from improved performance for these types of applications.

Overview

This blog post explains AVX2 and how you can take advantage of this instruction set in your Lambda functions. I walk through an example of how to enhance performance of a typical use case using AVX2 and measure the performance gain. This feature is available for new or existing Lambda-based workloads at no additional cost.

AVX2 provides extensions to the x86 instruction set architecture. This is a Single Instruction Multiple Data (SIMD) instruction set that enables running a set of highly parallelizable operations simultaneously. AVX2 allows CPUs to perform a higher number of integer and floating-point operations per clock cycle. For vectorizable algorithms, this can enhance performance resulting in lower latencies and higher throughput.

AVX2 for Lambda

Implementing AVX2 in an example application

Pillow is a popular Python-based imaging library. It provides powerful image manipulation functions that use computationally complex processes. Computer vision operations such as convolution resampling can benefit from parallelization. This is because the filters are applied on different windows that are independent and can be processed in parallel. In this section, I compare the performance of an image transformation after applying AVX2 instructions.

The following example downloads an original JPEG object from an Amazon S3 bucket, resizes the image, and then saves the result to another S3 bucket. There are three resizing filters used – bilinear, bicubic, and Lanczos.

import boto3
import os

from PIL import Image

# Download the image to /tmp
s3 = boto3.client('s3')
s3.download_file('my-input-bucket', 'photo.jpeg', '/tmp/photo.jpeg')

def lambda_handler(event, context):
    # Open image and perform resize
    image = Image.open('/tmp/photo.jpeg')

    # Select one of the three algorithms
    image = image.resize((256, 128), Image.BILINEAR) 
    # image = image.resize((256, 128), Image.BICUBIC) 
    # image = image.resize((256, 128), Image.LANCZOS) 
    
    # Save and upload to S3
    image.save('/tmp/thumbnail.jpeg', 'JPEG')
    s3.upload_file('/tmp/thumbnail.jpeg', 'my-output-bucket', 'thumbnail.jpeg')
    
    return "Success!"

To convert code to use AVX2, you must recompile the source code with the appropriate flags, or use packages and dependencies optimized for AVX2. In this example, you can use a production-ready fork of Pillow called pillow-simd. When compiled for AVX2, it uses the AVX2 instructions to accelerate many of the features in Pillow.

First, you must compile the library using the same Amazon Linux AMI and kernel version that is used by the Lambda service. To do this, use an EC2 or AWS Cloud9 instance running Amazon Linux 2, or using a Docker container with a Lambda-supported image. Compile the library using the following commands:

# Install dependencies
~ yum install -y \
    freetype-devel \
    gcc \
    ghostscript \
    lcms2-devel \
    libffi-devel \
    libimagequant-devel \
    libjpeg-devel \
    libraqm-devel \
    libtiff-devel \
    libwebp-devel \
    make \
    openjpeg2-devel \
    rh-python36 \
    rh-python36-python-virtualenv \
    sudo \
    tcl-devel \
    tk-devel \
    tkinter \
    which \
    xorg-x11-server-Xvfb \
    zlib-devel \
    && yum clean all

# Compile code with AVX2 flag
CC="cc -mavx2" pip install --force-reinstall --no-cache-dir -t . --compile  pillow-simd

You can then use this compiled, AVX2-compatible version of the Pillow library in a Lambda function. This can be bundled with the deployment code or you can deploy the library as a Lambda layer. Depending on the version, you may have to include the following binaries from the `/usr/lib64` directory with the function. If so, add this location to LD_LIBRARY_PATH so the binaries are discoverable:

cp /usr/lib64/libtiff.so.5 lib/libtiff.so.5
cp /usr/lib64/libjpeg.so.62 lib/libjpeg.so.62
cp /usr/lib64/libjbig.so.2.0 lib/libjbig.so.2.0

In this test, I compare the performance of both the original function and the AVX2-optimized version with 1024 MB of memory. The test uses the following image:

Resampled photo

Source: https://unsplash.com/photos/IMXhx6qhvf0. Photo credit: Daniel Seßler.

  1. Bilinear filter.
  2. Bicubic filter.
  3. Lanczos filter.

The timings exclude S3 transfers and only compare the image transformation operation. The results of the three resize operations are:

Filter Without AVX2 With AVX2 Performance
improvement
Bilinear

105 ms

71 ms

32%

Bicubic

122 ms

73 ms

40%

Lanczos

136 ms

77 ms

43%

Using AVX2 in popular Lambda runtimes

This process involves recompiling the source code with appropriate flags, or by selecting packages and dependencies optimized for AVX2. For popular runtimes used in Lambda:

  • Python: Python developers frequently use scipy and numpy libraries to support scientific or computationally complex work. These libraries can be compiled with the AVX2 flag or linked with MKL to take advantage of AVX2.
  • Java: Java’s JIT compiler can auto-vectorize code to run with AVX2 instructions. To learn more, see this post on how to detect vectorization and potentially optimize code to take advantage of this.
  • Golang: the standard golang compiler does not currently support auto-vectorization. However, you can use the gcc compiler for Go, gccgo.
  • Node: for compute intensive workloads, use the AVX2-enabled or MKL-enabled versions of libraries.
  • Compiling from source: for C or C++ libraries for vectorizable work, compile with the appropriate flags to allow the compiler to automatically vectorize your code. See the documentation for additional details.

Enabling AVX2 for the Intel Math Kernel Library

The Intel Math Kernel Library (MKL) is a library of optimized math operations that implicitly use AVX2 instructions when available on the compute platform. Many popular frameworks, such as PyTorch, build with MKL by default so you don’t need to take additional actions. Some libraries, such as TensorFlow, provide options in their build process to specify MKL optimization (set –config=mkl as an option).

You can also build popular scientific Python libraries, such as SciPy and NumPy, with MKL. For instructions on building libraries with MKL, read Numpy/Scipy with Intel MKL and Intel Compilers. Intel also provides a Python distribution that includes SciPy and NumPy with MKL.

Performance improvements

After enabling AVX2 for your Lambda functions, you can compare the before-and-after performance. Lambda emits a latency metric in CloudWatch that you can use to measure the performance improvement. Other third-party production monitoring tools (for example, Datadog or New Relic) can also capture these metrics to profile the performance.

Pricing and availability

Starting today, customers can either compile their existing workloads or deploy new ones to target this instruction set at no additional cost. To learn more on how to build AVX2 compatible applications on AWS Lambda, read the Lambda Developer Guide.

Support for AVX2 is available in all Regions where Lambda is available, except for the Regions in China. For more information on availability, see the AWS Region table.

Conclusion

With the release of AVX2 for Lambda, customers can now run AVX2-optimized workloads while benefitting from the pay-for-use, reduced operational model of AWS Lambda. This feature is provided at no additional cost.

Developers can create highly scalable synchronous, asynchronous, or streaming applications. Compared to the x86 Intel baseline instruction set, AVX2 allows CPUs to perform more integer and floating-point operations per clock cycle. This speeds up compute-intensive applications with parallelizable operations to process data faster and improve throughput. Developers can schedule queues with data-intensive jobs and deliver performant end user experiences.

To learn more, read the Lambda documentation. For more serverless learning resources, visit Serverless Land.


Introducing Amazon API Gateway service integration for AWS Step Functions

Post Syndicated from Benjamin Smith original https://aws.amazon.com/blogs/compute/introducing-amazon-api-gateway-service-integration-for-aws-step-functions/

AWS Step Functions now integrates with Amazon API Gateway to enable backend orchestration with minimal code and built-in error handling.

API Gateway is a fully managed service that makes it easy for developers to create, publish, maintain, monitor, and secure APIs at any scale. These APIs enable applications to access data, business logic, or functionality from your backend services.

Step Functions allows you to build resilient serverless orchestration workflows with AWS services such as AWS Lambda, Amazon SNS, Amazon DynamoDB, and more. AWS Step Functions integrates with a number of services natively. Using Amazon States Language (ASL), you can coordinate these services directly from a task state.

What’s new?

The new Step Functions integration with API Gateway provides an additional resource type, arn:aws:states:::apigateway:invoke and can be used with both Standard and Express workflows. It allows customers to call API Gateway REST APIs and API Gateway HTTP APIs directly from a workflow, using one of two integration patterns:

  1. Request-Response: calling a service and let Step Functions progress to the next state immediately after it receives an HTTP response. This pattern is supported by Standard and Express Workflows.
  2. Wait-for-Callback: calling a service with a task token and have Step Functions wait until that token is returned with a payload. This pattern is supported by Standard Workflows.

The new integration is configured with the following Amazon States Language parameter fields:

  • ApiEndpoint: The API root endpoint.
  • Path: The API resource path.
  • Method: The HTTP request method.
  • HTTP headers: Custom HTTP headers.
  • RequestBody: The body for the API request.
  • Stage: The API Gateway deployment stage.
  • AuthType: The authentication type.

Refer to the documentation for more information on API Gateway fields and concepts.

Getting started

The API Gateway integration with Step Functions is configured using AWS Serverless Application Model (AWS SAM), the AWS Command Line Interface (AWS CLI), AWS CloudFormation or from within the AWS Management Console.

To get started with Step Functions and API Gateway using the AWS Management Console:

  1. Go to the Step Functions page of the AWS Management Console.
  2. Choose Run a sample project and choose Make a call to API Gateway.
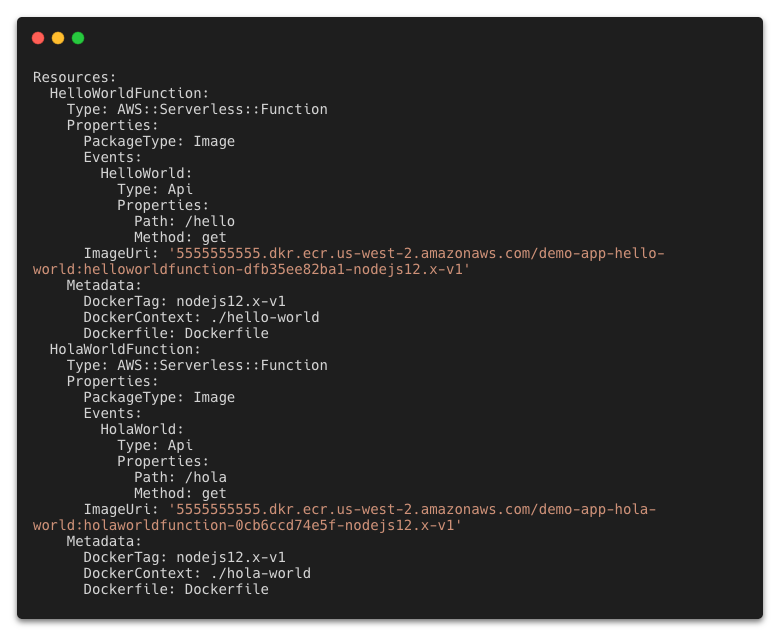
The Definition section shows the ASL that makes up the example workflow. The following example shows the new API Gateway resource and its parameters:
  3. Review example Definition, then choose Next.
  4. Choose Deploy resources.

This deploys a Step Functions standard workflow and a REST API with a /pets resource containing a GET and a POST method. It also deploys an IAM role with the required permissions to invoke the API endpoint from Step Functions.

The RequestBody field lets you customize the API’s request input. This can be a static input or a dynamic input taken from the workflow payload.

Running the workflow

  1. Choose the newly created state machine from the Step Functions page of the AWS Management Console
  2. Choose Start execution.
  3. Paste the following JSON into the input field:
    {
      "NewPet": {
        "type": "turtle",
        "price": 74.99
      }
    }
  4. Choose Start execution
  5. Choose the Retrieve Pet Store Data step, then choose the Step output tab.

This shows the successful responseBody output from the “Add to pet store” POST request and the response from the “Retrieve Pet Store Data” GET request.

Access control

The API Gateway integration supports AWS Identity and Access Management (IAM) authentication and authorization. This includes IAM roles, policies, and tags.

AWS IAM roles and policies offer flexible and robust access controls that can be applied to an entire API or individual methods. This controls who can create, manage, or invoke your REST API or HTTP API.

Tag-based access control allows you to set more fine-grained access control for all API Gateway resources. Specify tag key-value pairs to categorize API Gateway resources by purpose, owner, or other criteria. This can be used to manage access for both REST APIs and HTTP APIs.

API Gateway resource policies are JSON policy documents that control whether a specified principal (typically an IAM user or role) can invoke the API. Resource policies can be used to grant access to a REST API via AWS Step Functions. This could be for users in a different AWS account or only for specified source IP address ranges or CIDR blocks.

To configure access control for the API Gateway integration, set the AuthType parameter to one of the following:

  1. {“AuthType””: “NO_AUTH”}
    Call the API directly without any authorization. This is the default setting.
  2. {“AuthType””: “IAM_ROLE”}
    Step Functions assumes the state machine execution role and signs the request with credentials using Signature Version 4.
  3. {“AuthType””: “RESOURCE_POLICY”}
    Step Functions signs the request with the service principal and calls the API endpoint.

Orchestrating microservices

Customers are already using Step Functions’ built in failure handling, decision branching, and parallel processing to orchestrate application backends. Development teams are using API Gateway to manage access to their backend microservices. This helps to standardize request, response formats and decouple business logic from routing logic. It reduces complexity by allowing developers to offload responsibilities of authentication, throttling, load balancing and more. The new API Gateway integration enables developers to build robust workflows using API Gateway endpoints to orchestrate microservices. These microservices can be serverless or container-based.

The following example shows how to orchestrate a microservice with Step Functions using API Gateway to access AWS services. The example code for this application can be found in this GitHub repository.

To run the application:

  1. Clone the GitHub repository:
    $ git clone https://github.com/aws-samples/example-step-functions-integration-api-gateway.git
    $ cd example-step-functions-integration-api-gateway
  2. Deploy the application using AWS SAM CLI, accepting all the default parameter inputs:
    $ sam build && sam deploy -g

    This deploys 17 resources including a Step Functions standard workflow, an API Gateway REST API with three resource endpoints, 3 Lambda functions, and a DynamoDB table. Make a note of the StockTradingStateMachineArn value. You can find this in the command line output or in the Applications section of the AWS Lambda Console:


  3. Manually trigger the workflow from a terminal window:
    aws stepFunctions start-execution \
    --state-machine-arn <StockTradingStateMachineArnValue>

The response looks like:


When the workflow is run, a Lambda function is invoked via a GET request from API Gateway to the /check resource. This returns a random stock value between 1 and 100. This value is evaluated in the Buy or Sell choice step, depending on if it is less or more than 50. The Sell and Buy states use the API Gateway integration to invoke a Lambda function, with a POST method. A stock_value is provided in the POST request body. A transaction_result is returned in the ResponseBody and provided to the next state. The final state writes a log of the transition to a DynamoDB table.

Defining the resource with an AWS SAM template

The Step Functions resource is defined in this AWS SAM template. The DefinitionSubstitutions field is used to pass template parameters to the workflow definition.

StockTradingStateMachine:
    Type: AWS::Serverless::StateMachine # More info about State Machine Resource: https://docs.aws.amazon.com/serverless-application-model/latest/developerguide/sam-resource-statemachine.html
    Properties:
      DefinitionUri: statemachine/stock_trader.asl.json
      DefinitionSubstitutions:
        StockCheckPath: !Ref CheckPath
        StockSellPath: !Ref SellPath
        StockBuyPath: !Ref BuyPath
        APIEndPoint: !Sub "${ServerlessRestApi}.execute-api.${AWS::Region}.amazonaws.com"
        DDBPutItem: !Sub arn:${AWS::Partition}:states:::dynamodb:putItem
        DDBTable: !Ref TransactionTable

The workflow is defined on a separate file (/statemachine/stock_trader.asl.json).

The following code block defines the Check Stock Value state. The new resource, arn:aws:states:::apigateway:invoke declares the API Gateway service integration type.

The parameters object holds the required fields to configure the service integration. The Path and ApiEndpoint values are provided by the DefinitionsSubstitutions field in the AWS SAM template. The RequestBody input is defined dynamically using Amazon States Language. The .$ at the end of the field name RequestBody specifies that the parameter use a path to reference a JSON node in the input.

"Check Stock Value": {
  "Type": "Task",
  "Resource": "arn:aws:states:::apigateway:invoke",
  "Parameters": {
      "ApiEndpoint":"${APIEndPoint}",
      "Method":"GET",
      "Stage":"Prod",
      "Path":"${StockCheckPath}",
      "RequestBody.$":"$",
      "AuthType":"NO_AUTH"
  },
  "Retry": [
      {
          "ErrorEquals": [
              "States.TaskFailed"
          ],
          "IntervalSeconds": 15,
          "MaxAttempts": 5,
          "BackoffRate": 1.5
      }
  ],
  "Next": "Buy or Sell?"
},

The deployment process validates the ApiEndpoint value. The service integration builds the API endpoint URL from the information provided in the parameters block in the format https://[APIendpoint]/[Stage]/[Path].

Conclusion

The Step Functions integration with API Gateway provides customers with the ability to call REST APIs and HTTP APIs directly from a Step Functions workflow.

Step Functions’ built in error handling helps developers reduce code and decouple business logic. Developers can combine this with API Gateway to offload responsibilities of authentication, throttling, load balancing and more. This enables developers to orchestrate microservices deployed on containers or Lambda functions via API Gateway without managing infrastructure.

This feature is available in all Regions where both AWS Step Functions and Amazon API Gateway are available. View the AWS Regions table to learn more. For pricing information, see Step Functions pricing. Normal service limits of API Gateway and service limits of Step Functions apply.

For more serverless learning resources, visit Serverless Land.