APIs account for more than half of the total traffic of the Internet. They are the building blocks of many modern web applications. As API usage grows, so does the number of API attacks. And so now, more than ever, it’s important to keep these API endpoints secure. Cloudflare’s API Shield solution offers a comprehensive suite of products to safeguard your API endpoints and now we’re excited to give our customers one more tool to keep their endpoints safe. We’re excited to announce that customers can now bring their own Certificate Authority (CA) to use for mutual TLS client authentication. This gives customers more security, while allowing them to maintain control around their Mutual TLS configuration.
The power of Mutual TLS (mTLS)
Traditionally, when we refer to TLS certificates, we talk about the publicly trusted certificates that are presented by servers to prove their identity to the connecting client. With Mutual TLS, both the client and the server present a certificate to establish a two-way channel of trust. Doing this allows the server to check who the connecting client is and whether or not they’re allowed to make a request. The certificate presented by the client – the client certificate – doesn’t need to come from a publicly trusted CA. In fact, it usually comes from a private or self-signed CA. That’s because the only party that needs to be able to trust it is the connecting server. As long as the connecting server has the client certificate and can check its validity, it doesn’t need to be public.
Securing API endpoints with Mutual TLS
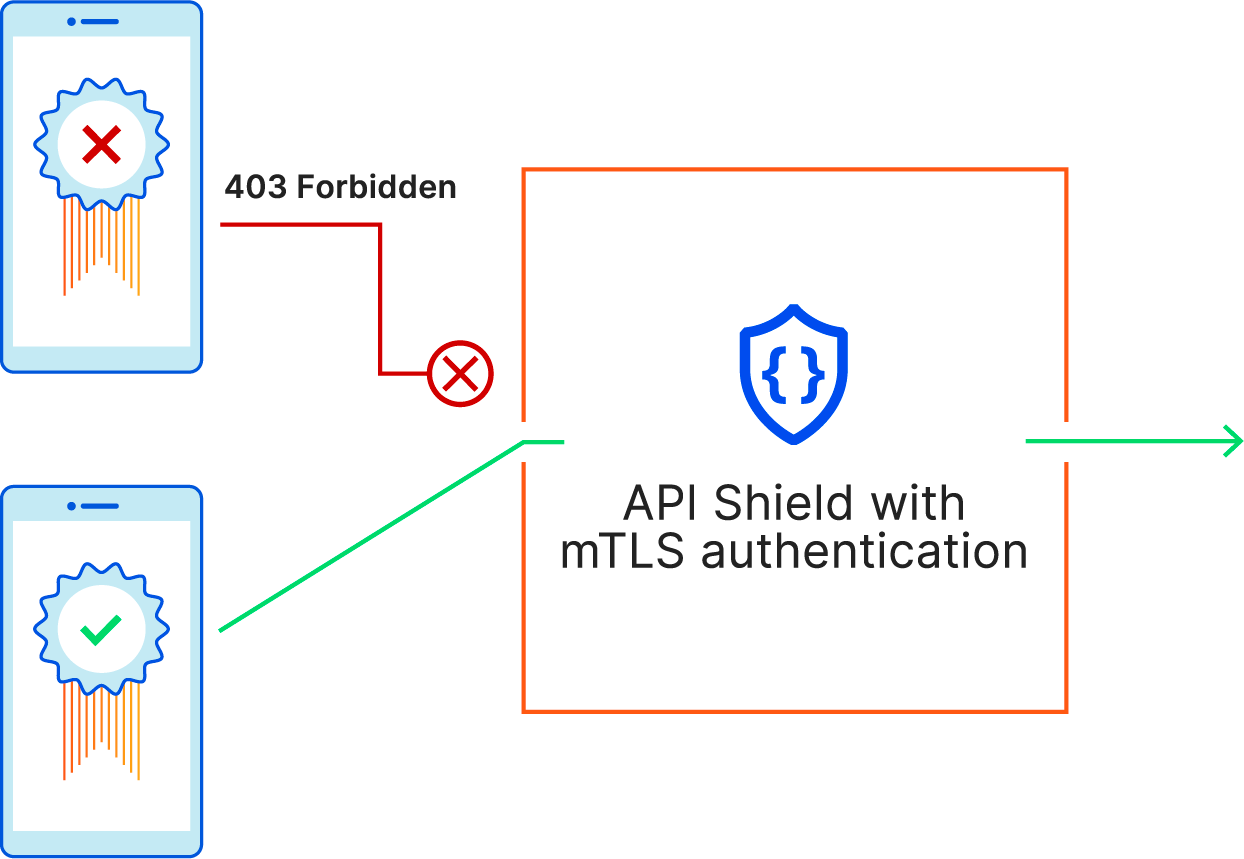
Mutual TLS plays a crucial role in protecting API endpoints. When it comes to safeguarding these endpoints, it's important to have a security model in place that only allows authorized clients to make requests and keeps everyone else out.
That’s why when we launched API Shield in 2020 – a product that’s centered around securing API endpoints – we included mutual TLS client certificate validation as a part of the offering. We knew that mTLS was the best way for our customers to identify and authorize their connecting clients.
When we launched mutual TLS for API Shield, we gave each of our customers a dedicated self-signed CA that they could use to issue client certificates. Once the certificates are installed on devices and mTLS is set up, administrators can enforce that connections can only be made if they present a client certificate issued from that self-signed CA.
This feature has been paramount in securing thousands of endpoints, but it does require our customer to install new client certificates on their devices, which isn’t always possible. Some customers have been using mutual TLS for years with their own CA, which means that the client certificates are already in the wild. Unless the application owner has direct control over the clients, it’s usually arduous, if not impossible, to replace the client certificates with ones issued from Cloudflare’s CA. Other customers may be required to use a CA issued from an approved third party in order to meet regulatory requirements.
To help all of our customers keep their endpoints secure, we’re extending API Shield’s mTLS capability to allow customers to bring their own CA.
Get started today
To simplify the management of private PKI at Cloudflare, we created one account level endpoint that enables customers to upload self-signed CAs to use across different Cloudflare products. Today, this endpoint can be used for API shield CAs and for Gateway CAs that are used for traffic inspection.
If you’re an Enterprise customer, you can upload up to five CAs to your account. Once you’ve uploaded the CA, you can use the API Shield hostname association API to associate the CA with the mTLS enabled hostnames. That will tell Cloudflare to start validating the client certificate against the uploaded CA for requests that come in on that hostname. Before you enforce the client certificate validation, you can create a Firewall rule that logs an event when a valid or invalid certificate is served. That will help you determine if you’ve set things up correctly before you enforce the client certificate validation and drop unauthorized requests.
At Amazon Web Services (AWS), we strive to continuously improve customer experience by delivering a cloud computing environment that supports the most modern security technologies. To improve the overall performance of your connections, we have already started to enable TLS version 1.3 globally across our AWS service API endpoints, and will complete this process by December 31, 2023. By using TLS 1.3, you can decrease your connection time by removing one network round trip for every connection request, and can benefit from some of the most modern and secure cryptographic cipher suites available today.
If you are using current software tools (2014 or later) including our AWS SDKs or AWS Command Line Interface (AWS CLI), you will automatically receive the benefits of TLS 1.3 with no action required on your part. This is because AWS services will negotiate the highest TLS protocol version that your client software supports. If you want to continue using TLS 1.2, you will still have full control through your client configurations. AWS will retain support for TLS 1.2, in addition to TLS 1.3, into the foreseeable future. Meanwhile, here’s the latest information on the on-going deprecation of TLS 1.0/1.1.
If you have any questions, start a new thread on AWS re:Post, or contact AWS Support or your technical account manager. If you have feedback about this post, submit comments in the Comments section below.
Want more AWS Security how-to content, news, and feature announcements? Follow us on Twitter.
On December 16, 2022, Cloudflare discovered a bug where, in limited circumstances, some users with revoked certificates may not have been blocked by Cloudflare firewall settings. Specifically, Cloudflare’s Firewall Rules solution did not block some users with revoked certificates from resuming a session via mutual transport layer security (mTLS), even if the customer had configured Firewall Rules to do so. This bug has been mitigated, and we have no evidence of this being exploited. We notified any customers that may have been impacted in an abundance of caution, so they can check their own logs to determine if an mTLS protected resource was accessed by entities holding a revoked certificate.
What happened?
One of Cloudflare Firewall Rules’ features, introduced in March 2021, lets customers revoke or block a client certificate, preventing it from being used to authenticate and establish a session. For example, a customer may use Firewall Rules to protect a service by requiring clients to provide a client certificate through the mTLS authentication protocol. Customers could also revoke or disable a client certificate, after which it would no longer be able to be used to authenticate a party initiating an encrypted session via mTLS.
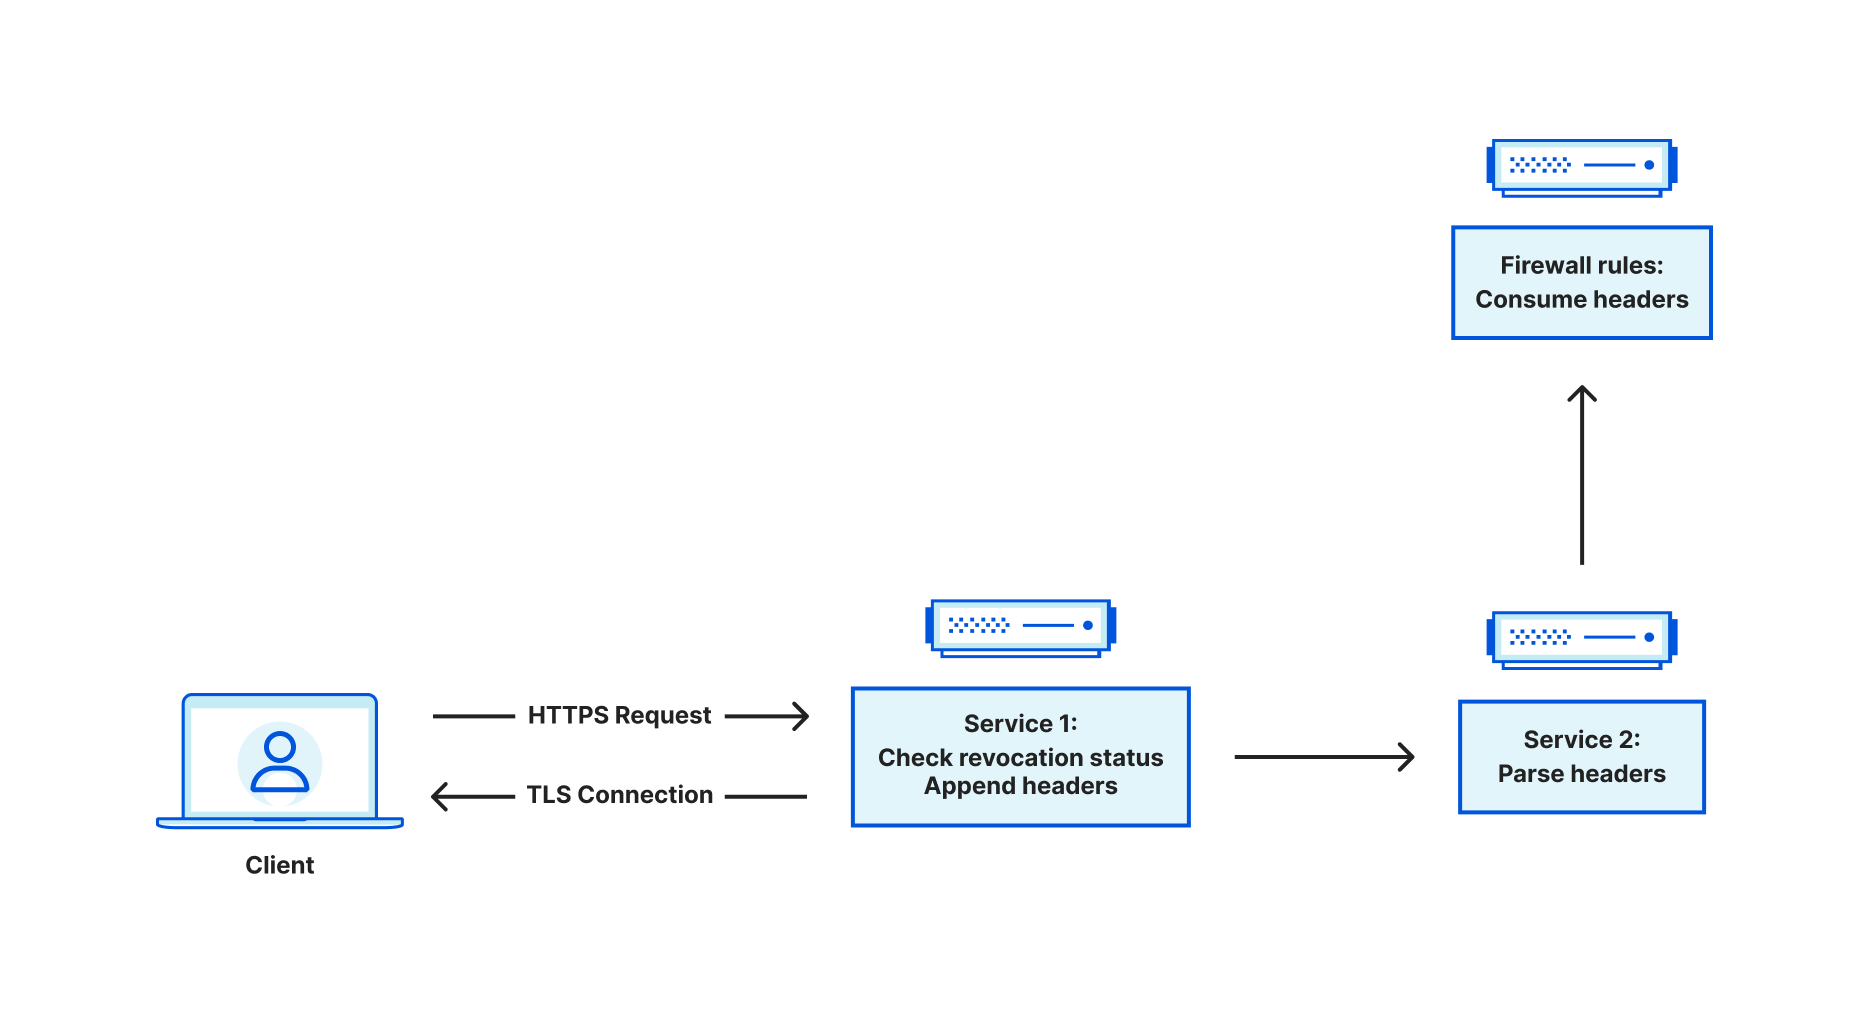
When Cloudflare receives traffic from an end user, a service at the edge is responsible for terminating the incoming TLS connection. From there, this service is a reverse proxy, and it is responsible for acting as a bridge between the end user and various upstreams. Upstreams might include other services within Cloudflare such as Workers or Caching, or may travel through Cloudflare to an external server such as an origin hosting content. Sometimes, you may want to restrict access to an endpoint, ensuring that only authorized actors can access it. Using client certificates is a common way of authenticating users. This is referred to as mutual TLS, because both the server and client provide a certificate. When mTLS is enabled for a specific hostname, this service at the edge is responsible for parsing the incoming client certificate and converting that into metadata that is attached to HTTP requests that are forwarded to upstreams. The upstreams can process this metadata and make the decision whether the client is authorized or not.
Customers can use the Cloudflare dashboard to revoke existing client certificates. Instead of immediately failing handshakes involving revoked client certificates, revocation is optionally enforced via Firewall Rules, which take effect at the HTTP request level. This leaves the decision to enforce revocation with the customer.
So how exactly does this service determine whether a client certificate is revoked?
When we see a client certificate presented as part of the TLS handshake, we store the entire certificate chain on the TLS connection. This means that for every HTTP request that is sent on the connection, the client certificate chain is available to the application. When we receive a request, we look at the following fields related to a client certificate chain:
Leaf certificate Subject Key Identifier (SKI)
Leaf certificate Serial Number (SN)
Issuer certificate SKI
Issuer certificate SN
Some of these values are used for upstream processing, but the issuer SKI and leaf certificate SN are used to query our internal data stores for revocation status. The data store indexes on an issuer SKI, and stores a collection of revoked leaf certificate serial numbers. If we find the leaf certificate in this collection, we set the relevant metadata for consumption in Firewall Rules.
But what does this have to do with TLS session resumption?
To explain this, let’s first discuss how session resumption works. At a high level, session resumption grants the ability for clients and servers to expedite the handshake process, saving both time and resources. The idea is that if a client and server successfully handshake, then future handshakes are more or less redundant, assuming nothing about the handshake needs to change at a fundamental level (e.g. cipher suite or TLS version).
Traditionally, there are two mechanisms for session resumption – session IDs and session tickets. In both cases, the TLS server will handle encrypting the context of the session, which is basically a snapshot of the acquired TLS state that is built up during the handshake process. Session IDs work in a stateful fashion, meaning that the server is responsible for saving this state, somewhere, and keying against the session ID. When a client provides a session ID in the client hello, the server checks to see if it has a corresponding session cached. If it does, then the handshake process is expedited and the cached session is restored. In contrast, session tickets work in a stateless fashion, meaning that the server has no need to store the encrypted session context. Instead, the server sends the client the encrypted session context (AKA a session ticket). In future handshakes, the client can send the session ticket in the client hello, which the server can decrypt in order to restore the session and expedite the handshake.
Recall that when a client presents a certificate, we store the certificate chain on the TLS connection. It was discovered that when sessions were resumed, the code to store the client certificate chain in application data did not run. As a result, we were left with an empty certificate chain, meaning we were unable to check the revocation status and pass this information to firewall rules for further processing.
To illustrate this, let’s use an example where mTLS is used for api.example.com. Firewall Rules are configured to block revoked certificates, and all certificates are revoked. We can reconstruct the client certificate checking behavior using a two-step process. First we use OpenSSL’s s_client to perform a handshake using the revoked certificate (recall that revocation has nothing to do with the success of the handshake – it only affects HTTP requests on the connection), and dump the session’s context into a “session.txt” file. We then issue an HTTP request on the connection, which fails with a 403 status code response because the certificate is revoked.
Now, if we reuse “session.txt” to perform session resumption and then issue an identical HTTP request, the request succeeds. This shouldn’t happen. We should fail both requests because they both use the same revoked client certificate.
Upon realizing that session resumption led to the inability to properly check revocation status, our first reaction was to disable session resumption for all mTLS connections. This blocked the vulnerability immediately.
The next step was to figure out how to safely re-enable resumption for mTLS. To do so, we need to remove the requirement of depending on data stored within the TLS connection state. Instead, we can use an API call that will grant us access to the leaf certificate in both session resumption and non session resumption cases. Two pieces of information are necessary: the leaf certificate serial number and the issuer SKI. The issuer SKI is actually included in the leaf certificate, also known as the Authority Key Identifier (AKI). Similar to how one would obtain the SKI for a certificate, X509_get0_subject_key_id, we can use X509_get0_authority_key_id to get the AKI.
Detailed timeline
All timestamps are in UTC
In March 2021 we introduced a new feature in Firewall Rules that allows customers to block traffic from revoked mTLS certificates.
2022-12-16 21:53 – Cloudflare discovers that the vulnerability resulted from a bug whereby certificate revocation status was not checked for session resumptions. Cloudflare begins working on a fix to disable session resumption for all mTLS connections to the edge. 2022-12-17 02:20 – Cloudflare validates the fix and starts to roll out a fix globally. 2022-12-17 21:07 – Rollout is complete, mitigating the vulnerability. 2023-01-12 16:40 – Cloudflare starts to roll out a fix that supports both session resumption and revocation. 2023-01-18 14:07 – Rollout is complete.
In conclusion: once Cloudflare identified the vulnerability, a remediation was put into place quickly. A fix that correctly supports session resumption and revocation has been fully rolled out as of 2023-01-18. After reviewing the logs, Cloudflare has not seen any evidence that this vulnerability has been exploited in the wild.
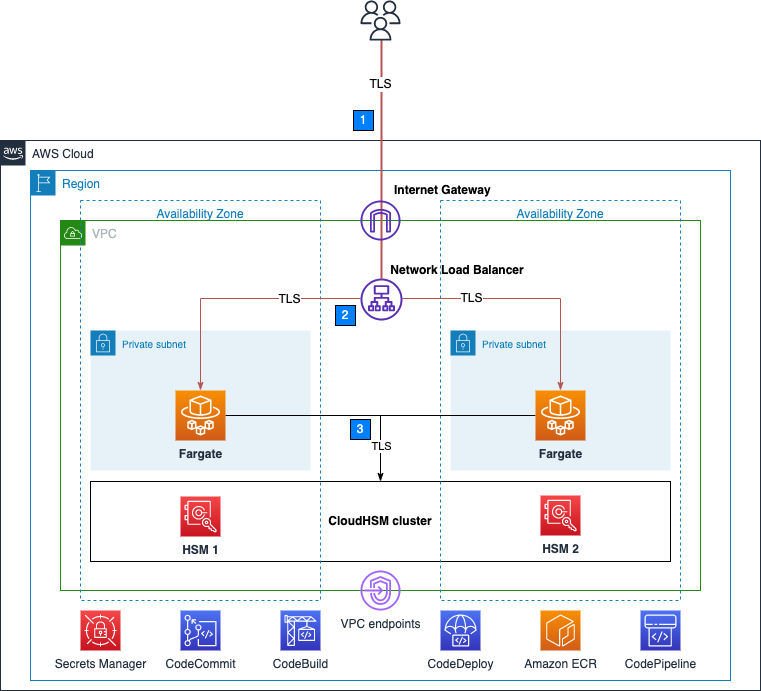
Customers who require private keys for their TLS certificates to be stored in FIPS 140-2 Level 3 certified hardware security modules (HSMs) can use AWS CloudHSM to store their keys for websites hosted in the cloud. In this blog post, we will show you how to automate the deployment of a web application using NGINX in AWS Fargate, with full integration with CloudHSM. You will also use AWS CodeDeploy to manage the deployment of changes to your Amazon Elastic Container Service (Amazon ECS) service.
CloudHSM offers FIPS 140-2 Level 3 HSMs that you can integrate with NGINX or Apache HTTP Server through the OpenSSL Dynamic Engine. The CloudHSM Client SDK 5 includes the OpenSSL Dynamic Engine to allow your web server to use a private key stored in the HSM with TLS versions 1.2 and 1.3 to support applications that are required to use FIPS 140-2 Level 3 validated HSMs.
CloudHSM uses the private key in the HSM as part of the server verification step of the TLS handshake that occurs every time that a new HTTPS connection is established between the client and server. Using the exchanged symmetric key, OpenSSL software performs the key exchange and bulk encryption. For more information about this process and how CloudHSM fits in, see How SSL/TLS offload with AWS CloudHSM works.
Solution overview
This blog post uses the AWS Cloud Development Kit (AWS CDK) to deploy the solution infrastructure. The AWS CDK allows you to define your cloud application resources using familiar programming languages.
Figure 1 shows an overview of the overall architecture deployed in this blog. This solution contains three CDK stacks: The TlsOffloadContainerBuildStack CDK stack deploys the CodeCommit, CodeBuild, and AmazonECR resources. The TlsOffloadEcsServiceStack CDK stack deploys the ECS Fargate service along with the required VPC resources. The TlsOffloadPipelineStack CDK stack deploys the CodePipeline resources to automate deployments of changes to the service configuration.
Figure 1: Overall architecture
At a high level, here’s how the solution in Figure 1 works:
Clients make an HTTPS request to the public IP address exposed by Network Load Balancer to connect to the web server and establish a secure connection that uses TLS.
Network Load Balancer routes the request to one of the ECS hosts running in private virtual private cloud (VPC) subnets, which are connected to the CloudHSM cluster.
The NGINX web server that is running on ECS containers performs a TLS handshake by using the private key stored in the HSM to establish a secure connection with the requestor.
Note: Although we don’t focus on perimeter protection in this post, AWS has a number of services that help provide layered perimeter protection for your internet-facing applications, such as AWS Shield and AWS WAF.
Figure 2 shows an overview of the automation infrastructure that is deployed by the TlsOffloadContainerBuildStack and TlsOffloadPipelineStack CDK stacks.
Figure 2: Deployment pipeline
At a high level, here’s how the solution in Figure 2 works:
A developer makes changes to the service configuration and commits the changes to the AWS CodeCommit repository.
An RSA private key in the HSM with a corresponding fake PEM file and certificate signed by a trusted Certificate Authority for the web server. Fake PEM files are PEM-encoded key files that store a reference to the key on the HSM instead of storing the private key information. For instructions on how to generate this file, see Generate or import a private key and SSL/TLS certificate.
An environment configured with AWS CDK to deploy the CDK stacks with the relevant resources. For instructions on how to set up this environment, see Getting started with the AWS CDK.
Step 1: Store secrets in Secrets Manager
As with other container projects, you need to decide what to build statically into the container (for example, libraries, code, or packages) and what to set as runtime parameters, to be pulled from a parameter store. In this walkthrough, we use Secrets Manager to store sensitive parameters and use the integration of Amazon ECS with Secrets Manager to securely retrieve them when the container is launched.
Important: You need to store the following information in Secrets Manager as plaintext, not as key/value pairs.
The web server certificate – In this example, the name of the secret for the web server certificate is tls/servercert. It will look similar to the following:
Figure 4: Store the web server certificate
The fake PEM file for the private key stored in the HSM that you generated in the Prerequisites section. In this example, the name of the secret for the fake PEM file is tls/fakepem.
Figure 5: Store the fake PEM
The HSM pin used to authenticate with the HSMs in your cluster. In this example, the name of the secret for the HSM pin is tls/pin.
Figure 6: Store the HSM pin
After you’ve stored your secrets, you should see output similar to the following:
Figure 7: List of required secrets
Step 2: Download and configure the CDK app
This post uses the AWS CDK to deploy the solution infrastructure. In this section, you will download the CDK app and configure it.
Run the following command to build the CDK stacks from the root of the project directory.
npm run build
To view the stacks that are available to deploy, run the following command from the root of the project directory.
cdk ls
You should see the following stacks available to deploy:
TlsOffloadContainerBuildStack — Deploys the CodeCommit, CodeBuild, and ECR repository that builds the ECS container image.
TlsOffloadEcsServiceStack — Deploys the ECS Fargate service along with the required VPC resources.
TlsOffloadPipelineStack — Deploys the CodePipeline that automates the deployment of updates to the service.
Step 3: Deploy the container build stack
In this step, you will deploy the container build stack, and then create a build and verify that the image was built successfully.
To deploy the container build stack
Deploy the TlsOffloadContainerBuildStack stack that we described in Figure 2 to your AWS account. In your CDK environment, run the following command:
cdk deploy TlsOffloadContainerBuildStack
The command line interface (CLI) will prompt you to approve the changes. After you approve them, you will see the following resources deployed to your newly created CodeCommit repository.
Dockerfile — This file provides a containerized environment for each of the Fargate containers to run. It downloads and installs necessary dependencies to run the NGINX web server with CloudHSM.
nginx.conf — This file provides NGINX with the configuration settings to run an HTTPS web server with CloudHSM configured as the SSL engine that performs the TLS handshake. The following nginx.conf values have already been configured in the file; if you want to make changes, update the file before deployment:
ssl_engine is set to cloudhsm
the environment variable is env CLOUDHSM_PIN
error_log is set to stderr so that the Fargate container can capture the logs in CloudWatch
the server section is set up to listen on port 443
ssl_ciphers are configured for a server with an RSA private key
run.sh — This script configures the CloudHSM OpenSSL Dynamic Engine on the Fargate task before the NGINX server is started.
nginx.service — This file specifies the configuration settings that systemd uses to run the NGINX service. Included in this file is a reference to the file that contains the environment variables for the NGINX service. This provides the HSM pin to the OpenSSL Engine.
index.html — This file is a sample HTML file that is displayed when you navigate to the HTTPS endpoint of the load balancer in your browser.
dhparam.pem — This file provides sample Diffie-Hellman parameters for demonstration purposes, but AWS recommends that you generate your own. You can generate your own Diffie-Hellman parameters by running the following command with the OpenSSL CLI. These parameters are not required for TLS but are recommended to provide perfect forward secrecy in your encrypted messages.
openssl dhparam -out ./dhparam.pem 2048
Your repository should look like the following:
Figure 8: CodeCommit repository
Before you deploy the Amazon ECS service, you need to build your first Docker image to populate the ECR repository. To successfully deploy the service, you need to have at least one image already present in the repository.
To create a build and verify the image was built successfully
Find the CodeBuild project that was created by the CDK deployment and select it.
Choose Start Build to initiate a new build.
Wait for the build to complete successfully, and then open the Amazon ECR console.
Select the repository that the CDK deployment created.
You should now see an image in your repository, similar to the following:
Figure 9: ECR repository
Step 4: Deploy the Amazon ECS service
Now that you have successfully built an ECR image, you can deploy the Amazon ECS service. This step deploys the following resources to your account:
VPC endpoints for the required AWS services that your ECS task needs to communicate with, including the following:
Amazon ECR
Secrets Manager
CloudWatch
CloudHSM
Network Load Balancer, which load balances HTTPS traffic to your ECS tasks.
A CloudWatch Logs log group to host the logs for the ECS tasks.
An ECS cluster with ECS tasks using your previously built Docker image that hosts the NGINX service.
To deploy the Amazon ECS service with the CDK
In your CDK environment, run the following command:
cdk deploy TlsOffloadEcsServiceStack
The CLI will prompt you to approve the changes. After you approve them, you will see these resources deploy to your account.
Checkpoint
At this point, you should have a working service. To confirm that you do, in your browser, navigate using HTTPS to the public address associated with the Network Load Balancer. While not covered in this blog, you can additionally configure DNS routing using Amazon Route53 to setup a custom domain name for your web service. You should see a screen similar to the following.
Figure 10: The sample website
Step 5: Use CodePipeline to automate the deployment of changes to the web server
Now that you have deployed a preliminary version of the application, you can take a few steps to automate further releases of the web server. As you maintain this application in production, you might need to update one or more of the following items:
Your website HTML source and other required libraries (for example, CSS or JavaScript)
Your Docker environment, such as the OpenSSL libraries, operating system and CloudHSM packages, and NGINX version.
Re-deploy the service after rotating your web server private key and certificate in Secrets Manager
Next, you will set up a CodePipeline project that orchestrates the end-to-end deployment of a change to the application—from an update to the code in our CodeCommit repo to the deployment of updated container images and the redirection of user traffic by the load balancer to the updated application.
This step deploys to your account a deployment pipeline that connects your CodeCommit, CodeBuild, and Amazon ECS services.
Deploy the CodePipeline stack with CDK
In your CDK environment, run the following command:
cdk deploy TlsOffloadPipelineStack
The CLI will prompt you to approve the changes. After you approve them, you will see the resources deploy to your account.
Start a deployment
To verify that your automation is working correctly, start a new deployment in your CodePipeline by making a change to your source repository. If everything works, the CodeBuild project will build the latest version of the Dockerfile located in your CodeCommit repository and push it to Amazon ECR. Then, the CodeDeploy application will create a new version of the ECS task definition and deploy new tasks while spinning down the existing tasks.
View your website
Now that the deployment is complete, you should again be able to view your website in your browser by navigating to the website for your application. If you made changes to the source code, such as changes to your index.html file, you should see these changes now.
Verify that the web server is properly configured by checking that the website’s certificate matches the one that you created in the Prerequisites section. Figure 11 shows an example of a certificate.
Figure 11: Certificate for the application
To verify that your NGINX service is using your CloudHSM cluster to offload the TLS handshake, you can view the CloudHSM client logs for this application in CloudWatch in the log group that you specified when you configured the ECS task definition.
Select the log group corresponding to your CloudHSM cluster. The log group has the following format: /aws/cloudhsm/<cluster-id>.
You can see entries similar to the following, which indicates that the NGINX application is connecting and logging in to the HSM to perform cryptographic operations.
Time: 02/04/23 17:45:40.333033, usecs:1675532740333033
Version No : 1.0
Sequence No : 0x2
Reboot counter : 0x8
Opcode : CN_LOGIN (0xd)
Command Type(hex) : CN_MGMT_CMD (0x0)
User id : 3
Session Handle : 0x15010002
Response : 0x0:HSM Return: SUCCESS
Log type : USER_AUTH_LOG (2)
User Name : crypto_user
User Type : CN_CRYPTO_USER (1)
Conclusion
In this post, you learned how to set up a NGINX web server on Fargate in a secure, private subnet that offloads the TLS termination to a FIPS 140-2 Level 3 HSM environment that uses the CloudHSM OpenSSL Dynamic Engine. You also learned how to set up a deployment pipeline to automate the Fargate deployments when updates are made.
You can expand this solution to fit your individual use case. For example, you can use the NGINX web server as a reverse proxy for additional servers in your internal network, and set up mutual TLS between these internal servers.
If you have feedback about this post, submit comments in the Comments section below. If you have questions about this post, start a new thread on the AWS CloudHSM re:Post or contact AWS Support.
Want more AWS Security news? Follow us on Twitter.
To get a TLS certificate issued, the requesting party must prove that they own the domain through a process called Domain Control Validation (DCV). As industry wide standards have evolved to enhance security measures, this process has become manual for Cloudflare customers that manage their DNS externally. Today, we’re excited to announce DCV Delegation — a feature that gives all customers the ability offload the DCV process to Cloudflare, so that all certificates can be auto-renewed without the management overhead.
Security is of utmost importance when it comes to managing web traffic, and one of the most critical aspects of security is ensuring that your application always has a TLS certificate that’s valid and up-to-date. Renewing TLS certificates can be an arduous and time-consuming task, especially as the recommended certificate lifecycle continues to gradually decrease, causing certificates to be renewed more frequently. Failure to get a certificate renewed can result in downtime or insecure connection which can lead to revenue decrease, mis-trust with your customers, and a management nightmare for your Ops team.
Every time a certificate is renewed with a Certificate Authority (CA), the certificate needs to pass a check called Domain Control Validation (DCV). This is a process that a CA goes through to verify that the party requesting the certificate does in fact own or control ownership over the domain for which the certificate is being requested. One of the benefits of using Cloudflare as your Authoritative DNS provider is that we can always prove ownership of your domain and therefore auto-renew your certificates. However, a big chunk of our customers manage their DNS externally. Before today, certificate renewals required these customers to make manual changes every time the certificate came up for renewal. Now, with DCV Delegation – you can let Cloudflare do all the heavy lifting.
DCV primer
Before we dive into how DCV Delegation works, let’s talk about it. DCV is the process of verifying that the party requesting a certificate owns or controls the domain for which they are requesting a certificate.
When a subscriber requests a certificate from a CA, the CA returns validation tokens that the domain owner needs to place. The token can be an HTTP file that the domain owner needs to serve from a specific endpoint or it can be a DNS TXT record that they can place at their Authoritative DNS provider. Once the tokens are placed, ownership has been proved, and the CA can proceed with the certificate issuance.
Better security practices for certificate issuance
Certificate issuance is a serious process. Any shortcomings can lead to a malicious actor issuing a certificate for a domain they do not own. What this means is that the actor could serve the certificate from a spoofed domain that looks exactly like yours and hijack and decrypt the incoming traffic. Because of this, over the last few years, changes have been put in place to ensure higher security standards for certificate issuances.
Shorter certificate lifetimes
The first change is the move to shorter lived certificates. Before 2011, a certificate could be valid for up to 96 months (about eight years). Over the last few years, the accepted validity period has been significantly shortened. In 2012, certificate validity went down to 60 months (5 years), in 2015 the lifespan was shortened to 39 months (about 3 years), in 2018 to 24 months (2 years), and in 2020, the lifetime was dropped to 13 months. Following the trend, we’re going to continue to see certificate lifetimes decrease even further to 3 month certificates as the standard. We’re already seeing this in action with Certificate Authorities like Let’s Encrypt and Google Trust Services offering a maximum validity period of 90 days (3 months). Shorter-lived certificates are aimed to reduce the compromise window in a situation where a malicious party has gained control over a TLS certificate or private key. The shorter the lifetime, the less time the bad actor can make use of the compromised material. At Cloudflare, we even give customers the ability to issue 2 week certificates to reduce the impact window even further.
While this provides a better security posture, it does require more overhead management for the domain owner, as they’ll now be responsible for completing the DCV process every time the certificate is up for renewal, which can be every 90 days. In the past, CAs would allow the re-use of validation tokens, meaning even if the certificate was renewed more frequently, the validation tokens could be re-used so that the domain owner wouldn’t need to complete DCV again. Now, more and more CAs are requiring unique tokens to be placed for every renewal, meaning shorter certificate lifetimes now result in additional management overhead.
Wildcard certificates now require DNS-based DCV
Aside from certificate lifetimes, the process required to get a certificate issued has developed stricter requirements over the last few years. The Certificate Authority/Browser Forum (CA/B Forum), the governing body that sets the rules and standards for certificates, has enforced or stricter requirements around certificate issuance to ensure that certificates are issued in a secure manner that prevents a malicious actor from obtaining certificates for domains they do not own.
In May 2021, the CA/B Forum voted to require DNS based validation for any certificate with a wildcard certificate on it. Meaning, that if you would like to get a TLS certificate that covers example.com and *.example.com, you can no longer use HTTP based validation, but instead, you will need to add TXT validation tokens to your DNS provider to get that certificate issued. This is because a wildcard certificate covers a large portion of the domain’s namespace. If a malicious actor receives a certificate for a wildcard hostname, they now have control over all of the subdomains under the domain. Since HTTP validation only proves ownership of a hostname and not the whole domain, it’s better to use DNS based validation for a certificate with broader coverage.
All of these changes are great from a security standpoint – we should be adopting these processes! However, this also requires domain owners to adapt to the changes. Failure to do so can lead to a certificate renewal failure and downtime for your application. If you’re managing more than 10 domains, these new processes become a management nightmare fairly quickly.
At Cloudflare, we’re here to help. We don’t think that security should come at the cost of reliability or the time that your team spends managing new standards and requirements. Instead, we want to make it as easy as possible for you to have the best security posture for your certificates, without the management overhead.
How Cloudflare helps customers auto-renew certificates
For years, Cloudflare has been managing TLS certificates for 10s of millions of domains. One of the reasons customers choose to manage their TLS certificates with Cloudflare is that we keep up with all the changes in standards, so you don’t have to.
One of the superpowers of having Cloudflare as your Authoritative DNS provider is that Cloudflare can add necessary DNS records on your behalf to ensure successful certificate issuances. If you’re using Cloudflare for your DNS, you probably haven’t thought about certificate renewals, because you never had to. We do all the work for you.
When the CA/B Forum announced that wildcard certificates would now require TXT based validation to be used, customers that use our Authoritative DNS didn’t even notice any difference – we continued to do the auto-renewals for them, without any additional work on their part.
While this provides a reliability and management boost to some customers, it still leaves out a large portion of our customer base — customers who use Cloudflare for certificate issuance with an external DNS provider.
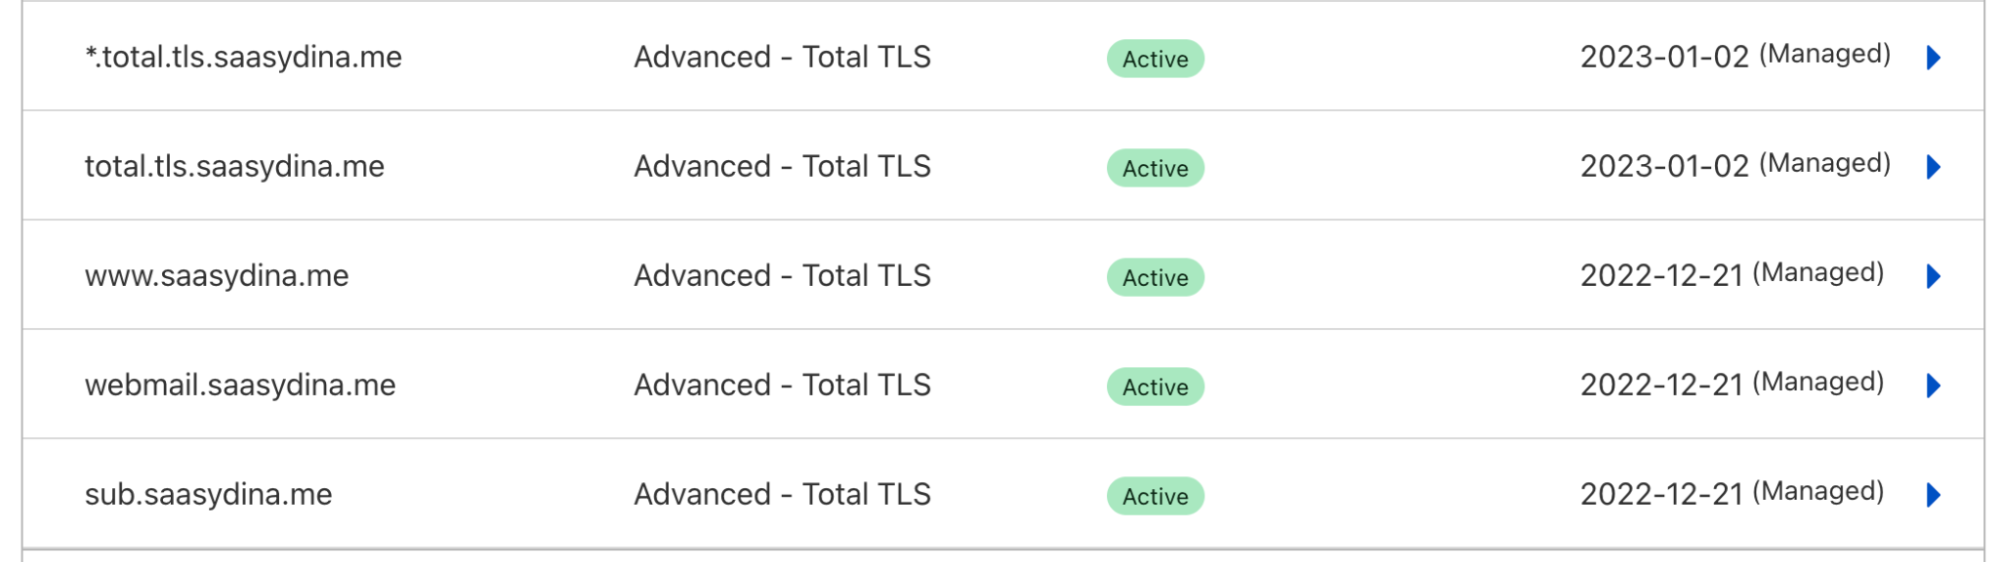
There are two groups of customers that were impacted by the wildcard DCV change: customers with domains that host DNS externally – we call these “partial” zones – and SaaS providers that use Cloudflare’s SSL for SaaS product to provide wildcard certificates for their customers’ domains.
Customers with “partial” domains that use wildcard certificates on Cloudflare are now required to fetch the TXT DCV tokens every time the certificate is up for renewal and manually place those tokens at their DNS provider. With Cloudflare deprecating DigiCert as a Certificate Authority, certificates will now have a lifetime of 90 days, meaning this manual process will need to occur every 90 days for any certificate with a wildcard hostname.
Customers that use our SSL for SaaS product can request that Cloudflare issues a certificate for their customer’s domain – called a custom hostname. SaaS providers on the Enterprise plan have the ability to extend this support to wildcard custom hostnames, meaning we’ll issue a certificate for the domain (example.com) and for a wildcard (*.example.com). The issue with that is that SaaS providers will now be required to fetch the TXT DCV tokens, return them to their customers so that they can place them at their DNS provider, and do this process every 90 days. Supporting this requires a big change to our SaaS provider’s management system.
At Cloudflare, we want to help every customer choose security, reliability, and ease of use — all three! And that’s where DCV Delegation comes in.
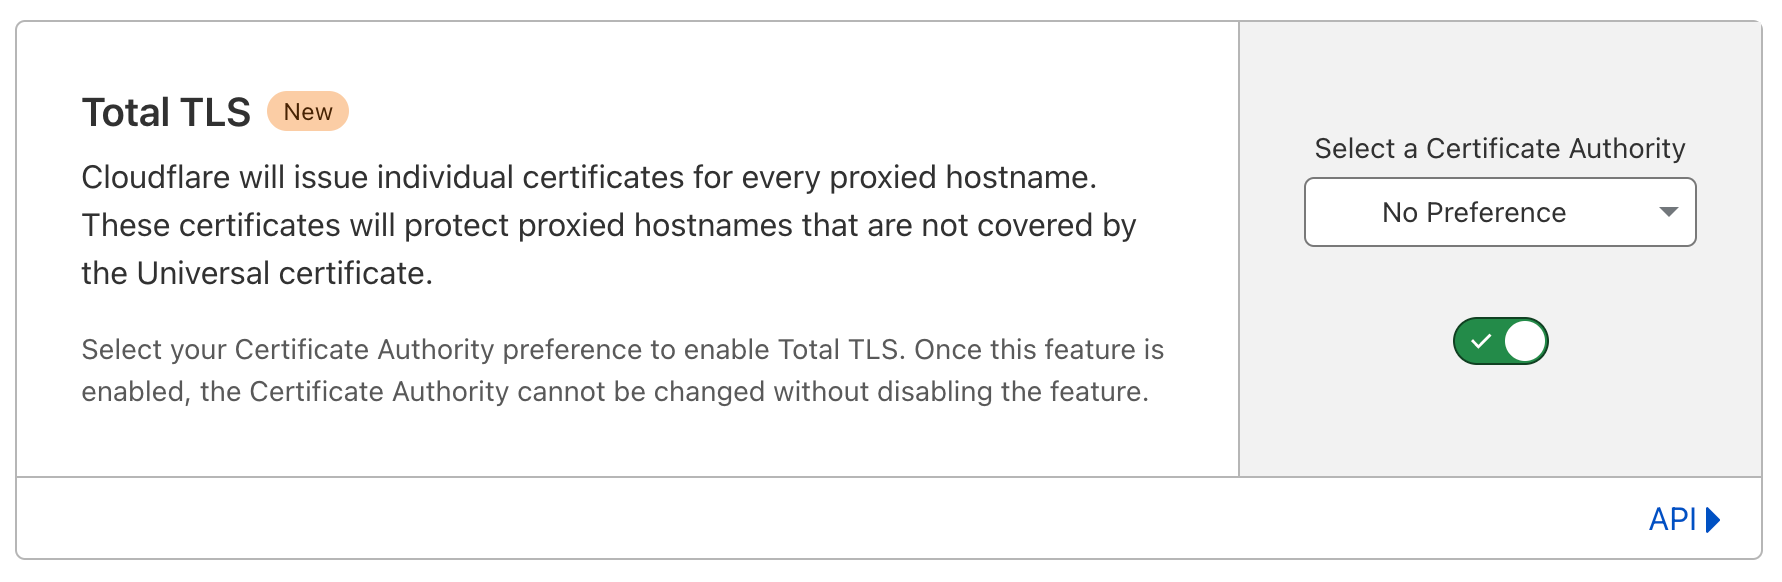
Enter DCV Delegation: certificate auto-renewal for every Cloudflare customer
DCV Delegation is a new feature that allows customers who manage their DNS externally to delegate the DCV process to Cloudflare. DCV Delegation requires customers to place a one-time record that allows Cloudflare to auto-renew all future certificate orders, so that there’s no manual intervention from the customer at the time of the renewal.
How does it work?
Customers will now be able to place a CNAME record at their Authoritative DNS provider at their acme-challenge endpoint – where the DCV records are currently placed – to point to a domain on Cloudflare.
Let’s say I own example.com and need to get a certificate issued for it that covers the apex and wildcard record. I would place the following record at my DNS provider: _acme-challenge.example.com CNAME example.com.<UUID>.dcv.cloudflare.com. Then, Cloudflare would place the two TXT DNS records required to issue the certificate at example.com.<UUID>.dcv.cloudflare.com.
As long as the partial zone or custom hostname remains Active on Cloudflare, Cloudflare will add the DCV tokens on every renewal. All you have to do is keep the CNAME record in place.
If you’re a “partial” zone customer or an SSL for SaaS customer, you will now see this card in the dashboard with more information on how to use DCV Delegation, or you can read our documentation to learn more.
DCV Delegation for Partial Zones:
DCV Delegation for Custom Hostnames:
The UUID in the CNAME target is a unique identifier. Each partial domain will have its own UUID that corresponds to all of the DCV delegation records created under that domain. Similarly, each SaaS zone will have one UUID that all custom hostnames under that domain will use. Keep in mind that if the same domain is moved to another account, the UUID value will change and the corresponding DCV delegation records will need to be updated.
If you’re using Cloudflare as your Authoritative DNS provider, you don’t need to worry about this! We already add the DCV tokens on your behalf to ensure successful certificate renewals.
What’s next?
Right now, DCV Delegation only allows delegation to one provider. That means that if you’re using multiple CDN providers or you’re using Cloudflare to manage your certificates but you’re also issuing certificates for the same hostname for your origin server then DCV Delegation won’t work for you. This is because once that CNAME record is pointed to Cloudflare, only Cloudflare will be able to add DCV tokens at that endpoint, blocking you or an external CDN provider from doing the same.
However, an RFC draft is in progress that will allow each provider to have a separate “acme-challenge” endpoint, based on the ACME account used to issue the certs. Once this becomes standardized and CAs and CDNs support it, customers will be able to use multiple providers for DCV delegation.
In conclusion, DCV delegation is a powerful feature that simplifies the process of managing certificate renewals for all Cloudflare customers. It eliminates the headache of managing certificate renewals, ensures that certificates are always up-to-date, and most importantly, ensures that your web traffic is always secure. Try DCV delegation today and see the difference it can make for your web traffic!
In today’s digital world, security is a top priority for businesses. Whether you’re a Fortune 500 company or a startup just taking off, it’s essential to implement security measures in order to protect sensitive information. Security starts inside an organization; it starts with having Zero Trust principles that protect access to resources.
Mutual TLS (mTLS) is useful in a Zero Trust world to secure a wide range of network services and applications: APIs, web applications, microservices, databases and IoT devices. Cloudflare has products that enforce mTLS: API Shield uses it to secure API endpoints and Cloudflare Access uses it to secure applications. Now, with mTLS support for Workers you can use Workers to authenticate to services secured by mTLS directly. mTLS for Workers is now generally available for all Workers customers!
A recap on how TLS works
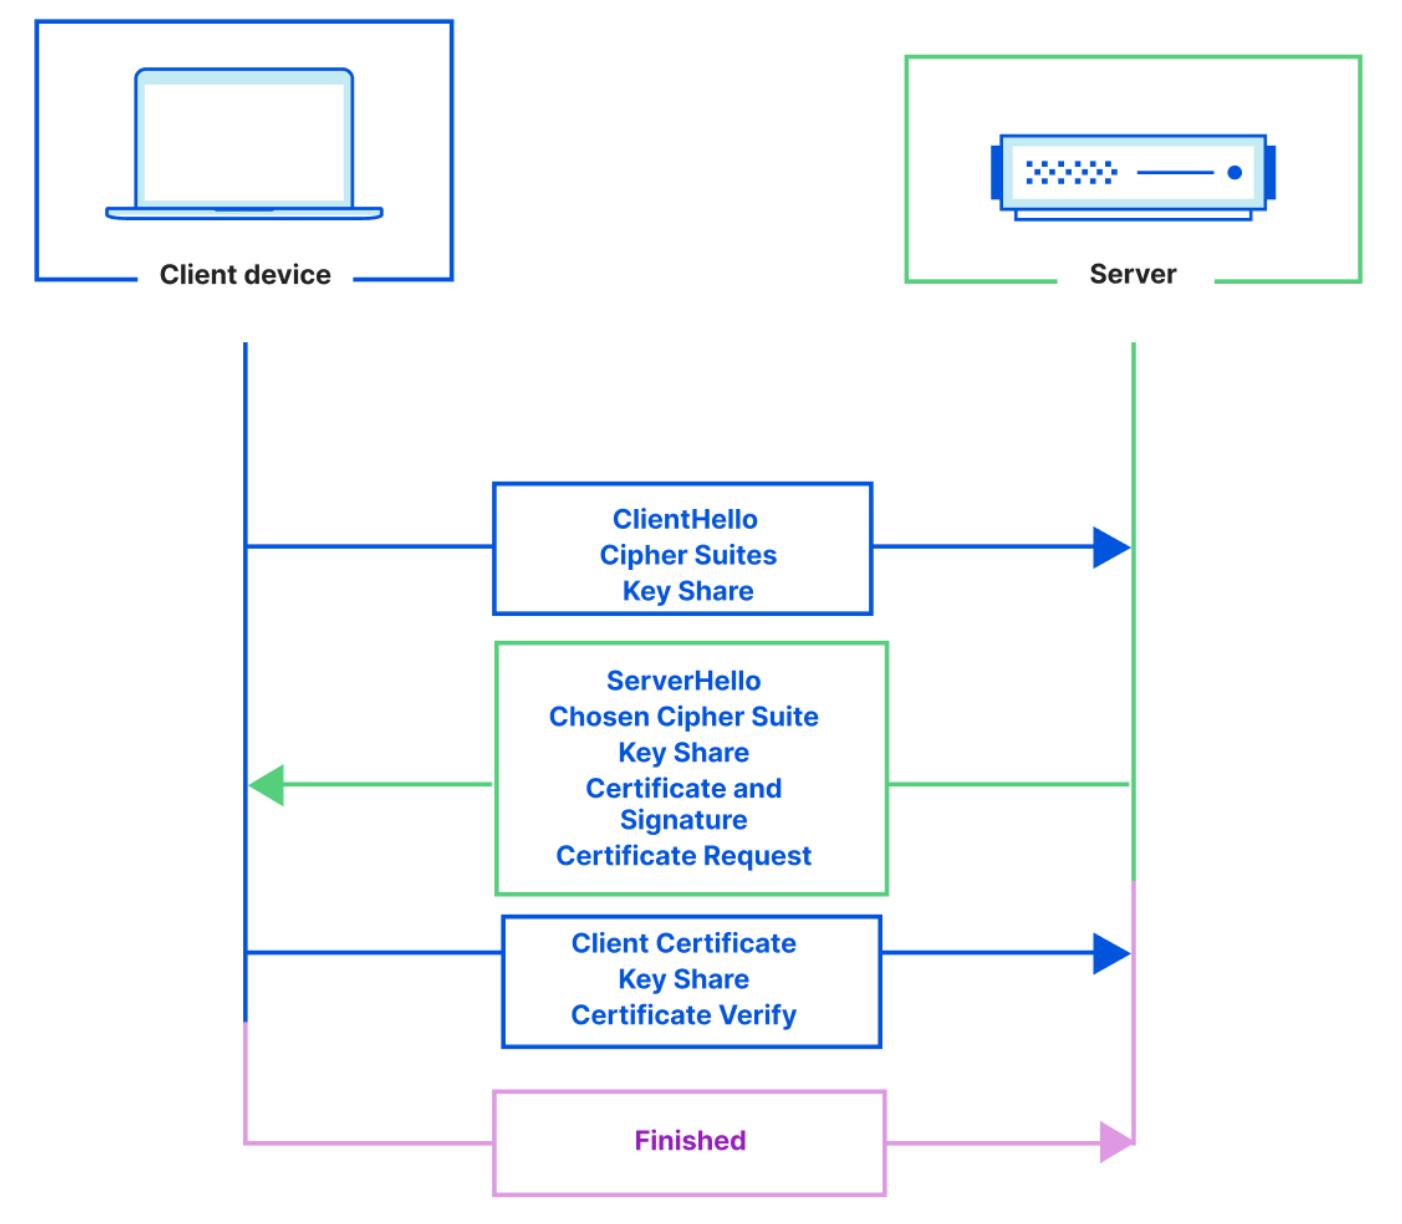
Before diving into mTLS, let’s first understand what TLS (Transport Layer Security) is. Any website that uses HTTPS, like the one you’re reading this blog on, uses TLS encryption. TLS is used to create private communications on the Internet – it gives users assurance that the website you’re connecting to is legitimate and any information passed to it is encrypted.
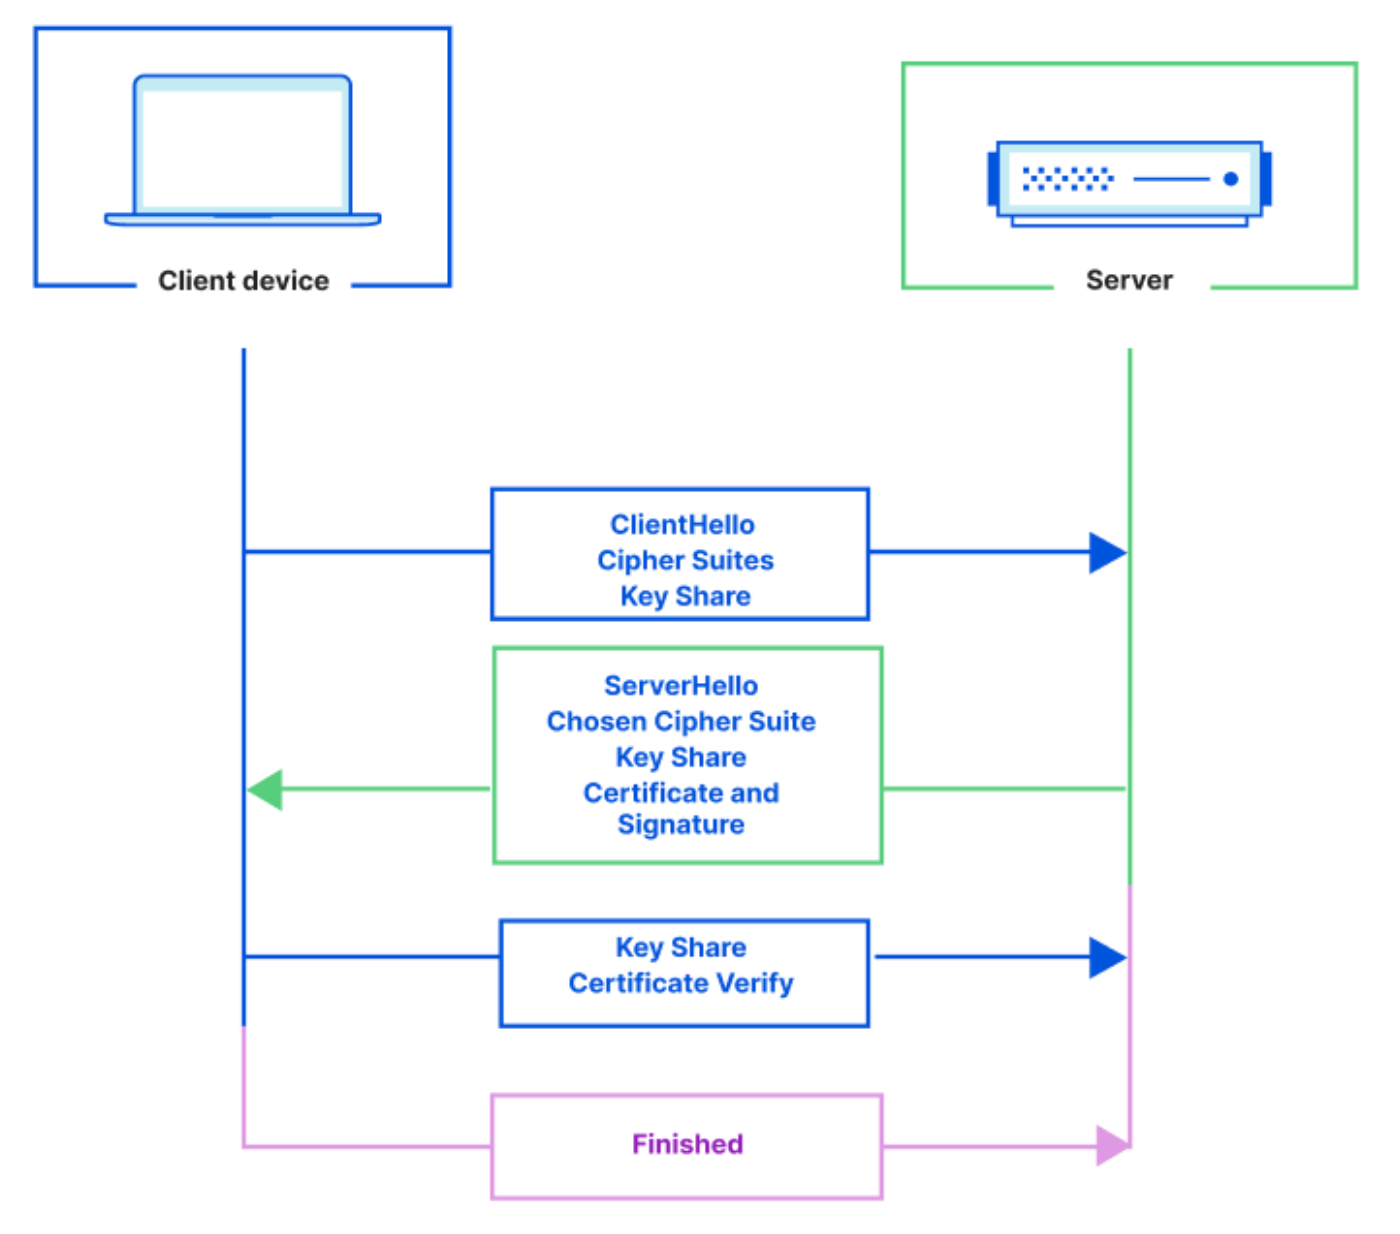
TLS is enforced through a TLS handshake where the client and server exchange messages in order to create a secure connection. The handshake consists of several steps outlined below:
The client and server exchange cryptographic keys, the client authenticates the server’s identity and the client and server generate a secret key that’s used to create an encrypted connection.
For most connections over the public Internet TLS is sufficient. If you have a website, for example a landing page, storefront or documentation, you want any user to be able to navigate to it – validating the identity of the client isn’t necessary. But, if you have services that run on a corporate network or private/sensitive applications you may want access to be locked down to only authorized clients.
Enter mTLS
With mTLS, both the client and server present a digital certificate during the TLS handshake to mutually verify each other’s credentials and prove identities. mTLS adds additional steps to the TLS handshake in order to authenticate the client as well as the server.
In comparison to TLS, with mTLS the server also sends a ‘Certificate Request’ message that contains a list of parties that it trusts and it tells the client to respond with its certificate. The mTLS authentication process is outlined below:
mTLS is typically used when a managed list of clients (eg. users, devices) need access to a server. It uses cryptographically signed certificates for authentication, which are harder to spoof than passwords or tokens. Some common use cases include: communications between APIs or microservices, database connections from authorized hosts, and machine-to-machine IoT connections.
Introducing mTLS on Workers
With mTLS support on Workers, your Workers can now communicate with resources that enforce an mTLS connection. mTLS through Workers can be configured in just a few easy steps:
1. Upload a client certificate and private key obtained from your service that enforces mTLS using wrangler
To get per-request granularity, you can configure multiple mTLS certificates if you’re connecting to multiple hosts within the same Worker. There’s a limit of 1,000 certificates that can be uploaded per account. Contact your account team or reach out through the Cloudflare Developer Discord if you need more certificates.
Try it yourself
It’s that easy! For more information and to try it yourself, refer to our developer documentation – client authentication with mTLS.
We love to see what you’re developing on Workers. Join our Discord community and show us what you’re building!
If you own a domain that you use for email, you want to maintain the reputation and goodwill of your domain’s brand. Several industry-standard mechanisms can help prevent your domain from being used as part of a phishing attack. In this post, we’ll show you how to deploy three of these mechanisms, which visually authenticate emails sent from your domain to users and verify that emails are encrypted in transit. It can take as little as 15 minutes to deploy these mechanisms on Amazon Web Services (AWS), and the result can help to provide immediate and long-term improvements to your organization’s email security.
Phishing through email remains one of the most common ways that bad actors try to compromise computer systems. Incidents of phishing and related crimes far outnumber the incidents of other categories of internet crime, according to the most recent FBI Internet Crime Report. Phishing has consistently led to large annual financial losses in the US and globally.
Brand Indicators for Message Identification (BIMI) – This standard allows you to associate a logo with your email domain, which some email clients will display to users in their inbox. Visit the BIMI Group’s Where is my BIMI Logo Displayed? webpage to see how logos are displayed in the user interfaces of BIMI-supporting mailbox providers; Figure 1 shows a mock-up of a typical layout that contains a logo.
Mail Transfer Agent Strict Transport Security (MTA-STS) – This standard helps ensure that email servers always use TLS encryption and certificate-based authentication when they send messages to your domain, to protect the confidentiality and integrity of email in transit.
SMTP TLS reporting – This reporting allows you to receive reports and monitor your domain’s TLS security posture, identify problems, and learn about attacks that might be occurring.
Figure 1: A mock-up of how BIMI enables branded logos to be displayed in email user interfaces
These three standards require your Domain Name System (DNS) to publish specific records, for example by using Amazon Route 53, that point to web pages that have additional information. You can host this information without having to maintain a web server by storing it in Amazon Simple Storage Service (Amazon S3) and delivering it through Amazon CloudFront, secured with a certificate provisioned from AWS Certificate Manager (ACM).
Note: This AWS solution works for DKIM, BIMI, and DMARC, regardless of what you use to serve the actual email for your domains, which services you use to send email, and where you host DNS. For purposes of clarity, this post assumes that you are using Route 53 for DNS. If you use a different DNS hosting provider, you will manually configure DNS records in your existing hosting provider.
Solution architecture
The architecture for this solution is depicted in Figure 2.
Figure 2: The architecture diagram showing how the solution components interact
As described in more detail in the BIMI section of this blog post, the Verified Mark Certificate is obtained from a BIMI-qualified certificate authority and stored in the S3 bucket.
When an external email system receives a message claiming to be from your domain, it looks up BIMI records for your domain in DNS. As depicted in the diagram, a DNS request is sent to Route 53.
To retrieve the BIMI logo image and Verified Mark Certificate, the external email system will make HTTPS requests to a URL published in the BIMI DNS record. In this solution, the URL points to the CloudFront distribution, which has a TLS certificate provisioned with ACM.
A few important warnings
Email is a complex system of interoperating technologies. It is also brittle: a typo or a missing DNS record can make the difference between whether an email is delivered or not. Pay close attention to your email server and the users of your email systems when implementing the solution in this blog post. The main indicator that something is wrong is the absence of email. Instead of seeing an error in your email server’s log, users will tell you that they’re expecting to receive an email from somewhere and it’s not arriving. Or they will tell you that they sent an email, and their recipient can’t find it.
The DNS uses a lot of caching and time-out values to improve its efficiency. That makes DNS records slow and a little unpredictable as they propagate across the internet. So keep in mind that as you monitor your systems, it can be hours or even more than a day before the DNS record changes have an effect that you can detect.
This solution uses AWS Cloud Development Kit (CDK) custom resources, which are supported by AWS Lambda functions that will be created as part of the deployment. These functions are configured to use CDK-selected runtimes, which will eventually pass out of support and require you to update them.
Prerequisites
You will need permission in an AWS account to create and configure the following resources:
An Amazon S3 bucket to store the files and access logs
A CloudFront distribution to publicly deliver the files from the S3 bucket
A TLS certificate in ACM
An origin access identity in IAM that CloudFront will use to access files in Amazon S3
Lambda functions, IAM roles, and IAM policies created by CDK custom resources
You might also want to enable these optional services:
Amazon Route 53 for setting the necessary DNS records. If your domain is hosted by another DNS provider, you will set these DNS records manually.
Amazon SES or an Amazon WorkMail organization with a single mailbox. You can configure either service with a subdomain (for example, [email protected]) such that the existing domain is not disrupted, or you can create new email addresses by using your existing email mailbox provider.
BIMI has some additional requirements:
BIMI requires an email domain to have implemented a strong DMARC policy so that recipients can be confident in the authenticity of the branded logos. Your email domain must have a DMARC policy of p=quarantine or p=reject. Additionally, the domain’s policy cannot have sp=none or pct<100.
Note: Do not adjust the DMARC policy of your domain without careful testing, because this can disrupt mail delivery.
You must have your brand’s logo in Scaled Vector Graphics (SVG) format that conforms to the BIMI standard. For more information, see Creating BIMI SVG Logo Files on the BIMI Group website.
Purchase a Verified Mark Certificate (VMC) issued by a third-party certificate authority. This certificate attests that the logo, organization, and domain are associated with each other, based on a legal trademark registration. Many email hosting providers require this additional certificate before they will show your branded logo to their users. Others do not currently support BIMI, and others might have alternative mechanisms to determine whether to show your logo. For more information about purchasing a Verified Mark Certificate, see the BIMI Group website.
Note: If you are not ready to purchase a VMC, you can deploy this solution and validate that BIMI is correctly configured for your domain, but your branded logo will not display to recipients at major email providers.
What gets deployed in this solution?
This solution deploys the DNS records and supporting files that are required to implement BIMI, MTA-STS, and SMTP TLS reporting for an email domain. We’ll look at the deployment in more detail in the following sections.
Brand Indicators for Message Identification (BIMI) permits Domain Owners to coordinate with Mail User Agents (MUAs) to display brand-specific Indicators next to properly authenticated messages. There are two aspects of BIMI coordination: a scalable mechanism for Domain Owners to publish their desired Indicators, and a mechanism for Mail Transfer Agents (MTAs) to verify the authenticity of the Indicator. This document specifies how Domain Owners communicate their desired Indicators through the BIMI Assertion Record in DNS and how that record is to be interpreted by MTAs and MUAs. MUAs and mail-receiving organizations are free to define their own policies for making use of BIMI data and for Indicator display as they see fit.
If your organization has a trademark-protected logo, you can set up BIMI to have that logo displayed to recipients in their email inboxes. This can have a positive impact on your brand and indicates to end users that your email is more trustworthy. The BIMI Group shows examples of how brand logos are displayed in user inboxes, as well as a list of known email service providers that support the display of BIMI logos.
As a domain owner, you can implement BIMI by publishing the relevant DNS records and hosting the relevant files. To have your logo displayed by most email hosting providers, you will need to purchase a Verified Mark Certificate from a BIMI-qualified certificate authority.
This solution will deploy a valid BIMI record in Route 53 (or tell you what to publish in the DNS if you’re not using Route 53) and will store your provided SVG logo and Verified Mark Certificate files in Amazon S3, to be delivered through CloudFront with a valid TLS certificate from ACM.
To support BIMI, the solution makes the following changes to your resources:
A DNS record of type TXT is published at the following host: default._bimi.<your-domain>. The value of this record is: v=BIMI1; l=<url-of-your-logo> a=<url-of-verified-mark-certificate>. The value of <your-domain> refers to the domain that is used in the From header of messages that your organization sends.
The logo and optional Verified Mark Certificate are hosted publicly at the HTTPS locations defined by <url-of-your-logo> and <url-of-verified-mark-certificate>, respectively.
SMTP (Simple Mail Transport Protocol) MTA Strict Transport Security (MTA-STS) is a mechanism enabling mail service providers to declare their ability to receive Transport Layer Security (TLS) secure SMTP connections and to specify whether sending SMTP servers should refuse to deliver to MX hosts that do not offer TLS with a trusted server certificate.
Put simply, MTA-STS helps ensure that email servers always use encryption and certificate-based authentication when sending email to your domains, so that message integrity and confidentiality are preserved while in transit across the internet. MTA-STS also helps to ensure that messages are only sent to authorized servers.
This solution will deploy a valid MTA-STS policy record in Route 53 (or tell you what value to publish in the DNS if you’re not using Route 53) and will create an MTA-STS policy document to be hosted on S3 and delivered through CloudFront with a valid TLS certificate from ACM.
To support MTA-STS, the solution makes the following changes to your resources:
A DNS record of type TXT is published at the following host: _mta-sts.<your-domain>. The value of this record is: v=STSv1; id=<unique value used for cache invalidation>.
The MTA-STS policy document is hosted at and obtained from the following location: https://mta-sts.<your-domain>/.well-known/mta-sts.txt.
The value of <your-domain> in both cases is the domain that is used for routing inbound mail to your organization and is typically the same domain that is used in the From header of messages that your organization sends externally. Depending on the complexity of your organization, you might receive inbound mail for multiple domains, and you might choose to publish MTA-STS policies for each domain.
Is it ever bad to encrypt everything?
In the example MTA-STS policy file provided in the GitHub repository and explained later in this post, the MTA-STS policy mode is set to testing. This means that your email server is advertising its willingness to negotiate encrypted email connections, but it does not require TLS. Servers that want to send mail to you are allowed to connect and deliver mail even if there are problems in the TLS connection, as long as you’re in testing mode. You should expect reports when servers try to connect through TLS to your mail server and fail to do so.
Be fully prepared before you change the MTA-STS policy to enforce. After this policy is set to enforce, servers that follow the MTA-STS policy and that experience an enforceable TLS-related error when they try to connect to your mail server will not deliver mail to your mail server. This is a difficult situation to detect. You will simply stop receiving email from servers that comply with the policy. You might receive reports from them indicating what errors they encountered, but it is not guaranteed. Be sure that the email address you provide in SMTP TLS reporting (in the following section) is functional and monitored by people who can take action to fix issues. If you miss TLS failure reports, you probably won’t receive email. If the TLS certificate that you use on your email server expires, and your MTA-STS policy is set to enforce, this will become an urgent issue and will disrupt the flow of email until it is fixed.
A number of protocols exist for establishing encrypted channels between SMTP Mail Transfer Agents (MTAs), including STARTTLS, DNS-Based Authentication of Named Entities (DANE) TLSA, and MTA Strict Transport Security (MTA-STS). These protocols can fail due to misconfiguration or active attack, leading to undelivered messages or delivery over unencrypted or unauthenticated channels. This document describes a reporting mechanism and format by which sending systems can share statistics and specific information about potential failures with recipient domains. Recipient domains can then use this information to both detect potential attacks and diagnose unintentional misconfigurations.
As you gain the security benefits of MTA-STS, SMTP TLS reporting will allow you to receive reports from other internet email providers. These reports contain information that is valuable when monitoring your TLS security posture, identifying problems, and learning about attacks that might be occurring.
This solution will deploy a valid SMTP TLS reporting record on Route 53 (or provide you with the value to publish in the DNS if you are not using Route 53).
To support SMTP TLS reporting, the solution makes the following changes to your resources:
A DNS record of type TXT is published at the following host: _smtp._tls.<your-domain>. The value of this record is: v=TLSRPTv1; rua=mailto:<report-receiver-email-address>
The value of <report-receiver-email-address> might be an address in your domain or in a third-party provider. Automated systems that process these reports must be capable of processing GZIP compressed files and parsing JSON.
Deploy the solution with the AWS CDK
In this section, you’ll learn how to deploy the solution to create the previously described AWS resources in your account.
Clone the following GitHub repository:
git clone https://github.com/aws-samples/serverless-mail
 cd serverless-mail/email-security-records
Edit CONFIG.py to reflect your desired settings, as follows:
If no Verified Mark Certificate is provided, set VMC_FILENAME = None.
If your DNS zone is not hosted on Route 53, or if you do not want this app to manage Route 53 DNS records, set ROUTE_53_HOSTED = False. In this case, you will need to set TLS_CERTIFICATE_ARN to the Amazon Resource Name (ARN) of a certificate hosted on ACM in us-east-1. This certificate is used by CloudFront and must support two subdomains: mta-sts and your configured BIMI_ASSET_SUBDOMAIN.
Finalize the preparation, as follows:
Place your BIMI logo and Verified Mark Certificate files in the assets folder.
Create an MTA-STS policy file at assets/.well-known/mta-sts.txt to reflect your mail exchange (MX) servers and policy requirements. An example file is provided at assets/.well-known/mta-sts.txt.example
Deploy the solution, as follows:
Open a terminal in the email-security-records folder.
(Recommended) Create and activate a virtual environment by running the following commands. python3 -m venv .venv source .venv/bin/activate
Install the Python requirements in your environment with the following command. pip install -r requirements.txt
Assume a role in the target account that has the permissions outlined in the Prerequisites section of this post.
Using AWS CDK version 2.17.0 or later, deploy the bootstrap in the target account by running the following command. To learn more, see Bootstrapping in the AWS CDK Developer Guide. cdk bootstrap
Run the following command to synthesize the CloudFormation template. Review the output of this command to verify what will be deployed. cdk synth
Run the following command to deploy the CloudFormation template. You will be prompted to accept the IAM changes that will be applied to your account. cdk deploy
Note: If you use Route53, these records are created and activated in your DNS zones as soon as the CDK finishes deploying. As the records propagate through the DNS, they will gradually start affecting the email in the affected domains.
If you’re not using Route53 and instead are using a third-party DNS provider, create the CNAME and TXT records as indicated. In this case, your email is not affected by this solution until you create the records in DNS.
Testing and troubleshooting
After you have deployed the CDK solution, you can test it to confirm that the DNS records and web resources are published correctly.
BIMI
Query the BIMI DNS TXT record for your domain by using the dig or nslookup command in your terminal.
In your web browser, open the URL from that response (for example, https://bimi-assets.<your-domain.example>/logo.svg) to verify that the logo is available and that the HTTPS certificate is valid.
The BIMI group provides a tool to validate your BIMI configuration. This tool will also validate your VMC if you have purchased one.
MTA-STS
Query the MTA-STS DNS TXT record for your domain.
dig +short TXT _mta-sts.<your-domain.example>
The value of this record is as follows:
v=STSv1; id=<unique value used for cache invalidation>
You can load the MTA-STS policy document using your web browser. For example, https://mta-sts.<your-domain.example>/.well-known/mta-sts.txt
You can also use third party tools to examine your MTA-STS configuration, such as MX Toolbox.
TLS reporting
Query the TLS reporting DNS TXT record for your domain.
dig +short TXT _smtp._tls.<your-domain.example>
Verify the response. For example:
"v=TLSRPTv1; rua=mailto:<your email address>"
You can also use third party tools to examine your TLS reporting configuration, such as Easy DMARC.
Depending on which domains you communicate with on the internet, you will begin to see TLS reports arriving at the email address that you have defined in the TLS reporting DNS record. We recommend that you closely examine the TLS reports, and use automated analytical techniques over an extended period of time before changing the default testing value of your domain’s MTA-STS policy. Not every email provider will send TLS reports, but examining the reports in aggregate will give you a good perspective for making changes to your MTA-STS policy.
Cleanup
To remove the resources created by this solution:
Open a terminal in the cdk-email-security-records folder.
Assume a role in the target account with permission to delete resources.
Run cdk destroy.
Note: The asset and log buckets are automatically emptied and deleted by the cdk destroy command.
Conclusion
When external systems send email to or receive email from your domains they will now query your new DNS records and will look up your domain’s BIMI, MTA-STS, and TLS reporting information from your new CloudFront distribution. By adopting the email domain security mechanisms outlined in this post, you can improve the overall security posture of your email environment, as well as the perception of your brand.
If you have feedback about this post, submit comments in the Comments section below. If you have questions about this post, contact AWS Support.
Want more AWS Security news? Follow us on Twitter.
Today, traffic on the Internet stays encrypted through the use of public and private keys that encrypt the data as it’s being transmitted. Cloudflare helps secure millions of websites by managing the encryption keys that keep this data protected. To provide lightning fast services, Cloudflare stores these keys on our fleet of data centers that spans more than 150 countries. However, some compliance regulations require that private keys are only stored in specific geographic locations.
In 2017, we introduced Geo Key Manager, a product that allows customers to store and manage the encryption keys for their domains in different geographic locations so that compliance regulations are met and that data remains secure. We launched the product a few months before General Data Protection Regulation (GDPR) went into effect and built it to support three regions: the US, the European Union (EU), and a set of our top tier data centers that employ the highest security measures. Since then, GDPR-like laws have quickly expanded and now, more than 15 countries have comparable data protection laws or regulations that include restrictions on data transfer across and/or data localization within a certain boundary.
At Cloudflare, we like to be prepared for the future. We want to give our customers tools that allow them to maintain compliance in this ever-changing environment. That’s why we’re excited to announce a new version of Geo Key Manager — one that allows customers to define boundaries by country, ”only store my private keys in India”, by a region ”only store my private keys in the European Union”, or by a standard, such as “only store my private keys in FIPS compliant data centers” — now available in Closed Beta, sign up here!
Learnings from Geo Key Manager v1
Geo Key Manager has been around for a few years now, and we’ve used this time to gather feedback from our customers. As the demand for a more flexible system grew, we decided to go back to the drawing board and create a new version of Geo Key Manager that would better meet our customers’ needs.
We initially launched Geo Key Manager with support for US, EU, and Highest Security Data centers. Those regions were sufficient at the time, but customers wrestling with data localization obligations in other jurisdictions need more flexibility when it comes to selecting countries and regions. Some customers want to be able to set restrictions to maintain their private keys in one country, some want the keys stored everywhere except in certain countries, and some may want to mix and match rules and say “store them in X and Y, but not in Z”. What we learned from our customers is that they need flexibility, something that will allow them to keep up with the ever-changing rules and policies — and that’s what we set out to build out.
The next issue we faced was scalability. When we built the initial regions, we included a hard-coded list of data centers that met our criteria for the US, EU, “high security” data center regions. However, this list was static because the underlying cryptography did not support dynamic changes to our list of data centers. In order to distribute private keys to new data centers that met our criteria, we would have had to completely overhaul the system. In addition to that, our network significantly expands every year, with more than 100 new data centers since the initial launch. That means that any new potential locations that could be used to store private keys are currently not in use, degrading the performance and reliability of customers using this feature.
With our current scale, automation and expansion is a must-have. Our new system needs to dynamically scale every time we onboard or remove a data center from our Network, without any human intervention or large overhaul.
Finally, one of our biggest learnings was that customers make mistakes, such as defining a region that’s so small that availability becomes a concern. Our job is to prevent our customers from making changes that we know will negatively impact them.
Define your own geo-restrictions with the new version of Geo Key Manager
Cloudflare has significantly grown in the last few years and so has our international customer base. Customers need to keep their traffic regionalized. This region can be as broad as a continent — Asia, for example. Or, it can be a specific country, like Japan.
From our conversations with our customers, we’ve heard that they want to be able to define these regions themselves. This is why today we’re excited to announce that customers will be able to use Geo Key Manager to create what we call “policies”.
A policy can be a single country, defined by two-letter (ISO 3166) country code. It can be a region, such as “EU” for the European Union or Oceania. It can be a mix and match of the two, “country:US or region: EU”.
Our new policy based Geo Key Manager allows you to create allowlist or blocklists of countries and supported regions, giving you control over the boundary in which your private key will be stored. If you’d like to store your private keys globally and omit a few countries, you can do that.
If you would like to store your private keys in the EU and US, you would make the following API call:
If you would like to store your private keys in the EU, but not in France, here is how you can define that:
curl -X POST "https://api.cloudflare.com/client/v4/zones/zone_id/custom_certificates" \
     -H "X-Auth-Email: [email protected]" \
     -H "X-Auth-Key: auth-key" \
     -H "Content-Type: application/json" \
     --data '{"certificate":"certificate","private_key":"private_key","policy": "region: EU and (not country: FR)", "type": "sni_custom"}'
Geo Key Manager can now support more than 30 countries and regions. But that’s not all! The superpower of our Geo Key Manager technology is that it doesn’t actually have to be “geo” based, but instead, it’s attribute based. In the future, we’ll have a policy that will allow our customers to define where their private keys are stored based on a compliance standard like FedRAMP or ISO 27001.
Reliability, resiliency, and redundancy
By giving our customers the remote control for Geo Key Manager, we want to make sure that customers understand the impact of their changes on both redundancy and latency.
On the redundancy side, one of our biggest concerns is allowing customers to choose a region small enough that if a data center is removed for maintenance, for example, then availability is drastically impacted. To protect our customers, we’ve added redundancy restrictions. These prevent our customers from setting regions with too few data centers, ensuring that all the data centers within a policy can offer high availability and redundancy.
Not just that, but in the last few years, we’ve significantly improved the underlying networking that powers Geo Key Manager. For more information on how we did that, keep an eye out for a technical deep dive inside Geo Key Manager.
Performance matters
With the original regions (US, EU, and Highest Security Data Centers), we learned customers may overlook possible latency impacts that occur when defining the key manager to a certain region. Imagine your keys are stored in the US. For your Asia-based customers, there’s going to be some latency impact for the requests that go around the world. Now, with customers being able to define more granular regions, we want to make sure that before customers make that change, they see the impact of it.
If you’re an E-Commerce platform then performance is always top-of-mind. One thing that we’re working on right now is performance metrics for Geo Key Manager policies both from a regional point of view — “what’s the latency impact for Asia based customers?” and from a global point of view — “for anyone in the world, what is the average impact of this policy?”.
By seeing the latency impact, if you see that the impact is unacceptable, you may want to create a separate domain for your service that’s specific to the region that it’s serving.
Closed Beta, now available!
Interested in trying out the latest version of Geo Key Manager? Fill out this form.
Coming soon!
Geo Key Manager is only available via API at the moment. But, we are working on creating an easy-to-use UI for it, so that customers can easily manage their policies and regions. In addition, we’ll surface performance measurements and warnings when we see any degraded impact in terms of performance or redundancy to ensure that customers are mindful when setting policies.
We’re also excited to extend our Geo Key Manager product beyond custom uploaded certificates. In the future, certificates issued through Advanced Certificate Manager or SSL for SaaS will be allowed to add policy based restrictions for the key storage.
Finally, we’re looking to add more default regions to make the selection process simple for our customers. If you have any regions that you’d like us to support, or just general feedback or feature requests related to Geo Key Manager, make a note of it on the form. We love hearing from our customers!
We’re excited to announce that Workers will soon be able to send outbound requests through a mutually authenticated channel via mutual TLS authentication!
When making outbound requests from a Worker, TLS is always used on the server side, so that the client can validate that the information is being sent to the right destination. But in the same way, the server may want to authenticate the client to ensure that the request is coming from an authorized client. This two-way street of authentication is called Mutual TLS. In this blog, we’re going to talk through the importance of mutual TLS authentication, what it means to use mutual TLS within Workers, and how in a few months you’ll be able to use it to send information through an authenticated channel — adding a layer of security to your application!
mTLS between Cloudflare and an Origin
Mutual TLS authentication works by having a server validate the client certificate against a CA. If the validation passes then the server knows that it’s the right client and will let the request go through. If the validation fails or if a client certificate is not presented then the server can choose to drop the request.
Today, customers use mTLS to secure connections between Cloudflare and an origin — this is done through a product called Authenticated Origin Pull. Once a customer enables it, Cloudflare starts serving a client certificate on all outgoing requests. This is either a Cloudflare managed client certificate or it can be one uploaded by the customer. When enabled, Cloudflare will present this certificate when connecting to an origin. The origin should then check the client certificate to see if it’s the one that it expects to see. If it is then the request will go through. If it’s the wrong client certificate or is not included then the origin can choose to drop the request.
Doing this brings a big security boost because it allows the origin to only accept traffic from Cloudflare and drop any unexpected external traffic.
Digging up problems with dogfooding
Today, many Cloudflare services are built on Cloudflare Workers — it’s the secret sauce we use to continuously ship fast, reliable products to our customers. Internally, we might have one Cloudflare account that runs multiple services, with each service deployed on an individual Worker.
Whenever one service needs to talk to another, the fetch() function is used to request or send information. This can be object data that we send to upstream providers, it can be a read or write to a database, or service to service communication. In most regards, the information that’s going to the origin is sensitive and requires a layer of authentication. Without proper authentication, any client would be able to access the data, removing a layer of security.
Implementing service to service authentication
Today, there are a few ways that you can set up service to service authentication, if you’re building on Workers.
One way to set up service authentication is to use Authenticated Origin Pull. Authenticated Origin Pull allows customers to implement mutual TLS between Cloudflare and an origin by attaching a client certificate and private key to a domain or hostname, so that all outbound requests include a client certificate. The origin can then check this certificate to see whether the request came from Cloudflare. If there’s a valid certificate, then the origin can let the request through and if there’s an invalid certificate or no certificate then the origin can choose to drop the request. However, Authenticated Origin Pull has its limitations and isn’t ideal for some use-cases.
The first limitation is that an Authenticated Origin Pull certificate is tied to a publicly hosted hostname or domain. Some services that are built on Workers don’t necessarily need to be exposed to the public Internet. Therefore, tying it to a domain doesn’t really make sense.
The next limitation is that if you have multiple Workers services that are each writing to the same database, you may want to be able to distinguish them. What if at some point, you need to take the “write” power away from the Worker? Or, what if only Workers A and B are allowed to make writes but Worker C should only make “read” requests?
Today, if you use Authenticated Origin Pulls with Cloudflare’s client certificate then all requests will be accepted as valid. This is because for all outbound requests, we attach the same client certificate. So even though you’re restricting your traffic to “Cloudflare-Only”, there’s no Worker-level granularity.
Now, there’s another solution that you can use. You can make use of Access and set up Token Authentication by using a pre-shared key and configuring your Worker to allow or deny access based on the pre-shared key, presented in the header. While this does allow you to lock down authentication on a per-Worker or per-service basis, the feedback that we’ve gotten from our internal teams who have implemented this is that it’s 1) cumbersome to manage and 2) requires the two service to speak over HTTP, and 3) doesn’t expose the client’s identity. And so, with these limitations in mind, we’re excited to bring mutual TLS authentication to Workers — an easy, scalable way to manage authentication and identity for anyone building on Workers.
Coming soon: Mutual TLS for Workers
We’re excited to announce that in the next few months, we’re going to be bringing mutual TLS support to Workers. Customers will be able to upload client certificates to Cloudflare and attach them in the fetch() requests within a Worker. That way, you can have per-Worker or even per-request level of granularity when it comes to authentication and identification.
When sending out the subrequest, Cloudflare will present the client certificate and the receiving server will be able to check:
1) Is this client presenting a valid certificate? 2) Within Cloudflare, what service or Worker is this request coming from?
This is one of our most highly requested features, both from customers and from internal teams, and we’re excited to launch it and make it a no-brainer for any developer to use Cloudflare as their platform for anything they want to build!
The major browsers natively trust a whole bunch of certificate authorities, and some of them are really sketchy:
Google’s Chrome, Apple’s Safari, nonprofit Firefox and others allow the company, TrustCor Systems, to act as what’s known as a root certificate authority, a powerful spot in the internet’s infrastructure that guarantees websites are not fake, guiding users to them seamlessly.
The company’s Panamanian registration records show that it has the identical slate of officers, agents and partners as a spyware maker identified this year as an affiliate of Arizona-based Packet Forensics, which public contracting records and company documents show has sold communication interception services to U.S. government agencies for more than a decade.
[…]
In the earlier spyware matter, researchers Joel Reardon of the University of Calgary and Serge Egelman of the University of California at Berkeley found that a Panamanian company, Measurement Systems, had been paying developers to include code in a variety of innocuous apps to record and transmit users’ phone numbers, email addresses and exact locations. They estimated that those apps were downloaded more than 60 million times, including 10 million downloads of Muslim prayer apps.
Measurement Systems’ website was registered by Vostrom Holdings, according to historic domain name records. Vostrom filed papers in 2007 to do business as Packet Forensics, according to Virginia state records. Measurement Systems was registered in Virginia by Saulino, according to another state filing.
AWS Certificate Manager (ACM) is a managed service that enables you to provision, manage, and deploy public and private SSL/TLS certificates that you can use to securely encrypt network traffic. You can now use ACM to request Elliptic Curve Digital Signature Algorithm (ECDSA) certificates and associate the certificates with AWS services like Application Load Balancer (ALB) or Amazon CloudFront. As a result, you get the benefit of managed renewal, where ACM can automatically renew ECDSA certificates before they expire. Previously, you could only request certificates with an RSA 2048 key algorithm from ACM. ECDSA certificates could be imported to ACM, but imported certificates cannot use managed renewal.
You can request both ECDSA P-256 and P-384 certificates from ACM. If you do not request an ECDSA certificate, ACM will issue an RSA 2048 certificate by default.
In this blog post, we will briefly examine the differences between RSA and ECDSA certificates, discuss some important considerations when evaluating which certificate type to use, and walk through how you can request an ECDSA certificate and associate it with an application load balancer in AWS.
Cryptographic certificates overview
TLS certificates are used to secure network communications and establish the identity of websites over the internet, as well as the identity of resources on private networks. Public certificates that you request through ACM are obtained from Amazon Trust Services, which is an Amazon managed public certificate authority (CA).
Both public and private certificates can help customers identify resources on networks and secure communication between these resources. Public certificates identify resources on the public internet, whereas private certificates do the same for private networks. One key difference is that applications and browsers trust public certificates by default, but an administrator must explicitly configure applications and devices to trust private certificates.
RSA and ECDSA primer
RSA and ECDSA are two widely used public-key cryptographic algorithms—algorithms that use two different keys to encrypt and decrypt data. In the case of TLS, a public key is used to encrypt data, and a private key is used to decrypt data. Public key (or asymmetric key) algorithms are not as computationally efficient as symmetric key algorithms like AES. For this reason, public key algorithms like RSA and ECDSA are primarily used to exchange secrets between two parties initiating a TLS connection. These secrets are then used by both parties to decipher the same symmetric key that actually encrypts the data in transit.
RSA stands for Rivest, Shamir, and Adleman: the researchers who first publicly described this algorithm in 1977. The basic functionality of RSA relies on the idea that large prime numbers are very difficult to efficiently factor. ECDSA, or Elliptic Curve Digital Signature Algorithm, is based on certain unique mathematical properties of elliptic curves that make them very useful for cryptographic operations. The cryptographic utility of ECDSA comes from a concept called the discrete logarithm problem.
Considerations when choosing between RSA and ECDSA
What are the important differences between RSA and ECDSA certificates? When should you choose ECDSA certificates to encrypt network traffic? In this section, we’ll examine the security and performance considerations that help to determine whether ECDSA or RSA certificates are the best choice for your workload.
Security
In cryptography, security is measured as the computational work it takes to exhaust all possible values of a symmetric key in an ideal cipher. An ideal cipher is a theoretical algorithm that has no weaknesses, so you must try every possible key to discover which is the correct key. This is similar to the idea of “brute forcing” a password: trying every possible character combination to find the correct password.
Let’s imagine you have a 112-bit key ideal cipher, which means it would take 2112 tries to exhaust the key space—we would say this cipher has a 112-bit security strength. However, it is important to realize that security strength and key length are not always equal—meaning that an encryption key with a length of 112 bits will not always have a 112-bit security strength.
ECDSA provides higher security strength for lower computational cost. ECDSA P-256, for example, provides 128-bit security strength and is equivalent to an RSA 3072 key. Meanwhile, ECDSA P-384 provides 192-bit security strength, equivalent to the key associated with an RSA 7680 certificate. In other words, an ECDSA P-384 key would require 2192 tries to exhaust the key space.
The following table provides an in-depth comparison of the different security strengths for RSA key lengths and ECDSA curve types. Note that only RSA 2048 and ECDSA P-256 and P-384 are currently issued by ACM. However, ACM does support the import and usage of the other certificate types listed in the table. For more information, see Importing certificates into AWS Certificate Manager.
Security strength
RSA key length
ECDSA curve type
80-bit
1024
160
112-bit
2048
224
128-bit
3072
256
192-bit
7680
384
256-bit
15360
512
Performance
ECDSA provides a higher security strength (for a given key length) than RSA but does not add performance overhead. For example, ECDSA P-256 is as performant as RSA 2048 while providing security strength that is comparable to RSA 3072.
ECDSA certificates also have up to a 50% smaller certificate size when compared to RSA certificates, and are therefore more suitable to protect data-in-transit over low bandwidth or for applications with limited memory and storage, such as Internet of Things (IoT) devices.
Take a look at the following certificate examples; you can see the size difference between RSA and ECDSA certificates.
Consider a small IoT sensor device that tracks temperature in an office building. This device typically has very low storage capacity and compute power, so the smaller ECDSA certificate will be easier to process and store. In the case of an IoT device, you might not be able to store the entire RSA certificate chain on the device due to memory limitations and the larger size of RSA certificates. This can make it more difficult to validate the chain of trust for that certificate.
Using ECDSA, customers can take advantage of the smaller size of the certificates (and the certificate trust chain) and store the entire chain of trust on the IoT device itself, enabling the IoT device to more easily validate the certificate.
When should I use ECDSA certificates from ACM?
In general, you should consider using ECDSA certificates wherever possible, because they provide stronger security (for a given key length) compared to RSA, without impacting performance. You can also choose to issue ECDSA certificates from ACM to implement 128-bit or 192-bit TLS security, where previously you could request up to 112-bit security from ACM by using RSA 2048 certificates.
ECDSA certificates are strongly recommended for applications that need to securely send data over low-bandwidth connections, or when you are using IoT devices that might not have much memory or computational power to store and process the larger certificate sizes that RSA offers.
If your application is not ECDSA compatible, you will need to continue using RSA certificates. RSA 2048 remains the default certificate type issued by ACM, in order to prevent compatibility issues with legacy applications or with applications that do not support ECDSA certificate types. We will provide links to check if your application is compatible with ECDSA certificate types in the next section of this blog.
Getting started with ECDSA certificates
Modern browsers and operating systems are ECDSA compatible. That said, some custom applications might not be ECDSA compatible. You can check whether your calling application is ECDSA compatible by accessing the following links from your application:
When you access one of these links, you should see a message stating “Expected Status: good”. This indicates that the application is ECDSA compatible. See Figure 1 for an example of a successful result.
Figure 1: ECDSA application compatibility example
When you terminate your TLS traffic with ALB, you can work around compatibility concerns by binding both ECDSA and RSA certificates for a given domain. ALB will prioritize and present the ECDSA certificate when the calling application is ECDSA compatible and will use the RSA certificate if the calling application is not ECDSA compatible. We’ll walk through this configuration in the demonstration portion of this post.
How to request an ECDSA certificate from ACM
You can use the ACM console, APIs, or AWS Command Line Interface (AWS CLI) to issue public or private ECDSA P-256 and P-384 TLS certificates. When you request certificates by using the API or AWS CLI, you can use the request-certificate API action with either EC_prime256v1 or EC_secp384r1 as the key-algorithm parameter to request a P-256 or P-384 ECDSA certificate, respectively.
Certificates have a defined validity period, and ACM will attempt to renew certificates that were issued by ACM and that are in use before they expire. ACM will also attempt to automatically bind the renewed certificates with an integrated service. ACM issued private ECDSA certificates can also be exported and used on other workloads to terminate TLS traffic.
Associate an ECDSA certificate with an Application Load Balancer for TLS
To demonstrate how to request and use ECDSA certificates from ACM, let’s examine a common use case: requesting a public certificate from ACM and associating it with an ALB. This walkthrough will also include requesting an RSA 2048 certificate and associating it with the same ALB, to facilitate TLS connections for applications that do not support ECDSA. ALB will prioritize and present the ECDSA certificate when the calling application is ECDSA compatible, and will use the RSA certificate if the calling application is not ECDSA compatible.
Navigate to the ACM console and choose Request a certificate.
Choose Request a public certificate, and then choose Next.
For Fully qualified domain name, enter your domain name.
Choose DNS validation. DNS validation is recommended wherever possible, because it enables automatic renewal of ACM issued certificates with no action required by the domain owner. If you use Amazon Route 53, you can use ACM to directly update your DNS records. DNS-validated certificates will be renewed by ACM as long as the certificate is in use and the DNS record is in place.
Figure 2: Requesting a public ECDSA certificate
In the Key algorithm options section, select your preferred algorithm based on your security requirements:
ECDSA P-256 — Equivalent in security strength to RSA 3072
ECDSA P-384 — Equivalent in security strength to RSA 7680
Figure 3: Key algorithms
(Optional) Add tags to help you identify and manage your certificate. You can find more information on using tags in Tagging AWS resources in the AWS General Reference.
Choose Request to request the public certificate.
The certificate will now be in the Pending Validation state until the domain can be validated, either through DNS or email validation, depending on your selection in the previous steps. For information on how to validate ownership of the domain name or names, see Validating domain ownership in the AWS Certificate Manager User Guide.
Take note of the certificate ARN; you will need this later to identify the certificate.
To request an RSA 2048 certificate from ACM
To request a public RSA 2048 certificate, use the same steps noted in the preceding section, but select RSA 2048 in the Key algorithm options section.
Make sure that both certificates you request have the same fully qualified domain name.
For this post, we will use an Application Load Balancer. You can view more details on each type of Load Balancer, and see a feature-to-feature breakdown, on the Elastic Load Balancing features page.
For the Application Load Balancer type, choose Create.
Enter a name for your load balancer.
Select the scheme and IP address type of the application load balancer. For this post, we will choose Internet-facing for the scheme and use the IPv4 address type.
Under Default SSL/TLS certificate, verify thatFrom ACM is selected, and then in the drop-down list, select the RSA certificate you requested earlier.
Note: We are using the RSA certificate as the default so that the ALB will use this certificate if the connecting client does not support ECDSA or the Server Name Indication (SNI) protocol. This is to maximize availability and compatibility with legacy applications.
Figure 6: Secure listener settings
(Optional) Add tags to the Application Load Balancer.
Review your selections, and then choose Create load balancer.
Figure 7: Review and create load balancer
To associate the ECDSA certificate with the Application Load Balancer
In the EC2 console, select the new ALB you just created, and choose the Listeners tab.
In the SSL Certificate column, you should see the default certificate you added when you created the ALB. Choose View/edit certificates to see the full list of certificates associated with this ALB.
Figure 8: ALB listeners
Under Listener certificates for SNI, choose Add certificate.
Figure 9: Listener certificates for SNI
Under ACM and IAM certificates, select the ECDSA certificate you requested earlier.
Note: You can use the certificate ARN to identify the appropriate certificate.
Choose Include as pending below to add the ECDSA certificate to the listener.
Figure 10: Adding the ECDSA certificate to the load balancer listener
Under Listener certificates for SNI, confirm that the ECDSA certificate is listed as pending, and choose Add pending certificates.
Figure 11: Confirm addition of pending certificates
Great! We’ve used ACM to request a public ECDSA certificate and a public RSA 2048 certificate. Next, we associated both of these certificates with an Application Load Balancer to facilitate TLS communications between the load balancer and client devices.
If clients support the SNI protocol, the ALB uses a smart certificate selection algorithm. The load balancer will select the best certificate that the client can support from the certificate list. Certificate selection is based on the following criteria, in the following order:
Public key algorithm (prefer ECDSA over RSA)
Hashing algorithm (prefer SHA over MD5)
Key length (prefer the longest key)
Validity period
In the earlier example, this means if clients support SNI and ECDSA, the ECDSA certificate will be prioritized and presented to the client. If the client does not support SNI or ECDSA, the RSA certificate will be used to maximize compatibility with legacy applications.
Conclusion
In this blog post, we discussed the basic differences between RSA and ECDSA certificates, when you might choose ECDSA over RSA, and how you can use AWS Certificate Manager to request public or private ECDSA certificates. We also covered how to request a public ECDSA certificate from ACM and associate it with an Application Load Balancer. Finally, we showed you how to request an RSA 2048 certificate and associate it with the same load balancer to facilitate TLS for applications that do not support ECDSA certificates.
Today, we’re excited to announce Total TLS — a one-click feature that will issue individual TLS certificates for every subdomain in our customer’s domains.
By default, all Cloudflare customers get a free, TLS certificate that covers the apex and wildcard (example.com, *.example.com) of their domain. Now, with Total TLS, customers can get additional coverage for all of their subdomains with just one-click! Once enabled, customers will no longer have to worry about insecure connection errors to subdomains not covered by their default TLS certificate because Total TLS will keep all the traffic bound to the subdomains encrypted.
A primer on Cloudflare’s TLS certificate offerings
Universal SSL — the “easy” option
In 2014, we announced Universal SSL — a free TLS certificate for every Cloudflare customer. Universal SSL was built to be a simple “one-size-fits-all” solution. For customers that use Cloudflare as their authoritative DNS provider, this certificate covers the apex and a wildcard e.g. example.com and *.example.com. While a Universal SSL certificate provides sufficient coverage for most, some customers have deeper subdomains like a.b.example.com for which they’d like TLS coverage. For those customers, we built Advanced Certificate Manager — a customizable platform for certificate issuance that allows customers to issue certificates with the hostnames of their choice.
Advanced certificates — the “customizable” option
For customers that want flexibility and choice, we build Advanced certificates which are available as a part of Advanced Certificate Manager. With Advanced certificates, customers can specify the exact hostnames that will be included on the certificate.
That means that if my Universal SSL certificate is insufficient, I can use the Advanced certificates UI or API to request a certificate that covers “a.b.example.com” and “a.b.c.example.com”. Today, we allow customers to place up to 50 hostnames on an Advanced certificate. The only caveat — customers have to tell us which hostnames to protect.
This may seem trivial, but some of our customers have thousands of subdomains that they want to keep protected. We have customers with subdomains that range from a.b.example.com to a.b.c.d.e.f.example.com and for those to be covered, customers have to use the Advanced certificates API to tell us the hostname that they’d like us to protect. A process like this is error-prone, not easy to scale, and has been rejected as a solution by some of our largest customers.
Instead, customers want Cloudflare to issue the certificates for them. If Cloudflare is the DNS provider then Cloudflare should know what subdomains need protection. Ideally, Cloudflare would issue a TLS certificate for every subdomain that’s proxying its traffic through the Cloudflare Network… and that’s where Total TLS comes in.
Enter Total TLS: easy, customizable, and scalable
Total TLS is a one-click button that signals Cloudflare to automatically issue TLS certificates for every proxied DNS record in your domain. Once enabled, Cloudflare will issue individual certificates for every proxied hostname. This way, you can add as many DNS records and subdomains as you need to, without worrying about whether they’ll be covered by a TLS certificate.
If you have a DNS record for a.b.example.com, we’ll issue a TLS certificate with the hostname a.b.example.com. If you have a wildcard record for *.a.b.example.com then we’ll issue a TLS certificate for “*.a.b.example.com”. Here’s an example of what this will look like in the Edge Certificates table of the dashboard:
Available now
Total TLS is now available to use as a part of Advanced Certificate Manager for domains that use Cloudflare as an Authoritative DNS provider. One of the superpowers of having Cloudflare as your DNS provider is that we’ll always add the proper Domain Control Validation (DCV) records on your behalf to ensure successful certificate issuance and renewal.
Enabling Total TLS is easy — you can do it through the Cloudflare dashboard or via API. In the SSL/TLS tab of the Cloudflare dashboard, navigate to Total TLS. There, choose the issuing CA — Let’s Encrypt, Google Trust Services, or No Preference, if you’d like Cloudflare to select the CA on your behalf then click on the toggle to enable the feature.
But that’s not all…
One pain point that we wanted to address for all customers was visibility. From looking at support tickets and talking to customers, one of the things that we realized was that customers don’t always know whether their domain is covered by a TLS certificate — a simple oversight that can result in downtime or errors.
To prevent this from happening, we are now going to warn every customer if we see that the proxied DNS record that they’re creating, viewing, or editing doesn’t have a TLS certificate covering it. This way, our customers can get a TLS certificate issued before the hostname becomes publicly available, preventing visitors from encountering this error:
Join the mission
At Cloudflare, we love building products that help secure all Internet properties. Interested in achieving this mission with us? Join the team!
AWS Certificate Manager (ACM) is a managed service that lets you provision, manage, and deploy public and private Secure Sockets Layer/Transport Layer Security (SSL/TLS) certificates for use with Amazon Web Services (AWS) and your internal connected resources. Starting October 11, 2022, at 9:00 AM Pacific Time, public certificates obtained through ACM will be issued from one of the multiple intermediate certificate authorities (CAs) that Amazon manages. In this blog post, we share important details about this change and how you can prepare.
What is changing and why?
Public certificates that you request through ACM are obtained from Amazon Trust Services, which is a public certificate authority (CA) that Amazon manages. Like other public CAs, Amazon Trust Services CAs have a structured trust hierarchy. The public certificate issued to you, also known as the leaf certificate, can chain to one or more intermediate CAs and then to the Amazon Trust Services root CA. The Amazon Trust Services root CA is trusted by default by most and operating systems. This is why Amazon can issue public certificates that are trusted by these systems.
Starting October 11, 2022 at 9:00 AM Pacific Time, public certificates obtained through ACM will be issued from one of the multiple intermediate CAs that Amazon manages. These intermediate CAs chain to an existing Amazon Trust Services root CA. With this change, leaf certificates issued to you will be signed by different intermediate CAs. Before this change, Amazon maintained a limited number of intermediate CAs and issued and renewed certificates from the same intermediate CAs.
Amazon is making this change to create a more resilient and agile certificate infrastructure that will help us respond more quickly to future requirements. This change also presents an opportunity to correct a known issue related to delayed revocation of a subordinate CA and help minimize the scope of impact for new risks that might emerge in the future.
What can I do to prepare?
Most customers won’t experience an impact from this change. Browsers and most applications will continue to work just as they do now, because these services trust the Amazon Trust Services root CA and not a specific intermediate CA. If you’re using one of the standard operating systems and web browsers that are listed in the next section of this post, you don’t need to take any action.
If you use intermediate CA information through certificate pinning, you will need to make changes and pin to an Amazon Trust Services root CA instead of an intermediate CA or leaf certificate. Certificate pinning is a process in which your application that initiates the TLS connection only trusts a specific public certificate through one or more certificate variables that you define. If the pinned certificate is replaced, your application won’t initiate the connection. AWS recommends that you don’t use certificate pinning because it introduces an availability risk. However, if your use case requires certificate pinning, AWS recommends that you pin to an Amazon Trust Services root CA instead of an intermediate CA or leaf certificate. When you pin to an Amazon Trust Services root CA, you should pin to all of the root CAs shown in the following table.
To test that your trust store contains the Amazon Trust Services root CA, see the preceding table, which lists the Amazon Trust Services root CA certificates, and choose each test URL in the table. If the test URL works, you should see a message that says Expected Status: Good, along with the certificate chain. If the test URL doesn’t work, you will receive an error message that indicates the connection has failed.
What should I do if the Amazon Trust Services CAs are not in my trust store?
If your application is using a custom trust store, you must add the Amazon Trust Services root CAs to your application’s trust store. The instructions for doing this vary based on the application or service. Refer to the documentation for the application or service that you’re using.
If your tests of any of the test URLs failed, you must update your trust store. The simplest way to update your trust store is to upgrade the operating system or browser that you’re using.
The following operating systems use the Amazon Trust Services CAs:
Amazon Linux (all versions)
Microsoft Windows versions, with updates installed, from January 2005, Windows Vista, Windows 7, Windows Server 2008, and newer versions
Mac OS X 10.4 with Java for Mac OS X 10.4 Release 5, Mac OS X 10.5, and newer versions
Red Hat Enterprise Linux 5 (March 2007 release), Linux 6, and Linux 7 and CentOS 5, CentOS 6, and CentOS 7
Ubuntu 8.10
Debian 5.0
Java 1.4.2_12, Java 5 update 2, and all newer versions, including Java 6, Java 7, and Java 8
Modern browsers trust Amazon Trust Services CAs. To update the certificate bundle in your browser, update your browser. For instructions on how to update your browser, see the update page for your browser:
The Windows operating system manages certificate bundles for Internet Explorer and Microsoft Edge, so to update your browser, you must update Windows.
Where can I get help?
If you have questions, contact AWS Support or your technical account manager (TAM), or start a new thread on the AWS re:Post ACM Forum. If you have feedback about this post, submit comments in the Comments section below.
Want more AWS Security news? Follow us on Twitter.
Practically all data sent over the Internet today is at risk in the future if a sufficiently large and stable quantum computer is created. Anyone who captures data now could decrypt it.
Luckily, there is a solution: we can switch to so-called post-quantum (PQ) cryptography, which is designed to be secure against attacks of quantum computers. After a six-year worldwide selection process, in July 2022, NIST announced they will standardize Kyber, a post-quantum key agreement scheme. The standard will be ready in 2024, but we want to help drive the adoption of post-quantum cryptography.
Today we have added support for the X25519Kyber512Draft00 and X25519Kyber768Draft00 hybrid post-quantum key agreements to a number of test domains, including pq.cloudflareresearch.com.
Do you want to experiment with post-quantum on your test website for free? Mail [email protected] to enroll your test website, but read the fine-print below.
What does it mean to enable post-quantum on your website?
If you enroll your website to the post-quantum beta, we will add support for these two extra key agreements alongside the existing classical encryption schemes such as X25519. If your browser doesn’t support these post-quantum key agreements (and none at the time of writing do), then your browser will continue working with a classically secure, but not quantum-resistant, connection.
Then how to test it?
We have open-sourced a fork of BoringSSL and Go that has support for these post-quantum key agreements. With those and an enrolled test domain, you can check how your application performs with post-quantum key exchanges. We are working on support for more libraries and languages.
What to look for?
Kyber and classical key agreements such as X25519 have different performance characteristics: Kyber requires less computation, but has bigger keys and requires a bit more RAM to compute. It could very well make the connection faster if used on its own.
We are not using Kyber on its own though, but are using hybrids. That means we are doing both an X25519 and Kyber key agreement such that the connection is still classically secure if either is broken. That also means that connections will be a bit slower. In our experiments, the difference is verysmall, but it’s best to check for yourself.
The fine-print
Cloudflare’s post-quantum cryptography support is a beta service for experimental use only. Enabling post-quantum on your website will subject the website to Cloudflare’s Beta Services terms and will impact other Cloudflare services on the website as described below.
No stability or support guarantees
Over the coming months, both Kyber and the way it’s integrated into TLS will change for several reasons, including:
Kyber will see small, but backward-incompatible changes in the coming months.
We want to be compatible with other early adopters and will change our integration accordingly.
As, together with the cryptography community, we find issues, we will add workarounds in our integration.
We will update our forks accordingly, but cannot guarantee any long-term stability or continued support. PQ support may become unavailable at any moment. We will post updates on pq.cloudflareresearch.com.
Features in enrolled domains
For the moment, we are running enrolled zones on a slightly different infrastructure for which not all features, notably QUIC, are available.
With that out of the way, it’s…
Demo time!
BoringSSL
With the following commands build our fork of BoringSSL and create a TLS connection with pq.cloudflareresearch.com using the compiled bssl tool. Note that we do not enable the post-quantum key agreements by default, so you have to pass the -curves flag.
$ git clone https://github.com/cloudflare/boringssl-pq
[snip]
$ cd boringssl-pq && mkdir build && cd build && cmake .. -Gninja && ninja
[snip]
$ ./tool/bssl client -connect pq.cloudflareresearch.com -server-name pq.cloudflareresearch.com -curves Xyber512D00
	Connecting to [2606:4700:7::a29f:8a55]:443
Connected.
  Version: TLSv1.3
  Resumed session: no
  Cipher: TLS_AES_128_GCM_SHA256
  ECDHE curve: X25519Kyber512Draft00
  Signature algorithm: ecdsa_secp256r1_sha256
  Secure renegotiation: yes
  Extended master secret: yes
  Next protocol negotiated:
  ALPN protocol:
  OCSP staple: no
  SCT list: no
  Early data: no
  Encrypted ClientHello: no
  Cert subject: CN = *.pq.cloudflareresearch.com
  Cert issuer: C = US, O = Let's Encrypt, CN = E1
Go
Our Go fork doesn’t enable the post-quantum key agreement by default. The following simple Go program enables PQ by default for the http package and GETs pq.cloudflareresearch.com.
package main
import (
"crypto/tls"
"fmt"
"net/http"
)
func main() {
http.DefaultTransport.(*http.Transport).TLSClientConfig = &tls.Config{
CurvePreferences: []tls.CurveID{tls.X25519Kyber512Draft00, tls.X25519},
CFEventHandler: func(ev tls.CFEvent) {
switch e := ev.(type) {
case tls.CFEventTLS13HRR:
fmt.Printf("HelloRetryRequest\n")
case tls.CFEventTLS13NegotiatedKEX:
switch e.KEX {
case tls.X25519Kyber512Draft00:
fmt.Printf("Used X25519Kyber512Draft00\n")
default:
fmt.Printf("Used %d\n", e.KEX)
}
}
},
}
if _, err := http.Get("https://pq.cloudflareresearch.com"); err != nil {
fmt.Println(err)
}
}
$ git clone https://github.com/cloudflare/go
[snip]
$ cd go/src && ./all.bash
[snip]
$ ../bin/go run path/to/example.go
Used X25519Kyber512Draft00
On the wire
So what does this look like on the wire? With Wireshark we can capture the packet flow. First a non-post quantum HTTP/2 connection with X25519:
This is a normal TLS 1.3 handshake: the client sends a ClientHello with an X25519 keyshare, which fits in a single packet. In return, the server sends its own 32 byte X25519 keyshare. It also sends various other messages, such as the certificate chain, which requires two packets in total.
Let’s check out Kyber:
As you can see the ClientHello is a bit bigger, but still fits within a single packet. The response takes three packets now, instead of two, because of the larger server keyshare.
Under the hood
Want to add client support yourself? We are using a hybrid of X25519 and Kyber version 3.02. We are writing out the details of the latter in version 00 of this CRFG IETF draft, hence the name. We are using TLS group identifiers0xfe30 and 0xfe31 for X25519Kyber512Draft00 and X25519Kyber768Draft00 respectively.
There are some differences between our Go and BoringSSL forks that are interesting to compare.
Our Go fork only sends one keyshare. If the server doesn’t support it, it will respond with a HelloRetryRequest message and the client will fallback to one the server does support. This adds a roundtrip. Our BoringSSL fork, on the other hand, will send two keyshares: the post-quantum hybrid and a classical one (if a classical key agreement is still enabled). If the server doesn’t recognize the first, it will be able to use the second. In this way we avoid a roundtrip if the server does not support the post-quantum key agreement.
Looking ahead
The quantum future is here. In the coming years the Internet will move to post-quantum cryptography. Today we are offering our customers the tools to get a headstart and test post-quantum key agreements. We love to hear your feedback: e-mail it to [email protected].
This is just a small, but important first step. We will continue our efforts to move towards a secure and private quantum-secure Internet. Much more to come — watch this space.
After five years of intensive research and cryptanalysis among partners from academia, the cryptographic community, and the National Institute of Standards and Technology (NIST), NIST has selected Kyber for post-quantum key encapsulation mechanism (KEM) standardization. This marks the beginning of the next generation of public key encryption. In time, the classical key establishment algorithms we use today, like RSA and elliptic curve cryptography (ECC), will be replaced by quantum-secure alternatives. At AWS Cryptography, we’ve been researching and analyzing the candidate KEMs through each round of the NIST selection process. We began supporting Kyber in round 2 and continue that support today.
A cryptographically relevant quantum computer that is capable of breaking RSA and ECC does not yet exist. However, we are offering hybrid post-quantum TLS with Kyber today so that customers can see how the performance differences of PQC affect their workloads. We also believe that the use of PQC raises the already-high security bar for connecting to AWS KMS and ACM, making this feature attractive for customers with long-term confidentiality needs.
Performance of hybrid post-quantum TLS with Kyber
Hybrid post-quantum TLS incurs a latency and bandwidth overhead compared to classical crypto alone. To quantify this overhead, we measured how long S2N-TLS takes to negotiate hybrid post-quantum (ECDHE + Kyber) key establishment compared to ECDHE alone. We performed the tests with the Linux perf subsystem on an Amazon Elastic Compute Cloud (Amazon EC2) c6i.4xlarge instance in the US East (Northern Virginia) AWS Region, and we initiated 2,000 TLS connections to a test server running in the US West (Oregon) Region, to include typical internet latencies.
Figure 1 shows the latencies of a TLS handshake that uses classical ECDHE and hybrid post-quantum (ECDHE + Kyber) key establishment. The columns are separated to illustrate the CPU time spent by the client and server compared to the time spent sending data over the network.
Figure 1: Latency of classical compared to hybrid post-quantum TLS handshake
Figure 2 shows the bytes sent and received during the TLS handshake, as measured by the client, for both classical ECDHE and hybrid post-quantum (ECDHE + Kyber) key establishment.
Figure 2: Bandwidth of classical compared to hybrid post-quantum TLS handshake
This data shows that the overhead for using hybrid post-quantum key establishment is 0.25 ms on the client, 0.23 ms on the server, and an additional 2,356 bytes on the wire. Intra-Region tests would result in lower network latency. Your latencies also might vary depending on network conditions, CPU performance, server load, and other variables.
The results show that the performance of Kyber is strong; the additional latency is one of the top contenders among the NIST PQC candidates that we analyzed in a previous blog post. In fact, the performance of these ciphers has improved during our latest test, because x86-64 assembly-optimized versions of these ciphers are now available for use.
Configure a Maven project for hybrid post-quantum TLS
In this section, we provide a Maven configuration and code example that will show you how to get started using our assembly-optimized, hybrid post-quantum TLS configuration with Kyber.
To configure a Maven project for hybrid post-quantum TLS
Configure the desired cipher suite in your code’s initialization. The following code sample configures an AWS KMS client to use the latest hybrid post-quantum cipher suite.
// Check platform support
if(!TLS_CIPHER_PREF_PQ_TLSv1_0_2021_05.isSupported()){
    throw new RuntimeException(“Hybrid post-quantum cipher suites are not supported.”);
}

// Configure HTTP client
SdkAsyncHttpClient awsCrtHttpClient = AwsCrtAsyncHttpClient.builder()
          .tlsCipherPreference(TLS_CIPHER_PREF_PQ_TLSv1_0_2021_05)
          .build();

// Create the AWS KMS async client
KmsAsyncClient kmsAsync = KmsAsyncClient.builder()
         .httpClient(awsCrtHttpClient)
         .build();
With that, all calls made with your AWS KMS client will use hybrid post-quantum TLS. You can use the latest hybrid post-quantum cipher suite with ACM by following the preceding example but using an AcmAsyncClient instead.
Tune connection settings for hybrid post-quantum TLS
Although hybrid post-quantum TLS has some latency and bandwidth overhead on the initial handshake, that cost is amortized over the duration of the TLS session, and you can fine-tune your connection settings to help further reduce the cost. In this section, you learn three ways to reduce the impact of hybrid PQC on your TLS connections: connection pooling, connection timeouts, and TLS session resumption.
Connection pooling
Connection pools manage the number of active connections to a server. They allow a connection to be reused without closing and reopening it, which amortizes the cost of connection establishment over time. Part of a connection’s setup time is the TLS handshake, so you can use connection pools to help reduce the impact of an increase in handshake latency.
To illustrate this, we wrote a test application that generates approximately 200 transactions per second to a test server. We varied the maximum concurrency setting of the HTTP client and measured the latency of the test request. In the AWS CRT HTTP client, this is the maxConcurrency setting. If the connection pool doesn’t have an idle connection available, the request latency includes establishing a new connection. Using Wireshark, we captured the network traffic to observe the number of TLS handshakes that took place over the duration of the application. Figure 3 shows the request latency and number of TLS handshakes as the maxConcurrency setting is increased.
Figure 3: Median request latency and number of TLS handshakes as concurrency pool size increases
The biggest latency benefit occurred with a maxConcurrency value greater than 1. Beyond that, the latencies were past the point of diminishing returns. For all maxConcurrency values of 10 and below, additional TLS handshakes took place within the connections, but they didn’t have much impact on median latency. These inflection points will depend on your application’s request volume. The takeaway is that connection pooling allows connections to be reused, thereby spreading the cost of any increased TLS negotiation time over many requests.
Connection timeouts work in conjunction with connection pooling. Even if you use a connection pool, there is a limit to how long idle connections stay open before the pool closes them. You can adjust this time limit to save on connection establishment overhead.
A nice way to visualize this setting is to imagine bursty traffic patterns. Despite tuning the connection pool concurrency, your connections keep closing because the burst period is longer than the idle time limit. By increasing the maximum idle time, you can reuse these connections despite bursty behavior.
To simulate the impact of connection timeouts, we wrote a test application that starts 10 threads, each of which activate at the same time on a periodic schedule every 5 seconds for a minute. We set maxConcurrency to 10 to allow each thread to have its own connection. We set connectionMaxIdleTime of the AWS CRT HTTP client to 1 second for the first test; and to 10 seconds for the second test.
When the maximum idle time was 1 second, the connections for all 10 threads closed during the time between each burst. As a result, 100 total connections were formed over the life of the test, causing a median request latency of 20.3 ms. When we changed the maximum idle time to 10 seconds, the 10 initial connections were reused by each subsequent burst, reducing the median request latency to 5.9 ms.
By setting the connectionMaxIdleTime appropriately for your application, you can reduce connection establishment overhead, including TLS negotiation time, to help achieve time savings throughout the life of your application.
TLS session resumption allows a client and server to bypass the key agreement that is normally performed to arrive at a new shared secret. Instead, communication quickly resumes by using a shared secret that was previously negotiated, or one that was derived from a previous secret (the implementation details depend on the version of TLS in use). This feature requires that both the client and server support it, but if available, TLS session resumption allows the TLS handshake time and bandwidth increases associated with hybrid PQ to be amortized over the life of multiple connections.
Conclusion
As you learned in this post, hybrid post-quantum TLS with Kyber is available for AWS KMS and ACM. This new cipher suite raises the security bar and allows you to prepare your workloads for post-quantum cryptography. Hybrid key agreement has some additional overhead compared to classical ECDHE, but you can mitigate these increases by tuning your connection settings, including connection pooling, connection timeouts, and TLS session resumption. Begin using hybrid key agreement today with AWS KMS and ACM.
If you have feedback about this post, submit comments in the Comments section below.
Want more AWS Security news? Follow us on Twitter.
At Amazon Web Services (AWS), we continuously innovate to deliver you a cloud computing environment that works to help meet the requirements of the most security-sensitive organizations. To respond to evolving technology and regulatory standards for Transport Layer Security (TLS), we will be updating the TLS configuration for all AWS service API endpoints to a minimum of version TLS 1.2. This update means you will no longer be able to use TLS versions 1.0 and 1.1 with all AWS APIs in all AWS Regions by June 28, 2023. In this post, we will tell you how to check your TLS version, and what to do to prepare.
We have continued AWS support for TLS versions 1.0 and 1.1 to maintain backward compatibility for customers that have older or difficult to update clients, such as embedded devices. Furthermore, we have active mitigations in place that help protect your data for the issues identified in these older versions. Now is the right time to retire TLS 1.0 and 1.1, because increasing numbers of customers have requested this change to help simplify part of their regulatory compliance, and there are fewer and fewer customers using these older versions.
If you are one of the more than 95% of AWS customers who are already using TLS 1.2 or later, you will not be impacted by this change. You are almost certainly already using TLS 1.2 or later if your client software application was built after 2014 using an AWS Software Development Kit (AWS SDK), AWS Command Line Interface (AWS CLI), Java Development Kit (JDK) 8 or later, or another modern development environment. If you are using earlier application versions, or have not updated your development environment since before 2014, you will likely need to update.
If you are one of the customers still using TLS 1.0 or 1.1, then you must update your client software to use TLS 1.2 or later to maintain your ability to connect. It is important to understand that you already have control over the TLS version used when connecting. When connecting to AWS API endpoints, your client software negotiates its preferred TLS version, and AWS uses the highest mutually agreed upon version.
To minimize the availability impact of requiring TLS 1.2, AWS is rolling out the changes on an endpoint-by-endpoint basis over the next year, starting now and ending in June 2023. Before making these potentially breaking changes, we monitor for connections that are still using TLS 1.0 or TLS 1.1. If you are one of the AWS customers who may be impacted, we will notify you on your AWS Health Dashboard, and by email. After June 28, 2023, AWS will update our API endpoint configuration to remove TLS 1.0 and TLS 1.1, even if you still have connections using these versions.
What should you do to prepare for this update?
To minimize your risk, you can self-identify if you have any connections using TLS 1.0 or 1.1. If you find any connections using TLS 1.0 or 1.1, you should update your client software to use TLS 1.2 or later.
AWS CloudTrail records are especially useful to identify if you are using the outdated TLS versions. You can now search for the TLS version used for your connections by using the recently added tlsDetails field. The tlsDetails structure in each CloudTrail record contains the TLS version, cipher suite, and the fully qualified domain name (FQDN, also known as the URL) field used for the API call. You can then use the data in the records to help you pinpoint your client software that is responsible for the TLS 1.0 or 1.1 call, and update it accordingly. Nearly half of AWS services currently provide the TLS information in the CloudTrail tlsDetails field, and we are continuing to roll this out for the remaining services in the coming months.
We recommend you use one of the following options for running your CloudTrail TLS queries:
Amazon CloudWatch Log Insights: There are two built-in CloudWatch Log Insights sample CloudTrail TLS queries that you can use, as shown in Figure 1.
Figure 1: Available sample TLS queries for CloudWatch Log Insights
Amazon Athena: You can query AWS CloudTrail logs in Amazon Athena, and we will be adding support for querying the TLS values in your CloudTrail logs in the coming months. Look for updates and announcements about this in future AWS Security Blog posts.
In addition to using CloudTrail data, you can also identify the TLS version used by your connections by performing code, network, or log analysis as described in the blog post TLS 1.2 will be required for all AWS FIPS endpoints. Note that while this post refers to the FIPS API endpoints, the information about querying for TLS versions is applicable to all API endpoints.
Will I be notified if I am using TLS 1.0 or TLS 1.1?
If we detect that you are using TLS 1.0 or 1.1, you will be notified on your AWS Health Dashboard, and you will receive email notifications. However, you will not receive a notification for connections you make anonymously to AWS shared resources, such as a public Amazon Simple Storage Service (Amazon S3) bucket, because we cannot identify anonymous connections. Furthermore, while we will make every effort to identify and notify every customer, there is a possibility that we may not detect infrequent connections, such as those that occur less than monthly.
How do I update my client to use TLS 1.2 or TLS 1.3?
If you are using an AWS Software Developer Kit (AWS SDK) or the AWS Command Line Interface (AWS CLI), follow the detailed guidance about how to examine your client software code and properly configure the TLS version used in the blog post TLS 1.2 to become the minimum for FIPS endpoints.
We encourage you to be proactive in order to avoid an impact to availability. Also, we recommend that you test configuration changes in a staging environment before you introduce them into production workloads.
What is the most common use of TLS 1.0 or TLS 1.1?
The most common use of TLS 1.0 or 1.1 are .NET Framework versions earlier than 4.6.2. If you use the .NET Framework, please confirm you are using version 4.6.2 or later. For information about how to update and configure the .NET Framework to support TLS 1.2, see How to enable TLS 1.2 on clients in the .NET Configuration Manager documentation.
What is Transport Layer Security (TLS)?
Transport Layer Security (TLS) is a cryptographic protocol that secures internet communications. Your client software can be set to use TLS version 1.0, 1.1, 1.2, or 1.3, or a subset of these, when connecting to service endpoints. You should ensure that your client software supports TLS 1.2 or later.
Is there more assistance available to help verify or update my client software?
If you have any questions or issues, you can start a new thread on the AWS re:Post community, or you can contact AWS Support or your Technical Account Manager (TAM).
Additionally, you can use AWS IQ to find, securely collaborate with, and pay AWS certified third-party experts for on-demand assistance to update your TLS client components. To find out how to submit a request, get responses from experts, and choose the expert with the right skills and experience, see the AWS IQ page. Sign in to the AWS Management Console and select Get Started with AWS IQ to start a request.
What if I can’t update my client software?
If you are unable to update to use TLS 1.2 or TLS 1.3, contact AWS Support or your Technical Account Manager (TAM) so that we can work with you to identify the best solution.
If you have feedback about this post, submit comments in the Comments section below.
Want more AWS Security how-to content, news, and feature announcements? Follow us on Twitter.
At Cloudflare, we pride ourselves in giving every customer the ability to provision a TLS certificate for their Internet application — for free. Today, we are responsible for managing the certificate lifecycle for almost 45 million certificates from issuance to deployment to renewal. As we build out the most resilient, robust platform, we want it to be “future-proof” and resilient against events we can’t predict.
Events that cause us to re-issue certificates for our customers, like key compromises, vulnerabilities, and mass revocations require immediate action. Otherwise, customers can be left insecure or offline. When one of these events happens, we want to be ready to mitigate impact immediately. But how?
By having a backup certificate ready to deploy — wrapped with a different private key and issued from a different Certificate Authority than the primary certificate that we serve.
Events that lead to certificate re-issuance
Cloudflare re-issues certificates every day — we call this a certificate renewal. Because certificates come with an expiration date, when Cloudflare sees that a certificate is expiring soon, we initiate a new certificate renewal order. This way, by the time the certificate expires, we already have an updated certificate deployed and ready to use for TLS termination.
Unfortunately, not all certificate renewals are initiated by the expiration date. Sometimes, unforeseeable events like key compromises can lead to certificate renewals. This is because a new key needs to be issued, and therefore a corresponding certificate does as well.
Key Compromises
A key compromise is when an unauthorized person or system obtains the private key that is used to encrypt and decrypt secret information — security personnel’s worst nightmare. Key compromises can be the result of a vulnerability, such as Heartbleed, where a bug in a system can cause the private key to be leaked. They can also be the result of malicious actions, such as a rogue employee accessing unauthorized information. In the event of a key compromise, it’s crucial that (1) new private keys are immediately issued, (2) new certificates are deployed, and (3) the old certificates are revoked.
The Heartbleed Vulnerability
In 2014, the Heartbleed vulnerability was exposed. It allowed attackers to extract the TLS certificate private key for any server that was running the affected version of OpenSSL, a popular encryption library. We patched the bug and then as a precaution, quickly reissued private keys and TLS certificates belonging to all of our customers, even though none of our keys were leaked. Cloudflare’s ability to act quickly protected our customers’ data from being exposed.
Heartbleed was a wake-up call. At the time, Cloudflare’s scale was a magnitude smaller. A similar vulnerability at today’s scale would take us weeks, not hours to re-issue all of our customers certificates.
Now, with backup certificates, we don’t need to worry about initiating a mass re-issuance in a small time frame. Instead, customers will already have a certificate that we’ll be able to instantly deploy. Not just that, but the backup certificate will also be wrapped with a different key than the primary certificate, preventing it from being impacted by a key compromise.
Key compromises are one of the main reasons certificates need to be re-issued at scale. But other events can prompt re-issuance as well, including mass revocations by Certificate Authorities.
Mass Revocations from CAs
Today, the Certificate Authority/Browser Forum (CA/B Forum) is the governing body that sets the rules and standards for certificates. One of the Baseline Requirements set by the CA/B Forum states that Certificate Authorities are required to revoke certificates whose keys are at risk of being compromised within 24 hours. For less immediate issues, such as certificate misuse or violation of a CA’s Certificate Policy, certificates need to be revoked within five days. In both scenarios, certificates will be revoked by the CA in a short timeframe and immediate re-issuance of certificates is required.
While mass revocations aren’t commonly initiated by CAs, there have been a few occurrences throughout the last few years. Recently, Let’s Encrypt had to revoke roughly 2.7 million certificates when they found a non-compliance in their implementation of a DCV challenge. In this case, Cloudflare customers were unaffected.
Another time, one of the Certificate Authorities that we use found that they were renewing certificates based on validation tokens that did not comply with the CA/B Forum standards. This caused them to invoke a mass revocation, impacting about five thousand Cloudflare-managed domains. We worked with our customers and the CA to issue new certificates before the revocation, resulting in minimal impact.
We understand that mistakes happen, and we have been lucky enough that as these issues have come up, our engineering teams were able to mitigate quickly so that no customers were impacted. But that’s not enough: our systems need to be future-proof so that a revocation of 45 million certificates will have no impact on our customers. With backup certificates, we’ll be ready for a mass re-issuance, no matter the scale.
To be resilient against mass revocations initiated by our CAs, we are going to issue every backup certificate from a different CA than the primary certificate. This will add a layer of protection if one of our CAs will have to invoke a mass revocation — something that when initiated, is a ticking time bomb.
Challenges when Renewing Certificates
Scale: With great power, comes great responsibility
When the Heartbleed vulnerability was exposed, we had to re-issue about 100,000 certificates. At the time, this wasn’t a challenge for Cloudflare. Now, we are responsible for tens of millions of certificates. Even if our systems are able to handle this scale, we rely on our Certificate Authority partners to be able to handle it as well. In the case of an emergency, we don’t want to rely on systems that we do not control. That’s why it’s important for us to issue the certificates ahead of time, so that during a disaster, all we need to worry about is getting the backup certificates deployed.
Manual intervention for completing DCV
Another challenge that comes with re-issuing certificates is Domain Control Validation (DCV). DCV is a check used to validate the ownership of a domain before a Certificate Authority can issue a certificate for it. When customers onboard to Cloudflare, they can either delegate Cloudflare to be their DNS provider, or they can choose to use Cloudflare as a proxy while maintaining their current DNS provider.
When Cloudflare acts as the DNS provider for a domain, we can add Domain Control Validation (DCV) records on our customer’s behalf. This makes the certificate issuance and renewal process much simpler.
Domains that don’t use Cloudflare as their DNS provider — we call them partial zones — have to rely on other methods for completing DCV. When those domains proxy their traffic through us, we can complete HTTP DCV on their behalf, serving the HTTP DCV token from our Edge. However, customers that want their certificate issued before proxying their traffic need to manually complete DCV. In an event where Cloudflare has to re-issue thousands or millions of certificates, but cannot complete DCV on behalf of the customer, manual intervention will be required. While completing DCV is not an arduous task, it’s not something that we should rely on our customers to do in an emergency, when they have a small time frame, with high risk involved.
This is where backup certificates come into play. From now on, every certificate issuance will fire two orders: one for a certificate from the primary CA and one for the backup certificate. When we can complete the DCV on behalf of the customer, we will do so for both CAs.
Today, we’re only issuing backup certificates for domains that use Cloudflare as an Authoritative DNS provider. In the future, we’ll order backup certificates for partial zones. That means that for backup certificates for which we are unable to complete DCV, we will give customers the corresponding DCV records to get the certificate issued.
Backup Certificates Deployment Plan
We are happy to announce that Cloudflare has started deploying backup certificates on Universal Certificate orders for Free customers that use Cloudflare as an Authoritative DNS provider. We have been slowly ramping up the number of backup certificate orders and in the next few weeks, we expect every new Universal certificate pack order initiated on a Free, Pro, or Biz account to include a backup certificate, wrapped with a different key and issued from a different CA than the primary certificate.
At the end of April we will start issuing backup certificates for our Enterprise customers. If you’re an Enterprise customer and have any questions about backup certificates, please reach out to your Account Team.
Next Up: Backup Certificates for All
Today, Universal certificates make up 72% of the certificates in our pipeline. But we want full coverage! That’s why our team will continue building out our backup certificates pipeline to support Advanced Certificates and SSL for SaaS certificates. In the future, we will also issue backup certificates for certificates that our customers upload themselves, so they can have a backup they can rely on.
In addition, we will continue to improve our pipeline to make the deployment of backup certificates instantaneous — leaving our customers secure and online in an emergency.
At Cloudflare, our mission is to help build a better Internet. With backup certificates, we’re helping build a secure, reliable Internet that’s ready for any disaster. Interested in helping us out? We’re hiring.
Quantum computers are a boon and a bane. Originally conceived by Manin and Feyman to simulate nature efficiently, large-scale quantum computers will speed-up innovation in material sciences by orders of magnitude. Consider the technical advances enabled by the discovery of new materials (with bronze, iron, steel and silicon each ascribed their own age!); quantum computers could help to unlock the next age of innovation. Unfortunately, they will also break the majority of the cryptography that’s currently used in TLS to protect our web browsing. They fall in two categories:
Digital signatures, such as RSA, which ensure you’re talking to the right server.
Key exchanges, such as Diffie–Hellman, which are used to agree on encryption keys.
A moderately-sized stable quantum computer will easily break the signatures and key exchanges currently used in TLS using Shor’s algorithm. Luckily this can be fixed: over the last two decades, there has been great progress in so-called post-quantum cryptography. “Post quantum”, abbreviated PQ, means secure against quantum computers. Five years ago, the standards institute NIST started a public process to standardise post-quantum signature schemes and key exchanges. The outcome is expected to be announced early 2022.
At Cloudflare, we’re not just following this process closely, but are also testing the real-world performance of PQ cryptography. In our 2019 experiment with Google, we saw that we can switch to a PQ key exchange with little performance impact. Among the NIST finalists, there are many with even better performance. This is good news, as we would like to switch to PQ key exchanges as soon as possible — indeed, an attacker could intercept sensitive data today, then keep and decrypt it years into the future using a quantum computer.
Why worry about PQ signatures today
One would think we can take it easy with signatures for TLS: we only need to have them replaced before a large quantum computer is built. The situation, however, is more complicated.
The lead time to change signatures is higher. Not only do we need to change the browsers and servers, we also need to change certificate authorities (CAs) and everyone’s certificate management.
TLS is addicted to small and fast signatures. For this page that you’re viewing we sent six signatures: two in the certificate chain; one handshake signature; one OCSP staple and finally two SCTs used for certificate transparency.
PQ signature schemes have wildly varying performance trade-offs and quirks (as we’ll see below) which stack up quickly with six signatures, which all have slightly different requirements.
One might ask: can’t we be clever and get rid of some of these signatures? We think so! For instance, we can replace the handshake signature with a smaller key exchange or suppress intermediate certificates. Such fundamental changes take years to be adopted. That is why we are also investigating the performance of plain TLS with drop-inPQ signatures.
So, what are our options?
The zoo of PQ signatures
The three finalists of the NIST competition are Dilithium, Falcon and Rainbow. In the table below we compare them against RSA and ECDSA, both of which are in common use today, and a selection of other PQ schemes that might see standardisation in the future.
(* There are many caveats to this table. We compare instances of PQC security level 1. Signing and verification times vary considerably by hardware platform and implementation constraints. They should be taken as a rough indication only. The signing time of Falcon512 is discussed later on. We do not list all relevant variants of the NIST alternates or promising schemes. This instance of XMSS can only sign a million messages, is stateful, requires quite a bit of storage for quick signing, is not standardised and thus far from a drop-in replacement. Rainbow has one other variant, which has smaller private keys.)
None of these PQ signatures are a clear-cut drop-in replacement. To start, all have (much) larger signatures, except for Rainbow, GeMMS and SQISign. Rainbow and GeMMS have huge public keys and SQISign is very slow.
TLS signatures
To confuse matters even more, the signatures within TLS are not all the same:
Online. Only the handshake signature is created with every incoming TLS connection, and so signing needs to be fast. Dilithium fits this role well.
Offline. All other signatures are made months/years in advance, and so signing time is not that important. This group splits in two:
With a public key. The certificate chain includes signatures and their public keys. Here Falcon seems most suited.
Without a public key. The remaining three (SCTs and OCSP staple) are just signatures. For these, Rainbow seems optimal, as its large public keys are not transmitted.
Using Dilithium, Falcon, and Rainbow, together, allows optimization for both speed and size simultaneously, which seems like a great idea. However, combining different signatures at the same time has disadvantages:
A security issue in the design or implementation of one of the signatures compromises the whole.
Clients need to implement multiple cryptographic algorithms, in this case three of them, which is troublesome for smaller devices — especially if separate hardware support is needed for each of them.
So do we really need to eke out every byte and every cycle of performance? Or can we stick to a single signature scheme for simplicity and security?
Can we pick just one?
If we stick to one signature scheme, looking just at the numbers, Falcon512 seems like a reasonable option. It needs 5KB of extra space (compared to a classical handshake), about the same as the Dilithium–Falcon–Rainbow chimera of before. Unfortunately Falcon comes with a caveat: creating signatures efficiently requires constant-time 64-bit floating point arithmetic. Without it, signing is 20x slower. But speed alone is not enough; it has to run inconstant time. Without that, one can slowly learn the secret key by measuring the time it takes to create a signature.
Although PCs typically have a sufficiently constant-time floating-point unit, many smaller devices do not. Thus, Falcon seems ill-suited for general purpose online signatures.
What about Dilithium2? It needs 17KB extra — let’s find out if that makes a big difference.
Evidence by Experiment
All the different variables and constraints clearly complicate an already challenging puzzle. The best thing is to just try the options. Over the last few years several interesting papers have appeared studying the various options, such as SKD20, PST20, SKD21 and PKNLN22. These are great starts, but don’t provide a complete picture:
SCTs and OCSP staples have yet to be considered. Leaving half (three) of the signatures out changes the results significantly.
The networks tested or emulated offer insights, but are far from representative of real-world conditions. All tests were conducted between two datacenters (which does not include real-world last-mile conditions such as Wi-Fi or spotty mobile connections); or a network was simulated with unrealistic packet loss rates.
Here, Cloudflare can contribute. One of the things we like to do is to put new ideas in the community to the test on a global scale.
In this case we’re just taking a first step. Setting up a real-world experiment with a modified browser is quite involved, especially when we consider the many possible variations. Instead, as a first step, we decided first to investigate the most striking variable, the size, and try to answer the question:
How do larger signatures affect the TLS handshake?
There are two parts to this: how fast are they, and, more importantly, do they work at all?
Experimental setup
We need some way to emulate bigger signatures without having to modify the clients. We considered several options. The first idea we had was to pad a valid certificate with a dummy extension. That would require a custom certificate for each size to test, which is cumbersome. Then we considered responding with a dummy ServerHello extension. This is, however, not allowed by TLS 1.2 without a corresponding ClientHello extension. In the end, we went for adding dummy certificates.
Dummy certificates
These dummy certificates are 1kB self-signed invalid certificates that have nothing to do with the certificate chain. To vary the size to test, we simply add more copies. Adding unrelated certificates to the certificate chain is a common misconfiguration and clients have learnt to ignore them. In fact, TLS 1.3 stipulates that these (in rfc-speak) SHOULD be ignored by the client. Testing out hundreds of browsers, we saw no issues.
Standards and reality don’t always agree: when inserting dummy certificates on actual traffic, we saw issues with a small, but not insignificant number of clients. We don’t want to ruin anyone’s connection, and so we decided to use separate connections for this purpose.
Using challenge pages to launch probes
So what did we actually do? On a small percentage of the challenge pages (those with the CAPTCHA), we pick a number n and a random key and send this key in two separate background requests to:
0.tls-size-experiment-c.cloudflareresearch.com
[n].tls-size-experiment-1.cloudflareresearch.com
The first, the control, is a normal webpage that stores the TLS handshake time under the key that’s been sent. The real action happens at the second, the live, which adds the n dummy certificates to its chain. The live also stores handshake time under the given key. We could call it “experimental” instead of “live”, but the benign control connection is also an important part of the experiment. Indeed, it allows us to see if live connections are missing. These endpoints were a breeze to write using Cloudflare Workers and KV.
How much dummy data to test?
Before launching the experiment, we tested several libraries and browsers on the live endpoint to see whether they would error due to the dummy certificates. None rejected a single certificate, but how far can we go? TLS 1.3 theoretically allows a certificate chain of 16MB, but in practice many clients reject a much shorter chain. OpenSSL, for instance, rejects one of 102kB. The most stingy we found is Go’s TLS client, which rejects a handshake larger than 64kB. Because of this, we tested with between 1 and 59 dummy certificates.
Intermezzo: TCP’s congestion window
So, what did we find? The graphs are in the next section, have a peek! Before diving right in, we would like to explain a crucial concept, the TCP congestion window, that helps us read the results.
Data sent over the Internet is broken down in packets of around 1.4kB that traverse many routers to reach their destination. Sometimes a router has more incoming packets than it can handle and it has to drop them — this is called congestion. To avoid causing congestion, TCP initially sends just a few packets (typically ten, so ~14kB). Then, with every acknowledgement received in return, the TCP sender will very quickly ramp up the number of packets that it keeps in flight. This number is called the congestion window (cwnd). When it gets too high, congestion occurs, packets are dropped and in response the sender backs off by dialing down the congestion window. Any dropped packet is seen as a sign of congestion by TCP. For this reason, Wi-Fi has its own retransmission mechanism transparent to TCP.
Considering all this, we would expect to see two effects with larger signatures:
Gentle slope. Every single packet needs some extra time to transmit, due to limited bandwidth and possible physical-layer retransmissions. This slope isn’t so gentle if your internet connection is slow or spotty.
cwnd wall. Once we fill the congestion window, we have to wait for a whole roundtrip before we can continue. This effect is stronger if the roundtrip time (RTT) is higher.
The strength of the two effects can differ. With a fast connection and high RTT we expect to see the graph below on the left. With a slow connection and low RTT, we expect the one on the right.
There might be other unknown effects. The best thing is to have a look.
In PQ research, the second effect has gained the most attention. The larger signatures simply do not fit in the initial congestion windows used today. A common suggestion in response has been to simply increase the initial congestion window to accommodate the larger signatures. This is far from a simplechange to make globally, and we have to understand if this solves the problem to begin with.
Results
Over 24 days we’ve received 964,499 live connections from 454,218 different truncated IPs (to 24 bits, “/24”, for IPv4 and 48 bits for IPv6) and 11,239 different ASNs. First, let’s check how many clients had trouble with the bigger handshakes.
Can clients handle the larger handshakes?
The control connection was missing for 2.4% of the live connections. This is not alarming: we expect some connections to be missing for harmless reasons, such as the user browsing away from the challenge page. There are, however, significantly more live connections without control connection at 3.6%.
In the graph below on the left we break the number of received live connections down by the number of dummy certificates added. Because we pick the number of certificates randomly, the graph is noisy. To get a clearer picture, we started storing the number of certificates added in the corresponding control request, which gives us the graph on the right. The bumps at 10kB and 30kB suggest that there are clients or middleboxes that cannot handle these handshake sizes.
Handshake times with larger signatures
What is the effect on the handshake time? The graph on the left shows the weighted median and 75th percentile TLS handshake times for different amounts of dummy data added. We use the weight so that every truncated IP contributes equally. On the right we show the slowdowns for each size, relative to the handshake time of the control connection.
We can see the not-so-gentle slope until 40kB, where we hit a littlewall that corresponds to Cloudflare’s default initial congestion window of 30 packets.
Adding 35kB fits within our initial congestion window. Nonetheless, the median handshake with 35kB extra is 40% slower. The slowest 10% are even worse off, taking 60% as much time. Thus even though we stay within the congestion window, the added data is not for free at all.
We can now translate these insights back to concrete PQ signatures. For example, using Dilithium2 as a drop-in replacement, we need around 17kB extra. That also fits within our initial congestion window with a median slowdown of 20%, which gets worse for the tail-end of users. For the normal initial congestion window of ten, we expect the slowdown to be much worse — around 60–80%.
There are several caveats to point out:
These experiments used an initial congestion window of 30 packets instead of ten. With a smaller initial congestion window of ten, which is the default for most systems, we would expect the wall to move from 40kB to around 10kB.
Because of our presence all across the world, our RTTs are fairly low. Thus the effect of the cwnd wall is smaller for us.
Challenge pages are served, by design, to those clients that we expect to be bots. This adds a significant bias because bots are generally hosted at well-connected providers, and so are closer than users.
HTTP/3 was not supported by the server we used for the endpoint. Support for IPv6 was only added ten days into the experiment and accounts for 10.9% of the measurements.
Actual TLS handshakes differ in size much more than tested in this setup due to differences in certificate sizes and extensions and other factors.
What have we learned?
The TLS handshake is just one step (~5–20%) in a long chain required to show you a webpage. Casually browsing, it would be hard to notice a TLS handshake that’s 60% slower. But such differences add up. To make a website really fast, you need many seemingly insignificant speedups. Browser developers take this seriously: only in exceptional cases does Chrome allow a change that slows down any microbenchmark by even a percent.
Because of the many parties and complexities involved, we should avoid waiting too long to adopt post-quantum signatures in TLS. That’s a hard sell if it comes at the price of a double-digit slowdown, not least to content servers but also to browser vendors and clients.
A timely adoption of PQ signatures on the web would be great. Our evidence so far suggests that this will be easiest, if six signatures and two public keys would fit in 9kB.
We will continue our efforts to help build a post-quantum secure Internet. To follow along, keep an eye on this blog or have a look at research.cloudflare.com.
Bas Westerbaan is co-submitter of the SPHINCS+ signature scheme.
During Developer Week a few months ago, we opened up the Beta for Cloudflare for SaaS: a one-stop shop for SaaS providers looking to provide fast load times, unparalleled redundancy, and the strongest security to their customers.
Since then, we’ve seen numerous developers integrate with our technology, allowing them to spend their time building out their solution instead of focusing on the burdens of running a fast, secure, and scalable infrastructure — after all, that’s what we’re here for.
Today, we are very excited to announce that Cloudflare for SaaS is generally available, so that every customer, big and small, can use Cloudflare for SaaS to continue scaling and building their SaaS business.
What is Cloudflare for SaaS?
If you’re running a SaaS company, you have customers that are fully reliant on you for your service. That means you’re responsible for keeping their domain fast, secure, and protected. But this isn’t simple. There’s a long checklist you need to get through to put a solution in your customers’ hands:
Set up an origin server
Encrypt your customers’ traffic
Keep your customers online
Boost the performance of global customers
Support vanity domains
Protect against attacks and bots
Scale for growth
Provide insights and analytics
And on top of that, you need to also focus on building out your solution and your business. As a developer or startup with limited resources, this can delay your product launch by weeks or months.
That’s what we’re here to help with! We have numerous engineering teams whose sole focus is to work on products that take care of each one of these tasks, so you don’t have to!
The Cloudflare solution:
Set up an origin server → Workers
Encrypt your customers’ traffic → SSL for SaaS
Keep your customers online → Cloudflare’s global Anycast network
Boost the performance of global customers → Argo Smart Routing/Cache
Support vanity domains → Custom Hostnames
Protect against attacks and bots → WAF and Bot Management
Scale for growth → Workers
Provide insights and analytics → Custom Hostname Analytics
Pricing, Made for Developers
Starting today, Cloudflare for SaaS is available to purchase on Free, Pro, and Business plans. We wanted to make sure that the pricing made sense for developers. At the time of building, you don’t know how many customers you’ll have, so we wanted to offer flexibility by keeping the pricing as simple as possible: only pay for the customers you use.
Each customer domain using the service is called a Custom Hostname. For each Custom Hostname, we automatically provision a TLS certificate. But not just that! Beyond the TLS certificate, each of your Custom Hostnames inherits the full suite of Cloudflare products that you set up on your SaaS zone. From Bot Management to Argo Smart Routing, you can extend these add-ons that protect and accelerate your domain to your customers.
Custom Hostnames cost two dollars per month. We will only charge you after each Custom Hostname has been onboarded, adjusted according to when you created it. That means that if you created 10 Custom Hostnames at the start of the month and 10 Custom Hostnames halfway through, at the end of the month you will be billed $30.
This way, you’re only charged for the Custom Hostnames that you provision. It’s also a great incentive to make sure you clean up after your churned customers.
If you’re an Enterprise customer and want to learn more about the benefits that you can from Cloudflare for SaaS, make sure you check out our blog post about the latest developments.
Show us what you’re building!
During the beta alone, we’ve seen incredible projects built out on the platform. We wanted to showcase these developers to show you what’s possible. And even better, some of these have been built on our Workers platform! We’d love to see what you’re working on. Join our Discord channel and showcase your work! Have feature requests for us? Let us know!
mmm.page: Simple Personal Websites
mmm.page is a drag-and-drop website builder that makes it dead simple to create auto-responsive, collage-like websites: websites with overlapping text, images, GIFs, YouTube videos, Spotify embeds, and (a lot) more. To make it easier, all the standard website tedium — uptime, usability, performance, reliability, responsiveness, SEO, etc. — are handled under the hood so all you have to worry about is adding content and arranging it how you want.
Under their hood is Cloudflare. Cloudflare’s CDN allows both the flexibility of server-side pages as well as the instant loading times of static pages — not to mention an 80% reduction in server costs. Custom Hostnames alone saved months of development time by handling domain names and SSL management (which are otherwise tricky to get perfect and reliable).
They’ve used Workers for increasingly more tasks that would’ve otherwise taken an order of magnitude more time if implemented with their current backend monolith — the ease of deployment and comparatively low cost of Workers is something that keeps them coming back.
The longer-term hope is for pages to be used as a sort of beacon signal, an easy-to-make yet unbounded way to express to others the things you’re interested in, especially for things that aren’t so easily describable or captured in words. They look forward to a world of a ton more DIY micro-sites. Cloudflare has been crucial in taking care of much of the difficult technical plumbing and giving them more time to work on designs and features that get them closer to this hope.
Lightfunnels
Lightfunnels is a performance driven e-commerce and lead generation platform. It focuses on delivering fast, reliable, and highly converting sales funnels to its users and their customers.
With Cloudflare for SaaS, Lightfunnels allows users to preserve their brand by easily connecting their own domain names with SSL to use on their funnels.
The platform handles large e-commerce traffic volume through Cloudflare Workers. This helps Lightfunnels serve pages from the closest edge to the customer, wherever they are in the world, allowing for blazing fast page load speeds.
Workers also come with a powerful caching API that eliminates a great percentage of back-end trips and reduces the stress on their servers.
“Our aim is to build the best performing e-commerce and lead generation platform on the market. Page load speeds play a significant role in performance. Using Cloudflare for SaaS along with Cloudflare Workers made building a reliable, secure, and fast infrastructure a breeze.” – Yassir Ennazk, Co-founder & CEO at Lightfunnels
Ventrata
Ventrata is a SaaS multi-channel booking platform for large attractions and tour operators.They power booking sites and B2B booking portals for clients that run on other domains. Cloudflare for SaaS has allowed them to leverage all of Cloudflare’s tools, including Firewall, image caching, Workers, and free TLS certificates on Custom Hostnames, while allowing their clients to keep full control of their brand. Their implementation involved just 4 lines of code without any infrastructure/DevOps help required, which would have been impossible before.
Currently a part of the Beta?
If you were accepted as a part of the Cloudflare for SaaS Beta, you will get a notice next week about migrating to the paid version.
Help build a better Internet
Want to be a part of the Cloudflare team and work on the products that power Cloudflare for SaaS? We’re hiring!
Last year the AddTrust root certificate expired and lots of clients had a bad time. Some Roku devices weren’t working right, Heroku had problems, and some folks couldn’t even curl. In the aftermath Ryan Sleevi wrote a really great blog post not just about the issue of this one certificate’s expiry, but the problem that so many TLS implementations have in general with certificate path building. If you haven’t read that blog post, you should. This post is probably going to make a lot more sense if you’ve read that one first, so go ahead and read it now.
To recap that previous AddTrust root certificate expiry, there was a certificate graph that looked like this:
The AddTrust certificate graph
This is a real example, and you can see the five certificates in the above graph here:
The important thing to understand about a certificate graph is that the boxes represent entities (meaning an X.500 Distinguished Name and public key). Entities are things you trust (or don’t, as the case may be). The arrows between entities represent certificates: a way to extend trust from one entity to another. This means that if you trust either the “USERTrust RSA Certification Authority” entity or the “AddTrust External CA Root” entity, you should be able to discover a chain of trust from that trusted entity (the “trust anchor”) down to “www.agwa.name”, the “end-entity”.
(Note that the self-signed certificates (4 and 5) are often useful for defining trusted entities, but aren’t going to be important in the context of path building.)
The problem that occurred last summer started because certificate 3 expired. The “USERTrust RSA Certificate Authority” was relatively new and not directly trusted by many clients and so most servers would send certificates 1, 2, and 3 to clients. If a client only trusted “AddTrust External CA Root” then this would be fine; that client can build a certificate chain 1 ← 2 ← 3 and see that they should trust www.agwa.name’s public key. On the other hand, if the client trusts “USERTrust RSA Certification Authority” then that’s also fine; it only needs to build a chain 1 ← 2.
The problem that arose was that some clients weren’t good at certificate path building (even though this is a fairly simple case of path building compared to the next example below). Those clients didn’t realize that they could stop building a chain at 2 if they trusted “USERTrust RSA Certification Authority”. So when certificate 3 expired on May 30, 2020, these clients treated the entire collection of certificates sent by the server as invalid and would no longer establish trust in the end-entity.
Even though that story is a year old and was well covered then, I’m retelling it here because a couple of weeks ago something kind of similar happened: a certificate for the Let’s Encrypt R3 CA expired (certificate 2 below) on September 30, 2021. This should have been fine; the Let’s Encrypt R3 entity also has a certificate signed by the ISRG Root X1 CA (3) which nowadays is trusted by most clients.
But predictably, even though it’s been a year since Ryan’s post, lots of services and clients had issues. You should read Scott Helme’s full post-mortem on the event to understand some of the contributing factors, but one big problem is that most TLS implementations still aren’t very good at path building. As a result, servers generally can’t send a complete collection of certificates down to clients (containing different possible paths to different trust anchors) which makes it hard to host a service that both old and new devices can talk to.
Maybe it’s because I saw history repeating or maybe it’s because I had just listened to Ryan Sleevi talk about the history of web PKI, but the whole episode really made me want to get back to something I had been wanting to do for a while. So over the last couple of weeks I set some time aside, started reading some RFCs, had to get more coffee, finished reading some RFCs, and finally started making certificates. The end result is the first major update to BetterTLS since its first release: a new suite of tests to exercise TLS implementations’ certificate path building. As a bonus, it also checks whether TLS implementations apply certain validity checks. Some of the checks are part of RFCs, like Basic Constraints, while others are not fully standardized, like distrusting deprecated signature algorithms and enforcing EKU constraints on CAs.
I found the results of applying these tests to various TLS implementations pretty interesting, but before I get into those results let me give you a few more details about why TLS implementations should be doing good path building and why we care about it.
What is Certificate Path Building?
If you want the really detailed answer to “What is Certificate Path Building” you can take a look at RFC 4158. But in short, certificate path building is the process of building a chain of trust from some end entity (like the blue boxes in the examples above) back to a trust anchor (like the ISRG Root X1 CA) given a collection of certificates. In the context of TLS, that collection of certificates is sent from the server to the client as part of the TLS handshake. A lot of the time, that collection of certificates is actually already an ordered sequence of certificates from end-entity to trust anchor, such as in the first example where servers would send certificates 1, 2, 3. This happens to already be a chain from “www.agwa.name” to “AddTrust External CA Root”.
But what happens if we can’t be sure what trust anchor the client has, such as the second example above where the server doesn’t know if the client will trust DST Root CA X3 or ISRG Root X1? In this case the server could send all the certificates (1, 2, and 3) and let the client figure out which path makes sense (either 1 ← 2, or 1 ← 3). But if the client expects the server’s certificates to simply be a chain already, the sequence 1 ← 2 ← 3 is going to fail to validate.
Why Does This Matter?
The most important reason for clients to support robust path building is that it allows for agility in the web PKI ecosystem. For example, we can add additional certificates that conform to new requirements such as SHA-1 deprecation, validity length restrictions, or trust anchor removal, all while leaving existing certificates in place to preserve legacy client functionality. This allows static, infrequently updated, or intentionally end-of-lifed clients to continue working while browsers (which frequently enforce new constraints like the ones mentioned above) can take advantage of the additional certificates in the handshake that conform to the new requirements.
In particular, Netflix runs on a lot of devices. Millions of them. The reality though is that the above description applies to many of them. Some devices only run older versions of Android of iOS. Some are embedded devices that no longer receive updates. Regardless of the specifics, the update cadence (if one exists) for those devices is outside of our control. But ideally we’d love it if every device that used to work just kept working. To that end, it’s helpful to know what trade-offs we can make in terms of agility versus retaining support for every device. Are those devices stuck using certain signature algorithms or cipher suites? Will those devices accept a certificate set that includes extra certificates with other alternate signature algorithms?
As service owners, having test suites that can answer these questions can guide decision making. On the other hand, TLS library implementers using these test suites can ensure that applications built with their libraries operate reliably throughout churn in the web PKI ecosystem.
An Aside About Agility
More than 4 years passed between publication of the first draft of the TLS 1.3 specification and the final version. An impressive amount of consideration went into the design of all of the versions of the TLS and SSL protocols and it speaks to the designers’ foresight and diligence that a single server can support clients speaking SSL 3.0 (final specification released 1996) all the way up to TLS 1.3 (final specification released 2018).
(Although I should say that in practice, supporting such a broad set of protocol versions on a single server is probably not a good idea.)
The reason that TLS protocol can support this is because agility has been designed into the system. The client advertises the TLS versions, cipher suites, and extensions it supports and the server can make decisions about the best supported version of those options and negotiate the details in its response. Over time this has allowed the ecosystem to evolve gracefully, supporting new cryptographic primitives (like elliptic curve cryptography) and deprecating old ones (like the MD5 hash algorithm).
Unfortunately the TLS specification has not enabled the same agility with the certificates that it relies on in practice. While there are great specifications like RFC 4158 for how to think about certificate path building, TLS specifications up to 1.2 only allowed for server to present “the chain”:
This is a sequence (chain) of certificates. The sender’s certificate MUST come first in the list. Each following certificate MUST directly certify the one preceding it.
Only in TLS 1.3 did the specification allow for greater flexibility:
The sender’s certificate MUST come in the first CertificateEntry in the list. Each following certificate SHOULD directly certify the one immediately preceding it. … Note: Prior to TLS 1.3, “certificate_list” ordering required each certificate to certify the one immediately preceding it; however, some implementations allowed some flexibility. Servers sometimes send both a current and deprecated intermediate for transitional purposes, and others are simply configured incorrectly, but these cases can nonetheless be validated properly. For maximum compatibility, all implementations SHOULD be prepared to handle potentially extraneous certificates and arbitrary orderings from any TLS version, with the exception of the end-entity certificate which MUST be first.
This change to the specification is hugely significant because it’s the first formalization that TLS implementations should be doing robust path building. Implementations which conform to this are far more likely to continue operating in a PKI ecosystem undergoing frequent changes. If more TLS implementations can tolerate changes, then web PKI ecosystem will be in a place where it is able to undergo those changes. And ultimately this means we will be able to update best practices and retain trust agility as time goes on, making the web a more secure place.
It’s hard to imagine a world where SSL and TLS were so inflexible that we wouldn’t have been able to gracefully transition off of MD5 or transition to PFS cipher suites. I’m hopeful that this update to the TLS specification will help bring the same agility that has existed in the TLS protocol itself to the web PKI ecosystem.
Test Results
So what does the new test suite in BetterTLS tell us about the state of certificate path building in TLS implementations? The good news is that there has been some improvement in the state of the world since Ryan’s roundup last year. The bad news is that that improvement isn’t everywhere.
The test suite both identifies what relevant features a TLS implementation supports (like default distrust of deprecated signing algorithms) and evaluates correctness. Here’s a quick enumeration of what features this test suite looks for:
Branching Path Building: Implementations that support “branching” path building can handle cases like the Let’s Encrypt R3 example above where an entity has multiple issuing certificates and the client needs to check multiple possible paths to find a route to a trust anchor. Importantly, as invalid certificates are found during path building (for all of the reasons listed below) the implementation should be able to pick an alternate issuer certificate to continue building a path. This is the primary feature of interest in this test suite.
Certificate expiration: Implementations should treat expired certificates as invalid during path building. This is a pretty straightforward expectation and fortunately all the tested implementations were properly verifying this.
Name constraints: Implementations should treat certificates with a name constraint extension in conflict with the end entity’s identity as invalid. Check out BetterTLS’s name constraints test suite for more thorough evaluations of this evaluation. All of the implementations tested below correctly evaluated the simple name constraints check in this test suite.
Bad Extended Key Usage (EKU) on CAs: This check tests whether an implementation rejects CA certificates with an Extended Key Usage extension that is incompatible with the end-entity’s use of the certificate for TLS server authentication. The Mozilla Certificate Policy FAQ states:
Inclusion of EKU in CA certificates is generally allowed. NSS and CryptoAPI both treat the EKU extension in intermediate certificates as a constraint on the permitted EKU OIDs in end-entity certificates. Browsers and certificate client software have been using EKU in intermediate certificates, and it has been common for enterprise subordinate CAs in Windows environments to use EKU in their intermediate certificates to constrain certificate issuance.
While many implementations support the semantics of an incompatible EKU in CAs as a reason to treat a certificate as invalid, RFCs do not require this behavior so we do see several implementations below not applying this verification.
Missing Basic Constraints Extension: This check tests whether the implementation rejects paths where a CA is missing the Basic Constraints extension. RFC 5280 requires that all CAs have this extension, so all implementations should support this.
Not a CA: This check tests whether the implementation rejects paths where a CA has a Basic Constraints extension, but that extension does not identify the certificate as being a CA. Similarly to the above, all implementations should support this and fortunately all of the implementations tested applied this check correctly.
Deprecated Signing Algorithm: This check tests whether the implementation rejects certificates that have been signed with an algorithm that is considered deprecated (in particular, with an algorithm using SHA-1). Enforcement of SHA-1 deprecation is not universally present in all TLS implementations at this point, so we see a mix of implementations below that do and do not apply it.
For more information about these checks, check out the repository’s README. Now on to the results!
webpki
webpki is a rust library for validating web PKI certificates. It’s the underlying validation mechanism for the rustls library that I actually tested. webpki shows up as the hero of the non-browser TLS implementations, supporting all of the features and having a 100% test pass rate. webpki is primarily maintained by Brian Smith who also worked on the mozilla::pkix codebase that’s used by Firefox.
Go
Go didn’t distrust deprecated signature algorithms by default (although looking at the issues tracker, an update was merged to change this long before I started working on this test suite; it should land in Go 1.18), but otherwise supported all the features in the test suite. However, while it supported EKU constraints on CAs the test suite discovered a bug that causes path building to fail under certain conditions when only a subset of paths have an EKU constraint.
Upon inspection, the Go x509 library validates most certificate constraints (like expiration and name constraints) as it builds paths, but EKU constraints are only applied after candidate paths are found. This looks to be a violation of Sleevi’s Rule, which probably explains why the EKU corner case causes Go to have a bad time:
Even if a library supports path building, doing some form of depth-first search in the PKI graph, the next most common mistake is still treating path building and path verification as separable, independent steps. That is, the path builder finds “a chain” that is rooted in a trusted CA, and then completes. The completed chain is then handed to a path verifier, which asks “Does this chain meet all the caller’s/application’s requirements”, and returns a “Yes/No” answer. If the answer is “No”, you want the path builder to consider those other paths in the graph, to see if there are any “Yes” paths. Yet if the path building and verification steps are different, you’re bound to have a bad time.
Java
I didn’t evaluate JDKs other than OpenJDK, but the latest version of OpenJDK 11 actually performed quite well. This JDK didn’t enforce EKU constraints on CAs or distrust certificates signed with SHA-1 algorithms. Otherwise, the JDK did a good job of building certificate paths.
PKI.js
The PKI.js library is a javascript library that can perform a number of PKI-related operations including certificate verification. It’s unclear if the “certificate chain validator” is meant to support complex certificate sets or if it was only meant to handle pre-validated paths, but the implementation fared poorly against the test suite. It didn’t support EKU constraints, distrust deprecated signature algorithms, didn’t perform any branching path building, and failed to validate even a simple “chain” when a parent certificate has expired but the intermediate was already trusted (this is the same issue OpenSSL ran into with the expired AddTrust certificate last year).
Even worse, when the certificate pool had a cycle (like in RFC 4158 figure 7), the validator got stuck in an infinite loop.
OpenSSL
In short, OpenSSL doesn’t appear to have changed significantly since Ryan’s roundup last year. OpenSSL does support the less ubiquitous validation checks (such as EKU constraints on CAs and distrusting deprecated signing algorithms), but it still doesn’t support branching path building (only non-branching chains).
LibreSSL
LibreSSL showed significant improvement over last year’s evaluation, which appears to be largely attributable to Bob Beck’s work on a new x509 verifier in LibreSSL 3.2.2 based on Go’s verifier. It supported path building and passed all of the non-skipped tests. As with other implementations it didn’t distrust deprecated algorithms by default. The one big surprise though is that it also didn’t distrust certificates missing the Basic Constraints extension, which as we described above is strictly required by the RFC 5280 spec:
If the basic constraints extension is not present in a version 3 certificate, or the extension is present but the cA boolean is not asserted, then the certified public key MUST NOT be used to verify certificate signatures.
BoringSSL
BoringSSL performed similarly to OpenSSL. Not only did it not support any path building (only non-branching chains), but it also didn’t distrust deprecated signature algorithms.
GnuTLS
GnuTLS looked just like OpenSSL in its results. It also supported all the validation checks in the test suite (EKU constraints, deprecated signature algorithms) but didn’t support branching path building.
Browsers
By and large, browsers (or the operating system libraries they utilize) do a good job of path building.
Firefox (all platforms)
Firefox didn’t distrust deprecated signature algorithms, but otherwise supported path building and passed all tests.
Chrome (all platforms) Chrome supported all validation cases and passed all tests.
Microsoft Edge (Windows) Edge supported all validation cases and passed all tests.
Safari (MacOS) Safari didn’t support EKU constraints on CAs but did pass simple branching path building test cases. However, it failed most of the more complicated path building test cases (such as cases with cycles).
For most of the history of TLS, implementations have been pretty poor at certificate path building (if they supported it at all). In fairness, until recently the TLS specifications asserted that servers MUST behave in such a way that didn’t require clients to implement certificate path building.
However the evolution of the web PKI ecosystem has necessitated flexibility and this has been more directly codified in the TLS 1.3 specification. If you work on a TLS implementation, you really really ought to take heed of these new expectations in the TLS 1.3 specification. We’re going to have a lot more stability on the web if implementations can do good path building.
To be clear, it doesn’t need to be every implementation’s goal to pass every test in this suite. I’ll be the first to admit that the test suite contains some more pathological test cases than you’re likely to see in web PKI in practice. But at a minimum you should look at the changes that have occurred in the web PKI ecosystem in the past decade and be confident that your library supports enough path building to easily handle transitions (such as servers sending multiple possible paths to a trust anchor). And passing all of the tests in the BetterTLS test suite is a useful metric for establishing that confidence.
It’s important to make sure clients are forward-compatible with changes to the web PKI, because it’s not a matter of “if” but “when.” In Scott’s own words:
One thing that’s certain is that this event is coming again. Over the next few years we’re going to see a wide selection of Root Certificates expiring for all of the major CAs and we’re likely to keep experiencing the exact same issues unless something changes in the wider ecosystem.
If you are in a position to choose between different client-side TLS libraries, you can use these test results as a point of consideration for which libraries are most likely to weather those changes.
And if you are a service owner, it is important to know your customers. Will they be able to handle a transition from RSA to ECDSA? Will they be able to handle a transition from ECDSA to a post-quantum signature algorithm? Will they be able to handle having multiple certificates in a handshake when an old trust is expiring or no longer trusted by new clients? Knowing your clients can help you be resilient and set up appropriate configurations and endpoints to support them.
Standards, security base lines, and best practices in web PKI have been rapidly changing over the last few years and are only going to keep changing. Whether you implement TLS or just consume it, whether it’s a distrusted CA, a broken signature algorithm, or just the expiry of a certificate in good standing, it’s important to make sure that your application will be able to handle the next big change. We hope that BetterTLS can play a part in making that easier!
To provide the best experiences, we use technologies like cookies to store and/or access device information. Consenting to these technologies will allow us to process data such as browsing behavior or unique IDs on this site. Not consenting or withdrawing consent, may adversely affect certain features and functions.
Functional
Always active
The technical storage or access is strictly necessary for the legitimate purpose of enabling the use of a specific service explicitly requested by the subscriber or user, or for the sole purpose of carrying out the transmission of a communication over an electronic communications network.
Preferences
The technical storage or access is necessary for the legitimate purpose of storing preferences that are not requested by the subscriber or user.
Statistics
The technical storage or access that is used exclusively for statistical purposes.The technical storage or access that is used exclusively for anonymous statistical purposes. Without a subpoena, voluntary compliance on the part of your Internet Service Provider, or additional records from a third party, information stored or retrieved for this purpose alone cannot usually be used to identify you.
Marketing
The technical storage or access is required to create user profiles to send advertising, or to track the user on a website or across several websites for similar marketing purposes.