Post Syndicated from Talks at Google original https://www.youtube.com/watch?v=X_TB4VxPjPo
Yearly Archives: 2024
Build a Secure One-Time Password Architecture with AWS
Post Syndicated from Bruno Giorgini original https://aws.amazon.com/blogs/messaging-and-targeting/build-a-secure-one-time-password-architecture-with-aws/
In today’s digital landscape, where cyberattacks continue to grow more sophisticated, the need for robust security measures has never been more paramount. One-Time Passwords (OTPs) have long been a crucial component of multi-factor authentication. They provide an additional layer of security to protect user accounts from unauthorized access.
The landscape of OTP delivery is evolving rapidly. While organizations increasingly favor more secure, phishing-resistant methods like passwordless solutions and hardware security keys, many still rely on SMS-based OTPs or require time to transition to newer technologies.
For organizations already leveraging Okta as their identity provider, AWS offers a comprehensive guidance on implementing phone-based multi-factor authentication. The “AWS Guidance for Okta Phone-Based Multi-Factor Authentication on AWS” provides a detailed reference architecture and implementation steps for integrating Okta with AWS services to deliver OTPs via SMS or voice calls.
This blog post offers a comprehensive guide for implementing a reliable, multi-channel OTP solution using AWS services including Amazon DynamoDB, Amazon Simple Email Service (SES), and AWS End User Messaging.
By the end of this blog, you’ll understand how to generate, store, and deliver OTPs via email, SMS, and voice. You’ll also learn best practices for secure OTP implementation. This solution serves organizations that need to maintain SMS-based OTP capabilities.
Let’s explore how to build a secure, multi-channel OTP solution on AWS.
AWS End User Messaging is the new name for Amazon Pinpoint’s SMS, MMS, push, WhatsApp, and text to voice messaging capabilities.
The authentication flow
Let’s imagine a hypothetical scenario where a bank customer want’s to access his online account:
Alex, a customer of the XYZ financial institution, needed to access their online account. They initiated the login process and requested an OTP from the mobile or web application provided by the bank. Upon receiving the request, the bank’s server created a user-specific session to handle the OTP generation and verification. A unique one-time password was then generated and sent to Alex’s registered mobile number via SMS. Alex received the OTP on their phone and had three attempts to enter the correct code within a 10-minute timeframe. This security measure prevented unauthorized access to their account. If Alex couldn’t receive the SMS, they had another option. They could request the bank to send the same OTP to their registered email address, if they had one on file. If Alex entered the correct OTP, the login process would be successful, and they would be granted access to their online banking services. However, if they exceeded the three attempts in the 10-minute time limit, their ability to login to the account would be temporarily suspended for security reasons and Alex would have to call the bank to lift the suspension or wait 2 hours to retry again. The bank implements this multi-factor authentication process with an alternative email-based OTP delivery. This approach safeguards Alex’s sensitive financial information and enhances the security of digital banking services. It also provides a backup option if the primary SMS channel is unavailable.

Prerequisites
To use the code examples provided in this blog post, you’ll need to have the following AWS resources in place:
- AWS Account: Sign up for an AWS account at AWS website if you don’t have one.
- Verified Email Address in Amazon SES: Enable email delivery of OTPs by verifying an email address in Amazon SES service.
- AWS End User Messaging Configuration: You’ll need to configure the necessary origination identity in the AWS End User Messaging service to deliver the OTPs via SMS or voice.
With these prerequisites in place, you’ll be ready to use the code examples provided in the following sections to implement your secure OTP solution.
Architecture:

Flow Explained:
- The user initiates the process by requesting an OTP.
- The request is sent through Amazon API Gateway.
- AWS Lambda receives the request and processes it.
- AWS KMS is used to encrypt the OTP for secure storage.
- The encrypted OTP and related information are stored in Amazon DynamoDB.
- AWS End User Messaging is used to send the OTP to the user via SMS, email, or voice, Amazon SES is used to send the OTP over email.
- When the user receives the OTP, they enter it in the portal for verification. The verification process encrypts the value with the key from AWS KMS and goes through the same flow (API Gateway -> Lambda)
- The Lambda decrypts the OTP for verification using KMS and compares it with the stored value in DynamoDB, which is also decrypted using the same KMS key.
Typical architecture for a secure one-time password (OTP) solution would involve the following components:
- Front-end Application: The OTP functionality is typically exposed through a web or mobile application, which serves as the user-facing interface.
- API Gateway: The front-end application interacts with the OTP solution through an API Gateway. This gateway serves as the entry point, providing scalable and secure access to underlying services.
- AWS Lambda: The business logic for generating, storing, and verifying the OTPs is handled by one or more AWS Lambda functions. These serverless functions are responsible for the core OTP-related operations.
- AWS KMS: Encrypts the OTP submitted for verification by the customer on the client side. AWS Lambda then decrypts it before verifying it against the OTP stored in Amazon DynamoDB.
- Amazon DynamoDB: The generated OTP encrypted and associated metadata, such as creation timestamp and expiration, are securely stored in an Amazon DynamoDB table.
- AWS End User Messaging: Used to deliver the OTPs to the users through various communication channels, such as SMS, and voice.
- Amazon SES: Deliver the OTPs to the users via email.
In a production environment, it’s also important to consider the following security measures:
- AWS WAF (Web Application Firewall): To protect the API Gateway from common web-based attacks, such as SQL injection and cross-site scripting (XSS).
- Authentication and Authorization Services: Ensuring that the front-end application and users are properly authenticated and authorized before accessing the OTP-related functionality. Visit Control and manage access to REST APIs in API Gateway to view the available methods of managing access to Amazon API Gateway.
This architecture enables organizations to build a comprehensive and secure one-time password solution. It protects users’ sensitive information and offers a seamless authentication experience.
Generating OTPs
To generate the OTPs, the server used the pyotp (link) library in Python. This library provides a secure random number generator to create unique, hexadecimal-encoded tokens. The server-side generation ensures that the OTPs are truly random and unpredictable, a crucial requirement for effective one-time password authentication.
The server generates a 6-character hexadecimal OTP, creating approximately 16.8 million possible unique combinations. This approach keeps codes short and easy for users to enter while maintaining security. After generation, the server securely stores the OTP and sends it to the user through the chosen delivery channel (SMS, email, or voice).
Sample Code:
import secrets
import pyotp

def generate_otp():
    """
    Generates a secure one-time password using the pyotp library.

    Returns:
        str: The generated one-time password.
    """
    # Generate a random base32 secret - https://pyauth.github.io/pyotp/
    totp = pyotp.TOTP(pyotp.random_base32())

    # Use the Time-based One-Time Password (TOTP) algorithm to generate a 6-digit OTP
    return totp.now()
It’s important to note that the generated OTP values should be encrypted on the client-side before being sent to the server for storage. This can be achieved by using AWS Key Management Service (KMS) to securely encrypt the OTP values.
By encrypting the OTP values before storing them in the DynamoDB table, you can further enhance the security of the solution and protect against potential data breaches. The encrypted values ensure that even if the database is compromised, the raw OTP values are not directly accessible.
Next, the encrypted OTP values are stored in the DynamoDB table, along with necessary metadata to manage the OTP lifecycle. This metadata includes creation timestamp, expiration, and verification attempts. The specifics of this storage process are covered in the ‘Securely Storing OTPs’ section.
Securely Storing OTPs
Once generated, the OTPs will be stored in an Amazon DynamoDB table. DynamoDB is a fully managed NoSQL database service that provides reliable, high-performance data storage and retrieval, making it an ideal choice for our secure OTP solution. To store the OTPs, you’ll create a DynamoDB table with the user_id as the primary key. This approach ensures that the same user can’t generate multiple OTPs. The put_item() operation will fail if it encounters a duplicate user_id value. Depending your use case, you can change this to be a random id or a concatenation of the user id and a random id.
Once generated, the OTPs are stored in an Amazon DynamoDB table. DynamoDB, a fully managed NoSQL database service, provides reliable, high-performance data storage and retrieval, making it ideal for our secure OTP solution.
To store the OTPs, create a DynamoDB table with the user_id as the primary key. This approach allows for efficient retrieval of a user’s current OTP. When storing a new OTP for a user:
- If no existing entry is found for the user_id, a new item is created.
- If an entry already exists, it’s updated with the new OTP, effectively overwriting the old one.
This method ensures that each user has only one active OTP at a time, while still allowing users to request new OTPs when needed (for example, if the previous one expired).
Depending on your use case, you can modify the primary key to be a random id or a concatenation of the user id and a random id for additional security.
In addition to the user_id and otp_code, we’ll also include the following attributes:
-
creation_timestamp: The timestamp indicating when the OTP was generated. This is compared with the timestamp of each attempt to ensure all attempts fall within the allowed time window.ttl: The Unix timestamp representing the time-to-live (TTL) for the OTP, after which the DynamoDB item will be automatically deleted. Set this value to 24 hours from the creation time. This allows for a reasonable cleanup period while ensuring expired OTPs are removed from the database.attempts: The number of remaining verification attempts for the OTP.verified: A boolean flag indicating whether the OTP has been successfully verified.locked: A boolean flag indicating whether the user’s account has been locked due to exhausted verification attempts.
Sample Code:
import time
import boto3
from datetime import datetime, timedelta

dynamodb = boto3.resource('dynamodb')
table = dynamodb.Table('otp_main')
def store_otp(user_id, otp_code):
    """
    Stores the generated one-time password in an Amazon DynamoDB table with a creation timestamp, TTL, and remaining attempts.

    Args:
        user_id (str): The unique identifier for the user.
        otp_code (str): The generated one-time password.

    Returns:
        dict: The response from the DynamoDB put_item operation.
    """
    # Get the current timestamp
    creation_timestamp = datetime.now().isoformat()

    # Calculate the expiration time for the OTP (10 minutes from now)
    expiration_time = datetime.now() + timedelta(minutes=10)

    # Convert the expiration time to a Unix timestamp for the DynamoDB TTL
    ttl_value = int(time.mktime(expiration_time.timetuple()))

    # Store the OTP, creation timestamp, TTL, remaining attempts, and verification status in the DynamoDB table
    response = table.put_item(
        Item={
            'user_id': user_id,
            'otp_code': otp_code,
            'creation_timestamp': creation_timestamp,
            'ttl': ttl_value,
            'attempts': 3,
            'verified': False,
            'locked': False
        }
    )

    return response
We use the user_id as the primary key and store creation timestamp, TTL, remaining attempts, verification status, and account lock status. This approach ensures a secure and efficient OTP storage and retrieval process. This approach also allows for precise management of OTP expiration and account locking, as demonstrated in the Verifying OTPs section.
The encrypted OTP values are stored in the otp_code attribute. Encryption is performed on the client-side using a secure key management solution, like the AWS KMS client-side library. This ensures that the raw OTP values are never transmitted or stored in plain text, further enhancing the security of the solution.
Note: As an optional enhancement, you could use Amazon SQS with a visibility timeout set to the OTP validity period. A payload containing the user_id is sent to a Lambda function. After the visibility timeout, the function processes the SQS message and deletes the corresponding DynamoDB item. This approach provides greater precision compared to relying solely on DynamoDB TTL, though it adds complexity to the implementation. The current solution compares each verification attempt’s timestamp with the creation timestamp, ensuring that no attempts occur after the OTP has expired.
Delivering OTPs via Multiple Channels
Now that we have a secure way to generate and store the OTPs, it’s time to focus on delivering them to your users. Our solution leverages the AWS End User Messaging capabilities to provide a seamless and redundant OTP delivery experience across multiple communication channels.
Sending OTPs via SMS and Voice
AWS End User Messaging offers a versatile platform for OTP delivery across multiple channels, including email, SMS, voice calls, push notifications, and WhatsApp. This provides a redundant and convenient authentication experience for your users, ensuring they can receive their one-time passwords via their preferred method.
Sample Code:
import boto3

def send_otp_sms(mobile_number, otp_code, user_id, region_name):
    """
    Sends an OTP code to the user's mobile number using AWS End User Messaging SMS.

    Args:
        mobile_number (str): The phone number to send the OTP to.
        otp_code (str): The one-time password to be sent.
        user_id (str): The unique identifier for the user.
        region_name (str): The AWS region to use for the SESv2 client.

    Returns:
        dict: The response from the End User Messaging SMS send_text_message operation.
    """
    # Construct the SMS message with the OTP code
    message = f"""
    This is an AWS End User Messaging OTP message.

    Your one-time password is: {otp_code}.
    """

    try:
        # Create a new SMS-Voice v2 client
        aws_sms = boto3.client('pinpoint-sms-voice-v2')
        # Use the End User Messaging SMS client to send the SMS message
        response = aws_sms.send_text_message(
            DestinationPhoneNumber=mobile_number,
            MessageBody=message,
            MessageType='TRANSACTIONAL'
        )
        return {'StatusCode': 200, 'Response': response['MessageId']}
    except ClientError as e:
        error_message = e.response['Error']['Message']
        return {'StatusCode': 500, 'Response': error_message}
Sending OTPs via Email
To deliver OTPs via email, we’ll use the Amazon SES (Simple Email Service) SendEmail API. SES is a highly scalable and cost-effective email service. It can send notifications, alerts, and in our case, one-time passwords to users.
Sample Code:
import boto3
from botocore.exceptions import ClientError

def send_otp_email(user_id, email_address, otp_code, region_name):
    """
    Sends an OTP code to the user's email address using Amazon SESv2.

    Args:
        user_id (str): The unique identifier for the user.
        email_address (str): The email address to send the OTP to.
        otp_code (str): The one-time password to be sent.
        region_name (str): The AWS region to use for the SESv2 client.

    Returns:
        dict: The response from the SESv2 send_email operation.
    """
    try:
        # Create a new SESv2 client
        ses = boto3.client('sesv2', region_name=region_name)

        # Construct the email message with the OTP code
        message = "<p>Your one-time password is: </p> {otp_code}"
        html_body = message.format(otp_code=otp_code)

        # Use the SESv2 client to send the email
        response = aws_email.send_email(
            FromEmailAddress='[email protected]',
            Destination={
                'ToAddresses': [
                    email_address,
                ]
            },
            Content={
                'Simple': {
                    'Subject': {
                        'Charset': 'UTF-8',
                        'Data': 'Your AWS OTP code'
                    },
                    'Body': {
                        'Html': {
                            'Charset': 'UTF-8',
                            'Data': html_body
                        }
                    }
                }
            }
        )
        return {'StatusCode': 200, 'Response': response['MessageId']}
    except ClientError as e:
        error_message = e.response['Error']['Message']
        return {'StatusCode': 500, 'Response': error_message}
Verifying OTPs
The final piece of our secure OTP solution is the process of verifying the one-time passwords entered by your users. This is a crucial step in the authentication flow, as it ensures that only legitimate users are granted access to your applications or services.
The OTP verification logic is handled by a Lambda function that interacts directly with the DynamoDB table where the OTPs are stored. This Lambda function performs the following steps:
- Retrieve the stored OTP and its associated metadata from the DynamoDB table, using the
user_idas the primary key. This metadata includes the creation timestamp and the number of remaining attempts. - Decrypt the retrieved OTP value using the KMS client-side library, as the OTP was encrypted on the client side before being stored.
- Compare the unencrypted OTP value with the one entered by the user.
- Verify that the OTP has not expired by comparing the creation timestamp with the current time.
- If the OTP is valid and not expired, update the verification status in the DynamoDB table and delete the corresponding item.
- If the OTP is invalid or expired, deduct an attempt from the remaining attempts count stored in the DynamoDB table.
- If the remaining attempts count reaches zero, lock the user’s account and return an appropriate response.
Sample Code:
import boto3
from boto3.dynamodb.conditions import Key
from datetime import datetime, timedelta

dynamodb = boto3.resource('dynamodb')
table = dynamodb.Table('otp_main')

def verify_otp(otp_entered, user_id):
    """
    Verifies the one-time password entered by the user against the stored OTP in DynamoDB.

    Args:
        otp_entered (str): The one-time password entered by the user.
        user_id (str): The unique identifier for the user.

    Returns:
        dict: The result of the OTP verification, containing the verification status and the OTP code.
    """
    try:
        # Query the DynamoDB table to find the stored OTP for the given user
        response = table.query(
            KeyConditionExpression=Key('user_id').eq(user_id)
        )

        if 'Items' in response and response['Items']:
            for item in response['Items']:
                # decrypt the retrieved OTP value using the KMS client-side library
                if str(otp_entered) == decrypt_otp(item['otp_code'], user_id):
                    # Check if the OTP has expired
                    creation_timestamp = datetime.fromisoformat(item['creation_timestamp'])
                    if datetime.now() - creation_timestamp < timedelta(minutes=10):
                        # Update the verification status and delete the DynamoDB item
                        update_item = table.update_item(
                            Key={'user_id': user_id},
                            UpdateExpression='SET verified = :verified',
                            ExpressionAttributeValues={':verified': True}
                        )
                        table.delete_item(Key={'user_id': user_id})
                        return {'result': True, 'otp': item['otp_code']}
                    else:
                        # Deduct an attempt from the remaining attempts count
                        update_item = table.update_item(
                            Key={'user_id': user_id},
                            UpdateExpression='SET attempts = attempts - :1',
                            ExpressionAttributeValues={':1': 1}
                        )
                        if item['attempts'] <= 0:
                            # Lock the account if the attempts are exhausted
                            update_item = table.update_item(
                                Key={'user_id': user_id},
                                UpdateExpression='SET locked = :locked',
                                ExpressionAttributeValues={':locked': True}
                            )
                        return {'result': False, 'otp': item['otp_code']}
                else:
                    # Handle invalid OTPs
                    pass

        # If the OTP is not found or does not match, return a failure result
        return {'result': False, 'otp': None}
    except Exception as e:
        error_message = str(e)
        return {'result': False, 'error': error_message}

def decrypt_otp(encrypted_otp, user_id):
    """
    decryptes the OTP value using the KMS client-side library.

    Args:
        encrypted_otp (str): The encrypted OTP value stored in DynamoDB.
        user_id (str): The unique identifier for the user.

    Returns:
        str: The unencrypted OTP value.
    """
    # decrypt the OTP value using the KMS client-side library
    return decrypt_using_kms(encrypted_otp, user_id)
In this implementation, a Lambda function handles the OTP verification logic. This ensures sensitive operations like OTP decryption and managing expiration and attempt counts occur in a secure, serverless environment.
Best Practices
As you implement a secure one-time password solution, it’s important to consider the following best practices:
OTP Message Best Practices
When delivering OTPs via email, SMS, or voice, clearly specify the sender and the content of the message. For example, the email subject and body, as well as the SMS or voice message, should include information like:
“This is a one-time password from [Company Name] for payment confirmation of your flight ABC123.”
Security Reminder in OTP Messages
Include a security reminder in the OTP message to encourage users to report any unauthorized access attempts. For example:
“If you did not request this OTP, please call [phone number] to report it.”
This helps raise user awareness and provides a clear course of action if they suspect their account has been compromised.
Configuration Set / Originating Identity
Include appropriate configuration sets and Context or EmailTags when using AWS End User Messaging services to deliver OTPs. This records message delivery events and traces them to your organization. Read more about Amazon SES and AWS End User Messaging configuration sets.
For example, in the send_otp_sms() and send_otp_email() functions, you should include the following parameters:
response = aws_sms.send_text_message(
    DestinationPhoneNumber=mobile_number,
    MessageBody=message,
    MessageType='TRANSACTIONAL',
    ConfigurationSetName='otp-config-set',
    OriginationNumber='+12345678901',
    Context={
        'user_id': user_id
    }
)
response = ses.send_email(
    FromEmailAddress='[email protected]',
    Destination={'ToAddresses': [email_address]},
    Content={
        # ...
    },
    ConfigurationSetName='otp-config-set',
    EmailTags=[
        {
            'Name': 'user_id',
            'Value': user_id
        }
    ]
)
Deleting OTPs After Verification
After a successful OTP verification, it’s recommended to delete the corresponding DynamoDB item. This helps maintain a clean and up-to-date database, reducing the risk of unauthorized access or potential data breaches.
Tracking Verification Attempts
Consider adding a column in the DynamoDB table to track the number of verification attempts for each OTP. This can help you implement rate-limiting and other security measures to prevent brute-force attacks.
Encrypting OTPs on the Client-side
As mentioned earlier, the OTP values should be encrypted on the client-side using a secure key management solution, such as the AWS KMS client-side library. This ensures that the raw OTP values are never transmitted or stored in plain text, further enhancing the security of the solution.
Following these best practices ensures your one-time password solution is secure and user-friendly. It also maintains necessary controls and traceability for production use cases.
Conclusion
In this guide, we’ve demonstrated a secure, multi-channel One-Time Password (OTP) solution using AWS services. You can now generate, store, and deliver OTPs via email, SMS, and voice channels using Amazon DynamoDB, Amazon SES, and AWS End User Messaging.
We’ve covered several important points throughout this process. We discussed using a secure random number generator and encrypting algorithms to generate and store OTPs. This ensures strong protection for your users’ sensitive information. By integrating with Amazon SES and AWS End User Messaging, you provide users with a convenient, redundant authentication experience through multiple channels.
This guide equips you with tools to maintain SMS-based OTP capabilities. However, it’s important to note the industry’s shift towards more secure, phishing-resistant authentication methods. These include passwordless solutions and hardware security keys. We encourage you to explore and implement these newer technologies as you develop your OTP solution.
Looking ahead, consider potential enhancements to this solution. Integrating support for standards like FIDO2 WebAuthn and Passkeys could allow seamless authentication without traditional OTPs. Keep these options as backup or alternative methods. Also, consider incorporating a mechanism to escalate users to live support for authentication issues.
Implement the secure OTP solution outlined in this guide and continuously update your authentication strategies. This approach ensures your organization remains equipped to protect users and assets from evolving digital threats.
Expanded resource awareness in Amazon Q Developer
Post Syndicated from Brendan Jenkins original https://aws.amazon.com/blogs/devops/expanded-resource-awareness-in-amazon-q-developer/
Recently, Amazon Q Developer announced expanded support for account resource awareness with Amazon Q in the AWS Management Console along with the general availability of Amazon Q Developer in AWS Chatbot, enabling you to ask questions from Microsoft Teams or Slack. Additionally, Amazon Q will now provide context-aware assistance for your questions about resources in your account depending on where you are in the console. Amazon Q in the console gives you the ability to use natural language with the Amazon Q Developer chat capability to list resources in your AWS account, get specific resource details, and ask about related resources, launched in preview on April 30, 2024.
In this blog, I will highlight the new expanded functionality of this feature in Amazon Q Developer including understanding relationships between account resources, context-awareness, and the general availability of the AWS Chatbot integration with Microsoft Teams and Slack.
Expanded account resource awareness with Amazon Q Developer
Prior to the launch of the expanded support, you could ask Amazon Q Developer to list resources in your AWS Account with prompts such as “List all my EC2 instances in us-east-1” and the service would list all your Amazon Elastic Compute Cloud (Amazon EC2) instances. Now, with the expanded support, you can ask more complex questions about your AWS account resources. I will show a few examples in this section of this post.
For our first example, imagine that you’re a developer who is responsible for maintaining code as a part of the software development lifecycle (SDLC) and you frequently use AWS Lambda for development and Amazon Relational Database Service (RDS) in the backend as a part of your development process. With this new update, a developer could open a new Q chat in the AWS Management Console, and enter a prompt such as: “Which RDS clusters are due for an update?”

Figure 1: Amazon Q Developer listing RDS clusters needing an update
As a result, the Amazon Q Developer console chat will return a list of all your Amazon RDS clusters that have available updates as shown in Figure 1 above.
Now, for another example, you want to update any Lambda functions in your AWS account that had a Simple Notification Service (SNS) topic as a trigger due to moving to a new SNS topic you recently created. To identify which SNS topics are still being used, you could enter a prompt such as “List all the SNS topics that trigger a lambda function.”

Figure 2: Amazon Q listing SNS topics that are lambda triggers
As shown in the prior example, Amazon Q Developer was able to identify any SNS topics in the form of Amazon resource name (ARN) that was set to trigger a lambda function in the AWS account as intended.
Additionally, you can ask a follow up question in the same chat to investigate more. You can send a prompt such as “Which lambda function uses the arn:aws:sns:us-east-1:76859XXXX:FailoverHealthcheck SNS topic?”

Figure 3: Asking Q Developer a follow up question about a resource
From Figure 3 above, you can see that there is a Lambda function/endpoint associated with the SNS topic resource that Amazon Q Developer was able to identify.
Outside of the examples above, here are some other prompts/examples that can be explored for the expanded support:
– “Do I have any ECS clusters with pending tasks?”
– “Are there any ECS clusters in my account with services in DRAINING status?”
Amazon Q Developer understands where you are in the console
Amazon Q Developer in the AWS Management Console now provides context-aware assistance for your questions about resources in your account. This feature allows you to ask questions directly related to the console page you’re viewing, eliminating the need to specify the service or resource in your query. Q Developer uses the current page as additional context to provide more accurate and relevant responses, streamlining your interaction with AWS services and resources.
Prior to the update, a user would have to prompt, “What is the public IPv4 address of my instance i-08ccXXXXXX?” Now, if you are viewing an EC2 instance in the console and prompt Amazon Q, “What is the public IPv4 address of my instance?” you will not need to specify the instance you are referring to.

Figure 4: Asking Amazon Q about an EC2 instance being viewed
In figure 4 above, Amazon Q’s console chat was able to use its context-awareness to pick up on what the IPv4 address was on the console page where I was currently working, despite me not specifying which instance I was referring to.
AWS ChatBot can now answer questions about AWS resources in Microsoft Teams and Slack
Recently, we announced the general availability of Amazon Q Developer in AWS Chatbot, which provides answers to customers’ AWS resource related queries in Microsoft Teams and Slack. This gives teams the ability to quickly find relevant resources to troubleshoot issues using natural language queries in the chat channels of Microsoft Teams or Slack.
For example, you could integrate the AWS Chatbot Service with Amazon Q Developer to allow you to enter a prompt in Slack such as “@aws show EC2 instances in running state in us-east-1”.

Figure 5: Amazon Q listing all EC2 resources in Slack
As shown in figure 5 above, Amazon Q was able to list all the EC2 resources and place them into a slack channel showing an example of the functionality in action.
Conclusion
Amazon Q Developer has enhanced its cloud resource management capabilities, enabling more intuitive and intelligent interactions with AWS resources. The new features allow developers to ask complex, context-aware questions about their cloud infrastructure directly through the AWS Management Console, Microsoft Teams, and Slack. Users can now easily discover new details about specific resources with natural language queries that provide precise, contextual information. These improvements represent a significant step forward in simplifying cloud resource management, making it faster and more user-friendly for development teams to understand, track, and maintain their AWS environments. To learn more about chatting with your AWS resources, check out Console documentation and AWS Chatbot documentation.
About the authors
The Right Engine Came Off.
Post Syndicated from The History Guy: History Deserves to Be Remembered original https://www.youtube.com/watch?v=lswsI9hxTuI
DO it again: how we used Durable Objects to add WebSockets support and authentication to AI Gateway
Post Syndicated from Catarina Pires Mota original https://blog.cloudflare.com/do-it-again
In October 2024, we talked about storing billions of logs from your AI application using AI Gateway, and how we used Cloudflare’s Developer Platform to do this.
With AI Gateway already processing over 3 billion logs and experiencing rapid growth, the number of connections to the platform continues to increase steadily. To help developers manage this scale more effectively, we wanted to offer an alternative to implementing HTTP/2 keep-alive to maintain persistent HTTP(S) connections, thereby avoiding the overhead of repeated handshakes and TLS negotiations with each new HTTP connection to AI Gateway. We understand that implementing HTTP/2 can present challenges, particularly when many libraries and tools may not support it by default and most modern programming languages have well-established WebSocket libraries available.
With this in mind, we used Cloudflare’s Developer Platform and Durable Objects (yes, again!) to build a WebSockets API that establishes a single, persistent connection, enabling continuous communication.
Through this API, all AI providers supported by AI Gateway can be accessed via WebSocket, allowing you to maintain a single TCP connection between your client or server application and the AI Gateway. The best part? Even if your chosen provider doesn’t support WebSockets, we handle it for you, managing the requests to your preferred AI provider.

By connecting via WebSocket to AI Gateway, we make the requests to the inference service for you using the provider’s supported protocols (HTTPS, WebSocket, etc.), and you can keep the connection open to execute as many inference requests as you would like.
To make your connection to AI Gateway more secure, we are also introducing authentication for AI Gateway. The new WebSockets API will require authentication. All you need to do is create a Cloudflare API token with the permission “AI Gateway: Run” and send that in the cf-aig-authorization header.

In the flow diagram above:
1️⃣ When Authenticated Gateway is enabled and a valid token is included, requests will pass successfully.
2️⃣ If Authenticated Gateway is enabled, but a request does not contain the required cf-aig-authorization header with a valid token, the request will fail. This ensures only verified requests pass through the gateway.
3️⃣ When Authenticated Gateway is disabled, the cf-aig-authorization header is bypassed entirely, and any token — whether valid or invalid — is ignored.
We recently used Durable Objects (DOs) to scale our logging solution for AI Gateway, so using WebSockets within the same DOs was a natural fit.
When a new WebSocket connection is received by our Cloudflare Workers, we implement authentication in two ways to support the diverse capabilities of WebSocket clients. The primary method involves validating a Cloudflare API token through the cf-aig-authorization header, ensuring the token is valid for the connecting account and gateway.
However, due to limitations in browser WebSocket implementations, we also support authentication via the “sec-websocket-protocol” header. Browser WebSocket clients don’t allow for custom headers in their standard API, complicating the addition of authentication tokens in requests. While we don’t recommend that you store API keys in a browser, we decided to add this method to add more flexibility to all WebSocket clients.
// Built-in WebSocket client in browsers
const socket = new WebSocket("wss://gateway.ai.cloudflare.com/v1/my-account-id/my-gateway/", [
   "cf-aig-authorization.${AI_GATEWAY_TOKEN}"
]);


// ws npm package
import WebSocket from "ws";
const ws = new WebSocket("wss://gateway.ai.cloudflare.com/v1/my-account-id/my-gateway/",{
   headers: {
       "cf-aig-authorization": "Bearer AI_GATEWAY_TOKEN",
   },
});
After this initial verification step, we upgrade the connection to the Durable Object, meaning that it will now handle all the messages for the connection. Before the new connection is fully accepted, we generate a random UUID, so this connection is identifiable among all the messages received by the Durable Object. During an open connection, any AI Gateway settings passed via headers — such as cf-aig-skip-cache (which bypasses caching when set to true) — are stored and applied to all requests in the session. However, these headers can still be overridden on a per-request basis, just like with the Universal Endpoint today.
Once the connection is established, the Durable Object begins listening for incoming messages. From this point on, users can send messages in the AI Gateway universal format via WebSocket, simplifying the transition of your application from an existing HTTP setup to WebSockets-based communication.
import WebSocket from "ws";
const ws = new WebSocket("wss://gateway.ai.cloudflare.com/v1/my-account-id/my-gateway/",{
   headers: {
       "cf-aig-authorization": "Bearer AI_GATEWAY_TOKEN",
   },
});

ws.send(JSON.stringify({
   type: "universal.create",
   request: {
      "eventId": "my-request",
      "provider": "workers-ai",
      "endpoint": "@cf/meta/llama-3.1-8b-instruct",
      "headers": {
         "Authorization": "Bearer WORKERS_AI_TOKEN",
         "Content-Type": "application/json"
      },
      "query": {
         "prompt": "tell me a joke"
      }
   }
}));

ws.on("message", function incoming(message) {
   console.log(message.toString())
});
When a new message reaches the Durable Object, it’s processed using the same code that powers the HTTP Universal Endpoint, enabling seamless code reuse across Workers and Durable Objects — one of the key benefits of building on Cloudflare.
For non-streaming requests, the response is wrapped in a JSON envelope, allowing us to include additional information beyond the AI inference itself, such as the AI Gateway log ID for that request.
Here’s an example response for the request above:
{
  "type":"universal.created",
  "metadata":{
     "cacheStatus":"MISS",
     "eventId":"my-request",
     "logId":"01JC3R94FRD97JBCBX3S0ZAXKW",
     "step":"0",
     "contentType":"application/json"
  },
  "response":{
     "result":{
        "response":"Why was the math book sad? Because it had too many problems. Would you like to hear another one?"
     },
     "success":true,
     "errors":[],
     "messages":[]
  }
}
For streaming requests, AI Gateway sends an initial message with request metadata telling the developer the stream is starting.
{
  "type":"universal.created",
  "metadata":{
     "cacheStatus":"MISS",
     "eventId":"my-request",
     "logId":"01JC40RB3NGBE5XFRZGBN07572",
     "step":"0",
     "contentType":"text/event-stream"
  }
}
After this initial message, all streaming chunks are relayed in real-time to the WebSocket connection as they arrive from the inference provider. Note that only the eventId field is included in the metadata for these streaming chunks (more info on what this new field is below).
{
  "type":"universal.stream",
  "metadata":{
     "eventId":"my-request",
  }
  "response":{
     "response":"would"
  }
}
This approach serves two purposes: first, all request metadata is already provided in the initial message. Second, it addresses the concurrency challenge of handling multiple streaming requests simultaneously.
With WebSocket connections, client and server can send messages asynchronously at any time. This means the client doesn’t need to wait for a server response before sending another message. But what happens if a client sends multiple streaming inference requests immediately after the WebSocket connection opens?
In this case, the server streams all the inference responses simultaneously to the client. Since everything occurs asynchronously, the client has no built-in way to identify which response corresponds to each request.
To address this, we introduced a new field in the Universal format called eventId, which allows AI Gateway to include a client-defined ID with each message, even in a streaming WebSocket environment.
So, to fully answer the question above: the server streams both responses in parallel chunks, and the client can accurately identify which request each message belongs to based on the eventId.
Once all chunks for a request have been streamed, AI Gateway sends a final message to signal the request’s completion. For added flexibility, this message includes all the metadata again, even though it was also provided at the start of the streaming process.
{
  "type":"universal.done",
  "metadata":{
     "cacheStatus":"MISS",
     "eventId":"my-request",
     "logId":"01JC40RB3NGBE5XFRZGBN07572",
     "step":"0",
     "contentType":"text/event-stream"
  }
}
AI Gateway’s real-time Websocket API is now in beta and open to everyone!
To try it out, copy your gateway universal endpoint URL, and replace the “https://” with “wss://”, like this:
wss://gateway.ai.cloudflare.com/v1/my-account-id/my-gateway/

Then open a WebSocket connection using your Universal Endpoint, and guarantee that it is authenticated with a Cloudflare token with the AI Gateway Run permission.
Here’s an example code using the ws npm package:
import WebSocket from "ws";
const ws = new WebSocket("wss://gateway.ai.cloudflare.com/v1/my-account-id/my-gateway/", {
   headers: {
       "cf-aig-authorization": "Bearer AI_GATEWAY_TOKEN",
   },
});

ws.on("open", function open() {
   console.log("Connected to server.");
   ws.send(JSON.stringify({
      type: "universal.create",
      request: {
         "provider": "workers-ai",
         "endpoint": "@cf/meta/llama-3.1-8b-instruct",
         "headers": {
            "Authorization": "Bearer WORKERS_AI_TOKEN",
            "Content-Type": "application/json"
         },
         "query": {
            "stream": true,
            "prompt": "tell me a joke"
         }
      }
   }));
});


ws.on("message", function incoming(message) {
   console.log(message.toString())
});
Here’s an example code using the built-in browser WebSocket client:
const socket = new WebSocket("wss://gateway.ai.cloudflare.com/v1/my-account-id/my-gateway/", [
   "cf-aig-authorization.${AI_GATEWAY_TOKEN}"
]);

socket.addEventListener("open", (event) => {
  console.log("Connected to server.");
   socket.send(JSON.stringify({
      type: "universal.create",
      request: {
         "provider": "workers-ai",
         "endpoint": "@cf/meta/llama-3.1-8b-instruct",
         "headers": {
            "Authorization": "Bearer WORKERS_AI_TOKEN",
            "Content-Type": "application/json"
         },
         "query": {
            "stream": true,
            "prompt": "tell me a joke"
         }
      }
   }));
});

socket.addEventListener("message", (event) => {
  console.log(event.data);
});
In Q1 2025, we plan to support WebSocket-to-WebSocket connections (using DOs), allowing you to connect to OpenAI’s new real-time API directly through our platform. In the meantime, you can deploy this Worker in your account to proxy the requests yourself.
If you have any questions, reach out on our Discord channel. We’re also hiring for AI Gateway, check out Cloudflare Jobs in Lisbon!
Securing the RAG ingestion pipeline: Filtering mechanisms
Post Syndicated from Laura Verghote original https://aws.amazon.com/blogs/security/securing-the-rag-ingestion-pipeline-filtering-mechanisms/
Retrieval-Augmented Generative (RAG) applications enhance the responses retrieved from large language models (LLMs) by integrating external data such as downloaded files, web scrapings, and user-contributed data pools. This integration improves the models’ performance by adding relevant context to the prompt.
While RAG applications are a powerful way to dynamically add additional context to an LLM’s prompt and make model responses more relevant, incorporating data from external sources can pose security risks.
For example, let’s assume you crawl a public website and ingest the data into your knowledge base. Because it’s public data, you risk also ingesting malicious content that was injected into that website by threat actors with the goal of exploiting the knowledge base component of the RAG application. Through this mechanism, threat actors can intentionally change the model’s behavior.
Risks like these emphasize the need for security measures in the design and deployment of RAG systems in general. Security measures should be applied not only at inference time (that is, filtering model outputs), but also when ingesting external data into the knowledge base of the RAG application.
In this post, we explore some of the potential security risks of ingesting external data or documents into the knowledge base of your RAG application. We propose practical steps and architecture patterns that you can implement to help mitigate these risks.
Overview of security of the RAG ingestion workflow
Before diving into specifics of mitigating risk in the ingestion pipeline, let’s have a look at a generic RAG workflow and which aspects you should keep in mind when it comes to securing a RAG application. For this post, let’s assume that you’re using Amazon Bedrock Knowledge Bases to build a RAG application. Amazon Bedrock Knowledge Bases offers built-in, robust security controls for data protection, access control, network security, logging and monitoring, and input/output validation that help mitigate many of the security risks.
In a RAG workflow with Amazon Bedrock Knowledge Bases, you have the following environments:
- An Amazon Bedrock service account, which is managed by the Amazon Bedrock service team.
- An AWS account where you can store your RAG data (if you’re using an AWS service as your vector store).
- A possible external environment, depending on the vector database you’ve chosen to store vector embeddings of your ingested content. If you choose Pinecone or Redis Enterprise Cloud for your vector database, you will use an environment external to AWS.

Figure 1: Visual representation of the knowledge base data ingestion flow
Looking at the workflow shown in Figure 1 for the ingestion of data into a knowledge base, an ingestion request is started by invoking the StartIngestionJob Bedrock API. From that point:
- If this request has the correct IAM permissions associated with it, it’s sent to the Bedrock API endpoint.
- This request is then passed to the knowledge base service component.
- The metadata collected related to the request is stored in the metadata Amazon DynamoDB database. This database is used solely to enumerate and characterize the data sources and their sync status. The API call includes metadata for the Amazon Simple Storage Service (Amazon S3) source location of the data to ingest, in addition to the vector store that will be used to store the embeddings.
- The process will begin to ingest customer-provided data from Amazon S3. If this data was encrypted using customer managed KMS keys, then these keys will be used to decrypt the data.
- As data is read from Amazon S3, chunks will be sent internally to invoke the chosen embedding model in Amazon Bedrock. A chunk refers to an excerpt from a data source that’s returned when the vector store that it’s stored in is queried. Using knowledge bases, you can chunk either with a fixed size (standard chunking), hierarchical chunking, semantic chunking, advanced parsing options for parsing non-textual information, or custom transformations. More information about chunking for knowledge bases can be found in How content chunking and parsing works for knowledge bases.
- The embeddings model in Amazon Bedrock will create the embeddings, which are then sent to your chosen vector store. Amazon Bedrock Knowledge Bases supports popular databases for vector storage, including the vector engine for Amazon OpenSearch Serverless, Pinecone, Redis Enterprise Cloud, Amazon Aurora, and MongoDB. If you don’t have an existing vector database, Amazon Bedrock creates an OpenSearch Serverless vector store for you. This option is only available through the console, not through the SDK or CLI.
- If credentials or secrets are required to access the vector store, they can be stored in AWS Secrets Manager where they will be automatically retrieved and used. Afterwards, the embeddings will be inserted into (or updated in) the configured vector store.
- Checkpoints for the in-progress ingestion jobs will be temporarily stored in a transient S3 bucket, encrypted with customer managed AWS Key Management Service (AWS KMS) keys. These checkpoints allow you to resume interrupted ingestion jobs from a previous successful checkpoint. Both the Aurora database and the Amazon OpenSearch Serverless database can be configured as public or private, and of course we recommend private databases. Changes in your ingestion data bucket (for example, uploading new files or new versions of files) will be reflected after the data source is synchronized; this synchronization is done incrementally. After the completion of an ingestion job, the data is automatically purged and deleted after a maximum of 8 days.
- The ingestion DynamoDB table stores information required for syncing the vector store. It stores metadata related to the chunks needed to keep track of data in the underlying vector database. The table is used so that the service can identify which chunks need to be inserted, updated, or deleted between one ingestion job and another.
When it comes to encryption at rest for the different environments:
- Customer AWS accounts – The resources in these can be encrypted using customer managed KMS keys
- External environments – Redis Enterprise Cloud and Pinecone have their own encryption features
- Amazon Bedrock service accounts – The S3 bucket (step 8) can be encrypted using customer managed KMS keys, but in the context of Amazon Bedrock, the DynamoDB tables of steps 3 and 9 can only be encrypted with AWS owned keys. However, the tables managed by Amazon Bedrock don’t contain personally identifiable information (PII) or customer-identifiable data.
Throughout the RAG ingestion workflow, data is encrypted in transit. Amazon Bedrock Knowledge Bases uses TLS encryption for communication with third-party vector stores where the provider permits and supports TLS encryption in transit. Customer data is not persistently stored in the Amazon Bedrock service accounts.
For identity and access management, it’s important to follow the principle of least privilege while creating the custom service role for Amazon Bedrock Knowledge Bases. As part of the role’s permissions, you create a trust relationship that allows Amazon Bedrock to assume this role and create and manage knowledge bases. For more information about the necessary permissions, see Providing secure access, usage, and implementation to generative AI RAG techniques.
Security risks of the RAG data ingestion pipeline and the need for ingest time filtering
RAG applications inherently rely on foundation models, introducing additional security considerations beyond the traditional application safeguards. Foundation models can analyze complex linguistic patterns and provide responses depending on the input context, and can be subject to malicious events such as jailbreaking, data poisoning, and inversion. Some of these LLM-specific risks are mapped out in documents such as the OWASP Top 10 for LLM Applications and MITRE ATLAS.
A risk that’s particularly relevant for the RAG ingestion pipeline, and one of the most common risks we see nowadays, is prompt injection. In prompt injection attacks, threat actors manipulate generative AI applications by feeding them malicious inputs disguised as legitimate user prompts. There are two forms of prompt injection: direct and indirect.
Direct prompt injections occur when a threat actor overwrites the underlying system prompt. This might allow them to probe backend systems by interacting with insecure functions and data stores accessible through the LLM. When it comes to securing generative AI applications against prompt injection, this type tends to be the one that customers focus on the most. To mitigate risks, you can use tools such as Amazon Bedrock Guardrails to set up inference-time filtering of the LLM’s completions.
Indirect prompt injections occur when an LLM accepts input from external sources that can be controlled by a threat actor, such as websites or files. This injection type is particularly important when you consider the ingestion pipeline of RAG applications, where a threat actor might embed a prompt injection in external content which is ingested into the database. This can enable the threat actor to manipulate additional systems that the LLM can access or return a different answer to the user. Additionally, indirect prompt injections might not be recognizable by humans. Security issues can result not only from the LLM’s responses based on its training data, but also from the data sources the RAG application has access to from its knowledge base. To mitigate these risks, you should focus on the intersection of the LLM, knowledge base, and external content ingested into the RAG application.
To give you a better idea of indirect prompt ingestion, let’s first discuss an example.
External data source ingestion risk: Examples of indirect prompt injection
Let’s say a threat actor crafts a document or injects content into a website. This content is designed to manipulate an LLM to generate incorrect responses. To a human, such a document could be indistinguishable from legitimate ones. However, the document could contain an invisible sequence, which, when used as a reference source for RAG, could manipulate the LLM into generating an undesirable response.
For example, let’s assume you have a file describing the process for downloading a company’s software. This file is ingested into a knowledge base for an LLM-powered chatbot. A user can ask the chatbot where to find the correct link to download software packages and then download the package by clicking on the link.
A threat actor could include a second link in the document using white text on a white background. This text is invisible to the reader and the company downloading the document to store in their knowledge base. However, it’s visible when parsed by the document parser and saved in the knowledge base. This could result in the LLM returning the hidden link, which could lead the user to download malware hosted by the threat actor on a site they manage, rather than legitimate software from the expected site.
If your application is connected to plugins or agents so that it can call APIs or execute code, the model could be manipulated to run code, open URLs chosen by the threat actor, and more.
If you look at Figure 2 that follows, you can see what the typical RAG workflow is and how an indirect prompt injection attack can happen (this example uses Amazon Bedrock Knowledge Bases).

Figure 2: Visual representation of the RAG workflow with both a generic file and a malicious file that looks identical to the generic one
As shown in Figure 2, for data ingestion (starting at the bottom right), File 1, the legitimate and unmodified file, is saved in the data source (typically an S3 bucket). During ingestion, the document is parsed by a document parser, split into chunks, converted into embeddings, and then saved in the vector store. When a user (top left) asks a question about the file, information from this file will be added as context to the user prompt. However, you might have a malicious File 2 instead, that looks exactly the same to a human reader but contains an invisible character sequence. After this sequence is inserted into the prompt sent to the LLM, it can influence the overall response of the environment.
Threat actors might analyze the following three aspects in the RAG workflow to create and place a malicious sequence:
- The document parser is software designed to read and interpret the contents of a document. It analyzes the text and extracts relevant information based on predefined rules or patterns. By analyzing the document parser, threat actors can determine how they might inject invisible content into different document formats.
- The text splitter (or chunker) splits text based on the subject matter of the content. Threat actors will analyze the text splitters to locate a proper injection position for their invisible sequence. Section-based splitters divide content according to tags that label different sections, which threat actors can use to place their invisible sequences within these delineated chunks. Length-based splitters split the content into fixed-length chunks with overlap (to help keep context between chunks).
- The prompt template is a predefined structure that is used to generate specific outputs or guide interactions with LLMs. Prompt templates determine how the content retrieved from the vector database is organized alongside the user’s original prompt to form the augmented prompt. The template is crucial, because it impacts the overall performance of RAG-based applications. If threat actors are aware of the prompt template used in your application, they can take that into account when constructing their threat sequence.
Potential mitigations
Threat actors can release documents containing well-constructed and well-placed invisible sequences onto the internet, thereby posing a threat to RAG applications that ingest this external content. Therefore, whenever possible, only ingest data from trusted sources. However, if your application requires you to use and ingest data from untrusted sources, it’s recommended to process them carefully to mitigate risks such as indirect prompt injection. To harden your RAG ingestion pipeline, you can use the following mitigation techniques to place additional security measures on your RAG ingestion pipeline. These can be implemented individually or together.
- Configure your application to display the source content underlying its responses, allowing users to cross-reference the content with the response. This is possible using Amazon Bedrock Knowledge Bases by using citations. However, this method isn’t a prevention technique. Also, it might be less effective with complex content because it can require that users invest a lot of time in verification to be effective.
- Establish trust boundaries between the LLM, external sources, and extensible functionality (for example, plugins, agents, or downstream functions). Treat the LLM as an untrusted actor and maintain final user control on decision-making processes. This comes back to the principle of least privilege. Make sure your LLM has access only to data sources that it needs to have access to and be especially careful when connecting it to external plugins or APIs.
- Continuous evaluation plays a vital role in maintaining the accuracy and reliability of your RAG system. When evaluating RAG applications, you can use labeled datasets containing prompts and target answers. However, frameworks such as RAGAS propose automated metrics that enable reference-free evaluation, alleviating the need for human-annotated ground truth answers. Implementing a mechanism for RAG evaluation can help you discover irregularities in your model responses and in the data retrieved from your knowledge base. If you want to explore how to evaluate your RAG application in greater depth, see Evaluate the reliability of Retrieval Augmented Generation applications using Amazon, which provides further insights and guidance on this topic.
- You can manually monitor content that you intend to ingest into your vector database—especially when the data includes external content such as websites and files. A human in the loop could potentially protect against less sophisticated, visible threat sequences.
For more advice on mitigating risks in generative AI applications, see the mitigations listed in the OWASP Top 10 for LLMs and MITRE ATLAS.
Architectural pattern 1: Using format breakers and Amazon Textract as document filters

Figure 3: Visual representation of a potential workflow to remove threat sequences from your files is using a format breaker and Amazon Textract
One potential workflow to remove potential threat sequences from your ingest files is to use a format breaker and Amazon Textract. This workflow specifically focuses on invisible threat vectors. The preceding Figure 3 shows a potential setup using AWS services that allows you to automate this.
- Let’s say you use an S3 bucket to ingest your files. Whichever file you want to upload into your knowledge base is initially uploaded in this bucket. The upload action in Amazon S3 automatically starts a workflow that will take care of the format break.
- A format break is a process used to sanitize and secure documents, by transforming them in a way that strips out potentially harmful elements such as macros, scripts, embedded objects, and other non-text content that could carry security risks. The format break in the ingest-time filter involves converting text content into PDF format and then to OCR format. To start, convert the text to PDF format. One of the options is to use an AWS Lambda function to convert text to PDF format. As an example, you can create such a function by putting the file renderers and PDF generator from LibreOffice into a Lambda function. This step is necessary to process the file using Amazon Textract because the service currently supports only PNG, JPEG, TIFF, and PDF formats.
- After the data is put into PDF format, you can save it into an S3 bucket. This upload to S3 can, in turn, trigger the next step in the format break: converting the PDF content to OCR format.
- You can process the PDF content using Amazon Textract, which will convert the text content to OCR format. Amazon Textract will render the PDF as an image. This involves extracting the text from the PDF, essentially creating a plain text version of the document. The OCR format makes sure that non-text elements, such as images or embedded files, aren’t carried over to the final document. Only the readable text is extracted, which significantly reduces the risk of hidden malicious content. This also removes white text on white backgrounds because that text is invisible when the PDF is rendered as an image before OCR conversion is performed. To use Amazon Textract to convert text to OCR format, create a Lambda function that will trigger Amazon Textract and input your PDF that was saved in Amazon S3.
- You can use Amazon Textract to process multipage documents in PDF format and detect printed and handwritten text from the Standard English alphabet and ASCII symbols. The service will extract printed text, forms, and tables in English, German, French, Spanish, Italian and Portuguese. This means that non-visible threat vectors won’t be detected or recognized by Amazon Textract and are automatically removed from the input. Amazon Textract operations return a Block object in the API response to the Lambda function.
- To ingest the information into a knowledge base, you need to transform the Amazon Textract output into a format that’s supported by your knowledge base. In this case, you would use code in your Lambda function to transform the Amazon Textract output into a plain text (.txt) file.
- The plain text file is then saved into an S3 bucket. This S3 bucket can then be used as a source for your knowledge base.
- You can automate the reflection of changes in your S3 bucket to your knowledge base by either having your Lambda function that created the Amazon S3 file run a
start_ingestion_job()API call or use an Amazon S3 event trigger on the destination bucket to configure a new Lambda function to run when a file is uploaded to this S3 bucket. Synchronization is incremental, so changes from the previous synchronization are incorporated. More info on managing your data sources can be found in Connect to your data repository for your knowledge base.
In addition to invisible sequences, threat actors can add sophisticated threat sequences that are difficult to classify or filter. Manually checking each document for unusual content isn’t feasible at scale, and creating a filter or model that accurately detects misleading information in such documents is challenging.
One powerful characteristic of LLMs is that they can analyze complex linguistic patterns. An optional pathway is to add a filtering LLM to your knowledge base ingest pipeline to detect malicious or misleading content, susceptible code, or unrelated context that might mislead your model.
Again, it’s important to note that threat actors might deliberately choose content that’s difficult to classify or filter and that resembles normal content. More capable, general-purpose LLMs provide a larger surface for threat actors, because they aren’t tuned to detect these specific attempts. The question is: can we train models to be robust against a wide variety of threats? Currently, there’s no definitive answer, and it remains a highly researched topic. However, some models address specific use cases. For example, LLamaGuard, a fine-tuned version of Meta’s Llama model, predicts safety labels in 14 categories such as elections, privacy, and defamation. It can classify content in both LLM inputs (prompt classification) and LLM responses (response classification).
For document classification, relevant for filtering ingest data, even a small model like BERT can be used. BERT is an encoder-only language model with a bi-directional attention mechanism, making it strong in tasks requiring deep contextual understanding, such as text classification, named entity recognition (NER), and question answering (QA). It’s open source and can be fine-tuned for various applications. This includes use cases in cybersecurity, such as phishing detection in email messages or detecting prompt injection attacks. If you have the resources in-house and work on critical applications that need advanced filtering for specific threats, consider fine-tuning a model like BERT to classify documents that might contain undesirable material.
In addition to natural-language text, threat actors might use data encoding techniques to obfuscate or conceal undesirable payloads within documents. These techniques include encoded scripts, malware, or other harmful content disguised using methods like base64 encoding, hexadecimal encoding, morse code, uucode, ASCII art, and more.
An effective way to detect such sequences is by using the Amazon Comprehend DetectDominantLanguage API. If a document is written entirely in a supported language, DetectDominantLanguage will return a high confidence score, indicating the absence of encoded data. Conversely, if a document contains encoded strings, such as base64, the API will struggle to categorize this text, resulting in a low confidence score. To automate the detection process, you can route documents to a human review stage if the confidence score falls below a certain threshold (for example, 85 percent). This reduces the need for manual checks for potentially malicious encoded data.
Additionally, the encoding and decoding capabilities of LLMs can assist in decoding encoded data. Various LLMs understand encoding schemes and can interpret encoded data within documents or files. For example, Anthropic’s Claude 3 Haiku can decode a base64 encoded string such as TGVhcm5pbmcgaG93IHRvIGNhbGwgU2FnZU1ha2VyIGVuZHBvaW50cyBmcm9tIExhbWJkYSBpcyB2ZXJ5IHVzZWZ1bC4 into its original plaintext form: “Learning how to call Amazon SageMaker endpoints from Lambda is very useful.” While this example is benign, it demonstrates the ability of LLMs to detect and decode encoded data, which can then be stripped before ingestion into your vector store.

Figure 4: Visual representation of a potential workflow to trigger a human in the loop review in case threat sequences are detected in your ingest files
In the preceding Figure 4, you can see a workflow that shows how you can integrate the above features into your document processing workflow to detect malicious content in ingest documents:
- As your ingestion point, you can use an S3 bucket. Files that you want to upload into your knowledge base are first uploaded into this bucket. In this diagram, the files are assumed to be .txt files.
- The upload action in Amazon S3 automatically starts an AWS Step Functions workflow.
- Amazon EventBridge is used to trigger the Step Functions workflow.
- The first Lambda function in the workflow calls the Amazon Comprehend
DetectDominantLanguageAPI, which flags documents if the confidence score of the language is below a certain threshold, indicating that the text might contain encoded data or data in other formats (such as a language Amazon Comprehend doesn’t recognize) that might be malicious. - If this is the case, the document is sent to a foundation model in Amazon Bedrock that can translate or decode the data.
- Next, another Lambda function is triggered. This function invokes a SageMaker endpoint, where you can deploy a model, such as a fine-tuned version of BERT, to classify documents as suspicious or not.
- If no suspicious content is detected, nothing is done and the content in the bucket remains the same (no need to override content, to prevent unnecessary costs) and the workflow ends. If undesirable content is detected, the document is stored in a second S3 bucket for human review.
- If not, the workflow ends.
Additional considerations for RAG data ingestion pipeline security
In previous sections, we focused on filtering patterns and current recommendations to secure the RAG ingestion pipeline. However, content filters that address indirect prompt injection aren’t the only mitigation to keep in mind when building a secure RAG application. To effectively secure generative AI-powered applications, responsible AI considerations and traditional security recommendations are still crucial.
To moderate content in your ingest pipeline, you might want to remove toxic language and PII data from your ingest documents. Amazon Comprehend offers built-in features for toxic content detection and PII detection in text documents. The Toxicity Detection API can identify content in categories such as hate speech, insults, and sexual content. This feature is particularly useful for making sure that harmful or inappropriate content isn’t ingested into your system. You can use the Toxicity Detection API to analyze up to 10 text segments at a time, each with a size limit of 1 KB. You might need to split larger documents into smaller segments before processing. For detailed guidance on using Amazon Comprehend toxicity detection, see Amazon Comprehend Toxicity Detection. For more information on PII detection and redaction with Amazon Comprehend, we recommend Detecting and redacting PII using Amazon Comprehend.
Keep the principle of least privilege in mind for your RAG application. Think about which permissions your application has, and give it only the permissions it needs to successfully function. Your application sends data in the context or orchestrates tools on behalf of the LLM, so it’s important that these permissions are limited. If you want to dive deep into achieving least privilege at scale, we recommend Strategies for achieving least privilege at scale. This is especially important when your RAG applications involves agents that might call APIs or databases. Make sure you carefully grant permissions to prevent potential security issues such as an SQL injection attack on your database.
Develop a threat model for your RAG application. It’s recommended that you document potential security risks in your application and have mitigation strategies for each risk. This session from Re:Invent 2023 gives an overview of how to approach threat modeling a generative AI workload. In addition, you can use the Threat Composer tool, which comes with a sample generative AI application, to help you in threat modeling your applications.
Lastly, when deciding what data to ingest into your RAG application, make sure to ask the right questions about the origin of the content, such as “who has access and edit rights to this content?” For example, anyone can edit a Wikipedia page. In addition, assess what the scope of your application is. Can the RAG application run code? Can it query a database? If so, this poses additional risks, so external data in your vector database should be carefully filtered.
Conclusion
In this blog post, you read about some of the security risks of RAG applications, with a specific focus on the RAG ingestion pipeline. Threat actors might engineer sophisticated methods to embed invisible content within websites or files. Without filtering or an evaluation mechanism, these might result in the LLM generating incorrect information, or worse, depending on the capabilities of the application (such as execute code, query a database, and so on). This makes it challenging to spot these threats when reviewing content.
You learned about some strategies and architectural patterns with filtering mechanisms to mitigate these risks. It’s important to note that the filtering mechanisms might not catch all undesirable content that should be removed from a file (for example, PII, base64 encoded data, and other undesirable sequences). Therefore, an evaluation mechanism and a human in the loop are crucial because there’s no model trained to detect such sequences for techniques like indirect prompt injection at this time (although there are models trained specifically to detect impolite language, but this doesn’t cover all possible cases).
Although there is currently no way to completely mitigate threats like injection attacks, these strategies and architectural patterns are a first step and form part of a layered approach to securing your application. In addition to these, make sure to evaluate your data regularly, consider having a human in the loop, and stay up to date on advancements in this space such as OWASP top 10 for LLM Applications or MITRE ATLAS
If you have feedback about this post, submit comments in the Comments section below.
Introducing Point in Time queries and SQL/PPL support in Amazon OpenSearch Serverless
Post Syndicated from Jagadish Kumar original https://aws.amazon.com/blogs/big-data/introducing-point-in-time-queries-and-sql-ppl-support-in-amazon-opensearch-serverless/
Today we announced support for three new features for Amazon OpenSearch Serverless: Point in Time (PIT) search, which enables you to maintain stable sorting for deep pagination in the presence of updates, and Piped Processing Language (PPL) and Structured Query Language (SQL), which give you new ways to query your data. Querying with SQL or PPL is useful if you’re already familiar with the language or want to integrate your domain with an application that uses them.
OpenSearch Serverless is a powerful and scalable search and analytics engine that enables you to store, search, and analyze large volumes of data while reducing the burden of manual infrastructure provisioning and scaling as you ingest, analyze, and visualize your time series and search data, simplifying data management and enabling you to derive actionable insights from data. The vector engine for OpenSearch Serverless also makes it easy for you to build modern machine learning (ML) augmented search experiences and generative artificial intelligence (generative AI) applications without needing to manage the underlying vector database infrastructure.
PIT search
Point in Time (PIT) search lets you run different queries against a dataset that’s fixed in time. Typically, when you run the same query on the same index at different points in time, you receive different results because documents are constantly indexed, updated, and deleted. With PIT, you can query against a state of your dataset for a point in time. Although OpenSearch still supports other ways of paginating results, PIT search provides superior capabilities and performance because it isn’t bound to a query and supports consistent pagination. When you create a PIT for a set of indexes, OpenSearch creates contexts to access data at that point in time and when you use a query with a PIT ID, it searches the contexts that are frozen in time to provide consistent results.
Using PIT involves the following high-level steps:
- Create a PIT.
- Run search queries with a PIT ID and use the
search_afterparameter for the next page of results. - Close the PIT.
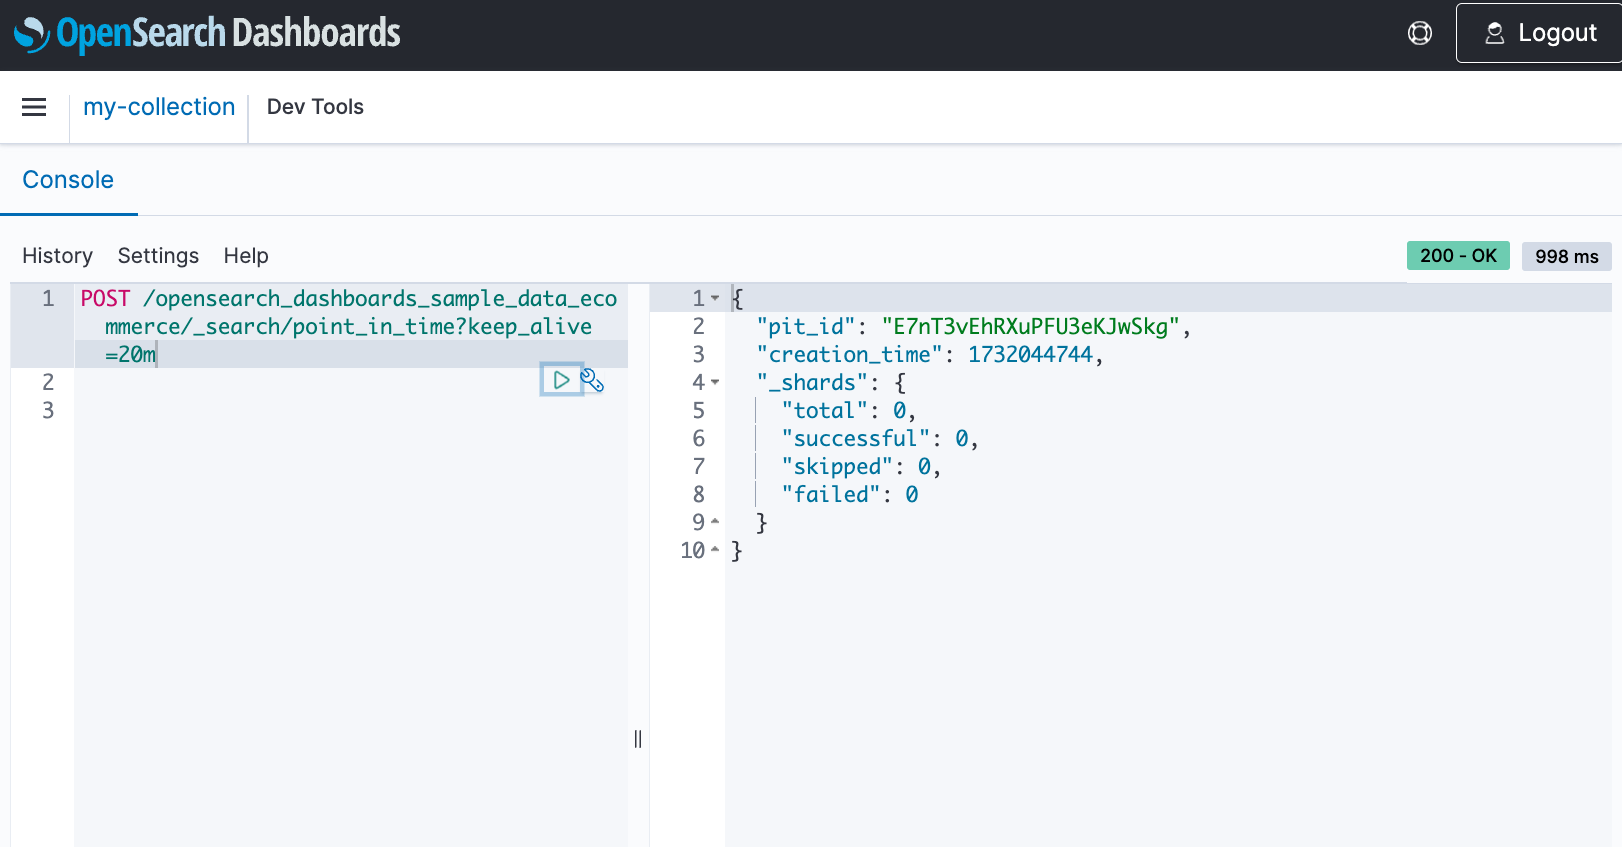
Create a PIT
When you create a PIT, OpenSearch Serverless provides a PIT ID, which you can use to run multiple queries on the frozen dataset. Even though the indexes continue to ingest data and modify or delete documents, the PIT references the data that hasn’t changed since the PIT creation.
Run a search query with the PIT ID
PIT search isn’t bound to a query, so you can run different queries on the same dataset, which is frozen in time.
When you run a query with a PIT ID, you can use the search_after parameter to retrieve the next page of results. This gives you control over the order of documents in the pages of results.
The following response contains the first 100 documents that match the query. To get the next set of documents, you can run the same query with the last document’s sort values as the search_after parameter, keeping the same sort and pit.id. You can use the optional keep_alive parameter to extend the PIT time.
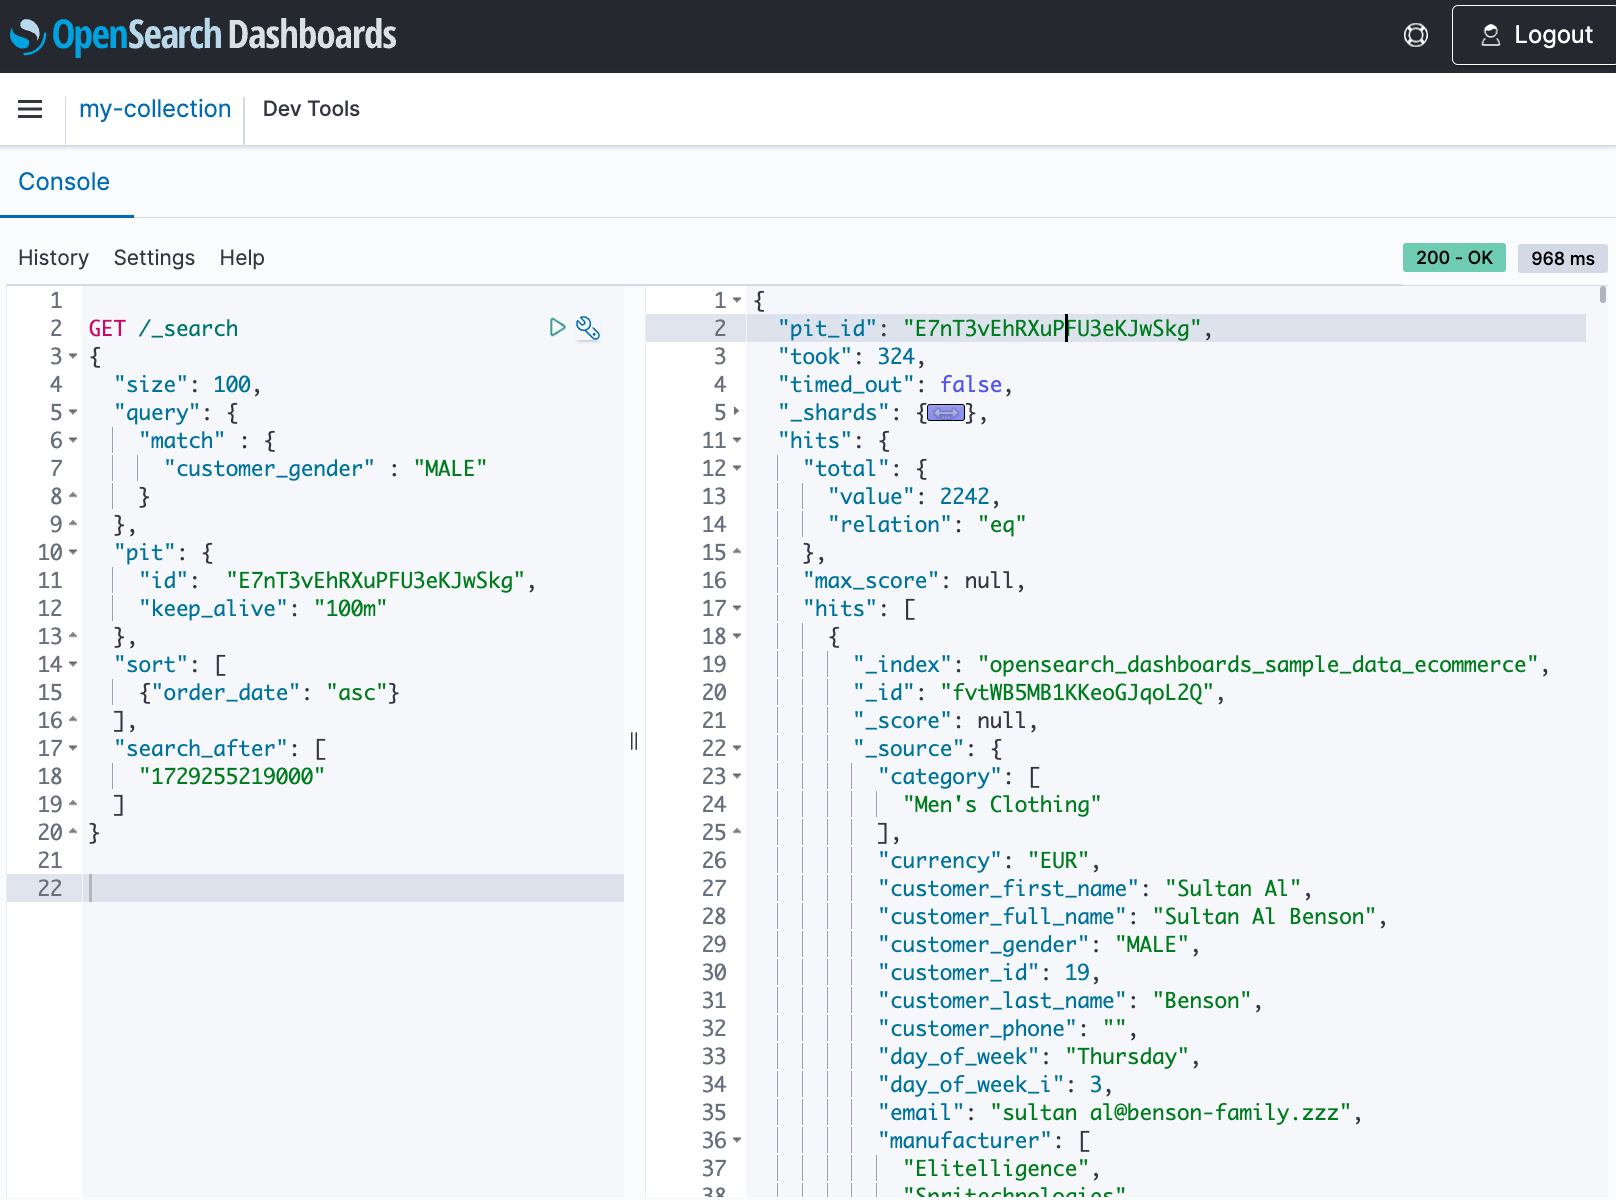
Close the PIT
When your queries on the dataset are complete, you can delete the PIT using the DELETE operation. PITs automatically expire after the keep_alive duration.

Considerations and limitations
Keep in mind the following limitations when using this feature:
- Search slicing is not supported in OpenSearch Serverless
- PIT list segment is not supported
- The total number of open PITs are restricted to 300 per collection that share the same AWS Key Management Service (AWS KMS) key
SQL and PPL support
OpenSearch Serverless provides a primary query interface called query DSL that you can use to search your data. Query DSL is a flexible language with a JSON interface. In addition to DSL, you can now extract insights out of OpenSearch Serverless using the familiar SQL query syntax.
You can use the SQL and PPL API, the /plugins/_sql and /plugins/_ppl endpoints respectively, to search the data. You can use aggregations, group by, and where clauses to investigate your data and read your data as JSON documents or CSV tables, so you have the flexibility to use the format that works best for you. By default, queries return data in JDBC format. You can specify the response format as JDBC, standard OpenSearch JSON, CSV, or raw.
Use the /plugins/_sql endpoint to send SQL queries to the SQL plugin, as shown in the following example.

Besides basic filtering and aggregation, OpenSearch SQL also supports complex queries, such as querying semi-structured data, set operations, sub-queries and limited JOINs. Beyond the standard functions, OpenSearch functions are provided for better analytics and visualization.
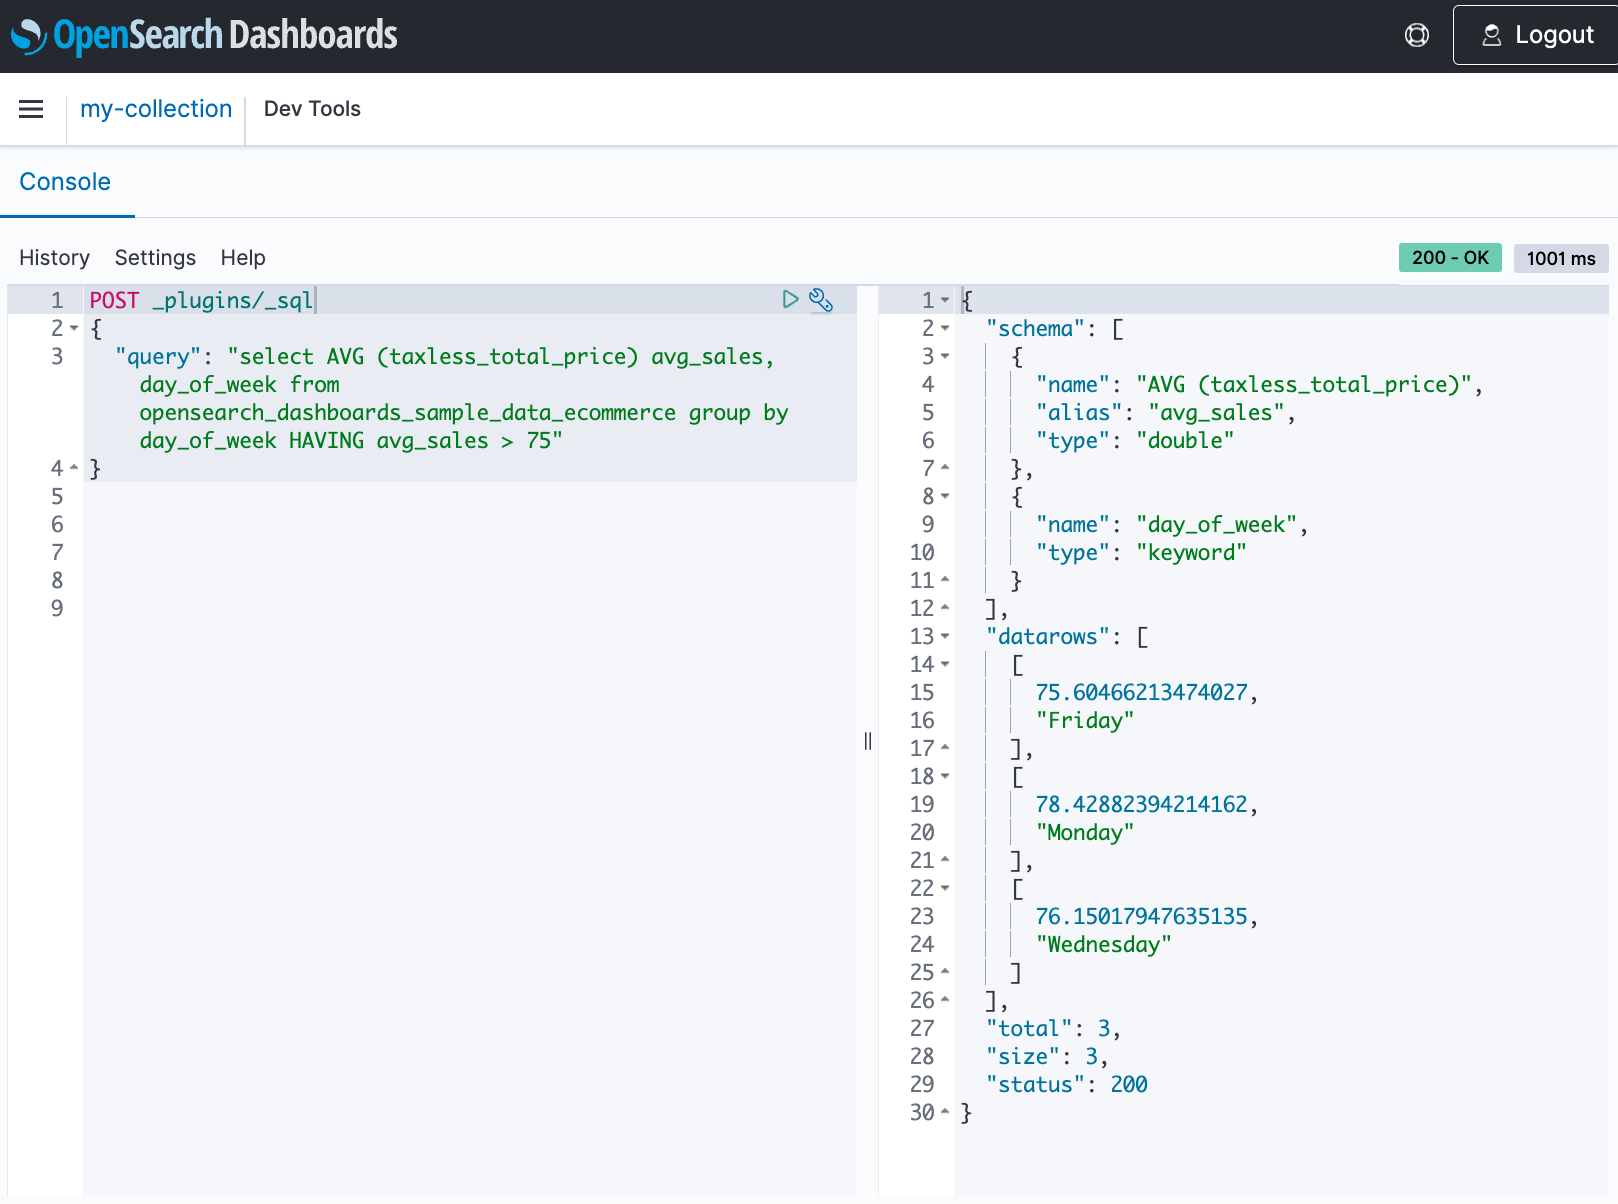
For PPL queries, use the /plugins/_ppl endpoint to send queries to the SQL plugin.
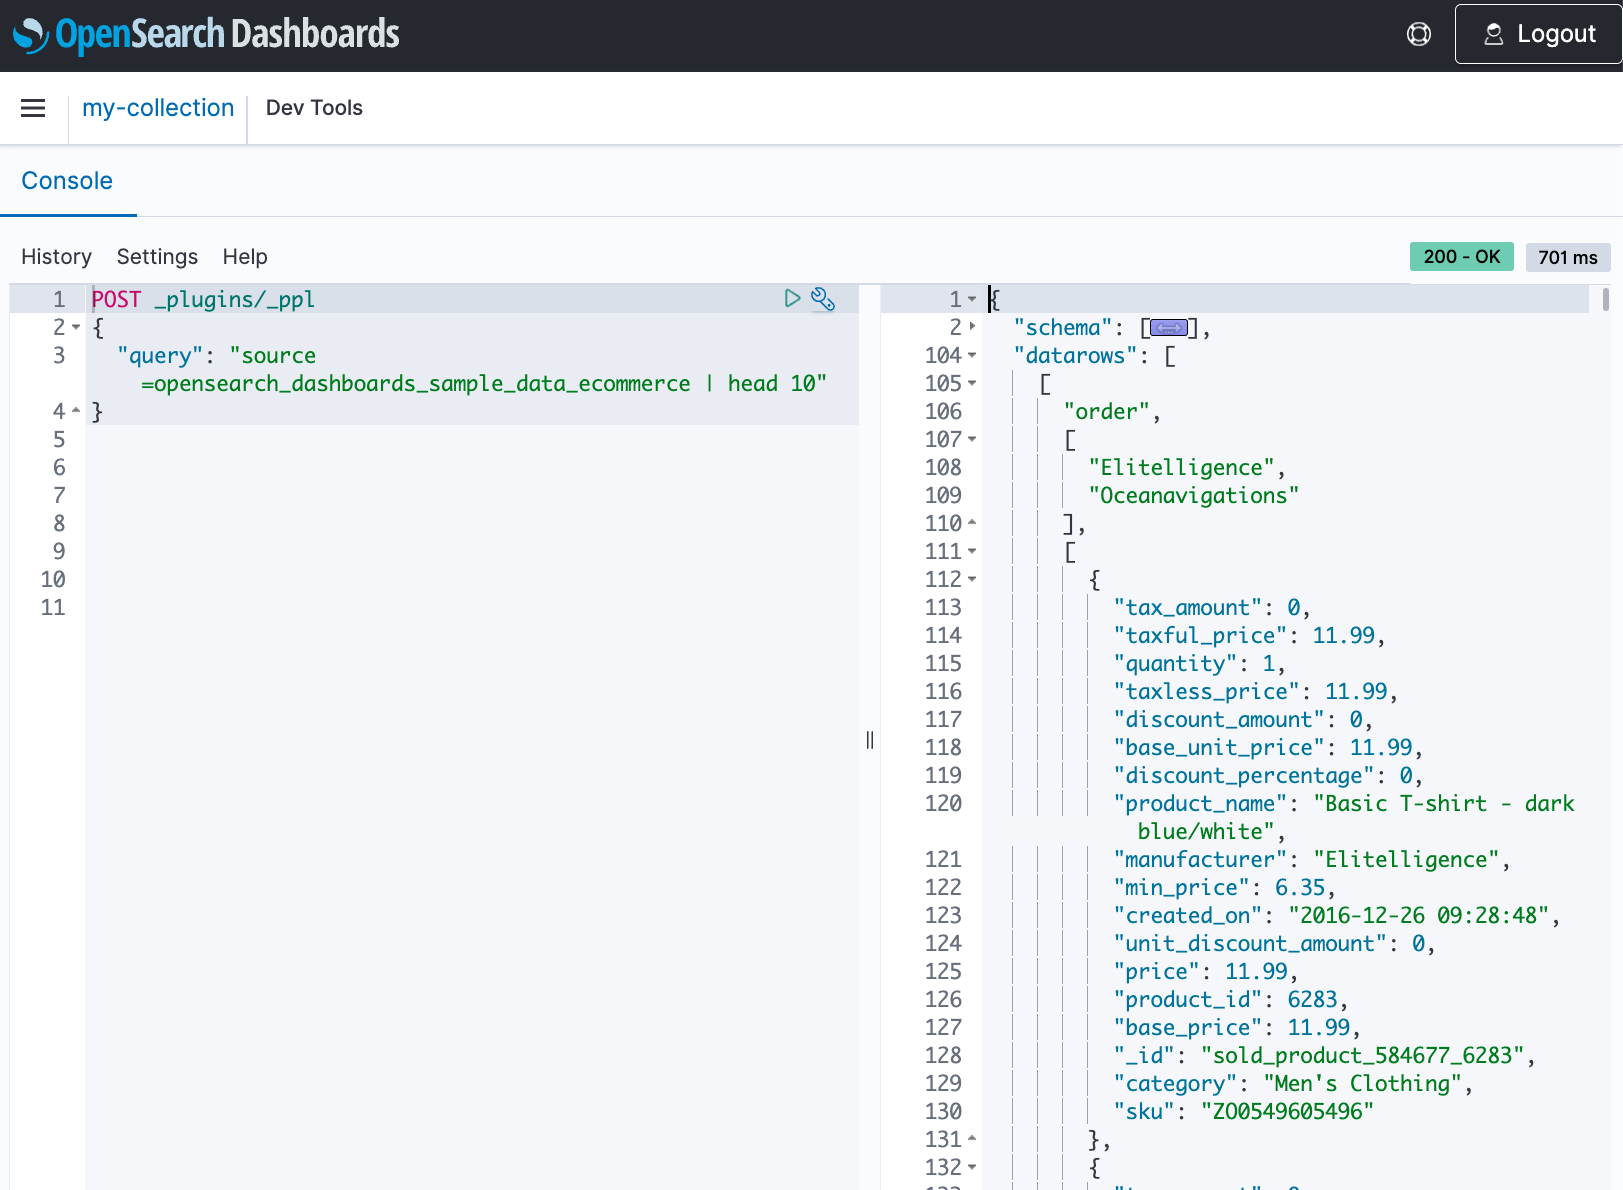
Considerations and limitations
Keep in mind the following:
- Query Workbench is not supported for SQL and PPL queries
- The SQL and PPL CLI is supported and can be used to issue SQL and PPL queries
- DELETE statements are not supported
- SQL plugin data sources are not supported
- The SQL query stats API is not supported
Summary
In this post, we discussed new features in OpenSearch Serverless. PIT is a useful feature when you need to maintain a consistent view of your data for pagination during search operations. SQL in OpenSearch Service bridges the gap between traditional relational database concepts and the flexibility of OpenSearch’s document-oriented data storage. You can send SQL and PPL queries to the _sql and _ppl endpoints, respectively, and use aggregations, group by, and where clauses to analyze their data.
For more information, refer to :
- Point in Time queries in Amazon OpenSearch Serverless
- SQL and PPL support in Amazon OpenSearch Serverless
About the Authors
 Jagadish Kumar (Jag) is a Senior Specialist Solutions Architect at AWS focused on Amazon OpenSearch Service. He is deeply passionate about Data Architecture and helps customers build analytics solutions at scale on AWS.
 Frank Dattalo is a Software Engineer with Amazon OpenSearch Service. He focuses on the search and plugin experience in Amazon OpenSearch Serverless. He has an extensive background in search, data ingestion, and AI/ML. In his free time, he likes to explore Seattle’s coffee landscape.
 Milav Shah is an Engineering Leader with Amazon OpenSearch Service. He focuses on the search experience for OpenSearch customers. He has extensive experience building highly scalable solutions in databases, real-time streaming, and distributed computing. He also possesses functional domain expertise in verticals like Internet of Things, fraud protection, gaming, and ML/AI. In his free time, he likes to ride his bicycle, hike, and play chess.
The serverless attendee’s guide to AWS re:Invent 2024
Post Syndicated from Julian Wood original https://aws.amazon.com/blogs/compute/the-serverless-attendees-guide-to-aws-reinvent-2024/
AWS re:Invent 2024 offers an extensive selection of serverless and application integration content.

AWS re:Invent Banner
For detailed descriptions and schedule, visit the AWS re:Invent Session Catalog.
Join AWS serverless experts and community members at the AWS Modern Apps and Open Source Zone in the AWS Expo Village. This serves as a hub for serverless discussions at re:Invent. While you are there, enjoy a free coffee and learn about serverless architectures at the Serverlesspresso booth. There are two this year, another one at the Certificate Lounge. The AWS Expo Village also includes Serverless and Serverless Containers booths.
Don’t have a ticket yet? Join us in Las Vegas from November 28-December 2, 2022 by registering for re:Invent 2024.
This guide organizes the sessions into categories to help you find the content this is most relevant to you.
Session Types
- Breakout Sessions are lecture-style presentations covering architecture, best practices, and deep dives into AWS services.
- Workshops are 2-hour hands-on sessions where you work through tasks in AWS accounts using AWS services. Laptops are required and AWS credits are provided.
- Chalk Talks are highly interactive 60-minute sessions with smaller audiences, focused on technical deep dives with whiteboards for architectural discussions.
- Builders’ Sessions are 60-minute small-group sessions led by an AWS expert who guides you through a technical problem using AWS services.
- Code Talks are 60-minute live coding sessions where AWS experts show how to build solutions using AWS services.
Leadership session: Nick Coult, Usman Khalid, Kathleen deValk
- SVS211: Celebrating 10 years of pioneering serverless and containers – Breakout.
- Explore how serverless has evolved to help organizations drive the highest performance, availability, and security at low costs.
Getting started sessions
Are you new to serverless or taking your first steps? Hear from AWS experts and customers on best practices and strategies for building serverless workloads. Get hands-on with services by attending a workshop or builders session. Create the next great “to do” app or add a new customer experience for a theme park.
- SVS202: Thinking serverless – Chalk Talk
- Learn how to approach building solutions with a serverless mindset by breaking down business problems into serverless building blocks.
- SVS205: Building a serverless web application for a theme park – Workshop
- Learn how to build a complete serverless web application for a theme park called Innovator Island.
- SVS201: Getting started with serverless patterns – Workshop
- Learn how to recognize and apply common serverless patterns by building production-ready code for a serverless application.
- SVS204: Write less code: Building applications with a serverless mindset – Builders Session
- Get more value by using built-in integrations between AWS services through configuration rather than writing glue code.
- SVS207: Effectively model costs for your serverless applications – Chalk Talk
- Gain insights into modeling the cost of serverless applications on AWS by considering request loads, payload sizes, and service pricing.
- API201: The AWS Step Functions workshop – Workshop
- Learn about the features of AWS Step Functions through hands-on interactive modules.
- API204: Building event-driven architectures – Workshop
- Learn about the basics of event-driven design using examples involving Amazon SNS, Amazon SQS, AWS Lambda, Amazon EventBridge, and more.
- API205: Unlock the power of an exceptional serverless developer experience – Code Talk
- Learn how to accelerate your serverless development with AWS tools, including Amazon Q Developer integrated into IDEs.
- SEG209: Getting started building serverless SaaS architectures
- Discover how to build your first serverless application, and learn how to handle multi-tenant architectures for SaaS applications.
Understanding serverless architectures
- SVS208: Balance consistency and developer freedom with platform engineering – Breakout
- Learn how platform teams can provide opinionated security, cost, observability, reliability, and sustainability patterns while maintaining developer flexibility.
- SVS209: Containers or serverless functions: A path for cloud-native success – Breakout
- Explore the fundamental differences between containers and serverless functions through real-world scenarios and insights into choosing the right approach.
- OPN301: Level up your serverless applications with Powertools for AWS Lambda – Workshop
- Learn why Powertools for AWS Lambda can be the developer toolkit of choice for serverless workloads.
- DEV341: From single to multi-tenant: Scaling a mission-critical serverless app
- Explore how to transition a mission-critical application from a single-tenant to a multi-tenant architecture
- DEV337: Zero to production serverless in 8 weeks
- Hear about a real-world project journey, from concept to production in only eight weeks. Expect practical insights, mistakes, tips, and how using the right technologies and development process can deliver results fast.
Building event-driven applications
- API204: Building event-driven architectures – Workshop
- Learn about the basics of event-driven design using examples involving Amazon SNS, Amazon SQS, AWS Lambda, Amazon EventBridge, and more.
- API206: How event-driven architectures can go wrong and how to fix them – Chalk Talk
- Explore common event-driven pitfalls including YOLO events, god events, observability soup, event loops, and surprise bills.
- DEV321: Choosing the right serverless compute services
- Learn when to use AWS serverless compute services like AWS Lambda and Amazon ECS on AWS Fargate and how to integrate them into your application architectures.
- API307: Event-driven architectures at scale: Manage millions of events – Breakout
- Discover proven patterns for building high-scale event-driven systems that can be effectively managed across a distributed organization with Amazon EventBridge.
- SVS206: Building an event sourcing system using AWS serverless technologies – Chalk Talk
- Explore strategies for building effective event sourcing architectures using AWS serverless technologies to store application state as an append-only event log.
- COP408: Coding for serverless observability
- Join this code talk to learn best practices for collecting signals from your serverless applications. Dive deep into techniques to effectively instrument your applications to provide you with optimal observability.
Incorporating orchestration
- API201: The AWS Step Functions workshop – Workshop
- Learn about the features of AWS Step Functions through hands-on interactive modules.
- API203: Building common orchestrated workflows with AWS Step Functions – Builders Session
- Build three orchestrated workflows, including streamlined data processing with Distributed Map state, external system integration using callback, and implementing the saga pattern.
- API207: Optimize data processing with built-in AWS Step Functions features – Chalk Talk
- Learn to optimize your serverless data processing workflows at scale using AWS Step Functions features, including intrinsic functions and Distributed Map state.
- API402: Building advanced workflows with AWS Step Functions – Breakout
- Learn how you can use generative AI to generate state machines automatically from textual descriptions and chat with your workflow to optimize it.
Understanding integration patterns
- API208: Building an integration strategy for the future – Breakout
- Boost productivity and create better customer experiences by building a modern integration strategy using AWS application, data, and file integration services.
- API306: Integration patterns for distributed systems – Breakout
- Learn about common design trade-offs for distributed systems and how to navigate them with design patterns, illustrated with real-world examples.
- API311: Application integration for platform builders – Breakout
- Explore the implementation of application integration using serverless components in enterprise environments.
Building APIs and frontends
- SVS203: Create your first API from scratch with OpenAPI and Amazon API Gateway – Builders Session
- Learn how to design and provision complete APIs using infrastructure as code following the OpenAPI specification.
- API303: Building modern API architectures: Which front door should I use? – Chalk Talk
- Explore options for building modern APIs including REST, GraphQL, and real-time APIs along with their benefits and drawbacks.
- API304: Building rate-limited solutions on AWS – Chalk Talk
- Learn some of the best ways to build rate limiting into your systems for improved reliability.
- API305: Asynchronous frontends: Building seamless event-driven experiences – Breakout
- Explore patterns to enable asynchronous, event-driven integrations with the frontend designed for architects and frontend, backend, and full-stack engineers.
Diving deep into advanced topics
- SVS401: Best practices for serverless developers – Breakout
- Discover architectural best practices, optimizations, and useful shortcuts for building production-ready serverless workloads.
- SVS403: From serverful to serverless Java – Workshop
- Learn how to bring your traditional Java Spring application to AWS Lambda with minimal effort and iteratively apply optimizations.
- SVS406: Scale streaming workloads with AWS Lambda – Chalk Talk
- Learn how to implement parallel processing techniques for ordered and unordered use cases to address throughput limitations in streaming data processing.
Processing data
- SVS404: Building serverless distributed data processing workloads – Workshop
- Learn how serverless technologies like AWS Step Functions and AWS Lambda can help you simplify management and scaling of distributed data processing.
- API401: Multi-tenant Amazon SQS queues: Mitigating noisy neighbors – Chalk Talk
- Explore advanced strategies for managing multi-tenant Amazon SQS queues and effective mitigation techniques, including shuffle sharding and overflow queues.
- SVS321: AWS Lambda and Apache Kafka for real-time data processing applications – Breakout
- Gain practical insights into building scalable, serverless data processing applications by integrating AWS Lambda with Apache Kafka.
Incorporating generative AI
- API209: Generative AI at scale: Serverless workflows for enterprise-ready apps – Workshop
- Learn to build enterprise-ready, scalable generative AI applications that can scale from serving 100 to 100,000 users.
- API310: Build a meeting summarization solution with generative AI & serverless – Code Talk
- See live coding of a serverless application for producing meeting summaries with generative AI using Amazon Transcribe and Amazon Bedrock, orchestrated with AWS Step Functions.
- SVS319: Unlock the power of generative AI with AWS Serverless – Breakout
- Learn to harness AWS Serverless to build robust, cost-effective generative AI applications. Explore using AWS Step Functions to orchestrate complex AI workflows.
- SVS325: Secure access to enterprise generative AI with serverless AI gateway – Chalk Talk
- Explore how to architect a serverless AI gateway on AWS to securely integrate and consume large language models from multiple providers.
Additional resources
For social activities see the Unofficial list of AWS re:Invent Conference and Vendor Parties.
If you are attending re:Invent, connect at our AWS Modern Apps and Open Source Zone in the AWS Expo Village. The AWS Expo Village also includes Serverless and Serverless Containers booths.
If you can not join us in-person, breakout sessions will be available via our YouTube channel after the event.
We look forward to seeing you at re:Invent 2024! For more serverless learning resources, visit Serverless Land.
[$] Book review: Run Your Own Mail Server
Post Syndicated from jzb original https://lwn.net/Articles/998153/
The most common piece of advice given to users who ask about
running their own mail server is don’t. Setting up
and securing a mail server in 2024 is not for the faint of heart, nor
for anyone without copious spare time. Spammers want to flood inboxes
with ads for questionable supplements, attackers want to abuse servers
to send spam (or worse), and getting the big providers to accept mail
from small servers is a constant uphill battle. Michael W. Lucas,
however, encourages users to thumb their nose at the “Email
“, and declare email independence. His self-published book,
Empire
Run Your Own Mail
Server, provides a manual (and manifesto) for users who are
interested in the challenge.
Introducing Amazon MWAA micro environments for Apache Airflow
Post Syndicated from Hernan Garcia original https://aws.amazon.com/blogs/big-data/introducing-amazon-mwaa-micro-environments-for-apache-airflow/
Amazon Managed Workflows for Apache Airflow (Amazon MWAA), is a managed Apache Airflow service used to extract business insights across an organization by combining, enriching, and transforming data through a series of tasks called a workflow. It enhances infrastructure security and availability while reducing operational overhead.
Today, we’re excited to announce mw1.micro, the latest addition to Amazon MWAA environment classes. This offering is designed to provide an even more cost-effective solution for running Airflow environments in the cloud. With mw1.micro, we’re bringing the power of Amazon MWAA to teams who require a lightweight environment without compromising on essential features. In this post, we’ll explore mw1.micro characteristics, key benefits, ideal use cases, and how you can set up an Amazon MWAA environment based on this new environment class.
Customers maintain multiple MWAA environments to separate development stages, optimize resources, manage versions, enhance security, ensure redundancy, customize settings, improve scalability, and facilitate experimentation. This approach offers greater flexibility and control over workflow management. These organizations often maintain multiple AWS accounts for development, testing, and production stages, leading to increased complexity and cost. The traditional approach of using full-sized Amazon MWAA environments for development and testing can also be expensive, especially for teams working on smaller projects or proof-of-concept initiatives. Additionally, customers adopting a federated deployment model find it challenging to provide isolated environments for different teams or departments, and at the same time optimize cost. The introduction of mw1.micro addresses these pain points by offering an option that enables a more efficient resource utilization and significant cost savings.
The micro environment class
The mw1.micro configuration provides a balanced set of resources suitable for small-scale data processing and orchestration tasks. The class allocates 1 vCPU and 3GB of RAM for a scheduler/worker hybrid container. Similarly, the web server is equipped with 1 vCPU and 3 GB RAM configuration. The Amazon Elastic Container Service (Amazon ECS) tasks launched in the environment use AWS Fargate platform version 1.4.0, increasing ephemeral task storage to 20 GB.
mw1.micro environments support up to three concurrent tasks, making it ideal for sequential or lightly parallelized workflows. Additionally, it can accommodate up to 25 DAGs, providing ample capacity for organizing and managing various data pipelines and processes. This micro environment is particularly well-suited for development, testing, or small production workloads where resource optimization and cost-efficiency are primary concerns.
The following table summarizes the environment capabilities of mw1.micro.
| Class/Resources | Scheduler and Worker vCPU/RAM | Web Server vCPU/RAM | Concurrent Tasks | DAG Capacity |
| mw1.micro | 1 vCPU / 3GB | 1 vCPU / 3GB | 3 | Up to 25 |
For mw1.micro, we maintain the general architecture of Amazon MWAA, and combine the Airflow scheduler and worker into a single container. For this reason, mw1.micro uses only two AWS Fargate tasks, one scheduler/worker hybrid, and one web server. The following diagram illustrates the environment architecture.

Another important change is that the meta database will now use a t4g.medium Amazon Aurora PostgreSQL-Compatible Edition instance powered by AWS Graviton2. With the Graviton2 family of processors, you get compute, storage, and networking improvements, and the reduction of your carbon footprint offered by the AWS family of processors.
Supported features
mw1.micro maintains Amazon MWAA and Airflow key functionalities that developers currently rely on:
- You can set up a public or private web server, allowing you to control access to your Airflow UI as needed
- You can add custom plugins and requirements, enabling you to extend Airflow’s capabilities and manage dependencies effortlessly
- Startup scripts can be used to perform initialization tasks, making sure your environment is configured precisely to your specifications
- The Airflow UI is fully functional, providing the same intuitive interface for managing and monitoring your workflows
- It has the same networking features as other Amazon MWAA environment classes, such as custom URLs and shared virtual private cloud (VPC) support
- Scheduler and worker logs remain separate in their respective Amazon CloudWatch log groups, providing ease of monitoring and troubleshooting
Considerations
The architectural decisions behind mw1.micro reflect a balance between functionality and cost-effectiveness. Here are the constraints the limited resources in mw1.micro brings:
- The scheduler and worker are combined into a single Fargate task. Only a single scheduler/worker container is supported.
- micro consists of a single Fargate task for the web server. The maximum number of web servers is 1.
- The number of concurrent Airflow tasks in the worker (
worker_autoscale) can be set to a maximum value of 3.
Pricing and availability
Amazon MWAA pricing dimensions remains unchanged, and you only pay for what you use:
- The environment class
- Metadata database storage consumed
Metadata database storage pricing remains the same. Refer to Amazon Managed Workflows for Apache Airflow Pricing for rates and more details.
Observe Amazon MWAA performance
When you start using the new environment class, it’s important to understand its behavior for maintaining optimal operation and identifying potential capacity issues. It’s essential to monitor key metrics such as metadata database memory usage, and CPU utilization of the worker/scheduler hybrid container. We recommend following the guidance described in Introducing container, database, and queue utilization metrics for Amazon MWAA to better understand the state of your environments, and get insights to right-size your resources.
Set up a new micro environment in Amazon MWAA
You can set up an Amazon MWAA micro environment in your account and preferred AWS Region using the AWS Management Console, API, or AWS Command Line Interface (AWS CLI). If you’re adopting infrastructure as code (IaC), you can automate the setup using AWS CloudFormation, the AWS Cloud Development Kit (AWS CDK), or Terraform scripts.
The Amazon MWAA micro environment class is available today in all Regions where Amazon MWAA is currently available.
Conclusion
In this post, we announced the availability of the new micro environment class in Amazon MWAA. This offering addresses the needs of teams working on smaller projects, proof-of-concept initiatives, or those requiring isolated environments for different departments. By providing a lightweight yet feature-rich solution, mw1.micro enables organizations to achieve substantial cost savings without compromising on essential functionalities.
As you explore the possibilities of mw1.micro, remember to monitor its performance using the recommended metrics to maintain optimal operation. With its availability across all Regions where Amazon MWAA is offered, your teams can now use the power of Airflow in a more streamlined and economical manner, opening up new opportunities for efficient data pipeline management and orchestration in the cloud.
For additional details and code examples on Amazon MWAA, visit the Amazon MWAA User Guide and the Amazon MWAA examples GitHub repo.
Apache, Apache Airflow, and Airflow are either registered trademarks or trademarks of the Apache Software Foundation in the United States and/or other countries.
About the Authors
 Hernan Garcia is a Senior Solutions Architect at AWS based in the Netherlands. He works in the financial services industry, supporting enterprises in their cloud adoption. He is passionate about serverless technologies, security, and compliance. He enjoys spending time with family and friends, and trying out new dishes from different cuisines.
 Sriharsh Adari is a Senior Solutions Architect at AWS, where he helps customers work backward from business outcomes to develop innovative solutions on AWS. Over the years, he has helped multiple customers on data platform transformations across industry verticals. His core area of expertise includes technology strategy, data analytics, and data science. In his spare time, he enjoys playing sports, watching TV shows, and playing Tabla.
Important changes to CloudTrail events for AWS IAM Identity Center
Post Syndicated from Arthur Mnev original https://aws.amazon.com/blogs/security/modifications-to-aws-cloudtrail-event-data-of-iam-identity-center/
AWS IAM Identity Center is streamlining its AWS CloudTrail events by including only essential fields that are necessary for workflows like audit and incident response. This change simplifies user identification in CloudTrail, addressing customer feedback. It also enhances correlation between IAM Identity Center users and external directory services, such as Okta Universal Directory or Microsoft Active Directory.
Effective January 13, 2025, IAM Identity Center will stop emitting userName and principalId fields under the user identity element in CloudTrail events. These fields will be excluded from the CloudTrail events that are initiated when users sign in to IAM Identity Center, use the AWS access portal, and access AWS accounts through the AWS CLI. Instead, IAM Identity Center now emits user ID and Identity Store Amazon Resource Name (ARN) fields to replace the userName and principalId fields, simplifying user identification. IAM Identity Center CloudTrail events will also specify IdentityCenterUser as the identity type instead of Unknown, providing a clear identifier for users. Additionally, IAM Identity Center will omit the value of a group’s displayName in CloudTrail events when you create or update a group. You can access group attributes, such as displayName, by using the Identity Store DescribeGroup API operation for authorized workflows.
We recommend that you update your workflows that process the userName, principalId, userIdentity type, or group displayName fields in CloudTrail events for IAM Identity Center before these changes take effect on January 13, 2025. This blog post provides guidance for these updates.
How to prepare your workflows for the upcoming changes to IAM Identity Center user identification in CloudTrail
To simplify user identification, IAM Identity Center is making changes to the user identity element for its CloudTrail events. Based on these changes, you can update your workflows to link CloudTrail events to a specific user, associate users with their external directories, and track user activity within the same session. The updated user identity element for a sample CloudTrail event is shared at the end of this section.
IAM Identity Center will update the userIdentity type for CloudTrail events that are emitted when users sign in, use the AWS access portal, and access AWS accounts through the AWS CLI. For authenticated users, the userIdentity type will change from Unknown to IdentityCenterUser. For unauthenticated users, the userIdentity type will remain Unknown. We recommend that you update your workflows to accept both values.
To identify the user linked to a CloudTrail event, IAM Identity Center now emits userId and identityStoreArn fields to replace the userName and principalId fields. The userId is a unique and immutable user identifier that IAM Identity Center assigns to every user in the Identity Store, its native directory referenced by the identityStoreArn. These new fields enhance user identification and action tracking in CloudTrail and are present in the CloudTrail entries where the userIdentity type is IdentityCenterUser. For an example of the user identity element with the new fields and the describe-user CLI command to retrieve user attributes using the user ID and Identity Store ARN, see the Identifying the user and session in IAM Identity Center user-initiated CloudTrail events section of the IAM Identity Center User Guide.
Among other user attributes, you can use the describe-user CLI command to retrieve the external ID associated with a user in the Identity Store. You can use the external ID to associate Identity Store users with their external directories. The external ID maps the user to an immutable user identifier in their external directory, such as Microsoft Active Directory or Okta Universal Directory.
Note: IAM Identity Center doesn’t emit an external ID in CloudTrail. You need access to the Identity Store to retrieve an external ID based on the
userIdandidentityStoreArnfields in CloudTrail.
If you have access to the CloudTrail events but not the Identity Store, you can use the UserName field emitted under the additionalEventData element to correlate your users with their external directories. This field represents the username that the user authenticates or federates with when signing in to IAM Identity Center. For more details, see the Correlating users between IAM Identity Center and external directories section of the IAM Identity Center User Guide.
Notes:
- When the identity source is the AWS Directory Service, the
UserNamevalue logged in theadditionalEventDataelement in CloudTrail is equal to the username that the user enters during authentication. For example, a user who has the username [email protected], can authenticate with anyuser, [email protected], or company.com\anyuser, and in each case the entered value is emitted in CloudTrail respectively.- For a sign-in failure caused by incorrect username input, IAM Identity Center emits the
UserNamefield in its CloudTrail event as a fixed-text value ofHIDDEN_DUE_TO_SECURITY_REASONS. This is because the username value input by the user in such a scenario could contain sensitive information, such as a user’s password.
To track user activity within the same session, IAM Identity Center now emits the credentialId field in CloudTrail events for user actions that take place in the AWS access portal or that use the AWS CLI. The credentialId field contains the AWS access portal session ID for a user, to help you track user actions during their session.
The following table shows a CloudTrail event example that illustrates the fields, highlighted in yellow, that will change on January 13, 2025. IAM Identity Center recently started emitting userId, identityStoreArn, credentialId, and UserName in the additional event data for its CloudTrail events. Therefore, this example considers them as existing fields.
| Before the upcoming changes |
|
| After the upcoming changes |
|
How to prepare your workflows for the upcoming changes to IAM Identity Center group management events in CloudTrail
Your workflows that require access to group attributes, such as displayName, can retrieve them by using the Identity Store DescribeGroup API operation. Beginning January 13, 2025, IAM Identity Center will replace the displayName value in the administrative CloudTrail events for CreateGroup and UpdateGroup with a fixed text value of HIDDEN_DUE_TO_SECURITY_REASONS. This update restricts access to the group displayName only to workflows that are authorized to access group attributes in the Identity Store.
The following table shows a CloudTrail event example that illustrates the upcoming change in the displayName field, which is highlighted in yellow.
| Before the upcoming changes |
|
| After the upcoming changes |
|
Gain a deeper understanding of the specific CloudTrail events impacted by the changes
Earlier in this post, we said that IAM Identity Center emits the relevant CloudTrail events when users sign in to IAM Identity Center, use the AWS access portal, and access AWS accounts through the AWS CLI, or when administrators create and update groups. These CloudTrail events belong to four event groups that the IAM Identity Center User Guide refers to as AWS access portal, OIDC, Sign-in, and Identity Store events. The following list provides more details about the use cases that lead to the emission of these CloudTrail events:
- The AWS access Portal events cover sign-in and sign-out from the AWS access portal, as well as the retrieval of a user’s account and application assignments, which are necessary to display the portal. IAM Identity Center also emits these events when configuring AWS CLI or IDE toolkits for access to AWS accounts as an IAM Identity Center user.
- The relevant OpenID Connect (OIDC) event is
CreateToken. IAM Identity Center emits this event when starting a session for an authenticated user (for example, to access assigned AWS accounts through AWS CLI or IDE toolkits). - The Sign-in events cover password-based and federated authentication, as well as multi-factor authentication (MFA).
- The relevant Identity Store events include the end-user management of MFA devices inside the AWS access portal and the two administrative Identity Store events, CreateGroup and UpdateGroup.
Note that some of the API operations behind the CloudTrail events in scope are also available as AWS CLI commands:
The two tables in this section provide a detailed record of the changes and their relation to CloudTrail events.
The following table lists the changes to fields emitted by IAM Identity Center and the relevant CloudTrail events.
| Changes | AWS access portal (Use of the portal) |
OIDC (Sign-in to IAM Identity Center through AWS CLI and IDE toolkits) |
Sign-in (authentication, including MFA, federation) |
Identity Store (MFA device and group management) |
| Available as of January 13, 2025 | ||||
Exclusion of userName from the userIdentity element for authenticated users |
Yes | Yes, limited to the CreateToken event |
Yes | Yes, limited to MFA management in the AWS access portal |
Exclusion of principalId from the userIdentity element |
Yes | Yes, limited to the CreateToken event |
Yes | Yes, limited to MFA management in the AWS access portal |
Modified userIdentity’s type value from Unknown to IdentityCenterUser |
Yes | Yes, limited to the CreateToken event |
Yes, limited to successful authentications | Yes, limited to MFA management in the AWS access portal |
Exclusion of the group displayName value from the requestParameters and responseElements elements |
No | No | No | Yes, limited to administrative CreateGroup and UpdateGroup events |
Exclusion of the UserName (in the additionalEventData element) a user keys in on failed authentication attempts |
No | No | Yes, limited to the CredentialChallenge event |
No |
| Available as of October 2024 | ||||
Addition of the onBehalfOf element with userId and identityStoreArn, and credentialId in the userIdentity element |
Yes | Yes, limited to the CreateToken event |
Yes, limited to successful authentications | Yes, limited to MFA management in the AWS access portal |
Addition of UserName in additionalEventData element |
No | No | Yes, limited to CredentialChallenge and UserAuthentication events in specific cases |
No |
The following table summarizes the relevant IAM Identity Center CloudTrail event groups, event sources, and event names.
| Event group | Source | Event names |
| AWS access portal | sso.amazonaws.com |
Authenticate |
| OIDC | sso.amazonaws.com |
CreateToken |
| Sign-in | signin.amazon.com |
CredentialChallenge |
| Identity Store | sso-directory.amazonaws.com oridentitystore.amazonaws.com |
ListMfaDevicesForUser |
Conclusion
In this post, we reviewed several important upcoming and recently completed changes to CloudTrail events that IAM Identity Center emits. We recommend that you update your CloudTrail based workflows before January 13, 2025 if they rely on the userName, principalId, or type fields in the CloudTrail user identity element when users sign in to IAM Identity Center, use the AWS access portal, access AWS accounts through the AWS CLI, or set a group’s displayName field in group management administrative events. AWS has recently introduced the fields userId, identityStoreArn, and credentialId in the CloudTrail user identity element to help you complete your updates.
Please contact your AWS account team or AWS support if you need additional assistance.
Rapid7 Recognized for ‘Excellence in Workplace Health and Wellbeing’ at the Belfast Telegraph IT Awards
Post Syndicated from Rapid7 original https://blog.rapid7.com/2024/11/19/rapid7-recognized-for-excellence-in-workplace-health-and-wellbeing-at-the-belfast-telegraph-it-awards/

On Friday, November 15th, Rapid7 was awarded ‘Excellence in Workplace Health and Wellbeing’ at the Belfast Telegraph IT Awards. This award recognizes technology companies in Belfast that prioritize employee well-being.
At Rapid7, we believe that the best ideas and solutions come from diverse, multi-faceted teams. By supporting our people with programs that enhance their well-being and quality of life, we create an environment where they can continue to have rewarding career experiences and make an incredible impact on our business. Our programs go beyond just taking care of people when they are sick. Instead, we look to increase their overall quality of life with unique initiatives and offerings that support both physical and mental health and wellness.
Our award submission was broken down into three key areas where we offer unique benefits that make us leaders in our field. These areas included benefit offerings, physical health and well-being, and mental health and well-being.
Benefit Offerings
Rapid7 is proud to offer unique and competitive benefits to employees and their families. One example is our neurodiversity coverage. Employees at Rapid7, and their family members, have access to specialists for evaluations, screenings, and treatment programs. Appointments and services that would otherwise take months or years are able to happen within weeks.
As part of our health benefit program, once a year, our company participates in a global health and well-being challenge. This is not your typical ‘steps’ challenge, but instead a comprehensive initiative encompassing physical activity, meditation, and mindfulness, designed to build connections across Rapid7 teams.
Physical health and well-being
Our cycle-to-work scheme allows employees to set aside a salary sacrifice to purchase a new bicycle. There is no maximum limit so our employees are often able to select high-end models at an affordable rate. Employees drop in and out of the program as they wish, and this year we have 16 employees saving up to get their new bikes.
For those who prefer a gym or fitness classes, our Chichester street office building is equipped with a full service gym featuring cardio and weight training equipment, as well as a yoga and group fitness studio. The fitness studio has a variety of virtual program on demand, many of which can be completed in just 20 minutes, making it easy for employees to fit in a quick break during their day.
Mental health and wellbeing
AwareNI is a local organization that we’ve been proud to partner with. We participate in their mood matters program, bringing mental health awareness and training to employees across Rapid7. However, what is most unique is our on-site mental health first aiders. We partner with AwareNI to train employees to be on-site mental health first aiders, giving employees a resource in the office to go to if they are experiencing a mental health crisis. As mental health first aiders, these employees are equipped with the skills and knowledge to guide and support colleagues experiencing a mental health-related crisis.
At Rapid7, we are on a mission to create a secure digital world for our customers, our industry, and our communities. We show up every day to keep our 11,000+ customers around the world protected from the latest threats. This requires us to build a dynamic workplace where innovation and collaboration thrive. Taking care of our people is a critical first step, and we’re honored to have been recognized as a leader in this space. To learn more, please visit our careers site at careers.rapid7.com.
Integrate custom applications with AWS Lake Formation – Part 1
Post Syndicated from Stefano Sandona original https://aws.amazon.com/blogs/big-data/integrate-custom-applications-with-aws-lake-formation-part-1/
AWS Lake Formation makes it straightforward to centrally govern, secure, and globally share data for analytics and machine learning (ML).
With Lake Formation, you can centralize data security and governance using the AWS Glue Data Catalog, letting you manage metadata and data permissions in one place with familiar database-style features. It also delivers fine-grained data access control, so you can make sure users have access to the right data down to the row and column level.
Lake Formation also makes it straightforward to share data internally across your organization and externally, which lets you create a data mesh or meet other data sharing needs with no data movement.
Additionally, because Lake Formation tracks data interactions by role and user, it provides comprehensive data access auditing to verify the right data was accessed by the right users at the right time.
In this two-part series, we show how to integrate custom applications or data processing engines with Lake Formation using the third-party services integration feature.
In this post, we dive deep into the required Lake Formation and AWS Glue APIs. We walk through the steps to enforce Lake Formation policies within custom data applications. As an example, we present a sample Lake Formation integrated application implemented using AWS Lambda.
The second part of the series introduces a sample web application built with AWS Amplify. This web application showcases how to use the custom data processing engine implemented in the first post.
By the end of this series, you will have a comprehensive understanding of how to extend the capabilities of Lake Formation by building and integrating your own custom data processing components.
Integrate an external application
The process of integrating a third-party application with Lake Formation is described in detail in How Lake Formation application integration works.
In this section, we dive deeper into the steps required to establish trust between Lake Formation and an external application, the API operations that are involved, and the AWS Identity and Access Management (IAM) permissions that must be set up to enable the integration.
Lake Formation application integration external data filtering
In Lake Formation, it’s possible to control which third-party engines or applications are allowed to read and filter data in Amazon Simple Storage Service (Amazon S3) locations registered with Lake Formation.
To do so, you can navigate to the Application integration settings page on the Lake Formation console and enable Allow external engines to filter data in Amazon S3 locations registered with Lake Formation, specifying the AWS account IDs from where third-party engines are allowed to access locations registered with Lake Formation. In addition, you have to specify the allowed session tag values to identify trusted requests. We discuss in later sections how these tags are used.

Lake Formation application integration involved AWS APIs
The following is a list of the main AWS APIs needed to integrate an application with Lake Formation:
- sts:AssumeRole – Returns a set of temporary security credentials that you can use to access AWS resources.
- glue:GetUnfilteredTableMetadata – Allows a third-party analytical engine to retrieve unfiltered table metadata from the Data Catalog.
- glue:GetUnfilteredPartitionsMetadata – Retrieves partition metadata from the Data Catalog that contains unfiltered metadata.
- lakeformation:GetTemporaryGlueTableCredentials – Allows a caller in a secure environment to assume a role with permission to access Amazon S3. To vend such credentials, Lake Formation assumes the role associated with a registered location, for example an S3 bucket, with a scope down policy that restricts the access to a single prefix.
- lakeformation:GetTemporaryGluePartitionCredentials – This API is identical to
GetTemporaryTableCredentialsexcept that it’s used when the target Data Catalog resource is of typePartition. Lake Formation restricts the permission of the vended credentials with the same scope down policy that restricts access to a single Amazon S3 prefix.
Later in this post, we present a sample architecture illustrating how you can use these APIs.
External application and IAM roles to access data
For an external application to access resources in an Lake Formation environment, it needs to run under an IAM principal (user or role) with the appropriate credentials. Let’s consider a scenario where the external application runs under the IAM role MyApplicationRole that is part of the AWS account 123456789012.
In Lake Formation, you have granted access to various tables and databases to two specific IAM roles:
AccessRole1AccessRole2
To enable MyApplicationRole to access the resources that have been granted to AccessRole1 and AccessRole2, you need to configure the trust relationships for these access roles. Specifically, you need to configure the following:
- Allow
MyApplicationRoleto assume each of the access roles (AccessRole1and AccessRole2) using the sts:AssumeRole - Allow
MyApplicationRoleto tag the assumed session with a specific tag, which is required by Lake Formation. The tag key should beLakeFormationAuthorizedCaller, and the value should match one of the session tag values specified in the Application integration settings page on the Lake Formation console (for example, “application1“).
The following code is an example of the trust relationships configuration for an access role (AccessRole1 or AccessRole2):
Additionally, the data access IAM roles (AccessRole1 and AccessRole2) must have the following IAM permissions assigned in order to read Lake Formation protected tables:
Solution overview
For our solution, Lambda serves as our external trusted engine and application integrated with Lake Formation. This example is provided in order to understand and see in action the access flow and the Lake Formation API responses. Because it’s based on a single Lambda function, it’s not meant to be used in production settings or with high volumes of data.
Moreover, the Lambda based engine has been configured to support a limited set of data files (CSV, Parquet, and JSON), a limited set of table configurations (no nested data), and a limited set of table operations (SELECT only). Due to these limitations, the application should not be used for arbitrary tests.
In this post, we provide instructions on how to deploy a sample API application integrated with Lake Formation that implements the solution architecture. The core of the API is implemented with a Python Lambda function. We also show how to test the function with Lambda tests. In the second post in this series, we provide instructions on how to deploy a web frontend application that integrates with this Lambda function.
Access flow for unpartitioned tables
The following diagram summarizes the access flow when accessing unpartitioned tables.

The workflow consists of the following steps:
- User A (authenticated with Amazon Cognito or other equivalent systems) sends a request to the application API endpoint, requesting access to a specific table inside a specific database.
- The API endpoint, created with AWS AppSync, handles the request, invoking a Lambda function.
- The function checks which IAM data access role the user is mapped to. For simplicity, the example uses a static hardcoded mapping (
mappings={ "user1": "lf-app-access-role-1", "user2": "lf-app-access-role-2"}). - The function invokes the sts:AssumeRole API to assume the user-related IAM data access role (
lf-app-access-role-1AccessRole1). TheAssumeRoleoperation is performed with the tagLakeFormationAuthorizedCaller, having as its value one of the session tag values specified when configuring the application integration settings in Lake Formation (for example,{'Key': 'LakeFormationAuthorizedCaller','Value': 'application1'}). The API returns a set of temporary credentials, which we refer to as StsCredentials1. - Using
StsCredentials1, the function invokes the glue:GetUnfilteredTableMetadata API, passing the requested database and table name. The API returns information like table location, a list of authorized columns, and data filters, if defined. - Using
StsCredentials1, the function invokes the lakeformation:GetTemporaryGlueTableCredentials API, passing the requested database and table name, the type of requested access (SELECT), andCELL_FILTER_PERMISSIONas the supported permission types (because the Lambda function implements logic to apply row-level filters). The API returns a set of temporary Amazon S3 credentials, which we refer to asS3Credentials1. - Using
S3Credentials1, the function lists the S3 files stored in the table location S3 prefix and downloads them. - The retrieved Amazon S3 data is filtered to remove those columns and rows that the user is not allowed access to (authorized columns and row filters were retrieved in Step 5) and authorized data is returned to the user.
Access flow for partitioned tables
The following diagram summarizes the access flow when accessing partitioned tables.

The steps involved are almost identical to the ones presented for partitioned tables, with the following changes:
- After invoking the glue:GetUnfilteredTableMetadata API (Step 5) and identifying the table as partitioned, the Lambda function invokes the glue:GetUnfilteredPartitionsMetadata API using
StsCredentials1(Step 6). The API returns, in addition to other information, the list of partition values and locations. - For each partition, the function performs the following actions:
- Invokes the lakeformation:GetTemporaryGluePartitionCredentials API (Step 7), passing the requested database and table name, the partition value, the type of requested access (
SELECT), andCELL_FILTER_PERMISSIONas the supported permissions type (because the Lambda function implements logic to apply row-level filters). The API returns a set of temporary Amazon S3 credentials, which we refer to asS3CredentialsPartitionX. - Uses
S3CredentialsPartitionXto list the partition location S3 files and download them (Step 8).
- Invokes the lakeformation:GetTemporaryGluePartitionCredentials API (Step 7), passing the requested database and table name, the partition value, the type of requested access (
- The function appends the retrieved data.
- Before the Lambda function returns the results to the user (Step 9), the retrieved Amazon S3 data is filtered to remove those columns and rows that the user is not allowed access to (authorized columns and row filters were retrieved in Step 5).
Prerequisites
The following prerequisites are needed to deploy and test the solution:
- Lake Formation should be enabled in the AWS Region where the sample application will be deployed
- The steps must be run with an IAM principal with sufficient permissions to create the needed resources, including Lake Formation databases and tables
Deploy solution resources with AWS CloudFormation
We create the solution resources using AWS CloudFormation. The provided CloudFormation template creates the following resources:
- One S3 bucket to store table data (
lf-app-data-<account-id>) - Two IAM roles, which will be mapped to client users and their associated Lake Formation permission policies (
lf-app-access-role-1andlf-app-access-role-2) - Two IAM roles used for the two created Lambda functions (
lf-app-lambda-datalake-population-roleandlf-app-lambda-role) - One AWS Glue database (
lf-app-entities) with two AWS Glue tables, one unpartitioned (users_tbl) and one partitioned (users_partitioned_tbl) - One Lambda function used to populate the data lake data (
lf-app-lambda-datalake-population) - One Lambda function used for the Lake Formation integrated application (
lf-app-lambda-engine) - One IAM role used by Lake Formation to access the table data and perform credentials vending (
lf-app-datalake-location-role) - One Lake Formation data lake location (
s3://lf-app-data-<account-id>/datasets) associated with the IAM role created for credentials vending (lf-app-datalake-location-role) - One Lake Formation data filter (
lf-app-filter-1) - One Lake Formation tag (key:
sensitive, values:trueorfalse) - Tag associations to tag the created unpartitioned AWS Glue table (
users_tbl) columns with the created tag
To launch the stack and provision your resources, complete the following steps:
- Download the code zip bundle for the Lambda function used for the Lake Formation integrated application (lf-integrated-app.zip).
- Download the code zip bundle for the Lambda function used to populate the data lake data (datalake-population-function.zip).
- Upload the zip bundles to an existing S3 bucket location (for example,
s3://mybucket/myfolder1/myfolder2/lf-integrated-app.zipands3://mybucket/myfolder1/myfolder2/datalake-population-function.zip) - Choose Launch Stack.
![]()
This automatically launches AWS CloudFormation in your AWS account with a template. Make sure that you create the stack in your intended Region.
- Choose Next to move to the Specify stack details section
- For Parameters, provide the following parameters:
- For powertoolsLogLevel, specify how verbose the Lambda function logger should be, from the most verbose to the least verbose (no logs). For this post, we choose DEBUG.
- For s3DeploymentBucketName, enter the name of the S3 bucket containing the Lambda functions’ code zip bundles. For this post, we use
mybucket. - For s3KeyLambdaDataPopulationCode, enter the Amazon S3 location containing the code zip bundle for the Lambda function used to populate the data lake data (
datalake-population-function.zip). For example,myfolder1/myfolder2/datalake-population-function.zip. - For s3KeyLambdaEngineCode, enter the Amazon S3 location containing the code zip bundle for the Lambda function used for the Lake Formation integrated application (
lf-integrated-app.zip). For example,myfolder1/myfolder2/lf-integrated-app.zip.
- Choose Next.

- Add additional AWS tags if required.
- Choose Next.
- Acknowledge the final requirements.
- Choose Create stack.
Enable the Lake Formation application integration
Complete the following steps to enable the Lake Formation application integration:
- On the Lake Formation console, choose Application integration settings in the navigation pane.
- Enable Allow external engines to filter data in Amazon S3 locations registered with Lake Formation.
- For Session tag values, choose
application1. - For AWS account IDs, enter the current AWS account ID.
- Choose Save.

Enforce Lake Formation permissions
The CloudFormation stack created one database named lf-app-entities with two tables named users_tbl and users_partitioned_tbl.
To be sure you’re using Lake Formation permissions, you should confirm that you don’t have any grants set up on those tables for the principal IAMAllowedPrincipals. The IAMAllowedPrincipals group includes any IAM users and roles that are allowed access to your Data Catalog resources by your IAM policies, and it’s used to maintain backward compatibility with AWS Glue.
To confirm Lake Formations permissions are enforced, navigate to the Lake Formation console and choose Data lake permissions in the navigation pane. Filter permissions by Database=lf-app-entities and remove all the permissions given to the principal IAMAllowedPrincipals.
For more details on IAMAllowedPrincipals and backward compatibility with AWS Glue, refer to Changing the default security settings for your data lake.
Check the created Lake Formation resources and permissions
The CloudFormation stack created two IAM roles—lf-app-access-role-1 and lf-app-access-role-2—and assigned them different permissions on the users_tbl (unpartitioned) and users_partitioned_tbl (partitioned) tables. The specific Lake Formation grants are summarized in the following table.
| IAM Roles |
lf-app-entities (Database) | |
| users _tbl (Table) | _tbl _partitioned_tbl (Table) | |
lf-app-access-role-1 |
No access | Read access on columns uid, state, and city for all the records. Read access to all columns except for address only on rows with value state=united kingdom. |
lf-app-access-role-2 |
Read access on columns with the tag sensitive = false |
Read access to all columns and rows. |
To better understand the full permissions setup, you should review the CloudFormation created Lake Formation resources and permissions. On the Lake Formation console, complete the following steps:
- Review the data filters:
- Choose Data filters in the navigation pane.
- Inspect the
lf-app-filter-1
- Review the tags:
- Choose LF-Tags and permissions in the navigation pane.
- Inspect the
sensitive
- Review the tag associations:
- Choose Tables in the navigation pane.
- Choose the
users_tbl - Inspect the LF-Tags associated to the different columns in the Schema
- Review the Lake Formation permissions:
- Choose Data lake permissions in the navigation pane.
- Filter by
Principal = lf-app-access-role-1and inspect the assigned permissions. - Filter by
Principal = lf-app-access-role-2and inspect the assigned permissions.
Test the Lambda function
The Lambda function created by the CloudFormation template accepts JSON objects as input events. The JSON events have the following structure:
Although the identity field is always needed in order to identify the called identity, depending on the requested operation (fieldName), different arguments should be provided. The following table lists these arguments.
| Operation | Description | Needed Arguments | Output |
getDbs |
List databases | No arguments needed | List of databases the user has access to |
getTablesByDb |
List tables | db: <db_name> |
List of tables inside a database the user has access to |
getUnfilteredTableMetadata |
Return the table metadata |
|
Returns the output of the glue:GetUnfilteredTableMetadata API |
getUnfilteredPartitionsMetadata |
Return the table partitions metadata |
|
Returns the output of the glue:GetUnfilteredPartitionsMetadata API |
getTableData |
Get table data |
|
|
To test the Lambda function, you can create some sample Lambda test events. Complete the following steps:
- On the Lambda console, choose Functions on the navigation pane.
- Choose the
lf-app-lambda-engine - On the Test tab, select Create new event.
- For Event JSON, enter a valid JSON (we provide some sample JSON events).
- Choose Test.

- Check the test results (JSON response).

The following are some sample test events you can try to see how different identities can access different sets of information.
| user1 | user2 |
As an example, in the following test, we request users_partitioned_tbl table data in the context of user1:
The following is the related API response:
To troubleshoot the Lambda function, you can navigate to the Monitoring tab, choose View CloudWatch logs, and inspect the latest log stream.
Clean up
If you plan to explore Part 2 of this series, you can skip this part, because you will need the resources created here. You can refer to this section at the end of your testing.
Complete the following steps to remove the resources you created following this post and avoid incurring additional costs:
- On the AWS CloudFormation console, choose Stacks in the navigation pane.
- Choose the stack you created and choose Delete.
Additional considerations
In the proposed architecture, Lake Formation permissions were granted to specific IAM data access roles that requesting users (for example, the identity field) were mapped to. Another possibility is to assign permissions in Lake Formation to SAML users and groups and then work with the AssumeDecoratedRoleWithSAML API.
Conclusion
In the first part of this series, we explored how to integrate custom applications and data processing engines with Lake Formation. We delved into the required configuration, APIs, and steps to enforce Lake Formation policies within custom data applications. As an example, we presented a sample Lake Formation integrated application built on Lambda.
The information provided in this post can serve as a foundation for developing your own custom applications or data processing engines that need to operate on an Lake Formation protected data lake.
Refer to the second part of this series to see how to build a sample web application that uses the Lambda based Lake Formation application.
About the Authors
 Stefano Sandonà is a Senior Big Data Specialist Solution Architect at AWS. Passionate about data, distributed systems, and security, he helps customers worldwide architect high-performance, efficient, and secure data platforms.
 Francesco Marelli is a Principal Solutions Architect at AWS. He specializes in the design, implementation, and optimization of large-scale data platforms. Francesco leads the AWS Solution Architect (SA) analytics team in Italy. He loves sharing his professional knowledge and is a frequent speaker at AWS events. Francesco is also passionate about music.
Integrate custom applications with AWS Lake Formation – Part 2
Post Syndicated from Stefano Sandona original https://aws.amazon.com/blogs/big-data/integrate-custom-applications-with-aws-lake-formation-part-2/
In the first part of this series, we demonstrated how to implement an engine that uses the capabilities of AWS Lake Formation to integrate third-party applications. This engine was built using an AWS Lambda Python function.
In this post, we explore how to deploy a fully functional web client application, built with JavaScript/React through AWS Amplify (Gen 1), that uses the same Lambda function as the backend. The provisioned web application provides a user-friendly and intuitive way to view the Lake Formation policies that have been enforced.
For the purposes of this post, we use a local machine based on MacOS and Visual Studio Code as our integrated development environment (IDE), but you could use your preferred development environment and IDE.
Solution overview
AWS AppSync creates serverless GraphQL and pub/sub APIs that simplify application development through a single endpoint to securely query, update, or publish data.
GraphQL is a data language to enable client apps to fetch, change, and subscribe to data from servers. In a GraphQL query, the client specifies how the data is to be structured when it’s returned by the server. This makes it possible for the client to query only for the data it needs, in the format that it needs it in.
Amplify streamlines full-stack app development. With its libraries, CLI, and services, you can connect your frontend to the cloud for authentication, storage, APIs, and more. Amplify provides libraries for popular web and mobile frameworks, like JavaScript, Flutter, Swift, and React.
Prerequisites
The web application that we deploy depends on the Lambda function that was deployed in the first post of this series. Make sure the function is already deployed and working in your account.
Install and configure the AWS CLI
The AWS Command Line Interface (AWS CLI) is an open source tool that enables you to interact with AWS services using commands in your command line shell. To install and configure the AWS CLI, see Getting started with the AWS CLI.
Install and configure the Amplify CLI
To install and configure the Amplify CLI, see Set up Amplify CLI. Your development machine must have the following installed:
Create the application
We create a JavaScript application using the React framework.
- In the terminal, enter the following command:
- Enter a name for your project (we use
lfappblog), choose React for the framework, and choose JavaScript for the variant.

You can now run the next steps, ignore any warning messages. Don’t run the npm run dev command yet.
- Enter the following command:

You should now see the directory structure shown in the following screenshot.

- You can now test the newly created application by running the following command:
By default, the application is available on port 5173 on your local machine.

The base application is shown in the workspace browser.

You can close the browser window and then the test web server by entering the following in the terminal: q + enter
Set up and configure Amplify for the application
To set up Amplify for the application, complete the following steps:
- Run the following command in the application directory to initialize Amplify:
- Refer to the following screenshot for all the options required. Make sure to change the value of Distribution Directory Path to dist. The command creates and runs the required AWS CloudFormation template to create the backend environment in your AWS account.


- Install the node modules required by the application with the following command:

The output of this command will vary depending on the packages already installed on your development machine.
Add Amplify authentication
Amplify can implement authentication with Amazon Cognito user pools. You run this step before adding the function and the Amplify API capabilities so that the user pool created can be set as the authentication mechanism for the API, otherwise it would default to the API key and further modifications would be required.
Run the following command and accept all the defaults:


Add the Amplify API
The application backend is based on a GraphQL API with resolvers implemented as a Python Lambda function. The API feature of Amplify can create the required resources for GraphQL APIs based on AWS AppSync (default) or REST APIs based on Amazon API Gateway.
- Run the following command to add and initialize the GraphQL API:
- Make sure to set Blank Schema as the schema template (a full schema is provided as part of this post; further instructions are provided in the next sections).
- Make sure to select Authorization modes and then Amazon Cognito User Pool.


Add Amplify hosting
Amplify can host applications using either the Amplify console or Amazon CloudFront and Amazon Simple Storage Service (Amazon S3) with the option to have manual or continuous deployment. For simplicity, we use the Hosting with Amplify Console and Manual Deployment options.
Run the following command:


Copy and configure the GraphQL API schema
You’re now ready to copy and configure the GraphQL schema file and update it with the current Lambda function name.
Run the following commands:
In the schema.graphql file, you can see that the lf-app-lambda-engine function is set as the data source for the GraphQL queries.

Copy and configure the AWS AppSync resolver template
AWS AppSync uses templates to preprocess the request payload from the client before it’s sent to the backend and postprocess the response payload from the backend before it’s sent to the client. The application requires a modified template to correctly process custom backend error messages.
Run the following commands:
In the InvokeLfAppLambdaEngineLambdaDataSource.res.vtl file, you can inspect the .vtl resolver definition.

Copy the application client code
As last step, copy the application client code:
You can now open App.jsx to inspect it.
Publish the full application
From the project directory, run the following command to verify all resources are ready to be created on AWS:

Run the following command to publish the full application:
This will take several minutes to complete. Accept all defaults apart from Enter maximum statement depth [increase from default if your schema is deeply nested], which must be set to 5.


All the resources are now deployed on AWS and ready for use.
Use the application
You can start using the application from the Amplify hosted domain.
- Run the following command to retrieve the application URL:

At first access, the application shows the Amazon Cognito login page.
- Choose Create Account and create a user with user name
user1(this is mapped in the application to the rolelf-app-access-role-1for which we created Lake Formation permissions in the first post).

- Enter the confirmation code that you received through email and choose Sign In.

When you’re logged in, you can start interacting with the application.

Controls
The application offers several controls:
- Database – You can select a database registered with Lake Formation with the Describe permission.

- Table – You can choose a table with Select permission.

- Number of records – This indicates the number of records (between 5–40) to display on the Data Because this is a sample application, no pagination was implemented in the backend.
- Row type – Enable this option to display only rows that have at least one cell with authorized data. If all cells in a row are unauthorized and checkbox is selected, the row is not displayed.
Outputs
The application has four outputs, organized in tabs.
Unfiltered Table Metadata
This tab displays the response of the AWS Glue API GetUnfilteredTableMetadata policies for the selected table. The following is an example of the content:
Unfiltered Partitions Metadata
This tab displays the response of the AWS Glue API GetUnfileteredPartitionsMetadata policies for the selected table. The following is an example of the content:
Authorized Data
This tab displays a table that shows the columns, rows, and cells that the user is authorized to access.

A cell is marked as Unauthorized if the user has no permissions to access its contents, according to the cell filter definition. You can choose the unauthorized cell to view the relevant cell filter condition.

In this example, the user can’t access the value of column surname in the first row because for the row, state is canada, but the cell can only be accessed when state=’united kingdom’.
If the Only rows with authorized data control is unchecked, rows with all cells set to Unauthorized are also displayed.
All Data
This tab contains a table that contains all the rows and columns in the table (the unfiltered data). This is useful for comparison with authorized data to understand how cell filters are applied to the unfiltered data.

Test Lake Formation permissions
Log out of the application and go to the Amazon Cognito login form, choose Create Account, and create a new user with called user2 (this is mapped in the application to the role lf-app-access-role-2 that we created Lake Formation permissions for in the first post). Get table data and metadata for this user to see how Lake Formation permissions are enforced and so the two users can see different data (on the Authorized Data tab).
The following screenshot shows that the Lake Formation permissions we created grant access to the following data (all rows, all columns) of table users_partitioned_tbl to user2 (mapped to lf-app-access-role-2).

The following screenshot shows that the Lake Formation permissions we created grant access to the following data (all rows, but only city, state, and uid columns) of table users_tbl to user2 (mapped to lf-app-access-role-2).

Considerations for the GraphQL API
You can use the AWS AppSync GraphQL API deployed in this post for other applications; the responses of the GetUnfilteredTableMetadata and GetUnfileteredPartitionsMetadata AWS Glue APIs were fully mapped in the GraphQL schema. You can use the Queries page on the AWS AppSync console to run the queries; this is based on GraphiQL.

You can use the following object to define the query variables:
The following code shows the queries available with input parameters and all fields defined in the schema as output:
Clean up
To remove the resources created in this post, run the following command:

Refer to Part 1 to clean up the resources created in the first part of this series.
Conclusion
In this post, we showed how to implement a web application that uses a GraphQL API implemented with AWS AppSync and Lambda as the backend for a web application integrated with Lake Formation. You should now have a comprehensive understanding of how to extend the capabilities of Lake Formation by building and integrating your own custom data processing applications.
Try out this solution for yourself, and share your feedback and questions in the comments.
About the Authors
Stefano Sandonà is a Senior Big Data Specialist Solution Architect at AWS. Passionate about data, distributed systems, and security, he helps customers worldwide architect high-performance, efficient, and secure data platforms.
Francesco Marelli is a Principal Solutions Architect at AWS. He specializes in the design, implementation, and optimization of large-scale data platforms. Francesco leads the AWS Solution Architect (SA) analytics team in Italy. He loves sharing his professional knowledge and is a frequent speaker at AWS events. Francesco is also passionate about music.
Manage access controls in generative AI-powered search applications using Amazon OpenSearch Service and Amazon Cognito
Post Syndicated from Karim Akhnoukh original https://aws.amazon.com/blogs/big-data/manage-access-controls-in-generative-ai-powered-search-applications-using-amazon-opensearch-service-and-aws-cognito/
Organizations of all sizes and types are using generative AI to create products and solutions. A common adoption pattern is to introduce document search tools to internal teams, especially advanced document searches based on semantic search. In semantic search, documents are stored as vectors, a numeric representation of the document content, in a vector database such as Amazon OpenSearch Service, and are retrieved by performing similarity search with a vector representation of the search query.
In a real-world scenario, organizations want to make sure their users access only documents they are entitled to access. They are looking for a reliable and scalable solution to implement robust access controls to make sure these documents are only accessible to individuals who have a legitimate business need and the appropriate level of authorization. The permission mechanism has to be secure, built on top of built-in security features, and scalable for manageability when the user base scales out. Maintaining proper access controls for these sensitive assets is paramount, because unauthorized access could lead to severe consequences, such as data breaches, compliance violations, and reputational damage.
In this post, we show you how to manage user access to enterprise documents in generative AI-powered tools according to the access you assign to each persona.
Common use cases
The following are industry-specific use cases for document access management across different departments:
- In R&D and engineering, access to product design documents evolves from restricted to broader as development progresses
- HR maintains open access to general policies while limiting access to sensitive employee information
- Finance and accounting documents require varying levels of access for auditing and executive decision-making
- Sales and marketing teams carefully manage customer data and strategies, implementing tiered access for different roles and departments
These examples demonstrate the need for dynamic, role-based access control to balance information sharing with confidentiality in various business contexts.
Solution overview
By combining the powerful vector search capabilities of OpenSearch Service with the access control features provided by Amazon Cognito, this solution enables organizations to manage access controls based on custom user attributes and document metadata.
This approach simplifies the management of access rights, making sure only authorized users can access and interact with specific documents based on their roles, departments, and other relevant attributes. Following this approach, you can manage the access to your organization’s documents at scale. The following diagram depicts the solution architecture.

The solution workflow consists of the following steps:
- The user accesses a smart search portal and lands on a web interface deployed on AWS Amplify.
- The user authenticates through an Amazon Cognito user pool and an access token is returned to the client. This access token will be used to retrieve the key pair custom attributes assigned to the user. In our case, we created two custom attributes (
custom:departmentandcustom:access_level). - For each user query, an API is invoked on Amazon API Gateway to process the request. Each invocation includes the user access token in the header.
- The API is integrated with AWS Lambda, which processes the user query and generates the answers based on available documents and user access using retrieval augmented generation (RAG). The process starts by creating a vector based on the question (embedding) by invoking the embedding model.
- A query is sent to OpenSearch Service that includes the following:
- The embedding vector generated.
- User custom attributes retrieved by Lambda based on their access token, by calling the Amazon Cognito
GetUserAPI. - The query relies on the support of an efficient k-NN filter in OpenSearch Service to perform the search.
- Pre-filtered documents that relate to the user query are included in the prompt of the large language model (LLM) that summarizes the answer. Then, Lambda replies back to the web interface with the LLM completion (reply).
- If the user’s access needs to be modified (assigned attributes), an API call is made through API Gateway to a Lambda function that processes the request to add or update the custom attributes’ value for a specific user.
- New attributes are reflected in the user’s profile in Amazon Cognito.
Our solution is implemented and wrapped within AWS Cloud Development Kit (AWS CDK) stacks, which are available in the GitHub repo.
Our sample documents assume a fictional manufacturing company called Unicorn Robotics Factory, which develops robotic unicorns. The dataset contains over 900 documents that are a mix of engineering, roadmap, and business reporting documents. The following is an example of a document’s content:
**CONFIDENTIAL - UNICORNS ROBOTICS INTERNAL DOCUMENT**

**Project: "Galactic Unicorn"**

Unicorns Robotics is proud to announce the development of our latest project, the "Galactic Unicorn".
This top-secret project aims to create a robotic unicorn that can travel through space and time, bringing magic and joy to children and adults alike.....
The associated metadata file for this document consists of the following:
Our solution in the GitHub repo takes care of loading the documents with associated metadata tags. For illustration purposes, we used the following mapping for the users and document access.

This solution is meant to delegate access management to the application tier, to simplify the implementation of use cases like generative AI-powered document search tools. However, if your use case requires a stricter approach to control document access, like multi-tenant environments or field-level security, you might want to use the fine-grained access control feature in OpenSearch Service. In our solution, we manage the access on the document level according to the assigned metadata.
Prerequisites
To deploy the solution, you need the following prerequisites:
- An AWS account. If you don’t already have an AWS account, you can create one.
- Your access to the AWS account must have AWS Identity and Access Management (IAM) permissions to launch AWS CloudFormation templates that create IAM roles.
- The AWS Command Line Interface (AWS CLI) installed.
- node.js and npm installed for the frontend.
- Docker installed.
- The AWS CDK configured. For more information, see Getting started with the AWS CDK.
- In case of LLM inference based on Amazon SageMaker, a sufficient service limit to deploy an
ml.g5.12xlargeinstance for the SageMaker endpoint. If needed, you can initiate a quota increase request. Refer to Service Quotas for more details.
Deploy the solution
To deploy the solution to your AWS account, refer to the Readme file in our GitHub repo.
Query documents with different personas
Now let’s test the application using different personas. In this example, we use the same users with their corresponding custom attributes as illustrated in the solution overview.
To start, let’s log in using the researcher account and run the search around a confidential document.
We ask, “What is the projected profit margin of the Galactic Unicorn project?” and get the result as shown in the following screenshot.

The question invokes a query to OpenSearch Service using the custom attributes assigned to the researcher. The following code illustrates how the query is structured:
Let’s sign out and log in again with an engineer profile to test the same query. Based on the assigned attributes and document metadata, the result should look like that in the following screenshot.

If you tried to query some support documents, you will get the desired answer, as shown in the following screenshot.

Modify user access
As depicted in the solution diagram, we’ve added a feature in the web interface to allow you to modify user access, which you could use to perform further tests. To do so, log in as a tool admin and choose Manage Attributes. Then modify the custom attribute value for a given user, as shown in the following screenshot.

Clean up
When deleting a stack, most resources will be deleted upon stack deletion, but that’s not the case for all resources. The Amazon Simple Storage Service (Amazon S3) bucket, Amazon Cognito user pool, and OpenSearch Service domain will be retained by default. However, our AWS CDK code altered this default behavior by setting the RemovalPolicy to DESTROY for the mentioned resources. If you want to retain them, you can adjust the RemovalPolicy in the AWS CDK code for the different resources.
You can use the following command to clean up the resources deployed to your AWS account:
make destroy
Conclusion
This post illustrated how to build a document search RAG solution that makes sure only authorized users can access and interact with specific documents based on their roles, departments, and other relevant attributes. It combines OpenSearch Service and Amazon Cognito custom attributes to make a tag-based access control mechanism that makes it straightforward to manage at scale.
For demonstration purposes, the following points weren’t included in the AWS CDK code. However, they’re still applicable and you might want to work on them before deploying for production purposes:
- OpenSearch Service best practices, such as instance sizing and using primary nodes
- Advanced document chunking strategies for RAG implementations, such as recursive or semantic chunking
About the Authors
 Karim Akhnoukh is a Solutions Architect at AWS working with manufacturing customers in Germany. He is passionate about applying machine learning and generative AI to solve customers’ business challenges. Besides work, he enjoys playing sports, aimless walks, and good quality coffee.
 Ahmed Ewis is a Senior Solutions Architect at AWS GenAI Labs. He helps customers build generative AI-based solutions to solve business problems. When not collaborating with customers, he enjoys playing with his kids and cooking.
 Fortune Hui is a Solutions Architect at AWS Hong Kong, working with conglomerate customers. He helps customers and partners build big data platform and generative AI applications. In his free time, he plays badminton and enjoys whisky.
Fing Agent: Raspberry Pi Network Security Made Easy!
Post Syndicated from Crosstalk Solutions original https://www.youtube.com/watch?v=3HBm8KfcJFU
Harper Steele | Will & Harper | Talks at Google
Post Syndicated from Talks at Google original https://www.youtube.com/watch?v=h5NhCUFup1U
HPE Slingshot 400 Brings a Liquid Cooled 51.2T Switch and 400Gbps Networking
Post Syndicated from Rohit Kumar original https://www.servethehome.com/hpe-slingshot-400-brings-a-liquid-cooled-51-2t-switch-and-400gbps-networking/
At SC24 we saw the liquid-cooled 51.2T HPE Slingshot 400 switch that will double the performance of HPE’s HPC interconnect
The post HPE Slingshot 400 Brings a Liquid Cooled 51.2T Switch and 400Gbps Networking appeared first on ServeTheHome.
The #1 Cause of G.A.S. for Photographers…
Post Syndicated from Matt Granger original https://www.youtube.com/watch?v=1qGzukI7dxU
Holiday Gift Guide 2024
Post Syndicated from Yev original https://www.backblaze.com/blog/holiday-gift-guide-2024/

Ah, the holidays. They can be both fun and stressful for many of us—not least because we have to make so many decisions around gift giving. The plethora of cyber sales and new products on the market make this a great time to try out new products yourself or buy some for the loved people in your lives. To that end, I’ve followed tradition and asked some of my fellow Backblazers to submit their gift ideas for this year and we’ve compiled them into this 2024 gift giving list!
Reading, (w)righting, (a)rithmatic

For the reader in your life, the Kindle Paperwhite is a great way to keep reading regardless of the conditions. It uses e-ink technology to avoid glare and allows for reading in both high and low light conditions!
This is one of the coolest devices out there, and I can personally say that I desperately want someone to gift me one (although it’s a bit on the pricey side, so I get it). This uses similar e-ink technology as the Paperwhite and allows you to take notes using your own handwriting—which (at least in my case when I write in cursive) helps me remember things!
Tekfun LCD Writing and Doodle Tablet

Mixing writing and artistry, this doodle tablet is great for kiddos that are with you in a restaurant or long-haul flight. In fact, I just bought one of these for my nephew!

Some people are math people. I don’t get it, but this Klein Bottle is basically an inside joke to math nerds (something about Möbius loops) and can serve as a lovely table prop for the math lover in your life.
Sounds good!
HyperX Cloud Alpha Wireless Gaming Headset

For the gamer in your life, these are some of the best headphones on the market. They’re wireless, they sound great, and the microphone picks up all of the positive (I’m sure) feedback for teammates.

The latest and greatest from Apple. These come with a new chip that helps with transparency mode so you can cross the street with confidence.
If you’re an Android user (raises hand) you may want something built for your phone and the latest Pro version of the Pixel Buds are here for you. These come with little nubs for snug fit, meaning you can run or lift or meander without worrying that your tiny buds will fall out.
Experiences

Who doesn’t want to impress loved ones with delicious dishes? If you have a Sur La Table near you, these are great.

If you’re a fan of traveling you’ve likely stayed at an AirBnB. But even if you’re more of a homebase person, their Experiences tab is worth checking out. From cooking to glass blowing to cow cuddle therapy (yes, that’s a thing).
Odds and ends

I have one of these in my car and, let me tell you, as a person who used to bite their nails out of boredom (gross, I know), it helps keep my mind and compulsions at bay! Highly recommend.

Many of us spend our day sitting, sometimes standing at a desk. Even when you’re sitting, though, ergonomics are a big deal and having an adjustable foot rest can help you get into a position that feels solid and sustainable for long stretches of time. I recommend getting up and stretching every now and again, but if you’re like me and have a bad back, these are great.

Whether you’re outdoors or indoors, sometimes you need to cut or saw or screw or open or pry or file something, and for that, these Leatherman tools cannot be beaten.
Give the gift of Backblaze
And, of course, we’d be remiss if we didn’t remind you that Backblaze Computer Backup makes a great gift. Help your family and friends experience the sweet, sweet peace of mind that comes from a good backup strategy and make sure they never lose a file again. Bonus: you don’t even have to go to the store to get it.

Go forth and gift!
We hope this guide sparked some ideas and simplified some choices. We love hearing about what folks are excited about, so feel free to give us some more good options in the comments below.
The post Holiday Gift Guide 2024 appeared first on Backblaze Blog | Cloud Storage & Cloud Backup