Post Syndicated from xkcd.com original https://xkcd.com/2940/

Post Syndicated from xkcd.com original https://xkcd.com/2940/
Post Syndicated from Crosstalk Solutions original https://www.youtube.com/watch?v=GFoEuSbMi_U
Post Syndicated from daroc original https://lwn.net/Articles/975830/
While BPF may be most famous for its use in the Linux kernel, there is actually
a growing effort to standardize BPF for use on other systems. These include
eBPF for Windows, but also
uBPF,
rBPF,
hBPF,
bpftime, and
others. Some hardware manufacturers are even
considering integrating BPF directly into networking hardware. Dave Thaler
led two sessions about all of the problems that cross-platform use inevitably
brings and the current status of the standardization work at the 2024
Linux Storage,
Filesystem, Memory Management, and BPF Summit.
Post Syndicated from Krishna Gogineni original https://aws.amazon.com/blogs/big-data/migrate-a-petabyte-scale-data-warehouse-from-actian-vectorwise-to-amazon-redshift/
Amazon Redshift is a fast, scalable, and fully managed cloud data warehouse that allows you to process and run your complex SQL analytics workloads on structured and semi-structured data. It also helps you securely access your data in operational databases, data lakes, or third-party datasets with minimal movement or copying of data. Tens of thousands of customers use Amazon Redshift to process large amounts of data, modernize their data analytics workloads, and provide insights for their business users.
In this post, we discuss how a financial services industry customer achieved scalability, resiliency, and availability by migrating from an on-premises Actian Vectorwise data warehouse to Amazon Redshift.
The customer’s use case required a high-performing, highly available, and scalable data warehouse to process queries against large datasets in a low-latency environment. Their Actian Vectorwise system was designed to replace Excel plugins and stock screeners but eventually evolved into a much larger and ambitious portfolio analysis solution running multiple API clusters on premises, serving some of the largest financial services firms worldwide. The customer saw growing demand that needed high performance and scalability due to 30% year-over-year increase in usage from the success of their products. The customer needed to keep up with increased volume of read requests, but they couldn’t do this without deploying additional hardware in the data center. There was also a customer mandate that business-critical products must have their hardware updated to cloud-based solutions or be deemed on the path to obsolescence. In addition, the business started moving customers onto a new commercial model, and therefore new projects would need to provision a new cluster, which meant that they needed improved performance, scalability, and availability.
They faced the following challenges:
The customer’s platform was the main source for one-time, batch, and content processing. It served many enterprise use cases across API feeds, content mastering, and analytics interfaces. It was also the single strategic platform within the company for entity screening, on-the-fly aggregation, and other one-time, complex request workflows.
The following diagram illustrates the legacy architecture.

The architecture consists of many layers:
Overall, the current architecture didn’t support workload prioritization, therefore a physical model of resources was reserved for this reason. The downside here is over-provisioning. The system had an integration with legacy backend services that were all hosted on premises.
Amazon Redshift is an industry-leading cloud data warehouse. Amazon Redshift uses SQL to analyze structured and semi-structured data across data warehouses, operational databases, and data lakes using AWS-designed hardware and machine learning (ML) to deliver the best price-performance at any scale.
Amazon Redshift is designed for high-performance data warehousing, which provides fast query processing and scalable storage to handle large volumes of data efficiently. Its columnar storage format minimizes I/O and improves query performance by reading only the relevant data needed for each query, resulting in faster data retrieval. Lastly, you can integrate Amazon Redshift with data lakes like Amazon Simple Storage Service (Amazon S3), combining structured and semi-structured data for comprehensive analytics.
The following diagram illustrates the architecture of the new solution.

In the following sections, we discuss the features of this solution and how it addresses the challenges of the legacy architecture.
Amazon API Gateway is a fully managed service that help developers deliver secure, robust, API-driven application backends at any scale. To address scalability and availability requirements of the rules and routing layer, we introduced API Gateway to do the routing of the client requests to different integration paths using routes and parameter mappings. Having API Gateway as the entry point allowed the customer to move away from the design, testing, and maintenance of their rules engine development workload. In their legacy environment, handling fluctuating amounts of traffic posed a significant challenge. However, API Gateway seamlessly addressed this issue by acting as a proxy and automatically scaling to accommodate varying traffic demands, providing optimal performance and reliability.
Amazon Redshift allowed the customer to meet their scalability and performance requirements. Amazon Redshift features such as workload management (WLM), massively parallel processing (MPP) architecture, concurrency scaling, and parameter groups helped address the requirements:
Together, these capabilities allowed them to meet their scalability and performance requirements in a managed fashion.
The legacy data center architecture was unable to partition the data without deploying additional hardware in the data center, and it couldn’t handle read workloads efficiently.
The MPP architecture of Amazon Redshift offers efficient data distribution across all the compute nodes, which helped run heavy workloads in parallel and subsequently lowered response times. With the data distributed across all the compute nodes, it allows data to be processed in parallel. Its MPP engine and architecture separates compute and storage for efficient scaling and performance.
Infrastructure maintenance and operational efficiency was a concern for the customer in their current state architecture. Amazon Redshift is a fully managed service that takes care of data warehouse management tasks such as hardware provisioning, software patching, setup, configuration, and monitoring nodes and drives to recover from failures or backups. Amazon Redshift periodically performs maintenance to apply fixes, enhancements, and new features to your Redshift data warehouse. As a result, the customer’s operational costs reduced by 500%, and they are now able to spend more time innovating and building mission-critical applications.
Amazon Redshift WLM was able to resolve issues with the legacy architecture where longer-running queries were consuming all the resources, causing other queries to run slower, impacting performance SLAs. With automatic WLM, the customer was able to create separate WLM queues with different priorities, which allowed them to manage the priorities for the critical SLA-bound workloads and other non-critical workloads. With short query acceleration (SQA) enabled, it prioritized selected short-running queries ahead of longer-running queries. Furthermore, the customer benefited by using query monitoring rules in WLM to apply performance boundaries to control poorly designed queries and take action when a query goes beyond those boundaries. To learn more about WLM, refer to Implementing workload management.
In the legacy architecture, all the workloads—extract, transform, and load (ETL); business intelligence (BI); and one-time workloads—were running on the same on-premises data warehouse, leading to the noisy neighbor problem and performance issues with the increase in users and workloads.
With the new solution architecture, this issue is remediated using data sharing in Amazon Redshift. With data sharing, the customer is able to share live data with security and ease across Redshift clusters, AWS accounts, or AWS Regions for read purposes, without the need to copy any data.
Data sharing improved the agility of the customer’s organization. It does this by giving them instant, granular, and high-performance access to data across Redshift clusters without the need to copy or move it manually. With data sharing, customers have live access to data, so their users can see the most up-to-date and consistent information as it’s updated in Redshift clusters. Data sharing provides workload isolation by running ETL workloads in its own Redshift cluster and sharing data with other BI and analytical workloads in their respective Redshift clusters.
With the legacy architecture, the customer was facing scalability challenges during large events to handle unpredictable spiky workloads and over-provisioning of the database capacity. Using concurrency scaling and elastic resize allowed the customer to meet their scalability requirements and handle unpredictable and spiky workloads.
The customer used a home-grown process to extract the data from Actian Vectorwise and store it in Amazon S3 and CSV files. The data from Amazon S3 was then ingested into Amazon Redshift.
The loading process used a COPY command and ingested the data from Amazon S3 in a fast and efficient way. A best practice for loading data into Amazon Redshift is to use the COPY command. The COPY command is the most efficient way to load a table because it uses the Amazon Redshift MPP architecture to read and load data in parallel from a file or multiple files in an S3 bucket.
To learn about the best practices for source data files to load using the COPY command, see Loading data files.
After the data is ingested into Redshift staging tables from Amazon S3, transformation jobs are run from Pentaho to apply the incremental changes to the final reporting tables.
The following diagram illustrates this workflow.

There are three ways of migrating an on-premises data warehouse to Amazon Redshift: one-step, two-step, and wave-based migration. To minimize the risk of migrating over 20 databases that vary in complexity, we decided on the wave-based approach. The fundamental concept behind wave-based migration involves dividing the migration program into projects based on factors such as complexity and business outcomes. The implementation then migrates each project individually or by combining certain projects into a wave. Subsequent waves follow, which may or may not be dependent on the results of the preceding wave.
This strategy requires both the legacy data warehouse and Amazon Redshift to operate concurrently until the migration and validation of all workloads are successfully complete. This provides a smooth transition while making sure the on-premises infrastructure can be retired only after thorough migration and validation have taken place.
In addition, within each wave, we followed a set of phases to make sure that each wave was successful:
In the process, we didn’t want to rewrite the legacy code for each migration. With minimal code changes, we migrated the data to Amazon Redshift because SQL compatibility was very important in the process due to existing knowledge within the organization and downstream application consumption. After the data was ingested into the Redshift cluster, we adjusted the tables for best performance.
One of the main benefits we realized as part of the migration was the option to integrate data in Amazon Redshift with other business groups in the future that use AWS Data Exchange, without significant effort.
We performed blue/green deployments to make sure that the end-users didn’t encounter any latency degradation while retrieving the data. We migrated the end-users in a phased manner to measure the impact and adjust the cluster configuration as needed.
The customer’s decision to use Amazon Redshift for their solution was further reinforced by the platform’s ability to handle both structured and semi-structured data seamlessly. Amazon Redshift allows the customer to efficiently analyze and derive valuable insights from their diverse range of datasets, including equities and institutional data, all while using standard SQL commands that teams are already comfortable with.
Through rigorous testing, Amazon Redshift consistently demonstrated remarkable performance, meeting the customer’s stringent SLAs and delivering exceptional subsecond query response times with an impressive latency. With the AWS migration, the customer achieved a 5% improvement in query performance. Scalability of the clusters was done in minutes compared to 6 months in the data center. Operational cost reduced by 500% due to the simplicity of the Redshift cluster operations in AWS. Stability of the clusters improved by 100%. Upgrades and patching cycle time improved by 200%. Overall, improvement in operational posture and total savings for the footprint has resulted in significant savings for the team and platform in general. In addition, the ability to scale the overall architecture based on market data trends in a resilient and highly available way not only met the customer demand in terms of time to market, but also significantly reduced the operational costs and total cost of ownership.
In this post, we covered how a large financial services customer improved performance and scalability, and reduced their operational costs by migrating to Amazon Redshift. This enabled the customer to grow and onboard new workloads into Amazon Redshift for their business-critical applications.
To learn about other migration use cases, refer to the following:
 Krishna Gogineni is a Principal Solutions Architect at AWS helping financial services customers. Krishna is Cloud-Native Architecture evangelist helping customers transform the way they build software. Krishna works with customers to learn their unique business goals, and then super-charge their ability to meet these goals through software delivery that leverages industry best practices/tools such as DevOps, Data Lakes, Data Analytics, Microservices, Containers, and Continuous Integration/Continuous Delivery.
 Dayananda Shenoy is a Senior Solution Architect with over 20 years of experience designing and architecting backend services for financial services products. Currently, he leads the design and architecture of distributed, high-performance, low latency analytics services for a data provider. He is passionate about solving scalability and performance challenges in distributed systems leveraging emerging technology which improve existing tech stacks and add value to the business to enhance customer experience.
 Vishal Balani is a Sr. Customer Solutions Manager based out of New York. He works closely with Financial Services customers to help them leverage cloud for businesses agility, innovation and resiliency. He has extensive experience leading large-scale cloud migration programs. Outside of work he enjoys spending time with family, tinkering with a new project or riding his bike.
 Ranjan Burman is a Sr. PostgreSQL Database Specialist SA. He specializes in RDS & Aurora PostgreSQL. He has more than 18 years of experience in different database and data warehousing technologies. He is passionate about automating and solving customer problems with the use of cloud solutions.
 Muthuvelan Swaminathan is an Enterprise Solutions Architect based out of New York. He works with enterprise customers providing architectural guidance in building resilient, cost-effective and innovative solutions that address business needs.
Post Syndicated from Welly Siauw original https://aws.amazon.com/blogs/devops/quickly-adopt-new-aws-features-with-the-terraform-aws-cloud-control-provider/
Today, we are pleased to announce the general availability of the Terraform AWS Cloud Control (AWS CC) Provider, enabling our customers to take advantage of AWS innovations faster. AWS has been continually expanding its services to support virtually any cloud workload; supporting over 200 fully featured services and delighting customers through its rapid pace of innovation with over 3,400 significant new features in 2023. Our customers use Infrastructure as Code (IaC) tools such as HashiCorp Terraform among others as a best-practice to provision and manage these AWS features and services as part of their cloud infrastructure at scale. With the Terraform AWS CC Provider launch, AWS customers using Terraform as their IaC tool can now benefit from faster time-to-market by building cloud infrastructure with the latest AWS innovations that are typically available on the Terraform AWS CC Provider on the day of launch. For example, AWS customer Meta’s Oculus Studios was able to quickly leverage Amazon GameLift to support their game development. “AWS and Hashicorp have been great partners in helping Oculus Studios standardize how we deploy our GameLift infrastructure using industry best practices.” said Mick Afaneh, Meta’s Oculus Studios Central Technology.
The Terraform AWS CC Provider leverages AWS Cloud Control API to automatically generate support for hundreds of AWS resource types, such as Amazon EC2 instances and Amazon S3 buckets. Since the AWS CC provider is automatically generated, new features and services on AWS can be supported as soon as they are available on AWS Cloud Control API, addressing any coverage gaps in the existing Terraform AWS standard provider. This automated process allows the AWS CC provider to deliver new resources faster because it does not have to wait for the community to author schema and resource implementations for each new service. Today, the AWS CC provider supports 950+ AWS resources and data sources, with more support being added as AWS service teams continue to adopt the Cloud Control API standard.
As a Terraform practitioner, using the AWS CC Provider would feel familiar to the existing workflow. You can employ the configuration blocks shown below, while specifying your preferred region.
During Terraform plan or apply, the AWS CC Terraform provider interacts with AWS Cloud Control API to provision the resources by calling its consistent Create, Read, Update, Delete, or List (CRUD-L) APIs.
AWS service teams own, publish, and maintain resources on the AWS CloudFormation Registry using a standardized resource model. This resource model uses uniform JSON schemas and provisioning logic that codifies the expected behavior and error handling associated with CRUD-L operations. This resource model enables AWS service teams to expose their service features in an easily discoverable, intuitive, and uniform format with standardized behavior. Launched in September 2021, AWS Cloud Control API exposes these resources through a set of five consistent CRUD-L operations without any additional work from service teams. Using Cloud Control API, developers can manage the lifecycle of hundreds of AWS and third-party resources with consistent resource-oriented API instead of using distinct service-specific APIs. Furthermore, Cloud Control API is up-to-date with the latest AWS resources as soon as they are available on the CloudFormation Registry, typically on the day of launch. You can read more on launch day requirement for Cloud Control API in this blog post. This enables AWS Partners such as HashiCorp to take advantage of consistent CRUD-L API operations and integrate Terraform with Cloud Control API just once, and then automatically access new AWS resources without additional integration work.
The general availability of Terraform AWS CC Provider project is a culmination of 4+ years of collaboration between AWS and HashiCorp. Our teams partnered across the Product, Engineering, Partner, and Customer Support functions in influencing, shaping, and defining the customer experience leading up to the the technical preview announcement of the AWS CC provider in September 2021. At technical preview, the provider supported more than 300 resources. Since then, we have added an additional 600+ resources to the provider, bringing the total to 950+ supported resources at general availability.
Beyond just increasing resource coverage, we gathered additional signals from customer feedback during the technical preview and rolled out several improvements since September 2021. Customers care deeply about the user experience on the providers available on the Terraform registry. Customers sought practical examples in the form of sample HCL configurations for each resource that they could use to immediately test in order to confidently start using the provider. This prompted us to enrich the AWS CC provider with hundreds of practical examples for popular AWS CC provider resources in the Terraform registry. This was made possible by contributions of hundreds of Amazonians who became early adopters of the AWS CC provider. We also published a how-to guide for anyone interested in contributing to AWS CC provider examples. Furthermore, customers also wanted to minimize context switching by moving between Terraform and AWS service documentation on what each attribute of a resource signified and the type of values it needed as part of configuration. This empowered us to prioritize augmenting the provider with rich resource attribute description with information taken from AWS documentation. The documentation provides detailed information of how to use the attributes, enumerations of the accepted attribute values and other relevant information for dozens of popularly used AWS resources.
We also worked with HashiCorp on various bug fixes and feature enhancements for the AWS CC provider, as well as the upstream Cloud Control API dependencies. We improved handling for resources with complex nested attribute schemas, implemented various bug fixes to resolve unintended resource replacement, and refined provider behavior under various conditions to support the idempotency expected by Terraform practitioners. While this are not an exhaustive list of improvements, we continue to listen to customer feedback and iterate on improving the experience. We encourage you to try out the provider and share feedback on the AWS CC provider’s GitHub page.
Let’s take an example of a recently introduced service, Amazon Q Business, a fully managed, generative AI-powered assistant that you can configure to answer questions, provide summaries, generate content, and complete tasks based on your enterprise data. Amazon Q Business resources were available in AWS CC provider shortly after the April 30th 2024 launch announcement. In the following example, we’ll create a demo Amazon Q Business application and deploy the web experience.
As you see in this example, you can use both the AWS and AWS CC providers in the same configuration file. This allows you to easily incorporate new resources available in the AWS CC provider into your existing configuration with minimal changes. The AWS CC provider also accepts the same authentication method and provider-level features available in the AWS provider. This means you don’t have to add additional configuration in your CI/CD pipeline to start using the AWS CC provider. In addition, you can also add custom agent information inside the provider block as described in this documentation.
The AWS CC provider is unique due to how it was developed and its dependencies with Cloud Control API and AWS resource model in the CloudFormation registry. As such, there are things that you should know before you start using the AWS CC provider.
If you want to dive deeper into AWS CC provider resource behavior, we encourage you to check the documentation here.
The AWS CC provider is now generally available and will be the fastest way for customers to access newly launched AWS features and services using Terraform. We will continue to add support for more resources, additional examples and enriching the schema descriptions. You can start using the AWS CC provider alongside your existing AWS standard provider. To learn more about the AWS CC provider, please check the HashiCorp announcement blog post. You can also follow the workshop on how to get started with AWS CC provider. If you are interested in contributing with practical examples for AWS CC provider resources, check out the how-to guide. For more questions or if you run into any issues with the new provider, don’t hesitate to submit your issue in the AWS CC provider GitHub repository.
Post Syndicated from BeardedTinker original https://www.youtube.com/watch?v=vqjHXOK71sw
Post Syndicated from Talks at Google original https://www.youtube.com/watch?v=kblMacUtSrQ
Post Syndicated from Rapid7 original https://blog.rapid7.com/2024/05/30/etr-cve-2024-24919-check-point-security-gateway-information-disclosure/

On May 28, 2024, Check Point published an advisory for CVE-2024-24919, a high-severity information disclosure vulnerability affecting Check Point Security Gateway devices configured with either the “IPSec VPN” or “Mobile Access” software blade.
On May 29, 2024, security firm mnemonic published a blog reporting that they have observed in-the-wild exploitation of CVE-2024-24919 since April 30, 2024, with threat actors leveraging the vulnerability to enumerate and extract password hashes for all local accounts, including accounts used to connect to Active Directory. They’ve also observed adversaries moving laterally and extracting the “ntds.dit” file from compromised customers’ Active Directory servers, within hours of an initial attack against a vulnerable Check Point Gateway.
On May 30, 2024, watchTowr published technical details of CVE-2024-24919 including a PoC.
The vulnerability allows an unauthenticated remote attacker to read the contents of an arbitrary file located on the affected appliance. For example, this allows an attacker to read the appliances /etc/shadow file, disclosing the password hashes for local accounts. The attacker is not limited to reading this file and may read other files that contain sensitive information. An attacker may be able to crack the password hashes for these local accounts, and if the Security Gateway allows password only authentication, the attacker may use the cracked passwords to authenticate.
According to the vendor advisory, the following products are vulnerable to CVE-2024-24919:
Check Point has advised that a Security Gateway is vulnerable if one of the following configuration is applied:
Check Point has released hotfixes for Quantum Security Gateway, Quantum Maestro, Quantum Scalable Chassis, and Quantum Spark Appliances. We advise customers to refer to the Check Point advisory for the most current information on affected versions and hotfixes.
The vendor supplied hotfixes should be applied immediately. Rapid7 strongly recommends that Check Point Security Gateway customers examine their environments for signs of compromise and reset local account credentials in addition to applying vendor-provided fixes.
Check Point notes that exploit attempts their team has observed “focus on remote access scenarios with old local accounts with unrecommended password-only authentication.” The company recommends that customers check for local account usage, disable any unused local accounts, and add certificate-based authentication rather than password-only authentication. More information and recommendations on user and client authentication for remote access is available here.
A vulnerability check is in development for InsightVM and Nexpose customers to assess exposure to CVE-2024-24919. This blog will be updated with the latest information as and when it is available
InsightIDR and Managed Detection and Response customers have existing detection coverage through Rapid7’s expansive library of detection rules. Rapid7 recommends installing the Insight Agent on all applicable hosts to ensure visibility into suspicious processes and proper detection coverage. Below is a non-exhaustive list of detections that are deployed and will alert on post-exploitation behavior related to this vulnerability:
Post Syndicated from Luca Mezzalira original https://aws.amazon.com/blogs/architecture/lets-architect-learn-about-machine-learning-on-aws/
A data-driven approach empowers businesses to make informed decisions based on accurate predictions and forecasts, leading to improved operational efficiency and resource optimization. Machine learning (ML) systems have the remarkable ability to continuously learn and adapt, improving their performance over time as they are exposed to more data. This self-learning capability ensures that organizations can stay ahead of the curve, responding dynamically to changing market conditions and customer preferences, ultimately driving innovation and enhancing competitiveness.
By leveraging the power of machine learning on AWS, businesses can unlock benefits that enhance efficiency, improve decision-making, and foster growth.
In this session, see how organizations with constrained resources (budgets, skill gaps, time) can jump start their data-driven journey with advanced analytics and ML capabilities. Learn AWS Working Backwards best practices to drive forward data-related projects that address tangible business value. Then dive into AWS analytics and AI/ML capabilities that simplify and expedite data pipeline delivery and business value from ML workloads. Hear about low-code no-code (LCNC) AWS services within the context of a complete data pipeline architecture.

Figure 1. See an architecture to analyze customer churn using AWS services
As artificial intelligence (AI) continues to revolutionize industries, the ability to operationalize and scale ML models has become a critical challenge. This session introduces the concept of MLOps, a discipline that builds upon and extends the widely adopted DevOps practices prevalent in software development. By applying MLOps principles, organizations can streamline the process of building, training, and deploying ML models, ensuring efficient and reliable model lifecycle management. By mastering MLOps, organizations can bridge the gap between AI development and operations, enabling them to unlock the full potential of their ML initiatives.

Figure 2. MLOps maturity level will help to assess your organization and understand how to reach the next level.
To power generative AI applications while keeping costs under control, AWS designs and builds machine learning accelerators like AWS Trainium and AWS Inferentia. This session introduces purpose-built ML hardware for model training and inference, and shows how Amazon and AWS customers take advantage of those solutions to optimize costs and reduce latency.
You can learn from practical examples showing the impact of those solutions and explanations about how these chips work. ML accelerators are not only beneficial for generative AI workloads; they can also be applied to other use cases, including representation learning, recommender systems, or any scenario with deep neural network models.

Figure 3. Discover the technology that powers our AI services
The following resources drill down into the ML infrastructure that’s used to train large models at Pinterest and the experimentation framework built by Booking.com.
The Pinterest video discusses the strategy to create an ML development environment, orchestrate training jobs, ingest data into the training loop, and accelerate the training speed. You can also learn about the advantages derived from containers in the context of ML and how Pinterest decided to set up the entire ML lifecycle, including distributed model training.
The second resource covers how Booking.com accelerated the experimentation process by leveraging Amazon SageMaker for data analysis, model training, and online experimentation. This resulted in shorter development times for their ranking models and increased speed for the data science teams.
Take me to Booking.com blog post

Figure 4. Let’s discover how Pinterest is using AWS services for machine learning workloads
Amazon SageMaker Immersion Day helps customers and partners provide end-to-end understanding of building ML use cases. From feature engineering to understanding various built-in algorithms, with a focus on training, tuning, and deploying the ML model in a production-like scenario, this workshop guides you to bring your own model to perform lift-and-shift from on-premises to the Amazon SageMaker platform. It further demonstrates more advanced concepts like model debugging, model monitoring, and AutoML.

Figure 5. Train, tune and deploy your workload using Amazon SageMaker
Thanks for reading! With this post, introduced you to the art of possibility on using AWS machine learning services. In the next blog, we will talk about cloud migrations.
To revisit any of our previous posts or explore the entire series, visit the Let’s Architect! page.
Post Syndicated from BeardedTinker original https://www.youtube.com/watch?v=F92RnFDZty4
Post Syndicated from Patrick Kennedy original https://www.servethehome.com/ualink-will-be-the-nvlink-standard-backed-by-amd-intel-broadcom-cisco-and-more/
AMD, Intel, Broadcom, Cisco, Meta, Goole, Microsoft and more are backing the UALink standard as an industry alternative to NVIDIA NVLink
The post UALink will be the NVLink Standard Backed by AMD Intel Broadcom Cisco and More appeared first on ServeTheHome.
Post Syndicated from Chris Morris original https://aws.amazon.com/blogs/security/how-to-issue-use-case-bound-certificates-with-aws-private-ca/
In this post, we’ll show how you can use AWS Private Certificate Authority (AWS Private CA) to issue a wide range of X.509 certificates that are tailored for specific use cases. These use-case bound certificates have their intended purpose defined within the certificate components, such as the Key Usage and Extended Key usage extensions. We will guide you on how you can define your usage by applying your required Key Usage and Extended Key usage values with the IssueCertificate API operation.
With the AWS Private CA service, you can build your own public key infrastructure (PKI) in the AWS Cloud and issue certificates to use within your organization. Certificates issued by AWS Private CA support both the Key Usage and Extended Key Usage extensions. By using these extensions with specific values, you can bind the usage of a given certificate to a particular use case during creation. Binding certificates to their intended use case, such as SSL/TLS server authentication or code signing, provides distinct security benefits such as accountability and least privilege.
When you define certificate usage with specific Key Usage and Extended Key Usage values, this helps your organization understand what purpose a given certificate serves and the use case for which it is bound. During audits, organizations can inspect their certificate’s Key Usage and Extended Key Usage values to determine the certificate’s purpose and scope. This not only provides accountability regarding a certificate’s usage, but also a level of transparency for auditors and stakeholders. Furthermore, by using these extensions with specific values, you will follow the principle of least privilege. You can grant least privilege by defining only the required Key Usage and Extended Key Usage values for your use case. For example, if a given certificate is going to be used only for email protection (S/MIME), you can assign only that extended key usage value to the certificate.
In AWS Private CA, the Key Usage and Extended Key Usage extensions and values are specified by using a configuration template, which is passed with the IssueCertificate API operation. The base template provided by AWS handles the most common certificate use cases, such as SSL/TLS server authentication or code signing. However, there are additional use cases for certificates that are not defined in base templates. To issue certificates for these use cases, you can pass blank certificate templates in your IssueCertificate requests, along with your required Key Usage and Extended Key usage values.
Such use cases include, but are not limited to the following:
If your certificates require less-common extended key usage values not defined in the AWS documentation, you can also pass object identifiers (OIDs) to define values in Extended Key Usage. OIDs are dotted-string identifiers that are mapped to objects and attributes. OIDs can be defined and passed with custom extensions using API passthrough. You can also define OIDs in a CSR (certificate signing request) with a CSR passthrough template. Such uses include:
OID: 1.3.6.1.5.5.7.3.5 (IPSEC_END_SYSTEM)OID: 1.3.6.1.5.5.7.3.6 (IPSEC_TUNNEL)OID: 1.3.6.1.5.5.7.3.7 (IPSEC_USER)It’s important to note that blank certificate templates aren’t limited to just end-entity certificates. For example, the BlankSubordinateCACertificate_PathLen0_APICSRPassthrough template sets the Basic constraints parameter to CA:TRUE, allowing you to issue a subordinate CA certificate with your own Key Usage and Extended Key Usage values.
When you browse through the AWS Private CA certificate templates, you may see that base templates don’t allow you to define your own Key Usage or Extended Key Usage extensions and values. They are preset to the extensions and values used for the most common certificate types in order to simplify issuing those types of certificates. For example, when using EndEntityCertificate/V1, you will always get a Key Usage value of Critical, digital signature, key encipherment and an Extended Key Usage value of TLS web server authentication, TLS web client authentication. The following table shows all of the values for this base template.
| EndEntityCertificate/V1 | |
| X509v3 parameter | Value |
| Subject alternative name | [Passthrough from certificate signing request (CSR)] |
| Subject | [Passthrough from CSR] |
| Basic constraints | CA:FALSE |
| Authority key identifier | [Subject key identifier from CA certificate] |
| Subject key identifier | [Derived from CSR] |
| Key usage | Critical, digital signature, key encipherment |
| Extended key usage | TLS web server authentication, TLS web client authentication |
| CRL distribution points | [Passthrough from CA configuration] |
When you look at blank certificate templates, you will see that there is more flexibility. For one example of a blank certificate template, BlankEndEntityCertificate_APICSRPassthrough/V1, you can see that there are fewer predefined values compared to EndEntityCertificate/V1. You can pass your own values for Extended Key Usage and Key Usage.
| BlankEndEntityCertificate_APICSRPassthrough/V1 | |
| X509v3 parameter | Value |
| Subject alternative name | [Passthrough from API or CSR] |
| Subject | [Passthrough from API or CSR] |
| Basic constraints | CA:FALSE |
| Authority key identifier | [Subject key identifier from CA certificate] |
| Subject key identifier | [Derived from CSR] |
| CRL distribution points
Note: CRL distribution points are included in the template only if the CA is configured with CRL generation enabled. |
[Passthrough from CA configuration or CSR] |
To specify your desired extension and value, you must pass them in the IssueCertificate API call. There are two ways of doing so: the API Passthrough and CSR Passthrough templates.
To accommodate the different ways of passing these values, there are three varieties of blank certificate templates. If you would like to pass extensions defined only in your CSR file to the issued certificate, you can use the BlankEndEntityCertificate_CSRPassthrough/V1 template. Similarly, if you would like to pass extensions defined only in the APIPassthrough parameter, you can use the BlankEndEntityCertificate_APIPassthrough/V1 template. Finally, if you would like to use a combination of extensions defined in both the CSR and APIPassthrough, you can use the BlankEndEntityCertificate_APICSRPassthrough/V1 template. It’s important to remember these points when choosing your template:
To get started issuing certificates, you must have appropriate AWS Identity and Access Management (IAM) permissions as well as an AWS Private CA in an “Active” status. You can verify if your private CA is active by running the aws acm-pca list-certificate-authorities command from the AWS Command Line Interface (CLI). You should see the following:
"Status": "ACTIVE"
After verifying the status, make note of your private CA Amazon Resource Name (ARN).
To issue use-case bound certificates, you must use the Private CA API operation IssueCertificate.
In the AWS CLI, you can call this API by using the command issue-certificate. There are several parameters you must pass with this command:
--certificate-authority-arn) – The ARN of your private CA.--csr) – The CSR in PEM format. It must be passed as a blob , like fileb://.--validity) – Sets the “Not After” date (expiration date) for the certificate.--signing-algorithm) – The signing algorithm to be used to sign the certificate. The value you choose must match the algorithm family of the private CA’s algorithm (RSA or ECDSA). For example, if the private CA uses RSA_2048, the signing algorithm must be an RSA variant, like SHA256WITHRSA.
You can check your private CA’s algorithm family by referring to its key algorithm. The command aws acm-pca describe-certificate-authority will show the corresponding KeyAlgorithm value.
--template-arn) – This is where the blank certificate template is defined. The template should be an AWS Private CA template ARN. The full list of AWS Private CA template ARNs are shown in the AWS documentation.We’ll now demonstrate how to issue use-case bound end-entity certificates by using blank end-entity certificate templates. We will issue two different certificates. One will be bound for email protection, and one will be bound for smart card authentication. Email protection and smart card authentication certificates have specific Extended Key Usage values which are not defined by any base template. We’ll use CSR passthrough to issue the smart card authentication certificate and use API passthrough to issue the email protection certificate.
The certificate templates that we will use are:
Important notes about this demo:
We will now demonstrate how to issue a certificate that is bound for email protection. We’ll specify Key Usage and Extended Key Usage values, and also a subject alternative name through API passthrough. The goal is to have these extensions and values in the email protection certificate.
Extensions:
Make sure to replace the data in arn:aws:acm-pca:<region>:<accountID>:certificate-authority/11111111-1111-1111-1111-111111111111 with your private CA ARN, and adjust the signing algorithm according to your private CA’s algorithm. Assuming my PCA is type RSA, I am using SHA256WITHRSA.
If the command is successful, then the ARN of the issued certificate is shown as the result:
We’ll now demonstrate how to issue a certificate that is bound for smart card authentication. We will specify Key Usage, Extended Key Usage, and subject alternative name extensions and values through CSR passthrough. The goal is to have these values in the smart card authentication certificate.
Extensions:
We’ll generate our CSR by requesting these specific extensions and values with OpenSSL. When we call IssueCertificate, the CSR passthrough template will acknowledge the requested extensions and copy them over to the issued certificate.
Following is an example of OpenSSL configuration file content. You can copy this configuration to the openssl_csr.conf file and adjust the values to your requirements. You can find further reference on the configuration in the OpenSSL documentation.
In this example, you can specify your Key Usage and Extended Key Usage values in the [ my_req_ext ] section of the configuration. In the extendedKeyUsage line, you may also define extended key usage OIDs, like 1.3.6.1.4.1.311.20.2.2. Possible values are defined in the OpenSSL documentation.
The output should show the requested extensions and their values, as follows.
Make sure to replace the data in arn:aws:acm-pca:us-east-1:<accountID>:certificate-authority/11111111-1111-1111-1111-111111111111 with your private CA ARN and adjust the signing algorithm and validity to for your use case. Assuming my PCA is type RSA, I am using SHA256WITHRSA.
If the command is successful, then the ARN of the issued certificate is shown as the result:
After using issue-certificate with API passthrough or CSR passthrough, you can retrieve the certificate material in PEM format. Use the get-certificate command and specify the ARN of the private CA that issued the certificate, as well as the ARN of the certificate that was issued:
You can use the --query command with the AWS CLI to get the certificate and certificate chain in separate files.
After you retrieve the certificate, you can decode it with the openssl x509 command. This will allow you to view the details of the certificate, including the extensions and values that you defined.
In AWS Private CA, you can implement the security benefits of accountability and least privilege by defining the usage of your certificates. The Key Usage and Extended Key Usage values define the usage of your certificates. Many certificate use cases require a combination of Key Usage and Extended Key Usage values, which cannot be defined with base certificate templates. Some examples include document signing, smart card authentication, and mobile driving license (mDL) certificates. To issue certificates for these specific use cases, you can use blank certificate templates with the IssueCertificate API call. In addition to the blank certificate template, you must also define the specific combination of Key Usage and Extended Key Usage values through CSR passthrough, API passthrough, or both.
If you have feedback about this post, submit comments in the Comments section below. If you have questions about this post, contact AWS Support.
Want more AWS Security news? Follow us on Twitter.
Post Syndicated from jake original https://lwn.net/Articles/975444/
A discussion of extensions to the statx()
system call comes up frequently at the Linux Storage,
Filesystem, Memory Management, and BPF Summit; this year’s edition was
no exception. Kent Overstreet led the first filesystem-only session at the
summit on querying information about filesystems that have subvolumes and
snapshots. While it was billed as a discussion on statx()
additions, it ranged more widely over new APIs needed for modern filesystems.
Post Syndicated from Cloudforce One original https://blog.cloudflare.com/disrupting-flyingyeti-campaign-targeting-ukraine

Cloudforce One is publishing the results of our investigation and real-time effort to detect, deny, degrade, disrupt, and delay threat activity by the Russia-aligned threat actor FlyingYeti during their latest phishing campaign targeting Ukraine. At the onset of Russia’s invasion of Ukraine on February 24, 2022, Ukraine introduced a moratorium on evictions and termination of utility services for unpaid debt. The moratorium ended in January 2024, resulting in significant debt liability and increased financial stress for Ukrainian citizens. The FlyingYeti campaign capitalized on anxiety over the potential loss of access to housing and utilities by enticing targets to open malicious files via debt-themed lures. If opened, the files would result in infection with the PowerShell malware known as COOKBOX, allowing FlyingYeti to support follow-on objectives, such as installation of additional payloads and control over the victim’s system.
Since April 26, 2024, Cloudforce One has taken measures to prevent FlyingYeti from launching their phishing campaign – a campaign involving the use of Cloudflare Workers and GitHub, as well as exploitation of the WinRAR vulnerability CVE-2023-38831. Our countermeasures included internal actions, such as detections and code takedowns, as well as external collaboration with third parties to remove the actor’s cloud-hosted malware. Our effectiveness against this actor prolonged their operational timeline from days to weeks. For example, in a single instance, FlyingYeti spent almost eight hours debugging their code as a result of our mitigations. By employing proactive defense measures, we successfully stopped this determined threat actor from achieving their objectives.
FlyingYeti is the cryptonym given by Cloudforce One to the threat group behind this phishing campaign, which overlaps with UAC-0149 activity tracked by CERT-UA in February and April 2024. The threat actor uses dynamic DNS (DDNS) for their infrastructure and leverages cloud-based platforms for hosting malicious content and for malware command and control (C2). Our investigation of FlyingYeti TTPs suggests this is likely a Russia-aligned threat group. The actor appears to primarily focus on targeting Ukrainian military entities. Additionally, we observed Russian-language comments in FlyingYeti’s code, and the actor’s operational hours falling within the UTC+3 time zone.
In the days leading up to the start of the campaign, Cloudforce One observed FlyingYeti conducting reconnaissance on payment processes for Ukrainian communal housing and utility services:
Cloudforce One judges that the observed reconnaissance is likely due to the Ukrainian government’s payment moratorium introduced at the start of the full-fledged invasion in February 2022. Under this moratorium, outstanding debt would not lead to evictions or termination of provision of utility services. However, on January 9, 2024, the government lifted this ban, resulting in increased pressure on Ukrainian citizens with outstanding debt. FlyingYeti sought to capitalize on that pressure, leveraging debt restructuring and payment-related lures in an attempt to increase their chances of successfully targeting Ukrainian individuals.
The disrupted phishing campaign would have directed FlyingYeti targets to an actor-controlled GitHub page at hxxps[:]//komunalka[.]github[.]io, which is a spoofed version of the Kyiv Komunalka communal housing site https://www.komunalka.ua. Komunalka functions as a payment processor for residents in the Kyiv region and allows for payment of utilities, such as gas, electricity, telephone, and Internet. Additionally, users can pay other fees and fines, and even donate to Ukraine’s defense forces.
Based on past FlyingYeti operations, targets may be directed to the actor’s Github page via a link in a phishing email or an encrypted Signal message. If a target accesses the spoofed Komunalka platform at hxxps[:]//komunalka[.]github[.]io, the page displays a large green button with a prompt to download the document “Рахунок.docx” (“Invoice.docx”), as shown in Figure 1. This button masquerades as a link to an overdue payment invoice but actually results in the download of the malicious archive “Заборгованість по ЖКП.rar” (“Debt for housing and utility services.rar”).

A series of steps must take place for the download to successfully occur:
Cloudforce One identified the infrastructure responsible for facilitating the download of the malicious RAR file and remediated the actor-associated Worker, preventing FlyingYeti from delivering its malicious tooling. In an effort to circumvent Cloudforce One’s mitigation measures, FlyingYeti later changed their malware delivery method. Instead of the Workers domain fetching the malicious RAR file, it was loaded directly from GitHub.
During remediation, Cloudforce One recovered the RAR file “Заборгованість по ЖКП.rar” and performed analysis of the malicious payload. The downloaded RAR archive contains multiple files, including a file with a name that contains the unicode character “U+201F”. This character appears as whitespace on Windows devices and can be used to “hide” file extensions by adding excessive whitespace between the filename and the file extension. As highlighted in blue in Figure 2, this cleverly named file within the RAR archive appears to be a PDF document but is actually a malicious CMD file (“Рахунок на оплату.pdf[unicode character U+201F].cmd”).

FlyingYeti included a benign PDF in the archive with the same name as the CMD file but without the unicode character, “Рахунок на оплату.pdf” (“Invoice for payment.pdf”). Additionally, the directory name for the archive once decompressed also contained the name “Рахунок на оплату.pdf”. This overlap in names of the benign PDF and the directory allows the actor to exploit the WinRAR vulnerability CVE-2023-38831. More specifically, when an archive includes a benign file with the same name as the directory, the entire contents of the directory are opened by the WinRAR application, resulting in the execution of the malicious CMD. In other words, when the target believes they are opening the benign PDF “Рахунок на оплату.pdf”, the malicious CMD file is executed.
The CMD file contains the FlyingYeti PowerShell malware known as COOKBOX. The malware is designed to persist on a host, serving as a foothold in the infected device. Once installed, this variant of COOKBOX will make requests to the DDNS domain postdock[.]serveftp[.]com for C2, awaiting PowerShell cmdlets that the malware will subsequently run.
Alongside COOKBOX, several decoy documents are opened, which contain hidden tracking links using the Canary Tokens service. The first document, shown in Figure 3 below, poses as an agreement under which debt for housing and utility services will be restructured.

The second document (Figure 4) is a user agreement outlining the terms and conditions for the usage of the payment platform komunalka[.]ua.

The use of relevant decoy documents as part of the phishing and delivery activity are likely an effort by FlyingYeti operators to increase the appearance of legitimacy of their activities.
The phishing theme we identified in this campaign is likely one of many themes leveraged by this actor in a larger operation to target Ukrainian entities, in particular their defense forces. In fact, the threat activity we detailed in this blog uses many of the same techniques outlined in a recent FlyingYeti campaign disclosed by CERT-UA in mid-April 2024, where the actor leveraged United Nations-themed lures involving Peace Support Operations to target Ukraine’s military. Due to Cloudforce One’s defensive actions covered in the next section, this latest FlyingYeti campaign was prevented as of the time of publication.
Cloudforce One mitigated FlyingYeti’s campaign through a series of actions. Each action was taken to increase the actor’s cost of continuing their operations. When assessing which action to take and why, we carefully weighed the pros and cons in order to provide an effective active defense strategy against this actor. Our general goal was to increase the amount of time the threat actor spent trying to develop and weaponize their campaign.
We were able to successfully extend the timeline of the threat actor’s operations from hours to weeks. At each interdiction point, we assessed the impact of our mitigation to ensure the actor would spend more time attempting to launch their campaign. Our mitigation measures disrupted the actor’s activity, in one instance resulting in eight additional hours spent on debugging code.
Due to our proactive defense efforts, FlyingYeti operators adapted their tactics multiple times in their attempts to launch the campaign. The actor originally intended to have the Cloudflare Worker fetch the malicious RAR file from GitHub. After Cloudforce One interdiction of the Worker, the actor attempted to create additional Workers via a new account. In response, we disabled all Workers, leading the actor to load the RAR file directly from GitHub. Cloudforce One notified GitHub, resulting in the takedown of the RAR file, the GitHub project, and suspension of the account used to host the RAR file. In return, FlyingYeti began testing the option to host the RAR file on the file sharing sites pixeldrain and Filemail, where we observed the actor alternating the link on the Komunalka phishing site between the following:
We notified GitHub of the actor’s evolving tactics, and in response GitHub removed the Komunalka phishing site. After analyzing the files hosted on pixeldrain and Filemail, we determined the actor uploaded dummy payloads, likely to monitor access to their phishing infrastructure (FileMail logs IP addresses, and both file hosting sites provide view and download counts). At the time of publication, we did not observe FlyingYeti upload the malicious RAR file to either file hosting site, nor did we identify the use of alternative phishing or malware delivery methods.
A timeline of FlyingYeti’s activity and our corresponding mitigations can be found below.
| Date | Event Description |
|---|---|
| 2024-04-18 12:18 | Threat Actor (TA) creates a Worker to handle requests from a phishing site |
| 2024-04-18 14:16 | TA creates phishing site komunalka[.]github[.]io on GitHub |
| 2024-04-25 12:25 | TA creates a GitHub repo to host a RAR file |
| 2024-04-26 07:46 | TA updates the first Worker to handle requests from users visiting komunalka[.]github[.]io |
| 2024-04-26 08:24 | TA uploads a benign test RAR to the GitHub repo |
| 2024-04-26 13:38 | Cloudforce One identifies a Worker receiving requests from users visiting komunalka[.]github[.]io, observes its use as a phishing page |
| 2024-04-26 13:46 | Cloudforce One identifies that the Worker fetches a RAR file from GitHub (the malicious RAR payload is not yet hosted on the site) |
| 2024-04-26 19:22 | Cloudforce One creates a detection to identify the Worker that fetches the RAR |
| 2024-04-26 21:13 | Cloudforce One deploys real-time monitoring of the RAR file on GitHub |
| 2024-05-02 06:35 | TA deploys a weaponized RAR (CVE-2023-38831) to GitHub with their COOKBOX malware packaged in the archive |
| 2024-05-06 10:03 | TA attempts to update the Worker with link to weaponized RAR, the Worker is immediately blocked |
| 2024-05-06 10:38 | TA creates a new Worker, the Worker is immediately blocked |
| 2024-05-06 11:04 | TA creates a new account (#2) on Cloudflare |
| 2024-05-06 11:06 | TA creates a new Worker on account #2 (blocked) |
| 2024-05-06 11:50 | TA creates a new Worker on account #2 (blocked) |
| 2024-05-06 12:22 | TA creates a new modified Worker on account #2 |
| 2024-05-06 16:05 | Cloudforce One disables the running Worker on account #2 |
| 2024-05-07 22:16 | TA notices the Worker is blocked, ceases all operations |
| 2024-05-07 22:18 | TA deletes original Worker first created to fetch the RAR file from the GitHub phishing page |
| 2024-05-09 19:28 | Cloudforce One adds phishing page komunalka[.]github[.]io to real-time monitoring |
| 2024-05-13 07:36 | TA updates the github.io phishing site to point directly to the GitHub RAR link |
| 2024-05-13 17:47 | Cloudforce One adds COOKBOX C2 postdock[.]serveftp[.]com to real-time monitoring for DNS resolution |
| 2024-05-14 00:04 | Cloudforce One notifies GitHub to take down the RAR file |
| 2024-05-15 09:00 | GitHub user, project, and link for RAR are no longer accessible |
| 2024-05-21 08:23 | TA updates Komunalka phishing site on github.io to link to pixeldrain URL for dummy payload (pixeldrain only tracks view and download counts) |
| 2024-05-21 08:25 | TA updates Komunalka phishing site to link to FileMail URL for dummy payload (FileMail tracks not only view and download counts, but also IP addresses) |
| 2024-05-21 12:21 | Cloudforce One downloads PixelDrain document to evaluate payload |
| 2024-05-21 12:47 | Cloudforce One downloads FileMail document to evaluate payload |
| 2024-05-29 23:59 | GitHub takes down Komunalka phishing site |
| 2024-05-30 13:00 | Cloudforce One publishes the results of this investigation |
Cloudforce One leveraged industry relationships to provide advanced warning and to mitigate the actor’s activity. To further protect the intended targets from this phishing threat, Cloudforce One notified and collaborated closely with GitHub’s Threat Intelligence and Trust and Safety Teams. We also notified CERT-UA and Cloudflare industry partners such as CrowdStrike, Mandiant/Google Threat Intelligence, and Microsoft Threat Intelligence.
There are several ways to hunt FlyingYeti in your environment. These include using PowerShell to hunt for WinRAR files, deploying Microsoft Sentinel analytics rules, and running Splunk scripts as detailed below. Note that these detections may identify activity related to this threat, but may also trigger unrelated threat activity.
Consider running a PowerShell script such as this one in your environment to identify exploitation of CVE-2023-38831. This script will interrogate WinRAR files for evidence of the exploit.
CVE-2023-38831
Description:winrar exploit detection
open suspios (.tar / .zip / .rar) and run this script to check it

function winrar-exploit-detect(){
$targetExtensions = @(".cmd" , ".ps1" , ".bat")
$tempDir = [System.Environment]::GetEnvironmentVariable("TEMP")
$dirsToCheck = Get-ChildItem -Path $tempDir -Directory -Filter "Rar*"
foreach ($dir in $dirsToCheck) {
    $files = Get-ChildItem -Path $dir.FullName -File
    foreach ($file in $files) {
        $fileName = $file.Name
        $fileExtension = [System.IO.Path]::GetExtension($fileName)
        if ($targetExtensions -contains $fileExtension) {
            $fileWithoutExtension = [System.IO.Path]::GetFileNameWithoutExtension($fileName); $filename.TrimEnd() -replace '\.$'
            $cmdFileName = "$fileWithoutExtension"
            $secondFile = Join-Path -Path $dir.FullName -ChildPath $cmdFileName

            if (Test-Path $secondFile -PathType Leaf) {
                Write-Host "[!] Suspicious pair detected "
                Write-Host "[*]  Original File:$($secondFile)" -ForegroundColor Green
                Write-Host "[*] Suspicious File:$($file.FullName)" -ForegroundColor Red

                # Read and display the content of the command file
                $cmdFileContent = Get-Content -Path $($file.FullName)
                Write-Host "[+] Command File Content:$cmdFileContent"
            }
        }
    }
}
}
winrar-exploit-detect
In Microsoft Sentinel, consider deploying the rule provided below, which identifies WinRAR execution via cmd.exe. Results generated by this rule may be indicative of attack activity on the endpoint and should be analyzed.
DeviceProcessEvents
| where InitiatingProcessParentFileName has @"winrar.exe"
| where InitiatingProcessFileName has @"cmd.exe"
| project Timestamp, DeviceName, FileName, FolderPath, ProcessCommandLine, AccountName
| sort by Timestamp desc
Consider using this script in your Splunk environment to look for WinRAR CVE-2023-38831 execution on your Microsoft endpoints. Results generated by this script may be indicative of attack activity on the endpoint and should be analyzed.
| tstats `security_content_summariesonly` count min(_time) as firstTime max(_time) as lastTime from datamodel=Endpoint.Processes where Processes.parent_process_name=winrar.exe `windows_shells` OR Processes.process_name IN ("certutil.exe","mshta.exe","bitsadmin.exe") by Processes.dest Processes.user Processes.parent_process_name Processes.parent_process Processes.process_name Processes.process Processes.process_id Processes.parent_process_id
| `drop_dm_object_name(Processes)`
| `security_content_ctime(firstTime)`
| `security_content_ctime(lastTime)`
| `winrar_spawning_shell_application_filter`
Cloudflare Email Security (CES) customers can identify FlyingYeti threat activity with the following detections.
Cloudflare recommends taking the following steps to mitigate this type of activity:
If you’re looking to uncover additional Threat Intelligence insights for your organization or need bespoke Threat Intelligence information for an incident, consider engaging with Cloudforce One by contacting your Customer Success manager or filling out this form.
| Filename | SHA256 Hash | Description |
|---|---|---|
| Заборгованість по ЖКП.rar | a0a294f85c8a19be048ffcc05ede6fd5a7ac5e2f0032a3ca0050dc1ae960c314 | RAR archive |
| Рахунок на оплату.pdf .cmd |
0cca8f795c7a81d33d36d5204fcd9bc73bdc2af7de315c1449cbc3551ef4fb59 | COOKBOX Sample (contained in RAR archive) |
| Реструктуризація боргу за житлово комунальні послуги.docx | 915721b94e3dffa6cef3664532b586be6cf989fec923b26c62fdaf201ee81d2c | Benign Word Document with Tracking Link (contained in RAR archive) |
| Угода користувача.docx | 79a9740f5e5ea4aa2157d9d96df34ee49a32e2d386fe55fedfd1aa33e151c06d | Benign Word Document with Tracking Link (contained in RAR archive) |
| Рахунок на оплату.pdf | 19e25456c2996ded3e29577b609de54a2bef90dad8f868cdad795c18df05a79b | Random Binary Data (contained in RAR archive) |
| Заборгованість по ЖКП станом на 26.04.24.docx | e0d65e2d36afd3db1b603f10e0488cee3f58ade24d8abc6bee240314d8696708 | Random Binary Data (contained in RAR archive) |
| Domain / URL | Description |
|---|---|
| komunalka[.]github[.]io | Phishing page |
| hxxps[:]//github[.]com/komunalka/komunalka[.]github[.]io | Phishing page |
| hxxps[:]//worker-polished-union-f396[.]vqu89698[.]workers[.]dev | Worker that fetches malicious RAR file |
| hxxps[:]//raw[.]githubusercontent[.]com/kudoc8989/project/main/Заборгованість по ЖКП.rar | Delivery of malicious RAR file |
| hxxps[:]//1014[.]filemail[.]com/api/file/get?filekey=e_8S1HEnM5Rzhy_jpN6nL-GF4UAP533VrXzgXjxH1GzbVQZvmpFzrFA&pk_vid=a3d82455433c8ad11715865826cf18f6 | Dummy payload |
| hxxps[:]//pixeldrain[.]com/api/file/ZAJxwFFX?download= | Dummy payload |
| hxxp[:]//canarytokens[.]com/stuff/tags/ni1cknk2yq3xfcw2al3efs37m/payments.js | Tracking link |
| hxxp[:]//canarytokens[.]com/stuff/terms/images/k22r2dnjrvjsme8680ojf5ccs/index.html | Tracking link |
| postdock[.]serveftp[.]com | COOKBOX C2 |
Post Syndicated from Rapid7 original https://blog.rapid7.com/2024/05/30/celebrating-excellence-joanne-guarglia-and-kelly-hiscoe-recognized-as-crns-2024-women-of-the-channel/

We are thrilled to announce that two of our exceptional team members, Joanne Guarglia and Kelly Hiscoe, have been recognized as CRN’s 2024 Women of the Channel. This recognition celebrates the achievements and leadership of women within the channel community, and we are incredibly proud to see Joanne and Kelly honored for their contributions.
Kelly Hiscoe and her team are at the forefront of designing and launching partner programs, optimizing our operations to support Rapid7’s global channel ecosystem. Their commitment to creating highly effective and streamlined partner experiences ensures seamless execution within our channel. Engaging continuously with partners, Kelly’s team drives simplified, scalable, and predictable experiences that benefit all stakeholders.
Kelly’s dedication to improving our operational infrastructure and incentive programs is unwavering. Kelly said: “We will never be done focusing on creating improved programs and processes. We will continue to be laser focused on enhancing our operational infrastructure and incentive programs because we care deeply about the partner experience with Rapid7.”
Her leadership and vision are integral to our ongoing success and the satisfaction of our partners.

Joanne Guarglia has demonstrated exceptional skill in building and nurturing lasting relationships with our partners, an area in which Rapid7 are investing heavily – making strides with the channel community more than ever.
“What I enjoy most is being able to build lasting relationships with our partners. Partners want to work with trusted brands who are leaders in the space, and we have that here at Rapid7. Being that trusted voice and growing the relationship, while educating them about our offerings, enables me to have a positive impact,” Joanne said.
Her dedication to partner success and her ability to educate and inform are key components of her impactful work.

At Rapid7, we are committed to fostering an environment where talented individuals like Joanne and Kelly can thrive. Their recognition as CRN’s 2024 Women of the Channel underscores our dedication to excellence and our focus on building a strong, supportive channel ecosystem. We look forward to their continued contributions and to the ongoing success of our partners.
Please join us in celebrating Joanne and Kelly for their outstanding achievements and their unwavering commitment to excellence in the channel community.
Learn more about Rapid7 global partnerships here.
Post Syndicated from jake original https://lwn.net/Articles/976007/
Greg Kroah-Hartman has announced the release of the 6.9.3 and 6.8.12 stable kernels. As usual, they contain
lots of important fixes throughout the tree. Note that 6.8.12 is the end
of the line for the 6.8.x stable kernel series.
Post Syndicated from jake original https://lwn.net/Articles/976006/
Security updates have been issued by Debian (python-pymysql), Fedora (chromium, mingw-python-requests, and thunderbird), Mageia (perl-Email-MIME and qtnetworkauth5 & qtnetworkauth6), Red Hat (gdisk and python39:3.9 and python39-devel:3.9 modules), SUSE (freerdp, gdk-pixbuf, gifsicle, glib2, java-1_8_0-ibm, kernel, libfastjson, libredwg, nodejs16, python, python3, python36, rpm, warewulf4, and xdg-desktop-portal), and Ubuntu (gst-plugins-base1.0, python-werkzeug, and tpm2-tss).
Post Syndicated from Kenny Johnson original https://blog.cloudflare.com/cloudflare-acquires-bastionzero

We’re excited to announce that BastionZero, a Zero Trust infrastructure access platform, has joined Cloudflare. This acquisition extends our Zero Trust Network Access (ZTNA) flows with native access management for infrastructure like servers, Kubernetes clusters, and databases.
Security teams often prioritize application and Internet access because these are the primary vectors through which users interact with corporate resources and external threats infiltrate networks. Applications are typically the most visible and accessible part of an organization’s digital footprint, making them frequent targets for cyberattacks. Securing application access through methods like Single Sign-On (SSO) and Multi-Factor Authentication (MFA) can yield immediate and tangible improvements in user security.
However, infrastructure access is equally critical and many teams still rely on castle-and-moat style network controls and local resource permissions to protect infrastructure like servers, databases, Kubernetes clusters, and more. This is difficult and fraught with risk because the security controls are fragmented across hundreds or thousands of targets. Bad actors are increasingly focusing on targeting infrastructure resources as a way to take down huge swaths of applications at once or steal sensitive data. We are excited to extend Cloudflare One’s Zero Trust Network Access to natively protect infrastructure with user- and device-based policies along with multi-factor authentication.
Application access typically involves interacting with web-based or client-server applications. These applications often support modern authentication mechanisms such as Single Sign-On (SSO), which streamline user authentication and enhance security. SSO integrates with identity providers (IdPs) to offer a seamless and secure login experience, reducing the risk of password fatigue and credential theft.
Infrastructure access, on the other hand, encompasses a broader and more diverse range of systems, including servers, databases, and network devices. These systems often rely on protocols such as SSH (Secure Shell), RDP (Remote Desktop Protocol), and Kubectl (Kubernetes) for administrative access. The nature of these protocols introduces additional complexities that make securing infrastructure access more challenging.
Cloudflare One facilitates Zero Trust Network Access (ZTNA) for infrastructure resources with an approach superior to traditional VPNs. An administrator can define a set of identity, device, and network-aware policies that dictate if a user can access a specific IP address, hostname, and/or port combination. This allows you to create policies like “Only users in the identity provider group ‘developers’ can access resources over port 22 (default SSH port) in our corporate network,” which is already much finer control than a VPN with basic firewall policies would allow.
However, this approach still has limitations, as it relies on a set of assumptions about how corporate infrastructure is provisioned and managed. If an infrastructure resource is configured outside of the assumed network structure, e.g. SSH over a non-standard port is allowed, all network-level controls may be bypassed. This leaves only the native authentication protections of the specific protocol protecting that resource and is often how leaked SSH keys or database credentials can lead to a wider system outage or breach.
Many organizations will leverage more complex network structures like a bastion host model or complex Privileged Access Management (PAM) solutions as an added defense-in-depth strategy. However, this leads to significantly more cost and management overhead for IT security teams and sometimes complicates challenges related to least-privileged access. Tools like bastion hosts or PAM solutions end up eroding least-privilege over time because policies expand, change, or drift from a company’s security stance. This leads to users incorrectly retaining access to sensitive infrastructure.
While our goal for years has been to help organizations of any size replace their VPNs as simply and quickly as possible, BastionZero expands the scope of Cloudflare’s VPN replacement solution beyond apps and networks to provide the same level of simplicity for extending Zero Trust controls to infrastructure resources. This helps security teams centralize the management of even more of their hybrid IT environment, while using standard Zero Trust practices to keep DevOps teams productive and secure. Together, Cloudflare and BastionZero can help organizations replace not only VPNs but also bastion hosts; SSH, Kubernetes, or database key management systems; and redundant PAM solutions.
BastionZero provides native integration to major infrastructure access protocols and targets like SSH, RDP, Kubernetes, database servers, and more to ensure that a target resource is configured to accept connections for that specific user, instead of relying on network level controls. This allows administrators to think in terms of resources and targets, not IP addresses and ports. Additionally, BastionZero leverages OpenPubKey, an open source library that uses two forms of authentication to generate an OpenID Connect (OIDC) token, which avoids single point of failure risks inherent to a standalone Identity Provider.
BastionZero will add the following capabilities to Cloudflare’s SASE platform:
The BastionZero team will be focused on integrating their infrastructure access controls directly into Cloudflare One. During the third and fourth quarters of this year, we will be announcing a number of new features to facilitate Zero Trust infrastructure access via Cloudflare One. All functionality delivered this year will be included in the Cloudflare One free tier for organizations less than 50 users. We believe that everyone should have access to world-class security controls.
We are looking for early beta testers and teams to provide feedback about what they would like to see with respect to infrastructure access. If you are interested in learning more, please sign up here.
Post Syndicated from Brian van Baekel original https://blog.zabbix.com/monitor-new-zabbix-releases-natively/28105/
In this blog post, I’ll guide you through building your own template to monitor the latest Zabbix releases directly from the Zabbix UI. Follow the simple walkthrough to know how.
With the release of Zabbix 7.0, it is possible to see which Zabbix version you are running and what the latest version is:

A great improvement obviously but (at least in 7.0.0rc1) I am missing the triggers to notify me and perhaps also really interesting, there is nothing available about older versions.
Once I saw the above screenshot, I became curious about where that data actually came from, and what’s available. A quick deep-dive into the sourcecode ( https://git.zabbix.com/projects/ZBX/repos/zabbix/browse/ui/js/class.software-version-check.js#18 ) gave away the URL that is used for this feature: https://services.zabbix.com/updates/v1 Once you visit that URL you will get a nice JSON formatted output:
{
  "versions": [
    {
      "version": "5.0",
      "end_of_full_support": true,
      "latest_release": {
        "created": "1711361454",
        "release": "5.0.42"
      }
    },
    {
      "version": "6.0",
      "end_of_full_support": false,
      "latest_release": {
        "created": "1716274679",
        "release": "6.0.30"
      }
    },
    {
      "version": "6.4",
      "end_of_full_support": false,
      "latest_release": {
        "created": "1716283254",
        "release": "6.4.15"
      }
    }
  ]
}
And as you may know, Zabbix is quite good at parsing JSON formatted data. So, I built a quick template to get this going and be notified once a new version is released.
In the examples below I used my 6.4 instance, but this also works on 6.0 and of course 7.0.
Before we jump into the building part, it’s important to think of the best approach for this template. I think there are 2:
I prefer the LLD route, as that is making the template as dynamic as possible (less time to maintain it) but also more fun to build!
Let’s go.
First, you go to Data Collection -> Templates and create a new template there:
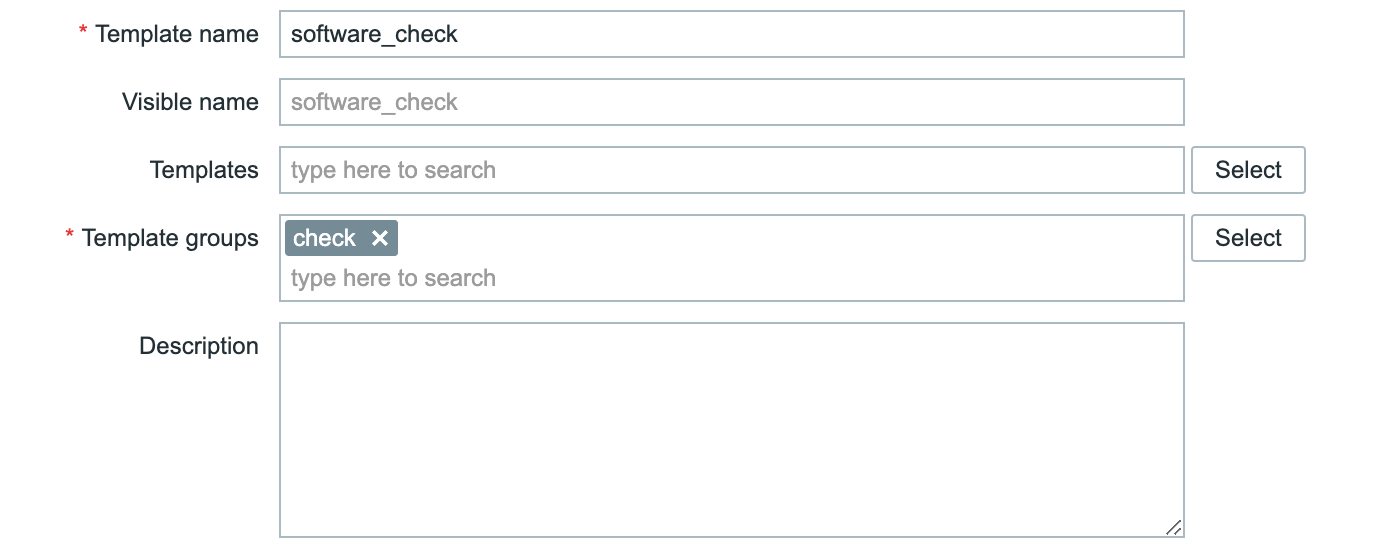
Of course, you can change the name of the template and the group. It’s completely up to you.
Once the template is created, it’s still an empty shell and we need to populate it. We will start with a normal item of type HTTP agent:
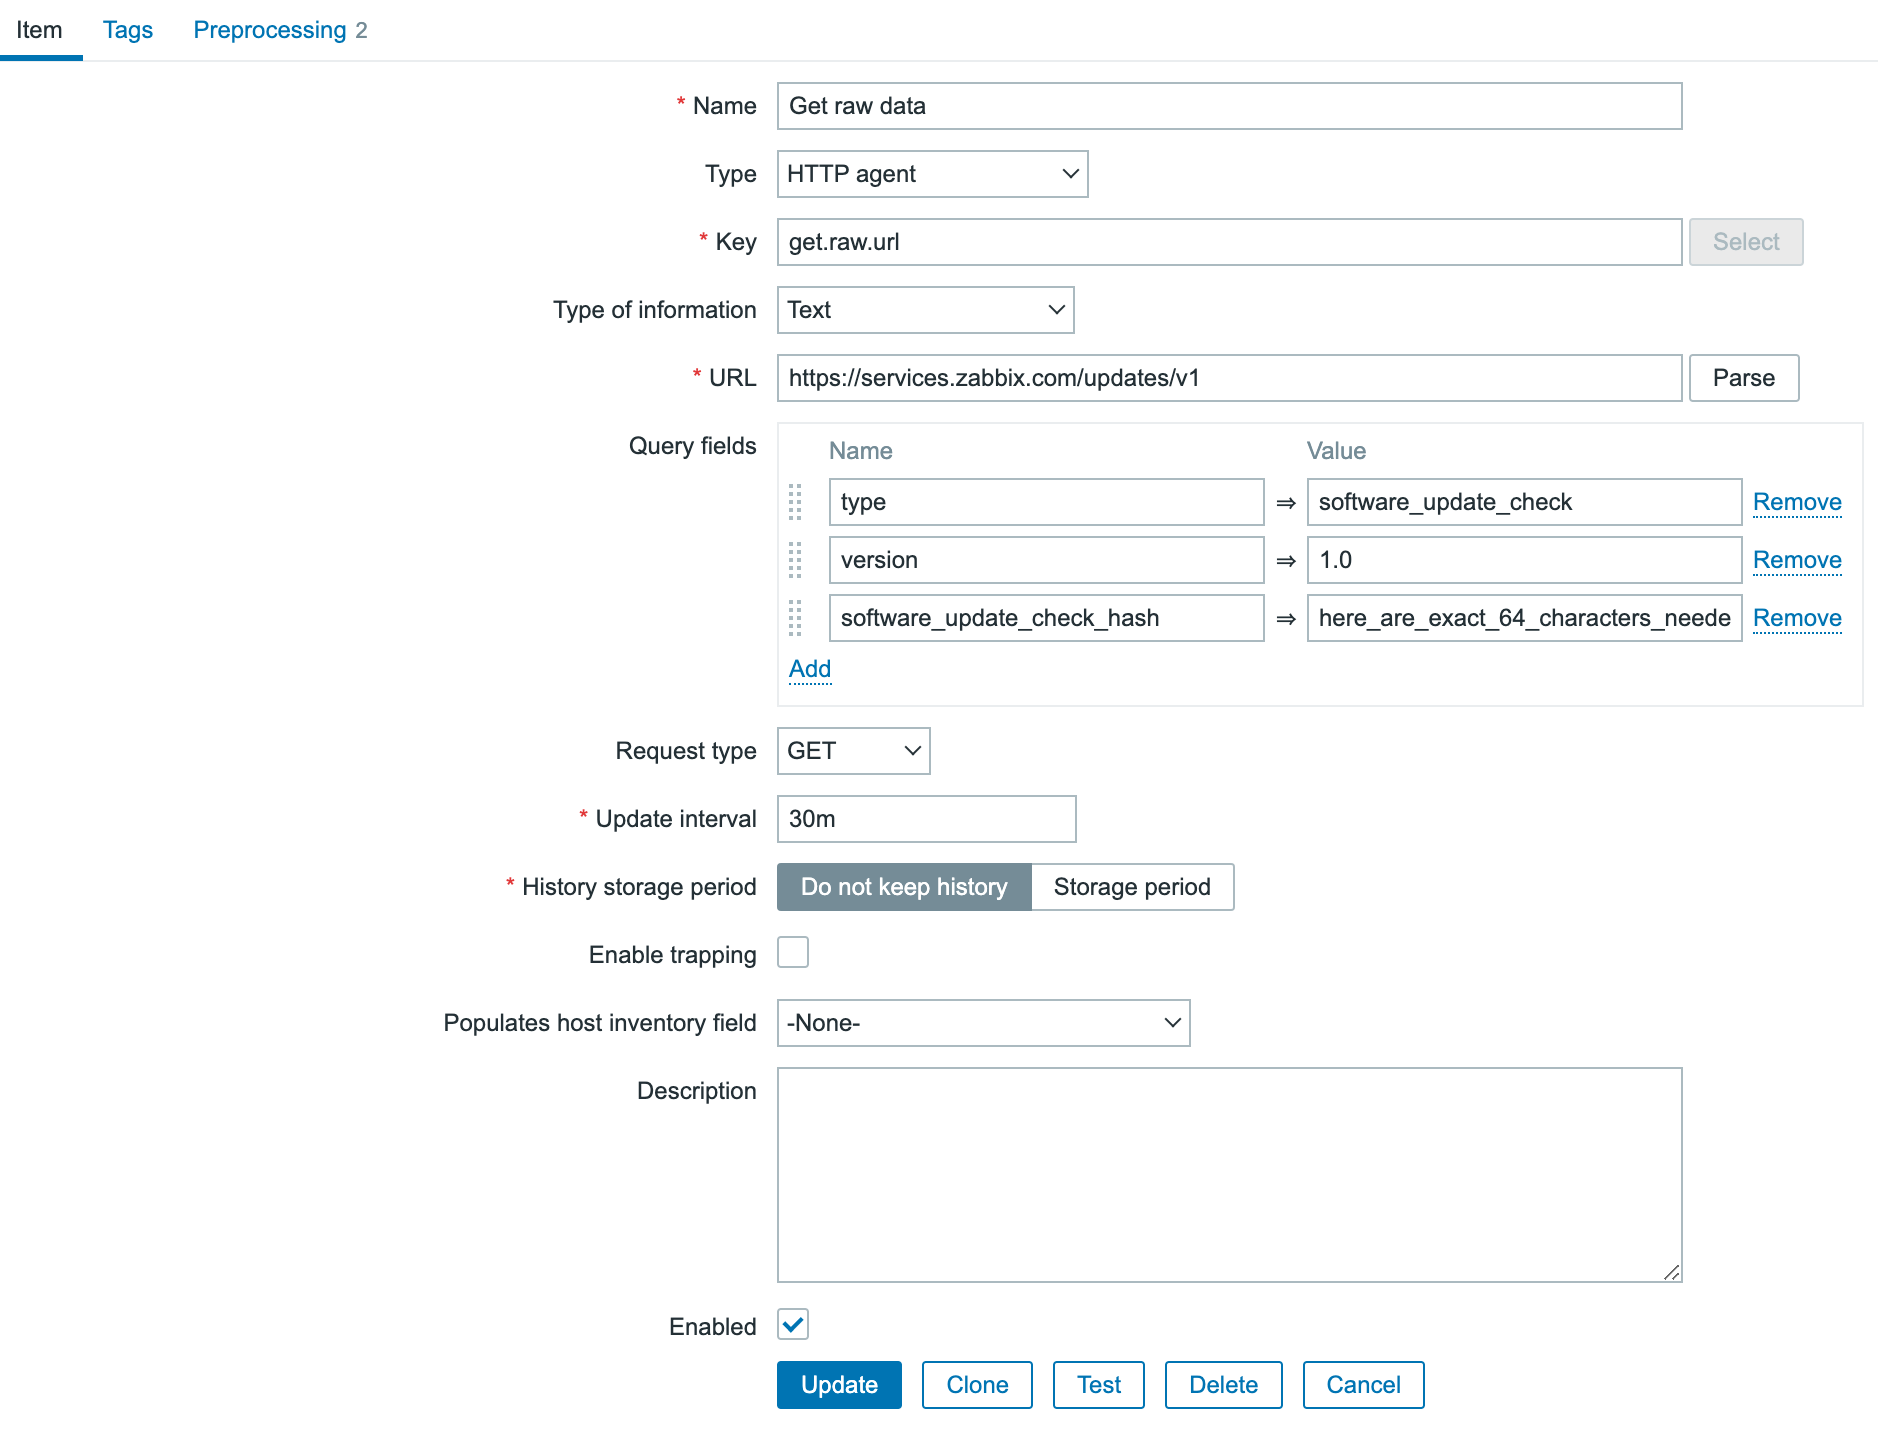
(note: screenshot is truncated)
We need to add 3 query fields:
 for the example i just used ‘here_are_exact_64_characters_needed_as_a_custom_hash_for_zabbix_’
As we go for the LLD route, I already set the “History Storage period” to “Do not keep history”. If you are building the template, it’s advised to keep the history and make sure you’ve got data to work with for the rest of the template. Once everything works, go back to this item and make sure to change the History storage period.
In the above screenshot, you can see I applied 2 preprocessing steps already.
The first is to replace the text ‘versions’ with ‘data’. This is done because Zabbix expects an array ‘data’ for its LLD logic. That ‘data’ is not available, so I just replaced the text ‘versions’. Quick and dirty.
The second preprocessing step is a “discard unchanged with heartbeat”. As long as there is no new release, I do not care about the data that came in, yet I want to store it once per day to make sure the item is still working. With this approach, we monitor the URL every 30 minutes so we get ‘quick’ updates but still do not use a lot of disk space.
The result of the preprocessing configuration:

Now it’s time to hit the “test all steps” button and see if everything works. The result you’ll get is:
{
  "data": [
    {
      "version": "5.0",
      "end_of_full_support": true,
      "latest_release": {
        "created": "1711361454",
        "release": "5.0.42"
      }
    },
    {
      "version": "6.0",
      "end_of_full_support": false,
      "latest_release": {
        "created": "1716274679",
        "release": "6.0.30"
      }
    },
    {
      "version": "6.4",
      "end_of_full_support": false,
      "latest_release": {
        "created": "1716283254",
        "release": "6.4.15"
      }
    }
  ]
}
This is almost identical to the information directly from the URL, except that ‘versions’ is replaced by ‘data’. Great. So as soon as you save this item we will monitor the releases now (don’t forget to link the template to a host otherwise nothing will happen)!
At the same time, this information is absolutely not useful at all, as it’s just a text portion. We need to parse it, and LLD is the way to go.
In the template, we go to “Discovery rules” and click on “Create discovery rule” in the upper right corner.
Now we create a new LLD rule, which is not going to query the website itself, but will get its information from the HTTP agent we’ve just created.
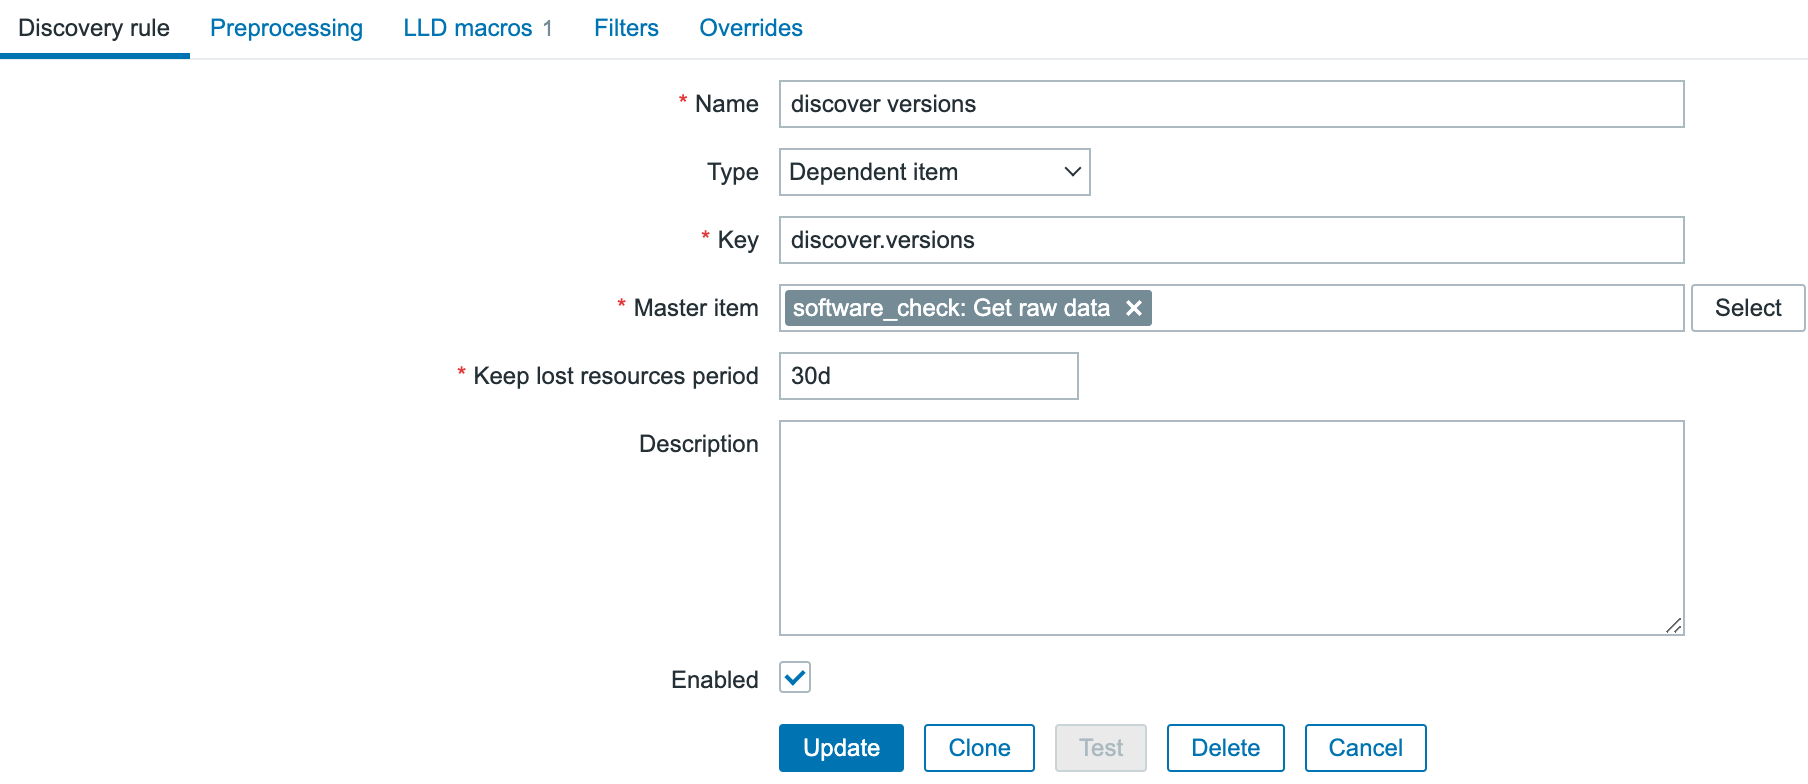
In the above screenshot, you see how it’s configured. a name, type ‘Dependent item’ some key just because Zabbix requires a key, and the Master item is the HTTP agent item we just created.
Now all data from the http agent item is pushed into the LLD rule as soon as it’s received, and we need to create LLD macros out of it. So in the Discovery rule, you jump to the 3rd tab ‘LLD macros’ and add a new macro there:
{#VERSION} with JSONPATH$..version.first()

Once this is done save the LLD rule and let’s create some item prototypes.
The first item prototype is the most complicated, the rest are “copy/paste”, more or less.
We create a new item prototype that looks like this:

As the type is dependent and it is getting all its information from the HTTP agent master item, there is preprocessing needed to filter out only that specific piece of information that is needed. You go to the preprocessing tab and add a JSONpath step there:
For copy/paste purposes: $.data.[?(@.version=='{#VERSION}’)].latest_release.created.first()
There is quite some magic happening in that step. We tell it to use a JSONpath to find the correct value, but there is also a lookup:
[?(@.version=='{#VERSION}')]
What we are doing here is telling it to go into the data array, look for an array ‘version’ with the value {#VERSION}. Of course that {#VERSION} LLD macro is going to be replaced dynamically by the discovery rule with the correct version. Once it found the version object, go in and find the object ‘latest_release’ and from that object we want the value of ‘created’. Now we will get back the epoch time of that release, and in the item we parse that with Unit unixtime.
Save the item, and immediately clone it to create the 2nd item prototype to get the support state:

Here we change the type of information and of course the preprocessing should be slightly different as we are looking for a different object:

JSONPath:
$.data.[?(@.version=='{#VERSION}')].end_of_full_support.first()
Save this item as well, and let’s create our last item to get the minor release number presented:

The preprocessing is again slightly different:

JSONPath:
$.data.[?(@.version=='{#VERSION}')].latest_release.release.first()
At this point you should have 1 master item, 1 LLD rule and 3 Item prototypes.
Now, create a new host, and link this template to it. Fairly quick you should see data coming in and everything should be nicely parsed:

The only thing that is missing now is a trigger to get alerted once a new version has been released, so let’s go back into the template, discovery rule and find the trigger prototypes. Create a new one that looks like this:
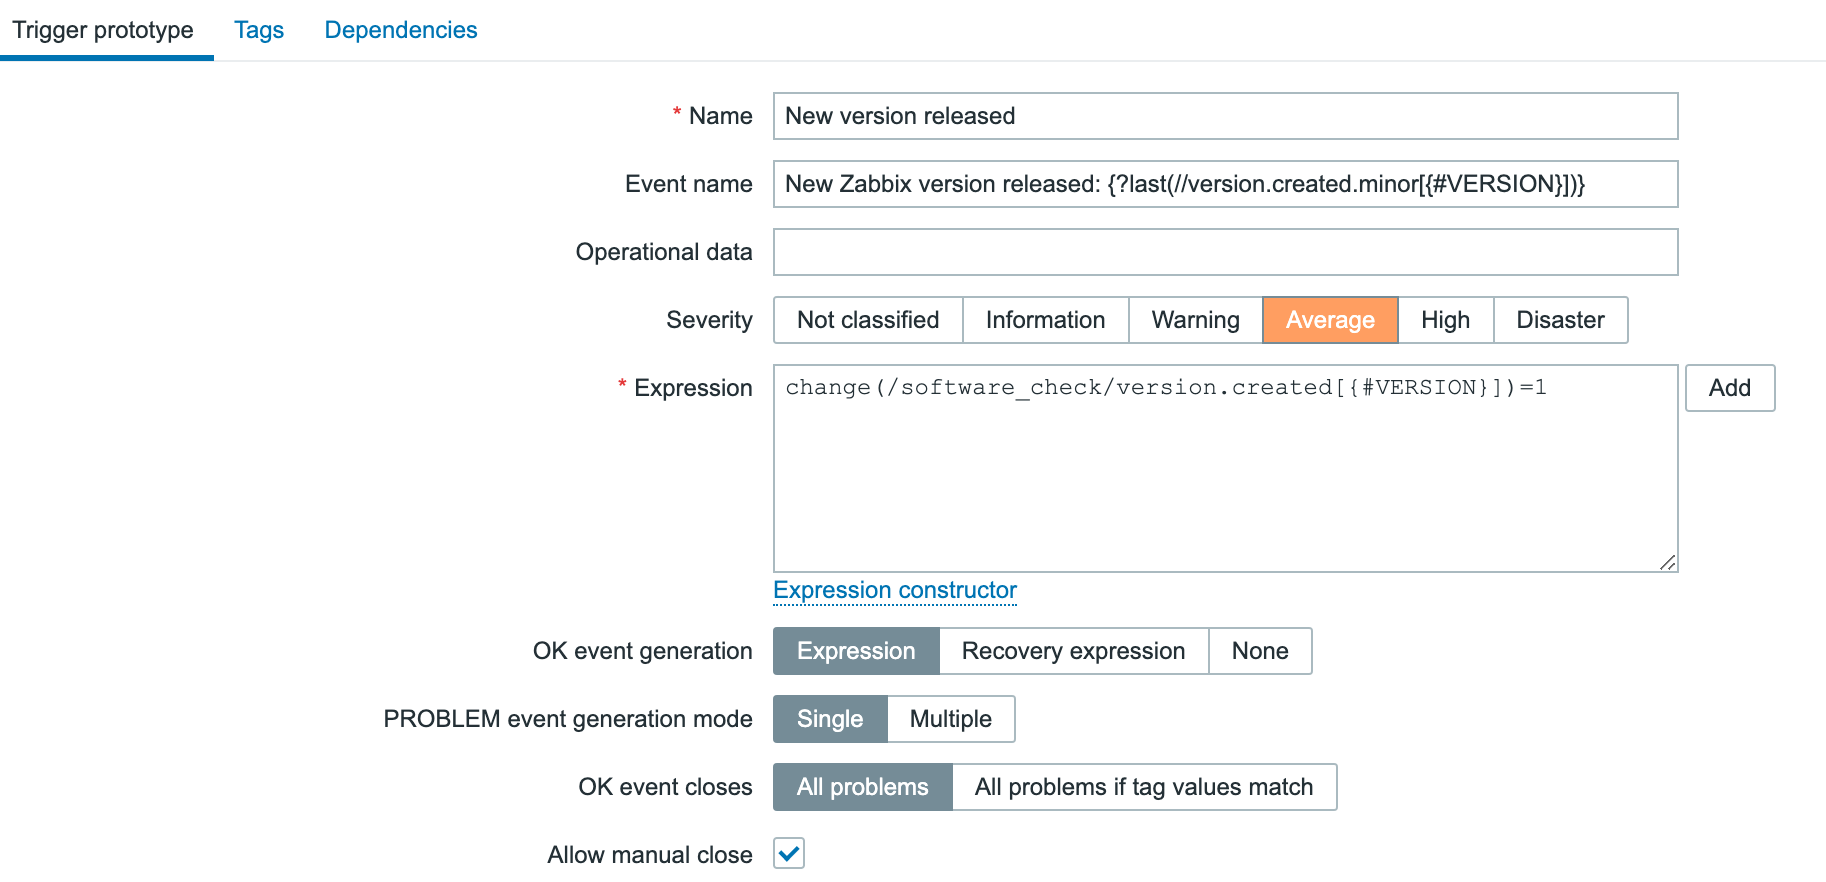
Since we populated the even name as well, our problem name will reflect the most recent version already:

Enjoy your new template! 
The post Monitor new Zabbix releases natively appeared first on Zabbix Blog.
Post Syndicated from Bruce Schneier original https://www.schneier.com/blog/archives/2024/05/supply-chain-attack-against-courtroom-software.html
No word on how this backdoor was installed:
A software maker serving more than 10,000 courtrooms throughout the world hosted an application update containing a hidden backdoor that maintained persistent communication with a malicious website, researchers reported Thursday, in the latest episode of a supply-chain attack.
The software, known as the JAVS Viewer 8, is a component of the
JAVS Suite 8, an application package courtrooms use to record, play back, and manage audio and video from proceedings. Its maker, Louisville, Kentucky-based Justice AV Solutions, says its products are used in more than 10,000 courtrooms throughout the US and 11 other countries. The company has been in business for 35 years.
It’s software used by courts; we can imagine all sort of actors who want to backdoor it.