Tag Archives: news

AWS Security Hub now generally available with near real-time analytics and risk prioritization

Post Syndicated from Esra Kayabali original https://aws.amazon.com/blogs/aws/aws-security-hub-now-generally-available-with-near-real-time-analytics-and-risk-prioritization/

Today, AWS Security Hub is generally available, transforming how security teams identify and respond to critical security risks across their AWS environments. These new capabilities were first announced in preview at AWS re:Inforce 2025. Security Hub prioritizes your critical security issues and unifies your security operations to help you respond at scale by correlating and enriching signals across multiple AWS security services. Security Hub provides near real-time risk analytics, trends, unified enablement, streamlined pricing, and automated correlation that transforms security signals into actionable insights.

Organizations deploying multiple security tools need to manually correlate signals across different consoles, creating operational overhead that can delay detection and response times. Security teams use various tools for threat detection, vulnerability management, security posture monitoring, and sensitive data discovery, but extracting value from the findings these tools generate requires significant manual effort to understand relationships and determine priority.

Security Hub addresses these challenges through built-in integration that unifies your cloud security operations. Available for individual accounts or entire AWS Organizations accounts, Security Hub automatically aggregates and correlates signals from Amazon GuardDuty, Amazon Inspector, AWS Security Hub Cloud Security Posture Management (AWS Security Hub CSPM), and Amazon Macie, organizing them by threats, exposures, resources, and security coverage. This unified approach reduces manual correlation work, helping you quickly identify critical issues, understand coverage gaps, and prioritize remediation based on severity and impact.

What’s new in general availability
Since the preview announcement, Security Hub has added several new features.

Historical trends
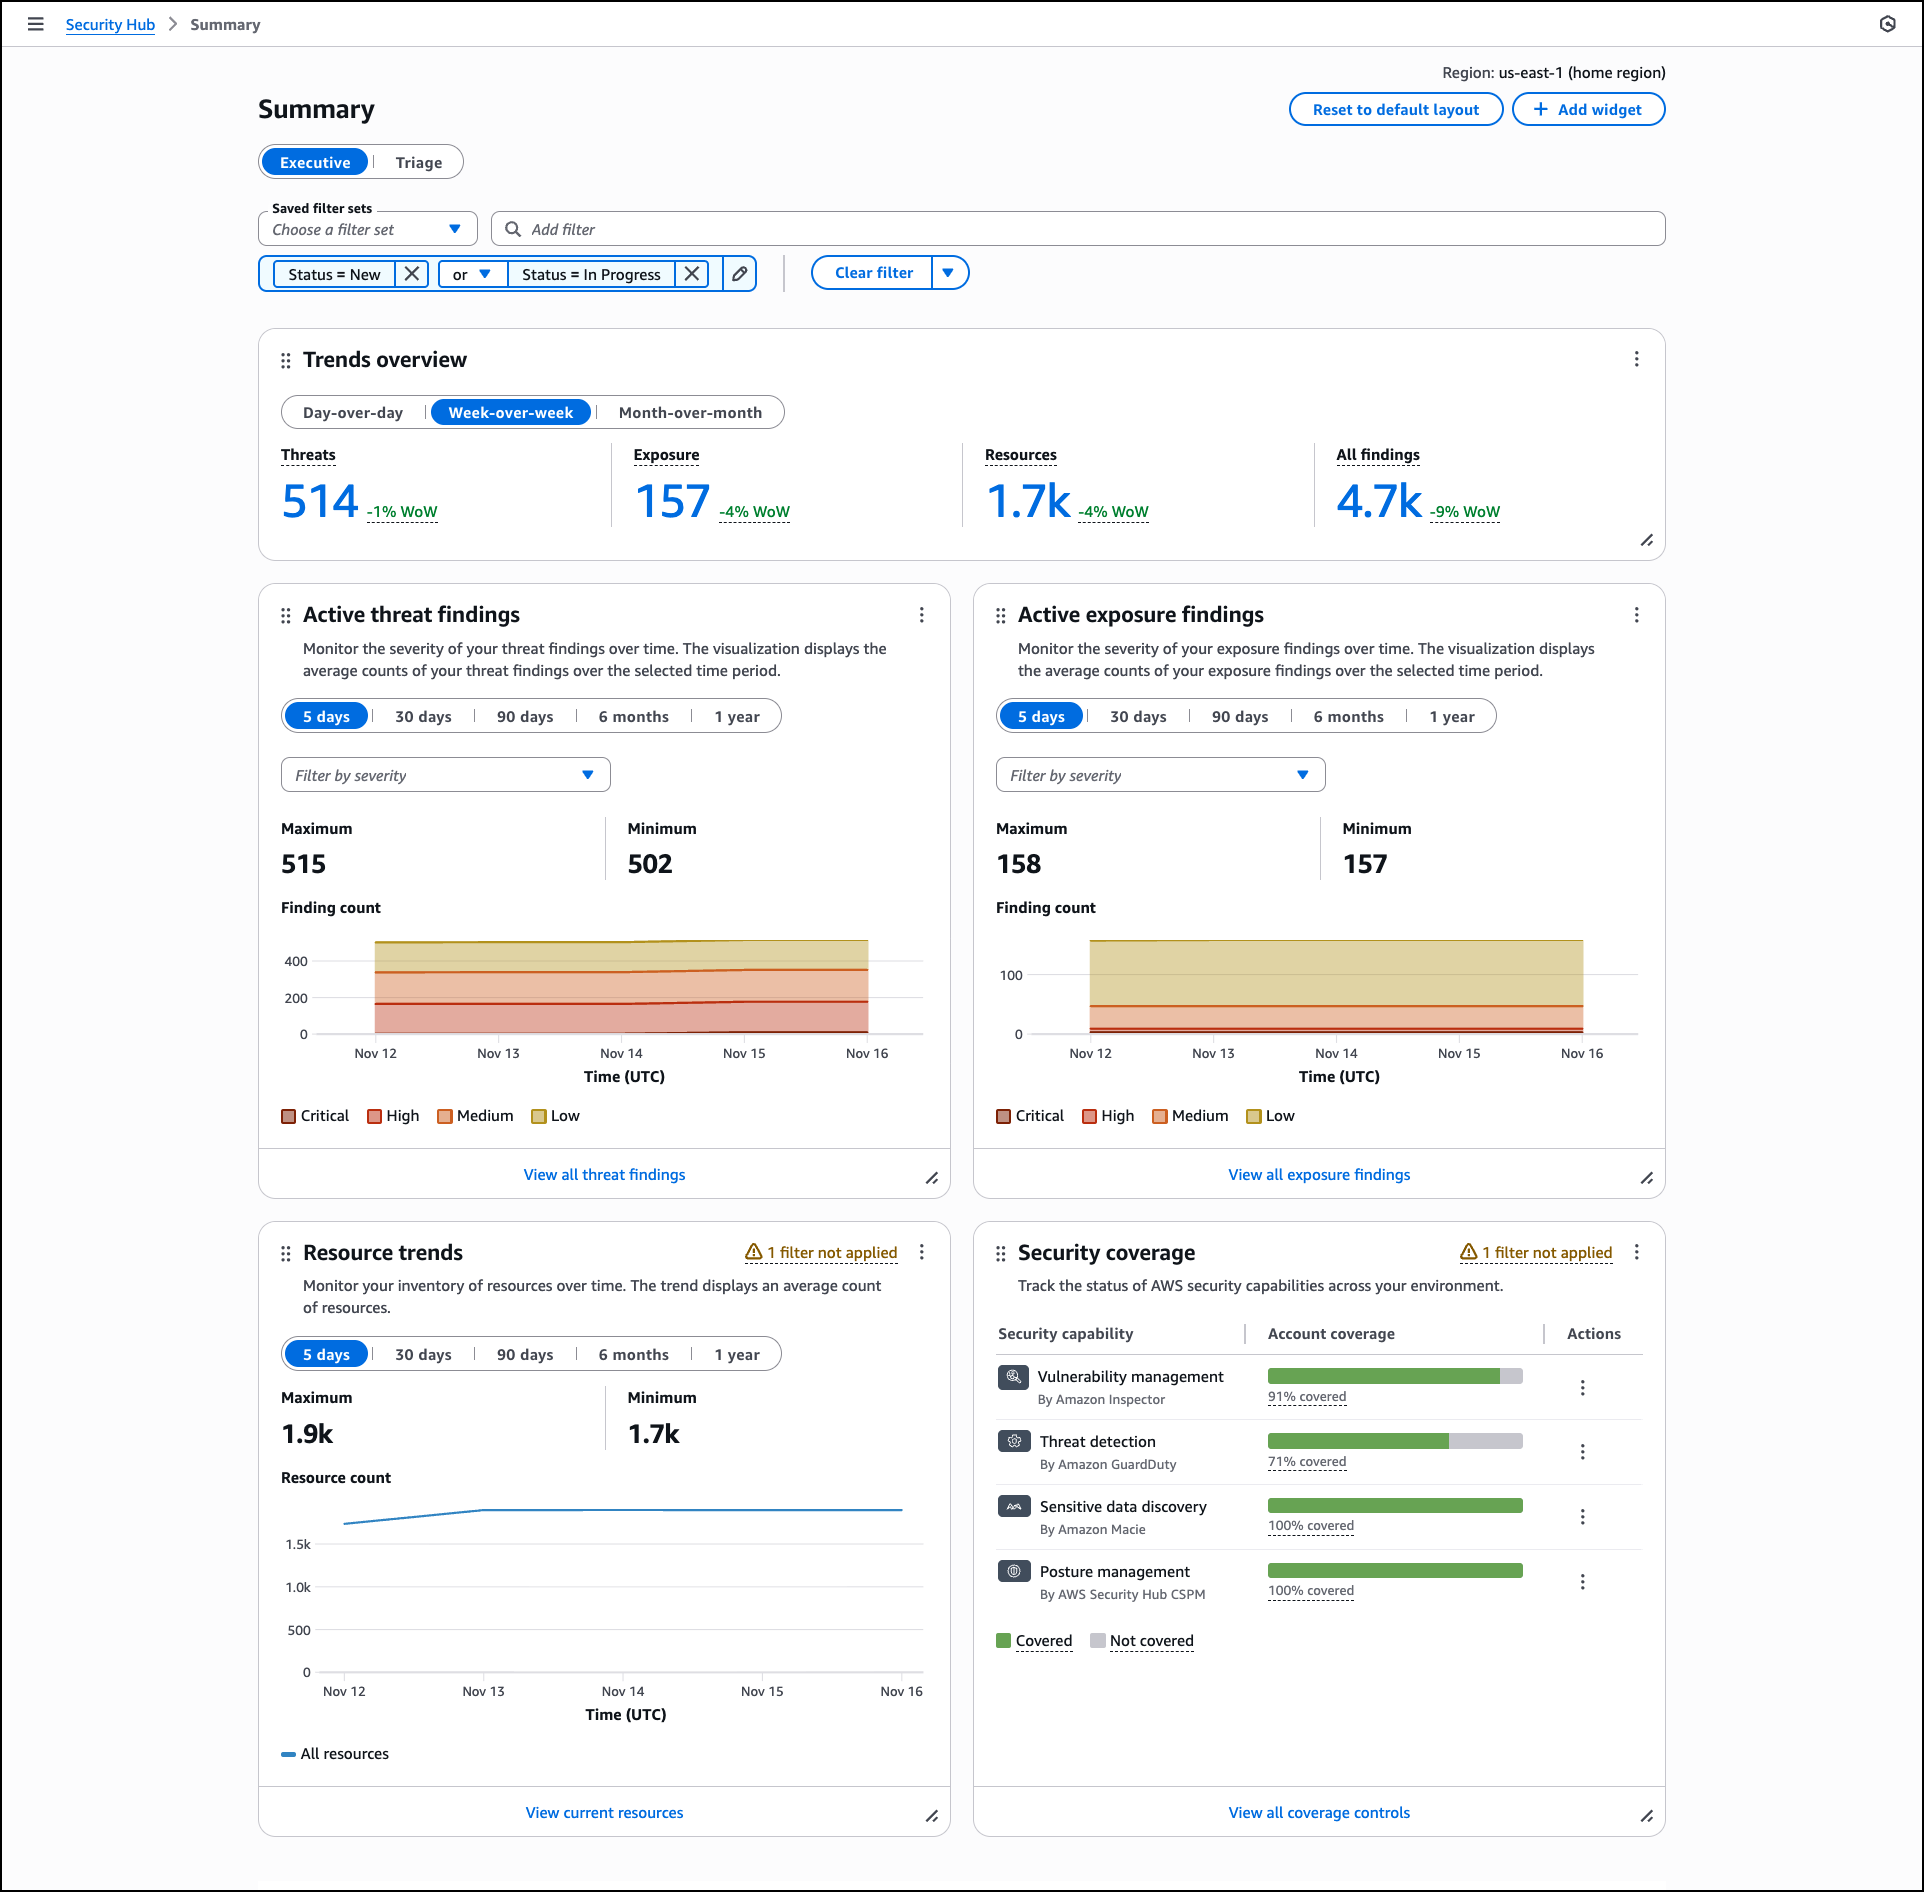
Security Hub includes a Trends feature through the Summary dashboard that provides up to 1 year of historical data for findings and resources across your organization. The Summary dashboard displays an overview of your exposures, threats, resources, and security coverage through customizable widgets that you can add, remove, and arrange based on your operational needs.

The dashboard includes a Trends overview widget that displays period-over-period analysis for day-over-day, week-over-week, and month-over-month comparisons, helping you track whether your security posture is improving or degrading. Trend widgets for Active threat findings, Active exposure findings, and Resource trends provide visualizations of average counts over selectable time periods including 5 days, 30 days, 90 days, 6 months, and 1 year. You can filter these visualizations by severity levels such as critical, high, medium, and low, and hover over specific points in time to review detailed counts.

The Summary dashboard also includes widgets that display current exposure summaries prioritized by severity, threat summaries showing malicious or suspicious activity, and resource inventories organized by type and associated findings.

The Security coverage widget helps you identify gaps in your security service deployment across your organization. This widget tracks which AWS accounts and Regions have security services enabled, helping you understand where you might lack visibility into threats, vulnerabilities, misconfigurations, or sensitive data. The widget displays account coverage across security capabilities including vulnerability management by Amazon Inspector, threat detection by GuardDuty, sensitive data discovery by Amazon Macie, and posture management by AWS Security Hub CSPM. Coverage percentages show which security checks passed or failed across your AWS accounts and Regions where Security Hub is enabled.

You can apply filters to widgets using shared filters that apply across all widgets, finding filters for exposure and threat data, or resource filters for inventory data. You can create and save filter sets using and/or operators to define specific criteria for your security analysis. Dashboard customizations, including saved filter sets and widget layouts, are saved automatically and persist across sessions.

If you configure cross-Region aggregation, the Summary dashboard includes findings from all linked Regions when viewing from your home Region. For delegated administrator accounts in AWS Organizations, data includes findings for both the administrator account and member accounts. Security Hub retains trends data for 1 year from the date findings are generated. After 1 year, trends data is automatically deleted.

Near real-time risk analytics
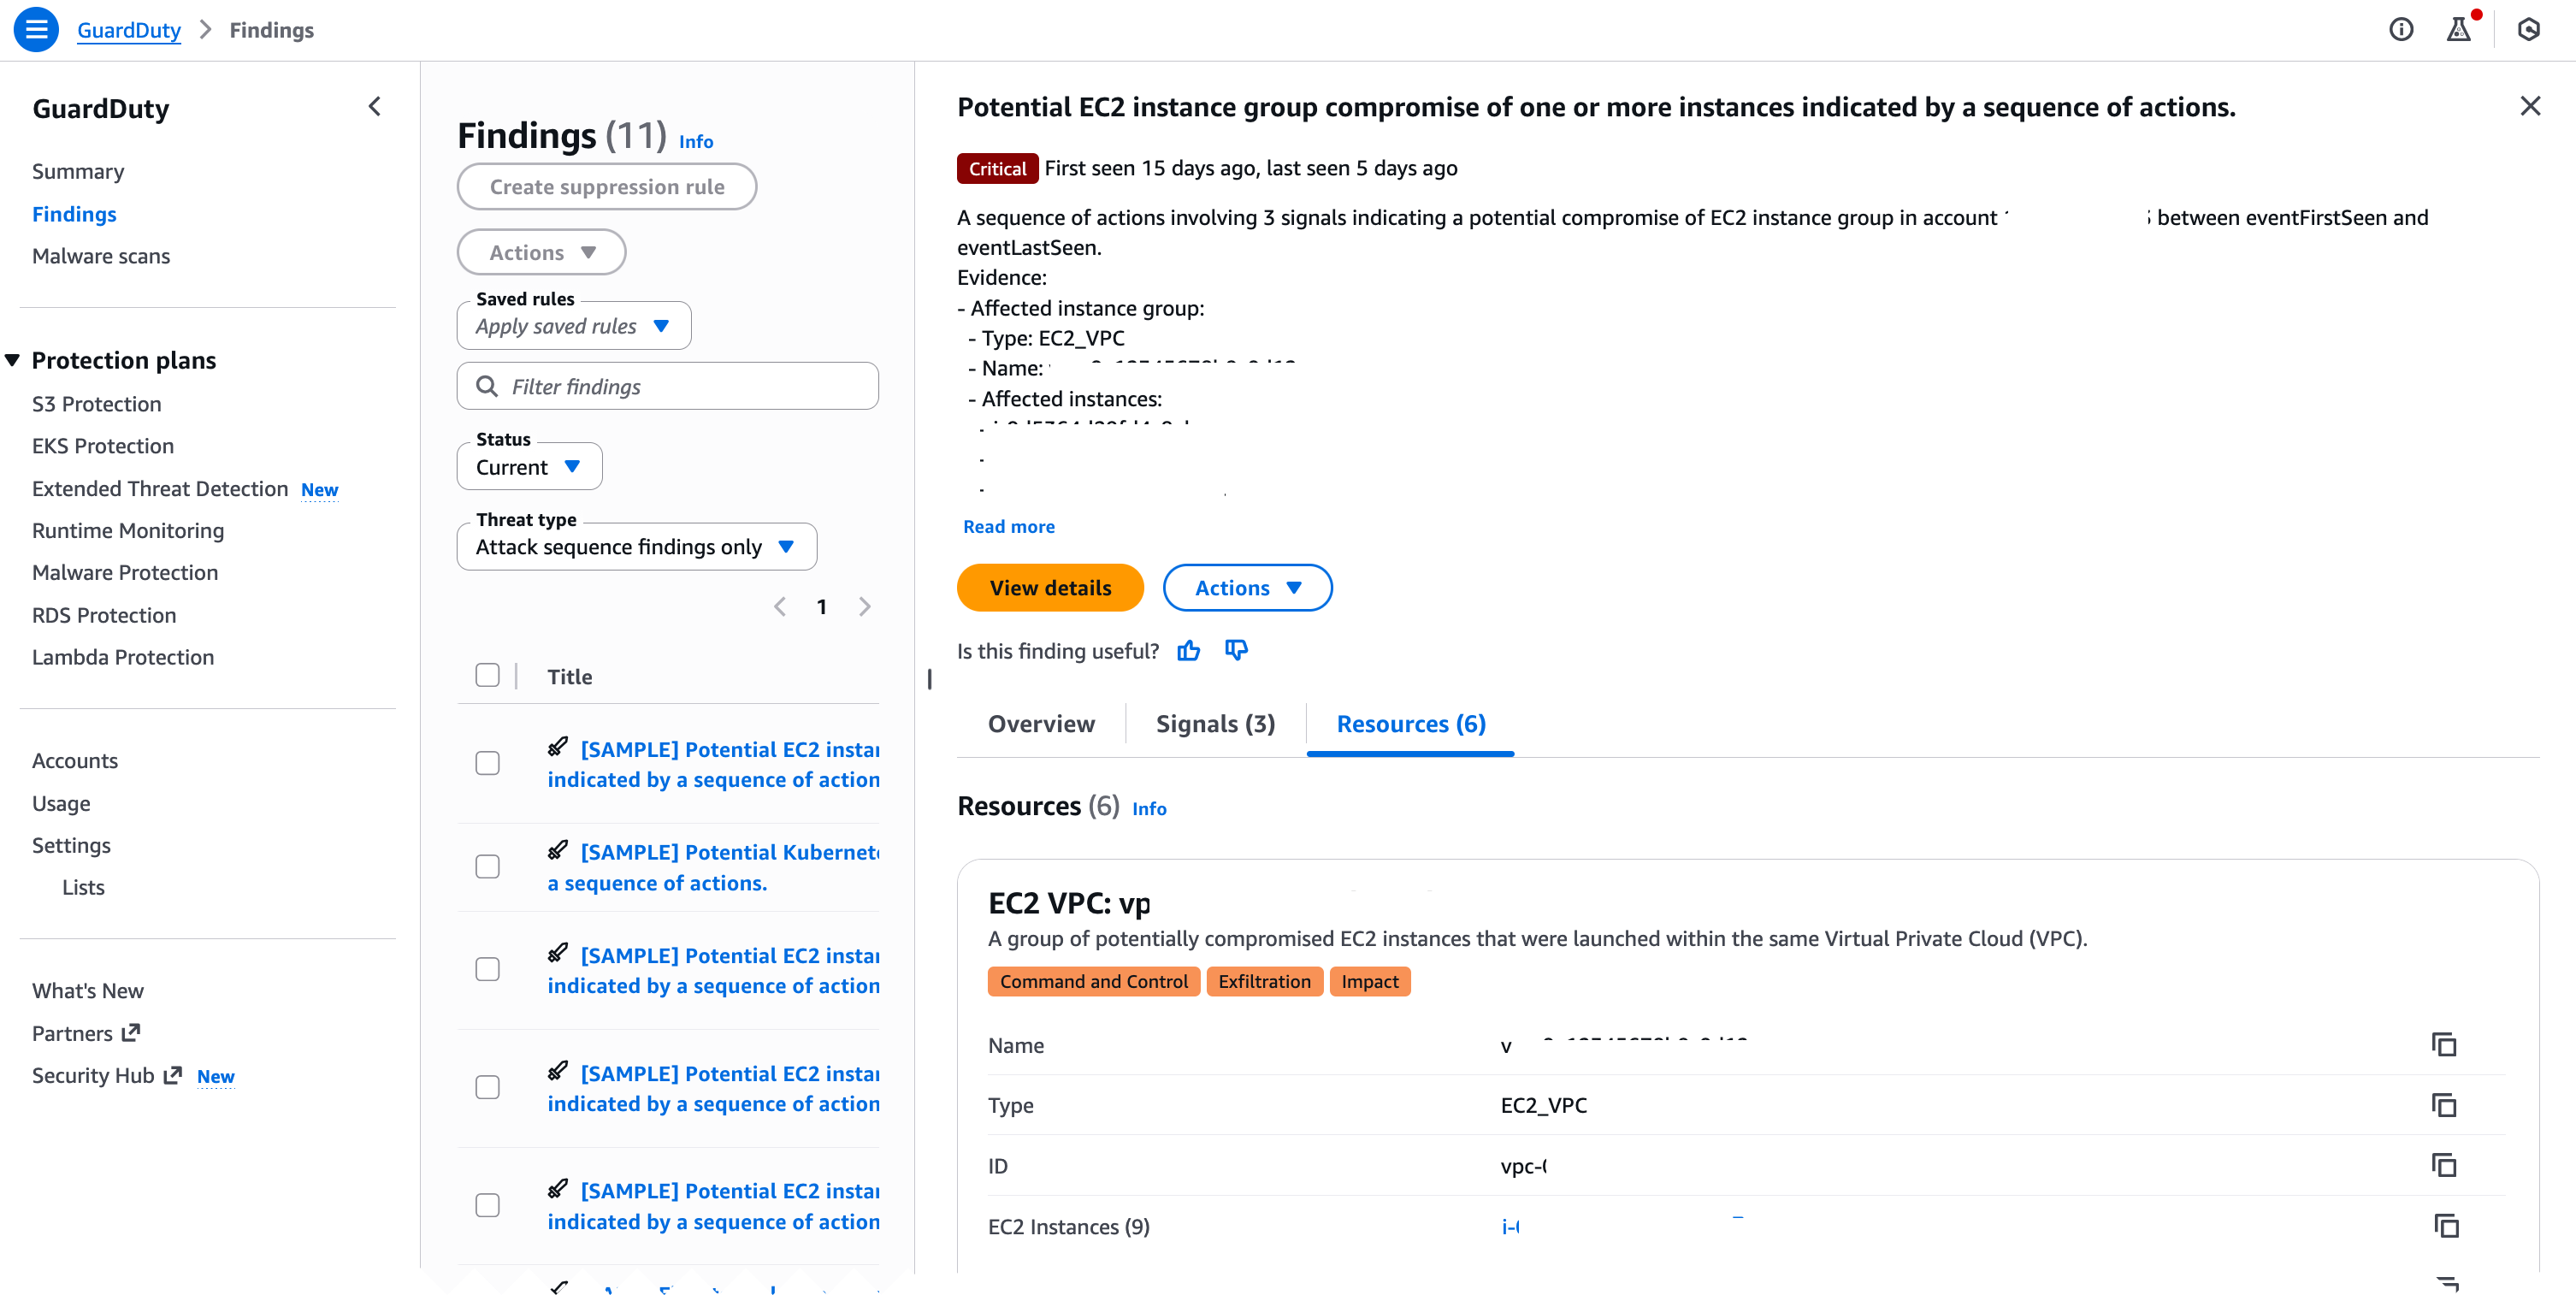
Security Hub now calculates exposures in near real-time and includes threat correlation from GuardDuty alongside existing vulnerability and misconfiguration analysis. When GuardDuty detects threats, Amazon Inspector identifies vulnerabilities, or AWS Security Hub CSPM discovers misconfigurations, Security Hub automatically correlates these findings and updates associated exposures. This advancement provides immediate feedback on your security posture, helping you quickly identify new exposures and verify that remediation actions have reduced risk as expected.

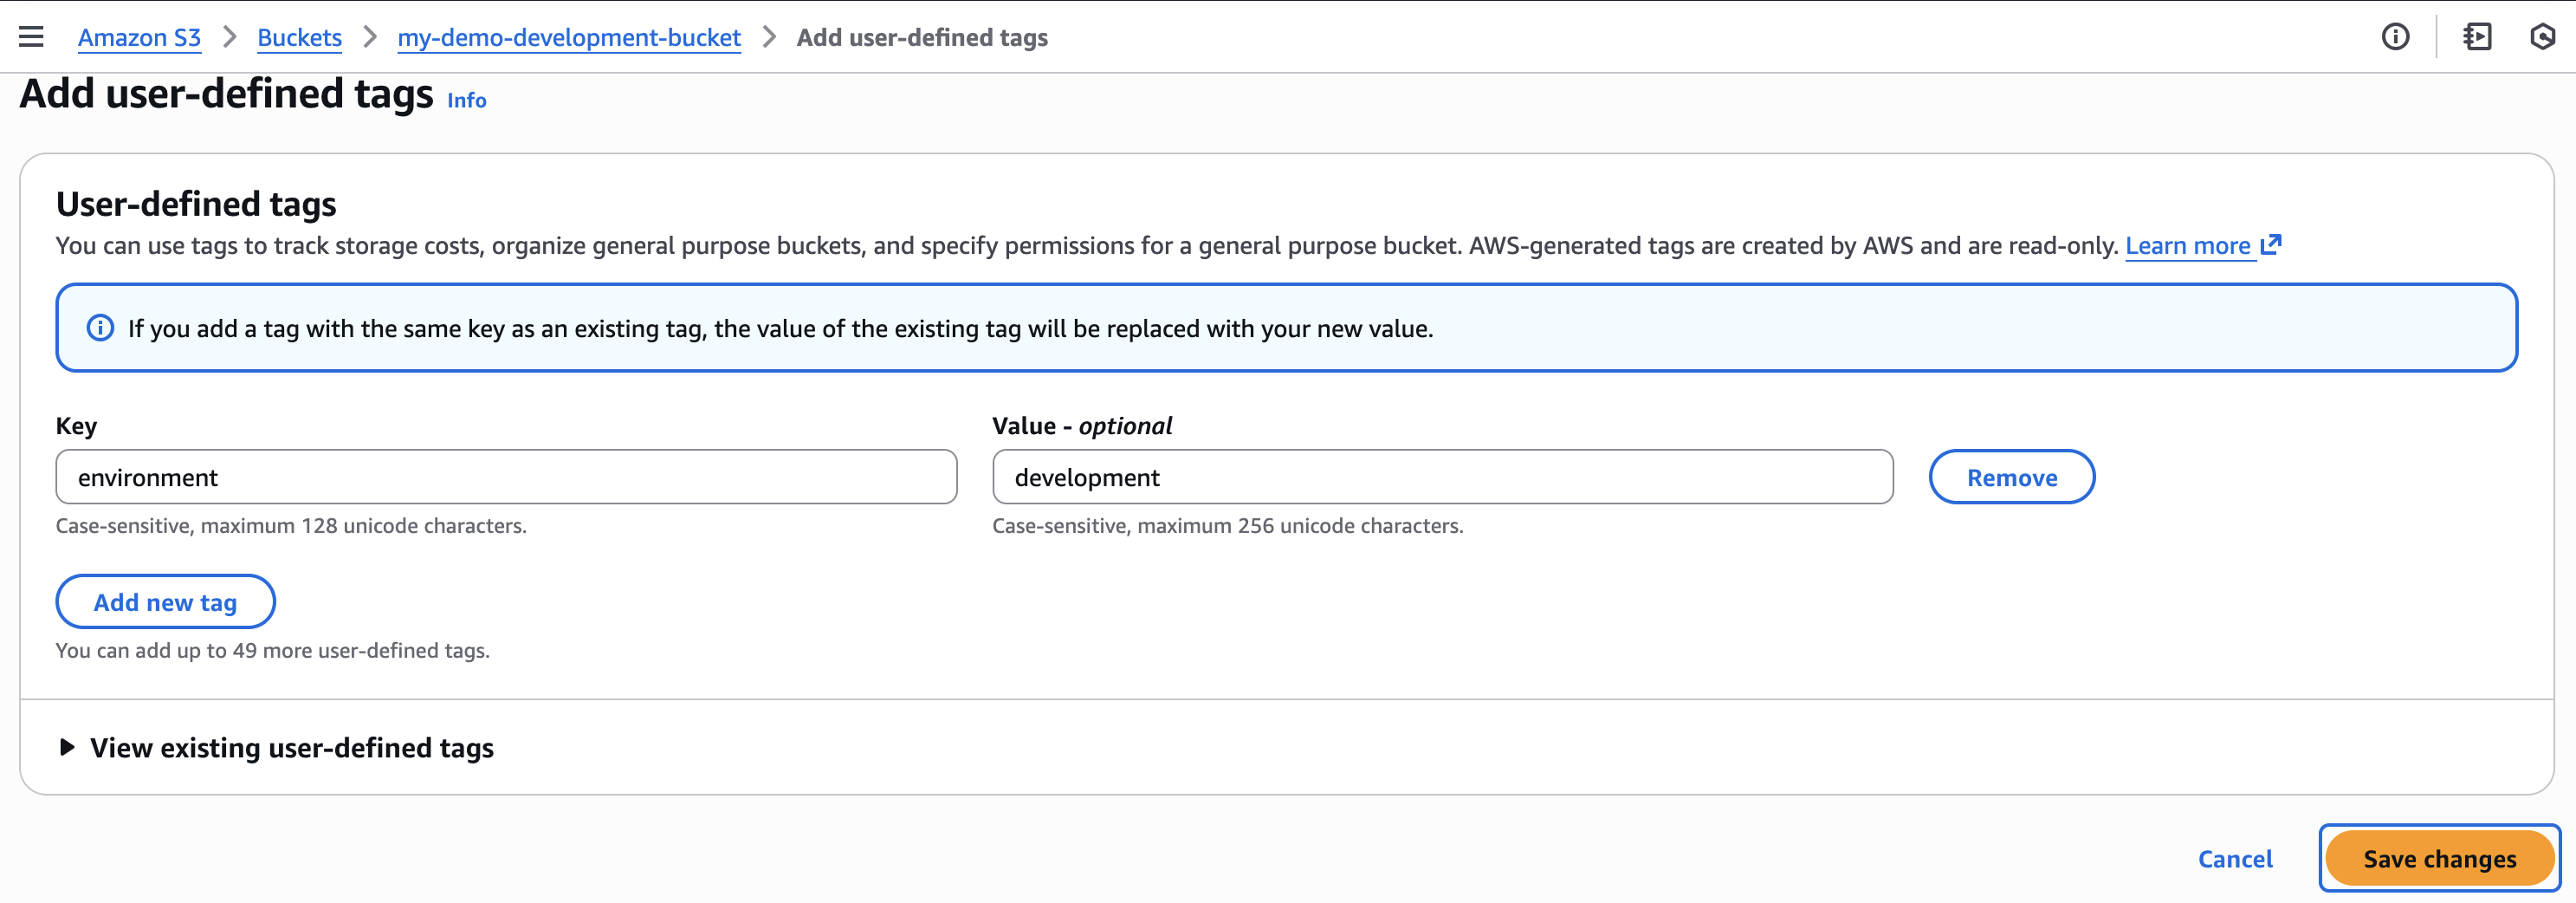
Security Hub correlates findings across AWS Security Hub CSPM, Amazon Inspector, Amazon Macie, Amazon GuardDuty, and other security services to identify exposures that could lead to security incidents. This correlation helps you understand when multiple security issues combine to create critical risk. Security Hub enriches security signals with context by analyzing resource associations, potential impact, and relationships between signals. For example, if Security Hub identifies an Amazon Simple Storage Service (Amazon S3) bucket containing sensitive data with versioning disabled, Object Lock disabled, and MFA delete disabled, remediating any component triggers automatic calculation, helping you verify remediation effectiveness without waiting for scheduled assessments.

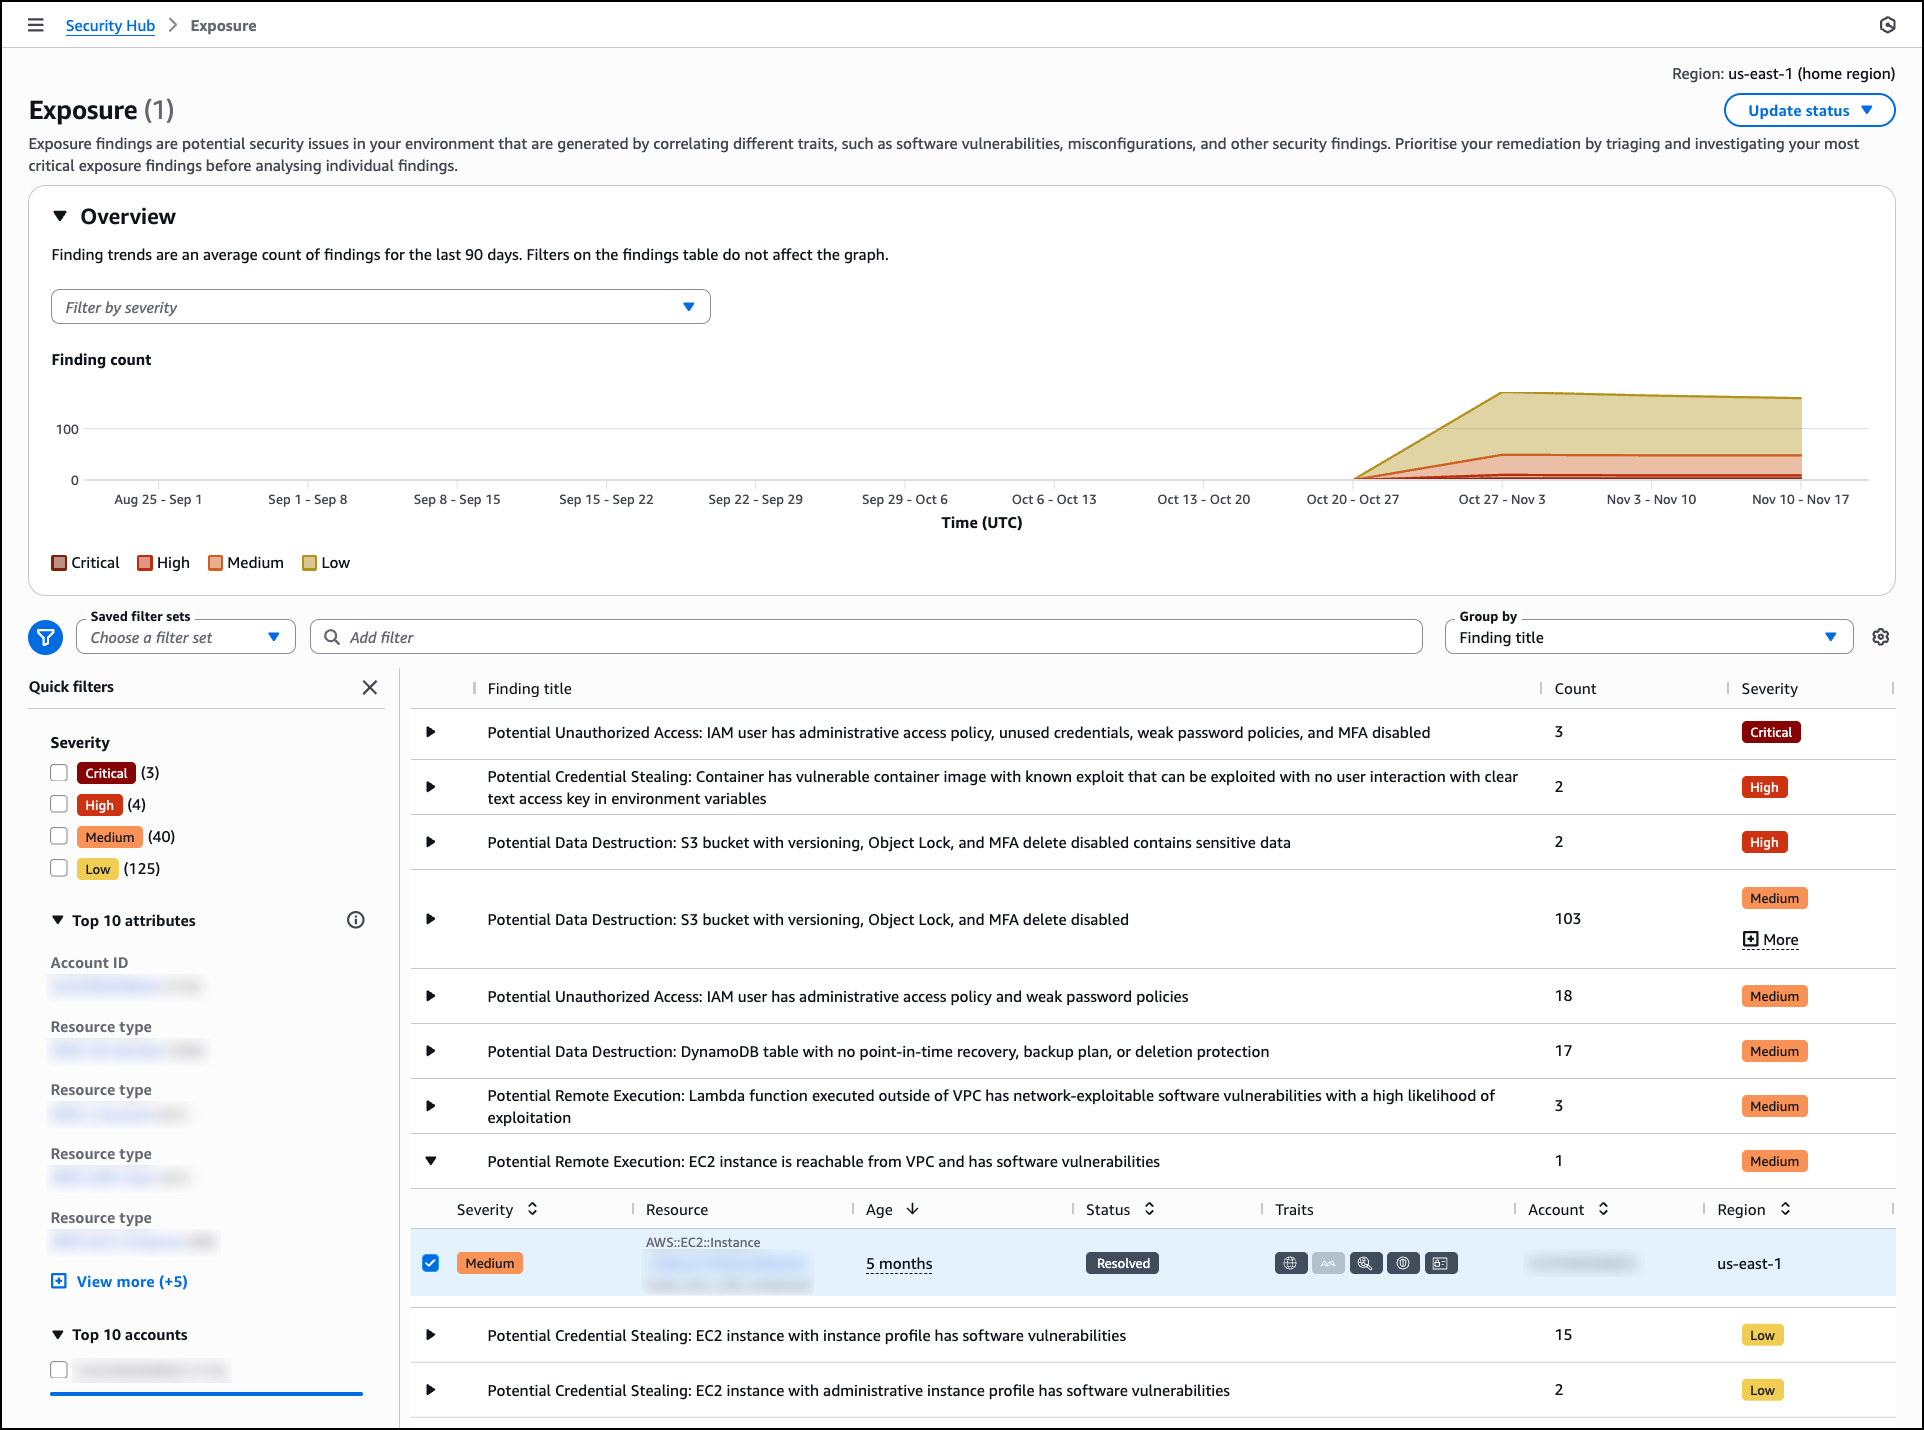
The Exposure page organizes findings by title and severity, helping you focus on critical issues first. The page includes an Overview section with a trends graph that displays the average count of exposure findings over the last 90 days, segmented by severity level. This visualization helps you track changes in your exposure posture over time and identify patterns in security risk.

Exposure findings are grouped by title with expandable rows showing the count of affected resources and overall severity. Each exposure title describes the potential security impact, such as “Potential Data Destruction: S3 bucket with versioning, Object Lock, and MFA delete disabled” or “Potential Remote Execution: EC2 instance is reachable from VPC and has software vulnerabilities.” You can filter exposures using saved filter sets or quick filters based on severity levels including critical, high, medium, and low. The interface also provides filtering by account ID, resource type, and accounts, helping you quickly narrow down exposures relevant to specific parts of your infrastructure.

Security Hub generates exposures as soon as findings are available. For example, when you deploy an Amazon Elastic Compute Cloud (Amazon EC2) instance that is publicly accessible and Amazon Inspector detects a highly exploitable vulnerability while AWS Security Hub CSPM identifies the public accessibility configuration, Security Hub automatically correlates these findings to generate an exposure without waiting for a scheduled assessment. This near-real time correlation helps you identify critical risks in newly deployed resources and take action before they can be exploited.

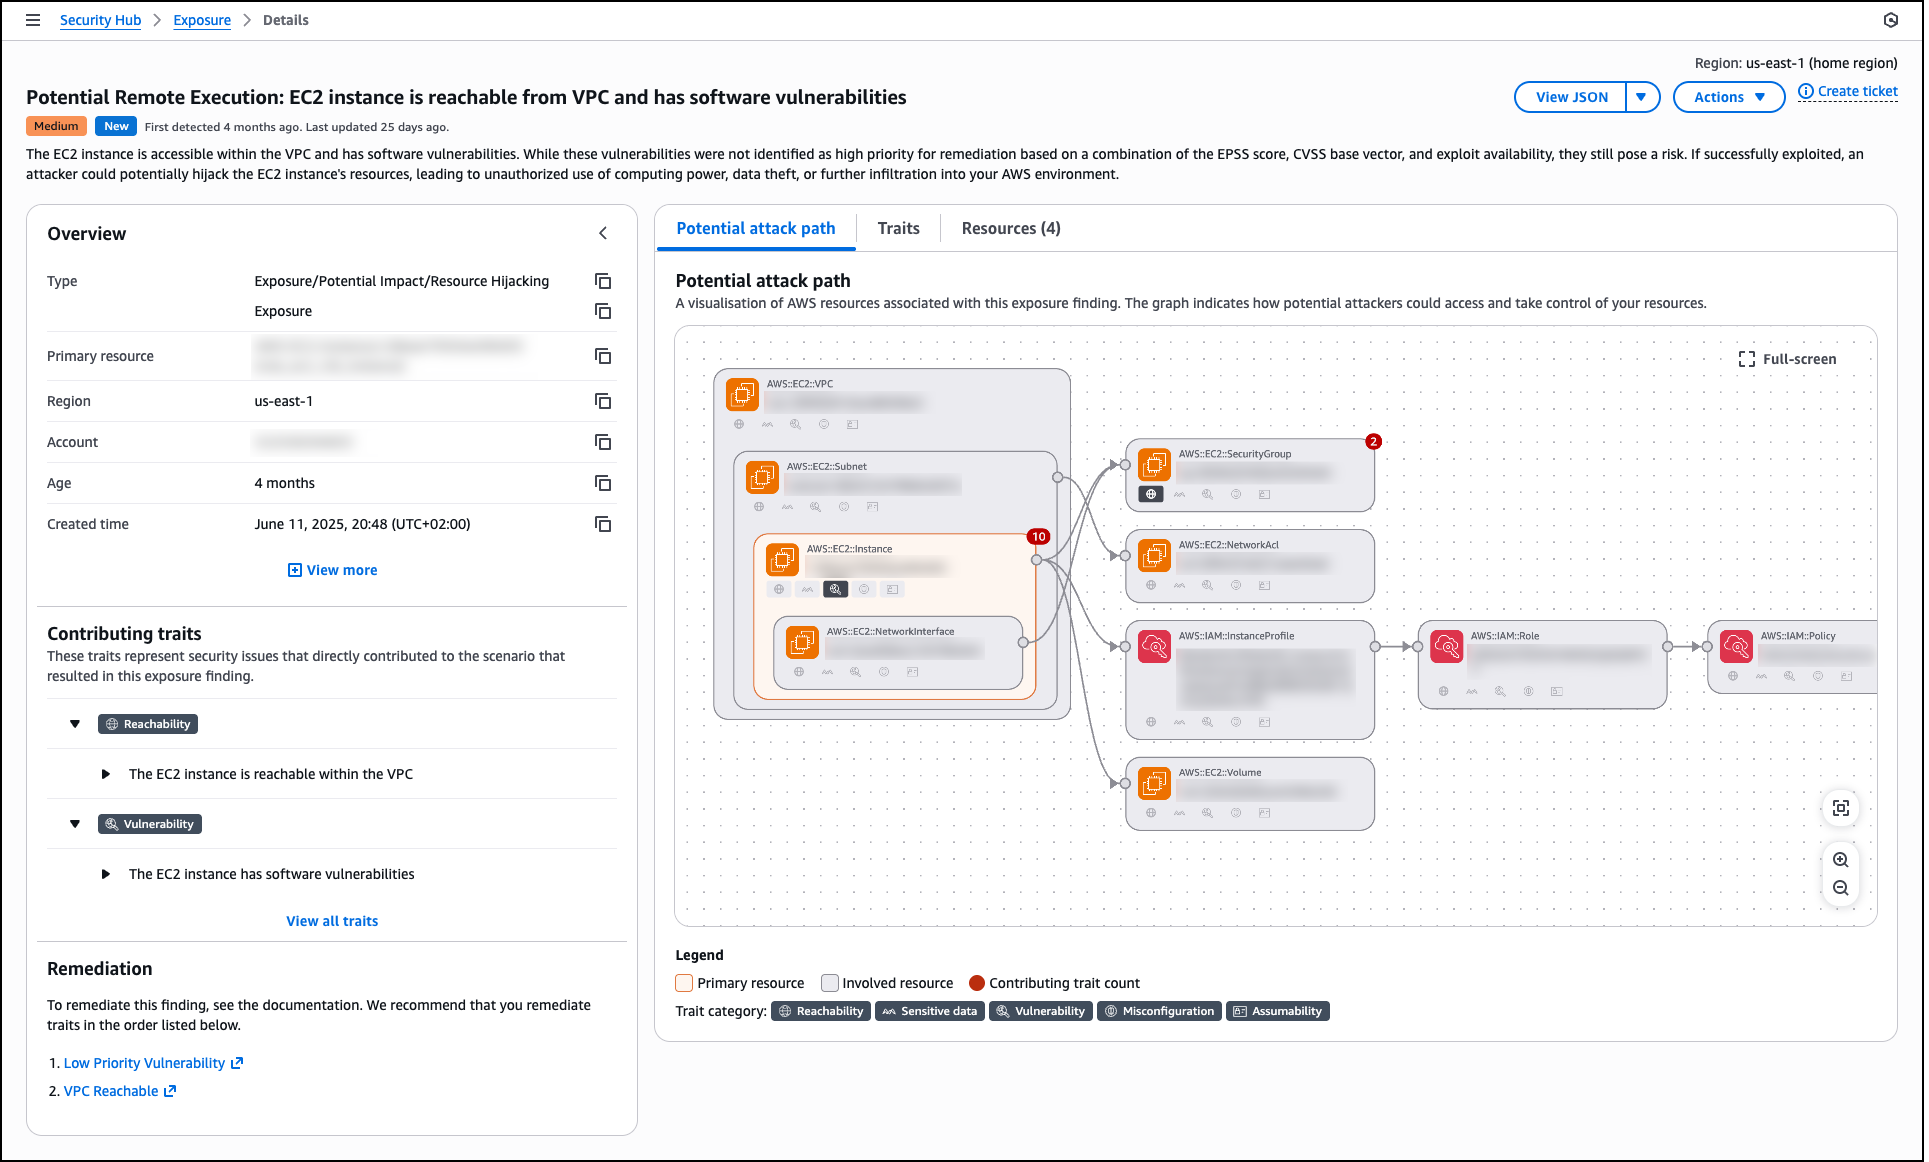
When you select an exposure finding, the details page displays the exposure type, primary resource, Region, account, age, and creation time. The Overview section shows contributing traits that represent the security issues directly contributing to the exposure scenario. These traits are organized by categories such as Reachability, Vulnerability, Sensitive data, Misconfiguration, and Assumability.

The details page includes a Potential attack path tab that provides a visual graph showing how potential attackers could access and take control of your resources. This visualization displays the relationships between the primary resource (such as an EC2 instance), involved resources (such as VPC, subnet, network interface, security group, AWS Identity and Access Management (IAM) instance profile, IAM role, IAM policy, and volumes), and contributing traits. The graph helps you understand the complete attack surface and identify which security controls need adjustment.

The Traits tab lists all security issues contributing to the exposure, and the Resources tab shows all affected resources. The Remediation section provides prioritized guidance with links to documentation, recommending which traits to address first to reduce risk most effectively. By using this comprehensive view, you can investigate specific exposures, understand the full context of security risks, and track remediation progress as your team addresses vulnerabilities, misconfigurations, and other security gaps across your environment.

Expanded partner integrations
Security Hub supports integration with Jira and ServiceNow for incident management workflows. When viewing a finding, you can create a ticket in your preferred system directly from the AWS Security Hub console with finding details, severity, and recommended remediation steps automatically populated. You can also define automation rules in Security Hub that automatically create tickets in Atlassian’s Jira Service Management and ServiceNow based on criteria you specify, such as severity level, resource type, or finding type. This helps you route critical security issues to your incident response teams without manual intervention.

Security Hub findings are formatted in the Open Cybersecurity Schema Framework (OCSF) schema, an open-source standard that enables security tools to share data seamlessly. Partners who have built integrations with the OCSF format with Security Hub include Cribl, CrowdStrike, Databee, DataDog, Dynatrace, Expel, Graylog, Netskope, Securonix, SentinelOne, Splunk a Cisco company, Sumo Logic, Tines, Upwind Security, Varonis, DTEX, and Zscaler. Additionally, service partners such as Accenture, Caylent, Deloitte, Optiv, PwC, and Wipro can help you adopt Security Hub and the OCSF schema.

Security Hub also supports automated response workflows through Amazon EventBridge. You can create EventBridge rules that identify findings based on criteria you specify and route them to targets such as AWS Lambda functions or AWS Systems Manager Automation runbooks for processing and remediation. This helps you act on findings programmatically without manual intervention.

Now available
If you currently use AWS Security Hub CSPM, Amazon GuardDuty, Amazon Inspector, or Amazon Macie, you can access these capabilities by navigating to the AWS Security Hub console. If you’re a new customer, you can enable Security Hub through the AWS Management Console and configure the security services appropriate for your workloads. Security Hub automatically consumes findings from enabled services, making the findings available in the unified console and creating correlated exposure findings based on the ingested security data.

For Regional availability, visit our AWS Services by Region page. Near real-time exposure calculation and the Trends feature are included at no additional charge. Security Hub uses a streamlined, resource-based pricing model that consolidates charges across integrated AWS security services. The console includes a cost estimator to help you plan and forecast security investments across your AWS accounts and Regions before deployment. For detailed information about capabilities, supported integrations, and pricing, visit the AWS Security Hub product page and technical documentation.

— Esra

Amazon GuardDuty adds Extended Threat Detection for Amazon EC2 and Amazon ECS

Post Syndicated from Betty Zheng (郑予彬) original https://aws.amazon.com/blogs/aws/amazon-guardduty-adds-extended-threat-detection-for-amazon-ec2-and-amazon-ecs/

Today, we’re announcing new enhancements to Amazon GuardDuty Extended Threat Detection with the addition of two attack sequence findings for Amazon Elastic Compute Cloud (Amazon EC2) instances and Amazon Elastic Container Service (Amazon ECS) tasks. These new findings build on the existing Extended Threat Detection capabilities, which already combine sequences involving AWS Identity and Access Management (IAM) credential misuse, unusual Amazon Simple Storage service (Amazon S3) bucket activity, and Amazon Elastic Kubernetes Service (Amazon EKS) cluster compromise. By adding coverage for EC2 instance groups and ECS clusters, this launch expands sequence-level visibility to virtual machine and container environments that support the same application. Together, these capabilities provide a more consistent and unified way to detect multistage activity across diverse Amazon Web Services (AWS) workloads.

Modern cloud environments are dynamic and distributed, often running virtual machines, containers, and serverless workloads at scale. Security teams strive to maintain visibility across these environments and connect related activities that might indicate complex, multistage attack sequences. These sequences can involve multiple steps, such as establishing initial access and persistence, providing missing credentials or performing unexpected data access, that unfold over time and across different sources. GuardDuty Extended Threat Detection automatically links these signals using AI and machine learning (ML) models trained at AWS scale to build a complete picture of the activity and surface high-confidence insights to help customers prioritize response actions. By combining evidence from diverse sources, this analysis produces high-fidelity, unified findings that would otherwise be difficult to infer from individual events.

How it works
Extended Threat Detection analyzes multiple types of security signals, including runtime activity, malware detections, VPC Flow Logs, DNS queries, and AWS CloudTrail events to identify patterns that represent a multistage attack across Amazon EC2 and Amazon ECS workloads. Detection works with the GuardDuty foundational plan, and turning on Runtime Monitoring for EC2 or ECS adds deeper process and network-level telemetry that strengthens signal analysis and increases the completeness of each attack sequence.

The new attack sequence findings combine runtime and other observed behaviors across the environment into a single critical-severity sequence. Each sequence includes an incident summary, a timeline of observed events, mapped MITRE ATT&CK® tactics and techniques, and remediation guidance to help you understand how the activity unfolded and which resources were affected.

EC2 instances and ECS tasks are often created and replaced automatically through Auto Scaling groups, shared launch templates, Amazon Machine Images (AMIs), IAM instance profiles, or cluster-level deployments. Because these resources commonly operate as part of the same application, activity observed across them might originate from a single underlying compromise. The new EC2 and ECS findings analyze these shared attributes and consolidate related signals into one sequence when GuardDuty detects a pattern affecting the group.

When a sequence is detected, the GuardDuty console highlights any critical-severity sequence findings on the Summary page, with the affected EC2 instance group or ECS cluster already identified. Selecting a finding opens a consolidated view that shows how the resources are connected, which signals contributed to the sequence, and how the activity progressed over time, helping you quickly understand the scope of impact across virtual machine and container workloads.

In addition to viewing sequences in the console, you can also see these findings in AWS Security Hub, where they appear on the new exposure dashboards alongside other GuardDuty findings to help you understand your overall security risk in one place. This detailed view establishes the context for interpreting how the analysis brings related signals together into a broader attack sequence.

Together, the analysis model and grouping logic give you a clearer, consolidated view of activity across virtual machine and container workloads, helping you focus on the events that matter instead of investigating numerous individual findings. By unifying related behaviors into a single sequence, Extended Threat Detection helps you assess the full context of an attack path and prioritize the most urgent remediation actions.

Now available
Amazon GuardDuty Extended Threat Detection with expanded coverage for EC2 instances and ECS tasks is now available in all AWS Regions where GuardDuty is offered. You can start using this capability today to detect coordinated, multistage activity across virtual machine and container workloads by combining signals from runtime activity, malware execution, and AWS API activity.

This expansion complements the existing Extended Threat Detection capabilities for Amazon EKS, providing unified visibility into coordinated, multistage activity across your AWS compute environment. To learn more, visit the Amazon GuardDuty product page.

Betty

AWS Transform for mainframe introduces Reimagine capabilities and automated testing functionality

Post Syndicated from Channy Yun (윤석찬) original https://aws.amazon.com/blogs/aws/aws-transform-for-mainframe-introduces-reimagine-capabilities-and-automated-testing-functionality/

In May, 2025, we launched AWS Transform for mainframe, the first agentic AI service for modernizing mainframe workloads at scale. The AI-powered mainframe agent accelerates mainframe modernization by automating complex, resource-intensive tasks across every phase of modernization—from initial assessment to final deployment. You can streamline the migration of legacy mainframe applications, including COBOL, CICS, DB2, and VSAM to modern cloud environments—cutting modernization timelines from years to months.

Today, we’re announcing enhanced capabilities in AWS Transform for mainframe that include AI-powered analysis features, support for the Reimagine modernization pattern, and testing automation. These enhancements solve two critical challenges in mainframe modernization: the need to completely transform applications rather than merely move them to the cloud, and the extensive time and expertise required for testing.

  • Reimagining mainframe modernization – This is a new AI-driven approach that completely reimagines the customer’s application architecture using modern patterns or moving from batch process to real-time functions. By combining the enhanced business logic extraction with new data lineage analysis and automated data dictionary generation from the legacy source code through AWS Transform, customers transform monolithic mainframe applications written in languages like COBOL into more modern architectural styles, like microservices.
  • Automated testing – Customers can use new automated test plan generation, test data collection scripts, and test case automation scripts. AWS Transform for mainframe also provides functional testing tools for data migration, results validation, and terminal connectivity. These AI-powered capabilities work together to accelerate testing timelines and improve accuracy through automation.

Let’s learn more about reimagining mainframe modernization and automated testing capabilities.

How to reimagine mainframe modernization
We recognize that mainframe modernization is not a one-size-fits-all proposition. Whereas tactical approaches focus on augmentation and maintaining existing systems, strategic modernization offers distinct paths: Replatform, Refactor, Replace, or the new Reimagine.

In the Reimagine pattern, AWS Transform AI-powered analysis combines mainframe system analysis with organizational knowledge to create detailed business and technical documentation and architecture recommendations. This helps preserve critical business logic while enabling modern cloud-native capabilities.

AWS Transform provides new advanced data analysis capabilities that are essential for successful mainframe modernization, including data lineage analysis and automated data dictionary generation. These features work together to define the structure and meaning to accompany the usage and relationships of mainframe data. Customers gain complete visibility into their data landscape, enabling informed decision-making for modernization. Their technical teams can confidently redesign data architectures while preserving critical business logic and relationships.

The Reimagining strategy follows the principle of human in the loop validation, which means that AI-generated application specifications and code such as AWS Transform and Kiro are continuously validated by domain experts. This collaborative approach between AI capabilities and human judgment significantly reduces transformation risk while maintaining the speed advantages of AI-powered modernization.

The pathway has a three-phase methodology to transform legacy mainframe applications into cloud-native microservices:

  • Reverse engineering to extract business logic and rules from existing COBOL or job control language (JCL) code using AWS Transform for mainframe.
  • Forward engineering to generate microservice specification, modernized source code, infrastructure as code (IaC), and modernized database.
  • Deploy and test to deploy the generated microservices to Amazon Web Services (AWS) using IaC and to test the functionality of the modernized application.

Although microservices architecture offers significant benefits for mainframe modernization, it’s crucial to understand that it’s not the best solution for every scenario. The choice of architectural patterns should be driven by the specific requirements and constraints of the system. The key is to select an architecture that aligns with both current needs and future aspirations, recognizing that architectural decisions can evolve over time as organizations mature their cloud-native capabilities.

The flexible approach supports both do-it-yourself and partner-led development, so you can use your preferred tools while maintaining the integrity of your business processes. You get the benefits of modern cloud architecture while preserving decades of business logic and reducing project risk.

Automated testing in action
The new automated testing feature supports IBM z/OS mainframe batch application stack at launch, which helps organizations address a wider range of modernization scenarios while maintaining consistent processes and tooling.

Here are the new mainframe capabilities:

  • Plan test cases – Create test plans from mainframe code, business logic, and scheduler plans.
  • Generate test data collection scripts – Create JCL scripts for data collection from your mainframe to your test plan.
  • Generate test automation scripts – Generate execution scripts to automate testing of modernized applications running in the target AWS environment.

To get started with automated testing, you should set up a workspace, assign a specific role to each user, and invite them to onboard your workspace. To learn more, visit Getting started with AWS Transform in the AWS Transform User Guide.

Choose Create job in your workspace. You can see all types of supported transformation jobs. For this example, I select the Mainframe Modernization job to modernize mainframe applications.

After a new job is created, you can kick off modernization for tests generation. This workflow is sequential and it is a place for you to answer the AI agent’s questions, providing the necessary input. You can add your collaborators and specify resource location where the codebase or documentation is located in your Amazon Simple Storage Service (Amazon S3) bucket.

I use a sample application for a credit card management system as the mainframe banking case with the presentation (BMS screens), business logic (COBOL) and data (VSAM/DB2), including online transaction processing and batch jobs.

After finishing the steps of analyzing code, extracting business logic, decomposing code, planning migration wave, you can experience new automated testing capabilities such as planning test cases, generating test data collection scripts, and test automation scripts.

The new testing workflow creates a test plan for your modernization project and generates test data collection scripts. You will have three planning steps:

  • Configure test plan inputs – You can link your test plan to your other job files. The test plan is generated based on analyzing the mainframe application code and can provide more details optionally using the extracted business logic, the technical documentation, the decomposition, and using a scheduler plan.
  • Define test plan scope – You can define the entry point, the specific program where the application’s execution flow begins. For example, the JCL for a batch job. In the test plan, each functional test case is designed to start the execution from a specific entry point.
  • Refine test plan – A test plan is made up of sequential test cases. You can reorder them, add new ones, merge multiple cases, or split one into two on the test case detail page. Batch test cases are composed of a sequence of JCLs following the scheduler plan.

Generating test data collection scripts collects test data from mainframe applications for functional equivalence testing. This step actively generates JCL scripts that will help you gather test data from the sample application’s various data sources (such as VSAM files or DB2 databases) for use in testing the modernized application. The step is designed to create automated scripts that can extract test data from VSAM datasets, query DB2 tables for sample data, collect sequential data sets, and generate data collection workflows. After this step is completed, you’ll have comprehensive test data collection scripts ready to use.

To learn more about automated testing, visit Modernization of mainframe applications in the AWS Transform User Guide.

Now available
The new capabilities in AWS Transform for mainframe are available today in all AWS Regions where AWS Transform for mainframe is offered. For Regional availability and future roadmap, visit the AWS Capabilities by Region. Currently, we offer our core features—including assessment and transformation—at no cost to AWS customers. To learn more, visit AWS Transform Pricing page.

Give it a try in the AWS Transform console. To learn more, visit the AWS Transform for mainframe product page and send feedback to AWS re:Post for AWS Transform for mainframe or through your usual AWS Support contacts.

Channy

AWS Transform announces full-stack Windows modernization capabilities

Post Syndicated from Prasad Rao original https://aws.amazon.com/blogs/aws/aws-transform-announces-full-stack-windows-modernization-capabilities/

Earlier this year in May, we announced the general availability of AWS Transform for .NET, the first agentic AI service for modernizing .NET applications at scale. During the early adoption period of the service, we received valuable feedback indicating that, in addition to .NET application modernization, you would like to modernize SQL Server and legacy UI frameworks. Your applications typically follow a three-tier architecture—presentation tier, application tier, and database tier—and you need a comprehensive solution that can transform all of these tiers in a coordinated way.

Today, based on your feedback, we’re excited to announce AWS Transform for full-stack Windows modernization, to offload complex, tedious modernization work across the Windows application stack. You can now identify application and database dependencies and modernize them in an orchestrated way through a centralized experience.

AWS Transform accelerates full-stack Windows modernization by up to five times across application, UI, database, and deployment layers. Along with porting .NET Framework applications to cross-platform .NET, it migrates SQL Server databases to Amazon Aurora PostgreSQL-Compatible Edition with intelligent stored procedure conversion and dependent application code refactoring. For validation and testing, AWS Transform deploys applications to Amazon Elastic Compute Cloud (Amazon EC2) Linux or Amazon Elastic Container Service (Amazon ECS), and provides customizable AWS CloudFormation templates and deployment configurations for production use. AWS Transform has also added capabilities to modernize ASP.NET Web Forms UI to Blazor.

There is much to explore, so in this post I’ll provide the first look at AWS Transform for full-stack Windows modernization capabilities across all layers.

Create a full-stack Windows modernization transformation job
AWS Transform connects to your source code repositories and database servers, analyzes application and database dependencies, creates modernization waves, and orchestrates full-stack transformations for each wave.

To get started with AWS Transform, I first complete the onboarding steps outlined in the getting started with AWS Transform user guide. After onboarding, I sign in to the AWS Transform console using my credentials and create a job for full-stack Windows modernization.

Create a new job for Windows Modernization
Create a new job by choosing SQL Server Database Modernization

After creating the job, I complete the prerequisites. Then, I configure the database connector for AWS Transform to securely access SQL Server databases running on Amazon EC2 and Amazon Relational Database Service (Amazon RDS). The connector can connect to multiple databases within the same SQL Server instance.

Create new database connector by adding connector name and AWS Account ID

Next, I set up a connector to connect to my source code repositories.

Add a source code connector by adding Connection name, AWS Account ID and Code Connector Arn

Furthermore, I have the option to choose if I would like AWS Transform to deploy the transformed applications. I choose Yes and provide the target AWS account ID and AWS Region for deploying the applications. The deployment option can be configured later as well.

Choose if you would like to deploy transformed apps

After the connectors are set up, AWS Transform connects to the resources and runs the validation to verify IAM roles, network settings, and related AWS resources.

After the successful validation, AWS Transform discovers databases and their associated source code repositories. It identifies dependencies between databases and applications to create waves for transforming related components together. Based on this analysis, AWS Transform creates a wave-based transformation plan.

Start assessment for discovered database and source code repositories

Assessing database and dependent applications
For the assessment, I review the databases and source code repositories discovered by AWS Transform and choose the appropriate branches for code repositories. AWS Transform scans these databases and source code repositories, then presents a list of databases along with their dependent .NET applications and transformation complexity.

Start wave planning of asessed databases and dependent repositories

I choose the target databases and repositories for modernization. AWS Transform analyzes these selections and generates a comprehensive SQL Modernization Assessment Report with a detailed wave plan. I download the report to review the proposed modernization plan. The report includes an executive summary, wave plan, dependencies between databases and code repositories, and complexity analysis.

View SQL Modernization Assessment Report

Wave transformation at scale
The wave plan generated by AWS Transform consists of four steps for each wave. First, it converts the SQL Server schema to PostgreSQL. Second, it migrates the data. Third, it transforms the dependent .NET application code to make it PostgreSQL compatible. Finally, it deploys the application for testing.

Before converting the SQL Server schema, I can either create a new PostgreSQL database or choose an existing one as the target database.

Choose or create target database

After I choose the source and target databases, AWS Transform generates conversion reports for my review. AWS Transform converts the SQL Server schema to PostgreSQL-compatible structures, including tables, indexes, constraints, and stored procedures.

Download Schema conversion reports

For any schema that AWS Transform can’t automatically convert, I can manually address them in the AWS Database Migration Service (AWS DMS) console. Alternatively, I can fix them in my preferred SQL editor and update the target database instance.

After completing schema conversion, I have the option to proceed with data migration, which is an optional step. AWS Transform uses AWS DMS to migrate data from my SQL Server instance to the PostgreSQL database instance. I can choose to perform data migration later, after completing all transformations, or work with test data by loading it into my target database.

Choose if you would like to migrate data

The next step is code transformation. I specify a target branch for AWS Transform to upload the transformed code artifacts. AWS Transform updates the codebase to make the application compatible with the converted PostgreSQL database.

Specify target branch destination for transformed codebase

With this release, AWS Transform for full-stack Windows modernization supports only codebases in .NET 6 or later. For codebases in .NET Framework 3.1+, I first use AWS Transform for .NET to port them to cross-platform .NET. I’ll expand on this in a following section.

After the conversion is completed, I can view the source and target branches along with their code transformation status. I can also download and review the transformation report.

Download transformation report

Modernizing .NET Framework applications with UI layer
One major feature we’re releasing today is the modernization of UI frameworks from ASP.NET Web Forms to Blazor. This is added to existing support for modernizing model-view-controller (MVC) Razor views to ASP.NET Core Razor views.

As mentioned previously, if I have a .NET application in legacy .NET Framework, then I continue using AWS Transform for .NET to port it to cross-platform .NET. For legacy applications with UIs built on ASP.NET Web Forms, AWS Transform now modernizes the UI layer to Blazor along with porting the backend code.

AWS Transform for .NET converts ASP.NET Web Forms projects to Blazor on ASP.NET Core, facilitating the migration of ASP.NET websites to Linux. The UI modernization feature is enabled by default in AWS Transform for .NET on both the AWS Transform web console and Visual Studio extension.

During the modernization process, AWS Transform handles the conversion of ASPX pages, ASCX custom controls, and code-behind files, implementing them as server-side Blazor components rather than web assembly. The following project and file changes are made during the transformation:

From To Description
*.aspx, *.ascx *.razor .aspx pages and .ascx custom controls become .razor files
Web.config appsettings.json Web.config settings become appsettings.json settings
Global.asax Program.cs Global .asax code becomes Program.cs code
*.master *layout.razor Master files become layout.razor files

Image showcasing how the specific project files are transformed

Other new features in AWS Transform for .NET
Along with UI porting, AWS Transform for .NET has added support for more transformation capabilities and enhanced developer experience. These new features include the following:

  • Port to .NET 10 and .NET Standard – AWS Transform now supports porting to .NET 10, the latest Long-Term Support (LTS) release, which was released on November 11, 2025. It also supports porting class libraries to .NET Standard, a formal specification for a set of APIs that are common across all .NET implementations. Furthermore, AWS Transform is now available with AWS Toolkit for Visual Studio 2026.
  • Editable transformation report – After the assessment is complete, you can now view and customize the transformation plan based on your specific requirements and preferences. For example, you can update package replacement details.
  • Real-time transformation updates with estimated remaining time – Depending on the size and complexity of the codebase, AWS Transform can take some time to complete the porting. You can now track transformation updates in real-time along with the estimated remaining time.
  • Next steps markdown – After the transformation is complete, AWS Transform now generates a next steps markdown file with the remaining tasks to complete the porting. You can use this as a revised plan to repeat the transformation with AWS Transform or use AI code-companions to complete the porting.

Things to know
Some more things to know are:

  • AWS Regions – AWS Transform for full-stack Windows modernization is generally available today in the US East (N. Virginia) Region. For Regional availability and future roadmap, visit the AWS Capabilities by Region.
  • Pricing – Currently, there is no added charge for Windows modernization features of AWS Transform. Any resources you create or continue to use in your AWS account using the output of AWS Transform are billed according to their standard pricing. For limits and quotas, refer to the AWS Transform User Guide.
  • SQL Server versions supported – AWS Transform supports the transformation of SQL Server versions from 2008 R2 through 2022, including all editions (Express, Standard, and Enterprise). SQL Server must be hosted on Amazon RDS or Amazon EC2 in the same Region as AWS Transform.
  • Entity Framework versions supported – AWS Transform supports the modernization of Entity Framework versions 6.3 through 6.5 and Entity Framework Core 1.0 through 8.0.
  • Getting started – To get started, visit AWS Transform for full-stack Windows modernization User Guide.

Prasad

Introducing AWS Transform custom: Crush tech debt with AI-powered code modernization

Post Syndicated from Matheus Guimaraes original https://aws.amazon.com/blogs/aws/introducing-aws-transform-custom-crush-tech-debt-with-ai-powered-code-modernization/

Technical debt is one of the most persistent challenges facing enterprise development teams today. Studies show that organizations spend 20% of their IT budget on technical debt instead of advancing new capabilities. Whether it’s upgrading legacy frameworks, migrating to newer runtime versions, or refactoring outdated code patterns, these essential but repetitive tasks consume valuable developer time that could be spent on innovation.

Today, we’re excited to announce AWS Transform custom, a new agent that fundamentally changes how organizations approach modernization at scale. This intelligent agent combines pre-built transformations for Java, Node.js, and Python upgrades with the ability to define custom transformations. By learning specific transformation patterns and automating them across entire codebases, customers using AWS Transform custom have achieved up to 80% reduction in execution time in many cases, freeing developers to focus on innovation.

You can define transformations using your documentation, natural language descriptions, and code samples. The service then applies these specific patterns consistently across hundreds or thousands of repositories, improving its effectiveness through both explicit feedback and implicit signals like developers’ manual fixes within your transformation projects.

AWS Transform custom offers both CLI and web interfaces to suit different modernization needs. You can use the CLI to define transformations through natural language interactions and execute them on local codebases, either interactively or autonomously. You can also integrate it into code modernization pipelines or workflows, making it ideal for machine-driven automation. Meanwhile, the web interface provides comprehensive campaign management capabilities, helping teams track and coordinate transformation progress across multiple repositories at scale.

Language and framework modernization
AWS Transform supports runtime upgrades without the need to provide additional information, understanding not only the syntax changes required but also the subtle behavioral differences and optimization opportunities that come with newer versions. The same intelligent approach applies to Node.js, Python and Java runtime upgrades, and even extends to infrastructure-level transitions, such as migrating workloads from x86 processors to AWS Graviton.

It also navigates framework modernization with sophistication. When organizations need to update their Spring Boot applications to take advantage of newer features and security patches, AWS Transform custom doesn’t merely update version numbers but understands the cascading effects of dependency changes, configuration updates, and API modifications.

For teams facing more dramatic shifts, such as migrating from Angular to React, AWS Transform custom can learn the patterns of component translation, state management conversion, and routing logic transformation that make such migrations successful.

Infrastructure and enterprise-scale transformations
The challenge of keeping up with evolving APIs and SDKs becomes particularly acute in cloud-based environments where services are continuously improving. AWS Transform custom supports AWS SDK updates across a broad spectrum of programming languages that enterprises use including Java, Python, and JavaScript. The service understands not only the mechanical aspects of API changes, but also recognizes best practices and optimization opportunities available in newer SDK versions.

Infrastructure as Code transformations represent another critical capability, especially as organizations evaluate different tooling strategies. Whether you’re converting AWS Cloud Development Kit (AWS CDK) templates to Terraform for standardization purposes, or updating AWS CloudFormation configurations to access new service features, AWS Transform custom understands the declarative nature of these tools and can maintain the intent and structure of your infrastructure definitions.

Beyond these common scenarios, AWS Transform custom excels at addressing the unique, organization-specific code patterns that accumulate over years of development. Every enterprise has its own architectural conventions, utility libraries, and coding standards that need to evolve over time. It can learn these custom patterns and help refactor them systematically so that institutional knowledge and best practices are applied consistently across the entire application portfolio.

AWS Transform custom is designed with enterprise development workflows in mind, enabling center of excellence teams and system integrators to define and execute organization-wide transformations while application developers focus on reviewing and integrating the transformed code. DevOps engineers can then configure integrations with existing continuous integration and continuous delivery (CI/CD) pipelines and source control systems. It also includes pre-built transformations for Java, Node.js and Python runtime updates which can be particularly useful for AWS Lambda functions, along with transformations for AWS SDK modernization to help teams get started immediately.

Getting started
AWS Transform makes complex code transformations manageable through both pre-built and custom transformation capabilities. Let’s start by exploring how to use an existing transformation to address a common modernization challenge: upgrading AWS Lambda functions due to end-of-life (EOL) runtime support.

For this example, I’ll demonstrate migrating a Python 3.8 Lambda function to Python 3.13, as Python 3.8 reached EOL and is no longer receiving security updates. I’ll use the CLI for this demo, but I encourage you to also explore the web interface’s powerful campaign management capabilities.

First, I use the command atx custom def list to explore the available transformation definitions. You can also access this functionality through a conversational interface by typing only atx instead of issuing the command directly, if you prefer.

This command displays all available transformations, including both AWS-managed defaults and any existing custom transformations created by users in my organization. AWS-managed transformations are identified by the AWS/ prefix, indicating they’re maintained and updated by AWS. In the results, I can see several options such as AWS/java-version-upgrade for Java runtime modernization, AWS/python-boto2-to-boto3-migration for updating Python AWS SDK usage, AWS/nodejs-version-upgrade for Node.js runtime updates.

For my Python 3.8 to 3.13 migration, I’ll use the AWS/python-version-upgrade transformation.

You run a migration by using the atx custom def exec command.  Please consult the documentation for more details about the command and all its options. Here, I run it against my project repository specifying the transformation name. I also add pytest to run unit tests for validation. More importantly, I use the additionalPlanContext section in the  --configuration input to specify which Python version I want to upgrade to. For reference, here’s the command I have for my demo (I’ve used multiple lines and indented it here for clarity):

atx custom def exec 
-p /mnt/c/Users/vasudeve/Documents/Work/Projects/ATX/lambda/todoapilambda 
-n AWS/python-version-upgrade
-C "pytest" 
--configuration 
    "additionalPlanContext= The target Python version to upgrade to is Python 3.13" 
-x -t

AWS Transform then starts the migration process. It analyzes my Lambda function code, identifies Python 3.8-specific patterns, and automatically applies the necessary changes for Python 3.13 compatibility. This includes updating syntax for deprecated features, modifying import statements, and adjusting any version-specific behaviors.

After execution, it provides a comprehensive summary including a report on dependencies updated in requirements.txt with Python 3.13-compatible package versions, instances of deprecated syntax replaced with current equivalents, updated runtime configuration notes for AWS Lambda deployment, suggested test cases to validate the migration, and more. It also provides a body of evidence that serve as proof of success.

The migrated code lives in a local branch so you can review and merge when satisfied. Alternatively, you can keep providing feedback and reiterating until yo’re happy that the migration is fully complete and meets your expectations.

This automated process changes what would typically require hours of manual work into a streamlined, consistent upgrade that maintains code quality while maintaining compatibility with the newer Python runtime.

Creating a new custom transformation
While AWS-managed transformations handle common scenarios effectively, you can also create custom transformations tailored to your organization’s specific needs. Let’s explore how to create a custom transformation to see how AWS Transform learns from your specific requirements.

I type atx to initialize the atx cli and start the process.

The first thing it asks me is if I want to use one of the existing transformations or create a new one. I choose to create a new one. Notice that from here on the whole conversation takes place using natural language, not commands. I typed new one but I could have typed I want to create a new one and it would’ve understood it exactly the same.

It then prompts me to provide more information about the kind of transformation I’d like to perform. For this demo, I’m going to migrate an Angular application, so I type angular 16 to 19 application migration which prompts the CLI to search for all transformations available for this type of migration. In my case, my team has already created and made available a few Angular migrations, so it shows me those. However, it warns me that none of them is an exact match to my specific request for migrating from Angular 16 to 19. It then asks if I’d like to select from one of the existing transformations listed or create a custom one.

I choose to create a custom one by continuing to use natural language and typing create a new one as a command. Again, this could be any variation of that statement provided that you indicate your intentions clearly. It follows by asking me a few questions including whether I have any useful documentation, example code or migration guides that I can provide to help customize the transformation plan.

For this demo, I’m only going to rely on AWS Transform to provide me with good defaults. I type I don't have these details. Follow best practices. and the CLI responds by telling me that it will create a comprehensive transformation definition for migrating Angular 16 to Angular 19.  Of course, I relied on the pre-trained data to generate results based on best practices. As usual, the recommendation is to provide as much information and relevant data as possible at this stage of the process for better results. However, you don’t need to have all the data upfront. You can keep on providing data at any time› as you iterate through the process of creating the custom transformation definition.

The transformation definition is generated as a markup file containing a summary and a comprehensive sequence of implementation steps grouped logically into phases such as premigration preparation, processing and partitioning, static dependency analysis, searching and applying specific transformation rules, and step-by-step migration and iterative validation.

It’s interesting to see that AWS Transform opted for the best practice of doing incremental framework updates creating steps for migrating the application first to 17 then 18 then 19 instead of trying to go directly from 16 to 19 to minimize issues.

Note that the plan includes various stages of testing and verification to confirm that the various phases can be concluded with confidence. At the very end, it also includes a final validation stage listing exit criteria that performs a comprehensive set of tests against all aspects of the application that will be used to accept the migration as successfully complete.

After the transformation definition is created, AWS Transform asks me about what I would like to do next. I can choose to review or modify the transformation definition and I can reiterate through this process as much as I need until I arrive at one that I’m satisfied with. I can also choose to already apply this transformation definition to an Angular codebase. However, first I want to make this transformation available to my team members as well as myself so we can all use it again in the future. So, I choose option 4 to publish this transformation to the registry.

This custom transformation needs a name and a description of its objective which is displayed when users browse the registry. AWS Transforms automatically extracts those from context for me and asks me if I would like to modify them before going ahead. I like the sensible default of “Angular-16-to-19-Migration”, and the objective is clearly stated, so I choose to accept the suggestions and publish it by answering with yes, looks good.

Now that the transformation definition is created and published, I can use it and run it multiple times against any code repository. Let’s apply the transformation to a code repository with a project written in Angular 16. I now choose option 1 from the follow-up prompt and the CLI asks me for the path in my file system to the application that I want to migrate and, optionally, the build command that it should use.

After I provide that information, AWS Transform proceeds to analyze the code base and formulate a thorough step-by-step transformation plan based on the definition created earlier. After it’s done, it creates a JSON file containing the detailed migration plan specifically designed for applying our transformation definition to this code base. Similar to the process of creating the transformation definition, you can review and iterate through this plan as much as you need, providing it with feedback and adjusting it to any specific requirements you might have.

When I’m ready to accept the plan, I can use natural language to tell AWS Transform that we can start the migration process. I type looks good, proceed and watch the progress in my shell as it starts executing the plan and making the changes to my code base one step at a time.

The time it takes will vary depending on the complexity of the application. In my case, it took a few minutes to complete. After it has finished, it provides me with a transformation summary and the status of each one of the exit criteria that were included in the final verification phase of the plan alongside all the evidence to support the reported status. For example, the Application Build – Production criteria was listed as passed and some of the evidence provided included the incremental Git commits, the time that it took to complete the production build, the bundle size, the build output message, and the details about all the output files created.

Conclusion
AWS Transform represents a fundamental shift in how organizations approach code modernization and technical debt. The service helps to transform what was at one time a fragmented, team-by-team effort into a unified, intelligent capability that eliminates knowledge silos, keeping your best practices and institutional knowledge available as scalable assets across the entire organization. This helps to accelerate modernization initiatives while freeing developers to spend more time on innovation and driving business value instead of focusing on repetitive maintenance and modernization tasks.

Things to know

AWS Transform custom is now generally available. Visit the get started guide to start your first transformation campaign or check out the documentation to learn more about setting up custom transformation definitions.

Top announcements of AWS re:Invent 2025

Post Syndicated from AWS News Blog Team original https://aws.amazon.com/blogs/aws/top-announcements-of-aws-reinvent-2025/

Matt Garman stands on stage at re:Invent 2024We’re rounding up the most exciting and impactful announcements from AWS re:Invent 2025, which takes place November 30-December 4 in Las Vegas. This guide highlights the innovations that will help you build, scale, and transform your business in the cloud.

We’ll update this roundup throughout re:Invent with our curation of the major announcements from each keynote session and more. To see the complete list of all AWS launches, visit What’s New with AWS.

(This post was updated Nov. 30, 2025.)


Analytics

AWS Clean Rooms launches privacy-enhancing dataset generation for ML model training
Train ML models on sensitive collaborative data by generating synthetic datasets that preserve statistical patterns while protecting individual privacy through configurable noise levels and protection against re-identification.

Compute

Introducing AWS Lambda Managed Instances: Serverless simplicity with EC2 flexibility
Run Lambda functions on EC2 compute while maintaining serverless simplicity—enabling access to specialized hardware and cost optimizations through EC2 pricing models, with AWS handling all infrastructure management.

Containers

Announcing Amazon EKS Capabilities for workload orchestration and cloud resource management
Streamline Kubernetes development with fully managed platform capabilities that handle workload orchestration and cloud resource management, eliminating infrastructure maintenance while providing enterprise-grade reliability and security.

Networking & Content Delivery

Introducing Amazon Route 53 Global Resolver for secure anycast DNS resolution (preview)
Simplify hybrid DNS management with a unified service that resolves public and private domains globally through secure, anycast-based resolution while reducing operational overhead and maintaining consistent security controls.

Partner Network

AWS Partner Central now available in AWS Management Console
Access Partner Central directly through the AWS Console to streamline your journey from customer to Partner—manage solutions, opportunities, and marketplace listings in one unified interface with enterprise-grade security.

Security, Identity, & Compliance

Simplify IAM policy creation with IAM Policy Autopilot, a new open source MCP server for builders
Speed up AWS development with an open source tool that analyzes your code to generate valid IAM policies, providing AI coding assistants with up-to-date AWS service knowledge and reliable permission recommendations.

Introducing Amazon Route 53 Global Resolver for secure anycast DNS resolution (preview)

Post Syndicated from Esra Kayabali original https://aws.amazon.com/blogs/aws/introducing-amazon-route-53-global-resolver-for-secure-anycast-dns-resolution-preview/

Today, we’re announcing Amazon Route 53 Global Resolver, a new Amazon Route 53 service that provides secure and reliable DNS resolution globally for queries from anywhere (preview). You can use Global Resolver to resolve DNS queries to public domains on the internet and private domains associated with Route 53 private hosted zones. Route 53 Global Resolver offers network administrators a unified solution to resolve queries from authenticated clients and sources in on-premises data centers, branch offices, and remote locations through globally distributed anycast IP addresses. This service includes built-in security controls including DNS traffic filtering, support for encrypted queries, and centralized logging to help organizations reduce operational overhead while maintaining compliance with security requirements.

Organizations with hybrid deployments face operational complexity when managing DNS resolution across distributed environments. Resolving public internet domains and private application domains often requires maintaining split DNS infrastructure, which increases cost and administrative burden especially when replicating to multiple locations. Network administrators must configure custom forwarding solutions, deploy Route 53 Resolver endpoints for private domain resolution, and implement separate security controls across different locations. Additionally, they must configure and maintain multi-Region failover strategies for Route 53 Resolver endpoints and provide consistent security policy enforcement across all Regions while testing failover scenarios.

Route 53 Global Resolver has key capabilities that address these challenges. The service resolves both public internet domains and Route 53 private hosted zones, eliminating the need for separate split-DNS forwarding. It provides DNS resolution through multiple protocols, including DNS over UDP (Do53), DNS-over-HTTPS (DoH), and DNS-over-TLS (DoT). Each deployment provides a single set of common IPv4 and IPv6 anycast IP addresses that route queries to the nearest AWS Region, reducing latency for distributed client populations.

Route 53 Global Resolver provides integrated security features equivalent to Route 53 Resolver DNS Firewall. Administrators can configure filtering rules using AWS Managed Domain Lists that provide flexible controls with lists classified by DNS threats (malware, spam, phishing) or web content (adult sites, gambling, social networking) that might not be safe for work or create custom domain lists by importing domains from a file. Advanced threat protection detects and blocks domain generation algorithm (DGA) patterns and DNS tunneling attempts. For encrypted DNS traffic, Route 53 Global Resolver supports DoH and DoT protocols to protect queries from unauthorized access during transit.

Route 53 Global Resolver only accepts traffic from known clients that need to authenticate with the Resolver. For Do53, DoT, and DoH connections, administrators can configure IP and CIDR allowlists. For DoH and DoT connections, token-based authentication provides granular access control with customizable expiration periods and revocation capabilities. Administrators can assign tokens to specific client groups or individual devices based on organizational requirements.

Route 53 Global Resolver supports DNSSEC validation to verify the authenticity and integrity of DNS responses from public nameservers. It also includes EDNS Client Subnet support, which forwards client subnet information to enable more accurate geographic-based DNS responses from content delivery networks.

Getting started with Route 53 Global Resolver
This walkthrough shows how to configure Route 53 Global Resolver for an organization with offices on the US East and West coasts that needs to resolve both public domains and private applications hosted in Route 53 private hosted zones. To configure Route 53 Global Resolver, go to the AWS Management Console, choose Global resolvers from the navigation pane, and choose Create global resolver.

In the Resolver details section, enter a Resolver name such as corporate-dns-resolver. Add an optional description like DNS resolver for corporate offices and remote clients. In the Regions section, choose the AWS Regions where you want the resolver to operate, such as US East (N. Virginia) and US West (Oregon). The anycast architecture routes DNS queries from your clients to the nearest selected Region.

After the resolver is created, the console displays the resolver details, including the anycast IPv4 and IPv6 addresses that you will use for DNS queries. You can proceed to create a DNS view by choosing Create DNS view to configure client authentication and DNS query resolution settings.

In the Create DNS view section, enter a DNS view name such as primary-view and optionally add a Description like DNS view for corporate offices. A DNS view helps you create different logical groupings for your clients and sources, and determine the DNS resolution for those groups. This helps you maintain different DNS filtering rules and private hosted zone resolution policies for different clients in your organization.

For DNSSEC validation, choose Enable to verify the authenticity of DNS responses from public DNS servers. For Firewall rules fail open behavior, choose Disable to block DNS queries when firewall rules can’t be evaluated, which provides additional security. For EDNS client subnet, keep Enable selected to forward client location information to DNS servers, which allows content delivery networks to provide more accurate geographic responses. DNS view creation might take a few minutes to become operational.

After the DNS view is created and operational, configure DNS Firewall rules to filter network traffic by choosing Create rule. In the Create DNS Firewall rules section, enter a Rule name such as block-malware-domains and optionally add a description. For Rule configuration type, you can choose Customer managed domain lists, AWS managed domain lists provided by AWS or DNS Firewall Advanced protection.

For this walkthrough, choose AWS managed domain lists. In the Domain lists dropdown, choose one or more AWS managed lists such as Threat – Malware to block known malicious domains. You can leave Query type empty to apply the rule to all DNS query types. In this example, choose A to apply this rule only to IPv4 address queries. In the Rule action section, select Block to prevent DNS resolution for domains that match the selected lists. For Response to send for Block action, keep NODATA selected to indicate that the query was successful but no response is available, then choose Create rules.

The next step is to configure access sources to specify which IP addresses or CIDR blocks are allowed to send DNS queries to the resolver. Navigate to the Access sources tab in the DNS view and then choose Create access source.

In the Access source details section, enter a Rule name such as office-networks to identify the access source. In the CIDR block field, enter the IP address range for your offices to allow queries from that network. For Protocol, select Do53 for standard DNS queries over UDP or choose DoH or DoT if you want to require encrypted DNS connections from clients. After configuring these settings, choose Create access source to allow the specified network to send DNS queries to the resolver.

Next, navigate to the Access tokens tab in the DNS view to create token-based authentication for clients and choose Create access token. In the Access token details section, enter a Token name such as remote-clients-token. For Token expiry, select an expiration period from the dropdown based on your security requirements, such as 365 days for long-term client access, or choose a shorter duration like 30 days or 90 days for tighter access control. After configuring these settings, choose Create access token to generate the token, which clients can use to authenticate DoH and DoT connections to the resolver.

After the access token is created, navigate to the Private hosted zones tab in the DNS view to associate Route 53 private hosted zones with the DNS view so that the resolver can resolve queries for your private application domains. Choose Associate private hosted zone and in the Private hosted zones section, select a private hosted zone from the list that you want the resolver to handle. After selecting the zone, choose Associate to enable the resolver to respond to DNS queries for these private domains from your configured access sources.

With the DNS view configured, firewall rules created, access sources and tokens defined, and private hosted zones associated, the Route 53 Global Resolver setup is complete and ready to handle DNS queries from your configured clients.

After creating your Route 53 Global Resolver, you need to configure your DNS clients to send queries to the resolver’s anycast IP addresses. The configuration method depends on the access control you configured in your DNS view:

  • For IP-based access sources (CIDR blocks) – Configure your source clients to point DNS traffic to the Route 53 Global Resolver anycast IP addresses provided in the resolver details. Global Resolver will only allow access from allowlisted IPs that you have specified in your access sources. You can also associate the access sources to different DNS views to provide more granular DNS resolution views for different sets of IPs.
  • For access token–based authentication – Deploy the tokens on your clients to authenticate DoH and DoT connections with Route 53 Global Resolver. You must also configure your clients to point the DNS traffic to the Route 53 Global Resolver anycast IP addresses provided in the resolver details.

For detailed configuration instructions for your specific operating system and protocol, refer to the technical documentation.

Additional things to know
We’re renaming the existing Route 53 Resolver to Route 53 VPC Resolver. This naming change clarifies the architectural distinction between the two services. VPC Resolver operates Regionally within your VPCs to provide DNS resolution for resources in your Amazon VPC environment. VPC Resolver continues to support inbound and outbound resolver endpoints for hybrid DNS architectures within specific AWS Regions.

Route 53 Global Resolver complements Route 53 VPC Resolver by providing internet-reachable, global and private DNS resolution for on-premises and remote clients without requiring VPC deployment or private connections.

Existing VPC Resolver configurations remain unchanged and continue to function as configured. The renaming affects the service name in the AWS Management Console and documentation, but API operation names remain unchanged. If your architecture requires DNS resolution for resources within your VPCs, continue using VPC Resolver.

Join the preview
Route 53 Global Resolver reduces operational overhead by providing unified DNS resolution for public and private domains through a single managed service. The global anycast architecture improves reliability and reduces latency for distributed clients. Integrated security controls and centralized logging help organizations maintain consistent security policies across all locations while meeting compliance requirements.

To learn more about Amazon Route 53 Global Resolver, visit the Amazon Route 53 documentation.

You can start using Route 53 Global Resolver through the AWS Management Console in US East (N. Virginia), US East (Ohio), US West (N. California), US West (Oregon), Europe (Frankfurt), Europe (Ireland), Europe (London), Asia Pacific (Mumbai), Asia Pacific (Singapore), Asia Pacific (Tokyo), and Asia Pacific (Sydney) Regions.

— Esra

AWS Clean Rooms launches privacy-enhancing synthetic dataset generation for ML model training

Post Syndicated from Micah Walter original https://aws.amazon.com/blogs/aws/aws-clean-rooms-launches-privacy-enhancing-synthetic-dataset-generation-for-ml-model-training/

Today, we’re announcing privacy-enhancing synthetic dataset generation for AWS Clean Rooms, a new capability that organizations and their partners can use to generate privacy-enhancing synthetic datasets from their collective data to train regression and classification machine learning (ML) models. You can use this feature to generate synthetic training datasets that preserve the statistical patterns of the original data, without the model having access to original records, opening new opportunities for model training that were previously not possible due to privacy concerns.

When building ML models, data scientists and analysts typically face a fundamental tension between data utility and privacy protection. Access to high-quality, granular data is essential for training accurate models that can recognize trends, personalize experiences, and drive business outcomes. However, using granular data such as user-level event data from multiple parties raises significant privacy concerns and compliance challenges. Organizations want to answer questions like, “What characteristics indicate a high-probability customer conversion?”, but training on the individual-level signals often conflicts with privacy policies and regulatory requirements.

Privacy-enhancing synthetic dataset generation for custom ML
To address this challenge, we’re introducing privacy-enhancing synthetic dataset generation in AWS Clean Rooms ML, which organizations can use to create synthetic versions of sensitive datasets that can be more securely used for ML model training. This capability uses advanced ML techniques to generate new datasets that maintain the statistical properties of the original data while de-identifying subjects from the original source data.

Traditional anonymization techniques such as masking still carry the risk of re-identifying individuals in a dataset—knowing attributes about a person such as zip code and date of birth can be sufficient to identify them with census data. Privacy-enhancing synthetic dataset generation addresses this risk through a fundamentally different approach. The system trains a model that learns the essential statistical patterns of the original dataset, then generates synthetic records by sampling values from the original dataset and using the model to predict the predicted value column. Rather than merely copying or perturbing the original data, the system uses a model capacity reduction technique to mitigate the risk that the model will memorize information about individuals in the training data. The resulting synthetic dataset has the same schema and statistical characteristics as the original data, making it suitable for training classification and regression models. This approach quantifiably reduces the risk of re-identification.

Organizations using this capability have control over the privacy parameters, including the amount of noise applied and the level of protection against membership inference attacks, where an adversary attempts to determine whether a specific individual’s data was included in the training set. After generating the synthetic dataset, AWS Clean Rooms provides detailed metrics to help customers and their compliance teams understand the quality of the synthetic dataset across two critical dimensions: fidelity to the original data and privacy preservation. The fidelity score uses KL-divergence to measure how similar the synthetic data is to the original dataset, and the privacy score quantifies how likely the dataset is protected from membership inference attacks.

Working with synthetic data in AWS Clean Rooms
Getting started with privacy-enhancing synthetic dataset generation follows the established AWS Clean Rooms ML custom models workflow, with new steps to specify privacy requirements and review quality metrics. Organizations begin by creating configured tables with analysis rules using their preferred data sources, then join or create a collaboration with their partners and associate their tables with that collaboration.

The new capability introduces an enhanced analysis template where data owners define not only the SQL query that creates the dataset but also specify that the resulting dataset must be synthetic. Within this template, organizations classify columns to indicate which column the ML model will predict and which columns contain categorical versus numerical values. Critically, the template also includes privacy thresholds that the generated synthetic data must meet to be made available for training. These include an epsilon value that specifies how much noise must be present in the synthetic data to protect against re-identification, and a minimum protection score against membership inference attacks. Setting these thresholds appropriately requires understanding your organization’s specific privacy and compliance requirements, and we recommend engaging with your legal and compliance teams during this process.

After all data owners review and approve the analysis template, a collaboration member creates a machine learning input channel that references the template. AWS Clean Rooms then begins the synthetic dataset generation process, which typically completes within a few hours depending on the size and complexity of the dataset. If the generated synthetic dataset meets the required privacy thresholds defined in the analysis template, a synthetic machine learning input channel becomes available along with detailed quality metrics. Data scientists can review the actual protection score achieved against a simulated membership inference attack.

Once satisfied with the quality metrics, organizations can proceed to train their ML models using the synthetic dataset within the AWS Clean Rooms collaboration. Depending on the use case, they can export the trained model weights or continue to run inference jobs within the collaboration itself.

Let’s try it out
When creating a new AWS Clean Rooms collaboration, I can now set who pays for synthetic dataset generation.

After my Collaboration is configured, I can choose Require analysis template output to be synthetic when creating a new analysis template.

After my synthetic analysis template is ready, I can use it when running protected queries and view all the relevant ML input channel details.

Clean Rooms Synthetic Data Console

Now available
You can start using privacy-enhancing synthetic dataset generation through AWS Clean Rooms today. The feature is available in all commercial AWS Regions where AWS Clean Rooms is available. Learn more about it in the AWS Clean Rooms documentation.

Privacy-enhancing synthetic dataset generation is billed separately based on usage. You pay only for the compute used to generate your synthetic dataset, charged as Synthetic Data Generation Units (SDGUs). The number of SDGUs varies based on the size and complexity of your original dataset. This fee can be configured as a payer setting, meaning any collaboration member can agree to pay the costs. For more information on pricing, refer to the AWS Clean Rooms pricing page.

The initial release supports training classification and regression models on tabular data. The synthetic datasets work with standard ML frameworks and can be integrated into existing model development pipelines without requiring changes to your workflows.

This capability represents a significant advancement in privacy-enhanced machine learning. Organizations can unlock the value of sensitive user-level data for model training while mitigating the risk that sensitive information about individual users could be leaked. Whether you’re optimizing advertising campaigns, personalizing insurance quotes, or enhancing fraud detection systems, privacy-enhancing synthetic dataset generation makes it possible to train more accurate models through data collaboration while respecting individual privacy.

AWS Partner Central now available in AWS Management Console

Post Syndicated from Sébastien Stormacq original https://aws.amazon.com/blogs/aws/aws-partner-central-now-available-in-aws-management-console/

Today, we’re announcing that AWS Partner Central is now available directly in the AWS Management Console, creating a unified experience that transforms how you engage with AWS as both customers and AWS Partners.

As someone who has worked with countless AWS customers over the years, I’ve observed how organizations evolve in their AWS journey. Many of our most successful Partners began as AWS customers—first using our services to build their own infrastructure and solutions, then expanding to create offerings for others. Seeing this natural progression from customer to Partner, we recognized an opportunity to streamline these traditionally separate experiences into one unified journey.

As AWS evolved, so did the needs of our Partner community. Organizations today operate in multiple capacities: using AWS services for their own infrastructure while simultaneously building and delivering solutions for their customers. Modern businesses need streamlined workflows that support their growth from AWS customer to Partner to AWS Marketplace Seller, with enterprise-grade security features that match how they actually work with AWS today.

A new unified console experience
The integration of AWS Partner Central into the Console represents a fundamental shift in partnership accessibility. For existing AWS customers, such as you, becoming an AWS Partner is now as clear as accessing any other AWS service. The familiar console interface provides direct access to partnership opportunities, program benefits, and AWS Marketplace capabilities without needing separate logins or navigation between different systems.

Getting started as an AWS Partner now takes only a few clicks within your existing console environment. You can discover partnership opportunities, understand program requirements, and begin your Partner journey without leaving the AWS interface you already know and trust.

The console integration creates an intuitive pathway for existing customers to transition into AWS Marketplace Sellers. You can now access AWS Marketplace Seller capabilities alongside your existing AWS services, managing both your infrastructure and AWS Marketplace business from a single interface. Private offer requests and negotiations can be managed directly within AWS Partner Central, and you can manage your AWS Marketplace listings alongside your other AWS activities through streamlined workflows.

Becoming an AWS Partner
The unified console experience provides access to comprehensive partnership benefits designed to accelerate your business growth.

Join the AWS Partner Network (APN) and complete your Partner and AWS Marketplace Seller requirements seamlessly within the same interface. Enroll in Partner Paths that align with your customer solutions to build, market, list, and sell in AWS Marketplace while growing alongside AWS. When you are established, use the Partner programs to differentiate your solution, list in AWS Marketplace to improve your go-to-market discoverability, and build AWS expertise through certifications to drive profitability by capturing new revenue streams. Scale your business by selling or reselling software and professional services in AWS Marketplace, helping you accelerate deals, boost revenue, and expand your customer reach to new geographies, industries, and segments.

Throughout your journey, you can continue using Amazon Q in the console, which provides personalized guidance through AWS Partner Assistant.

Let’s see the new Partner Central console
The new AWS Partner Central is accessible like any other AWS service from the console. Among many new capabilities, it provides four key sections that support Partner operations and business growth within the AWS Partner Network:

1. It helps you sell your solutions

AWS Partner Central - Solutions

You can create and publish solutions that address specific customer needs through AWS Marketplace. Solutions are made up of products such as software as a service (SaaS), Amazon Machine Images (AMI), containers, professional services, AI agents and tools, and more. The solutions management capability guides you through building offerings that include both products you own and those you are authorized to resell. You can craft compelling value propositions and descriptions that clearly communicate your solution benefits to potential buyers browsing AWS Marketplace.

I choose Create solution to start listing a new solution in the AWS Marketplace, as shown in the following figure.

AWS Partner Central - Create solution

2. It helps you update and manage your Partner profile

AWS Partner Central - Manage profile

Your Partner profile showcases your organization’s expertise and capabilities to the AWS community. You control how your business appears to potential customers and Partners by highlighting the industry segments you serve and describing your primary products or services. Profile visibility settings provide you with the option to choose whether your information is public or private.

3. It helps you track opportunities

AWS Partner Central - Track Opportunities

You can manage your pipeline of AWS customers, supporting joint collaborations with AWS on customer engagements. You monitor these prospects using clear status indicators: approved, rejected, draft, and pending approval. The opportunity dashboard shows stages, estimated AWS Monthly Recurring Revenue, and other key metrics that help you understand your pipeline. You can create more opportunities directly within the console and export data for your own reporting and analysis.

4. It provides you with the ability to discover and connect with other Partners

After becoming an AWS Partner, you get access to the AWS Partners network, where you can search for other Partners. You can connect with them to collaborate on sales opportunities and expand your customer outreach.

AWS Partner Central - Discover and Search for partners

You search through available Partners using filters for industry, location, Partner program type, and specialization. The centralized dashboard shows your active connections, pending requests, and connection history, so that you can manage business relationships and identify collaboration opportunities that can expand your reach. Like all other AWS services, these Partner connection capabilities are now available as APIs, which provide automation and integration into your existing workflows.

AWS Partner Central - Manage contact requests

These capabilities work together within the new AWS Partner Central console, accessible directly from the console, helping you transition from AWS customer to successful Partner with enterprise-grade security and streamlined workflows.

The technical foundation: Migrating the identity system
This unified console experience is made possible by our migration to a modern identity system built on AWS Identity and Access Management (IAM). We’ve transitioned from legacy identity infrastructure to IAM Identity Center, providing enterprise-grade security capabilities including single sign-on capabilities and multi-factor authentication. With security as job zero, this migration provides new and existing Partners with the possibility to connect their own identity providers to AWS Partner Central. It provides seamless integration with existing enterprise authentication systems while removing the complexity of managing separate credentials across different services.

One more thing
APIs are the core of what we do at AWS, and AWS Partner Central is no different. You can automate and streamline your co-sell workflows by connecting your business tools to AWS Partner Central. The APIs offered by AWS Partner Central help you accelerate APN benefits—from Account Management (Account API) and Solution Management (Solution API) to co-selling with Opportunity and Leads APIs, and Benefits APIs for faster benefit activation.

You can use these APIs to engage with AWS and grow your Partner business from your own CRM tools.

Get started today
This integration between the console and AWS Partner Central reflects our commitment to reducing complexity and improving the Partner experience. We’re bringing AWS Partner Central into the console to create a more intuitive path for organizations to grow with AWS from initial customer adoption through to full partnership engagement and AWS Marketplace success.

Your journey from AWS customer to successful AWS Partner and AWS Marketplace Seller starts with a few clicks in your console. I encourage you to explore the new unified experience today and discover how AWS Partner Central in the console can accelerate your organization’s growth and success within the AWS community.

Ready to get started? Visit AWS Partner Central in your console to learn more about the AWS Partner Network and discover the partnership path that’s right for your organization.

— seb

Introducing AWS Lambda Managed Instances: Serverless simplicity with EC2 flexibility

Post Syndicated from Micah Walter original https://aws.amazon.com/blogs/aws/introducing-aws-lambda-managed-instances-serverless-simplicity-with-ec2-flexibility/

Today, we’re announcing AWS Lambda Managed Instances, a new capability you can use to run AWS Lambda functions on your Amazon Elastic Compute Cloud (Amazon EC2) compute while maintaining serverless operational simplicity. This enhancement addresses a key customer need: accessing specialized compute options and optimizing costs for steady-state workloads without sacrificing the serverless development experience you know and love.

Although Lambda eliminates infrastructure management, some workloads require specialized hardware, such as specific CPU architectures, or cost optimizations from Amazon EC2 purchasing commitments. This tension forces many teams to manage infrastructure themselves, sacrificing the serverless benefits of Lambda only to access the compute options or pricing models they need. This often leads to a significant architectural shift and greater operational responsibility.

Lambda Managed Instances
You can use Lambda Managed Instances to define how your Lambda functions run on EC2 instances. Amazon Web Services (AWS) handles setting up and managing these instances in your account. You get access to the latest generation of Amazon EC2 instances, and AWS handles all the operational complexity—instance lifecycle management, OS patching, load balancing, and auto scaling. This means you can select compute profiles optimized for your specific workload requirements, like high-bandwidth networking for data-intensive applications, without taking on the operational burden of managing Amazon EC2 infrastructure.

Each execution environment can process multiple requests rather than handling just one request at a time. This can significantly reduce compute consumption, because your code can efficiently share resources across concurrent requests instead of spinning up separate execution environments for each invocation. Lambda Managed Instances provides access to Amazon EC2 commitment-based pricing models such as Compute Savings Plans and Reserved Instances, which can provide up to a 72% discount over Amazon EC2 On-Demand pricing. This offers significant cost savings for steady-state workloads while maintaining the familiar Lambda programming model.

Let’s try it out
To take Lambda Managed Instances for a spin, I first need to create a Capacity provider. As shown in the following image, there is a new tab for creating these in the navigation pane under Additional resources.

Lambda Managed Instances Console

Creating a Capacity provider is where I specify the virtual private cloud (VPC), subnet configuration and security groups. With a capacity provider configuration, I can also tell Lambda where to provision and manage the instances.

I can also specify the EC2 instance types I’d like to include or exclude, or I can choose to include all instance types for high diversity. Additionally, I can specify a few controls related to auto scaling, including the Maximum vCPU count, and if I want to use Auto scaling or use a CPU policy.

After I have my capacity provider configured, I can choose it through its Amazon Resource Name (ARN) when I go to create a new Lambda function. Here I can also select the memory allocation I want along with a memory-to-vCPU ratio.

Working with Lambda Managed Instances
Now that we’ve seen the basic setup, let’s explore how Lambda Managed Instances works in more detail. The feature organizes EC2 instances into capacity providers that you configure through the Lambda console, AWS Command Line Interface (AWS CLI), or infrastructure as code (IaC) tools such as AWS CloudFormation, AWS Serverless Application Model (AWS SAM), AWS Cloud Development Kit (AWS CDK) and Terraform. Each capacity provider defines the compute characteristics you need, including instance type, networking configuration, and scaling parameters.

When creating a capacity provider, you can choose from the latest generation of EC2 instances to match your workload requirements. For cost-optimized general-purpose compute, you could choose AWS Graviton4 based instances that deliver excellent price performance. If you’re not sure which instance type to select, AWS Lambda provides optimized defaults that balance performance and cost based on your function configuration.

After creating a capacity provider, you attach your Lambda functions to it through a straightforward configuration change. Before attaching a function, you should review your code for programming patterns that can cause issues in multiconcurrency environments, such as writing to or reading from file paths that aren’t unique per request or using shared memory spaces and variables across invocations.

Lambda automatically routes requests to preprovisioned execution environments on the instances, eliminating cold starts that can affect first-request latency. Each execution environment can handle multiple concurrent requests through the multiconcurrency feature, maximizing resource utilization across your functions. When additional capacity is needed during traffic increases, AWS automatically launches new instances within tens of seconds and adds them to your capacity provider. The capacity provider can absorb traffic spikes of up to 50% without needing to scale by default, but built-in circuit breakers protect your compute resources during extreme traffic surges by temporarily throttling requests with 429 status codes if the capacity provider reaches maximum provisioned capacity and additional capacity is still being spun up.

The operational and architectural model remains serverless throughout this process. AWS handles instance provisioning, OS patching, security updates, load balancing across instances, and automatic scaling based on demand. AWS automatically applies security patches and bug fixes to operating system and runtime components, often without disrupting running applications. Additionally, instances have a maximum 14-day lifetime to align with industry security and compliance standards. You don’t need to write automatic scaling policies, configure load balancers, or manage instance lifecycle yourself, and your function code, event source integrations, AWS Identity and Access Management (AWS IAM) permissions, and Amazon CloudWatch monitoring remain unchanged.

Now available
You can start using Lambda Managed Instances today through the Lambda console, AWS CLI, or AWS SDKs. The feature is available in US East (N. Virginia), US East (Ohio), US West (Oregon), Asia Pacific (Tokyo), and Europe (Ireland) Regions. For Regional availability and future roadmap, visit the AWS Capabilities by Region. Learn more about it in the AWS Lambda documentation.

Pricing for Lambda Managed Instances has three components. First, you pay standard Lambda request charges of $0.20 per million invocations. Second, you pay standard Amazon EC2 instance charges for the compute capacity provisioned. Your existing Amazon EC2 pricing agreements, including Compute Savings Plans and Reserved Instances, can be applied to these instance charges to reduce costs for steady-state workloads. Third, you pay a compute management fee of 15% calculated on the EC2 on-demand instance price to cover AWS’s operational management of your instances. Note that unlike traditional Lambda functions, you are not charged separately for execution duration per request. The multiconcurrency feature helps further optimize costs by reducing the total compute time required to process your requests.

The initial release supports the latest versions of Node.js, Java, .NET and Python runtimes, with support for other languages coming soon. The feature integrates with existing Lambda workflows including function versioning, aliases, AWS CloudWatch Lambda Insights, AWS AppConfig extensions, and deployment tools like AWS SAM and AWS CDK. You can migrate existing Lambda functions to Lambda Managed Instances without changing your function code (as long as it has been validated to be thread safe for multiconcurrency) making it easy to adopt this capability for workloads that would benefit from specialized compute or cost optimization.

Lambda Managed Instances represents a significant expansion of Lambda’s capabilities, which means you can run a broader range of workloads while preserving the serverless operational model. Whether you’re optimizing costs for high-traffic applications, or accessing the latest processor architectures like Graviton4, this new capability provides the flexibility you need without operational complexity. We’re excited to see what you build with Lambda Managed Instances.

Simplify IAM policy creation with IAM Policy Autopilot, a new open source MCP server for builders

Post Syndicated from Micah Walter original https://aws.amazon.com/blogs/aws/simplify-iam-policy-creation-with-iam-policy-autopilot-a-new-open-source-mcp-server-for-builders/

Today, we’re announcing IAM Policy Autopilot, a new open source Model Context Protocol (MCP) server that analyzes your application code and helps your AI coding assistants generate AWS Identity and Access Management (IAM) identity-based policies. IAM Policy Autopilot accelerates initial development by providing builders with a starting point that they can review and further refine. It integrates with AI coding assistants such as Kiro, Claude Code, Cursor, and Cline, and it provides them with AWS Identity and Access Management (IAM) knowledge and understanding of the latest AWS services and features. IAM Policy Autopilot is available at no additional cost, runs locally, and you can get started by visiting our GitHub repository.

Amazon Web Services (AWS) applications require IAM policies for their roles. Builders on AWS, from developers to business leaders, engage with IAM as part of their workflow. Developers typically start with broader permissions and refine them over time, balancing rapid development with security. They often use AI coding assistants in hopes of accelerating development and authoring IAM permissions. However, these AI tools don’t fully understand the nuances of IAM and can miss permissions or suggest invalid actions. Builders seek solutions that provide reliable IAM knowledge, integrate with AI assistants and get them started with policy creation, so that they can focus on building applications.

Create valid policies with AWS knowledge
IAM Policy Autopilot addresses these challenges by generating identity-based IAM policies directly from your application code. Using deterministic code analysis, it creates reliable and valid policies, so you spend less time authoring and debugging permissions. IAM Policy Autopilot incorporates AWS knowledge, including published AWS service reference implementation, to stay up to date. It uses this information to understand how code and SDK calls map to IAM actions and stays current with the latest AWS services and operations.

The generated policies provide a starting point for you to review and scope down to implement least privilege permissions. As you modify your application code—whether adding new AWS service integrations or updating existing ones—you only need to run IAM Policy Autopilot again to get updated permissions.

Getting started with IAM Policy Autopilot
Developers can get started with IAM Policy Autopilot in minutes by downloading and integrating it with their workflow.

As an MCP server, IAM Policy Autopilot operates in the background as builders converse with their AI coding assistants. When your application needs IAM policies, your coding assistants can call IAM Policy Autopilot to analyze AWS SDK calls within your application and generate required identity-based IAM policies, providing you with necessary permissions to start with. After permissions are created, if you still encounter Access Denied errors during testing, the AI coding assistant invokes IAM Policy Autopilot to analyze the denial and propose targeted IAM policy fixes. After you review and approve the suggested changes, IAM Policy Autopilot updates the permissions.

You can also use IAM Policy Autopilot as a standalone command line interface (CLI) tool to generate policies directly or fix missing permissions. Both the CLI tool and the MCP server provide the same policy creation and troubleshooting capabilities, so you can choose the integration that best fits your workflow.

When using IAM Policy Autopilot, you should also understand the best practices to maximize its benefits. IAM Policy Autopilot generates identity-based policies and doesn’t create resource-based policies, permission boundaries, service control policies (SCPs) or resource control policies (RCPs). IAM Policy Autopilot generates policies that prioritize functionality over minimal permissions. You should always review the generated policies and refine if necessary so they align with your security requirements before deploying them.

Let’s try it out
To set up IAM Policy Autopilot, I first need to install it on my system. To do so, I just need to run a one-liner script:

curl https://github.com/awslabs/iam-policy-autopilot/raw/refs/heads/main/install.sh | bash

Then I can follow the instructions to install any MCP server for my IDE of choice. Today, I’m using Kiro!

In a new chat session in Kiro, I start with a straightforward prompt, where I ask Kiro to read the files in my file-to-queue folder and create a new AWS CloudFormation file so I can deploy the application. This folder contains an automated Amazon Simple Storage Service (Amazon S3) file router that scans a bucket and sends notifications to Amazon Simple Queue Service (Amazon SQS) queues or Amazon EventBridge based on configurable prefix-matching rules, enabling event-driven workflows triggered by file locations.

The last part asks Kiro to make sure I’m including necessary IAM policies. This should be enough to get Kiro to use the IAM Policy Autopilot MCP server.

Next, Kiro uses the IAM Policy Autopilot MCP server to generate a new policy document, as depicted in the following image. After it’s done, Kiro will move on to building out our CloudFormation template and some additional documentation and relevant code files.

IAM Policy Autopilot

Finally, we can see our generated CloudFormation template with a new policy document, all generated using the IAM Policy Autopilot MCP server!

IAM Policy Autopilot

Enhanced development workflow
IAM Policy Autopilot integrates with AWS services across multiple areas. For core AWS services, IAM Policy Autopilot analyzes your application’s usage of services such as Amazon S3, AWS Lambda, Amazon DynamoDB, Amazon Elastic Compute Cloud (Amazon EC2), and Amazon CloudWatch Logs, then generates necessary permissions your code needs based on the SDK calls it discovers. After the policies are created, you can copy the policy directly into your CloudFormation template, AWS Cloud Development Kit (AWS CDK) stack, or Terraform configuration. You can also prompt your AI coding assistants to integrate it for you.

IAM Policy Autopilot also complements existing IAM tools such as AWS IAM Access Analyzer by providing functional policies as a starting point, which you can then validate using IAM Access Analyzer policy validation or refine over time with unused access analysis.

Now available
IAM Policy Autopilot is available as an open source tool on GitHub at no additional cost. The tool currently supports Python, TypeScript, and Go applications.

These capabilities represent a significant step forward in simplifying the AWS development experience so builders of different experience levels can develop and deploy applications more efficiently.

Announcing Amazon EKS Capabilities for workload orchestration and cloud resource management

Post Syndicated from Channy Yun (윤석찬) original https://aws.amazon.com/blogs/aws/announcing-amazon-eks-capabilities-for-workload-orchestration-and-cloud-resource-management/

Today, we’re announcing Amazon Elastic Kubernetes Service (Amazon EKS) Capabilities, an extensible set of Kubernetes-native solutions that streamline workload orchestration, Amazon Web Services (AWS) cloud resource management, and Kubernetes resource composition and orchestration. These fully managed, integrated platform capabilities include open source Kubernetes solutions that many customers are using today, such as Argo CD, AWS Controllers for Kubernetes, and Kube Resource Orchestrator.

With EKS Capabilities, you can build and scale Kubernetes applications without managing complex solution infrastructure. Unlike typical in-cluster installations, these capabilities actually run in EKS service-owned accounts that are fully abstracted from customers.

With AWS managing infrastructure scaling, patching, and updates of these cluster capabilities, you can use the enterprise reliability and security without needing to maintain and manage the underlying components.

Here are the capabilities available at launch:

  • Argo CD – This is a declarative GitOps tool for Kubernetes that provides continuous continuous deployment (CD) capabilities for Kubernetes. It’s broadly adopted, with more than 45% of Kubernetes end-users reporting production or planned production use in the 2024 Cloud Native Computing Foundation (CNCF) Survey.
  • AWS Controllers for Kubernetes (ACK) – ACK is highly popular with enterprise platform teams in production environments. ACK provides custom resources for Kubernetes that enable the management of AWS Cloud resources directly from within your clusters.
  • Kube Resource Orchestrator (KRO) – KRO provides a streamlined way to create and manage custom resources in Kubernetes. With KRO, platform teams can create reusable resource bundles that abstract away complexity while remaining natively to the Kubernetes ecosystem.

With these features, you can accelerate and scale your Kubernetes use with fully managed capabilities, using its opinionated but flexible features to build for scale right from the start. It is designed to offer a set of foundational cluster capabilities that layer seamlessly with each other, providing integrated features for continuous deployment, resource orchestration, and composition. You can focus on managing and shipping software without needing to spend time and resources building and managing these foundational platform components.

How it works
Platform engineers and cluster administrators can set up EKS Capabilities to offload building and managing custom solutions to provide common foundational services, meaning they can focus on more differentiated features that matter to your business.

Your application developers primarily work with EKS Capabilities as they do other Kubernetes features. They do this by applying declarative configuration to create Kubernetes resources using familiar tools, such as kubectl or through automation from git commit to running code.

Get started with EKS Capabilities
To enable EKS Capabilities, you can use the EKS console, AWS Command Line Interface (AWS CLI), eksctl, or other preferred tools. In the EKS console, choose Create capabilities in the Capabilities tab on your existing EKS cluster. EKS Capabilities are AWS resources, and they can be tagged, managed, and deleted.

You can select one or more capabilities to work together. I checked all three capabilities: ArgoCD, ACK, and KRO. However, these capabilities are completely independent and you can pick and choose which capabilities you want enabled on your clusters.

Now you can configure selected capabilities. You should create AWS Identity and Access Management (AWS IAM) roles to enable EKS to operate these capabilities within your cluster. Please note you cannot modify the capability name, namespace, authentication region, or AWS IAM Identity Center instance after creating the capability. Choose Next and review the settings and enable capabilities.

Now you can see and manage created capabilities. Select ArgoCD to update configuration of the capability.

You can see details of ArgoCD capability. Choose Edit to change configuration settings or Monitor ArgoCD to show the health status of the capability for the current EKS cluster.

Choose Go to Argo UI to visualize and monitor deployment status and application health.

To learn more about how to set up and use each capability in detail, visit Getting started with EKS Capabilities in the Amazon EKS User Guide.

Things to know
Here are key considerations to know about this feature:

  • Permissions – EKS Capabilities are cluster-scoped administrator resources, and resource permissions are configured through AWS IAM. For some capabilities, there is additional configuration for single sign-on. For example, Argo CD single sign-on configuration is enabled directly in EKS with a direct integration with IAM Identity Center.
  • Upgrades – EKS automatically updates cluster capabilities you enable and their related dependencies. It automatically analyzes for breaking changes, patches and updates components as needed, and informs you of conflicts or issues through the EKS cluster insights.
  • Adoptions – ACK provides resource adoption features that enable migration of existing AWS resources into ACK management. ACK also provides read-only resources which can help facilitate a step-wise migration from provisioned resources with Terraform, AWS CloudFormation into EKS Capabilities.

Now available
Amazon EKS Capabilities are now available in commercial AWS Regions. For Regional availability and future roadmap, visit the AWS Capabilities by Region. There are no upfront commitments or minimum fees, and you only pay for the EKS Capabilities and resources that you use. To learn more, visit the EKS pricing page.

Give it a try in the Amazon EKS console and send feedback to AWS re:Post for EKS or through your usual AWS Support contacts.

Channy

Amazon Route 53 launches Accelerated recovery for managing public DNS records

Post Syndicated from Micah Walter original https://aws.amazon.com/blogs/aws/amazon-route-53-launches-accelerated-recovery-for-managing-public-dns-records/

Today, we’re announcing Amazon Route 53 Accelerated recovery for managing public DNS records, a new Domain Name Service (DNS) business continuity feature that is designed to provide a 60-minute recovery time objective (RTO) during service disruptions in the US East (N. Virginia) AWS Region. This enhancement ensures that customers can continue making DNS changes and provisioning infrastructure even during regional outages, providing greater predictability and resilience for mission-critical applications.

Customers running applications that require business continuity have told us they need additional DNS resilience capabilities to meet their business continuity requirements and regulatory compliance obligations. While AWS maintains exceptional availability across our global infrastructure, organizations in regulated industries like banking, FinTech, and SaaS want the confidence that they will be able to make DNS changes even during unexpected regional disruptions, allowing them to quickly provision standby cloud resources or redirect traffic when needed.

Accelerated recovery for managing public DNS records addresses this need by targeting DNS changes that customers can make within 60 minutes of a service disruption in the US East (N. Virginia) Region. The feature works seamlessly with your existing Route 53 setup, providing access to key Route 53 API operations during failover scenarios, including ChangeResourceRecordSets, GetChange, ListHostedZones, and ListResourceRecordSets. Customers can continue using their existing Route 53 API endpoint without modifying applications or scripts.

Let’s try it out
Configuring a Route53 hosted zone to use accelerated recovery is simple. Here I am creating a new hosted zone for a new website I’m building.

Once I have created my hosted zone, I see a new tab labeled Accelerated recovery. I can see here that accelerated recovery is disabled by default.

To enable it, I just need to click the Enable button and confirm my choice in the modal that appears as depicted in the dialog below.

Enabling accelerated recovery will take a couple minutes to complete. Once it’s enabled, I see a green Enabled status as depicted in the screenshot below.

I can disable accelerated recovery at any time from this same area of the AWS Management Console. I can also enable accelerated recovery for any existing hosted zones I have already created.

Enhanced DNS business continuity
With accelerated recovery enabled, customers gain several key capabilities during service disruptions. The feature maintains access to essential Route 53 API operations, ensuring that DNS management remains available when it’s needed most. Organizations can continue to make critical DNS changes, provision new infrastructure, and redirect traffic flows without waiting for full service restoration.

The implementation is designed for simplicity and reliability. Customers don’t need to learn new APIs or modify existing automation scripts. The same Route 53 endpoints and API calls continue to work, providing a seamless experience during both normal operations and failover scenarios.

Now available
Accelerated recovery for Amazon Route 53 public hosted zones is available now. You can enable this feature through the AWS Management Console, AWS Command Line Interface (AWS CLI), AWS Software Development Kit (AWS SDKs), or infrastructure as code tools like AWS CloudFormation and AWS Cloud Development Kit (AWS CDK). There is no additional cost for using accelerated recovery.

To learn more about accelerated recovery and get started, visit the documentation. This new capability represents our continued commitment to providing customers with the DNS resilience they need to build and operate mission-critical applications in the cloud.

New one-click onboarding and notebooks with a built-in AI agent in Amazon SageMaker Unified Studio

Post Syndicated from Channy Yun (윤석찬) original https://aws.amazon.com/blogs/aws/new-one-click-onboarding-and-notebooks-with-ai-agent-in-amazon-sagemaker-unified-studio/

Today we’re announcing a faster way to get started with your existing AWS datasets in Amazon SageMaker Unified Studio. You can now start working with any data you have access to in a new serverless notebook with a built-in AI agent, using your existing AWS Identity and Access Management (IAM) roles and permissions.

New updates include:

  • One-click onboarding – Amazon SageMaker can now automatically create a project in Unified Studio with all your existing data permissions from AWS Glue Data Catalog, AWS Lake Formation, and Amazon Simple Storage Services (Amazon S3).
  • Direct integration – You can launch SageMaker Unified Studio directly from Amazon SageMaker, Amazon Athena, Amazon Redshift, and Amazon S3 Tables console pages, giving a fast path to analytics and AI workloads.
  • Notebooks with a built-in AI agent – You can use a new serverless notebook with a built-in AI agent, which supports SQL, Python, Spark, or natural language and gives data engineers, analysts, and data scientists one place to develop and run both SQL queries and code.

You also have access to other tools such as a Query Editor for SQL analysis, JupyterLab integrated developer environment (IDE), Visual ETL and workflows, and machine learning (ML) capabilities.

Try one-click onboarding and connect to Amazon SageMaker Unified Studio
To get started, go to the SageMaker console and choose the Get started button.

You will be prompted either to select an existing AWS Identity and Access Management (AWS IAM) role that has access to your data and compute, or to create a new role.

Choose Set up. It takes a few minutes to complete your environment. After this role is granted access, you’ll be taken to the SageMaker Unified Studio landing page where you will see the datasets that you have access to in AWS Glue Data Catalog as well as a variety of analytics and AI tools to work with.

This environment automatically creates the following serverless compute: Amazon Athena Spark, Amazon Athena SQL, AWS Glue Spark, and Amazon Managed Workflows for Apache Airflow (MWAA) serverless. This means you completely skip provisioning and can start working immediately with just-in-time compute resources, and it automatically scales back down when you finish, helping to save on costs.

You can also get started working on specific tables in Amazon Athena, Amazon Redshift, and Amazon S3 Tables. For example, you can select Query your data in Amazon SageMaker Unified Studio and then choose Get started in Amazon Athena console.

If you start from these consoles, you’ll connect directly to the Query Editor with the data that you were looking at already accessible, and your previous query context preserved. By using this context-aware routing, you can run queries immediately once inside the SageMaker Unified Studio without unnecessary navigation.

Getting started with notebooks with a built-in AI agent
Amazon SageMaker is introducing a new notebook experience that provides data and AI teams with a high-performance, serverless programming environment for analytics and ML jobs. The new notebook experience includes Amazon SageMaker Data Agent, a built-in AI agent that accelerates development by generating code and SQL statements from natural language prompts while guiding users through their tasks.

To start a new notebook, choose the Notebooks menu in the left navigation pane to run SQL queries, Python code, and natural language, and to discover, transform, analyze, visualize, and share insights on data. You can get started with sample data such as customer analytics and retail sales forecasting.

When you choose a sample project for customer usage analysis, you can open sample notebook to explore customer usage patterns and behaviors in a telecom dataset.

As I noted, the notebook includes a built-in AI agent that helps you interact with your data through natural language prompts. For example, you can start with data discovery using prompts like:

Show me some insights and visualizations on the customer churn dataset.

After you identify relevant tables, you can request specific analysis to generate Spark SQL. The AI agent creates step-by-step plans with initial code for data transformations and Python code for visualizations. If you see an error message while running the generated code, choose Fix with AI to get help resolving it. Here is a sample result:

For ML workflows, use specific prompts like:

Build an XGBoost classification model for churn prediction using the churn table, with purchase frequency, average transaction value, and days since last purchase as features.

This prompt receives structured responses including a step-by-step plan, data loading, feature engineering, and model training code using the SageMaker AI capabilities, and evaluation metrics. SageMaker Data Agent works best with specific prompts and is optimized for AWS data processing services including Athena for Apache Spark and SageMaker AI.

To learn more about new notebook experience, visit the Amazon SageMaker Unified Studio User Guide.

Now available
One-click onboarding and the new notebook experience in Amazon SageMaker Unified Studio are now available in US East (Ohio), US East (N. Virginia), US West (Oregon), Asia Pacific (Mumbai), Asia Pacific (Singapore), and Asia Pacific (Sydney), Asia Pacific (Tokyo), Europe (Frankfurt), Europe (Ireland) Regions. To learn more, visit the SageMaker Unified Studio product page.

Give it a try in the SageMaker console and send feedback to AWS re:Post for SageMaker Unified Studio or through your usual AWS Support contacts.

Channy

Build production-ready applications without infrastructure complexity using Amazon ECS Express Mode

Post Syndicated from Donnie Prakoso original https://aws.amazon.com/blogs/aws/build-production-ready-applications-without-infrastructure-complexity-using-amazon-ecs-express-mode/

Deploying containerized applications to production requires navigating hundreds of configuration parameters across load balancers, auto scaling policies, networking, and security groups. This overhead delays time to market and diverts focus from core application development.

Today, I’m excited to announce Amazon ECS Express Mode, a new capability from Amazon Elastic Container Service (Amazon ECS) that helps you launch highly available, scalable containerized applications with a single command. ECS Express Mode automates infrastructure setup including domains, networking, load balancing, and auto scaling through simplified APIs. This means you can focus on building applications while deploying with confidence using Amazon Web Services (AWS) best practices. Furthermore, when your applications evolve and require advanced features, you can seamlessly configure and access the full capabilities of the resources, including Amazon ECS.

You can get started with Amazon ECS Express Mode by navigating to the Amazon ECS console.

Amazon ECS Express Mode provides a simplified interface to the Amazon ECS service resource with new integrations for creating commonly used resources across AWS. ECS Express Mode automatically provisions and configures ECS clusters, task definitions, Application Load Balancers, auto scaling policies, and Amazon Route 53 domains from a single entry point.

Getting started with ECS Express Mode
Let me walk you through how to use Amazon ECS Express Mode. I’ll focus on the console experience, which provides the quickest way to deploy your containerized application.

For this example, I’m using a simple container image application running on Python with the Flask framework. Here’s the Dockerfile of my demo, which I have pushed to an Amazon Elastic Container Registry (Amazon ECR) repository:


# Build stage
FROM python:3.6-slim as builder
WORKDIR /app
COPY requirements.txt .
RUN pip install --no-cache-dir --user -r requirements.txt gunicorn

# Runtime stage
FROM python:3.6-slim
WORKDIR /app
COPY --from=builder /root/.local /root/.local
COPY app.py .
ENV PATH=/root/.local/bin:$PATH
EXPOSE 80
CMD ["gunicorn", "--bind", "0.0.0.0:80", "app:app"]

On the Express Mode page, I choose Create. The interface is streamlined — I specify my container image URI from Amazon ECR, then select my task execution role and infrastructure role. If you don’t already have these roles, choose Create new role in the drop down to have one created for you from the AWS Identity and Access Management (IAM) managed policy.

If I want to customize the deployment, I can expand the Additional configurations section to define my cluster, container port, health check path, or environment variables.

In this section, I can also adjust CPU, memory, or scaling policies.

Setting up logs in Amazon CloudWatch Logs is something I always configure so I can troubleshoot my applications if needed. When I’m happy with the configurations, I choose Create.

After I choose Create, Express Mode automatically provisions a complete application stack, including an Amazon ECS service with AWS Fargate tasks, Application Load Balancer with health checks, auto scaling policies based on CPU utilization, security groups and networking configuration, and a custom domain with an AWS provided URL. I can also follow the progress in Timeline view on the Resources tab.

If I need to do a programmatic deployment, the same result can be achieved with a single AWS Command Line Interface (AWS CLI) command:

aws ecs create-express-gateway-service \
--image [ACCOUNT_ID].ecr.us-west-2.amazonaws.com/myapp:latest \
--execution-role-arn arn:aws:iam::[ACCOUNT_ID]:role/[IAM_ROLE] \
--infrastructure-role-arn arn:aws:iam::[ACCOUNT_ID]:role/[IAM_ROLE]

After it’s complete, I can see my application URL in the console and access my running application immediately.

After the application is created, I can see the details by visiting the specified cluster, or the default cluster if I didn’t specify one, in the ECS service to monitor performance, view logs, and manage the deployment.

When I need to update my application with a new container version, I can return to the console, select my Express service, and choose Update. I can use the interface to specify a new image URI or adjust resource allocations.

Alternatively, I can use the AWS CLI for updates:

aws ecs update-express-gateway-service \
  --service-arn arn:aws:ecs:us-west-2:[ACCOUNT_ID]:service/[CLUSTER_NAME]/[APP_NAME] \
  --primary-container '{
    "image": "[IMAGE_URI]"
  }'

I find the entire experience reduces setup complexity while still giving me access to all the underlying resources when I need more advanced configurations.

Additional things to know
Here are additional things about ECS Express Mode:

  • Availability – ECS Express Mode is available in all AWS Regions at launch.
  • Infrastructure as Code support – You can use IaC tools such as AWS CloudFormation, AWS Cloud Development Kit (CDK), or Terraform to deploy your applications using Amazon ECS Express Mode.
  • Pricing – There is no additional charge to use Amazon ECS Express Mode. You pay for AWS resources created to launch and run your application.
  • Application Load Balancer sharing – The ALB created is automatically shared across up to 25 ECS services using host-header based listener rules. This helps distribute the cost of the ALB significantly.

Get started with Amazon ECS Express Mode through the Amazon ECS console. Learn more on the Amazon ECS documentation page.

Happy building!
Donnie

Introducing VPC encryption controls: Enforce encryption in transit within and across VPCs in a Region

Post Syndicated from Sébastien Stormacq original https://aws.amazon.com/blogs/aws/introducing-vpc-encryption-controls-enforce-encryption-in-transit-within-and-across-vpcs-in-a-region/

Today, we’re announcing virtual private cloud (VPC) encryption controls, a new capability of Amazon Virtual Private Cloud (Amazon VPC) that helps you audit and enforce encryption in transit for all traffic within and across VPCs in a Region.

Organizations across financial services, healthcare, government, and retail face significant operational complexity in maintaining encryption compliance across their cloud infrastructure. Traditional approaches require piecing together multiple solutions and managing complex public key infrastructure (PKI), while manually tracking encryption across different network paths using spreadsheets—a process prone to human error that becomes increasingly challenging as infrastructure scales.

Although AWS Nitro based instances automatically encrypt traffic at the hardware layer without affecting performance, organizations need simple mechanisms to extend these capabilities across their entire VPC infrastructure. This is particularly important for demonstrating compliance with regulatory frameworks such as Health Insurance Portability and Accountability (HIPAA), Payment Card Industry Data Security Standard (PCI DSS), and Federal Risk and Authorization Management Program (FedRAMP), which require proof of end-to-end encryption across environments. Organizations need centralized visibility and control over their encryption status, without having to manage performance trade-offs or complex key management systems.

VPC encryption controls address these challenges by providing two operational modes: monitor and enforce. In monitor mode, you can audit the encryption status of your traffic flows and identify resources that allow plaintext traffic. The feature adds a new encryption-status field to VPC flow logs, giving you visibility into whether traffic is encrypted using Nitro hardware encryption, application-layer encryption (TLS), or both.

After you’ve identified resources that need modification, you can take steps to implement encryption. AWS services, such as Network Load Balancer, Application Load Balancer, and AWS Fargate tasks, will automatically and transparently migrate your underlying infrastructure to Nitro hardware without any action required from you and with no service interruption. For other resources, such as the previous generation of Amazon Elastic Compute Cloud (Amazon EC2) instances, you will need to switch to modern Nitro based instance types or configure TLS encryption at application level.

You can switch to enforce mode after all resources have been migrated to encryption-compliant infrastructure. This migration to encryption-compliant hardware and communication protocols is a prerequisite for enabling enforce mode. You can configure specific exclusions for resources such as internet gateways or NAT gateways, that don’t support encryption (because the traffic flows outside of your VPC or the AWS network).

Other resources must be encryption-compliant and can’t be excluded. After activation, enforce mode provides that all future resources are only created on compatible Nitro instances, and unencrypted traffic is dropped when incorrect protocols or ports are detected.

Let me show you how to get started

For this demo, I started three EC2 instances. I use one as a web server with Nginx installed on port 80, serving a clear text HTML page. The other two are continuously making HTTP GET requests to the server. This generates clear text traffic in my VPC. I use the m7g.medium instance type for the web server and one of the two clients. This instance type uses the underlying Nitro System hardware to automatically encrypt in-transit traffic between instances. I use a t4g.medium instance for the other web client. The network traffic of that instance is not encrypted at the hardware level.

To get started, I enable encryption controls in monitor mode. In the AWS Management Console, I select Your VPCs in the left navigation pane, then I switch to the VPC encryption controls tab. I choose Create encryption control and select the VPC I want to create the control for.

Each VPC can have only one VPC encryption control associated with it, creating a one-to-one relationship between the VPC ID and the VPC encryption control Id. When creating VPC encryption controls, you can add tags to help with resource organization and management. You can also activate VPC encryption control when you create a new VPC.

VPC Encryption Control - create EC 1

I enter a Name for this control. I select the VPC I want to control. For existing VPCs, I have to start in Monitor mode, and I can turn on Enforce mode when I’m sure there is no unencrypted traffic. For new VPCs, I can enforce encryption at the time of creation.

Optionally, I can define tags when creating encryption controls for an existing VPC. However, when enabling encryption controls during VPC creation, separate tags can’t be created for VPC encryption controls—because they automatically inherit the same tags as the VPC. When I’m ready, I choose Create encryption control.

VPC Encryption Control - create EC 2Alternatively, I can use the AWS Command Line Interface (AWS CLI):

aws ec2 create-vpc-encryption-control --vpc-id vpc-123456789

Next, I audit the encryption status of my VPC using the console, command line, or flow logs:

aws ec2 create-flow-logs \
  --resource-type VPC \
  --resource-ids vpc-123456789 \
  --traffic-type ALL \
  --log-destination-type s3 \
  --log-destination arn:aws:s3:::vpc-flow-logs-012345678901/vpc-flow-logs/ \
  --log-format '${flow-direction} ${traffic-path} ${srcaddr} ${dstaddr} ${srcport} ${dstport} ${encryption-status}'
{
    "ClientToken": "F7xmLqTHgt9krTcFMBHrwHmAZHByyDXmA1J94PsxWiU=",
    "FlowLogIds": [
        "fl-0667848f2d19786ca"
    ],
    "Unsuccessful": []
}

After a few minutes, I see this traffic in my logs:

flow-direction traffic-path srcaddr dstaddr srcport dstport encryption-status
ingress - 10.0.133.8 10.0.128.55 43236 80 1 # <-- HTTP between web client and server. Encrypted at hardware-level
egress 1 10.0.128.55 10.0.133.8 80 43236 1
ingress - 10.0.133.8 10.0.128.55 36902 80 1
egress 1 10.0.128.55 10.0.133.8 80 36902 1
ingress - 10.0.130.104 10.0.128.55 55016 80 0 # <-- HTTP between web client and server. Not encrypted at hardware-level
egress 1 10.0.128.55 10.0.130.104 80 55016 0
ingress - 10.0.130.104 10.0.128.55 60276 80 0
egress 1 10.0.128.55 10.0.130.104 80 60276 0
  • 10.0.128.55 is the web server with hardware-encrypted traffic, serving clear text traffic at application level.
  • 10.0.133.8 is the web client with hardware-encrypted traffic.
  • 10.0.130.104 is the web client with no encryption at the hardware level.

The encryption-status field tells me the status of the encryption for the traffic between the source and destination address:

  • 0 means the traffic is in clear text
  • 1 means the traffic is encrypted at the network layer (Level 3) by the Nitro system
  • 2 means the traffic is encrypted at the application layer (Level7, TCP Port 443 and TLS/SSL)
  • 3 means the traffic is encrypted both at the application layer (TLS) and the network layer (Nitro)
  • “-” means VPC encryption controls are not enabled, or AWS Flow Logs don’t have the status information.

The traffic originating from the web client on the instance that isn’t Nitro based (10.0.130.104), is flagged as 0. The traffic initiated from the web client on the Nitro- ased instance (10.0.133.8) is flagged as 1.

I also use the console to identify resources that need modification. It reports two nonencrypted resources: the internet gateway and the elastic network interface (ENI) of the instance that isn’t based on Nitro.

VPC Encryption Control - list of exclusionsI can also check for nonencrypted resources using the CLI:

aws ec2 get-vpc-resources-blocking-encryption-enforcement --vpc-id vpc-123456789

After updating my resources to support encryption, I can use the console or the CLI to switch to enforce mode.

In the console, I select the VPC encryption control. Then, I select Actions and Switch mode.

VPC Encryption Control - switch modeOr the equivalent CLI:

aws ec2 modify-vpc-encryption-control --vpc-id vpc-123456789 --mode enforce

How to modify the resources that are identified as nonencrypted?

All your VPC resources must support traffic encryption, either at the hardware layer or at the application layer. For most resources, you don’t need to take any action.

AWS services accessed through AWS PrivateLink and gateway endpoints automatically enforce encryption at the application layer. These services only accept TLS-encrypted traffic. AWS will automatically drop any traffic that isn’t encrypted at the application layer.

When you enable monitor mode, we automatically and gradually migrate your Network Load Balancers, Application Load Balancers, AWS Fargate clusters, and Amazon Elastic Kubernetes Service (Amazon EKS) clusters to hardware that inherently supports encryption. This migration happens transparently without any action required from you.

Some VPC resources require you to select the underlying instances that support modern Nitro hardware-layer encryption. These include EC2 Instances, Auto Scaling groups, Amazon Relational Database Service (Amazon RDS) databases (including Amazon DocumentDB), Amazon ElastiCache node-based clusters, Amazon Redshift provisioned clusters, EKS clusters, ECS with EC2 capacity, MSK Provisioned, Amazon OpenSearch Service, and Amazon EMR. To migrate your Redshift clusters, you must create a new cluster or namespace from a snapshot.

If you use newer-generation instances, you likely already have encryption-compliant infrastructure because all recent instance types support encryption. For older-generation instances that don’t support encryption-in transit, you’ll need to upgrade to supported instance types.

Something to know when using AWS Transit Gateway

When creating a Transit Gateway through AWS CloudFormation with VPC encryption enabled, you need two additional AWS Identity and Access Management (IAM) permissions: ec2:ModifyTransitGateway and ec2:ModifyTransitGatewayOptions. These permissions are required because CloudFormation uses a two-step process to create a Transit Gateway. It first creates the Transit Gateway with basic configuration, then calls ModifyTransitGateway to enable encryption support. Without these permissions, your CloudFormation stack will fail during creation when attempting to apply the encryption configuration, even if you’re only performing what appears to be a create operation.

Pricing and availability

You can start using VPC encryption controls today in these AWS Regions: US East (Ohio, N. Virginia), US West (N. California, Oregon), Africa (Cape Town), Asia Pacific (Hong Kong, Hyderabad, Jakarta, Melbourne, Mumbai, Osaka, Singapore, Sydney, Tokyo), Canada (Central), Canada West (Calgary), Europe (Frankfurt, Ireland, London, Milan, Paris, Stockholm, Zurich), Middle East (Bahrain, UAE), and South America (São Paulo).

VPC encryption controls is free of cost until March 1, 2026. The VPC pricing page will be updated with details as we get closer to that date.

To learn more, visit the VPC encryption controls documentation or try it out in your AWS account. I look forward to hearing how you use this feature to strengthen your security posture and help you meet compliance standards.

— seb

Introducing attribute-based access control for Amazon S3 general purpose buckets

Post Syndicated from Matheus Guimaraes original https://aws.amazon.com/blogs/aws/introducing-attribute-based-access-control-for-amazon-s3-general-purpose-buckets/

As organizations scale, managing access permissions for storage resources becomes increasingly complex and time-consuming. As new team members join, existing staff changes roles, and new S3 buckets are created, organizations must constantly update multiple types of access policies to govern access across their S3 buckets. This challenge is especially pronounced in multi-tenant S3 environments where administrators must frequently update these policies to control access across shared datasets and numerous users.

Today we’re introducing attribute-based access control (ABAC) for Amazon Simple Storage Service (S3) general purpose buckets, a new capability you can use to automatically manage permissions for users and roles by controlling data access through tags on S3 general purpose buckets. Instead of managing permissions individually, you can use tag-based IAM or bucket policies to automatically grant or deny access based on tags between users, roles, and S3 general purpose buckets. Tag-based authorization makes it easy to grant S3 access based on project, team, cost center, data classification, or other bucket attributes instead of bucket names, dramatically simplifying permissions management for large organizations.

How ABAC works
Here’s a common scenario: as an administrator, I want to give developers access to all S3 buckets meant to be used in development environments.

With ABAC, I can tag my development environment S3 buckets with a key-value pair such as environment:development and then attach an ABAC policy to an AWS Identity and Access Management (IAM) principal that checks for the same environment:development tag. If the bucket tag matches the condition in the policy, the principal is granted access.

Let’s see how this works.

Getting started
First, I need to explicitly enable ABAC on each S3 general purpose bucket where I want to use tag-based authorization.

I navigate to the Amazon S3 console, select my general purpose bucket then navigate to Properties where I can find the option to enable ABAC for this bucket.

I can also use the AWS Command Line Interface (AWS CLI) to enable it programmatically by using the new PutBucketAbac API. Here I am enabling ABAC on a bucket called my-demo-development-bucket located in the US East (Ohio) us-east-2 AWS Region.

aws s3api put-bucket-abac --bucket my-demo-development-bucket abac-status Status=Enabled --region us-east-2

Alternatively, if you use AWS CloudFormation, you can enable ABAC by setting the AbacStatus property to Enabled in your template.

Next, let’s tag our S3 general purpose bucket. I add an environment:development tag which will become the criteria for my tag-based authorization.

Now that my S3 bucket is tagged, I’ll create an ABAC policy that verifies matching environment:development tags and attach it to an IAM role called dev-env-role. By managing developer access to this role, I can control permissions to all development environment buckets in a single place.

I navigate to the IAM console, choose Policies, and then Create policy. In the Policy editor, I switch to JSON view and create a policy that allows users to read, write and list S3 objects, but only when they have a tag with a key of “environment” attached and its value matches the one declared on the S3 bucket. I give this policy the name of s3-abac-policy and save it.

{
    "Version": "2012-10-17",
    "Statement": [
        {
            "Effect": "Allow",
            "Action": [
                "s3:GetObject",
                "s3:PutObject",
                "s3:ListBucket"
            ],
            "Resource": [
                "*"
            ],
            "Condition": {
                "StringEquals": {
                    "aws:ResourceTag/environment": "development"
                }
            }
        }
    ]
}

I then attach this s3-abac-policy to the dev-env-role.

That’s it! Now a user assuming the dev-role can access any ABAC-enabled bucket with the tag environment:development such as my-demo-development-bucket.

Using your existing tags
Keep in mind that although you can use your existing tags for ABAC, because these tags will now be used for access control, we recommend reviewing your current tag setup before enabling the feature. This includes reviewing your existing bucket tags and tag-based policies to prevent unintended access, and updating your tagging workflows to use the standard TagResource API (since enabling ABAC on your buckets will block the use of the PutBucketTagging API). You can use AWS Config to check which buckets have ABAC enabled and review your usage of PutBucketTagging API in your application using AWS Cloudtrail management events.

Additionally, the same tags you use for ABAC can also serve as cost allocation tags for your S3 buckets. Activate them as cost allocation tags in the AWS Billing Console or through APIs, and your AWS Cost Explorer and Cost and Usage Reports will automatically organize spending data based on these tags.

Enforcing tags on creation
To help standardize access control across your organization, you can now enforce tagging requirements when buckets are created through service control policies (SCPs) or IAM policies using the aws:TagKeys and aws:RequestTag condition keys. Then you can enable ABAC on these buckets to provide consistent access control patterns across your organization. To tag a bucket during creation you can add the tags to your CloudFormation templates or provide them in the request body of your call to the existing S3 CreateBucket API. For example, I could enforce a policy for my developers to create buckets with the tag environment=development so all my buckets are tagged accurately for cost allocation. If I want to use the same tags for access control, I can then enable ABAC for these buckets.

Things to know

With ABAC for Amazon S3, you can now implement scalable, tag-based access control across your S3 buckets. This feature makes writing access control policies simpler, and reduces the need for policy updates as principals and resources come and go. This helps you reduce administrative overhead while maintaining strong security governance as you scale.

Attribute-based access control for Amazon S3 general purpose buckets is available now through the AWS Management Console, API, AWS SDKs, AWS CLI, and AWS CloudFormation at no additional cost. Standard API request rates apply according to Amazon S3 pricing. There’s no additional charge for tag storage on S3 resources.

You can use AWS CloudTrail to audit access requests and understand which policies granted or denied access to your resources.

You can also use ABAC with other S3 resources such as S3 directory bucket, S3 access points and S3 tables buckets and tables. To learn more about ABAC on S3 buckets see the Amazon S3 User Guide.

You can use the same tags you use for access control for cost allocation as well. You can activate them as cost allocation tags through the AWS Billing Console or APIs. Check out the documentation for more details on how to use cost allocation tags.

Simplify access to external services using AWS IAM Outbound Identity Federation

Post Syndicated from Donnie Prakoso original https://aws.amazon.com/blogs/aws/simplify-access-to-external-services-using-aws-iam-outbound-identity-federation/

When building applications that span multiple cloud providers or integrate with external services, developers face a persistent challenge: managing credentials securely. Traditional approaches require storing long-term credentials like API keys and passwords, creating security risks and operational overhead.

Today, we’re announcing a new capability called AWS Identity and Access Management (IAM) outbound identity federation that customers can use to securely federate their Amazon Web Services (AWS) identities to external services without storing long-term credentials. You can now use short-lived JSON Web Tokens (JWTs) to authenticate your AWS workloads with a wide range of third-party providers, software-as-a-service (SaaS) platforms and self-hosted applications.

This feature enables IAM principals—such as IAM roles and users—to obtain cryptographically signed JWTs that assert their AWS identity. External services, such as third-party providers, SaaS platforms, and on-premises applications, can verify the token’s authenticity by validating its signature. Upon successful verification, you can securely access the external service.

How it works
With IAM outbound identity federation, you exchange your AWS IAM credentials for short-lived JWTs. This mitigates the security risks associated with long-term credentials while enabling consistent authentication patterns.

Let’s walk through a scenario where your application running on AWS needs to interact with an external service. To access the external service’s APIs or resources, your application calls the AWS Security Token Service (AWS STS) `GetWebIdentityToken` API to obtain a JWT.

The following diagram shows this flow:

  1. Your application running on AWS requests a token from AWS STS by calling the GetWebIdentityToken API. The application uses its existing AWS credentials obtained from the underlying platform (such as Amazon EC2 instance profiles, AWS Lambda execution roles, or other AWS compute services) to authenticate this API call.
  2. AWS STS returns a cryptographically signed JSON Web Token (JWT) that asserts the identity of your application.
  3. Your application sends the JWT to the external service for authentication.
  4. The external service fetches the verification keys from the JSON Web Key Set (JWKS) endpoint to verify the token’s authenticity.
  5. The external service validates the JWT’s signature using these verification keys and confirms the token is authentic and was issued by AWS.
  6. After successful verification, the external service exchanges the JWT for its own credentials. Your application can then use these credentials to perform its intended operations.

Setting up AWS IAM outbound identity federation
To begin using this feature, I need to enable outbound identity federation for my AWS account. I navigate to IAM and choose Account settings under Access management in the left-hand navigation pane.

After I enable the feature, AWS generates a unique issuer URL for my AWS account that hosts the OpenID Connect (OIDC) discovery endpoints at /.well-known/openid-configuration and /.well-known/jwks.json. The OpenID Connect (OIDC) discovery endpoints contain the keys and metadata necessary for token verification.

Next, I need to configure IAM permissions. My IAM principal (role or user) must have the sts:GetWebIdentityToken permission to request tokens.

For example, the following identity policy specifies access to the STS GetWebIdentityToken API, enabling the IAM principal to generate tokens.

{
  "Version": "2012-10-17",
  "Statement": [
    {
      "Effect": "Allow",
      "Action": "sts:GetWebIdentityToken",
      "Resource": "*",
    }
  ]
}

At this stage, I need to configure the external service to trust and accept tokens issued by my AWS account. The specific steps vary by service, but generally involve:

  1. Registering my AWS account issuer URL as a trusted identity provider
  2. Configuring which claims to validate (audience, subject patterns)
  3. Mapping token claims to permissions in the external service

Let’s get started
Now, let me walk you through an example showing both the client-side token generation and server-side verification process.

First, I call the STS GetWebIdentityToken API to obtain a JWT that asserts my AWS identity. When calling the API, I can specify the intended audience, signing algorithm, and token lifetime as request parameters.

  • Audience: Populates the `aud` claim in the JWT, identifying the intended recipient of the token (for example, “my-app”)
  • DurationSeconds: The token lifetime in seconds, ranging from 60 seconds (1 minute) to 3600 seconds (1 hour), with a default of 600 seconds (5 minutes)
  • SigningAlgorithm: Choose either ES384 (ECDSA using P-384 and SHA-384) or RS256 (RSA using SHA-256)
  • Tags (optional): An array of key-value pairs that appear as custom claims in the token, which you can use to include additional context that enables external services to implement fine-grained access control

Here’s an example of getting an identity token using the AWS SDK for Python (Boto3). I can also do this using AWS Command Line Interface (AWS CLI).


import boto3

sts_client = boto3.client('sts')
response = sts_client.get_web_identity_token(
    Audience=['my-app'],
    SigningAlgorithm='ES384',  # or 'RS256'
    DurationSeconds=300
)
jwt_token = response['IdentityToken']
print(jwt_token)

This returns a signed JWT that I can inspect using any JWT parser.

{
eyJraWQiOiJFQzM4NF8wIiwidHlwIjoiSldUIiwiYWxnIjoiRVMzODQifQ.hey<REDACTED FOR BREVITY>...

I can decode the token using any JWT parser like this JWT Debugger. The token header shows it’s signed with ES384 (ECDSA).


{
  "kid": "EC384_0",
  "typ": "JWT",
  "alg": "ES384"
}

Also, the payload contains standard OIDC claims plus AWS specific metadata. The standard OIDC claims include subject (“sub”), audience (“aud”), issuer (“iss”), and others.

{
  "aud": "my-app",
  "sub": "arn:aws:iam::ACCOUNT_ID:role/MyAppRole",
  "https://sts.amazonaws.com/": {
    "aws_account": "ACCOUNT_ID",
    "source_region": "us-east-1",
    "principal_id": "arn:aws:iam::ACCOUNT_ID:role/MyAppRole"
  },
  "iss": "https://abc12345-def4-5678-90ab-cdef12345678.tokens.sts.global.api.aws",
  "exp": 1759786941,
  "iat": 1759786041,
  "jti": "5488e298-0a47-4c5b-80d7-6b4ab8a4cede"
}

AWS STS also enriches the token with identity-specific claims (such as account ID, organization ID, and principal tags) and session context. These claims provide information about the compute environment and session where the token request originated. AWS STS automatically includes these claims when applicable based on the requesting principal’s session context. You can also add custom claims to the token by passing request tags to the API call. To learn more about claims provided in the JWT, visit the documentation page.

Note the iss (issuer) claim. This is your account-specific issuer URL that external services use to verify that the token originated from a trusted AWS account. External services can verify the JWT by validating its signature using AWS’s verification keys available at a public JSON Web Key Set (JWKS) endpoint hosted at the /.well-known/jwks.json endpoint of the issuer URL.

Now, let’s look at how external services handle this identity token.

Here’s a snippet of Python example that external services can use to verify AWS tokens:


import json
import jwt
import requests
from jwt import PyJWKClient

# Trusted issuers list - obtained from EnableOutboundFederation API response
TRUSTED_ISSUERS = [
    "https://EXAMPLE.tokens.sts.global.api.aws",
    # Add your trusted AWS account issuer URLs here
    # Obtained from EnableOutboundFederation API response
]

def verify_aws_jwt(token, expected_audience=None):
    """Verify an AWS IAM outbound identity federation JWT"""
    try:
        # Get issuer from token
        unverified_payload = jwt.decode(token, options={"verify_signature": False})
        issuer = unverified_payload.get('iss')

 	# Verify issuer is trusted
        if not TRUSTED_ISSUERS or issuer not in TRUSTED_ISSUERS:
            raise ValueError(f"Untrusted issuer: {issuer}")

        # Fetch JWKS from AWS using PyJWKClient
        jwks_client = PyJWKClient(f"{issuer}/.well-known/jwks.json")
        signing_key = jwks_client.get_signing_key_from_jwt(token)

        # Verify token signature and claims
        decoded_token = jwt.decode(
            token,
            signing_key.key,
            algorithms=["ES384", "RS256"],
            audience=expected_audience,
            issuer=issuer
        )
        return decoded_token
    except Exception as e:
        print(f"Token verification failed: {e}")
        return None

Using IAM policies to control access to token generation
An IAM principal (such as a role or user) must have the sts:GetWebIdentityToken permission in their IAM policies to request tokens for authentication with external services. AWS account administrators can configure this permission in all relevant AWS policy types such as identity policies, service control policies (SCPs), resource control policies (RCPs), and virtual private cloud endpoint (VPCE) policies to control which IAM principals in their account can generate tokens.

Additionally, administrators can use the new condition keys to specify signing algorithms (sts:SigningAlgorithm), permitted token audiences (sts:IdentityTokenAudience), and maximum token lifetimes (sts:DurationSeconds). To learn more about the condition keys, visit IAM and STS Condition keys documentation page.

Additional things to know
Here are key details about this launch:

Get started with AWS IAM outbound identity federation by visiting AWS IAM console and enabling the feature in your AWS account. For more information, visit Federating AWS Identities to External Services documentation page.

Happy building!
Donnie

Accelerate workflow development with enhanced local testing in AWS Step Functions

Post Syndicated from Donnie Prakoso original https://aws.amazon.com/blogs/aws/accelerate-workflow-development-with-enhanced-local-testing-in-aws-step-functions/

Today, I’m excited to announce enhanced local testing capabilities for AWS Step Functions through the TestState API, our testing API.

These enhancements are available through the API, so you can build automated test suites that validate your workflow definitions locally on your development machines, test error handling patterns, data transformations, and mock service integrations using your preferred testing frameworks. This launch introduces an API-based approach for local unit testing, providing programmatic access to comprehensive testing capabilities without deploying to Amazon Web Services (AWS).

There are three key capabilities introduced in this enhanced TestState API:

  • Mocking support – Mock state outputs and errors without invoking downstream services, enabling true unit testing of state machine logic. TestState validates mocked responses against AWS API models with three validation modes: STRICT (this is the default and validates all required fields), PRESENT (validates field types and names), and NONE (no validation), providing high-fidelity testing.

  • Support for all state types – All state types, including advanced states such as Map states (inline and distributed), Parallel states, activity-based Task states, .sync service integration patterns, and .waitForTaskToken service integration patterns, can now be tested. This means you can use TestState API across your entire workflow definition and write unit tests to verify control flow logic, including state transitions, error handling, and data transformations.

  • Testing individual states – Test specific states within a full state machine definition using the new stateName parameter. You can provide the complete state machine definition one time and test each state individually by name. You can control execution context to test specific retry attempts, Map iteration positions, and error scenarios.

Getting started with enhanced TestState
Let me walk you through these new capabilities in enhanced TestState.

Scenario 1: Mock successful results

The first capability is mocking support, which you can use to test your workflow logic without invoking actual AWS services or even external HTTP requests. You can either mock service responses for fast unit testing or test with actual AWS services for integration testing. When using mocked responses, you don’t need AWS Identity and Access Management (IAM) permissions.

Here’s how to mock a successful AWS Lambda function response:

aws stepfunctions test-state --region us-east-1 \
--definition '{
  "Type": "Task",
  "Resource": "arn:aws:states:::lambda:invoke",
  "Parameters": {"FunctionName": "process-order"},
  "End": true
}' \
--mock '{"result":"{\"orderId\":\"12345\",\"status\":\"processed\"}"}' \
--inspection-level DEBUG

This command tests a Lambda invocation state without actually calling the function. TestState validates your mock response against the Lambda service API model so your test data matches what the real service would return.

The response shows the successful execution with detailed inspection data (when using DEBUG inspection level):

{
    "output": "{\"orderId\":\"12345\",\"status\":\"processed\"}",
    "inspectionData": {
        "input": "{}",
        "afterInputPath": "{}",
        "afterParameters": "{\"FunctionName\":\"process-order\"}",
        "result": "{\"orderId\":\"12345\",\"status\":\"processed\"}",
        "afterResultSelector": "{\"orderId\":\"12345\",\"status\":\"processed\"}",
        "afterResultPath": "{\"orderId\":\"12345\",\"status\":\"processed\"}"
    },
    "status": "SUCCEEDED"
}

When you specify a mock response, TestState validates it against the AWS service’s API model so your mocked data conforms to the expected schema, maintaining high-fidelity testing without requiring actual AWS service calls.

Scenario 2: Mock error conditions
You can also mock error conditions to test your error handling logic:

aws stepfunctions test-state --region us-east-1 \
--definition '{
  "Type": "Task",
  "Resource": "arn:aws:states:::lambda:invoke",
  "Parameters": {"FunctionName": "process-order"},
  "End": true
}' \
--mock '{"errorOutput":{"error":"Lambda.ServiceException","cause":"Function failed"}}' \
--inspection-level DEBUG

This simulates a Lambda service exception so you can verify how your state machine handles failures without triggering actual errors in your AWS environment.

The response shows the failed execution with error details:

{
    "error": "Lambda.ServiceException",
    "cause": "Function failed",
    "inspectionData": {
        "input": "{}",
        "afterInputPath": "{}",
        "afterParameters": "{\"FunctionName\":\"process-order\"}"
    },
    "status": "FAILED"
}

Scenario 3: Test Map states
The second capability adds support for previously unsupported state types. Here’s how to test a Distributed Map state:

aws stepfunctions test-state --region us-east-1 \
--definition '{
  "Type": "Map",
  "ItemProcessor": {
    "ProcessorConfig": {"Mode": "DISTRIBUTED", "ExecutionType": "STANDARD"},
    "StartAt": "ProcessItem",
    "States": {
      "ProcessItem": {
        "Type": "Task", 
        "Resource": "arn:aws:states:::lambda:invoke",
        "Parameters": {"FunctionName": "process-item"},
        "End": true
      }
    }
  },
  "End": true
}' \
--input '[{"itemId":1},{"itemId":2}]' \
--mock '{"result":"[{\"itemId\":1,\"status\":\"processed\"},{\"itemId\":2,\"status\":\"processed\"}]"}' \
--inspection-level DEBUG

The mock result represents the complete output from processing multiple items. In this case, the mocked array must match the expected Map state output format.

The response shows successful processing of the array input:

{
    "output": "[{\"itemId\":1,\"status\":\"processed\"},{\"itemId\":2,\"status\":\"processed\"}]",
    "inspectionData": {
        "input": "[{\"itemId\":1},{\"itemId\":2}]",
        "afterInputPath": "[{\"itemId\":1},{\"itemId\":2}]",
        "afterResultSelector": "[{\"itemId\":1,\"status\":\"processed\"},{\"itemId\":2,\"status\":\"processed\"}]",
        "afterResultPath": "[{\"itemId\":1,\"status\":\"processed\"},{\"itemId\":2,\"status\":\"processed\"}]"
    },
    "status": "SUCCEEDED"
}

Scenario 4: Test Parallel states
Similarly, you can test Parallel states that execute multiple branches concurrently:

aws stepfunctions test-state --region us-east-1 \
--definition '{
  "Type": "Parallel",
  "Branches": [
    {"StartAt": "Branch1", "States": {"Branch1": {"Type": "Pass", "End": true}}},
    {"StartAt": "Branch2", "States": {"Branch2": {"Type": "Pass", "End": true}}}
  ],
  "End": true
}' \
--mock '{"result":"[{\"branch1\":\"data1\"},{\"branch2\":\"data2\"}]"}' \
--inspection-level DEBUG

The mock result must be an array with one element per branch. By using TestState, your mock data structure matches what a real Parallel state execution would produce.

The response shows the parallel execution results:

{
    "output": "[{\"branch1\":\"data1\"},{\"branch2\":\"data2\"}]",
    "inspectionData": {
        "input": "{}",
        "afterResultSelector": "[{\"branch1\":\"data1\"},{\"branch2\":\"data2\"}]",
        "afterResultPath": "[{\"branch1\":\"data1\"},{\"branch2\":\"data2\"}]"
    },
    "status": "SUCCEEDED"
}

Scenario 5: Test individual states within complete workflows
You can test specific states within a full state machine definition using the stateName parameter. Here’s an example testing a single state, though you would typically provide your complete workflow definition and specify which state to test:

aws stepfunctions test-state --region us-east-1 \
--definition '{
  "Type": "Task",
  "Resource": "arn:aws:states:::lambda:invoke",
  "Parameters": {"FunctionName": "validate-order"},
  "End": true
}' \
--input '{"orderId":"12345","amount":99.99}' \
--mock '{"result":"{\"orderId\":\"12345\",\"validated\":true}"}' \
--inspection-level DEBUG

This tests a Lambda invocation state with specific input data, showing how TestState processes the input and transforms it through the state execution.

The response shows detailed input processing and validation:

{
    "output": "{\"orderId\":\"12345\",\"validated\":true}",
    "inspectionData": {
        "input": "{\"orderId\":\"12345\",\"amount\":99.99}",
        "afterInputPath": "{\"orderId\":\"12345\",\"amount\":99.99}",
        "afterParameters": "{\"FunctionName\":\"validate-order\"}",
        "result": "{\"orderId\":\"12345\",\"validated\":true}",
        "afterResultSelector": "{\"orderId\":\"12345\",\"validated\":true}",
        "afterResultPath": "{\"orderId\":\"12345\",\"validated\":true}"
    },
    "status": "SUCCEEDED"
}

These enhancements bring the familiar local development experience to Step Functions workflows, helping me to get instant feedback on changes before deploying to my AWS account. I can write automated test suites to validate all Step Functions features with the same reliability as cloud execution, providing confidence that my workflows will work as expected when deployed.

Things to know
Here are key points to note:

  • Availability – Enhanced TestState capabilities are available in all AWS Regions where Step Functions is supported.
  • Pricing – TestState API calls are included with AWS Step Functions at no additional charge.
  • Framework compatibility – TestState works with any testing framework that can make HTTP requests, including Jest, pytest, JUnit, and others. You can write test suites that validate your workflows automatically in your continuous integration and continuous delivery (CI/CD) pipeline before deployment.
  • Feature support – Enhanced TestState supports all Step Functions features including Distributed Map, Parallel states, error handling, and JSONata expressions.
  • Documentation – For detailed options for different configurations, refer to the TestState documentation and API reference for the updated request and response model.

Get started today with enhanced local testing by integrating TestState into your development workflow.

Happy building!
Donnie