AWS re:Inforce returned to Boston, MA, in July after 2 years, and we were so glad to be back in person with customers. The conference featured over 250 sessions and hands-on labs, 100 AWS partner sponsors, and over 6,000 attendees over 2 days. If you weren’t able to join us in person, or just want to revisit some of the themes, this blog post is for you. It summarizes all the key announcements and points to where you can watch the event keynote, sessions, and partner lightning talks on demand.
Key announcements
Here are some of the announcements that we made at AWS re:Inforce 2022.
Free MFA token ordering portal – We’ve made our free multi-factor authentication (MFA) security key program easier. We now have an ordering portal in the AWS Management Console where eligible customers can order their token. In response to customer demand, we’ve streamlined the ordering process, especially for linked accounts. At this time, only US-based AWS account root users who have spent more than $100 each month over the past 3 months are eligible to place an order.
IAM Roles Anywhere – This new feature extends the capabilities of AWS Identity and Access Management (IAM) roles to workloads outside of AWS. You can use IAM Roles Anywhere to provide a secure way for on-premises servers, containers, or applications to obtain temporary AWS credentials and remove the need for creating and managing long-term AWS credentials.
AWS Marketplace Vendor Insights – This new feature helps simplify third-party software risk assessments by compiling security and compliance information in a unified dashboard.
AWS Cloud Audit Academy – PCI DSS on AWS – Cloud Audit Academy (CAA) PCI DSS on AWS is the third course in the AWS security auditing learning path. This path is designed for those who are in auditing, risk, and compliance roles and who are involved in assessing regulated workloads in the cloud.
New workshop – Threat modeling the right way for builders – This workshop introduces you to the background of threat modeling and why to do it, as well as some of the tools and techniques for modeling systems, identifying threats, and selecting mitigations.
Enable secure communication with end-to-end encryption with AWS Wickr, and collaborate on calls with confidence. AWS Wickr encrypts messages, calls, and files with a proprietary, 256-bit end-to-end encryption protocol. No one but intended recipients can decrypt them, reducing the risk of person-in-the-middle attacks.
Watch on demand
You can also watch these talks and learning sessions on demand.
Keynotes and leadership sessions
Watch the AWS re:Inforce 2022 keynote where Amazon Chief Security Officer Stephen Schmidt, AWS Chief Information Security Officer CJ Moses, Vice President of AWS Platform Kurt Kufeld, and MongoDB Chief Information Security Officer Lena Smart share the latest innovations in cloud security from AWS and what you can do to foster a culture of security in your business. Additionally, you can review all the leadership sessions to learn best practices for managing security, compliance, identity, and privacy in the cloud.
Breakout sessions and partner lightning talks
Data Protection and Privacy track – See how AWS, customers, and partners work together to protect data. Learn about trends in data management, cryptography, data security, data privacy, encryption, and key rotation and storage.
Governance, Risk, and Compliance track – Dive into the latest hot topics in governance and compliance for security practitioners, and discover how to automate compliance tools and services for operational use.
Identity and Access Management track – Hear from AWS, customers, and partners on how to use AWS Identity Services to manage identities, resources, and permissions securely and at scale. Learn how to configure fine-grained access controls for your employees, applications, and devices and deploy permission guardrails across your organization.
Network and Infrastructure Security track – Gain practical expertise on the services, tools, and products that AWS, customers, and partners use to protect the usability and integrity of their networks and data.
Threat Detection and Incident Response track – Learn how AWS, customers, and partners get the visibility they need to improve their security posture, reduce the risk profile of their environments, identify issues before they impact business, and implement incident response best practices.
Session presentation downloads are also available on our AWS Event Contents page. Consider joining us for more in-person security learning opportunities by registering for AWS re:Invent 2022, which will be held November 28 through December 2 in Las Vegas. We look forward to seeing you there!
If you’d like to discuss how these new announcements can help your organization improve its security posture, AWS is here to help. Contact your AWS account team today.
If you have feedback about this post, submit comments in the Comments section below. If you have questions about this post, contact AWS Support.
Want more AWS Security news? Follow us on Twitter.
Network and security teams often need to evaluate the internet accessibility of all their resources on AWS and block any non-essential internet access. Validating who has access to what can be complicated—there are several different controls that can prevent or authorize access to resources in your Amazon Virtual Private Cloud (Amazon VPC). The recently launched Amazon VPC Network Access Analyzer helps you understand potential network paths to and from your resources without having to build automation or manually review security groups, network access control lists (network ACLs), route tables, and Elastic Load Balancing (ELB) configurations. You can use this information to add security layers, such as moving instances to a private subnet behind a NAT gateway or moving APIs behind AWS PrivateLink, rather than use public internet connectivity. In this blog post, we show you how to use Network Access Analyzer to identify publicly accessible resources.
Network Access Analyzer uses automated reasoning to produce findings of potential network paths that don’t meet your network security policy. Network Access Analyzer reasons about all of your Amazon VPC configurations together rather than in isolation. For example, it produces findings for paths from an EC2 instance to an internet gateway only when the following conditions are met: the security group allows outbound traffic, the network ACL allows outbound traffic, and the instance’s route table has a route to an internet gateway (possibly through a NAT gateway, network firewall, transit gateway, or peering connection). Network Access Analyzer produces actionable findings with more context such as the entire network path from the source to the destination, as compared to the isolated rule-based checks of individual controls, such as security groups or route tables.
Sample environment
Let’s walk through a real-world example of using Network Access Analyzer to detect publicly accessible resources in your environment. Figure 1 shows an environment for this evaluation, which includes the following resources:
An EC2 instance in a public subnet allowing inbound public connections on port 80/443 (HTTP/HTTPS).
An EC2 instance in a private subnet allowing connections from an Application Load Balancer on port 80/443.
An Application Load Balancer in a public subnet with a Target Group connected to the private web server, allowing public connections on port 80/443.
An Amazon Aurora database in a public subnet allowing public connections on port 3306 (MySQL).
An Aurora database in a private subnet.
An EC2 instance in a public subnet allowing public connections on port 9200 (OpenSearch/Elasticsearch).
An Amazon EMR cluster allowing public connections on port 8080.
A Windows EC2 instance in a public subnet allowing public connections on port 3389 (Remote Desktop Protocol).
Figure 1: Example environment of web servers hosted on EC2 instances, remote desktop servers hosted on EC2, Relational Database Service (RDS) databases, Amazon EMR cluster, and OpenSearch cluster on EC2
Let us assume that your organization’s security policy requires that your databases and analytics clusters not be directly accessible from the internet, whereas certain workload such as instances for web services can have internet access only through an Application Load Balancer over ports 80 and 443. Network Access Analyzer allows you to evaluate network access to resources in your VPCs, including database resources such as Amazon RDS and Amazon Aurora clusters, and analytics resources such as Amazon OpenSearch Service clusters and Amazon EMR clusters. This allows you to govern network access to your resources on AWS, by identifying network access that does not meet your security policies, and creating exclusions for paths that do have the appropriate network controls in place.
Configure Network Access Analyzer
In this section, you will learn how to create network scopes, analyze the environment, and review the findings produced. You can create network access scopes by using the AWS Command Line Interface (AWS CLI) or AWS Management Console. When creating network access scopes using the AWS CLI, you can supply the scope by using a JSON document. This blog post provides several network access scopes as JSON documents that you can deploy to your AWS accounts.
In the navigation pane, under Network Analysis, choose Network Access Analyzer.
Under Network Access Scopes, select the checkboxes next to the scopes that you want to analyze, and then choose Analyze, as shown in Figure 2.
Figure 2: Custom network scopes created for Network Access Analyzer
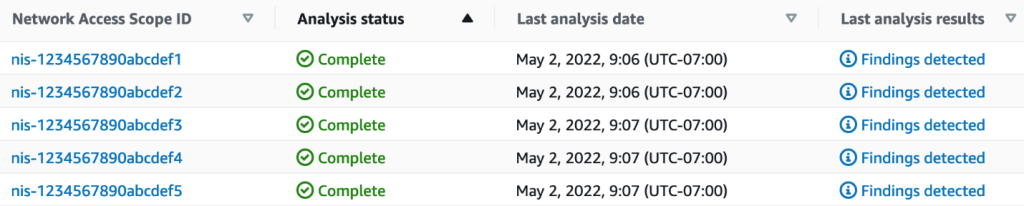
If Network Access Analyzer detects findings, the console indicates the status Findings detected for each scope, as shown in Figure 3.
Figure 3: Network Access Analyzer scope status
To review findings for a scope (console)
On the Network Access Scopes page, under Network Access Scope ID, select the link for the scope that has the findings that you want to review. This opens the latest analysis, with the option to review past analyses, as shown in Figure 4.
Figure 4: Finding summary identifying Amazon Aurora instance with public access to port 3306
To review the path for a specific finding, under Findings, select the radio button to the left of the finding, as shown in Figure 4. Figure 5 shows an example of a path for a finding.
Figure 5: Finding details showing access to the Amazon Aurora instance from the internet gateway to the elastic network interface, allowed by a network ACL and security group.
Choose any resource in the path for detailed information, as shown in Figure 6.
Figure 6: Resource detail within a finding outlining a specific security group allowing access on port 3306
How to remediate findings
After deploying network scopes and reviewing findings for publicly accessible resources, you should next limit access to those resources and remove public access. Use cases vary, but the scopes outlined in this post identify resources that you should share publicly in a more secure manner or remove public access entirely. The following techniques will help you align to the Protecting Networks portion of the AWS Well-Architected Framework Security Pillar.
When creating web servers in EC2, you should not place web servers directly in a public subnet with security groups allowing HTTP and HTTPS ports from all internet addresses. Instead, you should place your EC2 instances in private subnets and use Application Load Balancers in a public subnet. From there, you can attach a security group that allows HTTP/HTTPS access from public internet addresses to your Application Load Balancer, and attach a security group that allows HTTP/HTTPS from your Load Balancer security group to your web server EC2 instances. You can also associate AWS WAF web ACLs to the load balancer to protect your web applications or APIs against common web exploits and bots that may affect availability, compromise security, or consume excessive resources.
Similarly, if you have OpenSearch/Elasticsearch running on EC2 or Amazon OpenSearch Service, or are using Amazon EMR, you can share these resources using PrivateLink. Use the Amazon EMR block public access configuration to verify that your EMR clusters are not shared publicly.
To connect to Remote Desktop on EC2 instances, you should use AWS Systems Manager to connect using Fleet Manager. Connecting with Fleet Manager only requires your Windows EC2 instances to be a managed node. When connecting using Fleet Manager, the security group requires no inbound ports, and the instance can be in a private subnet. For more information, see the Systems Manager prerequisites.
Conclusion
This blog post demonstrates how you can identify and remediate publicly accessible resources. Amazon VPC Network Access Analyzer helps you identify available network paths by using automated reasoning technology and user-defined access scopes. By using these scopes, you can define non-permitted network paths, identify resources that have those paths, and then take action to increase your security posture. To learn more about building continuous verification of network compliance at scale, see the blog post Continuous verification of network compliance using Amazon VPC Network Access Analyzer and AWS Security Hub. Take action today by deploying the Network Access Analyzer scopes in this post to evaluate your environment and add layers of security to best fit your needs.
If you have feedback about this post, submit comments in the Comments section below. If you have questions about this post, contact AWS Support.
Want more AWS Security news? Follow us on Twitter.
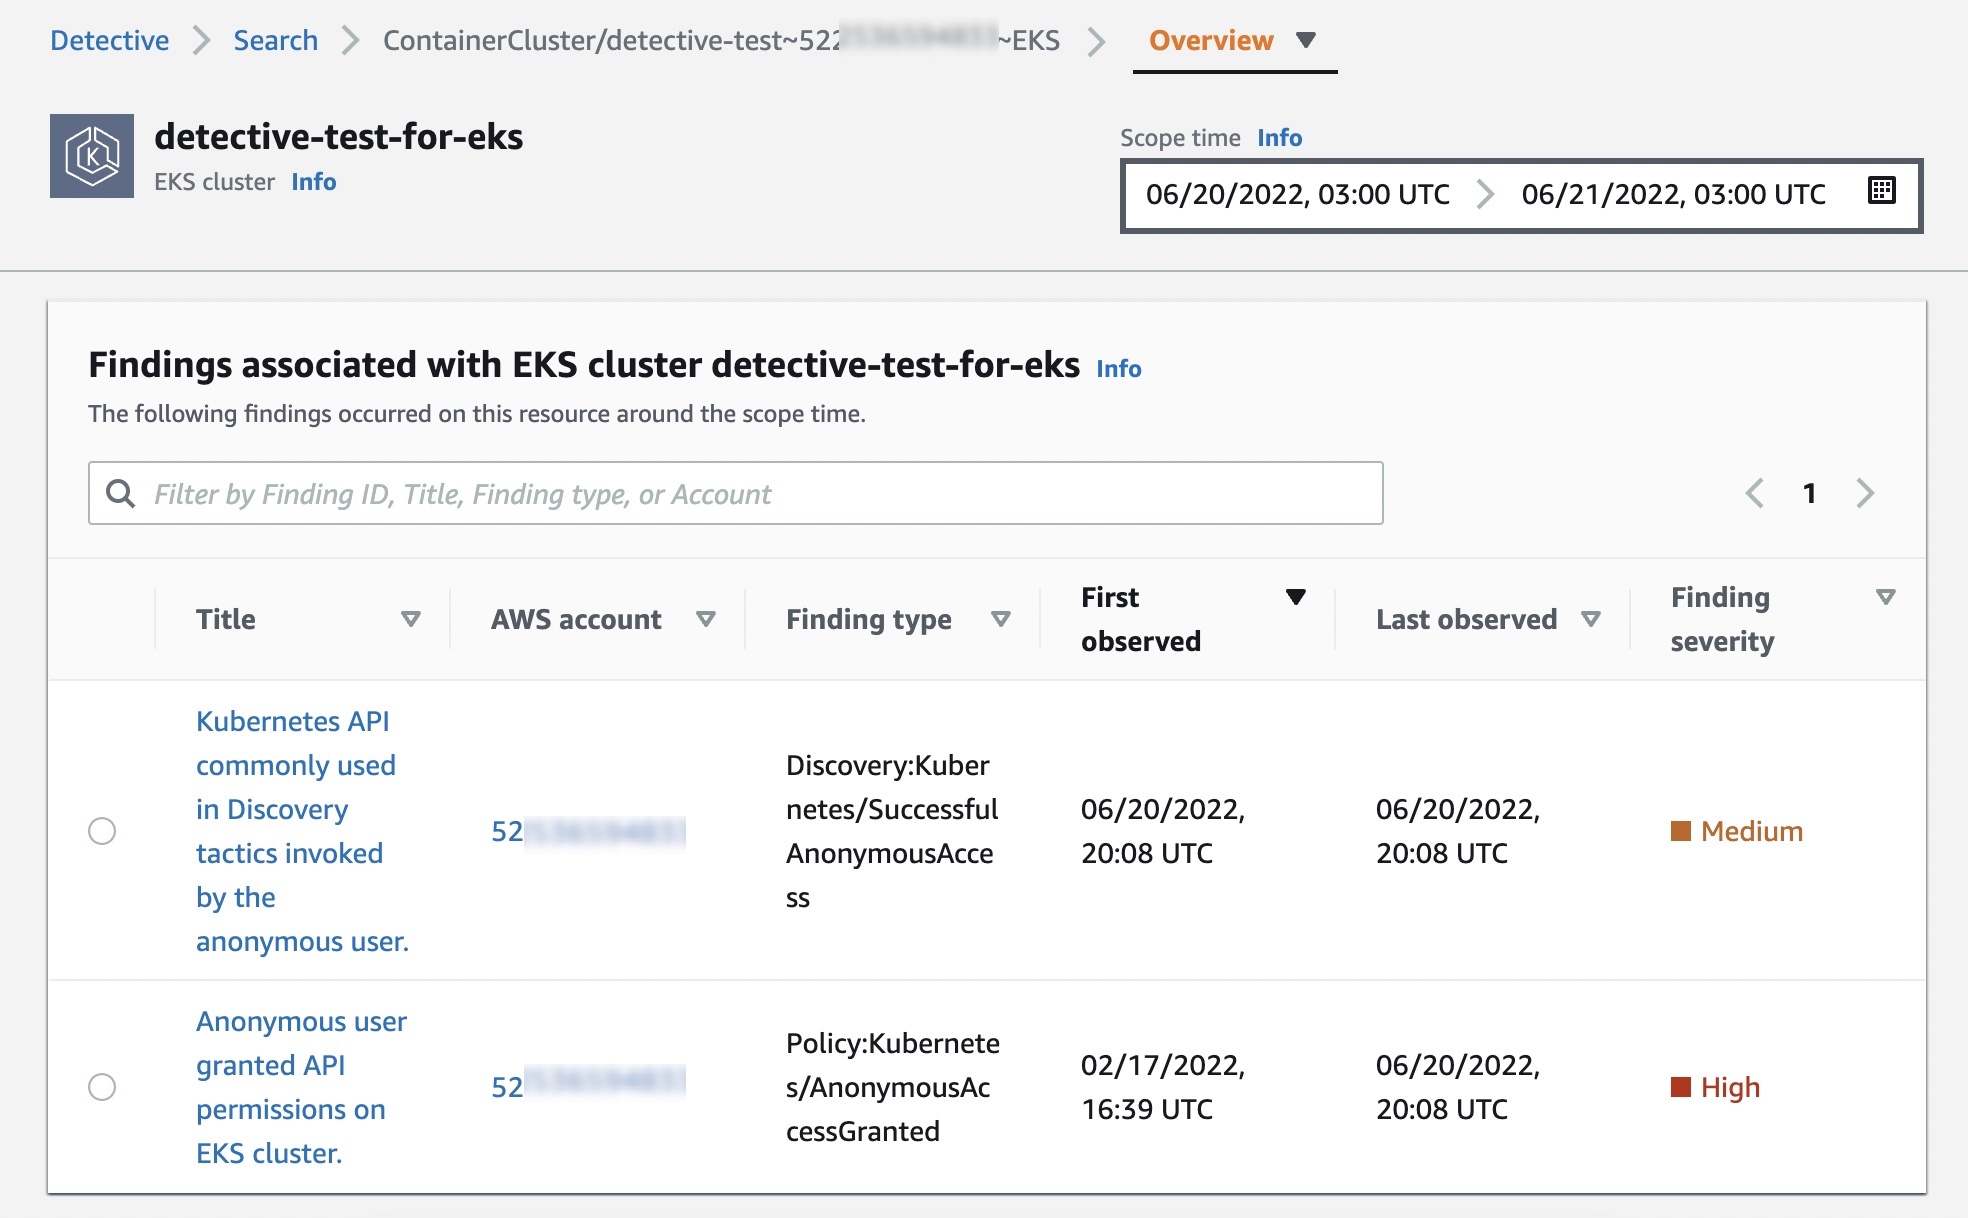
As customers mature their security posture on Amazon Web Services (AWS), they are adopting multiple ways to detect suspicious behavior and notify response teams or workflows to take action. One example is using Amazon GuardDuty to monitor AWS accounts and workloads for malicious activity and deliver detailed security findings for visibility and remediation. Another tactic is to deploy decoys, also called honeypots, as an effective way to detect suspicious behavior.
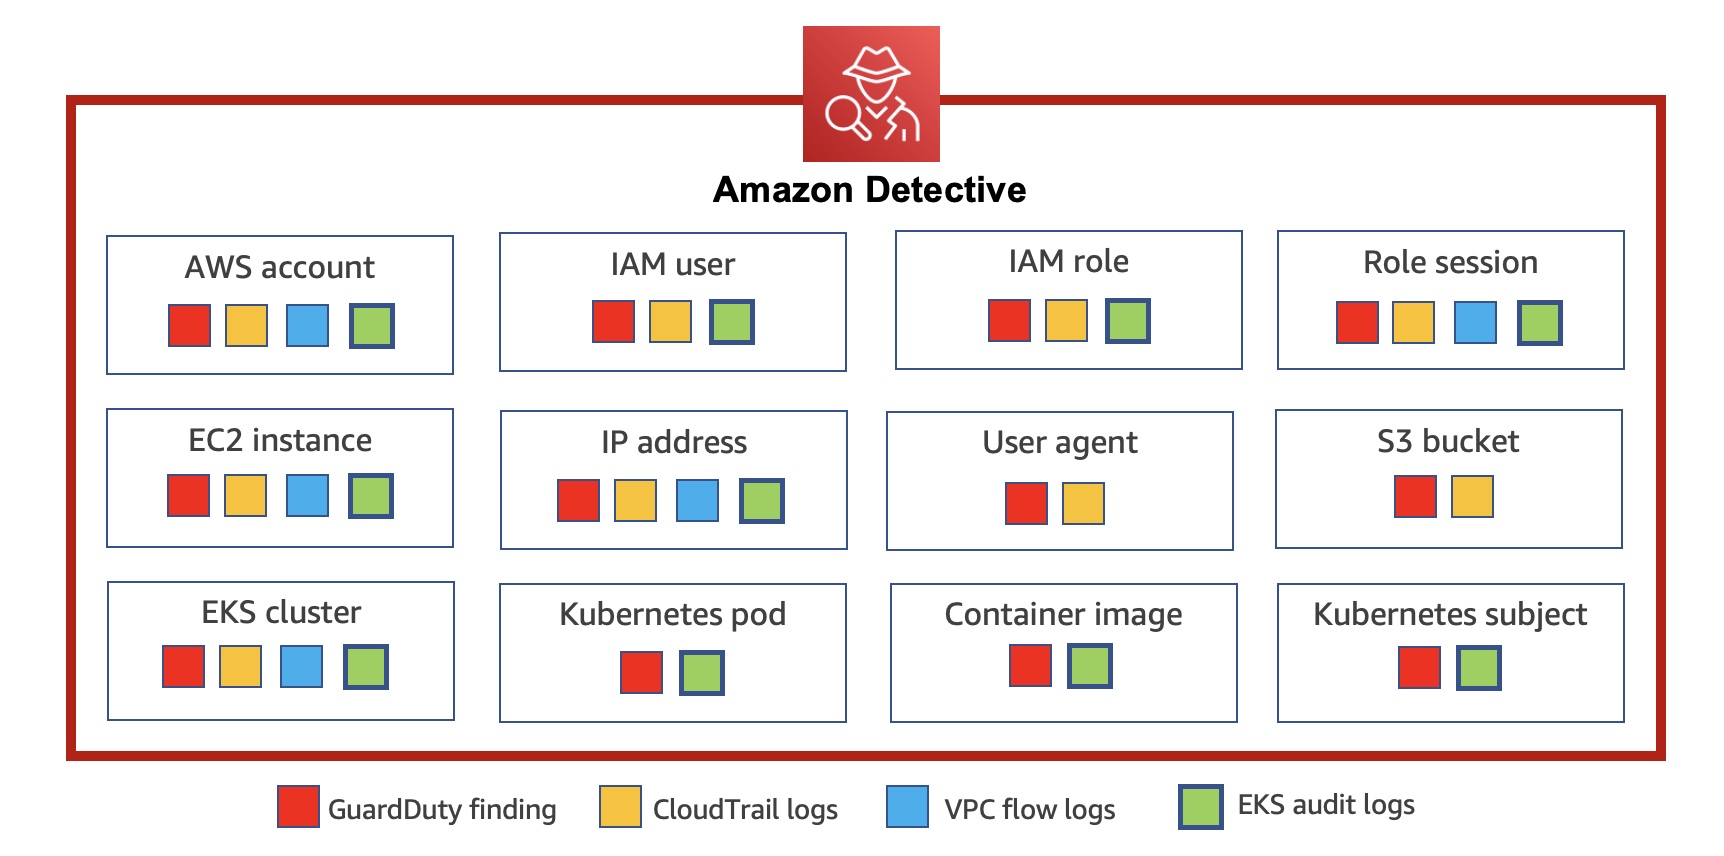
In this blog post, we’ll show how you can create low-cost private decoy AWS resources in your AWS accounts and configure them to generate alerts when they are accessed. These decoy resources appear legitimate but don’t contain any useful or sensitive data and typically are not accessed in the normal course of business by your users and systems. Any attempt to access them is a clear signal of suspicious activity that should be investigated. You can use data sources like AWS CloudTrail, services like Amazon Detective, and your own security incident and event monitoring (SIEM) systems to investigate the activity further. This post is aimed at experienced AWS users and security professionals.
Detecting suspicious activity
Imagine that an unauthorized user has obtained credentials for your account. This could also be an insider, malicious or careless, using their valid credentials inappropriately. The unauthorized user might use these credentials to invoke AWS API calls to list resources in your account. As the next step, they might try to access resources that are commonly used to store sensitive data—such as objects in Amazon Simple Storage Service (Amazon S3) buckets, secrets in AWS Secrets Manager, or items in Amazon DynamoDB. They might also try to elevate their privileges by assuming other Identity and Access Management (IAM) roles in your account. In your role as a security professional, your task is to detect this suspicious behaviour and take actions in response. One approach is to learn the baseline of activities of the IAM users and roles in your account and flag any deviations from the learned baseline—this is the approach taken by GuardDuty when it generates findings such as Discovery:IAMUser/AnomalousBehavior.
This post focuses on another approach of creating private decoy resources in your account that are intended to look legitimate, but don’t have any useful or sensitive data and are not exposed publicly. These decoys are designed to alert you about suspicious activities that could indicate AWS credentials exposure or account compromise. You can use the decoys in conjunction with other techniques, such as creating deception environments and public and private honeypots to better detect suspicious activity in your accounts and applications.
The Fidelity-Isolation-Cost trilemma
In an ACM Queue article titled Lamboozling Attackers: A New Generation of Deception, Kelly Shortridge and Ryan Petrich introduced the Fidelity-Isolation-Cost (FIC) trilemma that “captures the most important dimensions of designing deception systems: fidelity, isolation, and cost.” Using their definition of the FIC trilemma, we see that decoy AWS resources can be well suited to designing deception systems:
Fidelity – Because the decoys are actual AWS resources, they behave like other legitimate resources and have high fidelity. For example, a decoy S3 bucket behaves exactly like any other S3 bucket, with the only exception being that the object data it contains is dummy and not useful. However, the unauthorized user only discovers this fact after downloading the object data and generating an automated alert to your security team.
Isolation – You can simply isolate the decoy AWS resources from other resources in the same account. For example, an S3 bucket is inherently isolated from other S3 buckets in the same account. An unauthorized user that can read the decoy S3 bucket does not, by doing so, get the ability to access or impact the availability of other resources in the account. The credentials obtained by the unauthorized user might have permissions to actions on other services, but the presence of the decoy S3 bucket doesn’t add to those permissions in any way.
Cost – You can keep the cost of deception low by choosing AWS resources that have no cost or low cost to deploy, are deployed by means of automation, and require no further operation or maintenance effort. For example, an S3 bucket with several files that are a few MB in size costs a fraction of a US cent per month for storage. The API request cost should be zero, because the bucket is designed never to be accessed in the normal course of business. Choosing similar zero or low-cost resources can make it cost-effective and feasible to create such decoy resources in multiple accounts, including in Production accounts, where it’s especially important to detect suspicious activity.
Examples of private decoy AWS resources
The following table shows examples of private decoy AWS resources that are high-fidelity, high-isolation, low-cost and are suitable to be deployed in an account that has sensitive data or applications. The table also lists the CloudTrail event fields that provide the source and name for accesses to each resource. You can use these CloudTrail events to create corresponding Amazon EventBridge rules that will generate alerts and notifications.
Private decoy resource
CloudTrail event source
CloudTrail event names
Considerations
S3 bucket and S3 objects with dummy data
s3.amazonaws.com
GetObject HeadObject
Ensure that the S3 objects do not contain any sensitive data.
S3 data events must be enabled in CloudTrail for the decoy S3 bucket
IAM role that should never be assumed
sts.amazonaws.com
AssumeRole
Ensure that the IAM policies attached to this role allow access only to decoy resources and no other data or resources.
Ensure that the IAM role’s trust policy only trusts principals in the same account to assume the role.
Secrets Manager secret (See Note at end of table)
kms.amazonaws.com
Decrypt
Ensure that the secret value does not contain any sensitive data.
Ensure that the item does not have any sensitive data.
DynamoDB data events must be enabled in CloudTrail for the decoy DynamoDB table.
Note: When CloudTrail Management API events are sent to EventBridge, read-only events such as Get*, List*, and Describe* are filtered out and not processed. In order to get findings for secrets and Systems Manager parameters that are being accessed, you need to alert on GetSecretValue and GetParameter API calls. Since these are not processed by EventBridge, you can instead use the fact that secrets and secure string parameters are encrypted by using AWS Key Management Service (AWS KMS), and match on the corresponding AWS KMS Decrypt API calls. This means that successful calls from an unauthorized user to GetSecretValue and GetParameter are able to be matched and alerted on.
Notifications from matching EventBridge rules can be sent to an AWS Lambda function that generates custom findings in Security Hub. These findings can then be sent to downstream systems that you might have configured in your environment, such as your SIEM system or an automated response workflow in your Security Orchestration, Automation, and Response system. Figure 1 shows this workflow.
We’ve provided an AWS CloudFormation template that you can use to deploy the solution. The template creates the following private decoy AWS resources in your account:
In addition, the CloudFormation template deploys the following resources in your account to detect accesses to the decoys and send custom findings to Security Hub:
A CloudTrail data events trail that includes only data events from the decoy S3 bucket and DynamoDB table
Six EventBridge rules to match specific CloudTrail API events
Two Lambda functions with corresponding IAM roles:
The WriteData Lambda function is a CloudFormation custom resource that is used to create the decoy S3 object and the Systems Manager SecureString parameter
The Data Lambda function is a target for the EventBridge rules, and it sends custom findings to Security Hub when the decoy resources are accessed
Prerequisites
The prerequisites to deploying the solution are as follows:
Security Hub must be enabled in the AWS Regions where the private decoys will be deployed, in order to receive custom findings.
You must have created a CloudTrail trail to log management events for the AWS account in the Region where you deploy the private decoys. This trail can be created locally in the account or can be an organization trail. Ensure that you have enabled both read and write events, and enabled all AWS KMS events in the trail (this is the default configuration).
Deploy the solution
After you have the prerequisites set up, you can launch the CloudFormation template to deploy the private decoys.
To launch the template
Choose the following Launch Stack button to launch a CloudFormation stack in your account.
Note: The stack will launch in the N. Virginia (us-east-1) Region. To deploy this solution into other AWS Regions, download the solution’s CloudFormation template, modify it, and deploy it to the selected Region. In order to get maximum coverage for detecting suspicious activity, we recommend that you deploy the solution into your key production accounts and Regions.
On the Specify stack details page, enter the stack name, then choose Next.
The CloudFormation template will use the stack name as part of the naming of the resources that are created. We recommend that you use your organization’s existing naming conventions for stack names, and not make reference to decoy resources, because this could alert any unauthorized user to the real purpose of the resources they’re attempting to access.
Figure 2: Specify stack details
Configure any tags or other organization-specific stack options you need, or accept the default settings, and then choose Next.
Review the CloudFormation settings and select the box acknowledging that AWS CloudFormation might create IAM resources with custom names, and then choose Create stack.
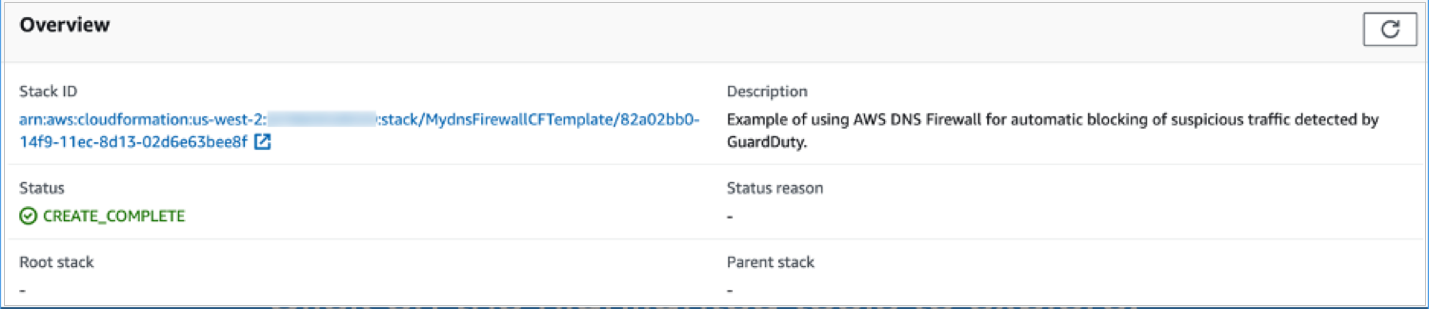
After the stack has completed deployment, the CloudFormation stack output will show the Amazon Resource Names (ARNs) of the decoy resources that were created.
Figure 3: CloudFormation stack outputs
Estimated costs
This solution has been designed to keep costs as low as possible, by using services that have no associated costs (such as IAM roles or any parameters stored in Systems Manager Parameter Store), and keeping the use of paid for services (such as S3 and DynamoDB) to a minimum.
Deploying the solution as outlined in this blog post should result in a cost of less than $1 per month for a single account deployment, however please refer to the AWS Pricing Calculator where you can create a pricing estimate based on your deployment using the most up-to-date pricing information.
Test the alerts
In normal circumstances, after you configure the decoys, there will be no attempted access to these resources, and no findings will be sent to Security Hub in your account. To test that the configuration is working as expected, you can issue the following commands from a device that has programmatic access to your account where the private decoy resources have been deployed. To run each command, replace the bracketed, italicized text with your own information. You can find the details for each of the resources in the outputs section of the CloudFormation stack after it has been deployed successfully.
An example of what these test-generated findings looks like is shown in Figure 4.
Figure 4: Security Hub findings
Considerations
Consider the following as you deploy decoy AWS resources:
You should consider decoy AWS resources as enhancements to your foundational security controls. Your foundational controls should include these measures:
Identify and investigate alerts generated by decoy resources by implementing detective controls.
Implement incident response mechanisms to respond to and mitigate the potential impact of security incidents, such as a decoy AWS resource being accessed.
You should ensure that your monitoring services and tools are configured to query the configuration of resources and not the data stored in resources. Otherwise, you might get a large volume of false positives because every time a resource is accessed, a custom finding is created in Security Hub. For example, consider a service like Security Hub Security Standards checks, or a cloud security posture management (CSPM) tool that monitors your S3 buckets by describing the properties of all buckets in your account. Such tools will find the decoy S3 bucket and will interrogate its configuration by making calls such as GetBucketPolicy and GetBucketLogging. However, as long as these tools don’t try to read data in the bucket through calls such as GetObject, the EventBridge rules that are configured as described in this post won’t generate a finding.
The solution generates custom findings in Security Hub only for successful accesses of Secrets Manager secrets and Systems Manager parameters. However, both successful and unsuccessful accesses of S3 objects and DynamoDB items, and IAM role assumption, will generate custom findings in Security Hub.
Conclusion
In this post, we discussed the advantages of using private decoy AWS resources to detect suspicious activities within your account and how these decoys can complement your existing security solutions. You learned how to create private decoys, set up alerting, and ingest (and test) these alerts as custom findings into Security Hub for central visibility across your AWS environment. The solution deployment included a set of common resources as private decoys; however, the necessary code and templates can be found in our GitHub repository, and you can extend and customize these to add other resources that you want to include in your accounts.
At Amazon Web Services (AWS), we’re continuously expanding our compliance programs to provide you with more tools and resources to perform effective due diligence on AWS. We’re excited to announce the availability of the AWS CyberVadis report to help you reduce the burden of performing due diligence on your third-party suppliers.
With the increase in adoption of cloud products and services across multiple sectors and industries, AWS is a critical component of customers’ third-party environments. Regulated customers, such as those in the financial services sector, are held to high standards by regulators and auditors when it comes to exercising effective due diligence on third parties.
Many customers use third-party cyber risk management (TPCRM) services such as CyberVadis to better manage risks from their evolving third-party environments and to drive operational efficiencies. To help with such efforts, AWS has completed the CyberVadis assessment of its security posture. CyberVadis security analysts perform the assessment and validate the results annually.
CyberVadis is a comprehensive third-party risk assessment process that combines the speed and scalability of automation with the certainty of analyst validation. The CyberVadis cybersecurity rating methodology assesses the maturity of a company’s information security management system (ISMS) through its policies, implementation measures, and results.
CyberVadis integrates responses from AWS with analytics and risk models to provide an in-depth view of the AWS security posture. The CyberVadis methodology maps to major international compliance standards, including the following:
Customers can download the AWS CyberVadis report at no additional cost. For details on how to access the report, see our AWS CyberVadis report page.
As always, we value your feedback and questions. Reach out to the AWS Compliance team through the Contact Us page. If you have feedback about this post, submit comments in the Comments section below. To learn more about our other compliance and security programs, see AWS Compliance Programs.
Want more AWS Security news? Follow us on Twitter.
Are you looking for a simpler way to manage permissions across all your AWS accounts? Perhaps you federate your identity provider (IdP) to each account and divide permissions and authorization between cloud and identity teams, but want a simpler administrative model. Maybe you use AWS IAM Identity Center (successor to AWS Single Sign-On) but are running out of room in your permission set policies; or need a way to keep the role models you have while tailoring the policies in each account to reference their specific resources. Or perhaps you are considering IAM Identity Center as an alternative to per-account federation, but need a way to reuse the customer managed policies that you have already created. Great news! Now you can use customer managed policies (CMPs) and permissions boundaries (PBs) to help with these more advanced situations.
In this blog post, we explain how you can use CMPS and PBs with IAM Identity Center to address these considerations. We describe how IAM Identity Center works, how these types of policies work with IAM Identity Center, and how to best use CMPs and PBs with IAM Identity Center. We also show you how to configure and use CMPs in your IAM Identity Center deployment.
IAM Identity Center background
With IAM Identity Center, you can centrally manage access to multiple AWS accounts and business applications, while providing your workplace users a single sign-on experience with your choice of identity system. Rather than manage identity in each account individually, IAM Identity Center provides one place to connect an existing IdP, Microsoft Active Directory Domain Services (AD DS), or workforce users that you create directly in AWS. Because IAM Identity Center integrates with AWS Organizations, it also provides a central place to define your roles, assign them to your users and groups, and give your users a portal where they can access their assigned accounts.
With AWS Identity Center, you manage access to accounts by creating and assigning permission sets. These are AWS Identity and Access Management (IAM) role templates that define (among other things) which policies to include in a role. If you’re just getting started, you can attach AWS managed policies to the permission set. These policies, created by AWS service teams, enable you to get started without having to learn how to author IAM policies in JSON.
For more advanced cases, where you are unable to express policies sufficiently using inline policies, you can create a custom policy in the permission set. When you assign a permission set to users or groups in a specified account, IAM Identity Center creates a role from the template and then controls single sign-on access to the role. During role creation, IAM Identity Center attaches any specified AWS managed policies, and adds any custom policy to the role as an inline policy. These custom policies must be within the 10,240 character IAM quota of inline policies.
IAM provides two other types of custom policies that increase flexibility when managing access in AWS accounts. Customer managed policies (CMPs) are standalone policies that you create and can attach to roles in your AWS accounts to grant or deny access to AWS resources. Permissions boundaries (PBs) provide an advanced feature that specifies the maximum permissions that a role can have. For both CMPs and PBs, you create the custom policy in your account and then attach it to roles. IAM Identity Center now supports attaching both of these to permission sets so you can handle cases where AWS Managed Policies and inline policies may not be enough.
How CMPs and PBs work with IAM Identity Center
Although you can create IAM users to manage access to AWS accounts and resources, AWS recommends that you use roles instead of IAM users for this purpose. Roles act as an identity (sometimes called an IAM principal), and you assign permissions (identity-based policies) to the role. If you use the AWS Management Console or the AWS Command Line Interface to assume a role, you get the permissions of the role that you assumed. With its simpler way to maintain your users and groups in one AWS location and its ability to centrally manage and assign roles, AWS recommends that you use IAM Identity Center to manage access to your AWS accounts.
With this new IAM Identity Center release, you have the option to specify the names of CMPs and one PB in your permission set (role definition). Doing so modifies how IAM Identity Center provisions roles into accounts. When you assign a user or group to a permission set, IAM Identity Center checks the target account to verify that all specified CMPs and the PB are present. If they are all present, IAM Identity Center creates the role in the account and attaches the specified policies. If any of the specified CMPs or the PB are missing, IAM Identity Center fails the role creation.
This all sounds simple enough, but there are important implications to consider.
If you modify the permission set, IAM Identity Center updates the corresponding roles in all accounts to which you assigned the permission set. What is different when using CMPs and PBs is that IAM Identity Center is uninvolved in the creation or maintenance of the CMPs or PBs. It’s your responsibility to make sure that the CMPs and PBs are created and managed in all of the accounts to which you assign permission sets that use the CMPs and PBs. This means that you must be careful in how you name, create, and maintain these policies in your accounts, to avoid unintended consequences. For example, if you do not apply changes to CMPs consistently across all your accounts, the behavior of an IAM Identity Center created role will vary between accounts.
What CMPs do for you
By using CMPs with permission sets, you gain four main benefits:
If you federate to your accounts directly and have CMPs already, you can reuse your CMPs with permission sets in IAM Identity Center. We describe exceptions later in this post.
If you are running out of space in your permission set inline policies, you can add permission sets to increase the aggregate size of your policies.
Policies often need to refer to account-specific resources by Amazon Resource Name (ARN). Designing an inline policy that does this correctly across all your accounts can be challenging and, in some cases, may not be possible. By specifying a CMP in a permission set, you can tailor the CMPs in each of your accounts to reference the resources of the account. When IAM Identity Center creates the role and attaches the CMPs of the account, the policies used by the IAM Identity Center–generated role are now specific to the account. We highlight this example later in this post.
You get the benefit of a central location to define your roles, which gives you visibility of all the policies that are in use across the accounts where you assigned permission sets. This enables you to have a list of CMP and PB names that you should monitor for change across your accounts. This helps you ensure that you are maintaining your policies correctly.
Considerations and best practices
Start simple, avoid complex – If you’re just starting out, try using AWS managed policies first. With managed policies, you don’t need to know JSON policy to get started. If you need more advanced policies, start by creating identity-based inline custom policies in the permission set. These policies are provisioned as inline policies, and they will be identical in all your accounts. If you need larger policies or more advanced capabilities, use CMPs as your next option. In most cases, you can accomplish what you need with inline and customer managed policies. When you can’t achieve your objective using CMPs, use PBs. For information about intended use cases for PBs, see the blog post When and where to use IAM permissions boundaries.
Permissions boundaries don’t constrain IAM Identity Center admins who create permission sets – IAM Identity Center administrators (your staff) that you authorize to create permission sets can create inline policies and attach CMPs and PBs to permission sets, without restrictions. Permissions boundary policies set the maximum permissions of a role and the maximum permissions that the role can grant within an account through IAM only. For example, PBs can set the maximum permissions of a role that uses IAM to create other roles for use by code or services. However, a PB doesn’t set maximum permissions of the IAM Identity Center permission set creator. What does that mean? Suppose you created an IAM Identity Center Admin permission set that has a PB attached, and you assigned it to John Doe. John Doe can then sign in to IAM Identity Center and modify permission sets with any policy, regardless of what you put in the PB. The PB doesn’t restrict the policies that John Doe can put into a permission set.
In short, use PBs only for roles that need to create IAM roles for use by code or services. Don’t use PBs for permission sets that authorize IAM Identity Center admins who create permission sets.
Create and use a policy naming plan – IAM Identity Center doesn’t consider the content of a named policy that you attach to a permission set. If you assign a permission set in multiple accounts, make sure that all referenced policies have the same intent. Failure to do this will result in unexpected and inconsistent role behavior between different accounts. Imagine a CMP named “S3” that grants S3 read access in account A, and another CMP named “S3” that grants S3 administrative permissions over all S3 buckets in account B. A permission set that attaches the S3 policy and is assigned in accounts A and B will be confusing at best, because the level access is quite different in each of the accounts. It’s better to have more specific names, such as “S3Reader” and “S3Admin,” for your policies and ensure they are identical except for the account-specific resource ARNs.
Use automation to provision policies in accounts – Using tools such as AWS CloudFormation stacksets, or other infrastructure-as-code tools, can help ensure that naming and policies are consistent across your accounts. It also helps reduce the potential for administrators to modify policies in undesirable ways.
Policies must match the capabilities of IAM Identity Center – Although IAM Identity Center supports most IAM semantics, there are exceptions:
If you use an identity provider as your identity source, IAM Identity Center passes only PrincipalTag attributes that come through SAML assertions to IAM. IAM Identity Center doesn’t process or forward other SAML assertions to IAM. If you have CMPs or PBs that rely on other information from SAML assertions, they won’t work. For example, IAM Identity Center doesn’t provide multi-factor authentication (MFA) context keys or SourceIdentity.
Resource policies that reference role names or tags as part of trust policies don’t work with IAM Identity Center. You can use resource policies that use attribute-based access control (ABAC). IAM Identity Center role names are not static, and you can’t tag the roles that IAM Identity Center creates from its permission sets.
How to use CMPs with permission sets
Now that you understand permission sets and how they work with CMPs and PBs, let’s take a look at how you can configure a permission set to use CMPs.
In this example, we show you how to use one or more permission sets that attach a CMP that enables Amazon CloudWatch operations to the log group of specified accounts. Specifically, the AllowCloudWatch_permission set attaches a CMP named AllowCloudWatchForOperations. When we assign the permission set in two separate accounts, the assigned users can perform CloudWatch operations against the log groups of the assigned account only. Because the CloudWatch operations policies are in CMPs rather than inline policies, the log groups can be account specific, and you can reuse the CMPs in other permission sets if you want to have CloudWatch operations available through multiple permission sets.
Note: For this blog post, we demonstrate using CMPs by utilizing the IAM Management Console to create policies and assignments. We recommend that after you learn how to do this, you create your policies through automation for production environments. For example, use AWS CloudFormation. The intent of this example is to demonstrate how you can have a policy in two separate accounts that refer to different resources; something that is harder to accomplish using inline policies. The use case itself is not that advanced, but the use of CMPs to have different resources referenced in each account is a more advanced idea. We kept this simple to make it easier to focus on the feature than the use case.
Prerequisites
In this example, we assume that you know how to use the AWS Management Console, create accounts, navigate between accounts, and create customer managed policies. You also need administrative privileges to enable IAM Identity Center and to create policies in your accounts.
Configure an IAM Identity Center permission set to use a CMP
Follow these four procedures to use a CMP with a permission set:
Create CMPs with consistent names in your target accounts
Create a permission set that references the CMP that you created
Assign groups or users to the permission set in accounts where you created CMPs
Test your assignments
Step 1: Create CMPs with consistent names in your target accounts
In this step, you create a customer managed policy named AllowCloudWatchForOperations in two member accounts. The policy allows your cloud operations users to access a predefined CloudWatch log group in the account.
To create CMPs in your target accounts
Sign into AWS.
Note: You can sign in to IAM Identity Center if you have existing permission sets that enable you to create policies in member accounts. Alternatively, you can sign in using IAM federation or as an IAM user that has access to roles that enable you to navigate to other accounts where you can create policies. Your sign-in should also give you access to a role that can administer IAM Identity Center permission sets.
Navigate to an AWS Organizations member account.
Note: If you signed in through IAM Identity Center, use the user portal page to navigate to the account and role. If you signed in by using IAM federation or as an IAM user, choose your sign-in name that is displayed in the upper right corner of the AWS Management Console and then choose switch role, as shown in Figure 1.
Figure 1: Switch role for IAM user or IAM federation
In the upper right of the page, choose Create policy.
On the Create Policy page, choose the JSON tab.
Paste the following policy into the JSON text box. Replace <account-id> with the ID of the account in which the policy is created.
Tip: To copy your account number, choose your sign-in name that is displayed in the upper right corner of the AWS Management Console, and then choose the copy icon next to the account ID, as shown in Figure 2.
On the Create Policy/Review Policy page, in the Name field, enter AllowCloudWatchForOperations. This is the name that you will use when you attach the CMP to the permission set in the next procedure (Step 2).
Repeat steps 1 through 7 in at least one other member account. Be sure to replace the <account-id> element in the policy with the account ID of each account where you create the policy. The only difference between the policies in each account is the <account-id> in the policy.
Step 2: Create a permission set that references the CMP that you created
At this point, you have at least two member accounts containing the same policy with the same policy name. However, the ResourceARN in each policy refers to log groups that belong to the respective accounts. In this step, you create a permission set and attach the policy to the permission set. Importantly, you attach only the name of the policy to the permission set. The actual attachment of the policy to the role that IAM Identity Center creates, happens when you assign the permission set to a user or group in Step 3.
To create a permission set that references the CMP
Sign in to the Organizations management account or the IAM Identity Center delegated administration account.
On the Select Permission set type screen, select Custom permission Set and choose Next.
Figure 3: Select custom permission set
On the Specify policies and permissions boundary page, expand the Customer managed policies option, and choose Attach policies.
Figure 4: Specify policies and permissions boundary
For Policy names, enter the name of the policy. This name must match the name of the policy that you created in Step 1. In our example, the name is AllowCloudWatchForOperations. Choose Next.
On the Permission set details page, enter a name for your permission set. In this example, use AllowCloudWatch_PermissionSet. You can alspecify additional details for your permission sets, such as session duration and relay state (these are a link to a specific AWS Management Console page of your choice).
Figure 5: Permission set details
Choose Next, and then choose Create.
Step 3: Assign groups or users to the permission set in accounts where you created your CMPs
In the preceding steps, you created a customer managed policy in two or more member accounts, and a permission set with the customer managed policy attached. In this step, you assign users to the permission set in your accounts.
To assign groups or users to the permission set
Sign in to the Organizations management account or the IAM Identity Center delegated administration account.
For testing purposes, in the AWS Organization section, select all the accounts where you created the customer managed policy. This means that any users or groups that you assign during the process will have access to the AllowCloudWatch_PermissionSet role in each account. Then, on the top right, choose Assign users or groups.
Choose the Users or Groups tab and then select the users or groups that you want to assign to the permission set. You can select multiple users and multiple groups in this step. For this example, we recommend that you select a single user for which you have credentials, so that you can sign in as that user to test the setup later. After selecting the users or groups that you want to assign, choose Next.
Figure 7: Assign users and groups to AWS accounts
Select the permission set that you created in Step 2 and choose Next.
Review the users and groups that you are assigning and choose Submit.
You will see a message that IAM Identity Center is configuring the accounts. In this step, IAM Identity Center creates roles in each of the accounts that you selected. It does this for each account, so it looks in the account for the CMP that you specified in the permission set. If the name of the CMP that you specified in the permission set matches the name that you provided when creating the CMP, IAM Identity Center creates a role from the permission set. If the names don’t match or if the CMP isn’t present in the account to which you assigned the permission set, you see an error message associated with that account. After successful submission, you will see the following message: We reprovisioned your AWS accounts successfully and applied the updated permission set to the accounts.
Step 4: Test your assignments
Congratulations! You have successfully created CMPs in multiple AWS accounts, created a permission set and attached the CMPs by name, and assigned the permission set to users and groups in the accounts. Now it’s time to test the results.
Copy the user portal URL, and then paste the user portal URL into your browser.
At the sign-in prompt, sign in as one of the users that you assigned to the permission set.
The IAM Identity Center user portal shows the accounts and roles that you can access. In the example shown in Figure 8, the user has access to the AllowCloudWatch_PermissionSet created in two accounts.
Figure 8: User portal
If you choose AllowCloudWatch_PermissionSet in the member-account, you will have access to the CloudWatch log group in the member-account account. If you choose the role in member-account-1, you will have access to CloudWatch Log group in member-account-1.
Test the access by choosing Management Console for the AllowCloudWatch_PermissionSet in the member-account.
In the navigation pane, choose Log groups. You should be able to access log groups, as shown in Figure 9.
Figure 9: CloudWatch log groups
Open the IAM console. You shouldn’t have permissions to see the details on this console, as shown in figure 10. This is because AllowCloudWatch_PermissionSet only provided CloudWatch log access.
Figure 10: Blocked access to the IAM console
Return to the IAM Identity Center user portal.
Repeat steps 4 through 8 using member-account-1.
Answers to key questions
What happens if I delete a CMP or PB that is attached to a role that IAM Identity Center created? IAM prevents you from deleting policies that are attached to IAM roles.
How can I delete a CMP or PB that is attached to a role that IAM Identity Center created? Remove the CMP or PB reference from all your permission sets. Then re-provision the roles in your accounts. This detaches the CMP or PB from IAM Identity Center–created roles. If the policies are unused by other IAM roles in your account or by IAM users, you can delete the policy.
What happens if I modify a CMP or PB that is attached to an IAM Identity Center provisioned role? The IAM Identity Center role picks up the policy change the next time that someone assumes the role.
Conclusion
In this post, you learned how IAM Identity Center works with customer managed policies and permissions boundaries that you create in your AWS accounts. You learned different ways that this capability can help you, and some of the key considerations and best practices to succeed in your deployments. That includes the principle of starting simple and avoiding unnecessarily complex configurations. Remember these four principles:
In most cases, you can accomplish everything you need by starting with custom (inline) policies.
Use customer managed policies for more advanced cases.
Use permissions boundary policies only when necessary.
Use CloudFormation to manage your customer managed policies and permissions boundaries rather than having administrators deploy them manually in accounts.
To learn more about this capability, see the IAM Identity Center User Guide. If you have feedback about this post, submit comments in the Comments section below. If you have questions about this post, start a new thread on the AWS IAM re:Post or contact AWS Support.
Want more AWS Security news? Follow us on Twitter.
AWS is excited to announce the launch of the AWS Wickr ATAK Plugin, which makes it easier for ATAK users to maintain secure communications.
The Android Team Awareness Kit (ATAK)—also known as Android Tactical Assault Kit (ATAK) for military use—is a smartphone geospatial infrastructure and situational awareness application. It provides mapping, messaging, and geofencing capabilities to enable safe collaboration over geography.
ATAK users, referred to as operators, can view the location of other operators and potential hazards—a major advantage over relying on hand-held radio transmissions. While ATAK was initially designed for use in combat zones, the technology has been adapted to fit the missions of local, state, and federal agencies.
ATAK is currently in use by over 40,000 US Department of Defense (DoD) users—including the Air Force, Army, Special Operations, and National Guard—along with the Department of Justice (DOJ), the Department of Homeland Security (DHS), and 32,000 nonfederal users.
Using AWS Wickr with ATAK
AWS Wickr is a secure collaboration service that provides enterprises and government agencies with advanced security and administrative controls to help them meet security and compliance requirements. The AWS Wickr service is now in preview.
With AWS Wickr, communication mechanisms such as one-to-one and group messaging, audio and video calling, screen sharing, and file sharing are protected with 256-bit end-to-end encryption (E2EE). Encryption takes place locally, on the endpoint. Every message, call, and file is encrypted with a new random key, and no one but the intended recipients can decrypt them. Flexible administrative features enable organizations to deploy at scale, and facilitate information governance.
AWS Wickr supports many agencies that use ATAK. However, until now, ATAK operators have had to leave the ATAK application in order to use AWS Wickr, which creates operational risk.
AWS Wickr ATAK Plugin
AWS Wickr has developed a plugin that enhances ATAK with secure communications features. ATAK operators are provided with a Wickr Enterprise or Wickr Pro account, so they can use AWS Wickr within ATAK for secure messaging, calling, and file transfer. This helps reduce interruptions, and the complexity of configuration with ATAK chat features.
Use cases
The AWS Wickr ATAK Plugin has multiple use cases.
Military
The military uses ATAK for blue force tracking to locate team members, red force tracking to locate enemies, terrain and weather analysis, and to visually communicate their movements to friendly forces.
The AWS Wickr ATAK Plugin enhances the ability of military personnel to maintain the situational awareness ATAK provides, while quickly receiving and reacting to Wickr communications. Ephemeral messaging options allow unit leaders to send mission plans, GPS points of interest, and set burn-on-read and expiration timers. Information can be deleted from the device, while being retained on the AWS Wickr service to help meet compliance requirements, and facilitate the creation of after-action reports.
Law enforcement
ATAK is a powerful tool for team tracking and mission planning that promotes a safer and better response to critical law enforcement and public-safety events.
The AWS Wickr ATAK Plugin adds to the capabilities of ATAK by supporting secure communications between tactical, negotiation, and investigative teams.
First responders
ATAK aids in search-and-rescue and multi-jurisdictional natural disaster responses, such as hurricane relief efforts.
The AWS Wickr ATAK Plugin provides secure, uninterrupted communication between all levels of first responders to help them get oriented quickly, and support complex coordination needs.
Using certificates to authenticate and encrypt data is vital to any enterprise security. For example, companies rely on certificates to provide TLS encryption for web applications so that client data is protected. However, not all certificates need to be issued from a publicly trusted certificate authority (CA). A privately trusted CA can be leveraged to issue certificates to help protect data in transit on resources such as load-balancers and also device authentication for endpoints and IoT devices. Many organizations already have that privately trusted CA running in their Microsoft Active Directory architecture via Active Directory Certificate Services (ADCS).
AWS Certificate Manager Private Certificate Authority (ACM Private CA or ACM PCA) is a private CA service that extends ACM certificate management capabilities to both public and private certificates. ACM PCA provides a highly available private CA service without the upfront investment and ongoing maintenance costs of operating your own private CA. ACM PCA allows developers to be more agile by providing them with APIs to create and deploy private certificates programmatically. You also have the flexibility to create private certificates for applications that require custom certificate lifetimes or resource names.
Why use ACM PCA with Windows Active Directory?
Many enterprises already use Active Directory to manage their IT resources. Whether it is on-premises or built into your AWS accounts, Active Directory’s built-in CA can be extended by ACM PCA. Using your ADCS to sign an ACM PCA means that members of your Active Directory automatically trust certificates issued by that ACM PCA. Keep in mind that these are still private certificates, and they are intended to be used just like certificates from ADCS itself. They will not be trusted by unmanaged devices, because these are not signed by a publicly trusted external CA. Therefore, systems like Mac and Linux may require that you manually deploy the ADCS certificate chain in order to trust certificates issued by your new ACM PCA.
This means it is more efficient for you to rapidly deploy certificates to your endpoint workstations for authentication. Or you can protect internal-only workloads with certificates that are constrained to your internal domain namespace. These tasks can be done conveniently through AWS APIs and the AWS SDK.
Solution overview
In the following sections, we will configure Microsoft ADCS to be able to sign a subordinate CA, deploy and sign ACM PCA, and then test the solution using a private website that is protected by a TLS certificate issued from the ACM PCA.
Configure Microsoft ADCS
Microsoft ADCS is normally deployed as part of your Windows Active Directory architecture. It can be extended to do multiple different types of certificate signing depending on your environment’s needs. Each of these different types of certificates is defined by a template that you must enable and configure. Each template contains configuration information about how Microsoft ADCS will issue the certificate type. You can copy and configure templates differently depending on your environment’s requirements. The specifics of each type of template is outside the scope of this blog post.
To configure ADCS to sign subordinate CAs
On the CA server that will be signing the private CA certificate, open the Certification Authority Microsoft Management Console (MMC).
In the left-side tree view, expand the name of the server.
Open the context (right-click) menu for Certificate Templates and choose Manage.
Figure 1: Navigating to the Manage option for the certificate templates
This opens the Certificate Template Console, which is populated with the list of optional templates.
Scroll down, open the context (right-click) menu for Subordinate Certification Authority, and choose Duplicate Template, as shown in Figure 2. This will create a duplicate of the template that you can alter for your needs, while leaving the original template unaltered for future use. Selecting Duplicate Template immediately opens the configuration for the new template.
Figure 2: Select Duplicate Template to create a copy of the Subordinate Certification Authority template
To configure and use the new template
On the new template configuration page, choose the General tab, and change the template display name to something that uniquely identifies it. The example in this post uses the name Subordinate Certification Authority – Private CA.
Select the check box for Publish certificate in Active Directory, and then choose OK. The new template appears in the list of available templates. Close the Certificate Templates Console.
Return to the Certification Authority MMC. Open the context (right-click) menu for Certificate Templates again, but this time choose New -> Certificate Template to Issue.
Figure 3: Issue the new Certificate Template you created for subordinate Cas
In the dialog box that appears, choose the new template you created in Step 1 of this procedure, and then choose OK.
That’s all that’s needed! Your CA is now ready to issue certificates for subordinate CAs in your public key infrastructure. Open a browser from either the ADCS CA server itself or through a network connection to the ADCS CA server, and use the following URL to access the certificate server’s certificate signing interface.
Now you can see that in the Certificate Templates list, you can choose the Subordinate Certification Authority template that you created, as shown in Figure 4.
Figure 4: The interface to sign certificates on your CA now shows the new certificate template you created
Deploy and sign the ACM Private CA’s certificate
In this step, you will deploy the ACM PCA, which is the first step to create a subordinate CA to deploy in your AWS account. The process of deploying the ACM PCA is well documented, so this post will not go into depth about the deployment itself. Instead, this procedure focuses on the steps for taking the certificate signing request (CSR) and signing it against the ADCS, and then covers the additional steps to convert the certificates that ADCS produces into the certificate format that ACM PCA expects.
After the ACM PCA is initially deployed, it needs to have a certificate signed to authenticate it. ACM PCA offers two options for signing the new instance’s certificate. You can choose to sign either through another ACM PCA instance, or via an external CA. Since you are using ADCS in this walkthrough, you will use the process of an external CA. The ACM PCA deployment is now at a point where it needs its CSR signed by Microsoft ADCS. You should see that it is ready in the AWS Management Console for ACM PCA.
To deploy and sign the ACM PCA’s certificate
When the ACM PCA is ready, in the ACM PCA console, begin the Install subordinate CA certificate process by choosing External private CA for the CA type.
Figure 5: Options for signing the new instance’s certificate
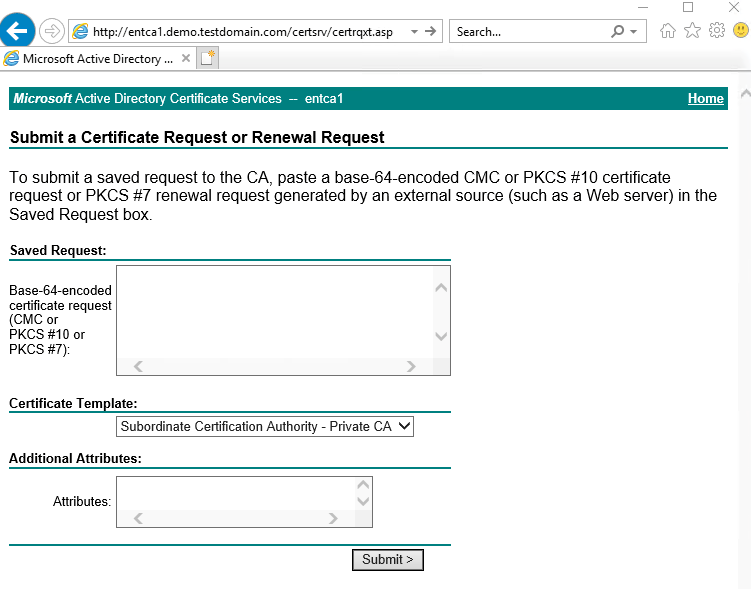
You will then be provided the certificate signing request (CSR) for the ACM PCA. Copy and paste the CSR content into the ADCS CA signing URL you visited earlier on the CA server. Then choose Next. The next page is where you will paste in the new signed certificate and certchain in a later step.
From the ADCS CA URL, be sure that the new Subordinate Certification Authority template is selected, and then choose Submit. The new certificate will be issued to you. The ADCS issuing page provides two different formats for the certificate, either as Distinguished Encoding Rules (DER) or base64-encoded.
Copy the base64-encoded files for both the certificate and the certchain to your local computer. The certificate is already in Privacy Enhanced Mail (PEM) format, and its contents can be pasted into the ACM PCA certificate input in the console. However, you must convert the certchain into the format required by the ACM PCA by following these steps:
To convert the format of the certchain, use the openssl tool from the command line. The process of installing the openssl tool is outside the scope of this blog post. Refer to the OpenSSL site documentation for installation options for your operating system.
Use the following command to convert the certchain file from Public Key Cryptographic Standards #7 (PKCS7) to PEM.
Using a text editor, open the certchain.pem file and copy the last certificate block from the file, starting with —–BEGIN CERTIFICATE—– and ending with —–END CERTIFICATE—–. You will notice that the file begins with the signed certificate and includes subject= and issuer= statements. ACM PCA only accepts the content that is the certificate chain.
Return to the ACM PCA console page from Step 1, and paste the text the you just copied into the input area provided for the certificate chain. After this step is complete, the private CA is now signed by your corporate PKI.
Test the solution
Now that the ACM PCA is online, one of the things it can do is issue certificates via ACM that are trusted by your corporate Active Directory joined clients. These certificates can be used in services such as Application Load Balancers to provide TLS protected endpoints that are unique to your organization and trusted only by your internal clients.
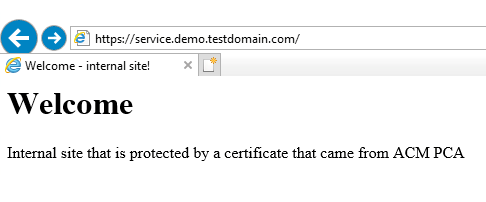
From a client joined to our test Active Directory, Internet Explorer shows that it trusts the TLS certificate issued by AWS Certificate Manager and used on the Application Load Balancer for a private site.
Figure 6: Internet Explorer showing that it trusts the TLS certificate
For this demo, we created a test web server that is hosting an example webpage. The web server is behind an AWS Application Load Balancer. The TLS certificate attached to the Application Load Balancer is issued from the new ACM PCA.
Conclusion
Organizations that have Microsoft Active Directory deployed can use Active Directory’s Certificate Services to issue certificates for private resources. This blog post shows how you can extend that certificate trust to AWS Certificate Manager Private CA. This provides a way for your developers to issue private certificates automatically, which are trusted by your Active Directory domain-joined clients or clients that have the ADCS certificate chain installed.
For more information on hybrid public key infrastructure (PKI) on AWS, refer to these blog posts:
In today’s fast-changing security environment, security professionals must continuously monitor, detect, respond to, and mitigate new and existing security issues. To do so, security teams must be able to analyze security-relevant telemetry and log data by using multiple tools, technologies, and vendors. The complex and heterogeneous nature of this task drives up costs and may slow down detection and response times. Our mission is to innovate on behalf of our customers so they can more quickly analyze and protect their environment when the need arises.
With that goal in mind, alongside a number of partner organizations, we’re pleased to announce the release of the Open Cybersecurity Schema Framework (OCSF) project, which includes an open specification for the normalization of security telemetry across a wide range of security products and services, as well as open-source tools that support and accelerate the use of the OCSF schema. As a co-founder of the OCSF effort, we’ve helped create the specifications and tools that are available to all industry vendors, partners, customers, and practitioners. Joining us in this announcement is an array of key security vendors, beginning with Splunk, the co-founder with AWS of the OCSF project, and also including Broadcom, Salesforce, Rapid7, Tanium, Cloudflare, Palo Alto Networks, DTEX, CrowdStrike, IBM Security, JupiterOne, Zscaler, Sumo Logic, IronNet, Securonix, and Trend Micro. Going forward, anyone can participate in the evolution of the specification and tooling at https://github.com/ocsf.
Our customers have told us that interoperability and data normalization between security products is a challenge for them. Security teams have to correlate and unify data across multiple products from different vendors in a range of proprietary formats; that work has a growing cost associated with it. Instead of focusing primarily on detecting and responding to events, security teams spend time normalizing this data as a prerequisite to understanding and response. We believe that use of the OCSF schema will make it easier for security teams to ingest and correlate security log data from different sources, allowing for greater detection accuracy and faster response to security events. We see value in contributing our engineering efforts and also projects, tools, training, and guidelines to help standardize security telemetry across the industry. These efforts benefit our customers and the broader security community.
Although we as an industry can’t directly control the behavior of threat actors, we can improve our collective defenses by making it easier for security teams to do their jobs more efficiently. At AWS, we are excited to see the industry come together to use the OCSF project to make it easier for security professionals to focus on the things that are important to their business: identifying and responding to events, then using that data to proactively improve their security posture.
When building serverless applications using AWS Lambda, there are a number of considerations regarding security, governance, and compliance. This post highlights how Lambda, as a serverless service, simplifies cloud security and compliance so you can concentrate on your business logic. It covers controls that you can implement for your Lambda workloads to ensure that your applications conform to your organizational requirements.
The Shared Responsibility Model
The AWS Shared Responsibility Model distinguishes between what AWS is responsible for and what customers are responsible for with cloud workloads. AWS is responsible for “Security of the Cloud” where AWS protects the infrastructure that runs all the services offered in the AWS Cloud. Customers are responsible for “Security in the Cloud”, managing and securing their workloads. When building traditional applications, you take on responsibility for many infrastructure services, including operating systems and network configuration.
Traditional application shared responsibility
One major benefit when building serverless applications is shifting more responsibility to AWS so you can concentrate on your business applications. AWS handles managing and patching the underlying servers, operating systems, and networking as part of running the services.
Serverless application shared responsibility
For Lambda, AWS manages the application platform where your code runs, which includes patching and updating the managed language runtimes. This reduces the attack surface while making cloud security simpler. You are responsible for the security of your code and AWS Identity and Access Management (IAM) to the Lambda service and within your function.
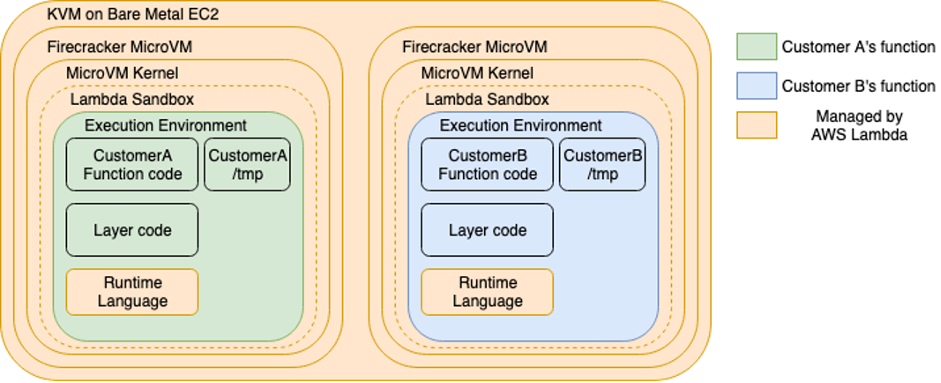
Lambda functions run in separate isolated AWS accounts that are dedicated to the Lambda service. Lambda invokes your code in a secure and isolated runtime environment within the Lambda service account. A runtime environment is a collection of resources running in a dedicated hardware-virtualized Micro Virtual Machines (MVM) on a Lambda worker node.
Lambda workers are bare metalEC2 Nitro instances, which are managed and patched by the Lambda service team. They have a maximum lease lifetime of 14 hours to keep the underlying infrastructure secure and fresh. MVMs are created by Firecracker, an open source virtual machine monitor (VMM) that uses Linux’s Kernel-based Virtual Machine (KVM) to create and manage MVMs securely at scale.
MVMs maintain a strong separation between runtime environments at the virtual machine hardware level, which increases security. Runtime environments are never reused across functions, function versions, or AWS accounts.
Isolation model for AWS Lambda workers
Network security
Lambda functions always run inside secure Amazon Virtual Private Cloud (Amazon VPCs) owned by the Lambda service. This gives the Lambda function access to AWS services and the public internet. There is no direct network inbound access to Lambda workers, runtime environments, or Lambda functions. All inbound access to a Lambda function only comes via the Lambda Invoke API, which sends the event object to the function handler.
You can configure a Lambda function to connect to private subnets in a VPC in your account if necessary, which you can control with IAM condition keys . The Lambda function still runs inside the Lambda service VPC but sends all network traffic through your VPC. Function outbound traffic comes from your own network address space.
AWS Lambda service VPC with VPC-to-VPC NAT to customer VPC
To give your VPC-connected function access to the internet, route outbound traffic to a NAT gateway in a public subnet. Connecting a function to a public subnet doesn’t give it internet access or a public IP address, as the function is still running in the Lambda service VPC and then routing network traffic into your VPC.
All internal AWS traffic uses the AWS Global Backbone rather than traversing the internet. You do not need to connect your functions to a VPC to avoid connectivity to AWS services over the internet. VPC connected functions allow you to control and audit outbound network access.
You can use security groups to control outbound traffic for VPC-connected functions and network ACLs to block access to CIDR IP ranges or ports. VPC endpoints allow you to enable private communications with supported AWS services without internet access.
You can use VPC Flow Logs to audit traffic going to and from network interfaces in your VPC.
Runtime environment re-use
Each runtime environment processes a single request at a time. After Lambda finishes processing the request, the runtime environment is ready to process an additional request for the same function version. For more information on how Lambda manages runtime environments, see Understanding AWS Lambda scaling and throughput.
Data can persist in the local temporary filesystem path, in globally scoped variables, and in environment variables across subsequent invocations of the same function version. Ensure that you only handle sensitive information within individual invocations of the function by processing it in the function handler, or using local variables. Do not re-use files in the local temporary filesystem to process unencrypted sensitive data. Do not put sensitive or confidential information into Lambda environment variables, tags, or other freeform fields such as Name fields.
AWS recommends using multiple accounts to isolate your resources because they provide natural boundaries for security, access, and billing. Use AWS Organizations to manage and govern individual member accounts centrally. You can use AWS Control Tower to automate many of the account build steps and apply managed guardrails to govern your environment. These include preventative guardrails to limit actions and detective guardrails to detect and alert on non-compliance resources for remediation.
Lambda access controls
Lambda permissions define what a Lambda function can do, and who or what can invoke the function. Consider the following areas when applying access controls to your Lambda functions to ensure least privilege:
Execution role
Lambda functions have permission to access other AWS resources using execution roles. This is an AWS principal that the Lambda service assumes which grants permissions using identity policy statements assigned to the role. The Lambda service uses this role to fetch and cache temporary security credentials, which are then available as environment variables during a function’s invocation. It may re-use them across different runtime environments that use the same execution role.
Ensure that each function has its own unique role with the minimum set of permissions..
Identity/user policies
IAM identity policies are attached to IAM users, groups, or roles. These policies allow users or callers to perform operations on Lambda functions. You can restrict who can create functions, or control what functions particular users can manage.
Resource policies
Resource policies define what identities have fine-grained inbound access to managed services. For example, you can restrict which Lambda function versions can add events to a specific Amazon EventBridge event bus. You can use resource-based policies on Lambda resources to control what AWS IAM identities and event sources can invoke a specific version or alias of your function. You also use a resource-based policy to allow an AWS service to invoke your function on your behalf. To see which services support resource-based policies, see “AWS services that work with IAM”.
Attribute-based access control (ABAC)
With attribute-based access control (ABAC), you can use tags to control access to your Lambda functions. With ABAC, you can scale an access control strategy by setting granular permissions with tags without requiring permissions updates for every new user or resource as your organization scales. You can also use tag policies with AWS Organizations to standardize tags across resources.
Permissions boundaries
Permissions boundaries are a way to delegate permission management safely. The boundary places a limit on the maximum permissions that a policy can grant. For example, you can use boundary permissions to limit the scope of the execution role to allow only read access to databases. A builder with permission to manage a function or with write access to the applications code repository cannot escalate the permissions beyond the boundary to allow write access.
Service control policies
When using AWS Organizations, you can use Service control policies (SCPs) to manage permissions in your organization. These provide guardrails for what actions IAM users and roles within the organization root or OUs can do. For more information, see the AWS Organizations documentation, which includes example service control policies.
Code signing
As you are responsible for the code that runs in your Lambda functions, you can ensure that only trusted code runs by using code signing with the AWS Signer service. AWS Signer digitally signs your code packages and Lambda validates the code package before accepting the deployment, which can be part of your automated software deployment process.
Auditing Lambda configuration, permissions and access
You should audit access and permissions regularly to ensure that your workloads are secure. Use the IAM console to view when an IAM role was last used.
IAM last used
IAM access advisor
Use IAM access advisor on the Access Advisor tab in the IAM console to review when was the last time an AWS service was used from a specific IAM user or role. You can use this to remove IAM policies and access from your IAM roles.
You can validate policies using IAM Access Analyzer, which provides over 100 policy checks with security warnings for overly permissive policies. To learn more about policy checks provided by IAM Access Analyzer, see “IAM Access Analyzer policy validation”.
You can also generate IAM policies based on access activity from CloudTrail logs, which contain the permissions that the role used in your specified date range.
IAM Access Analyzer
AWS Config
AWS Config provides you with a record of the configuration history of your AWS resources. AWS Config monitors the resource configuration and includes rules to alert when they fall into a non-compliant state.
For Lambda, you can track and alert on changes to your function configuration, along with the IAM execution role. This allows you to gather Lambda function lifecycle data for potential audit and compliance requirements. For more information, see the Lambda Operators Guide.
Lambda makes cloud security simpler by taking on more responsibility using the AWS Shared Responsibility Model. Lambda implements strict workload security at scale to isolate your code and prevent network intrusion to your functions. This post provides guidance on assessing and implementing best practices and tools for Lambda to improve your security, governance, and compliance controls. These include permissions, access controls, multiple accounts, and code security. Learn how to audit your function permissions, configuration, and access to ensure that your applications conform to your organizational requirements.
For more serverless learning resources, visit Serverless Land.
We’re continuing to expand the scope of our assurance programs at Amazon Web Services (AWS) and are pleased to announce that seven new services have been added to the scope of our Payment Card Industry Data Security Standard (PCI DSS) certification. This provides our customers with more options to process and store their payment card data and architect their cardholder data environment (CDE) securely in AWS.
We were evaluated by Coalfire, a third-party Qualified Security Assessor (QSA). Customers can access the Attestation of Compliance (AOC) report demonstrating AWS’ PCI compliance status through AWS Artifact.
To learn more about our PCI program and other compliance and security programs, see the AWS Compliance Programs page. As always, we value your feedback and questions; reach out to the AWS Compliance team through the Contact Us page.
If you have feedback about this post, submit comments in the Comments section below. If you have questions about this post, contact AWS Support.
Want more AWS Security news? Follow us on Twitter.
We are excited to announce that Amazon Web Services (AWS) has released the latest 2022 Payment Card Industry 3-D Secure (PCI 3DS) attestation to support our customers in the financial services sector. Although AWS doesn’t perform 3DS functions directly, the AWS PCI 3DS attestation of compliance can help customers to attain their own PCI 3DS compliance for their services running on AWS.
All AWS Regions in scope for PCI DSS were included in the 3DS attestation. AWS was assessed by Coalfire, an independent Qualified Security Assessor (QSA).
AWS compliance reports, including this latest PCI 3DS attestation, are available on demand through AWS Artifact. The 3DS package available in AWS Artifact includes the 3DS Attestation of Compliance (AOC) and Shared Responsibility Guide. To learn more about our PCI program and other compliance and security programs, visit the AWS Compliance Programs page.
We value your feedback and questions. If you have feedback about this post, or want to reach out to our team, submit comments through the Contact Us page.
Want more AWS Security news? Follow us on Twitter.
We’re happy to announce that an updated version of the AWS Security Reference Architecture (AWS SRA) is now available. The AWS SRA is a holistic set of guidelines for deploying the full complement of AWS security services in a multi-account environment. You can use it to help your organization to design, implement, and manage AWS security services so that they align with AWS best practices. The guidance is deeply informed by our collective experiences with AWS enterprise customers.
The AWS SRA update includes seven additional services and features, as well as updated guidance on all services in the AWS SRA with a special focus on service integrations. The AWS SRA update also includes new content about how your organization can use the AWS SRA to design, review, and assess your security architecture. We used direct customer feedback and our experience helping customers use the AWS SRA, as well as including new AWS service and feature releases, to make these updates.
At the core of the AWS SRA documentation is the AWS Security Reference Architecture, a one-page architecture diagram that includes all the security services in a multi-account environment, as shown in Figure 1.
Figure 1: AWS SRA one-page architecture diagram
In the AWS SRA, you’ll find additional documentation about the AWS SRA architecture diagram that dives deep into account structure, the reasoning behind why a specific security service is deployed in a particular account, and how the security services connect and relate to each other.
Update highlights
Based on direct customer feedback, new service and feature releases, and our experience helping customers use the AWS SRA, we’ve included the following changes in the AWS SRA update:
Updated the guidance about using the AWS SRA to design your security architecture. This includes topics such as applying security services across AWS Organizations, balancing distributed and centralized security service guardrails, and using a delegated administrator for AWS security services.
In addition to the architecture diagram and documented guidance, the AWS SRA code repository is regularly updated and has evolved considerably since its initial release. Highlights of the repository include a Quick Setup that uses a centralized AWS CloudFormation template, simplified deployment of the example solutions using nested stacks, updated documentation with diagrams and templates for all solutions, AWS Config management account solution, a Security Hub organization solution, an account alternate contacts solution, and more.
Getting started with the AWS SRA
There are different ways to use the AWS SRA, depending on where you are in your cloud adoption journey. The following are some recommendations to help you get the most value out of the AWS SRA:
Define the target state of your security architecture.
Review the designs and capabilities that you’ve already designed.
Bootstrap the implementation of your security architecture.
Learn more about AWS security services and features.
Start a discussion about organizational governance and responsibilities for security.
We greatly value feedback and contributions from our community. To share your thoughts and insights about the AWS SRA guide, your experience using it, and what you want to see in future versions of the AWS SRA, complete the AWS Proscriptive Guidance feedback form online. If you have feedback about the example code in the GitHub repository, open a GitHub Issue.
If you have feedback about this post, submit comments in the Comments section below. If you have questions about this post, contact AWS Support.
Want more AWS Security news? Follow us on Twitter.
Well, hello there! Thanks for reading our inaugural blog post.
Who are we, you ask? We are the AWS Customer Incident Response Team (CIRT). The AWS CIRT is a specialized 24/7 global Amazon Web Services (AWS) team that provides support to customers during active security events on the customer side of the AWS Shared Responsibility Model. The team is made up of AWS Global Services Consultants and Solutions Architects with experience in incident response.
When the AWS CIRT supports you, you will receive assistance with triage and recovery for an active security event on AWS. We will assist in root cause analysis through the use of AWS service logs and provide you with recommendations for recovery. We will also provide security tips and best practices to help you avoid security events in the future.
AWS CIRT is thrilled to talk with you in this new medium! This is AWS after all; getting customer feedback and taking steps to make your experience better is our number one goal. The AWS CIRT has heard from customers that they are challenged with 24/7 security event prevention, detection, analysis, and response to security events. You’ve told us that you are seeking the right AWS skill sets, knowledge, and best practices to address your security response needs in the case of an active security event. AWS CIRT wants to share our knowledge with you so that you can excel in preventing and detecting security events in the cloud.
Figure 1 shows the two different sides of the shared responsibility model, in which AWS is responsible for security OF the cloud, while customers are responsible for security IN the cloud.
Figure 1: The Customer/AWS Shared Responsibility Model
In addition to this blog post, we’ve been working overtime on our favorite social media platform, AWS Twitch. In December 2021, we developed five episodes to share with you some of the most common causes of security events. We received so much positive customer feedback that we decided to create a bi-weekly series! You can find all episodes of The Safe Room on AWS Twitch.
We mentioned earlier that our number one goal is to help you. We’ve heard from you, and understand that many of you do not have the tools or playbooks necessary to operate your AWS workloads securely. We are pleased to announce that we have developed open-source tools to support your security needs:
AWS Customer Playbook Framework – Publicly available response frameworks that use AWS CIRT lessons learned from security events
AWS CloudSaga – A tool for testing security controls and alerts within an AWS environment by using generated simulated events based on common security events seen by the AWS CIRT
Stay tuned to this blog. More tools are coming soon!
We’ve told you who we are and what we do—now, how do you contact us? All AWS Customers can engage the AWS CIRT through an AWS support case. Yes, that is correct. We support allAWS customers! For those customers that do have an account team, you can start an escalation to the AWS CIRT with the account team. However, we will always require that you open an AWS support case.
Thanks again for stopping by and giving us your eyeballs for a few minutes. Please stay tuned to this blog, because this is where we will comment on security trends and interesting stuff we find in the security world, as well as make new open source tools public.
Cloud safe, everyone!
If you have feedback about this post, submit comments in the Comments section below. If you have questions about this post, contact AWS Support.
Want more AWS Security news? Follow us on Twitter.
AWS Single Sign-On (AWS SSO) is now AWS IAM Identity Center. Amazon Web Services (AWS) is changing the name to highlight the service’s foundation in AWS Identity and Access Management (IAM), to better reflect its full set of capabilities, and to reinforce its recommended role as the central place to manage access across AWS accounts and applications. Although the technical capabilities of the service haven’t changed with this announcement, we want to take the opportunity to walk through some of the important features that drive our recommendation to consider IAM Identity Center your front door into AWS.
If you’ve worked with AWS accounts, chances are that you’ve worked with IAM. This is the service that handles authentication and authorization requests for anyone who wants to do anything in AWS. It’s a powerful engine, processing half a billion API calls per second globally, and it has underpinned and secured the growth of AWS customers since 2011. IAM provides authentication on a granular basis—by resource, within each AWS account. Although this gives you unsurpassed ability to tailor permissions, it also requires that you establish permissions on an account-by-account basis for credentials (IAM users) that are also defined on an account-by-account basis.
As AWS customers increasingly adopted a multi-account strategy for their environments, in December 2017 we launched AWS Single Sign-On (AWS SSO)—a service built on top of IAM to simplify access management across AWS accounts. In the years since, customer adoption of multi-account AWS environments continued to increase the need for centralized access control and distributed access management. AWS SSO evolved accordingly, adding integrations with new identity providers, AWS services, and applications; features for the consistent management of permissions at scale; multiple compliance certifications; and availability in most AWS Regions. The variety of use cases supported by AWS SSO, now known as AWS IAM Identity Center, makes it our recommended way to manage AWS access for workforce users.
IAM Identity Center, just like AWS SSO before it, is offered at no extra charge. You can follow along with our walkthrough in your own console by choosing Getting started on the console main page. If you don’t have the service enabled, you will be prompted to choose Enable IAM Identity Center, as shown in Figure 1.
Figure 1: IAM Identity Center Getting Started page
Freedom to choose your identity source
Once you’re in the IAM Identity Center console, you can choose your preferred identity source for use across AWS, as shown in Figure 2. If you already have a workforce directory, you can continue to use it by connecting, or federating, it. You can connect to the major cloud identity providers, including Okta, Ping Identity, Azure AD, JumpCloud, CyberArk, and OneLogin, as well as Microsoft Active Directory Domain Services. If you don’t have or don’t want to use a workforce directory, you have the option to create users in Identity Center. Whichever source you decide to use, you connect or create it in one place for use in multiple accounts and AWS or SAML 2.0 applications.
Figure 2 Choosing and connecting your identity source
Management of fine-grained permissions at scale
As noted before, IAM Identity Center builds on the per-account capabilities of IAM. The difference is that in IAM Identity Center, you can define and assign access across multiple AWS accounts. For example, permission sets create IAM roles and apply IAM policies in multiple AWS accounts, helping to scale the access of your users securely and consistently.
You can use predefined permission sets based on AWS managed policies, or custom permission sets, where you can still start with AWS managed policies but then tailor them to your needs.
Recently, we added the ability to use IAM customer managed policies (CMPs) and permissions boundary policies as part of Identity Center permission sets, as shown in Figure 3. This helps you improve your security posture by creating larger and finer-grained policies for least privilege access and by tailoring them to reference the resources of the account to which they are applied. By using CMPs, you can maintain the consistency of your policies, because CMP changes apply automatically to the permission sets and roles that use the CMP. You can govern your CMPs and permissions boundaries centrally, and auditors can find, monitor, and review them in one place. If you already have existing CMPs for roles you manage in IAM, you can reuse them without the need to create, review, and approve new inline policies.
Figure 3: Specify permission sets in IAM Identity Center
By default, users and permission sets in IAM Identity Center are administered by the management account in an organization in AWS Organizations. This management account has the power and authority to manage member accounts in the organization as well. Because of the power of this account, it is important to exercise least privilege and tightly control access to it. If you are managing a complex organization supporting multiple operations or business units, IAM Identity Center allows you to delegate a member account that can administer user permissions, reducing the need to access the AWS Organizations management account for daily administrative work.
One place for application assignments
If your workforce uses Identity Center enabled applications, such as Amazon Managed Grafana, Amazon SageMaker Studio, or AWS Systems Manager Change Manager, you can assign access to them centrally, through IAM Identity Center, and your users can have a single sign-on experience.
If you do not have a separate cloud identity provider, you have the option to use IAM Identity Center as a single place to manage user assignments to SAML 2.0-based cloud applications, such as top-tier customer relationship management (CRM) applications, document collaboration tools, and productivity suites. Figure 4 shows this option.
Figure 4: Assign users to applications in IAM Identity Center
Conclusion
IAM Identity Center (the successor to AWS Single Sign-On) is where you centrally create or connect your workforce users once, and manage their access to multiple AWS accounts and applications. It’s our recommended front door into AWS, because it gives you the freedom to choose your preferred identity source for use across AWS, helps you strengthen your security posture with consistent permissions across AWS accounts and applications, and provides a convenient experience for your users. Its new name highlights the service’s foundation in IAM, while also reflecting its expanded capabilities and recommended role.
With Amazon GuardDuty, you can monitor your AWS accounts and workloads to detect malicious activity. Today, we are adding to GuardDuty the capability to detect malware. Malware is malicious software that is used to compromise workloads, repurpose resources, or gain unauthorized access to data. When you have GuardDuty Malware Protection enabled, a malware scan is initiated when GuardDuty detects that one of your EC2 instances or container workloads running on EC2 is doing something suspicious. For example, a malware scan is triggered when an EC2 instance is communicating with a command-and-control server that is known to be malicious or is performing denial of service (DoS) or brute-force attacks against other EC2 instances.
GuardDuty supports many file system types and scans file formats known to be used to spread or contain malware, including Windows and Linux executables, PDF files, archives, binaries, scripts, installers, email databases, and plain emails.
When potential malware is identified, actionable security findings are generated with information such as the threat and file name, the file path, the EC2 instance ID, resource tags and, in the case of containers, the container ID and the container image used. GuardDuty supports container workloads running on EC2, including customer-managed Kubernetes clusters or individual Docker containers. If the container is managed by Amazon Elastic Kubernetes Service (EKS) or Amazon Elastic Container Service (Amazon ECS), the findings also include the cluster name and the task or pod ID so application and security teams can quickly find the affected container resources.
As with all other GuardDuty findings, malware detections are sent to the GuardDuty console, pushed through Amazon EventBridge, routed to AWS Security Hub, and made available in Amazon Detective for incident investigation.
How GuardDuty Malware Protection Works When you enable malware protection, you set up an AWS Identity and Access Management (IAM)service-linked role that grants GuardDuty permissions to perform malware scans. When a malware scan is initiated for an EC2 instance, GuardDuty Malware Protection uses those permissions to take a snapshot of the attached Amazon Elastic Block Store (EBS) volumes that are less than 1 TB in size and then restore the EBS volumes in an AWS service account in the same AWS Region to scan them for malware. You can use tagging to include or exclude EC2 instances from those permissions and from scanning. In this way, you don’t need to deploy security software or agents to monitor for malware, and scanning the volumes doesn’t impact running workloads. The EBS volumes in the service account and the snapshots in your account are deleted after the scan. Optionally, you can preserve the snapshots when malware is detected.
The service-linked role grants GuardDuty access to AWS Key Management Service (AWS KMS) keys used to encrypt EBS volumes. If the EBS volumes attached to a potentially compromised EC2 instance are encrypted with a customer-managed key, GuardDuty Malware Protection uses the same key to encrypt the replica EBS volumes as well. If the volumes are not encrypted, GuardDuty uses its own key to encrypt the replica EBS volumes and ensure privacy. Volumes encrypted with EBS-managed keys are not supported.
Security in cloud is a shared responsibility between you and AWS. As a guardrail, the service-linked role used by GuardDuty Malware Protection cannot perform any operation on your resources (such as EBS snapshots and volumes, EC2 instances, and KMS keys) if it has the GuardDutyExcluded tag. Once you mark your snapshots with GuardDutyExcluded set to true, the GuardDuty service won’t be able to access these snapshots. The GuardDutyExcluded tag supersedes any inclusion tag. Permissions also restrict how GuardDuty can modify your snapshot so that they cannot be made public while shared with the GuardDuty service account.
The EBS volumes created by GuardDuty are always encrypted. GuardDuty can use KMS keys only on EBS snapshots that have a GuardDuty scan ID tag. The scan ID tag is added by GuardDuty when snapshots are created after an EC2 finding. The KMS keys that are shared with GuardDuty service account cannot be invoked from any other context except the Amazon EBS service. Once the scan completes successfully, the KMS key grant is revoked and the volume replica in GuardDuty service account is deleted, making sure GuardDuty service cannot access your data after completing the scan operation.
Enabling Malware Protection for an AWS Account If you’re not using GuardDuty yet, Malware Protection is enabled by default when you activate GuardDuty for your account. Because I am already using GuardDuty, I need to enable Malware Protection from the console. If you’re using AWS Organizations, your delegated administrator accounts can enable this for existing member accounts and configure if new AWS accounts in the organization should be automatically enrolled.
In the GuardDuty console, I choose Malware Protection under Settings in the navigation pane. There, I choose Enable and then Enable Malware Protection.
Snapshots are automatically deleted after they are scanned. In General settings, I have the option to retain in my AWS account the snapshots where malware is detected and have them available for further analysis.
In Scan options, I can configure a list of inclusion tags, so that only EC2 instances with those tags are scanned, or exclusion tags, so that EC2 instances with tags in the list are skipped.
Testing Malware Protection GuardDuty Findings To generate several Amazon GuardDuty findings, including the new Malware Protection findings, I clone the Amazon GuardDuty Tester repo:
First, I create an AWS CloudFormation stack using the guardduty-tester.template file. When the stack is ready, I follow the instructions to configure my SSH client to log in to the tester instance through the bastion host. Then, I connect to the tester instance:
$ ssh tester
From the tester instance, I start the guardduty_tester.sh script to generate the findings:
$ ./guardduty_tester.sh

***********************************************************************
* Test #1 - Internal port scanning                                    *
* This simulates internal reconaissance by an internal actor or an   *
* external actor after an initial compromise. This is considered a    *
* low priority finding for GuardDuty because its not a clear indicator*
* of malicious intent on its own.                                     *
***********************************************************************


Starting Nmap 6.40 ( http://nmap.org ) at 2022-05-19 09:36 UTC
Nmap scan report for ip-172-16-0-20.us-west-2.compute.internal (172.16.0.20)
Host is up (0.00032s latency).
Not shown: 997 filtered ports
PORT     STATE  SERVICE
22/tcp   open   ssh
80/tcp   closed http
5050/tcp closed mmcc
MAC Address: 06:25:CB:F4:E0:51 (Unknown)

Nmap done: 1 IP address (1 host up) scanned in 4.96 seconds

-----------------------------------------------------------------------

***********************************************************************
* Test #2 - SSH Brute Force with Compromised Keys                     *
* This simulates an SSH brute force attack on an SSH port that we    *
* can access from this instance. It uses (phony) compromised keys in  *
* many subsequent attempts to see if one works. This is a common      *
* techique where the bad actors will harvest keys from the web in     *
* places like source code repositories where people accidentally leave*
* keys and credentials (This attempt will not actually succeed in     *
* obtaining access to the target linux instance in this subnet)       *
***********************************************************************

2022-05-19 09:36:29 START
2022-05-19 09:36:29 Crowbar v0.4.3-dev
2022-05-19 09:36:29 Trying 172.16.0.20:22
2022-05-19 09:36:33 STOP
2022-05-19 09:36:33 No results found...
2022-05-19 09:36:33 START
2022-05-19 09:36:33 Crowbar v0.4.3-dev
2022-05-19 09:36:33 Trying 172.16.0.20:22
2022-05-19 09:36:37 STOP
2022-05-19 09:36:37 No results found...
2022-05-19 09:36:37 START
2022-05-19 09:36:37 Crowbar v0.4.3-dev
2022-05-19 09:36:37 Trying 172.16.0.20:22
2022-05-19 09:36:41 STOP
2022-05-19 09:36:41 No results found...
2022-05-19 09:36:41 START
2022-05-19 09:36:41 Crowbar v0.4.3-dev
2022-05-19 09:36:41 Trying 172.16.0.20:22
2022-05-19 09:36:45 STOP
2022-05-19 09:36:45 No results found...
2022-05-19 09:36:45 START
2022-05-19 09:36:45 Crowbar v0.4.3-dev
2022-05-19 09:36:45 Trying 172.16.0.20:22
2022-05-19 09:36:48 STOP
2022-05-19 09:36:48 No results found...
2022-05-19 09:36:49 START
2022-05-19 09:36:49 Crowbar v0.4.3-dev
2022-05-19 09:36:49 Trying 172.16.0.20:22
2022-05-19 09:36:52 STOP
2022-05-19 09:36:52 No results found...
2022-05-19 09:36:52 START
2022-05-19 09:36:52 Crowbar v0.4.3-dev
2022-05-19 09:36:52 Trying 172.16.0.20:22
2022-05-19 09:36:56 STOP
2022-05-19 09:36:56 No results found...
2022-05-19 09:36:56 START
2022-05-19 09:36:56 Crowbar v0.4.3-dev
2022-05-19 09:36:56 Trying 172.16.0.20:22
2022-05-19 09:37:00 STOP
2022-05-19 09:37:00 No results found...
2022-05-19 09:37:00 START
2022-05-19 09:37:00 Crowbar v0.4.3-dev
2022-05-19 09:37:00 Trying 172.16.0.20:22
2022-05-19 09:37:04 STOP
2022-05-19 09:37:04 No results found...
2022-05-19 09:37:04 START
2022-05-19 09:37:04 Crowbar v0.4.3-dev
2022-05-19 09:37:04 Trying 172.16.0.20:22
2022-05-19 09:37:08 STOP
2022-05-19 09:37:08 No results found...
2022-05-19 09:37:08 START
2022-05-19 09:37:08 Crowbar v0.4.3-dev
2022-05-19 09:37:08 Trying 172.16.0.20:22
2022-05-19 09:37:12 STOP
2022-05-19 09:37:12 No results found...
2022-05-19 09:37:12 START
2022-05-19 09:37:12 Crowbar v0.4.3-dev
2022-05-19 09:37:12 Trying 172.16.0.20:22
2022-05-19 09:37:16 STOP
2022-05-19 09:37:16 No results found...
2022-05-19 09:37:16 START
2022-05-19 09:37:16 Crowbar v0.4.3-dev
2022-05-19 09:37:16 Trying 172.16.0.20:22
2022-05-19 09:37:20 STOP
2022-05-19 09:37:20 No results found...
2022-05-19 09:37:20 START
2022-05-19 09:37:20 Crowbar v0.4.3-dev
2022-05-19 09:37:20 Trying 172.16.0.20:22
2022-05-19 09:37:23 STOP
2022-05-19 09:37:23 No results found...
2022-05-19 09:37:23 START
2022-05-19 09:37:23 Crowbar v0.4.3-dev
2022-05-19 09:37:23 Trying 172.16.0.20:22
2022-05-19 09:37:27 STOP
2022-05-19 09:37:27 No results found...
2022-05-19 09:37:27 START
2022-05-19 09:37:27 Crowbar v0.4.3-dev
2022-05-19 09:37:27 Trying 172.16.0.20:22
2022-05-19 09:37:31 STOP
2022-05-19 09:37:31 No results found...
2022-05-19 09:37:31 START
2022-05-19 09:37:31 Crowbar v0.4.3-dev
2022-05-19 09:37:31 Trying 172.16.0.20:22
2022-05-19 09:37:34 STOP
2022-05-19 09:37:34 No results found...
2022-05-19 09:37:35 START
2022-05-19 09:37:35 Crowbar v0.4.3-dev
2022-05-19 09:37:35 Trying 172.16.0.20:22
2022-05-19 09:37:38 STOP
2022-05-19 09:37:38 No results found...
2022-05-19 09:37:38 START
2022-05-19 09:37:38 Crowbar v0.4.3-dev
2022-05-19 09:37:38 Trying 172.16.0.20:22
2022-05-19 09:37:42 STOP
2022-05-19 09:37:42 No results found...
2022-05-19 09:37:42 START
2022-05-19 09:37:42 Crowbar v0.4.3-dev
2022-05-19 09:37:42 Trying 172.16.0.20:22
2022-05-19 09:37:46 STOP
2022-05-19 09:37:46 No results found...

-----------------------------------------------------------------------

***********************************************************************
* Test #3 - RDP Brute Force with Password List                        *
* This simulates an RDP brute force attack on the internal RDP port  *
* of the windows server that we installed in the environment.  It uses*
* a list of common passwords that can be found on the web. This test  *
* will trigger a detection, but will fail to get into the target      *
* windows instance.                                                   *
***********************************************************************

Sending 250 password attempts at the windows server...
Hydra v9.4-dev (c) 2022 by van Hauser/THC & David Maciejak - Please do not use in military or secret service organizations, or for illegal purposes (this is non-binding, these *** ignore laws and ethics anyway).

Hydra (https://github.com/vanhauser-thc/thc-hydra) starting at 2022-05-19 09:37:46
[WARNING] rdp servers often don't like many connections, use -t 1 or -t 4 to reduce the number of parallel connections and -W 1 or -W 3 to wait between connection to allow the server to recover
[INFO] Reduced number of tasks to 4 (rdp does not like many parallel connections)
[WARNING] the rdp module is experimental. Please test, report - and if possible, fix.
[DATA] max 4 tasks per 1 server, overall 4 tasks, 1792 login tries (l:7/p:256), ~448 tries per task
[DATA] attacking rdp://172.16.0.24:3389/
[STATUS] 1099.00 tries/min, 1099 tries in 00:01h, 693 to do in 00:01h, 4 active
1 of 1 target completed, 0 valid password found
Hydra (https://github.com/vanhauser-thc/thc-hydra) finished at 2022-05-19 09:39:23

-----------------------------------------------------------------------

***********************************************************************
* Test #4 - CryptoCurrency Mining Activity                            *
* This simulates interaction with a cryptocurrency mining pool which *
* can be an indication of an instance compromise. In this case, we are*
* only interacting with the URL of the pool, but not downloading      *
* any files. This will trigger a threat intel based detection.        *
***********************************************************************

Calling bitcoin wallets to download mining toolkits

-----------------------------------------------------------------------

***********************************************************************
* Test #5 - DNS Exfiltration                                          *
* A common exfiltration technique is to tunnel data out over DNS      *
* to a fake domain.  Its an effective technique because most hosts    *
* have outbound DNS ports open.  This test wont exfiltrate any data,  *
* but it will generate enough unusual DNS activity to trigger the     *
* detection.                                                          *
***********************************************************************

Calling large numbers of large domains to simulate tunneling via DNS

***********************************************************************
* Test #6 - Fake domain to prove that GuardDuty is working            *
* This is a permanent fake domain that customers can use to prove that*
* GuardDuty is working.  Calling this domain will always generate the *
* Backdoor:EC2/C&CActivity.B!DNS finding type                         *
***********************************************************************

Calling a well known fake domain that is used to generate a known finding

; <<>> DiG 9.11.4-P2-RedHat-9.11.4-26.P2.amzn2.5.2 <<>> GuardDutyC2ActivityB.com any
;; global options: +cmd
;; Got answer:
;; ->>HEADER<<- opcode: QUERY, status: NOERROR, id: 11495
;; flags: qr rd ra; QUERY: 1, ANSWER: 8, AUTHORITY: 0, ADDITIONAL: 1

;; OPT PSEUDOSECTION:
; EDNS: version: 0, flags:; udp: 4096
;; QUESTION SECTION:
;GuardDutyC2ActivityB.com.	IN	ANY

;; ANSWER SECTION:
GuardDutyC2ActivityB.com. 6943	IN	SOA	ns1.markmonitor.com. hostmaster.markmonitor.com. 2018091906 86400 3600 2592000 172800
GuardDutyC2ActivityB.com. 6943	IN	NS	ns3.markmonitor.com.
GuardDutyC2ActivityB.com. 6943	IN	NS	ns5.markmonitor.com.
GuardDutyC2ActivityB.com. 6943	IN	NS	ns7.markmonitor.com.
GuardDutyC2ActivityB.com. 6943	IN	NS	ns2.markmonitor.com.
GuardDutyC2ActivityB.com. 6943	IN	NS	ns4.markmonitor.com.
GuardDutyC2ActivityB.com. 6943	IN	NS	ns6.markmonitor.com.
GuardDutyC2ActivityB.com. 6943	IN	NS	ns1.markmonitor.com.

;; Query time: 27 msec
;; SERVER: 172.16.0.2#53(172.16.0.2)
;; WHEN: Thu May 19 09:39:23 UTC 2022
;; MSG SIZE  rcvd: 238


*****************************************************************************************************
Expected GuardDuty Findings

Test 1: Internal Port Scanning
Expected Finding: EC2 Instance  i-011e73af27562827b  is performing outbound port scans against remote host. 172.16.0.20
Finding Type: Recon:EC2/Portscan

Test 2: SSH Brute Force with Compromised Keys
Expecting two findings - one for the outbound and one for the inbound detection
Outbound:  i-011e73af27562827b  is performing SSH brute force attacks against  172.16.0.20
Inbound:  172.16.0.25  is performing SSH brute force attacks against  i-0bada13e0aa12d383
Finding Type: UnauthorizedAccess:EC2/SSHBruteForce

Test 3: RDP Brute Force with Password List
Expecting two findings - one for the outbound and one for the inbound detection
Outbound:  i-011e73af27562827b  is performing RDP brute force attacks against  172.16.0.24
Inbound:  172.16.0.25  is performing RDP brute force attacks against  i-0191573dec3b66924
Finding Type : UnauthorizedAccess:EC2/RDPBruteForce

Test 4: Cryptocurrency Activity
Expected Finding: EC2 Instance  i-011e73af27562827b  is querying a domain name that is associated with bitcoin activity
Finding Type : CryptoCurrency:EC2/BitcoinTool.B!DNS

Test 5: DNS Exfiltration
Expected Finding: EC2 instance  i-011e73af27562827b  is attempting to query domain names that resemble exfiltrated data
Finding Type : Trojan:EC2/DNSDataExfiltration

Test 6: C&C Activity
Expected Finding: EC2 instance  i-011e73af27562827b  is querying a domain name associated with a known Command & Control server.
Finding Type : Backdoor:EC2/C&CActivity.B!DNS
After a few minutes, the findings appear in the GuardDuty console. At the top, I see the malicious files found by the new Malware Protection capability. One of the findings is related to an EC2 instance, the other to an ECS cluster.
First, I select the finding related to the EC2 instance. In the panel, I see the information on the instance and the malicious file, such as the file name and path. In the Malware scan details section, the Trigger finding ID points to the original GuardDuty finding that triggered the malware scan. In my case, the original finding was that this EC2 instance was performing RDP brute force attacks against another EC2 instance.
Here, I choose Investigate with Detective and, directly from the GuardDuty console, I go to the Detective console to visualize AWS CloudTrail and Amazon Virtual Private Cloud (Amazon VPC) flow data for the EC2 instance, the AWS account, and the IP address affected by the finding. Using Detective, I can analyze, investigate, and identify the root cause of suspicious activities found by GuardDuty.
When I select the finding related to the ECS cluster, I have more information on the resource affected, such as the details of the ECS cluster, the task, the containers, and the container images.
Using the GuardDuty tester scripts makes it easier to test the overall integration of GuardDuty with other security frameworks you use so that you can be ready when a real threat is detected.
Comparing GuardDuty Malware Protection with Amazon Inspector At this point, you might ask yourself how GuardDuty Malware Protection relates to Amazon Inspector, a service that scans AWS workloads for software vulnerabilities and unintended network exposure. The two services complement each other and offer different layers of protection:
Amazon Inspector offers proactive protection by identifying and remediating known software and application vulnerabilities that serve as an entry point for attackers to compromise resources and install malware.
GuardDuty Malware Protection detects malware that is found to be present on actively running workloads. At that point, the system has already been compromised, but GuardDuty can limit the time of an infection and take action before a system compromise results in a business-impacting event.
Availability and Pricing Amazon GuardDuty Malware Protection is available today in all AWS Regions where GuardDuty is available, excluding the AWS China (Beijing), AWS China (Ningxia), AWS GovCloud (US-East), and AWS GovCloud (US-West) Regions.
At launch, GuardDuty Malware Protection is integrated with these partner offerings:
With GuardDuty, you don’t need to deploy security software or agents to monitor for malware. You only pay for the amount of GB scanned in the file systems (not for the size of the EBS volumes) and for the EBS snapshots during the time they are kept in your account. All EBS snapshots created by GuardDuty are automatically deleted after they are scanned unless you enable snapshot retention when malware is found. For more information, see GuardDuty pricing and EBS pricing. Note that GuardDuty only scans EBS volumes less than 1 TB in size. To help you control costs and avoid repeating alarms, the same volume is not scanned more often than once every 24 hours.
In March 2020, we introduced Amazon Detective, a fully managed service that makes it easy to analyze, investigate, and quickly identify the root cause of potential security issues or suspicious activities.
Customers are rapidly moving to containers to deploy Kubernetes workloads with Amazon Elastic Kubernetes Service (Amazon EKS). Its highly programmatic nature allows thousands of individual container deployments and millions of configuration changes to occur in seconds. To effectively secure EKS workloads, it is important to monitor container deployments and configurations that are captured in the form of EKS audit logs and to correlate activities to user activity and network traffic happening across AWS accounts.
Today we announce new capabilities in Amazon Detective to expand security investigation coverage for Kubernetes workloads running on Amazon EKS. When you enable this new feature, Amazon Detective automatically starts ingesting EKS audit logs to capture chronological API activity from users, applications, and the control plane in Amazon EKS for clusters, pods, container images, and Kubernetes subjects (Kubernetes users and service accounts).
Detective automatically correlates user activity using CloudTrail, and network activity using Amazon VPC Flow logs, without the need for you to enable, store, or retain logs manually. The service gleans key security information from these logs and retains them in a security behavioral graph database that enables fast cross-referenced access to twelve months of activity. Detective provides a data analysis and visualization layer purpose-built to answer common security questions backed by a behavioral graph database that allows you to quickly investigate potential malicious behavior associated with your EKS workloads.
You can rapidly respond to security issues rather than focusing on log management, operational systems, or ongoing security tooling maintenance. Detective’s EKS capabilities come with a free 30-day trial for all customers that allows you to ensure that the capabilities meet your needs and to fully understand the cost for the service on an ongoing basis.
Getting Started with Security Investigations for EKS Audit Logs To get started, enable Amazon Detective with just a few clicks in the AWS Management Console. GuardDuty is a prerequisite of Amazon Detective. When you try to enable Detective, Detective checks whether GuardDuty has been enabled for your account. You must either enable GuardDuty or wait for 48 hours. This allows GuardDuty to assess the data volume that your account produces.
You can enable your account by attaching the AWS IAM policy or delegate it to an administrator of your organization. To learn more, refer to Setting up Detective in the AWS documentation.
To enable EKS support in Detective as an existing customer, navigate to the Settings menu in the left panel and select General. Under Optional source packages, enable EKS audit logs.
If you are a new customer of Detective, the EKS protection feature will be enabled by default. If you do not want to trial EKS audit logs right away, you can disable this feature within the first week of enabling Detective and preserve the full 30-day free trial period to use in the future.
Once enabled, Detective will begin monitoring the Kubernetes audit logs that are generated by Amazon EKS, extracting and correlating information for security usage. You do not need to enable any log sources or make any configuration changes to your existing EKS clusters or future deployments.
You can see recent monitoring results of your EKS clusters on the Summary page.
When you choose one of the EKS clusters, you will see the details of containers running in the cluster, Kubernetes API activities, and network activities that occurred on this resource around the scope time.
In the Overview tab, you also see details about all containers running in the cluster, including their pod, image and security context.
In the Kubernetes API activity tab, you can get an overview of the full API activities involving the EKS cluster. You can choose a time range to drill down based on specific API methods within the EKS cluster. When you select a specific time, you can see API subjects, IP addresses, and the number of API calls by the success, failure, unauthorized, or forbidden state.
You can also see details of newly observed Kubernetes API calls inside this cluster for the first time and subjects with increased volume that happened inside the cluster.
Enabling GuardDuty EKS Protection In January 2022, Amazon GuardDuty expanded coverage to EKS cluster activity to identify malicious or suspicious behavior that represents potential threats to container workloads.
When the optional GuardDuty EKS Protection is enabled, GuardDuty will continuously monitor your EKS deployments and alert you to threats detected in your workloads. You can view and investigate these security findings in Detective.
With Detective for EKS enabled, you can quickly access information about the resources involved in the finding, such as their CloudTrail and Kubernetes API activity, and netflow information. This can aid in investigation and help you determine root cause, impact, and other related resources that may also be compromised.
Now Available You can now use Amazon Detective for EKS protection in all Regions where Amazon Detective is available. This feature is priced based on the volume of audit logs processed and analyzed by Detective.
Detective provides a free 30-day trial to all customers that enable EKS coverage, allowing customers to ensure that Detective’s capabilities meet security needs and to get an estimate of the service’s monthly cost before committing to paid usage. To learn more, see the Detective pricing page.
At Amazon Web Services (AWS) we prioritize security, performance, and strong encryption in our cloud services. In order to be prepared for quantum computer advancements, we’ve been investigating the use of quantum-safe algorithms for key exchange in the TLS protocol. In this blog post, we’ll first bring you up to speed on what we’ve been doing on the TLS front. Then, we’ll focus on the QUIC transport protocol and show how you can enable and experiment with the newly released post-quantum (PQ) key exchange by using our s2n-quic library. The s2n-quic library is an open-source implementation of the QUIC protocol.
Why use PQ-hybrid key establishment in s2n-quic?
A large-scale quantum computer could break the current public key cryptography that is used to establish keys for secure communication connections. Although a large-scale quantum computer isn’t available today, traffic that is recorded now could be decrypted by one in the future. With such concerns in mind, the recent US Congress Quantum Computing Cybersecurity Preparedness Act and the White House National Security Memorandum set a goal of a timely and equitable transition of cryptographic systems to quantum-resistant cryptography.
PQ-hybrid key establishment in TLS is a feature that introduces post-quantum KEMs used in conjunction with classical Elliptic Curve Diffie-Hellman (ECDH) key exchange. The client and server still do an ECDH key exchange. Additionally, the server encapsulates a post-quantum shared secret to the client’s post-quantum KEM public key, which is advertised in the ClientHello message. This strategy combines the high assurance of a classical key exchange with the security of the proposed post-quantum key exchanges, to ensure that the handshakes are protected as long as the ECDH or the post-quantum shared secret cannot be broken.
After decapsulating the secret, the client and server have an ECDH and a post-quantum shared secret, which they concatenate and use to derive the symmetric keys that are used in the Authenticated Encryption with Additional Data (AEAD) cipher in TLS. These symmetric keys used by the AEAD cipher for data encryption will be secure against a quantum computer, which means that the TLS communication is secure against a quantum computer. The AWS implementation of TLS is s2n-tls, a streamlined open source implementation of TLS. The s2n-tls implementation already supports PQ-hybrid key exchange with ECDH and three NIST PQC Project KEMs (Kyber, BIKE, and SIKE) for TLS 1.2 and 1.3. The use of KEMs for TLS 1.2 is described in the draft-campagna-tls-bike-sike-hybrid IETF draft, and the use of KEMs for TLS 1.3 is described in the draft-ietf-tls-hybrid-design IETF draft.
Note: The Kyber, BIKE, and SIKE implementations follow the algorithm specifications described in NIST PQ Project Round 3, which are expected to be updated as standardization proceeds.
How PQ-hybrid key exchange works in s2n-quic
AWS recently announceds2n-quic, an open-source Rust implementation of the QUIC protocol. QUIC is an encrypted transport protocol that is designed for performance and is the foundation of HTTP/3. For tunnel establishment, QUIC uses TLS 1.3 carried over QUIC transport. To alleviate the harvest-now-decrypt-later concerns for customers that use s2n-quic, in the next section we show you how to enable PQ-hybrid key establishment in s2n-quic. AWS services and software that use s2n-quic will automatically inherit the ability to support quantum-safe key exchanges in the future when post-quantum algorithms are standardized and are officially supported in s2n-quic.
The s2n-quic implementation is written in the Rust programming language. It can use either s2n-tls (the TLS library for AWS) or rustls (the TLS library in Rust) to perform the TLS handshake. If you build s2n-quic with s2n-tls, then s2n-quic inherits the post-quantum support that is offered in s2n-tls. In turn, s2n-tls is built over other crypto libraries such as the AWS libcrypto (AWS-LC) or alternatively OpenSSL crypto library (libcrypto). AWS-LC is a general-purpose cryptographic library that is maintained by AWS, which will incorporate standardized post-quantum algorithms. Therefore, building s2n-tls with AWS-LC will provide s2n-tls with the post-quantum cryptographic algorithms for use in s2n-quic.
Such a model allows for AWS services and software that use s2n-quic to automatically inherit the standardized post-quantum options as they are implemented in s2n-tls and its underlying crypto libraries. There will be no need to tweak s2n-quic to support post-quantum TLS 1.3 handshakes. The whole stack of protocol implementations is architected in an agile manner without duplication of work.
The public s2n-quic GitHub repository includes an example that demonstrates how to build the library with PQ-hybrid key exchange support, along with a server and client to test. The PQ-hybrid key exchange feature test requires CMake in Linux or macOS. The experiments below were run in an Amazon Linux 2 instance with rustc, Cargo, Clang, and CMake installed. Connections that you establish with this experimental build of s2n-quic will support PQ-hybrid key exchange.
To test PQ-hybrid key establishment
Clone s2n-quic by using the following commands:
git clone https://github.com/aws/s2n-quic cd s2n-quic
Run the example post-quantum s2n-quic client and server in the post-quantum directory to confirm that they negotiate a PQ-hybrid key by using the following commands:
cd examples/post-quantum cargo run –bin pq_server cargo run –bin pq_client
Note: Although these examples with the PQ-hybrid feature experimental build of s2n-quic are self-contained, if you want to manually change and build s2n-quic and s2n-tls to enable PQ-hybrid key exchange, you have to update the default_tls13 policy in s2n-tls to point to security_policy_pq_tls_1_0_2021_05_26 in tls/s2n_security_policies.c. Then you rebuild s2n-tls and override the location that s2n-quic links to by setting the S2N_TLS_DIR, S2N_TLS_LIB_DIR, and S2N_TLS_INCLUDE_DIR environment variables at build time.
To confirm the PQ-hybrid key establishment, you capture the QUIC negotiation by using the following tcpdump command:
sudo tcpdump -i lo port 4433 -w test.pcap
Open the capture by using a packet capture visualization application. First you look at the ClientHello message, as shown in the capture in Figure 1 taken from Wireshark.
Figure 1: pq_client ClientHello in QUIC
In the QUIC CRYPTO frame, you can see the TLS 1.3 cipher suites, and that the TLS version is 1.3 while the supported key exchange groups are classical ECDH (with identifiers 0x0017, 0x0018, 0x001d) and 0x2f39, 0x2f3a, 0x2f37…. 0x2f1f. The 0x2f… groups are the agreed upon identifiers (not standardized yet) for PQ-hybrid key exchange. You also see the PQ-hybrid X25519+Kyber512 (with identifier 12089 or 0x2f39) key share that is offered by the client. That key share includes 32 bytes for the Curve25519 ephemeral ECDH client public key, 800 bytes for the ephemeral Kyber512 public key, and 4 bytes for the identifier and the key share length.
Note: The post-quantum KEMs implementations at the time of this writing follow the NIST Round 3 Kyber, BIKE, and SIKE specifications. We expect these specifications to change as the NIST PQC Project proceeds with standardization. Post-quantum support in s2n-tls and s2n-quic will be experimental until NIST has selected and published standardized algorithms and identifiers. Pushing the change to the main branch now would mean that s2n-quic clients would be sending a PQ-hybrid key share that won’t be used until the servers on the internet start supporting it. The actual algorithms and their identifiers will still be integrated in future releases of s2n-tls and AWS-LC. Therefore, s2n-quic will still be able to negotiate the NIST and IETF standardized options. Meanwhile, we will continue to experiment with post-quantum QUIC and its potential challenges.
Next, take a look at the server-negotiated keys in the ServerHello message, as shown in Figure 2.
Figure 2: pq_server ServerHello in QUIC
You can again see the TLS 1.3 cipher suite, the TLS version being 1.3, and the picked PQ-hybrid X25519+Kyber512 key share. The key share includes 4 bytes for the identifier and the key share length, 32 bytes for the Curve25519 ephemeral ECDH server public key, and 768 bytes for the Kyber512 ciphertext that encapsulates a post-quantum shared secret to the client’s ephemeral Kyber512 public key (included in its ClientHello message).
The rest of the handshake completes successfully by deriving symmetric keys from the X25519 and Kyber512 post-quantum shared secrets (as defined in the draft-ietf-tls-hybrid-design IETF draft) and encrypting the rest of the messages with Advanced Encryption Standard with Galois/Counter Mode (AES-GCM) by using these symmetric keys over QUIC.
Benchmark
Now you can benchmark the post-quantum QUIC client and server by using netbench, a transport protocol benchmarking tool that is available in the s2n-quic repository.
To benchmark the post-quantum QUIC client and server
Go in the netbench directory and build it with the correct flags for the experimental post-quantum QUIC examples, by using the following commands:
cd s2n-quic/netbench RUSTFLAGS=”–cfg s2n_quic_unstable –cfg s2n_quic_enable_pq_tls” cargo build –release
Generate the netbench scenario by using the following commands:
In this example, you’re trying to create 10,000 sequential QUIC connections. The scenario opens a connection, sends a single byte, receives a single byte, closes it, and repeats 10,000 times.
The drivers read the request_response.json to run the scenario. Then the driver is wrapped in a collector that outputs statistics to another JSON file. At the end of all of the 10,000 runs, the cli feature is used to generate the report.
Figure 3 shows the performance results for X25519, X25519+Kyber512, X25519+BIKE-1, and X25519+SIKEp434 key exchange. All connections used an ECDSA P256 server certificate for authentication.
Figure 3: PQ-hybrid key exchange impact on QUIC connection rates
The x-axis is time in seconds. The y-axis is the number of times send is called—which, for 1 byte per connection, practically means that the diagram shows the connection establishment rate (per second). The absolute performance numbers in these benchmarks are not important, because the results could change based on the netbench scenario parameters. The performance difference between PQ-hybrid key exchange algorithms is what this graph is highlighting.
You can see that the classical X25519 achieves higher connection rates, because it is the most efficient option (that offers no post-quantum protection). The performance of Kyber is competitive and achieves 8% fewer connections per second when used with X25519 in a PQ-hybrid key exchange. BIKE-1 is relatively efficient, but adds some extra latency and introduces two frames for the ClientHello, which leads to 37% fewer connections per second. SIKEp434, although it offers much smaller public keys and ciphertexts, is orders of magnitude slower, which means it offers 95% fewer connections per second. These results match previous results we have shared before and other research works, where the most efficient signature algorithms ended up with higher connection rates and lower connection failure probabilities due to overload.
Conclusion
In this post, we showed how you can use s2n-quic in conjunction with s2n-tls to enable QUIC connections to negotiate encryption keys in a quantum-resistant manner. If you’re interested in learning more about s2n-quic, join us at AWS re:Inforce in July for the breakout session entitled NIS304: Using s2n-quic: Bringing QUIC, the secure transport protocol, to AWS.
As always, if you’re interested in using or contributing to s2n-quic, the source code and documentation are publicly available under the terms of the Apache Software License 2.0 from our s2n-quic GitHub repository. If you package or distribute s2n-quic or s2n-tls, or use it as part of a large multi-user service, you might be eligible for pre-notification of security issues. Contact [email protected] for more information. If you discover a potential security issue in s2n-quic or s2n-tls, we ask that you notify AWS Security by using our vulnerability reporting page.
If you have feedback about this post, submit comments in the Comments section below. If you have questions about this post, contact AWS Support.
Want more AWS Security news? Follow us on Twitter.
In this blog post, you’ll learn how to extend the solution so you can use AWS Chatbot to remediate the findings in your Slack channel. You’ll receive the findings from Security Hub and then run AWS CLI commands from your Slack channel to remediate the reported security findings.
AWS Chatbot works by acting as a subscriber to an Amazon Simple Notification Service (Amazon SNS) topic that can receive notifications from either Amazon CloudWatch or Amazon EventBridge, and have them delivered to the configured Slack channels or Amazon Chime chat rooms. You can apply standard AWS Identity and Access Management (IAM) permissions to the Slack channel or Amazon Chime chatroom, and you can also associate some channel guardrails to provide granular control on what commands can be run from the channel. For example, you may want to allow running commands that would allow getting more details on findings reported from Security Hub, and remediating and archiving those findings, but use channel guardrails to prevent anyone from disabling Security Hub. Another example is that you might want to allow the channel members to query AWS CloudTrail logs in order to get more details on findings, but you use channel guardrails to prevent them from disabling AWS CloudTrail or changing the destination Amazon Simple Storage Services (Amazon S3) bucket.
Overview of ChatOps and ChatSecOps concepts
ChatOps, also known as Chat Operations, refers to using chatbots, tools, and clients to communicate, notify, assign, and launch operational tasks and issues. You can use your existing Slack channels and Amazon Chime chatrooms to receive alerts and notifications about operational issues or tasks, and you can also respond to those incidents or tasks in real time from the same chat room. SecOps is a philosophy of encouraging collaboration between the ITOps and Security teams of an organization. ChatSecOps, also known as Chat Security Operations, uses the ChatOps technology to enable customers to put SecOps in practice.
ChatSecOps facilitates this collaboration by allowing security-related notifications to be delivered to common chat rooms used by SecOps teams, providing visibility on the issues and actions that are taken to investigate and remediate the reported issues. SecOps teams can share threat analysis reports, compliance finding reports, and information on security vulnerabilities in these channels and work closely with DevOps teams to perform further analysis, investigation, and remediation of the issues and findings. This helps to ensure visibility and collaboration across the SecOps and DevOps teams and promotes the philosophy of DevSecOps.
Prerequisites
To get started, you’ll need the following prerequisites:
You need to grant permissions to the users in Slack channels, which you can do in one of the following ways:
Associate a channel IAM role with AWS Chatbot. This method provides similar permissions to all the members of the Slack channel. A channel IAM role is more useful if all your channel members require the same set of permissions. The channel IAM role can also be used to restrict the permissions provided by the user IAM role.
Define user roles. User roles require channel members to choose their own roles. This allows different users in your channel to have different sets of permissions. User roles are also useful when you don’t want new channel members to perform actions as soon as they join the channel.
For detailed instructions about setting up AWS Chatbot and defining permissions, see Getting started with AWS Chatbot. For more information about setting boundaries on the permissions that can be allowed by the channel and user IAM roles, see Channel guardrails.
Integrate the Slack channel with AWS Chatbot
After you set up the Slack channel with required permissions, you integrate the ChatOps for AWS app with your channel by using the following steps.
To integrate the Slack channel with AWS Chatbot
Log in to Slack by using either the Slack app or web browser.
In the Slack sidebar, from the Channels section, choose the channel name.
In the right pane, choose the channel name to open the channel configuration window.
Choose the Integrations tab, then choose Add an App.
In the search bar, enter AWS Chatbot. In the search results list, choose the Add button for AWS Chatbot.
On the Integrations tab, under Apps, you should see ChatOps for AWS, as shown in Figure 1.
Figure 1: Integrate the ChatOps for AWS app with your Slack channel
Now you’re ready to start running the commands. Note that you need to add @aws before writing any commands. For more information , see Running AWS CLI commands from Slack channels.
Use case: Amazon S3 Block Public Access enabled at the account level
The Amazon S3 Block Public Access feature provides settings for access points, buckets, and accounts to help you manage public access to Amazon S3 resources. With S3 Block Public Access, account administrators and bucket owners can set up centralized controls to limit public access to your S3 resources. These controls are enforced regardless of how the resources are created.
Amazon GuardDuty tracks and reports S3 Block Public Access feature configurations at the account level, as well as the bucket level. These findings are automatically sent to Security Hub.
To remediate finding for Amazon S3 Block Public Access from the Slack channel
You receive a Security Hub notification that Amazon S3 Block Public Access was disabled for an account in your designated Slack channel.
Figure 2: Notification received from Security Hub in Slack channel
This notification indicates that S3 Block Public Access was disabled for a specific account.
Note: Your Slack channel members require permissions to investigate and remediate the findings received in the Slack channel. As described earlier, you can grant permissions using a channel IAM role or a user IAM role. You should follow the principal of least privilege access when granting access and use IAM Access Analyzer to review the permissions that are granted through the channel or user IAM role.
Before you take any action, you need to find the current S3 Block Public Access configuration for the account. To do this, run the following AWS CLI command from the Slack channel, replacing <your_account_id> with the AWS account ID you are investigating.
Figure 3: AWS CLI command output in Slack channel indicating that S3 Block Public Access is disabled
You see that the output in Figure 3 shows that all the parameters of PublicAccessBlockConfiguration are set to false, which indicates that the Block Public Access feature is disabled at the account level.
To remediate this issue, run the following AWS CLI command in your Slack channel, replacing <your_account_id> with the AWS account ID you are investigating.
In the response from AWS Chatbot, look for Result was null to verify that the command was run without any errors.
Figure 4: AWS CLI command run from Slack channel to enable S3 Block Public Access
To check the current status of the configuration, and to validate whether the issue has been resolved, again run the following AWS CLI command from the Slack channel, replacing <your_account_id> with the AWS account ID you are investigating:
In the response, you see that all the parameters of PublicAccessBlockConfiguration are set to false, which indicates that the Block Public Access feature is enabled at the account level.
Figure 5: AWS CLI command output in Slack channel indicating S3 Block Public Access is enabled
Another example use case is that you get a security finding notifying you about unencrypted Amazon Elastic Block Store (Amazon EBS) volumes. You can remediate the finding by running AWS CLI commands to encrypt the volume. In addition to interacting with AWS services by running standard AWS CLI commands in the Slack channel, you can further extend this capability to run operating system (OS)-level commands by using AWS Systems Manager runbooks, using the same mechanism described in this post. For more information, see AWS Systems Manager Runbooks in the AWS Chatbot Administrator Guide.
Conclusion
In this blog post, you learned how to run AWS CLI commands from Slack channels to remediate your security findings. This allows you to receive alerts and notifications from Security Hub and other security services such as Amazon GuardDuty, then investigate and remediate the issues from a single platform. You can integrate AWS Chatbot with your security operation team’s Slack channel or Amazon Chime chatroom, and manage your security operations in a more collaborative, transparent, and automated manner.
If you have any questions about this post, let us know in the Comments section below. For more information about AWS Chatbot, see the AWS Chatbot Administrator Guide.
Want more AWS Security news? Follow us on Twitter.
Register now with discount code SALvWQHU2Km to get $150 off your full conference pass to AWS re:Inforce. For a limited time only and while supplies last.
Today we’re going to highlight just some of the network and infrastructure security focused sessions planned for AWS re:Inforce. AWS re:Inforce 2022 will take place in-person in Boston, MA July 26-27. AWS re:Inforce is a learning conference focused on security, compliance, identity, and privacy. When you attend the event, you have access to hundreds of technical and business sessions, demos of the latest technology, an AWS Partner expo hall, a keynote speech from AWS Security leaders, and more. re:Inforce 2022 organizes content across multiple themed tracks: identity and access management; threat detection and incident response; governance, risk, and compliance; networking and infrastructure security; and data protection and privacy. This post describes some of the Breakout sessions, Chalk Talk sessions, Builders’ sessions, and Workshops that are planned for the Network & Infrastructure Security track. For information on the other re:Inforce tracks, see our previous re:Inforce blog posts.
Breakout sessions
These are lecture-style presentations that cover topics at all levels and delivered by AWS experts, builders, customers, and partners. Breakout sessions typically include 10–15 minutes of Q&A at the end.
NIS201: An overview of AWS firewall services and where to use them
In this session, review the firewall services that can be used on AWS, including OS firewalls (Windows and Linux), security group, NACLs, AWS Network Firewall and AWS WAF. This session covers a quick description of each service and where to use it and then offer strategies to help you get the most out of these services.
NIS306: Automating patch management and compliance using AWS
In this session, learn how you can use AWS to automate one of the most common operational challenges that often emerge on the journey to the cloud: patch management and compliance. AWS gives you visibility and control of your infrastructure using AWS Systems Manager. See firsthand how-to setup and configure an automated, multi-account and multi-region patching operation using Amazon CloudWatch Events, AWS Lambda, and AWS Systems Manager.
NIS307: AWS Internet access at scale: Designing a cloud-native internet edge
Today’s on-premises infrastructure typically has a single internet gateway that is sized to handle all corporate traffic. With AWS, infrastructure as code allows you to deploy in different internet access patterns, including distributed DMZs. Automated queries mean you can identify your infrastructure with an API query and ubiquitous instrumentation, allowing precise anomaly detection. In this session, learn about AWS native security tools like Amazon API Gateway, AWS WAF, ELB, Application Load Balancer, and AWS Network Firewall. These options can help you simplify internet service delivery and improve your agility.
NIS308: Deploying AWS Network Firewall at scale: athenahealth’s journey
When the Log4j vulnerability became known in December 2021, athenahealth made the decision to increase their cloud security posture by adding AWS Network Firewall to over 100 accounts and 230 VPCs. Join this session to learn about their initial deployment of a distributed architecture and how they were able to reduce their costs by approximately two-thirds by moving to a centralized model. The session also covers firewall policy creation, optimization, and management at scale. The session is aimed at architects and leaders focused on network and perimeter security that are interested in deploying AWS Network Firewall.
Builders’ sessions
These are small-group sessions led by an AWS expert who guides you as you build the service or product on your own laptop. Use your laptop to experiment and build along with the AWS expert.
NIS251: Building security defenses for edge computing devices
Once devices run applications at the edge and are interacting with various AWS services, establishing a compliant and secure computing environment is necessary. It’s also necessary to monitor for unexpected behaviors, such as a device running malicious code or mining cryptocurrency. This builders’ session walks you through how to build security mechanisms to detect unexpected behaviors and take automated corrective actions for edge devices at scale using AWS IoT Device Defender and AWS IoT Greengrass.
NIS252: Analyze your network using Amazon VPC Network Access Analyzer
In this builders’ session, review how the new Amazon VPC Network Access Analyzer helps you identify network configurations that can lead to unintended network access. Learn ways that you can improve your security posture while still allowing you and your organization to be agile and flexible.
Chalk Talk sessions
These are highly interactive sessions with a small audience. Experts lead you through problems and solutions on a digital whiteboard as the discussion unfolds.
NIS332: Implementing traffic inspection capabilities at scale on AWS
Join this chalk talk to learn about a broad range of security offerings to integrate firewall services into your network, including AWS WAF, AWS Network Firewall, and third-party security products. Learn how to choose network architectures for these firewalling options to help protect inbound traffic to your internet-facing applications. Also learn best practices for applying security controls to various traffic flows, such as internet egress, east-west, and internet ingress.
NIS334: Building Zero Trust from the inside out
What is a protect surface and how can it simplify achieving Zero Trust outcomes on AWS? In this chalk talk, discover how to layer security controls on foundational services, such as Amazon EC2, Amazon EKS, and Amazon S3, to achieve Zero Trust. Starting with these foundational services, learn about AWS services and partner offerings to add security layer by layer. Learn how you can satisfy common Zero Trust use cases on AWS, including user, device, and system authentication and authorization.
Workshops
These are interactive learning sessions where you work in small teams to solve problems using AWS Cloud security services. Come prepared with your laptop and a willingness to learn!
NIS372: Build a DDoS-resilient perimeter and enable automatic protection at scale
In this workshop, learn how to build a DDoS-resilient perimeter and how to use services like AWS Shield, AWS WAF, AWS Firewall Manager, and Amazon CloudFront to architect for DDoS resiliency and maintain robust operational capabilities that allow rapid detection and engagement during high-severity events. Learn how to detect and filter out malicious web requests, reduce attack surface, and protect web-facing workloads at scale with maximum automation and visibility.
NIS373: Open-source security appliances with ELB Gateway Load Balancer
ELB Gateway Load Balancer (GWLB) can help you deploy and scale security appliances on AWS. This workshop focuses on integrating GWLB with an open-source thread detection engine from Suricata. Learn about the mechanics of GWLB, build rules for GeoIP blocking, and write scripts for enhanced malware detection. The architecture relies on AWS Transit Gateway for centralized inspection; automate it using a GitOps CI/CD approach.
NIS375: Segmentation and security inspection for global networks with AWS Cloud WAN
In this workshop, learn how to build and design connectivity for global networks using native AWS services. The workshop includes a discussion of security concepts such as segmentation, centralized network security controls, and creating a balance between self-service and governance at scale. Understand new services like AWS Cloud WAN and AWS Direct Connect SiteLink, as well as how they interact with existing services like AWS Transit Gateway, AWS Network Firewall, and SD-WAN. Use cases covered include federated networking models for large enterprises, using AWS as a WAN, SD-WAN at scale, and building extranets for partner connectivity.
NIS374: Strengthen your web application defenses with AWS WAF
In this workshop, use AWS WAF to build an effective set of controls around your web application and perform monitoring and analysis of traffic that is analyzed by your web ACL. Learn to use AWS WAF to mitigate common attack vectors against web applications such as SQL injection and cross-site scripting. Additionally, learn how to use AWS WAF for advanced protections such as bot mitigation and JSON inspection. Also find out how to use AWS WAF logging, query logs with Amazon Athena, and near-real-time dashboards to analyze requests inspected by AWS WAF.
If any of the above sessions look interesting, consider joining us by registering for AWS re:Inforce 2022. We look forward to seeing you in Boston!
If you have feedback about this post, submit comments in the Comments section below.
Want more AWS Security how-to content, news, and feature announcements? Follow us on Twitter.
The Security Pillar of the AWS Well-Architected Framework includes incident response, stating that your organization should implement mechanisms to automatically respond to and mitigate the potential impact of security issues. Automating incident response helps you scale your capabilities, rapidly reduce the scope of compromised resources, and reduce repetitive work by security teams.
Use cases for Route 53 Resolver DNS Firewall
Route 53 Resolver DNS Firewall is a managed firewall that you can use to block DNS queries that are made for known malicious domains and to allow queries for trusted domains. It provides more granular control over the DNS querying behavior of resources within your VPCs.
Let’s discuss two use cases for Route 53 Resolver DNS Firewall:
Use of allow lists – If you have stricter security requirements around network security controls and want to deny all outbound DNS queries for domains that don’t match those on your lists of approved domains (known as allow lists), you can create such rules. This is called a walled garden approach to DNS security. These allow lists only include the domains for which resources within your Amazon Virtual Private Cloud (Amazon VPC) are allowed to make DNS queries through Amazon-provided DNS. This helps to ensure that the DNS queries containing the domains that your organization doesn’t trust are blocked.
Use of deny lists – If your organization prefers to allow all outbound DNS lookups within your accounts by default and only requires the ability to block DNS queries for known malicious domains, you can use DNS Firewall to create deny lists, which include all the malicious domain names that your organization is aware of. DNS Firewall also provides AWS Managed Rules, giving you to the ability to configure protections against known DNS threats like command-and-control (C&C) bots. You can also add block lists from open-source third-party threat intelligence sources.
A few important points about the use of allow and deny lists:
Broader use of allow lists is more effective at blocking a greater number of malicious DNS queries than a short deny list. For example, if your workloads only need access to .com domains, then allowing only .com will block many malicious domains that might be specific to certain countries. View a list of country code top-level domains (ccTLDs).
If you use allow lists, you need to make sure that you keep up with the domains that your applications need to communicate with. Likewise, if you use deny lists, you need to keep up with updates to the lists.
Allow lists and deny lists are not mutually exclusive models and can be used together. For example, let’s say that you have an allow list that only allows .com domains (with the intention of blocking several ccTLDs by default). You can also use the built-in AWS Managed Rules deny list to block known malicious .com domains for an additional layer of security.
Solution overview
Refer to the DNS Firewall documentation to familiarize yourself with its constructs and understand how it works. The automation example we provide in this blog post is focused on providing blocks or alerts for DNS queries with suspicious domain names. For example, consider the scenario where an Amazon Elastic Compute Cloud (Amazon EC2) instance queries a domain name that is associated with a known command-and-control server. As shown in Figure 1, when GuardDuty detects communication with the malicious domain, it initiates a series of steps. First, AWS Step Functions orchestrates the remediation response through a defined workflow, then DNS Firewall adds the suspicious domain to deny list or alert list, and finally GuardDuty notifies the security operators of the attempted communication.
Figure 1: High-level solution overview
In this solution, the detection of threats by GuardDuty triggers the automated remediation procedure documented in this post. GuardDuty informs you of the status of your AWS environment by producing security findings. Each GuardDuty finding has an assigned severity level and value that reflects the potential risk that the finding could have to your network as determined by our security engineers. The value of the severity can fall anywhere within the 0.1 to 8.9 range, with higher values indicating greater security risk. To help you determine a response to a potential security issue that is highlighted by a finding, GuardDuty breaks down this range into High, Medium, and Low severity levels. We have seen that many of the DNS-based GuardDuty findings fall into the category of High severity, and many times these findings are strongly indicative of potential compromise (for example, pre ransomware activity).
In this blog post, we specifically focus on the following types of GuardDuty findings:
Backdoor:EC2/C&CActivity.B!DNS
Impact:EC2/MaliciousDomainRequest.Reputation
Trojan:EC2/DNSDataExfiltration
We’ve configured DNS Firewall to block only events with High severity by sending only those domains to the deny list. DNS Firewall sends the rest of the domains to an alert list.
This solution uses Step Functions and AWS Lambda so that incident response steps run in the correct order. Step Functions also provides retry and error-handling logic. Lambda functions interact with networking services to block traffic, and with databases to store data about blocked domain lists and AWS Security Hub finding Amazon Resource Names (ARNs).
How it works
Figure 2 shows the automated remediation workflow in detail.
Figure 2: Detailed workflow diagram
The solution is implemented as follows:
GuardDuty detects communication attempts that include a suspicious domain. GuardDuty generates a finding, in JSON format, that includes details such as the EC2 instance ID involved (if applicable), account information, type of finding, domain, and other details. Following is a sample finding (some fields removed for brevity).
Security Hub ingests the finding generated by GuardDuty and consolidates it with findings from other AWS security services. Security Hub also publishes the contents of the finding to the default bus in Amazon EventBridge. Following is a snippet from a sample event published to EventBridge.
EventBridge has a rule with an event pattern that matches GuardDuty events that contain the malicious domain name. When an event matching the pattern is published on the default bus, EventBridge routes that event to the designated target, in this case a Step Functions state machine. Following is a snippet of AWS CloudFormation code that defines the EventBridge rule.
# EventBridge Event Rule - For Security Hub event published to EventBridge:
  SecurityHubtoFirewallStateMachineEvent:
    Type: "AWS::Events::Rule"
    Properties:
      Description: "Security Hub - GuardDuty findings with DNS Domain"
      EventPattern:
        source:
        - aws.securityhub
        detail:
          findings:
            ProductFields:
              aws/guardduty/service/action/dnsRequestAction/blocked:
                - "exists": true
      State: "ENABLED"
      Targets:
        -
          Arn: !GetAtt SecurityHubtoDnsFirewallStateMachine.Arn
          RoleArn: !GetAtt SecurityHubtoFirewallStateMachineEventRole.Arn
          Id: "GuardDutyEvent-StepFunctions-Trigger"
The Step Functions state machine ingests the details of the Security Hub finding published in EventBridge and orchestrates the remediation response through a defined workflow. Figure 3 shows the state machine workflow.
Figure 3: AWS Step Functions state machine workflow
The first two steps in the state machine, getDomainFromDynamo and isDomainInDynamo, invoke the Lambda function CheckDomainInDynamoLambdaFunction that checks whether the flagged domain is already in the Amazon DynamoDB table. If the domain already exists in DynamoDB, then the workflow continues to check whether the domain is also in the domain list and adds it accordingly. If the domain is not in DynamoDB, then the workflow considers it a new addition and adds the domain to both domain lists, as well as the DynamoDB table.
The next three steps in the state machine—getDomainFromDomainList, isDomainInDomainList, and addDomainToDnsFirewallDomainList—invoke a second Lambda function that checks and updates the DNS Firewall domain lists with the domain name. Figure 4 shows an example of the DNS Firewall rules and associated domain list.
Figure 4: Sample rules in a DNS Firewall rule group
Figure 5 shows the domain lists.
Figure 5: Domain lists
The next step in the state machine, updateDynamoDB, invokes a third Lambda function that updates the DynamoDB table with the domain that was just added to the domain list. Figure 6 shows an example domain entry that gets stored inside the DynamoDB table.
If there was a failure in any of the previous steps, then the state machine runs the notifyFailure step. The state machine publishes a message on the SNS topic that the automated remediation workflow has failed to complete, and that manual intervention might be required.
Solution deployment and testing
To set up this solution, you’ll do the following steps:
Verify prerequisites in your AWS account.
Deploy the CloudFormation template.
Create a test Security Hub event.
Confirm the entry in the DNS Firewall rule group domain list.
Confirm the SNS notification.
Apply the rule group to your VPC by using DNS Firewall.
Step 1: Verify prerequisites in your AWS account
The sample solution we provide in this blog post requires that you activate both GuardDuty and Security Hub in your AWS account. If either of these services is not activated in your account, do the following:
GuardDuty – Learn more about the free trial and pricing for this service, and follow the steps in the GuardDuty documentation to set up the service and start monitoring your account.
For this next step, make sure that you deploy the template within the AWS account and the AWS Region where you want to monitor GuardDuty findings and block suspicious DNS activity. Depending on your architecture, you can deploy the solution one time centrally in a security account or deploy it repeatedly across multiple accounts.
To deploy the template
Choose the Launch Stack button to launch a CloudFormation stack in your account:
Note: The stack will launch in the N. Virginia (us-east-1) Region. It takes approximately 15 minutes for the CloudFormation stack to complete. To deploy this solution into other AWS Regions, download the solution’s CloudFormation template and deploy it to the selected Region. Network Firewall isn’t currently available in all Regions. For more information about where it’s available, see the list of service endpoints.
In the AWS CloudFormation console, select the Select Template form, and then choose Next.
On the Specify Details page, provide the following input parameters. You can modify the default values to customize the solution for your environment.
AdminEmail – The email address to receive notifications. This must be a valid email address. There is no default value.
DnsFireWallAlertDomainListName – The name of the domain list for DNS Firewall that consists of domains that will be only alerted and not blocked. The default value is DemoAlertDomainListAutoUpdated.
DnsFireWallBlockDomainListName – The name of the domain list for DNS Firewall that consists of domains that will be blocked. The default value is DemoBlockedDomainListAutoUpdated.
DnsFirewallBlockAction – You can select NODATA or NXDOMAIN. NODATA implies that there is no response available if a DNS query from the VPC matches a domain in the block domain list. NXDOMAIN implies that the response is an error message, which indicates that a domain doesn’t exist. The default value is NODATA.
Figure 7 shows an example of the values entered in the Parameters screen.
Figure 7: Sample CloudFormation stack parameters
After you’ve entered values for all of the input parameters, choose Next.
On the Options page, keep the defaults, and then choose Next.
On the Review page, in the Capabilities section, select the check box next to I acknowledge that AWS CloudFormation might create IAM resources. Then choose Create. Figure 8 shows what the CloudFormation capabilities acknowledgement prompt looks like.
While the stack is being created, check the email inbox that corresponds to the value that you gave for the AdminEmail address parameter. Look for an email message with the subject “AWS Notification – Subscription Confirmation.” Choose the link to confirm the subscription to the SNS topic.
After the Status field for the CloudFormation stack changes to CREATE_COMPLETE, as shown in Figure 9, the solution is implemented and is ready for testing.
After the CloudFormation stack has completed deployment, you can test the functionality by creating a test event in the same format as would be published by Security Hub.
To create a test run of the solution
In the AWS Management Console, choose Services, choose CloudFormation, and then for Stack, choose the stack name that you provided in Step 2: Deploy the CloudFormation template.
In the Resources tab for the stack, look for the SecurityHubDnsFirewallStateMachine entry. It should appear as shown in Figure 10.
Figure 10: CloudFormation stack resources
Choose the link in the entry. You’ll be redirected to the Step Functions console, with the state machine already open. Choose Start execution.
Figure 11: AWS Step Functions state machine
To facilitate testing, we’ve provided a test event file. On the Start execution page, in the Input section, paste the C&CActivity.B!DNS finding sample as shown in Figure 12.
Figure 12: Sample input for the Step Functions state machine execution
Note the domain name guarddutyc2activityb.com for the remote host identified in the GuardDuty finding in the test event on line 57 of the sample. The solution should block or alert traffic from that domain name in the following steps.
Choose Start execution to begin the processing of the test event.
You can now track the state machine processing of the test event. The processing should complete within a few seconds. You can select different steps in the visual Graph inspector to view input and output data. Figure 13 shows the input to the addDomainToDnsFirewallDomainList step that launches a Lambda function that interacts with DNS Firewall.
Figure 13: Step Functions state machine step details
Step 4: Confirm the entry in the DNS Firewall rule group
Now that a test event was processed by the state machine, you can check whether the DNS Firewall rule group would block traffic to the domain name identified in the GuardDuty finding.
To validate entries in the DNS Firewall rule group
In the AWS Management Console, choose Services, and then choose VPC. In the DNS Firewall section in the left navigation bar, choose DNS Firewall rule groups.
Choose the demoDnsFirewallRuleGroup rule group created by the solution, and you’ll be able to see the rules as shown in Figure 14.
Figure 14: Select the DNS Firewall rule
Choose the domain list associated with the BLOCK rule. Confirm that the rules blocking the traffic from the source and to the domain that you specified in the test event were created. The domain list should look similar to what is shown in Figure 15.
Figure 15: Verify that the domain was added to the blocked domain list
Step 5: Confirm the SNS notification
In this step, you’ll view the SNS notification that was sent to the email address you set up.
To confirm the SNS notification
Review the email inbox for the value that you provided for the AdminEmail parameter and look for a message with the subject line “AWS Notification Message.” The contents of the message from SNS should be similar to the following.
{"Blocked":"true","Input":{"ResponseMetadata":{"RequestId":"HOLOAAENUS3MN9B0DS6CO8BF4BVV4KQNSO5AEMVJF66Q9ASUAAJG","HTTPStatusCode":200,"HTTPHeaders":{"server":"Server","date":"Wed, 17 Nov 2021 08:20:38 GMT","content-type":"application/x-amz-json-1.0","content-length":"2","connection":"keep-alive","x-amzn-requestid":"HOLOAAENUS3MN9B0DS6CO8BF4BVV4KQNSO5AEMVJF66Q9ASUAAJG","x-amz-crc32":"2745614147"},"RetryAttempts":0}}}
Step 6: Apply the rule group to your VPC by using DNS Firewall
As part of the CloudFormation template deployment, two test VPCs have been created for you, to demonstrate that you can assign a single DNS Firewall rule group to multiple VPCs. You can also associate this rule group to your existing VPC of interest. To learn how to do this task, see Managing associations between your VPC and Route 53 Resolver DNS Firewall rule group. For visibility into DNS queries and for debugging purposes, the template creates log groups that accumulate DNS Resolver query logs.
After you’ve successfully tested the given sample that emulates C&CActivity.B!DNS, you can repeat steps 3 to 6 for the MaliciousDomainRequest.Reputation finding sample and the DNSDataExfiltration finding sample.
These samples are supplied for your convenience, and you will see the blocking action in a matter of minutes. Alternatively, you can use other ways to test, which might need about an hour for blocking action to happen. To initiate DNS C&C activity, you can make a DNS request from your instance (using dig for Linux or nslookup for Windows) against the test domain guarddutyc2activityb.com. Alternatively, you can use GuardDuty Tester, which generates DNS C&C activity and DNS exfiltration unauthorized events.
To take this solution one step further, you can implement automatic aging out of the domains that get added to the domain list. One way to do this is to use the Time to Live feature in DynamoDB and keep repopulating the domain list from DynamoDB at regular intervals of time. The benefit of this is that if the malicious nature of a domain in the domain list changes over time, the list will be kept up to date during this age out and repopulation process.
Considerations
There are a few considerations that you should keep in mind regarding DNS Firewall:
DNS Firewall and AWS Network Firewall work together for improved domain-filtering capability across HTTP(S) traffic. A domain list that you configure in Network Firewall should reflect the domain list configured in DNS Firewall.
DNS Firewall filters based on the domain name. It doesn’t translate that domain name to an IP address to be blocked.
It’s a best practice to block outbound traffic to port 53 with network access control lists (network ACLs) or Network Firewall so that GuardDuty can monitor DNS queries.
DNS Firewall filters DNS queries to the Amazon Route 53 Resolver (also known as AmazonProvidedDNS or VPC .2 Resolver) in the VPC. So for traffic leaving the VPC, we recommend that you use DNS Firewall along with Network Firewall, which you can use to secure traffic that isn’t headed to Amazon Route 53 Resolver. Network Firewall can also block domain names that exist in network traffic leaving the Amazon VPC, such as in HTTP HOST headers, TLS Server Name Indication (SNI) fields, and so on.
You can use Network Firewall to block external encrypted DNS services so that these services can’t be used to circumvent your DNS Firewall policies.
Conclusion
In this blog post, you learned how to automatically block malicious domains by using Route 53 Resolver DNS Firewall and GuardDuty. You can use this sample solution to automatically block communication to suspicious hosts discovered by GuardDuty, and you can apply those blocks across all configured DNS Firewall firewalls within your account.
All of the code for this solution is available on GitHub. Feel free to play around with the code; we hope it helps you learn more about automated security remediation. You can adjust the code to better fit your unique environment or extend the code with additional steps.
Want more AWS Security how-to content, news, and feature announcements? Follow us on Twitter.
The collective thoughts of the interwebz
Manage Consent
To provide the best experiences, we use technologies like cookies to store and/or access device information. Consenting to these technologies will allow us to process data such as browsing behavior or unique IDs on this site. Not consenting or withdrawing consent, may adversely affect certain features and functions.
Functional
Always active
The technical storage or access is strictly necessary for the legitimate purpose of enabling the use of a specific service explicitly requested by the subscriber or user, or for the sole purpose of carrying out the transmission of a communication over an electronic communications network.
Preferences
The technical storage or access is necessary for the legitimate purpose of storing preferences that are not requested by the subscriber or user.
Statistics
The technical storage or access that is used exclusively for statistical purposes.The technical storage or access that is used exclusively for anonymous statistical purposes. Without a subpoena, voluntary compliance on the part of your Internet Service Provider, or additional records from a third party, information stored or retrieved for this purpose alone cannot usually be used to identify you.
Marketing
The technical storage or access is required to create user profiles to send advertising, or to track the user on a website or across several websites for similar marketing purposes.