Post Syndicated from Ray Zaman original https://aws.amazon.com/blogs/architecture/field-notes-benchmarking-performance-of-the-new-m5zn-d3-and-r5b-instance-types-with-datadog/
This post was co-written with Danton Rodriguez, Product Manager at Datadog.
At re:Invent 2020, AWS announced the new Amazon Elastic Compute Cloud (Amazon EC2) M5zn, D3, and R5b instance types. These instances are built on top of the AWS Nitro System, a collection of AWS-designed hardware and software innovations that enable the delivery of private networking, and efficient, flexible, and secure cloud services with isolated multi-tenancy.
If you’re thinking about deploying your workloads to any of these new instances, Datadog helps you monitor your deployment and gain insight into your entire AWS infrastructure. The Datadog Agent—open-source software available on GitHub—collects metrics, distributed traces, logs, profiles, and more from Amazon EC2 instances and the rest of your infrastructure.
How to deploy Datadog to analyze performance data
The Datadog Agent is compatible with the new instance types. You can use a configuration management tool such as AWS CloudFormation to deploy it automatically across all your instances. You can also deploy it with a single command directly to any Amazon EC2 instance. For example, you can use the following command to deploy the Agent to an instance running Amazon Linux 2:
DD_AGENT_MAJOR_VERSION=7 DD_API_KEY=[Your API Key] bash -c "$(curl -L https://raw.githubusercontent.com/DataDog/datadog-agent/master/cmd/agent/install_script.sh)"
The Datadog Agent uses an API key to send monitoring data to Datadog. You can find your API key in the Datadog account settings page. Once you deploy the Agent, you can instantly access system-level metrics and visualize your infrastructure. The Agent automatically tags EC2 metrics with metadata, including Availability Zone and instance type, so you can filter, search, and group data in Datadog. For example, the Host Map helps you visualize how I/O load on d3.2xlarge instances is distributed across Availability Zones and individual instances (as shown in Figure 1 ).

Figure 1 – Visualizing read I/O operations on d3.2xlarge instances across three Availability Zones.
Enabling trace collection for better visibility
Installing the Agent allows you to use Datadog APM to collect traces from the services running on your Amazon EC2 instances, and monitor their performance with Datadog dashboards and alerts.
Datadog APM includes support for auto-instrumenting applications built on a wide range of languages and frameworks, such as Java, Python, Django, and Ruby on Rails. To start collecting traces, you add the relevant Datadog tracing library to your code. For more information on setting up tracing for a specific language, Datadog has language-specific guides to help get you started.
Visualizing M5zn performance in Datadog
The new M5zn instances are a high frequency, high speed and low-latency networking variant of Amazon EC2 M5 instances. M5zn instances deliver the highest all-core turbo CPU performance from Intel Xeon Scalable processors in the cloud, with a frequency up to 4.5 GHz —making them ideal for gaming, simulation modeling, and other high performance computing applications across a broad range of industries.
To demonstrate how to visualize M5zn’s performance improvements in Datadog, we ran a benchmark test for a simple Python application deployed behind Apache servers on two instance types:
- M5 instance (
hellobench-m5-x86_64 service in Figure 2)
- M5zn instance (
hellobench-m5zn-x86_64 service in Figure 2).
Our benchmark application used the aiohttp library and was instrumented with Datadog’s Python tracing library. To run the test, we used Apache’s HTTP server benchmarking tool to generate a constant stream of requests across the two instances.
The hellobench-m5zn-x86_64 service running on the M5zn instance reported a 95th percentile latency that was about 48 percent lower than the value reported by the hellobench-m5-x86_64 service running on the M5 instance (4.73 ms vs. 9.16 ms) over the course of our testing. The summary of results is shown in Datadog APM (as shown in figure 2 below):

Figure 2 – Performance benchmarks for a Python application running on two instance types: M5 and M5zn.
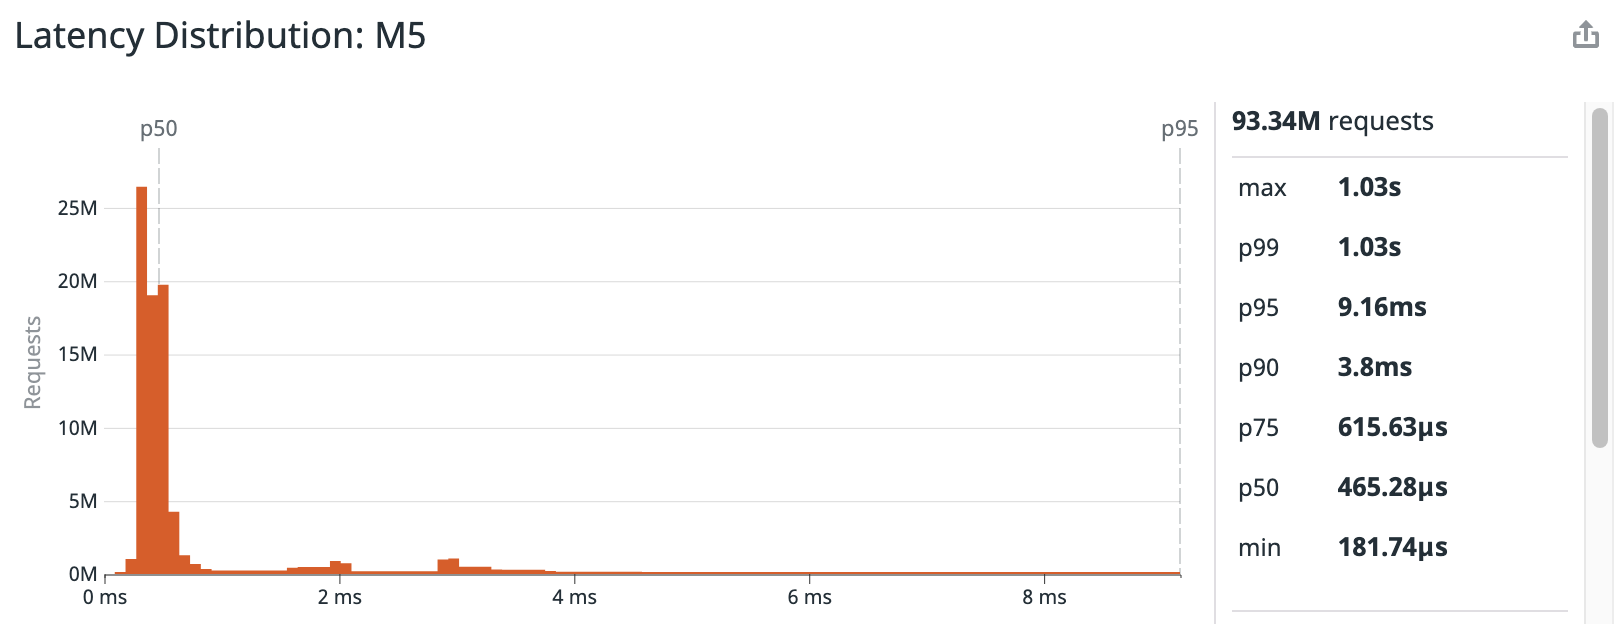
To analyze this performance data, we visualize the complete distribution of the benchmark response time results in a Datadog dashboard. Viewing the full latency distribution allows us to have a more complete picture when considering selecting the right instance type, so we can better adhere to Service Level Objective (SLO) targets.
Figure 3 shows that the M5zn was able to outperform the M5 across the entire latency distribution, both for the median request and for the long tail end of the distribution. The median request, or 50th percentile, was 36 percent faster (299.65 µs vs. 465.28 µs) while the tail end of the distribution process was 48 percent faster (4.73 ms vs. 9.16 ms) as mentioned in the preceding paragraph.


Figure 3 – Using a Datadog dashboard to show how the M5zn instance type performed faster across the entire latency distribution during the benchmark test.
We can also create timeseries graphs of our test results to show that the M5zn was able to sustain faster performance throughout the duration of the test, despite processing a higher number of requests. Figure 4 illustrates the difference by displaying the 95th percentile response time and the request rate of both instances across 30-second intervals.

Figure 4 – The M5zn’s p95 latency was nearly half of the M5’s despite higher throughput during the benchmark test.
We can dig even deeper with Datadog Continuous Profiler, an always-on production code profiler used to analyze code-level performance across your entire environment, with minimal overhead. Profiles reveal which functions (or lines of code) consume the most resources, such as CPU and memory.
Even though M5zn is already designed to deliver excellent CPU performance, Continuous Profiler can help you optimize your applications to leverage the M5zn high-frequency processor to its maximum potential. As shown in Figure 5, the Continuous Profiler highlights lines of code where CPU utilization is exceptionally high, so you can optimize those methods or threads to make better use of the available compute power.
After you migrate your workloads to M5zn, Continuous Profiler can help you quantify CPU-time improvements on a per-method basis and pinpoint code-level bottlenecks. This also occurs even as you add new features and functionalities to your application.

Figure 5 – Using Datadog Continuous Profiler to identify functions with the most CPU time.
Comparing D3, D3en, and D2 performance in Datadog
- The new D3 and D3en instances leverage 2nd-generation Intel Xeon Scalable Processors (Cascade Lake) and provide a sustained all core frequency up to 3.1 GHz.
- Compared to D2 instances, D3 instances provide up to 2.5x higher networking speed and 45 percent higher disk throughput.
- D3en instances provide up to 7.5x higher networking speed, 100 percent higher disk throughput, 7x more storage capacity, and 80 percent lower cost-per-TB of storage.
These instances are ideal for HDD storage workloads, such as distributed/clustered file systems, big data and analytics, and high capacity data lakes. D3en instances are the densest local storage instances in the cloud. For our testing, we deployed the Datadog Agent to three instances: the D2, D3, and D3en. We then used two benchmark applications to gauge performance under demanding workloads.
Our first benchmark test used TestDFSIO, an open-source benchmark test included with Hadoop that is used to analyze the I/O performance of an HDFS cluster.
We ran TestDFSIO with the following command:
hadoop jar $HADOOP_HOME/share/hadoop/mapreduce/hadoop-mapreduce-client-jobclient-*-tests.jar TestDFSIO -write -nrFiles 48 -size 10GB
The Datadog Agent automatically collects system metrics that can help you visualize how the instances performed during the benchmark test. The D3en instance led the field and hit a maximum write speed of 259,000 Kbps.

Figure 6 – Using Datadog to visualize and compare write speed of an HDFS cluster on D2, D3, and D3en instance types during the TestDFSIO benchmark test.
The D3en instance completed the TestDFSIO benchmark test 39 percent faster than the D2 (204.55 seconds vs. 336.84 seconds). The D3 instance completed the benchmark test 27 percent faster at 244.62 seconds.
Datadog helps you realize additional benefits of the D3en and D3 instances: notably, they exhibited lower CPU utilization than the D2 during the benchmark (as shown in figure 7).

Figure 7 – Using Datadog to compare CPU usage on D2, D3, and D3en instances during the TestDFSIO benchmark test.
For our second benchmark test, we again deployed the Datadog Agent to the same three instances: D2, D3, and D3en. In this test, we used TPC-DS, a high CPU and I/O load test that is designed to simulate real-world database performance.
TPC-DS is a set of tools that generates a set of data that can be loaded into your database of choice, in this case PostgreSQL 12 on Ubuntu 20.04. It then generates a set of SQL statements that are used to exercise the database. For this benchmark, 8 simultaneous threads were used on each instance.
The D3en instance completed the TPC-DS benchmark test 59 percent faster than the D2 (220.31 seconds vs. 542.44 seconds). The D3 instance completed the benchmark test 53 percent faster at 253.78 seconds.
Using the metrics collected from Datadog’s PostgreSQL integration, we learn that the D3en not only finished the test faster, but had lower system load during the benchmark test run. This is further validation of the overall performance improvements you can expect when migrating to the D3en.

Figure 8 – Using Datadog to compare system load on D2, D3, and D3en instances during the TPC-DS benchmark test.
The performance improvements are also visible when comparing rows returned per second. While all three instances had similar peak burst performance, the D3en and D3 sustained a higher rate of rows returned throughout the duration of the TPC-DS test.

Figure 9 – Using Datadog to compare Rows returned per second on D2, D3, and D3en instances during the TPC-DS benchmark test.
From these results, we learn that not only do the new D3en and D3 instances have faster disk throughput, but they also offer improved CPU performance, which translates into superior performance to power your most critical workloads.
Comparing R5b and R5 performance
The new R5b instances provide 3x higher EBS-optimized performance compared to R5 instances, and are frequently used to power large workloads that rely on Amazon EBS. Customers that operate applications with stringent storage performance requirements can consolidate their existing R5 workloads into fewer or smaller R5b instances to reduce costs.
To compare I/O performance across these two instance types, we installed the FIO benchmark application and the Datadog Agent on an R5 instance and an R5b instance. We then added EBS io1 storage volumes to each with a Provisioned IOPS setting of 25,000.
We ran FIO with a 75 percent read, 25 percent write workload using the following command:
sudo fio --randrepeat=1 --ioengine=libaio --direct=1 --gtod_reduce=1 --name=test --filename=/disk-io1/test --bs=4k --iodepth=64 --size=16G —readwrite=randrw —rwmixread=75
Using the metrics collected from the Datadog Agent, we were able to visualize the benchmark performance results. In approximately one minute, FIO ramped up and reached the maximum I/O operations per second.
The left side of Figure 10 shows the R5b instance reaching the provisioned maximum IOPS of 25,000, while the read operations at 25 percent as expected. The right side shows the R5 reaching its EBS IOPS limit of 18,750, with its relative 25 percent write operations.
It should be noted that R5b instances have far higher performance ceilings than what is being shown here, which you can find in the User Guide: Amazon EBS–optimized instances.

Figure 10 – Comparing IOPS on R5b and R5 instances during the FIO benchmark test.
Also, note that the R5b finished the benchmark test approximately one minute faster than the R5 (166 seconds vs. 223 seconds). We learn that the shorter test duration is driven by the R5b’s faster read time, which reached a maximum of 75,000 Kbps.

Figure 11 – The R5b instance’s faster read time enabled it to complete the benchmark test more quickly than the R5 instance.
From these results, we have learned that the R5b delivers superior I/O capacity with higher throughput, making it a great choice for large relational databases and other IOPS-intensive workloads.
Conclusion
If you are thinking about shifting your workloads to one of the new Amazon EC2 instance types, you can use the Datadog Agent to immediately begin collecting and analyzing performance data. With Datadog’s other AWS integrations, you can monitor even more of your AWS infrastructure and correlate that data with the data collected by the Agent. For example, if you’re running EBS-optimized R5b instances, you can monitor them alongside performance data from your EBS volumes with Datadog’s Amazon EBS integration.
About Datadog
Datadog is an AWS Partner Network (APN) Advanced Technology Partner with AWS Competencies in DevOps, Migration, Containers, and Microsoft Workloads.
Read more about the M5zn, D3en, D3, and R5b instances, and sign up for a free Datadog trial if you don’t already have an account.
Field Notes provides hands-on technical guidance from AWS Solutions Architects, consultants, and technical account managers, based on their experiences in the field solving real-world business problems for customers.


 Srinivas Manepalli is a DevSecOps Solutions Architect in the U.S. Fed SI SA team at Amazon Web Services (AWS). He is passionate about helping customers, building and architecting DevSecOps and highly available software systems. Outside of work, he enjoys spending time with family, nature and good food.


 We’ve included some case studies from Verizon and Ericsson, and take a look at Ribbon SBC SWe and network-slicing with Cloudify. There are detailed Reference Architectures for you to check out, and videos on DISH, Verizon, AWS Wavelength, VR, Automotive, and Telefónica.