Post Syndicated from Michael Pelts original https://aws.amazon.com/blogs/security/how-to-implement-saas-tenant-isolation-with-abac-and-aws-iam/
Multi-tenant applications must be architected so that the resources of each tenant are isolated and cannot be accessed by other tenants in the system. AWS Identity and Access Management (IAM) is often a key element in achieving this goal. One of the challenges with using IAM, however, is that the number and complexity of IAM policies you need to support your tenants can grow rapidly and impact the scale and manageability of your isolation model. The attribute-based access control (ABAC) mechanism of IAM provides developers with a way to address this challenge.
In this blog post, we describe and provide detailed examples of how you can use ABAC in IAM to implement tenant isolation in a multi-tenant environment.
Choose an IAM isolation method
IAM makes it possible to implement tenant isolation and scope down permissions in a way that is integrated with other AWS services. By relying on IAM, you can create strong isolation foundations in your system, and reduce the risk of developers unintentionally introducing code that leads to a violation of tenant boundaries. IAM provides an AWS native, non-invasive way for you to achieve isolation for those cases where IAM supports policies that align with your overall isolation model.
There are several methods in IAM that you can use for isolating tenants and restricting access to resources. Choosing the right method for your application depends on several parameters. The number of tenants and the number of role definitions are two important dimensions that you should take into account.
Most applications require multiple role definitions for different user functions. A role definition refers to a minimal set of privileges that users or programmatic components need in order to do their job. For example, business users and data analysts would typically have different set of permissions to allow minimum necessary access to resources that they use.
In software-as-a-service (SaaS) applications, in addition to functional boundaries, there are also boundaries between tenant resources. As a result, the entire set of role definitions exists for each individual tenant. In highly dynamic environments (e.g., collaboration scenarios with cross-tenant access), new role definitions can be added ad-hoc. In such a case, the number of role definitions and their complexity can grow significantly as the system evolves.
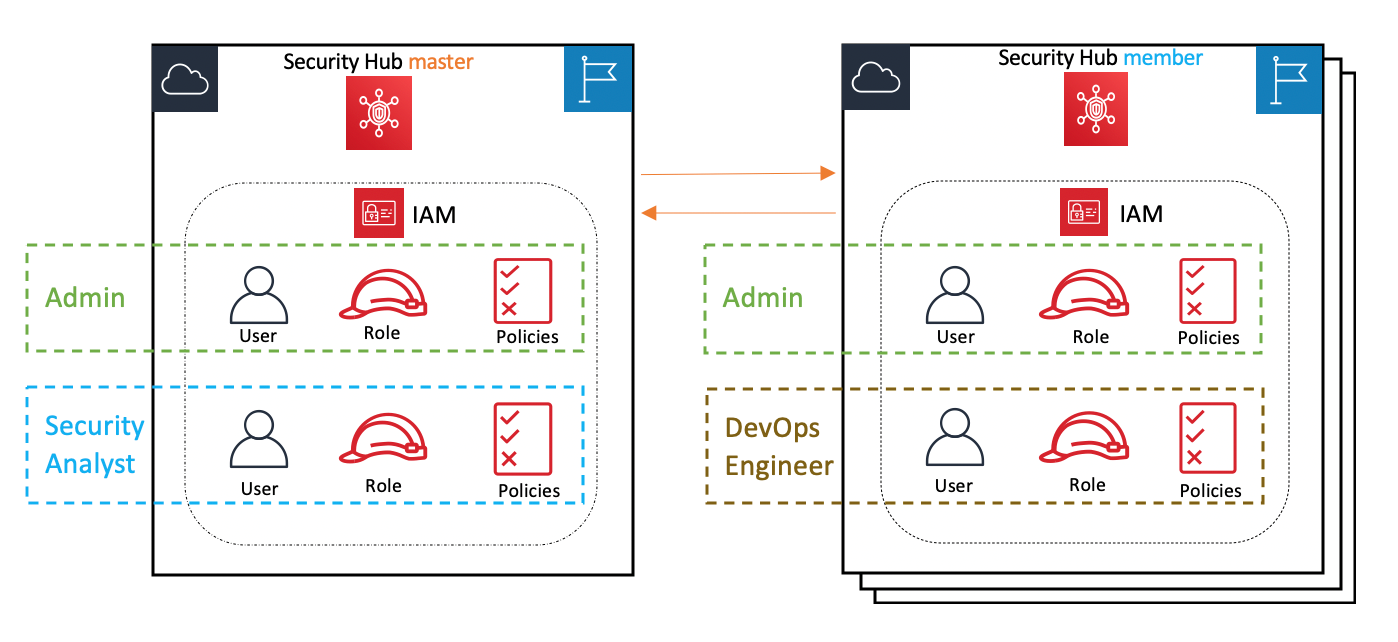
There are three main tenant isolation methods in IAM. Let’s briefly review them before focusing on the ABAC in the following sections.

Figure 1: IAM tenant isolation methods
RBAC – Each tenant has a dedicated IAM role or static set of IAM roles that it uses for access to tenant resources. The number of IAM roles in RBAC equals to the number of role definitions multiplied by the number of tenants. RBAC works well when you have a small number of tenants and relatively static policies. You may find it difficult to manage multiple IAM roles as the number of tenants and the complexity of the attached policies grows.
Dynamically generated IAM policies – This method dynamically generates an IAM policy for a tenant according to user identity. Choose this method in highly dynamic environments with changing or frequently added role definitions (e.g., tenant collaboration scenario). You may also choose dynamically generated policies if you have a preference for generating and managing IAM policies by using your code rather than relying on built-in IAM service features. You can find more details about this method in the blog post Isolating SaaS Tenants with Dynamically Generated IAM Policies.
ABAC – This method is suitable for a wide range of SaaS applications, unless your use case requires support for frequently changed or added role definitions, which are easier to manage with dynamically generated IAM policies. Unlike Dynamically generated IAM policies, where you manage and apply policies through a self-managed mechanism, ABAC lets you rely more directly on IAM.
ABAC for tenant isolation
ABAC is achieved by using parameters (attributes) to control tenant access to resources. Using ABAC for tenant isolation results in temporary access to resources, which is restricted according to the caller’s identity and attributes.
One of the key advantages of the ABAC model is that it scales to any number of tenants with a single role. This is achieved by using tags (such as the tenant ID) in IAM polices and a temporary session created specifically for accessing tenant data. The session encapsulates the attributes of the requesting entity (for example, a tenant user). At policy evaluation time, IAM replaces these tags with session attributes.
Another component of ABAC is the assignation of attributes to tenant resources by using special naming conventions or resource tags. The access to a resource is granted when session and resource attributes match (for example, a session with the TenantID: yellow attribute can access a resource that is tagged as TenantID: yellow).
For more information about ABAC in IAM, see What is ABAC for AWS?
ABAC in a typical SaaS architecture
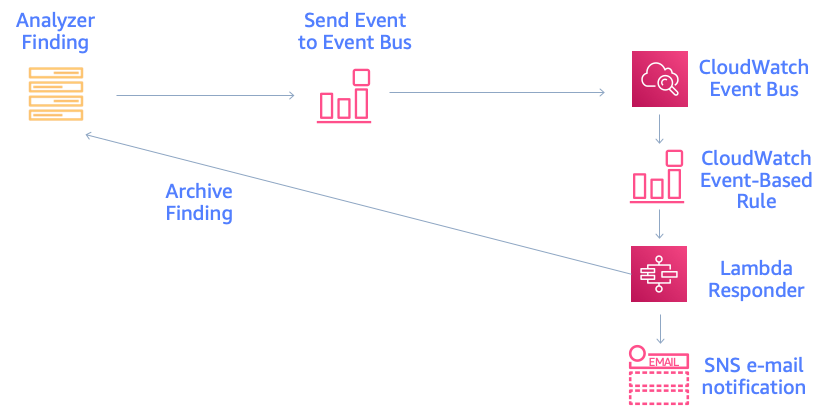
To demonstrate how you can use ABAC in IAM for tenant isolation, we will walk you through an example of a typical microservices-based application. More specifically, we will focus on two microservices that implement a shipment tracking flow in a multi-tenant ecommerce application.
Our sample tenant, Yellow, which has many users in many roles, has exclusive access to shipment data that belongs to this particular tenant. To achieve this, all microservices in the call chain operate in a restricted context that prevents cross-tenant access.

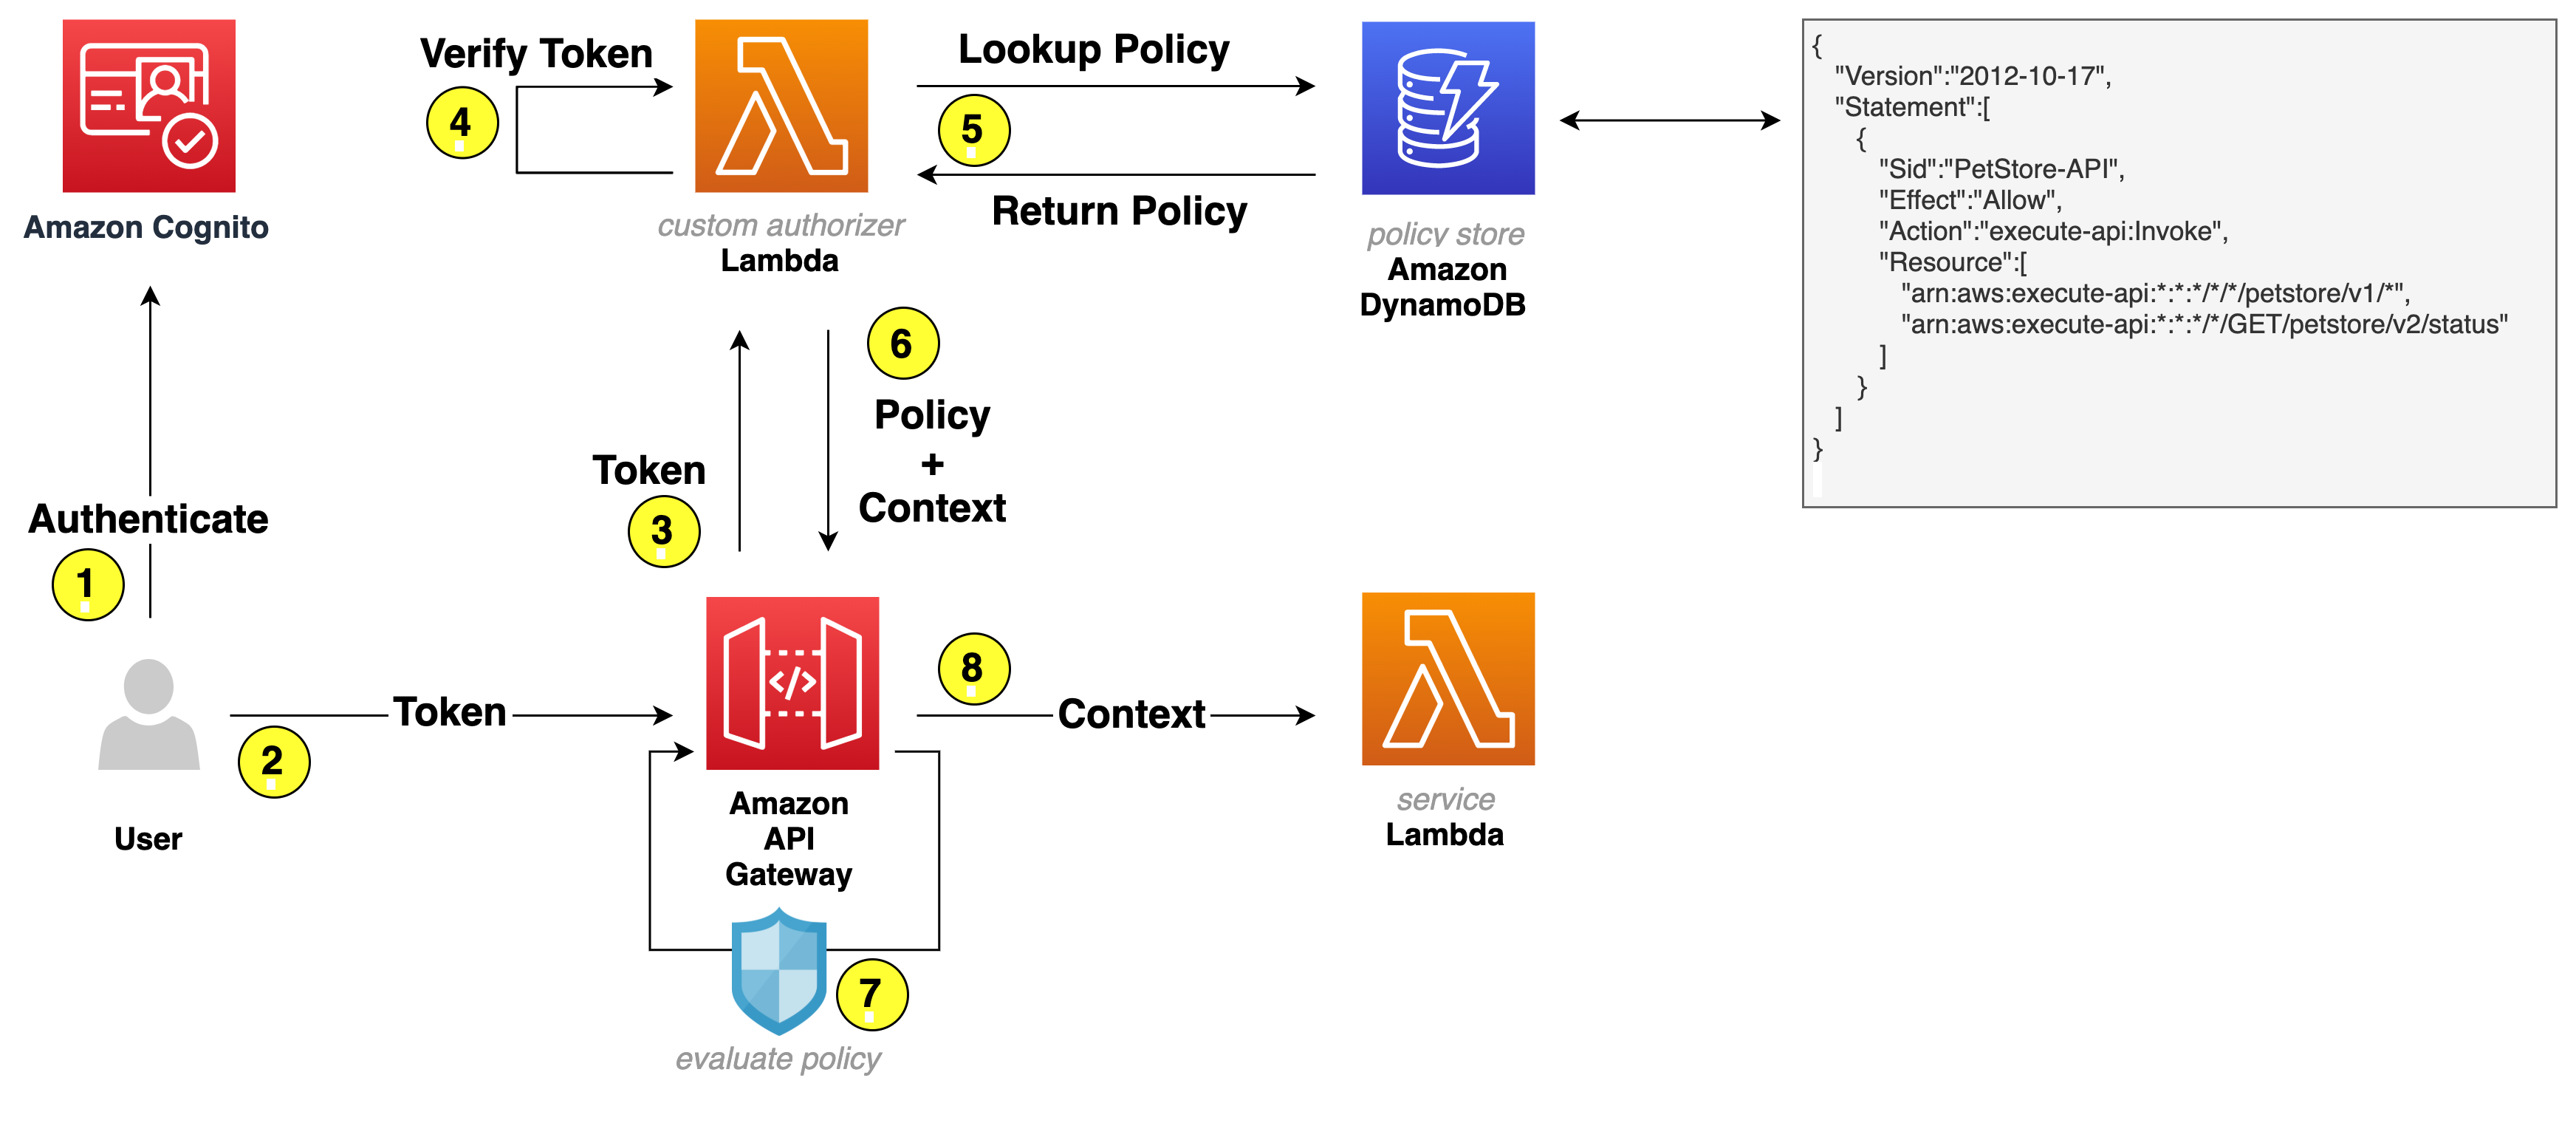
Figure 2: Sample shipment tracking flow in a SaaS application
Let’s take a closer look at the sequence of events and discuss the implementation in detail.
A shipment tracking request is initiated by an authenticated Tenant Yellow user. The authentication process is left out of the scope of this discussion for the sake of brevity. The user identity expressed in the JSON Web Token (JWT) includes custom claims, one of which is a TenantID. In this example, TenantID equals yellow.
The JWT is delivered from the user’s browser in the HTTP header of the Get Shipment request to the shipment service. The shipment service then authenticates the request and collects the required parameters for getting the shipment estimated time of arrival (ETA). The shipment service makes a GetShippingETA request using the parameters to the tracking service along with the JWT.
The tracking service manages shipment tracking data in a data repository. The repository stores data for all of the tenants, but each shipment record there has an attached TenantID resource tag, for instance yellow, as in our example.
An IAM role attached to the tracking service, called TrackingServiceRole in this example, determines the AWS resources that the microservice can access and the actions it can perform.
Note that TrackingServiceRole itself doesn’t have permissions to access tracking data in the data store. To get access to tracking records, the tracking service temporarily assumes another role called TrackingAccessRole. This role remains valid for a limited period of time, until credentials representing this temporary session expire.
To understand how this works, we need to talk first about the trust relationship between TrackingAccessRole and TrackingServiceRole. The following trust policy lists TrackingServiceRole as a trusted entity.
This policy needs to be associated with TrackingAccessRole. You can do that on the Trust relationships tab of the Role Details page in the IAM console or via the AWS CLI update-assume-role-policy method. That association is what allows the tracking service with the attached TrackingServiceRole role to assume TrackingAccessRole. The policy also allows TrackingServiceRole to attach the TenantID session tag to the temporary sessions it creates.
Session tags are principal tags that you specify when you request a session. This is how you inject variables into the request context for API calls executed during the session. This is what allows IAM policies evaluated in subsequent API calls to reference TenantID with the aws:PrincipalTag context key.
Now let’s talk about TrackingAccessPolicy. It’s an identity policy attached to TrackingAccessRole. This policy makes use of the aws:PrincipalTag/TenantID key to dynamically scope access to a specific tenant.
Later in this post, you can see examples of such data access policies for three different data storage services.
Now the stage is set to see how the tracking service creates a temporary session and injects TenantID into the request context. The following Python function does that by using AWS SDK for Python (Boto3). The function gets the TenantID (extracted from the JWT) and the TrackingAccessRole Amazon Resource Name (ARN) as parameters and returns a scoped Boto3 session object.
Use these parameters to create temporary sessions for a specific tenant with a duration that meets your needs.
access_role_arn – The assumed role with an attached templated policy. The IAM policy must include the aws:PrincipalTag/TenantID tag key.
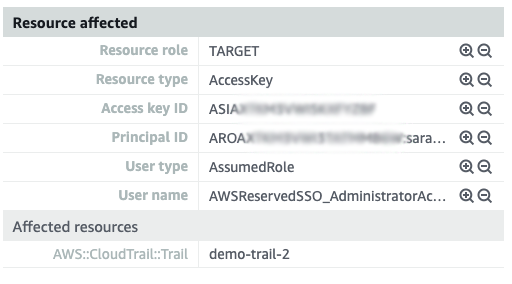
session_name – The name of the session. Use the role session name to uniquely identify a session. The role session name is used in the ARN of the assumed role principal and included in the AWS CloudTrail logs.
tenant_id – The tenant identifier that describes which tenant the session is created for. For better compatibility with resource names in IAM policies, it’s recommended to generate non-guessable alphanumeric lowercase tenant identifiers.
duration_sec – The duration of your temporary session.
Note: The details of token management can be abstracted away from the application by extracting the token generation into a separate module, as described in the blog post Isolating SaaS Tenants with Dynamically Generated IAM Policies. In that post, the reusable application code for acquiring temporary session tokens is called a Token Vending Machine.
The returned session can be used to instantiate IAM-scoped objects such as a storage service. After the session is returned, any API call performed with the temporary session credentials contains the aws:PrincipalTag/TenantID key-value pair in the request context.
When the tracking service attempts to access tracking data, IAM completes several evaluation steps to determine whether to allow or deny the request. These include evaluation of the principal’s identity-based policy, which is, in this example, represented by TrackingAccessPolicy. It is at this stage that the aws:PrincipalTag/TenantID tag key is replaced with the actual value, policy conditions are resolved, and access is granted to the tenant data.
Common ABAC scenarios
Let’s take a look at some common scenarios with different data storage services. For each example, a diagram is included that illustrates the allowed access to tenant data and how the data is partitioned in the service.
These examples rely on the architecture described earlier and assume that the temporary session context contains a TenantID parameter. We will demonstrate different versions of TrackingAccessPolicy that are applicable to different services. The way aws:PrincipalTag/TenantID is used depends on service-specific IAM features, such as tagging support, policy conditions and ability to parameterize resource ARN with session tags. Examples below illustrate these techniques applied to different services.
Pooled storage isolation with DynamoDB
Many SaaS applications rely on a pooled data partitioning model where data from all tenants is combined into a single table. The tenant identifier is then introduced into each table to identify the items that are associated with each tenant. Figure 3 provides an example of this model.

Figure 3: DynamoDB index-based partitioning
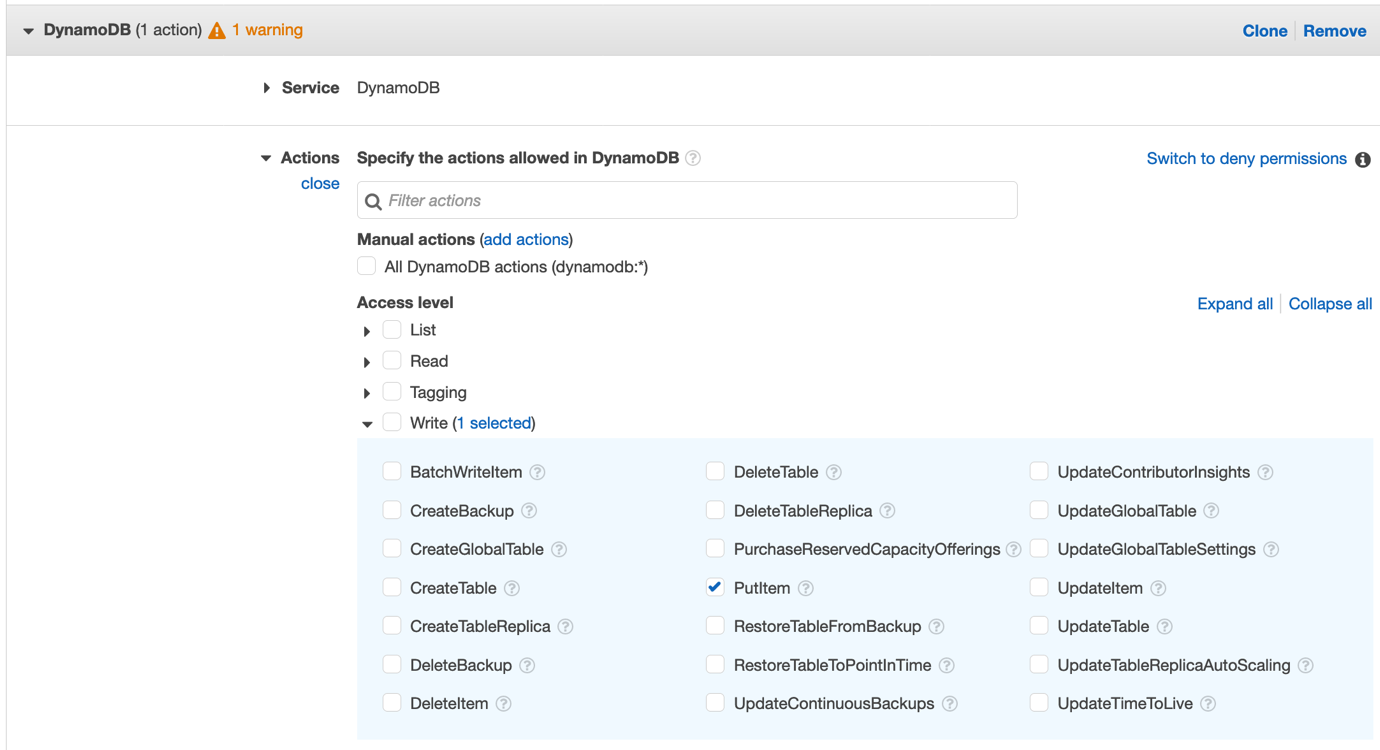
In this example, we’ve used Amazon DynamoDB, storing each tenant identifier in the table’s partition key. Now, we can use ABAC and IAM fine-grained access control to implement tenant isolation for the items in this table.
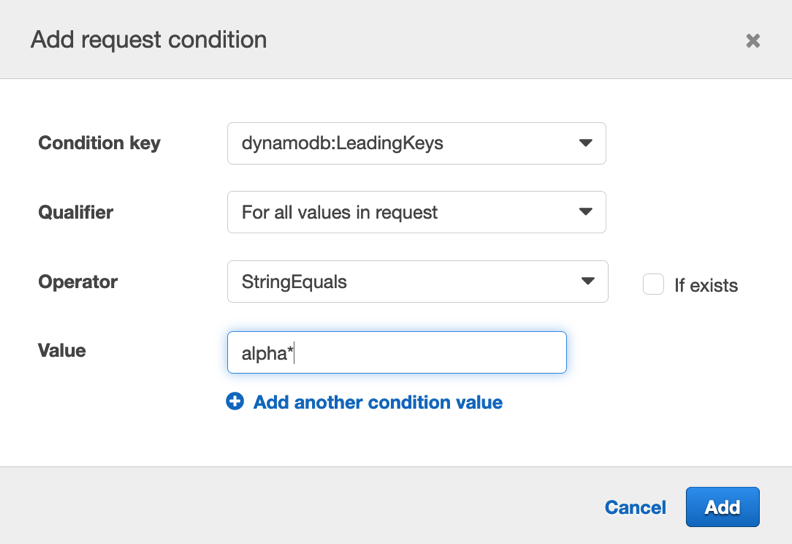
The following TrackingAccessPolicy uses the dynamodb:LeadingKeys condition key to restrict permissions to only the items whose partition key matches the tenant’s identifier as passed in a session tag.
This example uses the dynamodb:LeadingKeys condition key in the policy to describe how you can control access to tenant resources. You’ll notice that we haven’t bound this policy to any specific tenant. Instead, the policy relies on the aws:PrincipalTag tag to resolve the TenantID parameter at runtime.
This approach means that you can add new tenants without needing to create any new IAM constructs. This reduces the maintenance burden and limits your chances that any IAM quotas will be exceeded.
Siloed storage isolation with Amazon Elasticsearch Service
Let’s look at another example that illustrates how you might implement tenant isolation of Amazon Elasticsearch Service resources. Figure 4 illustrates a silo data partitioning model, where each tenant of your system has a separate Elasticsearch index for each tenant.

Figure 4: Elasticsearch index-per-tenant strategy
You can isolate these tenant resources by creating a parameterized identity policy with the principal TenantID tag as a variable (similar to the one we created for DynamoDB). In the following example, the principal tag is a part of the index name in the policy resource element. At access time, the principal tag is replaced with the tenant identifier from the request context, yielding the Elasticsearch index ARN as a result.
In the case where you have multiple indices that belong to the same tenant, you can allow access to them by using a wildcard. The preceding policy allows es:ESHttpGet and es:ESHttpPut actions to be taken on documents if the documents belong to an index with a name that matches the pattern.
Important: In order for this to work, the tenant identifier must follow the same naming restrictions as indices.
Although this approach scales the tenant isolation strategy, you need to keep in mind that this solution is constrained by the number of indices your Elasticsearch cluster can support.
Amazon S3 prefix-per-tenant strategy
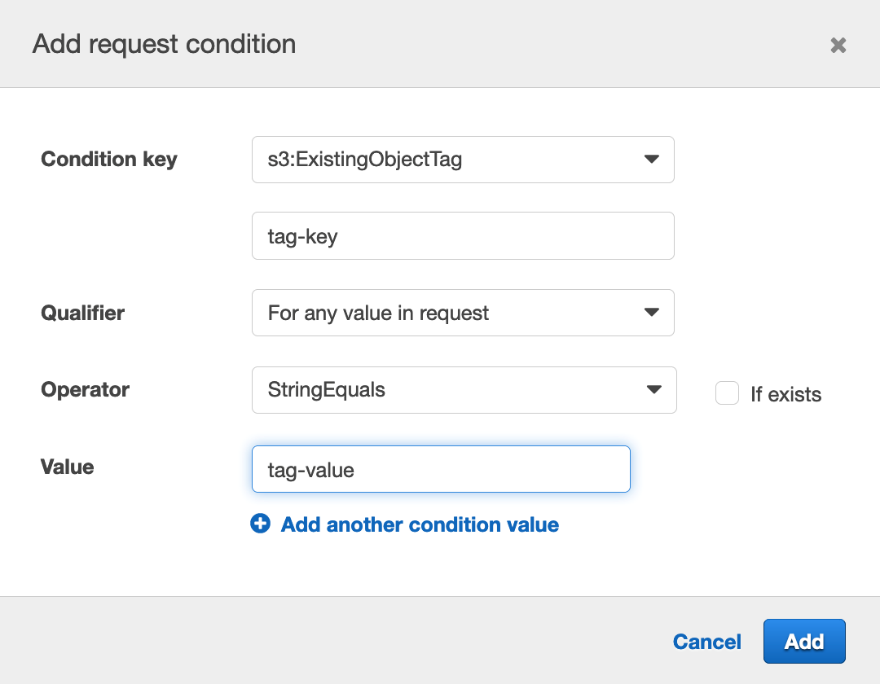
Amazon Simple Storage Service (Amazon S3) buckets are commonly used as shared object stores with dedicated prefixes for different tenants. For enhanced security, you can optionally use a dedicated customer master key (CMK) per tenant. If you do so, attach a corresponding TenantID resource tag to a CMK.
By using ABAC and IAM, you can make sure that each tenant can only get and decrypt objects in a shared S3 bucket that have the prefixes that correspond to that tenant.

Figure 5: S3 prefix-per-tenant strategy
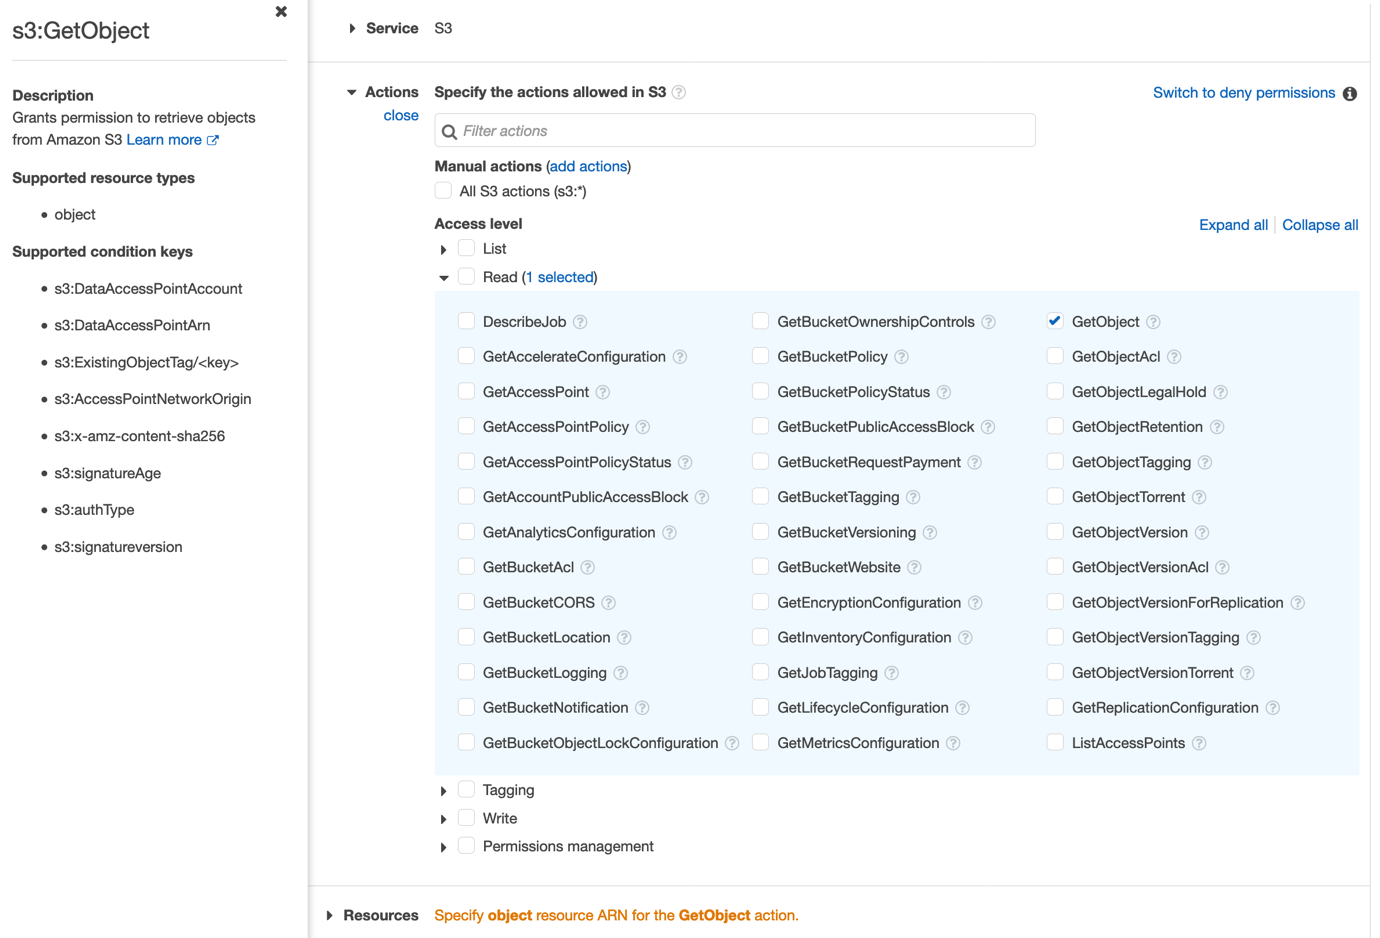
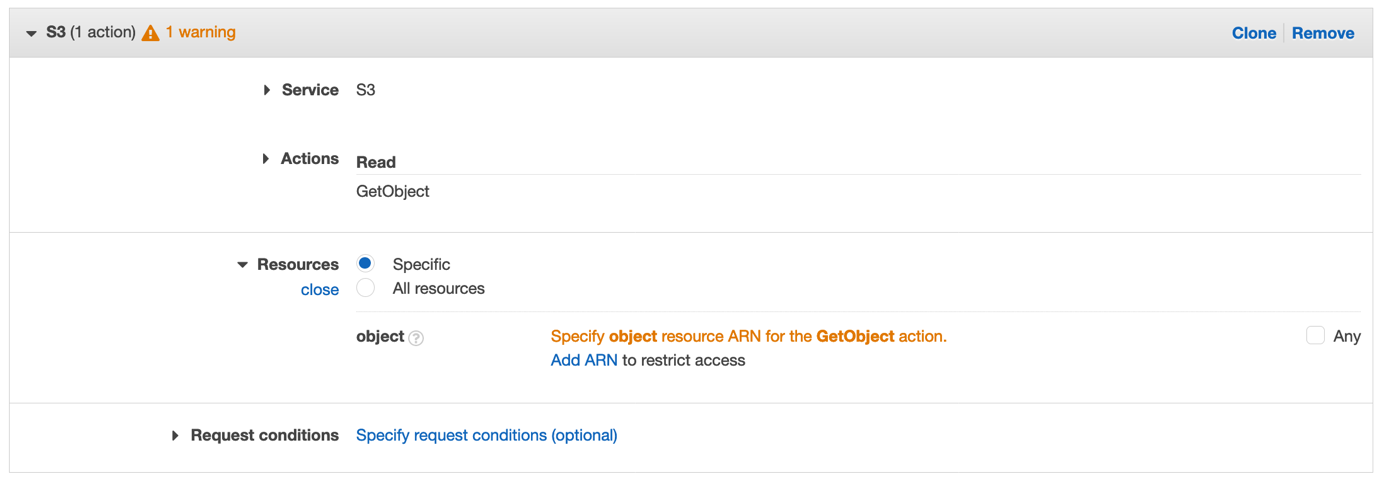
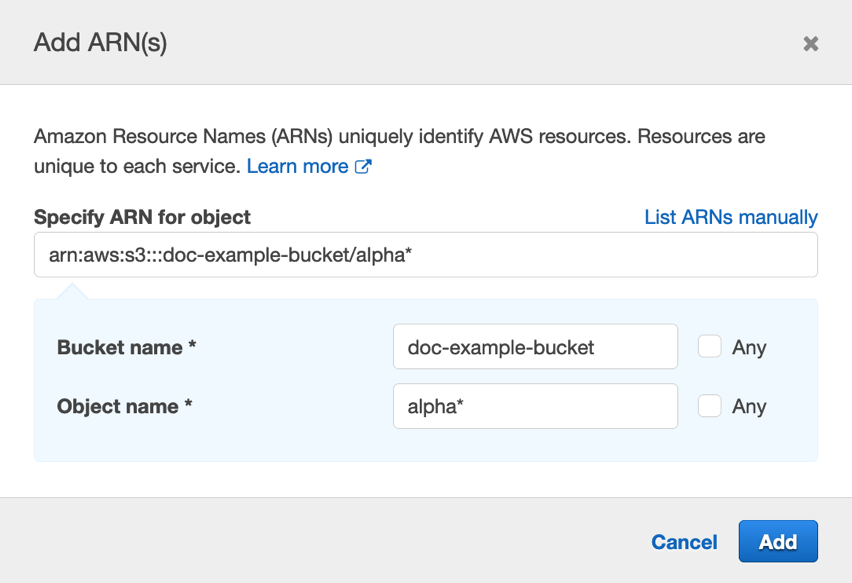
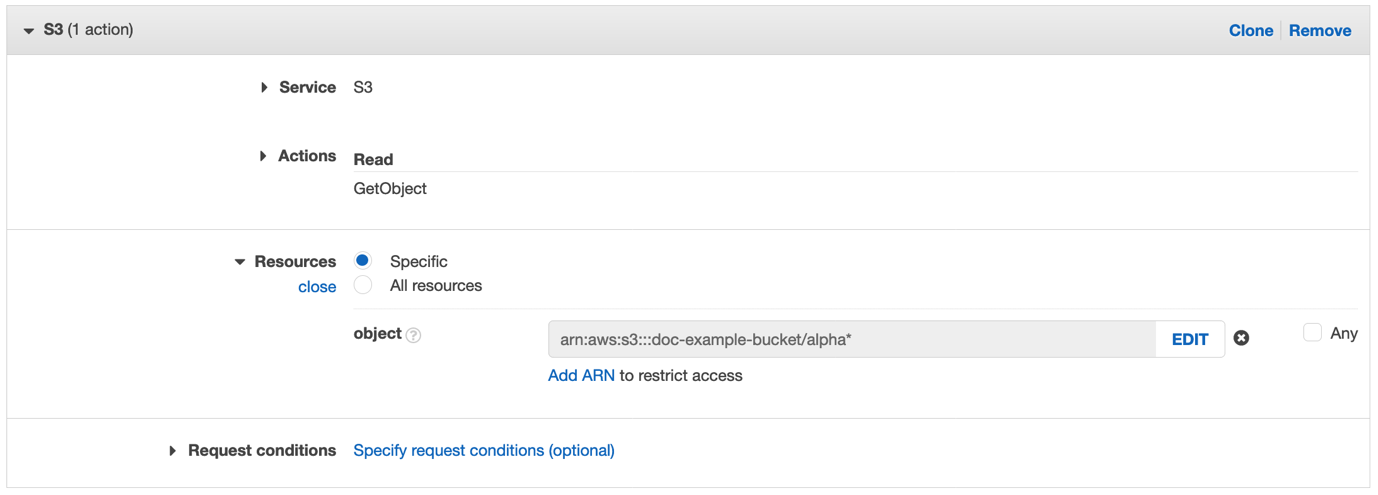
In the following policy, the first statement uses the TenantID principal tag in the resource element. The policy grants s3:GetObject permission, but only if the requested object key begins with the tenant’s prefix.
The second statement allows the kms:Decrypt operation on a KMS key that the requested object is encrypted with. The KMS key must have a TenantID resource tag attached to it with a corresponding tenant ID as a value.
Important: In order for this policy to work, the tenant identifier must follow the S3 object key name guidelines.
With the prefix-per-tenant approach, you can support any number of tenants. However, if you choose to use a dedicated customer managed KMS key per tenant, you will be bounded by the number of KMS keys per AWS Region.
Conclusion
The ABAC method combined with IAM provides teams who build SaaS platforms with a compelling model for implementing tenant isolation. By using this dynamic, attribute-driven model, you can scale your IAM isolation policies to any practical number of tenants. This approach also makes it possible for you to rely on IAM to manage, scale, and enforce isolation in a way that’s integrated into your overall tenant identity scheme. You can start experimenting with IAM ABAC by using either the examples in this blog post, or this resource: IAM Tutorial: Define permissions to access AWS resources based on tags.
If you have feedback about this post, submit comments in the Comments section below. If you have questions about this post, start a new thread on the AWS IAM forum or contact AWS Support.
Want more AWS Security how-to content, news, and feature announcements? Follow us on Twitter.