This post is written by Rahul Popat, Specialist SA, Serverless and Dhiraj Mahapatro, Sr. Specialist SA, Serverless
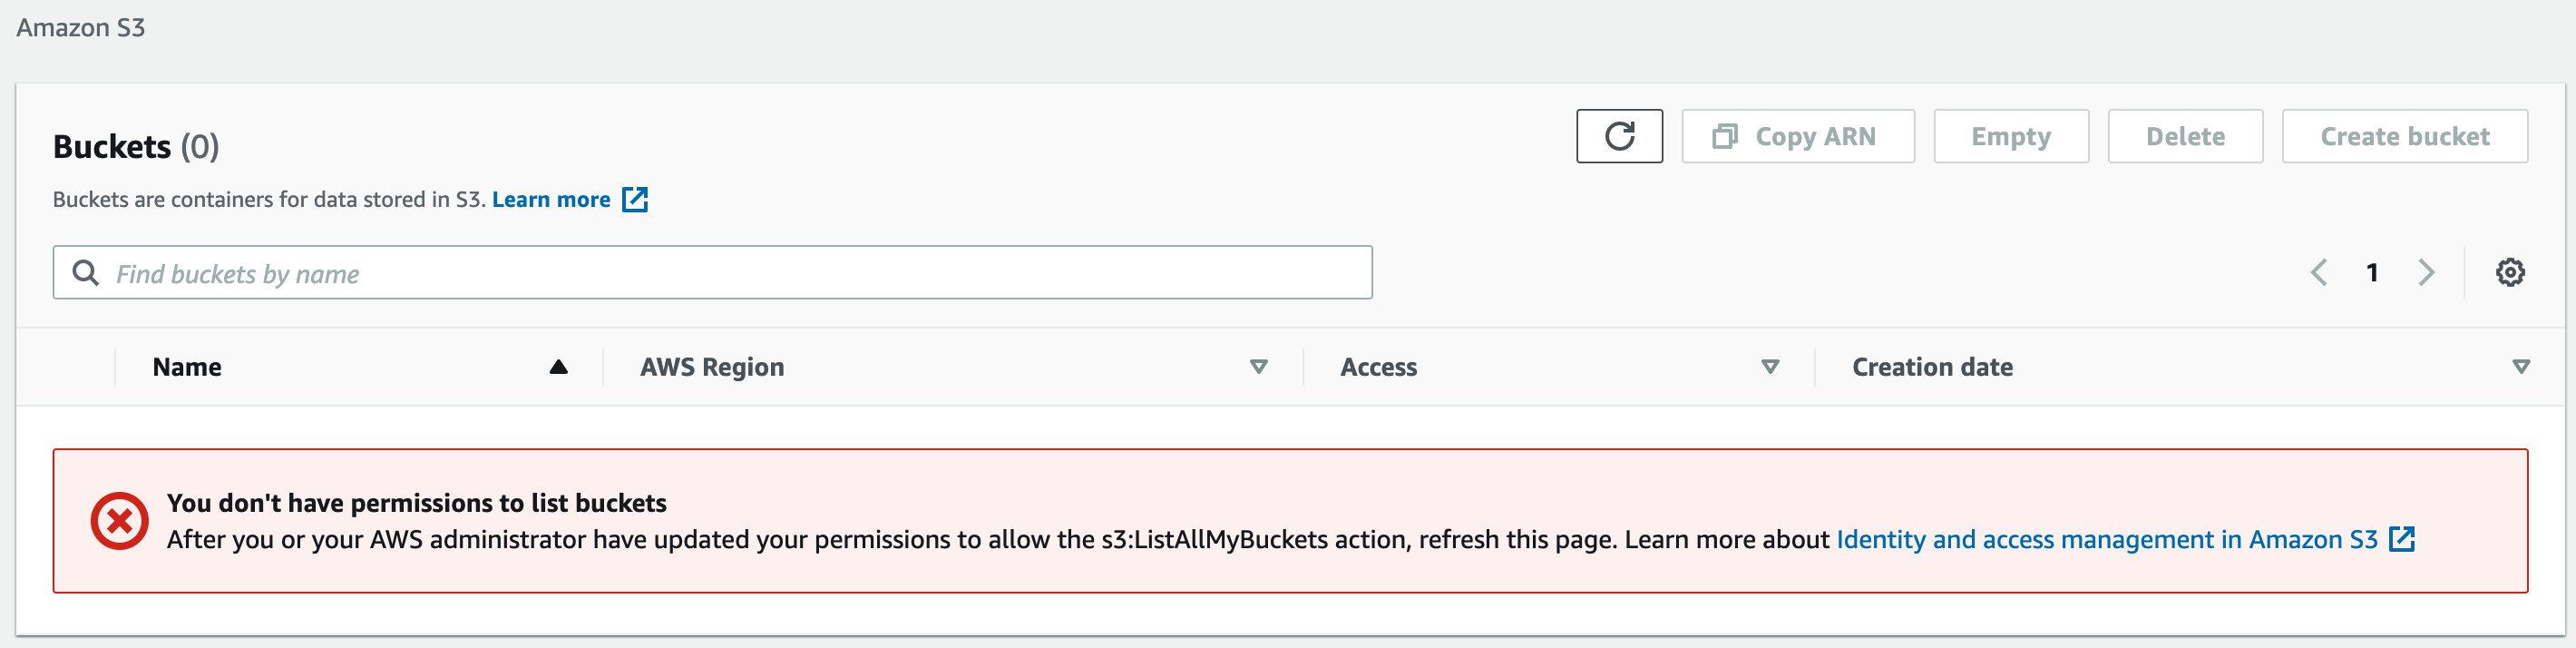
AWS Lambda is a serverless compute service that runs your code in response to events and automatically manages the underlying compute resources for you. These events may include changes in state or an update, such as a user placing an item in a shopping cart on an ecommerce website. You can use AWS Lambda to extend other AWS services with custom logic, or create your own backend services that operate at AWS scale, performance, and security.
You may have multiple AWS accounts for your application development, but may want to keep few common functionalities in one centralized account. For example, have user authentication service in a centralized account and grant permission to other accounts to access it using AWS Lambda.
Today, AWS Lambda launches improvements to resource-based policies, which makes it easier for you to control access to a Lambda function by using the identifier of the AWS Organizations as a condition in your resource policy. The service expands the use of the resource policy to enable granting cross-account access at the organization level instead of granting explicit permissions for each individual account within an organization.
Before this release, the centralized account had to grant explicit permissions to all other AWS accounts to use the Lambda function. You had to specify each account as a principal in the resource-based policy explicitly. While that remains a viable option, managing access for individual accounts using such resource policy becomes an operational overhead when the number of accounts grows within your organization.
In this post, I walk through the details of the new condition and show you how to restrict access to only principals in your organization for accessing a Lambda function. You can also restrict access to a particular alias and version of the Lambda function with a similar approach.
Overview
For AWS Lambda function, you grant permissions using resource-based policies to specify the accounts and principals that can access it and what actions they can perform on it. Now, you can use a new condition key, aws:PrincipalOrgID, in these policies to require any principals accessing your Lambda function to be from an account (including the management account) within an organization. For example, let’s say you have a resource-based policy for a Lambda function and you want to restrict access to only principals from AWS accounts under a particular AWS Organization. To accomplish this, you can define the aws:PrincipalOrgID condition and set the value to your Organization ID in the resource-based policy. Your organization ID is what sets the access control on your Lambda function. When you use this condition, policy permissions apply when you add new accounts to this organization without requiring an update to the policy, thus reducing the operational overhead of updating the policy every time you add a new account.
Condition concepts
Before I introduce the new condition, let’s review the condition element of an IAM policy. A condition is an optional IAM policy element that you can use to specify special circumstances under which the policy grants or denies permission. A condition includes a condition key, operator, and value for the condition. There are two types of conditions: service-specific conditions and globalconditions. Service-specific conditions are specific to certain actions in an AWS service. For example, the condition key ec2:InstanceType supports specific EC2 actions. Global conditions support all actions across all AWS services.
AWS:PrincipalOrgID condition key
You can use this condition key to apply a filter to the principal element of a resource-based policy. You can use any string operator, such as StringLike, with this condition and specify the AWS organization ID as its value.
Condition key
Description
Operators
Value
aws:PrincipalOrgID
Validates if the principal accessing the resource belongs to an account in your organization.
Restricting Lambda function access to only principals from a particular organization
Consider an example where you want to give specific IAM principals in your organization direct access to a Lambda function that logs to the Amazon CloudWatch.
You have a Lambda function that you want to restrict access from your organization only. Learn more at getting started with AWS Lambda.
Once you have an organization and accounts setup, on the AWS Organization looks like this:
Organization accounts example
This example has two accounts in the AWS Organization, the Management Account, and the MainApp Account. Make a note of the Organization ID from the left menu. You use this to set up a resource-based policy for the Lambda function.
Step 2 – Create resource-based policy for a Lambda function that you want to restrict access to
Now you want to restrict the Lambda function’s invocation to principals from accounts that are member of your organization. To do so, write and attach a resource-based policy for the Lambda function:
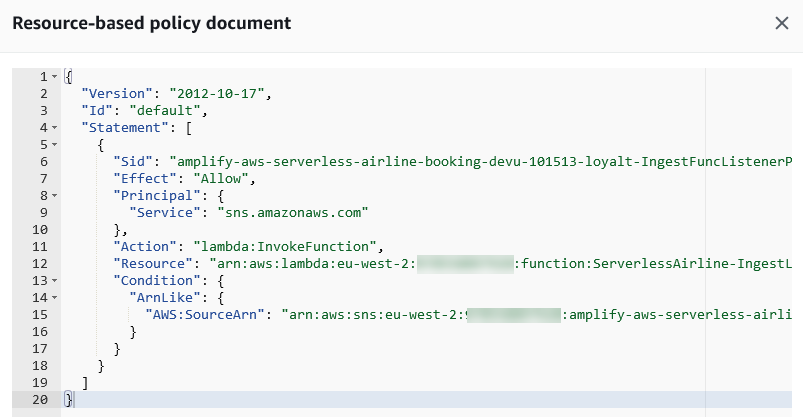
In this policy, I specify Principal as *. This means that all users in the organization ‘o-sabhong3hu’ get function invocation permissions. If you specify an AWS account or role as the principal, then only that principal gets function invocation permissions, but only if they are also part of the ‘o-sabhong3hu’ organization.
Next, I add lambda:InvokeFunction as the Action and the ARN of the Lambda function as the resource to grant invoke permissions to the Lambda function. Finally, I add the new condition key aws:PrincipalOrgID and specify an Organization ID in the Condition element of the statement to make sure only the principals from the accounts in the organization can invoke the Lambda function.
You could also use the AWS Management Console to create a resource-based policy. Go to Lambda function page, click on the Configuration tab. Select Permissions from the left menu. Choose Add Permissions and fill in the required details. Scroll to the bottom and expand the Principal organization ID – optional submenu and enter your organization ID in the text box labeled as PrincipalOrgID and choose Save.
Add permissions
Step 3 – Testing
The Lambda function ‘LogOrganizationEvents’ is in your Management Account. You configured a resource-based policy to allow all the principals in your organization to invoke your Lambda function. Now, invoke the Lambda function from another account within your organization.
Sign in to the MainApp Account, which is another member account in the same organization. Open AWS CloudShell from the AWS Management Console. Invoke the Lambda function ‘LogOrganizationEvents’ from the terminal, as shown below. You receive the response status code of 200, which means success. Learn more on how to invoke Lambda function from AWS CLI.
Console example of access
Conclusion
You can now use the aws:PrincipalOrgID condition key in your resource-based policies to restrict access more easily to IAM principals only from accounts within an AWS Organization. For more information about this global condition key and policy examples using aws:PrincipalOrgID, read the IAM documentation.
If you have questions about or suggestions for this solution, start a new thread on the AWS Lambda or contact AWS Support.
As more and more enterprises adopt serverless technologies to deliver their business capabilities in a more agile manner, it is imperative to automate release processes. Multiple AWS Accounts are needed to separate and isolate workloads in production versus non-production environments. Release automation becomes critical when you have multiple business units within an enterprise, each consisting of a number of AWS accounts that are continuously deploying to production and non-production environments.
As a DevOps best practice, the DevOps engineering team responsible for build-test-deploy in a non-production environment should not release the application and infrastructure code on to both non-production and production environments. This risks introducing errors in application and infrastructure deployments in production environments. This in turn results in significant rework and delays in delivering functionalities and go-to-market initiatives. Deploying the code in a repeatable fashion while reducing manual error requires automating the entire release process. In this blog, we show how you can build a cross-account code pipeline that automates the releases across different environments using AWS CloudFormation templates and AWS cross-account access.
Cross-account code pipeline enables an AWS Identity & Access Management (IAM) user to assume an IAM Production role using AWS Secure Token Service (Managing AWS STS in an AWS Region – AWS Identity and Access Management) to switch between non-production and production deployments based as required. An automated release pipeline goes through all the release stages from source, to build, to deploy, on non-production AWS Account and then calls STS Assume Role API (cross-account access) to get temporary token and access to AWS Production Account for deployment. This follow the least privilege model for granting role-based access through IAM policies, which ensures the secure automation of the production pipeline release.
Solution Overview
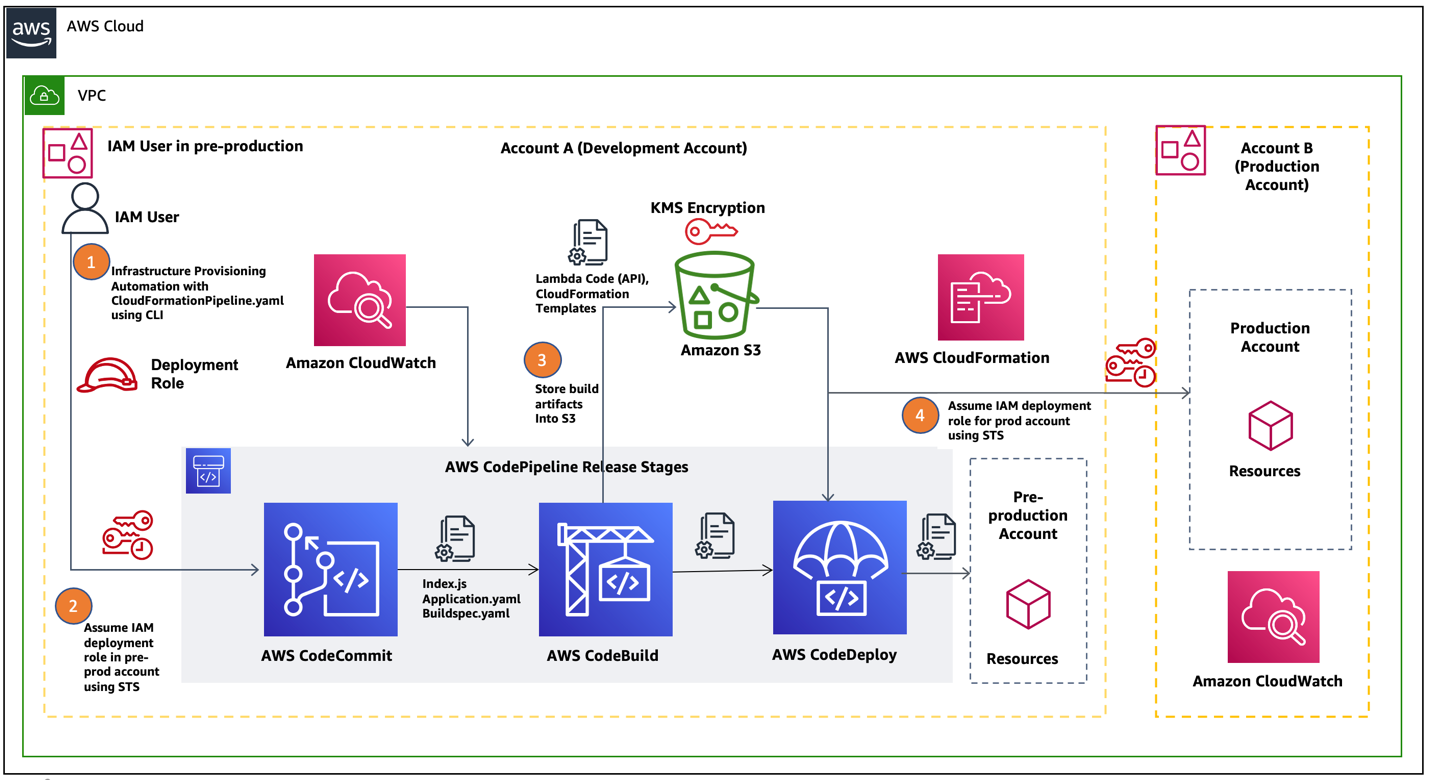
In this blog post, we will show how a cross-account IAM assume role can be used to deploy AWS Lambda Serverless API code into pre-production and production environments. We are building on the process outlined in this blog post: Building a CI/CD pipeline for cross-account deployment of an AWS Lambda API with the Serverless Framework by programmatically automating the deployment of Amazon API Gateway using CloudFormation templates. For this use case, we are assuming a single tenant customer with separate AWS Accounts to isolate pre-production and production workloads. In Figure 1, we have represented the code pipeline workflow diagramatically for our use case.
Figure 1. AWS cross-account AWS CodePipeline for production and non-production workloads
Let us describe the code pipeline workflow in detail for each step noted in the preceding diagram:
An IAM user belonging to the DevOps engineering team logs in to AWS Command-line Interface (AWS CLI) from a local machine using an IAM secret and access key.
A typical AWS CodePipeline comprises of build, test and deploy stages. In the build stage, the AWS CodeBuild service generates the Cloudformation template stack (template-export.yaml) into Amazon S3.
In the deploy stage, AWS CodePipeline uses a CloudFormation template (a yaml file) to deploy the code from an S3 bucket containing the application API endpoints via Amazon API Gateway in the pre-production environment.
The final step in the pipeline workflow is to deploy the application code changes onto the Production environment by assuming STS production IAM role.
Since the AWS CodePipeline is fully automated, we can use the same pipeline by switching between pre-production and production accounts. These accounts assume the IAM role appropriate to the target environment and deploy the validated build to that environment using CloudFormation templates.
Prerequisites
Here are the pre-requisites before you get started with implementation.
A user with appropriate privileges (for example: Project Admin) in a production AWS account
A user with appropriate privileges (for example: Developer Lead) in a pre-production AWS account such as development
In this section, we show how you can use AWS CodePipeline to release a serverless API in a secure manner to pre-production and production environments. AWS CloudWatch logging will be used to monitor the events on the AWS CodePipeline.
1. Create Resources in a pre-production account
In this step, we create the required resources such as a code repository, an S3 bucket, and a KMS key in a pre-production environment.
Clone the code repository into your CodeCommit. Make necessary changes to index.js and ensure the buildspec.yaml is there to build the artifacts.
Using codebase (lambda APIs) as input, you output a CloudFormation template, and environmental configuration JSON files (used for configuring Production and other non-Production environments such as dev, test). The build artifacts are packaged using AWS Serverless Application Model into a zip file and uploads it to an S3 bucket created for storing artifacts. Make note of the repository name as it will be required later.
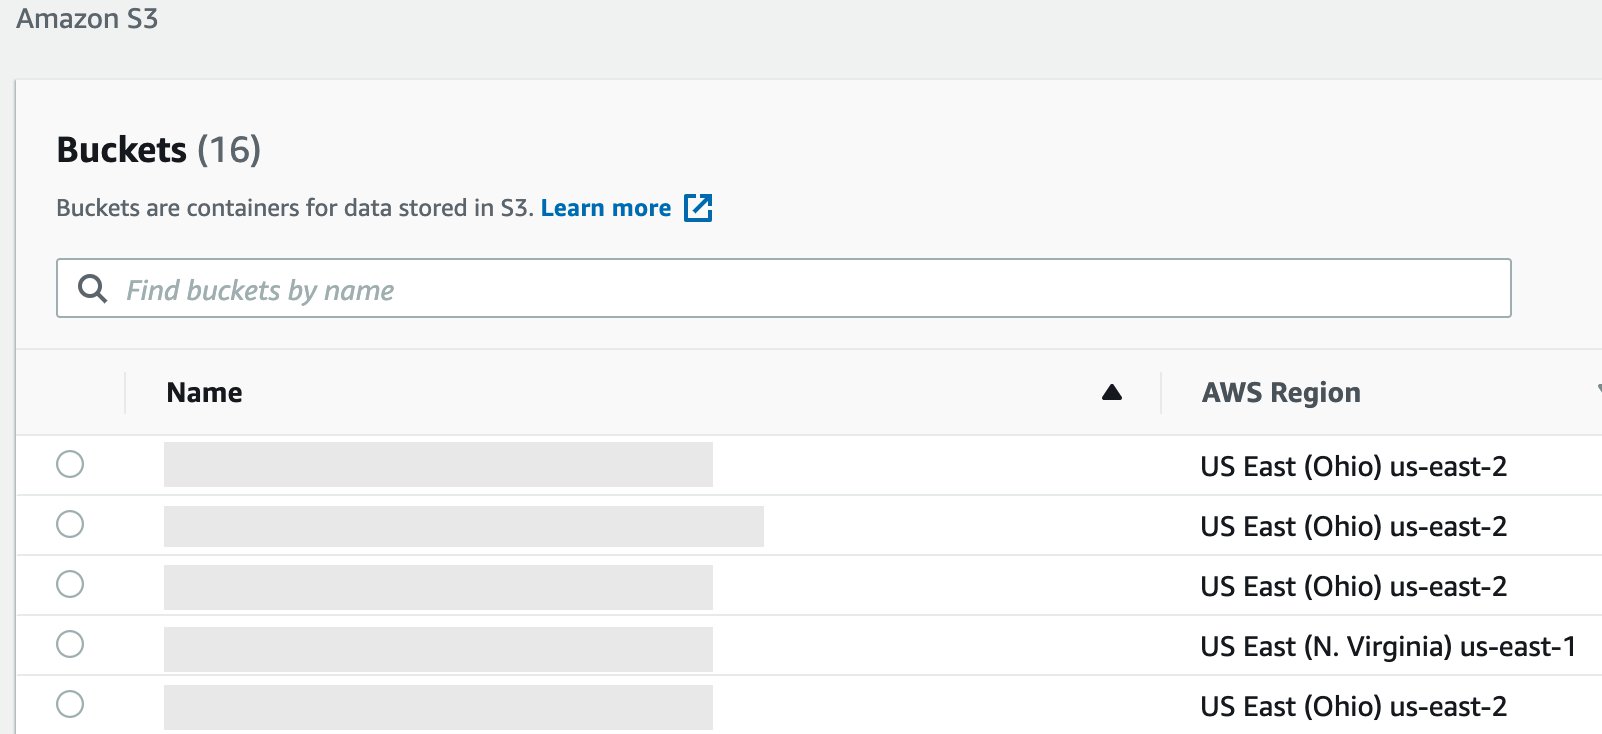
Create an S3 bucket in a Region (Example: us-east-2). This bucket will be used by the pipeline for get and put artifacts. Make a note of the bucket name.
Make sure you edit the bucket policy to have your production account ID and the bucket name. Refer to AWS S3 Bucket Policy documentation to make changes to Amazon S3 bucket policies and permissions.
{ "Version": "2012-10-17", "Statement": [ { "Effect": "Allow", "Action": [ "kms:DescribeKey", "kms:GenerateDataKey*", "kms:Encrypt", "kms:ReEncrypt*", "kms:Decrypt" ], "Resource": [ "Your KMS Key ARN you created in Development Account" ] } ] }
Once you’ve created both policies, attach them to the previously created cross-account role.
3. Create a CloudFormation Deployment role
In this step, you need to create another IAM role, “CloudFormationDeploymentRole” for Application deployment. Then attach the following four policies to it.
Policy 1: For Cloudformation to deploy the application in the Production account
If you have configured a profile in AWS CLI, mention that profile while executing the command:
–profile <your_profile_name>
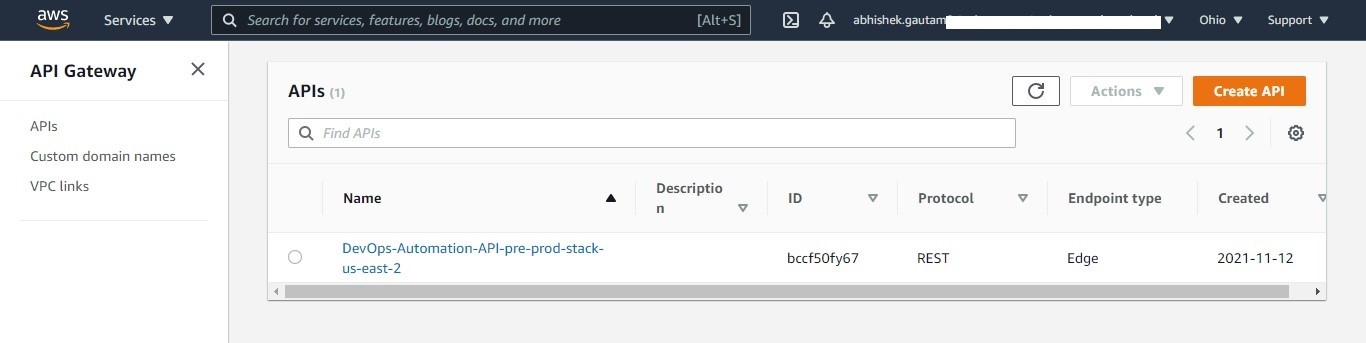
After launching the pipeline, your serverless API gets deployed in pre-production as well as in the production Accounts. You can check the deployment of your API in production or pre-production Account, by navigating to the API Gateway in the AWS console and looking for your API in the Region where it was deployed.
Figure 2. Check your deployment in pre-production/production environment
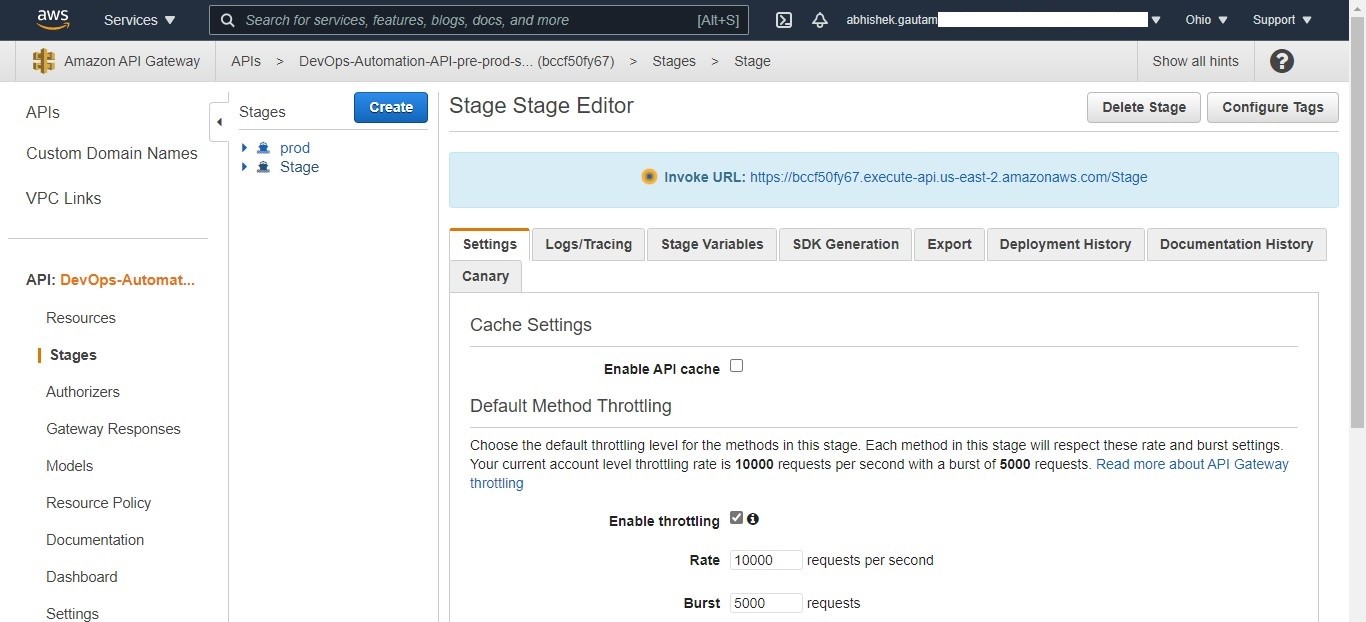
Then select your API and navigate to stages, to view the published API with an endpoint. Then validate your API response by selecting the API link.
Figure 3. Check whether your API is being published in pre-production/production environment
Alternatively you can also navigate to your APIs by navigating through your deployed application CloudFormation stack and selecting the link for API in the Resources tab.
Cleanup
If you are trying this out in your AWS accounts, make sure to delete all the resources created during this exercise to avoid incurring any AWS charges.
Conclusion
In this blog, we showed how to build a cross-account code pipeline to automate releases across different environments using AWS CloudFormation templates and AWS Cross Account Access. You also learned how serveless APIs can be securely deployed across pre-production and production accounts. This helps enterprises automate release deployments in a repeatable and agile manner, reduce manual errors and deliver business cababilities more quickly.
AWS customers are in various stages of their cloud journey. Frequently, enterprises begin that journey by rehosting (lift-and-shift migrating) their on-premises workloads into AWS, and running Amazon Elastic Compute Cloud (Amazon EC2) instances. You can rehost using AWS Application Migration Service (MGN), a cloud-native migration tool.
You may need to relocate instances and workloads to a Region that is closer in proximity to one of your offices or data centers. Or you may have a resilience requirement to balance your workloads across multiple Regions. This rehosting migration pattern with AWS MGN can also be used to migrate Amazon EC2-hosted workloads from one AWS Region to another.
In this blog post, we will show you how to configure AWS MGN for migrating your workloads from one AWS Region to another.
Overview of AWS MGN migration
AWS MGN, an AWS native service, minimizes time-intensive, error-prone, manual processes by automatically converting your source servers from physical, virtual, or cloud infrastructure to run natively on AWS. It reduces overall migration costs, such as investment in multiple migration solutions, specialized cloud development, or application-specific skills. With AWS MGN, you can migrate your applications from physical infrastructure, VMware vSphere, Microsoft Hyper-V, Amazon EC2, and Amazon Virtual Private Cloud (Amazon VPC) to AWS.
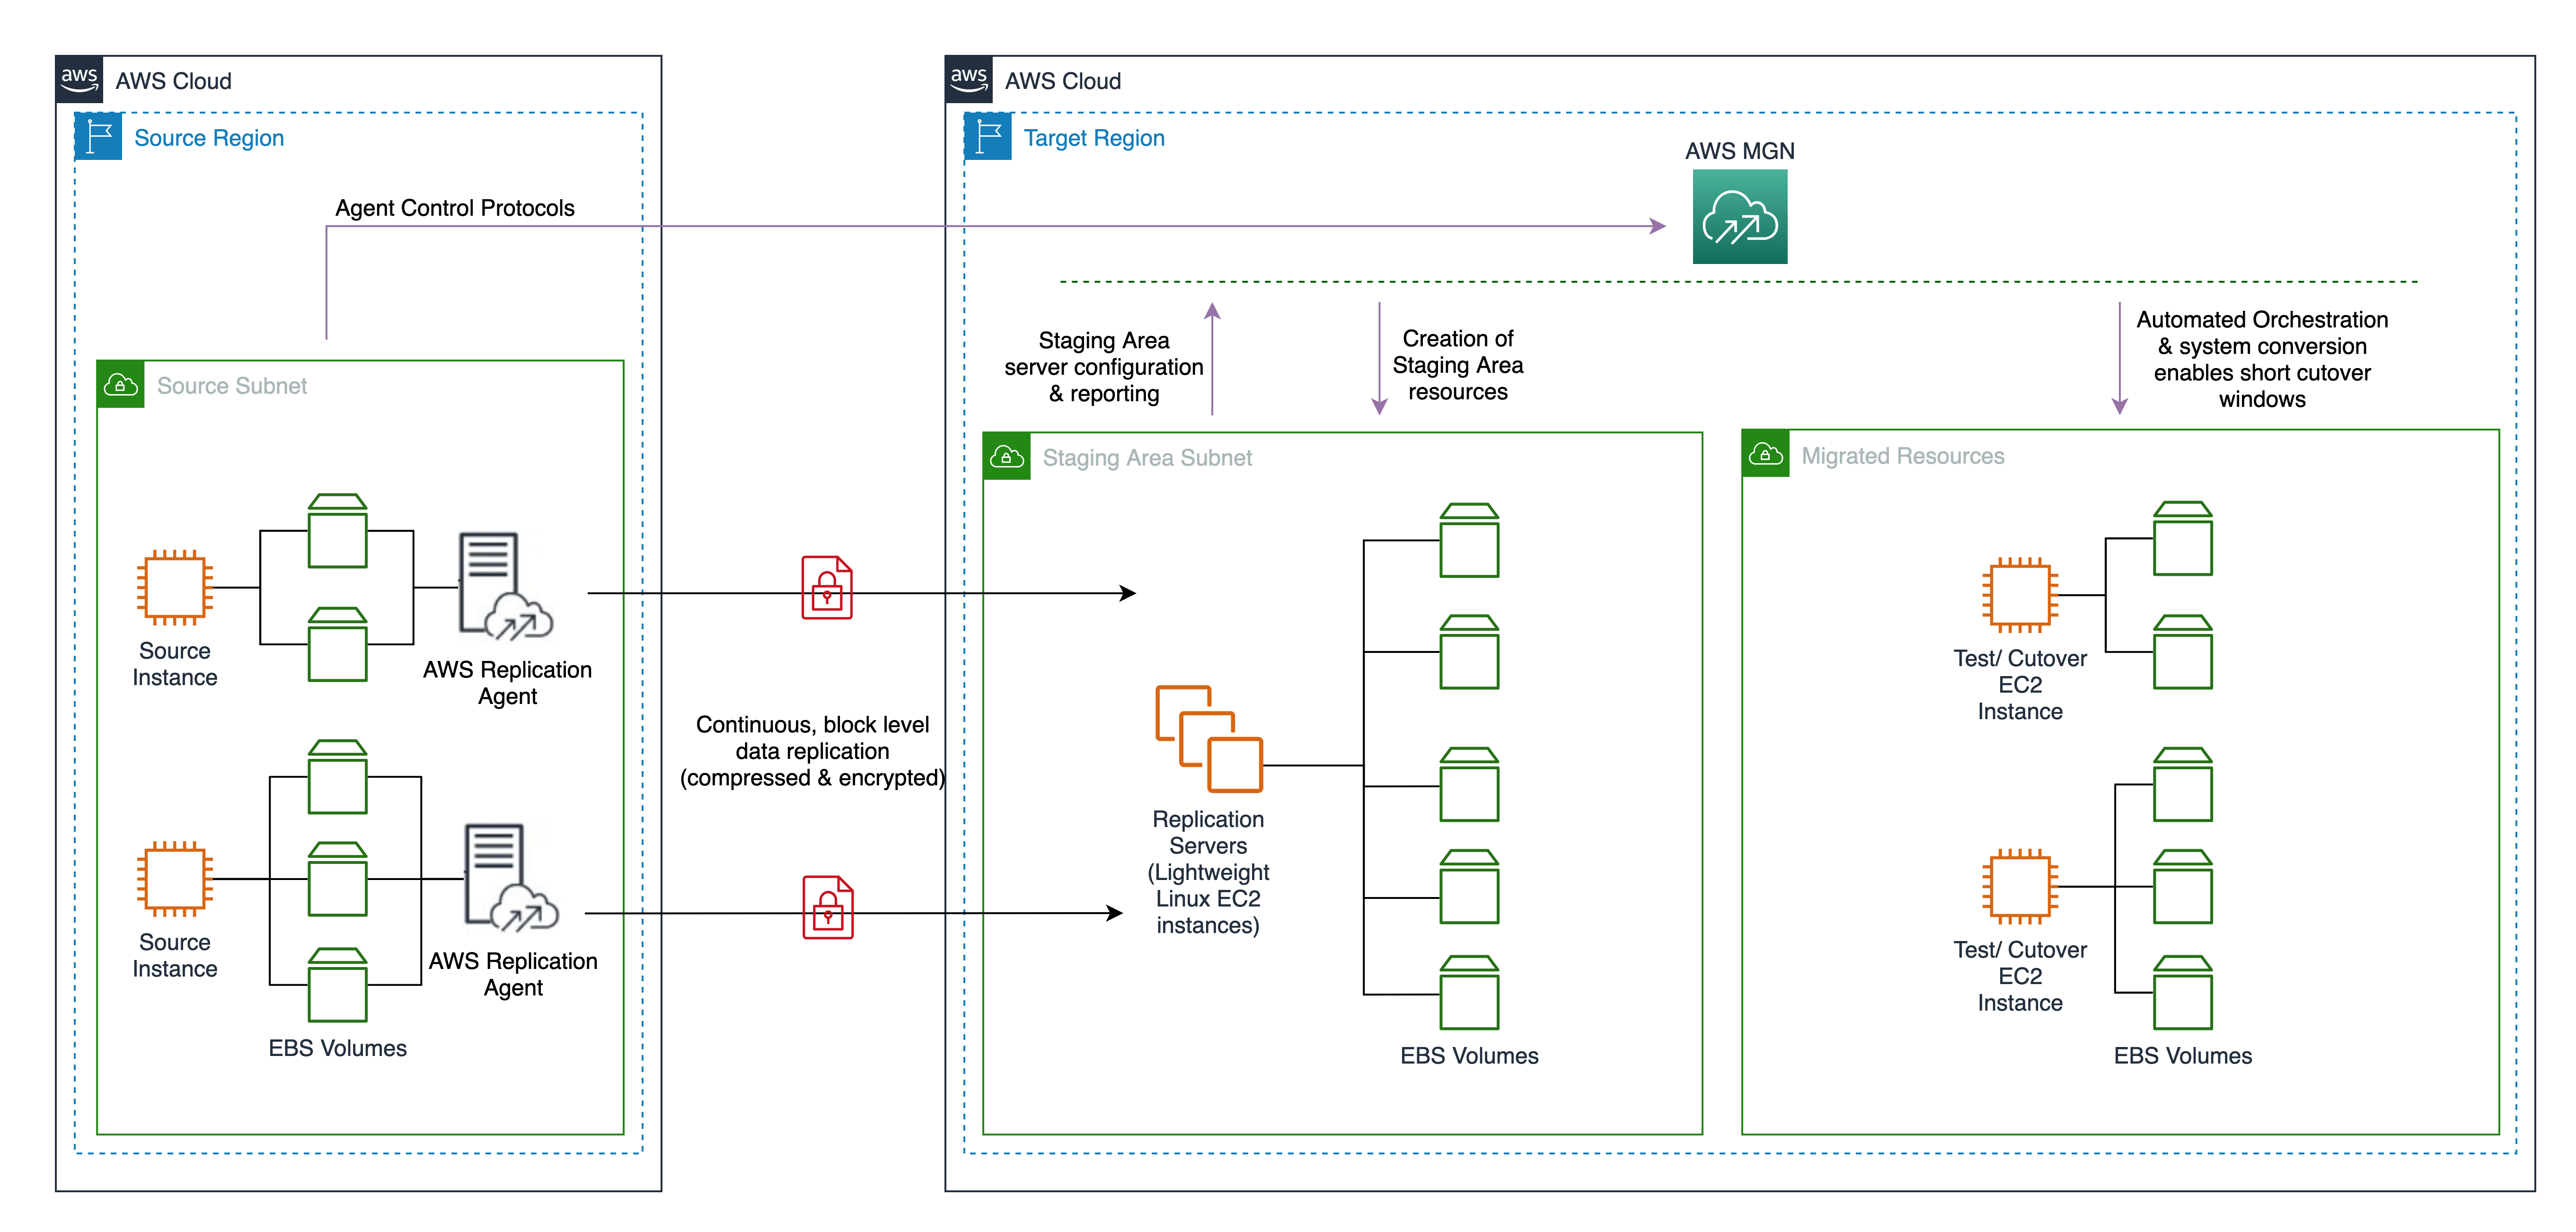
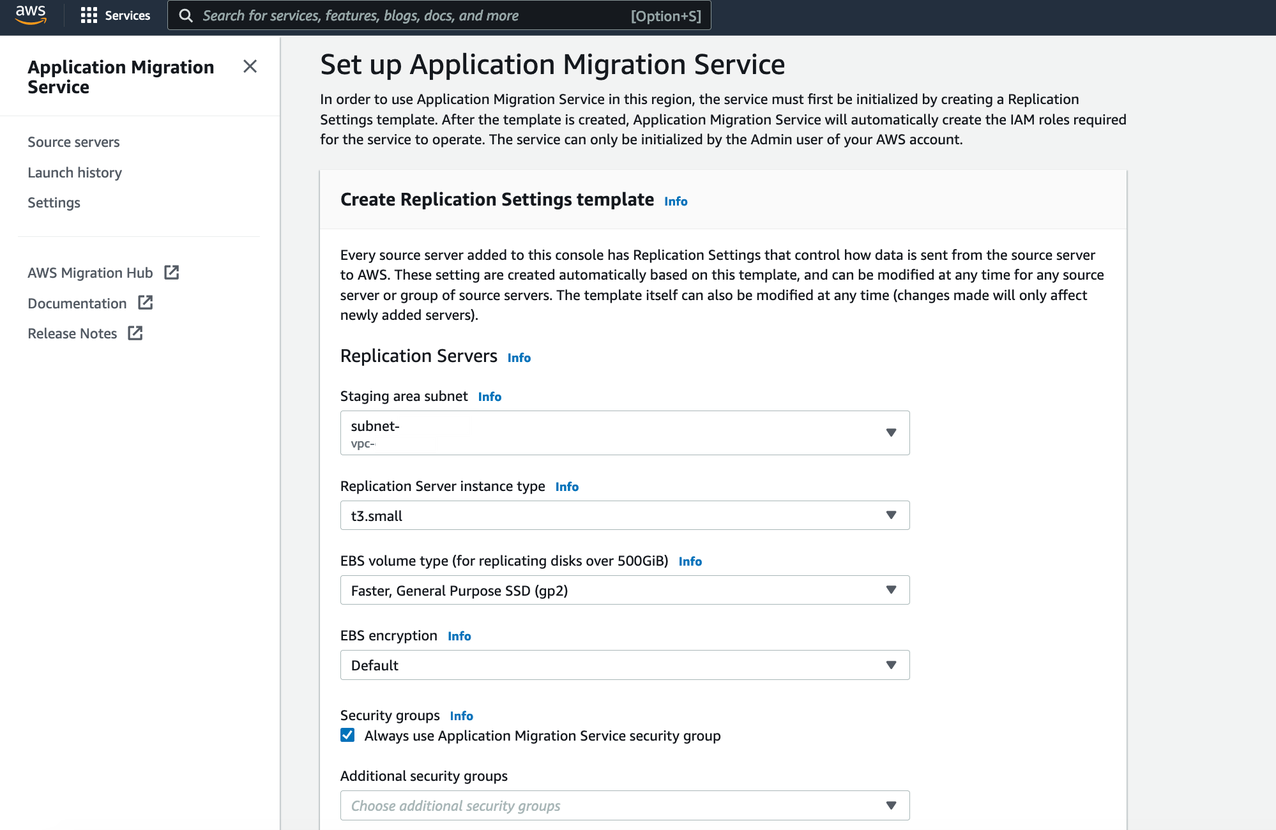
To migrate to AWS, install the AWS MGN Replication Agent on your source servers and define replication settings in the AWS MGN console, shown in Figure 1. Replication servers receive data from an agent running on source servers, and write this data to the Amazon Elastic Block Store (EBS) volumes. Your replicated data is compressed and encrypted in transit and at rest using EBS encryption.
AWS MGN keeps your source servers up to date on AWS using nearly continuous, block-level data replication. It uses your defined launch settings to launch instances when you conduct non-disruptive tests or perform a cutover. After confirming that your launched instances are operating properly on AWS, you can decommission your source servers.
Figure 1. MGN service architecture
Steps for migration with AWS MGN
This tutorial assumes that you already have your source AWS Region set up with Amazon EC2-hosted workloads running and a target AWS Region defined.
Migrating Amazon EC2 workload across AWS Regions include the following steps:
Create the Replication Settings template. These settings are used to create and manage your staging area subnet with lightweight Amazon EC2 instances. These instances act as replication servers used to replicate data between your source servers and AWS.
Install the AWS Replication Agent on your source instances to add them to the AWS MGN console.
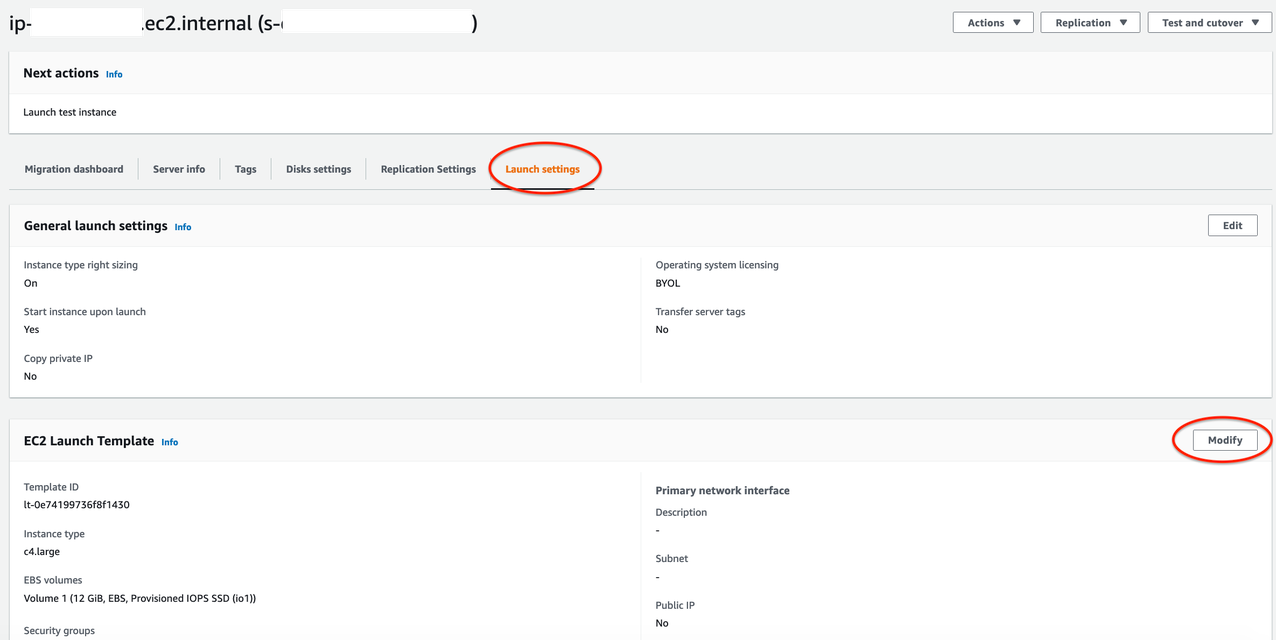
Configure the launch settings for each source server. These are a set of instructions that determine how a Test or Cutover instance will be launched for each source server on AWS.
Enter OS, Replication Preferences, IAM Access Key and Secret Access Key ID of the IAM user created following Prerequisites. This does not expose your Secret Access Key ID in any request
Copy the installation command and run on your source server for agent installation
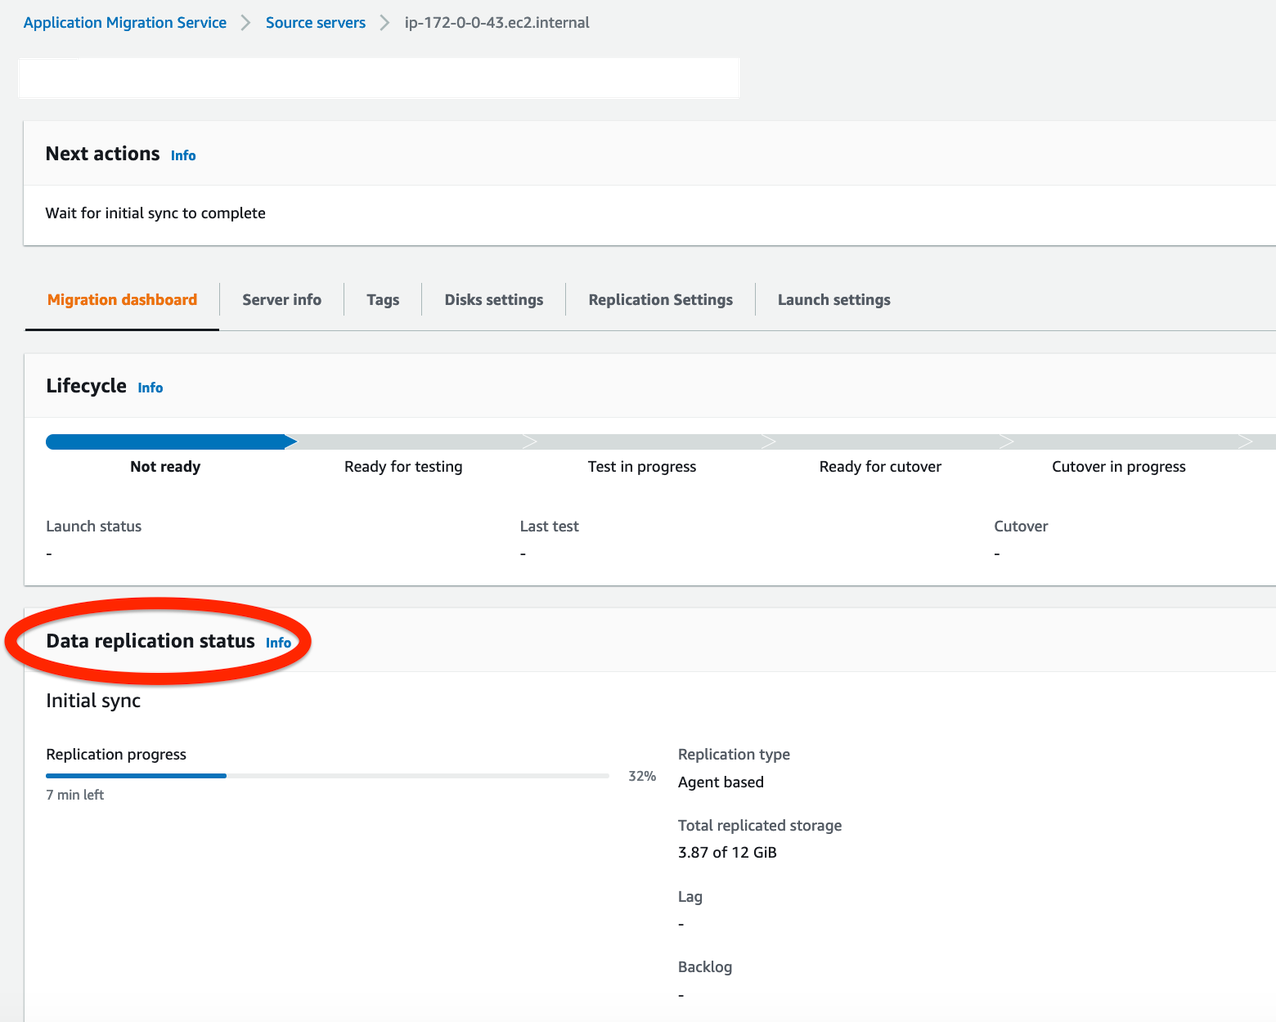
After successful agent installation, the source server is listed on the Source Servers page. Data replication begins after completion of the Initial Sync steps.
4. Monitor the Initial Sync status (shown in Figure 3):
Source server name > Migration Dashboard > Data Replication Status (Refer to the Source Servers page documentation for more details)
AMI: Recents tab > Don’t include in launch template
Instance Type: Can be kept same as source server or changed as per expected workload
Key pair (login): Create new or use existing if already created in the Target AWS Region
Network Settings > Subnet: Subnet for launching Test instance
Advanced network configuration:
Security Groups: For access to the test and final cutover instances
Configure Storage: Size – Do not change or edit this field
Volume type: Select any volume type (io1 is default)
Review details and click Create Template Version under the Summary section on right side of the console
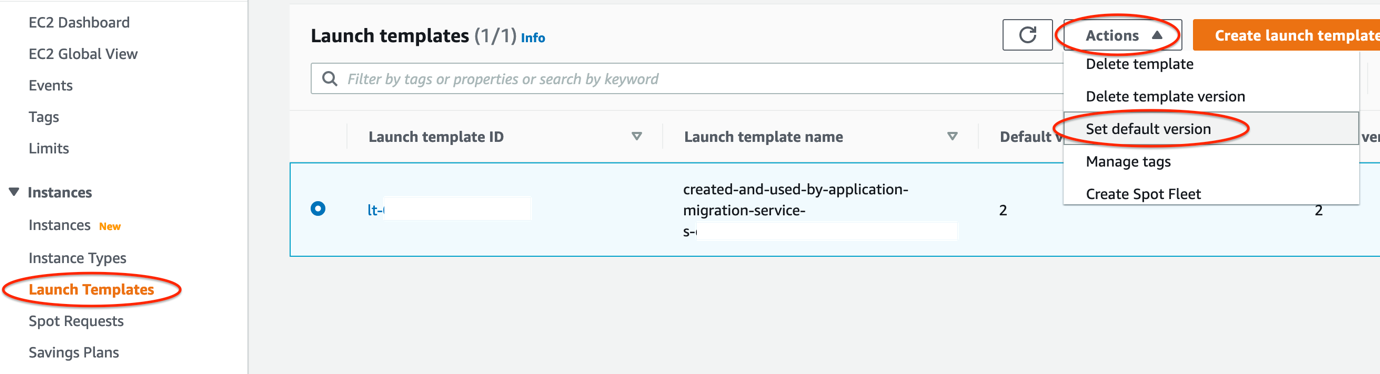
7. Every time you modify the Launch template, a new version is created. Set the launch template that you want to use with MGN as the default (shown in Figure 5):
Open the Actions menu and choose Set default version and select the latest Launch template created
Figure 5. Setting up your Launch template as the default
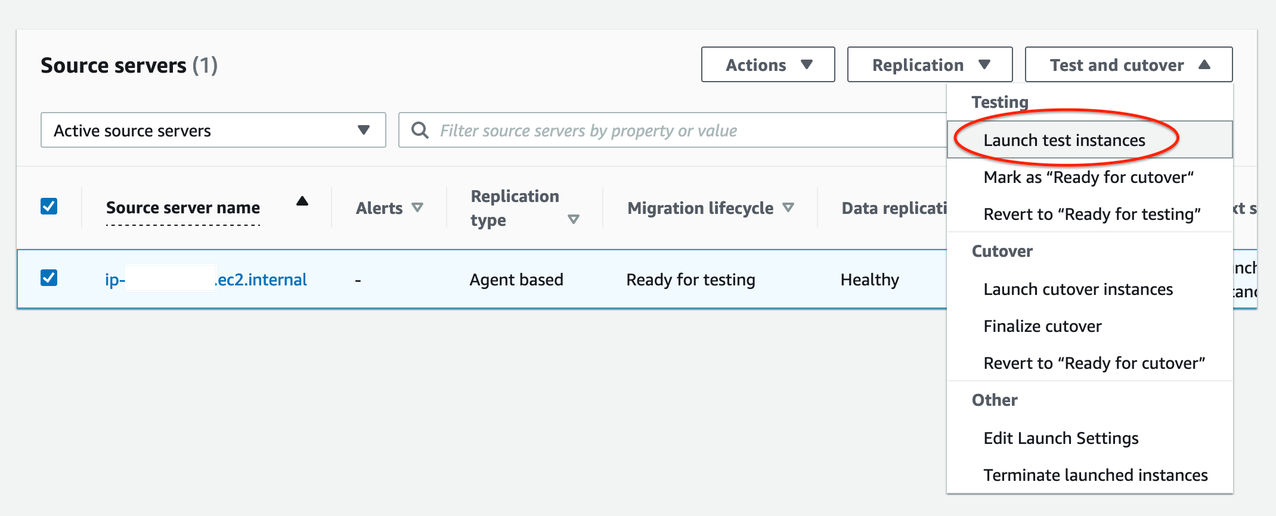
8. Launch a test instance and perform a Test prior to Cutover to identify potential problems and solve them before the actual Cutover takes place:
Go to the Source Servers page (see Figure 6)
Select source server > Open Test and Cutover menu
Under Testing, choose Launch test instances
Launch test instances for X servers > Launch
Choose View job details on the ‘Launch Job Created’ dialog box to view the specific Job details for the test launch in the Launch History tab
Figure 6. Launching test instances
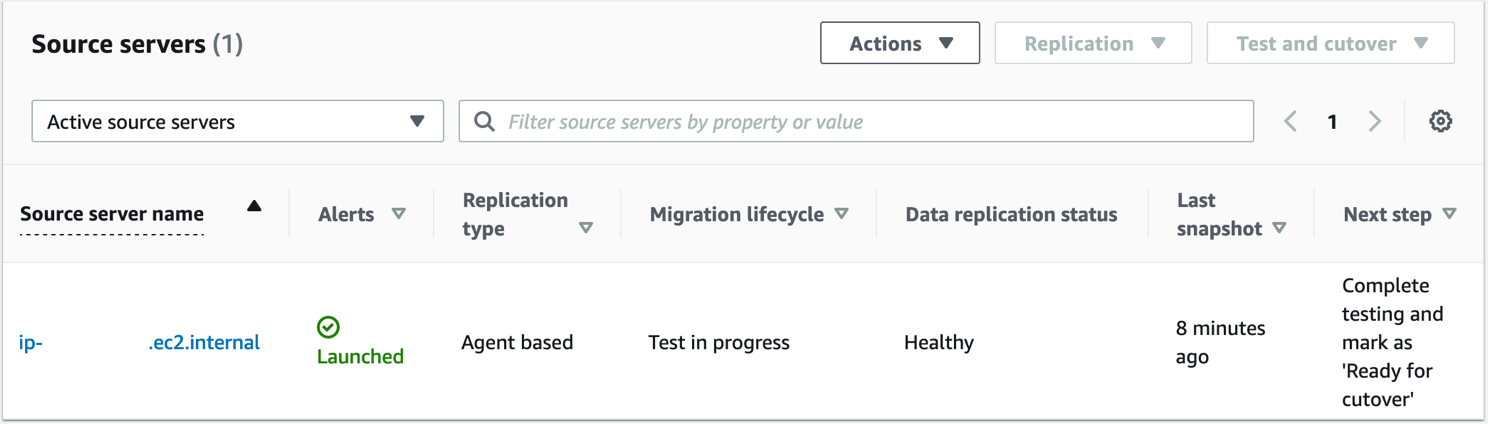
9. Validate launch of test instance (shown in Figure 7) by confirming:
Alerts column = Launched
Migration lifecycle column = Test in progress
Next step column = Complete testing and mark as ‘Ready for cutover’
Figure 7. Validating launch of test instances
10. SSH/ RDP into Test instance (view from EC2 console) and validate connectivity. Perform acceptance tests for your application as required. Revert the test if you encounter any issues.
11. Terminate Test instances after successful testing:
Go to Source servers page
Select source server > Open Test and Cutover menu
Under Testing, choose Mark as “Ready for cutover”
Mark X servers as “Ready for cutover” > Yes, terminate launched instances (recommended) > Continue
12. Validate the status of termination job and cutover readiness:
Migration Lifecycle = Ready for cutover
Next step = Launch cutover instance
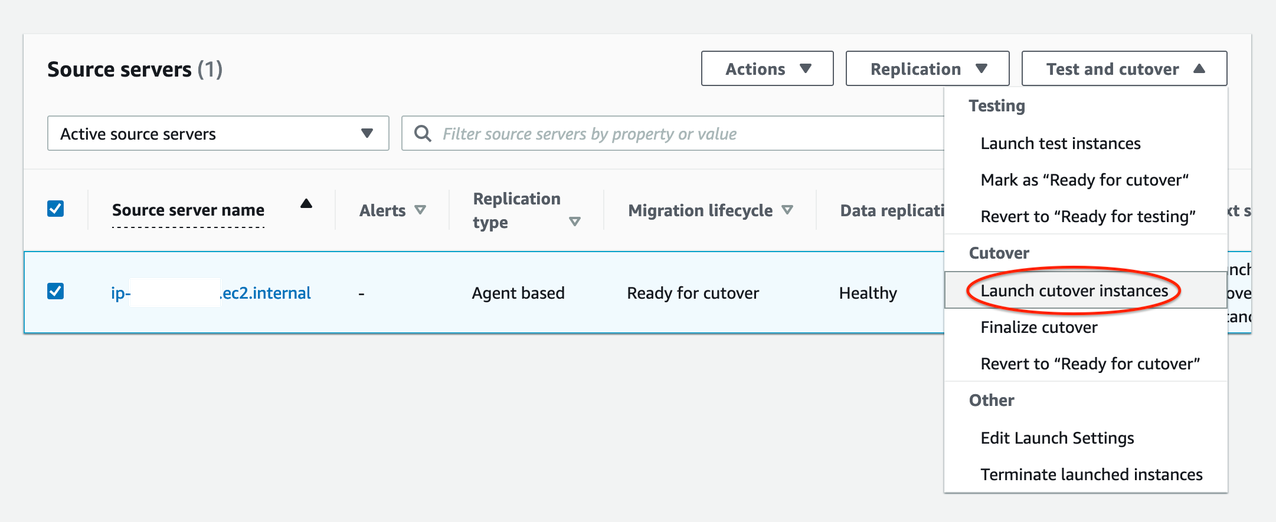
13. Perform the final cutover at a set date and time:
Go to Source servers page (see Figure 8)
Select source server > Open Test and Cutover menu
Under Cutover, choose Launch cutover instances
Launch cutover instances for X > Launch
Figure 8. Performing final Cutover by launching Cutover instances
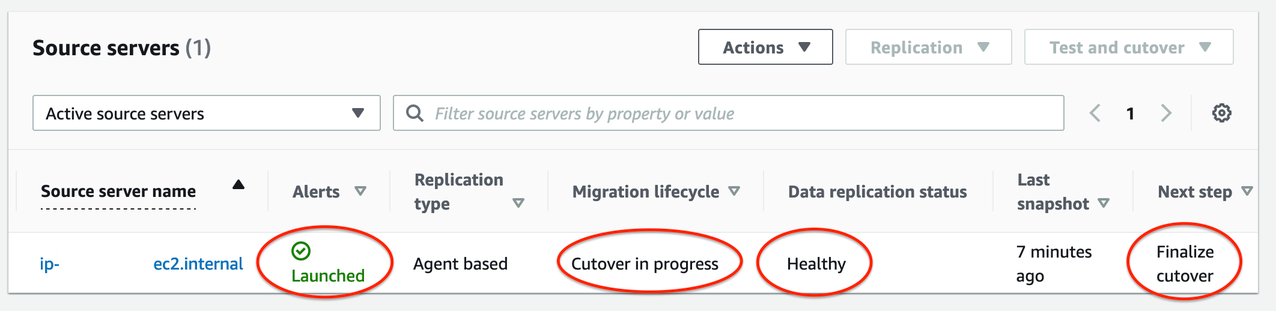
14. Monitor the indicators to validate the success of the launch of your Cutover instance (shown in Figure 9):
Alerts column = Launched
Migration lifecycle column = Cutover in progress
Data replication status = Healthy
Next step column = Finalize cutover
Figure 9. Indicators for successful launch of Cutover instances
15. Test Cutover Instance:
Navigate to Amazon EC2 console > Instances (running)
Select Cutover instance
SSH/ RDP into your Cutover instance to confirm that it functions correctly
Validate connectivity and perform acceptance tests for your application
16. Finalize the cutover after successful validation:
Navigate to AWS MGN console > Source servers page
Select source server > Open Test and Cutover menu
Under Cutover, choose Finalize Cutover
Finalize cutover for X servers > Finalize
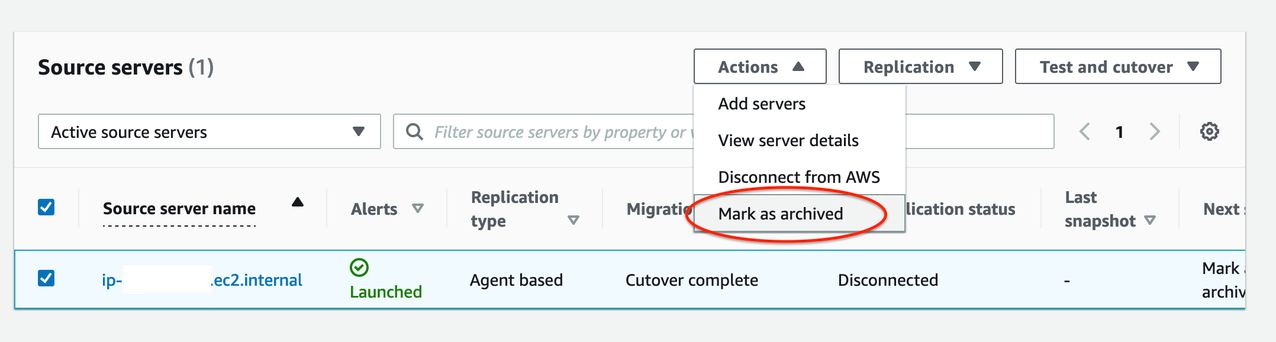
17. At this point, if your cutover is successful:
Migration lifecycle column = Cutover complete,
Data replication status column = Disconnected
Next step column = Mark as archived
The cutover is now complete and that the migration has been performed successfully. Data replication has also stopped and all replicated data will now be discarded.
Figure 10. Mark source servers as archived that are cutover
Conclusion
In this post, we demonstrated how AWS MGN simplifies, expedites, and reduces the cost of migrating Amazon EC2-hosted workloads from one AWS Region to another. It integrates with AWS Migration Hub, enabling you to organize your servers into applications. You can track the progress of all your MGN at the server and app level, even as you move servers into multiple AWS Regions. Choose a Migration Hub Home Region for MGN to work with the Migration Hub.
Note: Use of AWS MGN is free for 90 days but you will incur charges for any AWS infrastructure that is provisioned during migration and after cutover. For more information, refer to the pricing page.
Thanks for reading this blog post! If you have any comments or questions, feel free to put them in the comments section.
Many customers want to provision Amazon Web Services (AWS) cloud resources quickly and consistently with lifecycle management, by treating infrastructure as code (IaC). Commonly used services are AWS CloudFormation and HashiCorp Terraform. Currently, customers set up Amazon Connect data streaming manually, as the service is not available under CloudFormation resource types. Customers may want to extend it to retrieve real-time contact and agent data. Integration is done manually and can result in issues with IaC.
Amazon Connect contact trace records (CTRs) capture the events associated with a contact in the contact center. Amazon Connect agent event streams are Amazon Kinesis Data Streams that provide near real-time reporting of agent activity within the Amazon Connect instance. The events published to the stream include these contact control panel (CCP) events:
Agent login
Agent logout
Agent connects with a contact
Agent status change, such as to available to handle contacts, or on break, or at training.
In this blog post, we will show you how to automate Amazon Connect data streaming using AWS Cloud Development Kit (AWS CDK). AWS CDK is an open source software development framework to define your cloud application resources using familiar programming languages. We will create a custom CDK resource, which in turn uses Amazon Connect API. This can be used as a template to automate other parts of Amazon Connect, or for other AWS services that don’t expose its full functionality through CloudFormation.
Overview of Amazon Connect automation solution
Amazon Connect is an omnichannel cloud contact center that helps you provide superior customer service. We will stream Amazon Connect agent activity and contact trace records to Amazon Kinesis. We will assume that data will then be used by other services or third-party integrations for processing. Here are the high-level steps and AWS services that we are going use, see Figure 1:
Amazon Connect: We will create an instance and enable data streaming
Cloud Deployment Toolkit: We will create custom resource and orchestrate automation
Third-party tool or Amazon S3: Used as a destination of Connect data via Amazon Kinesis data
Figure 1. Connect data streaming automation workflow
Walkthrough and deployment tasks
Sample code for this solution is provided in this GitHub repo. The code is packaged as a CDK application, so the solution can be deployed in minutes. The deployment tasks are as follows:
Deploy the CDK app
Update Amazon Connect instance settings
Import the demo flow and data
Custom Resources enables you to write custom logic in your CloudFormation deployment. You implement the creation, update, and deletion logic to define the custom resource deployment.
CDK implements the AWSCustomResource, which is an AWS Lambda backed custom resource that uses the AWS SDK to provision your resources. This means that the CDK stack deploys a provisioning Lambda. Upon deployment, it calls the AWS SDK API operations that you defined for the resource lifecycle (create, update, and delete).
Prerequisites
For this walkthrough, you need the following prerequisites:
This post uses an AWS CDK stack written in Python; follow the instructions in the CDK Getting Started guide to set up your environment.
An Amazon Connect instance. If you do not have one, you can deploy a Connect instance and claim a phone number, see Set up your Amazon Connect instance.
Deploy and verify
1. Deploy the CDK application.
The resources required for this demo are packaged as a CDK app. Before proceeding, confirm you have command line interface (CLI) access to the AWS account where you would like to deploy your solution.
Open a terminal window and clone the GitHub repository in a directory of your choice: git clone [email protected]:aws-samples/connect-cdk-blog
Navigate to the cdk-app directory and follow the deployment instructions. The default Region is usually us-east-1. If you would like to deploy in another Region, you can run: export AWS_DEFAULT_REGION=eu-central-1
2. Create the CloudFormation stack by initiating the following commands.
Note: By default, the stack will create contact trace records stream [ctrStreamName] as a Kinesis Data Stream. If you want to use an Amazon Kinesis Data Firehose delivery stream instead, you can modify this behavior by going to cdk.json and adding “ctr_stream_type”: “KINESIS_FIREHOSE” as a parameter under “context.”
Once the status of CloudFormation stack is updated to CREATE_COMPLETE, the following resources are created:
Kinesis Data Stream
IAM roles
Lambda
3. Verify the integration.
Kinesis Data Streams are added to the Amazon Connect instance
Figure 2. Screenshot of Amazon Connect with Data Streaming enabled
Cleaning up
You can remove all resources provisioned for the CDK app by running the following command under connect-app directory:
cdk destroy
This will not remove your Amazon Connect instance. You can remove it by navigating to the AWS Management Console -> Services -> Amazon Connect. Find your Connect instance and click Delete.
Conclusion
In this blog, we demonstrated how to maintain Amazon Connect as Infrastructure as Code (IaC). Using a custom resource of AWS CDK, we have shown how to automate setting Amazon Kinesis Data Streams to Data Streaming in Amazon Connect. The same approach can be extended to automate setting other Amazon Connect properties such as Amazon Lex, AWS Lambda, Amazon Polly, and Customer Profiles. This approach will help you to integrate Amazon Connect with your Workflow Management Application in a faster and consistent manner, and reduce manual configuration.
The Availability and Beyond whitepaper discusses the concept of static stability for improving resilience. What does static stability mean with regard to a multi-Region disaster recovery (DR) plan? What if the very tools that we rely on for failover are themselves impacted by a DR event?
In this post, you’ll learn how to reduce dependencies in your DR plan and manually control failover even if critical AWS services are disrupted. As a bonus, you’ll see how to use service control policies (SCPs) to help simulate a Regional outage, so that you can test failover scenarios more realistically.
Failover plan dependencies and considerations
Let’s dig into the DR scenario in more detail. Using Amazon Route 53 for Regional failover routing is a common pattern for DR events. In the simplest case, we’ve deployed an application in a primary Region and a backup Region. We have a Route 53 DNS record set with records for both Regions, and all traffic goes to the primary Region. In an event that triggers our DR plan, we manually or automatically switch the DNS records to direct all traffic to the backup Region.
Relying on an automated health check to control Regional failover can be tricky. A health check might not be perfectly reliable if a Region is experiencing some type of degradation. Often, we prefer to initiate our DR plan manually, which then initiates with automation.
What are the dependencies that we’ve baked into this failover plan? First, Route 53, our DNS service, has to be available. It must continue to serve DNS queries, and we have to be able to change DNS records manually. Second, if we do not have a full set of resources already deployed in the backup Region, we must be able to deploy resources into it.
Both dependencies might violate static stability, because we are relying on resources in our DR plan that might be affected by the outage we’re seeing. Ideally, we don’t want to depend on other services running so we can failover and continue to serve our own traffic. How do we reduce additional dependencies?
Static stability
Let’s look at our first dependency on Route 53 – control planes and data planes. Briefly, a control plane is used to configure resources, and the data plane delivers services (see Understanding Availability Needs for a more complete definition.)
The Route 53 data plane, which responds to DNS queries, is highly resilient across Regions. We can safely rely on it during the failure of any single Region. But let’s assume that for some reason we are not able to call on the Route 53 control plane.
Amazon Route 53 Application Recovery Controller (Route 53 ARC) was built to handle this scenario. It provisions a Route 53 health check that we can manually control with a Route 53 ARC routing control, and is a data plane operation. The Route 53 ARC data plane is highly resilient, using a cluster of five Regional endpoints. You can revise the health check if three of the five Regions are available.
The second dependency, being able to deploy resources into the second Region, is not a concern if we run a fully scaled-out set of resources. We must make sure that our deployment mechanism doesn’t rely only on the primary Region. Most AWS services have Regional control planes, so this isn’t an issue.
The AWS Identity and Access Management (IAM) data plane is highly available in each Region, so you can authorize the creation of new resources as long as you’ve already defined the roles. Note: If you use federated authentication through an identity provider, you should test that the IdP does not itself have a dependency on another Region.
Testing your disaster recovery plan
Once we’ve identified our dependencies, we need to decide how to simulate a disaster scenario. Two mechanisms you can use for this are network access control lists (NACLs) and SCPs. The first one enables us to restrict network traffic to our service endpoints. However, the second allows defining policies that specify the maximum permissions for the target accounts. It also allows us to simulate a Route 53 or IAM control plane outage by restricting access to the service.
For the end-to-end DR simulation, we’ve published an AWS samples repository on GitHub that you can use to deploy. This evaluates Route 53 ARC capabilities if both Route 53 and IAM control planes aren’t accessible.
By deploying test applications across us-east-1 and us-west-1 AWS Regions, we can simulate a real-world scenario that determines the business continuity impact, failover timing, and procedures required for successful failover with unavailable control planes.
Figure 2. Simulating Regional failover using service control policies
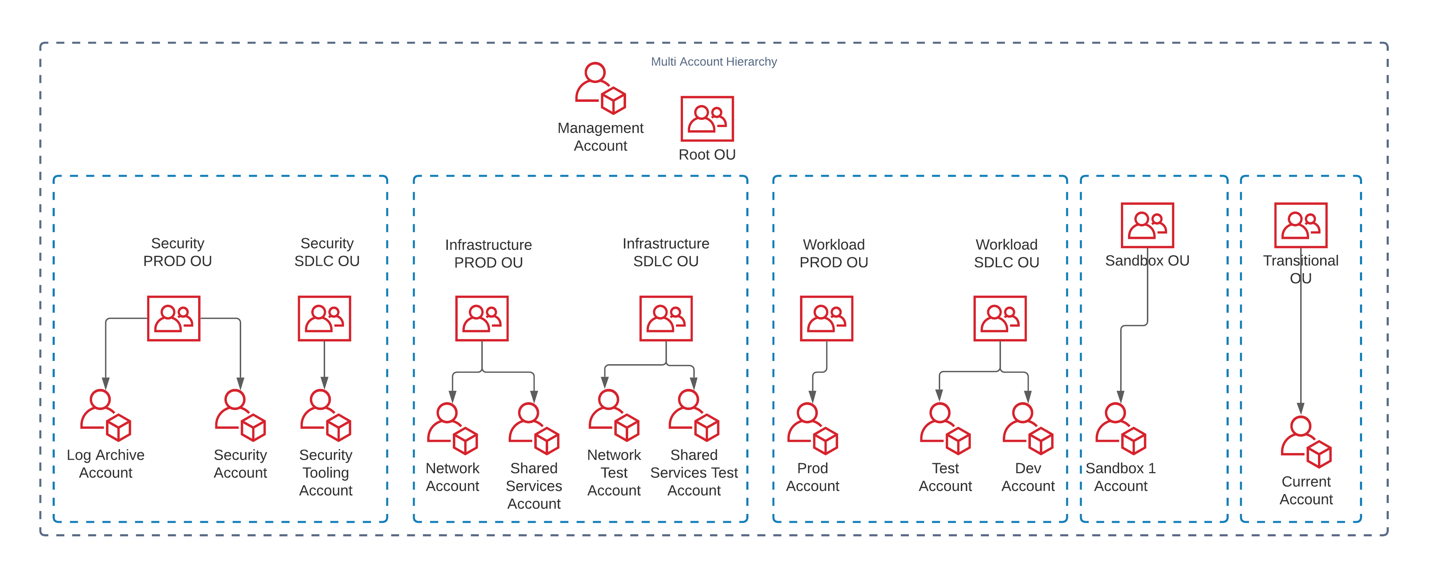
Before you conduct the test outlined in our scenario, we strongly recommend that you create a dedicated AWS testing environment with an AWS Organizations setup. Make sure that you don’t attach SCPs to your organization’s root but instead create a dedicated organization unit (OU). You can use this pattern to test SCPs and ensure that you don’t inadvertently lock out users from key services.
Chaos engineering
Chaos engineering is the discipline of experimenting on a system to build confidence in its capability to withstand turbulent production conditions. Chaos engineering and its principles are important tools when you plan for disaster recovery. Even a simple distributed system may be too complex to operate reliably. It can be hard or impossible to plan for every failure scenario in non-trivial distributed systems, because of the number of failure permutations. Chaos experiments test these unknowns by injecting failures (for example, shutting down EC2 instances) or transient anomalies (for example, unusually high network latency.)
In the context of multi-Region DR, these techniques can help challenge assumptions and expose vulnerabilities. For example, what happens if a health check passes but the system itself is unhealthy, or vice versa? What will you do if your entire monitoring system is offline in your primary Region, or too slow to be useful? Are there control plane operations that you rely on that themselves depend on a single AWS Region’s health, such as Amazon Route 53? How does your workload respond when 25% of network packets are lost? Does your application set reasonable timeouts or does it hang indefinitely when it experiences large network latencies?
Questions like these can feel overwhelming, so start with a few, then test and iterate. You might learn that your system can run acceptably in a degraded mode. Alternatively, you might find out that you need to be able to failover quickly. Regardless of the results, the exercise of performing chaos experiments and challenging assumptions is critical when developing a robust multi-Region DR plan.
Conclusion
In this blog, you learned about reducing dependencies in your DR plan. We showed how you can use Amazon Route 53 Application Recovery Controller to reduce a dependency on the Route 53 control plane, and how to simulate a Regional failure using SCPs. As you evaluate your own DR plan, be sure to take advantage of chaos engineering practices. Formulate questions and test your static stability assumptions. And of course, you can incorporate these questions into a custom lens when you run a Well-Architected review using the AWS Well-Architected Tool.
Amazon Redshift is a fast, scalable, secure, and fully managed cloud data warehouse that makes it simple and cost-effective to analyze all your data using standard SQL. Amazon Redshift offers up to three times better price performance than any other cloud data warehouse, and can expand to petabyte scale. Today, tens of thousands of AWS customers use Amazon Redshift to run mission-critical business intelligence dashboards, analyze real-time streaming data, and run predictive analytics jobs.
Many features in Amazon Redshift access other services, for example, when loading data from Amazon Simple Storage Service (Amazon S3). This requires you to create an AWS Identity and Access Management (IAM) role and grant that role to the Amazon Redshift cluster. Historically, this has required some degree of expertise to set up access configuration with other AWS services. For details about IAM roles and how to use them, see Create an IAM role for Amazon Redshift.
This post discusses the introduction of the default IAM role, which simplifies the use of other services such as Amazon S3, Amazon SageMaker, AWS Lambda, Amazon Aurora, and AWS Glue by allowing you to create an IAM role from the Amazon Redshift console and assign it as the default IAM role to new or existing Amazon Redshift cluster. The default IAM role simplifies SQL operations that access other AWS services (such as COPY, UNLOAD, CREATE EXTERNAL FUNCTION, CREATE EXTERNAL SCHEMA, CREATE MODEL, or CREATE LIBRARY) by eliminating the need to specify the Amazon Resource Name (ARN) for the IAM role.
Overview of solution
The Amazon Redshift SQL commands for COPY, UNLOAD, CREATE EXTERNAL FUNCTION, CREATE EXTERNAL TABLE, CREATE EXTERNAL SCHEMA, CREATE MODEL, or CREATE LIBRARY historically require the role ARN to be passed as an argument. Usually, these roles and accesses are set up by admin users. Most data analysts and data engineers using these commands aren’t authorized to view cluster authentication details. To eliminate the need to specify the ARN for the IAM role, Amazon Redshift now provides a new managed IAM policy AmazonRedshiftAllCommandsFullAccess, which has required privileges to use other related services such as Amazon S3, SageMaker, Lambda, Aurora, and AWS Glue. This policy is used for creating the default IAM role via the Amazon Redshift console. End-users can use the default IAM role by specifying IAM_ROLE with the DEFAULT keyword. When you use the Amazon Redshift console to create IAM roles, Amazon Redshift keeps track of all IAM roles created and preselects the most recent default role for all new cluster creations and restores from snapshots.
The Amazon Redshift default IAM role simplifies authentication and authorization with the following benefits:
It allows users to run SQL commands without providing the IAM role’s ARN
It avoids the need to use multiple AWS Management Console pages to create the Amazon Redshift cluster and IAM role
You don’t need to reconfigure default IAM roles every time Amazon Redshift introduces a new feature, which requires additional permission, because Amazon Redshift can modify or extend the AWS managed policy, which is attached to the default IAM role, as required
To demonstrate this, first we create an IAM role through the Amazon Redshift console that has a policy with permissions to run SQL commands such as COPY, UNLOAD, CREATE EXTERNAL FUNCTION, CREATE EXTERNAL TABLE, CREATE EXTERNAL SCHEMA, CREATE MODEL, or CREATE LIBRARY. We also demonstrate how to make an existing IAM role the default role, and remove a role as default. Then we show you how to use the default role with various SQL commands, and how to restrict access to the role.
Create a new cluster and set up the IAM default role
The default IAM role is supported in both Amazon Redshift clusters and Amazon Redshift Serverless (preview). To create a new cluster and configure our IAM role as the default role, complete the following steps:
On the Amazon Redshift console, choose Clusters in the navigation pane.
This page lists the clusters in your account in the current Region. A subset of properties of each cluster is also displayed.
Choose Create cluster.
Follow the instructions to enter the properties for cluster configuration.
If you know the required size of your cluster (that is, the node type and number of nodes), choose I’ll choose.
Choose the node type and number of nodes.
If you don’t know how large to size your cluster, choose Help me choose. Doing this starts a sizing calculator that asks you questions about the size and query characteristics of the data that you plan to store in your data warehouse.
Follow the instructions to enter properties for database configurations.
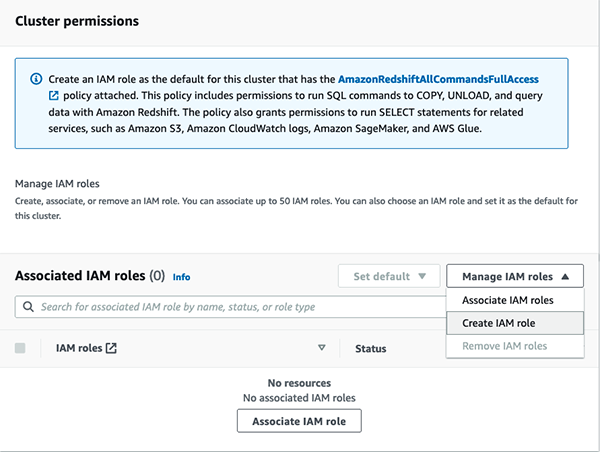
Under Associated IAM roles, on the Manage IAM roles menu, choose Create IAM role.
To specify an S3 bucket for the IAM role to access, choose one of the following methods:
Choose No additional S3 bucket to create the IAM role without specifying specific S3 buckets.
Choose Any S3 bucket to allow users that have access to your Amazon Redshift cluster to also access any S3 bucket and its contents in your AWS account.
Choose Specific S3 buckets to specify one or more S3 buckets that the IAM role being created has permission to access. Then choose one or more S3 buckets from the table.
Choose Create IAM role as default.
Amazon Redshift automatically creates and sets the IAM role as the default for your cluster.
Choose Create cluster to create the cluster.
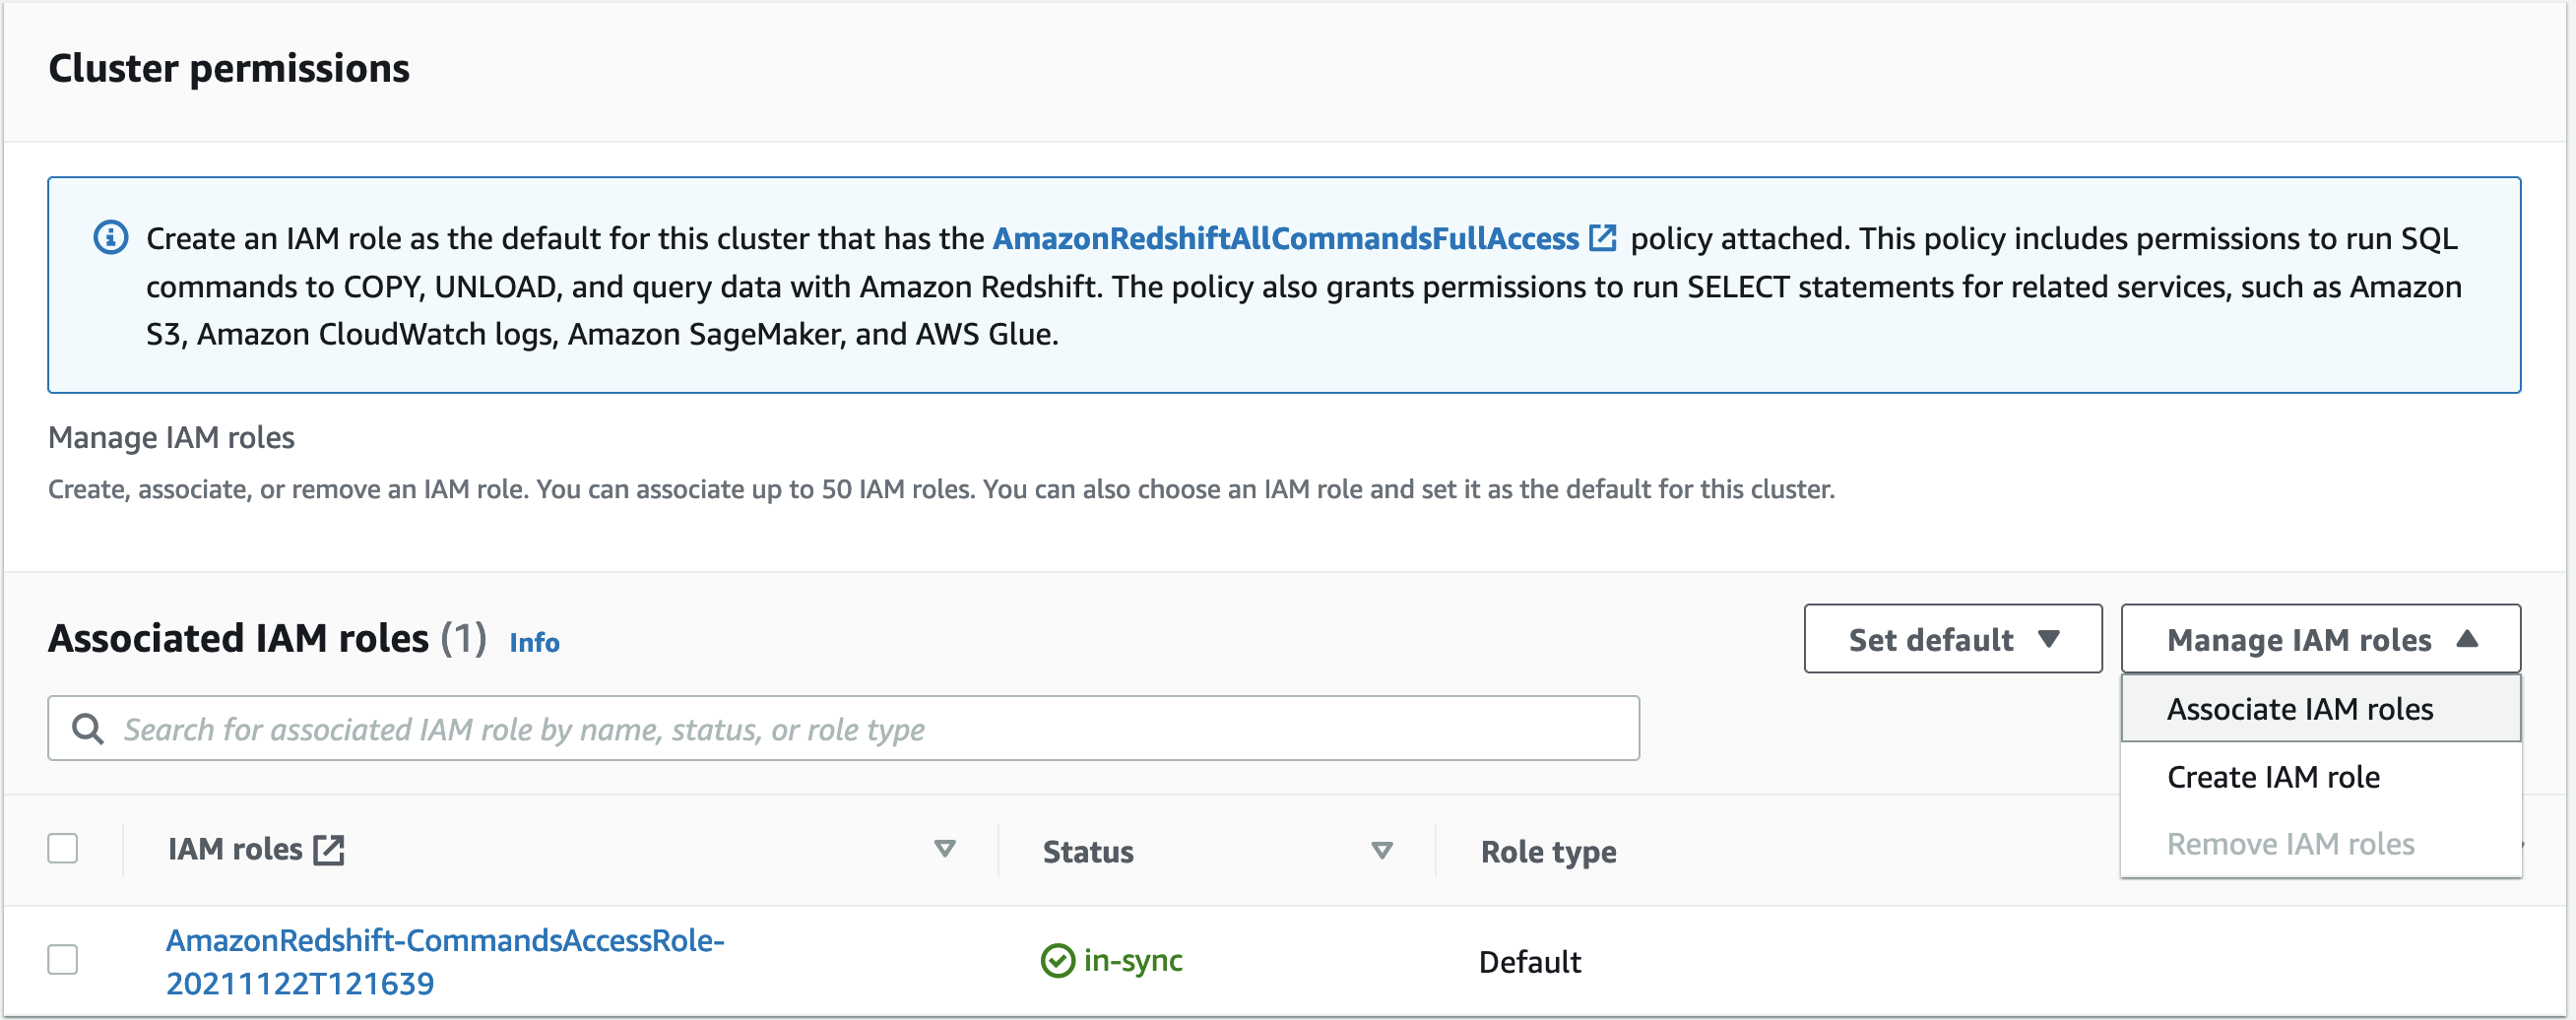
The cluster might take several minutes to be ready to use. You can verify the new default IAM role under Cluster permissions.
You can only have one IAM role set as the default for the cluster. If you attempt to create another IAM role as the default for the cluster when an existing IAM role is currently assigned as the default, the new IAM role replaces the other IAM role as default.
Make an existing IAM role the default for your new or existing cluster
You can also attach your existing role to the cluster and make it default IAM role for more granular control of permissions with customized managed polices.
On the Amazon Redshift console, choose Clusters in the navigation pane.
Choose the cluster you want to associate IAM roles with.
Under Associated IAM roles, on the Manage IAM roles menu, choose Associated IAM roles.
Select an IAM role that you want make the default for the cluster.
Choose Associate IAM roles.
Under Associated IAM roles, on the Set default menu, choose Make default.
When prompted, choose Set default to confirm making the specified IAM role the default.
Choose Confirm.
Your IAM role is now listed as default.
Make an IAM role no longer default for your cluster
You can make an IAM role no longer the default role by changing the cluster permissions.
On the Amazon Redshift console, choose Clusters in the navigation pane.
Choose the cluster that you want to associate IAM roles with.
Under Associated IAM roles, select the default IAM role.
On the Set default menu, choose Clear default.
When prompted, choose Clear default to confirm.
Use the default IAM role to run SQL commands
Now we demonstrate how to use the default IAM role in SQL commands like COPY, UNLOAD, CREATE EXTERNAL FUNCTION, CREATE EXTERNAL TABLE, CREATE EXTERNAL SCHEMA, and CREATE MODEL using Amazon Redshift ML.
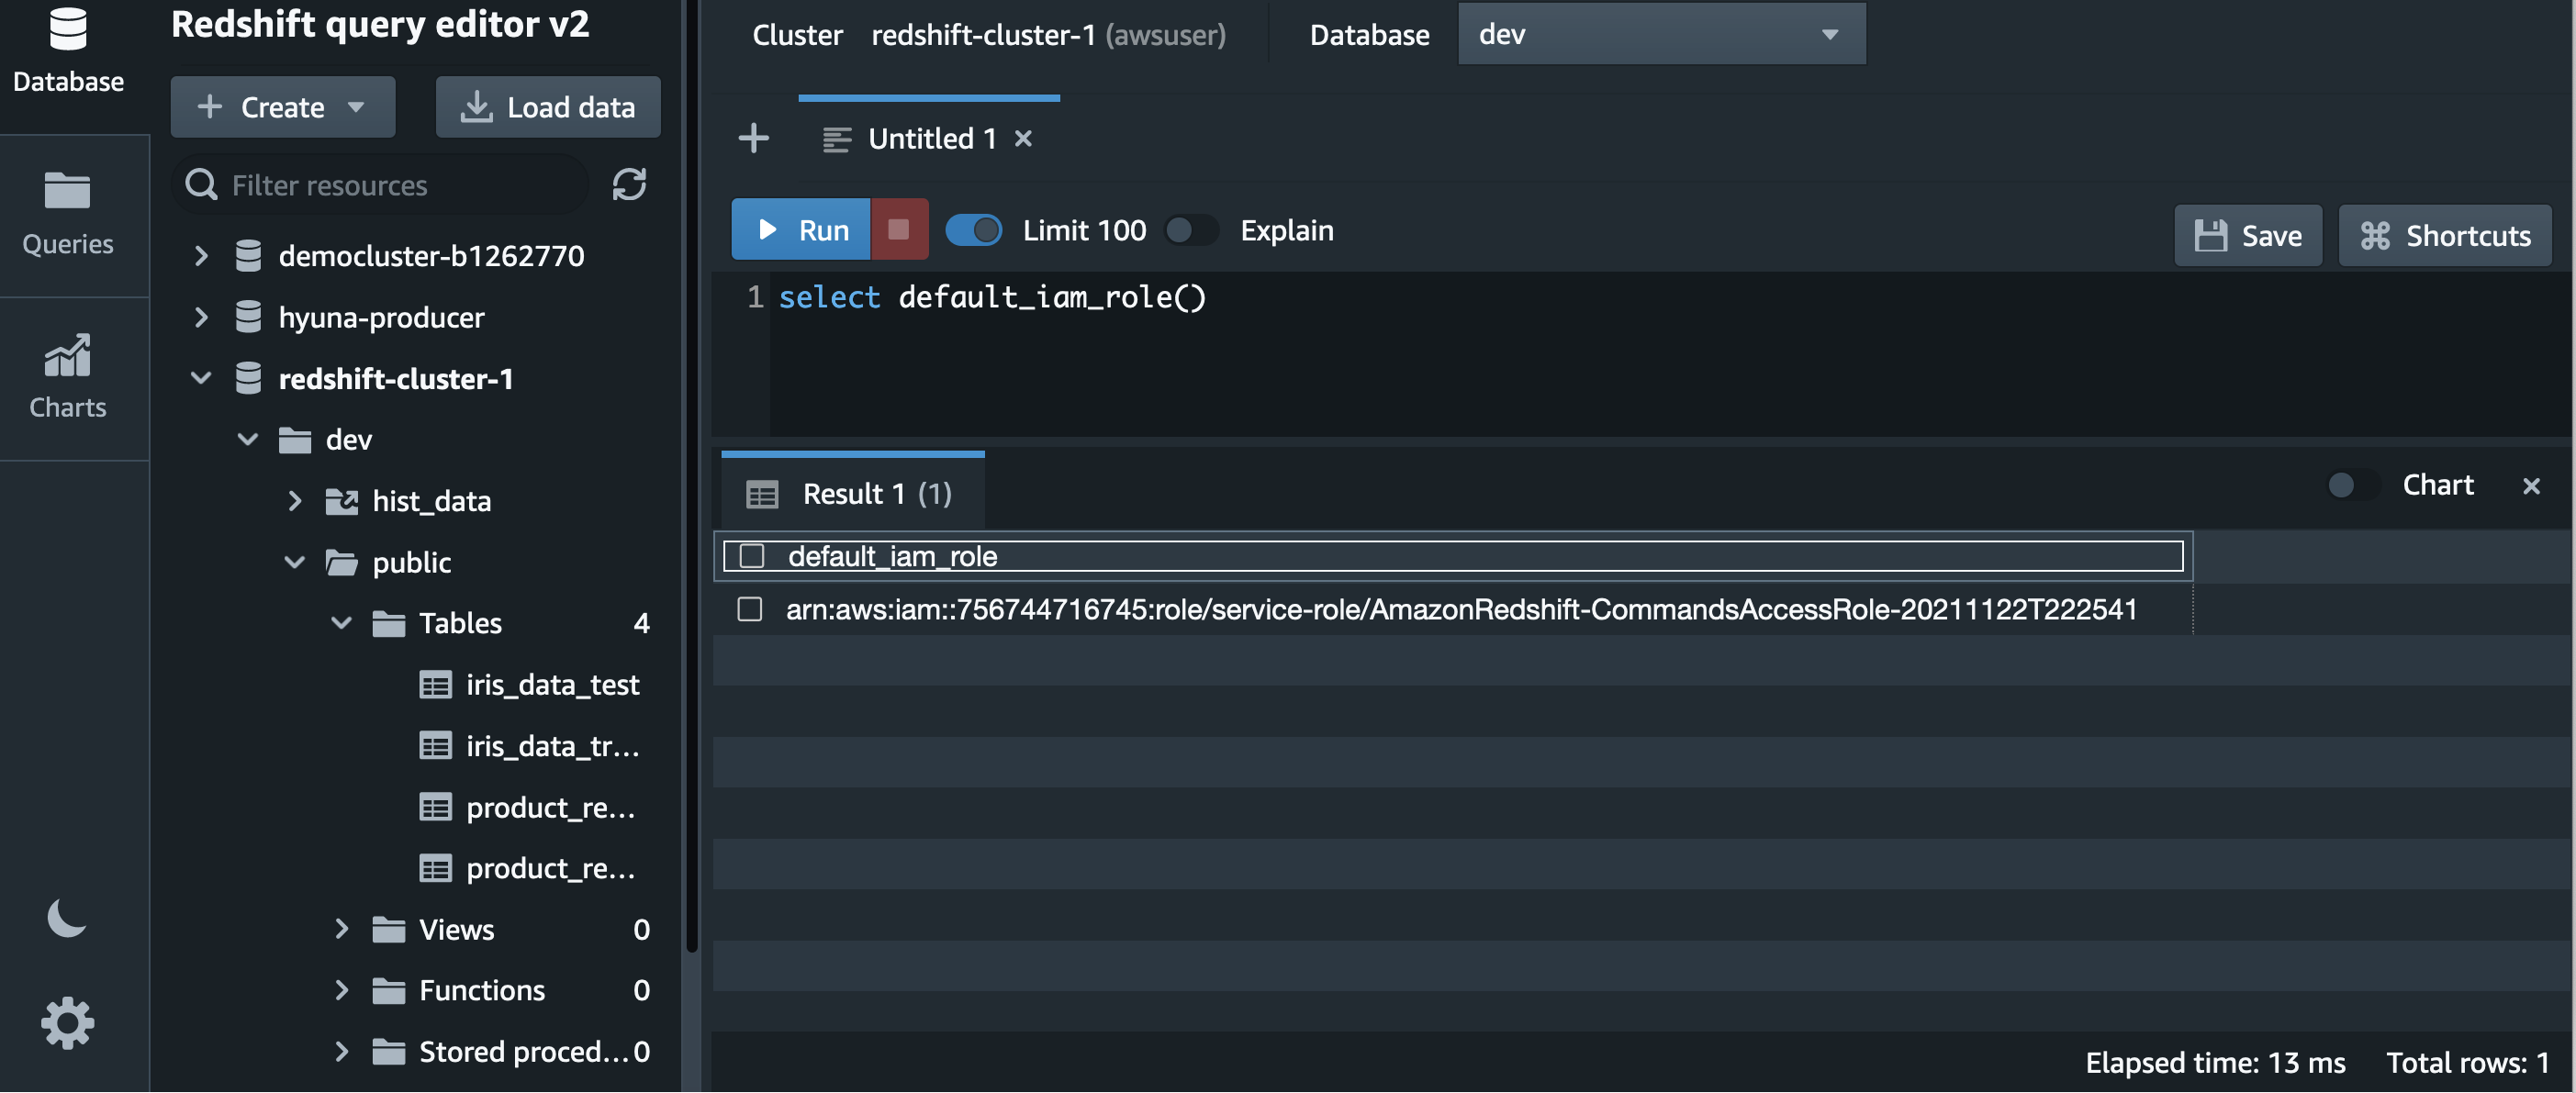
To run SQL commands, we use Amazon Redshift Query Editor V2, a web-based tool that you can use to explore, analyze, share, and collaborate on data stored on Amazon Redshift. It supports data warehouses on Amazon Redshift and data lakes through Amazon Redshift Spectrum. However, you can use the default IAM role with any tools of your choice.
First verify the cluster is using the default IAM role, as shown in the following screenshot.
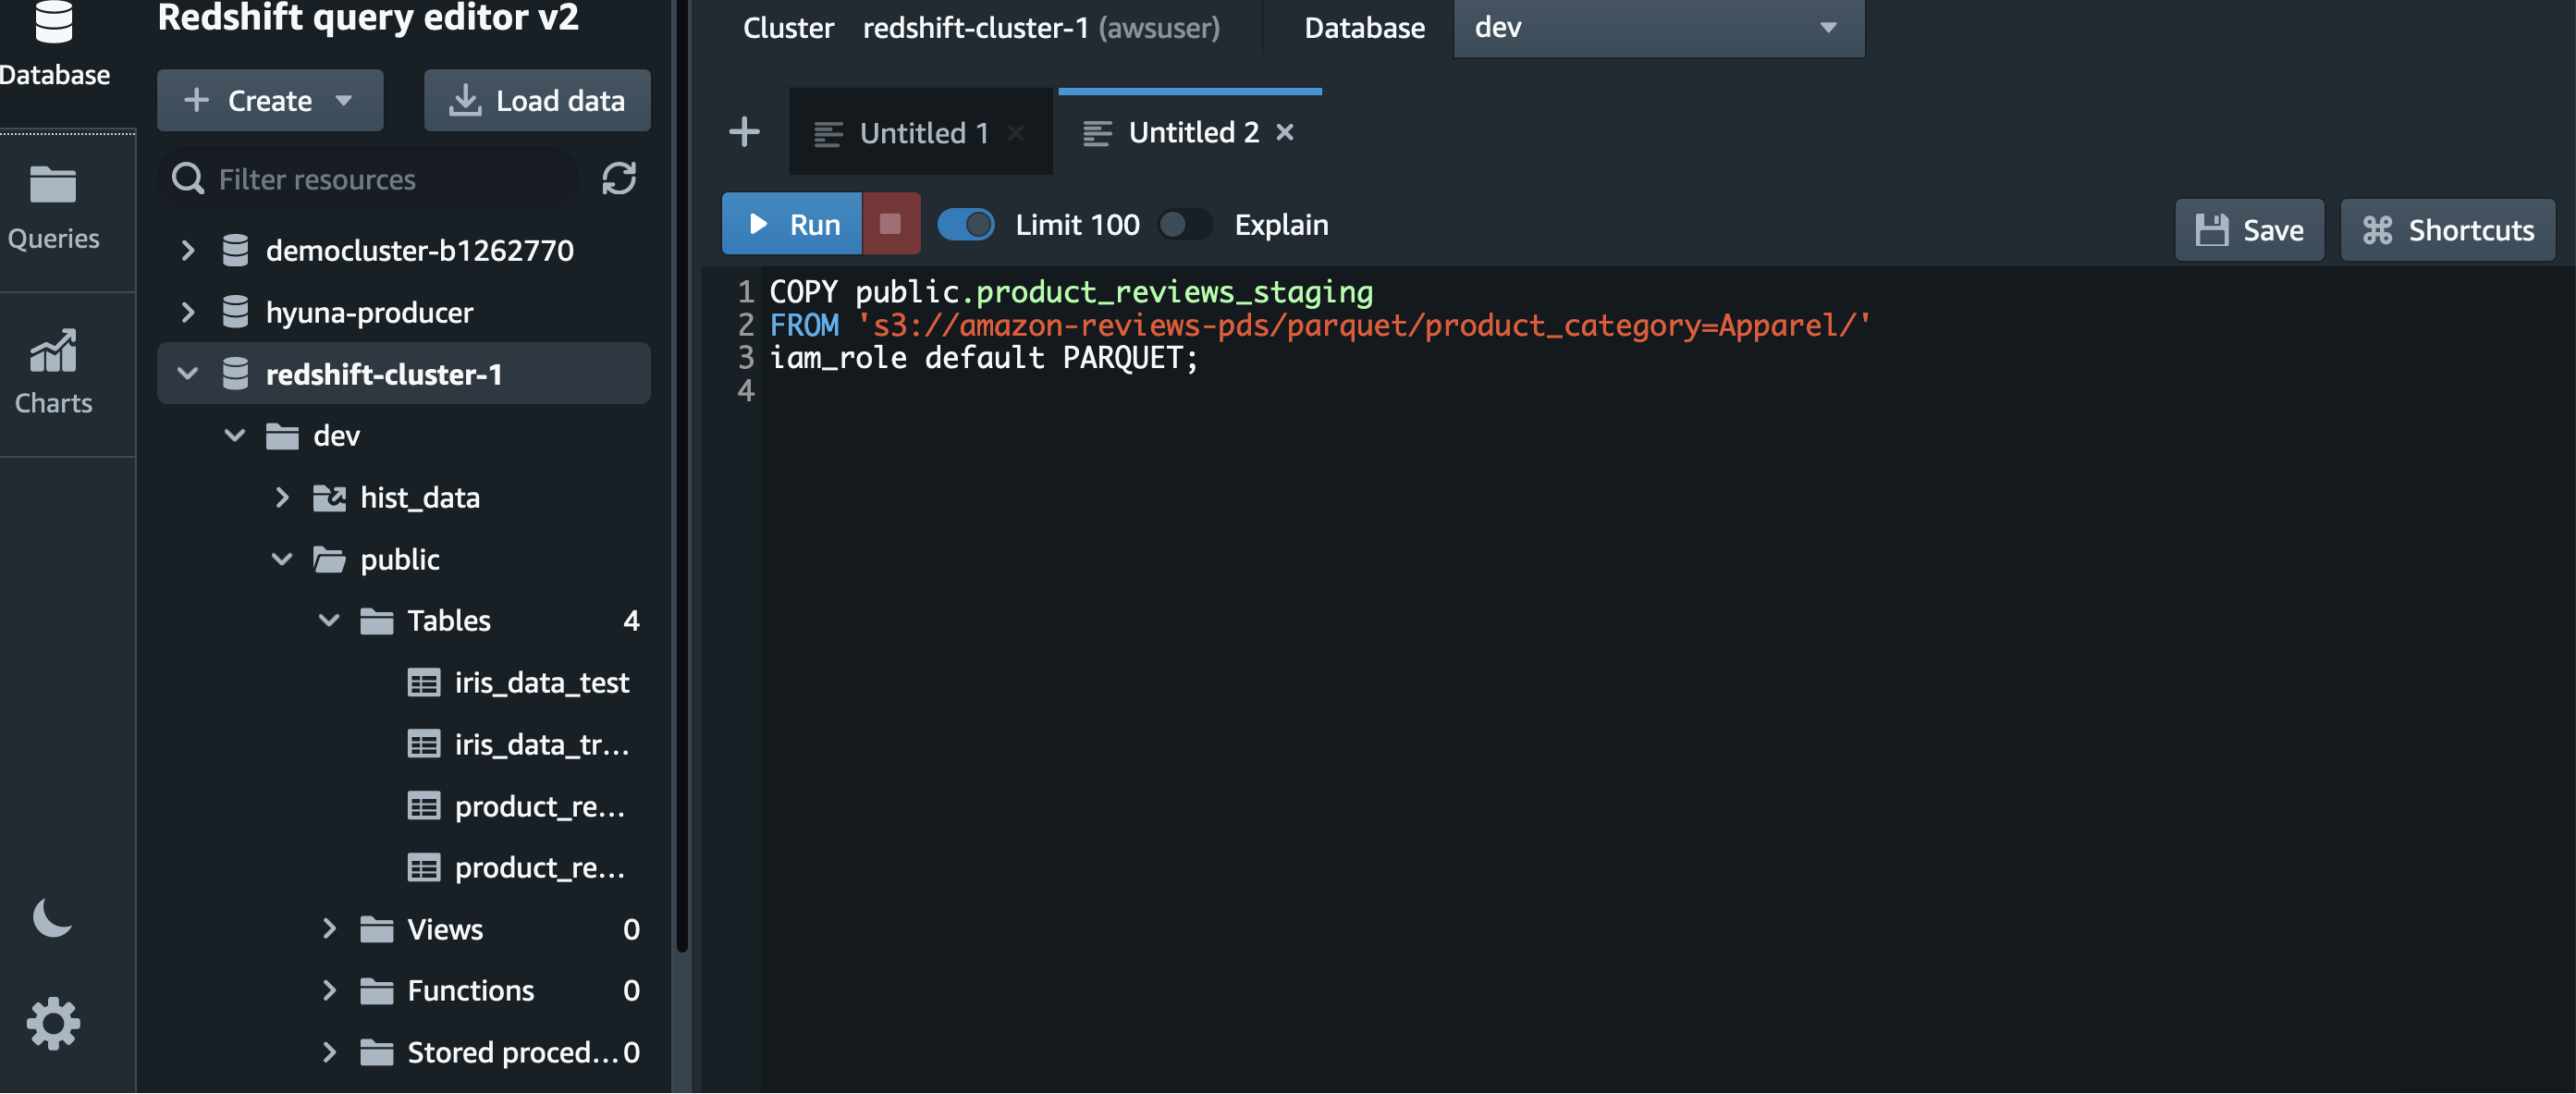
Load data from Amazon S3
The SQL in the following screenshot describes how to load data from Amazon S3 using the default IAM role.
Unload data to Amazon S3
With an Amazon Redshift lake house architecture, you can query data in your data lake and write data back to your data lake in open formats using the UNLOAD command. After the data files are in Amazon S3, you can share the data with other services for further processing.
The SQL in the following screenshot describes how to unload data to Amazon S3 using the default IAM role.
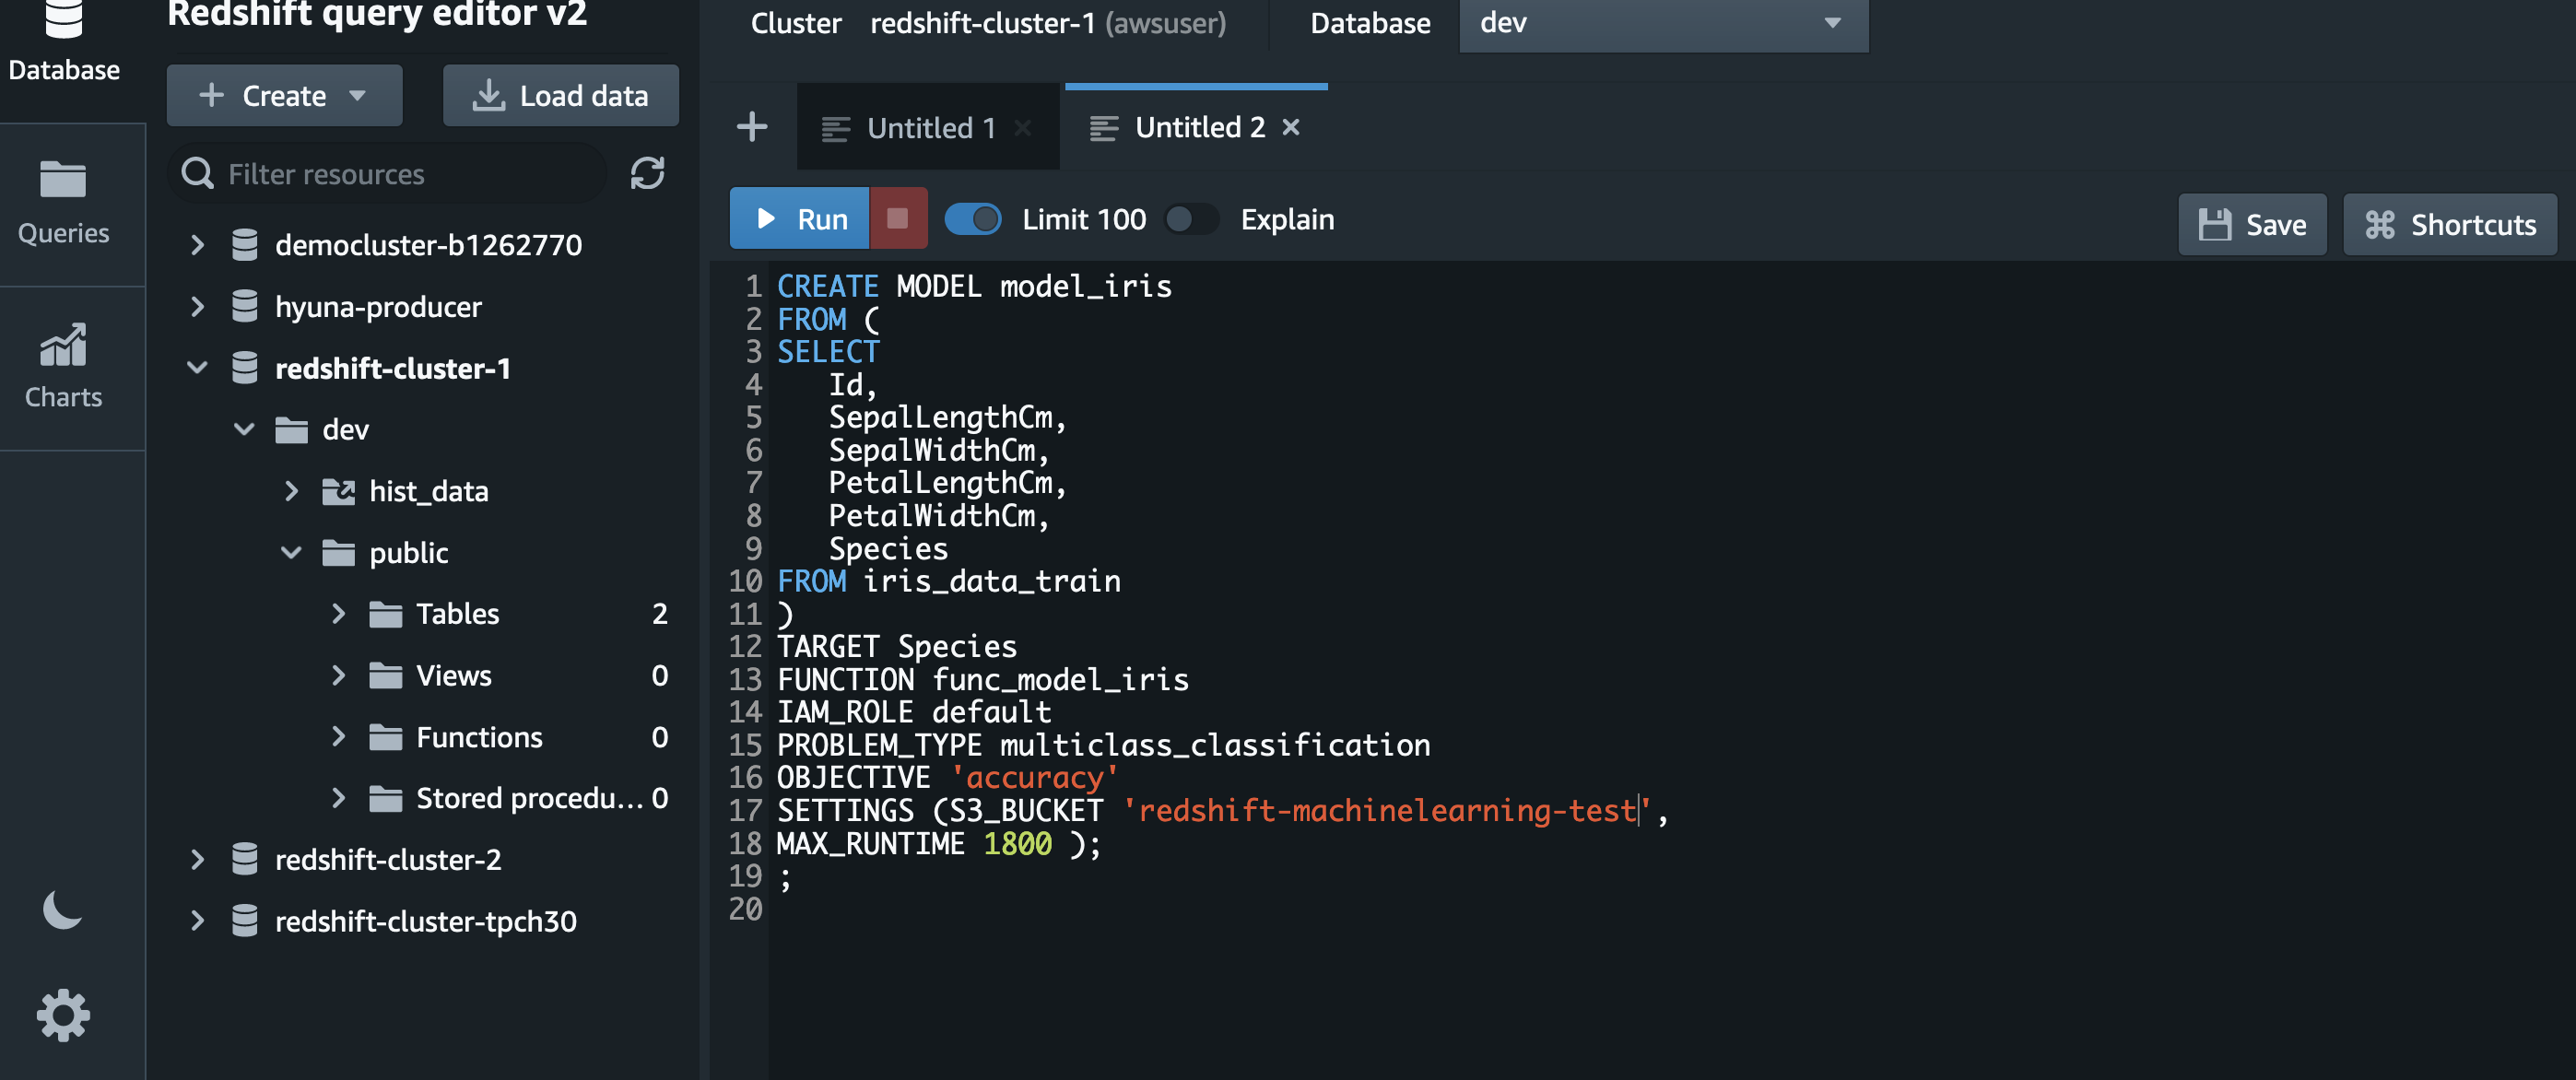
Create an ML model
Redshift ML enables SQL users to create, train, and deploy machine learning (ML) models using familiar SQL commands. The SQL in the following screenshot describes how to build an ML model using the default IAM role. We use the Iris dataset from the UCI Machine Learning Repository.
Create an external schema and external table
Redshift Spectrum is a feature of Amazon Redshift that allows you to perform SQL queries on data stored in S3 buckets using external schema and external tables. This eliminates the need to move data from a storage service to a database, and instead directly queries data inside an S3 bucket. Redshift Spectrum also expands the scope of a given query because it extends beyond a user’s existing Amazon Redshift data warehouse nodes and into large volumes of unstructured S3 data lakes.
The default IAM role requires redshift as part of the catalog database name or resources tagged with the Amazon Redshift service tag due to security considerations. You can customize the policy attached to default role as per your security requirement. In the following example, we use the AWS Glue Data Catalog name redshift_data.
Restrict access to the default IAM role
To control access privileges of the IAM role created and set it as default for your Amazon Redshift cluster, use the ASSUMEROLE privilege. This access control applies to database users and groups when they run commands such as COPY and UNLOAD. After you grant the ASSUMEROLE privilege to a user or group for the IAM role, the user or group can assume that role when running these commands. With the ASSUMEROLE privilege, you can grant access to the appropriate commands as required.
Best practices
Amazon Redshift uses the AWS security frameworks to implement industry-leading security in the areas of authentication, access control, auditing, logging, compliance, data protection, and network security. For more information, refer to Security in Amazon Redshift and Security best practices in IAM.
Conclusion
This post showed you how the default IAM role simplifies SQL operations that access other AWS services by eliminating the need to specify the ARN for the IAM role. This new functionality helps make Amazon Redshift easier than ever to use, and reduces reliance on an administrator to wrangle these permissions.
As an administrator, you can start using the default IAM role to grant IAM permissions to your Redshift cluster and allow your end-users such as data analysts and developers to use default IAM role with their SQL commands without having to provide the ARN for the IAM role.
About the Authors
Nita Shah is an Analytics Specialist Solutions Architect at AWS based out of New York. She has been building data warehouse solutions for over 20 years and specializes in Amazon Redshift. She is focused on helping customers design and build enterprise-scale well-architected analytics and decision support platforms.
Evgenii Rublev is a Software Development Engineer on the AWS Redshift team. He has worked on building end-to-end applications for over 10 years. He is passionate about innovations in building high-availability and high-performance applications to drive a better customer experience. Outside of work, Evgenii enjoys spending time with his family, traveling, and reading books.
Debu Panda, a Principal Product Manager at AWS, is an industry leader in analytics, application platform, and database technologies, and has more than 25 years of experience in the IT world. Debu has published numerous articles on analytics, enterprise Java, and databases and has presented at multiple conferences such as re:Invent, Oracle Open World, and Java One. He is lead author of the EJB 3 in Action (Manning Publications 2007, 2014) and Middleware Management (Packt).
Building a multi-Region application requires lots of preparation and work. Many AWS services have features to help you build and manage a multi-Region architecture, but identifying those capabilities across 200+ services can be overwhelming.
In this 3-part blog series, we’ll explore AWS services with features to assist you in building multi-Region applications. In Part 1, we’ll build a foundation with AWS security, networking, and compute services. In Part 2, we’ll add in data and replication strategies. Finally, in Part 3, we’ll look at the application and management layers.
Considerations before getting started
AWS Regions are built with multiple isolated and physically separate Availability Zones (AZs). This approach allows you to create highly available Well-Architected workloads that span AZs to achieve greater fault tolerance. There are three general reasons that you may need to expand beyond a single Region:
Expansion to a global audience as an application grows and its user base becomes more geographically dispersed, there can be a need to reduce latencies for different parts of the world.
Local laws and regulations may have strict data residency and privacy requirements that must be followed.
Ensuring security, identity, and compliance
Creating a security foundation starts with proper authentication, authorization, and accounting to implement the principle of least privilege. AWS Identity and Access Management (IAM) operates in a global context by default. With IAM, you specify who can access which AWS resources and under what conditions. For workloads that use directory services, the AWS Directory Service for Microsoft Active Directory Enterprise Edition can be set up to automatically replicate directory data across Regions. This allows applications to reduce lookup latencies by using the closest directory and creates durability by spanning multiple Regions.
AWS KMS can be used to encrypt data at rest, and is used extensively for encryption across AWS services. By default, keys are confined to a single Region. AWS KMS multi-Region keys can be created to replicate keys to a second Region, which eliminates the need to decrypt and re-encrypt data with a different key in each Region.
As your application expands to new Regions, AWS Security Hub can aggregate and link findings to a single Region to create a centralized view across accounts and Regions. These findings are continuously synced between Regions to keep you updated on global findings.
We put these features together in Figure 1.
Figure 1. Multi-Region security, identity, and compliance services
Building a global network
For resources launched into virtual networks in different Regions, Amazon Virtual Private Cloud (Amazon VPC) allows private routing between Regions and accounts with VPC peering. These resources can communicate using private IP addresses and do not require an internet gateway, VPN, or separate network appliances. This works well for smaller networks that only require a few peering connections. However, as the number of peered connections increases, the mesh of peered connections can become difficult to manage and troubleshoot.
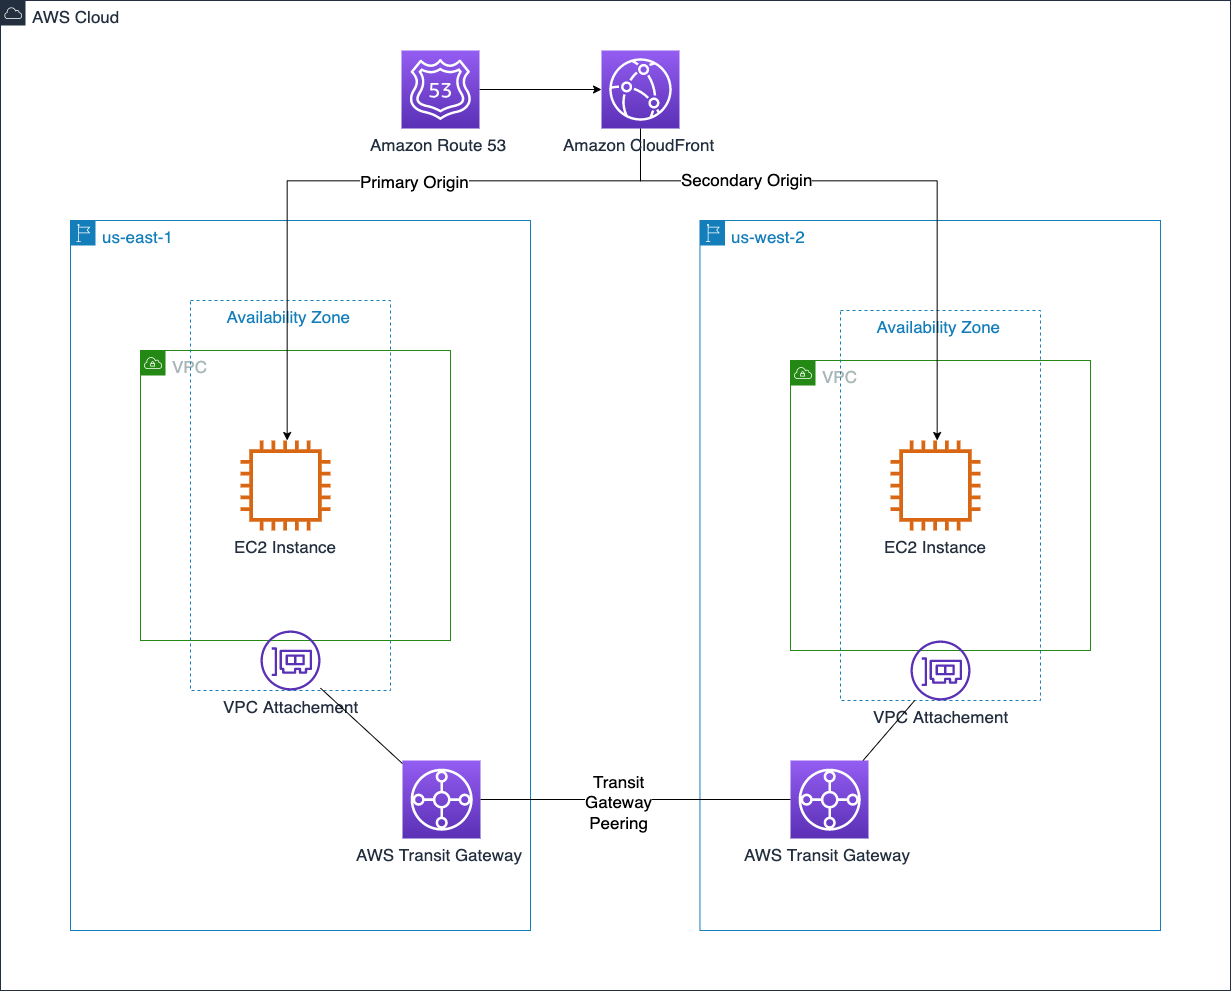
AWS Transit Gateway can help reduce these difficulties by creating a central transitive hub to act as a cloud router. A Transit Gateway’s routing capabilities can expand to additional Regions with Transit Gateway inter-Region peering to create a globally distributed private network.
Building a reliable, cost-effective way to route users to distributed Internet applications requires highly available and scalable Domain Name System (DNS) records. Amazon Route 53 does exactly that.
Route 53 routing policies can route traffic to a record with the lowest latency, or automatically fail over a record. If a larger failure occurs, the Route 53 Application Recovery Controller can simplify the monitoring and failover process for application failures across Regions, AZs, and on-premises.
Amazon CloudFront’s content delivery network is truly global, built across 300+ points of presence (PoP) spread throughout the world. Applications that have multiple possible origins, such as across Regions, can use CloudFront origin failover to automatically fail over the origin. CloudFront’s capabilities expand beyond serving content, with the ability to run compute at the edge. CloudFront functions make it easy to run lightweight JavaScript functions, and AWS Lambda@Edge makes it easy to run Node.js and Python functions across these 300+ PoPs.
Although EC2 instances and their associated Amazon Elastic Block Store (Amazon EBS) volumes live in a single AZ, Amazon Data Lifecycle Manager can automate the process of taking and copying EBS snapshots across Regions. This can enhance DR strategies by providing a relatively easy cold backup-and-restore option for EBS volumes.
As an architecture expands into multiple Regions, it can become difficult to track where instances are provisioned. Amazon EC2 Global View helps solve this by providing a centralized dashboard to see Amazon EC2 resources such as instances, VPCs, subnets, security groups, and volumes in all active Regions.
Microservice-based applications that use containers benefit from quicker start-up times. Amazon Elastic Container Registry (Amazon ECR) can help ensure this happens consistently across Regions with private image replication at the registry level. An ECR private registry can be configured for either cross-Region or cross-account replication to ensure your images are ready in secondary Regions when needed.
We bring these compute layer features together in Figure 3.
Figure 3. AMI and EBS snapshot copy across Regions
Summary
It’s important to create a solid foundation when architecting a multi-Region application. These foundations pave the way for you to move fast in a secure, reliable, and elastic way as you build out your application. In this post, we covered options across AWS security, networking, and compute services that have built-in functionality to take away some of the undifferentiated heavy lifting. We’ll cover data, application, and management services in future posts.
Looking for more architecture content?AWS Architecture Center provides reference architecture diagrams, vetted architecture solutions, Well-Architected best practices, patterns, icons, and more!
In this post you’ll learn about temporary elevated access and how it can mitigate risks relating to human access to your AWS environment. You’ll also be able to download a minimal reference implementation and use it as a starting point to build a temporary elevated access solution tailored for your organization.
Introduction
While many modern cloud architectures aim to eliminate the need for human access, there often remain at least some cases where it is required. For example, unexpected issues might require human intervention to diagnose or fix, or you might deploy legacy technologies into your AWS environment that someone needs to configure manually.
AWS provides a rich set of tools and capabilities for managing access. Users can authenticate with multi-factor authentication (MFA), federate using an external identity provider, and obtain temporary credentials with limited permissions. AWS Identity and Access Management (IAM) provides fine-grained access control, and AWS Single Sign-On (AWS SSO) makes it easy to manage access across your entire organization using AWS Organizations.
For higher-risk human access scenarios, your organization can supplement your baseline access controls by implementing temporary elevated access.
What is temporary elevated access?
The goal of temporary elevated access is to ensure that each time a user invokes access, there is an appropriate business reason for doing so. For example, an appropriate business reason might be to fix a specific issue or deploy a planned change.
Traditional access control systems require users to be authenticated and authorized before they can access a protected resource. Becoming authorized is typically a one-time event, and a user’s authorization status is reviewed periodically—for example as part of an access recertification process.
With persistent access, also known as standing access, a user who is authenticated and authorized can invoke access at any time just by navigating to a protected resource. The process of invoking access does not consider the reason why they are invoking it on each occurrence. Today, persistent access is the model that AWS Single Sign-On supports, and is the most common model used for IAM users and federated users.
With temporary elevated access, also known as just-in-time access, users must be authenticated and authorized as before—but furthermore, each time a user invokes access an additional process takes place, whose purpose is to identify and record the business reason for invoking access on this specific occasion. The process might involve additional human actors or it might use automation. When the process completes, the user is only granted access if the business reason is appropriate, and the scope and duration of their access is aligned to the business reason.
Why use temporary elevated access?
You can use temporary elevated access to mitigate risks related to human access scenarios that your organization considers high risk. Access generally incurs risk when two elements come together: high levels of privilege, such as ability to change configuration, modify permissions, read data, or update data; and high-value resources, such as production environments, critical services, or sensitive data. You can use these factors to define a risk threshold, above which you enforce temporary elevated access, and below which you continue to allow persistent access.
Your motivation for implementing temporary elevated access might be internal, based on your organization’s risk appetite; or external, such as regulatory requirements applicable to your industry. If your organization has regulatory requirements, you are responsible for interpreting those requirements and determining whether a temporary elevated access solution is required, and how it should operate.
Regardless of the source of requirement, the overall goal is to reduce risk.
Important: While temporary elevated access can reduce risk, the preferred approach is always to automate your way out of needing human access in the first place. Aim to use temporary elevated access only for infrequent activities that cannot yet be automated. From a risk perspective, the best kind of human access is the kind that doesn’t happen at all.
How can temporary elevated access help reduce risk?
In scenarios that require human intervention, temporary elevated access can help manage the risks involved. It’s important to understand that temporary elevated access does not replace your standard access control and other security processes, such as access governance, strong authentication, session logging and monitoring, and anomaly detection and response. Temporary elevated access supplements the controls you already have in place.
The following are some of the ways that using temporary elevated access can help reduce risk:
1. Ensuring users only invoke elevated access when there is a valid business reason. Users are discouraged from invoking elevated access habitually, and service owners can avoid potentially disruptive operations during critical time periods.
2. Visibility of access to other people. With persistent access, user activity is logged—but no one is routinely informed when a user invokes access, unless their activity causes an incident or security alert. With temporary elevated access, every access invocation is typically visible to at least one other person. This can arise from their participation in approvals, notifications, or change and incident management processes which are multi-party by nature. With greater visibility to more people, inappropriate access by users is more likely to be noticed and acted upon.
3. A reminder to be vigilant. Temporary elevated access provides an overt reminder for users to be vigilant when they invoke high-risk access. This is analogous to the kind security measures you see in a physical security setting. Imagine entering a secure facility. You see barriers, fences, barbed wire, CCTV, lighting, guards, and signs saying “You are entering a restricted area.” Temporary elevated access has a similar effect. It reminds users there is a heightened level of control, their activity is being monitored, and they will be held accountable for any actions they perform.
4. Reporting, analytics, and continuous improvement. A temporary elevated access process records the reasons why users invoke access. This provides a rich source of data to analyze and derive insights. Management can see why users are invoking access, which systems need the most human access, and what kind of tasks they are performing. Your organization can use this data to decide where to invest in automation. You can measure the amount of human access and set targets to reduce it. The presence of temporary elevated access might also incentivize users to automate common tasks, or ask their engineering teams to do so.
Implementing temporary elevated access
Before you examine the reference implementation, first take a look at a logical architecture for temporary elevated access, so you can understand the process flow at a high level.
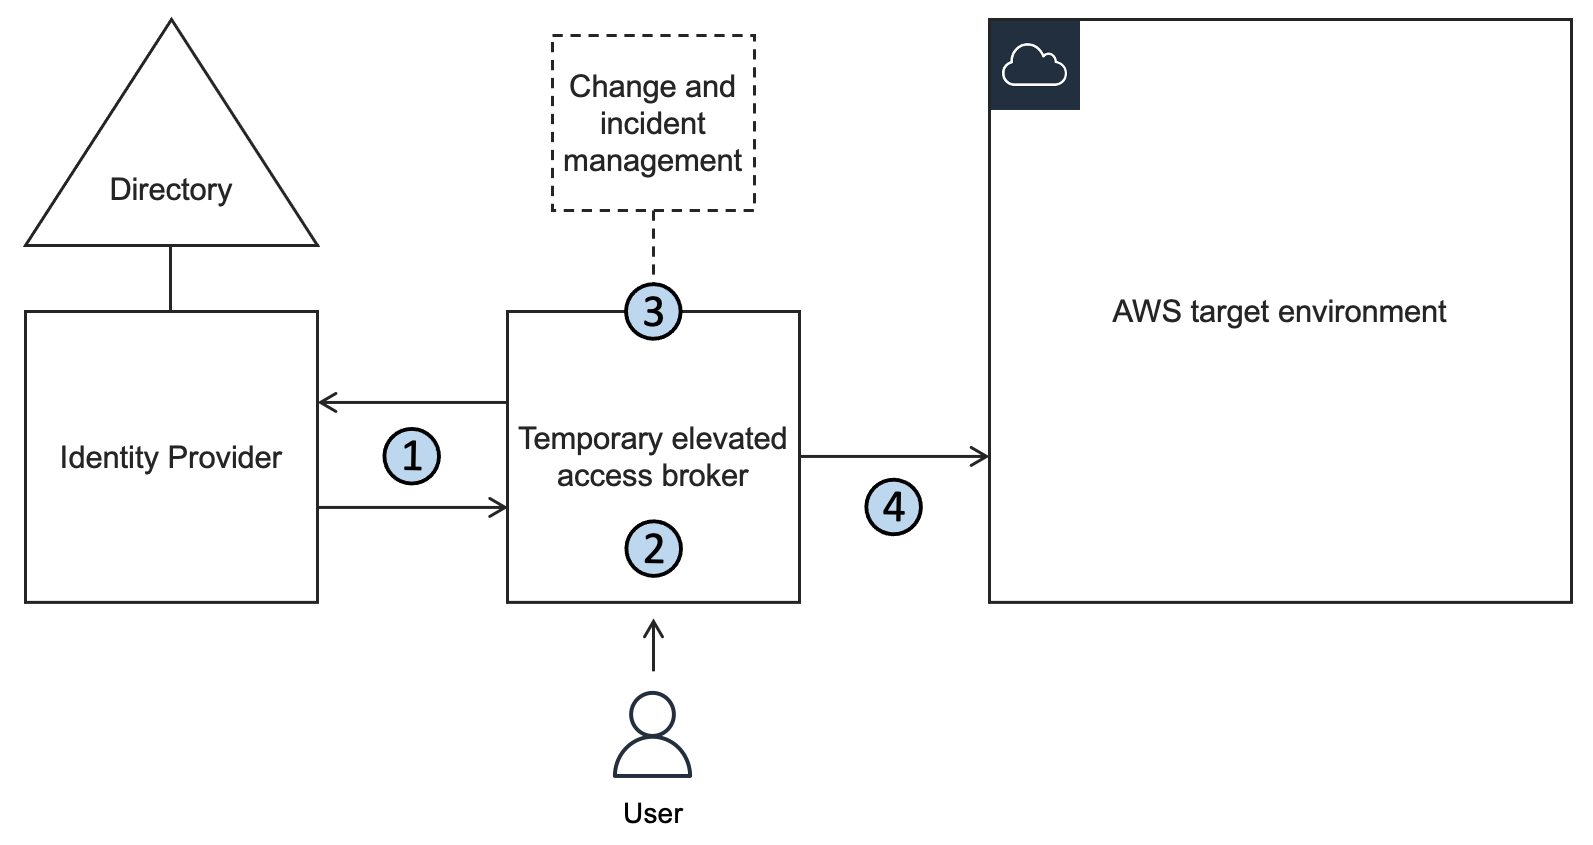
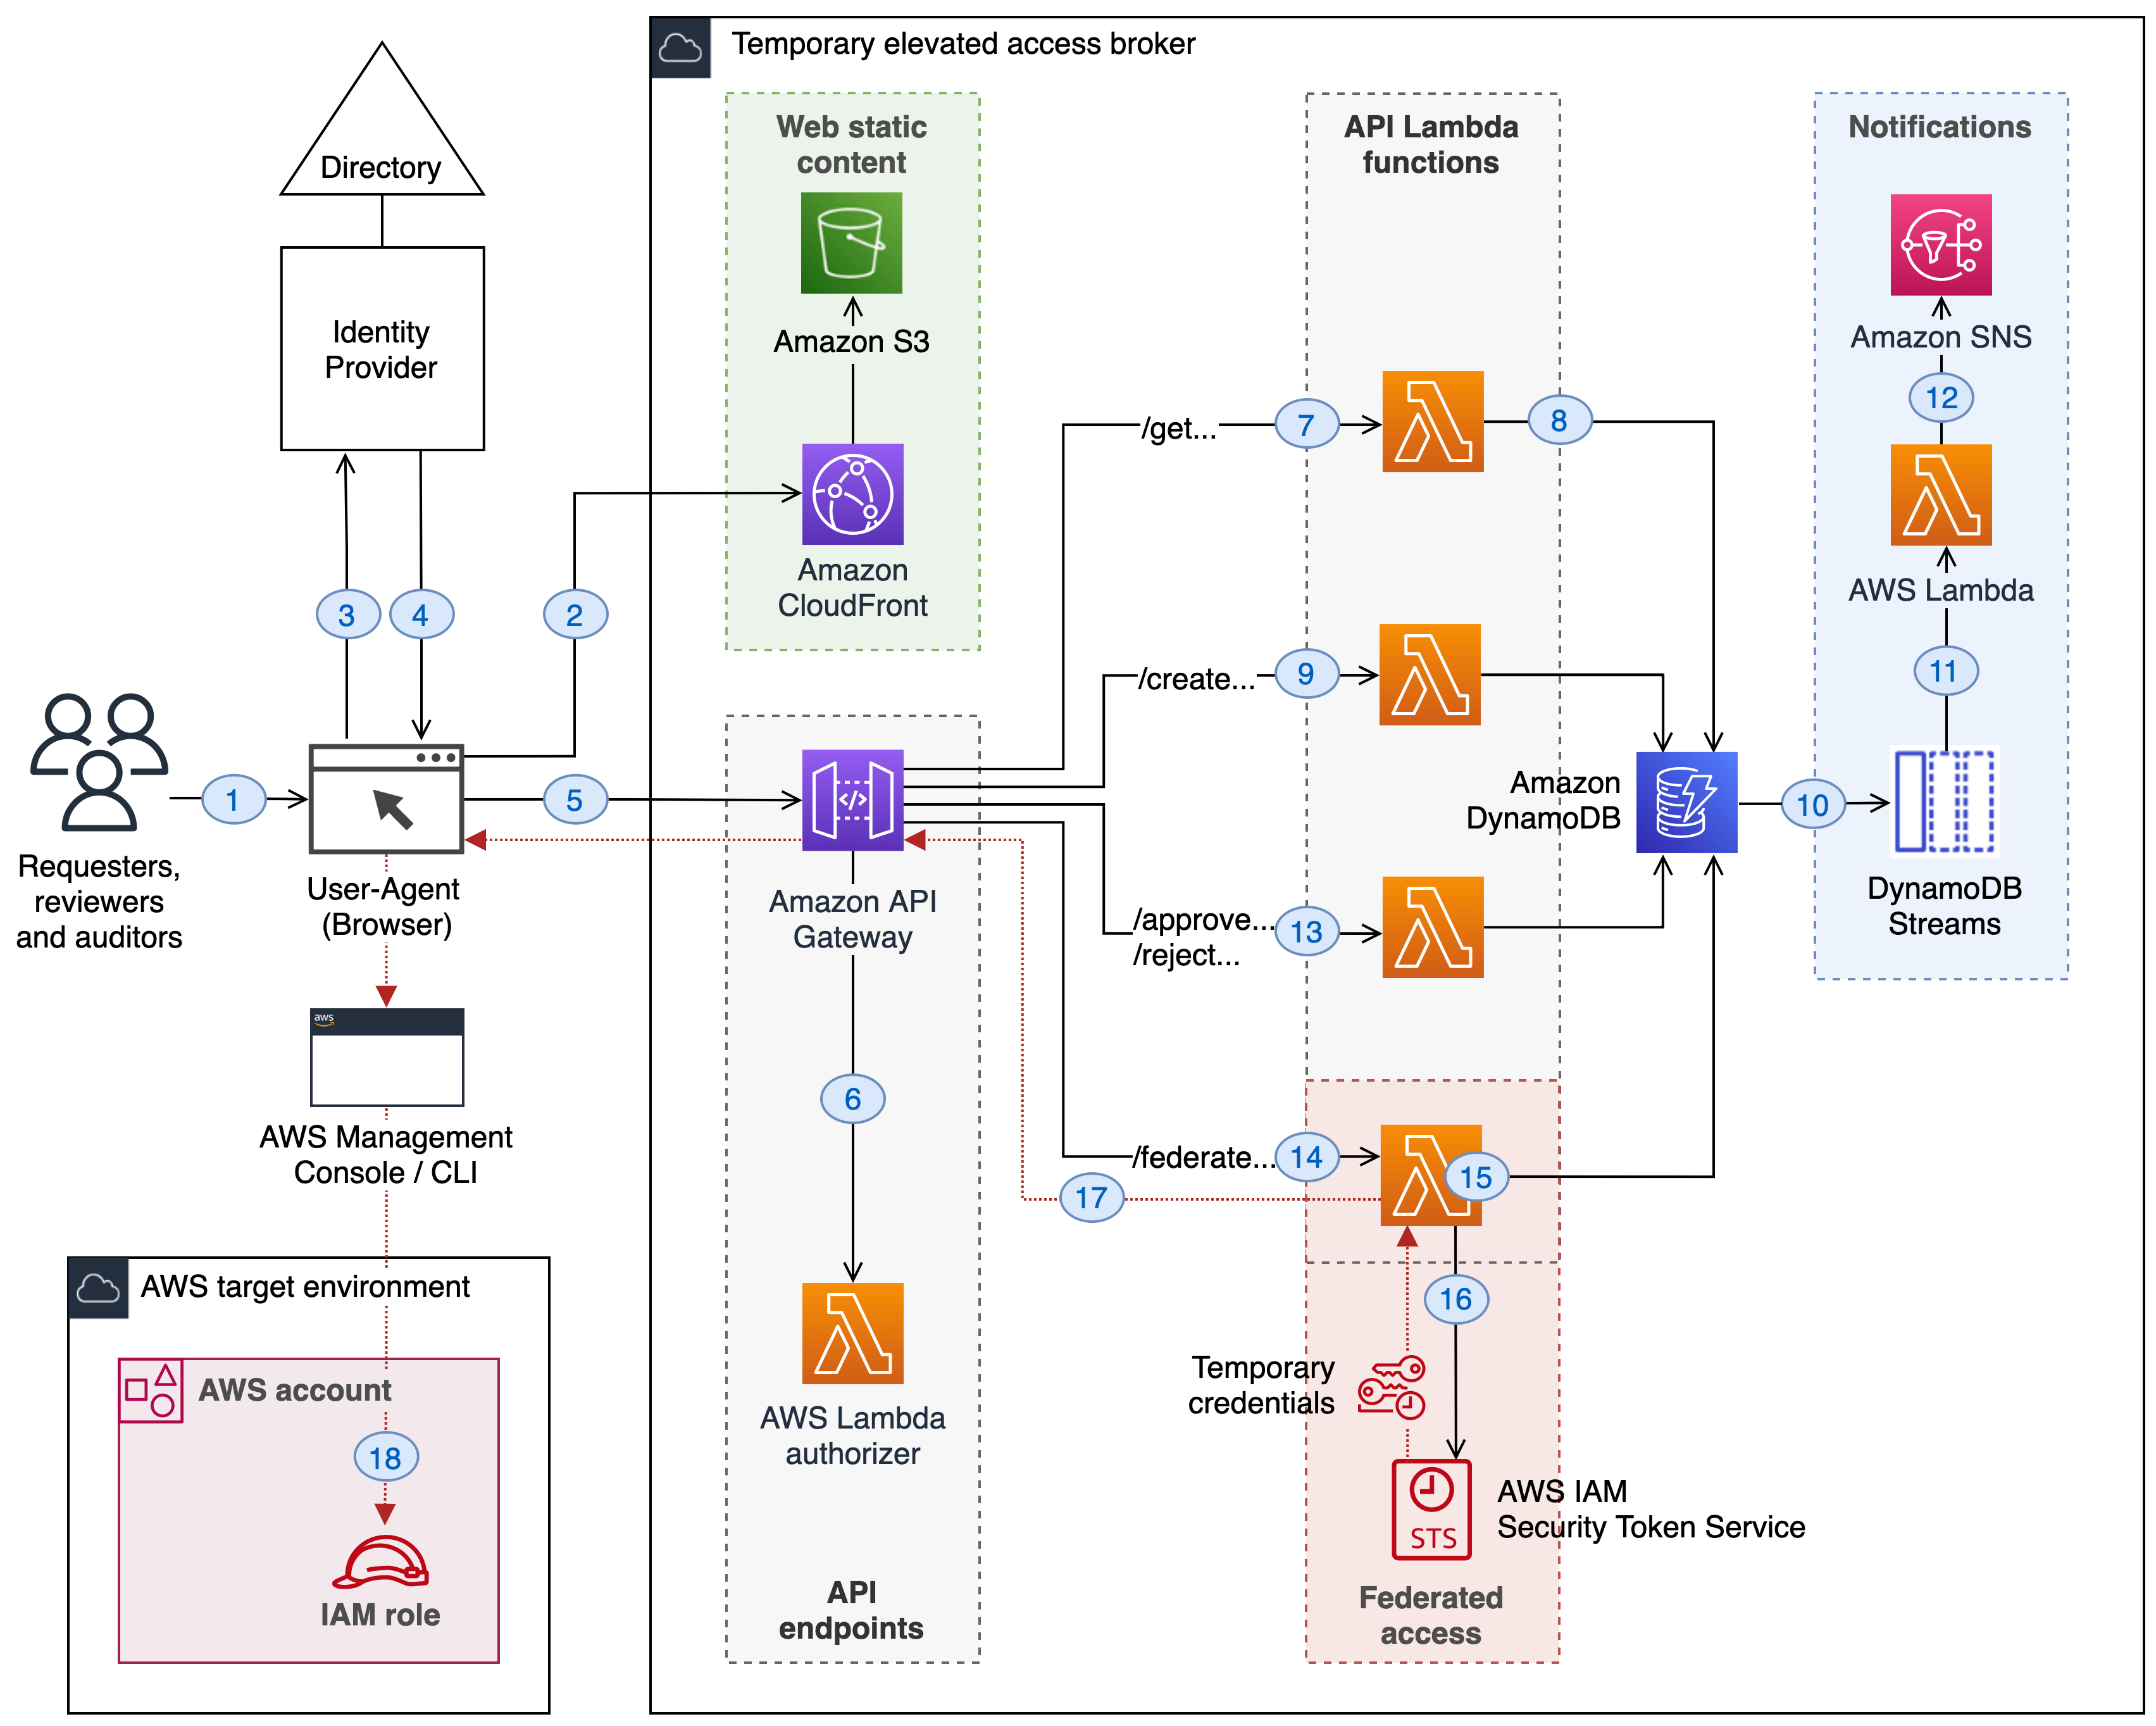
A typical temporary elevated access solution involves placing an additional component between your identity provider and the AWS environment that your users need to access. This is referred to as a temporary elevated access broker, shown in Figure 1.
Figure 1: A logical architecture for temporary elevated access
When a user needs to perform a task requiring temporary elevated access to your AWS environment, they will use the broker to invoke access. The broker performs the following steps:
1. Authenticate the user and determine eligibility. The broker integrates with your organization’s existing identity provider to authenticate the user with multi-factor authentication (MFA), and determine whether they are eligible for temporary elevated access.
Note: Eligibility is a key concept in temporary elevated access. You can think of it as pre-authorization to invoke access that is contingent upon additional conditions being met, described in step 3. A user typically becomes eligible by becoming a trusted member of a team of admins or operators, and the scope of their eligibility is based on the tasks they’re expected to perform as part of their job function. Granting and revoking eligibility is generally based on your organization’s standard access governance processes. Eligibility can be expressed as group memberships (if using role-based access control, or RBAC) or user attributes (if using attribute-based access control, or ABAC). Unlike regular authorization, eligibility is not sufficient to grant access on its own.
2. Initiate the process for temporary elevated access. The broker provides a way to start the process for gaining temporary elevated access. In most cases a user will submit a request on their own behalf—but some broker designs allow access to be initiated in other ways, such as an operations user inviting an engineer to assist them. The scope of a user’s requested access must be a subset of their eligibility. The broker might capture additional information about the context of the request in order to perform the next step.
3. Establish a business reason for invoking access. The broker tries to establish whether there is a valid business reason for invoking access with a given scope on this specific occasion. Why does this user need this access right now? The process of establishing a valid business reason varies widely between organizations. It might be a simple approval workflow, a quorum-based authorization, or a fully automated process. It might integrate with existing change and incident management systems to infer the business reason for access. A broker will often provide a way to expedite access in a time-critical emergency, which is a form of break-glass access. A typical broker implementation allows you to customize this step.
4. Grant time-bound access. If the business reason is valid, the broker grants time-bound access to the AWS target environment. The scope of access that is granted to the user must be a subset of their eligibility. Further, the scope and duration of access granted should be necessary and sufficient to fulfill the business reason identified in the previous step, based on the principle of least privilege.
A minimal reference implementation for temporary elevated access
To get started with temporary elevated access, you can deploy a minimal reference implementation accompanying this blog post. Information about deploying, running and extending the reference implementation is available in the Git repo README page.
Note: You can use this reference implementation to complement the persistent access that you manage for IAM users, federated users, or manage through AWS Single Sign-On. For example, you can use the multi-account access model of AWS SSO for persistent access management, and create separate roles for temporary elevated access using this reference implementation.
To establish a valid business reason for invoking access, the reference implementation uses a single-step approval workflow. You can adapt the reference implementation and replace this with a workflow or business logic of your choice.
To grant time-bound access, the reference implementation uses the identity broker pattern. In this pattern, the broker itself acts as an intermediate identity provider which conditionally federates the user into the AWS target environment granting a time-bound session with limited scope.
Figure 2 shows the architecture of the reference implementation.
Figure 2: Architecture of the reference implementation
To illustrate how the reference implementation works, the following steps walk you through a user’s experience end-to-end, using the numbers highlighted in the architecture diagram.
Starting the process
Consider a scenario where a user needs to perform a task that requires privileged access to a critical service running in your AWS environment, for which your security team has configured temporary elevated access.
Loading the application
The user first needs to access the temporary elevated access broker so that they can request the AWS access they need to perform their task.
The user navigates to the temporary elevated access broker in their browser.
The user’s browser loads a web application using web static content from an Amazon CloudFront distribution whose target is an Amazon S3 bucket.
The broker uses a web application that runs in the browser, known as a Single Page Application (SPA).
Note: CloudFront and S3 are only used for serving web static content. If you prefer, you can modify the solution to serve static content from a web server in your private network.
The user returns to the application as an authenticated user with an access token and ID token signed by the identity provider.
The access token grants delegated authority to the browser-based application to call server-side APIs on the user’s behalf. The ID token contains the user’s attributes and group memberships, and is used for authorization.
Calling protected APIs
The application calls APIs hosted by Amazon API Gateway and passes the access token and ID token with each request.
The Lambda authorizer checks whether the user’s access token and ID token are valid. It then uses the ID token to determine the user’s identity and their authorization based on their group memberships.
Displaying information
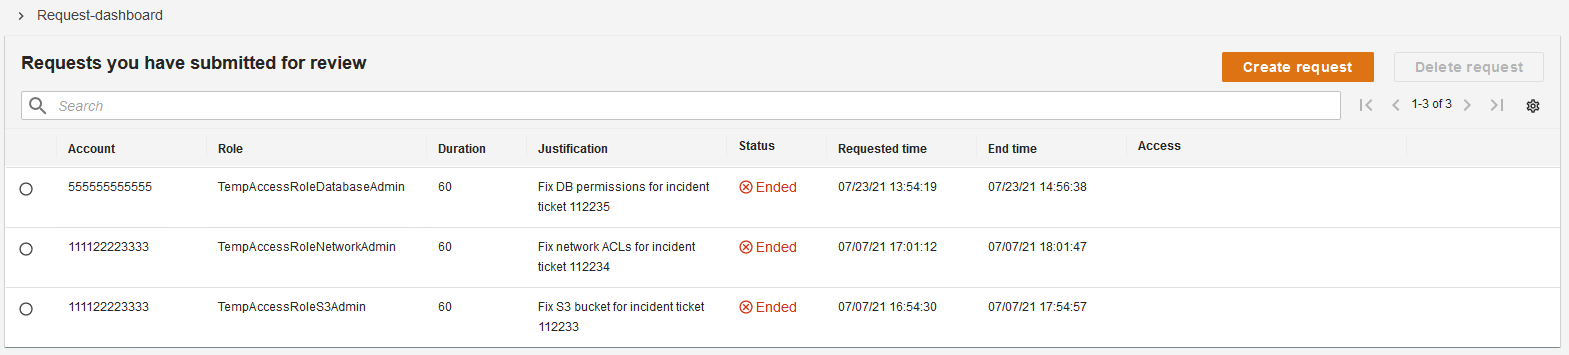
The application calls one of the /get… API endpoints to fetch data about previous temporary elevated access requests.
The /get… API endpoints invoke Lambda functions which fetch data from a table in Amazon DynamoDB.
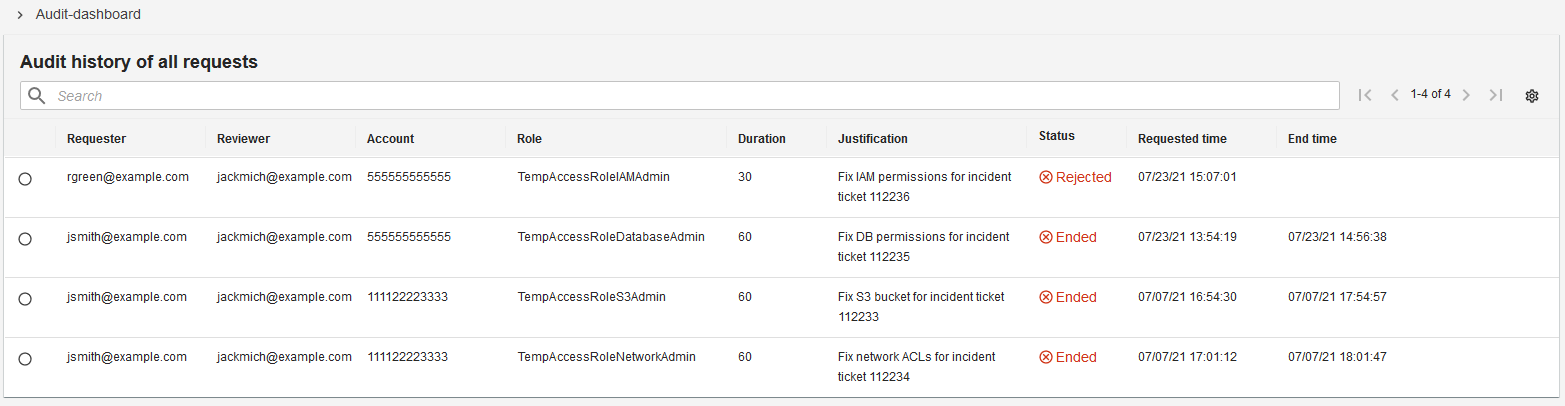
The application displays information about previously-submitted temporary elevated access requests in a request dashboard, as shown in Figure 3.
Figure 3: The request dashboard
Submitting requests
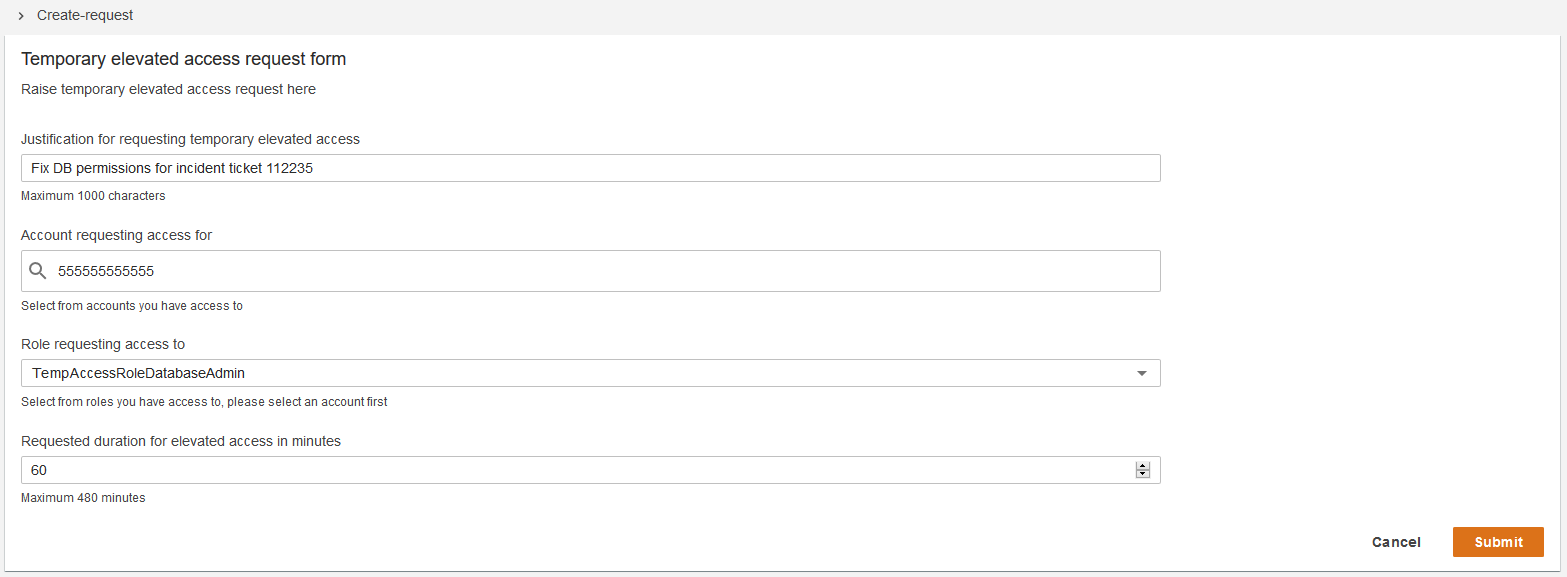
A user who is eligible for temporary elevated access can submit a new request in the request dashboard by choosing Create request. As shown in Figure 4, the application then displays a form with input fields for the IAM role name and AWS account ID the user wants to access, a justification for invoking access, and the duration of access required.
Figure 4: Submitting requests
The user can only request an IAM role and AWS account combination for which they are eligible, based on their group memberships.
Note: The duration specified here determines a time window during which the user can invoke sessions to access the AWS target environment if their request is approved. It does not affect the duration of each session. Session duration can be configured independently.
When a user submits a new request for temporary elevated access, the application calls the /create… API endpoint, which writes information about the new request to the DynamoDB table.
The user can submit multiple concurrent requests for different role and account combinations, as long as they are eligible.
Generating notifications
The broker generates notifications when temporary elevated access requests are created, approved, or rejected.
When a request is created, approved, or rejected, a DynamoDB stream record is created for notifications.
The stream record then invokes a Lambda function to handle notifications.
By default, when a user submits a new request for temporary elevated access, an email notification is sent to all authorized reviewers. When a reviewer approves or rejects a request, an email notification is sent to the original requester.
Reviewing requests
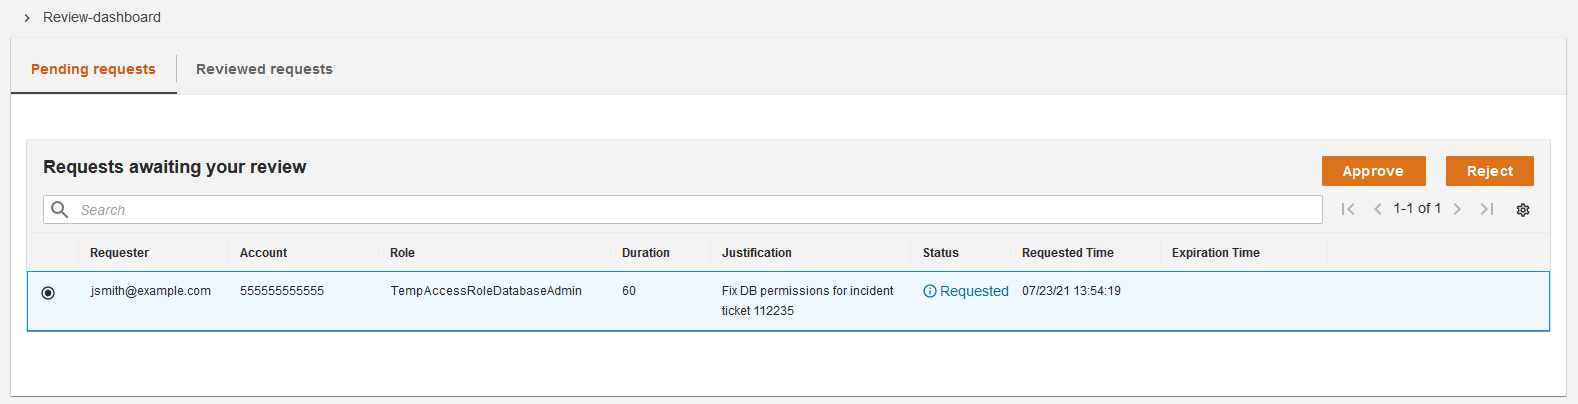
A user who is authorized to review requests can approve or reject requests submitted by other users in a review dashboard, as shown in Figure 5. For each request awaiting their review, the application displays information about the request, including the business justification provided by the requester.
Figure 5: The review dashboard
The reviewer can select a request, determine whether the request is appropriate, and choose either Approve or Reject.
When a reviewer approves or rejects a request, the application calls the /approve… or /reject… API endpoint, which updates the status of the request in the DynamoDB table and initiates a notification.
Invoking sessions
After a requester is notified that their request has been approved, they can log back into the application and see their approved requests, as shown in Figure 6. For each approved request, they can invoke sessions. There are two ways they can invoke a session, by choosing either Access console or CLI.
If the user chooses Access console, then the broker federates them into the AWS Management Console.
Both options grant the user a session in which they assume the IAM role in the AWS account specified in their request.
When a user invokes a session, the broker performs the following steps.
When the user chooses Access console or CLI, the application calls one of the /federate… API endpoints.
The /federate… API endpoint invokes a Lambda function, which performs the following three checks before proceeding:
Is the user authenticated? The Lambda function checks that the access and ID tokens are valid and uses the ID token to determine their identity.
Is the user eligible? The Lambda function inspects the user’s group memberships in their ID token to confirm they are eligible for the AWS role and account combination they are seeking to invoke.
Is the user elevated? The Lambda function confirms the user is in an elevated state by querying the DynamoDB table, and verifying whether there is an approved request for this user whose duration has not yet ended for the role and account combination they are seeking to invoke.
If all three checks succeed, the Lambda function calls sts:AssumeRole to fetch temporary credentials on behalf of the user for the IAM role and AWS account specified in the request.
The application returns the temporary credentials to the user.
The user obtains a session with temporary credentials for the IAM role in the AWS account specified in their request, either in the AWS Management Console or AWS CLI.
Once the user obtains a session, they can complete the task they need to perform in the AWS target environment using either the AWS Management Console or AWS CLI.
The IAM roles that users assume when they invoke temporary elevated access should be dedicated for this purpose. They must have a trust policy that allows the broker to assume them. The trusted principal is the Lambda execution role used by the broker’s /federate… API endpoints. This ensures that the only way to assume those roles is through the broker.
In this way, when the necessary conditions are met, the broker assumes the requested role in your AWS target environment on behalf of the user, and passes the resulting temporary credentials back to them. By default, the temporary credentials last for one hour. For the duration of a user’s elevated access they can invoke multiple sessions through the broker, if required.
Session expiry
When a user’s session expires in the AWS Management Console or AWS CLI, they can return to the broker and invoke new sessions, as long as their elevated status is still active.
Ending elevated access
A user’s elevated access ends when the requested duration elapses following the time when the request was approved.
Figure 7: Ending elevated access
Once elevated access has ended for a particular request, the user can no longer invoke sessions for that request, as shown in Figure 7. If they need further access, they need to submit a new request.
Viewing historical activity
An audit dashboard, as shown in Figure 8, provides a read-only view of historical activity to authorized users.
Figure 8: The audit dashboard
Logging session activity
When a user invokes temporary elevated access, their session activity in the AWS control plane is logged to AWS CloudTrail. Each time they perform actions in the AWS control plane, the corresponding CloudTrail events contain the unique identifier of the user, which provides traceability back to the identity of the human user who performed the actions.
The following example shows the userIdentity element of a CloudTrail event for an action performed by user [email protected] using temporary elevated access.
The temporary elevated access broker controls access to your AWS environment, and must be treated with extreme care in order to prevent unauthorized access. It is also an inline dependency for accessing your AWS environment and must operate with sufficient resiliency.
The broker should be deployed in a dedicated AWS account with a minimum of dependencies on the AWS target environment for which you’ll manage access. It should use its own access control configuration following the principle of least privilege. Ideally the broker should be managed by a specialized team and use its own deployment pipeline, with a two-person rule for making changes—for example by requiring different users to check in code and approve deployments. Special care should be taken to protect the integrity of the broker’s code and configuration and the confidentiality of the temporary credentials it handles.
In this blog post you learned about temporary elevated access and how it can help reduce risk relating to human user access. You learned that you should aim to eliminate the need to use high-risk human access through the use of automation, and only use temporary elevated access for infrequent activities that cannot yet be automated. Finally, you studied a minimal reference implementation for temporary elevated access which you can download and customize to fit your organization’s needs.
If you have feedback about this post, submit comments in the Comments section below. If you have questions about this post, start a new thread on the AWS IAM forum or contact AWS Support.
Want more AWS Security how-to content, news, and feature announcements? Follow us on Twitter.
AWS App2Container is a command line tool that you can install on a server to automate the containerization of applications. This simplifies the process of migrating a single server to containers. But if you have a fleet of servers, the process of migrating all of them could be quite time-consuming. In this situation, you can automate the process using App2Container. You’ll then be able to leverage configuration management tools such as Chef, Ansible, or AWS Systems Manager. In this blog, we will illustrate an architecture to scale out App2Container, using AWS Systems Manager.
Why migrate to containers?
Organizations can move to secure, low-touch services with Containers on AWS. A container is a lightweight, standalone collection of software that includes everything needed to run an application. This can include code, runtime, system tools, system libraries, and settings. Containers provide logical isolation and will always run the same, regardless of the host environment.
If you are running a .NET application hosted on Windows Internet Information Server (IIS), when it reaches end of life (EOL) you have two options. Either migrate entire server platforms, or re-host websites on other hosting platforms. Both options require manual effort and are often too complex to implement for legacy workloads. Once workloads have been migrated, you must still perform costly ongoing patching and maintenance.
Modernize with AWS App2Container
Containers can be used for these legacy workloads via AWS App2Container. AWS App2Container is a command line interface (CLI) tool for modernizing .NET and Java applications into containerized applications. App2Container analyzes and builds an inventory of all applications running in virtual machines, on-premises, or in the cloud. App2Container reduces the need to migrate the entire server OS, and moves only the specific workloads needed.
After you select the application you want to containerize, App2Container does the following:
Packages the application artifact and identified dependencies into container images
Deploy a worker node as an Amazon Elastic Compute Cloud (Amazon EC2) instance. This will include a compatible operating system, which will take the artifacts and convert them into containers.
Install the App2Container agent on each server that you want to migrate.
Run a set of commands on each server for each application that you want to convert into a container.
Run the commands on your worker node to perform the containerization and deployment.
Following, we will introduce a way to automate App2Container to reduce the time needed to deploy and scale this functionality throughout your environment.
Scaling App2Container
AWS App2Container streamlines the process of containerizing applications on a single server. For each server you must install the App2Container agent, initialize it, run an inventory, and run an analysis. But you can save time when containerizing a fleet of machines by automation, using AWS Systems Manager. AWS Systems Manager enables you to create documents with a set of command line steps that can be applied to one or more servers.
App2Container also supports setting up a worker node that can consume the output of the App2Container analysis step. This can be deployed to the new containerized version of the applications. This allows you to follow the security best practice of least privilege. Only the worker node will have permissions to deploy containerized applications. The migrating servers will need permissions to write the analysis output into an S3 bucket.
Separate the App2Container process into two parts to use the worker node.
Analysis. This runs on the target server we are migrating. The results are output into S3.
Deployment. This runs on the worker node. It pushes the container image to Amazon ECR. It can deploy a running container to either Amazon ECS or Amazon Elastic Kubernetes Service (EKS).
As you can see in Figure 1, we need to set up an Amazon EC2 instance as the worker node, an S3 bucket for the analysis output, and two AWS Systems Manager documents. The first document is run on the target server. It will install App2Container and run the analysis steps. The second document is run on the worker node and handles the deployment of the container image. The AWS Systems Manager targets one or many hosts, enabling you to run the analysis step in parallel for multiple servers. Results and artifacts such as files or .Net assembly code, are sent to the preconfigured Amazon S3 bucket for processing as shown in Figure 2.
Figure 2. Container migration target servers
After the artifacts have been generated, a second document can be run against the worker node. This scans all files in the Amazon S3 bucket, and workloads are automatically containerized. The resulting images are pushed to Amazon ECR, as shown in Figure 3.
Figure 3. Container migration conversion
When this process is completed, you can then choose how to deploy these images, using Amazon ECS and/or Amazon EKS. Once the images and deployments are tested and the migration is completed, target servers and migration factory resources can be safely decommissioned.
This architecture demonstrates an automated approach to containerizing .NET web applications. AWS Systems Manager is used for discovery, package creation, and posting to an Amazon S3 bucket. An EC2 instance converts the package into a container so it is ready to use. The final step is to push the converted container to a scalable container repository (Amazon ECR). This way it can easily be integrated into our container platforms (ECS and EKS).
Summary
This solution offers many benefits to migrating legacy .Net based websites directly to containers. This proposed architecture is powered by AWS App2Container and automates the tooling on many targets in a secure manner. It is important to keep in mind that every customer portfolio and application requirements are unique. Therefore, it’s essential to validate and review any migration plans with business and application owners. With the right planning, engagement, and implementation, you should have a smooth and rapid journey to AWS Containers.
If you have any questions, post your thoughts in the comments section.
Amazon Athena is an interactive query service that makes it easier to analyze data directly in Amazon Simple Storage Service (Amazon S3) using standard SQL. Cloud operation teams can use AWS Identity and Access Management (IAM) federation to centrally manage access to Athena. This simplifies administration by allowing a governing team to control user access to Athena workgroups from a centrally managed Azure AD connected to an on-premise Active Directory. This setup reduces the overhead experience by cloud operation teams when managing IAM users. Athena supports federation with Active Directory Federation Service (ADFS), PingFederate, Okta, and Microsoft Azure Active Directory (Azure AD) federation.
This blog post illustrates how to set up AWS IAM federation with Azure AD connected to on-premises AD and configure Athena workgroup- level access for different users. We are going to cover two scenarios:
Azure AD managed users and groups, and on-premises AD.
On-prem Active directory managed users and groups synchronized to Azure AD.
This solution helps you configure IAM federation with Azure AD connected to on-premises AD and configure Athena workgroup-level access for users. You can control access to the workgroup by either an on-premises AD group or Azure AD group. The solution consists of four sections:
Set up Azure AD as your identity provider (IdP):
Set up Azure AD as your SAML IdP for an AWS single-account app.
Configure the Azure AD app with delegated permissions.
Set up your IAM IdP and roles:
Set up an IdP trusting Azure AD.
Set up an IAM user with read role permission.
Set up an IAM role and policies for each Athena workgroup.
Set up user access in Azure AD:
Set up automatic IAM role provisioning.
Set up user access to the Athena workgroup role.
Access Athena:
Access Athena using the web-based Microsoft My Apps portal.
Access Athena using SQL Workbench/J a free, DBMS-independent, cross-platform SQL query tool.
The following diagram illustrates the architecture of the solution.
The solution workflow includes the following steps:
The developer workstation connects to Azure AD via a SQL Workbench/j JDBC Athena driver to request a SAML token (two-step OAuth process).
Azure AD sends authentication traffic back to on-premises via an Azure AD pass-through agent or ADFS.
The Azure AD pass-through agent or ADFS connects to on-premises DC and authenticates the user.
The pass-through agent or ADFS sends a success token to Azure AD.
Azure AD constructs a SAML token containing the assigned IAM role and sends it to the client.
The client connects to AWS Security Token Service (AWS STS) and presents the SAML token to assume the Athena role and generates temporary credentials.
AWS STS sends temporary credentials to the client.
The client uses the temporary credentials to connect to Athena.
Prerequisites
You must meet the following requirements prior to configuring the solution:
On the Azure AD side, complete the following:
Set up the Azure AD Connect server and sync with on-premises AD
Set up the Azure AD pass-through or Microsoft ADFS federation between Azure AD and on-premises AD
Create three users (user1, user2, user3) and three groups (athena-admin-adgroup, athena-datascience-adgroup, athena-developer-adgroup) for three respective Athena workgroups
On the Athena side, create three Athena workgroups: athena-admin-workgroup, athena-datascience-workgroup, athena-developer-workgroup
In this section we will cover Azure AD configuration details for Athena in Microsoft Azure subscription. Mainly we will register an app, configure federation, delegate app permission and generate App secret.
Set Azure AD as SAML IdP for an AWS single-account app
To set up Azure AD as your SAML IdP, complete the following steps:
Sign in to the Azure Portal with Azure AD global admin credentials.
Choose Azure Active Directory.
Choose Enterprise applications.
Choose New application.
Search for Amazon in the search bar.
Choose AWS Single-Account Access.
For Name, enter Athena-App.
Choose Create.
In the Getting Started section, under Set up single sign on, choose Get started.
On the Create role tab, search for athenaworkgroup1policy and select the policy.
Choose Next: Tags.
Choose Next: Review.
Choose Create role.
For Name, enter athenaworkgroup1role.
Choose Create role.
Set up user access in Azure AD
In this section we will setup Automatic provisioning and assign users to app from Microsoft Azure portal.
Set up automatic IAM role provisioning
To set up automatic IAM role provisioning, complete the following steps:
Sign in to the Azure Portal with Azure AD global admin credentials.
Choose Azure Active Directory.
Choose Enterprise Applications and choose Athena-App.
Choose Provision User Accounts.
In the Provisioning section, choose Get started.
For Provisioning Mode, choose Automatic.
Expand Admin credentials and populate clientsecret and Secret Token with the access key ID and secret access key of ReadRoleUser, respectively.
Choose Test Connection and Save.
Choose Start provisioning.
The initial cycle can take some time to complete, after which the IAM roles are populated in Azure AD.
Set up user access to the Athena workgroup role
To set up user access to the workgroup role, complete the following steps:
Sign in to Azure Portal with Azure AD global admin credentials.
Choose Azure Active Directory.
Choose Enterprise Applications and choose Athena-App.
Choose Assign users and groups and Add user/group.
Under Users and groups, select the group that you want to assign Athena permission to. For this post, we use athena-admin-adgroup; alternatively, you can select user1.
Choose Select.
For Select a role, select the role athenaworkgroup1role.
Choose Select.
Choose Assign.
Access Athena
In this section we will demonstrate how to access Athena from AWS console and developer tool SQL Workbench/J
Access Athena using the web-based Microsoft My Apps portal
To use the Microsoft My Apps portal to access Athena, complete the following steps:
Sign in to Azure Portal with Azure AD global admin credentials.
Choose Azure Active Directory
Choose Enterprise Applications and choose Athena-App.
In highly regulated organizations, internal users aren’t allowed to use the console to access Athena. In such cases, you can use SQL Workbench/J, an open-source tool that enables connectivity to Athena using a JDBC driver.
Download the latest Athena JDBC driver (choose the appropriate driver based on your Java version).
To connect using a user account with MFA enabled, use the browser Azure AD Credentials Provider. You need to construct the connection URL and fill out the user name Username and password
Use the following connection string to connect to Athena with a user account that has MFA enabled (provide the values you collected earlier):
Replace text in red with details collected earlier in the article.
When the connection is established, you can run queries against Athena.
Proxy configuration
If you’re connecting to Athena through a proxy server, make sure that the proxy server allows port 444. The result set streaming API uses port 444 on the Athena server for outbound communications. Set the ProxyHost property to the IP address or host name of your proxy server. Set the ProxyPort property to the number of the TCP port that the proxy server uses to listen for client connections. See the following code:
In this post, we configured IAM federation with Azure AD connected to on-premises AD and set up granular access to an Athena workgroup. We also looked at how to access Athena through the console using the Microsoft My Apps web portal and SQL Workbench/J tool. We also discussed how the connection works over a proxy. The same federation infrastructure can also be leveraged for ODBC driver configuration. You can also use the instructions in this post to set up SAML-based Azure IdP to enable federated access to Athena Workgroups.
About the Author
Niraj Kumar is a Principal Technical Account Manager for financial services at AWS, where he helps customers design, architect, build, operate, and support workloads on AWS in a secure and robust manner. He has over 20 years of diverse IT experience in the fields of enterprise architecture, cloud and virtualization, security, IAM, solution architecture, and information systems and technologies. In his free time, he enjoys mentoring, coaching, trekking, watching documentaries with his son, and reading something different every day.
In Part 3 of this series, Improved Resiliency and Standardized Observability, we talked about design patterns that you can adopt to improve resiliency, achieve minimum business continuity, and scale applications with lengthy transactions (more than 3 minutes).
As a refresher from previous blogs in this series, our example ecommerce company’s “Shoppers” application runs in the cloud. The company experienced hypergrowth, which posed a number of platform and technology challenges, namely, they needed to scale on the backend without impacting users.
Because of this hypergrowth, distributed denial of service (DDoS) attacks on the ecommerce company’s services increased 10 times in 6 months. Some of these attacks led to downtime and loss of revenue. This blog post shows you how we addressed these threats by implementing a multi-account strategy and applying AWS Identity and Access Management (IAM) best practices.
A multi-account strategy ensures security at scale
Originally, the company’s production and non-production services were running in a single account. This meant non-production vulnerabilities like frequently changing code or privileged access could impact the production environment. Additionally, the application experienced issues due to unexpectedly reaching service quotas. These include (but are not limited to) number of read replicas per master in Amazon Relational Database Service (Amazon RDS) and total storage for all DB instances in Auto Scaling Service Quotas for Amazon Elastic Compute Cloud (Amazon EC2).
To address these issues, we followed multi-account strategy best practices. We established the multi-account hierarchy shown in Figure 1 that includes the following eight organizational units (OUs) to meet business requirements:
Security PROD OU
Security SDLC OU
Infrastructure PROD OU
Infrastructure SDLC OU
Workload PROD OU
Workload SDLC OU
Sandbox OU
Transitional OU
To identify the right fit for our needs, we evaluated AWS Landing Zone and AWS Control Tower. To reduce operation overhead of maintaining a solution, we used AWS Control Tower to deploy guardrails as service control policies (SCPs). These guardrails were then separated into production and non-production environments, creating the hierarchy shown in Figure 1.
We created a new Payer (or Management) Account with Sandbox OU and Transitional OU under Root OU. We then moved existing AWS accounts under the Transitional OU and Sandbox OU. We provisioned new accounts with Account Factory and gradually migrated services from existing AWS accounts into the newly formed Log Archive Account, Security Account, Network Account, and Shared Services Account and applied appropriate guardrails. We then registered Sandbox OU with Control Tower. Additionally, we migrated the centralized logging solution from Part 3 of this blog series to the Security Account. We moved non-production applications into the Dev and Test Accounts, respectively, to isolate workloads. We then moved existing accounts that had production services from the Transitional OU to Workload PROD OU.
Figure 1. Multi-account hierarchy
Implementing a multi-account strategy alleviated service quota challenges. It isolated variable demand non-production environments from more consistent production environments, which reduced the downtime caused by unplanned scaling events. The multi-account strategy enforces governance at scale, but also promotes innovation by allocating separate accounts with distinct security requirements for proof of concepts and experimentation. This reduces impact risks to production accounts and allows the required guardrails to be automatically applied.
Improving access management and least privilege access
When the company experienced hypergrowth, they not only had to scale their application’s infrastructure, but they also had to increase how often they release their code. They also hired and onboarded new internal teams.
To strengthen new/existing employees’ credentials, we used AWS Trusted Advisor for IAM Access Key Rotation. This identifies IAM users whose access keys have not been rotated for more than 90 days and created an automated way to rotate them. We then generated an IAM credential report to identify IAM users that don’t need console access or that don’t need access keys. We gradually assigned these users role-based access versus IAM access keys.
During a Well-Architected Security Pillar review, we identified some applications that used hardcoded passwords that hadn’t been updated for more than 90 days. We re-factored these applications to get passwords from AWS Secrets Manager and followed best practices for performance.
Additionally, we set up a system to automatically change passwords for RDS databases and wrote an AWS Lambda function to update passwords for third-party integration. Some applications on Amazon EC2 were using IAM access keys to access AWS services. We re-factored them to get permissions from the EC2 instance role attached to the EC2 instances, which reduced operational burden of rotating access keys.
To streamline access for internal users, we migrated users to AWS Single Sign-On (AWS SSO) federated access. We enabled all features in AWS Organizations to use AWS SSO and created permission sets to define access boundaries for different functions. We assigned permission sets to different user groups and assigned users to user groups based on their job function. This allowed us to reduce the number of IAM policies and use tag-based control when defining AWS SSO permissions policies.
We followed the guidance in the Attribute-based Access Control with AWS SSO blog post to map user attributes and use tags to define permissions boundaries for user groups. This allowed us to provide access to users based on specific teams, projects, and departments. We enforced multi-factor authentication (MFA) for all AWS SSO users by configuring MFA settings to allow sign in only when an MFA device has been registered.
These improvements ensure that only the right people have access to the required resources for the right time. They reduce the risk of compromised security credentials by using AWS Security Token Service (AWS STS) to generate temporary credentials when needed. System passwords are better protected from unwanted access and automatically rotated for improved security. AWS SSO also allows us to enforce permissions at scale when people’s job functions change within or across teams.
Conclusion
In this blog post, we described design patterns we used to implement security governance at scale using multi-account strategy and AWS SSO integrations. We also talked about patterns you can adopt for IAM baselining that allow least privilege access, checking for IAM best practices, and proactively detecting unwanted access.
This blog post also covers why you need to refresh your threat model during hyperscale growth and how different services can make it easier to enforce security controls. In the next blog, we will talk about more security design patterns to improve infrastructure security and incident response during hyperscale.
Embedding this validation in a CI/CD pipeline can help prevent IAM policies that have IAM Access Analyzer findings from being deployed to your AWS environment. This tool acts as a guardrail that can allow you to delegate the creation of IAM policies to the developers in your organization. You can also use the tool to provide additional confidence in your existing policy authoring process, enabling you to catch mistakes prior to IAM policy deployment.
What is IAM Access Analyzer?
IAM Access Analyzer mathematically analyzes access control policies that are attached to resources, and determines which resources can be accessed publicly or from other accounts. IAM Access Analyzer can also validate both identity and resource policies against over 100 checks, each designed to improve your security posture and to help you to simplify policy management at scale.
The IAM Policy Validator for AWS CloudFormation tool
IAM Policy Validator for AWS CloudFormation (cfn-policy-validator) is a new command-line tool that parses resource-based and identity-based IAM policies from your CloudFormation template, and runs the policies through IAM Access Analyzer checks. The tool is designed to run in the CI/CD pipeline that deploys your CloudFormation templates, and to prevent a deployment when an IAM Access Analyzer finding is detected. This ensures that changes made to IAM policies are validated before they can be deployed.
The cfn-policy-validator tool looks for all identity-based policies, and a subset of resource-based policies, from your templates. For the full list of supported resource-based policies, see the cfn-policy-validator GitHub repository.
Parsing IAM policies from a CloudFormation template
One of the challenges you can face when parsing IAM policies from a CloudFormation template is that these policies often contain CloudFormation intrinsic functions (such as Ref and Fn::GetAtt) and pseudo parameters (such as AWS::AccountId and AWS::Region). As an example, it’s common for least privileged IAM policies to reference the Amazon Resource Name (ARN) of another CloudFormation resource. Take a look at the following example CloudFormation resources that create an Amazon Simple Queue Service (Amazon SQS) queue, and an IAM role with a policy that grants access to perform the sqs:SendMessage action on the SQS queue.
Figure 1- Example policy in CloudFormation template
As you can see in Figure 1, line 21 uses the function Fn::Sub to restrict this policy to MySQSQueue created earlier in the template.
In this example, if you were to pass the root policy (lines 15-21) as written to IAM Access Analyzer, you would get an error because !Sub ${MySQSQueue.Arn} is syntax that is specific to CloudFormation. The cfn-policy-validator tool takes the policy and translates the CloudFormation syntax to valid IAM policy syntax that Access Analyzer can parse.
The cfn-policy-validator tool recognizes when an intrinsic function such as !Sub ${MySQSQueue.Arn} evaluates to a resource’s ARN, and generates a valid ARN for the resource. The tool creates the ARN by mapping the type of CloudFormation resource (in this example AWS::SQS::Queue) to a pattern that represents what the ARN of the resource will look like when it is deployed. For example, the following is what the mapping looks like for the SQS queue referenced previously:
For some CloudFormation resources, the Ref intrinsic function also returns an ARN. The cfn-policy-validator tool handles these cases as well.
Cfn-policy-validator walks through each of the six parts of an ARN and substitutes values for variables in the ARN pattern (any text contained within ${}). The values of ${Partition} and ${Account} are taken from the identity of the role that runs the cfn-policy-validator tool, and the value for ${Region} is provided as an input flag. The cfn-policy-validator tool performs a best-effort resolution of the QueueName, but typically defaults it to the name of the CloudFormation resource (in the previous example, MySQSQueue). Validation of policies with IAM Access Analyzer does not rely on the name of the resource, so the cfn-policy-validator tool is able to substitute a replacement name without affecting the policy checks.
The final ARN generated for the MySQSQueue resource looks like the following (for an account with ID of 111111111111):
arn:aws:sqs:us-east-1:111111111111:MySQSQueue
The cfn-policy-validator tool substitutes this generated ARN for !Sub ${MySQSQueue.Arn}, which allows the cfn-policy-validator tool to parse a policy from the template that can be fed into IAM Access Analyzer for validation. The cfn-policy-validator tool walks through your entire CloudFormation template and performs this ARN substitution until it has generated ARNs for all policies in your template.
Validating the policies with IAM Access Analyzer
After the cfn-policy-validator tool has your IAM policies in a valid format (with no CloudFormation intrinsic functions or pseudo parameters), it can take those policies and feed them into IAM Access Analyzer for validation. The cfn-policy-validator tool runs resource-based and identity-based policies in your CloudFormation template through the ValidatePolicy action of the IAM Access Analyzer. ValidatePolicy is what ensures that your policies have correct grammar and follow IAM policy best practices (for example, not allowing iam:PassRole to all resources). The cfn-policy-validator tool also makes a call to the CreateAccessPreview action for supported resource policies to determine if the policy would grant unintended public or cross-account access to your resource.
The cfn-policy-validator tool categorizes findings from IAM Access Analyzer into the categories blocking or non-blocking. Findings categorized as blocking cause the tool to exit with a non-zero exit code, thereby causing your deployment to fail and preventing your CI/CD pipeline from continuing. If there are no findings, or only non-blocking findings detected, the tool will exit with an exit code of zero (0) and your pipeline can to continue to the next stage. For more information about how the cfn-policy-validator tool decides what findings to categorize as blocking and non-blocking, as well as how to customize the categorization, see the cfn-policy-validator GitHub repository.
Example of running the cfn-policy-validator tool
This section guides you through an example of what happens when you run a CloudFormation template that has some policy violations through the cfn-policy-validator tool.
The following template has two CloudFormation resources with policy findings: an SQS queue policy that grants account 111122223333 access to the SQS queue, and an IAM role with a policy that allows the role to perform a misspelled sqs:ReceiveMessages action. These issues are highlighted in the policy below.
Important: The policy in Figure 2 is written to illustrate a CloudFormation template with potentiallyundesirable IAM policies. You should be careful when setting the Principal element to an account that is not your own.
Figure 2: CloudFormation template with undesirable IAM policies
When you pass this template as a parameter to the cfn-policy-validator tool, you specify the AWS Region that you want to deploy the template to, as follows:
The output from the cfn-policy-validator tool includes the type of finding, the code for the finding, and a message that explains the finding. It also includes the resource and policy name from the CloudFormation template, to allow you to quickly track down and resolve the finding in your template. In the previous example, you can see that IAM Access Analyzer has detected two findings, one security warning and one error, which the cfn-policy-validator tool has classified as blocking. The actual response from IAM Access Analyzer is returned under details, but is excluded above for brevity.
If account 111122223333 is an account that you trust and you are certain that it should have access to the SQS queue, then you can suppress the finding for external access from the 111122223333 account in this example. Modify the call to the cfn-policy-validator tool to ignore this specific finding by using the –-allow-external-principals flag, as follows:
Now that you’ve seen an example of how you can run the cfn-policy-validator tool to validate policies that are on your local machine, you will take it a step further and see how you can embed the cfn-policy-validator tool in a CI/CD pipeline. By embedding the cfn-policy-validator tool in your CI/CD pipeline, you can ensure that your IAM policies are validated each time a commit is made to your repository.
Embedding the cfn-policy-validator tool in a CI/CD pipeline
The CI/CD pipeline you will create in this post uses AWS CodePipeline and AWS CodeBuild. AWS CodePipeline is a continuous delivery service that enables you to model, visualize, and automate the steps required to release your software. AWS CodeBuild is a fully-managed continuous integration service that compiles source code, runs tests, and produces software packages that are ready to deploy. You will also use AWS CodeCommit as the source repository where your CloudFormation template is stored. AWS CodeCommit is a fully managed source-control service that hosts secure Git-based repositories.
To deploy the pipeline
To deploy the CloudFormation template that builds the source repository and AWS CodePipeline pipeline, select the following Launch Stack button.
In the CloudFormation console, choose Next until you reach the Review page.
Select I acknowledge that AWS CloudFormation might create IAM resources and choose Create stack.
Watch as your commit travels through the pipeline. If you followed the previous instructions and made two separate commits, you can ignore the failed results of the first pipeline execution. As shown in Figure 3, you will see that the pipeline fails in the Validation stage on the CfnPolicyValidator action, because it detected a blocking finding in the template you committed, which prevents the invalid policy from reaching your AWS environment.
Figure 3: Validation failed on the CfnPolicyValidator action
Under CfnPolicyValidator, choose Details, as shown in Figure 3.
In the Action execution failed pop-up, choose Link to execution details to view the cfn-policy-validator tool output in AWS CodeBuild.
Architectural overview of deploying cfn-policy-validator in your pipeline
You can see the architecture diagram for the CI/CD pipeline you deployed in Figure 4.
Figure 4 shows the following steps, starting with the CodeCommit source action on the left:
The pipeline starts when you commit to your AWS CodeCommit source code repository. The AWS CodeCommit repository is what contains the CloudFormation template that has the IAM policies that you would like to deploy to your AWS environment.
AWS CodePipeline detects the change in your source code repository and begins the Validation stage. The first step it takes is to start an AWS CodeBuild project that runs the CloudFormation template through the AWS CloudFormation Linter (cfn-lint). The cfn-lint tool validates your template against the CloudFormation resource specification. Taking this initial step ensures that you have a valid CloudFormation template before validating your IAM policies. This is an optional step, but a recommended one. Early schema validation provides fast feedback for any typos or mistakes in your template. There’s little benefit to running additional static analysis tools if your template has an invalid schema.
If the cfn-lint tool completes successfully, you then call a separate AWS CodeBuild project that invokes the IAM Policy Validator for AWS CloudFormation (cfn-policy-validator). The cfn-policy-validator tool then extracts the identity-based and resource-based policies from your template, as described earlier, and runs the policies through IAM Access Analyzer.
Note: if your template has parameters, then you need to provide them to the cfn-policy-validator tool. You can provide parameters as command-line arguments, or use a template configuration file. It is recommended to use a template configuration file when running validation with an AWS CodePipeline pipeline. The same file can also be used in the deploy stage to deploy the CloudFormation template. By using the template configuration file, you can ensure that you use the same parameters to validate and deploy your template. The CloudFormation template for the pipeline provided with this blog post defaults to using a template configuration file.
If there are no blocking findings found in the policy validation, the cfn-policy-validator tool exits with an exit code of zero (0) and the pipeline moves to the next stage. If any blocking findings are detected, the cfn-policy-validator tool will exit with a non-zero exit code and the pipeline stops, to prevent the deployment of undesired IAM policies.
The final stage of the pipeline uses the AWS CloudFormation action in AWS CodePipeline to deploy the template to your environment. Your template will only make it to this stage if it passes all static analysis checks run in the Validation Stage.
Cleaning Up
To avoid incurring future charges, in the AWS CloudFormation console delete the validate-iam-policy-pipeline stack. This will remove the validation pipeline from your AWS account.
Summary
In this blog post, I introduced the IAM Policy Validator for AWS CloudFormation (cfn-policy-validator). The cfn-policy-validator tool automates the parsing of identity-based and resource-based IAM policies from your CloudFormation templates and runs those policies through IAM Access Analyzer. This enables you to validate that the policies in your templates follow IAM best practices and do not allow unintended external access to your AWS resources.
I showed you how the IAM Policy Validator for AWS CloudFormation can be included in a CI/CD pipeline. This allows you to run validation on your IAM policies on every commit to your repository and only deploy the template if validation succeeds.
To help you more easily troubleshoot your permissions in Amazon Web Services (AWS), we’re introducing additional context in the access denied error messages. We’ll start to introduce this change in September 2021, and gradually make it available in all AWS services over the next few months. If you’re currently relying on the exact text of the access denied error messages in your existing systems, it’s important to review the details in this post so you can determine any necessary changes that might be required in your environment.
What is the upcoming change in access denied error messages?
We’re adding information about the AWS Identity and Access Management (IAM) policy type that’s responsible for the denied access. This enables you to focus on the specific policy type that’s identified, rather than evaluating all IAM policies in your AWS environment when you troubleshoot access-related challenges. As a result of this change, you can more quickly identify the root cause for the denied access and unblock your developers by updating the relevant policies to grant the required access.
For example, when a developer who is trying to perform the CreateFunction action in AWS Lambda is denied access due to a service control policy (SCP) in her AWS organization, she can create a trouble ticket with her central security team, providing the access denied error message and highlighting the policy type that is responsible for the denied access. The security administrator can focus their troubleshooting efforts on SCPs that are related to Lambda, thus saving time and effort on troubleshooting permissions.
The policy types that will be covered in this update are SCPs, VPC endpoint policies, permissions boundaries, session policies, resource-based policies, and identity-based policies.
What should you do to prepare for this change?
If you don’t have any systems relying on the access denied error messages – There’s no action required at this point. As AWS gradually introduces this change, you’ll see additional context about the policy type in your access denied error messages.
If you’ve configured systems to rely on the access denied error messages in AWS – We recommend that you evaluate whether your existing systems and automation workflows rely on the exact access denied error message strings in AWS. If you have such configured systems, then you should update your systems to rely on the error codes instead, so that when AWS introduces changes to its access denied error messages, your systems remain unaffected.
When will this change become available?
Beginning in September 2021, this update will be introduced and will become gradually available in all AWS services in the following few months. We encourage all customers to be proactive about assessing and modifying any configured systems or automation workflows for access denied error messages.
Need more assistance?
The AWS Support tiers cover development and production issues for AWS products and services, along with other key stack components. AWS Support doesn’t include code development for client applications.
If you have any questions or issues, start a new thread on the AWS IAM forum, or contact AWS Support or your Technical Account Manager (TAM). If you have feedback about this post, submit comments in the Comments section below.
Want more AWS Security how-to content, news, and feature announcements? Follow us on Twitter.
In this post, we describe the AWS services that you can use to both detect and protect your data stored in Amazon Simple Storage Service (Amazon S3). When you analyze security in depth for your Amazon S3 storage, consider doing the following:
Monitor and remediate configuration changes with AWS Config
Using these additional AWS services along with Amazon S3 can improve your security posture across your accounts.
Audit and restrict Amazon S3 access with IAM Access Analyzer
IAM Access Analyzer allows you to identify unintended access to your resources and data. Users and developers need access to Amazon S3, but it’s important for you to keep users and privileges accurate and up to date.
Amazon S3 can often house sensitive and confidential information. To help secure your data within Amazon S3, you should be using AWS Key Management Service (AWS KMS) with server-side encryption at rest for Amazon S3. It is also important that you secure the S3 buckets so that you only allow access to the developers and users who require that access. Bucket policies and access control lists (ACLs) are the foundation of Amazon S3 security. Your configuration of these policies and lists determines the accessibility of objects within Amazon S3, and it is important to audit them regularly to properly secure and maintain the security of your Amazon S3 bucket.
IAM Access Analyzer can scan all the supported resources within a zone of trust. Access Analyzer then provides you with insight when a bucket policy or ACL allows access to any external entities that are not within your organization or your AWS account’s zone of trust.
The example in Figure 1 shows creating an analyzer with the zone of trust as the current account, but you can also create an analyzer with the organization as the zone of trust.
Figure 1: Creating IAM Access Analyzer and zone of trust
After you create your analyzer, IAM Access Analyzer automatically scans the resources in your zone of trust and returns the findings from your Amazon S3 storage environment. The initial scan shown in Figure 2 shows the findings of an unsecured S3 bucket.
Figure 2: Example of unsecured S3 bucket findings
For each finding, you can decide which action you would like to take. As shown in figure 3, you are given the option to archive (if the finding indicates intended access) or take action to modify bucket permissions (if the finding indicates unintended access).
Figure 3: Displays choice of actions to take
After you address the initial findings, Access Analyzer monitors your bucket policies for changes, and notifies you of access issues it finds. Access Analyzer is regional and must be enabled in each AWS Region independently.
Classify and secure sensitive data with Macie
Organizational compliance standards often require the identification and securing of sensitive data. Your organization’s sensitive data might contain personally identifiable information (PII), which includes things such as credit card numbers, birthdates, and addresses.
Macie is a data security and privacy service offered by AWS that uses machine learning and pattern matching to discover the sensitive data stored within Amazon S3. You can define your own custom type of sensitive data category that might be unique to your business or use case. Macie will automatically provide an inventory of S3 buckets and alert you of unprotected sensitive data.
Figure 4 shows a sample result from a Macie scan in which you can see important information regarding Amazon S3 public access, encryption settings, and sharing.
Figure 4: Sample results from a Macie scan
In addition to finding potential sensitive data, Macie also gives you a severity score based on the privacy risk, as shown in the example data in Figure 5.
Figure 5: Example Macie severity scores
When you use Macie in conjunction with AWS Step Functions, you can also automatically remediate any issues found. You can use this combination to help meet regulations such as General Data Protection Regulation (GDPR) and Health Insurance Portability and Accountability Act (HIPAA). Macie allows you to have constant visibility of sensitive data within your Amazon S3 storage environment.
When you deploy Macie in a multi-account configuration, your usage is rolled up to the master account to provide the total usage for all accounts and a breakdown across the entire organization.
Detect malicious access patterns with GuardDuty
Your customers and users can commit thousands of actions each day on S3 buckets. Discerning access patterns manually can be extremely time consuming as the volume of data increases. GuardDuty uses machine learning, anomaly detection, and integrated threat intelligence to analyze billions of events across multiple accounts and uses data collected in AWS CloudTrail logs for S3 data events as well as S3 access logs, VPC Flow Logs, and DNS logs. GuardDuty can be configured to analyze these logs and notify you of suspicious activity, such as unusual data access patterns, unusual discovery API calls, and more. After you receive a list of findings on these activities, you will be able to make informed decisions to secure your S3 buckets.
Figure 6 shows a sample list of findings returned by GuardDuty which shows the finding type, resource affected, and count of occurrences.
Figure 6: Example GuardDuty list of findings
You can select one of the results in Figure 6 to see the IP address and details associated from this potential malicious IP caller, as shown in Figure 7.
Figure 7: GuardDuty Malicious IP Caller detailed findings
Monitor and remediate configuration changes with AWS Config
Configuration management is important when securing Amazon S3, to prevent unauthorized users from gaining access. It is important that you monitor the configuration changes of your S3 buckets, whether the changes are intentional or unintentional. AWS Config can track all configuration changes that are made to an S3 bucket. For example, if an S3 bucket had its permissions and configurations unexpectedly changed, using AWS Config allows you to see the changes made, as well as who made them.
AWS Config can be used in conjunction with a service called AWS Lambda. If an S3 bucket is noncompliant, AWS Config can trigger a preprogrammed Lambda function and then the Lambda function can resolve those issues. This combination can be used to reduce your operational overhead in maintaining compliance within your S3 buckets.
Figure 8 shows a sample of AWS Config managed rules selected for configuration monitoring and gives a brief description of what the rule does.
Figure 8: Sample selections of AWS Managed Rules
Figure 9 shows a sample result of a non-compliant configuration and resource inventory listing the type of resource affected and the number of occurrences.
Figure 9: Example of AWS Config non-compliant resources
Conclusion
AWS has many offerings to help you audit and secure your storage environment. In this post, we discussed the particular combination of AWS services that together will help reduce the amount of time and focus your business devotes to security practices. This combination of services will also enable you to automate your responses to any unwanted permission and configuration changes, saving you valuable time and resources to dedicate elsewhere in your organization.
This post was co-written with Anusha Dharmalingam, former AWS Solutions Architect.
Must your Amazon Web Services (AWS) application connect to Amazon Simple Storage Service (S3) buckets, but not traverse the internet to reach public endpoints? Must the connection scale to accommodate bandwidth demands? AWS offers a mechanism called VPC endpoint to meet these requirements. This blog post provides guidance for selecting the right VPC endpoint type to access Amazon S3. A VPC endpoint enables workloads in an Amazon VPC to connect to supported public AWS services or third-party applications over the AWS network. This approach is used for workloads that should not communicate over public networks.
When a workload architecture uses VPC endpoints, the application benefits from the scalability, resilience, security, and access controls native to AWS services. Amazon S3 can be accessed using an interface VPC endpoint powered by AWS PrivateLink or a gateway VPC endpoint. To determine the right endpoint for your workloads, we’ll discuss selection criteria to consider based on your requirements.
VPC endpoint overview
A VPC endpoint is a virtual scalable networking component you create in a VPC and use as a private entry point to supported AWS services and third-party applications. Currently, two types of VPC endpoints can be used to connect to Amazon S3: interface VPC endpoint and gateway VPC endpoint.
When you configure an interface VPC endpoint, an elastic network interface (ENI) with a private IP address is deployed in your subnet. An Amazon EC2 instance in the VPC can communicate with an Amazon S3 bucket through the ENI and AWS network. Using the interface endpoint, applications in your on-premises data center can easily query S3 buckets over AWS Direct Connect or Site-to-Site VPN. Interface endpoint supports a growing list of AWS services. Consult our documentation to find AWS services compatible with interface endpoints powered by AWS PrivateLink.
Gateway VPC endpoints use prefix lists as the IP route target in a VPC route table. This routes traffic privately to Amazon S3 or Amazon DynamoDB. An EC2 instance in a VPC without internet access can still directly read from and/or write to an Amazon S3 bucket. Amazon DynamoDB and Amazon S3 are the services currently accessible via gateway endpoints.
Your internal security policies may have strict rules against communication between your VPC and the internet. To maintain compliance with these policies, you can use VPC endpoint to connect to AWS public services like Amazon S3. To control user or application access to the VPC endpoint and the resources it supports, you can use an AWS Identity and Access Management (AWS IAM) resource policy. This will separately secure the VPC endpoint and accessible resources.
Selecting gateway or interface VPC endpoints
With both interface endpoint and gateway endpoint available for Amazon S3, here are some factors to consider as you choose one strategy over the other.
Cost: Gateway endpoints for S3 are offered at no cost and the routes are managed through route tables. Interface endpoints are priced at $0.01/per AZ/per hour. Cost depends on the Region, check current pricing. Data transferred through the interface endpoint is charged at $0.01/per GB (depending on Region).
Access pattern: S3 access through gateway endpoints is supported only for resources in a specific VPC to which the endpoint is associated. S3 gateway endpoints do not currently support access from resources in a different Region, different VPC, or from an on-premises (non-AWS) environment. However, if you’re willing to manage a complex custom architecture, you can use proxies. In all those scenarios, where access is from resources external to VPC, S3 interface endpoints access S3 in a secure way.
VPC endpoint architecture: Some customers use centralized VPC endpoint architecture patterns. This is where the interface endpoints are all managed in a central hub VPC for accessing the service from multiple spoke VPCs. This architecture helps reduce the complexity and maintenance for multiple interface VPC endpoints across different VPCs. When using an S3 interface endpoint, you must consider the amount of network traffic that would flow through your network from spoke VPCs to hub VPC. If the network connectivity between spoke and hub VPCs are set up using transit gateway, or VPC peering, consider the data processing charges (currently $0.02/GB). If VPC peering is used, there is no charge for data transferred between VPCs in the same Availability Zone. However, data transferred between Availability Zones or between Regions will incur charges as defined in our documentation.
In scenarios where you must access S3 buckets securely from on-premises or from across Regions, we recommend using an interface endpoint. If you chose a gateway endpoint, install a fleet of proxies in the VPC to address transitive routing.
Figure 1. VPC endpoint architecture
Bandwidth considerations: When setting up an interface endpoint, choose multiple subnets across multiple Availability Zones to implement high availability. The number of ENIs should equal to number of subnets chosen. Interface endpoints offer a throughput of 10 Gbps per ENI with a burst capability of 40 Gbps. If your use case requires higher throughput, contact AWS Support.
Gateway endpoints are route table entries that route your traffic directly from the subnet where traffic is originating to the S3 service. Traffic does not flow through an intermediate device or instance. Hence, there is no throughput limit for the gateway endpoint itself. The initial setup for gateway endpoints consists in specifying the VPC route tables you would like to use to access the service. Route table entries for the destination (prefix list) and target (endpoint ID) are automatically added to the route tables.
The two architectural options for creating and managing endpoints are:
Single VPC architecture
Using a single VPC, we can configure:
Gateway endpoints for VPC resources to access S3
VPC interface endpoint for on-premises resources to access S3
The following architecture shows the configuration on how both can be set up in a single VPC for access. This is useful when access from within AWS is limited to a single VPC while still enabling external (non-AWS) access.
Figure 2. Single VPC architecture
DNS configured on-premises will point to the VPC interface endpoint IP addresses. It will forward all traffic from on-premises to S3 through the VPC interface endpoint. The route table configured in the subnet will ensure that any S3 traffic originating from the VPC will flow to S3 using gateway endpoints.
Multi-VPC centralized architecture
In a hub and spoke architecture that centralizes S3 access for multi-Region, cross-VPC, and on-premises workloads, we recommend using an interface endpoint in the hub VPC. The same pattern would also work in multi-account/multi-region design where multiple VPCs require access to centralized buckets.
Note: Firewall appliances that monitor east-west traffic will experience increased load with the Multi-VPC centralized architecture. It may be necessary to use the single VPC endpoint design to reduce impact to firewall appliances.
Figure 3. Multi-VPC centralized architecture
Conclusion
Based on preceding considerations, you can choose to use a combination of gateway and interface endpoints to meet your specific needs. Depending on the account structure and VPC setup, you can support both types of VPC endpoints in a single VPC by using a shared VPC architecture.
With AWS, you can choose between two VPC endpoint types (gateway endpoint or interface endpoint) to securely access your S3 buckets using a private network. In this blog, we showed you how to select the right VPC endpoint using criteria like VPC architecture, access pattern, and cost. To learn more about VPC endpoints and improve the security of your architecture, read Securely Access Services Over AWS PrivateLink.
You can improve your organization’s security posture by enforcing access to Amazon Web Services (AWS) resources based on IP address and geolocation. For example, users in your organization might bring their own devices, which might require additional security authorization checks and posture assessment in order to comply with corporate security requirements. Enforcing access to AWS resources based on geolocation can help you to automate compliance with corporate security requirements by auditing the connection establishment requests. In this blog post, we walk you through the steps to allow AWS Identity and Access Management (IAM) roles to access AWS resources only from specific geographic locations.
Solution overview
AWS Client VPN is a managed client-based VPN service that enables you to securely access your AWS resources and your on-premises network resources. With Client VPN, you can access your resources from any location using an OpenVPN-based VPN client. A client VPN session terminates at the Client VPN endpoint, which is provisioned in your Amazon Virtual Private Cloud (Amazon VPC) and therefore enables a secure connection to resources running inside your VPC network.
This solution uses Client VPN to implement geolocation authentication rules. When a client VPN connection is established, authentication is implemented at the first point of entry into the AWS Cloud. It’s used to determine if clients are allowed to connect to the Client VPN endpoint. You configure an AWS Lambda function as the client connect handler for your Client VPN endpoint. You can use the handler to run custom logic that authorizes a new connection. When a user initiates a new client VPN connection, the custom logic is the point at which you can determine the geolocation of this user. In order to enforce geolocation authorization rules, you need:
AWS WAF to determine the user’s geolocation based on their IP address.
An IAM policy that is attached to the IAM role and validated by AWS when the request origin IP address matches the IP address of the NAT gateway.
One of the key features of AWS WAF is the ability to allow or block web requests based on country of origin. When the client connection handler Lambda function is invoked by your Client VPN endpoint, the Client VPN service invokes the Lambda function on your behalf. The Lambda function receives the device, user, and connection attributes. The user’s public IP address is one of the device attributes that are used to identify the user’s geolocation by using the AWS WAF geolocation feature. Only connections that are authorized by the Lambda function are allowed to connect to the Client VPN endpoint.
Note: The accuracy of the IP address to country lookup database varies by region. Based on recent tests, the overall accuracy for the IP address to country mapping is 99.8 percent. We recommend that you work with regulatory compliance experts to decide if your solution meets your compliance needs.
A NAT gateway allows resources in a private subnet to connect to the internet or other AWS services, but prevents a host on the internet from connecting to those resources. You must also specify an Elastic IP address to associate with the NAT gateway when you create it. Since an Elastic IP address is static, any request originating from a private subnet will be seen with a public IP address that you can trust because it will be the elastic IP address of your NAT gateway.
AWS Identity and Access Management (IAM) is a web service for securely controlling access to AWS services. You manage access in AWS by creating policies and attaching them to IAM identities (users, groups of users, or roles) or AWS resources. A policy is an object in AWS that, when associated with an identity or resource, defines their permissions. In an IAM policy, you can define the global condition key aws:SourceIp to restrict API calls to your AWS resources from specific IP addresses.
Note: Throughout this post, the user is authenticating with a SAML identity provider (IdP) and assumes an IAM role.
Figure 1 illustrates the authentication process when a user tries to establish a new Client VPN connection session.
Figure 1: Enforce connection to Client VPN from specific geolocations
Let’s look at how the process illustrated in Figure 1 works.
The user device initiates a new client VPN connection session.
The Client VPN service redirects the user to authenticate against an IdP.
After user authentication succeeds, the client connects to the Client VPN endpoint.
The Client VPN endpoint invokes the Lambda function synchronously. The function is invoked after device and user authentication, and before the authorization rules are evaluated.
The Lambda function extracts the public-ip device attribute from the input and makes an HTTPS request to the Amazon API Gateway endpoint, passing the user’s public IP address in the X-Forwarded-For header.Because you’re using AWS WAF to protect API Gateway, and have geographic match conditions configured, a response with the status code 200 is returned only if the user’s public IP address originates from an allowed country of origin. Additionally, AWS WAF has another rule configured that blocks all requests to API Gateway if the request doesn’t originate from one of the NAT gateway IP addresses. Because Lambda is deployed in a VPC, it has a NAT gateway IP address, and therefore the request isn’t blocked by AWS WAF. To learn more about running a Lambda function in a VPC, see Configuring a Lambda function to access resources in a VPC.The following code example showcases Lambda code that performs the described step.
Note: Optionally, you can implement additional controls by creating specific authorization rules. Authorization rules act as firewall rules that grant access to networks. You should have an authorization rule for each network for which you want to grant access. To learn more, see Authorization rules.
The Lambda function returns the authorization request response to Client VPN.
When the Lambda function—shown following—returns an allow response, Client VPN establishes the VPN session.
import os
import http.client


cloud_front_url = os.getenv("ENDPOINT_DNS")
endpoint = os.getenv("ENDPOINT")
success_status_codes = [200]


def build_response(allow, status):
    return {
        "allow": allow,
        "error-msg-on-failed-posture-compliance": "Error establishing connection. Please contact your administrator.",
        "posture-compliance-statuses": [status],
        "schema-version": "v1"
    }


def handler(event, context):
    ip = event['public-ip']

    conn = http.client.HTTPSConnection(cloud_front_url)
    conn.request("GET", f'/{endpoint}', headers={'X-Forwarded-For': ip})
    r1 = conn.getresponse()
    conn.close()

    status_code = r1.status

    if status_code in success_status_codes:
        print("User's IP is based from an allowed country. Allowing the connection to VPN.")
        return build_response(True, 'compliant')

    print("User's IP is NOT based from an allowed country. Blocking the connection to VPN.")
    return build_response(False, 'quarantined')
After the client VPN session is established successfully, the request from the user device flows through the NAT gateway. The originating source IP address is recognized, because it is the Elastic IP address associated with the NAT gateway. An IAM policy is defined that denies any request to your AWS resources that doesn’t originate from the NAT gateway Elastic IP address. By attaching this IAM policy to users, you can control which AWS resources they can access.
Figure 2: Enforce access to AWS resources from specific IPs
Let’s look at how the process illustrated in Figure 2 works.
A user signs in to the AWS Management Console by authenticating against the IdP and assumes an IAM role.
Using the IAM role, the user makes a request to list Amazon S3 buckets. The IAM policy of the user is evaluated to form an allow or deny decision.
If the request is allowed, an API request is made to Amazon S3.
The aws:SourceIp condition key is used in a policy to deny requests from principals if the origin IP address isn’t the NAT gateway IP address. However, this policy also denies access if an AWS service makes calls on a principal’s behalf. For example, when you use AWS CloudFormation to provision a stack, it provisions resources by using its own IP address, not the IP address of the originating request. In this case, you use aws:SourceIp with the aws:ViaAWSService key to ensure that the source IP address restriction applies only to requests made directly by a principal.
IAM deny policy
The IAM policy doesn’t allow any actions. What the policy does is deny any action on any resource if the source IP address doesn’t match any of the IP addresses in the condition. Use this policy in combination with other policies that allow specific actions.
Prerequisites
Make sure that you have the following in place before you deploy the solution:
Client VPN to connect to a Client VPN endpoint. You can follow the AWS Client VPN download instructions to download the desktop client.
In this section, you create a CloudFormation stack that creates AWS resources for this solution. To start the deployment process, select the following Launch Stack button.
You also can download the CloudFormation template if you want to modify the code before the deployment.
The template in Figure 3 takes several parameters. Let’s go over the key parameters.
AuthenticationOptionResourceIdentifier: The ID of the AWS Managed Microsoft AD directory to use for Active Directory authentication, or the Amazon Resource Number (ARN) of the SAML provider for federated authentication.
ServerCertificateArn: The ARN of the server certificate. The server certificate must be provisioned in ACM.
LambdaProvisionedConcurrency: Provisioned concurrency for the client connection handler. We recommend that you configure provisioned concurrency for the Lambda function to enable it to scale without fluctuations in latency.
All other input fields have default values that you can either accept or override. Once you provide the parameter input values and reach the final screen, choose Create stack to deploy the CloudFormation stack.
This template creates several resources in your AWS account, as follows:
A VPC and associated resources, such as InternetGateway, Subnets, ElasticIP, NatGateway, RouteTables, and SecurityGroup.
A Client VPN endpoint, which provides connectivity to your VPC.
A Lambda function, which is invoked by the Client VPN endpoint to determine the country origin of the user’s IP address.
An API Gateway for the Lambda function to make an HTTPS request.
AWS WAF in front of API Gateway, which only allows requests to go through to API Gateway if the user’s IP address is based in one of the allowed countries.
A deny policy with a NAT gateway IP addresses condition. Attaching this policy to a role or user enforces that the user can’t access your AWS resources unless they are connected to your client VPN.
Note: CloudFormation stack deployment can take up to 20 minutes to provision all AWS resources.
After creating the stack, there are two outputs in the Outputs section, as shown in Figure 4.
Figure 4: CloudFormation stack outputs
ClientVPNConsoleURL: The URL where you can download the client VPN configuration file.
IAMRoleClientVpnDenyIfNotNatIP: The IAM policy to be attached to an IAM role or IAM user to enforce access control.
Attach the IAMRoleClientVpnDenyIfNotNatIP policy to a role
This policy is used to enforce access to your AWS resources based on geolocation. Attach this policy to the role that you are using for testing the solution. You can use the steps in Adding IAM identity permissions to do so.
Configure the AWS client VPN desktop application
When you open the URL that you see in ClientVPNConsoleURL, you see the newly provisioned Client VPN endpoint. Select Download Client Configuration to download the configuration file.
Figure 5: Client VPN endpoint
Confirm the download request by selecting Download.
To connect to the Client VPN endpoint, follow the steps in Connect to the VPN. After a successful connection is established, you should see the message Connected. in your AWS Client VPN desktop application.
If you can’t establish a Client VPN connection, here are some things to try:
Confirm that the Client VPN connection has successfully established. It should be in the Connected state. To troubleshoot connection issues, you can follow this guide.
If the connection isn’t establishing, make sure that your machine has TCP port 35001 available. This is the port used for receiving the SAML assertion.
Validate that the user you’re using for testing is a member of the correct SAML group on your IdP.
Confirm that the IdP is sending the right details in the SAML assertion. You can use browser plugins, such as SAML-tracer, to inspect the information received in the SAML assertion.
Test the solution
Now that you’re connected to Client VPN, open the console, sign in to your AWS account, and navigate to the Amazon S3 page. Since you’re connected to the VPN, your origin IP address is one of the NAT gateway IPs, and the request is allowed. You can see your S3 bucket, if any exist.
Figure 8: Amazon S3 service console view – user connected to AWS Client VPN
Now that you’ve verified that you can access your AWS resources, go back to the Client VPN desktop application and disconnect your VPN connection. Once the VPN connection is disconnected, go back to the Amazon S3 page and reload it. This time you should see an error message that you don’t have permission to list buckets, as shown in Figure 9.
Figure 9: Amazon S3 service console view – user is disconnected from AWS Client VPN
Access has been denied because your origin public IP address is no longer one of the NAT gateway IP addresses. As mentioned earlier, since the policy denies any action on any resource without an established VPN connection to the Client VPN endpoint, access to all your AWS resources is denied.
Scale the solution in AWS Organizations
With AWS Organizations, you can centrally manage and govern your environment as you grow and scale your AWS resources. You can use Organizations to apply policies that give your teams the freedom to build with the resources they need, while staying within the boundaries you set. By organizing accounts into organizational units (OUs), which are groups of accounts that serve an application or service, you can apply service control policies (SCPs) to create targeted governance boundaries for your OUs. To learn more about Organizations, see AWS Organizations terminology and concepts.
SCPs help you to ensure that your accounts stay within your organization’s access control guidelines across all your accounts within OUs. In particular, these are the key benefits of using SCPs in your AWS Organizations:
You don’t have to create an IAM policy with each new account, but instead create one SCP and apply it to one or more OUs as needed.
You don’t have to apply the IAM policy to every IAM user or role, existing or new.
This solution can be deployed in a separate account, such as a shared infrastructure account. This helps to decouple infrastructure tooling from business application accounts.
The following figure, Figure 10, illustrates the solution in an Organizations environment.
Figure 10: Use SCPs to enforce policy across many AWS accounts
The Client VPN account is the account the solution is deployed into. This account can also be used for other networking related services. The SCP is created in the Organizations root account and attached to one or more OUs. This allows you to centrally control access to your AWS resources.
Let’s review the new condition that’s added to the IAM policy:
The aws:PrincipalARN condition key allows your AWS services to communicate to other AWS services even though those won’t have a NAT IP address as the source IP address. For instance, when a Lambda function needs to read a file from your S3 bucket.
Note: Appending policies to existing resources might cause an unintended disruption to your application. Consider testing your policies in a test environment or to non-critical resources before applying them to production resources. You can do that by attaching the SCP to a specific OU or to an individual AWS account.
Cleanup
After you’ve tested the solution, you can clean up all the created AWS resources by deleting the CloudFormation stack.
Conclusion
In this post, we showed you how you can restrict IAM users to access AWS resources from specific geographic locations. You used Client VPN to allow users to establish a client VPN connection from a desktop. You used an AWS client connection handler (as a Lambda function), and API Gateway with AWS WAF to identify the user’s geolocation. NAT gateway IPs served as trusted source IPs, and an IAM policy protects access to your AWS resources. Lastly, you learned how to scale this solution to many AWS accounts with Organizations.
If you have feedback about this post, submit comments in the Comments section below.
Want more AWS Security how-to content, news, and feature announcements? Follow us on Twitter.
This series of blog posts uses the AWS Well-Architected Tool with the Serverless Lens to help customers build and operate applications using best practices. In each post, I address the serverless-specific questions identified by the Serverless Lens along with the recommended best practices. See the introduction post for a table of contents and explanation of the example application.
Security question SEC3: How do you implement application security in your workload?
This post continues part 1 of this security question. Previously, I cover reviewing security awareness documentation such as the Common Vulnerabilities and Exposures (CVE) database. I show how to use GitHub security features to inspect and manage code dependencies. I then show how to validate inbound events using Amazon API Gateway request validation.
Required practice: Store secrets that are used in your code securely
Store secrets such as database passwords or API keys in a secrets manager. Using a secrets manager allows for auditing access, easier rotation, and prevents exposing secrets in application source code. There are a number of AWS and third-party solutions to store and manage secrets.
AWS Partner Network (APN) member Hashicorp provides Vault to keep secrets and application data secure. Vault has a centralized workflow for tightly controlling access to secrets across applications, systems, and infrastructure. You can store secrets in Vault and access them from an AWS Lambda function to, for example, access a database. You can use the Vault Agent for AWS to authenticate with Vault, receive the database credentials, and then perform the necessary queries. You can also use the Vault AWS Lambda extension to manage the connectivity to Vault.
AWS Secrets Manager enables you to replace hardcoded credentials in your code with an API call to Secrets Manager to retrieve the secret programmatically. You can protect, rotate, manage, and retrieve database credentials, API keys, and other secrets throughout their lifecycle. You can also generate secure secrets. By default, Secrets Manager does not write or cache the secret to persistent storage.
The AWS CloudFormation stack deploys an Amazon RDS MySQL database with a randomly generated password. This is stored in Secrets Manager using a secret resource. A Lambda function behind an API Gateway endpoint returns the record count in a table from the database, using the required credentials. Lambda function environment variables store the database connection details and which secret to return for the database password. The password is not stored as an environment variable, nor in the Lambda function application code.
Lambda environment variables for Secrets Manager
The application flow is as follows:
Clients call the API Gateway endpoint
API Gateway invokes the Lambda function
The Lambda function retrieves the database secrets using the Secrets Manager API
The Lambda function connects to the RDS database using the credentials from Secrets Manager and returns the query results
View the password secret value in the Secrets Manager console, which is randomly generated as part of the stack deployment.
Example password stored in Secrets Manager
The Lambda function includes the following code to retrieve the secret from Secrets Manager. The function then uses it to connect to the database securely.
Browsing to the endpoint URL specified in the CloudFormation output displays the number of records. This confirms that the Lambda function has successfully retrieved the secure database credentials and queried the table for the record count.
Lambda function retrieving database credentials
Audit secrets access through a secrets manager
Monitor how your secrets are used to confirm that the usage is expected, and log any changes to them. This helps to ensure that any unexpected usage or change can be investigated, and unwanted changes can be rolled back.
Hashicorp Vault uses Audit devices that keep a detailed log of all requests and responses to Vault. Audit devices can append logs to a file, write to syslog, or write to a socket.
Secrets Manager supports logging API calls with AWS CloudTrail. CloudTrail captures all API calls for Secrets Manager as events. This includes calls from the Secrets Manager console and from code calling the Secrets Manager APIs.
Viewing the CloudTrail event history shows the requests to secretsmanager.amazonaws.com. This shows the requests from the console in addition to the Lambda function.
CloudTrail showing access to Secrets Manager
Secrets Manager also works with Amazon EventBridge so you can trigger alerts when administrator-specified operations occur. You can configure EventBridge rules to alert on deleted secrets or secret rotation. You can also create an alert if anyone tries to use a secret version while it is pending deletion. This can identify and alert when there is an attempt to use an out-of-date secret.
Enforce least privilege access to secrets
Access to secrets must be tightly controlled because the secrets contain sensitive information. Create AWS Identity and Access Management (IAM) policies that enable minimal access to secrets to prevent credentials being accidentally used or compromised. Secrets that have policies that are too permissive could be misused by other environments or developers. This can lead to accidental data loss or compromised systems. For more information, see “Authentication and access control for AWS Secrets Manager”.
Rotate secrets frequently.
Rotating your workload secrets is important. This prevents misuse of your secrets since they become invalid within a configured time period.
Secrets Manager allows you to rotate secrets on a schedule or on demand. This enables you to replace long-term secrets with short-term ones, significantly reducing the risk of compromise. Secrets Manager creates a CloudFormation stack with a Lambda function to manage the rotation process for you. Secrets Manager has native integrations with Amazon RDS, Amazon Redshift, and Amazon DocumentDB. It populates the function with the Amazon Resource Name (ARN) of the secret. You specify the permissions to rotate the credentials, and how often you want to rotate the secret.
The CloudFormation stack creates a MySecretRotationSchedule resource with a MyRotationLambda function to rotate the secret every 30 days.
MySecretRotationSchedule:
    Type: AWS::SecretsManager::RotationSchedule
    DependsOn: SecretRDSInstanceAttachment
    Properties:
    SecretId: !Ref MyRDSInstanceRotationSecret
    RotationLambdaARN: !GetAtt MyRotationLambda.Arn
    RotationRules:
        AutomaticallyAfterDays: 30
MyRotationLambda:
    Type: AWS::Serverless::Function
    Properties:
    Runtime: python3.7
    Role: !GetAtt MyLambdaExecutionRole.Arn
    Handler: mysql_secret_rotation.lambda_handler
    Description: 'This is a lambda to rotate MySql user passwd'
    FunctionName: 'cfn-rotation-lambda'
    CodeUri: 's3://devsecopsblog/code.zip'
    Environment:
        Variables:
        SECRETS_MANAGER_ENDPOINT: !Sub 'https://secretsmanager.${AWS::Region}.amazonaws.com'
View and edit the rotation settings in the Secrets Manager console.
Secrets Manager rotation settings
Manually rotate the secret by selecting Rotate secret immediately. This invokes the Lambda function, which updates the database password and updates the secret in Secrets Manager.
View the updated secret in Secrets Manager, where the password has changed.
Secrets Manager password change
Browse to the endpoint URL to confirm you can still access the database with the updated credentials.
Access endpoint with updated Secret Manager password
You can provide your own code to customize a Lambda rotation function for other databases or services. The code includes the commands required to interact with your secured service to update or add credentials.
Conclusion
Implementing application security in your workload involves reviewing and automating security practices at the application code level. By implementing code security, you can protect against emerging security threats. You can improve the security posture by checking for malicious code, including third-party dependencies.
In this post, I continue from part 1, looking at securely storing, auditing, and rotating secrets that are used in your application code.
In the next post in the series, I start to cover the reliability pillar from the Well-Architected Serverless Lens with regulating inbound request rates.
For more serverless learning resources, visit Serverless Land.
This series uses the AWS Well-Architected Tool with the Serverless Lens to help customers build and operate applications using best practices. In each post, I address the nine serverless-specific questions identified by the Serverless Lens along with the recommended best practices. See the introduction post for a table of contents and explanation of the example application.
Security question SEC2: How do you manage your serverless application’s security boundaries?
This post continues part 1 of this security question. Previously, I cover how to evaluate and define resource policies, showing what policies are available for various serverless services. I show some of the features of AWS Web Application Firewall (AWS WAF) to protect APIs. Then then go through how to control network traffic at all layers. I explain how AWS Lambda functions connect to VPCs, and how to use private APIs and VPC endpoints. I walk through how to audit your traffic.
Required practice: Use temporary credentials between resources and components
Do not share credentials and permissions policies between resources to maintain a granular segregation of permissions and improve the security posture. Use temporary credentials that are frequently rotated and that have policies tailored to the access the resource needs.
Use dynamic authentication when accessing components and managed services
AWS Identity and Access Management (IAM) roles allows your applications to access AWS services securely without requiring you to manage or hardcode the security credentials. When you use a role, you don’t have to distribute long-term credentials such as a user name and password, or access keys. Instead, the role supplies temporary permissions that applications can use when they make calls to other AWS resources. When you create a Lambda function, for example, you specify an IAM role to associate with the function. The function can then use the role-supplied temporary credentials to sign API requests.
Use IAM for authorizing access to AWS managed services such as Lambda or Amazon S3. Lambda also assumes IAM roles, exposing and rotating temporary credentials to your functions. This enables your application code to access AWS services.
Within the serverless airline example used in this series, the loyalty service uses a Lambda function to fetch loyalty points and next tier progress. AWS AppSync acts as the client using an HTTP resolver, via an API Gateway REST API /loyalty/{customerId}/get resource, to invoke the function.
To ensure only AWS AppSync is authorized to invoke the API, IAM authorization is set within the API Gateway method request.
Viewing API Gateway IAM authorization
The IAM role specifies that appsync.amazonaws.com can perform an execute-api:Invoke on the specific API Gateway resource arn:aws:execute-api:${AWS::Region}:${AWS::AccountId}:${LoyaltyApi}/*/*/*
Use a framework such as the AWS Serverless Application Model (AWS SAM) to deploy your applications. This ensures that AWS resources are provisioned with unique per resource IAM roles. For example, AWS SAM automatically creates unique IAM roles for every Lambda function you create.
Best practice: Design smaller, single purpose functions
Creating smaller, single purpose functions enables you to keep your permissions aligned to least privileged access. This reduces the risk of compromise since the function does not require access to more than it needs.
Create single purpose functions with their own IAM role
Single purpose Lambda functions allow you to create IAM roles that are specific to your access requirements. For example, a large multipurpose function might need access to multiple AWS resources such as Amazon DynamoDB, Amazon S3, and Amazon Simple Queue Service (SQS). Single purpose functions would not need access to all of them at the same time.
With smaller, single purpose functions, it’s often easier to identify the specific resources and access requirements, and grant only those permissions. Additionally, new features are usually implemented by new functions in this architectural design. You can specifically grant permissions in new IAM roles for these functions.
Avoid sharing IAM roles with multiple cloud resources. As permissions are added to the role, these are shared across all resources using this role. For example, use one dedicated IAM role per Lambda function. This allows you to control permissions more intentionally. Even if some functions have the same policy initially, always separate the IAM roles to ensure least privilege policies.
Use least privilege access policies with your users and roles
When you create IAM policies, follow the standard security advice of granting least privilege, or granting only the permissions required to perform a task. Determine what users (and roles) must do and then craft policies that allow them to perform only those tasks.
Start with a minimum set of permissions and grant additional permissions as necessary. Doing so is more secure than starting with permissions that are too lenient and then trying to tighten them later. In the unlikely event of misused credentials, credentials will only be able to perform limited interactions.
For a Lambda function, AWS SAM scopes the permissions of your Lambda functions to the resources that are used by your application. You add IAM policies as part of the AWS SAM template. The policies property can be the name of AWS managed policies, inline IAM policy documents, or AWS SAM policy templates.
For example, the serverless airline has a ConfirmBooking Lambda function that has UpdateItem permissions to the specific DynamoDB BookingTable resource.
One of the fastest ways to scope permissions appropriately is to use AWS SAM policy templates. You can reference these templates directly in the AWS SAM template for your application, providing custom parameters as required.
Auditing permissions and removing unnecessary permissions
Audit permissions regularly to help you identify unused permissions so that you can remove them. You can use last accessed information to refine your policies and allow access to only the services and actions that your entities use. Use the IAM console to view when last an IAM role was used.
IAM last used
Use IAM access advisor to review when was the last time an AWS service was used from a specific IAM user or role. You can view last accessed information for IAM on the Access Advisor tab in the IAM console. Using this information, you can remove IAM policies and access from your IAM roles.
IAM access advisor
When creating and editing policies, you can validate them using IAM Access Analyzer, which provides over 100 policy checks. It generates security warnings when a statement in your policy allows access AWS considers overly permissive. Use the security warning’s actionable recommendations to help grant least privilege. To learn more about policy checks provided by IAM Access Analyzer, see “IAM Access Analyzer policy validation”.
With AWS CloudTrail, you can use CloudTrail event history to review individual actions your IAM role has performed in the past. Using this information, you can detect which permissions were actively used, and decide to remove permissions.
AWS CloudTrail
To work out which permissions you may need, you can generate IAM policies based on access activity. You configure an IAM role with broad permissions while the application is in development. Access Analyzer reviews your CloudTrail logs. It generates a policy template that contains the permissions that the role used in your specified date range. Use the template to create a policy that grants only the permissions needed to support your specific use case. For more information, see “Generate policies based on access activity”.
IAM Access Analyzer
Conclusion
Managing your serverless application’s security boundaries ensures isolation for, within, and between components. In this post, I continue from part 1, looking at using temporary credentials between resources and components. I cover why smaller, single purpose functions are better from a security perspective, and how to audit permissions. I show how to use AWS SAM to create per-function IAM roles.
This series of blog posts uses the AWS Well-Architected Tool with the Serverless Lens to help customers build and operate applications using best practices. In each post, I address the serverless-specific questions identified by the Serverless Lens along with the recommended best practices. See the introduction post for a table of contents and explanation of the example application.
Security question SEC2: How do you manage your serverless application’s security boundaries?
Defining and securing your serverless application’s boundaries ensures isolation for, within, and between components.
Required practice: Evaluate and define resource policies
Understand and determine which resource policies are necessary
Resource policies can protect a component by restricting inbound access to managed services. Use resource policies to restrict access to your component based on a number of identities, such as the source IP address/range, function event source, version, alias, or queues. Resource policies are evaluated and enforced at IAM level before each AWS service applies it’s own authorization mechanisms, when available. For example, IAM resource policies for API Gateway REST APIs can deny access to an API before an AWS Lambda authorizer is called.
If you use multiple AWS accounts, you can use AWS Organizations to manage and govern individual member accounts centrally. Certain resource policies can be applied at the organizations level, providing guardrail for what actions AWS accounts within the organization root or OU can do. For more information see, “Understanding how AWS Organization Service Control Policies work”.
Review your existing policies and how they’re configured, paying close attention to how permissive individual policies are. Your resource policies should only permit necessary callers.
Implement resource policies to prevent unauthorized access
For Lambda, use resource-based policies to provide fine-grained access to what AWS IAM identities and event sources can invoke a specific version or alias of your function. Resource-based policies can also be used to control access to Lambda layers. You can combine resource policies with Lambda event sources. For example, if API Gateway invokes Lambda, you can restrict the policy to the API Gateway ID, HTTP method, and path of the request.
API Gateway resource-based policies can restrict API access to specific Amazon Virtual Private Cloud (VPC), VPC endpoint, source IP address/range, AWS account, or AWS IAM users.
Best practices for growing a serverless application
Good practice: Control network traffic at all layers
Apply controls for controlling both inbound and outbound traffic, including data loss prevention. Define requirements that help you protect your networks and protect against exfiltration.
Use networking controls to enforce access patterns
API Gateway and AWS AppSync have support for AWS Web Application Firewall (AWS WAF) which helps protect web applications and APIs from attacks. AWS WAF enables you to configure a set of rules called a web access control list (web ACL). These allow you to block, or count web requests based on customizable web security rules and conditions that you define. These can include specified IP address ranges, CIDR blocks, specific countries, or Regions. You can also block requests that contain malicious SQL code, or requests that contain malicious script. For more information, see How AWS WAF Works.
To restrict access to your private API to specific VPCs and VPC endpoints, you must add conditions to your API’s resource policy. For example policies, see the documentation.
By default, Lambda runs your functions in a secure Lambda-owned VPC that is not connected to your account’s default VPC. Functions can access anything available on the public internet. This includes other AWS services, HTTPS endpoints for APIs, or services and endpoints outside AWS. The function cannot directly connect to your private resources inside of your VPC.
You can configure a Lambda function to connect to private subnets in a VPC in your account. When a Lambda function is configured to use a VPC, the Lambda function still runs inside the Lambda service VPC. The function then sends all network traffic through your VPC and abides by your VPC’s network controls. Functions deployed to virtual private networks must consider network access to restrict resource access.
AWS Lambda service VPC with VPC-to-VPT NAT to customer VPC
When you connect a function to a VPC in your account, the function cannot access the internet, unless the VPC provides access. To give your function access to the internet, route outbound traffic to a NAT gateway in a public subnet. The NAT gateway has a public IP address and can connect to the internet through the VPC’s internet gateway. For more information, see “How do I give internet access to my Lambda function in a VPC?”. Connecting a function to a public subnet doesn’t give it internet access or a public IP address.
You can control the VPC settings for your Lambda functions using AWS IAM condition keys. For example, you can require that all functions in your organization are connected to a VPC. You can also specify the subnets and security groups that the function’s users can and can’t use.
Unsolicited inbound traffic to a Lambda function isn’t permitted by default. There is no direct network access to the execution environment where your functions run. When connected to a VPC, function outbound traffic comes from your own network address space.
You can use security groups, which act as a virtual firewall to control outbound traffic for functions connected to a VPC. Use security groups to permit your Lambda function to communicate with other AWS resources. For example, a security group can allow the function to connect to an Amazon ElastiCache cluster.
To filter or block access to certain locations, use VPC routing tables to configure routing to different networking appliances. Use network ACLs to block access to CIDR IP ranges or ports, if necessary. For more information about the differences between security groups and network ACLs, see “Compare security groups and network ACLs.”
In addition to API Gateway private endpoints, several AWS services offer VPC endpoints, including Lambda. You can use VPC endpoints to connect to AWS services from within a VPC without an internet gateway, NAT device, VPN connection, or AWS Direct Connect connection.
Using tools to audit your traffic
When you configure a Lambda function to use a VPC, or use private API endpoints, you can use VPC Flow Logs to audit your traffic. VPC Flow Logs allow you to capture information about the IP traffic going to and from network interfaces in your VPC. Flow log data can be published to Amazon CloudWatch Logs or S3 to see where traffic is being sent to at a granular level. Here are some flow log record examples. For more information, see “Learn from your VPC Flow Logs”.
Block network access when required
In addition to security groups and network ACLs, third-party tools allow you to disable outgoing VPC internet traffic. These can also be configured to allow traffic to AWS services or allow-listed services.
Conclusion
Managing your serverless application’s security boundaries ensures isolation for, within, and between components. In this post, I cover how to evaluate and define resource policies, showing what policies are available for various serverless services. I show some of the features of AWS WAF to protect APIs. Then I review how to control network traffic at all layers. I explain how Lambda functions connect to VPCs, and how to use private APIs and VPC endpoints. I walk through how to audit your traffic.
This well-architected question will be continued where I look at using temporary credentials between resources and components. I cover why smaller, single purpose functions are better from a security perspective, and how to audit permissions. I show how to use AWS Serverless Application Model (AWS SAM) to create per-function IAM roles.
This is part 5 of the Getting started with serverless series. In part 4, you learn how the developer workflow for building serverless applications differs to a traditional developer workflow. You see how to test business logic locally before deploying to an AWS account.
In this post, you learn how to secure and manage access to your AWS Lambda functions. I show how to invoke Lambda functions in a sandbox developer account directly from an integrated developer environment (IDE) and view output logs in near-real-time. Finally, I show how this helps to test for infrastructure and security configurations before committing changes to the main branch.
A sandbox developer account
Serverless services like Lambda and Amazon API Gateway are pay-per-use, this means developers no longer need to share multiple environments (for example, dev, staging, and production). Instead, every developer can have their own sandboxed AWS developer account. This allows developers to not have to replicate everything to their local environment but rather test with real resources in the cloud.
You can still run code locally during the development of a feature. In post 4, I show how I run Lambda function code locally, using a test harness. This allows me to maintain a fast inner loop, iteratively updating and locally testing code. If my Lambda function interacts with other AWS infrastructure, I deploy them to a sandboxed AWS developer account. This allows me to test my Lambda function code locally while still being able to access managed services in the cloud.
However, it is useful to deploy your function code to a Lambda function in a sandboxed developer account. A sandbox developer account is an AWS account allocated to a developer on a 1:1 basis. It should give developers as much freedom as possible while still protecting resources and budget.
This allows you to test for security configurations and ensure that your Lambda function code behaves as expected when run in the Lambda execution environment:
Creating a sandboxed developer account
The following best practices can help to minimize costs and prevent unauthorized usage.
After creating a sandbox account, it can be useful to associate a named profile with it. A named profile is a collection of credentials that you can apply to an AWS Command Line Interface (AWS CLI) command. When you specify a profile to run a command, the settings and credentials are used to run that command. The AWS CLI supports multiple named profiles that are stored in the config and credentials files.
Configure profiles by adding entries to the config and credentials files. To learn more about named profiles refer to the AWS CLI documentation.
In the following example I configure my credentials file with two named profiles.
The profile named prod is my production account, and the profile named default is my sandbox developer account. The CLI automatically uses the profile named default, if no --profile option is specified in a CLI command.
AWS Identity and Access Management (IAM) is the service used to manage access to AWS services. Lambda is fully integrated with IAM, allowing you to control precisely what each Lambda function can do within the AWS Cloud. There are two important things that define the scope of permissions in Lambda functions:
The resource policy: Defines which events are authorized to invoke the function.
The execution role policy: Limits what the Lambda function is authorized to do.
Using IAM roles to describe a Lambda function’s permissions, decouples it’s security configuration from the code. This helps reduce the complexity of a lambda function, making it easier to maintain.
A Lambda function’s resource and execution policy should be granted the minimum required permissions for the function to perform it’s task effectively. This is sometimes referred to as the rule of least privilege. As you develop a Lambda function, you expand the scope of this policy to allow access to other resources as required.
When building Lambda-based applications with frameworks such as AWS SAM, you describe both policies in the application’s template.
The following steps show how I deploy and test a Lambda function in a sandbox developer account from within my IDE.
Before you start
All the code relating to this example application can be found in this GitHub repository. To deploy this stage of the application, follow the steps from post 1 to clone the sample application.
Run the following command from the root directory of the cloned repository:
cd ./part_5
After creating a sandbox developer account, deploy the example application into it by specifying the corresponding profile name in the AWS SAM CLI command. You can omit this if you named the profile default:
sam deploy --config-file ../samconfig.toml –guided --profile default
This produces the following output: Make a note of the StarWebhookLambdaFunctionName, you will use this in the following steps.
Logging with serverless applications
After deploying your serverless application to the sandboxed developer account, you need to verify that it’s operating properly. Lambda automatically monitors functions on your behalf, reporting metrics through Amazon CloudWatch. It collects data in the form of logs, metrics, and events and provides a unified view of AWS resources, applications, and services.
To help simplify troubleshooting, the AWS Serverless Application Model CLI (AWS SAM CLI) has a command called sam logs. This command lets you fetch CloudWatch Logs generated by your Lambda function from the command line.
Run the following command in a terminal window to view a live tail of logs generated by the StarWebhookHandler Lambda function. Replace StarWebhookLambdaFunctionName with the Lambda function name generated by your deployment:
sam logs -n StarWebhookLambdaFunctionName --tail
Checking Lambda function permissions in a sandbox developer account
I open a new terminal window and invoke the StarWebhookHandler Lambda function directly from my IDE by running the following AWS SAM CLI command. To invoke the function I pass an example payload located in events/testEvent.json.
The following screenshot shows my two terminal windows side by side.
The response returned by the CLI command is on the right. The left window shows the tail of logs generated by the Lambda function. I observe that the CLI invocation shows a status 200 response, but the Lambda function logs report an ‘AccessDenied’ error. The function does not have the required permissions to write to Amazon S3.
I edit the Lambda function policy definition, adding permission for my Lambda function to write to an S3 bucket. I run sam build and sam deploy to re-deploy the application to the sandbox developer account. I invoke the Lambda function again. The logs show the following:
The Lambda function responds with “StatusCode 200″.
The Lambda function billed duration, memory size and running duration.
The Lambda function has successfully copied the file to S3
IAM permission errors such as these may not be detected when running the function code locally. This is one of the advantages of deploying and running Lambda functions in a sandboxed developer account while developing an application.
Conclusion
This post explains the advantages of using a sandbox developer account. It shows how to deploy your business logic to a Lambda function in a sandboxed developer account. You are introduced to IAM policies, which control precisely what each Lambda function can do within the AWS Cloud. You learn that CloudWatch provides a unified view of logs for all AWS resources.
Finally, I show how to use the AWS SAM CLI and AWS CLI to invoke a Lambda function in the cloud and view its log output directly from the IDE. This helps to test for security configurations and to ensure that your business logic behaves as expected when run in the Lambda service. Invoking functions and observing their log output directly from your IDE helps to reduce context switching as you build.
The collective thoughts of the interwebz
Manage Consent
To provide the best experiences, we use technologies like cookies to store and/or access device information. Consenting to these technologies will allow us to process data such as browsing behavior or unique IDs on this site. Not consenting or withdrawing consent, may adversely affect certain features and functions.
Functional
Always active
The technical storage or access is strictly necessary for the legitimate purpose of enabling the use of a specific service explicitly requested by the subscriber or user, or for the sole purpose of carrying out the transmission of a communication over an electronic communications network.
Preferences
The technical storage or access is necessary for the legitimate purpose of storing preferences that are not requested by the subscriber or user.
Statistics
The technical storage or access that is used exclusively for statistical purposes.The technical storage or access that is used exclusively for anonymous statistical purposes. Without a subpoena, voluntary compliance on the part of your Internet Service Provider, or additional records from a third party, information stored or retrieved for this purpose alone cannot usually be used to identify you.
Marketing
The technical storage or access is required to create user profiles to send advertising, or to track the user on a website or across several websites for similar marketing purposes.