Super Slurper is Cloudflare’s data migration tool that is designed to make large-scale data transfers between cloud object storage providers and Cloudflare R2 easy. Since its launch, thousands of developers have used Super Slurper to move petabytes of data from AWS S3, Google Cloud Storage, and other S3-compatible services to R2.
But we saw an opportunity to make it even faster. We rearchitected Super Slurper from the ground up using our Developer Platform — building on Cloudflare Workers, Durable Objects, and Queues — and improved transfer speeds by up to 5x. In this post, we’ll dive into the original architecture, the performance bottlenecks we identified, how we solved them, and the real-world impact of these improvements.
Initial architecture and performance bottlenecks
Super Slurper originally shared its architecture with SourcingKit, a tool built to bulk import images from AWS S3 into Cloudflare Images. SourcingKit was deployed on Kubernetes and ran alongside the Images service. When we started building Super Slurper, we split it into its own Kubernetes namespace and introduced a few new APIs to make it easier to use for the object storage use case. This setup worked well and helped thousands of developers move data to R2.
However, it wasn’t without its challenges. SourcingKit wasn’t designed to handle the scale required for large, petabytes-scale transfers. SourcingKit, and by extension Super Slurper, operated on Kubernetes clusters located in one of our core data centers, meaning it had to share compute resources and bandwidth with Cloudflare’s control plane, analytics, and other services. As the number of migrations grew, these resource constraints became a clear bottleneck.
For a service transferring data between object storage providers, the job is simple: list objects from the source, copy them to the destination, and repeat. This is exactly how the original Super Slurper worked. We listed objects from the source bucket, pushed that list to a Postgres-based queue (pg_queue), and then pulled from this queue at a steady pace to copy objects over. Given the scale of object storage migrations, bandwidth usage was inevitably going to be high. This made it challenging to scale.
To address the bandwidth constraints operating solely in our core data center, we introduced Cloudflare Workers into the mix. Instead of handling the copying of data in our core data center, we started calling out to a Worker to do the actual copying:
As Super Slurper’s usage grew, so did our Kubernetes resource consumption. A significant amount of time during data transfers was spent waiting on network I/O or storage, and not actually doing compute-intensive tasks. So we didn’t need more memory or more CPU, we needed more concurrency.
To keep up with demand, we kept increasing the replica count. But eventually, we hit a wall. We were dealing with scalability challenges when running on the order of tens of pods when we wanted multiple orders of magnitude more.
We decided to rethink the entire approach from first principles, instead of leaning on the architecture we had inherited. In about a week, we built a rough proof of concept using Cloudflare Workers, Durable Objects, and Queues. We listed objects from the source bucket, pushed them into a queue, and then consumed messages from the queue to initiate transfers. Although this sounds very similar to what we did in the original implementation, building on our Developer Platform allowed us to automatically scale an order of magnitude higher than before.
Cloudflare Queues: Enables asynchronous object transfers and auto-scales to meet the number of objects being migrated.
Cloudflare Workers: Runs lightweight compute tasks without the overhead of Kubernetes and optimizes where in the world each part of the process runsfor lower latency and better performance.
SQLite-backed Durable Objects (DOs): Acts as a fully distributed database, eliminating the limitations of a single PostgreSQL instance.
Hyperdrive: Provides fast access to historical job data from the original PostgreSQL database, keeping it as an archive store.
We ran a few tests and found that our proof of concept was slower than the original implementation for small transfers (a few hundred objects), but it matched and eventually exceeded the performance of the original as transfers scaled into the millions of objects. That was the signal we needed to invest the time to take our proof of concept to production.
We removed our proof of concept hacks, worked on stability, and found new ways to make transfers scale to even higher concurrency. After a few iterations, we landed on something we were happy with.
New architecture: Workers, Queues, and Durable Objects
Processing layer: managing the flow of migration
At the heart of our processing layer are queues, consumers, and workers. Here’s what the process looks like:
Kicking off a migration
When a client triggers a migration, it starts with a request sent to our API Worker. This worker takes the details of the migration, stores them in the database, and adds a message to the List Queue to start the process.
Listing source bucket objects
The List Queue Consumer is where things start to pick up. It pulls messages from the queue, retrieves object listings from the source bucket, applies any necessary filters, and stores important metadata in the database. Then, it creates new tasks by enqueuing object transfer messages into the Transfer Queue.
We immediately queue new batches of work, maximizing concurrency. A built-in throttling mechanism prevents us from adding more messages to our queues when unexpected failures occur, such as dependent systems going down. This helps maintain stability and prevents overload during disruptions.
Efficient object transfers
The Transfer Queue Consumer Workers pull object transfer messages from the queue, ensuring that each object is processed only once by locking the object key in the database. When the transfer finishes, the object is unlocked. For larger objects, we break them into manageable chunks and transfer them as multipart uploads.
Handling failures gracefully
Failures are inevitable in any distributed system, and we had to make sure we accounted for that. We implemented automatic retries for transient failures, so issues don’t interrupt the flow of the migration. But if something can’t be resolved with retries, the message goes into the Dead Letter Queue (DLQ), where it is logged for later review and resolution.
Job completion & lifecycle management
Once all the objects are listed and the transfers are in progress, the Lifecycle Queue Consumer keeps an eye on everything. It monitors the ongoing transfers, ensuring that no object is left behind. When all the transfers are complete, the job is marked as finished and the migration process wraps up.
Database layer: durable storage & legacy data retrieval
When building our new architecture, we knew we needed a robust solution to handle massive datasets while ensuring retrieval of historical job data. That’s where our combination of Durable Objects (DOs) and Hyperdrive came in.
Durable Objects
We gave each account a dedicated Durable Object to track migration jobs. Each job’s DO stores vital details, such as bucket names, user options, and job state. This ensured everything stayed organized and easy to manage. To support large migrations, we also added a Batch DO that manages all the objects queued for transfer, storing their transfer state, object keys, and any extra metadata.
As migrations scaled up to billions of objects, we had to get creative with storage. We implemented a sharding strategy to distribute request loads, preventing bottlenecks and working around SQLite DO’s 10 GB storage limit. As objects are transferred, we clean up their details, optimizing storage space along the way. It’s surprising how much storage a billion object keys can require!
Hyperdrive
Since we were rebuilding a system with years of migration history, we needed a way to preserve and access every past migration detail. Hyperdrive serves as a bridge to our legacy systems, enabling seamless retrieval of historical job data from our core PostgreSQL database. It’s not just a data retrieval mechanism, but an archive for complex migration scenarios.
Results: Super Slurper now transfers data to R2 up to 5x faster
So, after all of that, did we actually achieve our goal of making transfers faster?
We ran a test migration of 75,000 objects from AWS S3 to R2. With the original implementation, the transfer took 15 minutes and 30 seconds. After our performance improvements, the same migration completed in just 3 minutes and 25 seconds.
When production migrations started using the new service in February, we saw even greater improvements in some cases, especially depending on the distribution of object sizes. Super Slurper has been around for about two years. But the improved performance has led to it being able to move much more data — 35% of all objects copied by Super Slurper happened just in the last two months.
Challenges
One of the biggest challenges we faced with the new architecture was handling duplicate messages. There were a couple of ways duplicates could occur:
Queues provides at-least-once delivery, which means consumers may receive the same message more than once to guarantee delivery.
Failures and retries could also create apparent duplicates. For example, if a request to a Durable Object fails after the object has already been transferred, the retry could reprocess the same object.
If not handled correctly, this could result in the same object being transferred multiple times. To solve this, we implemented several strategies to ensure each object was accurately accounted for and only transferred once:
Since listing is sequential (e.g., to get object 2, you need the continuation token from listing object 1), we assign a sequence ID to each listing operation. This allows us to detect duplicate listings and prevent multiple processes from starting simultaneously. This is particularly useful because we don’t wait for database and queue operations to complete before listing the next batch. If listing 2 fails, we can retry it, and if listing 3 has already started, we can short-circuit unnecessary retries.
Each object is locked when its transfer begins, preventing parallel transfers of the same object. Once successfully transferred, the object is unlocked by deleting its key from the database. If a message for that object reappears later, we can safely assume it has already been transferred if the key no longer exists.
We rely on database transactions to keep our counts accurate. If an object fails to unlock, its count remains unchanged. Similarly, if an object key fails to be added to the database, the count isn’t updated, and the operation will be retried later.
As a last failsafe, we check whether the object already exists in the target bucket and was published after the start of our migration. If so, we assume it was transferred by our process (or another) and safely skip it.
What’s next for Super Slurper?
We’re always exploring ways to make Super Slurper faster, more scalable, and even easier to use — this is just the beginning.
Data migrations are still currently limited to 3 concurrent migrations per account, but we want to increase that limit. This will allow object prefixes to be split up into separate migrations and run in parallel, drastically increasing the speed at which a bucket can be migrated. For more information on Super Slurper and how to migrate data from existing object storage to R2, refer to our documentation.
P.S. As part of this update, we made the API much simpler to interact with, so migrations can now be managed programmatically!
We’re excited to announce Workers Observability – a new section in the Cloudflare Dashboard that allows you to query detailed log events across all Workers in your account to extract deeper insights.
In 2024, we set out to build the best first-party observability for any cloud platform. Since then, we’ve improved metrics reporting for all resources, launched Workers Logs to automatically ingest and store logs for Workers, and rebuilt real-time logs with improved filtering. However, observability insights have been limited to a single Worker.
Starting today, you can use Workers Observability to understand what is happening across all of your Workers:
Workers Metrics Dashboard (Beta): A single dashboard to view metrics and logs from all of your Workers
Query Builder (Beta): Construct structured queries to explore your logs, extract metrics from logs, create graphical and tabular visualizations, and save queries for faster future investigations.
Workers Logs: Now Generally Available, with a public API and improved invocation-based grouping.
Building queries
The Query Builder allows you to interact with your logs, and answer the “why” to any question you have. You can find it by navigating to Workers & Pages > Observability in the dashboard.
Using the Query Builder, you can now answer more questions than ever. For example, this query shows the p90 wall time for 200 OK responses from the /reference endpoint is 6 milliseconds.
The key components to structuring a query in the Query Builder are:
Visualizations: An aggregate function like average, count, percentile, or unique that performs a calculation on a group of values to return a single value. Each aggregate function returns a graph visualization and a summary table.
Filters: A condition that allows you to exclude data not matching the criteria.
Search: A condition that only returns the data matching the specified string.
Group by: A function to collapse a field into only its distinct values, allowing you to more granularly apply aggregate functions.
Order by: A sorting function to order the returned rows.
Limits: A cap on the number of returned rows, allowing you to focus on what is important.
The Query Builder relies on structured logs for efficient indexed queries and extracting metrics from logs. Workers Observability natively supports and encourages structured logs. Structured logs store context-rich metadata as key-value pairs in the form of distinct fields (high dimensionality), each with many potential unique values (high cardinality). Invocation Logs, which can be enabled in your Worker, contain deep insights from Cloudflare’s network, and are a great example of a structured log. By logging important metadata as a structured log, you empower yourself to answer questions about your system that you couldn’t predict when writing the code.
Internally at Cloudflare, we’ve already found tremendous value from this new product. During development, the Workers Observability team was able to use the Query Builder to discover a bug in the Workers Observability team’s staging environment. A query on the number of the events per script returned the following response:
After mapping this drop in recorded events against recent staging deployments, the team was able to isolate and root cause the introduction of the bug. Along with fixing the bug, the team also introduced new staging alerts to prevent errors like this from going unnoticed.
Queries built with the Query Builder or Workers Logs can be saved with a custom name and description. You can star your favorite queries, and also share them with your teammates using a shareable link, making it easier than ever to debug together and invest in developing visualizations from your telemetry data.
CPU time and wall time
You can now monitor CPU time and wall time for every Workers invocation across all of our observability offerings, including Tail Workers, Workers Logpush, and Workers Logs. These metrics help show how much time is spent executing code compared to the total elapsed time for the invocation, including I/O time.
For example, using the CPU time and wall time surfaced in the Invocation Log, you can use the Query Builder to show the p90 CPU time and wall time traffic for a single Worker script.
Revamped Workers metrics
In February, we released a new view into your Workers’ metrics to help you monitor your gradual deployments with improved visualizations. Today, we are also launching a new Workers Metrics overview page in the Observability tab. Now you can easily compare metrics across Workers and understand the current state of your deployments, all from a single view.
Invocations view
Invocations are mechanisms to trigger the execution of a Worker or Durable Object in response to an event, such as an alarm, cron job, or a fetch.
When the Worker or Durable Object executes, log events are emitted. To date, we have surfaced logs in an events view where each log is ordered by the time it was published.
We’re now introducing an Invocations View, so you can group and view all logs from each invocation. These views are available in each Worker’s view and the Workers Observability tab.
Workers Observability API
You can now use the Workers Observability API to programmatically retrieve your telemetry data and populate the tool of your choice.
The API allows you to automate, integrate, and customize in ways that our dashboard may not. For example, you may want to analyze your logs in a notebook or correlate your Workers logs with logs from a different source. Leveraging the Workers Observability API can help you optimize your monitoring strategy, automate repetitive tasks, and improve flexibility in how you interact with your telemetry data.
Enable Workers Logs today
To use Workers Logs, enable it in your Workers’ settings in the dashboard or add the following configuration to your Workers’ wrangler file:
We’re just getting started. We have lots in store to help make Cloudflare’s developer observability best-in-class. Join us in Discord in the #workers-observability channel for feedback and feature requests.
Today, we are announcing the 1.0 release of the Cloudflare Vite plugin, as well as official support for React Router v7!
Over the past few years, Vite’s meteoric rise has seen it become one of the most popular build tools for web development, with a large ecosystem and vibrant community. The Cloudflare Vite plugin brings the Workers runtime right into its beating heart! Previously, the Vite dev server would always run your server code in Node.js, even if you were deploying to Cloudflare Workers. By using the new Environment API, released experimentally in Vite 6, your Worker code can now run inside the native Cloudflare Workers runtime (workerd). This means that the dev server matches the production behavior as closely as possible, and provides confidence as you develop and deploy your applications.
Vite 6 includes the most significant changes to Vite’s architecture since its inception and unlocks many new possibilities for the ecosystem. Fundamental to this is the Environment API, which enables the Vite dev server to interact with any number of custom runtime environments. This means that it is now possible to run server code in alternative JavaScript runtimes, such as our own workerd.
We are grateful to have collaborated closely with the Vite team on its design and implementation. When you see first-hand the thoughtful and generous way in which they go about their work, it’s no wonder that Vite and its ecosystem are in such great shape!
Vite 6 with a Cloudflare Worker environment
Here you can see how it all fits together. The user views a page in the browser (1), which triggers a request to the Vite Dev Server (2). Vite processes the request, resolving, loading, and transforming source files into modules that are added to the client and Worker environments. The client modules are downloaded to the browser to be run as client-side JavaScript, and the Worker modules are sent to the Cloudflare Workers runtime to handle server-side requests. The request is handled by the Worker (3 and 4) and the Vite Dev Server returns the response to the browser (5), which displays the result to the user (6).
Single-page applications
Vite has become the go-to choice for developing single-page applications (SPAs), whether your preferred frontend framework is React, Vue, Svelte, or one of many others.
Create a new app
Let’s try out the new Cloudflare Vite plugin by creating a new React SPA using the create-cloudflare CLI.
This command runs create-vite and then makes the necessary changes to incorporate the Cloudflare Vite plugin.
Using the button below, you can also create a React SPA project on Cloudflare Workers, connected to a git repository of your choice, configured with Cloudflare Workers Builds to automatically deploy, and set up to use the new Vite plugin for local development.
Update an existing app
If you would instead like to update an existing Vite SPA project in the same way, you can follow these two steps:
Add the @cloudflare/vite-plugin dependency to the list of plugins:
import { defineConfig } from "vite";
import react from "@vitejs/plugin-react";
import { cloudflare } from "@cloudflare/vite-plugin";

// https://vite.dev/config/
export default defineConfig({
  plugins: [react(), cloudflare()],
});
Add a wrangler.jsonc configuration file alongside your Vite config:
For a purely front-end application, the Cloudflare plugin integrates the Vite dev server with Workers Assets to ensure that settings such as html_handling and not_found_handling behave the same way as they do in production. This is just the beginning, however. The real magic happens when you add a Worker backend that is seamlessly integrated into your development and deployment workflow.
Develop the app
To see this in action, start the Vite development server, which will run your Worker in the Cloudflare Workers runtime:
npm run dev
In your browser, click the first displayed button a few times to increment the counter. This is a classic SPA running JavaScript in your browser. Next, click the second button to fetch the response from the API. Notice that it displays Name from API is: Cloudflare. This is making an API request to a Cloudflare Worker running inside Vite.
Have a look at api/index.ts. This file contains a Worker that is invoked for any request not matching a static asset. It returns a JSON response if the pathname starts with /api/.
Edit api/index.ts by changing the name it returns to ’Cloudflare Workers’ and save your changes. If you click the second button in the browser again, it will now display the new name while preserving the previously set counter value. Vite tracked your changes and updated the Worker environment without affecting the client environment. With Vite and the Cloudflare plugin, you can iterate on the client and server parts of your app together, without losing UI state between edits.
The Cloudflare Vite integration doesn’t end with the dev server. vite build outputs the client and server parts of your application with a single command. vite preview allows you to preview your build output in the Workers runtime prior to deployment. Finally, wrangler deploy recognises that you have generated a Vite build and deploys your application directly without any additional bundling.
React Router v7
While Vite began its life primarily as a build tool for single-page applications, it has since become the foundation for the current generation of full-stack frameworks. Astro, Qwik, React Router, SvelteKit and others have all adopted Vite, drawing on its development server, build pipeline, and phenomenal developer experience. In addition to working with the Vite team on the Environment API, we have also partnered closely with the Remix team on their adoption of Vite Environments. Today, we are announcing first-class support for React Router v7 (the successor to Remix) in the Cloudflare Vite plugin.
You can use the create-cloudflare CLI to create a new React Router application configured with the Cloudflare Vite plugin.
Run npm run dev to start the dev server. You can also try building (npm run build), previewing (npm run preview), and deploying (npm run deploy) your application.
Have a look at the code below, taken from workers/app.ts. This is the file referenced in the main field in wrangler.jsonc:
This single file defines your Worker at both dev and build time and puts you in full control. No more build-time adapters! Notice how the env and ctx are passed down directly in the request handler. These are then accessible in your loaders and actions, which are running inside the Workers runtime along with the rest of your server code. You can add other exports to this file to suit your needs and then reference them in your Worker config. Want to add a Durable Object or a Workflow? Go for it!
This will be the first in a series of full-stack frameworks to be supported and we look forward to continuing discussion and collaboration with a range of teams over the coming months. If you are a framework contributor looking to improve integration with Cloudflare and/or the Vite Environment API, then please feel free to explore the code and reach out on GitHub or Discord.
Workers
While this post has focused thus far on using Vite to build web applications, the Cloudflare plugin enables you to use Vite to build anything you can build with Workers. The full Cloudflare Developer Platform is supported, including KV, D1, Service Bindings, RPC, Durable Objects, Workflows, Workers AI, etc. In fact, in most cases, taking an existing Worker and developing it with Vite is as simple as following these two steps:
Install the dependencies:
npm install –save-dev vite @cloudflare/vite-plugin
And add a Vite config:
// vite.config.ts

import { defineConfig } from "vite";
import { cloudflare } from "@cloudflare/vite-plugin";

export default defineConfig({
  plugins: [cloudflare()],
});
That’s it! By default, the plugin will look for a wrangler.json, wrangler.jsonc, or wrangler.toml config file in the root of your Vite project. By using Vite, you can draw on its rich ecosystem of plugins and integrations and easily customize your build output.
Wrapping up
In 2024, we announcedgetPlatformProxy() as a way to access Cloudflare bindings from development servers running in Node. At the end of that post, we imagined a future where it would instead be possible to develop directly in the Workers runtime. This would eliminate the many subtle ways that development and production behavior could differ. Today, that future is a reality, and we can’t wait for you to try it out!
Start a new project with our React Router, React, or Vue templates using the create-cloudflare CLI, use the “Deploy to Cloudflare” button below, or try adding @cloudflare/vite-plugin to your existing Vite applications. We’re excited to see what you build!
Today, we’re announcing support for MySQL in Cloudflare Workers and Hyperdrive. You can now build applications on Workers that connect to your MySQL databases directly, no matter where they’re hosted, with native MySQL drivers, and with optimal performance.
Connecting to MySQL databases from Workers has been an area we’ve been focusing on for quite some time. We want you to build your apps on Workers with your existing data, even if that data exists in a SQL database in us-east-1. But connecting to traditional SQL databases from Workers has been challenging: it requires making stateful connections to regional databases with drivers that haven’t been designed for the Workers runtime.
After multiple attempts at solving this problem for Postgres, Hyperdrive emerged as our solution that provides the best of both worlds: it supports existing database drivers and libraries while also providing best-in-class performance. And it’s such a critical part of connecting to databases from Workers that we’re making it free (check out the Hyperdrive free tier announcement).
With new Node.js compatibility improvements and Hyperdrive support for the MySQL wire protocol, we’re happy to say MySQL support for Cloudflare Workers has been achieved. If you want to jump into the code and have a MySQL database on hand, this “Deploy to Cloudflare” button will get you setup with a deployed project and will create a repository so you can dig into the code.
Read on to learn more about how we got MySQL to work on Workers, and why Hyperdrive is critical to making connectivity to MySQL databases fast.
Getting MySQL to work on Workers
Until recently, connecting to MySQL databases from Workers was not straightforward. While it’s been possible to make TCP connections from Workers for some time, MySQL drivers had many dependencies on Node.js that weren’t available on the Workers runtime, and that prevented their use.
This led to workarounds being developed. PlanetScale provided a serverless driver for JavaScript, which communicates with PlanetScale servers using HTTP instead of TCP to relay database messages. In a separate effort, a fork of the mysql package was created to polyfill the missing Node.js dependencies and modify the mysql package to work on Workers.
These solutions weren’t perfect. They required using new libraries that either did not provide the level of support expected for production applications, or provided solutions that were limited to certain MySQL hosting providers. They also did not integrate with existing codebases and tooling that depended on the popular MySQL drivers (mysql and mysql2). In our effort to enable all JavaScript developers to build on Workers, we knew that we had to support these drivers.
Improving our Node.js compatibility story was critical to get these MySQL drivers working on our platform. We first identified net and stream as APIs that were needed by both drivers. This, complemented by Workers’ nodejs_compat to resolve unused Node.js dependencies with unenv, enabled the mysql package to work on Workers:
Further work was required to get mysql2 working: dependencies on Node.js timers and the JavaScript eval API remained. While we were able to land support for timers in the Workers runtime, eval was not an API that we could securely enable in the Workers runtime at this time.
mysql2 uses eval to optimize the parsing of MySQL results containing large rows with more than 100 columns (see benchmarks). This blocked the driver from working on Workers, since the Workers runtime does not support this module. Luckily, prior effort existed to get mysql2 working on Workers using static parsers for handling text and binary MySQL data types without using eval(), which provides similar performance for a majority of scenarios.
In mysql2 version 3.13.0, a new option to disable the use of eval() was released to make it possible to use the driver in Cloudflare Workers:
import { createConnection  } from 'mysql2/promise';

export default {
 async fetch(request, env, ctx): Promise<Response> {
    const connection = await createConnection({
     host: env.DB_HOST,
     user: env.DB_USER,
     password: env.DB_PASSWORD,
     database: env.DB_NAME,
     port: env.DB_PORT

     // The following line is needed for mysql2 to work on Workers (as explained above)
     // mysql2 uses eval() to optimize result parsing for rows with > 100 columns
     // eval() is not available in Workers due to runtime limitations
     // Configure mysql2 to use static parsing with disableEval
     disableEval: true
   });

   const [results, fields] = await connection.query(
     'SHOW tables;'
   );

   return new Response(JSON.stringify({ results, fields }), {
     headers: {
       'Content-Type': 'application/json',
       'Access-Control-Allow-Origin': '*',
     },
   });
 },
} satisfies ExportedHandler<Env>;
So, with these efforts, it is now possible to connect to MySQL from Workers. But, getting the MySQL drivers working on Workers was only half of the battle. To make MySQL on Workers performant for production uses, we needed to make it possible to connect to MySQL databases with Hyperdrive.
Supporting MySQL in Hyperdrive
If you’re a MySQL developer, Hyperdrive may be new to you. Hyperdrive solves a core problem: connecting from Workers to regional SQL databases is slow. Database drivers require many roundtrips to establish a connection to a database. Without the ability to reuse these connections between Worker invocations, a lot of unnecessary latency is added to your application.
Hyperdrive solves this problem by pooling connections to your database globally and eliminating unnecessary roundtrips for connection setup. As a plus, Hyperdrive also provides integrated caching to offload popular queries from your database. We wrote an entire deep dive on how Hyperdrive does this, which you should definitely check out.
Getting Hyperdrive to support MySQL was critical for us to be able to say “Connect from Workers to MySQL databases”. That’s easier said than done. To support a new database type, Hyperdrive needs to be able to parse the wire protocol of the database in question, in this case, the MySQL protocol. Once this is accomplished, Hyperdrive can extract queries from protocol messages, cache results across Cloudflare locations, relay messages to a datacenter close to your database, and pool connections reliably close to your origin database.
Adapting Hyperdrive to parse a new language, MySQL protocol, is a challenge in its own right. But it also presented some notable differences with Postgres. While the intricacies are beyond the scope of this post, the differences in MySQL’s authentication plugins across providers and how MySQL’s connection handshake uses capability flags required some adaptation of Hyperdrive. In the end, we leveraged the experience we gained in building Hyperdrive for Postgres to iterate on our support for MySQL. And we’re happy to announce MySQL support is available for Hyperdrive, with all of the performanceimprovements we’ve made to Hyperdrive available from the get-go!
Now, you can create new Hyperdrive configurations for MySQL databases hosted anywhere (we’ve tested MySQL and MariaDB databases from AWS (including AWS Aurora), GCP, Azure, PlanetScale, and self-hosted databases). You can create Hyperdrive configurations for your MySQL databases from the dashboard or the Wrangler CLI:
In your Wrangler configuration file, you’ll need to set your Hyperdrive binding to the ID of the newly created Hyperdrive configuration as well as set Node.js compatibility flags:
From your Cloudflare Worker, the Hyperdrive binding provides you with custom connection credentials that connect to your Hyperdrive configuration. From there onward, all of your queries and database messages will be routed to your origin database by Hyperdrive, leveraging Cloudflare’s network to speed up routing.
import { createConnection  } from 'mysql2/promise';

export interface Env {
 HYPERDRIVE: Hyperdrive;
}

export default {
 async fetch(request, env, ctx): Promise<Response> {

   // Hyperdrive provides new connection credentials to use with your existing drivers
   const connection = await createConnection({
     host: env.HYPERDRIVE.host,
     user: env.HYPERDRIVE.user,
     password: env.HYPERDRIVE.password,
     database: env.HYPERDRIVE.database,
     port: env.HYPERDRIVE.port,

     // Configure mysql2 to use static parsing (as explained above in Part 1)
     disableEval: true
   });

   const [results, fields] = await connection.query(
     'SHOW tables;'
   );

   return new Response(JSON.stringify({ results, fields }), {
     headers: {
       'Content-Type': 'application/json',
       'Access-Control-Allow-Origin': '*',
     },
   });
 },
} satisfies ExportedHandler<Env>;
As you can see from this code snippet, you only need to swap the credentials in your JavaScript code for those provided by Hyperdrive to migrate your existing code to Workers. No need to change the ORMs or drivers you’re using!
Get started building with MySQL and Hyperdrive
MySQL support for Workers and Hyperdrive has been long overdue and we’re excited to see what you build. We published a template for you to get started building your MySQL applications on Workers with Hyperdrive:
As for what’s next, we’re going to continue iterating on our support for MySQL during the beta to support more of the MySQL protocol and MySQL-compatible databases. We’re also going to continue to expand the feature set of Hyperdrive to make it more flexible for your full-stack workloads and more performant for building full-stack global apps on Workers.
Finally, whether you’re using MySQL, PostgreSQL, or any of the other compatible databases, we think you should be using Hyperdrive to get the best performance. And because we want to enable you to build on Workers regardless of your preferred database, we’re making Hyperdrive available to the Workers free plan.
We want to hear your feedback on MySQL, Hyperdrive, and building global applications with Workers. Join the #hyperdrive channel in our Developer Discord to ask questions, share what you’re building, and talk to our Product & Engineering teams directly.
In September 2024, we introduced beta support for hosting, storing, and serving static assets for free on Cloudflare Workers — something that was previously only possible on Cloudflare Pages. Being able to host these assets — your client-side JavaScript, HTML, CSS, fonts, and images — was a critical missing piece for developers looking to build a full-stack application within a single Worker.
Today we’re announcing ten big improvements to building apps on Cloudflare. All together, these new additions allow you to build and host projects ranging from simple static sites to full-stack applications, all on Cloudflare Workers:
You can build complete full-stack apps on Workers without a framework: you can “just use Vite” and React together, and build a backend API in the same Worker. See our Vite + React template for an example.
The Cloudflare Vite plugin is now v1.0 and generally available. The Vite plugin allows you to run Vite’s development server in the Workers runtime (workerd), meaning you get all the benefits of Vite, including Hot Module Replacement, while still being able to use features that are exclusive to Workers (like Durable Objects).
You can now use static _headers and _redirects configuration files for your applications on Workers, something that was previously only available on Pages. These files allow you to add simple headers and configure redirects without executing any Worker code.
In addition to PostgreSQL, you can now connect to MySQL databases in addition from Cloudflare Workers, via Hyperdrive. Bring your existing Planetscale, AWS, GCP, Azure, or other MySQL database, and Hyperdrive will take care of pooling connections to your database and eliminating unnecessary roundtrips by caching queries.
More Node.js APIs are available in the Workers Runtime — including APIs from the crypto, tls, net, and dns modules. We’ve also increased the maximum CPU time for a Workers request from 30 seconds to 5 minutes.
The Images binding in Workers is generally available, allowing you to build more flexible, programmatic workflows.
These improvements allow you to build both simple static sites and more complex server-side rendered applications. Like Pages, you only get charged when your Worker code runs, meaning you can host and serve static sites for free. When you want to do any rendering on the server or need to build an API, simply add a Worker to handle your backend. And when you need to read or write data in your app, you can connect to an existing database with Hyperdrive, or use any of our storage solutions: Workers KV, R2, Durable Objects, or D1.
If you’d like to dive straight into code, you can deploy a single-page application built with Vite and React, with the option to connect to a hosted database with Hyperdrive, by clicking this “Deploy to Cloudflare” button:
Start with Workers
Previously, you needed to choose between building on Cloudflare Pages or Workers (or use Pages for one part of your app, and Workers for another) just to get started. This meant figuring out what your app needed from the start, and hoping that if your project evolved, you wouldn’t be stuck with the wrong platform and architecture. Workers was designed to be a flexible platform, allowing developers to evolve projects as needed — and so, we’ve worked to bring pieces of Pages into Workers over the years.
Now that Workers supports both serving static assets and server-side rendering, you should start with Workers. Cloudflare Pages will continue to be supported, but, going forward, all of our investment, optimizations, and feature work will be dedicated to improving Workers. We aim to make Workers the best platform for building full-stack apps, building upon your feedback of what went well with Pages and what we could improve.
Before, building an app on Pages meant you got a really easy, opinionated on-ramp, but you’d eventually hit a wall if your application got more complex. If you wanted to use Durable Objects to manage state, you would need to set up an entirely separate Worker to do so, ending up with a complicated deployment and more overhead. You also were limited to real-time logs, and could only roll out changes all in one go.
When you build on Workers, you can immediately bind to any other Developer Platform service (including Durable Objects, Email Workers, and more), and manage both your front end and back end in a single project — all with a single deployment. You also get the whole suite of Workers observability tooling built into the platform, such as Workers Logs. And if you want to rollout changes to only a certain percentage of traffic, you can do so with Gradual Deployments.
These latest improvements are part of our goal to bring the best parts of Pages into Workers. For example, we now support static _headers and _redirects config files, so that you can easily take an existing project from Pages (or another platform) and move it over to Workers, without needing to change your project. We also directly integrate with GitHub and GitLab with Workers Builds, providing automatic builds and deployments. And starting today, Preview URLs are posted back to your repository as a comment, with feature branch aliases and environments coming soon.
To learn how to migrate an existing project from Pages to Workers, read our migration guide.
Next, let’s talk about how you can build applications with different rendering modes on Workers.
Building static sites, SPAs, and SSR on Workers
As a quick primer, here are all the architectures and rendering modes we’ll be discussing that are supported on Workers:
Static sites: When you visit a static site, the server immediately returns pre-built static assets — HTML, CSS, JavaScript, images, and fonts. There’s no dynamic rendering happening on the server at request-time. Static assets are typically generated at build-time and served directly from a CDN, making static sites fast and easily cacheable. This approach works well for sites with content that rarely changes.
Single-Page Applications (SPAs): When you load an SPA, the server initially sends a minimal HTML shell and a JavaScript bundle (served as static assets). Your browser downloads this JavaScript, which then takes over to render the entire user interface client-side. After the initial load, all navigation occurs without full-page refreshes, typically via client-side routing. This creates a fast, app-like experience.
Server-Side Rendered (SSR) applications: When you first visit a site that uses SSR, the server generates a fully-rendered HTML page on-demand for that request. Your browser immediately displays this complete HTML, resulting in a fast first page load. Once loaded, JavaScript “hydrates” the page, adding interactivity. Subsequent navigations can either trigger new server-rendered pages or, in many modern frameworks, transition into client-side rendering similar to an SPA.
Next, we’ll dive into how you can build these kinds of applications on Workers, starting with setting up your development environment.
Setup: build and dev
Before uploading your application, you need to bundle all of your client-side code into a directory of static assets. Wrangler bundles and builds your code when you run wrangler dev, but we also now support Vite with our new Vite plugin. This is a great option for those already using Vite’s build tooling and development server — you can continue developing (and testing with Vitest) using Vite’s development server, all using the Workers runtime.
To get started using the Cloudflare Vite plugin, you can scaffold a React application using Vite and our plugin, by running:
The Vite plugin informs Wrangler that this /dist directory contains the project’s built static assets — which, in this case, includes client-side code, some CSS files, and images.
Once deployed, this single-page application (SPA) architecture will look something like this:
When a request comes in, Cloudflare looks at the pathname and automatically serves any static assets that match that pathname. For example, if your static assets directory includes a blog.html file, requests for example.com/blog get that file.
Static sites
If you have a static site created by a static site generator (SSG) like Astro, all you need to do is create a wrangler.jsonc file (or wrangler.toml) and tell Cloudflare where to find your built assets:
Once you’ve added this configuration, you can simply build your project and run wrangler deploy. Your entire site will then be uploaded and ready for traffic on Workers. Once deployed and requests start flowing in, your static site will be cached across Cloudflare’s network.
You can try starting a fresh Astro project on Workers today by running:
By enabling this, the platform assumes that any navigation request (requests which include a Sec-Fetch-Mode: navigate header) are intended for static assets and will serve up index.html whenever a matching static asset match cannot be found. For non-navigation requests (such as requests for data) that don’t match a static asset, Cloudflare will invoke the Worker script. With this setup, you can render the frontend with React, use a Worker to handle back-end operations, and use Vite to help stitch the two together. This is a great option for porting over older SPAs built with create-react-app, which was recently sunset.
Another thing to note in this Wrangler configuration file: we’ve defined a Hyperdrive binding and enabled Smart Placement. Hyperdrive lets us use an existing database and handles connection pooling. This solves a long-standing challenge of connecting Workers (which run in a highly distributed, serverless environment) directly to traditional databases. By design, Workers operate in lightweight V8 isolates with no persistent TCP sockets and a strict CPU/memory limit. This isolation is great for security and speed, but it makes it difficult to hold open database connections. Hyperdrive addresses these constraints by acting as a “bridge” between Cloudflare’s network and your database, taking care of the heavy lifting of maintaining stable connections or pools so that Workers can reuse them. By turning on Smart Placement, we also ensure that if requests to our Worker originate far from the database (causing latency), Cloudflare can choose to relocate both the Worker—which handles the database connection—and the Hyperdrive “bridge” to a location closer to the database, reducing round-trip times.
SPA example: Worker code
Let’s look at the “Deploy to Cloudflare” example at the top of this blog. In api/index.js, we’ve defined an API (using Hono) which connects to a hosted database through Hyperdrive.
import { Hono } from "hono";
import postgres from "postgres";
import booksRouter from "./routes/books";
import bookRelatedRouter from "./routes/book-related";

const app = new Hono();

// Setup SQL client middleware
app.use("*", async (c, next) => {
 // Create SQL client
 const sql = postgres(c.env.HYPERDRIVE.connectionString, {
   max: 5,
   fetch_types: false,
 });

 c.env.SQL = sql;

 // Process the request
 await next();

 // Close the SQL connection after the response is sent
 c.executionCtx.waitUntil(sql.end());
});

app.route("/api/books", booksRouter);
app.route("/api/books/:id/related", bookRelatedRouter);


export default {
 fetch: app.fetch,
};
When deployed, our app’s architecture looks something like this:
If Smart Placement moves the placement of my Worker to run closer to my database, it could look like this:
Server-Side Rendering (SSR)
If you want to handle rendering on the server, we support a number of popular full-stack frameworks.
Here’s a version of our previous example, now using React Router v7’s server-side rendering:
Deploy to Workers, with as few changes as possible
Node.js compatibility
We’ve also continued to make progress supporting Node.js APIs, recently adding support for the crypto, tls, net, and dns modules. This allows existing applications and libraries that rely on these Node.js modules to run on Workers. Let’s take a look at an example:
Previously, if you tried to use the mongodb package, you encountered the following error:
Error: [unenv] dns.resolveTxt is not implemented yet!
This occurred when mongodb used the node:dns module to do a DNS lookup of a hostname. Even if you avoided that issue, you would have encountered another error when mongodb tried to use node:tls to securely connect to a database.
Now, you can use mongodb as expected because node:dns and node:tls are supported. The same can be said for libraries relying on node:crypto and node:net.
Additionally, Workers now expose environment variables and secrets on the process.env object when the nodejs_compat compatibility flag is on and the compatibility date is set to 2025-04-01 or beyond. Some libraries (and developers) assume that this object will be populated with variables, and rely on it for top-level configuration. Without the tweak, libraries may have previously broken unexpectedly and developers had to write additional logic to handle variables on Cloudflare Workers.
Now, you can just access your variables as you would in Node.js.
We have also raised the maximum CPU time per Worker request from 30 seconds to 5 minutes. This allows for compute-intensive operations to run for longer without timing out. Say you want to use the newly supported node:crypto module to hash a very large file, you can now do this on Workers without having to rely on external compute for CPU-intensive operations.
Workers Builds
We’ve also made improvements to Workers Builds, which allows you to connect a Git repository to your Worker, so that you can have automatic builds and deployments on every pushed change. Workers Builds was introduced during Builder Day 2024, and initially only allowed you to connect a repository to an existing Worker. Now, you can bring a repository and immediately deploy it as a new Worker, reducing the amount of setup and button clicking needed to bring a project over. We’ve improved the performance of Workers Builds by reducing the latency of build starts by 6 seconds — they now start within 10 seconds on average. We also boosted API responsiveness, achieving a 7x latency improvement thanks to Smart Placement.
Note: On April 2, 2025, Workers Builds transitioned to a new pricing model, as announced during Builder Day 2024. Free plan users are now capped at 3,000 minutes of build time, and Workers Paid subscription users will have a new usage-based model with 6,000 free minutes included and $0.005 per build minute pricing after. To better support concurrent builds, Paid plans will also now get six (6) concurrent builds, making it easier to work across multiple projects and monorepos. For more information on pricing, see the documentation.
Last week, we wrote a blog post that covers how the Images binding enables more flexible, programmatic workflows for image optimization.
Previously, you could access image optimization features by calling fetch() in your Worker. This method requires the original image to be retrievable by URL. However, you may have cases where images aren’t accessible from a URL, like when you want to compress user-uploaded images before they are uploaded to your storage. With the Images binding, you can directly optimize an image by operating on its body as a stream of bytes.
We’re excited to see what you’ll build, and are focused on new features and improvements to make it easier to create any application on Workers. Much of this work was made even better by community feedback, and we encourage everyone to join our Discord to participate in the discussion.
In acknowledgement of its pivotal role in building distributed applications that rely on regional databases, we’re making Hyperdrive available on the free plan of Cloudflare Workers!
Hyperdrive enables you to build performant, global apps on Workers with your existing SQL databases. Tell it your database connection string, bring your existing drivers, and Hyperdrive will make connecting to your database faster. No major refactors or convoluted configuration required.
Over the past year, Hyperdrive has become a key service for teams that want to build their applications on Workers and connect to SQL databases. This includes our own engineering teams, with Hyperdrive serving as the tool of choice to connect from Workers to our own Postgres clusters for many of the control-plane actions of our billing, D1, R2, and Workers KV teams (just to name a few).
This has highlighted for us that Hyperdrive is a fundamental building block, and it solves a common class of problems for which there isn’t a great alternative. We want to make it possible for everyone building on Workers to connect to their database of choice with the best performance possible, using the drivers and frameworks they already know and love.
Performance is a feature
To illustrate how much Hyperdrive can improve your application’s performance, let’s write the world’s simplest benchmark. This is obviously not production code, but is meant to be reflective of a common application you’d bring to the Workers platform. We’re going to use a simple table, a very popular OSS driver (postgres.js), and run a standard OLTP workload from a Worker. We’re going to keep our origin database in London, and query it from Chicago (those locations will come back up later, so keep them in mind).
// This is the test table we're using
// CREATE TABLE IF NOT EXISTS test_data(userId bigint, userText text, isActive bool);

import postgres from 'postgres';

let direct_conn = '<direct connection string here!>';
let hyperdrive_conn = env.HYPERDRIVE.connectionString;

async function measureLatency(connString: string) {
	let beginTime = Date.now();
	let sql = postgres(connString);

	await sql`INSERT INTO test_data VALUES (${999}, 'lorem_ipsum', ${true})`;
	await sql`SELECT userId, userText, isActive FROM test_data WHERE userId = ${999}`;

	let latency = Date.now() - beginTime;
	ctx.waitUntil(sql.end());
	return latency;
}

let directLatency = await measureLatency(direct_conn);
let hyperdriveLatency = await measureLatency(hyperdrive_conn);
The code above
Takes a standard database connection string, and uses it to create a database connection.
Loads a user record into the database.
Queries all records for that user.
Measures how long this takes to do with a direct connection, and with Hyperdrive.
When connecting directly to the origin database, this set of queries takes an average of 1200 ms. With absolutely no other changes, just swapping out the connection string for env.HYPERDRIVE.connectionString, this number is cut down to 500 ms (an almost 60% reduction). If you enable Hyperdrive’s caching, so that the SELECT query is served from cache, this takes only 320 ms. With this one-line change, Hyperdrive will reduce the latency of this Worker by almost 75%! In addition to this speedup, you also get secure auth and transport, as well as a connection pool to help protect your database from being overwhelmed when your usage scales up. See it for yourself using our demo application.
A demo application comparing latencies between Hyperdrive and direct-to-database connections.
Traditional SQL databases are familiar and powerful, but they are designed to be colocated with long-running compute. They were not conceived in the era of modern serverless applications, and have connection models that don’t take the constraints of such an environment into account. Instead, they require highly stateful connections that do not play well with Workers’ global and stateless model. Hyperdrive solves this problem by maintaining database connections across Cloudflare’s network ready to be used at a moment’s notice, caching your queries for fast access, and eliminating round trips to minimize network latency.
With this announcement, many developers are going to be taking a look at Hyperdrive for the first time over the coming weeks and months. To help people dive in and try it out, we think it’s time to talk about how Hyperdrive actually works.
Staying warm in the pool
Let’s talk a bit about database connection poolers, how they work, and what problems they already solve. They are hardly a new technology, after all.
The point of any connection pooler, Hyperdrive or others, is to minimize the overhead of establishing and coordinating database connections. Every new database connection requires additional memory and CPU time from the database server, and this can only scale just so well as the number of concurrent connections climbs. So the question becomes, how should database connections be shared across clients?
Session mode: whenever a client connects, it is assigned a connection of its own until it disconnects. This dramatically reduces the available concurrency, in exchange for much simpler implementation and a broader selection of supported features
Transaction mode: when a client is ready to send a query or open a transaction, it is assigned a connection on which to do so. This connection will be returned to the pool when the query or transaction concludes. Subsequent queries during the same client session may (or may not) be assigned a different connection.
Statement mode: Like transaction mode, but a connection is given out and returned for each statement. Multi-statement transactions are disallowed.
When building Hyperdrive, we had to decide which of these modes we wanted to use. Each of the approaches implies some fairly serious tradeoffs, so what’s the right choice? For a service intended to make using a database from Workers as pleasant as possible we went with the choice that balances features and performance, and designed Hyperdrive as a transaction-mode pooler. This best serves the goals of supporting a large number of short-lived clients (and therefore very high concurrency), while still supporting the transactional semantics that cause so many people to reach for an RDBMS in the first place.
In terms of this part of its design, Hyperdrive takes its cues from many pre-existing popular connection poolers, and manages operations to allow our users to focus on designing their full-stack applications. There is a configured limit to the number of connections the pool will give out, limits to how long a connection will be held idle until it is allowed to drop and return resources to the database, bookkeeping around prepared statements being shared across pooled connections, and other traditional concerns of the management of these resources to help ensure the origin database is able to run smoothly. These are all described in our documentation.
Round and round we go
Ok, so why build Hyperdrive then? Other poolers that solve these problems already exist — couldn’t developers using Workers just run one of those and call it a day? It turns out that connecting to regional poolers from Workers has the same major downside as connecting to regional databases: network latency and round trips.
Establishing a connection, whether to a database or a pool, requires many exchanges between the client and server. While this is true for all fully-fledged client-server databases (e.g. MySQL, MongoDB), we are going to focus on the PostgreSQL connection protocol flow in this post. As we work through all of the steps involved, what we most want to keep track of is how many round trips it takes to accomplish. Note that we’re mostly concerned about having to wait around while these happen, so “half” round trips such as in the first diagram are not counted. This is because we can send off the message and then proceed without waiting.
The first step to establishing a connection between Postgres client and server is very familiar ground to anyone who’s worked much with networks: a TCP startup handshake. Postgres uses TCP for its underlying transport, and so we must have that connection before anything else can happen on top of it.
With our transport layer in place, the next step is to encrypt the connection. The TLS Handshake involves some back-and-forth in its own right, though this has been reduced to just one round trip for TLS 1.3. Below is the simplest and fastest version of this exchange, but there are certainly scenarios where it can be much more complex.
After the underlying transport is established and secured, the application-level traffic can actually start! However, we’re not quite ready for queries, the client still needs to authenticate to a specific user and database. Again, there are multiple supported approaches that offer varying levels of speed and security. To make this comparison as fair as possible, we’re again going to consider the version that offers the fastest startup (password-based authentication).
So, for those keeping score, establishing a new connection to your database takes a bare minimum of 5 round trips, and can very quickly climb from there.
While the latency of any given network round trip is going to vary based on so many factors that “it depends” is the only meaningful measurement available, some quick benchmarking during the writing of this post shows ~125 ms from Chicago to London. Now multiply that number by 5 round trips and the problem becomes evident: 625 ms to start up a connection is not viable in a distributed serverless environment. So how does Hyperdrive solve it? What if I told you the trick is that we do it all twice? To understand Hyperdrive’s secret sauce, we need to dive into Hyperdrive’s architecture.
Impersonating a database server
The rest of this post is a deep dive into answering the question of how Hyperdrive does what it does. To give the clearest picture, we’re going to talk about some internal subsystems by name. To help keep everything straight, let’s start with a short glossary that you can refer back to if needed. These descriptions may not make sense yet, but they will by the end of the article.
Hyperdrive subsystem name
Brief description
Client
Lives on the same server as your Worker, talks directly to your database driver. This caches query results and sends queries to Endpoint if needed.
Endpoint
Lives in the data center nearest to your origin database, talks to your origin database. This caches query results and houses a pool of connections to your origin database.
Edge Validator
Sends a request to a Cloudflare data center to validate that Hyperdrive can connect to your origin database at time of creation.
Placement
Builds on top of Edge Validator to connect to your origin database from all eligible data centers, to identify which have the fastest connections.
The first subsystem we want to dig into is named Client. Client’s first job is to pretend to be a database server. When a user’s Worker wants to connect to their database via Hyperdrive, they use a special connection string that the Worker runtime generates on the fly. This tells the Worker to reach out to a Hyperdrive process running on the same Cloudflare server, and direct all traffic to and from the database client to it.
import postgres from "postgres";

// Connect to Hyperdrive
const sql = postgres(env.HYPERDRIVE.connectionString);

// sql will now talk over an RPC channel to Hyperdrive, instead of via TCP to Postgres
Once this connection is established, the database driver will perform the usual handshake expected of it, with our Client playing the role of a database server and sending the appropriate responses. All of this happens on the same Cloudflare server running the Worker, and we observe that the p90 for all this is 4 ms (p50 is 2 ms). Quite a bit better than 625 ms, but how does that help? The query still needs to get to the database, right?
Client’s second main job is to inspect the queries sent from a Worker, and decide whether they can be served from Cloudflare’s cache. We’ll talk more about that later on. Assuming that there are no cached query results available, Client will need to reach out to our second important subsystem, which we call Endpoint.
In for the long haul
Before we dig into the role Endpoint plays, it’s worth talking more about how the Client→Endpoint connection works, because it’s a key piece of our solution. We have already talked a lot about the price of network round trips, and how a Worker might be quite far away from the origin database, so how does Hyperdrive handle the long trip from the Client running alongside their Worker to the Endpoint running near their database without expensive round trips?
This is accomplished with a very handy bit of Cloudflare’s networking infrastructure. When Client gets a cache miss, it will submit a request to our networking platform for a connection to whichever data center Endpoint is running on. This platform keeps a pool of ready TCP connections between all of Cloudflare’s data centers, such that we don’t need to do any preliminary handshakes to begin sending application-level traffic. You might say we put a connection pooler in our connection pooler.
Over this TCP connection, we send an initialization message that includes all of the buffered query messages the Worker has sent to Client (the mental model would be something like a SYN and a payload all bundled together). Endpoint will do its job processing this query, and respond by streaming the response back to Client, leaving the streaming channel open for any followup queries until Client disconnects. This approach allows us to send queries around the world with zero wasted round trips.
Impersonating a database client
Endpoint has a couple different jobs it has to do. Its first job is to pretend to be a database client, and to do the client half of the handshake shown above. Second, it must also do the same query processing that Client does with query messages. Finally, Endpoint will make the same determination on when it needs to reach out to the origin database to get uncached query results.
When Endpoint needs to query the origin database, it will attempt to take a connection out of a limited-size pool of database connections that it keeps. If there is an unused connection available, it is handed out from the pool and used to ferry the query to the origin database, and the results back to Endpoint. Once Endpoint has these results, the connection is immediately returned to the pool so that another Client can use it. These warm connections are usable in a matter of microseconds, which is obviously a dramatic improvement over the round trips from one region to another that a cold startup handshake would require.
If there are no currently unused connections sitting in the pool, it may start up a new one (assuming the pool has not already given out as many connections as it is allowed to). This set of handshakes looks exactly the same as the one Client does, but it happens across the network between a Cloudflare data center and wherever the origin database happens to be. These are the same 5 round trips as our original example, but instead of a full Chicago→London path on every single trip, perhaps it’s Virginia→London, or even London→London. Latency here will depend on which data center Endpoint is being housed in.
Distributed choreography
Earlier, we mentioned that Hyperdrive is a transaction-mode pooler. This means that when a driver is ready to send a query or open a transaction it must get a connection from the pool to use. The core challenge for a transaction-mode pooler is in aligning the state of the driver with the state of the connection checked out from the pool. For example, if the driver thinks it’s in a transaction, but the database doesn’t, then you might get errors or even corrupted results.
Hyperdrive achieves this by ensuring all connections are in the same state when they’re checked out of the pool: idle and ready for a query. Where Hyperdrive differs from other transaction-mode poolers is that it does this dance of matching up the states of two different connections across machines, such that there’s no need to share state between Client and Endpoint! Hyperdrive can terminate the incoming connection in Client on the same machine running the Worker, and pool the connections to the origin database wherever makes the most sense.
The job of a transaction-mode pooler is a hard one. Database connections are fundamentally stateful and keeping track of that state is important to maintain our guise when impersonating either a database client or a server. As an example, one of the trickier pieces of state to manage are prepared statements. When a user creates a new prepared statement, the prepared statement is only created on whichever database connection happened to be checked out at that time. Once the user finishes the transaction or query they are processing, the connection holding that statement is returned to the pool. From the user’s perspective they’re still connected using the same database connection, so a new query or transaction can reasonably expect to use that previously prepared statement. If a different connection is handed out for the next query and the query wants to make use of this resource, the pooler has to do something about it. We went into some depth on this topic in a previous blog post when we released this feature, but in sum, the process looks like this:
Hyperdrive implements this by keeping track of what statements have been prepared by a given client, as well as what statements have been prepared on each origin connection in the pool. When a query comes in expecting to re-use a particular prepared statement (#8 above), Hyperdrive checks if it’s been prepared on the checked-out origin connection. If it hasn’t, Hyperdrive will replay the wire-protocol message sequence to prepare it on the newly-checked-out origin connection (#10 above) before sending the query over it. Many little corrections like this are necessary to keep the client’s connection to Hyperdrive and Hyperdrive’s connection to the origin database lined up so that both sides see what they expect.
Better, faster, smarter, closer
This “split connection” approach is the founding innovation of Hyperdrive, and one of the most vital aspects of it is how it affects starting up new connections. While the same 5+ round trips must always happen on startup, the actual time spent on the round trips can be dramatically reduced by conducting them over the smallest possible distances. This impact of distance can be so big that there is still a huge latency reduction even though the startup round trips must now happen twice (once each between the Worker and Client, and Endpoint and your origin database). So how do we decide where to run everything, to lean into that advantage as much as possible?
The placement of Client has not really changed since the original design of Hyperdrive. Sharing a server with the Worker sending the queries means that the Worker runtime can connect directly to Hyperdrive with no network hop needed. While there is always room for microoptimizations, it’s hard to do much better than that from an architecture perspective. By far the bigger piece of the latency puzzle is where to run Endpoint.
Hyperdrive keeps a list of data centers that are eligible to house Endpoints, requiring that they have sufficient capacity and the best routes available for pooled connections to use. The key challenge to overcome here is that a database connection string does not tell you where in the world a database actually is. The reality is that reliably going from a hostname to a precise (enough) geographic location is a hard problem, even leaving aside the additional complexity of doing so within a private network. So how do we pick from that list of eligible data centers?
For much of the time since its launch, Hyperdrive solved this with a regional pool approach. When a Worker connected to Hyperdrive, the location of the Worker was used to infer what region the end user was connecting from (e.g. ENAM, WEUR, APAC, etc. — see a rough breakdown here). Data centers to house Endpoints for any given Hyperdrive were deterministically selected from that region’s list of eligible options using rendezvous hashing, resulting in one pool of connections per region.
This approach worked well enough, but it had some severe shortcomings. The first and most obvious is that there’s no guarantee that the data center selected for a given region is actually closer to the origin database than the user making the request. This means that, while you’re getting the benefit of the excellent routing available on Cloudflare’s network, you may be going significantly out of your way to do so. The second downside is that, in the scenario where a new connection must be created, the round trips to do so may be happening over a significantly larger distance than is necessary if the origin database is in a different region than the Endpoint housing the regional connection pool. This increases latency and reduces throughput for the query that needs to instantiate the connection.
The final key downside here is an unfortunate interaction with Smart Placement, a feature of Cloudflare Workers that analyzes the duration of your Worker requests to identify the data center to run your Worker in. With regional Endpoints, the best Smart Placement can possibly do is to put your requests close to the Endpoint for whichever region the origin database is in. Again, there may be other data centers that are closer, but Smart Placement has no way to do better than where the Endpoint is because all Hyperdrive queries must route through it.
We recently shipped some improvements to this system that significantly enhanced performance. The new system discards the concept of regional pools entirely, in favor of a single global Endpoint for each Hyperdrive that is in the eligible data center as close as possible to the origin database.
The way we solved locating the origin database such that we can accomplish this was ultimately very straightforward. We already had a subsystem to confirm, at the time of creation, that Hyperdrive could connect to an origin database using the provided information. We call this subsystem our Edge Validator.
It’s bad user experience to allow someone to create a Hyperdrive, and then find out when they go to use it that they mistyped their password or something. Now they’re stuck trying to debug with extra layers in the way, with a Hyperdrive that can’t possibly work. Instead, whenever a Hyperdrive is created, the Edge Validator will send a request to an arbitrary data center to use its instance of Hyperdrive to connect to the origin database. If this connection fails, the creation of the Hyperdrive will also fail, giving immediate feedback to the user at the time it is most helpful.
With our new subsystem, affectionately called Placement, we now have a solution to the geolocation problem. After Edge Validator has confirmed that the provided information works and the Hyperdrive is created, an extra step is run in the background. Placement will perform the exact same connection routine, except instead of being done once from an arbitrary data center, it is run a handful of times from every single data center that is eligible to house Endpoints. The latency of establishing these connections is collected, and the average is sent back to a central instance of Placement. The data centers that can connect to the origin database the fastest are, by definition, where we want to run Endpoint for this Hyperdrive. The list of these is saved, and at runtime is used to select the Endpoint best suited to housing the pool of connections to the origin database.
Given that the secret sauce of Hyperdrive is in managing and minimizing the latency of establishing these connections, moving Endpoints right next to their origin databases proved to be pretty impactful.
Pictured: query latency as measured from Endpoint to origin databases. The backfill of Placement to existing customers was done in stages on 02/22 and 02/25.
Serverless drivers exist, though?
While we went in a different direction, it’s worth acknowledging that other teams have solved this same problem with a very different approach. Custom database drivers, usually called “serverless drivers”, have made several optimization efforts to reduce both the number of round trips and how quickly they can be conducted, while still connecting directly from your client to your database in the traditional way. While these drivers are impressive, we chose not to go this route for a couple of reasons.
First off, a big part of the appeal of using Postgres is its vibrant ecosystem. Odds are good you’ve used Postgres before, and it can probably help solve whichever problem you’re tackling with your newest project. This familiarity and shared knowledge across projects is an absolute superpower. We wanted to lean into this advantage by supporting the most popular drivers already in this ecosystem, instead of fragmenting it by adding a competing one.
Second, Hyperdrive also functions as a cache for individual queries (a bit of trivia: its name while still in Alpha was actually sql-query-cache). Doing this as effectively as possible for distributed users requires some clever positioning of where exactly the query results should be cached. One of the unique advantages of running a distributed service on Cloudflare’s network is that we have a lot of flexibility on where to run things, and can confidently surmount challenges like those. If we’re going to be playing three-card monte with where things are happening anyway, it makes the most sense to favor that route for solving the other problems we’re trying to tackle too.
Pick your favorite cache pun
As we’ve talked about in the past, Hyperdrive buffers protocol messages until it has enough information to know whether a query can be served from cache. In a post about how Hyperdrive works it would be a shame to skip talking about how exactly we cache query results, so let’s close by diving into that.
First and foremost, Hyperdrive uses Cloudflare’s cache, because when you have technology like that already available to you, it’d be silly not to use it. This has some implications for our architecture that are worth exploring.
The cache exists in each of Cloudflare’s data centers, and by default these are separate instances. That means that a Client operating close to the user has one, and an Endpoint operating close to the origin database has one. However, historically we weren’t able to take full advantage of that, because the logic for interacting with cache was tightly bound to the logic for managing the pool of connections.
Part of our recent architecture refactoring effort, where we switched to global Endpoints, was to split up this logic such that we can take advantage of Client’s cache too. This was necessary because, with Endpoint moving to a single location for each Hyperdrive, users from other regions would otherwise have gotten cache hits served from almost as far away as the origin.
With the new architecture, the role of Client during active query handling transitioned from that of a “dumb pipe” to more like what Endpoint had always been doing. It now buffers protocol messages, and serves results from cache if possible. In those scenarios, Hyperdrive’s traffic never leaves the data center that the Worker is running in, reducing query latencies from 20-70 ms to an average of around 4 ms. As a side benefit, it also substantially reduces the network bandwidth Hyperdrive uses to serve these queries. A win-win!
In the scenarios where query results can’t be served from the cache in Client’s data center, all is still not lost. Endpoint may also have cached results for this query, because it can field traffic from many different Clients around the world. If so, it will provide these results back to Client, along with how much time is remaining before they expire, such that Client can both return them and store them correctly into its own cache. Likewise, if Endpoint does need to go to the origin database for results, they will be stored into both Client and Endpoint caches. This ensures that followup queries from that same Client data center will get the happy path with single-digit ms response times, and also reduce load on the origin database from any other Client’s queries. This functions similarly to how Cloudflare’s Tiered Cache works, with Endpoint’s cache functioning as a final layer of shielding for the origin database.
Come on in, the water’s fine!
With this announcement of a Free Plan for Hyperdrive, and newly armed with the knowledge of how it works under the hood, we hope you’ll enjoy building your next project with it! You can get started with a single Wrangler command (or using the dashboard):
We’ve also included a Deploy to Cloudflare button below to let you get started with a sample Worker app using Hyperdrive, just bring your existing Postgres database! If you have any questions or ideas for future improvements, please feel free to visit our Discord channel!
We first announced the Cloudflare adapter for OpenNext at Builder Day 2024. It transforms Next.js applications to enable them to run on Cloudflare’s infrastructure.
Over the seven months since that September announcement, we have been working hard to improve the adapter. It is now more tightly integrated with OpenNext to enable supporting many more Next.js features. We kept improving the Node.js compatibility of Workers and unenv was also improved to polyfill the Node.js features not yet implemented by the runtime.
With all of this work, we are proud to announce the 1.0.0-beta release of @opennextjs/cloudflare. Using the Cloudflare adapter is now the preferred way to deploy Next applications to the Cloudflare platform, instead of Next on Pages.
Read on to learn what is possible today, and about our plans for the coming months.
OpenNext
OpenNext is a build tool designed to transform Next.js applications into packages optimized for deployment across various platforms. Initially created for serverless environments on AWS Lambda, OpenNext has expanded its capabilities to support a wider range of environments, including Cloudflare Workers and traditional Node.js servers.
By integrating with the OpenNext codebase, the Cloudflare adapter is now able to support many more features than its original version. We are also leveraging the end-to-end (e2e) test suite of OpenNext to validate the implementation of these features.
Being part of OpenNext allows us to support future Next.js features shortly after they are released. We intend to support the latest minor version of Next.js 14 and all the minor versions of Next.js 15.
Features
Most of the Next.js 15 features are supported in @opennextjs/cloudflare. You can find an exhaustive list on the OpenNext website, but here are a few highlights:
Middleware allows modifying the response by rewriting, redirecting, or modifying the request and response headers, or responding directly before the request hits the app.
The adapter easily integrates with Cloudflare Images to deliver optimized images.
We are working on adding more features:
Microsoft Windows is not yet fully supported by the adapter. We plan to fully support Windows for development in the 1.0 release.
The adapter currently only supports the Node runtime of Next.js. You can opt-out of the Edge runtime by removing export const runtime = "edge" from your application. We plan to add support for the edge runtime in the next major release. Note that applications deployed to Cloudflare Workers run close to the user, whatever the Next.js runtime used, giving similar performance.
Composable caching (use cache) should also be supported in the next major release. It is a canary feature of Next.js that is still in development. It will be supported in OpenNext once it stabilizes.
Evolution in the ecosystem
While the adapter has vastly improved over the last several months, we should also mention the updates to the ecosystem that are enabling more applications to be supported.
NodeJS compatibility for Workers is becoming more comprehensive with the crypto, dns, timers, tls, and net NodeJS modules now being natively implemented by the Workers runtime. The remaining modules that are not yet implemented are supported through unenv.
The Worker size limit was bumped from 1 MiB to 3 MiB on free plans and from 10 MiB to 15 MiB for paid plans.
1.0 and the road ahead
With the release of 1.0-beta, we expect most Next.js 14 and 15 applications to be able to run seamlessly on Cloudflare.
We have already tackled a lot of the issues reported on GitHub by early adopters, and once the adapter stabilizes, we will release the 1.0 version.
After that, we are planning a v2 release with a focus on:
Reducing the bundle size.
Improving the application performance. The reduced bundle size and more work on the caching layer will make applications faster.
Allowing users to deploy to multiple Workers.
Deploy your first application to Workers
Developing and deploying a Next.js app on Workers is pretty simple, and you can do it today by following these steps:
Start by creating your application from a template:
You can then iterate on your application using the Next.js dev server by running npm run dev.
Once you are happy with your application in the development server, you can run the application on Workers locally by executing npm run preview, or deploy the application with npm run deploy.
You can now add a Deploy to Cloudflare button to the README of your Git repository containing a Workers application — making it simple for other developers to quickly set up and deploy your project!
The Deploy to Cloudflare button:
Creates a new Git repository on your GitHub/ GitLab account: Cloudflare will automatically clone and create a new repository on your account, so you can continue developing.
Automatically provisions resources the app needs: If your repository requires Cloudflare primitives like a Workers KV namespace, a D1 database, or an R2 bucket, Cloudflare will automatically provision them on your account and bind them to your Worker upon deployment.
Configures Workers Builds (CI/CD): Every new push to your production branch on your newly created repository will automatically build and deploy courtesy of Workers Builds.
There is nothing more frustrating than struggling to kick the tires on a new project because you don’t know where to start. Over the past couple of months, we’ve launched some improvements to getting started on Workers, including a gallery of Git-connected templates that help you kickstart your development journey.
But we think there’s another part of the story. Everyday, we see new Workers applications being built and open-sourced by developers in the community, ranging from starter projects to mission critical applications. These projects are designed to be shared, deployed, customized, and contributed to. But first and foremost, they must be simple to deploy.
Ditch the setup instructions
If you’ve open-sourced a new Workers application before, you may have listed in your README the following in order to get others going with your repository:
“Clone this repo”
“Install these packages”
“Install Wrangler”
“Create this database”
“Paste the database ID back into your config file”
“Run this command to deploy”
“Push to a new Git repo”
“Set up CI”
And the list goes on the more complicated your application gets, deterring other developers and making your project feel intimidating to deploy. Now, your project can be up and running in one shot — which means more traction, more feedback, and more contributions.
Self-hosting made easy
We’re not just talking about building and sharing small starter apps but also complex pieces of software. If you’ve ever self-hosted your own instance of an application on a traditional cloud provider before, you’re likely familiar with the pain of tedious setup, operational overhead, or hidden costs of your infrastructure.
Self-hosting with traditional cloud provider
Self-hosting with Cloudflare
Setup a VPC
Install tools and dependencies
Set up and provision storage
Manually configure CI/CD pipeline to automate deployments
Scramble to manually secure your environment if a runtime vulnerability is discovered
Configure autoscaling policies and manage idle servers
✅Serverless
✅Highly-available global network
✅Automatic provisioning of datastores like D1 databases and R2 buckets
✅Built-in CI/CD workflow configured out of the box
✅Automatic runtime updates to keep your environment secure
✅Scale automatically and only pay for what you use.
By making your open-source repository accessible with a Deploy to Cloudflare button, you can allow other developers to deploy their own instance of your app without requiring deep infrastructure expertise.
From starter projects to full-stack applications
We’re inviting all Workers developers looking to open-source their project to add Deploy to Cloudflare buttons to their projects and help others get up and running faster. We’ve already started working with open-source app developers! Here are a few great examples to explore:
Test and explore your APIs with Fiberplane
Fiberplane helps developers build, test and explore Hono APIs and AI Agents in an embeddable playground. This Developer Week, Fiberplane released a set of sample Worker applications built on the ‘HONC‘ stack — Hono, Drizzle ORM, D1 Database, and Cloudflare Workers — that you can use as the foundation for your own projects. With an easy one-click Deploy to Cloudflare, each application comes preconfigured with the open source Fiberplane API Playground, making it easy to generate OpenAPI docs, test your handlers, and explore your API, all within one embedded interface.
Deploy your first remote MCP server
You can now build and deploy remote Model Context Protocol (MCP) servers on Cloudflare Workers! MCP servers provide a standardized way for AI agents to interact with services directly, enabling them to complete actions on users’ behalf. Cloudflare’s remote MCP server implementation supports authentication, allowing users to login to their service from the agent to give it scoped permissions. This gives users the ability to interact with services without navigating dashboards or learning APIs — they simply tell their AI agent what they want to accomplish.
Start building your first agent
AI agents are intelligent systems capable of autonomously executing tasks by making real-time decisions about which tools to use and how to structure their workflows. Unlike traditional automation (which follows rigid, predefined steps), agents dynamically adapt their strategies based on context and evolving inputs. This template serves as a starting point for building AI-driven chat agents on Cloudflare’s Agent platform. Powered by Cloudflare’s Agents SDK, it provides a solid foundation for creating interactive AI chat experiences with a modern UI and tool integrations capabilities.
Be sure to make your Git repository public and add the following snippet including your Git repository URL.
[](https://deploy.workers.cloudflare.com/?url=<YOUR_GIT_REPO_URL>)
When another developer clicks your Deploy to Cloudflare button, Cloudflare will parse the Wrangler configuration file, provision any resources detected, and create a new repo on their account that’s updated with information about newly created resources. For example:
{
  "compatibility_date": "2024-04-03",

  "d1_databases": [
    {
      "binding": "MY_D1_DATABASE",

	//will be updated with newly created database ID
      "database_id": "1234567890abcdef1234567890abcdef"
    }
  ]
}
Check out our documentation for more information on how to set up a deploy button for your application and best practices to ensure a successful deployment for other developers.
Start building
For new Cloudflare developers, keep an eye out for “Deploy to Cloudflare” buttons across the web, or simply paste the URL of any public GitHub or GitLab repository containing a Workers application into the Cloudflare dashboard to get started.
During Developer Week, tune in to our blog as we unveil new features and announcements — many including Deploy to Cloudflare buttons — so you can jump right in and start building!
I’m thrilled to share that Cloudflare has acquired Outerbase. This is such an amazing opportunity for us, and I want to explain how we got here, what we’ve built so far, and why we are so excited about becoming part of the Cloudflare team.
Databases are key to building almost any production application: you need to persist state for your users (or agents), be able to query it from a number of different clients, and you want it to be fast. But databases aren’t always easy to use: designing a good schema, writing performant queries, creating indexes, and optimizing your access patterns tends to require a lot of experience. Add that to exposing your data through easy-to-grok APIs that make the ‘right’ way to do things obvious, a great developer experience (from dashboard to CLI), and well… there’s a lot of work involved.
The Outerbase team is already getting to work on some big changes to how databases (and your data) are viewed, edited, and visualized from within Workers, and we’re excited to give you a few sneak peeks into what we’ll be landing as we get to work.
Database DX
When we first started Outerbase, we saw how complicated databases could be. Even experienced developers struggled with writing queries, indexing data, and locking down their data. Meanwhile, non-developers often felt locked out and that they couldn’t access the data they needed. We believed there had to be a better way. From day one, our goal was to make data accessible to everyone, no matter their skill level. While it started out by simply building a better database interface, it quickly evolved into something much more special.
Outerbase became a platform that helps you manage data in a way that feels natural. You can browse tables, edit rows, and run queries without having to deal with memorizing SQL structure. Even if you do know SQL, you can use Outerbase to dive in deeper and share your knowledge with your team. We also added visualization features so entire teams, both technical and not, could see what’s happening with their data at a glance. Then, with the growth of AI, we realized we could use it to handle many of the more complicated tasks.
One of our more exciting offerings is Starbase, a SQLite-compatible database built on top of Cloudflare’s Durable Objects. Our goal was never to simply wrap a legacy system in a shiny interface; we wanted to make it so easy to get started from day one with nothing, and Cloudflare’s Durable Objects gave us a way to easily manage and spin up databases for anyone who needed one. On top of them, we provided automatic REST APIs, row-level security, WebSocket support for streaming queries, and much more.
1 + 1 = 3
Our collaboration with Cloudflare first started last year, when we introduced a way for developers to import and manage their D1 databases inside Outerbase. We were impressed with how powerful Cloudflare’s tools are for deploying and scaling applications. As we worked together, we quickly saw how well our missions aligned. Cloudflare was building the infrastructure we wished we’d had when we first started, and we were building the data experience that many Cloudflare developers were asking for. This eventually led to the seemingly obvious decision of Outerbase joining Cloudflare — it just made so much sense.
Going forward, we’ll integrate Outerbase’s core features into Cloudflare’s platform. If you’re a developer using D1 or Durable Objects, you’ll start seeing features from Outerbase show up in the Cloudflare dashboard. Expect to see our data explorer for browsing and editing tables, new REST APIs, query editor with type-ahead functionality, real-time data capture, and more of the other tooling we’ve been refining over the last couple of years show up inside the Cloudflare dashboard.
As part of this transition, the hosted Outerbase cloud will shut down on October 15, 2025, which is about six months from now. We know some of you rely on Outerbase as it stands today, so we’re leaving the open-source repositories as they are.
You will still be able to self-host Outerbase if you prefer, and we’ll provide guidance on how to do that within your own Cloudflare account. Our main goal will be to ensure that the best parts of Outerbase become part of the Cloudflare developer experience, so you no longer have to make a choice (it’ll be obvious!).
Sneak peek
We’ve already done a lot of thinking about how we’re going to bring the best parts of Outerbase into D1, Durable Objects, Workflows, and Agents, and we’re going to a share a little about what will be landing over the course of Q2 2025 as the Outerbase team gets to work.
Specifically, we’ll be heads-down focusing on:
Adapting the powerful table viewer and query runner experiences to D1 and Durable Objects (amongst many other things!)
Making it easier to get started with Durable Objects: improving the experience in Wrangler (our CLI tooling), the Cloudflare dashboard, and how you plug into them from your client applications
Improvements to how you visualize the state of a Workflow and the (thousands to millions!) of Workflow instances you might have at any point in time
Pre- and post-query hooks for D1 that allow you to automatically register handlers that can act on your data
Bringing the Starbase API to D1, expanding D1’s existing REST API, and adding WebSockets support — making it easier to use D1, even for applications hosted outside of Workers.
We have already started laying the groundwork for these changes. In the coming weeks, we’ll release a unified data explorer for D1 and Durable Objects that borrows heavily from the Outerbase interface you know.
Bringing Outerbase’s Data Explorer into the Cloudflare Dashboard
We’ll also tie some of Starbase’s features directly into Cloudflare’s platform, so you can tap into its unique offerings like pre- and post-query hooks or row-level security right from your existing D1 databases and Durable Objects:
const beforeQuery = ({ sql, params }) => {
    // Prevent unauthorized queries
    if (!isAllowedQuery(sql)) throw new Error('Query not allowed');
};

const afterQuery = ({ sql, result }) => {
    // Basic PII masking example
    for (const row of result) {
        if ('email' in row) row.email = '[redacted]';
    }
};

// Execute the query with pre- and post- query hooks
const { results } = await env.DB.prepare("SELECT * FROM users;", beforeQuery, afterQuery);
Define hooks on your D1 queries that can be re-used, shared and automatically executed before or after your queries run.
This should give you more clarity and control over your data, as well as new ways to secure and optimize it.
Rethinking the Durable Objects getting started experience
We have even begun optimizing the Cloudflare dashboard experience around Durable Objects and D1 to improve the empty state, provide more Getting Started resources, and overall, make managing and tracking your database resources even easier.
For those of you who’ve supported us, given us feedback, and stuck with us as we grew: thank you. You have helped shape Outerbase into what it is today. This acquisition means we can pour even more resources and attention into building the data experience we’ve always wanted to deliver. Our hope is that, by working as part of Cloudflare, we can help reach even more developers by building intuitive experiences, accelerating the speed of innovation, and creating tools that naturally fit into your workflows.
This is a big step for Outerbase, and we couldn’t be more excited. Thank you for being part of our journey so far. We can’t wait to show you what we’ve got in store as we continue to make data more accessible, intuitive, and powerful — together with Cloudflare.
What’s next?
We’re planning to get to work on some of the big changes to how you interact with your data on Cloudflare, starting with D1 and Durable Objects.
We’ll also be ensuring we bring a great developer experience to the broader database & storage platform on Cloudflare, including how you access data in Workers KV, R2, Workflows and even your AI Agents (just to name a few).
Betas are useful for feedback and iteration, but at the end of the day, not everyone is willing to be a guinea pig or can tolerate the occasional sharp edge that comes along with beta software. Sometimes you need that big, shiny “Generally Available” label (or blog post), and now it’s Workflows’ turn.
Workflows, our serverless durable execution engine that allows you to build long-running, multi-step applications (some call them “step functions”) on Workers, is now GA.
In short, that means it’s production ready — but it also doesn’t mean Workflows is going to ossify. We’re continuing to scale Workflows (including more concurrent instances), bring new capabilities (like the new waitForEvent API), and make it easier to build AI agents with our Agents SDK and Workflows.
If you prefer code to prose, you can quickly install the Workflows starter project and start exploring the code and the API with a single command:
How does Workflows work? What can I build with it? How do I think about building AI agents with Workflows and the Agents SDK? Well, read on.
Building with Workflows
Workflows is a durable execution engine built on Cloudflare Workers that allows you to build resilient, multi-step applications.
At its core, Workflows implements a step-based architecture where each step in your application is independently retriable, with state automatically persisted between steps. This means that even if a step fails due to a transient error or network issue, Workflows can retry just that step without needing to restart your entire application from the beginning.
When you define a Workflow, you break your application into logical steps.
Each step can either execute code (step.do), put your Workflow to sleep (step.sleep or step.sleepUntil), or wait on an event (step.waitForEvent).
As your Workflow executes, it automatically persists the state returned from each step, ensuring that your application can continue exactly where it left off, even after failures or hibernation periods.
This durable execution model is particularly powerful for applications that coordinate between multiple systems, process data in sequence, or need to handle long-running tasks that might span minutes, hours, or even days.
Workflows are particularly useful at handling complex business processes that traditional stateless functions struggle with.
For example, an e-commerce order processing workflow might check inventory, charge a payment method, send an email confirmation, and update a database — all as separate steps. If the payment processing step fails due to a temporary outage, Workflows will automatically retry just that step when the payment service is available again, without duplicating the inventory check or restarting the entire process.
You can see how this works below: each call to a service can be modelled as a step, independently retried, and if needed, recovered from that step onwards:
import { WorkflowEntrypoint, WorkflowStep, WorkflowEvent } from 'cloudflare:workers';

// The params we expect when triggering this Workflow
type OrderParams = {
	orderId: string;
	customerId: string;
	items: Array<{ productId: string; quantity: number }>;
	paymentMethod: {
		type: string;
		id: string;
	};
};

// Our Workflow definition
export class OrderProcessingWorkflow extends WorkflowEntrypoint<Env, OrderParams> {
	async run(event: WorkflowEvent<OrderParams>, step: WorkflowStep) {
		// Step 1: Check inventory
		const inventoryResult = await step.do('check-inventory', async () => {
			console.log(`Checking inventory for order ${event.payload.orderId}`);

			// Mock: In a real workflow, you'd query your inventory system
			const inventoryCheck = await this.env.INVENTORY_SERVICE.checkAvailability(event.payload.items);

			// Return inventory status as state for the next step
			return {
				inStock: true,
				reservationId: 'inv-123456',
				itemsChecked: event.payload.items.length,
			};
		});

		// Exit workflow if items aren't in stock
		if (!inventoryResult.inStock) {
			return { status: 'failed', reason: 'out-of-stock' };
		}

		// Step 2: Process payment
		// Configure specific retry logic for payment processing
		const paymentResult = await step.do(
			'process-payment',
			{
				retries: {
					limit: 3,
					delay: '30 seconds',
					backoff: 'exponential',
				},
				timeout: '2 minutes',
			},
			async () => {
				console.log(`Processing payment for order ${event.payload.orderId}`);

				// Mock: In a real workflow, you'd call your payment processor
				const paymentResponse = await this.env.PAYMENT_SERVICE.processPayment({
					customerId: event.payload.customerId,
					orderId: event.payload.orderId,
					amount: calculateTotal(event.payload.items),
					paymentMethodId: event.payload.paymentMethod.id,
				});

				// If payment failed, throw an error that will trigger retry logic
				if (paymentResponse.status !== 'success') {
					throw new Error(`Payment failed: ${paymentResponse.message}`);
				}

				// Return payment info as state for the next step
				return {
					transactionId: 'txn-789012',
					amount: 129.99,
					timestamp: new Date().toISOString(),
				};
			},
		);

		// Step 3: Send email confirmation
		await step.do('send-confirmation-email', async () => {
			console.log(`Sending confirmation email for order ${event.payload.orderId}`);
			console.log(`Including payment confirmation ${paymentResult.transactionId}`);
			return await this.env.EMAIL_SERVICE.sendOrderConfirmation({ ... })
		});

		// Step 4: Update database
		const dbResult = await step.do('update-database', async () => {
			console.log(`Updating database for order ${event.payload.orderId}`);
			await this.updateOrderStatus(...)

			return { dbUpdated: true };
		});

		// Return final workflow state
		return {
			orderId: event.payload.orderId,
			processedAt: new Date().toISOString(),
		};
	}
}
This combination of durability, automatic retries, and state persistence makes Workflows ideal for building reliable distributed applications that can handle real-world failures gracefully.
Human-in-the-loop
Workflows are just code, and that makes them extremely powerful: you can define steps dynamically and on-the-fly, conditionally branch, and make API calls to any system you need. But sometimes you also need a Workflow to wait for something to happen in the real world.
For example:
Approval from a human to progress.
An incoming webhook, like from a Stripe payment or a GitHub event.
A state change, such as a file upload to R2 that triggers an Event Notification, and then pushes a reference to the file to the Workflow, so it can process the file (or run it through an AI model).
The new waitForEvent API in Workflows allows you to do just that:
let event = await step.waitForEvent<IncomingStripeWebhook>("receive invoice paid webhook from Stripe", { type: "stripe-webhook", timeout: "1 hour" })
You can then send an event to a specific instance from any external service that can make a HTTP request:
interface Env {
  MY_WORKFLOW: Workflow;
}

interface Payload {
  transaction: string;
  id: string;
}

export default {
  async fetch(req: Request, env: Env) {
    const instanceId = new URL(req.url).searchParams.get("instanceId")
    const webhookPayload = await req.json<Payload>()

    let instance = await env.MY_WORKFLOW.get(instanceId);
    // Send our event, with `type` matching the event type defined in
    // our step.waitForEvent call
    await instance.sendEvent({type: "stripe-webhook", payload: webhookPayload})

    return Response.json({
      status: await instance.status(),
    });
  },
};
You can even wait for multiple events, using the type parameter, and/or race multiple events using Promise.race to continue on depending on which event was received first:
export class MyWorkflow extends WorkflowEntrypoint<Env, Params> {
	async run(event: WorkflowEvent<Params>, step: WorkflowStep) {
		let state = await step.do("get some data", () => { /* step call here /* })
		// Race the events, resolving the Promise based on which event
// we receive first
		let value = Promise.race([
step.waitForEvent("payment success", { type: "payment-success-webhook", timeout: "4 hours" ),
step.waitForEvent("payment failure", { type: "payment-failure-webhook", timeout: "4 hours" ),
])
// Continue on based on the value and event received
	}
}
To visualize waitForEvent in a bit more detail, let’s assume we have a Workflow that is triggered by a code review agent that watches a GitHub repository.
Without the ability to wait on events, our Workflow can’t easily get human approval to write suggestions back (or even submit a PR of its own). It could potentially poll for some state that was updated, but that means we have to call step.sleep for arbitrary periods of time, poll a storage service for an updated value, and repeat if it’s not there. That’s a lot of code and room for error:
Without waitForEvent, it’s harder to send data to a Workflow instance that’s running
If we modified that same example to incorporate the new waitForEvent API, we could use it to wait for human approval before making a mutating change:
Adding waitForEvent to our code review Workflow, so it can seek explicit approval.
You could even imagine an AI agent itself sending and/or acting on behalf of a human here: waitForEvent simply exposes a way for a Workflow to retrieve and pause on something in the world to change before it continues (or not).
Critically, you can call waitForEvent just like any other step in Workflows: you can call it conditionally, and/or multiple times, and/or in a loop. Workflows are just Workers: you have the full power of a programming language and are not restricted by a domain specific language (DSL) or config language.
Pricing
Good news: we haven’t changed much since our original beta announcement! We’re adding storage pricing for state stored by your Workflows, and retaining our CPU-based and request (invocation) based pricing as follows:
Because the storage pricing is new, we will not actively bill for storage until September 15, 2025. We will notify users above the included 1 GB limit ahead of charging for storage, and by default, Workflows will expire stored state after three (3) days (Free plan) or thirty (30) days (Paid plan).
If you’re wondering what “CPU time” is here: it’s the time your Workflow is actively consuming compute resources. It doesn’t include time spent waiting on API calls, reasoning LLMs, or other I/O (like writing to a database). That might seem like a small thing, but in practice, it adds up: most applications have single digit milliseconds of CPU time, and multiple seconds of wall time: an API or two taking 100 – 250 ms to respond adds up!
Bill for CPU, not for time spent when a Workflow is idle or waiting.
Workflow engines, especially, tend to spend a lot of time waiting: reading data from object storage (like Cloudflare R2), calling third-party APIs or LLMs like o3-mini or Claude 3.7, even querying databases like D1, Postgres, or MySQL. With Workflows, just like Workers: you don’t pay for time your application is just waiting.
Start building
So you’ve got a good handle on Workflows, how it works, and want to get building. What next?
When building a full-stack application, many developers spend a surprising amount of time trying to make sure that the various services they use can communicate and interact with each other. Media-rich applications require image and video pipelines that can integrate seamlessly with the rest of your technology stack.
With this in mind, we’re excited to introduce the Images binding, a way to connect the Images API directly to your Worker and enable new, programmatic workflows. The binding removes unnecessary friction from application development by allowing you to transform, overlay, and encode images within the Cloudflare Developer Platform ecosystem.
In this post, we’ll explain how the Images binding works, as well as the decisions behind local development support. We’ll also walk through an example app that watermarks and encodes a user-uploaded image, then uploads the output directly to an R2 bucket.
The challenges of fetch()
Cloudflare Images was designed to help developers build scalable, cost-effective, and reliable image pipelines. You can deliver multiple copies of an image — each resized, manipulated, and encoded based on your needs. Only the original image needs to be stored; different versions are generated dynamically, or as requested by a user’s browser, then subsequently served from cache.
With Images, you have the flexibility to transform images that are stored outside the Images product. Previously, the Images API was based on the fetch() method, which posed three challenges for developers:
First, when transforming a remote image, the original image must be retrieved from a URL. This isn’t applicable for every scenario, like resizing and compressing images as users upload them from their local machine to your app. We wanted to extend the Images API to broader use cases where images might not be accessible from a URL.
Second, the optimization operation — the changes you want to make to an image, like resizing it — is coupled with the delivery operation. If you wanted to crop an image, watermark it, then resize the watermarked image, then you’d need to serve one transformation to the browser, retrieve the output URL, and transform it again. This adds overhead to your code, and can be tedious and inefficient to maintain. Decoupling these operations means that you no longer need to manage multiple requests for consecutive transformations.
Third, optimization parameters — the way that you specify how an image should be manipulated — follow a fixed order. For example, cropping is performed before resizing. It’s difficult to build a flow that doesn’t align with the established hierarchy — like resizing first, then cropping — without a lot of time, trial, and effort.
But complex workflows shouldn’t require complex logic. In February, we released the Images binding in Workers to make the development experience more accessible, intuitive, and user-friendly. The binding helps you work more productively by simplifying how you connect the Images API to your Worker and providing more fine-grained control over how images are optimized.
Extending the Images workflow
Since optimization parameters follow a fixed order, we’d need to output the image to resize it after watermarking. The binding eliminates this step.
Bindings connect your Workers to external resources on the Developer Platform, allowing you to manage interactions between services in a few lines of code. When you bind the Images API to your Worker, you can create more flexible, programmatic workflows to transform, resize, and encode your images — without requiring them to be accessible from a URL.
Within a Worker, the Images binding supports the following functions:
.transform(): Accepts optimization parameters that specify how an image should be manipulated
.draw(): Overlays an image over the original image. The overlaid image can be optimized through a child transform() function.
.output(): Defines the output format for the transformed image.
.info(): Outputs information about the original image, like its format, file size, and dimensions.
The life of a binding request
At a high level, a binding works by establishing a communication channel between a Worker and the binding’s backend services.
To do this, the Workers runtime needs to know exactly which objects to construct when the Worker is instantiated. Our control plane layer translates between a given Worker’s code and each binding’s backend services. When a developer runs wrangler deploy, any invoked bindings are converted into a dependency graph. This describes the objects and their dependencies that will be injected into the env of the Worker when it runs. Then, the runtime loads the graph, builds the objects, and runs the Worker.
In most cases, the binding makes a remote procedure call to the backend services of the binding. The mechanism that makes this call must be constructed and injected into the binding object; for Images, this is implemented as a JavaScript wrapper object that makes HTTP calls to the Images API.
These calls contain the sequence of operations that are required to build the final image, represented as a tree structure. Each .transform() function adds a new node to the tree, describing the operations that should be performed on the image. The .draw() function adds a subtree, where child .transform() functions create additional nodes that represent the operations required to build the overlay image. When .output() is called, the tree is flattened into a list of operations; this list, along with the input image itself, is sent to the backend of the Images binding.
For example, let’s say we had the following commands:
Put together, the request would look something like this:
To communicate with the backend, we chose to send multipart forms. Each binding request is inherently expensive, as it can involve decoding, transforming, and encoding. Binary formats may offer slightly lower overhead per request, but given the bulk of the work in each request is the image processing itself, any gains would be nominal. Instead, we stuck with a well-supported, safe approach that our team had successfully implemented in the past.
Meeting developers where they are
Beyond the core capabilities of the binding, we knew that we needed to consider the entire developer lifecycle. The ability to test, debug, and iterate is a crucial part of the development process.
Developers won’t use what they can’t test; they need to be able to validate exactly how image optimization will affect the user experience and performance of their application. That’s why we made the Images binding available in local development without incurring any usage charges.
As we scoped out this feature, we reached a crossroad with how we wanted the binding to work when developing locally. At first, we considered making requests to our production backend services for both unit and end-to-end testing. This would require open-sourcing the components of the binding and building them for all Wrangler-supported platforms and Node versions.
Instead, we focused our efforts on targeting individual use cases by providing two different methods. In Wrangler, Cloudflare’s command-line tool, developers can choose between an online and offline mode of the Images binding. The online mode makes requests to the real Images API; this requires Internet access and authentication to the Cloudflare API. Meanwhile, the offline mode requests a lower fidelity fake, which is a mock API implementation that supports a limited subset of features. This is primarily used for unit tests, as it doesn’t require Internet access or authentication. By default, wrangler dev uses the online mode, mirroring the same version that Cloudflare runs in production.
See the binding in action
Let’s look at an example app that transforms a user-uploaded image, then uploads it directly to an R2 bucket.
To start, we created a Worker application and configured our wrangler.toml file to add the Images, R2, and assets bindings:
In our Worker project, the assets directory contains the image that we want to use as our watermark.
Our frontend has a <form> element that accepts image uploads:
const html = `
<!DOCTYPE html>
        <html>
          <head>
            <meta charset="UTF-8">
            <title>Upload Image</title>
          </head>
          <body>
            <h1>Upload an image</h1>
            <form method="POST" enctype="multipart/form-data">
              <input type="file" name="image" accept="image/*" required />
              <button type="submit">Upload</button>
            </form>
          </body>
        </html>
`;

export default {
  async fetch(request, env) {
    if (request.method === "GET") {
      return new Response(html, {headers:{'Content-Type':'text/html'},})
    }
    if (request.method ==="POST") {
      // This is called when the user submits the form
    }
  }
};
Next, we set up our Worker to handle the optimization.
The user will upload images directly through the browser; since there isn’t an existing image URL, we won’t be able to use fetch() to get the uploaded image. Instead, we can transform the uploaded image directly, operating on its body as a stream of bytes.
Once we read the image, we can manipulate the image. Here, we apply our watermark and encode the image to AVIF before uploading the transformed image to our R2 bucket:
var __defProp = Object.defineProperty;
var __name = (target, value) => __defProp(target, "name", { value, configurable: true });

function assetUrl(request, path) {
	const url = new URL(request.url);
	url.pathname = path;
	return url;
}
__name(assetUrl, "assetUrl");

export default {
  async fetch(request, env) {
    if (request.method === "GET") {
      return new Response(html, {headers:{'Content-Type':'text/html'},})
    }
    if (request.method === "POST") {
      try {
        // Parse form data
        const formData = await request.formData();
        const file = formData.get("image");
        if (!file || typeof file.arrayBuffer !== "function") {
          return new Response("No image file provided", { status: 400 });
        }

        // Read uploaded image as array buffer
        const fileBuffer = await file.arrayBuffer();

	     // Fetch image as watermark
        let watermarkStream = (await env.ASSETS.fetch(assetUrl(request, "watermark.png"))).body;

        // Apply watermark and convert to AVIF
        const imageResponse = (
          await env.IMAGES.input(fileBuffer)
              // Draw the watermark on top of the image
              .draw(
                env.IMAGES.input(watermarkStream)
                  .transform({ width: 100, height: 100 }),
                { bottom: 10, right: 10, opacity: 0.75 }
              )
              // Output the final image as AVIF
              .output({ format: "image/avif" })
          ).response();

          // Add timestamp to file name
          const fileName = `image-${Date.now()}.avif`;

          // Upload to R2
          await env.R2.put(fileName, imageResponse.body)

          return new Response(`Image uploaded successfully as ${fileName}`, { status: 200 });
      } catch (err) {
        console.log(err.message)
      }
    }
  }
};
Looking ahead, the Images binding unlocks many exciting possibilities to seamlessly transform and manipulate images directly in Workers. We aim to create an even deeper connection between all the primitives that developers use to build AI and full-stack applications.
Have some feedback for this release? Let us know in the Community forum.
Today, we are excited to announce that we have contributed an implementation of the URLPattern API to Node.js, and it is available starting with the v23.8.0 update. We’ve done this by adding our URLPattern implementation to Ada URL, the high-performance URL parser that now powers URL handling in both Node.js and Cloudflare Workers. This marks an important step toward bringing this API to the broader JavaScript ecosystem.
Cloudflare Workers has, from the beginning, embraced a standards-based JavaScript programming model, and Cloudflare was one of the founding companies for what has evolved into ECMA’s 55th Technical Committee, focusing on interoperability between Web-interoperable runtimes like Workers, Node.js, Deno, and others. This contribution highlights and marks our commitment to this ongoing philosophy. Ensuring that all the JavaScript runtimes work consistently and offer at least a minimally consistent set of features is critical to ensuring the ongoing health of the ecosystem as a whole.
URLPattern API contribution is just one example of Cloudflare’s ongoing commitment to the open-source ecosystem. We actively contribute to numerous open-source projects including Node.js, V8, and Ada URL, while also maintaining our own open-source initiatives like workerd and wrangler. By upstreaming improvements to foundational technologies that power the web, we strengthen the entire developer ecosystem while ensuring consistent features across JavaScript runtimes. This collaborative approach reflects our belief that open standards and shared implementations benefit everyone – reducing fragmentation, improving developer experience and creating a better Internet.
What is URLPattern?
URLPattern is a standard published by the WHATWG (Web Hypertext Application Technology Working Group) which provides a pattern-matching system for URLs. This specification is available at urlpattern.spec.whatwg.org. The API provides developers with an easy-to-use, regular expression (regex)-based approach to handling route matching, with built-in support for named parameters, wildcards, and more complex pattern matching that works uniformly across all URL components.
URLPattern is part of the WinterTC Minimum Common API, a soon-to-be standardized subset of web platform APIs designed to ensure interoperability across JavaScript runtimes, particularly for server-side and non-browser environments, and includes other APIs such as URL and URLSearchParams.
Cloudflare Workers has supported URLPattern for a number of years now, reflecting our commitment to enabling developers to use standard APIs across both browsers and server-side JavaScript runtimes. Contributing to Node.js and unifying the URLPattern implementation simplifies the ecosystem by reducing fragmentation, while at the same time improving our own implementation in Cloudflare Workers by making it faster and more specification compliant.
The following example demonstrates how URLPattern is used by creating a pattern that matches URLs with a “/blog/:year/:month/:slug” path structure, then tests if one specific URL string matches this pattern, and extracts the named parameters from a second URL using the exec method.
const pattern = new URLPattern({
  pathname: '/blog/:year/:month/:slug'
});

if (pattern.test('https://example.com/blog/2025/03/urlpattern-launch')) {
  console.log('Match found!');
}

const result = pattern.exec('https://example.com/blog/2025/03/urlpattern-launch');
console.log(result.pathname.groups.year); // "2025"
console.log(result.pathname.groups.month); // "03"
console.log(result.pathname.groups.slug); // "urlpattern-launch"
The URLPattern constructor accepts pattern strings or objects defining patterns for individual URL components. The test() method returns a boolean indicating if a URL simply matches the pattern. The exec() method provides detailed match results including captured groups. Behind this simple API, there’s sophisticated machinery working behind the scenes:
When a URLPattern is used, it internally breaks down a URL, matching it against eight distinct components: protocol, username, password, hostname, port, pathname, search, and hash. This component-based approach gives the developer control over which parts of a URL to match.
Upon creation of the instance, URLPattern parses your input patterns for each component and compiles them internally into eight specialized regular expressions (one for each component type). This compilation step happens just once when you create an URLPattern object, optimizing subsequent matching operations.
During a match operation (whether using test() or exec()), these regular expressions are used to determine if the input matches the given properties. The test() method tells you if there’s a match, while exec() provides detailed information about what was matched, including any named capture groups from your pattern.
Fixing things along the way
While implementing URLPattern, we discovered some inconsistencies between the specification and the web-platform tests, a cross-browser test suite maintained by all major browsers to test conformance to web standard specifications. For instance, we found that URLs with non-special protocols (opaque-paths) and URLs with invalid characters in hostnames were not correctly defined and processed within the URLPattern specification. We worked actively with the Chromium and the Safari teams to address these issues.
URLPatterns constructed from hostname components that contain newline or tab characters were expected to fail in the corresponding web-platform tests. This was due to an inconsistency with the original URLPattern implementation and the URLPattern specification.
const pattern = new URL({ "hostname": "bad\nhostname" });
const matched = pattern.test({ "hostname": "badhostname" });
// This now returns true.
We opened several issues to document these inconsistencies and followed up with a pull-request to fix the specification, ensuring that all implementations will eventually converge on the same corrected behavior. This also resulted in fixing several inconsistencies in web-platform tests, particularly around handling certain types of white space (such as newline or tab characters) in hostnames.
Getting started with URLPattern
If you’re interested in using URLPattern today, you can:
Use it natively in modern browsers by accessing the global URLPattern class
Try it in Cloudflare Workers (which has had URLPattern support for some time, now with improved spec compliance and performance)
Here is a more complex example showing how URLPattern can be used for routing in a Cloudflare Worker — a common use case when building API endpoints or web applications that need to handle different URL paths efficiently and differently. The following example shows a pattern for REST APIs that matches both “/users” and “/users/:userId”
const routes = [
  new URLPattern({ pathname: '/users{/:userId}?' }),
];

export default {
  async fetch(request, env, ctx): Promise<Response> {
    const url = new URL(request.url);
    for (const route of routes) {
      const match = route.exec(url);
      if (match) {
        const { userId } = match.pathname.groups;
        if (userId) {
          return new Response(`User ID: ${userId}`);
        }
        return new Response('List of users');
      }
    }
    // No matching route found
    return new Response('Not Found', { status: 404 });
  },
} satisfies ExportedHandler<Env>;
What does the future hold?
The contribution of URLPattern to Ada URL and Node.js is just the beginning. We’re excited about the possibilities this opens up for developers across different JavaScript environments.
In the future, we expect to contribute additional improvements to URLPattern’s performance, enabling more use cases for web application routing. Additionally, efforts to standardize the URLPatternList proposal will help deliver faster matching capabilities for server-side runtimes. We’re excited about these developments and encourage you to try URLPattern in your projects today.
Try it and let us know what you think by creating an issue on the workerd repository. Your feedback is invaluable as we work to further enhance URLPattern.
We hope to do our part to build a unified Javascript ecosystem, and encourage others to do the same. This may mean looking for opportunities, such as we have with URLPattern, to share API implementations across backend runtimes. It could mean using or contributing to web-platform-tests if you are working on a server-side runtime or web-standard APIs, or it might mean joining WinterTC to help define web-interoperable standards for server-side JavaScript.
It’s a big day here at Cloudflare! Not only is it Security Week, but today marks Cloudflare’s first step into a completely new area of functionality, intended to improve how our users both interact with, and get value from, all of our products.
We’re excited to share a first glance of how we’re embedding AI features into the management of Cloudflare products you know and love. Our first mission? Focus on security and streamline the rule and policy management experience. The goal is to automate away the time-consuming task of manually reviewing and contextualizing Custom Rules in Cloudflare WAF, and Gateway policies in Cloudflare One, so you can instantly understand what each policy does, what gaps they have, and what you need to do to fix them.
Meet Cloudy, Cloudflare’s first AI agent
Our initial step toward a fully AI-enabled product experience is the introduction of Cloudy, the first version of Cloudflare AI agents, assistant-like functionality designed to help users quickly understand and improve their Cloudflare configurations in multiple areas of the product suite. You’ll start to see Cloudy functionality seamlessly embedded into two Cloudflare products across the dashboard, which we’ll talk about below.
And while the name Cloudy may be fun and light-hearted, our goals are more serious: Bring Cloudy and AI-powered functionality to every corner of Cloudflare, and optimize how our users operate and manage their favorite Cloudflare products. Let’s start with two places where Cloudy is now live and available to all customers using the WAF and Gateway products.
WAF Custom Rules
Let’s begin with AI-powered overviews of WAF Custom Rules. For those unfamiliar, Cloudflare’s Web Application Firewall (WAF) helps protect web applications from attacks like SQL injection, cross-site scripting (XSS), and other vulnerabilities.
One specific feature of the WAF is the ability to create WAF Custom Rules. These allow users to tailor security policies to block, challenge, or allow traffic based on specific attributes or security criteria.
However, for customers with dozens or even hundreds of rules deployed across their organization, it can be challenging to maintain a clear understanding of their security posture. Rule configurations evolve over time, often managed by different team members, leading to potential inefficiencies and security gaps. What better problem for Cloudy to solve?
Powered by Workers AI, today we’ll share how Cloudy will help review your WAF Custom Rules and provide a summary of what’s configured across them. Cloudy will also help you identify and solve issues such as:
Identifying redundant rules: Identify when multiple rules are performing the same function, or using similar fields, helping you streamline your configuration.
Optimising execution order: Spot cases where rules ordering affects functionality, such as when a terminating rule (block/challenge action) prevents subsequent rules from executing.
Analysing conflicting rules: Detect when rules counteract each other, such as one rule blocking traffic that another rule is designed to allow or log.
Identifying disabled rules: Highlight potentially important security rules that are in a disabled state, helping ensure that critical protections are not accidentally left inactive.
Cloudy won’t just summarize your rules, either. It will analyze the relationships and interactions between rules to provide actionable recommendations. For security teams managing complex sets of Custom Rules, this means less time spent auditing configurations and more confidence in your security coverage.
Available to all users, we’re excited to show how Cloudflare AI Agents can enhance the usability of our products, starting with WAF Custom Rules. But this is just the beginning.
Cloudflare One Firewall policies
We’ve also added Cloudy to Cloudflare One, our SASE platform, where enterprises manage the security of their employees and tools from a single dashboard.
In Cloudflare Gateway, our Secure Web Gateway offering, customers can configure policies to manage how employees do their jobs on the Internet. These Gateway policies can block access to malicious sites, prevent data loss violations, and control user access, among other things.
But similar to WAF Custom Rules, Gateway policy configurations can become overcomplicated and bogged down over time, with old, forgotten policies that do who-knows-what. Multiple selectors and operators working in counterintuitive ways. Some blocking traffic, others allowing it. Policies that include several user groups, but carve out specific employees. We’ve even seen policies that block hundreds of URLs in a single step. All to say, managing years of Gateway policies can become overwhelming.
So, why not have Cloudy summarize Gateway policies in a way that makes their purpose clear and concise?
Available to all Cloudflare Gateway users (create a free Cloudflare One account here), Cloudy will now provide a quick summary of any Gateway policy you view. It’s now easier than ever to get a clear understanding of each policy at a glance, allowing admins to spot misconfigurations, redundant controls, or other areas for improvement, and move on with confidence.
Built on Workers AI
At the heart of our new functionality is Cloudflare Workers AI (yes, the same version that everyone uses!) that leverages advanced large language models (LLMs) to process vast amounts of information; in this case, policy and rules data. Traditionally, manually reviewing and contextualizing complex configurations is a daunting task for any security team. With Workers AI, we automate that process, turning raw configuration data into consistent, clear summaries and actionable recommendations.
How it works
Cloudflare Workers AI ingests policy and rule configurations from your Cloudflare setup and combines them with a purpose-built LLM prompt. We leverage the same publicly-available LLM models that we offer our customers, and then further enrich the prompt with some additional data to provide it with context. For this specific task of analyzing and summarizing policy and rule data, we provided the LLM:
Policy & rule data: This is the primary data itself, including the current configuration of policies/rules for Cloudy to summarize and provide suggestions against.
Documentation on product abilities: We provide the model with additional technical details on the policy/rule configurations that are possible with each product, so that the model knows what kind of recommendations are within its bounds.
Enriched datasets: Where WAF Custom Rules or CF1 Gateway policies leverage other ‘lists’ (e.g., a WAF rule referencing multiple countries, a Gateway policy leveraging a specific content category), the list item(s) selected must be first translated from an ID to plain-text wording so that the LLM can interpret which policy/rule values are actually being used.
Output instructions: We specify to the model which format we’d like to receive the output in. In this case, we use JSON for easiest handling.
Additional clarifications: Lastly, we explicitly instruct the LLM to be sure about its output, valuing that aspect above all else. Doing this helps us ensure that no hallucinations make it to the final output.
By automating the analysis of your WAF Custom Rules and Gateway policies, Cloudflare Workers AI not only saves you time but also enhances security by reducing the risk of human error. You get clear, actionable insights that allow you to streamline your configurations, quickly spot anomalies, and maintain a strong security posture—all without the need for labor-intensive manual reviews.
What’s next for Cloudy
Beta previews of Cloudy are live for all Cloudflare customers today. But this is just the beginning of what we envision for AI-powered functionality across our entire product suite.
Throughout the rest of 2025, we plan to roll out additional AI agent capabilities across other areas of Cloudflare. These new features won’t just help customers manage security more efficiently, but they’ll also provide intelligent recommendations for optimizing performance, streamlining operations, and enhancing overall user experience.
We’re excited to hear your thoughts as you get to meet Cloudy and try out these new AI features – send feedback to us at [email protected], or post your thoughts on X, LinkedIn, or Mastodon tagged with #SecurityWeek! Your feedback will help shape our roadmap for AI enhancement, and bring our users smarter, more efficient tooling that helps everyone get more secure.
As engineers, we’re obsessed with efficiency and automating anything we find ourselves doing more than twice. If you’ve ever done this, you know that the happy path is always easy, but the second the inputs get complex, automation becomes really hard. This is because computers have traditionally required extremely specific instructions in order to execute.
The state of AI models available to us today has changed that. We now have access to computers that can reason, and make judgement calls in lieu of specifying every edge case under the sun.
That’s what AI agents are all about.
Today we’re excited to share a few announcements on how we’re making it eveneasier to build AI agents on Cloudflare, including:
agents-sdk — a new JavaScript framework for building AI agents
Updates to Workers AI: structured outputs, tool calling, and longer context windows for Workers AI, Cloudflare’s serverless inference engine
We truly believe that Cloudflare is the ideal platform for building Agents and AI applications (more on why below), and we’re constantly working to make it better — you can expect to see more announcements from us in this space in the future.
Before we dive deep into the announcements, we wanted to give you a quick primer on agents. If you are familiar with agents, feel free to skip ahead.
What are agents?
Agents are AI systems that can autonomously execute tasks by making decisions about tool usage and process flow. Unlike traditional automation that follows predefined paths, agents can dynamically adapt their approach based on context and intermediate results. Agents are also distinct from co-pilots (e.g. traditional chat applications) in that they can fully automate a task, as opposed to simply augmenting and extending human input.
Agents → non-linear, non-deterministic (can change from run to run)
Workflows → linear, deterministic execution paths
Co-pilots → augmentative AI assistance requiring human intervention
Example: booking vacations
If this is your first time working with, or interacting with agents, this example will illustrate how an agent works within a context like booking a vacation.
Imagine you’re trying to book a vacation. You need to research flights, find hotels, check restaurant reviews, and keep track of your budget.
Traditional workflow automation
A traditional automation system follows a predetermined sequence: it can take inputs such as dates, location, and budget, and make calls to predefined APIs in a fixed order. However, if any unexpected situations arise, such as flights being sold out, or the specified hotels being unavailable, it cannot adapt.
AI co-pilot
A co-pilot acts as an intelligent assistant that can provide hotel and itinerary recommendations based on your preferences. If you have questions, it can understand and respond to natural language queries and offer guidance and suggestions. However, it is unable to take the next steps to execute the end-to-end action on its own.
Agent
An agent combines AI’s ability to make judgements and call the relevant tools to execute the task. An agent’s output will be nondeterministic given: real-time availability and pricing changes, dynamic prioritization of constraints, ability to recover from failures, and adaptive decision-making based on intermediate results. In other words, if flights or hotels are unavailable, an agent can reassess and suggest a new itinerary with altered dates or locations, and continue executing your travel booking.
agents-sdk — the framework for building agents
You can now add agent powers to any existing Workers project with just one command:
$ npm i agents-sdk
… or if you want to build something from scratch, you can bootstrap your project with the agents-starter template:
$ npm create cloudflare@latest agents-starter --template=cloudflare/agents-starter
// ... and then deploy it
$ npm run deploy
agents-sdk is a framework that allows you to build agents — software that can autonomously execute tasks — and deploy them directly into production on Cloudflare Workers.
Your agent can start with the basics and act on HTTP requests…
import { Agent } from "agents-sdk";

export class IntelligentAgent extends Agent {
  async onRequest(request) {
    // Transform intention into response
    return new Response("Ready to assist.");
  }
}
Although this is just the initial release of agents-sdk, we wanted to ship more than just a thin wrapper over an existing library. Agents can communicate with clients in real time, persist state, execute long-running tasks on a schedule, send emails, run asynchronous workflows, browse the web, query data from your Postgres database, call AI models, and support human-in-the-loop use-cases. All of this works today, out of the box.
For example, you can build a powerful chat agent with the AIChatAgent class:
// src/index.ts
export class Chat extends AIChatAgent<Env> {
  /**
   * Handles incoming chat messages and manages the response stream
   * @param onFinish - Callback function executed when streaming completes
   */
  async onChatMessage(onFinish: StreamTextOnFinishCallback<any>) {
    // Create a streaming response that handles both text and tool outputs
    return agentContext.run(this, async () => {
      const dataStreamResponse = createDataStreamResponse({
        execute: async (dataStream) => {
          // Process any pending tool calls from previous messages
          // This handles human-in-the-loop confirmations for tools
          const processedMessages = await processToolCalls({
            messages: this.messages,
            dataStream,
            tools,
            executions,
          });

          // Initialize OpenAI client with API key from environment
          const openai = createOpenAI({
            apiKey: this.env.OPENAI_API_KEY,
          });

          // Cloudflare AI Gateway
          // const openai = createOpenAI({
          //   apiKey: this.env.OPENAI_API_KEY,
          //   baseURL: this.env.GATEWAY_BASE_URL,
          // });

          // Stream the AI response using GPT-4
          const result = streamText({
            model: openai("gpt-4o-2024-11-20"),
            system: `
              You are a helpful assistant that can do various tasks. If the user asks, then you can also schedule tasks to be executed later. The input may have a date/time/cron pattern to be input as an object into a scheduler The time is now: ${new Date().toISOString()}.
              `,
            messages: processedMessages,
            tools,
            onFinish,
            maxSteps: 10,
          });

          // Merge the AI response stream with tool execution outputs
          result.mergeIntoDataStream(dataStream);
        },
      });

      return dataStreamResponse;
    });
  }
  async executeTask(description: string, task: Schedule<string>) {
    await this.saveMessages([
      ...this.messages,
      {
        id: generateId(),
        role: "user",
        content: `scheduled message: ${description}`,
      },
    ]);
  }
}

export default {
  async fetch(request: Request, env: Env, ctx: ExecutionContext) {
    if (!env.OPENAI_API_KEY) {
      console.error(
        "OPENAI_API_KEY is not set, don't forget to set it locally in .dev.vars, and use `wrangler secret bulk .dev.vars` to upload it to production"
      );
      return new Response("OPENAI_API_KEY is not set", { status: 500 });
    }
    return (
      // Route the request to our agent or return 404 if not found
      (await routeAgentRequest(request, env)) ||
      new Response("Not found", { status: 404 })
    );
  },
} satisfies ExportedHandler<Env>;
… and connect to your Agent with any React-based front-end with the useAgent hook that can automatically establish a bidirectional WebSocket, sync client state, and allow you to build Agent-based applications without a mountain of bespoke code:
We spent some time thinking about the production story here too: an agent framework that absolves itself of the hard parts — durably persisting state, handling long-running tasks & loops, and horizontal scale — is only going to get you so far. Agents built with agents-sdk can be deployed directly to Cloudflare and run on top of Durable Objects — which you can think of as stateful micro-servers that can scale to tens of millions — and are able to run wherever they need to. Close to a user for low-latency, close to your data, and/or anywhere in between.
agents-sdk also exposes:
Integration with React applications via a useAgent hook that can automatically set up a WebSocket connection between your app and an agent
An AIChatAgent extension that makes it easier to build intelligent chat agents
State management APIs via this.setState as well as a native sql API for writing and querying data within each Agent
State synchronization between frontend applications and the agent state
Agent routing, enabling agent-per-user or agent-per-workflow use-cases. Spawn millions (or tens of millions) of agents without having to think about how to make the infrastructure work, provision CPU, or scale out storage.
Over the coming weeks, expect to see even more here: tighter integration with email APIs to enable more human-in-the-loop use-cases, hooks into WebRTC for voice & video interactivity, a built-in evaluation (evals) framework, and the ability to self-host agents on your own infrastructure.
We’re aiming high here: we think this is just the beginning of what agents are capable of, and we think we can make Workers the best place (but not the only place) to build & run them.
JSON mode, longer context windows, and improved tool calling in Workers AI
When users express needs conversationally, tool calling converts these requests into structured formats like JSON that APIs can understand and process, allowing the AI to interact with databases, services, and external systems. This is essential for building agents, as it allows users to express complex intentions in natural language, and AI to decompose these requests, call appropriate tools, evaluate responses and deliver meaningful outcomes.
When using tool calling or building AI agents, the text generation model must respond with valid JSON objects rather than natural language. Today, we’re adding JSON mode support to Workers AI, enabling applications to request a structured output response when interacting with AI models. Here’s a request to @cf/meta/llama-3.1-8b-instruct-fp8-fast using JSON mode:
As you can see, the model is complying with the JSON schema definition in the request and responding with a validated JSON object. JSON mode is compatible with OpenAI’s response_format implementation:
We will continue extending this list to keep up with new, and requested models.
Lastly, we are changing how we restrict the size of AI requests to text generation models, moving from byte-counts to token-counts, introducing the concept of context window and raising the limits of the models in our catalog.
In generative AI, the context window is the sum of the number of input, reasoning, and completion or response tokens a model supports. You can now find the context window limit on each model page in our developer documentation and decide which suits your requirements and use case.
JSON mode is also the perfect companion when using function calling. You can use structured JSON outputs with traditional function calling or the Vercel AI SDK via the workers-ai-provider.
workers-ai-provider 0.1.1
One of the most common ways to build with AI tooling today is by using the popular AI SDK. Cloudflare’s provider for the AI SDK makes it easy to use Workers AI the same way you would call any other LLM, directly from your code.
A key part of building agents is using LLMs for routing, and making decisions on which tools to call next, and summarizing structured and unstructured data. All of these things need to happen quickly, as they are on the critical path of the user-facing experience.
Workers AI, with its globally distributed fleet of GPUs, is a perfect fit for smaller, low-latency LLMs, so we’re excited to make it easy to use with tools developers are already familiar with.
Why build agents on Cloudflare?
Since launching Workers in 2017, we’ve been building a platform to allow developers to build applications that are fast, scalable, and cost-efficient from day one. We took a fundamentally different approach from the way code was previously run on servers, making a bet about what the future of applications was going to look like — isolates running on a global network, in a way that was truly serverless. No regions, no concurrency management, no managing or scaling infrastructure.
The release of Workers was just the beginning, and we continued shipping primitives to extend what developers could build. Some more familiar, like a key-value store (Workers KV), and some that we thought would play a role in enabling net new use cases like Durable Objects. While we didn’t quite predict AI agents (though “Agents” was one of the proposed names for Durable Objects), we inadvertently created the perfect platform for building them.
What do we mean by that?
A platform that only charges you for what you use (regardless of how long it takes)
To be able to run agents efficiently, you need a system that can seamlessly scale up and down to support the constant stop, go, wait patterns. Agents are basically long-running tasks, sometimes waiting on slow reasoning LLMs and external tools to execute. With Cloudflare, you don’t have to pay for long-running processes when your code is not executing. Cloudflare Workers is designed to scale down and only charge you for CPU time, as opposed to wall-clock time.
In many cases, especially when calling LLMs, the difference can be in orders of magnitude — e.g. 2–3 milliseconds of CPU vs. 10 seconds of wall-clock time. When building on Workers, we pass that difference on to you as cost savings.
Serverless AI Inference
We took a similar serverless approach when it comes to inference itself. When you need to call an AI model, you need it to be instantaneously available. While the foundation model providers offer APIs that make it possible to just call the LLM, if you’re running open-source models, LoRAs, or self-trained models, most cloud providers today require you to pre-provision resources for what your peak traffic will look like. This means that the rest of the time, you’re still paying for GPUs to sit there idle. With Workers AI, you can pay only when you’re calling our inference APIs, as opposed to unused infrastructure. In fact, you don’t have to think about infrastructure at all, which is the principle at the core of everything we do.
A platform designed for durable execution
Durable Objects and Workflows provide a robust programming model that ensures guaranteed execution for asynchronous tasks that require persistence and reliability. This makes them ideal for handling complex operations like long-running deep thinking LLM calls, human-in-the-loop approval processes, or interactions with unreliable third-party APIs. By maintaining state across requests and automatically handling retries, these tools create a resilient foundation for building sophisticated AI agents that can perform complex, multistep tasks without losing context or progress, even when operations take significant time to complete.
Lastly, new and updated agents documentation
Did you catch all of that?
No worries if not: we’ve updated our agents documentation to include everything we talked about above, from breaking down the basics of agents, to showing you how to tackle foundational examples of building with agents.
We’ve also updated our Workers prompt with knowledge of the agents-sdk library, so you can use Cursor, Windsurf, Zed, ChatGPT or Claude to help you build AI Agents and deploy them to Cloudflare.
Can’t wait to see what you build!
We’re just getting started, and we love to see all that you build. Please join our Discord, ask questions, and tell us what you’re building.
I’ve noticed that many shops are increasingly using e-paper displays. They’re impressive: high contrast, no backlight, and no visible cables. Unlike most electronics, these displays are seamlessly integrated and feel very natural. This got me wondering: is it possible to use such a display for a pet project? I want to experiment with this technology myself.
My main goal in this project is to understand the hardware and its capabilities. Here, I’ll be using an e-paper display to show the current weather, but at its core, I’m simply feeding data from a website to the display. While it sounds straightforward, it actually requires three layers of software to pull off. Still, it’s a fun challenge and a great opportunity to work with both embedded hardware and Cloudflare Workers.
Sourcing the hardware
For this project, I’m using components from Waveshare. They offer a variety of e-paper displays, ranging from credit card-sized to A4-sized models. I chose the 7.5-inch, two-color “e-Paper (G)” display. For the controller, I’m using a Waveshare ESP32-based universal board. With just these two components — a display and a controller — I was ready to get started.
When the components arrived, I carefully connected the display’s ribbon cable to the ESP32 board. Even though this step isn’t documented anywhere, it was simple and almost impossible to get wrong. Best of all, no soldering was needed!
That’s pretty much it for the hardware setup! I’m keeping the device powered with a 5V supply through a micro-USB connection.
This was my first time working with the ESP32 CPU family, and I’m really impressed. It’s a system-on-chip controller with built-in Bluetooth and Wi-Fi. It’s relatively fast, very power-efficient, and quite popular in DSP (digital signal processing) applications. For example, your audio device might be powered by a CPU like this. Interestingly, the newer models have switched to the RISC-V instruction set.
For our purposes, we’ll only scratch the surface of what the ESP32 is capable of. The chip is straightforward to work with, thanks to the familiar Arduino environment. A great starting point is the demo provided by Waveshare. It sets up a web page where you can easily upload a custom image to the display.
Install “Additional Boards Manager URL” as per the instructions, and install the “esp32 by expressif” bundle.
Open the “Loader_esp32wf” example downloaded from waveshare.
Change the Wi-Fi name, password and IP address in the Arduino IDE srvr.h tab.
Once everything is set up, you should be able to connect to the ESP32’s IP address and use the simple web interface to upload an image to the display.
With a simple click of the “Upload Image” button, the magic happens: the e-paper display comes to life, showcasing the uploaded image.
With the demo up and running, we can move on to the next step: figuring out how to render a web page on the e-paper display.
Three layers of software
The ESP32 comes with some limitations. It has 520 KiB of RAM, 4 MiB of flash, and a 240 MHz clock speed. While this is fine for tasks like connecting to Wi-Fi or fetching a simple URL, it’s not powerful enough for more demanding tasks, such as parsing JSON or rendering an entire web page.
There are basic Arduino libraries for handling bitmaps, which can draw rectangles and render simple fonts, but manually managing layout doesn’t sound appealing to me. A better approach is to play to the ESP32’s strengths — fetching and displaying bitmaps — and delegate the more complex task of HTML rendering to a more powerful server.
Let’s break the problem into three layers:
ESP32 (Display Layer): The ESP32 will periodically, say every minute, fetch a pre-rendered bitmap from the server and display it on the e-paper screen. This keeps the ESP32’s tasks lightweight and manageable.
Server A (Rendering Layer): This server will fetch the desired website, render it, and rasterize it into a bitmap format. Its job is to prepare a bitmap that the ESP32 can handle without additional processing.
Server B (Content Layer): This server hosts the actual website with the HTML and CSS content. In this case, it will provide the local weather data in a styled format, ready to be fetched and rendered by Server A.
ESP32 (Display Layer)
The ESP32 provides some great higher-level libraries to simplify development. For this project, we’ll need three key components:
Then, it fetches a rendered bitmap from an HTTP endpoint
Then it pushes it to the e-paper display if needed
Waits a minute
And repeats the whole process forever
E-paper displays typically start to degrade after about one million refresh cycles. To preserve the display’s lifespan, I’m being extra careful to avoid unnecessary refreshes.
Server A (Rendering Layer)
Now for the exciting part! We need an online service that can fetch a website, render it, rasterize it to fit our small monochromatic display, and return it as a display-sized binary blob. Initially, I considered using headless Chrome paired with an ImageMagick script, but then I discovered Cloudflare’s Browser Rendering API, which fits our needs perfectly.
This API can be used quite trivially and nicely fits our needs. Here’s the typescript worker code, and there are two particularly interesting parts: handling a remote browser and dithering.
Remote Browser API
First, see how easy it is to render a website as a PNG using Browser Rendering:
I’m genuinely surprised at how practical and effective this approach is. While the remote browser startup isn’t exactly fast — it can take a few seconds to generate the screenshot — it’s not an issue for my use case. The delay is perfectly acceptable, especially considering how much work is offloaded to the cloud.
Dithering
To prepare the bitmap for the ESP32, we need to decode the PNG, reduce the color palette to monochromatic, and apply dithering. Here’s the dithering code:
This was my first time experimenting with dithering, and it’s been a lot of fun! I was surprised by how straightforward the process is and that it’s fully deterministic. Now that I understand the details of the algorithm, I can’t help but notice its subtle side effects everywhere — in printed materials, on screens, and even in design choices around me. It’s fascinating how something so simple has such a broad impact!
To deploy this code as a Cloudflare Worker, you only need to install the required dependencies, configure the wrangler.toml file, and publish the code. Here’s a step-by-step guide:
2025-01-e-paper/worker-render-raster$ npx wrangler dev --remote

 ⛅️ wrangler 3.99.0
-------------------

Your worker has access to the following bindings:
- KV Namespaces:
  - KV: XXX
- Browser:
  - Name: BROWSER
[wrangler:inf] Ready on http://localhost:46131
⎔ Starting remote preview...
Total Upload: 755.39 KiB / gzip: 149.05 KiB
╭─────────────────────────────────────────────────────────────────────────────────────────────────╮
│  [b] open a browser, [d] open devtools, [l] turn on local mode, [c] clear console, [x] to exit  │
╰─────────────────────────────────────────────────────────────────────────────────────────────────╯
With everything set up, you can now open a browser and see a rendered and rasterized version of a website, processed through your Cloudflare Worker! For example, here’s how the 1.1.1.1 page looks in a 800×480 monochromatic resolution, complete with dithering:
This demonstrates how effectively the Worker can handle rendering, rasterizing, and adapting web content for an e-paper display. It’s quite satisfying to see the pipeline in action.
Server B (Content Layer)
To create the weather panel, I designed a simple HTML and CSS page and published it as another Cloudflare Worker. This time, I used Python in Cloudflare Workers because it felt more straightforward, especially since the site needs to query an external weather API. The simplicity of the code was surprising and made the process smooth.
async def on_fetch(request, env):
    cached = await env.KV.get("weather")
    if cached:
        cached = json.loads(cached)
    else:
        u = "https://api.open-meteo.com/..."
        a = await fetch(u)
        result = await a.text()
        cached = json.loads(result)
        await env.KV.put("weather", json.dumps(cached))
    return Response.new(render(...), headers=[('content-type', 'text/html')])
Here’s how it appears in a normal browser compared to the rendered and rasterized version by our worker:
Summary
Finally, the display deserves a proper frame. Here’s the finished version:
I started this project wanting to experiment with an e-paper display hardware, but I ended up spending most of my time writing software—and it turned out to be surprisingly enjoyable across all layers:
ESP32: The CPU is fantastic. Programming it is straightforward, thanks to powerful built-in libraries that simplify development.
Cloudflare Worker Browser Rendering: This is an underrated but incredibly powerful technology. It made implementing features like the Floyd–Steinberg dithering algorithm surprisingly easy.
Cloudflare Worker Python: Although still in beta, it worked flawlessly for my needs and was a great fit for handling API requests and serving dynamic content.
It’s remarkable how much you can achieve with relatively inexpensive hardware and free Cloudflare services.
HTTP caching is conceptually simple: if the response to a request is in the cache, serve it, and if not, pull it from your origin, put it in the cache, and return it. When the response is old, you repeat the process. If you are worried about too many requests going to your origin at once, you protect it with a cache lock: a small program, possibly distinct from your cache, that indicates if a request is already going to your origin. This is called cache revalidation.
In this blog post, we dive into how cache revalidation works, and present a new approach based on probability. For every request going to the origin, we simulate a die roll. If it’s 6, the request can go to the origin. Otherwise, it stays stale to protect our origin from being overloaded. To see how this is built and optimised, read on.
Background
Let’s take the example of an online image library. When a client requests an image, the service first checks its cache to see if the resource is present. If it is, it returns it. If it is not, the image server processes the request, places the response into the cache for a day, and returns it. When the cache expires, the process is repeated.
Figure 1: Uncached request goes to the origin
Figure 2: Cached request stops at the cache
And this is where things get complex. The image of a cat might be quite popular. Let’s say it’s requested 10 times per second. Let’s also assume the image server cannot handle more than 1 request per second. After a day, the cache expires. 10 requests hit the service. Given there are no up-to-date items in cache, these 10 requests are going to go directly to the image server. This problem is known as cache stampede. When the image server sees these 10 requests all happening at the same time, it gets overloaded.
Figure 3: Image server overloaded upon cache expiration. This can happen to one or multiple users, across locations.
This all stops if the cache gets populated, as it can handle a lot more requests than the origin.
Figure 4: Cache is populated and can handle the load. The image server is healthy again.
In the following sections, we build this image service, see how it can prevent cache stampede with a cache lock, then dive into probabilistic cache revalidation, and its optimisation.
Setup
Let’s write this image service. We need an image, a server, and a cache. For the image we’re going to use a picture of my cat, Cloudflare Workers for the server, and the Cloudflare Cache API for caching.
Note to the reader: On purpose, we aren’t using Cloudflare KV or Cloudflare CDN Cache, because they already solve our cache validation problem by using a cache lock.
let cache = caches.default
const CACHE_KEY = new Request('https://cache.local/')
const CACHE_AGE_IN_S = 86_400 // 1 day

function cacheExpirationDate() {
  return new Date(Date.now() + 1000*CACHE_AGE_IN_S)
}

function fetchAndCache(ctx) {
  let response = await fetch('https://files.research.cloudflare.com/images/cat.jpg')
  response = new Response(
	await response.arrayBuffer(),
	{
  	  headers: {
  	    'Content-Type': response.headers.get('Content-Type'),
  	    'Expires': cacheExpirationDate().toUTCString(),
  	  },
	},
  )
  ctx.waitUntil(cache.put(CACHE_KEY, response.clone()))
  return response
}

export default {
  async fetch(request, env, ctx) {
	let cachedResponse = await cache.match(CACHE_KEY)
	if (cachedResponse) {
  	  return cachedResponse
	}
	return fetchAndCache(ctx)
  }
}
Codeblock 1: Image server with a non-collapsing cache
Expectation about cache revalidation
The image service is receiving 10 requests per second, and it caches images for a day. It’s reasonable to assume we would like to start revalidating the cache 5 minutes before it expires. The code evolves as follows:
let cache = caches.default
const CACHE_KEY = new Request('https://cache.local/')
const CACHE_AGE_IN_S = 86_400 // 1 day
const CACHE_REVALIDATION_INTERVAL_IN_S = 300

function cacheExpirationDate() {
  // Date constructor in workers takes Unix time in milliseconds
  // Date.now() returns time in milliseconds as well
  return new Date(Date.now() + 1000*CACHE_AGE_IN_S)
}

async function fetchAndCache(ctx) {
  let response = await fetch('https://files.research.cloudflare.com/images/cat.jpg')
  response = new Response(
	await response.arrayBuffer(),
	{
  	  headers: {
  	    'Content-Type': response.headers.get('Content-Type'),
  	    'Expires': cacheExpirationDate().toUTCString(),
  	  },
	},
  )
  ctx.waitUntil(cache.put(CACHE_KEY, response.clone()))
  return response
}

// Revalidation function added here
// This is were we are going to focus our effort: should the request be revalidated ?
function shouldRevalidate(expirationDate) {
  let remainingCacheTimeInS = (expirationDate.getTime() - Date.now()) / 1000

  return remainingCacheTimeInS <= CACHE_REVALIDATION_INTERVAL_IN_S
}

export default {
  async fetch(request, env, ctx) {
	let cachedResponse = await cache.match(CACHE_KEY)
	if (cachedResponse) {
       // revalidation happens only if the request was cached. Otherwise, the resource is fetched anyway
  	  if (shouldRevalidate()) {
    	    ctx.waitUntil(fetchAndCache(ctx))
  	  }
  	  return cachedResponse
	}
	return fetchAndCache(ctx)
  }
}
Codeblock 2: Image server with early-revalidation and a non-collapsing cache
That code works, and we can now revalidate 5 minutes in advance of cache expiration. However, instead of fetching the image from the origin server at expiration time, all requests are going to be made 5 minutes in advance, and that does not solve our cache stampede problem. This happens no matter if requests are coming to a single location or not, given the code above does not collapse requests.
To solve our cache stampede problem, we need the revalidation process to not send too many requests at the same time. Ideally, we would like only one request to be sent between expiration - 5min and expiration.
The usual solution: a cache lock
To make sure there is only one request at a time going to the origin server, the solution that’s usually deployed is a cache lock. The idea is that for a specific item, a cat picture in our case, requests to the origin try to obtain a lock. The request obtaining the lock can go to the origin, the others will serve stale content.
The lock has two methods: try_lock() and unlock.
* try_lock if the lock is free, take it and return true. If not, return false.
* unlock releases the lock.
import { WorkerEntrypoint } from 'cloudflare:workers'

class Lock extends WorkerEntryPoint {
  async try_lock(key) {
	let value = await this.ctx.storage.get(key)
	if (!value) {
  	  await this.ctx.storage.put(key, true)
  	  return true
	}
	return false
  }

  unlock() {
	return this.ctx.storage.delete(key)
  }
}
Codeblock 3: Lock service implemented with a Durable Object
That service can then be used as a cache lock.
// CACHE_LOCK is an instantiation of the above binding
// Assuming the above is deployed as a worker with name `lock`
// It can be bound in wrangler.toml as follows
// services = [ { binding = "CACHE_LOCK", service = "lock" } ]

const LOCK_KEY = "cat_image_service"

async function fetchAndCache(env, ctx) {
  let response = await fetch('...')
  ctx.waitUntil(env.CACHE_LOCK.unlock(LOCK_KEY))
  ...
}

function shouldRevalidate(env, expirationDate) {
  let remainingCacheTimeInS = (expirationDate.getTime() - Date.now()) / 1000

  // check if the expiry window is now, and then if the revalidation lock is available. if it is, take it
  return remainingCacheTimeInS <= CACHE_REVALIDATION_INTERVAL_IN_S && env.CACHE_LOCK.try_lock(LOCK_KEY)
}
Codeblock 4: Image server with early-revalidation and a cache using a cache-lock
Now you might say “Et voilà. No need for probabilities and mathematics. Peak engineering has triumphed.” And you might be right, in most cases. That’s why cache locks are so predominant: they are conceptually simple, deterministic for the same key, and scale well with predictable resource usage.
On the other hand, cache locks add latency and fallibility. To take ownership of a lock, cache revalidation has to contact the lock service. This service is shared across different processes, possibly different machines in different locations. Requests therefore take time. In addition, this service might be unavailable. Probabilistic cache revalidation does not suffer from these, given it does not reach out to an external service but rolls a die with the local randomness generator. It does so at the cost of not guaranteeing the number of requests going to the origin server: maybe zero for an extended period, maybe more than one. On average, this is going to be fine. But there can be border cases, similar to how one can roll a die 10 times and get 10 sixes. It’s unlikely, but not unrealistic, and certain services need that certainty. In the following sections, we dissect this approach.
First dive into probabilities given a stable request rate
A first approach is to reduce the number of requests going to the origin server. Instead of always sending a request to revalidate, we are going to send 1 out of 10. This means that instead of sending 10 requests per second when the cache is invalidated, we send 1 per second.
Because we don’t have a lock, we do that with probabilities. We set the probability of sending a request to the origin to be $p=\frac{1}{10}$. With a rate of 10 requests per second, after 1 second, the expectancy of a request being sent to the origin is $1-(1-p)^10=65\%$. We draw the evolution of the function $E(r, t)=1-(1-p)^{r \times t}$ representing the expectancy of a request being sent to the server over time. $r = 10$ and is the request rate.
Figure 5: Revalidation time $E(t)$ with $r=10$ and $p=\frac{1}{10}$. At time $t$, $E(t)$ is the probability that an early revalidation occurred.
The graph moves very quickly towards $1$. This means we might still have space to reduce the number of requests going to our origin server. We can set a lower probability, such as $p_2=\frac{1}{500}$ (1 request every 5 seconds on average). The graph looks as follows:
Figure 6: Revalidation time $E(t)$ with $r=10$ and $p=\frac{1}{500}$.
This looks great. Let’s implement it.
const CACHE_REVALIDATION_INTERVAL_IN_S = 300
const CACHE_REVALIDATION_PROBABILITY = 1/500

function shouldRevalidate(expirationDate) {
  let remainingCacheTimeInS = (expirationDate.getTime() - Date.now()) / 1000

  if (remainingCacheTimeInS > CACHE_REVALIDATION_INTERVAL_IN_S) {
	return false
  }
  if (remainingCacheTimeInS <= 0) {
	return true
  }
  return Math.random() < CACHE_REVALIDATION_PROBABILITY
}
Codeblock 5: Image server with early-revalidation and a probabilistic cache using uniform distribution
That’s it. If the cache is not close to expiration, we don’t revalidate. If the cache is expired, we revalidate. Otherwise, we revalidate based on a probability.
Adaptive cache revalidation
Until now, we assumed the picture of the cat received a stable request rate. However, for a real service, this does not necessarily hold. For instance, if instead of 10 requests per second, imagine the service receives only 1. The expectancy function does not look as good. After 5 minutes (300s), $E(r=1, t=300)=45\%$. On the other hand, if the image service is receiving 10,000 requests per second, $E(r=10000, t = 300) \approx 100\%$, but our server receives on average $10000 \times \frac{1}{500} = 20$ requests per second. It would be ideal to design a probability function that would adapt to the request rate.
That function would return a low probability when expiration time is far in the future, and increase over time such that the cache is revalidated before it expires. It would cap the request rate going to the origin server.
Let’s design the variation of probability $p$ over 5 minutes. When far from the expiration, the probability to revalidate should be low. This should help match the high request rate. For example, with a request rate of 10k requests per second, we would like the revalidation probability $p$ to be $\frac{1}{100000}$. This ensures the request rates seen by our server are going to be low on average, at about 1 request every 10 seconds. As time passes, we increase this probability to allow for revalidation even at a lower request rate.
Time to expiration $t$ (in s)
Revalidation probability $p$
Target request rate $r$ (in rps)
300
1/100000
10000
240
1/10000
1000
180
1/1000
100
120
1/100
10
60
1/10
1
0
1
–
Table 1: Variation of revalidation probability over time
For each of these intervals, there is a high likelihood that a request rate $r$ will trigger a cache revalidation, and low likelihood that a lower request rate will trigger it. If it does, it’s ok.
We can update our revalidation function as follows:
const CACHE_REVALIDATION_INTERVAL_IN_S = 300
const CACHE_REVALIDATION_PROBABILITY_PER_MIN = [1/100_000, 1/10_000, 1/1000, 1/100, 1/10, 1]

function shouldRevalidate(expirationDate) {
  let remainingCacheTimeInS = (expirationDate.getTime() - Date.now()) / 1000

  if (remainingCacheTimeInS > CACHE_REVALIDATION_INTERVAL_IN_S) {
	return false
  }
  if (remainingCacheTimeInS <= 0) {
	return true
  }
  let currentMinute = Math.floor(remainingCacheTimeInS/60)
  return Math.random() < CACHE_REVALIDATION_PROBABILITY_PER_MIN[currentMinute]
}
Codeblock 6: Image server with early-revalidation and a probabilistic cache using piecewise uniform distribution
Optimal cache stampede solution
There seems to be a lot of decisions going on here. To solve this, we can reference an academic paper written by A Vattani, T Chierichetti, and K Lowenstein in 2015 called Optimal Probabilistic Cache Stampede Prevention. If you read it, you’ll recognise that what we have been discussing until now is close to what the paper presents. For instance, both the cache revalidation algorithm structure and the early revalidation function look similar.
Figure 7: Probabilistic early expiration of a cache item as defined by Figure 2 of Optimal Probabilistic Cache Stampede Prevention paper. In our case, $\mathcal{D}=300$
One takeaway from the paper is that instead of discretization, with a probability from 0 to 60s, then from 60s to 120s, …, the probability function can be continuous. Instead of a fixed $p$, there is a function $p(t)$ of time $t$.
$p(t)=e^{-\lambda (expiry-t)}, \text{ with } expiry=300, \text{ and } t \in [0, 300]$
We call $\lambda$ the steepness parameter, and set it to $\frac{1}{300}$, $300$ being our early expiration gap.
The expectancy over time is $E(r, t)=1-e^{-rλt}$. This leads to the expectancy below for various request rates. You can note that when $r=1$, there is not a $100%$ chance that the request will be revalidated before expiry.
Figure 8: Revalidation time $E(t)$ for multiple $r$ with an exponential distribution.
This leads to the final code snippet:
const CACHE_REVALIDATION_INTERVAL_IN_S = 300
const REVALIDATION_STEEPNESS = 1/300

function shouldRevalidate(expirationDate) {
  let remainingCacheTimeInS = (expirationDate.getTime() - Date.now()) / 1000

  if (remainingCacheTimeInS > CACHE_REVALIDATION_INTERVAL_IN_S) {
	return false
  }
  if (remainingCacheTimeInS <= 0) {
	return true
  }
  // p(t) is evaluated here
  return Math.random() < Math.exp(-REVALIDATION_STEEPNESS*(CACHE_REVALIDATION_INTERVAL_IN_S-remainingCacheTimeInS)
}
Codeblock 7: Image server with early-revalidation and a probabilistic cache using exponential distribution
And that’s it. Given Date.now() has a granularity, and is not continuous, it would also be possible to discretise these functions, even though the gains are minimal. This is what we have done in a production worker implementation, where the number of requests is important. It is a service that benefits from caching for performance consideration, and that cannot use built-in stale-while-revalidate from within Cloudflare workers. Probabilistic cache stampede prevention is well-suited here, as no new component has to be built, and it performs well at different request rates.
Conclusion
We have seen how to solve cache stampede without a lock, its implementation, and why it is optimal. In the real world, you likely will not encounter this issue: either because it’s good enough to optimize your origin service to serve more requests, or because you can leverage a CDN cache. In fact, most HTTP caches provide an API that follows Cache Control, and likely have all the tools you need. This primitive is also built into certain products, such as Cloudflare KV.
If you have not done so, you can go and experiment with all the code snippets presented in this blog on the Cloudflare Workers Playground at cloudflareworkers.com.
Cloudflare Stream launched AI-powered automated captions to transcribe English in on-demand videos in March 2024. Customers’ immediate next questions were about other languages — both transcribing audio from other languages, and translating captions to make subtitles for other languages. As the Stream Product Manager, I’ve thought a lot about how we might tackle these, but I wondered…
What if I just translated a generated VTT (caption file)? Can we do that? I hoped to use Workers AI to conduct a quick experiment to learn more about the problem space, challenges we may find, and what platform capabilities we can leverage.
There is a sample translator demo in Workers documentation that uses the “m2m100-1.2b” Many-to-Many multilingual translation model to translate short input strings. I decided to start there and try using it to translate some of the English captions in my Stream library into Spanish.
Selecting test content
I started with my short demo video announcing the transcription feature. I wanted a Worker that could read the VTT captions file from Stream, isolate the text content, and run it through the model as-is.
The first step was parsing the input. A VTT file is a text file that contains a sequence of numbered “cues,” each with a number, a start and end time, and text content.
WEBVTT
X-TIMESTAMP-MAP=LOCAL:00:00:00.000,MPEGTS:900000

1
00:00:00.000 --> 00:00:02.580
Good morning, I'm Taylor Smith,

2
00:00:02.580 --> 00:00:03.520
the Product Manager for Cloudflare

3
00:00:03.520 --> 00:00:04.460
Stream. This is a quick

4
00:00:04.460 --> 00:00:06.040
demo of our AI-powered automatic

5
00:00:06.040 --> 00:00:07.580
subtitles feature. These subtitles

6
00:00:07.580 --> 00:00:09.420
were generated with Cloudflare WorkersAI

7
00:00:09.420 --> 00:00:10.860
and the Whisper Model,

8
00:00:10.860 --> 00:00:12.020
not handwritten, and it took

9
00:00:12.020 --> 00:00:13.940
just a few seconds.
Parsing the input
I started with a simple Worker that would fetch the VTT from Stream directly, run it through a function I wrote to deconstruct the cues, and return the timestamps and original text in an easier to review format.
export default {
  async fetch(request: Request, env: Env, ctx): Promise<Response> {
    // Step One: Get our input.
    const input = await fetch(PLACEHOLDER_VTT_URL)
      .then(res => res.text());

    // Step Two: Parse the VTT file and get the text
    const captions = vttToCues(input);

    // Done: Return what we have.
    return new Response(captions.map(c =>
      (`#${c.number}: ${c.start} --> ${c.end}: ${c.content.toString()}`)
    ).join('\n'));
  },
};
That returned this text:
#1: 0 --> 2.58: Good morning, I'm Taylor Smith,
#2: 2.58 --> 3.52: the Product Manager for Cloudflare
#3: 3.52 --> 4.46: Stream. This is a quick
#4: 4.46 --> 6.04: demo of our AI-powered automatic
#5: 6.04 --> 7.58: subtitles feature. These subtitles
#6: 7.58 --> 9.42: were generated with Cloudflare WorkersAI
#7: 9.42 --> 10.86: and the Whisper Model,
#8: 10.86 --> 12.02: not handwritten, and it took
#9: 12.02 --> 13.94: just a few seconds.
AI-ify
As a proof of concept, I adapted a snippet from the demo into my Worker. In the example, the target language and input text are extracted from the user’s request. In my experiment, I decided to hardcode the languages. Also, I had an array of input objects, one for each cue, not just a string. After interpreting the caption input but before returning a response, I used a map callback to parallelize all the AI.run() calls to translate each cue, so they could execute asynchronously and in-place, then awaited them all to resolve. Ultimately, the AI inference call itself is the simplest part of the script.
Then the script returns the translated output in the format from before.
Of course, this is not a scalable or error-tolerant approach for production use because it doesn’t make affordances for rate limiting, failures, or processing bigger throughput. But for a few minutes of tinkering, it taught me a lot.
#1: 0 --> 2.58: Buen día, soy Taylor Smith.
#2: 2.58 --> 3.52: El gerente de producto de Cloudflare
#3: 3.52 --> 4.46: Rápido, esto es rápido
#4: 4.46 --> 6.04: La demostración de nuestro automático AI-powered
#5: 6.04 --> 7.58: Los subtítulos, estos subtítulos
#6: 7.58 --> 9.42: Generado con Cloudflare WorkersAI
#7: 9.42 --> 10.86: y el modelo de susurro,
#8: 10.86 --> 12.02: No se escribió, y se tomó
#9: 12.02 --> 13.94: Sólo unos segundos.
A few immediate observations: first, these results came back surprisingly quickly and the Workers AI code worked on the first try! Second, evaluating the quality of translation results is going to depend on having team members with expertise in those languages. Because — third, as a novice Spanish speaker, I can tell this output has some issues.
Cues 1 and 2 are okay, but 3 is not (“Fast, this is fast” from “[Cloudflare] Stream. This is a quick…”). Cues 5 through 9 had several idiomatic and grammatical issues, too. I theorized that this is because Stream splits the English captions into groups of 4 or 5 words to make them easy to read quickly in the overlay. But that also means sentences and grammatical constructs are interrupted. When those fragments go to the translation model, there isn’t enough context.
Consolidating sentences
I speculated that reconstructing sentences would be the most effective way to improve translation quality, so I made that the one problem I attempted to solve within this exploration. I added a rough pre-processor in the Worker that tries to merge caption cues together and then splits them at sentence boundaries instead. In the process, it also adjusts the timing of the resulting cues to cover the same approximate timeframe.
Looking at each cue in order:
// Break this cue up by sentence-ending punctuation.
const sentences = thisCue.content.split(/(?<=[.?!]+)/g);

// Cut here? We have one fragment and it has a sentence terminator.
const cut = sentences.length === 1 && thisCue.content.match(/[.?!]/);
But if there’s a cue that splits into multiple sentences, cut it up and split the timing. Leave the final fragment to roll into the next cue:
else if (sentences.length > 1) {
  // Save the last fragment for later
  const nextContent = sentences.pop();

  // Put holdover content and all-but-last fragment into the content
  newContent += ' ' + sentences.join(' ');

  const thisLength = (thisCue.end - thisCue.start) / 2;

    result.push({
      number: newNumber,
      start: newStart,
      end: thisCue.start + (thisLength / 2), // End this cue early
      content: newContent,
    });

    // … then treat the next cue as a holdover
    cueLength = 1;
    newContent = nextContent;
    // Start the next consolidated cue halfway into this cue's original duration
    newStart = thisCue.start + (thisLength / 2) + 0.001;
    // Set the next consolidated cue's number to this cue's number
    newNumber = thisCue.number;
  }
}
Applying that to the input, it generates sentence-grouped output, visualized here in green:
There are only 3 “new” cues, each starts at the beginning of a sentence. The consolidated cues are longer and might be harder to read when overlaid on a video, but they are complete grammatical units:
#1: 0 --> 3.755:  Good morning, I'm Taylor Smith, the Product Manager for Cloudflare Stream.
#3: 3.756 --> 6.425:  This is a quick demo of our AI-powered automatic subtitles feature.
#5: 6.426 --> 12.5:  These subtitles were generated with Cloudflare Workers AI and the Whisper Model, not handwritten, and it took just a few seconds.
Translating this “prepared” input the same way as before:
#1: 0 --> 3.755: Buen día, soy Taylor Smith, el gerente de producto de Cloudflare Stream.
#3: 3.756 --> 6.425: Esta es una demostración rápida de nuestra función de subtítulos automáticos alimentados por IA.
#5: 6.426 --> 12.5: Estos subtítulos fueron generados con Cloudflare WorkersAI y el Modelo Whisper, no escritos a mano, y solo tomó unos segundos.
¡Mucho mejor! [Much better!]
Re-exporting to VTT
To use these translated captions on a video, they need to be formatted back into a VTT with renumbered cues and properly formatted timestamps. Ultimately, the solution should automatically upload them back to Stream, too, but that is an established process, so I set it aside as out of scope. The final VTT result from my Worker is this:
WEBVTT

1
00:00:00.000 --> 00:00:03.754
Buen día, soy Taylor Smith, el gerente de producto de Cloudflare Stream.

2
00:00:03.755 --> 00:00:06.424
Esta es una demostración rápida de nuestra función de subtítulos automáticos alimentados por IA.

3
00:00:06.426 --> 00:00:12.500
Estos subtítulos fueron generados con Cloudflare WorkersAI y el Modelo Whisper, no escritos a mano, y solo tomó unos segundos.
I saved it to a file locally and, using the Cloudflare Dashboard, I added it to the video which you may have noticed embedded at the top of this post! Captions can also be uploaded via the API.
More testing and what I learned
I tested this script on a variety of videos from many sources, including short social media clips, 30-minute video diaries, and even a few clips with some specialized vocabulary. Ultimately, I was surprised at the level of prototype I was able to build on my first afternoon with Workers AI. The translation results were very promising! In the process, I learned a few key things that I will be bringing back to product planning for Stream:
We have the tools. Workers AI has a model called “m2m100-1.2b” from Hugging Face that can do text translations between many languages. We can use it to translate the plain text cues from VTT files — whether we generate them or they are user-supplied. We’ll keep an eye out for new models as they are added, too.
Quality is prone to “copy-of-a-copy” effect. When auto-translating captions that were auto-transcribed, issues that impact the English transcription have a huge downstream impact on the translation. Editing the source transcription improves quality a lot.
Good grammar and punctuation counts. Translations are significantly improved if the source content is grammatically correct and punctuated properly. Punctuation is often missing when captions are auto-generated, but not always — I would like to learn more about how to predict that and if there are ways we can increase punctuation in the output of transcription jobs. My cue consolidator experiment returns giant walls of text if there’s no punctuation on the input.
Translate full sentences when possible. We split our transcriptions into cues of about 5 words for several reasons. However, this produces lower quality output when translated because it breaks grammatical constructs. Translation results are better with full sentences or at least complete fragments. This is doable, but easier said than done, particularly as we look toward support for additional input languages that use punctuation differently.
We will have blind spots when evaluating quality. Everyone on our team was able to adequately evaluate English transcriptions. Sanity-checking the quality of translations will require team members who are familiar with those languages. We state disclaimers about transcription quality and offer tips to improve it, but at least we know what we’re looking at. For translations, we may not know how far off we are in many cases. How many readers of this article objected to the first translation sample above?
Clear UI and API design will be important for these related but distinct workflows. There are two different flows being requested by Stream customers: “My audio is in English, please make translated subtitles” alongside “My audio is in another language, please transcribe captions as-is.” We will need to carefully consider how we shape user-facing interactions to make it really clear to a user what they are asking us to do.
Workers AI is really easy to use. Sheepishly, I will admit: although I read Stream’s code for the transcription feature, this was the first time I’ve ever used Workers AI on my own, and it was definitely the easiest part of this experiment!
Finally, as a product manager, it is important I remain focused on the outcome. From a certain point of view, this experiment is a bit of an XY Problem. The need is “I have audio in one language and I want subtitles in another.” Are there other avenues worth looking into besides “transcribe to captions, then restructure and translate those captions?” Quite possibly. But this experiment with Workers AI helped me identify some potential challenges to plan for and opportunities to get excited about!
In late November 2024, Anthropic announced a new way to interact with AI, called Model Context Protocol (MCP). Today, we’re excited to show you how to use MCP in combination with Cloudflare to extend the capabilities of Claude to build applications, generate images and more. You’ll learn how to build an MCP server on Cloudflare to make any service accessible through an AI assistant like Claude with just a few lines of code using Cloudflare Workers.
A quick primer on the Model Context Protocol (MCP)
MCP is an open standard that provides a universal way for LLMs to interact with services and applications. As the introduction on the MCP website puts it,
“Think of MCP like a USB-C port for AI applications. Just as USB-C provides a standardized way to connect your devices to various peripherals and accessories, MCP provides a standardized way to connect AI models to different data sources and tools.”
From an architectural perspective, MCP is comprised of several components:
MCP hosts: Programs or tools (like Claude) where AI models operate and interact with different services
MCP clients: Client within an AI assistant that initiates requests and communicates with MCP servers to perform tasks or access resources
MCP servers: Lightweight programs that each expose the capabilities of a service
Local data sources: Files, databases, and services on your computer that MCP servers can securely access
Remote services: External Internet-connected systems that MCP servers can connect to through APIs
Imagine you ask Claude to send a message in a Slack channel. Before Claude can do this, Slack must communicate which tools are available. It does this by defining tools — such as “list channels”, “post messages”, and “reply to thread” — in the MCP server. Once the MCP client knows what tools it should invoke, it can complete the task. All you have to do is tell it what you need, and it will get it done.
Allowing AI to not just generate, but deploy applications for you
What makes MCP so powerful? As a quick example, by combining it with a platform like Cloudflare Workers, it allows Claude users to deploy a Cloudflare Worker in just one sentence, resulting in a site like this:
But that’s just one example. Today, we’re excited to show you how you can build and deploy your own MCP server to allow your users to interact with your application directly from an LLM like Claude, and how you can do that just by writing a Cloudflare Worker.
Simplifying your MCP Server deployment with workers-mcp
The new workers-mcp tooling handles the translation between your code and the MCP standard, so that you don’t have to do the maintenance work to get it set up.
Once you create your Worker and install the MCP tooling, you’ll get a worker-mcp template set up for you. This boilerplate removes the overhead of configuring the MCP server yourself:
import { WorkerEntrypoint } from 'cloudflare:workers'
import { ProxyToSelf } from 'workers-mcp'
export default class MyWorker extends WorkerEntrypoint<Env> {
  /**
   * A warm, friendly greeting from your new Workers MCP server.
   * @param name {string} the name of the person we are greeting.
   * @return {string} the contents of our greeting.
   */
  sayHello(name: string) {
    return `Hello from an MCP Worker, ${name}!`
  }
  /**
   * @ignore
   **/
  async fetch(request: Request): Promise<Response> {
    return new ProxyToSelf(this).fetch(request)
  }
}
Let’s unpack what’s happening here. This provides a direct link to MCP. The ProxyToSelf logic ensures that your Worker is wired up to respond as an MCP server, without any complex routing or schema definitions.
It also provides tool definition with JSDoc. You’ll notice that the `sayHello` method is annotated with JSDoc comments describing what it does, what arguments it takes, and what it returns. These comments aren’t just for human readers, but they’re also used to generate documentation that your AI assistant (Claude) can understand.
Adding image generation to Claude
When you build an MCP server using Workers, adding custom functionality to an LLM is easy. Instead of setting up the server infrastructure, defining request schemas, all you have to do is write the code. Above, all we did was generate a “hello world”, but now let’s power up Claude to generate an image, using Workers AI:
import { WorkerEntrypoint } from 'cloudflare:workers'
import { ProxyToSelf } from 'workers-mcp'

export default class ClaudeImagegen extends WorkerEntrypoint<Env> {
 /**
   * Generate an image using the flux-1-schnell model.
   * @param prompt {string} A text description of the image you want to generate.
   * @param steps {number} The number of diffusion steps; higher values can improve quality but take longer.
   */
  async generateImage(prompt: string, steps: number): Promise<string> {
    const response = await this.env.AI.run('@cf/black-forest-labs/flux-1-schnell', {
      prompt,
      steps,
    });
        // Convert from base64 string
        const binaryString = atob(response.image);
        // Create byte representation
        const img = Uint8Array.from(binaryString, (m) => m.codePointAt(0)!);

        return new Response(img, {
          headers: {
            'Content-Type': 'image/jpeg',
          },
        });
      }
  /**
   * @ignore
   */
  async fetch(request: Request): Promise<Response> {
    return new ProxyToSelf(this).fetch(request)
  }
}
Once you update the code and redeploy the Worker, Claude will now be able to use the new image generation tool. All you have to say is: “Hey! Can you create an image of a lava lamp wall that lives in San Francisco?”
If you’re looking for some inspiration, here are a few examples of what you can build with MCP and Workers:
Let Claude send follow-up emails on your behalf using Email Routing
To build out an MCP server without access to Cloudflare’s tooling, you would have to: initialize an instance of the server, define your APIs by creating explicit schemas for every interaction, handle request routing, ensure that the responses are formatted correctly, write handlers for every action, configure how the server will communicate, and more… As shown above, we do all of this for you.
For reference, an implementation may look something like this:
import { Server } from "@modelcontextprotocol/sdk/server/index.js";
import { StdioServerTransport } from "@modelcontextprotocol/sdk/server/stdio.js";

const server = new Server({ name: "example-server", version: "1.0.0" }, {
  capabilities: { resources: {} }
});

server.setRequestHandler(ListResourcesRequestSchema, async () => {
  return {
    resources: [{ uri: "file:///example.txt", name: "Example Resource" }]
  };
});

server.setRequestHandler(ReadResourceRequestSchema, async (request) => {
  if (request.params.uri === "file:///example.txt") {
    return {
      contents: [{
        uri: "file:///example.txt",
        mimeType: "text/plain",
        text: "This is the content of the example resource."
      }]
    };
  }
  throw new Error("Resource not found");
});

const transport = new StdioServerTransport();
await server.connect(transport);
While this works, it requires quite a bit of code just to get started. Not only do you need to be familiar with the MCP protocol, but you need to complete a fair amount of set up work (e.g. defining schemas) for every action. Doing it through Workers removes all these barriers, allowing you to spin up an MCP server without the complexity.
We’re always looking for ways to simplify developer workflows, and we’re excited about this new standard to open up more possibilities for interacting with LLMs, and building agents.
If you’re interested in setting this up, check out this tutorial which walks you through these examples. We’re excited to see what you build. Be sure to share your MCP server creations with us on Discord, X, or Bluesky!
During 2024’s Birthday Week, we launched Workers Builds in open beta — an integrated Continuous Integration and Delivery (CI/CD) workflow you can use to build and deploy everything from full-stack applications built with the most popular frameworks to simple static websites onto the Workers platform. With Workers Builds, you can connect a GitHub or GitLab repository to a Worker, and Cloudflare will automatically build and deploy your changes each time you push a commit.
Workers Builds is intended to bridge the gap between the developer experiences for Workers and Pages, the latter of which launched with an integrated CI/CD system in 2020. As we continue to merge the experiences of Pages and Workers, we wanted to bring one of the best features of Pages to Workers: the ability to tie deployments to existing development workflows in GitHub and GitLab with minimal developer overhead.
The core problem for Workers Builds is how to pick up a commit from GitHub or GitLab and start a containerized job that can clone the repo, build the project, and deploy a Worker.
Pages solves a similar problem, and we were initially inclined to expand our existing architecture and tech stack, which includes a centralized configuration plane built on Go in Kubernetes. We also considered the ways in which the Workers ecosystem has evolved in the four years since Pages launched — we have since launched so many more tools built for use cases just like this!
The distributed nature of Workers offers some advantages over a centralized stack — we can spend less time configuring Kubernetes because Workers automatically handles failover and scaling. Ultimately, we decided to keep using what required no additional work to re-use from Pages (namely, the system for connecting GitHub/GitLab accounts to Cloudflare, and ingesting push events from them), and for the rest build out a new architecture on the Workers platform, with reliability and minimal latency in mind.
The Workers Builds system
We didn’t need to make any changes to the system that handles connections from GitHub/GitLab to Cloudflare and ingesting push events from them. That left us with two systems to build: the configuration plane for users to connect a Worker to a repo, and a build management system to run and monitor builds.
Client Worker
We can begin with our configuration plane, which consists of a simple Client Worker that implements a RESTful API (using Hono) and connects to a PostgreSQL database. It’s in this database that we store build configurations for our users, and through this Worker that users can view and manage their builds.
We considered a more distributed data model (like D1, sharded by account), but ultimately decided that keeping our database in a datacenter more easily fit our use-case. The Workers Builds data model is relational — Workers belong to Cloudflare Accounts, and Builds belong to Workers — and build metadata must be consistent in order to properly manage build queues. We chose to keep our failover-ready database in a centralized datacenter and take advantage of two other Workers products, Smart Placement and Hyperdrive, in order to keep the benefits of a distributed control plane.
Everything that you see in the Cloudflare Dashboard related to Workers Builds is served by this Worker.
Build Management Worker
The more challenging problem we faced was how to run and manage user builds effectively. We wanted to support the same experience that we had achieved with Pages, which led to these key requirements:
Builds should be initiated with minimal latency.
The status of a build should be tracked and displayed through its entire lifecycle, starting when a user pushes a commit.
Customer build logs should be stored in a secure, private, and long-lived way.
To solve these problems, we leaned heavily into the technology of Durable Objects (DO).
We created a Build Management Worker with two DO classes: A Scheduler class to manage the scheduling of builds, and a class called BuildBuddy to manage individual builds. We chose to design our system this way for an efficient and scalable system. Since each build is assigned its own build manager DO, its operation won’t ever block other builds or the scheduler, meaning we can start up builds with minimal latency. Below, we dive into each of these Durable Objects classes.
Scheduler DO
The Scheduler DO class is relatively simple. Using Durable Objects Alarms, it is triggered every second to pull up a list of user build configurations that are ready to be started. For each of those builds, the Scheduler creates an instance of our other DO Class, the Build Buddy.
import { DurableObject } from 'cloudflare:workers'


export class BuildScheduler extends DurableObject {
   state: DurableObjectState
   env: Bindings


   constructor(ctx: DurableObjectState, env: Bindings) {
       super(ctx, env)
   }

   // The DO alarm handler will be called every second to fetch builds
   async alarm(): Promise<void> {
// set alarm to run again in 1 second
       await this.updateAlarm()


       const builds = await this.getBuildsToSchedule()
       await this.scheduleBuilds(builds)
   }


   async scheduleBuilds(builds: Builds[]): Promise<void> {
       // Don't schedule builds, if no builds to schedule
       if (builds.length === 0) return


       const queue = new PQueue({ concurrency: 6 })
       // Begin running builds
       builds.forEach((build) =>
           queue.add(async () => {
       	  // The BuildBuddy is another DO described more in the next section!
               const bb = getBuildBuddy(this.env, build.build_id)
               await bb.startBuild(build)
           })
       )


       await queue.onIdle()
   }


   async getBuildsToSchedule(): Promise<Builds[]> {
       // returns list of builds to schedule
   }


   async updateAlarm(): Promise<void> {
// We want to ensure we aren't running multiple alarms at once, so we only set the next alarm if there isn’t already one set.
       const existingAlarm = await this.ctx.storage.getAlarm()
       if (existingAlarm === null) {
           this.ctx.storage.setAlarm(Date.now() + 1000)
       }
   }
}
Build Buddy DO
The Build Buddy DO class is what we use to manage each individual build from the time it begins initializing to when it is stopped. Every build has a buddy for life!
Upon creation of a Build Buddy DO instance, the Scheduler immediately calls startBuild() on the instance. The startBuild() method is responsible for fetching all metadata and secrets needed to run a build, and then kicking off a build on Cloudflare’s container platform (not public yet, but coming soon!).
As the containerized build runs, it reports back to the Build Buddy, sending status updates and logs for the Build Buddy to deal with.
Build status
As a build progresses, it reports its own status back to Build Buddy, sending updates when it has finished initializing, has completed successfully, or been terminated by the user. The Build Buddy is responsible for handling this incoming information from the containerized build, writing status updates to the database (via a Hyperdrive binding) so that users can see the status of their build in the Cloudflare dashboard.
Build logs
A running build generates output logs that are important to store and surface to the user. The containerized build flushes these logs to the Build Buddy every second, which, in turn, stores those logs in DO storage.
The decision to use Durable Object storage here makes it easy to multicast logs to multiple clients efficiently, and allows us to use the same API for both streaming logs and viewing historical logs.
// build-management-app.ts
// We created a Hono app to for use by our Client Worker API
const app = new Hono<HonoContext>()
   .post(
       '/api/builds/:build_uuid/status',
       async (c) => {
           const buildStatus = await c.req.json()


           // fetch build metadata
           const build = ...


           const bb = getBuildBuddy(c.env, build.build_id)
           return await bb.handleStatusUpdate(build, statusUpdate)
       }
   )
   .post(
       '/api/builds/:build_uuid/logs',
       async (c) => {
           const logs = await c.req.json()
     // fetch build metadata
           const build = ...


           const bb = getBuildBuddy(c.env, build.build_id)
           return await bb.addLogLines(logs.lines)
       }
   )


export default {
   fetch: app.fetch
}
// build-buddy.ts
import { DurableObject } from 'cloudflare:workers'


export class BuildBuddy extends DurableObject {
   compute: WorkersBuildsCompute


   constructor(ctx: DurableObjectState, env: Bindings) {
       super(ctx, env)
       this.compute = new ComputeClient({
           // ...
       })
   }


   // The Scheduler DO calls startBuild upon creating a BuildBuddy instance
   startBuild(build: Build): void {
       this.startBuildAsync(build)
   }


   async startBuildAsync(build: Build): Promise<void> {
       // fetch all necessary metadata build, including
	// environment variables, secrets, build tokens, repo credentials,
// build image URI, etc
	// ...


	// start a containerized build
       const computeBuild = await this.compute.createBuild({
           // ...
       })
   }


   // The Build Management worker calls handleStatusUpdate when it receives an update
   // from the containerized build
   async handleStatusUpdate(
       build: Build,
       buildStatusUpdatePayload: Payload
   ): Promise<void> {
// Write status updates to the database
   }


   // The Build Management worker calls addLogLines when it receives flushed logs
   // from the containerized build
   async addLogLines(logs: LogLines): Promise<void> {
       // Generate nextLogsKey to store logs under
       this.ctx.storage.put(nextLogsKey, logs)
   }


   // The Client Worker can call methods on a Build Buddy via RPC, using a service binding to the Build Management Worker.
   // The getLogs method retrieves logs for the user, and the cancelBuild method forwards a request from the user to terminate a build.
   async getLogs(cursor: string){
       const decodedCursor = cursor !== undefined ? decodeLogsCursor(cursor) : undefined
       return await this.getLogs(decodedCursor)
   }


   async cancelBuild(compute_id: string, build_id: string): void{
      await this.terminateBuild(build_id, compute_id)
   }


   async terminateBuild(build_id: number, compute_id: string): Promise<void> {
       await this.compute.stopBuild(compute_id)
   }
}


   export function getBuildBuddy(
   env: Pick<Bindings, 'BUILD_BUDDY'>,
   build_id: number
): DurableObjectStub<BuildBuddy> {
   const id = env.BUILD_BUDDY.idFromName(build_id.toString())
   return env.BUILD_BUDDY.get(id)
}
Alarms
We utilize alarms in the Build Buddy to check that a build has a healthy startup and to terminate any builds that run longer than 20 minutes.
How else have we leveraged the Developer Platform?
Now that we’ve gone over the core behavior of the Workers Builds control plane, we’d like to detail a few other features of the Workers platform that we use to improve performance, monitor system health, and troubleshoot customer issues.
Smart Placement and location hints
While our control plane is distributed in the sense that it can be run across multiple datacenters, to reduce latency costs, we want most requests to be served from locations close to our primary database in the western US.
While a build is running, Build Buddy, a Durable Object, is continuously writing status updates to our database. For the Client and the Build Management API Workers, we enabled Smart Placement with location hints to ensure requests run close to the database.
This graph shows the reduction in round trip time (RTT) observed for our Worker with Smart Placement turned on.
Workers Logs
We needed a logging tool that allows us to aggregate and search across persistent operational logs from our Workers to assist with identifying and troubleshooting issues. We worked with the Workers Observability team to become early adopters of Workers Logs.
Workers Logs worked out of the box, giving us fast and easy to use logs directly within the Cloudflare dashboard. To improve our ability to search logs, we created a tagging library that allows us to easily add metadata like the git tag of the deployed worker that the log comes from, allowing us to filter logs by release.
See a shortened example below for how we handle and log errors on the Client Worker.
// client-worker-app.ts
// The Client Worker is a RESTful API built with Hono
const app = new Hono<HonoContext>()
   // This is from the workers-tagged-logger library - first we register the logger
   .use(useWorkersLogger('client-worker-app'))
   // If any error happens during execution, this middleware will ensure we log the error
   .onError(useOnError)
   // routes
   .get(
       '/apiv4/builds',
       async (c) => {
           const { ids } = c.req.query()
           return await getBuildsByIds(c, ids)
       }
   )


function useOnError(e: Error, c: Context<HonoContext>): Response {
   // Set the project identifier n the error
   logger.setTags({ release: c.env.GIT_TAG })

   // Write a log at level 'error'. Can also log 'info', 'log', 'warn', and 'debug'
   logger.error(e)
   return c.json(internal_error.toJSON(), internal_error.statusCode)
}
This setup can lead to the following sample log message from our Workers Log dashboard. You can see the release tag is set on the log.
We can get a better sense of the impact of the error by adding filters to the Workers Logs view, as shown below. We are able to filter on any of the fields since we’re logging with structured JSON.
R2
Coming soon to Workers Builds is build caching, used to store artifacts of a build for subsequent builds to reuse, such as package dependencies and build outputs. Build caching can speed up customer builds by avoiding the need to redownload dependencies from NPM or to rebuild projects from scratch. The cache itself will be backed by R2 storage.
Testing
We were able to build up a great testing story using Vitest and workerd — unit tests, cross-worker integration tests, the works. In the example below, we make use of the runInDurableObject stub from cloudflare:test to test instance methods on the Scheduler DO directly.
// scheduler.spec.ts
import { env, runInDurableObject } from 'cloudflare:test'
import { expect, test } from 'vitest'
import { BuildScheduler } from './scheduler'


test('getBuildsToSchedule() runs a queued build', async () => {
   // Our test harness creates a single build for our scheduler to pick up
   const { build } = await harness.createBuild()


   // We create a scheduler DO instance
   const id = env.BUILD_SCHEDULER.idFromName(crypto.randomUUID())
   const stub = env.BUILD_SCHEDULER.get(id)
   await runInDurableObject(stub, async (instance: BuildScheduler) => {
       expect(instance).toBeInstanceOf(BuildScheduler)


// We check that the scheduler picks up 1 build
       const builds = await instance.getBuildsToSchedule()
       expect(builds.length).toBe(1)

// We start the build, which should mark it as running
       await instance.scheduleBuilds(builds)
   })


   // Check that there are no more builds to schedule
   const queuedBuilds = ...
   expect(queuedBuilds.length).toBe(0)
})
We use SELF.fetch() from cloudflare:test to run integration tests on our Client Worker, as shown below. This integration test covers our Hono endpoint and database queries made by the Client Worker in retrieving the metadata of a build.
// builds_api.test.ts
import { env, SELF } from 'cloudflare:test'

it('correctly selects a single build', async () => {
   // Our test harness creates a randomized build to test with
   const { build } = await harness.createBuild()


   // We send a request to the Client Worker itself to fetch the build metadata
   const getBuild = await SELF.fetch(
       `https://example.com/builds/${build1.build_uuid}`,
       {
           method: 'GET',
           headers: new Headers({
               Authorization: `Bearer JWT`,
               'content-type': 'application/json',
           }),
       }
   )


   // We expect to receive a 200 response from our request and for the
   // build metadata returned to match that of the random build that we created
   expect(getBuild.status).toBe(200)
   const getBuildV4Resp = await getBuild.json()
   const buildResp = getBuildV4Resp.result
   expect(buildResp).toBeTruthy()
   expect(buildResp).toEqual(build)
})
These tests run on the same runtime that Workers run on in production, meaning we have greater confidence that any code changes will behave as expected when they go live.
Analytics
We use the technology underlying the Workers Analytics Engine to collect all of the metrics for our system. We set up Grafana dashboards to display these metrics.
JavaScript-native RPC
JavaScript-native RPC was added to Workers in April of 2024, and it’s pretty magical. In the scheduler code example above, we call startBuild() on the BuildBuddy DO from the Scheduler DO. Without RPC, we would need to stand up routes on the BuildBuddy fetch() handler for the Scheduler to trigger with a fetch request. With RPC, there is almost no boilerplate — all we need to do is call a method on a class.
const bb = getBuildBuddy(this.env, build.build_id)


// Starting a build without RPC 😢
await bb.fetch('http://do/api/start_build', {
    method: 'POST',
    body: JSON.stringify(build),
})


// Starting a build with RPC 😸
await bb.startBuild(build)
Conclusion
By using Workers and Durable Objects, we were able to build a complex and distributed system that is easy to understand and is easily scalable.
It’s been a blast for our team to build on top of the very platform that we work on, something that would have been much harder to achieve on Workers just a few years ago. We believe in being Customer Zero for our own products — to identify pain points firsthand and to continuously improve the developer experience by applying them to our own use cases. It was fulfilling to have our needs as developers met by other teams and then see those tools quickly become available to the rest of the world — we were collaborators and internal testers for Workers Logs and private network support for Hyperdrive (both released on Birthday Week), and the soon to be released container platform.
Opportunities to build complex applications on the Developer Platform have increased in recent years as the platform has matured and expanded product offerings for more use cases. We hope that Workers Builds will be yet another tool in the Workers toolbox that enables developers to spend less time thinking about configuration and more time writing code.
Want to try it out? Check out the docs to learn more about how to deploy your first project with Workers Builds.
When Baselime joined Cloudflare in April 2024, our architecture had evolved to hundreds of AWS Lambda functions, dozens of databases, and just as many queues. We were drowning in complexity and our cloud costs were growing fast. We are now building Baselime and Workers Observability on Cloudflare and will save over 80% on our cloud compute bill. The estimated potential Cloudflare costs are for Baselime, which remains a stand-alone offering, and the estimate is based on the Workers Paid plan. Not only did we achieve huge cost savings, we also simplified our architecture and improved overall latency, scalability, and reliability.
Daily Cost
Before (AWS)
After (Cloudflare)
Compute
$650 – AWS Lambda
$25 – Cloudflare Workers
CDN
$140 – Cloudfront
$0 – Free
Data Stream + Analytics database
$1,150 – Kinesis Data Stream + EC2
$300 – Workers Analytics Engine
Total
$1,940
$325 (83% cost reduction)
Table 1: Daily Costs Comparison ($USD)
When we joined Cloudflare, we immediately saw a surge in usage, and within the first week following the announcement, we were processing over a billion events daily and our weekly active users tripled.
As the platform grew, so did the challenges of managing real-time observability with new scalability, reliability, and cost considerations. This drove us to rebuild Baselime on the Cloudflare Developer Platform, where we could innovate quickly while reducing operational overhead.
Initial architecture — all on AWS
Our initial architecture was all on Amazon Web Services (AWS). We’ll focus here on the data pipeline, which covers ingestion, processing, and storage of tens of billions of events daily.
This pipeline was built on top of AWS Lambda, Cloudfront, Kinesis, EC2, DynamoDB, ECS, and ElastiCache.
Figure1: Initial data pipeline architecture
The key elements are:
Data receptors: Responsible for receiving telemetry data from multiple sources, including OpenTelemetry, Cloudflare Logpush, CloudWatch, Vercel, etc. They cover validation, authentication, and transforming data from each source into a common internal format. The data receptors were deployed either on AWS Lambda (using function URLs and Cloudfront) or ECS Fargate depending on the data source.
Kinesis Data Stream: Responsible for transporting the data from the receptors to the next step: data processing.
Processor: A single AWS Lambda function responsible for enriching and transforming the data for storage. It also performed real-time error tracking and detecting patterns in logs.
ClickHouse cluster: All the telemetry data was ultimately indexed and stored in a self-hosted ClickHouse cluster on EC2.
In addition to these key elements, the existing stack also included orchestration with Firehose, S3 buckets, SQS, DynamoDB and RDS for error handling, retries, and storing metadata.
While this architecture served us well in the early days, it started to show major cracks as we scaled our solution to more and larger customers.
Handling retries at the interface between the data receptors and the Kinesis Data Stream was complex, requiring introducing and orchestrating Firehose, S3 buckets, SQS, and another Lambda function.
Self-hosting ClickHouse also introduced major challenges at scale, as we continuously had to plan our capacity and update our setup to keep pace with our growing user base whilst attempting to maintain control over costs.
Costs began scaling unpredictably with our growing workloads, especially in AWS Lambda, Kinesis, and EC2, but also in less obvious ways, such as in Cloudfront (required for a custom domain in front of Lambda function URLs) and DynamoDB. Specifically, the time spent on I/O operations in AWS Lambda was a particularly costly piece. At every step, from the data receptors to the ClickHouse cluster, moving data to the next stage required waiting for a network request to complete, accounting for over 70% of wall time in the Lambda function.
In a nutshell, we were continuously paged by our alerts, innovating at a slower pace, and our costs were out of control.
Additionally, the entire solution was deployed in a single AWS region: eu-west-1. As a result, all developers located outside continental Europe were experiencing high latency when emitting logs and traces to Baselime.
Modern architecture — transitioning to Cloudflare
The shift to the Cloudflare Developer Platform enabled us to rethink our architecture to be exceptionally fast, globally distributed, and highly scalable, without compromising on cost, complexity, or agility. This new architecture is built on top of Cloudflare primitives.
Figure 2: Modern data pipeline architecture
Cloudflare Workers: the core of Baselime
Cloudflare Workers are now at the core of everything we do. All the data receptors and the processor run in Workers. Workers minimize cold-start times and are deployed globally by default. As such, developers always experience lower latency when emitting events to Baselime.
Additionally, we heavily use JavaScript-native RPC for data transfer between steps of the pipeline. It’s low-latency, lightweight, and simplifies communication between components. This further simplifies our architecture, as separate components behave more as functions within the same process, rather than completely separate applications.
Code Block 1: Simplified data receptor using JavaScript-native RPC to execute the processor.
Workers also expose a Rate Limiting binding that enables us to automatically add rate limiting to our services, which we previously had to build ourselves using a combination of DynamoDB and ElastiCache.
Moreover, we heavily use ctx.waitUntil within our Worker invocations, to offload data transformation outside the request / response path. This further reduces the latency of calls developers make to our data receptors.
Durable Objects: stateful data processing
Durable Objects is a unique service within the Cloudflare Developer Platform, as it enables building stateful applications in a serverless environment. We use Durable Objects in the data pipelines for both real-time error tracking and detecting log patterns.
For instance, to track errors in real-time, we create a durable object for each new type of error, and this durable object is responsible for keeping track of the frequency of the error, when to notify customers, and the notification channels for the error. This implementation with a single building block removes the need for ElastiCache, Kinesis, and multiple Lambda functions to coordinate protecting the RDS database from being overwhelmed by a high frequency error.
Durable Objects gives us precise control over consistency and concurrency of managing state in the data pipeline.
In addition to the data pipeline, we use Durable Objects for alerting. Our previous architecture required orchestrating EventBridge Scheduler, SQS, DynamoDB and multiple AWS Lambda functions, whereas with Durable Objects, everything is handled within the alarm handler.
Workers Analytics Engine: high-cardinality analytics at scale
Though managing our own ClickHouse cluster was technically interesting and challenging, it took us away from building the best observability developer experience. With this migration, more of our time is spent enhancing our product and none is spent managing server instances.
Workers Analytics Engine lets us synchronously write events to a scalable high-cardinality analytics database. We built on top of the same technology that powers Workers Analytics Engine. We also made internal changes to Workers Analytics Engine to natively enable high dimensionality in addition to high cardinality.
Moreover, Workers Analytics Engine and our solution leverages Cloudflare’s ABR analytics. ABR stands for Adaptive Bit Rate, and enables us to store telemetry data in multiple tables with varying resolutions, from 100% to 0.0001% of the data. Querying the table with 0.0001% of the data will be several orders of magnitudes faster than the table with all the data, with a corresponding trade-off in accuracy. As such, when a query is sent to our systems, Workers Analytics Engine dynamically selects the most appropriate table to run the query, optimizing both query time and accuracy. Users always get the most accurate result with optimal query time, regardless of the size of their dataset or the timeframe of the query. Compared to our previous system, which was always running queries on the full dataset, the new system now delivers faster queries across our entire user base and use cases.
In addition to these core services (Workers, Durable Objects, Workers Analytics Engine), the new architecture leverages other building blocks from the Cloudflare Developer Platform. Queues for asynchronous messaging, decoupling services and enabling an event-driven architecture; D1 as our main database for transactional data (queries, alerts, dashboards, configurations, etc.); Workers KV for fast distributed storage; Hono for all our APIs, etc.
How did we migrate?
Baselime is built on an event-driven architecture, where every user action triggers an event. It operates on the principle that every user action is recorded as an event and emitted to the rest of the system — whether it’s creating a user, editing a dashboard, or performing any other action. Migrating to Cloudflare involved transitioning our event-driven architecture without compromising uptime and data consistency. Previously, this was powered by AWS EventBridge and SQS, and we moved entirely to Cloudflare Queues.
We followed the strangler fig pattern to incrementally migrate the solution from AWS to Cloudflare. It consists of gradually replacing specific parts of the system with newer services, with minimal disruption to the system. Early in the process, we created a central Cloudflare Queue which acted as the backbone for all transactional event processing during the migration. Every event, whether a new user signup or a dashboard edit, was funneled into this Queue. From there, events were dynamically routed, each event to the relevant part of the application. User actions were synced into D1 and KV, ensuring that all user actions were mirrored across both AWS and Cloudflare during the transition.
This syncing mechanism enabled us to maintain consistency and ensure that no data was lost as users continued to interact with Baselime.
Here’s an example of how events are processed:
export default {
  async queue(batch, env) {
    for (const message of batch.messages) {
      try {
        const event = message.body;
        switch (event.type) {
          case "WORKSPACE_CREATED":
            await workspaceHandler.create(env, event.data);
            break;
          case "QUERY_CREATED":
            await queryHandler.create(env, event.data);
            break;
          case "QUERY_DELETED":
            await queryHandler.remove(env, event.data);
            break;
          case "DASHBOARD_CREATED":
            await dashboardHandler.create(env, event.data);
            break;
          //
          // Many more events...
          //
          default:
            logger.info("Matched no events", { type: event.type });
        }
        message.ack();
      } catch (e) {
        if (message.attempts < 3) {
          message.retry({ delaySeconds: Math.ceil(30 ** message.attempts / 10), });
        } else {
          logger.error("Failed handling event - No more retrys", { event: message.body, attempts: message.attempts }, e);
        }
      }
    }
  },
} satisfies ExportedHandler<Env, InternalEvent>;
Code Block 2: Simplified internal events processing during migration.
We migrated the data pipeline from AWS to Cloudflare with an outside-in method: we started with the data receptors and incrementally moved the data processor and the ClickHouse cluster to the new architecture. We began writing telemetry data (logs, metrics, traces, wide-events, etc.) to both ClickHouse (in AWS) and to Workers Analytics Engine simultaneously for the duration of the retention period (30 days).
The final step was rewriting all of our endpoints, previously hosted on AWS Lambda and ECS containers, into Cloudflare Workers. Once those Workers were ready, we simply switched the DNS records to point to the Workers instead of the existing Lambda functions.
Despite the complexity, the entire migration process, from the data pipeline to all re-writing API endpoints, took our then team of 3 engineers less than three months.
We ended up saving over 80% on our cloud bill
Savings on the data receptors
After switching the data receptors from AWS to Cloudflare in early June 2024, our AWS Lambda cost was reduced by over 85%. These costs were primarily driven by I/O time the receptors spent sending data to a Kinesis Data Stream in the same region.
Figure 4: Baselime daily AWS Lambda cost [note: the gap in data is the result of AWS Cost Explorer losing data when the parent organization of the cloud accounts was changed.]
Moreover, we used Cloudfront to enable custom domains pointing to the data receptors. When we migrated the data receptors to Cloudflare, there was no need for Cloudfront anymore. As such, our Cloudfront cost was reduced to $0.
Figure 5: Baselime daily Cloudfront cost [note: the gap in data is the result of AWS Cost Explorer losing data when the parent organization of the cloud accounts was changed.]
If we were a regular Cloudflare customer, we estimate that our daily Cloudflare Workers bill would be around \$25 after the switch, against \$790 on AWS: over 95% cost reduction. These savings are primarily driven by the Workers pricing model, since Workers charge for CPU time, and the receptors are primarily just moving data, and as such, are mostly I/O bound.
Savings on the ClickHouse cluster
To evaluate the cost impact of switching from self-hosting ClickHouse to using Workers Analytics Engine, we need to take into account not only the EC2 instances, but also the disk space, networking, and the Kinesis Data Stream cost.
We completed this switch in late August, achieving over 95% cost reduction in both the Kinesis Data Stream and all EC2 related costs.
Figure 6: Baselime daily Kinesis Data Stream cost [note: the gap in data is the result of AWS Cost Explorer losing data when the parent organization of the cloud accounts was changed.]
Figure 7: Baselime daily EC2 cost [note: the gap in data is the result of AWS Cost Explorer losing data when the parent organization of the cloud accounts was changed.]
If we were a regular Cloudflare customer, we estimate that our daily Workers Analytics Engine cost would be around \$300 after the switch, compared to \$1150 on AWS, a cost reduction of over 70%.
Not only did we significantly reduce costs by migrating to Cloudflare, but we also improved performance across the board. Responses to users are now faster, with real-time event ingestion happening across Cloudflare’s network, closer to our users. Responses to users querying their data are also much faster, thanks to Cloudflare’s deep expertise in operating ClickHouse at scale.
Most importantly, we’re no longer bound by limitations in throughput or scale. We launched Workers Logs on September 26, 2024, and our system now handles a much higher volume of events than before, with no sacrifices in speed or reliability.
These cost savings are outstanding as is, and do not include the total cost of ownership of those systems. We significantly simplified our systems and our codebase, as the platform is taking care of more for us. We’re paged less, we spend less time monitoring infrastructure, and we can focus on delivering product improvements.
Conclusion
Migrating Baselime to Cloudflare has transformed how we build and scale our platform. With Workers, Durable Objects, Workers Analytics Engine, and other services, we now run a fully serverless, globally distributed system that’s more cost-efficient and agile. This shift has significantly reduced our operational overhead and enabled us to iterate faster, delivering better observability tooling to our users.
You can start observing your Cloudflare Workers today with Workers Logs. Looking ahead, we’re excited about the features we will deliver directly in the Cloudflare Dashboard, including real-time error tracking, alerting, and a query builder for high-cardinality and dimensionality events. All coming by early 2025.
The collective thoughts of the interwebz
Manage Consent
To provide the best experiences, we use technologies like cookies to store and/or access device information. Consenting to these technologies will allow us to process data such as browsing behavior or unique IDs on this site. Not consenting or withdrawing consent, may adversely affect certain features and functions.
Functional
Always active
The technical storage or access is strictly necessary for the legitimate purpose of enabling the use of a specific service explicitly requested by the subscriber or user, or for the sole purpose of carrying out the transmission of a communication over an electronic communications network.
Preferences
The technical storage or access is necessary for the legitimate purpose of storing preferences that are not requested by the subscriber or user.
Statistics
The technical storage or access that is used exclusively for statistical purposes.The technical storage or access that is used exclusively for anonymous statistical purposes. Without a subpoena, voluntary compliance on the part of your Internet Service Provider, or additional records from a third party, information stored or retrieved for this purpose alone cannot usually be used to identify you.
Marketing
The technical storage or access is required to create user profiles to send advertising, or to track the user on a website or across several websites for similar marketing purposes.
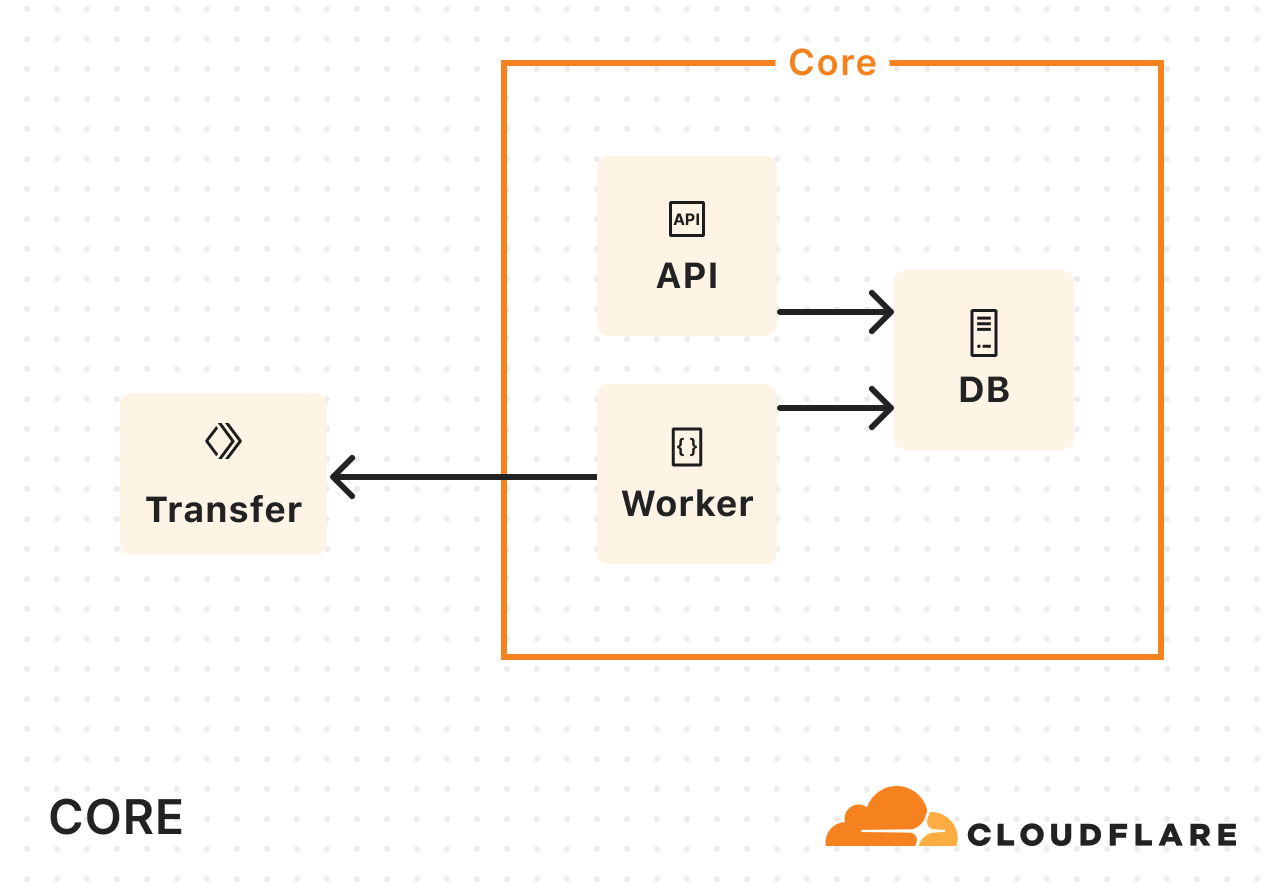
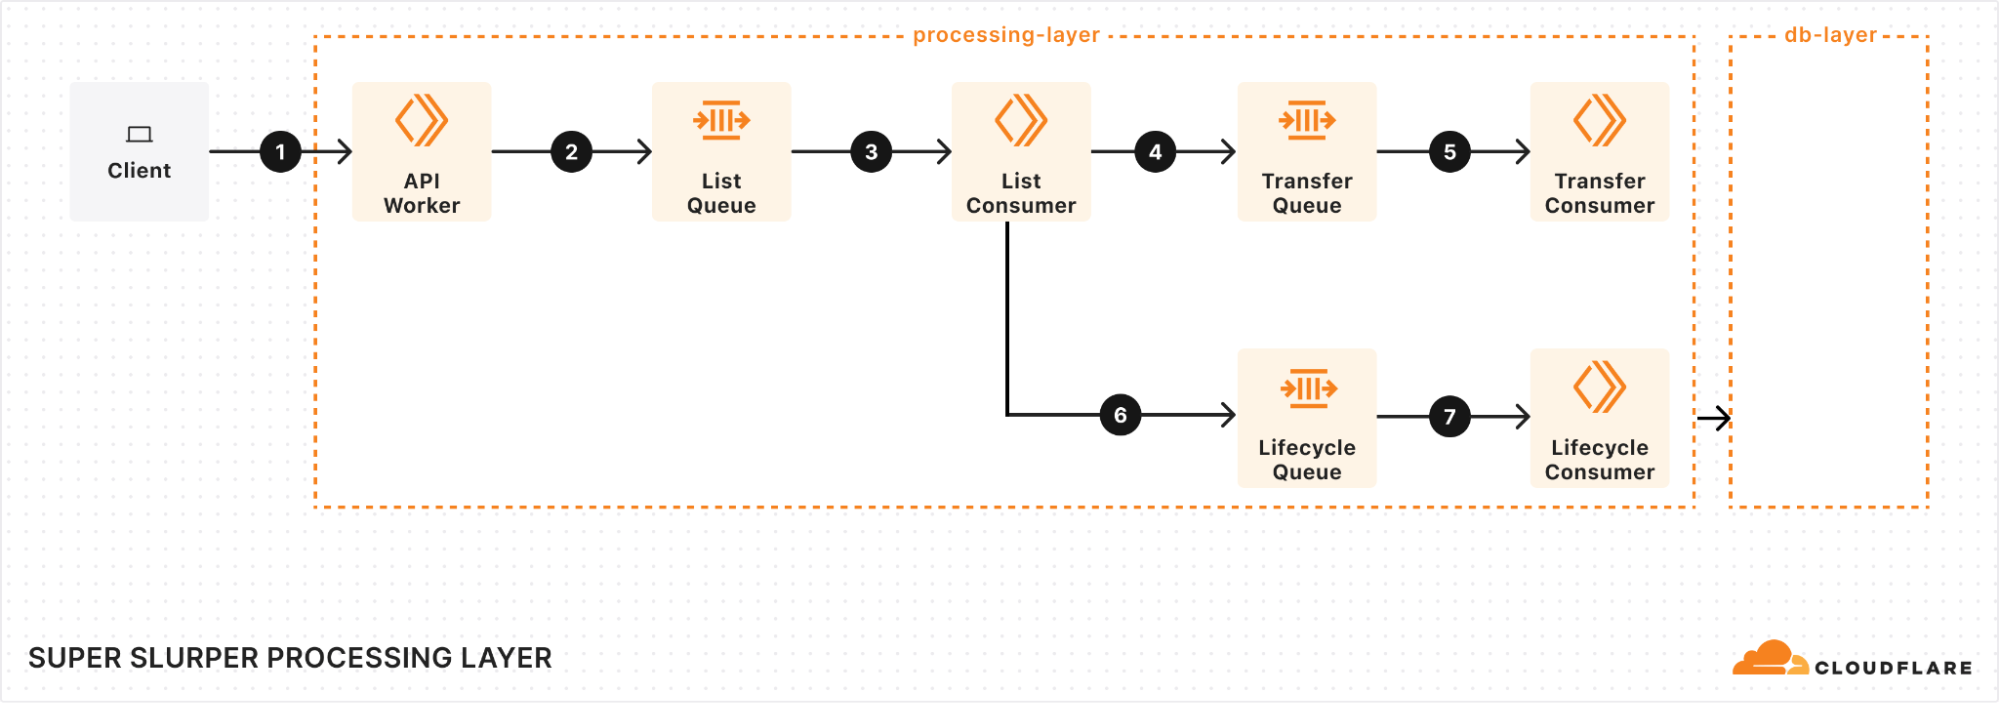
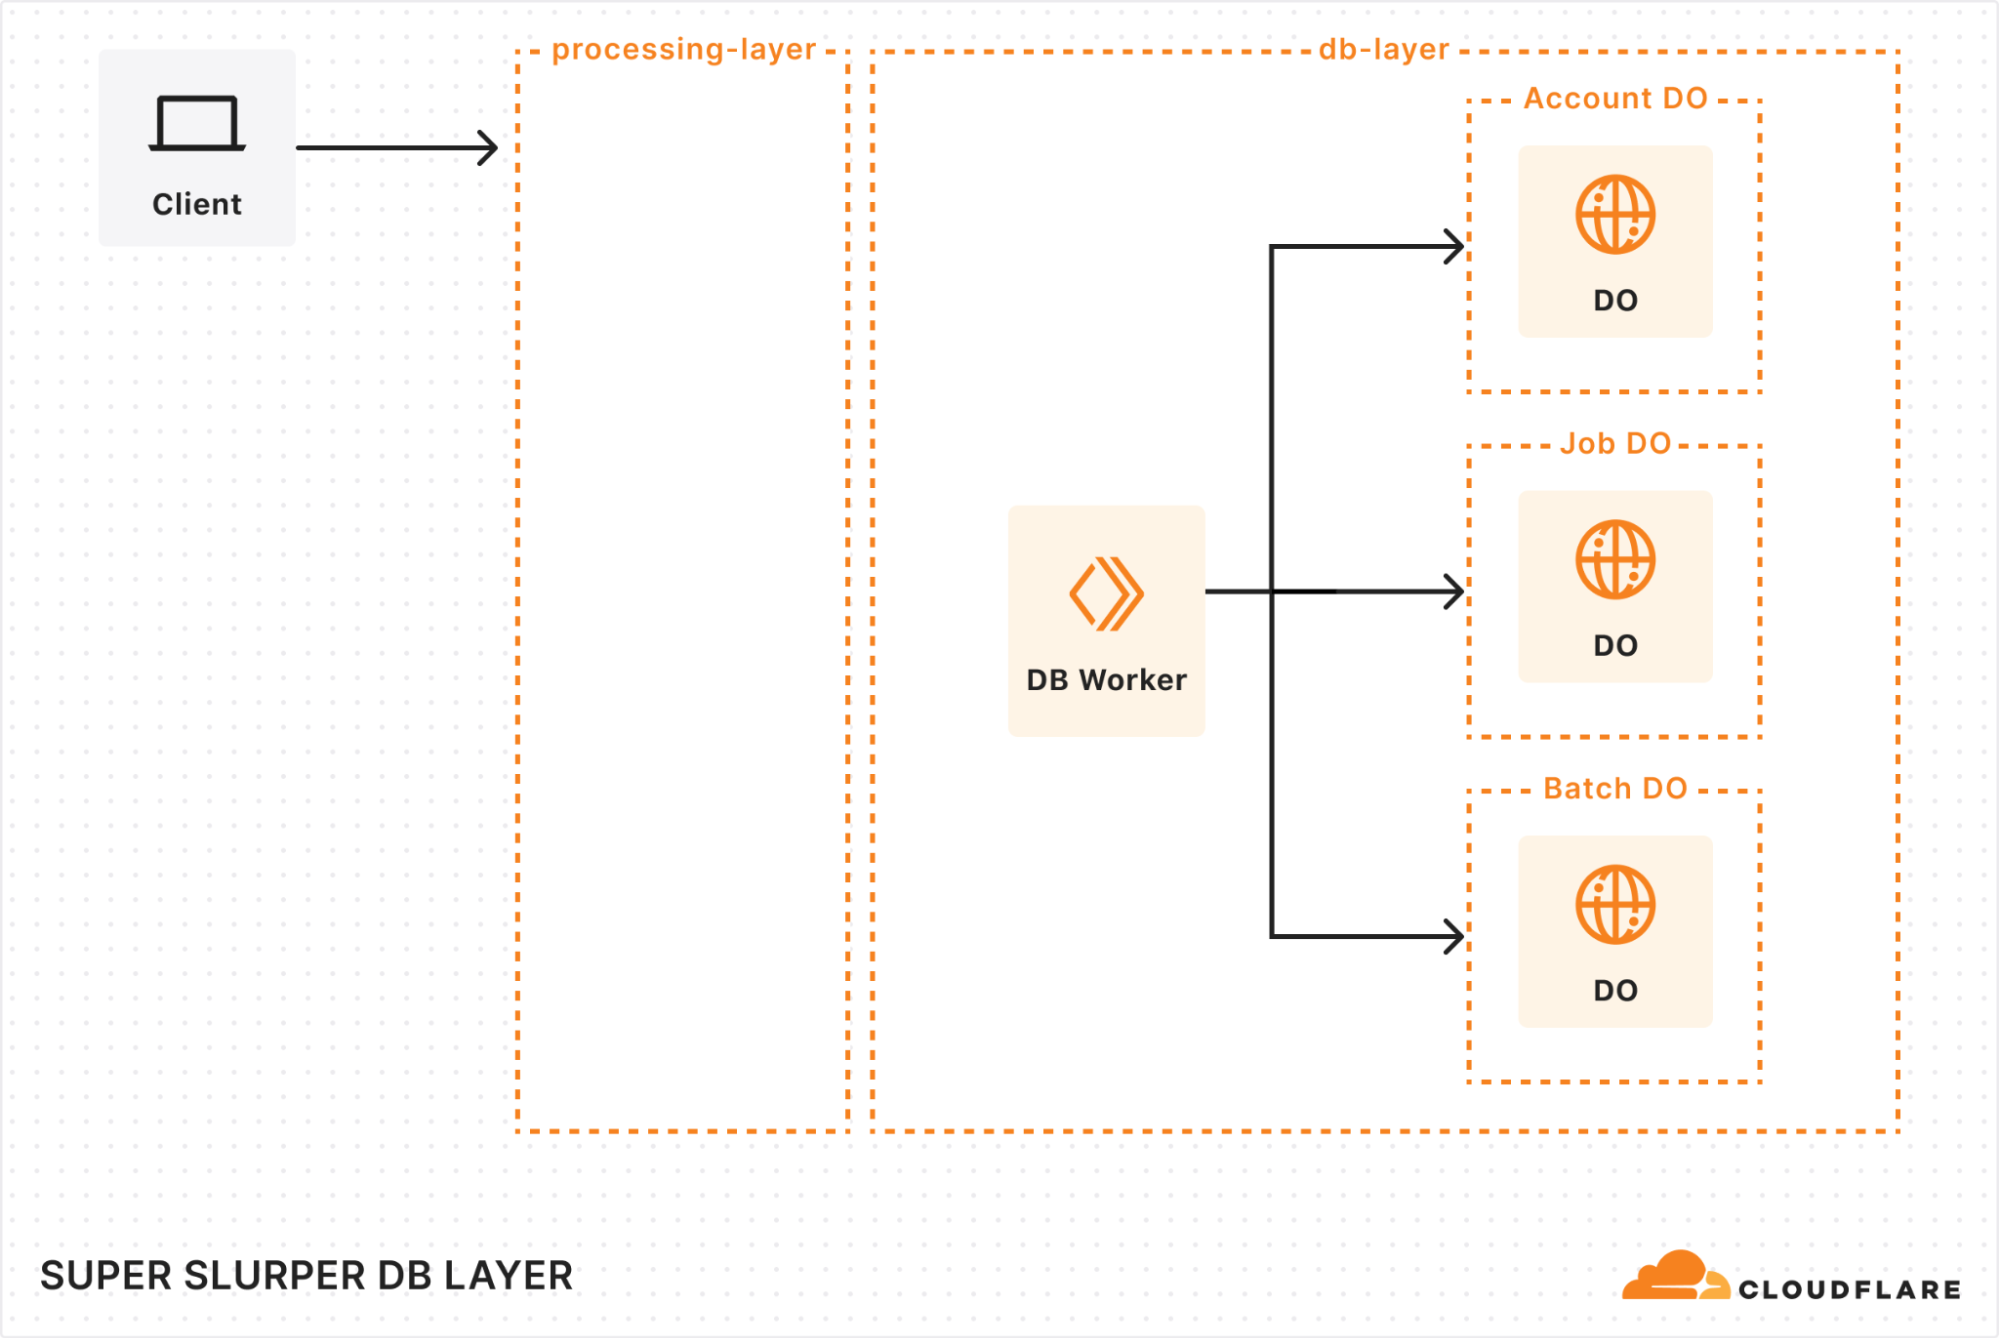
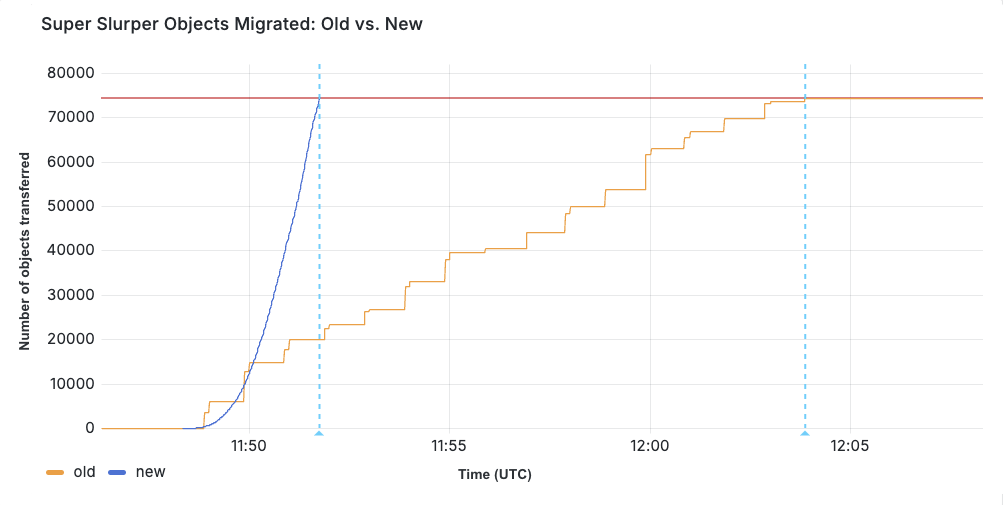

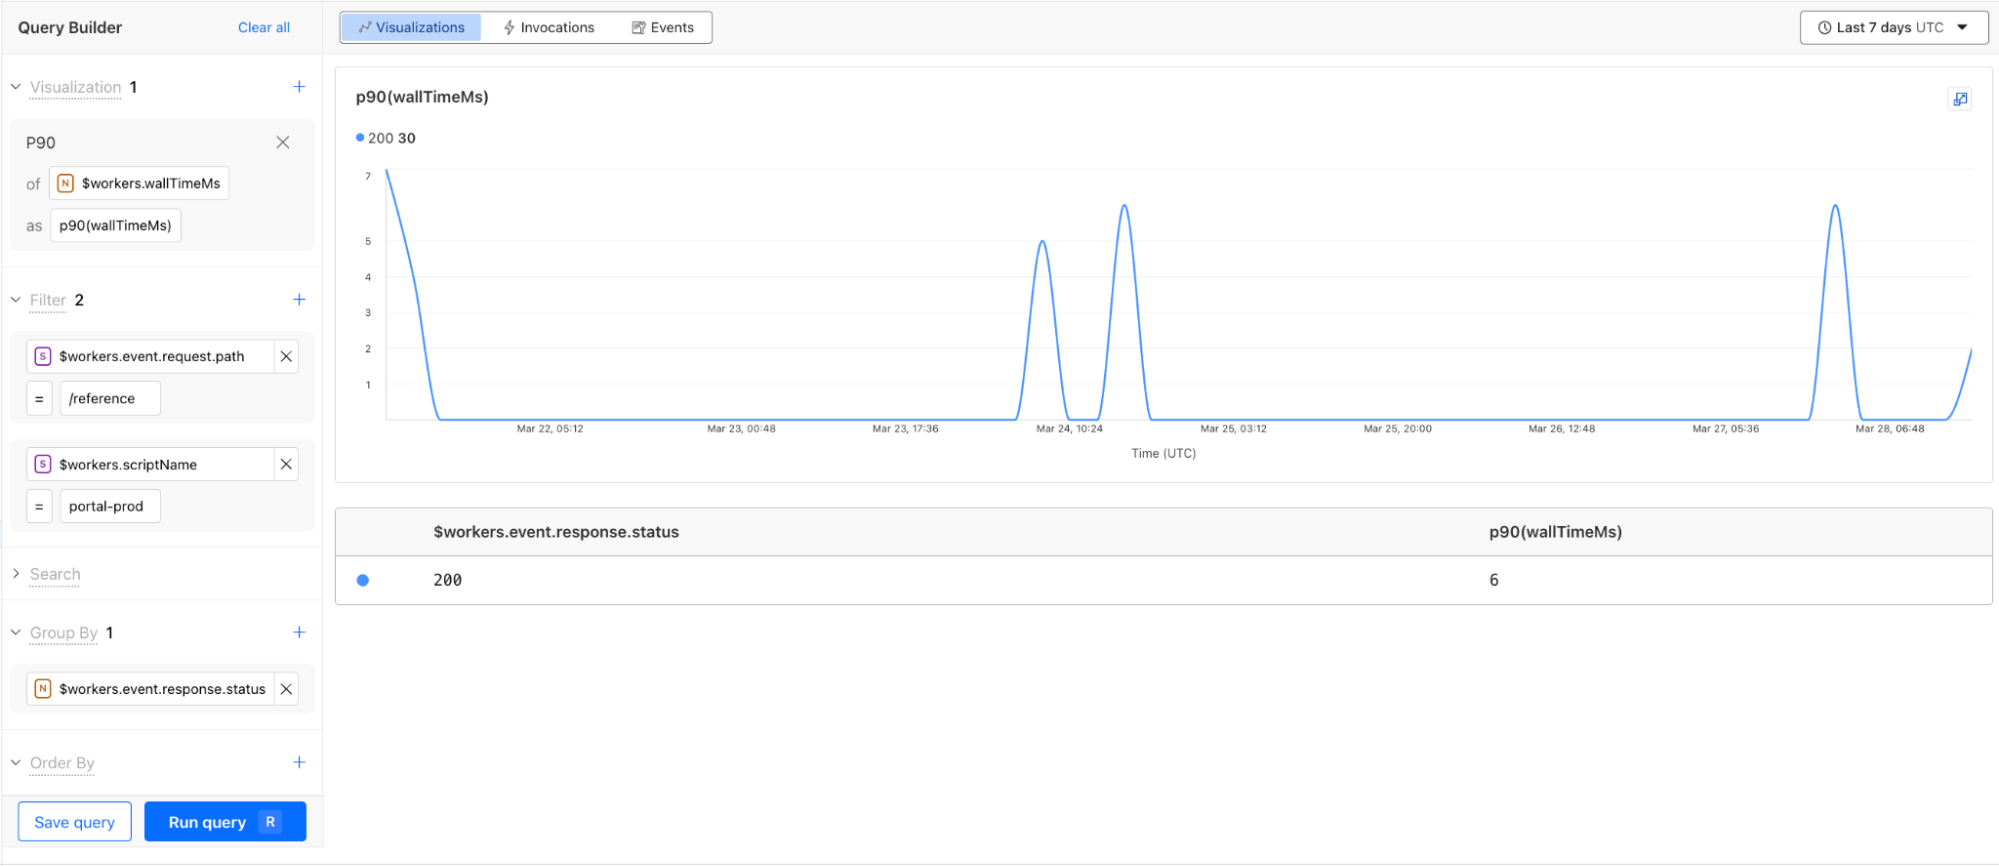
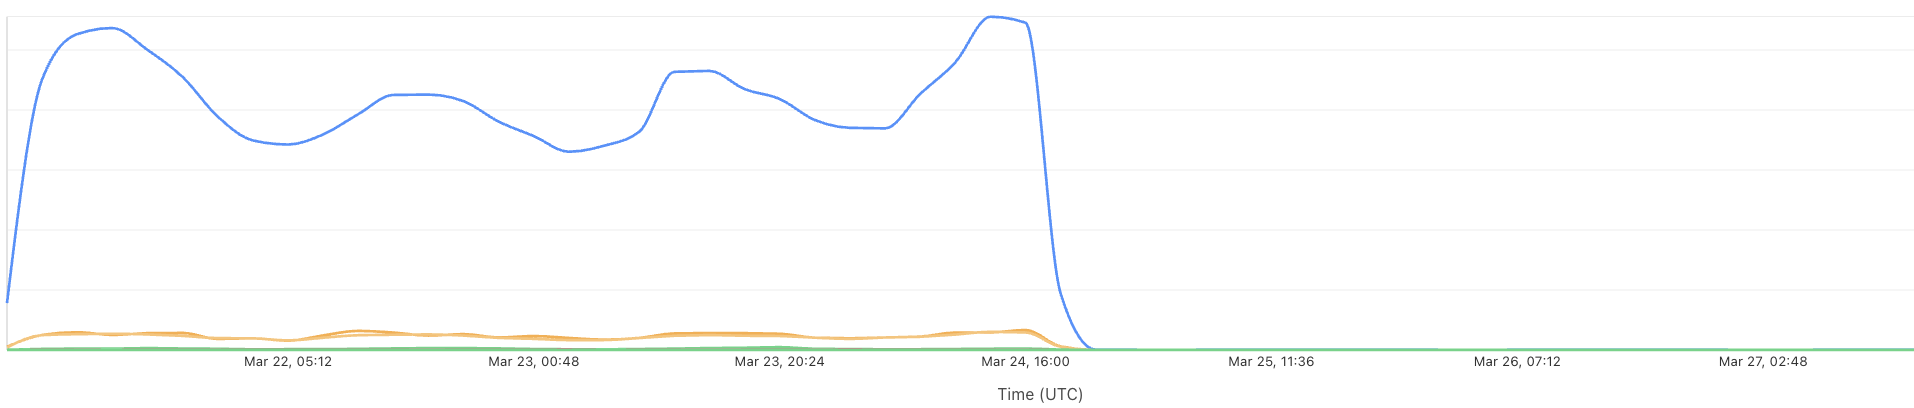
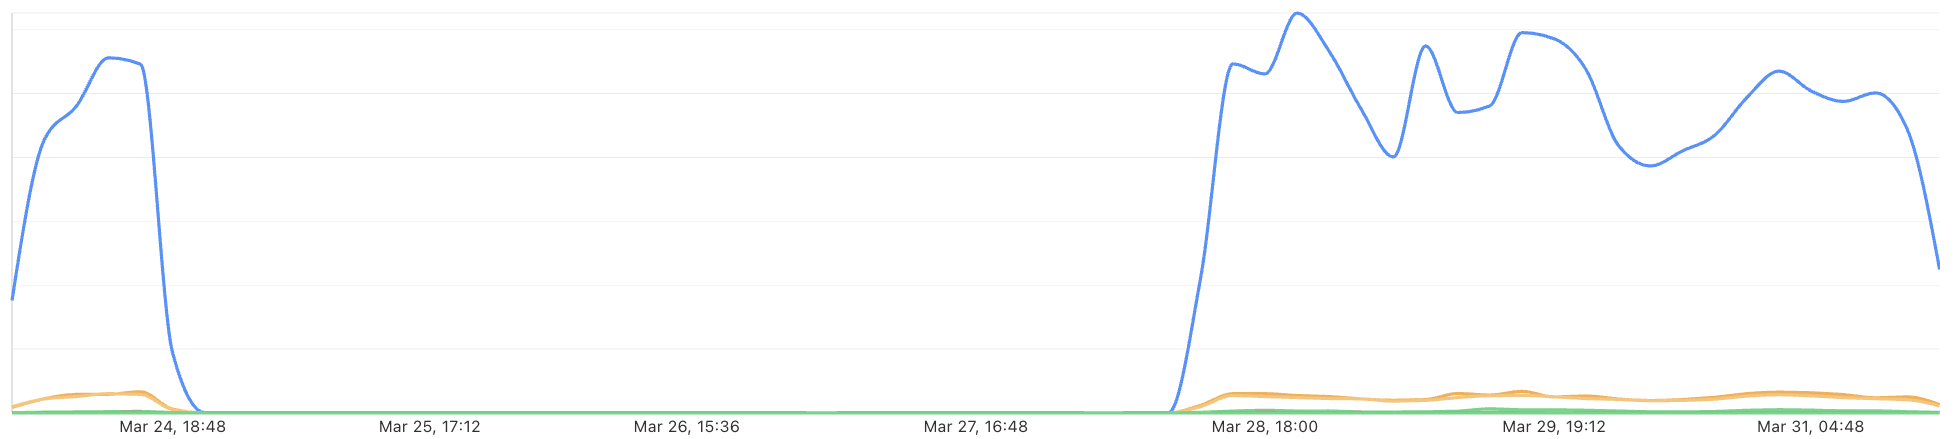

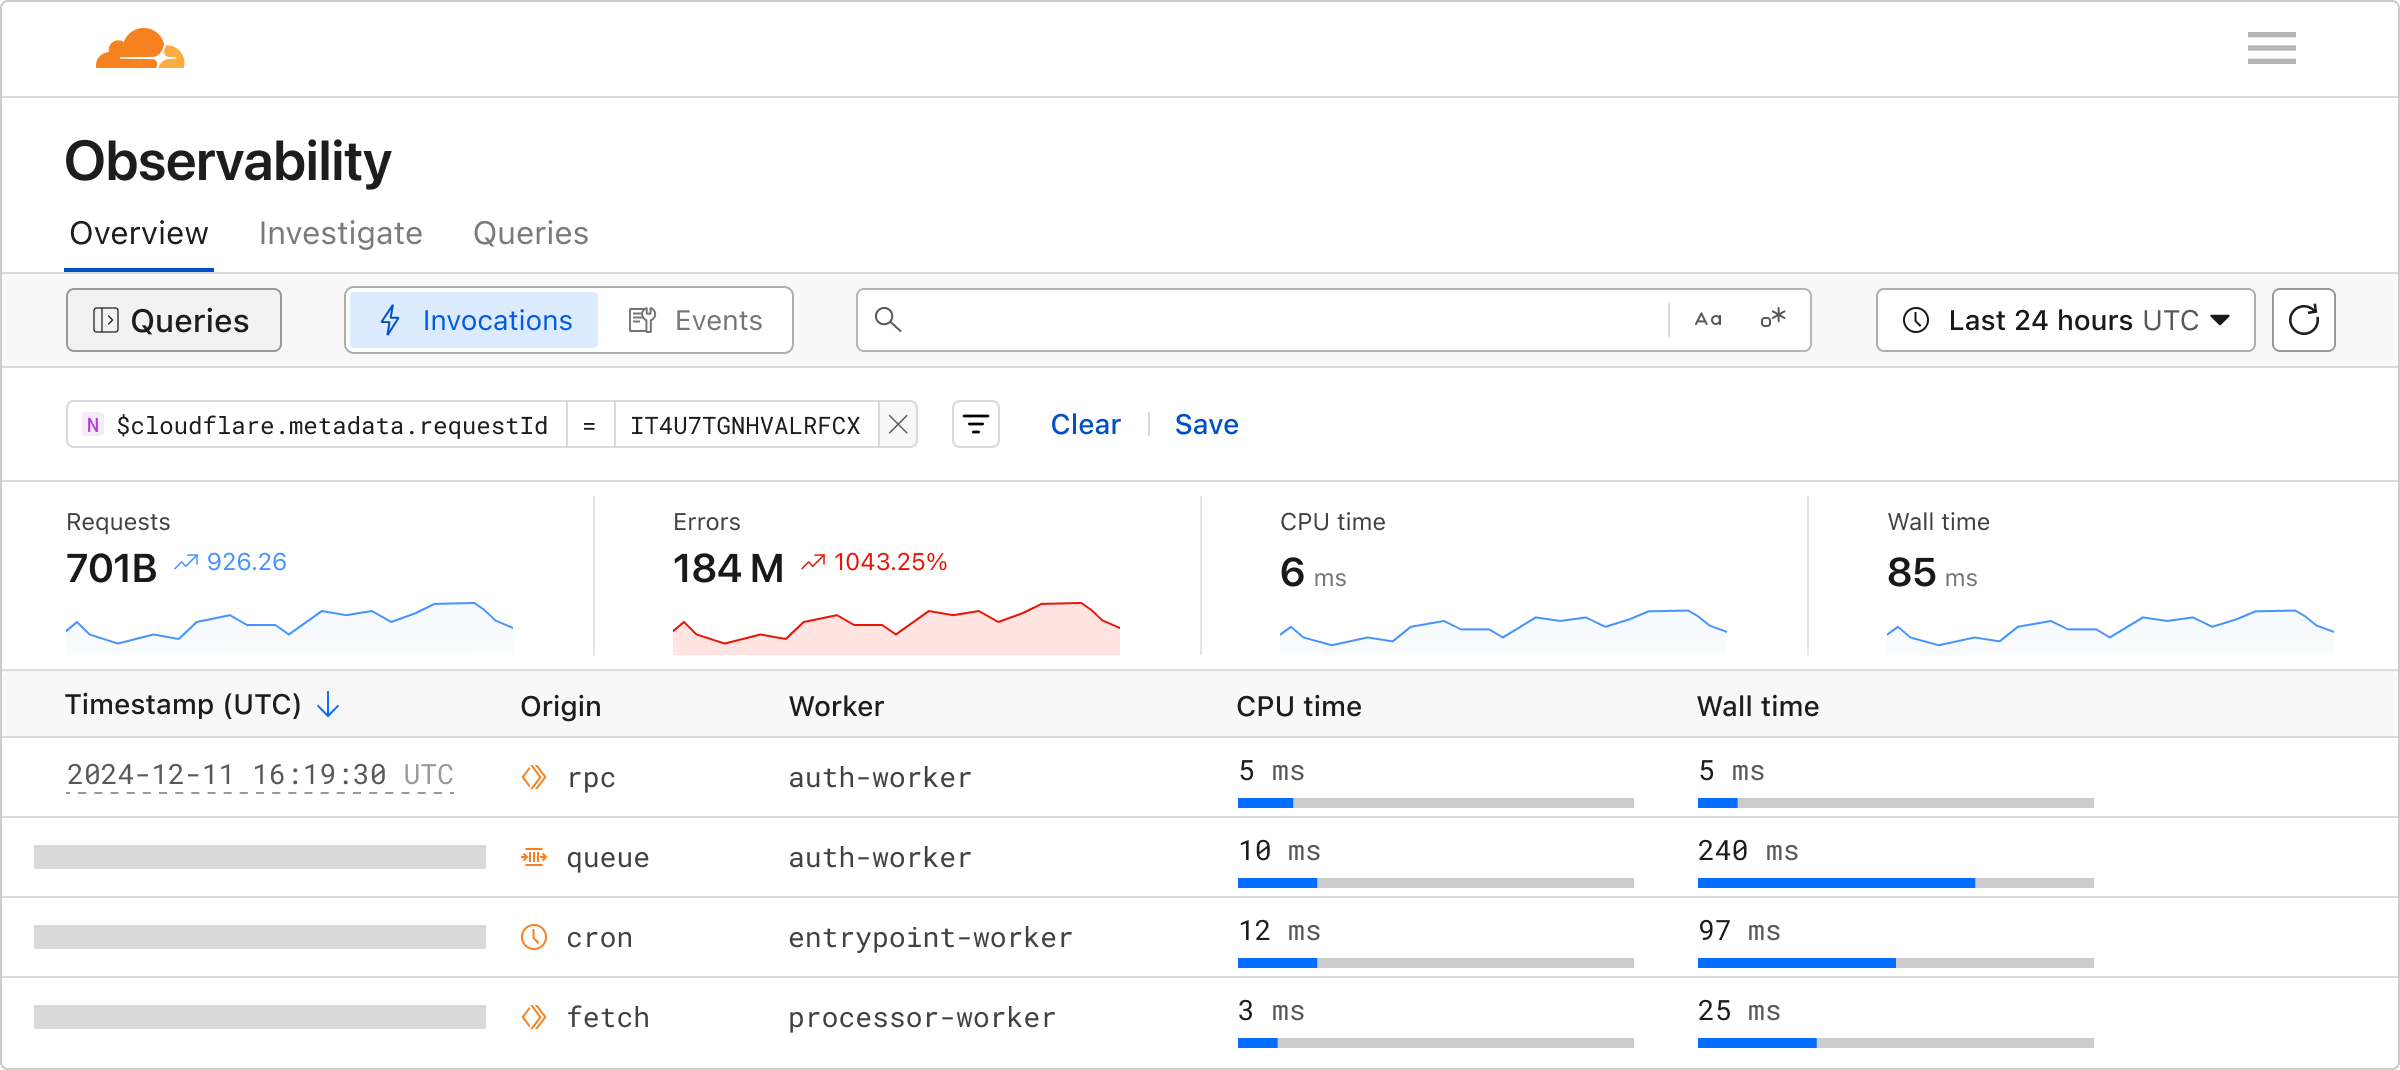
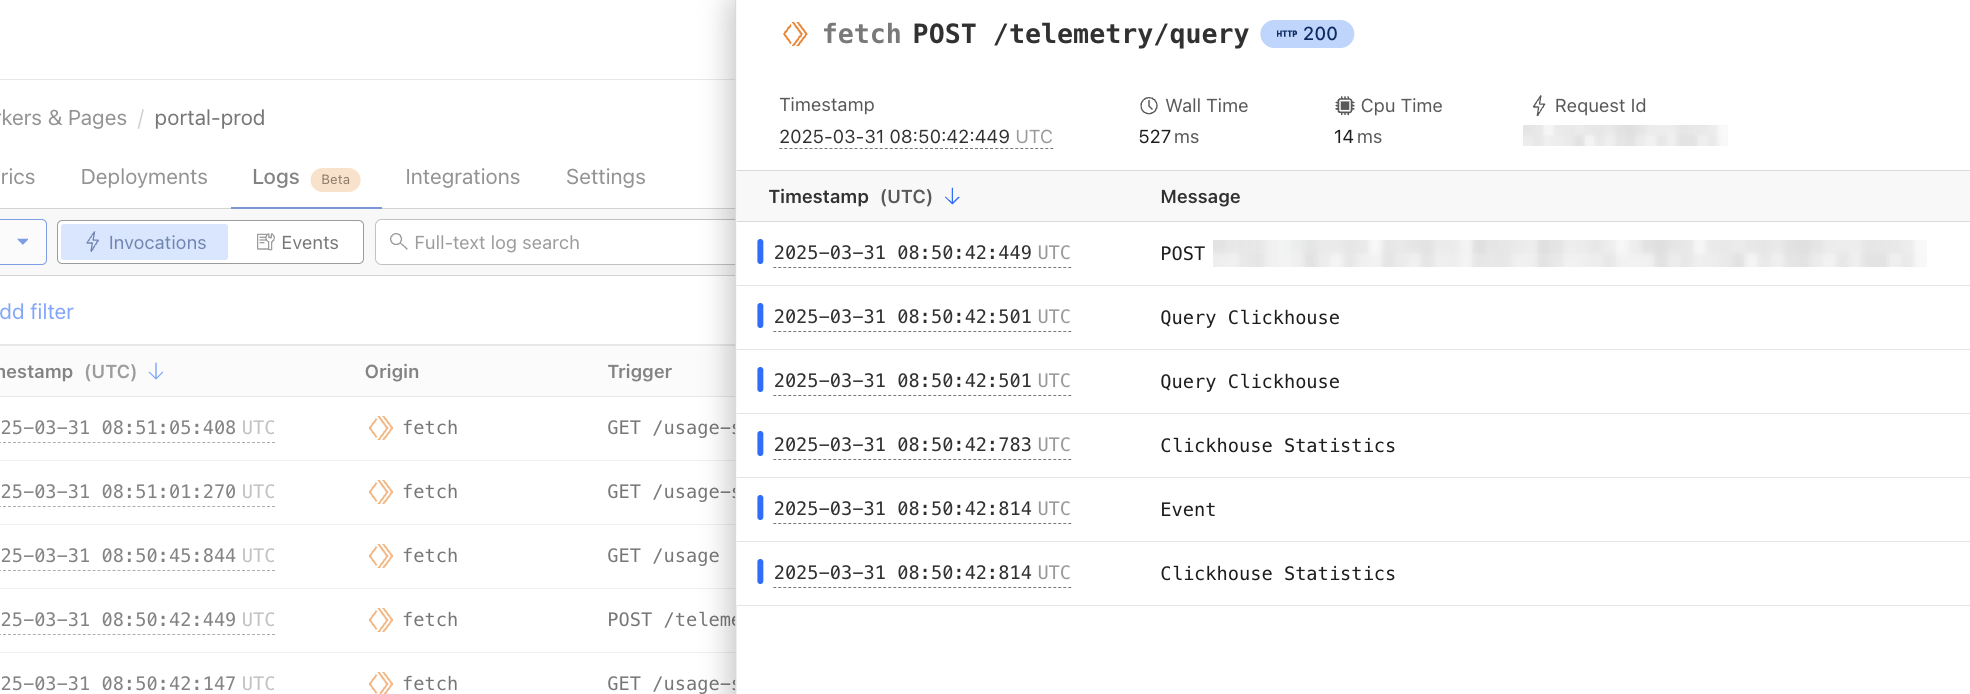


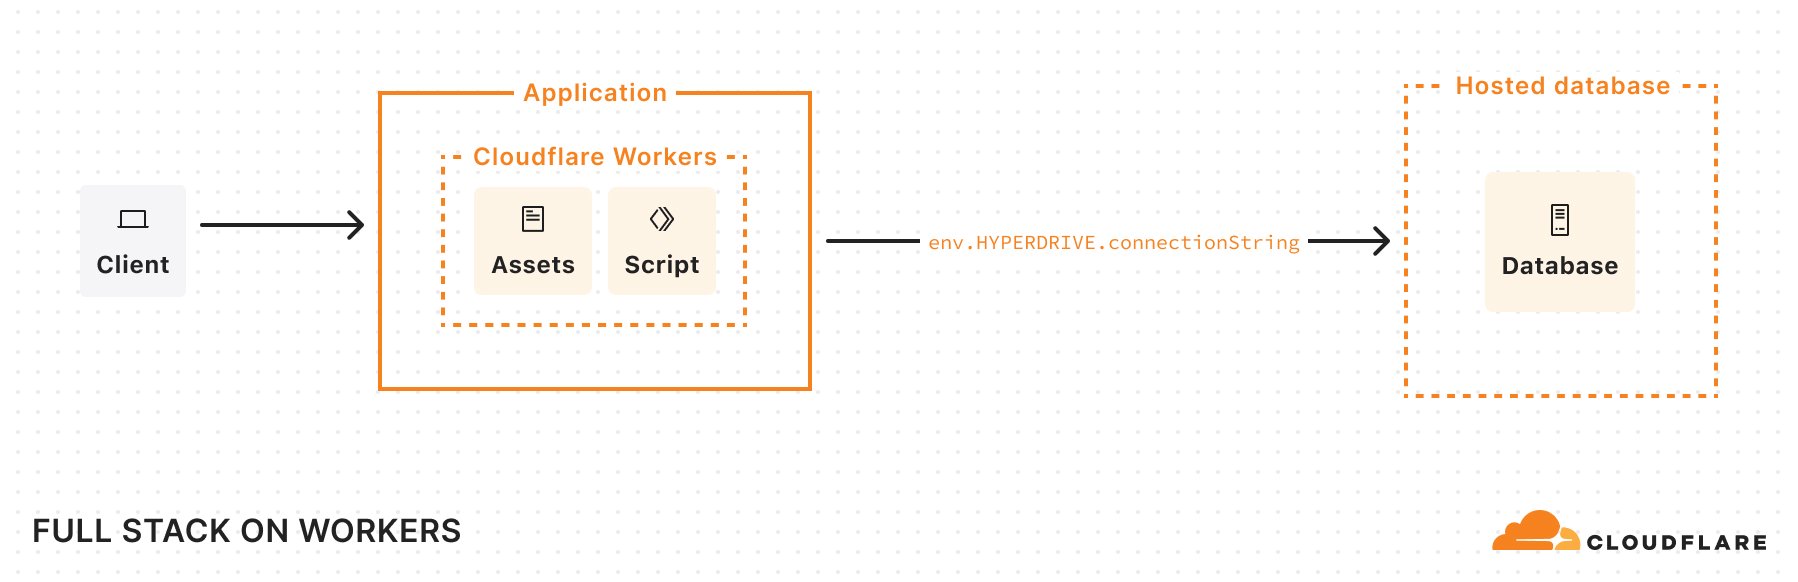
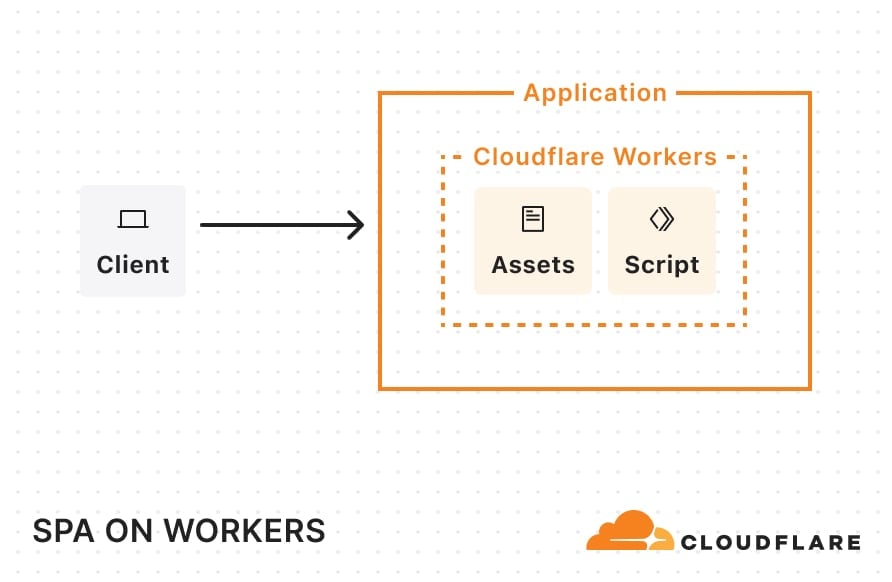
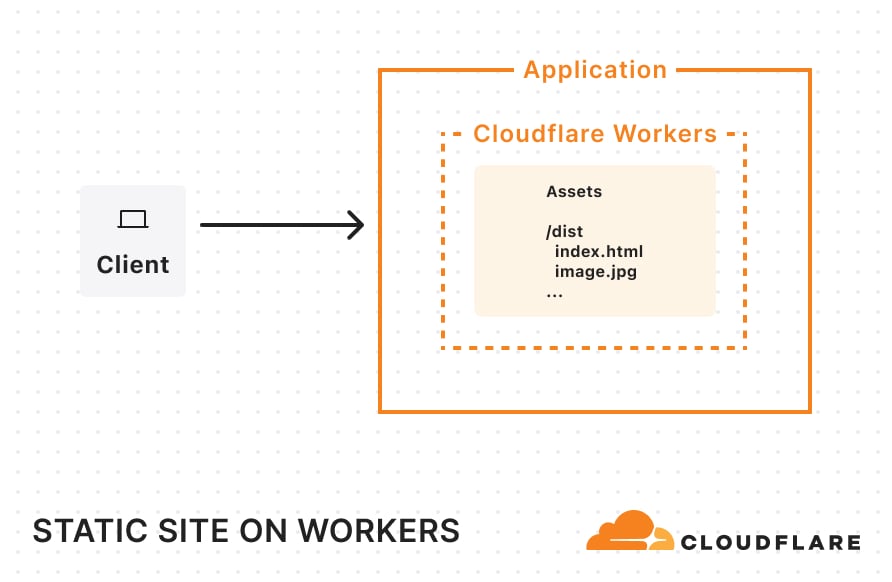
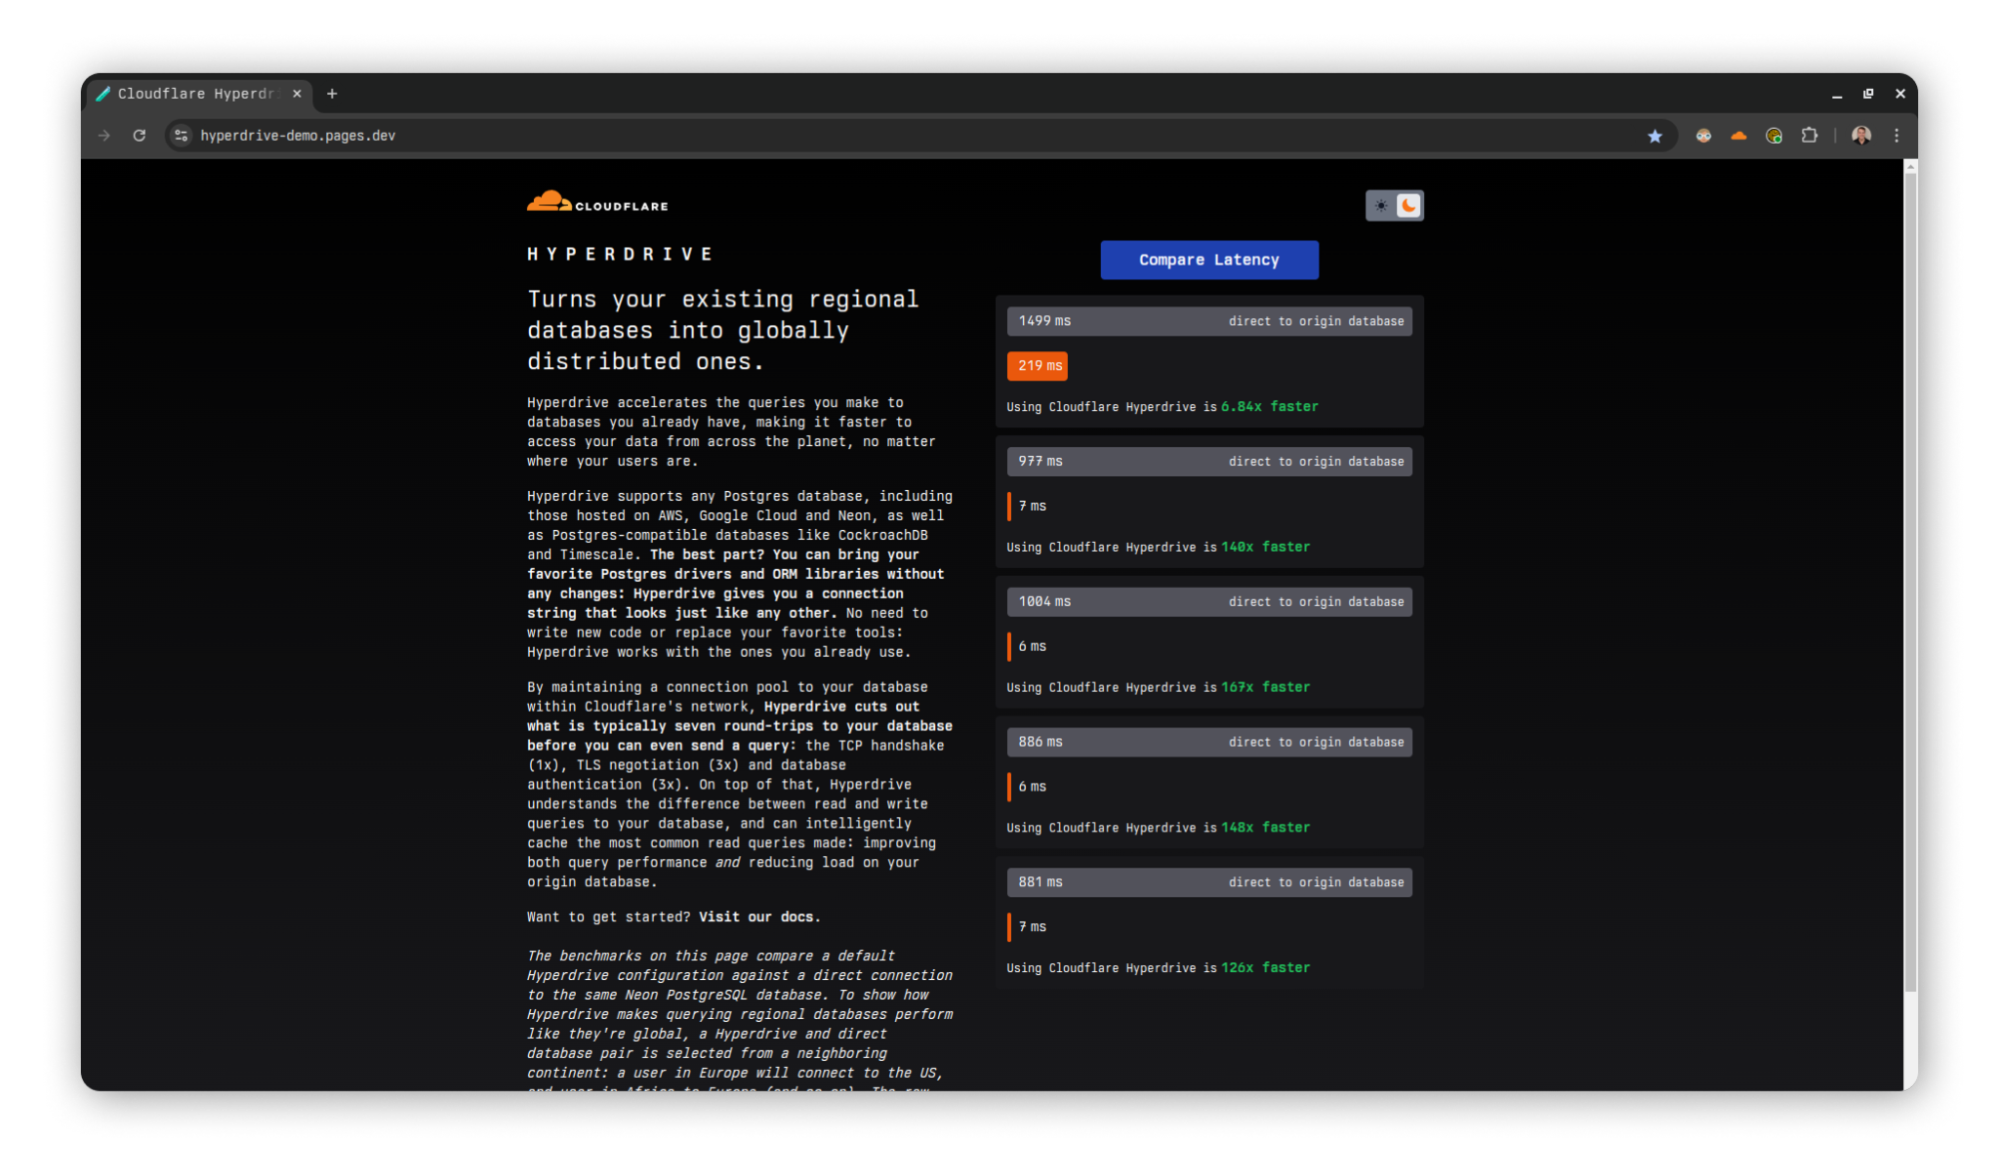
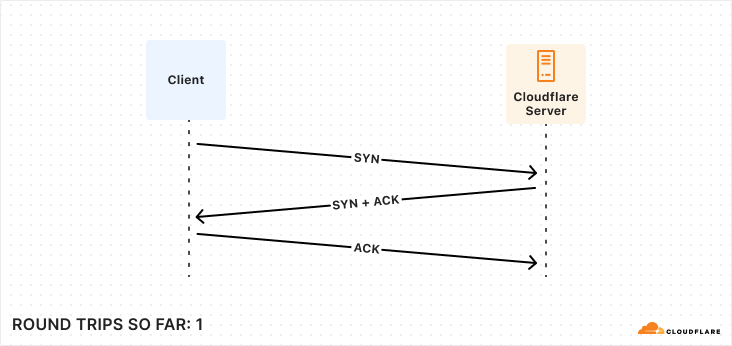
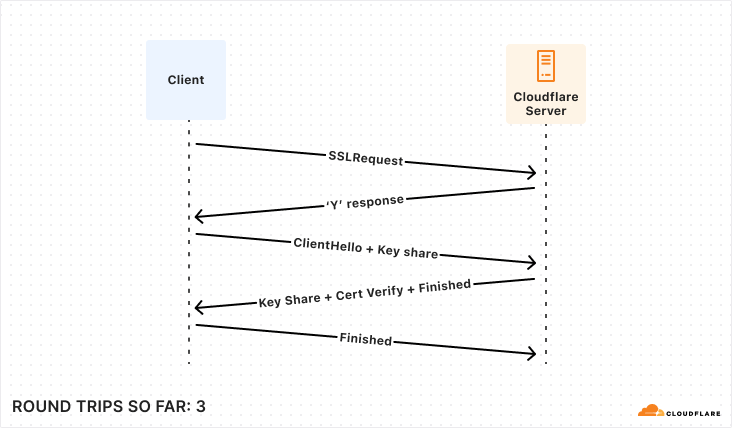
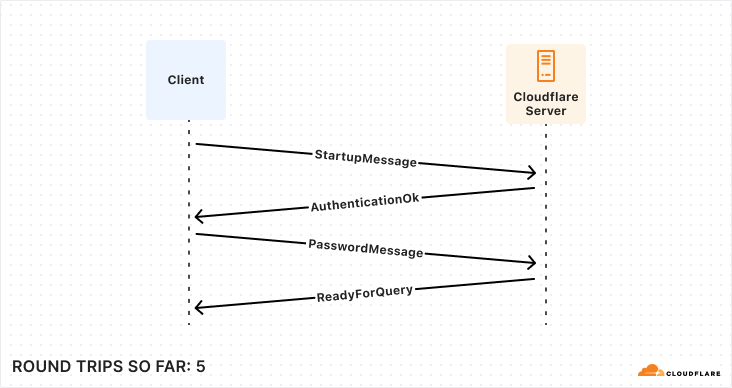

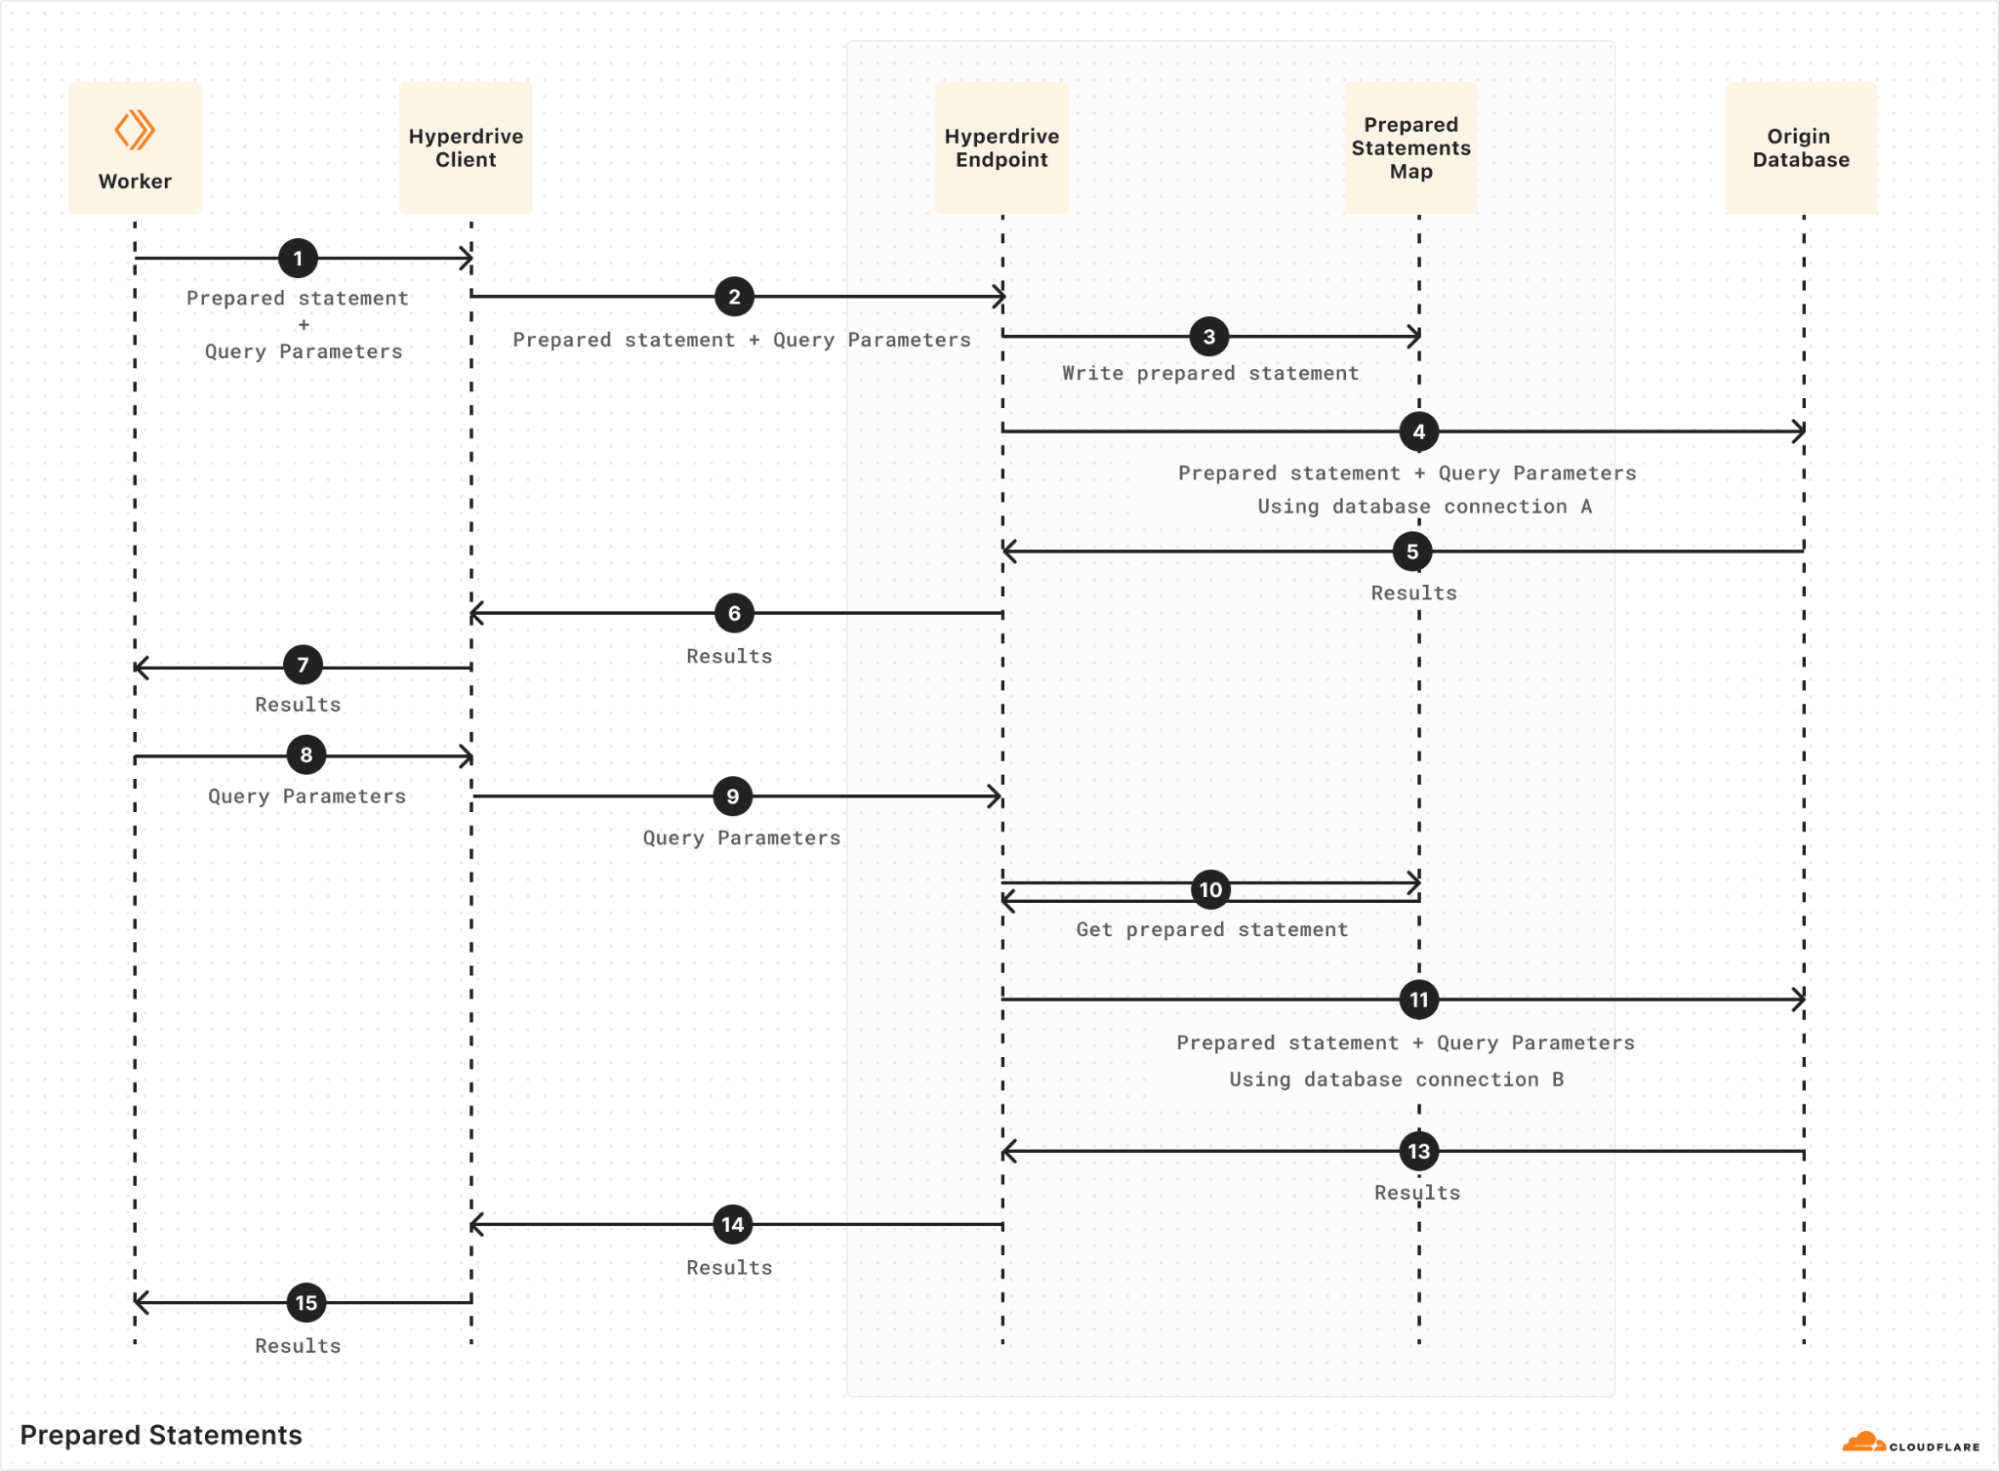
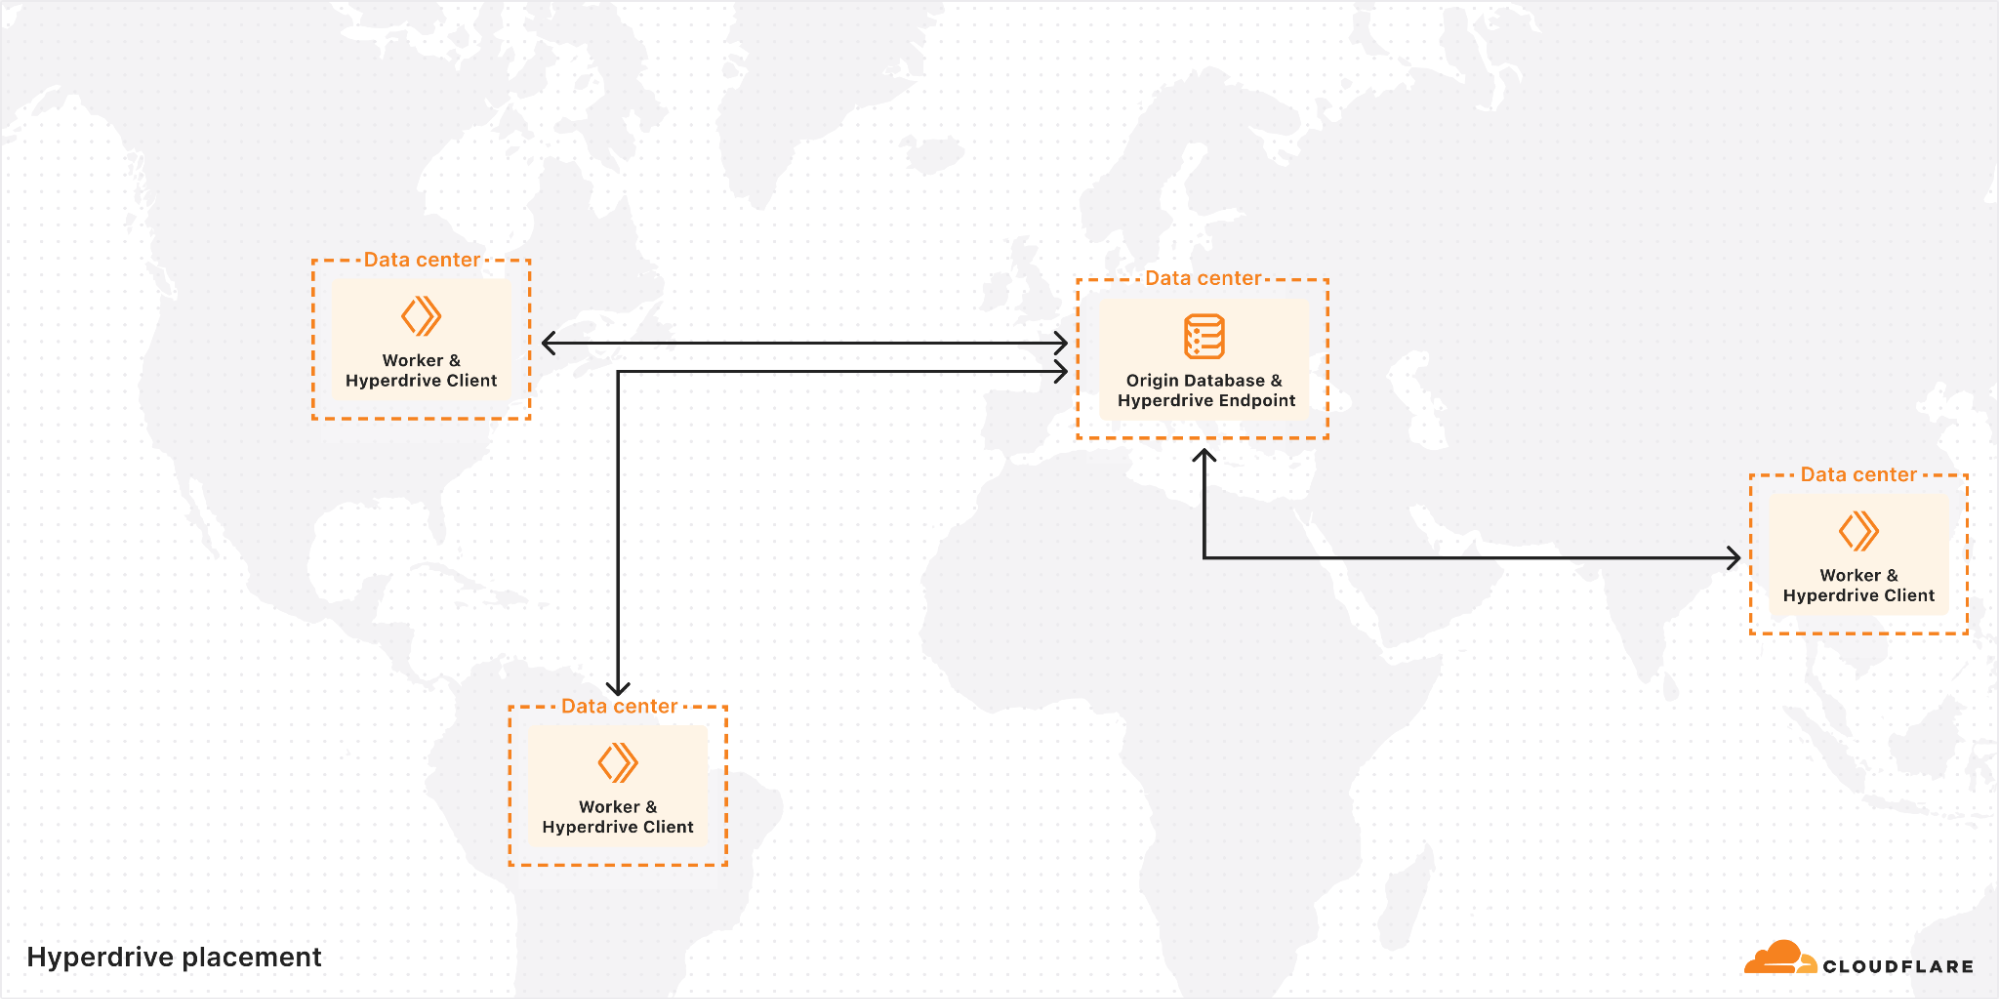
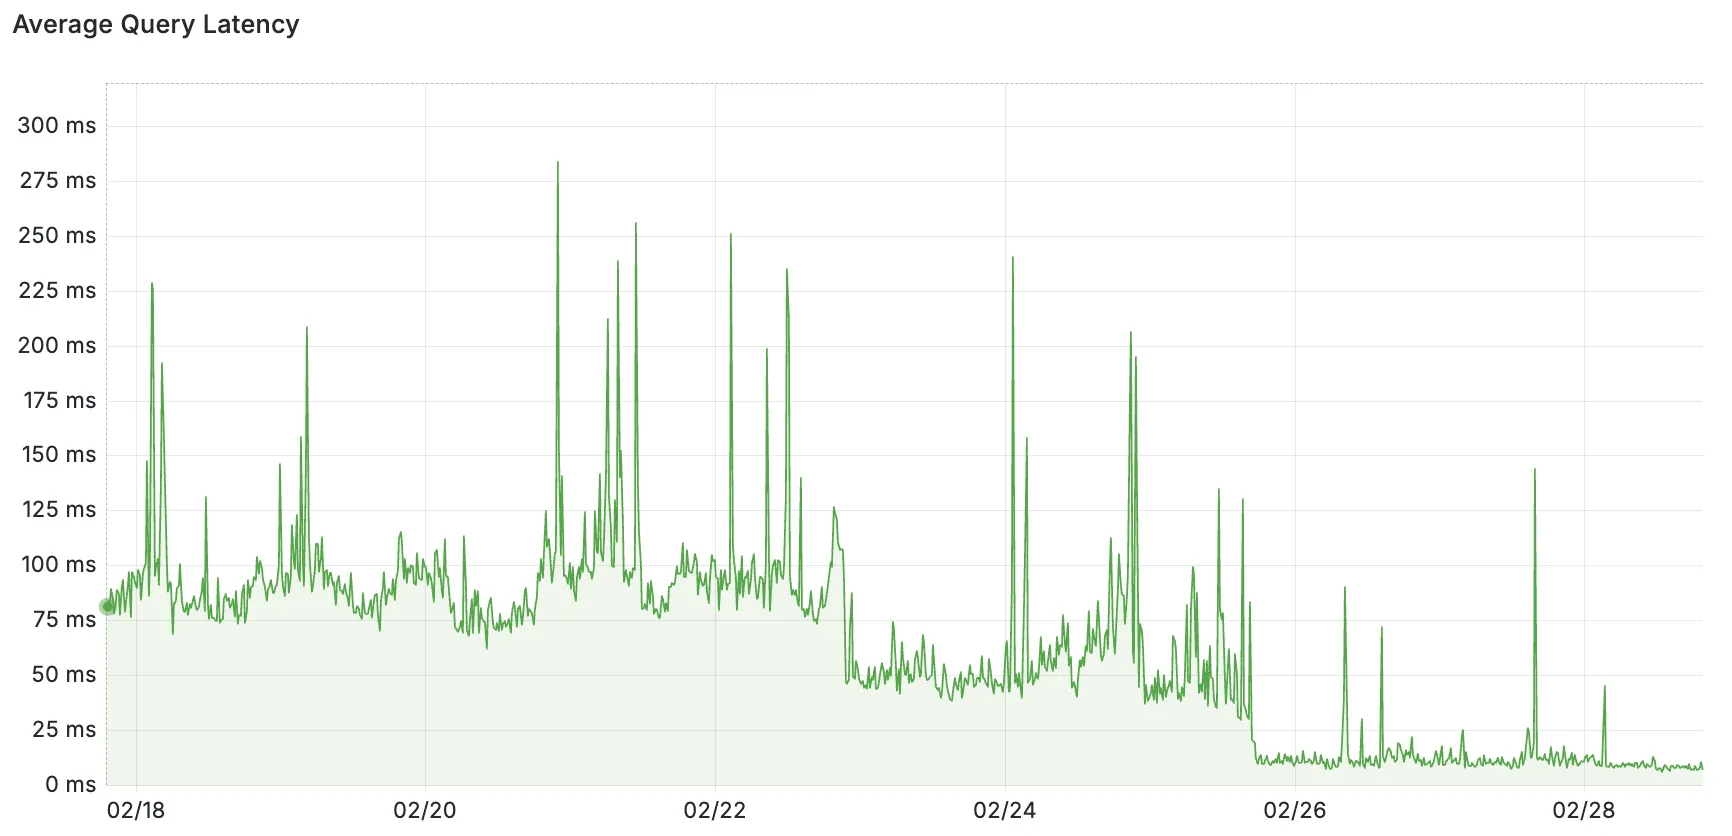
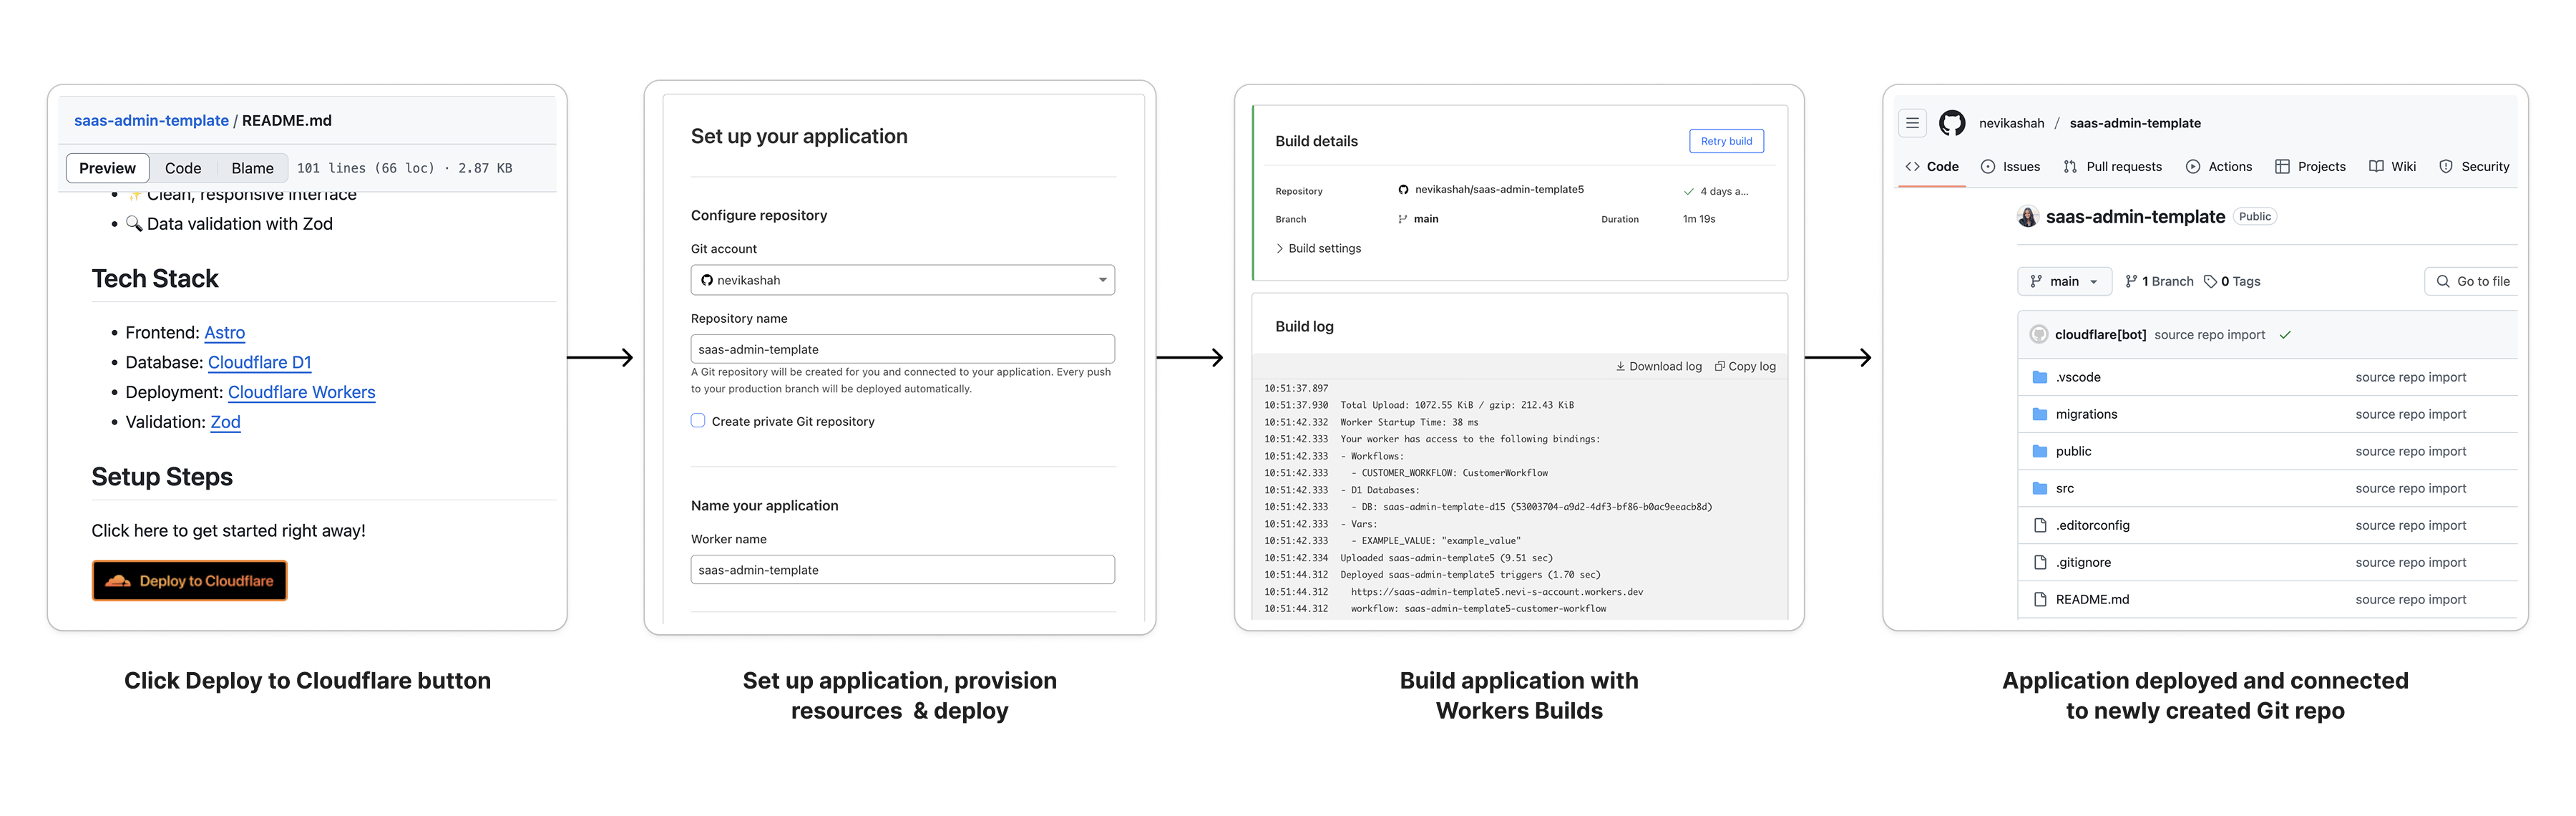

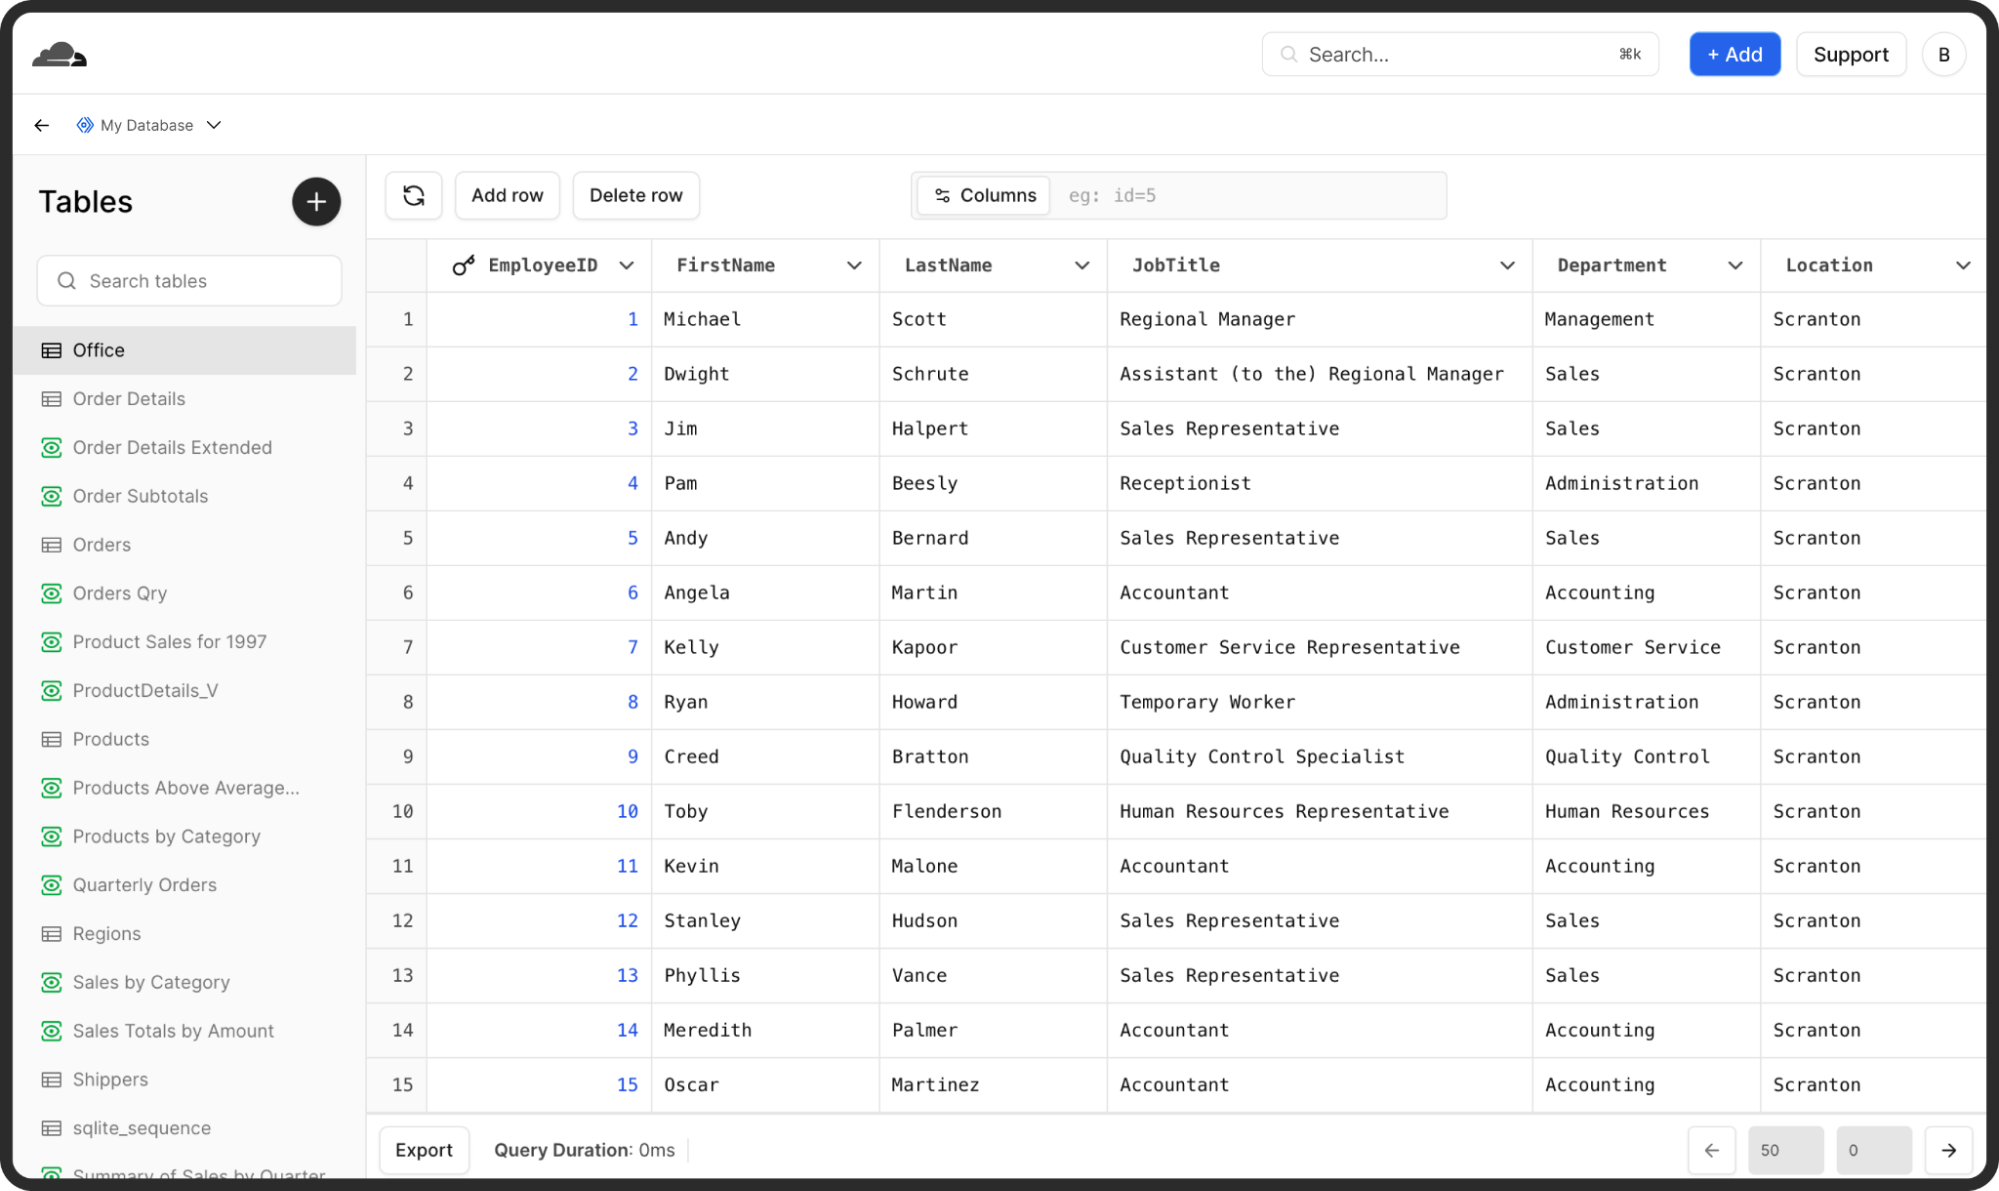
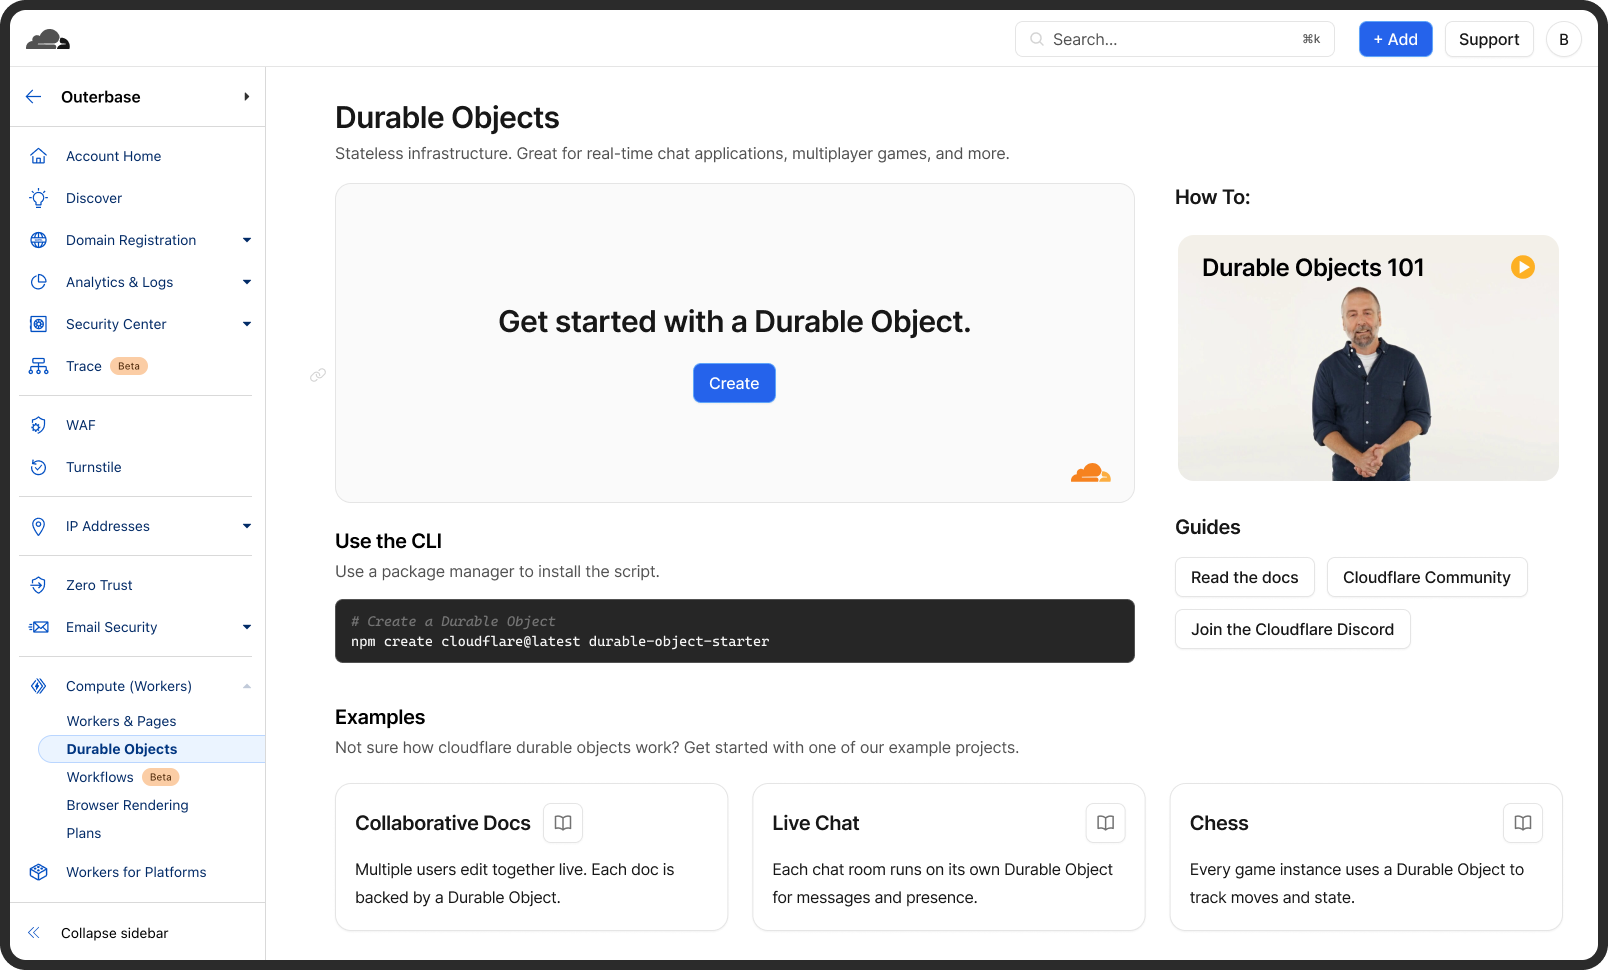
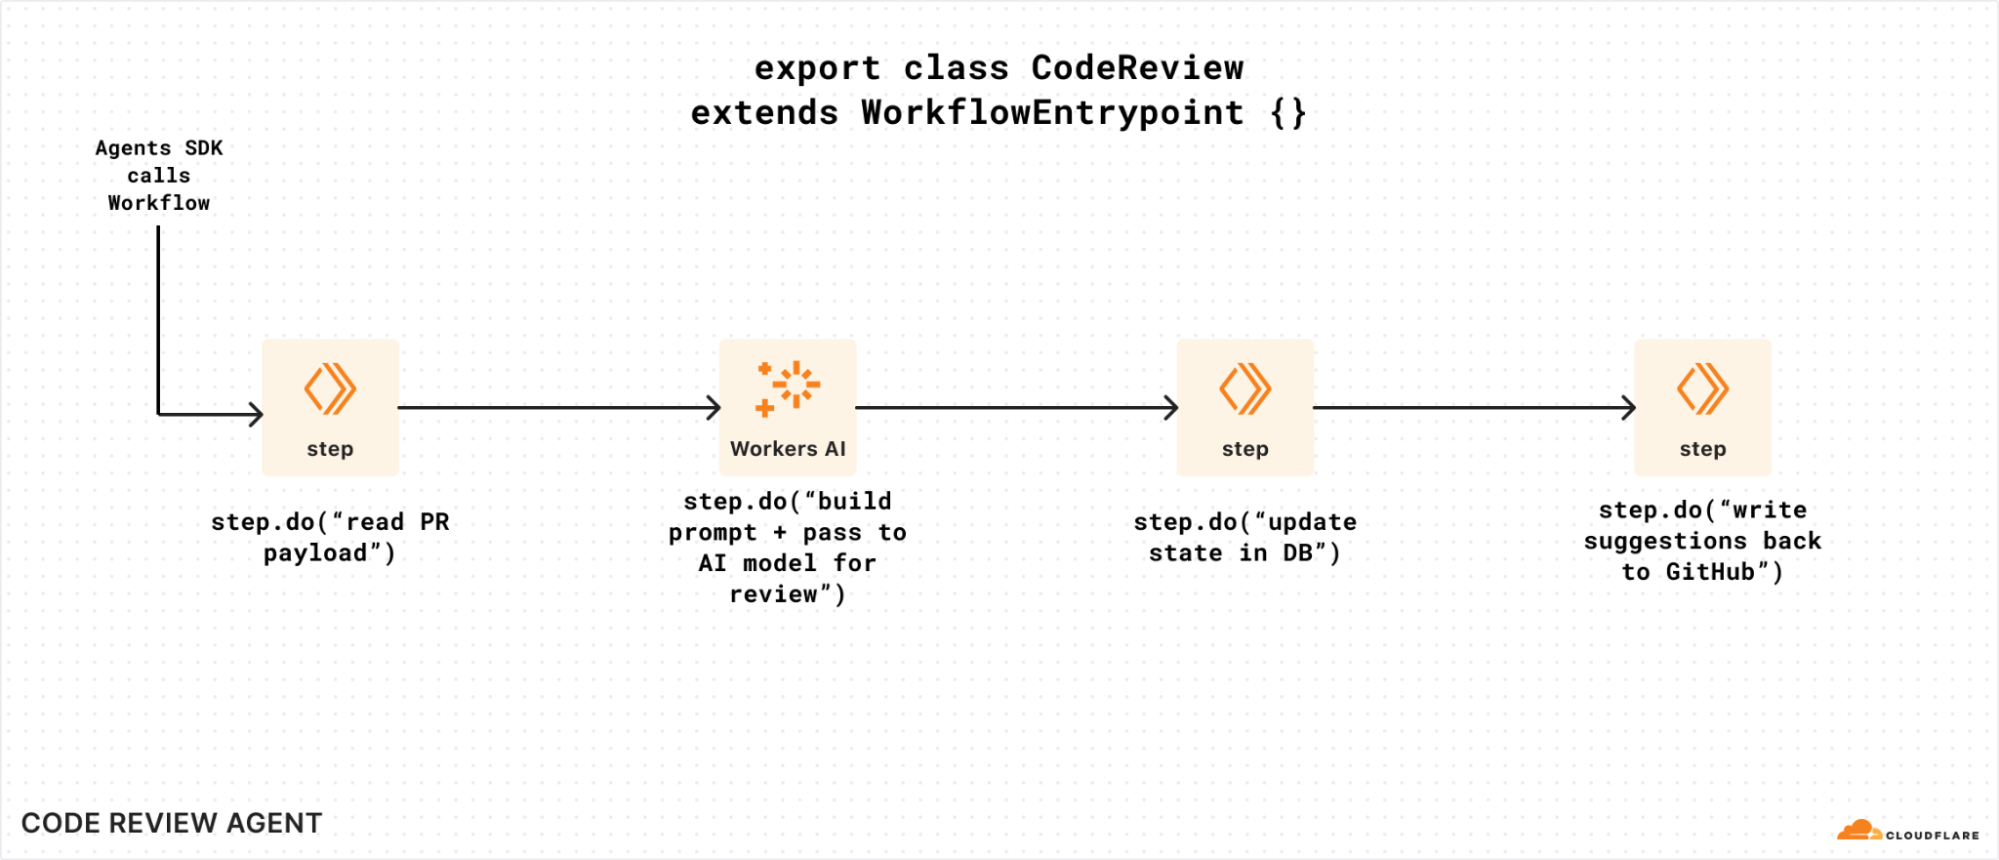
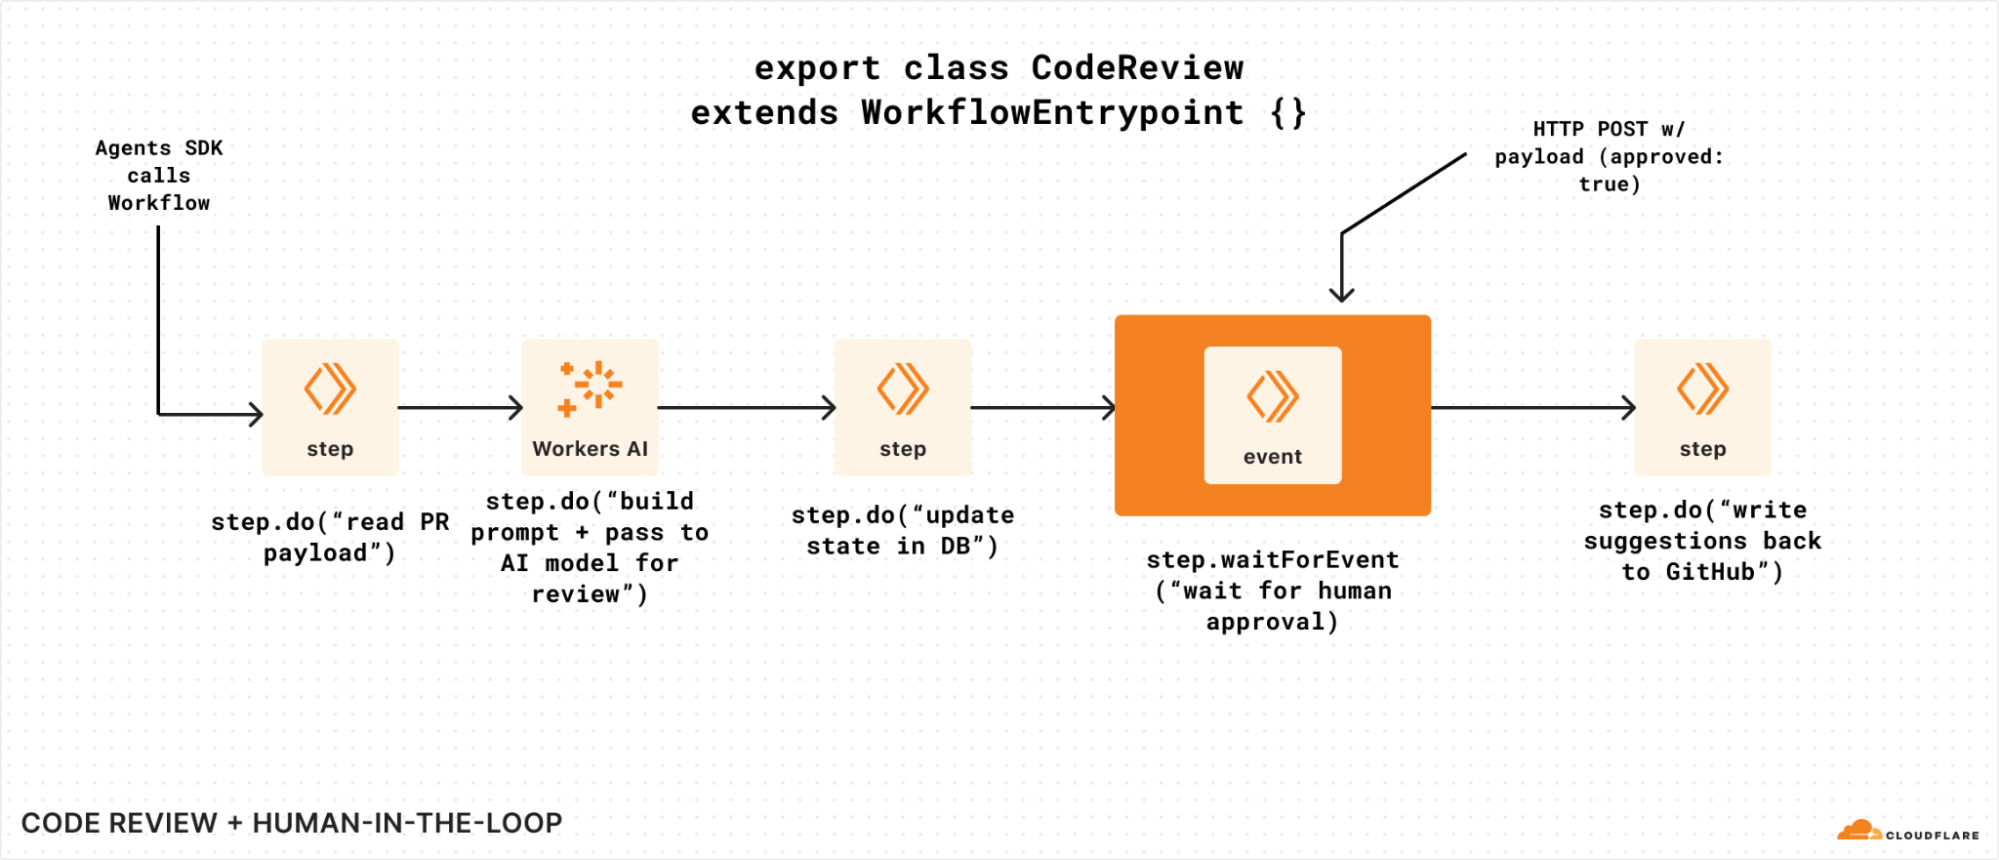

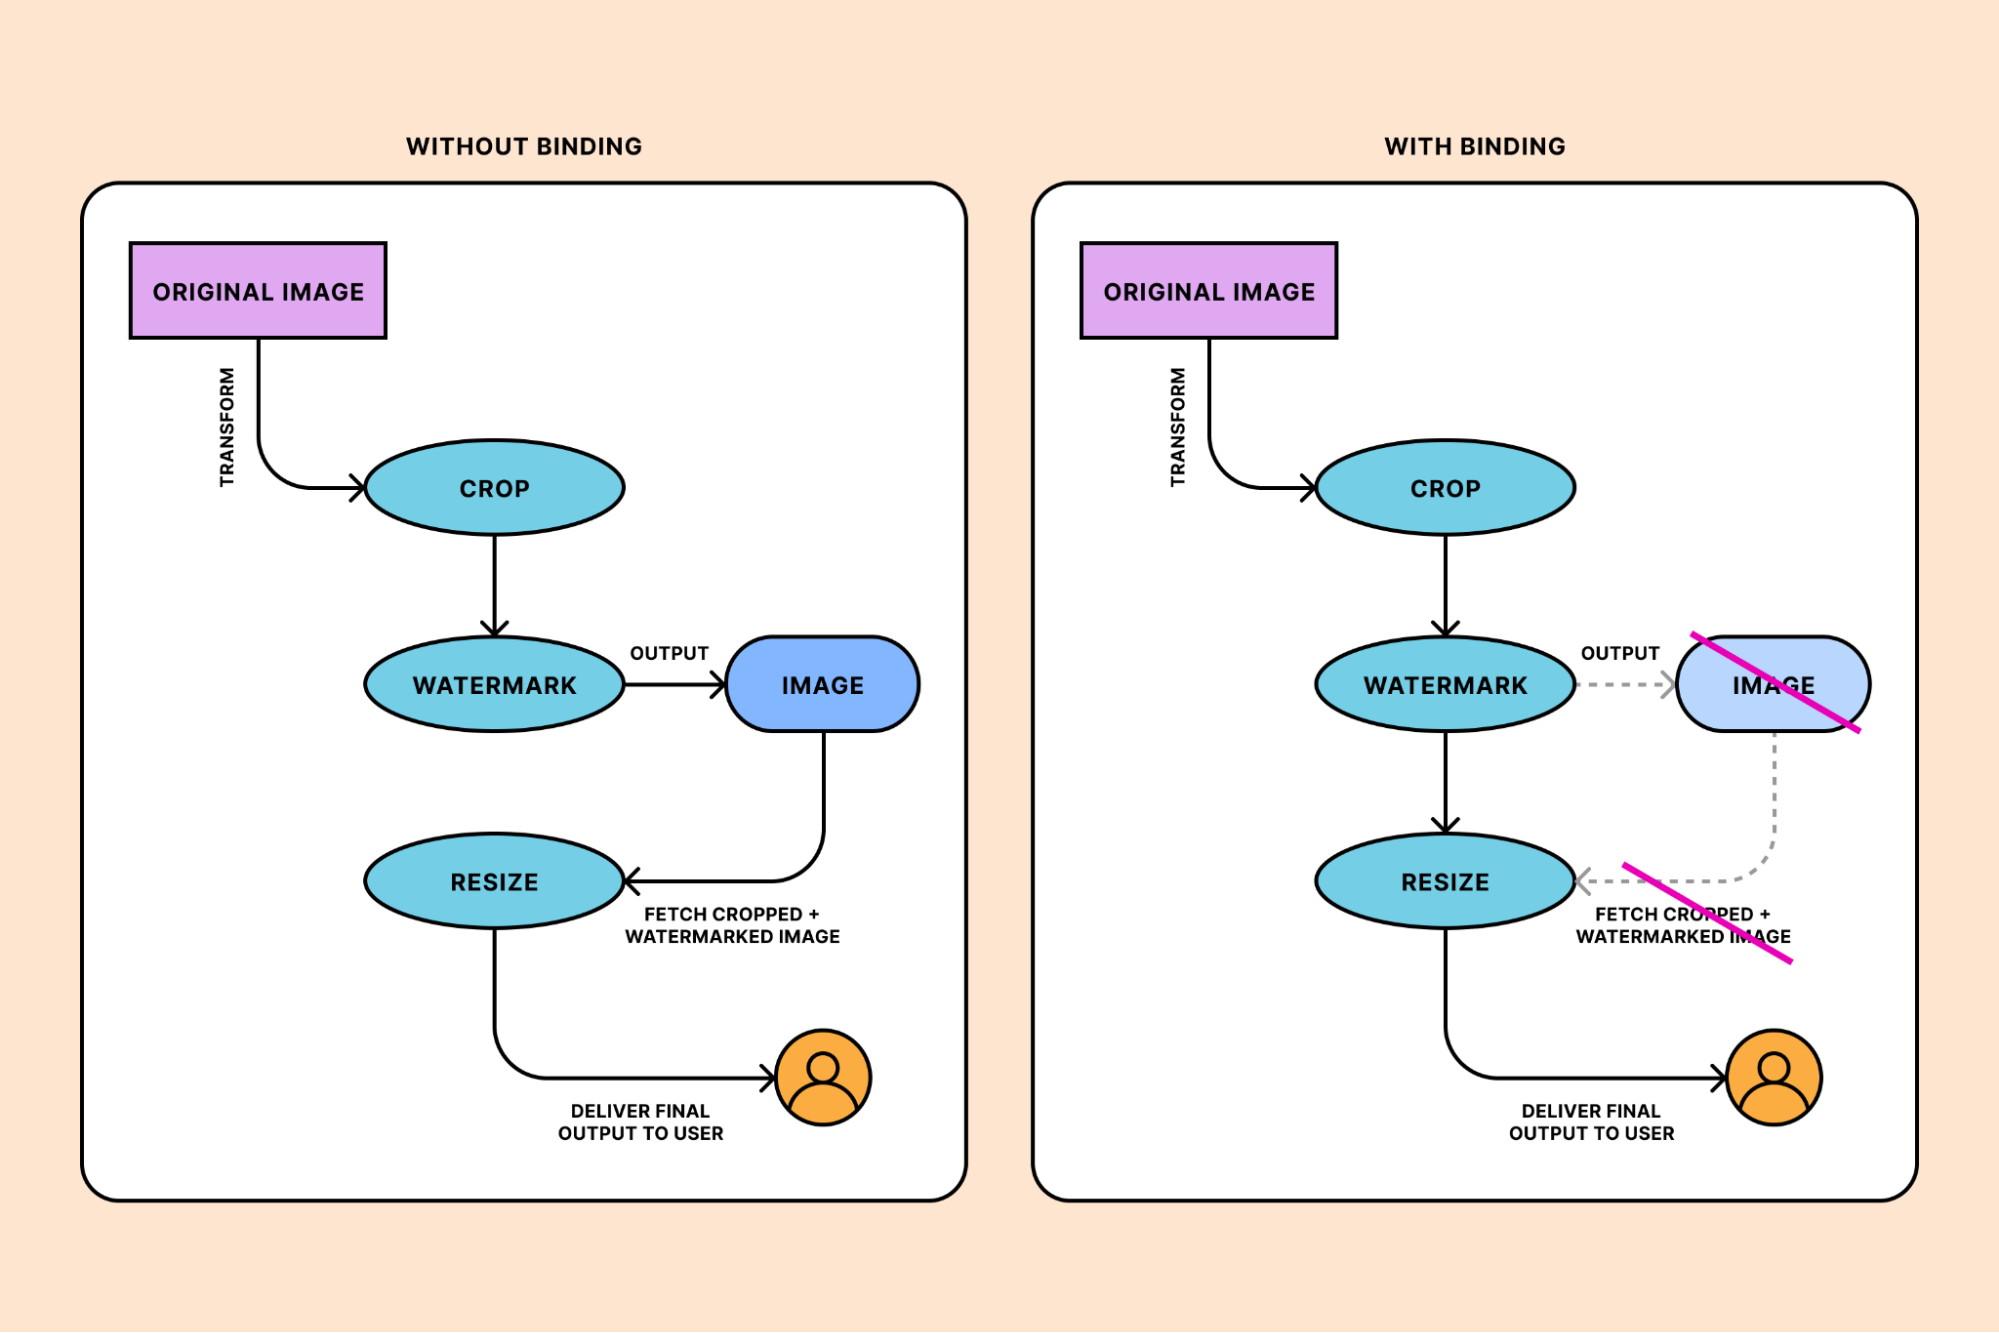
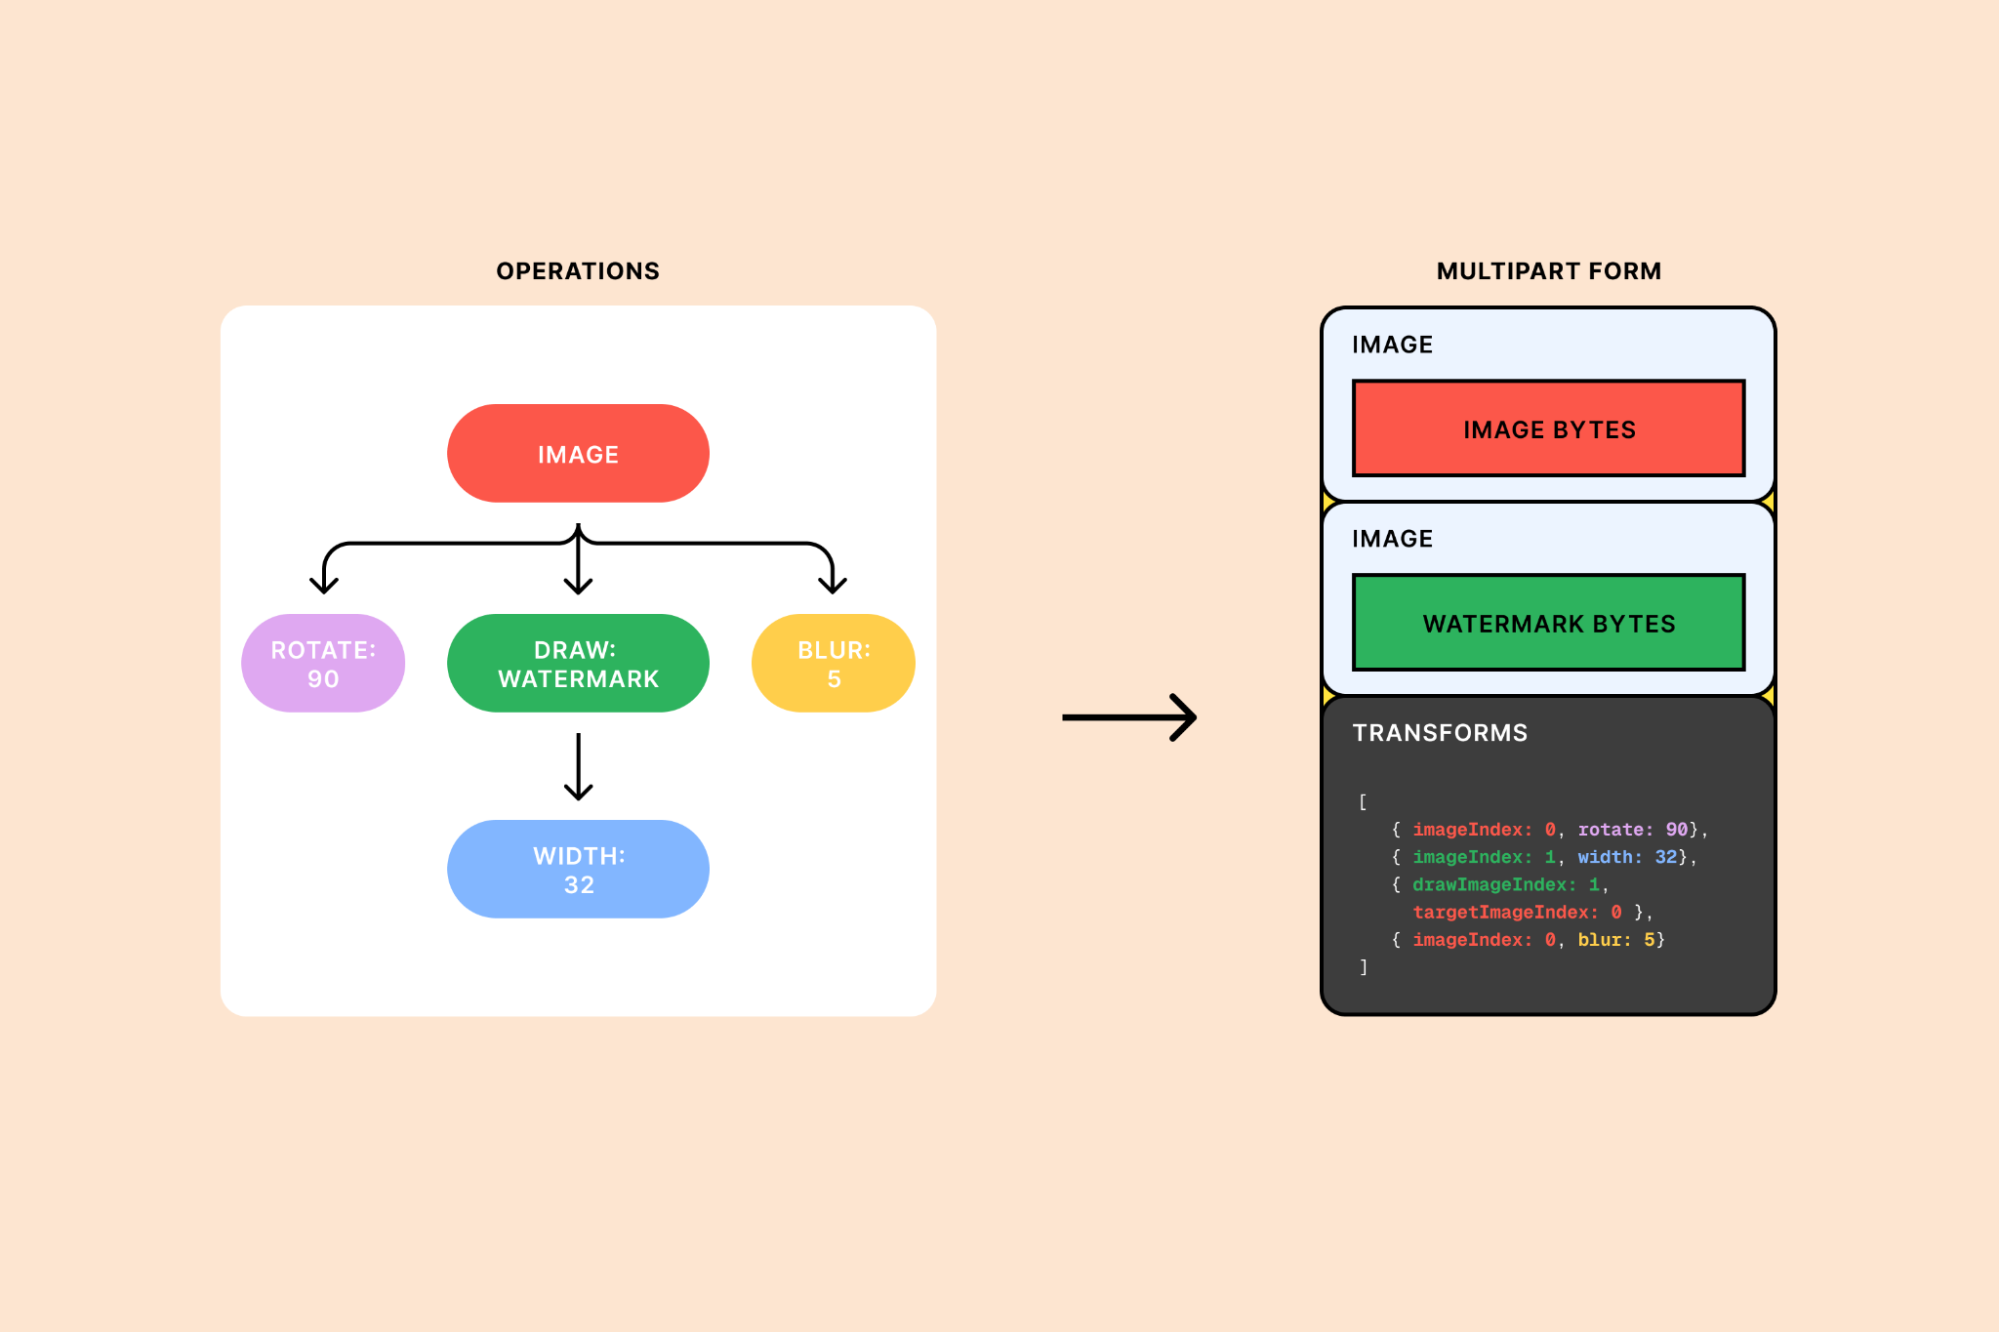
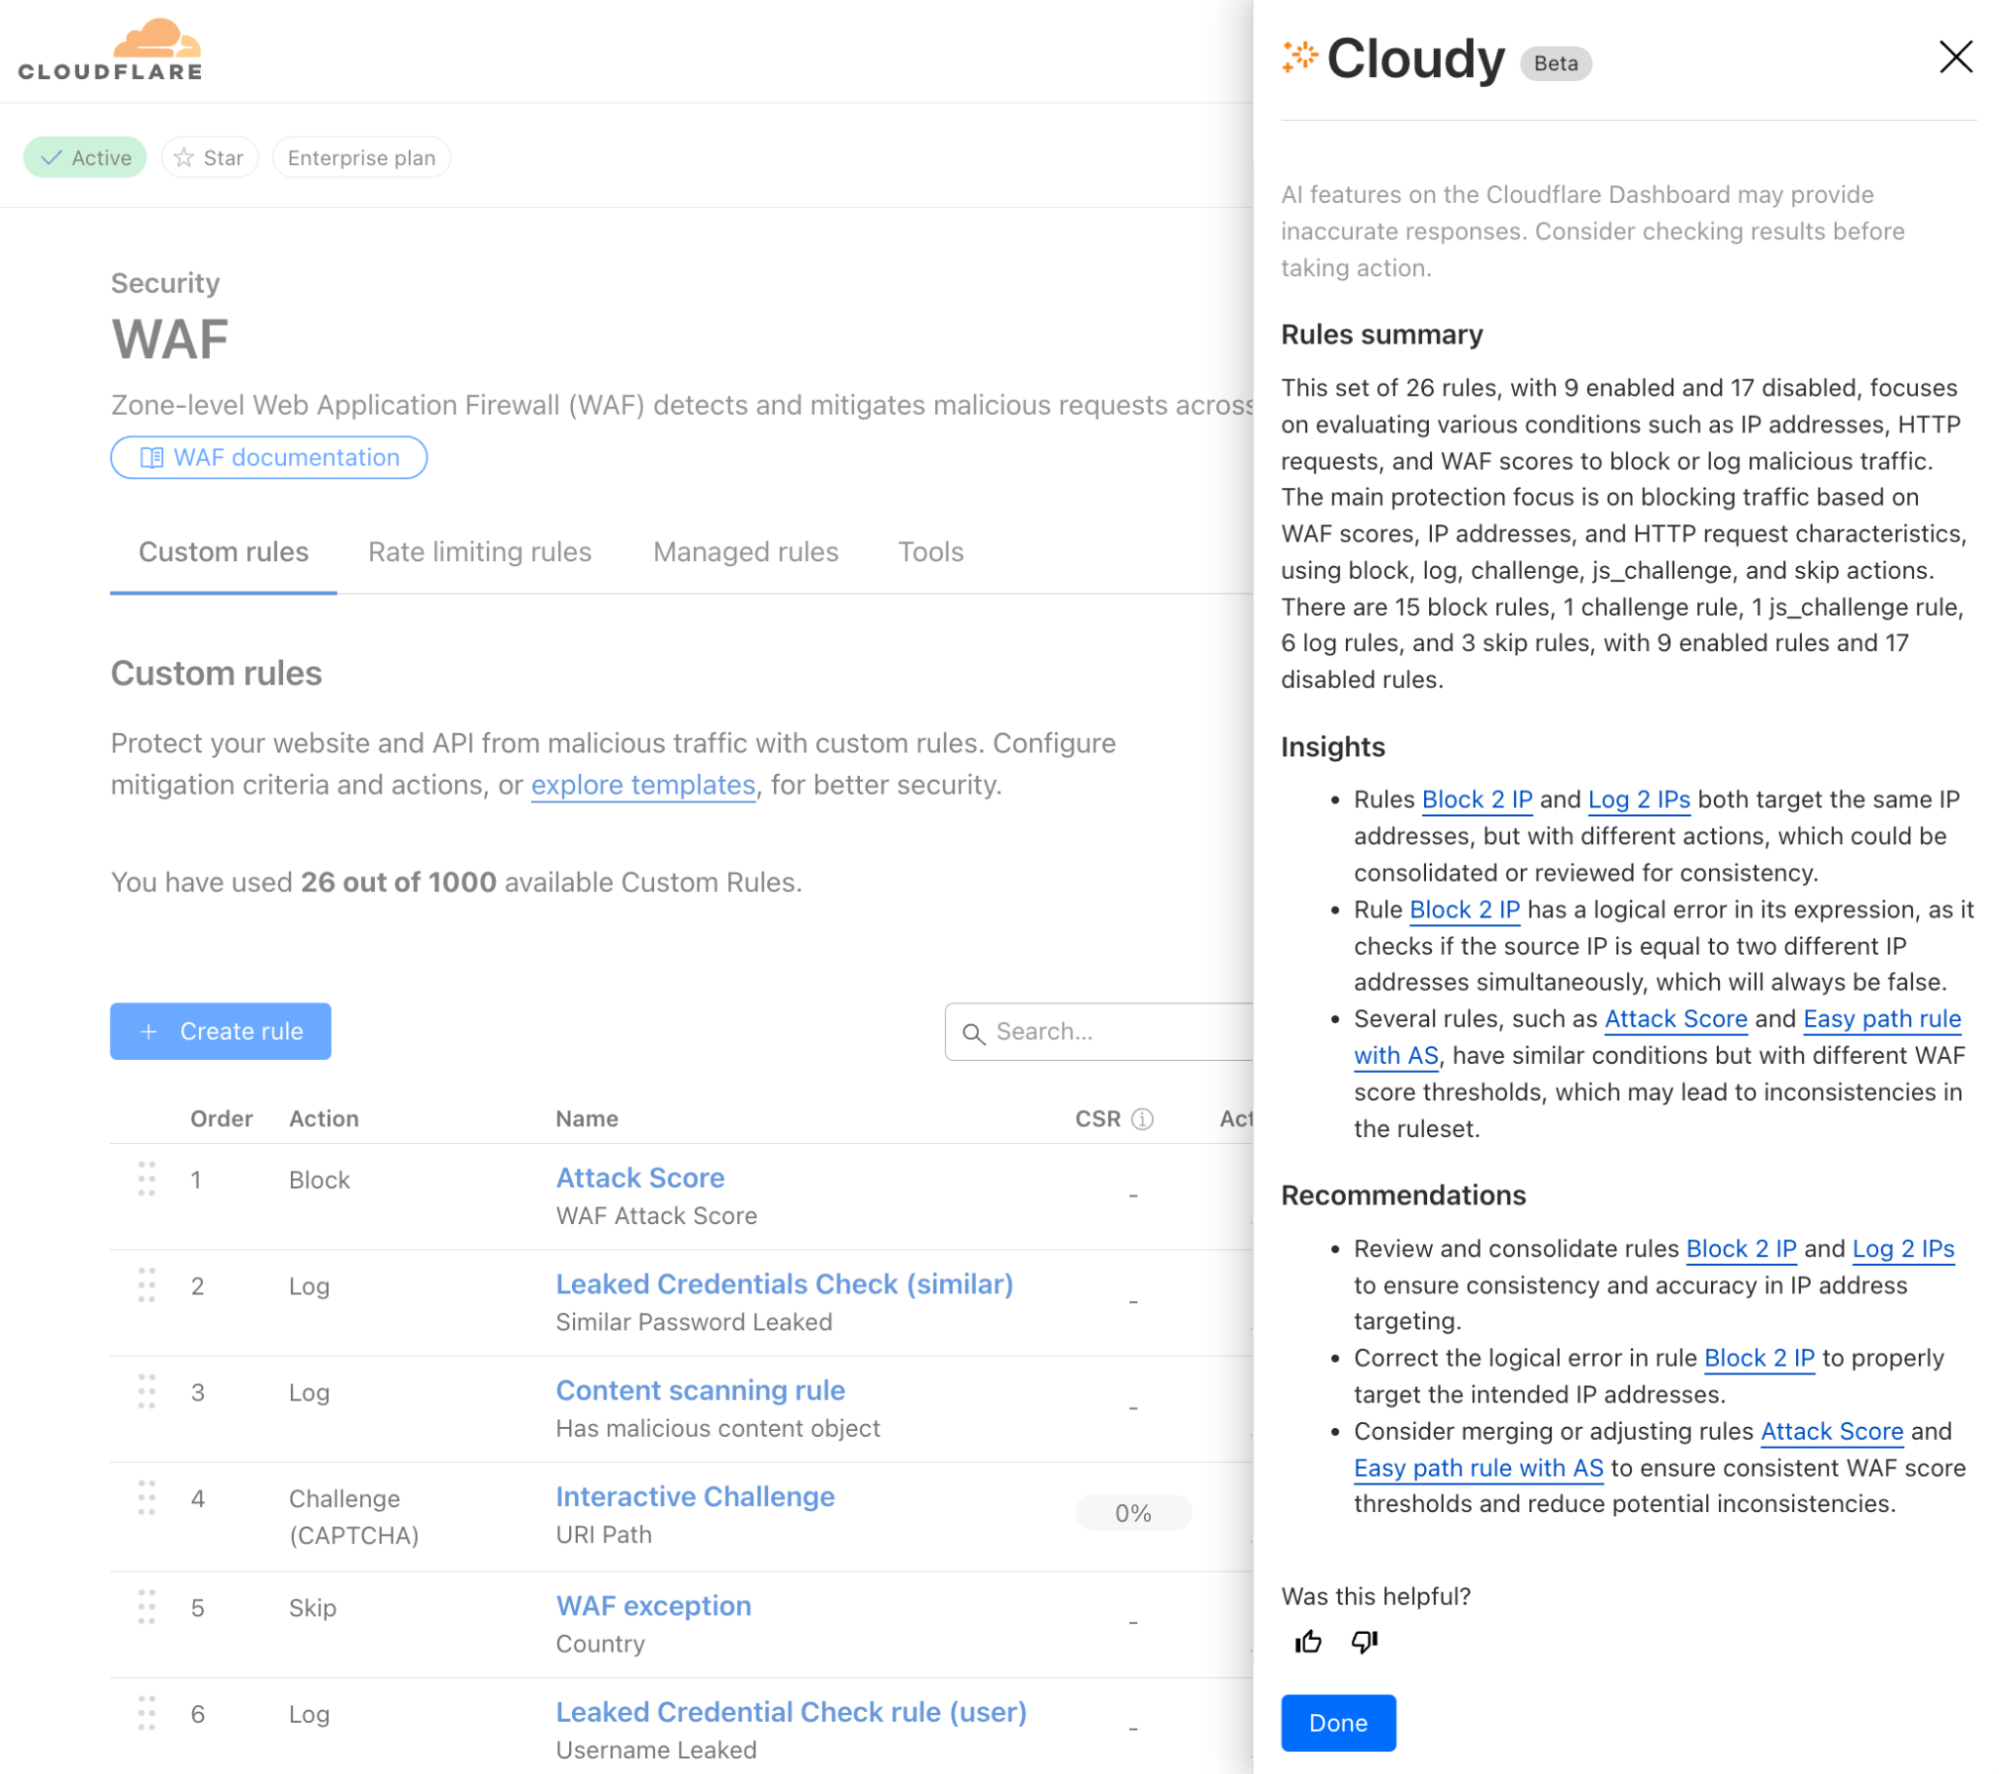
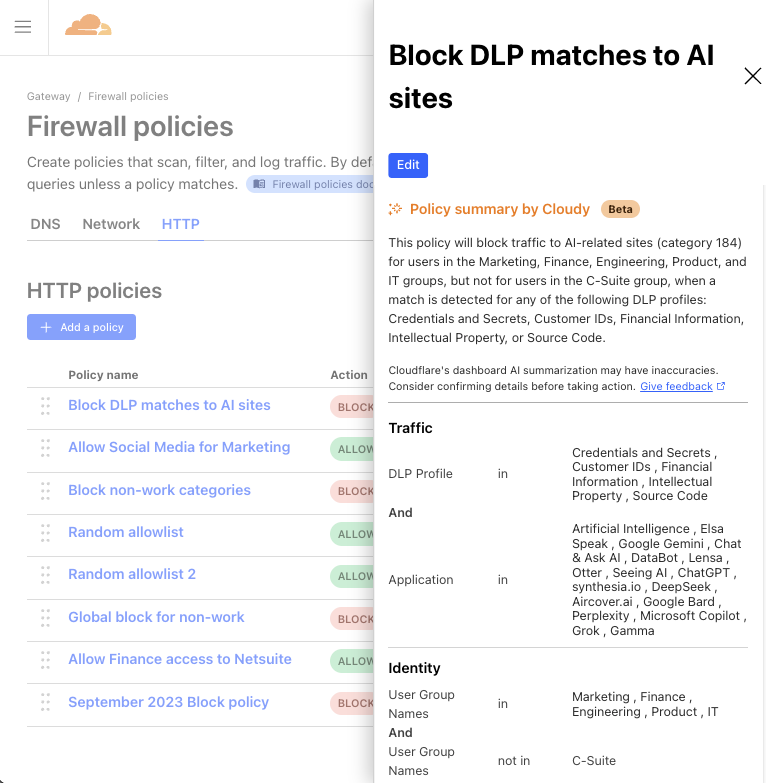


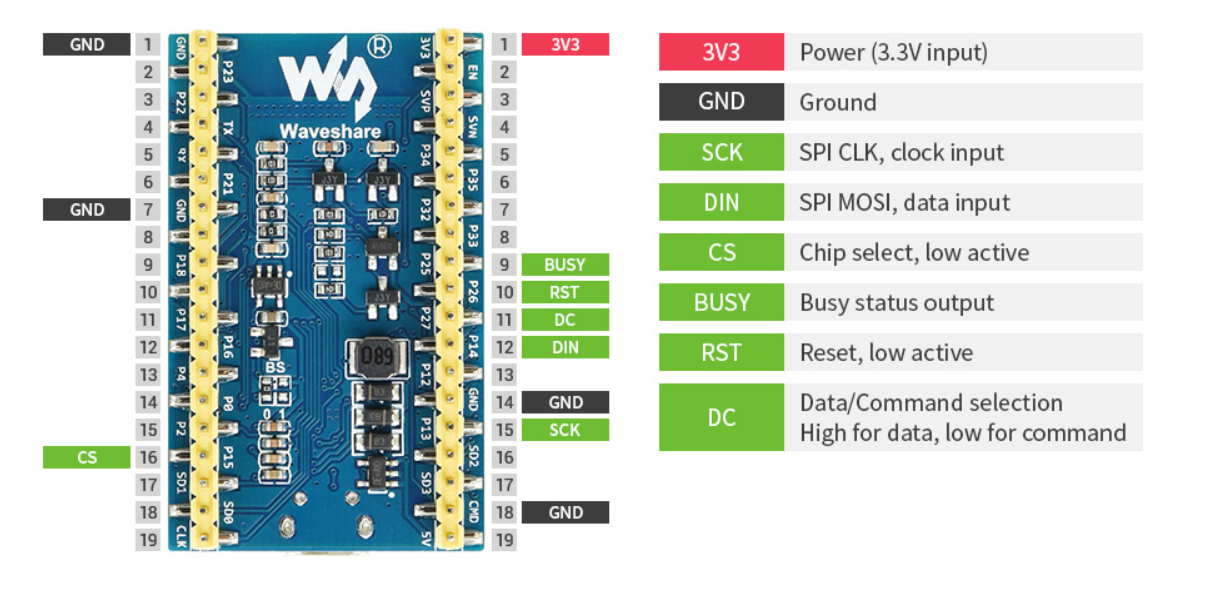
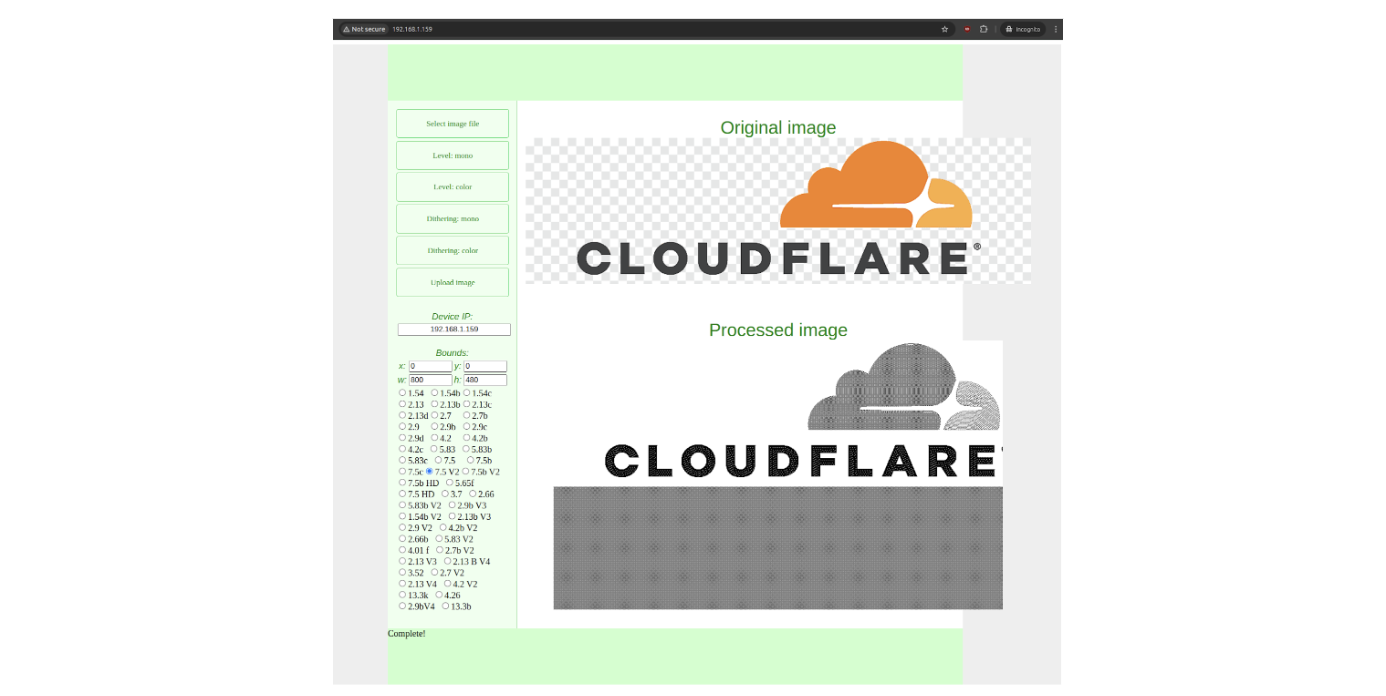
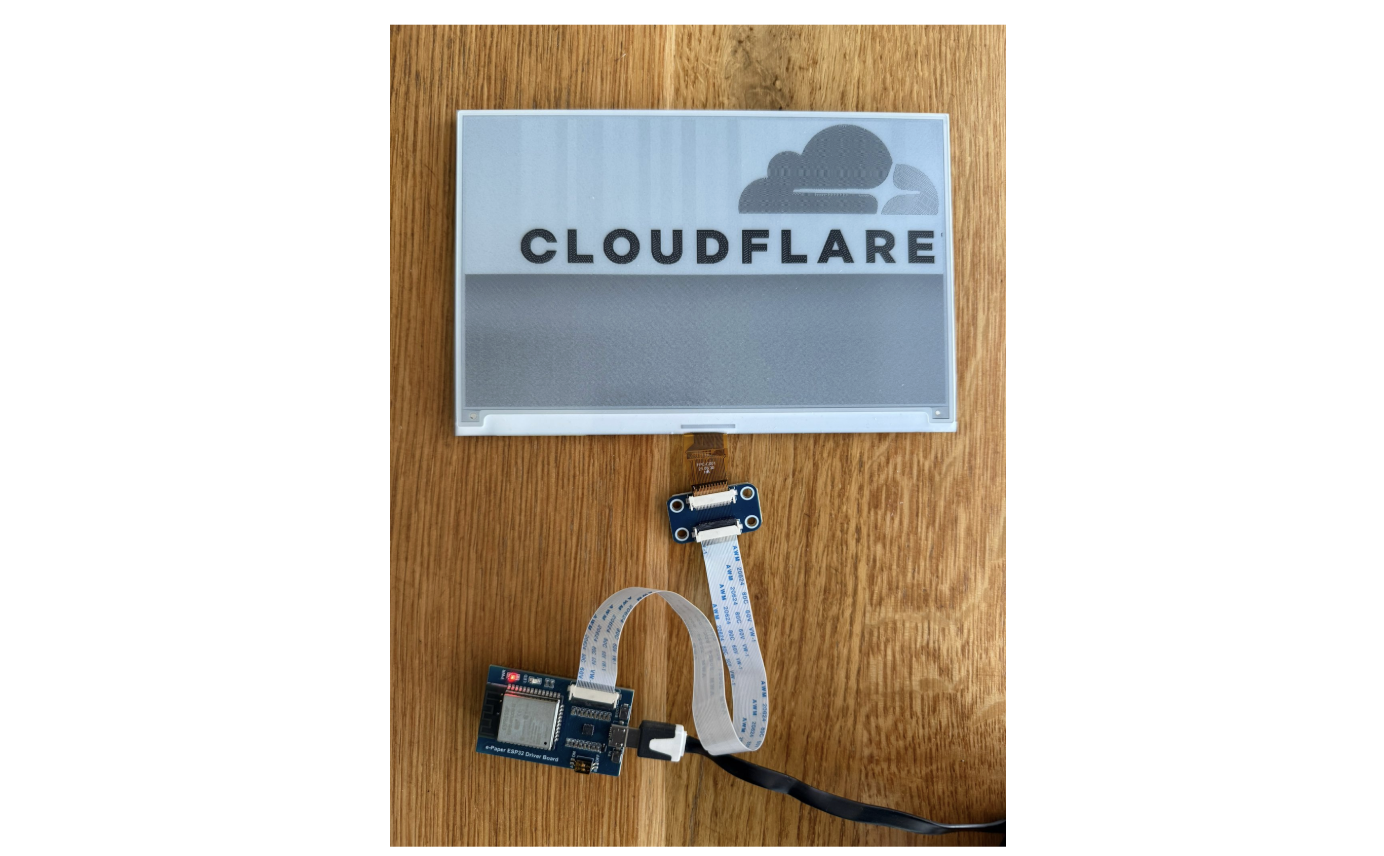

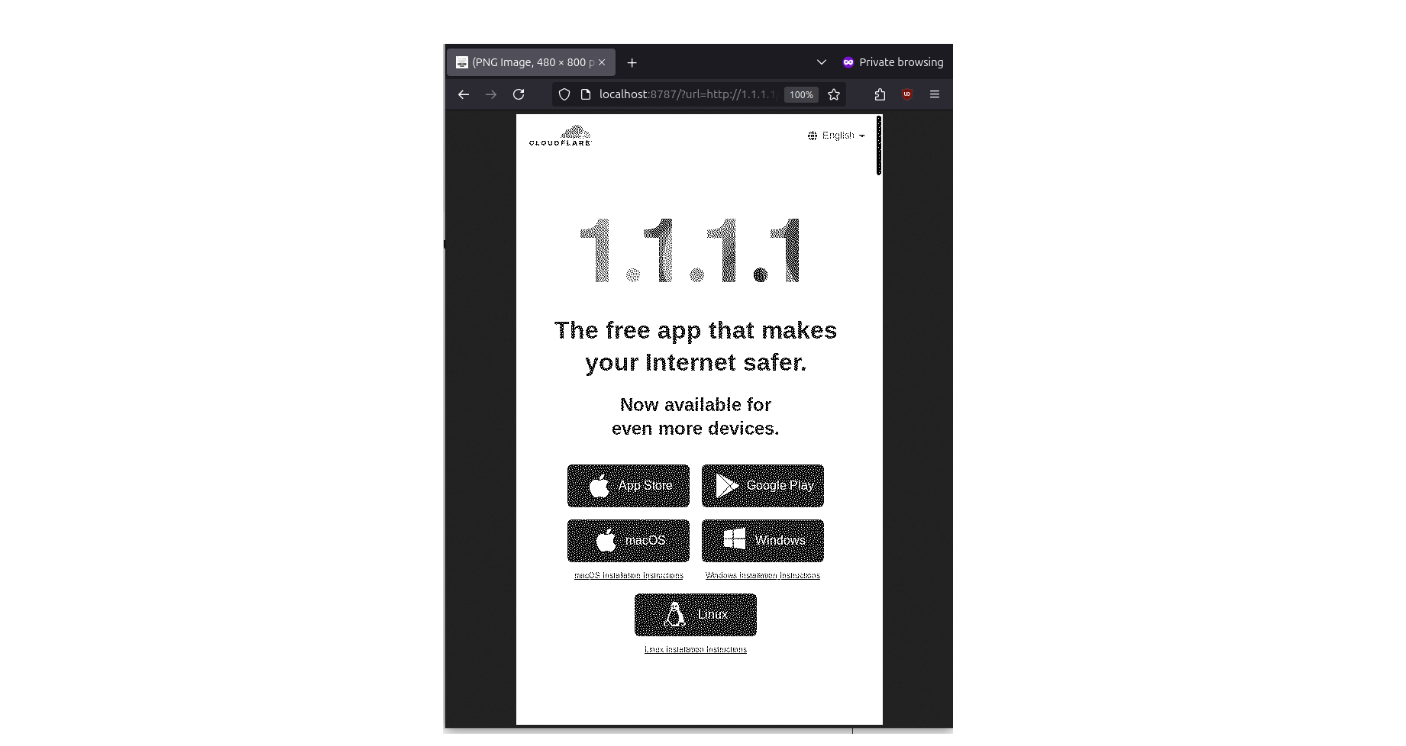
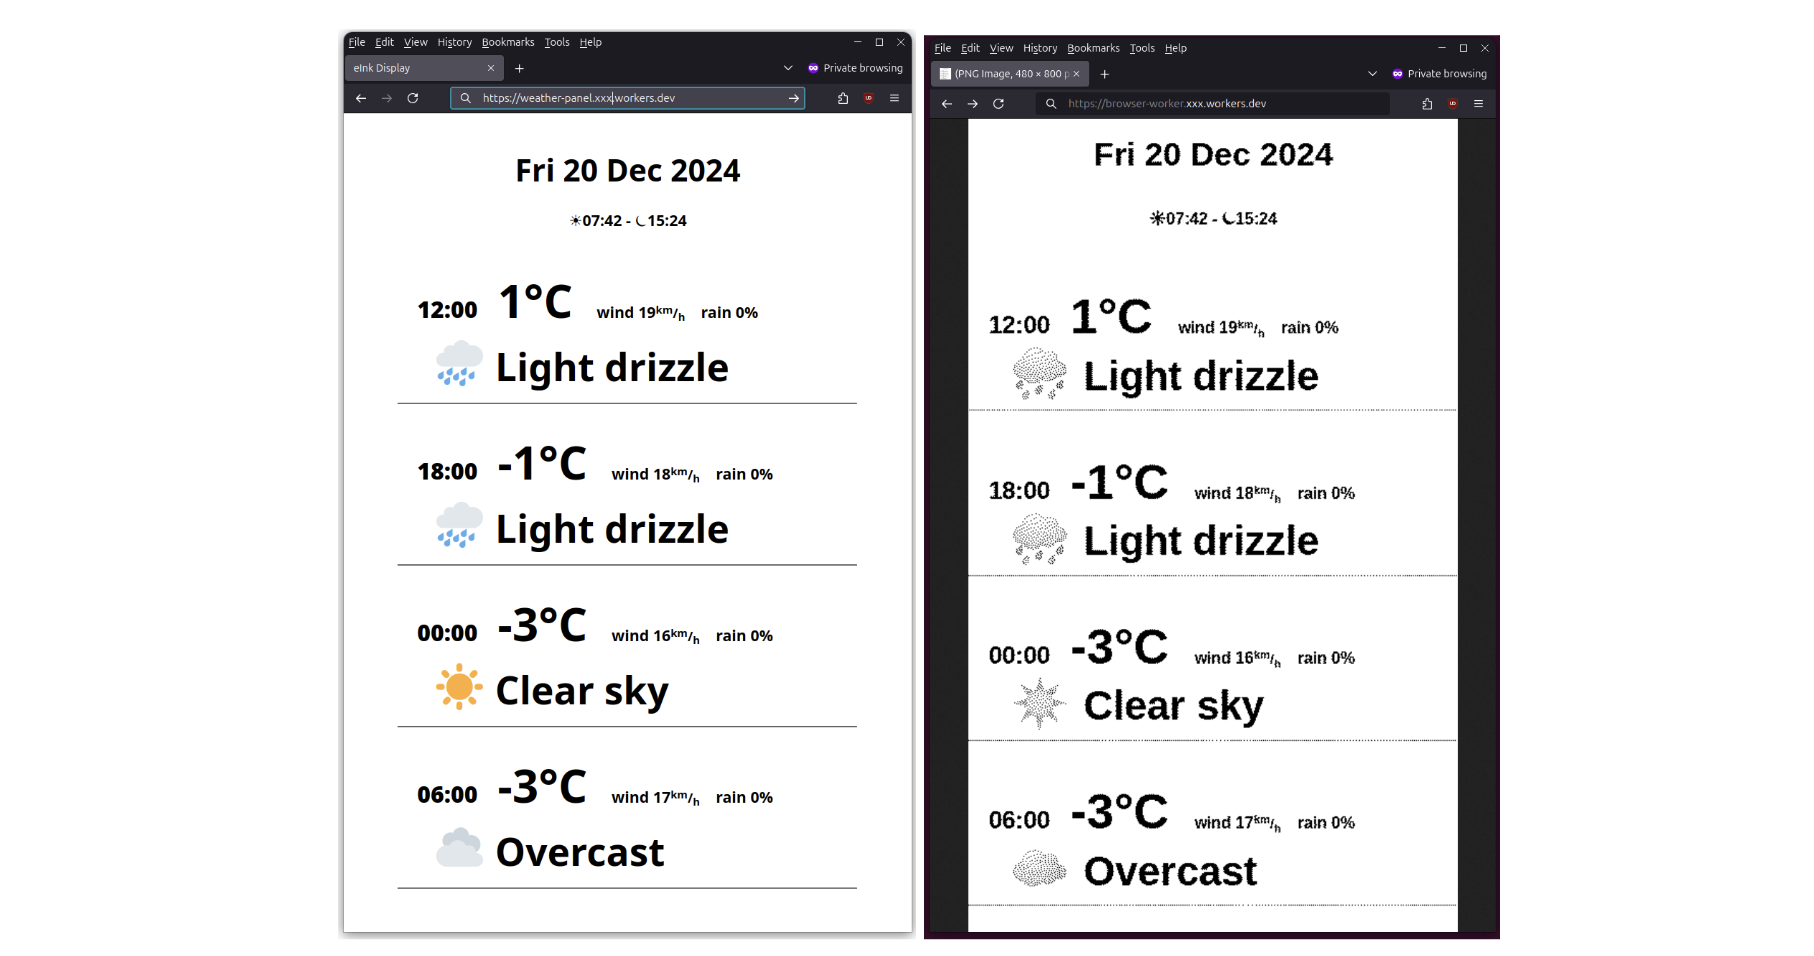


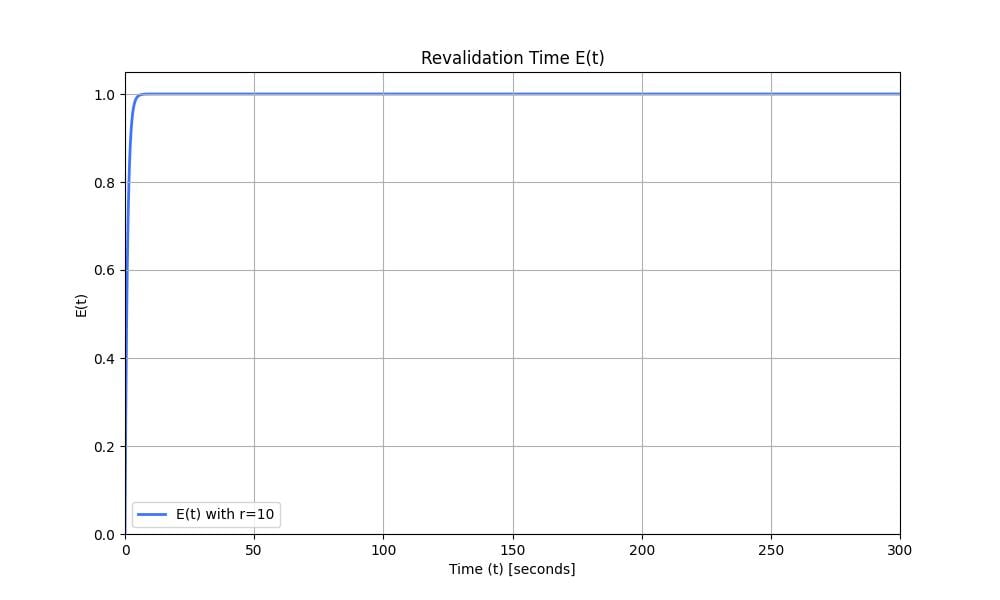
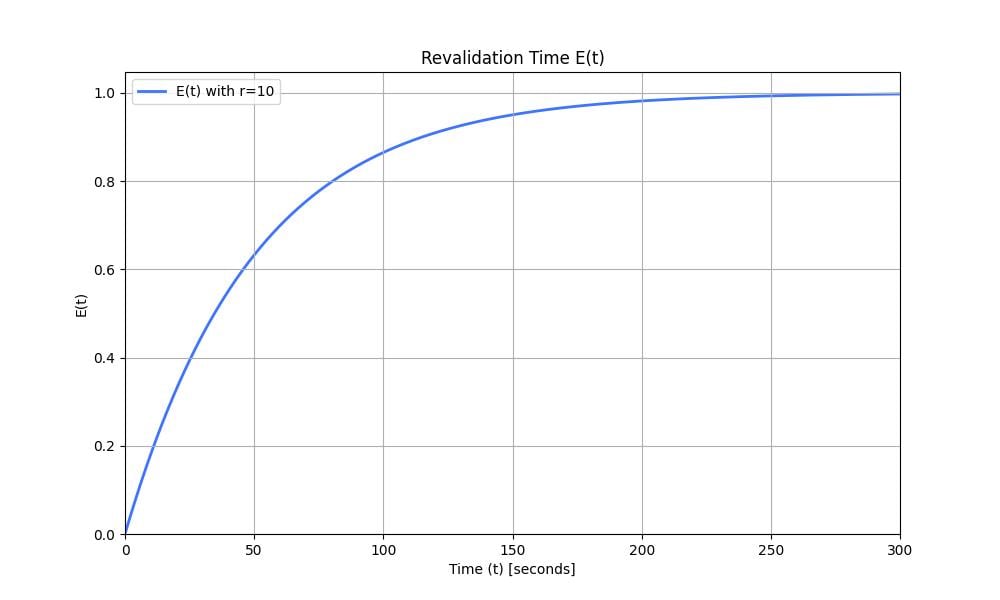
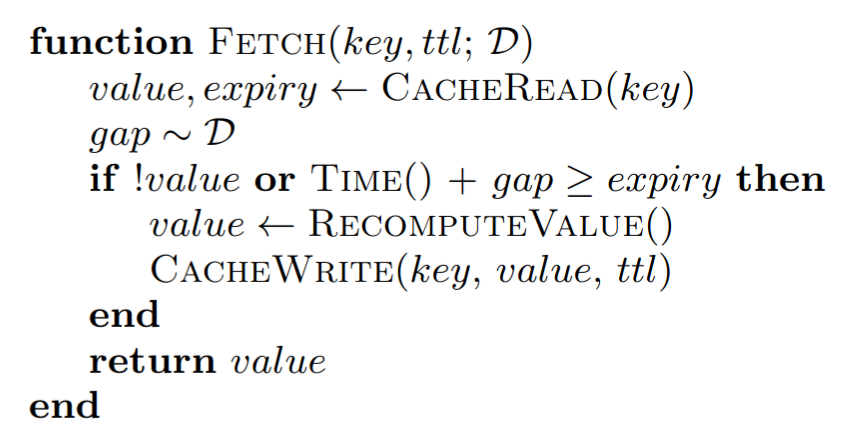
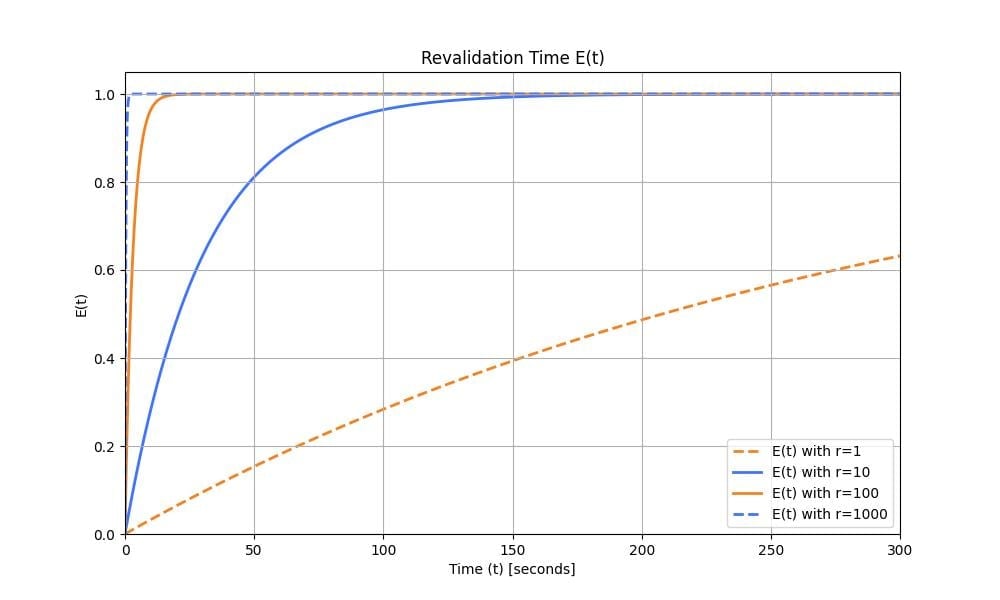


