Tag Archives: Security Blog

Use CodeWhisperer to identify issues and use suggestions to improve code security in your IDE

Post Syndicated from Peter Grainger original https://aws.amazon.com/blogs/security/use-codewhisperer-to-identify-issues-and-use-suggestions-to-improve-code-security-in-your-ide/

I’ve always loved building things, but when I first began as a software developer, my least favorite part of the job was thinking about security. The security of those first lines of code just didn’t seem too important. Only after struggling through security reviews at the end of a project, did I realize that a security focus at the start can save time and money, and prevent a lot of frustration.

This focus on security at the earliest phases of development is known in the DevOps community as DevSecOps. By adopting this approach, you can identify and improve security issues early, avoiding costly rework and reducing vulnerabilities in live systems. By using the security scanning capabilities of Amazon CodeWhisperer, you can identify potential security issues in your integrated development environment (IDE) as you code. After you identify these potential issues, CodeWhisperer can offer suggestions on how you can refactor to improve the security of your code early enough to help avoid the frustration of a last-minute change to your code.

In this post, I will show you how to get started with the code scanning feature of CodeWhisperer by using the AWS Toolkit for JetBrains extension in PyCharm to identify a potentially weak hashing algorithm in your IDE, and then use CodeWhisperer suggestions to quickly cycle through possible ways to improve the security of your code.

Overview of CodeWhisperer

CodeWhisperer understands comments written in natural language (in English) and can generate multiple code suggestions in real time to help improve developer productivity. The code suggestions are based on a large language model (LLM) trained on Amazon and publicly available code with identified security vulnerabilities removed during the training process. For more details, see Amazon CodeWhisperer FAQs.

Security scans are available in VS Code and JetBrains for Java, Python, JavaScript, C#, TypeScript, CloudFormation, Terraform, and AWS Cloud Development Kit (AWS CDK) with both Python and TypeScript. AWS CodeGuru Security uses a detection engine and a machine leaning model that uses a combination of logistic regression and neural networks, finding relationships and understanding paths through code. CodeGuru Security can detect common security issues, log injection, secrets, and insecure use of AWS APIs and SDKs. The detection engine uses a Detector Library that has descriptions, examples, and additional information to help you understand why CodeWhisperer highlighted your code and whether you need to take action. You can start a scan manually through either the AWS Toolkit for Visual Studio Code or AWS Toolkit for JetBrains. To learn more, see How Amazon CodeGuru Security helps you effectively balance security and velocity.

CodeWhisperer code scan sequence

To illustrate how PyCharm, Amazon CodeWhisperer, and Amazon CodeGuru interact, Figure 1 shows a high-level view of the interactions between PyCharm and services within AWS. For more information about this interaction, see the Amazon CodeWhisperer documentation.
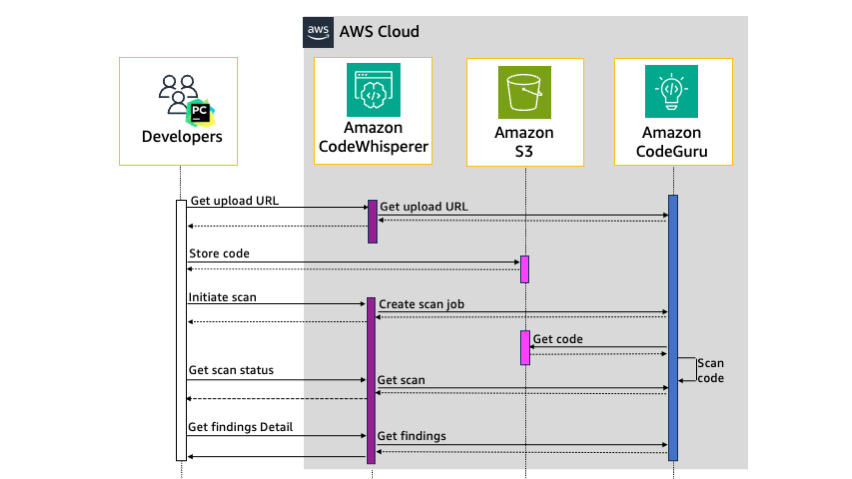
Figure 1: Sequence diagram of the security scan workflow

Figure 1: Sequence diagram of the security scan workflow

Communication from PyCharm to CodeWhisperer is HTTPS authenticated by using a bearer token in the authorization header of each request. As shown in Figure 1, when you manually start a security scan from PyCharm, the sequence is as follows:

  1. PyCharm sends a request to CodeWhisperer for a presigned Amazon Simple Storage Service (Amazon S3) upload URL, which initiates a request for an upload URL from CodeGuru. CodeWhisperer returns the URL to PyCharm.
  2. PyCharm archives the code in open PyCharm tabs along with linked third-party libraries into a gzip file and uploads this file directly to the S3 upload URL. The S3 bucket where the code is stored is encrypted at rest with strict access controls.
  3. PyCharm initiates the scan with CodeWhisperer, which creates a scan job with CodeGuru. CodeWhisperer returns the scan job ID that CodeGuru created to PyCharm.
  4. CodeGuru downloads the code from Amazon S3 and starts the code scan.
  5. PyCharm requests the status of the scan job from CodeWhisperer, which gets the scan status from CodeGuru. If the status is pending, PyCharm keeps polling CodeWhisperer for the status until the scan job is complete.
  6. When CodeWhisperer responds that the status of the scan job is complete, PyCharm requests the details of the security findings. The findings include the file path, line numbers, and details about the finding.
  7. The finding details are displayed in the PyCharm code editor window and in the CodeWhisperer Security Issues window.

Walkthrough

For this walkthrough, you will start by configuring PyCharm to use AWS Toolkit for JetBrains. Then you will create an AWS Builder ID to authenticate the extension with AWS. Next, you will scan Python code that CodeWhisperer will identify as a potentially weak hashing algorithm, and learn how to find more details. Finally, you will learn how to use CodeWhisperer to improve the security of your code by using suggestions.

Prerequisites

To follow along with this walkthrough, make sure that you have the following prerequisites in place:

Install and authenticate the AWS Toolkit for JetBrains

This section provides step-by-step instructions on how to install and authenticate your JetBrains IDE. If you’ve already configured JetBrains or you’re using a different IDE, skip to the section Identify a potentially weak hashing algorithm by using CodeWhisperer security scans.

In this step, you will install the latest version of AWS Toolkit for JetBrains, create a new PyCharm project, sign up for an AWS Builder ID, and then use this ID to authenticate the toolkit with AWS. To authenticate with AWS, you need either an AWS Builder ID, AWS IAM Identity Center user details, or AWS IAM credentials. Creating an AWS Builder ID is the fastest way to get started and doesn’t require an AWS account, so that’s the approach I’ll walk you through here.

To install the AWS Toolkit for JetBrains

  1. Open the PyCharm IDE, and in the left navigation pane, choose Plugins.
  2. In the search box, enter AWS Toolkit.
  3. For the result — AWS Toolkit — choose Install.

Figure 2 shows the plugins search dialog and search results for the AWS Toolkit extension.
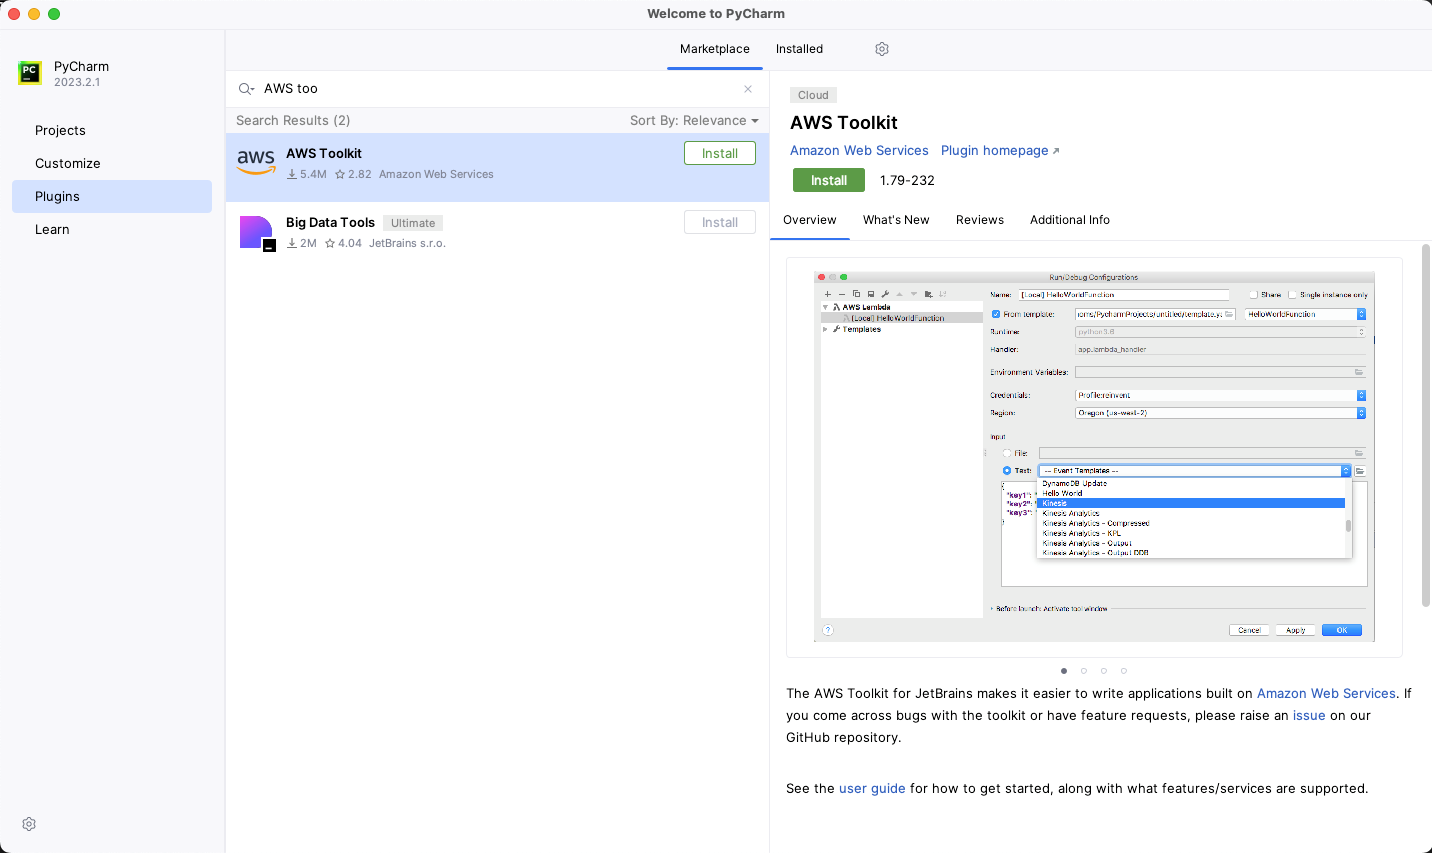
Figure 2: PyCharm plugins browser

Figure 2: PyCharm plugins browser

To create a new project

  1. Open the PyCharm IDE.
  2. From the menu bar, choose File > New Project, and then choose Create.

To authenticate CodeWhisperer with AWS

  1. In the navigation pane, choose the AWS icon (AWS icon).
  2. In the AWS Toolkit section, choose the Developer Tools tab.
  3. Under CodeWhisperer, double-click the Start icon(play icon).
    Figure 3: Start CodeWhisperer

    Figure 3: Start CodeWhisperer

  4. In the AWS Toolkit: Add Connection section, select Use a personal email to sign up and sign in with AWS Builder ID, and then choose Connect.
    Figure 4: AWS Toolkit Add Connection

    Figure 4: AWS Toolkit Add Connection

  5. For the Sign in with AWS Builder ID dialog box, choose Open and Copy Code.
  6. In the opened browser window, in the Authorize request section, in the Code field, paste the code that you copied in the previous step, and then choose Submit and continue.
    Figure 5: Authorize request page

    Figure 5: Authorize request page

  7. On the Create your AWS Builder ID page, do the following:
    1. For Email address, enter a valid current email address.
    2. Choose Next.
    3. For Your name, enter your full name.
    4. Choose Next.
      Figure 6: Create your AWS Builder ID

      Figure 6: Create your AWS Builder ID

  8. Check your inbox for an email sent from [email protected] titled Verify your AWS Builder ID email address, and copy the verification code that’s in the email.
  9. In your browser, on the Email verification page, for Verification code, paste the verification code, and then choose Verify.
    Figure 7: Email verification

    Figure 7: Email verification

  10. On the Choose your password page, enter a Password and Confirm password, and then choose Create AWS Builder ID.
  11. In the Allow AWS Toolkit for JetBrains to access your data? section, choose Allow.
    Figure 8: Allow AWS Toolkit for JetBrains to access your data

    Figure 8: Allow AWS Toolkit for JetBrains to access your data

  12. To confirm that the authentication was successful, in the PyCharm IDE navigation pane, select the AWS icon (AWS icon). On the AWS Toolkit window, make sure that Connected with AWS Builder ID is displayed.

Identify a potentially weak hashing algorithm by using CodeWhisperer security scans

The next step is to create a file that uses the hashing algorithm, SHA-224. CodeWhisperer considers this algorithm to be potentially weak and references Common Weakness Enumeration (CWE)-328. In this step, you use this weak hashing algorithm instead of the recommend algorithm SHA-256 so that you can see how CodeWhisperer flags this potential issue.

To create the file with the weak hashing algorithm (SHA-224)

  1. Create a new file in your PyCharm project named app.py
  2. Copy the following code snippet and paste it in the app.py file. In this code snippet, PBKDF2 is used with SHA-224, instead of the recommended SHA-256 algorithm.
    import hashlib
    import os
    
    salt = os.urandom(8)
    password = ‘secret’.encode()
    # Noncompliant: potentially weak algorithm used.
    derivedkey = hashlib.pbkdf2_hmac('sha224', password, salt, 100000)
    derivedkey.hex()

To initiate a security scan

  • In the AWS Toolkit section of PyCharm, on the Developer Tools tab, double-click the play icon (play icon) next to Run Security Scan. This opens a new tab called CodeWhisperer Security Issues that shows the scan was initiated successfully, as shown in Figure 9.
    Figure 9: AWS Toolkit window with security scan in progress

    Figure 9: AWS Toolkit window with security scan in progress

Interpret the CodeWhisperer security scan results

You can now interpret the results of the security scan.

To interpret the CodeWhisperer results

  1. When the security scan completes, CodeWhisperer highlights one of the rows in the main code editor window. To see a description of the identified issue, hover over the highlighted code. In our example, the issue that is displayed is CWE-327/328, as shown in Figure 10.
    Figure 10: Code highlighted with issue CWE-327,328 – Insecure hashing

    Figure 10: Code highlighted with issue CWE-327,328 – Insecure hashing

  2. The issue description indicates that the algorithm used in the highlighted line might be weak. The first argument of the pbkdf2_hmac function shown in Figure 10 is the algorithm SHA-224, so we can assume this is the highlighted issue.

CodeWhisperer has highlighted SHA-224 as a potential issue. However, to understand whether or not you need to make changes to improve the security of your code, you must do further investigation. A good starting point for your investigation is the CodeGuru Detector Library, which powers the scanning capabilities of CodeWhisperer. The entry in the Detector Library for insecure hashing provides example code and links to additional information.

This additional information reveals that the SHA-224 output is truncated and is 32 bits shorter than SHA-256. Because the output is truncated, SHA-224 is more susceptible to collision attacks than SHA-256. SHA-224 has 112-bit security compared to the 128-bit security of SHA-256. A collision attack is a way to find another input that yields an identical hash created by the original input. The CodeWhisperer issue description for insecure hashing in Figure 10 describes this as a potential issue and is the reason that CodeWhisperer flagged the code. However, if the size of the hash result is important for your use case, SHA-224 might be the correct solution, and if so, you can ignore this warning. But if you don’t have a specific reason to use SHA-224 over other algorithms, you should consider the alternative suggestions that CodeWhisperer offers, which I describe in the next section.

Use CodeWhisperer suggestions to help remediate security issues

CodeWhisperer automatically generates suggestions in real time as you type based on your existing code and comments. Suggestions range from completing a single line of code to generating complete functions. However, because CodeWhisperer uses an LLM that is trained on vast amounts of data, you might receive multiple different suggestions. These suggestions might change over time, even when you give CodeWhisperer the same context. Therefore, you must use your judgement to decide if a suggestion is the correct solution.

To replace the algorithm

  1. In the previous step, you found that the first argument of the pbkdf2_hmac function contains the potentially vulnerable algorithm SHA-224. To initiate a suggestion for a different algorithm, delete the arguments from the function. The suggestion from CodeWhisperer was to change the algorithm from SHA-224 to SHA-256. However, because of the nature of LLMs, you could get a different suggested algorithm.
  2. To apply this suggestion and update your code, press Tab. Figure 11 shows what the suggestion looks like in the PyCharm IDE.
    Figure 11: CodeWhisperer auto-suggestions

    Figure 11: CodeWhisperer auto-suggestions

Validate CodeWhisperer suggestions by rescanning the code

Although the training data used for the CodeWhisperer machine learning model has identified that security vulnerabilities were removed, it’s still possible that some suggestions will contain security vulnerabilities. Therefore, make sure that you fully understand the CodeWhisperer suggestions before you accept them and use them in your code. You are responsible for the code that you produce. In our example, other algorithms to consider are those from the SHA-3 family, such as SHA3-256. This family of algorithms are built using the sponge function rather than the Merkle-Damgård structure that SHA-1 and SHA-2 families are built with. This means that the SHA-3 family offers greater resistance to certain security events but can be slower to compute in certain configurations and hardware. In this case, you have multiple options to improve the security of SHA-224. Before you decide which algorithm to use, test the performance on your target hardware. Whether you use the solution that CodeWhisperer proposes or an alternative, you should validate changes in the code by running the security scans again.

To validate the CodeWhisperer suggestions

  • Choose Run Security Scan to rerun the scan. When the scan is complete, the CodeWhisperer Security Issues panel of PyCharm shows a notification that the rescan was completed successfully and no issues were found.
    Figure 12: Final security scan results

    Figure 12: Final security scan results

Conclusion

In this blog post, you learned how to set up PyCharm with CodeWhisperer, how to scan code for potential vulnerabilities with security scans, and how to view the details of these potential issues and understand the implications. To improve the security of your code, you reviewed and accepted CodeWhisperer suggestions, and ran the security scan again, validating the suggestion that CodeWhisperer made. Although many potential security vulnerabilities are removed during training of the CodeWhisperer machine learning model, you should validate these suggestions. CodeWhisperer is a great tool to help you speed up software development, but you are responsible for accepting or rejecting suggestions.

The example in this post showed how to identify a potentially insecure hash and improve the security of the algorithm. But CodeWhisperer security scans can detect much more, such as the Open Web Application Security Project (OWASP) top ten web application security risks, CWE top 25 most dangerous software weaknesses, log injection, secrets, and insecure use of AWS APIs and SDKs. The detector engine behind these scans uses the searchable Detector Library with descriptions, examples, and references for additional information.

In addition to using CodeWhisperer suggestions, you can also integrate security scanning into your CI/CD pipeline. By combining CodeWhisperer and automated release pipeline checks, you can detect potential vulnerabilities early with validation throughout the delivery process. Catching potential issues earlier can help you resolve them quickly and reduce the chance of frustrating delays late in the delivery process.

Prioritizing security throughout the development lifecycle can help you build robust and secure applications. By using tools such as CodeWhisperer and adopting DevSecOps practices, you can foster a security-conscious culture on your development team and help deliver safer software to your users.

If you want to explore code scanning on your own, CodeWhisperer is now generally available, and the individual tier is free for individual use. With CodeWhisperer, you can enhance the security of your code and minimize potential vulnerabilities before they become significant problems.

If you have feedback about this post, submit comments in the Comments section below. If you have questions about this post, start a new thread on the Amazon CodeWhisperer re:Post or contact AWS Support.

Want more AWS Security news? Follow us on Twitter.

Peter Grainger

Peter Grainger

Peter is a Technical Account Manager at AWS. He is based in Newcastle, England, and has over 14 years of experience in IT. Peter helps AWS customers build highly reliable and cost-effective systems and achieve operational excellence while running workloads on AWS. In his free time, he enjoys the outdoors and traveling.

How to improve cross-account access for SaaS applications accessing customer accounts

Post Syndicated from Ashwin Phadke original https://aws.amazon.com/blogs/security/how-to-improve-cross-account-access-for-saas-applications-accessing-customer-accounts/

Several independent software vendors (ISVs) and software as a service (SaaS) providers need to access their customers’ Amazon Web Services (AWS) accounts, especially if the SaaS product accesses data from customer environments. SaaS providers have adopted multiple variations of this third-party access scenario. In some cases, the providers ask the customer for an access key and a secret key, which is not recommended because these are long-term user credentials and require processes to be built for periodic rotation. However, in most cases, the provider has an integration guide with specific details on creating a cross-account AWS Identity and Access Management (IAM) role.

In all these scenarios, as a SaaS vendor, you should add the necessary protections to your SaaS implementation. At AWS, security is the top priority and we recommend that customers follow best practices and incorporate security in their product design. In this blog post intended for SaaS providers, I describe three ways to improve your cross-account access implementation for your products.

Why is this important?

As a security specialist, I’ve worked with multiple ISV customers on improving the security of their products, specifically on this third-party cross-account access scenario. Consumers of your SaaS products don’t want to give more access permissions than are necessary for the product’s proper functioning. At the same time, you should maintain and provide a secure SaaS product to protect your customers’ and your own AWS accounts from unauthorized access or privilege escalations.

Let’s consider a hypothetical scenario with a simple SaaS implementation where a customer is planning to use a SaaS product. In Figure 1, you can see that the SaaS product has multiple different components performing separate functions, for example, a SaaS product with separate components performing compute analysis, storage analysis, and log analysis. The SaaS provider asks the customer to provide IAM user credentials and uses those in their product to access customer resources. Let’s look at three techniques for improving the cross-account access for this scenario. Each technique builds on the previous one, so you could adopt an incremental approach to implement these techniques.

Figure 1: SaaS architecture using customer IAM user credentials

Figure 1: SaaS architecture using customer IAM user credentials

Technique 1 – Using IAM roles and an external ID

As stated previously, IAM user credentials are long-term, so customers would need to implement processes to rotate these periodically and share them with the ISV.

As a better option, SaaS product components can use IAM roles, which provide short-term credentials to the component assuming the role. These credentials need to be refreshed depending on the role’s session duration setting (the default is 1 hour) to continue accessing the resources. IAM roles also provide an advantage for auditing purposes because each time an IAM principal assumes a role, a new session is created, and this can be used to identify and audit activity for separate sessions.

When using IAM roles for third-party access, an important consideration is the confused deputy problem, where an unauthorized entity could coerce the product components into performing an action against another customers’ resources. To mitigate this problem, a highly recommended approach is to use the external ID parameter when assuming roles in customers’ accounts. It’s important and recommended that you generate these external ID parameters to make sure they’re unique for each of your customers, for example, using a customer ID or similar attribute. For external ID character restrictions, see the IAM quotas page. Your customers will use this external ID in their IAM role’s trust policy, and your product components will pass this as a parameter in all AssumeRole API calls to customer environments. An example of the trust policy principal and condition blocks for the role to be assumed in the customer’s account follows:

    "Principal": {"AWS": "<SaaS Provider’s AWS account ID>"},
    "Condition": {"StringEquals": {"sts:ExternalId": "<Unique ID Assigned by SaaS Provider>"}}
Figure 2: SaaS architecture using an IAM role and external ID

Figure 2: SaaS architecture using an IAM role and external ID

Technique 2 – Using least-privilege IAM policies and role chaining

As an IAM best practice, we recommend that an IAM role should only have the minimum set of permissions as required to perform its functions. When your customers create an IAM role in Technique 1, they might inadvertently provide more permissions than necessary to use your product. The role could have permissions associated with multiple AWS services and might become overly permissive. If you provide granular permissions for separate AWS services, you might reach the policy size quota or policies per role quota. See IAM quotas for more information. That’s why, in addition to Technique 1, we recommend that each component have a separate IAM role in the customer’s account with only the minimum permissions required for its functions.

As a part of your integration guide to the customer, you should ask them to create appropriate IAM policies for these IAM roles. There needs to be a clear separation of duties and least privilege access for the product components. For example, an account-monitoring SaaS provider might use a separate IAM role for Amazon Elastic Compute Cloud (Amazon EC2) monitoring and another one for AWS CloudTrail monitoring. Your components will also use separate IAM roles in your own AWS account. However, you might want to provide a single integration IAM role to customers to establish the trust relationship with each component role in their account. In effect, you will be using the concept of role chaining to access your customer’s accounts. The auditing mechanisms on the customer’s end will only display the integration IAM role sessions.

When using role chaining, you must be aware of certain caveats and limitations. Your components will each have separate roles: Role A, which will assume the integration role (Role B), and then use the Role B credentials to assume the customer role (Role C) in customer’s accounts. You need to properly define the correct permissions for each of these roles, because the permissions of the previous role aren’t passed while assuming the role. Optionally, you can pass an IAM policy document known as a session policy as a parameter while assuming the role, and the effective permissions will be a logical intersection of the passed policy and the attached permissions for the role. To learn more about these session policies, see session policies.

Another consideration of using role chaining is that it limits your AWS Command Line Interface (AWS CLI) or AWS API role session duration to a maximum of one hour. This means that you must track the sessions and perform credential refresh actions every hour to continue accessing the resources.

Figure 3: SaaS architecture with role chaining

Figure 3: SaaS architecture with role chaining

Technique 3 – Using role tags and session tags for attribute-based access control

When you create your IAM roles for role chaining, you define which entity can assume the role. You will need to add each component-specific IAM role to the integration role’s trust relationship. As the number of components within your product increases, you might reach the maximum length of the role trust policy. See IAM quotas for more information.

That’s why, in addition to the above two techniques, we recommend using attribute-based access control (ABAC), which is an authorization strategy that defines permissions based on tag attributes. You should tag all the component IAM roles with role tags and use these role tags as conditions in the trust policy for the integration role as shown in the following example. Optionally, you could also include instructions in the product integration guide for tagging customers’ IAM roles with certain role tags and modify the IAM policy of the integration role to allow it to assume only roles with those role tags. This helps in reducing IAM policy length and minimizing the risk of reaching the IAM quota.

"Condition": {
     "StringEquals": {"iam:ResourceTag/<Product>": "<ExampleSaaSProduct>"}

Another consideration for improving the auditing and traceability for your product is IAM role session tags. These could be helpful if you use CloudTrail log events for alerting on specific role sessions. If your SaaS product also operates on CloudTrail logs, you could use these session tags to identify the different sessions from your product. As opposed to role tags, which are tags attached to an IAM role, session tags are key-value pair attributes that you pass when you assume an IAM role. These can be used to identify a session and further control or restrict access to resources based on the tags. Session tags can also be used along with role chaining. When you use session tags with role chaining, you can set the keys as transitive to make sure that you pass them to subsequent sessions. CloudTrail log events for these role sessions will contain the session tags, transitive tags, and role (also called principal) tags.

Conclusion

In this post, we discussed three incremental techniques that build on each other and are important for SaaS providers to improve security and access control while implementing cross-account access to their customers. As a SaaS provider, it’s important to verify that your product adheres to security best practices. When you improve security for your product, you’re also improving security for your customers.

To see more tutorials about cross-account access concepts, visit the AWS documentation on IAM Roles, ABAC, and session tags.

If you have feedback about this post, submit comments in the Comments section below. If you have questions about this post, start a new thread on the AWS Identity and Access Management re:Post or contact AWS Support.

Want more AWS Security news? Follow us on Twitter.

Ashwin Phadke

Ashwin Phadke

Ashwin is a Sr. Solutions Architect, working with large enterprises and ISV customers to build highly available, scalable, and secure applications, and to help them successfully navigate through their cloud journey. He is passionate about information security and enjoys working on creative solutions for customers’ security challenges.

Fall 2023 SOC reports now available with 171 services in scope

Post Syndicated from Ryan Wilks original https://aws.amazon.com/blogs/security/fall-2023-soc-reports-now-available-with-171-services-in-scope/

At Amazon Web Services (AWS), we’re committed to providing our customers with continued assurance over the security, availability, confidentiality, and privacy of the AWS control environment.

We’re proud to deliver the Fall 2023 System and Organizational (SOC) 1, 2, and 3 reports to support your confidence in AWS services. The reports cover the period October 1, 2022, to September 30, 2023. We extended the period of coverage to 12 months so that you have a full year of assurance from a single report. We also updated the associated infrastructure supporting our in-scope products and services to reflect new edge locations, AWS Wavelength zones, and AWS Local Zones.

The SOC 2 report includes the Security, Availability, Confidentiality, and Privacy Trust Service Criteria that cover both the design and operating effectiveness of controls over a period of time. The SOC 2 Privacy Trust Service Criteria, developed by the American Institute of Certified Public Accountants (AICPA), establishes the criteria for evaluating controls and how personal information is collected, used, retained, disclosed, and disposed of. For more information about our privacy commitments supporting the SOC 2 Type 2 report, see the AWS Customer Agreement.

The scope of the Fall 2023 SOC 2 Type 2 report includes information about how we handle the content that you upload to AWS, and how we protect that content across the services and locations that are in scope for the latest AWS SOC reports.

The Fall 2023 SOC reports include an additional 13 services in scope, for a total of 171 services. See the full list on our Services in Scope by Compliance Program page.

Here are the 13 additional services in scope for the Fall 2023 SOC reports:

Customers can download the Fall 2023 SOC reports through AWS Artifact in the AWS Management Console. You can also download the SOC 3 report as a PDF file from AWS.

AWS strives to bring services into the scope of its compliance programs to help you meet your architectural and regulatory needs. If there are additional AWS services that you would like us to add to the scope of our SOC reports (or other compliance programs), reach out to your AWS representatives.

We value your feedback and questions. Feel free to reach out to the team through the Contact Us page. If you have feedback about this post, submit comments in the Comments section below.

Want more AWS Security how-to-content, news, and feature announcements? Follow us on Twitter.

ryan wilks

Ryan Wilks

Ryan is a Compliance Program Manager at AWS. He leads multiple security and privacy initiatives within AWS. Ryan has 13 years of experience in information security. He has a bachelor of arts degree from Rutgers University and holds ITIL, CISM, and CISA certifications.

Nathan Samuel

Nathan Samuel

Nathan is a Compliance Program Manager at AWS. He leads multiple security and privacy initiatives within AWS. Nathan has a bachelor of commerce degree from the University of the Witwatersrand, South Africa, and has over 20 years of experience in security assurance. He holds the CISA, CRISC, CGEIT, CISM, CDPSE, and Certified Internal Auditor certifications.

Brownell Combs

Brownell Combs

Brownell is a Compliance Program Manager at AWS. He leads multiple security and privacy initiatives within AWS. Brownell holds a master of science degree in computer science from the University of Virginia and a bachelor of science degree in computer science from Centre College. He has over 20 years of experience in IT risk management and CISSP, CISA, and CRISC certifications.

Paul Hong

Paul Hong

Paul is a Compliance Program Manager at AWS. He leads multiple security, compliance, and training initiatives within AWS, and has 10 years of experience in security assurance. Paul holds CISSP, CEH, and CPA certifications, and holds a master’s degree in accounting information systems and a bachelor’s degree in business administration from James Madison University, Virginia.

Optimize AWS administration with IAM paths

Post Syndicated from David Rowe original https://aws.amazon.com/blogs/security/optimize-aws-administration-with-iam-paths/

As organizations expand their Amazon Web Services (AWS) environment and migrate workloads to the cloud, they find themselves dealing with many AWS Identity and Access Management (IAM) roles and policies. These roles and policies multiply because IAM fills a crucial role in securing and controlling access to AWS resources. Imagine you have a team creating an application. You create an IAM role to grant them access to the necessary AWS resources, such as Amazon Simple Storage Service (Amazon S3) buckets, Amazon Key Management Service (Amazon KMS) keys, and Amazon Elastic File Service (Amazon EFS) shares. With additional workloads and new data access patterns, the number of IAM roles and policies naturally increases. With the growing complexity of resources and data access patterns, it becomes crucial to streamline access and simplify the management of IAM policies and roles

In this blog post, we illustrate how you can use IAM paths to organize IAM policies and roles and provide examples you can use as a foundation for your own use cases.

How to use paths with your IAM roles and policies

When you create a role or policy, you create it with a default path. In IAM, the default path for resources is “/”. Instead of using a default path, you can create and use paths and nested paths as a structure to manage IAM resources. The following example shows an IAM role named S3Access in the path developer:

arn:aws:iam::111122223333:role/developer/S3Access

Service-linked roles are created in a reserved path /aws-service-role/. The following is an example of a service-linked role path.

arn:aws:iam::*:role/aws-service-role/SERVICE-NAME.amazonaws.com/SERVICE-LINKED-ROLE-NAME

The following example is of an IAM policy named S3ReadOnlyAccess in the path security:

arn:aws:iam::111122223333:policy/security/S3ReadOnlyAccess

Why use IAM paths with roles and policies?

By using IAM paths with roles and policies, you can create groupings and design a logical separation to simplify management. You can use these groupings to grant access to teams, delegate permissions, and control what roles can be passed to AWS services. In the following sections, we illustrate how to use IAM paths to create groupings of roles and policies by referencing a fictional company and its expansion of AWS resources.

First, to create roles and policies with a path, you use the IAM API or AWS Command Line Interface (AWS CLI) to run aws cli create-role.

The following is an example of an AWS CLI command that creates a role in an IAM path.

aws iam create-role --role-name <ROLE-NAME> --assume-role-policy-document file://assume-role-doc.json --path <PATH>

Replace <ROLE-NAME> and <PATH> in the command with your role name and role path respectively. Use a trust policy for the trust document that matches your use case. An example trust policy that allows Amazon Elastic Compute Cloud (Amazon EC2) instances to assume this role on your behalf is below:

{
    "Version": "2012-10-17",
    "Statement": [
        {
            "Effect": "Allow",
            "Action": [
                "sts:AssumeRole"
            ],
            "Principal": {
                "Service": [
                    "ec2.amazonaws.com"
                ]
            }
        }
    ]
}

The following is an example of an AWS CLI command that creates a policy in an IAM path.

aws iam create-policy --policy-name <POLICY-NAME> --path <PATH> --policy-document file://policy.json

IAM paths sample implementation

Let’s assume you’re a cloud platform architect at AnyCompany, a startup that’s planning to expand its AWS environment. By the end of the year, AnyCompany is going to expand from one team of developers to multiple teams, all of which require access to AWS. You want to design a scalable way to manage IAM roles and policies to simplify the administrative process to give permissions to each team’s roles. To do that, you create groupings of roles and policies based on teams.

Organize IAM roles with paths

AnyCompany decided to create the following roles based on teams.

Team name Role name IAM path Has access to
Security universal-security-readonly /security/ All resources
Team A database administrators DBA-role-A /teamA/ TeamA’s databases
Team B database administrators DBA-role-B /teamB/ TeamB’s databases

The following are example Amazon Resource Names (ARNs) for the roles listed above. In this example, you define IAM paths to create a grouping based on team names.

  1. arn:aws:iam::444455556666:role/security/universal-security-readonly-role
  2. arn:aws:iam::444455556666:role/teamA/DBA-role-A
  3. arn:aws:iam::444455556666:role/teamB/DBA-role-B

Note: Role names must be unique within your AWS account regardless of their IAM paths. You cannot have two roles named DBA-role, even if they’re in separate paths.

Organize IAM policies with paths

After you’ve created roles in IAM paths, you will create policies to provide permissions to these roles. The same path structure that was defined in the IAM roles is used for the IAM policies. The following is an example of how to create a policy with an IAM path. After you create the policy, you can attach the policy to a role using the attach-role-policy command.

aws iam create-policy --policy-name <POLICY-NAME> --policy-document file://policy-doc.json --path <PATH>
  1. arn:aws:iam::444455556666:policy/security/universal-security-readonly-policy
  2. arn:aws:iam::444455556666:policy/teamA/DBA-policy-A
  3. arn:aws:iam::444455556666:policy/teamB/DBA-policy-B

Grant access to groupings of IAM roles with resource-based policies

Now that you’ve created roles and policies in paths, you can more readily define which groups of principals can access a resource. In this deny statement example, you allow only the roles in the IAM path /teamA/ to act on your bucket, and you deny access to all other IAM principals. Rather than use individual roles to deny access to the bucket, which would require you to list every role, you can deny access to an entire group of principals by path. If you create a new role in your AWS account in the specified path, you don’t need to modify the policy to include them. The path-based deny statement will apply automatically.

{
  "Version": "2012-10-17",
  "Statement": [
    {
      "Action": "s3:*",
      "Effect": "Deny",
      "Resource": [
		"arn:aws:s3:::EXAMPLE-BUCKET",
		"arn:aws:s3:::EXAMPLE-BUCKET/*"
		],
      "Principal": "*",
"Condition": {
        "ArnNotLike": {
          "aws:PrincipalArn": "arn:aws:iam::*:role/teamA/*"
        }
      }
}
  ]
}

Delegate access with IAM paths

IAM paths can also enable teams to more safely create IAM roles and policies and allow teams to only use the roles and policies contained by the paths. Paths can help prevent teams from privilege escalation by denying the use of roles that don’t belong to their team.

Continuing the example above, AnyCompany established a process that allows each team to create their own IAM roles and policies, providing they’re in a specified IAM path. For example, AnyCompany allows team A to create IAM roles and policies for team A in the path /teamA/:

  1. arn:aws:iam::444455556666:role/teamA/<role-name>
  2. arn:aws:iam::444455556666:policy/teamA/<policy-name>

Using IAM paths, AnyCompany can allow team A to more safely create and manage their own IAM roles and policies and safely pass those roles to AWS services using the iam:PassRole permission.

At AnyCompany, four IAM policies using IAM paths allow teams to more safely create and manage their own IAM roles and policies. Following recommended best practices, AnyCompany uses infrastructure as code (IaC) for all IAM role and policy creation. The four path-based policies that follow will be attached to each team’s CI/CD pipeline role, which has permissions to create roles. The following example focuses on team A, and how these policies enable them to self-manage their IAM credentials.

  1. Create a role in the path and modify inline policies on the role: This policy allows three actions: iam:CreateRole, iam:PutRolePolicy, and iam:DeleteRolePolicy. When this policy is attached to a principal, that principal is allowed to create roles in the IAM path /teamA/ and add and delete inline policies on roles in that IAM path.
    {
      "Version": "2012-10-17",
      "Statement": [
    {
            "Effect": "Allow",
            "Action": [
                "iam:CreateRole",
                "iam:PutRolePolicy",
                "iam:DeleteRolePolicy"
            ],
            "Resource": "arn:aws:iam::444455556666:role/teamA/*"
        }
    ]
    }

  2. Add and remove managed policies: The second policy example allows two actions: iam:AttachRolePolicy and iam:DetachRolePolicy. This policy allows a principal to attach and detach managed policies in the /teamA/ path to roles that are created in the /teamA/ path.
    {
      "Version": "2012-10-17",
      "Statement": [
    
    {
            "Effect": "Allow",
            "Action": [
                "iam:AttachRolePolicy",
                "iam:DetachRolePolicy"
            ],
            "Resource": "arn:aws:iam::444455556666:role/teamA/*",
            "Condition": {
                "ArnLike": {
                    "iam:PolicyARN": "arn:aws:iam::444455556666:policy/teamA/*"
                }          
            }
        }
    ]}

  3. Delete roles, tag and untag roles, read roles: The third policy allows a principal to delete roles, tag and untag roles, and retrieve information about roles that are created in the /teamA/ path.
    {
      "Version": "2012-10-17",
      "Statement": [
    
    
    {
            "Effect": "Allow",
            "Action": [
                "iam:DeleteRole",
                "iam:TagRole",
                "iam:UntagRole",
                "iam:GetRole",
                "iam:GetRolePolicy"
            ],
            "Resource": "arn:aws:iam::444455556666:role/teamA/*"
        }]}

  4. Policy management in IAM path: The final policy example allows access to create, modify, get, and delete policies that are created in the /teamA/ path. This includes creating, deleting, and tagging policies.
    {
      "Version": "2012-10-17",
      "Statement": [
    
    {
            "Effect": "Allow",
            "Action": [
                "iam:CreatePolicy",
                "iam:DeletePolicy",
                "iam:CreatePolicyVersion",            
                "iam:DeletePolicyVersion",
                "iam:GetPolicy",
                "iam:TagPolicy",
                "iam:UntagPolicy",
                "iam:SetDefaultPolicyVersion",
                "iam:ListPolicyVersions"
             ],
            "Resource": "arn:aws:iam::444455556666:policy/teamA/*"
        }]}

Safely pass roles with IAM paths and iam:PassRole

To pass a role to an AWS service, a principal must have the iam:PassRole permission. IAM paths are the recommended option to restrict which roles a principal can pass when granted the iam:PassRole permission. IAM paths help verify principals can only pass specific roles or groupings of roles to an AWS service.

At AnyCompany, the security team wants to allow team A to add IAM roles to an instance profile and attach it to Amazon EC2 instances, but only if the roles are in the /teamA/ path. The IAM action that allows team A to provide the role to the instance is iam:PassRole. The security team doesn’t want team A to be able to pass other roles in the account, such as an administrator role.

The policy that follows allows passing of a role that was created in the /teamA/ path and does not allow the passing of other roles such as an administrator role.

{
    "Version": "2012-10-17",
    "Statement": [{
        "Effect": "Allow",
        "Action": "iam:PassRole",
        "Resource": "arn:aws:iam::444455556666:role/teamA/*"
    }]
}

How to create preventative guardrails for sensitive IAM paths

You can use service control policies (SCP) to restrict access to sensitive roles and policies within specific IAM paths. You can use an SCP to prevent the modification of sensitive roles and policies that are created in a defined path.

You will see the IAM path under the resource and condition portion of the statement. Only the role named IAMAdministrator created in the /security/ path can create or modify roles in the security path. This SCP allows you to delegate IAM role and policy management to developers with confidence that they won’t be able to create, modify, or delete any roles or policies in the security path.

{
    "Version": "2012-10-17",
    "Statement": [
        {
	    "Sid": "RestrictIAMWithPathManagement",
            "Effect": "Deny",
            "Action": [
                "iam:AttachRolePolicy",
                "iam:CreateRole",
                "iam:DeleteRole",
                "iam:DeleteRolePermissionsBoundary",
                "iam:DeleteRolePolicy",
                "iam:DetachRolePolicy",
                "iam:PutRolePermissionsBoundary",
                "iam:PutRolePolicy",
                "iam:UpdateRole",
                "iam:UpdateAssumeRolePolicy",
                "iam:UpdateRoleDescription",
                "sts:AssumeRole",
                "iam:TagRole",
                "iam:UntagRole"
            ],
            "Resource": [
                "arn:aws:iam::*:role/security/* "
            ],
            "Condition": {
                "ArnNotLike": {
                    "aws:PrincipalARN": "arn:aws:iam::444455556666:role/security/IAMAdministrator"
                }
            }
        }
    ]
}

This next example shows you how you can safely exempt IAM roles created in the security path from specific controls in your organization. The policy denies all roles except the roles created in the /security/ IAM path to close member accounts.

{
  "Version": "2012-10-17",
  "Statement": [
    {
      "Sid": "PreventCloseAccount",
      "Effect": "Deny",
      "Action": "organizations:CloseAccount",
      "Resource": "*",
      "Condition": {
        "ArnNotLikeIfExists": {
          "aws:PrincipalArn": [
            "arn:aws:iam::*:role/security/*"
          ]
        }
      }
    }
  ]
}

Additional considerations when using IAM paths

You should be aware of some additional considerations when you start using IAM paths.

  1. Paths are immutable for IAM roles and policies. To change a path, you must delete the IAM resource and recreate the IAM resource in the alternative path. Deleting roles or instance profiles has step-by-step instructions to delete an IAM resource.
  2. You can only create IAM paths using AWS API or command line tools. You cannot create IAM paths with the AWS console.
  3. IAM paths aren’t added to the uniqueness of the role name. Role names must be unique within your account without the path taken into consideration.
  4. AWS reserves several paths including /aws-service-role/ and you cannot create roles in this path.

Conclusion

IAM paths provide a powerful mechanism for effectively grouping IAM resources. Path-based groupings can streamline access management across AWS services. In this post, you learned how to use paths with IAM principals to create structured access with IAM roles, how to delegate and segregate access within an account, and safely pass roles using iam:PassRole. These techniques can empower you to fine-tune your AWS access management and help improve security while streamlining operational workflows.

You can use the following references to help extend your knowledge of IAM paths. This post references the processes outlined in the user guides and blog post, and sources the IAM policies from the GitHub repositories.

  1. AWS Organizations User Guide, SCP General Examples
  2. AWS-Samples Service-control-policy-examples GitHub Repository
  3. AWS Security Blog: IAM Policy types: How and when to use them
  4. AWS-Samples how-and-when-to-use-aws-iam-policy-blog-samples GitHub Repository

 
If you have feedback about this post, submit comments in the Comments section below. If you have questions about this post, contact AWS Support.

Want more AWS Security news? Follow us on Twitter.

David Rowe

David Rowe

As a Senior Solutions Architect, David unites diverse global teams to drive cloud transformation through strategies and intuitive identity solutions. He creates consensus, guiding teams to adopt emerging technologies. He thrives on bringing together cross-functional perspectives to transform vision into reality in dynamic industries.

Use IAM Roles Anywhere to help you improve security in on-premises container workloads

Post Syndicated from Ulrich Hinze original https://aws.amazon.com/blogs/security/use-iam-roles-anywhere-to-help-you-improve-security-in-on-premises-container-workloads/

This blog post demonstrates how to help meet your security goals for a containerized process running outside of Amazon Web Services (AWS) as part of a hybrid cloud architecture. Managing credentials for such systems can be challenging, including when a workload needs to access cloud resources. IAM Roles Anywhere lets you exchange static AWS Identity and Access Management (IAM) user credentials with temporary security credentials in this scenario, reducing security risks while improving developer convenience.

In this blog post, we focus on these key areas to help you set up IAM Roles Anywhere in your own environment: determining whether an existing on-premises public key infrastructure (PKI) can be used with IAM Roles Anywhere, creating the necessary AWS resources, creating an IAM Roles Anywhere enabled Docker image, and using this image to issue AWS Command Line Interface (AWS CLI) commands. In the end, you will be able to issue AWS CLI commands through a Docker container, using credentials from your own PKI.

The AWS Well-Architected Framework and AWS IAM best practices documentation recommend that you use temporary security credentials over static credentials wherever possible. For workloads running on AWS—such as Amazon Elastic Compute Cloud (Amazon EC2) instances, AWS Lambda functions, or Amazon Elastic Kubernetes Service (Amazon EKS) pods—assigning and assuming IAM roles is a secure mechanism for distributing temporary credentials that can be used to authenticate against the AWS API. Before the release of IAM Roles Anywhere, developers had to use IAM users with long-lived, static credentials (access key IDs and secret access keys) to call the AWS API from outside of AWS. Now, by establishing trust between your on-premises PKI or AWS Private Certificate Authority (AWS Private CA) with IAM Roles Anywhere, you can also use IAM roles for workloads running outside of AWS.

This post provides a walkthrough for containerized environments. Containers make the setup for different environments and operating systems more uniform, making it simpler for you to follow the solution in this post and directly apply the learnings to your existing containerized setup. However, you can apply the same pattern to non-container environments.

At the end of this walkthrough, you will issue an AWS CLI command to list Amazon S3 buckets in an AWS account (aws s3 ls). This is a simplified mechanism to show that you have successfully authenticated to AWS using IAM Roles Anywhere. Typically, in applications that consume AWS functionality, you instead would use an AWS Software Development Kit (SDK) for the programming language of your application. You can apply the same concepts from this blog post to enable the AWS SDK to use IAM Roles Anywhere.

Prerequisites

To follow along with this post, you must have these tools installed:

  • The latest version of the AWS CLI, to create IAM Roles Anywhere resources
  • jq, to extract specific information from AWS API responses
  • Docker, to create and run the container image
  • OpenSSL, to create cryptographic keys and certificates

Make sure that the principal used by the AWS CLI has enough permissions to perform the commands described in this blog post. For simplicity, you can apply the following least-privilege IAM policy:

{
    "Version": "2012-10-17",
    "Statement": [
        {
            "Sid": "IAMRolesAnywhereBlog",
            "Effect": "Allow",
            "Action": [
                "iam:CreateRole",
                "iam:DeleteRole",
                "iam:PutRolePolicy",
                "iam:DeleteRolePolicy",
                "iam:PassRole",
                "rolesanywhere:CreateTrustAnchor",
                "rolesanywhere:ListTrustAnchors",
                "rolesanywhere:DeleteTrustAnchor",
                "rolesanywhere:CreateProfile",
                "rolesanywhere:ListProfiles",
                "rolesanywhere:DeleteProfile"
            ],
            "Resource": [
                "arn:aws:iam::*:role/bucket-lister",
                "arn:aws:rolesanywhere:*:*:trust-anchor/*",
                "arn:aws:rolesanywhere:*:*:profile/*"
            ]
        }
    ]
}

This blog post assumes that you have configured a default AWS Region for the AWS CLI. If you have not, refer to the AWS CLI configuration documentation for different ways to configure the AWS Region.

Considerations for production use cases

To use IAM Roles Anywhere, you must establish trust with a private PKI. Certificates that are issued by this certificate authority (CA) are then used to sign CreateSession API requests. The API returns temporary AWS credentials: the access key ID, secret access key, and session key. For strong security, you should specify that the certificates are short-lived and the CA automatically rotates expiring certificates.

To simplify the setup for demonstration purposes, this post explains how to manually create a CA and certificate by using OpenSSL. For a production environment, this is not a suitable approach, because it ignores security concerns around the CA itself and excludes automatic certificate rotation or revocation capabilities. You need to use your existing PKI to provide short-lived and automatically rotated certificates in your production environment. This post shows how to validate whether your private CA and certificates meet IAM Roles Anywhere requirements.

If you don’t have an existing PKI that fulfils these requirements, you can consider using AWS Private Certificate Authority (Private CA) for a convenient way to help you with this process.

In order to use IAM Roles Anywhere in your container workload, it must have access to certificates that are issued by your private CA.

Solution overview

Figure 1 describes the relationship between the different resources created in this blog post.

Figure 1: IAM Roles Anywhere relationship between different components and resources

Figure 1: IAM Roles Anywhere relationship between different components and resources

To establish a trust relationship with the existing PKI, you will use its CA certificate to create an IAM Roles Anywhere trust anchor. You will create an IAM role with permissions to list all buckets in the account. The IAM role’s trust policy states that it can be assumed only from IAM Roles Anywhere, narrowing down which exact end-entity certificate can be used to assume it. The IAM Roles Anywhere profile defines which IAM role can be assumed in a session.

The container that is authenticating with IAM Roles Anywhere needs to present a valid certificate issued by the PKI, as well as Amazon Resource Names (ARNs) for the trust anchor, profile, and role. The container finally uses the certificate’s private key to sign a CreateSession API call, returning temporary AWS credentials. These temporary credentials are then used to issue the aws s3 ls command, which lists all buckets in the account.

Create and verify the CA and certificate

To start, you can either use your own CA and certificate or, to follow along without your own CA, manually create a CA and certificate by using OpenSSL. Afterwards, you can verify that the CA and certificate comply with IAM Roles Anywhere requirements.

To create the CA and certificate

Note: Manually creating and signing RSA keys into X.509 certificates is not a suitable approach for production environments. This section is intended only for demonstration purposes.

  1. Create an OpenSSL config file called v3.ext, with the following content.
    [ req ]
    default_bits                    = 2048
    distinguished_name              = req_distinguished_name
    x509_extensions                 = v3_ca
    
    [ v3_cert ]
    basicConstraints                = critical, CA:FALSE
    keyUsage                        = critical, digitalSignature
    
    [ v3_ca ]
    subjectKeyIdentifier            = hash
    authorityKeyIdentifier          = keyid:always,issuer:always
    basicConstraints                = CA: true
    keyUsage                        = Certificate Sign
    
    [ req_distinguished_name ]
    countryName                     = Country Name (2 letter code)
    countryName_default             = US
    countryName_min                 = 2
    countryName_max                 = 2
    
    stateOrProvinceName             = State or Province Name (full name)
    stateOrProvinceName_default     = Washington
    
    localityName                    = Locality Name (eg, city)
    localityName_default            = Seattle

  2. Create the CA RSA private key ca-key.pem and choose a passphrase.
    openssl genrsa -aes256 -out ca-key.pem 2048

  3. Create the CA X.509 certificate ca-cert.pem, keeping the default settings for all options.
    openssl req -new -x509 -nodes -days 1095 -config v3.ext -key ca-key.pem -out ca-cert.pem

    The CA certificate is valid for three years. For recommendations on certificate validity, refer to the AWS Private CA documentation.

  4. Create an RSA private key key.pem, choose a new passphrase, and create a certificate signing request (CSR) csr.pem for the container. For Common Name (eg, fully qualified host name), enter myContainer. Leave the rest of the options blank.
    openssl req -newkey rsa:2048 -days 1 -keyout key.pem -out csr.pem

  5. Use the CA private key, CA certificate, and CSR to issue an X.509 certificate cert.pem for the container.
    openssl x509 -req -days 1 -sha256 -set_serial 01 -in csr.pem -out cert.pem -CA ca-cert.pem -CAkey ca-key.pem -extfile v3.ext -extensions v3_cert

To verify the CA and certificate

  1. Check whether your CA certificate satisfies IAM Roles Anywhere constraints.
    openssl x509 -text -noout -in ca-cert.pem

    The output should contain the following.

    Certificate:
        Data:
            Version: 3 (0x2)
        ...
        Signature Algorithm: sha256WithRSAEncryption
        ...
            X509v3 extensions:
        ...
                X509v3 Basic Constraints:
                    CA:TRUE
                X509v3 Key Usage:
                    Certificate Sign
        ...

  2. Check whether your certificate satisfies IAM Roles Anywhere constraints.
    openssl x509 -text -noout -in cert.pem

    The output should contain the following.

    Certificate:
        Data:
            Version: 3 (0x2)
        ...
        Signature Algorithm: sha256WithRSAEncryption
        ...
            X509v3 extensions:
        ...
                X509v3 Basic Constraints:
                    CA:FALSE
                X509v3 Key Usage:
                    Digital Signature
        ...

    Note that IAM Roles Anywhere also supports stronger encryption algorithms than SHA256.

Create IAM resources

After you verify that your PKI complies with IAM Roles Anywhere requirements, you’re ready to create IAM resources. Before you start, make sure you have configured the AWS CLI, including setting a default AWS Region.

To create the IAM role

  1. Create a file named policy.json that specifies a set of permissions that your container process needs. For this walkthrough, you will issue the simple AWS CLI command aws s3 ls, which needs the following permissions:
    {
      "Version": "2012-10-17",
      "Statement": [
        {
          "Effect": "Allow",
          "Action": [
             "s3:ListAllMyBuckets"
          ],
          "Resource": "*"
        }
      ]
    }

  2. Create a file named trust-policy.json that contains the assume role policy for an IAM role by the service IAM Roles Anywhere. Note that this policy defines which certificate can assume the role. We define this based on the common name (CN) of the certificate, but you can explore other possibilities in the IAM Roles Anywhere documentation.
    {
      "Version": "2012-10-17",
      "Statement": [
        {
          "Effect": "Allow",
          "Principal": {
              "Service": "rolesanywhere.amazonaws.com"
          },
          "Action": [
            "sts:AssumeRole",
            "sts:TagSession",
            "sts:SetSourceIdentity"
          ],
          "Condition": {
            "StringEquals": {
              "aws:PrincipalTag/x509Subject/CN": "myContainer"
            }
          }
        }
      ]
    }

  3. Create the IAM role named bucket-lister.
    aws iam create-role --role-name bucket-lister --assume-role-policy-document file://trust-policy.json

    The response should be a JSON document that describes the role.

  4. Attach the IAM policy document that you created earlier.
    aws iam put-role-policy --role-name bucket-lister --policy-name list-buckets --policy-document file://policy.json

    This command returns without a response.

To enable authentication with IAM Roles Anywhere

  1. Establish trust between IAM Roles Anywhere and an on-premises PKI by making the CA certificate known to IAM Roles Anywhere using a trust anchor. Create an IAM Roles Anywhere trust anchor from the CA certificate by using the following command:
    aws rolesanywhere create-trust-anchor --enabled --name myPrivateCA --source sourceData={x509CertificateData="$(cat ca-cert.pem)"},sourceType=CERTIFICATE_BUNDLE

    The response should be a JSON document that describes the trust anchor.

  2. Create an IAM Roles Anywhere profile. Make sure to replace <AWS_ACCOUNT ID> with your own information.
    aws rolesanywhere create-profile --enabled --name bucket-lister --role-arns "arn:aws:iam::<AWS_ACCOUNT_ID>:role/bucket-lister"

    The response should be a JSON document that describes the profile.

Create the Docker image

The Docker image that you will create in this step enables you to issue commands with the AWS CLI that are authenticated by using IAM Roles Anywhere.

To create the Docker image

  1. Create a file named docker-entrypoint.sh that configures the AWS CLI to use the IAM Roles Anywhere signing helper.
    #!/bin/sh
    set -e
    
    openssl rsa -in $ROLESANYWHERE_KEY_LOCATION -passin env:ROLESANYWHERE_KEY_PASSPHRASE -out /tmp/key.pem > /dev/null 2>&1
    
    echo "[default]" > ~/.aws/config
    echo "  credential_process = aws_signing_helper credential-process \
        --certificate $ROLESANYWHERE_CERT_LOCATION \
        --private-key /tmp/key.pem \
        --trust-anchor-arn $ROLESANYWHERE_TRUST_ANCHOR_ARN \
        --profile-arn $ROLESANYWHERE_PROFILE_ARN \
        --role-arn $ROLESANYWHERE_ROLE_ARN" >> ~/.aws/config
    
    exec "$@"

  2. Create a file named Dockerfile. This contains a multi-stage build. The first stage builds the IAM Roles Anywhere signing helper. The second stage copies the compiled signing helper binary into the official AWS CLI Docker image and changes the container entry point to the script you created earlier.
    FROM ubuntu:22.04 AS signing-helper-builder
    WORKDIR /build
    
    RUN apt update && apt install -y git build-essential golang-go
    
    RUN git clone --branch v1.1.1 https://github.com/aws/rolesanywhere-credential-helper.git
    RUN go env -w GOPRIVATE=*
    RUN go version
    
    RUN cd rolesanywhere-credential-helper && go build -buildmode=pie -ldflags "-X main.Version=1.0.2 -linkmode=external -extldflags=-static -w -s" -trimpath -o build/bin/aws_signing_helper main.go
    
    
    FROM amazon/aws-cli:2.11.27
    COPY --from=signing-helper-builder /build/rolesanywhere-credential-helper/build/bin/aws_signing_helper /usr/bin/aws_signing_helper
    
    RUN yum install -y openssl shadow-utils
    
    COPY ./docker-entrypoint.sh /docker-entrypoint.sh
    RUN chmod +x /docker-entrypoint.sh
    
    RUN useradd user
    USER user
    
    RUN mkdir ~/.aws
    
    ENTRYPOINT ["/bin/bash", "/docker-entrypoint.sh", "aws"]

    Note that the first build stage can remain the same for other use cases, such as for applications using an AWS SDK. Only the second stage would need to be adapted. Diving deeper into the technical details of the first build stage, note that building the credential helper from its source keeps the build independent of the processor architecture. The build process also statically packages dependencies that are not present in the official aws-cli Docker image. Depending on your use case, you may opt to download pre-built artifacts from the credential helper download page instead.

  3. Create the image as follows.
    docker build -t rolesanywhere .

Use the Docker image

To use the Docker image, use the following commands to run the created image manually. Make sure to replace <PRIVATE_KEY_PASSSPHRASE> with your own data.

profile_arn=$(aws rolesanywhere list-profiles  | jq -r '.profiles[] | select(.name=="bucket-lister") | .profileArn')
trust_anchor_arn=$(aws rolesanywhere list-trust-anchors | jq -r '.trustAnchors[] | select(.name=="myPrivateCA") | .trustAnchorArn')
role_arn=$(aws iam list-roles | jq -r '.Roles[] | select(.RoleName=="bucket-lister") | .Arn')

docker run -it -v $(pwd):/rolesanywhere -e ROLESANYWHERE_CERT_LOCATION=/rolesanywhere/cert.pem -e ROLESANYWHERE_KEY_LOCATION=/rolesanywhere/key.pem -e ROLESANYWHERE_KEY_PASSPHRASE=<PRIVATE_KEY_PASSSPHRASE> -e ROLESANYWHERE_TRUST_ANCHOR_ARN=$trust_anchor_arn -e ROLESANYWHERE_PROFILE_ARN=$profile_arn -e ROLESANYWHERE_ROLE_ARN=$role_arn rolesanywhere s3 ls

This command should return a list of buckets in your account.

Because we only granted permissions to list buckets, other commands that use this certificate, like the following, will fail with an UnauthorizedOperation error.

docker run -it -v $(pwd):/rolesanywhere -e ROLESANYWHERE_CERT_LOCATION=/rolesanywhere/cert.pem -e ROLESANYWHERE_KEY_LOCATION=/rolesanywhere/key.pem -e ROLESANYWHERE_KEY_PASSPHRASE=<PRIVATE_KEY_PASSSPHRASE> -e ROLESANYWHERE_TRUST_ANCHOR_ARN=$trust_anchor_arn -e ROLESANYWHERE_PROFILE_ARN=$profile_arn -e ROLESANYWHERE_ROLE_ARN=$role_arn rolesanywhere ec2 describe-instances --region us-east-1

Note that if you use a certificate that uses a different common name than myContainer, this command will instead return an AccessDeniedException error as it fails to assume the role bucket-lister.

To use the image in your own environment, consider the following:

  • How to provide the private key and certificate to your container. This depends on how and where your PKI provides certificates. As an example, consider a PKI that rotates certificate files in a host directory, which you can then mount as a directory to your container.
  • How to configure the environment variables. Some variables mentioned earlier, like ROLESANYWHERE_TRUST_ANCHOR_ARN, can be shared across containers, while ROLESANYWHERE_PROFILE_ARN and ROLESANYWHERE_ROLE_ARN should be scoped to a particular container.

Clean up

None of the resources created in this walkthrough incur additional AWS costs. But if you want to clean up AWS resources you created earlier, issue the following commands.

  • Delete the IAM policy from the IAM role.
    aws iam delete-role-policy --role-name bucket-lister --policy-name list-buckets

  • Delete the IAM role.
    aws iam delete-role --role-name bucket-lister

  • Delete the IAM Roles Anywhere profile.
    profile_id=$(aws rolesanywhere list-profiles | jq -r '.profiles[] | select(.name=="bucket-lister") | .profileId')
    aws rolesanywhere delete-profile --profile-id $profile_id

  • Delete the IAM Roles Anywhere trust anchor.
    trust_anchor_id=$(aws rolesanywhere list-trust-anchors | jq -r '.trustAnchors[] | select(.name=="myPrivateCA") | .trustAnchorId')
    aws rolesanywhere delete-trust-anchor --trust-anchor-id $trust_anchor_id

  • Delete the key material you created earlier to avoid accidentally reusing it or storing it in version control.
    rm ca-key.pem ca-cert.pem key.pem csr.pem cert.pem

What’s next

After you reconfigure your on-premises containerized application to access AWS resources by using IAM Roles Anywhere, assess your other hybrid workloads running on-premises that have access to AWS resources. The technique we described in this post isn’t limited to containerized workloads. We encourage you to identify other places in your on-premises infrastructure that rely on static IAM credentials and gradually switch them to use IAM Roles Anywhere.

Conclusion

In this blog post, you learned how to use IAM Roles Anywhere to help you meet security goals in your on-premises containerized system. Improve your security posture by using temporary credentials instead of static credentials to authenticate against the AWS API. Use your existing private CA to make credentials short-lived and automatically rotate them.

For more information, check out the IAM Roles Anywhere documentation. The workshop Deep Dive on AWS IAM Roles Anywhere provides another walkthrough that isn’t specific to Docker containers. If you have any questions, you can start a new thread on AWS re:Post or reach out to AWS Support.

Want more AWS Security news? Follow us on Twitter.

Ulrich Hinze

Ulrich Hinze

Ulrich is a Solutions Architect at AWS. He partners with software companies to architect and implement cloud-based solutions on AWS. Before joining AWS, he worked for AWS customers and partners in software engineering, consulting, and architecture roles for over 8 years.

Alex Paramonov

Alex Paramonov

Alex is an AWS Solutions Architect for Independent Software Vendors in Germany, passionate about Serverless and how it can solve real world problems. Before joining AWS, he worked with large and medium software development companies as a Full-stack Software Engineer and consultant.

Security at multiple layers for web-administered apps

Post Syndicated from Guy Morton original https://aws.amazon.com/blogs/security/security-at-multiple-layers-for-web-administered-apps/

In this post, I will show you how to apply security at multiple layers of a web application hosted on AWS.

Apply security at all layers is a design principle of the Security pillar of the AWS Well-Architected Framework. It encourages you to apply security at the network edge, virtual private cloud (VPC), load balancer, compute instance (or service), operating system, application, and code.

Many popular web apps are designed with a single layer of security: the login page. Behind that login page is an in-built administration interface that is directly exposed to the internet. Admin interfaces for these apps typically have simple login mechanisms and often lack multi-factor authentication (MFA) support, which can make them an attractive target for threat actors.

The in-built admin interface can also be problematic if you want to horizontally scale across multiple servers. The admin interface is available on every server that runs the app, so it creates a large attack surface. Because the admin interface updates the software on its own server, you must synchronize updates across a fleet of instances.

Multi-layered security is about identifying (or creating) isolation boundaries around the parts of your architecture and minimizing what is permitted to cross each boundary. Adding more layers to your architecture gives you the opportunity to introduce additional controls at each layer, creating more boundaries where security controls can be enforced.

In the example app scenario in this post, you have the opportunity to add many additional layers of security.

Example of multi-layered security

This post demonstrates how you can use the Run Web-Administered Apps on AWS sample project to help address these challenges, by implementing a horizontally-scalable architecture with multi-layered security. The project builds and configures many different AWS services, each designed to help provide security at different layers.

By running this solution, you can produce a segmented architecture that separates the two functions of these apps into an unprivileged public-facing view and an admin view. This design limits access to the web app’s admin functions while creating a fleet of unprivileged instances to serve the app at scale.

Figure 1 summarizes how the different services in this solution work to help provide security at the following layers:

  1. At the network edge
  2. Within the VPC
  3. At the load balancer
  4. On the compute instances
  5. Within the operating system
Figure 1: Logical flow diagram to apply security at multiple layers

Figure 1: Logical flow diagram to apply security at multiple layers

Deep dive on a multi-layered architecture

The following diagram shows the solution architecture deployed by Run Web-Administered Apps on AWS. The figure shows how the services deployed in this solution are deployed in different AWS Regions, and how requests flow from the application user through the different service layers.

Figure 2: Multi-layered architecture

Figure 2: Multi-layered architecture

This post will dive deeper into each of the architecture’s layers to see how security is added at each layer. But before we talk about the technology, let’s consider how infrastructure is built and managed — by people.

Perimeter 0 – Security at the people layer

Security starts with the people in your team and your organization’s operational practices. How your “people layer” builds and manages your infrastructure contributes significantly to your security posture.

A design principle of the Security pillar of the Well-Architected Framework is to automate security best practices. This helps in two ways: it reduces the effort required by people over time, and it helps prevent resources from being in inconsistent or misconfigured states. When people use manual processes to complete tasks, misconfigurations and missed steps are common.

The simplest way to automate security while reducing human effort is to adopt services that AWS manages for you, such as Amazon Relational Database Service (Amazon RDS). With Amazon RDS, AWS is responsible for the operating system and database software patching, and provides tools to make it simple for you to back up and restore your data.

You can automate and integrate key security functions by using managed AWS security services, such as Amazon GuardDuty, AWS Config, Amazon Inspector, and AWS Security Hub. These services provide network monitoring, configuration management, and detection of software vulnerabilities and unintended network exposure. As your cloud environments grow in scale and complexity, automated security monitoring is critical.

Infrastructure as code (IaC) is a best practice that you can follow to automate the creation of infrastructure. By using IaC to define, configure, and deploy the AWS resources that you use, you reduce the likelihood of human error when building AWS infrastructure.

Adopting IaC can help you improve your security posture because it applies the rigor of application code development to infrastructure provisioning. Storing your infrastructure definition in a source control system (such as AWS CodeCommit) creates an auditable artifact. With version control, you can track changes made to it over time as your architecture evolves.

You can add automated testing to your IaC project to help ensure that your infrastructure is aligned with your organization’s security policies. If you ever need to recover from a disaster, you can redeploy the entire architecture from your IaC project.

Another people-layer discipline is to apply the principle of least privilege. AWS Identity and Access Management (IAM) is a flexible and fine-grained permissions system that you can use to grant the smallest set of actions that your solution needs. You can use IAM to control access for both humans and machines, and we use it in this project to grant the compute instances the least privileges required.

You can also adopt other IAM best practices such as using temporary credentials instead of long-lived ones (such as access keys), and regularly reviewing and removing unused users, roles, permissions, policies, and credentials.

Perimeter 1 – network protections

The internet is public and therefore untrusted, so you must proactively address the risks from threat actors and network-level attacks.

To reduce the risk of distributed denial of service (DDoS) attacks, this solution uses AWS Shield for managed protection at the network edge. AWS Shield Standard is automatically enabled for all AWS customers at no additional cost and is designed to provide protection from common network and transport layer DDoS attacks. For higher levels of protection against attacks that target your applications, subscribe to AWS Shield Advanced.

Amazon Route 53 resolves the hostnames that the solution uses and maps the hostnames as aliases to an Amazon CloudFront distribution. Route 53 is a robust and highly available globally distributed DNS service that inspects requests to protect against DNS-specific attack types, such as DNS amplification attacks.

Perimeter 2 – request processing

CloudFront also operates at the AWS network edge and caches, transforms, and forwards inbound requests to the relevant origin services across the low-latency AWS global network. The risk of DDoS attempts overwhelming your application servers is further reduced by caching web requests in CloudFront.

The solution configures CloudFront to add a shared secret to the origin request within a custom header. A CloudFront function copies the originating user’s IP to another custom header. These headers get checked when the request arrives at the load balancer.

AWS WAF, a web application firewall, blocks known bad traffic, including cross-site scripting (XSS) and SQL injection events that come into CloudFront. This project uses AWS Managed Rules, but you can add your own rules, as well. To restrict frontend access to permitted IP CIDR blocks, this project configures an IP restriction rule on the web application firewall.

Perimeter 3 – the VPC

After CloudFront and AWS WAF check the request, CloudFront forwards it to the compute services inside an Amazon Virtual Private Cloud (Amazon VPC). VPCs are logically isolated networks within your AWS account that you can use to control the network traffic that is allowed in and out. This project configures its VPC to use a private IPv4 CIDR block that cannot be directly routed to or from the internet, creating a network perimeter around your resources on AWS.

The Amazon Elastic Compute Cloud (Amazon EC2) instances are hosted in private subnets within the VPC that have no inbound route from the internet. Using a NAT gateway, instances can make necessary outbound requests. This design hosts the database instances in isolated subnets that don’t have inbound or outbound internet access. Amazon RDS is a managed service, so AWS manages patching of the server and database software.

The solution accesses AWS Secrets Manager by using an interface VPC endpoint. VPC endpoints use AWS PrivateLink to connect your VPC to AWS services as if they were in your VPC. In this way, resources in the VPC can communicate with Secrets Manager without traversing the internet.

The project configures VPC Flow Logs as part of the VPC setup. VPC flow logs capture information about the IP traffic going to and from network interfaces in your VPC. GuardDuty analyzes these logs and uses threat intelligence data to identify unexpected, potentially unauthorized, and malicious activity within your AWS environment.

Although using VPCs and subnets to segment parts of your application is a common strategy, there are other ways that you can achieve partitioning for application components:

  • You can use separate VPCs to restrict access to a database, and use VPC peering to route traffic between them.
  • You can use a multi-account strategy so that different security and compliance controls are applied in different accounts to create strong logical boundaries between parts of a system. You can route network requests between accounts by using services such as AWS Transit Gateway, and control them using AWS Network Firewall.

There are always trade-offs between complexity, convenience, and security, so the right level of isolation between components depends on your requirements.

Perimeter 4 – the load balancer

After the request is sent to the VPC, an Application Load Balancer (ALB) processes it. The ALB distributes requests to the underlying EC2 instances. The ALB uses TLS version 1.2 to encrypt incoming connections with an AWS Certificate Manager (ACM) certificate.

Public access to the load balancer isn’t allowed. A security group applied to the ALB only allows inbound traffic on port 443 from the CloudFront IP range. This is achieved by specifying the Region-specific AWS-managed CloudFront prefix list as the source in the security group rule.

The ALB uses rules to decide whether to forward the request to the target instances or reject the traffic. As an additional layer of security, it uses the custom headers that the CloudFront distribution added to make sure that the request is from CloudFront. In another rule, the ALB uses the originating user’s IP to decide which target group of Amazon EC2 instances should handle the request. In this way, you can direct admin users to instances that are configured to allow admin tasks.

If a request doesn’t match a valid rule, the ALB returns a 404 response to the user.

Perimeter 5 – compute instance network security

A security group creates an isolation boundary around the EC2 instances. The only traffic that reaches the instance is the traffic that the security group rules allow. In this solution, only the ALB is allowed to make inbound connections to the EC2 instances.

A common practice is for customers to also open ports, or to set up and manage bastion hosts to provide remote access to their compute instances. The risk in this approach is that the ports could be left open to the whole internet, exposing the instances to vulnerabilities in the remote access protocol. With remote work on the rise, there is an increased risk for the creation of these overly permissive inbound rules.

Using AWS Systems Manager Session Manager, you can remove the need for bastion hosts or open ports by creating secure temporary connections to your EC2 instances using the installed SSM agent. As with every software package that you install, you should check that the SSM agent aligns with your security and compliance requirements. To review the source code to the SSM agent, see amazon-ssm-agent GitHub repo.

The compute layer of this solution consists of two separate Amazon EC2 Auto Scaling groups of EC2 instances. One group handles requests from administrators, while the other handles requests from unprivileged users. This creates another isolation boundary by keeping the functions separate while also helping to protect the system from a failure in one component causing the whole system to fail. Each Amazon EC2 Auto Scaling group spans multiple Availability Zones (AZs), providing resilience in the event of an outage in an AZ.

By using managed database services, you can reduce the risk that database server instances haven’t been proactively patched for security updates. Managed infrastructure helps reduce the risk of security issues that result from the underlying operating system not receiving security patches in a timely manner and the risk of downtime from hardware failures.

Perimeter 6 – compute instance operating system

When instances are first launched, the operating system must be secure, and the instances must be updated as required when new security patches are released. We recommend that you create immutable servers that you build and harden by using a tool such as EC2 Image Builder. Instead of patching running instances in place, replace them when an updated Amazon Machine Image (AMI) is created. This approach works in our example scenario because the application code (which changes over time) is stored on Amazon Elastic File System (Amazon EFS), so when you replace the instances with a new AMI, you don’t need to update them with data that has changed after the initial deployment.

Another way that the solution helps improve security on your instances at the operating system is to use EC2 instance profiles to allow them to assume IAM roles. IAM roles grant temporary credentials to applications running on EC2, instead of using hard-coded credentials stored on the instance. Access to other AWS resources is provided using these temporary credentials.

The IAM roles have least privilege policies attached that grant permission to mount the EFS file system and access AWS Systems Manager. If a database secret exists in Secrets Manager, the IAM role is granted permission to access it.

Perimeter 7 – at the file system

Both Amazon EC2 Auto Scaling groups of EC2 instances share access to Amazon EFS, which hosts the files that the application uses. IAM authorization applies IAM file system policies to control the instance’s access to the file system. This creates another isolation boundary that helps prevent the non-admin instances from modifying the application’s files.

The admin group’s instances have the file system mounted in read-write mode. This is necessary so that the application can update itself, install add-ons, upload content, or make configuration changes. On the unprivileged instances, the file system is mounted in read-only mode. This means that these instances can’t make changes to the application code or configuration files.

The unprivileged instances have local file caching enabled. This caches files from the EFS file system on the local Amazon Elastic Block Store (Amazon EBS) volume to help improve scalability and performance.

Perimeter 8 – web server configuration

This solution applies different web server configurations to the instances running in each Amazon EC2 Auto Scaling group. This creates a further isolation boundary at the web server layer.

The admin instances use the default configuration for the application that permits access to the admin interface. Non-admin, public-facing instances block admin routes, such as wp-login.php, and will return a 403 Forbidden response. This creates an additional layer of protection for those routes.

Perimeter 9 – database security

The database layer is within two additional isolation boundaries. The solution uses Amazon RDS, with database instances deployed in isolated subnets. Isolated subnets have no inbound or outbound internet access and can only be reached through other network interfaces within the VPC. The RDS security group further isolates the database instances by only allowing inbound traffic from the EC2 instances on the database server port.

By using IAM authentication for the database access, you can add an additional layer of security by configuring the non-admin instances with less privileged database user credentials.

Perimeter 10 – Security at the application code layer

To apply security at the application code level, you should establish good practices around installing updates as they become available. Most applications have email lists that you can subscribe to that will notify you when updates become available.

You should evaluate the quality of an application before you adopt it. The following are some metrics to consider:

  • Number of developers who are actively working on it
  • Frequency of updates to it
  • How quickly the developers respond with patches when bugs are reported

Other steps that you can take

Use AWS Verified Access to help secure application access for human users. With Verified Access, you can add another user authentication stage, to help ensure that only verified users can access an application’s administrative functions.

Amazon GuardDuty is a threat detection service that continuously monitors your AWS accounts and workloads for malicious activity and delivers detailed security findings for visibility and remediation. It can detect communication with known malicious domains and IP addresses and identify anomalous behavior. GuardDuty Malware Protection helps you detect the potential presence of malware by scanning the EBS volumes that are attached to your EC2 instances.

Amazon Inspector is an automated vulnerability management service that automatically discovers the Amazon EC2 instances that are running and scans them for software vulnerabilities and unintended network exposure. To help ensure that your web server instances are updated when security patches are available, use AWS Systems Manager Patch Manager.

Deploy the sample project

We wrote the Run Web-Administered Apps on AWS project by using the AWS Cloud Development Kit (AWS CDK). With the AWS CDK, you can use the expressive power of familiar programming languages to define your application resources and accelerate development. The AWS CDK has support for multiple languages, including TypeScript, Python, .NET, Java, and Go.

This project uses Python. To deploy it, you need to have a working version of Python 3 on your computer. For instructions on how to install the AWS CDK, see Get Started with AWS CDK.

Configure the project

To enable this project to deploy multiple different web projects, you must do the configuration in the parameters.properties file. Two variables identify the configuration blocks: app (which identifies the web application to deploy) and env (which identifies whether the deployment is to a dev or test environment, or to production).

When you deploy the stacks, you specify the app and env variables as CDK context variables so that you can select between different configurations at deploy time. If you don’t specify a context, a [default] stanza in the parameters.properties file specifies the default app name and environment that will be deployed.

To name other stanzas, combine valid app and env values by using the format <app>-<env>. For each stanza, you can specify its own Regions, accounts, instance types, instance counts, hostnames, and more. For example, if you want to support three different WordPress deployments, you might specify the app name as wp, and for env, you might want devtest, and prod, giving you three stanzas: wp-devwp-test, and wp-prod.

The project includes sample configuration items that are annotated with comments that explain their function.

Use CDK bootstrapping

Before you can use the AWS CDK to deploy stacks into your account, you need to use CDK bootstrapping to provision resources in each AWS environment (account and Region combination) that you plan to use. For this project, you need to bootstrap both the US East (N. Virginia) Region (us-east-1)  and the home Region in which you plan to host your application.

Create a hosted zone in the target account

You need to have a hosted zone in Route 53 to allow the creation of DNS records and certificates. You must manually create the hosted zone by using the AWS Management Console. You can delegate a domain that you control to Route 53 and use it with this project. You can also register a domain through Route 53 if you don’t currently have one.

Run the project

Clone the project to your local machine and navigate to the project root. To create the Python virtual environment (venv) and install the dependencies, follow the steps in the Generic CDK instructions.

To create and configure the parameters.properties file

Copy the parameters-template.properties file (in the root folder of the project) to a file called parameters.properties and save it in the root folder. Open it with a text editor and then do the following:

If you want to restrict public access to your site, change 192.0.2.0/24 to the IP range that you want to allow. By providing a comma-separated list of allowedIps, you can add multiple allowed CIDR blocks.

If you don’t want to restrict public access, set allowedIps=* instead.

If you have forked this project into your own private repository, you can commit the parameters.properties file to your repo. To do that, comment out the parameters.properties  line in the .gitignore file.

To install the custom resource helper

The solution uses an AWS CloudFormation custom resource for cross-Region configuration management. To install the needed Python package, run the following command in the custom_resource directory:

cd custom_resource
pip install crhelper -t .

To learn more about CloudFormation custom resource creation, see AWS CloudFormation custom resource creation with Python, AWS Lambda, and crhelper.

To configure the database layer

Before you deploy the stacks, decide whether you want to include a data layer as part of the deployment. The dbConfig parameter determines what will happen, as follows:

  • If dbConfig is left empty — no database will be created and no database credentials will be available in your compute stacks
  • If dbConfig is set to instance — you will get a new Amazon RDS instance
  • If dbConfig is set to cluster — you will get an Amazon Aurora cluster
  • If dbConfig is set to none — if you previously created a database in this stack, the database will be deleted

If you specify either instance or cluster, you should also configure the following database parameters to match your requirements:

  • dbEngine — set the database engine to either mysql or postgres
  • dbSnapshot — specify the named snapshot for your database
  • dbSecret — if you are using an existing database, specify the Amazon Resource Name (ARN) of the secret where the database credentials and DNS endpoint are located
  • dbMajorVersion — set the major version of the engine that you have chosen; leave blank to get the default version
  • dbFullVersion — set the minor version of the engine that you have chosen; leave blank to get the default version
  • dbInstanceType — set the instance type that you want (note that these vary by service); don’t prefix with db. because the CDK will automatically prepend it
  • dbClusterSize — if you request a cluster, set this parameter to determine how many Amazon Aurora replicas are created

You can choose between mysql or postgres for the database engine. Other settings that you can choose are determined by that choice.

You will need to use an Amazon Machine Image (AMI) that has the CLI preinstalled, such as Amazon Linux 2, or install the AWS Command Line Interface (AWS CLI) yourself with a user data command. If instead of creating a new, empty database, you want to create one from a snapshot, supply the snapshot name by using the dbSnapshot parameter.

To create the database secret

AWS automatically creates and stores the RDS instance or Aurora cluster credentials in a Secrets Manager secret when you create a new instance or cluster. You make these credentials available to the compute stack through the db_secret_command variable, which contains a single-line bash command that returns the JSON from the AWS CLI command aws secretsmanager get-secret-value. You can interpolate this variable into your user data commands as follows:

SECRET=$({db_secret_command})
USERNAME=`echo $SECRET | jq -r '.username'`
PASSWORD=`echo $SECRET | jq -r '.password'`
DBNAME=`echo $SECRET | jq -r '.dbname'`
HOST=`echo $SECRET | jq -r '.host'`

If you create a database from a snapshot, make sure that your Secrets Manager secret and Amazon RDS snapshot are in the target Region. If you supply the secret for an existing database, make sure that the secret contains at least the following four key-value pairs (replace the <placeholder values> with your values):

{
    "password":"<your-password>",
    "dbname":"<your-database-name>",
    "host":"<your-hostname>",
    "username":"<your-username>"
}

The name for the secret must match the app value followed by the env value (both in title case), followed by DatabaseSecret, so for app=wp and env=dev, your secret name should be WpDevDatabaseSecret.

To deploy the stacks

The following commands deploy the stacks defined in the CDK app. To deploy them individually, use the specific stack names (these will vary according to the info that you supplied previously), as shown in the following.

cdk deploy wp-dev-network-stack -c app=wp -c env=dev
cdk deploy wp-dev-database-stack -c app=wp -c env=dev
cdk deploy wp-dev-compute-stack -c app=wp -c env=dev
cdk deploy wp-dev-cdn-stack -c app=wp -c env=dev

To create a database stack, deploy the network and database stacks first.

cdk deploy wp-dev-network-stack -c app=wp -c env=dev
cdk deploy wp-dev-database-stack -c app=wp -c env=dev

You can then initiate the deployment of the compute stack.

cdk deploy wp-dev-compute-stack -c app=wp -c env=dev

After the compute stack deploys, you can deploy the stack that creates the CloudFront distribution.

cdk deploy wp-dev-cdn-stack -c env=dev

This deploys the CloudFront infrastructure to the US East (N. Virginia) Region (us-east-1). CloudFront is a global AWS service, which means that you must create it in this Region. The other stacks are deployed to the Region that you specified in your configuration stanza.

To test the results

If your stacks deploy successfully, your site appears at one of the following URLs:

  • subdomain.hostedZone (if you specified a value for the subdomain) — for example, www.example.com
  • appName-env.hostedZone (if you didn’t specify a value for the subdomain) — for example, wp-dev.example.com.

If you connect through the IP address that you configured in the adminIps configuration, you should be connected to the admin instance for your site. Because the admin instance can modify the file system, you should use it to do your administrative tasks.

Users who connect to your site from an IP that isn’t in your allowedIps list will be connected to your fleet instances and won’t be able to alter the file system (for example, they won’t be able to install plugins or upload media).

If you need to redeploy the same app-env combination, manually remove the parameter store items and the replicated secret that you created in us-east-1. You should also delete the cdk.context.json file because it caches values that you will be replacing.

One project, multiple configurations

You can modify the configuration file in this project to deploy different applications to different environments using the same project. Each app can have different configurations for dev, test, or production environments.

Using this mechanism, you can deploy sites for test and production into different accounts or even different Regions. The solution uses CDK context variables as command-line switches to select different configuration stanzas from the configuration file.

CDK projects allow for multiple deployments to coexist in one account by using unique names for the deployed stacks, based on their configuration.

Check the configuration file into your source control repo so that you track changes made to it over time.

Got a different web app that you want to deploy? Create a new configuration by copying and pasting one of the examples and then modify the build commands as needed for your use case.

Conclusion

In this post, you learned how to build an architecture on AWS that implements multi-layered security. You can use different AWS services to provide protections to your application at different stages of the request lifecycle.

You can learn more about the services used in this sample project by building it in your own account. It’s a great way to explore how the different services work and the full features that are available. By understanding how these AWS services work, you will be ready to use them to add security, at multiple layers, in your own architectures.

 
If you have feedback about this post, submit comments in the Comments section below. If you have questions about this post, contact AWS Support.

Want more AWS Security news? Follow us on Twitter.

Guy Morton

Guy Morton

Guy is a Senior Solutions Architect at AWS. He enjoys bringing his decades of experience as a full stack developer, architect, and people manager to helping customers build and scale their applications securely in the AWS Cloud. Guy has a passion for automation in all its forms, and is also an occasional songwriter and musician who performs under the pseudonym Whtsqr.

Introducing new central configuration capabilities in AWS Security Hub

Post Syndicated from Nicholas Jaeger original https://aws.amazon.com/blogs/security/introducing-new-central-configuration-capabilities-in-aws-security-hub/

As cloud environments—and security risks associated with them—become more complex, it becomes increasingly critical to understand your cloud security posture so that you can quickly and efficiently mitigate security gaps. AWS Security Hub offers close to 300 automated controls that continuously check whether the configuration of your cloud resources aligns with the best practices identified by Amazon Web Services (AWS) security experts and with industry standards. Furthermore, you can manage your cloud security posture at scale by using a single action to enable Security Hub across your organization with the default settings, and by aggregating findings across your organization accounts and Regions to a single account and Region of your choice.

With the release of the new central configuration feature of Security Hub, the setup and management of control and policy configurations is simplified and centralized to the same account you have already been using to aggregate findings. In this blog post, we will explain the benefits of the new feature and describe how you can quickly onboard to it.

Central configuration overview

With the release of the new central configuration capabilities in Security Hub, you are now able to use your delegated administrator (DA) account (an AWS Organizations account designated to manage Security Hub throughout your organization) to centrally manage Security Hub controls and standards and to view your Security Hub configuration throughout your organization from a single place. To facilitate this functionality, central configuration allows you to set up policies that specify whether or not Security Hub should be enabled and which standards and controls should be turned on. You can then choose to associate your policies with your entire organization or with specific accounts or organizational units (OUs), with your policies applying automatically across linked Regions. Policies applied to specific OUs (or to the entire organization) are inherited by child accounts. This not only applies to existing accounts, but also to new accounts added to those OUs (or to the entire organization) after you created the policy. Furthermore, when you add a new linked Region to Security Hub, your existing policies will be applied to that Region immediately. This allows you to stop maintaining manual lists of accounts and Regions to which you’d like to apply your custom configurations; instead, you can maintain several policies for your organization, with each one being associated to a different set of accounts in your organization. As a result, by using the central configuration capabilities, you can significantly reduce the time spent on configuring Security Hub and switch your focus to remediating its findings.

After applying your policies, Security Hub also provides you with a view of your organization that shows the policy status per OU and account while also preventing drift. This means that after you set up your organization by using central configuration, account owners will not be able to deviate from your chosen settings—your policies will serve as the source of truth for your organizational configuration, and you can use them to understand how Security Hub is configured for your organization.

The use of the new central configuration feature is now the recommended approach to configuring Security Hub, and its standards and controls, across some or all AWS accounts in your AWS Organizations structure.

Prerequisites

To get started with central configuration, you need to complete three prerequisites:

  1. Enable AWS Config in the accounts and Regions where you plan to enable Security Hub. (For more information on how to optimize AWS Config configuration for Security Hub usage, see this blog post.)
  2. Turn on Security Hub in your AWS Organizations management account at least in one Region where you plan to use Security Hub.
  3. Use your Organizations management account to delegate an administrator account for Security Hub.

If you are new to Security Hub, simply navigate to it in the AWS Management Console from your organization management account, and the console will walk you through setting the last two prerequisites listed here. If you already use Security Hub, these can be configured from the Settings page in Security Hub. In both cases, upon completing these three prerequisites, you can proceed with the central configuration setup from the account you set as the DA.

Recommended setup

To begin the setup, open the Security Hub console from your AWS Organizations management account or from your Security Hub delegated administrator account. In the left navigation menu, choose Configuration to open the new Configuration page, shown in Figure 1. Choose Start central configuration.

Figure 1: The new Configuration page, where you can see your current organizational configuration and start using the new capabilities

Figure 1: The new Configuration page, where you can see your current organizational configuration and start using the new capabilities

If you signed in to Security Hub using the AWS Organizations management account, you will be brought to step 1, Designate delegated administrator, where you will be able to designate a new delegated administrator or confirm your existing selection before continuing the setup. If you signed in to Security Hub using your existing delegated administrator account, you will be brought directly to step 2, Centralize organization, which is shown in Figure 2. In step 2, you are first asked to choose your home Region, which is the AWS Region you will use to create your configuration policies. By default, the current Region is selected as your home Region, unless you already use cross-Region finding aggregation — in which case, your existing aggregation Region is pre-selected as your home Region.

You are then prompted to select your linked Regions, which are the Regions you will configure by using central configuration. Regions that were already linked as part of your cross-Region aggregation settings will be pre-selected. You will also be able to add additional Regions or choose to include all AWS Regions, including future Regions. If your selection includes opt-in Regions, note that Security Hub will not be enabled in them until you enable those Regions directly.

Figure 2: The Centralize organization page

Figure 2: The Centralize organization page

Step 3, Configure organization, is shown in Figure 3. You will see a recommendation that you use the AWS recommended Security Hub configuration policy (SHCP) across your entire organization. This includes enabling the AWS Foundational Security Best Practices (FSBP) v1.0.0 standard and enabling new and existing FSBP controls in accounts in your AWS Organizations structure. This is the recommended configuration for most customers, because the AWS FSBP have been carefully curated by AWS security experts and represent trusted security practices for customers to build on.

Alternatively, if you already have a custom configuration in Security Hub and would like to import it into the new capabilities, choose Customize my Security Hub configuration and then choose Pre-populate configuration.

Figure 3: Step 3 – creating your first policy

Figure 3: Step 3 – creating your first policy

Step 4, Review and apply, is where you can review the policy you just created. Until you complete this step, your organization’s configuration will not be changed. This step will override previous account configurations and create and apply your new policy. After you choose Create policy and apply, you will be taken to the new Configuration page, which was previously shown in Figure 1. The user interface will now be updated to include three tabs — Organization, Policies, and Invitation account — where you can do the following:

  • On the Organization tab, which serves as a single pane of glass for your organization configuration in Security Hub, you can see the policy status for each account and OU and verify that your desired configuration is in effect.
  • On the Policies tab, you can view your policies, update them, and create new ones.
  • On the Invitation accounts tab, you can view and update findings for invitation accounts, which do not belong to your AWS Organizations structure. These accounts cannot be configured using the new central configuration capabilities.

Together, those tabs serve as a single pane of glass for your organization configuration in Security Hub. To that end, the organization chart you now see shows which of your accounts have already been affected by the policy you just created and which are still pending. Normally, an account will show as pending only for a few minutes after you create new policies or update existing ones. However, an account can stay in pending status for up to 24 hours. During this time, Security Hub will try to configure the account with your chosen policy settings.

If Security Hub determines that a policy cannot be successfully propagated to an account, it will show its status as failed (see Figure 4). This is most likely to happen when you missed completing the prerequisites in the account where the failure is showing. For example, if AWS Config is not yet enabled in an account, the policy will have a failed status. When you hover your pointer over the word “Failed”, Security Hub will show an error message with details about the issue. After you fix the error, you can try again to apply the policy by selecting the failed account and choosing the Re-apply policy button.

Figure 4: The Organization tab on the <strong>Configuration</strong> page shows all your organization accounts, if they are being managed by a policy, and the policy status for each account and OU” width=”780″ class=”size-full wp-image-32053″ style=”border: 1px solid #bebebe”></p>
<p id=Figure 4: The Organization tab on the Configuration page shows all your organization accounts, if they are being managed by a policy, and the policy status for each account and OU

Flexibility in onboarding to central configuration

As mentioned earlier, central configuration makes it significantly more accessible for you to centrally manage Security Hub and its controls and standards. This feature also gives you the granularity to choose the specific accounts to which your chosen settings will be applied. Even though we recommend to use central configuration to configure all your accounts, one advantage of the feature is that you can initially create a test configuration and then apply it across your organization. This is especially useful when you have already configured Security Hub using previously available methods and you would like to check that you have successfully imported your existing configuration.

When you onboard to central configuration, accounts in the organization are self-managed by default, which means that they still maintain their previous configuration until you apply a policy to them, to one of their parent OUs, or to the entire organization. This gives you the option to create a test policy when you onboard, apply it only to a test account or OU, and check that you achieved your desired outcome before applying it to other accounts in the organization.

Configure and deploy different policies per OU

Although we recommend that you use the policy recommended by Security Hub whenever possible, every customer has a different environment and some customization might be required. Central configuration does not require you to use the recommended policy, and you can instead create your own custom policies that specify how Security Hub is used across organization accounts and Regions. You can create one configuration policy for your entire organization, or multiple policies to customize Security Hub settings in different accounts.

In addition, you might need to implement different policies per OU. For example, you might need to do that when you have a finance account or OU in which you want to use Payment Card Industry Data Security Standard (PCI DSS) v3.2.1. In this case, you can go to the Policies tab, choose Create policy, specify the configuration you’d like to have, and apply it to those specific OUs or accounts, as shown in Figure 5. Note that each policy must be complete — which means that it must contain the full configuration settings you would like to apply to the chosen set of accounts or OUs. In particular, an account cannot inherit part of its settings from a policy associated with a parent OU, and the other part from its own policy. The benefit of this requirement is that each policy serves as the source of truth for the configuration of the accounts it is applied to. For more information on this behavior or on how to create new policies, see the Security Hub documentation.

Figure 5: Creation of a new policy with the FSBP and the PCI DSS standards

Figure 5: Creation of a new policy with the FSBP and the PCI DSS standards

You might find it necessary to exempt accounts from being centrally configured. You have the option to set an account or OU to self-managed status. Then only the account owner can configure the settings for that account. This is useful if your organization has teams that need to be able to set their own security coverage. Unless you disassociate self-managed accounts from your Security Hub organization, you will still see findings from self-managed accounts, giving you organization-wide visibility into your security posture. However, you won’t be able to view the configuration of those accounts, because they are not centrally managed.

Understand and manage where controls are applied

In addition to being able to centrally create and view your policies, you can use the control details page to define, review, and apply how policies are configured at a control level. To access the control details page, go to the left navigation menu in Security Hub, choose Controls, and then choose any individual control.

The control details page allows you to review the findings of a control in accounts where it is already enabled. Then, if you decide that these findings are not relevant to specific accounts and OUs, or if you decide that you want to use the control in additional accounts where it is not currently enabled, you can choose Configure, view the policies to which the control currently applies, and update the configuration accordingly as shown in Figure 6.

Figure 6: Configuring a control from the control details page

Figure 6: Configuring a control from the control details page

Organizational visibility

As you might already have noticed in the earlier screenshot of the Organization view (Figure 4), the new central configuration capability gives you a new view of the policies applied (and by extension, the controls and standards deployed) to each account and OU. If you need to customize this configuration, you can modify an existing policy or create a new policy to quickly apply to all or a subset of your accounts. At a glance, you can also see which accounts are self-managed or don’t have Security Hub turned on.

Conclusion

Security Hub central configuration helps you to seamlessly configure Security Hub and its controls and standards across your accounts and Regions so that your organization’s accounts have the level of security controls coverage that you want. AWS recommends that you use this feature when configuring, deploying, and managing controls in Security Hub across your organization’s accounts and Regions. Central configuration is now available in all commercial AWS Regions. Try it out today by visiting the new Configuration page in Security Hub from your DA. You can benefit from the Security Hub 30-day free trial even if you use central configuration, and the trial offer will be automatically applied to organization accounts in which you didn’t use Security Hub before.

 
If you have feedback about this post, submit comments in the Comments section below. If you have questions about this post, contact AWS Support.

Want more AWS Security news? Follow us on Twitter.

Nicholas Jaeger

Nicholas Jaeger

Nicholas is a Principal Security Solutions Architect at AWS. His background includes software engineering, teaching, solutions architecture, and AWS security. Today, he focuses on helping companies and organizations operate as securely as possible on AWS. Nicholas also hosts AWS Security Activation Days to provide customers with prescriptive guidance while using AWS security services to increase visibility and reduce risk.

Gal Ordo

Gal Ordo

Gal is a Senior Product Manager for AWS Security Hub at AWS. He has more than a decade of experience in cybersecurity, having focused on IoT, network, and cloud security throughout his career. He is passionate about making sure that customers can continue to scale and grow their environments without compromising on security. Outside of work, Gal enjoys video games, reading, and exploring new places.

Use IAM Identity Center APIs to audit and manage application assignments

Post Syndicated from Laura Reith original https://aws.amazon.com/blogs/security/use-iam-identity-center-apis-to-audit-and-manage-application-assignments/

You can now use AWS IAM Identity Center application assignment APIs to programmatically manage and audit user and group access to AWS managed applications. Previously, you had to use the IAM Identity Center console to manually assign users and groups to an application. Now, you can automate this task so that you scale more effectively as your organization grows.

In this post, we will show you how to use IAM Identity Center APIs to programmatically manage and audit user and group access to applications. The procedures that we share apply to both organization instances and account instances of IAM Identity Center.

Automate management of user and group assignment to applications

IAM Identity Center is where you create, or connect, your workforce users one time and centrally manage their access to multiple AWS accounts and applications. You configure AWS managed applications to work with IAM Identity Center directly from within the relevant application console, and then manage which users or groups need permissions to the application.

You can already use the account assignment APIs to automate multi-account access and audit access assigned to your users using IAM Identity Center permission sets. Today, we expanded this capability with the new application assignment APIs. You can use these new APIs to programmatically control application assignments and develop automated workflows for auditing them.

AWS managed applications access user and group information directly from IAM Identity Center. One example of an AWS managed application is Amazon Redshift. When you configure Amazon Redshift as an AWS managed application with IAM Identity Center, and a user from your organization accesses the database, their group memberships defined in IAM Identity Center can map to Amazon Redshift database roles that grant them specific permissions. This makes it simpler for you to manage users because you don’t have to set database-object permissions for each individual. For more information, see The benefits of Redshift integration with AWS IAM Identity Center.

After you configure the integration between IAM Identity Center and Amazon Redshift, you can automate the assignment or removal of users and groups by using the DeleteApplicationAssignment and CreateApplicationAssignment APIs, as shown in Figure 1.

Figure 1: Use the CreateApplicationAssignment API to assign users and groups to Amazon Redshift

Figure 1: Use the CreateApplicationAssignment API to assign users and groups to Amazon Redshift

In this section, you will learn how to use Identity Center APIs to assign a group to your Amazon Redshift application. You will also learn how to delete the group assignment.

Prerequisites

To follow along with this walkthrough, make sure that you’ve completed the following prerequisites:

  • Enable IAM Identity Center, and use the Identity Store to manage your identity data. If you use an external identity provider, then you should handle the user creation and deletion processes in those systems.
  • Configure Amazon Redshift to use IAM Identity Center as its identity source. When you configure Amazon Redshift to use IAM Identity Center as its identity source, the application requires explicit assignment by default. This means that you must explicitly assign users to the application in the Identity Center console or APIs.
  • Install and configure AWS Command Line Interface (AWS CLI) version 2. For this example, you will use AWS CLI v2 to call the IAM Identity Center application assignment APIs. For more information, see Installing the AWS CLI and Configuring the AWS CLI.

Step 1: Get your Identity Center instance information

The first step is to run the following command to get the Amazon Resource Name (ARN) and Identity Store ID for the instance that you’re working with:

aws sso-admin list-instances

The output should look similar to the following:

{
  "Instances": [
      {
          "InstanceArn": "arn:aws:sso:::instance/ssoins-****************",
          "IdentityStoreId": "d-**********",
          "OwnerAccountId": "************",
          "Name": "MyInstanceName",
          "CreatedDate": "2023-10-08T16:45:19.839000-04:00",
          "State": {
              "Name": "ACTIVE"
          },
          "Status": "ACTIVE"
      }
  ],
  "NextToken": <<TOKEN>>
}

Take note of the IdentityStoreId and the InstanceArn — you will use both in the following steps.

Step 2: Create user and group in your Identity Store

The next step is to create a user and group in your Identity Store.

Note: If you already have a group in your Identity Center instance, get its GroupId and then proceed to Step 3. To get your GroupId, run the following command:

aws identitystore get-group-id --identity-store-id “d-********” –alternate-identifier “GroupName” ,

Create a new user by using the IdentityStoreId that you noted in the previous step.

aws identitystore create-user --identity-store-id "d-**********" --user-name "MyUser" --emails Value="[email protected]",Type="Work",Primary=true —display-name "My User" —name FamilyName="User",GivenName="My" 

The output should look similar to the following:

{
    "UserId": "********-****-****-****-************",
    "IdentityStoreId": "d--********** "
}

Create a group in your Identity Store:

aws identitystore create-group --identity-store-id d-********** --display-name engineering

In the output, make note of the GroupId — you will need it later when you create the application assignment in Step 4:

{
    "GroupId": "********-****-****-****-************",
    "IdentityStoreId": "d-**********"
}

Run the following command to add the user to the group:

aws identitystore create-group-membership --identity-store-id d-********** --group-id ********-****-****-****-************ --member-id UserId=********-****-****-****-************

The result will look similar to the following:

{
    "MembershipId": "********-****-****-****-************",
    "IdentityStoreId": "d-**********"
}

Step 3: Get your Amazon Redshift application ARN instance

The next step is to determine the application ARN. To get the ARN, run the following command.

aws sso-admin list-applications --instance-arn "arn:aws:sso:::instance/ssoins-****************"

If you have more than one application in your environment, use the filter flag to specify the application account or the application provider. To learn more about the filter option, see the ListApplications API documentation.

In this case, we have only one application: Amazon Redshift. The response should look similar to the following. Take note of the ApplicationArn — you will need it in the next step.

{

    "ApplicationArn": "arn:aws:sso:::instance/ssoins-****************/apl-***************",
    "ApplicationProviderArn": "arn:aws:sso::aws:applicationProvider/Redshift",
    "Name": "Amazon Redshift",
    "InstanceArn": "arn:aws:sso:::instance/ssoins-****************",
    "Status": "DISABLED",
    "PortalOptions": {
        "Visible": true,
        "Visibility": "ENABLED",
        "SignInOptions": {
            "Origin": "IDENTITY_CENTER"
        }
    },
    "AssignmentConfig": {
        "AssignmentRequired": true
    },
    "Description": "Amazon Redshift",
    "CreatedDate": "2023-10-09T10:48:44.496000-07:00"
}

Step 4: Add your group to the Amazon Redshift application

Now you can add your new group to the Amazon Redshift application managed by IAM Identity Center. The principal-id is the GroupId that you created in Step 2.

aws sso-admin create-application-assignment --application-arn "arn:aws:sso:::instance/ssoins-****************/apl-***************" --principal-id "********-****-****-****-************" --principal-type "GROUP"

The group now has access to Amazon Redshift, but with the default permissions in Amazon Redshift. To grant access to databases, you can create roles that control the permissions available on a set of tables or views.

To create these roles in Amazon Redshift, you need to connect to your cluster and run SQL commands. To connect to your cluster, use one of the following options:

Figure 2 shows a connection to Amazon Redshift through the query editor v2.

Figure 2: Query editor v2

Figure 2: Query editor v2

By default, all users have CREATE and USAGE permissions on the PUBLIC schema of a database. To disallow users from creating objects in the PUBLIC schema of a database, use the REVOKE command to remove that permission. For more information, see Default database user permissions.

As the Amazon Redshift database administrator, you can create roles where the role name contains the identity provider namespace prefix and the group or user name. To do this, use the following syntax:

CREATE ROLE <identitycenternamespace:rolename>;

The rolename needs to match the group name in IAM Identity Center. Amazon Redshift automatically maps the IAM Identity Center group or user to the role created previously. To expand the permissions of a user, use the GRANT command.

The identityprovidernamespace is assigned when you create the integration between Amazon Redshift and IAM Identity Center. It represents your organization’s name and is added as a prefix to your IAM Identity Center managed users and roles in the Redshift database.

Your syntax should look like the following:

CREATE ROLE <AWSIdentityCenter:MyGroup>;

Step 5: Remove application assignment

If you decide that the new group no longer needs access to the Amazon Redshift application but should remain within the IAM Identity Center instance, run the following command:

aws sso-admin delete-application-assignment --application-arn "arn:aws:sso:::instance/ssoins-****************/apl-***************" --principal-id "********-****-****-****-************" --principal-type "GROUP"

Note: Removing an application assignment for a group doesn’t remove the group from your Identity Center instance.

When you remove or add user assignments, we recommend that you review the application’s documentation because you might need to take additional steps to completely onboard or offboard a given user or group. For example, when you remove a user or group assignment, you must also remove the corresponding roles in Amazon Redshift. You can do this by using the DROP ROLE command. For more information, see Managing database security.

Audit user and group access to applications

Let’s consider how you can use the new APIs to help you audit application assignments. In the preceding example, you used the AWS CLI to create and delete assignments to Amazon Redshift. Now, we will show you how to use the new ListApplicationAssignments API to list the groups that are currently assigned to your Amazon Redshift application.

aws sso-admin list-application-assignments --application-arn arn:aws:sso::****************:application/ssoins-****************/apl-****************

The output should look similar to the following — in this case, you have a single group assigned to the application.

{
    "ApplicationAssignments": [
        {
        "ApplicationArn": "arn:aws:sso::****************:application/ssoins-****************/apl-****************",
        "PrincipalId": "********-****-****-****-************",
        "PrincipalType": "GROUP"
        }
    ]
}

To see the group membership, use the PrincipalId information to query Identity Store and get information on the users assigned to the group with a combination of the ListGroupMemberships and DescribeGroupMembership APIs.

If you have several applications that IAM Identity Center manages, you can also create a script to automatically audit those applications. You can run this script periodically in an AWS Lambda function in your environment to maintain oversight of the members that are added to each application.

To get the script for this use case, see the multiple-instance-management-iam-identity-center GitHub repository. The repository includes instructions to deploy the script using Lambda within the AWS Organizations delegated administrator account. After deployment, you can invoke the Lambda function to get .csv files of every IAM Identity Center instance in your organization, the applications assigned to each instance, and the users that have access to those applications.

Conclusion

In this post, you learned how to use the IAM Identity Center application assignment APIs to assign users to Amazon Redshift and remove them from the application when they are no longer part of the organization. You also learned to list which applications are deployed in each account, and which users are assigned to each of those applications.

To learn more about IAM Identity Center, see the AWS IAM Identity Center user guide. To test the application assignment APIs, see the SSO-admin API reference guide.

If you have feedback about this post, submit comments in the Comments section below. If you have questions about this post, start a new thread on AWS IAM Identity Center re:Post or contact AWS Support.

Want more AWS Security news? Follow us on Twitter.

Author

Laura Reith

Laura is an Identity Solutions Architect at AWS, where she thrives on helping customers overcome security and identity challenges. In her free time, she enjoys wreck diving and traveling around the world.

Steve Pascoe

Steve Pascoe

Steve is a Senior Technical Product Manager with the AWS Identity team. He delights in empowering customers with creative and unique solutions to everyday problems. Outside of that, he likes to build things with his family through Lego, woodworking, and recently, 3D printing.

sowjir-1.jpeg

Sowjanya Rajavaram

Sowjanya is a Sr Solution Architect who specializes in Identity and Security in AWS. Her entire career has been focused on helping customers of all sizes solve their Identity and Access Management problems. She enjoys traveling and experiencing new cultures and food.

Introducing IAM Access Analyzer custom policy checks

Post Syndicated from Mitch Beaumont original https://aws.amazon.com/blogs/security/introducing-iam-access-analyzer-custom-policy-checks/

AWS Identity and Access Management (IAM) Access Analyzer was launched in late 2019. Access Analyzer guides customers toward least-privilege permissions across Amazon Web Services (AWS) by using analysis techniques, such as automated reasoning, to make it simpler for customers to set, verify, and refine IAM permissions. Today, we are excited to announce the general availability of IAM Access Analyzer custom policy checks, a new IAM Access Analyzer feature that helps customers accurately and proactively check IAM policies for critical permissions and increases in policy permissiveness.

In this post, we’ll show how you can integrate custom policy checks into builder workflows to automate the identification of overly permissive IAM policies and IAM policies that contain permissions that you decide are sensitive or critical.

What is the problem?

Although security teams are responsible for the overall security posture of the organization, developers are the ones creating the applications that require permissions. To enable developers to move fast while maintaining high levels of security, organizations look for ways to safely delegate the ability of developers to author IAM policies. Many AWS customers implement manual IAM policy reviews before deploying developer-authored policies to production environments. Customers follow this practice to try to prevent excessive or unwanted permissions finding their way into production. Depending on the volume and complexity of the policies that need to be reviewed; these reviews can be intensive and take time. The result is a slowdown in development and potential delay in deployment of applications and services. Some customers write custom tooling to remove the manual burden of policy reviews, but this can be costly to build and maintain.

How do custom policy checks solve that problem?

Custom policy checks are a new IAM Access Analyzer capability that helps security teams accurately and proactively identify critical permissions in their policies. Custom policy checks can also tell you if a new version of a policy is more permissive than the previous version. Custom policy checks use automated reasoning, a form of static analysis, to provide a higher level of security assurance in the cloud. For more information, see Formal Reasoning About the Security of Amazon Web Services.

Custom policy checks can be embedded in a continuous integration and continuous delivery (CI/CD) pipeline so that checks can be run against policies without having to deploy the policies. In addition, developers can run custom policy checks from their local development environments and get fast feedback about whether or not the policies they are authoring are in line with your organization’s security standards.

How to analyze IAM policies with custom policy checks

In this section, we provide step-by-step instructions for using custom policy checks to analyze IAM policies.

Prerequisites

To complete the examples in our walkthrough, you will need the following:

  1. An AWS account, and an identity that has permissions to use the AWS services, and create the resources, used in the following examples. For more information, see the full sample code used in this blog post on GitHub.
  2. An installed and configured AWS CLI. For more information, see Configure the AWS CLI.
  3. The AWS Cloud Development Kit (AWS CDK). For installation instructions, refer to Install the AWS CDK.

Example 1: Use custom policy checks to compare two IAM policies and check that one does not grant more access than the other

In this example, you will create two IAM identity policy documents, NewPolicyDocument and ExistingPolicyDocument. You will use the new CheckNoNewAccess API to compare these two policies and check that NewPolicyDocument does not grant more access than ExistingPolicyDocument.

Step 1: Create two IAM identity policy documents

  1. Use the following command to create ExistingPolicyDocument.
    cat << EOF > existing-policy-document.json
    {
        "Version": "2012-10-17",
        "Statement": [
            {
                "Effect": "Allow",
                "Action": [
                    "ec2:StartInstances",
                    "ec2:StopInstances"
                ],
                "Resource": "arn:aws:ec2:*:*:instance/*",
                "Condition": {
                    "StringEquals": {
                        "aws:ResourceTag/Owner": "\${aws:username}"
                    }
                }
            }
        ]
    }
    EOF

  2. Use the following command to create NewPolicyDocument.
    cat << EOF > new-policy-document.json
    {
        "Version": "2012-10-17",
        "Statement": [
            {
                "Effect": "Allow",
                "Action": [
                    "ec2:StartInstances",
                    "ec2:StopInstances"
                ],
                "Resource": "arn:aws:ec2:*:*:instance/*"
            }
        ]
    }
    EOF

Notice that ExistingPolicyDocument grants access to the ec2:StartInstances and ec2:StopInstances actions if the condition key aws:ResourceTag/Owner resolves to true. In other words, the value of the tag matches the policy variable aws:username. NewPolicyDocument grants access to the same actions, but does not include a condition key.

Step 2: Check the policies by using the AWS CLI

  1. Use the following command to call the CheckNoNewAccess API to check whether NewPolicyDocument grants more access than ExistingPolicyDocument.
    aws accessanalyzer check-no-new-access \
    --new-policy-document file://new-policy-document.json \
    --existing-policy-document file://existing-policy-document.json \
    --policy-type IDENTITY_POLICY

After a moment, you will see a response from Access Analyzer. The response will look similar to the following.

{
    "result": "FAIL",
    "message": "The modified permissions grant new access compared to your existing policy.",
    "reasons": [
        {
            "description": "New access in the statement with index: 1.",
            "statementIndex": 1
        }
    ]
}

In this example, the validation returned a result of FAIL. This is because NewPolicyDocument is missing the condition key, potentially granting any principal with this identity policy attached more access than intended or needed.

Example 2: Use custom policy checks to check that an IAM policy does not contain sensitive permissions

In this example, you will create an IAM identity-based policy that contains a set of permissions. You will use the CheckAccessNotGranted API to check that the new policy does not give permissions to disable AWS CloudTrail or delete any associated trails.

Step 1: Create a new IAM identity policy document

  • Use the following command to create IamPolicyDocument.
    cat << EOF > iam-policy-document.json
    {
        "Version": "2012-10-17",
        "Statement": [
            {
                "Effect": "Allow",
                "Action": [
                    "cloudtrail:StopLogging",
                    "cloudtrail:Delete*"
                ],
                "Resource": ["*"] 
            }
        ]
    }
    EOF

Step 2: Check the policy by using the AWS CLI

  • Use the following command to call the CheckAccessNotGranted API to check if the new policy grants permission to the set of sensitive actions. In this example, you are asking Access Analyzer to check that IamPolicyDocument does not contain the actions cloudtrail:StopLogging or cloudtrail:DeleteTrail (passed as a list to the access parameter).
    aws accessanalyzer check-access-not-granted \
    --policy-document file://iam-policy-document.json \
    --access actions=cloudtrail:StopLogging,cloudtrail:DeleteTrail \
    --policy-type IDENTITY_POLICY

Because the policy that you created contains both cloudtrail:StopLogging and cloudtrail:DeleteTrail actions, Access Analyzer returns a FAIL.

{
    "result": "FAIL",
    "message": "The policy document grants access to perform one or more of the listed actions.",
    "reasons": [
        {
            "description": "One or more of the listed actions in the statement with index: 0.",
            "statementIndex": 0
        }
    ]
}

Example 3: Integrate custom policy checks into the developer workflow

Building on the previous two examples, in this example, you will automate the analysis of the IAM policies defined in an AWS CloudFormation template. Figure 1 shows the workflow that will be used. The workflow will initiate each time a pull request is created against the main branch of an AWS CodeCommit repository called my-iam-policy (the commit stage in Figure 1). The first check uses the CheckNoNewAccess API to determine if the updated policy is more permissive than a reference IAM policy. The second check uses the CheckAccessNotGranted API to automatically check for critical permissions within the policy (the validation stage in Figure 1). In both cases, if the updated policy is more permissive, or contains critical permissions, a comment with the results of the validation is posted to the pull request. This information can then be used to decide whether the pull request is merged into the main branch for deployment (the deploy stage is shown in Figure 1).

Figure 1: Diagram of the pipeline that will check policies

Figure 1: Diagram of the pipeline that will check policies

Step 1: Deploy the infrastructure and set up the pipeline

  1. Use the following command to download and unzip the Cloud Development Kit (CDK) project associated with this blog post.
    git clone https://github.com/aws-samples/access-analyzer-automated-policy-analysis-blog.git
    cd ./access-analyzer-automated-policy-analysis-blog

  2. Create a virtual Python environment to contain the project dependencies by using the following command.
    python3 -m venv .venv

  3. Activate the virtual environment with the following command.
    source .venv/bin/activate

  4. Install the project requirements by using the following command.
    pip install -r requirements.txt

  5. Use the following command to update the CDK CLI to the latest major version.
    npm install -g aws-cdk@2 --force

  6. Before you can deploy the CDK project, use the following command to bootstrap your AWS environment. Bootstrapping is the process of creating resources needed for deploying CDK projects. These resources include an Amazon Simple Storage Service (Amazon S3) bucket for storing files and IAM roles that grant permissions needed to perform deployments.
    cdk bootstrap

  7. Finally, use the following command to deploy the pipeline infrastructure.
    cdk deploy --require-approval never

    The deployment will take a few minutes to complete. Feel free to grab a coffee and check back shortly.

    When the deployment completes, there will be two stack outputs listed: one with a name that contains CodeCommitRepo and another with a name that contains ConfigBucket. Make a note of the values of these outputs, because you will need them later.

    The deployed pipeline is displayed in the AWS CodePipeline console and should look similar to the pipeline shown in Figure 2.

    Figure 2: AWS CodePipeline and CodeBuild Management Console view

    Figure 2: AWS CodePipeline and CodeBuild Management Console view

    In addition to initiating when a pull request is created, the newly deployed pipeline can also be initiated when changes to the main branch of the AWS CodeCommit repository are detected. The pipeline has three stages, CheckoutSources, IAMPolicyAnalysis, and deploy. The CheckoutSource stage checks out the contents of the my-iam-policy repository when the pipeline is triggered due to a change in the main branch.

    The IAMPolicyAnalysis stage, which runs after the CheckoutSource stage or when a pull request has been created against the main branch, has two actions. The first action, Check no new access, verifies that changes to the IAM policies in the CloudFormation template do not grant more access than a pre-defined reference policy. The second action, Check access not granted, verifies that those same updates do not grant access to API actions that are deemed sensitive or critical. Finally, the Deploy stage will deploy the resources defined in the CloudFormation template, if the actions in the IAMPolicyAnalysis stage are successful.

    To analyze the IAM policies, the Check no new access and Check access not granted actions depend on a reference policy and a predefined list of API actions, respectively.

  8. Use the following command to create the reference policy.
    cd ../ 
    cat << EOF > cnna-reference-policy.json
    {
        "Version": "2012-10-17",
        "Statement": [
            {
                "Effect": "Allow",
                "Action": "*",
                "Resource": "*"
            },
            {
                "Effect": "Deny",
                "Action": "iam:PassRole",
                "Resource": "arn:aws:iam::*:role/my-sensitive-roles/*"
            }
        ]
    }	
    EOF

    This reference policy sets out the maximum permissions for policies that you plan to validate with custom policy checks. The iam:PassRole permission is a permission that allows an IAM principal to pass an IAM role to an AWS service, like Amazon Elastic Compute Cloud (Amazon EC2) or AWS Lambda. The reference policy says that the only way that a policy is more permissive is if it allows iam:PassRole on this group of sensitive resources: arn:aws:iam::*:role/my-sensitive-roles/*”.

    Why might a reference policy be useful? A reference policy helps ensure that a particular combination of actions, resources, and conditions is not allowed in your environment. Reference policies typically allow actions and resources in one statement, then deny the problematic permissions in a second statement. This means that a policy that is more permissive than the reference policy allows access to a permission that the reference policy has denied.

    In this example, a developer who is authorized to create IAM roles could, intentionally or unintentionally, create an IAM role for an AWS service (like EC2 for AWS Lambda) that has permission to pass a privileged role to another service or principal, leading to an escalation of privilege.

  9. Use the following command to create a list of sensitive actions. This list will be parsed during the build pipeline and passed to the CheckAccessNotGranted API. If the policy grants access to one or more of the sensitive actions in this list, a result of FAIL will be returned. To keep this example simple, add a single API action, as follows.
    cat << EOF > sensitive-actions.file
    dynamodb:DeleteTable
    EOF

  10. So that the CodeBuild projects can access the dependencies, use the following command to copy the cnna-reference-policy.file and sensitive-actions.file to an S3 bucket. Refer to the stack outputs you noted earlier and replace <ConfigBucket> with the name of the S3 bucket created in your environment.
    aws s3 cp ./cnna-reference-policy.json s3://<ConfgBucket>/cnna-reference-policy.json
    aws s3 cp ./sensitive-actions.file s3://<ConfigBucket>/sensitive-actions.file

Step 2: Create a new CloudFormation template that defines an IAM policy

With the pipeline deployed, the next step is to clone the repository that was created and populate it with a CloudFormation template that defines an IAM policy.

  1. Install git-remote-codecommit by using the following command.
    pip install git-remote-codecommit

    For more information on installing and configuring git-remote-codecommit, see the AWS CodeCommit User Guide.

  2. With git-remote-codecommit installed, use the following command to clone the my-iam-policy repository from AWS CodeCommit.
    git clone codecommit://my-iam-policy && cd ./my-iam-policy

    If you’ve configured a named profile for use with the AWS CLI, use the following command, replacing <profile> with the name of your named profile.

    git clone codecommit://<profile>@my-iam-policy && cd ./my-iam-policy

  3. Use the following command to create the CloudFormation template in the local clone of the repository.
    cat << EOF > ec2-instance-role.yaml
    ---
    AWSTemplateFormatVersion: 2010-09-09
    Description: CloudFormation Template to deploy base resources for access_analyzer_blog
    Resources:
      EC2Role:
        Type: AWS::IAM::Role
        Properties:
          AssumeRolePolicyDocument:
            Version: 2012-10-17
            Statement:
            - Effect: Allow
              Principal:
                Service: ec2.amazonaws.com
              Action: sts:AssumeRole
          Path: /
          Policies:
          - PolicyName: my-application-permissions
            PolicyDocument:
              Version: 2012-10-17
              Statement:
              - Effect: Allow
                Action:
                  - 'ec2:RunInstances'
                  - 'lambda:CreateFunction'
                  - 'lambda:InvokeFunction'
                  - 'dynamodb:Scan'
                  - 'dynamodb:Query'
                  - 'dynamodb:UpdateItem'
                  - 'dynamodb:GetItem'
                Resource: '*'
              - Effect: Allow
                Action:
                  - iam:PassRole 
                Resource: "arn:aws:iam::*:role/my-custom-role"
            
      EC2InstanceProfile:
        Type: AWS::IAM::InstanceProfile
        Properties:
          Path: /
          Roles:
            - !Ref EC2Role
    EOF

The actions in the IAMPolicyValidation stage are run by a CodeBuild project. CodeBuild environments run arbitrary commands that are passed to the project using a buildspec file. Each project has already been configured to use an inline buildspec file.

You can inspect the buildspec file for each project by opening the project’s Build details page as shown in Figure 3.

Figure 3: AWS CodeBuild console and build details

Figure 3: AWS CodeBuild console and build details

Step 3: Run analysis on the IAM policy

The next step involves checking in the first version of the CloudFormation template to the repository and checking two things. First, that the policy does not grant more access than the reference policy. Second, that the policy does not contain any of the sensitive actions defined in the sensitive-actions.file.

  1. To begin tracking the CloudFormation template created earlier, use the following command.
    git add ec2-instance-role.yaml 

  2. Commit the changes you have made to the repository.
    git commit -m 'committing a new CFN template with IAM policy'

  3. Finally, push these changes to the remote repository.
    git push

  4. Pushing these changes will initiate the pipeline. After a few minutes the pipeline should complete successfully. To view the status of the pipeline, do the following:
    1. Navigate to https://<region>.console.aws.amazon.com/codesuite/codepipeline/pipelines (replacing <region> with your AWS Region).
    2. Choose the pipeline called accessanalyzer-pipeline.
    3. Scroll down to the IAMPolicyValidation stage of the pipeline.
    4. For both the check no new access and check access not granted actions, choose View Logs to inspect the log output.
  5. If you inspect the build logs for both the check no new access and check access not granted actions within the pipeline, you should see that there were no blocking or non-blocking findings, similar to what is shown in Figure 4. This indicates that the policy was validated successfully. In other words, the policy was not more permissive than the reference policy, and it did not include any of the critical permissions.
    Figure 4: CodeBuild log entry confirming that the IAM policy was successfully validated

    Figure 4: CodeBuild log entry confirming that the IAM policy was successfully validated

Step 4: Create a pull request to merge a new update to the CloudFormation template

In this step, you will make a change to the IAM policy in the CloudFormation template. The change deliberately makes the policy grant more access than the reference policy. The change also includes a critical permission.

  1. Use the following command to create a new branch called add-new-permissions in the local clone of the repository.
    git checkout -b add-new-permissions

  2. Next, edit the IAM policy in ec2-instance-role.yaml to include an additional API action, dynamodb:Delete* and update the resource property of the inline policy to use an IAM role in the /my-sensitive-roles/*” path. You can copy the following example, if you’re unsure of how to do this.
    ---
    AWSTemplateFormatVersion: 2010-09-09
    Description: CloudFormation Template to deploy base resources for access_analyzer_blog
    Resources:
      EC2Role:
        Type: AWS::IAM::Role
        Properties:
          AssumeRolePolicyDocument:
            Version: 2012-10-17
            Statement:
            - Effect: Allow
              Principal:
                Service: ec2.amazonaws.com
              Action: sts:AssumeRole
          Path: /
          Policies:
          - PolicyName: my-application-permissions
            PolicyDocument:
              Version: 2012-10-17
              Statement:
              - Effect: Allow
                Action:
                  - 'ec2:RunInstances'
                  - 'lambda:CreateFunction'
                  - 'lambda:InvokeFunction'
                  - 'dynamodb:Scan'
                  - 'dynamodb:Query'
                  - 'dynamodb:UpdateItem'
                  - 'dynamodb:GetItem'
                  - 'dynamodb:Delete*'
                Resource: '*'
              - Effect: Allow
                Action:
                  - iam:PassRole 
                Resource: "arn:aws:iam::*:role/my-sensitive-roles/my-custom-admin-role"
            
      EC2InstanceProfile:
        Type: AWS::IAM::InstanceProfile
        Properties:
          Path: /
          Roles:
            - !Ref EC2Role

  3. Commit the policy change and push the updated policy document to the repo by using the following commands.
    git add ec2-instance-role.yaml 
    git commit -m "adding new permission and allowing my ec2 instance to assume a pass sensitive IAM role"

  4. The add-new-permissions branch is currently a local branch. Use the following command to push the branch to the remote repository. This action will not initiate the pipeline, because the pipeline only runs when changes are made to the repository’s main branch.
    git push -u origin add-new-permissions

  5. With the new branch and changes pushed to the repository, follow these steps to create a pull request:
    1. Navigate to https://console.aws.amazon.com/codesuite/codecommit/repositories (don’t forget to the switch to the correct Region).
    2. Choose the repository called my-iam-policy.
    3. Choose the branch add-new-permissions from the drop-down list at the top of the repository screen.
      Figure 5: my-iam-policy repository with new branch available

      Figure 5: my-iam-policy repository with new branch available

    4. Choose Create pull request.
    5. Enter a title and description for the pull request.
    6. (Optional) Scroll down to see the differences between the current version and new version of the CloudFormation template highlighted.
    7. Choose Create pull request.
  6. The creation of the pull request will Initiate the pipeline to fetch the CloudFormation template from the repository and run the check no new access and check access not granted analysis actions.
  7. After a few minutes, choose the Activity tab for the pull request. You should see a comment from the pipeline that contains the results of the failed validation.
    Figure 6: Results from the failed validation posted as a comment to the pull request

    Figure 6: Results from the failed validation posted as a comment to the pull request

Why did the validations fail?

The updated IAM role and inline policy failed validation for two reasons. First, the reference policy said that no one should have more permissions than the reference policy does. The reference policy in this example included a deny statement for the iam:PassRole permission with a resource of /my-sensitive-role/*. The new created inline policy included an allow statement for the iam:PassRole permission with a resource of arn:aws:iam::*:role/my-sensitive-roles/my-custom-admin-role. In other words, the new policy had more permissions than the reference policy.

Second, the list of critical permissions included the dynamodb:DeleteTable permission. The inline policy included a statement that would allow the EC2 instance to perform the dynamodb:DeleteTable action.

Cleanup

Use the following command to delete the infrastructure that was provisioned as part of the examples in this blog post.

cdk destroy 

Conclusion

In this post, I introduced you to two new IAM Access Analyzer APIs: CheckNoNewAccess and CheckAccessNotGranted. The main example in the post demonstrated one way in which you can use these APIs to automate security testing throughout the development lifecycle. The example did this by integrating both APIs into the developer workflow and validating the developer-authored IAM policy when the developer created a pull request to merge changes into the repository’s main branch. The automation helped the developer to get feedback about the problems with the IAM policy quickly, allowing the developer to take action in a timely way. This is often referred to as shifting security left — identifying misconfigurations early and automatically supporting an iterative, fail-fast model of continuous development and testing. Ultimately, this enables teams to make security an inherent part of a system’s design and architecture and can speed up product development workflow.

You can find the full sample code used in this blog post on GitHub.

To learn more about IAM Access Analyzer and the new custom policy checks feature, see the IAM Access Analyzer documentation.

If you have feedback about this post, submit comments in the Comments section below. If you have questions about this post, contact AWS Support.

Want more AWS Security news? Follow us on Twitter.

Mitch Beaumont

Mitch Beaumont

Mitch is a Principal Solutions Architect for AWS, based in Sydney, Australia. Mitch works with some of Australia’s largest financial services customers, helping them to continually raise the security bar for the products and features that they build and ship. Outside of work, Mitch enjoys spending time with his family, photography, and surfing.

Author

Matt Luttrell

Matt is a Principal Solutions Architect on the AWS Identity Solutions team. When he’s not spending time chasing his kids around, he enjoys skiing, cycling, and the occasional video game.

How to use the BatchGetSecretsValue API to improve your client-side applications with AWS Secrets Manager

Post Syndicated from Brendan Paul original https://aws.amazon.com/blogs/security/how-to-use-the-batchgetsecretsvalue-api-to-improve-your-client-side-applications-with-aws-secrets-manager/

AWS Secrets Manager is a service that helps you manage, retrieve, and rotate database credentials, application credentials, OAuth tokens, API keys, and other secrets throughout their lifecycles. You can use Secrets Manager to help remove hard-coded credentials in application source code. Storing the credentials in Secrets Manager helps avoid unintended or inadvertent access by anyone who can inspect your application’s source code, configuration, or components. You can replace hard-coded credentials with a runtime call to the Secrets Manager service to retrieve credentials dynamically when you need them.

In this blog post, we introduce a new Secrets Manager API call, BatchGetSecretValue, and walk you through how you can use it to retrieve multiple Secretes Manager secrets.

New API — BatchGetSecretValue

Previously, if you had an application that used Secrets Manager and needed to retrieve multiple secrets, you had to write custom code to first identify the list of needed secrets by making a ListSecrets call, and then call GetSecretValue on each individual secret. Now, you don’t need to run ListSecrets and loop. The new BatchGetSecretValue API reduces code complexity when retrieving secrets, reduces latency by running bulk retrievals, and reduces the risk of reaching Secrets Manager service quotas.

Security considerations

Though you can use this feature to retrieve multiple secrets in one API call, the access controls for Secrets Manager secrets remain unchanged. This means AWS Identity and Access Management (IAM) principals need the same permissions as if they were to retrieve each of the secrets individually. If secrets are retrieved using filters, principals must have both permissions for list-secrets and get-secret-value on secrets that are applicable. This helps protect secret metadata from inadvertently being exposed. Resource policies on secrets serve as another access control mechanism, and AWS principals must be explicitly granted permissions to access individual secrets if they’re accessing secrets from a different AWS account (see Cross-account access for more information). Later in this post, we provide some examples of how you can restrict permissions of this API call through an IAM policy or a resource policy.

Solution overview

In the following sections, you will configure an AWS Lambda function to use the BatchGetSecretValue API to retrieve multiple secrets at once. You also will implement attribute based access control (ABAC) for Secrets Manager secrets, and demonstrate the access control mechanisms of Secrets Manager. In following along with this example, you will incur costs for the Secrets Manager secrets that you create, and the Lambda function invocations that are made. See the Secrets Manager Pricing and Lambda Pricing pages for more details.

Prerequisites

To follow along with this walk-through, you need:

  1. Five resources that require an application secret to interact with, such as databases or a third-party API key.
  2. Access to an IAM principal that can:
    • Create Secrets Manager secrets through the AWS Command Line Interface (AWS CLI) or AWS Management Console.
    • Create an IAM role to be used as a Lambda execution role.
    • Create a Lambda function.

Step 1: Create secrets

First, create multiple secrets with the same resource tag key-value pair using the AWS CLI. The resource tag will be used for ABAC. These secrets might look different depending on the resources that you decide to use in your environment. You can also manually create these secrets in the Secrets Manager console if you prefer.

Run the following commands in the AWS CLI, replacing the secret-string values with the credentials of the resources that you will be accessing:

  1.  
    aws secretsmanager create-secret --name MyTestSecret1 --description "My first test secret created with the CLI for resource 1." --secret-string "{\"user\":\"username\",\"password\":\"EXAMPLE-PASSWORD-1\"}" --tags "[{\"Key\":\"app\",\"Value\":\"app1\"},{\"Key\":\"environment\",\"Value\":\"production\"}]"
  2.  
    aws secretsmanager create-secret --name MyTestSecret2 --description "My second test secret created with the CLI for resource 2." --secret-string "{\"user\":\"username\",\"password\":\"EXAMPLE-PASSWORD-2\"}" --tags "[{\"Key\":\"app\",\"Value\":\"app1\"},{\"Key\":\"environment\",\"Value\":\"production\"}]"
  3.  
    aws secretsmanager create-secret --name MyTestSecret3 --description "My third test secret created with the CLI for resource 3." --secret-string "{\"user\":\"username\",\"password\":\"EXAMPLE-PASSWORD-3\"}" --tags "[{\"Key\":\"app\",\"Value\":\"app1\"},{\"Key\":\"environment\",\"Value\":\"production\"}]"
  4.  
    aws secretsmanager create-secret --name MyTestSecret4 --description "My fourth test secret created with the CLI for resource 4." --secret-string "{\"user\":\"username\",\"password\":\"EXAMPLE-PASSWORD-4 \"}" --tags "[{\"Key\":\"app\",\"Value\":\"app1\"},{\"Key\":\"environment\",\"Value\":\"production\"}]"
  5.  
    aws secretsmanager create-secret --name MyTestSecret5 --description "My fifth test secret created with the CLI for resource 5." --secret-string "{\"user\":\"username\",\"password\":\"EXAMPLE-PASSWORD-5\"}" --tags "[{\"Key\":\"app\",\"Value\":\"app1\"},{\"Key\":\"environment\",\"Value\":\"production\"}]"

Next, create a secret with a different resource tag value for the app key, but the same environment key-value pair. This will allow you to demonstrate that the BatchGetSecretValue call will fail when an IAM principal doesn’t have permissions to retrieve and list the secrets in a given filter.

Create a secret with a different tag, replacing the secret-string values with credentials of the resources that you will be accessing.

  1.  
    aws secretsmanager create-secret --name MyTestSecret6 --description "My test secret created with the CLI." --secret-string "{\"user\":\"username\",\"password\":\"EXAMPLE-PASSWORD-6\"}" --tags "[{\"Key\":\"app\",\"Value\":\"app2\"},{\"Key\":\"environment\",\"Value\":\"production\"}]"

Step 2: Create an execution role for your Lambda function

In this example, create a Lambda execution role that only has permissions to retrieve secrets that are tagged with the app:app1 resource tag.

Create the policy to attach to the role

  1. Navigate to the IAM console.
  2. Select Policies from the navigation pane.
  3. Choose Create policy in the top right corner of the console.
  4. In Specify Permissions, select JSON to switch to the JSON editor view.
  5. Copy and paste the following policy into the JSON text editor.
    {
    	"Version": "2012-10-17",
    	"Statement": [
    		{
    			"Sid": "Statement1",
    			"Effect": "Allow",
    			"Action": [
    				"secretsmanager:ListSecretVersionIds",
    				"secretsmanager:GetSecretValue",
    				"secretsmanager:GetResourcePolicy",
    				"secretsmanager:DescribeSecret"
    			],
    			"Resource": [
    				"*"
    			],
    			"Condition": {
    				"StringNotEquals": {
    					"aws:ResourceTag/app": [
    						"${aws:PrincipalTag/app}"
    					]
    				}
    			}
    		},
    		{
    			"Sid": "Statement2",
    			"Effect": "Allow",
    			"Action": [
    				"secretsmanager:ListSecrets"
    			],
    			"Resource": ["*"]
    		}
    	]
    }

  6. Choose Next.
  7. Enter LambdaABACPolicy for the name.
  8. Choose Create policy.

Create the IAM role and attach the policy

  1. Select Roles from the navigation pane.
  2. Choose Create role.
  3. Under Select Trusted Identity, leave AWS Service selected.
  4. Select the dropdown menu under Service or use case and select Lambda.
  5. Choose Next.
  6. Select the checkbox next to the LambdaABACPolicy policy you just created and choose Next.
  7. Enter a name for the role.
  8. Select Add tags and enter app:app1 as the key value pair for a tag on the role.
  9. Choose Create Role.

Step 3: Create a Lambda function to access secrets

  1. Navigate to the Lambda console.
  2. Choose Create Function.
  3. Enter a name for your function.
  4. Select the Python 3.10 runtime.
  5. Select change default execution role and attach the execution role you just created.
  6. Choose Create Function.
    Figure 1: create a Lambda function to access secrets

    Figure 1: create a Lambda function to access secrets

  7. In the Code tab, copy and paste the following code:
    import json
    import boto3
    from botocore.exceptions import ClientError
    import urllib.request
    import json
    
    session = boto3.session.Session()
    # Create a Secrets Manager client
    client = session.client(
            service_name='secretsmanager'
        )
        
    
    def lambda_handler(event, context):
    
         application_secrets = client.batch_get_secret_value(Filters =[
            {
            'Key':'tag-key',
            'Values':[event["TagKey"]]
            },
            {
            'Key':'tag-value',
            'Values':[event["TagValue"]]
            }
            ])
    
    
        ### RESOURCE 1 CONNECTION ###
        try:
            print("TESTING CONNECTION TO RESOURCE 1")
            resource_1_secret = application_secrets["SecretValues"][0]
            ## IMPLEMENT RESOURCE CONNECTION HERE
    
            print("SUCCESFULLY CONNECTED TO RESOURCE 1")
        
        except Exception as e:
            print("Failed to connect to resource 1")
            return e
    
        ### RESOURCE 2 CONNECTION ###
        try:
            print("TESTING CONNECTION TO RESOURCE 2")
            resource_2_secret = application_secrets["SecretValues"][1]
            ## IMPLEMENT RESOURCE CONNECTION HERE
            
            print("SUCCESFULLY CONNECTED TO RESOURCE 2")
        
        except Exception as e:
            print("Failed to connect to resource 2",)
            return e
    
        
        ### RESOURCE 3 CONNECTION ###
        try:
            print("TESTING CONNECTION TO RESOURCE 3")
            resource_3_secret = application_secrets["SecretValues"][2]
            ## IMPLEMENT RESOURCE CONNECTION HERE
            
            print("SUCCESFULLY CONNECTED TO DB 3")
            
        except Exception as e:
            print("Failed to connect to resource 3")
            return e 
    
        ### RESOURCE 4 CONNECTION ###
        try:
            print("TESTING CONNECTION TO RESOURCE 4")
            resource_4_secret = application_secrets["SecretValues"][3]
            ## IMPLEMENT RESOURCE CONNECTION HERE
            
            print("SUCCESFULLY CONNECTED TO RESOURCE 4")
            
        except Exception as e:
            print("Failed to connect to resource 4")
            return e
    
        ### RESOURCE 5 CONNECTION ###
        try:
            print("TESTING ACCESS TO RESOURCE 5")
            resource_5_secret = application_secrets["SecretValues"][4]
            ## IMPLEMENT RESOURCE CONNECTION HERE
            
            print("SUCCESFULLY CONNECTED TO RESOURCE 5")
            
        except Exception as e:
            print("Failed to connect to resource 5")
            return e
        
        return {
            'statusCode': 200,
            'body': json.dumps('Successfully Completed all Connections!')
        }

  8. You need to configure connections to the resources that you’re using for this example. The code in this example doesn’t create database or resource connections to prioritize flexibility for readers. Add code to connect to your resources after the “## IMPLEMENT RESOURCE CONNECTION HERE” comments.
  9. Choose Deploy.

Step 4: Configure the test event to initiate your Lambda function

  1. Above the code source, choose Test and then Configure test event.
  2. In the Event JSON, replace the JSON with the following:
    {
    "TagKey": "app",
    “TagValue”:”app1”
    }

  3. Enter a Name for your event.
  4. Choose Save.

Step 5: Invoke the Lambda function

  1. Invoke the Lambda by choosing Test.

Step 6: Review the function output

  1. Review the response and function logs to see the new feature in action. Your function logs should show successful connections to the five resources that you specified earlier, as shown in Figure 2.
    Figure 2: Review the function output

    Figure 2: Review the function output

Step 7: Test a different input to validate IAM controls

  1. In the Event JSON window, replace the JSON with the following:
    {
      "TagKey": "environment",
    “TagValue”:”production”
    }

  2. You should now see an error message from Secrets Manager in the logs similar to the following:
    User: arn:aws:iam::123456789012:user/JohnDoe is not authorized to perform: 
    secretsmanager:GetSecretValue because no resource-based policy allows the secretsmanager:GetSecretValue action

As you can see, you were able to retrieve the appropriate secrets based on the resource tag. You will also note that when the Lambda function tried to retrieve secrets for a resource tag that it didn’t have access to, Secrets Manager denied the request.

How to restrict use of BatchGetSecretValue for certain IAM principals

When dealing with sensitive resources such as secrets, it’s recommended that you adhere to the principle of least privilege. Service control policies, IAM policies, and resource policies can help you do this. Below, we discuss three policies that illustrate this:

Policy 1: IAM ABAC policy for Secrets Manager

This policy denies requests to get a secret if the principal doesn’t share the same project tag as the secret that the principal is trying to retrieve. Note that the effectiveness of this policy is dependent on correctly applied resource tags and principal tags. If you want to take a deeper dive into ABAC with Secrets Manager, see Scale your authorization needs for Secrets Manager using ABAC with IAM Identity Center.

{
  "Version": "2012-10-17",
  "Statement": [
    {
      "Sid": "Statement1",
      "Effect": "Deny",
      "Action": [
        "secretsmanager:GetSecretValue",
	“secretsmanager:BatchGetSecretValue”
      ],
      "Resource": [
        "*"
      ],
      "Condition": {
        "StringNotEquals": {
          "aws:ResourceTag/project": [
            "${aws:PrincipalTag/project}"
          ]
        }
      }
    }
  ]
}

Policy 2: Deny BatchGetSecretValue calls unless from a privileged role

This policy example denies the ability to use the BatchGetSecretValue unless it’s run by a privileged workload role.

"Version": "2012-10-17",
	"Statement": [
		{
			"Sid": "Statement1",
			"Effect": "Deny",
			"Action": [
				"secretsmanager:BatchGetSecretValue",
			],
			"Resource": [
				"arn:aws:secretsmanager:us-west-2:12345678910:secret:testsecret"
			],
			"Condition": {
				"StringNotLike": {
					"aws:PrincipalArn": [
						"arn:aws:iam::123456789011:role/prod-workload-role"
					]
				}
			}
		}]
}

Policy 3: Restrict actions to specified principals

Finally, let’s take a look at an example resource policy from our data perimeters policy examples. This resource policy restricts Secrets Manager actions to the principals that are in the organization that this secret is a part of, except for AWS service accounts.

{
    "Version": "2012-10-17",
    "Statement": 
	[
        {
            "Sid": "EnforceIdentityPerimeter",
            "Effect": "Deny",
            "Principal": 
			{
                "AWS": "*"
            },
            "Action": "secretsmanager:*",
            "Resource": "*",
            "Condition": 
			{
                "StringNotEqualsIfExists": 
				{
                    "aws:PrincipalOrgID": "<my-org-id>"
                },
                "BoolIfExists": 
				{
                    "aws:PrincipalIsAWSService": "false"
                }
            }
        },
     ]
}

Conclusion

In this blog post, we introduced the BatchGetSecretValue API, which you can use to improve operational excellence, performance efficiency, and reduce costs when using Secrets Manager. We looked at how you can use the API call in a Lambda function to retrieve multiple secrets that have the same resource tag and showed an example of an IAM policy to restrict access to this API.

To learn more about Secrets Manager, see the AWS Secrets Manager documentation or the AWS Security Blog.

 
If you have feedback about this post, submit comments in the Comments section below. If you have questions about this post, contact AWS Support.

Want more AWS Security news? Follow us on Twitter.

Brendan Paul

Brendan Paul

Brendan is a Senior Solutions Architect at Amazon Web Services supporting media and entertainment companies. He has a passion for data protection and has been working at AWS since 2019. In 2024, he will start to pursue his Master’s Degree in Data Science at UC Berkeley. In his free time, he enjoys watching sports and running.

How to use the PassRole permission with IAM roles

Post Syndicated from Liam Wadman original https://aws.amazon.com/blogs/security/how-to-use-the-passrole-permission-with-iam-roles/

iam:PassRole is an AWS Identity and Access Management (IAM) permission that allows an IAM principal to delegate or pass permissions to an AWS service by configuring a resource such as an Amazon Elastic Compute Cloud (Amazon EC2) instance or AWS Lambda function with an IAM role. The service then uses that role to interact with other AWS resources in your accounts. Typically, workloads, applications, or services run with different permissions than the developer who creates them, and iam:PassRole is the mechanism in AWS to specify which IAM roles can be passed to AWS services, and by whom.

In this blog post, we’ll dive deep into iam:PassRole, explain how it works and what’s required to use it, and cover some best practices for how to use it effectively.

A typical example of using iam:PassRole is a developer passing a role’s Amazon Resource Name (ARN) as a parameter in the Lambda CreateFunction API call. After the developer makes the call, the service verifies whether the developer is authorized to do so, as seen in Figure 1.

Figure 1: Developer passing a role to a Lambda function during creation

Figure 1: Developer passing a role to a Lambda function during creation

The following command shows the parameters the developer needs to pass during the CreateFunction API call. Notice that the role ARN is a parameter, but there is no passrole parameter.

aws lambda create-function 
    --function-name my-function 
    --runtime nodejs14.x 
    --zip-file fileb://my-function.zip 
    --handler my-function.handler 
    --role arn:aws:iam::123456789012:role/service-role/MyTestFunction-role-tges6bf4

The API call will create the Lambda function only if the developer has the iam:PassRole permission as well as the CreateFunction API permissions. If the developer is lacking either of these, the request will be denied.

Now that the permissions have been checked and the Function resource has been created, the Lambda service principal will assume the role you passed whenever your function is invoked and use the role to make requests to other AWS services in your account.

Understanding IAM PassRole

When we say that iam:PassRole is a permission, we mean specifically that it is not an API call; it is an IAM action that can be specified within an IAM policy. The iam:PassRole permission is checked whenever a resource is created with an IAM service role or is updated with a new IAM service role.

Here is an example IAM policy that allows a principal to pass a role named lambda_role.

{
  "Version": "2012-10-17",
  "Statement": [
    {
      "Effect": "Allow",
      "Action": "iam:PassRole",
      "Resource": [
        "arn:aws:iam::111122223333:role/lambda_role"
      ]
    }
  ]
}

The roles that can be passed are specified in the Resource element of the IAM policy. It is possible to list multiple IAM roles, and it is possible to use a wildcard (*) to match roles that begins with the pattern you specify. Use a wildcard as the last characters only when you’re matching a role pattern, to help prevent over-entitlement.

Note: We recommend that you avoid using resource ”*” with the iam:PassRole action in most cases, because this could grant someone the permission to pass any role, opening the possibility of unintended privilege escalation.

The iam:PassRole action can only grant permissions when used in an identity-based policy attached to an IAM role or user, and it is governed by all relevant AWS policy types, such as service control policies (SCPs) and VPC endpoint policies.

When a principal attempts to pass a role to an AWS service, there are three prerequisites that must be met to allow the service to use that role:

  1. The principal that attempts to pass the role must have the iam:PassRole permission in an identity-based policy with the role desired to be passed in the Resource field, all IAM conditions met, and no implicit or explicit denies in other policies such as SCPs, VPC endpoint policies, session policies, or permissions boundaries.
  2. The role that is being passed is configured via the trust policy to trust the service principal of the service you’re trying to pass it to. For example, the role that you pass to Amazon EC2 has to trust the Amazon EC2 service principal, ec2.amazonaws.com.

    To learn more about role trust policies, see this blog post. In certain scenarios, the resource may end up being created or modified even if a passed IAM role doesn’t trust the required service principal, but the AWS service won’t be able to use the role to perform actions.

  3. The role being passed and the principal passing the role must both be in the same AWS account.

Best practices for using iam:PassRole

In this section, you will learn strategies to use when working with iam:PassRole within your AWS account.

Place iam:PassRole in its own policy statements

As we demonstrated earlier, the iam:PassRole policy action takes an IAM role for a resource. If you specify a wildcard as a resource in a policy granting iam:PassRole permission, it means that the principals to whom this policy applies will be able to pass any role in that account, allowing them to potentially escalate their privilege beyond what you intended.

To be able to specify the Resource value and be more granular in comparison to other permissions you might be granting in the same policy, we recommend that you keep the iam:PassRole action in its own policy statement, as indicated by the following example.

{
  "Version": "2012-10-17",
  "Statement": [
    {
      "Effect": "Allow",
      "Action": "iam:PassRole",
      "Resource": [
        "arn:aws:iam::111122223333:role/lambda_role"
      ]
    },
    {
      "Effect": "Allow",
      "Action": "cloudwatch:GetMetricData",
      "Resource": [
        "*"
      ]
    }
  ]
}

Use IAM paths or naming conventions to organize IAM roles within your AWS accounts

You can use IAM paths or a naming convention to grant a principal access to pass IAM roles using wildcards (*) in a portion of the role ARN. This reduces the need to update IAM policies whenever new roles are created.

In your AWS account, you might have IAM roles that are used for different reasons, for example roles that are used for your applications, and roles that are used by your security team. In most circumstances, you would not want your developers to associate a security team’s role to the resources they are creating, but you still want to allow them to create and pass business application roles.

You may want to give developers the ability to create roles for their applications, as long as they are safely governed. You can do this by verifying that those roles have permissions boundaries attached to them, and that they are created in a specific IAM role path. You can then allow developers to pass only the roles in that path. To learn more about using permissions boundaries, see our Example Permissions Boundaries GitHub repo.

In the following example policy, access is granted to pass only the roles that are in the /application_role/ path.

{
  "Version": "2012-10-17",
  "Statement": [
    {
      "Effect": "Allow",
      "Action": "iam:PassRole",
      "Resource": [
        "arn:aws:iam::111122223333:role/application_role/*"
      ]
    }
  ]
}

Protect specific IAM paths with an SCP

You can also protect specific IAM paths by using an SCP.

In the following example, the SCP prevents your principals from passing a role unless they have a tag of “team” with a value of “security” when the role they are trying to pass is in the IAM path /security_app_roles/.

{
  "Version": "2012-10-17",
  "Statement": [
    {
      "Effect": "Deny",
      "Action": "iam:PassRole",
      "Resource": "arn:aws:iam::*:role/security_app_roles/*",
      "Condition": {
        "StringNotEquals": {
          "aws:PrincipalTag/team": "security"
        }
      }
    }
  ]
}

Similarly, you can craft a policy to only allow a specific naming convention or IAM path to pass a role in a specific path. For example, the following SCP shows how to prevent a role outside of the IAM path security_response_team from passing a role in the IAM path security_app_roles.

{
  "Version": "2012-10-17",
  "Statement": [
    {
      "Effect": "Deny",
      "Action": "iam:PassRole",
      "Resource": "arn:aws:iam::*:role/security_app_roles/*",
      "Condition": {
        "ArnNotLike": {
          "aws:PrincipalARN": "arn:aws:iam::*:role/security_response_team/*"
        }
      }
    }
  ]
}

Using variables and tags with iam:PassRole

iam:PassRole does not support using the iam:ResourceTag or aws:ResourceTag condition keys to specify which roles can be passed. However, the IAM policy language supports using variables as part of the Resource element in an IAM policy.

The following IAM policy example uses the aws:PrincipalTag condition key as a variable in the Resource element. That allows this policy to construct the IAM path based on the values of the caller’s IAM tags or Session tags.

{
  "Version": "2012-10-17",
  "Statement": [
    {
      "Effect": "Allow",
      "Action": "iam:PassRole",
      "Resource": [
"arn:aws:iam::111122223333:role/${aws:PrincipalTag/AllowedRolePath}/*"
      ]
    }
  ]
}

If there was no value set for the AllowedRolePath tag, the resource would not match any role ARN, and no iam:PassRole permissions would be granted.

Pass different IAM roles for different use cases, and for each AWS service

As a best practice, use a single IAM role for each use case, and avoid situations where the same role is used by multiple AWS services.

We recommend that you also use different IAM roles for different workloads in your AWS accounts, even if those workloads are built on the same AWS service. This will allow you to grant only the permissions necessary to your workloads and make it possible to adhere to the principle of least privilege.

Using iam:PassRole condition keys

The iam:PassRole action has two available condition keys, iam:PassedToService and iam:AssociatedResourceArn.

iam:PassedToService allows you to specify what service a role may be passed to. iam:AssociatedResourceArn allows you to specify what resource ARNs a role may be associated with.

As mentioned previously, we typically recommend that customers use an IAM role with only one AWS service wherever possible. This is best accomplished by listing a single AWS service in a role’s trust policy, reducing the need to use the iam:PassedToService condition key in the calling principal’s identity-based policy. In circumstances where you have an IAM role that can be assumed by more than one AWS service, you can use iam:PassedToService to specify which service the role can be passed to. For example, the following policy allows ExampleRole to be passed only to the Amazon EC2 service.

{
  "Version": "2012-10-17",
  "Statement": [
    {
      "Effect": "Allow",
      "Action": "iam:PassRole",
      "Resource": "arn:aws:iam::*:role/ExampleRole",
      "Condition": {
        "StringEquals": {
          "iam:PassedToService": "ec2.amazonaws.com"
        }
      }
    }
  ]
}

When you use iam:AssociatedResourceArn, it’s important to understand that ARN formats typically do not change, but each AWS resource will have a unique ARN. Some AWS resources have non-predictable components, such as EC2 instance IDs in their ARN. This means that when you’re using iam:AssociatedResourceArn, if an AWS resource is ever deleted and a new resource created, you might need to modify the IAM policy with a new resource ARN to allow a role to be associated with it.

Most organizations prefer to limit who can delete and modify resources in their AWS accounts, rather than limit what resource a role can be associated with. An example of this would be limiting which principals can modify a Lambda function, rather than limiting which function a role can be associated with, because in order to pass a role to Lambda, the principals would need permissions to update the function itself.

Using iam:PassRole with service-linked roles

If you’re dealing with a service that uses service-linked roles (SLRs), most of the time you don’t need the iam:PassRole permission. This is because in most cases such services will create and manage the SLR on your behalf, so that you don’t pass a role as part of a service configuration, and therefore, the iam:PassRole permission check is not performed.

Some AWS services allow you to create multiple SLRs and pass them when you create or modify resources by using those services. In this case, you need the iam:PassRole permission on service-linked roles, just the same as you do with a service role.

For example, Amazon EC2 Auto Scaling allows you to create multiple SLRs with specific suffixes and then pass a role ARN in the request as part of the ec2:CreateAutoScalingGroup API action. For the Auto Scaling group to be successfully created, you need permissions to perform both the ec2:CreateAutoScalingGroup and iam:PassRole actions.

SLRs are created in the /aws-service-role/ path. To help confirm that principals in your AWS account are only passing service-linked roles that they are allowed to pass, we recommend using suffixes and IAM policies to separate SLRs owned by different teams.

For example, the following policy allows only SLRs with the _BlueTeamSuffix to be passed.

{
  "Version": "2012-10-17",
  "Statement": [
    {
      "Effect": "Allow",
      "Action": "iam:PassRole",
      "Resource": [
        "arn:aws:iam::*:role/aws-service-role/*_BlueTeamSuffix"
      ]
    }
  ]
}

You could attach this policy to the role used by the blue team to allow them to pass SLRs they’ve created for their use case and that have their specific suffix.

AWS CloudTrail logging

Because iam:PassRole is not an API call, there is no entry in AWS CloudTrail for it. To identify what role was passed to an AWS service, you must check the CloudTrail trail for events that created or modified the relevant AWS service’s resource.

In Figure 2, you can see the CloudTrail log created after a developer used the Lambda CreateFunction API call with the role ARN noted in the role field.

Figure 2: CloudTrail log of a CreateFunction API call

Figure 2: CloudTrail log of a CreateFunction API call

PassRole and VPC endpoints

Earlier, we mentioned that iam:PassRole is subject to VPC endpoint policies. If a request that requires the iam:PassRole permission is made over a VPC endpoint with a custom VPC endpoint policy configured, iam:PassRole should be allowed through the Action element of that VPC endpoint policy, or the request will be denied.

Conclusion

In this post, you learned about iam:PassRole, how you use it to interact with AWS services and resources, and the three prerequisites to successfully pass a role to a service. You now also know best practices for using iam:PassRole in your AWS accounts. To learn more, see the documentation on granting a user permissions to pass a role to an AWS service.

If you have feedback about this post, submit comments in the Comments section below. If you have questions about this post, start a new thread on the AWS Security, Identity, & Compliance re:Post or contact AWS Support.

Want more AWS Security news? Follow us on Twitter.

Author

Laura Reith

Laura is an Identity Solutions Architect at AWS, where she thrives on helping customers overcome security and identity challenges.

Liam Wadman

Liam Wadman

Liam is a Solutions Architect with the Identity Solutions team. When he’s not building exciting solutions on AWS or helping customers, he’s often found in the hills of British Columbia on his mountain bike. Liam points out that you cannot spell LIAM without IAM.

AWS Security Profile: Chris Betz, CISO of AWS

Post Syndicated from Chris Betz original https://aws.amazon.com/blogs/security/aws-security-profile-chris-betz-ciso-of-aws/

In the AWS Security Profile series, we feature the people who work in Amazon Web Services (AWS) Security and help keep our customers safe and secure. This interview is with Chris Betz, Chief Information Security Officer (CISO), who began his role as CISO of AWS in August of 2023.


How did you get started in security? What prompted you to pursue this field?

I’ve always had a passion for technology, and for keeping people out of harm’s way. When I found computer science and security in the Air Force, this world opened up to me that let me help others, be a part of building amazing solutions, and engage my competitive spirit. Security has the challenges of the ultimate chess game, though with real and impactful consequences. I want to build reliable, massively scaled systems that protect people from malicious actors. This is really hard to do and a huge challenge I undertake every day. It’s an amazing team effort that brings together the smartest folks that I know, competing with threat actors.

What are you most excited about in your new role?

One of the most exciting things about my role is that I get to work with some of the smartest people in the field of security, people who inspire, challenge, and teach me something new every day. It’s exhilarating to work together to make a significant difference in the lives of people all around the world, who trust us at AWS to keep their information secure. Security is constantly changing, we get to learn, adapt, and get better every single day. I get to spend my time helping to build a team and culture that customers can depend on, and I’m constantly impressed and amazed at the caliber of the folks I get work with here.

How does being a former customer influence your role as AWS CISO?

I was previously the CISO at Capital One and was an AWS customer. As a former customer, I know exactly what it’s like to be a customer who relies on a partner for significant parts of their security. There needs to be a lot of trust, a lot of partnership across the shared responsibility model, and consistent focus on what’s being done to keep sensitive data secure. Every moment that I’m here at AWS, I’m reminded about things from the customer perspective and how I can minimize complexity, and help customers leverage the “super powers” that the cloud provides for CISOs who need to defend the breadth of their digital estate. I know how important it is to earn and keep customer trust, just like the trust I needed when I was in their shoes. This mindset influences me to learn as much as I can, never be satisfied with ”good enough,” and grab every opportunity I can to meet and talk with customers about their security.

What’s been the most dramatic change you’ve seen in the security industry recently?

This is pretty easy to answer: artificial intelligence (AI). This is a really exciting time. AI is dominating the news and is on the mind of every security professional, everywhere. We’re witnessing something very big happening, much like when the internet came into existence and we saw how the world dramatically changed because of it. Every single sector was impacted, and AI has the same potential. Many customers use AWS machine learning (ML) and AI services to help improve signal-to-noise ratio, take over common tasks to free up valuable time to dig deeper into complex cases, and analyze massive amounts of threat intelligence to determine the right action in less time. The combination of Data + Compute power + AI is a huge advantage for cloud companies.

AI and ML have been a focus for Amazon for more than 25 years, and we get to build on an amazing foundation. And it’s exciting to take advantage of and adapt to the recent big changes and the impact this is having on the world. At AWS, we’re focused on choice and broadening access to generative AI and foundation models at every layer of the ML stack, including infrastructure (chips), developer tools, and AI services. What a great time to be in security!

What’s the most challenging part of being a CISO?

Maintaining a culture of security involves each person, each team, and each leader. That’s easy to say, but the challenge is making it tangible—making sure that each person sees that, even though their title doesn’t have “security” in it, they are still an integral part of security. We often say, “If you have access, you have responsibility.” We work hard to limit that access. And CISOs must constantly work to build and maintain a culture of security and help every single person who has access to data understand that security is an important part of their job.

What’s your short- and long-term vision for AWS Security?

Customers trust AWS to protect their data so they can innovate and grow quickly, so in that sense, our vision is for security to be a growth lever for our customers, not added friction. Cybersecurity is key to unlocking innovation, so managing risk and aligning the security posture of AWS with our business objectives will continue for the immediate future and long term. For our customers, my vision is to continue helping them understand that investing in security helps them move faster and take the right risks—the kind of risks they need to remain competitive and innovative. When customers view security as a business accelerator, they achieve new technical capabilities and operational excellence. Strong security is the ultimate business enabler.

If you could give one piece of advice to all CISOs, what would it be?

Nail Zero Trust. Zero Trust is the path to the strongest, most effective security, and getting back to the core concepts is important. While Zero Trust is a different journey for every organization, it’s a natural evolution of cybersecurity and defense in depth in particular. No matter what’s driving organizations toward Zero Trust—policy considerations or the growing patchwork of data protection and privacy regulations—Zero Trust meaningfully improves security outcomes through an iterative process. When companies get this right, they can quickly identify and investigate threats and take action to contain or disrupt unwanted activity.

What are you most proud of in your career?

I’m proud to have worked—and still be working with—such talented, capable, and intelligent security professionals who care deeply about security and are passionate about making the world a safer place. Being among the world’s top security experts really makes me grateful and humble for all the amazing opportunities I’ve had to work alongside them, working together to solve problems and being part of creating a legacy to make security better.

 
If you have feedback about this post, submit comments in the Comments section below. If you have questions about this post, contact AWS Support.

Want more AWS Security news? Follow us on Twitter.

Chris Betz

Chris Betz

Chris is CISO at AWS. He oversees security teams and leads the development and implementation of security policies, with the aim of managing risk and aligning the company’s security posture with business objectives. Chris joined Amazon in August 2023, after holding CISO and security leadership roles at leading companies. He lives in Northern Virginia with his family.

Lisa Maher

Lisa Maher

Lisa Maher joined AWS in February 2022 and leads AWS Security Thought Leadership PR. Before joining AWS, she led crisis communications for clients experiencing data security incidents at two global PR firms. Lisa, a former journalist, is a graduate of Texas A&M School of Law, where she specialized in Cybersecurity Law & Policy, Risk Management & Compliance.

How to use multiple instances of AWS IAM Identity Center

Post Syndicated from Laura Reith original https://aws.amazon.com/blogs/security/how-to-use-multiple-instances-of-aws-iam-identity-center/

Recently, AWS launched a new feature that allows deployment of account instances of AWS IAM Identity Center . With this launch, you can now have two types of IAM Identity Center instances: organization instances and account instances. An organization instance is the IAM Identity Center instance that’s enabled in the management account of your organization created with AWS Organizations. This instance is used to manage access to AWS accounts and applications across your entire organization. Organization instances are the best practice when deploying IAM Identity Center. Many customers have requested a way to enable AWS applications using test or sandbox identities. The new account instances are intended to support sand-boxed deployments of AWS managed applications such as Amazon CodeCatalyst and are only usable from within the account and AWS Region in which they were created. They can exist in a standalone account or in a member account within AWS Organizations.

In this blog post, we show you when to use each instance type, how to control the deployment of account instances, and how you can monitor, manage, and audit these instances at scale using the enhanced IAM Identity Center APIs.

IAM Identity Center instance types

IAM Identity Center now offers two deployment types, the traditional organization instance and an account instance, shown in Figure 1. In this section, we show you the differences between the two.
 

Figure 1: IAM Identity Center instance types

Figure 1: IAM Identity Center instance types

Organization instance of IAM Identity Center

An organization instance of IAM Identity Center is the fully featured version that’s available with AWS Organizations. This type of instance helps you securely create or connect your workforce identities and manage their access centrally across AWS accounts and applications in your organization. The recommended use of an organization instance of Identity Center is for workforce authentication and authorization on AWS for organizations of any size and type.

Using the organization instance of IAM Identity Center, your identity center administrator can create and manage user identities in the Identity Center directory, or connect your existing identity source, including Microsoft Active Directory, Okta, Ping Identity, JumpCloud, Google Workspace, and Azure Active Directory (Entra ID). There is only one organization instance of IAM Identity Center at the organization level. If you have enabled IAM Identity Center before November 15, 2023, you have an organization instance.

Account instances of IAM Identity Center

Account instances of IAM Identity Center provide a subset of the features of the organization instance. Specifically, account instances support user and group assignments initially only to Amazon CodeCatalyst. They are bound to a single AWS account, and you can deploy them in either member accounts of an organization or in standalone AWS accounts. You can only deploy one account instance per AWS account regardless of Region.

You can use account instances of IAM Identity Center to provide access to supported Identity Center enabled application if the application is in the same account and Region.

Account instances of Identity Center don’t support permission sets or assignments to customer managed applications. If you’ve enabled Identity Center before November 15, 2023 then you must enable account instance creation from your management account. To learn more see Enable account instances in the AWS Management Console documentation. If you haven’t yet enabled Identity Center, then account instances are now available to you.

When should I use account instances of IAM Identity Center?

Account instances are intended for use in specific situations where organization instances are unavailable or impractical, including:

  • You want to run a temporary trial of a supported AWS managed application to determine if it suits your business needs. See Additional Considerations.
  • You are unable to deploy IAM Identity Center across your organization, but still want to experiment with one or more AWS managed applications. See Additional Considerations.
  • You have an organization instance of IAM Identity Center, but you want to deploy a supported AWS managed application to an isolated set of users that are distinct from those in your organization instance.

Additional considerations

When working with multiple instances of IAM Identity Center, you want to keep a number of things in mind:

  • Each instance of IAM Identity Center is separate and distinct from other Identity Center instances. That is, users and assignments are managed separately in each instance without a means to keep them in sync.
  • Migration between instances isn’t possible. This means that migrating an application between instances requires setting up that application from scratch in the new instance.
  • Account instances have the same considerations when changing your identity source as an organization instance. In general, you want to set up with the right identity source before adding assignments.
  • Automating assigning users to applications through the IAM Identity Center public APIs also requires using the applications APIs to ensure that those users and groups have the right permissions within the application. For example, if you assign groups to CodeCatalyst using Identity Center, you still have to assign the groups to the CodeCatalyst space from the Amazon CodeCatalyst page in the AWS Management Console. See the Setting up a space that supports identity federation documentation.
  • By default, account instances require newly added users to register a multi-factor authentication (MFA) device when they first sign in. This can be altered in the AWS Management Console for Identity Center for a specific instance.

Controlling IAM Identity Center instance deployments

If you’ve enabled IAM Identity Center prior to November 15, 2023 then account instance creation is off by default. If you want to allow account instance creation, you must enable this feature from the Identity Center console in your organization’s management account. This includes scenarios where you’re using IAM Identity Center centrally and want to allow deployment and management of account instances. See Enable account instances in the AWS Management Console documentation.

If you enable IAM Identity Center after November 15, 2023 or if you haven’t enabled Identity Center at all, you can control the creation of account instances of Identity Center through a service control policy (SCP). We recommend applying the following sample policy to restrict the use of account instances to all but a select set of AWS accounts. The sample SCP that follows will help you deny creation of account instances of Identity Center to accounts in the organization unless the account ID matches the one you specified in the policy. Replace <ALLOWED-ACCOUNT_ID> with the ID of the account that is allowed to create account instances of Identity Center:

{
    "Version": "2012-10-17",
    "Statement" : [
        {
            "Sid": "DenyCreateAccountInstances",
            "Effect": "Deny",
            "Action": [
                "sso:CreateInstance"
            ],
            "Resource": "*",
            "Condition": {
                "StringNotEquals": [
                    "aws:PrincipalAccount": ["<ALLOWED-ACCOUNT-ID>"]
                ]
            }
        }
    ]
}

To learn more about SCPs, see the AWS Organizations User Guide on service control policies.

Monitoring instance activity with AWS CloudTrail

If your organization has an existing log ingestion pipeline solution to collect logs and generate reports through AWS CloudTrail, then IAM Identity Center supported CloudTrail operations will automatically be present in your pipeline, including additional account instances of IAM Identity Center actions such as sso:CreateInstance.

To create a monitoring solution for IAM Identity Center events in your organization, you should set up monitoring through AWS CloudTrail. CloudTrail is a service that records events from AWS services to facilitate monitoring activity from those services in your accounts. You can create a CloudTrail trail that captures events across all accounts and all Regions in your organization and persists them to Amazon Simple Storage Service (Amazon S3).

After creating a trail for your organization, you can use it in several ways. You can send events to Amazon CloudWatch Logs and set up monitoring and alarms for Identity Center events, which enables immediate notification of supported IAM Identity Center CloudTrail operations. With multiple instances of Identity Center deployed within your organization, you can also enable notification of instance activity, including new instance creation, deletion, application registration, user authentication, or other supported actions.

If you want to take action on IAM Identity Center events, you can create a solution to process events using additional service such as Amazon Simple Notification Service, Amazon Simple Queue Service, and the CloudTrail Processing Library. With this solution, you can set your own business logic and rules as appropriate.

Additionally, you might want to consider AWS CloudTrail Lake, which provides a powerful data store that allows you to query CloudTrail events without needing to manage a complex data loading pipeline. You can quickly create a data store for new events, which will immediately start gathering data that can be queried within minutes. To analyze historical data, you can copy your organization trail to CloudTrail Lake.

The following is an example of a simple query that shows you a list of the Identity Center instances created and deleted, the account where they were created, and the user that created them. Replace <Event_data_store_ID> with your store ID.

SELECT 
    userIdentity.arn AS userARN, eventName, userIdentity.accountId 
FROM 
    <Event_data_store_ID> 
WHERE 
    userIdentity.arn IS NOT NULL 
    AND eventName = 'DeleteInstance' 
    OR eventName = 'CreateInstance'

You can save your query result to an S3 bucket and download a copy of the results in CSV format. To learn more, follow the steps in Download your CloudTrail Lake saved query results. Figure 2 shows the CloudTrail Lake query results.

Figure 2: AWS CloudTrail Lake query results

Figure 2: AWS CloudTrail Lake query results

If you want to automate the sourcing, aggregation, normalization, and data management of security data across your organization using the Open Cyber Security Framework (OCSF) standard, you will benefit from using Amazon Security Lake. This service helps make your organization’s security data broadly accessible to your preferred security analytics solutions to power use cases such like threat detection, investigation, and incident response. Learn more in What is Amazon Security Lake?

Instance management and discovery within an organization

You can create account instances of IAM Identity Center in a standalone account or in an account that belongs to your organization. Creation can happen from an API call (CreateInstance) from the Identity Center console in a member account or from the setup experience of a supported AWS managed application. Learn more about Supported AWS managed applications.

If you decide to apply the DenyCreateAccountInstances SCP shown earlier to accounts in your organization, you will no longer be able to create account instances of IAM Identity Center in those accounts. However, you should also consider that when you invite a standalone AWS account to join your organization, the account might have an existing account instance of Identity Center.

To identify existing instances, who’s using them, and what they’re using them for, you can audit your organization to search for new instances. The following script shows how to discover all IAM Identity Center instances in your organization and export a .csv summary to an S3 bucket. This script is designed to run on the account where Identity Center was enabled. Click here to see instructions on how to use this script.

. . .
. . .
accounts_and_instances_dict={}
duplicated_users ={}

main_session = boto3.session.Session()
sso_admin_client = main_session.client('sso-admin')
identity_store_client = main_session.client('identitystore')
organizations_client = main_session.client('organizations')
s3_client = boto3.client('s3')
logger = logging.getLogger()
logger.setLevel(logging.INFO)

#create function to list all Identity Center instances in your organization
def lambda_handler(event, context):
    application_assignment = []
    user_dict={}
    
    current_account = os.environ['CurrentAccountId']
 
    logger.info("Current account %s", current_account)
    
    paginator = organizations_client.get_paginator('list_accounts')
    page_iterator = paginator.paginate()
    for page in page_iterator:
        for account in page['Accounts']:
            get_credentials(account['Id'],current_account)
            #get all instances per account - returns dictionary of instance id and instances ARN per account
            accounts_and_instances_dict = get_accounts_and_instances(account['Id'], current_account)
                    
def get_accounts_and_instances(account_id, current_account):
    global accounts_and_instances_dict
    
    instance_paginator = sso_admin_client.get_paginator('list_instances')
    instance_page_iterator = instance_paginator.paginate()
    for page in instance_page_iterator:
        for instance in page['Instances']:
            #send back all instances and identity centers
            if account_id == current_account:
                accounts_and_instances_dict = {current_account:[instance['IdentityStoreId'],instance['InstanceArn']]}
            elif instance['OwnerAccountId'] != current_account: 
                accounts_and_instances_dict[account_id]= ([instance['IdentityStoreId'],instance['InstanceArn']])
    return accounts_and_instances_dict
  . . .  
  . . .
  . . .

The following table shows the resulting IAM Identity Center instance summary report with all of the accounts in your organization and their corresponding Identity Center instances.

AccountId IdentityCenterInstance
111122223333 d-111122223333
111122224444 d-111122223333
111122221111 d-111111111111

Duplicate user detection across multiple instances

A consideration of having multiple IAM Identity Center instances is the possibility of having the same person existing in two or more instances. In this situation, each instance creates a unique identifier for the same person and the identifier associates application-related data to the user. Create a user management process for incoming and outgoing users that is similar to the process you use at the organization level. For example, if a user leaves your organization, you need to revoke access in all Identity Center instances where that user exists.

The code that follows can be added to the previous script to help detect where duplicates might exist so you can take appropriate action. If you find a lot of duplication across account instances, you should consider adopting an organization instance to reduce your management overhead.

...
#determine if the member in IdentityStore have duplicate
def get_users(identityStoreId, user_dict): 
    global duplicated_users
    paginator = identity_store_client.get_paginator('list_users')
    page_iterator = paginator.paginate(IdentityStoreId=identityStoreId)
    for page in page_iterator:
        for user in page['Users']:
            if ( 'Emails' not in user ):
                print("user has no email")
            else:
                for email in user['Emails']:
                    if email['Value'] not in user_dict:
                        user_dict[email['Value']] = identityStoreId
                    else:
                        print("Duplicate user found " + user['UserName'])
                        user_dict[email['Value']] = user_dict[email['Value']] + "," + identityStoreId
                        duplicated_users[email['Value']] = user_dict[email['Value']]
    return user_dict 
... 

The following table shows the resulting report with duplicated users in your organization and their corresponding IAM identity Center instances.

User_email IdentityStoreId
[email protected] d-111122223333, d-111111111111
[email protected] d-111122223333, d-111111111111, d-222222222222
[email protected] d-111111111111, d-222222222222

The full script for all of the above use cases is available in the multiple-instance-management-iam-identity-center GitHub repository. The repository includes instructions to deploy the script using AWS Lambda within the management account. After deployment, you can invoke the Lambda function to get .csv files of every IAM Identity center instance in your organization, the applications assigned to each instance, and the users that have access to those applications. With this function, you also get a report of users that exist in more than one local instance.

Conclusion

In this post, you learned the differences between an IAM Identity Center organization instance and an account instance, considerations for when to use an account instance, and how to use Identity Center APIs to automate discovery of Identity Center account instances in your organization.

To learn more about IAM Identity Center, see the AWS IAM Identity Center user guide.

If you have feedback about this post, submit comments in the Comments section below. If you have questions about this post, start a new thread on AWS IAM Identity Center re:Post or contact AWS Support.

Want more AWS Security news? Follow us on Twitter.

Author

Laura Reith

Laura is an Identity Solutions Architect at AWS, where she thrives on helping customers overcome security and identity challenges. In her free time, she enjoys wreck diving and traveling around the world.

Steve Pascoe

Steve Pascoe

Steve is a Senior Technical Product Manager with the AWS Identity team. He delights in empowering customers with creative and unique solutions to everyday problems. Outside of that, he likes to build things with his family through Lego, woodworking, and recently, 3D printing.

sowjir-1.jpeg

Sowjanya Rajavaram

Sowjanya is a Sr Solutions Architect who specializes in Identity and Security in AWS. Her entire career has been focused on helping customers of all sizes solve their identity and access management challenges. She enjoys traveling and experiencing new cultures and food.

AWS achieves SNI 27001 certification for the AWS Asia Pacific (Jakarta) Region

Post Syndicated from Airish Mariano original https://aws.amazon.com/blogs/security/aws-achieves-sni-27001-certification-for-the-aws-asia-pacific-jakarta-region/

Amazon Web Services (AWS) is proud to announce the successful completion of its first Standar Nasional Indonesia (SNI) certification for the AWS Asia Pacific (Jakarta) Region in Indonesia. SNI is the Indonesian National Standard, and it comprises a set of standards that are nationally applicable in Indonesia. AWS is now certified according to the SNI 27001 requirements. An independent third-party auditor that is accredited by the Komite Akreditasi Nasional (KAN/National Accreditation Committee) assessed AWS, per regulations in Indonesia.

SNI 27001 is based on the ISO/IEC 27001 standard, which provides a framework for the development and implementation of an effective information security management system (ISMS). An ISMS that is implemented according to this standard is a tool for risk management, cyber-resilience, and operational excellence.

AWS achieved the certification for compliance with SNI 27001 on October 28, 2023. The SNI 27001 certification covers the Asia Pacific (Jakarta) Region in Indonesia. For a full list of AWS services that are certified under the SNI 27001, see the SNI 27001 compliance page. Customers can also download the latest SNI 27001 certificate on AWS Artifact, a self-service portal for on-demand access to AWS compliance reports. Sign in to AWS Artifact in the AWS Management Console, or learn more at Getting Started with AWS Artifact.

AWS is committed to bringing new services into the scope of its compliance programs to help you meet your architectural, business, and regulatory needs. If you have questions about the SNI 27001 certification, contact your AWS account team.

If you have feedback about this post, submit comments in the Comments section below.

Want more AWS Security how-to content, news, and feature announcements? Follow us on Twitter.

Airish Mariano

Airish Mariano

Airish is an Audit Specialist at AWS based in Singapore. She leads security audit engagements in the Asia-Pacific region. Airish also drives the execution and delivery of compliance programs that provide security assurance for customers to accelerate their cloud adoption.

Establishing a data perimeter on AWS: Require services to be created only within expected networks

Post Syndicated from Harsha Sharma original https://aws.amazon.com/blogs/security/establishing-a-data-perimeter-on-aws-require-services-to-be-created-only-within-expected-networks/

Welcome to the fifth post in the Establishing a data perimeter on AWS series. Throughout this series, we’ve discussed how a set of preventative guardrails can create an always-on boundary to help ensure that your trusted identities are accessing your trusted resources over expected networks. In a previous post, we emphasized the importance of preventing access from unexpected locations, even for authorized users. For example, you wouldn’t expect non-public corporate data to be accessed from outside the corporate network. In this post, we demonstrate how to use preventative controls to help ensure that your resources are deployed within your Amazon Virtual Private Cloud (Amazon VPC), so that you can effectively enforce the network perimeter controls. We also explore detective controls you can use to detect the lack of adherence to this requirement.

Let’s begin with a quick refresher on the fundamental concept of data perimeters using Figure 1 as a reference. Customers generally prefer establishing a high-level perimeter to help prevent untrusted entities from coming in and data from going out. The perimeter defines what access customers expect within their AWS environment. It refers to the access patterns among your identities, resources, and networks that should always be blocked. Using those three elements, an assertion can be made to define your perimeter’s goal: access can only be allowed if the identity is trusted, the resource is trusted, and the network is expected. If any of these conditions are false, then the access inside the perimeter is unintended and should be denied. The perimeter is composed of controls implemented on your identities, resources, and networks to maintain that the necessary conditions are true.

Figure 1: A high-level depiction of defining a perimeter around your AWS resources to prevent interaction with unintended IAM principals, unintended resources, and unexpected networks

Figure 1: A high-level depiction of defining a perimeter around your AWS resources to prevent interaction with unintended IAM principals, unintended resources, and unexpected networks

Now, let’s consider a scenario to understand the problem statement this post is trying to solve. Assume a setup like the one in Figure 2, where an application needs to access an Amazon Simple Storage Service (Amazon S3) bucket using its temporary AWS Identity and Access Management (IAM) credentials over an Amazon S3 VPC endpoint.

Figure 2: Scenario of a simple app using its temporary credential to access an S3 bucket

Figure 2: Scenario of a simple app using its temporary credential to access an S3 bucket

From our previous posts in this series, we’ve learned that we can use the following set of capabilities to build a network perimeter to achieve our control objectives for this sample scenario.

Control objective Implemented using Applicable IAM capability
My identities can access resources only from expected networks. For example, in Figure 2, my application’s temporary credential can only access my S3 bucket when my application is within my expected network space. Service control policies (SCP) aws:SourceIp
aws:SourceVpc
aws:SourceVpce
My resources can only be accessed from expected networks. For example, in Figure 2, my S3 bucket can only be accessed from my expected network space. Resource-based policies aws:SourceIp
aws:SourceVpc
aws:SourceVpce

But there are certain AWS services that allow for different network deployment models, such as providing the choice of associating the service resources with either an AWS managed VPC or a customer managed VPC. For example, an AWS Lambda function always runs inside a VPC owned by the Lambda service (AWS managed VPC) and by default isn’t connected to VPCs in your account (customer managed VPC). For more information, see Connecting Lambda functions to your VPC.

This means that if your application code was deployed as a Lambda function that isn’t connected to your VPC, then the function cannot access your resources with standard network perimeter controls enforced. Let’s understand this situation better using Figure 3, where a Lambda function isn’t configured to connect to the customer VPC. This function cannot access your S3 bucket over the internet because of how the recommended data perimeter in the preceding table has been defined, that is, to only allow your bucket to be accessible from a known network segment (the customer VPC and IP CIDR range) and only allow the IAM role associated with the Lambda function to allow accessing the bucket from known networks. The function also cannot access your S3 bucket through your S3 VPC endpoint because the function isn’t associated with the customer VPC. Lastly, unless other compensating controls are in place, this function might be able to access untrusted resources as your standard data perimeter controls enforced with the VPC endpoint policies won’t be in effect, which might not meet your company’s security requirements.

Figure 3: Lambda function configured to be associated with AWS managed VPC

Figure 3: Lambda function configured to be associated with AWS managed VPC

This means that for the Lambda function to conform to your data perimeter, it must be associated with your network segment (customer VPC) as shown in Figure 4.

Figure 4: Lambda function configured to be associated with the customer managed VPC

Figure 4: Lambda function configured to be associated with the customer managed VPC

To make sure that your Lambda functions are deployed into your networks so that they can access your resources under the purview of data perimeter controls, it’s preferable to have a way to automatically prevent deployment or configuration errors. Additionally, if you have a large deployment of Lambda functions across hundreds or even thousands of accounts, you want an efficient way to enforce conformance of these functions to your data perimeter.

To solve for this problem and make sure that an application team or a developer cannot create a function that’s not associated with your VPC, you can use the lambda:VpcIds or lambda:SubnetIds IAM condition keys (for more information, see Using IAM condition keys for VPC settings). These keys allow you to create and update functions only when VPC settings are satisfied.

In the following SCP example, an IAM principal that is subject to the following SCP policy will only be able to create or update a Lambda function if the function is associated with a VPC (customer VPC). When the customer VPC isn’t specified, the lambda:VpcIds condition key has no value—it is null—and thus this policy will deny creating or updating the function. For more information about how the Null condition operator functions, see Condition operator to check existence of condition keys.

{
  "Version": "2012-10-17",
  "Statement": [
    {
      "Sid": "EnforceVPCFunction",
      "Action": [
          "lambda:CreateFunction",
          "lambda:UpdateFunctionConfiguration"
       ],
      "Effect": "Deny",
      "Resource": "*",
      "Condition": {
        "Null": {
           "lambda:VpcIds": "true"
        }
      }
    }
  ]
}

Additionally, you can use variations of the preceding example and create more fine-grained controls using these condition keys. For more such examples, see Example policies with condition keys for VPC settings.

AWS services such as AWS Glue and Amazon SageMaker have similar feature behavior and provide similar condition keys. For example, the glue:VpcIds condition key allows you to govern the creation of AWS Glue jobs only in your VPC. For further details and an example policy, see Control policies that control settings using condition keys.

Similarly, Amazon SageMaker Studio, SageMaker notebook instances, SageMaker training, and deployed inference containers are internet accessible or enabled by default. The sagemaker:VpcSubnets condition key can be used to restrict launching these resources in a VPC. For more information, see Condition keys for Amazon SageMaker, Connect to Resources From Within a VPC, and Run Training and Inference Containers in Internet-Free Mode.

Detective controls

The AWS Well-Architected Framework recommends applying a defense in-depth approach with multiple security controls (see Security Pillar). This is why in addition to the preventative controls discussed in the form of condition keys in this post, you should also consider using AWS native fully managed governance tools to help you manage your environment’s deployed resources and their conformance to your data perimeter (see Management and Governance on AWS).

For example, AWS Config provides managed rules to check for Lambda functions inside a VPC and Sagemaker notebooks inside a VPC. You can also use the built-in checks of AWS Security Hub to detect and consolidate findings, such as [Lambda.3] Lambda functions should be in a VPC and [SageMaker.2] SageMaker notebook instances should be launched in a custom VPC.

You can also use similar detective controls for AWS services that don’t currently offer built-in preventative controls. For example, OpenSearch Service has an AWS Config managed rule for OpenSearch in VPC only and security hub check for [Opensearch.2] OpenSearch domains should be in a VPC.

Conclusion

In this post, we discussed how you can enforce that specific AWS services resources can only be created such that they adhere to your data perimeter. We used a sample scenario to dive into AWS Lambda and its network deployment options. We then used IAM condition keys as preventative controls to enforce predictable creation of Lambda functions conforming with our security standard. We also discussed additional AWS services that have similar behavior when the same concepts apply. Finally, we briefly discussed some AWS provided managed rules and security checks that you can use as supplementary detective controls to ensure that your preventative controls are in effect as expected.

Additional resources

The following are some additional resources that you can use to further explore data perimeters.

If you have feedback about this post, submit comments in the Comments section below. If you have questions about this post, contact AWS Support.

Want more AWS Security news? Follow us on Twitter.

Harsha Sharma

Harsha Sharma

Harsha is a Principal Solutions Architect with AWS in New York. He joined AWS in 2016 and works with Global Financial Services customers to design and develop architectures on AWS, supporting their journey on the AWS Cloud.

Download AWS Security Hub CSV report

Post Syndicated from Pablo Pagani original https://aws.amazon.com/blogs/security/download-aws-security-hub-csv-report/

AWS Security Hub provides a comprehensive view of your security posture in Amazon Web Services (AWS) and helps you check your environment against security standards and best practices. In this post, I show you a solution to export Security Hub findings to a .csv file weekly and send an email notification to download the file from Amazon Simple Storage Service (Amazon S3). By using this solution, you can share the report with others without providing access to your AWS account. You can also use it to generate assessment reports and prioritize and build a remediation roadmap.

When you enable Security Hub, it collects and consolidates findings from AWS security services that you’re using, such as threat detection findings from Amazon GuardDuty, vulnerability scans from Amazon Inspector, S3 bucket policy findings from Amazon Macie, publicly accessible and cross-account resources from AWS Identity and Access Management Access Analyzer, and resources missing AWS WAF coverage from AWS Firewall Manager. Security Hub also consolidates findings from integrated AWS Partner Network (APN) security solutions.

Cloud security processes can differ from traditional on-premises security in that security is often decentralized in the cloud. With traditional on-premises security operations, security alerts are typically routed to centralized security teams operating out of security operations centers (SOCs). With cloud security operations, it’s often the application builders or DevOps engineers who are best situated to triage, investigate, and remediate security alerts.

This solution uses the Security Hub API, AWS Lambda, Amazon S3, and Amazon Simple Notification Service (Amazon SNS). Findings are aggregated into a .csv file to help identify common security issues that might require remediation action.

Solution overview

This solution assumes that Security Hub is enabled in your AWS account. If it isn’t enabled, set up the service so that you can start seeing a comprehensive view of security findings across your AWS accounts.

How the solution works

  1. An Amazon EventBridge time-based event invokes a Lambda function for processing.
  2. The Lambda function gets finding results from the Security Hub API and writes them into a .csv file.
  3. The API uploads the file into Amazon S3 and generates a presigned URL with a 24-hour duration, or the duration of the temporary credential used in Lambda, whichever ends first.
  4. Amazon SNS sends an email notification to the address provided during deployment. This email address can be updated afterwards through the Amazon SNS console.
  5. The email includes a link to download the file.
Figure 1: Solution overview, deployed through AWS CloudFormation

Figure 1: Solution overview, deployed through AWS CloudFormation

Fields included in the report:

Note: You can extend the report by modifying the Lambda function to add fields as needed.

Solution resources

The solution provided with this blog post consists of an AWS CloudFormation template named security-hub-full-report-email.json that deploys the following resources:

  1. An Amazon SNS topic named SecurityHubRecurringFullReport and an email subscription to the topic.
    Figure 2: SNS topic created by the solution

    Figure 2: SNS topic created by the solution

  2. The email address that subscribes to the topic is captured through a CloudFormation template input parameter. The subscriber is notified by email to confirm the subscription. After confirmation, the subscription to the SNS topic is created. Additional subscriptions can be added as needed to include additional emails or distribution lists.
    Figure 3: SNS email subscription

    Figure 3: SNS email subscription

  3. The SendSecurityHubFullReportEmail Lambda function queries the Security Hub API to get findings into a .csv file that’s written to Amazon S3. A pre-authenticated link to the file is generated and sends the email message to the SNS topic described above.
    Figure 4: Lambda function created by the solution

    Figure 4: Lambda function created by the solution

  4. An IAM role for the Lambda function to be able to create logs in CloudWatch, get findings from Security Hub, publish messages to SNS, and put objects into an S3 bucket.
    Figure 5: Permissions policy for the Lambda function

    Figure 5: Permissions policy for the Lambda function

  5. An EventBridge rule that runs on a schedule named SecurityHubFullReportEmailSchedule used to invoke the Lambda function that generates the findings report. The default schedule is every Monday at 8:00 AM UTC. This schedule can be overwritten by using a CloudFormation input parameter. Learn more about creating cron expressions.
    Figure 6: Example of the EventBridge schedule created by the solution

    Figure 6: Example of the EventBridge schedule created by the solution

Deploy the solution

Use the following steps to deploy this solution in a single AWS account. If you have a Security Hub administrator account or are using Security Hub cross-Region aggregation, the report will get the findings from the linked AWS accounts and Regions.

To deploy the solution

  1. Download the CloudFormation template security-hub-full-report-email.json from our GitHub repository.
  2. Copy the template to an S3 bucket within your target AWS account and Region. Copy the object URL for the CloudFormation template .json file.
  3. On the AWS Management Console, go to the CloudFormation console. Choose Create Stack and select With new resources.
    Figure 7: Create stack with new resources

    Figure 7: Create stack with new resources

  4. Under Specify template, in the Amazon S3 URL textbox, enter the S3 object URL for the .json file that you uploaded in step 1.
    Figure 8: Specify S3 URL for CloudFormation template

    Figure 8: Specify S3 URL for CloudFormation template

  5. Choose Next. On the next page, do the following:
    1. Stack name: Enter a name for the stack.
    2. Email address: Enter the email address of the subscriber to the Security Hub findings email.
    3. RecurringScheduleCron: Enter the cron expression for scheduling the Security Hub findings email. The default is every Monday at 8:00 AM UTC. Learn more about creating cron expressions.
    4. SecurityHubRegion: Enter the Region where Security Hub is aggregating the findings.
    Figure 9: Enter stack name and parameters

    Figure 9: Enter stack name and parameters

  6. Choose Next.
  7. Keep all defaults in the screens that follow and choose Next.
  8. Check the box I acknowledge that AWS CloudFormation might create IAM resources, and then choose Create stack.

Test the solution

You can send a test email after the deployment is complete. To do this, open the Lambda console and locate the SendSecurityHubFullReportEmail Lambda function. Perform a manual invocation with an event payload to receive an email within a few minutes. You can repeat this procedure as many times as you want.

Conclusion

In this post I’ve shown you an approach for rapidly building a solution for sending weekly findings report of the security posture of your AWS account as evaluated by Security Hub. This solution helps you to be diligent in reviewing outstanding findings and to remediate findings in a timely way based on their severity. You can extend the solution in many ways, including:

  • Send a file to an email-enabled ticketing service, such as ServiceNow or another security information and event management (SIEM) that you use.
  • Add links to internal wikis for workflows such as organizational exceptions to vulnerabilities or other internal processes.
  • Extend the solution by modifying the filters, email content, and delivery frequency.

To learn more about how to set up and customize Security Hub, see these additional blog posts.

If you have feedback about this post, submit comments in the Comments section below. If you have any questions about this post, start a thread on the AWS Security Hub re:Post forum.

Want more AWS Security news? Follow us on Twitter.

Pablo Pagani

Pablo Pagani

Pablo is the Sr. Latam Security Manager for AWS Professional Services based in Buenos Aires, Argentina. He helps customers build a secure journey in AWS. He developed his passion for computers while writing his first lines of code in BASIC using a Talent MSX.

2023 Canadian Centre for Cyber Security Assessment Summary report available with 20 additional services

Post Syndicated from Naranjan Goklani original https://aws.amazon.com/blogs/security/2023-canadian-centre-for-cyber-security-assessment-summary-report-available-with-20-additional-services/

At Amazon Web Services (AWS), we are committed to providing continued assurance to our customers through assessments, certifications, and attestations that support the adoption of current and new AWS services and features. We are pleased to announce the availability of the 2023 Canadian Centre for Cyber Security (CCCS) assessment summary report for AWS. With this assessment, a total of 150 AWS services and features are assessed in the Canada (Central) Region, including 20 additional AWS services and features. The assessment report is available for review and download on demand through AWS Artifact.

The full list of services in scope for the CCCS assessment is available on the Services in Scope page. The 20 new services and features are the following:

The CCCS is Canada’s authoritative source of cyber security expert guidance for the Canadian government, industry, and the general public. Public and commercial sector organizations across Canada rely on CCCS’s rigorous Cloud Service Provider (CSP) IT Security (ITS) assessment in their decision to use CSP services. In addition, CCCS’s ITS assessment process is a mandatory requirement for AWS to provide cloud services to Canadian federal government departments and agencies.  

The CCCS cloud service provider information technology security assessment process determines if the Government of Canada (GC) ITS requirements for the CCCS Medium cloud security profile (previously referred to as GC’s PROTECTED B/Medium Integrity/Medium Availability [PBMM] profile) are met as described in ITSG-33 (IT security risk management: A lifecycle approach, Annex 3 – Security control catalogue). As of November 2023, 150 AWS services in the Canada (Central) Region have been assessed by CCCS and meet the requirements for the Medium cloud security profile. Meeting the Medium cloud security profile is required to host workloads that are classified up to and including Medium categorization. On a periodic basis, CCCS assesses new or previously unassessed services and re-assesses the AWS services that were previously assessed to verify that they continue to meet the GC’s requirements. CCCS prioritizes the assessment of new AWS services based on their availability in Canada, and customer demand for the AWS services. The full list of AWS services that have been assessed by CCCS is available on our Services in Scope for CCCS Assessment page.

To learn more about the CCCS assessment or our other compliance and security programs, visit AWS Compliance Programs. As always, we value your feedback and questions; reach out to the AWS Compliance team through the Contact Us page.

 
If you have feedback about this post, submit comments in the Comments section below. If you have questions about this post, contact AWS Support.

Want more AWS Security news? Follow us on Twitter.

Naranjan Goklani

Naranjan Goklani

Naranjan is an Audit Lead for Canada. He has experience leading audits, attestations, certifications, and assessments across the Americas. Naranjan has more than 13 years of experience in risk management, security assurance, and performing technology audits. He previously worked in one of the Big 4 accounting firms and supported clients from the financial services, technology, retail, and utilities industries.

Implement an early feedback loop with AWS developer tools to shift security left

Post Syndicated from Barry Conway original https://aws.amazon.com/blogs/security/implement-an-early-feedback-loop-with-aws-developer-tools-to-shift-security-left/

Early-feedback loops exist to provide developers with ongoing feedback through automated checks. This enables developers to take early remedial action while increasing the efficiency of the code review process and, in turn, their productivity.

Early-feedback loops help provide confidence to reviewers that fundamental security and compliance requirements were validated before review. As part of this process, common expectations of code standards and quality can be established, while shifting governance mechanisms to the left.

In this post, we will show you how to use AWS developer tools to implement a shift-left approach to security that empowers your developers with early feedback loops within their development practices. You will use AWS CodeCommit to securely host Git repositories, AWS CodePipeline to automate continuous delivery pipelines, AWS CodeBuild to build and test code, and Amazon CodeGuru Reviewer to detect potential code defects.

Why the shift-left approach is important

Developers today are an integral part of organizations, building and maintaining the most critical customer-facing applications. Developers must have the knowledge, tools, and processes in place to help them identify potential security issues before they release a product to production.

This is why the shift-left approach is important. Shift left is the process of checking for vulnerabilities and issues in the earlier stages of software development. By following the shift-left process (which should be part of a wider application security review and threat modelling process), software teams can help prevent undetected security issues when they build an application. The modern DevSecOps workflow continues to shift left towards the developer and their practices with the aim to achieve the following:

  • Drive accountability among developers for the security of their code
  • Empower development teams to remediate issues up front and at their own pace
  • Improve risk management by enabling early visibility of potential security issues through early feedback loops

You can use AWS developer tools to help provide this continual early feedback for developers upon each commit of code.

Solution prerequisites

To follow along with this solution, make sure that you have the following prerequisites in place:

Make sure that you have a general working knowledge of the listed services and DevOps practices.

Solution overview

The following diagram illustrates the architecture of the solution.

Figure 1: Solution overview

Figure 1: Solution overview

We will show you how to set up a continuous integration and continuous delivery (CI/CD) pipeline by using AWS developer tools—CodeCommit, CodePipeline, CodeBuild, and CodeGuru—that you will integrate with the code repository to detect code security vulnerabilities. As shown in Figure 1, the solution has the following steps:

  1. The developer commits the new branch into the code repository.
  2. The developer creates a pull request to the main branch.
  3. Pull requests initiate two jobs: an Amazon CodeGuru Reviewer code scan and a CodeBuild job.
    1. CodeGuru Reviewer uses program analysis and machine learning to help detect potential defects in your Java and Python code, and provides recommendations to improve the code. CodeGuru Reviewer helps detect security vulnerabilities, secrets, resource leaks, concurrency issues, incorrect input validation, and deviation from best practices for using AWS APIs and SDKs.
    2. You can configure the CodeBuild deployment with third-party tools, such as Bandit for Python to help detect security issues in your Python code.
  4. CodeGuru Reviewer or CodeBuild writes back the findings of the code scans to the pull request to provide a single common place for developers to review the findings that are relevant to their specific code updates.

The following table presents some other tools that you can integrate into the early-feedback toolchain, depending on the type of code or artefacts that you are evaluating:

Early feedback – security tools Usage License
cfn-guard , cfn-nag , cfn-lint Infrastructure linting and validation cfn-guard license, cfn-nag license, cfn-lint license
CodeGuru, Bandit Python Bandit license
CodeGuru Java
npm-audit, Dependabot npm libraries Dependabot license

When you deploy the solution in your AWS account, you can review how Bandit for Python has been built into the deployment pipeline by using AWS CodeBuild with a configured buildspec file, as shown in Figure 2. You can implement the other tools in the table by using a similar approach.

Figure 2: Bandit configured in CodeBuild

Figure 2: Bandit configured in CodeBuild

Walkthrough

To deploy the solution, you will complete the following steps:

  1. Deploy the solution by using a CloudFormation template
  2. Associate CodeGuru with a code repository
  3. Create a pull request to the code repository
  4. Review the code scan results in the pull request and address the findings

Deploy the solution

The first step is to deploy the required resources into your AWS environment by using CloudFormation.

To deploy the solution

  1. Choose the following Launch Stack button to deploy the solution’s CloudFormation template:

    Select this image to open a link that starts building the CloudFormation stack

    The solution deploys in the AWS US East (N. Virginia) Region (us-east-1) by default because each service listed in the Prerequisites section is available in this Region. To deploy the solution in a different Region, use the Region selector in the console navigation bar and make sure that the services required for this walkthrough are supported in your newly selected Region. For service availability by Region, see AWS Services by Region.

  2. On the Quick Create Stack screen, do the following:
    1. Leave the provided parameter defaults in place.
    2. Scroll to the bottom, and in the Capabilities section, select I acknowledge that AWS CloudFormation might create IAM resources with custom names.
    3. Choose Create Stack.
  3. When the CloudFormation template has completed, open the AWS Cloud9 console.
  4. In the Environments table, for the provisioned shift-left-blog-cloud9-ide environment, choose Open, as shown in Figure 3.
    Figure 3: Cloud9 environments

    Figure 3: Cloud9 environments

  5. The provisioned Cloud9 environment opens in a new tab. Wait for Cloud9 to initialize the two sample code repositories: shift-left-sample-app-java and shift-left-sample-app-python, as shown in Figure 4. For this post, you will work only with the Python sample repository shift-left-sample-app-python, but the procedures we outline will also work for the Java repository.
    Figure 4: Cloud9 IDE

    Figure 4: Cloud9 IDE

Associate CodeGuru Reviewer with a code repository

The next step is to associate the Python code repository with CodeGuru Reviewer. After you associate the repository, CodeGuru Reviewer analyzes and comments on issues that it finds when you create a pull request.

To associate CodeGuru Reviewer with a repository

  1. Open the CodeGuru console, and in the left navigation pane, under Reviewer, choose Repositories.
  2. In the Repositories section, choose Associate repository and run analysis.
  3. In the Associate repository section, do the following:
    1. For Select source provider, select AWS CodeCommit.
    2. For Repository location,select shift-left-sample-app-python.
  4. In the Run a repository analysis section, do the following, as shown in Figure 5:
    1. For Source branch, select main.
    2. For Code review name – optional, enter a name.
    3. For Tagsoptional, leave the default settings.
    4. Choose Associate repository and run analysis.
      Figure 5: CodeGuru repository configuration

      Figure 5: CodeGuru repository configuration

  5. CodeGuru initiates the Full repository analysis and the status is Pending, as shown in Figure 6. The full analysis takes about 5 minutes to complete. Wait for the status to change from Pending to Completed.
    Figure 6: CodeGuru full analysis pending

    Figure 6: CodeGuru full analysis pending

Create a pull request

The next step is to create a new branch and to push sample code to the repository by creating a pull request so that the code scan can be initiated by CodeGuru Reviewer and the CodeBuild job.

To create a new branch

  1. In the Cloud9 IDE, locate the terminal and create a new branch by running the following commands.
    cd ~/environment/shift-left-sample-app-python
    git checkout -b python-test

  2. Confirm that you are working from the new branch, which will be highlighted in the Cloud9 IDE terminal, as shown in Figure 7.
    git branch -v

    Figure 7: Cloud9 IDE terminal

    Figure 7: Cloud9 IDE terminal

To create a new file and push it to the code repository

  1. Create a new file called sample.py.
    touch sample.py

  2. Copy the following sample code, paste it into the sample.py file, and save the changes, as shown in Figure 8.
    import requests
    
    data = requests.get("https://www.example.org/", verify = False)
    print(data.status_code)

    Figure 8: Cloud9 IDE noncompliant code

    Figure 8: Cloud9 IDE noncompliant code

  3. Commit the changes to the repository.
    git status
    git add -A
    git commit -m "shift left blog python sample app update"

    Note: if you receive a message to set your name and email address, you can ignore it because Git will automatically set these for you, and the Git commit will complete successfully.

  4. Push the changes to the code repository, as shown in Figure 9.
    git push origin python-test

    Figure 9: Git push

    Figure 9: Git push

To create a new pull request

  1. Open the CodeCommit console and select the code repository called shift-left-sample-app-python.
  2. From the Branches dropdown, select the new branch that you created and pushed, as shown in Figure 10.
    Figure 10: CodeCommit branch selection

    Figure 10: CodeCommit branch selection

  3. In your new branch, select the file sample.py, confirm that the file has the changes that you made, and then choose Create pull request, as shown in Figure 11.
    Figure 11: CodeCommit pull request

    Figure 11: CodeCommit pull request

    A notification appears stating that the new code updates can be merged.

  4. In the Source dropdown, choose the new branch python-test. In the Destination dropdown, choose the main branch where you intend to merge your code changes when the pull request is closed.
  5. To have CodeCommit run a comparison between the main branch and your new branch python-test, choose Compare. To see the differences between the two branches, choose the Changes tab at the bottom of the page. CodeCommit also assesses whether the two branches can be merged automatically when the pull request is closed.
  6. When you’re satisfied with the comparison results for the pull request, enter a Title and an optional Description, and then choose Create pull request. Your pull request appears in the list of pull requests for the CodeCommit repository, as shown in Figure 12.
    Figure 12: Pull request

    Figure 12: Pull request

The creation of this pull request has automatically started two separate code scans. The first is a CodeGuru incremental code review and the second uses CodeBuild, which utilizes Bandit to perform a security code scan of the Python code.

Review code scan results and resolve detected security vulnerabilities

The next step is to review the code scan results to identify security vulnerabilities and the recommendations on how to fix them.

To review the code scan results

  1. Open the CodeGuru console, and in the left navigation pane, under Reviewer, select Code reviews.
  2. On the Incremental code reviews tab, make sure that you see a new code review item created for the preceding pull request.
    Figure 13: CodeGuru Code review

    Figure 13: CodeGuru Code review

  3. After a few minutes, when CodeGuru completes the incremental analysis, choose the code review to review the CodeGuru recommendations on the pull request. Figure 14 shows the CodeGuru recommendations for our example.
    Figure 14: CodeGuru recommendations

    Figure 14: CodeGuru recommendations

  4. Open the CodeBuild console and select the CodeBuild job called shift-left-blog-pr-Python. In our example, this job should be in a Failed state.
  5. Open the CodeBuild run, and under the Build history tab, select the CodeBuild job, which is in Failed state. Under the Build Logs tab, scroll down until you see the following errors in the logs. Note that the severity of the finding is High, which is why the CodeBuild job failed. You can review the Bandit scanning options in the Bandit documentation.
    Test results:
    >> Issue: [B501:request_with_no_cert_validation] Call to requests with verify=False disabling SSL certificate checks, security issue.
       Severity: High   Confidence: High
       CWE: CWE-295 (https://cwe.mitre.org/data/definitions/295.html)
       More Info: https://bandit.readthedocs.io/en/1.7.5/plugins/b501_request_with_no_cert_validation.html
       Location: sample.py:3:7
    
    2   
    3   data = requests.get("https://www.example.org/", verify = False)
    4   print(data.status_code)

  6. Navigate to the CodeCommit console, and on the Activity tab of the pull request, review the CodeGuru recommendations. You can also review the results of the CodeBuild jobs that Bandit performed, as shown in Figure 15.
    Figure 15: CodeGuru recommendations and CodeBuild logs

    Figure 15: CodeGuru recommendations and CodeBuild logs

This demonstrates how developers can directly link the relevant information relating to security code scans with their code development and associated pull requests, hence shifting to the left the required security awareness for developers.

To resolve the detected security vulnerabilities

  1. In the Cloud9 IDE, navigate to the file sample.py in the Python sample repository, as shown in Figure 16.
    Figure 16: Cloud9 IDE sample.py

    Figure 16: Cloud9 IDE sample.py

  2. Copy the following code and paste it in the sample.py file, overwriting the existing code. Save the update.
    import requests
    
    data = requests.get("https://www.example.org", timeout=5)
    print(data.status_code)

  3. Commit the changes by running the following commands.
    git status
    git add -A
    git commit -m "shift left python sample.py resolve security errors"
    git push origin python-test

  4. Open the CodeCommit console and choose the Activity tab on the pull request that you created earlier. You will see a banner indicating that the pull request was updated. You will also see new comments indicating that new code scans using CodeGuru and CodeBuild were initiated for the new pull request update.
  5. In the CodeGuru console, on the Incremental code reviews page, check that a new code scan has begun. When the scans are finished, review the results in the CodeGuru console and the CodeBuild build logs, as described previously. The previously detected security vulnerability should now be resolved.
  6. In the CodeCommit console, on the Activity tab, under Activity history, review the comments to verify that each of the code scans has a status of Passing, as shown in Figure 17.
    Figure 17: CodeCommit activity history

    Figure 17: CodeCommit activity history

  7. Now that the security issue has been resolved, merge the pull request into the main branch of the code repository. Choose Merge, and under Merge strategy, select Fast Forward merge.

AWS account clean-up

Clean up the resources created by this solution to avoid incurring future charges.

To clean up your account

  1. Start by deleting the CloudFormation stacks for the Java and Python sample applications that you deployed. In the CloudFormation console, in the Stacks section, select one of these stacks and choose Delete; then select the other stack and choose Delete.
    Figure 18: Delete repository stack

    Figure 18: Delete repository stack

  2. To initiate deletion of the Cloud9 CloudFormation stack, select it and choose Delete.
  3. Open the Amazon S3 console, and in the search box, enter shift-left to search for the S3 bucket that CodePipeline used.
    Figure 19: Select CodePipeline S3 bucket

    Figure 19: Select CodePipeline S3 bucket

  4. Select the S3 bucket, select all of the object folders in the bucket, and choose Delete
    Figure 20: Select CodePipeline S3 objects

    Figure 20: Select CodePipeline S3 objects

  5. To confirm deletion of the objects, in the section Permanently delete objects?, enter permanently delete, and then choose Delete objects. A banner message that states Successfully deleted objects appears at the top confirming the object deletion.
  6. Navigate back to the CloudFormation console, select the stack named shift-left-blog, and choose Delete.

Conclusion

In this blog post, we showed you how to implement a solution that enables early feedback on code development through status comments in the CodeCommit pull request activity tab by using Amazon CodeGuru Reviewer and CodeBuild to perform automated code security scans on the creation of a code repository pull request.

We configured CodeBuild with Bandit for Python to demonstrate how you can integrate third-party or open-source tools into the development cycle. You can use this approach to integrate other tools into the workflow.

Shifting security left early in the development cycle can help you identify potential security issues earlier and empower teams to remediate issues earlier, helping to prevent the need to refactor code towards the end of a build.

This solution provides a simple method that you can use to view and understand potential security issues with your newly developed code and thus enhances your awareness of the security requirements within your organization.

It’s simple to get started. Sign up for an AWS account, deploy the provided CloudFormation template through the Launch Stack button, commit your code, and start scanning for vulnerabilities.

If you have feedback about this post, submit comments in the Comments section below. If you have questions about this post, start a new thread on AWS re:Post or contact AWS Support.

Want more AWS Security news? Follow us on Twitter.
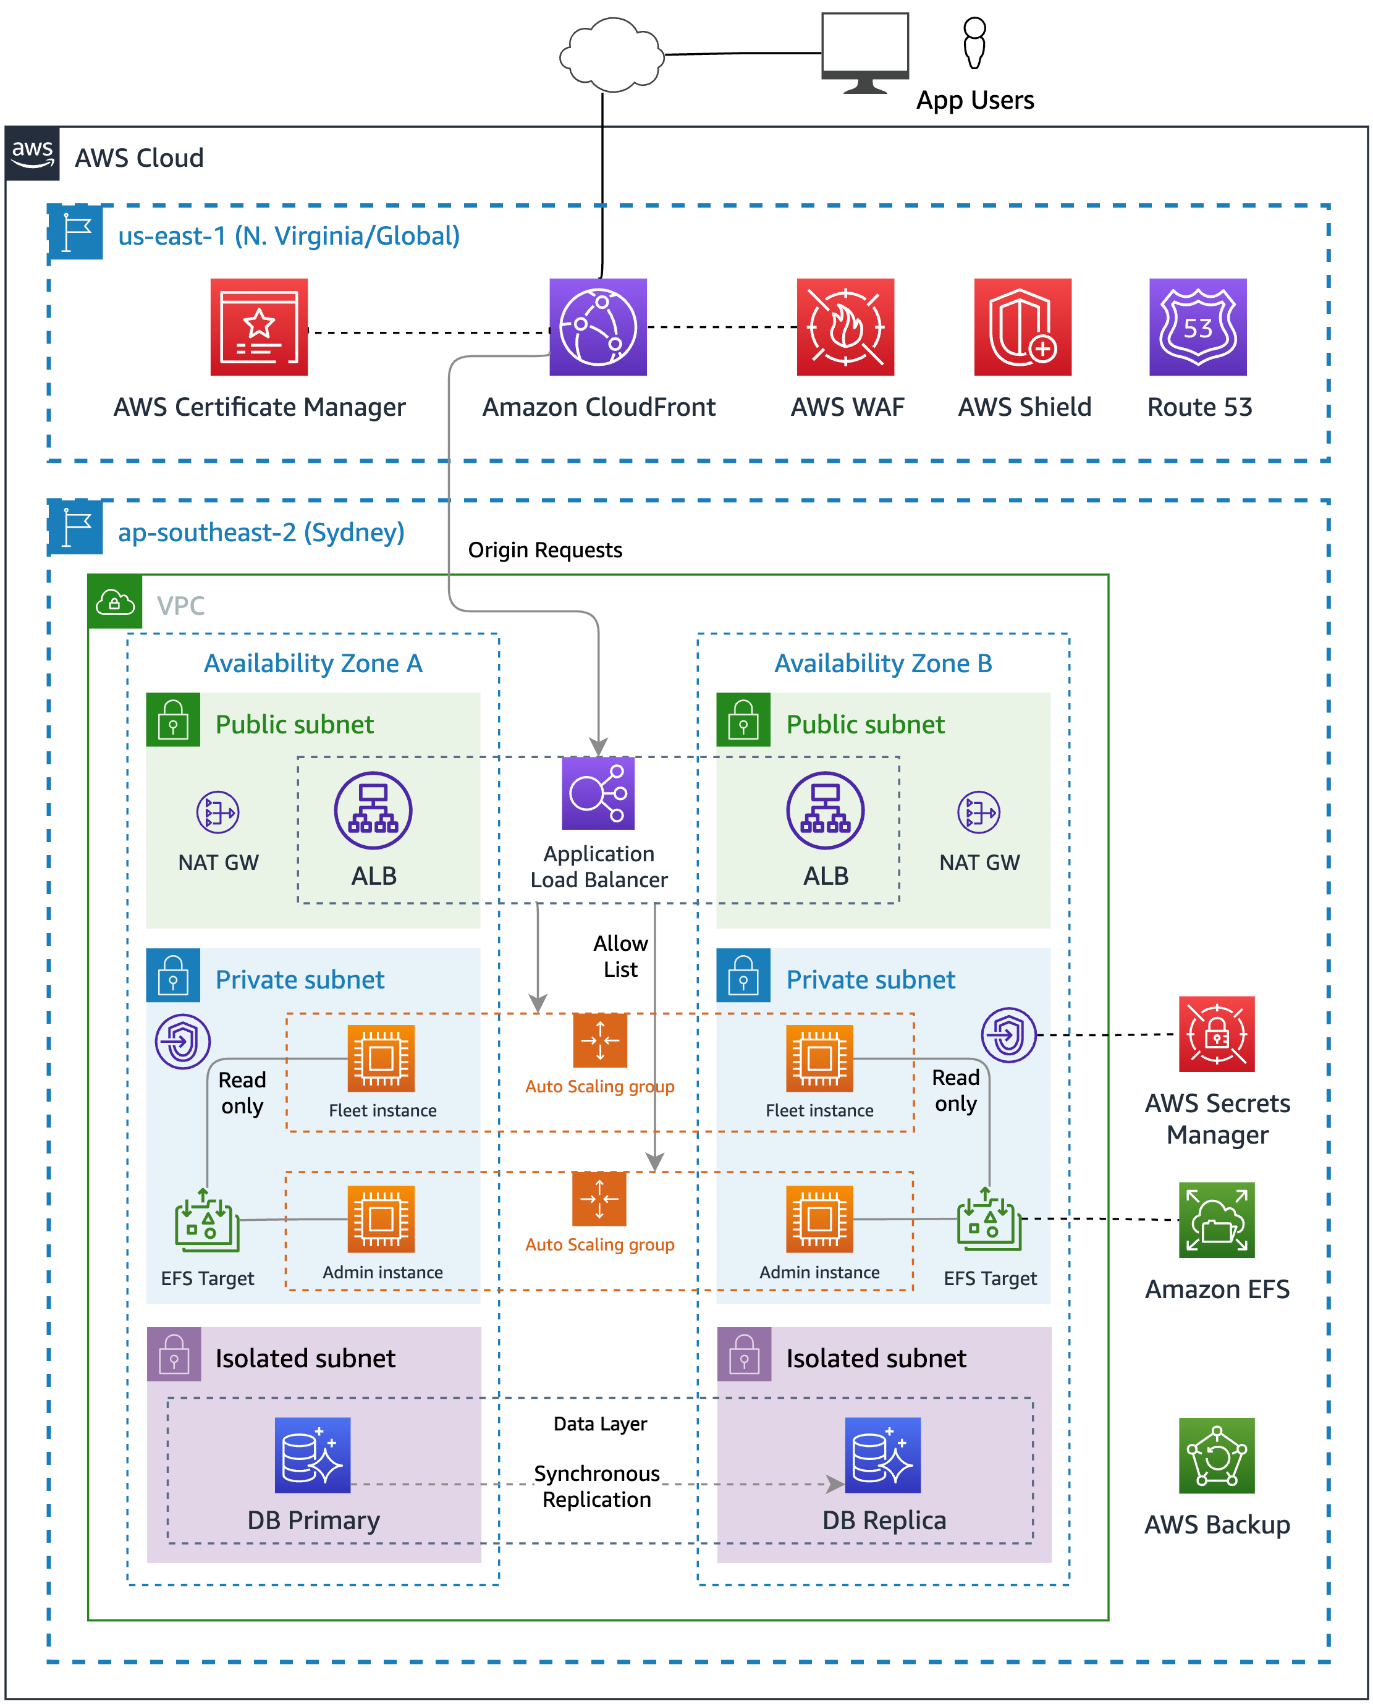
Barry Conway

Barry Conway

Barry is an Enterprise Solutions Architect with years of experience in the technology industry, bridging the gap between business and technology. Barry has helped banking, manufacturing, logistics, and retail organizations realize their business goals.

Author

Deenadayaalan Thirugnanasambandam

Deenadayaalan is a Senior Practice manager at AWS. He provides prescriptive architectural guidance and consulting to help accelerate customers’ adoption of AWS.

Balamurugan Kumaran

Balamurugan Kumaran

Balamurugan is a Senior Cloud Architect at AWS. Over the years, Bala has architected and implemented highly available, scalable, and secure applications using AWS services for various enterprise customers.

Nitin Kumar

Nitin Kumar

Nitin is a Senior Cloud Architect at AWS. He plays a pivotal role in driving organizational success by harnessing the power of technology. With a focus on enabling innovation through architectural guidance and consulting, he empowers customers to excel on the AWS Cloud. Outside of work, Nitin dedicates his time to crafting IoT devices for reef tanks.

Use scalable controls for AWS services accessing your resources

Post Syndicated from James Greenwood original https://aws.amazon.com/blogs/security/use-scalable-controls-for-aws-services-accessing-your-resources/

Sometimes you want to configure an AWS service to access your resource in another service. For example, you can configure AWS CloudTrail, a service that monitors account activity across your AWS infrastructure, to write log data to your bucket in Amazon Simple Storage Service (Amazon S3). When you do this, you want assurance that the service will only access your resource on your behalf—you don’t want an untrusted entity to be able to use the service to access your resource. Before today, you could achieve this by using the two AWS Identity and Access Management (IAM) condition keys, aws:SourceAccount and aws:SourceArn. You can use these condition keys to help make sure that a service accesses your resource only on behalf of specific accounts or resources that you trust. However, because these condition keys require you to specify individual accounts and resources, they can be difficult to manage at scale, especially in larger organizations.

Recently, IAM launched two new condition keys that can help you achieve this in a more scalable way that is simpler to manage within your organization:

  • aws:SourceOrgID — use this condition key to make sure that an AWS service can access your resources only when the request originates from a particular organization ID in AWS Organizations.
  • aws:SourceOrgPaths — use this condition key to make sure that an AWS service can access your resources only when the request originates from one or more organizational units (OUs) in your organization.

In this blog post, we describe how you can use the four available condition keys, including the two new ones, to help you control how AWS services access your resources.

Background

Imagine a scenario where you configure an AWS service to access your resource in another service. Let’s say you’re using Amazon CloudWatch to observe resources in your AWS environment, and you create an alarm that activates when certain conditions occur. When the alarm activates, you want it to publish messages to a topic that you create in Amazon Simple Notification Service (Amazon SNS) to generate notifications.

Figure 1 depicts this process.

Figure 1: Amazon CloudWatch publishing messages to an SNS topic

Figure 1: Amazon CloudWatch publishing messages to an SNS topic

In this scenario, there’s a resource-based policy controlling access to your SNS topic. For CloudWatch to publish messages to it, you must configure the policy to allow access by CloudWatch. When you do this, you identify CloudWatch using an AWS service principal, in this case cloudwatch.amazonaws.com.

Cross-service access

This is an example of a common pattern known as cross-service access. With cross-service access, a calling service accesses your resource in a called service, and a resource-based policy attached to your resource grants access to the calling service. The calling service is identified using an AWS service principal in the form <SERVICE-NAME>.amazonaws.com, and it accesses your resource on behalf of an originating resource, such as a CloudWatch alarm.

Figure 2 shows cross-service access.

Figure 2: Cross-service access

Figure 2: Cross-service access

When you configure cross-service access, you want to make sure that the calling service will access your resource only on your behalf. That means you want the originating resource to be controlled by someone whom you trust. If an untrusted entity creates their own CloudWatch alarm in their AWS environment, for example, then their alarm should not be able to publish messages to your SNS topic.

If an untrusted entity could use a calling service to access your resource on their behalf, it would be an example of what’s known as the confused deputy problem. The confused deputy problem is a security issue in which an entity that doesn’t have permission to perform an action coerces a more privileged entity (in this case, a calling service) to perform the action instead.

Use condition keys to help prevent cross-service confused deputy issues

AWS provides global condition keys to help you prevent cross-service confused deputy issues. You can use these condition keys to control how AWS services access your resources.

Before today, you could use the aws:SourceAccount or aws:SourceArn condition keys to make sure that a calling service accesses your resource only when the request originates from a specific account (with aws:SourceAccount) or a specific originating resource (with aws:SourceArn). However, there are situations where you might want to allow multiple resources or accounts to use a calling service to access your resource. For example, you might want to create many VPC flow logs in an organization that publish to a central S3 bucket. To achieve this using the aws:SourceAccount or aws:SourceArn condition keys, you must enumerate all the originating accounts or resources individually in your resource-based policies. This can be difficult to manage, especially in large organizations, and can potentially cause your resource-based policy documents to reach size limits.

Now, you can use the new aws:SourceOrgID or aws:SourceOrgPaths condition keys to make sure that a calling service accesses your resource only when the request originates from a specific organization (with aws:SourceOrgID) or a specific organizational unit (with aws:SourceOrgPaths). This helps avoid the need to update policies when accounts are added or removed, reduces the size of policy documents, and makes it simpler to create and review policy statements.

The following table summarizes the four condition keys that you can use to help prevent cross-service confused deputy issues. These keys work in a similar way, but with different levels of granularity.

Use case Condition key Value Allowed operators Single/multi valued Example value
Allow a calling service to access your resource only on behalf of an organization that you trust. aws:SourceOrgID AWS organization ID of the resource making a cross-service access request String operators Single-valued key o-a1b2c3d4e5
Allow a calling service to access your resource only on behalf of an organizational unit (OU) that you trust. aws:SourceOrgPaths Organization entity paths of the resource making a cross-service access request Set operators and string operators Multivalued key o-a1b2c3d4e5/r-ab12/ou-ab12-11111111/ou-ab12-22222222/
Allow a calling service to access your resource only on behalf of an account that you trust. aws:SourceAccount AWS account ID of the resource making a cross-service access request String operators Single-valued key 111122223333
Allow a calling service to access your resource only on behalf of a resource that you trust. aws:SourceArn Amazon Resource Name (ARN) of the resource making a cross- service access request ARN operators (recommended) or string operators Single-valued key arn:aws:cloudwatch:eu-west-1:111122223333:alarm:myalarm

When to use the condition keys

AWS recommends that you use these condition keys in any resource-based policy statements that allow access by an AWS service, except where the relevant condition key is not yet supported by the service. To find out whether a condition key is supported by a particular service, see AWS global condition context keys in the AWS Identity and Access Management User Guide.

Note: Only use these condition keys in resource-based policies that allow access by an AWS service. Don’t use them in other use cases, including identity-based policies and service control policies (SCPs), where these condition keys won’t be populated.

Use condition keys for defense in depth

AWS services use a variety of mechanisms to help prevent cross-service confused deputy issues, and the details vary by service. For example, where a calling service accesses an S3 bucket, some services use S3 prefixes to help prevent confused deputy issues. For more information, see the relevant service documentation.

Where supported by the service, AWS recommends that you use the condition keys we describe in this post regardless of whether the service has another mechanism in place to help prevent cross-service confused deputy issues. This helps to make your intentions explicit, provide defense in depth, and guard against misconfigurations.

Example use cases

Let’s walk through some example use cases to learn how to use these condition keys in practice.

First, imagine you’re using Amazon Virtual Private Cloud (Amazon VPC) to manage logically isolated virtual networks. In Amazon VPC, you can configure flow logs, which capture information about your network traffic. Let’s say you want a flow log to write data into an S3 bucket for later analysis. This process is depicted in Figure 3.

Figure 3: Amazon VPC writing flow logs to an S3 bucket

Figure 3: Amazon VPC writing flow logs to an S3 bucket

This constitutes another cross-service access scenario. In this case, Amazon VPC is the calling service, Amazon S3 is the called service, the VPC flow log is the originating resource, and the S3 bucket is your resource in the called service.

To allow access, the resource-based policy for your S3 bucket (known as a bucket policy) must allow Amazon VPC to put objects there. The Principal element in this policy specifies the AWS service principal of the service that will access the resource, which for VPC flow logs is delivery.logs.amazonaws.com.

Initial policy without confused deputy prevention

The following is an initial version of the bucket policy that allows Amazon VPC to put objects in the bucket but doesn’t yet provide confused deputy prevention. We’re showing this policy for illustration purposes; don’t use it in its current form.

{
    "Version": "2012-10-17",
    "Statement": [
        {
            "Sid": "PARTIAL-EXAMPLE-DO-NOT-USE",
            "Effect": "Allow",
            "Principal": {
                "Service": "delivery.logs.amazonaws.com"
            },
            "Action": "s3:PutObject",
            "Resource": "arn:aws:s3:::<DOC-EXAMPLE-BUCKET>/*"
        }
    ]
}

Note: For simplicity, we only show one of the policy statements that you need to allow VPC flow logs to write to a bucket. In a real-life bucket policy for flow logs, you need two policy statements: one allowing actions on the bucket, and one allowing actions on the bucket contents. These are described in Publish flow logs to Amazon S3. Both policy statements work in the same way with respect to confused deputy prevention.

This policy statement allows Amazon VPC to put objects in the bucket. However, it allows Amazon VPC to do that on behalf of any flow log in any account. There’s nothing in the policy to tell Amazon VPC that it should access this bucket only if the flow log belongs to a specific organization, OU, account, or resource that you trust.

Let’s now update the policy to help prevent cross-service confused deputy issues. For the rest of this post, the remaining policy samples provide confused deputy protection, but at different levels of granularity.

Specify a trusted organization

Continuing with the previous example, imagine that you now have an organization in AWS Organizations, and you want to create VPC flow logs in various accounts within your organization that publish to a central S3 bucket. You want Amazon VPC to put objects in the bucket only if the request originates from a flow log that resides in your organization.

You can achieve this by using the new aws:SourceOrgID condition key. In a cross-service access scenario, this condition key evaluates to the ID of the organization that the request came from. You can use this condition key in the Condition element of a resource-based policy to allow actions only if aws:SourceOrgID matches the ID of a specific organization, as shown in the following example. In your own policy, make sure to replace <DOC-EXAMPLE-BUCKET> and <MY-ORGANIZATION-ID> with your own information.

{
    "Version": "2012-10-17",
    "Statement": [
        {
            "Sid": "VPCLogsDeliveryWrite",
            "Effect": "Allow",
            "Principal": {
                "Service": "delivery.logs.amazonaws.com"
            },
            "Action": "s3:PutObject",
            "Resource": "arn:aws:s3:::<DOC-EXAMPLE-BUCKET>/*",
            "Condition": {
                "StringEquals": {
                    "aws:SourceOrgID": "<MY-ORGANIZATION-ID>"
                }
            }
        }
    ]
}

The revised policy states that Amazon VPC can put objects in the bucket only if the request originates from a flow log in your organization. Now, if someone creates a flow log outside your organization and configures it to access your bucket, they will get an access denied error.

You can use aws:SourceOrgID in this way to allow a calling service to access your resource only if the request originates from a specific organization, as shown in Figure 4.

Figure 4: Specify a trusted organization using aws:SourceOrgID

Figure 4: Specify a trusted organization using aws:SourceOrgID

Specify a trusted OU

What if you don’t want to trust your entire organization, but only part of it? Let’s consider a different scenario. Imagine that you want to send messages from Amazon SNS into a queue in Amazon Simple Queue Service (Amazon SQS) so they can be processed by consumers. This is depicted in Figure 5.

Figure 5: Amazon SNS sending messages to an SQS queue

Figure 5: Amazon SNS sending messages to an SQS queue

Now imagine that you want your SQS queue to receive messages only if they originate from an SNS topic that resides in a specific organizational unit (OU) in your organization. For example, you might want to allow messages only if they originate from a production OU that is subject to change control.

You can achieve this by using the new aws:SourceOrgPaths condition key. As before, you use this condition key in a resource-based policy attached to your resource. In a cross-service access scenario, this condition key evaluates to the AWS Organizations entity path that the request came from. An entity path is a text representation of an entity within an organization.

You build an entity path for an OU by using the IDs of the organization, root, and all OUs in the path down to and including the OU. For example, consider the organizational structure shown in Figure 6.

Figure 6: Example organization structure

Figure 6: Example organization structure

In this example, you can specify the Prod OU by using the following entity path:

o-a1b2c3d4e5/r-ab12/ou-ab12-11111111/ou-ab12-22222222/

For more information about how to construct an entity path, see Understand the AWS Organizations entity path.

Let’s now match the aws:SourceOrgPaths condition key against a specific entity path in the Condition element of a resource-based policy for an SQS queue. In your own policy, make sure to replace <MY-QUEUE-ARN> and <MY-ENTITY-PATH> with your own information.

{
    "Version": "2012-10-17",
    "Statement": [
        {
            "Sid": "Allow-SNS-SendMessage",
            "Effect": "Allow",
            "Principal": {
                "Service": "sns.amazonaws.com"
            },
            "Action": "sqs:SendMessage",
            "Resource": "<MY-QUEUE-ARN>",
            "Condition": {
                "Null": {
                    "aws:SourceOrgPaths": "false"
                },
                "ForAllValues:StringEquals": {
                    "aws:SourceOrgPaths": "<MY-ENTITY-PATH>"
                }
            }
        }
    ]
}

Note: aws:SourceOrgPaths is a multivalued condition key, which means it’s capable of having multiple values in the request context. At the time of writing, it contains a single entity path if the request originates from an account in an organization, and a null value if the request originates from an account that’s not in an organization. Because this key is multivalued, you need to use both a set operator and a string operator to compare values.

In this policy, there are two conditions in the Condition block. The first uses the Null condition operator and compares with a false value to confirm that the condition key’s value is not null. The second uses set operator ForAllValues, which returns true if every condition key value in the request matches at least one value in your policy condition, and string operator StringEquals, which requires an exact match with a value specified in your policy condition.

Note: The reason for the null check is that set operator ForAllValues returns true when a condition key resolves to null. With an Allow effect and the null check in place, access is denied if the request originates from an account that’s not in an organization.

With this policy applied to your SQS queue, Amazon SNS can send messages to your queue only if the message came from an SNS topic in a specific OU.

You can use aws:SourceOrgPaths in this way to allow a calling service to access your resource only if the request originates from a specific organizational unit, as shown in Figure 7.

Figure 7: Specify a trusted OU using aws:SourceOrgPaths

Figure 7: Specify a trusted OU using aws:SourceOrgPaths

Specify a trusted OU and its children

In the previous example, we specified a trusted OU, but that didn’t include its child OUs. What if you want to include its children as well?

You can achieve this by replacing the string operator StringEquals with StringLike. This allows you to use wildcards in the entity path. Using the organization structure from the previous example, the following Condition evaluates to true only if the condition key value is not null and the request originates from the Prod OU or any of its child OUs.

"Condition": {
    "Null": {
        "aws:SourceOrgPaths": "false"
    },
    "ForAllValues:StringLike": {
        "aws:SourceOrgPaths": "o-a1b2c3d4e5/r-ab12/ou-ab12-11111111/ou-ab12-22222222/*"
    }
}

Specify a trusted account

If you want to be more granular, you can allow a service to access your resource only if the request originates from a specific account. You can achieve this by using the aws:SourceAccount condition key. In a cross-service access scenario, this condition key evaluates to the ID of the account that the request came from. 

The following Condition evaluates to true only if the request originates from the account that you specify in the policy. In your own policy, make sure to replace <MY-ACCOUNT-ID> with your own information.

"Condition": {
    "StringEquals": {
        "aws:SourceAccount": "<MY-ACCOUNT-ID>"
    }
}

You can use this condition element within a resource-based policy to allow a calling service to access your resource only if the request originates from a specific account, as shown in Figure 8.

Figure 8: Specify a trusted account using aws:SourceAccount

Figure 8: Specify a trusted account using aws:SourceAccount

Specify a trusted resource

If you want to be even more granular, you can allow a service to access your resource only if the request originates from a specific resource. For example, you can allow Amazon SNS to send messages to your SQS queue only if the request originates from a specific topic within Amazon SNS.

You can achieve this by using the aws:SourceArn condition key. In a cross-service access scenario, this condition key evaluates to the Amazon Resource Name (ARN) of the originating resource. This provides the most granular form of cross-service confused deputy prevention.

The following Condition evaluates to true only if the request originates from the resource that you specify in the policy. In your own policy, make sure to replace <MY-RESOURCE-ARN> with your own information.

"Condition": {
    "ArnEquals": {
        "aws:SourceArn": "<MY-RESOURCE-ARN>"
    }
}

Note: AWS recommends that you use an ARN operator rather than a string operator when comparing ARNs. This example uses ArnEquals to match the condition key value against the ARN specified in the policy.

You can use this condition element within a resource-based policy to allow a calling service to access your resource only if the request comes from a specific originating resource, as shown in Figure 9.

Figure 9: Specify a trusted resource using aws:SourceArn

Figure 9: Specify a trusted resource using aws:SourceArn

Specify multiple trusted resources, accounts, OUs, or organizations

The four condition keys allow you to specify multiple trusted entities by matching against an array of values. This allows you to specify multiple trusted resources, accounts, OUs, or organizations in your policies.

Conclusion

In this post, you learned about cross-service access, in which an AWS service communicates with another AWS service to access your resource. You saw that it’s important to make sure that such services access your resources only on your behalf in order to help avoid cross-service confused deputy issues.

We showed you how to help prevent cross-service confused deputy issues by using two new condition keys aws:SourceOrgID and aws:SourceOrgPaths, as well as the other available condition keys aws:SourceAccount and aws:SourceArn. You learned that you should use these condition keys in any resource-based policy statements that allow access by an AWS service, if the condition key is supported by the service. This helps make sure that a calling service can access your resource only when the request originates from a specific organization, OU, account, or resource that you trust.

If you have feedback about this post, submit comments in the Comments section below. If you have questions about this post, start a new thread on AWS IAM re:Post or contact AWS Support.

Want more AWS Security news? Follow us on Twitter.

Author

James Greenwood

James is a Principal Security Solutions Architect who helps AWS Financial Services customers meet their security and compliance objectives in the AWS Cloud. James has a background in identity and access management, authentication, credential management, and data protection with more than 20 years of experience in the financial services industry.

Sophia Yang

Sophia Yang

Sophia is a Senior Product Manager on the AWS Identity and Access Management (IAM) service. She is passionate about enabling customers to build and innovate in AWS in a secure manner.