AWS Network Firewall is a managed, stateful network firewall and intrusion detection and prevention service. It allows you to implement security rules for fine-grained control of your VPC network traffic. In this blog post, we discuss flow capture and flow flush, new features of AWS Network Firewall that enhance network visibility and security policy enforcement. Flow capture provides comprehensive visibility into active network flows for monitoring and troubleshooting, while flow flush enables selective termination of specific flows or all flows. These capabilities are valuable for routine network monitoring, troubleshooting, and policy updates, as well as during security incidents, where quick isolation of potentially compromised systems is crucial.
Once the traffic flow is allowed by the firewall, that decision remains in effect for the lifetime of the flow. When you modify firewall rules—for example, changing from a broader to a more targeted firewall policy—you may want to review and re-apply the new policy on the existing flows to maintain compliance with your updated security requirements. This is particularly valuable in dynamic cloud environments where security policies are regularly updated, or during security incidents requiring rapid response. These new features provide additional visibility and control of this fundamental aspect of firewall behavior by providing a native capability to identify active flows and selectively flush their connection details from firewall’s inspection engine. As a result, you can maintain consistent policy enforcement across your network during planned security updates or while flushing suspicious network traffic flows during security events.
Before we dive into how to use these new features, let’s go over some of the terms that are introduced.
Understanding the terminologies:
Active flow: A flow in AWS Network Firewall is a tracked network connection identified by a unique 5-tuple (source IP, destination IP, source port, destination port, and protocol). In the context of flow capture and flush features, an active flow refers to a network flow that is not in a CLOSED state. For example, for TCP, this includes a session in the NEW or ESTABLISHED state.
Flow filter: A set of parameters that defines which active network flows to match based on one or more criteria (such as source IP address, destination IP address, source port, destination port, or protocol). A single flow filter can match multiple network flows that meet the defined criteria.
Flow capture: A firewall operation that generates a point-in-time snapshot of active flows based on the defined flow filter(s). You can use this feature to gain network traffic visibility, analyze security events, and validate flows before flush operation.
Flow flush: A firewall operation that flushes selected active flows from the firewall flow table at a specific point in time based on your defined flow filter(s). Subsequent packets after the flush are treated as midstream flows and are re-evaluated against the stream exception policy.
Overview: Flow capture and flow flush operations workflow
AWS Network Firewall uses the open-source intrusion detection and prevention system (IDS/IPS) Suricata for stateful inspection. When inspecting your VPC traffic, the firewall maintains detailed connection state information in a flow table. This means that rather than examining individual packets in isolation, the firewall understands the full context of each network connection. You might need to flush flows in two common scenarios: either to clear all active flows (for example, during troubleshooting or maintenance) or to selectively flush specific flows (for example, when you update your firewall rules and want to flush long-running flows) based on flow filter criteria like IP address, port, or protocol. You can either capture flows first to review them before flushing, or directly flush flows using specified filters. You can monitor and verify the status and details of your capture and flush operations through the firewall operation history.
Let’s see flow capture and flush features in action:
To access these features via console:
Sign in to the AWS management console and open Amazon VPC console.
In the navigation pane, under Network Firewall, select Firewalls.
Under Firewalls, select the name of the Firewall you want to capture/flush flows from.
In the Firewall operations section, you can see the Configure flow capture and Configure flow flush options.
Figure 1: Firewall operations
Flow capture
In this section, you will learn how to capture active flows based on full or partial 5-tuple filters. In this setup, traffic between subnets 10.0.1.0/24 and 10.0.2.0/24, both within the same VPC, is configured to go through AWS Network Firewall for inspection. The goal here is to identify active flows from source subnet 10.0.1.0/24 to destination subnet 10.0.2.0/24 on TCP port 80, and then flush these identified flows.
Figure 2: Network setup
To start flow capture via the console:
Select Configure flow capture to identify active flows as shown in figure 1. This opens a new window, as shown in figure 3.
Select Availability Zone.
Enter Source or Destination address (at least one field is required).
Optionally, enter Minimum age of flow, Source Port, Destination Port, and Protocol (ICMP, TCP, UDP, IPv6-ICMP, or SCTP).
Click Add filter. You can add up to 20 filters using full or partial 5-tuple combinations.
Choose Start capture as shown in figure 3.
In figure 3, only the first filter is needed to capture traffic from subnet 10.0.1.0/24 to 10.0.2.0/24 on TCP port 80. Additional filters are shown to demonstrate other filter possibilities. Using more specific filters results in faster operation times.
Figure 3: Start capture operation
Once capture is complete, the flow operation displays the flows captured by the filter, as shown in figure 4.
Figure 4: Flow capture operation result
Flow flush
In this section, you will learn how to flush flows based on a full or partial 5-tuple. When you need to identify active flows before flushing them, first use the capture operation described in the previous section. Alternatively, you can initiate a new flow flush operation by defining new filters to flush specific active flows.
To start flow flush via the console:
Option 1: Capture then flush
Select Configure flow flush from figure 4 to flush the flows matching your previously defined Filters in the Configure flow capture operation.
Select Start flush in figure 5 to start the flush operation.
Figure 5: Start flush from previous flow capture filter
Option 2: Direct flush
Select Configure flow flush in Firewall operations as shown in figure 1.
Configure the Filter properties as shown in figure 3.
Initiate the Start flush operation.
After the flow flush operation is complete using either option, you can see the flushed flows as shown in figure 6.
Figure 6: Flow flush operation result
For additional verification of flow flushing, you can perform a flow capture operation followed by a flow flush. When flows are flushed, clients typically attempt to reconnect. These retry attempts are recorded in the firewall’s flow table and appear in flow capture results. You can use the Minimum age parameter as a filter to help prevent retry flows from cluttering your flow capture data.
Additionally, if you have AWS Network Firewall flow logs configured for your firewall’s stateful engine, the flow logs display entries for flushed flows. These entries show the reason’ field as flushed and include the last state of the flow before it was flushed.
Figure 7: AWS Network Firewall Flow logs when flow is flushed
Firewall operation history
The Firewall operation history displays the capture and flush operations from the past 12 hours with unique operation IDs for the selected Availability Zone (AZ). Operations older than 12 hours are automatically purged. By clicking on a specific Flow operation ID, you can see the details of each capture or flush flow operation.
Figure 8: Firewall operation history
Things to know:
You can perform one operation (either flow capture or flow flush) at a time per AZ per firewall. If your firewall endpoints are deployed in multiple AZs, you can run a flow capture or flow flush operation simultaneously in multiple AZs.
Use the Minimum age parameter in Filter properties to identify or flush long-running flows. For example, setting Minimum age to 300 seconds includes only flows that are active for 5+ minutes.
The firewall policy’s stream exception policy is applied to packets that arrive at the firewall after their corresponding flow state is flushed. For most applications, we recommend the reject stream exception policy.
Due to the distributed nature of the firewall infrastructure, the actual execution of flow capture and flush operations may vary slightly across different firewall hosts. Both capture and flush operations roll across the firewall infrastructure rather than executing as point-in-time operations.
These features support both IPv4 and IPv6 flows.
AWS CloudTrail records flow capture and flush operations as Management events for auditing.
Conclusion
In this post, you learned how the flow capture and flush features allow you to identify and flush existing flows and validate your security configurations, including stream exception policy implementations, on demand. By using these enhanced features, organizations can actively monitor their network traffic, quickly respond to security events, and verify that their updated security policies are consistently enforced across active connections. There is no additional cost to use these features, and they are enabled by default for existing and new customers.
To learn more about AWS Network Firewall, see the AWS Network Firewall product page and the service documentation. To see which Regions AWS Network Firewall is available in, visit the AWS Region Table.
If you have feedback about this post, submit comments in the comments section below. If you have questions about this post, contact AWS Support.
Today’s organizations rely heavily on secure and reliable communication channels and digital certificates play a crucial role in securing internal and external-facing infrastructure by establishing trust and enabling encrypted communication. While public certificates are commonly used to secure internet applications, many organizations prefer private certificates for internal resources to maintain confidentiality and enable custom configurations that public certificates don’t support. AWS Private Certificate Authority (AWS Private CA) offers a comprehensive solution to create and manage private certificate hierarchies within an organization’s public key infrastructure (PKI). AWS handles the heavy lifting of certificate authority (CA) management, allowing organizations to issue certificates for various use cases, including creating encrypted communication channels, authenticating clients, and cryptographically signing code. These certificates remain trusted within the organization, helping to ensure internal security without exposing them to the public internet.
AWS Certificate Manager (ACM) and AWS Private CA provide robust tools to issue and manage certificates seamlessly within AWS. However, as workloads evolve—spanning cloud native microservices, containerized environments, and hybrid edge deployments—the default certificate configurations might not meet every need. For instance, private TLS certificates requested using ACM come with a fixed 13-month validity period, which ACM tracks and renews automatically. But what if your organization requires certificates with custom validity periods such as short-lived certificates for ephemeral containers or certificates with extended durations for your on-premises systems? This is a common scenario for enterprises using modern architectures. You can gain significant advantages by creating and updating your certificates through AWS Command Line Interface (AWS CLI) or AWS SDKs. These powerful tools offer enhanced flexibility and integrate seamlessly with existing workflows.
Taking this efficiency even further, you can optimize your certificate management by bypassing the AWS Management Console, using the AWS CLI or SDK to generate certificates programmatically through their custom PKI pipelines.
You can use this automation-friendly approach to maintain full control over your certificate lifecycle, though it’s worth noting that ACM doesn’t inherently track the expiration of certificates that are issued using the acm-pca:IssueCertificate API, and aren’t requested using ACM. Lack of oversight on certificate expiration can lead to operational disruptions and compromise the accessibility of your applications. The AWS Private CA offers a powerful option to address this gap: the Generate audit report option. This option produces a detailed report of the certificates issued by your certificate hierarchy—including their expiration dates—regardless of how they were generated. However, with organizations managing vast numbers of certificates across multiple certificate hierarchies, manual report generation and review becomes impractical and unsustainable.
In this blog post, we guide you through a custom automation workflow that harnesses AWS Private CA audit reports to monitor certificate expirations proactively. The solution uses Amazon EventBridge, AWS Lambda, Amazon Simple Storage Service (Amazon S3), Amazon Simple Notification Service (Amazon SNS), and AWS Security Hub to generate daily reports, review them for expiring certificates, notify stakeholders, and generate log findings for centralized visibility. We’ve also included an AWS CloudFormation template to deploy this solution in your AWS environments, complete with step-by-step instructions. This approach can help ensure that you stay ahead of certificate expirations.
The challenge: Certificate management beyond the defaults
To understand why this solution matters, let’s explore the evolving needs of certificate management.
Certificates requested using ACM that are issued by your private CA through the console default to a 13-month validity period; a reasonable middle ground for many workloads. ACM tracks these certificates, monitors their expiration, and even automates renewals. This hands-off approach works well for standard cloud applications, but modern IT environments are rarely standard because of the diverse requirements of real-world use cases.
Consider these real-world examples:
Short-lived certificates: in containerized environments running on EKS or Amazon Elastic Container Service (Amazon ECS) certificates with validity periods of a few hours or days are increasingly common. Service meshes like Istio or Linkerd rely on short-lived certificates to secure pod-to-pod communication, reducing the threat surface if a key is compromised. A 13-month certificate might not be optimal for this use case.
Long-lived certificates: On the other hand, some workloads—often found in traditional or resource-constrained environments—benefit from certificates with extended validity periods. For instance, systems deployed in locations with unreliable or restricted network access might require longer-lived certificates to minimize the challenges of frequent renewals, which could disrupt operations or require manual intervention. Likewise, infrastructures running critical applications with minimal automation might lean towards multi-year certificates to reduce the administrative burden and maintain consistent security over time. In such cases, long-lived certificates offer a dependable solution, balancing security needs with operational simplicity and minimizing the frequency of maintenance tasks.
To address these needs, many organizations turn to their own continuous integration and delivery (CI/CD) pipelines and custom automation using AWS Private CA and ACM. Using AWS CLI or SDKs, you can use AWS Private CA to issue certificates that have custom validity periods tailored to their workload requirements.
Even if certificates aren’t requested using ACM, you can optionally re-import the certificates into ACM. After the certificates have been imported, ACM begins tracking and monitoring them. However, you have the flexibility to decide which certificates to import. Certificates that aren’t imported into ACM will not be tracked by the service. These certificates won’t appear in the ACM console, their expiration events won’t trigger Amazon CloudWatch Logs and managed renewals of these certificates aren’t supported by ACM.
Without a centralized view, you must manually monitor expiration dates, a task that quickly becomes unmanageable as certificate volume grows. An expired certificate can lead to downtime (for example, a load balancer rejecting traffic). This is where the ability to generate an audit report from AWS Private CA can help you. It provides a comprehensive list of all the certificates issued by your CA, including serial numbers, issuance dates, and expiration dates. However, generating this report manually using the console and reviewing it daily isn’t scalable.
In the following section, we show you how to set up a more scalable, automated solution that will notify you when certificates need to be renewed.
Prerequisites
For this walkthrough, you need to have the following:
An AWS account
A private CA from AWS Private CA
An externally created certificate imported into ACM
Solution overview
This audit generation solution provides an automated, scalable, and integrated approach to generating and analyzing audit reports for certificates issued by AWS Private CA. It uses AWS services to monitor certificate statuses, detect impending expirations, and notify administrators while integrating findings into Security Hub for centralized security monitoring. The solution helps ensure timely awareness of expiring certificates; enhancing compliance and operational security.
The following figure shows the solution architecture. The process begins with an EventBridge rule (PCAReportRule) that triggers the audit report generation on a user-defined schedule (for example: daily). This rule invokes the first of the two Lambda functions: PCAauditReportLambdaGenerator. This function interacts with the AWS boto3 SDK to generate an audit report, capturing details of issued certificates. The report is formatted as a CSV file (with optional JSON support configurable in the Lambda function) and stored in a designated S3 bucket. To simulate expiration alerts for demonstration purposes, certificates can be issued with a validity period of less than 30 days, as opposed to the default 13-month validity of AWS Private CA certificates.
Figure 1: Solution architecture
After the audit report is uploaded to the S3 bucket, an S3:PutObject event notification triggers the second Lambda function, PCAAuditReportLambdaProcessor. This function downloads the most recent report, parses the data in the CSV file, and analyzes the details to identify certificates that are expiring within the 30-day threshold. Upon identifying expiring certificates, the function sends a consolidated notification using an Amazon SNS topic PCASNSTopic, which supports subscriptions such as an email or an optional Amazon Simple Queue Service (Amazon SQS) queue for further processing. Simultaneously, the function integrates findings into Security Hub, providing a centralized view of expiring certificates for compliance tracking and security monitoring.
The architecture is deployed using a CloudFormation template, automating the setup of the core components—EventBridge, Lambda functions, an S3 bucket, an SNS topic, and Security Hub integration—into a cohesive system. Security Hub serves as a cloud security posture management service that provides organizations with a consolidated view of their security alerts and compliance status across your AWS accounts. It functions as a central dashboard where security data from various sources and AWS services is aggregated, enabling automatic assessment of resources against established security standards while helping teams prioritize security concerns throughout their environment. This design helps ensure scalability, flexibility, and minimal manual intervention, enabling users to modify the Lambda functions to support additional report formats (such as JSON) or adjust notification thresholds as required. It’s also worth noting that you can generate a report every 30 minutes.
Deploy the solution
With the prerequisites in place and an understanding of the architecture, you’re ready to deploy and test the automation workflow and run an audit report on-demand.
Deploy the CloudFormation template
To get started, clone the following GitHub repo.
~ $ curl -O https://aws-security-blog-content.s3.us-east-1.amazonaws.com/public/sample/2526-monitor-private-ca-issued-certificates-aws-private-certificate-authority-eventbridge/ACM-PCA-Monitoring-cfn.yml

~ $ ls
ACM-PCA-Monitoring-cfn.yml
The ACM-PCA-Monitoring-cfn.yml CloudFormation template includes the following parameters, which allow you to customize the deployment:
CertificateAuthorityArn: The Amazon Resource Name (ARN) (<ARN_of_your_PrivateCA>) of your pre-existing private CA for which the audit report is generated.
S3BucketName: A new S3 bucket (<Name_of_s3_bucket>) where the audit report will be stored.
EventBridgeRuleName: The name of the EventBridge rule (<Name_of_EventBridgeRule>) to trigger the Lambda function (default value: PCAReportRule).
CronJobExpression: A cron expression (<Frequency_of_running_evaluation>) to define the schedule for report generation (default value: cron(0 21 * * ? *)).
SNSName: The name of a new Amazon SNS topic (<Name_of_SNS_Topic>) for expiration alerts (default value: PCASNSTopic).
SQSName: The name of a new Amazon SQS queue (<Name_of_SQS>) for expiration alerts (default value PCASQS).
EmailAddress: The email address for receiving notifications (<Email_to_Receive_alerts>).
CertificateExpirationThreshold: The threshold value in days (<Expiration_threshold_in_days>) to monitor for your certificate’s expiration (default value: 30).
Run the following command to create the CloudFormation stack. Stack creation will take 2–3 minutes to complete.
When stack creation is complete, you’ll get an email asking you to confirm your subscription to the specified SNS topic from the previous step.
Figure 2: Sample notification email sent by Amazon SNS
Test the automation workflow
Test the automation workflow by creating a private certificate that will trigger your expiration alert system. To do this, you’ll generate a private certificate using your private CA with an intentionally short expiration period. The certificate should expire before the threshold you set in the CloudFormation template (the default is 30 days). For example, if you kept the default 30-day threshold, the following code will generate a certificate that expires in 20 days, which should trigger the notification system:
Note: You’ll receive alerts for all certificates that are approaching expiration, even for certificates that are requested using ACM, which support managed renewal. You can compare the ARN of the expiring certificate to your list of requested certificates in the ACM console, or to the results of the acm:ListCertificates API.
With the audit report infrastructure deployed and a test certificate created within your expiration threshold, the next step is to trigger the automation workflow to generate and process the audit report.
Run an audit report on-demand
To test the EventBridge rule PCAReportRule, you’ll temporarily modify it to run every 30 minutes. When you’re done testing, you can revert it back to the original scheduled that you specified in the CloudFormation template parameters.
In the Amazon EventBridge console, choose Rules in the navigation pane. Select PCAReportRule and then choose Edit rule.
Select Define schedule.
Under Schedule pattern, select A schedule that runs at a regular rate…
Under Rate expression, for Value enter 30, and for Unit, select Minutes.
Choose Next.
Figure 3: Edit the schedule of PCAReportRule for the test
For an immediate test, you can also trigger this workflow from the Lambda console.
In the Lambda console, choose Functions in the navigation pane, and then select the PCAauditReportLambdaGenerator Lambda function.
Choose the Test tab, leave the default values for the Event JSON.
Choose Test at the top of the window.
Figure 4: Use the console to trigger a test
This Lambda function generates an AWS Private CA audit report and saves it to the specified S3 bucket at the audit-report prefix. To verify this, navigate to the Amazon S3 console and choose Buckets from the navigation pane.
Select the bucket that you created when you ran the CloudFormation template and verify the reports in the audit-report folder.
Figure 5: The audit report is saved to the specified S3 bucket
When an audit report is uploaded to the S3 bucket, it automatically triggers the PCAAuditReportLambdaProcessor Lambda function through S3 event notifications. The function analyzes the audit report to identify any certificates approaching expiration. If certificates are found that will expire within the specified threshold (30 days by default), the function automatically creates detailed findings in Security Hub for tracking and monitoring purposes. These findings include important details such as the certificate ARN, expiration date, and severity level.
Because you created a test certificate that expires in 20 days (which is within the test threshold), the automation workflow will detect this and generate corresponding findings in Security Hub. To see the results go to the Security Hub console and choose Findings in the navigation pane.
Figure 6: View the audit report findings in Security Hub
After creating Security Hub findings, the Lambda function sends detailed certificate expiration alerts through Amazon SNS. You’ll receive an email notification at the address you provided in the CloudFormation parameters. The email will contain important information about the certificates approaching expiration, including their ARNs and exact expiration dates. Here’s an example of the email notification format
Figure 7: Sample notification email sent by Amazon SNS
Conclusion
Certificate management is crucial for maintaining security across modern workloads, and AWS Private CA plays a vital role in issuing certificates with custom validity periods. The solution in this post delivers a robust, automated approach to certificate lifecycle management by seamlessly integrating several AWS services.
The solution combines Amazon EventBridge for scheduled execution of audit reports, AWS Lambda for automated processing and analysis, Amazon S3 for secure storage of audit reports, Amazon SNS for immediate notification delivery, and AWS Security Hub for centralized monitoring and tracking. This powerful integration creates a comprehensive automation workflow that actively monitors certificate expirations and provides timely alerts across your cloud, hybrid, and edge deployments.
By implementing this CloudFormation template, you can:
Automate the generation and processing of AWS Private CA audit reports at scheduled intervals
Receive immediate notifications when certificates approach their expiration threshold
Maintain centralized visibility through detailed Security Hub findings
Track certificate lifecycles across your entire infrastructure
Help ensure compliance with organizational security policies
Minimize the risk of service disruptions due to expired certificates
The solution transforms traditional certificate management from a manual, error-prone process into a streamlined, automated workflow. It provides security teams with the tools they need to proactively manage certificate lifecycles, maintain compliance requirements, and respond quickly to potential certificate-related issues. The automated notifications and centralized monitoring through Security Hub help ensure that no certificate expiration goes unnoticed, allowing teams to take timely action before service disruptions occur.
The result is a scalable, reliable system that simplifies certificate management and strengthens your organization’s overall security posture through consistent monitoring and proactive management of certificate lifecycles.
If you have feedback about this post, submit comments in the Comments section below.
Amazon Web Services (AWS) is pleased to announce the successful renewal of the United Kingdom Cyber Essentials Plus certification. The Cyber Essentials Plus certificate is valid for one year until March 21, 2026.
Cyber Essentials Plus is a UK Government-backed, industry-supported certification scheme intended to help organizations demonstrate organizational cybersecurity against common cybersecurity threats. An independent third-party auditor certified by Information Assurance for Small and Medium Enterprises (IASME) completed the audit. The scope of our Cyber Essentials Plus certificate covers the AWS corporate network for the United Kingdom and Ireland.
AWS strives to continuously improve its compliance programs to help you meet your architectural and regulatory needs. Contact your AWS account team for questions.
To learn more about our compliance and security programs, see AWS Compliance Programs. As always, we value your feedback and questions; reach out to the AWS Compliance team through the Contact Us page.
If you have feedback about this post, submit comments in the Comments section below.
These three services were chosen because they are security-critical AWS services with the most urgent need for post-quantum confidentiality. These three AWS services have previously deployed support for CRYSTALS-Kyber, the predecessor of ML-KEM. Support for CRYSTALS-Kyber will continue through 2025, but will be removed across all AWS service endpoints in 2026 in favor of ML-KEM.
Our migration to post-quantum cryptography
AWS is committed to following our post-quantum cryptography migration plan. As part of this commitment, and part of the AWS post-quantum shared responsibility model, AWS plans to deploy support for ML-KEM to all AWS services with HTTPS endpoints over the coming years. AWS customers must update their TLS clients and SDKs to offer ML-KEM when connecting to AWS service HTTPS endpoints. This will protect against future harvest now, decrypt later threats posed by quantum computing advancements. Meanwhile, AWS service HTTPS endpoints will be responsible for selecting ML-KEM when offered by clients.
The effect of hybrid post-quantum ML-KEM on TLS performance
Migrating from an Elliptic Curve Diffie-Hellman (ECDH)-only key agreement to an ECDH+ML-KEM hybrid key agreement necessarily requires that the TLS handshake send more data and perform more cryptographic operations. Switching from a classical to a hybrid post-quantum key agreement will transfer approximately 1600 additional bytes during the TLS handshake and will require approximately 80–150 microseconds more compute time to perform ML-KEM cryptographic operations. This is a one-time TLS connection startup cost and is amortized over the lifetime of the TLS connection across the HTTP requests sent over that connection.
AWS is working to provide a smooth migration to hybrid post-quantum key agreement for TLS. This work includes performing benchmarks on example workloads to help customers understand the impact of enabling hybrid post-quantum key agreement with ML-KEM.
Using the AWS SDK for Java v2, AWS has measured the number of AWS KMS GenerateDataKey requests per second that a single thread can issue serially between an Amazon Elastic Compute Cloud (Amazon EC2) C6in.metal client and the public AWS KMS endpoint. Both the client and server were in the us-west-2 Region. Classical TLS connections to AWS KMS negotiated the P256 elliptic curve for key agreement, and hybrid post-quantum TLS connections negotiated the X25519 elliptic curve with ML-KEM-768 for their hybrid key agreement. Your own performance characteristics might differ and will depend on your environment, including your instance type, your workload profiles, the amount of parallelism and number of threads used, and your network location and capacity. The HTTP request transaction rates were measured with TLS connection reuse both enabled and disabled.
Figure 1 shows the number of requests per second issued at different percentiles when TLS 1.3 connection reuse is disabled. It shows that in the worst-case scenario—when the cost of a TLS handshake is never amortized and every HTTP request must perform a full TLS handshake—enabling hybrid post-quantum TLS decreases the transactions per second (TPS) by about 2.3 percent on average, from 108.7 TPS to 106.2 TPS.
Figure 1: AWS KMS GenerateDataKey requests per second without TLS connection reuse
Figure 2 shows the number of requests per second issued at different percentiles when TLS connection reuse is enabled. Reusing TLS connections and amortizing the cost of a TLS handshake over many HTTP requests is the default setting in the AWS SDK for Java v2. We show that enabling hybrid post-quantum TLS when using default SDK settings leaves the TPS rate almost unchanged, with only a 0.05 percent decrease on average, from 216.1 TPS to 216.0 TPS.
Figure 2: AWS KMS GenerateDataKey requests per second with TLS connection reuse
Our results show that the performance impact of enabling hybrid post-quantum TLS is negligible when using typical configuration settings in your SDK. Our measurements show that enabling hybrid post-quantum TLS for a default-case example workload only lowered maximum TPS rate by 0.05 percent. Our results also show that overriding SDK defaults to force the worst-case scenario of performing a new TLS handshake for every request only decreased maximum TPS rate by 2.3 percent.
The following table shows the benchmark data that we measured. Each benchmark performed 500 one-second TPS measurements for varying TLS key agreement settings and TLS connection reuse settings. The measurements used v2.30.22 of the AWS SDK for Java v2. The TLS key agreement was switched between classical and hybrid post-quantum by toggling the postQuantumTlsEnabled() configuration. TLS connection reuse was toggled by injecting a Connection: close HTTP header into each HTTP request. This header forces the TLS connection to be shut down after each HTTP request and requires that a new TLS connection be created for each HTTP request.
TLS key agreement
TLS conn resuse
Total HTTP requests
Average (TPS)
p01 (TPS)
p10 (TPS)
p25 (TPS)
p50 (TPS)
p75 (TPS)
p90 (TPS)
p99 (TPS)
Classical (P256)
No
54,367
108.7
78
86
96
102
129
137
145
Hybrid post-quantum (X25519MLKEM768)
No
53,106
106.2
76
85
93
100
126
134
141
Classical (P256)
Yes
108,052
216.1
181
194
200
216
233
240
245
Hybrid post-quantum (X25519MLKEM768)
Yes
107,994
216
177
194
200
216
233
239
245
Removing support for draft post-quantum standards
AWS service endpoints with support for CRYSTALS-Kyber, the predecessor of ML-KEM, will continue to support CRYSTALS-Kyber through 2025. We will slowly phase out support for the pre-standard CRYSTALS-Kyber implementations after customers have moved to the ML-KEM standard. Customers using previous versions of the AWS SDK for Java with CRYSTALS-Kyber support should upgrade to the latest SDK versions that have ML-KEM support. No code changes are necessary for customers using a generally available release of the AWS SDK for Java v2 to upgrade from CRYSTALS-Kyber to ML-KEM.
Customers currently negotiating CRYSTALS-Kyber who do not upgrade their AWS Java SDK v2 clients by 2026 will see their clients gracefully fall back to a classical key agreement once CRYSTALS-Kyber is removed from AWS service HTTPS endpoints.
How to use hybrid post-quantum key agreement
If using the AWS SDK for Rust, you can enable the hybrid post-quantum key agreement by adding the rustls package to your crate and enabling the prefer-post-quantum feature flag. See the rustls documentation for more information.
If using the AWS SDK for Java 2.x, you can enable hybrid post-quantum key agreement by calling .postQuantumTlsEnabled(true) when building your AWS Common Runtime HTTP client.
Step 1: Add the AWS Common Runtime HTTP client to your Java dependencies.
Add the AWS Common Runtime HTTP client to your Maven dependencies. We recommend using the latest available version. Use version 2.30.22 or greater to enable the use of ML-KEM.
Step 2: Enable post-quantum TLS in your Java SDK client configuration
When configuring your AWS service client, use the AwsCrtAsyncHttpClient configured with post-quantum TLS.
// Configure an AWS Common Runtime HTTP client with Post-Quantum TLS enabled
SdkAsyncHttpClient awsCrtHttpClient = AwsCrtAsyncHttpClient.builder()
          .postQuantumTlsEnabled(true)
          .build();

// Create an AWS service client that uses the AWS Common Runtime client
KmsAsyncClient kmsAsync = KmsAsyncClient.builder()
         .httpClient(awsCrtHttpClient)
         .build();

// Make a request over a TLS connection that uses post-quantum key agreement
ListKeysReponse keys = kmsAsync.listKeys().get();
Here are some ideas about how to use this post-quantum-enabled client:
Run load tests and benchmarks. The AwsCrtAsyncHttpClient is heavily optimized for performance and uses AWS Libcrypto on Linux-based environments. If you aren’t already using the AwsCrtAsyncHttpClient, try it today to see the performance benefits compared to the default SDK HTTP client. After using AwsCrtAsyncHttpClient, enable post-quantum TLS support. See if using AwsCrtAsyncHttpClient with post-quantum TLS is an overall performance gain to using the default SDK HTTP client without post-quantum TLS.
Try connecting from different network locations. Depending on the network path that your request takes, you might discover that intermediate hosts, proxies, or firewalls with deep packet inspection (DPI) block the request. If this is the case, you might need to work with your security team or IT administrators to update firewalls in your network to unblock these new TLS algorithms. We want to hear from you about how your infrastructure interacts with this new variant of TLS traffic.
Conclusion
Support for ML-KEM-based hybrid key agreement has been deployed to three security-critical AWS service endpoints. The performance impact of enabling hybrid post-quantum TLS is likely to be negligible when TLS connection reuse is enabled. Our measurements showed only a 0.05 percent decrease to maximum transactions per second when calling AWS KMS GenerateDataKey.
Starting with version 2.30.22, the AWS SDK for Java v2 now supports ML-KEM-based hybrid key agreement on Linux-based platforms when using the AWS Common Runtime HTTP client. Try enabling post quantum key agreement for TLS in your Java SDK client configuration today.
AWS plans to deploy support for ML-KEM-based hybrid post-quantum key agreement to every AWS service HTTPS endpoint over the coming years as part of our post-quantum cryptography migration plan. AWS customers will be responsible for updating their TLS clients and SDKs to help ensure that ML-KEM key agreement is offered when connecting to AWS service HTTPS endpoints. This will protect against future harvest now, decrypt later threats posed by quantum computing advancements.
For additional information, blog posts, and periodic updates on our post-quantum cryptography migration, keep watching the AWS Post-Quantum Cryptography page. To learn more about post-quantum cryptography with AWS, contact the post-quantum cryptography team.
Amazon Web Services (AWS) is excited to announce the successful completion of the Cloud Security Assurance Program (CSAP) low-tier certification for the AWS Seoul (ICN) Region for the very first time. The certification is valid for a period of five years, from March 28, 2025 to March 27, 2030.
The Cloud Security Assurance Program (CSAP) enables Korean public sector organizations to comply with national security standards and regulations, including the Act on the Development of Cloud Computing and Protection of its Users (also known as the Cloud Computing Act). By obtaining this certification, AWS can now provide secure cloud services that adhere to these standards, enabling domestic public sector organizations to safely innovate on AWS.
The Korea Internet and Security Agency (KISA, a government organization), under the Ministry of Science and ICT (MSIT), evaluated AWS in December 2024 and completed its re-assessment in March 2025. The CSAP scope includes 191 services that Korean customers can use in the AWS Seoul Region. For the full list of services, see the CSAP tab on the AWS Services in Scope by Compliance Program page. AWS strives to continuously bring as many services as possible into the scope of its compliance programs to help customers adhere to their architectural and regulatory needs.
If you have questions or feedback about CSAP, reach out to your AWS account team.
To learn more about our compliance and security programs, see AWS Compliance Programs. As always, we value your feedback and questions; reach out to the AWS Compliance team through the Contact Us page.
If you have feedback about this post, submit comments in the Comments section below.
Before you start using IAM Roles Anywhere, it’s important to plan how you’ll integrate it with your PKI and with your applications running outside of AWS. In this blog post, we share considerations and best practices for integrating IAM Roles Anywhere with your PKI and applications.
Placing your trust anchor within your PKI
The first step when you configure IAM Roles Anywhere is to create a trust anchor. A trust anchor is a resource that represents your certificate authority (CA). A trust anchor can be a root CA or an intermediate or issuing CA.
The choice of which CA to use as your trust anchor within your PKI has implications for which end-entity certificates can be used with IAM Roles Anywhere and the security of your IAM Roles Anywhere deployment. Any valid end-entity certificate issued by your trust anchor, or a valid end-entity certificate issued by a CA that is beneath your trust anchor in your PKI’s hierarchy, can be used with IAM Roles Anywhere.
For example, in a three-level PKI where you select your root CA as your trust anchor, an end-entity certificate issued by your root, or an intermediate certificate authority below your root, can be used with this trust anchor for IAM Roles Anywhere, as shown in Figure 1.
Figure 1: The useable end-entity certificates if you select a root CA as a trust anchor
As shown in Figure 2, if you select Intermediate CA 2 (a CA two levels below the root) as your trust anchor for IAM Roles Anywhere, only end-entity certificates issued from Intermediate CA 2 could be used to get temporary AWS credentials with your IAM Roles Anywhere deployment.
Figure 2: The useable end entity certificates if you select a lower level or issuing certificate authority as a trust anchor
In Figure 2, we selected Intermediate CA as our trust anchor and only end-entity certificates issued by Intermediate CA 2 can be used with IAM Roles Anywhere.
Selecting a root or higher-level intermediate CA will give you more flexibility when it comes to rotation of lower-level CAs, but might allow for more certificates than you intend to be able to access your AWS resources. Using a lower-level issuing CA will not allow certificates issued by other CAs within your PKI to be able to use IAM Roles Anywhere, even if they have identical attributes.
To use the certificate revocation list (CRL) functionality of IAM Roles Anywhere, the certificate used as a trust anchor MUST also contain the CRL Sign for key usage.
The certificate must not be issued by a public CA, or be a public CA.
Choosing your trust anchor: AWS Private CA compared to a self-managed PKI
If you already have an existing PKI and the capability to distribute certificates to your workloads, it’s likely that your existing PKI (which you have experience managing) will be a good choice to use as your IAM Roles Anywhere trust anchor.
However, if you’re looking to establish a PKI without the investment and maintenance costs of operating an on-premises CA, consider using AWS Private Certificate Authority (AWS Private CA). When you use this service, AWS hosts your CAs and allows you to issue certificates by using AWS API requests.
Consider the following when deciding whether to use AWS Private CA for your PKI:
Automatic rotation of your trust anchor: AWS Private CA is designed to integrate quickly with IAM Roles Anywhere, so you don’t need additional rotation of trust anchor certificates within IAM Roles Anywhere—this will be entirely managed in AWS Private CA.
Cost: There’s a cost to using AWS Private CA, which can make reusing your existing PKI more cost effective, if you have one. However, there are benefits to using AWS Private CA, such as automatic rotation, scalability, and resiliency, which can offset the cost of the service.
Scalability and availability: AWS Private CA is a highly scalable and available service across many AWS Regions. AWS Private CA also integrates with AWS Certificate Manager, so that you can conveniently manage certificate issuance and automate certificate renewals.
Resiliency: You can configure an identical AWS Private CA setup in another supported Region.
AWS API integration: You can use AWS Private CA to manage and issue certificates with AWS credentials, using IAM roles and temporary security credentials that are subject to the relevant AWS policies.
Technology integrations: AWS Private CA can integrate with technologies such as third-party certificate management services.
For more information about implementing IAM Roles Anywhere with AWS Private CA, see this Security Blog post.
Working with end-entity certificates with IAM Roles Anywhere
In IAM Roles Anywhere, end-entity X.509 certificates are used to authenticate with the CreateSession API call. These end-entity certificates must meet the following constraints:
The certificates MUST be X.509v3.
Basic constraints MUST include CA: false.
The key usage MUST include Digital Signature.
The signing algorithm MUST include SHA256 or stronger. MD5 and SHA1 signing algorithms are rejected.
Most certificates issued today, such as those used to serve HTTPS requests or to perform mutual TLS (mTLS) authentication, meet these constraints. Those certificates could be used with IAM Roles Anywhere without changes.
Each end-entity’s certificate serial number doesn’t need to be unique, but it’s a best practice for each certificate issued by your certificate authority to have a unique serial number. The serial number of a certificate is used as the role session name of the IAM role session IAM Roles Anywhere creates, and this number can be used to associate events logged to AWS CloudTrail back to the end-entity certificate that was used to assume an IAM role.
IAM roles and workload identity
After you’ve planned for integration with your PKI, the next step when you set up IAM Roles Anywhere is to plan for how your workload identity will integrate with IAM Roles Anywhere and your PKI. The IAM role session that is created by calling CreateSession represents the identity and permissions of your external workloads within AWS.
To help you achieve least privilege, AWS recommends that you use a dedicated IAM role for each of your applications so that you can give each application only the permissions it requires to operate. For example, if you had two applications, Red and Blue, you would create a separate IAM role for each application and grant each role the IAM permissions it needs to do its job.
To make sure that the Red and Blue applications cannot access each other’s roles, you can restrict access by using X.509 attributes as tags in the trust policy for each IAM role. (See Certificate attribute mapping for more information on attributes.) For this example, we will use the Common Name (CN) attribute to restrict access for the Red application.
The following is a sample IAM role trust policy that lets the Red certificate from a trust anchor named ExampleCorpAnchor assume the role from IAM Roles Anywhere:
The role session created will have the SourceIdentity value in AWS set to be equal to the CN of the certificate. For example, the Red certificate would have a SourceIdentity value of CN=Red.
You can find a complete list of session tags and attributes used in IAM Roles Anywhere in the IAM Roles Anywhere documentation The session tags set on roles created with IAM Roles Anywhere are transitive and will be present on any further roles assumed by a role session that is created by IAM Roles Anywhere.
Rotating trust anchor certificates
When you’re using IAM Roles Anywhere with a self-hosted PKI for your trust anchor, you’re responsible for updating your trust anchor with the new CA certificate.
IAM Roles Anywhere supports up to two certificates configured within a trust anchor at a time. When it comes time to rotate the certificate authority used as your trust anchor, you can add your new certificate into the trust anchor so that certificates issued from either CA certificate can be used with IAM Roles Anywhere.
After you have both CA certificates in your trust anchor, you can migrate your workloads over to end-entity certificates issued by your new CA for a seamless migration without the need to update code or configurations on your workloads. After your workloads have migrated to your new certificate authority, you can remove the unused certificate from your trust anchor configuration.
IAM Roles Anywhere profiles and session policies
When you set up IAM Roles Anywhere, you create a profile to associate IAM roles with. A profile allows you to optionally apply a session policy.
Most customers deploy IAM Roles Anywhere by creating one profile for each IAM role that they configure. This gives you the flexibility to apply session policies to each application or IAM role in IAM Roles Anywhere without impacting other roles or applications. We recommend that customers use the one-profile-per-role approach to achieve more operational flexibility.
By using one profile across many different IAM roles, you can minimize configuration work and have a common session policy for the different IAM roles you have set up with IAM Roles Anywhere. This approach requires management of fewer AWS resources, but means that changes to the profile will impact a larger number of applications.
When you set a session policy on a profile, we recommend that you use a managed policy Amazon Resource Name (ARN), rather than the default in-line session policy ARN, because this allows you to have more IAM policy space. The most common use case we’ve seen for applying session policies with IAM Roles Anywhere profiles is restricting the IAM Roles Anywhere session to only expected IP address ranges, such as your on-premises data centers.
The role sessions created by IAM Roles Anywhere are subject to all relevant AWS policies, such as resource control policies (RCPs), service control policies (SCPs), resource policies, permissions boundaries, and VPC endpoint policies.
Working with distributed applications
If you have multiple deployments of an application, we recommend that, wherever possible, you use a unique certificate and key for each instance of that application. For example, this would apply if Blue is a distributed application, and each instance of the Blue application has a requirement to communicate with AWS resources. Sharing a key across distributed applications increases the risk a key could accidentally be made available to unauthorized parties when it’s copied and stored over a network.
By using a unique certificate and key for each instance, you can keep the private key on the server that is using IAM Roles Anywhere instead of needing to distribute the private key over the network, which is a best practice to help prevent exposure of a private key. IAM Roles Anywhere can use private keys and certificates that are stored in Trusted Platform Modules (TPMs), Windows and MacOS certificate stores, files on a file system, or in a hardware security module (HSM) that is accessible with the PKCS #11 protocol.
Because the certificates that are issued to each instance typically have different serial numbers, you can associate events in CloudTrail back to the actual instance of a workload that was issued a certificate. The IAM role session created by a certificate uses the certificate’s serial number as the role session name, which is visible in CloudTrail logs for actions taken by that role session.
Comparing short-lived and long-lived end entity certificates
X.509 certificates have an expiration date. The longer a credential is used, the greater the chance that it might come under the control of an unauthorized person.
We recommend that the certificates you issue to your workloads expire as quickly as your operational tolerances can withstand. For example, if you’re experienced in operating a PKI and can allow applications to request certificates through self-service, we recommend that the certificates issued have a relatively short expiration time so that new certificates must be requested frequently.
If your PKI certificates are issued or distributed manually, you might need to issue longer-lived certificates to ease your operational burden and give yourself longer periods of overlap in validity so that certificates can be rotated without disrupting your business.
It’s possible for multiple end-entity certificates to be valid at the same time with identical attributes. For example, if there were multiple non-expired, non-revoked CN=Red certificates, any of those CN=Red certificates can be used to access the CreateSessions API with IAM Roles Anywhere.
Certificate revocation
Traditionally, certificates are given a long validity period which helps reduce the operational burden for systems engineers who support certificates manually. However, sometimes you might need to revoke certificates for security reasons such as a compromised private key, a change in certificate fields, or a certificate that has been issued incorrectly. Certificate revocation helps maintain the trust and integrity of the PKI system.
A CRL is one of the primary mechanisms to help maintain the health of your PKI. The CRL contains information about the certificates that have been revoked due to security or other reasons.
IAM Roles Anywhere checks the validity of your certificates against your CRL. Using your PKI, after your certificate has been added to the CRL, you can import the CRL to IAM Roles Anywhere by using the using ImportCrl API operation or the import-crl CLI command. A copy of the CRL you import is hosted within IAM Roles Anywhere. After the CRL has been updated, IAM Roles Anywhere validates the certificate against your CRL before issuing credentials.
The fact that your CRL is hosted within IAM Roles Anywhere helps to mitigate a common scenario where the CRL is the target of a denial-of-service (DoS) attempt, causing applications to either deny all access because they’re unable to check the status of a cert against a CRL, or to let unauthorized users use revoked certificates to access services that are configured to ignore the CRL if it isn’t reachable.
Deployment patterns: centralized or decentralized
There are two approaches you can choose when deploying IAM Roles Anywhere: centralized or decentralized. We’ll look at the pros and cons of both.
Centralized trust anchor pattern
The following image describes how a centralized trust anchor would be deployed. First, a central trust anchor is deployed in a dedicated IAM account. Workloads then authenticate to IAM Roles Anywhere in a centralized account, and the workload performs role chaining to access the workload account.
In Figure 3, the workload running in the on-premises datacenter uses its certificate to get temporary AWS credentials from IAM Roles Anywhere in the IAM Roles Anywhere landing account. It then uses those credentials to assume a role into the workload account that hosts its AWS resources.
We recommend a centralized trust anchor pattern if you’re just getting started with IAM Roles Anywhere. This pattern simplifies the management and governance of IAM Roles Anywhere and allows you to scale with fewer resources to manage.
If you have more than one CA that you want to use with IAM Roles Anywhere, you can scale this pattern with multiple trust anchors in the same IAM Roles Anywhere landing account.
Pros of the centralized trust anchor pattern:
A simplified setup and fewer IAM Roles Anywhere resources to manage: Administrators only need to configure IAM Roles Anywhere profiles, roles, and trust anchors in one AWS account per Region.
Easier to manage CRLs: Because IAM Roles Anywhere is centralized, administrators only need to update the CRL in one account per Region.
Minimal application setup: Applications will need to set up role chaining to access their workloads accounts. Later in this post, we show you how to set up role chaining with IAM Roles Anywhere and the various AWS SDKs using a configuration that allows you to access other accounts without writing custom code.
Scaling: Based on the number of CAs you have, you can add additional trust anchors for additional CAs you want to use with IAM Roles Anywhere.
Cons of the centralized trust anchor pattern:
Cross-account access: The account that you’re creating for IAM Roles Anywhere will have access to other AWS accounts hosting your workloads. This might not meet your isolation requirements because it introduces cross-account access. However, remember that you can use certificate attributes in a role-trust policy to limit which workloads can access which AWS accounts.
Considerations of the centralized trust anchor pattern:
Multiple trust anchors: IAM Roles Anywhere supports two certificates per trust anchor, to help with rotation of certificates, so that you don’t have to update the ARNs during certificate rotation.
However, if there was a requirement to support multiple CAs, then it would be best to create separate trust anchors. For example, if you have a root CA and three issuing CAs, instead of creating a bundle of four certificates, you could create a trust anchor with a root CA, which would trust all certificates. Alternatively, you could create three different trust anchors per each issuing CA. So, it’s recommended to consider your PKI hierarchy during this process.
Auditing: If you have multiple trust anchors for different CAs deployed into the IAM Roles Anywhere account, you might need to use the aws:SourceARN condition key in role-trust policies to specify that that only a specific trust anchor can be used to assume a role with IAM Roles Anywhere.
When you use the centralized trust anchor pattern, you can use the certificate attributes to segregate access based on workloads, as described in the IAM roles and workload identity section earlier in this post.
Distributed trust anchor pattern
If you have more advanced security and compliance requirements, you can achieve greater isolation and granular access control by using a distributed (multi-trust-anchor, multi-account) approach with IAM Roles Anywhere.
In Figure 4, you see a distributed pattern where multiple trust anchors have been deployed based on which workloads and applications need access. In this model, the on-premises resource would call the respective trust anchor that has been mapped to each application to gain access to the AWS resource.
Based on your strategy, it’s possible to migrate from the centralized architecture to a distributed architecture as your organization grows or your operating model changes. Let’s looks at some of the considerations for this approach.
Pros of the distributed trust anchor pattern:
Better isolation: This pattern doesn’t require cross-account roles to be set up, and therefore AWS accounts and workloads are better isolated.
PKI flexibility: If you have different subordinate or issuing CAs that align with specific workloads or compliance requirements, you can have a distributed IAM Roles Anywhere setup for each workload in each AWS account.
Cons of the distributed trust anchor pattern:
Additional setup and AWS resources to manage: Trust anchors, profiles, and CRLs need to be set up in each AWS account that you want to use with IAM Roles Anywhere.
Additional configuration of applications: IAM Roles Anywhere ARNs will be different across accounts, and you will need to update the configuration of your applications that use IAM Roles Anywhere with the correct trust anchor and profile ARNs for each account.
Considerations of the distributed trust anchor pattern:
Scale: Infrastructure as code, such as AWS CloudFormation StackSets, can be used to scale the distributed pattern. Administrators can use AWS CloudFormation StackSets as a convenient way to implement trust anchors and profiles across accounts.
Working with IAM Roles Anywhere in your applications
Your applications integrate with IAM Roles Anywhere by using the aws signing helper (also known as the credential helper) with the AWS SDK. The signing helper is a lightweight executable written in Go that uses your private keys and certificate to authenticate to the IAM Roles Anywhere API and request temporary AWS credentials, and then delivers the credentials to your application.
The signing helper uses Go’s cryptographic libraries and doesn’t need specific versions of cryptographic software to be deployed into the environment where it runs, which helps it to run seamlessly and without conflict to other applications. The signing helper can use certificates and keys from OS certificate stores, TPMs, or locations on the file system.
In most cases, we recommend that customers use the signing helper with the credential_process setting because this allows you to use IAM Roles Anywhere without setting up environment variables and also allows you to configure role chaining seamlessly. The AWS SDK will automatically attempt to refresh credentials that are retrieved by the signing helper when the helper is used with the credential_process setting when the AWS credentials are nearing expiration.
If you set up the [default] profile in the AWS configuration file (~.aws/credentials on Linux and MacOS, C:\Users\ USERNAME \.aws\credentials on Windows), the AWS SDK default credentials provider chain will be used by IAM Roles Anywhere, provided that there are no other AWS credentials configured in that environment in a higher priority in the default credential providers chain.
Note: As described in the AWS SDK documentation, the default credential providers will vary slightly based on the language and AWS SDK used. However, many credential providers support using the credential_process setting in the default profile.
Here’s an example default profile that will use IAM Roles Anywhere:
You can also use a non-default profile and call that profile explicitly in your code when creating a credential providers or session object. How your application calls the AWS profile and IAM Roles Anywhere will vary depending on which AWS SDK you use, but we recommend checking the documentation for each SDK, and wherever possible, reuse clients, sessions, or credential providers to avoid unneeded calls to the IAM Roles Anywhere service to get new credentials. Otherwise, workloads may use up more CreateSession quota than expected or introduce unexpected latency to your application while making unnecessary calls to get AWS credentials when it already has some.
Note: AWS SDKs call the IAM Roles Anywhere credential_process to get credentials each time a new credential provider, session, or client is created, depending on the SDK.
Many applications that are written using the AWS SDK use the default credentials providers chain, and might be compatible with IAM Roles Anywhere without additional configuration or code change when using the default profile.
As a best practice, if you have multiple different applications running on the same host and accessing AWS that have totally different security requirements, you should have them run as separate users on that host and avoid sharing configuration files.
Configuring role chaining with IAM Roles Anywhere
Role chaining means to use a role to assume a second role through the AWS Command Line Interface (AWS CLI) or API. For example, RoleA has permission to assume RoleB. You can enable User1 to assume RoleA by using User1’s long-term user credentials in the AssumeRole API operation. This returns RoleA short-term credentials. With role chaining, you can use RoleA’s short-term credentials to enable User1 to assume RoleB.
You can set up role chaining with IAM Roles Anywhere by using profiles in the AWS configuration file, without writing code to manage role chaining or sessions. In the following example, there is a default profile that references the rolesanywhere profile. Applications that use the default profile will automatically use the credentials from the rolesanywhere profile to assume the role specified by the role_arn value, without writing code to manage credentials.
The diagram in Figure 5 describes what happens when the AWS SDK performs role chaining with SDK configuration.
Figure 5: A work sequence diagram detailing the interactions that happen when the AWS SDK reads the preceding config file
The flow in Figure 5 is as follows:
The AWS SDK reads the default profile and discovers it must get credentials from the specified source_profile.
The AWS SDK reads the source profile and uses the configuration to request credentials from IAM Roles Anywhere.
The AWS SDK then uses the credentials retrieved from the source_profile to call STS AssumeRole on the role workload role defined in the default profile.
The AWS SDK returned the temporary AWS credentials for workload role, which can now be used to access AWS resources in the workload account.
Logging and monitoring
Teams and security analysts typically prefer to have visibility into all actions taken. To help with this goal, logging and monitoring is available across different notification channels for IAM Roles Anywhere.
CA certificate expiry: Checks whether the certificate in the trust anchor is due for expiry.
End entity certificate expiry: Checks whether the certificate used for vending temporary security credentials is due for expiry.
Using such information, you can set up alarms and email notifications to remind administrators or developers to rotate the certificates before they expire. It’s especially important to monitor the expiry of the certificates for the trust anchor so that workloads that use IAM Roles Anywhere can continue operations without business disruption.
Using notification events to help with certificate revocation, you can use automations to help with other certificate expiry events. Note that if you’re using AWS Certificate Manager, rotation is automatically handled for you. For more information, see Managed certificate renewal in AWS Certificate Manager.
Tip: IAM Roles Anywhere logs also include the field SourceIdentity, which can help when you’re trying to trace back which workloads are taking what actions in AWS. The SourceIdentity field is usually the common name (CN) of the certificate.
IAM Roles Anywhere and AWS Regions
IAM Roles Anywhere is a regional AWS service. Meaning that configurations for resources like profiles and trust anchors exist in the Region in which you configure them.
As a best practice, we recommend setting up IAM Roles Anywhere in the same Region as the resources you will be accessing (for example, if you’re using IAM Roles Anywhere to access AWS resources in the us-west-2 Region, you should configure IAMRA in the us-west-2 Region).
Credentials issued by IAM Roles Anywhere, like other AWS credentials, can be used to access resources in other Regions (for example, credentials acquired from IAM Roles Anywhere in the us-west-2 Region can be used to access resources in the ca-central-1 Region).
If required, you can have your application introduce logic to try to use IAM Roles Anywhere in different Regions by having different profiles defined for your IAM Roles Anywhere deployment in different Regions. The following Python example will attempt to get credentials from the profile rolesanywhere-uswest2 for IAM roles anywhere in the us-west-2 Region, and if that fails, it will then attempt to get credentials with the rolesanywhere-cacentral1 profile for the ca-central-1 Region.
import boto3

def get_session():
    try:
        #tries to create a session using the profile “rolesanywhere-uswest2”
        #add additional logic and logging, per your requirements
        return boto3.Session(profile_name='rolesanywhere-uswest2')
    except:
        #tries to create a session using the profile “rolesanywhere-cacentral1”
        #add additional logic and logging, per your requirements
        return boto3.Session(profile_name='rolesanywhere-cacentral1')

session = get_session()
sts_client = session.client('sts')
print(sts_client.get_caller_identity())
Conclusion
In this blog post, we showed you the considerations for selecting a CA to use as your trust anchor, considerations for mapping your workload identity to IAM roles, patterns for deploying IAM Roles Anywhere, and how to integrate IAM Roles Anywhere with your applications.
IAM Roles Anywhere is a great solution for companies that have a PKI and want to access AWS resources from outside AWS, without needing to use long-lived credentials for IAM users.
AWS has been a proud participant in FedRAMP since 2013. As FedRAMP continues to modernize federal cloud security assessments, we are excited to support this transformation toward a more automated and efficient compliance framework. Today, we’re emphasizing our support for both APN partners and government customers through this evolution and sharing our perspective on these important changes.
On Monday, March 24, the General Services Administration announced a major overhaul of how it supports cloud service provider IT security authorizations as part of FedRAMP. AWS remains dedicated to maintaining support for existing FedRAMP authorizations while preparing for the new program framework, titled FedRAMP 20x (FR 20x). This means continuing to comply with all current processes, including continuous monitoring, as part of existing authorizations of our own services until government processes formally change.
Going forward, we intend to participate in industry working groups to help shape implementation standards. We are also investing in tools and services that will help both partner and agency customers adapt to the new compliance model in order to securely accelerate their cloud journeys. We look forward to supporting FedRAMP to “do once, and reuse many.”
Key updates for our partners and customers:
Adopting an automation-first approach. Automation accelerates the availability and use of the latest cloud services by federal customers. AWS continues to enhance our automated compliance verification capabilities to align with FR 20x’s vision.
Streamlining the authorization process. FedRAMP is moving toward a more efficient authorization process that leverages automation and continuous monitoring. AWS is well positioned to support this transition through our extensive suite of Cloud Governance services.
Enhancing security validation. The new framework will emphasize real-time compliance verification and automated control validation. AWS continues to invest in capabilities that will help customers meet these evolving requirements while maintaining the highest security standards.
Looking ahead: The modernization of FedRAMP represents an important step forward in federal cloud security. AWS remains committed to providing our government customers with the tools, resources, and support they need to succeed in this evolving landscape.
We encourage our customers to:
Continue operating under current FedRAMP guidelines
Stay informed about upcoming changes through AWS channels
Engage with their account manager for further guidance
Begin exploring automation capabilities for security compliance
As these changes roll out, AWS will continue to provide updates and guidance to help our customers navigate the transition successfully. For the latest information about AWS compliance offerings and FedRAMP authorizations, please visit our FedRAMP Compliance page.
If you have feedback about this post, submit comments in the Comments section below. If you have questions about this post, contact AWS Support.
As AI and machine learning (AI/ML) become increasingly accessible through cloud service providers (CSPs) such as Amazon Web Services (AWS), new security issues can arise that customers need to address. AWS provides a variety of services for AI/ML use cases, and developers often interact with these services through different programming languages. In this blog post, we focus on Python and its pickle module, which supports a process called pickling to serialize and deserialize object structures. This functionality simplifies data management and the sharing of complex data across distributed systems. However, because of potential security issues, it’s important to use pickling with care (see the warning note in pickle — Python object serialization). In this post, we’re going to show you ways to build secure AI/ML workloads that use this powerful Python module, ways to detect that it’s in use that you might not know about, and when it might be getting abused, and finally highlight alternative approaches that can help you avoid these issues.
Quick tips
Avoid unpickling data from untrusted sources
Use alternative serialization formats, when possible, such as Safetensors
Implement integrity checks for serialized data
Use static code analysis tools to detect unsafe pickling patterns, such as Semgrep
Understanding insecure pickle serialization and deserialization in Python
Effective data management is crucial in Python programming, and many developers turn to the pickle module for serialization. However, issues can arise when deserializing data from untrusted sources. The Python bytestream that pickling uses, is proprietary to Python. Until it’s unpickled, the data in the bytestream can’t be thoroughly evaluated. This is where security controls and validation become critical. Without proper validation, there’s a risk that an unauthorized user could inject unexpected code, potentially leading to arbitrary code execution, data tampering, or even unintended access to a system. In the context of AI model loading, secure deserialization is particularly important—it helps prevent outside parties from modifying model behavior, injecting backdoors, or causing inadvertent disclosure of sensitive data.
Throughout this post, we will refer to pickle serialization and deserialization collectively as pickling. Similar issues can be present in other languages (for example, Java and PHP) when untrusted data is used to recreate objects or data structures, resulting in potential security issues such as arbitrary code execution, data corruption, and unauthorized access.
Static code analysis compared to dynamic testing for detecting pickling
Security code reviews, including static code analysis, offer valuable early detection and thorough coverage of pickling-related issues. By examining source code (including third-party libraries and custom code) before deployment, teams can minimize security risks in a cost-effective way. Tools that provide static analysis can automatically flag unsafe pickling patterns, giving developers actionable insights to address issues promptly. Regular code reviews also help developers improve secure coding skills over time.
While static code analysis provides a comprehensive white-box approach, dynamic testing can uncover context-specific issues that only appear during runtime. Both methods are important. In this post, we focus primarily on the role of static code analysis in identifying unsafe pickling.
Tools like Amazon CodeGuru and Semgrep are effective at detecting security issues early. For open source projects, Semgrep is a great option to maintain consistent security checks.
The risks of insecure pickling in AI/ML
Pickling issues in AI/ML contexts can be especially concerning.
Invalidated object loading: AI/ML models are often serialized for future use. Loading these models from untrusted sources without validation can result in arbitrary code execution. Libraries such as pickle, joblib, and some yaml configurations allow serialization but must be handled securely.
For example: If a web application stores user input using pickle and unpickles it later with no validation, an unauthorized user could craft a harmful payload that executes arbitrary code on the server.
Data integrity: The integrity of pickled data is critical. Unexpectedly crafted data could corrupt models, resulting in incorrect predictions or behaviors, which is especially concerning in sensitive domains such as finance, healthcare, and autonomous systems.
For example: A team updates its AI model architecture or preprocessing steps but forgets to retrain and save the updated model. Loading the old pickled model under new code might trigger errors or unpredictable outcomes.
Exposure of sensitive information: Pickling often includes all attributes of an object, potentially exposing sensitive data such as credentials or secrets.
For example: An ML model might contain database credentials within its serialized state. If shared or stored without precautions, an unauthorized user who unpickles the file might gain unintended access to these credentials.
Insufficient data protection: When sent across networks or stored without encryption, pickled data can be intercepted, leading to inadvertent disclosure of sensitive information.
For example: In a healthcare environment, a pickled AI model containing patient data could be transmitted over an unsecured network, enabling an outside party to intercept and read sensitive information.
Performance overhead: Pickling can be slower than other serialization formats (such as, JSON or Protocol Buffers), which can affect ML and large language model (LLM) applications when inference speed is critical.
For example: In a real-time natural language processing (NLP) application using an LLM, heavy pickling or unpickling operations might reduce responsiveness and degrade the user experience.
Detecting unsafe unpickling with static code analysis tools
Static code analysis (SCA) is a valuable practice for applications dealing with pickled data, because it helps detect insecure pickling before deployment. By integrating SCA tools into the development workflow, teams can spot questionable deserialization patterns as soon as code is committed. This proactive approach reduces the risk of events involving unexpected code execution or unintended access due to unsafe object loading.
For instance, in a financial services application where objects are routinely pickled, a SCA tool can scan new commits to detect unvalidated unpickling. If identified, the development team can quickly address the issue, protecting both the integrity of the application and sensitive financial data.
Patterns in the source code
There are various ways to load a pickle object in Python. In this context, methods for detection can be tailored for secure coding habits and needed package dependencies. Many Python libraries include a function to load pickle objects. An effective approach can be to catalog all Python libraries used in the project, then create custom rules in your static code analysis tool to detect unsafe pickling or unpickling within those libraries.
CodeGuru and other static analysis tools continue to evolve their capability to detect unsafe pickling patterns. Organizations can use these tools and create custom rules to identify potential security issues in AI/ML pipelines.
Let’s define the steps for creating a safe process for addressing pickling issues:
Generate a list of all the Python libraries that are used in your repository or environment.
Check the static code analysis tool in your pipeline for current rules and the ability to add custom rules. If the tool is capable of discovering all the libraries used in your project, you can rely on it. However, if it’s not able to discover all the libraries used in your project, you should consider adding user-provided custom rules in your static code analysis tool.
Most of the issues can be identified with well-designed, context-driven patterns in the static code analysis tool. For addressing the pickling issues, you need to identify pickling and unpickling functions.
Implement and test the custom rules to verify full coverage of pickling and unpickling risks. Let’s identify patterns for a few libraries:
NumPy can efficiently pickle and unpickle arrays; useful for scientific computing workflows requiring serialized arrays. To catch potential unsafe pickle usage in NumPy, custom rules could target patterns like:
import numpy as np
data = np.load('data.npy', allow_pickle=True)
npyfile is a utility for loading NumPy arrays from pickled files. You can add the following patterns to your custom rules to discover potentially unsafe pickle object usage.
import npyfile
data = npyfile.load('example.pkl')
pandas can pickle and unpickle DataFrames using pickle, allowing for efficient storage and retrieval of tabular data. You can add the following patterns to your custom rules to discover potentially unsafe pickle object usage.
import pandas as pd
df = pd.read_pickle('dataframe.pkl')
joblib is often used for pickling and unpickling Python objects that involve large data, especially NumPy arrays, more efficiently than standard pickle. You can add the following patterns to your custom rules to discover potentially unsafe pickle object usage.
from joblib import load
data = load('large_data.pkl')
Scikit-learn provides joblib for pickling and unpickling objects and is particularly useful for models. You can add the following patterns to your custom rules to discover potentially unsafe pickle object usage.
from sklearn.externals import joblib
data = joblib.load('example.pkl')
PyTorch provides utilities for loading pickled objects that are especially useful for ML models and tensors. You can add the following patterns to your custom rule format to discover potentially unsafe pickle object usage.
import torch
data = torch.load('example.pkl')
By searching for these functions and parameters in code, you can set up targeted rules that highlight potential issues with pickling.
Effective mitigation
Addressing pickling issues requires not only detection, but also clear guidance on remediation. Consider recommending more secure formats or validations where possible as follows:
PyTorch
Use Safetensors to store tensors. If pickling remains necessary, add integrity checks (for example, hashing) for serialized data.
pandas
Verify data sources and integrity when using pd.read_pickle. Encourage safer alternatives (for example, CSV, HDF5, or Parquet) to help avoid pickling risks.
scikit-learn (via joblib)
Consider Skops for safer persistence. If switching formats isn’t feasible, implement strict validation checks before loading.
General advice
Identify safer libraries or methods whenever possible.
Switch to formats such as CSV or JSON for data, unless object-specific serialization is absolutely required.
Perform source and integrity checks before loading pickle files—even those considered trusted.
Example
The following is an example implementation that shows safe pickle implementation as a representation of the preceding information.
import io
import base64
import pickle
import boto3
import numpy as np
from cryptography.fernet import Fernet

###############################################################################
# 1) RESTRICTED UNPICKLER
###############################################################################
#
# By default, pickle can execute arbitrary code when loading. Here we implement
# a custom Unpickler that only allows certain safe modules/classes. Adjust this
# to your application's requirements.
#

class RestrictedUnpickler(pickle.Unpickler):
    """
    Restricts unpickling to only the modules/classes we explicitly allow.
    """
    allowed_modules = {
        "numpy": set(["ndarray", "dtype"]),
        "builtins": set(["tuple", "list", "dict", "set", "frozenset", "int", "float", "bool", "str"])
    }

    def find_class(self, module, name):
        if module in self.allowed_modules:
            if name in self.allowed_modules[module]:
                return super().find_class(module, name)
        # If not allowed, raise an error to prevent arbitrary code execution.
        raise pickle.UnpicklingError(f"Global '{module}.{name}' is forbidden")

def restricted_loads(data: bytes):
    """Helper function to load pickle data using the RestrictedUnpickler."""
    return RestrictedUnpickler(io.BytesIO(data)).load()

###############################################################################
# 2) AWS KMS & ENCRYPTION HELPERS
###############################################################################

def generate_data_key(kms_key_id: str, region: str = "us-east-1"):
    """
    Generates a fresh data key using AWS KMS.
    Returns (plaintext_key, encrypted_data_key).
    """
    kms_client = boto3.client("kms", region_name=region)
    response = kms_client.generate_data_key(KeyId=kms_key_id, KeySpec='AES_256')

    # Plaintext data key (use to encrypt the pickle data locally)
    plaintext_key = response["Plaintext"]
    # Encrypted data key (store along with your ciphertext)
    encrypted_data_key = response["CiphertextBlob"]
    return plaintext_key, encrypted_data_key

def decrypt_data_key(encrypted_data_key: bytes, region: str = "us-east-1"):
    """
    Decrypts the encrypted data key via AWS KMS, returning the plaintext key.
    """
    kms_client = boto3.client("kms", region_name=region)
    response = kms_client.decrypt(CiphertextBlob=encrypted_data_key)
    return response["Plaintext"]

def build_fernet_key(plaintext_key: bytes) -> Fernet:
    """
    Construct a Fernet instance from a 32-byte data key.
    Fernet requires a 32-byte key *encoded* in URL-safe base64.
    """
    if len(plaintext_key) < 32:
        raise ValueError("Data key is smaller than 32 bytes; cannot build a Fernet key.")
    fernet_key = base64.urlsafe_b64encode(plaintext_key[:32])
    return Fernet(fernet_key)

###############################################################################
# 3) MAIN LOGIC
###############################################################################

def upload_pickled_data_s3(
    numpy_obj: np.ndarray,
    bucket_name: str,
    s3_key: str,
    kms_key_id: str,
    region: str = "us-east-1"
):
    """
    Pickle a numpy object, encrypt it locally, and upload the ciphertext +
    encrypted data key to S3.
    """
    # 1. Generate data key from KMS
    plaintext_key, encrypted_data_key = generate_data_key(kms_key_id, region)

    # 2. Build Fernet from plaintext data key
    fernet = build_fernet_key(plaintext_key)

    # 3. Serialize the numpy object with pickle
    pickled_data = pickle.dumps(numpy_obj, protocol=pickle.HIGHEST_PROTOCOL)

    # 4. Encrypt the pickled data
    encrypted_data = fernet.encrypt(pickled_data)

    # 5. Upload to S3 along with the encrypted data key (in metadata)
    s3_client = boto3.client("s3", region_name=region)
    s3_client.put_object(
        Bucket=bucket_name,
        Key=s3_key,
        Body=encrypted_data,
        Metadata={
            "encrypted_data_key": base64.b64encode(encrypted_data_key).decode("utf-8")
        }
    )
    print(f"Encrypted pickle uploaded to s3://{bucket_name}/{s3_key}")

def download_and_unpickle_data_s3(
    bucket_name: str,
    s3_key: str,
    region: str = "us-east-1"
) -> np.ndarray:
    """
    Download the ciphertext and the encrypted data key from S3. Decrypt the data
    key with KMS, use it to decrypt the pickled data, then load with a restricted
    unpickler for safety.
    """
    s3_client = boto3.client("s3", region_name=region)

    # 1. Get object from S3
    response = s3_client.get_object(Bucket=bucket_name, Key=s3_key)

    # 2. Extract the encrypted data key from metadata
    metadata = response["Metadata"]
    encrypted_data_key_b64 = metadata.get("encrypted_data_key")
    if not encrypted_data_key_b64:
        raise ValueError("Missing encrypted_data_key in S3 object metadata.")

    encrypted_data_key = base64.b64decode(encrypted_data_key_b64)

    # 3. Decrypt data key via KMS
    plaintext_key = decrypt_data_key(encrypted_data_key, region)
    fernet = build_fernet_key(plaintext_key)

    # 4. Decrypt the pickled data
    encrypted_data = response["Body"].read()
    decrypted_pickled_data = fernet.decrypt(encrypted_data)

    # 5. Use restricted unpickler to load the numpy object
    numpy_obj = restricted_loads(decrypted_pickled_data)

    return numpy_obj

###############################################################################
# DEMO USAGE
###############################################################################

if __name__ == "__main__":
    # --- Replace with your actual values ---
    KMS_KEY_ID = "arn:aws:kms:us-east-1:123456789012:key/your-kms-key-id"
    BUCKET_NAME = "your-secure-bucket"
    S3_OBJECT_KEY = "encrypted_npy_demo.bin"
    AWS_REGION = "us-east-1"  # or region of your choice

    # Example numpy array
    original_array = np.random.rand(2, 3)
    print("Original Array:")
    print(original_array)

    # Upload (pickle + encrypt) to S3
    upload_pickled_data_s3(
        numpy_obj=original_array,
        bucket_name=BUCKET_NAME,
        s3_key=S3_OBJECT_KEY,
        kms_key_id=KMS_KEY_ID,
        region=AWS_REGION
    )

    # Download (decrypt + unpickle) from S3
    retrieved_array = download_and_unpickle_data_s3(
        bucket_name=BUCKET_NAME,
        s3_key=S3_OBJECT_KEY,
        region=AWS_REGION
    )

    print("\nRetrieved Array:")
    print(retrieved_array)

    # Verify integrity
    assert np.allclose(original_array, retrieved_array), "Arrays do not match!"
    print("\nSuccess! The retrieved array matches the original array.")
Conclusion
With the rapid expansion of cloud technologies, integrating static code analysis into your AI/ML development process is increasingly important. While pickling offers a powerful way to serialize objects for AI/ML and LLM applications, you can mitigate potential risks by applying manual secure code reviews, setting up automated SCA with custom rules, and following best practices such as using alternative serialization methods or verifying data integrity.
When working with ML models on AWS, see the AWS Well-Architected Framework’s Machine Learning Lens for guidance on secure architecture and recommended practices. By combining these approaches, you can maintain a strong security posture and streamline the AI/ML development lifecycle.
If you have feedback about this post, submit comments in the Comments section below. If you have questions about this post, contact AWS Support.
Amazon Web Services (AWS) is pleased to announce that the Winter 2024 System and Organization Controls (SOC) 1 report is now available. The report covers 183 services over the 12-month period from January 1, 2024, to December 31, 2024, giving customers a full year of assurance. This report demonstrates our continuous commitment to adhere to the heightened expectations for cloud service providers.
AWS strives to continuously bring services into the scope of its compliance programs to help customers meet their architectural and regulatory needs. Customers can reach out to their AWS account team if they have any questions or feedback about SOC compliance.
To learn more about AWS compliance and security programs, see AWS Compliance Programs. As always, we value feedback and questions; reach out to the AWS Compliance team through the Contact Us page.
If you have feedback about this post, submit comments in the Comments section below.
Every organization strives to empower teams to drive innovation while safeguarding their data and systems from unintended access. For organizations that have thousands of Amazon Web Services (AWS) resources spread across multiple accounts, organization-wide permissions guardrails can help maintain secure and compliant configurations. For example, some AWS services support resource-based policies that can be used to grant identities permissions to perform actions on the resources they’re attached to. With the management of resource-based policies frequently delegated to application owners, central security teams use permissions guardrails to help ensure that possible misconfigurations don’t lead to unintended access to these resources.
In this post, we discuss how you can use resource control policies (RCPs) to centrally restrict access to resources. We demonstrate how RCPs can help improve your security posture while allowing even more freedom to developers in managing their resources, thus reducing friction between central security and application teams. Using a sample use case, we uncover key considerations for designing and effectively implementing RCPs in your organization at scale.
We recommend implementing permissions guardrails, including RCPs, using the following iterative process, which consists of five phases (as shown in Figure 1).
This phased approach helps ensure an effective integration of RCPs into your security strategy, improving your security posture while helping to maintain business continuity. Let’s explore each phase of RCP implementation in detail and outline key considerations for an effective implementation strategy.
Phase 1: Examine your security control objectives
The first step in implementing RCPs is identifying areas where RCPs can help improve your security posture or optimize the implementation of controls for your organization’s specific security control objectives.
Your control objectives can be influenced by a variety of factors such as compliance and regulatory requirements, legal and contractual obligations, types of workloads, data classification, and your organization’s threat model. After your control objectives are well-defined and prioritized, identify those that can be achieved using RCPs.
Like SCPs, RCPs are designed to establish coarse-grained access controls, security invariants that rarely change and serve as always-on boundaries across a wide range of AWS resources in your accounts. RCPs aren’t for managing fine-grained access controls. You will keep using policies such as resource-based and identity-based policies to apply least-privilege permissions.
More specifically, the following are key control objectives that you can achieve using RCPs:
Establish a data perimeter around your AWS resources. For example, you can use RCPs to help ensure that only trusted identities can access your AWS resources.
Mitigate the cross-service confused deputy risk. You can use RCPs to help ensure that your AWS resources are accessed by AWS services only on behalf of your organization.
Apply consistent access controls to your AWS resources regardless of the identities accessing them. For example, you can use RCPs to help ensure your Amazon Simple Storage Service (Amazon S3) buckets require TLS v1.2 or higher for in-transit encryption.
Let’s begin with the scenario illustrated in Figure 2. Your company’s central cloud team manages your corporate AWS Organizations organization, which consists of two corporate AWS accounts. An IAM principal in Account A should be able to assume an IAM role in Account B to perform day-to-day operations. To align to the broader control objective of Only trusted identities can access my resources, the central security team wants to make sure that the IAM role in Account B (my resource) can only be assumed by IAM principals that belong to their organization (trusted identities).
Figure 2: Simple scenario depicting a trusted identity accessing an IAM role
One way of achieving this control objective is to follow the principle of least-privilege and make sure that the role trust policy, the resource-based policy attached to the IAM role, only allows access to identities that require that access. The following is an example trust policy that grants permissions to Role A in Account A to assume Role B in Account B.
In organizations that have only a few accounts, central teams typically manage these policies. While this centralized governance model helps ensure that trust policies applied to roles are always restricted to trusted identities, it can also impede the productivity of application teams when operating at a greater scale.
Assume that your company has started growing its cloud footprint so much that your central security team now must achieve the same control objective with hundreds of IAM roles that are spread across multiple AWS accounts, as demonstrated in Figure 3.
Figure 3: Restricting access by managing individual IAM role trust policies
At this scale, we see organizations delegating permissions management to application teams to better support the growth of their business and empower developers to innovate faster. While central security teams no longer have full control over the permissions granted to resources across AWS accounts, they must make sure that access is aligned with their organization’s security standard. For example, they might want to make sure that the GrantCrossAccountAccess statement that is now managed by developers doesn’t inadvertently grant access to an account that doesn’t belong to their organization. Previously, central security teams typically achieved this by developing automated mechanisms to insert a standard statement into all trust policies. This statement helped ensure that access remained bounded to their organization, even when developers configured broad access permissions for their roles. The following is an example trust policy where a developer granted permissions to an external account through the GrantCrossAccountAccess statement. However, because of the RestrictAccessToMyOrg statement added to the policy by the central security team, the external account will be unable to use these permissions.
The RestrictAccessToMyOrg statement uses the aws:PrincipalOrgID and aws:PrincipalIsAWSService condition keys to restrict access to principals within your organization or to AWS service principals. The BoolIfExists operator with the aws:PrincipalIsAWSService condition key is required if the roles you’re applying a control to are service roles that are used by AWS services to perform operations on your behalf. When an AWS service assumes a service role, it uses its AWS service principal, an identity that is owned by AWS and that does not belong to your organization.
The central security teams could, for example, use AWS Config rules to detect misconfigurations and then use AWS Config remediation to automatically add the RestrictAccessToMyOrg statement to the IAM roles’ trust policies when new IAM roles are created or their trust policies are changed. Even though the addition of the RestrictAccessToMyOrg statement to trust policies can be automated, RCPs can greatly simplify enforcement of such coarse-grained controls in a multi-account environment.
Phase 2: Design permissions guardrails
Central security teams can implement permissions guardrails by creating an RCP that centrally blocks external access to IAM roles. The RCP that you will implement contains similar restrictions to the RestrictAccessToMyOrg statement that you used in the IAM trust policy.
Like SCPs, you attach the RCP to an account, organizational unit (OU), or the root of your organization. After being attached, the RCP automatically applies to applicable resources—in this case, IAM roles—within the scope of that AWS Organizations entity. This centralized approach alleviates the need to modify hundreds of trust policies across multiple accounts, lowering the operational overhead for central security teams and helping ensure consistent access controls are applied at scale. RCPs also help you achieve separation of duties with developers still managing their least-privilege permissions in trust policies and administrators applying coarse-grained access controls in RCPs. If developers make configuration mistakes while managing permissions for their applications, the preventative access controls implemented using RCPs will help ensure that they stay within your organization’s access control guidelines. See How AWS enforcement code logic evaluates requests to allow or deny access to understand how different policy types impact the authorization process.
If you’re transitioning existing controls from resource-based policies to RCPs, use the opportunity to reassess the control design based on your current control objectives and the additional benefits offered by RCPs. For example, your previous controls might have been limited to specific resource types, such as IAM roles in this use case, or to particular accounts, such as those storing the most sensitive data. RCPs enable you to extend controls to additional resources across your entire organization, reducing operational overhead through centralized management of permissions guardrails.
While designing your RCPs, consider the following guidelines.
Design for operational excellence
A key foundation for effectively implementing and operating permissions guardrails like RCPs is organizing your AWS environment using multiple accounts. Account boundaries and strategic placement of workloads across them allow you to apply tailored access controls that align with data sensitivity and specific access requirements. Grouping accounts into OUs within AWS Organizations enables more effective access control, even in scenarios where cross-account access is required. Figure 4 illustrates an example organization structure, demonstrating how RCPs can be applied at various levels of the organizational hierarchy to adhere to the security requirements of different workloads.
Figure 4: A sample organization with RCPs applied at various levels
When operating at scale, consider delegating policy management to a central security account in your organization. With AWS Organizations resource-based delegation, central teams don’t need access to the management account for any SCP or RCP related changes or troubleshooting.
Establishing clear governance helps you define how to implement and continuously manage RCPs within your organization. This includes the operating model, change management processes, and exceptions handling procedures. RCPs provide authorization controls similar to SCPs and therefore should integrate with your existing governance framework rather than requiring separate oversight. For example, if your change management process requires two-person approval for SCP changes, you should consider applying the same approval process for RCP implementation. You should also adopt the same mechanisms you currently use to prevent unauthorized changes or detect drifts in your policies.
Plan for exceptions
There might be scenarios where you have a few resources that should be accessible publicly or by identities that don’t belong to your organization. If you’re organizing your resources across multiple accounts and OUs based on their compliance requirements or a common set of controls, then you most likely have such resources in a dedicated set of accounts or OUs, such as the Public Data OU in Figure 4. These accounts or OUs can have applicable policies that account for their unique access requirements.
Another option to accommodate these scenarios is to use the aws:ResourceAccount or aws:ResourceOrgPaths condition key to exclude certain accounts from the control. For example, the following policy will deny access to identities outside your organization from assuming IAM roles unless the identity is an AWS service principal or the role that is being accessed belongs to Account A.
There also might be situations where your company’s trusted partners or acquisitions need to be granted an exception for access to a subset of your company’s resources distributed across multiple accounts. For example, your company might integrate with Cloud Security Posture Management (CSPM) tools that assume roles in your accounts to assess your accounts’ security posture, as shown in Figure 5.
Figure 5: Representative view of granting exceptions to trusted partners
When implementing a control with an RCP that by default will apply to all resources of the entity it’s attached to, you can manage resource specific exceptions using the aws:ResourceTag condition key. In addition, use the aws:PrincipalAccount context key to conditionally grant exceptions based on the AWS account ID of the trusted partner.
Let’s examine the two statements in the preceding RCP:
RestrictAccessToMyOrgExceptTaggedRoles
This statement helps ensure that your roles can only be assumed by identities that belong to your organization or by AWS service principals, unless a role is tagged with partner-access-exception set to trusted-partner.
RestrictAccessForTaggedRoles
This statement further restricts access by helping ensure that the roles that have the partner-access-exception tag can only be assumed by identities that belong to your trusted partner account.
If you have a well-known, tightly scoped set of resources that need to be excluded, you can also use the IAM policy element, NotResource, to list the Amazon Resource Names (ARNs) of resources to exclude from the control.
When implementing tag-based exception processes, establishing strict controls over tag management is key. Unauthorized modifications of tags on resources, principals, or sessions could impact your security posture by enabling unintended access. You should implement controls to help prevent unauthorized tag manipulation. For example, the following SCP restricts the use of the partner-access-exception tag to the admin role so that unauthorized users cannot alter the control by attaching, detaching, or modifying the tag.
You should also make sure that the partner-access-exception tag cannot be passed as a session tag when identities assume roles. See the sample RCP in the data perimeter policy examples repository.
Phase 3: Anticipate potential impacts
Before rolling out RCPs, you need to understand their potential impact on your organization. Introducing new policies or modifying existing ones without proper validation can disrupt your security-productivity balance. Be aware that overly restrictive policies might inadvertently impede legitimate data flows that are essential for achieving your business objectives.
Another effective method to assess impact is to review and analyze your account activity using AWS CloudTrail. For example, if you centralize all your CloudTrail logs in an S3 bucket, you can use Amazon Athena to query these logs. Specifically, look for STS API calls made against your IAM roles by identities outside your organization. Then, compare the results with your list of known trusted partners and those you have already accounted for in your RCPs. Based on this analysis, determine if you need to add the partner-access-exception tag to additional IAM roles and further refine the policy before enforcement. This is essential to ensure trusted partner integrations continue to function as expected when you enforce your RCPs. Furthermore, use this analysis to identify any illegitimate access patterns in your environment and plan for necessary remediations, further enhancing your security posture as part of RCP implementation.
As you transition into the implementation phase, consider the following key factors to promote a smooth rollout while enhancing your security posture.
Deployment automation and integration
Use your existing deployment pipelines to implement RCPs, the same as you do for SCPs. This approach will minimize operational overhead while maintaining consistency in the deployment of your controls.
As with SCPs, AWS strongly advises against attaching RCPs in production environments without thoroughly testing the impact that the policies have on resources in your accounts. Follow standard CI/CD processes and begin your RCP rollout in lower environments by attaching them to individual test accounts or OUs first. After you validate that the controls behave as excepted, gradually promote the RCPs to upper environments.
If your goal is to transition an existing control from resource-based policies to RCPs, keep your resource-based policies in place while conducting the progressive rollout. After you have completed rolling out your RCPs and confirmed that they operate as expected, you can consider deactivating the automation you used to apply the control using resource-based policies. This approach lets you deploy RCPs without impacting your existing security posture or disrupting business workflows.
Additionally, consider deploying RCPs to a subset of resources or accounts first to limit the scope of impact and provide an opportunity to test and refine your deployment and operational processes. You can follow your standard prioritization approach to define deployment waves, for example, start with resources or accounts that store sensitive data or pose the highest risk, based on your current operational practices and other controls that might be in place. For additional best practices, see OPS06-BP03 Employ safe deployment strategies in the AWS Well-Architected Framework: Operation Excellence Pillar whitepaper.
Phase 5: Monitor permissions guardrails
Finally, establish monitoring processes to help ensure that controls for preventing external access to your resources operate as expected. You can use the same tools you used for impact analysis. For example, you can use IAM Access Analyzer external access findings to understand the impact of your RCPs on resource permissions. This information will help you verify that your RCPs are crafted in accordance with your intent and plan remediation actions, if required. You can also set alerts for occurrences of unintended access patterns observed in your CloudTrail logs.
Furthermore, follow the phased approach outlined in this post to regularly review and update your controls to help ensure that they align with evolving business and security objectives. Consider factors such as organizational changes, changes in partner relationships, data criticality shifts, and opportunities for expanding your RCP coverage. This continuous improvement process helps maintain the effectiveness of your security controls while supporting business growth and transformation.
Conclusion
In this post, we discussed how to effectively implement coarse-grained access controls on AWS resources at scale using RCPs. You can use the phased implementation approach described here to achieve your security control objectives while minimizing the risk of disrupting your business workflows. You can apply the same approach to implement other preventative controls, such as SCPs, across your multi-account environment.
Remember that RCPs, like SCPs, provide a powerful mechanism for enforcing coarse-grained controls across multiple accounts in your organization. They don’t replace your least-privilege controls and should be part of a broader, multi-layered approach to data security that includes other well-architected security design principles.
If you have feedback about this post, submit comments in the Comments section below. If you have questions about this post, contact AWS Support.
Amazon Web Services (AWS) provides service reference information in JSON format to help you automate policy management workflows. With the service reference information, you can access available actions across AWS services from machine-readable files. The service reference information helps to address a key customer need: keeping up with the ever-growing list of services and actions in AWS. As new services launch and existing services expand their capabilities, you can now conveniently identify and incorporate available actions, resources, and condition keys for each AWS service into your policy authoring and validation workflows. As your business expands and your AWS footprint grows, you might decide to automate your policy management workflows. With the service authorization reference, you can build custom tools to make it easier to evaluate and use new actions, resources, and condition keys that AWS services introduce.
Getting started with service reference information
The service reference information is static information about the actions, resources, and condition keys available for each service in AWS. To obtain the list of AWS services for which reference information is available, go to the following URL: https://servicereference.us-east-1.amazonaws.com/v1/service-list.json
This URL endpoint provides a JSON file that contains an up-to-date catalog of AWS services with available reference information. By querying this endpoint, you can retrieve the most current list of services supported by the AWS Service Reference Information feature.
To retrieve the list of actions, resources, and condition keys for a specific AWS service, go to the following URL: https://servicereference.us-east-1.amazonaws.com/v1/<service-name>/<service-name>.json
Replace <service-name> with the name of the desired AWS service (for example, “s3” for Amazon Simple Storage service (Amazon S3) or “ec2” for Amazon Elastic Compute Cloud (Amazon EC2)). This URL endpoint provides a JSON file that contains the comprehensive list of actions, resources, and condition keys that are available for that particular service.
The following example shows the format of the output from the service-list.json file, which contains the service names and URLs for each service’s reference information:
You can navigate to the service information page by using the url field to view the list of permissions for the service. You can also download the JSON file to use in your policy authoring workflows. For example, you can download the permissions for Amazon S3 by following this URL: https://servicereference.us-east-1.amazonaws.com/v1/s3/s3.json
The following example shows a partial output of the permissions for Amazon S3. The AWS Identity and Access Management (IAM) actions are available in JSON format, and each action is its own JSON object. The Name field for those objects provides the name of the IAM action, the ActionConditionKeys field provides the available condition keys for this action, and the Resources field provides the available resources for this action.
What can you build with the service reference information?
Let’s explore how you can make use of the service reference information through practical examples. To help you get started, here are two custom tools that use the service reference information. You can find these tools in our GitHub repository, ready for you to use and adapt to your specific needs. You can download the source code for these tools by visiting the following links:
The SCP pre-processor provides a convenient way to write SCPs. You run the SCP pre-processor as a command-line tool. The tool takes a single, monolithic JSON file and runs a series of transformations and optimizations, then outputs a collection of valid service control policies that fit within policy size quotas. The tool uses AWS service reference information data in order to optimize lists of IAM actions.
Notification tool for new or removed IAM actions
You might find yourself needing to update various policies throughout your AWS environment when new IAM actions or services are released. You can use this tool to notify you when new services or new actions are added or removed. It works by downloading the service reference information and comparing it to the previous version of the file when the tool last ran. You can use these notifications to perform actions like automatically updating IAM policies when new actions are added or manually reviewing the notifications for new, sensitive actions.
The AWS service reference information makes it easier for you to create automation for policy authoring and validation. By providing the AWS service actions reference in JSON format, this feature enables you to create custom tools for policy authoring and management.
We’re excited to know what kind of policy authoring tools you can think up.
If you have feedback about this post, submit comments in the Comments section below. If you have questions about this post, contact AWS Support.
The new IRAP report includes an additional six AWS services that are now assessed at the PROTECTED level under IRAP. This brings the total number of services assessed at the PROTECTED level to 164.
The following are the six newly assessed services:
AWS has developed an IRAP documentation pack to help Australian customers and their partners plan, architect, and assess risk for their workloads when they use AWS Cloud services.
The IRAP pack on AWS Artifact also includes newly updated versions of the AWS Consumer Guide and the whitepaper Reference Architectures for ISM PROTECTED Workloads in the AWS Cloud.
Reach out to your AWS representatives to let us know which additional services you would like to see in scope for upcoming IRAP assessments. We strive to bring more services into scope at the PROTECTED level under IRAP to support your requirements.
If you have feedback about this post, submit comments in the Comments section below. If you have questions about this post, contact AWS Support.
The IAR provides management and technical information security controls to help establish, implement, maintain, and continuously improve information assurance. AWS alignment with IAR requirements demonstrates our ongoing commitment to adhere to the heightened expectations for cloud service providers. As such, IAR-regulated customers can continue to use AWS services with confidence.
Independent third-party auditors from BDO evaluated AWS for the period of November 1, 2023, to October 31, 2024. The assessment report that illustrates the status of AWS compliance is available through AWS Artifact. AWS Artifact is a self-service portal for on-demand access to AWS compliance reports. Sign in to AWS Artifact in the AWS Management Console, or learn more at Getting Started with AWS Artifact.
AWS strives to continuously bring services into the scope of its compliance programs to help you meet your architectural and regulatory needs. If you have questions or feedback about IAR compliance, reach out to your AWS account team.
To learn more about our compliance and security programs, see AWS Compliance Programs. As always, we value your feedback and questions; reach out to the AWS Compliance team through the Contact Us page.
If you have feedback about this post, submit comments in the Comments section below.
AWS Key Management Service (AWS KMS) is pleased to launch key-level filtering for AWS KMS API usage in Amazon CloudWatch metrics, providing enhanced visibility to help customers improve their operational efficiency and aid in security and compliance risk management.
AWS KMS currently publishes account-level AWS KMS API usage metrics to Amazon CloudWatch, enabling you to monitor and manage your API usage. However, if you’re using numerous KMS keys, pinpointing the ones with the highest request rate quota usage or significant API costs becomes challenging. For example, if you have more than 10 active KMS keys in your account, prior to this launch you would have needed to build a custom CloudTrail and Amazon Athena based solution to locate which specific keys are driving the majority of API usage and costs. With the new CloudWatch metrics, which are available under the AWS/KMS namespace in CloudWatch, you can track, understand, and set alerts on detailed API usage at the individual KMS key level without building a costly customized solution.
This blog post explores several use cases to help you better take advantage of these newly introduced CloudWatch metrics to manage your AWS KMS API usage and costs. The use cases cover viewing and understanding your API usage at the key level, and creating CloudWatch alerts to detect unintentional runaway usage.
Overview of new CloudWatch metrics for KMS keys
With CloudWatch metrics for KMS keys, you can now do the following:
View the API usage for a specific KMS key, filtered by individual API operations (for example, Encrypt, Decrypt, or GenerateDataKey).
See the aggregated usage across cryptographic operations for a given KMS key.
Set up an alarm if a specific KMS key exceeds a specified threshold on a single API operation, or a set of API operations.
This streamlined approach allows you to quickly monitor, understand, and troubleshoot the API usage patterns of your KMS keys, without the overhead of the previous multi-step process. Let’s detail how these key-level API usage metrics can be used in two real-world examples.
Example 1: How to locate the KMS keys that consume the most API usage quota or contribute the most API charges
When you surpass your AWS KMS API request rate quotas, you can view your AWS KMS API utilization within the Service Quotas console. However, you might still find it cumbersome to identify the KMS keys that consume the largest amount of your request quota. When you receive the AWS KMS API charges that exceed your expectation, you can check the detailed billing usage in each AWS Region in Cost Explorer, but you cannot easily locate the KMS keys with the most API charges. This process becomes even more challenging when you manage a large number of KMS keys.
With the key-level API usage CloudWatch metrics, you can use the advanced metric query option to query CloudWatch Metrics Insights data with a user-friendly dialect of SQL to locate the KMS keys that consume the largest portion of the API usage quota or contribute the most API charges.
Walkthrough
To use Amazon CloudWatch Metrics Insights to identify the top 20 KMS keys that have the most cryptographic API usage up to the last 3 hours, complete the following steps:
In the navigation pane, choose Metrics, and then choose All metrics.
Choose the Multi source query tab.
For the data source, choose CloudWatch Metrics Insights.
You can enter the following example query in Editor view:
Note: In Builder view, the metric namespace, metric name, filter by, group by, order by, and limit options are shown. In Editor view, the same options as in Builder view are shown in query format.
	SELECT SUM(SuccessfulRequest)
	FROM SCHEMA("AWS/KMS", KeyArn, Operation)
	GROUP BY KeyArn
	ORDER BY MAX () DESC
	LIMIT 20
Choose Run in the Editor view or Graph query in the Builder view.
Example 2: How to set a new detailed alarm on unintentional runaway AWS KMS API usage
Running big data processing workflows that read Amazon Simple Storage Service (Amazon S3) files encrypted by KMS keys is a common scenario for analytics, business reporting, or machine learning projects. Typically, these workflows read a limited number of files from S3 on each invocation. However, misconfigured workflows could unintentionally read a large number of S3 files, which could result in exceeding your AWS KMS API request rate quotas or incurring undesirable charges due to spiky AWS KMS API usage. Historically, to address this issue, you would have had to build a customized alarm system by following these steps: 1) send AWS CloudTrail events generated by AWS KMS to Amazon CloudWatch Logs; 2) write queries in Amazon CloudWatch Logs Insights to track your API request usage; and 3) enable anomaly detection on the corresponding CloudWatch Log Insights math expression.
Now, with key-level API usage CloudWatch metrics, you can directly enable anomaly detection on these metrics to set up alarms for anomalous AWS KMS API usage patterns. This provides a more streamlined and efficient way to monitor and detect potential runaway workflows. By using these CloudWatch metrics and anomaly detection capabilities, you can proactively identify and address unintended increases in AWS KMS API usage, helping to avoid unexpected charges or service disruptions in your analytics, reporting, or machine learning pipelines.
Walkthrough
Consider a scenario where you have an analytics workflow that runs frequently, which uses the Decrypt AWS KMS API operation on a KMS key to decrypt and read data from S3. You would like to enable anomaly detection on the KMS key to trigger an alarm when the Decrypt call volume to the specific KMS key sees a discernible trend or pattern. To do so, complete the following steps:
In the navigation pane, choose Metrics, and then choose All metrics.
Choose KMS, and then choose KeyArn, Operation.
In the search bar, enter the Amazon Resource Name (ARN) of the key, and then choose Search. Select the CloudWatch metric you would like to enable anomaly detection for.
Navigate to Graphed metrics, and using the Statistic and Period drop-down lists, choose the statistic and period that you would like to monitor. Then you can enable anomaly detection by selecting the Pulse icon.
Figure 1: How to enable anomaly detection on a SuccessfulRequest metric
Figure 2: Anomaly detection is enabled on the SuccessfulRequest metric. The gray band illustrates the expected range of values and the anomaly is in red
Conclusion
This blog post highlighted the newly introduced key-level filtering capability for the AWS KMS API usage in CloudWatch. We showed two real-world use cases to demonstrate how you can use the new CloudWatch metrics. These use cases include improving operational visibility, setting up proactive alarms on anomalies in KMS API usage patterns, and potentially tracking detailed key usage for compliance purposes.
If you have feedback about this blog post, submit comments in the Comments section below. If you have questions about this blog post, start a new thread in the AWS Key Management Service re:Post.
Every day, I talk with security leaders who are navigating a critical balancing act. On one side, their organizations are moving faster than ever, adopting transformative technologies like generative AI and expanding their cloud footprint. On the other, they’re working to maintain strong security controls and visibility across an increasingly complex landscape. We all know that adding more tools and controls isn’t sustainable. We need a different approach to security at scale.
re:Inforce 2025: Your roadmap to security that powers innovation
This is what shaped our vision for AWS re:Inforce 2025. When done right, security at scale becomes a business accelerator, helping organizations move faster and more confidently in the cloud. This is more than just a philosophy; it’s a practical reality I’ve seen proven time and again by our customers, and it’s what we want to help every organization achieve.
At re:Inforce, we’ll share a vision for simplifying security at scale that’s deeply rooted in our experiences supporting millions of customers worldwide. We’ll explore how organizations are building inherently resilient applications that can withstand modern threats while accelerating innovation. I’m particularly excited to showcase real customer examples and architectural patterns that demonstrate how security better enables your business goals.
An environment built for learning cloud security
There’s a reason we created re:Inforce as a dedicated in-person security event. While I love our broader AWS events, security practitioners need space to dive deep into implementation details, ask tough questions, and work through complex scenarios. At re:Inforce, you can grab a whiteboard with the engineers who built our security services, collaborate with security partners, and schedule personal time with our leaders to tackle your specific security needs. It’s the kind of environment where real learning happens.
We’ve designed multiple learning paths to meet you wherever you are in your security journey. With over 250 technical sessions, you’ll find content that matches your needs – whether you’re looking to automate security controls, align development and security teams, or transform your security operations. You’ll find interactive workshops where you’ll build solutions in real-time, small-group technical deep-dives, hands-on labs where you can test new approaches, and solution-building sessions with AWS experts. Best of all, 70% of our content is at advanced or expert level, making sure you get the detailed implementation guidance you need.
I invite you to join us for three days that will transform how you think about and implement security in the cloud. Registration is now open, and I encourage you to secure your spot early—based on previous years, spots will fill up quickly. Join us to explore how simplified, scalable cloud security can fuel your organization’s future.Register today with the code SECBLObhZzr9 to receive a limited time $300 USD discount, while supplies last.
If you have feedback about this post, submit comments in the Comments section below.
Containerization offers organizations significant benefits such as portability, scalability, and efficient resource utilization. However, managing access control and authorization for containerized workloads across diverse environments—from on-premises to multi-cloud setups—can be challenging.
This blog post explores four architectural patterns that use Amazon Verified Permissions for application authorization in Kubernetes environments. Verified Permissions is a scalable permissions management and fine-grained authorization service for your applications.
In this blog post, we cover the following patterns and discuss their trade-offs:
Calling Verified Permissions from an Amazon API Gateway API fronting your application in Kubernetes
Calling Verified Permissions from a Kubernetes Ingress controller component
Calling Verified Permissions from a sidecar container running in the same pod as the application container
Calling Verified Permissions from the application container
Understanding these patterns and their implications can help you implement secure and consistent authorization mechanisms across your entire infrastructure without compromising the scalability, portability, and resource efficiency of your containerized workloads.
Consistent authorization through centralized policy management
Access to application resources can be secured more effectively with a centralized and consistent approach to authorization. Especially in containerized environments with distributed architectures and shared resources, traditional access control methods, like embedding authorization logic within individual application code or relying on local access control policies, can become difficult to manage and prone to errors. This becomes even more challenging when you have a combination of on-premises and cloud setups.
A centralized authorization solution empowers developers to implement consistent access control across individual components of an application efficiently. Benefits include reduced duplicate work, an improved security posture, and lower complexity in managing and enforcing access control policies.
Verified Permissions benefits in a containerized environment
Amazon Verified Permissions provides several key benefits as an external authorization service:
Benefits for the platform engineering team – Centralized authorization enables platform engineering teams to implement, maintain, and govern authorization policies across the organization without requiring changes to individual applications. This aligns with modern platform engineering practices, where platform engineering teams can provide authorization as a service to application teams, promoting consistent security standards while reducing the operational burden on development teams.
Consistent authorization across environments – With Verified Permissions, you can define and manage access control policies in a centralized location. This makes it easier to apply consistent authorization rules across your entire infrastructure, including on-premises deployments and different cloud environments.
Simplified application development – Externalizing authorization logic from applications reduces development complexity. Developers can focus on core application functionality without having to implement and maintain authorization mechanisms within each service or component. This separation of concerns promotes code modularity, reusability, and faster iteration cycles.
Scalable and highly available – Verified Permissions is a managed service, designed to be scalable and highly available out of the box. As your containerized workloads grow in scale and complexity, Verified Permissions can handle increasing authorization request volumes while maintaining performance and availability.
Fine-grained access control – Verified Permissions supports attribute-based access control (ABAC) and role-based access control (RBAC). This allows you to define granular policies in the open source Cedar language based on various attributes like user roles, resource properties, environmental factors, and more.
Integration patterns for authorization
Kubernetes provides many options for architecting applications. Therefore, there are multiple locations in a typical architecture where authorization decisions can be enforced, as shown in Figure 1.
Figure 1: Integration points for authorization in containerized workloads
The workflow is as follows:
API Gateway. Organizations can use entry points to the application outside of the Kubernetes cluster, such as an API gateway, to obtain an authorization decision. In AWS, Amazon API Gateway enables customers to use authorizer Lambda functions to send an authorization request to Verified Permissions.
Ingress controller. The Kubernetes API defines Ingress objects, which provide load balancing and routing functions on layer 7. Common Ingress controllers like Traefik offer the option to integrate external authorization services.
Sidecar proxy container. You can intercept every request routed to the application by using a sidecar container running in the same pod as the application container. This sidecar container calls Verified Permissions for authorization decisions.
Application container. Developers can use the Amazon SDK to communicate with Verified Permissions from inside the application when an authorization decision is needed.
In the following sections, we explore each of these patterns in detail, examining their implementation, use cases, and specific considerations. At the end of our discussion, we provide a comprehensive comparison table to help you choose the most appropriate pattern based on factors such as scalability, performance, maintenance overhead, and specific use case requirements. This will help you make an informed decision about which pattern best suits your application’s needs.
Authorization workflow
Independent of which of the four mentioned options for authorization you choose, the overall authorization workflow, shown in Figure 2, will stay the same.
Figure 2: Authorization workflow with Amazon Verified Permissions
The workflow is as follows:
Authentication. The user first authenticates with an identity provider to obtain a JSON Web Token (JWT). You can configure the identity provider to write relevant information like user roles, tenant ID, or other needed user attributes into the JWT. You can then use this information later to make an authorization decision.
API request. The user makes a request to your application that includes the JWT.
Authorization information. Your application extracts the relevant information that is needed to make an authorization decision from the request. This can include principal information from the JWT, information about the resource that the user requests, and what action the user wants to perform.
(Optional) Policy information point lookup. Depending on your policies, you might need additional information in order for Verified Permissions to make an authorization decision. For example, you can query ownership details for a document from a database.
Authorization decision. You then send the relevant information to Verified Permissions, which returns a decision stating whether the request is permitted or forbidden.
Authorization enforcement. You then enforce the decision from Verified Permissions in your application by allowing or denying an action. For a REST API, this would result in sending back an HTTP 403 forbidden status if the request was denied, or processing the request if it was allowed and sending an HTTP 200 OK status.
Authorization outside of the cluster by using Amazon API Gateway
In this pattern, authorization decisions are made at the API gateway layer before requests reach the Kubernetes cluster. When a request arrives at the API gateway, it triggers an authorization check with Verified Permissions to evaluate the request against defined policies. Based on the Verified Permissions response, the gateway either forwards the request to the containerized application or denies access.
This pattern excels in scenarios where you need coarse-grained access control that can be enforced with information accessible at the API level (such as an HTTP header or ID or access token) and that supports RBAC and ABAC. Consider a document management application where different users have access to different documents based on group membership or identity attribute.
This approach to authorization works consistently regardless of whether your application runs in containers, virtual machines, or serverless environments. The API gateway acts as a unified control point for enforcing access policies across backend services.
For implementations that use Amazon API Gateway specifically, you can use Lambda authorizers to integrate with Verified Permissions. For each incoming API request, API Gateway invokes the authorizer Lambda function, which makes a call to Verified Permissions to evaluate the request against the defined authorization policies, as shown in Figure 3.
Figure 3: Integration of Amazon Verified Permissions in Amazon API Gateway
Another option to implement coarse-grained access control in use cases as described in the previous section is to use a Kubernetes Ingress layer. Some customers prefer Kubernetes-native solutions, especially if they need to run Kubernetes clusters within and outside of AWS.
Kubernetes provides an API to create and maintain Ingress objects, operating at layer 7 (the application layer), which enables routing decisions based on HTTP attributes. This layer 7 capability makes Ingress controllers ideal for implementing authorization checks.
One Kubernetes Ingress controller that supports external authorization is Traefik Proxy. With this feature, you can delegate authorization decisions to an external service like Verified Permissions before routing requests to the application container.
Assuming that the authorization endpoint is backed by a service in the same Kubernetes cluster, the architecture looks as shown in Figure 4.
Figure 4: Integration of Amazon Verified Permissions in a Kubernetes Ingress
The workflow is as follows:
Authenticated users access the service through an Elastic Load Balancer of type Network Load Balancer (NLB).
The NLB—operating at layer 4—exposes a Kubernetes Ingress inside the cluster that provides layer 7 capabilities. The Ingress object is implemented by an Ingress controller that supports external authorization, as described earlier.
The Ingress forwards the request—or parts of it—that needs authorization to a local authorization service in the cluster. We use a dedicated authorization service in this architecture because the Ingress backend service allows an external endpoint to be called for authorization.
The authorization service is deployed into its own Kubernetes namespace with a dedicated Kubernetes service account. EKS Pod Identity provides the ability to link the service account in this namespace to an AWS Identity and Access Management (IAM) role that grants access to Verified Permissions by injecting temporary AWS access credentials into the pod at runtime.
The authorization service extracts relevant information from the request and sends it to Verified Permissions for an authorization decision.
The Ingress for the backend service awaits the response of the authorization service and forwards it to the backend service, if access is granted. The Ingress expects the authorization service to respond with HTTP status code 200 for authorized requests. If the Ingress receives HTTP status code 403, the requester is not allowed to access the requested resource, and the Ingress will block the request at this stage.
Only authorized requests are forwarded to registered backend pods.
Because integration with external authorization services is not part of the Kubernetes Ingress API, you need to consult the documentation of the Ingress controller that you decide to use to determine the availability of this feature and its implementation details. Forward authentication of the Traefik Kubernetes Ingress supports this pattern and can be configured with the vendor-specific annotations described in the Traefik documentation.
Authorization in sidecar containers
Not all Ingress controllers support integration with an external authorization service. Amazon Elastic Kubernetes Service (Amazon EKS) customers might prefer the AWS Load Balancer Controller to manage the lifecycle of NLBs and ALBs for their services. Customers can continue using their existing Ingress controller, even if it does not support calling external authorization services today. You can move the authorization of requests behind the Ingress layer with the sidecar container pattern.
Sidecar containers are a common pattern for extending an application’s functionality in Kubernetes. A sidecar is a container running in the same pod as the application it relates to. This means that the sidecar and application follow the same lifecycle and share resources, such as the network ID. This pattern is a good fit when the authorization logic is service-specific. Because the authorization service is deployed alongside the application, this pattern also provides better support in situations where changes to the application demand changes in the authorization logic.
Consider a document management system where access control depends on document metadata and team structures. When a user attempts to edit a document, the sidecar queries the document’s metadata, such as the classification level, tags, and department ownership. The sidecar can also check the organizational team hierarchy to understand reporting relationships and access privileges. This context enables fine-grained authorization decisions that consider not just who the user is, but also, for example, their organizational context or the individual document’s metadata.
Although it’s possible to configure sidecar proxies such as Envoy for individual pods manually, the more convenient option is to introduce a service mesh. A service mesh provides a control plane to manage proxies, including centralized configuration, automated injection of sidecars, and an Ingress layer for traffic routing. Istio is a popular option for a service mesh in Kubernetes.
The diagram in Figure 5 shows the deployment architecture to implement authorization with Verified Permissions in a service mesh.
Figure 5: Integration of Amazon Verified Permissions in a Kubernetes Ingress
The workflow is as follows:
Authenticated users access the application through an NLB.
The request is routed through an Ingress in the Kubernetes cluster.
The Ingress forwards the request directly to the backend service.
Pods of the backend service consist of multiple containers. Each request is routed through an Envoy proxy first.
The Envoy proxy forwards the request to a co-located container running the authorization service.
Pod Identity is used to map an IAM role to a Kubernetes service account bound to the pod, which enables the authorization sidecar to invoke Verified Permissions for an authorization decision. Note that each container in this pod has access to the IAM credentials that are mapped to the service account.
The Envoy proxy awaits the response of the authorization sidecar and blocks or forwards the request to the backend container, depending on the Verified Permissions authorization decision.
When Istio is deployed into a Kubernetes cluster, it introduces Custom Resource Definitions (CRDs) for managing the service mesh. The authorization workflow can be implemented using the ServiceEntry CRD and an Istio Authorization Policy. The authorization service running as a local container in the application pod becomes a registered service entry in the mesh. This service entry can then be configured in an authorization policy as the target for request authorization in the proxy. For more details, see the External Authorization section in the Istio documentation.
Application container
When it comes to integrating Verified Permissions directly within your application container, you have the advantage of fine-grained control over authorization decisions at the application level. This approach allows for more context-aware authorization checks and can be useful when you need to make authorization decisions based on application-specific data that you can query from a policy information point.
Unlike the sidecar pattern, where authorization happens before the request reaches your application code, this approach lets you gather the necessary context from your application state, databases, or other services before making the authorization call. This is particularly valuable when the authorization logic is deeply intertwined with business logic or requires data that’s only available within the application context. This pattern also supports minimizing the number of authorization requests, if, for example, only a subset of requests processed by a monolithic service require authorization.
However, it’s important to note that this tight coupling between authorization and business logic makes the system more brittle and susceptible to breakage when functional or business logic changes occur. This means that modifications to your application code might require careful consideration of their impact on the authorization logic, potentially increasing maintenance complexity.
The architecture for authorization requests from the application container is shown in Figure 6.
Figure 6: Integration of Amazon Verified Permissions in the application container
The workflow is as follows:
Authenticated users access the application through an Elastic Load Balancer—either Application Load Balancer (ALB) or NLB depending on workload requirements.
The Kubernetes service or Ingress for the backend application is directly registered at the ALB or NLB by the AWS Load Balancer Controller.
Requests are directly routed to a pod that is backing the service.
The backend application’s logic is responsible for identifying whether a request needs authorization. The backend uses an IAM role injected at runtime through Pod Identity, when an authorization decision from Verified Permission is needed. The backend application returns HTTP status code 403 if the decision is a deny; otherwise it will continue processing the request.
You now have a set of patterns to introduce authorization into your containerized workloads. You need to consider multiple factors and understand the trade-offs that come with each pattern to identify the best option for a given scenario. In the following table, we list certain areas with influence on your architectural decisions.
Granularity of authorization decisions
API gateway
Authorization on API or service level
Decision based on information from HTTP request
Suitable for consistent coarse-grained authorization
Ingress controller
Authorization on API or service level
Decision based on information from HTTP request
Suitable for consistent coarse-grained authorization
Sidecar proxy
Authorization on service level
Decision based on information from HTTP request and service domain (such as policy information point or static service-specific rules)
Suitable for service-specific authorization with low or mid-level complexity for decisions
Application container
Authorization on code level
Decision based on information from HTTP request and arbitrary business logic
Unauthorized requests don’t consume application pod resources
Sidecar proxy
Authorization services increases resource demand of each pod in the cluster
Unauthorized requests consume application pod resources
Application container
Authorization service consumes resources only when authorization is performed
Unauthorized requests consume CPU cycles of application logic until the authorization logic is triggered
Scalability
API gateway
Fully managed serverless service
Ingress controller
Scaling of Ingress pods needs to be defined
Cluster auto-scaling or capacity planning for compute resources in cluster needed
Sidecar proxy
Existing scaling policies can be leveraged
Application container
Existing scaling policies can be leveraged
Performance
API gateway
Invokes Verified Permission in AWS for each request that needs authorization
Supports caching to reduce number of requests to Verified Permission out of the box
Ingress controller
Invokes Verified Permission in AWS for each request that needs authorization
(Optional) Integration of avp-local-agent to minimize number of requests to Verified Permissions
Sidecar proxy
Invokes Verified Permissions in AWS for each request that needs authorization
(Optional) Integration of avp-local-agent to minimize number of requests to Verified Permissions
Application container
Invokes Verified Permissions in AWS only if the business logic processing a request requires authorization
(Optional) Integration of avp-local-agent to minimize number of requests to Verified Permissions
Cost
API gateway
Consumption-based costs depending on requests received and data transferred out, and optionally cache size
Consumption-based costs to invoke Verified Permissions
Enabling a cache potentially reduces costs per requests
Ingress controller
Adds to infrastructure costs depending on the underlying compute resources needed to run the fleet of pods for Ingress and authorization service
Consumption-based costs to invoke Verified Permissions, which can be minimized by integrating avp-local-agent
Sidecar proxy
Adds to infrastructure costs depending on the underlying compute resources needed to run the sidecar containers for the proxy and authorization service in each pod
Consumption-based costs to invoke Verified Permissions, which can be minimized by integrating avp-local-agent
Application container
Typically minimal additional costs, since authorization code shares the application’s resources
Consumption-based costs to invoke Verified Permissions, which can be minimized by integrating avp-local-agent
Portability
API gateway
Portability is limited and depends on API Gateway with functionality for custom authorization
Ingress controller
Portable across Kubernetes environments with Ingress controller supporting external authorization
Sidecar proxy
Portable across Kubernetes environments
Application container
Highly portable without dependencies to underlying components
Complexity
API gateway
Offered as central component by platform engineering team to offload complexity of authorization from product teams
Changes in authorization service impact product teams
Ingress controller
Offered as central component by platform engineering team to offload complexity of authorization from product teams
Changes in authorization service impact product teams
Sidecar proxy
Platform engineering teams provide standardized patterns (and optionally implementation) for authorization that can be integrated and implemented by product teams
Increases autonomy of individual teams
Application container
Full responsibility for authorization lies with the product teams
Increases autonomy of individual teams
Not all services have the same requirements for authorization. You can also combine the patterns discussed in this post. You can, for example, put a basic authorization workflow with coarse-grained access control in front of the majority of your services. You can then rely on sidecar proxies with policy information points to inject additional, dynamic context into authorization decisions for specific services. Lastly, if certain use cases of a service demand complex authorization decisions, you can fall back to application-level authorization for specific parts of your code base.
Conclusion
In this blog post, we explored four patterns for integrating Verified Permissions into a containerized environment. We discussed the benefits and considerations of implementing Verified Permissions at different levels: from an API gateway outside of Kubernetes clusters, by means of Ingress controllers and sidecar proxies as network components inside the Kubernetes cluster, to authorization within the application itself. We saw how each pattern offers unique advantages. We also discussed considerations for finding a suitable option for your situation and when to combine patterns.
By using Verified Permissions, organizations can implement consistent, fine-grained authorization across their containerized workloads, whether they’re running on-premises, in the cloud, or in hybrid environments. This centralized approach to authorization can enhance security and simplify policy management and application development.
This alignment with DESC requirements demonstrates our continued commitment to adhere to the heightened expectations for CSPs. Government customers of AWS can run their applications in AWS Cloud-certified Regions with confidence.
The independent third-party auditor (BSI) issued the Certificate of Compliance to AWS on behalf of DESC on January 23, 2025. The Certificate of Compliance that illustrates the compliance status of AWS is available through AWS Artifact. AWS Artifact is a self-service portal for on-demand access to AWS compliance reports. Sign in to AWS Artifact in the AWS Management Console, or learn more at Getting Started with AWS Artifact.
The certification includes 11 additional services in scope, for a total of 98 services. This is a 13% year-on-year increase in the number of services in the Middle East (UAE) Region that are in scope of the DESC CSP certification. For up-to-date information, including when additional services are added, see the AWS Services in Scope by Compliance Program webpage and choose DESC CSP.
AWS strives to continuously bring services into the scope of its compliance programs to help you adhere to your architectural and regulatory needs. If you have questions or feedback about DESC compliance, reach out to your AWS account team.
To learn more about our compliance and security programs, see AWS Compliance Programs. As always, we value your feedback and questions; reach out to the AWS Compliance team through the Contact Us page.
If you have feedback about this post, submit comments in the Comments section below.
We’ve added four additional AWS services to the audit scope since the last certification issued on November 29, 2024. These are the four additional services:
For a full list of AWS services that are certified under ISO and CSA STAR, see the AWS ISO and CSA STAR Certified page. You can also access the certifications in the AWS Management Console through AWS Artifact.
If you have feedback about this post, submit comments in the Comments section below.
By implementing the PBHVA control overlay over a CCCS Medium baseline, you can better protect your organization’s most critical assets from potential threats and vulnerabilities, providing continuity of essential government operations and safeguarding sensitive information.
Understanding CCCS PBHVA overlay requirements
The CCCS PBHVA overlay consists of 137 controls designed to protect high-value assets, including 69 new controls and 68 controls from CCCS Medium. These controls provide enhanced data protection, particularly for integrity and availability, and are based on NIST SP 800-53 Revision 5.
Key findings from the Coalfire assessment
Coalfire’s assessment found that the LZA on AWS solution significantly supports CCCS PBHVA overlay compliance requirements:
71 percent of in-scope controls (97 of 137) are supported by the AWS contribution to compliance in the shared responsibility model
The solution uses over 35 AWS services to provide comprehensive security capabilities
Strong network segmentation is achieved through network account and network-boundary VPC design
Infrastructure-as-code (IaC) enables reliable build and deployment results
The 29 percent of controls not addressed by the LZA are on the customer side of the shared responsibility model. They are addressed in the customer’s application stack or as non-technical controls such as policies and procedures.
Key security capabilities
The LZA solution implements several critical security features:
While the LZA solution provides significant compliance support, organizations should note:
The solution alone does not guarantee compliance
Organizations must implement their own policies, standards, and procedures
A thorough understanding of the shared responsibility model is essential
The AWS Landing Zone Accelerator Verified Reference Architecture documentation is available for customer download in AWS Artifact. This resource can help organizations reduce the time and effort required to deploy an environment that aligns with CCCS PBHVA overlay requirements.
Conclusion
The Coalfire assessment confirms that the LZA on AWS solution provides effective support for CCCS PBHVA overlay compliance objectives. However, organizations should remember that compliance is an ongoing process that requires active management and cannot be achieved through technology alone.
For more information about implementing the Landing Zone Accelerator for CCCS PBHVA overlay requirements, contact your AWS account team or the AWS Public Sector team directly.
If you have feedback about this post, submit comments in the Comments section below. If you have questions about this post, contact AWS Support.
As your Amazon Web Services (AWS) environment grows, you might develop a need to grant cross-account access to resources. This could be for various reasons, such as enabling centralized operations across multiple AWS accounts, sharing resources across teams or projects within your organization, or integrating with third-party services. However, granting cross-account access requires careful consideration of your security, availability, and manageability requirements.
In this blog post, we explore four different ways to grant cross-account access using resource-based policies. Each method has its own unique tradeoffs, and the best choice depends on your specific requirements and use case.
Evaluating different techniques for granting cross-account access
Your choice of how to specify the principal in a resource-based policy impacts some aspects of both the confidentiality and the availability of your solution. Understanding this impact and making the right tradeoffs for your use case is the focus of this post.
An example scenario
Imagine that you have an S3 bucket in your AWS account (Account A) that needs to be accessed by different principals in another AWS account (Account B). For this scenario, we assume that the principals in Account B have the necessary access to S3 in their identity-based policies, and we will focus on authoring the resource-based policies in Account A. While the methods explained here use Amazon S3, the concepts discussed apply to all AWS services that support resource-based policies. In the following sections, we walk through four different ways to grant cross-account access in this scenario and discuss the tradeoffs of each.
Method 1: Grant access to a specific IAM role using the Principal element of the resource-based policy
In this example, you use an S3 bucket policy to grant access to a specific IAM role (RoleFromAccountB) in Account B by specifying the IAM role’s Amazon Resource Name (ARN) in the Principal element of the policy in Account A.
Using this bucket policy, if someone in Account B deletes or recreates the role (RoleFromAccountB), then that role can no longer access the amzn-s3-demo-bucket-account-a bucket, even if that role is recreated with the same name. The reason is that when you save this policy, the role ARN is mapped to the unique ID of the role, which looks something like this: AROADBQP57FF2AEXAMPLE. You will see a role identifier in the Principal element of your resource-based policies if you view them after you delete the role that they referenced.
This behavior is intentional. The resource-based policy only allows the specific instance of the role that you set as principal at the time of policy creation. This helps prevent unintended access to your resources if you delete a role, but forget to update your resource-based policy to remove that role. This behavior can also cause an availability risk because the role (RoleFromAccountB) will have a new unique ID when it is recreated and will no longer have access to the bucket. Roles can be recreated for a number of reasons, including accidentally when you use tools such as infrastructure as code.
You might consider choosing this method if:
You own the roles in both Account A and Account B and can control the creation and deletion of these roles.
You want your resource-based policy in Account A to stop granting access when the specified role (RoleFromAccountB) is deleted.
You prioritize granular access control over potential availability concerns if the role (RoleFromAccountB) is deleted.
Method 2: Grant access to an account using the Principal element of the resource-based policy
In this example, you grant access to a specific account in the Principal element of the resource-based policy. This resource-based policy of Account A allows any user or role from Account B that also has an identity-based policy that grants them access to read the objects.
Note: You can use either "Principal": {"AWS": "111122223333"} or "Principal": {"AWS": "arn:aws:iam::111122223333:root"} in the Principal element. They are equivalent, and the long-form ARN does not represent the root user.
This resource-based policy helps avoid the potential availability issue discussed for Method 1. If a role in Account B that needs to have access to the bucket is recreated, it will still have access after the recreation of that role. This is because you don’t specify a role in the Principal element—instead, you specify an account. If you use Method 2, you must be comfortable delegating access control decisions to the owner of that account.
This approach explicitly delegates access control decisions to IAM in the other account (Account B). Principals in Account B have access to this bucket if allowed by their identity-based policies.
You might consider choosing this method if:
You need to grant access to many principals in Account B.
You want to delegate the access decision in the account where the principal exists (Account B).
You prioritize ease of management and availability over granular access control.
Method 3: Grant access to a specific IAM role using the aws:PrincipalArn condition
This method expands on Method 2 and adds a condition that grants access only to a specific IAM role. Similar to Method 2, you use the account number as the value of the Principal element, but also use the aws:PrincipalArn condition key to limit access to a specific principal in Account B.
The aws:PrincipalArn condition key is a global condition key that compares the ARN of the principal that made the request with the ARN that you specify in the policy. For IAM roles, the request context returns the ARN of the role, not the ARN of the user that assumed the role.
This policy comes with the same availability benefits as the policy in Method 2: access to this resource will survive role recreation. This is because the role is translated to its unique identifier only when it is used in the Principal element. It is not translated to a unique identifier when it is used in a condition. If the role (RoleFromAccountB) in Account B is recreated, accidentally or intentionally, the policy will continue to grant access because the role matches the role ARN specified in the condition key of the resource-based policy in Account A. As a result, Method 3 provides a balanced approach to availability and security.
You might consider choosing this method if:
You are comfortable that this policy will continue to grant access to the role specified in the aws:PrincipalArn condition key if that role (RoleFromAccountB) is recreated.
You don’t own the Account B you are granting access to and don’t control when that role may be recreated.
You want a balance of availability and confidentiality.
Method 4: Grant access to an entire AWS Organizations organization
This method is focused on a different use case and is not an alternative to the methods listed earlier. Use this method if you have a resource (an S3 bucket, in this example) that you want to share with your entire organization, but not share with anyone outside of it.
There is no way to specify an organization by using the Principal element of a resource-based policy, so you must use the aws:PrincipalOrgId condition key to restrict access to a specific organization. In this policy, you specify a wildcard in the Principal element, which says that anyone can access the bucket. Then the condition reduces “anyone” to just those AWS account principals that belong to the specified organization and have an identity-based policy that allows them access.
You then add an additional conditional block that compares the aws:PrincipalAccount condition key to the aws:ResourceAccount condition key by using a policy variable. This extra conditional block is optional and excludes the account that owns the bucket (Account A) from the allow statement. The reason for using this extra conditional block is so that principals in Account A still require an allow statement in their identity-based policy to access this bucket. If you choose to exclude this aws:PrincipalAccount comparison, principals in Account A are granted access to the bucket without an explicit allow statement in their identity-based policy. Policy evaluation logic only requires either the identity-based policy or the resource-based policy (but not both) to allow a request when the principal and resource are in the same account.
You might consider choosing this method if:
You have a shared resource that should be accessible to your entire organization.
Conclusion
Choosing a method to grant cross-account access requires careful consideration of your requirements and use case. Each of the four methods discussed in this blog post has its own advantages and tradeoffs. By understanding these methods and their implications, you can decide on the most appropriate approach to grant cross-account access to your AWS resources. Remember to regularly review and audit your resource-based policies to verify that they align with your security and access requirements.
If you have feedback about this post, submit comments in the Comments section below. If you have questions about this post, contact AWS Support.
The collective thoughts of the interwebz
Manage Consent
To provide the best experiences, we use technologies like cookies to store and/or access device information. Consenting to these technologies will allow us to process data such as browsing behavior or unique IDs on this site. Not consenting or withdrawing consent, may adversely affect certain features and functions.
Functional
Always active
The technical storage or access is strictly necessary for the legitimate purpose of enabling the use of a specific service explicitly requested by the subscriber or user, or for the sole purpose of carrying out the transmission of a communication over an electronic communications network.
Preferences
The technical storage or access is necessary for the legitimate purpose of storing preferences that are not requested by the subscriber or user.
Statistics
The technical storage or access that is used exclusively for statistical purposes.The technical storage or access that is used exclusively for anonymous statistical purposes. Without a subpoena, voluntary compliance on the part of your Internet Service Provider, or additional records from a third party, information stored or retrieved for this purpose alone cannot usually be used to identify you.
Marketing
The technical storage or access is required to create user profiles to send advertising, or to track the user on a website or across several websites for similar marketing purposes.


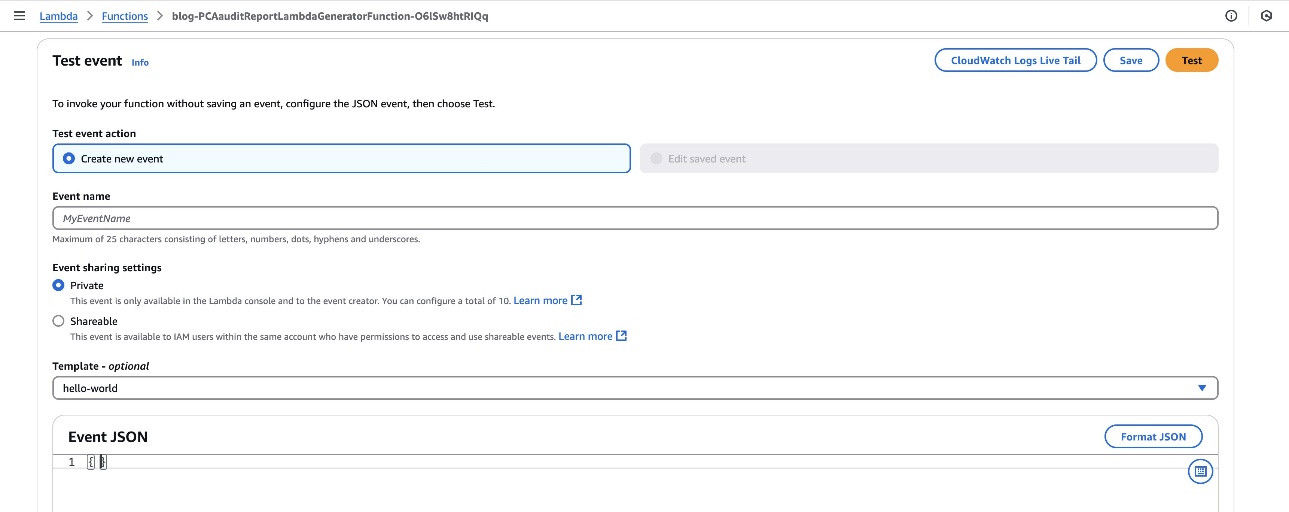


 Figure 1: AWS KMS GenerateDataKey requests per second without TLS connection reuse
 Figure 2: AWS KMS GenerateDataKey requests per second with TLS connection reuse


