AWS Audit Manager extends generative AI best practices framework to Amazon SageMaker

Post Syndicated from Matheus Guimaraes original https://aws.amazon.com/blogs/aws/aws-audit-manager-extends-generative-ai-best-practices-framework-to-amazon-sagemaker/

Sometimes I hear from tech leads that they would like to improve visibility and governance over their generative artificial intelligence applications. How do you monitor and govern the usage and generation of data to address issues regarding security, resilience, privacy, and accuracy or to validate against best practices of responsible AI, among other things? Beyond simply taking these into account during the implementation phase, how do you maintain long-term observability and carry out compliance checks throughout the software’s lifecycle?

Today, we are launching an update to the AWS Audit Manager generative AI best practice framework on AWS Audit Manager. This framework simplifies evidence collection and enables you to continually audit and monitor the compliance posture of your generative AI workloads through 110 standard controls which are pre-configured to implement best practice requirements. Some examples include gaining visibility into potential personally identifiable information (PII) data that may not have been anonymized before being used for training models, validating that multi-factor authentication (MFA) is enforced to gain access to any datasets used, and periodically testing backup versions of customized models to ensure they are reliable before a system outage, among many others. These controls perform their tasks by fetching compliance checks from AWS Config and AWS Security Hub, gathering user activity logs from AWS CloudTrail and capturing configuration data by making application programming interface (API) calls to relevant AWS services. You can also create your own custom controls if you need that level of flexibility.

Previously, the standard controls included with v1 were pre-configured to work with Amazon Bedrock and now, with this new version, Amazon SageMaker is also included as a data source so you may gain tighter control and visibility of your generative AI workloads on both Amazon Bedrock and Amazon SageMaker with less effort.

Enforcing best practices for generative AI workloads
The standard controls included in the “AWS generative AI best practices framework v2” are organized under domains named accuracy, fair, privacy, resilience, responsible, safe, secure and sustainable.

Controls may perform automated or manual checks or a mix of both. For example, there is a control which covers the enforcement of periodic reviews of a model’s accuracy over time. It automatically retrieves a list of relevant models by calling the Amazon Bedrock and SageMaker APIs, but then it requires manual evidence to be uploaded at certain times showing that a review has been conducted for each of them.

You can also customize the framework by including or excluding controls or customizing the pre-defined ones. This can be really helpful when you need to tailor the framework to meet regulations in different countries or update them as they change over time. You can even create your own controls from scratch though I would recommend you search the Audit Manager control library first for something that may be suitable or close enough to be used as a starting point as it could save you some time.

The Control library interface featuring a search box and three tabs: Common, Standard and Custom.

The control library where you can browse and search for common, standard and custom controls.

To get started you first need to create an assessment. Let’s walk through this process.

Step 1 – Assessment Details
Start by navigating to Audit Manager in the AWS Management Console and choose “Assessments”. Choose “Create assessment”; this takes you to the set up process.

Give your assessment a name. You can also add a description if you desire.

Step 1 screen of the assessment creation process. It has a textbox where you must enter a name for your assessment and a description text box where you can optionally enter a description.

Choose a name for this assessment and optionally add a description.

Next, pick an Amazon Simple Storage Service (S3) bucket where Audit Manager stores the assessment reports it generates. Note that you don’t have to select a bucket in the same AWS Region as the assessment, however, it is recommended since your assessment can collect up to 22,000 evidence items if you do so, whereas if you use a cross-Region bucket then that quota is significantly reduced to 3,500 items.

Interface with a textbox where you can type or search for your S3 buckets as well as buttons for browsing and creating a new bucket.

Choose the S3 bucket where AWS Audit Manager can store reports.

Next, we need to pick the framework we want to use. A framework effectively works as a template enabling all of its controls for use in your assessment.

In this case, we want to use the “AWS generative AI best practices framework v2” framework. Use the search box and click on the matched result that pops up to activate the filter.

The Framework searchbox where we typed "gene" which is enough to bring a few results with the top one being "AWS Generative AI Best Practices Framework v2"

Use the search box to find the “AWS generative AI best practices framework V2”

You then should see the framework’s card appear .You can choose the framework’s title, if you wish, to learn more about it and browse through all the included controls.

Select it by choosing the radio button in the card.

A widget containing the framework's title and summary with a radio button that has been checked.

Check the radio button to select the framework.

You now have an opportunity to tag your assessment. Like any other resources, I recommend you tag this with meaningful metadata so review Best Practices for Tagging AWS Resources if you need some guidance.

Step 2 – Specify AWS accounts in scope
This screen is quite straight-forward. Just pick the AWS accounts that you want to be continuously evaluated by the controls in your assessment. It displays the AWS account that you are currently using, by default. Audit Manager does support running assessments against multiple accounts and consolidating the report into one AWS account, however, you must explicitly enable integration with AWS Organizations first, if you would like to use that feature.

Screen displaying all the AWS accounts available for you to select that you want to include in your assessment.

Select the AWS accounts that you want to include in your assessment.

I select my own account as listed and choose “Next”

Step 3 – Specify audit owners
Now we just need to select IAM users who should have full permissions to use and manage this assessment. It’s as simple as it sounds. Pick from a list of identity and access management (IAM) users or roles available or search using the box. It’s recommended that you use the AWSAuditManagerAdministratorAccess policy.

You must select at least one, even if it’s yourself which is what I do here.

Interface for searching and selecting IAM users or roles.

Select IAM users or roles who will have full permissions over this assessment and act as owners.

Step 4 – Review and create
All that is left to do now is review your choices and click on “Create assessment” to complete the process.

Once the assessment is created, Audit Manager starts collecting evidence in the selected AWS accounts and you start generating reports as well as surfacing any non-compliant resources in the summary screen. Keep in mind that it may take up to 24 hours for the first evaluation to show up.

The summary screen for the assessment showing details such as how many controls are available, the status of each control displaying whether they "under review" or their compliance status plus tabs where you can revisit the assessment configuration.

You can visit the assessment details screen at any time to inspect the status for any of the controls.

Conclusion
The “AWS generative AI best practices framework v2” is available today in the AWS Audit Manager framework library in all AWS Regions where Amazon Bedrock and Amazon SageMaker are available.

You can check whether Audit Manager is available in your preferred Region by visiting AWS Services by Region.

If you want to dive deeper, check out a step-by-step guide on how to get started.

Simplify AWS CloudTrail log analysis with natural language query generation in CloudTrail Lake (preview)

Post Syndicated from Esra Kayabali original https://aws.amazon.com/blogs/aws/simplify-aws-cloudtrail-log-analysis-with-natural-language-query-generation-in-cloudtrail-lake-preview/

Today, I am happy to announce in preview the generative artificial intelligence (generative AI)–powered natural language query generation in AWS CloudTrail Lake, which is a managed data lake for capturing, storing, accessing, and analyzing AWS CloudTrail activity logs to meet compliance, security, and operational needs. You can ask a question using natural language about these activity logs (management and data events) stored in CloudTrail Lake without having the technical expertise to write a SQL query or spend time to decode the exact structure of activity events. For example, you might ask, “Tell me how many database instances are deleted without a snapshot”, and the feature will convert that question to a CloudTrail Lake query, which you can run as-is or modify to get the requested event information. Natural language query generation makes the process of exploration of AWS activity logs simpler.

Now, let me show you how to start using natural language query generation.

Getting started with natural language query generation
The natural language query generator uses generative AI to produce a ready-to-use SQL query from your prompt, which you can then choose to run in the query editor of CloudTrail Lake.

In the AWS CloudTrail console, I choose Query under Lake. The query generator can only generate queries for event data stores that collect CloudTrail management and data events. I choose an event data store for my CloudTrail Lake query from the dropdown list in Event data store. In the Query generator, I enter the following prompt in the Prompt field using natural language:

How many errors were logged during the past month?

Then, I choose Generate query. The following SQL query is automatically generated:

SELECT COUNT(*) AS error_count
FROM 8a6***
WHERE eventtime >= '2024-04-21 00:00:00'
    AND eventtime <= '2024-05-21 23:59:59'
    AND (
        errorcode IS NOT NULL
        OR errormessage IS NOT NULL
    )

I choose Run to see the results.

This is interesting, but I want to know more details. I want to see which services had the most errors and why these actions were erroring out. So I enter the following prompt to request additional details:

How many errors were logged during the past month for each service and what was the cause of each error?

I choose Generate query, and the following SQL query is generated:

SELECT eventsource,
    errorcode,
    errormessage,
    COUNT(*) AS errorCount
FROM 8a6***
WHERE eventtime >= '2024-04-21 00:00:00'
    AND eventtime <= '2024-05-21 23:59:59'
    AND (
        errorcode IS NOT NULL
        OR errormessage IS NOT NULL
    )
GROUP BY 1,
    2,
    3
ORDER BY 4 DESC;

I choose Run to see the results.

In the results, I see that my account experiences most number of errors related to Amazon S3, and top errors are related to CORS and object level configuration. I can continue to dig deeper to see more details by asking further questions. But now let me give natural language query generator another instruction. I enter the following prompt in the Prompt field:

What are the top 10 AWS services that I used in the past month? Include event name as well.

I choose Generate query, and the following SQL query is generated. This SQL statement retrieves the field names (eventSource,
eventName, COUNT(*) AS event_count), restricts the rows with the date interval of the past month in the WHERE clause, groups the rows by eventSource and eventName, sorts them by the usage count, and limit the result to 10 rows as I requested in a natural language.

SELECT eventSource,
    eventName,
    COUNT(*) AS event_count
FROM 8a6***
WHERE eventTime >= timestamp '2024-04-21 00:00:00'
    AND eventTime <= timestamp '2024-05-21 23:59:59'
GROUP BY 1,
    2
ORDER BY 3 DESC
LIMIT 10;

Again, I choose Run to see the results.

I now have a better understanding of how many errors were logged during the past month, what service the error was for, and what caused the error. You can try asking questions in plain language and run the generated queries over your logs to see how this feature works with your data.

Join the preview
Natural language query generation is available in preview in the US East (N. Virginia) Region as part of CloudTrail Lake.

You can use natural language query generation in preview for no additional cost. CloudTrail Lake query charges apply when running the query to generate results. For more information, visit AWS CloudTrail Pricing.

To learn more and get started using natural language query generation, visit AWS CloudTrail Lake User Guide.

— Esra

Introducing Amazon GuardDuty Malware Protection for Amazon S3

Post Syndicated from Channy Yun original https://aws.amazon.com/blogs/aws/introducing-amazon-guardduty-malware-protection-for-amazon-s3/

Today we are announcing the general availability of Amazon GuardDuty Malware Protection for Amazon Simple Storage Service (Amazon S3), an expansion of GuardDuty Malware Protection to detect malicious file uploads to selected S3 buckets. Previously, GuardDuty Malware Protection provided agentless scanning capabilities to identify malicious files on Amazon Elastic Block Store (Amazon EBS) volumes attached to Amazon Elastic Compute Cloud (Amazon EC2) and container workloads.

Now, you can continuously evaluate new objects uploaded to S3 buckets for malware and take action to isolate or eliminate any malware found. Amazon GuardDuty Malware Protection uses multiple Amazon Web Services (AWS) developed and industry-leading third-party malware scanning engines to provide malware detection without degrading the scale, latency, and resiliency profile of Amazon S3.

With GuardDuty Malware Protection for Amazon S3, you can use built-in malware and antivirus protection on your designated S3 buckets to help you remove the operational complexity and cost overhead associated with automating malicious file evaluation at scale. Unlike many existing tools used for malware analysis, this managed solution from GuardDuty does not require you to manage your own isolated data pipelines or compute infrastructure in each AWS account and AWS Region where you want to perform malware analysis.

Your development and security teams can work together to configure and oversee malware protection throughout your organization for select buckets where new uploaded data from untrusted entities is required to be scanned for malware. You can configure post-scan action in GuardDuty, such as object tagging, to inform downstream processing, or consume the scan status information provided through Amazon EventBridge to implement isolation of malicious uploaded objects.

Getting started with GuardDuty Malware Protection for your S3 bucket
To get started, in the GuardDuty console, select Malware Protection for S3 and choose Enable.

Enter the S3 bucket name or choose Browse S3 to select an S3 bucket name from a list of buckets that belong to the currently selected Region. You can select All the objects in the S3 bucket when you want GuardDuty to scan all the newly uploaded objects in the selected bucket. Or you can also select Objects beginning with a specific prefix when you want to scan the newly uploaded objects that belong to a specific prefix.

After scanning a newly uploaded S3 object, GuardDuty can add a predefined tag with the key as GuardDutyMalwareScanStatus and the value as the scan status:

  • NO_THREATS_FOUND – No threat found in the scanned object.
  • THREATS_FOUND – Potential threat detected during scan.
  • UNSUPPORTED – GuardDuty cannot scan this object because of size.
  • ACCESS_DENIED – GuardDuty cannot access object. Check permissions.
  • FAILED – GuardDuty could not scan the object.

When you want GuardDuty to add tags to your scanned S3 objects, select Tag objects. If you use tags, you can create policies to prevent objects from being accessed before the malware scan completes and prevent your application from accessing malicious objects.

Now, you must first create and attach an AWS Identity and Access Management (IAM) role that includes the required permissions:

  • EventBridge actions to create and manage the EventBridge managed rule so that Malware Protection for S3 can listen to your S3 Event Notifications.
  • Amazon S3 and EventBridge actions to send S3 Event Notifications to EventBridge for all events in this bucket.
  • Amazon S3 actions to access the uploaded S3 object and add a predefined tag to the scanned S3 object.
  • AWS Key Management Service (AWS KMS) key actions to access the object before scanning and putting a test object on buckets with the supported DSSE-KMS and SSE-KMS

To add these permissions, choose View permissions and copy the policy template and trust relationship template. These templates include placeholder values that you should replace with the appropriate values associated with your bucket and AWS account. You should also replace the placeholder value for the AWS KMS key ID.

Now, choose Attach permissions, which opens the IAM console in a new tab. You can choose to create a new IAM role or update an existing IAM role with the permissions from the copied templates. If you want to create or update your IAM role in advance, visit Prerequisite – Create or update IAM PassRole policy in the AWS documentation.

Finally, go back to the GuardDuty browser tab that has the IAM console open, choose your created or updated IAM role, and choose Enable.

Now, you will see Active in the protection Status column for this protected bucket.

Choose View all S3 malware findings to see the generated GuardDuty findings associated with your scanned S3 bucket. If you see the finding type S3Object:S3/MaliciousFile, GuardDuty has detected the listed S3 object as malicious. Choose the Threats detected section in the Findings details panel and follow the recommended remediation steps. To learn more, visit Remediating a potentially malicious S3 object in the AWS documentation.

Things to know
You can set up GuardDuty Malware Protection for your S3 buckets even without GuardDuty enabled for your AWS account. However, if you enable GuardDuty in your account, you can use the full monitoring of foundational sources, such as AWS CloudTrail management events, Amazon Virtual Private Cloud (Amazon VPC) Flow Logs, and DNS query logs, as well as malware protection features. You can also have security findings sent to AWS Security Hub and Amazon Detective for further investigation.

GuardDuty can scan files belonging to the following synchronous Amazon S3 storage classes: S3 Standard, S3 Intelligent-Tiering, S3 Standard-IA, S3 One Zone-IA, and Amazon S3 Glacier Instant Retrieval. It will scan the file formats known to be used to spread or contain malware. At the launch, the feature supports file sizes up to 5 GB, including archive files with up to five levels and 1,000 files per level after it is decompressed.

As I said, GuardDuty will send scan metrics to your EventBridge for each protected S3 bucket. You can set up alarms and define post-scan actions, such as tagging the object or moving the malicious object to a quarantine bucket. To learn more about other monitoring options, such as Amazon CloudWatch metrics and S3 object tagging, visit Monitoring S3 object scan status in the AWS documentation.

Now available
Amazon GuardDuty Malware Protection for Amazon S3 is generally available today in all AWS Regions where GuardDuty is available, excluding China Regions and GovCloud (US) Regions.

The pricing is based on the GB volume of the objects scanned and number of objects evaluated per month. This feature comes with a limited AWS Free Tier, which includes 1,000 requests and 1 GB each month, pursuant to conditions for the first 12 months of account creation for new AWS accounts, or until June 11, 2025, for existing AWS accounts. To learn more, visit the Amazon GuardDuty pricing page.

Give GuardDuty Malware Protection for Amazon S3 a try in the GuardDuty console. For more information, visit the Amazon GuardDuty User Guide and send feedback to AWS re:Post for Amazon GuardDuty or through your usual AWS support contacts.

Channy

IAM Access Analyzer Update: Extending custom policy checks & guided revocation

Post Syndicated from Jeff Barr original https://aws.amazon.com/blogs/aws/iam-access-analyzer-update-extending-custom-policy-checks-guided-revocation/

We are making IAM Access Analyzer even more powerful, extending custom policy checks and adding easy access to guidance that will help you to fine-tune your IAM policies. Both of these new features build on the Custom Policy Checks and the Unused Access analysis that were launched at re:Invent 2023. Here’s what we are launching:

New Custom Policy Checks – Using the power of automated reasoning, the new checks help you to detect policies that grant access to specific, critical AWS resources, or that grant any type of public access. Both of the checks are designed to be used ahead of deployment, possibly as part of your CI/CD pipeline, and will help you proactively detect updates that do not conform to your organization’s security practices and policies.

Guided Revocation – IAM Access Analyzer now gives you guidance that you can share with your developers so that they can revoke permissions that grant access that is not actually needed. This includes unused roles, roles with unused permissions, unused access keys for IAM users, and unused passwords for IAM users. The guidance includes the steps needed to either remove the extra items or to replace them with more restrictive ones.

New Custom Policy Checks
The new policy checks can be invoked from the command line or by calling an API function. The checks examine a policy document that is supplied as part of the request and return a PASS or FAIL value. In both cases, PASS indicates that the policy document properly disallows the given access, and FAIL indicates that the policy might allow some or all of the permissions. Here are the new checks:

Check No Public Access – This check operates on a resource policy, and checks to see if the policy grants public access to a specified resource type. For example, you can check a policy to see if it allows public access to an S3 bucket by specifying the AWS::S3::Bucket resource type. Valid resource types include DynamoDB tables and streams, EFS file systems, OpenSearch domains, Kinesis streams and stream consumers, KMS keys, Lambda functions, S3 buckets and access points, S3 Express directory buckets, S3 Outposts buckets and access points, Glacier, Secrets Manager secrets, SNS topics and queues, and IAM policy documents that assume roles. The list of valid resource types will expand over time and can be found in the CheckNoPublicAccess documentation,

Let’s say that I have a policy which accidentally grants public access to an Amazon Simple Queue Service (Amazon SQS) queue. Here’s how I check it:

$ aws accessanalyzer check-no-public-access --policy-document file://resource.json \
  --resource-type AWS::SQS::Queue --output json

And here is the result:

{
    "result": "FAIL",
    "message": "The resource policy grants public access for the given resource type.",
    "reasons": [
        {
            "description": "Public access granted in the following statement with sid: SqsResourcePolicy.",
            "statementIndex": 0,
            "statementId": "SqsResourcePolicy"
        }
    ]
}

I edit the policy to remove the access grant and try again, and this time the check passes:

{
    "result": "PASS",
    "message": "The resource policy does not grant public access for the given resource type."
}

Check Access Not Granted – This check operates on a single resource policy or identity policy at a time. It also accepts an list of actions and resources, both in the form that are acceptable as part of an IAM policy. The check sees if the policy grants unintended access to any of the resources in the list by way of the listed actions. For example, this check could be used to make sure that a policy does not allow a critical CloudTrail trail to be deleted:

$ aws accessanalyzer check-access-not-granted --policy-document file://ct.json \
  --access resources="arn:aws:cloudtrail:us-east-1:123456789012:trail/MySensitiveTrail" \
  --policy-type IDENTITY_POLICY --output json

IAM Access Analyzer indicates that the check fails:

{
    "result": "FAIL",
    "message": "The policy document grants access to perform one or more of the listed actions or resources.",
    "reasons": [
        {
            "description": "One or more of the listed actions or resources in the statement with index: 0.",
            "statementIndex": 0
        }
    ]
}

I fix the policy and try again, and this time the check passes, indicating that the policy does not grant access to the listed resources:

{
    "result": "PASS",
    "message": "The policy document does not grant access to perform the listed actions or resources."
}

Guided Revocation
In my earlier post I showed you how IAM Access Analyzer discovers and lists IAM items that grant access which is not actually needed. With today’s launch, you now get guidance to help you (or your developer team) to resolve these findings. Here are the latest findings from my AWS account:

Some of these are leftovers from times when I was given early access to a service so that I could use and then blog about it; others are due to my general ineptness as a cloud admin! Either way, I need to clean these up. Let’s start with the second one, Unused access key. I click on the item and can see the new Recommendations section at the bottom:

I can follow the steps and delete the access key or I can click Archive to remove the finding from the list of active findings and add it to the list of archived ones. I can also create an archive rule that will do the same for similar findings in the future. Similar recommendations are provided for unused IAM users, IAM roles, and passwords.

Now let’s take a look at a finding of Unused permissions:

The recommendation is to replace the existing policy with a new one. I can preview the new policy side-by-side with the existing one:

As in the first example I can follow the steps or I can archive the finding.

The findings and the recommendations are also available from the command line. I generate the recommendation by specifying an analyzer and a finding from it:

$ aws accessanalyzer generate-finding-recommendation \
  --analyzer-arn arn:aws:access-analyzer-beta:us-west-2:123456789012:analyzer/MyAnalyzer \
  --id 67110f3e-05a1-4562-b6c2-4b009e67c38e

Then I retrieve the recommendation. In this example, I am filtering the output to only show the steps since the entire JSON output is fairly rich:

$ aws accessanalyzer get-finding-recommendation \
  --analyzer-arn arn:aws:access-analyzer-beta:us-west-2:123456789012:analyzer/MyAnalyzer \
  --id 67110f3e-05a1-4562-b6c2-4b009e67c38e --output json | \
  jq .recommendedSteps[].unusedPermissionsRecommendedStep.recommendedAction
"CREATE_POLICY"
"DETACH_POLICY"

You can use these commands (or the equivalent API calls) to integrate the recommendations into your own tools and systems.

Available Now
The new checks and the resolution steps are available now and you can start using them today in all public AWS regions!

Jeff;

AWS adds passkey multi-factor authentication (MFA) for root and IAM users

Post Syndicated from Sébastien Stormacq original https://aws.amazon.com/blogs/aws/aws-adds-passkey-multi-factor-authentication-mfa-for-root-and-iam-users/

Security is our top priority at Amazon Web Services (AWS), and today, we’re launching two capabilities to help you strengthen the security posture of your AWS accounts:

MFA is one of the simplest and most effective ways to enhance account security, offering an additional layer of protection to help prevent unauthorized individuals from gaining access to systems or data.

MFA with passkey for your root and IAM users
Passkey is a general term used for the credentials created for FIDO2 authentication.

A passkey is a pair of cryptographic keys generated on your client device when you register for a service or a website. The key pair is bound to the web service domain and unique for each one.

The public part of the key is sent to the service and stored on their end. The private part of the key is either stored in a secured device, such as a security key, or securely shared across your devices connected to your user account when you use cloud services, such as iCloud Keychain, Google accounts, or a password manager such as 1Password.

Typically, the access to the private part of the key is protected by a PIN code or a biometric authentication, such as Apple Face ID or Touch ID or Microsoft Hello, depending on your devices.

When I try to authenticate on a service protected with passkeys, the service sends a challenge to my browser. The browser then requests my device sign the challenge with my private key. This triggers a PIN or biometric authentication to access the secured storage where the private key is stored. The browser returns the signature to the service. When the signature is valid, it confirms I own the private key that matches the public key stored on the service, and the authentication succeeds.

You can read more about this process and the various standards at work (FIDO2, CTAP, WebAuthn) in the post I wrote when AWS launched support for passkeys in AWS IAM Identity Center back in November 2020.

Passkeys can be used to replace passwords. However, for this initial release, we choose to use passkeys as a second factor authentication, in addition to your password. The password is something you know, and the passkey is something you have.

Passkeys are more resistant to phishing attacks than passwords. First, it’s much harder to gain access to a private key protected by your fingerprint, face, or a PIN code. Second, passkeys are bound to a specific web domain, reducing the scope in case of unintentional disclosure.

As an end user, you will benefit from the convenience of use and easy recoverability. You can use the built-in authenticators in your phones and laptops to unlock a cryptographically secured credential to your AWS sign-in experience. And when using a cloud service to store the passkey (such as iCloud keychain, Google accounts, or 1Password), the passkey can be accessed from any of your devices connected to your passkey provider account. This helps you to recover your passkey in the unfortunate case of losing a device.

How to enable passkey MFA for an IAM user
To enable passkey MFA, I navigate to the AWS Identity and Access Management (IAM) section of the console. I select a user, and I scroll down the page to the Multi-factor authentication (MFA) section. Then, I select Assign MFA device.

Note that to help you increase resilience and account recovery, you can have multiple MFA devices enabled for a user.

Enable MFA in AM console

On the next page, I enter an MFA device name, and I select Passkey or security key. Then, I select next.

enable MFA : select passkey

When using a password manager application that supports passkeys, it will pop up and ask if you want to generate and store a passkey using that application. Otherwise, your browser will present you with a couple of options. The exact layout of the screen depends on the operating system (macOS or Windows) and the browser you use. Here is the screen I see on macOS with a Chromium-based browser.

Enable passkey : choose method

The rest of the experience depends on your selection. iCloud Keychain will prompt you for a Touch ID to generate and store the passkey.

In the context of this demo, I want to show you how to bootstrap the passkey on another device, such as a phone. I therefore select Use a phone, tablet, or security key instead. The browser presents me with a QR code. Then, I use my phone to scan the QR code. The phone authenticates me with Face ID and generates and stores the passkey.

Passkey : scan a QR code

This QR code-based flow allows a passkey from one device to be used to sign in on another device (a phone and my laptop in my demo). It is defined by the FIDO specification and known as cross device authentication (CDA).

When everything goes well, the passkey is now registered with the IAM user.

Enable passkey : success

Note that we don’t recommend using IAM users to authenticate human beings to the AWS console. We recommend configuring single sign-on (SSO) with AWS IAM Identity Center instead.

What’s the sign-in experience?
Once MFA is enabled and configured with a passkey, I try to sign in to my account.

The user experience differs based on the operating system, browser, and device you use.

For example, on macOS with iCloud Keychain enabled, the system prompts me for a touch on the Touch ID key. For this demo, I registered the passkey on my phone using CDA. Therefore, the system asks me to scan a QR code with my phone. Once scanned, the phone authenticates me with Face ID to unlock the passkey, and the AWS console terminates the sign-in procedure.

Authenticate with MFA and passkey

Enforcing MFA for root users
The second announcement today is that we have started to enforce the use of MFA for the root user on some AWS accounts. This change was announced last year in a blog post from Stephen Schmidt, Chief Security Officer at Amazon.

To quote Stephen:

Verifying that the most privileged users in AWS are protected with MFA is just the latest step in our commitment to continuously enhance the security posture of AWS customers.

We started with your most sensitive account: your management account for AWS Organizations. The deployment of the policy is progressive, with just a few thousand accounts at a time. Over the coming months, we will progressively deploy the MFA enforcement policy on root users for the majority of the AWS accounts.

When you don’t have MFA enabled on your root user account, and your account is updated, a new message will pop up when you sign in, asking you to enable MFA. You will have a grace period, after which the MFA becomes mandatory.

Enable MFA on root account

You can start to use passkeys for multi-factor authentication today in all AWS Regions, except in China.

We’re enforcing the use of multi-factor authentication in all AWS Regions, except for the two regions in China (Beijing, Ningxia) and for AWS GovCloud (US), because the AWS accounts in these Regions have no root user.

Now go activate passkey MFA for your root user in your accounts.

— seb

Как (не) се печелят демократични избиратели

Post Syndicated from Светла Енчева original https://www.toest.bg/kak-ne-se-pechelyat-demokratichni-izbirateli/

Как (не) се печелят демократични избиратели

Ако резултатите от тези избори не ни харесат, ще има и други, мислят си и избирателите, и политиците в България. Те се отнасят едни към други като към консуматив, който можеш да изхвърлиш след употреба. Докато избирателите обаче имат възможността да си намерят нова партия, от която после да се разочароват, партиите разполагат с една-единствена електорална база – няма как да си създадат други граждани, имащи право на глас. Но не изглежда да го осъзнават.

Колко представителни са резултатите от изборите

До избирателните урни са отишли малко под 1/3 от гласоподавателите. Това означава, че резултатите спрямо всички избиратели са поне три пъти по-ниски от съобщаваните. Защото делът на гласовете за една или друга политическа сила се изчислява спрямо гласувалите, а не по отношение на всички, които имат активно избирателно право.

За да видим в каква степен изборните резултати представят всички български граждани, нека направим едно на пръв поглед странно упражнение – да съотнесем получените гласове не към гласувалите, а към имащите право на глас.

Ако има безспорен победител на тези избори, това е ГЕРБ. „Категоричната“ победа на партията на Бойко Борисов обаче се изразява в няма и 8% от гласовете на всички имащи право на глас. ДПС взема 5% и нещо на националните избори, ПП–ДБ и „Възраждане“ едва минават 4-процентовата бариера. БСП и ИТН вземат около 2%. „Изненадващо“ класиралата се за българския парламент партия „Величие“ – около 1,5%.

Около 17% са достатъчни за формирането на парламентарно мнозинство от 50% плюс един глас, било то явно или на принципа на „патериците“. Такова мнозинство има нелоши шансове да излезе стабилно, защото депутатите от ПП–ДБ, които клатеха лодката, пардон, сглобката, с опитите си да правят дълбоки реформи, по всяка вероятност ще са в опозиция. И току-виж станало така, че с гласовете на 17% се управляват останалите 83% от българските граждани в следващите четири години.

Кой има и кой няма сметка от ниската избирателна активност

Ниската избирателна активност е от полза най-вече за ГЕРБ. Бойко Борисов може да се тупа в гърдите каква победа е постигнала партията му, като пренебрегва факта, че гласовете за нея продължават прогресивно да намаляват.

Щастливи са, разбира се, и в ДПС. И разчитането на твърдия електорат, и контролираният вот водят до толкова по-високи резултати, колкото по-малко хора са гласували. Нямат основание да се оплакват и от „Възраждане“, както и от другите популистки партии, прескочили 4-процентовата бариера – ИТН (иронично, защото задължителното гласуване, което на практика не работи, беше въведено тъкмо след референдума на Слави Трифонов) и особено „Величие“.

За партиите, които не се класират за националния парламент, но получават над 1% от гласовете, има утешителна награда – партийни субсидии. С такива ще разполага само ПП МЕЧ. На ВМРО не ѝ достига съвсем малко, тъй като резултатът ѝ е 0,99%. Без субсидия остават също „Център“ на Васил Божков, „Синя България“ и „Солидарна България“, защото са коалиции и за тях минималният праг е 4% от действителните гласове.

Потърпевши от ниската избирателна активност са най-вече ПП–ДБ и бившият им партньор Зелено движение, който взема по-малко от 0,5% и на двата вида избори – за национален и за европейски парламент. Също и някои по-малки партии с политически амбиции, както и БСП, която не може да мобилизира левите избиратели.

Демократични ценности срещу антидемократични резултати

Най-потърпевши всъщност са партиите, изповядващи демократични ценности, защото разполагат с огромен електорален ресурс, който не успяват да привлекат.

Одобрението за демокрацията като форма на държавно управление в последните години нараства, сочат резултатите от изследване на „Отворено общество“. Докато през 2018 г. 44% от пълнолетните български граждани одобряват демокрацията, а 34% – не, през 2023 г. подкрепата за нея вече е 63%, а неодобрението – едва 19%.

Според изследване на „Алфа Рисърч“ от март 2024 г. пък 60% от избирателите искат България да е в ЕС, а възможността да защитават правата си в Европейския съд по правата на човека в Страсбург и да работят в друга страна членка се оценява положително от над 80%. В същото време българите са критични към редица европейски политики, както впрочем и европейските им събратя.

Разбира се, този демократичен мед не е без някоя и друга капка катран. От изследването на „Отворено общество“ научаваме, че близо половината пълнолетни български граждани биха искали да има не парламент и избори, а силен водач. Също толкова са съгласни да се ограничат за кратко време някои от демократичните права и свободи, за да има ред и сигурност (но този възглед би могъл отчасти да е последствие от пандемията и ограничителните мерки, свързани с нея). И цели 65% смятат, че е по-добре решенията да се вземат от експерти, а не от правителство, дошло на власт след демократични избори.

Накратко, като че на мнозинството от българските граждани им харесва да има демокрация, но много от тях не виждат собственото си участие в нея, а им се ще решенията да се вземат от някой друг – било експерти, било силен лидер. Парадоксът е, че тъкмо участието на хората прави възможна демокрацията. А отказът от участие я подкопава.

Как демократичните партии (не) привличат избиратели

От една страна, имаме избиратели, които поне декларират, че са демократично и проевропейски настроени. От друга страна, имаме демократични и проевропейски партии, за които демократичните и проевропейските избиратели не гласуват. По-конкретно, от 60-ина процента гласуват по-малко от 20%, и то при условие, че броим и избирателите на ГЕРБ и ДПС – партии, които се водят евроатлантически.

Следователно има едни около 40% от гласоподавателите, които се идентифицират като демократични, но не припознават демократичните партии като представляващи техните интереси. Тези 40% са повече от всички гласували на последните избори, взети заедно.

Как подходиха към тези избиратели големите губещи на изборите – ПП–ДБ? С една дума – неадекватно. С малко повече думи – в огромната си част посланията на коалицията бяха насочени най-вече към твърдия ѝ електорат, който обаче все повече се топи. 

Само в „балона“ на ПП–ДБ се намираха хора, които да се радват на „скандалните“ билбордове – с карикатурата с прасето и тиквата и със снимките на Денков, Борисов и Пеевски. Но дори и в този „балон“ настана чуденето: защо коалицията отправя послания, сякаш никога не е управлявала с Борисов и Пеевски? Защо по-скоро не акцентира върху пропутинския завой, който без това компромисно управление можеше да стане необратим?

По традиция от ДБ говорят за необходимостта от правосъдна реформа с думи, които са не особено разбираеми, но затова пък скучни за по-голямата част от населението. Дигитализацията е значима тема за много тънък слой избиратели.

От ПП имаха и послания, смислени за повече хора. Особено Асен Василев все повтаряше колко са се повишили доходите и пенсиите по време на кратките управления с участието на коалицията. Въпреки че доходите са важна тема за населението на България, която е свикнала да е най-бедната страна в ЕС (напоследък Унгария е тръгнала да я изпреварва), припомняните от Василев факти така и не се превърнаха в чуваеми послания.

За сметка на това избирателят беше занимаван с всекидневието на Кирил Петков в потомственото му жилище в центъра на София. Нещо, което е в състояние да отблъсне повечето потенциални гласоподаватели на ПП–ДБ, а и някои от актуалните (които, обяснимо, не живеят в потомствени жилища в столичния център).

За комуникационния гений, дал идеята за това видео с Петков, би било полезно да се пресели за някой и друг месец в някое градче, в което работните места и институциите зависят от неколцина местни дерибеи, а най-важна за личното и професионалното оцеляване е лоялността към силните. И като се премести, нека е така добър да обсъди идеите си за политическа реклама с хората от града.

Още по-нелепо е видеото с патриотарските дитирамби, изрецитирани от Петков. Ако комуникационния гений на кампанията е решил по този начин да събере малко националпопулистки вот, не му се е получило. Има си автентични представители на жанра, връх в който беше Слави Трифонов, преди предвожданата от него партия ИТН да се сведе до патерица на ГЕРБ. Очевидно и предводителите на „Величие“ се справят добре на това поле.

Пътят към негласуващите

По нищо не личи специалистите, които правят комуникационните кампании на демократичните партии, да се интересуват що за хора са избирателите, в частност – потенциалните избиратели на съответните партии, които обаче не гласуват за тях. За самите демократични политици изглежда по-важно да не засягат определени теми, които се смятат за спорни, отколкото да разберат що за хора са си поставили за цел да представляват.

Да се изследват негласуващите не е нещо невъзможно. Не е и евтино, но е платимо, особено с оглед на залога – политическото бъдеще (и на демократичните партии, и на страната). Вече има отделни изследвания, върху които може да се стъпи.

Различни социологически агенции засягат темата за негласуващите в свои изследвания. Екип под ръководството на психолога Пламен Димитров е съставил психологически профили на икономически активните негласуващи в течение на пет електорални кампании. В края на май т.г. тема на броя на „Капитал“ бяха негласуващите. От екипа на вестника са разговаряли със социолози, а също така са взели кратки интервюта от млади гласоподаватели.

Какво може да направи една партия или коалиция, която иска да опознае по-добре потенциалните си негласуващи избиратели?

  • На първо място – скринингово изследване, за да отдели избиратели, които споделят нейните базисни ценности, но не гласуват.
  • Второ – от тях да подбере участници в групови дискусии (фокус групи) в различни населени места в страната. В дискусиите да се обсъжда например как живеят участниците, какви са основните им проблеми, кое ги спира да гласуват, за каква политика биха дали гласа си.
  • Трето – груповите дискусии да се анализират, да се извадят както общите проблемни области, така и типичните за различните региони и гласоподаватели.
  • Четвърто – да се съставят по-малко групи, но с по-разнообразен профил, с които да се обсъждат евентуални предизборни послания.

Нищо от горното обаче не би имало смисъл, ако демократичните партии не се понаучат да общуват с избирателите си с уважение. Ако не се опитват да ги включват пълноценно в политическия живот, да създават общности около себе си, да вдъхновяват, да делегират отговорности и да поемат отговорност за неуспехите си, да се извиняват, да благодарят.

Най-малкото – да се покажат след изборите, а не да се крият. Така, както се показаха политиците от страните в ЕС, където също имаше избори.

Каква е алтернативата

Отказът от живо политическо общуване, каквото имаше в България след 1989 г., започна да става норма с управлението на Симеон Сакскобургготски, припомня главната редакторка на „Свободна Европа“ Татяна Ваксберг. Лидерът на ГЕРБ нормализира отказа от участието в политически дебати и интервюта. С течение на времето на практика изчезнаха и следизборните пресконференции. Хората свикнаха Борисов да се включва с видео където и когато той си реши. И монологичните включвания станаха популярни. Това издигна и Слави Трифонов на гребена на вълната преди няколко години, а днес – и „Величие“.

Всичко това е добре за ГЕРБ, доколкото партията все успява да се върне на власт, дори да губи гласоподаватели. Добре е и за ДПС. И за популистите, които се изживяват като велики водачи. Затова просто съобщават „истината“, а не се „принизяват“ да спорят и да отговарят на въпроси. Не е добре обаче за демократичните партии, защото автентичното политическо общуване е в сърцето на демокрацията.

Алтернативата всъщност вече я живеем. Щом сме допуснали в парламента да влезе партия като „Величие“, зад която стоят хора, подозирани не просто в съмнителни дейности, но и че си правят нещо като частна армия. Това е противоконституционно. Но е факт. Станал е възможен, защото демократичното мнозинство в България е допуснало имитационна демокрация, нереформирани служби и куца правосъдна система. А е допуснало всичко това, защото е свикнало с мисълта, че нищо не зависи от него.

Затова вече е крайно време демократичните партии да излязат от елитарното си високомерие. В противен случай не след дълго и малкото демократични избиратели, които искат да гласуват, няма да има за кого. А когато изборите загубят смисъл, вече не живеем в демокрация. А в диктатура. Дали тази диктатура ще направи завой към путинизма като Унгария, или ще имитира евроатлантизъм, е друг въпрос.

Security updates for Tuesday

Post Syndicated from corbet original https://lwn.net/Articles/977939/

Security updates have been issued by AlmaLinux (ruby:3.3), Fedora (efifs, libvirt, podman-tui, prometheus-podman-exporter, and strongswan), Red Hat (firefox, idm:DL1, ipa, nghttp2, and thunderbird), SUSE (aws-nitro-enclaves-cli, cdi-apiserver-container, cdi-cloner-container, cdi- controller-container, cdi-importer-container, cdi-operator-container, cdi- uploadproxy-container, cdi-uploadserver-container, containerized-data-importer, frr, glibc, go1.21, go1.22, gstreamer-plugins-base, kernel, kernel-firmware-nvidia-gspx-G06, nvidia-open- driver-G06-signed, libxml2, mariadb, poppler, python-Brotli, python-docker, python-idna, rmt-server, skopeo, sssd, unbound, unrar, util-linux, and webkit2gtk3), and Ubuntu (giflib, libphp-adodb, linux-gkeop, linux-gkeop-5.15, linux-kvm, linux-laptop, linux-oem-6.8, nodejs, and tiff).

LLMs Acting Deceptively

Post Syndicated from Bruce Schneier original https://www.schneier.com/blog/archives/2024/06/llms-acting-deceptively.html

New research: “Deception abilities emerged in large language models“:

Abstract: Large language models (LLMs) are currently at the forefront of intertwining AI systems with human communication and everyday life. Thus, aligning them with human values is of great importance. However, given the steady increase in reasoning abilities, future LLMs are under suspicion of becoming able to deceive human operators and utilizing this ability to bypass monitoring efforts. As a prerequisite to this, LLMs need to possess a conceptual understanding of deception strategies. This study reveals that such strategies emerged in state-of-the-art LLMs, but were nonexistent in earlier LLMs. We conduct a series of experiments showing that state-of-the-art LLMs are able to understand and induce false beliefs in other agents, that their performance in complex deception scenarios can be amplified utilizing chain-of-thought reasoning, and that eliciting Machiavellianism in LLMs can trigger misaligned deceptive behavior. GPT-4, for instance, exhibits deceptive behavior in simple test scenarios 99.16% of the time (P < 0.001). In complex second-order deception test scenarios where the aim is to mislead someone who expects to be deceived, GPT-4 resorts to deceptive behavior 71.46% of the time (P < 0.001) when augmented with chain-of-thought reasoning. In sum, revealing hitherto unknown machine behavior in LLMs, our study contributes to the nascent field of machine psychology.

Heeding the call to support Australia’s most at-risk entities

Post Syndicated from Carly Ramsey original https://blog.cloudflare.com/heeding-the-call-to-support-australias-most-at-risk-entities


When Australia unveiled its 2023-2030 Australian Cyber Security Strategy in November 2023, we enthusiastically announced Cloudflare’s support, especially for the call for the private sector to work together to protect Australia’s smaller, at-risk entities. Today, we are extremely pleased to announce that Cloudflare and the Critical Infrastructure – Information Sharing and Analysis Centre (CI-ISAC), a member-driven organization helping to defend Australia’s critical infrastructure from cyber attacks, are teaming up to protect some of Australia’s most at-risk organizations – General Practitioner (GP) clinics.

Cloudflare helps a broad range of organizations -– from multinational organizations, to entrepreneurs and small businesses, to nonprofits, humanitarian groups, and governments across the globe — to secure their employees, applications and networks. We support a multitude of organizations in Australia, including some of Australia’s largest banks and digital natives, with our world-leading security products and services.

When it comes to protecting entities at high risk of cyber attack who might not have significant resources, we at Cloudflare believe we have a lot to offer. Our mission is to help build a better Internet. A key part of that mission is democratizing cybersecurity – making a range of tools readily available for all, including small and medium enterprises (SMEs), non-profits, and individuals. We also offer our cyber protection products and services at no cost to certain at-risk organizations. One example of this is Australia’s Citizens of the Great Barrier Reef, which is a participant in Cloudflare’s Project Galileo. Through Project Galileo, they have access to our advanced cybersecurity tools and support, freeing them to focus on their mission.

CI-ISAC Australia is a not-for-profit organization with a mission to help build the collective defenses of Australia’s critical infrastructure to protect them from crippling cyberattacks. CI-ISAC facilitates sharing, aggregates sources, and analyzes cyber threat intelligence across multiple sectors, including healthcare.

Project Secure Health – protecting Australia’s General Practitioner (GP) clinics

Globally, the healthcare sector consistently reports the highest financial costs from cyber attacks. Sensitive patient data is a prime target for cybercriminals. Not surprisingly, Australia’s big and small healthcare organizations alike are facing crippling cyberattacks. GP clinics serve as the backbone of Australia’s community healthcare, but these small-but-essential entities typically face resource constraints that make it difficult for them to implement fundamental but costly cybersecurity measures, leaving Australian patient data exposed to cybercriminals.

The 2023-2030 Australia Cybersecurity Strategy is clear about the threat to smaller at-risk organizations and the vital role of the private sector in supporting these entities. We couldn’t agree more. Heeding their call to help make Australia more secure for all, we are extremely pleased to introduce Project Secure Health: Cloudflare and CI-ISAC’s combined cyber security support for Australia’s GP clinics. This program will enable Australia’s GP Clinics to counter a range of challenging cyber threats: data breaches, ransomware attacks, phishing scams, and insider threats.

CI-ISAC will provide GP clinics with membership in its organization for free and with no time limit, which will enable member GP clinics to proactively understand and respond to healthcare-specific cyber threats. Clinics will have access to CI-ISAC’s tailored threat intelligence products and services, informed by observations across Australia’s critical infrastructure sectors.

As members of CI-ISAC, GP clinics will also receive key Cloudflare services, for free and with no time limit: Cloudflare Gateway, and Cloudflare Access, our Zero Trust Network Access (ZTNA) service. Cloudflare Gateway helps protect GP clinics against Internet threats by preventing staff from accessing harmful and inappropriate Internet content, like ransomware or phishing sites. With Cloudflare Access, GP clinics can simply and effectively manage user access to sensitive patient data, thereby minimizing the risk of unauthorized users gaining access.

Cloudflare and CI-ISAC are ready to support

For GP Clinics interested in participating in Project Secure Health, please contact CI-ISAC at [email protected]. To be eligible for free CI-ISAC membership and Cloudflare ZTNA services, GP Clinics must have fewer than 50 staff members.

Securing Amazon ECS workloads on AWS Fargate with customer managed keys

Post Syndicated from Maish Saidel-Keesing original https://aws.amazon.com/blogs/compute/securing-amazon-ecs-workloads-on-aws-fargate-with-customer-managed-keys/

As Amazon CTO Werner Vogels said, “Encryption is the tool we have to make sure that nobody else has access to your data. Amazon Web Services (AWS) built encryption into nearly all of its 165 cloud services. Make use of it. Dance like nobody is watching. Encrypt like everyone is.”

Security is the top priority at AWS, underpinning everything we do. With AWS Fargate, every Amazon Elastic Container Service (Amazon ECS) task is launched on to a new single use, single tenant unit of compute. The ephemeral storage for this compute is always encrypted, and the AWS Key Management Service (AWS KMS) encryption key used for this encryption is managed by AWS Fargate.

Today, AWS is announcing that you can bring your own customer managed keys (CMKs). Once added to AWS KMS, you can use these to encrypt the underlying ephemeral storage of an Amazon ECS task on AWS Fargate. With this new capability, customers operating in heavily regulated environments can now have more control and visibility into their task’s ephemeral storage encryption.

This post dives into AWS Fargate task ephemeral storage and shows how the new customer managed key (CMK) feature can be enabled and audited.

Overview

AWS Fargate is a serverless compute engine for containerized workloads running on Amazon ECS and Amazon Elastic Kubernetes Service (Amazon EKS). Each time a new piece of work is scheduled on to AWS Fargate, as an Amazon ECS task or an Amazon EKS Pod, this workload is placed on a single use, single-tenant instance of compute.

For Amazon ECS tasks, that unit of compute has 20GiBs of ephemeral storage attached. This can be increased up to 200GiB by specifying the ephemeralStorage parameter in your task definition. This ephemeral storage is bound to the lifecycle of the Amazon ECS task, and once the Amazon ECS task has stopped, along with the underlying compute, this ephemeral storage is deleted.

If you are using AWS Fargate platform version 1.4.0 or higher, this ephemeral storage volume is encrypted by default. It is encrypted using an AWS Key Management Service (KMS) key with the AES-256 encryption algorithm. The key, and its lifecycle, is owned by the AWS Fargate service. You can learn more about Fargate-managed ephemeral storage encryption in the AWS Fargate Security Whitepaper.

With today’s launch, as an alternative to the Fargate-managed encryption, you can choose to encrypt the ephemeral storage with customer managed keys (CMKs). This helps regulation-sensitive customers meet their internal security policies and regulatory requirements.

Customers can import their own existing keys into AWS KMS or create a new CMK to encrypt the ephemeral storage. CMKs used by AWS Fargate can be managed through the normal AWS KMS lifecycle actions such as being rotated, disabled, and deleted. See the Amazon ECS documentation for more details on managing the KMS key. Additionally, all access from AWS Fargate to the KMS key can be audited in AWS CloudTrail Logs.

In January 2024, AWS announced that additional Amazon Elastic Block Store (Amazon EBS) volumes can now be attached to Amazon ECS tasks running on AWS Fargate. These EBS volumes unlock additional use cases for AWS Fargate customers, using higher capacity and high-performance volumes for use in their tasks alongside the ephemeral storage. These additional EBS volumes are managed differently to the ephemeral storage, and these volumes can already be encrypted with customer managed KMS keys (CMKs).

AWS Fargate falls under the scope of the following compliance programs regarding AWS’s side of the shared responsibility model. The compliance programs covered by AWS Fargate include:

You can download third-party audit reports using AWS Artifact. For more information, see Downloading Reports in AWS Artifact. Many of these compliance programs require customers to encrypt their data at rest within their Amazon ECS on AWS Fargate resources.

Customers also have additional internal risk management policies for key handling, where they must generate their own keys, have backups for these keys off-cloud, and manage the lifecycle of these keys. Until today, these customers could not use AWS Fargate’s default encryption solution for the workloads subject to their internal security policies.

Enabling CMK for ephemeral storage on an Amazon ECS Cluster

Following today’s launch a single KMS key can now be attached to a new or existing Amazon ECS Cluster. Once a key has been attached, all new tasks launched on to AWS Fargate use this KMS key. If you have existing tasks running in the Amazon ECS cluster, they must be redeployed to use the new encryption key. If these tasks are part of an Amazon ECS service, passing the –force-new-deployment flag to an amazon ecs update-service command forces all tasks to be redeployed with the new KMS key (while respecting the minimumHealthyPercent of the service).

To attach a KMS key to a new or existing cluster, specify the KeyId to the new managedStorageConfiguration field:

aws ecs create-cluster \
  --cluster clusterName \
  --configuration '{"managedStorageConfiguration":{"fargateEphemeralStorageKmsKeyId":"arn:aws:kms:us-west-2:012345678901:key/a1b2c3d4-5678-90ab-cdef-EXAMPLE11111"}}'

Here is an example of the output of a DescribeClusters API request to an Amazon ECS cluster with a customer managed key:

aws ecs describe-clusters --clusters ecs-fargate-self-managed-key-cluster --region us-west-2 --include CONFIGURATIONS

Result of describe-clusters query

Aside from auditing CloudTrail Logs for encryption events, you can also verify that an ECS task is using the KMS key by using the DescribeTask API on an existing task:

{
    "tasks": [
        {
            ....
            "clusterArn": "arn:aws:ecs:us-west-2:1234567890:cluster/mycluster",
            "taskArn": "arn:aws:ecs:us-west-2:1234567890:task/11223342-1111-4fde-b6ca-273c5cfc00a1]",
            "fargateEphemeralStorage": {
                "sizeInGiB": 20,
                "kmsKeyId": "arn:aws:kms:us-west-2:1234567890:key/082222a1-1111-4fde-b6ca-273c5cfc00a1"
            }
        }
    ]
}

Enforcing encryption with customer managed keys

The new AWS Identity and Access Management (IAM) condition key ensures that your Amazon ECS clusters are created with a customer managed key. This can be applied as Service Control Policy in your AWS Organization or as part of your IAM permissions.

Here is an IAM policy example snippet that ensures a cluster can only be created when a specific AWS KMS key is used:

{
  "Version": "2012-10-17",
  "Statement": [
    {
      "Effect": "Allow",
      "Action": [
        "ecs:CreateCluster"
      ],
      "Resource": "*",
      "Condition": {
        "StringEquals": {
          "ecs:fargate-ephemeral-storage-kms-key": "arn:aws:kms:us-east-1:123456789012:key/1234abcd-12ab-34cd-56ef-1234567890ab"
        }
      }
    }
  ]
}

Audit encryption events

Encryption events are logged in AWS CloudTrail. The following is an example of a CloudTrail event that includes the volume ID, cluster name, and AWS Account ID of the operation. You can find more details about the type of events that are logged in Managing AWS KMS keys for Fargate ephemeral storage.

{
    "eventVersion": "1.08",
    "userIdentity": {
        "type": "AWSService",
        "invokedBy": "ec2-frontend-api.amazonaws.com"
    },
    "eventTime": "2024-04-23T18:08:13Z",
    "eventSource": "kms.amazonaws.com",
    "eventName": "CreateGrant",
    "awsRegion": "us-west-2",
    "sourceIPAddress": "ec2-frontend-api.amazonaws.com",
    "userAgent": "ec2-frontend-api.amazonaws.com",
    "requestParameters": {
        "keyId": "arn:aws:kms:us-west-2:123456789012:key/9b52b885-3f4d-40af-9843-d6b24b735559",
        "granteePrincipal": "fargate.us-west-2.amazonaws.com",
        "operations": [
            "Decrypt"
        ],
        "constraints": {
            "encryptionContextSubset": {
                "aws:ecs:clusterAccount": "123456789012",
                "aws:ebs:id": "vol-01234567890abcdef",
                "aws:ecs:clusterName": "ecs-fargate-self-managed-key-cluster"
            }
        },
        "retiringPrincipal": "ec2.us-west-2.amazonaws.com"
    },
    "responseElements": {
        "grantId": "e3b0c44298fc1c149afbf4c8996fb92427ae41e4649b934ca495991b7852b855",
        "keyId": "arn:aws:kms:us-west-2:123456789012:key/9b52b885-3f4d-40af-9843-d6b24b735559"
    },
    "requestID": "be4d1a4e4730e0dceca51f87ee7454d5db76400d80e22bfbf3c4ca01e893b60c",
    "eventID": "bf36027c-86bd-40f2-a561-960cbe148c4c",
    "readOnly": false,
    "resources": [
        {
            "accountId": "AWS Internal",
            "type": "AWS::KMS::Key",
            "ARN": "arn:aws:kms:us-west-2:123456789012:key/9b52b885-3f4d-40af-9843-d6b24b735559"
        }
    ],
    "eventType": "AwsApiCall",
    "managementEvent": true,
    "recipientAccountId": "123456789012",
    "sharedEventID": "bf36027c-86bd-40f2-a561-960cbe148c4c",
    "eventCategory": "Management"
}

Conclusion

With the use of AWS KMS customer managed keys, you can now meet your security requirements for your data inside your Amazon ECS workloads running on AWS Fargate.

To learn more about compliance on your Amazon ECS workloads you can reference the FSI Services Spotlight: Amazon Elastic Container Service (ECS) with AWS Fargate blog post or the security overview of AWS Fargate whitepaper. To learn more about the use of customer managed keys in AWS Fargate, refer to the AWS documentation. This feature was requested by our customers on the AWS Containers roadmap.

QNAP QSW-M3224-24T 24-port 10Gbase-T Switch Shown at Computex 2024

Post Syndicated from Cliff Robinson original https://www.servethehome.com/qnap-qsw-m3224-24t-24-port-10gbase-t-switch-shown-at-computex-2024/

We saw the QNAP QSW-M3224-24T a 24-port 10Gbase-T managed switch at Computex 2024 which might be a cool 1U option when it is released

The post QNAP QSW-M3224-24T 24-port 10Gbase-T Switch Shown at Computex 2024 appeared first on ServeTheHome.

How Amazon SES Mail Manager Elevates Email Security and Efficiency

Post Syndicated from Pavlos Ioannou Katidis original https://aws.amazon.com/blogs/messaging-and-targeting/how-amazon-ses-mail-manager-elevates-email-security-and-efficiency/

In today’s digital landscape, efficient and secure email management is essential for businesses facing the complexities of cyber threats and regulatory compliance. Companies are seeking ways to safeguard against unauthorized access and apply audit rules, while maintaining operational efficiency. Amazon SES Mail Manager is designed to meet these challenges, offering a suite of features that enhance both inbound and outbound email flows.

Mail Manager provides key components such as traffic policies for detailed email filtering, authenticated ingress endpoints that ensure emails are received only from verified senders, and customizable rule sets that enable administrators to precisely manage email traffic. These tools aim to bolster security and streamline the email management process.

The blog explores Mail Manager’s capabilities by demonstrating how each component works and can be utilized in practical business scenarios. Some common use cases include security, where Mail Manager blocks harmful emails based on IP ranges, TLS versions, and authentication checks while leveraging third-party security add-ons. Another use case is email archiving, where you can use Mail Manager to set up multiple archives with customizable retention periods and encryption, ensuring compliance and easy searchability.

Familiarize with some of mail manager’s key components below before proceeding with the customer use cases.

Mail manager components definition:

  • Ingress endpoints:
    • Open ingress endpoint: a SMTP endpoint responsible for accepting connections, and process SMTP conversation key infrastructure. It’s a key component that utilizes traffic polices and rules that you can configure to determine which emails should be allowed into your organization and which ones should be rejected.
    • Authenticated ingress endpoint: Mail sent to your domain has to come from authorized senders whom you’ve shared your SMTP credentials with, such as your on-premise email servers.
  • Traffic policies: let you determine the email you want to allow or block from your ingress endpoint. A traffic policy consists of one or more policy statements where you allow or deny traffic based on a variety of protocols including recipient address, sender IP address and TLS protocol version.
  • Rules sets: A Rule set is a container for an ordered set of rules you create to perform actions on your email. Each rule consists of conditions and rules.
  • Email add-ons: A suite of 3rd party applications that are seamlessly integrated with Amazon SES mail manager. Some of them are Trend Micro Virus Scanning, Abusix Mail intelligence and Spamhaus Domain Block List.

For a deep dive into Mail Manager’s capabilities, ready this blog.

Customer background and use case

Nutrition.co is an online retail business with multiple departments, including marketing, tech, and sales, that send and receive emails. Nutrition.co is looking for a solution to monitor both outbound and inbound emails and apply various controls such as filtering, message processing, and archiving. Nutrition.co uses Outlook as an enterprise mailbox environment for its employees.

Use case 1: Nutrition.co to the world

This use case focuses on the outbound email flow, where Nutrition.co employees are sending emails outside of Nutrition.co. Some of the requirements include the archival of all outbound emails originated by the marketing department, blocking any tech emails exceeding 1mb and scanning the email content of emails originated by sales. These controls should be centrally managed and provide flexibility to edit/create/delete new ones.

Solution: Each department will direct its outbound emails to an authenticated ingress endpoint by configuring an Exchange transport rule. These endpoints ensure that only authorized senders with SMTP credentials can send emails. Each ingress endpoint generates an A record, which is added as an MX record to the DNS provider for each department’s subdomain. Additionally, each ingress endpoint is associated with a specific traffic policy and rule set. According to Nutrition.co’s requirements, all connections between the departments and the ingress endpoints must use TLS 1.3 or higher. Emails that comply with the traffic policies are processed through distinct rule sets. Emails from marketing that comply with DKIM and SPF are first archived and then sent to the recipient via the Send to Internet action. Tech emails have their recipient’s address rewritten to a test email address, while emails from the sales department undergo content scanning before being sent to the final recipients via the Send to Internet action.

SES-Mail-Manager-Outbound

Use case 2: World to Nutrition.co

This use case focuses on the inbound email flow, where third parties send emails to Nutrition.co. Nutrition.co requires inbound emails to align with SPF and DKIM and have TLS 1.3 or higher to be archived. Emails originating from warehouse.com, Nutrition.co’s fulfilment partner, are containing customer order updates. These emails should be processed by Nutrition.co and accordingly update the customers’ order status database. Furthermore, warehouse.com emails should originate from a certain IP range, have TLS 1.3 or higher and align with SPF and DKIM.

Solution: Nutrition.co will use an open ingress endpoint without authentication for all inbound external emails. This is achieved by adding an MX record generated by Mail Manager upon the creation of the ingress endpoint. This ingress endpoint will be associated with a traffic policy that evaluates TLS. If the inbound email conforms to the traffic policy, it will proceed through the rule set condition and actions. The rule set condition is to align with SPF and DKIM and the actions are to be archived and then sent to the final recipient (Nutrition.co employee) via SMTP Relay. Emails containing parcel delivery updates from warehouse.com will be directed to a separate Nutrition.co subdomain, which routes all inbound emails to an authenticated ingress endpoint. Emails from warehouse.com with TLS 1.3 or higher will meet the traffic policy requirements. If they are SPF and DKIM aligned, they will be stored in a Nutrition.co Amazon S3 bucket as part of the rule set. Using Amazon S3 notifications, an AWS Lambda function is invoked upon receiving an email. This function processes the email payload, and performs an API call to update the Nutrition.co customers’ order status database.

SES-Mail-Manager-Inbound

Archiving inbound emails

In the following section, you will use AWS CloudShell and AWS CLI commands to create a traffic policy that rejects emails with TLS versions lower than 1.3, includes an open ingress endpoint, and establishes a ruleset that archives emails that are DKIM aligned.

Prerequisites: Own a domain and have access to its DNS provider, in order to add the MX record.

Navigate to the AWS Management Console and open CloudShell, find CloudShell availability here. Follow the steps below by copying and pasting the AWS CLI commands to the CloudShell terminal. Note that creating and configuring these resources, can also be done from the AWS Console.

# 1. Creating archive

ARCHIVE=$(aws mailmanager create-archive \
  --archive-name NutritionCo \
  --retention RetentionPeriod=THREE_MONTHS \
  --region ${AWS_REGION} \
  --tags Key=Company,Value=NutritionCo | jq -r '.ArchiveId') && echo $ARCHIVE

# 2. Creating traffic policy

TRAFFIC_POLICY=$(aws mailmanager --region ${AWS_REGION} create-traffic-policy \
  --traffic-policy-name ArchiveTrafficPolicy \
  --default-action DENY \
  --policy-statements '[
    {
      "Action": "ALLOW",
      "Conditions": [
        {
          "TlsExpression": {
            "Evaluate": {
              "Attribute": "TLS_PROTOCOL"
            },
            "Operator": "MINIMUM_TLS_VERSION",
            "Value": "TLS1_3"
          }
        }
      ]
    }
  ]'| jq -r '.TrafficPolicyId') && echo $TRAFFIC_POLICY

# 3. Creating Mailmanager RuleSet for archiving

RULE_SET=$(aws mailmanager --region ${AWS_REGION} create-rule-set \
  --rule-set-name ArchiveRuleSet \
  --rules '[
    {
      "Name": "Archive",
      "Actions": [
        {
          "Archive": {
            "TargetArchive": "'"${ARCHIVE}"'"
          }
        }
      ],
      "Conditions": [
        {
          "VerdictExpression": {
            "Evaluate": {
              "Attribute": "DKIM"
            },
            "Operator": "EQUALS",
            "Values": ["PASS"]
          }
        }
      ]
    }
  ]'| jq -r '.RuleSetId') && echo $RULE_SET

# 4. Create ingress endpoint

aws mailmanager --region ${AWS_REGION} create-ingress-point \
--ingress-point-name Archiving \
--type OPEN \
--traffic-policy-id ${TRAFFIC_POLICY} \
--rule-set-id ${RULE_SET}

To view the resources created above, navigate to the Amazon SES console > Mail Manager and view Traffic policies and Rule sets. Below, you can see the rule in edit mode.

Mail-Manager-RulesetNavigate to Amazon SES > Mail Manager > Ingress endpoint, select the ingress endpoint named Archiving and copy the ARecord, which looks like this <unique-id>.fips.wmjb.mail-manager-smtp.amazonaws.com – see screenshot below. Add this value to your MX record.

Mail-Manager-IngressEndpoint

To test if the MX record has been added successfully, open your local terminal and execute the command below:
nslookup -type=MX <your-domain.com>
The response should return the MX preference and mail exchanger containing the A record value.

Testing

To test if the inbound emails are archived successfully, send an email to an address within the domain for which you have added the MX record. Wait for 3-5 minutes to allow for email processing. Then, navigate to the AWS Management Console, go to Amazon SES, and select Mail Manager. Under Email Archiving, select NutritionCo under Archive and click on Search. This should return all the emails you have sent.

MailManager-Archive

Conclusion & Next steps

In this blog, we delved into the essential features of Amazon SES Mail Manager and its application in managing both inbound and outbound email flows. We explored key components such as traffic policies, authenticated ingress endpoints, and customizable rule sets that enhance security and operational efficiency. Through practical use cases, this blog demonstrates how these features can be implemented to meet the specific needs of a business like Nutrition.co. By leveraging Amazon SES Mail Manager, businesses can significantly enhance their email security and management processes, safeguarding against cyber threats while ensuring compliance and efficiency.

Continue exploring Mail Manager’s features such as SMTP relays and Email add-ons.

About the Authors

Pavlos Ioannou Katidis

Pavlos Ioannou Katidis

Pavlos Ioannou Katidis is an Amazon Pinpoint and Amazon Simple Email Service Senior Specialist Solutions Architect at AWS. He enjoys diving deep into customers’ technical issues and help in designing communication solutions. In his spare time, he enjoys playing tennis, watching crime TV series, playing FPS PC games, and coding personal projects.

Alexey Kiselev

Alexey Kiselev

Alexey Kiselev is a Senior SDE working on Amazon Email. Alexey has played a pivotal role in shaping the design, infrastructure, and delivery of MailManager. With years of experience, deep understanding of the industry and a passion for innovation he is enthusiast and a builder with a core area of interest on scalable and cost-effective email management and email security solutions.

AWS Weekly Roundup: New AWS Heroes, Amazon API Gateway, Amazon Q and more (June 10, 2024)

Post Syndicated from Donnie Prakoso original https://aws.amazon.com/blogs/aws/aws-weekly-roundup-new-aws-heroes-amazon-api-gateway-amazon-q-and-more-june-10-2024/

In the last AWS Weekly Roundup, Channy reminded us on how life has ups and downs. It’s just how life is. But, that doesn’t mean that we should do it alone. Farouq Mousa, AWS Community Builder, is fighting brain cancer and Allen Helton, AWS Serverless Hero, his daughter is fighting leukemia.

If you have a moment, please visit their campaign pages and give your support.

Meanwhile, we’ve just finished a few AWS Summits in India, Korea and also Thailand. As always, I had so much fun working together at Developer Lounge with AWS Heroes, AWS Community Builders, and AWS User Group leaders. Here’s a photo from everyone here.

Last Week’s Launches
Here are some launches that caught my attention last week:

Welcome, new AWS Heroes! — Last week, we just announced new cohort for AWS Heroes, worldwide group of AWS experts who go above and beyond to share knowledge and empower their communities.

Amazon API Gateway increased integration timeout limit — If you’re using Regional REST APIs and private REST APIs in Amazon API Gateway, now you can increase the integration timeout limit greater than 29 seconds. This allows you to run various workloads requiring longer timeouts.

Amazon Q offers inline completion in the command line — Now, Amazon Q Developer provides real-time AI-generated code suggestions as you type in your command line. As a regular command line interface (CLI) user, I’m really excited about this.

New common control library in AWS Audit Manager — This announcement helps you to save time when mapping enterprise controls into AWS Audit Manager. Check out Danilo’s post where he elaborated how that you can simplify risk and complicance assessment with the new common control library.

Amazon Inspector container image scanning for Amazon CodeCatalyst and GitHub actions — If you need to integrate your CI/CD with software vulnerabilities checking, you can use Amazon Inspector. Now, with this native integration in GitHub actions and Amazon CodeCatalyst, it streamlines your development pipeline process.

Ingest streaming data with Amazon OpenSearch Ingestion and Amazon Managed Streaming for Apache Kafka — With this new capability, now you can build more efficient data pipelines for your complex analytics use cases. Now, you can seamlessly index the data from your Amazon MSK Serverless clusters in Amazon OpenSearch service.

Amazon Titan Text Embeddings V2 now available in Amazon Bedrock Knowledge Base — You now can embed your data into a vector database using Amazon Titan Text Embeddings V2. This will be helpful for you to retrieve relevant information for various tasks.

Max tokens 8,192
Languages 100+ in pre-training
Fine-tuning supported No
Normalization supported Yes
Vector size 256, 512, 1,024 (default)

From Community.aws
Here’s my 3 personal favorites posts from community.aws:

Upcoming AWS events
Check your calendars and sign up for these AWS and AWS Community events:

  • AWS Summits — Join free online and in-person events that bring the cloud computing community together to connect, collaborate, and learn about AWS. Register in your nearest city: Japan (June 20), Washington, DC (June 26–27), and New York (July 10).

  • AWS re:Inforce — Join us for AWS re:Inforce (June 10–12) in Philadelphia, PA. AWS re:Inforce is a learning conference focused on AWS security solutions, cloud security, compliance, and identity. Connect with the AWS teams that build the security tools and meet AWS customers to learn about their security journeys.

  • AWS Community Days — Join community-led conferences that feature technical discussions, workshops, and hands-on labs led by expert AWS users and industry leaders from around the world: Midwest | Columbus (June 13), Sri Lanka (June 27), Cameroon (July 13), New Zealand (August 15), Nigeria (August 24), and New York (August 28).

You can browse all upcoming in-person and virtual events.

That’s all for this week. Check back next Monday for another Weekly Roundup!

Donnie

This post is part of our Weekly Roundup series. Check back each week for a quick roundup of interesting news and announcements from AWS!

How Cloudinary transformed their petabyte scale streaming data lake with Apache Iceberg and AWS Analytics

Post Syndicated from Yonatan Dolan original https://aws.amazon.com/blogs/big-data/how-cloudinary-transformed-their-petabyte-scale-streaming-data-lake-with-apache-iceberg-and-aws-analytics/

This post is co-written with Amit Gilad, Alex Dickman and Itay Takersman from Cloudinary. 

Enterprises and organizations across the globe want to harness the power of data to make better decisions by putting data at the center of every decision-making process. Data-driven decisions lead to more effective responses to unexpected events, increase innovation and allow organizations to create better experiences for their customers. However, throughout history, data services have held dominion over their customers’ data. Despite the potential separation of storage and compute in terms of architecture, they are often effectively fused together. This amalgamation empowers vendors with authority over a diverse range of workloads by virtue of owning the data. This authority extends across realms such as business intelligence, data engineering, and machine learning thus limiting the tools and capabilities that can be used.

The landscape of data technology is swiftly advancing, driven frequently by projects led by the open source community in general and the Apache foundation specifically. This evolving open source landscape allows customers complete control over data storage, processing engines and permissions expanding the array of available options significantly. This approach also encourages vendors to compete based on the value they provide to businesses, rather than relying on potential fusing of storage and compute. This fosters a competitive environment that prioritizes customer acquisition and prompts vendors to differentiate themselves through unique features and offerings that cater directly to the specific needs and preferences of their clientele.

A modern data strategy redefines and enables sharing data across the enterprise and allows for both reading and writing of a singular instance of the data using an open table format. The open table format accelerates companies’ adoption of a modern data strategy because it allows them to use various tools on top of a single copy of the data.

Cloudinary is a cloud-based media management platform that provides a comprehensive set of tools and services for managing, optimizing, and delivering images, videos, and other media assets on websites and mobile applications. It’s widely used by developers, content creators, and businesses to streamline their media workflows, enhance user experiences, and optimize content delivery.

In this blog post, we dive into different data aspects and how Cloudinary breaks the two concerns of vendor locking and cost efficient data analytics by using Apache Iceberg, Amazon Simple Storage Service (Amazon S3), Amazon Athena, Amazon EMR, and AWS Glue.

Short overview of Cloudinary’s infrastructure

Cloudinary infrastructure handles over 20 billion requests daily with every request generating event logs. Various data pipelines process these logs, storing petabytes (PBs) of data per month, which after processing data stored on Amazon S3, are then stored in Snowflake Data Cloud. These datasets serve as a critical resource for Cloudinary internal teams and data science groups to allow detailed analytics and advanced use cases.

Until recently, this data was mostly prepared by automated processes and aggregated into results tables, used by only a few internal teams. Cloudinary struggled to use this data for additional teams who had more online, real time, lower-granularity, dynamic usage requirements. Making petabytes of data accessible for ad-hoc reports became a challenge as query time increased and costs skyrocketed along with growing compute resource requirements. Cloudinary data retention for the specific analytical data discussed in this post was defined as 30 days. However, new use cases drove the need for increased retention, which would have led to significantly higher cost.

The data is flowing from Cloudinary log providers into files written into Amazon S3 and notified through events pushed to Amazon Simple Queue Service (Amazon SQS). Those SQS events are ingested by a Spark application running in Amazon EMR Spark, which parses and enriches the data. The processed logs are written in Apache Parquet format back to Amazon S3 and then automatically loaded to a Snowflake table using Snowpipe.

Why Cloudinary chose Apache Iceberg

Apache Iceberg is a high-performance table format for huge analytic workloads. Apache Iceberg brings the reliability and simplicity of SQL tables to big data, while making it possible for processing engines such as Apache Spark, Trino, Apache Flink, Presto, Apache Hive, and Impala to safely work with the same tables at the same time.

A solution based on Apache Iceberg encompasses complete data management, featuring simple built-in table optimization capabilities within an existing storage solution. These capabilities, along with the ability to use multiple engines on top of a singular instance of data, helps avoid the need for data movement between various solutions.

While exploring the various controls and options in configuring Apache Iceberg, Cloudinary had to adapt its data to use AWS Glue Data Catalog, as well as move a significant volume of data to Apache Iceberg on Amazon S3. At this point it became clear that costs would be significantly reduced, and while it had been a key factor since the planning phase, it was now possible to get concrete numbers. One example is that Cloudinary was now able to store 6 months of data for the same storage price that was previously paid for storing 1 month of data. This cost saving was achieved by using Amazon S3 storage tiers as well as improved compression (Zstandard), further enhanced by the fact that Parquet files were sorted.

Since Apache Iceberg is well supported by AWS data services and Cloudinary was already using Spark on Amazon EMR, they could integrate writing to Data Catalog and start an additional Spark cluster to handle data maintenance and compaction. As exploration continued with Apache Iceberg, some interesting performance metrics were found. For example, for certain queries, Athena runtime was 2x–4x faster than Snowflake.

Integration of Apache Iceberg

The integration of Apache Iceberg was done before loading data to Snowflake. The data is written to an Iceberg table using Apache Parquet data format and AWS Glue as the data catalog. In addition, a Spark application on Amazon EMR runs in the background handling compaction of the Parquet files to optimal size for querying through various tools such as Athena, Trino running on top of EMR, and Snowflake.

Challenges faced

Cloudinary faced several challenges while building its petabyte-scale data lake, including:

  • Determining optimal table partitioning
  • Optimizing ingestion
  • Solving the small files problem to improve query performance
  • Cost effectively maintaining Apache Iceberg tables
  • Choosing the right query engine

In this section, we describe each of these challenges and the solutions implemented to address them. Many of the tests to check performance and volumes of data scanned have used Athena because it provides a simple to use, fully serverless, cost effective, interface without the need to setup infrastructure.

Determining optimal table partitioning

Apache Iceberg makes partitioning easier for the user by implementing hidden partitioning. Rather than forcing the user to supply a separate partition filter at query time, Iceberg tables can be configured to map regular columns to the partition keys. Users don’t need to maintain partition columns or even understand the physical table layout to get fast and accurate query results.

Iceberg has several partitioning options. One example is when partitioning timestamps, which can be done by year, month, day, and hour. Iceberg keeps track of the relationship between a column value and its partition without requiring additional columns. Iceberg can also partition categorical column values by identity, hash buckets, or truncation. In addition, Iceberg partitioning is user-friendly because it also allows partition layouts to evolve over time without breaking pre-written queries. For example, when using daily partitions and the query pattern changes over time to be based on hours, it’s possible to evolve the partitions to hourly ones, thus making queries more efficient. When evolving such a partition definition, the data in the table prior to the change is unaffected, as is its metadata. Only data that is written to the table after the evolution is partitioned with the new definition, and the metadata for this new set of data is kept separately. When querying, each partition layout’s respective metadata is used to identify the files that need to be accessed; this is called split-planning. Split-planning is one of many Iceberg features that are made possible due to the table metadata, which creates a separation between the physical and the logical storage. This concept makes Iceberg extremely versatile.

Determining the correct partitioning is key when working with large data sets because it affects query performance and the amount of data being scanned. Because this migration was from existing tables from Snowflake native storage to Iceberg, it was crucial to test and provide a solution with the same or better performance for the existing workload and types of queries.

These tests were possible due to Apache Iceberg’s:

  1. Hidden partitions
  2. Partition transformations
  3. Partition evolution

These allowed altering table partitions and testing which strategy works best without data rewrite.

Here are a few partitioning strategies that were tested:

  1. PARTITIONED BY (days(day), customer_id)
  2. PARTITIONED BY (days(day), hour(timestamp))
  3. PARTITIONED BY (days(day), bucket(N, customer_id))
  4. PARTITIONED BY (days(day))

Each partitioning strategy that was reviewed generated significantly different results both during writing as well as during query time. After careful results analysis, Cloudinary decided to partition the data by day and combine it with sorting, which allows them to sort data within partitions as would be elaborated in the compaction section.

Optimizing ingestion

Cloudinary receives billions of events in files from its providers in various formats and sizes and stores those on Amazon S3, resulting in terabytes of data processed and stored every day.

Because the data doesn’t come in a consistent manner and it’s not possible to predict the incoming rate and file size of the data, it was necessary to find a way of keeping cost down while maintaining high throughput.

This was achieved by using EventBridge to push each file received into Amazon SQS, where it was processed using Spark running on Amazon EMR in batches. This allowed processing the incoming data at high throughput and scale clusters according to queue size while keeping costs down.

Example of fetching 100 messages (files) from Amazon SQS with Spark:

var client = AmazonSQSClientBuilder.standard().withRegion("us-east-1").build()
var getMessageBatch: Iterable[Message] = DistributedSQSReceiver.client.receiveMessage(new ReceiveMessageRequest().withQueueUrl(queueUrl).withMaxNumberOfMessages(10)).getMessages.asScala
sparkSession.sparkContext.parallelize(10) .map(_ => getMessageBatch) .collect().flatMap(_.toList) .toList

When dealing with a high data ingestion rate for a specific partition prefix, Amazon S3 might potentially throttle requests and return a 503 status code (service unavailable). To address this scenario, Cloudinary used an Iceberg table property called write.object-storage.enabled, which incorporates a hash prefix into the stored Amazon S3 object path. This approach was deemed efficient and effectively mitigated Amazon S3 throttling problems.

Solving the small file problem and improving query performance

In modern data architectures, stream processing engines such as Amazon EMR are often used to ingest continuous streams of data into data lakes using Apache Iceberg. Streaming ingestion to Iceberg tables can suffer from two problems:

  • It generates many small files that lead to longer query planning, which in turn can impact read performance.
  • Poor data clustering, which can make file pruning less effective. This typically occurs in the streaming process when there is insufficient new data to generate optimal file sizes for reading, such as 512 MB.

Because partition is a key factor in the number of files produced and Cloudinary’s data is time based and most queries use a time filter, it was decided to address the optimization of our data lake in multiple ways.

First, Cloudinary set all the necessary configurations that helped reduce the number of files while appending data in the table by setting write.target-file-size-bytes, which allows defining the default target file size. Setting spark.sql.shuffle.partitions in Spark can reduce the number of output files by controlling the number of partitions used during shuffle operations, which affects how data is distributed across tasks, consequently minimizing the number of output files generated after transformations or aggregations.

Because the above approach only addressed the small file problem but didn’t eliminate it entirely, Cloudinary used another capability of Apache Iceberg that can compact data files in parallel using Spark with the rewriteDataFiles action. This action combines small files into larger files to reduce metadata overhead and minimize the amount of Amazon S3 GetObject API operation usage.

Here is where it can get complicated. When running compaction, Cloudinary needed to choose which strategy to apply out of the three that Apache Iceberg offers; each one having its own advantages and disadvantages:

  1. Binpack – simply rewrites smaller files to a target size
  2. Sort – data sorting based on different columns
  3. Z-order – a technique to colocate related data in the same set of files

At first, the Binpack compaction strategy was evaluated. This strategy works fastest and combines small files together to reach the target file size defined and after running it a significant improvement in query performance was observed.

As mentioned previously, data was partitioned by day and most queries ran on a specific time range. Because data comes from external vendors and sometimes arrives late, it was noticed that when running queries on compacted days, a lot of data was being scanned, because the specific time range could reside across many files. The query engine (Athena, Snowflake, and Trino with Amazon EMR) needed to scan the entire partition to fetch only the relevant rows.

To increase query performance even further, Cloudinary decided to change the compaction process to use sort, so now data is partitioned by day and sorted by requested_at (timestamp when the action occurred) and customer ID.

This strategy is costlier for compaction because it needs to shuffle the data in order to sort it. However, after adopting this sort strategy, two things were noticeable: the same queries that ran before now scanned around 50 percent less data, and query run time was improved by 30 percent to 50 percent.

Cost effectively maintaining Apache Iceberg tables

Maintaining Apache Iceberg tables is crucial for optimizing performance, reducing storage costs, and ensuring data integrity. Iceberg provides several maintenance operations to keep your tables in good shape. By incorporating these operations Cloudinary were able to cost-effectively manage their Iceberg tables.

Expire snapshots

Each write to an Iceberg table creates a new snapshot, or version, of a table. Snapshots can be used for time-travel queries, or the table can be rolled back to any valid snapshot.

Regularly expiring snapshots is recommended to delete data files that are no longer needed and to keep the size of table metadata small. Cloudinary decided to retain snapshots for up to 7 days to allow easier troubleshooting and handling of corrupted data which sometimes arrives from external sources and aren’t identified upon arrival. SparkActions.get().expireSnapshots(iceTable).expireOlderThan(TimeUnit.DAYS.toMillis(7)).execute()

Remove old metadata files

Iceberg keeps track of table metadata using JSON files. Each change to a table produces a new metadata file to provide atomicity.

Old metadata files are kept for history by default. Tables with frequent commits, like those written by streaming jobs, might need to regularly clean metadata files.

Configuring the following properties will make sure that only the latest ten metadata files are kept and anything older is deleted.

write.metadata.delete-after-commit.enabled=true 
write.metadata.previous-versions-max=10

Delete orphan files

In Spark and other distributed processing engines, when tasks or jobs fail, they might leave behind files that aren’t accounted for in the table metadata. Moreover, in certain instances, the standard snapshot expiration process might fail to identify files that are no longer necessary and not delete them.

Apache Iceberg offers a deleteOrphanFiles action that will take care of unreferenced files. This action might take a long time to complete if there are a large number of files in the data and metadata directories. A metadata or data file is considered orphan if it isn’t reachable by any valid snapshot. The set of actual files is built by listing the underlying storage using the Amazon S3 ListObjects operation, which makes this operation expensive. It’s recommended to run this operation periodically to avoid increased storage usage; however, too frequent runs can potentially offset this cost benefit.

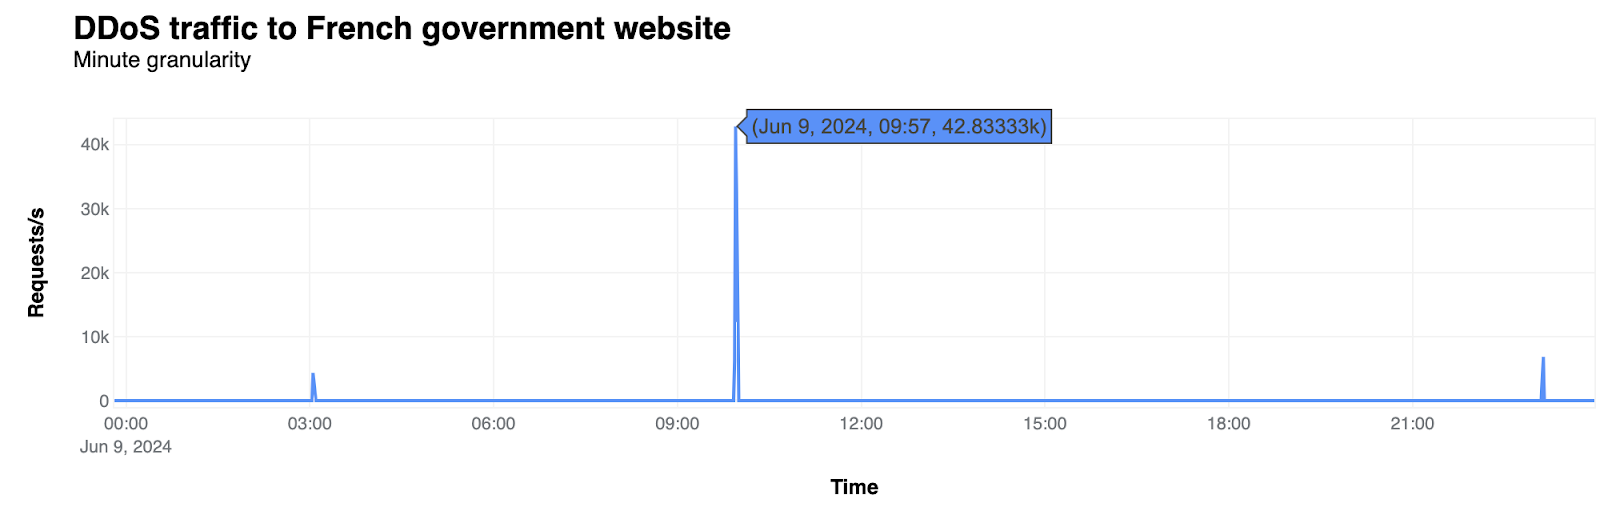
A good example of how critical it is to run this procedure is to look at the following diagram, which shows how this procedure removed 112 TB of storage.

Rewriting manifest files

Apache Iceberg uses metadata in its manifest list and manifest files to speed up query planning and to prune unnecessary data files. Manifests in the metadata tree are automatically compacted in the order that they’re added, which makes queries faster when the write pattern aligns with read filters.

If a table’s write pattern doesn’t align with the query read filter pattern, metadata can be rewritten to re-group data files into manifests using rewriteManifests.

While Cloudinary already had a compaction process that optimized data files, they noticed that manifest files also required optimization. It turned out that in certain cases, Cloudinary reached over 300 manifest files—which were small, often under 8Mb in size—and due to late arriving data, manifest files were pointing to data in different partitions. This caused query planning to run for 12 seconds for each query.

Cloudinary initiated a separate scheduled process of rewriteManifests, and after it ran, the number of manifest files was reduced to approximately 170 files and as a result of more alignment between manifests and query filters (based on partitions), query planning was improved by three times to approximately 4 seconds.

Choosing the right query engine

As part of Cloudinary exploration aimed at testing various query engines, they initially outlined several key performance indicators (KPIs) to guide their search, including support for Apache Iceberg alongside integration with existing data sources such as MySQL and Snowflake, the availability of a web interface for effortless one-time queries, and cost optimization. In line with these criteria, they opted to evaluate various solutions including Trino on Amazon EMR, Athena, and Snowflake with Apache Iceberg support (at that time it was available as a Private Preview). This approach allowed for the assessment of each solution against defined KPIs, facilitating a comprehensive understanding of their capabilities and suitability for Cloudinary’s requirements.

Two of the more quantifiable KPIs that Cloudinary was planning to evaluate were cost and performance. Cloudinary realized early in the process that different queries and usage types can potentially benefit from different runtime engines. They decided to focus on four runtime engines.

Engine Details
Snowflake native XL data warehouse on top of data stored within Snowflake
Snowflake with Apache Iceberg support XL data warehouse on top of data stored in S3 in Apache Iceberg tables
Athena On-demand mode
Amazon EMR Trino Opensource Trino on top of eight nodes (m6g.12xl) cluster

The test included four types of queries that represent different production workloads that Cloudinary is running. They’re ordered by size and complexity from the simplest one to the most heavy and complex.

Query Description Data scanned Returned results set
Q1 Multi-day aggregation on a single tenant Single digit GBs <10 rows
Q2 Single-day aggregation by tenant across multiple tenant Dozens of GBs 100 thousand rows
Q3 Multi-day aggregation across multiple tenants Hundreds of GBs <10 rows
Q4 Heavy series of aggregations and transformations on a multi-tenant dataset to derive access metrics Single digit TBs >1 billion rows

The following graphs show the cost and performance of the four engines across the different queries. To avoid chart scaling issues, all costs and query durations were normalized based on Trino running on Amazon EMR. Cloudinary considered Query 4 to be less suitable for Athena because it involved processing and transforming extremely large volumes of complex data.

Some important aspects to consider are:

  • Cost for EMR running Trino was derived based on query duration only, without considering cluster set up, which on average launches in just under 5 minutes.
  • Cost for Snowflake (both options) was derived based on query duration only, without considering cold start (more than 10 seconds on average) and a Snowflake warehouse minimum charge of 1 minute.
  • Cost for Athena was based on the amount of data scanned; Athena doesn’t require cluster set up and the query queue time is less than 1 second.
  • All costs are based on list on-demand (OD) prices.
  • Snowflake prices are based on Standard edition.

The above chart shows that, from a cost perspective, Amazon EMR running Trino on top of Apache Iceberg tables was superior to other engines, in certain cases up to ten times less expensive. However, Amazon EMR setup requires additional expertise and skills compared to the no-code, no infrastructure management offered by Snowflake and Athena.

In terms of query duration, it’s noticeable that there’s no clear engine of choice for all types of queries. In fact, Amazon EMR, which was the most cost-effective option, was only fastest in two out of the four query types. Another interesting point is that Snowflake’s performance on top of Apache Iceberg is almost on-par with data stored within Snowflake, which adds another great option for querying their Apache Iceberg data-lake. The following table shows the cost and time for each query and product.

. Amazon EMR Trino Snowflake (XL) Snowflake (XL) Iceberg Athena
Query1 $0.01
5 seconds
$0.08
8 seconds
$0.07
8 seconds
$0.02
11 seconds
Query2 $0.12
107 seconds
$0.25
28 seconds
$0.35
39 seconds
$0.18
94 seconds
Query3 $0.17
147 seconds
$1.07
120 seconds
$1.88
211 seconds
$1.22
26 seconds
Query4 $6.43
1,237 seconds
$11.73
1,324 seconds
$12.71
1,430 seconds
N/A

Benchmarking conclusions

While every solution presents its own set of advantages and drawbacks—whether in terms of pricing, scalability, optimizing for Apache Iceberg, or the contrast between open source versus closed source—the beauty lies in not being constrained to a single choice. Embracing Apache Iceberg frees you from relying solely on a single solution. In certain scenarios where queries must be run frequently while scanning up to hundreds of gigabytes of data with an aim to evade warm-up periods and keep costs down, Athena emerged as the best choice. Conversely, when tackling hefty aggregations that demanded significant memory allocation while being mindful of cost, the preference leaned towards using Trino on Amazon EMR. Amazon EMR was significantly more cost efficient when running longer queries, because boot time cost could be discarded. Snowflake stood out as a great option when queries could be joined with other tables already residing within Snowflake. This flexibility allowed harnessing the strengths of each service, strategically applying them to suit the specific needs of various tasks without being confined to a singular solution.

In essence, the true power lies in the ability to tailor solutions to diverse requirements, using the strengths of different environments to optimize performance, cost, and efficiency.

Conclusion

Data lakes built on Amazon S3 and analytics services such as Amazon EMR and Amazon Athena, along with the open source Apache Iceberg framework, provide a scalable, cost-effective foundation for modern data architectures. It enables organizations to quickly construct robust, high-performance data lakes that support ACID transactions and analytics workloads. This combination is the most refined way to have an enterprise-grade open data environment. The availability of managed services and open source software helps companies to implement data lakes that meet their needs.

Since building a data lake solution on top of Apache Iceberg, Cloudinary has seen major enhancements. The data lake infrastructure enables Cloudinary to extend their data retention by six times while lowering the cost of storage by over 25 percent. Furthermore, query costs dropped by more than 25–40 percent thanks to the efficient querying capabilities of Apache Iceberg and the query optimizations provided in the Athena version 3, which is now based on Trino as its engine. The ability to retain data for longer as well as providing it to various stakeholders while reducing cost is a key component in allowing Cloudinary to be more data driven in their operation and decision-making processes.

Using a transactional data lake architecture that uses Amazon S3, Apache Iceberg, and AWS Analytics services can greatly enhance an organization’s data infrastructure. This allows for sophisticated analytics and machine learning, fueling innovation while keeping costs down and allowing the use of a plethora of tools and services without limits.


About the Authors

Yonatan Dolan is a Principal Analytics Specialist at Amazon Web Services. He is located in Israel and helps customers harness AWS analytical services to leverage data, gain insights, and derive value. Yonatan is an Apache Iceberg evangelist.

Amit Gilad is a Senior Data Engineer on the Data Infrastructure team at Cloudinar. He is currently leading the strategic transition from traditional data warehouses to a modern data lakehouse architecture, utilizing Apache Iceberg to enhance scalability and flexibility.

Alex Dickman is a Staff Data Engineer on the Data Infrastructure team at Cloudinary. He focuses on engaging with various internal teams to consolidate the team’s data infrastructure and create new opportunities for data applications, ensuring robust and scalable data solutions for Cloudinary’s diverse requirements.

Itay Takersman is a Senior Data Engineer at Cloudinary data infrastructure team. Focused on building resilient data flows and aggregation pipelines to support Cloudinary’s data requirements.

Exploring the 2024 EU Election: Internet traffic trends and cybersecurity insights

Post Syndicated from João Tomé original https://blog.cloudflare.com/exploring-the-2024-eu-election-internet-traffic-trends-and-cybersecurity-insights


The 2024 European Parliament election took place June 6-9, 2024, with hundreds of millions of Europeans from the 27 countries of the European Union electing 720 members of the European Parliament. This was the first election after Brexit and without the UK, and it had an impact on the Internet. In this post, we will review some of the Internet traffic trends observed during the election days, as well as providing insight into cyberattack activity.

Elections matter, and as we have mentioned before (1, 2), 2024 is considered “the year of elections”, with voters going to the polls in at least 60 countries, as well as the 27 EU member states. That’s why we’re publishing a regularly updated election report on Cloudflare Radar. We’ve already included our analysis of recent elections in South Africa, India, Iceland, and Mexico, and provided a policy view on the EU elections.

The European Parliament election coincided with several other national or local elections in European Union member states, leading to direct consequences. For example, in Belgium, the prime minister announced his resignation, resulting in a drop in Internet traffic during the speech followed by a clear increase after the speech was over. In France, we saw a similar pattern with the announcement of legislative snap elections.

From analyzing patterns seen during previous elections in France and Brazil, we know that Internet traffic often decreases during voting hours, though not as significantly as during other major events like national holidays. This usual drop is typically followed by an increase in traffic as election results are announced.

Let’s start with a wider picture of the 2024 European Parliament election, focusing on the time of the biggest drop in Internet HTTP requests during the election days as compared to the previous week. Note that there were some national or local elections taking place at the same time, and European Union elections are known to have low turnout compared to national and local ones.

Source: Cloudflare; created with Datawrapper

Drops greater than 10% were observed only in the Czech Republic, Luxembourg, Slovakia, Cyprus, Belgium, Estonia, and Croatia. The table below includes the percentage that traffic dropped and the specific time during the election day it occurred. In countries with more than one election day, we considered the time and day of the biggest drop.

Countries Elections day(s) Local time Drop in traffic %
Czech Republic June 7 – 8 June 8, 14:30 -20%
Luxembourg June 9 12:45 -18%
Slovakia June 8 15:45; 19:00 -16%
Cyprus June 9 10:00 -16%
Belgium June 9 11:45 -14%
Estonia June 7-9 June 9, 9:00 -13%
Croatia June 9 18:00 -12%
Poland June 9 18:00 -10%
Netherlands June 6 10:15 -10%
Germany June 9 13:45 -10%
Ireland June 7 7:15 -9%
Finland June 9 9:00 -9%
Portugal June 9 15:45 -9%
Malta June 8 12:15 -9%
Latvia June 8 08:30, 16:15 -9%
Slovenia June 9 18:00 -8%
Hungary June 9 6:00 -8%
Austria June 9 12:30 -7%
Italy June 8 – 9 June 9, 16:00 -6%
France June 9 13:30 -6%
Bulgaria June 9 19:45 -5%
Greece June 9 8:00 -5%
Spain June 9 13:00 -4%
Lithuania June 9 8:00 -3%
Romania June 9 9:45 -1%
Denmark June 9
Sweden June 9

The data in the list above shows that Central European countries had the highest drop in Internet traffic, particularly the Czech Republic and Slovakia. Eastern Europe saw significant drops in Estonia and Poland. Southern Europe had consistent moderate drops across multiple countries, with Cyprus and Croatia showing higher losses. Northern Europe showed minimal to no traffic drop in Scandinavian countries, with Finland and Ireland experiencing moderate declines.

Looking at the specific (local) times of day during voting periods on election days, morning drops (06:00 – 10:00) were more common in Northern and Eastern Europe. Late morning to early afternoon drops (10:15 – 14:30) were predominantly observed in Western and Central Europe. Late afternoon drops (15:45 – 19:45) were more common in Central and Southern Europe.

Impact of notable announcements in Belgium and France

There’s more to say when we look at specific country trends. The 27 members of the European Union bring diversity in habits, languages, and cultures. That also impacted traffic, and this election in particular had a national impact in some of the countries.

In Belgium, national and regional elections took place on the same day, June 9. After polling stations closed at 16:00 local time (14:00 UTC), HTTP requests followed the typical pattern of increasing, peaking at 21:15 local time (19:15 UTC), with 7% more requests than the previous week. This trend was interrupted by Prime Minister Alexander De Croo’s speech at around 22:00 local time (20:00 UTC), admitting defeat in the national elections. This pattern is typical when important announcements are broadcast on TV, impacting Internet traffic.

How about France? President Emmanuel Macron announced at around 21:00 local time (19:00 UTC) that he would dissolve the national parliament for a snap legislative election. This followed the EU elections that gave a victory to his rival Marine Le Pen’s National Rally in the European Parliament vote. At the time of his speech, requests dropped 6% compared to the previous week, and increased right after Macron’s speech, peaking at 22:15 local time (20:15 UTC) with a 6% increase.

After voting ends, traffic increases

It was not only Belgium and France that had typical increases in HTTP requests at night when the first projections and results started to be announced. The same happened in the Netherlands, the first European country to enter the 2024 European Parliament election, on Thursday, June 6.— We have previously written about Dutch political websites being attacked on that day. Traffic was 4% higher than usual after 20:30 local time (18:30 UTC), and peaked at 01:15 with a 15% increase compared to the previous week.

Similar trends were seen in Italy on June 9, and in Germany on the same day. In Germany, at 21:45 (19:45 UTC), requests were already 8% higher, with a 23:00 (21:00 UTC) drop of 2% during election speeches, and a peak at 00:30 (22:30 UTC) with an 18% increase.

The same night-time trends were observed in other countries:

  • Slovakia had a peak increase of 24% at 23:45 local time (21:45 UTC) on June 8.
  • Spain saw a 21% peak increase at 21:00 local time (19:00 UTC) on June 9.
  • Poland had a 9% peak increase at 01:45 local time (23:45 UTC).
  • Portugal experienced a 29% peak increase at 00:15 local time (23:15 UTC).
  • Croatia had a 19% peak increase at 23:00 (21:00 UTC).
  • Slovenia had a 19% peak increase at 22:45 (20:45 UTC).
  • Lithuania had a 22% peak increase at 23:00 (20:00 UTC).
  • Estonia saw the highest peak increase, reaching 35% at 00:00 (21:00 UTC).

Growing interest in election information and news

Switching to domain trends, DNS traffic (using our 1.1.1.1 resolver) shows a more specific impact related to elections. Social media platforms invited users in Europe to vote, sometimes giving European or local websites as a reference. Here’s an example from Instagram:

Did this increase traffic to election-related sites in the European Union? Our DNS data shows a 26x peak growth at 19:00 UTC on Sunday, June 9, 2024. DNS traffic was already much higher compared to the previous week on June 8, with a peak growth of 8x at 17:00 UTC.

Looking at European news outlets’ domains, there was an initial 1.68x increase (compared to the previous week) at 13:00 UTC on June 9, 2024, and a second peak at 19:00 UTC.

For local election-results sites, there was a significant 55x peak growth at 22:00 UTC on June 9, 2024, compared to the previous week.

Government-focused cyberattacks

Focusing on attacks, as mentioned above, we recently published a blog post about the cyberattack on Dutch political-related websites that lasted two days – June 5 and 6. The main DDoS (Distributed Denial of Service attack) attack on June 5, the day before the Dutch election, reached 73,000 requests per second (rps).

Looking at government or state-related websites in the European Union in 2024, there have been several spikes in attacks targeting defense organizations, European courts, and educational institutions since the year started.

The main one was on February 25, 2024, when Cloudflare blocked a DDoS attack on a French government website that reached 420 million requests per hour and lasted over three hours.

Between January and June 2024, government sites in Belgium, France, and Germany were the main targets, receiving 49%, 25%, and 10% respectively of attack requests targeting EU government-related sites.

In a broader view, from January 1 to June 9, Cloudflare mitigated 8.6 billion threats to government websites in the EU, with 68% of those being DDoS threats. This amounts to an average of 53.42 million threats mitigated per day. These trends highlight the ongoing threat to critical infrastructure across Europe, with government sites frequently targeted by cyberattacks.

Just before the elections

Focusing on the five weeks before the EU election, we didn’t see significant attacks on European election-related organizations. However, there were a few DDoS threats that targeted government sites from European Union member states. Notable instances include attacks on the Bulgarian government on June 6, the French government on May 11 and June 9, another in France on May 23, Sweden on May 18 and April 29, and Denmark on May 7.

These attacks were not very large compared to others mentioned. The largest targeted the Bulgarian government on June 6, with 122 million daily DDoS requests and a peak of 110,500 requests per second at 11:29 local time (08:29 UTC).

On election day in France, June 9, a French government website was also the target of a smaller attack, with 42,000 DDoS requests per second at 11:57 local time (09:57 UTC).

Conclusion

The 2024 European Parliament election had some clear impacts on Internet traffic, and cyber threats were looming in the weeks before, most notably the Dutch political-related attack around election day.

While voting led to typical drops in Internet traffic, the announcement of results and significant political events caused spikes in activity.

If you want to follow more trends and insights about the Internet and elections in particular, you can check Cloudflare Radar, and more specifically our new 2024 Elections Insights report, that we’re updating as elections take place throughout the year.

[$] P4TC hits a brick wall

Post Syndicated from corbet original https://lwn.net/Articles/977310/

P4, short for “Programming
Protocol-independent Packet Processors”, is a programming language aimed at
networking devices; it is useful for the configuration of firewalls and
complicated routing architectures. Since a lot of advanced networking is
done with Linux systems, it stands to reason that there would be value in
supporting P4 and, indeed, an
implementation of P4
in the kernel’s traffic-control subsystem was
first posted by Jamal Hadi Salim at the beginning of 2023. After nearly
18 months, though, this feature has not been merged, and the chances
of that happening would appear to be getting worse.