Post Syndicated from Technology Connextras original https://www.youtube.com/watch?v=hQFkbg7he-4
Yves Morieux | The Social Economics of Productivity | Talks at Google
Post Syndicated from Talks at Google original https://www.youtube.com/watch?v=NIYeLLmT6oI
AWS achieves Spain’s ENS High certification across 166 services
Post Syndicated from Daniel Fuertes original https://aws.amazon.com/blogs/security/aws-achieves-spains-ens-high-certification-across-166-services/
Amazon Web Services (AWS) is committed to bringing additional services and AWS Regions into the scope of our Esquema Nacional de Seguridad (ENS) High certification to help customers meet their regulatory needs.
ENS is Spain’s National Security Framework. The ENS certification is regulated under the Spanish Royal Decree 3/2010 and is a compulsory requirement for central government customers in Spain. ENS establishes security standards that apply to government agencies and public organizations in Spain, and service providers on which Spanish public services depend. Updating and achieving this certification every year demonstrates our ongoing commitment to meeting the heightened expectations for cloud service providers set forth by the Spanish government.
We are happy to announce the addition of 17 services to the scope of our ENS High certification, for a new total of 166 services in scope. The certification now covers 25 Regions. Some of the additional security services in scope for ENS High include the following:
- AWS CloudShell – a browser-based shell that makes it simpler to securely manage, explore, and interact with your AWS resources. With CloudShell, you can quickly run scripts with the AWS Command Line Interface (AWS CLI), experiment with AWS service APIs by using the AWS SDKs, or use a range of other tools for productivity.
- AWS Cloud9 – a cloud-based integrated development environment (IDE) that you can use to write, run, and debug your code with just a browser. It includes a code editor, debugger, and terminal.
- Amazon DevOps Guru – a service that uses machine learning to detect abnormal operating patterns so that you can identify operational issues before they impact your customers.
- Amazon HealthLake – a HIPAA-eligible service that offers healthcare and life sciences companies a complete view of individual or patient population health data for query and analytics at scale.
- AWS IoT SiteWise – a managed service that simplifies collecting, organizing, and analyzing industrial equipment data.
AWS achievement of the ENS High certification is verified by BDO Auditores S.L.P., which conducted an independent audit and confirmed that AWS continues to adhere to the confidentiality, integrity, and availability standards at its highest level.
For more information about ENS High, see the AWS Compliance page Esquema Nacional de Seguridad High. To view the complete list of services included in the scope, see the AWS Services in Scope by Compliance Program – Esquema Nacional de Seguridad (ENS) page. You can download the ENS High Certificate from AWS Artifact in the AWS Management Console or from the Compliance page Esquema Nacional de Seguridad High.
As always, we are committed to bringing new services into the scope of our ENS High program based on your architectural and regulatory needs. If you have questions about the ENS program, reach out to your AWS account team or contact AWS Compliance.
If you have feedback about this post, submit comments in the Comments section below.
Want more AWS Security how-to content, news, and feature announcements? Follow us on Twitter.
Asahi Linux November 2022 progress report
Post Syndicated from original https://lwn.net/Articles/915725/
For those who are waiting for Linux on Apple hardware, the Asahi Linux
project has put out a detailed
report on progress toward a working kernel and distribution.
This kind of safety model is not new: it is already commonplace on
Android phones, where it is usually implemented in DSP
firmware. But of course, the desktop Linux ecosystem doesn’t even
have a speaker EQ database framework yet, nevermind safety models!
The eternal lagging behind of Linux audio strikes again. What’s the
plan? While this isn’t settled yet, our current idea is to
implement the safety model in a stand-alone daemon that captures
the voltage/current feedback data from the ALSA device, and drives
the mixer volume itself as as means of implementing soft power
limits, together with some kind of “safety watchdog interlock” with
the kernel that only enables higher volume limits when the daemon
is active and running
Apple’s Device Analytics Can Identify iCloud Users
Post Syndicated from Bruce Schneier original https://www.schneier.com/blog/archives/2022/11/apples-device-analytics-can-identify-icloud-users.html
Researchers claim that supposedly anonymous device analytics information can identify users:
On Twitter, security researchers Tommy Mysk and Talal Haj Bakry have found that Apple’s device analytics data includes an iCloud account and can be linked directly to a specific user, including their name, date of birth, email, and associated information stored on iCloud.
Apple has long claimed otherwise:
On Apple’s device analytics and privacy legal page, the company says no information collected from a device for analytics purposes is traceable back to a specific user. “iPhone Analytics may include details about hardware and operating system specifications, performance statistics, and data about how you use your devices and applications. None of the collected information identifies you personally,” the company claims.
Apple was just sued for tracking iOS users without their consent, even when they explicitly opt out of tracking.
How I make Money as a Photographer 💵 📸
Post Syndicated from Matt Granger original https://www.youtube.com/watch?v=4MlM4K1LdUA
Search Made Easy: InsightIDR’s Secret Weapon for Efficiency and Efficacy
Post Syndicated from Rapid7 original https://blog.rapid7.com/2022/11/22/search-made-easy-insightidrs-secret-weapon-for-efficiency-and-efficacy/

By Matt Heidet
Matt is a Senior Information Security Engineer at a Regional Financial Institution. He is a Customer and Guest Blogger for Rapid7
Have you ever groaned when divvying up incidents from a pen-test amongst an overworked team? Or maybe you’ve struggled to present how you adhere to multiple compliance frameworks to your board. As a Senior Information Security Engineer at a Regional Finance Institute, I’m all too familiar with the daily grind – too many threats, not nearly enough time. Fortunately, Rapid7’s InsightIDR has helped me and my team unify our data, verify the nature of threats, and uphold a security posture that we’re confident in.
InsightIDR has lots of features that have enabled my organization to identify and respond more easily to threats. In this blog post, I’m going to share some insight into my favorite – InsightIDR’s Log Search function.
Back to the Beginning: Why We Chose Rapid7
Choosing InsightIDR was a no-brainer for us. We tried two other products, but as soon as we finished the proof-of-concept with Rapid7, we went straight to purchase. There was no point in even testing the others, as InsightIDR provided us with the visibility and context necessary to keep our environment secure
If you already have InsightVM, Rapid7’s vulnerability management solution, it’s a pretty smooth transition to InsightIDR. As existing InsightVM users, we already had the Rapid7 Insight Agent deployed on our endpoints, which provided us with real-time endpoint monitoring for vulnerabilities. When we added InsightIDR to our environment, we were automatically covered on those same endpoints, without any need to set up anything additional.
We were able to get up and running and integrate with a number of Azure Event Hubs out of the gate (a centralized service from which to collect Azure data and logs). Only a few other tools would provide that same capability – but they wouldn’t fit into our existing environment the way that Rapid7 did.
Getting Started with Log Search
When we first started using InsightIDR, my team wanted to bring in as much data to InsightIDR as we could to get a clear picture of what was happening in our environment. We knew we needed holistic visibility, but weren’t 100% on what we should be alerting on or necessarily looking for. Luckily, InsightIDR’s Log Search intuitively organized all of our data and helped us get a view of everything in one place, narrowing our focus and enabling us to really focus on high priority data.
InsightIDR removed the complexity of traditional Log Search. If you’re not sure where to start, just start with a simple search – a host name, a kind of attack, or an event. Then, based on your results, you can create a more advanced search by filtering, iterating, or narrowing down your simple searches. From there, you can start creating reports. Your reports can tell you (and you can then customize) how you should be watching an endpoint, how you should be alerted, and more.
Let’s Talk Outcomes
Now it’s time to do something with all this data! We were able to compare data from those sources to the email alerts that we got from Microsoft on Azure and easily generate a report based on the email events we were seeing from Microsoft. From there, we were able to generate custom detections.
One reason this was all so straightforward is that Rapid7’s powerful search language, Log Entry Query Language (LEQL – which allows you to construct queries that can extract the hidden insights within your logs), is easy to pick up. Even if you’re not a programmer or engineer, the structure and syntax of the language are accessible.
Once you get the first couple workflows ironed out, it’s easy to extrapolate to other ones. Once my team focused on this task we were able to come up with 45 custom detections over just three days!
Where Do I Go From Here?
Detections are your bread and butter, of course. But once you’re oriented to the dashboard, the language, and the basics of a workflow, the sky’s the limit. You can then customize your reports to your heart’s desire. My team currently has about 22 reports coming in daily, summarizing almost 100 custom detections that all stem from log search.
Rapid7’s alerting and reporting is hands down the best I’ve ever worked with. But it’s not just about volume – it’s also about versatility. We’re able to monitor all of our Cloud services – including Amazon, Azure, and Google – with ease. In the past, when using managed security providers, this wasn’t nearly as straightforward. We’re looking at InsightIDR’s pre-built Attacker Behavior Analytics (ABA) and User Behavior Analytics (UBA) detections with regularity, using a mix of both custom and pre-built “cards” (a visually appealing representation of data) in our InsightIDR dashboard.
Furthermore, it’s not just that you have options. The pre-built detections that InsightIDR ships out of the box boasts plenty of efficacy, resulting in unprecedented efficiency. The ability to have all of the data you need in one place – the equivalent of a “single pane of glass” – just can’t be overstated.
Welcome Stéphane Guillou, new QA Analyst for LibreOffice (Document Foundation)
Post Syndicated from original https://lwn.net/Articles/915711/
The Document Foundation has announced
the hiring of a quality-assurance analyst, bringing its staff up to 13
people.
A lot of my time will be spent on triaging the issues users report
on Bugzilla – our bug-reporting platform. There is a lot of
activity on Bugzilla, and classifying and testing the reports is
fundamental for us to focus on the most pressing issues, help the
work developers are doing, and keep improving the software for
everyone! Part of the work will also be to analyse and summarise
the wealth of data available to help us see the bigger picture and
make better decisions when allocating resources.
Security updates for Tuesday
Post Syndicated from original https://lwn.net/Articles/915708/
Security updates have been issued by Debian (ntfs-3g), Fedora (krb5 and samba), Gentoo (firefox-bin, ghostscript-gpl, pillow, sudo, sysstat, thunderbird-bin, and xterm), Red Hat (firefox, hsqldb, and thunderbird), SUSE (cni, cni-plugins, and krb5), and Ubuntu (isc-dhcp and sqlite3).
Callisto:The Oldest Surface in the Solar System
Post Syndicated from Geographics original https://www.youtube.com/watch?v=LGcllv9il0g
THG Podcast: Hurricane History
Post Syndicated from The History Guy: History Deserves to Be Remembered original https://www.youtube.com/watch?v=2dwklJRYKg0
Now Open the 30th AWS Region – Asia Pacific (Hyderabad) Region in India
Post Syndicated from Channy Yun original https://aws.amazon.com/blogs/aws/now-open-the-30th-aws-region-asia-pacific-hyderabad-region-in-india/
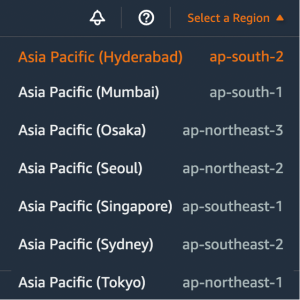 In November 2020, Jeff announced the upcoming AWS Asia Pacific (Hyderabad) as the second Region in India. Yes! Today we are announcing the general availability of the 30th AWS Region, Asia Pacific (Hyderabad) Region, with three Availability Zones and the
ap-south-2 API name.
The Asia Pacific (Hyderabad) Region is located in the state of Telangana. As the capital and the largest city in Telangana, Hyderabad is already an important talent hub for IT professionals and entrepreneurs. For example, AWS Hyderabad User Groups has more than 4,000 community members and holds active meetups, including an upcoming Community Day in December 2022.
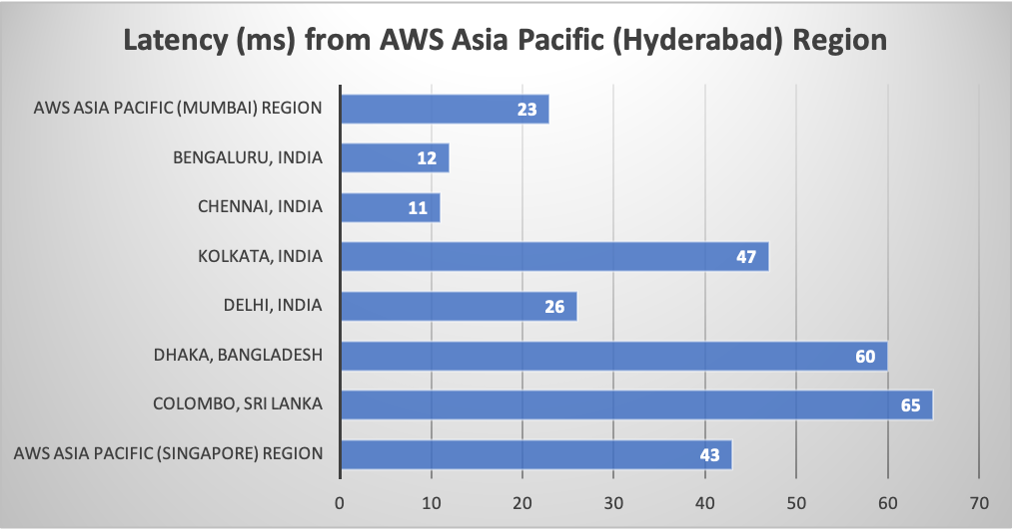
The new Hyderabad Region gives customers an additional option for running their applications and serving end users from data centers located in India. Customers with data-residency requirements arising from statutes, regulations, and corporate policy can run workloads and securely store data in India while serving end users with even lower latency.
Here are the latest numbers of latency:
AWS Services in the Asia Pacific (Hyderabad) Region
In the new Hyderabad Region, you can use C5, C5d, C6g, M5, M5d, M6gd, R5, R5d, R6g, I3, I3en, T3, and T4g instances, and use a long list of AWS services including: Amazon API Gateway, AWS AppConfig, AWS Application Auto Scaling, Amazon Aurora, Amazon EC2 Auto Scaling, AWS Config, AWS Certificate Manager, AWS Cloud Control API, AWS CloudFormation, AWS CloudTrail, Amazon CloudWatch, Amazon CloudWatch Events, Amazon CloudWatch Logs, AWS CodeDeploy, AWS Database Migration Service, AWS Direct Connect, Amazon DynamoDB, Amazon Elastic Block Store (Amazon EBS), Amazon Elastic Compute Cloud (Amazon EC2), Amazon Elastic Container Registry (Amazon ECR), Amazon Elastic Container Service (Amazon ECS), Amazon ElastiCache, Amazon EMR, Elastic Load Balancing, Elastic Load Balancing – Network (NLB), Amazon EventBridge, AWS Fargate, AWS Health Dashboard, AWS Identity and Access Management (IAM), Amazon Kinesis Data Streams, AWS Key Management Service (AWS KMS), AWS Lambda, AWS Marketplace, Amazon OpenSearch Service, Amazon Relational Database Service (Amazon RDS), Amazon Redshift, Amazon Route 53, AWS Secrets Manager, Amazon Simple Storage Service (Amazon S3), Amazon S3 Glacier, Amazon Simple Notification Service (Amazon SNS), Amazon Simple Queue Service (Amazon SQS), AWS Step Functions, AWS Support API, Amazon Simple Workflow Service (Amazon SWF), AWS Systems Manager, AWS Trusted Advisor, VM Import/Export, Amazon Virtual Private Cloud (Amazon VPC), AWS VPN, and AWS X-Ray.
AWS in India
AWS has a long-standing history of helping drive digital transformation in India. AWS first established a presence in the country in 2011, with the opening of an office in Delhi. In 2016, AWS launched the Asia Pacific (Mumbai) Region giving enterprises, public sector organizations, startups, and SMBs access to state-of-the-art public cloud infrastructure. In May 2019, AWS expanded the Region to include a third Availability Zone to support rapid customer growth and provide more choice, flexibility, the ability to replicate workloads across more Availability Zones, and even higher availability.
There are currently 33 Amazon CloudFront edge locations: Mumbai, India (10), New Delhi (7), Chennai (7), Bangalore (4), Hyderabad (3), and Kolkata (2) in India. The edge locations work in concert with a CloudFront Regional edge cache in Mumbai to speed delivery of content. There are six AWS Direct Connect locations, all of which connect to the Asia Pacific (Mumbai) Region: two in Mumbai, one in Chennai, one in Hyderabad, one in Delhi, and one in Bangalore. Finally, the first AWS Local Zones launched in Delhi, India for bringing selected AWS services very close to a particular geographic area. We announced plans to launch three more AWS Local Zones in India, in the cities of Chennai, Bengaluru, and Kolkata.
AWS is also investing in the future of the Indian technology community and workforce, training tech professionals to expand their skillset and cloud knowledge. In fact, since 2017, AWS has trained over three million individuals in India on cloud skills. AWS has worked with government officials, educational institutes, and corporate organizations to achieve this milestone, which has included first-time learners and mid-career professionals alike.
AWS continues to invest in upskilling local developers, students, and the next generation of IT leaders in India through programs such as AWS Academy, AWS Educate, AWS re/Start, and other Training and Certification programs.
AWS Customers in India
We have many amazing customers in India that are doing incredible things with AWS, for example:
- SonyLIV is the first Over the top (OTT) service in India born on the AWS Cloud. SonyLIV launched Kaun Banega Crorepati (KBC) interactive game show to allow viewers to submit answers to questions on the show in real time via their mobile devices. SonyLIV uses Amazon ElastiCache to support real-time, in-memory caching at scale, Amazon CloudFront as a low-latency content delivery network, and Amazon SQS as a highly available message queuing service.
- DocOnline is a digital healthcare platform that provides video or phone doctor consultations to over 3.5 million families in 10 specialties and 14 Indian languages. DocOnline delivers over 100,000 consultations, diagnostic tests, and medicines every year. DocOnline has built its entire business on AWS to power its online consultation services 24-7 and to continuously measure and improve health outcomes. Being in the Healthcare domain, DocOnline needs to comply with regulatory guidelines, including Data Residency, PII security, and Disaster Recovery in seismic zones. With the AWS Asia Pacific (Hyderabad) Region, DocOnline can ensure critical patient data is hosted in India on the most secure, extensive, and reliable cloud platform while serving customers with even faster response times.
- ICICI Lombard General Insurance is one of the first among the large insurance companies in India to move over 140+ applications, including its core application, to AWS. The rapid advances in technology and computing power delivered by cloud computing are poised to radically change the way insurance is delivered as well as consumed. ICICI Lombard has launched new generation products like cyber insurance, telehealth, cashless homecare, and IoT-based risk management solutions for marine transit insurance, providing seamless integration with various digital partners for digital distribution of insurance products and virtual motor claims inspection solutions, which have seen adoption increase from 61 percent last year to 80 percent this year. ICICI Lombard was able to process group health endorsements for their corporate customers in less than a day as compared to 10–12 days earlier. ICICI Lombard is looking at the cloud for further transformative possibilities in real-time inspection of risk and personalized underwriting.
- Ministry of Health and Family Welfare (MoHFW), Government of India, needed a highly reliable, scalable, and resilient technical infrastructure to power a large-scale COVID-19 vaccination drive for India’s more than 1.3 billion citizens in 2021. To facilitate the required performance and speed, the MoHFW engaged India’s Ministry of Electronics and Information Technology to build and launch the Co-WIN application powered by AWS, which scales in seconds to handle user registrations and consistently supports 10 million vaccinations daily.
You can find more customer stories in India.
Available Now
The new Hyderabad Region is ready to support your business. You can find a detailed list of the services available in this Region on the AWS Regional Services List.
With this launch, AWS now spans 96 Availability Zones within 30 geographic Regions around the world, with three new Regions launched in 2022, including the AWS Middle East (UAE) Region, the AWS Europe (Zurich) Region, and the AWS Europe (Spain) Region. We have also announced plans for 15 more Availability Zones and five more AWS Regions in Australia, Canada, Israel, New Zealand, and Thailand.
To learn more, see the Global Infrastructure page, and please send feedback through your usual AWS support contacts in India.
— Channy
Govern and manage permissions of Amazon QuickSight assets with the new centralized asset management console
Post Syndicated from Srikanth Baheti original https://aws.amazon.com/blogs/big-data/govern-and-manage-permissions-of-amazon-quicksight-assets-with-the-new-centralized-asset-management-console/
Amazon QuickSight is a fully-managed, cloud-native business intelligence (BI) service that makes it easy to connect to your data, create interactive dashboards, and share these with tens of thousands of users, either within the QuickSight interface or embedded in software as a service (SaaS) applications or web portals. With QuickSight providing insights to power daily decisions across the organization, it becomes more important than ever for administrators to ensure they can easily govern and manage permissions of all the assets in their account.
We recently announced the launch of a new admin asset management console in QuickSight, which enables administrators at enterprises and independent software vendors (ISVs) to govern their QuickSight account at scale and have self-service support capabilities by providing easy visibility and access to all the assets across the entire account, including in a multi-tenant setup. In addition, admins can perform actions that were previously possible only via API, such as bulk transfer of assets from one user or group to another, share multiple assets with someone at once, or revoke a user’s access to an asset.
This launch also supports APIs for searching assets which allows administrators to automate and govern at scale. Administrators and developers can programmatically search for assets a user or group has access to and search for assets by name. Additionally, they can describe and manage assets permissions.
In this post, we show how to access this console and some of the administration and governance use cases that you can achieve.
Feature overview
The QuickSight admin asset management console is available for admins with AWS Identity and Access Management (IAM) permissions who have access to QuickSight admin console pages. The following IAM policy allows an IAM user get access to all the features in the asset management console:
APIs
Assets can be searched by using the following public APIs:
Permissions of the assets can be described and managed by using the following public APIs:
- DescribeAnalysisPermissions
- DescribeDashboardPermissions
- DescribeDataSetPermissions
- DescribeDataSourcePermissions
- DescribeFolderPermissions
- UpdateAnalysisPermissions
- UpdateDashboardPermissions
- UpdateDataSetPermissions
- UpdateDataSourcePermissions
- UpdateFolderPermissions
Access the QuickSight asset management console
To access the new QuickSight asset management console, complete the following steps:
- On the QuickSight console, navigate to the user menu and choose Manage QuickSight.

- In the navigation pane, choose Manage assets.


The landing page presents three ways to list assets:
- Search for assets owned by a user or a group in a namespace
- Search for assets by name
- Browse all assets or filter by asset type in the account


If you have only one namespace, you won’t see namespace drop-down, as shown in the following screenshot.

Use case overview
Let’s consider a fictional company, AnyCompany, which is an ISV that provides services to thousands of customers across the globe. QuickSight is one of the services used by AnyCompany for providing multi-tenant BI and analytics solutions. They have already implemented multi-tenancy in QuickSight using namespaces to isolate users and groups. Within each tenant, assets are organized using folders.
Previously, there was no single pane of glass view in the QuickSight user interface that could show them all the assets by tenant users or groups and associated permissions. To get a holistic view, they were dependent on IT administrators to run tenant-specific API calls and export that information on a regular basis to validate the asset permissions.
With this feature, AnyCompany is no longer dependent on IT administrators for the asset information, and doesn’t have to go through the tedious task of reconciliation and access validation. This not only removes a dependency on IT administrators’ availability, but also provides a centralized solution for asset governance.
AnyCompany has the following key administration and governance needs that they deem critical:
- Transfer assets – They want to be able to quickly transfer assets from one user or group to another in case the original owner is leaving the company or is on an extended leave
- Onboard new employees – They want to be able to speed up onboarding of new employees by giving them access to assets their teammates have
- Support authors – They want their in-house BI engineers to be able to easily and quickly support authors in other tenants by getting access to their dashboards
- Revoke access – They want the capability to quickly audit and revoke permissions when changes occur
In the following sections, we discuss how AnyCompany meets their asset management needs in more detail.
Transfer assets
One of the business analysts, who was responsible for authoring some the key dashboards for use within the management team in headquarters and common dashboards that were being shared with all the tenants, recently switched organizations within AnyCompany. The central administrator wants to transfer all the assets to another team member and to maintain continuity.
To transfer assets, complete the following steps:
- Log in to QuickSight and navigate to Manage assets.
- Choose the namespace of the business analyst who left.

- Enter at least the first three characters of the username or the email of the analyst who left and choose the user from the search results.


A list of all the assets that the analyst is owner or viewer of is displayed.
- Use the filters to list assets of which the analyst is the sole owner.
- You can also choose to list only a single type of asset, such as dashboards.

- Select all the assets on the first page.

- On the Actions menu, choose Transfer.
- Choose the namespace the new user belongs to.
- Search for the analyst to whom all the assets will be transferred to by entering at least the first three characters of the username or the email.
- Choose the appropriate user from the search results.

- For Permissions, you can choose to replicate permissions that the analyst had to the new user, or make the new user owner or viewer of all assets being transferred.
- Choose Transfer.

- When the transfer is complete, choose Done.

- Repeat these steps if there is more than one page of assets listed.


Onboard new employees
A new analyst has joined AnyCompany, and the manager wants this analyst to have access to all QuickSight assets as one of the existing analyst.
To share assets, the administrator takes the following steps:
- Log in to QuickSight and navigate to Manage assets.
- Choose the namespace the existing business analyst belongs to.
- Search for the existing analyst by entering at least the first three characters of the username or the email and choose the user from the search results.


A list of all the assets that the analyst is owner or viewer of is displayed.
- Select all the assets on the first page.

- On the Actions menu, choose Share.

- Choose the namespace the new user belongs to.
- Search for the analyst who just joined the team by entering at least the first three characters of the username or the email and choose the appropriate user from the search results.

- You can choose to replicate permissions that the analyst had to the new user, or make the new user the owner or viewer of all assets being shared.
- Choose Share.

- When the share is complete, choose Done.


Support authors
AnyCompany often receives support requests from their tenant authors who are creating and sharing dashboards within the boundary of their tenant, which is achieved by namespaces in QuickSight. AnyCompany’s support team wants to get easy access to other tenant authors’ assets and provide the necessary support quickly.
To get access to an author’s assets, complete the following steps:
- Log in to QuickSight and navigate to Manage assets.
- For Search by asset name, enter the name of the asset that the support team wants to get access to.


A list of assets that contain the search text is displayed.
- Select the assets you want to give the support team access to.
- Choose Share.

- Choose the namespace the support team belongs to.

- Choose the group the support team belongs to.

- Choose the Owner permission in order for the support team to have complete access to the asset.
- Choose Share.

- When the share is complete, choose Done.


Revoke access
In case of policy changes or if the central administrator discovers that a QuickSight user shouldn’t have access to certain assets, you can revoke asset access.
To revoke a user’s access to an asset, complete the following steps:
- Log in to QuickSight and navigate to Manage assets.
- Choose the namespace the existing business analyst belongs to.
- Search for the user you want to remove access to by entering at least the first three characters of the username or the email and choose the appropriate user from the search results.

A list of all the assets that the analyst is owner or viewer of is displayed.
- Choose the menu icon (three vertical dots) in the Actions column of the assets you want to revoke access to and choose Revoke access.

- Choose Revoke.

- After access has been revoked, choose Done.


Conclusion
With the asset management console, admins now have easy visibility to all the assets in an account and can govern and manage permissions of all the assets in an account. Try out the asset management console for your centralized governance in QuickSight and share your feedback and questions in the comments. For more information, refer to Asset Management Console user guide.
Stay tuned for more new admin capabilities, and follow What’s New with Analytics for the latest on QuickSight.
About the Authors
 Srikanth Baheti is a Specialized World Wide Sr. Solution Architect for Amazon QuickSight. He started his career as a consultant and worked for multiple private and government organizations. Later he worked for PerkinElmer Health and Sciences & eResearch Technology Inc, where he was responsible for designing and developing high traffic web applications, highly scalable and maintainable data pipelines for reporting platforms using AWS services and Serverless computing.
 Raji Sivasubramaniam is a Sr. Solutions Architect at AWS, focusing on Analytics. Raji is specialized in architecting end-to-end Enterprise Data Management, Business Intelligence and Analytics solutions for Fortune 500 and Fortune 100 companies across the globe. She has in-depth experience in integrated healthcare data and analytics with wide variety of healthcare datasets including managed market, physician targeting and patient analytics.
 Mayank Agarwal is a product manager for Amazon QuickSight, AWS’ cloud-native, fully managed BI service. He focuses on account administration, governance and developer experience. He started his career as an embedded software engineer developing handheld devices. Prior to QuickSight he was leading engineering teams at Credence ID, developing custom mobile embedded device and web solutions using AWS services that make biometric enrollment and identification fast, intuitive, and cost-effective for Government sector, healthcare and transaction security applications.
Amazon Alexa Audio migrates business intelligence to Amazon QuickSight for faster performance
Post Syndicated from Weijia Shou original https://aws.amazon.com/blogs/big-data/amazon-alexa-audio-migrates-business-intelligence-to-amazon-quicksight-for-faster-performance/
The Amazon Alexa Audio Data & Insights (AUDI) team strives to make business intelligence (BI) accessible for engineers across Amazon Alexa Audio. Amazon Alexa Audio helps you stay entertained with your favorite music, podcasts, books, and radio from providers such as Amazon Music, Spotify, and iHeart Radio. The AUDI team manages dashboards and reports to help Amazon Alexa Audio teams pull metrics, derive insights, and perform deep-dive analyses. To support the performance of business-critical activities, the team sought a fast, high-performing BI solution so that it could improve the user experience.
The AUDI team turned to AWS and migrated its dashboards to Amazon QuickSight, a fully managed, cloud-native BI service powered by machine learning. By moving its dashboards to QuickSight, the AUDI team reduced load times by a factor of 25, from 2–5 minutes to only 5–10 seconds. This has made it simpler than ever for Amazon Alexa Audio to quickly harness BI insights.
“Our users were blown away at how fast Amazon QuickSight loaded our dashboards,” says Kani Singaravel, BI manager at Amazon Alexa Audio. “It’s pretty sleek and very simple to use, which is why we love it.”

Delivering BI insights across Amazon Alexa
The AUDI team delivers nimble BI insights for the Amazon Alexa Audio organization, harnessing data to generate weekly, monthly, quarterly, and exception-based business reports. To support the needs of the users who rely on the BI service, the AUDI team needed a faster, higher-performing solution. Previously, it would take several minutes to load dashboards and view insights, and Amazon Alexa Audio teams required lower latency to perform their important work.
After recognizing these challenges, the AUDI team began to explore advanced BI options on AWS.
“We chose to migrate to AWS after we received a lot of complaints about latency,” says Weijia Shou, BI engineer at Amazon Alexa Audio. “This decision also aligned well with our usage of other AWS tools.”
In February 2022, with the goal of quickly accessing key insights, the team chose Amazon QuickSight as its preferred BI service and began to migrate its dashboards.
Reducing costs and latency on Amazon QuickSight
From research to launch, the AUDI team’s first dashboard migration took 2 months to complete. As of July 2022, it has migrated more than 10 dashboards to Amazon QuickSight.
“The first dashboard that we migrated was the Alexa Audio Summary Trend dashboard, which covers more than 80% of the use cases in our organization,” Shou says. “After that pilot migration, we saw a great improvement on latency from our dashboard.”
The team saw a more than 25-times improvement in latency, reducing dashboard loading times from 2–5 minutes to only 5–10 seconds.
To achieve this acceleration in performance, the AUDI team took advantage of the Super-fast, Parallel, In-Memory Calculation Engine (SPICE) in-memory data store in Amazon QuickSight. SPICE is a purpose-built query engine that offers consistently fast performance and automatically scales to meet high concurrency needs during peak periods, such as weekday mornings or end-of-month reporting cycles. When data is imported into SPICE, it’s converted into a highly optimized, proprietary format. Dashboard queries are then powered by SPICE, providing fast performance for dashboard users across Amazon Alexa Audio and shielding the underlying data source from the intensity of traffic generated by interactive dashboard queries. SPICE data can be refreshed on a schedule or by one-time API calls.
On Amazon QuickSight, the AUDI team has vastly accelerated its querying time for the BI service, which is used by over 300 employees. “The new dashboard is much faster, so we can quickly understand how we’re tracking against our goals and key engagement metrics,” says Blake N., Senior Product Manager at Amazon Alexa International. In addition to improving speed and performance, the AUDI team has also reduced its expenses. Because Amazon QuickSight has a pay-as-you-go pricing structure, it’s much more cost effective than other BI tools on the market.
Accelerating data-driven decision-making on AWS
By migrating BI dashboards to Amazon QuickSight, the AUDI team has made it simpler and faster for hundreds of Amazon Alexa Audio engineers to access the information that they need to make critical decisions in their roles. In the future, the team will continue the migration, and plans to build new dashboards on Amazon QuickSight as it launches innovative new features and services.
“Amazon QuickSight has been a critical migration for our business,” says LeAnn Lorbiecki, senior manager at Amazon Alexa Audio. “Previously, the latency made our dashboards unusable and challenged our ability to make data-driven decisions quickly on behalf of our customers, products, and overall business. The work on this migration was an incredible team effort with returns seen very quickly.”

About the authors
 Weijia Shou is a Business Intelligence Engineer II at Amazon Alexa Audio Data & Insights team. She led the Alexa Audio migration of reporting dashboards to AWS QuickSight. Weijia is passionate about building scalable solutions and tools to accelerate data-driven decision making.
 Kani Singaravel is a Business Intelligence Manager at Alexa Audio, where she enjoys working with the team to solve customer problems and challenges using data analytics.
Automate your Amazon QuickSight deployment with the new API-based account creation and deletion
Post Syndicated from Srikanth Baheti original https://aws.amazon.com/blogs/big-data/automate-your-amazon-quicksight-deployment-with-the-new-api-based-account-creation-and-deletion/
Amazon QuickSight is a fully managed, cloud-native business intelligence (BI) service that makes it easy to connect to your data, create interactive dashboards, and share these with tens of thousands of users, either within the QuickSight interface, or embedded in software as a service (SaaS) applications or web portals.
We’re excited to announce the availability of QuickSight APIs that enable administrators and developers to programmatically create and delete accounts with QuickSight Enterprise and Enterprise + Q editions. This allows developers and administrators to automate the deployment and teardown of QuickSight accounts in their organization at scale.
Feature overview
To create and delete QuickSight accounts programmatically, you can use the following APIs:
- CreateAccountSubscription
- DescribeAccountSubscription
- UpdateAccountSettings
- DeleteAccountSubscription
You need to have the correct AWS Identity and Access Management (IAM) permissions to sign up for QuickSight. For more information, see IAM policy examples for Amazon QuickSight. If your IAM policy includes both the Subscribe and CreateAccountSubscription actions, make sure that both actions are set to Allow. If either action is set to Deny, the Deny action prevails and your API call fails.
Create a QuickSight account
Use the CreateAccountSubscription API to create a QuickSight account:
You can choose to subscribe to Enterprise or Enterprise + Q edition of QuickSight. You can choose the user authentication method: IAM only, IAM and QuickSight, or Active Directory. If you choose Active Directory, you need to provide an Active Directory name and an admin group associated with your Active Directory. Provide the notification email address that you want QuickSight to send notifications to regarding your QuickSight account or QuickSight subscription.
The following code shows the response for CreateAccountSubscription:
Describe a QuickSight account
Use the DescribeAccountSubscription API to receive a description of a QuickSight account’s subscription:
A successful API call returns an AccountInfo object that includes an account’s name, subscription status, authentication type, edition, and notification email address:
Update and delete a QuickSight account
To avoid accidental deletion, a termination protection flag has been introduced. When a new QuickSight account is provisioned through the CreateAccountSubscription API or user interface, the termination protection flag is set to True by default. You can use the existing DescribeAccountSettings API to inquire the current value of the termination protection flag:
The following code shows the response for DescribeAccountSettings:
Use the UpdateAccountSettings API to disable the termination protection flag before proceeding with deleting the account. Optionally, this API can be used to update notification email:


How GoDaddy built a data mesh to decentralize data ownership using AWS Lake Formation
Post Syndicated from Ankit Jhalaria original https://aws.amazon.com/blogs/big-data/how-godaddy-built-a-data-mesh-to-decentralize-data-ownership-using-aws-lake-formation/
This is a guest post co-written with Ankit Jhalaria from GoDaddy.
GoDaddy is empowering everyday entrepreneurs by providing all the help and tools to succeed online. With more than 20 million customers worldwide, GoDaddy is the place people come to name their idea, build a professional website, attract customers, and manage their work.
GoDaddy is a data-driven company, and getting meaningful insights from data helps them drive business decisions to delight their customers. In 2018, GoDaddy began a large infrastructure revamp and partnered with AWS to innovate faster than ever before to meet the needs of its customer growth around the world. As part of this revamp, the GoDaddy Data Platform team wanted to set the company up for long-term success by creating a well-defined data strategy and setting goals to decentralize the ownership and processing of data.
In this post, we discuss how GoDaddy uses AWS Lake Formation to simplify security management and data governance at scale, and enable data as a service (DaaS) supporting organization-wide data accessibility with cross-account data sharing using a data mesh architecture.
The challenge
In the vast ocean of data, deriving useful insights is an art. Prior to the AWS partnership, GoDaddy had a shared Hadoop cluster on premises that various teams used to create and share datasets with other analysts for collaboration. As the teams grew, copies of data started to grow in the Hadoop Distributed File System (HDFS). Several teams started to build tooling to manage this challenge independently, duplicating efforts. Managing permissions on these data assets became harder. Making data discoverable across a growing number of data catalogs and systems is something that had started to become a big challenge. Although the cost of storage these days is relatively inexpensive, when there are several copies of the same data asset available, it makes it harder for analysts to efficiently and reliably use the data available to them. Business analysts need robust pipelines on key datasets that they rely upon to make business decisions.
Solution overview
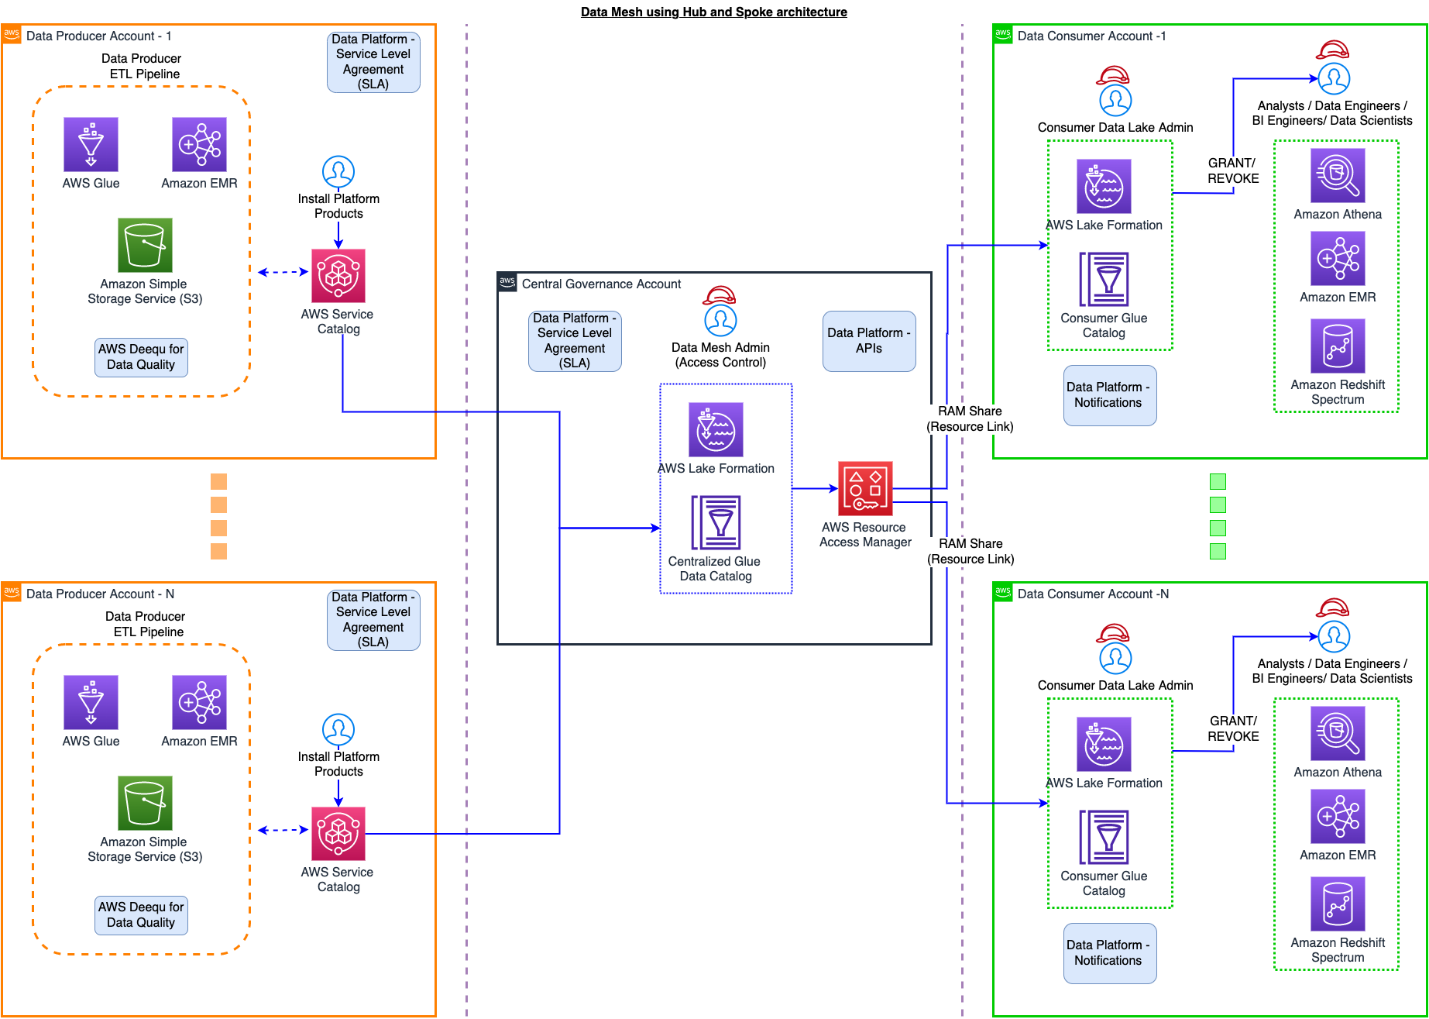
In GoDaddy’s data mesh hub and spoke model, a central data catalog contains information about all the data products that exist in the company. In AWS terminology, this is the AWS Glue Data Catalog. The data platform team provides APIs, SDKs, and Airflow Operators as components that different teams use to interact with the catalog. Activities such as updating the metastore to reflect a new partition for a given data product, and occasionally running MSCK repair operations, are all handled in the central governance account, and Lake Formation is used to secure access to the Data Catalog.
The data platform team introduced a layer of data governance that ensures best practices for building data products are followed throughout the company. We provide the tooling to support data engineers and business analysts while leaving the domain experts to run their data pipelines. With this approach, we have well-curated data products that are intuitive and easy to understand for our business analysts.
A data product refers to an entity that powers insights for analytical purposes. In simple terms, this could refer to an actual dataset pointing to a location in Amazon Simple Storage Service (Amazon S3). Data producers are responsible for the processing of data and creating new snapshots or partitions depending on the business needs. In some cases, data is refreshed every 24 hours, and other cases, every hour. Data consumers come to the data mesh to consume data, and permissions are managed in the central governance account through Lake Formation. Lake Formation uses AWS Resource Access Manager (AWS RAM) to send resource shares to different consumer accounts to be able to access the data from the central governance account. We go into details about this functionality later in the post.
The following diagram illustrates the solution architecture.
Defining metadata with the central schema repository
Data is only useful if end-users can derive meaningful insights from it—otherwise, it’s just noise. As part of onboarding with the data platform, a data producer registers their schema with the data platform along with relevant metadata. This is reviewed by the data governance team that ensures best practices for creating datasets are followed. We have automated some of the most common data governance review items. This is also the place where producers define a contract about reliable data deliveries, often referred to as Service Level Objective (SLO). After a contract is in place, the data platform team’s background processes monitor and send out alerts when data producers fail to meet their contract or SLO.
When managing permissions with Lake Formation, you register the Amazon S3 location of different S3 buckets. Lake Formation uses AWS RAM to share the named resource.
When managing resources with AWS RAM, the central governance account creates AWS RAM shares. The data platform provides a custom AWS Service Catalog product to accept AWS RAM shares in consumer accounts.
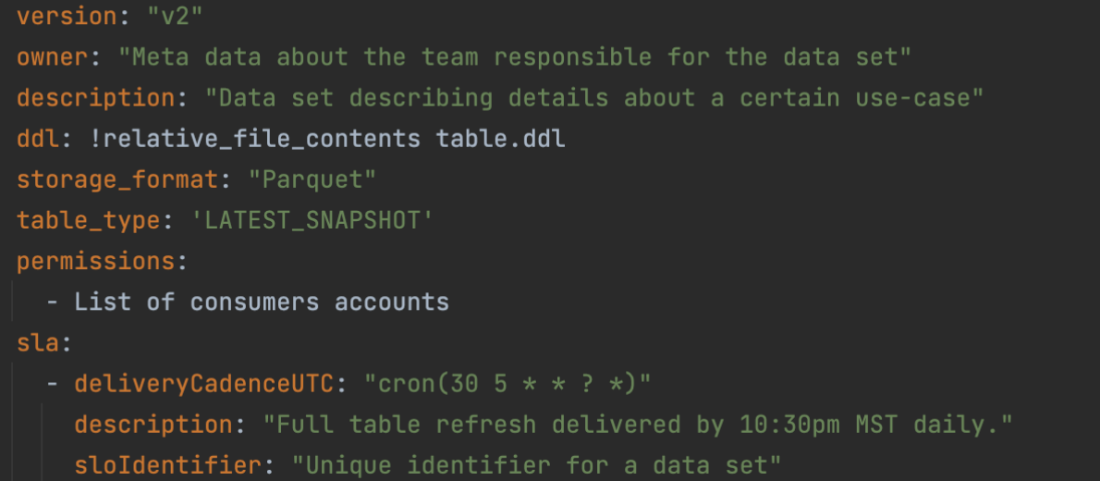
Having consistent schemas with meaningful names and descriptions makes the discovery of datasets easy. Every data producer who is a domain expert is responsible for creating well-defined schemas that business users use to generate insights to make key business decisions. Data producers register their schemas along with additional metadata with the data lake repository. Metadata includes information about the team responsible for the dataset, such as their SLO contract, description, and contact information. This information gets checked into a Git repository where automation kicks in and validates the request to make sure it conforms to standards and best practices. We use AWS CloudFormation templates to provision resources. The following code is a sample of what the registration metadata looks like.
As part of the registration process, automation steps run in the background to take care of the following on behalf of the data producer:
- Register the producer’s Amazon S3 location of the data with Lake Formation – This allows us to use Lake Formation for fine-grained access to control the table in the AWS Glue Data Catalog that refers to this location as well as to the underlying data.
- Create the underlying AWS Glue database and table – Based on the schema specified by the data producer along with the metadata, we create the underlying AWS Glue database and table in the central governance account. As part of this, we also use table properties of AWS Glue to store additional metadata to use later for analysis.
- Define the SLO contract – Any business-critical dataset needs to have a well-defined SLO contract. As part of dataset registration, the data producer defines a contract with a cron expression that gets used by the data platform to create an event rule in Amazon EventBridge. This rule triggers an AWS Lambda function to watch for deliveries of the data and triggers an alert to the data producer’s Slack channel if they breach the contract.
Consuming data from the data mesh catalog
When a data consumer belonging to a given line of business (LOB) identifies the data product that they’re interested in, they submit a request to the central governance team containing their AWS account ID that they use to query the data. The data platform provides a portal to discover datasets across the company. After the request is approved, automation runs to create an AWS RAM share with the consumer account covering the AWS Glue database and tables mapped to the data product registered in the AWS Glue Data Catalog of the central governance account.
The following screenshot shows an example of a resource share.
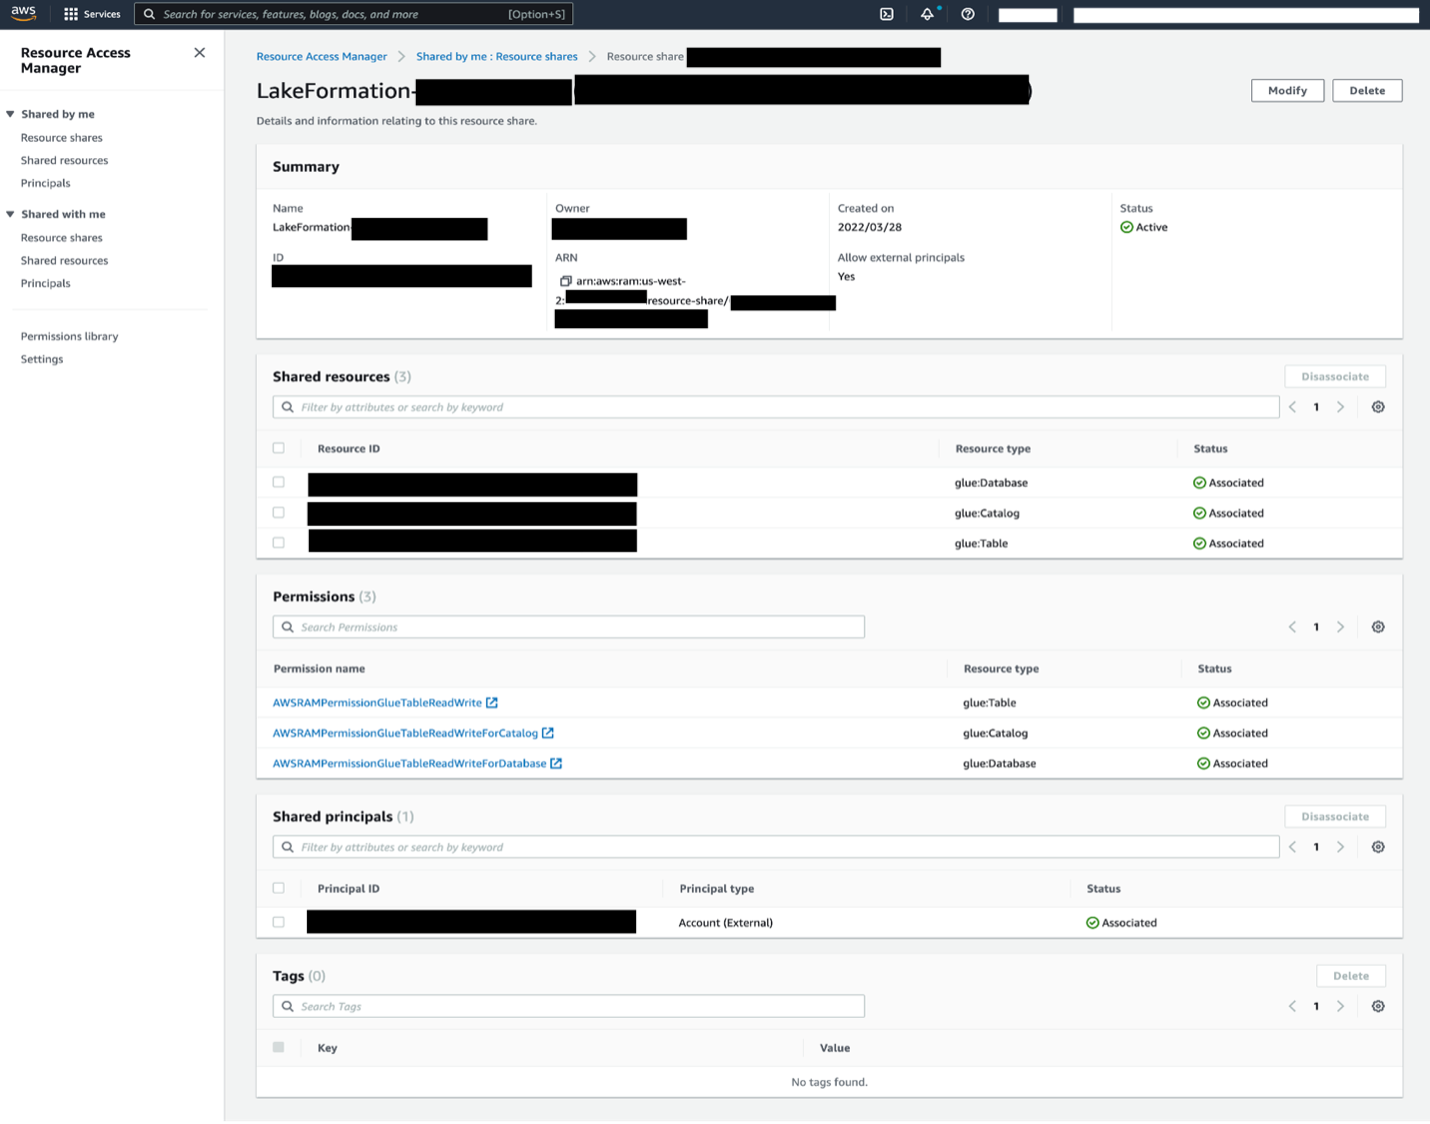
The consumer data lake admin needs to accept the AWS RAM share and create a resource link in Lake Formation to start querying the shared dataset within their account. We automated this process by building an AWS Service Catalog product that runs in the consumer’s account as a Lambda function that accepts shares on behalf of consumers.
When the resource linked datasets are available in the consumer account, the consumer data lake admin provides grants to IAM users and roles mapping to data consumers within the account. These consumers (application or user persona) can now query the datasets using AWS analytics services of their choice like Amazon Athena and Amazon EMR based on the access privileges granted by the consumer data lake admin.
Day-to-day operations and metrics
Managing permissions using Lake Formation is one part of the overall ecosystem. After permissions have been granted, data producers create new snapshots of the data at a certain cadence that can vary from every 15 minutes to a day. Data producers are integrated with the data platform APIs that informs the platform about any new refreshes of the data. The data platform automatically writes a 0-byte _SUCCESS file for every dataset that gets refreshed, and notifies the subscribed consumer account via an Amazon Simple Notification Service (Amazon SNS) topic in the central governance account. Consumers use this as a signal to trigger their data pipelines and processes to start processing newer version of the data utilizing an event-driven approach.
There are over 2,000 data products built on the GoDaddy data mesh on AWS. Every day, there are thousands of updates to the AWS Glue metastore in the central data governance account. There are hundreds of data producers generating data every hour in a wide array of S3 buckets, and thousands of data consumers consuming data across a wide array of tools, including Athena, Amazon EMR, and Tableau from different AWS accounts.
Business outcomes
With the move to AWS, GoDaddy’s Data Platform team laid the foundations to build a modern data platform that has increased our velocity of building data products and delighting our customers. The data platform has successfully transitioned from a monolithic platform to a model where ownership of data has been decentralized. We accelerated the data platform adoption to over 10 lines of business and over 300 teams globally, and are successfully managing multiple petabytes of data spread across hundreds of accounts to help our business derive insights faster.
Conclusion
GoDaddy’s hub and spoke data mesh architecture built using Lake Formation simplifies security management and data governance at scale, to deliver data as a service supporting company-wide data accessibility. Our data mesh manages multiple petabytes of data across hundreds of accounts, enabling decentralized ownership of well-defined datasets with automation in place, which helps the business discover data assets quicker and derive business insights faster.
This post illustrates the use of Lake Formation to build a data mesh architecture that enables a DaaS model for a modernized enterprise data platform. For more information, see Design a data mesh architecture using AWS Lake Formation and AWS Glue.
About the Authors
 Ankit Jhalaria is the Director Of Engineering on the Data Platform at GoDaddy. He has over 10 years of experience working in big data technologies. Outside of work, Ankit loves hiking, playing board games, building IoT projects, and contributing to open-source projects.
 Harsh Vardhan is an AWS Solutions Architect, specializing in Analytics. He has over 6 years of experience working in the field of big data and data science. He is passionate about helping customers adopt best practices and discover insights from their data.
 Kyle Tedeschi is a Principal Solutions Architect at AWS. He enjoys helping customers innovate, transform, and become leaders in their respective domains. Outside of work, Kyle is an avid snowboarder, car enthusiast, and traveler.
Get started with data integration from Amazon S3 to Amazon Redshift using AWS Glue interactive sessions
Post Syndicated from Vikas Omer original https://aws.amazon.com/blogs/big-data/get-started-with-data-integration-from-amazon-s3-to-amazon-redshift-using-aws-glue-interactive-sessions/
Organizations are placing a high priority on data integration, especially to support analytics, machine learning (ML), business intelligence (BI), and application development initiatives. Data is growing exponentially and is generated by increasingly diverse data sources. Data integration becomes challenging when processing data at scale and the inherent heavy lifting associated with infrastructure required to manage it. This is one of the key reasons why organizations are constantly looking for easy-to-use and low maintenance data integration solutions to move data from one location to another or to consolidate their business data from several sources into a centralized location to make strategic business decisions.
Most organizations use Spark for their big data processing needs. If you’re looking to simplify data integration, and don’t want the hassle of spinning up servers, managing resources, or setting up Spark clusters, we have the solution for you.
AWS Glue is a serverless data integration service that makes it easy to discover, prepare, and combine data for analytics, ML, and application development. AWS Glue provides both visual and code-based interfaces to make data integration simple and accessible for everyone.
If you prefer a code-based experience and want to interactively author data integration jobs, we recommend interactive sessions. Interactive sessions is a recently launched AWS Glue feature that allows you to interactively develop AWS Glue processes, run and test each step, and view the results.
There are different options to use interactive sessions. You can create and work with interactive sessions through the AWS Command Line Interface (AWS CLI) and API. You can also use Jupyter-compatible notebooks to visually author and test your notebook scripts. Interactive sessions provide a Jupyter kernel that integrates almost anywhere that Jupyter does, including integrating with IDEs such as PyCharm, IntelliJ, and Visual Studio Code. This enables you to author code in your local environment and run it seamlessly on the interactive session backend. You can also start a notebook through AWS Glue Studio; all the configuration steps are done for you so that you can explore your data and start developing your job script after only a few seconds. When the code is ready, you can configure, schedule, and monitor job notebooks as AWS Glue jobs.
If you haven’t tried AWS Glue interactive sessions before, this post is highly recommended. We work through a simple scenario where you might need to incrementally load data from Amazon Simple Storage Service (Amazon S3) into Amazon Redshift or transform and enrich your data before loading into Amazon Redshift. In this post, we use interactive sessions within an AWS Glue Studio notebook to load the NYC Taxi dataset into an Amazon Redshift Serverless cluster, query the loaded dataset, save our Jupyter notebook as a job, and schedule it to run using a cron expression. Let’s get started.
Solution overview
We walk you through the following steps:
- Set up an AWS Glue Jupyter notebook with interactive sessions.
- Use notebook’s magics, including AWS Glue connection and bookmarks.
- Read data from Amazon S3, and transform and load it into Redshift Serverless.
- Save the notebook as an AWS Glue job and schedule it to run.
Prerequisites
For this walkthrough, we must complete the following prerequisites:
- Upload Yellow Taxi Trip Records data and the taxi zone lookup table datasets into Amazon S3. Steps to do that are listed in the next section.
- Prepare the necessary AWS Identity and Access Management (IAM) policies and roles to work with AWS Glue Studio Jupyter notebooks, interactive sessions, and AWS Glue.
- Create the AWS Glue connection for Redshift Serverless.
Upload datasets into Amazon S3
Download Yellow Taxi Trip Records data and taxi zone lookup table data to your local environment. For this post, we download the January 2022 data for yellow taxi trip records data in Parquet format. The taxi zone lookup data is in CSV format. You can also download the data dictionary for the trip record dataset.
- On the Amazon S3 console, create a bucket called
my-first-aws-glue-is-project-<random number>in theus-east-1Region to store the data.S3 bucket names must be unique across all AWS accounts in all the Regions. - Create folders
nyc_yellow_taxiandtaxi_zone_lookupin the bucket you just created and upload the files you downloaded.
Your folder structures should look like the following screenshots.


Prepare IAM policies and role
Let’s prepare the necessary IAM policies and role to work with AWS Glue Studio Jupyter notebooks and interactive sessions. To get started with notebooks in AWS Glue Studio, refer to Getting started with notebooks in AWS Glue Studio.
Create IAM policies for the AWS Glue notebook role
Create the policy AWSGlueInteractiveSessionPassRolePolicy with the following permissions:
This policy allows the AWS Glue notebook role to pass to interactive sessions so that the same role can be used in both places. Note that AWSGlueServiceRole-GlueIS is the role that we create for the AWS Glue Studio Jupyter notebook in a later step. Next, create the policy AmazonS3Access-MyFirstGlueISProject with the following permissions:
This policy allows the AWS Glue notebook role to access data in the S3 bucket.
Create an IAM role for the AWS Glue notebook
Create a new AWS Glue role called AWSGlueServiceRole-GlueIS with the following policies attached to it:
- AWSGlueServiceRole
- AwsGlueSessionUserRestrictedNotebookPolicy
- AWSGlueInteractiveSessionPassRolePolicy
- AmazonS3Access-MyFirstGlueISProject
Create the AWS Glue connection for Redshift Serverless
Now we’re ready to configure a Redshift Serverless security group to connect with AWS Glue components.
- On the Redshift Serverless console, open the workgroup you’re using.
You can find all the namespaces and workgroups on the Redshift Serverless dashboard. - Under Data access, choose Network and security.
- Choose the link for the Redshift Serverless VPC security group.
 You’re redirected to the Amazon Elastic Compute Cloud (Amazon EC2) console.
- In the Redshift Serverless security group details, under Inbound rules, choose Edit inbound rules.
- Add a self-referencing rule to allow AWS Glue components to communicate:
- For Type, choose All TCP.
- For Protocol, choose TCP.
- For Port range, include all ports.
- For Source, use the same security group as the group ID.

- Similarly, add the following outbound rules:
- A self-referencing rule with Type as All TCP, Protocol as TCP, Port range including all ports, and Destination as the same security group as the group ID.
- An HTTPS rule for Amazon S3 access. The
s3-prefix-list-idvalue is required in the security group rule to allow traffic from the VPC to the Amazon S3 VPC endpoint.


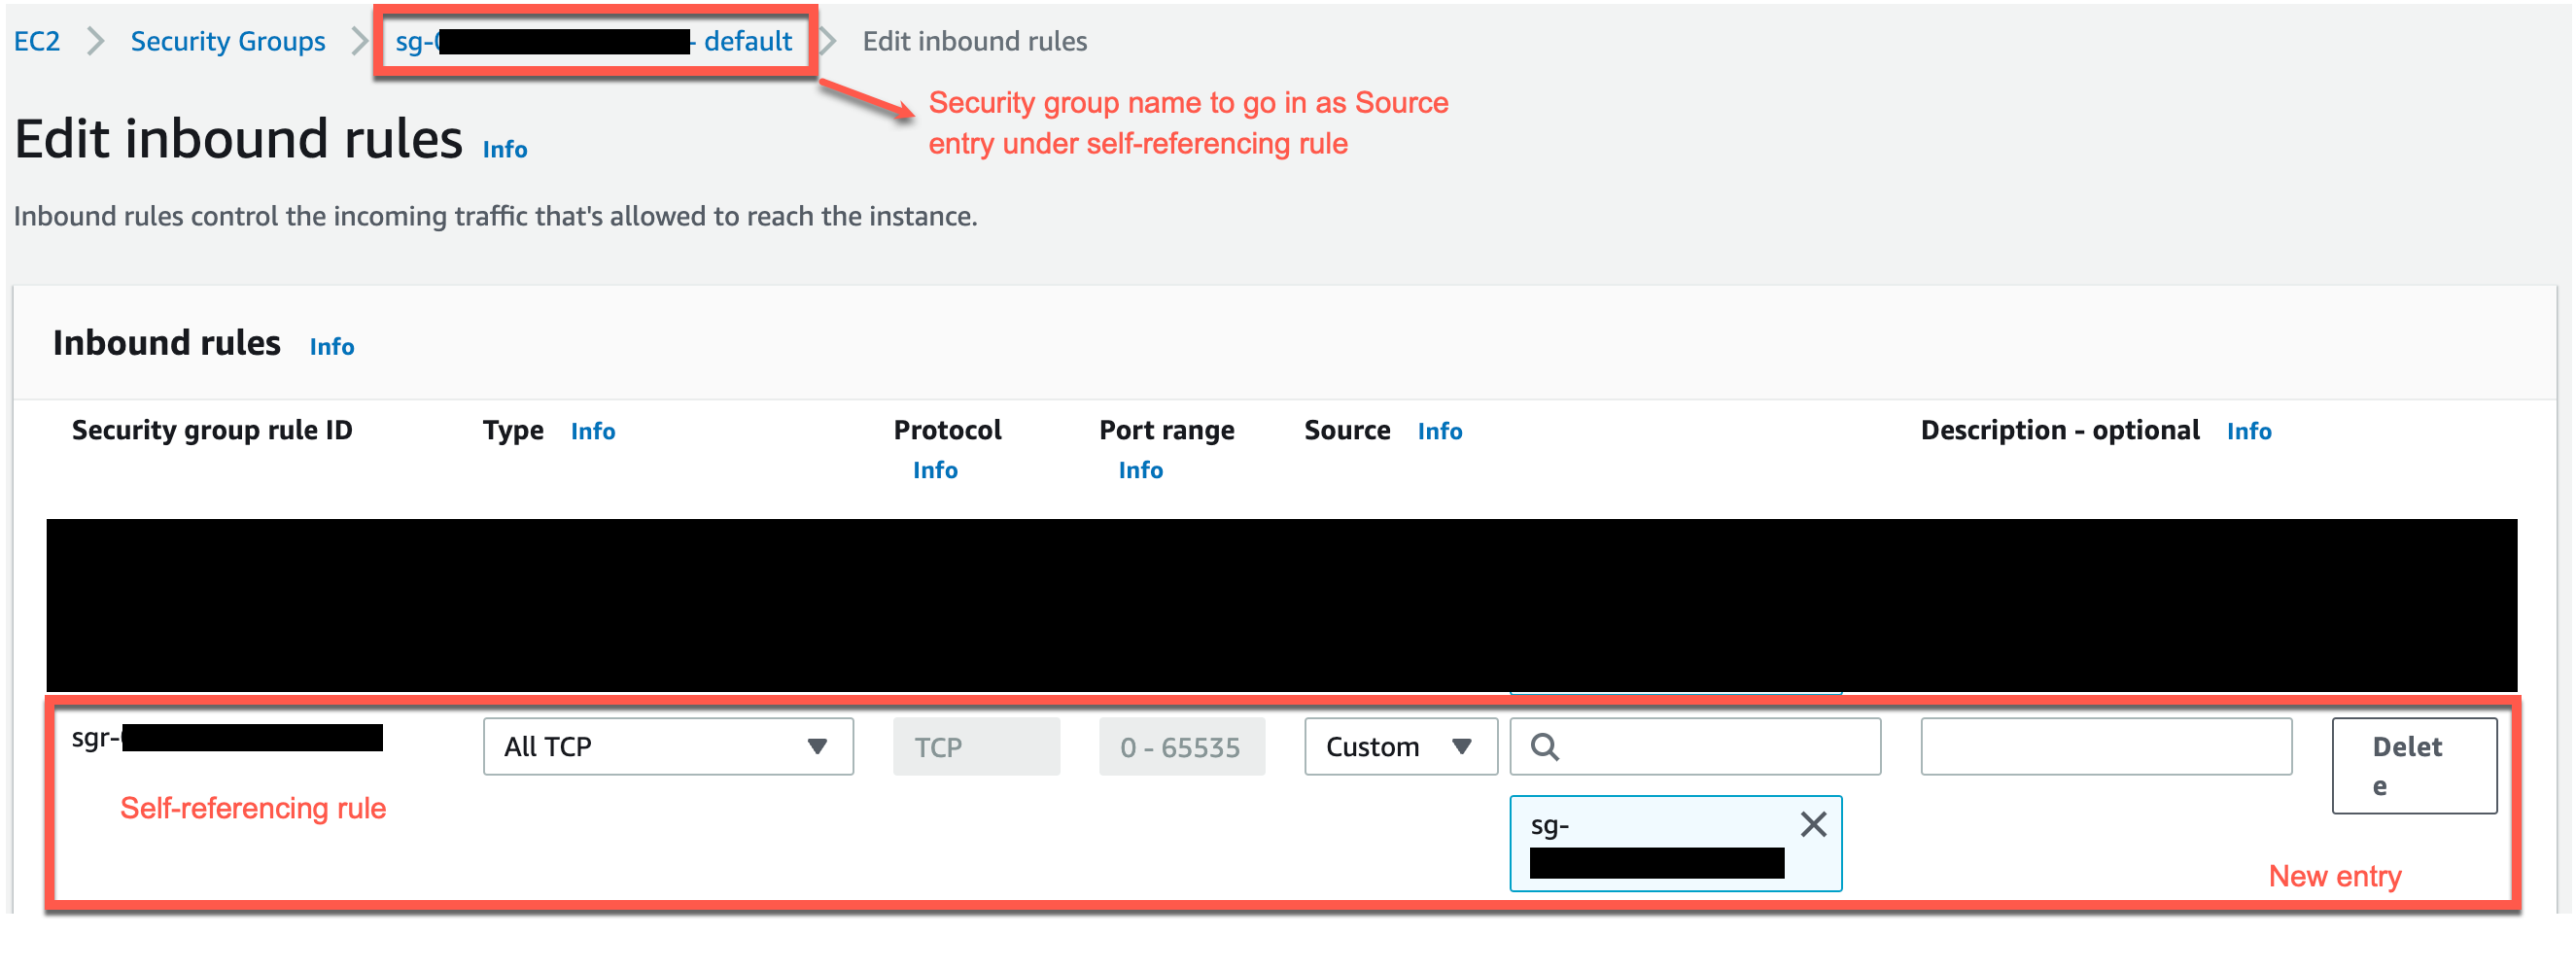
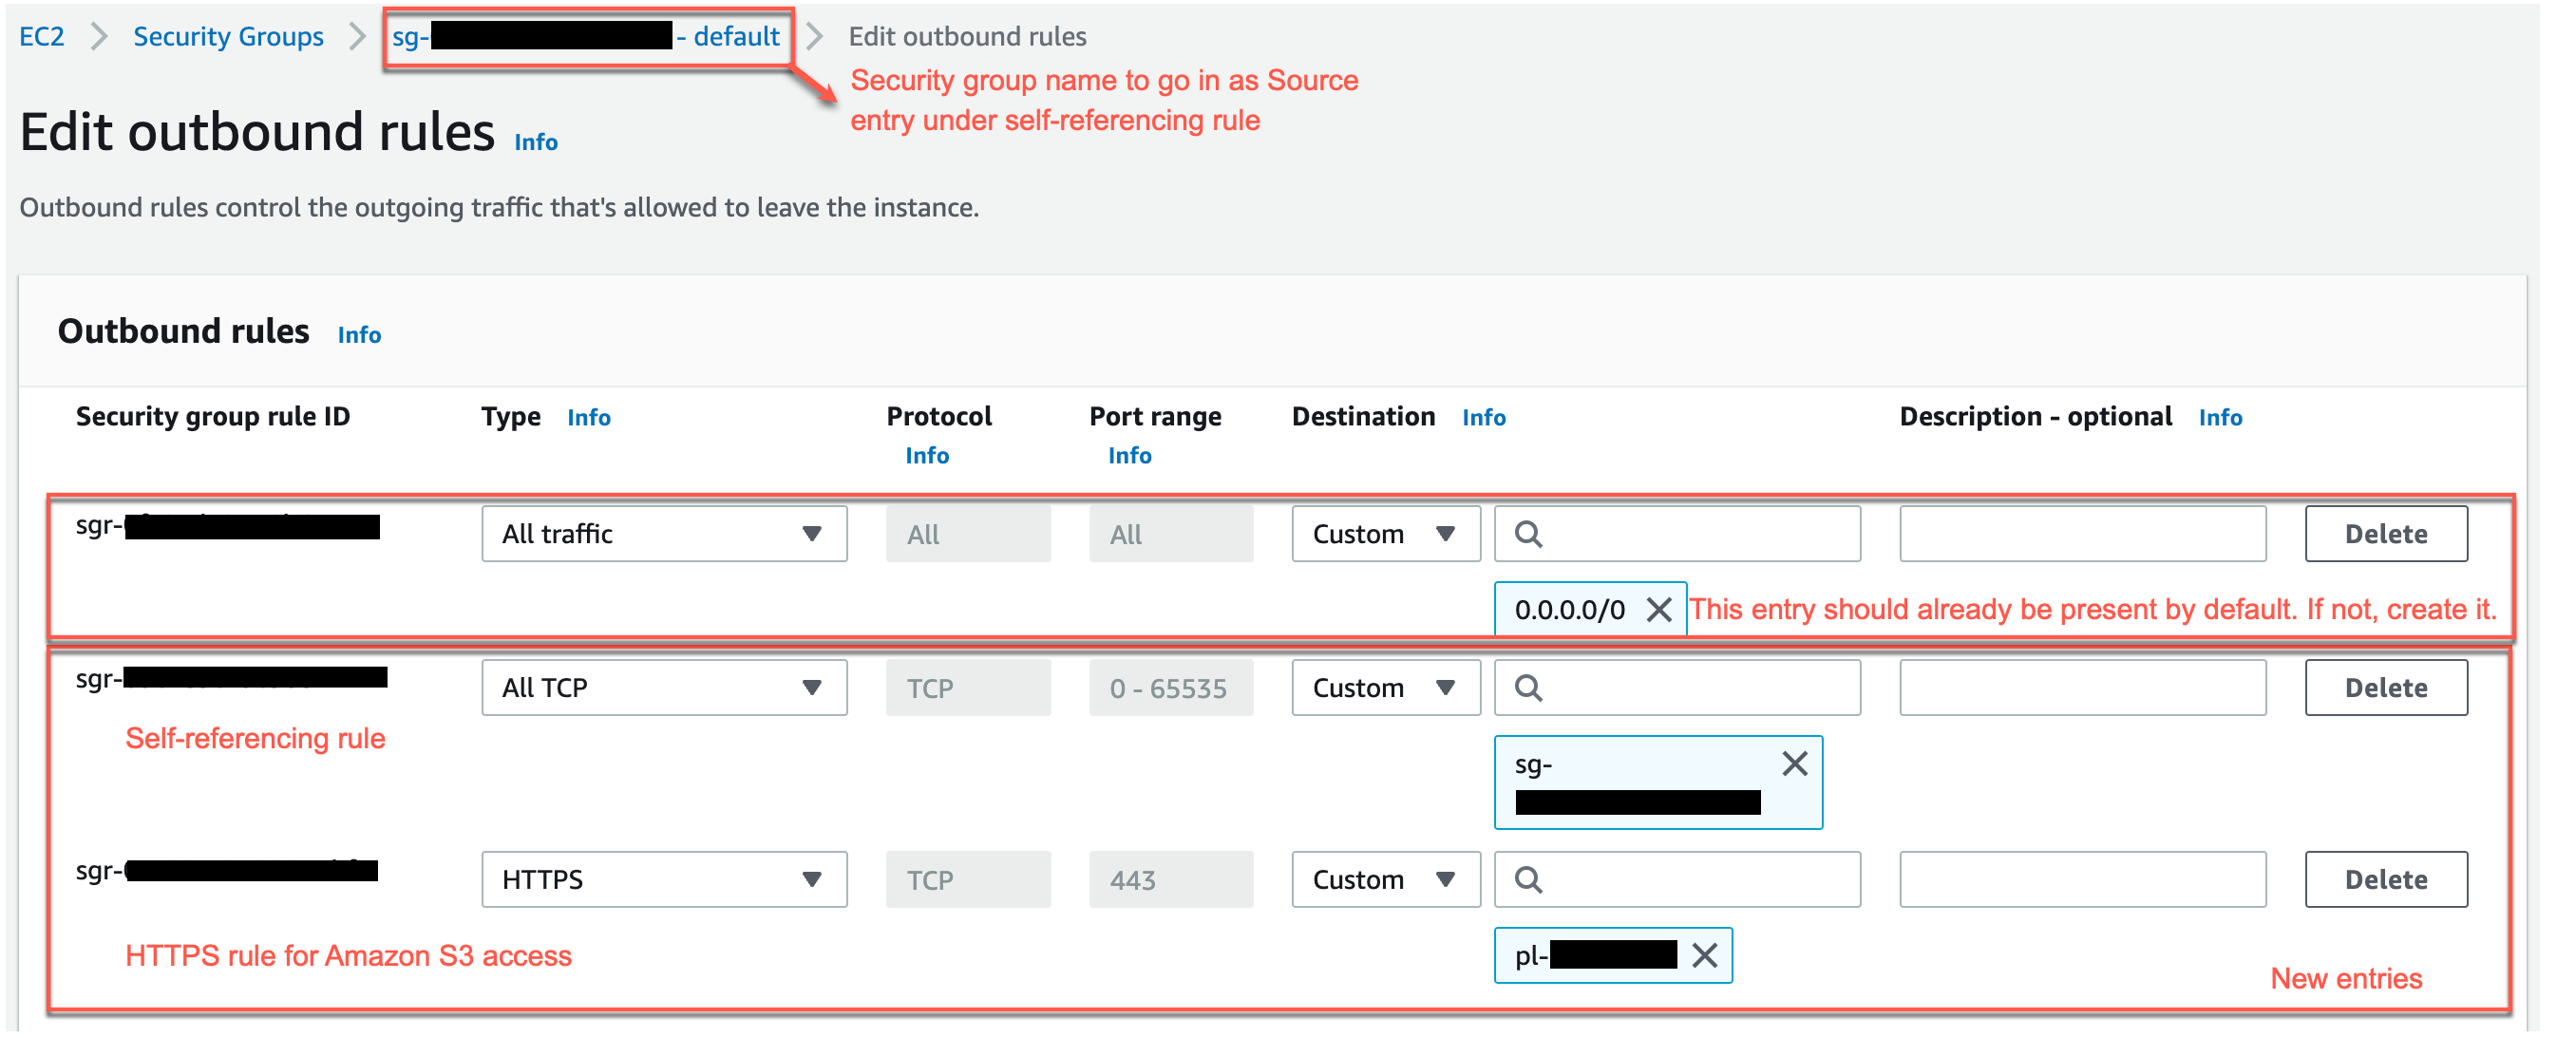
If you don’t have an Amazon S3 VPC endpoint, you can create one on the Amazon Virtual Private Cloud (Amazon VPC) console.

You can check the value for s3-prefix-list-id on the Managed prefix lists page on the Amazon VPC console.

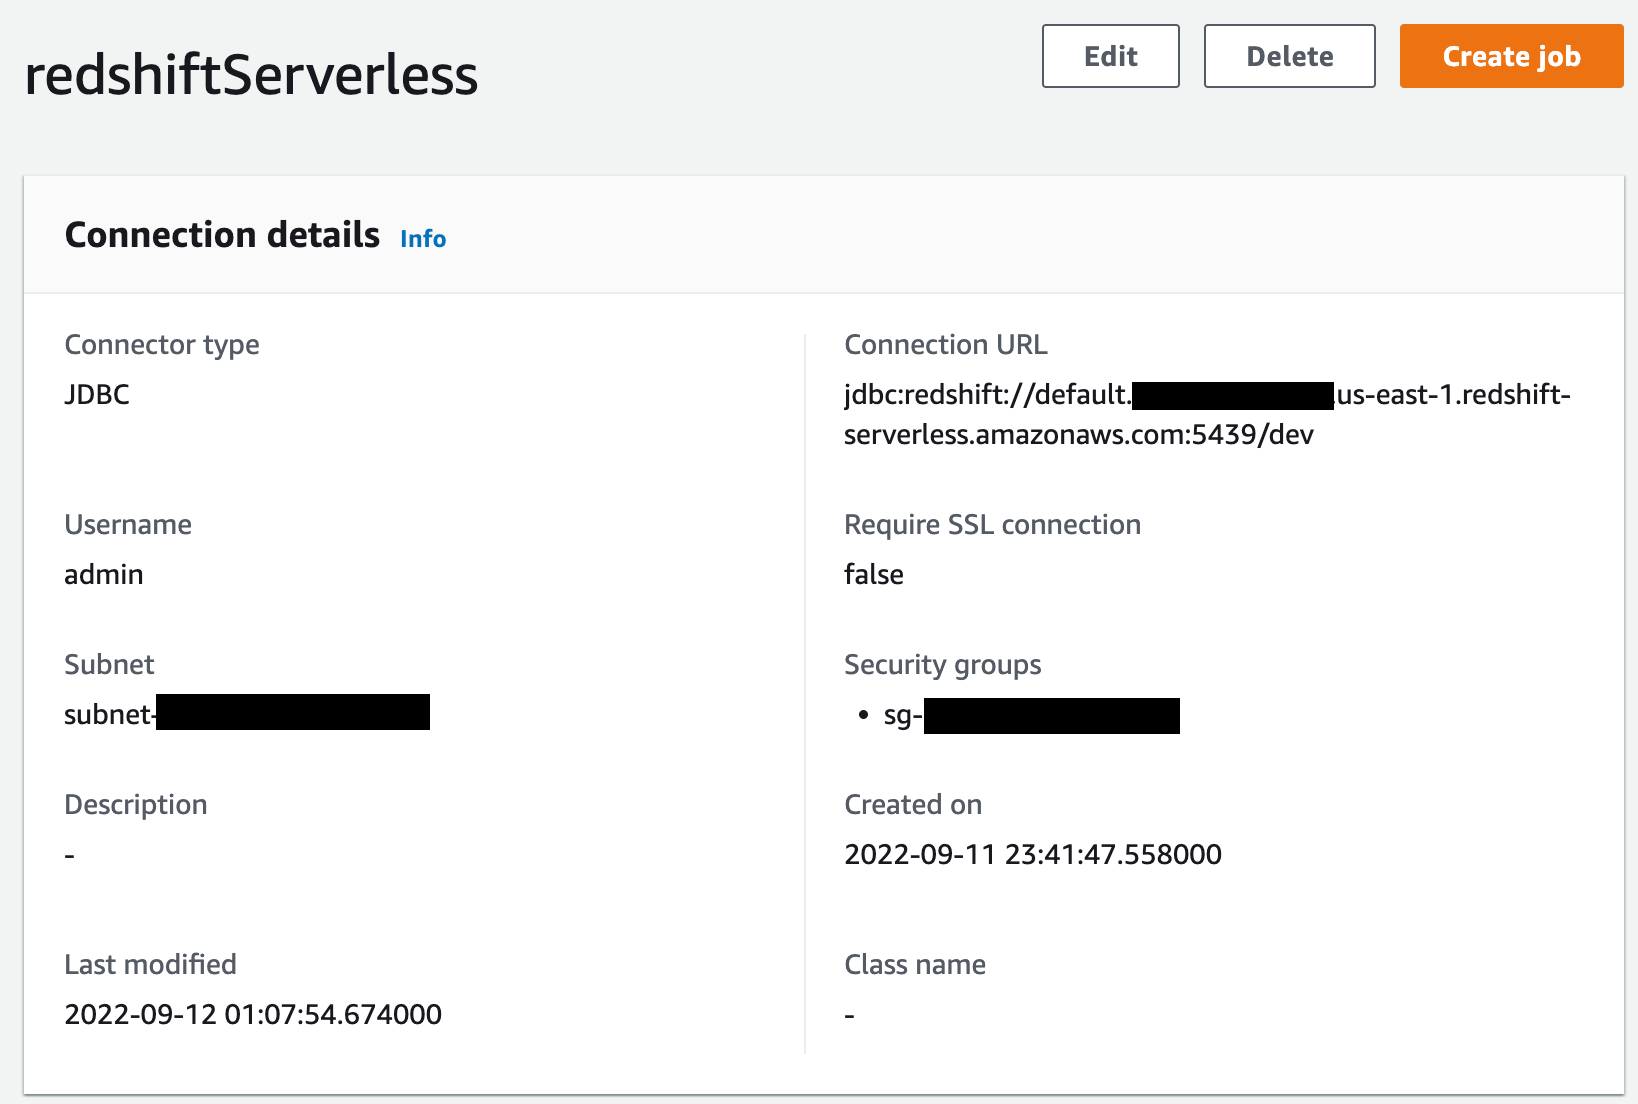
Next, go to the Connectors page on AWS Glue Studio and create a new JDBC connection called redshiftServerless to your Redshift Serverless cluster (unless one already exists). You can find the Redshift Serverless endpoint details under your workgroup’s General Information section. The connection setting looks like the following screenshot.
Write interactive code on an AWS Glue Studio Jupyter notebook powered by interactive sessions
Now you can get started with writing interactive code using AWS Glue Studio Jupyter notebook powered by interactive sessions. Note that it’s a good practice to keep saving the notebook at regular intervals while you work through it.
- On the AWS Glue Studio console, create a new job.
- Select Jupyter Notebook and select Create a new notebook from scratch.
- Choose Create.

- For Job name, enter a name (for example,
myFirstGlueISProject). - For IAM Role, choose the role you created (
AWSGlueServiceRole-GlueIS). - Choose Start notebook job.
 After the notebook is initialized, you can see some of the available magics and a cell with boilerplate code. To view all the magics of interactive sessions, run
%helpin a cell to print a full list. With the exception of%%sql, running a cell of only magics doesn’t start a session, but sets the configuration for the session that starts when you run your first cell of code. For this post, we configure AWS Glue with version 3.0, three G.1X workers, idle timeout, and an Amazon Redshift connection with the help of available magics.
- Let’s enter the following magics into our first cell and run it:
We get the following response:
- Let’s run our first code cell (boilerplate code) to start an interactive notebook session within a few seconds:
We get the following response:
- Next, read the NYC yellow taxi data from the S3 bucket into an AWS Glue dynamic frame:
Let’s count the number of rows, look at the schema and a few rows of the dataset.
- Count the rows with the following code:
We get the following response:
- View the schema with the following code:
We get the following response:
- View a few rows of the dataset with the following code:
We get the following response:
- Now, read the taxi zone lookup data from the S3 bucket into an AWS Glue dynamic frame:
Let’s count the number of rows, look at the schema and a few rows of the dataset.
- Count the rows with the following code:
We get the following response:
- View the schema with the following code:
We get the following response:
- View a few rows with the following code:
We get the following response:
- Based on the data dictionary, lets recalibrate the data types of attributes in dynamic frames corresponding to both dynamic frames:
- Now let’s check their schema:
We get the following response:
We get the following response:
- Let’s add the column
trip_durationto calculate the duration of each trip in minutes to the taxi trip dynamic frame:Let’s count the number of rows, look at the schema and a few rows of the dataset after applying the above transformation.
- Get a record count with the following code:
We get the following response:
- View the schema with the following code:
We get the following response:
- View a few rows with the following code:
We get the following response:
- Next, load both the dynamic frames into our Amazon Redshift Serverless cluster:
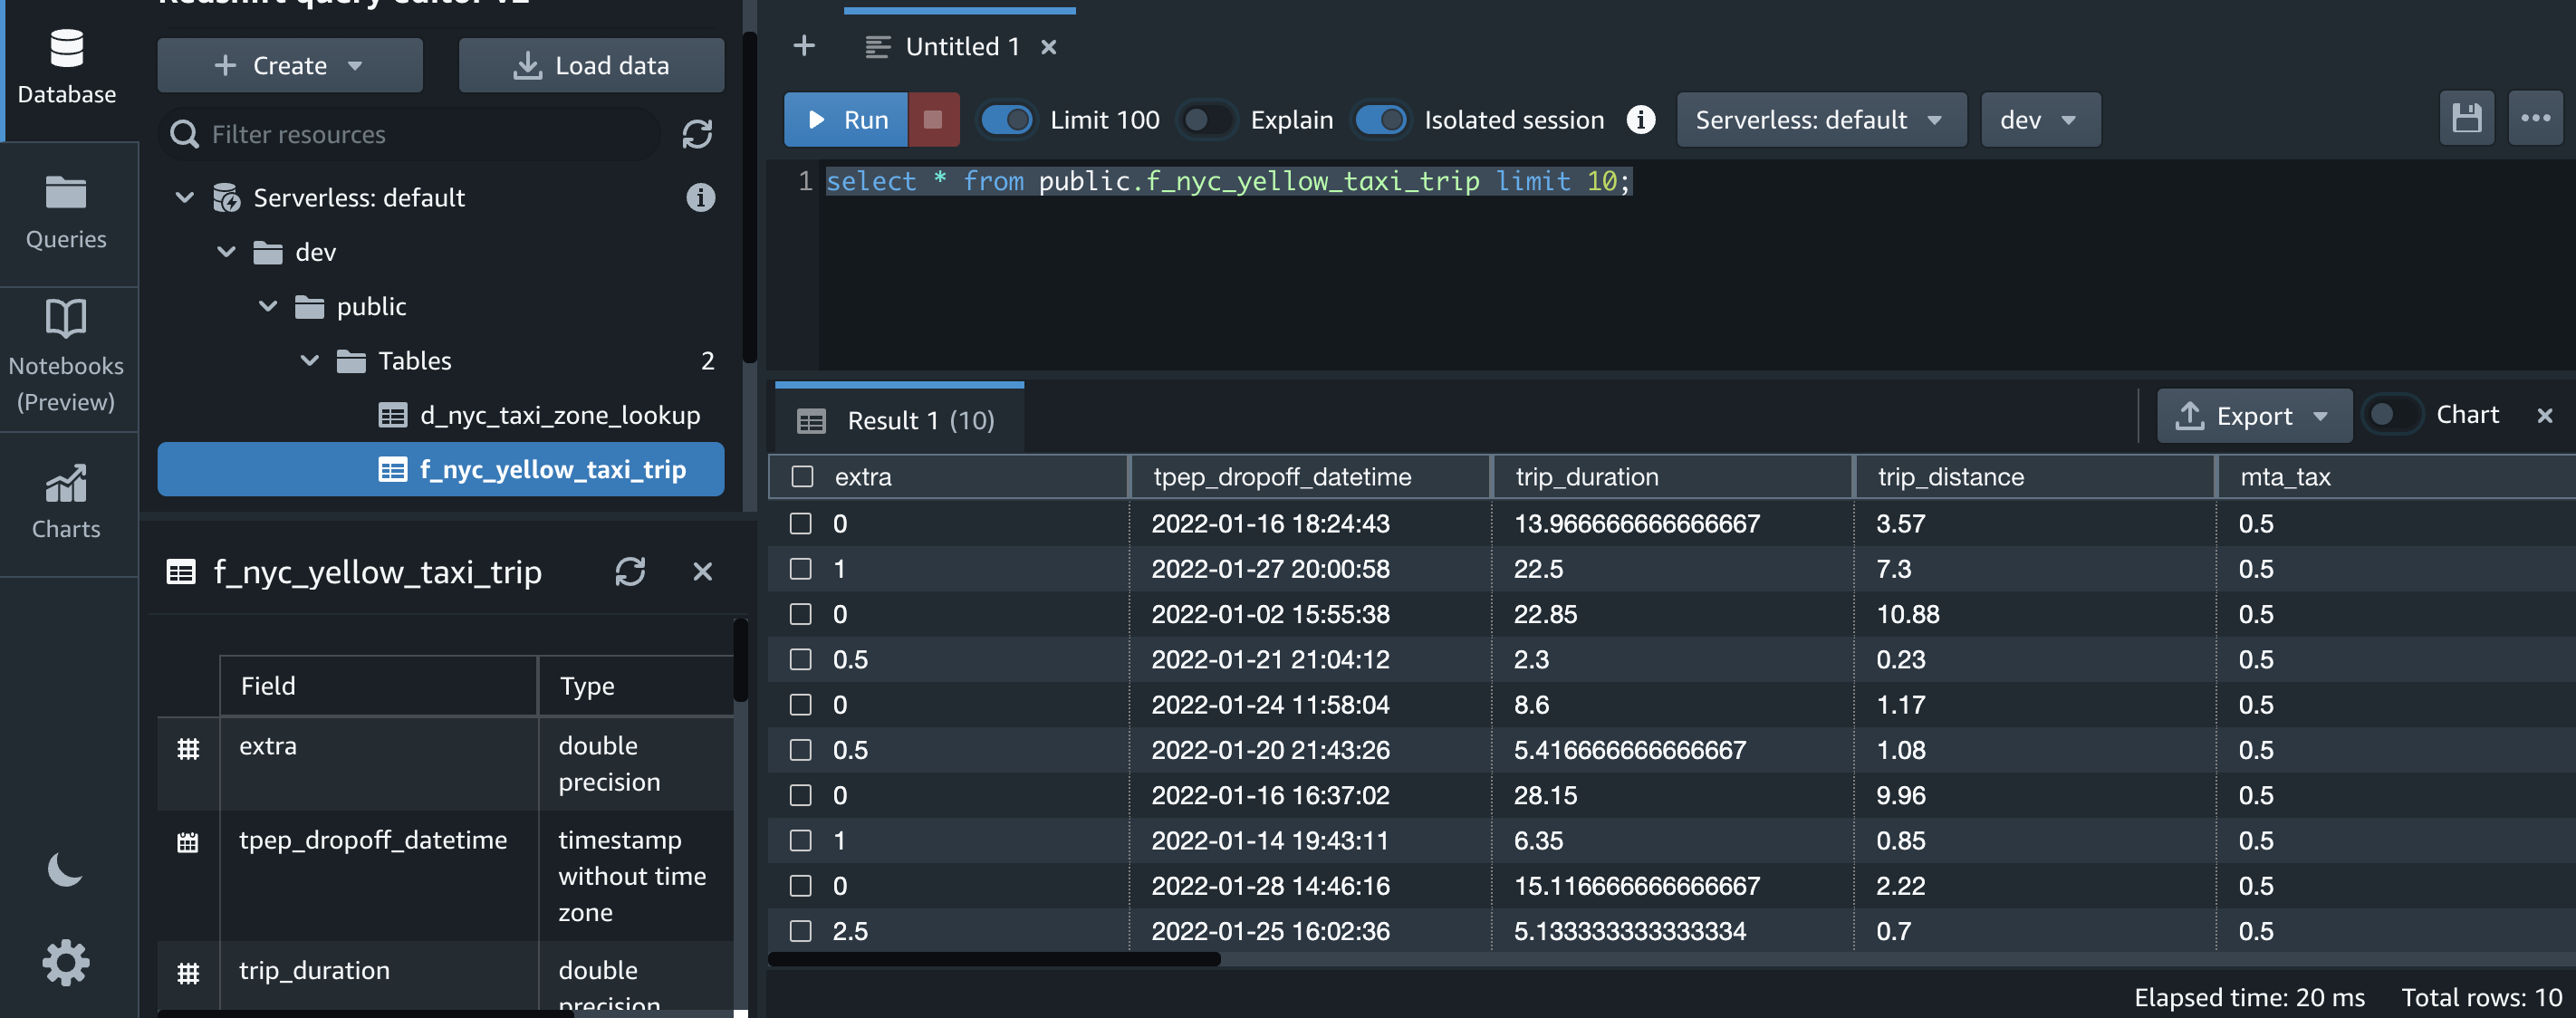
Now let’s validate the data loaded in Amazon Redshift Serverless cluster by running a few queries in Amazon Redshift query editor v2. You can also use your preferred query editor.
- First, we count the number of records and select a few rows in both the target tables (
f_nyc_yellow_taxi_tripandd_nyc_taxi_zone_lookup):
The number of records in
f_nyc_yellow_taxi_trip(2,463,931) andd_nyc_taxi_zone_lookup(265) match the number of records in our input dynamic frame. This validates that all records from files in Amazon S3 have been successfully loaded into Amazon Redshift.You can view some of the records for each table with the following commands:


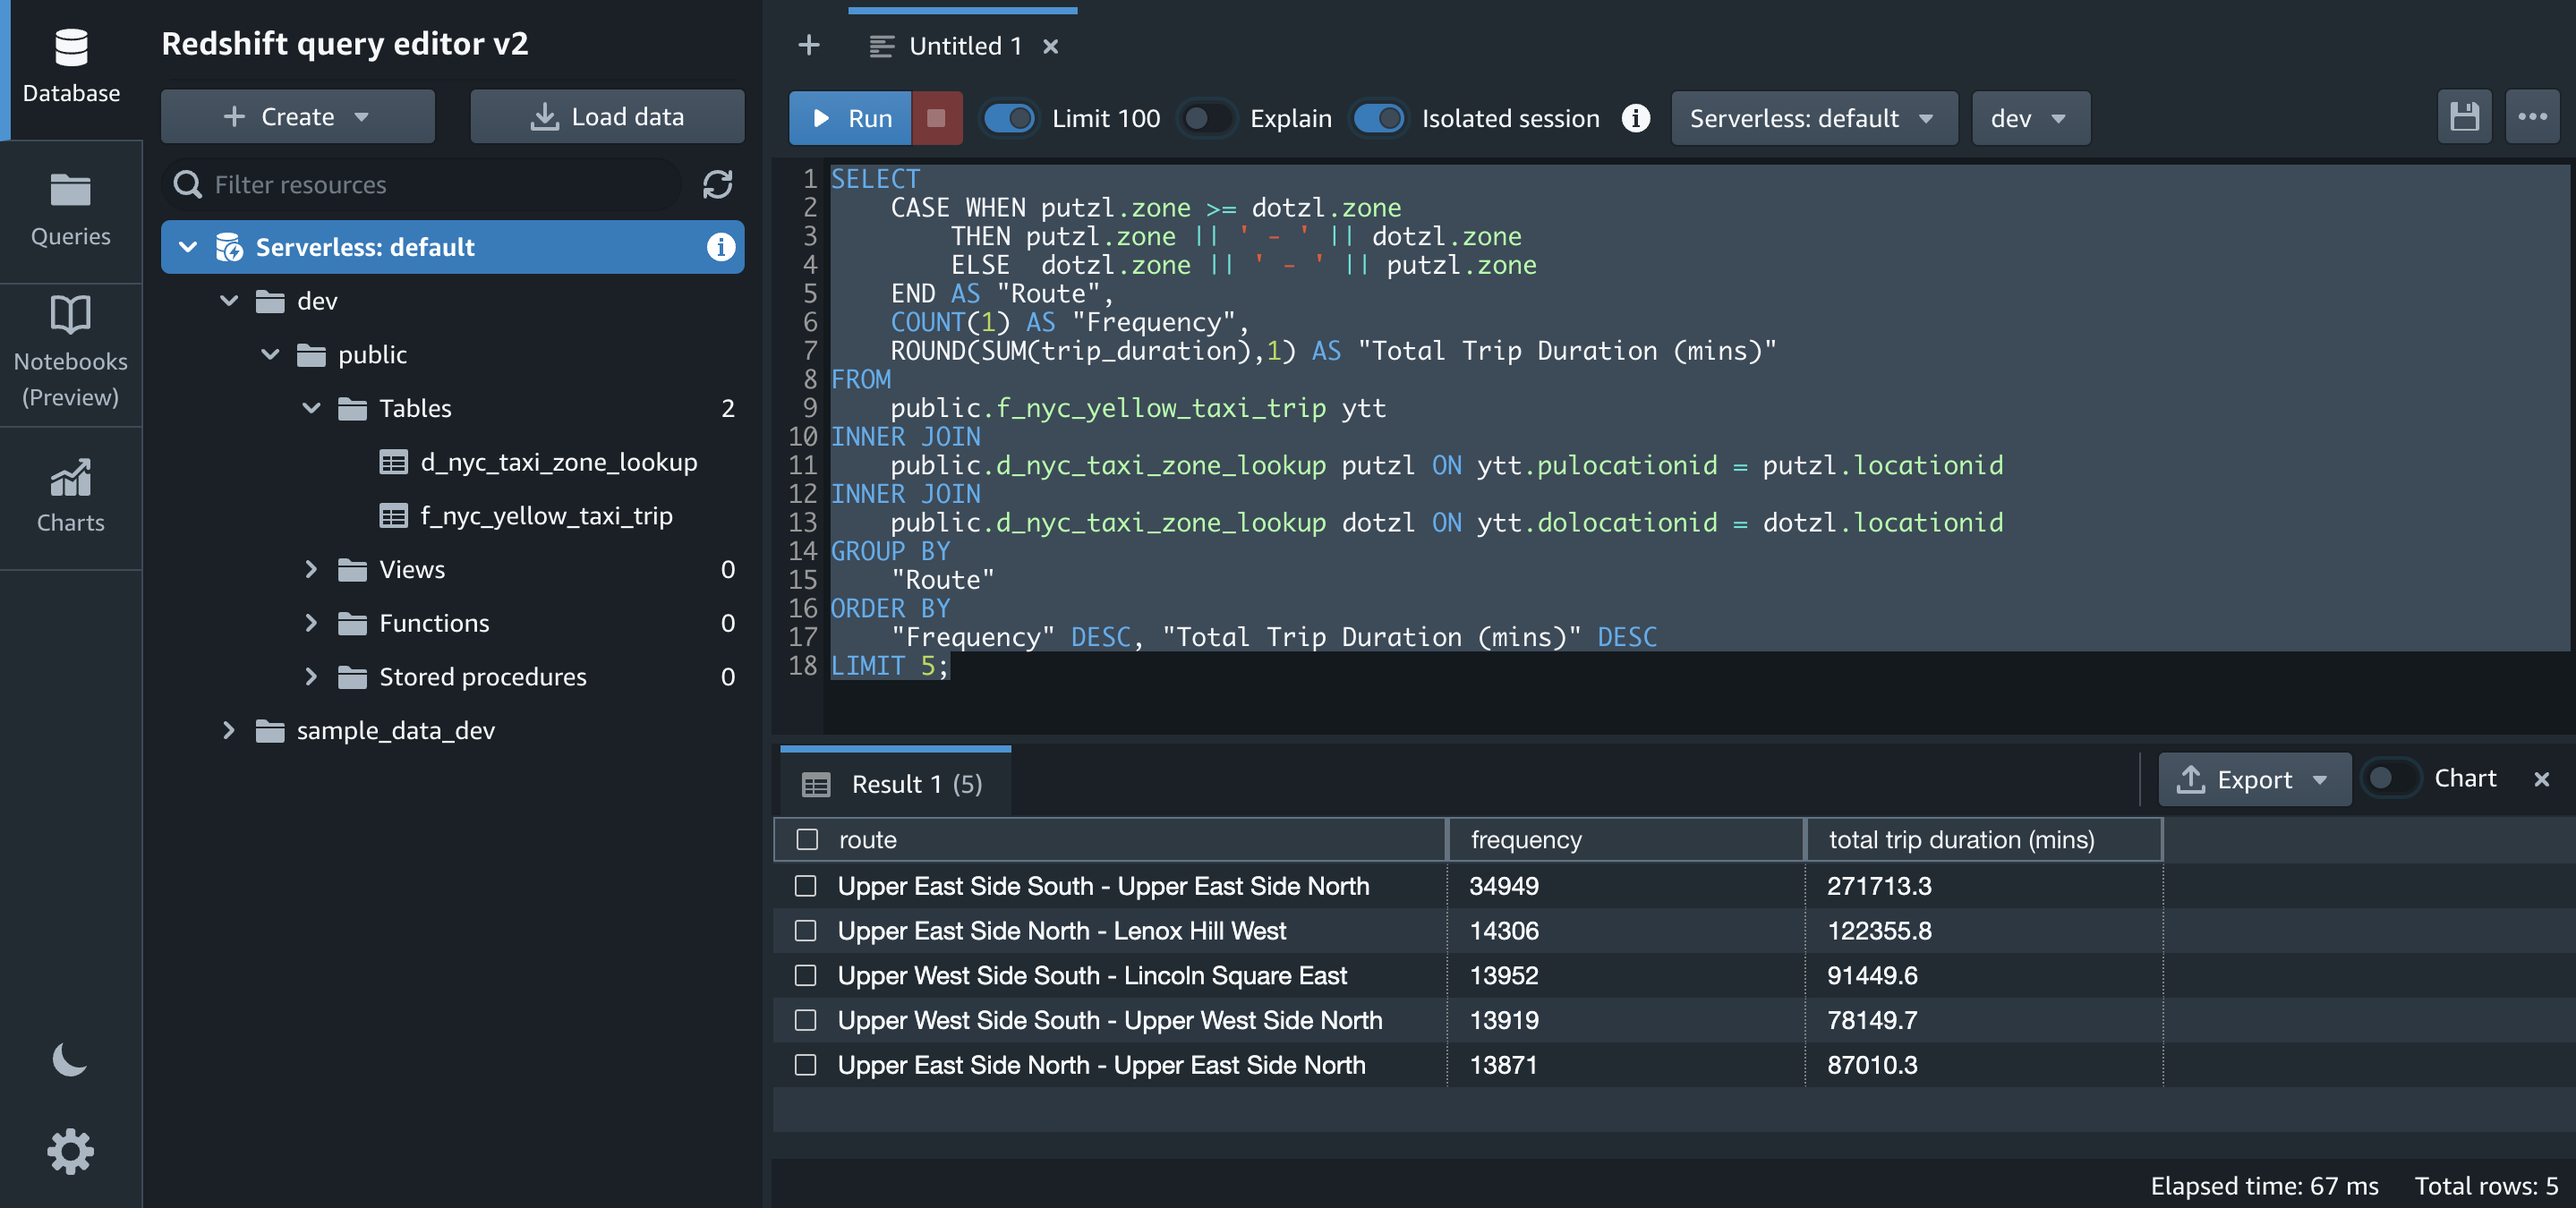
- One of the insights that we want to generate from the datasets is to get the top five routes with their trip duration. Let’s run the SQL for that on Amazon Redshift:



Transform the notebook into an AWS Glue job and schedule it
Now that we have authored the code and tested its functionality, let’s save it as a job and schedule it.
Let’s first enable job bookmarks. Job bookmarks help AWS Glue maintain state information and prevent the reprocessing of old data. With job bookmarks, you can process new data when rerunning on a scheduled interval.
- Add the following magic command after the first cell that contains other magic commands initialized during authoring the code:
To initialize job bookmarks, we run the following code with the name of the job as the default argument (
myFirstGlueISProjectfor this post). Job bookmarks store the states for a job. You should always havejob.init()in the beginning of the script and thejob.commit()at the end of the script. These two functions are used to initialize the bookmark service and update the state change to the service. Bookmarks won’t work without calling them. - Add the following piece of code after the boilerplate code:
- Then comment out all the lines of code that were authored to verify the desired outcome and aren’t necessary for the job to deliver its purpose:
- Save the notebook.

You can check the corresponding script on the Script tab. Note that
job.commit()is automatically added at the end of the script.Let’s run the notebook as a job. - First, truncate
f_nyc_yellow_taxi_tripandd_nyc_taxi_zone_lookuptables in Amazon Redshift using the query editor v2 so that we don’t have duplicates in both the tables: - Choose Run to run the job.
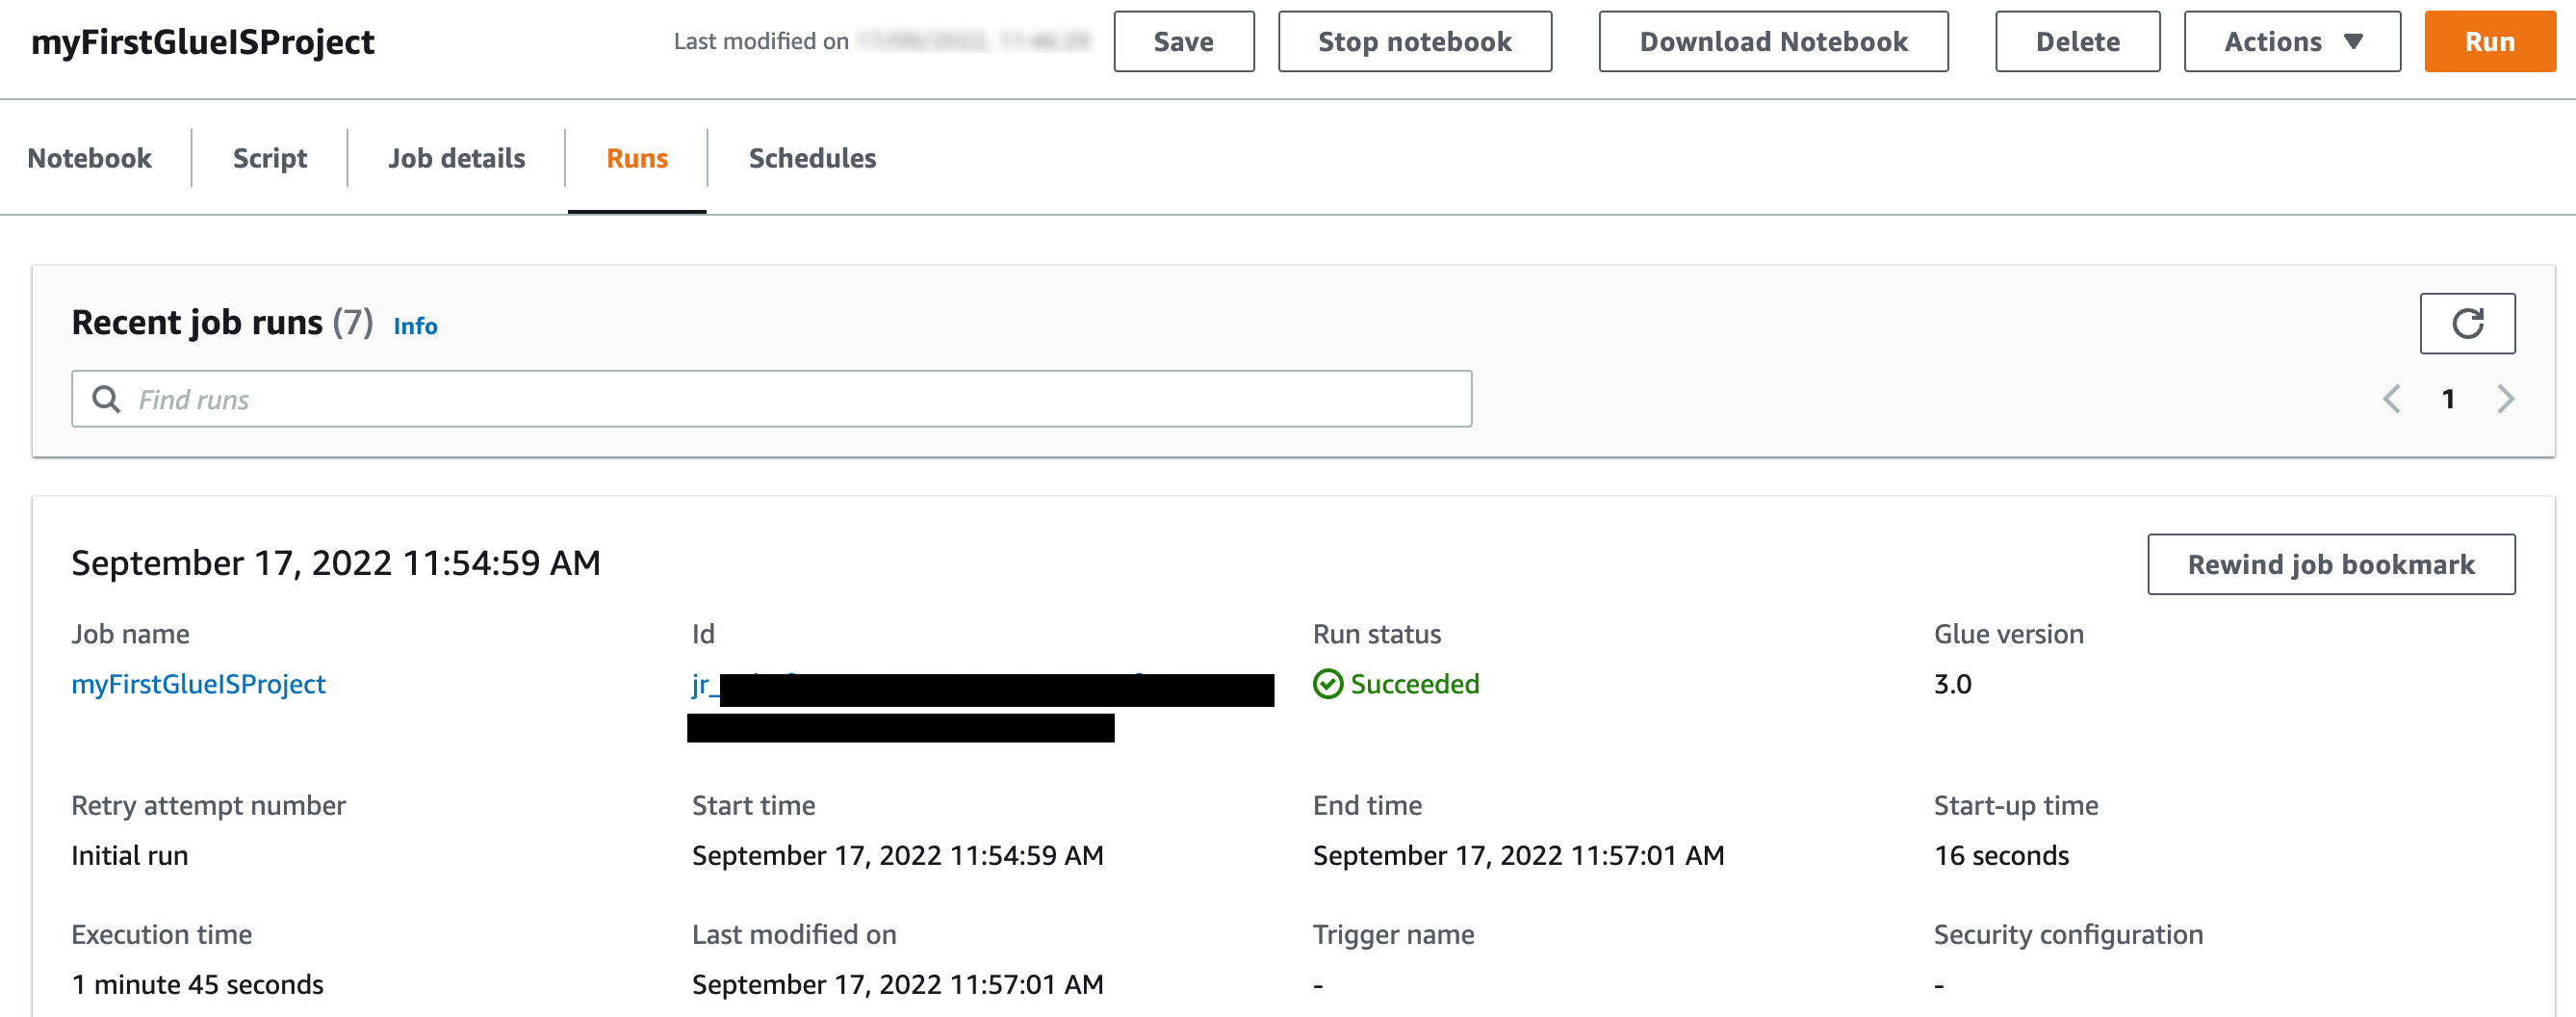
 You can check its status on the Runs tab.
 The job completed in less than 5 minutes with G1.x 3 DPUs.
- Let’s check the count of records in
f_nyc_yellow_taxi_tripandd_nyc_taxi_zone_lookuptables in Amazon Redshift:
With job bookmarks enabled, even if you run the job again with no new files in corresponding folders in the S3 bucket, it doesn’t process the same files again. The following screenshot shows a subsequent job run in my environment, which completed in less than 2 minutes because there were no new files to process.

Now let’s schedule the job.
- On the Schedules tab, choose Create schedule.

- For Name¸ enter a name (for example,
myFirstGlueISProject-testSchedule). - For Frequency, choose Custom.
- Enter a cron expression so the job runs every Monday at 6:00 AM.
- Add an optional description.
- Choose Create schedule.




The schedule has been saved and activated. You can edit, pause, resume, or delete the schedule from the Actions menu.

Clean up
To avoid incurring future charges, delete the AWS resources you created.
- Delete the AWS Glue job (
myFirstGlueISProjectfor this post). - Delete the Amazon S3 objects and bucket (
my-first-aws-glue-is-project-<random number>for this post). - Delete the AWS IAM policies and roles (
AWSGlueInteractiveSessionPassRolePolicy,AmazonS3Access-MyFirstGlueISProjectandAWSGlueServiceRole-GlueIS). - Delete the Amazon Redshift tables (
f_nyc_yellow_taxi_tripandd_nyc_taxi_zone_lookup). - Delete the AWS Glue JDBC Connection (
redshiftServerless). - Also delete the self-referencing Redshift Serverless security group, and Amazon S3 endpoint (if you created it while following the steps for this post).
Conclusion
In this post, we demonstrated how to do the following:
- Set up an AWS Glue Jupyter notebook with interactive sessions
- Use the notebook’s magics, including the AWS Glue connection onboarding and bookmarks
- Read the data from Amazon S3, and transform and load it into Amazon Redshift Serverless
- Configure magics to enable job bookmarks, save the notebook as an AWS Glue job, and schedule it using a cron expression
The goal of this post is to give you step-by-step fundamentals to get you going with AWS Glue Studio Jupyter notebooks and interactive sessions. You can set up an AWS Glue Jupyter notebook in minutes, start an interactive session in seconds, and greatly improve the development experience with AWS Glue jobs. Interactive sessions have a 1-minute billing minimum with cost control features that reduce the cost of developing data preparation applications. You can build and test applications from the environment of your choice, even on your local environment, using the interactive sessions backend.
Interactive sessions provide a faster, cheaper, and more flexible way to build and run data preparation and analytics applications. To learn more about interactive sessions, refer to Job development (interactive sessions), and start exploring a whole new development experience with AWS Glue. Additionally, check out the following posts to walk through more examples of using interactive sessions with different options:
- Introducing AWS Glue interactive sessions for Jupyter
- Author AWS Glue jobs with PyCharm using AWS Glue interactive sessions
- Interactively develop your AWS Glue streaming ETL jobs using AWS Glue Studio notebooks
- Prepare data at scale in Amazon SageMaker Studio using serverless AWS Glue interactive sessions
About the Authors
 Vikas Omer is a principal analytics specialist solutions architect at Amazon Web Services. Vikas has a strong background in analytics, customer experience management (CEM), and data monetization, with over 13 years of experience in the industry globally. With six AWS Certifications, including Analytics Specialty, he is a trusted analytics advocate to AWS customers and partners. He loves traveling, meeting customers, and helping them become successful in what they do.
 Noritaka Sekiyama is a Principal Big Data Architect on the AWS Glue team. He enjoys collaborating with different teams to deliver results like this post. In his spare time, he enjoys playing video games with his family.
 Gal Heyne is a Product Manager for AWS Glue and has over 15 years of experience as a product manager, data engineer and data architect. She is passionate about developing a deep understanding of customers’ business needs and collaborating with engineers to design elegant, powerful and easy to use data products. Gal has a Master’s degree in Data Science from UC Berkeley and she enjoys traveling, playing board games and going to music concerts.
AWS Week in Review – November 21, 2022
Post Syndicated from Danilo Poccia original https://aws.amazon.com/blogs/aws/aws-week-in-review-november-21-2022/
A new week starts, and the News Blog team is getting ready for AWS re:Invent! Many of us will be there next week and it would be great to meet in person. If you’re coming, do you know about PeerTalk? It’s an onsite networking program for re:Invent attendees available through the AWS Events mobile app (which you can get on Google Play or Apple App Store) to help facilitate connections among the re:Invent community.
If you’re not coming to re:Invent, no worries, you can get a free online pass to watch keynotes and leadership sessions.
Last Week’s Launches
It was a busy week for our service teams! Here are the launches that got my attention:
AWS Region in Spain – The AWS Region in Aragón, Spain, is now open. The official name is Europe (Spain), and the API name is eu-south-2.
Amazon Athena – You can now apply AWS Lake Formation fine-grained access control policies with all table and file format supported by Amazon Athena to centrally manage permissions and access data catalog resources in your Amazon Simple Storage Service (Amazon S3) data lake. With fine-grained access control, you can restrict access to data in query results using data filters to achieve column-level, row-level, and cell-level security.
Amazon EventBridge – With these additional filtering capabilities, you can now filter events by suffix, ignore case, and match if at least one condition is true. This makes it easier to write complex rules when building event-driven applications.
AWS Controllers for Kubernetes (ACK) – The ACK for Amazon Elastic Compute Cloud (Amazon EC2) is now generally available and lets you provision and manage EC2 networking resources, such as VPCs, security groups and internet gateways using the Kubernetes API. Also, the ACK for Amazon EMR on EKS is now generally available to allow you to declaratively define and manage EMR on EKS resources such as virtual clusters and job runs as Kubernetes custom resources. Learn more about ACK for Amazon EMR on EKS in this blog post.
Amazon HealthLake – New analytics capabilities make it easier to query, visualize, and build machine learning (ML) models. Now HealthLake transforms customer data into an analytics-ready format in near real-time so that you can query, and use the resulting data to build visualizations or ML models. Also new is Amazon HealthLake Imaging (preview), a new HIPAA-eligible capability that enables you to easily store, access, and analyze medical images at any scale. More on HealthLake Imaging can be found in this blog post.
Amazon RDS – You can now transfer files between Amazon Relational Database Service (RDS) for Oracle and an Amazon Elastic File System (Amazon EFS) file system. You can use this integration to stage files like Oracle Data Pump export files when you import them. You can also use EFS to share a file system between an application and one or more RDS Oracle DB instances to address specific application needs.
Amazon ECS and Amazon EKS – We added centralized logging support for Windows containers to help you easily process and forward container logs to various AWS and third-party destinations such as Amazon CloudWatch, S3, Amazon Kinesis Data Firehose, Datadog, and Splunk. See these blog posts for how to use this new capability with ECS and with EKS.
AWS SAM CLI – You can now use the Serverless Application Model CLI to locally test and debug an AWS Lambda function defined in a Terraform application. You can see a walkthrough in this blog post.
AWS Lambda – Now supports Node.js 18 as both a managed runtime and a container base image, which you can learn more about in this blog post. Also check out this interesting article on why and how you should use AWS SDK for JavaScript V3 with Node.js 18. And last but not least, there is new tooling support to build and deploy native AOT compiled .NET 7 applications to AWS Lambda. With this tooling, you can enable faster application starts and benefit from reduced costs through the faster initialization times and lower memory consumption of native AOT applications. Learn more in this blog post.
AWS Step Functions – Now supports cross-account access for more than 220 AWS services to process data, automate IT and business processes, and build applications across multiple accounts. Learn more in this blog post.
AWS Fargate – Adds the ability to monitor the utilization of the ephemeral storage attached to an Amazon ECS task. You can track the storage utilization with Amazon CloudWatch Container Insights and ECS Task Metadata endpoint.
AWS Proton – Now has a centralized dashboard for all resources deployed and managed by AWS Proton, which you can learn more about in this blog post. You can now also specify custom commands to provision infrastructure from templates. In this way, you can manage templates defined using the AWS Cloud Development Kit (AWS CDK) and other templating and provisioning tools. More on CDK support and AWS CodeBuild provisioning can be found in this blog post.
AWS IAM – You can now use more than one multi-factor authentication (MFA) device for root account users and IAM users in your AWS accounts. More information is available in this post.
Amazon ElastiCache – You can now use IAM authentication to access Redis clusters. With this new capability, IAM users and roles can be associated with ElastiCache for Redis users to manage their cluster access.
Amazon WorkSpaces – You can now use version 2.0 of the WorkSpaces Streaming Protocol (WSP) host agent that offers significant streaming quality and performance improvements, and you can learn more in this blog post. Also, with Amazon WorkSpaces Multi-Region Resilience, you can implement business continuity solutions that keep users online and productive with less than 30-minute recovery time objective (RTO) in another AWS Region during disruptive events. More on multi-region resilience is available in this post.
Amazon CloudWatch RUM – You can now send custom events (in addition to predefined events) for better troubleshooting and application specific monitoring. In this way, you can monitor specific functions of your application and troubleshoot end user impacting issues unique to the application components.
AWS AppSync – You can now define GraphQL API resolvers using JavaScript. You can also mix functions written in JavaScript and Velocity Template Language (VTL) inside a single pipeline resolver. To simplify local development of resolvers, AppSync released two new NPM libraries and a new API command. More info can be found in this blog post.
AWS SDK for SAP ABAP – This new SDK makes it easier for ABAP developers to modernize and transform SAP-based business processes and connect to AWS services natively using the SAP ABAP language. Learn more in this blog post.
AWS CloudFormation – CloudFormation can now send event notifications via Amazon EventBridge when you create, update, or delete a stack set.
AWS Console – With the new Applications widget on the Console home, you have one-click access to applications in AWS Systems Manager Application Manager and their resources, code, and related data. From Application Manager, you can view the resources that power your application and your costs using AWS Cost Explorer.
AWS Amplify – Expands Flutter support (developer preview) to Web and Desktop for the API, Analytics, and Storage use cases. You can now build cross-platform Flutter apps with Amplify that target iOS, Android, Web, and Desktop (macOS, Windows, Linux) using a single codebase. Learn more on Flutter Web and Desktop support for AWS Amplify in this post. Amplify Hosting now supports fully managed CI/CD deployments and hosting for server-side rendered (SSR) apps built using Next.js 12 and 13. Learn more in this blog post and see how to deploy a NextJS 13 app with the AWS CDK here.
Amazon SQS – With attribute-based access control (ABAC), you can define permissions based on tags attached to users and AWS resources. With this release, you can now use tags to configure access permissions and policies for SQS queues. More details can be found in this blog.
AWS Well-Architected Framework – The latest version of the Data Analytics Lens is now available. The Data Analytics Lens is a collection of design principles, best practices, and prescriptive guidance to help you running analytics on AWS.
AWS Organizations – You can now manage accounts, organizational units (OUs), and policies within your organization using CloudFormation templates.
For a full list of AWS announcements, be sure to keep an eye on the What’s New at AWS page.
Other AWS News
A few more stuff you might have missed:
Introducing our final AWS Heroes of the year – As the end of 2022 approaches, we are recognizing individuals whose enthusiasm for knowledge-sharing has a real impact with the AWS community. Please meet them here!
The Distributed Computing Manifesto – Werner Vogles, VP & CTO at Amazon.com, shared the Distributed Computing Manifesto, a canonical document from the early days of Amazon that transformed the way we built architectures and highlights the challenges faced at the end of the 20th century.
AWS re:Post – To make this community more accessible globally, we expanded the user experience to support five additional languages. You can now interact with AWS re:Post also using Traditional Chinese, Simplified Chinese, French, Japanese, and Korean.
For AWS open-source news and updates, here’s the latest newsletter curated by Ricardo to bring you the most recent updates on open-source projects, posts, events, and more.
Upcoming AWS Events
As usual, there are many opportunities to meet:
AWS re:Invent – Our yearly event is next week from November 28 to December 2. If you can’t be there in person, get your free online pass to watch live the keynotes and the leadership sessions.
AWS Community Days – AWS Community Day events are community-led conferences to share and learn together. Join us in Sri Lanka (on December 6-7), Dubai, UAE (December 10), Pune, India (December 10), and Ahmedabad, India (December 17).
That’s all from me for this week. Next week we’ll focus on re:Invent, and then we’ll take a short break. We’ll be back with the next Week in Review on December 12!
— Danilo
Flipper Zero LED Light Strip Control #flipperzero #hacking
Post Syndicated from Crosstalk Solutions original https://www.youtube.com/watch?v=gr8vWOBR7XU
ICYMI: Serverless pre:Invent 2022
Post Syndicated from Benjamin Smith original https://aws.amazon.com/blogs/compute/icymi-serverless-preinvent-2022/
During the last few weeks, the AWS serverless team has been releasing a wave of new features in the build-up to AWS re:Invent 2022. This post recaps some of the most important releases for serverless developers building event-driven applications.
AWS Lambda
Lambda Support for Node.js 18
You can now develop Lambda functions using the Node.js 18 runtime. This version is in active LTS status and considered ready for general use. When creating or updating functions, specify a runtime parameter value of nodejs18.x or use the appropriate container base image to use this new runtime. Lambda’s Node.js runtimes include the AWS SDK for JavaScript.
This enables customers to use the AWS SDK to connect to other AWS services from their function code, without having to include the AWS SDK in their function deployment. This is especially useful when creating functions in the AWS Management Console. It’s also useful for Lambda functions deployed as inline code in CloudFormation templates. This blog post explains the major changes available with the Node.js 18 runtime in Lambda.
Lambda Telemetry API
The AWS Lambda team launched Lambda Telemetry API to provide an easier way to receive enhanced function telemetry directly from the Lambda service and send it to custom destinations. This makes it easier for developers and operators using third-party observability extensions to monitor and observe their Lambda functions.
The Lambda Telemetry API is an enhanced version of Logs API, which enables extensions to receive platform events, traces, and metrics directly from Lambda in addition to logs. This enables tooling vendors to collect enriched telemetry from their extensions, and send to any destination.
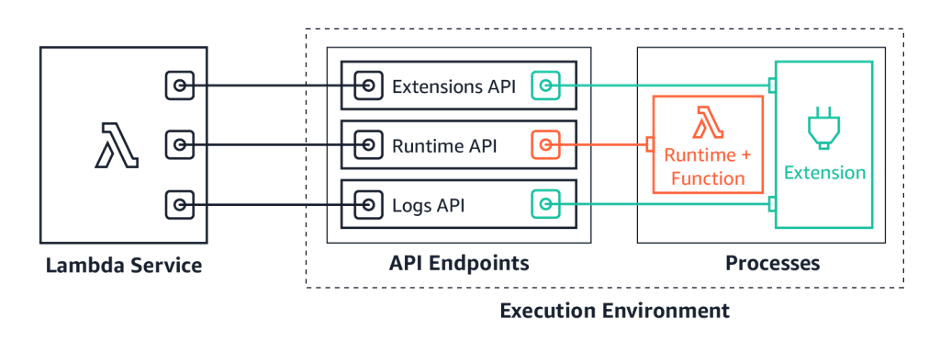
To see how the Telemetry API works, try the demos in the GitHub repository. Build your own extensions using the Telemetry API today, or use extensions provided by the Lambda observability partners.
.NET tooling
Lambda launched tooling support to enable applications running .NET 7 to be built and deployed on AWS Lambda. This includes applications compiled using .NET 7 native AOT. .NET 7 is the latest version of .NET and brings many performance improvements and optimizations. Customers can use .NET 7 with Lambda in two ways. First, Lambda has released a base container image for .NET 7, enabling customers to build and deploy .NET 7 functions as container images. Second, you can use Lambda’s custom runtime support to run functions compiled to native code using .NET 7 native AOT.
The new AWS Parameters and Secrets Lambda Extension provides a convenient method for Lambda users to retrieve parameters from AWS Systems Manager Parameter Store and secrets from AWS Secrets Manager. Use the extension to improve application performance by reducing latency and cost of retrieving parameters and secrets. The extension caches parameters and secrets, and persists them throughout the lifecycle of the Lambda function.
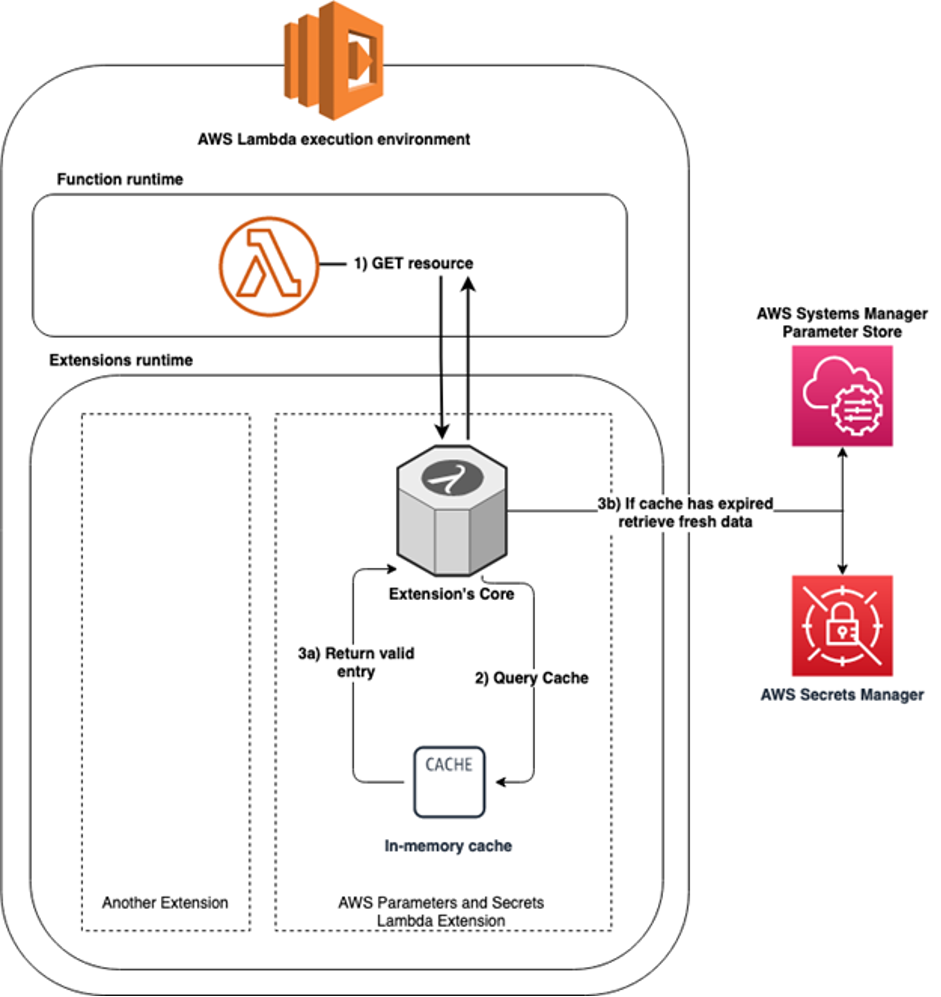
Amazon EventBridge
Amazon EventBridge Scheduler
Amazon EventBridge announced Amazon EventBridge Scheduler, a new capability that allows you to create, run, and manage scheduled tasks at scale. With EventBridge Scheduler, you can schedule one-time or recurrently tens of millions of tasks across many AWS services without provisioning or managing underlying infrastructure.
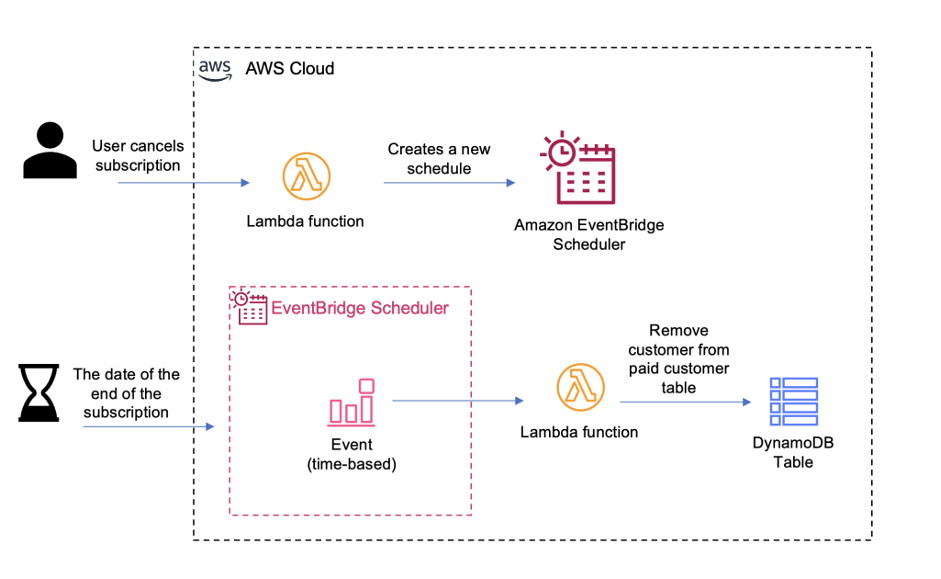
With EventBridge Scheduler, you can create schedules that trigger over 200 services with more than 6,000 APIs. EventBridge Scheduler allows you to configure schedules with a minimum granularity of one minute. It is priced per one million invocations, and the service is included in the AWS Free Tier. See the pricing page for more information. Visit the launch blog post to get started with EventBridge scheduler.
EventBridge now supports enhanced filtering capabilities including the ability to match against characters at the end of a value (suffix filtering), to ignore case sensitivity (equals-ignore-case), and to have a single EventBridge rule match if any conditions across multiple separate fields are true (OR matching). The bounds supported for numeric values has also been increased from -5e9 to 5e9 from -1e9 to 1e9. The new filtering capabilities further reduce the need to write and manage custom filtering code in downstream services.
AWS Step Functions
Intrinsic Functions
We have added 14 new intrinsic functions to AWS Step Functions. These are Amazon States Language (ASL) functions that perform basic data transformations. Intrinsic functions allow you to reduce the use of other services, such as AWS Lambda or AWS Fargate to perform basic data manipulation. This helps to reduce the amount of code and maintenance in your application. Intrinsics can also help reduce the cost of running your workflows by decreasing the number of states, number of transitions, and total workflow duration.
Standard Workflows, Express Workflows, and synchronous Express Workflows all support the new intrinsic functions, which can be grouped into six categories:
- Intrinsics for arrays
- Intrinsics for JSON data manipulation
- Intrinsics for data encoding and decoding
- Intrinsics for math operations
- Intrinsic for string operations
- Intrinsic for unique identifier generation
The intrinsic functions documentation contains the complete list of intrinsics.
Cross-account access capabilities
Now, customers can take advantage of identity-based policies in Step Functions so your workflow can directly invoke resources in other AWS accounts, allowing cross-account service API integrations. The compute blog post demonstrates how to use cross-account capability using two AWS accounts.
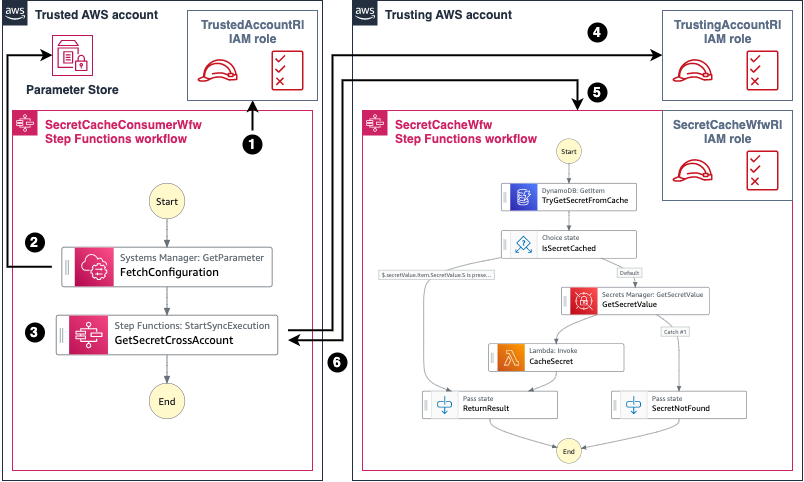
New executions experience for Express Workflows
Step Functions now provides a new console experience for viewing and debugging your Express Workflow executions that makes it easier to trace and root cause issues in your executions.
You can opt in to the new console experience of Step Functions, which allows you to inspect executions using three different views: graph, table, and event view, and add many new features to enhance the navigation and analysis of the executions. You can search and filter your executions and the events in your executions using unique attributes such as state name and error type. Errors are now easier to root cause as the experience highlights the reason for failure in a workflow execution.
The new execution experience for Express Workflows is now available in all Regions where AWS Step Functions is available. For a complete list of Regions and service offerings, see AWS Regions.
Step Functions Workflows Collection
The AWS Serverless Developer Advocate team created the Step Functions Workflows Collection, a fresh experience that makes it easier to discover, deploy, and share Step Functions workflows. Use the Step Functions workflows collection to find simple “building blocks”, reusable patterns, and example applications to help build your serverless applications with Step Functions. All Step Functions builders are invited to contribute to the collection. This is done by submitting a pull request to the Step Functions Workflows Collection GitHub repository. Each submission is reviewed by the Serverless Developer advocate team for quality and relevancy before publishing.
AWS Serverless Application Model (AWS SAM)
AWS SAM Connector
Speed up serverless development while maintaining secure best practices using new AWS SAM connector. AWS SAM Connector allows builders to focus on the relationships between components without expert knowledge of AWS Identity and Access Management (IAM) or direct creation of custom policies. AWS SAM connector supports AWS Step Functions, Amazon DynamoDB, AWS Lambda, Amazon SQS, Amazon SNS, Amazon API Gateway, Amazon EventBridge and Amazon S3, with more resources planned in the future.
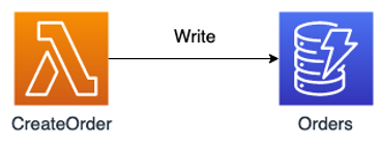
Connectors are best for those getting started and who want to focus on modeling the flow of data and events within their applications. Connectors will take the desired relationship model and create the permissions for the relationship to exist and function as intended.
View the Developer Guide to find out more about AWS SAM connectors.
SAM CLI Pipelines now supports Open ID Connect Protocol
SAM Pipelines make it easier to create continuous integration and deployment (CI/CD) pipelines for serverless applications with Jenkins, GitLab, GitHub Actions, Atlassian Bitbucket Pipelines, and AWS CodePipeline. With this launch, SAM Pipelines can be configured to support OIDC authentication from providers supporting OIDC, such as GitHub Actions, GitLab and BitBucket. SAM Pipelines will use the OIDC tokens to configure the AWS Identity and Access Management (IAM) identity providers, simplifying the setup process.
AWS SAM CLI Terraform support
You can now use AWS SAM CLI to test and debug serverless applications defined using Terraform configurations. This public preview allows you to build locally, test, and debug Lambda functions defined in Terraform. Support for the Terraform configuration is currently in preview, and the team is asking for feedback and feature request submissions. The goal is for both communities to help improve the local development process using AWS SAM CLI. Submit your feedback by creating a GitHub issue here.
Still looking for more?
Get your free online pass to watch all the biggest AWS news and updates from this year’s re:Invent.
For more learning resources, visit Serverless Land.