Post Syndicated from corbet original https://lwn.net/Articles/950829/
The LWN.net Weekly Edition for November 16, 2023 is available.
Post Syndicated from corbet original https://lwn.net/Articles/950829/
The LWN.net Weekly Edition for November 16, 2023 is available.
Post Syndicated from Macey Neff original https://aws.amazon.com/blogs/compute/introducing-instance-maintenance-policy-for-amazon-ec2-auto-scaling/
This post is written by Ahmed Nada, Principal Solutions Architect, Flexible Compute and Kevin OConnor, Principal Product Manager, Amazon EC2 Auto Scaling.
Amazon Web Services (AWS) customers around the world trust Amazon EC2 Auto Scaling to provision, scale, and manage Amazon Elastic Compute Cloud (Amazon EC2) capacity for their workloads. Customers have come to rely on Amazon EC2 Auto Scaling instance refresh capabilities to drive deployments of new EC2 Amazon Machine Images (AMIs), change EC2 instance types, and make sure their code is up-to-date.
Currently, EC2 Auto Scaling uses a combination of ‘launch before terminate’ and ‘terminate and launch’ behaviors depending on the replacement cause. Customers have asked for more control over when new instances are launched, so they can minimize any potential disruptions created by replacing instances that are actively in use. This is why we’re excited to introduce instance maintenance policy for Amazon EC2 Auto Scaling, an enhancement that provides customers with greater control over the EC2 instance replacement processes to make sure instances are replaced in a way that aligns with performance priorities and operational efficiencies while minimizing Amazon EC2 costs.
This post dives into varying ways to configure an instance maintenance policy and gives you tools to use it in your Amazon EC2 Auto Scaling groups.
AWS launched Amazon EC2 Auto Scaling in 2009 with the goal of simplifying the process of managing Amazon EC2 capacity. Since then, we’ve continued to innovate with advanced features like predictive scaling, attribute-based instance selection, and warm pools.
A fundamental Amazon EC2 Auto Scaling capability is replacing instances based on instance health, due to Amazon EC2 Spot Instance interruptions, or in response to an instance refresh operation. The instance refresh capability allows you to maintain a fleet of healthy and high-performing EC2 instances in your Amazon EC2 Auto Scaling group. In some situations, it’s possible that terminating instances before launching a replacement can impact performance, or in the worst case, cause downtime for your applications. No matter what your requirements are, instance maintenance policy allows you to fine-tune the instance replacement process to match your specific needs.
Instance maintenance policy adds two new Amazon EC2 Auto Scaling group settings: minimum healthy percentage (MinHealthyPercentage) and maximum healthy percentage (MaxHealthyPercentage). These values represent the percentage of the group’s desired capacity that must be in a healthy and running state during instance replacement. Values for MinHealthyPercentage can range from 0 to 100 percent and from 100 to 200 percent for MaxHealthyPercentage. These settings are applied to all events that lead to instance replacement, such as Health-check based replacement, Max Instance Lifetime, EC2 Spot Capacity Rebalancing, Availability Zone rebalancing, Instance Purchase Option Rebalancing, and Instance refresh. You can also override the group-level instance maintenance policy during instance refresh operations to meet specific deployment use cases.
Before launching instance maintenance policy, an Amazon EC2 Auto Scaling group would use the previously described behaviors when replacing instances. By setting the MinHealthyPercentage of the instance maintenance policy to 100% and the MaxHealthyPercentage to a value greater than 100%, the Amazon EC2 Auto Scaling group first launches replacement instances and waits for them to become available before terminating the instances being replaced.
You can add an instance maintenance policy to new or existing Amazon EC2 Auto Scaling groups using the AWS Management Console, AWS Command Line Interface (AWS CLI), AWS SDK, AWS CloudFormation, and Terraform.
When creating or editing Amazon EC2 Auto Scaling groups in the Console, you are presented with four options to define the replacement behavior of your instance maintenance policy. These options include the No policy option, which allows you to maintain the default instance replacement settings that the Amazon EC2 Auto Scaling service uses today.

Image 1: The GUI for the instance maintenance policy feature within the “Create Auto Scaling group” wizard.
The Launch before terminating policy is the right selection when you want to favor availability of your Amazon EC2 Auto Scaling group capacity. This policy setting temporarily increases the group’s capacity by launching new instances during replacement operations. In the Amazon EC2 console, you select the Launch before terminating replacement behavior, and then set your desired MaxHealthyPercentage value to determine how many more instances should be launched during instance replacement.
For example, if you are managing a workload that requires optimal availability during instance replacements, choose the Launch before terminating policy type with a MinHealthyPercentage set to 100%. If you set your MaxHealthyPercentage to 150%, then Amazon EC2 Auto Scaling launches replacement instances before terminating instances to be replaced. You should see the desired capacity increase by 50%, exceeding the group maximum capacity during the operation to provide you with the needed availability. The chart in the following figure illustrates what an instance refresh operation would behave like with a Launch before terminating policy.

Figure 1: A graph simulating the instance replacement process with a policy configured to launch before terminating.
Instance maintenance policy settings apply to all instance replacement operations, but they can be overridden at the start of a new instance refresh operation. Overriding instance maintenance policy is helpful in situations like a bad code deployment that needs replacing without downtime. You could configure an instance maintenance policy to bring an entirely new group’s worth of instances into service before terminating the instances with the problematic code. In this situation, you set the MaxHealthyPercentage to 200% for the instance refresh operation and the replacement happens in a single cycle to promptly address the bad code issue. Setting the MaxHealthyPercentage to 200% will allow the replacement settings to breach the Auto Scaling Group’s Max capacity value, but would be constrained by any account level quotas, so be sure to factor these into application of this feature. See the following figure for a visualization of how this operation would behave.

Figure 2: A graph simulating the instance replacement process with a policy configured to accelerate a new deployment.
The Terminate and launch policy option allows you to favor cost control during instance replacement. By configuring this policy type, Amazon EC2 Auto Scaling terminates existing instances and then launches new instances during the replacement process. To set a Terminate and launch policy, you must specify a MinHealthyPercentage to establish how low the capacity can drop, and keep your MaxHealthyPercentage set to 100%. This configuration keeps the Auto Scaling group’s capacity at or below the desired capacity setting.
The following figure shows behavior with the MinHealthyPercentage set to 80%. During the instance replacement process, the Auto Scaling group first terminates 20% of the instances and immediately launches replacement instances, temporarily reducing the group’s healthy capacity to 80%. The group waits for the new instances to pass its configured health checks and complete warm up before it moves on to replacing the remaining batches of instances.

Figure 3: A graph simulating the instance replacement process with a policy configured to terminate and launch.
Note that the difference between MinHealthyPercentage and MaxHealthyPercentage values impacts the speed of the instance replacement process. In the preceding figure, the Amazon EC2 Auto Scaling group replaces 20% of the instances in each cycle. The larger the gap between the MinHealthyPercentage and MaxHealthyPercentage, the faster the replacement process.
You can also choose to adopt a Custom behavior option, where you have the flexibility to set the MinHealthyPercentage and MinHealthyPercentage values to whatever you choose. Using this policy type allows you to fine-tune the replacement behavior and control the capacity of your instances within the Amazon EC2 Auto Scaling group to tailor the instance maintenance policy to meet your unique needs.
Amazon EC2 Auto Scaling always favors availability when performing instance replacements. When instance maintenance policy is configured, Amazon EC2 Auto Scaling also prioritizes launching a new instance rather than going below the MinHealthyPercentage. For example, in an Amazon EC2 Auto Scaling group with a desired capacity of 10 instances and an instance maintenance policy with MinHealthyPercentage set to 99% and MaxHealthyPercentage set to 100%, your settings do not allow for a reduction in capacity of at least one instance. Therefore, Amazon EC2 Auto Scaling biases toward launch before terminating and launches one new instance before terminating any instances that need replacing.
Configuring an instance maintenance policy is not mandatory. If you don’t configure your Amazon EC2 Auto Scaling groups to use an instance maintenance policy, then there is no change in the behavior of your Amazon EC2 Auto Scaling groups’ existing instance replacement process.
You can set a group-level instance maintenance policy through your CloudFormation or Terraform templates. Within your templates, you must set values for both the MinHealthyPercentage and MaxHealthyPercentage settings to determine the instance replacement behavior that aligns with the specific requirements of your Amazon EC2 Auto Scaling group.
In this post, we introduced the new instance maintenance policy feature for Amazon EC2 Auto Scaling groups, explored its capabilities, and provided examples of how to use this new feature. Instance maintenance policy settings apply to all instance replacement processes with the option to override the settings on a per instance refresh basis. By configuring instance maintenance policies, you can control the launch and lifecycle of instances in your Amazon EC2 Auto Scaling groups, increase application availability, reduce manual intervention, and improve cost control for your Amazon EC2 usage.
To learn more about the feature and how to get started, refer to the Amazon EC2 Auto Scaling User Guide.
Post Syndicated from The Atlantic original https://www.youtube.com/watch?v=U8L_MKWXcOA
Post Syndicated from Jeff Barr original https://aws.amazon.com/blogs/aws/new-amazon-ebs-snapshot-lock/
You can now lock individual Amazon Elastic Block Store (Amazon EBS) snapshots in order to enforce better compliance with your data retention policies. Locked snapshots cannot be deleted until the lock is expired or released, giving you the power to keep critical backups safe from accidental or malicious deletion, including ransomware attacks.
The Need for Locking
AWS customers use EBS snapshots for backups, disaster recovery, data migration, and compliance. Customers in financial services and health care often need to meet specific compliance requirements, with prescribed time frames for retention, and also need to ensure that the snapshots are truly Write Once Read Many (WORM). In order to meet these requirements, customers have implemented solutions that use multiple AWS accounts with one-way “air gaps” between them.
EBS Snapshot Lock
The new EBS Snapshot Lock feature helps you to meet your retention and compliance requirements without the need for custom solutions. You can lock new and existing EBS snapshots using a lock duration that can range from one day to about 100 years. The snapshot is locked for the specified duration and cannot be deleted.
There are two lock modes:
Governance – This mode protects snapshots from deletions by all users. However, with the proper IAM permissions, the lock duration can be extended or shortened, the lock can be deleted, and the mode can be changed from Governance mode to Compliance mode.
Compliance – This mode protects snapshots from actions by the root user and all IAM users. After a cooling-off period of up to 72 hours, neither the snapshot nor the lock can be deleted until the lock duration expires, and the mode cannot be changed. With the proper IAM permissions the lock duration can be extended, but it cannot be shortened.
Snapshots in either mode can still be shared or copied. They can be archived to the low-cost Amazon EBS Snapshots Archive tier, and locks can be applied to snapshots that have already been archived.
Using Snapshot Lock
From the EBS Console I select a snapshot (Snap-Monthly-2023-09) and choose Manage snapshot lock from Snapshot Settings in the Actions menu:
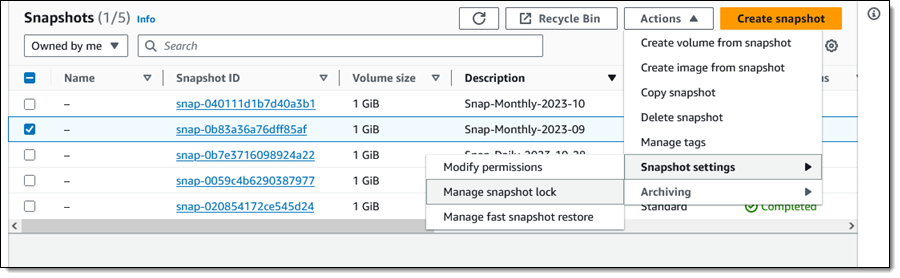
This is a monthly snapshot and I want to lock it for one year. I choose Governance mode and select the duration, then click Save lock settings:

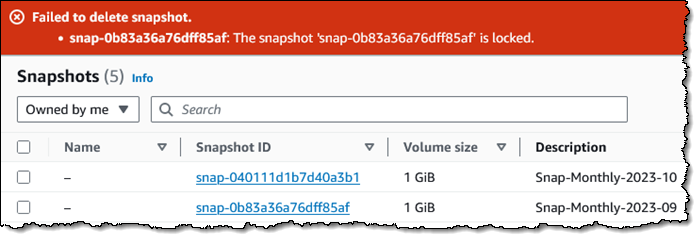
I try to delete it, and the deletion fails, as it should:
Now I would like to lock one of my annual snapshots for 5 years, using Compliance mode this time:
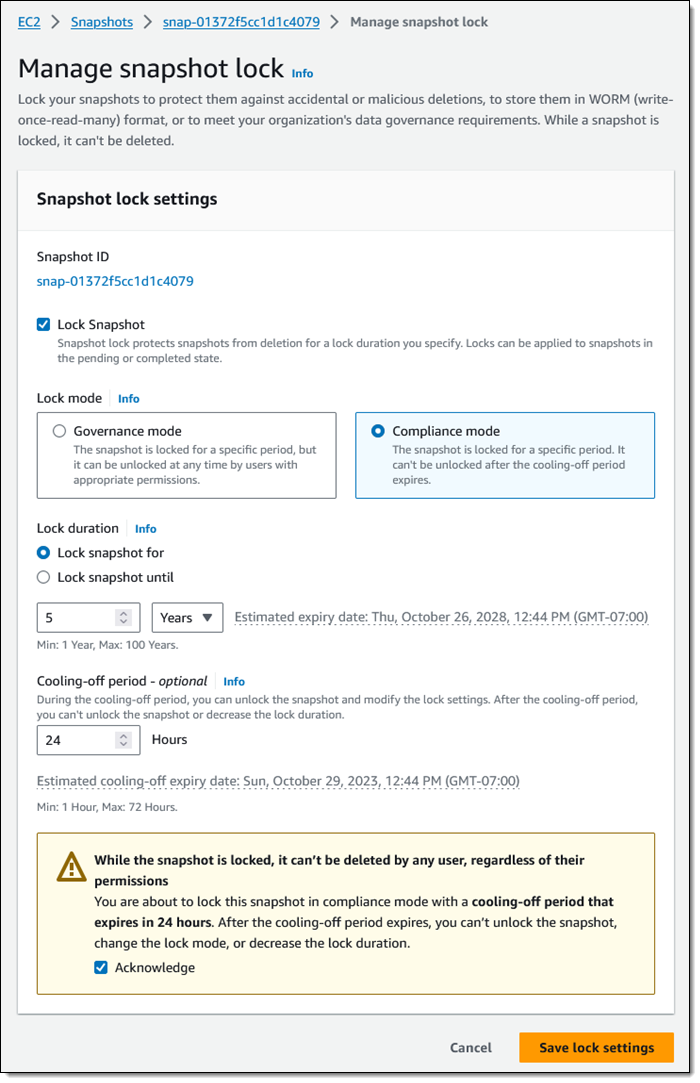
I set my cooling-off period to 24 hours, just in case I change my mind. Perhaps I have to run some kind of audit or final date validation on the snapshot before committing to keeping it around for five years.
Programmatically, I can use new API functions to establish and control locks on my EBS snapshots:
LockSnapshot – Lock a snapshot in governance or compliance mode, or modify the settings of a snapshot that is already locked.
UnlockSnapshot – Unlock a snapshot that is is governance mode, or is in compliance mode but within the cooling-off period.
DescribeLockedSnapshots – Get information about the lock status of my snapshots, with optional filtering based on the state of the lock.
IAM users must have the appropriate permissions (ec2:lockSnapshot, ec2:UnlockSnapshot, and ec2:DescribeLockedSnapshots) in order to use these functions.
Things to Know
Here are a couple of things to keep in mind about this new feature:
AWS Backup – AWS Backup independently manages retention for the snapshots that it creates. We do not recommend locking them.
Pricing – There is no extra charge for the use of this feature. You pay the usual rates for storage of snapshots and archived snapshots.
Regions – EBS Snapshot Locking is available in all commercial AWS Regions.
KMS Key Retention – If you are using customer-managed AWS Key Management Service (AWS KMS) keys to encrypt your EBS volumes and snapshots, you need to make sure that the key will remain valid for the lifetime of the snapshot.
— Jeff;
Post Syndicated from Curious Droid original https://www.youtube.com/watch?v=xEZgaSib4FA
Post Syndicated from John Lee original https://www.servethehome.com/microsoft-azure-eagle-is-a-paradigm-shifting-cloud-supercomputer-nvidia-intel/
At SC23, the Microsoft Azure Eagle supercomputer made its debut as a Top 3 system and it will shift access to enormous HPC and AI compute
The post Microsoft Azure Eagle is a Paradigm Shifting Cloud Supercomputer appeared first on ServeTheHome.
Post Syndicated from jake original https://lwn.net/Articles/951313/
Building new kernels and booting into them is an unavoidable—and
time-consuming—part of kernel development. Andrea Righi works for
Canonical on the Ubuntu kernel team, so he does a lot of that and wanted to
find a way to speed up the task. To that end, he has been working
on virtme-ng, which is a
way to boot a new kernel in a virtual machine, and it does
so quickly. He came to the 2023
Linux Plumbers Conference (LPC) in Richmond, Virginia to introduce the
project to a wider audience.
Post Syndicated from Николай Марченко original https://bivol.bg/vasil-terziev-korupciq-bivol-liberta.html

Новоизбраният кмет на София Васил Терзиев бе почетен гост на представянето на книгата на одитора и съосновател на Антикорупционен фонд (АКФ) Йордан Карабинов “Система за превенция на корупция и измами”…
Post Syndicated from Darren Roback original https://aws.amazon.com/blogs/security/building-sensitive-data-remediation-workflows-in-multi-account-aws-environments/
The rapid growth of data has empowered organizations to develop better products, more personalized services, and deliver transformational outcomes for their customers. As organizations use Amazon Web Services (AWS) to modernize their data capabilities, they can sometimes find themselves with data spread across several AWS accounts, each aligned to distinct use cases and business units. This can present a challenge for security professionals, who need not only a mechanism to identify sensitive data types—such as protected health information (PHI), payment card industry (PCI), and personally identifiable information (PII), or organizational intellectual property—stored on AWS, but also the ability to automatically act upon these findings through custom logic that supports organizational policies and regulatory requirements.
In this blog post, we present a solution that provides you with visibility into sensitive data residing across a fleet of AWS accounts through a ChatOps-style notification mechanism using Microsoft Teams, which also provides contextual information needed to conduct security investigations. This solution also incorporates a decision logic mechanism to automatically quarantine sensitive data assets while they’re pending review, which can be tailored to meet unique organizational, industry, or regulatory environment requirements.
Before you proceed, ensure that you have the following within your environment:
Things to know about the solution in this blog post:
The solution architecture and overall workflow are detailed in Figure 1 that follows.
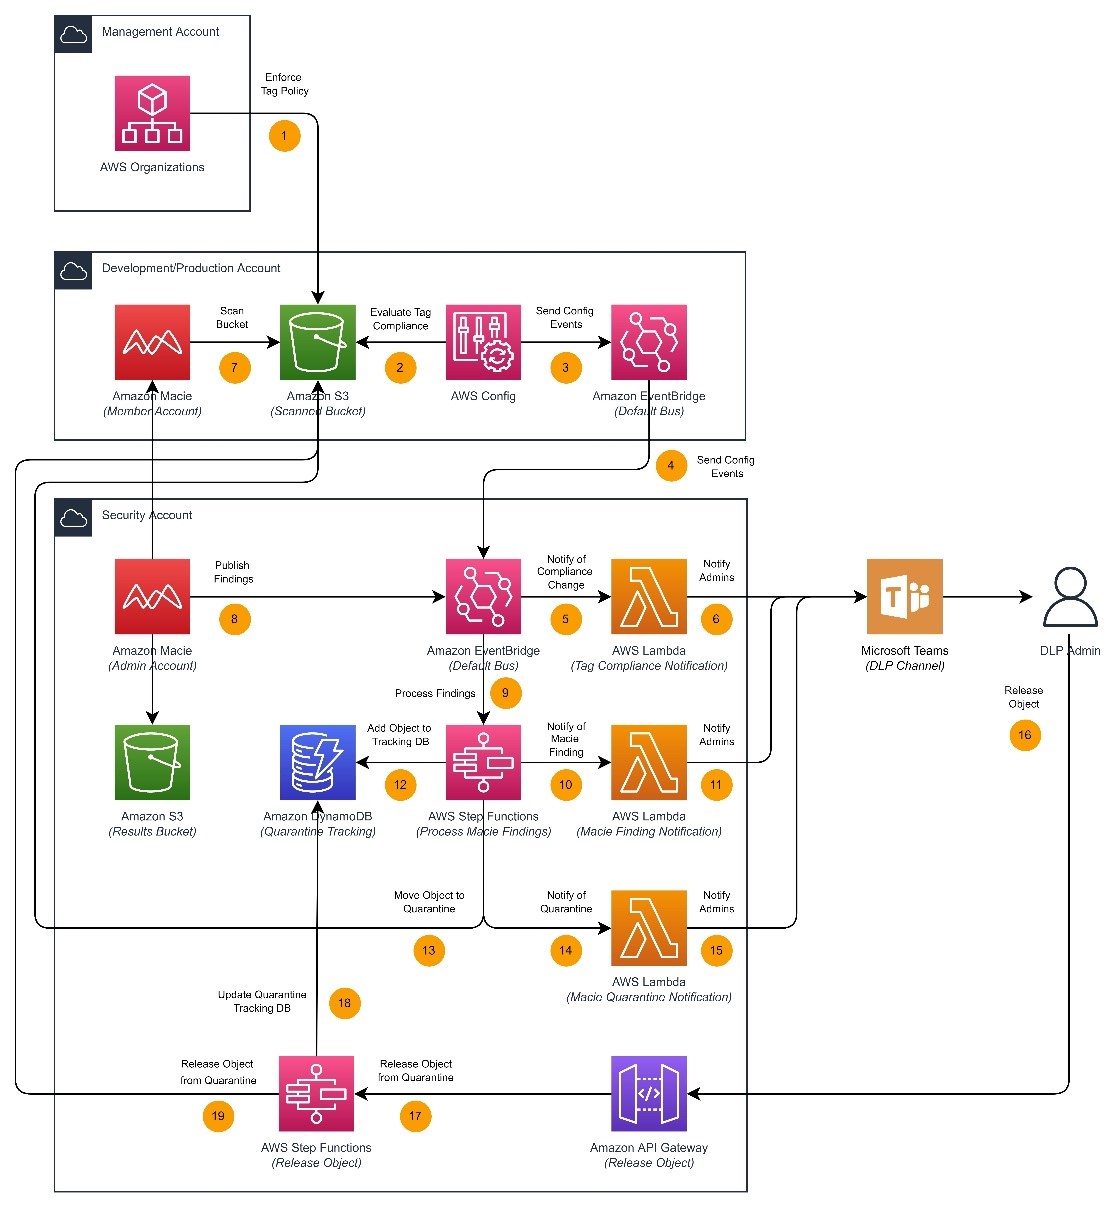
Figure 1: Solution overview
Upon discovering sensitive data in member accounts, this solution selectively quarantines objects based on their finding severity and public status. This logic can be customized to evaluate additional details such as the finding type or number of sensitive data occurrences detected. The ability to adjust this workflow logic can provide a custom-tailored solution to meet a variety of industry use cases, helping you adhere to industry-specific security regulations and frameworks.
Figure 1 provides an overview of the components used in this solution, and for illustrative purposes we step through them here.
Macie supports various scope options for sensitive data discovery jobs, including the use of bucket tags to determine in-scope buckets for scanning. Setting up automated scanning includes the use of an AWS Organizations tag policy to verify that the S3 buckets deployed in your chosen OUs conform to tagging requirements, an AWS Config job to automatically check that tags have been applied correctly, an Amazon EventBridge rule and bus to receive compliance events from a fleet of member accounts, and an AWS Lambda function to notify administrators of compliance change events.
Macie is a key component of this solution and facilitates sensitive data discovery across a fleet of AWS accounts based on the RequireMacieScan tag value configured at the time of bucket creation. Setting up sensitive data detection includes using Macie for sensitive data discovery, an EventBridge rule and bus to receive these finding events from the Macie delegated administrator account, an AWS Step Functions state machine to process these findings, and a Lambda function to notify administrators of new findings.
As outlined in the previous section, this solution uses event processing decision logic in Step Functions to determine whether to quarantine a sensitive object in place. Setting up automated quarantine includes a Step Functions state machine for Macie finding processing logic, an Amazon DynamoDB table to track items moved to quarantine, a Lambda function to notify administrators of quarantine, and an Amazon API Gateway and second Step Functions state machine to facilitate remediation or removal of objects from quarantine.
As mentioned in the prerequisites, the solution uses a set of AWS accounts that have been joined to an organization, which is shown in Figure 2. While the logical structure of your AWS Organizations deployment can differ from what’s shown, for illustration purposes, we’re looking for sensitive data in the Development and Production AWS accounts, and the examples shown throughout the remainder of this blog post reflect that.
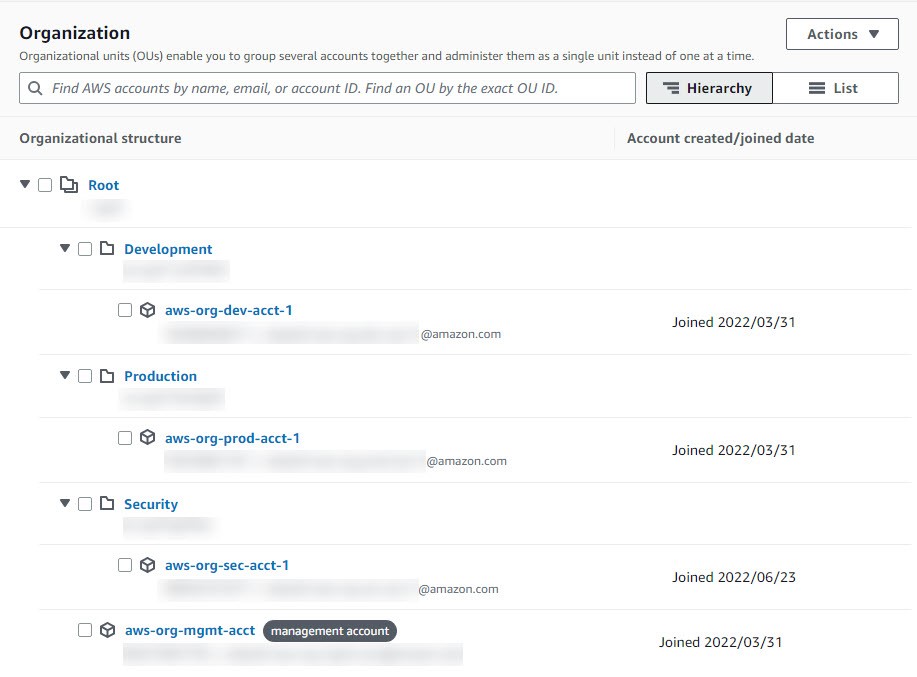
Figure 2: Organization structure
The overall deployment process of this solution has been decomposed into three AWS CloudFormation templates to be deployed to your management, security, and member accounts as CloudFormation stacks and StackSets, respectively. Performing the deployment in this manner not only verifies that the solution is extended to other member accounts created after the initial solution deployment, but also serves as an illustrative aid of the components deployed in each portion of the solution. An overview of the deployment process is as follows:
Before deploying the solution, you must create two incoming webhooks in a Microsoft Teams channel of your choice. Due to the sensitivity of the event information provided and the ability to release objects from quarantine, we recommend that this channel only be accessible to information security professionals. In addition, we recommend creating two distinct webhooks to distinguish tag compliance events from finding events and have named the webhooks in the examples S3-Tag-Compliance-Notification and Macie-Finding-Notification, respectively. A complete walkthrough of creating an incoming webhook is out of scope for this blog post, but you can access Microsoft’s documentation on creating incoming webhooks for an overview. After the webhooks have been created, save the URLs, to use in the solution deployment process.
The first step of the deployment process is to deploy a CloudFormation stack in your management account that creates an AWS Organizations tag policy and applies it to the OUs of your choice. Before performing this step, note the two OU IDs you will apply the policy to, as these will be captured as input parameters for the CloudFormation stack.
![]()
Note: The stack will launch in the N. Virginia (us-east-1) Region. To deploy this solution into other AWS Regions, change your regional selection in the CloudFormation console, and deploy it to the selected Region.

Figure 3: Management account stack details
After you’ve entered all details, launch the stack and wait until the stack has reached CREATE_COMPLETE status before proceeding. The deployment process will take 1–2 minutes.
The next step of the deployment process is to deploy a CloudFormation Stack, which will initiate a StackSet deployment from your management account that’s scoped to the OUs of your choice. This stack set will enable AWS Config along with an AWS Config rule to evaluate Amazon S3 tag compliance and will deploy an EventBridge rule to send compliance events from AWS Config in your member accounts to a centralized event bus in your security account. If AWS Config has previously been enabled, select True for the AWS Config Status parameter to help prevent an overwrite of your existing settings. Prior to performing this setup, note the two AWS Organizations OU IDs you will deploy the stack set to. You will also be prompted to enter the AWS account ID and Region of your security account.
![]()
Note: The stack will launch in the N. Virginia (us-east-1) Region. To deploy this solution into other AWS Regions, change your regional selection in the CloudFormation console, and deploy it to the selected Region.

Figure 4: Member account Stack details
After you’ve entered all details, launch the stack and wait until the stack has reached CREATE_COMPLETE status before proceeding. The deployment process will take 3–5 minutes.
The next step of the deployment process involves deploying a CloudFormation stack in your security account that creates all the resources needed for at-scale sensitive data detection, automated quarantine, and security professional notification and response. This stack configures the following:
Before performing this setup, note your AWS Organizations ID and two Microsoft Teams webhook URLs previously configured.
![]()
Note: The stack will launch in the N. Virginia (us-east-1) Region. To deploy this solution into other AWS Regions, change your regional selection in the CloudFormation console, and deploy it to the selected Region.

Figure 5: Security account stack details
After you’ve entered all details, launch the stack and wait until the stack has reached CREATE_COMPLETE status before proceeding. The deployment process will take 3–5 minutes.
While most of the solution is deployed automatically using CloudFormation, there are a few items that you must configure manually.
When the CloudFormation stack was deployed to the security account, CloudFormation created a new REST API for security professionals to release objects from quarantine. This API was configured with an API key to be used for authorization, and you must retrieve the value of this API key and set it as an environment variable in your MacieQuarantineNotification function, which also deployed in the security account. To retrieve the value of this API key, navigate to the REST API created in the security account, select API Keys, and retrieve the value of APIKey1. Next, navigate to the MacieQuarantineNotification function in the Lambda console, and set the ReleaseObjectApiKey environment variable to the value of your API key.
Next, you must enable Macie to facilitate sensitive data discovery in selected accounts in your organization, and this process begins with the selection of a delegated administrator account (that is, the security account), followed by onboarding the member accounts you want to test with. See Integrating and configuring an organization in Amazon Macie for detailed instructions on enabling Macie in your organization.
Macie creates an analysis record for each Amazon S3 object that it analyzes. This includes objects where Macie has detected sensitive data as well as objects where sensitive data was not detected or that Macie could not analyze. The CloudFormation stack deployed in the security account created an S3 bucket and KMS key for this, and they are noted as MacieResultsS3BucketName and MacieResultsKmsKeyAlias in the CloudFormation stack output. Use these resources to configure the Macie results bucket and KMS key in the security account according to Storing and retaining sensitive data discovery results with Amazon Macie. Customization of the S3 bucket policy or KMS key policy has already been done for you as part of the ConfigureSecurityAccount CloudFormation template deployed earlier.
With the solution fully deployed, you now need to deploy an S3 bucket with sample data to test the solution and review the findings.
In any of the member accounts onboarded into this solution as part of the Configure the member accounts step, deploy a new S3 bucket and the KMS key used to encrypt the bucket using the CloudFormation template that follows. Before performing this step, note the InvestigateMacieFindingsRole, StepFunctionsProcessFindingsRole, and StepFunctionsReleaseObjectRole outputs from the CloudFormation template deployed to the security account, as these will be captured as input parameters for the CloudFormation stack.
![]()
Note: The stack will launch in the N. Virginia (us-east-1) Region. To deploy this solution into other AWS Regions, change your regional selection in the CloudFormation console, and deploy it to the selected Region.

Figure 6: Deploy S3 bucket and KMS key stack details
After you’ve entered all details, launch the stack and wait until the stack has reached CREATE_COMPLETE status before proceeding. The deployment process will take 3–5 minutes.
Shortly after the deployment of the new S3 bucket, you should see a message in your Microsoft Teams channel notifying you of the tag compliance status of the new bucket. This AWS Config rule is evaluated automatically any time an S3 resource event takes place, and the tag compliance event is sent to the centralized security account for notification purposes. While the notification shown in Figure 7 depicts a compliant S3 bucket, a bucket deployed without the required tags will be marked as NON_COMPLIANT, and security professionals can check the AWS Config compliance status directly in the AWS console for the member account.
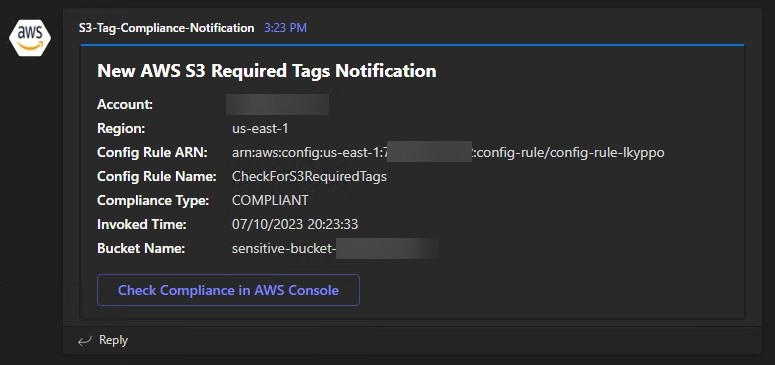
Figure 7: S3 tag compliance notification
Download this .zip file of sample data and upload the expanded files into the newly created S3 bucket. The sample files include fictitious PII, including credit card information and social security numbers, and so will invoke various Macie findings.
Note: All data in this blog post has been artificially created by AWS for demonstration purposes and has not been collected from any individual person. Similarly, such data does not, nor is it intended, to relate back to any individual person.
Configure a sensitive data discovery job in the Amazon Macie delegated administrator account (that is, the security account) according to Creating a sensitive data discovery job. When creating the job, specify tag-based bucket criteria instructing Macie to scan any bucket with a tag key of RequireMacieScan and a tag value of True. This instructs Macie to scan buckets matching this criterion across the accounts that have been onboarded into Macie.
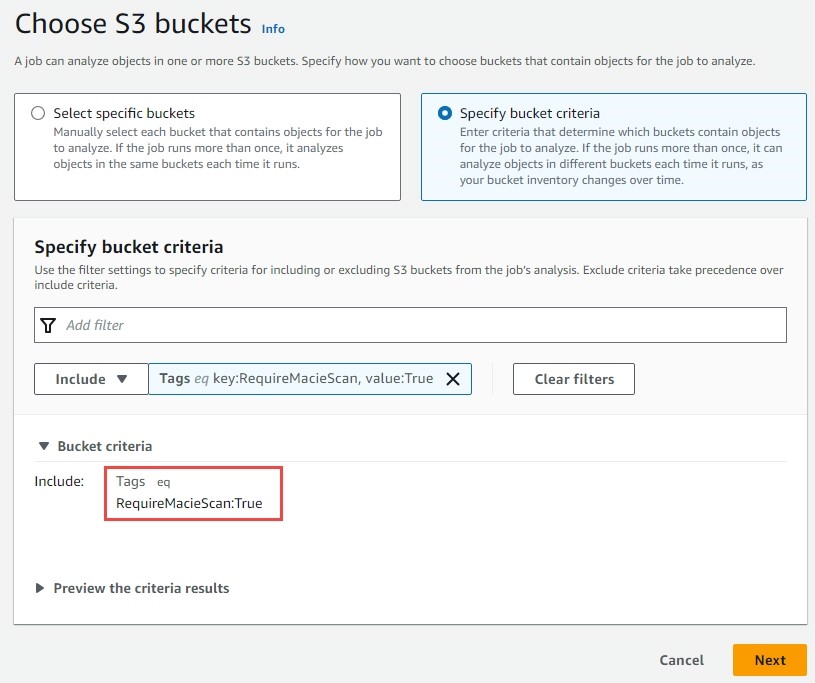
Figure 8: Macie bucket criteria
On the discovery options page, specify a one-time job with a sampling depth of 100 percent. Further refine the job scope by adding the quarantine prefix to the exclusion criteria of the sensitive data discovery job.
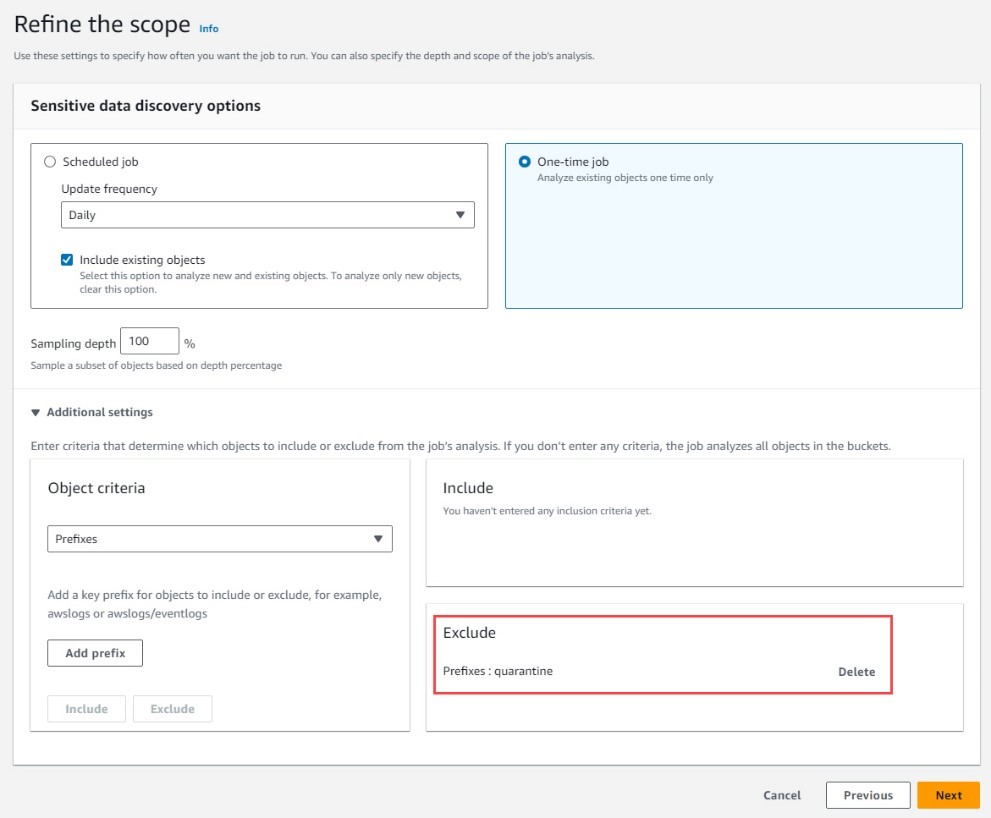
Figure 9: Macie scan scope
Select the AWS_CREDENTIALS, CREDIT_CARD_NUMBER, CREDIT_CARD_SECURITY_CODE, and DATE_OF_BIRTH managed data identifiers and proceed to the review screen. On the review screen, ensure that the bucket name you created is listed under bucket matches, and launch the discovery job.
Note: This solution also works with the Automated Sensitive Data Discovery feature in Amazon Macie. I recommend you investigate this feature further for broad visibility into where sensitive data might reside within your Amazon S3 data estate. Regardless of the method you choose, you will be able to integrate the appropriate notification and quarantine solution.
After a few minutes, the discovery job will complete and soon you should see four messages in your Microsoft teams channel notifying you of the finding events created by Macie. One of these findings will be marked as medium severity, while the other three will be marked as high.
Review the medium severity finding, and recall the flow of event information from the solution overview section. Macie scanned a bucket in the member account and presented this finding in the Macie delegated administrator account. Macie then sent this finding event to EventBridge, which initiated a workflow run in Step Functions. Step Functions invoked customer-specified logic to evaluate the finding and determined that because the object isn’t publicly accessible, and because the finding isn’t high severity, it should only notify security professionals rather than quarantine the object in question. Several key pieces of information necessary for investigation are presented to the security team, along with a link to directly investigate the finding in the AWS console of the central security account.
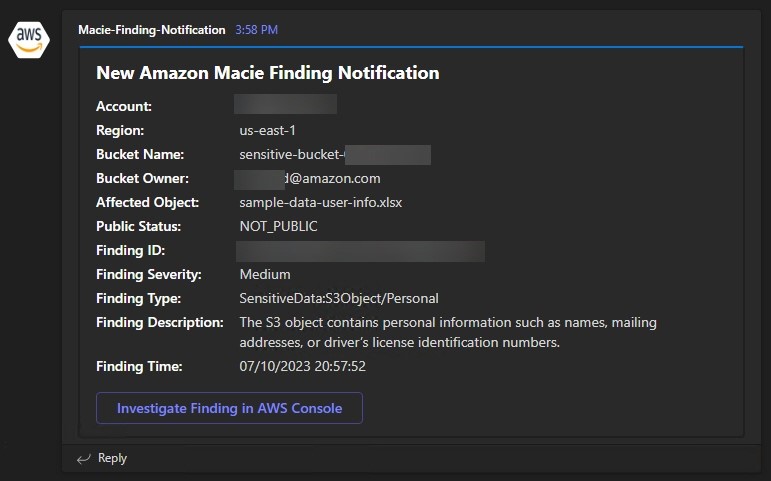
Figure 10: Macie medium severity finding notification
Now review the high severity finding. The flow of event information in this scenario is identical to the medium severity finding, but in this case, Step Functions quarantined the object because the severity is high. The security team is again presented with an option to use the console to investigate further. The process to investigate this finding is a bit different due to the object being moved to a quarantine prefix. If security professionals want to view the original object in its entirety, they would assume the InvestigateMacieFindingsRole in the security account, which has cross-account access to the S3 bucket quarantine prefix in the in-scope member accounts. S3 buckets deployed in member accounts using the CloudFormation template listed above will have a special bucket policy that denies access to the quarantine prefix for any role other than the InvestigateMacieFindingsRole, StepFunctionsProcessFindingsRole, and StepFunctionsReleaseObjectRole. This makes sure that objects are truly quarantined and inaccessible while being investigated by security professionals.
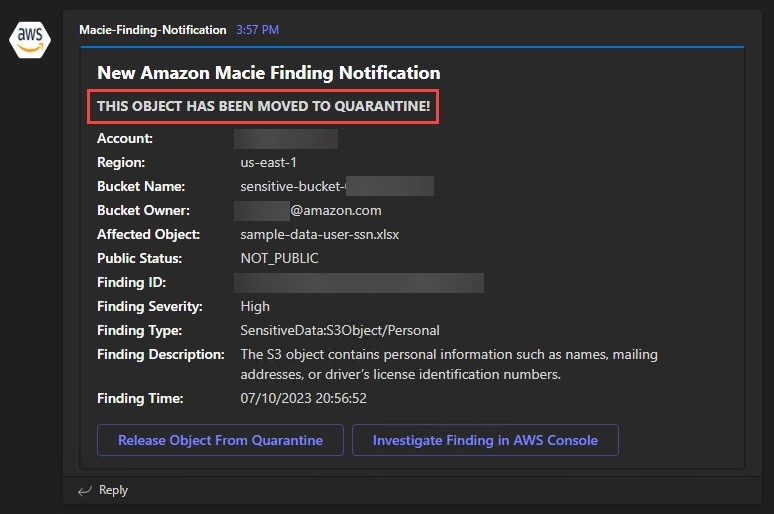
Figure 11: Macie high severity finding notification
Unlike the previous example, the security team is also notified that an affected object was moved to quarantine, and is presented with a separate option to release the object from quarantine. Choosing Release Object from Quarantine runs an HTTP POST to the REST API transparently in the background, and the API responds with a SUCCEEDED or FAILED message indicating the result of the operation.
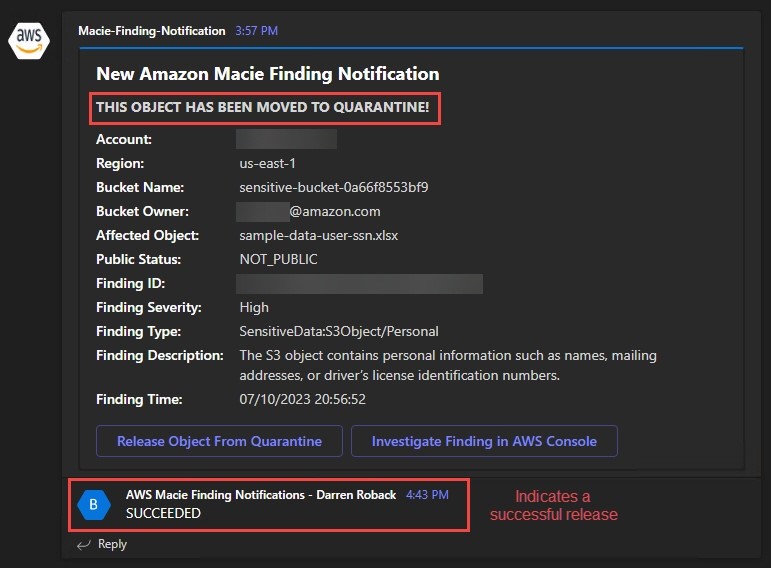
Figure 12: Release object from quarantine
The state machine uses decision logic based on the affected object’s public status and the severity of the finding. Customers deploying this solution can choose to alter this logic or add additional customization by altering the Step Functions state machine definition either directly in the CloudFormation template or through the Step Functions Workflow Studio low-code interface available in the Step Functions console. For reference, the full event schema used by Macie can be found in the Eventbridge event schema for Macie findings.
The logic of the Step Functions state machine used to process Macie finding events follows and is shown in Figure 13.

Figure 13: Process Macie findings workflow
To remove the solution and avoid incurring additional charges for the AWS resources used in this solution, perform the following steps.
Note: If you want to only suspend Macie, which will preserve your settings, resources, and findings, see Suspending or disabling Amazon Macie.
In this blog post, we demonstrated a solution to process—and act upon—sensitive data discovery findings surfaced by Macie through the incorporation of decision logic implemented in Step Functions. This logic provides granularity on quarantine decisions and extensibility you can use to customize automated finding response to suit your business and regulatory needs.
In addition, we demonstrated a mechanism to notify you of finding event information as it’s discovered, while providing you with the contextual details necessary for investigative purposes. Additional customization of the information presented in Microsoft Teams can be accomplished through parsing of the event payload. You can also customize the Lambda functions to interface with Slack, as demonstrated in this sample solution for Macie.
Finally, we demonstrated a solution that can operate at-scale, and will automatically be deployed to new member accounts in your organization. By using an in-place quarantine strategy instead of one that is centralized, you can more easily manage this solution across potentially hundreds of AWS accounts and thousands of S3 buckets. By incorporating a global tracking database in DynamoDB, this solution can also be enhanced through a visual dashboard depicting quarantine insights.
If you have feedback about this post, let us know in the comments section. If you have questions about this post, start a new thread on AWS Security, Identity, & Compliance re:Post or contact AWS Support.
Want more AWS Security news? Follow us on Twitter.
Post Syndicated from John Jackson original https://aws.amazon.com/blogs/big-data/introducing-shared-vpc-support-on-amazon-mwaa/
In this post, we demonstrate automating deployment of Amazon Managed Workflows for Apache Airflow (Amazon MWAA) using customer-managed endpoints in a VPC, providing compatibility with shared, or otherwise restricted, VPCs.
Data scientists and engineers have made Apache Airflow a leading open source tool to create data pipelines due to its active open source community, familiar Python development as Directed Acyclic Graph (DAG) workflows, and extensive library of pre-built integrations. Amazon MWAA is a managed service for Airflow that makes it easy to run Airflow on AWS without the operational burden of having to manage the underlying infrastructure. For each Airflow environment, Amazon MWAA creates a single-tenant service VPC, which hosts the metadatabase that stores states and the web server that provides the user interface. Amazon MWAA further manages Airflow scheduler and worker instances in a customer-owned and managed VPC, in order to schedule and run tasks that interact with customer resources. Those Airflow containers in the customer VPC access resources in the service VPC via a VPC endpoint.
Many organizations choose to centrally manage their VPC using AWS Organizations, allowing a VPC in an owner account to be shared with resources in a different participant account. However, because creating a new route outside of a VPC is considered a privileged operation, participant accounts can’t create endpoints in owner VPCs. Furthermore, many customers don’t want to extend the security privileges required to create VPC endpoints to all users provisioning Amazon MWAA environments. In addition to VPC endpoints, customers also wish to restrict data egress via Amazon Simple Queue Service (Amazon SQS) queues, and Amazon SQS access is a requirement in the Amazon MWAA architecture.
Shared VPC support for Amazon MWAA adds the ability for you to manage your own endpoints within your VPCs, adding compatibility to shared and otherwise restricted VPCs. Specifying customer-managed endpoints also provides the ability to meet strict security policies by explicitly restricting VPC resource access to just those needed by your Amazon MWAA environments. This post demonstrates how customer-managed endpoints work with Amazon MWAA and provides examples of how to automate the provisioning of those endpoints.
Shared VPC support for Amazon MWAA allows multiple AWS accounts to create their Airflow environments into shared, centrally managed VPCs. The account that owns the VPC (owner) shares the two private subnets required by Amazon MWAA with other accounts (participants) that belong to the same organization from AWS Organizations. After the subnets are shared, the participants can view, create, modify, and delete Amazon MWAA environments in the subnets shared with them.
When users specify the need for a shared, or otherwise policy-restricted, VPC during environment creation, Amazon MWAA will first create the service VPC resources, then enter a pending state for up to 72 hours, with an Amazon EventBridge notification of the change in state. This allows owners to create the required endpoints on behalf of participants based on endpoint service information from the Amazon MWAA console or API, or programmatically via an AWS Lambda function and EventBridge rule, as in the example in this post.
After those endpoints are created on the owner account, the endpoint service in the single-tenant Amazon MWAA VPC will detect the endpoint connection event and resume environment creation. Should there be an issue, you can cancel environment creation by deleting the environment during this pending state.
This feature also allows you to remove the create, modify, and delete VPCE privileges from the AWS Identity and Access Management (IAM) principal creating Amazon MWAA environments, even when not using a shared VPC, because that permission will instead be imposed on the IAM principal creating the endpoint (the Lambda function in our example). Furthermore, the Amazon MWAA environment will provide the SQS queue Amazon Resource Name (ARN) used by the Airflow Celery Executor to queue tasks (the Celery Executor Queue), allowing you to explicitly enter those resources into your network policy rather than having to provide a more open and generalized permission.
In this example, we create the VPC and Amazon MWAA environment in the same account. For shared VPCs across accounts, the EventBridge rule and Lambda function would exist in the owner account, and the Amazon MWAA environment would be created in the participant account. See Sending and receiving Amazon EventBridge events between AWS accounts for more information.
You should have the following prerequisites:
dagsWe begin by creating a restrictive VPC using an AWS CloudFormation template, in order to simulate creating the necessary VPC endpoint and modifying the SQS endpoint policy. If you want to use an existing VPC, you can proceed to the next section.
cfn-vpc-private-bjs.yml, edit the SqsVpcEndoint section to appear as follows:This additional policy document entry prevents Amazon SQS egress to any resource not explicitly listed.
Now we can create our CloudFormation stack.
MWAA-Environment-VPC.We have two options for self-managing our endpoints: manual and automated. In this example, we create a Lambda function that responds to the Amazon MWAA EventBridge notification. You could also use the EventBridge notification to send an Amazon Simple Notification Service (Amazon SNS) message, such as an email, to someone with permission to create the VPC endpoint manually.
First, we create a Lambda function to respond to the EventBridge event that Amazon MWAA will emit.
mwaa-create-lambda.lambda_function, enter the following code:
The complete policy should look similar to the following:
Next, we configure EventBridge to send the Amazon MWAA notifications to our Lambda function.
You may also specify an SNS notification in order to receive a message when the environment state changes.
mwaa-create-lambda.Finally, we create an Amazon MWAA environment with customer-managed endpoints.
dags/ folder in your S3 bucket, or enter the Amazon S3 URI.Because the security groups of the AWS PrivateLink endpoints from the earlier step are self-referencing, you must choose the same security group for your Amazon MWAA environment.
When your environment is available, you can access it via the Open Airflow UI link on the Amazon MWAA console.
Cleaning up resources that are not actively being used reduces costs and is a best practice. If you don’t delete your resources, you can incur additional charges. To clean up your resources, complete the following steps:
This post described how to automate environment creation with shared VPC support in Amazon MWAA. This gives you the ability to manage your own endpoints within your VPC, adding compatibility to shared, or otherwise restricted, VPCs. Specifying customer-managed endpoints also provides the ability to meet strict security policies by explicitly restricting VPC resource access to just those needed by their Amazon MWAA environments. To learn more about Amazon MWAA, refer to the Amazon MWAA User Guide. For more posts about Amazon MWAA, visit the Amazon MWAA resources page.
 John Jackson has over 25 years of software experience as a developer, systems architect, and product manager in both startups and large corporations and is the AWS Principal Product Manager responsible for Amazon MWAA.
Post Syndicated from Benjamin Smith original https://aws.amazon.com/blogs/compute/introducing-aws-step-functions-redrive-a-new-way-to-restart-workflows/
Developers use AWS Step Functions, a visual workflow service to build distributed applications, automate IT and business processes, and orchestrate AWS services with minimal code.
Step Functions redrive for Standard Workflows allows you to redrive a failed workflow execution from its point of failure, rather than having to restart the entire workflow. This blog post explains how to use the new redrive feature to skip unnecessary workflow steps and reduce the cost of redriving failed workflows.
Any workflow state can encounter runtime errors. Errors happen for various reasons, including state machine definition issues, task failures, incorrect permissions, and exceptions from downstream services. By default, when a state reports an error, Step Functions causes the workflow execution to fail. Step Functions allows you to handle errors by retrying, catching, and falling back to a defined state.
Now, you can also redrive the workflow from the failed state, skipping the successful prior workflow steps. This results in faster workflow completion and lower costs. You can only redrive a failed workflow execution from the step where it failed using the same input as the last non-successful state. You cannot redrive a failed workflow execution using a state machine definition that is different from the initial workflow execution.
Use the retry mechanism for transient issues such as network connectivity problems or momentary service unavailability You can configure the number of retries, along with intervals and back-off rates, providing the workflow with multiple attempts to complete a task successfully.
In scenarios where the underlying cause of an error requires longer investigation or resolution time, redrive becomes a valuable tool. Consider a situation where a downstream service experiences extended downtime or manual intervention is needed, such as updating a database or making code changes to a Lambda function. In these cases, being able to redrive the workflow can give you time to address the root cause before resuming the workflow execution.
Adopt a hybrid strategy that combines retry and redrive mechanisms:
AWS charges for Standard Workflows based on the number of state transitions required to run a workload. Step Functions counts a state transition each time a step of your workflow runs. Step Functions charges for the total number of state transitions across state machines, including retries. The cost is $0.025 per 1,000 state transitions. This means that reducing the number of state transitions reduces the cost of running your Standard Workflows.
If a workflow has many steps, includes parallel or map states, or is prone to errors that require frequent re-runs, this new feature reduces the costs incurred. You pay only for each state transition after the failed state and those costs for every downstream service invoked as part of the re-run.
The following example explains the cost implications of retrying a workflow that has failed, with and without redrive. In this example, a Step Functions workflow orchestrates Amazon Transcribe to generate a text transcription from an .mp4 file.

Since the failed state occurs towards the end of this workflow, the redrive execution does not run the successful states, reducing the overall successful completion time. If this workflow were to fail regularly, the reduction in transitions and execution duration becomes increasingly valuable.
The first time this workflow runs, the final state, which uses an AWS Lambda function to make an HTTP request fails with an IAM error. This is because the workflow does not have the required permissions to invoke the Lambda function. After granting the required permissions to the workflow’s execution role, redrive to continue the workflow from the failed state.

After the redrive, Step Functions workflow reports a different failure. This time it is related to the configuration of the Lambda function. This is an example of a downstream failure that does not require an update to my workflow definition.

After resolving the Lambda configuration issue and redriving the workflow, the execution completes successfully. The following image shows the execution details, including the number of redrives, the total state transitions, and the last redrive time:

Redrive works for Standard Workflows only. You can redrive a workflow from its failed step programmatically, via the AWS CLI or AWS SDK, or using the Step Functions console, which provides a visual operator experience:


The state to redrive from, the workflow definition, and the previous input are immutable.
To redrive a workflow execution programmatically from its point of failure, call the new Redrive Execution API action. The same workflow execution starts from the last non-successful state and uses the same input as the last non-successful state from the initial failed workflow execution.
Step Functions can process workloads autonomously, without the need for human interaction, or can include intervention from a user by implementing the .waitForTastToken pattern.
Redrive is for unhandled and unexpected errors only. Handling errors within a workflow using the built-in mechanisms for catch, retry, and routing to a Fail state, does not permit the workflow to redrive. However, it is possible to detect in near real-time when a workflow has failed, and programmatically redrive. When a workflow fails, it emits an event onto the Amazon EventBridge default event bus. The event looks like the following JSON object:

There are four new key/values pairs in this event:
"redriveCount": 0,
"redriveDate": null,
"redriveStatus": "REDRIVABLE",
"redriveStatusReason": null,
The redrive count shows how many times the workflow has previously been redriven. The redrive status shows if the failed workflow is eligible for redrive execution.
To programmatically redrive the workflow from the failed state. Create a rule that pattern matches this event, and route the event onto a target service to handle the error. The target service uses the new States.RedriveExecution API to redrive the workflow.
Download and deploy the previous pattern from this example on serverlessland.com.
In the following example, the first state sends a post request to an API endpoint. If the request fails due to network connectivity or latency issues, the state retries. If the retry fails, then Step Functions emits a ` Step Functions Execution Status Change event onto the EventBridge default event bus. An EventBridge rule routes this event to a service where you can rectify this error and then redrive the task using the Step Functions API.

The new redrive feature also supports the distributed map state.
Redrive for express child workflow executions
For failed child workflow executions that are Express Workflows within a Distributed Map, the redrive capability ensures a seamless restart from the beginning of the child workflow. This allows you to resolve issues that are specific to individual iterations without restarting the entire map.
Redrive for standard child workflow executions
For failed child workflow executions within a Distributed Map that are Standard Workflows, the redrive feature functions in the same way in standalone Standard Workflows. You can restart the failed iteration from its point of failure, skipping unnecessary steps that have already successfully executed.
Step Functions redrive for Standard Workflows allows you to redrive a failed workflow execution from its point of failure rather than having to restart the entire workflow. This results in faster workflow completion and lower costs for processing failed executions. This is because it minimizes the number of state transitions and downstream service invocations.
Visit the Serverless Workflows Collection to browse the many deployable workflows to help build your serverless applications.
Post Syndicated from Pradeep Parmar original https://aws.amazon.com/blogs/big-data/unlock-innovation-in-data-and-ai-at-aws-reinvent-2023/
For organizations seeking to unlock innovation with data and AI, AWS re:Invent 2023 offers several opportunities. Attendees will discover services, strategies, and solutions for tackling any data challenge. In this post, we provide a curated list of keynotes, sessions, demos, and exhibits that will showcase how you can unlock innovation in data and AI using AWS for Data.
Several keynotes will shine a spotlight on data. For example, Dr. Swami Sivasubramanian, VP of Data and AI at AWS, keynotes Wednesday, November 29, from 8:30 AM – 10:30 AM on using company data to build differentiated generative AI applications that can unlock new levels of productivity and creativity across the organization.
Several Innovation Talks will provide insights into data topics. These 60-minute talks will also spotlight how AWS is empowering customers to innovate and overcome their most important business challenges:
FORMULA 1 cars are data powerhouses, with over 300 sensors collecting more than 1.1 million data points per second. F1 uses all that data with AWS to gain insights on race strategy and car performance. They also integrate some of those insights into the live TV broadcast to entertain and educate fans.

Stop by the AWS for Data booth in the AWS Village to get data strategy advice from an AI-powered Data Concierge created by the AWS Generative AI Innovation Center. You can race slot cars while seeing AWS technologies pull data in real time. You can also explore an augmented reality experience demonstrating F1 insights powered by AWS.
Several educational sessions will explore best practices for deriving value from data on AWS. Examples include ANT335: Get the most out of your data warehousing workloads, DAT323: Discovering the vector database power of Amazon Aurora and Amazon RDS, and AIM337: Accelerate generative AI application development with Amazon Bedrock.
You can learn about data integration technologies and strategies with sessions such as ANT326: Set up a zero-ETL based analytics architecture for your organizations, ANT331: Build an end-to-end data strategy for analytics and generative AI, and ANT218: Unified and integrated near real-time analytics with zero-ETL.
We will also cover data governance with sessions such as ANT206: Modern data governance customer panel, ANT334: End-to-end data and machine learning governance on AWS, and AIM344: Scaling AI/ML governance.
From data ingestion and storage to analysis and visualization, AWS provides a comprehensive, integrated, and governed set of data services. re:Invent offers a close look at how organizations can use these data services to transform their business. Browse the agenda to plan your re:Invent visit. You will leave inspired and equipped to use data like never before.
 Pradeep S. Parmar is a Senior Product Marketing Manager at AWS. He focuses on data and AI services for technical decision makers. His prior experience includes leading product marketing for SaaS, networking, and server products at a startup, Cisco Systems and Sun Microsystems. Outside work, Pradeep dedicates time to volunteering with a non-profit wellness organization.
Post Syndicated from Sunaina Abdul Salah original https://aws.amazon.com/blogs/big-data/whats-cooking-with-amazon-redshift-at-aws-reinvent-2023/
AWS re:Invent is a powerhouse of a learning event and every time I have attended, I’ve been amazed at its scale and impact. There are keynotes packed with announcements from AWS leaders, training and certification opportunities, access to more than 2,000 technical sessions, an elaborate expo, executive summits, after-hours events, demos, and much more. The analytics team is waiting to engage with our customers and partners at the analytics kiosk in the expo hall.
For the latest and greatest with Amazon Redshift, our cloud data warehousing solution, I’ve curated a few must-attend sessions. The Amazon Redshift team will be there meeting with customers and discussing the newest announcements. And there are plenty of announcements you don’t want to miss! My personal favorite in this session list is the What’s new in Amazon Redshift session, led by Neeraja Rentachintala, Director of Product Management for Amazon Redshift and Matt Sandler, Senior Director of Data & Analytics from McDonalds giving a broad view of everything the team has been working on. But there are so many good ones on the list. Product and data engineers, data analysts, data scientists, data and technology leaders, and line of business owners can take their pick of sessions!
And here’s a tip—reserve your seat now so you can get into the session you want and avoid waiting in long lines. To access the session catalog and reserve your seat for one of our sessions, you must be registered for re:Invent. Register now!

Adam Selipsky, Chief Executive Officer of Amazon Web Services – Keynote
Tuesday, 11/28 | 8:30 AM – 10:30 AM
Join Adam Selipsky, CEO of Amazon Web Services, as he shares his perspective on cloud transformation and highlights the latest innovations from data to infrastructure to AI and ML, helping you achieve your goals faster.
Swami Sivasubramanian, Vice President of Data and AI, AWS – Keynote
Wednesday, 11/29 | 8:30 AM – 10:30 AM
Swami’s session is all about data, so if that’s the thing that makes your world go round, then this is the big stage session for you. Generative AI is augmenting our productivity and creativity in new ways, while also being fueled by massive amounts of enterprise data and human intelligence, and Swami’s keynote will lay the groundwork for your understanding of AWS offerings in this realm.
Peter DeSantis, Senior Vice President of AWS Utility Computing – Keynote
Monday, 11/27 | 7:30 PM – 9:00 PM
Join Peter DeSantis, Senior Vice President of AWS Utility Computing, as he continues the Monday Night Live tradition of diving deep into the engineering that powers AWS services and keep a look out for any Amazon Redshift related announcements.
G2 Krishnamoorthy, Vice President of AWS Analytics
ANT219-INT | Data drives transformation: Data foundations with AWS analytics
Thursday, 11/30 | 2:00 PM – 3:00 PM
G2’s session discusses strategies for embedding analytics into your applications and ideas for building a data foundation that supports your business initiatives. With new capabilities for self-service and straightforward builder experiences, you can democratize data access for line of business users, analysts, scientists, and engineers. Hear also from Adidas, GlobalFoundries, and University of California, Irvine.
We’ve got something for everyone, from deep learning sessions on building multi-cluster architectures and AWS’s zero-ETL approach to near-real-time analytics and ML in Amazon Redshift, powering self-service analytics for your organization and much more. Sessions can be big room breakout sessions, usually with a customer speaker, or more intimate and technical chalk talks, workshops, or builder sessions. Take a look, plan your week, and soak in the learning!
Monday, November 27
Tuesday, November 28
Wednesday, November 29
Thursday, November 30
When you are onsite, stop by the Analytics kiosk in the AWS re:Invent expo hall. Connect with experts, meet with book authors on data warehousing and analytics (at the Meet the Authors event on November 29 and 30, 3:00 PM – 4:00 PM), win prizes, and learn all about the latest innovations from our AWS Analytics services.
We are excited to introduce the 2023 AWS Analytics Superheroes at this year’s re:Invent conference! Are you lightning fast and ultra-adaptable like Wire Weaver? A shapeshifting guardian and protector of data like Data Lynx? Or a digitally clairvoyant master of data insights like Cloud Sight? Join us at the Analytics kiosk to learn more about which AWS Analytics Superhero you are and receive superhero swag!
To recap, here is what you can do to prepare:
See you in Vegas!

 Sunaina AbdulSalah leads product marketing for Amazon Redshift. She focuses on educating customers about the impact of data warehousing and analytics and sharing AWS customer stories. She has a deep background in marketing and GTM functions in the B2B technology and cloud computing domains. Outside of work, she spends time with her family and friends and enjoys traveling.
Post Syndicated from Roger Park original https://aws.amazon.com/blogs/security/aws-speaker-profile-zach-miller-senior-worldwide-security-specialist-solutions-architect/

In the AWS Speaker Profile series, we interview Amazon Web Services (AWS) thought leaders who help keep our customers safe and secure. This interview features Zach Miller, Senior Worldwide Security Specialist SA and re:Invent 2023 presenter of Securely modernize payment applications with AWS and Centrally manage application secrets with AWS Secrets Manager. Zach shares thoughts on the data protection and cloud security landscape, his unique background, his upcoming re:Invent sessions, and more.
I’ve been at AWS for more than four years, and I’ve enjoyed every minute of it! I started as a consultant in Professional Services, and I’ve been a Security Solutions Architect for around three years.
Well, my mother doesn’t totally understand my role, and she’s been known to tell her friends that I’m the cable company technician that installs your internet modem and router. I usually tell my non-tech friends that I help AWS customers protect their sensitive data. If I mention cryptography, I typically only get asked questions about cryptocurrency—which I’m not qualified to answer. If someone asks what cryptography is, I usually say it’s protecting data by using mathematics.
I originally went to school to become a network engineer, but I discovered that moving data packets from point A to point B wasn’t as interesting to me as securing those data packets. Early in my career, I was an intern at an insurance company, and I had a mentor who set up ethnical hacking lessons for me—for example, I’d come into the office and he’d have a compromised workstation preconfigured. He’d ask me to do an investigation and determine how the workstation was compromised and what could be done to isolate it and collect evidence. Other times, I’d come in and find my desk cabinets were locked with a padlock, and he wanted me to pick the lock. Security is particularly interesting because it’s an ever-evolving field, and I enjoy learning new things.
One of the changes that I’ve been excited to see is an emphasis on encrypting everything. When I started my career, we’d often have discussions about encryption in the context of tradeoffs. If we needed to encrypt sensitive data, we’d have a conversation with application teams about the potential performance impact of encryption and decryption operations on their systems (for example, their databases), when to schedule downtime for the application to encrypt the data or rotate the encryption keys protecting the data, how to ensure the durability of their keys and make sure they didn’t lose data, and so on.
When I talk to customers about encryption on AWS today—of course, it’s still useful to talk about potential performance impact—but the conversation has largely shifted from “Should I encrypt this data?” to “How should I encrypt this data?” This is due to services such as AWS Key Management Service (AWS KMS) making it simpler for customers to manage encryption keys and encrypt and decrypt data in their applications with minimal performance impact or application downtime. AWS KMS has also made it simple to enable encryption of sensitive data—with over 120 AWS services integrated with AWS KMS, and services such as Amazon Simple Storage Service (Amazon S3) encrypting new S3 objects by default.
My last two posts covered how to use AWS Identity and Access Management (IAM) condition context keys to create enterprise controls for certificate management and how to use AWS Secrets Manager to securely manage and retrieve secrets in hybrid or multicloud workloads. I like writing posts that show customers how to use a new feature, or highlight a pattern that many customers ask about.
I’m delivering two sessions at re:Invent this year. The first is a chalk talk, Centrally manage application secrets with AWS Secrets Manager (SEC221), that I’m delivering with Ritesh Desai, who is the General Manager of Secrets Manager. We’re discussing how you can securely store and manage secrets in your workloads inside and outside of AWS. We will highlight some recommended practices for managing secrets, and answer your questions about how Secrets Manager integrates with services such as AWS KMS to help protect application secrets.
The second session is also a chalk talk, Securely modernize payment applications with AWS (SEC326). I’m delivering this talk with Mark Cline, who is the Senior Product Manager of AWS Payment Cryptography. We will walk through an example scenario on creating a new payment processing application. We will discuss how to use AWS Payment Cryptography, as well as other services such as AWS Lambda, to build a simple architecture to help process and secure credit card payment data. We will also include common payment industry use cases such as tokenization of sensitive data, and how to include basic anti-fraud detection, in our example app.
My re:Invent sessions are definitely something that I’m excited about. Otherwise, I spend most of my time talking to customers about AWS Cryptography services such as AWS KMS, AWS Secrets Manager, and AWS Private Certificate Authority. I also lead a program at AWS that enables our subject matter experts to create and publish videos to demonstrate new features of AWS Security Services. I like helping people create videos, and I hope that our videos provide another mechanism for viewers who prefer information in a video format. Visual media can be more inclusive for customers with certain disabilities or for neurodiverse customers who find it challenging to focus on written text. Plus, you can consume videos differently than a blog post or text documentation. If you don’t have the time or desire to read a blog post or AWS public doc, you can listen to an instructional video while you work on other tasks, eat lunch, or take a break. I invite folks to check out the AWS Security Services Features Demo YouTube video playlist.
I always appreciate when customers provide candid feedback on our services. AWS is a customer-obsessed company, and we build our service roadmaps based on what our customers tell us they need. You should feel comfortable letting AWS know when something could be easier, more efficient, or less expensive. Many customers I’ve worked with have provided actionable feedback on our services and influenced service roadmaps, just by speaking up and sharing their experiences.
I have two toddlers that keep me pretty busy, so most of my hobbies are what they like to do. So I tend to spend a lot of time building elaborate toy train tracks, pushing my kids on the swings, and pretending to eat wooden toy food that they “cook” for me. Outside of that, I read a lot of fiction and indulge in binge-worthy TV.
If you have feedback about this post, submit comments in the Comments section below.
Want more AWS Security how-to content, news, and feature announcements? Follow us on Twitter.
Post Syndicated from Bruce Schneier original https://www.schneier.com/blog/archives/2023/11/new-ssh-vulnerability.html
This is interesting:
For the first time, researchers have demonstrated that a large portion of cryptographic keys used to protect data in computer-to-server SSH traffic are vulnerable to complete compromise when naturally occurring computational errors occur while the connection is being established.
[…]
The vulnerability occurs when there are errors during the signature generation that takes place when a client and server are establishing a connection. It affects only keys using the RSA cryptographic algorithm, which the researchers found in roughly a third of the SSH signatures they examined. That translates to roughly 1 billion signatures out of the 3.2 billion signatures examined. Of the roughly 1 billion RSA signatures, about one in a million exposed the private key of the host.
Research paper:
Passive SSH Key Compromise via Lattices
Abstract: We demonstrate that a passive network attacker can opportunistically obtain private RSA host keys from an SSH server that experiences a naturally arising fault during signature computation. In prior work, this was not believed to be possible for the SSH protocol because the signature included information like the shared Diffie-Hellman secret that would not be available to a passive network observer. We show that for the signature parameters commonly in use for SSH, there is an efficient lattice attack to recover the private key in case of a signature fault. We provide a security analysis of the SSH, IKEv1, and IKEv2 protocols in this scenario, and use our attack to discover hundreds of compromised keys in the wild from several independently vulnerable implementations.
Post Syndicated from Phillip Karg original https://aws.amazon.com/blogs/big-data/bmw-cloud-efficiency-analytics-powered-by-amazon-quicksight-and-amazon-athena/
This post is written in collaboration with Philipp Karg and Alex Gutfreund from BMW Group.
Bayerische Motoren Werke AG (BMW) is a motor vehicle manufacturer headquartered in Germany with 149,475 employees worldwide and the profit before tax in the financial year 2022 was € 23.5 billion on revenues amounting to € 142.6 billion. BMW Group is one of the world’s leading premium manufacturers of automobiles and motorcycles, also providing premium financial and mobility services.
BMW Group uses 4,500 AWS Cloud accounts across the entire organization but is faced with the challenge of reducing unnecessary costs, optimizing spend, and having a central place to monitor costs. BMW Cloud Efficiency Analytics (CLEA) is a homegrown tool developed within the BMW FinOps CoE (Center of Excellence) aiming to optimize and reduce costs across all these accounts.
In this post, we explore how the BMW Group FinOps CoE implemented their Cloud Efficiency Analytics tool (CLEA), powered by Amazon QuickSight and Amazon Athena. With this tool, they effectively reduced costs and optimized spend across all their AWS Cloud accounts, utilizing a centralized cost monitoring system and using key AWS services. The CLEA dashboards were built on the foundation of the Well-Architected Lab. For more information on this foundation, refer to A Detailed Overview of the Cost Intelligence Dashboard.
CLEA gives full transparency into cloud costs, usage, and efficiency from a high-level overview to granular service, resource, and operational levels. It seamlessly consolidates data from various data sources within AWS, including AWS Cost Explorer (and forecasting with Cost Explorer), AWS Trusted Advisor, and AWS Compute Optimizer. Additionally, it incorporates BMW Group’s internal system to integrate essential metadata, offering a comprehensive view of the data across various dimensions, such as group, department, product, and applications.
The ultimate goal is to raise awareness of cloud efficiency and optimize cloud utilization in a cost-effective and sustainable manner. The dashboards, which offer a holistic view together with a variety of cost and BMW Group-related dimensions, were successfully launched in May 2023 and became accessible to users within the BMW Group.
At the BMW Group, Cloud Data Hub (CDH) is the central platform for managing company-wide data and data solutions. It works as a bundle for resources that are bound to a specific staging environment and Region to store data on Amazon Simple Storage Service (Amazon S3), which is renowned for its industry-leading scalability, data availability, security, and performance. Additionally, it manages table definitions in the AWS Glue Data Catalog, containing references to data sources and targets of extract, transform, and load (ETL) jobs in AWS Glue.
Data providers and consumers are the two fundamental users of a CDH dataset. Providers create datasets within assigned domain and as the owner of a dataset, they are responsible for the actual content and for providing appropriate metadata. They can use their own toolsets or rely on provided blueprints to ingest the data from source systems. Once released, consumers use datasets from different providers for analysis, machine learning (ML) workloads, and visualization.
Each CDH dataset has three processing layers: source (raw data), prepared (transformed data in Parquet), and semantic (combined datasets). It is possible to define stages (DEV, INT, PROD) in each layer to allow structured release and test without affecting PROD. Within each stage, it’s possible to create resources for storing actual data. Two resource types are associated with each database in a layer:
The following diagram is a high-level overview of some of the technologies used for the extract, load, and transform (ELT) stages, as well as the final visualization and analysis layer. You might notice that this differs slightly from traditional ETL. The difference lies in when and where data transformation takes place. In ETL, data is transformed before it’s loaded into the data warehouse. In ELT, raw data is loaded into the data warehouse first, then it’s transformed directly within the warehouse. The ELT process has gained popularity with the rise of cloud-based, high-performance data warehouses, where transformation can be done more efficiently after loading.
Regardless of the method used, the goal is to provide high-quality, reliable data that can be used to drive business decisions.

In this section, we take a closer look at the three essential stages mentioned previously: extract, load and transform.
The extract stage plays a pivotal role in the CLEA, serving as the initial step where data related to cost and usage and optimization is collected from a diverse range of sources within AWS. These sources encompass the AWS Cost and Usage Reports, Cost Explorer (and forecasting with Cost Explorer), Trusted Advisor, and Compute Optimizer. Furthermore, it fetches essential metadata from BMW Group’s internal system, offering a comprehensive view of the data across various dimensions, such as group, department, product, and applications in the later stages of data transformation.
The following diagram illustrates one of the data collection architectures that we use to collect Trusted Advisor data from nearly 4,500 AWS accounts and subsequently load that into Cloud Data Hub.
 Let’s go through each numbered step as outlined in the architecture:
For the data transformations, we used an open-source data transformation tool called dbt (Data Build Tool), modifying and preprocessing the data through a number of abstract data layers:
Overall, using dbt’s data modeling and the pay-as-you-go pricing of Athena, BMW Group can control costs by running efficient queries on demand. Furthermore, with the serverless architecture of Athena and dbt’s structured transformations, you can scale data processing without worrying about infrastructure management. In CLEA there are currently more than 120 dbt models implemented with complex transformations. The semantic layer is incrementally materialized and partially ingested into QuickSight with up to 4 TB of SPICE capacity. For dbt deployment and scheduling, we use GitHub Actions which allows us to introduce new dbt models and changes easily with automatic deployments and tests.
In this section, we explain how we implemented access control using row-level security in QuickSight and QuickSight embedding for authentication and authorization.
Row-level security (RLS) is a key feature that governs data access and privacy, which we implemented for CLEA. RLS is a mechanism that allows us to control the visibility of data at the row level based on user attributes. In essence, it ensures that users can only access the data that they are authorized to view, adding an additional layer of data protection within the QuickSight environment.
Understanding the importance of RLS requires a broader view of the data landscape. In organizations where multiple users interact with the same datasets but require different access levels due to their roles, RLS becomes a pivotal tool. It ensures data security and compliance with privacy regulations, preventing unauthorized access to sensitive data. Additionally, it offers a tailored user experience by displaying only relevant data to the user, thereby enhancing the effectiveness of data analysis.
For CLEA, we collected BMW Group metadata such as department, application, and organization, which are quite important to allow users to only see the accounts within their department, application, organization, and so on. This is achieved using both a user name and group name for access control. We use the user name for user-specific access control and the group name for adding some users to a specific group to extend their permissions for different use cases.
Lastly, because there are many dashboards created by CLEA, we also control which users a unique user can see and also the data itself in the dashboard. This is done at the group level. By default, all users are assigned to CLEA-READER, which is granted access to core dashboards that we want to share with users, but there are different groups that allow users to see additional dashboards after they’re assigned to that group.
The RLS dataset is refreshed daily to catch recent changes regarding new user additions, group changes, or any other user access changes. This dataset is also ingested to SPICE daily, which automatically updates all datasets restricted via this RLS dataset.
CLEA is a cross-platform application that provides secure access to QuickSight embedded content with custom-built authentication and authorization logic that sits on top of BMW Group identity and role management services (referred to as BMW IAM).
CLEA provides access to sensitive data to multiple users with different permissions, which is why it is designed with fine-grained access control rules. It enforces access control using role-based access control (RBAC) and attribute-based access control (ABAC) models at two different levels:
Dashboard-level permissions define the list of dashboards users are able to visualize.
Dashboard data-level permissions define the subsets of dashboard data shown to the user and are applied using RLS with the user attributes mentioned earlier. Although the majority of roles defined in CLEA are used for dashboard-level permissions, some specific roles are strategically defined to grant permissions at the dashboard data level, taking priority over the ABAC model.
BMW has a defined set of guidelines suggesting the usage of their IAM services as the single source of truth for identity and access control, which the team took into careful consideration when designing the authentication and authorization processes for CLEA.
Upon their first login, users are automatically registered in CLEA and assigned a base role that grants them access to a basic set of dashboards.
The process of registering users in CLEA consists of mapping a user’s identity as retrieved from BMW’s identity provider (IdP) to a QuickSight user, then assigning the newly created user to the respective QuickSight user group.
For users that require more extensive permissions (at one of the levels mentioned before), it is possible to order additional role assignments via BMW’s self-service portal for role management. Authorized reviewers will then review it and either accept or reject the role assignments.
Role assignments will take effect the next time the user logs in, at which time the user’s assigned roles in BMW Group IAM are synced to the user’s QuickSight groups—internally referred to as the identity and permissions sync. As shown in the following diagram, the sync groups step calculates which users’ group memberships should be kept, created, and deleted following the logic.

Amazon CloudWatch plays an indispensable role in enhancing the efficiency and usability of CLEA dashboards. Not only does CloudWatch offer real-time monitoring of AWS resources, but it also allows to track user activity and dashboard utilization. By analyzing usage metrics and logs, we can see who has logged in to the CLEA dashboards, what features are most frequently accessed, and how long users interact with various elements. These insights are invaluable for making data-driven decisions on how to improve the dashboards for a better user experience. Through the intuitive interface of CloudWatch, it’s possible to set up alarms for alerting about abnormal activities or performance issues. Ultimately, employing CloudWatch for monitoring offers a comprehensive view of both system health and user engagement, helping us refine and enhance our dashboards continually.
BMW Group’s CLEA platform offers a comprehensive and effective solution to manage and optimize cloud resources. By providing full transparency into cloud costs, usage, and efficiency, CLEA offers insights from high-level overviews to granular details at the service, resource, and operational level.
CLEA aggregates data from various sources, enabling a detailed roadmap of the cloud operations, tracking footprints across primes, departments, products, applications, resources, and tags. This dynamic vision helps identify trends, anticipate future needs, and make strategic decisions.
Future plans for CLEA include enhancing capabilities with data consistency and accuracy, integrating additional sources like Amazon S3 Storage Lens for deeper insights, and introducing Amazon QuickSight Q for intelligent recommendations powered by machine learning, further streamlining cloud operations.
By following the practices here, you can unlock the potential of efficient cloud resource management by implementing Cloud Intelligence Dashboards, providing you with precise insights into costs, savings, and operational effectiveness.
 Philipp Karg is Lead FinOps Engineer at BMW Group and founder of the CLEA platform. He focus on boosting cloud efficiency initiatives and establishing a cost-aware culture within the company to ultimately leverage the cloud in a sustainable way.
 Alex Gutfreund is Head of Product and Technology Integration at the BMW Group. He spearheads the digital transformation with a particular focus on platforms ecosystems and efficiencies. With extensive experience at the interface of business and IT, he drives change and makes an impact in various organizations. His industry knowledge spans from automotive, semiconductor, public transportation, and renewable energies.
 Cizer Pereira is a Senior DevOps Architect at AWS Professional Services. He works closely with AWS customers to accelerate their journey to the cloud. He has a deep passion for Cloud Native and DevOps, and in his free time, he also enjoys contributing to open-source projects.
 Selman Ay is a Data Architect in the AWS Professional Services team. He has worked with customers from various industries such as e-commerce, pharma, automotive and finance to build scalable data architectures and generate insights from the data. Outside of work, he enjoys playing tennis and engaging in outdoor activities.
 Nick McCarthy is a Senior Machine Learning Engineer in the AWS Professional Services team. He has worked with AWS clients across various industries including healthcare, finance, sports, telecoms and energy to accelerate their business outcomes through the use of AI/ML. Outside of work Nick loves to travel, exploring new cuisines and cultures in the process.
 Miguel Henriques is a Cloud Application Architect in the AWS Professional Services team with 4 years of experience in the automotive industry delivering cloud native solutions. In his free time, he is constantly looking for advancements in the web development space and searching for the next great pastel de nata.
Post Syndicated from Luis Morales original https://aws.amazon.com/blogs/big-data/implement-apache-flink-near-online-data-enrichment-patterns/
Stream data processing allows you to act on data in real time. Real-time data analytics can help you have on-time and optimized responses while improving the overall customer experience.
Data streaming workloads often require data in the stream to be enriched via external sources (such as databases or other data streams). Pre-loading of reference data provides low latency and high throughput. However, this pattern may not be suitable for certain types of workloads:
For example, if you’re receiving temperature data from a sensor network and need to get additional metadata of the sensors to analyze how these sensors map to physical geographic locations, you need to enrich it with sensor metadata data.
Apache Flink is a distributed computation framework that allows for stateful real-time data processing. It provides a single set of APIs for building batch and streaming jobs, making it easy for developers to work with bounded and unbounded data. Amazon Managed Service for Apache Flink (successor to Amazon Kinesis Data Analytics) is an AWS service that provides a serverless, fully managed infrastructure for running Apache Flink applications. Developers can build highly available, fault tolerant, and scalable Apache Flink applications with ease and without needing to become an expert in building, configuring, and maintaining Apache Flink clusters on AWS.
You can use several approaches to enrich your real-time data in Amazon Managed Service for Apache Flink depending on your use case and Apache Flink abstraction level. Each method has different effects on the throughput, network traffic, and CPU (or memory) utilization. For a general overview of data enrichment patterns, refer to Common streaming data enrichment patterns in Amazon Managed Service for Apache Flink.
This post covers how you can implement data enrichment for near-online streaming events with Apache Flink and how you can optimize performance. To compare the performance of the enrichment patterns, we ran performance testing based on synthetic data. The result of this test is useful as a general reference. It’s important to note that the actual performance for your Flink workload will depend on various and different factors, such as API latency, throughput, size of the event, and cache hit ratio.
We discuss three enrichment patterns, detailed in the following table.
| . | Synchronous Enrichment | Asynchronous Enrichment | Synchronous Cached Enrichment |
| Enrichment approach | Synchronous, blocking per-record requests to the external endpoint | Non-blocking parallel requests to the external endpoint, using asynchronous I/O | Frequently accessed information is cached in the Flink application state, with a fixed TTL |
| Data freshness | Always up-to-date enrichment data | Always up-to-date enrichment data | Enrichment data may be stale, up to the TTL |
| Development complexity | Simple model | Harder to debug, due to multi-threading | Harder to debug, due to relying on Flink state |
| Error handling | Straightforward | More complex, using callbacks | Straightforward |
| Impact on enrichment API | Max: one request per message | Max: one request per message | Reduce I/O to enrichment API (depends on cache TTL) |
| Application latency | Sensitive to enrichment API latency | Less sensitive to enrichment API latency | Reduce application latency (depends on cache hit ratio) |
| Other considerations | none | none |
Customizable TTL. Only synchronous implementation as of Flink 1.17 |
| Result of the comparative test (Throughput) | ~350 events per second | ~2,000 events per second | ~28,000 events per second |
For this post, we use an example of a temperature sensor network (component 1 in the following architecture diagram) that emits sensor information, such as temperature, sensor ID, status, and the timestamp this event was produced. These temperature events get ingested into Amazon Kinesis Data Streams (2). Downstream systems also require the brand and country code information of the sensors, in order to analyze, for example, the reliability per brand and temperature per plant side.
Based on the sensor ID, we enrich this sensor information from the Sensor Info API (3), which provide us with information of the brand, location, and an image. The resulting enriched stream is sent to another Kinesis data stream and can then be analyzed in an Amazon Managed Service for Apache Flink Studio notebook (4).

To get started with implementing near-online data enrichment patterns, you can clone or download the code from the GitHub repository. This repository implements the Flink streaming application we described. You can find the instructions on how to set up Flink in either Amazon Managed Service for Apache Flink or other available Flink deployment options in the README.md file.
If you want to learn how these patterns are implemented and how to optimize performance for your Flink application, you can simply follow along with this post without deploying the samples.
The project is structured as follows:
The main method in the ProcessTemperatureStream class sets up the run environment and either takes the parameters from the command line, if it’s is a local environment, or uses the application properties from Amazon Managed Service for Apache Flink. Based on the parameter EnrichmentStrategy, it decides which implementation to pick: synchronous enrichment (default), asynchronous enrichment, or cached enrichment based on the Flink concept of KeyedState.
We go over the three approaches in the following sections.
When you want to enrich your data from an external provider, you can use synchronous per-record lookup. When your Flink application processes an incoming event, it makes an external HTTP call and after sending every request, it has to wait until it receives the response.
As Flink processes events synchronously, the thread that is running the enrichment is blocked until it receives the HTTP response. This results in the processor staying idle for a significant period of processing time. On the other hand, the synchronous model is easier to design, debug, and trace. It also allows you to always have the latest data.
It can be integrated into your streaming application as such:
The implementation of the enrichment function looks like the following code:
To optimize the performance for synchronous enrichment, you can use the KeepAlive flag because the HTTP client will be reused for multiple events.
For applications with I/O-bound operators (such as external data enrichment), it can also make sense to increase the application parallelism without increasing the resources dedicated to the application. You can do this by increasing the ParallelismPerKPU setting of the Amazon Managed Service for Apache Flink application. This configuration describes the number of parallel subtasks an application can perform per Kinesis Processing Unit (KPU), and a higher value of ParallelismPerKPU can lead to full utilization of KPU resources. But keep in mind that increasing the parallelism doesn’t work in all cases, such as when you are consuming from sources with few shards or partitions.
In our synthetic testing with Amazon Managed Service for Apache Flink, we saw a throughput of approximately 350 events per second on a single KPU with 4 parallelism per KPU and the default settings.

Synchronous enrichment doesn’t take full advantage of computing resources. That’s because Fink waits for HTTP responses. But Flink offers asynchronous I/O for external data access. This allows you to enrich the stream events asynchronously, so it can send a request for other elements in the stream while it waits for the response for the first element and requests can be batched for greater efficiency.
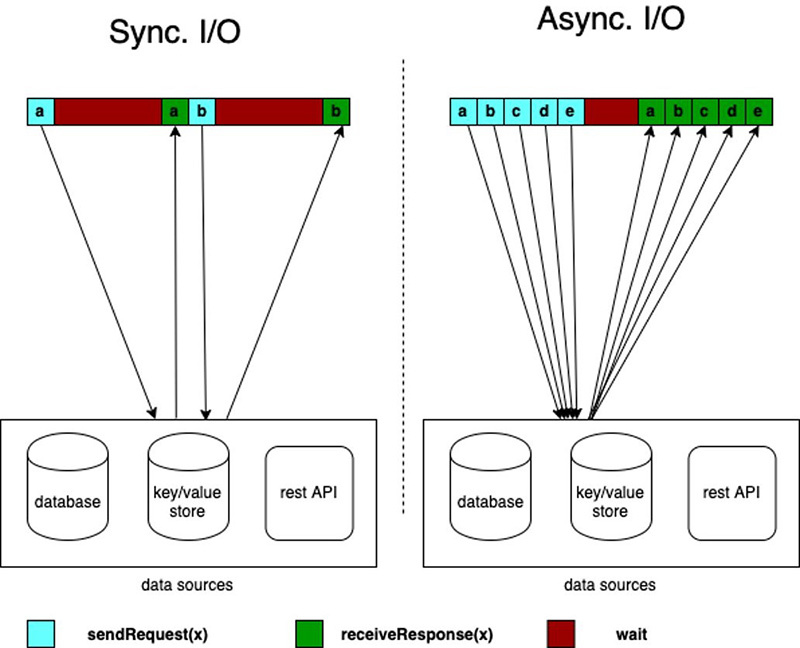
While using this pattern, you have to decide between unorderedWait (where it emits the result to the next operator as soon as the response is received, disregarding the order of the elements on the stream) and orderedWait (where it waits until all inflight I/O operations complete, then sends the results to the next operator in the same order as the original elements were placed on the stream). When your use case doesn’t require event ordering, unorderedWait provides better throughput and less idle time. Refer to Enrich your data stream asynchronously using Amazon Managed Service for Apache Flink to learn more about this pattern.
The asynchronous enrichment can be added as follows:
The enrichment function works similar as the synchronous implementation. It first retrieves the sensor info as a Java Future, which represents the result of an asynchronous computation. As soon as it’s available, it parses the information and then merges both objects into an EnrichedTemperature:
In our testing with Amazon Managed Service for Apache Flink, we saw a throughput of 2,000 events per second on a single KPU with 2 parallelism per KPU and the default settings.
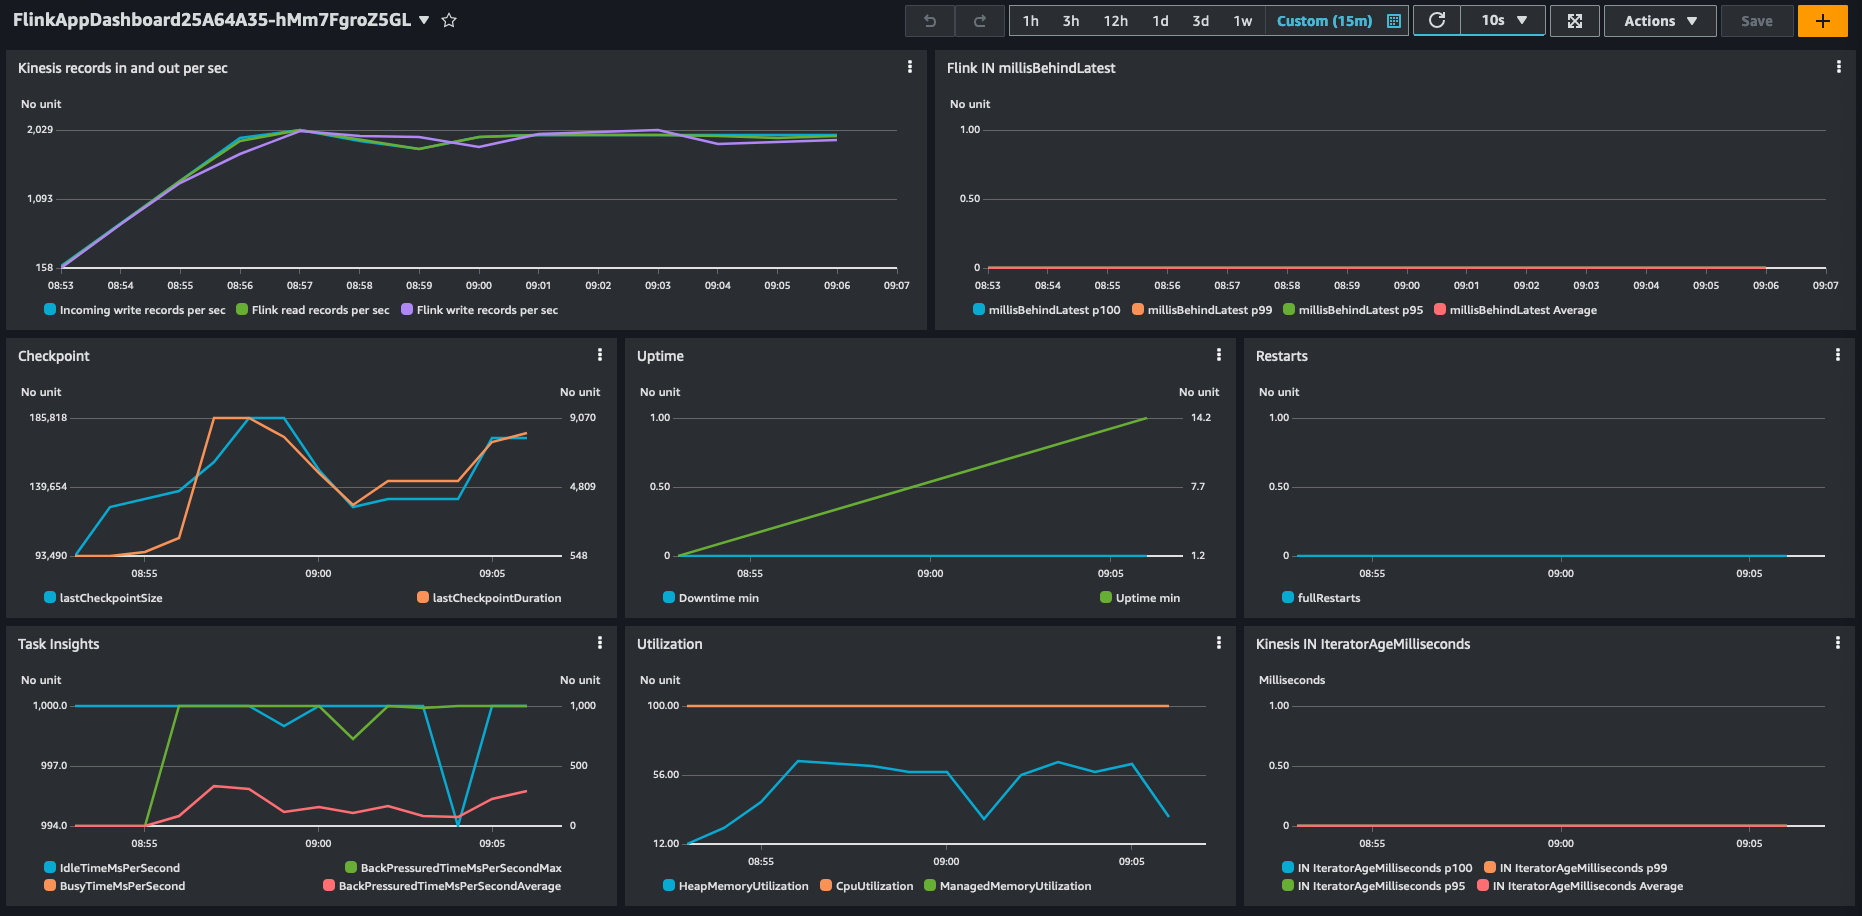
Although numerous operations in a data flow focus on individual events independently, such as event parsing, there are certain operations that retain information across multiple events. These operations, such as window operators, are referred to as stateful due to their ability to maintain state.
The keyed state is stored within an embedded key-value store, conceptualized as a part of Flink’s architecture. This state is partitioned and distributed in conjunction with the streams that are consumed by the stateful operators. As a result, access to the key-value state is limited to keyed streams, meaning it can only be accessed after a keyed or partitioned data exchange, and is restricted to the values associated with the current event’s key. For more information about the concepts, refer to Stateful Stream Processing.
You can use the keyed state for frequently accessed information that doesn’t change often, such as the sensor information. This will not only allow you to reduce the load on downstream resources, but also increase the efficiency of your data enrichment because no round-trip to an external resource for already fetched keys is necessary and there’s also no need to recompute the information. But keep in mind that Amazon Managed Service for Apache Flink stores transient data in a RocksDB backend, which adds a latency to retrieving the information. But because RocksDB is local to the node processing the data, this is faster than reaching out to external resources, as you can see in the following example.
To use keyed streams, you have to partition your stream using the .keyBy(...) method, which assures that events for the same key, in this case sensor ID, will be routed to the same worker. You can implement it as follows:
We are using the sensor ID as the key to partition the stream and later enrich it. This way, we can then cache the sensor information as part of the keyed state. When picking a partition key for your use case, choose one that has a high cardinality. This leads to an even distribution of events across different workers.
To store the sensor information, we use the ValueState. To configure the state management, we have to describe the state type by using the TypeHint. Additionally, we can configure how long a certain state will be cached by specifying the time-to-live (TTL) before the state will be cleaned up and has to retrieved or recomputed again.
As of Flink 1.17, access to the state is not possible in asynchronous functions, so the implementation must be synchronous.
It first checks if the sensor information for this particular key exists; if so, it gets enriched. Otherwise, it retrieves the sensor information, parses it, and then merges both objects into an EnrichedTemperature:
In our synthetic testing with Amazon Managed Service for Apache Flink, we saw a throughput of 28,000 events per second on a single KPU with 4 parallelism per KPU and the default settings.
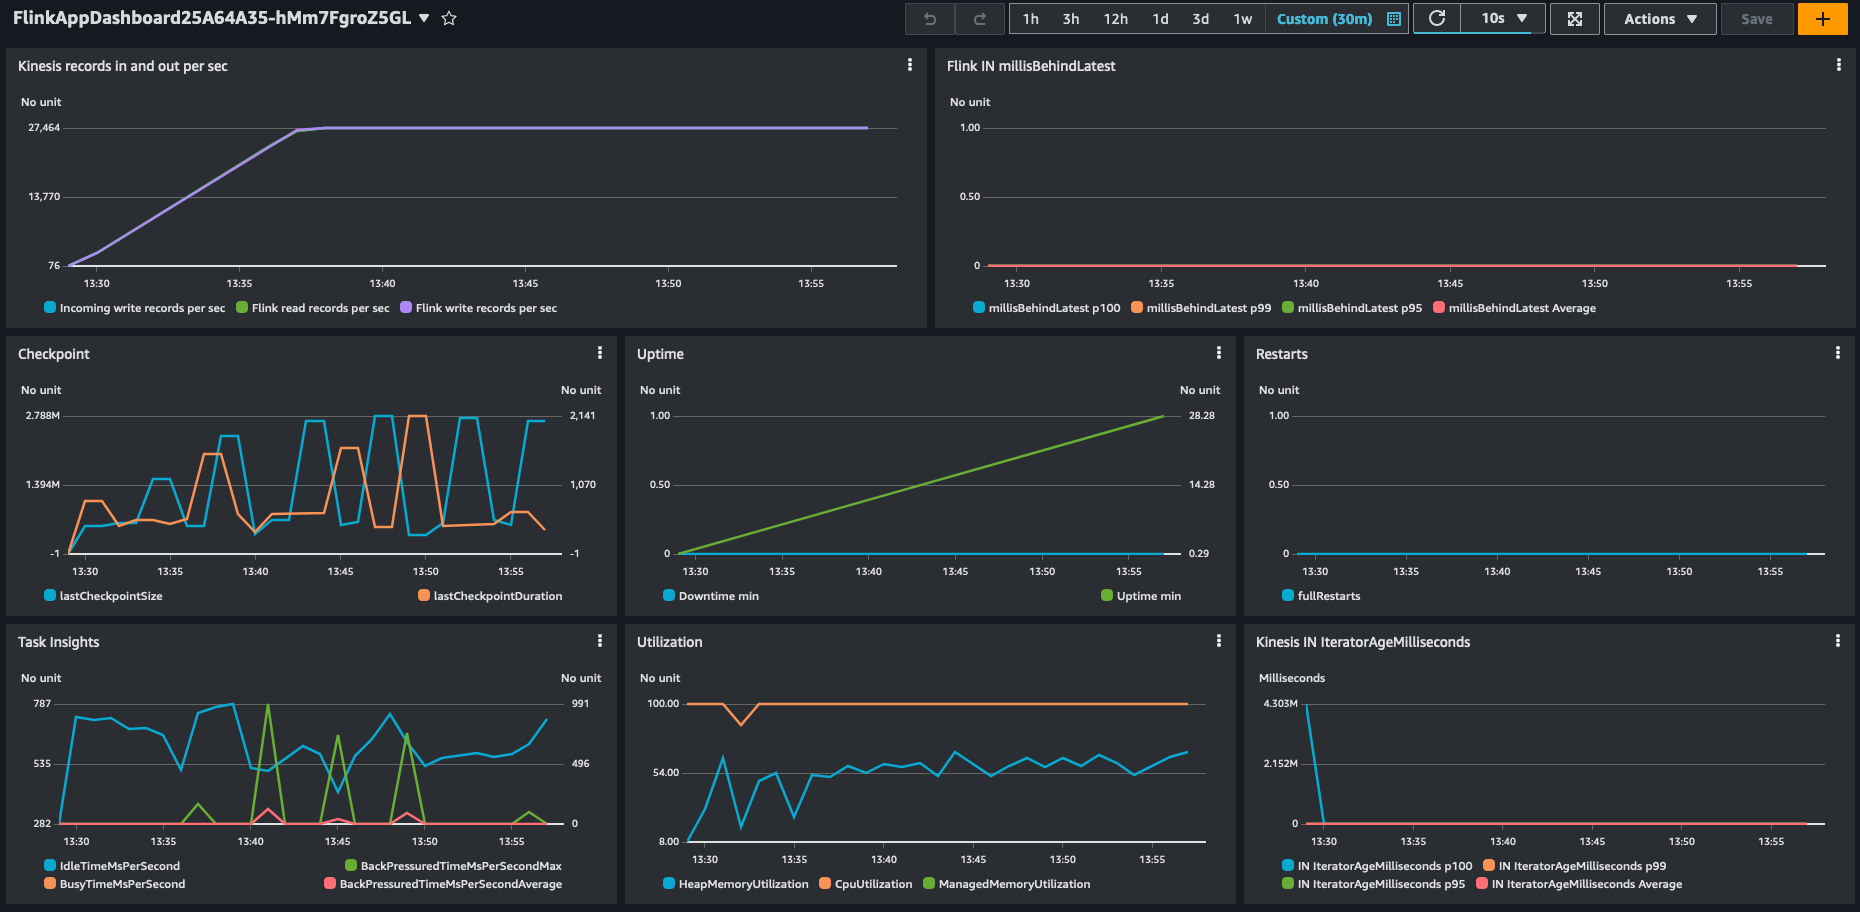
You can also see the impact and reduced load on the downstream sensor API.
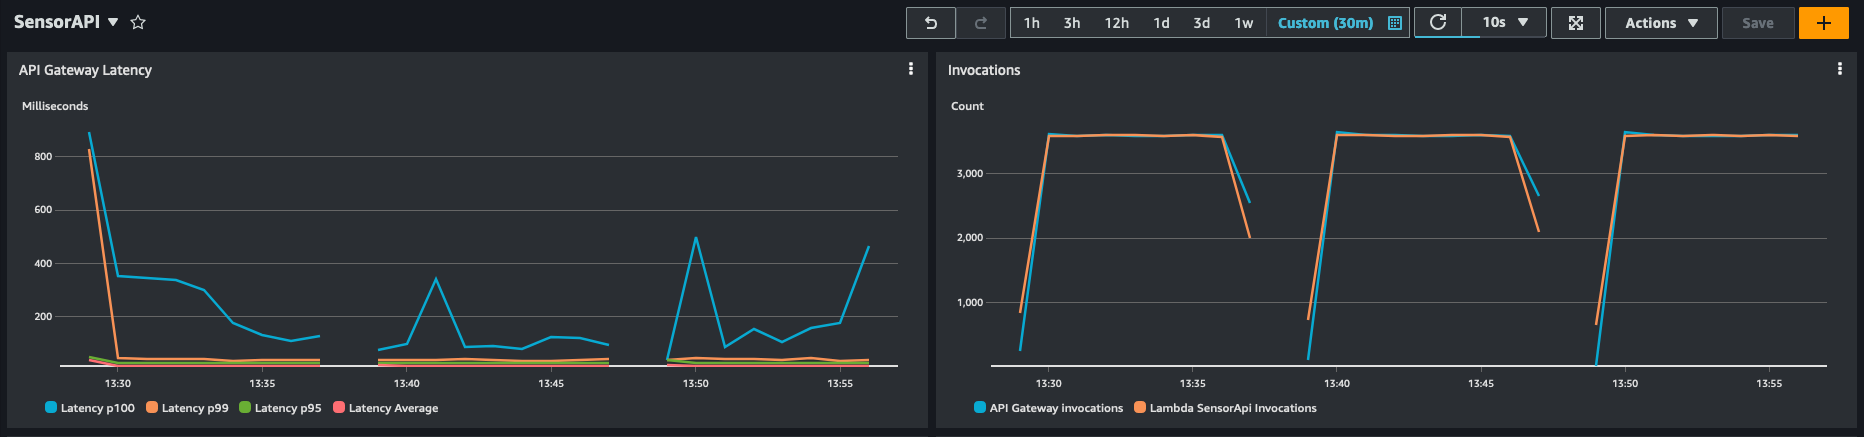
This post compared different approaches to run an application on Amazon Managed Service for Apache Flink with 1 KPU. Testing with a single KPU gives a good performance baseline that allows you to compare the enrichment patterns without generating a full-scale production workload.
It’s important to understand that the actual performance of the enrichment patterns depends on the actual workload and other external systems the Flink application interacts with. For example, performance of cached enrichment may vary with the cache hit ratio. Synchronous enrichment may behave differently depending on the response latency of the enrichment endpoint.
To evaluate which approach best suits your workload, you should first perform scaled-down tests with 1 KPU and a limited throughput of realistic data, possibly experimenting with different values of Parallelism per KPU. After you identify the best approach, it’s important to test the implementation at full scale, with real data and integrating with real external systems, before moving to production.
This post explored different approaches to implement near-online data enrichment using Flink, focusing on three communication patterns: synchronous enrichment, asynchronous enrichment, and caching with Flink KeyedState.
We compared the throughput achieved by each approach, with caching using Flink KeyedState being up to 14 times faster than using asynchronous I/O, in this particular experiment with synthetic data. Furthermore, we delved into optimizing the performance of Apache Flink, specifically on Amazon Managed Service for Apache Flink. We discussed strategies and best practices to maximize the performance of Flink applications in a managed environment, enabling you to fully take advantage of the capabilities of Flink for your near-online data enrichment needs.
Overall, this overview offers insights into different data enrichment patterns, their performance characteristics, and optimization techniques when using Apache Flink, particularly in the context of near-online data enrichment scenarios and on Amazon Managed Service for Apache Flink.
We welcome your feedback. Please leave your thoughts and questions in the comments section.
 Luis Morales works as Senior Solutions Architect with digital-native businesses to support them in constantly reinventing themselves in the cloud. He is passionate about software engineering, cloud-native distributed systems, test-driven development, and all things code and security.
 Lorenzo Nicora works as Senior Streaming Solution Architect helping customers across EMEA. He has been building cloud-native, data-intensive systems for several years, working in the finance industry both through consultancies and for fin-tech product companies. He leveraged open source technologies extensively and contributed to several projects, including Apache Flink.
Post Syndicated from Ismail Makhlouf original https://aws.amazon.com/blogs/big-data/clean-up-your-excel-and-csv-files-without-writing-code-using-aws-glue-databrew/
Managing data within an organization is complex. Handling data from outside the organization adds even more complexity. As the organization receives data from multiple external vendors, it often arrives in different formats, typically Excel or CSV files, with each vendor using their own unique data layout and structure. In this blog post, we’ll explore a solution that streamlines this process by leveraging the capabilities of AWS Glue DataBrew.
DataBrew is an excellent tool for data quality and preprocessing. You can use its built-in transformations, recipes, as well as integrations with the AWS Glue Data Catalog and Amazon Simple Storage Service (Amazon S3) to preprocess the data in your landing zone, clean it up, and send it downstream for analytical processing.
In this post, we demonstrate the following:
For this use case, imagine you’re a data analyst working at your organization. The sales leadership have requested a consolidated view of the net sales they are making from each of the organization’s suppliers. Unfortunately, this information is not available in a database. The sales data comes from each supplier in layouts like the following example.

However, with hundreds of resellers, manually extracting the information at the top is not feasible. Your goal is to clean up and flatten the data into the following output layout.

To achieve this, you can use pre-built transformations in DataBrew to quickly get the data in the layout you want.
For this walkthrough, you should have the following prerequisites:
The first thing we need to do is upload the input dataset to Amazon S3. Create an S3 bucket for the project and create a folder to upload the raw input data. The output data will be stored in another folder in a later step.

Next, we need to connect DataBrew to our CSV file. We create what we call a dataset, which
is an artifact that points to whatever data source we will be using. Navigate to “Datasets” on
the left hand menu.

Ensure the Column header values field is set to Add default header. The input CSV has an irregular format, so the first row will not have the needed column values.

To create a new project, complete the following steps:
FoodMartSales-AllUpProject.FoodMartSales-AllUpProject-recipe.
FoodMartSales-AllUp dataset.

After the project is opened, an interactive session is created where you can author transformations on a sample of the data.
In this section, we consider data that has metadata on the first few rows of the file, followed by transactional data. We walk through how to extract data relevant to the whole file from the top of the document and combine it with the transactional data into one flat table.

Complete the following steps to extract metadata from the header:

Column_1.RESELLER NAME.Column_2.INVALID.Your dataset should now look like the following screenshot, with the Reseller Name value extracted to a column by itself.

Next, you remove invalid rows and fill the rows with the Reseller Name value.

ResellerName.
FirstTransactionDate.Your dataset should now look like the following screenshot, with the Reseller Name value extracted to a column by itself.

Repeat the same steps in this section for the rest of the metadata, including Reseller Email Address, Reseller ID, and First Transaction Date.
To promote column headers, complete the following steps:


Now you can clean up some columns and rows.
Column_7.You can also delete invalid rows by filtering out records that don’t have a transaction date value.
Transaction_Date column and choose date.

The dataset should now have the metadata extracted and the column headers promoted.

The next issue to address is transactions pertaining to the same row that are split across multiple lines. In the following steps, we extract the needed data from the rows and merge it into single-line transactions. For this example specifically, the Reseller Margin data is split across two lines.

Complete the following steps to get the Reseller Margin value on the same line as the corresponding transaction. First, we identify the Reseller Margin rows and store them in a temporary column.

Transaction_ID.TransactionAmount.ResellerMargin_Temp.Next, you shift the Reseller Margin value up one row.

ResellerMargin_Temp.1.ResellerMargin.Next, delete the invalid rows.

TransactionDate.Your dataset should now look like the following screenshot, with the Reseller Margin value extracted to a column by itself.

With the data structured properly, we can move on to mining the cleaned data.
Many types of data contain important information stored as unstructured text in a cell. In this section, we look at how to extract this data. Within the sample dataset, the BankTransferText column has valuable information around our resellers’ registered bank account numbers as well as the currency of the transaction, namely IBAN, SWIFT Code, and Currency.

Complete the following steps to extract IBAN, SWIFT code, and Currency into separate columns. First, you extract the IBAN number from the text using a regular expression (regex).

BankTransferText.[a-zA-Z][a-zA-Z][0-9]{2}[A-Z0-9]{1,30}.(?!^)(SWIFT Code: )([A-Z]{2}[A-Z0-9]+).Next, remove the SWIFT Code: label from the extracted text.

SWIFT Code.(?!^)(Currency: )([A-Z]{3}).Currency: label from the extracted text following the same steps used to remove the SWIFT Code: label.You can clean up by deleting any unnecessary columns.

BankTransferText.Your dataset should now look like the following screenshot, with IBAN, SWIFT Code, and Currency extracted to separate columns.

With all the steps captured in the recipe, the last step is to write the transformed data to Amazon S3.

FoodMartSalesToDataLake.
s3://{name of S3 bucket}/clean/.
Your dataset should look similar to the following screenshot.

To optimize cost, make sure to clean up the resources deployed for this project by completing the following steps:
The reality of exchanging data with suppliers is that we can’t always control the shape of the input data. With DataBrew, we can use a list of pre-built transformations and repeatable steps to transform incoming data into a desired layout and extract relevant data and insights from Excel or CSV files. Start using DataBrew today and transform 3 rd party files into structured datasets ready for consumption by your business.
 Ismail Makhlouf is a Senior Specialist Solutions Architect for Data Analytics at AWS. Ismail focuses on architecting solutions for organizations across their end-to-end data analytics estate, including batch and real-time streaming, big data, data warehousing, and data lake workloads. He primarily works with direct-to-consumer platform companies in the ecommerce, FinTech, PropTech, and HealthTech space to achieve their business objectives with well-architected data platforms.
Post Syndicated from Julian Wood original https://aws.amazon.com/blogs/compute/managing-aws-lambda-runtime-upgrades/
This post is written by Julian Wood, Principal Developer Advocate, and Dan Fox, Principal Specialist Serverless Solutions Architect.
AWS Lambda supports multiple programming languages through the use of runtimes. A Lambda runtime provides a language-specific execution environment, which provides the OS, language support, and additional settings, such as environment variables and certificates that you can access from your function code.
You can use managed runtimes that Lambda provides or build your own. Each major programming language release has a separate managed runtime, with a unique runtime identifier, such as python3.11 or nodejs20.x.
Lambda automatically applies patches and security updates to all managed runtimes and their corresponding container base images. Automatic runtime patching is one of the features customers love most about Lambda. When these patches are no longer available, Lambda ends support for the runtime. Over the next few months, Lambda is deprecating a number of popular runtimes, triggered by end of life of upstream language versions and of Amazon Linux 1.
| Runtime | Deprecation |
|---|---|
| Node.js 14 | Nov 27, 2023 |
| Node.js 16 | Mar 11, 2024 |
| Python 3.7 | Nov 27, 2023 |
| Java 8 (Amazon Linux 1) | Dec 31, 2023 |
| Go 1.x | Dec 31, 2023 |
| Ruby 2.7 | Dec 07, 2023 |
| Custom Runtime (provided) | Dec 31, 2023 |
Runtime deprecation is not unique to Lambda. You must upgrade code using Python 3.7 or Node.js 14 when those language versions reach end of life, regardless of which compute service your code is running on. Lambda can help make this easier by tracking which runtimes you are using and providing deprecation notifications.
This post contains considerations and best practices for managing runtime deprecations and upgrades when using Lambda. Adopting these techniques makes managing runtime upgrades easier, especially when working with a large number of functions.
When you deploy your function as a .zip file archive, you choose a runtime when you create the function. To change the runtime, you can update your function’s configuration.
Lambda keeps each managed runtime up to date by taking on the operational burden of patching the runtimes with security updates, bug fixes, new features, performance enhancements, and support for minor version releases. These runtime updates are published as runtime versions. Lambda applies runtime updates to functions by migrating the function from an earlier runtime version to a new runtime version.
You can control how your functions receive these updates using runtime management controls. Runtime versions and runtime updates apply to patch updates for a given Lambda runtime. Lambda does not automatically upgrade functions between major language runtime versions, for example, from nodejs14.x to nodejs18.x.
For a function defined as a container image, you choose a runtime and the Linux distribution when you create the container image. Most customers start with one of the Lambda base container images, although you can also build your own images from scratch. To change the runtime, you create a new container image from a different base container image.
Lambda deprecates a runtime when upstream runtime language maintainers mark their language end-of-life or security updates are no longer available.
In almost all cases, the end-of-life date of a language version or operating system is published well in advance. The Lambda runtime deprecation policy gives end-of-life schedules for each language that Lambda supports. Lambda notifies you by email and via your Personal Health Dashboard if you are using a runtime that is scheduled for deprecation.
Lambda runtime deprecation happens in several stages. Lambda first blocks creating new functions that use a given runtime. Lambda later also blocks updating existing functions using the unsupported runtime, except to update to a supported runtime. Lambda does not block invocations of functions that use a deprecated runtime. Function invocations continue indefinitely after the runtime reaches end of support.
Lambda is extending the deprecation notification period from 60 days before deprecation to 180 days. Previously, blocking new function creation happened at deprecation and blocking updates to existing functions 30 days later. Blocking creation of new functions now happens 30 days after deprecation, and blocking updates to existing functions 60 days after.
Lambda occasionally delays deprecation of a Lambda runtime for a limited period beyond the end of support date of the language version that the runtime supports. During this period, Lambda only applies security patches to the runtime OS. Lambda doesn’t apply security patches to programming language runtimes after they reach their end of support date.
Moving from one major version of the language runtime to another has a significant risk of being a breaking change. Some libraries and dependencies within a language have deprecation schedules and do not support versions of a language past a certain point. Moving functions to new runtimes could potentially impact large-scale production workloads that customers depend on.
Since Lambda cannot guarantee backward compatibility between major language versions, upgrading the Lambda runtime used by a function is a customer-driven operation.
You can use function versions to manage the deployment of your functions. In Lambda, you make code and configuration changes to the default function version, which is called $LATEST. When you publish a function version, Lambda takes a snapshot of the code, runtime, and function configuration to maintain a consistent experience for users of that function version. When you invoke a function, you can specify the version to use or invoke the $LATEST version. Lambda function versions are required when using Provisioned Concurrency or SnapStart.
Some developers use an auto-versioning process by creating a new function version each time they deploy a change. This results in many versions of a function, with only a single version actually in use.
While Lambda applies runtime updates to published function versions, you cannot update the runtime major version for a published function version, for example from Node.js 16 to Node.js 20. To update the runtime for a function, you must update the $LATEST version, then create a new published function version if necessary. This means that different versions of a function can use different runtimes. The following shows the same function with version 1 using Node.js 14.x and version 2 using Node.js 18.x.

Version 1 using Node.js 14.x

Version 2 using Node.js 18.x
Ensure you create a maintenance process for deleting unused function versions, which also impact your Lambda storage quota.
Managing function runtime upgrades should be part of your software delivery lifecycle, in a similar way to how you treat dependencies and security updates. You need to understand which functions are being actively used in your organization. Organizations can create prioritization based on security profiles and/or function usage. You can use the same communication mechanisms you may already be using for handling security vulnerabilities.
Implement preventative guardrails to ensure that developers can only create functions using supported runtimes. Using infrastructure as code, CI/CD pipelines, and robust testing practices makes updating runtimes easier.
There are tools available to check Lambda runtime configuration and to identify which functions and what published function versions are actually in use. Deleting a function or function version that is no longer in use is the simplest way to avoid runtime deprecations.
You can identify functions using deprecated or soon to be deprecated runtimes using AWS Trusted Advisor. Use the AWS Lambda Functions Using Deprecated Runtimes check, in the Security category that provides 120 days’ notice.

AWS Trusted Advisor Lambda functions using deprecated runtimes
Trusted Advisor scans all versions of your functions, including $LATEST and published versions.
The AWS Command Line Interface (AWS CLI) can list all functions in a specific Region that are using a specific runtime. To find all functions in your account, repeat the following command for each AWS Region and account. Replace the <REGION> and <RUNTIME> parameters with your values. The --function-version ALL parameter causes all function versions to be returned; omit this parameter to return only the $LATEST version.
aws lambda list-functions --function-version ALL --region <REGION> --output text —query "Functions[?Runtime=='<RUNTIME>'].FunctionArn"You can use AWS Config to create a view of the configuration of resources in your account and also store configuration snapshot data in Amazon S3. AWS Config queries do not support published function versions, they can only query the $LATEST version.
You can then use Amazon Athena and Amazon QuickSight to make dashboards to visualize AWS Config data. For more information, see the Implementing governance in depth for serverless applications learning guide.

Dashboard showing AWS Config data
There are a number of ways that you can track Lambda function usage.
You can use Amazon CloudWatch metrics explorer to view Lambda by runtime and track the Invocations metric within the default CloudWatch metrics retention period of 15 months.

Track invocations in Amazon CloudWatch metrics
You can turn on AWS CloudTrail data event logging to log an event every time Lambda functions are invoked. This helps you understand what identities are invoking functions and the frequency of their invocations.
AWS Cost and Usage Reports can show which functions are incurring cost and in use.
AWS CloudFormation Guard is an open-source evaluation tool to validate infrastructure as code templates. Create policy rules to ensure that developers only chose approved runtimes. For more information, see Preventative Controls with AWS CloudFormation Guard.
AWS Config rules allow you to check that Lambda function settings for the runtime match expected values. For more information on running these rules before deployment, see Preventative Controls with AWS Config. You can also reactively flag functions as non-compliant as your governance policies evolve. For more information, see Detective Controls with AWS Config.
Lambda does not currently have service control policies (SCP) to block function creation based on the runtime
Use infrastructure as code tools to build and manage your Lambda functions, which can make it easier to manage upgrades.
Ensure you run tests against your functions when developing locally. Include automated tests as part of your CI/CD pipelines to provide confidence in your runtime upgrades. When rolling out function upgrades, you can use weighted aliases to shift traffic between two function versions as you monitor for errors and failures.
AWS strongly advises you to upgrade your functions to a supported runtime before deprecation to continue to benefit from security patches, bug-fixes, and the latest runtime features. While deprecation does not affect function invocations, you will be using an unsupported runtime, which may have unpatched security vulnerabilities. Your function may eventually stop working, for example, due to a certificate expiry.
Lambda blocks function creation and updates for functions using deprecated runtimes. To create or update functions after these operations are blocked, contact AWS Support.
Lambda is deprecating a number of popular runtimes over the next few months, reflecting the end-of-life of upstream language versions and Amazon Linux 1. This post covers considerations for managing Lambda function runtime upgrades.
For more serverless learning resources, visit Serverless Land.
Post Syndicated from Pascal Vogel original https://aws.amazon.com/blogs/compute/node-js-20-x-runtime-now-available-in-aws-lambda/
This post is written by Pascal Vogel, Solutions Architect, and Andrea Amorosi, Senior Solutions Architect.
You can now develop AWS Lambda functions using the Node.js 20 runtime. This Node.js version is in active LTS status and ready for general use. To use this new version, specify a runtime parameter value of nodejs20.x when creating or updating functions or by using the appropriate container base image.
You can use Node.js 20 with Powertools for AWS Lambda (TypeScript), a developer toolkit to implement serverless best practices and increase developer velocity. Powertools for AWS Lambda includes proven libraries to support common patterns such as observability, Parameter Store integration, idempotency, batch processing, and more.
You can also use Node.js 20 with Lambda@Edge, allowing you to customize low-latency content delivered through Amazon CloudFront.
This blog post highlights important changes to the Node.js runtime, notable Node.js language updates, and how you can use the new Node.js 20 runtime in your serverless applications.
By default, Node.js includes root certificate authority (CA) certificates from well-known certificate providers. Earlier Lambda Node.js runtimes up to Node.js 18 augmented these certificates with Amazon-specific CA certificates, making it easier to create functions accessing other AWS services. For example, it included the Amazon RDS certificates necessary for validating the server identity certificate installed on your Amazon RDS database.
However, loading these additional certificates has a performance impact during cold start. Starting with Node.js 20, Lambda no longer loads these additional CA certificates by default. The Node.js 20 runtime contains a certificate file with all Amazon CA certificates located at /var/runtime/ca-cert.pem. By setting the NODE_EXTRA_CA_CERTS environment variable to /var/runtime/ca-cert.pem, you can restore the behavior from Node.js 18 and earlier runtimes.
This causes Node.js to validate and load all Amazon CA certificates during a cold start. It can take longer compared to loading only specific certificates. For the best performance, we recommend bundling only the certificates that you need with your deployment package and loading them via NODE_EXTRA_CA_CERTS. The certificates file should consist of one or more trusted root or intermediate CA certificates in PEM format.
For example, for RDS, include the required certificates alongside your code as certificates/rds.pem and then load it as follows:
See Using Lambda environment variables in the AWS Lambda Developer Guide for detailed instructions for setting environment variables.
The Node.js 20 runtime is based on the provided.al2023 runtime. The provided.al2023 runtime in turn is based on the Amazon Linux 2023 minimal container image release and brings several improvements over Amazon Linux 2 (AL2).
provided.al2023 contains only the essential components necessary to install other packages and offers a smaller deployment footprint with a compressed image size of less than 40MB compared to the over 100MB AL2-based base image.
With glibc version 2.34, customers have access to a more recent version of glibc, updated from version 2.26 in AL2-based images.
The Amazon Linux 2023 minimal image uses microdnf as package manager, symlinked as dnf, replacing yum in AL2-based images. Additionally, curl and gnupg2 are also included as their minimal versions curl-minimal and gnupg2-minimal.
Learn more about the provided.al2023 runtime in the blog post Introducing the Amazon Linux 2023 runtime for AWS Lambda and the Amazon Linux 2023 launch blog post.
The Node.js 20 runtime uses the open source AWS Lambda NodeJS Runtime Interface Client (RIC). You can now use the same RIC version in your Open Container Initiative (OCI) Lambda container images as the one used by the managed Node.js 20 runtime.
The Node.js 20 runtime supports Lambda response streaming which enables you to send response payload data to callers as it becomes available. Response streaming can improve application performance by reducing time-to-first-byte, can indicate progress during long-running tasks, and allows you to build functions that return payloads larger than 6MB, which is the Lambda limit for buffered responses.
Node.js allows you to configure the heap size of the v8 engine via the --max-old-space-size and --max-semi-space-size options. By default, Lambda overrides the Node.js default values with values derived from the memory size configured for the function. If you need control over your runtime’s memory allocation, you can now set both of these options using the NODE_OPTIONS environment variable, without needing an exec wrapper script. See Using Lambda environment variables in the AWS Lambda Developer Guide for details.
Use the --max-old-space-size option to set the max memory size of V8’s old memory section, and the --max-semi-space-size option to set the maximum semispace size for V8’s garbage collector. See the Node.js documentation for more details on these options.
With this release, Lambda customers can take advantage of new Node.js 20 language features, including:
keepAlive to true by default. Any outgoing HTTPs connections use HTTP 1.1 keep-alive with a default waiting window of 5 seconds. This can deliver improved throughput as connections are reused by default.globalThis.crypto.For a detailed overview of Node.js 20 language features, see the Node.js 20 release blog post and the Node.js 20 changelog.
Node.js 19.3 introduced a change that impacts how non-essential modules are lazy-loaded during the Node.js process startup. In terms of the impact to your Lambda functions, this reduces the work during initialization of each execution environment, then if used, the modules will instead be loaded during the first function invoke. This change remains in Node.js 20.
Builders should continue to measure and test function performance and optimize function code and configuration for any impact. To learn more about how to optimize Node.js performance in Lambda, see Performance optimization in the Lambda Operator Guide, and our blog post Optimizing Node.js dependencies in AWS Lambda.
Lambda occasionally delays deprecation of a Lambda runtime for a limited period beyond the end of support date of the language version that the runtime supports. During this period, Lambda only applies security patches to the runtime OS. Lambda doesn’t apply security patches to programming language runtimes after they reach their end of support date.
In the case of Node.js 16, we have delayed deprecation from the community end of support date on September 11, 2023, to June 12, 2024. This gives customers the opportunity to migrate directly from Node.js 16 to Node.js 20, skipping Node.js 18.
Up until Node.js 16, Lambda’s Node.js runtimes included the AWS SDK for JavaScript version 2. This has since been superseded by the AWS SDK for JavaScript version 3, which was released in December 2020. Starting with Node.js 18, and continuing with Node.js 20, the Lambda Node.js runtimes have upgraded the version of the AWS SDK for JavaScript included in the runtime from v2 to v3. Customers upgrading from Node.js 16 or earlier runtimes who are using the included AWS SDK for JavaScript v2 should upgrade their code to use the v3 SDK.
For optimal performance, and to have full control over your code dependencies, we recommend bundling and minifying the AWS SDK in your deployment package, rather than using the SDK included in the runtime. For more information, see Optimizing Node.js dependencies in AWS Lambda.
To use the Node.js 20 runtime to develop your Lambda functions, specify a runtime parameter value Node.js 20.x when creating or updating a function. The Node.js 20 runtime version is now available in the Runtime dropdown on the Create function page in the AWS Lambda console:

To update an existing Lambda function to Node.js 20, navigate to the function in the Lambda console, then choose Edit in the Runtime settings panel. The new version of Node.js is available in the Runtime dropdown:

Change the Node.js base image version by modifying the FROM statement in your Dockerfile:
FROM public.ecr.aws/lambda/nodejs:20
# Copy function code
COPY lambda_handler.xx ${LAMBDA_TASK_ROOT}
Customers running Node.js 20 Docker images locally, including customers using AWS SAM, will need to upgrade their Docker install to version 20.10.10 or later.
In AWS SAM, set the Runtime attribute to node20.x to use this version:
AWSTemplateFormatVersion: "2010-09-09"
Transform: AWS::Serverless-2016-10-31

Resources:
  MyFunction:
    Type: AWS::Serverless::Function
    Properties:
      Handler: lambda_function.lambda_handler
      Runtime: nodejs20.x
      CodeUri: my_function/.
      Description: My Node.js Lambda Function
In the AWS CDK, set the runtime attribute to Runtime.NODEJS_20_X to use this version:
import * as cdk from "aws-cdk-lib";
import * as lambda from "aws-cdk-lib/aws-lambda";
import * as path from "path";
import { Construct } from "constructs";

export class CdkStack extends cdk.Stack {
  constructor(scope: Construct, id: string, props?: cdk.StackProps) {
    super(scope, id, props);

    // The code that defines your stack goes here

    // The Node.js 20 enabled Lambda Function
    const lambdaFunction = new lambda.Function(this, "node20LambdaFunction", {
      runtime: lambda.Runtime.NODEJS_20_X,
      code: lambda.Code.fromAsset(path.join(__dirname, "/../lambda")),
      handler: "index.handler",
    });
  }
}
Lambda now supports Node.js 20. This release uses the Amazon Linux 2023 OS, supports configurable CA certificate loading for faster cold starts, as well as other improvements detailed in this blog post.
You can build and deploy functions using the Node.js 20 runtime using the AWS Management Console, AWS CLI, AWS SDK, AWS SAM, AWS CDK, or your choice of Infrastructure as Code (IaC). You can also use the Node.js 20 container base image if you prefer to build and deploy your functions using container images.
The Node.js 20 runtime empowers developers to build more efficient, powerful, and scalable serverless applications. Try the Node.js runtime in Lambda today and read about the Node.js programming model in the Lambda documentation to learn more about writing functions in Node.js 20.
For more serverless learning resources, visit Serverless Land.